
IKE 238-6 - Refrigerator Küppersbusch - Free user manual and instructions
Find the device manual for free IKE 238-6 Küppersbusch in PDF.


| Product type | Built-in refrigerator |
| Dimensions (H x W x D) | 177.2 x 54 x 54 cm |
| Net weight | 50 kg |
| Power supply | 220-240 V, 50 Hz |
| Energy class | E |
| Total volume | 230 L |
| Refrigerator volume | 200 L |
| Freezer volume | 30 L |
| Number of shelves | 4 glass shelves |
| Defrost type | Automatic |
| Lighting | LED |
| Reversible door | Yes |
| Climate class | SN-ST |
| Noise level | 38 dB |
| Maintenance | Clean with a soft cloth and soapy water |
| Power failure | Cold storage for up to 9 hours |
| Repairability index | 7/10 |
| Spare parts | Available on request |
| Warranty | 2 years |
Frequently Asked Questions - IKE 238-6 Küppersbusch
User questions about IKE 238-6 Küppersbusch
0 question about this device. Answer the ones you know or ask your own.
Ask a new question about this device
Download the instructions for your Refrigerator in PDF format for free! Find your manual IKE 238-6 - Küppersbusch and take your electronic device back in hand. On this page are published all the documents necessary for the use of your device. IKE 238-6 by Küppersbusch.
USER MANUAL IKE 238-6 Küppersbusch
Instructions for use
Important: Read these instructions carefully and then store them in a safe place
Integrated refrigerator
natural_image
Illustration of a hand inserting a black arrow into a filing cabinet (no text or symbols)natural_image
Line drawing of a hand holding a shelf with a small object, no text or symbols presentnatural_image
Diagram of a door with two compartments and directional arrows indicating flow or movement (no text or symbols)natural_image
Diagram of a double door with a vertical double-headed arrow and a small lamp on the floor (no text or symbols)natural_image
Technical diagram of a mechanical device with an inset showing a component and a directional arrow (no text or symbols)natural_image
Diagram of a device with arrows indicating direction, no text or symbols presentNotes which are important for your safety or for the proper functioning of the appliance
Supplementary information regarding operation and practical applications of the appliance.
Tips and notes concerning economical and environmentally sound use of the appliance

Safety Instructions
Please read these operating instructions carefully before installing the appliance. These warnings are provided in the interests of your safety. Ensure you fully understand them before installing or using the appliance. If you are unsure about the meaning of these warnings contact the Customer Care Department.
Domestic Use
- The domestic refrigerators and freezers are designed to be used specifically for the storage of edible foodstuffs only.
- Check the appliance for transport damage. Under no circumstances should a damaged appliance be installed. In the event of damage please contact your retailer.
- This appliance is heavy. The edges and projecting parts of the cabinet may be sharp. Be careful when moving the cabinet and always use gloves.
- Any electrical work required to install this appliance should be carried out by a qualified electrician or competent person.
- Ensure that the appliance does not stand on the electrical supply cable.
- Do not use electrical appliances inside the appliance.
-
Do not keep carbonated drinks or bottles in the freezer compartment. The glass bottles may break.
-
Ice lollies can cause 'frost/freezer burns' if consumed straight from the freezer.
- It is dangerous to try and alter the specifications or modify this product in any way.
- Under no circumstances should you attempt to repair the appliance yourself. Refer to your local Service Centre, and always insist on genuine spare parts.
Child Safety
- This appliance is designed to be operated by adults only. There is a risk of suffocation! Keep packaging material away from children!
- In case of disposal of the appliance, cut off the supply cable as close as possible and make the lock unusable, to prevent children from closing themselves inside the appliances.

Environment Protection
- This appliance does not contain gasses which could damage the ozone layer, in either its refrigerant circuit or insulation materials. The appliance shall not be discarded together with the urban refuse and rubbish. Avoid damaging the cooling unit, especially at the rear near the heat exchanger. Information on your local disposal sites may be obtained from your municipal authorities.
Contents
Safety Instructions 10
Disposal 11
Use and Control Before Use / Control panel 11
Refrigerator compartment - Starting the appliance / Temperature control / Internal parts / Hints .....12
Freezer compartment - Temperature control / Interior accessories / Hints 13
Maintenance Defrosting / Cleaning / Changing the light bulb 14
Something not Working 15
Customer Service and Spare Parts 15
Technical Specifications....15
Installation Positioning / Electrical connection .....16
Building-in 17

Disposal
Appliance Packaging Information
- The materials used on this appliance marked with the symbol are recyclable.
PE<=polyethylene
PS<=polystyrene
PP<=polypropylene
All materials are environmentally sound!
Disposal of old Appliances
Information concerning collection schedules or locations can be obtained from your local Council or Environmental Health Office.
Use and Control
Before Use

Wait two hours before connecting the appliance to allow the oil to flow back in the compressor.
- Before using the appliance for the first time, wash the interior and all internal accessories with lukewarm water and some neutral soap so as to remove the typical smell of a brand-new product, then dry thoroughly.

Do not use detergents or abrasive powders, as these will damage the finish.
- Remove safety elements used for transportation.
Refrigerator compartment Control panel

1 Light switch
2 SUPERFROST-function "on" indicator (yellow) (not on all models)
- SUPERFROST for freezing items quickly in the freezer compartment
3 SUPERFROST button (not on all models)
4 Temperature regulator and ON/OFF switch
Starting the appliance
- The temperature regulator is located at the top of the appliance on the control panel. It is also the ON/OFF switch.
- A coin is required to turn the temperature regulator.
- Insert the plug into the wall socket and turn the thermostat knob clockwise beyond position «O» (OFF).
- The interior lighting comes on. The compressor starts and then runs automatically. To switch off the appliance, turn the temperature regulator to position «O».
Temperature Control
- The temperature regulator allows you to adjust the temperature inside the refrigerator according to use and external conditions.
• The following effects are of significance in respect of the interior temperature:
• Ambient temperature
• Quantity and temperature of the food stored;
• Frequency with which the door is opened and how long it is left open
• the location of the appliance.
- The temperature inside the appliance is automatically adjusted.
- Setting „1“ = hightest temperature, warmest setting
- Setting „6“ = lowest temperature, coldest setting.
- Setting „O“ = Off
A medium setting is generally the most suitable.
Internal Parts
Storage shelves
• The shelves can be removed for cleaning.
- To permit storage of food packages of various sizes, the shelves can be placed at different heights.
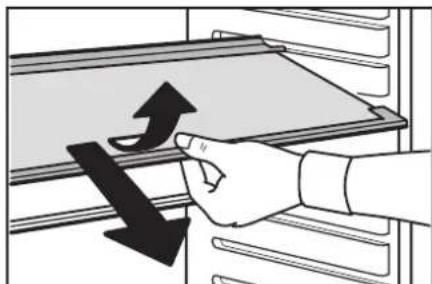
• To remove the internal shelf pull forward until it can be tipped up or down and removed.
natural_image
Illustration of a hand inserting a directional arrow into a filing cabinet (no text or symbols)- Please do the same in reverse to insert the shelf at a different height.
natural_image
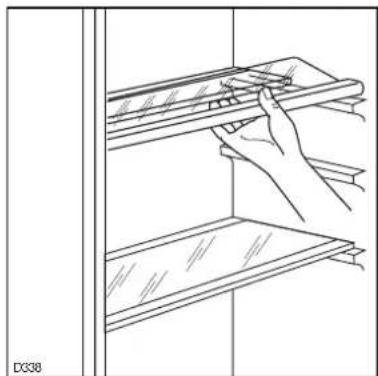
Line drawing of a hand holding a shelf with a ruler, no text or symbols present- For better use of space, the front half-shelves can lie over the rear ones.
The glass shelf above the vegetable drawers and the bottle shelf should always remain in position, to ensure correct air circulation.
- To permit storage of food packages of various sizes, the central door shelf can be adjusted in height.
- Gradually pull the shelf in the direction of the arrows until it comes free, then reposition as required.

natural_image
Diagram of a door or vent with directional arrows indicating flow or movement, no text or symbols present.- For more thorough cleaning, the top and bottom door sheves can be removed by pulling them in the direction of the arrows, then refitting them in position.
i Hints
Saving Energy
- Pay careful attention to where the cabinet is placed. See the section "Installation". When installed correctly the cabinet will consume less energy.
- Try to avoid keeping the doors open for long periods or opening the doors too frequently as warm air will enter the cabinet and cause the compressor to switch on unnecessarily often.
- If the ambient temperature is high, the thermostat knob is on the coldest setting (higher numbers) and
the appliance is fully loaded, the compressor may run continuously, causing frost or ice to form on the evaporator. If this happens, turn the knob to a warmer setting (lower numbers) to allow automatic defrosting and so a saving in electricity consumption.
- Do not place warm foods inside the appliance. Allow warm foods to cool first.
- Put frozen food in the fridge to defrost. The cold in the frozen food will then be used to cool the fridge.
Hints for refrigeration
- Do not store warm food or evaporating liquids in the refrigerator and do cover or wrap up the food, particularly if it has a strong smell.
To help you use your refrigerator correctly, here are some useful hints:
- Raw meat (beef, pork, lamb & poultry): wrap in polythene bags and place on top of the salad compartment, this being the coldest spot in the refrigerator. Meat can only be stored safely in this way for one or two days at the most.
- Cooked food, cold cuts, jelly, etc.: these should be well covered and can be stored on any of the glass shelves.
- Fruit & vegetables: these should be thoroughly cleaned and placed in the bottom drawer/s.
- Butter & cheese: these should be placed in special airtight containers or wrapped in aluminium foil or polythene bags to keep out as much air as possible.
- Milk bottles: these should have a top and should be stored in the bottle rack on the door.
Bananas, potatoes, onions and garlic, if not packed, must not be kept in the refrigerator.
Freezer compartment
Temperature Control
- To freeze fresh foods it is not necessary to change the setting of the thermostat knob.
- For a quicker freezing operation, turn the temperature regulator to setting "6" several hours before freezing fresh items, or press the SUPERFROST button if the model has one. The yellow indicator will light up.
- In this condition, the refrigerator compartment temperature might drop below 0°C. If this occurs return the temperature regulator to a warmer setting or switch off the SUPERFROST function. To do that, press the SUPERFROST button again. The yellow indicator will go off.
- At the first starting-up or after a period out of use, before putting the products in the compartment, let the appliance run for at least two hours on the coldest setting, then turn the thermostat knob to the normal operating position.
Interior Accessories
Ice-cube production
This appliance is equipped with one or more trays for the production of ice-cubes.
Fill these trays with water, then put them in the freezer compartment.

Do not use metallic instruments to remove the trays from the freezer.

Hints
Freezing of fresh food and storage of frozen food
- Prepare food in small portions to enable it to be rapidly and completely frozen and to make it possible subsequently to thaw only the quantity required.
- Wrap up the food in aluminium foil or polythene and make sure that the packages are airtight.
- Do not allow fresh, unfrozen food to touch food which is already frozen, thus avoiding a rise in temperature of the latter.
- Do not touch frozen food with wet hands. Your hands could stick to the food and cause skin abrasions.
- It is advisable to show the freezing-in date on each individual pack to enable you to keep tab of the storage time.
- Be sure that frozen foodstuffs are transferred from the foodstore to the freezer in the shortest possible time.
- Do not put carbonated liquids (fizzy drinks, etc.) in the freezing compartment as they may burst.
- Once defrosted, food deteriorates rapidly and cannot be refrozen.

Unplug the appliance before carrying out any maintenance operation.

Warning
This appliance contains hydrocarbons in its cooling unit maintenance and recharging must therefore only be carried out by authorised technicians.
Defrosting
Refrigerator compartment
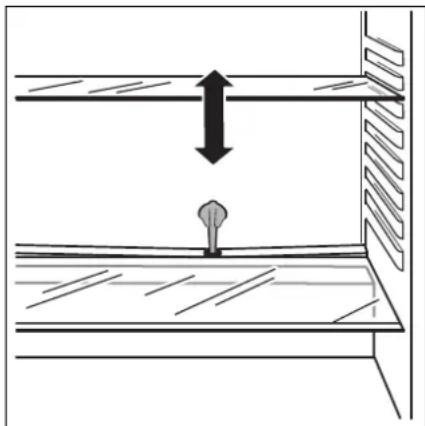
- Defrosting the refrigerator compartment is automatic. The defrost water drains out through a trough into a container at the back of the appliance, above the motor compressor, where it evaporates.
natural_image
Diagram of a window with a vertical double-headed arrow and a small object on the floor, no text or symbols present.- It is important to periodically clean the defrost water drain hole.
Freezer compartment
- Remove the frost with a plastic scraper.
- Whenever the thickness of the frost exceeds 5 mm complete defrosting should be carried out.
Proceed as follows:
- Remove any stored food, wrap it in several layers of newspaper and put it in a cool place.
- Pull out the plug from the wall socket or turn the thermostat knob to the «O» setting.
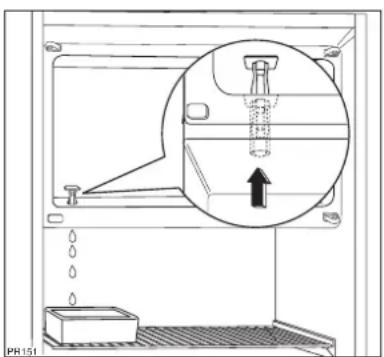
- Leave the door open, place a basin on the top shelf of the refrigerator compartment, under the drain hole, remove the plug as shown in the figure.
natural_image
Technical diagram of a mechanical device with an inset showing a piston and arrow, labeled PH151 (no text or symbols on the diagram itself)- When defrosting is completed, dry the interior thoroughly and refit the plug.
- Turn the thermostat knob back to the required setting or replace the plug in the power socket.
- Reload the previously removed food into the compartment.

Never use sharp metal tools to scrape off frost from the evaporator as you could damage it.
Do not use a mechanical device or any artificial means to speed up the thawing process other than those recommended by the manufacturer.
Cleaning

Never use metal objects for cleaning your appliance as it may get damaged.
NEVER use detergents, abrasive powders, highly perfumed cleaning products or wax polishes to clean the interior as these will damage the surface and leave a strong odour.
Clean the inside with warm water and bicarbonate of soda. Rinse and dry thoroughly.
When the appliance is not in use
Disconnect the appliance from the electricity supply. Empty all foods and clean the appliance, leaving the doors ajar to prevent unpleasant smells.
Changing the light bulb
- Should the interior light fail to work, first switch off the appliance and disconnect from the electricity supply, then replace the bulb as follows:
- unscrew the light cover securing screws.
- unhook the moving part by pressing it as shown in the figure.
- Replace the bulb by other with another with the same characteristics.

natural_image
Diagram of a device with arrows indicating direction, no text or symbols presentProblems may be due to causes which can easily be solved before calling the Technical Service. Please follow these instructions:
| SYMPTOM SOLUTION | |
| Door does not close | Weight surpasses the storage limit of the door shelf so spread weight more evenly or take some products out.The appliance is not properly installed. Please look in the “Building-in” section. |
| It is too warm inside the refrigerator | Set a lower temperature.Distribute the food products to allow cold air to circulate around them.Make sure that the door is completely closed and that the insulating strip is complete and clean.The temperature where the cabinet is placed is above normal room temperature. |
| It is too cold inside the refrigerator. | Set a warmer temperature. |
| The compressor works continuously. | Turn the temperature regulator to a lower number.The temperature where the cabinet is placed is above normal room temperature.Check that the ventilation is sufficient and that the ventilation openings are unobstructed.The cause could be the introduction of large quantities of food and/or frequent opening/closing of the door. |
| There is water inside/outside the refrigerator. | Sometimes is normal. During automatic defrosting frost thaws on the cooling plate. |
| Water comes out on the floor. | Place the drain hose at the back of the cabinet above the drain bowl. |
| Noises | Sometimes this is normal. Temperature control may cause clicking sounds when the system is connected or disconnected.The injected cooling gas may produce a gurgling sound while passing through the tubes.The motor may cause a humming noise and/or slight bumping.The insulation material used has a tendency to slightly increase noise levels, how ever it allows for much better insulation and a lower energy consumption. |
Customer service and spare parts
If you cannot find the remedy for a malfunction in these operating instructions, please contact your dealer or our customer service department and consult the Guarantee card.
Selective ordering of replacement parts can save unnecessary travel and costs.
For this reason always provide the following
appliance information:
- Model Name
• Model Number (PNC) - Serial Number (S-No.)
This information can be found on the rating plate inside the cabenit on the left hand wall. We recommend that you enter this information here, so that it is handy if needed.
Technical specifications
The technical data is indicated in the rating plate on the left side inside the appliance.

If there is a power failure when food is in the freezer, do not open the door of the freezer compartment. The frozen food will not be affected if the power cut is of short duration (up to 12 hours) and the freezer compartment is full, otherwise, it is recommended that the food should be used within a short time (a temperature increase of the frozen food shortens its safe storage period).

Take utmost care when handling your appliance so as not to cause any damages to the cooling unit with consequent possible fluid leakages.
- During normal operation, the condenser and compressor at the back of the appliance heat up considerably. Always ensure that there is adequate ventilation as a failure to do this will result in component failure and possible food loss. See installation instructions.
- Important: if the supply cord is damaged, it must be replaced by a special cord or assembly available from the manufacturer or its service agent.
Positioning
- Unpack the cabinet and check that it is in good condition and free of any transport damage.
- The appliance must not be located close to radiators or gas cookers.
- Avoid prolonged exposure of the appliance to direct sunlight.
- For safety reasons, minimum ventilation must be as shown in Fig.
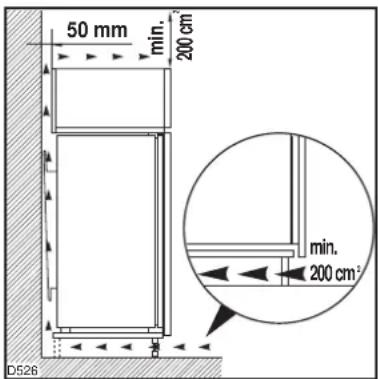
Attention: keep ventilation openings clear of obstruction.
- It is necessary that the niche is provided with a conduct of ventilation having the following dimensions:
Depth 50 mm
Width 540 mm
The climate classification can be found on the rating plate, which is located inside the cabinet on the left hand wall.
The following table shows which ambient temperature is correct for each climate classification:
| Climate classification | for an ambient temperature of |
| SN +10 to +32°C | |
| N | +16 to +32°C |
| ST | +18 to +38°C |
| T | +18 to +43°C |
When the ambient temperature is not included within the range indicated for the class of this appliance, the storage temperature in the appliance cannot be guaranteed; therefore it is advisable to use the food stored as soon as possible.
Electrical connection
Before plugging in, ensure that the voltage and frequency shown on the serial number plate correspond to your domestic power supply.
Voltage can vary by ±6% of the rated voltage. For operation with different voltages, a suitably sized auto-transformer must be used.

Important
The appliance must be earthed.
The power supply cable plug is provided with a contact for this purpose.
If the domestic power supply socket is not earthed, connect the appliance to a separate earth in compliance with current regulations, consulting a specialist technician.
The Manufacturer declines all responsibility if the above safety precautions are not observed.
This appliance complies with the following E.E.C. Directives:

- 87/308 EEC of 2/6/87 relative to radio interference suppression.
- 73/23 EEC of 19.2.73 (Low Voltage Directive) and subsequent modifications.
- 89/336 EEC of 3.5.89 (Electromagnetic Compatibility Directive) and subsequent modifications.

Attention!
It must be possible to disconnect the appliance from the mains power supply; the plug must therefore be easily accessible after installation.
See „Installation Instructions“ supplied.
Please check whether, after installing your appliance and especially after rehingeing the door, the door seal seals right round. An untight door seal may lead to heavy frosting and thereby to a higher power consumption.

Warning!
If the ambient temperature is cold (i.e. in Winter), the gasket may not fit perfectly to the cabinet. In that case, wait for the natural fitting of the gasket or accelerate this process by heating up the part involved with a normal hairdrier.
natural_image
Hand placing a black arrow on a shelf with arrows indicating direction (no text or symbols)natural_image
Line drawing of a hand holding a shelf with a tray, no text or symbols presentnatural_image
Diagram of a door or cabinet with directional arrows indicating movement, no text or symbols presentCongélation et surgélation
natural_image
Diagram showing a light bulb placed between two horizontal bars with an upward arrow indicating direction (no text or symbols)natural_image
Technical diagram of a mechanical device with an inset showing a component and water flow, labeled PR151 (no text or symbols on the diagram itself)natural_image
Diagram of a device with arrows indicating direction, no text or symbols present- 73/23 CEE 19/02/73 (Basse Tension) et modifications successives;
natural_image
Illustration of a hand inserting a device into a filing cabinet with an upward arrow indicating motion (no text or symbols)natural_image
Line drawing of a hand holding a shelf with shelves, no text or symbols presentnatural_image
Diagram of a door or vent with directional arrows indicating flow or movement, no text or symbols present.natural_image
Diagram showing a light bulb placed between two horizontal bars with an upward arrow indicating direction (no text or symbols)natural_image
Technical diagram of a mechanical device with an inset showing a piston and arrow (no text or symbols)natural_image
Diagram of a device with arrows indicating direction, no text or symbols presentStoringen
natural_image
Illustration of a hand inserting a directional arrow into a filing cabinet (no text or symbols)natural_image
Line drawing of a hand holding a shelf with a small object, no text or symbols presentnatural_image
Diagram of a door with two doors and directional arrows indicating movement or flow (no text or symbols)natural_image
Diagram of a double door with a light bulb and directional arrow indicating compression or lifting (no text or symbols)natural_image
Technical diagram of a mechanical assembly with a magnified inset showing a component (no text or symbols present)natural_image
Diagram of a device with arrows indicating direction, no text or symbols present- Modello
- Prod. No. (PNC)
- Ser. No. (S-No.)
natural_image
Illustration of a hand inserting a directional arrow into a filing cabinet (no text or symbols)natural_image
Line drawing of a hand holding a shelf with a small object, no text or symbols presentnatural_image
Diagram of a door with two compartments and directional arrows indicating movement (no text or symbols)natural_image
Diagram of a double door with a light bulb and upward arrow indicating vertical motion (no text or symbols)natural_image
Technical diagram of a mechanical device with an inset showing a piston and arrow, no text or symbols present.natural_image
Diagram of a device with arrows indicating direction, no text or symbols present


- Safety Instructions
- Domestic Use
- Child Safety
- Environment Protection
- Contents
- Safety Instructions 10
- Disposal 11
- Use and Control Before Use / Control panel 11
- Maintenance Defrosting / Cleaning / Changing the light bulb 14
- Something not Working 15
- Customer Service and Spare Parts 15
- Technical Specifications....15
- Installation Positioning / Electrical connection .....16
- Building-in 17
- Disposal
- Appliance Packaging Information
- Disposal of old Appliances
- Use and Control
- Before Use
- Refrigerator compartment Control panel
- Starting the appliance
- Temperature Control
- Internal Parts
- Storage shelves
- i Hints
- Saving Energy
- Hints for refrigeration
- Freezer compartment
- Interior Accessories
- Ice-cube production
- Hints
- Freezing of fresh food and storage of frozen food
- Warning
- Defrosting
- Refrigerator compartment
- Cleaning
- When the appliance is not in use
- Changing the light bulb
- Customer service and spare parts
- Technical specifications
- Positioning
- Attention: keep ventilation openings clear of obstruction.
- Electrical connection
- Important
- The appliance must be earthed.
- Attention!
- Warning!
- Congélation et surgélation
- Storingen
Brand : Küppersbusch
Model : IKE 238-6
Category : Refrigerator