
AVM-56270BT - Car radio ORION - Free user manual and instructions
Find the device manual for free AVM-56270BT ORION in PDF.


| Product Type | Car Stereo with DVD/VCD/CD/MP3/MP4/USB/SD/MMC/Bluetooth/FM/AM Tuner and TV |
| Model | AVM-56270BT |
| Brand | Orion |
| Dimensions (Chassis) | 178 x 100 x 154 mm |
| Dimensions (Nose) | 178 x 101.5 x 15 mm |
| Weight | 2.5 kg |
| Power Supply | 12V DC (11-16V), negative ground |
| Fuse | 15A |
| Maximum Power Output | 45W x 4 channels |
| Continuous Power Output | 25W x 4 channels (4 Ω, 10% THD) |
| Speaker Impedance | 4-8 ohm |
| Pre-Amp Output Voltage | 4.0V (CD play mode: 1KHz, 0 dB, 10KΩ load) |
| Display | 6.2-inch TFT LCD, 800x480 resolution, touchscreen |
| Disc Playback | DVD-R/RW, CD-R/RW, VCD, MP3, WMA, JPEG, MPEG 1/2, MP4 (AVI, VOB, DAT) |
| Media Inputs | USB, SD/MMC card slot, AV-IN (front and rear), TV antenna |
| Bluetooth | Hands-free calling, audio streaming, pairing code default 1234 |
| Tuner | FM (87.5-108 MHz), AM (522-1620 kHz), RDS (AF, TA, EON) |
| TV Tuner | Built-in analog TV, supports PAL/NTSC/Auto |
| Safety Features | Parking brake lock for video, reverse camera input, steering wheel control support |
| Accessories Included | Remote control (lithium battery), mounting bolts, wire connector, trim plate, SWC cable, TV antenna, rubber cushion |
| Warranty | Refer to manual; professional installation recommended |
Frequently Asked Questions - AVM-56270BT ORION
User questions about AVM-56270BT ORION
0 question about this device. Answer the ones you know or ask your own.
Ask a new question about this device
Download the instructions for your Car radio in PDF format for free! Find your manual AVM-56270BT - ORION and take your electronic device back in hand. On this page are published all the documents necessary for the use of your device. AVM-56270BT by ORION.
USER MANUAL AVM-56270BT ORION
Operating Instructions
AVM-56270BT
DVD/VCD/CD/MP3/MP4/USB/SD/MMC/BT PLAYER WITH FM/AM TUNER
BUILDING TV INTO
Safety Precautions
Thank you for purchasing this product. Please read through the se oper at in g instructions so you will know how to operate your model properly. After you have finished reading the instructions, keep this manual in a safe place for future reference.
Only connect the unit to a 12-volt power supply with negative grounding.

Never install this unit where the operation & condition for safety driving is restrained.

Never use the video display function in the front when driving to prevent the violation of laws & regulations and also to reduce the risk of traffic accident except using for rear view video camera.

To ensure safe driving, please adjust the volume to a safe & comfort level in case of emergency situations.
Never expose this unit, amplifier, and speakers to moisture or water for preventing electric sparks or fires.
natural_image
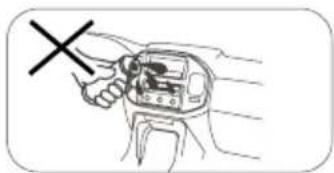
Line drawing of a hand holding a device with a cross mark, no text or symbols presentPlease don't change the fuse on the power cord without professional guidance, using improper fuse may cause damage to this unit or even cause fire.

natural_image
Simple line drawing of a hand holding a rectangular object with an 'X' mark, no text or symbols presentPlease power off this unit at once and send it back to the after-sales service center or the dealer /distributor you purchased from if one of the following symptoms is found:
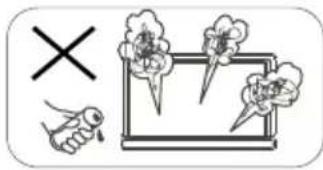
(a). Water or other obstacle enters the unit;
(b). Smoking;
(c). Peculiar smell.
To provide a clear demonstration and an alternative for easy understanding of the operation of this unit, graphic illustration was used. However, this illustration is not necessary printed as the actual image found on the unit.
Safety Precautions (continued)
Warning
Operate the unit correctly according to the manual instruction to prevent unnecessary problem.
Caution
This product is a CLASS 1 LASER PRODUCT. Use of controls or adjustments or performance of procedures other than those specified herein may result in hazardous radiation exposure. Do not open covers and do not repair yourself. Refer servicing to qualified personnel.
Two laser products
Wave length: CD: 780nm DVD: 650nm
Laser power: No hazardous radiation is emitted with safety protection.
To reduce the risk of fire electric shock, and annoying interference, use only the included components.
Caution of disc using
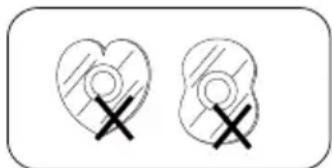
- DO NOT use irregular shaped disc.
natural_image
Two heart-shaped icons with cross symbols, no text or labels present- Disc Cleaning. Use a dry, soft cloth to wipe the disc from center to edge, only neutral detergent can be used.

natural_image
Diagram of a CD or DVD disc with arrows indicating direction, no text or symbols present- When playing a new disc. New disc may have some rough spots around the inner and outer edges. If such a disc is used, remove these rough spots with a pencil or ball-point pen, etc.

Contents
Safety Precautions .... 1
Features 3
Panel Controls 4
Remote Controls.... 5
Basic Operations 7
USB/SD/MMC Card Operation 8
Disc Operations 9
Tuner Operation 13
Bluetooth Operation.... 14
TV Operation 16
Other Mode.... 16
System Setup 17
Device Connections.... 20
Installation 23
Troubleshooting 24
Specifications 25
Features
DVD-R/RW compatibility
It is possible to playback DVD-R/RW discs recorded with the video format and Video Recording format.
WMA and MP3 compatibility
It is possible to playback WMA and MP3 files.
About WMA
The Windows Media™ logo printed on the box indicates that this unit can playback WMData.
!Windows Media and the Windows logo are trade marks or registered trademarks of Microsoft Corporation in the United States and/or other countries.
!This unit may not operate correctly depending on the application used to encode WMA files.
About MP3
Supply of this product only conveys a license for private, non-commercial use and does not convey a license or imply any right to use this product in any commercial (i.e. revenue-generating) realtime broadcasting (terrestrial, satellite, cable and/or any other media), broadcasting/streaming via internet, intranets and/or other networks or in other electronic content distribution systems, such as pay-audio or audio-on-demand applications. An independent license for such use is required. For details, please visit http://www.mp3licensing.com.
Button Operation Explanations
Touch panel key operation
It is possible to operate this unit by using touch panel key.
Some frequent operations
1) Move cursor

2) Confirm
Open the SOURCE MENU
Touch the top left corner of TFT screen under playing mode.
Touch screen
Due to the touch screen, you can fulfill most functions not only by pressing buttons but also by touching the options you desired.
Panel Controls
Press PWR button to turn on the unit.
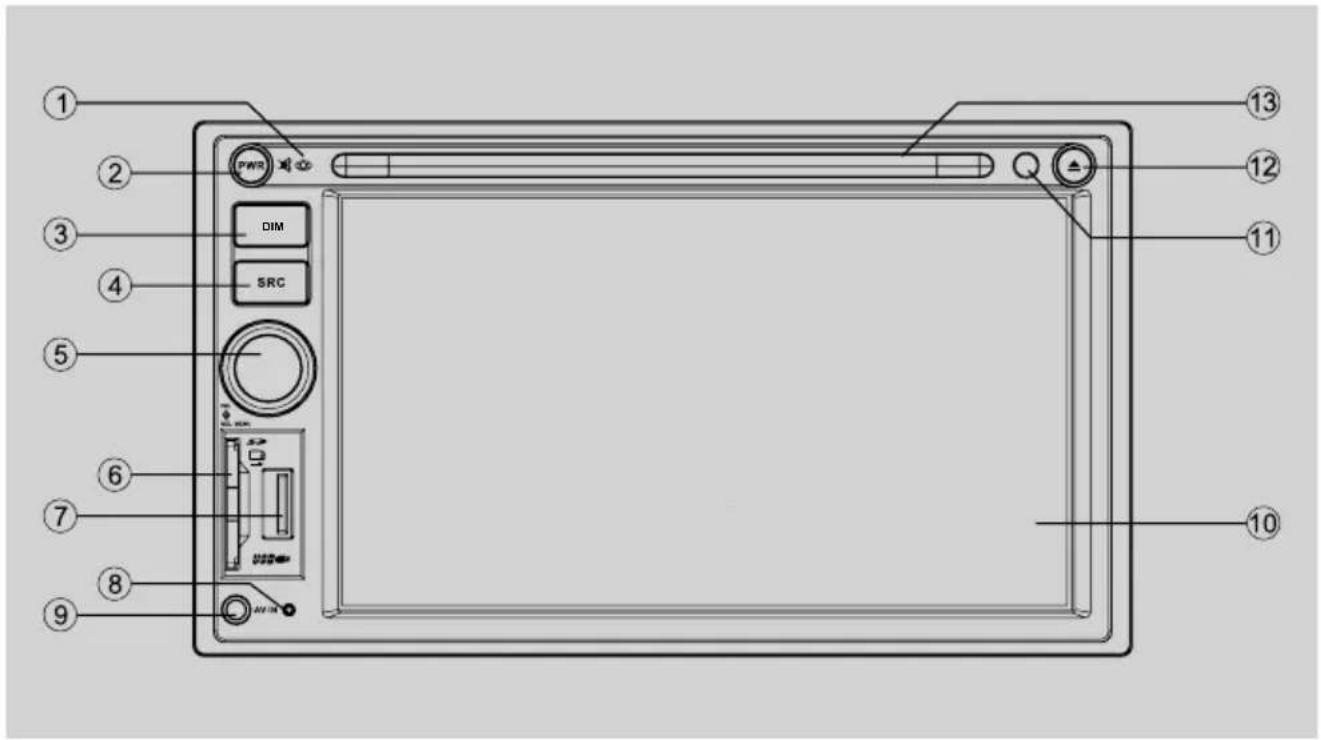
-
- Microphone
-
- Power on
-
Mute
-
When on, long press to power off.
-
- Adjust brightness of screen.
-
- Select the following sources:
Radio
Disc (when disc inserted)
Card (when SD/MMC card inserted)
USB (when USB connected)
AV1 (rear AV in)
AV2 (front AV in)
Blue-tooth
TV
-
- Rotate to adjust volume level.
-
Press and hold it to enter setting mode.
-
- SD/MMC card slot
-
- USB connector
-
- Reset
-
- AV-in jack
-
- Touch panel
-
- Remote sensor
-
- Eject disc (when disc inserted)
- Reset the mechanism (long press)
-
- Disc slot
Safety Notes:
The DVD video display of the in-dash unit will not operate while the vehicle is moving. This is a safety feature to prevent driver distraction. In-dash DVD video functions will only operate when vehicle is in Park and the parking brake is engaged. It is illegal in most countries for the driver to view video while the vehicle is in motion.
Remote Controls
Remote control operating range
The remote control can operate within a distance of 3\~5m.

Remote sensor
Press ⏻ to turn on/off the unit.
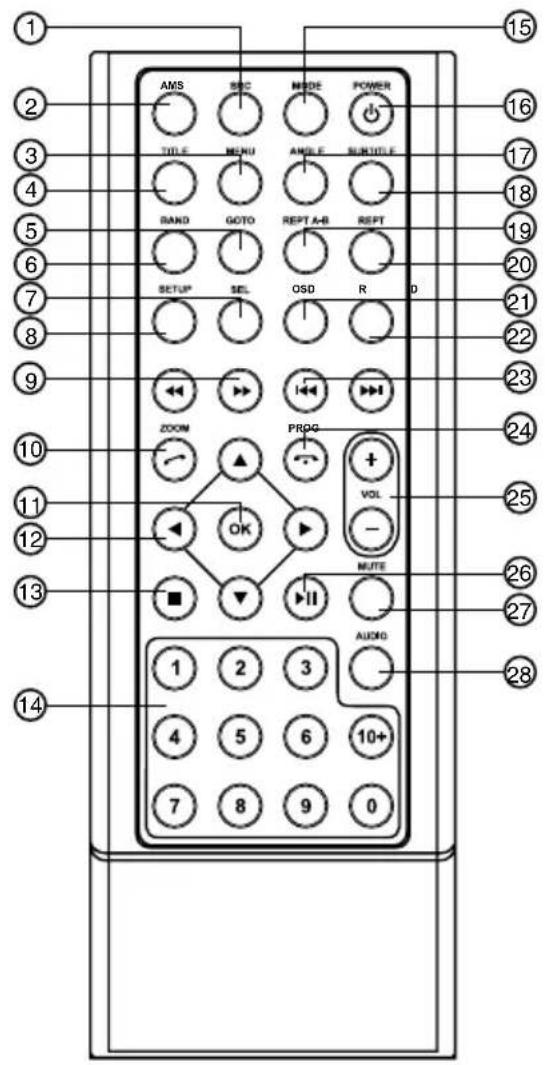
-
- Select the following sources:
Radio
Disc (when disc inserted)
Card (when SD/MMC card inserted)
USB (when USB connected)
AV1 (rear AV in)
AV2 (front AV in)
Blue-tooth
TV
- Select the following sources:
-
- Radio preset scan
Radio auto preset
-
- Menu (DVD)
-
- Title (DVD)
-
- Goto search
-
- Radio band
- Video system PAL/NTSC/AUTO
-
- Sound/display setting
- Setting menu (press 2 sec.)
-
- System setup
-
- Fast reverse/forward playback
-
- Zoom (DVD/VCD)
- Dial/Receive call
-
- Enter
-
- Menu cursor
-
- Stop/Return
-
- Digit area
-
- Enter source menu
-
- Power on/off
-
- Angle (DVD)
-
- DVD subtitle
-
- A-B repeat
-
- Repeat
-
- On screen display
-
- Track random play
-
- Radio tune
- Track skip/seek
-
- Call off/cancel
- Program
-
- Volume
-
- Play/Pause
-
- Mute
-
- DVD audio
- VCD audio L/R/ST
Remote Controls (continued)
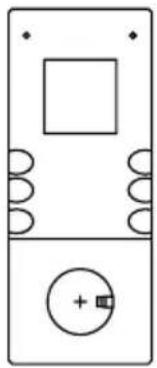
Replacing the lithium battery of remote control unit
When the range of the operation of the card remote control becomes short or no functions while operating, replace the battery with a new lithium battery. Make sure the battery polarity replacement is correct.
- Open the back cover of the remote control unit.
- Insert the button-type battery with the stamped (+) mark facing upward. Close the back cover.

natural_image
Pure electrical circuit lines without any symbols↓
natural_image
Simple line drawing of a rectangular device with a square top and circular base, no text or symbols present.
natural_image
Simple line drawing of a rectangular panel with a square cutout and a triangular base (no text or symbols)↑
Warning
- Store the battery where children cannot reach. If a child accidentally swallowed the battery, consult a doctor immediately.
- Do not recharge, short, disassemble or heat the battery or dispose it in a fire.
- Do not expose or bring into contact the battery with other metallic materials. Doing this may cause the battery to give off heat, crack or start a fire.
- When throwing away or saving the battery, wrap it in tape and insulate; otherwise, the battery may give off heat, crack or start a fire.
Basic Operations
Turn on/off the power
- Press [PWR] button to turn on the unit. The unit goes back to the last status after power on.
- When on, press [PWR] button more than 2 seconds to turn off the unit.
Mute
When on, press [PWR] button briefly to cut the sound.

Note:
- Pressing [PWR] button briefly again or adjusting volume will release muting.
- MUTE appears on the TFT during muting.
Adjust the volume
Rotate the [VOL] knob to increase or decrease the volume level.
The adjustable range of volume is 0 to 39.
Playing source selection
Method 1:
Press [SRC] button on the panel or remote control to cycle through all the available sources.
Method 2:
Open the 'SOURCE MENU' by touch the top left corner of the TFT or press MODE button on remote control, and then touch the option you desired or select the option by moving the cursor and then confirm.

Note:
- When some devices are not ready, they cannot be selected.
- You should stop switching when the playing source you desired has been selected and wait for some seconds, the unit will auto enter the playing source mode you have selected.
When parking brake applied
- If 'PRK SW' cable is connected to hand brake switch, the video display of the TFT monitor will be controlled by driving status, system setup and input video sources.
- When the car is moving ahead, if the video disc is played, and the "Parking on" is selected on the setting menu, the screen appears "WARNING!! Engage Parking Brake to View Video", and blank screen. The above warning screen will prevent the driver watching images. The passengers at the rear seats can watch normally.
When reverse driving
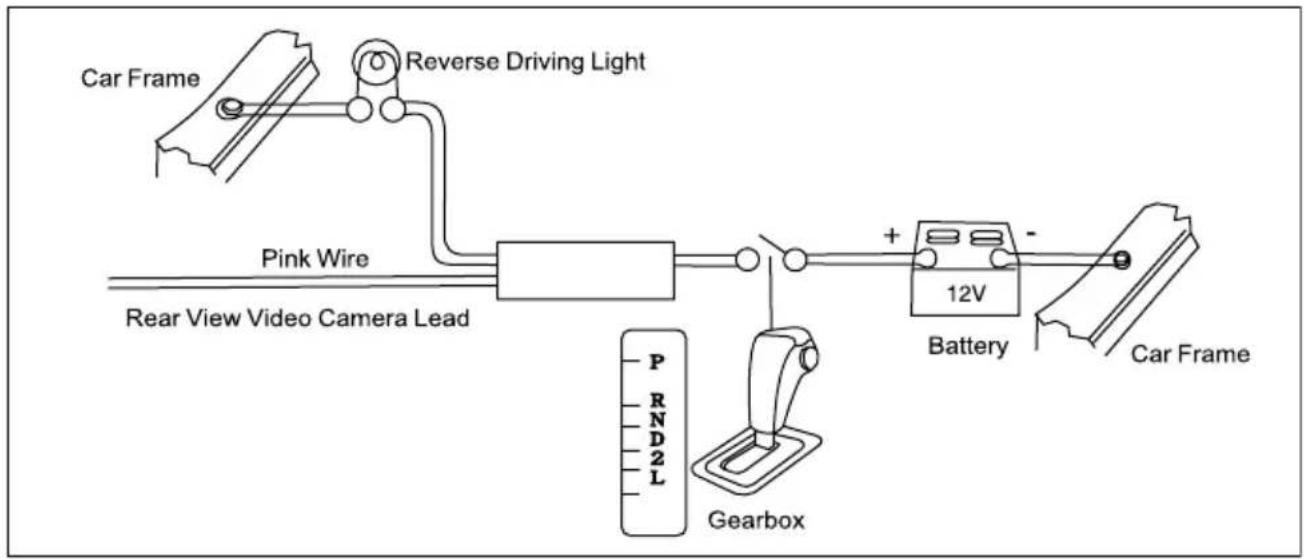
If the rear view video camera is connected, the unit automatically switches to CAMERA source during reverse driving. The unit returns to the original work mode after the reverse driving is done.
Steering Wheel Control
Touch the top left of the screen to enter source menu, touch [💡] button to enter the unit system setup menu, select [Other].
- At SWC option, use ◀ / ▶ button to select a function, then press and hold a button on the steering wheel (if your steering wheel support the function) until the item on the screen lighted. Now the function is saved in the button.
- Repeat step 1 to set functions of other steering wheel buttons.
- Exit the setting menu and you can operate the player by the buttons on the steering wheel.
- If you want to change the setting, enter the SWC setting menu, select a function on the screen, press and hold a button on the steering wheel more than 2 seconds, then the function is saved into the button on steering wheel. At the same time, all other steering wheel settings are clear, you must reset them.
USB/SD/MMC Card Operation
Using SD/MMC Card
-
Loading SD/MMC card Insert the SD/MMC card into the slot. Close the panel, the unit will read the file of the card automatically.
-
Take out SD/MMC card Push SRC button to other mode, press the SD/MMC card to pop it out. Take out the card.

natural_image
Isometric line drawing of a rectangular frame with a handle and mounting bracket (no text or symbols)USB Notes
USB functions (flash memory type) MP3 music play
- USB flash memory 2 in 1 support
- Fat 12/fat 16/fat 32 is possible
-
File name: 32 byte/dir name: 32 byte /tag name: 32 byte
-
Tag (ID3 tag ver 2.0)
-
Title/artist/album: 32 byte support
-
USB 1.1 support USB 2.0 support (It can not support USB 2.0 speed. Just, get the same speed with USB 1.1)
Not all kinds of USB devices are compatible with the unit.
Using USB device
- Insert a USB device into the USB connector.
When connecting a USB device, the unit will read the files automatically.
- To remove the USB device, you should first select another source, in order to avoid damaging the USB device. Then take off the USB device.

natural_image
Technical line drawing of a mechanical component with a cylindrical pipe inserted into a rectangular frame (no text or symbols)Disc Operation
Insert a disc
Insert a disc into the slot, and the unit will change to disc mode automatically.

Note:
- Please confirm whether there is a disc in the unit before you insert another one.
- The unit will exit current playing source and enter DVD mode when one disc is inserted.
- Some recorded discs, such as CD-R, CD-RW, DVD-R, DVD+R, DVD-RW, DVD+RW cannot be played back because of different recording status. Otherwise, the discs without being closed could not be played back.
Eject the disc
Press [▲button to eject the disc.
Notes:
- After ejecting the disc, the unit reverts to other mode automatically.
- You can eject a disc when the unit powered off. The unit remains off after the disc ejected.
- If the disc is not removed from the unit within 10 seconds, the disc will be reloaded to prevent accidental damage.
Using the touch screen controls
The touch key areas for CD/VCD/D VD playback are outlined below:

A - Turn to main source menu
B - Display on screen control menu
Disc Playback
- When disc inserted, display shows "READ". For MP3 or disc with mixed files, reading time may exceed 1 minute.
- "ERROR" will be displayed if error found in disc operation.
- While CD/MP3/WMA files playback, CD/MP3/WMA playback menu will appear on the display.
- For DVD, DVD icon will appear on the display and TITLE appears. Press [ ] to play.
- For VCD, VCD icon will appear on the display.
- When video disc is playing, touch the screen, some touch keys will appear.
File type supported
Audio file: MP3(*.mp3), WMA(*.wma)
Video file:
MP4 (*.avi)
MPEG 2 (*.vob)
MPEG 1 (*.dat)
Picture file: JPEG (*.jpg)
MP3 file:
ISO 9660 or ISO 9660 + Joliet format - Max. 30 characters.
Max. nested directory is 8 levels.
The max. album number is 99.
The max. length of each track is 99 minutes 59 seconds.
Supported sampling frequency for MP3 disc: 8KHz to 48KHz (44.1KHz preferably).
Supported bit-rates of MP3 disc are: 32 - 320 kbps (128 kbps preferably).
Disc and file NOT supported
*.AAC, *.DLF, *.M3U, *.PLS, MP3 PRO files and files with DRM.
Open session discs.
Stop playback temporarily
- During playback, press [ ]No pause playback.
Disc Operation (continued)
- The sound will be muted.
- Display "PAUSE" in the TV screen.
Press [ ] again to continue playback. To resume normal play, repeat the operation.
Stop playback entirely
During DVD, VCD, CD, MP3 playback:
- Press [■] key on remote control once stopping the playback and the relevant location on the disc is saved, press [▶] to resume the playback from the saved disc location.
- Press [■] twice to cease the playback. Press [▶] to start the playback from the very beginning the Title page of the DVD or the first track of VCD / CD.
Select desired track
- Press [◀]▶▶ skip to the next track.
- Use 1-9 and 0, 10+ buttons on the remote control to select desired track number.
Fast forward/backward during playback
Press [ ] for more than 2 seconds repeatedly to select X2, X4, X8, X20 to fast backward or forward track during playback.
- During the fast forward or backward operation, press [▶] briefly to playback again.
- During the fast forward or backward operation, the volume will be muted.
Random track playback (for CD/VCD/MP3 Only)
You can play all the tracks in random order.
- During playback, press [∞].
- "SHUFFLE" appears on the display.
- Press [→] again to select normal playback.
Repeat
During playback, press [ REPT ] or [ ⬇] repeatedly.
- RPT icon will appear on the display.
- For VCD/CD: Display appears REP 1 → REP ALL → OFF
- For DVD: Display appears CHAPTER → TITLE → REP ALL → OFF
- For File disc: Display appears REP 1→REP DIR→REP ALL→OFF

Note:
If you do not select REP on, when the entire disc or TITLE playback has finished, the system will stop. If no other control, after 5 minutes the unit will turn into standby mode.
Repeat A - B
Select desired passage to repeat playback.
- Press A - B once to select starting point Display shows "REPEAT A".
- Press A - B again to select ending point. Display shows "REPEAT A - B", and selected passage start to replay.
- Press A - B once again to exit. Display shows "A - B CANCEL".
GOTO
Goto desired track/chapter or time point directly.
Press [ GOTO ] button on the remote control, track or DVD Title/Chapter and time display on top of the screen. Current item is highlighted.
Use [◀▶] to select desired item. Use digit button to select number. Press [OK] to confirm.
Program
- Press [PROG] to enter program list. Use [▲/▼] or [◀] cursor and digit button to enter number.
Disc Operation (continued)
For DVD and File disc, select title and chapter number.
For VCD and CD, select track number.
- Press [▶] to play, or move the cursor to select "PLAY" and press [OK] to play.
- If you want to delete the list, move the cursor to "CLEAR", press [OK] to delete all the list set before.
- Press [PROG] again to exit program play.
DVD Audio Select
Press [AUDIO] to select audio language to listen if the DVD has multiple audio languages.
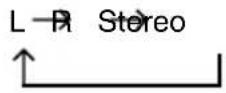
VCD Audio Select
Press [ AUDIO ] to select audio channel to listen.
DVD Subtitle Select
Press [ SUBTITLE ] to select the subtitle language to show if the DVD has multiple language subtitles.
DVD Title Select
Press [TITLE] to display title or chapter list, use [◀] or [/▲] cursor or digit number to select, press [OK] to play.
DVD Angle Select
Press [ ANGLE ] to select different angle to view if the DVD has multiple-angle views.
ZOOM
Press ZOOM button, the picture will be zoomed accordingly.

flowchart
graph TD
    A["X2"] --> B["X3"]
    B --> C["X4"]
    C --> D["X1/2"]
    D --> E["X1/3"]
    E --> F["X1/4"]
    F --> G["OFF"]
    G --> H["↑"]
DVD Playback Menu
While playback touch the center of the screen:
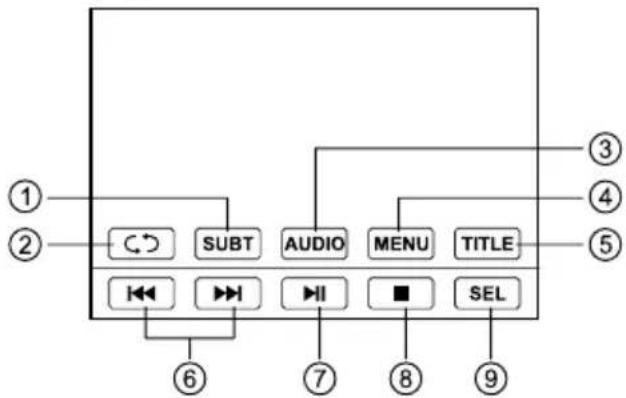
flowchart
graph TD
    A["①"] --> B["②"]
    B --> C["③"]
    B --> D["④"]
    B --> E["⑤"]
    B --> F["⑥"]
    B --> G["⑦"]
    B --> H["⑧"]
    B --> I["⑨"]
    B --> J["⑩"]
    B --> K["⑪"]
    B --> L["⑫"]
    B --> M["⑬"]
    B --> N["⑭"]
    B --> O["⑮"]
    B --> P["⑯"]
    B --> Q["⑰"]
    B --> R["⑱"]
    B --> S["⑲"]
    B --> T["⑳"]
    B --> U["㉑"]
    B --> V["㉒"]
    B --> W["㉓"]
    B --> X["㉔"]
    B --> Y["㉕"]
Touch the icon to access desired function.
- Subtitle select
- Repeat playback
- Audio select
- Menu play
- Select title
- Track skip/seek
- Play/Pause
- Stop
- Display audio/video setting menu
Video VCD Playback Menu
While playback touch the center of the screen:
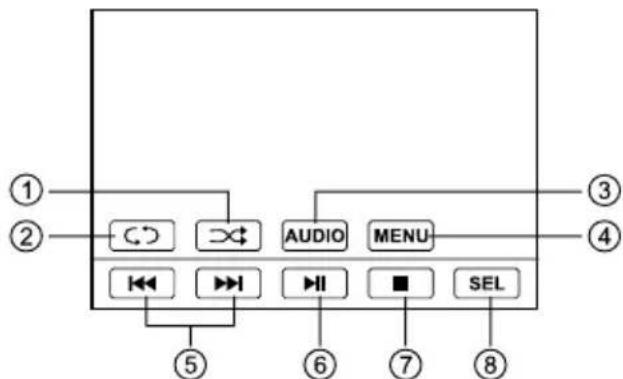
Touch the icon to access desired function.
- Random play
- Repeat play
- Audio select
- Menu play
- Track skip/seek
- Play/Pause
- Stop
- Display audio/video setting menu
Disc Operation (continued)
CD/MP3/MP4/PHOTO Menu
While playback touch the center of the screen:

- Display source menu
- Display audio/video setting menu
- Current time
- Folder/file list
- Repeat playback
- Previous/next page
- Random play
- Play/Pause
- Stop
- Show audio file
- Show video file
- Show photo file
- back to up folder
- Show next menu
PHOTO Intro Menu
While intro photos, touch the center of the screen:

flowchart
graph TD
    A["①"] --> B["◀"]
    A --> C["▶"]
    B --> D["▲"]
    C --> E["▼"]
    D --> F["SEL"]
    E --> F
    G["②"] --> H["◀"]
    G --> I["▶"]
    H --> J["◀"]
    I --> K["▶"]
    J --> L["◀"]
    K --> M["▶"]
    L --> N["◀"]
    M --> O["▶"]
    N --> P["◀"]
    O --> Q["▶"]
    P --> R["◀"]
    Q --> S["▶"]
    R --> T["◀"]
    S --> U["▶"]
    T --> V["◀"]
    U --> W["▶"]
    V --> X["◀"]
    W --> Y["▶"]
    X --> Z["◀"]
Touch to access desired function.
- Rotate the picture anticlockwise/clockwise.
- Mirror the picture vertically/horizontally
- Zoom
- Previous/next picture
- Play/Pause
- Stop
- Display audio/video setting menu
MP3/MP4/PHOTO Menu

- Current track number/total track number
- Playback information
- Track skip/seek
- Play/Pause
- Stop
- Show previous menu
Tuner Operation
Radio Menu

Touch to access desired function:
- Display source menu
- Display audio/video setting menu
- Current time
- Tuner information
- Touch to tune automatically.
Press more than 2 seconds to tune manually. - Select previous/next preset station.
- Show next menu
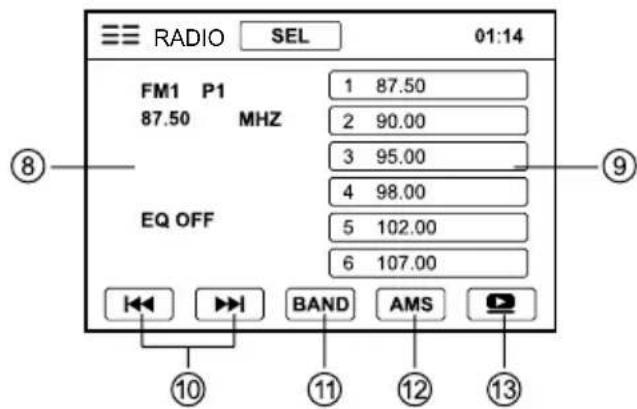
-
Tuner information
-
Preset stations
-
Touch to tune automatically.
Press more than 2 seconds to tune manually.
- Band switch
- Auto search and store stations
- Show previous menu
RDS Basics
RDS service availability varies with areas. Please understand if RDS service is not available in you area, the following service is not available.
AF Mode
AF (Alternative Frequency): When the radio signal strength is poor, enabling the AF function will allow the unit to automatically search another station with the same PI (program identification) as the current station but with stronger signal strength.
Touch [💡] button on the source menu to enter the unit system setup menu, touch [Radio] to enter radio setting menu, then select AF on or off.
AF ON: AF function is activated.
AF OFF: AF function is disabled.
Remark: AF indicator on LCD will flash until RDS information is received. If RDS service is not available in your area, turn off the AF mode.
TA Mode
Some RDS FM stations periodically provide traffic information.
TP (Traffic Program Identification)
Broadcasting of traffic information
TA (Traffic Announcements Identification)
Radio announcements on traffic conditions
Touch [💡] button on the source menu to enter the unit system setup menu, touch [Radio] to enter radio setting menu, then select TA on or off.
When TA mode is turned on, the TA indicator will blink.
When traffic announcement is received, the TA indicator will display. The unit will temporarily switch to the tuner mode (regardless of the current mode) and begin broadcasting the announcement at TA volume level. After the traffic announcement is over, it will return to the previous mode and volume level. When TA is turned on, SEEK, SCAN, AMS function can only be received or saved when traffic program identification (TP) code is received.
Tuner Operation (continued)
Bluetooth Operation
TA SEEK/TA ALARM
Touch [button on the source menu to enter the unit system setup menu, touch [Radio] to enter radio setting menu, then select TA Seek or TA Alarm.
If the TA (Traffic Announcements) is turned on and there is no traffic program identification code received in the specified time, no TA/TP will display and either TA ALARM or TA SEEK will be activated.
TA ALARM mode: Alarm is turned on.
TA SEEK mode: TA SEEK is automatically activated.
TA VOL
Touch [button on the source menu to enter the unit system setup menu, touch [Radio] to enter radio setting menu, then touch //to adjust TA volume.
REG Mode
Touch [button on the source menu to enter the unit system setup menu, touch [Radio] to enter radio setting menu, then select REG on or off.
REG ON: AF function will implement the regional code (of the PI) and only stations in the current region can be tuned automatically.
REG OFF: AF function will ignore the regional code (of the PI) and stations in the other regions can also be tuned automatically.
EON (Enhanced Other Networks)
When EON data is received, the EON indicator lights and the TA and AF functions are enhanced.
TA: Traffic information can be received from the current station or stations in other network. AF: The frequency list of preset RDS stations is updated by EON data. EON enables the radio to make fuller use of RDS information. It constantly updates the AF list of preset stations, including the one that currently tuned into. If you preset a station around the area at your home, you will later be able to receive the same station at an alternative frequency, or any other station serving the same program, EON also keeps track of locally available TP stations for quick reception.
Note:
For your safety, avoid talking on the phone as much as possible while driving.
Bluetooth is a wireless transmission way for short distance. The built-in Bluetooth can connect with the mobile phones having Bluetooth function.
After connecting, you can control your mobile phone through the unit.
Pairing
Use this function to establish a connection between the unit and your mobile phone.
Press the SRC button repeatedly on the panel or touch BT on the source menu to enter Bluetooth mode.

- Display source menu
- Display audio/video setting menu
- Current time
- BT information
- Display LOG menu
- Previous track
- Play/Pause
- Next track
- Keypad
- Terminate call
- Dial
Turn on Bluetooth function of your mobile phone, keep phone within 3 meters to the unit and start to search for Bluetooth devices.
After the name of the Bluetooth module "AVM-56270BT" appears on the pairing list of your mobile phone, select it. At this time, a pairing code is required. Enter the pairing code ("1234" by default) and the Bluetooth pairing will process automatically. Some mobile
Bluetooth Operation (continued)
phones may instruct you to select connect or disconnect, please select connecting.
After pairing successfully, the Bluetooth icon lights up. Touch and hold 📞 button to disconnect.
Dial

- Touch open keypad, input dial number by the number buttons, touch to erase previous number. Touch to confirm and dial out.
- Touch 📞 or press ⏱ key on the remote control to cancel.
- At BT main menu, touch 🔍 to dial out the last dialled number.
Receive
- After pair successfully, if there is a call incoming, the unit switch to BT mode automatically.
- Touch 📋 or press ⏻ key on the remote control to receive.
- Touch 📞 or press ⓑ key on the remote control to hang up.
History
After pair successfully, touch 📋 to open LOG menu.

- Dial
- Page up
- Page down
- Phone book
- Received calls
- Dialled numbers
- Missed calls
- Show previous menu
BT MENU General Operation
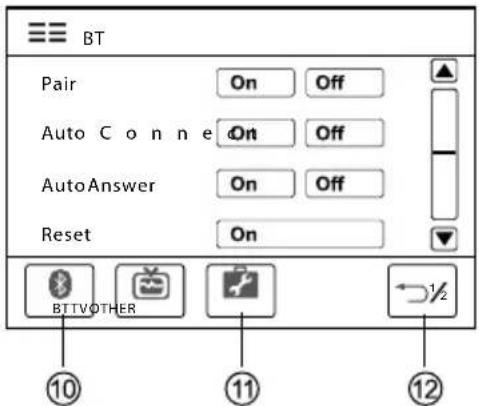
Press the [SRC] button on the panel or touch top left of the screen to enter source menu, touch [💡] button to enter the unit system setup menu, then touch BT to enter BT setting menu.
1. Pair On/Off
Set the automatically pair on or off. If select On, the unit will pair automatically.
2. Auto Connect On/Off
Set the automatic connection on or off. When Auto Connect On and Paired OK, if the distance is over 10 metres, the connection will exit. The Bluetooth technology will automatically establish a connection between the unit and the registered mobile phone when the transmission distance is 10 metres or shorter.
When Auto Connect Off and Paired OK, if the distance is over 10 metres, the connection will exit. The Bluetooth technology will not automatically establish a connection between the unit and the registered mobile phone when the transmission distance is 10 metres or shorter.
Whether the automatic connections is set ON or OFF, when power is off then on again, the unit Bluetooth will connect the mobile phone (if the Bluetooth function turning on) which is paired OK last time.
3. Auto Answer On/Off
Set the automatic answering a call ON/OFF. When Auto Answer On and Paired OK, if there is an incoming call, in 15 seconds, the unit will answer automatically, and voice will be transferred to the unit too.
When Auto Answer Off and Paired OK, if there is an incoming call, the unit will not answer automatically until you choose receiving or rejecting.
Other ModeTV Operation
Select TV mode
Press SRC button repeatedly or select TV at source menu to switch to TV mode.
Touch the center of the screen to display the control button.
Automatic tuning
Touch [I]◄[ ] on the screen, the automatic tuning will start.
Manual tuning
Press [I]▶[ ] button on the remote control to tune upward or downward step by step.
Adjust the Preset at TV Setting menu
Touch [AMS] on the screen to search available TV channels and store 18 channels with the strongest TV signal automatically.
Change TV channel
Touch ▲/ ▼ on the screen to select the previous/next stored TV channel.
Change TV video format
Press the [SRC] button on the panel or touch top left of the screen to enter Source menu, touch [💡] button to enter the unit system setup menu, then touch TV to enter TV setting menu.
Touch ◀/▶to choose TV Video format.
AV mode
External peripheral devices with RCA audio and video outputs can be connected with the unit.
For more details, please refer to < Electrical
Connections Overall Diagram >.
System Setup
Audio/Video Setting
You have 2 methods to enter audio/video setting menu.
Method 1: Touch SEL on the TFT.
Method 2: Press the SEL button on the remote control.
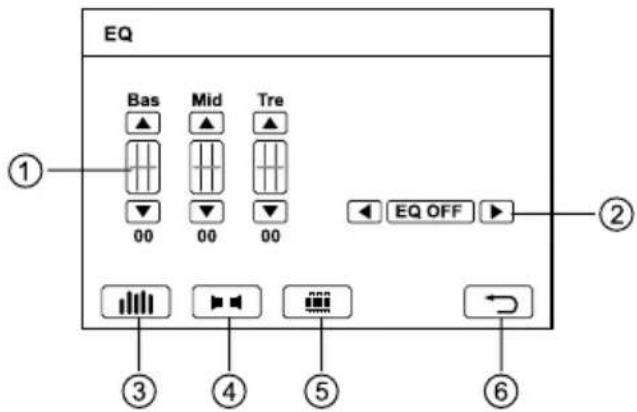
- Touch ▲/▼ button on the TFT to adjust Bass/Middle/Treble.
- Touch [◀/ ] on the TFT to select preset EQ.
- Touch to access EQ setting menu.
- Touch to access Fader/Balance menu, then touch [▲/▼/◄] on the TFT to adjust.
- Touch to access Video setting menu, then touch [▲/▼button on the TFT to adjust brightness, Contrast/Colour/Dimmer of the TFT.
- Touch to exit audio/video setting menu and return to previous mode.
SETUP Menu
You have 3 methods to enter setup menu.
Method 1: Select ⚙️ on the source menu Method 2: Press the VOL knob more than 2 seconds.
Method 3: Press the SETUP button on the remote control.

- Display source menu
- Current time
- Adjustable options
- Page up/down
- Touch to access general setting options
- Touch to access language setting options
- Touch to access DVD setting options
- Touch to access radio setting options
- Touch to show next page of setting menu
- Touch to access BT setting options
- Touch to access other setting options
- Touch to show previous page of setting menu
General Setting
Beep: On, Off
Touch [On] or [Off] to select beep sound on or off.
Loudness: On, Off
Touch [On] or [Off] to select loudness on or off.
Time Mode: 12H, 24H
Touch [12H] or [24H] to select 12 or 24 hour time format.
Time Adjust: 02:20
Touch left side of 02:20 to active hour setting, touch ▶ / ▶ to adjust. Touch right side of 02:20 to active minute setting, touch ▶ / ▶ to adjust.
Subwoofer: Off, 80Hz, 120Hz, 160Hz
Touch [Off] to turn off the subwoofer, touch [80Hz], [120Hz] or [160Hz] to set subwoofer frequency.
System Setup (continued)
Subw Volume: ◀, ▶
When the subwoofer on, touch [ ]◀ [ ] ▶ to adjust subwoofer volume.
Mirror: On, Off
Touch [On] or [Off] to select mirror or normal display. While enter MIRROR IMAGE ON mode, the video of camera is mirror image.
Parking: On, Off
Touch [On] or [Off] to turn on or off the parking mode. At PARKING ON mode, play video disc, the screen appears blank screen.
Language Setting
OSD Language
Audio Language
Subtitle Language
Menu Language
Touch the language to the right of the option to show all the optional languages, touch to select. Touch → y2 to return to previous menu without any modification.
If the DVD disc has the audio file in the selected language, the dialogues you listened to will be in the selected language.
If the DVD disc does not contain the audio file in the selected language, the dialogues you listened to will be in the default language.
You can change the language by pressing [AUDIO] key of the remote controller.
DVD Setting
TV System: NTSC, PAL, Auto
Touch [NTSC], [PAL] or [Auto] to select TV system.
TV Type: 4:3PS, 4:3LB, 16:9
Touch [4:3PS], [4:3LB] or [16:9] to select TV type to watch wide screen movies.
4:3 Pan Scan: For 4:3 TV, left and right edges will be cut.
4:3 Letter Box: For 4:3 TV, black bars will appear on top and bottom.
16:9: For 16:9 wide screen TV.
Password: Set
Touch [Set] to open keypad, enter rating password by the number buttons. Touch
← to erase previous number. Touch
to confirm. The original password is "0000".
After you enter the password, [UNLOCK] appears on the screen, now you can adjust the rating level. If you want to [LOCK] it, enter a 4-digit password in the keypad.
Rating: ◀, ▶
Touch [◀] / [▶] to select a rating level.
The rating of the disc is from 1 to 8:
(1) with the most limits when playing.
(8) with the least limits when playing.
Original setting: 8
Brightness: ◀, ▶
Touch [◀] / [▶] to set brightness of the video output.
Contrast: ◀, ►
Touch [◀]/[ ]▶ to set contrast of the video output.
Hue: ◀, ►
Touch [◀] / [▶] to set hue of the video output.
Saturation: ◀, ▶
Touch [★]/[ ] to set saturation of the video output.
Default: Restore (only DVD)
Touch [Restore] to load original setting.
Radio Setting
LOC\_DX: LOC, DX
Touch [LOC] or [DX] to select radio local or distant.
LOC: Only stations with strong signal can be broadcast.
DX: Stations with strong and weak signals can be broadcast.
Stereo\_Mono: Mono, Stereo
Touch to select FM stereo or mono.
System Setup (continued)
AF: On, Off
Touch [On] or [Off] to select alternative frequency on or off.
Other Setting
SWC (Steering Wheel Control)
refer to
TA: On, Off
Touch [On] or [Off] to select traffic announcement on or off.
TS: Adjust
Touch [Adjust] to calibrate the screen.
When the touch operation is not sensitive or valid, you should calibrate the touch screen through "TS Calibrate" function.
TA mode: Seek, Alarm
Touch [Seek] or [Alarm] to select traffic announcement's active mode.
REG: On, Off
Touch [On] or [Off] to select whether identify the regional code when tuning.
RDS CT: On, Off
Touch [On] or [Off] to select whether synchronize clock time with the signal source.
BT Setting
Pair: On, Off
Touch [On] or [Off] to choose pair automatically on or off.
Auto Connect: On, Off
Touch [On] or [Off] to choose e conn ect automatically on or off.
Auto Answer: On, Off
Touch [On] or [O ff] to choose an swer automatically on or off.
PIN Code: Set
Touch [Set] button to open keypad, then set the bluetooth password by the number buttons. Touch ← the erase previous number. Touch ← to confirm .The original password is "1234".
To reset the password, you should enter the original password first, then input a new password, touch ☐ to confirm, input the password again to confirm.
Device Connections
Notes of connection
- This unit is designed to be used in a vehicle with a 12-volt battery and negative grounding. Before installing this unit to a recreational vehicle, a bus, or a truck, make sure the battery voltage is appropriate for this unit to be used, otherwise, install a transformer by professional to convert the output voltage to 12V.
- To avoid short circuit in the electrical system, ensure that the negative battery cable is disconnected before installation.
- To prevent short circuit in the wiring and damaging to this unit, secure all wirings with cable clamp or adhesive tape. Route the wirings in a secured, out of heating place without touching any moving parts such as gear shift, handbrake, and seat rails to prevent the wiring insulation being melted / wore off.
- Never pass the yellow power cord through the installation hole into the engine compartment and connect to the car battery. Otherwise, a high possibility of serious short circuit to the electrical system may be occurred.
- Replacing a new fuse with 15A rating when the old one is broken, using no fuse or fuse with improper rating may cause damage to this unit or even fires. If a proper fuse is installed and electrical problems still occur, please contact with any professional car shops for inquiry.
- DO NOT connect other equipments with the car battery to avoid battery overheating.
-
Please make sure all the wiring connections & the cables of the Speakers are well-insulated. Otherwise, this unit may be damaged by short circuit.
-
If there is no ACC available, please connect ACC lead to the power supply with a switch.
- If an external power amplifier is connected, please don't connect P.CONT lead to the power lead of the external power amplifier, otherwise, electric spark or other damage may be resulted.
- Never ground the speaker output to prevent the damage to the built-in power amplifier.
- The minimum rating of the speakers connected to this unit is 45W with 4 to 8Ω impedance.
Device Connections (continued)
Parking Brake Cable Connections
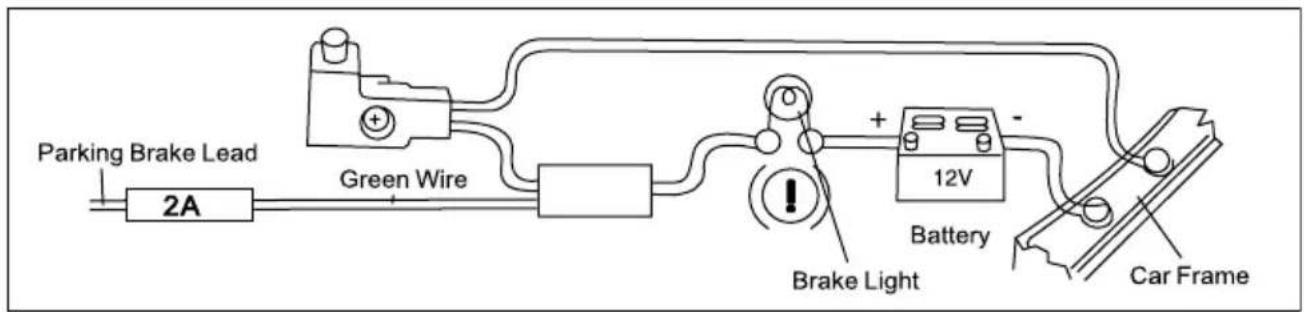

Reverse Driving Cable Connections
flowchart
graph LR
    A["Car Frame"] --> B["Reverse Driving Light"]
    B --> C["Pink Wire"]
    C --> D["Rear View Video Camera Lead"]
    D --> E["+"]
    E --> F["Battery 12V"]
    F --> G["Car Frame"]
    H["Gearbox"] --> I["P"]
    H --> J["R"]
    H --> K["N"]
    H --> L["D"]
    H --> M["2"]
    H --> N["L"]
Steering Wheel Control Cable Connections

Electronic Connections

Installation
Installation Guide
-
If relevant, remove any other audio system from the car.
-
Perform the required electrical connections:
-
If necessary, connect the hand brake wire to your hand brake contact in order to activate the video display when playing a DVD (when the car is parked).
- Connect the wire that activates the reversing camera to the reversing sensor or to a reversing light. If necessary, connect your reversing camera to the car radio's reversing camera input using a video cable (not supplied).
- Ensure that you now place the USB cable located at the back of the unit in such a way that it comes out of the dashboard or the glove box.
- Then check that everything works before installing the main unit.
- Remove the two screws on the top of the unit, otherwise, the unit will not work.
- Install the car radio in the dashboard using the supplied screws (M5x6mm).
- Attach the outer trim frame.
If you are not sure how to install this unit correctly, contact a qualified technician.

Troubleshooting
The following checklist can help you solve the problems which you may encounter when using the unit. Before consulting it, check the connections and follow the instructions in the user manual.
| Problem Possible cause | Solution | |
| General | ||
| The unit will not switch on. | Car ignition is not on.Cable is not properly connected.Fuse is burnt. | Turn your car key in the ignition.Check cable connection.Replace fuse with a new fuse of the same capacity. |
| No sound | Volume is set at minimum or the mute function is on. | Check the volume or switch the mute function off. |
| The unit or screen does not function normally. | The unit system is unstable. | Press the RESET button. |
| DVD mode | ||
| The appliance will not play discs. | The disc is inserted incorrectly.The disc is dirty or damaged. | Disc must be inserted with the label side facing up. Clean the disc and check for damage. Try another disc. |
| Sound skips due vibration. | Mounting angle is over 30°.Mounting is unstable. | Adjust mounting angle to less than 30°.Mount the unit securely with the supplied parts. |
| TUNER mode | ||
| Unable to receive stations. | The antenna is not connected properly. | Connect the antenna properly. |
| Poor quality reception of radio station. | The antenna is not fully extended or it is broken. | Fully extend the antenna and if broken, replace it with a new one. |
| Preset stations are lost. | The battery cable is not properly connected. | Connect the permanent live on the unit to the permanent live on the vehicle. |
| USB/SD/MMC mode | ||
| Unable to insert USB device or SD/MMC card. | The memory card or USB device has been inserted the wrong way round. | Insert it the other way around. |
| The USB device or SD/MMC card cannot be read. | NTFS format is not supported. | Check that the USB/SD/MMC file system is in FAT or FAT32 format.Due to different formats, some models of USB storage devices or MP 3 players may not be read. |
| Remote control | ||
| The remote control is not working or does not work properly | The batteries are low empty. | orChange the batteries. |
Specifications
General
Power supply 12V DC (11V-16V)
Test voltage 14.4V,
negative ground
Maximum power output 45Wx4 channels
Continuous power output 25Wx4 channels (4 Ω
10% T.H.D.)
Suitable speaker impedance 4-8 ohm
Pre-Amp output voltage 4.0V (CD play mode:
1KHz, 0 dB, 10K Ω
load)
Fuse 15A
Dimensions (WxHxD)
- Chassis 178x100x154mm
- Nose 178x101.5x15mm
Weight 2.5kg
Aux-in level 300mV
SUB-out 4.0V
Disc Player
| System | Disc digital audio system |
| Frequency response | 20Hz - 20KHz |
| Signal/noise ratio | >80dB |
| Total harmonic distortion | Less than 0.20% (1KHz) |
| Channel separation | >60dB |
| Video signal output | NTSC/PAL |
| Video output level | 1±0.2V |
| Video signal input | NTSC/PAL |
FM Stereo Radio
| Frequency range | 87.5-108.0MHz (EUR) |
| 65.0-74.0 (OIRT) | |
| Usable sensitivity | 8dBμ |
| Frequency response | 30Hz-15KHz |
| Stereo separation | 30dB (1KHz) |
| Image response ratio | 50dB |
| IF response ratio | 70dB |
| Signal/noise ratio | >55dB |
AM(MW) Radio
| Frequency range | 522-1620KHz (EUR) |
| Usable sensitivity | 30dBμ |
6.2 Inch TFT LCD
| Display resolution (dot) | 800RGB (H) x 480(V) |
| Active area (mm) | 137.52(H) x 77.232(V) |
| Screen size (inch) | 6.2 (Diagonal) |
| Dot pitch (mm) | 0.1719(H) x 0.1609(V) |
| Brightness | 400 cd/m 2 |
Components
| Machine screws M5x6 mm | 4 |
| Mounting bolt (50 mm) | 1 |
| Wire connector | 2 |
| Trim plate | 1 |
| Operating Instructions | 1 |
| Rubber cushion 1 | |
| Remote control | 1 |
| SWC cable | 1 |
| TV antenna | 1 |
Note: Specifications and the design are subject to change without notice due to improvements in technology.

CLASS 1 LASER PRODUCT
PN.: 12707500XXX

- Operating Instructions
- Safety Precautions
- Safety Precautions (continued)
- Warning
- Caution
- Two laser products
- Caution of disc using
- Contents
- Features
- DVD-R/RW compatibility
- WMA and MP3 compatibility
- About WMA
- About MP3
- Button Operation Explanations
- Touch panel key operation
- Some frequent operations
- 1) Move cursor
- 2) Confirm
- Open the SOURCE MENU
- Touch screen
- Panel Controls
- Press PWR button to turn on the unit.
- Safety Notes:
- Remote Controls
- Remote control operating range
- Remote Controls (continued)
- Replacing the lithium battery of remote control unit
- Basic Operations
- Turn on/off the power
- Mute
- Note:
- Adjust the volume
- Playing source selection
- Method 1:
- Method 2:
- When parking brake applied
- When reverse driving
- Steering Wheel Control
- USB/SD/MMC Card Operation
- Using SD/MMC Card
- USB Notes
- Using USB device
- Disc Operation
- Insert a disc
- Eject the disc
- Notes:
- Using the touch screen controls
- Disc Playback
- File type supported
- Disc and file NOT supported
- Stop playback temporarily
- Disc Operation (continued)
- Stop playback entirely
- Select desired track
- Fast forward/backward during playback
- Random track playback (for CD/VCD/MP3 Only)
- Repeat
- Repeat A - B
- GOTO
- Program
- DVD Audio Select
- VCD Audio Select
- DVD Subtitle Select
- DVD Title Select
- DVD Angle Select
- ZOOM
- DVD Playback Menu
- Touch the icon to access desired function.
- Video VCD Playback Menu
- CD/MP3/MP4/PHOTO Menu
- PHOTO Intro Menu
- Touch to access desired function.
- Tuner Operation
- Touch to access desired function:
- RDS Basics
- AF Mode
- TA Mode
- Tuner Operation (continued)
- Bluetooth Operation
- TA SEEK/TA ALARM
- TA VOL
- REG Mode
- EON (Enhanced Other Networks)
- Pairing
- Bluetooth Operation (continued)
- Receive
- History
- BT MENU General Operation
- Pair On/Off
- Auto Connect On/Off
- Auto Answer On/Off
- Other ModeTV Operation
- Select TV mode
- Automatic tuning
- Manual tuning
- Adjust the Preset at TV Setting menu
- Change TV channel
- Change TV video format
- AV mode
- System Setup
- Audio/Video Setting
- SETUP Menu
- General Setting
- Beep: On, Off
- Loudness: On, Off
- Time Mode: 12H, 24H
- Time Adjust: 02:20
- Subwoofer: Off, 80Hz, 120Hz, 160Hz
- System Setup (continued)
- Subw Volume: ◀, ▶
- Mirror: On, Off
- Parking: On, Off
- Language Setting
- OSD Language
- Audio Language
- Subtitle Language
- Menu Language
- DVD Setting
- TV System: NTSC, PAL, Auto
- TV Type: 4:3PS, 4:3LB, 16:9
- Password: Set
- Rating: ◀, ▶
- Brightness: ◀, ▶
- Contrast: ◀, ►
- Hue: ◀, ►
- Saturation: ◀, ▶
- Default: Restore (only DVD)
- Radio Setting
- LOC\_DX: LOC, DX
- Stereo\_Mono: Mono, Stereo
- AF: On, Off
- Other Setting
- SWC (Steering Wheel Control)
- TA: On, Off
- TS: Adjust
- TA mode: Seek, Alarm
- REG: On, Off
- RDS CT: On, Off
- BT Setting
- Pair: On, Off
- Auto Connect: On, Off
- Auto Answer: On, Off
- PIN Code: Set
- Device Connections
- Notes of connection
- Device Connections (continued)
- Installation
- Installation Guide
- Troubleshooting
- Specifications
- General
- CLASS 1 LASER PRODUCT
Brand : ORION
Model : AVM-56270BT
Category : Car radio