
Fresh Time Cafe KAM 120 - Coffee machine AEG - Free user manual and instructions
Find the device manual for free Fresh Time Cafe KAM 120 AEG in PDF.


| Product Type | Coffee machine with integrated coffee grinder |
| Brand | AEG |
| Model | Fresh Time Cafe KAM 120 |
| Water Tank Capacity | Up to 12 cups (marked on coffee jug) |
| Bean Container Capacity | Approximately 125 g |
| Grinder Settings | 4 grind texture levels (light to dark roast) |
| Aroma Function | Optimized extraction for 2–4 cups |
| Coffee Strength Options | Weak, medium, strong |
| Programmable Timer | Up to 24 hours in advance |
| Auto Shut-off | 2 hours after brewing |
| Warming Plate | Coated, keeps coffee warm |
| Anti-drip Valve | Prevents dripping when jug is removed |
| Water Filtration | Integrated carbon filter (replace every 60 brews or 2 months) |
| Filter Type | Paper filter size 4 |
| Display | LCD showing time, number of cups, coffee strength |
| Safety Features | Automatic shut-off, cool-down before refilling, child safety warning |
| Cleaning and Maintenance | Clean grinder channel regularly; descale every 3 months |
| Spare Parts | Carbon filter (E No. 950 078 802), replacement coffee jug |
| Dishwasher Safe Parts | Coffee jug and jug lid only |
Frequently Asked Questions - Fresh Time Cafe KAM 120 AEG
User questions about Fresh Time Cafe KAM 120 AEG
0 question about this device. Answer the ones you know or ask your own.
Ask a new question about this device
Download the instructions for your Coffee machine in PDF format for free! Find your manual Fresh Time Cafe KAM 120 - AEG and take your electronic device back in hand. On this page are published all the documents necessary for the use of your device. Fresh Time Cafe KAM 120 by AEG.
USER MANUAL Fresh Time Cafe KAM 120 AEG
Fresh Time Cafe KAM 120 automatic
Kaffeeautomat mit integrierter Kaffeemühle Coffee Maker with integrated Coffee Mill Cafetière avec moulin à café intégré Koffieautomaat met geïntegreerde koffiemolen Caffettiera con macinacaffè integrato Cafetera automática con molinillo de café Cafeteira automática com moinho integrado Kaffebryggare med inbyggd kaffekvarn Kahvimyllyllä varustettu kahvinkeitin Kávovar s integrovaným mlýnkem Automata kávéfőzők beépített kávédarálóval Μηχανή του καφέ με ευσωματωμέυσ μύλο του καφέ
Gebrauchsanweisung Operating instructions Mode d'emploi Gebruiksaanwijzing Istruzioni per l'uso Instrucciones para el uso Instruções de utilização Bruksanvisning Käyttöohje Návod k použití Használati útmutató Οδηγίες χρήσης
1

Ausstattung
Bedienelemente
3
4

5

6
7

8


10
11
9
12

13
14

15

16/A

16/B

17 18

19
GB
Dear Customer,
Please read these operating instructions carefully. Above all please observe the safety instructions on the initial pages of these operating instructions! Please keep these operating instructions for future reference. Pass them on to any subsequent owner of the appliance.
Features
A Fresh water container with lid and insert for carbon filter
B Swivel filter with filter insert, aroma lid and anti-drip valve
C Coffee jug with cup markings and jug lid
D Coated warming plate
E Rating plate (underside of appliance)
F Controls
G Display
H Release button for swivel filter
J Ground coffee outlet
K Grinding texture adjustment
L Coffee grinder bean container with cover
M Grind position
Controls
A Display for showing: time (or start time), number of cups, coffee strength
B On/Off button with power indicator (red)
C Aroma button with power indicator (green)
D Clock setting button for hours
E Programming button for start time, number of cups, coffee strength
F Clock setting button for minutes
G Button for number of cups
H Button for coffee strength
J Button for programme activation with indicator (green)
K Filter control with indicator (green)
!
Safety information
- The appliance may only be connected to the mains if the voltage, type of current, and frequency match the information on the rating plate (see underside of the appliance)!
- Never let the mains lead touch the warming plate when it is hot!
- Never pull the plug from the socket by means of the mains lead!
- Do not use the appliance if: - the mains lead is damaged, - the housing shows visible signs of damage.
- The warming plate, coffee jug and filter cover become hot during operation due to the nature of their function. Keep children away!
- Do not put water into the appliance when it is hot! Switch off the coffee machine and leave to cool for approx. 5 minutes!
- Follow the instructions on descaling!
- Prior to carrying out maintenance or cleaning, ensure that the appliance is switched off and unplugged from the mains!
- Do not immerse the base unit in water!
- Do not leave the appliance switched on unnecessarily.
- Only use the coffee grinder for grinding roasted coffee beans; never use it to grind other types of seed or bean. Ensure that there are no foreign bodies among the coffee beans. Otherwise the guarantee will be void.
If it is necessary to repair the appliance or to replace the mains lead, send the appliance either to the specialist dealer you bought it from (specialist tools must be used for repairs), or to one of the AEG customer service centres. Electrical appliances may only be repaired by trained technicians. Repairs carried out by inexperienced persons may cause serious injury to the user.
No responsibility can be accepted for any damage if the appliance is used incorrectly or for the wrong purposes.
CE This appliance complies with the following EU Directives:
- 73/23/EEC dated 19.02.1973 "Low Voltage Directive", including Directive Amendment 93/68/EEC
- 89/336/EEC dated 03.05.1989 "EMC Directive", including Directive Amendment 92/31/EEC
Cable compartment (Figure 3)
Your coffee machine has a cable compartment. If the mains lead is too long, you can push cable that is not needed into the compartment on the rear of the appliance.
Prior to using for the first time
Prior to preparing coffee for the first time, you should perform one or two brews with water only.
Fill the fresh water container up to the top cup marking with cold water, and with the appliance switched on, allow the water to flow through into the coffee jug without using ground coffee or filter paper. To do this, press the On/Off button 🔒
Preparation
1 Inserting the carbon filter
Remove the carbon filter from the plastic packaging and rinse it thoroughly under running water.
Open the lid of the water tank (Figure 1/A).
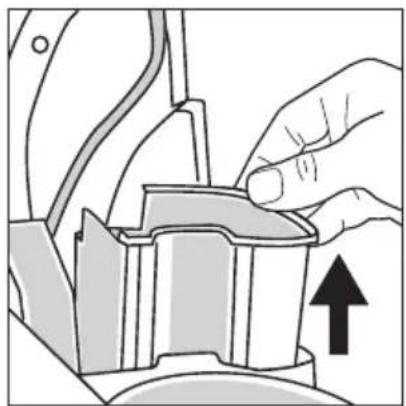
Remove the container (Figure 4).
Insert the carbon filter in the filter holder (Figure 5).
Insert the filter holder in the container so that the marking arrows on the filter holder and the container are positioned opposite one another. Turn the filter holder clockwise (Figure 6).
Close the lid of the water tank.
The tap water will be filtered during the brewing procedure. Please note that the carbon filter must be changed either after 60 brewing procedures or after 2 months (whichever is the sooner) so as to maintain the effectiveness of the filter. The old carbon filter cannot be cleaned, and must be replaced with a new one.
Filter control
The unit has an automatic filter control.
Switch the appliance on using the On/Off button 📊 the green indicator next to the button 📕 figure 2/K) is illuminated. After 60 brewing procedures, or at the latest after 2 months, the green indicator will start to flash.
It is then time to change the carbon filter. Afterwards, press button filter (Figure 2/K) for longer than 3 seconds. The indicator will be illuminated as usual.
Briefly press button filiyou want to use the appliance without a carbon filter. The green indicator will go out.
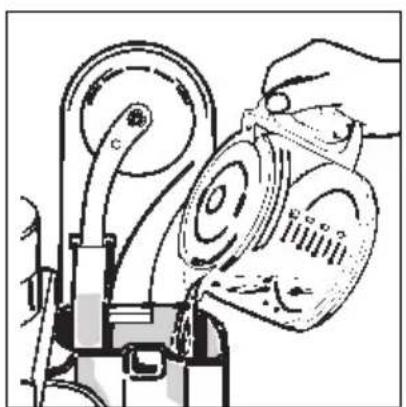
2 Filling with water (Figure 7)
Raise the lid of the fresh water tank (Figure 1/A). Fill the container with clear, cold tap water. You will find cup markings on the coffee jug for measuring out the required quantity.
The markings apply to the quantity of fresh water. As the ground coffee absorbs water, the amount of coffee produced will be less.
Never use hot water.
Nor should you fill the fresh water container with milk, prepared coffee, tea etc.
3 Inserting filter paper (Figure 8)
Place size 4 filter paper in the filter insert. Please first fold back the side and lower edge of the paper filter. So as not to lose any aroma while grinding and brewing the coffee your coffee machine has an aroma lid. Make sure that it is always positioned correctly: the aroma lid has a semicircular rib on its underside that needs to be fitted into the matching recess on the filter holder. The opening with the sealing lip is positioned on the left. Close the lid of the fresh water container again.
4 Place the coffee jug with lid on the warming plate (Figure 9)
5 Coffee grinder
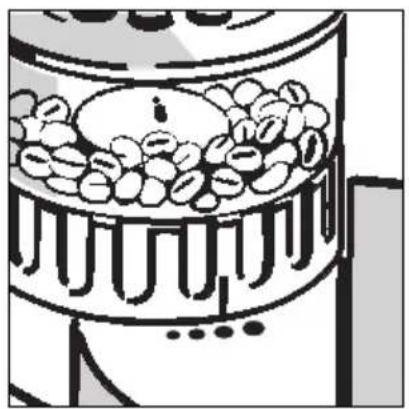
5.1 Place coffee beans in the bean container (Figure 10)
The coffee grinder has a bean container (Figure 1/L), which keeps the beans constantly aroma fresh. Fill the container to the top and fasten firmly with the lid.
The bean container holds approximately 125 g of coffee beans.
5.2 Grinding texture adjustment (Figure 11)
You can change the size of coffee ground to suit the strength of roast using the adjusting ring (Figure 1/K). Setting 1 = ● is for lightly roasted beans, and setting 4 = ● for dark roast beans. We recommend beginning with a medium setting which is suitable for the types of coffee that are usually commercially available.
6 Using the controls to set the functions (Figure 2)
6.1 Using for the first time
Insert plug into mains socket.
Appears in the display (2/A) (with the time display flashing).
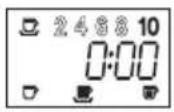
Your appliance has a timer with which to set the time and pre-program the start time up to 24 h in advance.
Now press the relevant buttons (each for longer than 1 sec.).
6.2 Setting the time
Setting the hours:
Button (Figure 2/D)
Setting the minutes:
Button (Figure 2/F)
6.3 Number of cups
Button (Figure 2/G)
6.4 Aroma setting
The aroma button 2-4 (figure 2/C) guarantees full coffee enjoyment even with small quantities (2-4 cups).
Press the 2.4-tton (Figure 2/C).
The green indicator next to the aroma button is illuminated.
Pressing the aroma button again cancels the selection.
If the appliance has been switched off the aroma setting must be selected again.
6.5 Coffee strength
Button (Figure 2/H)
Working from left to right, the moving saucer in the display means: weak, medium, strong coffee.
If, for example, you want: 4 cups, medium strength, then the following
appears:

6.6 Pre-selecting the start time, number of cups and coffee strength:
Press:
Button (Figure 2/E)
Button (Figure 2/D)
Button (Figure 2/F)
For how to pre-select the number of cups and coffee strength refer to Item 6.3 and 6.5.
If, for example, for 8 o'clock in the morning you want
4 cups, medium strength
then the following will
appear:
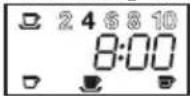
The button (Figure 2/E) concludes the programming. The time and settings appear again in normal mode. (In programming mode the saucer flashes for the coffee strength setting).
7 Making coffee
Once you have made the preparations described in Item 1 - Item 6 (see above) there are various options for making coffee.
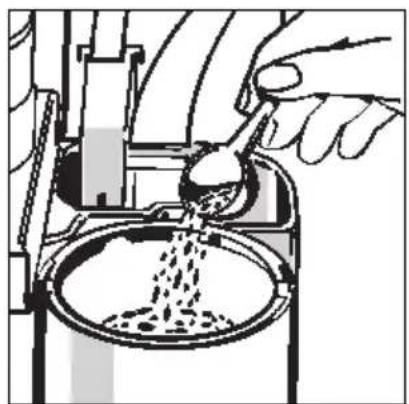
7.1 Coffee using ready ground coffee (Figure 2 and 12)
Pour in water (Item 2), insert filter paper (Item 3), add ground coffee, place coffee jug on the warming plate (Item 4), and finally press button ⏻ (Figure 2/B).
The red indicator will come on.
The brewing procedure will start.
7.2 Coffee using ready ground coffee with pre-programmed start time (Figure 12 and 2)
Pour in water (Item 2), insert filter paper (Item 3), add ground coffee, place coffee jug on the warming plate (Item 4), and press prog h m
prog. 140 buttons. The green power indicator for the button will be illuminated. The brewing procedure will start automatically at the set time.
At the start time, the green indicator (Figure 2/K) will go off and the red indicator next to the button 📋 will be illuminated (Figure 2/B).
Comment: If, once pre-programmed, the start time is not to be changed you need only press the button to activate the programme.
7.3 Coffee using the coffee grinder (Figures 2, 13)
Pour in water (Item 2), insert filter paper (Item 3), place coffee jug on the warming plate (Item 4).
Set number of cups using 📄 and coffee strength using ⚡ select aroma setting 2.4 required.
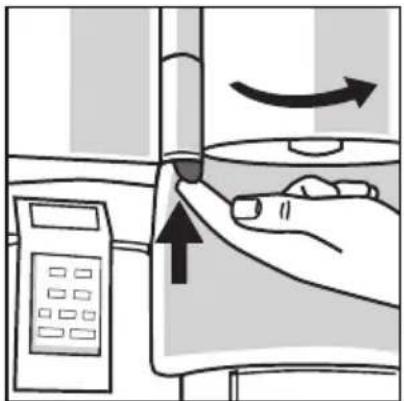
Swivel the swivel filter (Figure 13) to the left until it clicks into place.
Press button figure 2/B). The red indicator will come on. Once the coffee has been ground, the filter automatically swivels into the brewing position and brewing begins.
7.4 Coffee using the coffee grinder with pre-programmed start time (Figures 2, 13)
Pour in water (Item 2), insert filter paper (Item 3), place coffee jug on the warming plate (Item 4) and press prog b
The green indicator for button auto (Figure 2/J) will come on. Swivel the swivel filter (Figure 13) to the left until it clicks into place.
The grinding and brewing procedure will start automatically at the set time. At the start time the green indicator for button I go off and the red indicator (Figure 2/B) will be illuminated. Once the coffee has been ground, the filter automatically swivels into the brewing position and brewing begins.
Comment: If, once pre-programmed, the start time, number of cups and coffee strength are not to be changed you need only press the button to activate the programme.
7.5 Quick-Start
If the appliance is pre-programmed using the "Auto" function (the green indicator for the button is illuminated to indicate "Program activated"), but you would like some coffee before the start time, press the button (Figure 2/B). The red indicator (Figure 2/B) will be illuminated and the green indicator (Figure 2/J) for "Program activated" will go off. Grinding and brewing will begin at once.
7.6 Deactivating the "Auto" function
If you have activated the "Auto" function but do not want the programme to start, simply press the asttton (Figure 2/J). The green indicator will go off.
7.7 Switching off
Switch the appliance off with the button (Figure 2/B).
8 Warming plate (Figure 1/D)
After brewing the warming plate keeps the coffee in the glass jug warm. Two hours after brewing the appliance switches off automatically.
9 Removing the jug (Figure 15)
When the jug is removed, the anti-drip valve prevents dripping.
10 Cleaning
(It is imperative that these instructions are observed!)
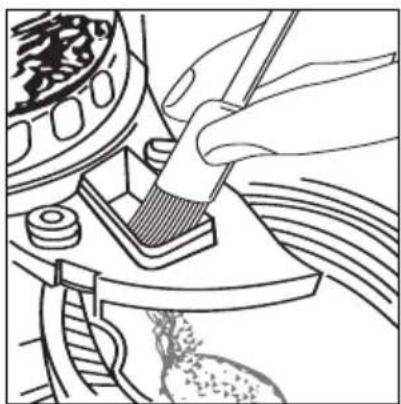
10.1 Coffee grinder (Figures 14, 17-19)
From time to time (at the latest when a blockage occurs), it is necessary to clean the grinder channel to free it from oily coffee residues.
To do this, proceed as follows: Remove the plug from the mains.
Open the lid of the fresh water container and turn the screw (e.g., with a coin) on the cover of the grinder channel to "Open" (Figure 17). Take hold of the cover of the grinder channel at the
front left and remove it slowly (Figure 18). Insert a paper filter in the swivel filter and move the swivel filter until it clicks into the grinding position. Brush the coffee residue (including that from the rear of the channel) into the paper filter using a suitable item (e.g., paintbrush) (Figure 19). The coffee residue can also be removed using a vacuum cleaner.
Then wipe the grinding channel with a dry cloth. Press the release button to move the swivel filter back into the brewing position (Figure 14). Empty the paper filter, replace the cover and turn the screw back to the "Close" position. Check that the cover is correctly positioned. Your coffee machine is now fully ready for use again. If dark, oily coffee beans are used, the grinding channel needs to be cleaned more often than for light beans.
To avoid blockages in the grinding channel:
- Do not use frozen coffee beans, as water condenses on them on defrosting and can lead to blockages.
- Do not swivel the swivel filter back to the grinding position immediately after brewing as steam rising from the coffee grounds can cause a blockage.
- Position the appliance sufficiently far away from the cooker or a deep fat fryer as fat can cause a blockage.
• Always keep the container for the coffee beans closed.
Every now and again clean the coffee grinder (Figure 1/L) of oily residues from the coffee beans using a dry cloth.
10.2 Coffee part (Figure 16/A and B)
The filter insert can be removed for emptying and cleaning. Remove the glass jug and raise the lid of the fresh water container (Figure 1/A), place your finger in the rear handle recess (Figure 16/A) and pull the bracket up. This unlocks the filter insert and it can be removed for
cleaning. Activate the anti-drip valve several times during cleaning. To insert, press the filter bracket vertically upwards and into the rear handle recess by its lug. Reposition the bracket for the fresh water container (Figure 16/B).
The filter insert is now relocked. Please check that it is positioned correctly! The glass jug can now be returned to the warming plate.
Only clean the appliance using a damp cloth; never immerse it in water. Only the coffee jug and jug lid are dish-washer safe.
Descaling - to prolong the life of your coffee machine
As a precaution we recommend descaling every three months. If you are using a gold filter, remove it from the filter insert before descaling. Use only an environmentally friendly descaling agent and always follow the manufacturer's instructions. Do not use any concentrated descaler based on formic acid. Nor should you use a powdered descaling agent.
First fill the fresh water container with water and then add the descaling agent. Never vice versa.
Place the coffee jug with lid on the warming plate. Allow the descaling solution to work for approximately 15 minutes, then switch on the appliance. Once the descaling solution has percolated through, switch the appliance off. If necessary, repeat the descaling procedure. Then repeat the procedure at least twice using clear water.
Rinse the coffee jug, jug lid and filter insert thoroughly under running water. Activate the anti-drip valve several times as it is rinsed.
Important
- In the event of a short-term power failure, any data entered will be stored for approximately 5 seconds.
- If the swivel filter is moved to the grinding position by mistake, swivel it back to the right using the release button (Figure 14).
What to do, if ...
- the swivel filter does not swivel properly to the brewing position?
- Ensure that the filter insert is correctly positioned (Item 10.2)!
- Check that the aroma lid is also positioned correctly!
• the coffee runs into the jug too slowly? - Clean the anti-drip valve (Item10.2)!
- Descale the appliance (see instructions on descaling).
Spare parts/accessories
Carbon filter
New carbon filters can be obtained from your specialist dealer (E No. 950 078 802) or from your local AEG customer service centre (ET No. 663 910 450).
Coffee jug
If you break your coffee jug, you can purchase a replacement jug at the appropriate charge from your specialist dealer or from an AEG customer service centre. You will need to state the model of your coffee machine: see rating plate (Figure 1/E).

Protecting the environment
Do not simply throw packaging material away.
- The cardboard box can be deposited in the old paper collection or the relevant refuse collection system.
If used:
- Deposit the polyethylene (PE) plastic bag at a collection point for recycling.
- The foam polystyrene (PS) padding is CFC-free.
Please ask your local authority for the address of your nearest recycling centre.
The used coffee grounds are excellent for composting.
- FRESH TIME CAFE KAM 120 AUTOMATIC
- AUSSTATTUNG
- BEDIENELEMENTE
- GB
- DEAR CUSTOMER
- FEATURES
- CONTROLS
- SAFETY INFORMATION
- CE THIS APPLIANCE COMPLIES WITH THE FOLLOWING EU DIRECTIVES
- CABLE COMPARTMENT (FIGURE 3)
- PRIOR TO USING FOR THE FIRST TIME
- PREPARATION
- 1 INSERTING THE CARBON FILTER
- FILTER CONTROL
- BRIEFLY PRESS BUTTON FILIYOU WANT TO USE THE APPLIANCE WITHOUT A CARBON FILTER. THE GREEN INDICATOR WILL GO OUT
- 2 FILLING WITH WATER (FIGURE 7)
- 3 INSERTING FILTER PAPER (FIGURE 8)
- 4 PLACE THE COFFEE JUG WITH LID ON THE WARMING PLATE (FIGURE 9)
- 5 COFFEE GRINDER
- 5.1 PLACE COFFEE BEANS IN THE BEAN CONTAINER (FIGURE 10)
- 5.2 GRINDING TEXTURE ADJUSTMENT (FIGURE 11)
- 6 USING THE CONTROLS TO SET THE FUNCTIONS (FIGURE 2)
- 6.1 USING FOR THE FIRST TIME
- 6.2 SETTING THE TIME
- 6.3 NUMBER OF CUPS
- 6.4 AROMA SETTING
- 6.5 COFFEE STRENGTH
- 6.6 PRE-SELECTING THE START TIME, NUMBER OF CUPS AND COFFEE STRENGTH
- 7 MAKING COFFEE
- 7.1 COFFEE USING READY GROUND COFFEE (FIGURE 2 AND 12)
- 7.2 COFFEE USING READY GROUND COFFEE WITH PRE-PROGRAMMED START TIME (FIGURE 12 AND 2)
- 7.3 COFFEE USING THE COFFEE GRINDER (FIGURES 2, 13)
- 7.4 COFFEE USING THE COFFEE GRINDER WITH PRE-PROGRAMMED START TIME (FIGURES 2, 13)
- 7.5 QUICK-START
- 7.6 DEACTIVATING THE "AUTO" FUNCTION
- 7.7 SWITCHING OFF
- 8 WARMING PLATE (FIGURE 1/D)
- 9 REMOVING THE JUG (FIGURE 15)
- 10 CLEANING
- (IT IS IMPERATIVE THAT THESE INSTRUCTIONS ARE OBSERVED!)
- 10.1 COFFEE GRINDER (FIGURES 14, 17-19)
- 10.2 COFFEE PART (FIGURE 16/A AND B)
- DESCALING - TO PROLONG THE LIFE OF YOUR COFFEE MACHINE
- IMPORTANT
- WHAT TO DO, IF
- SPARE PARTS/ACCESSORIES
- CARBON FILTER
- COFFEE JUG
- PROTECTING THE ENVIRONMENT
Brand : AEG
Model : Fresh Time Cafe KAM 120
Category : Coffee machine