
9800 - Printer Océ - Free user manual and instructions
Find the device manual for free 9800 Océ in PDF.


| Product Type | Wide format monochrome printer |
| Model | Océ 9800 Printer |
| Max Print Speed | 10 m/min |
| Max Media Width | 914 mm (36 inches) |
| Media Types | Bond paper, vellum, polyester film |
| Media Input | 4 rolls (auto detection), manual sheet feed |
| Dimensions (W x D x H) | 1720 x 1096 x 1365 mm |
| Weight | 735 kg |
| Power Consumption (operation) | 3500 W |
| Power Consumption (standby) | 1000 W |
| Voltage | 120/208V, 240V, 240/415V (depending on configuration) |
| Interfaces | Serial RS232, Centronics parallel, SCSI |
| Supported Data Formats | HP-GL, HP-GL/2, Calcomp, ASCII |
| Print Features | Auto format selection, synchro cut, custom cut, auto shift, mirror, stamp, folding, stacking (6 bins), punching |
| Optional Equipment | High Capacity Stacker, Folder, Punch unit, Lower Container unit |
| Display | Operator panel with LCD display and soft buttons |
| Key Operator Functions | Clock settings, default programs, stamp editing, media type setting, automatic roll change |
| System Administrator | Connectivity settings, language defaults, pen settings, auto rotate, legend correction, auto roll, print time-out, ALS |
| Maintenance Tasks | Loading paper rolls, emptying chip tray, refilling toner (by service personnel) |
| Safety Features | Ozone filter, safety data sheets, NiCad battery removal procedure |
| Sound Pressure Level (operation) | 55 dB(A) (printer only) |
| Warm-up Time | Approximately 20 minutes |
Frequently Asked Questions - 9800 Océ
User questions about 9800 Océ
0 question about this device. Answer the ones you know or ask your own.
Ask a new question about this device
Download the instructions for your Printer in PDF format for free! Find your manual 9800 - Océ and take your electronic device back in hand. On this page are published all the documents necessary for the use of your device. 9800 by Océ.
USER MANUAL 9800 Océ
This manual contains a description of the Océ 9800 Printer and its printing functions. The introduction (chapter 1) contains general instructions for using the printer. We recommend that you read at least this chapter.
Overview of copier parts
To assist you in quickly finding the various parts of the copier and the functions on the operator panel, an illustration of the Océ 9800 Printer is presented on the inside front cover and an illustration of the operator panel on the inside back cover, both of which can be folded out.
Safety information
This manual contains the following safety information:
■ Appendix B lists 'Instructions for safe use'. You are advised to read this information before you start to actually use the printing system. Technical safety information such as safety data sheets can also be found in appendix B.
■ Where applicable, cautions and warnings are used throughout this manual to draw your attention to the necessary safety precautions.
Copyright
Océ-Nederland B.V. Venlo, The Netherlands © 1996
All rights reserved. No part of this work may be reproduced, copied, adapted, or transmitted in any form or by any means without written permission from Océ.
Océ-Nederland B.V. makes no representation or warranties with respect to the contents hereof and specifically disclaims any implied warranties of merchantability or fitness for any particular purpose.
Furthermore, Océ-Nederland B.V. reserves the right to revise this publication and to make changes from time to time in the content hereof without obligation to notify any person of such revision or changes.
Contents
Chapter 1
Getting started
Turning the Océ 9800 on and off 8
Reading the display 10
Océ 9800 system configurations 11
Océ 9800 Copier/Printer 11
Océ 9800 Printer 12
Océ 9800 options 12
Chapter 2
Using the Océ 9800 Printer
The operating panel (layout and use) 14
Buttons 14
Display 15
Stopping a print job 22
Collecting your output 24
Using the upper delivery output 24
Using the lower delivery output 27
Printing on cut sheet media 29
Printing status information and test pages 31
Resetting errors 33
Resetting the counter 34
Accounting 35
Chapter 3
Default printer settings
Auto format selection 40
Printing non-standard sized originals 41
Defining your copy length 42
Editing 43
Auto shift 43
Mirror-image 44
Shifting the image 45
Stamp unit (optional) 47
High Capacity Stacker (optional) 49
Lower Container unit (optional) 52
Contents 3
Folder (optional) 53
High capacity output unit with punch unit (optional) 55
Pre-programmed groups of default settings 59
Chapter 4
Key operator
The Océ 9800 key operator 62
Entering key operator mode 63
Defining clock settings 64
Setting the current time and date 64
Setting the reset time 65
Activating the time switch 66
Image correction 67
Programming groups of default settings 68
Editing stamps 71
Defining the standard copy media type 72
Defining automatic roll change 73
Chapter 5
System Administrator
Introduction 76
Entering system administrator mode 77
Defining connectivity settings 78
Serial 78
Centronics 78
SCSI 79
Defining default language settings 80
Language (data format) 80
Pens 81
Automatics settings 82
General settings 84
Reset functions 86
Restoring controller to factory default settings 86
Resetting controller 86
Chapter 6
Maintenance
Introduction 90
Loading rolls of copy material 91
Emptying the chip tray 94
Chapter 7
Problem solving
Introduction 98
Clearing paper jams 99
Clearing a paper jam in the manual feed 100
Clearing a paper jam in the fuser section 101
Clearing a paper jam in the roll feed section 104
Clearing a paper jam in the High Capacity Stacker 107
Clearing a paper jam in the folder 110
Clearing a paper jam in the high capacity output unit (folder) 113
Print controller errors 117
Other problems (call Océ service) 117
Product specifications 120
Copy material specifications 121
Overview of default settings on delivery 122
Controller default settings 123
Océ 9800 controller error codes 127
General safety information 132
Radio interference 132
Symbols 132
Instructions for safe use 133
Removal of NiCad battery 135
Safety data sheets 136
Safety data sheet for the Océ 9800 High Capacity Stacker 136
Safety data sheet for the Océ 9800 printer 137
Safety data sheet for the Océ 9800 printer and folder 138
Safety data sheet for the Océ 9800 printer, folder and high capacity output unit 139
Safety data sheet for the Océ 9800 printer, folder, high capacity output unit and puncher 140
Notation conventions 142
User comment sheet 143
Index 145
Océ 9800 Printer
User Manual
Chapter 1 Getting started
This chapter describes how to turn the Océ 9800 'on' and 'off', and how to read basic components of the printer display. It also explains the configurations in which the Océ 9800 Printer is available.

Turning the Océ 9800 on and off
The Océ 9800 can be turned on manually, or automatically by using the time switch. The setting of the time switch is set by the key operator. The on/off timer key is located on the right side of the display panel (see figure 1). Turn this key to the 'timer' position to turn the system on and off automatically.
Your key operator can program the time switch to turn the system on at a specified time, each day of the work week. This can be quite handy because it takes approximately 20 minutes for the system to warm up. By activating the timer, you will always find the system ready for use when you need it.
The on/off timer key has three settings:
■ on: the system is turned on.
■ off: the system is turned off.
■ timer: the system will be turned on automatically at a time of your choice and turned off after a certain idle time.

[1] On/off timer keened settings
▼ Turning Océ 9800 on
1 Turn the key to the 'on' position. The system takes about 20 minutes to warm up. As soon as the system is warmed up, the message 'Ready to print' appears.
▼ Turning the timer on
1 Turn the key to the 'timer' position.
▼ Turning the Océ 9800 off
1 Ensure that the printer is not running
2 Turn the key to the 'off' position.
3 Then turn the key to the 'timer' position if you want the machine to be automatically turned on by the timer.
For details, refer to ‘Activating the time switch’ on page 66.
High Capacity Stacker (optional) The on/off switch on the optional High Capacity Stacker must always be left in the 'on' position. The High Capacity Stacker is automatically turned on and off along with the printer.
Reading the display
The display on the printer shows the following components:

[2] Components of the printer display
By pressing the button located under 'Print' in the lower right corner of the display, you can enable or disable plotting on the Océ 9800 printer.
If ‘Print’ is selected (black), the system will accept and print incoming jobs. The jobs will be handled in incoming order. If the controller is currently processing a print job, the display will show ‘Processing’. If ‘Print’ is not selected (white), the printing process is stopped after the current job has been finished. However, the system will continue to accept incoming print jobs as long as enough memory is available. For more information about stopping print jobs, see ‘Stopping a print job’ on page 22.
The memory indicator shows the amount of memory that is currently in use, along with the number of jobs in memory and the time it will take to print these jobs. 'Prints', in the upper left corner of the display, indicates the number of (sets of) prints that remain to be printed for the current job.
The roll indicator shows the kind of copy media and the format that is currently loaded on the different rolls in the printer.
The message area above the print button area displays the current activity of the controller.
Océ 9800 system configurations
The Océ 9800 is available in two versions:
■ Océ 9800 Copier/Printer
■ Océ 9800 Printer (this manual)
Océ 9800 Copier/Printer
The basic configuration of the Océ 9800 Copier/Printer consists of a scanner and a printer. The operating panel is located on the scanner.

[3] Océ 9800 Copier/Printer, described in another manual
Use the scanner to feed in your originals and to control the various functions of the printer.
If your printer is equipped with a controller, you can connect it to your computer system. To send your print jobs to the printer, you can use the Océ 9800 Job Director, the Océ 9800 Repro Station, or other printer drivers, described in separate user manuals.
The Océ 9800 Copier/Printer is described in the Océ 9800 Copier/Printer User Manual.
Océ 9800 Printer
The basic configuration of the Océ 9800 Printer consists only of a printer. The operating panel is located on the printer.

[4] Océ 9800 Printer
To send your print jobs to the printer, you can use separate applications such as the Océ 9800 Job Director and the Océ 9800 Repro Station, described in separate user manuals.
This manual describes the Océ 9800 Printer.
Océ 9800 options
- High Capacity Stacker. The 6-bin High Capacity Stacker can be installed as a replacement for the single copy receiving tray.
■ folder and/or punch unit. The folder can be supplied with optional belt-delivery units, and an optional punch unit.
- Lower Container unit If no folder/punch unit is installed, this optional piece of equipment can be used for delivering long copies.
Océ 9800 Printer
User Manual
Chapter 2
Using the Océ 9800 Printer
This chapter describes the layout and functions of the operating panel, and explains how to use the buttons of the operating panel to define basic print settings for your printed output.

The operating panel (layout and use)
The operating panel of the Océ 9800 Printer is located at the front of the printer. It is illustrated on this manual's inside back cover. As you can see in this illustration, the operating panel consists of a display, and below this, the start, stop and correction buttons, as well as a set of numeric buttons.
This section consists of two sub-sections. The first sub-section deals with basic use, giving the names of the fixed buttons and indicating where to find them. The second sub-section deals with special use. It explains how to use the soft buttons, located above and along the sides of the display, to define your default print settings.
Buttons
Start The ◊ button is used to re-start the print process, or for other purposes such as confirming dialogs.
Numeric buttons The numbered buttons on the lower part of the operating panel are used to specify numbers.
Correction The orange button marked with C, located on the right-hand side of the operating panel, is used to switch to another level of settings, to cancel a dialog, or to retrieve default settings.
Stop Pressing the small red button above the Correction button stops the printing process.
Display
The operating panel is used to (re-)start and stop the printer. The display provides feedback about print job status and memory content. The section and function buttons above and below the display allow you to access (default) printer settings.
The display provides information about:
■ the number of (sets of) prints which remain to be produced for the current job.
■ the memory indicator shows the amount of memory that is currently in use, along with the number of jobs in memory and the time it will take to print these jobs.
■ the roll indicator shows the type of copy media that is currently loaded on the different rolls in the printer.
■ current system status, for example: 'Warming up'. In the event of an error in the printer, the exact error location (covers or panels) is graphically shown on the display, along with instructions on how to solve the problem.
![graph TD A["KEY"] --> B["key operator button"] B --> C["system status"] C --> D["Prints: 3"] D --> E["Ready to print"] E --> F["Machine"] F --> G["Program"] G --> H["Finishing"] H --> I["Roll 1"] I --> J["A3 Bond"] J --> K["A2 Bond"] K --> L["Roll 3"] L --> M["A1 Bond"] M --> N["A0 Bond"] N --> O["R…](/content/2026/06/1254120/images/b54b3c849a71270d5ea1ff490475673085aefec93cf9cc729707e5eac04f2e79.jpg)
[5] Section, card selection, function, and higher/lower buttons
You can use the operating panel to specify machine settings and default settings:
■ Machine settings can not be overruled by job-specific printer settings. Examples of machine settings are: changing the timer/clock, specifying the
type of copy media that is currently loaded in the printer, and resetting the counter.
- Default settings can be overruled by job-specific printer settings that are sent along with the print job. Examples of default settings are: copy media to be used, deposit mode, folding method and stamp selection.
Key operator button By pressing this button you can enter the key operator or system administrator mode. As this functionality is restricted to a dedicated user, a different PIN code is required for each mode.
Section and function buttons By means of the section buttons, you can access the machine, program, finishing and copy sections. In a section, you can use the function buttons to select a specific function; the function name associated with each button is shown in the display.
As you can see in illustration 5 on page 15, the display is surrounded by buttons. Their functions vary, depending on the display level in use.
The top four buttons (section buttons) provide access to the sections (main menus). Each high-level menu item contains several functions ('cards'). The left button, or card selection button, provides access to the cards. The function buttons allow you to select functions or sub-functions in a card, after which you can use the higher/lower buttons, or the numeric buttons to define numeric settings.
When operating the buttons of the Océ 9800 display, keep this sequence in mind: start with one of the section buttons and work counter-clockwise to the card selection and function buttons. Finally, use the triangular higher/lower buttons to make a selection.
![graph TD A["KEY"] --> B["Prints: 3"] B --> C["Ready to print"] C --> D["Machine"] D --> E["Program"] E --> F["Finishing"] G["Time: 0:11"] --> H["Processing"] H --> I["Roll 1"] H --> J["A3 Bond"] H --> K["A2 Bond"] H --> L["Roll 3"] H --> M["A1 Bond"] H --> N["A0 Bond"] O["Jobs: 7"] --> P["Print"] P…](/content/2026/06/1254120/images/a24fa391a774baeb8d3d835ccea81aeff18fd620361c144149efe4e8684c7109.jpg)
[6] When using the Océ 9800 menu, work counter-clockwise
If you want access to a section, simply press the button associated with that section. Pressing Copy, for example, displays:

[7] The Copy section
If you press the Finishing button, this display will be shown:
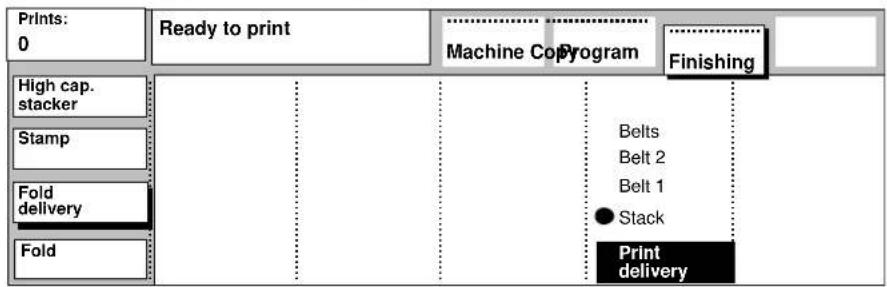
[8] The Finishing section (folder)
If you have selected settings in the Copy or Finishing section which are different from the default settings, a bullet will appear in the appropriate button:

[9] Indication of changed settings in Finishing menu
You can leave a section by:
1 pressing the same section button again. The start-up (blank) display will be shown, as seen in illustration 5 on page 15,
2 pressing another section button. In this case, the new section will be displayed immediately.
Each section can be subdivided into several cards or sub-menus. For instance, the copy section contains these cards:

[10] The four cards in the Copy section
You can leave a card by:
pressing the card selection button or (another) section button.
You can move between cards by:
pressing the card selection button. For instance, if you press the card selection button in the Copy size section as displayed above, the Copy media card will be displayed:
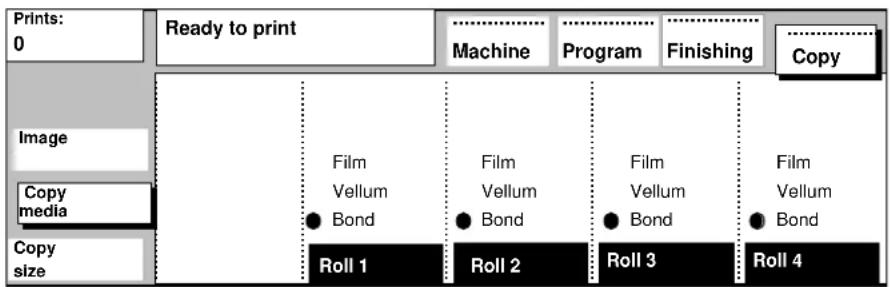
[11] The Copy media card selected
How to modify the settings in a card:
Consider the image card in the Copy section as an example:
| Prints: 0 | Ready to print | Machine | Program | Finishing | Copy | |
| Stretch | ||||||
| Image | Erase Shift | |||||
| Copy media | Mirror Autoshift | |||||
| Copy size | Edit | |||||
[12] Image card selected
If you press the Edit button, the function name is printed white-on-black. This indicates that the Edit function has been activated. See the illustration below:

[13] Edit function in image card activated
If you press the Edit button twice, the Shift function will be activated, as can be seen in illustration 14.

[14] Selecting another edit function
Changing a numeric value If you press the 'Horizontal' function button, the display will change to:
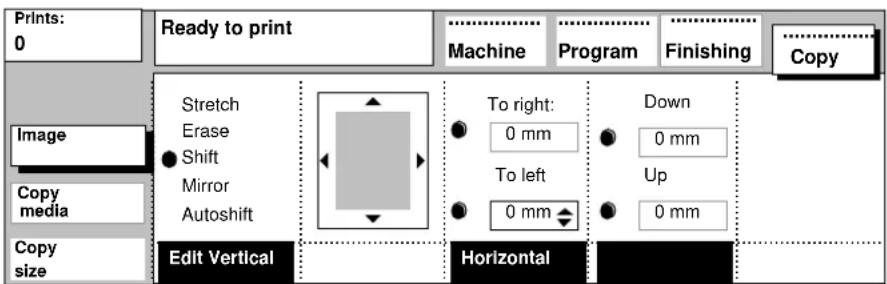
[15] Selecting the 'Horizontal' function in the Image card
Note the two triangles located to the right of the horizontal shift value in the 'To left' area. They inform you that the system is ready to modify a numeric value.
You can modify a numeric value in two ways:
1 by using the higher/lower buttons, or
2 by using the numeric buttons.
The display will now change to reflect the new value you entered. Note the shaded rectangle in the display which has been moved to the left as an illustration of your current settings:

[16] The 'Horizontal' function in the Image card has been modified
Stopping a print job
Pressing the stop button stops the active print process.
▼ Stopping a print job when printing a single original
1 Press the Stop button. If you are printing a number of copies, only the current copy of the original will be finished before the machine stops.
▼ Stopping a print job when printing a set of originals
1 Press the Stop button. If you are printing a number of copies of the entire set, the current copy of the entire set will be finished before the machine stops.
2 If you do not want the machine to finish the current copy of the entire set, press the Stop button again. Only the copy of the current original of the set will be finished before the machine stops. The set that was being printed will not be finished.
Note: Generally, the machine cannot stop until any media in the machine has been processed completelyInterrupting a job
You can interrupt a job that is currently being processed, in order to process an urgent job immediately. The settings of the current job will be saved, and you will be requested to wait. As soon as the machine is ready, you can start the urgent job. When the urgent job is finished, you can introduce another urgent job, or you can instruct the machine to continue with the job that was being processed at the moment of interruption.
Note: Interrupting a job automatically disables the processing of new print jobs. If you wish to resume printing, you must enable printing as described in the following procedure.
▼ Interrupting a job
1 Stop the print queue, using your printer driver.
2 Open the 'General' card in the 'Machine' section.
3 Press the 'Interrupt job' function button (see figure 17).
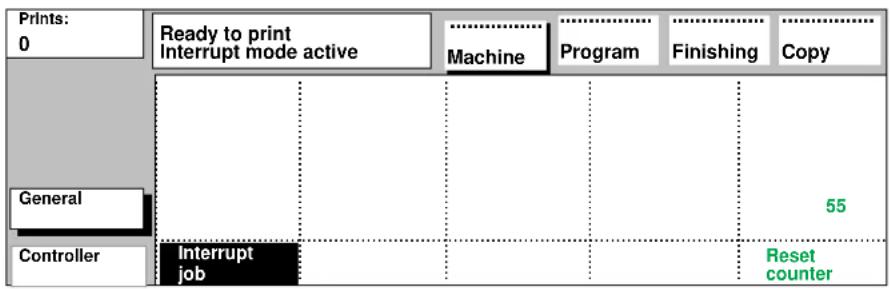
[17] Interrupting a job
4 Wait until the message ‘Interrupt mode active’ appears.
5 Return to the main menu, and enable printing by pressing the 'Print' function button (see figure 18).

[18] Enable printing
6 Send the urgent print job, using your printer driver.
7 After the urgent job has finished, you can:
Start another urgent job, or,
8 Open the ‘General’ card in the ‘Machine’ section and press the ‘Interrupt job’ function button again, to continue with the job that was being processed at the moment of interruption.
Collecting your output
The Océ 9800 Printer is available in several configurations, each of which may have a special copy output delivery device. This section describes where to find the print output for the various configurations.
Using the upper delivery output
The default output delivery location is the upper delivery output. If you have the basic configuration, this output is connected to a single copy receiving tray. Optionally, this tray can be replaced with a 6-bin High Capacity Stacker.
Single Copy Receiving Tray If you have the basic configuration, the copies are ejected at he rear of the printer into the single copy receiving tray. This tray can neatly stack up to 100 unfolded copies of one size and 60 unfolded copies of various sizes, and the tray can be extended to accommodate longer copies.
The ‘Single Copy Receiving Tray’ can be used in combination with the ‘Lower Container Unit’ or the ‘Folder’, with either of these connected to the lower delivery output (see ‘Using the lower delivery output’ on page 27).

[19] Basic configuration: unfolded copies are delivered into the Single Copy Receiving Tray.
If a High Capacity Stacker is installed in your configuration, copies can be ejected at the rear of the printer into one of the six stacker bins. Each bin can stack up to 200 unfolded copies. Copies which are longer than 122 cm (48") are collected under the stacker unit. Copies on polyester film are always delivered into the lower bin (bin 6). The upper bin (bin 1) cannot be moved. Bins 2 through 6 can be pulled out (opened) 30 cm (approx. 12") to facilitate emptying.
The ‘High Capacity Stacker’ can be used in combination with the ‘Lower Container Unit’ or the ‘Folder’, with either of these connected to the lower delivery output (see ‘Using the lower delivery output’ on page 27).

[20] Emptying the High Capacity Stacker
'Bin in use' indicator If the indicator light next to a bin remains on continuously, the bin is in use for copy delivery and the bin should not be opened.
'Bin full' indicator If the indicator light next to a bin flashes slowly (1Hz), the bin is full. After emptying the bin completely, the light will stop flashing.
'Close bin' indicator If the indicator light is flashing rapidly (2Hz) and the alarm is buzzing, the bin should be closed immediately. If the bin is not closed in time, an error will occur and the machine will stop.

[21] Extending the trays of the High Capacity Stacker
For more information, see 'High Capacity Stacker (optional)' on page 49
Using the lower delivery output
The Lower delivery output can be used with the Lower Container, or a Folder can be connected to this output.
If the Lower Container Unit is installed, the copies can be collected under the lower delivery output, using an optional container for long copies (see 'Lower Container unit (optional)' on page 52).
The ‘Lower Container Unit’ can be used in combination with the ‘Single Copy Receiving Tray’ or the ‘High Capacity Stacker’, with either of these connected to the upper delivery output (see ‘Using the upper delivery output’ on page 24).
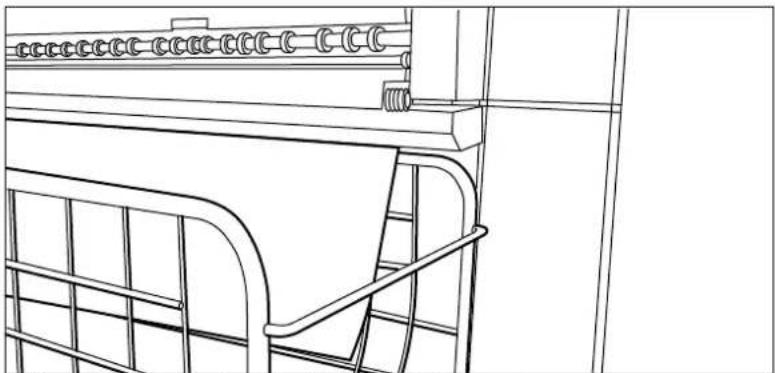
[22] Long copies can be collected under the lower delivery output.
If a Folder is installed, the folded copies are fed into the stack unit of the folder (see figure 23 on page 28). For more information, see 'Folder (optional)' on page 53.
The ‘Folder’ can be used in combination with the ‘Single Copy Receiving Tray’ or the ‘High Capacity Stacker’, with either of these connected to the upper delivery output (see ‘Using the upper delivery output’ on page 24).

[23] Folded copies will be placed in the stacker or on the belts if a high capacity output unit is used
If a high capacity output unit is installed, the folded copies are delivered on one of the two available belts. The machine can be configured to switch to the second belt when the first one becomes full, increasing productivity.
Printing on cut sheet media
If you want to print a job on paper of a type and/or size that is not available on one of the paper rolls, it may be easier to manually feed in sheets of paper instead of changing one of the paper rolls. The sheet feed is a special slot located just above the printer's paper roll drawers. You can insert pre-cut copy media into this slot, one sheet at a time.
Note: Use only the media types and sizes specified in 'Copy material specifications' on page 121.
▼ Printing on pre-cut sheets
1 Select the 'Manual feed' setting on your printer driver before sending the job to the printer.
Note: More information about the Océ 9800 Job Director, the Océ 9800
Repro Station and other printer drivers can be found in separate user manuals.
2 Wait until a message similar to the following example appears in the printer display:
'Sheet feed, feed A1 copy media'.
3 Take your sheet of copy media to the side of the printer which houses the sheet feed.
4 Use both hands to align the copy material in the sheet feed in accordance with the format indication and the sticker on the manual feed table.
5 Move the copy material forward into the nip of the roller until it causes an ample bulge over the full width of the page.
6 Hold the copy material with both hands until the printer pulls in the first part of the sheet.
The bulge will be reduced or it will disappear. A few seconds later, the complete sheet will be pulled into the printer.
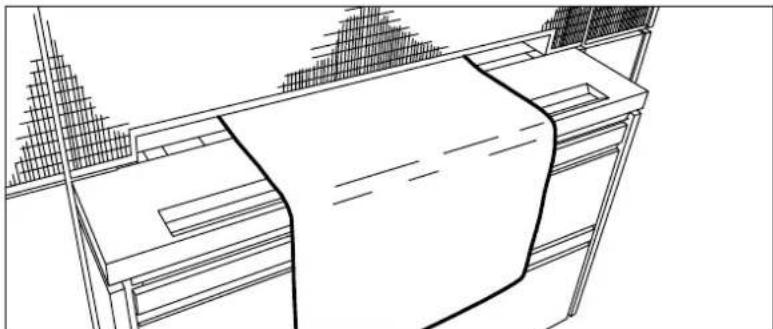
[24] Manually feeding in a sheet of paper
7 If the copy job requires more sheets, the display will ask you to feed in the next sheet.
8 Repeat steps 3 to 7 in order to complete the job.
9 Collect your output.
Note: The image will be printed on the side of the sheet which is facing up.
Printing status information and test pages
Selecting the 'Print settings' function enables you to print a status report of the current settings for your Océ 9800 configuration.
The list includes controller details such as software version, memory size, extension slots, RS232 setup, and communications details. Pen settings, language settings, and machine configuration are also included in this status report, as are the default plot settings and the current original to copy matrix
▼ Printing system status information
1 Open the 'Controller' card in the 'Machine' section (see figure 25).
![graph TD A["Prints: 0"] --> B["Ready to print"] B --> C["Machine"] C --> D["Program"] D --> E["Language"] E --> F["Connect"] G["General"] --> H["Test print"] G --> I["Print settings"] I --> J["Reset config."] J --> K["Reset error"] K --> L["Reset controller"]](/content/2026/06/1254120/images/3ac0a660ae40f05199fe0495111d833cca7f7c58e58df931441cf7cc2bdcb012.jpg)
[25] Obtaining printed system status information
2 Press the 'Print settings' button.
3 To confirm, press the Start button.
The status information will then be printed.
▼ Printing test page
1 Open the 'Controller' card in the 'Machine' section (see figure 25).

[26] Printing test page
2 Press the 'Test print' button.
3 To confirm, press the Start button.
The test page will then be printed.
Resetting errors
The message area above the Print button area displays the current status of the controller. An icon will be displayed in the event of a warning or an error, as shown in figure 27.

[27] Error Message and icon
You can get more information about the error if you open the Controller card in the Machine section. For example:

[28] Resetting an error, example screen
To continue, press the 'Reset error' button.
Resetting the counter
If you wish to record daily production, the counter must be reset on a daily basis.
▼ Resetting the counter
1 Open the 'Counter' card in the 'Machine' section.
2 Press the 'Reset counter' function button (see figure 29).
![graph TD A["Prints: 0"] --> B["Reset counter? Start @confirm Clear C = cancel"] B --> C["Machine"] C --> D["Program"] D --> E["Finishing"] E --> F["Copy"] G["General"] --> H["Interrupt job"] H --> I["0"] J["Controller"] --> K["Interrupt job"] K --> L["Reset counter"]](/content/2026/06/1254120/images/1b86ba54a8faf95d1ba7b652ae799672c1bb3cba451a413bc7e7a9cb0699489d.jpg)
[29] Resetting the day counter
3 Press Start to reset the counter. The value of the counter will change to '0'.
Accounting
You can keep track of your print jobs with the help of the accounting function. The RSR232 output port on the scanner's operating panel sends accounting data as a line of ASCII text after each job. To use these data, you need to connect a PC to the port and write your own computer application to read the ASCII data. The structure of the data is as follows.
Note: Océ can provide you with a demonstration application.
A line of ASCII text is sent to the RS232 port (connected to the PC) after each job. The structure of the data is as follows.
"AI=AccountIdUI=UserIdMI=MachineIdPT=PrintTypeST=SortTypeTO=TotalOriginalsPP=PaperPrintsSP=tranSparentPrintsYP=polYesterPrintsPC=PaperClicksSC=tranSparentClicksYC=polYesterClicksTF=TotalFoldedTU=TotalpUnchedTS=TotalStampedTE=TotalEditedTG=TotalenlarGedTC=TotalreduCedSR=ScanjobResolutionSF=ScanjobFile formatSW=ScanjobWidthSH=ScanjobHeight;;;"
For example:
"AI=123456789UI=123456789MI=123456789PT=0ST=1 TO=123456789PP=123456789SP=123456789YP=123456789PC=123456789S 123456789C=123456789YC=123456789TF=123456789TU=123456789TS=12 3456789TE=123456789TG=123456789TC=123456789SR=3SF=1SW=297SH=4 20;;;"
The following table contains the applicable accounting parameters:
Accounting parameter reference
Parameter Type Meaning
AccountId
Accounting parameter reference
polYesterPrints
PaperClicks
tranSparentClicks
polYesterClicks
TotalFolded
TotalpUnched
TotalStamped
TotalEdited
TotalenlarGed
TotalreduCed
ScanjobResolution
ScanjobFileformat
ScanjobWidth
ScanjobHeight
Note: Parameters that are not used by the Océ 9800 configuration are set to 0.
The following table contains the communications parameters applicable to your scanner's RS232 port::
Accounting communication RS232 parameters
| baudrate | 9600 |
| handshake | off |
| parity | none |
| databits | 8 |
| stopbits | 1 |
[30] Accounting data communication parameters
Clicks can be registered in m, m2 , ft, or ft2 . This depends on your particular machine configuration. Your Océ service engineer can provide you with the necessary configuration information. You must divide the number of clicks by 1000 to get the real number of m, m2 , ft, or ft2 .
For instance, the PaperClicks value for a particular account is 1730
(PC=1730). This is 1730 × 0.001 = 1.73 clicks of output media, for example 1.73 m2 .
You can specify a numeric user and account identification for each job to be logged. If no user ID or account ID have been specified, 0 will be sent to the output port as the default for user ID, and 0 will be sent to the output port as the default for account ID.
Océ 9800 Printer
User Manual
Chapter 3 Default printer settings
This chapter describes how to define default printer settings with the help of the operating panel on the printer. These default settings are overruled by settings sent to the printer along with the print job by printer drivers.

Auto format selection
If you have selected 'Auto Format' and 'Auto Zoom' in your printer driver, but you have not defined a format selection table, the following default table will be used to select the size of the copy media and the appropriate zoom factor.
Note: The 'Auto format selection table' is also called 'Automatic size and zoom table'.
Example When an A0 original is received, the system should automatically select an A1 roll and the appropriate zoom factor:

[31] Auto format selection table
▼ Defining your default 'Auto format selection' table
1 Open the 'Copy size' card in the 'Copy' section.
2 Press the 'Auto format selection' function button and select A0 original size (see figure 31).
3 Adjust the copy size using the higher/lower buttons.
Printing non-standard sized originals
Note: The following default print settings are usually overruled by settings that are sent to the printer along with the print job.
The Océ 9800 determines the length and width of each digital original.
The Océ 9800 has three cut options:
- Standard cut, which cuts copies to a standard length. The system cuts at the predicted length, which is based on the measured standard width.
- Synchro cut, which cuts copies at the end of the image. The system cuts at the measured length of the original, and
- Custom cut, which cuts copies to a specified length. See 'Defining your copy length' on page 42.
When printing non-standard sized originals, use 'Synchro cut' or 'Custom cut'.
When folding copies of non-standard sized originals, two restrictions apply:
- Copies between 2,5 m and 6 m in length (approx. 8' and 20' respectively) cannot be processed by the second fold unit (fan-fold only), and must be collected from the first fold unit (see figure 107 on page 111).
- Copies that would exceed the maximum length are cut to 6 m (approx. 20'), to prevent jams in the folder.
▼ Selecting default settings to print non-standard sized originals
1 Open the 'Copy size' card in the 'Copy' section.
2 Press the 'Copy length' function button to select 'Synchro cut', 'Standard cut' or 'Custom cut' (see figure 32).

[32] Copying with standard cut
Defining your copy length
Copy length can be defined in inches or millimetres. Use the Copy length card if you need copies of a specified length.
▼ Defining your default copy length
1 Open the 'Copy length' card in the 'Copy' section.
2 Press the 'Copy length' function button to select the numeric option (see figure 33).

[33] Copying with custom cut
3 Type in the copy length using the numeric buttons, or define the length by using the scroll buttons.
Editing
Note: The following default print settings are usually overruled by settings that are sent to the printer along with the print job.
The Océ 9800 is equipped with the editing functions ‘Auto shift’, Mirror and ‘Shift’. Only one edit function at a time can be selected.
Note: Only 'Shift', 'Mirror' and 'Autoshift' can be used. 'Stretch' and 'Erase' cannot be used, and should be ignored.
Auto shift
The Auto shift function allows you to automatically move your image to one side of the page.
The Auto shift function supports these shift options:
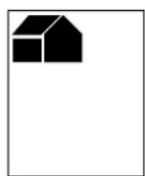




Upper left Upper right Centre Lower left Lower right
[34] Auto shift options with standard cut option active
Note: 'Standard cut' must be enabled in order to generate copies similar to the ones shown in the example above (illustration 34). If Synchro cut is enabled, use of Auto shift will result in the following output


Upper left Upper right Centre Lower left Lower right
[35] Auto shift options with synchro cut option active
'Shifting the image' on page 45 explains how to define the exact position of your image on the page.
▼ Selecting default settings for auto shifting
1 Open the 'Image' card in the 'Copy' section.
2 Press the 'Edit' function button until 'Autoshift' is selected (see figure 36).

[36] Auto shift
3 Press the 'Shift position' button.
4 Use the scroll buttons to select the Autoshift option of your choice.
Mirror-image
It is possible to print a mirror-image of an original, as shown in the figure below:
![graph LR A["Computer"] --> B["Device"] B --> C["Arrow"] C --> D["Device"]](/content/2026/06/1254120/images/e5a6601f105ce6c2440d1c070060bb802fe517f3d16a7b0b50d601f435451157.jpg)
[37] Example of a mirror-image copy
▼ Making a mirror-image copy
1 Open the 'Image' card in the 'Copy' section.

[38] Mirror-image
2 Press the 'Edit' function button until 'Mirror' is selected (see figure 38).
Shifting the image
In some cases, the margin may be too small to accommodate punch holes or filing strips without loss of information. To avoid loss of information, you can shift the image both horizontally and vertically (see figure 39).
![graph TD A["House Icon"] --> B["Box"] C["House Icon"] <--> B D["House Icon"] --> B E["House Icon"] --> B B --> F["House Icon"] B --> G["House Icon"] B --> H["House Icon"]](/content/2026/06/1254120/images/e8d6ab2d56acae4e64a22bd19f8da246a4f2760eaaced3e418d684669e88ae92.jpg)
[39] Example of shifting the image
▼ Selecting default settings for shifting the image
1 Open the 'Image' card in the 'Copy' section.

[40] Image shift
2 Press the 'Edit' function button to select 'Shift' (see figure 40).
Note: Only 'Shift', 'Autoshift' and 'Mirror' can be used. 'Stretch' and 'Erase' cannot be used, and should be ignored.
3 Press the 'Horizontal' function button.
4 To shift the image to the left, press the numeric or the higher/lower buttons until the required distance has been set.
or,
5 Press the 'Horizontal' function button again.
6 To shift the image to the right, press the numeric or the higher/lower buttons until the required distance has been set.
Note: 'Horizontal' shifting can only be used to shift the image to the right or to the left.
7 Press the 'Vertical' function button.
8 To shift the image upwards, press the numeric or the higher/lower buttons until the required distance has been set.
or,
9 Press the 'Vertical' function button again.
10 To shift the image downwards, press the numeric or the higher/lower buttons until the required distance has been set.
Note: 'Vertical' shifting can only be used to shift the image upwards or downwards.
Note: You can use one horizontal and one vertical shift simultaneously.
Stamp unit (optional)
Note: The following default print settings are usually overruled by settings that are sent to the printer along with the print job.
The optional stamp unit allows you to print a predefined text on all of your copies. Such texts can be created and modified by your key operator. The stamp function is useful if you want to have the date, time or other information printed on your copies. 50 programmable stamps are available.
This section describes how to select a stamp and how to modify its layout.
Note: Your key operator can define the information contained on stamps (see 'Editing stamps' on page 71).
▼ Selecting default stamp option
1 Open the ‘Stamp’ card in the ‘Finishing’ section.
2 Choose 'Select' by pressing the function button once (see figure 41).

[41] Stamp card
You can select one of the available stamps by using the higher/lower buttons.
3 Press the 'Stamp' function button again to adjust the layout if required (see figure 42).

[42] Card to adjust the stamp
Note: Stamps are printed in the legend area. This means that you must select the legend function and set the folding method (Standard, Ericson or Afnor) if you wish to use the Stamp function.
High Capacity Stacker (optional)
Note: The following default print settings are usually overruled by settings that are sent to the printer along with the print job.
If a High Capacity Stacker is installed, copies can be ejected at the rear of the printer into one of the six stacker bins. Each bin can stack up to 200 unfolded copies. Copies longer than 122 cm (48") are collected under the stacker unit. Copies on polyester film are always delivered into the lower bin (bin 6). The upper bin (bin 1) cannot be moved. Bins 2 through 6 can be pulled out (opened) 30 cm (approx. 12") to facilitate emptying.
Note: If 'Lower output' or 'Folding' are selected, copies are not delivered to the High Capacity Stacker (see 'Lower Container unit (optional)' on page 52 and 'Folder (optional)' on page 53).
'Bin in use' Indicator If the indicator light next to a bin remains on continuously, the bin is in use for copy delivery and the bin should not be opened.
'Bin full' indicator If the indicator light next to a bin flashes slowly (1Hz), the bin is full. After emptying the bin completely, the light will stop flashing.
'Close bin' indicator If the indicator light is flashing rapidly (2Hz) and the alarm is buzzing, the bin should be closed immediately. If the bin is not closed in time, an error will occur and the machine will stop.
The following stacker options can be selected:
Offset stack Before the first copy of a new set or job is delivered, the delivery bin will shift stacking position to provide easy job/set separation (see figure 43).

Offset stack not selected

Offset stack selected
[43] Using 'Offset stack'
Bin selection method You can select one of the following options:
■ Continuous
The printer will switch to the next bin to deliver all copies. If this bin is full, the next bin will be used (bin 6 will be followed by bin 1). This process will continue until all bins are full, at which time printing will stop.
■ Per Job
The printer will switch to the next bin to deliver all copies within the first job. Copies of the following job will be delivered at the next bin (bin 6 will be followed by bin 1). This process will continue until the next bin is completely full (regardless of the contents of other bins), at which time printing will stop.
Note: If a job does not fit into a single bin, the machine will automatically begin delivering copies to the next bin in order to finish the job.
Note: A single job may contain several sets, as defined by the printer driver.
■ Per Set
The printer will switch to the next bin to deliver all copies within the first set. Copies of the following set will be delivered at the next bin (bin 6 will be followed by bin 1). This process will continue until the next bin is completely full (regardless of the contents of other bins), at which time printing will stop.
Note: If a set does not fit into a single bin, the machine will automatically begin delivering copies to the next bin in order to finish the set.
- Bin number
All copies are delivered into the specified bin. This process will continue until the specified bin is full (regardless of whether another bin is empty), at which time printing will stop.
Note: To prevent the printer from stopping, you can empty bins that are not in use without interrupting the print process. This is not possible if you have selected 'Bin number'.
Note: If you have selected 'Per Job' or 'Per Set', we recommend that you empty any bins which are not in use in order to prevent the printer from delivering a new job or set in a bin which contains other output.
▼ Selecting settings for the High Capacity Stacker
1 Open the 'High cap. stacker' card in the 'Finishing' section.
2 If required, press the 'Offset stack' button to select or deselect this option.
3 Select the required bin selection method by pressing the 'Bin selection' button (see figure 44 on page 51).

[44] Default settings for High Capacity Stacker
4 If you select 'Bin number', the 'Bin number' button will appear at the right-hand side of the display. Press the button and then use the higher/lower buttons or the numeric buttons to select the required bin numbe (see figure 44).
Lower Container unit (optional)
Note: The following default print settings are usually overruled by settings that are sent along with the print job.
You can use the 'Delivery' menu to select which output is to be used for delivering copies: the upper delivery output or the lower delivery output.
Note: If a folding unit is installed, the lower delivery output will be used for folded copies. The 'Delivery' menu will not be present.
The following options can be selected in the ‘Delivery’ menu:
Upper output The copies are delivered to a single receiving tray or to the optional High Capacity Stacker.
Lower output The copies can be collected under the lower delivery output, using an optional container for long copies.
Automatic Generally, the upper delivery is used, except in cases in which the copy is too long to be collected in the single receiving tray or the High Capacity Stacker, in which case the lower delivery output is used.
▼ Selecting default settings for the Lower Container unit
1 Open the 'Delivery' card in the 'Finishing' section.
2 Press the 'Delivery' button to select the required output (see figure 45).
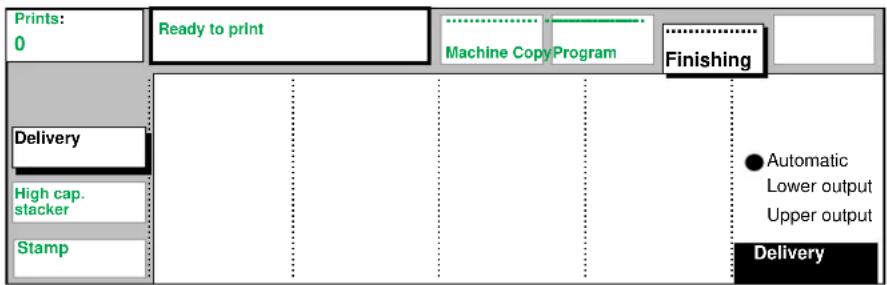
[45] Default settings for Lower Container unit
Folder (optional)
Note: The following default print settings are usually overruled by settings that are sent to the printer along with the print job.
If a folder is installed, you may choose to have your copies folded. The copies are folded according to the selected folding width and length in combination with a folding method. The folding methods are Standard, Ericson and Afnor, with or without a binding edge.
If you select ‘Portrait’ as the Folding method, make sure that all digital originals are in portrait orientation (see ‘Auto rotate’ on page 82). Only portrait-oriented drawings can be folded with the legend on top. If ‘Automatic’ is selected, the machine measures the length of the digital original to obtain a good fold package, depending on the roll width.
Polyester film and vellum cannot be folded. If you try to do so, a warning will appear in the display.
Note: Long copies can be folded in lengths of up to 6 m (approx. 201). Copies between 2.5 m and 6 m long (approx. 8' and 20' respectively), however, can only be processed by the first fold unit, and these copies must be removed from the folder. This is indicated on the display.
You can also select a folding method, and, if required, a folding length, folding width, binding edge and, if configured, punching (see figure 46). When changing the folding width on machines with a high capacity output unit with punch unit, you must also adjust the side guides in the high capacity output unit (see 'High capacity output unit with punch unit (optional)' on page 55).
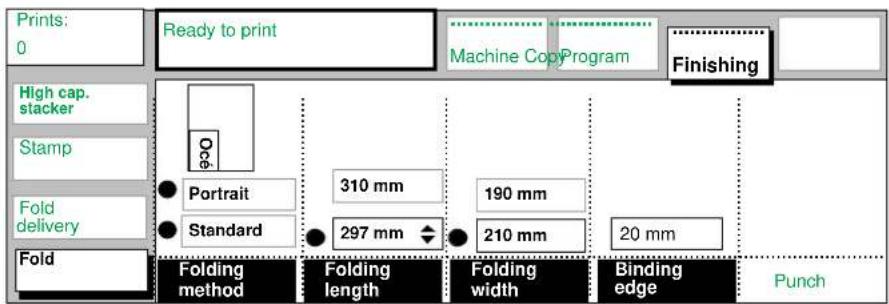
[46] Folding method, folding length, folding width
▼ Selecting default folding settings
1 Open the 'Fold' card in the 'Finishing' section.
2 Press the 'Folding method' function button to select 'Standard', 'Ericson' or 'Afnor' fold.
3 Press the 'Folding method' function button again to select 'Portrait' or 'Automatic'.
4 If required, press the 'Folding length' function button.
5 Set the required folding length using the higher/lower buttons or the numeric buttons.
6 If required, press the 'Folding width' function button.
7 Set the required folding width using the higher/lower buttons or the numeric buttons.
8 If required, press the 'Binding edge' function button.
9 Set the required binding edge using the higher/lower buttons or the numeric buttons.
Folded copies are delivered in the receiving tray of the folder (see figure 47).

[47] Receiving tray of the folder
High capacity output unit with punch unit (optional)
The optional high capacity output unit is equipped with either one (standard) or two belts that offer a larger capacity and more flexibility. This output unit delivers copies on belt 1 or belt 2. For maximum capacity, the two belts can be linked so that the system automatically switches to the empty belt when the first one is full. The copies are delivered offset stacked. You can adjust the side guides of the belts, depending on the width of the fold package. The amount of copy output to be delivered on the belts can be adjusted by your Océ service technician.
An optional punching unit can be installed in the high capacity output unit, to perforate your copies. Four-hole punching is standard. Your Océ service technician can change the system to two-hole punching.
Note: If you want to use a different folding length and folding width, you must also adapt the folding length and folding width in the punching unit (see 'Adjusting the punching unit' on page 57).
When selecting the default settings for the high capacity output unit, you have the following options:
■ stack: the copies will be deposited in the output tray.
■ belt 1: the copies will be delivered on belt 1. If this belt is full, an error message will be displayed.
■ belt 2: the copies will be delivered on belt 2. If this belt is full, an error message will be displayed.
■ belts: copies will be delivered on one of the belts. As soon as the current belt is full, the output will automatically be delivered on the other belt. This is the full production mode. If both belts are full, an error message will be displayed.
▼ Selecting default settings for high capacity output unit
1 Open the 'Fold delivery' card in the 'Finishing' section.
2 Press the 'Print delivery' function button (see figure 48)
3 Select the required output delivery.

[48] Default settings for delivery on the high capacity output unit
▼ Adjusting the side guides of the belts
1 Loosen the fastening screws (see figure 49).

[49] Adjusting the side guides of the belts
2 Adjust the plate in accordance with the width of the fold package.
3 Tighten the fastening screws.
Note: If you change the folding width and/or the folding length, you must adjust the punching unit.
▼ Adjusting the punching unit
1 Open the door at the front of the high capacity output unit.
2 Turn the black knob to adjust the folding width (see figure 50). Refer to the sticker inside the unit.

[50] Knob for adjusting the folding width in the punch unit
3 Loosen the fastening screw and position the plate in accordance with the folding length (see figure 51).
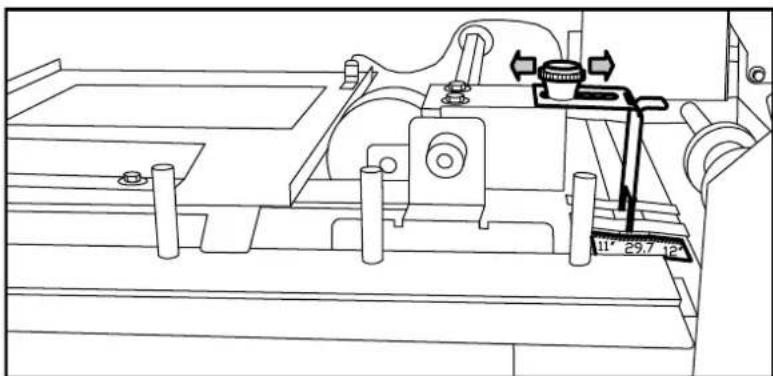
[51] Fastening screw for adjusting the folding length in the punch unit
4 Tighten the fastening screw.
▼ Selecting default settings for punched copies
1 Open the 'Fold' card in the 'Finishing' section.
2 Press the 'Punch' function button.

[52] Selecting default punching
Note: If you select 'Punch', you must also define a 'Binding edge'.
Pre-programmed groups of default settings
Note: The following default print settings are usually overruled by settings that are sent along with the print job.
Besides the standard default settings, the Océ 9800 is equipped with a memory function which can be used to retrieve 5 extra groups of default settings. This is useful for jobs which have to be done on a regular basis. Your key operator can store settings in 5 different programs (see 'Programming groups of default settings' on page 68). If you wish to process a job using these settings, you only need to retrieve the program and send your job to the printer, thus reducing the time spent on programming.
▼ Retrieving a default program
1 Press the 'Program' section button.
2 Select 'Load' using the higher/lower buttons (see figure 53).
| Prints:0 | Ready to print | Machine | ProgramLoad | Finishing | Copy | |
| NormalExposureSynchro cutZoom % (auto)Roll: (auto)Sort by pageCopies: 1Standard settings | stampfoldcopy delivery beltZoom: % (auto)Roll: (auto)Sort by setCopies: 10 | photoshiftstandard cutcopy delivery:beltZoom: %(auto))Roll: (auto)Sort by pageCopies: 2 | mirrorcopydeliver:beltZoom: % (auto)Roll:3Sort by setCopies: 3 | fold:Zoom: % (auto)Roll:4Sort by pageCopies: 5 | ||
| 2 | 31 | 4 | 5 | |||
[53] Retrieving a program
3 Press one of the five function buttons to load the required program (see figure 53).
4 The operating panel will now show the selected group of default settings.
Océ 9800 Printer
User Manual
Chapter 4 Key operator
This chapter describes the tasks performed by the key operator and explains how to enter key operator mode.

The Océ 9800 key operator
This chapter is meant for key operators only and contains all of the information needed by key operators to support printer users and to keep the Océ 9800 Printer in excellent condition.
The key operator is responsible for configuring the appropriate default settings for the system, including pre-programmed settings for recurring copy jobs as well as general defaults.
The key operator is also responsible for defining all clock settings, including time and date, switch-off time and reset time. The definition of default zoom settings and output delivery mode are also the responsibility of the key operator.
This chapter explains how to enter key operator mode and how to define key operator settings.
Entering key operator mode
In order to perform special key operator functions, you must first enter key operator mode.
This functionality is restricted to dedicated key operators, and is protected by a PIN code. Your service engineer configures the key operator PIN code upon installation.
Note: After performing key operator functions, be sure to exit key operator mode to prevent improper use of the Océ 9800 Printer.
▼ Entering key operator mode
1 Press the 'key' button.
2 The display will show the selection 'Key Operator' (see figure 54).

[54] Accessing key operator mode
3 Enter the key operator PIN code.
If correct, a key symbol is indicated in the display.
▼ Exiting key operator mode
1 Press the 'key' button.
Defining clock settings
The Océ 9800 Printer has an internal clock which must be properly set if it is to be used for stamping purposes or to automatically turn the Océ 9800 Printer on or off. The way in which the current time and date is displayed can be adapted to local conventions by your Océ service engineer.
The reset time is the time the system will wait before it returns to the default settings. This parameter can be modified.
The ‘Timers’ card in the ‘Machine’ section allows you to define the following time-related settings.
Setting the current time and date
To ensure correct functioning of the time switch, you must set the current time and date. The way in which the time and date are displayed can be adapted to local conventions.
▼ Selecting the required time and/or date
1 Access key operator mode.
2 Open the 'Timers' card in the 'Machine' section.
3 Press the 'Time and Date' function button (see figure 55).
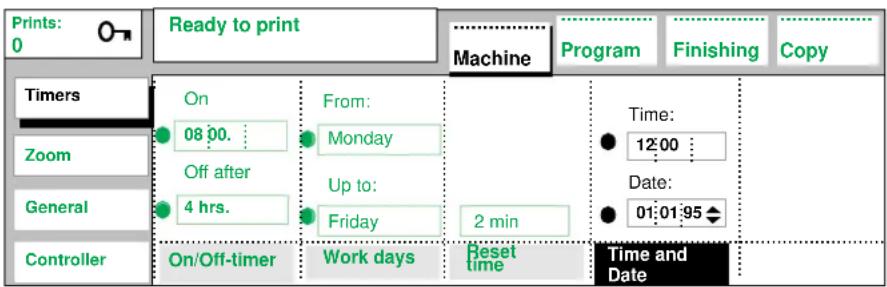
[55] Time and date notation
4 You can now adjust the day. Press the 'Time and Date' function button again to enter the month, then press the 'Time and Date' function button again to enter the year.
To select the current time:
5 Press the 'Time and Date' function button.
6 You can now adjust the hour displayed. Press the 'Time and Date' function button again to adjust the minutes displayed.
7 When finished, exit key operator mode.
Setting the reset time
If the printer remains inactive for a given period of time (no buttons pressed), or if the 'Correction' button is pressed, and reset time is enabled, the default printer settings will return to their default values. This period of time is called the reset time.
The factory default for reset time is 2 minutes, but this value can be changed to any time between 1 and 99 minutes, or it can be de-activated entirely.
▼ Setting the reset time
1 Access key operator mode.
2 Open the 'Timers' card in the 'Machine' section.
3 Enable 'Reset time' by pressing the function button (see figure 56).

[56] Reset time
4 Use the numeric or higher/lower buttons to set the required reset time. Or,
5 Press the function button to de-activate the function, thus forcing users to manually reset the system.
6 When ready, exit key operator mode.
Activating the time switch
The time switch function allows you to program the system to automatically turn itself on at a specified time and off after a certain idle-time.
The advantages of this time switch are:
■ the system is ready for use at the start of the working day
■ energy-savings when the system is not being used.
▼ Defining the switch on/off time and days
1 Access key operator mode.
2 Open the 'Timers' card in the 'Machine' section.
3 Press the 'On/Off timer' function button (see figure 57).

[57] On/Off timer
4 Enter the required switch-on time/switch-off delay (hours/minutes), using the 'higher/lower' buttons.
5 Press the 'Work days' function button.
6 Enter the required working days using the 'higher/lower' buttons.
7 When finished, exit key operator mode.
Note: Make sure that you turn the key to the 'timer' position if you want the machine to automatically be turned on.
Image correction
To correct possible horizontal or vertical image deviations, use the 'horizontal' and/or 'vertical' 'Calibration' function. Vertical and horizontal correction can be adjusted independently within a range of +/- 3%, in increments of 0.1%. In practice, this means that you can specify a calibration factor between 0.970 and 1.030.
▼ Calibrating the printer
1 Open the 'Zoom' card in the "Machine" section.
2 Press the 'Calibration' function button twice (see figure 58).
Note: Only 'Vertical' is used. 'Horizontal' is not used, and should be ignored.

[58] Calibration
3 Enter the required value for vertical calibration using the numeric or the higher/lower buttons.
4 When finished, exit key operator mode.
Programming groups of default settings
Groups of default printer settings can be stored in a program. Besides the standard default settings, up to five extra groups of default settings can be stored under the five program buttons. This section explains how to store settings under a button, what feedback is provided on the display, and how to erase programs.
When the Océ 9800 is installed, the standard 'Default settings' program contains the factory default settings. Refer to Appendix A for a complete overview.
Not all factory default settings are visible in the 'Default settings' area. The area can contain up to 8 values. The most important settings are:
■ the number of copies
■ sort by set/sort by page
■ the selected roll number and whether auto-roll has been pressed. This will be indicated as: (auto)
■ the zoom factor
■ print delivery (if applicable)
Other settings that can be displayed in the remaining 2 or 3 lines are:
■ synchro cut/standard cut/custom cut
■fold (always visible if switched on)
■edit: shift, auto shift
Note: Only 'Shift', 'Mirror' and 'Autoshift' are used. 'Stretch' and 'Erase' are not used, and should be ignored.
■ stamp (always visible if switched on)
▼ Storing settings under a program button
1 Define the settings you want to store under a program button.
2 Press the 'Program' section button.
3 Select 'Store' using the higher/lower buttons (see figure 59).

[59] Storing program settings
4 Press the button of the appropriate program (1-5) to store the current settings as a group of default printer settings in the selected program memory.
Note: You will be asked to confirm the store procedure after the data has been entered in the program.
5 When finished, exit key operator mode.
▼ Erasing settings under a program button
1 Press the 'Program' section button.
2 Select 'Erase' (see figure 60).
| Prints: 0 | Ready to print | Machine Program Finishing Copy | |||
| Normal Exposure Synchro cut Zoom % (auto) Roll: (auto) Sort by page Copies: 1 | copydelivery:belt1 Zoom: % (auto) Roll: (auto) Sort by set Copies: 3 | Erase | |||
| Default settings | 1 | 2 | 3 | 4 | 5 |
[60] Erasing program settings
3 Press the button of the appropriate program (1-5) to erase or overwrite the group of default printer settings.
Note: You will be asked to confirm the erase/overwrite procedure after the data has been entered in the program.
4 When finished, exit key operator mode.
▼ Changing the Océ 9800 standard 'Default' settings
1 Define the settings which you wish to use in place of the standard default settings.
2 Press the 'Program' section button.
3 Select 'Store' using the higher/lower buttons.
4 Press the 'Default settings' function button. The system will ask you to confirm that you want to replace the standard settings.
The new defaults are now stored in memory. Note that not all active settings can be displayed. The maximum number of settings which can be displayed is eight.
5 When finished, exit key operator mode.
You can also restore the factory default settings in your 'Default settings' program by erasing the program you have stored:
▼ Returning to the factory default settings
1 Press the 'Program' section button.
2 Select 'Erase' using the higher/lower buttons.
3 Press the 'Default settings' function button.
You will be asked to confirm the erase procedure.
4 When finished, exit key operator mode.
Editing stamps
Stamps are pre-defined strings of text. This information may be any sequence of characters, including date and time. If you select the symbol current date will be printed. The symbol is led to print the time. If you want to use a space, select the 'space' button located to the right of the Z character.
Note: If you have selected date and/or time, the current date and/or time will be printed on your output.
Users can select a stamp to print pre-defined information on their output (see 'Stamp unit (optional)' on page 47). Your key operator can define up to 50 stamps. The procedure below explains how to define stamps.
▼ Editing a stamp
1 Open the 'Stamp' card in the 'Finishing' section.

[61] Stamp card
2 Press the 'Stamp' function button to choose 'Select' and then use the higher/lower buttons to choose the stamp you want to change.
3 Press the 'Stamp' function button again to select 'Edit' (see figure 61).
4 The function button (move right) and function button (move left) can be used to move the cursor to the desired character.
5 Press the 'Write character' function button to include the selected character in your stamp.
6 If you want to delete the last character entered in the stamp, press the 'Erase character' function button.
7 Edit the stamp as required.
8 When finished, exit key operator mode.
Defining the standard copy media type
You can instruct the Océ 9800 to select a role with a given type of copy material in cases in which it has to choose between two rolls with the same width but different copy materials by defining a standard copy material. Océ 9800 Printer.
Note: The machine is unable to detect the type of media loaded on the copy material roles. This should be specified as described in 'Defining the type of media' on page 93.
▼ Defining the standard type of copy media
1 Open the 'Copy media' card in the 'Copy' section.
2 Press the 'Standard' function button (see figure 62).

[62] Default copy media
3 Select the preferred copy media.
4 When finished, exit key operator mode.
Defining automatic roll change
Enabling ‘Automatic roll change’ will cause the printer to switch to another roll loaded with the same copy material and format when the first roll is used up during printing. Disabling ‘Automatic roll change’ causes the machine to stop printing once the selected roll is empty and to ask you to load a new roll.
Note: The machine is unable to detect the type of media loaded on the copy material roles. This should be specified as described in 'Defining the type of media' on page 93.
▼ Turning 'Automatic roll change' on and off
1 Open the 'Copy size' card in the 'copy' section.
2 Press the ‘Automatic roll change’ function button to switch the automatic roll change function on or off (see figure 63).

[63] Turning 'Automatic roll change' on and off
3 When finished, exit key operator mode.
Océ 9800 Printer
User Manual
Chapter 5 System Administrator
The system administrator is responsible for the maintenance of controller settings. This chapter explains how to access system administrator mode and how to change controller settings.

Introduction
The system administrator is responsible for maintaining controller settings. In order to modify settings, you must enter system administrator mode.
The first section of this chapter explains how to enter system administrator mode.
The system administrator defines system defaults at three levels:
■ connectivity level
■ language level
■ machine level
Each of these levels is explained in a separate section.
Note: If you use the 'Direct Raster Interface' in combination with a separate controller, only the 'Reset controller' function is supported.
Entering system administrator mode
To perform special system administrator functions, you must first enter system administrator mode. This requires a system administrator's access code, which is defined by your Océ service engineer during installation of the Océ 9800.
▼ Accessing system administrator mode
1 Press the 'key' button.
2 Press the higher/lower button to select 'System administrator'.

[64] Accessing system administrator mode
3 Enter the system administrator PIN code.
▼ Quitting system administrator mode
1 Press the 'key' button.
Defining connectivity settings
The Océ 9800 supports several types of interfaces. During installation, your Océ service engineer will define the interface settings. If communications parameters on your host system change over time, you can use system administrator mode to define new connectivity settings.
You can change serial, Centronics, and SCSI communications parameters.
Serial
▼ Defining a serial connection
1 Open the 'Connection' card in the 'Connect' section (see figure 65)

[65] Connection card
2 Press the 'Select connection' button and select Serial.
3 Define the parameters.
4 When finished, exit system administrator mode.
Centronics
▼ Defining a centronics connection
1 Open the 'Connection' card in the 'Connect' section.
2 Press the 'Select connection' button and select 'Centronics'.
3 Specify normal or high speed.
4 When finished, exit system administrator mode.
SCSI
▼ Defining an SCSI connection
1 Open the 'Connection' card in the 'Connect' section.
2 Press the 'Select connection' button and select 'SCSI'.
3 Specify the appropriate SCSI-id, using the numeric buttons.
4 When finished, exit system administrator mode.
Defining default language settings
During installation, your Océ service engineer will define the appropriate language settings for your particular system. If these settings change over time, you can use system administrator mode to define new system-wide defaults.
Language (data format)
Note: The following default print settings are usually overruled by settings that are sent along with the print job.
The Océ 9800 accepts print files in various data formats (languages). You can change the settings for Calcomp, HP-GL, HP-GL/2, and ASCII.
▼ Setting the default language format
1 Open the 'Formats' card in the 'Language' section (see figure 66).
2 Press the 'Select data format' function button to select the required language.
Note: The ASCII and Calcomp settings are distributed over two windows.
Press the 'Select data format' button again to open the second window.
3 Define the appropriate settings.
4 When finished, exit system administrator mode.

[66] Selecting the required data format: the first window of Calcomp settings
Pens
Note: The following default print settings are usually overruled by settings that are sent along with the print job.
Pen settings can be changed in the Pen menu. You can change the default width and pattern for each pen number. These settings apply to all vector languages: HP-GL, HP-GL/2 and Calcomp.
▼ Defining the default pen settings
1 Open the 'Pen menu' card in the 'Language' section (see figure 67).
2 Press the 'Pen number' function button.

[67] Selecting a pen
3 Use the higher/lower buttons to select the desired pen and to define its pattern and width.
4 When finished, exit system administrator mode.
Pen Priority For HP-GL/2 and Calcomp files, you must also define the Pen Priority:
■Language:
The pen settings definition in the plot file will be used.
■ Remote:
The default pen settings will be used, unless they are overruled by settings sent by the printer driver with the print job.
See ‘Defining Pen priority for Calcomp or HP-GL/2 files’ on page 82.
▼ Defining Pen priority for Calcomp or HP-GL/2 files
1 Open the 'Formats' card in the 'Language' section (see figure 68).
2 Press the 'Select data format' function button to select Calcomp or HP-GL/2.
Note: The Calcomp settings are distributed over two windows. To select Pen priority for Calcomp, press the 'Select data format' button until the following window appears:

[68] Defining Pen priority for Calcomp files
3 Press the 'Pen priority' function button.
4 Use the higher/lower buttons to select 'Remote' or 'Language'.
5 When finished, exit system administrator mode.
Automatics settings
Note: The following default print settings are usually overruled by settings that are sent along with the print job.
This card can be used to define 'Auto rotate', 'Legend correction' and 'Auto roll'. Each parameter is described briefly below.
Auto rotate The Océ 9800 printer can be allowed to automatically select a rotation:
- 'Productive': the orientation of the image will be changed, if possible, to landscape. Drawings in landscape orientation can be printed faster because this requires less movement of output media through the machine.
- To portrait: the orientation of the image will be changed, if possible, to portrait. Only portrait-oriented drawings can be folded with the legend on top (see 'Folder (optional)' on page 53).
▼ Defining default 'Auto rotate'
1 Open the ‘Automatics’ card in the ‘Language’ section (see figure 69).
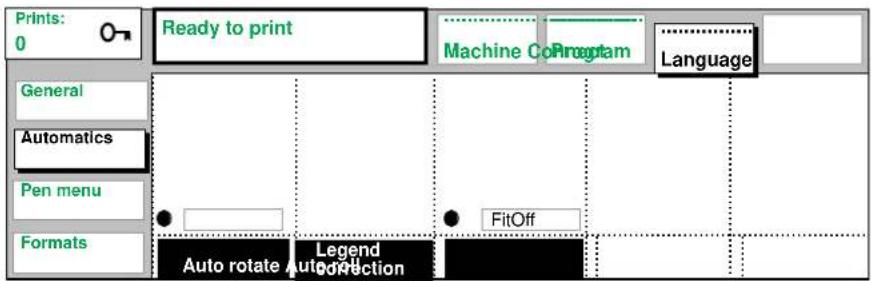
[69] Automatics card
2 Press the 'Auto rotate' function button.
3 Use the scroll buttons to define the new auto rotate mode.
4 When finished, exit system administrator mode.
Legend correction Some digital originals with a legend require an additional 180 degree rotation for the legend to be printed on top after folding. The location of the legend is determined by the application that generated the plot file.
▼ Defining default 'Legend correction'
1 Open the 'Automatics' card in the 'Language' section (see figure 69).
2 Press the 'Legend correction' function button to select this option (black background).
3 When finished, exit system administrator mode.
Auto roll The Auto roll parameter allows you to specify whether or not automatic roll selection may be overruled, and if so, how.
Roll selections and zoom factors may or may not be determined automatically. Whether these variables are automatically determined or not, the end result will be a specific roll and, possibly, a specific zoom factor. The Auto roll parameter has three options:
- 'Fit': if the computed copy material format is not available on one of the rolls, the operator will be prompted to load the appropriate format copy material. The roll selection will not be changed.
- 'Next size': if the computed copy material format is not available on one of the rolls, the printer selects a roll with larger-sized copy material. The original will be printed using the (original) zoom factor.
- 'Reduced': if the required copy material format is not available on one of the rolls, the printer will select a roll with larger-sized copy material. If
larger-sized copy material is unavailable, the printer will select a roll with smaller-sized copy media. In this case, a new zoom factor will be calculated to prevent information loss.
▼ Defining default Auto roll
1 Open the ‘Automatics’ card in the ‘Language’ section.
2 Press the 'Auto roll' function button.
3 Use the scroll buttons to define the new 'Auto roll' mode.
4 When finished, exit system administrator mode.
General settings
This card can be used to define the system settings 'Print time-out' and 'Automatic Language Sensing (ALS)'. Each parameter is explained briefly below.
Print time-out The print time-out is a timer. It is started as soon as no more print data are received. When the timer reaches the selected limit, the system assumes that the end of file has been reached and the data stream associated with the current print job will be considered terminated.
▼ Defining print time-out
1 Open the ‘General’ card in the ‘Language’ section (see figure 70).

[70] General card
2 Press the 'Print time-out' function button.
3 Use the higher/lower buttons or the numeric buttons to define the new print time-out in seconds.
4 When finished, exit system administrator mode.
ALS Automatic Language Sensing is the mechanism used by the system to detect the language (data format) of files which do not contain a format specification in their file header. ALS scans the file contents for clues about the data format.
Use the ALS formats parameter to define which data formats are to be searched for in the print files.
▼ Defining ALS formats
1 Open the ‘General’ card in the ‘Language’ section.
2 Press the 'ALS formats' function button.
3 Use the scroll buttons to select the data format of your choice.
4 Press the 'move right' function button to activate the format switch-on box.
5 Use the scroll buttons to select 'on' for the current data format.
6 Repeat steps 2 through 5 for each data format.
7 When finished, exit system administrator mode.
Reset functions
The system administrator can make use of the following functions in the 'Machine' section:
■Restore factory default settings
■ Reset controller
Restoring controller to factory default settings
The system administrator can use the Reset configuration function to undo all changes which may have been made to the Océ 9800 controller settings.
▼ Restoring factory default settings
1 Open the 'Controller' card in the 'Machine' section (see figure 71).

[71] Controller card
2 Press the 'Reset config.' button.
3 Press the Start button to confirm.
All changes will be undone and the system will be restored to its default status.
4 When finished, exit system administrator mode.
Resetting controller
If a controller error cannot be solved by resetting an error message, you can reset the entire controller without turning the printer off.
▼ Resetting the printer controller
1 From the host system, stop the print application.
2 Open the 'Controller' card in the 'Machine' section (see figure 71).
![graph TD A["Prints: 0"] --> B["Ready to print"] B --> C["Machine"] C --> D["Program"] D --> E["Language"] E --> F["Connect"] G["General"] --> H["Controller"] H --> I["Test print"] H --> J["Print settings"] H --> K["Reset config."] H --> L["Reset error"] H --> M["Reset controller"]](/content/2026/06/1254120/images/730c9295d37f5648ed3012376876253cfc973b7144af993b9d3fc54e3e450df8.jpg)
[72] Resetting an error, example screen
3 Press the 'Reset controller' button.
The entire controller will be reset.
4 When finished, exit system administrator mode.
5 From the host system, restart the print application.
Océ 9800 Printer
User Manual
Chapter 6 Maintenance
This chapter describes regular maintenance tasks such as refilling copy material and toner.

Introduction
This chapter covers important maintenance activities, such as:
■ Loading rolls of copy material
■ Adding toner
Loading rolls of copy material
The Océ 9800 has four rolls, each of which may be loaded with media of a different width or type. The operating panel displays the width and type of media on each roll.
After loading a roll, you need to inform the system which type of media was loaded, i.e. bond paper, vellum or polyester film. The roll width is detected automatically.
The definition of the new copy media is important when ‘Automatic roll change’ has been turned on (see ‘Defining automatic roll change’ on page 73), and is also important for preventing fold errors.
Note: We recommend placing heavy rolls containing 650 feet of 20 lb.bond paper in position two in the upper media roll compartment. The diameter of such rolls may not exceed 184mm (approx. 7.25").
▼ Re-loading copy material
1 Open the appropriate media roll compartment (see figure 73).

[73] Opening the appropriate media roll compartment
2 If necessary, empty the chip tray (see 'Emptying the chip tray' on page 94).
3 Remove the roll holder from the media roll compartment.
4 Release the locking mechanism by pressing the green button, then remove the core from the holder (see figure 74).

[74] Removing the core from the roll holder
Note: You can place the new roll in the groove above the media roll compartment on the printer.
5 Press the locking mechanism down and, from the left, slide the roll holder into the core of the new roll.
6 Position the roll between the appropriate format indicators and release the locking mechanism (see figure 75).
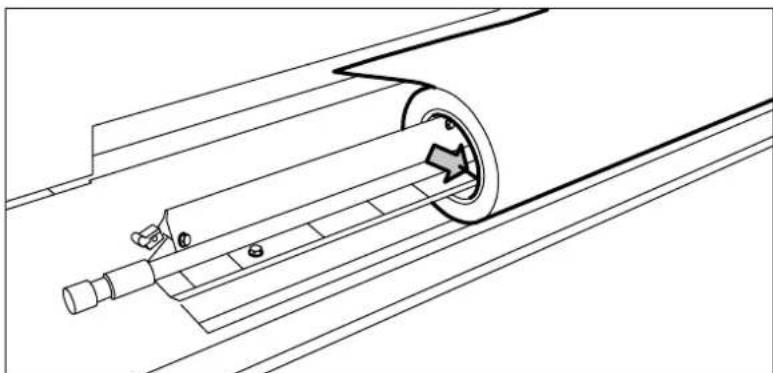
[75] Placing a new roll on the holder
7 Use both hands to place the holder in the media roll compartment. Position the left-hand side of the holder into its notch first, and then the right-hand side (see figure 76).
8 If the new roll does not have a straight leading edge you can cut it manually.

[76] Placing the roll into the media roll compartment
9 Press the appropriate button inside the media roll compartment and feed the copy material between the input guide plates as indicated by the arrow (see figure 77). The media will automatically be fed into the machine.

[77] Button for feeding the copy material
10 Close the media roll compartment. The media will be cut automatically. The size of the media is automatically indicated on the operating panel.
If you have loaded a new type of copy material, you will also need to define the type of media which has been loaded.
▼ Defining the type of media
1 Open the 'Copy media' card in the 'Copy' section.
2 Press the appropriate function button, either Roll 1, 2, 3 or 4, to enter the type of copy media (see figure 78).

[78] Setting the appropriate copy media
3 When finished, you can continue processing your copy job.
Emptying the chip tray
If the chip tray is full, you will need to remove the chips of clipped media from it.
▼ Emptying the chip tray
1 Open the upper media roll compartment.
2 Remove the chips (see figure 79).

[79] Chip tray
3 Close the media roll compartment.
Refilling toner
If the toner indicator on the display flashes, you should add toner as soon as possible. This can be done at any time - even while a job is printing - without interrupting processing of jobs in progress.
Note: If you do not add toner in time, the system will stop.
▼ Adding toner
1 Shake the toner bottle well, then unscrew the cap.
2 Open the front top cover.
Attention: Use only Océ 9800 toner.
3 Open the toner re-fill opening.
Note: Do not remove the seal from the opening of the bottle.
4 Position the bottle with the ridge in the notch of the fill opening and push it down (see figure 80).

[80] Pushing the toner bottle into the fill opening
The seal of the bottle opening will automatically be cut when the bottle is inserted at the opening of the toner reservoir, allowing the toner to flow out of the wide bottle neck.
5 Tap the toner out of the bottle.
Note: Add only one bottle at a time.
6 Once the bottle is completely empty, remove it carefully.
7 Close the fill opening
8 Close the top cover by lifting it up and pulling the hinge towards you (see figure 81).

[81] Closing the top cover
9 Screw the cap onto the empty toner bottle. It will be collected by your Océ service engineer during his next visit.
Attention: Should you accidentally spill some toner, refer to 'Safety data sheets' on page 136 for information about proper disposal and cleaning.
Océ 9800 Printer
User Manual
Chapter 7 Problem solving
This chapter explains how to handle certain problems that may occur while using the Océ 9800.

Introduction
Problems that may occur when using the Océ 9800:
■ Paper jams, see page 99.
■ Problems which can be solved by following the instructions on the display.
■ Other problems (Call Océ service), see page 117.
When an error occurs, the display provides information about
■ what the problem is
■ where it occurred
■ how to solve it
Copy media is normally transported through the system without any problems. Occasionally, however, paper may get jammed in the machine. If this happens, a flashing cover or door will be displayed on the graphic display, indicating the section of the printer in which the jam occurred.
Prints: 0
Check machine
Open roll unit and doors Remove copy media Close roll unit and doors
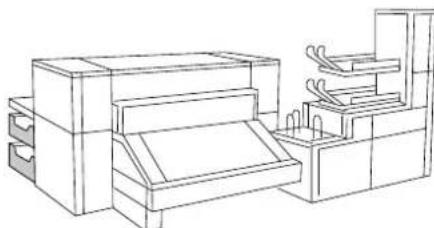
[82] Example of an error message
Stickers on certain parts of the system indicate which green handles, green knobs, green bars and covers, etc. need to be lifted, pressed or opened to remove any jammed copy material.
The display guides you through a sequence of steps to solve the problem. If a jam occurs in more than one location, the display will continue to instruct you until all jammed copy material has been removed.
Once the error has been cleared, the display will give you instructions on how to continue the job in such a way that all copies are correctly produced.
Clearing paper jams
When paper misfeeds, copying stops, the message 'paper jam' appears in the display, and the error location is shown by flashing covers or doors.
When paper misfeeds:
■ Follow the instructions on the display
- Leave the main power switch on to prevent data loss, and remove the jammed paper as described on the display.
■ Thoroughly remove any scraps of paper from the machine.
If misfeeds occur frequently, check whether:
■ the paper is properly loaded ('Loading rolls of copy material' on page 91)
- the correct paper is being used ('Copy material specifications' on page 121)
- jammed paper, scraps of paper or foreign matter have been left in the paper path.
The following procedures provide detailed instructions for handling paper jams.
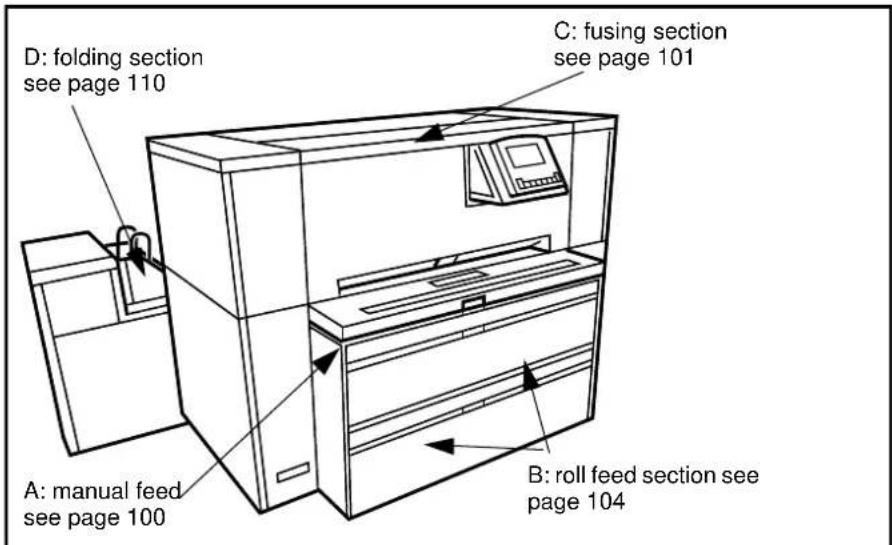
[83] Sections for paper jams
Clearing a paper jam in the manual feed
When paper misfeeds in section A (see figure 83), paper has jammed in the manual feed.
▼ Clearing a paper jam in the manual feed
1 Open the manual feed table by pulling it towards you (see figure 84).

[84] Opening the manual feed table
Note: Make sure that you open the manual feed table completely.
2 Lift the green lever to open the plate and remove the misfed paper (see figure 85).

[85] Removing the misfed paper
3 Lower the plate.
4 Close the manual feed table.
Clearing a paper jam in the fuser section
The fusing section is indicated as section C (see figure 83).
Attention: Always wear heat-protective gloves when removing paper from the fuser section.
▼ Clearing a paper jam in the fuser section
1 Remove the copy receiving tray (see figure 86).

[86] Removing the copy receiving tray
2 Open the top cover at the rear side (see figure 87).
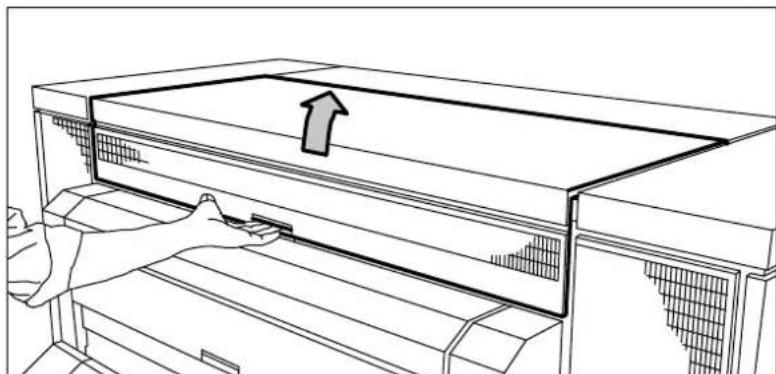
[87] Opening the top cover
3 Open the lower cover of the output transport unit by pulling the green lever towards you (see figure 88). If the transport cannot be opened, the paper must first be cut at this location and then removed.
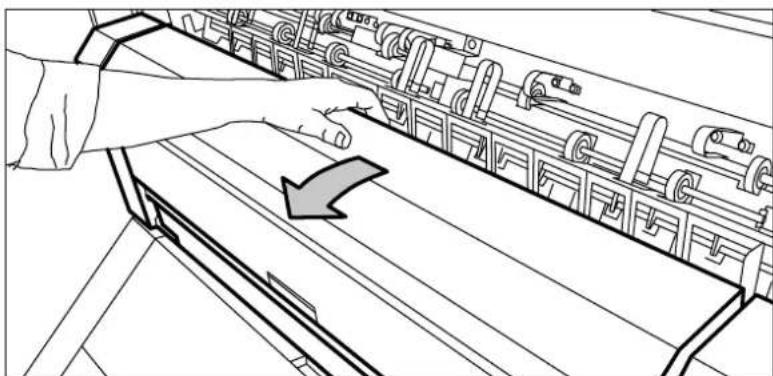
[88] Opening the lower cover
4 Open the fuser section by pulling the green bar of the fuser section towards you (see figure 89).
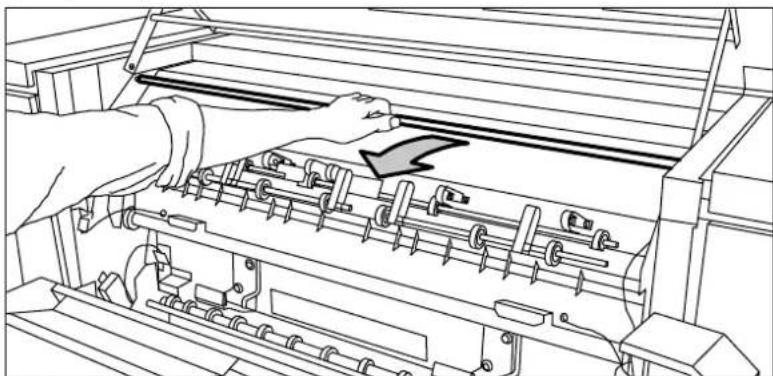
[89] Bar of the fuser section
5 Remove the crank from the right-hand cover of the paper output unit.
6 Insert the crank in the slot and turn it clockwise (see figure 90). The jammed paper will be delivered.

[90] Crank.
7 If the paper keeps coming, it is not cut and it must be manually cut.
8 Open the pre-heater section by pressing handle 1 down (see figure 91).
9 Pull both green catches (2) towards you and release handle 1 (see figure 91).
10 Pull the green bar (3) towards you (see figure 91).

[91] Opening the pre-heater section
11 Cut the paper and turn the crank clockwise to deliver the jammed paper.
12 Refer to 'Clearing a paper jam in the roll feed section' on page 104.
13 Remove the crank and return it to its original position.
Close as follows:
1 Push bar 3 to the rear.
2 Press handle 1 downwards.
3 Press both green catches (2) to the rear.
4 Close the bar of the fuser section.
5 Close the lower cover of the output unit.
6 Unlock the green bar and close the top cover.
Note: If the problem has not been solved despite your efforts, open the output transport unit by pulling it towards you (see figure 92) and look for jammed paper there.
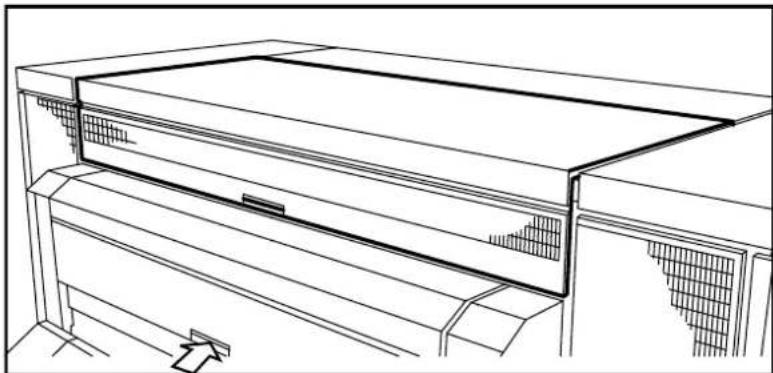
[92] Opening the transport output unit
Note: If the fuser section covers continue to flash on the display, re-check the fuser section.
Clearing a paper jam in the roll feed section
The roll feed section is indicated as section B (see figure 83).
Note: Make sure that you have solved all problems in the fuser section before you solve the problem in the roll feed section.
▼ Clearing a paper jam in the media roll compartments
1 Open the appropriate media roll compartment completely.
2 Remove any jammed paper:
■ behind the chip tray (see figure 94) or the vertical transport (see figure 95)
■ underneath the plate (see figure 96)
■ underneath the roll 2 or roll 4 feed plate (see figure 97).
If the system asks you to re-load the roll, then re-load the roll.
3 Close the media roll compartment.
▼ Removing paper from behind the chip tray or vertical transport
1 Turn the green knob of the chip tray (upper compartment) or the vertical transport (lower compartment) (see figure 93).

[93] Knob of the chip tray or vertical transport
2 Remove all copy media clippings. or,
3 Open the chip tray in the upper compartment by lifting it up and then pulling it towards you (see figure 94).
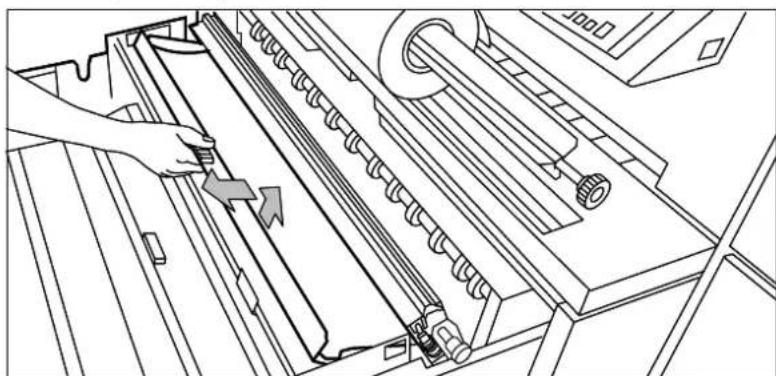
[94] Opening the chip tray
4 Remove all copy media clippings.
5 Close the chip tray by pushing it back or,
6 Open the vertical transport in the lower compartment (see figure 95).

[95] Opening the vertical transport in the lower compartment
7 Remove all copy media clippings.
8 Close the vertical transport.
▼ Removing paper from underneath the plate
1 Remove roll 1 (upper compartment) or roll 3 (lower compartment).
2 Remove the plate underneath the roll holder by pulling it towards you (see figure 96).

[96] Removing the plate
3 Remove any jammed paper.
4 Return the plate to its original position, making sure that the notch is placed over the pegs at the left- and right-hand sides of the media roll compartment.
▼ Removing paper from underneath the roll 2 or roll 4 feed plate
1 Remove roll 2 (upper compartment) or roll 4 (lower compartment).
2 Remove the roll 2 or roll 4 feed plate (see figure 97).

[97] Removing roll 2 or roll 4 feed plate
3 Remove all jammed media.
4 Return roll 2 or roll 4 feed plate.
5 Close the media roll compartment.
Note: If the roll feed covers continue to flash on the display, re-check the roll feed section.
Clearing a paper jam in the High Capacity Stacker
When a paper jam occurs in the High Capacity Unit, the display on the operator panel will show which section of the High Capacity Stacker should be checked for jammed paper.

[98] Sections of the High Capacity Stacker that should be checked for jammed paper.
▼ Clearing a paper jam in section A of the High Capacity Stacker
1 Open the cover of section A of the High Capacity Stacker (see figure 99).

[99] Opening the cover of section A of the High Capacity Stacker.
2 Remove any jammed paper.
3 Close the cover.
▼ Clearing a paper jam in section B of the High Capacity Stacker
1 Lift the cover of section B of the High Capacity Stacker (see figure 100).

[100] Opening the cover of section B of the High Capacity Stacker
2 Remove any jammed paper.
3 Close the cover.
▼ Clearing a paper jam in section C of the High Capacity Stacker
1 Lift section B to a vertical position.

[101] Lifting section B to a vertical position
2 Open the outside cover of section C of the High Capacity Stacker.

[102] Opening the outside cover of section C of the High Capacity Stacker
3 Open the inside cover of section C.

[103] Opening the inside cover of section C
4 Remove any jammed paper.
5 Close the inside and outside covers.
6 Lower section B to its original horizontal position.
Clearing a paper jam in the folder
When paper misfeeds in section D (see figure 83), paper has jammed in the folding section.
▼ Clearing a paper jam in the first fold section
1 Open the cover of the first fold section (see figure 104).

[104] Cover of the first fold section
2 Open the guide plate (A) to the first fold section by pulling the green lever (see figure 105).

[105] Opening guide plate A to the first fold section
3 Remove any jammed copies.
4 Open the next guide plate (B) (see figure 106).

[106] Opening guide plate B
5 Remove any jammed copies.
6 Close the guide plate (B).
7 Lock the guide plate (A) to the first fold section with the green lever.
8 Close the cover of the first fold section.
▼ Clearing a paper jam in the second fold section
1 Open the cover of the transport to the second fold section(see figure 107).

[107] Opening the cover of the transport to the second fold section
2 Remove any jammed copies.
3 Close the cover of the transport to the second fold section.
4 Open the door at the front of the second fold section (see figure 108).
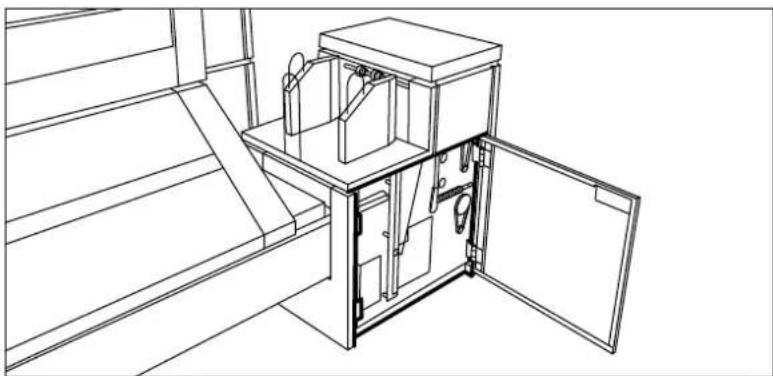
[108] Opening the door at the front of the second fold section
5 Remove any jammed copy at the bottom of the second fold section.
6 Close the door at the front of the second fold section.
7 Open the receiving unit (see figure 109).
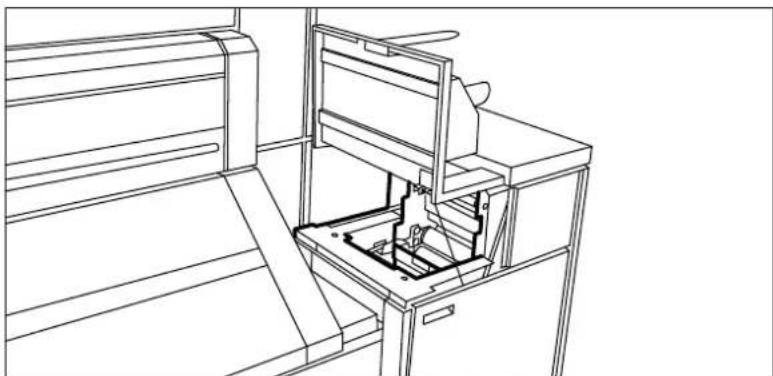
[109] Opening the receiving unit
8 Open the guide plate with the green lever (see figure 110).
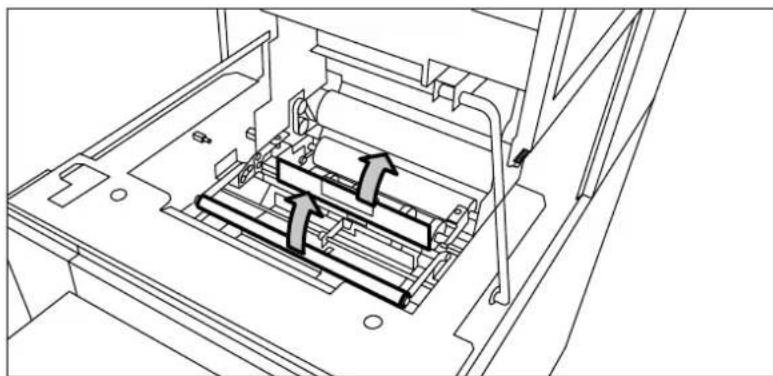
[110] Opening the guide plate with the green lever
9 Remove any jammed copies.
10 Open the vertical transport with the green lever (see figure 111).

[111] Opening the vertical transport
11 Remove any jammed copies.
12 Close the vertical transport.
13 Close the guide plate.
14 Close the receiving unit.
Clearing a paper jam in the high capacity output unit (folder)
▼ Clearing a paper jam in the high capacity output unit
1 Open the appropriate door of the output unit.
2 Squeeze the two knobs and open the plate (see figure 112).
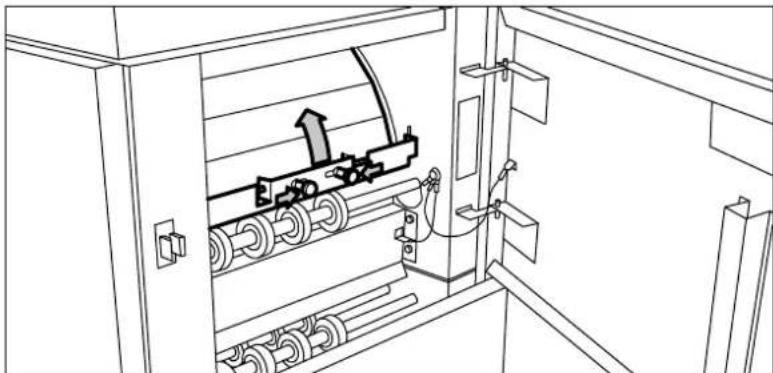
[112] Opening the plate
3 Remove any jammed copies.
4 Fasten the plate.
5 Close the top door.
6 Open the lower door.
7 Squeeze the two knobs of the upper plate and lower the plate (see figure 113).
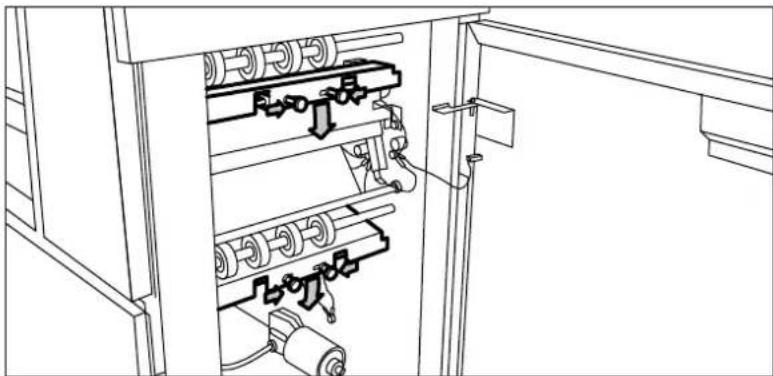
[113] Lowering the upper plate
8 Remove any jammed copies.
If it is not possible to remove the jammed copy:
9 Loosen the fastening screws and remove the plate (see figure 114).
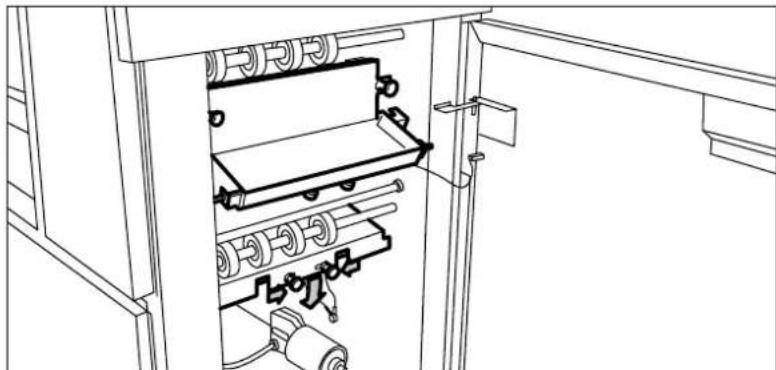
[114] Loosen the fastening screws and remove the plate
10 Remove any jammed copies.
11 Replace the plate and tighten the fastening screws.
12 Close the lower door.
13 Open the front door.
14 Remove the waste tray by tilting it and pulling it towards you (see figure 115).

[115] Removing the waste tray
15 Lift the next plate (see figure 116).

[116] Lifting the plate
16 Remove any jammed copies.
17 Open the cover behind the receiving tray for the second fold section (see figure 117).

[117] Opening the cover behind the receiving tray for the second fold section
18 Remove any jammed copies.
19 Close the cover, lower the plate and reposition the waste tray.
20 Close the front door.
Print controller errors
If a print controller error occurs, first try to reset the error as described in 'Resetting errors' on page 33. If this option does not work, try to reset the entire controller as described in 'Resetting controller' on page 86. Always write down any error codes displayed. Error codes are explained in 'Océ 9800 controller error codes' on page 127. Also check whether 'Print' is selected on the main display (see 'Reading the display' on page 10), and whether the 'Stop' button has been used (see 'Stopping a print job' on page 22).
Other problems (call Océ service)
Should you encounter a problem that you cannot solve, call the Océ service organisation, then turn the system off using the main switch, and leave the system as it is.
Océ 9800 Printer
User Manual
Appendix A
Overviews

Product specifications
General
Sheet feed 2 media roll compartments, each containing 2 rolls; manual sheet feed
Reproduction scale automatic zoom to selected media size
Process indirect electrostatic with Océ Copy Press
Process speed 10 m/min. (approx. 30 ft/min.)
Photoconductor OPC
Background control automatic/manual
Copy output Single copy receiving tray for unfolded copies
High Capacity Stacker (optional)
Folding unit (optional)
High capacity output unit for folder (optional), with 1 or 2 belts (optional)
Lower Container unit (optional)
Output capacity 8 A0 copies/min.
Warm-up time approx. 20 minutes
Note: For additional information on product specifications, refer to the Océ 9800 safety data sheet on page 136.
Copy material specifications
Océ machines and material are matched for optimal quality and performance. We therefore recommend that you use only approved Océ media in the Océ 9800.
A full list of Océ copy materials suitable for use in the Océ 9800, including bond paper, transparent paper, colored papers, vellum and various polyester films, is available from your Océ representative.
Bond paper 16 - 28 lbs.
Transparent paper 24 lbs.
Vellum 16 - 20 lbs.
Polyester film 3.3 - 3.5 mil
Minimum Maximum
Width 11" 36"
Length 8.5" guaranteed 20 ft.
[118] Overview of copy material that can be used
Attention: Avoid storing paper in rooms subject to high temperature and humidity, and protect paper from dust and direct sunlight. Wrap unused paper in plastic to prevent it from absorbing moisture.
Overview of default settings on delivery
Default settings
number of copies 1 (fixed)
fold off
stamp off
manual feed off
roll automatic (fixed)
zoom automatic (fixed)
Default settings Key operator adjustable
display/reset counter 0
program settings ----
folder:
orientation portrait
method standard
length 297
width 210
filing strip off
punch off
folded copy deposit stack tray
Select stamp:
string 1
position 1
font 1
greyscale 1
copy cut synchro
original format selection table A4 > A4
A3 > A3
A2 > A2
A1 > A1
A0 > A0
remove strip 0
add strip 0
roll media paper
edit:
shift off
auto shift off
Default settings
Key operator adjustable
calibration 1000 ‰
on/off timer:
on time
8:00
off time
after 4 hours
working days
Monday through Friday
date & time ----
reset time off
change stamp strings ----
automatic roll change off
default copy media paper
Controller default settings
Dataformat CalComp
step size [100,200,400,500,1016,2032, 4064]
origin: [lower left, lower right, upper left, upper right, center]
synchro code: [0-63 by 1], 2
double synchro: [yes, no]
checksum: [yes, no]
endofmessage [0-30 by 1, 3]
pen priority pen settings values may be overruled by RCF
Dataformat HP-GL
origin [lower left, lower right, upper left, upper right,
center]
page advance [yes, no]
If page advance is yes, pen 0 is end of file
emulate type [HP_7475A, HP_7440A, HP_7550A, HP_7580B,
HP_7595B, HP_7580A, HP_7586B, HP_7570A,
HP_7585B, HP_7596A, HP-7600, DESIGNJET]
Dataformat HP-GL/2
origin
[lower left, lower right, upper left, upper right, center]
pen 0 end of file
page advance [yes, no]
emulate type
[HP_7595B, HP_7596A, HP_7600, DESIGNJET]
pen priority [language, remote]
Dataformat ASCII
line overflow [wrap, truncate]
end of line [CR, LF, CR-LF]
font size [8, 10, 12]
top margin
[0-25 by 1,10] mm [0-1 by 0.1,0.4] inch
bottom margin
[0-25 by 1, 10] mm [0-1 by 0.1, 0.4] inch
left margin
[0-25 by 1, 10] mm [0-1 by 0.1, 0.4] inch
right margin
[0-25 by 1, 10] mm [0-1 by 0.1, 0.4] inch
Pen
pen number [1-32 by 1], I
pen width
[0.12-16.25 by 0.01, 0.19] [0.0025-0.6390, by 0.0001, 0.0074]
rounded to the nearest available value which is device dependent
pen pattern
[1-32 by 1, 16] (16 = black) 1-16 are shade patterns
General
print time-out
[1-240 by 1], 15 seconds
autoplot rotation
[off, to_portrait, productive]
roll fit method
[fit, next size, reduced]
General
ALS format [CALCOMP, HP-GL, HP-GL2, CALS, TIFF]
ALS is the mechanism which the system uses to detect the language (data format) of files which do not contain a format specification in their fileheader. ALS scans the file contents for clues about the data format.
Connection
select connection [SERIAL,CENTRONICS,SCSI, LONG LINE]
no default
SERIAL: Protocol
Handshake [CTS/RTS, XON/XOFF, BOTH]
Port [DCE, DTE]
SERIAL: Delay
turn around [0.0-10.0 by 0.1], 1.0
inter char [0.0-10.0 by 0.1], I.0
SERIAL: Transmission (part1)
baud rate [300, 600, 1200, 2400, 4800, 9600, 19200]
Stopbits [Istop, 2stop]
SERIAL: Transmission (part2)
Bits [8, 7, 6]
Parity [none, even, odd]
remark: startbit = 0 (fixed)
CENTRONICS
speed [normal, fast]
SCSI
SCSI-id [0-7 by 1], 4
Plot job settings
scale x, scale y 100%
number of copies 1
auto_format ON
auto_zoom ON
auto_rotate ON
Océ 9800 controller error codes
If an error occurs, an icon will appear on the LCD-screen of the operating panel. Additional information on warnings is displayed in the 'Machine' menu.
There are 3 different types of recoveries for warnings:
■ Temporary Warnings (TW)
Warnings related to a specific print file. Although they will not affect machine functioning, output will probably not be what the operator expected (e.g. it may be clipped, or a set may be split into two or more sets). The operator can reset the warning message via the 'Machine' menu.
■ Operator Recoverable Warnings (ORW)
Most of these warnings are communication problems between host and controller. The system administrator may have to change settings (e.g. rs232, etc.). After changing settings as necessary, the system administrator can reset the controller-error by pushing the reset-error soft key in the 'Machine' menu, which will clear all active controller errors. Activating this function will re-activate all host<->controller communications which were de-activated when the communication error was detected.
■Machine Recoverable Warnings (MRW)
To recover from these warnings, the operator must first try to reset the entire controller by pressing the reset-controller soft key in the 'Machine' menu.
Note: Depending on the type of connection, it may be necessary to restart printing from the host system.
If the machine does not recover, the operator must turn the machine off and then on again.
| error | error | error name |
| number | type |
Controller errors:
20803 MRW Radical pba error.
20804 MRW SCUSI pba error.
20805 MRW Ethernet pba error.
20806 MRW TAXI Scanner board error
20807 MRW Vector firmware checksum error
20808 MRW Vector extension checksum error
20809 MRW DRAM simm pba's error
20810 MRW TAXI interface printer pba
20811 MRW Communication error printer-> controller
20812 MRW Communication error controller -> printer
Memory allocation warnings:
| 20813 | TW | Insufficient controller memory; The plot file cannot be processed in the controller due to insufficient controller memory.Ask your Océ service engineer if additional memory can be installed. |
Memory allocation warnings:
20814 TW Set split; The plot set does not fit completely in set memory. The set will be split into two or more sub-sets.
20815 TW The plot does not fit into set memory and therefore cannot be processed.
RS-232 errors:
20820 ORW Framing error; Check serial communications link and settings
20821 ORW Parity error; Check serial communications link and settings
20822 ORW Overrun error; Check serial communications link and settings
SCSI errors:
Note: Never connect or disconnect an SCSI device while the system is turned on.
20830 ORW CMD group error; Check SCSI communications link and settings
20831 ORW Check SCSI communications link and settings.
The console displays 'Reset error'. Reboot the system.
20832 ORW SCSI parity error; Check SCSI communications link and settings
Data format errors:
20860 TW Command not supported; Check plot file.
20861 TW Syntax Error; Check plot file.
20862
TW
Language not recognized; The ALS function was not able to detect the format of the plot file. Select the appropriate language in the RCF header.
20863 TW The plot does not fit entirely on the selected media size. Check RCF header and plot file.
20864 TW The plot file contains language functionality that is not supported.
RCF errors:
20870 TW Job description error; Check RCF header.
Océ 9800 Printer
User Manual
Appendix B Safety information

General safety information
Radio interference
Note: This equipment has been tested and found to comply with the limits for a class A digital device pursuant to part 15 of the FCC Rules. These limits are designed to provide reasonable protection against harmful interference when the equipment is operated in a commercial environment. This equipment generates, uses, and can radiate radio frequency energy and, if not installed and used in accordance with the user manual, may cause harmful interference to radio communications. Operation of this equipment in a residential area is likely to cause harmful interference in which case the user will be required to correct the interference at his own expense.
FCC = Federal Communications Commission.
Symbols
The following symbols are used to indicate a specific area inside the copier which may be unsafe to touch or access (high voltage or hot parts) or which requires attention.

Caution, high voltage

Caution, high temperature

Attention
Instructions for safe use
Océ machines and media have been developed and tested in conformance with the strictest international safety standards. To guarantee the safe operation of these products, it is important that you observe the following safety recommendations:
- Do not remove any screws from fixed panels.
- Except for the components and maintenance materials mentioned in this manual, the machine is not user-serviceable.
■ Do not place any liquids on the printer. - Use maintenance materials or other materials for their original purpose only. Keep maintenance materials away from children.
■ Do not mix cleaning fluids or other materials. - To avoid risks, all modifications to Océ equipment are strictly reserved for Océ service personnel. We recommend that you use only those copy-control devices that comply with (inter)national standards regarding product safety and radio-frequency interference, and that you use the attachment cables specified by Océ.
- The printer is equipped with an ozone filter. If your printer is covered under an Océ maintenance contract, your Océ service technician will check this filter regularly and replace it when necessary. Correct operation is guaranteed only if the filter is replaced by Océ personnel.
- Do not move the printer yourself. Contact Océ Customer Service if you wish to relocate the printer. If, for some reason, you have to move the printer yourself, make sure that the electrical circuit breaker has the right fuse capacity. See the Océ 9800 Printer safety data sheet in this appendix for information about fuses.
- Do not bridge any mechanical or electrical circuit breakers.
- Do not use an extension cord to connect the printer.
- Place the printer close to an easily-accessible electrical power outlet.
■ The switch in the fixed connection (if any) should be easily accessible. - This printer is not designed for connection to an IT power system. (An IT power system is a voltage network in which the neutral wire and safety earth are separated.).
- Do not block the printer's ventilation openings.
■ Make sure that the printer is placed on a sufficiently strong, level, horizontal surface. See the Océ 9800 Printer safety data sheet in this appendix for information about the weight of the printer.
■ Make sure that there is sufficient space around the printer. This facilitates both proper loading of media and printer maintenance.
- Do not place the printer in a room subject to excessive vibration.
- Do not place the printer in a room that is too small and insufficiently ventilated. See the Océ 9800 Printer safety data sheet in this appendix for information about space and ventilation requirements.
■ Always use materials recommended by Océ and developed for this Océ printer. Materials not approved by Océ may cause damage to your printer.
- Do not use the printer if it is making unusual sounds. Remove the plug from the power outlet and contact Océ Customer Service.
Removal of NiCad battery
This machine is equipped with a nickel-cadmium battery containing substances which could pollute the environment if improperly handled. After the battery is removed from the machine, it should be disposed of in an environmentally safe manner and in conformance with local laws and regulations.
If you have an Océ maintenance contract, Océ service personnel will remove the battery and properly dispose of it, if required. If you do not have a maintenance contract with Océ, battery removal should be carried out as follows:
▼ Removing the NiCad battery from the printer
Attention: Océ accepts no liability for any damages resulting from removal of the battery by persons other than Océ service personnel.
1 Before removing the battery, turn off the machine and disconnect the power supply.
2 Remove the cover at the left-hand side (see figure 119).

[119] Cover of the main engine
3 Loosen all of the cpu-io board connectors.
4 Loosen the screws of the printed circuit board assembly.
5 Remove the print board
6 Remove the blue plastic holder (containing the battery) from the printed circuit board.
Safety data sheets
Disclaimer The disclaimer below is applicable to all safety data sheets in this manual.
This safety data sheet has been compiled to the best of our knowledge as a compact guide to safe handling of this product. We reserve the right to revise this safety data sheet as new information becomes available. It is the user's responsibility to determine the suitability of this information for the adoption of safety precautions as may be necessary and to contact the company to make sure that the sheet is the latest one issued. If and in so far as limitation of liability is permitted under the applicable laws we do not accept liability for any inaccuracy that may occur in this safety data sheet.
Safety data sheet for the Océ 9800 High Capacity Stacker
At the date of publication of this manual, the safety data sheet for the Océ 9800 High Capacity Stacker was not yet available. For a copy of this sheet, please contact the Océ service organisation.
Safety data sheet for the Océ 9800 printer
Océ-Bruning
telephone 708 351 2900 Date: April 1995

| Model Oce 9800 (printer) | |
| Description Digital high volume wide format (914 mm) printer | |
| Max. process speed 10 min/min | |
| Dimensions Width 1720 mmDepth 1096 mmHeight 1365 mm | |
| Weight 735 kg | |
| Voltage | 120/208 Vφ 240 V 240/415 Vφ N |
| Frequency | 60 Hz 60 Hz 60 Hz |
| Current-rated | 14-11-11 A 22 A 9-4-9 A |
| Current-max | 15-15-15 A 25 A 10-10-10 A |
| Power consumption, operation | 3500 W |
| Power consumption, standby | 1000 W |
| Mains connection | Cable with plug |
| Safety class | I (IEC 535) Protective earth connection |
| Protection class | IP 20 (IEC 529) |
| Sound pressure level | At systender position: standby 44 dB(A); in operation 55 dB(A); impulse ΔL = 3 dB(A) |
| Sound power level | Standby 60 dB(A); in operation 71 dB(A) |
| Radio Interference | Comples with FCC rules and regulations, part 15 class A |
| Radiation | Below the Threshold Limit V value for UV radiation (TL V list of ACOIH) |
| Heat emission | Standby 1000 W; in operation 3500 W |
| Ozone emission | 0,01 mg/min at continuous operation |
| Room volume | Recommendation: min. 75 m-3 |
| Room ventilation | Recommendation: min. 37.5 m-3m (natural ventilation)For heat evacuation extra ventilation may be necessary |
| Use simulation at random operation | Room volume and ventilation as recommendedDairy copy volume (much more than average ) 900 m2Total worksme 6 hOzone concentrations:- Time weighted average 0,001 mg/m3(0,0005 ppm)- Peak 0,002 mg/m3(0,001 ppm)Threshold Limit V value:Occupational Exposure Limit(Time Weighted A average) for ozone 0,2 mg/m3(0,1 ppm)Our Perception Limit for ozone 0,04 mg/m3(0,02 ppm) |
| Consumables | Oce 9800 OPC (Oce Safety Data Sheet E-194)Oce 9800 T onar (Oce Safety Data Sheet E-179)Oce Copying Materials |
| Marking | Listed according to standard UL 1950 Listed according to standardCANVCSA-G22 S No. 950 |
| Additional safety information | The ozone timer does not have to be replaced for keeping the ozone concentration in theworkplace below 0,01 mg/m3 [the life of the filler equals that of the courier]. |
This company has a short time commitment to the best of our knowledge that a company goes to sale leadership of this product. The reverse the right to retail safety claims should be new information on becomes available to it. In the use a responsibility to deliver the author file of his information for the adopter of safety precautions are may be necessary and to collect the company to make sure that the debt is the level one used. It and in fact an limitation or liability is permitted under the applicable law, we do not accept liability for any accuracy and may occur in this manner.
Copyright ©1995 Océ-Nederland B.V., Venlo, NL
The contents of this safety data sheet are subject to the disclaimer on page 136 of this manual.
Safety data sheet for the Océ 9800 printer and folder
Océ-Bruning
.....a division of Oct-USA, Inc.
1800 Bruning Drive West
llasca, Illinois 60143 Number: E 655 a US ES
Telephone 708-551-2900 Date: April 1995

| Model Oce 9800 (printer + folder) | |
| Description Digital high volume wide format (914 mm); printer | |
| Max. process speed 10 m/min | |
| Dimensions Width 2235 mmDepth 1583 mmHeight 1565 mm | |
| Weight 800 kg | |
| VoltageFrequencyCurrent-ratedCurrent-maxPower consumption, operationPower consumption, standbyMains connectionSafety classProtection class | 120/206 VΦ 240 V 240/415 VΦ N60 Hz 80 Hz 60 Hz14-11-11 A 22 A 9-4-9 A15 15-15 A 25 A 10-10-10 A3500 W1000 WCable with plugI (IEC 536) Protective earth connectionIP 20 (IEC 528) |
| Sound pressure levelSound power levelRadio interferenceRadiationHeat emissionOzone emission | At bystander position: standby 44 dB(A); in operation 58 dB(A); impulse ∧ L1=8 dB(A)Standby 60 dB(A); in operation 75 dB(A)Complicity with FCC rules and regulations, part 15 class ABelow the Threshold Limit V - value for UV radiation (TL V list of ACGIH)Standby 1000 W : in operation 3500 W0,01 mg/min at continuous operation |
| Room volumeRoom ventilation | Recommendation: min. 75 m-2Recommendation: min. 37.5 m-3h (natural ventilation)For heat evacuation extra ventilation may be necessary |
| Use simulation at randomoperation | Room volume and ventilation as recommendationsDaily copy volume (much more than average ) 900 m-2Total worktime 8 hOzone concentrations:- Time weighted average 0,001 mg/m-3(0,005 ppm)- Peak 0,002 mg/m-3(0,001 ppm)Threshold Limit Value/Occupational Exposure Limit(Time Weighted A averaged for ozone 0,2 mg/m-3(0,1 ppm)Colour Perception Limit for ozone 0,04 mg/m-3(0,02 ppm) |
| Consumables | Oce 9800 OPC (Oce Safety Data Sheet E-104)Oce 9800 Toner (Oce Safety Data Sheet E-179)Oce Copying Materials |
| Marking | Listed according to standard UL 1950Listed according to standardCAN/CSA-C22.2 No. 950[IMAGE] |
| Additional safety information | The ozone filter does not have to be replaced for keeping the ozone concentration in theworkplace below 0,04 mg/m-3(the life of the filter equais that of the cooler) |
This safety data sheet has been controlled to the best of our knowledge as a compact guide to sale handling of this product. We reserve the right to revise safety data sheets as new information on becomes available. It is the user's reasons only to determine the usability of the Information for the adoption of safety precautions as may be necessary and to contact the company to make sure that this asset is the bulk of issued. If not under no limitation of liability is permitted under the expiration must, we do not accept validity for any infectiousity that may occur in this information.
Copyright ©1995 Océ-Nederland B.V., Venlo, NL
The contents of this safety data sheet are subject to the disclaimer on page 136 of this manual.
Safety data sheet for the Océ 9800 printer, folder and high capacity output unit
Océ-Bruning
.....a division of Océ-USA, Inc.
1800 Bruning Drive West
Itasca, Illinois 60143 Number: E-656-a-US-ES
Telephone 708-351-2900 Date: April 1995

| Model Oce 9800 (printer + folder + high capacity output unit) | ||||
| Description Digital high volume wide format (914 mm) printer | ||||
| Max. process speed 10 m/min | ||||
| Dimensions Width 2965 mmDepth 1583 mmHeight 1500 mm | ||||
| Weight 980 kg | ||||
| Voltage | 120/208 Vφ | 240 V | 240/415 Vφ N | |
| Frequency | 60 Hz | 60 Hz | 60 Hz | |
| Current-rated | 14-11-11 A | 22 A | 9-4-9 A | |
| Current-max | 15-15-15 A | 25 A | 10-10-10 A | |
| Power consumption, operation | 3500 W | |||
| Power consumption, standby | 1000 W | |||
| Mains connection | Cable with plug | |||
| Safety class | I (IEC 536) Protective earth connection | |||
| Protection class | IP 20 (IEC 529) | |||
| Sound pressure level | At bystander position: standby 44 dB(A); in operation 58 dB(A); impulse A L1-6 dB(A) | |||
| Sound power level | Standby 60 dB(A); in operation 75 dB(A) | |||
| Radio interference | Complices with FCC rules and regulations, part 15 class A | |||
| Radiation | Below the Threshold Limit V aluc for UV radiation (TL V list of ACGIH) | |||
| Heat emission | Standby 1000 W; in operation 3500 W | |||
| Ozone emission | 0.01 mg/min at continuous operation | |||
| Room volume | Recommendation: min. 75 m-3 | |||
| Room ventilation | Recommendation: min. 37.5 m-3h (natural ventilation);For heat evacuation extra ventilation may be necessary | |||
| Use simulation at random operation | Room volume and ventilation as recommendedDaily copy volume (much more than average) Total worktime Ozone concentrations:- Time weighted average - Peak Threshold Limit Value/Occupational Exposure Limit(Time W eighted A range) for ozone Colour Perception Limit for ozone | 900 m28 h0.001 mg/m30.002 mg/m30.02 mg/m30.04 mg/m3 | (0.0005 ppm)(0.001 ppm)(0.1 ppm)(0.02 ppm) | |
| Consumables | Cool 9800 OPC (Oce Safety Data Shoot E-194)Oce 9800 T orer (Oce Safety Data Sheet E 179)Oce Copying Materials | |||
| Marking | Listed according to standard UL 1950 | Listed according to standardCAN/CSA-C22.2 No. 950 | ||
| Additional safety information | The ozone filler does not have to be replaced for keeping the ozone concentration in theworkplace below 0.04 mg/m-3(the life of the filler equals that of the option) | |||
This safety data sheet has been compiled to the best of our knowledge as a compact guide to safe handling of this process. We review the right to revise safety data sheets as new information becomes available. Its use is responsibility to determine the publicity of this information for the adoption of safety proceedings as may be necessary and to contact the company to make sure that this sheet is the latest one issued. It and in particular, all limitation of liability is permitted under the applicable laws, we can not accept liability for any法律责任 that may occur in this information.
Copyright ©1995 Océ-Nederland B.V., Venlo, NL
The contents of this safety data sheet are subject to the disclaimer on page 136 of this manual.
Safety data sheet for the Océ 9800 printer, folder, high capacity output unit and puncher
Océ-Bruning
telephone 708-351-2900 Date: April 1995

| Model Océ 9800 (printer + folder + high capacity output unit + puncher) | |||
| Description Digital high volume wide formal (914 mm); printer | |||
| Max. process speed 10 m/min | |||
| Dimensions Width 2665 mmDepth 1563 mmHeight 1500 mm | |||
| Weight | 980 kg | ||
| Voltage | 120/208 Vφ | 240 V | 240/415 Vφ N |
| Frequency | 60 Hz | 60 Hz | 60 Hz |
| Current-rated | 14-11-11 A | 22 A | 9-4-9 A |
| Current-max | 15-15-15 A | 25 A | 10-10-10 A |
| Power consumption, operation | 3500 W | ||
| Power consumption, standby | 1000 W | ||
| Mains connection | Cable with plug | ||
| Safety class | I (IEC 538) Protective earth connection | ||
| Protection class | IP 20 (IEC 529) | ||
| Sound pressure level | Al bystander position: standby 44 dB(A); in operation 60 dB(A); impulse L = 5 dB(A) | ||
| Sound power level | Standby 80 dB(A); in operation 76 dB(A) | ||
| Radio interference | Complies with FCC rules and regulations, part 15 class A | ||
| Radiation | Below the Threshold Limit V value for UV radiation (TL V list of ACGIH) | ||
| Heat emission | Standby 1000 W ; in operation 3500 W | ||
| Ozone emission | 0.01 mg/min at continuous operation | ||
| Room volume | Recommendation: min. 75 m 3 | ||
| Room ventilation | Recommendation: min. 37.5 m 3 h (natural ventilation)For heat evacuation extra ventilation may be necessary | ||
| Use simulation at random operation | Room volume and ventilation as recommendedDaily copy volume (much more than average ) 930 m 2 Total worktime 8 hOzone concentrations:- Time weighted average 0.001 mg/m 3 (0.0005 ppm)- Peak 0.002 mg/m 3 (0.001 ppm)Threshold Limit Value/Occupational Exposure Limit(Time Weighted A range) for ozone 0.2 mg/m 3 (0.1 ppm)Colour Perception Limit for ozone 0.04 mg/m 3 (0.02 ppm) | ||
| Consumables | Océ 9800 OPC (Océ Safety Data Shoot E-194)Océ 9800 T oncr (Océ Safety Data Shoot E-179)Océ Copying Materials | ||
| Marking | Listed according to standard UL 1950 Listed according to standardCAN/CSA-C22.2 No. 950[IMAGE] [IMAGE] | ||
| Additional safety information | The ozone filter does not have to be replaced for keeping the ozone concentration in theworkplace below 0.04 mg/m 3 (the life of the filter equis that of the coter) | ||
In a safety chain wheel have been composed to the best of our knowledge on a command, guide to make handling of this product. We reserve the right to restore safety chain assets as new information becomes available. It is the user's responsibility to categorize the utility of this information for the adoption of safety products as may be necessary and to contact the company to make sure that this sheet is the latest one issued. It and in order as limitation or liability is permitted under the applicable laws, we do not accept liability for any insolvency that may occur in this information.
Copyright ©1995 Océ-Nederland B.V., Venlo, NL
The contents of this safety data sheet are subject to the disclaimer on page 136 of this manual.
Océ 9800 Printer
User Manual
Appendix C Miscellaneous

Notation conventions
A number of notation conventions are used in this manual. This consistent style enables you to quickly become conversant with the use of this manual and consequently the Océ 9800 Printer.
Description Each section or subsection contains a description of the feature or operation identified in the title. It might also include possible applications, as well as any guidelines that you should bear in mind.
Procedures A description is followed by a procedure. A procedure always begins with a phrase which briefly describes the procedure (for example, Loading paper:) followed by a series of numbered steps that take you through all phases of performing the operation.
Command conventions Commands which can be found in sub-menus are indicated by means of the angle bracket >. For example, the Ready queue command in the Queues sub-menu is referred to as Queues > Ready queue.
Figures and tables Figures and tables are titled and numbered sequentially throughout this manual. Figures include pictures of product components, examples, and diagrams of concepts discussed in the description.
Attention getters We draw your special attention to several types of information with the help of attention getters. This information is classified as follows:
Note: In a 'Note', information is provided on various items which are relevant to the proper functioning of the system, as well as useful advice on operating the system.
Attention: Information preceded by 'Attention' is a step in a procedure which, if not performed correctly, could result in loss of data or damage to the equipment.
Caution: Information preceded by ‘Caution’ is given to prevent personal injury.
User comment sheet
Did you find this manual to be accurate?
□ Yes
□ No
Were you able to operate the product after reading this manual?
□ Yes
□ No
Does this manual provide enough background information?
□ Yes
□ No
Is the format of this manual convenient in terms of size, readability and arrangement (page layout, chapter order, etc.)?
□ Yes
□ No
Were you able to find the information you were looking for?
□ Always
□ Most of the time
□ Sometimes
□ Not at all
How did you find the information you were looking for?
Table of contents
□ Index
Are you satisfied with this manual?
□ Yes
□ No
Thank you for evaluating this manual.
If you have other comments or concerns, please explain them, or suggest improvements, on the overleaf or on a separate sheet of paper.
2986906
Comments:
Date:
This user comment sheet was completed by:
(If you prefer to remain anonymous, please fill in only your occupation)
Name:
Occupation:
Company:
Phone:
Address:
City:
Country:
Please return this sheet to:
Océ-Nederland B.V.
Attn: ITC-user documentation
P.O. Box 101
5900 MA Venlo
The Netherlands
Index
"ready to print" 8
A
accounting 35
als see automatic language sensing
ascii 124
auto roll 83
auto rotate 82
auto shift 43
automatic language sensing, specifying what
formats 85
automatic roll change 73
automatics settings 82
B
belts, high capacity output unit 55
buttons, layout and use 14
C
calcomp 123
calibrating the scanner 67
call service 98, 117
centronics communication 78
change, defining automatic roll - 73
chip tray 91, 94
clicks see accounting
clock settings 64
communication 31
connectivity settings, defining the - 78
controller 10
controller error codes 127
copier/printer 11
copy media
loading roll of - 91
copy media type
defining the standard - 72
copy receiving tray 24
copying
on cut sheet material 29
correction button 14
counter, resetting the - 34
custom cut 41
cut 41
D
data format see language
date and time
setting the current - 64
default settings 15
returning to controller factory - 86
delivery output
using the lower - 27
using the upper - 24
display
using the display see menu
display, reading the 10
E
editing image 43
editing stamp 71
erase group of default settings 68
erase settings 69
error message 33
extension slots 31
F
firmware version 31
folded copies 53
folded copies 53
collecting - 27
folder 12
function buttons 16
H
high capacity output unit 55
high capacity stacker
collecting your output 25
indication lights 25, 49
selecting settings for - 50
turning on/off 9
higher button 16
hp-gl 123
hp-gl/2 124
|
image
centering - 43
correction 67
moving - to one side of the page 43
shift 45
information, how to get printer system- 31
J
job manager see also display
K
key operator 62, 63
pin code 63
key operator button 16
L
landscape
automatic rotation to print - 82
language settings 31, 80
legend correction 83
length, defining your copy - 42
loading 200 meter rolls - 91
loading rolls of copy media 91
long copies
collecting- 27
long originals 42
lower button 16
M
manual feed 29
memory size 31
menu
access a section 17
card 18
entering a number 20, 21
leave a section 18
modify a card 19
move between cards 19
using the océ 9800 menu 16
mirror-image copies 44
misfeed see paper jam
N
nicad battery 135
numeric buttons 14, 21
0
operating panel, layout and use 14
operator
recoverable warnings 127
original to copy matrix 31
other problems 98, 117
output
using the lower delivery - 27
using the upper delivery - 24
output unit 28
P
paper jam 98
in folder (first fold section) 110
in folder section (transport cover to second
fold) 111
in high capacity output unit 113
in manual feed 100
in upper paper roll compartment 104
paper roll compartment 91
pattern see pen settings
pen 124
pen priority defining - for hpgl/2 and calcomp 81
pen settings 31, 81
pin code system administrator 77
portrait automatic rotation to print - 82
print button 10
print settings 31
print time-out 84
productive automatic rotation to print - 82
program pre-programmed default settings 59 storing default settings in a - 68
programming groups of default settings 68
punch unit 12, 55
R
reset error 33
reset time 64, 65
retrieving a program 59
roll change, defining automatic - 73
roll holder 91
roll selection, overruling - 83
rolls of copy media 91
rotation automatic landscape printing 82 automatic portrait printing 82 productive printing 82
rs232 setup 31
s
safety data sheets 136
safety information 133
scsi communication 79
section buttons 16
serial connection, defining the -78
sheet feed 29
shifting the image 45
stack unit 27
stamp unit 47
stamp, editing the - 71
standard copy media type 72
standard cut 41
start button 14
stop a print job 22
stop button 14, 22
synchro cut 41
system administrator 77
system information, how to get printed- 31
T
temporary warnings 127
time and date setting the current - 64
time switch 66
time-out 84
timer
switching on automatically 66 turning on automatically 8
toner refilling - 95
turn off and on print mode 10
turning on and off 8
W
warning message 33
width see pen settings
- OVERVIEW OF COPIER PARTS
- SAFETY INFORMATION
- COPYRIGHT
- CONTENTS
- CHAPTER 1
- GETTING STARTED
- CHAPTER 2
- USING THE OCÉ 9800 PRINTER
- CHAPTER 3
- DEFAULT PRINTER SETTINGS
- CHAPTER 4
- KEY OPERATOR
- CHAPTER 5
- SYSTEM ADMINISTRATOR
- CHAPTER 6
- MAINTENANCE
- CHAPTER 7
- PROBLEM SOLVING
- CHAPTER 1 GETTING STARTED
- TURNING THE OCÉ 9800 ON AND OFF
- ▼ TURNING OCÉ 9800 ON
- ▼ TURNING THE TIMER ON
- ▼ TURNING THE OCÉ 9800 OFF
- READING THE DISPLAY
- OCÉ 9800 SYSTEM CONFIGURATIONS
- OCÉ 9800 COPIER/PRINTER
- OCÉ 9800 PRINTER
- OCÉ 9800 OPTIONS
- THE OPERATING PANEL (LAYOUT AND USE)
- BUTTONS
- DISPLAY
- YOU CAN LEAVE A SECTION BY
- YOU CAN MOVE BETWEEN CARDS BY
- YOU CAN MODIFY A NUMERIC VALUE IN TWO WAYS
- STOPPING A PRINT JOB
- ▼ STOPPING A PRINT JOB WHEN PRINTING A SINGLE ORIGINAL
- ▼ STOPPING A PRINT JOB WHEN PRINTING A SET OF ORIGINALS
- ▼ INTERRUPTING A JOB
- COLLECTING YOUR OUTPUT
- USING THE UPPER DELIVERY OUTPUT
- USING THE LOWER DELIVERY OUTPUT
- PRINTING ON CUT SHEET MEDIA
- ▼ PRINTING ON PRE-CUT SHEETS
- PRINTING STATUS INFORMATION AND TEST PAGES
- ▼ PRINTING SYSTEM STATUS INFORMATION
- ▼ PRINTING TEST PAGE
- RESETTING ERRORS
- RESETTING THE COUNTER
- ▼ RESETTING THE COUNTER
- ACCOUNTING
- FOR EXAMPLE
- ACCOUNTING PARAMETER REFERENCE
- CHAPTER 3 DEFAULT PRINTER SETTINGS
- AUTO FORMAT SELECTION
- ▼ DEFINING YOUR DEFAULT 'AUTO FORMAT SELECTION' TABLE
- PRINTING NON-STANDARD SIZED ORIGINALS
- ▼ SELECTING DEFAULT SETTINGS TO PRINT NON-STANDARD SIZED ORIGINALS
- DEFINING YOUR COPY LENGTH
- ▼ DEFINING YOUR DEFAULT COPY LENGTH
- EDITING
- AUTO SHIFT
- ▼ SELECTING DEFAULT SETTINGS FOR AUTO SHIFTING
- MIRROR-IMAGE
- ▼ MAKING A MIRROR-IMAGE COPY
- SHIFTING THE IMAGE
- STAMP UNIT (OPTIONAL)
- ▼ SELECTING DEFAULT STAMP OPTION
- HIGH CAPACITY STACKER (OPTIONAL)
- ▼ SELECTING SETTINGS FOR THE HIGH CAPACITY STACKER
- LOWER CONTAINER UNIT (OPTIONAL)
- ▼ SELECTING DEFAULT SETTINGS FOR THE LOWER CONTAINER UNIT
- FOLDER (OPTIONAL)
- ▼ SELECTING DEFAULT FOLDING SETTINGS
- HIGH CAPACITY OUTPUT UNIT WITH PUNCH UNIT (OPTIONAL)
- ▼ SELECTING DEFAULT SETTINGS FOR HIGH CAPACITY OUTPUT UNIT
- ▼ ADJUSTING THE SIDE GUIDES OF THE BELTS
- ▼ ADJUSTING THE PUNCHING UNIT
- ▼ SELECTING DEFAULT SETTINGS FOR PUNCHED COPIES
- PRE-PROGRAMMED GROUPS OF DEFAULT SETTINGS
- ▼ RETRIEVING A DEFAULT PROGRAM
- CHAPTER 4 KEY OPERATOR
- THE OCÉ 9800 KEY OPERATOR
- ENTERING KEY OPERATOR MODE
- ▼ ENTERING KEY OPERATOR MODE
- ▼ EXITING KEY OPERATOR MODE
- DEFINING CLOCK SETTINGS
- SETTING THE CURRENT TIME AND DATE
- ▼ SELECTING THE REQUIRED TIME AND/OR DATE
- SETTING THE RESET TIME
- ▼ SETTING THE RESET TIME
- ACTIVATING THE TIME SWITCH
- ▼ DEFINING THE SWITCH ON/OFF TIME AND DAYS
- IMAGE CORRECTION
- ▼ CALIBRATING THE PRINTER
- PROGRAMMING GROUPS OF DEFAULT SETTINGS
- ▼ STORING SETTINGS UNDER A PROGRAM BUTTON
- ▼ ERASING SETTINGS UNDER A PROGRAM BUTTON
- ▼ CHANGING THE OCÉ 9800 STANDARD 'DEFAULT' SETTINGS
- ▼ RETURNING TO THE FACTORY DEFAULT SETTINGS
- EDITING STAMPS
- ▼ EDITING A STAMP
- DEFINING THE STANDARD COPY MEDIA TYPE
- ▼ DEFINING THE STANDARD TYPE OF COPY MEDIA
- DEFINING AUTOMATIC ROLL CHANGE
- ▼ TURNING 'AUTOMATIC ROLL CHANGE' ON AND OFF
- CHAPTER 5 SYSTEM ADMINISTRATOR
- INTRODUCTION
- ENTERING SYSTEM ADMINISTRATOR MODE
- ▼ ACCESSING SYSTEM ADMINISTRATOR MODE
- ▼ QUITTING SYSTEM ADMINISTRATOR MODE
- DEFINING CONNECTIVITY SETTINGS
- SERIAL
- ▼ DEFINING A SERIAL CONNECTION
- CENTRONICS
- ▼ DEFINING A CENTRONICS CONNECTION
- SCSI
- ▼ DEFINING AN SCSI CONNECTION
- DEFINING DEFAULT LANGUAGE SETTINGS
- LANGUAGE (DATA FORMAT)
- ▼ SETTING THE DEFAULT LANGUAGE FORMAT
- PENS
- ▼ DEFINING THE DEFAULT PEN SETTINGS
- ▼ DEFINING PEN PRIORITY FOR CALCOMP OR HP-GL/2 FILES
- AUTOMATICS SETTINGS
- ▼ DEFINING DEFAULT 'AUTO ROTATE
- ▼ DEFINING DEFAULT 'LEGEND CORRECTION
- ▼ DEFINING DEFAULT AUTO ROLL
- GENERAL SETTINGS
- ▼ DEFINING PRINT TIME-OUT
- ▼ DEFINING ALS FORMATS
- RESET FUNCTIONS
- RESTORING CONTROLLER TO FACTORY DEFAULT SETTINGS
- ▼ RESTORING FACTORY DEFAULT SETTINGS
- RESETTING CONTROLLER
- ▼ RESETTING THE PRINTER CONTROLLER
- CHAPTER 6 MAINTENANCE
- LOADING ROLLS OF COPY MATERIAL
- ▼ RE-LOADING COPY MATERIAL
- ▼ DEFINING THE TYPE OF MEDIA
- EMPTYING THE CHIP TRAY
- ▼ EMPTYING THE CHIP TRAY
- REFILLING TONER
- ▼ ADDING TONER
- CHAPTER 7 PROBLEM SOLVING
- CLEARING PAPER JAMS
- CLEARING A PAPER JAM IN THE MANUAL FEED
- ▼ CLEARING A PAPER JAM IN THE MANUAL FEED
- CLEARING A PAPER JAM IN THE FUSER SECTION
- ▼ CLEARING A PAPER JAM IN THE FUSER SECTION
- CLEARING A PAPER JAM IN THE ROLL FEED SECTION
- ▼ CLEARING A PAPER JAM IN THE MEDIA ROLL COMPARTMENTS
- ▼ REMOVING PAPER FROM BEHIND THE CHIP TRAY OR VERTICAL TRANSPORT
- ▼ REMOVING PAPER FROM UNDERNEATH THE PLATE
- ▼ REMOVING PAPER FROM UNDERNEATH THE ROLL 2 OR ROLL 4 FEED PLATE
- CLEARING A PAPER JAM IN THE HIGH CAPACITY STACKER
- ▼ CLEARING A PAPER JAM IN SECTION A OF THE HIGH CAPACITY STACKER
- ▼ CLEARING A PAPER JAM IN SECTION B OF THE HIGH CAPACITY STACKER
- ▼ CLEARING A PAPER JAM IN SECTION C OF THE HIGH CAPACITY STACKER
- CLEARING A PAPER JAM IN THE FOLDER
- ▼ CLEARING A PAPER JAM IN THE FIRST FOLD SECTION
- ▼ CLEARING A PAPER JAM IN THE SECOND FOLD SECTION
- PRINT CONTROLLER ERRORS
- OTHER PROBLEMS (CALL OCÉ SERVICE)
- APPENDIX A
- OVERVIEWS
- PRODUCT SPECIFICATIONS
- GENERAL
- COPY MATERIAL SPECIFICATIONS
- OVERVIEW OF DEFAULT SETTINGS ON DELIVERY
- DEFAULT SETTINGS
- DEFAULT SETTINGS KEY OPERATOR ADJUSTABLE
- KEY OPERATOR ADJUSTABLE
- CONTROLLER DEFAULT SETTINGS
- DATAFORMAT CALCOMP
- DATAFORMAT HP-GL
- DATAFORMAT HP-GL/2
- DATAFORMAT ASCII
- PEN
- CONNECTION
- PLOT JOB SETTINGS
- OCÉ 9800 CONTROLLER ERROR CODES
- TEMPORARY WARNINGS (TW)
- OPERATOR RECOVERABLE WARNINGS (ORW)
- MACHINE RECOVERABLE WARNINGS (MRW)
- CONTROLLER ERRORS
- MEMORY ALLOCATION WARNINGS
- RS-232 ERRORS
- SCSI ERRORS
- DATA FORMAT ERRORS
- RCF ERRORS
- APPENDIX B SAFETY INFORMATION
- GENERAL SAFETY INFORMATION
- RADIO INTERFERENCE
- SYMBOLS
- INSTRUCTIONS FOR SAFE USE
- REMOVAL OF NICAD BATTERY
- ▼ REMOVING THE NICAD BATTERY FROM THE PRINTER
- SAFETY DATA SHEETS
- SAFETY DATA SHEET FOR THE OCÉ 9800 PRINTER
- OCÉ-BRUNING
- SAFETY DATA SHEET FOR THE OCÉ 9800 PRINTER AND FOLDER
- APPENDIX C MISCELLANEOUS
- NOTATION CONVENTIONS
- USER COMMENT SHEET
- DATE
- INDEX
- A
- B
- C
- D
- E
- F
- H
- J
- K
- L
- M
- N
- 0
- P
- R
- S
- T
- W
Brand : Océ
Model : 9800
Category : Printer