
TA 5040 - Toaster GRUNDIG - Free user manual and instructions
Find the device manual for free TA 5040 GRUNDIG in PDF.


| Product type | 2-slice toaster |
| Model | TA 5040 |
| Brand | Grundig |
| Dimensions (W x D x H) | 30 x 18 x 20 cm |
| Weight | 1.2 kg |
| Power supply | 220-240 V ~ 50/60 Hz, 850 W |
| Number of browning levels | 6 levels |
| Functions | Toasting, defrost, reheat, manual stop |
| Display | Power-on indicator light |
| Slots | Wide slots for varying bread sizes |
| Automatic centering | Yes, for even browning |
| High lift | Yes, to easily remove small items |
| Cancel button | Yes |
| Automatic shut-off | Yes, in case of bread jam |
| Anti-scale protection | Not applicable |
| Housing material | Brushed stainless steel and plastic |
| Cord storage | Cord wrap under base |
| Non-slip base | Yes, with rubber feet |
| Included accessories | Removable crumb tray |
| Care and cleaning | Clean the crumb tray regularly; wipe exterior with a damp cloth |
| Spare parts and repairability | Parts available via Grundig after-sales service; repairable |
| General information | 2-year warranty; made in China |
Frequently Asked Questions - TA 5040 GRUNDIG
User questions about TA 5040 GRUNDIG
0 question about this device. Answer the ones you know or ask your own.
Ask a new question about this device
Download the instructions for your Toaster in PDF format for free! Find your manual TA 5040 - GRUNDIG and take your electronic device back in hand. On this page are published all the documents necessary for the use of your device. TA 5040 by GRUNDIG.
USER MANUAL TA 5040 GRUNDIG
Please read this instruction manual thoroughly prior to using this device! Follow all safety instructions in order to avoid damages due to improper use!
Keep the instruction manual for future reference. Should this device be given to a third party, than this instruction manual must also be handed over.
■ The appliance is designed for domestic use only.
- Do not use the appliance for anything other than its intended use. The Toaster is designed for toasting and warming bread and buns only.
- Do not use the appliance outdoors or in the bathroom.
- Check if the mains voltage on the rating label corresponds to your local mains supply. The only way to disconnect the appliance from the mains is to pull out the plug.
■ For additional protection, this device should be connected to a household faulty current protection switch with no more than 30 mA. Consult your electrician for advice.
- Do not immerse the appliance, power cord or power plug in water or in other liquids; do not hold it under running water and do not clean parts in dishwasher.
■ Disconnect the power plug after using the appliance, before cleaning the appliance, before leaving the room or if a fault occurs. Do not disconnect the plug by pulling on the cord.
- Do not wrap the power cord around the appliance.
■ Prevent damage to the power cord by not squeezing, bending or rubbing it on sharp edges. Keep the cord away from hot surfaces and open flames.
■ Do not use an extension cord with the appliance.
■ Never use the appliance if the power cord or the appliance is damaged.
- Our GRUNDIG Household Appliances meet applicable safety standards, thus if the appliance or power cord is damaged, it must be repaired or replaced by the dealer, a service centre or a similarly qualified and authorized service person to avoid any dangers. Faulty or unqualified repair work may cause danger and risks to the user.
- Do not dismantle the appliance under any circumstances. No warranty claims are accepted for damage caused by improper handling.
- Keep the appliance always out of the reach of children.
The appliance should not be used by the following persons, including children: those with limited physical, sensory or mental capabilities and also those with a lack of experience and knowledge. This does not apply to the latter if they were instructed in the use of the appliance or if they use it under the supervision of a person responsible for their safety. Children should always be supervised to ensure that they do not play with the appliance.
- Do not leave the appliance unattended as long as it is in use. Extreme caution is advised when the appliance is being used near children and people with limited physical, sensory or mental capabilities.
■ Before using of the appliance for first time, clean all parts. Please see details in the "Cleaning and Care" section.
■ Dry the appliance and all accessories before connecting it to mains supply and before attaching the parts.
■ Never operate or place any part of this appliance on or near to hot surfaces such as gas burner, electric burner or heated oven.
The bread can set on fire because of overheating. Never use the appliance in or near to combustible, inflammable places, materials and furniture. Do not let the appliance come into contact with or become covered by inflammable materials e.g. curtains, textiles, walls, etc. Please make sure that the appliance is always kept a safe distance away from flammable materials and furniture.
- Do not use paper, cardboard, plastic in or under the appliance.
■ Use bread slices which are suitable to the bread slots.
■ Operate the appliance with delivered parts only.
- Do not use the appliance with damp or wet hands.
■ Always use the appliance on a stable, flat, clean, dry and non-slip surface.
■ Make sure that there is no danger that the power cord could be accidentally pulled or that someone could trip over it when the appliance is in use.
■ Position the appliance in such a way that the plug is always accessible.
There is a danger of burns. Avoid contact with hot surfaces; the outer casing becomes very hot during use.
- Do not stick any foreign objects on the appliance.
■ This appliance must not be operated with an external clock timer or separate remote control system.
■ When using for the first time, smoke can develop due to production residues.
However, this does not mean the appliance is defective. The first time you turn it on, use the appliance as you normally would, but without bread. Ensure for proper room ventilation.
In case of fire, disconnect the plug from the wall socket first before using appropriate fire-fighting measures.
■ To avoid the risk of fire, frequently remove crumbs from crumb tray. Make sure the crumb tray is correctly placed. Always ensure that there is sufficient ventilation during use.
If the toaster begins to emit smoke during operation, immediately stop the toasting process. Should bread get stuck in the toaster, always unplug the appliance before you pull out the bread. Be careful the bread can be very hot.
■ The toaster can only be switched on when the plug is connected to a wall socket.
- Do not use any tools or objects in the appliance. Metal objects could cause short circuits or electric shock. Do not damage the heating elements and mechanics.
■ Do not use the appliance as a source of heat.
In case of fire, disconnect the plug from the wall socket first before using appropriate fire-fighting measures.
■ To avoid the risk of fire, frequently remove crumbs from crumb tray. Make sure the crumb tray is correctly placed. Always ensure that there is sufficient ventilation during use.
If the toaster begins to emit smoke during operation, immediately stop the toasting process. Should bread get stuck in the toaster, always unplug the appliance before you pull out the bread. Be careful the bread can be very hot.
■ The toaster can only be switched on when the plug is connected to a wall socket.
- Do not use any tools or objects in the appliance. Metal objects could cause short circuits or electric shock. Do not damage the heating elements and mechanics.
■ Do not use the appliance as a source of heat.
Dear Customer,
Congratulations on the purchase of your new GRUNDIG Toaster TA 5040.
Please read the following user notes carefully to ensure you can enjoy your quality product from GRUNDIG for many years to come.
Special features
The GRUNDIG Toaster is equipped with:
1000 Watt output.
■ Defrost function.
■ Reheat function.
■ Variable browning control.
■ High-lift function.
Control and parts
See the figure on page 3.
A Bun warming rack
B Bread slot
c Start lever and High-lift
D Browning control
E Cancel button with indicator light
F Defrost button with indicator light
G Reheat button with indicator light
H Housing
Crumb tray
☐ Positioning lever for bun warming rack
OPERATION
Preparation
1 Remove all packaging and sticker materials and dispose of them according to the applicable legal regulation.
2 Before using of the appliance for first time, clean the appliance (See the "Cleaning and care" section).
3 Make sure that the appliance is sitting in an upright position and on a stable, flat, clean, dry and non-slip surface.
Note
- When using for the first time, smoke can develop due to production residues. However, this does not mean the appliance is defective. The first time you turn it on, use the appliance as you normally would, but without bread. It is recommended to use the medium setting of the browning control D to burn in. Ensure for proper room ventilation.
Toasting
1 Insert only one slice of bread in each of the two bread slots B.
2 Connect the power plug into the wall socket.
3 Using the browning control D by selecting the desired degree of browning.
Notes
■ Turning the browning control to the left will give the lightest degree of browning and to the right the darkest. The browning degree can vary depending on the type of bread.
- When toasting several slices of bread consecutively, the toaster will become hotter and therefore the bread will gradually become darker. Therefore select an appropriate browning degree. Let the toaster cool down after each toasting process for approx. 15-20 seconds to reset the integrated thermostat.
4 Press the start lever ⓒ down until it automatically snap into place.
- The toasting process begins. The indicator light of the Cancel button 📆 illuminates during the toasting process.
Notes
If the power plug is not connected into the wall socket, the start lever C doesn't snap into place.
The degree of browning can also be adjusted during the toasting process with the browning control D.
5 The appliance automatically switches off as soon as the set degree of browning has been reached.
The start lever C springs back up and the Cancel button E light goes off. The toast slices are pushed upwards and can be taken out of the toaster.
Note
■ After the start lever C springs back up, you can use high-lift function by pushing the start lever C upwards.
To cancel the toasting process before it has finished, press the Cancel button E. The start lever C springs back up and the toast slices can be taken out of the toaster.
Caution
- Be very careful when taking the toast slices out of the toaster as the metal parts of the toaster and also the bread can become very hot.
6 Disconnect the appliance from the wall socket.
Toasting frozen bread
1 Follow the steps from 1 to 4 at the Toasting section.
2 Press the Defrost button F.
1 Follow the steps from 1 to 4 at the Toasting section. 2 Press the Defrost button F.
- The indicator lights of the defrost button F and Cancel button E illuminate and the toasting process begins.
Note
- When the Defrost button F is pressed, the toasting process takes longer than with normal toasting.
3 The appliance automatically switches off as soon as the set degree of browning has been reached. The start lever C springs back up; Defrost button F and the Cancel button E lights go off. The toast slices are pushed upwards and can be taken out of the toaster.
Note
■ After the start lever C springs back up, you can use high-lift function by pushing the start lever C upwards.
To cancel the toasting process before it has finished, press the Cancel button E. The start lever C springs back up and the toast slices can be taken out of the toaster.
Caution
- Be very careful when taking the toast slices out of the toaster as the metal parts of the toaster and also the bread can become very hot.
4 Disconnect the appliance from the wall socket.
Warming up already toasted bread
1 Follow the steps from 1 to 4 at the Toasting section.
2 Press the Reheat button G.
- The indicator lights of the Reheat button G and Cancel button E illuminate and the warming up process begins.
3 The appliance automatically switches off as soon as the set degree of warming has been reached. The start lever C springs back up; Reheat button G and the Cancel button E lights go off. The toast slices are pushed upwards and can be taken out of the toaster.
Note
■ After the start lever C springs back up, you can use high-lift function by pushing the start lever C upwards.
To cancel the toasting process before it has finished, press the Cancel button E. The start lever C springs back up and the toast slices can be taken out of the toaster.
Caution
- Be very careful when taking the toast slices out of the toaster as the metal parts of the toaster and also the bread can become very hot.
4 Disconnect the appliance from the wall socket.
Warming up buns
This toaster is equipped with an integrated bun warming rack A.
1 Press down positioning lever J for the bun warming rack until it snaps into place.
- This sets the bun warming rack in the upright position.
2 Position the buns on the rack.
3 Connect the power plug into the wall socket.
4 Using the browning control D by selecting the desired degree of warming.
5 Press down the start lever c.
- The indicator light of the Cancel button illuminates and the warming up process begins.
6 Turn the buns in order to reach a consistent browning.
7 The appliance automatically switches off as soon as the set degree of warming has been reached. The start lever C springs back up; and the Cancel button E light goes off.
8 After warming up the buns, take them off the rack and press the positioning lever J upwards. This will return the rack A.
9 Disconnect the appliance from the wall socket.
Notes
- Do not toast bread and warm up buns at the same time.
- Do not warm up toast slices on the bun warming rack A. The toast slices hinder sufficient ventilation.
■ To cancel the toasting process before it has finished, press the Cancel button E.
If you accidentally activate the wrong mode (defrost instead of reheat or reheat instead of defrost), then the selected mode must be cancelled first by pressing the Cancel button E before you can select the right mode.
For small slices of bread the toaster is equipped with a high lift function. This function lifts with the start lever (additionally 15mm) far enough out of the appliance to take out the slices better.
Caution
■ The toast slices or buns and the housing H of the toaster become very hot during and directly after the toasting process. Do not touch them with bare hands.
If toast slices get stuck in the toaster, switch the toaster off immediately by pressing the Cancel button E. Pull the power plug out of the wall socket. Let the toaster cool down completely. Carefully try to take the bread out of the toaster without damaging the sensitive heating elements and other parts. Do not use any electroconductive objects to remove the bread from the toaster.
- Do not use any tools or objects in the appliance. Metal objects could cause short circuits or electric shock. Do not damage the heating elements and mechanics
Cleaning and care
Caution
■ Never use petrol, solvents or abrasive cleaners, metal objects or hard brushes to clean the appliance.
■ Never put the appliance or power cord in water or any other liquid.
1 Turn the appliance off and disconnect it from wall socket.
2 Let the appliance cool down completely.
3 Remove the crumbs after each use by pulling out the crumb tray 1. Clean the crumb tray with a damp cloth only. Before pushing back the crump tray in the appliance assure that the tray is dry. Do not let bread crumbs collect inside the toaster, they may cause fire.
4 Turn the toaster upside down and shake it slightly to remove bread crumbs from inside.
5 Use a damp soft cloth and a small mild cleanser to clean the housing H of the appliance. Dry the housing thoroughly.
Note
■ Before using the appliance after cleaning, dry all parts carefully using a soft towel.
Storage
If you do not plan to use the appliance for a long period of time, please store it carefully.
Make sure the appliance is unplugged and completely dry.
Wrap the power cord around the cable coil on the bottom of the toaster.
Store the appliance in a cool, dry place.
Make sure the appliance is kept out of the reach of children.
Environmental note
This product has been made from high-quality parts and materials which can be re-used and

are suitable for recycling.
Therefore, do not dispose the product with normal household waste at the end of its service life. Take it to a collection point for the recycling of electrical and
electronic equipment. This is indicated by this symbol on the product, in the operating manual and on the packaging.
1|FBTF□DPOTV□ZPVS□PDB□BVJI PSJWFT□UP□GJOE□PVU □XI FSF□UI F□OFBSFT□DPMMFDUPO□QPJOU□JT□
Help protect the environment by recycling used products.
Technical data
This product conforms to the European directives 2004/108/EC and 2006/95/EC.
Power supply: 220 V - 240 V\~, 50 Hz
Power: 100840 W -
Technical and design modifications reserved.
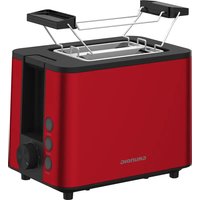
Brand : GRUNDIG
Model : TA 5040
Category : Toaster