
KF-4301 - Bottle Warmer TRISTAR - Free user manual and instructions
Find the device manual for free KF-4301 TRISTAR in PDF.


| Product type | Bottle warmer |
| Brand | TriStar |
| Model | KF-4301 |
| Power supply | 220-240 V ~ 50/60 Hz |
| Power | 200 W |
| Capacity | 2 bottles (fits standard bottles) |
| Dimensions (L x W x H) | 20 x 15 x 15 cm |
| Net weight | 0.5 kg |
| Functions | Heating, keep warm, defrost |
| Control type | Rotary or toggle button |
| Automatic shut-off | Yes, overheat protection |
| Housing material | Heat-resistant plastic |
| Cleaning | Clean with a damp cloth; do not immerse |
| Maintenance | Regular descaling with white vinegar |
| Included accessories | Not specified |
| Repairability | Spare parts available on request |
| Warranty | 2 years |
Frequently Asked Questions - KF-4301 TRISTAR
User questions about KF-4301 TRISTAR
0 question about this device. Answer the ones you know or ask your own.
Ask a new question about this device
Download the instructions for your Bottle Warmer in PDF format for free! Find your manual KF-4301 - TRISTAR and take your electronic device back in hand. On this page are published all the documents necessary for the use of your device. KF-4301 by TRISTAR.
USER MANUAL KF-4301 TRISTAR
natural_image
White baby bottle with lid, open lid, and side bowl filled with granular food (no visible text or symbols)USER GUIDE / HANDLEIDING / MANUEL D'UTILISATEUR BEDIENUNGSANLEITUNG / MANUAL DE USUARIO BRUKSANVISNING / BRUGERVEJLEDNING
ANVÄNDARHANDBOK / KÄYTTÖOHJE / MANUALE D'USO
MANUAL DO UTILIZADOR / UŽIVATELSKÁ PŘÍRUČKA
ΟΔΗΓΙΕΣ ΧΡΗΣΗΣ / HASZNÁLATI ÚTMUTATÓ / INSTRUKCJA OBSŁUGI
MANUAL DE INSTALARE SI UTILIZARE / UŽÍVATEL'SKÝ MANUÁL
V.1.0-05/11
CE
UK The features described in this manual are published with reservation to modifications.
The Baby Bottle Warmer 301 is a wonderful product to warm and keep your baby's bottle warm at the right temperature.
1.1 Safety advice
The device is only intended for the purpose described in this user guide. The manufacturer cannot be held liable for personal injuries or damages occurring as a result of inappropriate or careless use.
1.2 General
• Always read the safety instructions carefully and keep this user guide for future reference.
- Follow the basic safety precautions for all electronic equipment when using this product.
- This product is not a toy. Don't let children play with it.
- Close supervision is necessary when the unit is used with children around.
- It is not intended for use by infirm persons without supervision.
- Do not leave the product unattended when plugged in. Unplug the product immediately from the main power after use.
- The device is only for private use and is not intended for medical or commercial purposes.
- This unit is not waterproof. Don't expose this product to rain or moisture.
- Make sure that the appliance is not too close to heat sources such as ovens, radiators or direct sunlight.
1.3 Electric shock
- Before connecting the appliance to the mains power supply, check that the voltage indicated on the rating label (underneath the base) corresponds to the local mains voltage.
- Do not operate this product when the cord or plug is damaged.
- Do not use the product if it is not working properly, dropped or damaged.
- Repairs to electrical appliances must only be carried out by qualified persons. Incorrect repairs can lead to considerable danger for the user. In the event of repairs, please contact our customer service or an authorized dealer.
- Don't disassemble this product. It doesn't contain parts that can be repaired by the user.
- Do not connect other attachments than the one supplied with the product.
- Do not drop or insert object into any opening.
- Do not place the basic unit in a damp room and at a distance of less than 1.5 m away from a water source.
- Don't disassemble this product. It doesn't contain parts that can be repaired by the user.
- Never use the appliance during a thunderstorm.
1.4 Baby Bottle Warmer 301 precautions
- Never use the base without water in it.
- Do not touch hot surfaces.
- Do not move the base when it contains hot water.
- Do not immerse the base, cord, or plug in water or any other liquid.
- Do not let the mains cable hang over the edge of a table or counter.
- Do not place the appliance on a hot surface or in a heated oven.
-
Test food on the back of your hand before serving to ensure it is at a safe temperature for your baby.
-
Only use baby bottles that have been approved for boiling.
- For hygienic reasons, you should change the water every time you used the appliance.
- Food should not be heated for too long.
2 Product description
2.1 Accessories
- Cover
- Juicer
- Food cup
- Warming basin
- Power LED
- Thermostat
- Mains power connector
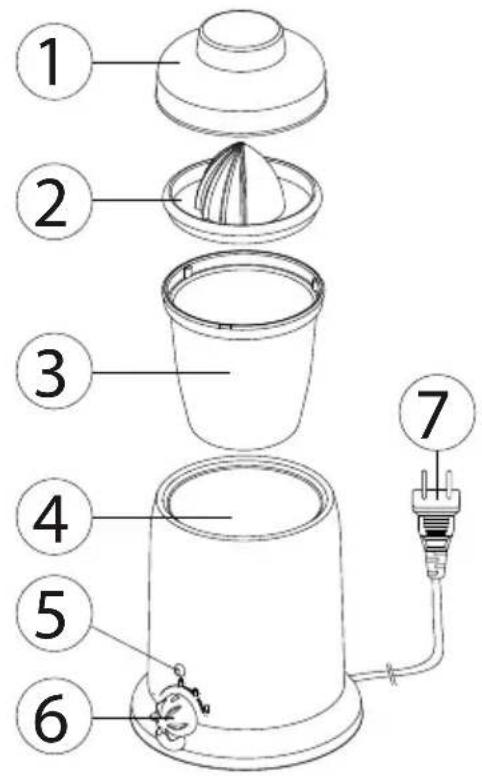
3 Installation
- Plug the end of the power cord into the 230V outlet. The wall outlet for the power supply must be close and accessible.
4 Getting started
4.1 Baby Bottle Warmer
- Remove every accessory from the unit.
- Pour the 100ml water into the warming basin .
- Put the baby bottle with milk (240 ml) into the warming basin . 4
- Turn the thermostat to 60ircC .
• The water will warm up and this will heat the baby bottle.
• After 10 minutes, the milk will be about 40irc C. - Remove the bottle from the warmer and check the milk temperature.
- Disconnect the power after use. Let the device cool down and remove the water.

natural_image
Illustration of a baby bottle with a funnel pouring liquid into it, labeled '100ml' (no other text or symbols)Changing the thermostat temperature will influence the warming time. The higher the temperature, the quicker the bottle will warm.
- 240ml, starting from fridge temperature (7°C) will take +/- 10 minutes (thermostat 70°C).
- 150 ml, starting from room temperature (20°C) will take +/- 7 minutes (thermostat 70°C).
Rol the bottle between your two hands to spread the temperature in the bottle. Do not shake! Always check that the food temperature by testing some on the back of your hand.
4.2 Sterilizer
- Pour the 50ml water into the warming basin . 4
- Put a baby bottle, teat or pacifier into the warming basin.
• Install the food cup upside down on top of the warming basin. - Turn the thermostat to 600°C.
- The heating element will heat the water to a 100ircC and creates steam.
- It will need 15 minutes to sterilize the baby bottle, teat or pacifier.
- Disconnect power.
- Remove the food cup and remove the baby bottle, teat or pacifier.
The sterilized items can be extremely hot. Do not remove them with bare hands as this may cause burn injuries.
Wash bottles, teats and pacifiers in warm water prior to sterilization.
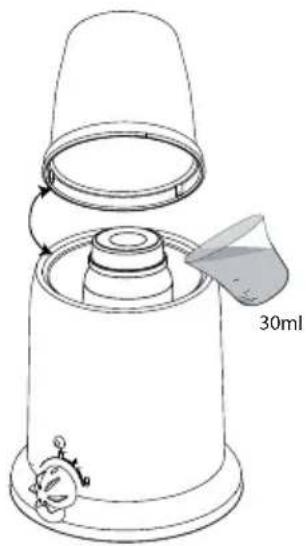
natural_image
Line drawing of a container with a lid and a funnel pouring liquid into it, labeled '30ml' (no text or symbols on the diagram itself)4.3 Warming function
The Baby Bottle Warmer 301 can be used to warm your baby's hotchpotch.
- Pour the 150ml water into the warming basin .
- Put the baby food (max 150g) in the food cup . 3
- Put the food cup in 3 warming basin . 4
- Position the cup cover on the food cup.
- Turn the thermostat to 600°C.
- The water will warm up to maximum 100ircC . The water will heat and heat the food.
- Stir regularly
- Disconnect power, let the device cool down and clean the steamer bowl and cover immediately after use.

natural_image
Line drawing of a coffee maker with a lid and side cup, labeled 150ml (no text or symbols on the diagram itself)The cooking time and result can vary according to the size and quality of the food. Exercise before use.
Do not put your hands over the holes as this may cause burn injuries.
Do not lift the cover during heating without wearing oven gloves.
Stir the food after heating to distribute the heat.
Always check the food temperature by testing some on the back of your hand.
4.4 Keep warm function
Once you have warmed your baby bottle or food, you can keep it warm.
• Make sure that there is 150ml water in the warming basin.
- Put the baby bottle or the food cup in 3 warming basin.
- Turn the thermostat to the desired temperature.
- The water will warm up and keep the baby bottle or food cup content on the selected temperature.
Do not keep the bottle longer warm than 1 hour.
Always check that the food temperature by testing some on the back of your hand.
5 Technical data
| Power supplyRated powerTemperature | 100-240 V/AC/50-60 Hz80WMaximum 100°C (+/- 5°C) |
6 Cleaning
- Disconnect the device and allow it to cool down.
- Clean it with a soft cloth or slightly damp sponge.
- Never allow that water or any other liquid enters the device or accessories.
- Never use abrasive cleaners, brushes, gasoline, kerosene, glass polish or paint thinner to clean.
7 Disposal of the device (environment)

At the end of the product lifecycle, you should not throw this product into the normal household garbage but bring the product to a collection point for the recycling of electrical and electronic equipments. The symbol on the product, user guide and/or box indicate this. Some of the product materials can be re-used if you bring them to a recycling point. By re-using some parts or raw materials from used products you make an important contribution
to the protection of the environment. Please contact your local authorities in case you need more information on the collection points in your area.
8 Topcom warranty
8.1 Warranty period
The Topcom units have a 24-month warranty period. The warranty period starts on the day the new unit is purchased.
Consumables or defects causing a negligible effect on operation or value of the equipment are not covered.
The warranty has to be proven by presentation of the original purchase receipt, on which the date of purchase and the unit-model are indicated.
8.2 Warranty exclusions
Damage or defects caused by incorrect treatment or operation and damage resulting from use of non-original parts or accessories not recommended by Topcom are not covered by the warranty.
The warranty does not cover damage caused by outside factors, such as lightning, water and fire, nor any damage caused during transportation.
No warranty can be claimed if the serial number on the units has been changed, removed or rendered illegible.

This product is in compliance with the essential requirements and other relevant provisions of the directive 2004/108/EC.
The Declaration of conformity can be found on:
http://www.topcom.net/cedeclarations.php
1 Bedoeld gebruik
3 Installatie
natural_image
Illustration of a baby bottle with a glass pouring liquid into it, labeled '100ml' (no other text or symbols)natural_image
Line drawing of a container with a lid and a funnel pouring liquid into it, labeled '30ml' (no text or symbols on the diagram itself)natural_image
Line drawing of a multi-tiered container with a lid and a side bucket, labeled 150ml (no text or symbols on the diagram itself)3 Installation
natural_image
Line drawing of a baby bottle with a funnel pouring liquid into it, labeled '100ml' (no other text or symbols)natural_image
Line drawing of a container with a lid and a funnel pouring liquid into it, labeled '30ml' (no text or symbols on the diagram itself)natural_image
Line drawing of a coffee maker with a lid and side cup, pouring liquid into a container (no text or symbols)3 Inbetriebnahme
4.1 Baby Bottle Warmer
natural_image
Illustration of a baby bottle with a glass pouring liquid into it, labeled '100ml' (no other text or symbols)natural_image
Line drawing of a container with a lid and a funnel, pouring liquid into a container (no text or symbols)natural_image
Line drawing of a coffee maker with a lid and side cup, labeled 150ml (no text or symbols on the diagram itself)3 Instalación
natural_image
Illustration of a baby bottle with a funnel pouring liquid into a container (no text or symbols)natural_image
Line drawing of a container with a lid and a funnel pouring liquid into it, labeled '30ml' (no text or symbols on the diagram itself)natural_image
Line drawing of a coffee maker with a lid and side cup, labeled 150ml (no text or symbols on the diagram itself)3 Installation
natural_image
Illustration of a baby bottle with a funnel pouring liquid into a container, labeled '100ml' (no text or symbols on the diagram itself)natural_image
Line drawing of a coffee maker with a lid and side cup, showing volume measurement (150ml) and a cartoon character (no text or symbols on the diagram itself)3 Installation
4.1 Baby Bottle Warmer
natural_image
Line drawing of a baby bottle with a funnel pouring liquid into it, labeled '100ml' (no other text or symbols)natural_image
Line drawing of a container with a lid and a funnel pouring liquid into it, labeled '30ml' (no text or symbols on the diagram itself)4.3 Varmefunktion
natural_image
Line drawing of a coffee maker with a lid and side cup, showing volume measurement (150ml) and a cartoon character (no text or symbols on the diagram itself)3 Montering
natural_image
Illustration of a baby bottle with a glass container pouring liquid into it, labeled '100ml' (no other text or symbols)natural_image
Line drawing of a container with a lid and a funnel pouring liquid into it, showing a cartoon character (no text or symbols)natural_image
Line drawing of a coffee maker with a lid and side cup, showing volume measurement (150ml) and a small cartoon character at the base (no text or symbols on the diagram itself)3 Asennus
- Kytke virtajohdon pistoke pistorasiaan (230 V).
natural_image
Illustration of a bottle with a glass pouring liquid into a container, labeled '100ml' (no other text or symbols)natural_image
Line drawing of a container with a lid and a funnel pouring liquid into it, labeled '30ml' (no text or symbols on the diagram itself)
natural_image
Line drawing of a coffee maker with a lid and side cup, labeled 150ml (no text or symbols on the diagram itself)3 Installazione
4.1 Baby Bottle Warmer
natural_image
Illustration of a baby bottle with a funnel pouring liquid into a container (no text or symbols)natural_image
Line drawing of a container with a lid and a funnel, showing liquid being poured into it (no text or symbols)natural_image
Line drawing of a coffee maker with a lid and side cup, labeled 150ml (no text or symbols on the diagram itself)natural_image
Line drawing of a container with a lid and a funnel pouring liquid into it, labeled '30ml' (no text or symbols on the diagram itself)natural_image
Line drawing of a coffee maker with a lid and side cup, labeled 150ml (no text or symbols on the diagram itself)3 Instalace
natural_image
Line drawing of a container with a lid and a funnel pouring liquid into it, labeled '30ml' (no text or symbols on the diagram itself)4.3 Ohřivací funkce
natural_image
Line drawing of a coffee maker with a lid and side cup, labeled 150ml (no text or symbols on the diagram itself)3 Εγκατάσταση
natural_image
Illustration of a bottle with a funnel pouring liquid into a container, labeled '100ml' (no text or symbols on the diagram itself)natural_image
Illustration of a container with liquid being poured into it, showing a small container and a 30ml volume (no text or symbols on the diagram itself)natural_image
Line drawing of a coffee maker with a cup and lid, pouring liquid into a container (no text or symbols)3 Üzembe helyezés
natural_image
Illustration of a baby bottle with a glass pouring liquid into it, labeled '100ml' (no other text or symbols)natural_image
Line drawing of a container with a lid and a funnel pouring liquid into it, showing a small object inside (no text or symbols)natural_image
Line drawing of a portable coffee maker with a lid and side cup, labeled 150ml (no text or symbols on the device itself)3 Instalacja
natural_image
Line drawing of a bottle with a funnel pouring liquid into a container, labeled '100ml' (no other text or symbols)natural_image
Line drawing of a container with a lid and a funnel, showing liquid being poured into it (no text or symbols)natural_image
Line drawing of a coffee maker with a lid and side cup, labeled 150ml (no text or symbols on the diagram itself)3 Inštalácia
natural_image
Line drawing of a bottle with a funnel pouring liquid into a container, labeled '100ml' (no other text or symbols)natural_image
Line drawing of a container with liquid being poured into it, showing a cartoon character inside (no text or symbols)4.3 Funkcia ohrievania.
Ohrievač detských fliaš Baby Bottle Warmer 301 je možné použi na ohrievanie detskej mixovanej stravy.
• Nalejte 150 ml vody do ohrievacej nádržky . 4
• Vložte detskú stravu (max. 150 g) do nádoby na jedlo .
• Vložte nádobu na jedlo do 3ohrievacej nádržky . 4
- Na vrch nádoby na jedlo položte kryt .
• Nastavte termostat na 6100 °C.
- Voda sa zohreje na maximálne 100 °C. Voda bude vrie a tak zohrieva jedlo.
- Pravidelne miešajte
- Odpojte zariadenie od elektrickej siete, nechajte ho vychladnú a hned' po použití vyčistite misku paráka a kryt.
natural_image
Line drawing of a coffee maker with a lid and side cup, pouring liquid into the cup (no text or symbols)- Safety advice
- General
- Electric shock
- Baby Bottle Warmer 301 precautions
- Product description
- Accessories
- Installation
- Getting started
- Baby Bottle Warmer
- Sterilizer
- Warming function
- Keep warm function
- Technical data
- Cleaning
- Disposal of the device (environment)
- Topcom warranty
- Warranty period
- Warranty exclusions
- Bedoeld gebruik
- Installatie
- Inbetriebnahme
- Instalación
- Varmefunktion
- Montering
- Asennus
- Installazione
- Instalace
- Ohřivací funkce
- Εγκατάσταση
- Üzembe helyezés
- Instalacja
- Inštalácia
- Funkcia ohrievania.
Brand : TRISTAR
Model : KF-4301
Category : Bottle Warmer