
AS80PR11 - Motion detector ELRO - Free user manual and instructions
Find the device manual for free AS80PR11 ELRO in PDF.


| Product Type | Motion Detector |
| Brand | Elro |
| Model | AS80PR11 |
| Detection Method | Passive Infrared (PIR) |
| Detection Range | Up to 12 meters (110° angle) |
| Power Supply | DC 9-16V or AC 7-12V, 50/60Hz |
| Power Consumption | < 0.5W (standby), < 2W (active) |
| Dimensions | 105 x 65 x 45 mm |
| Weight | Approximately 90 g |
| Operating Temperature | -10°C to +50°C |
| Ingress Protection | IP44 (indoor/outdoor under eaves) |
| Mounting Type | Wall or ceiling mount (bracket included) |
| Output Type | Normally closed (NC) relay, 30V/1A max |
| Installation Height | 1.8 - 2.5 meters recommended |
| Adjustable Timer | 10 seconds to 5 minutes (dip switch) |
| Adjustable Sensitivity | Low / Medium / High (dip switch) |
| Lux Control | Day / Night / 10 lux / 30 lux (dip switch) |
| LED Indicator | Red LED for detection (disablable) |
| Maintenance | Clean lens with soft dry cloth; avoid solvents |
| Safety | Install in dry location; disconnect power before wiring |
| Spare Parts | Mounting brackets, screws, and connectors included |
| Certification | CE, RoHS |
Frequently Asked Questions - AS80PR11 ELRO
User questions about AS80PR11 ELRO
0 question about this device. Answer the ones you know or ask your own.
Ask a new question about this device
Download the instructions for your Motion detector in PDF format for free! Find your manual AS80PR11 - ELRO and take your electronic device back in hand. On this page are published all the documents necessary for the use of your device. AS80PR11 by ELRO.
USER MANUAL AS80PR11 ELRO
AS80PR11 PIR Motion Detector
Installation Instructions
General Introduction
This Detector is designed with a Passive Infra-Red (PIR) sensor and light sensor in order to fulfill the purpose of security and home automation. It detects motion by monitoring changes in infra-red radiation levels emitted by body heat.
Product Overview
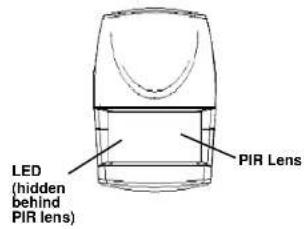

LED Indication
| Red LED | Used to indicate trigger events, low battery power, and warm up |
| Green LED | Used to indicate key learning controls |
| Orange LED | Used to indicate no codes learned |
Binding
- Undo and remove the fixing screw from the bottom of the detector. Carefully pull the bottom of the detector away from the rear cover and then slide down to release the top clips.
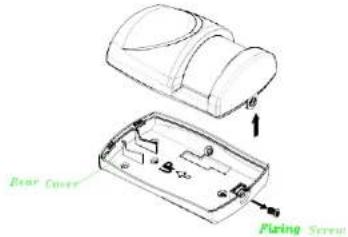
- Prepare a CR123A battery. Do not insert the battery into the unit yet.
- Log into the ELRO Smart Home Alarm account from a web browser.
- Select "System" then "Add a Device".

- Select "PIR Detector".
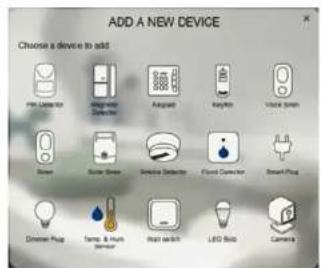
- The following screen will appear. This means the gateway is entering binding mode.
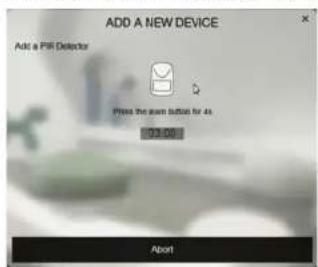
- At this for point, insert the battery with correct polarity into the unit.

- The screen below will appear in 10 seconds if the process is successful.

- Time-out will occur if the binding process was unsuccessful. Please refer to the "Manual binding" section.
Note: Leave the detector with the rear cover open to prepare for testing.
Manual Binding
-
Repeat steps 3 to 6 of the Binding with Homesys section.
-
With the battery inserted, press and hold the link key on the PCB for 3 or more seconds, and the detector LED will start to flash, implying that it has entered ID code learning mode.

- The LED indicator will stop flashing and turn off within 5 seconds, indicating the learning procedure is completed. The screen below will appear indicating the process is successful.
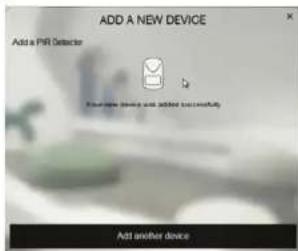
- If after 30 seconds the LED flashes rapidly (with an interval of 0.1 second) for 3 times, it means the PIR failed the binding process.
Operation & Testing
Warm-Up
It will take approximately 2 minutes to warm up the Detector after a battery is inserted. During this period the LED will flash red slowly. When the LED turns red for 5 seconds, it implies warm-up procedure is complete and the detector is ready for detection.
Testing
- Go to System, and set it to ARM.

-
Wait for 30 secs then wave your hand in front of the detector.
-
If the test is successful the system will trigger an alarm (alarms are listed in "Events").
Note: It is necessary that the gateway is powered and connected to internet.
- If the test is unsuccessful, please check the troubleshooting section.
Mounting
The PIR Detector is suitable for mounting in dry interior locations only.
The recommended position for a PIR Detector is in the corner of a room mounted at a height between 1.8 and 2m . At this height, the detector will have a maximum range of up to 10m with a field of view of 110^ and the position of the PCB set at 5. The position of the PCB inside the PIR can be set to 5 different positions to adjust the range of the detector. Setting the PCB in position 3 will reduce the range to approximately 6m , with position 1 providing a range of approximately 3m . The recommended position for the PCB is position 5.
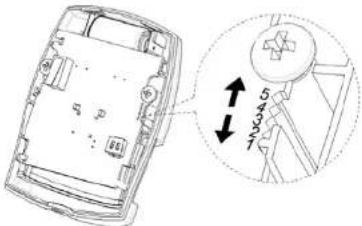
| PCB Position | Range |
| 1 | 3m |
| 3 | 6m |
| 5 | 9m |
When considering and deciding upon the mounting position for the detector, the following points should be considered to ensure a trouble free operation:
- Do not install the detector facing a window, exposed to or facing direct sunlight. PIR Detectors are not suitable for use in conservatories.
- Do not install the detector exposed to ventilators or above a heat source (e.g. fire, radiators, boilers)
- Where possible, mount the detector in the corner of the room so that the path of an intruder would cut across the fan detection pattern. PIR detectors respond more effectively to movement across the device than to movement directly towards it.


- Do not install the detector in a position where it is subject to excessive vibration.
- Ensure that the position selected for the PIR Detector is within effective range of the system (please refer to the Troubleshooting section).
Note: When the system is armed, household pets should not be allowed into an area protected by a PIR Detector as their movement would trigger the PIR and generate an alarm.
Installation
- Using a 3mm drill, carefully drill out the required mounting holes in the rear cover according to whether the unit is being mounted in a corner or against a flat wall.
Note: Drill 1 ^st mounting hole positions to fulfill corner mounting installation, and 2 ^nd mounting hole positions for flat wall installation.
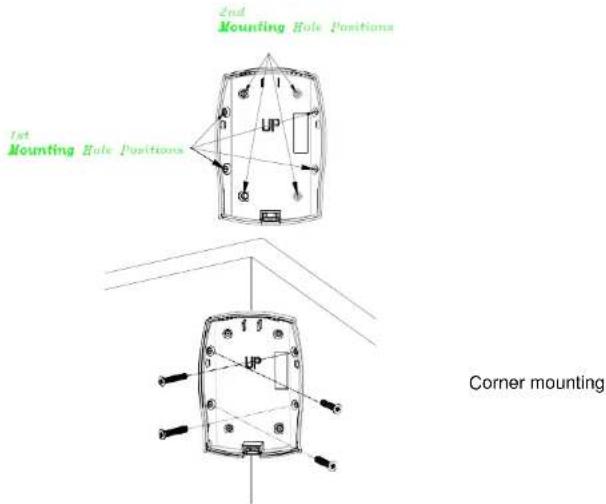
- Using the rear cover as a template, mark the positions of the fixing holes on the wall.
- Fix the rear cover to the wall using the two 18mm No.4 screws and 25mm wall plugs (a 5mm hole will be required for the wall plugs). Do not over-tighten the fixing screws as this may distort or damage the cover.
- Check that the detector PCB is located and set in the correct position to provide the required detection range. To adjust the PCB position, simply slide it up or down ensuring that the location legs are aligned with the required position number marked on the board.
-
Refit the detector to the rear cover and locate the clips in the top edge into the rear cover. Push the lower edge of the detector into place and refit the fixing screw in the bottom edge of the detector to secure in position. Do not over-tighten the fixing screws as this may damage the casing.
-
Perform the test using the same steps described in Operation & Testing section above to ensure the unit is working properly. By walking into the protected area with coverage of 110 degrees, the detector will now be triggered each time it senses movement. Note that the detector can only be triggered once every 30 seconds when mounted on the wall.
Maintenance
Low Battery: When the battery becomes low, the LED will flash red when motion is detected to indicate low battery condition to the user.
Troubleshooting
The troubleshooting table lists some possible causes and solutions. Please contact your original retailer or nearest service center if the below solutions cannot solve your problem.
| Symptom | Cause of Failure | Recommendation |
| LED cannot be displayed | 1. Run out of battery power.2. Check if reverse battery polarity. | 1. Replace a new battery.2. Refit the battery with correct polarity. |
| The detector is not working | 1. The PIR detector cannot communicate with the gateway.2. Check if the detector is out of order. | 1. Place the PIR Detector closer to the gateway.2. Send the device in for repair and do not open it. |
| After the two-minute warm up is completed, the detector does not work and LED flashes on and off repeatedly at with an interval of 2 seconds | 1. Check if detector has completed binding with Gateway | 1. Remove the battery and follow the steps for “Manual binding”. |
Reset to Factory Settings
- Press and hold the link key on the PCB for 3 or more seconds, and the detector LED will start to flash.
- Press and hold the link key for 6 or more seconds within 30 seconds until the LED turns off. The device is now reset back to factory mode
Specifications
| Battery | CR123A 3.0V 1700mAh Lithium Battery |
| Operating Temperature | -10°C to 40°C |
| Warm Up Time | About 2 minutes |
| PIR Detection Coverage | Wall-Mounted:Up to 10m x 110° (at 1.8m mounting height & 25°C) |
| Operating Frequency | 868MHz |
** Specifications are subject to change without notice.
WARNING:
Do not dispose of electrical appliances as unsorted municipal waste, use separate collection facilities.
Contact your local government for information regarding the collection systems available.
If electrical appliances are disposed of in landfills or dumps, hazardous substances can leak into the groundwater and get into the food chain, damaging your health and well-being.
When replacing old appliances with new ones, the retailer is legally obligated to take back your old appliance for disposal at least for free of charge.
| ELRO Europe Postbus 9607 - Box E8O 1006 GC Amsterdam The Netherlands | GUARANTEE www.elro.eu V1 | Symbols: Recycling and disposal; The WEEE symbol means that this product and batteries must be disposed separately from other household waste. When it reaches its end of life, take it to a designated waste collection point in your area to guarantee a safe disposal or recycling. Protect the environment, human health and natural resources! |
A501112384R02
Brand : ELRO
Model : AS80PR11
Category : Motion detector