
PCI2S1PDV - Expansion card StarTech.com - Free user manual and instructions
Find the device manual for free PCI2S1PDV StarTech.com in PDF.


| Product Type | Serial Port Expansion Card |
| Model | PCI2S1PDV |
| Brand | StarTech.com |
| Bus Interface | PCI Express |
| Number of Ports | 2 |
| Port Type | RS-232 DB9 |
| Data Transfer Rate | Up to 115.2 kbps |
| Form Factor | Low profile / Standard profile (bracket included) |
| Dimensions (approx.) | 12.0 x 7.0 x 1.8 cm |
| Weight | 40 g |
| Power Source | Bus-powered via PCIe slot |
| Operating Systems Supported | Windows, Linux, and more |
| Chipset | Oxford Semiconductor OXPCIe954 or equivalent |
| Connector Type | PCI Express x1 |
| Compliance | RoHS, CE, FCC |
| Operating Temperature | 0°C to 55°C |
| Storage Temperature | -20°C to 85°C |
| Humidity | 5% to 95% non-condensing |
| Package Contents | Card, low-profile bracket, driver CD, manual |
| Warranty | 2 years |
| Cleaning | Use a dry, soft cloth to clean the card. Avoid liquids. |
Frequently Asked Questions - PCI2S1PDV StarTech.com
User questions about PCI2S1PDV StarTech.com
0 question about this device. Answer the ones you know or ask your own.
Ask a new question about this device
Download the instructions for your Expansion card in PDF format for free! Find your manual PCI2S1PDV - StarTech.com and take your electronic device back in hand. On this page are published all the documents necessary for the use of your device. PCI2S1PDV by StarTech.com.
USER MANUAL PCI2S1PDV StarTech.com
Dual Voltage Serial Card
2 Port Serial and 1 Port Parallel Dual Voltage PCI Card
2 Port Serial and 1 Port Parallel Low Profile Dual Voltage PCI Card
PCI2S1PDV
PCI2S1PDVLP
Instruction Manual

natural_image
Close-up of a network interface with multiple connected VGA connectors and a circuit board (no visible text or symbols)Actual product may vary from photo
StarTech.com

The Professionals' Source for Hard-to-Find Computer Parts
FCC Compliance Statement
This equipment has been tested and found to comply with the limits for a Class B digital device, pursuant to part 15 of the FCC Rules. These limits are designed to provide reasonable protection against harmful interference in a residential installation. This equipment generates, uses and can radiate radio frequency energy and, if not installed and used in accordance with the instructions, may cause harmful interference to radio communications. However, there is no guarantee that interference will not occur in a particular installation. If this equipment does cause harmful interference to radio or television reception, which can be determined by turning the equipment off and on, the user is encouraged to try to correct the interference by one or more of the following measures:
- Reorient or relocate the receiving antenna.
- Increase the separation between the equipment and receiver.
- Connect the equipment into an outlet on a circuit different from that to which the receiver is connected.
- Consult the dealer or an experienced radio/TV technician for help.
Use of Trademarks, Registered Trademarks, and other Protected Names and Symbols
This manual may make reference to trademarks, registered trademarks, and other protected names and/or symbols of third-party companies not related in any way to StarTech.com. Where they occur these references are for illustrative purposes only and do not represent an endorsement of a product or service by StarTech.com, or an endorsement of the product(s) to which this manual applies by the third-party company in question. Regardless of any direct acknowledgement elsewhere in the body of this document, StarTech.com hereby acknowledges that all trademarks, registered trademarks, service marks, and other protected names and/or symbols contained in this manual and related documents are the property of their respective holders.
Instruction Manual
Table of Contents
Introduction ....1
Features ....1
Before You Begin....1
System Requirements ....1
Contents 1
Installation 2
Configuration 12
Specifications 19
Technical Support....20
Warranty Information ....20
Instruction Manual
Introduction
Thank you for purchasing a StarTech.com 2 Port Serial and 1 Port Parallel Dual Voltage PCI Card. This PCI I/O card allows you to connect additional DB-9M Serial and DB-25F Parallel devices to your computer - an all-in-one connectivity solution that maximizes functionality, while taking up minimal space inside the computer casing.
Features
- Dual voltage card supports both 64-bit(3.3V) and 32-bit(5V) PCI
• High speed serial ports support baud rates up to 921Kbps - 128K transmit/receive FIFO buffer helps improve overall system performance
- IRQ sharing eliminates IRQ conflicts
- Plug and Play and re-map to ISA address 3F8, 3E8, 2F8 and 2E8
- Low profile design saves space
Before You Begin
System Requirements
• A computer with an available PCI port
• A computer running Windows 95/98SE/NT/ME/2000/XP/2003, Linux or DOS
- A CD-ROM, DVD-ROM, or other compatible optical drive (for software installation)
• 2 Serial + 1 Parallel connector cable
Contents
This package should contain:
- PCI Serial I/O card (1)
- Driver CD (1)
- Instruction Manual (1)
• 2 Serial + 1 Parallel connector cable (1)
Instruction Manual
Installation
Installing the PCI2S1PDV/PCI2S1PDVLP Card
- Shut down all power connected to the computer, as well as all devices connected to the computer peripherally (i.e. Printers, Monitors, Scanners etc.). As an added step to ensure safe installation, unplug the power supply from the computer.
- Remove the computer cover. For more detailed instruction on how to perform this step, please refer to the documentation that was included with your computer at the time of purchase.
- Locate an empty PCI slot, removing the metal bracket covering the accompanying empty port/socket.
- Position the serial card above the open PCI slot, ensuring that the card is aligned with the entire slot. Insert the card firmly into the slot, distributing force evenly across the length of the board. Once inserted, secure the card into the adjoining socket (previously covered by metal bracket), using the correct size screw (please consult documentation that accompanied purchase of computer).
- Replace the computer cover and re-connect all power to the computer.
Driver Installation - Windows XP
Upon rebooting the computer for the first time following the installation of the serial card, the following screen will be displayed prior to the operating system welcome screen:
| Bus No | Device No | Func No | Vendor ID | Device ID | Device Class | IRQ |
| 0 | 7 | 1 | 8086 | 7010 | IDE Controller | 14 |
| 0 | 13 | 0 | 1409 | 7268 | Simple COMM. Controller | 10 |
Once Windows XP loads, it will detect the PCI Parallel Controller automatically and run the Add New Hardware Wizard to assist you in installing the new device.
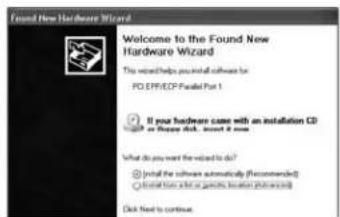
- Insert the Driver CD that was included with this PCI card.
- Select Install the software automatically(recommended), and click Next.
Instruction Manual

- Windows will automatically search for the necessary drivers. Highlight D:\IO\PCI\Win2k and xp, where D:\ designates the letter assignment for your CD-ROM or DVD-ROM device, and click Next.
Please note: If Windows does not locate the driver, please click Back, and select Install from a list or specific location and click Next. At the screen that follows, please select Search for the best driver in these locations, and Include this location in the search:. Click the Browse button to locate the appropriate folder, or type D:\IO\PCI\Win2k and XP in the text box provided. Click Next to continue.
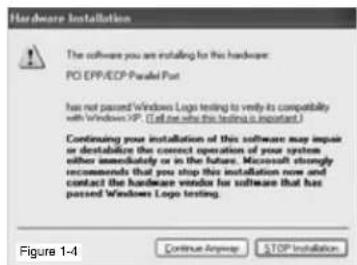
- At the screen pictured in Figure 1-4, please click Continue Anyway.

- Click Finish to complete the software installation.
Please note: Following the installation of each parallel/serial port, you will be prompted to reboot. Please omit the request to reboot, until all ports have been added. Instead, please follow steps 1-5 for each parallel and serial connection, then reboot the computer.
Instruction Manual
Verifying installation - Windows XP

Once all connections have been installed and Windows has been rebooted, please browse to the Device Manager to verify that the additional ports are displayed. To locate this: Open the Control Panel, System, Hardware, Device Manager. The new ports will appear under Ports (COM & LPT).
Driver Installation - Windows 2000
Upon rebooting the computer for the first time following the installation of the serial card, the following screen will be displayed prior to the operating system welcome screen:
| Bus No | Device No | Func No | Vendor ID | Device ID | Device Class | IRQ |
| 0 | 7 | 1 | 8086 | 7010 | IDE Controller | 14 |
| 0 | 13 | 0 | 1409 | 7268 | Simple COMM. Controller | 10 |
Once Windows 2000 loads, it will detect the PCI Parallel Controller automatically and run the Add New Hardware Wizard to assist you in installing the new device.
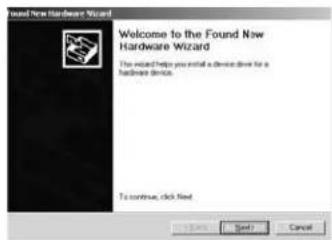
- Insert the Driver CD that was included with this PCI card.
Instruction Manual
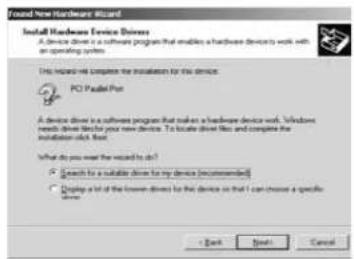
- Select Search for a suitable driver for my devices, and click next to continue.

- Please select Specify a location, and click Next.

- Locate the necessary file by clicking Browse and selecting D:\IO\PCI IP\Win2k and XP. Click Next to continue installation.
- Windows will then notify you that The wizard found a driver for the following device: PCI Multi IO Adapter (snxpci.inf). Please click Next.
- The screen that follows will then notify you that Windows has finished installing the software for this device. Please click Finish, to complete installation.
Please note: Following the installation of each parallel/serial port, you will be prompted to reboot. Please omit the request to reboot, until all ports have been added. Instead, please follow steps 1-5 for each parallel and serial connection, then reboot the computer.
Instruction Manual
Verifying installation - Windows 2000
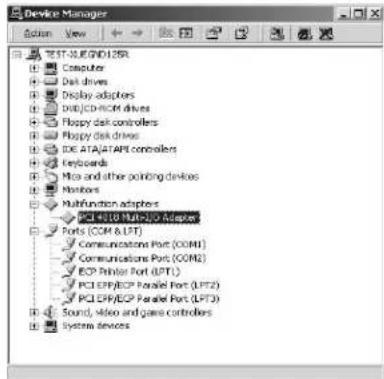
Once all connections have been installed and Windows has been rebooted, please browse to the Device Manager to verify that the additional ports are displayed. To locate this: Open the Control Panel, System, Hardware, Device Manager. The new ports will appear under Ports (COM & LPT).
Driver Installation - Windows 95/98SE/ME
Upon rebooting the computer for the first time following the installation of the serial card, the following screen will be displayed prior to the operating system welcome screen:
| Bus No | Device No | Func No | Vendor ID | Device ID | Device Class | IRQ |
| 0 | 7 | 1 | 8086 | 7010 | IDE Controller | 14 |
| 0 | 13 | 0 | 1409 | 7268 | Simple COMM. Controller | 10 |
Once Windows loads, it will detect the PCI Parallel Controller automatically and run the Add New Hardware Wizard to assist you in installing the new device.

- Insert the Driver CD that was included with this PCI card.
Instruction Manual
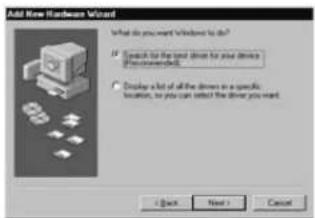
- Select Search for the best driver for your device (recommended), and click next to continue.
Please note: Windows ME will search the drive automatically. When given the option, please highlight D:\IO\PCI IO\Win9x\SPCIMIO.INF and click OK. Following this, please skip to step 4.

- Please select Specify a location and click Browse. Locate D:\IO\PCI IO\Win9x, where D:\ is the CD-ROM or DVD-ROM drive designation, and click Next.

- Windows will detect the driver (SPCIMIO.INF) and indicate that it is about to install the driver file for Multi IO Controller. Click Next to copy the necessary files.
Please note: Following the installation of each parallel/serial port, you will be prompted to reboot. Please omit the request to reboot, until all ports have been added. Instead, please follow steps 1-5 for each parallel and serial connection, then reboot the computer.
Instruction Manual
Verifying installation - Windows 95/98SE/ME

Once all connections have been installed and Windows has been rebooted, please browse to the Device Manager to verify that the additional ports are displayed. To locate this: Open the Control Panel, System, Hardware, Device Manager. The new ports will appear under Ports (COM & LPT).
Driver Installation - Windows NT 4.0
- Once Windows loads after rebooting your computer, please insert the Driver CD into your CD-ROM/DVD-ROM drive.
- Browse to, and double-click on the Setup.exe file, located on the Driver CD (located in D:\IO\PCI IP\WinNT, where D:\ is the letter assigned to designate your CD-ROM or DVD-ROM drive)

- Press Continue to install the necessary driver.
- Once the driver installation has finished, you will be asked to reboot your system in order for the changes to take effect. Please select Yes, I want to restart my computer now and click OK.
Instruction Manual
Verifying installation - Windows NT 4.0

Once all connections have been installed and Windows has been rebooted, please open the Windows NT Diagnostics utility. Here, you will find the I/O addresses of the parallel port (SNXPAR) and two serial ports (SNXSER). The IRQ information can be found by clicking the IRQ button.
Driver Installation - Windows 3.1
Normally, serial and parallel I/O ports can be supported by Windows 3.1 default device drivers. However, there are only 4 serial ports (3F8h, 2F8h, 3E8h, 2E8h) and 3 parallel ports (3BCh, 378h, 278h) that are supported by default. Most likely, the ports added by this card will require manual port setting changes, however, it is important to determine the PCI serial and parallel port resources, prior to doing so:
[OS Platform] :
Microsoft Windows :V3.1/3.11
- Run PCIDOS.exe (located on the Driver CD under \PCI IO\DOS\PCIDOS.exe) to display the following information:
On-Board/ISA Serial COM1 3f8H
On-Board/ISA Serial COM2 2f8H
PCI Serial COM3 b800H,IRQ 10
PCI Serial COM4 b808H,IRQ 10
On-Board/ISA Parallel LPT1 3bcH
- Make note of the information displayed in PCIDOS.exe.
- Start Windows 3.1.
Instruction Manual


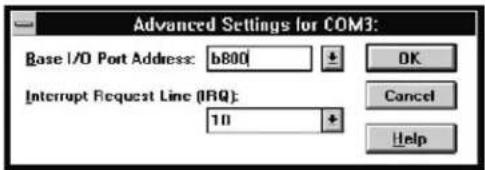
- Change the port settings accordingly, based on the information displayed in Step 2, by entering Ports, located in Control Panel.
- When asked if you wish to restart the computer, please select Restart Now.
- To verify the PCI port settings, open \Windows\system.ini.
Instruction Manual
A note about remapping:
- Since some PCI serial ports can support the remapping function (4025D/4027D/4028D/4036D/4037D/4038D/4079D/E/F), please check the PCI card using the SunixPCI.exe utility, located on the Driver CD.
Clock = 1.8432 MHz for remappable port
| Item | Actual Baudrate BIOS/DOS setting Remark | |
| 1 | 92 | 1600 Does not support |
| 2 | 46 | 0800 Does not support |
| 3 | 23 | 0400 Does not support |
| 4 | 11 | 5200 115200 |
| 5 | 57 | 600 57600 |
| 6 | 38 | 400 38400 |
| 7 | 19 | 200 19200 |
| 8 | 96 | 00 9600 |
| 9 | 48 | 00 4800 |
| 10 | 24 | 00 2400 |
| 11 | 12 | 00 1200 |
| 12 | 300 | 300 |
- Since the PCI serial card is driven by a higher CLK (14.7456 MHz), the actual baud rate is 8 times higher than the BIOS/DOS baud rate setting. The below table illustrates the relationship:
| Item | Actual Baudrate | BIOS/DOS setting | Remark |
| 1 | 921600 115200 | ||
| 2 | 460800 | 57600 | |
| 3 | 230400 | 28800 | Non-BIOS standard |
| 4 | 115200 | 14400 | Non-BIOS standard |
| 5 | 57600 | 7200 | Non-BIOS standard |
| 6 | 38400 | 4800 | Item |
| 7 | 19200 | 2400 | Item |
| 8 | 9600 1200 | Item | |
| 9 | 4800 | 600 | Non-BIOS standard |
| 10 | 2400 | 300 | Item |
| 11 | 1200 | 150 | Item |
| 12 | 300 | 37.5 | Non-BIOS standard |
Instruction Manual
Driver Installation - Linux
For detailed instructions on driver installation using a Linux operating system, please refer to the included Driver CD, in the following locations:
D:\IO\PCI IO/Linux\Red Hat V8.0.pdf
D:\IO\PCI IO/Linux\Red Hat V6.0.pdf
Configuration
Com Port Configuration - Windows 2000/XP
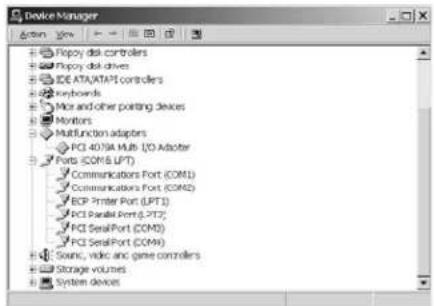
- Enter the Device Manager utility, located in the Control Panel. The newly installed ports will be located under Ports (COM & LPT). Please locate and select the ports you wish to configure by right-clicking on the COM Port name, and selecting Properties.
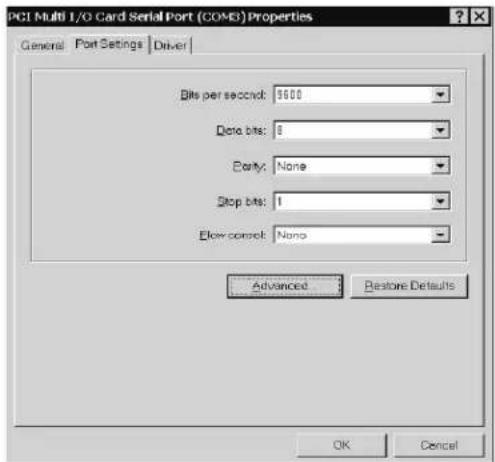
- Select Port Settings. Here, you will be able to configure Bits per second, Data bits, Parity, Stop bits and Flow control.
Instruction Manual
Please note: There are three kinds of flow control: Xon/Xoff, Hardware, and None. The Xon/Xoff selection uses a software protocol. Hardware indicates that the flow control is using RTS/CTS, however the RTS/CTS is controlled by software as well. None indicates that no flow control is present. Click the Advanced button, if you want to set more advanced features.
Com Port Configuration - Windows 95/98/98SE/ME
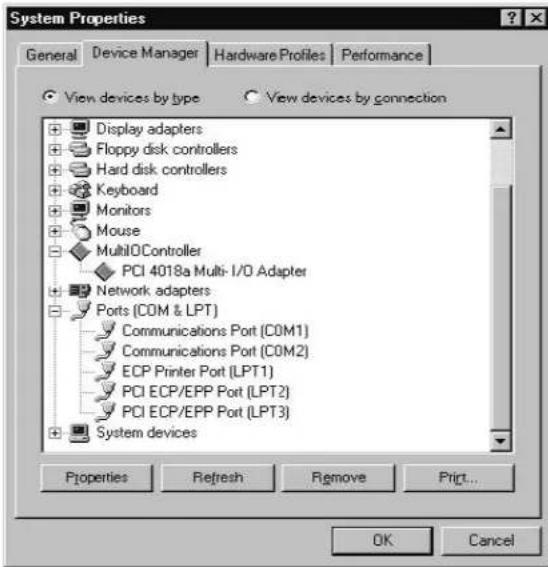
- Enter the System Properties utility, located in the Control Panel. The newly installed ports will be located under Ports (COM & LPT). Please locate and select the ports you wish to configure by right-clicking on the COM Port name, and selecting Properties.
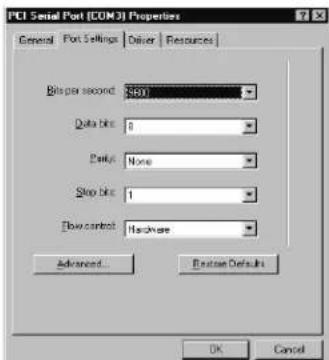
- Select Port Settings. Here, you will be able to configure Bits per second, Data bits, Parity, Stop bits and Flow control.
Instruction Manual
Please note: There are three kinds of flow control: Xon/Xoff, Hardware, and None. The Xon/Xoff selection uses a software protocol. Hardware indicates that the flow control is using RTS/CTS, however the RTS/CTS is controlled by software as well. None indicates that no flow control is present. Click the Advanced button, if you want to set more advanced features.

- Configure the Enable Auto CTS/RTS Flow Control, 16/32/64 bytes FIFO length and Receive/Transmit Buffer trigger level if necessary.
Enabling Auto CTS/RTS Flow Control means the CTS/RTS flow control is controlled by hardware automatically. The system will remain more stable if the function is enabled.
Setting the Receive/Transmit Buffer to a higher value will get faster performance, because the interrupts will be reduced, but the time for interrupt service routine will become shorter. The receive buffer overflow will occur if the CPU is incapable of handling the request. If you notice system instability, please reduce this setting to a lower value.
Com Port Configuration - Windows NT 4.0

- Locate the Multi-I/O Card Configuration icon, located in the Control Panel.
Instruction Manual

- Select PCI/ISA Serial Ports and select the serial port you wish to configure from the drop-down box. Press Setup to configure the serial port.

- Set the 32 byte FIFO or Auto Flow Control or Recieve Trigger Level, and click OK. Please note: If you stall the modem using Auto Flow Control, please remove the checkmark from Auto Flow Control Enable.
LPT Port Configuration - Windows 95/98/98SE/ME
- Please ensure that the desired parallel peripheral device is securely connected to the parallel port provided by PCI2S1PDVLP.
- Enter My Computer and double-click on the Printers icon.
- Double-click on the Add Printer icon and click Next.
- Once the Add Printer Wizard appears, please click Next.
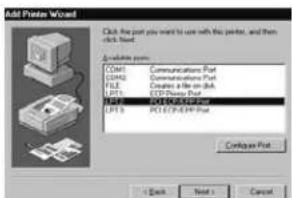
- Install the drivers that were included with your printer at the time of purchase. If you want to connect the printer to the newly installed parallel port, please select PCI ECP/EPP port, and click Next.
Instruction Manual
- If you wish to connect a scanner or zip disk to the newly installed port, you will need to remap the Parallel Port I/O address to 0x378 or 0x278. To do so:
a. Open System Properties.
b. Locate and double-click on Multi IO Controller, from within the Device Manager.
c. Select PCI Multi I/O Adapter by right-clicking on the listing, and click Properties.
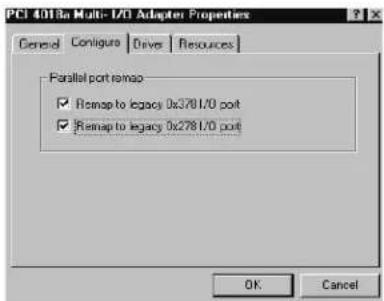
- Select the Configure tab. If you need to remap the I/O address, please select Remap to legacy 0x378 I/O port and/or Remap to legacy 0x278 I/O port. This setting will be saved once you click OK, and will take effect once the computer has been rebooted.
LPT Port Configuration - Windows NT 4.0
![Control Panel File Edit View Help Accessibility iTunes Add/Remove Programs Chrome Case/Time Devices DiskUp Monitor Display Fonts Internet Keyboard Licensing Modems Mouse Multi-AU Card Configuration1 Multimedia Network ODBC PC Card [POP.CIA] Posts Printers](/content/2026/06/1249856/images/2b593e88c0208d70e01951464cf4fb0054eda38c9e4f420d4c3afe3bb8f56216.jpg)
- Double-click on the Multi I/O Card Configuration icon, located within the Control Panel.
Instruction Manual

- Select PCI Parallel Ports to configure the I/O address of the parallel port. Select Remap to legacy 0x378 and/or 0x278, if you wish to remap to these addresses.
- Click OK to confirm your selection. These settings will take effect upon rebooting the computer.
Please Note: The onboard parallel port is always set to LPT1, if the remap function is disabled. When the parallel port is remapped to 0x378 or 0x278, the onboard parallel port will become the last available LPT port.
Please Note: When you connect a scanner to the remapped parallel port, you must turn on the scanner prior to turning on the computer, for it to function properly.
LPT Port Configuration - Windows 3.1
Since Windows 3.1 only supports 3 parallel ports (3BCh, 378h, 278h), the PCI parallel ports can only be recognized if the DOS driver is activated in advance.

- To activate the DOS driver, run PCIDOS.exe, located on the Driver CD under D:\PCI IO\DOS\PCIDOS.exe.


- Install the printer in Control Panel
Click Connect
Instruction Manual

- Select the parallel port you wish to use for the printer connection. For optimum compatibility, it is recommended that the onboard LPT1 is set to 3BCh.
Instruction Manual
Specifications
| Bus Type PCI / PCI-X | |
| Maximum Data Transfer Rate | 921.6 Kbps/sec |
| Chipset | SUN1889 |
| OS Support | Win 98/ME/NT, Win K/XP/2003, Win CE Linux 2.0.x / 2.2.x / 2.4.x / 2.6.x, and DOS |
| Operation Temperature | 0 degrees C to 57 degrees C |
| Storage Temperature | -20 degrees C to 85 degrees C |
| Data bits | 4,5,6,7, and 8 |
| Stop bits | 1, 1.5, and 2 |
| Parity | None, Odd, Even, Space, Mark |
| Flow Control | None, Xon/Xoff, RTS/CTS |
Accessory Products from StarTech.com
Contact your local StarTech.com dealer or visit www.startech.com for cables or other accessories that will help you get the best performance out of your new product.
MC3MF
3 ft. AT Modem Cable DB9F-DB25M
MC6MF
6 ft. AT Modem Cable (male to female)
MXT100
6 ft. 9-pin Straight Through Cable (male to female)
MXT100\_25
25 ft. 9-pin Straight Through Cable (male to female)
AT925FF
Adapter DB9F to DB25F
MXT10010
10 ft. 9-pin Straight Through Cable (male to female)
MXT10050
50 ft. 9-pin Straight Through Cable (male to female) (Special Order)
AT925FM
Adapter DB9F to DB25M
AT925SFM
Slimline Adapter DB9F to DB25M
SCNM925FM
10 ft. Cross Wired Serial/Null Modem Cable DB9F to DB25M
SCNM9FF
10 ft. Cross Wired Serial/Null Modem Cable DB9 F/F
SCNM9FF25
25 ft. Cross Wired Serial/Null Modem Cable DB9 F/F
Instruction Manual
Technical Support
StarTech.com's lifetime technical support is an integral part of our commitment to provide industry-leading solutions. If you ever need help with your product, visit www.startech.com/support and access our comprehensive selection of online tools, documentation, and downloads.
Warranty Information
This product is backed by a lifetime warranty. In addition, StarTech.com warrants its products against defects in materials and workmanship for the periods noted, following the initial date of purchase. During this period, the products may be returned for repair, or replacement with equivalent products at our discretion. The warranty covers parts and labor costs only. StarTech.com does not warrant its products from defects or damages arising from misuse, abuse, alteration, or normal wear and tear.
Limitation of Liability
In no event shall the liability of StarTech.com Ltd. and StarTech.com USA LLP (or their officers, directors, employees or agents) for any damages (whether direct or indirect, special, punitive, incidental, consequential, or otherwise), loss of profits, loss of business, or any pecuniary loss, arising out of or related to the use of the product exceed the actual price paid for the product.
Some states do not allow the exclusion or limitation of incidental or consequential damages. If such laws apply, the limitations or exclusions contained in this statement may not apply to you.
About StarTech.com
StarTech.com is “The Professionals’ Source for Hard-to-Find Computer Parts”. Since 1985, we have been providing IT professionals with the quality products they need to complete their solutions. We offer an unmatched selection of computer parts, cables, server management solutions and A/V products and serve a worldwide market through our locations in the United States, Canada, the United Kingdom and Taiwan.
Visit www.startech.com for complete information about all our products and to access exclusive interactive tools such as the Parts Finder and the KVM Reference Guide. StarTech.com makes it easy to complete almost any IT solution. Find out for yourself why our products lead the industry in performance, support, and value.

- Dual Voltage Serial Card
- FCC Compliance Statement
- Use of Trademarks, Registered Trademarks, and other Protected Names and Symbols
- Instruction Manual
- Table of Contents
- Introduction
- Features
- Before You Begin
- System Requirements
- Contents
- Installation
- Installing the PCI2S1PDV/PCI2S1PDVLP Card
- Driver Installation - Windows XP
- Verifying installation - Windows XP
- Driver Installation - Windows 2000
- Verifying installation - Windows 2000
- Driver Installation - Windows 95/98SE/ME
- Verifying installation - Windows 95/98SE/ME
- Driver Installation - Windows NT 4.0
- Driver Installation - Windows 3.1
- [OS Platform] :
- A note about remapping:
- Driver Installation - Linux
- Configuration
- Com Port Configuration - Windows 95/98/98SE/ME
- Com Port Configuration - Windows NT 4.0
- LPT Port Configuration - Windows 95/98/98SE/ME
- LPT Port Configuration - Windows NT 4.0
- LPT Port Configuration - Windows 3.1
- Accessory Products from StarTech.com
- MC3MF
- MC6MF
- MXT100
- MXT100\_25
- AT925FF
- MXT10010
- MXT10050
- AT925FM
- AT925SFM
- SCNM925FM
- SCNM9FF
- SCNM9FF25
- Technical Support
- Warranty Information
- Limitation of Liability
- About StarTech.com
Brand : StarTech.com
Model : PCI2S1PDV
Category : Expansion card