
KD-PS42 - Router Key Digital - Free user manual and instructions
Find the device manual for free KD-PS42 Key Digital in PDF.


| Product Type | Router |
| Brand | Key Digital |
| Model | KD-PS42 |
| Dimensions (W x D x H) | 10.5 x 7.5 x 2.0 inches (approx.) |
| Weight | 1.2 lbs (approx.) |
| Power Supply | 12V DC, 1A |
| Wireless Standard | 802.11ac (Wi-Fi 5) |
| Maximum Data Rate | Up to 1200 Mbps |
| Frequency Band | 2.4 GHz / 5 GHz dual-band |
| Number of Antennas | 4 (internal) |
| Ports | 4 x Gigabit LAN, 1 x Gigabit WAN, 1 x USB 2.0 |
| Security | WPA2, WPA3, SPI firewall, VPN pass-through |
| Supported Protocols | TCP/IP, DHCP, DNS, IPv4/IPv6 |
| Management | Web GUI, mobile app |
| Operating Temperature | 0°C to 40°C |
| Cooling | Passive (fanless) |
| Mounting | Desktop or wall mountable |
| LED Indicators | Power, Ethernet, Wi-Fi, Internet |
| Cleaning | Wipe with a dry cloth; do not use liquid cleaners |
| Safety | Use only with provided power adapter; keep away from water |
| Spare Parts | Power adapter available from Key Digital |
| Repairability | No user-serviceable parts; contact support for repairs |
Frequently Asked Questions - KD-PS42 Key Digital
User questions about KD-PS42 Key Digital
0 question about this device. Answer the ones you know or ask your own.
Ask a new question about this device
Download the instructions for your Router in PDF format for free! Find your manual KD-PS42 - Key Digital and take your electronic device back in hand. On this page are published all the documents necessary for the use of your device. KD-PS42 by Key Digital.
USER MANUAL KD-PS42 Key Digital
4K/18G Presentation Switcher with 4 Inputs (HDBaseT, 3x HDMI), HDBaseT and HDMI Mirrored Outputs, Audio De-Embed, CEC Display Control, Auto Switching. Includes Rx. KD-App and KDPlug & Present™ Ready.




The Experts in Digital Video Technology and Solutions™
Default static IP address: 192.168.1.239, port 23
Table of Contents
About KD-PS42 3
Quick Setup Guide 5
Connect 5
Configure 6
Control 10
Application Examples 12
Mounting Options 14
Connections, Buttons, and LEDs 15
System Integration with KD-CamUSB, KD-Amp220, KD-App 23
TCP/IP and RS-232 Commands 25
Specifications 30
Warranty Information 30
Product Warnings & Safety Instructions
31

Default IP Address: 192.168.1.239
Operation Manual
Please visit www.keydigital.com for the latest product documentation, firmware, control drivers and software downloads. Product features and specifications are subject to change without notice
Always follow the instructions provided in this Operating Manual.
About KD-PS42
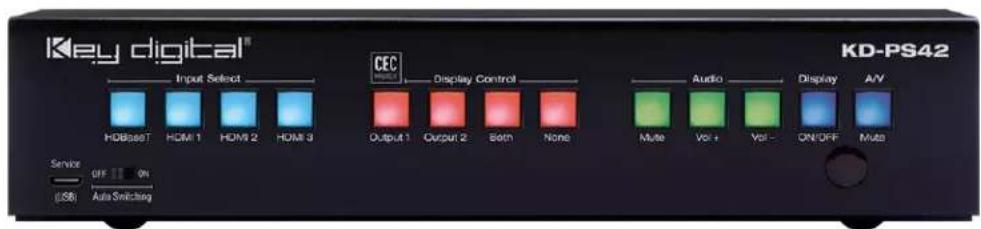
Key Digital® KD-PS42 is a 4K/18G KD-App Ready Presentation Switcher kit with CEC Manager™, auto switching, and audio de-embedding creating a user-friendly, simplified presentation system. KD-PS42 features three HDMI and one HDBaseT input which integrates natively with Key Digital wall plate HDBaseT transmitters. Mirrored HDMI and HDBaseT outputs enable audience + presenter views and the HDBaseT output marries in with the included KD-X40MRx for integrating monitors or projectors up to 40m / 131ft away when the selected source is outputting 4K/UHD (up to 70m / 230ft at 1080p).
Designed for professional audio video installations in conference rooms, board rooms, classrooms, lecture halls, auditoriums, and more, KD-PS42 enables multiple video sources to be displayed on up to two connected displays while analog (balanced/unbalanced) and digital (PCM) audio de-embed ports feed audio of the selected source into an amplifier, DSP, or sound bar. Integrating KD-PS42 with KD-AMP220 and KD-CAMUSB will enable an app-ready all-in-one solution for control of video switching, sound and speech enforcement, and PTZ camera control. Key Digital CEC Manager™ enables basic controls of the connected displays for a simplistic all-in-one integration system. KD-PS42 presentation switcher supports all SD, HD, VESA and Ultra HD/4K video standards with HDR header information included in a variety of 4K EDID handshakes. In addition to IR, RS-232, and TCP/IP control, KD-PS42 can also be controlled via trigger voltage and features status monitoring LEDs.
Key Features
- Presentation Switcher Kit: Presentation Switcher Kit: Includes KD-PS42 and KD-X40MRx. Add KD-X2x1WDTx or KD-X2x1WVTx wall plate HDBaseT transmitter for plug-in on walls, floor and table boxes
- Presentation Switching: 3 HDMI, 1 HDBaseT source selection by push button, IP, RS-232, IR, auto switching, or trigger control.
- Ultra HD/4K: Supports up to 4096x2160 or 3840x2160 24/25/30/60hz at 4:4:4 (signals up to 18Gbps bandwidth)
- Auto-Sensing: Automatic selection of newly detected source and switching from newly disconnected source when enabled
- CEC Manager™: Power, volume, and muting controls of the connected CEC supporting display/projector without any additional control wiring. Selection of desired CEC command recipient.
- KD-App Ready: Network scan & detect populates pre-built GUI including connected display/projector controls via CEC Manager™
- Ease of Integration: Complete configuration using Key Digital Management Software™ Pro
-
Audio De-embedding: Audio of the selected source is de-embedded at the unit's analog L/R balanced/unbalanced and PCM digital audio connectors.
-
KD-AMP220 Control Mode: Command forward to KD-Amp220 for an all-in-one user-friendly control UI of video switching, audio and speech enforcement
- PTZ USB Camera Integration: Add KD-CAMUSB for full PTZ control via KD-App. Use with KD-XUSB2 extender for USB signal extension over CAT5e/6.
• HDCP Licensing: Fully licensed and compatible with HDCP 2.2
• HDR10+ and Dolby Vision: More life-like images through a greater range of luminance levels
• Power Over HDBaseT: Rx unit (included) and wall plate Tx unit (sold separately) powered by KD-PS42
• Installation: Half-rack width with rack and under-table mounting ears included
• Signal Extension: For resolution and cable quality - 4K/UHD (18G): Up to 40m / 131ft
- 1080p: Up to 70m / 230ft
- Deep Color Support: Up to UHD/4K 30Hz 4:4:4/12 bits or 60Hz 4:2:2/12 bit
- Full Buffer System™: Manages TMDS re-clocking / signal re-generation, HDCP authentication to source & display, EDID Control handshake, and Hot Plug Detection Voltage
- EDID Management: Internal library with 15 internal EDID handshakes including 4K with HDR in addition to native EDID data copied from the Rx display/device
• RS-232: Bi-Directional control to/from Tx and Rx/Presentation Switch unit
- Unit Control Mode: Provides TCP/IP and RS-232 control and status of/from Tx unit
- EDID Management: Internal library with 15 internal EDID handshakes including 4K with HDR in addition to native EDID data copied from the output/display 1
- Digital Audio Format Support: DTS-HD Master Audio™, DTS:X®, Dolby® TrueHD, Dolby Atmos®
- Control System Support: Key Digital® App ready. Compass Control® Pro ready. Fully controllable by all IR, RS-232, and TCP/IP supported control systems via open API.
Accessories
• Qty 1: Power supply (48V/1.66A, 80W)
- Qty 1: Remote control and battery set (model KD-RMPS)
• Qty 2: Mounting bracket (L-Bracket)
• Qty 4: L-Bracket mounting screw
• Qty 1: Half-rack ear mount
• Qty 1: Short rack ear
• Qty 4: Rack Ear Screw
• Qty 1: RX Extender (model KD-X40MRx)
- Qty 2: Mounting bracket for KD-X40MRx (L-Bracket)
- Qty 4: L-Bracket mounting screw for KD-X40MRx
• Qty 1: 6-pin blue color terminal block plug
• Qty 1: 6-pin green color terminal block plug
• Qty 3: 2-pin green color terminal block plug - Qty 1: 6ft Micro USB to USB A data cable (USB 2.0)
• Qty 1: IR Emitter (3.5mm mono)
• Qty 1: IR Sensor (3.5mm stereo)
Quick Setup Guide
Begin with the KD-PS42 unit, KD-X40MRx, Key Digital wall-plate transmitter (sold separately), all input/output devices, and audio system powered off.
Connect
- Connect HDMI sources to the input ports of KD-PS42 unit
- (Optional) Connect HDMI and Display Port / VGA sources to wall-plate transmitter (sold separately)
- Connect HDMI displays / projectors to KD-PS42's HDMI output and the HDMI output port of the KD-X40MRx unit
- Connect CAT wire from KD-PS42's HDBaseT outputs to KD-X40MRx HDBaseT input and (optional) from KD-PS42's HDBaseT input to wall-plate transmitter (sold separately)
- Connect analog or digital audio to audio system
- (Optional) Connect RS-232 wiring for Integrated System. If utilizing KD-AMP220 or KD-CAMUSB integration control mode, connect RS-232 wiring from KD-UFS42 Unit Control TxD and Ground pins into KD-AMP220 and KD-CAMUSB RxD and Ground. Using a stripped mono or stereo audio cable is recommended, but other cables will work as well. See below diagram
- Connect Control System. For KD-App control and/or IP control from a control system or PC, connect TCP/IP port to network. For unit control, connect control system and/or PC to TCP/IP, RS-232, or place IR emitter over IR sensor.
- Connected monitors are controlled by CEC Manager™ on the HDMI connection.
a. Alternately, connect IR/RS-232 wiring from control system into pass-thru ports of KD-PS42 and IR/RS-232 ports of the KD-X40MRx
-
Connect power. Screw-in power supply to the KD-PS42 unit, and then connect power to outlets.
-
Power on HDMI sources and displays
Integrated Systems Wiring: KD-PS42 with KD-Amp220 and KD-CamUSB

flowchart
graph TD
    A["IP to RS-232 Conversion"] --> B["Network Wire"]
    B --> C["KD-PS42"]
    C --> D["AND / OR"]
    C --> E["HDBaseT"]
    E --> F["KD-AMP220"]
    F --> G["Tx + Gnd to RxD + Ground to KD-AMP220"]
    G --> H["KD-X40MRx"]
    H --> I["Tx + Gnd to RxD + Ground to KD-CAMUSB"]
    I --> J["KD-CAMUSB"]
    C --> K["TD Control with WiFi Network"]
    E --> L["TD Control with WiFi Network"]
Configure
Configure KD-PS42 with Key Digital Management Software Pro (KDMS Pro). Download HERE
- Connect to KD-PS42 from your PC using the USB micro port on the face of the unit
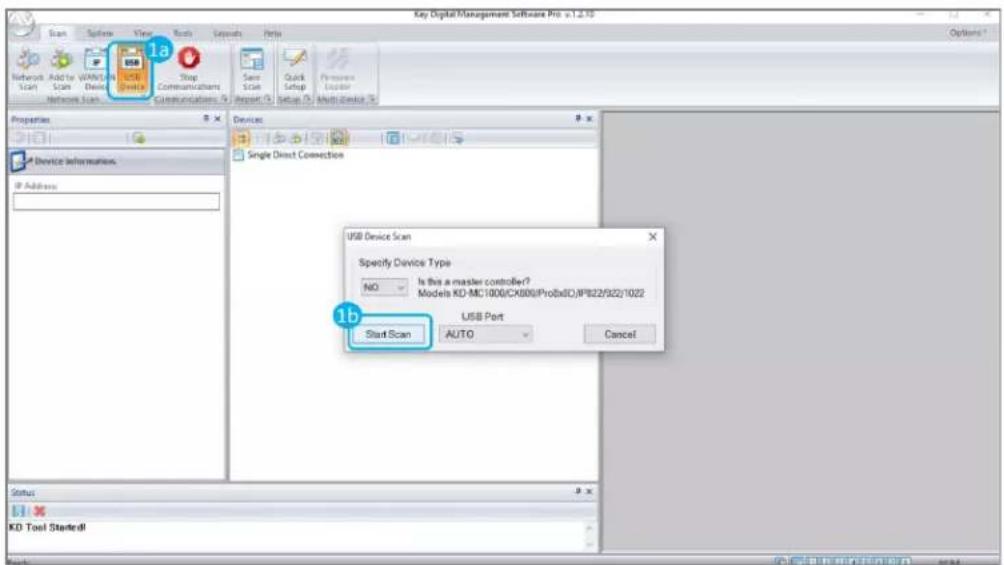
- Open the KDMS Pro software and perform a USB scan (fig. 1a). Choose "NO" and Start Scan when the USB Device Scan prompt appears (fig. 1b)
- Choose the detected device from the Devices window (fig. 2a)
- Set the desired Device Name in the KD-PS42 Information window (fig. 2b)
- In the Network Settings section of the Properties window, enter the desired IP settings (fig. 2c)
a. IP Address (default is 192.168.1.239)
b. Subnet Mask (default is 255.255.255.0)
c. Gateway (default is 192.168.1.1)
d. Port (default is 23)
e. Note: If using KD-App, please do not change the port number.
- Save (fig. 2d)
![Scan System View Tools Layouts Help Properties 2d KD-PS42 Information Device Name: Room 323 F/W Version: 1.03 F/W Release Date: 2/20/2019 Read Update Firmware Update Network Settings MAC Address: 60:89:B1:13:00:0F DHCP IP Address: 192.168.001.21 | IP Mask: 255.255.000.000 Gateway: 192.168.001.001 Port: 0023 Status 15:25:13 USB[COM4] DETECTED. 15:25:13 USB[COM4] - "KD-UFS42" Device found Devices Single Direct Connection USB Switchers 192.168.001.216 (KD-UFS42 "Room 323") 2a](/content/2026/06/1249023/images/0e50f6957894b5f87af939547ad15d5c87facac3f765878c967491afb8077117.jpg)
- Set the EDID handshaking to position "A" for 4K video with 2ch audio. Choose setting "4" for 1080p video with 2ch audio.
- Refer to the Connections, Buttons, and LEDs section for more information on the remaining control rotaries, slide switches, etc. Full access to all settings/commands is achieved via terminal session using Tera Term or PuTTy software.
Additional configuration steps for control by KD-App and KDMS Pro
- Set the desired Input/Output names by entering the Input/Output Settings section of the properties window, and selecting the Change Input/Output Name button (fig. 3a), selecting the desired input/output and entering the name (fig. 3b)

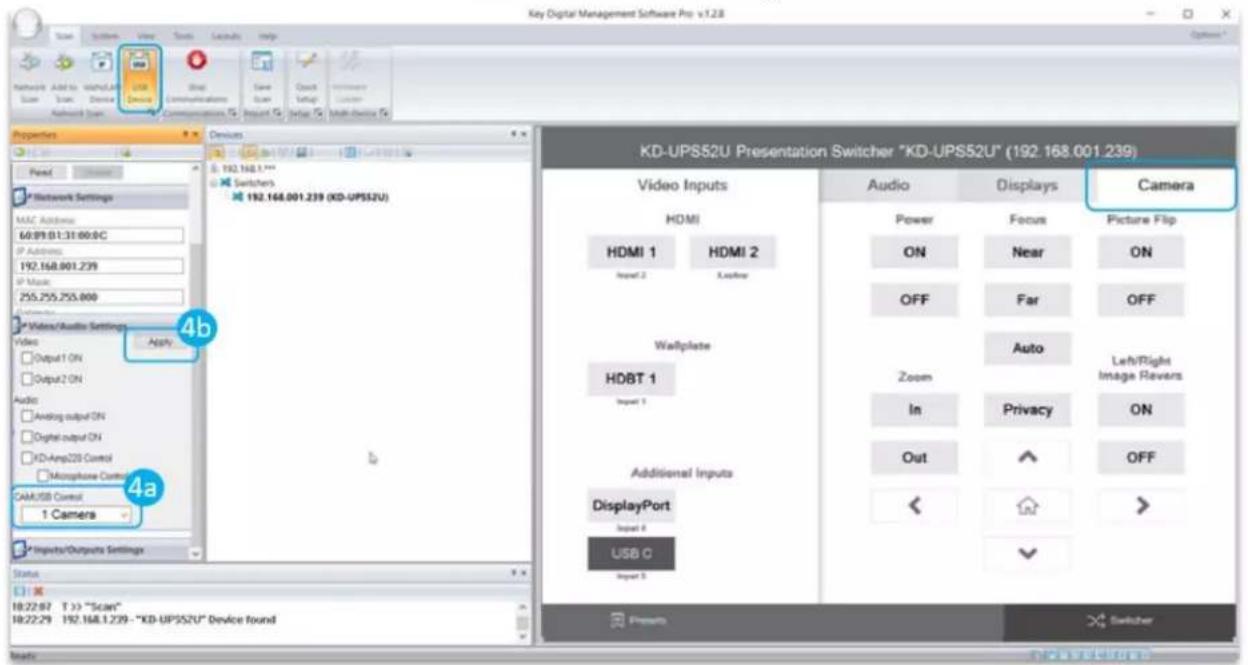
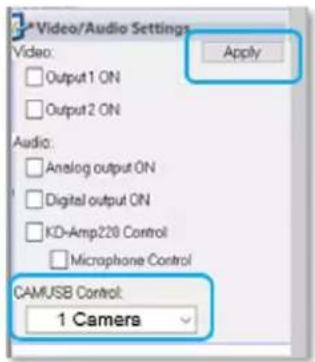
- If utilizing KD-CamUSB integration control mode, choose the quantity of cameras needed to control (fig 4a). Press Apply (fig 4b)
a. Note: Controlling more than two cameras will require the use of active third-party RS-232 signal distribution. Maximum of seven cameras is supported.
- If utilizing KD-AMP220 integration control mode, choose the KD-AMP220 Control selection box (fig. 5a) in the Audio/Video properties section. To control the mix level of KD-AMP220's microphone input, choose the selection box for Microphone Control (fig. 5b).

- Your unit is now ready to control from the KDMS™ Control Panel, KD-App, or by professional control system.
Control
Option 1: Control via Remote Control
- Output 1 display/projector control via CEC
- Output 2 display/projector control via CEC
- Input selection of KD-PS42 connected sources
- KD-CamUSB (sold separately) IR control

Option 2: Control via KD-App, KDMS Pro™
KD-PS42 is controllable by Key Digital's user-friendly iOS App (downloadable in the App Store) or Key Digital® Management Software™ Pro.
- Connect and Configure your KD-PS42 as described in this Connect & Configure sections
- Download and open KD-App and/or KDMS™
- Ensure the iOS device and/or PC computer are on the same network with KD-PS42
- Perform a network scan in the KD-App/KDMS™
- Select and control the selected KD-PS42
- To enter KDMS Pro end-user mode, key CTRL + ALT + N after selecting the unit in the devices tree.
Key Digital® App on the App Store

Option 3: Control via professional control system
KD-PS42 allows control over serial interface for bi-directional communication.
- For RS-232 control use pins 4, 5, and 6 of the Unit Control port
- For TCP/IP control the default static IP address is 192.168.1.239, with port 23
Default static IP address: 192.168.1.239, port 23

- For the past 10 years, most Key Digital matrix switches have supported a standard audio + video switching command. KD-PS42 is also controllable by this command, so if you have previously integrated Key Digital matrixes by third-party control systems you may have success using the same driver/module.
a. Switching Video + Audio together (two commands supported)
i. SPO01Slyy yy = input number (01-05)
ii. SPOSlyy yy = input number (01-05)
b. Display CEC On / Off
i. SPOxxTVy xx = output number (01-02), y = ON or OFF
• See the TCP/IP and RS-232 Commands section for full command set.

Test for proper operation of the unit and cables in your system before permanently securing the unit for final installation. Ensure that you leave enough ventilation space to provide sufficient airflow and cooling
Application Examples
Complete Key Digital Presentation Solution

flowchart
graph TD
    A["Teekore"] -->|USB 2.0| B["KD-PS42"]
    C["TD"] -->|HDMI| B
    D["KD-BYOD4K"] -->|HDMI| B
    E["Laptop"] -->|HDMI DP VGA| F["KD-Amp220 Amp/Pre-Amp"]
    G["User"] -->|KD-X2x1WVTx or KD-X2x1WDTx| F
    F --> H["3rd Party Audio Amplifier for Distributed/Expanded Audio (optional)"]
    F --> I["3rd Party Audio Amplifier for Distributed/Expanded Audio (optional)"]
    J["WiFi"] --> K["KD-XUSB2"]
    K --> L["KD-CamUSB"]
    L --> M["Conferencing Camera, 1080p. PTZ. Presets"]
    M --> N["Welcome Back Students!"]
    N --> O["Touch Screen Display Or Overlay"]
    O --> P["Camera"]
    style A fill:#f9f,stroke:#333
    style C fill:#f9f,stroke:#333
    style D fill:#f9f,stroke:#333
    style E fill:#f9f,stroke:#333
    style F fill:#f9f,stroke:#333
    style G fill:#f9f,stroke:#333
    style J fill:#f9f,stroke:#333
    style K fill:#f9f,stroke:#333
    style L fill:#f9f,stroke:#333
    style M fill:#f9f,stroke:#333
    style N fill:#f9f,stroke:#333
    style O fill:#f9f,stroke:#333
CEC Controlled Presentation Space

flowchart
graph TD
    A["Telekem"] -->|HDMI| B["KD-PS42"]
    C["Apple TV"] -->|HDMI| B
    D["Laptop"] -->|HDMI| B
    B --> E["HDMI"]
    B --> F["HDMI"]
    B --> G["HDMI"]
    B --> H["HDMI"]
    B --> I["HDMI"]
    B --> J["HDMI"]
    B --> K["HDMI"]
    B --> L["HDMI"]
    M["Front button control\nCEC Display power & volume, video select"] --> N["MDI"]
    O["KD-X40MRx"] --> P["MDI"]
    Q["Myself"] --> R["Others"]
    S["Equipment"] --> T["C"]
    U["Copyright"] --> V["Copyright"]
    W["Audio"] --> X["Display"]
    Y["ON/OFF"] --> Z["A/V"]
    AA["Mute"] --> AB["Video"]
    AC["Multi"] --> AD["Video"]
    AE["Multi"] --> AF["Video"]
Simple Conference Room / Hybrid Classroom

flowchart
graph TD
    A["User"] -->|USB 2.0| B["KD-XUSB2"]
    B --> C["KD-PS42"]
    C --> D["KD-CamUSB"]
    D --> E["Conferencing Camera 1080p, PTZ"]
    C --> F["KD-X40MRx"]
    F --> G["Front button control CEC Display power & volume, video select"]
    C --> H["HDMI"]
    H --> I["KD-BYOD4K"]
    I --> J["User"]
    C --> K["Audio"]
    C --> L["Display"]
    C --> M["A/V"]
    C --> N["Auto"]
    C --> O["Vol +"]
    C --> P["Vol -"]
    C --> Q["ON/OFF"]
    C --> R["Multi"]
    C --> S["Video Select"]
    C --> T["Video Select"]
Lecture Hall with Wired and Wireless Presentation
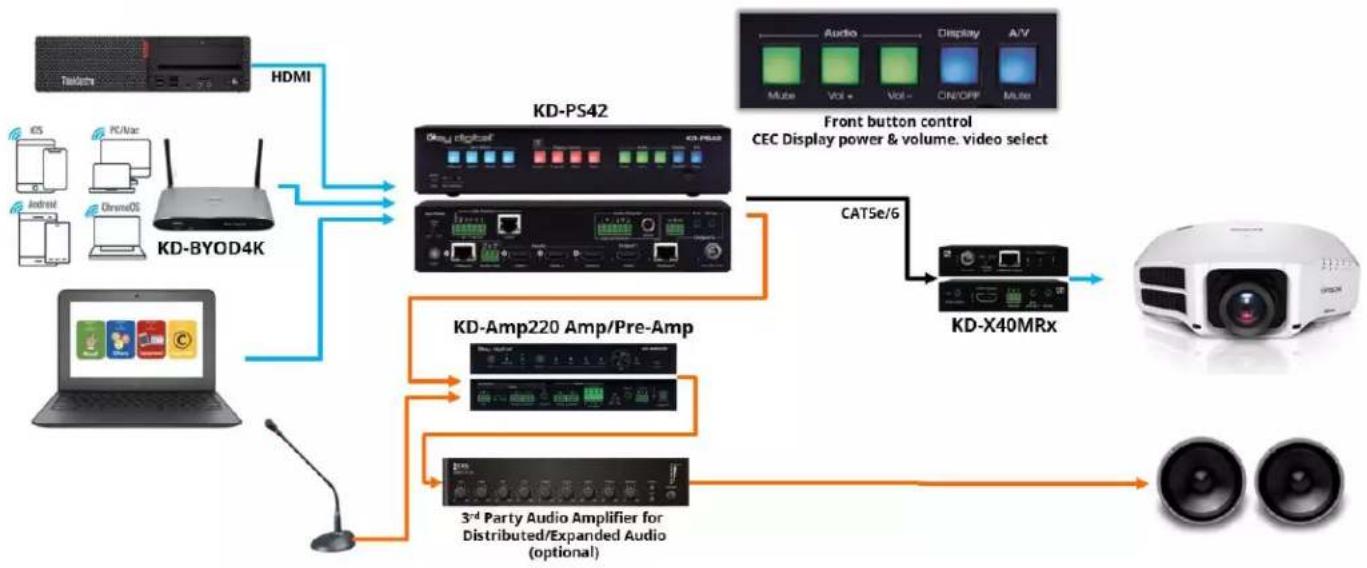
flowchart
graph TD
    A["TDAM"] -->|HDMI| B["KD-PS42"]
    C["CD-BYOD4K"] -->|HDMI| B
    D["Laptop"] -->|HDMI| B
    B -->|CATSe/6| E["KD-X40MRx"]
    E --> F[" projector"]
    G["3rd Party Audio Amplifier for Distributed/Expanded Audio (optional)"] --> E
    H["Android"] --> I["PC/Vac"]
    I --> J["Android"]
    J --> K["PC/Vac"]
    K --> L["Android"]
    M["Video Player"] --> N["3rd Party Audio Amplifier for Distributed/Expanded Audio (optional)"]
    O["Computer"] --> P["3rd Party Audio Amplifier for Distributed/Expanded Audio (optional)"]
    P --> Q["3rd Party Audio Amplifier for Distributed/Expanded Audio (optional)"]
    R["Front button control CEC Display power & volume. video select"] --> B
    S["Audio"] --> B
    T["Display"] --> B
    U["A/V"] --> B
Mounting Options
KD-PS42 includes hardware for multiple mounting options.
- For mounting in a standard-width rack, use the included half-rack blank and short rack ear

- For mounting under table or on wall, use the included L brackets

natural_image
Metal perforated metal panel with mounting holes and mounting holes (no text or symbols visible)- For mounting two units side by side in a standard-width rack, use KD-BKTHF (sold separately)

Connections, Buttons, and LEDs
Inputs and EDID Handshaking Rotary
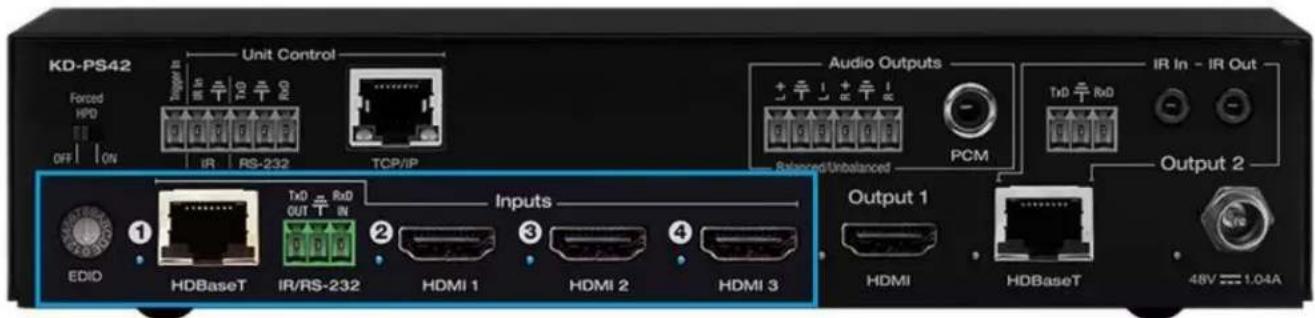
HDBaseT Port (Input 1): Using a CAT5e/6 cable, connect from a compatible KD Transmitter
- KD-X2x1WDTx – Wall plate transmitter with HDMI and Display Port inputs. Designed for installation in a US dual-gang wall plate on wall, in a table or floor pocket.
- KD-X2x1WVTx – Wall plate transmitter with HDMI and VGA + L/R inputs. Designed for installation in a US dual-gang wall plate on wall, in a table or floor pocket.
• 4K/UHD (18G): Up to 40m / 131 ft
• 1080p: Up to 70m / 230 ft - Provides power over HDBaseT to connected transmitter
- Link light to the left of the port illuminates solid from healthy HDBaseT connectivity with Tx unit and active incoming video signal.
- Does not support Dolby® Vision
HDMI (Input 2, 3 and 4): Using an HDMI cable, connect your HDMI sources.
• Supports up to UHD/4K @ 50/60 fps [4:4:4], 18Gbps
• Supports HDR10 and Dolby Vision
- Dolby Vision only available through HDMI inputs & outputs, not HDBaseT.
• Compliant with HDCP 2.2 and previous
- Supports lossless compressed audio formats including Dolby® TrueHD, Dolby® Digital Plus, Dolby Atmos®, and DTS-HD Master Audio™
- Does not support CEC pass through from connected Rx unit / presentation switch
- Link light to the left of each port illuminates when there is an active HDMI signal passing through.
Supported standard 4K video formats:
| Resolution | Bandwidth | |
| 1 | 4K@24/25/30 [4:4:4] 8bit | < 10.2Gbps |
| 2 | 4K@24/25/30 [4:2:2] 8/10/12bit | < 10.2Gbps |
| 3 | 4K@50/60 [4:2:0] 8bit | < 10.2Gbps |
| 4 | 4K@24/25/30 [4:4:4] 10/12bit | < 18Gbps |
| 5 | 4K@50/60 [4:2:2] 8/10/12bit | < 18Gbps |
| 6 | 4K@50/60 [4:2:0] 10/12bit | < 18Gbps |
| 7 | 4K@50/60 [4:4:4] 8bit | < 18Gbps |
EDID Handshaking Rotary
- EDID authentication is provided from the unit to the connected inputs/sources.
- Inputs/sources connected to a KD Transmitter receive their EDID handshake from the KD Transmitter
- The EDID file (AKA "handshake" is selected using the EDID rotary and provides a list of compatible video and audio formats as well as digital data, informing the source device what it should outputs.
- Most sources will comply with a new EDID file without a power-cycle, but devices do behave differently
- Adjustments may speed up sync time during source selection
| Position | EDID Handshake Description | EDID Rotary |
| 0 | Copy EDID from HDMI Output 1 | 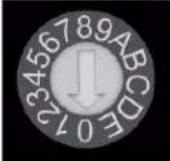 Note: Default position is "A" Note: Default position is "A" |
| 1 | 1080i, 2CH AUDIO | |
| 2 | 1080i, DOLBY/DTS 5.1 | |
| 3 | 1080i, HD AUDIO | |
| 4 | 1080p, 2CH AUDIO | |
| 5 | 1080p, DOLBY/DTS 5.1 | |
| 6 | 1080p, HD AUDIO | |
| 7 | 4Kx2K@60, 10.2G, HDR, 2CH AUDIO | |
| 8 | 4Kx2K@60, 10.2G, HDR, DOLBY/DTS 5.1 | |
| 9 | 4Kx2K@60, 10.2G, HDR, HD AUDIO | |
| A | 4Kx2K@60, 18G, HDR, 2CH AUDIO | |
| B | 4Kx2K@60, 18G, HDR, DOLBY/DTS 5.1 | |
| C | 4Kx2K@60, 18G, HDR, HD AUDIO | IMPORTANT: Please apply light pressure to the EDID rotary when making your selection. |
| D | 1280x720p@60 DVI (no audio) | |
| E | 1920x1080p@60 DVI (no audio) | |
| F | 4Kx2K@30, 10.2G, HDR, 2CH AUDIO |
IMPORTANT: Please apply light pressure to the EDID rotary when making your selection.
Outputs
The HDMI and HDBaseT outputs are mirrored. The selected source is viewed on both outputs simultaneously.
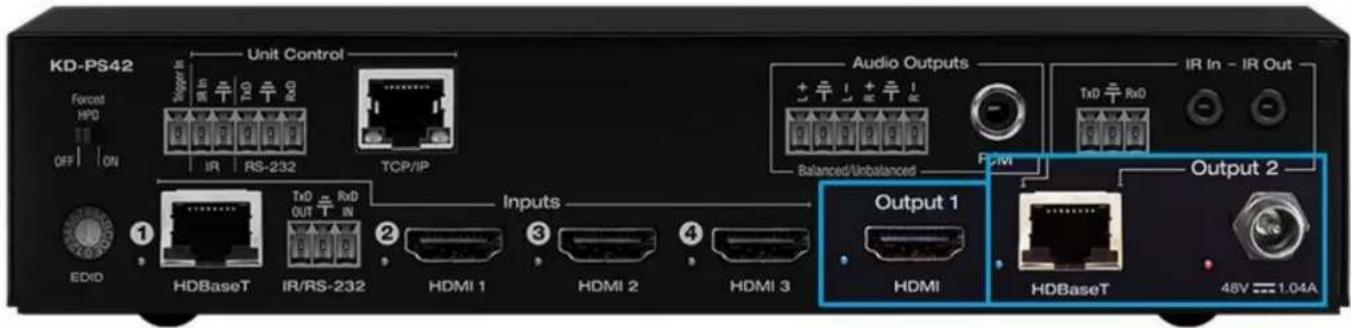
HDMI (Output 1): Using an HDMI cable, connect your display or system. For DVI-D/DVI-I sources use an appropriate adapter. For Display Port, use active adapters.
• Supports up to UHD/4K @ 50/60 fps [4:4:4], 18Gbps
• Supports HDR10
• Compliant with HDCP 2.2 and previous
- Supports lossless compressed audio formats including Dolby® TrueHD, Dolby® Digital Plus, Dolby Atmos®, and DTS-HD Master Audio™
- Supports CEC Manager™ control of connected supporting display. Does not support CEC pass through.
- Link light to the left of port illuminates when there is HPD from the connected display.
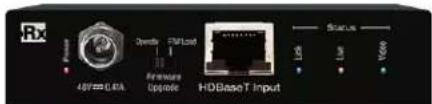
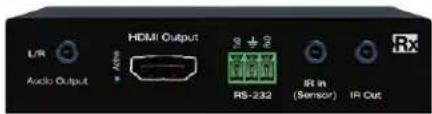
HDBaseT (Output 2): Connect a CAT5e/6 cable to the Rx unit at the HDBaseT Input port.
• 4K/UHD (18G): Up to 40m / 131 ft
• 1080p: Up to 70m / 230 ft
• Use with included KD-X40MRx.
- Compatible with third party HDBaseT Rx, including projectors, but cannot be guaranteed.
- Provides power over HDBaseT to connected transmitter
- Link light to the left of the port illuminates solid from healthy HDBaseT connectivity with Rx unit.
- Does not support Dolby® Vision
Audio Outputs

- Analog and digital de-embedded audio from the selected source
• There are no volume or tone control features
• There are no pre-amp features
| Audio Input Signal Format | Analog Output | Digital Output |
| 2ch PCM | Pass-Through | Pass-Through |
| Multi-Channel PCM | Front L/R Pass-Through | MUTE |
| Dolby®, DTS ^TM 5.1 / 6.1 | MUTE | Pass-Through |
| HD Audio(incl. Dolby®, DTS ^TM 7.1) | MUTE | MUTE |
Analog L/R Balance/Unbalanced
- 6-pin terminal block
- Drives audio signals up to 2 VRMS with a sampling rate of 192Hz
• Automatically mutes if audio formatting is not PCM 2ch - Pin assignment:
○ Left + is Pin 1; Left - is Pin 3; Left Ground is Pin 2
○ Right + is Pin 4; Right - is Pin 6; Right Ground is Pin 5
PCM Digital
- RCA coaxial
• SPDIF IEC 60958 format
• Compatible with sampling rates up to 192KHz
• Supports multi-channel Dolby® surround formats up to 5.1 and DTV™ 6.1
• Automatically mutes if audio formatting is not PCM, Dolby®, or DTS™
Service USB Port
- Micro USB port
- Used for configuration and control from PC via KDMS Pro or third-party control terminal
- Used for firmware updates (consult with Key Digital tech support before updating firmware)
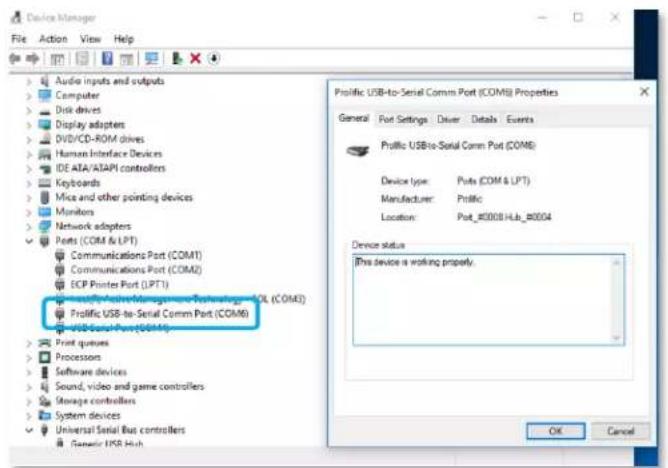
• Supports USB driver for Windows 10, 7, XP, Mac, Linux - Will register as "Prolific USB-to-Serial Comm Port in Device Manager
- Can be used as RS-232 control port. Baud rate is 57,600 unless adjusted otherwise

Front Panel Buttons

Input Source (Blue)
• Used for selecting the desired source to be routed to both outputs.
- When an input source selection occurs, a Power On CEC command is sent to the display(s) enabled on the Display Control button section
CEC Manager™ Display Control (Red)
- Choose the display that you desire CEC control commands be sent to
CEC Manager™ Commands (Green & Blue)
- Sends CEC commands via HDMI to the display(s) specified by the Display Control buttons.
- Ensure that CEC is enabled on your displays/projectors. Depending on the manufacturer, HDMI-CEC may be given a different name. View THIS ARTICLE for a list of CEC names and how to enable CEC on popular displays.
- With KD-Amp220 mode enabled, Mute, Vol +, and Vol -, buttons send RS-232 commands to the KD-Amp220 instead of CEC commands to the displays(s)
- When Vol + or Vol – button is held, the command is sent every 0.5 second
- Pressing the A/V Mute button sends a black screen to the output. It is not a CEC command.
Note: Press and hold HDMI 1 + A/V Mute buttons simultaneously for 10 seconds to apply a factory default reset. Release the buttons when all front LEDs turn off and the unit will re-boot.
Unit Control Ports

Unit Control Phoenix Connector
- 6-pin terminal block for Trigger In, IR and RS-232
- TCP/IP and RS-232 commands may be found in the TCP/IP & RS-232 Commands section
- Pinout:
○ Pin 1 = Trigger In
○ Pin 2 = IR In
○ Pin 3 = IR/Trigger Ground
○ Pin 4 = RS-232 Tx Data
○ Pin 5 = RS-232 Ground
○ Pin 6 = RS-232 Tx Data

TCP/IP Control Port
- Default static IP address is 192.168.1.239, port 23
- Connect an ether cable from the KD-PS42 to a network router or connect a straight through cable directly from a PC
- Unit configuration, control, and firmware updates are achieved with Key Digital Management software downloaded at www.keydigital.com
IR Sensor
• Used to collect line-of-sight IR from remote control
- Receives signals from a 90^ angle at up to 30ft away.
- Mount an IR emitter from Compass Control Pro or to control by another professional control system
HDBaseT Control Pass-Thru Ports
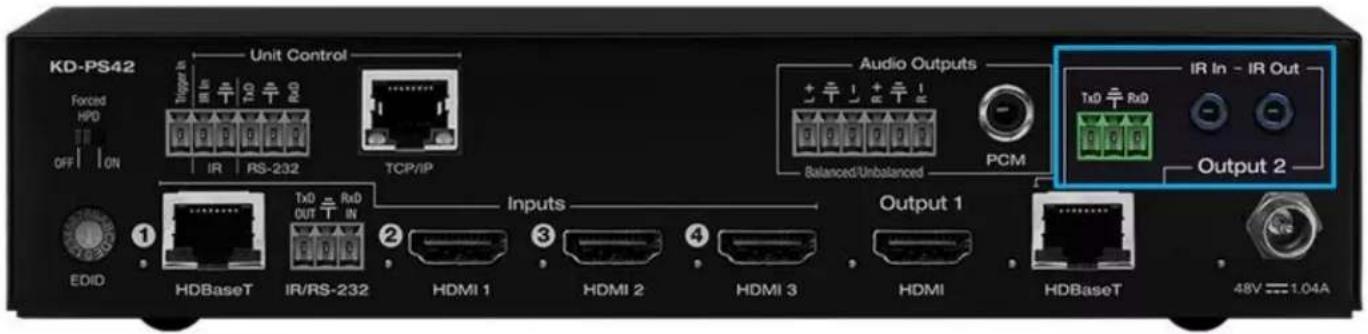
Output 2 HDBaseT IR In & Out Pass-Thru
- 2x 3.5mm mono
-
Pinout
-
Tip = Signal
-
Sleeve = Ground
-
IR In corresponds with IR Out port of KD-X40MRx
- IR Out corresponds with IR In port of KD-X40MRx
• Maximum supported IR burst frequency = 55kHz
Output 2 HDBaseT RS-232 Pass-Thru
- 3-pin terminal block
- Pinout:
○ Pin 1 = RS-232 Tx Data
○ Pin 2 = Ground
○ Pin 3 = RS-232 Rx Data
• Corresponds with RS-232 control ports of KD-X40MRx
Power
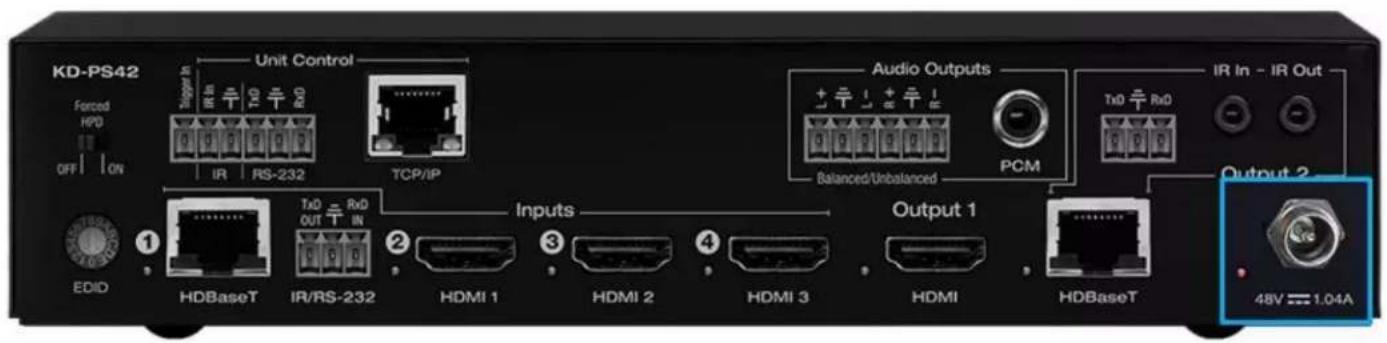
• 48V/1.04A (50W) Power Supply
- Provides power to KD-PS42, and KD-X40MRx.
Auto Switching and Forced HPD Switches
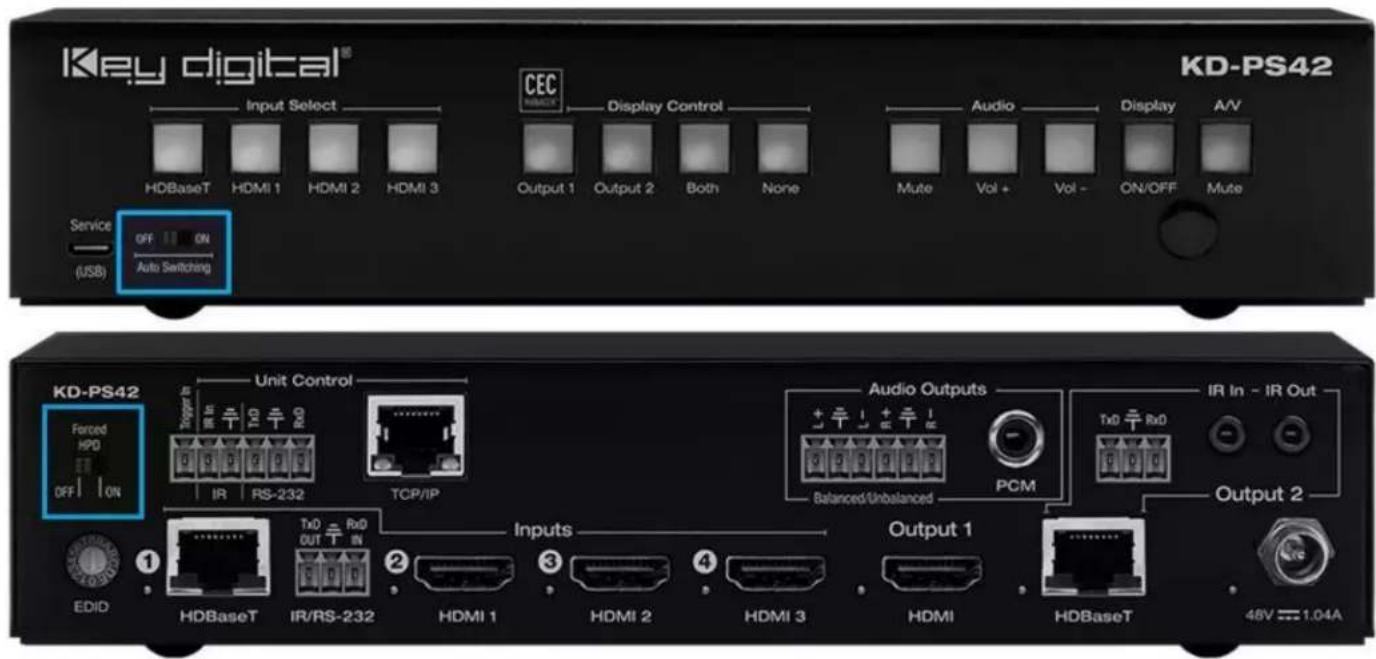
Auto Switching
- ON: Unit will automatically select a newly detected active source. If current source is disconnected or becomes inactive, auto sensing will sequentially advance to an active input/source
• OFF: Unit is in normal mode and regular switching functionality will occur - IF Auto sensing has been set via any method other than the front toggle switch, it will be automatically disabled when the KD-PS42 is manually controlled by the front panel button, IR, RS-232, TCP/IP, or USB control. If fixed Auto Switching is required, please set via the front toggle switch
Forced HPD Troubleshooting Tool
• ON: Hot Plug Detection (HPD) voltage is fixed on at the connected displays and sources
• OFF: HPD voltage is passed through HDMI cabling as typical HDMI behavior.
System Integration with KD-CamUSB, KD-Amp220, KD-App
KD-PS42 may be integrated with KD-CamUSB and/or KD-Amp220 and controlled by the Key Digital iOS app for a simplistic, user-friendly AV system that does not require programming a professional control system.
- Download the Key Digital iOS app for free from the App Store
- Ensure Connection steps 5, 6, and 7 have been completed according to the Quick Setup Guide section

flowchart
graph TD
    A["IP to RS-232 Conversion"] --> B["Network Wire"]
    B --> C["KD-PS42"]
    C --> D["Tx + Gnd to RxD + Ground HDBaseT Output"]
    D --> E["KD-App Control WiFi Network"]
    E --> F["HDBaseT"]
    F --> G["KD-X40MRx"]
    G --> H["Tx + Gnd to RxD + Ground to KD-CAMUSB"]
    H --> I["KD-CAMUSB"]
    C --> J["AND / OR"]
    J --> K["KD-AMP220"]
    K --> L["Tx + Gnd to RxD + Ground to KD-AMP220"]
- Ensure Configuration steps 4, 5, 9, 10, and 11 have been completed, as instructed in the Quick Setup Guide section
- Ensure the iPad / iOS device is on the same network with KD-PS42
- Open Key Digital app and press DEVICES button to begin scan
- Select the KD-PS42 unit to enter control GUI
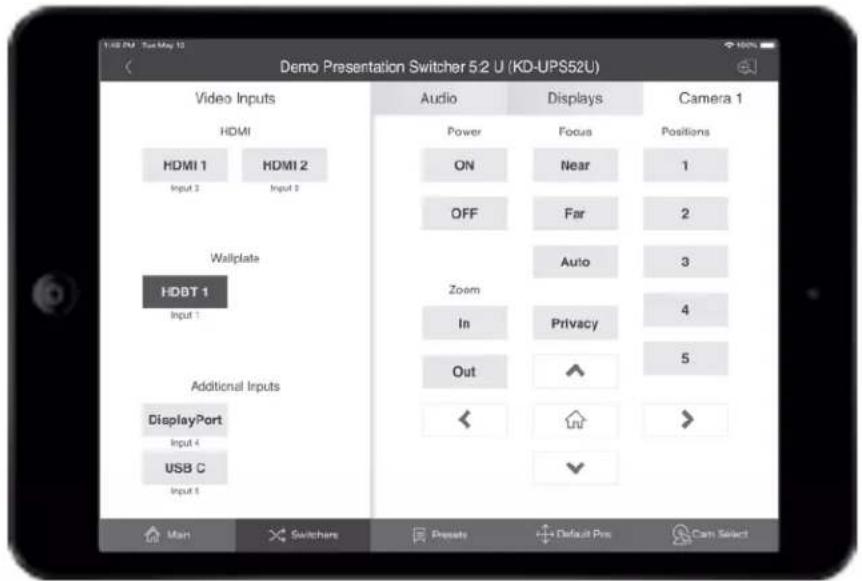
KD-PS42 control GUI
Video source selection is always visible at the left-side of screen.
Input names entered in KDMS Pro are visible as sub-text beneath each Video Input button
Display CEC control page is visible on the right-side of screen.
If an output is turned OFF in KDMS Pro, that display control button group is no longer visible.
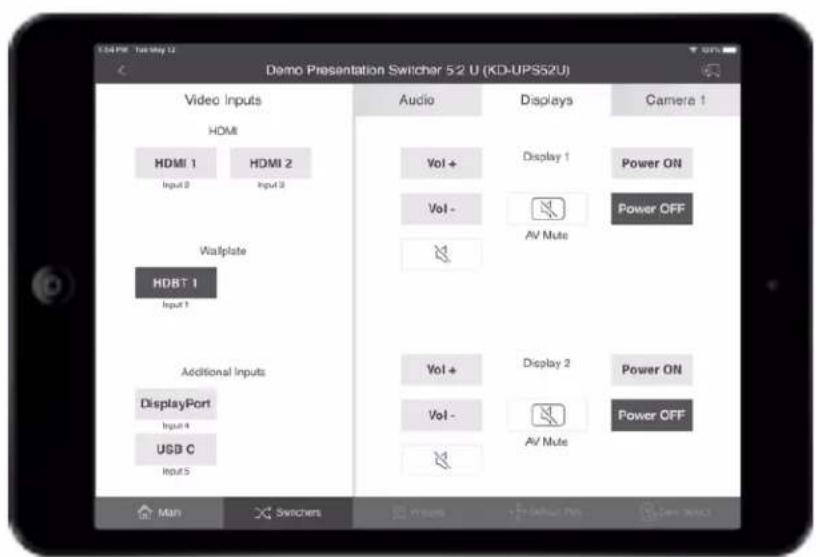
Output names entered in KDMS Pro are visible at the top-center of each Display control button group.
If KD-Amp220 control and KD-CamUSB mode have been activated, the Audio and Camera page tabs are visible. They are invisible if they have not been activated.
Audio Control
With KD-Amp220 control mode activated, the Audio control page may be entered, offering speaker volume and mute, microphone mix level (optional), and KD-Amp220 source selection.
Enable Microphone Control in KDMS Pro to make the Mic mix level controls visible.


Camera Control
With KD-CamUSB control mode activated, the Camera control page may be entered for pan, tilt, zoom, power, preset calling and preset creation.
Up to 7 KD-CamUSB cameras may be controlled, with the camera selection button on the bottom-right corner of the screen.
TCP/IP and RS-232 Commands
- KD-PS42 allows control over serial interface for bi-directional communication.
- Use Unit Control pins 4, 5, and 6 for RS-232 communication
- Serial interface may also be accessed using a TCP/IP connection or using the USB Service port
- Default IP address is 192.168.1.239, with default port 23

Connection Protocol
- Baud Rate = 57,600 bits per second as default
Note: Activating KD-CamUSB or KD-Amp220 control mode will automatically adjust the baud-rate to 9,600. It must be 9,600 to support KD-CamUSB and KD-Amp220 Integrated Systems
- Data Bits = 8
- Stop Bits = 1
- Parity = None
- Flow Control = None
- Carriage Return = Required at end of each string
Notes:
- Commands are not case-sensitive
- Spaces are shown for clarity; commands should NOT have any spaces
• After a new command is received, a prompt should be sent back
Help Command (H). Returns entire API in readable format:
KD-PS42> help
| -- | Key Digital Systems HELP | -- |
| --KD-PS42 | System Address = 00 F/W Version : 1.21 | -- |
| -- | -- | |
| --Azz | : All Commands may have Prefix System Address zz=[01-99] | -- |
| --H | : Help | -- |
| --PF | : Power Off | -- |
| --PN | : Power ON | -- |
| --STA | : Show Global System Status | -- |
| -- | -- | |
| --Video Output Setup Commands: xx = [01-02,A=All], yy = [01-04,U,D] | -- | |
| --(yy:01=HDBT,02=HDMI1,03=HDMI2,04=HDMI3) | -- | |
| --SPO SI yy | : Set Output to Video Input yy | -- |
| --SPO xx SI yy | : Set Output to Video Input yy | -- |
| --SPO xx ON/OFF | : Set Output xx ON/OFF | -- |
| --SPO xx VM E/D | : Set Output xx Video Mute Enable/Disable | -- |
| --SPO xx DBG ON/OFF | : Set Output xx Debug Mode ON/OFF | -- |
| -- | -- | |
| --Display Control Commands: xx = [01-02,A=All] | -- | |
| --SPO xx TV ON/OFF | : Set Display xx ON/OFF (Turn TV On/OFF) | -- |
| --SPO xx AV U/D | : Set Display xx Volume Up/Down | -- |
| --SPO xx AM E/D/T | : Set Display xx Audio Mute Enabled/Disabled/Toggle | -- |
| -- | -- | |
| --Audio Output Setup Commands: [E=Enable, D=Disable] | -- | |
| --SPO AA E/D | : Set External Analog Audio Output Enable/Disable | -- |
| --SPO DA E/D | : Set External PCM/Digital Audio Output Enable/Disable | -- |
-- SPO AMP ON/OFF : Set AMP220 Control Mode ON/OFF
-- SPO MIC ON/OFF : Set AMP220 MIC Mode ON/OFF
--
-- HDBT Input Control Setup Commands: xx = [01,A=All], y = [1-2]
-- SPI xx HBC y : Set Control of HDBT xx to y (1=IR, 2=RS232)
--
-- Input/Output/Device Naming Commands (Max. 16 Chars)
-- SPI xx WN ccccccccccccccc : Write Input xx Name
-- SPI xx RN : Read Input xx Name
-- SPO xx WN ccccccccccccccc : Write Output xx Name
-- SPO xx RN : Read Output xx Name
-- SPC WN ccccccccccccccc : Write Device Name
-- SPC RN : Read Device Name
--
-- Network Setup, ( xxx=[000-255], zzzz=[0001~9999] )
-- SPCETIPA xxx.xxx.xxx.xxx : Set Host IP Address to xxx.xxx.xxx.xxx
-- SPCETIPM xxx.xxx.xxx.xxx : Set Net Mask to xxx.xxx.xxx.xxx
-- SPCETIPR xxx.xxx.xxx.xxx : Set Route IP Address to xxx.xxx.xxx.xxx
-- SPCETIPP zzzz : Set TCP/IP Port to zzzz
-- SPCETIPB : Apply New Network Config
--
-- System Address Setup Command: xx = [00-99], 00 = Single
-- SPC Axx : Set System Address to xx
--
-- System Control Setup Commands:
-- SPC AS x : Set Auto Sense Mode x = [0=OFF,1=AUTO,2=FORCED ON]
-- SPC FB E/D : Enable/Disable Front Panel Buttons
-- SPC CAM z : Set CAMUSB Control Mode x = [0-7]
-- SPC RSB z : Set RS232 Baud Rate to z bps, z=[0-4]
--
[0:57600, 1:38400, 2:19200, 3:9600, 4:4800]
-- SPC DF : Reset to Factory Defaults --
-- SPC DF00 : Reset to Factory Defaults without Network Reset --
Status Command (STA). Returns unit status and settings in readable format:
KD-PS42> sta
-- Key Digital Systems STATUS --
-- Model: KD-PS42, System Address = 00, Device Name: KD-PS42 --
-- Main F/W Ver: 1.21, Splitter Ver: 1.03, CEC Ver: 1.05 --
-- Power : ON --
-- CAMUSB Control Mode : 0 --
-- RS232 : Baud Rate=57600bps, Data=8bit, Parity=None, Stop=1bit --
-- Front Panel Button : Enabled --
-- Network Setting(Web Server/TCP Control) Status --
-- MAC Address = 60:89:B1:32:00:4A --
-- Host IP Address = 192.168.001.239 --
-- Net Mask = 255.255.255.000 --
-- Router IP Address = 192.168.001.001 --
-- TCP Port = 0023 --
-- Video Input Status --
-- EDID = DEFAULT 10, FORCED HPD = OFF, AUTO SENSE = OFF --
-- 01 : HDBT , LINK = OFF, VIDEO = OFF, LIVE = ON , CTRL = IR
-- 02 : HDMI1, LINK = OFF
-- 03 : HDMI2, LINK = OFF
-- 04 : HDMI3, LINK = OFF
--
-- Video Output Status (D=Disable, E=Enable)
-- HDMI Output : IN = 02, OUT = ON , V/MUTE = D, LINK = OFF, DBG = OFF
-- HDBT Output : IN = 02, OUT = ON , V/MUTE = D, LINK = OFF, DBG = OFF
--
-- Display Output Status (CEC Control)
-- HDMI Output : TV = ON , A/V MUTE = Disable, A/MUTE = Disable
-- HDBT Output : TV = ON , A/V MUTE = Disable, A/MUTE = Disable
--
-- Audio Output Status
-- Audio Output : IN = Video 02, Balanced = Enabled, PCM = Enabled
--
AMP220 Mode = OFF, MIC Mode = OFF
KD-PS42>
Specifications
Technical
• AV Inputs: 1x HDBaseT, 3x HDMI
- AV Outputs: 1x HDBaseT RJ45, 1x HDMI, 1x Analog Audio on 6-pin terminal block, 1x Digital Audio on PCM RCA
- DDC Signal (Data): Input DDC Signal: 5 Volts p-p (TTL)
• HDMI Video/Audio Signal: Input Video Signal: 1.2 Volts p-p
- RJ45 Connectors: Shielded Link Connector, 2x HDBaseT, 1x LAN
• Unit Control: TCP/IP on RJ45, Bi-directional RS-232, Serial IR, IR sensor, USB Micro
- RS-232 Connector: 1x 3-pin terminal for unit control, 2x 3-pin terminal for pass-thru to/from HDBaseT Input and HDBaseT output
- IR Connectors: 1x IR Sensor, 1x 2-pin terminal for unit control, 1x 3.5mm mono for IR input pass-thru to HDBaseT Output, 1x 3.5mm mono for IR output pass-thru from HDBaseT Output
• RS-232 Connector: 3-pin phoenix terminal
General
• Regulation: CE, RoHS, WEEE, EAC
• Enclosure: Black metal
• Product Dimensions: 8.27 x 6.42 x 1.75" (210 x 163 x 44.4mm)
• Product Weight: Weight: 3.5 lbs / 1.59kg
• Packaging Dimensions: 15.16 x 9.10 x 3.94 (385 x 230 x 100 mm)
• Packaging Weight: 11.0 lbs / 5kg
Warranty Information
All Key Digital® products are built to high manufacturing standards and should provide years of trouble-free operation. They are backed by a Key Digital Limited 3 Year Product Warranty Policy.
http://www.keydigital.com/warranty.htm
Product Warnings & Safety Instructions

Important Product Warnings:
- Connect all cables before providing power to the unit.
- Test for proper operation before securing unit behind walls or in hard to access spaces.
- If installing the unit into wall or mounting bracket into sheet-rock, provide proper screw support with bolts or sheet-rock anchors.

Safety Instructions:
Please be sure to follow these instructions for safe operation of your unit.
- Read and follow all instructions.
- Heed all warnings.
- Do not use this device near water.
- Clean only with dry cloth.
- Install in accordance with the manufacturer's instructions.
- Do not install near any heat sources such as radiators, heat registers, stoves, or other apparatus (including amplifiers) that produce heat.
- Only use attachments/accessories specified by the manufacturer.
- Refer all servicing to qualified service personnel. Servicing is required when the device has been damaged in any way including:
o Damage to the power supply or power plug
- Exposure to rain or moisture

Power Supply Use:
You MUST use the Power Supply provided with your unit or you VOID the Key Digital® Warranty and risk damage to your unit and associated equipment.
- Table of Contents
- Default IP Address: 192.168.1.239
- About KD-PS42
- Key Features
- Accessories
- Quick Setup Guide
- Connect
- Configure
- Configure KD-PS42 with Key Digital Management Software Pro (KDMS Pro). Download HERE
- Additional configuration steps for control by KD-App and KDMS Pro
- Control
- Option 1: Control via Remote Control
- Option 2: Control via KD-App, KDMS Pro™
- Option 3: Control via professional control system
- Application Examples
- Mounting Options
- Connections, Buttons, and LEDs
- EDID Handshaking Rotary
- Outputs
- Analog L/R Balance/Unbalanced
- PCM Digital
- Service USB Port
- Input Source (Blue)
- CEC Manager™ Display Control (Red)
- CEC Manager™ Commands (Green & Blue)
- Unit Control Phoenix Connector
- TCP/IP Control Port
- IR Sensor
- Output 2 HDBaseT IR In & Out Pass-Thru
- Output 2 HDBaseT RS-232 Pass-Thru
- Auto Switching
- Forced HPD Troubleshooting Tool
- System Integration with KD-CamUSB, KD-Amp220, KD-App
- KD-PS42 control GUI
- Audio Control
- Camera Control
- TCP/IP and RS-232 Commands
- Connection Protocol
- Notes:
- Help Command (H). Returns entire API in readable format:
- Status Command (STA). Returns unit status and settings in readable format:
- Specifications
- Technical
- General
- Warranty Information
- Product Warnings & Safety Instructions
- Important Product Warnings:
- Safety Instructions:
- Power Supply Use:
Brand : Key Digital
Model : KD-PS42
Category : Router