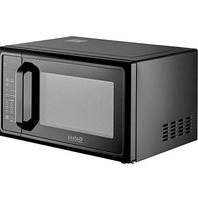
MW900GUA - Kitchen Appliances GALAXY - Free user manual and instructions
Find the device manual for free MW900GUA GALAXY in PDF.


| Product Type | Microwave Oven |
| Brand | GALAXY |
| Model | MW900GUA |
| Power Output | 900 W |
| Capacity | 25 L |
| Dimensions (W x D x H) | 450 x 350 x 250 mm |
| Weight | 12 kg |
| Power Supply | 230 V ~ 50 Hz |
| Control Type | Touch Control |
| Display | LED Digital |
| Cooking Modes | Microwave, Grill, Convection, Combination |
| Defrost Function | Auto and Manual |
| Timer | Up to 99 minutes |
| Child Lock | Yes |
| Interior Light | Yes |
| Turntable | 12 inch |
| Material | Stainless Steel interior |
| Cleaning | Wipe with damp cloth; avoid abrasives |
| Safety Features | Auto shut-off, door interlock, overheat protection |
| Spare Parts Availability | Contact GALAXY service center |
| Warranty | 1 year |
Frequently Asked Questions - MW900GUA GALAXY
User questions about MW900GUA GALAXY
0 question about this device. Answer the ones you know or ask your own.
Ask a new question about this device
Download the instructions for your Kitchen Appliances in PDF format for free! Find your manual MW900GUA - GALAXY and take your electronic device back in hand. On this page are published all the documents necessary for the use of your device. MW900GUA by GALAXY.
USER MANUAL MW900GUA GALAXY
900W Microwave
Model: 177MW900GUA
05/2023
Please read and keep these instructions. Indoor use only.
User Manual
Galaxy™ equipment
Table of Contents
Safety Instructions ....3
Grounding Instructions....4
Microwave Assembly 5
Installation....6
Operation 7
Care and Cleaning....13
Troubleshooting 13
Specifications
| Model | 177MW900GUA |
| Rated Voltage | 120V~60Hz |
| Rated Input Power (Microwave): | 1350W |
| Rated Output Power (Microwave): | 900W |
| Oven Capacity: | 25L |
| Turntable Diameter: | ø10.63" |
| External Dimensions: | 19.10" x 14.76" x 11.53" |
| Net Weight: | 27.88 lbs. |
Important Safety Instructions

When using electrical equipment, basic safety precautions should be followed to reduce the risk of burns, electrical shock, fire, or injury to persons.
READ ALL OF THE INSTRUCTIONS BEFORE USING THIS EQUIPMENT.
- This equipment MUST BE GROUNDED. Connect only to properly GROUNDED outlet. See "GROUNDING INSTRUCTIONS" on page 4 for further details.
- Use this equipment ONLY for its intended use as described in this manual. This type of microwave is specifically designed to heat, cook or dry food. It is not designed for industrial, laboratory or commercial food service use.
- DO NOT heat items able to explode in this microwave, such as eggs, sealed containers, glass jars, etc.
- DO NOT operate this equipment if the cord, plug and/or door is damaged, if it is not working properly or if it has been damaged or dropped.
- This equipment, including power cord, must be serviced ONLY by qualified service personnel. Contact the nearest authorized service facility for examination, repair, or adjustment.
- DO NOT cover or block filter or other openings on equipment.
- DO NOT store this equipment outdoors.
-
DO NOT use this product near water or immerse the cord and/or plug in water.
-
Keep cord AWAY from HEATED surfaces.
- DO NOT let cord hang over edge of table or counter.
- DO NOT overcook food as to avoid fire in microwave cavity.
- If materials inside the microwave ignite, keep microwave door CLOSED, turn microwave off and disconnect the power cord, or shut off power at the fuse or circuit breaker panel.
- DO NOT use the cavity for storage.
- DO NOT overheat liquids.
- After heating, allow the container to stand in the microwave oven for a short time before removing the container.
- DO NOT operate equipment without load or food in microwave cavity.
- DO NOT use metal utensils in microwave.
- NEVER use paper, plastic, or combustible materials that are not intended for cooking.
- Clean microwave regularly and remove any food deposits.
- Not certified for commercial food service use.
- This product is intended for office/light duty non-commercial food service use. Excessive use can shorten the lifespan of electrical parts.
SAVE THESE INSTRUCTIONS

TO AVOID RISK OF ELECTRICAL SHOCK OR DEATH, THIS MICROWAVE MUST BE EARTHED. TO AVOID RISK OF ELECTRICAL SHOCK OR DEATH, DO NOT ALTER THE PLUG.
Opening Your New Microwave
- Inspect microwave for any damage such as cracks or dents in door or inside microwave cavity.
- Remove all materials from microwave interior.
- Remove all plastic wrap and packaging material before use.
- Do not install microwave next to or above source of heat, such as an oven or radiator. This could cause the microwave oven to operate improperly and could shorten life of electrical parts.
• Install microwave on a level countertop surface. - Outlet should be located so that the plug is accessible when microwave is in place.
Grounding Instructions
Microwave MUST be grounded. Grounding reduces risk of electric shock by providing an escape wire for the electric current, if an electrical short occurs. This microwave is equipped with a cord having a ground wire with a grounding plug. The plug must be plugged into an outlet that is properly installed and grounded. Do not use an extension cord.
This device complies with part 18 of the FCC Rules
Microwave Assembly
Remove the microwave and accompanying materials from the carton and oven cavity. Your microwave comes with the following accessories:
(1) Glass Tray
(1) Turntable Ring

A. Control panel
B. Turntable Shaft
C. Turntable Ring Assembly
D. Glass Tray
E. Observation Window
F. Door Assembly
G. Safety Interlock System
Turntable Installation
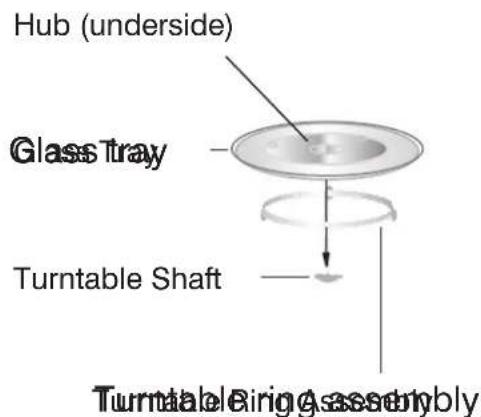
a. DO NOT place the glass tray upside down.
The glass tray should never be restricted in motion.
b. Both the glass tray and turntable ring assembly must always be used during operation.
c. All food and containers of food must be placed on the glass tray during operation.
d. If the glass tray or turntable ring assembly becomes damaged, contact the manufacturer for replacement.
User Manual
Galaxy™ equipment
Installation
Remove all packaging materials and accessories.
Examine the microwave for any potential damage. If damage is found, DO NOT install the unit and immediately contact the manufacturer.
Remove the protective film on the microwave oven cabinet surface.
Do not remove the light brown Mica cover that is attached to the oven cavity to protect the magnetron component.
- Select a level surface that provides enough space for the intake and outlet vents. See below for clearance details.

A minimum clearance of 3.0 inches (7.5cm) is required between the microwave and any adjacent walls. The unit cannot be fully enclosed, one side must be open.
- Leave a minimum clearance of 12 inches (30cm) above the oven.
- Do not remove the legs from the bottom of the oven.
-
Blocking the intake and/or outlet openings can damage the oven.
-
Plug your oven into a standard 120V\~ outlet. Confirm your outlets are wired as 120V\~ before plugging in.

WARNING: DO NOT INSTALL OVEN OVER RANGE COOKTOP OR OTHER HEAT-PRODUCING APPLIANCE. IF INSTALLED NEAR OR OVER A HEAT SOURCE, THE OVEN COULD BE DAMAGED AND THE WARRANTY WOULD BE VOID.
Operation
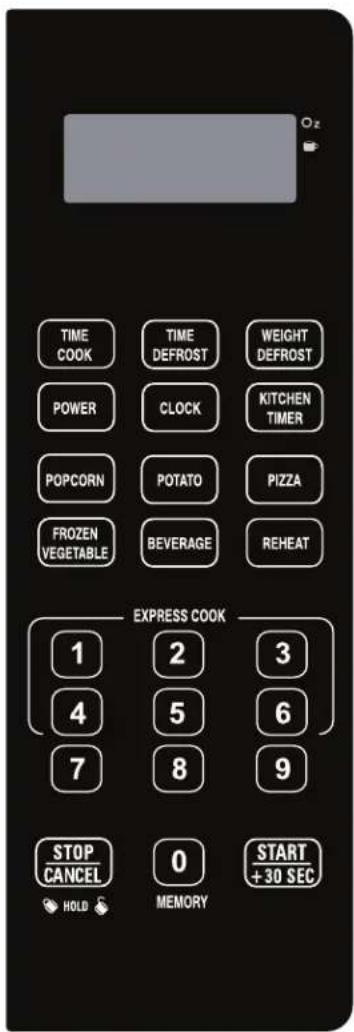
1. Power Level
11 power levels are available.
| Level | 10 | 9 | 8 | 7 | 6 | 5 | 4 | 3 | 2 | 1 | 0 |
| Power | 100% | 90% | 80% | 70% | 60% | 50% | 40% | 30% | 20% | 10% | 0% |
| Display | PL10 | PL9 | PL8 | PL7 | PL6 | PL5 | PL4 | PL3 | PL2 | PL1 | PL0 |
2. Clock Setting
(1) Press "CLOCK" once, "00:00" will display.
(2) Press the number keys and enter the current time. For example, if it is 12:10, press "1, 2, 1, 0" consecutively.
(3) Press "CLOCK" again to finalize the clock setting.
(4) If the numbers entered are not within the range of 1:00--12:59, the setting will be invalid until valid numbers are entered.
Note: (1) In the process of clock setting, if the "STOP/CANCEL" button is pressed or if there is no operation within 1 minute, the oven will automatically go back to the former setting.
(2) If the clock needs to be reset, please repeat steps 1 to 3.
3. Kitchen Timer
(1) Press "KITCHEN TIMER" once, the screen will display 00:00.
(2) Press the number keys and enter the desired time.
(3) Press "START/+30SEC" to confirm setting.
(4) When the timer is up, the buzzer will ring 5 times. If the clock has been set, the screen will then display the current time.
Note: While using the kitchen timer, no other programs can be set.

User Manual
Galaxy™ equipment
4. Manual Cook Mode
(1) Press "TIME COOK" once, the screen will display "00:00".
(2) Press number keys to input the cooking time. The maximum cooking time is 99 minutes and 99 seconds.
(3) Press "POWER" once, the screen will display "PL10". The default power is 100% power. From here you can adjust the power level by selecting different number keys.
(4) Press "START/+30SEC" to start cooking.
Example: To cook with 50% microwave power for 15 minutes.
a. Press "TIME COOK" once. "00:00" displays.
b. Press "1", "5", "0", "0" consecutively.
c. Press "POWER" once, then press "5" to select 50% microwave power.
d. Press "START/+30SEC" to start cooking.
Note: (1) In the process of setting, if the "STOP/CANCEL" button is pressed or if there is no operation within 1 minute, the oven will automatically go back to the former setting.
(2) If "PL 0" (Power Level 0) is selected, the fan will operate with no cooking power. This setting is useful to remove odor within the oven cavity.
(3) During microwave cooking, "POWER" can be pressed to change the power level. After pressing "POWER", the current power will flash for 3 seconds, then press the number button to change to the desired power level. The microwave will work with the selected power for the remaining cook time.
5. Express Cooking
(1) Instant cooking at 100% power level can be started by selecting a cooking time from 1 to 6 minutes by pressing numbers 1 to 6. Press " START/+30SEC " to increase the cooking time; the maximum cooking time is 99 minutes and 99 seconds.
(2) By pressing the "START/+30 SEC" button, a 100% power level 30 second cooking cycle will begin.
Note: During microwave cooking and time defrost cycles, time can be added by pressing the "START/+30SEC" button.

6. Weight Defrost Function
(1) Press "WEIGHT DEFROST", the screen will display "dEF1".
(2) Input the weight of the product to be defrosted in ounces by selecting numbers on the keypad. Weight must be between 4 and 100 ounces.
(3) Press "START/+30SEC" to start defrosting. The live cooking time remaining will show on the digital screen until defrosting is complete.
7. Time Defrost Function
(1) Press "TIME DEFROST", the screen will display "dEF2".
(2) Input defrosting time by selecting numbers on the keypad. Time must be between 0:01 and 99:99.
(3) The default microwave power is power level 3. If you want to change the power level, press "POWER", and the screen will display "PL 3", then press the number that corresponds with the power level you would like.
(4) Press "START/+30SEC" to start defrosting. The remaining defrost time will be displayed.
8. Popcorn
(1) Press "POPCORN" repeatedly until the number of ounces you are cooking appears in the display. "1.75", "3.0", "3.5" oz. will display in that order. For example, if you are cooking 1.75 oz. of kernels, press "POPCORN" once.
(2) Press "START/+30 SEC" to cook. When cooking finishes, the buzzer will sound five times and then go back into the waiting state.
9. Potato
(1) Press "POTATO" repeatedly until the number of potatoes you would like to cook appears in the display. "1", "2", "3" will display in that order.
"1"SET : 1 potato (approximate 8 oz.)
"2"SETS: 2 potatoes (approximate 16 oz.)
"3"SETS: 3 potatoes (approximate 24 oz.)
(2) Press "START/+30 SEC" to cook. When cooking finishes, the buzzer will sound five times and then go back into the waiting state.

User Manual
Galaxy™ equipment
10. Frozen Vegetable
(1) Press "FROZEN VEGETABLE" repeatedly until the number of ounces you are cooking appears in the display. "4.0", "8.0", "16.0" oz. will display in that order.
(2) Press "START/+30 SEC" to cook. When cooking finishes, the buzzer will sound five times and then go back into the waiting state.
11. Beverage
(1) Press "BEVERAGE" repeatedly until the number of cups you are heating up appears in the display. "1", "2", "3" cup will display in that order. One cup is about 120 ml.
(2) Press "START/+30 SEC" to start. When the warming cycle is finished, the buzzer will sound five times before returning back to the waiting state.
12. Reheat
(1) Press "REHEAT" repeatedly until the number of ounces of food on your plate appears in the display. "9.0", "12.0", "18.0" oz. will display in that order.
(2) Press "START/+30 SEC" to start. When re-heating finishes, the buzzer will sound five times and then go back into the waiting state.
13. Pizza
(1) Press "PIZZA" repeatedly until the number of ounces you are re-heating appears in the display. "4.0", "8.0", "14.0" oz. will display in that order.
(2) Press "START/+30 SEC" to start. When re-heating finishes, the buzzer will sound five times and then go back into waiting state.
14. Memory Function
(1) Press "0/MEMORY" repeatedly to choose between 3 programmed memorized recipes. The screen will display 1, 2, 3 in that order.
(2) If the memory has already been set, press "START/+30 SEC" to use it. If not, please reference the steps in the below example.
Example: Programming a recipe as memory 2:
To set a recipe with 80% microwave power for 3 minutes and 20 seconds, the steps are as follows:
a. In the waiting state, press "0/MEMORY" twice. Stop pressing when the screen displays "2".
b. Press "TIME COOK" once, then press "3", "2", "0" consecutively.
c. Press "POWER" once, "PL10" will display. Then press "8" and "PL8" will display to set the power level to 80%.
d. Press "START/+30 SEC" to save the setting. The buzzer will sound once and the screen will display "2". If you press "START/+30SEC" again, the procedure will be saved as memory 2.
e. If the electricity does not get cut off, the procedure will be saved indefinitely. If the electricity does get cut off, the recipe will need to be re-programmed.
f. If you want to run the memorized recipe, press "0/MEMORY" twice, the screen will display "2", then press "START/+30SEC" to run.
15. Multi-Stage Cooking
When using multi-stage cooking, 2 stages can be set at most. If one of the stages is defrosting, then defrosting will automatically be placed as the first stage.
Example: If you want to cook with 80% microwave power for 5 minutes + 60% microwave power for 10 minutes. The steps are as follows:
(1) Press "TIME COOK" once, then press "5", "0", "0" to set the cooking time.
(2) Press "POWER" once, then press "8" to select 80% microwave power.
(3) Press "TIME COOK" once, then press "1", "0", "0", "0" to set the cooking time.
(4) Press "POWER" once, then press "6" to select 60% microwave power.
(5) Press "START/+30 SEC" to start cooking.

User Manual
Galaxy™ equipment
16. LOCK FUNCTION FOR CHILDREN
Lock: In waiting state, press "STOP/CANCEL" for 3 seconds, there will be a long "beep" denoting the activation of the child lock. Meanwhile, screen will display "C:...\".
Lock Disarming: In the locked state, press "STOP/CANCEL" for 3 seconds, there will be a long "beep" denoting that the lock is disarmed.
17. INQUIRING FUNCTION
(1) In the cooking state, press "CLOCK", to display the time for three seconds.
(2) In the cooking state, press "POWER" to check the microwave power level, and the current microwave power will be displayed. After three seconds, the oven will return to the previous state.

Care and Cleaning

TO AVOID ELECTRICAL SHOCK WHICH CAN CAUSE SEVERE PERSONAL INJURY OR DEATH, UNPLUG POWER CORD OR OPEN CIRCUIT BREAKER TO MICROWAVE BEFORE CLEANING OR REMOVING LIGHT BULB.
• Cleaning the interior and exterior will require a mild detergent, water and a soft sponge or cloth.
- Do not use cleaners that include ammonia or citrus.
- Do not use water pressure cleaning systems on your microwave.
- Inspect air vents monthly and clean using a damp cloth.
Troubleshooting
If something is wrong with your unit, please reference the chart below and try solutions for each problem. If the microwave still does not work properly, please contact a reputable service technician and/or the manufacturer.
| TROUBLE | POSSIBLE CAUSE | POSSIBLE REMEDY |
| Oven will not start | a. Electrical cord for oven is not plugged in.b. Door is open.c. Wrong operation is set. | a. Plug into the outlet.b. Close the door and try again.c. Check instructions. |
| Arcing or sparking | a. Materials to be avoided in microwave oven were used.b. The oven is operated when empty.c. Spilled food remains in the cavity. | a. Use microwave-safe cookware only.b. Do not operate with oven empty.c. Clean cavity with wet towel. |
| Unevenly cooked foods | a. Materials to be avoided in microwave oven were used.b. Food is not defrosted completely.c. Cooking time, power level is not suitable.d. Food is not turned or stirred. | a. Use microwave-safe cookware only.b. Completely defrost food.c. Use correct cooking time, power level.d. Turn or stir food. |
| Overcooked foods | Cooking time, power level is not suitable. | Use correct cooking time, power level. |
| Undercooked foods | a. Materials to be avoided in microwave oven were used.b. Food is not defrosted completely.c. Oven ventilation ports are restricted.d. Cooking time, power level is not suitable. | a. Use microwave-safe cookware only.b. Completely defrost food.c. Check to see that oven ventilation ports are not restricted.d. Use correct cooking time, power level. |
| Improper defrosting | a. Materials to be avoided in microwave oven were used.b. Cooking time, power level is not suitable.c. Food is not turned or stirred. | a. Use microwave-safe cookware only.b. Use correct cooking time, power level.c. Turn or stir food. |

- 900W Microwave
- User Manual
- Galaxy™ equipment
- Table of Contents
- Specifications
- Important Safety Instructions
- SAVE THESE INSTRUCTIONS
- Opening Your New Microwave
- Grounding Instructions
- Microwave Assembly
- Turntable Installation
- Installation
- Operation
- Power Level
- Clock Setting
- Kitchen Timer
- Manual Cook Mode
- Express Cooking
- Weight Defrost Function
- Time Defrost Function
- Popcorn
- Potato
- Frozen Vegetable
- Beverage
- Reheat
- Pizza
- Memory Function
- Multi-Stage Cooking
- LOCK FUNCTION FOR CHILDREN
- INQUIRING FUNCTION
- Care and Cleaning
- Troubleshooting
Brand : GALAXY
Model : MW900GUA
Category : Kitchen Appliances