
Tensioned Conference Electrol - Video Conferencing System DA-LITE - Free user manual and instructions
Find the device manual for free Tensioned Conference Electrol DA-LITE in PDF.


| Product Type | Tensioned Motorized Projection Screen |
| Brand | Da-Lite |
| Model | Tensioned Conference Electrol |
| Screen Surface | Matte White vinyl, tensioned for flatness |
| Diagonal Size | Available in 84", 92", 96", 100", 110", 120" (16:9) |
| Motor | Silent, 120V AC / 60Hz, low-voltage control |
| Control Options | Wall switch, IR remote, RS232, dry contact |
| Mounting | Ceiling recessed or surface mount |
| Tensioning | Side tensioning cables for wrinkle-free surface |
| Dimensions (Housing) | Varies by size; approx. 10" x 10" cross-section |
| Weight | Approx. 25-40 lbs depending on size |
| Power Supply | 120V AC, 2A maximum |
| Drop Length | Adjustable limit switches for screen drop |
| Viewing Angle | 180° horizontal, 180° vertical |
| Surface Care | Clean with soft, dry cloth; mild soap for stains |
| Safety | UL listed, thermal overload protection |
| Spare Parts | Motor, remote, control board, tension cables available |
| Repairability | Modular design; motors and electronics replaceable |
| Warranty | 1 year parts and labor |
Frequently Asked Questions - Tensioned Conference Electrol DA-LITE
User questions about Tensioned Conference Electrol DA-LITE
0 question about this device. Answer the ones you know or ask your own.
Ask a new question about this device
Download the instructions for your Video Conferencing System in PDF format for free! Find your manual Tensioned Conference Electrol - DA-LITE and take your electronic device back in hand. On this page are published all the documents necessary for the use of your device. Tensioned Conference Electrol by DA-LITE.
USER MANUAL Tensioned Conference Electrol DA-LITE
natural_image
Black and white photo of a flat-screen monitor with a black frame and stand (no text or symbols visible)INSTRUCTION BOOK FOR
Tensioned Conference Electrol
Original Instructions
Disclaimer
Milestone and its affiliated corporations and subsidiaries (collectively "Milestone"), intend to make this manual accurate and complete. However, Milestone makes no claim that the information contained herein covers all details, conditions or variations, nor does it provide for every possible contingency in connection with the installation or use of this subject to change without notice or obligation of any kind. Milestone makes no representation of warranty, expressed or implied, regarding the information contained herein. Milestone assumes no responsibility for accuracy, completeness or sufficiency of the information contained in this document.
Da-Lite ® is a registered trademark of Milestone AV Technologies. All rights reserved.
Important Safety Instructions
When using your video equipment, basic safety precautions should always be followed, including the following:
- Read and understand all instructions before using.
- To reduce the risk of electric shock, do not disassemble this appliance. Contact an authorized service dealer when repair work is required. Incorrect reassembly can cause electric shock when the appliance is used subsequently.
- The use of an accessory attachment not recommended by the manufacturer may cause a risk of fire, electric shock, or injury to persons.
- Do NOT lift or push up on the camera arm mechanism at any time. This may cause improper operation and/or component failure or injury to persons.
- Failure to provide adequate structural strength for this component can result in serious personal injury or damage to equipment! It is the installer's responsibility to make sure the structure to which this component is attached can support the weight of all equipment. Reinforce the structure as required before installing the component.
- Use this projection screen only for its intended use as described in these instructions. Do not use attachments not recommended by the manufacturer.
Save These Instructions
Pre-Installation
- Carefully unpack screen and remove outer wrapping from case.
- Make sure to recheck measurements of screen location before installation.
Installation
NOTE: Unit is not to be installed in air handling spaces.
- The case brackets provide multiple attachment points for bolts, cables, or threaded rod. The following page shows two locations for typical threaded rod installations with the external case mounting brackets (Figure 1a) and without them (Figure 1b). The internal case brackets can be accessed through the hand holes (Figure 1c).

Figure 1a - Threaded Rod with Internal Bracket

Figure 1b - Threaded Rod with Internal and External Bracket

Figure 1c - Internal Bracket
- The case has a self-trimming flange around the bottom. Ceiling tiles or drywall may be placed on top of this flange to provide a finished appearance.
- After securing the case in the ceiling, check that the case is level and plumb.
- Use supplied 1/8" nex key and a 1/4" wrench to remove silver shipping brackets attached to slat and screen case.
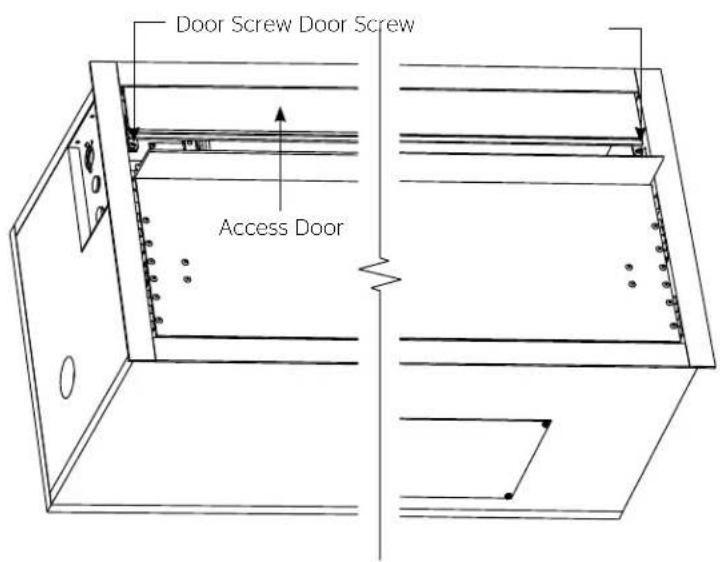
- Install electrical connections that apply to your unit. Refer to the electrical diagram'. The electrical connections are accessible by removing the two screws on the primary junction box cover and the two screws on the secondary low voltage cover (Figure 2). You can remove the access door if needed to allow for greater access to the electrical wiring. To remove the access door; remove the screw from each end of the door while holding the door and slide the door off the flanges (Figure 3).
NOTE: Must be installed in accordance with the requirements of the Local Building Codes, the Canadian Electrical Code (CEC), CAN/CSA C22.1 and the National Electric Code (NEC), NFPA 70.
- Remove shipping brackets by removing the hex head screws from aluminum slat and case. Slat should move freely (Figure 2). (Only if the roller assembly is pre installed.)
- Test installation by operating the screen several times. Be prepared to stop the screen. Standard Duty Cycle: 1MIN. ON/3 MIN. OFF. The fabric door (rear door) will not close until the wall switch is placed in the up position and when the screen motor stops at its limit switch in the up direction.
⚠AUTION: Excessive continuous operation may cause the motor to overheat. If this happens the motor will shut off until it cools to a normal operating temperature.
- Run the screen down enough to open the fabric door. Insert the access door on the flanges and reinstall the screws to secure the door.
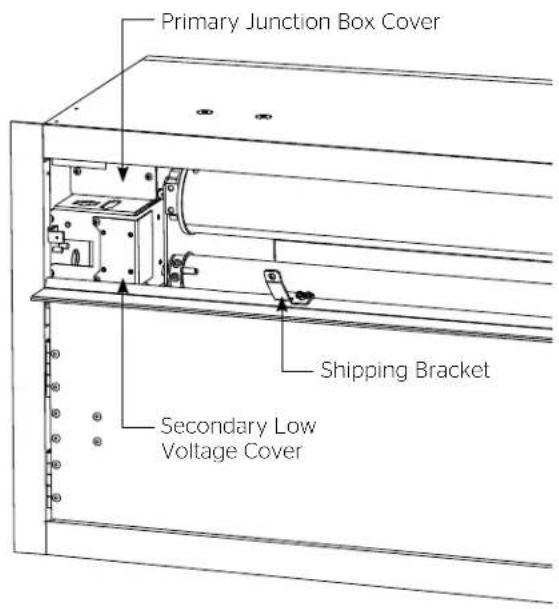
Figure 2 - Bottom of Case Figure 3 - Bottom of Case
NOTE: Unit is to be used with a camera weighing no more than 8 pounds. Camera and camera cables NOT included.
- Run the camera arm down and then disconnect the power to the unit.
- Install the camera cables through the cable loops. See Figure 4. Start from the camera shelf and then up the arms through the camera cable exit in the end of the case.
NOTE: The camera cables must not interfere with the arm or door mechanisms. Leave enough cable to allow for a natural bend at the pivot points (Figure 4). Use cable ties if needed to secure the camera cables through the loops. Do NOT go around the camera arm tubes with wire ties.
- Connect camera to the cable(s) and secure the camera to the camera shelf. The camera shelf is perforated for easy camera attachment (Figure 4).
- Check the camera cable path and ensure there will not be interference with the arm or door mechanism operation.
- Reconnect power to the unit and test operation.

Figure 4
NOTE: 20-24AWG wire recommended for dry contact wiring.

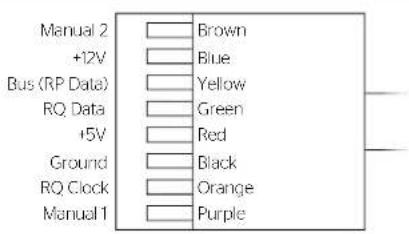
RJ-14 Pin-Outs (Tab Is Facing Down)

RJ-25 Pin-Outs (Tab Is Facing Down)
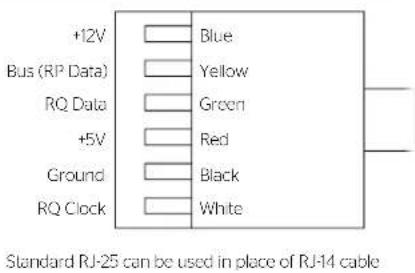
RJ-45 Pin-Outs (Tab Is Facing Down)

NOTE: 20-24AWG wire recommended for dry contact wiring.

RJ-14 Pin-Outs (Tab Is Facing Down)
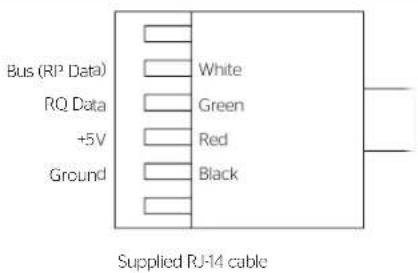
RJ-25 Pin-Outs (Tab Is Facing Down)

RJ-45 Pin-Outs (Tab Is Facing Down)
CAUTION: CONTACT DA-LITE AT 800-622-3737 OR 574-267-8101 IF SCREEN, DOOR MOTOR NEEDS ADJUSTMENT.
ATTENTION! CONTACTEZ DA-LITE AU 800-622-3737 OU AU 574-267-8101 AU CAS LE MOTEUR DE L'ÉCRAN A BESOIN D'ÊTRE AJUSTÉ.
Troubleshooting
Symptom Cause Solution
| Screen or camera arm will not operate or will not go UP or DOWN and the MOTOR DOES NOT HUM. | There is no power at the junction box | Incorrect line voltage. | Verify 115-125V (or 220-240V). If insufficient voltage, rewire incoming electric line. |
| Brown facility fuse. Replace fuse. | |||
| Tripped facility circuit breaker. Reset circuit breaker. | |||
| No power to operating switch or junction. | Check above. Tighten all loose wire connections. Correct any improper connections.If the Screen is stuck in the DOWN POSITION:Check for power across black and white leads.If the Screen is stuck in the UP POSITION:Check for power across red and white leads. | ||
| There is power at the junction box | Thermal overload tripped. Let motor cool down for 15 minutes. Try again.Broken wire in the "down" or "up" position.Defective motor, limit switch or capacitor. | Check for continuity. Cut off old splice and reconnect.Replace motor assembly. NOTE: Motor is a sealed assembly. | |
| Screen or camera arm will not operate or will not go UP or DOWN and the MOTOR DOES HUM. | There is power at the junction box | Capacitor burned out. Replace motor assembly. | |
| Screen or camera arm will not move upward. Motor does not hum. | Limit switch out of adjustment. See Screen Adjustment section. | ||
| Door will not open. | Hinge is bound or has a foreign substance on it which does not allow it to open by gravity.No power. See Above | Check installation to free door. Clear any foreign substance; i.e., paint or plaster from hinge. | |
| Door does not close. No power from screen motor. Replace screen motor. | |||
| DOWN limit switch incorrect. | Down" limit switch out of adjustment. | Contact Da-Lite. | |
| Screen produces excessive noise. (The screen will naturally operate with a low-pitched hum.) | Gear noise. | Replace motor assembly. | |
| Coasting. | Defective brake. | Replace motor assembly. | |
| Roller displaced from mounting bracket. | Pin end slipped out of nylon bearing. | Realign pin end bracket. | |
| Fabric hangs crooked. | Screen not installed properly.Fabric is damaged. | Check for level and plumb.Replace fabric. | |
| Door closes before screen is all the way up. | Screen "up" limit out of adjustment. | Adjust "up" limit (call factory for instructions). | |
| Door opens but screen does not operate. | Loose wire. | Check all wiring and connections. | |
• Temperature: Between 40 - 100°F (5 - 40°C)
• Relative Humidity: 30% to 70%, non-condensing
• Always keep the projection screen horizontal during transport and storage
• Make sure the entire package is supported when stored
- Do not stack more than six projection screens on top of each other
- Make sure the heaviest package is places at the bottom of the stack
Screen surface should be allowed to air out once every two months, or otherwise used on a regular basis, if the temperature is above 72irc F ( 22irc C) and at least once every month if the temperature goes above 85irc F ( 30irc C).
LIMITED FIVE YEAR WARRANTY ON DA-LITE PRESENTATION PRODUCTS
Milestone AV Technologies LLC warrants certain Da-Lite branded products to the original purchaser only, to be free from defects in materials and workmanship for a period of five (5) years from the date of purchase by the original purchaser; provided they are properly operated according to Da-Lite's instructions and are not damaged due to improper handling or treatment after shipment from the factory.
This warranty does not apply to equipment showing evidence of misuse, abuse or accidental damage, or which has been tampered with or repaired by a person other than authorized Da-Lite personnel.
Da-Lite's sole obligation under this warranty shall be to repair or to replace (at Da-Lite's option) the defective part of the merchandise. Returns for service should be made to your Da-Lite dealer. If it is necessary for the dealer to return the screen or part to Da-Lite, transportation expenses to and from Da-Lite are payable by the purchaser and Da-Lite is not responsible for damage in shipment. To protect yourself against damage or loss in transit, insure the product and prepay all transportation expenses.
TO THE MAXIMUM EXTENT PERMITTED BY APPLICABLE LAW, THIS WARRANTY IS IN LIEU OF ALL OTHER WARRANTIES, EXPRESS OR IMPLIED, INCLUDING WARRANTIES AS TO FITNESS FOR USE AND MERCHANTABILITY. Any implied warranties of fitness for use, or merchantability, that may be mandated by statute or rule of law are limited to the five (5) year warranty period. This warranty gives you specific legal rights, and you may also have other rights, which vary from state-to-state. TO THE MAXIMUM EXTENT PERMITTED BY APPLICABLE LAW, NO LIABILITY IS ASSUMED FOR EXPENSES OR DAMAGES RESULTING FROM INTERRUPTION IN OPERATION OF EQUIPMENT, OR FOR INCIDENTAL, DIRECT, OR CONSEQUENTIAL DAMAGES OF ANY NATURE.
In the event that there is a defect in materials or workmanship of a Da-Lite product, you may contact our Customer Care Specialists at 3100 North Detroit Street, Warsaw, IN 46582, (574) 267-8101, (800) 622-3737.
IMPORTANT: THIS WARRANTY SHALL NOT BE VALID AND DA-LITE BRANDED PRODUCTS SHALL NOT BE BOUND BY THIS WARRANTY IF THE PRODUCT IS NOT OPERATED IN ACCORDANCE WITH THE DA-LITE WRITTEN INSTRUCTIONS.
Keep your sales receipt to prove the date of purchase and your original ownership.

FOR YOUR IMAGE | legrandav.com
USA P 866.977.3901 E info@da-lite.com
CANADA P 877.345.4329 E canadainfo@milestone.com
EMEA P +31 495 580 840 E emea.sales@milestone.com
APAC P +852 2145 4099 E asia.da-lite@milestone.com
In British Columbia, Milestone AV Technologies ULC carries on business as MAVT Milestone AV Technologies ULC. ©2018 Milestone AV Technologies. DL-0169 (Rev. 5) 7/18 Da-Lite is a registered trademark of Milestone AV Technologies. All other brand names or marks are used for Identification purposes and are trademarks of their respective owners. All patents are protected under existing designations. Other patents pending.
Brand : DA-LITE
Model : Tensioned Conference Electrol
Category : Video Conferencing System