
ETB3700J-A - Cooker ELECTROLUX - Free user manual and instructions
Find the device manual for free ETB3700J-A ELECTROLUX in PDF.


| Product Type | Top Freezer Refrigerator-Freezer |
| Brand | Electrolux |
| Model | ETB3700J-A |
| Power Supply | 220-240V, 50/60Hz AC, dedicated outlet |
| Refrigerant | R600a (flammable, amount on rating plate) |
| Installation Clearance | 30mm sides, 50mm back, 10mm above hinge cover (90mm if not enclosed) |
| Temperature Control | Slide control for refrigerator and freezer; adjust to colder/less cold |
| Special Compartments | TasteSeal Room (adjustable temperature for meat, dairy, drinks) |
| Humidity-Controlled Crisper | Yes, with humidity slide for vegetables/fruits |
| Deodorizer | FreshTaste Deodorizer to reduce food odors |
| Lighting | LED interior lighting (serviceable by qualified technician) |
| Door Alarm | Buzzer sounds if door open >2 minutes; reset by pressing Light switch or closing door |
| Ice Maker | Ice Twist & Serve tray in freezer |
| Shelves and Bins | Adjustable glass shelves, door bins, FlexStor bins/rails, egg tray, bottle bins |
| Multiflow Cooling | Multi Flow system for even temperature distribution |
| Stability Foot | Adjustable levelling leg for stability |
| Cleaning Method | Lukewarm soapy water and soft cloth; no abrasive cleaners or steam cleaners |
| Safety Features | Stability foot, R600a warning, dedicated electrical outlet, child supervision required |
| Energy Efficiency | Uses energy efficient components; normal to hear refrigerant flow/expansion sounds |
| Disposal | Recyclable packaging; dispose appliance per local regulations (remove doors to prevent child entrapment) |
Frequently Asked Questions - ETB3700J-A ELECTROLUX
User questions about ETB3700J-A ELECTROLUX
0 question about this device. Answer the ones you know or ask your own.
Ask a new question about this device
Download the instructions for your Cooker in PDF format for free! Find your manual ETB3700J-A - ELECTROLUX and take your electronic device back in hand. On this page are published all the documents necessary for the use of your device. ETB3700J-A by ELECTROLUX.
USER MANUAL ETB3700J-A ELECTROLUX
EASY WAY TO REGISTER YOUR PRODUCT WITH YOUR SMARTPHONE

Photograph the camera icon located on your product's serial tag, including the 4 dots (●).


Send it in via Line, Facebook Messenger or go online.

@eluxreg

eluxreg

eluxreg.com

Enjoy many privileges.*
* Terms and conditions apply.

Electrolux
VN
2
Deodorizing filter
LED light
Photograph the camera icon located on your product's serial tag, including the 4 dots (●).


Send it in via Line, Facebook Messenger or go online.

@eluxreg

eluxreg

eluxreg.com

Enjoy many privileges.*
* Terms and conditions apply.

Electrolux
ENG

Thank You for choosing Electrolux!
Congratulations and thank you for choosing an Electrolux refrigerator/freezer. We are sure you will find your new appliance a pleasure to use. Before you start using the appliance, we recommend you read through the entire user manual which describes the appliance and its many functions. To avoid any unnecessary risks, misuse or hazards that may be present when using a new electrical appliance, it is important you read the safety instructions carefully. We recommend you keep this user manual for future reference and pass it on to future owners. After unpacking the appliance, please check that it is not damaged. If in doubt, do not use the appliance but contact your local Electrolux Customer Care Centre.
CONTENTS
Important Safety Information 3
Installing the New Refrigerator 4
Cleaning the Refrigerator 5
Temperature Control 5
TasteSeal Room 6
Door Storage Bins 6
Crisper Bin 6
-Storing Vegetables
-Storing Fruits and Small Items
Deodorizer 6
LED Lighting 6
Refrigerator Features 7
Food Storage Guide 10
Troubleshooting 11
Noise 12
RoHS Compliant
Being ensured the permissible content limitation of some toxic chemicals (RoHS compliant) (According to the Circular No. 30/2011/TT-BCT, Vietnam, dated 10th August, 2011)

ENVIRONMENTAL TIP
Disposal information for users
Most of the packing materials are recyclable. Please dispose these materials through your local recycling depot or place them in appropriate collection containers.
If you wish to discard this appliance, please contact your local authorities and ask for the correct method of disposal. These products are RoHS compliant.
Conditions of use
This appliance is intended to be used in household and similar applications such as:
- The kitchen areas in shops, offices and other working environments;
- Farm houses and by clients in hotels, motels and other residential type environments; • Bed and breakfast type environments; • Catering and similar non-retail applications;
Please read the user manual carefully and keep it in a handy place for later reference.
The symbols you see in this manual have the following meanings:

WARNING
This symbol indicates information concerning your personal safety.

CAUTION
This symbol indicates information on how to avoid damaging the appliance.

TIPS AND INFORMATION
This symbol indicates tips and information about the use of the appliance.

ENVIRONMENTAL TIP
This symbol indicates tips and information about economical and ecological use of the appliance.
MEANING OF SYMBOLS

This symbol indicates to never do this.

This symbol indicates to always do this.

TIPS AND INFORMATION
Important: Check for any damages or marks. If you find that the refrigerator is damaged or marked, you must report this within 7 days if you wish to claim for damages/marks under the manufacturer's warranty. This does not affect your statutory rights.

WARNING

If pressurised aerosol containers bear the word 'Flammable' and/or a small flame symbol, do not store them inside any refrigerator. If you do so, you may cause an explosion.
When you dispose of refrigerators and freezers, remove all doors. Children can suffocate if they get trapped inside. This refrigerator contains insulation formed with flammable blowing gases. Avoid safety hazards by carefully disposing of this appliance.

WARNING
This appliance must be plugged into its own dedicated 220-240V, 50/60Hz AC electrical outlet. Ensure that the electrical outlet is properly earthed to ground. Consult a qualified electrician if you are unsure. Do not use an extension cord or adapter plug. If the power cord is damaged, it must be replaced by the manufacturer, its service agent, or similarly qualified personnel in order to avoid a hazard. Unplug the appliance before cleaning and before changing the light bulb to avoid electric shock. Never unplug the appliance by pulling on the power cord. Always grip the plug firmly and pull straight out of the receptacle to prevent damaging the power cord. Choose a location that is not too cold for installation. The temperature should be above 10 degrees Celsius. Put the appliance in a dry place, avoiding areas of high moisture or humidity. Do not place the appliance in frosty or unprotected areas, such as in a garage or on a verandah. Do not place the appliance in direct sunlight. Do not place the appliance near stoves, fires, or heaters. The plug must be accessible when the appliance is in position.

WARNING
This appliance is not intended for use by persons (including children) with reduced physical, sensory, or mental capabilities, or lack of experience and knowledge, unless they have been given supervision or instruction concerning use of the appliance by a person responsible for their safety. Children should be supervised to ensure that they do not play with the appliance.
Please follow these tips:
Never let children play with the refrigerator. Never store fizzy drinks in the freezer compartment. Never try to repair the refrigerator on your own. Never use electric heaters or dryers to defrost the freezer because you can receive an electric shock. Never use electrical appliances inside the storage areas.

WARNING
Stability Foot
When your refrigerator is in place, wind down the stability foot to the floor to stabilize it. Lift the front of the refrigerator to take the weight off the stability foot, then turn it a quarter turn further to ensure firm contact with the floor.
If you do move the refrigerator, remember to wind it back up to allow the refrigerator to roll. Remember to reset it when reinstalling.

R600A REFRIGERANT WARNING
- This appliance contains flammable R600a refrigerant. Avoid safety hazards by carefully installing, handling, servicing, and disposing of this appliance. If your appliance contains R600a, it will be indicated on the rating plate inside the appliance.
- Ensure that the tubing of the refrigerant circuit is not damaged during transportation and installation. In the event any damage accidentally occurs, keep the appliance away from open fires and any devices that produce sparks or arcs and luminaries during normal or abnormal operation, and unplug the appliance at the power point. Call authorized service for necessary action and advice.
- Leaking refrigerant may ignite if a leak occurs in a vent area.
- The room for installing the appliance must be at least 1 m³ per 8 g of refrigerant. The amount and type of refrigerant in the appliance can be found on the rating plate inside the appliance.
- Do not damage the refrigerant circuit.
- Do not use electrical appliances inside the food storage compartments of the appliance, unless they are of the type recommended by the manufacturer.
- Keep ventilation openings, in the appliance enclosure or in the built-in structure, clear of obstruction.
- Do not use mechanical devices or other means to accelerate the defrosting process, other than those recommended by the manufacturer.
WARNING
- Do not use a steam cleaner. If live components come in contact with the condensing steam, they may short circuit or cause an electric shock.
- Do not plug the appliance into a timer fitted to the power point.
- Do not put your appliance on an uneven surface.
- Do not store explosive substances such as aerosol cans with flammable propellant in the appliance.
- Do not store fizzy drinks in the freezer compartment.
- Never try to repair the refrigerator on your own. Use only a qualified or authorised service person for repairs.
- Never use electric heaters or dryers to defrost the freezer because you can receive an electric shock.
Installing Your New Refrigerator
Clean the refrigerator thoroughly according to instruction, and wipe away any dust that has accumulated during shipping.
Check that the floor is level. If it is not then adjust the provided levelling leg so product is level and stable.
We recommend that you let your refrigerator run for two to three hours before you put any food in it. This will allow you to check that it is operating properly and that enough cool air is going to the freezer.
Clearance around your Top and Bottom Mount refrigerator
- Allow a minimum of 30mm clearance on both sides of the refrigerator.
- Allow 50mm clearance at the back of the refrigerator.
- Allow a minimum of 10mm clearance above the hinge cover.
- If you do not have a cupboard with allowance for air flow above the refrigerator, the recommended clearance area on top increases to 90 mm.
- When positioned in a corner area, spacing of at 350mm on the hinge side will allow the doors to open enough to enable the removal of bins and shelves.

NOTE: In installations where both sides and the rear of the refrigerator are not enclosed by cabinetry (e.g., the refrigerator is placed against a wall), the clearance between the rear of the refrigerator and the wall should not be greater than 75mm.
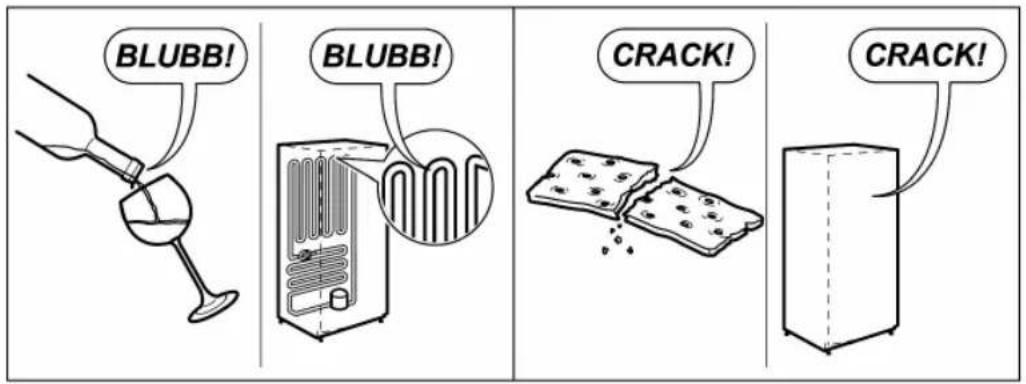
Your refrigerator uses energy-efficient components that may produce different noises (refer to the "Noises" page for examples) compared to your old refrigerator. Occasionally, a gurgling sound of refrigerant flowing or the sound of parts expanding and contracting can be heard. These noises are quite normal.
Installing your refrigerator
- Roll the refrigerator into place. The rollers are designed for forward or backward movement only. They are not castors. Moving the refrigerator sideways may damage your floor and the rollers. Before moving your refrigerator, ensure the height adjusting nut and the stability foot are fully wound up off the floor.
- Wind the height adjusting nut under the door hinge down until the refrigerator is tilted back by 10mm (see diagram).

- Wind the height adjusting nut on the handle side down until the refrigerator is level and stable. If you have difficulty winding the nut or height adjusting foot down, have someone tilt the refrigerator back so you have better access.
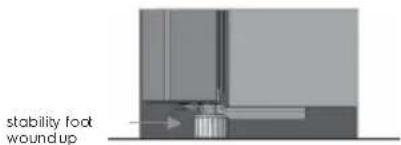
- Check the alignment of the refrigerator to the surrounding cupboards to see if it is level. You can adjust the level as detailed in steps 2 and 3.

Cleaning Your Refrigerator
Exterior
You should only clean your refrigerator with lukewarm soapy water and a soft cloth. Rinse with clean water and then wipe the surface with a soft clean cloth to remove any soap residue.
Interior
You should clean the refrigerator interior regularly. Wash the interior with a soft cloth and lukewarm soapy water. Thoroughly dry all surfaces and removable parts. Avoid getting water on refrigerator controls. If you have taken out any removable parts, replace them and switch the power on before restocking the refrigerator with food. Naturally, you should keep the interior of your refrigerator hygienic by promptly and thoroughly wiping up any food spills.
WARNING
Never use hot water, solvents, commercial, caustic or abrasive cleaners, or scourers to clean this appliance as they will damage it. Many commercially available cleaning products and detergents contain solvents that will damage your refrigerator. When cleaning, use only a soft cloth and lukewarm soapy water.
TEMPERATURE CONTROL
When you first turn on the refrigerator, set both the refrigerator and freezer temperature controls to normal. Please refer to the section below for information on adjusting refrigerator and freezer temperature.
TIPS AND INFORMATION
When you set a temperature, you set an average temperature for the whole refrigerator cabinet.
Checking the softness of ice cream is a good indication that your freezer is at the right temperature, while checking the temperature of water kept in the refrigerator is a good way of checking the temperature of the food compartment.
Temperatures inside each compartment may vary, depending on how much food you store and where you place it.
High or low room temperature may also affect the actual temperature inside the refrigerator.
When you change the temperature settings, make small adjustments and wait 24 hours before assessing whether you need to make any further changes.
For Top Freezer models
Freezer temperature setting recommendation
Summer (Higher than 35°C)
Set to normal
Winter (Under 15°C)

TIPS AND INFORMATION
Setting the freezer temperature to colder is not recommended for normal or very hot climate conditions, as this will limit the cooling capacity to other sections of the refrigerator. In very cold climates, the freezer will need to be set colder.
Refrigerator temperature adjustment
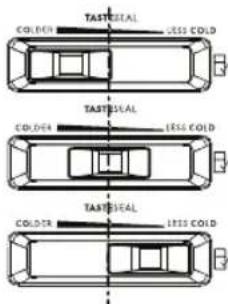
- Select the refrigerator control
- Slide the control to the left to set it to colder
- Slide the control to the right to set less cold
Refrigerator temperature setting recommendation
Set to colder
Set to TASTESEAL
Set to less cold
FEATURES
This section tells you how to make the most of the many useful features of the refrigerator and how to clean them.
TASTESEAL Room
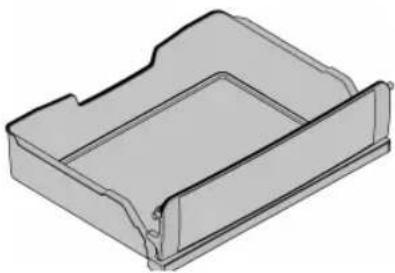
Use the TASTESEAL compartment to store meat, snack, beverage and dairy products. You can adjust TASTESEAL temperature by sliding the refrigerator temperature control.
Recommended food storage
| Temperature adjustment | Product |
| COLDER | Soft freezing |
| TASTE SEAL | Meats and Fish |
| LESS COLD | Cheese, yogurt, dairy products and drinks |

WARNING
Please refer to page 10 for storage guidelines when storing meat and fish.
Please do not store beverages or bottles of drink in the TASTESEAL compartment once the refrigerator temperature is set to COLDER and TASTESEAL.
Door storage bins (shelves)
Both the refrigerator and freezer have door storage bins. You can adjust the refrigerator bins to meet different storage needs. All the door bins are completely removable for cleaning. If you want to remove or adjust a bin, lift and tilt to remove. To replace, tilt the top and push the bin down until the support lugs lock it in place.

Store safe compartment (where fitted)
You can use this compartment to store food and other items. To operate the lock, push up to open and down to lock.
Crisper bin
Storing vegetables
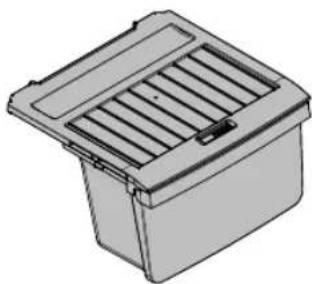
Use the crisper bin to store vegetables, fruits, or small items. You can adjust the humidity inside the bin by sliding the humidity control.
Storing fruits and small items
You can store fruits in the crisper bin, but do remember to lower the humidity by sliding the lever on the humidity control.
Deodorizer
Your refrigerator is fitted with FreshTaste Deodorizer to assist with the removal of food odours inside your refrigerator. Keeping the food covered and wrapping it in plastic will also help to reduce the odours inside your refrigerator.

LED Lighting
Your refrigerator is fitted with long life LED lighting. In the unlikely event the LED lights should ever fail, then the LED lights need to be serviced by a qualified technician. Refer to page 11 for contact details.
DOOR ALARM
If the refrigerator door is left open longer than two minutes, a buzzer will sound. Re-set the alarm by pressing the Light switch or closing the door.
TOP FREEZER FEATURES
- ETB2302J-A
- ETB2302J-H


The details of the refrigerator feature:
| 1 | Doors |
| 2 | Door Handles |
| 3 | Slide Control Freezer |
| 4 | Ice Tray |
| 5 | Freezer Shelf |
| 6 | TasteSeal Room |
| 7 | Multi Flow |
| 8 | Refrigerator Light |
| 9 | Shelf |
| 10 | Deodoriser Cover Refrigerator |
| 11 | Slide Control Refrigerator |
| 12 | Humidity Slide |
| 13 | Crisper |
| 14 | Feet |
| 15 | Gaskets |
| 16 | Door Bins |
| 17 | FlexStor Rails |
| 18 | Egg Tray |
| 19 | FlexStor Bins |
| 20 | Bottle Bins |
TOP FREEZER FEATURES
- ETB2502J-A
- ETB2802J-A
- ETB2502J-H
- ETB2802J-H


The details of the refrigerator feature:
| 1 | Doors 11 |
| 2 | 12 Door Handles Humidity Slide |
| 3 | Ice Twist & Serve |
| 4 | 14SIFed Control Freezer |
| 5 | Freezer Shelf |
| 6 | 16TasteSeal Room |
| 7 | Multi Flow |
| 8 | Refrigerator Light |
| 9 | Shelves |
| 10 |
| Slide Control Refrigerator | |
| 13 | Crisper |
| 15 | Gaskets |
| Door Bins | |
| 17 | Egg Tray |
| 18 | FlexStor Bins |
| 19 | FlexStor Rails |
| 20 | Bottle Bins Deodoriser Cover Refrigerator |
TOP FREEZER FEATURES
- ETB3400J-A
- ETB3700J-A
- ETB3400J-H
- ETB3700J-H


The details of the refrigerator feature:
| 1 | Doors 11 |
| 2 | 12 Door Handles Humidity Slide |
| 3 | 13 Freeze Shelf |
| 4 | 14 Slide Control Freezer |
| 5 | Ice Twist & Serve |
| 6 | 16 Taste Seal Room |
| 7 | Multi Flow |
| 8 | Refrigerator Light |
| 9 | Shelves |
| 10 |
| Slide Control Refrigerator | |
| 15 | Gaskets |
| Door Bins | |
| 17 | FlexStor Rails |
| 18 | Egg Tray |
| 19 | FlexStor Bins |
| 20 | Bottle Bins Deodoriser Cover Refrigerator |
FOOD STORAGE GUIDE
| CATEGORY PRODUCT REFRIGERATOR | FREEZER STORAGE | TIPS | ||
| MEAT | Sausages and Mince | 1-2 Days | 2-3 Months | Keep cold meat at the back of the refrigerator where it is coldest. |
| Chops and Steak | 3-4 Days | 4-6 Months | ||
| Cold Meats 3-5 Da | ys | 4-6 Months | Plastic can cause meat to sweat if stored in refrigerator for more than a day. | |
| Roasts 3-5 Days 12 Months | Roast can take up to 48 hours to defrost properly, transfer frozen roast to the refrigerator 2 days before use. | |||
| POULTRY | Chicken 1-2 Days 2 Months | If poultry takes on a smell or colour you are unsure about it is best to throw it out. | ||
| Roast Chicken | 3-5 Days | 12 Months | ||
| Eggs | 6 Weeks | Not Suitable | Whole eggs are not suitable for freezing, slightly beaten eggs may be frozen for four months. | |
| SEAFOOD | Whole fish and fillets | 2-3 Days 2 Months | Store in an airtight container or foil. | |
| Lobster and crabs | 1-2 Days | 2 Months | Never freeze prawns in salty water as this will dehydrate the flesh. | |
| Prawns | 1-2 Days | 2 Months | ||
| DAIRY | Milk | Until Expiry Date | Not Suitable | If dairy takes on a smell or colour and you are unsure about it, it is best to throw it out. |
| Yoghurt | 7-10 Days | Not Suitable | ||
| Hard Cheeses | 2 Weeks - 2 Months | 2 Months (Grated) | ||
| Soft Cheeses | 1-2 Weeks | Not Suitable | Depending on the variety hard cheese can last from 2 weeks to 2 months. | |
| Butter | 8 Weeks | 12 Months | ||
| FRUIT & VEGETABLES | Every fruit and vegetable has a different shelf life. Some stay fresh for a couple of days e.g. beans, others can last for a couple of months e.g. onions. | 8-12 MonthsWhen freezing chop and blanch in small portions. | Keep vegetables in the crisper and away from the air vents to avoid freezing. | |
| Don't wash fruit and vegetables before storing them in the refrigerator as this can make them susceptible to rotting. | ||||
| LEFT OVERS | Homemade meals | 3-4 Days | 2-6 Months | Store in sealed container.Freeze meals in small portion sizes to limit wastage. |
i IMPORTANT
Please note, use this information as a guide only, actual storage times will vary depending on how you use your refrigerator, climatic conditions and the freshness of the food.
TROUBLESHOOTING
If you find that something is wrong with your refrigerator, you can carry out some easy checks before calling for service. You may be able to fix the problem and save time and costs, and spare yourself from some inconvenience.
Problem Solution
When your appliance is not operating
- Check that the power cord is plugged into the power outlet properly and that the outlet is switched on.
- Try running another appliance from the same power outlet. If no power is coming out from the outlet, you may have a blown fuse or tripped your household power supply circuit.
- Try adjusting the temperature control to a slightly colder position.
- It is normal for the freezer fan to NOT operate during the automatic defrost cycle or for a short time after the refrigerator is turned on.
When there is refrigerator noise
- Your refrigerator uses energy efficient components that may produce different noises from your old refrigerator.
- Occasionally, a gurgling sound of the refrigerant flowing or the sound of parts contracting or expanding may be heard. These sounds are quite normal. If the refrigerator is rattling or making vibrating noises, check that it is level and adjust levelling foot.
If there are odours inside the refrigerator
The interior may need cleaning. Some foods may produce strong odours and need to be tightly sealed.
If the temperature in the refrigerator is too warm
- Check that the refrigerator has enough clearance at the sides, back and top. Refer to the installation instructions in this manual. Refer to 'Temperature Control' section.
- The door may have been opened for too long or too frequently.
- Food containers or packaging may be holding the door
If the temperature in the refrigerator is too cold
Refer to 'Temperature Control' section. Increase the temperature to avoid high energy consumption.
SERVICE REQUEST
If the problem persists after you have made the above mentioned checks, contact your nearest service centre or the dealer where you bought the refrigerator from. Be ready to quote the model number which is stated on the label found at the inner plastic compartment liner wall of the refrigerator.
Important notice
Before calling a service technician, please check carefully the operating instructions, service booklet and warranty terms and conditions.
Noise


Notes

Contact details for Electrolux Customer Care
Vietnam
Domestic Toll Free: 1800-58-88-99
Tel: (+84 8) 3910 5465
Electrolux Vietnam Ltd
Floor 9th, A&B Tower
76 Le Lai Street - Ben Thanh Ward - District 1
Ho Chi Minh City Vietnam
Office Tel: (+84 8) 3910 5465
Office Fax: (+84 8) 3910 5470
Email: vncare@electrolux.com
Share more of our thinking at electrolux.com.
P/No: A12081651
- EASY WAY TO REGISTER YOUR PRODUCT WITH YOUR SMARTPHONE
- DEODORIZING FILTER
- LED LIGHT
- ELECTROLUX
- ENG
- THANK YOU FOR CHOOSING ELECTROLUX
- CONTENTS
- ENVIRONMENTAL TIP
- WARNING
- CAUTION
- TIPS AND INFORMATION
- MEANING OF SYMBOLS
- R600A REFRIGERANT WARNING
- INSTALLING YOUR NEW REFRIGERATOR
- INSTALLING YOUR REFRIGERATOR
- CLEANING YOUR REFRIGERATOR
- EXTERIOR
- INTERIOR
- TEMPERATURE CONTROL
- FOR TOP FREEZER MODELS
- FEATURES
- TASTESEAL ROOM
- DOOR STORAGE BINS (SHELVES)
- STORE SAFE COMPARTMENT (WHERE FITTED)
- CRISPER BIN
- DEODORIZER
- LED LIGHTING
- DOOR ALARM
- TOP FREEZER FEATURES
- THE DETAILS OF THE REFRIGERATOR FEATURE
- I IMPORTANT
- TROUBLESHOOTING
- PROBLEM SOLUTION
- SERVICE REQUEST
- IMPORTANT NOTICE
- NOISE
- NOTES
- CONTACT DETAILS FOR ELECTROLUX CUSTOMER CARE
Brand : ELECTROLUX
Model : ETB3700J-A
Category : Cooker