
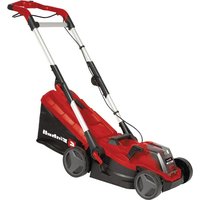
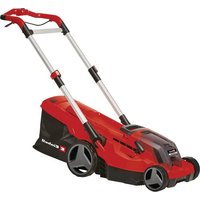
BG-EM 1030 - Lawn mower EINHELL - Free user manual and instructions
Find the device manual for free BG-EM 1030 EINHELL in PDF.


| Product type | Corded electric lawn mower |
| Brand | Einhell |
| Model | BG-EM 1030 |
| Motor power | 1000 W |
| Cutting width | 30 cm |
| Adjustable cutting height | Yes, 25-65 mm (6 positions) |
| Grass bag capacity | 25 L |
| Power supply | 230 V / 50 Hz |
| Cable length | 10 m |
| Weight | 9,5 kg |
| Dimensions (L x W x H) | 70 x 35 x 28 cm |
| Wheel type | 4 plastic wheels |
| Sound pressure level (LpA) | 76 dB(A) |
| Sound power level (LWA) | 90 dB(A) |
| Vibrations | 2,5 m/s² |
| Safety device | Double safety switch (handle + button) |
| Blade type | Hardened steel blade |
| Cutting height adjustment | Central, via lever |
| Maintenance | Clean after each use, sharpen blade regularly |
| Available spare parts | Blade, bag, wheels, power cable |
| Warranty | 2 years |
| Recommended use | Lawns up to 200 m² |
Frequently Asked Questions - BG-EM 1030 EINHELL
User questions about BG-EM 1030 EINHELL
0 question about this device. Answer the ones you know or ask your own.
Ask a new question about this device
Download the instructions for your Lawn mower in PDF format for free! Find your manual BG-EM 1030 - EINHELL and take your electronic device back in hand. On this page are published all the documents necessary for the use of your device. BG-EM 1030 by EINHELL.
USER MANUAL BG-EM 1030 EINHELL
GB Original operating instructions Electric Lawn Mower
natural_image
Model of a lawn mower with labeled parts (3a, 3b) and number 8, shown in grayscale without any text or symbols on the device itself.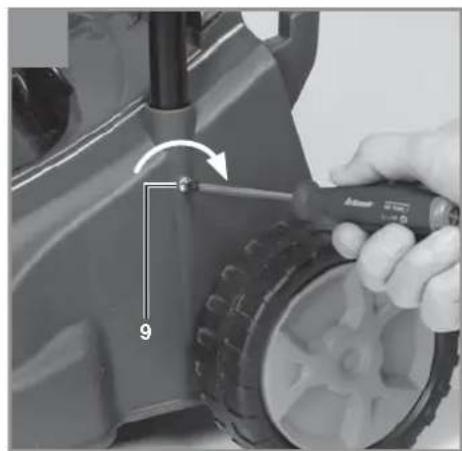
natural_image
Close-up of a hand using a tool to adjust or install a tire on a wheeled vehicle (no visible text or symbols)
natural_image
Close-up of a hand holding a black cable with a 10-degree angle indicator (no text or symbols on the diagram itself)
natural_image
Close-up of a black plastic bag with perforated side panels, showing internal structure and measurement arrows (no text or symbols)
natural_image
Hand holding a small mechanical component labeled '13' with an arrow indicating motion (no text or symbols on the device itself)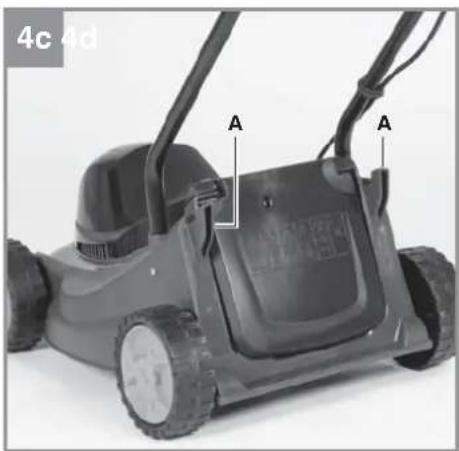

natural_image
Close-up of a lawn mower with hand operating the blade (no visible text or symbols)
natural_image
Close-up of a hand pressing down on a small wheeled motorcycle wheel (no text or symbols visible)


natural_image
Close-up of a robotic lawn mower with a hand adjusting the wheel rim (no visible text or symbols)
natural_image
Close-up of a hand using a power tool to clean or inspect the interior of a mechanical device (no visible text or symbols)8

2
9
-5-
D
Inhaltsverzeichnis
- Safety regulations
- Layout and items supplied
- Proper use
- Technical data
- Before starting the equipment
- Operation
- Replacing the power cable
- Cleaning, maintenance and ordering of spare parts
- Disposal and recycling
- Storage
- Troubleshooting
GB
⚠️ Important!
When using the equipment, a few safety precautions must be observed to avoid injuries and damage. Please read the complete operating instructions and safety regulations with due care. Keep this manual in a safe place, so that the information is available at all times. If you give the equipment to any other person, hand over these operating instructions and safety regulations as well. We cannot accept any liability for damage or accidents which arise due to a failure to follow these instructions and the safety instructions.
1. Safety regulations
The corresponding safety information can be found in the enclosed booklet.
Caution!
Read all safety regulations and instructions.
Any errors made in following the safety regulations and instructions may result in an electric shock, fire and/or serious injury.
Keep all safety regulations and instructions in a safe place for future use.
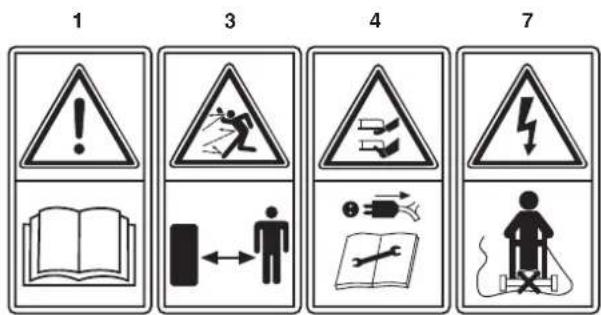
Explanation of the warning signs on the equipment (see Fig. 8/9)
1 = Read the directions for use before operating the equipment
2 = Wear ear guards and goggles
3 = Keep all other persons away from the danger zone.
4 = Caution! -Sharp blades- Before carrying out any maintenance work or if you damage the cable, pull the plug out of the socket.
5 = Caution: The cutters continue to run after the motor is switched off
6 = Do not expose the equipment to rain or moisture.
7 = Caution: Keep the power cable away from the cutters!
2. Layout and items supplied
2.1 Layout (Fig. 1/2)
- ON/OFF switch
- Cable strain-relief clamp
- Carry handle
- Grass basket
- Ejector fl ap
- Mains plug
- Top push bar
- Bottom push bar
- Fastening screws for bottom push bar
- Fastening screws for top push bar
- Cable clips
- Grass box housing halves
- Grass box handle
- Wheels
2.2 Items supplied
Please check that the article is complete as specified in the scope of delivery. If parts are missing, please contact our service center or the sales outlet where you made your purchase at the latest within 5 working days after purchasing the product and upon presentation of a valid bill of purchase. Also, refer to the warranty table in the service information at the end of the operating instructions.
- Open the packaging and take out the equipment with care.
- Remove the packaging material and any packaging and/or transportation braces (if available).
• Check to see if all items are supplied. - Inspect the equipment and accessories for transport damage.
- If possible, please keep the packaging until the end of the guarantee period.
Important!
The equipment and packaging material are not toys. Do not let children play with plastic bags, foils or small parts. There is a danger of swallowing or suffocating!
Electric lawn mower
• Original operating instructions
- Safetyinstructions
GB
3. Proper use
The lawn mower is intended for private use, i.e. for use in home and gardening environments.
Private use of the lawn mower refers an annual operating time generally not exceeding that of 50 hours, during which time the equipment is primarily used to maintain small-scale, residential lawns and home/hobby gardens. Public facilities, sporting halls, and agricultural/forestry applications are excluded.
Important! Due to the high risk of bodily injury to the user, the lawn mower may not be used to trim bushes, hedges or shrubs, to cut scaling vegetation, planted roofs, or balcony-grown grass, to clean (suck up) dirt and debris off walkways, or to chop up tree or hedge clippings. Moreover, the lawn mower may not be used as a power cultivator to level out high areas such as molehills.
For safety reasons, the lawn mower may not be used as a drive unit for other work tools or toolkits of any kind, unless they have been expressly permitted by the manufacturer.
The equipment is to be used only for its prescribed purpose. Any other use is deemed to be a case of misuse. The user / operator and not the manufacturer will be liable for any damage or injuries of any kind caused as a result of this.
Please note that our equipment has not been designed for use in commercial, trade or industrial applications. Our warranty will be voided if the machine is used in commercial, trade or industrial businesses or for equivalent purposes.
4. Technical data
Voltage: 230 V \~ 50 Hz Power input: 1000 watts Motor speed: 3600 rpm Cutting width: 30 cm Cutting height adjustment: 25-60 mm; 3 levels Volume of catch bag: 28 liters L_pA sound pressure level: 72,8 dB(A) L_WA sound power level: 96 dB(A) Vibration at the handlebars a_in : < 2,5 m/s ^2 Protection class II/☐
Sound and vibration
Sound and vibration values were measured in accordance with the standards EN ISO 3744:1995, EN ISO 11201:1995 and EN ISO 20643:2005.
Keep the noise emissions and vibrations to a minimum.
- Only use appliances which are in perfect working order.
• Service and clean the appliance regularly.
• Adapt your working style to suit the appliance.
• Do not overload the appliance. - Have the appliance serviced whenever necessary.
- Switch the appliance off when it is not in use.
• Wear protective gloves.
• Limit your working time
Residual risks
Even if you use this electric power tool in accordance with instructions, certain residual risks cannot be rules out. The following hazards may arise in connection with the equipment's construction and layout:
- Lung damage if no suitable protective dust mask is used.
- Damage to hearing if no suitable ear protection is used.
Warning!
This equipment generates an electromagnetic fi eld during operation. Under certain circumstances this fi eld may actively or passively impede medical implants. To reduce the risk of serious or fatal injuries, we recommend persons with medical implants to consult their doctor and the manufacturer of the medical implant prior to using the equipment.
GB
5. Before starting the equipment
Before you connect the equipment to the mains supply make sure that the data on the rating plate are identical to the mains data.
Always pull the power plug before making adjustments to the equipment.
The lawn mower is delivered unassembled. The complete push bar and the grass collector must be assembled before using the lawn mower. Follow the operating instructions step-by-step and use the pictures provided as a visual guide to easily assemble the machine.
5.1 Fitting the push bar (Fig. 3a to 3d)
Fit a bottom push bar (Fig. 3a / Item 8) into the opening provided for it (Fig. 3a) and secure it as shown in Fig. 3b with a screw (Fig. 3b / Item 9). Proceed in the same way on the other side.
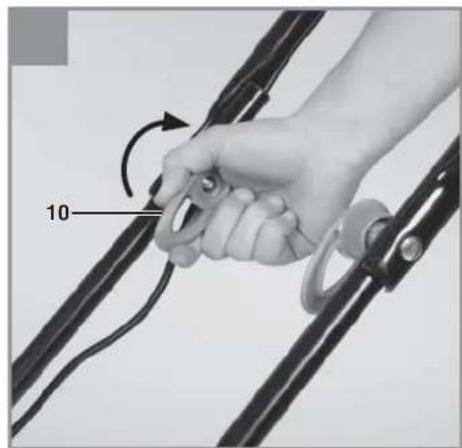
When you fit the top push bar you can decide the height of the push bar by selecting the appropriate fastening hole (Fig. 3c). Fasten the top push bar using either the holes L for a low position or H for a high position. Screw the top push bar to the bottom push bar as shown in Fig. 3d.
5.2 Fitting the grass box (Fig. 4a to 4d)
Fit the two halves of the grass box together (Fig. 4a / Item 12). The two halves are identical. Ensure that all the plastic lugs engage correctly. Next push the grass box handle (Fig. 4b / Item 13) into the openings on the grass box.
Before you fit the grass bag you must ensure that the motor is switched off and the blade is not rotating. The grass box must be attached to the two hooks on the mower (Fig. 4c / Item A). To do this, open the ejector fl ap with one hand (Fig. 4d / Item 5) and attach the grass box with the other hand as shown in Fig. 4d. The ejector fl ap is held against the grass box by a spring.
5.3 Fitting the wheels (5a and 5b)
Fit the four wheels (Fig. 2/Item 14) as shown in Fig. 5a. Turn the wheel caps (Fig. 5a/Item A) clockwise to tighten them. Fit all four wheels in the same position (Fig. 5b).
5.4 Setting the cutting heights Important!
Adjust the cutting height only when the engine is switched off and the power cable has been disconnected.
Before you begin to mow, check to ensure that the blade is not blunt and that none of the fasteners are damaged. To prevent any imbalance, replace blunt and/or damaged blades. To carry out this check, first switch off the motor and pull out the power plug.
The cutting height is adjusted as follows. Turn the hub cap counter-clockwise to release the axle (Fig. 5a) and remove the hub cap together with the screw and wheel. The wheel can now be fitted in position 1, 2 or 3 (Fig. 5b) to suit the required cutting height. Fit all four wheels at the same height so that the cutting blade runs parallel to the lawn.
Position Cutting depth
| 1 | 60 | mm |
| 2 | 42.5 | mm |
| 3 | 25 | mm |
Power supply
The lawn mower can be connected to any light socket-outlet with a 230 Volt alternating current. However, the socket outlet must have an earthing contact protected by a 16 A circuit breaker. Additionally, a residual current device (RCD) circuit-breaker with max. 30 mA must be used!
Power cable for the device
Please only use power cables that are not damaged. The total length of the power cable should not exceed 50 meters; going beyond this distance will reduce the power output of the electric motor. The power cable must have a cross-section of 3 x 1.5 mm. The insulating sheath of lawn aerator power cables is frequently damaged.
Some of the causes for this are:
• Cuts caused by driving over the cable.
- Pinching when the power cable is dragged under doors and pulled through windows.
• Cracking due to old age of the insulation.
- Kinking by improperly fastening or guiding the power cable.
The power cables must, at the very minimum, be of type HO5RN-F and 3-stranded. The cable type must be printed somewhere on the power cable. Only purchase power cables that are marked! Plugs and socket couplers for the power cables must be made from rubber and splash-proof.
There is a limit to how long power cables can be. Longer power cables require larger conductor cross-sections. Power cables and connecting li-
GB
nes must be regularly checked for damage. Ensure that the lines are switched off before checking them. Completely unwind the power cable. Also check power cable entry points, plugs and socket couplers for kinks.
6. Operation
Before you connect the equipment to the mains supply make sure that the data on the rating plate are identical to the mains data. Connect the plug (Fig. 1/Item 6) to an extension cable. It is imperative to secure the extension cable with the cable grip as shown in Figure 6.
Important!
To prevent the machine switching on accidentally, the lawn mower is equipped with a safety lock-off (Fig. 6/Item A) which must be pressed before the switching bar (Fig. 6/Item B) can be activated. The lawn mower switches itself off when the switch is released. Repeat this process several times so that you are sure that the machine functions properly. Before you perform any repair or maintenance work on the machine, ensure that the blade is not rotating and that the power supply is disconnected.
Important!
Never open the discharge flap if the grass box is being emptied and the motor is still running. The rotating blade can cause serious injuries. Always secure the discharge flap and grass bag carefully. Always switch off the motor before you remove these items. The safety distance between the blade casing and the user provided by the guide struts must be maintained at all times. Take special care when mowing and changing direction on embankments and slopes. Ensure that you have a secure surface to stand on, wear shoes with anti-slip soles that off er good grip, and long trousers. Always mow across the slope (not in up or down direction). Do not use the mower on gradients exceeding 15° for safety reasons.
Take special care when moving backwards and pulling the lawn mower. Danger of stumbling.
Information on correct mowing
We recommend that you mow in overlapping lines. Only mow with sharp, perfect blades so that the blades of grass do not fray, making the lawn turn yellow. To achieve a good cut, guide the lawn mower in lines that are as straight as possible. These lines should always overlap by a few centimeters so that you do not leave any strips.
How often you should mow the lawn depends on how fast the lawn grows. During the main growth period (May – June), mow it twice a week, and once a week at other times. The cutting height should be between 4 and 6 cm and the growth before the next cut should be between 4 and 5 cm. If the lawn grows longer than this on occasion, do not make the mistake of cutting to normal length straight away since this will damage the lawn. Never cut the grass by more than half its height.
Keep the underside of the mower casing clean and remove all grass deposits from it. Deposits make it more difficult to start the mower and also adversely affect the mowing quality and the grass discharge.
On slopes mow across the slope (not in up or down direction). You can counteract the tendency of the mower to slide down the slope by setting it at an angle upwards. Select the cutting height to suit the actual length of the grass. Make several passes to ensure that you do not remove more than 4 cm of grass length in any one pass.
Switch off the motor before you carry out any inspections of the blade. Remember than the blade will continue to turn for a few seconds after the motor has been switched off. Never attempt to stop the blade. Check regularly that the blade is correctly secured, in good condition and well ground. If not, grind or replace the blade.
If the moving blade strikes an object, stop the mower and wait until the blade has come to a complete standstill. Then check the condition of the blade and the blade holder. If they are damaged, they must be replaced.
Place the mains lead in loops on the ground in front of the socket. Mow away from the socket and cable and ensure that the mains lead is always on the section of lawn that you have already mowed so that you do not run over the mains lead with the mower.
GB
As soon as you see mown grass on the lawn whilst you are mowing, the grass bag will need emptying.
Important!
Before you remove the grass bag switch off the motor and wait until the cutting tool reaches a standstill.
To remove the grass bag, raise the discharge fl ap with one hand and remove the grass bag using its handle with your other hand. To maintain safety, the discharge fl ap will close when you remove the grass back to seal the rear discharge opening. If any grass residues are caught in the opening, it is a good idea to pull the mower backwards around 1 m to make it easier to start the motor. Do not remove grass cuttings in the mower casing or on the cutter by hand or with your feet. Instead use suitable tools such as a brush or broom. To ensure that it can collect the grass correctly the grass bag and in particular the net must be cleaned from the inside after use. Only attach the grass bag after switching off the motor and the cutting tool has reached a standstill. Raise the discharge fl ap with one hand and, holding the grass bag by its handle in your other hand, attach it from the top.
7. Replacing the power cable
If the power cable for this equipment is damaged, it must be replaced by the manufacturer or its after-sales service or similarly trained personnel to avoid danger.
8. Cleaning, maintenance and ordering of spare parts
Always pull out the mains power plug before starting any cleaning work.
8.1 Cleaning
- Keep all safety devices, air vents and the motor housing free of dirt and dust as far as possible. Wipe the equipment with a clean cloth or blow it with compressed air at low pressure.
• We recommend that you clean the device immediately each time you have finished using it. - Clean the equipment regularly with a moist cloth and some soft soap. Do not use cleaning agents or solvents; these could attack the plastic parts of the equipment. Ensure that no water can seep into the device. The ingress of water into an electric tool increases the risk of an electric shock.
8.2 Carbon brushes
In case of excessive sparking, have the carbon brushes checked only by a qualified electrician. Important! The carbon brushes should not be replaced by anyone but a qualified electrician.
8.3 Maintenance
- Worn out or damaged blades, blade mounts, and bolts should be replaced as a set by an authorized professional in order to keep the equipment in balance.
- Do not clean the lawn mower with running water, particularly with high-pressure water. Ensure that all mounting components (i.e. screws, bolts, nuts etc.) are always tightened so that the equipment can be safely operated at all times.
- Frequently check the grass catch assembly for signs of wear.
- Replace excessively worn or damaged parts immediately.
• Store your lawn mower in a dry room. - In order to ensure that you enjoy the equipment for many years to come, all screwed parts, as well as the wheels and axles, should be cleaned and lubricated.
- Keeping your lawn mower in good condition not only ensures a long lifespan and high performance, but also enables the equipment to thoroughly cut your grass with minimal effort. For best results, clean the lawn mower with a
GB
brush or rag. Do not use any solvents or water to remove dirt.
- The blade is subjected to more wear and tear than any other component. Therefore, routinely check the condition of the blade and make sure that it is tightly fastened. If the blade is completely worn out, it must be immediately replaced or ground sharp again. An excessively vibrating mower means that the blade is not properly balanced or has become deformed from striking an object. In this case, the blade must be repaired or replaced.
• There are no parts inside the equipment which require additional maintenance.
8.4 Replacing the blade
For safety reasons, we recommend having the blade replaced by an authorized professional. Important. Wear work gloves! Only replace the blade with a genuine Einhell replacement blade, as this will ensure top performance and safety under all conditions.
Carry out the following steps to change the blade:
- Undo the fastening screw (Fig. 7a)
- Remove the blade and replace with a new one.
- When fitting the blade, make sure it is installed in the right direction. The blade's air vanes must jut into the motor compartment (Fig. 7b).
- Then retighten the fastening screw. The tightening torque should be approx. 25 Nm.
8.5 Ordering replacement parts:
Please quote the following data when ordering replacement parts:
• Type of machine
• Article number of the machine
• Identification number of the machine
• Replacement part number of the part required
For our latest prices and information please go to www.isc-gmbh.info
Replacement blade art. no. 34.056.00
9. Disposal and recycling
The equipment is supplied in packaging to prevent it from being damaged in transit. The raw materials in this packaging can be reused or recycled. The equipment and its accessories are made of various types of material, such as metal and plastic. Never place defective equipment in your household refuse. The equipment should be taken to a suitable collection center for proper disposal. If you do not know the whereabouts of such a collection point, you should ask in your local council offices.
10. Storage
Store the equipment and accessories out of children's reach in a dark and dry place at above freezing temperature. The ideal storage temperature is between 5 and 30^ . Store the electric tool in its original packaging.
11. Troubleshooting
| Fault | Possible causes Remedies | |
| The motor fails to start | a) The capacitor is defectiveb) There is no electricity at the plugc) The cable is defectived) The combined switch/plug is defectivee) The connectors have become separated from the motor or the capacitorf) The mower is standing in high grassg) The mower housing is clogged | a) The mower housing is clogged.Have repaired by the Customer Service Centerb) Check the cable and the fusec) Check the cabled) Have repaired by the Customer Service Centere) Have repaired by the Customer Service Centerf) Start in low grass or on an area that has already been mowed; change the cutting height if necessaryg) Clean the housing so that the blade moves freely |
| The motor performance drops | a) The grass is too high or too dampb) The mower housing is cloggedc) The blade is severely worn | a) Correct the cutting heightb) Clean the housingc) Replace the blade |
| Cutting is irregular | a) The blade is wornb) Wrong cutting height | a) Replace or resharpen the bladeb) Correct the cutting height |
Important! For protection, the motor is equipped with a thermal switch which cuts out when the motor is overloaded and switches on again automatically after a short cooling period.
GB

For EU countries only
Never place any electric power tools in your household refuse.
To comply with European Directive 2012/19/EC concerning old electric and electronic equipment and its implementation in national laws, old electric power tools have to be separated from other waste and disposed of in an environment-friendly fashion, e.g. by taking to a recycling depot.
Recycling alternative to the return request:
As an alternative to returning the equipment to the manufacturer, the owner of the electrical equipment must make sure that the equipment is properly disposed of if he no longer wants to keep the equipment. The old equipment can be returned to a suitable collection point that will dispose of the equipment in accordance with the national recycling and waste disposal regulations. This does not apply to any accessories or aids without electrical components supplied with the old equipment.
The reprinting or reproduction by any other means, in whole or in part, of documentation and papers accompanying products is permitted only with the express consent of the iSC GmbH.
Subject to technical changes
GB
Service information
We have competent service partners in all countries named on the guarantee certificate whose contact details can also be found on the guarantee certificate. These partners will help you with all service requests such as repairs, spare and wearing part orders or the purchase of consumables.
Please note that the following parts of this product are subject to normal or natural wear and that the following parts are therefore also required for use as consumables.
| Category Example | |
| Wear parts* V-belt, carbon brushes | |
| Consumables* Blade | |
| Missing parts |
* Not necessarily included in the scope of delivery!
In the effect of defects or faults, please register the problem on the internet at www.isc-gmbh.info. Please ensure that you provide a precise description of the problem and answer the following questions in all cases:
• Did the equipment work at all or was it defective from the beginning?
• Did you notice anything (symptom or defect) prior to the failure?
• What malfunction does the equipment have in your opinion (main symptom)?
Describe this malfunction.
GB
Warranty certifi cate
Dear Customer,
All of our products undergo strict quality checks to ensure that they reach you in perfect condition. In the unlikely event that your device develops a fault, please contact our service department at the address shown on this guarantee card. You can also contact us by telephone using the service number shown. Please note the following terms under which guarantee claims can be made:
- These guarantee terms apply to consumers only, i.e. natural persons intending to use this product neither for their commercial activities nor for any other self-employed activities. These warranty terms regulate additional warranty services, which the manufacturer mentioned below promises to buyers of its new products in addition to their statutory rights of guarantee. Your statutory guarantee claims are not affected by this guarantee. Our guarantee is free of charge to you.
- The warranty services cover only defects due to material or manufacturing faults on a product which you have bought from the manufacturer mentioned below and are limited to either the rectification of said defects on the product or the replacement of the product, whichever we prefer. Please note that our devices are not designed for use in commercial, trade or professional applications. A guarantee contract will not be created if the device has been used by commercial, trade or industrial business or has been exposed to similar stresses during the guarantee period.
-
The following are not covered by our guarantee:
-
Damage to the device caused by a failure to follow the assembly instructions or due to incorrect installation, a failure to follow the operating instructions (for example connecting it to an incorrect mains voltage or current type) or a failure to follow the maintenance and safety instructions or by exposing the device to abnormal environmental conditions or by lack of care and maintenance.
- Damage to the device caused by abuse or incorrect use (for example overloading the device or the use or unapproved tools or accessories), ingress of foreign bodies into the device (such as sand, stones or dust, transport damage), the use of force or damage caused by external forces (for example by dropping it).
-
Damage to the device or parts of the device caused by normal or natural wear or tear or by normal use of the device.
-
The guarantee is valid for a period of 24 months starting from the purchase date of the device. Guarantee claims should be submitted before the end of the guarantee period within two weeks of the defect being noticed. No guarantee claims will be accepted after the end of the guarantee period. The original guarantee period remains applicable to the device even if repairs are carried out or parts are replaced. In such cases, the work performed or parts fitted will not result in an extension of the guarantee period, and no new guarantee will become active for the work performed or parts fitted. This also applies if an on-site service is used.
-
To make a claim under the guarantee, please register the defective device at: www.isc-gmbh.info. Please keep your bill of purchase or other proof of purchase for the new device. Devices that are returned without proof of purchase or without a rating plate shall not be covered by the guarantee, because appropriate identification will not be possible. If the defect is covered by our guarantee, then the item in question will either be repaired immediately and returned to you or we will send you a new replacement.
Of course, we are also happy offer a chargeable repair service for any defects which are not covered by the scope of this guarantee or for units which are no longer covered. To take advantage of this service, please send the device to our service address.
Also refer to the restrictions of this warranty concerning wear parts, consumables and missing parts as set out in the service information in these operating instructions.
F
Sommaire
X 2000/14/EC\_2005/88/EC
2012/46/EU
Standard references: EN 60335-1; EN 60335-2-77; EN 62233; EN 55014-1; EN 55014-2; EN 61000-3-2; EN 61000-3-3
Subject to change without notice
Archive-File/Record: NAPR015015
Documents registrar: Dallinger Roland
Wiesenweg 22, D-94405 Landau/Isar


EH 09/2016 (01)


- Inhaltsverzeichnis
- GB
- ⚠️ Important!
- Safety regulations
- Caution!
- Explanation of the warning signs on the equipment (see Fig. 8/9)
- Layout and items supplied
- Layout (Fig. 1/2)
- Items supplied
- Important!
- Proper use
- Technical data
- Sound and vibration
- Keep the noise emissions and vibrations to a minimum.
- Residual risks
- Warning!
- Before starting the equipment
- Always pull the power plug before making adjustments to the equipment.
- Fitting the push bar (Fig. 3a to 3d)
- Fitting the grass box (Fig. 4a to 4d)
- Fitting the wheels (5a and 5b)
- Setting the cutting heights Important!
- Power supply
- Power cable for the device
- Some of the causes for this are:
- Operation
- Information on correct mowing
- Replacing the power cable
- Cleaning, maintenance and ordering of spare parts
- Cleaning
- Carbon brushes
- Maintenance
- Replacing the blade
- Carry out the following steps to change the blade:
- Ordering replacement parts:
- Disposal and recycling
- Storage
- Troubleshooting
- Service information
- Warranty certifi cate
- F
- Sommaire
- X 2000/14/EC\_2005/88/EC
- 2012/46/EU
- Standard references: EN 60335-1; EN 60335-2-77; EN 62233; EN 55014-1; EN 55014-2; EN 61000-3-2; EN 61000-3-3
Brand : EINHELL
Model : BG-EM 1030
Category : Lawn mower