Q120 - Barbecue WEBER - Free user manual and instructions
Find the device manual for free Q120 WEBER in PDF.

User questions about Q120 WEBER
0 question about this device. Answer the ones you know or ask your own.
Ask a new question about this device
Download the instructions for your Barbecue in PDF format for free! Find your manual Q120 - WEBER and take your electronic device back in hand. On this page are published all the documents necessary for the use of your device. Q120 by WEBER.
USER MANUAL Q120 WEBER
Register your grill online at www.weber.com
⚠️ DANGER
If you smell gas:
- Shut off gas to the appliance.
- Extinguish any open flames.
- Open lid.
- If odour continues, keep away from the appliance and immediately call your gas supplier or your fire service.
Failure to follow these instructions could result in fire or explosion, which could cause property damage, personal injury or death.
THIS GAS APPLIANCE IS INTENDED FOR OUTDOOR USE ONLY.
⚠️ DANGER
- Never operate this appliance unattended.
- Do not store spare liquid butane/propane cartridge/cylinder within 3m (10 feet) of this appliance.
- Do not store or use petrol or other flammable liquids or vapours within 8m (25 feet) of this appliance.
- If a fire should occur, keep away from the appliance and immediately call your fire service. Do not attempt to extinguish an oil or grease fire with water.
Failure to follow these instructions could result in a fire, explosion or burn hazard, which could cause property damage, personal injury or death.
This instruction manual contains important information necessary for the proper assembly and safe use of the appliance.
⚠️ Read and follow all warnings and instructions before assembling and using the appliance.
⚠️ Follow all warnings and instructions when using the appliance.
⚠️ Keep this manual for future reference.
DANGERS AND WARNINGS
⚠ Follow regulator connection instructions for your type of gas barbecue.
⚠ Do not store a spare or disconnected gas supply cartridge/cylinder under or near this barbecue.
⚠ Do not put a barbecue cover or anything flammable on or in the storage area under the barbecue.
⚠ Improper assembly may be dangerous. Please carefully follow the assembly instructions in this manual.
After a period of storage and/or non-use, the Weber® gas barbecue should be checked for gas leaks and burner obstructions before use. See instructions in this manual for correct procedures.
⚠ Do not use a flame to check for gas leaks.
⚠ Do not operate your Weber® gas barbecue if there are any leaking gas connections.
△ Flammable materials should not be present within approximately 60 cm of the top, bottom, back or sides of the barbecue.
Your Weber gas barbecue should not be used by children. Accessible parts of the barbecue may be very hot. Keep young children away while it is in use.
Exercise caution when using your Weber® gas barbecue. It will be hot during cooking or cleaning, and should never be left unattended, or moved while in operation.
△ If the burners should go out during cooking, turn off all gas valves. Open the lid and wait five minutes before attempting to re-light the gas flame, while observing the ignition instructions.
⚠ Do not use charcoal, briquettes or lava rock in your Weber® gas barbecue.
While cooking, never lean over the open barbecue or place hands or fingers on the front edge of the cooking box.
⚠️ Should an uncontrolled flare-up occur, move food away from the flames until flaring subsides.
Should a grease fire occur, turn off all burners and leave lid closed until fire is out.
⚠ The Weber® gas barbecue should be cleaned thoroughly at regular intervals.
⚠ When cleaning valves or burners do not enlarge orifices or ports.
△ Butane/propane gas is not natural gas. The conversion or attempted use of natural gas in a butane/propane gas unit is dangerous and will void your warranty.
A dented or rusty gas supply cartridge/cylinder may be hazardous and should be checked by your gas supplier. Do not use a gas supply cartridge/cylinder with a damaged valve.
Even though your gas supply cartridge/cylinder may appear to be empty, it might still contain gas. The cartridge/cylinder should be transported and stored accordingly.
△ Under no circumstances should you attempt to disconnect the gas regulator or any gas fitting while your barbecue is in operation.
⚠️ Use heat-resistant oven gloves when operating barbecue.
Do not use this barbecue unless all parts are in place. The unit must be properly assembled according to the instructions outlined in the “ASSEMBLY” section of the Owner’s Guide.
Do not use the Weber® barbecue in the boot of any vehicle, or inside an estate car, people carrier, minibus or caravan.
⚠ Use the regulator that is supplied with your Weber® gas barbecue.
⚠ Warning: Make sure you are outdoors and away from any source of ignition when changing or connecting the butane/propane cartridge/cylinder.
Do not build this model of barbecue in any built-in or slide in construction. Ignoring this Warning could cause a fire or an explosion that can damage property and cause serious bodily injury or death.
Q100 - 120 Use butane/propane disposable cartridges with a minimum capacity of 430g and a maximum capacity of 460g. The cartridge must have an EN417 valve as illustrated. One type of cartridge that can be used is a Weber® Baby Q®/Performer® gas cartridge. Another type of cartridge is a Primus model 2202.
TABLE OF CONTENTS
DANGERS AND WARNINGS....2
TABLE OF CONTENTS 3
EXPLODED VIEW Q100....4
EXPLODED VIEW Q120 5
EXPLODED VIEW Q200 6
EXPLODED VIEW Q220....7
PARTS LIST 8
ASSEMBLY....9
WARRANTY 10
GENERAL INSTRUCTIONS....11
OPERATING....11
STORAGE AND/OR NON-USE 11
GAS INSTRUCTIONS - BUTANE/PROPANE CARTRIDGE .... 12
CONNECTING THE BUTANE/PROPANE CARTRIDGE 12
CHECK FOR GAS LEAKS....13
GAS INSTRUCTIONS - LIQUID PROPANE CYLINDER ..... 14
IMPORTANT LP CYLINDER INFORMATION 14
SAFE HANDLING TIPS FOR LIQUID PROPANE GAS CYLINDERS ..... 14
CONNECTING THE LIQUID PROPANE CYLINDER.... 15
CHECK FOR GAS LEAKS....16
REFILLING THE LIQUID PROPANE CYLINDER.... 18
RECONNECT THE LIQUID PROPANE CYLINDER 18
BEFORE USING THE BARBECUE....19
CATCH PAN AND DISPOSABLE DRIP PAN 19
HOSE INSPECTION 19
IGNITER INSPECTION FOR MODELS WITH ELECTRONIC IGNITION ..... 19
IGNITION INSTRUCTIONS....20
IGNITION 20
TO EXTINGUISH 20
MANUAL IGNITION 21
TO EXTINGUISH 21
GRILLING TIPS & HELPFUL HINTS 22
PREHEATING THE BARBECUE 22
GRILLING BASICS 22
TROUBLESHOOTING 23
MAINTENANCE 24
CLEANING....24
WEBER® SPIDER/INSECT SCREENS 24
BURNER TUBE CLEANING OR REPLACEMENT 25
PUSH-BUTTON IGNITION SYSTEM OPERATIONS (Q100 & Q200) ..... 26
ELECTRONIC IGNITION SYSTEM OPERATIONS (Q120 & Q220)....26
ELECTRONIC IGNITION SYSTEM REPLACEMENT 26
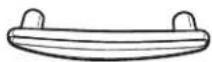
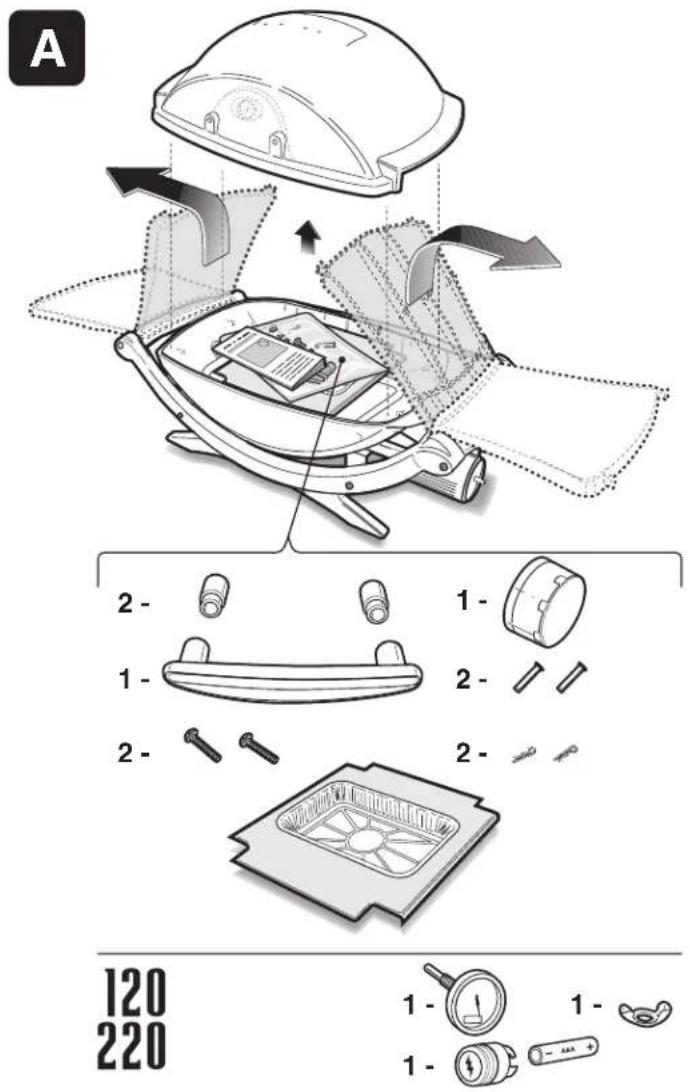
- Lid
- Handle Spacer
- Handle
- Cooking Grate
- Igniter Electrode Assembly
- Burner Tube
- Cookbox
- Carrying Handle
- Rear Cradle
- Front Cradle
- Igniter
- Hose Bracket / Gas Cartridge Support Basket
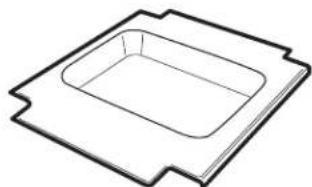
- Disposable Drip Pan
- Catch Pan
- Valve, Hose and Regulator Assembly / Gas Cartridge Valve, Hose and Regulator Assembly (Hose and Regulator may not be Included)
- Control Panel
- Control Knob
EXPLODED VIEW Q120
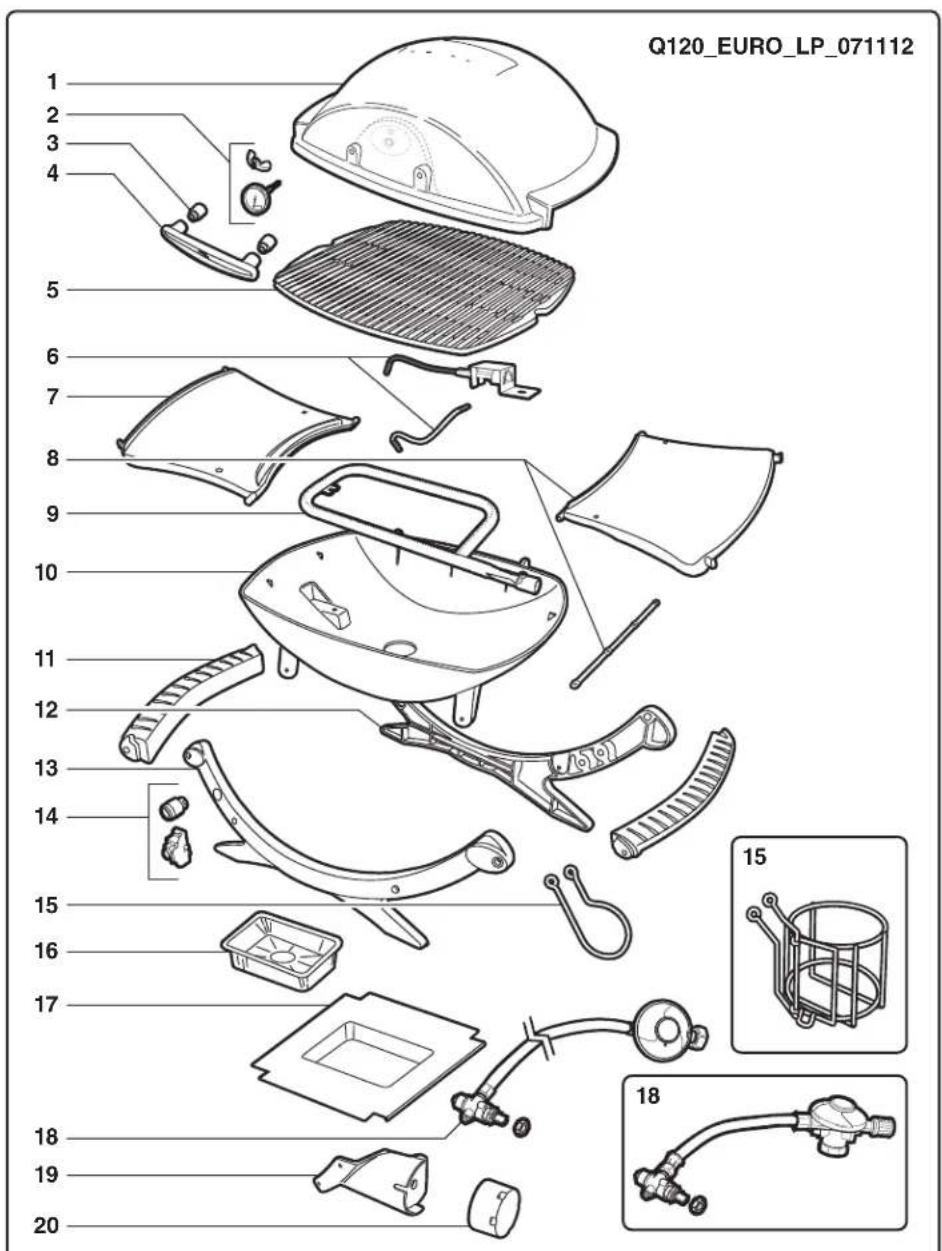
text_image
Q120_EURO_LP_071112 1 2 3 4 5 6 7 8 9 10 11 12 13 14 15 16 17 18 19 20 15 18- Lid
- Thermometer
- Handle Spacer
- Handle
- Cooking Grate
- Igniter Electrode Assembly
- Left Side Table
- Right Side Table Assembly
- Burner Tube
- Cookbox
- Carrying Handle
- Rear Cradle
- Front Cradle
- Igniter Button/Igniter Module
- Hose Bracket / Gas Cartridge Support Basket
- Disposable Drip Pan
- Catch Pan
- Valve, Hose and Regulator Assembly / Gas Cartridge Valve, Hose and Regulator Assembly (Hose and Regulator may not be Included)
- Control Panel
- Control Knob
EXPLODED VIEW Q200
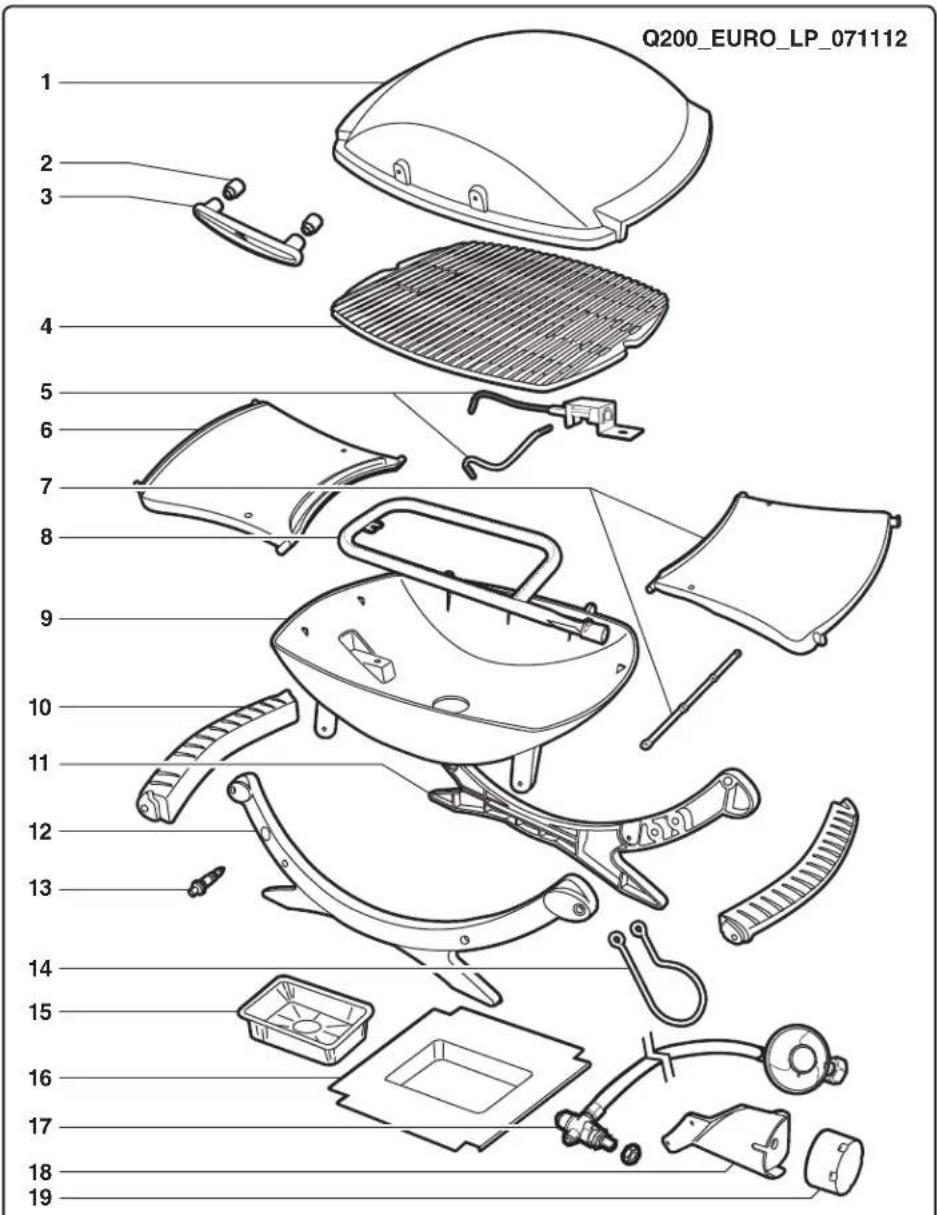
text_image
Q200_EURO_LP_071112-
Lid
-
Handle Spacer
-
Handle
-
Cooking Grate
-
Igniter Electrode Assembly
-
Left Side Table
-
Right Side Table Assembly
-
Burner Tube
-
Cookbox
-
Carrying Handle
-
Rear Cradle
-
Front Cradle
-
Igniter
-
Hose Bracket
-
Disposable Drip Pan
-
Catch Pan
-
Valve, Hose and Regulator Assembly (Hose and Regulator may not be included)
-
Control Panel
-
Control Knob
EXPLODED VIEW Q220
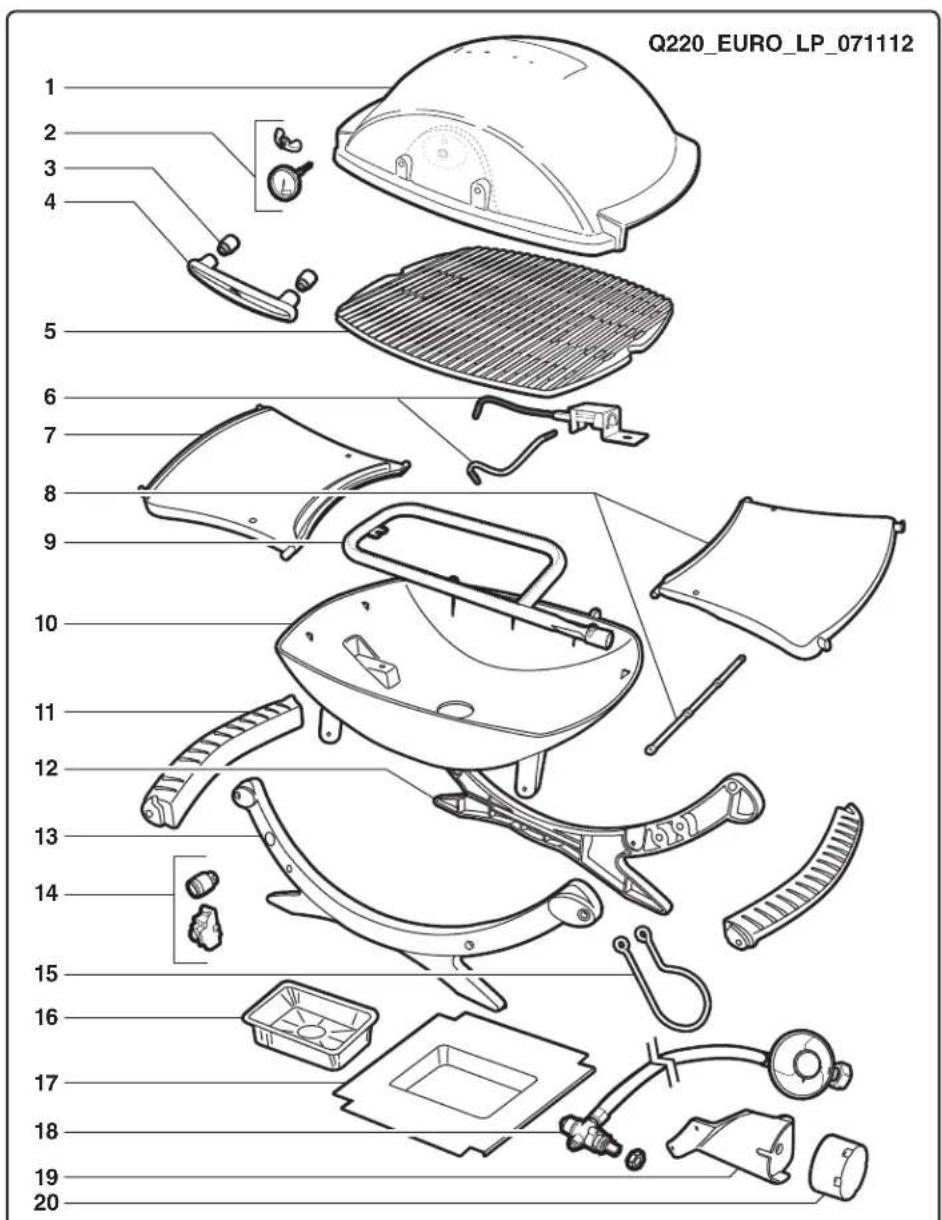
text_image
Q220_EURO_LP_071112 1 2 3 4 5 6 7 8 9 10 11 12 13 14 15 16 17 18 19 20- Lid
- Thermometer
- Handle Spacer
- Handle
- Cooking Grate
- Igniter Electrode Assembly
- Left Side Table
- Right Side Table Assembly
- Burner Tube
- Cookbox
- Carrying Handle
- Rear Cradle
- Front Cradle
- Igniter Button/Igniter Module
- Hose Bracket
- Disposable Drip Pan
- Catch Pan
- Valve, Hose and Regulator Assembly (Hose and Regulator may not be included)
- Control Panel
- Control Knob
PARTS LIST
natural_image
Line drawing of a dome-shaped mechanical component with mounting holes and a central circular feature (no text or symbols)Lid - 1
Handle - 1

natural_image
Diagram of a vehicle rear blade with parallel grooves and side-mounted sensors (no text or symbols)Cooking Grate - 1

Handle Spacer - 2

Stainless Steel Pan Head Phillips Screw (1/4-20 x 1 1/2" Screw) - 2
Control Knob - 1

Hinge Pin - 2

Disposable Drip Pan - 1
natural_image
Simple line drawing of a rectangular tray or container with a recessed top (no text or symbols)Catch Pan - 1

Cotter Pin - 2
120 220

Thermometer - 1
Wing Nut - 1
Electronic Ignition Button - 1
ASSEMBLY
text_image
A 2 - 1 - 2 - 120 220 1 - 1 - 1 -
text_image
C 120 220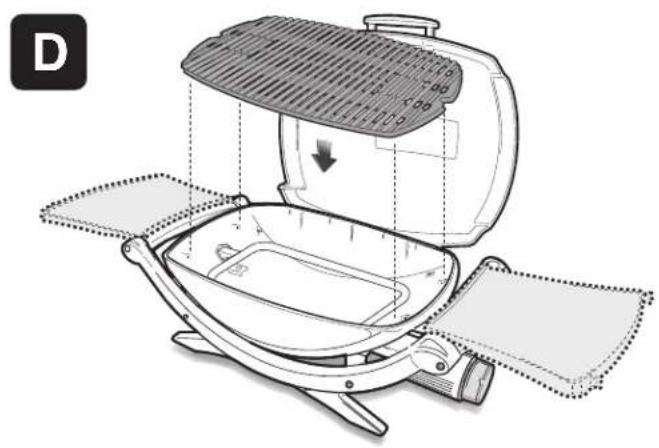
natural_image
Line drawing of a portable grill with lid and side panels, showing internal compartments and a downward arrow indicating cooling or movement (no text or symbols)
text_image
B 1 2
text_image
EWARRANTY
Weber-Stephen Products LLC (Weber) hereby warrants to the ORIGINAL PURCHASER of this Weber ^® gas barbecue that it will be free of defects in material and workmanship from the date of purchase as follows:
Aluminium Castings 5 years, 2 years paint excluding fading or discolouration
Thermoplastic/Thermoset Parts 5 years excluding fading
Stationary Cart/Q
^① Stand 2 years
All Remaining Parts 2 years
Weber may require reasonable proof of your date of purchase. THEREFORE, YOU SHOULD RETAIN YOUR SALES RECEIPT OR INVOICE.
This Limited Warranty shall be limited to the repair or replacement of parts that prove defective under normal use and service and which on examination shall indicate, to Weber's satisfaction, that they are defective. Before returning any parts, contact the Customer Service Representative in your region using the contact information sheet provided with your manual. If Weber confirms the defect and approves the claim, Weber will elect to replace such parts without charge. If you are required to return defective parts, transportation charges must be prepaid. Weber will return parts to the purchaser, freight or postage prepaid.
This Limited Warranty does not cover any failures or operating difficulties due to accident, abuse, misuse, alteration, misapplication, vandalism, improper installation or improper maintenance or service, or failure to perform normal and routine maintenance, including but not limited to damage caused by insects within the burner tubes, as set out in this owner's manual.
Deterioration or damage due to severe weather conditions such as hail, hurricanes, earthquakes or tornadoes, discolouration due to exposure to chemicals either directly or in the atmosphere, is not covered by this Limited Warranty.
There are no other express warrants except as set forth herein and any applicable implied warranties of merchantability and fitness are limited in duration to the period of coverage of this express written Limited Warranty. Some regions do not allow limitation on how long an implied warranty lasts, so this limitation may not apply to you.
Weber is not liable for any special, indirect or consequential damages. Some regions do not allow the exclusion or limitation of incidental or consequential damages, so this limitation or exclusion may not apply to you.
Weber does not authorise any person or company to assume for it any other obligation or liability in connection with the sale, installation, use, removal, return, or replacement of its equipment; and no such representations are binding on Weber.
This Warranty applies only to products sold at retail.
Visit www.weber.com®, select your country of origin, and register your grill today.
GENERAL INSTRUCTIONS
If you have questions or need advice regarding your barbecue or its safe operation, please log onto www.weber.com ^4 .
Your Weber® gas barbecue is a portable outdoor cooking appliance. With the Weber® gas barbecue you can grill, barbecue, roast and bake with results that are difficult to duplicate with indoor kitchen appliances. The closed lid produces that "outdoor" flavour in the food.
The Weber ^® gas barbecue is portable, so you can easily change its location in your garden or on your patio. Portability means you can take your Weber ^® gas barbecue with you if you move.
Butane/propane gas supply is easy to use and gives you more cooking control than charcoal fuel.
- These instructions will give you the minimum requirements for assembling your Weber ^® gas barbecue. Please read the instructions carefully before using your Weber ^® gas barbecue. Improper assembly can be dangerous.
• Not for use by children. - This Weber gas barbecue is designed for use with butane/propane gas only. Do not use with natural gas. The valve and regulator are for butane/propane gas only.
• Do not use with charcoal fuel.
• This Weber gas barbecue is not intended for commercial use. - The use of alcohol and/or prescription or non-prescription drugs may impair the consumer's ability to properly assemble or safely operate the appliance.
- This Weber gas barbecue is not intended for and should never be used as a heater.
- Do not leave the Weber gas barbecue unattended. Keep children and pets away from the Weber gas barbecue at all times.
- Check that the area under the control panel and the catch pan are free from debris that might obstruct the flow of combustion or ventilation air.
• Change the flexible hose when national regulations stipulate this as a requirement.
• Any parts sealed by the manufacturer must not be altered by the user.
• Any modification of the appliance may be dangerous.
OPERATING
⚠ WARNING: This barbecue should only be used outdoors in a well-ventilated area. Do not use in a garage, shed, hut or any other enclosed area.
⚠ WARNING: Your Weber® gas barbecue must not be used under an unprotected combustible roof or overhang.
⚠ WARNING: Your Weber® gas barbecue is not intended for installation in or on recreational vehicles and caravans and/or boats.
⚠ WARNING: Do not use the barbecue where the top, back or sides of the barbecue are within 60 cm (24 in) of combustible materials.
⚠ WARNING: The entire cookbox gets hot when in use. Do not leave unattended.
⚠ WARNING: Keep any electrical power cable away from any heated surface.
⚠ WARNING: Keep the cooking area clear of flammable vapours and liquids such as petrol, paraffin, alcohol, etc., and other combustible materials.
⚠ WARNING: Never store an extra (spare) butane /propane cartridge/cylinder under or near the Weber® gas barbecue.
⚠ WARNING: When cooking, the appliance must be on a level, stable surface in an area clear of combustible material.
STORAGE AND/OR NON-USE
- When the Weber gas barbecue is not in use, the gas cartridge/cylinder must be DISCONNECTED and stored outdoors in a well-ventilated place.
- The Weber gas barbecue should be checked for gas leaks and any obstructions in the burner tubes before using. Refer to "MAINTENANCE."
- The Spider/Insect screen should also be checked for any obstructions. Refer to "MAINTENANCE."
GAS INSTRUCTIONS - BUTANE/PROPANE CARTRIDGE
CONNECTING THE BUTANE/PROPANE CARTRIDGE
Use butane/propane disposable cartridges with a minimum capacity of 430g and a maximum capacity of 460g. The cartridge must have an EN417 valve as illustrated. One type of cartridge that can be used is a Weber® Baby Q®/Performer® gas cartridge. Another type of cartridge is a Primus model 2202.
⚠️ CAUTION: Only use cylinders that are marked “Propane fuel” or “Butane-Propane mix”.
Push LP disposable cartridge into regulator and turn clockwise until tight.
⚠ WARNING: Hand tighten only. Using excessive force could damage the regulator coupling and cartridge valve. This could cause a leak or prevent gas flow.
⚠ The disposable cartridge must fit within the support basket.
△ DANGER
Do not store a spare butane/propane cartridge under or near this appliance.

text_image
30g and a illustrated. gas cartridge. propane Normal Damaged 1 Hose 2 Regulator 3 Gas Control Valve: Close clockwise until tight| COUNTRY GAS TYPE & PRESSURE | |
| Denmark, Sweden, Norway, Finland,Netherlands, Iceland, Hungary, CzechRepublic, Cyprus, Estonia, Lithuania,Latvia, Morocco, Slovenia, Slovak Republic | I_3B/P - 30mbar |
| United Kingdom, France, Spain, Portugal,Belgium, Ireland, Greece, Luxembourg,Italy, Switzerland | I_31 - 28-30 / 37mbar |
| Germany, Austria I | _3B/P - 50mbar |
| CONSUMPTION DATA | |
| Propane/Butane Main | Burner. Max |
| kW(Hs) 2,8 | |
| gm(Hs) 202 | |
| REPLACEMENT HOSE, REGULATOR AND VALVE ASSEMBLY |
| ▲ IMPORTANT NOTICE: We recommend that you replace the gas hose assembly on your Weber gas barbecue every 5 years. Some countries may have requirements that the gas hose be replaced within less than 5 years, in which case that country’s requirement would take precedence. |
| For replacement hose, regulator, and valve assemblies, contact the Customer Service Representative in your area using the contact information on our web site.Log on to www.weber.com®. |
GAS INSTRUCTIONS - BUTANE/PROPANE CARTRIDGE
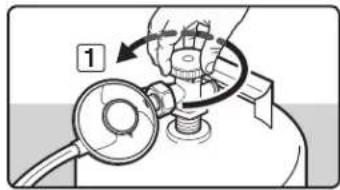
CHECK FOR GAS LEAKS
⚠️ DANGER
Do not use an open flame to check for gas leaks. Be sure there are no sparks or open flames in the area while you check for leaks. Sparks or flames will result in a fire or explosion, which can cause serious bodily injury or death as well as damage to property.
You will need: butane/propane cartridge, a soap-and-water solution and a rag or brush to apply it.
A) Mix the soap and water.
B) Turn the gas control to ON by turning anti-clockwise.
C) Check for leaks by wetting the fitting with the soap-and-water solution and watching for bubbles. If bubbles form, or if a bubble grows, there is a leak.
Check
A) Regulator-to-butane/propane cartridge connection (1).
⚠ WARNING: If there is a leak at connection (1), remove butane/propane cartridge. Do not operate barbecue. Use a different butane/propane cartridge and recheck for leaks with soap-and-water solution. If a leak persists after changing the butane/propane cartridge, turn OFF the gas. DO NOT OPERATE THE BARBECUE. Contact the Customer Service Representative in your area using the contact information on our web site. Log onto www.weber.com®.
B) Valve-to-regulator connections (2).
⚠ WARNING: If there is a leak at connection (2) turn OFF the gas. DO NOT OPERATE THE BARBECUE. Contact the Customer Service Representative in your region using the contact information on our web site.
Log onto www.weber.com®.
When leak checks are complete, turn gas supply OFF at the source and rinse connections with water.
Note: Since some leak test solutions, including soap and water, may be slightly corrosive, all connections should be rinsed with water after checking for leaks.

text_image
Technical diagram showing car engine components with numbered annotations and close-ups of parts like 'Nobel Baby Q' and 'Joubet'.GAS INSTRUCTIONS - LIQUID PROPANE CYLINDER
IMPORTANT LP CYLINDER INFORMATION
The cylinder must always be installed, transported and stored in an upright position. Never allow the cylinder to drop or be handled carelessly. Never store cylinder where temperatures can exceed 51^ C (too hot to hold by hand). For example, do not leave the cylinder in your car on hot days. Refer to “SAFE HANDLING TIPS FOR LIQUID PROPANE GAS CYLINDERS”.
Failure to follow these DANGER statements exactly may result in a fire causing death or serious injury.
△ DANGER
NEVER store a spare LP Cylinder under or near this barbecue.
If this is not followed exactly, a fire causing death or serious injury may occur.
⚠ WARNING: Only use this grill outdoors in a well-ventilated area. Do not use in a garage, building, breezeway or any other enclosed area.
SAFE HANDLING TIPS FOR LIQUID PROPANE GAS CYLINDERS
- Liquid Propane (LP) gas is a petroleum product as are petrol and natural gas. LP gas is a gas at normal temperature and pressure. Under moderate pressure, inside a cylinder, LP gas is a liquid. As the pressure is released, the liquid readily vapourises and becomes gas.
• LP gas has an odour similar to natural gas. You should be aware of this odour. - LP gas is heavier than air. Leaking LP gas may collect in low areas and prevent dispersion.
- The LP cylinder must be installed, transported and stored in an upright position. LP cylinders should not be dropped or handled roughly.
- Never store or transport the LP cylinder where temperatures can reach 51°C (too hot to hold by hand - for example: do not leave the LP cylinder in a car on a hot day).
- Treat "empty" LP cylinders with the same care as when full. Even when the LP tank is empty of liquid there still may be gas pressure in the cylinder. Always close the cylinder valve before disconnecting.
- Do not use a damaged LP cylinder. Dented or rusty LP cylinders or LP cylinders with a damaged valve may be hazardous and should be replaced with a new one immediately.
- The joint where the hose connects to the LP cylinder must be leak-tested each time the LP cylinder is reconnected. For example, test each time the LP cylinder is refilled.
- Be sure the regulator is mounted with the small vent hole pointed downward so that it will not collect water. This vent should be free of dirt, grease, insects etc.
| COUNTRY GAS TYPE & PRESSURE | |
| Demark, Sweden, Norway, Finland, Iceland, The Netherlands, Hungary, Czech Republic | I_3B/P - 30mbar |
| United Kingdom, France, Spain, Portugal, Belgium, Ireland, Greece, Luxembourg, Italy, Switzerland | I_3+ - 28-30 / 37mbar |
| Germany, Austria | I_3B/P - 50mbar |
| CONSUMPTION DATA | |
| LP Main Burner. Max | |
| kW(Hs) | 3,7 |
| gm(Hs) | 264 |
REPLACEMENT HOSE, REGULATOR AND VALVE ASSEMBLY
IMPORTANT NOTICE: We recommend that you replace the gas hose assembly on your Weber gas barbecue every 5 years. Some countries may have requirements that the gas hose be replaced within less than 5 years, in which case that country's requirement would take precedence.
For replacement hose, regulator, and valve assemblies, contact the Customer Service Representative in your area using the contact information on our web site. Log on to www.weber.com®.
GAS INSTRUCTIONS - LIQUID PROPANE CYLINDER
CONNECTING THE LIQUID PROPANE CYLINDER
Use LP cylinders with a minimum capacity of 5 kg and a maximum capacity of 13 kg.
The regulator illustrations shown in this manual may not be similar to the one you are using for your barbecue, due to different country or regional regulations.
⚠ WARNING: Make sure that the LP cylinder or regulator valve is closed.
A) Connect LP cylinder.
Some regulators push ON to connect, and pull OFF to disconnect, others have a nut that has a left-hand thread that connects to the cylinder valve. Follow one of the specific regulator connection instructions illustrated based on your regulator type. a) Screw regulator fitting onto tank turning clockwise (1). Position the regulator so that the vent hole (2) faces down.
b) Screw regulator fitting onto tank turning anti-clockwise (3) (4).
c) Make sure regulator lever (5) is in the down/off position. Push regulator down on tank valve until regulator snaps into position (6).
d) Make sure regulator lever is in the off position. Slide the collar of the regulator up (7) (9). Push the regulator down onto the tank valve and maintain pressure. Slide collar closed (8) (10). If regulator does not lock, repeat procedure.
DANGER
Do not store a spare LP cylinder under or near this appliance.

text_image
Technical diagram showing a medical device with labeled parts and a magnified inset view of its internal components.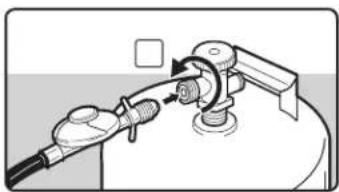
natural_image
Diagram of a fuel pump assembly with valve and fittings (no text or labels)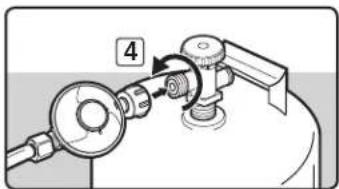
text_image
4
text_image
6 5
text_image
7 8
text_image
9 10GAS INSTRUCTIONS - LIQUID PROPANE CYLINDER
CHECK FOR GAS LEAKS
Check that the burner valves are off. Check by pushing the control knob in and turning clockwise. Confirm that the knob is set in the OFF indicator position. If the control knob does turn, continue turning clockwise until it stops. It is now in the OFF position.
⚠ WARNING: You should check for gas leaks every time you disconnect and reconnect a gas fitting.
⚠ WARNING: Perform these leak checks even if your barbecue was dealer or store assembled.
⚠ WARNING: Do not ignite burners when leak checking.
⚠️ DANGER
Do not use an open flame to check for gas leaks. Be sure there are no sparks or open flames in the area while you check for leaks. Sparks or open flames will result in a fire or explosion, which can cause serious bodily injury or death and damage to property.
You will need: LP cylinder, a soap-and-water solution and a rag or brush to apply it.
A) Mix the soap and water.
B) Turn on the cylinder valve using one of the appropriate options based on your cylinder and regulator type.
a) Turn cylinder valve anti-clockwise (1) (2) (3).
b) Move regulator lever to the up/on position (4).
c) Move regulator lever to the on position (5) (6).
C) Check for leaks by wetting the fitting with the soap-and-water solution and watching for bubbles. If bubbles form, or if a bubble grows, there is a leak.
text_image
1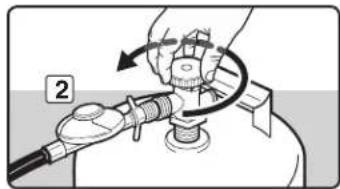
natural_image
Illustration of a gasifier with valve and tubing, showing mechanical components (no text or symbols)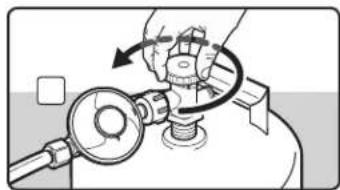
natural_image
Illustration of a hand using a valve to adjust a cylindrical component (no text or symbols visible)
natural_image
Diagram of a gasifier with a valve and tubing, labeled with number 4 (no text or symbols on the diagram itself)
natural_image
Diagram of a spray gun with a lever and label '5' (no text or symbols on the diagram itself)
natural_image
Illustration of a hand holding a container with a label '6' pointing to it (no text or symbols on the diagram itself)GAS INSTRUCTIONS - LIQUID PROPANE CYLINDER
Check
A) Valve-to-regulator connections (1).
⚠ WARNING: If there is a leak at connection (1), retighten the fitting with a spanner and recheck for leaks with soap-and-water solution. If a leak persists after re-tightening the fitting, turn off the gas. DO NOT OPERATE THE GRILL. Contact the Customer Service Representative in your area using the contact information on our web site.
Log onto www.weber.com®.
B) Regulator-to-cylinder connection (2).
⚠ WARNING: If there is a leak at connection (2), remove LP cylinder. Do not operate barbecue. Use a different LP cylinder and recheck for leaks with soap-and-water solution. If a leak persists after changing the LP cylinder, turn OFF the gas. DO NOT OPERATE THE BARBECUE. Contact the Customer Service Representative in your area using the contact information on our web site.
Log onto www.weber.com®.
C) Hose-to-regulator connection (3).
⚠ WARNING: If there is a leak at connection (3) turn OFF the gas. DO NOT OPERATE THE BARBECUE. Contact the Customer Service Representative in your area using the contact information on our web site.
Log onto www.weber.com®.
When leak checks are complete, turn gas supply OFF at the source and rinse connections with water.
Note: Since some leak test solutions, including soap and water, may be slightly corrosive, all connections should be rinsed with water after checking for leaks.

text_image
Technical diagram illustrating the step-by-step installation of a gas jet engine, showing progressive assembly from valve to condenser.GAS INSTRUCTIONS - LIQUID PROPANE CYLINDER
REFILLING THE LIQUID PROPANE CYLINDER
We recommend that you refill the LP cylinder before it is completely empty. To refill, take LP cylinder to a "Gas Propane" dealer.
Removal of the gas supply cylinder:
A) Shut off gas supply and disconnect hose and regulator assembly from the cylinder.
Follow one of the specific regulator connection instructions illustrated based on your regulator type.
a) Unscrew regulator fitting from tank turning anticlockwise (1).
b) Unscrew regulator fitting from tank turning clockwise (2) (3).
c) Move regulator lever (4) to the down/off position. Push in on regulator lever until it releases from tank (5).
d) Move regulator lever to the off position (6) (8). Slide the collar of the regulator up (7) (9) to disconnect from tank.
B) Exchange empty cylinder for a full cylinder.
RECONNECT THE LIQUID PROPANE CYLINDER
Refer to "CONNECTING THE LIQUID PROPANE CYLINDER"

natural_image
Medical device diagram showing a gas pump connected to a tank, with an inset view of the pump's internal structure (no text or labels)
natural_image
Diagram of a mechanical device with a valve and connector, labeled with number 2 (no text or symbols on the diagram itself)
natural_image
Diagram of a mechanical device with rotating arm and housing (no text or symbols)
text_image
4 5
text_image
6 7
text_image
8 9BEFORE USING THE BARBECUE
CATCH PAN AND DISPOSABLE DRIP PAN
Your grill was built with a grease collection system. Check the catch pan and disposable drip pan for grease build-up each time you use your grill.
Remove excess grease with a plastic spatula; see illustration. When necessary, wash the catch pan and drip pan with a soap-and-water solution, then rinse with clean water. Replace the disposable drip pan as needed.
⚠ WARNING: Always check the catch pan and disposable drip pan for grease build-up before using. Remove excess grease to avoid a grease fire. A grease fire can cause serious bodily injury or damage to property.
CAUTION: Do not line the cookbox with aluminium foil.

natural_image
Line drawing of a portable grill with open lid, showing interior grating and cooking step (no text or symbols)HOSE INSPECTION
The hose should be inspected for any signs of cracking.
⚠ WARNING: Always check hose before using barbecue for nicks, cracking, abrasions or cuts. If the hose is found to be damaged in any way, do not use the barbecue. Replace using only Weber® authorised replacement hose. Contact the Customer Service Representative in your area using the contact information on our web site. Log onto www.weber.com®.
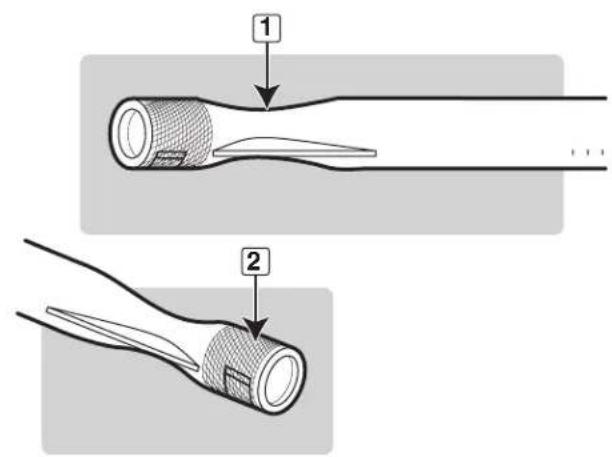
IGNITER INSPECTION FOR MODELS WITH ELECTRONIC IGNITION
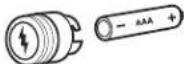
Verify that your AAA battery is in good condition and that it is installed correctly (1). Some batteries have a plastic protective wrap around them. This plastic must be removed. Do not confuse this plastic protective wrap with the battery label.
natural_image
Illustration of a spray gun with attached hose and cable, shown with magnified detail (no text or symbols)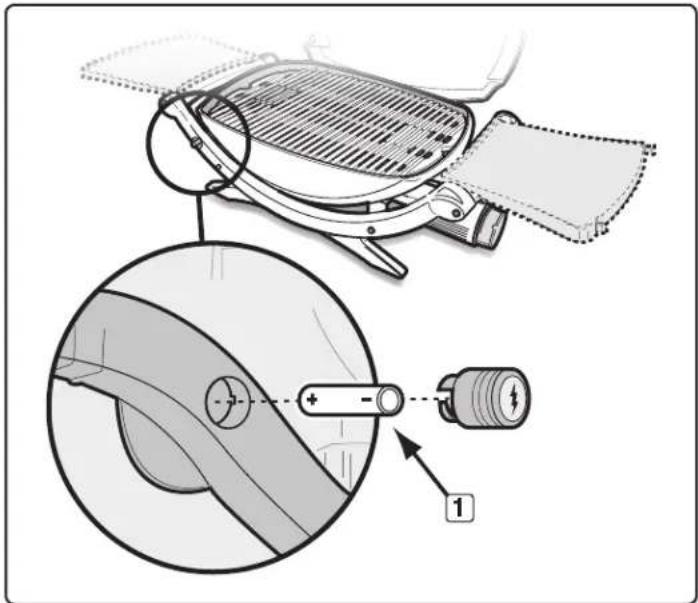
text_image
Technical diagram showing a car hood with labeled components and a magnified view of the component being inserted into a battery.IGNITION INSTRUCTIONS
IGNITION
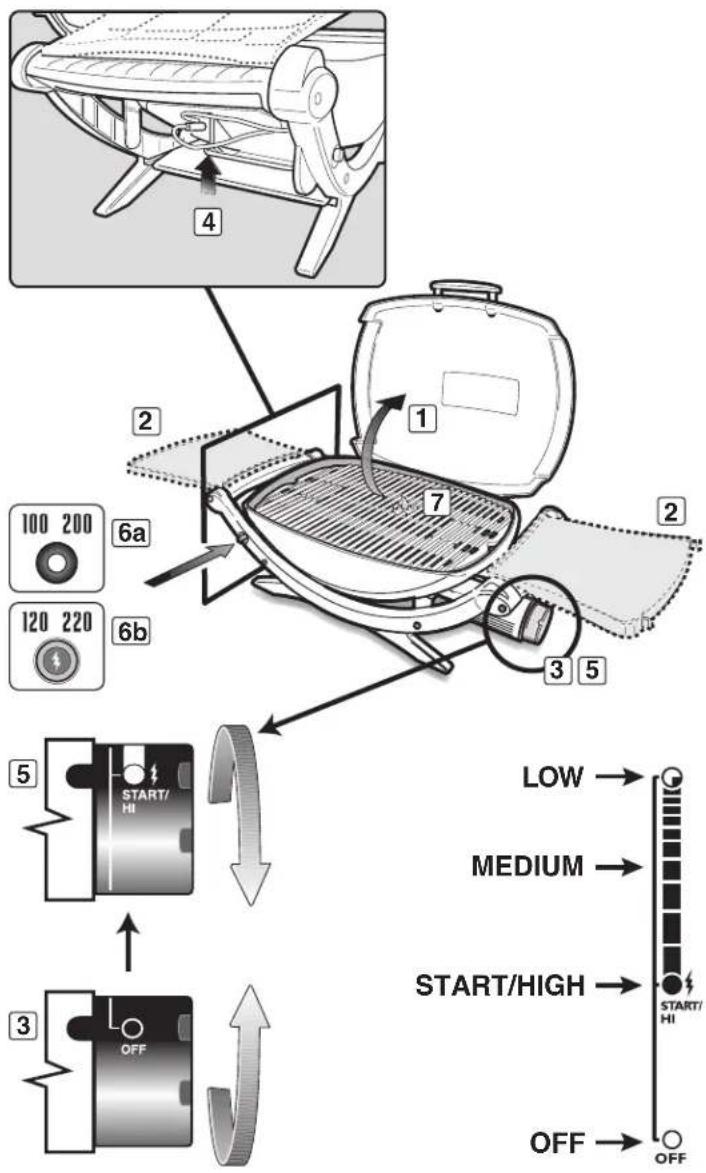
Summary lighting instructions are on the fold-out side table (Q120, 200, 220).
A) Open the lid (1).
B) Unfold the side tables (2) (Q120, 200, 220).
C) Make sure the control knob is turned OFF (3).
(Push control knob in and turn clockwise to ensure that it is in the OFF position.)
⚠ WARNING: Do not lean over the open barbecue. Keep your face and body at least 30 cm (12 in) away from the matchlight hole when lighting the barbecue (4).
D) Turn on the cylinder valve using one of the appropriate options based on your cylinder and regulator type.
E) Push burner control knob in and turn to START/HI (5).
F) Push the red ignition button several times, so it clicks each time (6a) (Q100, 200).
G) Push the electronic ignition button several times. You will hear it spark (6b) (Q120, 220).
H) Check that the burner is lit by looking down through the cooking grate. You should see a flame (7).
⚠ WARNING: If the burner does not light, turn the burner control knob to OFF and wait five minutes to let the gas clear before you try again or before you try to light with a match.
⚠️ CAUTION: Do not fold in side tables until barbecue is cold (Q120, 200, 220).
⚠️ DANGER
Failure to open the lid while igniting the barbecue's burner, or not waiting five minutes to allow the gas to clear if the barbecue does not light, may result in an explosive flare-up, which can cause serious bodily injury or even death.
TO EXTINGUISH
Push in and turn burner control knob clockwise to the OFF position.
text_image
100 200 120 220 6a 6b 1 7 3 5 5 START/ HI 3 OFF LOW → MEDIUM → START/HIGH → START/ HI OFF → OFFIGNITION INSTRUCTIONS
MANUAL IGNITION
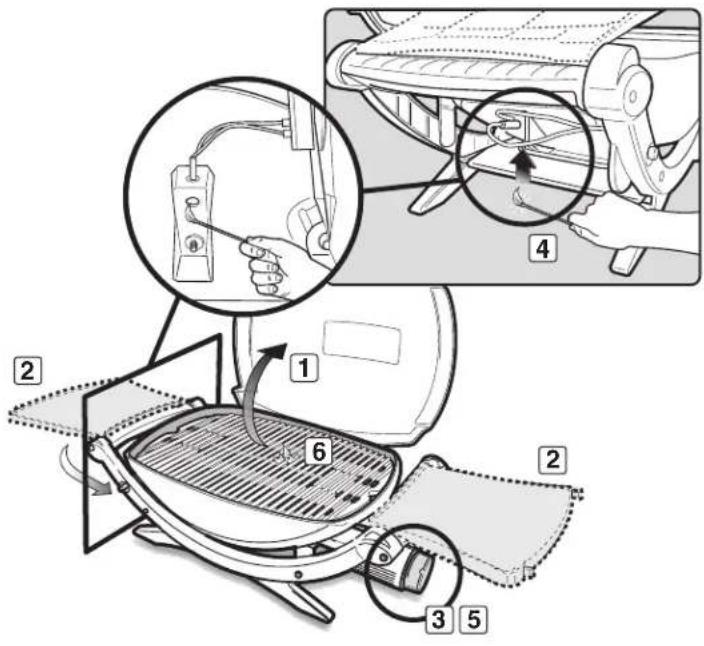
A) Open the lid (1).
B) Unfold the side tables (2) (Q120, 200, 220).
C) Make sure the control knob is turned OFF (3).
D) Turn on the cylinder valve using one of the appropriate options based on your cylinder and regulator type.
E) Strike a match and put the flame into the matchlight hole under the igniter (4).
△ WARNING: Do not lean over open barbecue. Keep your face and body at least 30 cm (12 inches) away from the matchlight hole when lighting the barbecue (4).
F) Push burner control knob in and turn to START/HI (5).
G) Check that the burner is lit by looking down through the cooking grate. You should see a flame (6).
⚠ WARNING: If the burner does not light, turn the burner control knob to OFF and wait five minutes to let the gas clear before you try again or before you try to light with a match.
CAUTION: do not fold in side tables until barbecue is cold (Q120, 200, 220).
⚠️ DANGER
Failure to open the lid while igniting the barbecue's burner, or not waiting five minutes to allow the gas to clear if the barbecue does not light, may result in an explosive flare-up, which can cause serious bodily injury or even death.
TO EXTINGUISH
Push in and turn burner control knob clockwise to the OFF position.
text_image
Diagram illustrating a cooking process with labeled steps and component views, including a grating pan and a valve mechanism.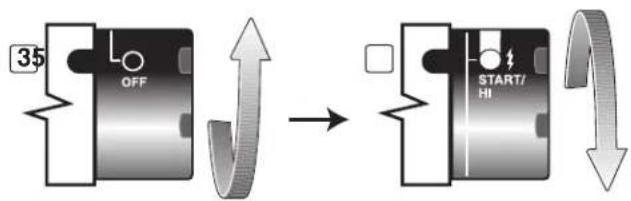
text_image
35 OFF START/ HIGRILLING TIPS & HELPFUL HINTS
PREHEATING THE BARBECUE
Light the Weber gas barbecue according to the ignition instructions in this owner's manual. Close the lid. Preheat the barbecue for 5-10 minutes (depending on conditions such as air temperature and wind).
⚠ WARNING: Do not move the Weber® gas barbecue when operating or while the barbecue is hot.
Note: Wind and weather may require adjustment of the burner control knob to obtain the correct cooking temperature.
If the burner goes out during cooking, open the lid, turn off the burner, and wait five minutes before relighting.
GRILLING BASICS
A light coating of oil will help brown your food evenly and keep it from sticking to the cooking grate. Always brush or spray oil onto your food, not directly onto the cooking grate.
We suggest that you barbecue with the lid down. Why? Because it reduces the chance of flare-ups, and cooks your food faster and more evenly.
When using a marinade, sauce or glaze with a high sugar content or other ingredients that burn easily, only brush it onto the food during the last 10 to 15 minutes of barbecuing.
Don't forget to regularly brush off your cooking grate and clean out the drip pan under the barbecue.
The following cuts, thicknesses, weights, and barbecuing times for food are meant to be guidelines rather than hard and fast rules. Cooking times are affected by such factors as wind, outside temperature and how well done the food should be cooked. Barbecue for the time given on the chart or to the desired degree of doneness, turning once halfway through the barbecuing time. Cooking times for beef and lamb are for "medium" cooking time, unless otherwise noted. Let thick chops and steaks rest for 5 to 10 minutes before carving. The internal temperature of the meat will rise by 5 to 10 degrees during this time.
For more barbecuing tips and recipes, visit www.weber.com.
| BEEF | Thickness/Weight Approximate Grilling Time | |
| Steak: fillet, rump or entrecote 2 cm (3/4 in) thick 6 to 8 minutes High | ||
| 2.5 cm (1 in) thick 8 to 10 minutes High | ||
| 2.5 – 3 cm (1 to 1-1/2 in) thick 14 to 16 minutes; sear 10 minutes High, barbecue 4 to 6 minutes Low | ||
| Kebab 2.5 – 3 cm (1 to 1-1/2 in) cubes 10 to 12 minutes Medium | ||
| Beefburger or rissole 2 cm (3/4 in) thick 8 to 10 minutes Medium | ||
| PORK | Thickness/Weight Approximate Grilling Time | |
| Chop: rib, loin, or shoulder | 2 – 2.5 cm (3/4 to 1 inch) thick | 10 to 15 minutes; sear 6 minutes High, barbecue 4 to 8 minutes Low |
| 3 – 4 cm (1-1/4 to 1-1/2 in) thick 14 to 18 minutes; sear 8 minutes High, barbecue 6 to 10 minutes Low | ||
| Loin, boneless | 2 – 2.5 cm (3/4 to 1 in) thick | 10 to 12 minutes; sear 6 minutes High, barbecue 4 to 6 minutes Low |
| Sausage | 25 to 30 minutes Low | |
| POULTRY | Thickness/Weight Approximate Grilling Time | |
| Chicken breast, boneless, skinless | 175 g (6 oz) | 8 to 12 minutes Medium |
| Chicken, half | 550 – 675 g (1-1/4 to 1-1/2 lb) | 1 to 1-1/4 hours Low |
| Chicken pieces, bone-in breast/wing | 30 to 40 minutes Low | |
| Chicken pieces, bone-in leg/thigh | 40 to 50 minutes Low | |
| FISH & SEAFOOD | Thickness/Weight Approximate Grilling Time | |
| Fish, fillet or slice | 3 – 4 cm (1/4 to 1/2 in) thick | 3 to 5 minutes High |
| 1 – 2.5 cm (1/2 to 1 in) thick | 5 to 10 minutes High | |
| 2.5 – 3 cm (1 to 1-1/4 in) thick 10 to 12 minutes High | ||
| Prawns | 2 to 5 minutes High | |
| Fish, whole | 450 g (1 lb) | 15 to 20 minutes Medium |
| 1 kg (2 to 2-1/2 lb) | 20 to 30 minutes Medium | |
| VEGETABLES | Approximate Grilling Time | |
| Asparagus | 6 to 8 minutes Medium | |
| Corn on the cob, husked | 10 to 12 minutes Medium | |
| Corn on the cob, in husk | 25 to 30 minutes Medium | |
| Garlic, whole | 45 to 60 minutes Low | |
| Mushroom: shiitake or button | 8 to 10 minutes Medium | |
| Mushroom: chestnut, cups or flats | 12 to 15 minutes Medium | |
| Onion, 1.27 cm (1/2 in) slices | 8 to 12 minutes Medium | |
| Potato, 1.27 cm (1/2 in) slices | 14 to 16 minutes Medium | |
| Aubergine, 1.27 cm (1/2 in) slices | 8 to 10 minutes Medium | |
TROUBLESHOOTING
| PROBLEM CHECK SOLUTION | ||
| Burner burns with a yellow or orange flame, in conjunction with the smell of gas. | Inspect Weber® Spider/Insect screen for possible obstructions (blockage of holes). | Clean Weber® Spider/Insect screen. Refer to “ANNUAL MAINTENANCE.” |
| Burner does not light, or flame is low in HI position. | Is butane/propane cartridge/cylinder fuel low or empty? | Replace butane/propane cartridge/cylinder. Refer to “GAS INSTRUCTIONS.” |
| Does the burner light with a match? Clean burner. Refer to “MAINTENANCE.” | ||
| Burner does not light when you push the igniter button. | Be sure that there is gas flow to the burners by attempting to match-light your burners. Refer to “MANUAL IGNITION”. | If match-lighting is successful, the problem lies in the ignition system. Refer to “MAINTENANCE.” |
| Is there is a fresh battery installed? Verify that the battery is in good condition and installed correctly. Refer to “BEFORE USING THE BARBECUE.” | ||
| Are the wires connected properly to the ignition box? Be sure that wires are correctly inserted into terminals on ignition box. Refer to “MAINTENANCE.” | ||
| Is there plastic wrapping around the new battery? Remove plastic wrapping. Do not confuse this with the battery label. | ||
| Is burner tube positioned too far away from the igniter electrode? | Check that the burner tube is positioned correctly to the igniter electrode. Refer to “MAINTENANCE.” | |
| Experiencing flare-ups:△ CAUTION: Do not line the cookbox with aluminium foil. | Are you preheating barbecue in the prescribed manner? All burners on HI for 10 to 15 minutes for preheating. | |
| Is the cooking grate heavily coated with burned-on grease? | Clean thoroughly. Refer to “CLEANING.” | |
| Is the cookbox dirty and not allowing grease to flow into catch pan? | Clean cookbox. Refer to “CLEANING.” | |
| Burner flame pattern is erratic. Flame is low when burner is on HI. Flames do not run the whole length of the burner tube. | Are burners clean? | Clean burner. Refer to “MAINTENANCE.” |
| Inside of lid appears to be “peeling.” (resembles paint peeling). | The inside of the lid is Cast Aluminum, and is not painted. It cannot “peel”. What you are seeing is baked on grease that has turned to carbon and is flaking off. THIS IS NOT A DEFECT. | Clean thoroughly. Refer to “CLEANING.” |
| If problems cannot be corrected using these methods, please contact the Customer Service Representative in your area using the contact information on our web site. Log onto www.weber.com†. | ||
MAINTENANCE
CLEANING
⚠ WARNING: Turn your Weber® gas barbecue OFF and wait for it to cool before cleaning.
For availability of replacement cooking grate contact the Customer Service Representative in your region using the contact information on our web site. Log onto www.weber.com ^® .
Outside surfaces - Use a warm soapy water solution to clean, then rinse with water.
CAUTION: Do not use oven cleaner, abrasive cleaning products, (kitchen cleaning products) cleaners that contain citrus products, or abrasive cleaning pads on barbecue.
Cooking grate - Clean with a suitable stainless steel bristle brush. As needed, remove from barbecue and wash with warm soapy water, then rinse with water.
Catch pan - Check the catch pan for grease build-up each time you use your grill. Remove excess grease with a plastic scraper. Wash the catch pan with warm, soapy water and rinse with water. Disposable Weber ^b drip pans are available that fit the catch pan.
Inside cookbox - Brush any debris off burner tubes. DO NOT ENLARGE BURNER PORTS (OPENINGS). Wash the inside of cookbox with warm soapy water and rinse with water.
Inside lid - While lid is warm, wipe inside with paper towel to prevent grease build-up. Flaking built-up grease resembles paint flakes.
Side tables (Q120, 200, 220) - Wash with a soft cloth and a soap-and-water solution.
Do not use cleaners that contain acid, mineral spirits or xylene. Rinse well after cleaning.
Side tables (Q120, 200, 220) are not to be used as cutting boards.
WEBER® SPIDER/INSECT SCREENS
Your Weber ^6 gas barbecue, as well as any outdoor gas appliance, is a target for spiders and other insects. They can nest in the venturi section (1) of the burner tube. This blocks the normal gas flow, and can cause the gas to flow back out of the air shutter. This could result in a fire in and around the air shutter, causing serious damage to your barbecue.
The burner tube air shutter is fitted with a stainless steel screen (2) to prevent spiders and other insects from accessing the burner tubes through the air shutter openings.
We recommend that you inspect the Spider/Insect screen at least once a year. Refer to "ANNUAL MAINTENANCE." Also inspect and clean the the Spider/Insect screen if any of the following symptoms should ever occur:
A) The smell of gas in conjunction with the burner flames appearing yellow and lazy.
B) Barbecue does not reach temperature.
C) Barbecue heats unevenly.
D) Burner does not ignite.
⚠️ DANGER
Failure to correct symptoms may result in a fire, which can cause serious bodily injury or death, and cause damage to property.
text_image
Diagram illustrating two-step assembly of a mechanical component, labeled with step 1 and step 2.MAINTENANCE
BURNER TUBE CLEANING OR REPLACEMENT
You will need: a flathead screwdriver.
A) Your Weber ^® Q ^® barbecue must be OFF and cool.
B) Turn gas OFF at source.
C) Open the lid.
D) Remove cooking grate.
Burner Tube Removal
A) Remove the ¼-20 x ½ inch screw that holds the burner tube to the cookbox (1).
B) Carefully slide the burner tube out from the cookbox.
Burner Tube Cleaning
A) Look inside the burner with a torch (2).
B) Clean the inside of the burner with a wire (a straightened-out coat hanger will work) (3).
C) Check and clean the air shutter opening at the ends of the burner. Check and clean the valve orifice at the base of the valve. Use a steel bristle brush to clean outside of burner. This is to make sure all the burner ports are fully open.
⚠️ CAUTION: Do not enlarge the burner ports when cleaning.
D) Lightly tap the burner to get debris and dirt out of the burner tube. Once the Spider/Insect screen and burner is clean reinstall the burner.
Burner Tube Reinstallation
A) To reinstall the burner tubes, perform steps for "Burner Tube Removal" in reverse order, as previously described.
CAUTION: The burner opening (4) must be positioned properly over the valve orifices (5).
⚠ WARNING: After reinstalling the burners, the gas connections should be leak checked with a soap-and-water solution before using the barbecue. Refer to “CHECK FOR GAS LEAKS.”

text_image
Technical diagram illustrating car seat assembly steps with numbered instructions for each step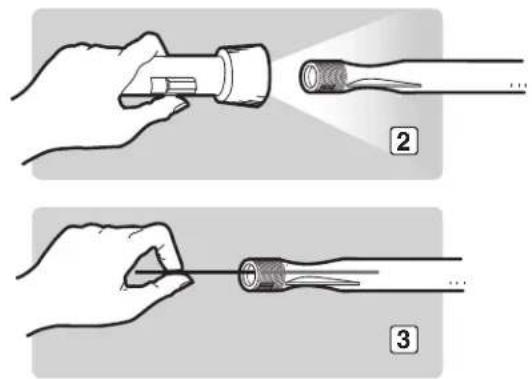
natural_image
Illustration showing two hand positions (labeled 2 and 3) of a flashlight being inserted into a cable, with no text or symbols present.MAINTENANCE
PUSH-BUTTON IGNITION SYSTEM OPERATIONS (Q100 & Q200)
If the Push-Button Ignition System (a feature on some of our barbecues) fails to ignite the burner, be sure there is gas flow by attempting to match-light your burners. Refer to "MANUAL IGNITION". If match-lighting is successful, the problem lies is the ignition system.
⚠ WARNING: All gas controls and supply valves should be in the OFF position.
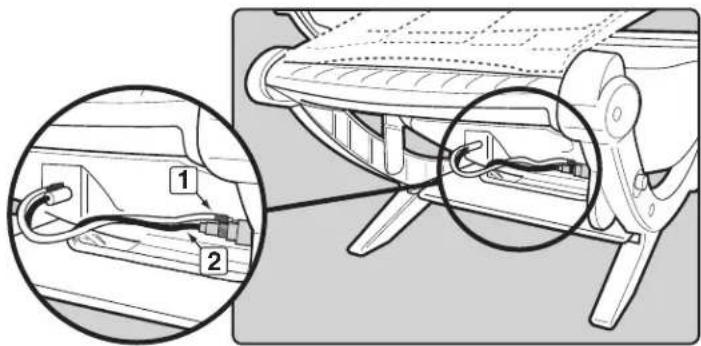
- Check that both the white (1) and black (2) ignition wires are attached properly. - Verify that the ignition button pushes in, clicks and returns to the out position.
If the ignition system still fails to light, contact the Customer Service Representative in your area using the contact information on our web site. Log onto www.weber.com®.
ELECTRONIC IGNITION SYSTEM OPERATIONS (Q120 & Q220)
If the Electronic Ignition System (a feature on some of our barbecues) fails to ignite the burner, be sure there is gas flow by attempting to match-light your burners. Refer to "MANUAL IGNITION". If match-lighting is successful, the problem lies in the Electronic Ignition System.
⚠ WARNING: All gas controls and supply valves should be in the OFF position.
- Check that both of the ignition wires are attached properly to the igniter electrodes on the ignition module. Black wire to electrode (1), white wire to electrode (2).
- Verify that the AAA battery (alkaline only) is in good condition and installed correctly. Some batteries have a plastic protective wrap around them. This plastic must be removed. Do not confuse this plastic with the battery label.
- Make sure the Electronic Ignition button is working by listening and looking for sparks at burner.
If the Electronic Ignition System still fails to light, contact the Customer Service Representative in your area using the contact information on our web site. Log onto www.weber.com ^ .
ELECTRONIC IGNITION SYSTEM REPLACEMENT
If replacement of the ignition module is necessary it must be removed and disposed of properly. Please see back page for further information on proper disposal.
text_image
Technical diagram showing cable installation steps with numbered annotations for component identification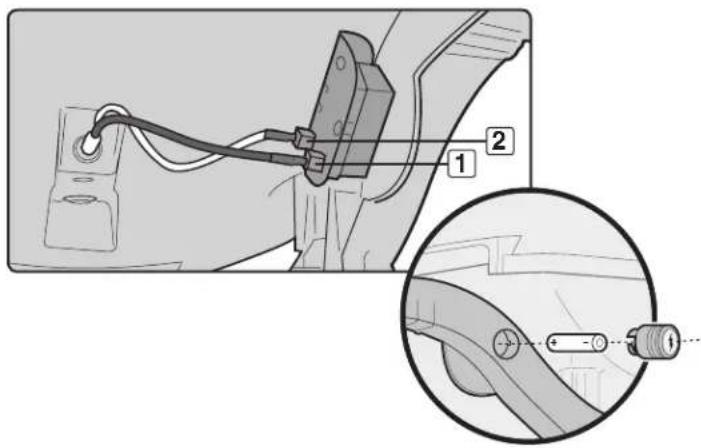
text_image
Technical diagram showing a cable or connector assembly with labeled parts and an inset close-up of the component detail.
natural_image
Illustration of a hand holding a medical device with attached tubing and a circular component (no text or symbols)MAINTENANCE
ANNUAL MAINTENANCE
Inspection and Cleaning of the Spider/Insect Screen
If there is dust or dirt on the Spider/Insect screen, remove the burner to clean the screen. Refer to "BURNER TUBE CLEANING OR REPLACEMENT".
Brush the Spider/Inspect screen, lightly, with a soft bristle brush (i.e. an old toothbrush).
CAUTION: Do not clean the Spider/Insect screen with hard or sharp tools. Do not dislodge the Spider/Insect screen or enlarge the screen openings.
Lightly tap the burner to get debris and dirt out of the burner tube. Once the Spider/Insect screen and burner is clean, replace the burner.
If the Spider/Insect screen becomes damaged or cannot be cleaned, contact the Customer Service Representative in your area using the contact information on our web site. Log onto www.weber.conf.
Main Burner Flame Pattern
The Weber ^® gas barbecue burner has been factory-set for the correct air and gas mixture. The correct flame pattern is shown.
A) Burner tube (1)
B) Tips occasionally flicker yellow (2)
C) Light blue (3)
D) Dark blue (4)
If the flames do not appear to be uniform throughout the burner tube, follow the burner cleaning procedures.

natural_image
Technical illustration of a mechanical component with threaded end and base, showing internal structure (no text or symbols)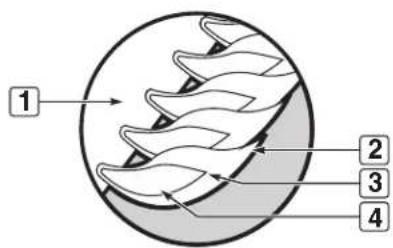
text_image
1 2 3 4ATTENTION: This product has been safety-tested and is only certified for use in a specific country. Refer to country designation located on outside of box.
These parts may be gas-carrying or gas-burning components. Please contact Weber-Stephen Products LLC Customer Service Department for genuine Weber-Stephen Products LLC replacement part(s) information.
⚠ WARNING: Do not attempt to make any repair to gas-carrying or gas-burning components without contacting Weber-Stephen Products LLC Customer Service Department. Your actions, if you fail to follow this product warning, may cause a fire or an explosion resulting in serious personal injury or death and damage to property.
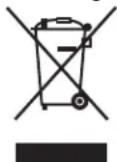
This symbol indicates that the product cannot be disposed of with household refuse. For instructions regarding proper disposal of this product in Europe, please visit www.weber.com®, and contact the importer listed for your country. If you do not have internet access, contact your dealer for the importer's name, address and telephone number.
When you decide to dispose of or discard your barbeque, all electrical components (e.g., rotisserie motor, batteries, ignition module, handle lights) must be removed and disposed of properly according to WEEE. They should be disposed of separately from the barbeque.
WEBER-STEPHEN ÖSTERREICH GMBH
WEBER-STEPHEN PRODUCTS BELGIUM Sprl
Blarenberglaan 6 Bus 4
Industriezone Noord
BE-2800 Mechelen
BELGIUM
TEL: +32 015 28 30 90; infobelux@weberstephen.com
WEBER-STEPHEN CZ & SK spol. s r.o.
U Hajovny 246
25243 Pruhonice
CZECH REPUBLIC
TEL: +42 267 312 973; info-cz@weberstephen.com
WEBER-STEPHEN NORDIC ApS
WEBER-STEPHEN NORDIC MIDDLE EAST
Ras Al Khaimah FTZ
P.O. Box 10559
UNITED ARAB EMIRATES
TEL: +971 4 360 9256; info@weberstephen.ac
WEBER-STEPHEN FRANCE SAS
WEBER-STEPHEN NETHERLANDS B.V.
Tsjükemarwei 12
8521 NA Sint Nicolaasga
Postbus 18
8520 AA Sint Nicolaagsa
NETHERLANDS
TEL: +31 513 4333 22; info@weberbarbecues.nl
JARN & GLER WHOLESALE EHF
Skutuvogur 1H
1-104 Reykjavik
ICELAND
TEL: +354 58 58 900
D&S IMPORTS
14 Shenkar Street
Petach, Tikva 49001
ISRAEL
TEL: +972 392 41119; info@weber.co.il
WEBER-STEPHEN PRODUCTS ITALIA Srl
WEBER-STEPHEN POLSKA Sp. z o.o.
Ul. Trakt Lubelski 153
04-766 Warszawa
POLSKA
TEL: +48 22 392 04 69; info-pl@weberstephen.com
GALACTEX OUTDOOR (PTY) LTD.
141-142 Hertz Draai
Meadowdale, Edenvale
Gauteng
SOUTH AFRICA
TEL: +27 11 454 2369; info@weber.co.za
WEBER-STEPHEN IBERICA Srl
Avda. de les Corts Catalanes 9-11
Despacho 10 B
WEBER-STEPHEN SCHWEIZ GMBH
Talackerstr. 89a
8404 Winterthur
SWITZERLAND
TEL: +41 52 24402 50; info-ch@weberstephen.com
WEBER-STEPHEN PRODUCTS
(U.K.) LIMITED
The Four Columns
Broughton Hall Business Park
Skipton, North Yorkshire BD23 3AE
UNITED KINGDOM
TEL: +44 01756 692611;
Customerservicenwe@weberstephen.com
WEBER-STEPHEN PRODUCTS LLC
200 East Daniels Road
Palatine, IL 60067-6266
USA
TEL: 847 934 5700; support@weberstephen.com
OOO WEBER-STEPHEN Vostok
142784 Moscow Region,
Leninskiy District
Rumyantsevo Village
Building 1
RUSSIA
TEL: +7 495 973 16 49; info.ru@weberstephen.com
WEBER-STEPHEN MAGYARORSZÁG KFT.
For Republic of Ireland, please contact:
Weber-Stephen Products (U.K.) Limited.
For other eastern European countries,
such as ROMANIA, SLOVENIA, CROATIA,
TURKEY, or GREECE, please contact:
For Baltic States, please contact:
Weber-Stephen Nordic ApS.
The Weber ^10 Q ^10 grill includes designs and features originally created by Robert DeMars of Original Ideas, Inc.

WEBER-STEPHEN PRODUCTS LLC
www.weber.com®