
Magnifica ESAM 3200.S EX1 - Coffee machine DELONGHI - Free user manual and instructions
Find the device manual for free Magnifica ESAM 3200.S EX1 DELONGHI in PDF.
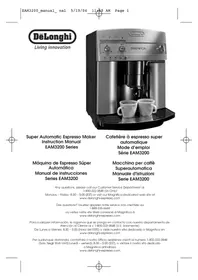


| Product type | Super automatic espresso coffee machine |
| Brand | DeLonghi |
| Model | Magnifica ESAM 3200.S EX1 |
| Dimensions (W x D x H) | 28 x 37 x 34 cm |
| Weight | 10 kg |
| Power supply | 110-120 V ~ 50-60 Hz, 1150 W |
| Water tank capacity | 1.8 L (60 oz) |
| Bean hopper capacity | 200 g (7.1 oz) |
| Built-in grinder | Adjustable conical burr grinder with 13 grind settings |
| Pump pressure | 15 bar (standard espresso) |
| Main functions | Espresso, long coffee, cappuccino, latte, hot water |
| Coffee strength adjustment | 3 levels (normal, strong, extra strong) |
| Quantity adjustment | Continuous from 0.5 oz to 12 oz (15-350 ml) |
| Frothing system | Patented milk frother (Cappuccino System) |
| Spout | Adjustable height for different cup sizes |
| Control panel | Buttons for 1 cup, 2 cups, steam, ground coffee, rinse/descaling |
| Indicator lights | Water level, coffee grounds full, descaling, steam, temperature |
| Auto-off function | Shuts off after 3 hours of inactivity with rinse cycle |
| Maintenance and cleaning | Regular cleaning of frother, brewing unit, automatic descaling |
| Safety | Auto shut-off, overheat protection, hot surfaces indicated |
| Spare parts and repairability | Removable brewing unit, detachable frother, removable water tank; customer service 1-888-335-6644 |
| Warranty | 1 year limited |
Frequently Asked Questions - Magnifica ESAM 3200.S EX1 DELONGHI
User questions about Magnifica ESAM 3200.S EX1 DELONGHI
0 question about this device. Answer the ones you know or ask your own.
Ask a new question about this device
Download the instructions for your Coffee machine in PDF format for free! Find your manual Magnifica ESAM 3200.S EX1 - DELONGHI and take your electronic device back in hand. On this page are published all the documents necessary for the use of your device. Magnifica ESAM 3200.S EX1 by DELONGHI.
USER MANUAL Magnifica ESAM 3200.S EX1 DELONGHI
Super Automatic Espresso Maker Instruction Manual EAM3200 Series
Any questions, please call our Customer Service Department at 1-800-322-3848 (US Only) Monday – Friday: 8:30 – 5:00 (EST) or visit our Magnifica-dedicated web site at www.delonghi-espresso.com
Table of Contents:
- Thank You and De'Longhi Introduction 3
- Product Registration 3
- Introduction to Magnifica 3
- Magnifica Features and Benefits 4 • What is Crema?____ 5
- Machine Description (User Components) 6
- Control Panel Description____ 7
- Indicator and Warning Lights 8
- Important Safeguards 10
- Before First Use 12
- Checking the Water Hardness 12 • Preparing the Machine 13 • Preparing the Espresso / Coffee 16
- Frothing or Steaming (How to Prepare Cappuccinos and Lattes) 20
- Processing Hot Water 22
- Cleaning and Maintenance 22
- Troubleshooting 26
- Limited Warranty and Extended Service Plan 32
- Ordering Accessories or Parts 34
- Technical Information 34
3: Thank You and De'Longhi Introduction
Thank you for choosing De'Longhi!
A steadfast commitment to quality and innovation has made De'Longhi a leader in household appliances around the world for over 100 years. Our Italian heritage is reflected in every product, every feature and every design. And we are dedicated to creating products that enhance and benefit the lives of our consumers. We hope that you'll enjoy your De'Longhi appliance for years to come!
Now that you've discovered us, we think you'll agree, that each and every De'Longhi appliance is truly a "Living Innovation".
Get to know us better...visit us at www.delonghi.com for our full line of products.
4: Product Registration (U.S. & Canada)
Register Magnifica on-line and receive a free trial issue of Cook's Illustrated. Visit www.prodregister.com/delonghi.
5: Introduction To Magnifica
Magnifica...The Name Says it All
The Magnifica, a super automatic machine, is capable of preparing a variety of beverages: espresso, coffee, cappuccino, latte and even hot water for tea. It delivers custom beans-to-espresso results with the simple touch of a button. This state-of-the-art machines allows you to savor the pleasures of an at-home coffee bar, with consistent results every time. Authentic espresso is the
4
heritage of Italian culture and tradition. So now that you know who the experts are, who else but De'Longhi could create the ultimate super automatic machine?
5.1 Features and Benefits
What You Grind is What You Brew The compact and patented Direct-to-Brew System with Thermo Block technology provides excellent heat distribution and it's removable for easy cleaning. The beans are ground instantly to ensure the freshest espresso or coffee.
Professional-Quality Conical Burr Grinder Integrated burr grinder produces consistent, fresh and aromatic espresso or coffee. Grind settings allow you to adjust the fineness for all types of beans.
Instant Reheat Function The instant reheat function heats the core of the machine, ensuring that Magnifica maintains an ideal temperature for brewing.
Patented Cappuccino System Frother This special frothing system includes a chamber that mixes steam and milk to create a rich creamy froth. It's perfect for making the ideal cappuccino, latte or any other frothy milk espresso / coffee beverage.
Espresso / Coffee Flavor and Quantity Controls Two separate easy-to-use control dials allow you to easily make adjustments to espresso / coffee strength and brewed espresso / coffee amounts.
Automatic Controls and Indicators The water level and used coffee containers are monitored automatically for worry-free use. There are also indicators for rinsing, cleaning and decalcifying. This will facilitate care and maintenance of the machine.
6: Introduction To Crema
What is an Authentic Espresso?
To appreciate the quality and consistency of the Magnifica, you need to understand what makes a good espresso. The identifying mark of an authentic Italian espresso can be found in the brown layer of foam that lies on top of a properly brewed espresso. The brown foam, referred to as the “crema”, is the essence of a perfect espresso. The crema holds all of the compounds that constitute the aroma and flavor of an espresso. A good crema will last about thirty to ninety seconds before it dissipates completely, once this has happened, the aromatics are infused into the drink to deliver an authentic-tasting espresso.

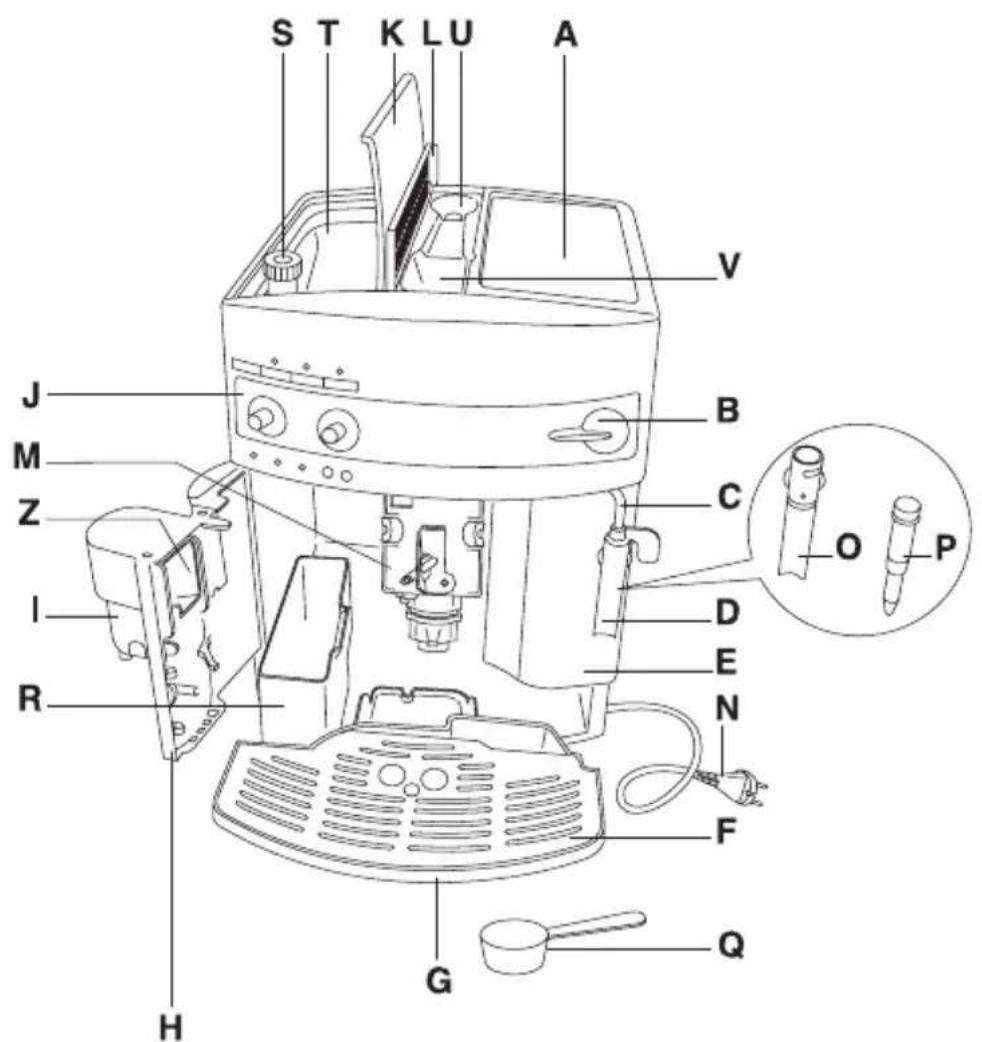
7: Machine Description (User Components):
A. Cup Warmer B. Steam Control Dial C. Steam Spout D. Patented Cappuccino System Frother (Milk Frother) E. Removable Water Tank F. Removable Drip Tray G. Removable Used Water Tray H. Service Door I. Height Adjustable Coffee Spout J. Control Panel (See "Control Panel Description" section of the manual for more details) K. Coffee Bean Container Lid
L. Ground Coffee Container Lid M. Brewing System N. Power Cord O. Removable Milk Frother Body P. Removable Steam Nozzle Q. Measuring Scoop R. Removable Used Coffee Container S. Adjustable Grinding Dial T. Coffee Beans Container U. Storage Compartment for Measuring Scoop V. Ground Coffee Funnel Z. Mobile Drawer

8: Control Panel Description:
1. On / Off Button
Description: Turns the machine on and off.
2. 1-Cup and Coffee Temperature Ready Light (Green)
Description: When illuminated, shows that you selected the 1-cup option by pressing the 1-Cup Button.
3. 1-Cup Button
Description: When pressed, the machine will only deliver 1 cup of espresso / coffee.
4. 2-Cup and Coffee Temperature Ready Light (Green)
Description: When illuminated, shows that you selected the 2-cup option by pressing the 2-Cup Button.
5. 2-Cup Button
Description: When pressed, the machine will only deliver 2 cups of espresso / coffee.
8
6. Steam and Steam Temperature Ready Light (Red)
Description: When illuminated, shows that you selected the steam function by pressing the Steam Function Button.
7. Steam Function Button
Description: When pressed, the machine will deliver steam through the milk frother.
8. Espresso / Coffee Quantity Dial
Description: By turning the dial, you can select the desired amount or quantity of espresso / coffee.
9. Espresso / Coffee Flavor Dial
Description: By turning the dial, you can select the desired taste of your espresso/coffee, from regular, strong, to extra strong.
10. Rinse and Decalcification Button
Description: When pressed, it will automatically rinse or decalcify the machine.
11. Ground Coffee Button
Description: If you are using pre-ground coffee, press this button. It will disable the coffee grinder.
12. Ground Coffee Light (Green)
Description: When illuminated, it shows that you have selected to disable the coffee grinder and use pre-ground coffee by pressing the Ground Coffee Button.
Warning Lights: Note: Also refer to the "Troubleshooting" section of the manual for more details.
IMPORTANT: If a warning light illuminates to signal a problem, first review this section or the "Troubleshooting" section of the manual to see if the problem can be easily resolved. Then, if the problem still persists, call our customer service department at 1-800-322-3848.
13. Decalcification Warning Light (Red)
Description: When illuminated, tells you that the machine needs to be decalcified.
What to do if this light appears:

- Decalcify the machine according to the instructions listed in the "Decalcification" section of the manual.
14. General Warning Light (Red)
Description: When illuminated steadily, tells you there is a technical problem.
What to do if this light appears:
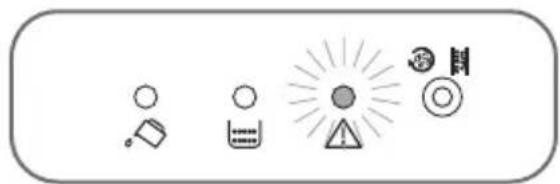
- Call our customer service department at 1-800-322-3848. (U.S. Only)
What to do when the light is flashing:
- Close the service door.
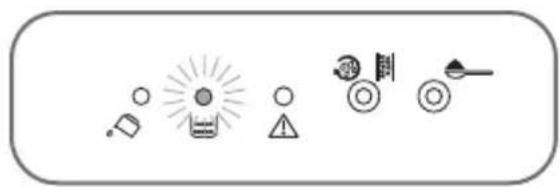
15. Used Coffee Container Warning Light (Red)
Description: When illuminated steadily, tells you that the used coffee container is full (needs to be emptied), missing or improperly positioned. Note: The used coffee container will need to be emptied after about 14 single cups (or 7 double cups).
What to do if this light appears:
10
- Check the used coffee container by removing it. If it is full, empty the container, clean it and replace it. Note: Refer to the "Cleaning and Maintenance" section of the manual for more details on how to clean the container.
- Check to make sure the used coffee container is in the machine. If it is missing, replace the container.
- Check to make sure the used coffee container is properly positioned. If it is not properly positioned, reposition the container until it fits correctly inside the machine.
16. Water Warning Light (Red)
Description: When illuminated steadily, tells you that the water tank is empty (needs to be refilled), missing or improperly positioned. Note: The water tank must be full, otherwise espresso / coffee cannot be made.
What to do if this light appears:
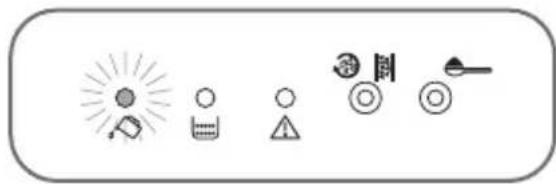
- Check the water tank by removing it. If it is empty, refill the tank with water and replace it.
- Check to make sure the water tank is in the machine. If it is missing, replace the tank.
- Check to make sure the water tank is properly positioned. If it is not properly positioned, reposition the tank until it fits correctly inside the machine.
Important Safeguards:
When using electrical appliances, basic safety precautions should always be followed, including the following:
- Read all instructions.
- THIS MACHINE MUST BE CLEANED. For more details, please refer to the Cleaning and Maintenance section of manual.
- Do not touch hot surfaces. Use handles or knobs.
- To protect against fire, electric shock and injury to persons, do not immerse cord, plugs or body of machine in water or other liquid.
- Close supervision is necessary when any appliance is used by or near children.
- Unplug from outlet when not in use and before cleaning. Allow to cool before putting on or taking off parts, and before cleaning the appliance.
- Do not operate any appliance with a damaged cord or plug or after the appliance malfunctions, or has been damaged in any manner. For any service related issues, please contact our customer service department at 1-800-322-3848. (U.S. Only)
- The use of accessory attachments is not recommended by the appliance manufacturer, it may result in fire, electric shock or injury to persons.
- Do not use outdoors.
- Do not let the cord hang over the edge of the table or counter, or touch hot surfaces.
- Do not place on or near a hot gas or electric burner, or in heated oven.
- Do not use appliance for other than intended use.
- Use extreme caution when disposing of hot steam.
- This appliance is for Household Use Only. All other use is considered improper and dangerous.
- This machine is designed to make espresso / coffee and other hot drinks, be careful to avoid burning from the water and steam jets or by using the machine incorrectly.
- Do not operate the machine without water in the water tank.
- The manufacturer is not liable for damage caused by improper, incorrect or unreasonable use of the appliance.
- Do not touch the appliance with damp hands.
SAVE THESE INSTRUCTIONS
Short Cord Instructions
- A short power cord is provided to reduce the risk of becoming entangled in or tripping over a long cord.
- Longer extension cords are available and may be used if care is exercised in their use.
- If an extension cord is used:
a. The marked electrical rating of the extension cord should be at least as great as the electrical rating of the appliance, and
b. The longer cord should be arranged so that it will not drape over the counter top or tabletop where it can be pulled on by children or tripped over.
- This appliance has a polarized plug (one blade is wider than the other). As a safety feature, this plug will fit in a polarized outlet only
12
one way. If the plug does not fit fully in the outlet, reverse the plug. If it still does not fit, contact a qualified electrician. Do not attempt to defeat this safety feature.
9: Before First Use
Place the box on a large, sturdy flat surface. Carefully unpack your machine and remove all packaging material and literature. Remove the hanging tag from the frother before use. After unpacking the machine, check to make sure the appliance is complete and undamaged. If in doubt, please call our customer service department at 1-800-322-3848 (U.S. Only), and wait for the Magnifica prompt. To remove any dust that may have accumulated during packaging, you may wipe the unit with a clean, damp cloth. Dry thoroughly. Do not immerse the machine in water or other liquid. Clean the water tank with warm water and mild detergent. Rinse and dry thoroughly. Do not use harsh or abrasive cleaners. (See "Cleaning and Maintenance" section of this manual for detailed instructions.) Keep all plastic bags away from children. Note: Test the water hardness before first use. Refer to the "Checking the Water Hardness" section of this manual for more details.
10: Checking the Water Hardness
The machine was released from the factory with a specific pre-set setting for water hardness. To change that setting, please follow the instructions below step by step.
- After removing the "Water Hardness" test strip from its packaging, immerse it completely in the water for a few seconds, then remove it.
- Wait about 30 seconds for the test strip to change color. A number of red squares will appear.
- Check that the machine is off (Note: All of the indicator lights are off).
- Press the 📋 button and hold it for 5 seconds. The four


lights will illuminate.
- Press the 🔒 button repeatedly until the number of lights coincides with the number of red squares on the test strip. (Ex. If 3 red squares appear on the test strip, press the 🔒 button until the 3rd light is illuminated.)
- Press the ⚙️ button to save the data. The machine is now programmed to indicate a decalcification warning when necessary, based on the hardness of the water.
11: Preparing the Machine
Please follow the instructions below.
- Set the water hardness according to the instructions in the "Checking the Water Hardness" section of the manual.
- Place the machine on a flat, level surface away from any edge.
- Plug the machine into a 120V / 60Hz only outlet.
- Press the on/off button.
11.1 Filling the Water Tank
Caution: Never switch the machine on when the water tank is completely empty. Without water, the machine cannot make espresso / coffee and the machine will become noisy.
- Move the frother to the center of the machine to remove the water tank.
- Rinse the water tank and fill it with clean, cold water without exceeding the MAX line. Replace the water tank by pushing it all the way in. (Figure 1)
Tip: Renew water daily.
11.2 Filling the Coffee Bean Container (If you are using whole coffee beans)
- Never fill coffee bean container with pre-ground coffee.
Tip: Before filling the coffee bean container, make sure to remove any foreign objects
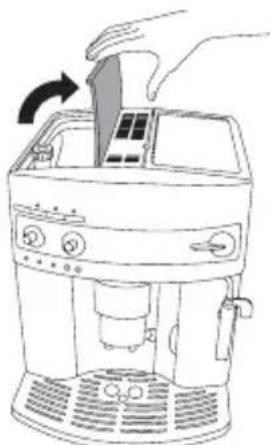
- Open the coffee bean container lid and fill container with coffee beans and close the lid. (Figure 2)
- Note: If you are using frozen coffee beans, let them thaw for 3 to 4 hours before filling them into the bean container. This will prevent moisture from seeping into the grinder. Never use sugar-coated beans.
Note: It is recommended not to use oily, sugar coated or flavored beans. These types of beans could damage the machine.
11.2A Setting the Coffee Grinder (If you are using whole coffee beans)
- The coffee grinder does not need to be adjusted for the first use. The coffee grinder has already been pre-set in the factory for the
Correct delivery of the espresso/coffee.
- If after making the first espresso/coffee the delivery is too fast or too slow (in drops), the grinding coarseness must be adjusted using the coffee grinder dial (Figure 3) located inside the bean container.
- Turning one click (one number) clockwise achieves faster delivery of the espresso/coffee and a coarser ground coffee.
- Turning one click (one number) counter-clockwise achieves slower delivery of the espresso/coffee and a finer ground coffee (and makes the coffee creamier in appearance).
- These adjustments will only be evident after the delivery of at least 2 cups of espresso/coffee.
- The coffee grinder dial must only be turned when the coffee grinder is on.
11.3 Filling the Ground Coffee Container (If you are using pre-ground coffee)
- Never add the pre-ground coffee when the machine is off.
- Never add more than 1 full measure of pre-ground coffee. The ground coffee funnel will get blocked.
- When dosing the quantity of pre-ground coffee to be added, only use the measuring scoop provided.
- Use only pre-ground coffee specifically for use in espresso machines. Do not use whole coffee beans, freeze-dried coffee or other materials that may damage the machine.
- Never use instant coffee. It could severely damage the brewing system.
Tip: Before filling the ground coffee container, make sure to remove any foreign objects.
- Open the ground coffee container lid (located in the center of the machine). To prepare one espresso/coffee, add just one level measure of pre-ground coffee with the measuring scoop (provided). (Figure 4)
- Note: You can only make one espresso/coffee at a time when using pre-ground coffee.
- Close the lid.
Using the Machine for the First Time
Figure 3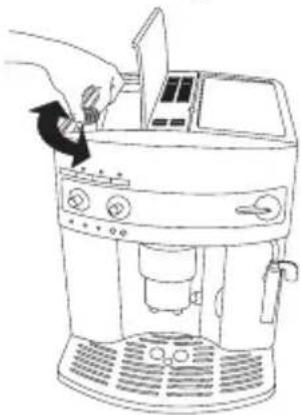
Figure 4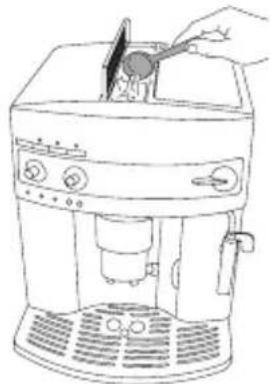
Figure 5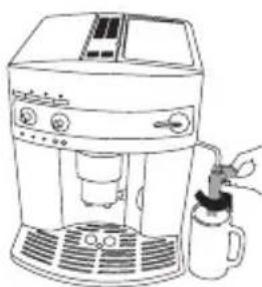
Figure 6
- Note: Make sure you have plugged the machine into an outlet and turned it on by pressing the on/off button before proceeding.
- Move the frother towards the outside (Figure 5) and place cup underneath frother. Turn the machine on by pressing the ⏻ button. (Figure 6)
- Turn the steam control dial half a turn counterclockwise (Figure 7). Note: It is normal for the machine to make some noise.
- After a few seconds, a little water will release from the frother. When the cup is 1/3 full, turn the steam control dial half a turn clockwise (Figure 8) to terminate the flow of water.
- Wait for the 📁 and 🌐 lights to stop flashing. When the lights are flashing, the machine is still preheating.
- The machine will automatically perform a rinse cycle and a little hot water will release from the coffee spouts and collect in the drip tray.
- Once the lights illuminate steadily, the machine has reached the ideal temperature for making espresso/coffee and is now ready for use.
- Note: Before preparing the espresso/coffee, always make sure that the green 🎨 and 🎨 lights are on steadily.
Figure 7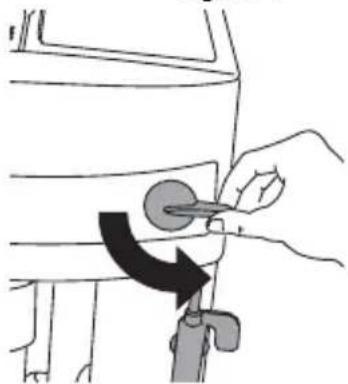
Figure 8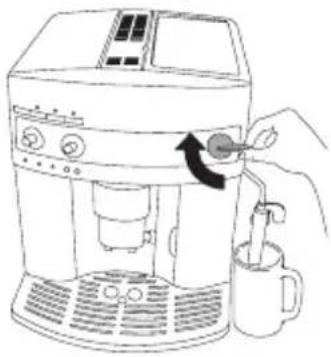
Figure 9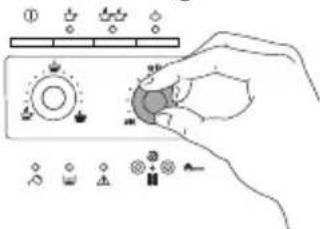
11.4 Setting the Espresso / Coffee Flavor Dial
- Turn the espresso / coffee flavor dial (Figure 9) to set the desired taste of your espresso/coffee from regular, strong to extra strong.
- Turning the dial clockwise increases the quantity of coffee beans the machine will grind, and
therefore makes the taste stronger. Note: When using the machine for the first time, the correct position for the dial can be found by trial and error.
- Note: Make sure not to turn it too far clockwise, otherwise the espresso / coffee will be delivered too slowly (in drops) when preparing two cups of espresso / coffee.
11.5 Espresso / Coffee Quantity
11.5A The Difference Between Espresso/Coffee Quantity
- "Ristretto" (small/short) espresso: 1/2 oz. to 1 oz. of coffee
- "Espresso": 1 oz. to 1.5 oz. of coffee • Large (long/double shot/American coffee): 5 oz. to 8 oz. of coffee
16
Note: It is recommended to add a bit of sugar to "ristretto" or "espresso" coffee. Drink the large (American coffee) black or add sugar and milk if you prefer.
Tip: If you add sugar and milk to your cup before you brew your espresso/coffee it will be dissolved more uniformly.
Figure 10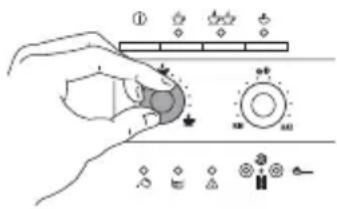
Tip: If you set the espresso / coffee quantity dial to maximum and push the 2-cup button, the machine will prepare a 12 oz. coffee. The average coffee drinker may find this to be too mild, so adjust the volume accordingly.
11.5B Setting the Espresso / Coffee Quantity
- Turn the coffee quantity dial (Figure 10) to set the amount of espresso/coffee desired.
- Turning the dial clockwise makes a longer coffee. Note: When using the machine for the first time, the correct position for the dial can be found by trial and error.
12: Preparing the Espresso / Coffee
Please follow the instructions below. You can make any quantity of espresso/coffee from 1/2 oz. to 12 oz.
Note: The process is always the same: water is forced through the coffee in a very short time period to avoid over-extraction, for perfect espresso / coffee every time.
Caution: Never switch the machine on when the water tank is completely empty. Without water, the machine cannot make espresso / coffee and the machine will become noisy.
Before preparing the espresso / coffee, make sure you have done the following:
- Followed all of the instructions listed under Section 11 of the manual ("Preparing the Machine").
- The water tank and either the bean container or ground coffee container is full.
- If using for first time, followed all of the instructions listed under section 11 of the manual.
- The machine is on a flat, level surface away from any edge.
- The machine is plugged into a 120V / 60Hz only outlet.
- Turned the machine on by pressing the on/off button.
- The green lights are on steadily (not flashing).
- Set the coffee flavor, coffee quantity, and coffee grinder (if using coffee beans) dials to the desired level.
12.1 Preparing Espresso / Coffee (Using Whole Coffee Beans)
Note: When using the machine for the first time, 4 to 5 cups of espresso / coffee needs to be made before the machine delivers satisfying results.
- Fill the water tank with water and the coffee bean container with
coffee beans, according to the directions listed in sections 11.1 and 11.3 of the manual.
- Place one empty cup under the spout to make one espresso / coffee (Figure 11) or two empty cups for two espressos / coffees (Figure 12).
Tip: Use cups that have been previously heated by rinsing them with hot water or by leaving them on the cup warmer for at least 20 minutes.
Note: For more tips on making coffee hotter, see "Tips on Making Hotter Coffee" section of the manual.
- Make sure to lower the adjustable coffee spout if the cups are small (Figure 13). For larger cups, push the adjustable coffee spout up to accommodate the size.
- Press the button (Figure 14) to make one cup of espresso / coffee or the button (Figure 15) to make two espressos / coffees.
- The machine will now grind the beans, run a short pre-brewing cycle, pause and then complete the delivery.
Note: While the machine is preparing the espresso/coffee, the delivery can be terminated at any time by pressing the 📋 button (Figure 14) or the 📋 button (Figure 15), as previously selected.
- Once the desired quantity is reached, the machine will automatically terminate espresso/coffee delivery and discharge the grounds into the used coffee container.
Figure 11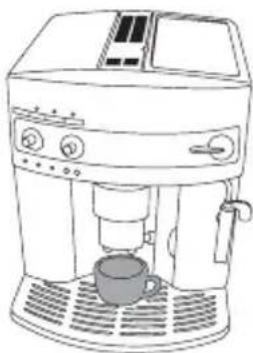
Figure 12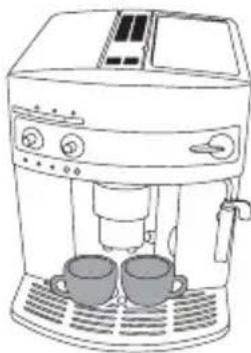
Figure 13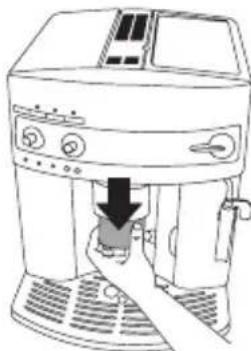
Figure 14
18
Note: There is no need to empty the used coffee container until the used coffee container warning light illuminates. (For more details on this light, please refer to the Troubleshooting section of the manual).
Figure 15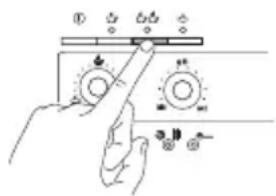
Note: As soon as delivery is complete, to increase the quantity of the coffee simply press and hold the 📁 button (Figure 14) or the 📁 button (Figure 15), as previously selected, until reaching the desired quantity. This operation must be performed within 3 seconds of the last espresso/coffee delivery.
Caution: While the machine is delivering espresso/coffee, never remove the water tank. If it is removed, the machine will not be able to make espresso/coffee and will become noisy.
- After a few seconds, when both the green 🎨 and 🎨 🎨 indicator lights are on again steadily, another espresso/coffee can be made.
- To switch the machine off, press the Ⓐ button. Note: Before switching off, the machine will automatically run a rinse cycle. A little hot water will release from the coffee spout and collect in the removable drip tray.
- Use caution when removing the contents of the used water tray, as they may be very hot. Allow contents to cool, and then remove the used water tray and discard the water.
- If the machine is not switched off using the ① button, it will switch itself off and run a brief rinse cycle 3 hours after the last operation.
12.2 Preparing Espresso / Coffee (Using Pre-Ground Coffee)
- Fill the water tank with water and the ground coffee container with pre-ground coffee, according to the directions listed in sections 11.1 and 11.2 of the manual.
- Place one empty cup under the spout to make one espresso / coffee (Figure 11).
- Note: You can only make one espresso / coffee at a time when using pre-ground coffee. Tip: Use cups that have been previously heated by rinsing them with hot water or by leaving them for at least 20 minutes on the cup warmer.
Note: For more tips on making coffee hotter, see "Tips on Making Hotter Coffee" section of the manual.
- Make sure to lower the adjustable coffee spout if the cup is small
(Figure 13). For a larger cup, push the adjustable coffee spout up to accommodate the size.
- Press the 🔊 button (Figure 16) to select the ground coffee function. The button will illuminate indicating that the function has been selected and the coffee grinder has been disabled.
- Press the 📋 button (Figure 14) to make one cup of espresso / coffee.
- The machine will now run a short pre-brewing cycle, pause and then complete the delivery.
Figure 16
Note: While the machine is preparing the espresso / coffee, the delivery can be terminated at any time by pressing the 📁 button (Figure 14).
- Once the desired quantity is reached, the machine will automatically terminate espresso / coffee delivery and discharge the grounds into the used coffee container. Note: There is no need to empty the used coffee container until the used coffee container warning light illuminates. (For more details on this light, please refer to the Troubleshooting section of the manual).
Caution: While the machine is delivering espresso / coffee, never remove the water tank. If it is removed, the machine will not be able to make espresso / coffee and will become noisy.
- Once the espresso/coffee has been delivered, to make espresso/coffee using pre-ground coffee again, simply press the 1-cup button again.
- To make espresso/coffee using whole coffee beans again: First press the 📄 button to deactivate the ground coffee function and enable the coffee grinder. Then make sure that the coffee grinder is full of coffee beans. Press the 1-cup or 2-cup button depending on how much espresso/coffee you want to brew.
- To switch the machine off, press the ⏻ button. Note: Before switching off, the machine will automatically run a rinse cycle. A little hot water will release from the coffee spout and collect in the removable drip tray.
- Use caution when removing the contents of the used water tray, as they may be very hot. Allow contents to cool, and then remove the used water tray and discard the water.
- If the machine is not switched off using the ⏻ button, it will switch itself off and run a brief rinse cycle 3 hours after the last operation.
20
12.3 Tips on Making Hotter Coffee
- When the machine is first turned on and a short cup of espresso/coffee is required, use the hot rinse cycle to pre-heat cups (refer to point 14 in section 11.3 of the manual).
- Unless pre-heated, do not use cups that are too thick.
- Use cups that have been previously heated by rinsing them with hot water.
- Use cups that have been previously heated using the cup warmer on top of the machine.
13: Frothing or Steaming (How to Make the Perfect Cappuccino or Latte)
What is cappuccino?
A cup of cappuccino is one shot of espresso, 1/3 cup steamed milk with a dollop of froth. It can be garnished with chocolate, cinnamon or nutmeg.
What is a latte?
A cup of latte is one shot of espresso (or two shots for a double latte), 1/2 cup steamed milk with about 1/2 to 1/3 froth.
- Use this feature to heat up liquids or to froth or steam milk for cappuccinos or lattes.
- The milk frother must be cleaned after each use. Please refer to the "Cleaning and Maintenance" section of the manual for more detailed instructions.
Before First Use:
- The removable parts of the milk frother (milk frother body and steam nozzle) are high precision parts. Always keep these two parts clean and free of milk residue. (See "Cleaning and Maintenance" section of the manual for more detailed instructions on cleaning.)
Ready to Begin Frothing or Steaming:
- Fill a container (metal container is recommended) with about 3.5 oz. of cold milk.
- Note: Skim (0% fat) milk is recommended. It will produce the most froth and will let you taste more of the espresso / coffee. 1% and 2% milk will produce less froth, and regular milk (3% fat) will give you half or less than half the froth of skim milk.
- When choosing the size of the container, remember that the volume will increase by two or three times.
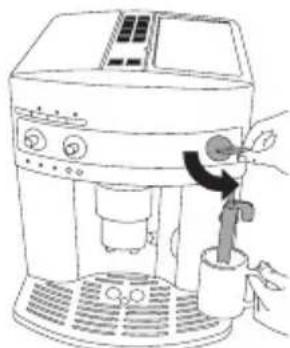
- Move the milk frother to the outside of the machine.
- Prepare the espresso / coffee as described in
section 12 of the manual, using sufficiently large cups.
- Press the steam function button (Figure 17). The light (Figure 18) starts flashing to indicate that the machine is heating up.
- When the light remains on steadily (without
flashing), the temperature of the machine has reached the ideal temperature for making steam.
- Immediately after (within a span of no more than 2 minutes, otherwise the machine automatically switches back to the espresso / coffee function), dip the milk frother into the container of milk (Figure 19).
- Make sure not to immerse the line on the milk frother (indicated by the arrow in Figure 20). Turn the steam control dial half a turn counter-clockwise until it stops (Figure 7). Use caution, steam is hot!
- The steam released will make the milk froth increase in volume.
Note: To make a creamier froth, dip the milk frother into the milk and rotate the container with slow movements from the bottom to the top. It is recommended to limit steam delivery to no more than 2 minutes at a time.
- Once you have achieved the desired froth, stop the steam flow by
turning the steam control dial clockwise until it stops (Figure 8), and then press the steam function button (Figure 17) to deactivate the steam function.
- Note (Making espresso / coffee after using steam function): Immediately after using the milk frother, press the steam function button to deactivate the steam function. If you press the espresso or the coffee button to make espresso / coffee again, the
machine is too hot to make espresso / coffee. The green espresso and coffee lights will flash indicating that the temperature is not suitable for making espresso / coffee. Simply wait 10 minutes for the machine to cool down. The lights will illuminate steadily (without flashing) indicating that the machine is now ready to make espresso / coffee again.
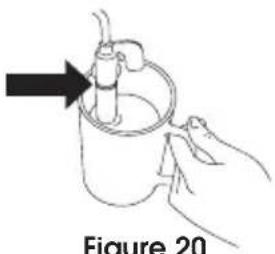
Figure 20
Tip: To cool the machine down more quickly after having deactivated the steam function, turn the steam control dial and release some water from the milk frother into a container, until the green espresso and coffee lights stop flashing.
22
14: Processing Hot Water Through the Frother
Please follow the instructions below.
- Make sure that the green espresso and coffee lights are on steadily (not flashing).
- Turn the milk frother towards the outside of the machine (Figure 3).
- Position a container underneath the milk frother (Figure 3).
- Turn the steam control dial half a turn counter-clockwise until it stops. (Figure 7).
- Hot water will release from the milk frother and start to fill the container. Use caution, water is hot!
- To stop the flow of hot water, turn the steam control dial all the way clockwise. (Figure 8) and return the milk frother to the original position towards the center of the machine.
- Note: It is recommended to deliver hot water for no more than 2 minutes.
15: Cleaning and Maintenance
- WARNING: Before performing any cleaning operations, the machine MUST be cooled down, turned off (unless otherwise noted) and unplugged from the power outlet (unless otherwise noted).
- The machine must be cleaned in order to function properly.
- Never immerse the machine in water or other liquid. It's an electrical appliance.
- Do not use solvents or harsh abrasive detergents.
- The outside surface of the machine can be cleaned with a soft damp cloth.
- All of the components (parts and accessories) of the machine must not be washed in the dishwasher.
15.1 Cleaning the Used Coffee Container:
- Whenever the 📄 light illuminates steadily, the used coffee container needs to be cleaned.
- Remove the used coffee container and discard the coffee grounds.
- Wash the container with warm water and mild detergent. Rinse and dry thoroughly.
- Replace the used coffee container.
15.2 Cleaning the Water Tank:
- The water tank should be cleaned regularly.
- Remove the water tank by moving the milk frother to the outside of the machine.
- Wash the tank with warm water and mild detergent. Rinse and dry thoroughly.
- Replace the water tank.
15.3 Cleaning the Drip Tray and Used Water Tray:
- The drip tray is fitted with a red level indicator, showing the level of the water inside.
- When the indicator is visible, the drip tray and used water tray must be emptied and cleaned.
- Wash the drip tray and used water tray with warm water and mild detergent. Rinse and dry thoroughly.
- Replace the used water tray and drip tray.
15.4 Cleaning the Coffee Spout:
- Check that the holes in the coffee spout are not blocked. To clean them, carefully scrape the dry coffee residues from the coffee spout with a needle (Figure 21).
15.5 Cleaning the Milk Frother:
Note: The milk frother must be cleaned after each use. Deactivate the steam function before cleaning. Please proceed as follows (the machine must be on during the cleaning of the milk frother):
- Release a little steam for a few seconds by turning the steam control dial counter-clockwise until it stops (Figure 7).
- With this operation, the steam nozzle discharges any milk that may have been left inside. IMPORTANT: For health reasons, this operation
should always be performed to prevent previously used milk from remaining inside the milk frother.
- With one hand, hold the milk frother handle and with the other hand unscrew the milk frother by turning it clockwise and then pull it down. (Figure 22)
- Carefully wash the milk frother and steam nozzle in warm water.
- Check that the two holes (indicated by the arrows in Figure 23) are not clogged. If necessary,
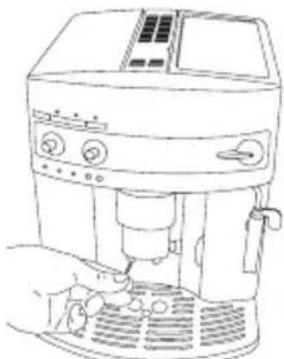
Figure 21
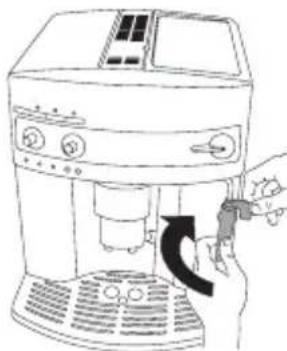
Figure 22
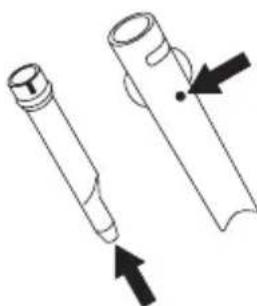
Figure 23
24
clean them using a needle or pin.
- Replace the steam nozzle by inserting it and vigorously turning it upwards into the steam spout.
- Replace the milk frother by pushing it upwards and turning it counter-clockwise.
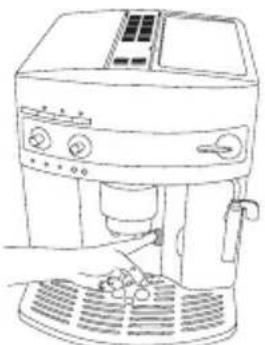
Figure 24
15.6 Cleaning the Brewing System:
Warning: The brewing system can only be removed when the machine is off. Attempting to remove the brewing system with the machine on will risk causing damage.
Note: The brewing system must be cleaned very frequently (depending on use) to prevent it from filling with coffee deposits (that may lead to malfunctions). To clean it, proceed as follows:
- Make sure the machine is turned off, but do not unplug it. Wait for all indicator lights to go off.
- Open the service door (Figure 24).

- Remove the drip tray and used coffee container and clean them (as noted above).
- Press the two red release buttons on the brewing system (Figure 25) and pull it out.
- Wash the brewing system under running water, without using detergents. Never place the brewing system in
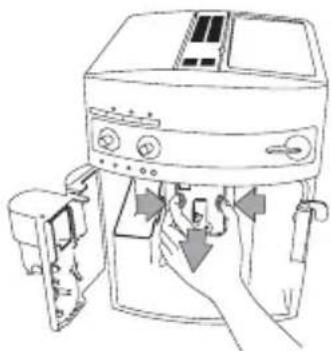
Figure 25
the dishwasher.
Carefully clean the inside of the machine by scraping it with a plastic or wooden fork (Figure 26) and then pick up all the residues using a vacuum cleaner (Figure 27).
Replace the brewing system by sliding it onto the supports and the pin at the bottom. Then push the PUSH symbol fully in until you hear a click.
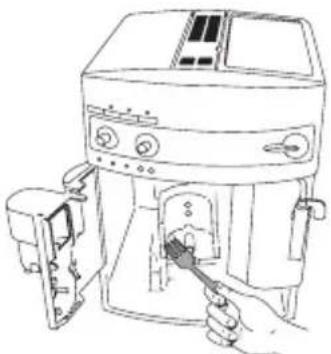
Figure 26
Check that the two red buttons have opened back out, otherwise the service door cannot close properly.
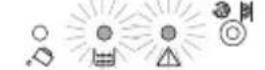
- If the brewing system is not inserted correctly until hearing the click, the two red buttons have not opened out properly and the service door will not close, and the machine will not operate. The ⚠ light will start flashing if this is the case.
- If it is difficult to insert the brewing system, squeeze it into size by vigorously pressing from above and below at the same time (Figure 28).
- If it is still difficult to insert the brewing system, leave it out of the machine, close the service
door, unplug the machine from the power outlet and then plug it in
again. Wait for all the lights to go off, then open the door and replace the brewing system.
- Replace the drip tray and used coffee container.
- Close the service door.
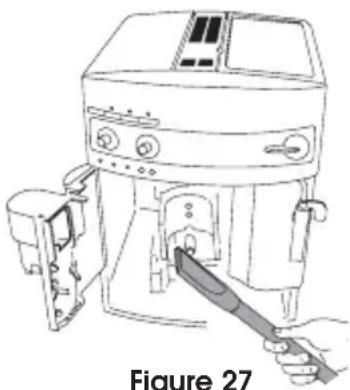
Figure 27
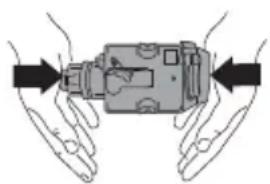
Figure 28
15.7 Decalcification:
- Due to the continuous heating of the water used to make espresso / coffee, over time it is normal for the tubing inside the machine to fill with lime scale. When the lights start flashing, it is time to decalcify the machine.
- When the 🎨 🥘 light switches on, the machine still can be used to prepare espresso / coffee. But for the best tasting espresso / coffee, it is recommended that you decalcify the machine when the 🎨 🥘 light starts to flash.
- The machine must be plugged in and turned on during the decalcification process.
Proceed as follows:
- Prepare the solution as indicated on the packaging of the decalcification product supplied with the machine. To purchase the decalcification solution, please contact a De'Longhi customer service representative at 1-800-322-3848 (U.S. Only). Note: Only use the decalcification solution supplied by De'Longhi.
- Pour the contents of the bottle (20 oz. / 0.5 liters) into the water tank and then add water (20 oz. / 0.5 liters – as described in the instructions on the bottle).
- Place a container (with a minimum capacity of 60 oz. / 1.5 liters) under the milk frother (Figure 5).
- Turn the machine on by pressing the power button (Figure 6).
- Wait for the green 📁 and 🌐 🌐 🌐 🐘 indicator lights to illuminate steadily (not flashing).
26
- Press and hold the 🎨 🌐 button for at least 5 seconds (Figure 29). The button will illuminate to indicate the start of the decalcification process (the 🎨 and 🌐 lights remain off to indicate that it is not possible to make espresso / coffee).
- Turn the steam control dial half a turn counterclockwise (Figure 7). The decalcification solution will come out of the milk frother and start to fill the container underneath.
- The decalcification process automatically performs a series of deliveries and pauses to remove the lime scale deposits from inside the machine.
- After about 30 minutes, when the light illuminates, turn the steam control dial half a turn clockwise (Figure 8) until it stops.
Note: The machine must be rinsed to eliminate residues of decalcification solution from inside the machine.
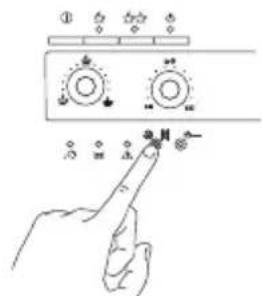
Figure 29
Proceed as follows:
- Remove the water tank, rinse it and fill it with clean, cold water. Replace the tank
- Empty the collection container (located underneath the milk frother) that is full of liquid, and then replace it under the milk frother.
- Turn the steam control dial a turn counter-clockwise (Figure 7). Hot water will release from the milk frother and fill the container underneath.
- When the water tank is empty, the light goes off and the light illuminates.
- Turn the steam control dial all the way clockwise (Figure 8) and fill the water tank with clean, cold water again.
- The decalcification process has now ended, and the machine is ready to deliver espresso / coffee again.
- Note: If the decalcification process is terminated before completion, the ⚠ illuminates and the procedure must be started again from the beginning.
16: Troubleshooting
IMPORTANT: If you encounter a problem, first review this section or the "Indicator and Warning Lights" section of the manual to see if the problem can be easily resolved. Then, if the problem still persists, call our customer service department at 1-800-322-3848 (U.S. Only).
Indicator Lights: Description, Explanation
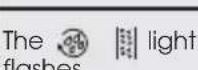
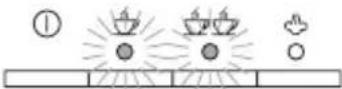 | The indicator lights flash. | The machine is not ready to make espresso / coffee (the ideal water temperature has not yet been reached). Wait for the indicator lights to illuminate steadily before making the espresso / coffee. |
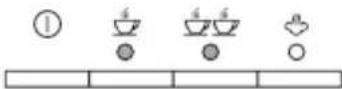 | The indicator lights are on steadily. | The machine is at the right temperature and ready to make espresso / coffee. |
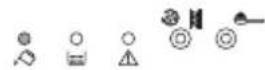
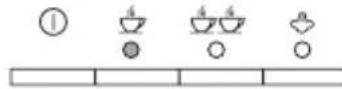 | The light is on steadily. | The machine is delivering one cup of coffee. |
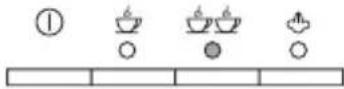 | The light is on steadily. | The machine is delivering two cups of coffee. |
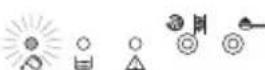
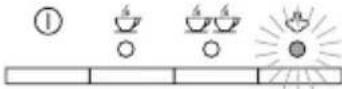 | The steam light flashes. | The machine is heating to the ideal temperature to produce steam. Wait for the light to illuminate steadily before turning the steam dial. |
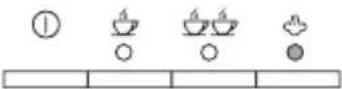 | The light is on steadily. | The machine is ready to deliver steam and the steam control dial can be turned. |
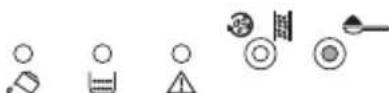 | The light is on steadily. | The machine is ready for espresso / coffee delivery using pre-ground coffee. |
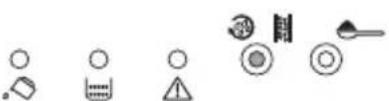 | The light is on steadily. | The automatic decalcification program is in progress. |
Warning Lights: Description, Explanation, Action
 |  |  The water tank is dirty or lined with lime scale. The water tank is dirty or lined with lime scale. |  Rinse or decalcify the water tank. Rinse or decalcify the water tank. |
 |  |  The espresso / coffee is coming out too slowly. The espresso / coffee is coming out too slowly. |  Turn the adjustable grinding dial one click clockwise. Turn the adjustable grinding dial one click clockwise. |
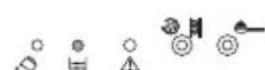 |  |  The used coffee container is missing. The used coffee container is missing. |  Open the service door and replace the used coffee container. Open the service door and replace the used coffee container. |
 | 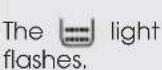 |  No more coffee beans.If the coffee grinder is noisy, it means that a small stone is blocking the coffee grinder. No more coffee beans.If the coffee grinder is noisy, it means that a small stone is blocking the coffee grinder. |     |
 |  |  | |
 |  makes a strange noise and the four makes a strange noise and the four 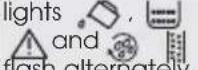 |  |   |
 |  |  |  |
 |  |  |  |
Warning Lights: Description, Explanation, Action
| The light is flashing. | The service door is open. | If the service door cannot be closed, check that the brewing system is inserted correctly. | |
| The light is on steadily and green lights are flashing. | After cleaning, the brewing system has probably been left out of the machine.The inside of the machine is very dirty. | Replace the brewing system.Thoroughly clean the inside of the machine as described in section 15 of the manual. | |
| The light is flashing. | The ground coffee funnel is very dirty. | Empty the funnel with the help of a knife. |
| Problems: | Possible Cause(s) | Solution |
| The espresso / coffee is not hot | ·The cups have not been pre-heated·The brewing system is too cold | ·Heat cups by rinsing them in hot water or leave them on the cup warmer·Heat the brewing system by pressing the 🎨 🌐 button before making the espresso / coffee (Figure 29) |
| The espresso / coffee does not have a crema | ·The machine uses too little coffee during the brewing process·The coffee is ground too coarse·The ground coffee is not correct | ·Turn the espresso / coffee flavor dial (Figure 9) a little clockwise·Turn the grinding dial (Figure 3) one click counter-clockwise·Use another brand or coffee blend |
| The espresso / coffee comes out too slowly | ·The coffee is ground too fine·The machine uses too much coffee during the brewing process | ·Turn the grinding dial (Figure 3) one click clockwise·Turn the espresso / coffee flavor dial (Figure 9) a little counter-clockwise |
| The espresso / coffee comes out too quickly | ·The coffee is ground too coarse·The machines uses too little coffee during the brewing process | ·Turn the grinding dial (Figure 3) one click counter-clockwise·Turn the espresso / coffee flavor dial (Figure 9) a little clockwise |
30
| Problems: | Possible Cause(s) | Solution |
| The espresso / coffee does not come out of one of the spouts | •The spout is blocked | •Scrape the remains of dry coffee with a needle |
| Turning the steam dial, no steam comes out of the milk frother | •The holes in the spouts are clogged | •Clean the holes in the milk frother and the steam nozzle (Figure 23) |
| Pressing the 📁 and 🔒 buttons does not deliver coffee, but only water | •Ground coffee may be blocked in the funnel | •Remove the ground coffee inside the funnel, using a knife. Then clean the brewing system and the inside of the machine. |
| Pressing the ⏻ button, the machine does not switch on | •The machine is not plugged in | •Check that the power cord is plugged into the outlet |
| The brewing system cannot be removed for cleaning | •The machine is on. The brewing system can only be removed if the machine is off. | •Turn the machine off.WARNING:The brewing system can only be removed when the machine is off. |
| Ground coffee is used (rather than beans) and the machine does not deliver espresso / coffee | •Too much or not enough ground coffee has been added•The 🔒 button has not been pressed and the machine has used both pre-ground coffee and coffee ground by the grinder•Ground coffee has been added when the machine is off | •Remove the brewing system and thoroughly clean the inside of the machine if too much coffee has been added. Not enough coffee, add a little more.•Thoroughly clean the inside of the machine. Repeat the operation by pressing the 🔒 button.•Remove the brewing system and thoroughly clean the inside of the machine. |
| Espresso / coffee is dispensed outside the dispenser | •The holes in the spouts are clogged with dry coffee•The mobile drawer inside the service door is blocked and cannot swing | •Scrape the holes with a needle•Thoroughly clean the mobile drawer and also near the hinges so that it can swing smoothly |
| No coffee comes out of coffee spout | ·No water in water tank·No beans or no pre-ground coffee·The brewing system needs to be cleaned·Coffee is too fine | ·Fill water tank and replace inside machine.·Fill bean container with beans or fill ground coffee container with pre-ground coffee·Clean the brewing system·Adjust the grinder setting |
| The grinder makes an extremely loud noise | ·Check the coffee bean container, a stone may be blocking the grinding burrs | ·Remove the stone from the coffee bean container |
| The appliance takes too long to heat up or a limited volume of water comes out of the nozzle | ·The circuit of the appliance is clogged by lime scale | ·Decalcify the machine |
32
This warranty applies to all products with De'Longhi or Kenwood brand names.
Limited Warranty
What does the warranty cover?
We warrant each appliance to be free from defects in material and workmanship. Our obligation under this warranty is limited to repair at our factory or authorized service center of any defective parts or part thereof, other than parts damaged in transit. In the event of a product replacement or return, the unit must be returned transportation prepaid. The repaired or new model will be returned at the company expense.
This warranty shall apply only if the appliance is used in accordance with the factory directions, which accompany it, and on an Alternating current (AC) circuit.
How long does the coverage last?
This warranty runs for one year (1) from the purchase date found on your receipt and applies only to the original purchaser for use.
What is not covered by the warranty?
The warranty does not cover defects or damage of the appliance, which result from repairs or alterations to the appliance outside our factory or authorized service centers, nor shall it apply to any appliance, which has been subject to abuse, misuse, negligence or accidents. Also, consequential and incidental damage resulting from the use of this product or arising out of any breach of contract or breach of this warranty are not recoverable under this warranty. Some states do not allow the exclusion or limitation of incidental or consequential damage, so the above limitation may not apply to you.
How do you get service?
If repairs become necessary, see contact information below:
U.S. Residents:
Please contact our toll free hotline at 1-800-322-3848 or log onto our website at www.delonghi.com. For all accessories, spare parts or replacement parts, please contact our parts division at 1-800-865-6330.
Residents of Canada: Please contact our toll free hotline at 1-888-335-6644 or log onto our website at www.delonghi.com.
Residents of Mexico: Please refer to the Limited Warranty statement for Mexico.
Please refer to the back page of the manual for De'Longhi addresses.
The above warranty is in lieu of all other express warranties and representations. All implied warranties are limited to the applicable warranty period set forth above. This limitation does not apply if you enter into an extended warranty with De'Longhi. Some states do not allow limitations on how long an implied warranty lasts, so the above exclusions may not apply to you. De'Longhi does not authorize any other person or company to assume for it any liability in connection with the sale or use of its appliance.
How does state law apply?
This warranty gives you specific legal rights, and you may also have other rights, which vary from state to state.
PROTECT YOUR INVESTMENT WITH DE'LONGHI'S EXTENDED SERVICE PLAN
For your convenience and protection an optional extended service plan is available!
For a small price you can be sure that your appliance is protected. If your product needs repair two years beyond the manufacturer's limited warranty, we will fix it at no cost to you.
If you choose to enroll, please detach and fill out this form and mail with payment (check or money order only). Your Extended Service Plan certificate will be sent to you by return mail.
PLEASE PRINT
Name:
Address:
City, State and Zip Code: ____
TWO-YEAR EXTENDED SERVICE PLAN
Super Automatic Espresso Maker $150.00
MAIL TO:
De'Longhi America, Inc.
Park 80 West, Plaza One
Saddle Brook, NJ 07663
Attn: Consumer Service Dept.
Service Centers
For a list of service centers specifically for
Magnifica, please call
1-800-322-3848 (U.S. Only)
and wait for the Magnifica prompt.
Ordering Accessories or Parts
To order accessories or parts, please either call
our customer service department at
1-800-865-6330
Monday – Friday: 8:30 – 5:00 (EST)
or visit our Magnifica-dedicated site at
www.delonghi-espresso.com
Technical Information:
Rated Voltage / Frequency:
110/120 Volts - 50 / 60 Hz
Power: 1150 Watts
Water Container Capacity: 60 oz. / 1.8 liter
Bean Container Capacity: 7.10 oz. / 200 grams
De'Longhi America
Park 80 West, Plaza One
4th Floor
Saddle Brook, NJ 07663
www.delonghi.com
Figure 2
46
Figure 4
Figure 5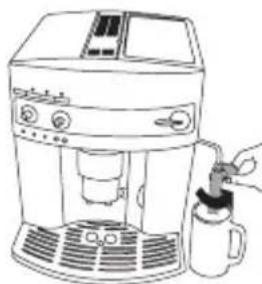
Figure 8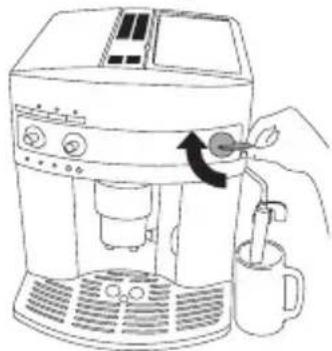
48
Figure 12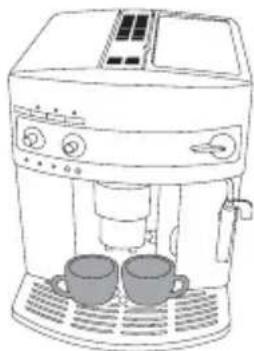
Figure 13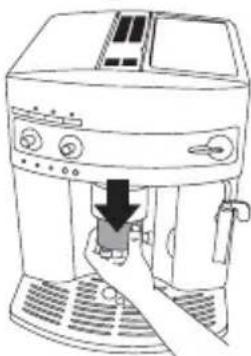
Figure 14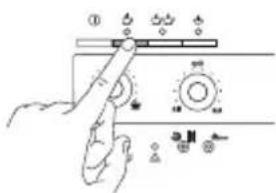
Figure 16
52
Figure 18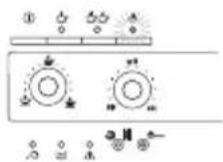
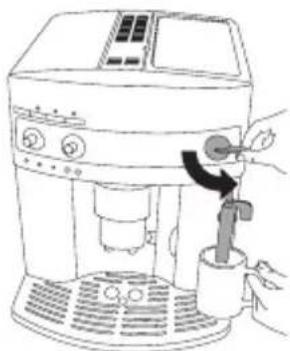
Figure 19

Figure 20
Figure 21
Figure 22
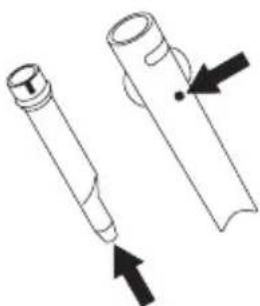
Figure 23
Figure 24
58
Figure 25
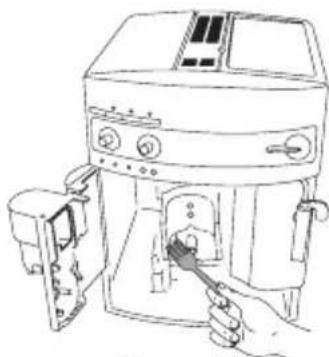
Figure 26
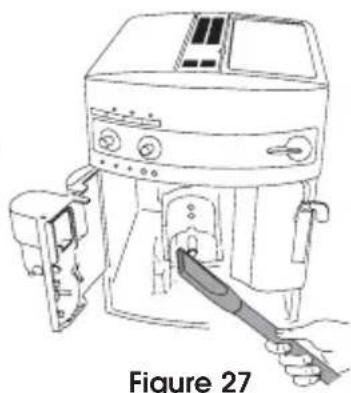
Figure 27
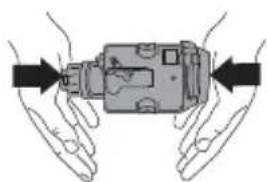
Figure 28
Figure 29
Figure 2
Figure 5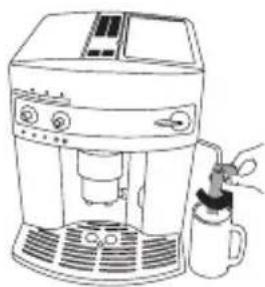
Figure 6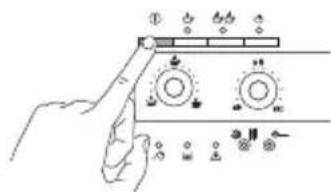
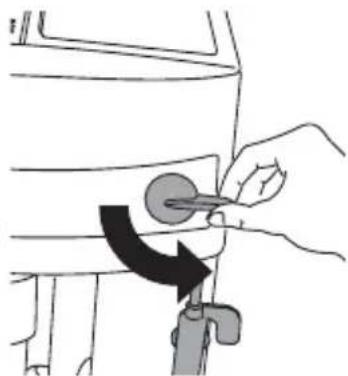
Figure 7
Figure 12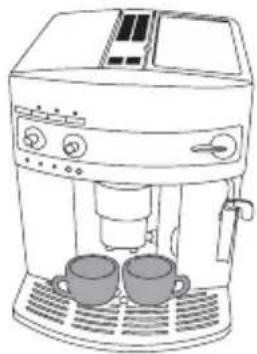
Figure 13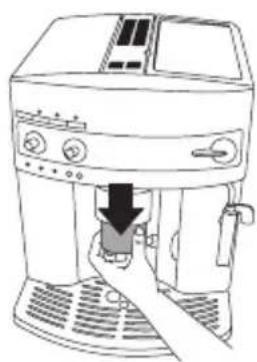
Figure 14
84
the espresso/coffee.
Figure 16
Figure 18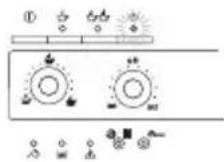
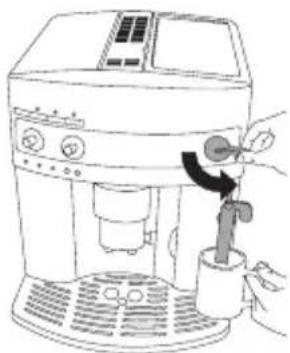
Figure 19
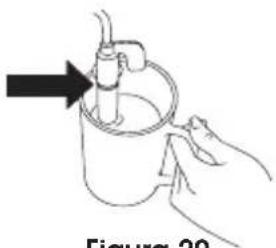
Figure 20
88
Figure 21
Figure 22
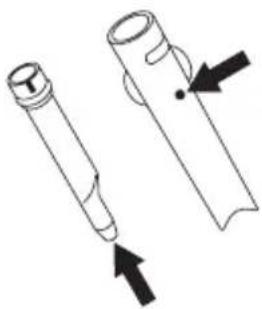
Figure 23
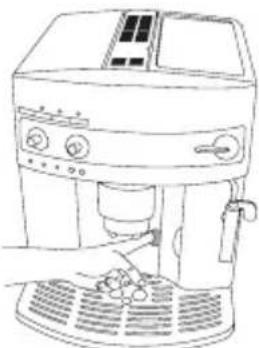
Figure 24
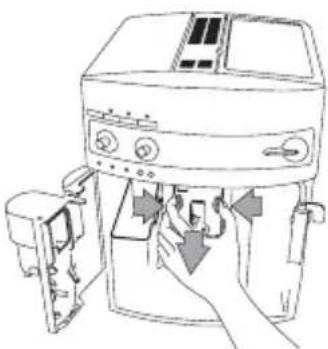
Figure 25
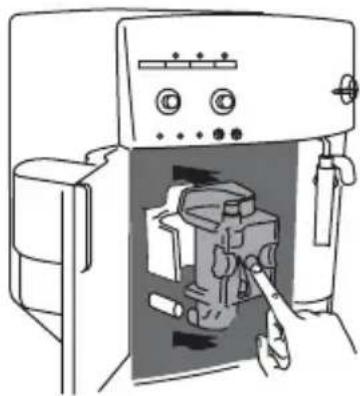
Figure 26
Figure 27
Figure 28
Figure 29
Park 80 West, Plaza One
4th Floor
Saddle Brook, NJ 07663
www.delonghi.com
102
2: Summary:
Figure 2
114
Figure 5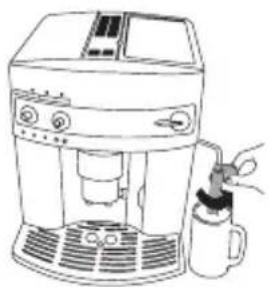
Figure 6
Figure 7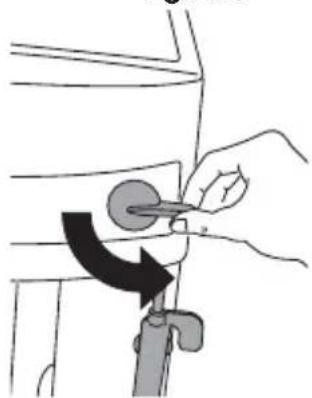
Figure 9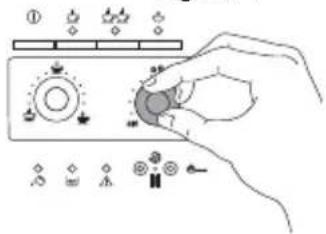
116
Figure 12
Figure 13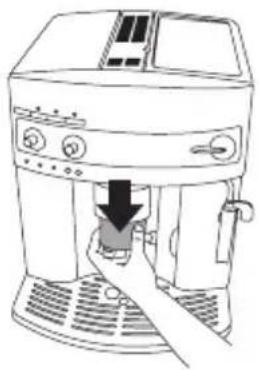
Figure 14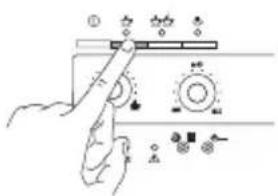
118
Figure 18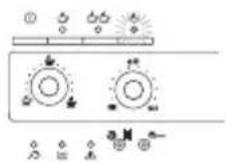
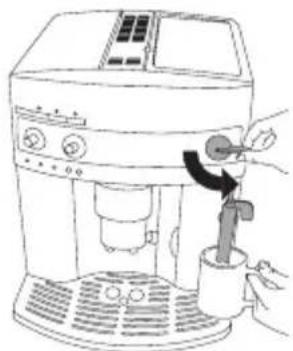
Figure 19
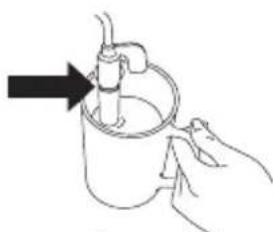
Figure 20
122
milk foam.
Figure 21
Figure 22
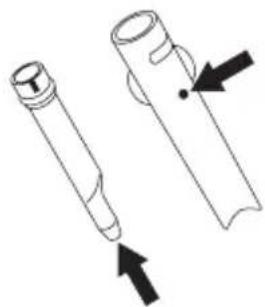
Figure 23
Figure 24
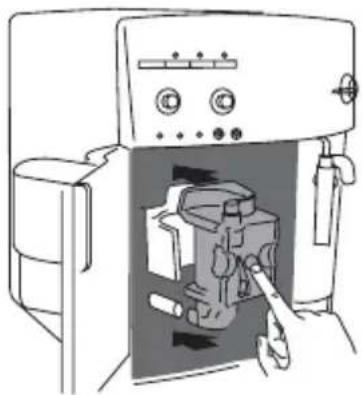
Figure 25
Figure 26
Figure 27

Figure 28
Figure 29
Park 80 West, Plaza One
4th Floor
Saddle Brook, NJ 07663
www.delonghi.com
De'Longhi America
Park 80 West, Plaza One
4th Floor
Saddle Brook, NJ 07663
- TABLE OF CONTENTS
- THANK YOU AND DE'LONGHI INTRODUCTION
- PRODUCT REGISTRATION (U.S. & CANADA)
- INTRODUCTION TO MAGNIFICA
- MAGNIFICA...THE NAME SAYS IT ALL
- FEATURES AND BENEFITS
- INTRODUCTION TO CREMA
- MACHINE DESCRIPTION (USER COMPONENTS)
- CONTROL PANEL DESCRIPTION
- ON / OFF BUTTON
- CUP AND COFFEE TEMPERATURE READY LIGHT (GREEN)
- CUP BUTTON
- STEAM AND STEAM TEMPERATURE READY LIGHT (RED)
- STEAM FUNCTION BUTTON
- ESPRESSO / COFFEE QUANTITY DIAL
- ESPRESSO / COFFEE FLAVOR DIAL
- RINSE AND DECALCIFICATION BUTTON
- GROUND COFFEE BUTTON
- GROUND COFFEE LIGHT (GREEN)
- WARNING LIGHTS: NOTE: ALSO REFER TO THE "TROUBLESHOOTING" SECTION OF THE MANUAL FOR MORE DETAILS
- DECALCIFICATION WARNING LIGHT (RED)
- GENERAL WARNING LIGHT (RED)
- USED COFFEE CONTAINER WARNING LIGHT (RED)
- WATER WARNING LIGHT (RED)
- IMPORTANT SAFEGUARDS
- SAVE THESE INSTRUCTIONS
- SHORT CORD INSTRUCTIONS
- BEFORE FIRST USE
- CHECKING THE WATER HARDNESS
- PREPARING THE MACHINE
- FILLING THE WATER TANK
- FILLING THE COFFEE BEAN CONTAINER (IF YOU ARE USING WHOLE COFFEE BEANS)
- FILLING THE GROUND COFFEE CONTAINER (IF YOU ARE USING PRE-GROUND COFFEE)
- SETTING THE ESPRESSO / COFFEE FLAVOR DIAL
- ESPRESSO / COFFEE QUANTITY
- A THE DIFFERENCE BETWEEN ESPRESSO/COFFEE QUANTITY
- B SETTING THE ESPRESSO / COFFEE QUANTITY
- PREPARING THE ESPRESSO / COFFEE
- PREPARING ESPRESSO / COFFEE (USING WHOLE COFFEE BEANS)
- PREPARING ESPRESSO / COFFEE (USING PRE-GROUND COFFEE)
- TIPS ON MAKING HOTTER COFFEE
- FROTHING OR STEAMING (HOW TO MAKE THE PERFECT CAPPUCCINO OR LATTE)
- WHAT IS CAPPUCCINO
- WHAT IS A LATTE
- READY TO BEGIN FROTHING OR STEAMING
- PROCESSING HOT WATER THROUGH THE FROTHER
- CLEANING AND MAINTENANCE
- CLEANING THE USED COFFEE CONTAINER
- CLEANING THE WATER TANK
- CLEANING THE DRIP TRAY AND USED WATER TRAY
- CLEANING THE COFFEE SPOUT
- CLEANING THE MILK FROTHER
- CLEANING THE BREWING SYSTEM
- DECALCIFICATION
- PROCEED AS FOLLOWS
- TROUBLESHOOTING
- LIMITED WARRANTY
- WHAT DOES THE WARRANTY COVER
- HOW LONG DOES THE COVERAGE LAST
- WHAT IS NOT COVERED BY THE WARRANTY
- HOW DO YOU GET SERVICE
- U.S. RESIDENTS
- HOW DOES STATE LAW APPLY
- PROTECT YOUR INVESTMENT WITH DE'LONGHI'S EXTENDED SERVICE PLAN
- PLEASE PRINT
- SERVICE CENTERS
- ORDERING ACCESSORIES OR PARTS
- TECHNICAL INFORMATION
- SUMMARY
Brand : DELONGHI
Model : Magnifica ESAM 3200.S EX1
Category : Coffee machine