TS551 - Projector OPTOMA - Free user manual and instructions
Find the device manual for free TS551 OPTOMA in PDF.

User questions about TS551 OPTOMA
0 question about this device. Answer the ones you know or ask your own.
Ask a new question about this device
Download the instructions for your Projector in PDF format for free! Find your manual TS551 - OPTOMA and take your electronic device back in hand. On this page are published all the documents necessary for the use of your device. TS551 by OPTOMA.
USER MANUAL TS551 OPTOMA
Safety Instructions 2
Introduction ....5
Projector Features .... 5
Package Contents 6
Projector Overview 7
Using the Product 9
Control Panel 9
Connection Ports 10
Remote Control 11
Installing the Batteries 13
Remote Control Operation 14
Connection 15
Connecting a computer or monitor 16
Connecting Video source devices 17
Operation 21
Powering On/Off the Projector 21
Adjusting the Projector Height 22
Adjusting the Projector Zoom and Focus 22
Adjusting Projection Image Size 23
Menu Operation 24
Appendix 33
Replacing the Lamp 33
Ceiling mount installation 35
Compatibility Modes 36
RS232 Commands and Protocol Function List 39
Troubleshooting 43
Optoma Global Offices 45
Regulation & Safety Notices 48
Remote Control 50
Usage Notice
Safety Instructions
Read all of these instructions before you operate your projector and save for future reference.
-
Read instructions
All the safety and operating instructions should be read before the appliance is operated. -
Notes and warnings
All notes and warnings in the operating instructions should be adhered to.
- Cleaning
Unplug the projector from the wall socket before cleaning. Use a damp cloth for cleaning the projector housing. Do not use liquid or aerosol cleaners.
- Accessories
Do not place this product on an unstable cart, stand, or table. The product may fall, causing serious damage to the product.
Keep the plastic packing materials (from the projector, accessories and optional parts) out of the reach of children as these bags may result in death by suffocation. Be particularly careful around the small children.
- Ventilation
The projector is equipped with ventilation holes (intake) and ventilation holes (exhaust). Do not block or place anything near these slots, or internal heat build-up may occur, causing picture degradation or damage to the projector.
- Power sources
Check that the operating voltage of your unit is identical with the voltage of your local power supply.
- Servicing
Do not attempt to service this projector yourself. Refer all servicing to qualified service personnel.
8. Replacement parts
When replacement parts are required, be sure that the replacement parts are specified by the manufacture. Unauthorized substitutions may result in fire, electric shock or other hazards.
9. Moisture Condensation
Never operate this projector immediately after moving it from a cold location to a warm one. When the projector is exposed to such a change in temperature, moisture may condense on the lens and the crucial internal parts. To prevent the unit from possible damage, do not use the projector for at least 2 hours when there is an extreme or sudden change in temperature.
Notes on the AC Power Cord
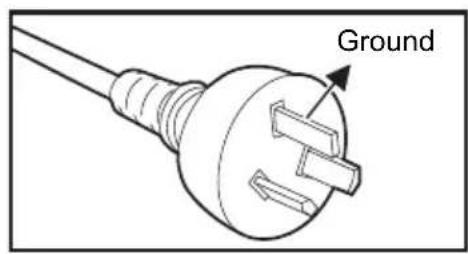
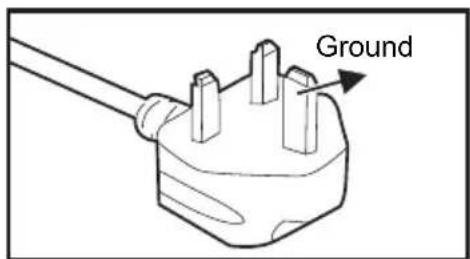
AC Power Cord must meet the requirement of countries where you use this projector. Please confirm your AC plug type with the graphics below and ensure that the proper AC Power Cord is used. If the supplied AC Power Cord does not match your AC outlet, please contact your sales dealer. This projector is equipped with a grounding type AC line plug. Please ensure that your outlet fits the plug. Do not defeat the safety purpose of this grounding type plug. We highly recommend using a video source device also equipped with a grounding type AC line plug to prevent signal interference due to voltage fluctuations.
text_image
GroundFor Australia and Mainland China
text_image
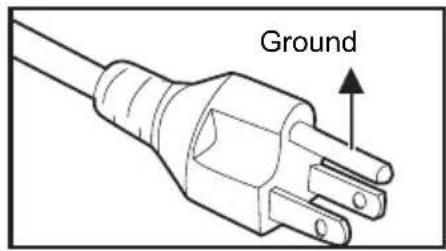
GroundFor the U.S.A. and Canada
text_image
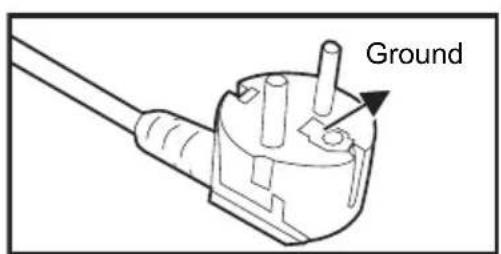
GroundFor Continental Europe
text_image
GroundFor the U.K.
Introduction
Projector Features
The projector integrates high-performance optical engine projection and a user-friendly design to deliver high reliability and ease of use.
The projector offers the following features:
■ Single chip 0.55" Texas Instruments DLP® technology
■ SVGA (800 x 600 pixels)
■ XGA (1024 x 768 pixels)
■ Compatibility with Macintosh ^® computers
■ Compatibility with NTSC, PAL, SECAM and HDTV
■ D-Sub 15-pin terminal for analog video connectivity
■ User-friendly, multi-language on-screen display
■ Advanced electronic keystone correction
■ RS-232 connector for serial control
Note
■ The information in this manual is subject to change without notices.
■ The reproduction, transfer or copy of all or any part of this document is not permitted without express written consent.
Package Contents
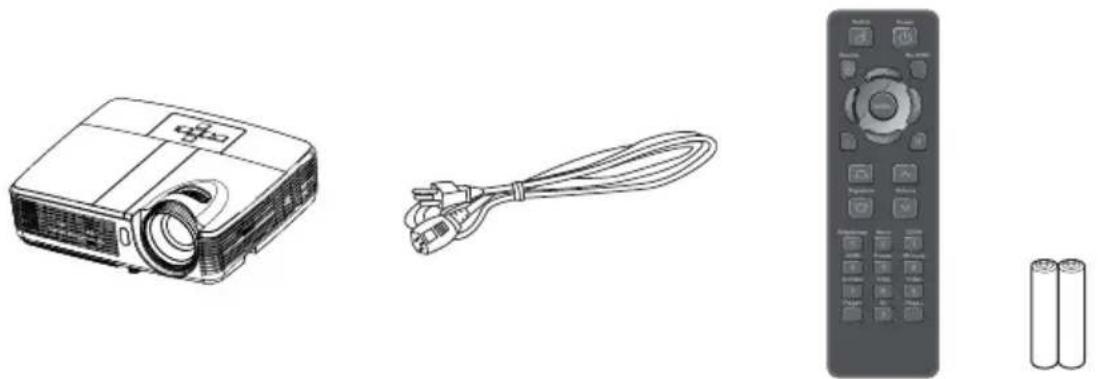
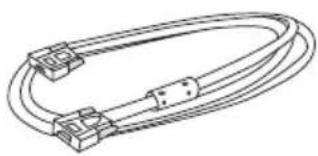
When you unpack the projector, make sure you have all these components:
natural_image
Illustration of three electronic devices: projector, cable with plug, and remote control with two batteries (no text or symbols)Projector AC Power Cord Remote Control (IR) & batteries
(AAA *2 PCS)
natural_image
Line drawing of a multi-core cable with connectors (no text or symbols)VGA Cable (D-SUB to D-SUB)

natural_image
Simple line drawing of a cooking pot with a lid and handle (no text or symbols)Carry Bag (optional for certain models)
text_image
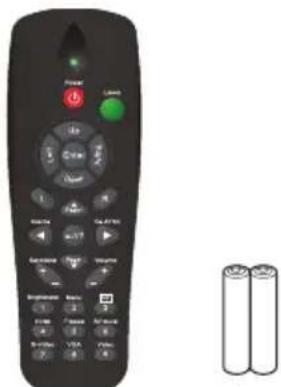
Black remote control with labeled buttons and battery images showing two batteriesRemote Control (IR) & batteries (AAA *2 PCS) for certain regions
Documentation:
User's Manual
Warranty Card
Quick Start Card
WEEE Card (for EMEA only)
Note
■ For European warrant information please visit www.optomaeurope.com
■ Due to the difference in applications for each country, some regions may have different accessories.
■ Contact you dealer immediately if any items are missing, appear damaged, or if the unit does not work.
■ Save the original shipping carton and Packing material; they will come-in handy if you ever to ship your unit. for maximum protection, repack your unit as it was originally packed at the factory.
Projector Overview
Front View

text_image
Diagram of a projector with numbered parts labeled for identification① Front IR remote control sensor
6 Control panel
② Elevator foot Zoom ring
7
③ Projection lens Focus ring
8
4 Speaker Lamp cover
9
⑤ Ventilation holes
Rear View
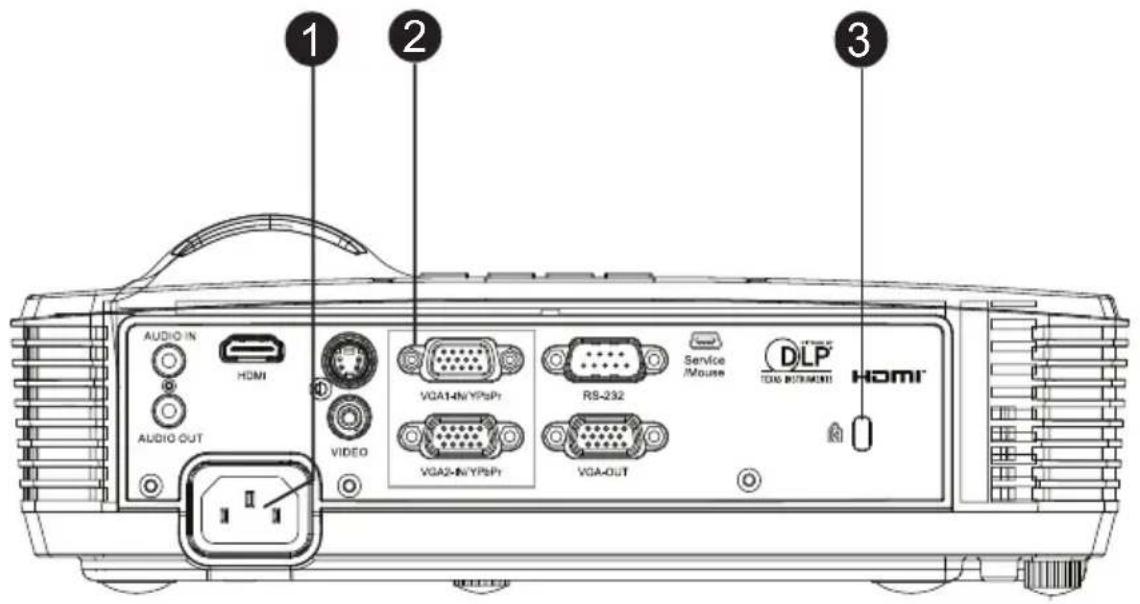
text_image
AUDIO IN HDMI AUDIO OUT VIDEO VGA14N/YP6P1 VGA24N/YP6P1 VGA-OUT RS-232 Service /Mouse DLP TOMA BETHNICHEI HDMI① AC power socket
② Connection ports (HDMI is only on certain models)
Kensington lock
Bottom View
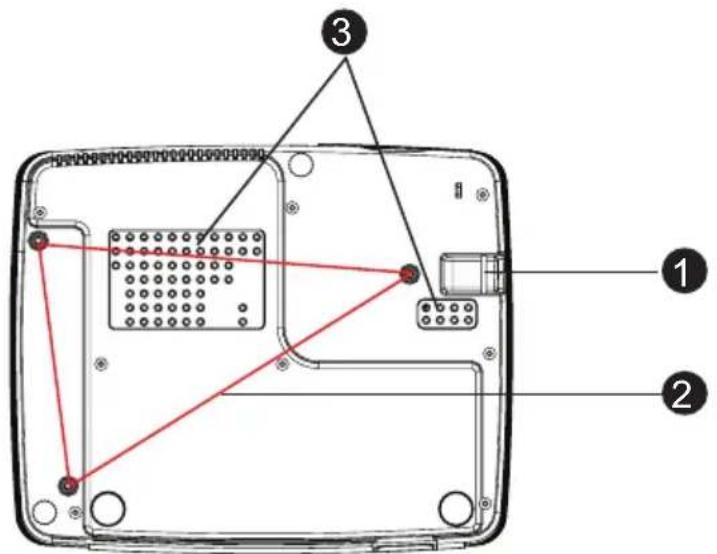
text_image
Labeled diagram of a device rear panel showing internal components and connectors, with numbered annotations 1, 2, and 3.① Security bar
- Ceiling mount holes
③ Ventilation holes
Note
This projector can be used with a ceiling mount for support. The ceiling mount is not included in the package.
■ Contact your dealer for information to mount the projector on a ceiling.
EN-8
Using the Product
Control Panel

flowchart
graph TD
    A["Power"] --> B["SOURCE"]
    B --> C["MENU/EXIT"]
    C --> D["Re-SYNC"]
    D --> E["Signal"]
    E --> F["7"]
    E --> G["8"]
1 Power
Turn the projector on or off.
② SOURCE
Switch between input signals.
③ MENU/EXIT
Display or exit the on-screen display menus.
④ Keystone (▼)
Manually correct distorted images resulting from an angled projection.
⑤ Four directional buttons
Use four directional buttons to select items or make adjustments to your selection.
⑥ Re-SYNC
Automatically synchronize the projector to the input source.
7 POWER (Power LED indicator)
Refer to "LED Indicator Messages".
⑧ TEMP/LAMP (Temp/Lamp LED indicator)
Refer to "LED Indicator Messages".
Connection Ports
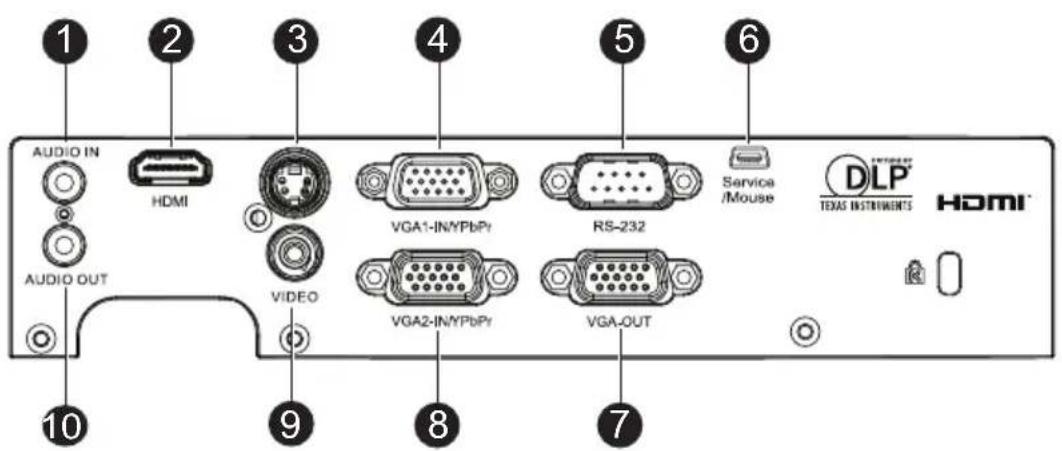
text_image
1 AUDIO IN HDMI AUDIO OUT 2 3 VIDEO 9 4 VGA1-IN/YPbPr VGA2-IN/YPbPr 8 5 RS-232 VGA-OUT 7 6 Service /Mouse DLP TEXAS INSTRUMENTS HDMI1 AUDIO IN
Connect an audio output from video equipment or computer to this jack.
② HDMI (HDMI is only on certain models)
Connect HDMI output from video equipment to this jack.
③ S-VIDEO
Connect S-Video output from video equipment to this jack.
4 VGA1-IN/YPbPr
Connect image input signal (analog RGB or component) to this jack.
⑤ RS-232
When operating the projector via a computer, connect this to the controlling computer's RS-232C port.
6 Service/Mouse
This connector is for firmware update and mouse function support.
⑦ VGA OUT
Connect to a computer display, etc.
8 VGA2-IN/YPbPr
Connect image input signal (analog RGB or component) to this jack.
9 VIDEO
Connect composite video output from video equipment to this jack.
10 AUDIO OUT
Connect to a speaker or other audio input equipment.
Remote Control
1 Switch
Switch to mouse mode when the on-screen menus are close.
② Source
Switch between input signals.
③ Four directional buttons
Use four directional buttons to select items or make adjustments to your selection.
4 Left mouse
Perform the left button of the mouse when mouse mode is activated.
⑤ Keystone (△) ▽
Manually correct distorted images resulting from an angled projection.
6 Brightness
Display the setting bar for adjustment of brightness.
7 Freeze
Freeze the projected image.
8 HDMI
Display HDMI signal. (This function will not work if product does not have HDMI)
9 S-Video
Display S-Video signal.
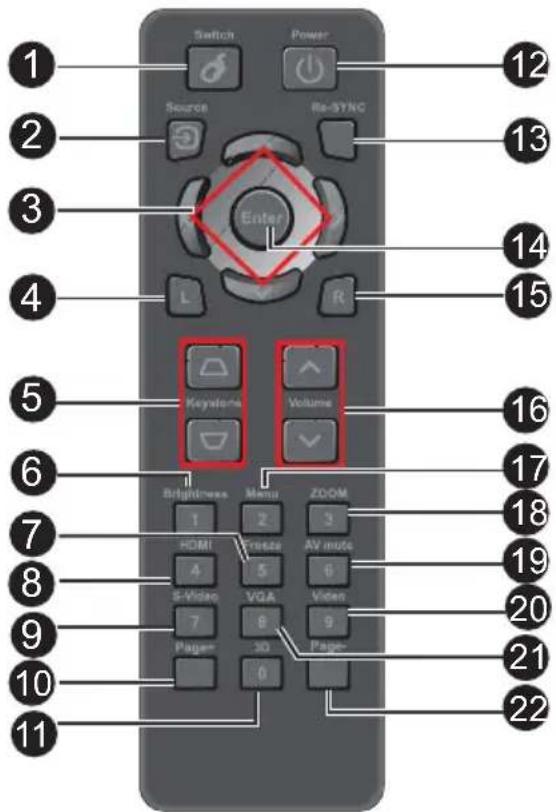
text_image
Switch Power 1 2 3 4 5 6 7 8 9 10 11 Source Re-SYNC Enter L R Keywords Volume Brightness Menu ZOOM 1 2 3 HOMI Freeze AV mode 4 5 6 S-Video VGA Video 7 8 9 Page- 30 Page- 0 12 13 14 15 16 17 18 19 20 21 2210 Page+
Perform page up function when mouse mode is activated.
11 3D
Turn on or off 3D function.
12 Power
Turn the projector on or off.
13 Re-SYNC
Automatically synchronize the projector to the input source.
14 Enter Confirmed selections.
⑮ Right mouse Perform the right button of the mouse when mouse mode is activated.
16 Volume (↑)√ Adjust the volume level.
⑰ Menu Display on-screen display menus.
18 ZOOM Magnifies or reduces the projected picture size.
19 AV mute Cut off the AV Mute temporarily. Only pressing AV Mute again can output sound and image. If any other buttons are pressed, the projection image will become abnormal and no sound will be output.
20 Video Display video signal.
21 VGA Switch input source to VGA1 or VGA2 by sequence.
② Page- Perform page down function when mouse mode is activated.
Using the remote mouse control
The capability of operating your computer with the remote control gives you more flexibility when delivering presentations.
-
Connect the projector to your PC or notebook with a USB cable prior to using the remote control in place of your computer's mouse. See "Connecting a computer" on page 16 for details.
-
Set the input signal to VGA1 or VGA2.
-
Press Switch on the remote control to switch to mouse mode when the on-screen menus are close. An icon appears on the screen to indicate the activation of the mouse mode.
-
Perform the desired mouse controls on your remote control.
■ To move the cursor on the screen, press ▲ /▼/.◀ ▶
■ To left-click, press L.
■ To right-click, press R.
■ To return to the normal mode, press Switch again.
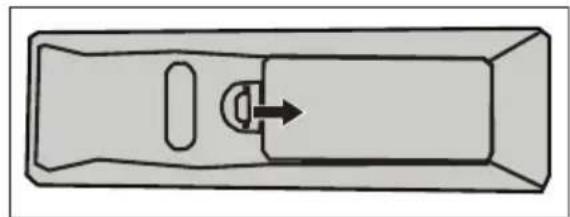
Installing the Batteries
-
Open the battery cover in the direction shown.
-
Install batteries as indicated by the diagram inside the compartment.
-
Close the battery cover into position.
natural_image
Top-down schematic of a rectangular device with a handle and internal component, no text or symbols present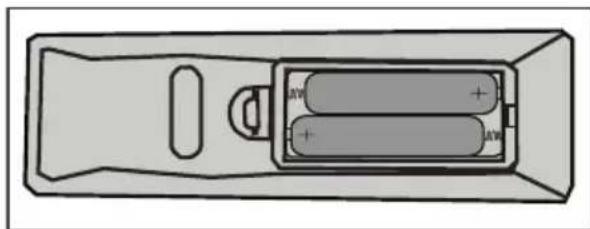
natural_image
Top-down schematic of a remote control panel showing two batteries and a door (no text or symbols)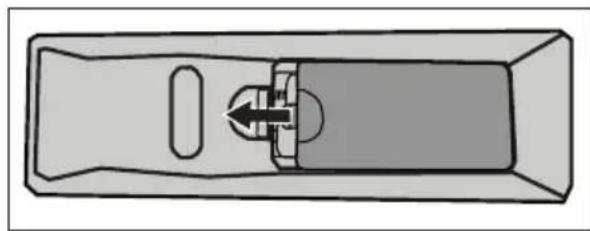
natural_image
Top-down schematic of a mechanical component with internal flow arrow (no text or symbols)
Caution
■Risk of explosion if battery is replaced by an incorrect type.
■Dispose of used batteries according to the instructions.
■Make sure the plus and minus terminals are correctly aligned when loading a battery.
Note
- Keep the batteries out of the reach of children. There is a danger of death by accidentally swallowing the batteries.
■ Remove batteries from remote control when not using for extended periods.
■ Do not dispose of the used batteries along with household waste. Dispose of used batteries according to local regulations.
■ Danger of explosion may happen if batteries are incorrectly replaced. Replace all the batteries with new ones.
■ Batteries should not be in or near to fire or water, keep batteries in a dark, cool and dry place.
If suspect battery leakage, wipe out the leakage and then replace new batteries. If the leakage adheres to your body or clothes, rinse well with water immediately.
Remote Control Operation
Point the remote control at the infrared remote sensor and press a button.
■ Operating the projector from the front
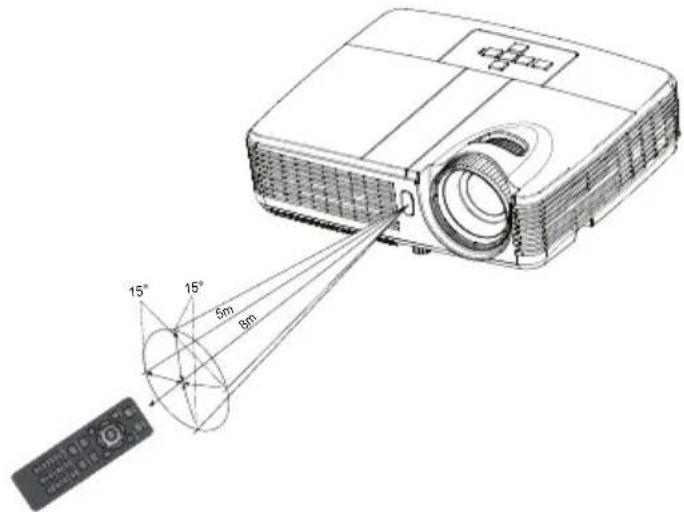
text_image
15° 15° 6m 8mNote
■ The remote control may not operate when there is sunlight or other strong light such as a fluorescent lamp shining on the remote sensor.
■ Operate the remote control from a position where the remote sensor is visible.
■ Do not drop the remote control or jolt it.
- Keep the remote control out of locations with excessively high temperature or humidity.
■ Do not get water on the remote control or place wet objects on it.
■ Do not disassemble the remote control.
Connection
When connecting a signal source to the projector, be sure to:
- Turn all equipment off before making any connections.
- Use the correct signal cables for each source.
- Ensure the cables are firmly inserted.

flowchart
graph TD
    A["Radio System"] --> B["Switch 1"]
    C["Computer Interface"] --> D["Switch 2"]
    B --> E["Switch 3"]
    D --> F["Switch 4"]
    E --> G["Switch 5"]
    F --> H["Switch 6"]
    G --> I["Switch 7"]
    H --> J["Switch 8"]
    I --> K["Switch 9"]
    J --> L["Switch 10"]
    K --> M["Audio In"]
    K --> N["Video"]
    L --> O["Audio Out"]
    M --> P["Home"]
    N --> Q["Home"]
    O --> R["Video"]
    P --> S["Video Out"]
    Q --> T["Video Out"]
- ....*Audio cable
- ......*HDMI cable
- ....*Composite Video cable
- ....*S-Video cable
- ....*VGA (D-Sub) to HDTV (RCA) cable
- VGA cable (D-Sub to D-Sub)
- ....*USB cable
- ....*VGA to DVI-A cable
Note
■ Due to the difference in applications for each country, some regions may have different accessories.
■ (*) Optional Accessory
Connecting a computer or monitor
Connecting a computer
The projector provides two VGA input sockets that allow you to connect them to both IBM ^® compatibles and Macintosh ^® computers. A Mac adapter is needed if you are connecting legacy version Macintosh computers.
To connect the projector to a notebook or desktop computer:
- Take the supplied VGA cable and connect one end to the D-Sub output socket of the computer.
- Connect the other end of the VGA cable to the VGA1-IN/YPbPr or VGA2-IN/YPbPr signal input socket on the projector.

Important
■ Many notebooks do not turn on their external video ports when connected to a projector. Usually a key combo like FN + F3 or CRT/LCD key turns the external display on/off. Locate a function key labeled CRT/LCD or a function key with a monitor symbol on the notebook. Press FN and the labeled function key simultaneously. Refer to your notebook's documentation to find your notebook's key combination.
Connecting a monitor
If you want to view your presentation close-up on a monitor as well as on the screen, you can connect the VGA OUT signal output socket on the projector to an external monitor with a VGA cable following the instructions below:
To connect the projector to a monitor:
- Connect the projector to a computer as described in "Connecting a computer" on page 16.
- Take a suitable VGA cable (only one supplied) and connect one end of the cable to the D-Sub input socket of the video monitor.
Or if your monitor is equipped with a DVI input socket, take a VGA to DVI-A cable and connect the DVI end of the cable to the DVI input socket of the video monitor. - Connect the other end of the cable to the VGA OUT socket on the projector.

Important
■ The VGA OUT output only works when VGA1-IN/YPbPr or VGA2-IN/YPbPr is made to the projector.
Connecting Video source devices
You can connect your projector to various Video source devices that provide any one of the following output sockets:
■ HDMI
■ Component Video
■ S-Video
■ Video (composite)
You need only connect the projector to a Video source device using just one of the above connecting methods, however each provides a different level of video quality. The method you choose will most likely depend upon the availability of matching terminals on both the projector and the Video source device as described below:
| Terminal name | Terminal appearance | Reference Picture quality | |
| HDMI HDMI | "Connecting an | HDMI source device" on page 18 | Best |
| Component Video | VGA1-IN/YPbPr or VGA2-IN/YPbPr | "Connecting a Component Video source device" on page 18 | Better |
| S-Video S-VIDEO | "Connecting an | S-Video source device" on page 19 | Good |
| Video VIDEO | "Connecting a | composite Video source device" on page 20 | Normal |
Note
■ Not all models have HDMI input jack, please check your projector before connecting
Connecting an HDMI source device
Examine your Video source device to determine if it has a set of unused HDMI output jacks available:
■ If so, you can continue with this procedure.
If not, you will need to reassess which method you can use to connect to the device.
To connect the projector to an HDMI source device:
-
Take an HDMI cable and connect one end to the HDMI output jack of the HDMI source device.
-
Connect the other end of the HDMI cable to the HDMI jack on the projector.
Connecting a Component Video source device
Examine your Video source device to determine if it has a set of unused Component Video output sockets available:
■ If so, you can continue with this procedure.
If not, you will need to reassess which method you can use to connect to the device.
To connect the projector to a Component Video source device:
-
Take a VGA (D-Sub) to HDTV (RCA) cable and connect the end with 3 RCA type connectors to the Component Video output sockets of the Video source device. Match the color of the plugs to the color of the sockets; green to green, blue to blue, and red to red.
-
Connect the other end of the cable (with a D-Sub type connector) to the VGA1-IN/YPbPr or VGA2-IN/YPbPr socket on the projector.

Important
If the selected video image is not displayed after the projector is turned on and the correct video source has been selected, check that the Video source device is turned on and operating correctly. Also check that the signal cables have been connected correctly.
Connecting an S-Video source device
Examine your Video source device to determine if it has an unused S-Video output socket available:
■ If so, you can continue with this procedure.
If not, you will need to reassess which method you can use to connect to the device.
To connect the projector to an S-Video source device:
- Take an S-Video cable and connect one end to the S-Video output socket of the Video source device.
- Connect the other end of the S-Video cable to the S-VIDEO socket on the projector.

Important
■ If the selected video image is not displayed after the projector is turned on and the correct video source has been selected, check that the Video source device is turned on and operating correctly. Also check that the signal cables have been connected correctly.
If you have already made a Component Video connection between the projector and this S-Video source device using Component Video connections, you need not connect to this device using an S-Video connection as this makes an unnecessary second connection of poorer picture quality. See “Connecting Video source devices” on page 17 for details.
Connecting a composite Video source device
Examine your Video source device to determine if it has a set of unused composite Video output sockets available:
■ If so, you can continue with this procedure.
If not, you will need to reassess which method you can use to connect to the device.
To connect the projector to a composite Video source device:
- Take a Video cable and connect one end to the composite Video output socket of the Video source device.
- Connect the other end of the Video cable to the VIDEO socket on the projector.

Important
■ If the selected video image is not displayed after the projector is turned on and the correct video source has been selected, check that the Video source device is turned on and operating correctly. Also check that the signal cables have been connected correctly.
- You need only connect to this device using a composite Video connection if Component Video and S-Video inputs are unavailable for use. See “Connecting Video source devices” on page 17 for details.
Operation
Powering On/Off the Projector
Powering On the Projector:
- Complete the AC power cord and peripheral signal cable(s) connections.
- Press to turn on the projector.
The projector takes a minute or so to warm up.
- Turn on your source (computer, notebook, DVD, etc.). The projector automatically detects your source.
■ If you are connecting multiple sources to the projector simultaneously, press SOURCE on the projector or Source on the remote control to select your desired signal or press your desired signal key on the remote control.

Warning
■ Never look into the lens when the lamp is on. This can damage your eyes.
■ This focal point concentrates high temperature. Do not place any object near it to avoid possible fire hazard.
Powering Off the Projector:
- Press to turn off the projector lamp. You will see a message "Power off? Press Power again" appear on the screen.
- Press again to confirm.
■ The cooling fans continue to operate for cooling cycle.
■ When the Power LED becomes steady blue, the projector has entered stand-by mode.
If you want to turn the projector back on, you must wait until the projector has completed the cooling cycle and has entered stand-by mode. Once in stand-by mode, simply press ⏻ to restart the projector.
-
Disconnect the AC power cord from the electrical outlet and the projector.
-
Do not turn on the projector right after power off.
Adjusting the Projector Height

text_image
Elevator footThe projector is equipped with an elevator foot to adjust the image height. To raise or lower the image, turn the elevator foot to fine-tune the height.
Note
■ To avoid damaging the projector, make sure that the elevator foot is fully retracted before placing the projector in its carrying case.
Adjusting the Projector Zoom and Focus

text_image
Zoom ring Focus ring-
Focus the image by rotating the focus ring. A still image is recommended for focusing.
-
Adjust the image size by rotating the zoom ring.
Adjusting Projection Image Size
Refer to the graphic and table below to determine the screen size and projection distance.

text_image
Maximum zoom Minimum zoom Screen Center of lens Vertical offset Projection distance| Screen sizeDiagonal[inch (cm)] | 4 : 3 Screen | |||
| Projection distance [inch (m)] | Image height[inch (cm)] | Vertical offset[inch (cm)] | ||
| (min. zoom) (max. zoom) | ||||
| 30 (76) 45.3 (1.2) | 50.6 (1.3) 18 (45.72) 2.70 (6.86) | |||
| 60 (152) 92.2 (2.3) | 102.9 (2.6) 36 (91.44) 5.40 (13.72) | |||
| 80 (203) 123.5 (3.1) | 137.7 (3.5) 48 (121.92) 7.20 (18.29) | |||
| 100 (254) 154.8 (3.9) | 172.5 (4.4) 60 (152.4) 9.00 (22.86) | |||
| 150 (381) 233.0 (5.9) | 259.6 (6.6) 90 (228.6) 13.50 (34.29) | |||
| 200 (508) 311.2 (7.9) | 346.7 (8.8) 120 (304.8) 18.00 (45.72) | |||
| 250 (635) 389.4 (9.9) | 433.8 (11.0) | 150 (381.0) 22.50 (57.15) | ||
| 300 (762) | 467.6 (11.9) | - 180 (457.2) 27.00 (68.58) | ||
Note
■ Position the projector in a horizontal position; other positions can cause heat build-up and damage to the projector.
- Keep a space of 30 cm or more between the sides of the projector.
■ Do not use the projector in a smoky environment. Smoke residue may build-up on critical parts and damage the projector or its performance.
■ Consult with your dealer for special installation such as suspending from a ceiling.
Menu Operation
The projector has multilingual on-screen display menus that allow you to make image adjustments and change a variety of settings.
How to operate
- Press MENU on the projector or Menu on the remote control to open the OSD menu.
- When OSD is displayed, use / ▲ to ▼elect any feature in the main menu.
- After selecting the desired main menu item, press to enter sub-menu for feature setting.
- Use / to select the desired item and adjust the settings with /.
- Press MENU on the projector or Menu on the remote control, the screen will return to the main menu.
- To exit OSD, Press MENU on the projector or Menu on the remote control again. The OSD menu will close and the projector will automatically save the new settings.

text_image
Main Menu Image Signal Video Image Sound Setting Language Factory Default Enter MENU Exit Select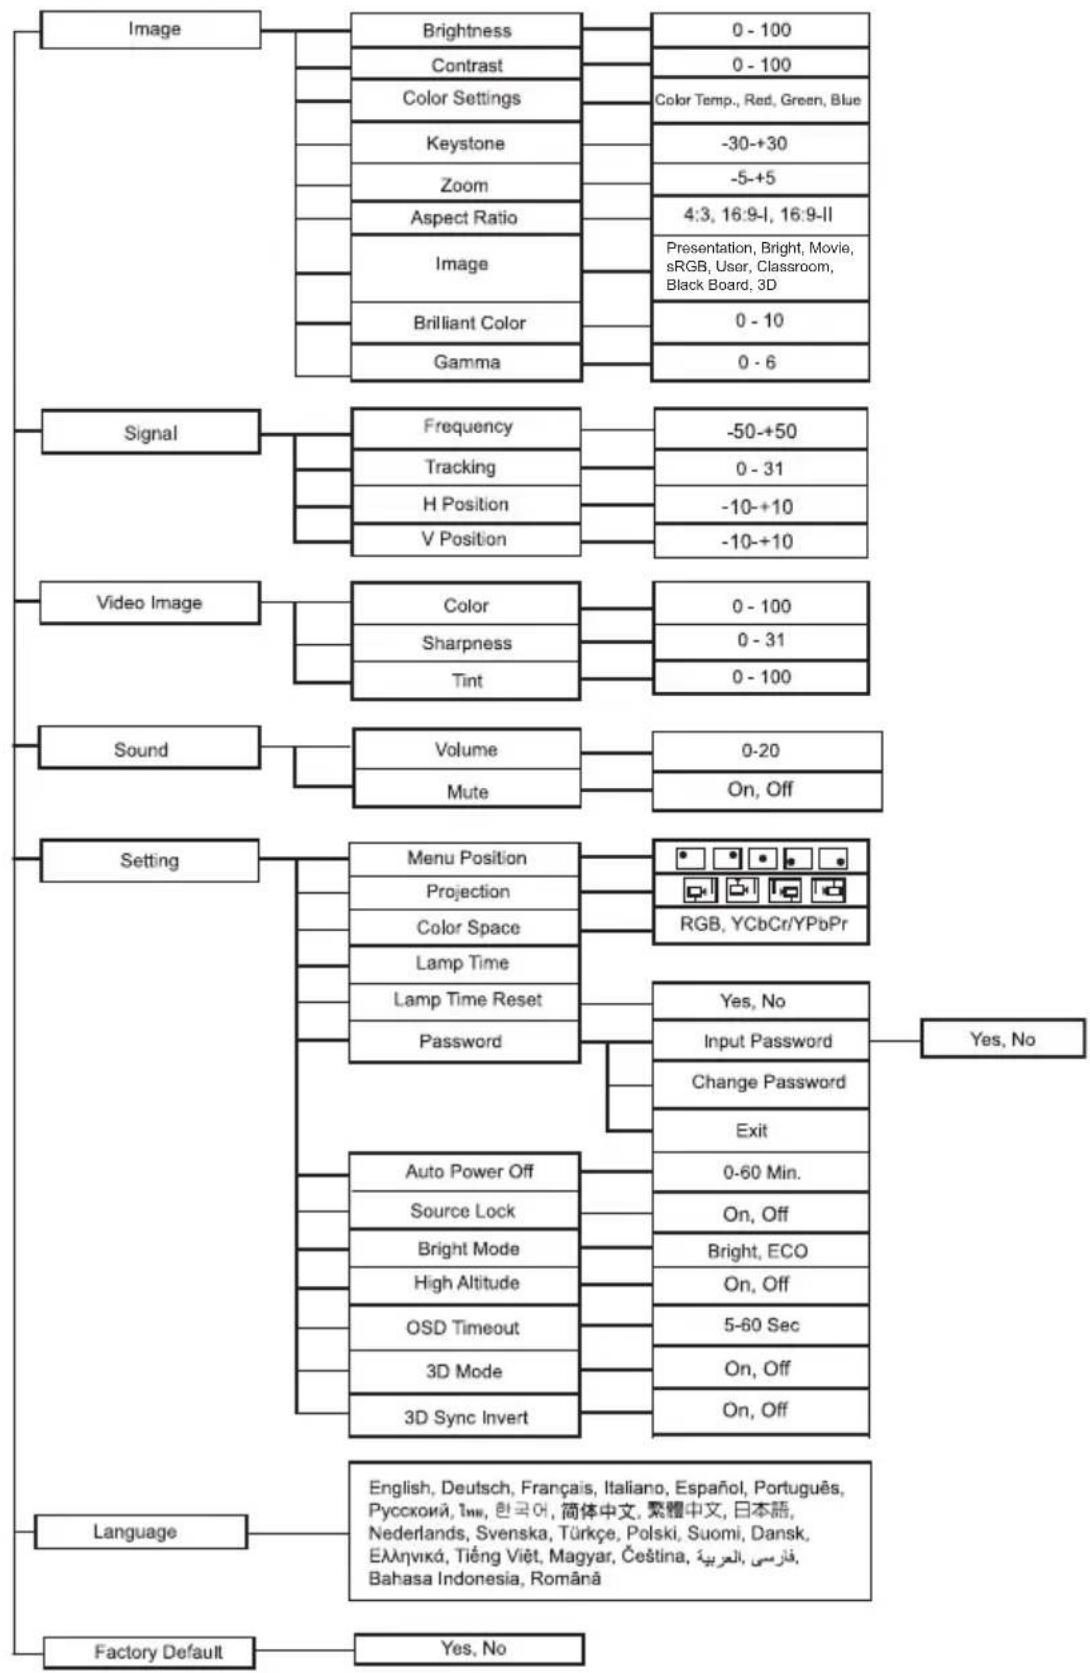
flowchart
graph TD
    A["Image"] --> B["Brightness"]
    A --> C["Contrast"]
    A --> D["Color Settings"]
    A --> E["Keystone"]
    A --> F["Zoom"]
    A --> G["Aspect Ratio"]
    A --> H["Image"]
    A --> I["Brilliant Color"]
    A --> J["Gamma"]
    B --> K["0 - 100"]
    C --> L["0 - 100"]
    D --> M["Color Temp., Red, Green, Blue"]
    E --> N["-30-+30"]
    F --> O["-5-+5"]
    G --> P["4:3, 16:9-I, 16:9-II"]
    H --> Q["Presentation, Bright, Movie, sRGB, User, Classroom, Black Board, 3D"]
    I --> R["0 - 10"]
    J --> S["0 - 6"]

    T["Signal"] --> U["Frequency"]
    T --> V["Tracking"]
    T --> W["H Position"]
    T --> X["V Position"]
    U --> Y["-50-+50"]
    V --> Z["0 - 31"]
    W --> AA["-10-+10"]
    X --> AB["-10-+10"]

    AC["Video Image"] --> AD["Color"]
    AC --> AE["Sharpness"]
    AC --> AF["Tint"]
    AD --> AG["0 - 100"]
    AE --> AH["0 - 31"]
    AF --> AI["0 - 100"]

    AJ["Sound"] --> AK["Volume"]
    AJ --> AL["Mute"]
    AK --> AM["0-20"]
    AL --> AN["On, Off"]

    AO["Setting"] --> AP["Menu Position"]
    AO --> AQ["Projection"]
    AO --> AR["Color Space"]
    AO --> AS["Lamp Time"]
    AO --> AT["Lamp Time Reset"]
    AO --> AU["Password"]
    AP --> AV["Yes, No"]
    AQ --> AW["Input Password"]
    AR --> AX["Change Password"]
    AS --> AY["Exit"]
    AT --> AZ["Auto Power Off"]
    AT --> BA["Source Lock"]
    AT --> BB["Bright Mode"]
    AT --> BC["High Altitude"]
    AT --> BD(OSD Timeout)
    AT --> BE["3D Mode"]
    AT --> BF["3D Sync Invert"]

    BG["Language"] --> BH["English, Deutsch, Français, Italiano, Español, Português, Русской, İнн, 한국어, 简体中文, 繁體中文, 日本語, Nederlands, Svenska, Türkçe, Polski, Suomi, Dansk, Еллэнıká, Tiếng Việt, Magyar, Čeština, فارسي, العربية, Bahasa Indonesia, Română"]

    BI["Factory Default"] --> BJ["Yes, No"]
Image

text_image
Image Brightness 50 Contrast 50 Color settings Keystone 0 Zoom 0 Aspect Ratio 4:3 Image Presentation BrilliantColor™ 5 Gamma 3 Adjust MENU Exit SelectBrightness
Brighten or darken the image.
Contrast
Set the difference between light and dark areas.
Color Settings
Adjust the color temperature. At higher temperature the screen looks colder; at lower temperature, the screen looks warmer. If you select "User", then you can change the intensity of each of 3 color (Red, Green, Blue) to customize user color temperature.
Keystone
Manually correct distorted images resulting from an angled projection.
Zoom
Zoom in and out the images.
Aspect Ratio
Use this function to choose your desired aspect ratio.
For SVGA models:
■ 4:3 The input source will be scaled to 800 x 600.
■ 16:9-I: The input source will be scaled to 800 x 450.
■ 16:9-II: The input source will be scaled to 800 x 480 (show 800 x 600).
For XGA models:
■ 4:3 The input source will be scaled to 1024 x 768.
■ 16:9-1: The input source will be scaled to 1024 x 576.
■ 16:9-II: The input source will be scaled to 1024 x 614 (show 1024 x 768).
Image
EN-26
There are many factory presets optimized for various types of images.
■ Presentation: For computer or notebook.
■ Bright: For bright environment.
■ Movie: For home theater.
■ sRGB: For PC standard color.
■ User: Memorize user's settings.
■ Classroom: For projection in the classroom.
■ Black Board: For black projection screen type.
■ 3D: For viewing 3D videos.
Brilliant Color
Adjusts the Brilliant Color value to extend the exposure range and sharpens detail for grain free images.
Gamma
Effect the represent of dark scenery. With greater gamma value, dark scenery will look brighter.
Note
■ When Economic Standby (<1W), VGA and audio loop through will not work in standby mode.
Signal

text_image
Signal Frequency —— 0 Tracking —— 16 H. Position —— 0 V. Position —— 0 Adjust MENU Exit SelectFrequency
Adjust the timing of the projector relative to the computer.
Tracking
Adjust the phase of the projector relative to the computer.
H Position (Horizontal Position)
Adjust the image left or right within the projection area.
V Position (Vertical Position)
Adjust the image up or down within the projection area.
Video Image

text_image
Video Image Color 50 Sharpness 16 Tint 50 Adjust MENU Exit SelectColor
Adjust a video image from black and white to fully saturated color.
Sharpness
Sharpen or soften the image.
Tint
Shift colors toward red or green.
Sound

text_image
Sound Volume 10 Mute Off Adjust MENU Exit SelectVolume
Adjust the volume level.
Mute
Cut off the sound temporarily.
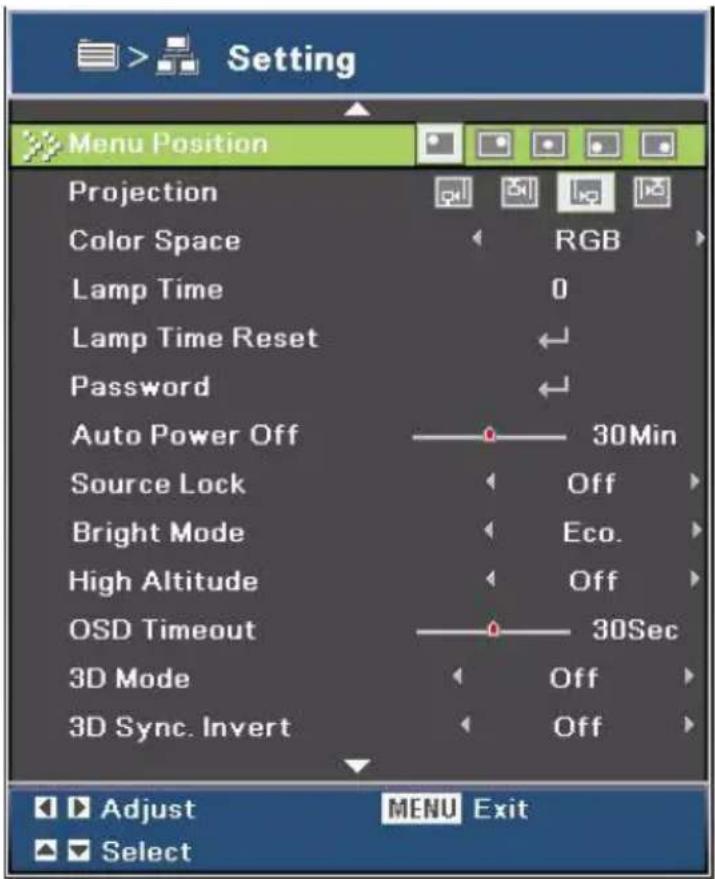
Setting
text_image
Setting Menu Position Projection Color Space RGB Lamp Time 0 Lamp Time Reset Password Auto Power Off —— 30Min Source Lock Off Bright Mode Eco. High Altitude Off OSD Timeout —— 30Sec 3D Mode Off 3D Sync. Invert Off Adjust MENU Exit SelectMenu Position
Choose the menu location on the display screen.
Projection
Adjust the picture to match the orientation of the projector: upright or upside-down, in front of or behind the screen. Invert or reverse the image accordingly.
Color Space
Select an appropriate color matrix type from RGB,YCbCr/YPbPr.
Lamp Time
Display the lamp's elapsed operating time (in hours).
Lamp Time Reset
Reset the lamp Hour to 0 hours.
Password
Set or change the password. When the password function is added, image projection will require to input the preset password when turning on the projector. Pass-code default value is "Right-Left-Down-Up" (first time).
Auto Power Off
Set the countdown timer interval. The countdown timer will start, when there is no signal being sent to the projector. Then projector will automatically power off when the countdown has finished (in minutes).
EN-30
Source Lock
■ On: The projector will search specified connection port.
■ Off: The projector will search for other signals if the current input signal is lost.
Bright Mode
■ ECO: Choose “ECO” to dim the projector lamp which will lower power consumption and extend the lamp life by up to 120%.
■ Bright: Choose "Bright" to increase the brightness.
High Altitude
Use this function to allow the fans operates at full speed continuously to achieve proper high altitude cooling of the projector.
OSD Timeout
Duration of OSD menu display countly starts (at idle state by second).
3D Mode
■ On: Enable 3D Mode function.
■ Off: Disable 3D Mode function.
When 3D Sync is set to "On", the settings for input source or broadcast device are required as below:
- For S-VIDEO and VIDEO input source, signal type should be NTSC (60).
- For computer input source, the hardware and software requirements should be Windows 7 operating system, 3D videos and professional 3D video player softwares. Computer's output frequency should be 120Hz and display card should be higher than NVIDIA 9800.
3D Sync Invert
■ On: Invert left and right frame contents.
■ Off: Default frame contents.
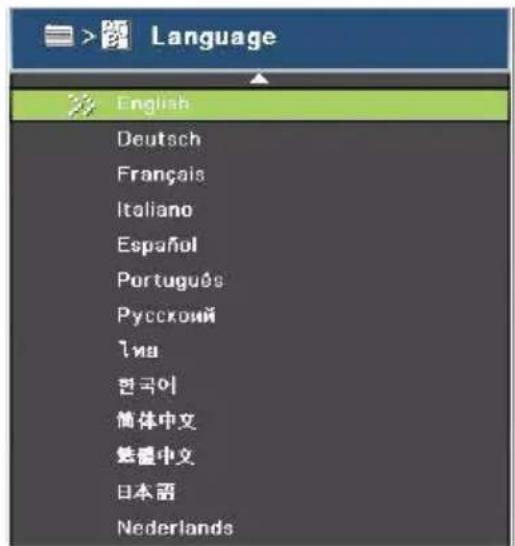
Language
text_image
Language 多 English Deutsch Français Italiano Español Português Русской İna 한국이 简体中文 フェ锰中文 日本語 Nederlands
text_image
Svenska Türkçe Polski Suomi Dansk Ελληνικά Tiếng Việt Magyar Čeština Βροχεί Βρωτής Bahasa Indonesia Românã Enter MENU Exit SelectSelect the language used by the on-screen menu.
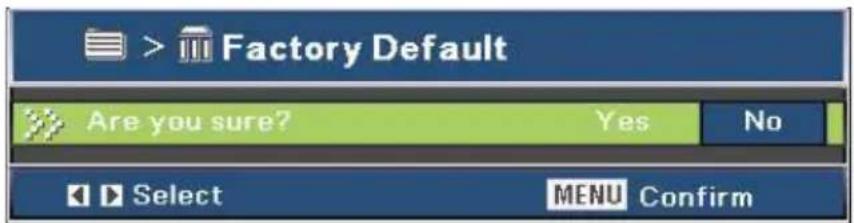
Factory Default
text_image
> Factory Default Are you sure? Yes No Select MENU ConfirmRestore settings to factory default.
Appendix
Replacing the Lamp
As the projector operates over time, the brightness of the projector lamp gradually decreases and the lamp becomes more susceptible to breakage. We recommend replacing the lamp if a warning message is displayed. Do not attempt to replace the lamp yourself. Contact the qualified service personnel for replacement.
Note
The lamp is extremely hot right after turning off the projector. If you touch the lamp, you may scald your finger. When you replace the lamp, wait for at least 45 minutes for the lamp to cool down.
■ Do not touch the lamp glass at any time. The lamp may explode due to improper handling, including the touching of the lamp glass.
Lamp lifetime may differ from lamp to lamp and according to the environment of use. There is no guarantee of the same lifetime for each lamp. Some lamps may fail or terminate their lifetime in a shorter period of time than other similar lamps.
A lamp may explode as a result of vibration, shock or degradation as a result of hours of use as its lifetime draws to an end. Risk of explosion may differ according to the environment or conditions in which the projector and lamp are being used.
■ Wear protective gloves and eyeglasses when fixing or detaching the lamp.
■ Faster on-off-cycles will damage the lamp and reduce lamp life. Wait at least for 5 minutes to turn off the projector after powering on.
- Do not operate the lamp in proximity to paper, cloth, or other combustible material nor cover it with such materials.
■ Do not operate the lamp in an atmosphere containing an inflammable substance, such as thinner.
■ Thoroughly ventilate the area or the room when operating the lamp in an oxygen atmosphere (in the air). If ozone is inhaled, it could cause headaches, nausea, dizziness, and other symptoms.
The inorganic mercury is involved in the lamp. If the lamp bursts, the mercury inside the lamp will be exposed. Leave the area immediately if the lamp shatters while being operated and ventilate the area for at least 30 minutes in order to avoid the inhalation of mercury fumes. Otherwise it could be harmful to user's health.
- Turn off the projector.
- If the projector is installed in a ceiling mount, remove it
- Unplug the power cord.
-
Remove the screw in the side of the lamp cover. 1
-
Remove the cover. 2
-
Loosen the screws from the lamp module. 3
-
Raise the handle, and lift out the module. 4
-
Insert the new lamp module into the projector and tighten the screws.
-
Replace the lamp cover and tighten the screw.
-
Turn on the projector. If the lamp does not turn on after the warm-up period, try reinstalling the lamp.
-
Reset the lamp hour. Refer to the "Setting > Lamp Time Reset" menu.

text_image
Diagram illustrating the operation of a projector with labeled parts and directional arrows indicating assembly steps.Note
■ Dispose the used lamp according to local regulations.
■ Ensure that screws are tightened properly. Screws not tightened fully may result in injury or accidents.
■ Since the lamp is made of glass, do not drop the unit and do not scratch the glass.
■ Do not reuse the old lamp. This could cause the lamp to explode.
■ Be sure to turn off the projector and unplug the AC power cord before replacing the lamp.
■ Do not use the projector with the lamp cover removed.
Ceiling mount installation
- To prevent damage to your projector, please use the Optoma ceiling mount.
- If you wish to use a third party ceiling mount kit, please ensure the screws used to attach a mount to the projector meet the following specifications:
■ Screw type: M4*3
■ Maximum screw length: 8mm
■ Minimum screw length: 6mm
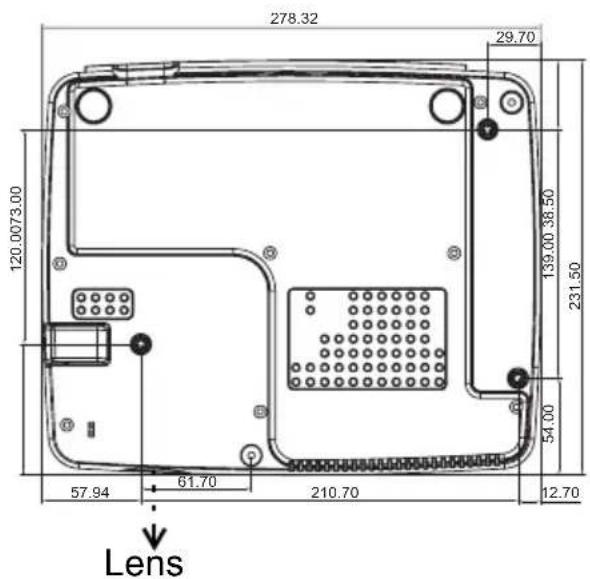
text_image
278.32 29.70 120.0073.00 139.00 38.50 231.50 54.00 57.94 61.70 210.70 12.70 LensUnit: mm
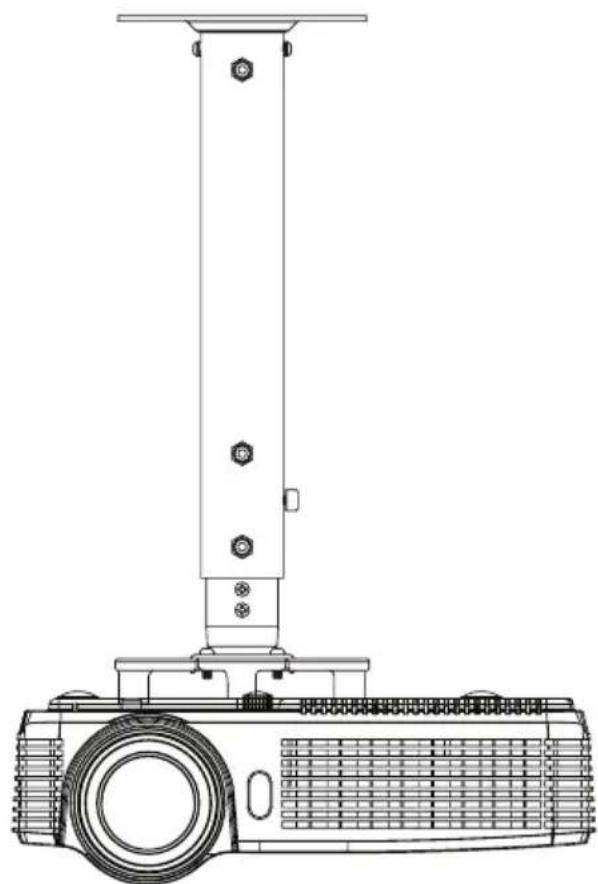
natural_image
Technical line drawing of a mechanical device with a vertical support structure and textured base (no text or symbols)Note
■ Please note that damage resulting from incorrect installation will void the warranty.

Warning
- If you buy a ceiling mount from another company, please be sure to use the correct screw size. Screw size will vary depending on the thickness of the mounting plate.
- Be sure to keep at least 10 cm gap between the ceiling and the bottom of the projector.
- Avoid installing the projector near a heat source.
Compatibility Modes
Computer:
| Mode Resolution H-Sync [KHz] V-Sync [Hz] | |||
| 640 x 350 31.5 70 | |||
| 640 x 350 37.9 85 | |||
| 720 x 350 31.5 70 | |||
| 640 x 400 31.5 70 | |||
| 640 x 400 37.9 85.1 | |||
| 720 x 400 31.5 70 | |||
| 720 x 400 37.9 85 | |||
| 720 x 576 - 50 | |||
| 720 x 576 - 60 | |||
| VGA 640 x 480 31.5 60 | |||
| - | 67 | ||
| 37.9 72.8 | |||
| 37.5 75 | |||
| 43.3 85 | |||
| SVGA 800 x 600 35.2 56.3 | |||
| 37.9 60.3 | |||
| 46.9 75 | |||
| 48.1 72.2 | |||
| - | 80 | ||
| 53.7 85.1 | |||
| 832 x 624 - 72 | |||
| 832 x 624 - 75 | |||
| 1024 x 576 - 50 | |||
| 1024 x 576 - 60 | |||
| XGA 1024 x 768 48.4 60 | |||
| 56.5 70.1 | |||
| 57.7 72 | |||
| 60 75 | |||
| 68.7 85 | |||
| 1152 x 864 - 60 | |||
| - | 70 | ||
| - | 75 | ||
| - | 85 | ||
| 1152 x 870 - 75 | |||
| HD720 | 1280 x 720 - 50 | ||
| HD720 | 1280 x 720 - 60 | ||
| HD720 | 1280 x 720 - 75 | ||
| HD720 | 1280 x 720 - 85 | ||
| WXGA | 1280 x 768 47.4 60 | ||
| - | |||
| - | |||
| - | |||
| WXGA-800 1280 x 800 - 60 | |||
| SXGA 1280 x 1024 64 60 | |||
| 80 75 | |||
| 91.1 85 | |||
| 1366 x 768 - 60 | |||
| 1440 x 900 55.935 60 | |||
| SXGA+ 1400 x 1050 - 60 | |||
| UXGA 1600 x 1200 75 60 | |||
| HDTV 1920 x 1080 33.8 30 | |||
| 1920 x 1080 28.1 25 | |||
| 1920 x 1080i - 50 | |||
| 1920 x 1080i - 60 | |||
| 1920 x 1080p - 24 | |||
| 1920 x 1080p - 25 | |||
| 1920 x 1080p - 30 | |||
| 1920 x 1080p - 50 | |||
| 1920 x 1080p - 60 | |||
| 1280 x 720 45 60 | |||
| 1280 x 720p - 50 | |||
| 1280 x 720p - 60 | |||
| SDTV 720 x 576 31.3 50 | |||
| 720 x 576i | -50 | ||
| 720 x 576p - 50 | |||
| 720 x 480 | 31.5 60 | ||
| 720 x 480i | -60 | ||
| 720 x 480p - 60 | |||
| Macbook/Macbook Pro (Intel) | 800 x 600 | -60, 72, 75, 85 | |
| 1024 x 768 - 60, 70, 75, 85 | |||
| 1280 x 720 - | 60, 75, 85 | ||
| 1280 x 768 - | 60, 75, 85 | ||
| 1680 x 1050 - 60 | |||
| Macbook Pro (Intel) | 1280 x 800 - 60 | ||
| 1280 x 1024 | 60, 75 | ||
| Power Mac G4/G5 | 800 x 600 | - | 72, 75, 85 |
| 1024 x 768 - 60, 70, 75, 85 | |||
| 1280 x 720 - 60 | |||
| 1280 x 768 - 75 | |||
| 1280 x 800 - 60 | |||
| 1280 x 1024 - 60 | |||
| Power Mac G4 | 1280 x 720 - | 75, 85 | |
| Power Mac G4 | 1280 x 768 - | 60, 85 | |
| Power Mac G5 | 1280 x 1024 - 75 | ||
Video:
| NTSC NTSC M/J, 3.58MHz, 4.43MHz |
| PAL PAL B/D/G/H/I/M/N, 4.43MHz |
| SECAM SECAM B/D/G/K/K1/L, 4.25/4.4 MHz |
| SDTV 480i/p, 576i/p |
| HDTV 720p(50/60Hz), 1080i(50/60Hz), 1080P(50/60Hz) |
RS232 Commands and Protocol Function List
RS232 Pin Assignments

text_image
P 5 P 1 P 1 P 5D-Sub 9 pin
| 1 | 1 | C |
| 2 | RXD | |
| 3 | TXD | |
| 4 | DTR | |
| 5 | GND | |
| 6 | DSR | |
| 7 | RTS | |
| 8 | CTS | |
| 9 | RI |
D
Wire List
| C1 COLOR C2 | ||
| 1 Black 1 | ||
| 2 | B r o | |
| 3 | R e | |
| 4 | O r a | |
| 5 Yellow 5 | ||
| 6 | Green 6 | |
| 7 | Blue | |
| 8 Purple 8 | ||
| 9 | White | |
| SHELL | DW SHELL | |
w d n
7 9
RS232 Protocol Function List
Baud Rate : 9600
Data Bits: 8
Parity: None
Stop Bits: 1
Flow Control : None
UART16550 FIFO: Disable
Projector Return (Pass): P
Projector Return (Fail): F
XX=01-99, projector's ID,
XX=00 is for all projectors
Note
There is a
■ 0D is the HEX code for
SEND to projector
232 ASCII Code HEX Code Function Description
\~XX00 1 7E 30 30 30 30 20 31 0D Power ON
\~XX00 0 7E 30 30 30 30 20 30 0D Power OFF (0/2 for backward compatible)
\~XX00 1 \~nnnn 7E 30 30 30 30 20 31 20 a 0D Power ON with Password \~nnnn = \~1111 (a=7E 30 30 30 30)
(Password only support Up(1)/Down(2)/Left(3)/Right(4)) \~4444 (a=7E 39 39 39 39)
\~XX01 1 7E 30 30 30 31 20 31 0D Resync
\~XX02 1 7E 30 30 30 32 20 31 0D AV Mute On
\~XX02 0 7E 30 30 30 32 20 30 0D Off (0/2 for backward compatible)
\~XX03 1 7E 30 30 30 33 20 31 0D Mute On
\~XX03 0 7E 30 30 30 33 20 30 0D Off (0/2 for backward compatible)
\~XX04 1 7E 30 30 30 34 20 31 0D Freeze
\~XX04 0 7E 30 30 30 34 20 30 0D Unfreeze
\~XX05 1 7E 30 30 30 35 20 31 0D Zoom Plus
\~XX06 1 7E 30 30 30 36 20 31 0D Zoom Minus
\~XX12 1 7E 30 30 31 32 20 35 0D Direct Source Commands HDMI (ES551/EX551/ only)
\~XX12 5 7E 30 30 31 32 20 35 0D VGA 1
\~XX12 6 7E 30 30 31 32 20 35 0D VGA 2
\~XX12 8 7E 30 30 31 32 20 38 0D VGA 1 Component
\~XX12 9 7E 30 30 31 32 20 39 0D S-Video
\~XX12 10 7E 30 30 31 32 20 31 30 0D
\~XX12 13 7E 30 30 31 32 20 31 33 0D
\~XX20 0 7E 30 30 32 30 20 30 0D Display Mode None
\~XX20 1 7E 30 30 32 30 20 31 0D Presentation
\~XX20 2 7E 30 30 32 30 20 32 0D Bright
\~XX20 3 7E 30 30 32 30 20 33 0D Movie
\~XX20 4 7E 30 30 32 30 20 34 0D sRGB
\~XX20 5 7E 30 30 32 30 20 35 0D User
\~XX20 7 7E 30 30 32 30 20 37 0D Blackboard
\~XX20 8 7E 30 30 32 30 20 38 0D Classroom
\~XX20 9 7E 30 30 32 30 20 39 0D 3D
\~XX21 n 7E 30 30 32 31 20 a 0D Brightness n = 0 (a=30) \~ 100 (a=31 30 30)
\~XX22 n 7E 30 30 32 32 20 a 0D Contrast n = 0 (a=30) \~ 100 (a=31 30 3
\~XX23 n 7E 30 30 32 33 20 a 0D Sharpness n = 0 (a=30) \~ 31 (a=33 31)
\~XX24 n 7E 30 30 32 34 20 a 0D Color Settings Red Gain n = -50 (a=2D 35 30) \~ 50 (a=35 30)
\~XX25 n 7E 30 30 32 35 20 a 0D Green Gain n = -50 (a=2D 35 30) \~ 50 (a=35 30)
\~XX26 n 7E 30 30 32 36 20 a 0D Blue Gain n = -50 (a=2D 35 30) \~ 50 (a=35 30)
\~XX34 n 7E 30 30 33 34 20 a 0D BrilliantColor ^TM n = 0 (a=30) \~ 10 (a=31 30)
\~XX35 1 7E 30 30 33 35 20 31 0D Degamma Film
\~XX35 2 7E 30 30 33 35 20 32 0D Video
\~XX35 3 7E 30 30 33 35 20 33 0D Graphics
\~XX35 4 7E 30 30 33 35 20 34 0D PC
\~XX36 1 7E 30 30 33 36 20 31 0D Color Temp. Warm
\~XX36 2 7E 30 30 33 36 20 32 0D Medium
\~XX36 3 7E 30 30 33 36 20 33 0D Cold
\~XX37 2 7E 30 30 33 37 20 32 0D Color Space RGB
\~XX37 3 7E 30 30 33 37 20 33 0D YUV
\~XX45 n 7E 30 30 34 34 20 a 0D Color (Saturation) n = 0 (a=30) \~ 100 (a=31 30 30)
\~XX44 n 7E 30 30 34 35 20 a 0D Tint n = 0 (a=30) \~ 100 (a=31 30 30)
\~XX60 1 7E 30 30 36 30 20 31 0D Format 4:3
\~XX60 2 7E 30 30 36 30 20 32 0D 16:9-I
\~XX60 3 7E 30 30 36 30 20 33 0D 16:9-II
\~XX62 n 7E 30 30 36 32 20 a 0D Zoom n = -5 (a=2D 35) \~ 5 (a=35)
\~XX66 n 7E 30 30 36 36 20 a 0D V Keystone n = -30 (a=2D 33 30) \~ 30 (a=33 30)
\~XX230 1 7E 30 30 32 33 30 20 31 0D 3D Mode DLP-Link
\~XX230 0 7E 30 30 32 33 30 20 30 0D 3D Mode Off
\~XX231 1 7E 30 30 32 33 31 20 31 0D 3D Sync Invert On
\~XX231 0 7E 30 30 32 33 31 20 30 0D 3D Sync Invert Off
\~XX70 1 7E 30 30 37 30 20 31 0D Language English
\~XX70 2 7E 30 30 37 30 20 32 0D German
\~XX70 3 7E 30 30 37 30 20 33 0D French
\~XX70 4 7E 30 30 37 30 20 34 0D Italian
\~XX70 5 7E 30 30 37 30 20 35 0D Spanish
\~XX70 6 7E 30 30 37 30 20 36 0D Portuguese
\~XX70 7 7E 30 30 37 30 20 37 0D Polish
\~XX70 8 7E 30 30 37 30 20 38 0D Dutch
\~XX70 9 7E 30 30 37 30 20 39 0D Swedish
\~XX70 10 7E 30 30 37 30 20 31 30 0D Norwegian/Danish
\~XX70 11 7E 30 30 37 30 20 31 31 0D Finnish
\~XX70 12 7E 30 30 37 30 20 31 32 0D Greek
\~XX70 13 7E 30 30 37 30 20 31 33 0D Traditional Chinese
\~XX70 14 7E 30 30 37 30 20 31 34 0D Simplified Chinese
\~XX70 15 7E 30 30 37 30 20 31 35 0D Japanese
\~XX70 16 7E 30 30 37 30 20 31 36 0D Korean
\~XX70 17 7E 30 30 37 30 20 31 37 0D Russian
\~XX70 18 7E 30 30 37 30 20 31 38 0D Hungarian
\~XX70 19 7E 30 30 37 30 20 31 39 0D Czech
\~XX70 20 7E 30 30 37 30 20 32 30 0D Arabic
\~XX70 21 7E 30 30 37 30 20 32 31 0D Thai
\~XX70 22 7E 30 30 37 30 20 32 32 0D Turkish
\~XX70 23 7E 30 30 37 30 20 32 33 0D Farsi
\~XX70 25 7E 30 30 37 30 20 32 35 0D Vietnamese
\~XX70 26 7E 30 30 37 30 20 32 36 0D Indonesian
\~XX70 27 7E 30 30 37 30 20 32 37 0D Romanian
Front-Desktop
\~XX71 1 7E 30 30 37 31 20 31 0D Projection
\~XX71 2 7E 30 30 37 31 20 32 0D Rear-Desktop
\~XX71 3 7E 30 30 37 31 20 33 0D Front-Ceiling
\~XX71 4 7E 30 30 37 31 20 34 0D Rear-Ceiling
\~XX72 1 7E 30 30 37 32 20 31 0D Menu Location Top Left
\~XX72 2 7E 30 30 37 32 20 32 0D Top Right
\~XX72 3 7E 30 30 37 32 20 33 0D Centre
\~XX72 4 7E 30 30 37 32 20 34 0D Bottom Left
\~XX72 5 7E 30 30 37 32 20 35 0D Bottom Right
\~XX73 n 7E 30 30 37 33 20 a 0D Signal Frequency n = -50 (a=2D 35 30) \~ 50 (a=35 30) By signal
\~XX74 n 7E 30 30 37 34 20 a 0D Phase n = 0 (a=30) \~ 31 (a=33 31) By signal
\~XX75 n 7E 30 30 37 35 20 a 0D H. Position n = -5 (a=2D 35) \~ 5 (a=35) By timing
\~XX76 n 7E 30 30 37 36 20 a 0D V. Position n = -5 (a=2D 35) \~ 5 (a=35) By timing
\~XX78 1 7E 30 30 37 38 20 31 0D Security Settings Enable
Disable(0/2 for backward compatible)
\~XX80 1 7E 30 30 38 30 20 31 0D Mute On
\~XX80 0 7E 30 30 38 30 20 30 0D Off (0/2 for backward compatible)
\~XX81 n 7E 30 30 38 31 20 a 0D Volume n = 0 (a=30) \~ 20 (a=32 30)
\~XX100 1 7E 30 30 31 30 30 20 31 0D Source Lock On
Off (0/2 for backward compatible)
\~XX100 0 7E 30 30 31 30 30 20 30 0D
\~XX100 3 7E 30 30 31 30 30 20 33 0D Next Source
\~XX101 1 7E 30 30 31 30 31 20 31 0D High Altitude
\~XX101 0 7E 30 30 31 30 31 20 30 0D Off (0/2 for backward compatible)
\~XX106 n 7E 30 30 31 30 36 20 a 0D Auto Power Off (min) n = 0 (a=30) \~ 60 (a=36 30)
\~XX110 1 7E 30 30 31 31 30 20 31 0D Brightness Mode Bright
\~XX110 0 7E 30 30 31 31 30 20 30 0D STD (0/2 for backward compatible)
Lamp Reset Yes
\~XX111 1 7E 30 30 31 31 31 20 31 0D
\~XX111 0 7E 30 30 31 31 31 20 30 0D
\~XX112 1 7E 30 30 31 31 32 20 31 0D Reset Yes
\~XX99 1 7E 30 30 39 39 20 31 0D RS232 Alert Reset Reset System Alert
SEND to emulate Remote
\~XX140 1 7E 30 30 31 34 30 20 31 0D
Power
\~XX140 10 7E 30 30 31 34 30 20 31 30 0D Up/Page +
\~XX140 11 7E 30 30 31 34 30 20 31 31 0D Left/Source
\~XX140 12 7E 30 30 31 34 30 20 31 32 0D Enter (for projection MENU)
\~XX140 13 7E 30 30 31 34 30 20 31 33 0D Right/Re-SYNC
\~XX140 14 7E 30 30 31 34 30 20 31 34 0D Down/Page -
\~XX140 15 7E 30 30 31 34 30 20 31 35 0D Keystone +
\~XX140 16 7E 30 30 31 34 30 20 31 36 0D Keystone -
\~XX140 17 7E 30 30 31 34 30 20 31 37 0D Volume -
\~XX140 18 7E 30 30 31 34 30 20 31 38 0D Volume +
\~XX140 19 7E 30 30 31 34 30 20 31 39 0D Brightness (1)
\~XX140 20 7E 30 30 31 34 30 20 32 30 0D Menu (2)
\~XX140 21 7E 30 30 31 34 30 20 32 31 0D 3D (3)
\~XX140 22 7E 30 30 31 34 30 20 32 32 0D
\~XX140 23 7E 30 30 31 34 30 20 32 32 0D <ES550 & 551/EX550 & 551/
only>
\~XX140 24 7E 30 30 31 34 30 20 32 34 0D AV Mute (6)
\~XX140 25 7E 30 30 31 34 30 20 32 35 0D S-Video (7)
\~XX140 26 7E 30 30 31 34 30 20 32 36 0D VGA1/2 toggle (8)
\~XX140 27 7E 30 30 31 34 30 20 32 37 0D Video (9)
SEND from projector automatically
232 ASCII Code HEX Code Function Projector Return Description
when Standby/Warming/Cooling/Out of Range/Lamp fail/ INFOn n : 0/1/2/3/4/6/7/8/9 = Standby/Warming/
Contrast (4)
Fan Lock/Over Temperature/Lamp Hours Running Out/Cover Open Fan Lock/Over Temperature/Lamp Hours
Cooling/Out of Range/Lamp fail/
Running Out/Cover Open
READ from projector
232 ASCII Code HEX Code Function Projector Return Description
| ~XX121 1 | 7E 30 30 31 32 31 20 31 0D | Input Source Commands | OKn | n : 0/1/2/3/4/5 = None/VGA1/VGA2/S-Video/Video/HDMI |
| ~XX122 1 | 7E 30 30 31 32 32 20 31 0D | Software Version | OKdddd | dddd: FW version |
| ~XX123 1 | 7E 30 30 31 32 33 20 31 0D | Display Mode | OKn | n : 0/1/2/3/4/5/7/8/9/None/Presentation/Bright/Movie/sRGB/User/Blackboard/Classroom/3D |
| ~XX124 1 | 7E 30 30 31 32 34 20 31 0D | Power State | OKn | n : 0/1 = Off/On |
| ~XX125 1 7E 30 30 31 32 35 20 31 0D Brightness | OKn | |||
| ~XX126 1 7E 30 30 31 32 36 20 31 0D Contrast | OKn | |||
| ~XX127 1 | 7E 30 30 31 32 37 20 31 0D | Aspect Ratio | OKn | (ES550/ES551/EX550/EX551) n: 0/1/2 = 4:3/16:9-I/16:9-II |
| ~XX128 1 | 7E 30 30 31 32 38 20 31 0D | Color Temperature | OKn | n : 0/1/2 = Warm/Medium/Cold |
| ~XX129 1 | 7E 30 30 31 32 39 20 31 0D | Projection Mode | OKn | n : 0/1/2/3 = Front-Desktop/ Rear-Desktop/Front-Ceiling/ Rear-Ceiling |
| ~XX150 1 7E 30 30 31 35 30 20 31 0D Information | OKabbbbccdddde | |||
| bbbb: LampHourc: source 00/01/02/03/04/05 = None/VGA1/VGA2/S-Video/Video/HDMIonly> | |||||
| dddd: FW versione : Display mode 0/1/2/3/4/5/7/8/9 | |||||
| None/Presentation/Bright/Movie/sRGB/User/Blackboard/Classroom/3D | |||||
| ~XX151 1 | 7E 30 30 31 35 31 20 31 0D | Model name | OKn | n:1/2/3/4 =ES550/ES551/EX550/EX551 | |
| ~XX108 1 | 7E 30 30 31 30 38 20 31 0D | Lamp Hours | OKbbbb | bbbb: LampHour | |
| ~XX108 2 | 7E 30 30 31 30 38 20 31 0D | Cumulative Lamp Hours | OKbbbb | bbbb: (5 digits) Total Lamp Hours | |
Troubleshooting
Refer to the symptoms and measures listed below before sending the projector for repairs. If the problem persists, contact your local reseller or service center. Please refer to "LED Indicator Messages" as well.
Start-up problems
If no lights turn on:
■ Be sure that the power cord is securely connected to the projector and the other end is plugged into an outlet with power.
■ Press the power button again.
■ Unplug the power cord and wait for a short while, then plug it in and press the power button again.
Image problems
If the searching source is displayed:
■ Press SOURCE on the projector or Source on the remote control to select an active input source.
■ Be sure the external source is turned on and connected.
For a computer connection, ensure your notebook computer's external video port is turned on. Refer to the computer manual.
If the image is out of focus:
■ While displaying the on-screen menu, adjust the focus ring. (The image size should not change; if it does, you are adjusting the zoom, not the focus.)
■ Check the projection lens to see if it needs cleaning.
If the image is flickering or unstable for a computer connection:
■ Press MENU on the projector or Menu on the remote control, go to Signal and adjust Frequency or Tracking.
Remote control problems
If the remote control does not operate:
■ Be sure nothing is blocking the remote control receiver on the front of the projector. Use the remote control within the effective range.
■ Aim the remote control at the screen or at the front of the projector.
■ Move the remote control so it is more directly in front of the projector and not as far to the side.
LED Indicator Messages
| Projector Status POWER TEMP LAMP | |||
| Standby mode Blue solid Off Off | |||
| Normal running mode Flashing 30 seconds after powering on and then become solid blue | Off Off | ||
| Normal cooling Blue solid Blue solid Red solid | |||
| Lamp ignition failed Blue solid Off Red flashing | |||
| Lamp life end Blue solid Off Red solid | |||
| Temp error Blue solid Blue flashing Off | |||
| Fan error Blue solid Blue solid Off | |||
| Color wheel or DMD error Blue flashing Blue flashing Red flashing | |||
Optoma Global Offices
For service or support please contact your local office.
USA
3178 Laurelview Ct.
Fremont, CA 94538, USA 888-289-678
www.optomausa.com services@optoma.com
Canada
5630 Kennedy Road, Mississauga, 905-61-2582
ON, L4Z 2A9, Canada 905-361-2581

www.optoma.ca services@optoma.com
(No text)
Europe
42 Caxton Way, The Watford Business
Park
Watford, Hertfordshire,
WD18 8QZ, UK +44 (0) 1923 691 800

www.optoma.eu +44 (0) 1923 691 888

Service Tel : +44 (0)1923 691865 service@tsc-europe.com
France
Batiment E +33 1 41 46 12 20

81-83 avenue Edouard Vaillant +33 1 4 46 94 35
92100 Boulogne Billancourt, France savoptoma@optoma.fr
Spain
C/ Jose Hierro,36 Of. 1C +34 91 499 06:06
28522 Rivas VaciaMadrid,
昌 +34 91 670 08 32
Spain
Deutschland
Wiesenstrasse 21 W
+49 (0) 211 506 6670
D40549 Dusseldorf,
昌 +49 (0) 211 506 66799
Germany
info@optoma.de
Scandinavia
Lerpeveien 25 +47 32 98 89 90
3040 Drammen +47 32 98 89 99
Norway info@optoma.no
PO.BOX 9515
3038 Drammen
Norway


Latin America
3178 Laurelview Ct.
Fremont, CA 94538, USA 888-289-678
www.optoma.com.br www.optoma.com.mx
Korea
WOOMI TECH.CO.,LTD.
4F, Minu Bldg.33-14, Kangnam-Ku, +82+34430004
seoul,135-815, KOREA +82+2+344300
Japan
東京都足立区綾瀬 3-25-18
株式会社オーエスエム
www.os-worldwide.com
Taiwan
5F., No. 108, Minchiuan Rd. +886-2-22-2360
Shindian City, +886-2-2218-2313
Taipei Taiwan 231, R.O.C.
www.optoma.com.tw

services@optoma.com.tw
asia.optoma.com
Hong Kong
Unit A, 27/F Dragon Centre,
79 Wing Hong Street,
Cheung Sha Wan,
Kowloon, Hong Kong
+852-2396-8968
昌 +852-2370-1222
www.optoma.com.hk
China
5F, No. 1205, Kaixuan Rd.,
+86-21-62947376
EN-46
Regulation & Safety Notices
This appendix lists the general notices of your projector.
FCC Notice
This equipment has been tested and found to comply with the limits for a Class B digital device, pursuant to part 15 of the FCC Rules. These limits are designed to provide reasonable protection against harmful interference in residential installation. This equipment generates, uses and can radiate radio frequency energy and if not installed and used in accordance with the instructions, may cause harmful interference to radio communications.
However, there is no guarantee that interference will not occur in a particular installation. If this equipment does cause harmful interference to radio or television reception, detectable by turning the equipment in question off and on, the user is encouraged to try to correct the interference by one or more of the following measures:
■ Reorient or relocate the receiving antenna
■ Increase the distance between the equipment and the receiver
■ Connect the equipment to an outlet on a different circuit than that which the receiver is connected to
■ Or consult the dealer or an experienced radio/TV technician for help.
Notice: Shielded cables
All connections to other computing devices must be made using shielded cables to maintain compliance with FCC regulations.
Caution
Changes or modifications not expressly approved by the manufacturer could void the user's authority, which is granted by the Federal Communications Commission, to operate this projector.
Operation conditions
This device complies with Part 15 of the FCC Rules. Operation is subject to the following two conditions:
- This device may not cause harmful interference and
- This device must accept any interference received, including interference that may cause undesired operation.
Notice: Canadian users
This Class B digital apparatus complies with Canadian ICES-003.
Declaration of Conformity for EU countries
■ EMC Directive 2004/108/EC (including amendments)
■ Low Voltage Directive 2006/95/EC
■ R & TTE Directive 1999/5/EC (if product has RF function)
Disposal instructions

natural_image
Symbol of a trash bin crossed with a diagonal line and a horizontal bar below (no text or numbers present)Do not throw this electronic device into the trash when discarding. To minimize pollution and ensure utmost protection of the global environment, please recycle it.
Remote Control
Power
Turn the projector on or off.
L Button
Perform the left button of the mouse.
R Button
Perform the right button of the mouse.
Page +
Perform page up function.
Page -
Perform page down function.
Enter/Help?
← Confirm your item selection.
? Open the Help Menu.
Source
Switch between input signals.
Re-SYNC
Automatically synchronize the projector to the input source.
Four directional buttons
Use four directional buttons to select items or make adjustments to your selection.
Keystone+/-
Manually correct distorted images resulting from an angled projection.
Volume+/-
Adjust the volume level.
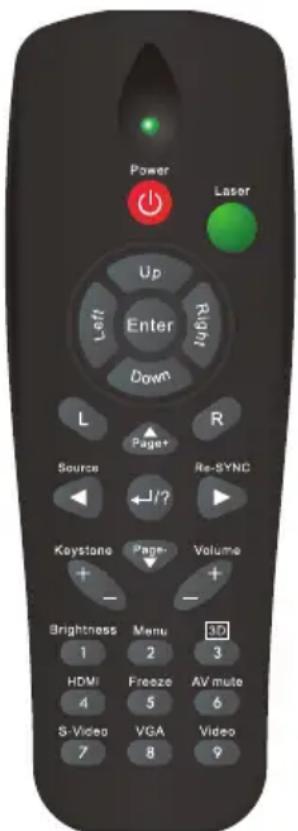
text_image
Power Later Up Right Left Enter Down L R Page+ Source Re-SYNC J/? Keystone Page- Volume + - - - Brightness Menu 3D 1 2 3 HDMI Freeze AV mute 4 5 6 S-Video VGA Video 7 8 9Brightness
Display the setting bar for adjustment of brightness.
3D
Turn on or off 3D function.
Menu
Display on-screen display menus.
HDMI
Display HDMI signal.
(This function will not work if product does not have HDMI)
Freeze
Freeze the projected image.
AV mute
Cut off the AV Mute temporarily. Only pressing AV Mute again can output sound and image. If any other buttons are pressed, the projection image will become abnormal and no sound will be output.
S-Video
Display S-Video signal.
VGA
Switch input source to VGA1 or VGA2 by sequence.
Video
Display video signal.