VP4910 - Wireless pointer SMK-Link - Free user manual and instructions
Find the device manual for free VP4910 SMK-Link in PDF.

User questions about VP4910 SMK-Link
0 question about this device. Answer the ones you know or ask your own.
Ask a new question about this device
Download the instructions for your Wireless pointer in PDF format for free! Find your manual VP4910 - SMK-Link and take your electronic device back in hand. On this page are published all the documents necessary for the use of your device. VP4910 by SMK-Link.
USER MANUAL VP4910 SMK-Link
This device complies with Part 15 of the FCC Rules.
Operation is subject to the following two conditions: (1) This device may not cause harmful interference, and (2) This device must accept any interference received, including interference that may cause undesired operation.
This equipment has been tested and found to comply with the limits for a CLASS B digital device, pursuant to Part 15 of the FCC rules. These limits are designed to provide reasonable protection against harmful interference when the equipment is operated in a residential installation. This equipment generates, uses, can radiate radio frequency energy and if not installed and used in accordance with the instruction guide, may cause harmful interference to radio communications. However, there is no guarantee that this radio interference will not occur in a particular installation. If this equipment does cause harmful interference to radio or television reception, which can be determined by turning the equipment on and off, the user is encouraged to try to correct the interference by one or more of the following measures:
Re-orient or relocate the receiving antenna.
Increase the separation between the equipment and the receiver.
Consult the dealer or an experienced Radio-TV technician for help.
Notice: Any changes or modifications not expressly approved by the party responsible for compliance could void the user's authority to operate the equipment. Extension cables are not recommended, if used, they must be shielded in order to comply with the emission limits.
IC Certification
The term “IC” before the certification/registration number only signifies that the Industry Canada technical specifications were met.
Declaration of conformity
Manufacturer: Interlink Electronics, Inc.
546 Flynn Road
Camarillo, CA 93012
Hereby, Interlink Electronics, Inc. declares that the VP4910 is in compliance with the essential requirements and other relevant provisions of Directive 1999/5/EC.
EMC/EMI/Safety Standards:
EN 300 440-2 V1.1.1 (2001-09)
EN 301 489-1 V1.4.1 (2002-08)
EN 301 489-3 V1.4.1 (2002-08)
EN 60825-1 (1994, A11:1996, A2:2001)

text_image
CAUTION LASER RADIATION - DO NOT STARE INTO BEAM WAVE LENGTH: 532nm MAX OUTPUT: <1mW CLASS II LASER PRODUCTIntroduction
Overview
Congratulations on your purchase of the VP4910 RemotePoint™ Jade Green Laser Presentation Remote. The VP4910 offers full 360° mouse control with patented click-trigger support, programmable buttons, and the brightest laser in its class.

natural_image
Black interlink electronic device with control buttons and a green indicator light (no readable text or symbols)Installation
Adding or Changing Batteries
Open the battery compartment by pressing down on the latch. Insert the batteries per the diagram on the remote. Standard AA alkaline batteries are recommended.
Using the USB Base Station
An optional USB Base Station is provided for fixed installations. To use the USB Base Station, plug the USB cable into a free USB port on your computer and plug the USB receiver into the USB port in the center of the USB Base Station. To achieve maximum range and performance, experiment with the orientation and position of the USB Base Station until satisfied.
Use the Receiver Directly
The receiver can also be plugged directly into any free USB port on your computer or laptop for immediate use.

text_image
gged ort for The USB port will be marked with a logoPairing the Receiver
The receiver and remote come pre-paired at the factory. The remote will automatically adjust frequencies and channels to ensure reliable communication. Should you have any problem with communication, you can re-pair them by plugging the USB receiver into the AutoRF Port on the back of the remote.

natural_image
Line drawing of a remote control device with two separate views: one showing internal components and the other showing external ports (no text or symbols)Familiarizing Yourself with the Controls
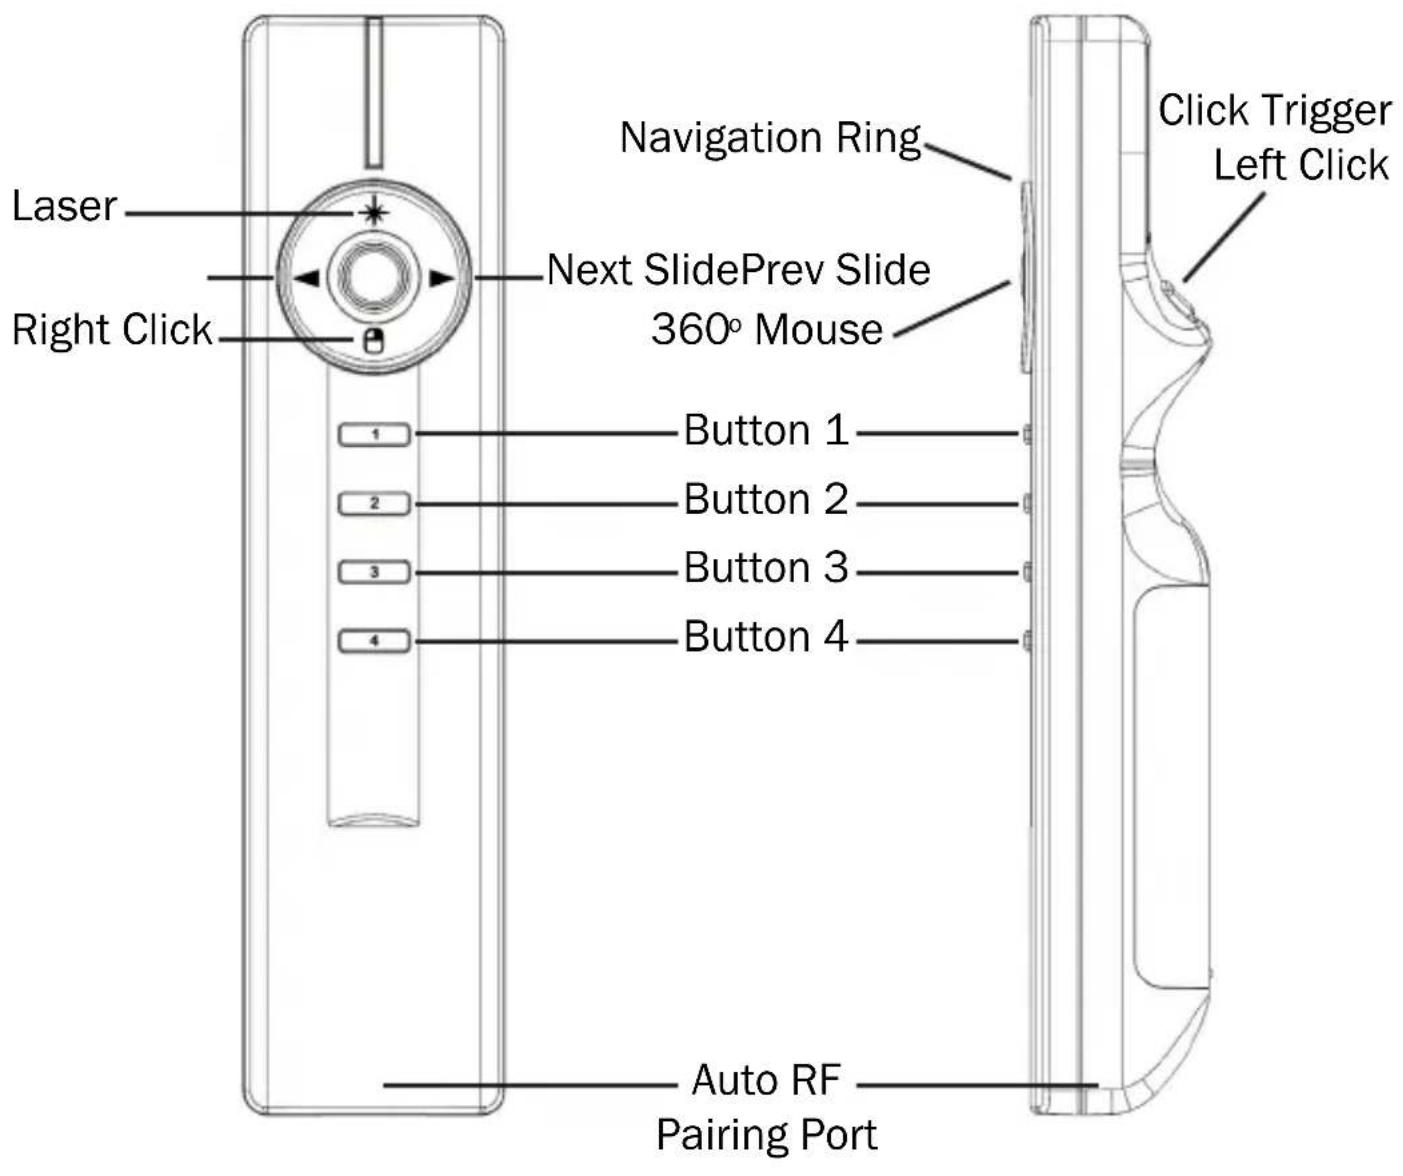
text_image
Laser Right Click Navigation Ring Next SlidePrev Slide 360° Mouse Click Trigger Left Click 1 2 3 4 Button 1 Button 2 Button 3 Button 4 Auto RF Pairing PortDefault Control
Mouse Control
Move the 360 degree mouse by moving the mouse button in the center of the navigation ring in the direction you wish to move.
Left Click: Use the button on the Click-Trigger ^TM on the bottom of the remote.
Right Click: Use the bottom button on the navigation ring to right click.
Presentation Controls

Laser
◀ Previous Slide
▶ Next Slide
Button 1: Next Slide
Button 2: Previous Slide
Button 3: Start Presentation
Button 4: Blank Screen
Using the Laser Pointer
Press the button * on the top of the ring to activate the laser pointer. The laser pointer can be used to highlight important points on slides and graphs.
Because the laser emits a green beam it will appear much brighter than a standard laser beam.

text_image
CAUTION LASER RADIATION - DO NOT STARE INTO BEAM WAVE LENGTH: 532nm MAX OUTPUT: <1mW CLASS II LASER PRODUCTUsing the Base Station
For permanent installations, the VP4910 comes with an optional base station. To use the base station, plug the USB cable into the USB port on your computer. The receiver plugs into the USB port in the center of the base station. Best results are achieved when the receiver is unobstructed and pointed towards the presenter or podium.
Custom Programming VP4910 Remote
The four buttons on the bottom of the VP4910 can be programmed to send a wide variety of keystrokes. The software is available online at http://www.interlinkelectronics.com/support/downloads.html
The remote can also be programmed to meet your own needs. To change the functions of the remote, select individual keys from the drop down menu. Once you have made your selection click “Program Receiver.”

text_image
Interlink Electronics, Inc. (c) 2007 INTERLINK ELECTRONICS Button1 Button2 Button3 Button4 Sound Profile Presentation PC.PPT Button 1 Custom = >> Button 2 Custom = >> Button 3 Startup PC.PPT Button 4 Blank Cognos Forms Ctrl+Alt Ctrl+Alt Ctrl+Alt Ctrl+Alt Ctrl+Alt Program Receiver with Selections Cancelled / ExitOne programmed, the changes are written to non-volatile memory on the receiver.
Once programmed those buttons will send those keys even on machines that aren't running the setup utility software
Product Specifications
Laser: 532 nm Green Class II Laser
Range: 150 ft Omni-Directional Range
Frequency: Auto RF 64k unique addressess
2.4 GHz Radio Frequency
Features: Full 360 ° Mouse
PowerPoint Slide Control
4 Programmable Buttons
Battery Type: 2 x AA Batteries
Size: 38 mm (W) x 160 mm (L) x
27.4 mm (H)
System Requirements
Operation: PC or Mac
Available USB Port
Microsoft PowerPoint
Keynote
Programming: Windows XP or Vista
^® or Apple
For Product Support Please Contact
546 Flynn Road
Camarillo, CA 93012 USA
TEL 888 696 3500
FAX 805 484 5997
INTERLINKELECTRONICS.COM
THANK YOU
Thank you for purchasing a VP4910 RemotePoint™ Jade Green Laser Presentation Remote. We know you had other choices and we appreciate that you chose Interlink Electronics for your wireless needs. So that we may better serve you in the future, please register online at www.interlinkelec.com/register.
Sincerely,

text_image
Emilol hE. Michael Thoben President, Chairman and CEO Interlink Electronics, Inc.
WARRANTY
30-Day Money Back Guarantee One Year, Limited Warranty
P/N 94-74889 Rev. B