C285 Duo - Phone GIGASET - Free user manual and instructions
Find the device manual for free C285 Duo GIGASET in PDF.

User questions about C285 Duo GIGASET
0 question about this device. Answer the ones you know or ask your own.
Ask a new question about this device
Download the instructions for your Phone in PDF format for free! Find your manual C285 Duo - GIGASET and take your electronic device back in hand. On this page are published all the documents necessary for the use of your device. C285 Duo by GIGASET.
USER MANUAL C285 Duo GIGASET
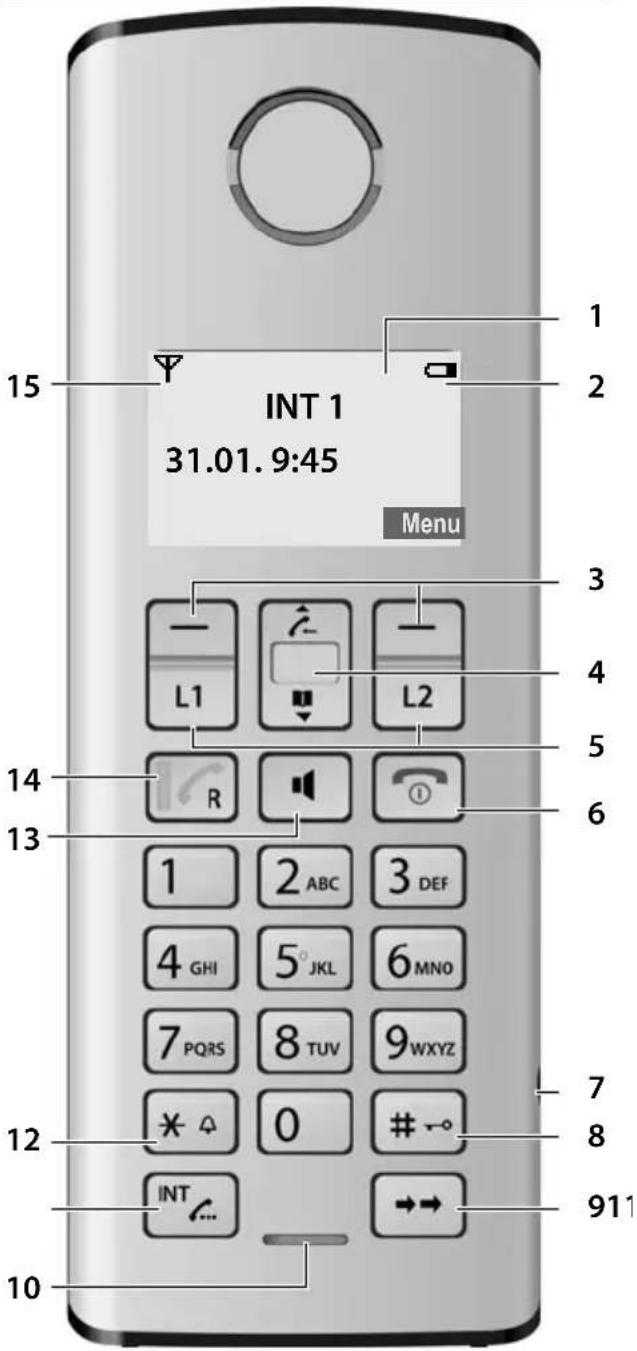
The handset at a glance
text_image
INT 1 31.01.9:45 Menu 1 2 3 4 5 6 1 2 ABC 3 DEF 4 GHI 5° JKL 6 MNO 7 PQRS 8 TUV 9 WXYZ * 0 # INT 911Note:
Pictures in this user manual may differ from the actual product.
1 Display in idle status
2 Charge status of the batteries (page 4)
3 Display keys (page 16)
4 Control key
Access to Calls list. Access to directory.
5 Line keys
Answer an incoming call for Line 1/Line 2.
Make a call from Line 1/Line 2.
Start a second call from Line 2 while telephoning from Line 1(page 27).
6 End Call key, On/Off key
End call, cancel function, return to idle status, activate/deactivate handset (press and hold in idle status).
7 2.5-mm socket (mono) for headset
8 Pound (#) key
Enter # symbol.
Keypad lock on/off (press and hold in idle status).
Switch between uppercase and lowercase letters for text entry.
9 Redial/Pause key
Open redial list (in idle status) or insert a dialing pause (when editing a number).
10 Microphone
11 Intercom/Hold/Conference key
Set up an internal call (page 28).
Switch between an external call and internal party (handset/base station, page 29), or transfer a call during an external call (page 28).
Set up a conference call between an external line and an internal party (handset/base station, page 29). Press and hold the key in hold-intercom mode.
12 Star (*) key
Ring tone on/off (press and hold).
Switch temporarily to tone dialing (DTMF).
13 Handsfree key
Answer or place a call in speaker mode.
Switch between speaker on and speaker off (in off-the-hook mode).
14 Talk/Flash key
Answer or start a call.
Key flashes: incoming call.
Add a flash (in the directory).
Send FLASH (when off the hook).
15 Reception indicator (page 4)
Overview of handset's display icons
Reception indicator
Handset is linked with the base station.
Flashes: the handset is out of range or not registered
Charge status of the batteries
□ □ ■ (empty to full)
☐ flashes: batteries almost empty
■ flashes: batteries charging
L1 Is shown when the respective line is off the
☐2 hook, in external talk mode, in use mode or on hold.
Is displayed in the Calls lists to show the line on which the call came in.
Off-Hook
Outgoing call initiated or during a call.
Flashes: indicates incoming call, L1CALL / L2CALL in the display header shows the line of the incoming call
[LI] Calls list icon
Entries stored in the Calls list.
Flashes: New missed calls in the Calls list
Voice mail envelope
At least one new message on voice mailbox
Handsfree icon
Handsfree mode activated
Ringer off icon
Ring tone volume of handset is turned off
Q0 L1 Answering machine icon
Answering machine is switched on for either Line 1 or for Line 2 or for both lines.
QD L1 Flashes: answering machine is recording or is being operated by another handset or there are new messages on the answering machine
How to change the display language, see
"Example: menu input" on page 10 or
"Changing the display language" on page 31.
The base station at a glance

text_image
4 SUN 09:23 31.01. Menu 3 - - 2 1 1 2 ABC 3 DEF 4 GHI 5 JKL 6 MNO 7 PQRS 8 TUV 9 WXYZ * 0 # 5 6 7 8 9 10 INT 11 12 L1 L2 13 14 151 Numeric key pad
2 Control key
Access to Calls list. Access to directory.
3 Display keys (page 16)
4 Display in idle status
L1, L2 - Flashes when the respective line is receiving an incoming call.
- Is on when the respective line is
- Off the hook
- In external talk mode
- On hold or in use mode
- Is displayed in the Calls list to show the line on which the call came in.
The answering machine is on.
Full Flashes when the answering machine's message memory is full.
R Flashes when the answering machine is controlled by a handset.
Is on when the ring tone volume of the base station is set to zero (see page 31).
5 Answering machine On/Off key Activate/deactivate answering machine.
6 Volume keys
- In idle mode: change the ring tone volume of the base station. - During message playback: change the volume of playback. - During call: change the volume of the loudspeaker. - During call screening: change the volume of call screening.
7 Erase key
Erase the current message during playback. Erase all old messages (press and hold in idle mode).
8 Start/Stop key with integrated LED for Line 1/Line 2
Start/stop playback.
LED status indicator:
- I s o n w h e n p l a y i n g m e respective line.
- Flashes slowly when there is at least one new message on the answering machine for the respective line.
- Flashes rapidly when the message memory for the respective line is full.
9 Redial/Pause key
Open redial list (in idle status) or insert a dialing pause (when editing a number).
10 Page key
Page handsets (press briefly). Start the registration procedure (press and hold in idle mode). You will hear a beep.
The base station at a glance
11 Mute key
Mute/unmute microphone.
12 Intercom/Hold/Conference key
Set up an internal call.
Switch between an external call and internal party (handset/base station), or transfer a call during an external call.
Set up a conference call between an external line and an internal party (handset/base station). Press and hold the key in hold-intercom mode.
13 Line keys
Answer an incoming call for Line 1/Line 2.
Make a call from Line 1/Line 2.
Start a second call from Line 2 while telephoning from Line 1 (see page 27).
LED status indicator:
– Flashes rapidly when the respective line is receiving an incoming call.
- Flashes slowly when a handset is off the hook on the respective line.
- Flashes very slowly when the respective line is on hold on the base station.
– Is on when the base station is in talk mode.
14 End Call key
End call, cancel function, return to idle status.
15 Talk/Flash key
Answer or start a call.
Add a flash (in the directory)
Send FLASH (when off the hook).
Please remember:
◆If the answering machine is being operated from a handset, or if it is recording a message, you cannot operate it from the base station.
◆If the start/stop key flashes although the answering machine is switched off, it means that there is still at least one new message that has not been played back.
Contents
The handset at a glance ....3
Overview of handset's display icons ..... 4
The base station at a glance ..... 5
Safety precautions 8
Notes on the operating instructions 10
Symbols used 10
Example: menu input 10
Gigaset C285 – more than just a telephone 11
First Steps 11
Package contents 11
Installing the base station 11
Setting up the handset for use 12
Making calls 14
Making an external call 14
Ending a call 14
Answering a call 14
Caller ID 15
Handsfree operation 15
Operating the telephone ..... 16
Control key 16
Display keys 16
Returning to idle status 17
Menu guidance 17
Writing, editing, and correcting entries 17
Using the directory and lists 18
Directory 18
Last number redial list 19
Calls list 19
Operating the answering machine.... 20
Operation using the base station keys 20
Operation using the handset 21
Setting up the answering machine ..... 24
Operating when on the move (remote operation) 25
Using the voice mailbox .....26
Configuring the voice mailbox for fast access .... 26
Using several handsets ..... 27
Registering and de-registering handsets .... 27
Locating a handset ("paging") 28
Changing the base station 28
Making internal calls 28
Accepting/rejecting call waiting ..... 29
Linking internal callers to an external call 29
Making two external calls simultaneously.... 30
Handset settings ....31
Changing the name of a handset ..... 31
Changing the display language ..... 31
Setting the display contrast 31
Activating/deactivating auto answer .... 31
Adjusting the loudspeaker and earpiece volume 31
Changing ring tones 31
Activating/deactivating the key-touch tone 32
Base station settings ..... 32
System settings 33
Restoring the default settings ..... 33
Appendix 34
Care 34
Contact with liquid 34
Questions and answers 34
Specifications 35
Authorisation 36
Customer Service & Assistance 36
Manufacturer warranty (Middle East) 38
Service Centres (Midde East) 40
Menu of the handset 42
Menu of the base station ..... 44
Index 45
Warning
Be sure to read this user guide and the safety precautions in detail before using your telephone. Explain their content and the potential hazards associated with using the telephone to your children.

Use only the power adapter supplied, as indicated on the underside of the base.

Use only rechargeable batteries that correspond to the specification provided (see page 35), as this could otherwise result in significant health risks and personal injury. Do not charge the handset in the charger or base while the headset is connected.

Using your telephone may affect nearby medical equipment. Be aware of the technical conditions in your particular environment e.g., doctor's surgery.

Do not hold the rear of the handset to your ear when it is ringing or when handsfree mode is activated. This may cause serious and permanent damage to your hearing.
Your Gigaset is compatible with the majority of digital hearing aids on the market. However, perfect function with all hearing aids cannot be guaranteed.
The handset may cause interference in analogue hearing aids. If you require assistance, please contact the hearing aid supplier.

Do not install the base or charger in bathrooms or shower rooms. The base and charger are not splashproof.

Do not use your phone in environments with a potential explosion hazard (e.g., paint shops).

If you give your phone to a third party, make sure you also give them the user guide.

Remove faulty bases from use or have them repaired by our Service, as these could interfere with other wireless services.
Batteries should not be disposed of in general household waste. Observe the local waste disposal regulations, details of which can be obtained from your local authority.
All electrical and electronic products should be disposed of separately from the municipal waste stream via designated collection facilities appointed by the government or the local authorities.

This crossed-out wheeled bin symbol on the product means the product is covered by the European Directive 2002/96/EC.
The correct disposal and separate collection of your old appliance will help prevent potential negative consequences for the environment and human health. It is a precondition for reuse and recycling of used electrical and electronic equipment.
For more detailed information about disposal of your old appliance, please contact your local council refuse centre or the original supplier of the product.
Please note
◆ Not all of the functions described in this user guide are available in all countries.
◆ The device cannot be used in the event of a power failure. It is also not possible to transmit emergency calls.
◆ Emergency numbers cannot be dialed if the keypad lock is activated!
Notes on the operating instructions
This section explains the meaning of certain symbols and typographical conventions used in this user guide.
Symbols used
On / Off (example)
Select one of the two menu functions specified.
\~ Enter digits or letters.
Back The display keys' current functions are shown in reverse and are highlighted in the lower display line. Press the display key below to launch the function.
q Press the top or the bottom of the control key: scroll up or down.
c / Q / * etc.
Press the corresponding key of the handset.
Example: menu input
In the user guide, the steps you need to perform are shown in abbreviated form. This is illustrated below using "Changing the display language" as an example.
What you need to do is explained in the box.
Menu → Settings → Handset
→ Language → Italian / Français / English
▶ With the handset in idle status, press the right display key to open the main menu.
▶ Select Settings using the control key q – press the control key at the top or bottom.
▶ Press the OK display key to confirm the function Settings.
The Settings submenu is displayed.
▶ Press the bottom of the control key s repeatedly until Handset is selected.
▶ Press the OK display key to confirm the function.
The Handset submenu is displayed.
▶ Press the bottom of the control key s repeatedly until Language is selected.
▶ Press the OK display key to confirm the function.
The Language submenu is displayed.
▶ Select the language you want using the control key q – press the control key at the top or bottom.
▶ Press the OK display key to confirm the selected language.
The language is now changed for all text.
Gigaset C285 – more than just a telephone
Your phone not only lets you store up to 250 phone numbers (page 18), it can do a whole lot more:
◆Phone directly using the base station: Your base station has the same keys as your handset. So nearly all functions you usually use on the handset are also available directly on the base station.
◆Use two telephone lines with only one telephone.
◆Make conference calls with two external parties (page 30).
◆View missed calls on your phone (page 19).
◆ECO DECT uses a power supply with low power consumption. Your handset reduces the transmission power depending on its distance from the base station (close-up range).
Note:
The transmission power of the base station is lowered to its minimum level when the handset is placed in the base station and only one handset is registered on the base station.
Headset socket
Which headsets are compatible?
0845 367 0812 (local call cost charge)
or contact us at
www.gigaset.com/customercare for information.
Caution:
Do not charge the handset in the charging cradle or base station while the headset is connected.
Have fun using your new phone!
First Steps
Package contents
◆One base station Gigaset C285
◆Two telephone line cords
◆One AC adapter for the base station (with yellow marked plug)
One User Guide
◆One Gigaset C28H handsets with battery cover
◆Two batteries
◆One belt clip
Included with each additional handset:
◆One Gigaset C28H handset with battery cover
◆One Gigaset charging cradle
◆One AC adapter for the charging cradle (with black marked plug)
◆Two batteries
◆One belt clip
Installing the base station
The base station is designed for use in dry rooms in a temperature range of +5°C to +45°C.
Set the base station at a central point in the building.
Please note:
◆Never expose the phone to heat sources, direct sunlight, or other electrical appliances.
◆Protect your phone from moisture, dust, corrosive liquids, and vapors.
Range and reception indicator
Range:
◆Up to 300 m outdoors
◆Up to 50 m indoors
Reception indicator:
The display shows if the handset is linked to the base station:
◆Y is on: handset is linked to the base station.
◆ flashes: no reception; handset is out of range or not registered.
Connecting the base station
▶ First connect the yellow marked plug pin to the base station's socket (yellow marked) and then the AC adapter to the AC outlet (see below).
▶ Afterwards connect the phone jacks as shown below.
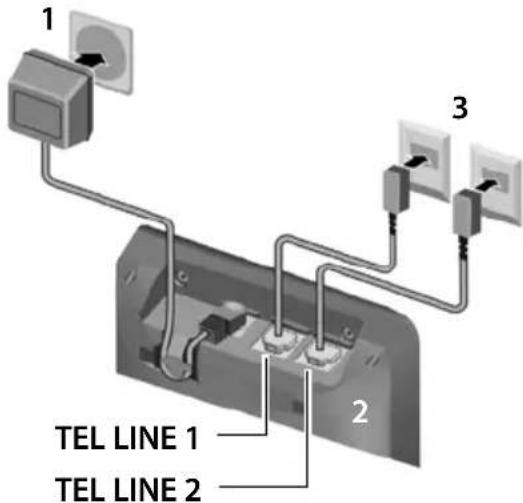
text_image
1 2 3 TEL LINE 1 TEL LINE 21 230 V power adapter
2 Back of the base station
3 Phone jacks with telephone line cords To connect your base station with the phone jack: For each line use either the telephone line cord or telephone line cord with adapter which fits into your telephone jack.
Please note
◆The power adapter must always be connected, as the phone will not operate without an electrical supply.
◆Your answering machine is set to give a standard announcement.
Setting up the handset for use
All supplied handsets are already registered to the base station by factory settings.
Carry out the following steps for each hand-set.
Inserting the batteries
Caution:
Use only rechargeable Nickel-metal hydride (NiMH) AAA batteries. Never use a conventional (non-rechargeable) battery or other battery types as this could result in significant health risks and personal injury. For example, the batteries could explode. The phone could also malfunction or be damaged as a result of using batteries that are not of the recommended type.
Note:
If attached, remove the belt clip before opening the battery cover.
▶ Open the battery cover.

natural_image
3D rendering of a metallic mechanical component with a black arrow indicating a directional change or movement (no text or symbols present)▶ Insert the batteries according to the correct polarity (see diagram).
The polarity is indicated in/on the battery compartment.

natural_image
Close-up of a battery pack with three cylindrical cells and two 100-pin connectors (no text or symbols visible)▶ Close the cover, and press the top so that it clicks into place.
Attaching the belt clip
There are notches on the sides of the handset for attaching the belt clip, nearly at the same height as the handset earpiece.
▶ Press the belt clip onto the back of the handset so that the protrusions on the belt clip engage the notches.
For multiple handsets: Connecting charger
▶ First connect the black marked plug pin to the charger's socket (black marked) and then the AC adapter to the AC outlet.
Placing the handset in the base station
▶ Place the handset in the base station or charger with the handset's display facing outwards.
Charging the batteries for the first time
▶ To charge the batteries, leave the handset in the base station or charging cradle continuously for ten hours.
The alternately flashing battery icons □ on the upper right side of the display screen indicate that the batteries are being charged.
Note:
- If the handset has turned itself off because its batteries are empty, and you then place the handset into the base station, it will turn on automatically.
- Only place the handset into the base station or charging cradle specifically intended for it.
- During handset operation, the battery icon □ indicates the charge status of the batteries (page 3).
– The batteries may feel warm when they are charging. This is not dangerous.
For questions and troubleshooting, seepage 34.
Setting the date and time
You should set the date and time, for example, to ensure the correct time of incoming calls is recorded.
Time and date can be set on the handset or on the base station.
To change the time and date, open the input field using:
Menu → □ → Settings → Date/Time → Set Date/Time
Enter the time and date using 10
digits, for example, 0 7 PQRS 1 a.o 5 JKL 1 a.o 5 JKL 0 1 a.o 1 a.o 0 for January 15, 2016 07:15.
To correct an incorrect entry, overwrite the character by typing the correct one.
OK Press the display key to save changes.
You can change the date and time format:
Menu → Settings → Date/Time → Set Format
▶ Choose between 12- and 24-hour time formats:
→ Time Format → 12 Hours / 24 Hours
▶ Choose between day/month and month/day date formats:
→ Date Format → DD.MM or MM.DD
Note:
Date and time settings apply to base station and all registered handsets.
Date and time format settings apply only to your own handset or to the base station. You must set date and time format at each device separately.
Selecting the line settings
For each handset and the base station, you can set how your telephone will use the two telephone lines:
Auto All incoming calls will ring. For outgoing calls, your phone will use whichever line is currently free.
Line 1 / Line 2
For incoming and outgoing calls, your phone will always use the selected line.
If you have selected Line 1 or Line 2, you can still answer or make a call on the free line by using the L1 or L2 keys.
Selecting line settings for a handset
On the handset:
Menu → □ → Settings → Handset → Line Setting
Auto / Line 1 / Line 2
Select entry and press OK.
Selecting line settings for the base station
On the base station:
Menu → □ → Settings → Base → Line Setting
Auto / Line 1 / Line 2
Select entry and press OK.
Display in idle status
Once the phone is registered and the time set, the idle display looks as shown here (example). The symbol □□ shown in the display's header indicates that the answering machine is turned on.

text_image
L1 L2 INT 1 31.01.9:45 MenuYour phone is now ready to use.
Making calls
Making an external call
External calls are calls using the outside telephone network.

Enter the number and press the Talk key 📊 or Handsfree key 📋.
Or:

Briefly press the Talk key 📄 or Handsfree key 📋, and then enter the number.
To cancel the dialing operation, press the End Call key 🔒.
Depending on the line settings of the used handset/base station (see page 14), the telephone selects the line. You can use the line keys L1 or L2 instead of the R or key to select the line for this call.
You are shown the duration of the call while the call is in progress.
Note:
Dialing using the directory (page 18) or Calls list (page 19) saves time re-entering numbers.
Ending a call

Press the End Call key.
Answering a call
The handset indicates an incoming call in three ways: by ringing, by a display on the screen, and by the flashing Talk key .
The base station indicates an incoming call in three ways: by ringing, by a display on the screen, and by the flashing line key L1 or L2.
You can accept the call by:
▶ Pressing the Talk key ☐.
▶ Pressing the line key L1 or L2.
▶ Pressing the Handsfree key 📄.
Depending on the line settings of the used handset/base station (see page 14), the telephone reacts differently:
If you have selected Auto, you can use the Talk key 📄 or Handsfree key 📋 for calls on both lines.
If you have selected Line 1 or Line 2, you can only answer calls on the selected line with the Talk key 📄 or Handsfree key 📋. For calls on the other line, you must use the L1 key or L2 key to answer the call.
If the handset is in the base station or charger and the Auto Answer function is activated (page 31), the call will be answered automatically when you lift the handset from the base station or charger. Lifting the handset from the base station or charger in this case has the same effect as pressing the Talk key.
You can press the Quiet display key to mute the ring tone of your handset without answering the call. The other registered handsets and the base station keep ringing. You can answer the call as long the call is displayed on the screen.
Note:
If two calls are ringing simultaneously on the two lines, your telephone display will switch from one line to the other every 3 seconds.
▶ Use the L1 key or L2 key to answer the call.
Caller ID
Caller ID (CID) is an optional subscription service provided by your telephone service provider. This feature supplies incoming caller identification information that will be displayed on your handset and the base station.
Call display with Caller ID/Name
If the number of the caller is stored with a name in the directory, on the display you will see both number and name.
Depending on the information that Gigaset C285 receives from the network of your provider it is also possible that the phone number is shown twice on the display (on both lines), if the name is not available (for example in the phone book).
This behaviour changes depending on the network provider.
The following is displayed in place of the number:
◆External Call, if no number is transmitted, or the caller has not subscribed to Caller ID.
◆Withheld, if the caller has withheld Caller ID.
Handsfree operation
You can activate the speakerphone at any time to provide handsfree operation during a call.
Activating/deactivating handsfree
Activating while dialing


Enter the number and press the Handsfree key.
▶ You should inform your caller before you use the handsfree function so that the caller knows someone else may be listening.
Switching between the earpiece and the handsfree mode
Press the Handsfree key.
During a call and when listening to the answering machine, turn handsfree on or off.
For how to adjust the volume, see page 31.
Operating the telephone
Most of the keys are the same on the handset and on the base station, so that, with few exceptions, you can operate the base station the same way as the handset.
Activating/deactivating the handset

Press and hold the End Call key to turn the handset on/off.
Activating/deactivating the keypad lock of the handset
→ Press and hold the pound key.
Keypad Locked appears in the display when the keypad lock is activated.
The keypad lock is deactivated automatically if someone calls you. It is re-activated when the call is finished.
Control key

text_image
- L1 ↑ - L2 Control keyIn the description below, the top or bottom of the Control key (up, down), which you must press depending on the operating situation, is marked in black, for example, [▲] for "press up on the Control key".
The Control key has different functions:
When the handset is in idle status

Open
the
directory

Open Calls list (page 19)
In input fields
You can use the Control key to move the cursor backwards or forwards.
In the main menu, lists and submenus
/ Scroll up/down line by line.
At the bottom/top of a menu or a list: A feedback tone signals that the menu/list has wrapped around automatically (the first/last entry is selected in the display).
When the handset is off the hook or when the answering machine is playing

Increase/decrease
volume
Display keys
The function of the display keys changes depending on the particular operating situation. Example:

text_image
Back Menu 1 21 The display keys' current functions are shown on the bottom display line.
2 Display keys
The most important display symbols are:

Open the main menu (in idle mode) or the context-dependent menu.

Go back one menu level.

Confirm your choice or save edited characters.

Clear key: deletes one character at a time from right to left (press briefly), or deletes all characters (hold).
Returning to idle status
You can return to idle status from anywhere in the menu as follows:
▶ Press the End Call key 📞.
Or:
▶ Do not press any key: after 2 minutes, the display will automatically return to idle status.
Changes that you have not confirmed or saved by pressing OK will not be saved.
An example of the display in idle status is shown on page 14.
Menu guidance
Your phone's functions are accessed using a menu that has a number of levels.
Main menu (first menu level)
▶ Press the display key Menu with the handset in idle status to open the main menu.
The main menu functions are shown on the screen in a list.
To access a function, open the corresponding submenu (next menu level):
▶ Navigate to the function using the control key [◀]. Pressing the display key OK.
Submenus
The functions in the submenus are displayed as lists.
To access a function:
▶ Scroll to the function with the control key [◀] and press OK.
Pressing the Back display key returns you to the previous menu level. 📞 cancels the operation.
Writing, editing, and correcting entries
Correcting incorrect entries
You can correct incorrect characters in the text by navigating to the incorrect entry using the control key. You can then:
◆ Press Clear to delete the character to the left of the cursor.
◆Insert characters by typing.
Entering and editing names
The following rules apply when creating an entry:
◆ Control the cursor with [▲].
◆ Press the pound key #→ to switch between uppercase and lowercase.
Entering special characters
You can enter special characters using the 0 or 1∞ key.
$$ \boxed {0} \quad . 0, /::" ^ {\prime}!? * + - \% \wedge \sim | $$
$$ \boxed {1 \circ} \quad \begin{array}{l} \text {SPACE 1 @ _ {-} # = < >} \ () \& [ ] {} \end{array} $$
Using the directory and lists
The options are:
◆Directory
◆Last Number Redial list
◆Calls list
You can store a maximum of 250 entries in the directory. Each entry must consist of a name and a number.
The directory is stored in the base station and is shared by all registered handsets.
Directory
In the directory, you can store phone numbers and the names associated with them.
▶ With the handset in idle status, open the directory by pressing the □ key.
Length of entries
Number: max. 24 digits
Name: max. 16 characters
Saving a number in the directory
Quickly storing a number starting from the idle status
The handset is in the idle status:

Enter the number and press
Save.

Enter the name and press OK.

Correct the number, if necessary, and press OK.
Storing a number starting from the directory
Menu → New Entry


Enter the name and press OK.
Enter the number and press OK.
You can use the Clear key to delete one character at a time from right to left (press briefly) or all characters (press and hold).
Entering and editing names
The following rules apply when creating an entry:
◆To enter a letter press the corresponding numeric key as often as necessary.
◆ Use ▲□ to move the cursor to the left or right.
◆Characters are inserted after the cursor.
◆ Press the pound key #→, before entering the letter, to switch between uppercase and lowercase.
Entering special characters see page 17.
Selecting a directory entry
Open the directory.
You have the following options:
◆ Use [◀] to scroll to the entry until the desired name is selected.
◆Enter the first character of the name, or scroll to the entry with □, if necessary.
Dialing with the directory
→ [▲] (Select entry)
/ Press the Talk key or the Hands-free key.
The number is dialed.
You can press the L1 or L2 key instead, if you want to specify which line to use.
Managing entries in the directory
→ [◀] (Select entry)
Viewing an entry
Menu → View
The entry is displayed.
Go back with Back.
Editing entries
Menu → Edit Entry

Edit the name and press OK.

Edit the number and press OK.
You can use the Clear key to delete one character at a time from right to left (press briefly) or all characters (press and hold).
Deleting entries
Menu → Delete
Delete the displayed entry.
Or:
Menu → Delete List
▶ Confirm question Delete? by pressing OK.
All entries in your directory will be deleted.
Adding a displayed number to the directory
Numbers that appear in a list, such as the Calls list or the Last Number Redial list can be added to the directory. If you have Caller ID and the name is transmitted, the first 16 characters of the transmitted name are copied to the name line.
A number is displayed:
Menu → Copy To Dir.
▶ Complete the entry as described in the section "Saving a number in the directory" (see page 18).
Last number redial list
The Last Number Redial list contains the 50 numbers last dialed with the handset (max. 32 digits). If a number has been dialed several times, only the last try is shown in the list.
Last number redial
→→ Press the key.
[▲] Select the entry.
/ ☐ Press the Talk key or the Hands-free key. The number is dialed.
You can press the L1 or L2 key instead, if you want to specify which line to use.
Managing entries in the Last Number Redial list
→→ Press the key.
[▲] Select the entry.
Menu Open menu.
The following functions can be selected with [▲]:
View
In the list long numbers are shown abbreviated. Select View to show the whole number.
Copy To Dir.
Copy an entry to the directory (page 19)
Delete (as in the directory, page 19)
Delete List (as in the directory, page 19)
Calls list
Requirement: Caller ID Presentation (CIP, seepage 15)
The numbers of the last 100 incoming calls are stored.
The [L] icon is shown on the display of the idle status when incoming calls are stored in the Calls list. The [L] icon flashes if new missed calls are in the Calls list.
New missed calls and the number of the calls are shown for the corresponding line on the display of the idle status, e.g.:
L1:01 L2:01.
▶ With the handset in the idle status, open the Calls list by pressing the ▲ key.
Dialing with the Calls list
→ [◀] (Select entry)
/ Press the Talk key or the Hands-free key.
The number is dialed.
You can press the L1 or L2 key instead, if you want to specify which line to use.
Viewing an entry


(Select entry)
Menu

View
The entry is displayed.


Press the Talk key or the Hands-free key.
The number is dialed.
Or:
Back
Press display key to go back.
List entry
New messages are at the top. A list entry contains the following information:
◆List type (in header)
◆Status of entry (new entries are marked with a star (*) in the header)
◆Name of caller, if name is transmitted or stored in directory
Caller's phone number, if only the number is transmitted
External Call, if no number is transmitted or the caller has not subscribed to Caller ID
Withheld, if the caller has withheld Caller ID
You can add the number of the caller to the directory (page 19).
◆Date and time of call (if set, page 13)
◆ Line: L1 or L2 behind the text shows whether the call has come in on Line 1 or Line 2.
You can manage the entries in the same way as the entries of the Last Number Redial list (see page 19).
Operating the answering machine
You can use the answering machine for both lines or only for one line, depending on your needs.
You can operate the base station's answering machine using the handset, using the keypad of the base station (page 5), or using remote operation (from another phone/cell phone).
Announcement mode
You can use the answering machine in two different modes.
◆ In Answer & Rec. mode, the caller hears your announcement and can then leave a message.
◆ In Answer Only mode, the caller hears your announcement but cannot leave a message.
Operation using the base station keys
You can use the base station keys for the most commonly used functions of your answering machine. For more information, see page 5.
Status of the answering machine
The LED in the Start/Stop key and the symbols in the display of the base station indicate the status of the answering machine.
The LED in the respective Start/Stop key ▶■1 or ▶■2
◆Is on when playing messages on the respective line.
◆Flashes slowly when there is at least one new message on the answering machine for the respective line.
◆Flashes rapidly when the message memory for the respective line is full.
The display of the base station may show the symbols shown here:
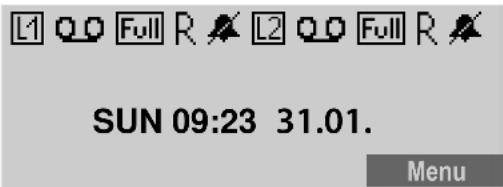
text_image
L1 Q0 Full R ✗ L2 Q0 Full R ✗ SUN 09:23 31.01. MenuThe following symbols provide information about the answering machine. Symbols on the left side of the display refer to Line 1, while symbols on the right side refer to Line 2.
oo is on The answering machine is on.
Full flashes The message memory is full.
R flashes The answering machine is controlled by a handset.
For the other symbols, see page 5.
Operation using the handset
Most of the functions described are also available using the keys and the display of your base station.
Call screening
If you have enabled call screening on the base station (see page 24) you can automatically listen through the loudspeaker of the base station while a caller is recording a message.
Provided you have enabled call screening on your handset (see page 24) you also can listen through the loudspeaker of your handset:
▶ While a caller is recording a message press the Screen display key.
The loudspeaker of your handset is activated.
▶ To switch off the loudspeaker press the handsfree key ☐.
Switching the answering machine on/off
You can switch the answering machine on and off separately for each line.
Menu → Answer Machine → Ans On/Off
Line 1 / Line 2
Select the line for which you want to switch the answering machine on/off and press OK.
On / Off Select an entry and press OK.
On the base station:
▶ Press the 🔑 key.
▶ Press the display key Line 1 / Line 2 to select the line for which you want to switch the answering machine on/off.
When the answering machine is turned on the icon for the respective line is displayed on the screen.
The phone includes a prerecorded announcement for the answer and record mode and announce-only mode. If a personal announcement has not been recorded, the corresponding prerecorded announcement is used.
Recording a personal announcement/announce only
Note:
When recording your announcement, speak directly into the handset's microphone, as if talking on the phone. You can also use the base station to record announcements.
You can record different announcements for each line.
Menu → Answer Machine → Record OGM
(OGM = outgoing message)
Line 1 / Line 2
Select the line for which you want to record an announcement and press OK.
Answer & Rec. / Answer Only
Select the mode in which you want to record the personal announcement and press OK.
Record Select and press OK to start recording.
You will hear the ready tone (short tone).
▶ Now record your announcement (must be at least 3 seconds long).
▶ Press OK to end the recording.
The recorded announcement will be played back automatically. You can record the announcement again by repeating these steps.
Please note:
◆Recording ends automatically if the maximum recording time of 90 seconds is reached.
◆If you cancel the recording, the prerecorded announcement will be used.
◆The recording is canceled if the answering machine memory is full.
▶ If necessary, delete old messages and repeat the recording.
Playing back announcements
Menu → Answer Machine → Record OGM
→ Line 1 / Line 2
→ Answer & Rec. / Answer Only
Play Select and press OK to start playback.
If a personal announcement has not been recorded, the corresponding prerecorded announcement is used.
Deleting personal announcements
Menu → Answer Machine → Record OGM
→ Line 1 / Line 2
→ Answer & Rec. / Answer Only
Delete Select and press OK to delete the announcement. If no personal announcement exists, you will hear an error tone.
After deleting the personal announcement, the corresponding prerecorded announcement will be used.
Selecting an announcement mode
You can choose between Answer & Rec. and Answer Only.
Menu → Answer Machine → Answer Mode → Line 1 / Line 2
Answer & Rec. / Answer Only
Select announcement mode and press OK.
The selected mode is saved even after the answering machine is deactivated.
Note:
If the message memory is full when in Answer & Rec. mode, the answering machine switches automatically to Answer Only mode. The flashing Full icon is displayed on the base station. If there are no new messages on the answering machine and no new missed calls in the Calls List, Memory Full! is displayed on the handsets.
▶ Delete old messages.
The answering machine automatically switches back to the mode set once deletion is complete, or you can select another recording mode.
Playing back messages
Note:
The base station and the handset operate differently when playing back messages.
The date and time of each message is logged (provided this has been set, page 13) and displayed during playback.
Playing back new messages
New messages that you have not yet listened to are indicated by a slowly flashing LED on the respective Start/Stop key ▶■1 / ▶■2 on the base station (see page 5).
Play Press the display key to start playback.
If you have new messages only for one line, playback starts immediately.
If you have new messages for both lines:
On the handset
Line 1 / Line 2
Select the line and press OK.
On the base station
Line 1 / Line 2
Press the display key corresponding to the line.
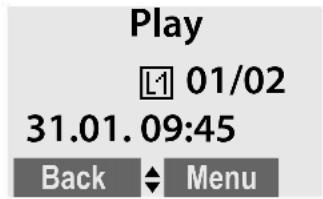
The following example shows a display when playing back new messages:
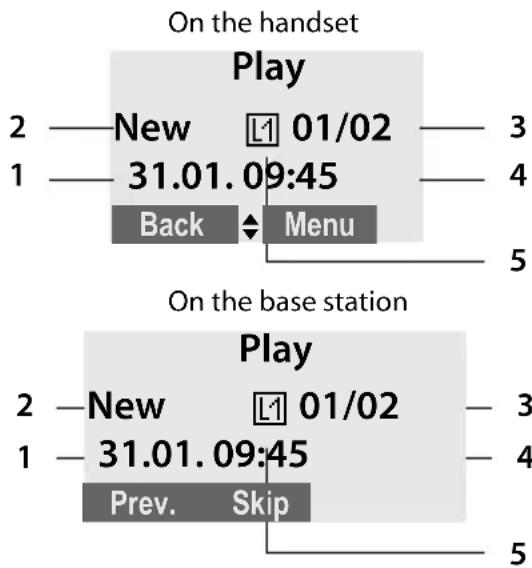
text_image
On the handset Play 2 — New 01/02 — 3 1 — 31.01.09:45 — 4 Back ▼ Menu 5 On the base station Play 2 — New 01/02 — 3 1 — 31.01.09:45 — 4 Prev. Skip 51 Date when message was recorded.
2 New: you have not yet listened to the message.
3 01/02: The first of two messages is played.
4 Time when message was recorded.
5 Line on which message was recorded.
If you have...
◆New messages:
New (2) is displayed. The number of messages (3) only indicates the number of new messages:
01/02 means that the first of two new messages is being played.
◆Messages that you have already listened to:
New (2) is not displayed. The number of messages (3) only indicates the number of old messages:
01/02 means that the first of two old messages is displayed.
On the handset
text_image
Play 01/02 31.01.09:45 Back MenuOn the base station

text_image
Play L1 01/02 31.01. 09:45 Prev. Skip◆No messages:
No Messages appears on the display screen.

An announcement tells you if there are any new messages, just old messages, or no messages.
If there are new messages, playback begins with the first new message. After the last new message, you will be returned to the Play menu.
After a new message has been played completely, its status becomes "old".
If the recorded message has been saved with the date and time, you will hear the date and the time announced before playback begins.
Playing back old messages
You can listen to old messages if there are no more new messages.

OK Press the display key to start playback.
On the base station: Press the respective Start/Stop key ▶■1 / ▶■2.
Controlling playback
During message playback:
Menu Press the display key to enter the Options menu.
◆Repeat
Repeat playback of the current message.
On the base station: Press Prev..
◆Next / Previous
Jump to playback of the following or previous message.
On the base station: Press Skip to jump to the following message. Press Prev. twice to jump to the previous message.
◆Delete
Delete the current message.
On the base station: Press the ☒ key.
Deleting messages
You can delete old messages all at once or individually.
Deleting all old messages
On the handset:
Menu → Answer Machine
→ Delete Old Msgs → Line 1 / Line 2
▶ Confirm question Delete? by pressing OK.
On the base station in idle status: Press and hold the ☒ key.
If you have no old messages, you will hear an error tone and No Messages will be displayed on the screen.
Deleting individual old messages
During playback:
Menu → Delete
▶ Press OK to delete the current message.
On the base station:
Press the ☒ key during playback.
Picking up a call from the answering machine
You can pick up a call while the answering machine is recording a message or being operated remotely:
Press the Talk key.
Recording stops and you can speak to the caller.
If two seconds of the call have already been recorded when you pick it up, the call will be displayed as a new message.
You can accept the call on every handset. If you use call screening on a handset, only this handset can answer up the call.
Setting up the answering machine
The answering machine is preconfigured at the factory. Change individual settings using the handset or the corresponding keys of the base station.
Activating/deactivating call screening
While a caller is recording a message, you can listen through the loudspeakers of registered handsets and the base station.
Menu → Answer Machine → Settings → Call Screening
If you use the handset for this setting:
Base / Handset
Select this if you want to make the setting for the handset or the base station.
On / Off Press the OK display key to confirm your selection.
The default setting for the base station is On; the default setting for the handset is Off.
For call screening on the handset:
Screen Press the display key to start call screening.
Toll-Saver Mode – Call acceptance/charge saving function for remote operation
For each line, you can set when you want the answering machine to respond to calls.
The options are: 2 Rings, 4 Rings, 6 Rings, 8 Rings, as well as the cost-saving setting Toll Saver.
Note:
The number of rings refers to the ring tones of the base station. If you have selected another ring tone, the number of rings you hear may differ from the selected number of rings.
When Toll Saver is set, the following determines when the answering machine accepts calls:
◆If no new messages are present, the answering machine accepts calls after 4 Rings.
◆If new messages are present, the answering machine accepts calls after 2 Rings.
When operating remotely, you know there are no new messages when you hear the third ring (otherwise the answering machine would have already accepted your call). There will be no call charges if you hang up now.
Menu → Answer Machine → Settings
→ Ring Delay → Line 1 / Line 2
2 Rings / 4 Rings / 6 Rings / 8 Rings / Toll Saver
Select an option and press OK.
Changing the language of voice prompts and prerecorded announcements
You can select English, Spanish, or French as the language of voice prompts and prerecorded announcements. You can select different languages for line 1 and line 2.
Menu → Answer Machine → Settings
→ Voice Language → Line 1 / Line 2
Italian / Français / English
Select a language and press OK.
Operating when on the move (remote operation)
You can check or activate the answering machine from any other telephone (hotel, pay phone, etc.).
Requirements:
◆The phone you are using for remote operation must have tone dialing (DTMF), so that you hear different tones when you press the keys.
◆ You must activate Remote Access.
Activating Remote Access
Menu → Answer Machine → Settings
→ Remote Access
On / Off Select and press OK to confirm your selection.
Calling the answering machine and playing back messages
Dial your own number.
While listening to your announcement, press the # key and enter the system PIN (default setting: 0000, see page 33).
You will be informed whether any new messages have been recorded. The messages are then played back. You can now operate the answering machine using the keypad.
Using the voice mailbox
Operating the answering machine using the keypad
The following keys are used:
Delete the current message.
Repeat the previous message.
2 Play the message.
3 Skip to the next message.
7 Turn on the answering machine.
8 Stop message playback.
9 Turn off the answering machine.
Enter the remote access code if the answering machine is on.
Note:
After message playback, if no key operation is detected for 10 seconds, the call will be terminated.
Activating the answering machine

Dial the number of the line you want to activate answering machine for.
▶ Allow the phone to ring until the ring back tone stops and the phone answers with a beep.

Enter system PIN (default setting: 0000, see page 33).
◆If messages are stored on the answering machine:
The answering machine starts playback.
▶ Press the 8 key to stop playback.
▶ After the beep press the ⑦ key to activate the answering machine.
Or
▶ Listen to the playback until you hear one beep (=the end of message playback)
▶ Press the ☑ key to activate the answering machine.
◆If no (new or old) messages are stored on the answering machine:
You will hear a beep. A status message is played back and informs that no messages are stored on the answering machine.
▶ Press the ☐ key to activate the answering machine.
You will hear a beep. The answering machine is now activated on the corresponding line and the activated announcement is played back.
Deactivating the answering machine

Dial the number of the line you want to deactivate answering machine for.

While listening to the announcement, press the # key and enter the system PIN (default setting: 0000, see page 33).

Press
the
9 key.
You will hear a beep. Your answering machine is now deactivated.
Using the voice mailbox
The voice mailbox is your telephone network provider's answering machine within their telephone network.
Configuring the voice mailbox for fast access
Entering the voice mailbox number
Menu
→ Voice Mail → Settings
→ Line 1 / Line 2

Enter the number of the voice mailbox and press OK.
The setting for fast access applies to all handsets.
If your network voice mail requires a password for access, it is possible to add a password by entering pauses (press the key) immediately after entering the mailbox access number and before entering your password.
Calling your voice mailbox
Menu → Voice Mail → Call VM
Line 1 / Line 2
Select which mailbox you want to call and press OK.
If you have new messages in your voice mail-box:
Call Press the display key to call the voice mailbox.
Press the Handsfree key ☐, if required. You hear the voice mailbox announcement.
If you have new messages only for one voice mailbox, the respective mailbox is immediately called.
If you have new messages for both voice mailboxes:
When using a handset:
Line 1 / Line 2
Select the line and press OK.
When using the base station:
Line 1 / Line 2
Press the respective display key to start the call.
For further operation steps, please refer to the instructions provided by your mailbox operator.
Please note: if you call your voice mailbox without having entered a voice mailbox number, your phone will only change into off hook state.
Using several handsets
Registering and de-registering handsets
You can register up to six handsets with your base station.
A Gigaset C28H handset can be registered with up to four base stations.
Note:
The base station and supplied handsets are pre-registered at the factory.
Registering the Gigaset C28H handset
On the handset
Menu → Settings → Registration → Register HS
Select the base you want to register your handset with and press OK. Bases that have been registered will be marked by √.
Enter your PIN and press (default setting: 0000, se e p a g e 3 3 )
The handset will be registered.
On the base station
Within 60 seconds press and hold the registration/page key (for about 5 seconds) on the base station (see page 5).
De-registering handsets
You can de-register any registered handset from your Gigaset C285.
On a handset:
Menu → Settings → Registration → Unregister HS
Enter your PIN and press OK (default setting: 0000, se e page 3 3).
Select the handset you want to de-register and press OK.
OK Press the display key to confirm deletion.
Locating a handset ("paging")
You can locate your handset using the base station.
▶ Press the Registration/Paging key ☐ on the base station briefly.
▶ All handsets will ring at the same time ("paging"), even if the ringers are switched off.
On individual handsets you can press the display key Quiet to mute the ring tone.
Ending paging
▶ Briefly press the Registration/Paging key on the base station ☐ or press any key on the handset.
Changing the base station
If your handset is registered to more than one base station, you can set it to a particular base station or to the base station that has the best reception (Best Base).
Menu → Settings → Registration → Select Base
Select one of the registered base stations or Best Base and press OK.
Making internal calls
Internal calls to other handsets registered with the same base station or to the base station are free.
INT Initiate internal call.
Select the handset or the base station you want to call and press OK.
Note:
If only one handset is registered to the base, the internal call will be established immediately after pressing the key.
Ending a call
Press the End Call key.
Transferring a call to another handset
You can transfer an external call to another handset (connect) or to the base station.
▶ Initiate an internal call as described in the section "Making internal calls" (see page 28).
Attended call transfer
When the internal party answers:
▶ If necessary, announce the external call.
Press the End Call key.
The external call is transferred to the other handset/the base station.
If the internal party does not answer, press the End display key to return to the external call. If the internal party is busy, you will hear the error tone and return automatically to the external call.
Unattended call transfer
Press the End Call key.
The external call is directly transferred to the other handset.
Then, if the internal party does not answer, the call will automatically return to you (the display will show External Call).
Hold while making internal call
When you are speaking to an external party, you can simultaneously call an internal party.
▶ Initiate an internal call as described in the section "Making internal calls" (see page 28).
The external party hears the hold melody.
Use the key to switch between the internal and external parties.
Ending the internal call
▶ Ask the other internal party to end the call.
You are reconnected to the external caller.
Accepting/rejecting call waiting
If you get an external call while conducting another external or internal call, you will hear the call waiting tone (short tone). The caller's number or name will appear on the screen if caller ID is enabled.
Call waiting while conducting an internal call
Press the End Call key to end the internal call.
▶ Answer the external call as described in the section "Answering a call" (see page 14).
You are connected to the waiting call.
Call waiting while conducting an external call on the same line as the waiting call
Accept Press the display key to answer the incoming external call.
The active call is put on hold. You are connected to the waiting call. You have the following possibilities:
- Press the Talk key to switch between the callers.
- Press end call key 🔍 to end the call with the online party.
Or:
Press the End Call key to end the existing external call.
▶ Answer the external call as described in the section "Answering a call" (see page 14).
You are connected to the waiting call.
Call waiting on the other line while conducting an external call
L1 / L2 Press the line key of the waiting call.
The current call is put on hold. You are connected to the waiting call.
Linking internal callers to an external call
Important: The internal conference function (called Listening In) must be activated.
You are conducting an external call. An internal caller can join this call and take part in the conversation. The other parties are made aware of additional listeners by a signal tone.
Activating/deactivating internal conference
Menu → Settings → System → Listening In → On / Off
Default setting is On.
Internal conference call
There are two ways to start an internal conference call:
◆Another handset can join the call using Listening In
◆You can call another handset using the ☑ key and add it to a conference.
Note:
A total of two handsets or one handset and the base station may be connected to an external call. If additional handsets attempt to join, they will see an error message.
Joining the call
When the line is engaged with an external call and you want join the call:
☐ / ☐ Press the Talk key or Handsfree key briefly.
When you join the call. The other parties hear a signal tone. On both handsets, you will see Conference on the display.
Calling another handset and adding it to the conference
You are conducting an external call.
▶ Initiate an internal call as described in the section "Making internal calls" (see page 28).
When the called handset has answered the call:
Conf. Press the display key to start the conference.
On both handsets, you will see Conference on the display.
Ending conference call
Press the End Call key.
The other parties hear a signal tone.
If the first internal party presses the End Call key ☐, the handset/base station that has entered the conference call remains connected to the external caller.
Making two external calls simultaneously
You can start a second call while already talking to one party. You can switch between these two parties or combine them in a conference call.
Requirement: The other line is not in use.
Starting a second call
The L1 or L2 display icon shows you which line you are using.
L1 / L2 Press the line key of the free line.
Your current call is put on hold. The other line is off the hook.
Enter the number for the second party.
A call to the second party is established.
Toggling between two external calls
In the display, you can see which line is active (icon L1 or L2) and which line is on hold.
L1 / L2 Press the line key of the line you want to talk to.
The selected line is now active; the other is put on hold.
Starting an external conference call
You can make conference calls with two external parties by following these three steps:
- Call the first party (see page 14).
- Call the second party (see "Starting a second call" on page 30).
- Start the conference call:
Menu → Conference
OK Press the display key to start the conference.
Ending an external conference call
Ending all calls
Press the End Call key. The conference call is ended.
Talking to one party and putting the other party on hold
L1 / L2 Press the line key for the party you want to talk to.
You will talk to the party whose line key you pressed. The other party will be put on hold.
Handset settings
Your handset is preconfigured, but you can change these settings to suit your individual needs.
Changing the name of a handset
The names "INT 1", "INT 2", etc., are assigned automatically during registration. You can change these names. The number of the handset, however, never changes. The changed name is only displayed on this handset.
Menu → Settings → Handset → Handset Name

Enter the name and press OK. The name must not exceed 12 characters.
Changing the display language
You can view the display texts in different languages.
Menu → Settings → Handset → Language
Italian / Français / English Select a language and press OK.
Setting the display contrast
You have a choice of five different contrast levels.
Menu → Settings → Handset → Display Contrast
Level 1 / ... / Level 5 Select a level and press OK.
Activating/deactivating auto answer
This function is active by default, so that when you get a call, you can simply lift the handset out of the base station without having to press the Talk key ☐.
Menu → Settings → Handset → Auto Answer → On / Off
Default setting is On.
Adjusting the loudspeaker and earpiece volume
You can set the loudspeaker volume and the earpiece volume to five different levels. You can only make these adjustments during a call.
The handsfree volume can only be adjusted when this function is in use.
You are conducting a call.
[◀] Increase or decrease the volume.
Changing ring tones
To set the ring tones on the base station, see page 32.
You can set different ring tones for Line1 and Line2.
Volume
You can choose between five volumes (1–5; for example, volume 4 = ____ ).
Menu → Settings → Audio Settings → HS Ring Volume
Line 1 / Line 2 Select the line for which you want to set the volume and press OK.
Select the volume and press OK.
Ring tones
You can choose between 15 different melodies.
Menu → Settings → Audio Settings → HS Ring Tones → Line 1 / Line 2
Select a melody and press OK.
Activating/deactivating the ring tone
You can deactivate the ring tone on your handset before you answer a call or when the handset is in idle status; the ring tone can be deactivated permanently or just for the current call.
Deactivating and reactivating the ring tone permanently
* ☐ Press and hold the star key.
Line 1/Line 2
Select the line for which you want to deactivate or reactivate the ring tone and press OK.
On/Off Select if you want to deactivate or reactivate the ring tone and press OK.
If the ring tone is deactivated, the 🎨 icon appears in the display for the respective line.
Deactivating the ring tone for the current call
Quiet Press the display key.
Adjusting the ring tone during an incoming call
▶ Press the □ or ▲ key until the ring tone volume reaches the desired level.
Activating/deactivating the key-touch tone
Each key press is acknowledged by a beep. You can deactivate this function:
Menu → Settings → Audio Settings → Key Touch Tone → On / Off
Base station settings
Use the keys on the base station to carry out these settings.
Setting the display contrast
You have a choice of five different contrast levels.
Menu → Settings → Base → Display Contrast
Level 1 / ... / Level 5 Select a level and press OK.
Changing the display language
You can view the display texts in different languages.
Menu → Settings → Base → Language Italian / Français / English Select a language and press OK.
Changing the ring tone volume
You can adjust the ring tone on the base station before you answer a call or when the base station is in idle status.
▶ Use the volume keys - and + on the base station to adjust the volume of the base station ring tone.
Changing ring tone melodies
You can use a registered Gigaset C28H handset or the keys on the base station to enter this setting.
You can choose between 5 different melodies.
Menu → Settings → Audio Settings → Base Ring Tones
Select your preferred melody and press OK.
System settings
The following base station settings can only be made using a registered Gigaset C28H handset.
Protecting against unauthorized access
Protect the system settings of the base station with a PIN known only to you. The system PIN must be entered when registering/de-registering a handset with/from the base station.
Changing the system PIN
You can change the 4-digit system PIN set on the base station (default setting: 0000) to a 4-digit PIN known only to you.
Caution:
Do not forget the new system PIN! If you forget it, you must reset your phone to the default settings (see "Restoring the default settings" on page 33).
Menu → Settings → System → Change PIN
Enter the old PIN and press OK.
Enter the new PIN and press OK.
To confirm, enter the new PIN again and press OK.
Settings for connecting the base station to the PABX
The following settings are only needed when your PABX requires them. Please refer to the user guide of your PABX.
Changing the dialing mode
The following dialing modes can be selected:
◆Tone dialing (DTMF)
◆Pulse dialing (DP)
Menu → Settings → System → Dialling Mode → Line 1 / Line 2
Tone/ Pulse Select the dialing mode and press OK.
Setting the flash time
Menu → Settings → System → Recall → Line 1 / Line 2
Short / Medium / Long
Select the flash time (Short =
100 ms, Medium = 280 ms,
Long = 600 ms) and press OK.
Switching temporarily to tone dialing (DTMF)
If your PABX still operates with pulse dialing (DP), but you need tone dialing (DTMF) for a connection (for example to listen to the voice mailbox), you must switch to tone dialing for the call.
Requirement: You are conducting a call or have already dialed an external number.
Menu → Tone Dialling
OK Press the display key to confirm.
Tone dialing is now activated for this call only.
Restoring the default settings
You can restore the default values for most settings. When resetting, all handsets remain registered and the directory will not be deleted.
▶ Perform the following on a registered Gigaset C28H handset!
Menu → Settings → System → Reset
OK Press the display key to confirm reset.
Appendix
Care
Wipe the base station and handset with a damp cloth (do not use solvents) or an anti-static cloth.
Never use a dry cloth. This can cause static.
Contact with liquid

If the handset has come into contact with liquid:
- Immediately switch the handset off and remove the batteries.
- Allow the liquid to drain from the handset.
- Pat all parts dry, then place the handset, with the battery compartment open and the keypad facing down, in a dry, warm place for at least 72 hours (not in a microwave oven, convection oven, or similar place).
- Do not switch on the handset again until it has completely dried.
When it has fully dried, you should be able to use it again normally.
Questions and answers
If you have any questions about the use of your telephone, you can contact us at any time atwww.gigaset.com/customercare
The table below (page 34) contains a list of common problems and possible solutions.
Troubleshooting
The display is blank.
-
The handset is not switched on.
▶ Press 🔍 and hold the End Call key. -
The batteries are empty. ▶ Charge or replace the batteries (page 12).
The handset does not respond to a key press.
The keypad lock is activated.
▶ Press and hold the pound key #→ (page 3).
Base Search and is flashing on the display screen.
- The handset is outside the range of the base station.
▶ Reduce the distance between handset/base station. - The handset has been de-registered. Please Register is flashing on the display screen.
▶ Register the handset (page 27). - The base station is not switched on.
▶ Check the base station power cord (page 12).
Handset does not ring.
The ring tone is switched off.
▶ Activate the ring tone (page 32).
You cannot hear the ring tone/dialing tone.
Base station's phone cord has been replaced.
▶ When purchasing a new cord, make sure that it has the correct pin connections.
▶ Correct phone jack assignment
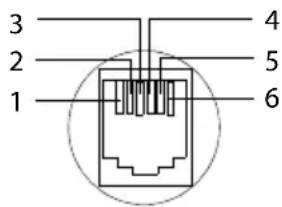
text_image
3 2 1 4 5 61 unused
2 unused
3 a
4 b
5 unused
6 unused
The other party cannot hear you.
You have pressed the display key Mute or the key. The handset is on hold.
▶ Press the left display key to switch on the microphone again.
| The incoming call number is not displayed. Caller ID is not enabled. ▶You must ask the telephone network provider to activate Caller ID. |
| You hear an error tone when keying an input. Action has failed/invalid input. ▶Repeat the operation. Watch the display and refer to the operating instructions, if necessary. |
| You cannot listen to messages left on the voice mailbox. Your phone system is set for pulse dialing. ▶Set your phone system to tone dialing. |
| The phone number appears twice on the display: ▶This behaviour depends on the network provider and is correct. If you wish to see the number on one line and the corresponding name on the other line you first have to store them in the directory. |
| You hear an error beep from the answering machine during remote operation. The system PIN entered is incorrect. ▶Enter the system PIN again (see page 33). |
| You cannot operate the answering machine using remote operation. Remote Access is not activated. ▶Activate Remote Access (see page 25) |
| The answering machine does not record messages/has switched to "announce only". Its memory is full. ▶Delete old messages. ▶Play back new messages and delete. |
| A power failure has occurred and the display of the base station doesn't show any information (it is blank) after switching it on. ▶The restart did not succeed, please disconnect and reconnect the power adapter. If the display still remains blank after two tries, please contact the customer care service. |
Specifications
Recommended batteries
Technology: Nickel-metal hydride (NiMH)
Type: AAA (Micro, HR03)
Tension: 1,2 V
Capacity: 550 mAh
The handset is supplied with two authorized batteries.
Handset operating times/charging times
| Standby time Approx. | 260 hours(10.8 days) |
| Talk time Approx. | 16 hours |
| Charge time Approx. | 10 hours |
The operating and charge times apply only when using the recommended batteries.
Base station power consumption
In standby mode: approx. 1.5 watts During a call: approx. 2 watts
General specifications
| DECT standard is supported | |
| No. of channels 60 d | duplex channels |
| Radio frequency range 1880–1900 MHz | |
| Duplex method Time | multiplex, 10-ms frame length |
| Channel grid 1728 kHz | |
| Bitrate 1152 kbit/s | |
| Modulation GFSK | |
| Language code 32 kbit/s | |
| Transmission power | 10 mW, average power per channel |
| Range Up to 300 m | outdoors, up to 50 m indoors |
| Power supply/ input 120-240 V ~/50-60 Hz | |
| Environmental operating condi-tions | +5°C to +45°C; 20% to 75% relative humidity |
| Dialing mode DTMF | (tone dialing)/DP (pulse dialing) |
| Flash time | France (280 ms) / Italy (100 ms) |
Authorisation
This device is intended for connection to analogue networks outside the European Economic Area (with the exception of Switzerland) depending on national type approval.
Country-specific requirements have been taken into consideration.
We, Gigaset Communications GmbH, declare that this device meets the essential requirements and other relevant regulations laid down in Directive 1999/5/CE.
A copy of the 1999/5/EC Declaration of Conformity is available at this Internet address: www.gigaset.com/docs
CE 0682
Customer Service & Assistance
Do you have any questions? As a Gigaset customer, you can find help quickly in this User Manual and in the service section of our Gigaset online portal www.gigaset.com/service.
In our constantly updated online service you can find:
◆Extensive information about our products
◆FAQ compilations
◆Keyword search to help find topics quickly
◆Compatibility database: Find out which base stations and handsets can be combined.
◆Product comparison: Compare the features of several products with each other.
◆Downloads for user manuals and current software updates
◆E-mail contact form for customer service
Please register your phone online right after purchase.
This enables us to provide you with even better service regarding questions or an after sales query/issue/claim. In order to contact our customer service via email, please use the email contact form from our Gigaset online portal after selecting your home country.
Our representatives are also available on the telephone hotlines for consultation.
Customer Service & Assistance
Australia....1300 780 878
Austria 0043 1 311 3046
Bahrain....97 31 73 11 173
Belgium 078156679
Bosnia Herzegovina....033 276 649
Brazil 4003 3020
India ....Please refer to your ....local warranty card
Indonesia .....(62-21) 5673813
(62-21) 888856000
Ireland .....18 50 77 72 77
Italy....199.15.11.15
Norway....22 70 84 00
Please have your record of purchase ready when calling. After sales service is not offered in countries where our product is not sold by authorised dealers.
Manufacturer warranty (Middle East)
On the purchase of your new Gigaset product, we guarantee that this equipment is a genuine manufacturer's product and extend the following warranty:
We guarantee this product against manufacturing defects for two full years from the date of purchase, unless specified otherwise.
Adaptors and batteries for cordless phones carry 6 months warranty from the date of purchase.
Gigaset Communications authorized Service Centres will replace or repair, if necessary, any defective part/parts free of charge by presenting this certificate of warranty at the Service Centre mentioned overleaf.
This Certificate of warranty does not apply if the telephone has:
- Been misused, mishandled, willfull damaged, neglected, damaged by lightning, improperly repaired, tested, altered improperly in any way.
- A defect arising out of any failure to follow instructions either in the manual or product specification.
- In case repairs are carried out of by unauthorized personnel or unauthorized source warranty will be void.
- A defect arising from using non-Gigaset approved accessories or ancillary items attached to or in connection with the telephone.
- If this certificate of warranty is not signed and stamped by the authorised distributor.
- Any other claim resulting out of or in connection with the device shall be excluded from this warranty.
For Southern Africa:
In the event of an after-sales issue/warranty claim please refer back to your point of purchase.
Proof of purchase (receipt) has to be submitted.
Certificate of warranty (Middle East)
The warranty is not valid if it is not signed and stamped by the authorized distributor.
Please fill in the following details and stamp the card to validate the warranty. All details must be filled in by the dealer and retained by the customer. This warranty shall apply to products purchased in the Middle East only.
Customer's Name:
Product / Model:
Dealer's Name:
Date of Purchase:
Invoice / Cash Memo Details:
Dealer's Stamp
Service Centres (Midde East)
UAE
Customer Service Hotline UAE
TEL: 00971-4-4458255 / 00971-4-4458254
Service Collection Point
www.technocare-prodigy.com
KARAMA
Sea Shell Electronics
Opp. Karama Centre
Dubai, UAE
Tel: 00971-4-3979228
Fax: 00971-4-3966205
Deira
Souvenir Mobiles,
Omar Bin Katab Road,
Oppst. Gulf Peral hotel (Tahir Hotel)
Al Baraha Street,
Tel: 00971-4-2731910 / 00971-4-2737377
Sharajah
Hotline Telecom
Sahara Centre
Sharjah, UAE
Tel: 00971-6-5312126
Al Ain
Phone Station
Al Ain Mall, Town Centre,
Tel: 00971-3-7515588
Fujairah
Al Manzil,
Al Gurfa Street,
Main market Road,
Tel: 00971-9-2233488
Oman
National Telephone Services Co. LLC
P.O. Box 2786 PC:112, Sultanate of Oman
Tel: +968-709281 Ext. 45/21/75
Fax: +968-791013
E-mail: isonts@omentel.net.om
Qatar
Modern Home,
51-East - Salwa Road,
Al-Maha Complex, Doha
Tel: 00974-4257844 / 00974-4257777
Fax: 00974-4314700
Bahrain
Authorized Service Center,
Bldg: 211, Rd: 339, Block: 321,
Old Place Road, Manama,
Tel: 00973-17311173
E-mail: servicemanager@ashrafs.com.bh
Saudi Arabian Service Centers:
Ahmed Abdulwahed Trading Co.
Jeddah Service Center
Al-Amal Plaza, Hail Street,
Jeddeh, Saudi Arabia,
Tel: 02-6500282 Ext. 209
Riyadh Service Center
Olaya Street
Riyadh, Saudi Arabia,
Tel: 01-4622470 / 4623850
Khobar Service Centre
Al-Khobar Street,
Al-Khobar, Saudi Arabia,
Tel: 03-8944193/03-8952359
Madina Munawara
Al-Ayon Street,
Tel: 00966-4-8387931
Khamis Mushyat
Al-Khalidiya St.,
Tel: 00966-7-2230772
Tabuk
Main Street,
Tel: 00966-4-4219232
Kuwait
Customer Service Hotline Kuwait
Tel: 00965-22458737 / 00965-22458738
Al-Baptain Service Center
Shop #: 247
Qibla, Block 11,
Avenue 11,
Souk al Kabeer,
Fahad Al Salem Street,
Tel: 00965-2464993
Jordan
SEDR Home & office Electronics
Co - Tronicom
Wasfi Al-Tal St.,
Building No. 80,
2nd floor,
Tel: 00962-6-5625460/1/2
Lebanon
306, Jdeideh Sin el Fil Blvd,
Tel: 00961-1240259 / 00961-1236110
Menu of the handset\*
flowchart
graph TD
    A["Directory"] --> B["<directory list>"]
    B --> C["View"]
    C --> D["New Entry → page 18"]
    C --> E["Edit Entry"]
    C --> F["Delete → page 19"]
    C --> G["Delete List → page 19"]
    H["Answer Machine"] --> I["Play"]
    I --> J["Line 1"]
    I --> K["Line 2"]
    I --> L["Ans On/Off Line 1 On"]
    L --> M["Off"]
    L --> N["Line 2 On"]
    O["Answer Mode"] --> P["Line 1"]
    O --> Q["Line 2 Answer & Rec."]
    P --> R["Answer & Rec."]
    P --> S["Answer Only"]
    T["Record OGM"] --> U["Line 1"]
    T --> V["Line 2 Answer & Rec."]
    U --> W["Answer Only"]
    X["Delete Old Msgs"] --> Y["Settings"]
    Y --> Z["Ring Delay"]
    Z --> AA["Line 1"]
    Z --> AB["Line 2"]
    AC["Voice Mail"] --> AD["Call VM"]
    AD --> AE["Line 1"]
    AD --> AF["Line 2"]
    AG["Voice Mail"] --> AH["Settings"]
    AH --> AI["Line 1"]
    AH --> AJ["Line 2"]
    AK["Answer Machine"] --> AL["Page 18"]
    AK --> AM["Page 18"]
    AK --> AN["Page 23"]
    AK --> AO["Page 21"]
    AK --> AP["Page 22"]
    AK --> AQ["Page 21"]
    AK --> AR["Page 24"]
    AK --> AS["Page 25"]
    AK --> AT["Page 24"]
    AK --> AU["Page 25"]
    AK --> AV["Page 27"]
    AK --> AW["Page 26"]
*The grey colored parts of the menu are also available in the base station's menu

flowchart
graph TD
    A["Settings"] --> B["Date/Time"]
    B --> C["Set Date/Time"]
    C --> D["Set Format"]
    B --> E["Audio Settings"]
    E --> F["HS Ring Volume"]
    F --> G["Line 1"]
    F --> H["Line 2"]
    E --> I["HS Ring Tones Line 1"]
    I --> J["Line 2"]
    E --> K["Base Ring Tones Line 1"]
    K --> L["Line 2"]
    E --> M["Key Touch Tone"]
    M --> N["page 32"]
    O["Registration Register HS"] --> P["Unregister HS"]
    O --> Q["Select Base"]
    R["Handset Handset Name"] --> S["Language"]
    R --> T["Display Contrast"]
    R --> U["Auto Answer"]
    R --> V["Line Setting"]
    V --> W["Auto"]
    V --> X["Line 1"]
    V --> Y["Line 2"]
    R --> Z["System"]
    Z --> AA["Listening In"]
    AA --> AB["Change PIN"]
    AA --> AC["Dialling Mode"]
    AC --> AD["Line 1"]
    AC --> AE["Line 2"]
    Z --> AF["Recall"]
    AF --> AG["Line 1"]
    AF --> AH["Line 2"]
    Z --> AI["Reset"]
Menu of the base station
flowchart
graph TD
    A["Directory View"] --> B["page 18"]
    B --> C["Edit"]
    C --> D["New Entry"]
    C --> E["Entry"]
    C --> F["Delete"]
    C --> G["Delete List"]
    H["Answer Machine"] --> I["Answer Mode Line 1"]
    I --> J["Answer & Rec."]
    J --> K["Answer Only"]
    I --> L["Record OGM Line 1"]
    L --> M["Answer & Rec."]
    M --> N["Answer Only"]
    L --> O["Settings Ring Delay"]
    O --> P["Line 1"]
    P --> Q["Call Screening"]
    P --> R["Remote Access"]
    P --> S["Voice Language"]
    S --> T["Line 1"]
    T --> U["Line 2"]
    V["Voice Mail"] --> W["Call VM"]
    W --> X["Line 1"]
    W --> Y["Line 2"]
    V --> Z["Settings Line 1"]
    Z --> AA["Line 2"]
    AB["Settings"] --> AC["Date/Time"]
    AC --> AD["Set Date/Time"]
    AD --> AE["Set Format"]
    AF["Audio Settings"] --> AG["Base Ring Tones"]
    AG --> AH["Line 1"]
    AH --> AI["Line 2"]
    AG --> AJ["Key Touch Tone"]
    AJ --> AK["Language"]
    AK --> AL["Display Contrast"]
    AL --> AM["Line Setting"]
    AM --> AN["Auto"]
    AN --> AO["Line 1"]
    AN --> AP["Line 2"]

    style A fill:#f9f,stroke:#333
    style H fill:#f9f,stroke:#333
    style V fill:#f9f,stroke:#333
    style AB fill:#f9f,stroke:#333
Index
Symbols
"External" (Calls list) 20
"Withheld" (Calls list) 20
A
Access protection 33
Activating
answering machine 21
answering machine (remote operation)....26
auto answer 31
handset....16
internal conference call....29
keypad lock 16
Announcement (answering machine) 21, 22
Announcement mode (answering machine)....20, 22
Answering machine 21
activating/deactivation....21
deleting messages 24
playing back messages 22
recording an announcement/ announce only 21
remote operation 25
Answering machine within the network see Voice mailbox
Area codes 14
Attended call transfer....28
Auto answer 15,31
B
Base station
changing....28
connecting and setting up.... 11
connecting the device.... 12
display contrast....32
display language....32
PABX relevant settings. 33
range 12
ring tone melody 32
ring tone volume 32
setting 32, 33
settings 32
system PIN 33
Battery
charge status....3
fitting....12
recommended batteries.... 35
Best base station....28
C
Call
answering.... 14
conference call 29
ending.... 14
external.... 14
internal 28
picking up from answering machine 24
transferring (connecting).... 28
Call acceptance 25
Call duration.... 14
Call history 19
Call transfer.... 28
attended 28
unattended.... 28
Call waiting.... 29
internal call.... 29
Caller ID 15
Calls list
"External" 20
"Withheld" 20
dialing 19
list type 20
name of caller 20
number of caller 20
status of entry 20
Care of the telephone 34
Changing
dialing mode 33
flash time 33
name of handset.... 31
ring tone 31
system PIN 33
Character set table 17
Charge saving function 25
Charge status of the batteries ..... 3,4
Clear key 16, 17, 18
Conference call 29
external.... 30
Control key 3,16
Index
Correcting entries 17
Customer Care 36
Customer Service & Assistance 36
D
Date format.... 13
Deactivating
answering machine .... 21
auto answer 31
conference call....29
handset.... 16
keypad lock 16
Default settings....33
Deleting announcement (answering machine)....22
characters.... 17
message 24
De-registering handset 27
Dialing mode 33
Dialing with Calls list 19
Directory 18
managing entries 18
opening.... 16
saving entry 18
Display charge status of the batteries .....3
handset....3
in idle status....17
keys....3,5,16
number (CID/CNID) 15
Display contrast
base station .... 32
handset.... 31
Display language
base station .... 32
handset 31
Ending, see Deactivate
Entry
selecting (menu).... 10
selecting from directory....18
status (Calls list).... 20
writing, editing, correcting.... 17
Erase key ....5
Example for menu input .... 10
External
conference call .... 30
starting second external call ..... 30
toggling between two calls 30
two simultaneous calls 30
F
Fast access voice mailbox.... 26
Fast access, voice mailbox. 26
Flash time 33
Format of Date, Time 13
H
Handset activating/deactivating.... 16
auto answer 31
changing name.... 31
changing to best reception ..... 28
changing to different base station.... 28
charge times 35
contact with liquid 34
deactivating ring tone.... 32
de-registering 27
display contrast.... 31
display in idle status....3
display language.... 31
idle status....14, 17
loudspeaker volume 31
operating time.... 35
paging 28
plug for headset ....3
reception indicator.... 12
registering 27
registering with another base station....28
ring tone melody 31
ring tone volume 31
settings 31
setup 12
transferring call.... 28
using several handsets 27
Handsfree talking 15
Headset plug ....3
Hold while making internal call....28
|
Icon
answering machine 21
display....16
keypad lock 16
new message....22
ring tone 32
Idle status (display) 14
returning to 17
Intercom/Conference key .....6
Internal
making calls 28
simultaneous internal call....28
Internal call....28
call waiting 29
Internal conference....29
Internal conference call 29
K
Keypad lock 16
Keys
clear key 16, 17, 18
Control key 3,16
display keys 3,5,16
End Call key ....3, 6, 14, 30
Erase key....5
intercom/conference key 6
Last Number Redial key.....19
Line 1....3
Line 1 with LED 6
Line 2....3
Line 2 with LED 6
menu key 16, 17, 18
mute key....6
On/Off key 3,6
page key 5
Pound key 3,16
redial/pause key 5
star key 3,32
start/stop key with LED 5
Talk key 3,14
talk/flash key 6
L
Last number redial list 19
Line keys 3
Line keys with LEDs 6
Line settings....14
Liquid 34
List (Calls list)
call history 19
missed calls 20
type 20
Listening in.... 29
Listening in during recording 24
Listening In function,
see internal conference
Locating handset 28
Lock keypad 16
Loudspeaker volume (handset).... 31
M
Making calls
answering a call.... 14
external.... 14
internal 28
Manufacturer warranty (Middle East) ... 38
Menu
key 16, 17, 18
menu guidance.... 17
menu input.... 10
Messages.... 20
deleting.... 24
icon for new message 22
playing back....22
Microphone 3
mute/unmute 34
Missed call.... 20
Mute key 6,34
N
Name of caller (Calls list) 20
Network mailbox, see Voice mailbox
Number
adding to directory 19
display calling number (CIP) ..... 15
saving in directory 18
Number of caller (Calls list) 20
0
On/Off key.... 3,6
P
PABX
setting dialing mode 33
setting flash time 33
settings 33
switching to tone dialing 33
Package contents 11
Index
Page key 5
Paging 28
Paging, handset....28
PIN....33
Playback (answering machine) announcement .... 22
messages 22
Pound key 3,16
Power adapter 8
Power consumption 35
Protecting phone from access 33
Pulse dialing 33
Q
Questions and answers 34
R
Range.... 12
Reception indicator 12
Redial/Pause key 5,19
Registering handset 27
Remote control 25
Ring tone
activating/deactivating....32
ajusting 32
changing.... 31
setting melody (base station) ..... 32
setting melody (handset) ..... 31
setting volume (base station) ..... 32
setting volume (handset) ..... 31
S
Safety precautions ....8
Searching in the directory....18
Service Centres (Midde East) 40
Setting up, base station....11
Settings
auto answer 31
base station 32
date/time 13
dialing mode 33
display contrast (base station).... 32
display contrast (handset) 31
display language (base station)..... 32
display language (handset) ..... 31
flash time 33
for connecting to PABX....33
handset.... 31
line settings 14
loudspeaker volume (handset) ..... 31
restoring default settings 33
ring tone melody (base station) ..... 32
ring tone melody (handset) 31
ring tone volume (base station) ..... 32
ring tone volume (handset) 31
system 33
tone dialing 33
Setup, handset.... 12
Sound, see ring tone
Special characters 17
Specifications....35
Star key 3,32
Start/stop key with LED....5
System PIN 33
T
Talk key 3,14
Talk/flash key 6
Time format 13
Tone dialing 33
Troubleshooting 34
U
Unattended call transfer 28
Unknown caller 15
Unmute key
Unmute microphone....34
V
Voice mailbox.... 26
Volume
handset loudspeaker....31
handset ring tone.... 31
W
Writing entries.... 17
Issued by
Gigaset Communications GmbH
Frankenstr. 2a, D-46395 Bocholt
© Gigaset Communications GmbH 2011
All rights reserved. Subject to availability.
Rights of modification reserved.
www.gigaset.com
A31008-M1931-A601-1-UZ19
U01UF272ZZZ(0)