Golf (2005) - Car VOLKSWAGEN - Free user manual and instructions
Find the device manual for free Golf (2005) VOLKSWAGEN in PDF.

User questions about Golf (2005) VOLKSWAGEN
0 question about this device. Answer the ones you know or ask your own.
Ask a new question about this device
Download the instructions for your Car in PDF format for free! Find your manual Golf (2005) - VOLKSWAGEN and take your electronic device back in hand. On this page are published all the documents necessary for the use of your device. Golf (2005) by VOLKSWAGEN.
USER MANUAL Golf (2005) VOLKSWAGEN
0.1 Alphabetical Index 2
1.1 Maintenance 34
1.2 USA Warranty 66
2.1 Safety First 106
3.1 Controls and Equipment 170
3.2 Tips and Advice 290
3.3 Technical Data 401
3.4 Sound System Premium CD Monsoon 417
3.5 Telematics by OnStar Operating Instructions 447
Volkswagen
Owner's Manual
text_image
0.1 Golf Alphabetical Index Model year 20050.1 Golf
Alphabetical Index Model year 2005
Dear User
Enclosed you'll find an extensive and comprehensive alphabetical index of all manuals supplied with your vehicle. This index will help you to find information quickly by using key words.
The title of each booklet provided by Volkswagen is highlighted with capital letters, for example WARRANTY.
Key words
Booklet
Page
A
ABS (Anti-Lock Brakes) 3.4 8
Adding
- Brake fluid 3.2 47
-Engine coolant 3.2 45
-Engine oil 3.2 41
- Windshield washer fluid 3.4 53
Additional accessories 3.2 54
Additional emission control maintenance 1.1 4
Adjustable steering column 3.1 58
Adjustable steering wheel 3.1 58
Adjusting
- Climate controls 3.1 72
- Head restraints 2.1 49
3.1 54
-Mirrors 3.1 50
- Seats 2.1 50
3.1 55
-Washer jets 3.2 53
Address 1.2
Adjustments
- Climate controls 3.1 79
-Mirror 3.1 50
Air bag system 2.1
- Head airbags 2.1 28
- Importance of proper seating position 2.1 19
- Seating position 3.1 55
Air Circulation 3.1 63
Air circulation, - luggage compartment 3.1 63
Air conditioning 3.1 72
-Air recirculation 3.1 73
- Defogging windshield & side windows 3.1 75
- Defrosting windshield & side windows 3.1 75
-Fan switch 3.1 72
- Heating interior quickly 3.1 75
Key words
Booklet Page
- Keeping interior comfortable 3.1 75
- Maintenance 3.1 77
-Temperature control 3.1 72 - Vents 3.1 74
Air outlets 3.1 74
Air recirculation
-Air conditioning 3.1 73
- Climatronic 3.1 81
Air vents
-Air conditioning 3.1 74
- Climatronic 3.1 82
Airbag 2.1 17
-Indicator light 3.1 16
- System components 2.1 18
Airbag indicator light 3.1 16
Airbag system
- Care, service and disposal 2.1 29
- Front airbags 2.1 23
- How many airbags does my vehicle have? 2.1 17
- How the Airbag system works 2.1 24
- Side airbags 2.1 25
- What happens when the airbags deploy? 2.1 19
- When must the system be inspected? 2.1 18
-Where are my airbags located? 2.1 17
Alarm system 3.1 30
Alarms
-Anti-theft system 3.1 30
- Setting 3.1 28
Alternator 3.1 19
Alternator/Generator 3.1 19
Anchors for a child restraint system 2.1 39
Anti-Lock Brake System 3.2 9
Anti-lock braking system (ABS) 3.1 17
Anti-Slip Regulation 3.1 17
- Indicator light 3.1 17
Anti-Slip Regulation (ASR) 3.2 11
Anti-Slip regulation (ASR), - Switch 3.1 43
Anti-Slip-Regulation 3.1 43
Key words
Booklet
Page
Anti-theft wheel bolts 3.2 78
Anti-theft alarm system 3.1 30
Armrest 3.1 59
- Front 3.1 59
- Storage bin 3.1 59
Ashtray
- Rear 3.1 70
- Front 3.1 70
Ashtrays 3.1 70
- Front 3.1 70
ASR (Anti-Slip Regulation) 3.1 17
Assist handles 3.1 53
Auto Safety Hotline 2.1 21
Automatic car wash. 3.2 25
Automatic locking 3.1 31
Automatic transmission
- Back-up lights 3.1 86
- Ignition key safety interlock 3.1 84
- Kick-Down 3.1 94
- Kick-down device 3.1 87
- Tiptronic 3.1 91
- Towing 3.1 95
Automatic transmission (4-speed) 3.1 84
Automatic transmission (5-speed) 3.1 90
- Back-up lights 3.1 93
- Ignition key safety interlock 3.1 90
Average fuel consumption indicator 3.1 11
B
Back-up lights 3.1 86,93
-Automatic transmission 3.1 86
-Automatic transmission (5-speed) 3.1 93
- Manual transmission 3.1 96
Backrest, - Folding 3.1 61
Backward adjustment of seats 3.1 57
Battery 3.2 48
-Charging 3.2 51
- Replacing 3.2 52
- Winter operation 3.2 49
BBB Auto Line 1.2 25
Key words
Booklet
Page
Battery replacement, remote key 3.1 25
Battery, vehicle 3.2 48
Belt tensioner 2.1 13
- What happens when the belt tensioner is activated? . 2.1 13
Beverage holder 3.1 68
Body cavity sealing 3.2 28
Booster seats 2.1 33
Brake, - Warning light 3.1 18
Brake booster 3.2 8
Brake fluid 3.2 46
Brake fluid reservoir 3.2 46
Brakes
-Fluid 3.2 45
- Pads 3.1 22
- Warning light 3.1 18
- Wear indicator 3.1 22
Braking 3.2 7
Break-in period 3.2 13
Buzzer 3.1 22
C
California Proposition warning 3.2 37,49
Canadian emissions warranties 1.2 14
Capacities 3.3
Car seat, Child 2.1 30
Care of
- exterior 3.2 25
- interior 3.2 29
Catalytic converter 3.2 18
CB radios 3.2 55
Center safety belt on the rear seat 2.1 14
Central locking system 3.1 31
- Rear lid 3.1 34
Child restraint (CR) Anchors 2.1 39
Central locking systems 3.1 32
Changing a wheel 3.2 73
Changing engine oil 3.2 41
Checking oil level, - Engine 3.2 40
Child restraint anchorages 2.1 43
Key words
Booklet
Page
Controls
- Climate 3.1 72
Child restraints
- Important information about child restraints and the front seat 2.1 22
- Securing on the rear seat using the center safety belt 2.1 38
Child Safety, - Child Car Seat 3.1 56
Child safety 2.1 30
Child Safety Lock
- Disengaging 3.1 33
- Engaging 3.1 33
Child safety lock for rear doors 3.1 33
Child seat, - Installing a rear facing child seat 2.1 22
Chime 3.1 25,42,98
- Door 3.1 25
- Ignition 3.1 98
-Oil 3.1 22 - Safety belt 3.1 19
Cigarette lighter 3.1 69
Child seats, - Older children 2.1 35
Cleaning
-Engine compartment 3.2 31
-Glass 3.2 29
- Inside of vehicle 3.2 29
- Leather upholstery 3.2 30
- Outside of vehicle 3.2 25
- Safety belts 3.2 30
Cleaning and protection 3.2 24
Climate controls 3.1 72
Climatronic 3.1 82
- air recirculation 3.1 81
-Air vents 3.1 78
-AUTO operation 3.1 80
-Automatic control 3.1 78 - ECON cooling 3.1 83
- Maintenance 3.1 83
- Manual control 3.1 78
- Manual operation 3.1 80
- Operating controls 3.1 79
Key words
Booklet
Page
- Switching between Fahrenheit & Centigrade ..... 3.1 80
Clock 3.1 10
- Setting 3.1 10
Coat hooks 3.1 53
Cold starting 3.1 101
Comfort clips 2.1 8
- Interior light 3.1 49
-Locks 3.1 31
- Remote 3.1 27
- Unlocking window 3.1 36
Convertible child seats 2.1 32
Convertible locking feature 2.1 9
Convertible locking retractor 2.1 36
-Activating 2.1 37
- Deactivating 2.1 37
Coolant losses 3.2 44
Coolant temperature gauge 3.1 9
Coolant temperature gauge, engine 3.1 9
Cooling system 3.2 43
-Engine 3.2 43
- Expansion tank 3.2 44
CR (Child Restraint) 2.1 39
Cruise control 3.1 104
-Activating 3.1 104
- Turning off, completely 3.1 106
-Turning off, temporarily 3.1 105
Cup holder, - Front 3.1 68
Cup-holder 3.1 68
Curb weight 3.3
Customer relations 1.2 23
D
Dashboard 3.1 3
Data Link Connector (DLC) 3.1 23
Day-Night mirror 3.1 50
Daytime running light 3.1 42
Defogging
- Rear window switch 3.1 43
Key words
Booklet
Page
- Side windows 3.1 75
- Windshield 3.1 75
- Windshield and side windows 3.1 75
Defrosting
- Rear window 3.1 43
- Side windows 3.1 75
-Windshield 3.1 75 - Windshield and side windows 3.1 75, 80
Delivery of vehicle to customer 1.1 7
Diesel engine
- empty fuel tank 3.1 101
-starting 3.1 101
Diesel fuel 3.2 6
- Winter operation 3.2 6
Differential lock 3.2 10
Difficult operating conditions 3.2 15
Digital clock 3.1 10
Dimmer switch, - Dashboard lights 3.1 42
Dirty safety belts 2.1 9
Displays 3.1 11
Distance driven indicator 3.1 13
DLC 3.1 23
Do-it-yourself service 3.2 54
Doors 3.1 31
-Closing 3.1 31
- Fuel filler flap release 3.1 44
-Locking with key 3.1 31
-Locking with remote 3.1 28
- Power locking switch 3.1 32
- Power locks 3.1 31
- Rear lid release 3.1 44
- Unlocking with key 3.1 31
- Unlocking with remote 3.1 28
Driver position 3.1 55
Driver's Seat, - Adjustments, - Manual, - Height 3.1 57
Driver's Seat
- Adjustments, Headrest 3.1 54
- Seating Position 3.1 55
Driver's seat 3.1 55
-Adjusting 2.1 20
Key words
Booklet
Page
- Proper position 2.1 51
Driving economically 3.2 16
Driving in foreign countries 3.2 86
Driving under difficult conditions 3.2 15
Duplicate key 3.1 26
E
Easy-Entry-Function 3.1 57
Electrical / Electronic
- Heated driver's seat 3.1 43
- Heated passenger seat 3.1 44
- Power locks 3.1 31
Electrical Socket 3.1 69
Electrically heated driver's seat 3.1 43
Electrically heated passenger seat 3.1 44
Electronic Differential Lock 3.1 43
Electronic differential lock 3.2 10
Electronic differential lock (EDL) 3.1 17
Electronic immobilizer 3.1 19, 99
Electronic power control (EPC) 3.1 16
Electronic Stabilization Program (ESP) 3.2 12
Electronic Stabilization Program (ESP) - Switch 3.1 43
Emergency
- Closing sunroof 3.1 41
-Flasher 3.1 43
-Flasher switch 3.1 43
- Starting 3.2 80
- Towing 3.2 83
Emergency flasher switch 3.1 43
Emission control maintenance 1.1 4
Emission control system 3.2 18
- Malfunction indicator light 3.1 23
Engine
- Compartment 3.1 103, 35
- Coolant Level 3.1 20
- Coolant Temperature 3.1 20
- Coolant temperature 3.1 9
- Cooling 3.2 43
- Fuel specifications 3.2 4
- Hood 3.2 35
-Oil 3.2 39
Key words
Booklet
Page
- Oil pressure 3.1 22
- Oil specifications 3.2 39
-Specifications 3.2 39 - Starting 3.1 100
-Stopping 3.1 102
Engine Coolant Temperature (ECT) Gauge 3.1 20
Engine oil
- Adding 3.2 41
- Additives 3.2 41
-Changing 3.2 41
- Checking 3.2 40
- Grades 3.2 39
Environment
- Brake fluid 3.2 47
-Cleaning and protection 3.2 24
- Coolant 3.2 45
- Driving to minimize pollution and noise 3.2 16
-Engine oil 3.2 42
-Fuel 3.2 3
- Maintenance 3.2 33
- Starting procedures 3.1 100
-Tire pressure 3.2 64
- Unleaded fuel 3.2 4
-Washing 3.2 25
ESP (Electronic Stabilization Program) 3.2 12
Exhaust system 3.2 18
Expansion tank 3.2 44
Extenders for the safety belt 2.1 15
F
Fahrenheit to Centigrade, setting 3.1 80
Fan
- Climatronic 3.1 78
- Radiator 3.2 45
- Switch - Air conditioning 3.1 72
-Air conditioning 3.1 72
Fan switch, - Air conditioning 3.1 72
Fastening 3.1 64
Key words
Booklet
Page
Fastening and unfastening
- Booster seats 2.1 33
- Center safety belt on the rear seat 2.1 9, 14
-Child seat on the center position on the rear seat.... 2.1 38
-Child seats on the outer rear seat position 2.1 36 - Convertible child seats 2.1 32
- Infant seats 2.1 31
- LATCH system 2.1 39
- Safety belt extender 2.1 16
- Safety belts 2.1 10, 13
Fastening eyes 3.1 64
Fastening your safety belt 2.1 10
Federal emissions warranties 2.1 10
Filler cap 3.2 3
Floor jack 3.2 84
Floor mats 3.1 60
Fluid
- Brake 3.2 46
- Coolant 3.2 43
- Windshield washer tank 3.2 53
Fog lights 3.1 42
Folding luggage compartment cover 3.1 65
Folding outside mirrors 3.1 52
Folding the seatbench back into place 3.1 62
Folding the seatbench forward 3.1 61
Forward adjustment of seats 3.1 57
Forward facing child seat, - Precautions 2.1 22
Fresh air 3.1 76
Front
- Seat
- Driver's 3.1 55
- Head Restraints 3.1 54
- Seats 2.1 50
Front airbags 2.1 23
Front armrest 3.1 59
Front door panel light 3.1 49
Front doors 3.1 31
Front fog lights 3.1 42
Front interior light 3.1 49
Front map lights 3.1 49
Key words
Booklet
Page
Front passenger position 3.1 56
Front passenger's seat 3.1 56
- Proper position 2.1 52
Front seats 2.1 50
3.1 55
- How to adjust 2.1 50
Fuel
- Consumption indicator 3.1 11
- Diesel 3.2 6
- Lock fuel tank 3.2 2
- Momentary consumption, - Average consumption ... 3.1 13
-Tank capacity 3.2 2
Fuel Consumption, - Average 3.1 13
Fuel economy 3.2 16
Fuel filler flap release 3.1 44
Fuel gauge 3.1 10
Fuel supply 3.2 4
Fuel tank 3.2 2
- Refuelling 3.2 3
Fuses 3.2 79
G
Gasoline engine, - starting 3.1 100
Gauge
- Coolant temperature 3.1 9
-Engine coolant temperature 3.1 9
-Fuel 3.1 10
-Odometer 3.1 10
- Speedometer 3.1 10
-Tachometer 3.1 8
Gauges, - Engine Coolant Temperature 3.1 20
Gearshift lever 3.1 96
General illustration 3.1 3
Generator 3.1 19
Glove box light 3.1 49
Glove Box/Compartment 3.1 71
- Owner's literature storage 3.1 71
Glove compartment / box, - Light 3.1 49
Glow plugs indicator light 3.1 16
Key words
Booklet
Page
Gross vehicle weight rating 3.3
Guaranteed mobility
- Canada 1.2 11
- United States of America 1.2 11
Guide fixtures 2.1 46
Height Adjustment 3.1 54
H
Head airbags 2.1 28
Head Restraints
Installing 3.1 54
Removing 3.1 54
Head restraints 2.1 49
3.1 54
- Proper position for maximum protection 2.1 49
-Removing and Installing 2.1 49
Headlight
- Dimmer switch 3.1 45
-Flasher 3.1 45
Headlight dimmer switch lever 3.1 45
Headlight flasher 3.1 45
Heated
- Driver's seat 3.1 43
- Passenger's seat 3.1 44
- Window 3.1 43
Heated driver's seat 3.1 43
Heated outside mirrors 3.1 51
Heated passenger seat 3.1 44
Heating 3.1 72
Heating interior quickly 3.1 75
Heavy clothing and safety belts 2.1 8
Height adjustment of seats 3.1 57
Height adjustors 2.1 11
High beam 3.1 17
High beam lever 3.1 45
High Beams, - Operation 3.1 45
Hood release 3.2 35
Hood, opening 3.2 35
Key words
Booklet
Page
Hooks 3.1 64
Horn 3.1 3
How can I adjust the height of my safety belt? 2.1 11
How can I tell when the safety belt is securely locked? .. 2.1 10
How many airbags does my vehicle have? 2.1 17
How to attach the tether strap to your vehicle? 2.1 42
How to fasten the rear center safety belt? 2.1 9
How to use the air conditioning more economically ..... 3.1 77
How to wear safety belts properly? 2.1 8
Hydroplaning 3.2 15
I
Ignition 3.1 98
- Key safety interlock 3.1 84, 90
- Switch 3.1 98
Ignition key safety interlock 3.1 84,90,98
Immobilizer 3.1 19, 99
Increasing size of luggage compartment 3.1 63
Indicator, - Multifunction (MFA) 3.1 11
Indicator light
-Air bag system 2.1 18
- Door open 3.1 22
- Trunk / Rear lid 3.1 22
- What should I do if the airbag indicator light comes on and stays on? 2.1 18
Indicator lights 3.1 6, 15
-Airbag system 3.1 16
- Anti-Lock brake system 3.1 17
- Anti-Slip Regulation 3.1 17
- Brake 3.1 18
- Electronic power control 3.1 16
-Engine oil pressure 3.1 22
- Front brake pads worn 3.1 22
- Fuel level too low 3.1 23
- Generator 3.1 19
- High beam 3.1 17
- Safety belts 3.1 19
- Turn signals 3.1 17
- Windshield washer 3.1 23
Key words
Booklet
Page
- Windshield washer fluid level too low 3.1 23
Infant seats 2.1 31
Inside day-night mirror 3.1 50
Installing - Booster seats 2.1 33
-Child seat on the outer rear seat position 2.1 36 - Child seat to LATCH system 2.1 48
-Child seat to lower anchorage point 2.1 43
-Child seat using the LATCH system 2.1 39 - Convertible child seats 2.1 32
- Infant seats 2.1 31
- Tether strap to anchorage point 2.1 42
Installing a child restraint 2.1 48
Installing a radio 3.2 55
Installing a roof rack 3.1 67
Installing wiper blades 3.1 48
Instrument Cluster - Engine Coolant Temperature (ECT) Gauge 3.1 20
- Instrument illumination 3.1 42
Instrument cluster 3.1 8
Instrument illumination 3.1 42
Instrument panel 3.1 3 - Digital clock 3.1 10
- Display, Multifunction indicator 3.1 11
-Engine coolant temperature gauge 3.1 9 - Fuel gauge 3.1 10
- Odometer 3.1 10
- Speedometer 3.1 10
Interior light control 3.1 49
Interior lights 3.1 49 - Front map light 3.1 49
- Light control 3.1 49
Jack 3.2 76
Jack and tools 3.2 57
Jack support positions 3.2 76
Jumper cables 3.2 80
J
Key words
Booklet Page
K
Keep this manual with your vehicle 2.1 2
Keeping interior comfortable 3.1 75
Key
-Coding 3.1 29
-Duplicate 3.1 26
- Ignition, Safety Interlock 3.1 84, 90
- Master with remote 3.1 25
- Remote release 3.1 25
- Replacement 3.1 26
- Tag 3.1 26
- Valet 3.1 26
Key for remote release 3.1 25
Keys 3.1 25
Kick-down 3.1 87,94
L
Lane changer 3.1 45
Lap-shoulder belt 2.1 9
LATCH (Lower Anchor and Tether for Children) 2.1 39
LATCH System, - Seat markings 2.1 45
LATCH system 2.1 48
- Attaching a child restraint to the LATCH system ..... 2.1 48
Lifting
-Floor jack 3.2 84
-Jack 3.2 73
- Workshop hoist 3.2 84
Lifting point
-front 3.2 85
- rear 3.2 85
Lifting vehicle 3.2 84
Light bulbs 3.2 80
Light switch 3.1 42
Lighter 3.1 69
Lights 3.1 42
- Backup 3.1 86,93
- Brake warning 3.1 18
-Daytime running 3.1 42
Key words
Booklet
Page
- Front door panel 3.1 49
-Glove compartment / box 3.1 49
-Hazard 3.1 43 - Indicator 3.1 6, 15
- Interior control 3.1 49
- Interior front 3.1 49
- Luggage compartment 3.1 49
-Map 3.1 49 - Storage compartment 3.1 49
-Warning 3.1 15
Limited new vehicle warranty 1.2 2
Limited powertrain warranty 1.2 6
Loading a roof rack 3.1 66
Lock positions of trunk lock cylinder 3.1 34
Locking retractor 2.1 36
Locking Switch, Power 3.1 32
Locking the vehicle 3.1 31
Locks
- Doors 3.1 31
- Fuel tank 3.2 2
- Rear lid 3.1 34
- Truck / Rear lid 3.1 34
Locks,,Glove Box/Compartment 3.1 71
Lower Anchor and Tether for Children (LATCH) 2.1 39
Lower anchorages 2.1 43
- Guide fixtures 2.1 46
- Seat markings 2.1 45
Lubricants 3.2 39
Luggage Compartment
-Air Circulation 3.1 63
- Cover
- Installing 3.1 65
-Removing 3.1 65
- Electrical Socket 3.1 69
- Increasing size of compartment 3.1 63
-Tie-down hooks 3.1 64 - Transporting heavy objects 3.1 63
Luggage compartment 3.1 63
Luggage compartment cover 3.1 65
Luggage compartment light 3.1 49
Key words
Booklet
Page
Luggage compartment socket 3.1 69
Lumbar Support 3.1 57
M
Maintenance 1.1
Maintenance 3.2 33
Malfunction indicator lamp 3.1 23
Manual air conditioning 3.1 72
Manual transmission 3.1 96
- Back-up lights 3.1 96
Master key 3.1 25
- With remote 3.1 25
Mats, Floor 3.1 60
Maximum cooling 3.1 76
Memory functions, - Multi-Function Indicator (MFA) ..... 3.1 11
MFA 3.1 11
Miles per gallon (liter) 3.1 13
Miles per gallon / Liters per 100 km 3.1 13
Miles per hour / Kilometers per hour 3.1 13
Mirrors 3.1 50
- Outside 3.1 51
Mobile telephones 3.2 55
Modifications 3.2 54
Momentary fuel consumption indicator 3.1 13
Multi function steering wheel 3.1 24
Multi-Function Indicator
-Average driving speed 3.1 13
-Average fuel consumption 3.1 13
- Erasing the settings 3.1 12
- Outside temperature 3.1 12
Multi-function indicator 3.1 11
Multi-Function Indicator (MFA)
-Momentary fuel consumption 3.1 13
-Time driven 3.1 13
Multi-function steering wheel
-Lighting 3.1 24
- Radio system 3.1 24
Multifunction steering wheel, - Cruise control 3.1 24
Key words
Booklet
Page
N
New vehicle warranty 1.2 2
Normal cooling 3.1 76
Notice of address change 1.2
Notice of used car purchasers 1.2
Number of seats 2.1 9
O
OBD II 3.1 23
Odometer 3.1 10, 14
Oil
- Additives 3.2 41
- Change 3.2 41
-Specification 3.2 39
Oil pressure 3.1 22
Oil specification 3.2 39
On Board Diagnostic System 3.1 23
One-touch down feature 3.1 36
One-touch up feature 3.1 36
Opening the hood 3.2 35
Opening the vehicle 3.1 31
Operating controls
-Air conditioning 3.1 72
- Climatronic 3.1 79
Outlets, - Air 3.1 74
Outside Mirrors
-Folding mirrors 3.1 52
- Synchronized adjustment 3.1 52
Outside mirrors 3.1 51
Outside temperature indicator 3.1 12
Owner's Literature storage 3.1 71
Owner's literature storage 3.1 71
P
Padded head restraints 3.1 54
Panic button / switch 3.1 28
Parking 3.1 88,95
Parking brake lever 3.1 97
Parts replacement 3.2 54
Key words
Booklet Page
Passenger's Seat, - Front
- Forward & backward adjustment 3.1 57
- Heated seat switch 3.1 44
- Height adjustment 3.1 57
-Lumbar support 3.1 57
Passenger's seat, - Proper position 2.1 52
Pedals 3.1 60
Pinch protection 3.1 38
- Windows 3.1 38
Power
-Locking Switch 3.1 32
- Steering 3.1 99, 12
-Windows 3.1 36
Power controls
-Locking switch 3.1 32
-Locks 3.1 31
- Outside mirrors 3.1 51
-Roof 3.1 40
Power locking switch 3.1 32
Power locks 3.1 31
Power outside mirrors 3.1 51
Power roof 3.1 40
-Closing 3.1 40
- Convenience closing 3.1 41
- Emergency closing 3.1 41
- Opening 3.1 40
Power Window 3.1 36
Power windows, - Pinch protection 3.1 38
Pregnant women, - Special considerations when wearing a safety belt 2.1 12
R
Radiator 3.3 44
Radiator fan 3.2 45
Radio 3.2 55
- Control on Multifunction steering wheel 3.1 24
Rain sensor 3.1 46
Key words
Booklet
Page
Rear
- Lid/Trunk Lid, - Remote Release 3.1 28
-
Seat
-
Backrest 3.1 61
- Backrest, Folding 3.1 61
-
Backrest, Unfolding 3.1 62
-
View mirror 3.1 50
- Window defogger switch 3.1 43
Rear / Trunk lid
-Closing 3.1 34
- Locks 3.1 34
- Opening 3.1 34
Rear center safety belt 2.1 14
- How to fasten 2.1 9
- Making sure the rear seatback is securely latched ... 2.1 9
-Precautions 2.1 14
Rear lid 3.1 34
Rear seat 3.1 61
Rear view mirror 3.1 50
Rear window defogger 3.1 43
Rear window washer container 3.2 53
Rear window wiper/washer 3.1 47
Rear-facing child seat, - Precautions 2.1 22
Recirculation air 3.1 73
Refuelling the vehicle 3.2 3
Release button on the buckle 2.1 13
Releases
-Hood 3.2 35
- Trunk / Rear lid 3.1 34
Remote Control
- Manual programming 3.1 29
- Operating range 3.1 27
- Rear lid release 3.1 28
- Resetting 3.1 29
- Unfolding/Folding master key 3.1 28
- Unlocking & locking vehicle 3.1 28
Remote control 3.1 25, 27
- Battery replacement 3.1 25
Key words
Booklet
Page
Remote controls, - Locking, - Release,
- Resetting, - Unlocking 3.1 28
Remote locking / unlocking 3.1 27
Removing the roof rack 3.1 67
Remote controls, - Locking, - Release,
- Resetting, - Unlocking 3.1 28
Remote locking / unlocking 3.1 27
Removing the roof rack 3.1 67
Replacement of keys 3.1 26
Replacing
- Batteries, remote control 3.1 25
-Bulbs 3.2 80
-Keys 3.1 26
Replacing a fuse 3.2 79
Replacing a radio 3.2 55
Replacing batteries
- Remote control 3.1 25
- Vehicle battery 3.2 52
Replacing wiper blades 3.1 48
Reporting safety defects 3.2 86
Restraint System, Head Restraint 3.1 54
Restraints
- Adjusting seating position 3.1 55
- Head restraints
- Height Adjustment 3.1 54
- Remove and install, front 3.1 54
- Remove and install, rear 3.1 54
Retractors 2.1 9
Reverse
- Automatic transmission 3.1 86
-Automatic transmission (5-speed) 3.1 93
- Manual transmission 3.1 96
Roof 3.1 40
Roof Rack, - Loading 3.1 66
Roof rack 3.1 66
Roof rack installing 3.1 67
Key words
Booklet
Page
Roof, power
-Closing 3.1 40
- Convenience closing 3.1 41
-Lowering 3.1 40
- Opening 3.1 40
- Raising 3.1 40
S
Safe driving hints 3.2 14
Safety belt, - Lap-shoulder belt 2.1 9
Safety belt extenders 2.1 15
-Fastening 2.1 16
-Precautions your should take when using 2.1 15
- Use with a child restraint 2.1 15
Safety belt height adjustors 2.1 11
Safety belt warning light 2.1 7,19
Safety belts 2.1 3
-Adjusting seating position 3.1 55
- Extender 2.1 15
- How can I adjust the height of my safety belt? ..... 2.1 11
- How can I tell when the belt is securely locked? ..... 2.1 10
- How to fasten 2.1 10
- How to wear properly 2.1 8
- Making sure all passengers are correctly restrained .. 2.1 9
-Older children 2.1 35
-Precautions 2.1 8
- Retractors - how they work 2.1 9
-Special considerations for pregnant women 2.1 12
- Torn or frayed 2.1 8
-Unfastening 2.1 13
-Warning system 2.1 7
- What can happen if you do not wear your safety belt? 2.1 4
- What happens if you wear your safety belt too loose? 2.1 12
- When must safety belts be replaced? 2.1 9
-When would a safety belt lock up? 2.1 9
-Why safety belts protect? 2.1 6
Safety first 2.1 2
Seat, Rear 3.1 61
Key words
Booklet
Page
Seat belts 2.1 3
Seat markings for lower anchorages 2.1 45
Seatback adjustment 3.1 57
Seatback release 3.1 57
Seating position
- Distance between the driver and the steering wheel. 2.1 21
Seats
- Adjustment
- Forward and Backward 3.1 57
-Height 3.1 57
- Lumbar Support 3.1 57
- Front, - Driver's 3.1 55
-front 3.1 55
- Heated driver's seat switch 3.1 43
- Heated passenger's seat switch 3.1 44
Manual Adjustment, Head Restraint 3.1 54
- Rear
- Seat bench, folding 3.1 61
- Seat bench, unfolding 3.1 62
- Seatback release 3.1 57
- Easy-Entry-Function 3.1 57
- Forward and backward adjustment 3.1 57
- Height adjustment 3.1 57
- Seatback adjustment 3.1 57
-Child Car Seat 3.1 56
Secondary key 3.1 26
Securing a child seat 2.1 36, 38
Securing luggage 3.1 64
Selector lever display 3.1 85,92
Selector lever position display 3.1 14
Self-dimming mirror 3.1 50
Sensor, rain 3.1 46
Service kit 3.2 56
Settings
- Clock 3.1 10
-Odometer 3.1 10
Key words
Booklet Page
Side airbags 2.1 17,25,28
Seating capacity of your vehicle 2.1 9
Side Curtain Protection 2.1 17, 28
Signals, Turn 3.1 45
Signals, turn 3.1 17
Snow chains 3.2 72
- Driver 3.1 55
- Front passenger 3.1 56
Socket 3.1 69
Socket, Electrical 3.1 69
Spare wheel 3.2 57,60
Speed range 3.2 13
Speedometer 3.1 10
Starter switch 3.1 98
Starting
- Diesel engine 3.1 101
- Gasoline engine 3.1 100
Starting engine 3.1 100
Starting procedures 3.1 100
Starting with jumper cables 3.2 80
Steering
-Wheel, Multi-function 3.1 24
- Wheel, Multi-function, - Sound System 3.1 24
- Wheel, Multi-functions, -Lighting 3.1 24
Steering lock 3.1 98
Steering wheel 3.1 58
- Distance between the driver and steering wheel .... 2.1 21
Stopping engine 3.1 102
Storage
-Light 3.1 49
- Box/Compartment 3.1 71
Storage bin 3.1 71
armrest 3.1 59
Storage Compartment
- Cup Holder 3.1 68
- Glove Box/Compartment 3.1 71
Storage compartment light 3.1 49
Key words
Booklet
Page
Sun visors 3.1 53
Switches 3.1 42
- Anti-Slip Regulation (ASR) 3.1 43
- Daytime running lights 3.1 42
- Electronic Stabilization Program (ESP) 3.1 43
- Emergency flasher 3.1 43
- Fuel filler flap release 3.1 44
- Heated seat, driver's 3.1 43
- Heated seat, passenger's 3.1 44
- Instrument illumination 3.1 42
- Light switch 3.1 42
- Panic button switch 3.1 28
- Power locking switch 3.1 32
- Rear lid release 3.1 44
- Rear window defogger 3.1 43
Synchronized mirror adjustment 3.1 52
T
Tachometer 3.1 8
Tag 3.1 26
- Key 3.1 26
Temperature control
-Air conditioning 3.1 72
- Climatronic 3.1 78
Temperature indicator, outside 3.1 12
Tensioner for the safety belt, - Function 2.1 13
Tether anchors 2.1 40
Tether strap 2.1 41
- How to attach on your vehicle 2.1 42
Tie-down hooks 3.1 64
Tilt and telescopic steering wheel 3.1 58
Time driven indicator 3.1 13
tiptronic 3.1 91
- Top speed 3.1 93
Tire
-Pressure 3.2 64
- Replacement 3.2 66
Key words
Booklet
Page
- Rotation 3.2 66
- Specification 3.2 68
- Wear 3.2 65
Tire manufacturers 1.2 28
Tire quality grading 3.2 69
Tires 3.2 63
Tools 3.2 57
Top speed 3.1 93
Torn safety belts 2.1 8
Towing 3.1 95,80 - Distance 3.2 83
-Speed 3.2 83
Trailer towing 3.2 20 - Driving instructions 3.2 22
- Technical requirements 3.2 20
-Tips 3.2 23
-Tire pressure 3.2 21 - Tongue load 3.2 21
- Trailer brakes 3.2 20
-Automatic (4-speed) 3.1 84
-Automatic (5-speed) 3.1 90 - Manual 3.1 96
Transporting heavy objects 3.1 63
Trip odometer 3.1 14
Trunk, - Light 3.1 49
Trunk/Rear Lid Release 3.1 28,44
Turn signals 3.1 17,45 - Indicators 3.1 17
-Operation 3.1 45
Undercoating 3.2 19,28
Unfastening your safety belt 2.1 13
Uniform tire quality grading 3.2 69
Unleaded fuel 3.2 4
Unlocking the vehicle 3.1 31
Used car purchasers (notice of) 1.2
Transmission
U
Key words
Booklet
Page
V
Valet key 3.1 26
Valve extenders 3.2 64
Vehicle battery 3.2 49
Vehicle care
- Exterior 3.2 25
-Interior 3.2 29
- Windows 3.2 27
Vehicle Identification 3.3 3
Vehicle Identification label 1.1
Vehicle Identification label 3.3 3
Vehicle Identification Number 3.3 3
Vehicle jack 3.2 58
Ventilation 3.1 72,76,81
W
Warning / Indicator lights
-Airbag system 3.1 16
-Alternator/Generator 3.1 19
- Anti-Lock brake system 3.1 17
- Anti-Slip Regulation 3.1 17
- Brake 3.1 18
- Electronic power control 3.1 16
- Front brake pads worn 3.1 22
- Generator 3.1 19
- High beam 3.1 17
-Turn signals 3.1 45
- Washer fluid 3.1 23
Warning and indicator lights 3.1 6
Warning light in the instrument cluster 2.1 7
Warning lights 3.1 6, 15
Warning system 2.1 7
Warning/indicator light
-Air bag system 3.1 16
- Anti-lock brake system 3.1 17
- Anti-Slip Regulation 3.1 17
- Door open 3.1 22
- Rear lid open 3.1 22
Key words
Booklet
Page
Warning/Indicator Lights
-Engine Coolant Level 3.1 20
-Engine Coolant Temperature 3.1 20
-Glow Plugs 3.1 16
Warning/indicator lights
-Air bag system 3.1 16
-Alternator 3.1 19
- Brake 3.1 18
- Coolant level 3.1 20
- Coolant temperature 3.1 20
-Engine oil pressure 3.1 22
- Front brake pads 3.1 22
-Fuel level 3.1 23
-High beam 3.1 17
-Malfunction indicator light 3.1 23
- Safety belts 3.1 19
-Turn signals 3.1 17
-Washer fluid 3.1 23
Washer fluid 3.1 23 3.2 53
Washer reservoir 3.2 53
Washer system 3.1 46
What can happen if you do not wear your safety belt? .. 2.1 4
What happens if you wear your safety belt too loose? . . . 2.1 12
What happens when the airbags deploy? 2.1 19
What happens when the belt tensioner is activated? . . . 2.1 13
What should I do if the airbag indicator light comes on and stays on? 2.1 18
Wheels 3.2 63
- valve extenders 3.2 64
Wheels replacement 3.2 66
When must safety belts be replaced? 2.1 9
When would a safety belt lock up? 2.1 9
Where are my airbags located? 2.1 17
Why safety belts protect? 2.1 6
Window / Windshield
- Pinch protection 3.1 36
- Rear defogger 3.1 43
- Wiper blades 3.1 48
Key words
Booklet
Page
Windows 3.1 36
3.2 27
-Defogging 3.1 75
- Defrosting 3.1 75,80
- Ignition off 3.1 39
- Ignition on 3.1 39
Windshield washer container 3.2 53
Windshield wiper 3.1 46
Winter operation
-Battery 3.2 49
- Cooling system 3.2 43
- Diesel fuel 3.2 6
-Snow chains 3.2 72
-Tires 3.2 71
- Vehicle care 3.2 25
- Windows 3.2 27
- Windshield washer system 3.2 53
Winter tires 3.2 71
Wiper 3.1 46
Wiper / Washer system
- Blades 3.1 48
- Rain sensor 3.1 46
- Windshield 3.1 46
Wiper blades 3.1 48
-Installing 3.1 48
-Removing 3.1 48
Wiper/Washer system 3.1 46
-Fluid 3.2 53
-Wiper blades 3.1 48
-Wiper speeds 3.1 46
Workshop hoist 3.2 84
© VOLKSWAGEN Brazil
All rights reserved
May not be reproduced or translated in whole or in part without consent of VOLKSWAGEN Brazil.
Specifications subject to change without notice.
Printed in Brazil

natural_image
Close-up of a metallic cylindrical object with circular holes, partially obscured by a white panel (no text or symbols visible)
text_image
1.1 Volkswagen Maintenance Model year 2005
natural_image
Aerial view of a car driving on a curved highway with lane markings (no visible text or symbols)1.1 Volkswagen
Maintenance
Model year 2005
Warranty Voucher
for the new Volkswagen automobile.
Present this voucher to an authorized dealer if warranty service is required.
Warranty begins on the month of first use of the vehicle or its delivery to the first retail purchaser, namely on:
$$ \frac {1 1 - 2 7 - 0 5}{\mathrm {M o n t h} \quad \mathrm {D a y} \quad \mathrm {Y e a r}} $$
(to be filled in by authorized Volkswagen Dealer)

text_image
422 116 VOLKS GEN PASA Pasacip of authorized Volkswagen Dealer1.
2.
3.
4.
| LFTF | N2P/RD |
| X9A | BOD C4L GOF H7K J1L |
| MQ7 | Q4P LO8 IAT //// 2PX |
| EOA | 5RR SSH TBC OYZ 3BD |
| 4UB | 1KV OG7 CAL B6D |
| 9VG | 677 12D //// UA9 //// |
AMP GNZ

26WDE61J154027436
Vehicle Identification Label
- Vehicle Identification No. / Engine Code
- Type / Engine / Transmission
- Transmission Code / Paint No. / Interior / Engine / Engine Code
- Optional Equipment
Air Conditioner
Warranty Registration Certificate
(except factory installation)
Attach here
(for dealer use only)

text_image
Scanned text of contract clauses with partially visible Chinese characters and a horizontal lineFederal Law requires that a label be affixed
to the left door frame when the replacement odometer
does not indicate the actual vehicle mileage (kilometers)
after repair or replacement.
Genuine Volkswagen replacement odometers
are supplied with a label
Odometer Replacement
Month
Day
Year
(to be filled in by authorized
Volkswagen Dealer)
At mileage / km
Stamp of authorized
Volkswagen Dealer
TABLE OF CONTENTS
Warranty Voucher /
Vehicle Identification Label ...... previous pages
Service Information
Dealer Service 3
Do-It-Yourself Service 3
Emission Control Maintenance 4
Why Service? 4
When do I bring my car in for service?
1.8L Turbo or 2.8L V6 Gasoline Engines
If your car has a 1.8L Turbo or 2.8L V6 Gasoline engine, then this is your Service Schedule 5
2.0L, 2.8L VR 6, VR 6 4-Valve, 4.0L W8, 3.2L VR6, 4.2L V8, 6.0L W12 Gasoline Engines or 1.9L, 2.0L or 5.0L V10 TDI Diesel Engines
If your car has a 2.0L, 2.8L VR6, 4.0L W8, 3.2L VR6, 4.2L V8 and 6.0L W12
Gasoline engine
or a 1.9L, 2.0L or 5.0L TDI-PD Diesel engine, then this is
your Service Schedule 6-7
If you are not sure when to bring your car in for service, ask your authorized Volkswagen Service Advisor.
Service Schedule
Delivery Inspection 8
Service Schedule 8-25
Brake Fluid Replacement Record
Brake Fluid Replacement Record....26 - 27
Dealer Service
There are nearly 800 authorized Volkswagen dealers in North America. They have Volkswagen trained technicians, proper workshop equipment and parts to give you expert service.
Volkswagen dealers are committed to quality service.
- Your authorized Volkswagen dealer offers many services for your convenience, such as extended service hours, early bird service, body repairs, to name just a few. Ask about them.
- Arrange your service with your dealer when it is convenient for you.
- Ask your Service Advisor about the service you need and discuss the cost involved.
- Leave word where you can be reached during the day and when you would like to pick your car up.
- Keep all receipts of maintenance and repairs performed. Your service record is important when making use of your warranty.
● Maintenance services performed by your authorized dealer at the intervals specified, will also be documented in this booklet.
● Automobile technology changes continuously. Your authorized Volkswagen dealer always has the most current Service and Maintenance information for your Volkswagen model. It is possible that this information may differ from the check points listed in this booklet. Your Volkswagen Service Advisor can answer any questions you may have.
Do-It-Yourself Service
Your Owner's Manual contains many helpful hints on what you can service yourself.
- You can check tires for wear or damage and correct tire pressure, including the spare.
- You can check the windshield washer container.
- You can check your car's interior and exterior lighting system for correct functioning.
● You can check the engine oil level with every fuel filling. - You can perform these simple checks once a week.
They save time, trouble and expense later.
Your technician will not check the above mentioned items in each case during regular service and maintenance visits.
Emission Control Maintenance
1 - A clean environment is of concern to all of us. Volkswagen has built into your vehicle an efficient emission control system, using genuine Volkswagen parts, in conformance with the Federal Clean Air Act in the United States and Canadian Emission Standards, respectively. To help keep our air clean, you can do your part by providing regular maintenance for the emission control system in your vehicle.
2 - Maintenance, repair or replacement of emission control components may be performed by any qualified automotive service and repair establishment or individual without affecting the Emission Control System Warranty, provided that such repairs are performed to manufacturer's specifications, and that replacement parts are at least equivalent to genuine Volkswagen parts in emission performance and durability. Warranty repairs and replacements, however, must be performed by an authorized Volkswagen dealer.
3 - If other than genuine Volkswagen replacement parts are used, the owner should make sure that such parts are warranted by their manufacturer and that they are at least equivalent to genuine Volkswagen replacement parts in emission performance and durability.
To be certain that the emission control system functions as designed, regular maintenance is necessary for all components of the vehicle which influence exhaust emissions.
Why Service?
● An untuned engine wastes fuel.
● An un-serviced emission control system can increase pollution.
● A minor adjustment now may prevent a repair later.
- Follow the recommended maintenance schedule and make in-between checks. This way you help keep your car dependable and safe.
● The intervals shown in the table on the following pages are based on vehicles operating under normal conditions. In the case of severe conditions, such as extremely low temperatures, excessive dust etc., it is necessary for certain operations to be carried out in between the given intervals. This applies particularly to engine oil changes and the cleaning or replacing of the air cleaner filter element.
- If you have questions about how to maintain your vehicle or about your Maintenance Services, ask your authorized Volkswagen dealer.
Authorized VOLKSWAGEN dealers are ready to serve you and are committed to quality service and customer care.
If your vehicle has one of these engines, then this is your Service Interval Schedule.
- 1.8L Turbo Gasoline Engine (Golf, GTI, Jetta, New Beetle, Passat)
- 2.8L V6 Gasoline Engine (Passat),
If you are not sure when to bring your car in for service, ask your authorized Volkswagen Service Advisor.
| 5,000 miles (8,000 km) | Oil Change Service |
| 10,000 miles (16,000 km) | Oil Change & Maintenance Service |
| 15,000 miles (24,000 km) | Oil Change Service |
| 20,000 miles (32,000 km) | Oil Change & Maintenance Service |
| 25,000 miles (40,000 km) | Oil Change Service |
| 30,000 miles (48,000 km) | Oil Change & Maintenance Service |
| 35,000 miles (56,000 km) | Oil Change Service |
| 40,000 miles (64,000 km) | Oil Change & Maintenance Service |
| 45,000 miles (72,000 km) | Oil Change Service |
| 50,000 miles (80,000 km) | Oil Change & Maintenance Service |
| 55,000 miles (88,000 km) | Oil Change Service |
| 60,000 miles (96,000 km) | Oil Change & Maintenance Service |
Services should be performed at the scheduled mileage (kilometre) intervals, or 12 months after the last Service, whichever occurs first.
Your Service advisor will fill in the necessary information and stamp your Maintenance booklet each time you bring in your vehicle for Service.
At this time, the Service advisor will also inform you when the next Service is due. Therefore, it is important that you follow the Service schedule.
The brake fluid must be replaced every 2 years regardless of mileage (kilometres).
WHEN DO I BRING MY CAR IN FOR SERVICE?
If you vehicle has one of these engines, then refer to the Service Interval Schedule on the following page.
Gasoline Engines
- 2.0L Gasoline Engine (Golf, Jetta, New Beetle, Passat)
- 2.8L VR6 Gasoline Engine (Golf, GTI, Jetta)
- VR6 4-valve Gasoline Engine (Jetta)
- 4.0L W8 Gasoline Engine (Passat)
- 3.2L VR6 or 4.2L V8 Gasoline Engine (Touareg)
- 3.2L VR6 Gasoline Engine (R32)
- 4.2L V8 or 6.0L W12 Gasoline Engine (Phaeton)
Diesel Engines
- 1.9L TDI-PD Diesel Engine (Golf, Jetta, New Beetle),
- 2.0L TDI-PD Diesel Engine (Passat)
- 5.0L V10 TDI-PD Diesel Engine (Touareg)
If you are not sure when to bring your car in for service, ask your authorized Volkswagen Service Advisor.
| 5,000 miles (8,000 km) | Oil Change Service |
| 10,000 miles (16,000 km) | Oil Change & Maintenance Service |
| 20,000 miles (32,000 km) | Oil Change & Maintenance Service |
| 30,000 miles (48,000 km) | Oil Change & Maintenance Service |
| 40,000 miles (64,000 km) | Oil Change & Maintenance Service |
| 50,000 miles (80,000 km) | Oil Change & Maintenance Service |
| 60,000 miles (96,000 km) | Oil Change & Maintenance Service |
| 70,000 miles (112,000 km) | Oil Change & Maintenance Service |
| Services should be performed at the scheduled mileage (kilometre) intervals, or 12 months after the last Service, whichever occurs first. Your Service Advisor will fill in the necessary information and stamp your Maintenance booklet each time you bring in your vehicle for Service. At this time, the Service Advisor will also inform you when the next Service is due. Therefore, it is important that you follow the Service schedule. | |
| The brake fluid must be replaced every 2 years regardless of mileage (kilometres). | |
Delivery Inspection
- Your authorized Volkswagen dealer will fill out the necessary information and stamp your Maintenance book to confirm that the necessary services have been performed.
● Automobile technology changes continuously. Your authorized Volkswagen dealer always has the most current Service and Maintenance information for your Volkswagen model. It is possible that this information may differ from the check points listed in this booklet. Your Volkswagen Service Advisor can answer any questions you may have. - If you are not sure when to bring your car in for service, ask your authorized Volkswagen Service Advisor.
Delivery Inspection
Before your vehicle is delivered to you, it is inspected according to factory guidelines.
The Delivery Inspection was performed on:
Next Service:
Date: 5-27-06
Miles / km: 5,000
whichever occurs first
422
116
VOLKSWAGEN PASADENA
Pasadena, CA
today's date and Volkswagen Dealer stamp
First Service at 5,000 miles (8,000 km) - ALL MODELS
● Engine: Change oil and oil filter
● Water separator: Drain water (TDI engine only)
Next Service:
Date: ....
Miles / km: ....
whichever occurs first
Today's date and Volkswagen Dealer stamp
Service at 10,000 miles (16,000 km) - ALL MODELS
● Engine: Change oil and oil filter
● Water separator: Drain water (TDI engine only)
● Windshield washer: Check fluid level, add if necessary
● Automatic shift lock: Check operation including park/neutral position switch
● Brake system: Check for damage/leaks, brake pad thickness, brake fluid level
● Wheels: Rotate from front to rear
● Rear spoiler: Lubricate (New Beetle only)
● Airbag system: Visual check every 12 months regardless of mileage (kilometres)
● 12V starter and auxiliary battery: check (where applicable)
● Tires: Check tread depth, adjust tire pressure if necessary.
- Tire pressure monitoring system sensors: Check battery charge, replace wheel electronics and aluminum valve if necessary (where applicable).

text_image
Next Service: Date: ...... Miles / km: ...... whichever occurs firstToday's date and Volkswagen Dealer stamp
Service at 15,000 miles (24,000 km) - Models with a 1.8T or V6 engine ONLY.
● Engine: Change oil and oil filter
text_image
Next Service: Date: ...... Miles / km: ...... whichever occurs firstToday's date and Volkswagen Dealer stamp
Service at 20,000 miles (32,000 km) - ALL MODELS
● Engine: Change oil and oil filter
● Engine: Check for leaks
● Exhaust system: Check for damage and leaks
● Water separator: Drain water (TDI engine only)
● Fuel filter: Replace (TDI engine only)
● Battery: Check electrolyte level (Passat)
● Battery: Check (Golf, Jetta, New Beetle)
● Door check straps: Lubricate
● Dust and pollen filter (where applicable): Replace
● Cooling system: Check coolant level; add if necessary
● Windshield washer: Check fluid level; add if necessary
● Automatic shift lock: Check operation including park/neutral/safety switch
● Automatic transmission: Check for leaks
● Manual transmission: Check oil level; add if necessary; check for leaks
● Wheels: Rotate from front to rear
● Tires/spare wheel: Check condition and pressure
● Brake system: Check for damage/leaks, brake pad thickness and brake fluid level
● Drive shafts: Check boots
● On-Board diagnostic system: Check fault memory; purge if necessary
● Roof frame: Clean and lubricate
● Front axle: Check dust seals on ball joints and tie rod ends; check tie rods
● Headlights: Adjust
● Rear spoiler: Lubricate (New Beetle only)
● 12V starter and auxiliary battery: check (where applicable)
● Airbag system: Visual check every 12 months regardless of mileage (kilometres)
● Road test: Check kickdown, braking, steering, heating and ventilation, air conditioning, power accessories and electrical systems
● Tires: Check tread depth, adjust tire pressure if necessary.
- Tire pressure monitoring system sensors: Check battery charge, replace wheel electronics and aluminum valve if necessary (where applicable).
Continued on next page
Service at 20,000 miles (32,000 km) - continued
| Next Service:Date:....Miles / km:....whichever occurs first | Today's date andVolkswagen Dealer stamp |
Service at 25,000 miles (40,000 km) - Models with a 1.8T or V6 engine ONLY.
● Engine: Change oil and oil filter
Next Service:
Date:
Miles / km: ....
whichever occurs first
Today's date and
Volkswagen Dealer stamp
Service at 30,000 miles (48,000 km) - ALL MODELS
● Engine: Change oil and oil filter
● Water separator: Drain water (TDI engine only)
● Windshield washer: Check fluid level, add if necessary
● Automatic shift lock: Check operation including park/neutral position switch
● Brake system: Check for damage/leaks, brake pad thickness, brake fluid level
● Wheels: Rotate from front to rear
● Rear spoiler: Lubricate (New Beetle only)
● Airbag system: Visual check every 12 months regardless of mileage (kilometres)
● 12V starter and auxiliary battery: check (where applicable)
● Tires: Check tread depth, adjust tire pressure if necessary.
- Tire pressure monitoring system sensors: Check battery charge, replace wheel electronics and aluminum valve if necessary (where applicable).
Next Service:
Date: ....
Miles / km: ....
whichever occurs first
Today's date and Volkswagen Dealer stamp
Service at 35,000 miles (56,000 km) - Models with a 1.8T or V6 engine ONLY.
● Engine: Change oil and oil filter
Next Service:
Date: ....
Miles / km: ....
whichever occurs first
Today's date and Volkswagen Dealer stamp
Service at 40,000 miles (64,000 km) - ALL MODELS
● Engine: Change oil and oil filter
● Engine: Check for leaks
● Exhaust system: Check for damage and leaks
● Fuel filter: Replace (TDI engine only)
● Water separator: Drain (TDI engine only)
● Battery: Check electrolyte level (Passat)
● Battery: Check (Golf, Jetta, New Beetle)
● Door check straps: Lubricate
● V-belt: Check tension and condition; adjust if necessary
● Windshield washer: Check fluid level; add if necessary
● Automatic transmission: Check for leaks
● Manual transmission: Check oil level; add if necessary; check for leaks
● Automatic shift lock: Check operation including park/neutral/safety switch
● Automatic transmission final drive oil: Check level and for leaks; add if necessary
● Wheels: Rotate from front to rear
● Headlights: Adjust
● Tires/spare wheel: Check condition and pressure
● Brake system: Check for damage/leaks, brake pad thickness, brake fluid level
● Brake fluid: Replace every 2 years regardless of mileage (kilometres)
● Spark plugs: Replace (except Touareg V8 and Phaeton V8)
● Interior and exterior lights: check function
● Air suspension: check for damage/leaks (Touareg and Phaeton)
● Underbody: check for damage (Touareg and Phaeton)
Continued on next page
Service at 40,000 miles (64,000 km) - continued
● Air cleaner: Replace filter element
● Cooling system: Check coolant level; add if necessary
● Dust and pollen filter (where applicable): Replace
● Ribbed belt: Check condition
● Power Steering: Check fluid level
● Drive shafts: Check boots
● Front axle: Check dust seals on ball joints, tie rod ends; check tie rods
● On-Board diagnostic system: Check fault memory; purge if necessary
● Roof frame: Clean and lubricate
● Automatic transmission: Check ATF
● Rear spoiler: Lubricate (New Beetle only)
● Airbag system: Visual check every 12 months regardless of mileage (kilometres)
● Road test: Check kickdown, braking, steering, heating and ventilation, air conditioning, power accessories and electrical systems
● 12V starter and auxiliary battery: check (where applicable)
- Convertible top: Check function and check roll-over protection with convertible top open (New Beetle Convertible only)
● Tires: Check tread depth, adjust tire pressure if necessary.
● Tire pressure monitoring system sensors: Check battery charge, replace wheel electronics and aluminum valve if necessary (where applicable).
Next Service:
Date: ....
Miles / km: ....
whichever occurs first
Today's date and
Volkswagen Dealer stamp
Service at 45,000 miles (72,000 km) - Models with a 1.8T or V6 engine ONLY.
● Engine: Change oil and oil filter
Next Service:
Date: ....
Miles / km: ....
whichever occurs first
Today's date and Volkswagen Dealer stamp
Service at 50,000 miles (80,000 km) - ALL MODELS
● Engine: Change oil and oil filter
● Water separator: Drain water (TDI engine only)
● Windshield washer: Check fluid level, add if necessary
● Automatic shift lock: Check operation including park/neutral position switch
● Brake system: Check for damage/leaks, brake pad thickness, brake fluid level
● Wheels: Rotate from front to rear
● Rear spoiler: Lubricate (New Beetle only)
● Airbag system: Visual check every 12 months regardless of mileage (kilometres)
● 12V starter and auxiliary battery: check (where applicable)
● Tires: Check tread depth, adjust tire pressure if necessary.
● Tire pressure monitoring system sensors: Check battery charge, replace wheel electronics and aluminum valve if necessary (where applicable).
Next Service:
Date: ....
Miles / km: ....
whichever occurs first
Today's date and Volkswagen Dealer stamp
Service at 55,000 miles (88,000 km) - Models with a 1.8T or V6 engine ONLY.
● Engine: Change oil and oil filter
Next Service:
Date: ....
Miles / km: ....
whichever occurs first
Today's date and Volkswagen Dealer stamp
Service at 60,000 miles (96,000 km) - ALL MODELS
● Engine: Change oil and oil filter
● Engine: Check for leaks
● Exhaust system: Check for damage and leaks
● Water separator: Drain water (TDI engine only)
● Fuel filter: Replace (TDI engine only)
● Battery: Check electrolyte level (Passat)
● Battery: Check (Golf, Jetta, New Beetle)
● Door check straps: Lubricate
● Dust and pollen filter (where applicable): Replace
● Cooling system: Check coolant level; add if necessary
● Windshield washer: Check fluid level; add if necessary
● Automatic shift lock: Check operation including park/neutral/safety switch
● Automatic transmission: Check for leaks
● Manual transmission: Check oil level; add if necessary; check for leaks
● Timing belt: Check condition (4 cylinder gasoline engine only)
● Automatic transmission final drive: Check fluid level and for leaks
● Wheels: Rotate from front to rear
● Tires/spare wheel: Check condition and pressure
● Brake system: Check for damage/leaks, brake pad thickness and brake fluid level
● Drive shafts: Check boots
● On-Board diagnostic system: Check fault memory; purge if necessary
● Roof frame: Clean and lubricate
● Front axle: Check dust seal on ball joints and tie rods; check tie rods
● Headlights: Adjust
● Rear spoiler: Lubricate (New Beetle only)
● Airbag system: Visual check every 12 months regardless of mileage (kilometres)
● Road test: Check kickdown, braking, steering, heating and ventilation, air conditioning, power accessories and electrical systems
● 12V starter and auxiliary battery: check (where applicable)
● Spark plugs: replace (Touareg V8 and Phaeton V8 only)
● Tires: Check tread depth, adjust tire pressure if necessary.
- Tire pressure monitoring system sensors: Check battery charge, replace wheel electronics and aluminum valve if necessary (where applicable).
Continued on next page
Service at 60,000 miles (96,000 km) - continued
| Next Service:Date:....Miles / km:....whichever occurs first | Today's date andVolkswagen Dealer stamp |
Service at 65,000 miles (104,000 km) - Models with a 1.8T or V6 engine ONLY.
● Engine: Change oil and oil filter
Next Service:
Date:
Miles / km: ....
whichever occurs first
Today's date and Volkswagen Dealer stamp
Service at 70,000 miles (112,000 km) - ALL MODELS
● Engine: Change oil and oil filter
● Water separator: Drain water (TDI engine only)
● Windshield washer: Check fluid level, add if necessary
● Automatic shift lock: Check operation including park/neutral position switch
● Brake system: Check for damage/leaks, brake pad thickness, brake fluid level
● Wheels: Rotate from front to rear
● Rear spoiler: Lubricate (New Beetle only)
● Airbag system: Visual check every 12 months regardless of mileage (kilometres)
● 12V starter and auxiliary battery: check (where applicable)
● Tires: Check tread depth, adjust tire pressure if necessary.
● Tire pressure monitoring system sensors: Check battery charge, replace wheel electronics and aluminum valve if necessary (where applicable).
Next Service:
Date: ....
Miles / km: ....
whichever occurs first
Today's date and
Volkswagen Dealer stamp
Service at 75,000 miles (120,000 km) - Models with a 1.8T or V6 engine ONLY.
● Engine: Change oil and oil filter
Next Service:
Date:
Miles / km: ....
whichever occurs first
Today's date and
Volkswagen Dealer stamp
Service at 80,000 miles (128,000 km) - ALL MODELS
● Engine: Change oil and oil filter
● Engine: Check for leaks
● Exhaust system: Check for damage and leaks
● Fuel filter: Replace (TDI engine only)
● Water separator: Drain (TDI engine only)
● Battery: Check electrolyte level (Passat)
● Battery: Check (Golf, Jetta, New Beetle)
● Door check straps: Lubricate
● Spark plugs: Replace (except Touareg V8 and Phaeton V8)
● Air cleaner: Replace filter element
● Cooling system: Check coolant level; add if necessary
● Dust and pollen filter (where applicable): Replace
● Timing belt: Check condition (4 cylinder gasoline engine only)
● V-belt: Check tension and condition; adjust if necessary
● Ribbed belt: Check condition
● Timing belt: change (Touareg V8 and Phaeton V8 only)
● Windshield washer: Check fluid level; add if necessary
● Automatic shift lock: Check operation including park/neutral/safety switch
● Automatic transmission: Check for leaks
● Manual transmission: Check oil level; add if necessary; check for leaks
Continued on next page
Service at 80,000 miles (128,000 km) - continued
● Automatic transmission final drive oil: Check level and for leaks; add if necessary
● Wheels: Rotate from front to rear
● Headlights: Adjust
● Tires/spare wheel: Check condition and pressure
● Brake system: Check for damage/leaks, brake pad thickness, brake fluid level
● Power steering: Check fluid level
● Brake fluid: Replace every 2 years regardless of mileage (kilometres)
● Drive shafts: Check boots
● Front axle: Check dust seals on ball joints, tie rod ends; check tie rods
● On-Board diagnostic system: Check fault memory; purge if necessary
● Roof frame: Clean and lubricate
● Automatic transmission: Check ATF
● Rear spoiler: Lubricate (New Beetle only)
● Airbag system: Visual check every 12 months regardless of mileage (kilometres)
● Road test: Check kickdown, braking, steering, heating and ventilation, air conditioning, power accessories and electrical systems
● 12V starter and auxiliary battery: check (where applicable)
- Convertible top: Check function and check roll-over protection with convertible top open (New Beetle Convertible only)
● Tires: Check tread depth, adjust tire pressure if necessary.
- Tire pressure monitoring system sensors: Check battery charge, replace wheel electronics and aluminum valve if necessary (where applicable).
Next Service:
Date: ....
Miles / km: ....
whichever occurs first
Today's date and Volkswagen Dealer stamp
Service at 85,000 miles (136,000 km) - Models with a 1.8T or V6 engine ONLY.
● Engine: Change oil and oil filter
Next Service:
Date:
Miles / km: ....
whichever occurs first
Today's date and Volkswagen Dealer stamp
Service at 90,000 miles (144,000 km) - ALL MODELS
● Engine: Change oil and oil filter
● Water separator: Drain water (TDI engine only)
● Windshield washer: Check fluid level, add if necessary
● Automatic shift lock: Check operation including park/neutral position switch
● Brake system: Check for damage/leaks, brake pad thickness, brake fluid level
● Wheels: Rotate from front to rear
● Rear spoiler: Lubricate (New Beetle only)
● Airbag system: Visual check every 12 months regardless of mileage (kilometres)
● 12V starter and auxiliary battery: check (where applicable)
● Timing belt: Replace (TDI engine only)
● Tires: Check tread depth, adjust tire pressure if necessary.
● Tire pressure monitoring system sensors: Check battery charge, replace wheel electronics and aluminum valve if necessary (where applicable).
Next Service:
Date: ....
Miles / km: ....
whichever occurs first
Today's date and Volkswagen Dealer stamp
Service at 95,000 miles (152,000 km) - Models with a 1.8T or V6 engine ONLY.
● Engine: Change oil and oil filter
Next Service:
Date: ....
Miles / km: ....
whichever occurs first
Today's date and Volkswagen Dealer stamp
Service at 100,000 miles (160,000 km) - ALL MODELS
● Engine: Change oil and oil filter
● Engine: Check for leaks
● Exhaust system: Check for damage and leaks
● Water separator: Drain water (TDI engine only)
● Fuel filter: Replace (TDI engine only)
● Battery: Check electrolyte level (Passat)
● Battery: Check (Golf, Jetta, New Beetle)
● Door check straps: Lubricate
● Dust and pollen filter (where applicable): Replace
● Cooling system: Check coolant level; add if necessary
● Windshield washer: Check fluid level; add if necessary
● Automatic shift lock: Check operation including park/neutral/safety switch
● Automatic transmission: Check for leaks
● Manual transmission: Check oil level; add if necessary; check for leaks
● Wheels: Rotate from front to rear
● Tires/spare wheel: Check condition and pressure
● Brake system: Check for damage/leaks, brake pad thickness and brake fluid level
● Drive shafts: Check boots
● On-Board diagnostic system: Check fault memory; purge if necessary
● Roof frame: Clean and lubricate
● Front axle: Check dust seals on ball joints and tie rod ends; check tie rods
Continued on next page
Service at 100,000 miles (160,000 km) - continued
● Headlights: Adjust
● Rear spoiler: Lubricate (New Beetle only)
● Airbag system: Visual check every 12 months regardless of mileage (kilometres)
● Road test: Check kickdown, braking, steering, heating and ventilation, air conditioning, power accessories and electrical systems
● Timing belt: Replace (TDI engine only)
● 12V starter and auxiliary battery: check (where applicable)
● Tires: Check tread depth, adjust tire pressure if necessary.
● Tire pressure monitoring system sensors: Check battery charge, replace wheel electronics and aluminum valve if necessary (where applicable).
Next Service:
Date: ....
Miles / km: ....
whichever occurs first
Today's date and Volkswagen Dealer stamp
Service at 105,000 miles (168,000 km) - Models with a 1.8T or V6 engine ONLY.
● Engine: Change oil and oil filter
- Timing belt and timing belt tensioning roller: Replace (Passat 2.8L V6 5-valve engines only)
- Timing belt and timing belt tensioning roller: Replace (Passat, Golf, Jetta, New Beetle 1.8 T engine only)
Next Service:
Date:
Miles / km: ....
whichever occurs first
Today's date and Volkswagen Dealer stamp
Brake fluid replacement record
The brake fluid must be replaced every 2 years regardless of mileage (kilometres).
● The first brake fluid replacement was performed on ____
Next Brake Fluid Replacement:
Date:
Today's date and Volkswagen Dealer stamp
● A brake fluid replacement was performed on ____
Next Brake Fluid Replacement:
Date: ....
Today's date and Volkswagen Dealer stamp
● A brake fluid replacement was performed on ____
Next Brake Fluid Replacement:
Date: ....
Today's date and Volkswagen Dealer stamp
Brake fluid replacement record
The brake fluid must be replaced every 2 years regardless of mileage (kilometres).
● The first brake fluid replacement was performed on
Next Brake Fluid Replacement:
Date: ....
Today's date and Volkswagen Dealer stamp
● A brake fluid replacement was performed on
Next Brake Fluid Replacement:
Date: ....
Today's date and Volkswagen Dealer stamp
● A brake fluid replacement was performed on ____
Next Brake Fluid Replacement:
Date: ....
Today's date and Volkswagen Dealer stamp
© VOLKSWAGEN of America, Inc.
All rights reserved
May not be reproduced or translated in whole or in part without consent of VOLKSWAGEN of America, Inc.
Specifications subject to change without notice.
Printed in Brazil
text_image
1.2 Passat, Golf, Jetta, New Beetle Models USA Warranty Model year 2005
natural_image
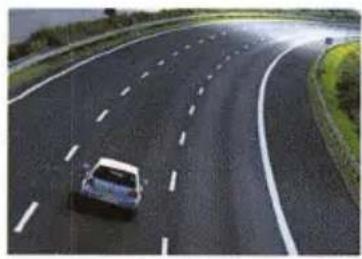
Aerial view of a car driving on a multi-lane highway with lane markings and greenery (no visible text or symbols)1.2 Passat, Golf, Jetta, New Beetle Models
USA Warranty Model year 2005
Dear owner,
This booklet contains the warranties applicable to your new Volkswagen. Please read these warranties carefully to determine your warranty rights and obligations.
Your Limited New Vehicle Warranty includes virtually bumper to bumper coverage for 4 years or 50,000 miles, whichever occurs first and limited powertrain coverage for 5 years or 60,000 miles, whichever occurs first. Your vehicle is also warranted against corrosion perforation for a period of 12 years irrespective of mileage.
In addition, your vehicle is covered by emissions warranties mandated by Federal law. If you are a resident of California, Massachusetts, Vermont, or Maine and have purchased a California emissions equipped vehicle, you may also have rights under California mandated emissions warranties. Please consult these warranties whenever a repair to your emission control system is required to determine whether it is covered by warranty. Your satisfaction in understanding the warranties that apply to your Volkswagen is important to us. Any questions concerning warranty coverage should be directed to:
This booklet contains the warranties applicable to your new Volkswagen. Please read these warranties carefully to determine your warranty rights and obligations.
Volkswagen Customer CARE Center 3499 West Hamlin Road Rochester Hills, MI 48309
If you have a concern or you are not satisfied with the service that you receive from your dealer, we suggest that you discuss it with the Service Manager at your dealership. If it is not resolved through your dealership, you may call or write to the Volkswagen Customer CARE Center.
Volkswagen of America, Inc., provides a mediation and arbitration service for the resolution of disputes arising under this Limited New Vehicle Warranty. This service is called BBB AUTO LINE and is conducted through local offices of the Better Business Bureau. If you wish to use this service, call the following toll-free number:
1 (800) 955-5100
Council of Better Business Bureaus, Inc. 4200 Wilson Boulevard Arlington, VA 22203-1804
Notice of Address Change Notice of Used Car Purchase
The "National Traffic & Motor Vehicle Safety Act of 1966" requires manufacturers to be in a position to contact vehicle owners if a correction of a product defect becomes necessary. If you change your address or buy a used Volkswagen, complete one of the postcards in the middle of this booklet. You need not use this card if you purchased your Volkswagen through an authorized Volkswagen dealer.
Table of contents
Limited New Vehicle Warranty .. 2
What is covered 2
What is not covered 4
Limited Powertrain Warranty .... 7
What is covered 7
What is not covered 8
Limited Warranty Against Corrosion Perforation .... 10
What is covered 10
What is not covered 11
24 Hour Roadside Assistance .... 13
The Volkswagen 24 Hour Roadside Assistance program 13
Federal Emissions Warranties ... 14
General 14
Emissions Control System Warranty ..... 15
Emissions Performance Warranty 16
Additional Information 18
California Emissions Warranties . 19
California law requires us to provide you with the following Emissions Warranty Statement 19
CALIFORNIA EMISSION CONTROL WARRANTY STATEMENT 19
Emissions Performance Warranty 22
Customer CARE 26
Dealer assistance 26
When to notify the manufacturer 26
Repairs not covered by warranty 27
BBB AUTO LINE 28
BBB AUTO LINE dispute resolution services 28
Service Publications 29
Volkswagen Technical Literature Ordering Center 29
Tire Manufacturers 30
List of tire manufacturers for new Volkswagen vehicles 30
Limited New Vehicle Warranty
What is covered
Warranty period
The New Vehicle Warranty period is 4 years or 50,000 miles, whichever occurs first.
Any implied warranty, including any implied warranty of merchantability or warranty of fitness for a particular purpose, is limited in dura-
tion to the period of this written warranty. Some states do not allow limitations on how long an implied warranty lasts, so this limitation may not apply to you.
Coverage
This warranty covers any repair to correct a manufacturer's defect in material or workmanship except wheel alignment, tire balance, and the repair or replacement of tires. The repair or replacement of wear and tear items, such as manual transmission clutch friction material, brake pads worn below manufacturer specifications, light bulbs (excluding Halogen headlights, instrument panel bulbs, and Xenon headlights, unless damaged by outside influences), seat covers, carpeting and replacement of rubber wiper blade inserts, replaced for wear and tear,
are covered up to one year or 12,000 miles, whichever occurs first.
Batteries are covered 100% parts and labor for 4 years or 50,000 miles, whichever occurs first, for defects in material or workmanship.
Mechanical adjustment not associated with a defect in material and workmanship, are not covered after the first year or 12,000 miles, whichever occurs first (i.e. headlight adjustment).
Where to go for warranty service
This warranty will be honored by any authorized Volkswagen dealer in the United States, including its territories, or Canada.
If your Volkswagen is brought to an authorized Volkswagen dealer outside the United States, in-
cluding its territories, or Canada, this warranty will not apply. Defects in material or workmanship will be corrected under the terms of the warranty for new Volkswagen vehicles in effect in that country.
When the warranty period begins
The warranty period begins on the date the vehicle is delivered to either the original purchaser or the original lessee; or if the vehicle is first placed in service as a "demonstrator" or "company" car, on the date such vehicle is first placed in service.
This Limited New Vehicle Warranty is automatically transferred without cost if the ownership of the vehicle changes within the Warranty period.
Free-of-charge repair
Repairs under this warranty are free of charge. Your authorized Volkswagen dealer will repair
the defective part or replace it with a new or remanufactured genuine Volkswagen part.
Emergency repairs
If an emergency repair was performed by a non-Volkswagen service facility, keep all receipts, repair orders, and parts removed from your Volkswagen.
You will be reimbursed if the repair work was needed and correctly performed and it was impossible or unreasonable under the circum-
stances to tow or drive your Volkswagen to the nearest authorized Volkswagen dealer.
A statement of the circumstances that prevented you from getting to an authorized Volkswagen dealer, together with the paid receipts, repair orders, and replaced parts must be submitted to your authorized Volkswagen dealer in order to be considered for reimbursement.
BBB AUTO LINE dispute resolution services
If you are not satisfied with the warranty service you receive, you may wish to follow the steps set forth page 28.
Volkswagen of America, Inc., provides a mediation and arbitration service for the resolution of warranty and other product related disputes. This service is called BBB AUTO LINE and is conducted through local offices of the Better Business Bureau. If you wish to use this service, you may call the following toll-free number:
1 (800) 955-5100
We encourage you to use BBB AUTO LINE before you decide to seek remedies in a court of law
In some states you may be required to use BBB AUTO LINE before you can assert your rights in a court of law.
The BBB AUTO LINE service is free of charge and permits you to present your case without an attorney. Additional information on BBB AUTO LINE can be found page 28.
What is not covered
Tires
Tires are not covered by this warranty, but are separately warranted by the tire manufacturer. To assist you in obtaining related Warranty information, a list of tire manufacturers and ad-
dresses is provided at the end of this booklet. Verify with the tire manufacturer what is covered under their warranty.
Maintenance services and mechanical adjustments
This warranty does not cover the cost of parts and labor involved in any scheduled maintenance service.
This warranty does not cover the replacement of filters, oil, lubricants, fluids, or air conditioner refrigerant charge, unless their replacement is a necessary part of warranty service on a covered component.
Mechanical adjustments not associated with a defect in material or workmanship are not covered after the first year or 12,000 miles, whichever occurs first (i.e. headlight adjustment). This warranty does not cover wheel alignment or tire balancing.
Damage or malfunction due to misuse, negligence, alteration, accident or fire
This warranty does not cover:
- damage or malfunctions which are the result of improper repair of the vehicle, installation of any non Genuine Volkswagen parts that will alter the vehicle performance specifications from those set by the vehicle manufacturer, modifications to the vehicle (including the engine management system), accessories such as alarm systems, remote starters, roof racks or communications equipment, defects or failures resulting from the use of new parts not sold or approved by Volkswagen, or used parts, or the resultant damage to associated parts or systems; or;
- damage or malfunctions which were caused by the alteration of the vehicle, in particular any major or structural alterations such as the conversion of the vehicle to a convertible or the modification of the roof to accommodate a glass roof structure or other similar structural alterations; or
- damage or malfunctions caused by intentional or unintentional misfueling, collision or modifications of the vehicle, including, but not limited to the installation of engine management components not approved by Volkswagen; or
- damage or malfunctions resulting from the use of the vehicle in competitive events or caused by accident or fire; or
- damage or malfunctions resulting from continued operation of the vehicle after a warning light, gauge reading or other warnings indicate a mechanical or operational problem; or
- damage or malfunctions due to suspension modifications, such as the installation of aftermarket springs, shock absorbers, or lowering kits.
This warranty does not cover vehicles severely damaged and / or declared to be a total loss by an insurer or vehicles substantially re-assembled from or repaired with parts obtained from another used vehicle.
Damage or malfunctions due to lack of maintenance
This warranty does not cover damage or malfunctions due to failure to follow recommended maintenance and use requirements as set forth in the Volkswagen Owner's Manual and the Maintenance Booklet.
Your dealer will deny warranty coverage unless you present to the dealer proof in the form of Service or Repair Orders that all scheduled maintenance was performed in a timely manner.
Damage caused by the environment
This warranty does not cover damage caused by airborne industrial pollutants (e.g. acid rain),
bird droppings, stones, floodwater, windstorms, tree sap or other similar occurrences.
Glass
This warranty does not cover glass breakage, unless due to a defect in manufacturer's material or workmanship.
Odometer tampering
These warranties do not cover repairs on an Volkswagen on which the odometer has been altered or on which the actual mileage cannot readily be determined.
If the speedometer unit is replaced, a "Speedometer Replacement Record" must be filled out by an authorized Volkswagen dealer.
Other expenses:
This warranty does not cover any incidental or consequential damage, including loss of value of the vehicle, lost profits or earnings, and out-of-pocket expenses for substitute transportation or lodging ^1) .
This warranty gives you specific legal rights and you may also have other rights, which vary from state to state.
Other terms:
This warranty is issued by Volkswagen of America, Inc. (VWoA). This warranty does not apply to Volkswagen vehicles or parts and accessories not imported or distributed by Volkswagen.
This warranty, the Limited Warranty Against Corrosion Perforation, and the Emissions Warranties are the only express warranties made in connection with the sale of this Volkswagen. Any implied warranty, including any warranty of merchantability or warranty of fitness for a particular purpose, is limited in duration to the stated period of these written warranties.
Some states do not allow limitations on how long an implied warranty lasts, so, the above limitation may not apply to you.
Volkswagen of America, Inc. reserves the right to make improvements or change the design of any Volkswagen model at anytime with no obligation to make similar changes on vehicles previously sold.
Neither Volkswagen nor the manufacturer assumes, or authorizes any person to assume, any other obligation or liability on its behalf.
Limited Powertrain Warranty
What is covered
Warranty period
The coverage under this warranty lasts for 5 years or 60,000 miles whichever occurs first, from the date the vehicle was first placed in service.
This warranty does not apply to vehicles used for commercial purposes such as taxi, limousine and rental vehicles.
If a commercial vehicle is sold to a subsequent retail owner, this warranty still does not apply.
Any implied warranty, including any implied warranty of merchantability or warranty of fitness for a particular purpose, is limited in duration to the period of this written warranty. Some states do not allow limitations on how long an implied warranty lasts, so this limitation may not apply to you.
Coverage
The Limited Powertrain Warranty covers any repair to correct a manufacturer's defect in material or workmanship for the following Volkswagen parts and components:
Engine
Cylinder block and all internal parts, cylinder head and all internal parts, valve train, spur belt,
flywheel, oil pump, water pump, manifolds, all related seals and gaskets.
Transmission
Case and all internal parts, torque converter, all related seals and gaskets.
Drivetrain
Differential and all internal parts, drive shafts and constant velocity (CV) joints.
Where to go for warranty service
This warranty will be honored by any authorized Volkswagen dealer in the United States, including its territories, or Canada.
If your Volkswagen is brought to an authorized Volkswagen dealer outside the United States, in-
cluding its territories, or Canada, this warranty will not apply. Defects in material or workmanship will be corrected only under the terms of the warranty for new Volkswagen vehicles in effect in that country.
When the warranty period begins
The warranty period begins on the date the vehicle is delivered to either the original purchaser or the original lessee; or if the vehicle is first placed in service as a "demonstrator" or "company car", on the date such vehicle is first placed in service.
The Limited Powertrain Warranty is automatically transferred without cost if the ownership of the vehicle changes within the Warranty period.
Free-of-charge repair
Repairs under this warranty are made free of charge. Your authorized Volkswagen dealer will repair the defective part or replace it with a new or remanufactured genuine Volkswagen part.
What is not covered
Maintenance services
This warranty does not cover the cost of parts and labor involved in any scheduled maintenance service. Scheduled maintenance services are described in your Volkswagen Maintenance Booklet. This warranty does not cover the replacement of filters, oil, lubricants or fluids unless their replacement is a necessary part of warranty service on a covered component.
Damage or malfunction due to misuse, negligence, alteration, accident or fire
This warranty does not cover:
- damage or malfunctions which are the result of improper repair of the vehicle, installation of any non Genuine Volkswagen parts that will alter the vehicle performance specifications from those set by the vehicle manufacturer, modifications to the vehicle (including the engine management system), accessories such as alarm systems, remote starters, roof racks or communications equipment, defects or failures resulting from the use of new parts not sold or approved by Volkswagen, or used parts, or the resultant damage to associated parts or systems;
- damage or malfunctions which were caused by the alteration of the vehicle, in particular any major or structural alterations such as the conversion of the vehicle to a convertible or the modification of the roof to accommodate a glass roof structure or other similar structural alterations;
- damage or malfunctions caused by intentional or unintentional misfueling, collision or modifications of the vehicle, including, but not limited to the installation of engine management components not approved by Volkswagen;
- damage or malfunctions resulting from the use of the vehicle in competitive events or caused by accident or fire; or
- damage or malfunctions resulting from continued operation of the vehicle after a warning light, gauge reading or other warnings indicate a mechanical or operational problem; or
- damage or malfunctions due to suspension modifications, such as the installation of aftermarket springs, shock absorbers, or lowering kits.
This warranty does not cover vehicles severely damaged and / or declared to be a total loss by an insurer or vehicles substantially re-assembled from or repaired with parts obtained from another used vehicle.
Wear and tear items
This warranty does not cover the replacement of any powertrain components that wear as a result of normal use or deterioration.
Damage or malfunctions due to lack of maintenance
This warranty does not cover damage or malfunctions which are due to failure to follow recommended maintenance requirements as set forth in the Volkswagen Owner's Manual and the Maintenance Booklet. Your dealer will deny war-
ranty coverage unless you present to the dealer proof in the form of service or repair orders that all scheduled maintenance was performed in a timely manner.
Damage caused by the environment
This warranty does not cover damage caused by airborne industrial pollutants (e.g. acid rain),
bird droppings, tree sap, stones, flood water, windstorm or other similar occurrences.
Other expenses
This warranty does not cover any incidental or consequential damage, including loss of value of the vehicle, lost profits or earnings, or out-of-pocket expenses for substitute transportation or lodging ^2) .
The "Other Terms" Presented in The Limited New Vehicle Warranty Also Apply to This Warranty.
Limited Warranty Against Corrosion Perforation
What is covered
Warranty period
The coverage under this warranty lasts for 12 years without mileage limitation.
Any implied warranty, including any implied warranty of merchantability or warranty of fitness for a particular purpose, is limited in duration to the period of this written warranty. Some
states do not allow limitations on how long an implied warranty lasts, so this limitation may not apply to you.
Neither Volkswagen nor the manufacturer assumes, or authorizes any person to assume, any other obligation or liability on its behalf.
Coverage
This warranty covers any repair or replacement of body sheet metal panels that have been perforated by rust.
Where to go for warranty service
This warranty will be honored by any authorized Volkswagen dealer in the United States, including its territories, or Canada.
If your Volkswagen is brought to an authorized Volkswagen dealer outside the United States, in-
cluding its territories, or Canada, this warranty will not apply. Defects in material or workmanship will be corrected under the terms of the warranty for new Volkswagen vehicles in effect in that country.
When the warranty period begins
The warranty period begins on the date the vehicle is delivered to either the original purchaser or the original lessee; or if the vehicle is first placed in service as a "demonstrator" or "company" car, on the date such vehicle is first placed in service.
This Limited Warranty Against Corrosion Perforation is automatically transferred without cost if the ownership of the vehicle changes within the warranty period.
Free-of-charge repair
Repairs under this warranty are made free of charge. The authorized Volkswagen dealer will repair the defective part or replace it with a new or remanufactured genuine Volkswagen part.

Tips
Your Volkswagen is corrosion protected at the factory. You do not need to purchase rust-proofing when you buy your Volkswagen in order to keep this warranty in effect.
What is not covered
Surface corrosion without perforation
Repairs are covered under this warranty only if there is rust-through condition in the body sheet metal not caused by outside influences.
Perforation of sheet metal due to accident, lack of care, or failure to repair or modifications to the paint/painted surface
This warranty does not cover corrosion perforation resulting from the failure to promptly repair paint damage, damaged undercoating, or surface corrosion.
It does not cover damage due to failure to wash or otherwise regularly care for the vehicle as described in the Volkswagen Owner's Manual.
This warranty does not cover corrosion perforation resulting from unrepaired collision damage or improper collision repair.
Special exclusion for any aluminum portions that may be part of your Volkswagen vehicle
This warranty does not cover corrosion perforation due to failure to perform body repairs in accordance with Volkswagen's specified repair procedures, including use of non-aluminum alloy parts.
It does not cover corrosion perforation resulting from the use of any inferior rustproofing agent or method.
Your authorized Volkswagen dealership will do its best to match your vehicles original finish, but this warranty does not cover the cost of painting the entire vehicle solely for paint matching.
Environmental damage
This warranty does not cover damage caused by airborne industrial pollutants (e.g. acid rain),
bird droppings, stones, flood water, wind storms, tree sap or other similar occurrences
Corrosion perforation because of failure to rustproof when collision damage is repaired
Body parts that have been repaired or newly installed after a collision must be treated with a rustproofing agent that is compatible with Volkswagen's own factory corrosion protection. If you fail to have your vehicle treated in this way after a collision, Volkswagen will not be responsible for the repair of any resulting rust-through.

Tips
The "Other Terms" presented in the Limited New Vehicle Warranty also apply to this warranty.
24 Hour Roadside Assistance
The Volkswagen 24 Hour Roadside Assistance program
The Volkswagen 24 Hour Roadside Assistance program is your assurance that help will be there should your model year 2005 Volkswagen have a mechanical breakdown under normal ^3) driving conditions. Whether this happens thousands of miles from home (anywhere in the U.S. or Canada), or in your own driveway, you only have to call one toll-free number and help will be on the way.
1 (800) 411-6688
To identify yourself as a member, simply quote your Vehicle Identification Number (VIN). This number can be found on your 24 Hour Roadside Assistance membership card, or you can find it on the driver's side of the dashboard visible through the windshield. 24 Hour Roadside Assis-
tance is available to you for the first four years of your new vehicle ownership or 50,000 miles, which occurs first.
The Volkswagen 24 Hour Roadside Assistance Program includes the following emergency roadside services: emergency towing, battery jump start, flat tire change, emergency fuel service, lock-out service and extrication/winch service.
Other services and benefits include: trip routing services and trip interruption benefits throughout the U.S. and Canada.
Please refer to your 24 Hour Roadside Assistance Owner's Guide for specific details on the services provided.
Federal Emissions Warranties
General
The Emissions Warranties set out on the following pages are warranties which the manufacturer is required by law to furnish to you at the time you take delivery of your new vehicle.
The warranties required by Federal law apply to all new Volkswagen vehicles imported and distributed by Volkswagen of America, Inc. ("Volkswagen") for sale in the United States, including California. The warranties required by California law apply to all new Volkswagen vehicles imported and distributed by Volkswagen for sale and registration in the State of California.
The Commonwealth of Massachusetts and the States of Vermont and Maine have adopted warranty requirements that are identical to the California warranties.
The owner of a vehicle certified for sale and registered in California, Massachusetts, Vermont or Maine, may, therefore, have warranty rights under both Federal and State mandated emissions warranties. The State of New York has adopted emissions warranty requirements identical to California mandated emissions
warranties ONLY for vehicles equipped to meet California's Partial Zero Emission Vehicle (P-ZEV) emissions requirements, as identified on the Vehicle Emission Control Information Label located on the hood.
The owner of a new Volkswagen vehicle im- ported and distributed by Volkswagen for sale in states other than California, Massachusetts, Ver- mont, Maine or New York (as set forth in the above paragraph) has rights only under the Fed- eral Emissions Warranty.
Please read these warranties carefully. If you have any questions concerning the applicability of each warranty to your vehicle or want to know whether a particular repair will be performed free of charge pursuant to these warranties, please write to or telephone:
Volkswagen Customer CARE Center Volkswagen of America, Inc. 3499 West Hamlin Road Rochester Hills, MI 48309 Tel.: 1 (800) 822-8987
Emissions Control System Warranty
For 2 years or 24,000 miles
Emissions Control System Warranty ^4)
Volkswagen of America, Inc. ("Volkswagen"), the authorized United States importer of Volkswagen vehicles, warrants to the original retail purchaser or original lessee and any subsequent purchaser or lessee that every model year 2005 Volkswagen vehicle imported by Volkswagen:
- was designed, built and equipped so as to conform at the time of sale with all applicable regulations of the United States Environmental Protection Agency ("EPA"), and
- is free from defects in material and workmanship which causes the vehicle to fail to conform with EPA regulations for 2 years after the date of first use or delivery of the vehicle to the original retail purchaser or original lessee or until the vehicle has been driven 24,000 miles, whichever comes first. The following parts listed, if defective, could cause the vehicle to fail to conform with EPA regulations:
• EVAP Canister
• Mass Air Flow Sensor Assembly
• Three-Way Catalytic Converter
• Engine Electronic Control Module and Power Supply Relay
• Electronic Feedback Controls, Sensors, Switches and Valves
• EVAP Canister Purge Valve
• Exhaust Manifold and Gaskets
• Exhaust Pipe Up to Catalytic Converter
• Fuel Filler Neck Restrictor
• Fuel Filler Cap and Gasket
- Fuel Injectors, Fuel Injector Lines and Gaskets and Pressure Regulator
- Fuel Tank
• Gravity Check Valve
- Knock Sensor
• Malfunction Indicator Lamp (MIL)
- OBD System
- Camshaft Adjuster
• OBD Data Link Connector
- Oxygen Sensor
• PCV Valve
• EVAP Leak Detection Pump
• Secondary Air Injection Pump and Associated Controls
- Emission-Related Hoses, Gaskets, Clamps and other accessories used with the above components
The obligation of Volkswagen under this warranty is limited, however, to the following: If within this period a defect in material or workmanship causes the vehicle to fail to conform with EPA regulations and the vehicle is brought to the workshop of any authorized Volkswagen dealer in the continental United States, Alaska, Hawaii or Canada, the dealer will make repairs as may be required by these regulations free of charge.
For 8 years or 80,000 miles
If the vehicle has been in use for more than 24 months or 24,000 miles, but less than 8 years or 80,000 miles, whichever occurs first, your Volkswagen dealer will repair or replace free-of-charge the following major emission control components only:
• Catalytic Converter
• Engine Electronic Control Module
- On Board Diagnostic Device
Emissions Performance Warranty
For 2 years or 24,000 miles and 8 years or 80,000 miles
Emissions Performance Warranty ^5)
Volkswagen of America, Inc., ("Volkswagen") warrants to the original retail purchaser or original lessee of a model year 2005 Volkswagen vehicle and any subsequent purchaser or lessee of the vehicle that if the following conditions are met, any authorized Volkswagen dealer in the continental United States, Alaska, Hawaii or Canada will remedy any nonconformity, as determined below, free-of-charge, under the following conditions:
- the vehicle fails to conform at any time during 24 months or 24,000 miles, whichever occurs first, to applicable emission inspection standards as determined by an EPA Approved
State Inspection and Maintenance Test ("I/M Test"), or
- if the vehicle has been in use for more than 24 months or 24,000 miles, but less than 8 years or 80,000 miles, whichever occurs first, the vehicle fails an I/M Test resulting from a malfunction of a catalytic converter, engine electronic control module or on-board diagnostic device (OBD), and
- the failure of the I/M Test requires the vehicle owner to bear any penalty or other sanction, including the denial of the right to use the vehicle under local, state or federal law, and
- the vehicle has been maintained and operated in accordance with Volkswagen's instructions for proper maintenance and use.
Instructions for proper maintenance and use
Instructions for proper maintenance are contained in your Volkswagen Maintenance Booklet. Time and mileage intervals at which maintenance is to be performed, may vary from
model to model. Instructions for proper use of the vehicle are contained in your Volkswagen Owner's Manual.
Use of EPA certified replacement parts
Volkswagen may deny an emission performance warranty claim on the basis that a non-EPA certified replacement part was used in the maintenance or repair of the vehicle if Volkswagen can prove that the non-certified part is either defective in materials or workmanship, or not equiva-
lent from an emission standpoint to the original part, and you are not able to offer information that the part is either not defective or equivalent to the original part with respect to its emission performance.
Warranty coverage for parts not scheduled for replacement
Any part which is not required to be replaced at maintenance intervals specified in the Volk-
swagen Maintenance Booklet is covered by this warranty for the full warranty period.

NO POSTAGE NECESSARY IF MAILED IN THE UNITED STATES
BUSINESS REPLY MAIL
FIRST CLASS MAIL PERMIT 107 PONTIAC, MI
POSTAGE WILL BE PAID BY ADDRESSEE
VOLKSWAGEN OF AMERICA, INC.
ATTENTION: RECALL
P.O. BOX 217022
AUBURN HILLS, MI 48321-7022
-
-
-
-
-
-
-
-
-
-
-
-
- 1.
-
-
-
-
-
-
-
-
-
-
-
NOTICE OF ADDRESS CHANGE/USED CAR PURCHASE

natural_image
Pure horizontal line pattern with no text, numbers, or symbolsComplete Vehicle Identification Number

natural_image
Pure diagram of two identical rectangular blocks with vertical lines, no text or symbols presentLast Name
First Name
Initial

natural_image
Pure diagram of a horizontal line with evenly spaced vertical tick marks (no text or symbols)Number
Street
Apt. No.

natural_image
Pure horizontal line pattern with no text, numbers, or symbolsCity

Zip Code
Please PRINT and give complete information


NO POSTAGE
NECESSARY
IF MAILED
IN THE
UNITED STATES
BUSINESS REPLY MAIL
FIRST CLASS MAIL PERMIT 107 PONTIAC, MI
POSTAGE WILL BE PAID BY ADDRESSEE
VOLKSWAGEN OF AMERICA, INC.
ATTENTION: RECALL
P.O. BOX 217022
AUBURN HILLS, MI 48321-7022
NOTICE OF ADDRESS CHANGE/USED CAR PURCHASE

flowchart
graph TD
    A["Complete Vehicle Identification Number"] --> B["Last Name"]
    B --> C["First Name"]
    C --> D["Initial"]
    D --> E["Number"]
    E --> F["Street"]
    F --> G["Apt. No."]
    G --> H["City"]
    H --> I["State"]
    I --> J["Zip Code"]
Please PRINT and give complete information


When to claim
You may raise a claim under this warranty immediately after your vehicle has failed an I/M Test if, as a result of that failure, you are required by law to repair the vehicle to avoid imposition
of a penalty or cancellation of your right to use the vehicle. You need not actually suffer the loss or lose the right to use your vehicle or pay for the repair before presenting your claim.
Acceptance or denial of claim within 30 days
Claims may be presented only by bringing your vehicle to any authorized Volkswagen dealer in the United States, its territories or Canada. The dealer will honor or deny your claim within a reasonable time, not to exceed thirty (30) days, from the time at which your vehicle is presented for repair or within any time period specified by local, state or federal law, whichever is shorter,
except when a delay is caused by events not attributable to Volkswagen or the dealer. If the dealer denies your claim, you will be notified in writing of the reasons for rejecting the claim. If you do not receive notice of denial of your claim within the above time period, Volkswagen is required by law to honor the claim.
Denial of claim for failure to comply with instructions for scheduled maintenance or proper use
Under certain circumstances, your claim may be denied because you have failed to comply with instructions for scheduled maintenance contained in your Volkswagen Maintenance booklet. In determining whether you have complied with the instructions for scheduled main-
tenance and proper use, Volkswagen may require you to furnish proof of compliance only with those maintenance instructions which Volkswagen has reason to believe were not performed and which could be the cause of the I/M Test failure.
Record of scheduled maintenance
Volkswagen recommends that you keep a record of scheduled maintenance by making sure that the Maintenance Record contained in your Volkswagen Maintenance booklet is validated at the approximate time or mileage intervals by the authorized Volkswagen dealer or other service fa-
cility which performed the maintenance, or by furnishing proof upon request that you have performed the maintenance yourself at the approximate time or mileage intervals, that you have used proper parts, and that you were able to perform the maintenance properly yourself.
Additional Information
Denial of warranty claim for other reasons
Additional information about the Federal Emissions Control Systems and the Federal Emissions Performance warranties.
Volkswagen may deny a claim on the basis that:
• the vehicle was abused, or
- the vehicle was maintained or used in a manner which included the improper installation of a component or the adjustment of parameters substantially outside the manufacturer's specifications for proper maintenance, or
- unscheduled maintenance was performed on your vehicle and in the course of such maintenance, components affecting your vehicle's emissions were removed or rendered inoperative, or
- contaminated fuel or fuel not meeting the specifications set forth in your Owner's Manual was used
Volkswagen will not deny a claim relating to:
- warranty work or pre-delivery service performed by an authorized Volkswagen dealer, or
- work performed in an emergency to rectify an unsafe condition attributable to Volkswagen, provided you have taken steps in a timely manner to put the vehicle back into a conforming condition, or
- the use of an uncertified part or to noncompliance with the instructions for proper maintenance and use which is not related to the I/M Test failure.
i Tips
Maintenance, Repair o.r Replacement of Emission Control Devices and Systems may be Performed by any Automotive Service and Repair Establishment or Qualified Individual Using any Part Certified by the Environment Protection Agency (EPA).
- Any implied warranty, including any warranty of merchantability or warranty of fitness for a particular purpose, is limited in duration to the stated period of these written warranties.
- Some states do not allow limitations on how long an implied warranty lasts, so the above limitation may not apply to you.
• These warranties do not cover any incidental or consequential damages, including loss of resale value, lost profits or earnings, and out-of-pocket expenses for substitute transportation or lodging. - Some states do not allow the exclusion or limitation of incidental or consequential damages, so this limitation or exclusion may not apply to you.
- You may obtain further information regarding the Emissions Performance Warranty or report violation of the terms of the Emissions Performance Warranty by contacting: Manager, Certification and Compliance Division (6405J), Warranty Claims, Environmental Protection Agency, Ariel Rios Building, 1200 Pennsylvania Avenue NW, Washington, DC 20460
California Emissions Warranties
California law requires us to provide you with the following Emissions Warranty Statement
CALIFORNIA EMISSION CONTROL WARRANTY STATEMENT
Your warranty rights and obligations:
The California Air Resources Board is pleased to explain the emission control system warranty on your model year 2005 vehicle. In California, new motor vehicles must be designed, built and equipped to meet the State's stringent anti-smog standards. Volkswagen must warrant the emission control system on your vehicle for the periods of time listed below provided there has been no abuse, neglect or improper maintenance of your vehicle.
Your emission control system may include parts such as the fuel-injection system, the ignition system, catalytic converter, and engine computer. Also included may be hoses, belts, connectors and other emission-related assemblies.
Where a warrantable condition exits, Volkswagen will repair your vehicle at no cost to you including diagnosis, parts and labor.
Manufacturer's warranty coverage:
For 3 years or 50,000 miles, whichever occurs first. ^6)
If your vehicle fails an Inspection and Maintenance Test, all necessary repairs and adjustments will be made by Volkswagen to ensure that your vehicle passes the inspection This is your Emission Control System PERFORMANCE WARRANTY.
If any emission-related part on your vehicle is defective, the part will be repaired or replaced by
Volkswagen. This is your short-term Emission Control System DEFECTS WARRANTY.
For 7 years or 70,000 miles, whichever occurs first
If an emission-related part listed in this warranty booklet specially noted with coverage for 7 years or 70,000 miles is defective, the part will be repaired or replaced by Volkswagen. This is your long-term Emission Control System DEFECTS WARRANTY.
For 15 years or 150,000 miles, whichever occurs first
Some Volkswagen models may be specially equipped to meet California Partial Zero Emission Vehicle (P-ZEV) requirements, as identified on the Vehicle Emission Control Information Label located on the hood. For these vehicles, if your Volkswagen fails an Inspection and Maintenance Test, OR if any emission-related part is found to be defective, the part will be repaired or replaced by Volkswagen for 15 years or 150,000 miles, whichever occurs first, from the time of retail delivery of your vehicle. This represents your Emission Control System PERFORMANCE WARRANTY and DEFECTS WARRANTY.
Owner's warranty responsibilities:
As the vehicle owner, you are responsible for the performance of the required maintenance listed in your owner's Maintenance booklet. Volkswagen recommends that you retain all receipts
covering maintenance on your vehicle, but Volkswagen cannot deny warranty solely for the lack of receipts or for your failure to ensure the performance of all scheduled maintenance.
You are responsible for presenting your vehicle to a Volkswagen dealer as soon as a problem exists. The warranty repairs should be completed in a reasonable amount of time, not to exceed 30 days.
As the vehicle owner, you should also be aware that Volkswagen may deny you warranty coverage if your vehicle or a part has failed due to abuse, neglect, improper maintenance or unapproved modifications.
IF YOU HAVE ANY QUESTIONS REGARDING YOUR WARRANTY RIGHTS AND RESPONSIBILITIES, YOU SHOULD CONTACT VOLKSWAGEN OF AMERICA, INC., CUSTOMER CARE CENTER AT 1 (800) 822-8987 OR THE CALIFORNIA AIR RESOURCES BOARD AT P.O. BOX 8001, EL MONTE, CA 91734-2302.
Emissions Control System Defects Warranty: Warranty for 3 years / 50,000 miles
Volkswagen of America, Inc., ("Volkswagen"), warrants to the original retail purchaser or original lessee and any subsequent purchaser or
lessee that every model year 2005 Volkswagen vehicle imported by Volkswagen and certified for sale and registered in California:
- was designed, built and equipped so as to conform with all applicable requirements of the California Air Resources Board ("CARB") and
- is free from defects in material and workmanship which cause the vehicle to fail to conform with CARB requirements, including any defect which would cause the vehicle's onboard malfunction indicator to illuminate, for 3 years or 50,000 miles, whichever comes first.
A warranted part is any part installed on a motor vehicle or motor vehicle engine by the vehicle or engine manufacturer, or installed in a warranty repair, which affects any regulated emission from a motor vehicle or engine which is subject to California emission standards.
Warranty for 7 years / 70,000 Miles Covering Certain Emission System Parts
The following emissions control system parts marked with "yes" are covered for 7 years or 70,000 miles, whichever comes first.
Those marked with "no" are covered for 3 years or 50,000 miles, whichever occurs first.
| Passat 1.8L | Passat 2.8L V6 | |
| Camshaft adjuster | yes | yes |
| Fuel tank | yes | yes |
| Turbo charger | yes | no |
| Charge air cooler | no | no |
| Fuel injection pump | no | no |
| Fuel injector with lift sensor | no | no |
| Throttle body | yes | yes |
| Air mass sensor | no | no |
| Intake manifold | no | yes |
| Front oxygen sensor | no | no |
| Powertrain control module | yes | yes |
| Rear oxygen sensor | no | no |
| Exhaust manifold | yes | yes |
| Front exhaust pipe | no | no |
| Secondary air injection pump | no | no |
| Catalytic converter | yes | yes |
| Powertrain control module (transmission) | yes | yes |
| Instrument cluster - MIL (Only instrument clusters equipped with Multi-Function Indicator are covered AND only when an integral Malfunction Indicator Lamp (MIL) failure is determined.) | yes | yes |
| Golf, Jetta, New Beetle 2.0L | Golf, Jetta, New Beetle 1.8L | Jetta, GTI VR6 2.8L | |
| Camshaft adjuster | no | yes | yes |
| Fuel tank | yes | yes | yes |
| EVAP canister | New Beetle only | no | no |
| Turbo charger | no | yes | no |
| Charge air cooler | no | New Beetle Convertible only | no |
| Fuel injection pump | no | no | no |
| Fuel injector with lift sensor | no | no | no |
| Throttle body | no | yes | no |
| Air mass sensor | no | no | no |
| Intake manifold | yes | no | yes |
| Front oxygen sensor | no | no | no |
| Powertrain control module | yes | yes | yes |
| Rear oxygen sensor | no | no | no |
| Exhaust manifold | yes | yes | yes |
| Front exhaust pipe | no | no | no |
| Secondary air injection pump | no | New Beetle Convertible only | no |
| Catalytic converter | yes | yes | yes |
| Powertrain control module (transmission) | no | yes | yes |
| Instrument cluster - MIL (Only instrument clusters equipped with Multi-Function Indicator are covered AND only when an integral Malfunction Indicator Lamp (MIL) failure is determined.) | yes | yes | yes |
Emissions Performance Warranty
General
California maintains a mandatory emissions Inspection and Maintenance (I/M test) program requiring motor vehicles to be smog tested at regular intervals. If your vehicle fails to pass an I/M test performed by a Licensed I/M test station pursuant to the California Inspection and Maintenance Program within 3 years or 50,000 miles, whichever comes first, any authorized Volkswagen dealer in the continental United States, Alaska, Hawaii or Canada, will perform free of charge any repairs necessary for the vehicle to pass the smog test. These repairs include diagnosis, replacement, repair, and adjustments. After the 3 year / 50,000 miles performance warranty has expired, an I/M test failure due to a defect in a part which is warranted for 7 years / 70,000 miles is covered.
For 15 years or 150,000 miles, whichever occurs first
Some Volkswagen models may be specially equipped to meet California Partial Zero Emission Vehicle (P-ZEV) requirements, as identified on the Vehicle Emission Control Information Label located on the hood. For these vehicles, if your Volkswagen fails an I/M test, OR if any emission-related part is found to be defective, the part will be repaired or replaced by Volkswagen for 15 years or 150,000 miles, whichever occurs first, from the time of retail delivery of your vehicle. This represents your Emission Control System PERFORMANCE WARRANTY and DEFECTS WARRANTY.
Additional information about the California Emissions Control System and the California Emissions Performance Warranties
When the warranty period begins
The warranty period begins on the date the vehicle is delivered to the original purchaser or the original lessee, if the vehicle is first placed in ser-
vice as a "demonstrator" or "company" car prior to delivery, on the date it is first placed in service.
Maintaining your vehicle
Volkswagen recommends that you use and maintain your vehicle in accordance with the instructions set forth in the Volkswagen Owner's Manual and Volkswagen Maintenance booklet and that you keep a record of your maintenance. Failure to maintain your vehicle according to the required maintenance schedule may cause the vehicle to exceed applicable emissions standards and could result in denial of warranty cov-
erage. However, Volkswagen will not deny a warranty claim solely on the basis of your failure to maintain the vehicle in accordance with these instructions or your failure to keep a record of your maintenance of the vehicle. We also recommend that you provide your maintenance records to the new owner whenever you sell your vehicle.
Warranty coverage for diagnostic services
Repair and diagnostic services related to any repair covered by this warranty will be performed free of charge, if the vehicle is delivered to any
authorized Volkswagen dealer in the continental United States, Alaska, Hawaii or Canada.
Use of Genuine Volkswagen parts
Volkswagen recommends that Genuine Volkswagen parts be used as replacement parts for the maintenance, repair or replacement of emission control systems. Use of replacement parts which are not equivalent to Genuine Volkswagen parts in emission performance and durability may impair the effectiveness of emission
control systems. Although use of parts other than Genuine Volkswagen parts does not invalidate these warranties, Volkswagen assumes no liability under these warranties for failure of such parts and damage to other parts caused by such failure.
Warranty coverage for parts not scheduled for inspection or replacement
Any warranted part which is not scheduled for inspection or replacement is covered for the warranty period. Any such parts repaired or re-
placed under warranty are warranted for the remaining warranty period.
Warranty coverage of parts scheduled for replacement
A part which is installed in accordance with Volkswagen's instructions or required scheduled maintenance is warranted until the next
scheduled replacement interval or until the vehicle has been driven 3 years or 50,000 miles, whichever occurs first.
Warranty coverage for parts scheduled for inspection
A part which is scheduled only for inspection in accordance with Volkswagen's instructions for
scheduled maintenance of the vehicle is covered for the duration of these warranties.
Maintenance and repairs performed by independent service shops
Without invalidating these warranties, you may choose to have maintenance, repair or replacement of emission control components performed by any automotive service establishment or individual qualified to perform such services. However, the cost of such services is not covered by these warranties except in emergencies. If the independent service establish-
ment finds a warrantable defect, you may deliver the vehicle to an authorized Volkswagen dealer and have the defect corrected free of charge. Volkswagen will not be liable for any expenses which you have incurred at the independent service establishment, except for emergency repairs.
Emergency repairs
In an emergency when an authorized Volkswagen dealer is not reasonably available to perform a warranty repair, the repair may be performed at any available service establishment, or by the owner, using any replacement part. Volkswagen will reimburse the owner for expenses including diagnosis not to exceed Volkswagen's suggested retail price for the warranted part and a labor charge based upon Volkswagen's recommended time allowance for the warranty repair multiplied by the labor rate per hour appropriate for the area where the warranty repair was performed. In order to receive
reimbursement of such expenses, you must keep all replaced parts and receipts and present them to any authorized Volkswagen dealer in support of your claim. These emergency warranty service procedures also apply in the event the servicing Volkswagen dealer does not have replacement parts available within a reasonable time not to exceed 30 days, in order to perform the warranty repair or, if the servicing Volkswagen dealer is unable to complete the repairs within 30 days from the time you present the vehicle for repairs.
Coverage of non-warranty parts
If failure of a warranted part causes damage to a part not covered by warranty, the non-warranted part will also be replaced free of charge.
Damage caused by tampering, use of improper fuel, abuse, neglect and improper maintenance are not covered
These warranties do not cover any damage to the vehicle caused by tampering with emission controls, use of fuel containing lead, or fuel not meeting the specifications set forth in the
Owner's Manual, and abuse, neglect or improper maintenance of the vehicle. Diagnosis and repair of such damage are at the expense of the owner.
Notice of denial of warranty claim
If you are not notified within 30 days that a performance warranty claim is not valid, then Volk-
swagen is required to repair the vehicle free of charge.
Implied warranties
Any implied warranty, including any warranty of merchantability or warranty of fitness for a particular purpose, is limited in duration to the stated period of these written warranties.
Some states do not allow limitations on how long an implied warranty lasts, so the above limitation may not apply to you.
Incidental and consequential damages
These warranties do not cover any incidental or consequential damages, such as loss of resale value, lost profits or earnings, and out-of-pocket expenses for substitute transportation or lodging.
Some states do not allow the exclusion or limitation of incidental or consequential damages, so
this limitation or exclusion may not apply to you.
In the event you have not received the services promised in these warranties, please follow the procedures described in this brochure under the title "Customer CARE".
Customer CARE
Dealer assistance
If you have questions about the service you have received, we suggest that you first discuss them with the service personnel at your authorized Volkswagen dealer. You may want to speak to the Service Manager or directly to the owner of the dealership.
It is their business to be concerned about your satisfaction and goodwill. Since they are closest to the situation, they are in the best position to quickly resolve any concerns you may have.
When to notify the manufacturer
Your satisfaction with our product is very important to us, and we would like to make certain that we have had the opportunity to work with you and your dealer to resolve your concerns.
If your concerns are not resolved to your satisfaction by the dealer, please contact Volkswagen of America, Inc., immediately by calling our toll-free number:
If you prefer to write, please use the following address:
Volkswagen Customer CARE Center 3499 West Hamlin Road Rochester Hills, MI 48309
You can also contact us using our Internet address:
www.vw.com.
Simply click on "Contact Us".
When you call or write, please provide the following information:
- Your name, address and telephone number
• Vehicle Identification Number (VIN)
• Vehicle delivery date and mileage
• Dealer's name and location
• Nature of complaint or problem - Original repair order (retain a copy for your records) or pertinent documents if you are writing to us
A Customer CARE Representative will gather and carefully review all facts relating to your request for assistance. After this review is completed, the Customer CARE Representative will inform you of any assistance that the company will be able to provide.
Please note that as part of our continuing effort to maintain the highest quality of service to our Customers, supervisors will occasionally monitor the quality of telephone calls between our Customers and representatives. We hope you understand our interest in providing the best possible service.
Repairs not covered by warranty
In some circumstances, Volkswagen of America, Inc. may offer financial assistance toward repairs or expenses not covered by Volkswagen of America, Inc.'s Limited New Vehicle Warranties.
In certain instances, Volkswagen of America, Inc. may pay for such repairs in accordance with the terms of service action campaigns it will conduct from time to time. In the event of a service action, Volkswagen of America, Inc. will notify you by mail and request that you bring your vehicle to your nearest authorized Volkswagen dealer for repair free of charge.
If you have not recently changed your address and Volkswagen United States has your current address on file, you will receive notification automatically. If you are concerned that you may not have received notice concerning a particular service action, please check with your dealer to
determine whether your vehicle is eligible for any repair free of charge.
In other instances, Volkswagen of America, Inc. may offer assistance with a repair beyond warranty on a case-by-case basis. If you believe that your vehicle needs a repair not covered by warranty which Volkswagen of America, Inc. should pay for in part or in whole, please discuss the request with your dealer. If you are not satisfied with your dealer's decision, please contact Volkswagen of America, Inc. Customer CARE by telephone or in writing. Your request should provide the vehicle identification number, the mileage, maintenance history and an explanation of why you believe that the repair should be performed free of charge. Your request should be accompanied by all available maintenance and repair records which you have retained. A Customer CARE Representative will review your request and advise you of our decision.
BBB AUTO LINE
BBB AUTO LINE dispute resolution services
If your dealer or Customer CARE Representative does not resolve your product concern to your satisfaction or if you do not wish to present your concern to either of them, you may take advantage of the mediation and arbitration services of the Better Business Bureau. This program is called BBB AUTO LINE and is available to you free of charge, on a nationwide basis as long as your vehicle has been driven less than 24,000 miles and has not been in use for more than 2 years. Not every claim is eligible; there are some age and mileage limitations, so please check with your local Better Business Bureau ("BBB") regarding your claim.
The BBB AUTO LINE program has two parts. The first part is mediation. Mediation means that the BBB staff will facilitate negotiations between the parties in an effort to bring your claim to a mutually acceptable resolution. You do not have to participate in mediation if you would rather proceed immediately to arbitration. Arbitration is the other part of BBB AUTO LINE. Arbitration is a process by which an impartial person makes a decision on your claim. The arbitrators are not connected with the automobile industry and serve on a voluntary basis.
If you do not agree with the mediated resolution and/or have opted to arbitrate, an arbitration hearing will be scheduled. You may attend the hearing in person, be represented by an attorney, bring witnesses, and give supporting evidence. Instead of appearing personally, you may request a written or even a telephone arbitration hearing.
If you wish to use BBB AUTO LINE, please call the following toll-free number:
Tel.: 1 (800) 955-5100
When you call the local office of the "BBB", its staff will need the following information:
- Your name, address and telephone number
• Make, model and Vehicle Identification Number of your vehicle (VIN)
• Delivery date and current mileage
• Nature of complaint or problem
The "BBB" will follow-up on your complaint; and if it cannot be mediated, they will arrange an arbitration hearing.
A decision will be made by the arbitrator within 3 days of the hearing (typically a decision is made 40 days from the date you filed your claim with "BBB").
You then have the opportunity to accept or reject the decision. If you accept the decision, Volkswagen of America, Inc. will be bound by the decision and fulfill its obligation within the time specified by the arbitrator.
If you reject the decision:
1 - You are free to pursue other legal remedies available under state and federal law.
2 - The manufacturer will not have to comply with any part of the decision.
California residents
Additional information relating to your rights to arbitrate warranty claims under the BBB AUTO LINE Arbitration Program is provided in the Owner Information about Consumer Protection Laws booklet which is presented to you by your dealer when you take delivery of your new vehicle.
Service Publications
Volkswagen Technical Literature Ordering Center
Updated service information you can obtain
Volkswagen monitors product performance in the field and regularly sends dealers the latest service information about Volkswagen vehicles. Now you too, can get these bulletins.
Bulletins cover a wide variety of subjects: the proper use and care of your car, costly repairs, inexpensive repairs or adjustments which, if done early, may avoid costly future repairs. Some bulletins describe repairs about new or unexpected conditions. Others describe improved repair procedures or parts improvements. All of this information can also help a qualified technician better service your vehicle.
Most bulletins apply to conditions affecting a small number of vehicles. Your dealer or a qualified technician may have to determine if a specific bulletin applies to your vehicle. You can order Volkswagen bulletins, Volkswagen repair information and Volkswagen Owner's Literature 24 hours / 7 days a week on the Internet from the Volkswagen Technical Literature Ordering Center at:
www.vw.ddsltd.com
Or if you prefer, you can contact our literature distribution service at:
Telephone: 1 (800) 544-8021
Fax: 1 (800) 572-1438
What you will also find on the website
- A list of Volkswagen bulletins for 1985 and later model years, covering all North American specification Volkswagen models.
- Ordering and pricing information on how to buy specific bulletins.
- Ordering and price information for Volkswagen Repair Manuals on paper format or CD ROM.
- Ordering and price information for Volkswagen Electrical Wiring Diagrams.
- Owner's Manuals
- Maintenance Booklets
- Warranty Manuals
• Sound System Manuals

WARNING
These bulletins are intended for qualified technicians. They are not meant for the CA-SUAL do-it-yourselfer. Qualified technicians have the equipment, tools, safety instructions, and know-how to do a job properly and safely. Improperly performed repairs or maintenance can adversely affect the safety of your vehicle, possibly leading to accident or injury. They may also impair the economy, durability or reliability of your vehicle and may void the warranty of your car. If you are not sure that you can perform a job properly and safely, you should not risk trying to do so.
Tire Manufacturers
List of tire manufacturers for new Volkswagen vehicles
The Magnuson-Moss Warranty Federal Trade Commission Improvement Act of 1975 and regulations issued pursuant to the act require that a tire warranty pamphlet be placed in every new vehicle prior to sale.
To assist you in obtaining the related warranty information, the following list of tire manufacturers and addresses is being provided.
Tire Manufacturers
Dunlop Tire Corp.
1144 East Market Street
Akron, OH 44316
Tel.: 1 (800) 548-4714
Bridgestone/Firestone Inc.
1 Bridgestone Park
Nashville, TN 37214
Tel.: 1 (800) 356-4644
Goodyear Tire & Rubber Co.
1144 East Market Street
Akron, OH 44316
Tel.: 1 (800) 321-2136
Continental General
1800 Continental Blvd.
Charlotte, NC 28273
Greenville, SC 29602-9001
Tel.: 1 (800) 887-0662
Pirelli Tires North America
300 George Street, 5th Floor
New Haven, CT 06511
Tel.: 1 (800) 747-3554
Uniroyal Goodrich Tire Co.
P.O. Box 19001
Greenville, SC 29602-9001
Tel.: 1 (800) 521-9796


It has always been Volkswagen's policy to continuously improve its products. Volkswagen, therefore, reserves the right to make changes in design and specifications, and to make additions or improvements to its products without incurring any obligation to install them on products previously manufactured.
All rights reserved.
May not be reproduced or translated in whole or in part without the written consent of Volkswagen of America, Inc. Specifications are subject to change without notice.
Text and specifications in this manual are based on information and knowledge available at the time of printing.
May not be reproduced or translated in whole or in part without consent of Volkswagen AG.
Printed in Brazil
© Volkswagen

For the sake of environment
Printed on environmentally friendly paper (bleached without chlorine, recyclable).

text_image
2.1 Golf Safety first Model year 20052.1 Golf
Safety first
Model year 2005
Please read this important information before reading your booklet.
Vehicle Equipment
This manual describes all the equipment intended to be offered at the time of printing. Some of the equipment may be available at a later date or not at all.

Please note that items marked with an asterisk may be standard on certain models, optional on others or available on your model.
Illustrations
Each illustration in the manual shows a feature and / or equipment which your vehicle may or may not have, depending on the model. The illustrations are simply to show you how a feature looks and its function.
Indication of directions
Whenever a direction is specified (for example: left, right, forward, backward, etc.), you should imagine yourself as sitting in the vehicle facing in the driving direction. If something is explained which is different from this position, it will be clearly identified.
Table of Contents
On the following page, you will find the Table of Contents which describes all the features of your vehicle in the order they appear in this manual.
WARNINGS

WARNINGS
concern safety and are highlighted like this throughout this manual.
Texts printed in bold type refer to possible damage to your vehicle, or to other important information.
TABLE OF CONTENTS
Welcome 2
Safety first 2
Safety belts 3
Airbag system 17
Child safety 30
Head restraints 49
Front seats 50
Alphabetical Index 53
Welcome
Dear Volkswagen Owner,
This booklet contains important information, tips and suggestions on occupant safety.
We've prepared this booklet in order to summarize what you need to know about such topics as safety belts, airbags, seats for children and infants, child safety and head restraints.
Please make certain that you follow the suggestions and WARNINGS in this booklet – it's in your own interest and in the interest of all your passengers.
However, please note, that important safety information regarding your vehicle and its operation will also be found in all other booklets.
Please be sure that this manual always remains with your VOLKS-WAGEN whenever you lend your vehicle to another person or if you sell it so that this and other important information will always be available to the driver and passengers.
Remember - safety first!
Safety first
Your safety and the safety of your passengers shouldn't be left to chance. Advances in technology have made a variety of features available to help reduce the risk of injury in an accident. The following is a listing of just a few of the safety features in your Volkswagen:
– sophisticated safety belts with tensioners
- optimized safety belt geometry through safety belt anchorages on front seats
- safety belt height adjustors
- front airbags
- side airbags in the front seats
- Side Curtain ProtectionTM*
- special seat pan structure
- adjustable steering column.
These individual safety features, can work together as a system to help protect you and your passengers in a wide range of accidents. These features can't work as a system if they are not always properly adjusted and properly used!
The following sections provide important information about why these features are important, how they work to help protect you and your passengers and how they must be adjusted and used to get the greatest benefit and reduce the likelihood of injury.
The sections also contain important WARNINGS which you and your passengers must always heed in order to reduce the risk of personal injury.
Safety is everybody's responsibility!
Safety belts

Always wear your safety belts!

WARNING
● Safety belts are the single most effective means available to reduce the potential for serious injury and death in automobile accidents. For your protection and that of your passengers, always properly wear safety belts when the vehicle is moving.
- Pregnant women, injured, or physically impaired persons should also use safety belts. Like all vehicle occupants, they are more likely to be seriously injured if they do not wear safety belts. The best way to protect a fetus is to protect the mother – throughout the entire pregnancy.
This section explains why safety belts are necessary, how they work and how to adjust and wear them properly.
Please read all the information given, and always observe the following instructions and WARNINGS.
For information on child safety see page 30.

natural_image
Illustration of two people driving a car on a platform with motion lines indicating speed (no text or symbols)Why safety belts work
Safety belts can't work unless they are worn and worn properly.
The illustration above shows the passengers on a "vehicle" headed for a brick wall. They're not using safety belts.
The physical principles are simple. Both the vehicle and the passengers possess energy which varies with vehicle speed and body weight. Engineers call this energy "kinetic energy."
The higher the speed of the vehicle and the greater the vehicles' weight, the more energy there is to be "absorbed" in an accident.
For details see next pages.

natural_image
Illustration of a person pushing a car seat with motion lines indicating speed, no text or symbols presentVehicle speed is the most significant factor. If the speed doubles from 15 to 30 mph (25 to 50 km/h), the energy increases 4 times!
Because these passengers are not using safety belts, they will keep moving at the same speed the vehicle was moving just before the crash, until something stops them – here, the wall.

natural_image
Illustration of a car with impact on the wall, showing exhaust motion (no text or symbols)The same principles apply to people sitting in a vehicle that is involved in a frontal collision.
Even at city speeds of 20 to 30 mph (30 to 50 km/h), the forces acting on the body can reach one ton (2000 lbs, or 1000 kg) or more. At greater speeds, these forces are even higher.
People who do not use safety belts are also not attached to their vehicle. In a frontal collision they will also continue to move forward at the speed their vehicle was travelling just before the impact.

natural_image
Interior view of a car showing a person adjusting the seatbelt, with no visible text or symbols.Unbelted occupants are not able to resist the tremendous forces of impact by holding tight or bracing themselves. Without the benefit of safety restraint systems, the unrestrained occupant will slam violently into the steering wheel, dashboard, windshield, or whatever else is in the way. Their impact with the vehicle interior has all the energy they had just before the collision.
Don't rely on airbags alone for protection. Even when they deploy, airbags provide only supplemental protection. Airbags are not supposed to deploy in all kinds of accidents. Although your Volkswagen is equipped with airbags for the driver and front seat passenger, all vehicle occupants, including the driver, still have to wear safety belts – regardless of whether their seating position has an airbag.
Remember too, that airbags will deploy only once and that your safety belts are always there to offer protection in those accidents in which airbags are not supposed to deploy or when they have already deployed.
Unbelted occupants can also be thrown out of the vehicle where even more severe or fatal injuries can occur.

natural_image
Illustration of a person wearing a seatbelt driving a car, with visible steering wheel and dashboard (no text or symbols)Unbelted passengers in the rear seats endanger not only themselves but also other passengers. In a frontal collision they will be thrown forward violently, where they can hit and injure the driver or front seat passenger.
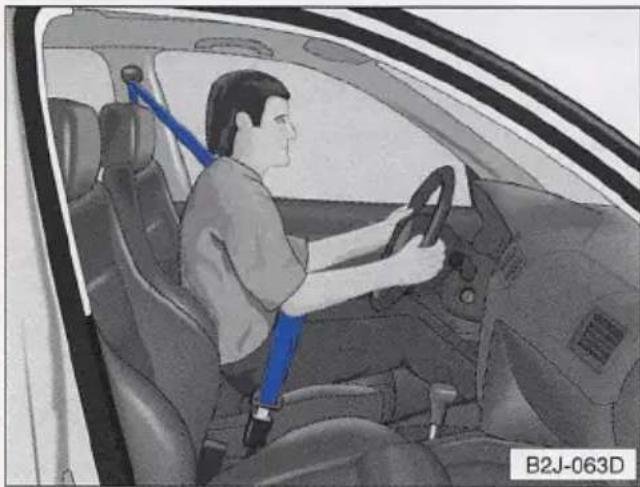
natural_image
Interior view of a car showing a person seated in the driver's seat, with blue safety belt and steering wheel visible (no text or symbols)Safety belts protect
Safety belts used properly can make a big difference. Safety belts help to keep passengers in their seats, gradually reduce energy levels applied to the body in an accident, and help prevent the uncontrolled movement that can cause serious injuries. In addition, safety belts reduce the danger of being thrown out of the vehicle.
Safety belts attach passengers to the car and give them the benefit of being slowed down more gently or "softly" through the "give" in the safety belts, crumple zones and other safety features engineered into today's vehicles. By "absorbing" the kinetic energy over a longer period of time, the forces on the body become more "tolerable" and less likely to cause injury.
Although these examples are based on a frontal collision, safety belts can also substantially reduce the risk of injury in other types of accidents. So, whether you are on a long trip or just going to the corner store, always buckle up and make sure others do, too.
Accident statistics show that vehicle occupants properly wearing safety belts have a lower risk of being injured and a much better chance of surviving an accident. Properly using safety belts also greatly increases the ability of the supplemental airbags to do their job in an accident. For this reason, wearing a safety belt is legally required in most countries including much of the United States and Canada.
The following pages provide important instructions to enable you to use safety belts properly. Be sure to read and follow the instructions carefully. Heed all WARNINGS.
To further increase the safety for the front passengers, the vehicle is equipped with a supplemental airbag system. See page 17.
The safety belts provided must nevertheless be worn because the front airbags are activated only in some frontal collisions. The front airbags are not activated in all frontal collisions, side and rear collisions, in roll overs or in some cases where there is not enough deceleration through impact to the front of the vehicle.
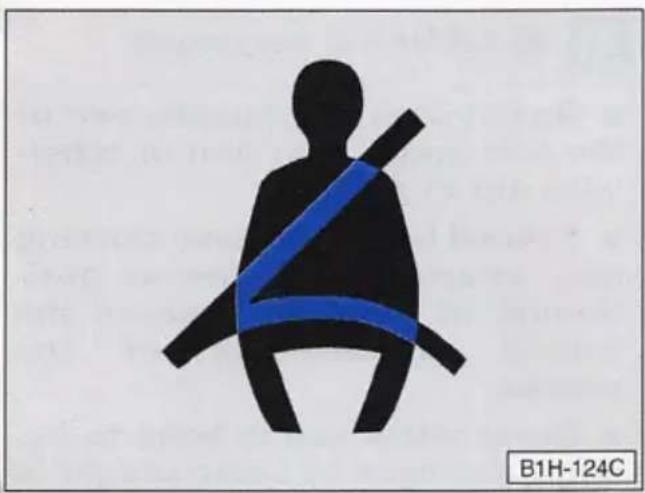
natural_image
Silhouette of a person wearing a blue safety belt, no text or symbols presentBelt warning system
Your vehicle has a warning system for the driver to remind you about the importance of buckling-up.
After the ignition is switched on, the warning tone will come on for about 6 seconds along with a warning light in the instrument cluster if the driver has not fastened his or her safety belt. As soon as the driver has fastened his or her belt, the warning tone will stop and the warning light will go out.
If the driver has not buckled-up within about 24 seconds after the warning tone has stopped, the warning tone will sound again for about 6 seconds. The warning tone will sound repeatedly for about 6 seconds at 24 second intervals until the driver has buckled-up. The safety belt warning system is active for about 5 minutes and during this time the warning light in the instrument cluster will stay on.
Fasten your safety belt now and make sure that your passengers also properly put on their safety belts.
How to wear safety belts properly
Safety belts must always be properly positioned across the strongest bones of your body.

WARNING
Always fasten your safety belts before driving off. Always make sure your passengers are properly restrained - even those sitting in the rear.
Safety belts can work only when used properly. Never wear safety belts in any other way than illustrated and described in this section. Always observe the following precautions:
● Never wear belts twisted.
● Never strap more than one person, including small children, into any belt. It is especially dangerous to place a safety belt over a child sitting on your lap.
● Never place your feet on the instrument panel or on the seat.
Always keep both feet on the floor in front of the seat.
● Never wear belts over rigid or breakable objects in or on your clothing, such as eye glasses, pens, keys, etc., as these may cause injury.

WARNING continued
- Do not wear the shoulder part of the belt under your arm or otherwise out of position.
● Several layers of heavy clothing may interfere with proper positioning of belts and reduce the overall effectiveness of the system.
● Never allow safety belts to become damaged by being caught in door or seat hardware. Always keep belt buckles free of any obstruction that may prevent secure locking.
● Never use comfort clips or devices that create slack in the shoulder belt portion. However, clips may be required for the proper use of some child restraint systems.
● Torn or frayed safety belts can tear and damaged belt hardware can break in an accident. Inspect belts periodically.
If belts show damage to webbing, bindings, buckles, or retractors, have them replaced.

WARNING continued
- Keep the belts clean. Dirty belts may not work properly
- see also "Cleaning and protection", Booklet 3.2.
● Safety belts that have been worn and loaded in an accident must be replaced with the correct replacement safety belt by an authorized VOLKSWAGEN dealer. Replacement may be necessary even if damage cannot be clearly seen.
● Safety belt anchorages that have been loaded in an accident must be inspected by a qualified workshop or an authorized VOLKSWAGEN dealer.
● Never modify, disassemble, or try to repair your safety belts.
Seating capacity
Your Golf has 5 seating positions, 2 in the front and 3 in the rear. Each seating position has a safety belt.
Never let more people ride in the vehicle than there are seat belts available. Be sure everyone riding in the vehicle is correctly restrained with a separate seat belt.
Lap-shoulder belt
The front and rear seats have three-point safety belts which have a convertible locking feature in addition to the emergency locking feature. The convertible locking feature is used when a child seat* is installed, see page 36.
The retractors in the combination lap-shoulder belts allow the system to adjust to your size and movements as long as the pull on the belt is slow.
Hard braking or a collision locks the belt. The belt may also lock when you drive up or down a steep hill or through a sharp curve.
Fastening the rear center safety belt
Make sure the seat back of the rear seat bench is in upright position and securely latched in place before using the belt as described in this chapter.

WARNING
● The rear center three-point safety belt cannot protect a passenger if the seat backrest to which it is attached is not securely latched. The passenger would not be properly restrained and would move forward during sudden braking, in a sudden maneuver and especially in an accident.
A passenger who is not properly restrained can be seriously injured by striking the interior of the passenger compartment or by the safety belt itself which can be displaced from stronger parts of the body into sensitive areas like the abdomen. See page 11.
● Always make sure that the rear seat backrest to which the center rear safety belt is attached is securely latched whenever the rear center safety belt is being used, Booklet 3.1, chapter "Rear seat".

natural_image
Illustration of people seated in a car, wearing blue and black seatbelt designs (no text or symbols visible)Fastening the safety belt
- Adjust your seat before fastening the safety belt. See page 50.

natural_image
Close-up of a person adjusting a car seatbelt, no visible text or symbols- Insert the belt tongue into the buckle on the inboard side of the seat. Push down until it is securely locked with an audible click. Pull belt to check!

WARNING
Safety belts offer optimum protection only when the seat back is upright and belts are properly positioned on the body. Improperly positioned safety belts can cause serious personal injury in an accident.
● To fasten, grasp belt tongue and pull the belt in a continuous slow motion across your chest and lap.

WARNING
● Always make sure the safety belt tongue is inserted into the buckle for the same seating position.
- Attaching the safety belt to the buckle for another seat could reduce safety belt effectiveness and cause injury.
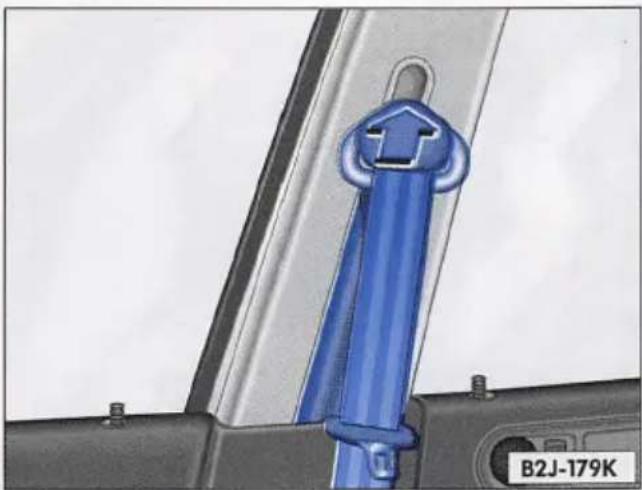
natural_image
Close-up of a blue plastic buckle with an arrow pointing upward, mounted on a car door (no text or symbols visible)Safety belt height adjusters for the front seats and the rear outer seating positions* can be used to adjust the height of the shoulder portion of the safety belt. This feature will help you properly position the shoulder portion of the safety belt across your shoulder.
- To adjust the height of the safety belt, press the upper part of the handle in the direction of the arrow, hold it in this position and then slide the height adjuster up or down until the shoulder portion of the safety belt is positioned directly over the center of your shoulder - it must never rest against the neck (see right illustration).
- Pull on the shoulder belt to check whether the belt anchor is securely locked in place.
Wearing your safety belt properly - see page 8.

natural_image
Human skeletal structure with a blue surgical band attached, labeled B1H-229C (no text or symbols on the diagram itself)The shoulder belt must be positioned over the shoulder. It must never rest against the neck and must fit against your body. The lap belt must be worn low and tight across the pelvis. See illustration above. Pull belt tight.
The lap belt portion must never pass over the stomach or abdomen.

Always read and heed all WARNINGS on next page.

natural_image
Anatomical illustration of human lower back with skeletal structure and blue surgical band (no text or labels)
WARNING
● Always position your safety belt properly over your body for maximum safety. An improperly positioned safety belt can cause serious injury in an accident.
● Safety belts worn too loose will let your body move too far forward in a collision.
A loose belt can also shift its position on your body from the strong bones to more vulnerable soft tissue and cause serious injury.
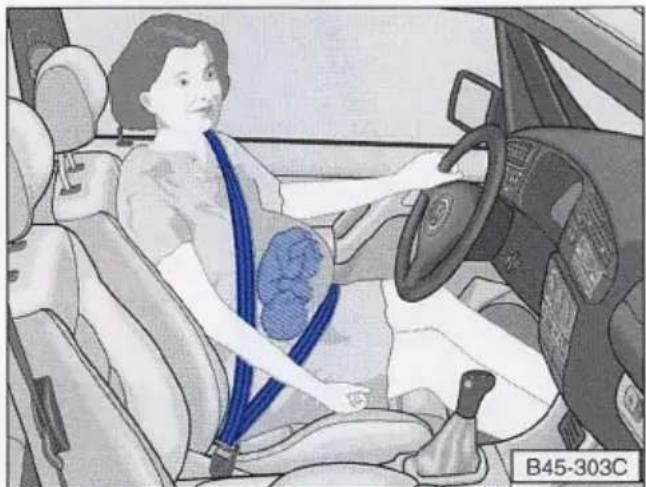
natural_image
Illustration of a person wearing a car seatbelt and blue belt, seated in a vehicle (no text or symbols visible)
WARNING
Pregnant women should especially make sure to wear the lap portion of the safety belt as low as possible across the pelvis and below the rounding of the abdomen. The best way to protect the fetus is to protect the mother - throughout the entire pregnancy.
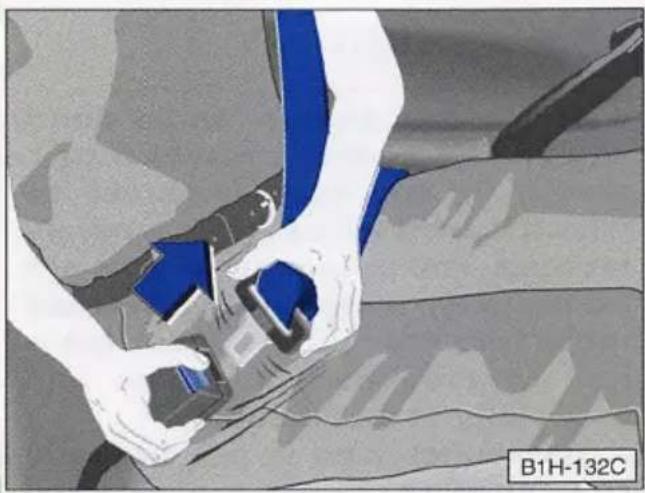
natural_image
Person adjusting a blue belt buckle on a car seat (no text or symbols visible)Unfastening the safety belt
- Push the orange release button on the buckle. The belt tongue will spring out of the buckle.
- Let the belt to wind up on the retractor as you guide belt tongue to its stowed position.
Belt pre-tensioner and load limiter
The retractors for the front three-point safety belts and for the rear outboard three-point safety belts are equipped with belt pre-tensioners. The retractors for the front three-point safety belts are also equipped with load limiters.
Sensors activate the belt pre-tensioners in frontal collisions when deceleration is high enough. This tightens the belt and takes up belt slack. Taking up the slack helps to reduce forward occupant movement during a collision.
The belt pre-tensioner can only be activated once.
The belt pre-tensioner will not activate in a frontal collision when the deceleration is not high enough, or in any side impact, rollover, or rear-end collision.
The load limiter feature helps to reduce the forces applied to the body in a crash.
Never let the belt remain over a rear seat back that has been folded forward. The rear belt tensioner will be activated unnecessarily in an accident and then have to be replaced.
The belt tensioner will not activate in a light frontal collision insufficient to actuate the tensioner or in any side, rollover, or rear-end collision.

WARNING
● Safety belt systems including belt tensioners cannot be repaired. Special procedures are required for removal and installation of this system. Therefore, any work on the safety belt system must be performed only by an authorized VOLKSWAGEN dealer.
● The belt tensioner system works for one accident only. If belt tensioners have been activated, the system must be replaced.
Notes
- When the safety belt tensioner is activated, a fine dust is released. This is normal and is not caused by a fire in the vehicle.
- Observe all safety regulations if the vehicle or individual parts of the system, particularly the safety belt or airbag, are to be scrapped. Your authorized VOLKSWAGEN dealers are familiar with these regulations and can perform this service for you.
Rear center safety belt
The center seating position in the rear is equipped with a three-point safety belt.
Fastening the rear center safety belt
Make sure the seat back of the rear seat bench is in upright position and securely latched in place before using the belt as described in this chapter.

WARNING
● The rear center three-point safety belt cannot protect a passenger if the seat backrest to which it is attached is not securely latched. The passenger would not be properly restrained and would move forward during sudden braking, in a sudden maneuver and especially in an accident.
A passenger who is not properly restrained can be seriously injured by striking the interior of the passenger compartment or by the safety belt itself which can be displaced from stronger parts of the body into sensitive areas like the abdomen. See page 11.
● Always make sure that the rear seat backrest to which the center rear safety belt is attached is securely latched whenever the rear center safety belt is being used, Booklet 3.1, chapter "Rear seat".
Safety Belt Extender

text_image
2 3 B6N-052M
Always Wear Your Safety Belts!
If a safety belt is too short because of body size or driving position, even when the three point safety belt is fully extended and when the adjustable upper shoulder belt anchorage (if so equipped) is in the lowest position, you can use a seat belt extender. This extender can be used only if existing belt is not long enough. The extender adds approximately 8 inches (200 mm) of length.
The vehicle safety belt buckle for the driver and front seat passenger have switches that tell the airbag control module if the safety belt is being used or not. If the safety belt is being used, the front airbag will deploy at a slightly higher rate of deceleration than if the belt is not being used. Therefore, in a particular collision, it is possible that an airbag will not deploy at a seating position where the safety belt is being used but will inflate at the position where the safety belt is not being used, see page 17 for details.
For that reason, always remove the safety belt extender when it is not needed and stow it safely.
See your VOLKSWAGEN dealer for assistance if the extender is required.

WARNING
● Always read and heed all WARNINGS in this chapter.
- Using a safety belt extender when not needed can increase the risk of injury in a collision. Only use when the safety belt is not long enough when its worn low and snug, and in the recommended seating position. Remove and stow when not needed.
● Never use the safety belt extender if you can fasten the safety belt without it.
● Safety belts can work only when used properly. Never wear safety belts in any other way than illustrated and described in this chapter.
● A driver or passenger who is not properly restrained can be seriously injured by striking the interior of the passenger compartment or by the safety belt itself which can be displaced from stronger parts of the body into sensitive areas like the abdomen.
● Never use more than one extender with a safety belt. The use of more than one extender can change the way the safety belt passes over the body and can cause serious injury.
● Never use the safety belt extender to secure a child restraint.
● Never leave the safety belt extender attached to the vehicle safety belt latch when it is not needed and being used because the airbag control module will not receive the correct signal from the safety belt latch.
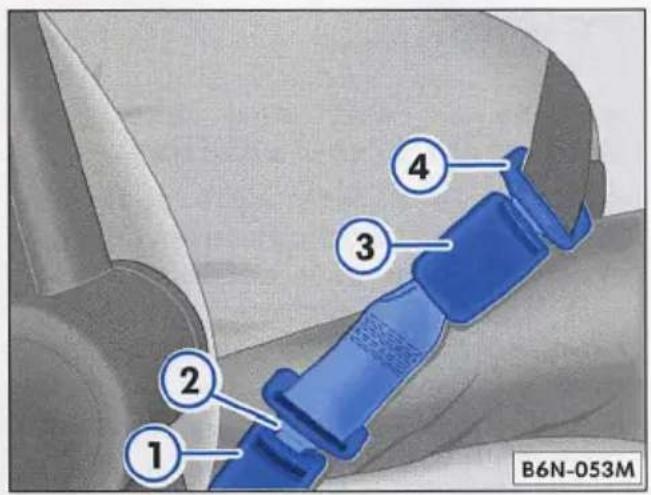
text_image
1 2 3 4 B6N-053MFastening the safety belt ex-tender
- Adjust your seat and head restraint before fastening the safety belt. See pages 49 and 50.

WARNING
Safety belts offer optimum protection only when the seat back is upright and belts are properly positioned on the body. Improperly positioned safety belts can cause serious personal injury in an accident.
● To use the safety belt extender, insert the metal tongue of the extender (2) (latch plate) into the respective safety belt buckle (1).
- Then, grasp belt tongue of the safety belt (4) and pull the belt in a continuous slow motion across your chest and lap.
- Insert the safety belt tongue (4) into the buckle of the extender (3). Push down until it is securely locked with an audible click. Make sure the safety belt or the extender is not twisted.
Pull belt to check!
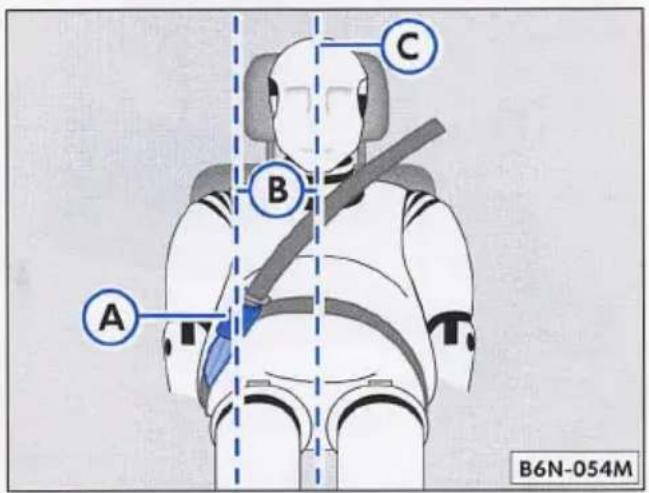
text_image
A B C B6N-054MA - Front edge of buckle
B - Distance of buckle and body-centerline,
(less than 6 inches (15 cm)
C - Bodycenterline

WARNING
● Never use the extender unless it is physically required in order to wear the vehicles safety belt.
- Never use the extender if the distance (B) between the front edge of the extender buckle (A) and the occupant's body centerline (C) to be less than 6 inches (15 cm) – see illustration!
● Always make sure the safety belt tongue is inserted into the buckle for the same seating position.
- Attaching the safety belt to the buckle for another seat could reduce safety belt effectiveness and cause injury.
Airbag system
Your vehicle has two front and two side airbags, one front and one side airbag for each front seat occupant.
Additionally your vehicle is equipped with two Side Curtain Protection'sTM*.The Side Curtain ProtectionTM* covers the window area on the front and rear doors on both sides of the vehicle.

WARNING
● To reduce the risk of injury when the airbags inflate, the driver and passengers should always sit in an upright position, should not lean against or place any part of their body too close to the area where the airbags are located.
- See "Importance of proper seating position" in this section at pages 19 and 26 and heed all WARNINGS.
● Occupants who are unbelted, out of position or too close to the airbag can be seriously injured by an airbag as it unfolds with great force in the blink of an eye. For seat adjustment, see page 50.
The safety belt buckle for the driver and front seat passenger have switches that tell the airbag control module if the safety belt is being used or not. If the safety belt is being used, the front airbag will deploy at a slightly higher rate of deceleration than if the belt is not being used. Therefore, in a particular collision, it is possible that an airbag will not deploy at a seating position where the safety belt is being used but will inflate at the position where the safety belt is not being used.
For that reason, always remove the safety belt extender when it is not needed and stow it safely, see page 15.
Remember too, airbags will deploy only once and only in certain kinds of accidents – your safety belts are always there to offer protection in those accidents in which airbags are not supposed to deploy or when they have already deployed.
An airbag is not a substitute for the safety belt. It is part of the overall vehicle safety system. The airbag system works most effectively when used with the safety belts. Therefore, always wear your safety belts. See pages 3 to 13.
It is important to remember that while the supplemental airbag system is designed to reduce the likelihood of serious injuries, it can cause swelling, bruising, and minor abrasions.

WARNING
- Objects between you and the airbag can increase the risk of injury in an accident by interfering with the way the airbag unfolds or by being pushed into you as the airbag inflates.
● Never hold things in your hands or on your lap when the vehicle is in use.
● Never place or attach accessories or other objects (such as cup holders, telephone brackets or even large and bulky objects) on the doors, over or near the area marked "Airbag" on the steering wheel, instrument panel, seat backrests or between those areas and yourself. These objects could cause injury in a crash especially when the airbags inflate.

Always read and heed all WARNINGS and more details on next page.

WARNING continued
● Never transport items on or in the area of the front passenger seat. Objects could move into the area of the front airbags during braking or other sudden maneuver and become dangerous projectiles that can cause serious personal injury if the airbags inflate.
- Never recline the front passenger's seat to transport objects. Items can also move into the area of the side airbags or the front airbag during braking or sudden maneuver. Objects near the airbags can become projectiles and cause injury particularly when the seat is reclined.
System components
The airbag system consists of the following:
● electronic control module,
● an inflatable airbag with gas generator inside the steering wheel,
● an inflatable airbag with gas generator inside the instrument panel for the front passenger,
● supplemental side airbags in the back-rest padding of the front seats,
- supplemental Side Curtain Protection™* above the side windows,
- an indicator light in the instrument cluster, "Warning / Indicator lights", Booklet 3.1.
The indicator light in the instrument cluster (readiness light) will light up for a few seconds each time the ignition is switched on. The light monitors the electronic control module, sensor circuits, and system wiring.
The system must be inspected if the indicator light:
- does not come on when the ignition is switched on,
● does not go out after a few seconds after the ignition is switched on, or - comes on while driving.
In the event of a system malfunction, the indicator light will first start flashing to catch the driver's attention and then stay on continuously to serve as a constant reminder to have the system inspected.

WARNING
If any of these conditions occur, have the system inspected immediately by your VOLKSWAGEN dealer. Otherwise, the airbag may not work properly in case of a frontal impact.
Some other important points to know
Because airbags inflate in the blink of an eye with great force, things you have on your lap or have placed on the seat could become dangerous projectiles and be pushed into you if the airbag inflates.
When the system is activated, fine dust is released. This is normal and is not caused by a fire in the vehicle. This dust is made up mostly of a powder used to lubricate the airbags as they deploy. It could irritate skin.

WARNING
● The fine dust created when airbags deploy can cause breathing problems for people with a history of asthma or other breathing conditions.
● To reduce the risk of breathing problems, those with asthma or other respiratory conditions should get fresh air right away by getting out of the vehicle or opening windows or doors.
- If you are in an accident in which airbags deploy, wash your hands and face with mild soap and water before eating.
● Be careful not to get the dust into your eyes or into any cuts or scratches.
- If the residue should get into your eyes, flush them with water.
Importance of proper seating position
In a collision airbags must inflate within a blink of an eye and with considerable force. The supplemental airbags could injure you if you are not seated properly. Therefore in order to help the airbag to do its job, it is important, both as a driver and as a passenger to sit properly at all times. By keeping room between your body and the front of the passenger compartment, the airbag can inflate fully and completely and provide supplemental protection in certain frontal collisions. See page 50 for information on the adjustment of the front seats and also "Front seats", Booklet 3.1, for details on the operation of the seat adjustment controls. It's especially important that children be properly restrained. See chapter "Child safety", page 30.

WARNING
- Sitting too close to the steering wheel or instrument panel will decrease the effectiveness of the airbags and will increase the risk of personal injury in an accident.
- If you are unrestrained, leaning forward, sitting sideways or out of position in any way, your risk of injury is much higher. You will also receive serious or fatal injuries from the airbag if you are up against it or too close to it when it inflates.

Always read and heed all WARNINGS on next pages.

WARNING continued
● To reduce the risk of injury when an airbag inflates, always wear safety belts properly.
See "How to wear the safety belts properly" in this Booklet.
● Children age 12 or younger should always ride in the rear seat. If children are not properly restrained, they may be severely injured or killed when an airbag inflates. Never let children ride unrestrained or improperly restrained in the vehicle.
- Adjust the front seats properly.
- Never ride with the backrest reclined.
- Always sit as far as possible from the steering wheel or the instrument panel.
- Always sit upright with your back against the backrest of your seat.
- Never place your feet on the instrument panel or on the seat. Always keep both feet on the floor in front of the seat to help prevent serious injuries to the legs and hips if the airbag inflates.
There is a lot that you and your passengers can do to help the individual safety features installed in your Volkswagen work together as a system.
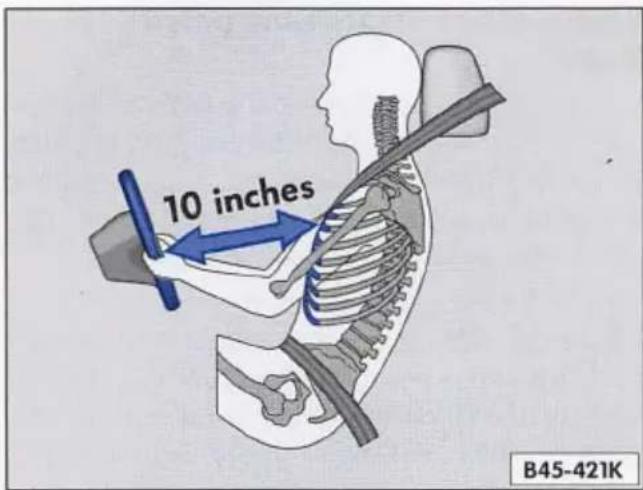
text_image
10 inches B45-421KAdjusting the driver's seat
For detailed steps for adjusting the driver's seat please see "Front Seats" on page 50. We recommend that you adjust the driver's seat as follows:
- adjust the seat in fore and aft direction so that you can easily push the pedals all the way while keeping your knee slightly bent.
- adjust the seatback so that when you sit with your back against the seatback, you can still grasp the top of the steering wheel.
- adjust the steering wheel - see below and chapter "Adjustable steering column", Booklet 3.1.
- the distance from the center of your breastbone to the center of the airbag cover on the steering wheel must be at least 10 inches (25 cm) or more. See illustration above.

Always read and heed all WARNINGS on next pages.

WARNING
● Never sit closer than 10 inches (25 cm) to the steering wheel.
- If you cannot sit more than 10 inches (25 cm) from the steering wheel, we recommend that you investigate whether adaptive equipment may be available to help you reach the pedals and increase your seating distance from the steering wheel.
- If it is impossible for you to sit at least 10 inches (25 cm) or more from the steering wheel, the National Highway Traffic Safety Administration (NHTSA) may permit you to have an on/off switch for the airbag installed. For address and telephone number of NHTSA - see below:
To contact NHTSA, you may either call the Auto Safety Hotline toll-free at:
1-800-424-9393
(or 366-0123 in Washington, D.C. area)
or write to:
NHTSA,
U.S. Department of Transportation, Washington, D.C. 20590.
Adjusting the steering wheel
For detailed steps for adjusting the steering wheel please see "Adjustable steering column", Booklet 3.1.
Adjust the steering wheel so that the steering wheel and airbag cover points at your chest and not at your face. The steering wheel should be adjusted so that you can hold the outer rim of the steering wheel comfortably with your hands at the 3 o'clock and 9 o'clock positions.

WARNING
- Pointing the steering wheel toward your face decreases the ability of the supplemental driver's airbag to protect you in an accident.
- Holding the steering wheel the wrong way can cause serious injuries to the hands, arms and head if the driver's airbag inflates.
● Never hold the steering wheel at the 12 o'clock position or with your hands at other positions inside the steering wheel rim or on the steering wheel hub.
Adjusting the passenger's seat
For detailed steps for adjusting the passenger's seat please see "Front Seats" on page 50.
We recommend that you adjust the passenger's seat as follows:
- backrest upright (never reclined)
— place your feet on the floor in front of the passenger's seat - adjust the passenger's seat as far as possible to the rear of the fore and aft adjustment range.

WARNING
● Always keep both feet on the floor in front of the seat.
● Never place your feet on the instrument panel or on the seat. If the airbag inflates and your feet are on the instrument panel or on the seat, your could receive serious personal injuries.
Child restraints on the front seat - important things to know
All children, especially 12 years and younger should always ride in the back seat properly restrained for their age and size. The airbag on the passenger side makes the front seat a potentially dangerous place for a child to ride. The front seat is not the safest place for a child in a forward-facing child seat. It is a very dangerous place for an infant or a larger child in a rearward-facing seat.

WARNING
● Never install rear-facing child seats or infant carriers on the front passenger seat. A child will be seriously injured and can be killed when the passenger airbag inflates.
● The inflating airbag will hit the child seat or infant carrier with great force and will smash the child seat and child against the backrest, center arm rest, or door.
● Always install rear-facing child seats or infant carriers on the rear seat.
A child seat or infant carrier installed on the front seat may be struck and knocked out of position by the rapidly inflating passenger's airbag in a frontal collision. The airbag could greatly reduce the effectiveness of the child restraint and even seriously injure the child during inflation.
For this reason, and because children are generally better protected – when properly restrained according to their age and size – in a rear seating position, we strongly recommend that children always sit in the back seat. See "Child Safety" on page 30.

WARNING
Forward-facing child seats installed on the front passenger's seat may interfere with the deployment of the airbag and cause serious injury to the child. Install forward-facing child seats on the rear seat.
If exceptional circumstances require the use of a forward-facing child seat on the front seat, the child's safety and well-being require that the following special precautions be taken:

WARNING
If, in exceptional circumstances, you must install a forward-facing child restraint on the front passenger's seat:
- make sure the forward-facing seat has been designed and certified by its manufacturer for use on a front seat with a passenger front and side airbag.
- Always follow the manufacturer's instructions provided with the child seat or carrier.
- Always move the passenger seat into its rearmost position, as far away from the airbag as possible before installing the child restraint. The backrest must be adjusted to an upright position.
- For more important information on the use of child restraints in your VOLKSWAGEN, see "child seats", page 30, in this Booklet.
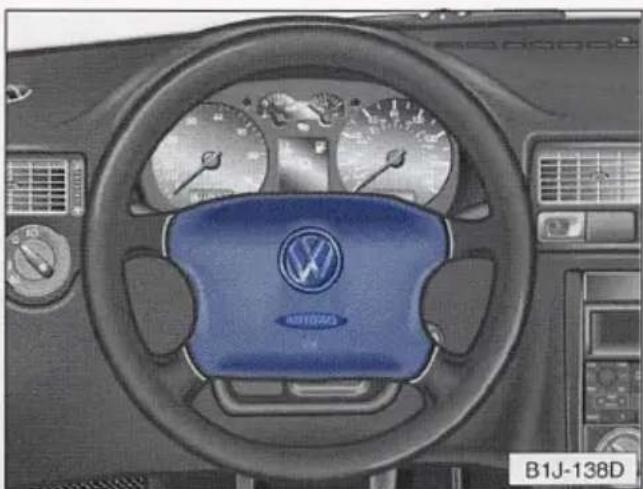
natural_image
Interior view of a Volkswagen car dashboard with steering wheel and gauges (no readable text or symbols)Front airbags
The airbag for the driver is located in the steering wheel hub and is marked "AIRBAG." The airbag for the front passenger's seat is located in the instrument panel above the glove compartment and is also marked with "AIRBAG." See illustration.
It is very important to remember that front airbags only supplement the three point safety belts in some frontal accidents in which the vehicle deceleration is high enough to activate the airbags.
Front airbags are not activated...
- if the ignition is switched off
- in side collisions
- in rear-end collisions
- in rollovers.
Front airbags may not inflate in certain frontal collisions. Vehicle damage, repair costs or even the lack of vehicle damage is not necessarily an indication of proper airbag operation.

natural_image
Top-down view of a car's front compartment showing the door panel and rear wheels (no text or symbols visible)The front airbags can only provide additional protection for the chest and face of the driver and the front seat passenger when...
● safety belts are worn properly,
● the seats have been positioned so that the occupant is properly seated as far as possible from the airbag
● and the head restraints have been properly adjusted.
Airbags do not protect the lower part of the body.
Safety belts are important to help keep front seat occupants in the proper seated position so that airbags can unfold properly and provide added protection as intended.
For more details see next pages.

natural_image
Top-down illustration of a car with a blue triangular reflector or sensor array, no text or symbols presentHow the front airbag system works
Both front airbags inflate only in some frontal collisions occurring within the approximate area indicated in the illustration. The front airbags will not inflate in frontal collisions in which vehicle deceleration is not high enough, or in side or rear collisions, or in rollovers.
It is not possible to define an airbag triggering range that will cover every possible angle of impact, since the circumstances will vary considerably between one accident and another.
Important factors include, for example, the nature (hard or soft) of the object which the car hits, the angle of impact, vehicle speed, and etc.
The triggering of the airbag system depends on the vehicle deceleration rate caused by the collision and registered by the control unit. If this rate is below the reference value programmed into the control unit, the airbags will not be triggered, even though the car may be badly damaged as a result of the accident.

natural_image
Illustration of two crash test cars inside a car, one carrying a blue seat and the other assisting (no text or symbols)When the system is activated, the airbags fill with a propellant gas, break open the padded covers, and inflate between the steering wheel and the driver and between the instrument panel and the front passenger.
All this takes place within the blink of an eye, so fast that many people don't even realize that the airbags have deployed. The airbags also inflate with a great deal or force and nothing should be in their way when they deploy.
Fully inflated airbags in combination with properly worn safety belts slow down and limit the occupant's forward movement and help to reduce the risk of injury to the head and upper torso.
The airbags will deflate immediately after the deployment so that the front occupants can see through the windshield again.
When the system is activated, fine dust is released. This is normal and is not caused by a fire in the vehicle. This dust is made up mostly of a powder used to lubricate the airbags as they deploy. It could irritate skin.
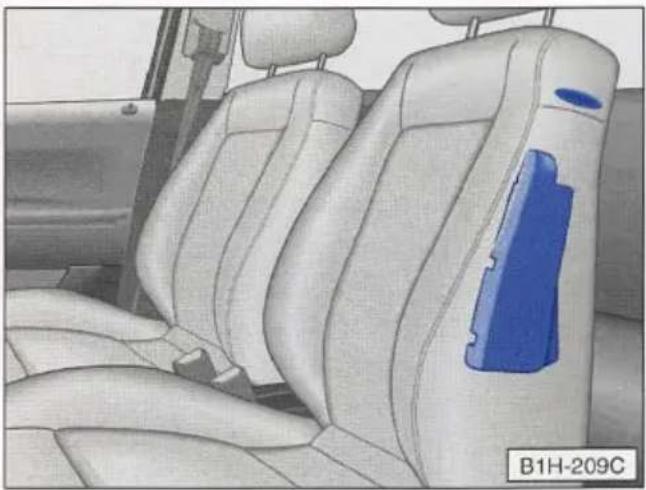
natural_image
Interior view of a car showing the backrest seat and rear seats, with a blue plastic cover on the side (no text or symbols visible)Side airbags
The side airbags are in the backrest padding for the front seats (see illustration) and can help to reduce the risk of injury to the upper torso on that side of the vehicle that is struck in a side collision. The outboard side of each front backrest is marked with the word "AIRBAG."

WARNING
To be sure the side airbags can deploy in a side impact:
● Never place protective seat covers or replacement upholstery over the front seatbacks that have not been specifically approved by VOLKSWAGEN. Since the side airbags deploy out of the side of the seatback, they would not be able to deploy and protect properly. See Booklet 3.1 for more details.
- Do not use additional seat cushions that cover or interfere with the areas where the side airbags inflate.
● Damage to the original seat covers or to the seam in the area of the side airbag module must be repaired immediately by an authorized VOLKSWAGEN dealer.
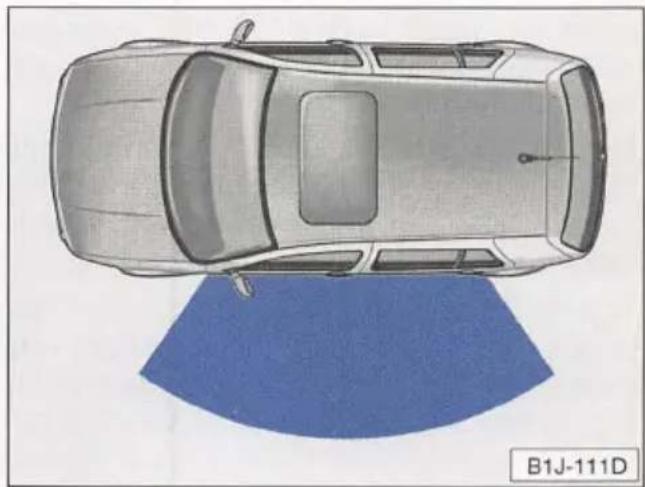
natural_image
Top-down technical illustration of a car with a blue curved surface and a small object, labeled B1J-111D (no text or symbols on the diagram itself)The side airbags inflate only in some side collisions occurring within the approximate area indicated in the illustration.
The side airbags will not inflate...
- if the ignition is switched off
- in frontal collisions
- in side collisions in which vehicle deceleration is not high enough
- in rear collisions
- in rollovers.
Vehicle damage, repair costs or even the lack of vehicle damage is not necessarily an indication of proper airbag operation.
Under some accident conditions, both front and side airbags may inflate.
Remember too, airbags will deploy only once and only in certain kinds of accidents – your safety belts are always there to offer protection in those accidents in which airbags are not supposed to deploy or when they have already deployed.
How the supplemental side airbag system works
In a side collision the supplemental side airbags can help to reduce the risk of injury to the upper part of the body on the side of the car that is struck in a side collision.
In order to assure this additional protection, the side airbag must inflate within the blink of an eye during a collision.
It is not possible to define an airbag triggering range that will cover every possible
angle of impact, since the circumstances will vary considerably between one accident and another.
Important factors include, for example, the nature (hard or soft) of the object which the vehicle hits, the angle of impact, vehicle speed, and etc.
The triggering of the airbag system depends on the vehicle deceleration rate caused by the collision and registered by the control unit. If this rate is below the reference value programmed into the control unit, the airbags will not be triggered, even though the vehicle may be badly damaged as a result of the accident.
When the supplemental side airbag is activated, it breaks through a seam on the side of the seatback identified by the AIRBAG label. It inflates between the side trim panel and the passenger within the blink of an eye at very high speed and with great force. The supplemental side airbag could injure you if your seating position is not proper or upright or if items are located in the area where the supplemental side airbag inflates. This applies especially to children. See also "Child safety", on page 30 in this Booklet.

natural_image
Interior view of a car showing a person seated in the steering wheel, with a blue seatbelt resting on the dashboard (no text or symbols visible)
WARNING continued
- a child must never rest his/her head against the side trim panel in the area where the supplemental side airbag inflates. An inflating airbag can cause serious or fatal injury.
- see "Importance of proper seating position" in this section at pages 19 and 26 and heed all WARNINGS.

WARNING
To reduce the risk of injury when the supplemental side airbag inflates,
- always sit in an upright position and do not lean against the area where the supplemental side airbag is located.
- always make sure that safety belts are worn properly,
Importance of proper seating position
In a collision supplemental side airbags must inflate within a fraction of a second and with considerable force. In order to help the airbag to do its job, it is important, both as a driver and as a passenger to sit properly at all times. By keeping room between your body and the side of the passenger compartment, the airbag can inflate fully and completely and provide supplemental protection in certain side collisions.

Always read and heed all WARNINGS on next pages.

WARNING
Failure to maintain an upright and proper seating position will increase the risk of personal injury when the supplemental side airbag inflates. To reduce the risk of injury that can be caused by an inflating supplemental side airbag:
- Never lean against the door and over the area where the side airbag is located.
- Never let anyone to place their hand, leg or face near the supplemental side airbag.
- Do not let anyone sitting in the front seat put their hand out of the window or lean against the door.
- Never let anyone sitting in the rear seat hold onto the sides of the front seat backrest.
Some other important points to know
Because airbags inflate in the blink of an eye with great force, things you have on your lap or have placed on the seat could become dangerous projectiles and be pushed into you if the airbag inflates.

WARNING
- Objects between you and the airbag can increase the risk of injury in an accident by interfering with the way the airbag unfolds or by being pushed into you as the airbag inflates.

WARNING continued
● Never hold things in your hands or on your lap when the vehicle is in use.
● Never place or attach accessories or other objects (such as cup holders, telephone brackets, or even large, bulky objects) on the doors, over or near the area marked "Airbag" on the seat backrests or between those areas and yourself (an umbrella, bag, etc.). Such objects can become dangerous projectiles and cause injury if the supplemental side airbag inflates.
● Always prevent heavy objects from knocking against or hitting the sides of the seatbacks. This could damage the side airbag systems and they would not deploy in case of an accident!
- Use the built-in coat hooks only for lightweight clothing. Do not leave any heavy or sharp-edged objects in the pockets which may interfere with side airbag deployment and can cause personal injury in an accident.
- Never recline the front passenger's seat to transport objects. Items can also move into the area of the side airbags during braking or sudden maneuvers. Objects near the supplemental side airbag can become projectiles and cause injury particularly when the seat is reclined.

text_image
AFBAS B45-361PSide Curtain Protection™\*
The Side Curtain Protection™* is located on the right and left sides above the doors and behind the headliner and behind the front door column trim. They are identified by the word "AIRBAG" in the upper portion of the center door column.
The bag will expand to cover the side windows and door column and thus help protect both front and rear occupants.
The inflated airbag will cushion the lateral movement of vehicle occupants by means of the controlled discharge of propellant under load. This will help reduce the risk of upper torso and head injuries on the side where the airbag deploys.
When the side airbag deploys, the Side Curtain Protection™* on the same side will deploy automatically.
Please refer to page 18 of this Booklet for information on functional reliability and potential system malfunctions.
The area into which the airbag expands must be kept clear to ensure that the Side Curtain Protection™* can provide this additional protection.
Please observe the following WARNINGS in order to make certain that you are optimally protected by the Side Curtain Protection™*:

natural_image
Side view of a car with blue vented glass panels, showing front and side views (no text or symbols)
WARNING
- Do not hang any items other than lightweight clothing from the clothes hooks in the vehicle. Clothing pockets must never contain any heavy, sharp-cornered objects. Never use hangers to hang clothing from the hooks.
- Never allow any persons, animals or objects to be positioned between vehicle occupants and the area into which the Side Curtain Protection™ inflate. Occupants must never place any parts of their bodies in the area from which the Side Curtain Protection™ emerges. Nor must any objects be allowed to obstruct this area. Keeping this area clear will allow the Side Curtain Protection™ to deploy freely.
For the same reason, only factory-installed sun shades or, in the case of shades installed after the vehicle leaves the factory, only genuine Volkswagen sun shades can be used.
● The airbag system will only help protect occupants for a single accident. The system must be replaced if it has deployed.
Care, Service and Disposal of Airbags
Parts of the airbag system have been installed at different places on your Volkswagen. Servicing or repairing in an area of the vehicle could impair airbag performance.
Some general requirements for airbags must be observed to make sure the effectiveness of the system will not be impaired and that discarded components do not cause injury or pollute the environment.

WARNING
A damaged airbag system may not work properly in an accident. Incorrect service procedures could cause an airbag to deploy unexpectedly during service, injuring someone. To avoid damaging the airbag system, possibly causing malfunction leading to injury in an accident or during repair:
- Do not cover, obstruct, or change the steering wheel horn pad or airbag cover or the instrument panel, particularly in the area of the passenger side airbag module.
- For cleaning the horn pad or instrument panel, use only a soft, dry cloth or one moistened with plain water. Solvents or cleaners could damage the airbag cover. Do not make any repairs, adjustments, or modifications to any parts of the the airbag system.
- Do not modify the front bumper or vehicle body structure.

WARNING continued
● Never place protective seat covers or replacement upholstery over the front seatbacks that have not been specifically approved by VOLKSWAGEN. Since the side airbags deploy out of the side of the seatback, it would not be able to deploy and protect properly.
- Do not use additional seat cushions that cover or interfere with the areas where the side airbags inflate.
● Damage to the original seat covers or to the seam in the area of the side airbag module must be repaired immediately by an authorized VOLKSWAGEN dealer. - Any work on the airbag system, such as removing/installing, repairing, or any work on the steering wheel, instrument panel, front seats or electrical system (including the installation of audio equipment, mobile telephones and CB radios, etc.) must be performed by a qualified technician who has the training and special equipment necessary. Improper handling may result in injury.
- For any work on the airbag system, we strongly recommend that you see your VOLKSWAGEN dealer.
● The airbag system can be activated only once. After an airbag has inflated, it must be replaced.
Child safety
The physical principles of what happens when your car is in an accident, illustrated on pages 3 – 6, apply also to children. But unlike adults and teenagers, their muscles and bones are not fully developed. In many respects children are at greater risk of serious injury in accidents than are adults.
Because children's bodies are not fully developed, they require restraint systems especially designed for their size, weight, and body structure. Many countries and all states of the United States and provinces of Canada have laws requiring the use of approved child restraint systems for infants and small children.
Child restraints, like adult safety belts, must be used properly to be effective. Used improperly, they can increase the risk of serious injury in an accident.
Please be sure to read and heed the important information and WARNINGS about child safety and the installation of child restraints in your Volkswagen.

WARNING
- Accident statistics have shown that children are generally safer in the rear seat area than in the front seating position. Always restrain any child age 12 and under in the rear.
- All vehicle occupants and especially children must be restrained properly whenever riding in a vehicle. An unrestrained or improperly restrained child could be injured by striking the interior or by being ejected from the vehicle during a sudden maneuver or impact. An unrestrained or improperly restrained child is also at greater risk of injury or death through contact with an inflating airbag. A suitable child restraint properly installed and used at one of the rear seating positions provides the highest degree of protection for infants and small children in most accidents.
Consult the child seat manufacturer's instructions to be sure the seat is right for your child's size.
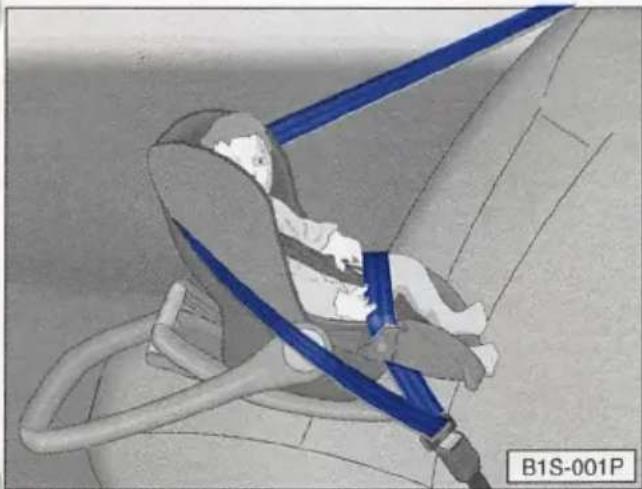
natural_image
Illustration of a child wearing a blue car seatbelt, seated in a car seat (no text or symbols on the diagram itself)Infant seats
Infants up to about one year old who weigh up to 20-22 lbs. (9-10 kg) receive the best protection in special infant carriers and child seats designed for their age group. Many experts believe that infants and small children should ride only in special restraints in which the child's back faces the driving direction. These child seats can be used safely only on the rear seat of your VOLKS-WAGEN.
Using a rear-facing child seat on the front seat of a vehicle equipped with an airbag will seriously injure and can even kill a child when the airbag inflates in an accident.

WARNING
● Never install rear-facing child seats or infant carriers on the front passenger seat. A child will be seriously injured and can be killed when the passenger airbag inflates.
● The inflating airbag will hit the child seat or infant carrier with great force and will smash the child seat and child against the backrest, center arm rest, or door.
● Always install rear-facing child seats or infant carriers on the rear seat.
● Never install a rear-facing child restraint in the forward-facing direction. Such restraints are designed for the special needs of infants and very small children and cannot protect them properly if turned forward-facing.
Child restraints on the front seat - important things to know
The airbag on the passenger side makes the front seat a potentially dangerous place for a child to ride. The front seat is not the safest place for a child in a forward-facing child seat. It is a very dangerous place for an infant or a larger child in a rearward-facing seat.
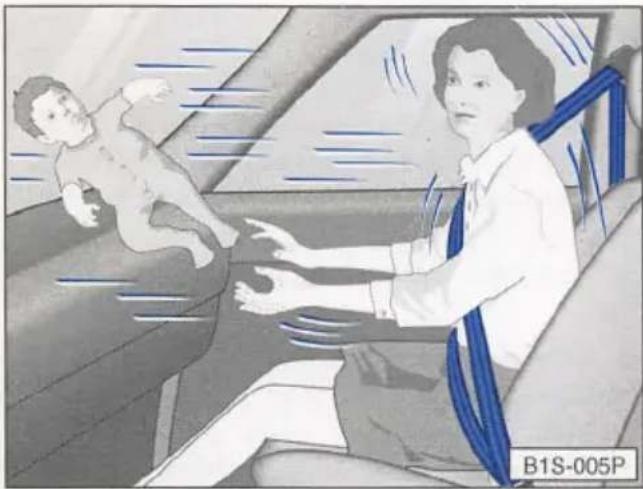
natural_image
Illustration of a person interacting with a baby on a vehicle, no text or symbols present
WARNING
Babies and older children must never ride in a vehicle sitting on the lap of an adult. Holding a child in your arms is never a substitute for a child restraint system. The strongest adult could not hold onto the child under the forces exerted in an accident. The child would strike the interior of the vehicle and could also be struck by the adult's body moving forward. The child and the adult could injure each another.
In a frontal accident at a speed of 20–35 mph (30–56 km/h) the forces acting on a 13-pound (6 kg) infant would be more than 20 times the weight of the child. This means the weight of the child would suddenly be more than 260 pounds (120 kg). Under these conditions, only an appropriate child restraint properly used can reduce the risk of serious injury.

natural_image
Illustration of a child seated in a car seat with a blue safety belt, no text or symbols presentConvertible seats
A child too large for an infant restraint up to 4 years old (40 lbs. or 18 kg) should be restrained in a child seat certified for their weight.
The airbag on the passenger side makes the front seat a potentially dangerous place for a child to ride. The front seat is not the safest place for a child in a forward-facing child seat. It is a very dangerous place for an infant or a larger child in a rearward-facing seat.

WARNING
Forward-facing child seats installed on the front passenger's seat may interfere with the deployment of the airbag and cause serious injury to the child. Install forward-facing child seats on the rear seat.

Always read and heed all WARNINGS on next pages.
If exceptional circumstances require the use of a forward-facing child seat on the front seat, the child's safety and well-being require that the following special precautions be taken:

WARNING
If, in exceptional circumstances, you must install a forward-facing child restraint on the front passenger's seat:
- make sure the forward-facing seat has been designed and certified by its manufacturer for use on a front seat with a passenger front and side airbag.
- Always follow the manufacturer's instructions provided with the child seat or carrier.
- Always move the passenger seat into its rearmost position, as far away from the airbag as possible before installing the child restraint. The backrest must be adjusted to an upright position.
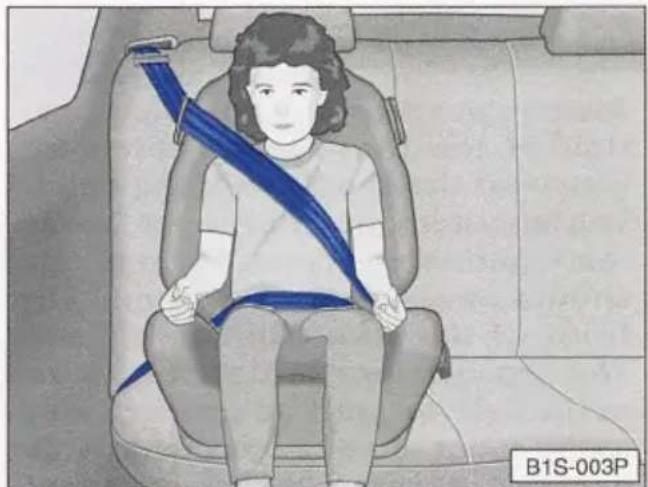
natural_image
Illustration of a person sitting in a car seat with a blue safety belt, no text or symbols presentBooster seats
Children up to 8 years old who weigh over 40 lbs (18 kg) and are less than 4'9" (1.45 m) tall are best protected in child safety seats designed for their age and weight. Experts say that the skeletal structure, particularly the pelvis, of these children is not fully developed, and they should not use the vehicle safety belts.
Children of average size of about 7 years and older may use available three point combination lap and shoulder belts. It is usually best to put these children in appropriate booster seats. Be sure the booster seat meets all applicable safety standards.
Booster seats raise the seating position of the child and reposition both the lap and shoulder parts of the safety belt so that they pass across the child's body in the right places.
The routing of the belt over the child's body is very important for the child's protection, whether or not a booster seat is used.
Children age 12 and under should always ride in the rear seat.

Always read and heed all WARNINGS on next pages.

WARNING
Always position the shoulder portion of the three-point belt midway over the shoulder of the child. The shoulder portion must never rest against or across the neck. It should never contact or remain in front of the face, chin, or throat. The lap belt portion of the three point belt as well as any lap belt alone must always pass as low as possible across the pelvis, never over the abdomen. Failure to properly route safety belts over a child's body will cause severe injuries in an accident.
In a collision, airbags must inflate within a blink of an eye and with considerable force. In order to do its job, the airbag needs room to inflate so that it will be there to protect the occupant as the occupant moves forward into the airbag.
A vehicle occupant who is out of position and to close to the airbag gets in the way of an inflating airbag. When an occupant is too close, he or she will be struck violently and will receive serious or possibly even fatal injury.
In order for the airbag to offer protection, it is important that all vehicle occupants, especially any children, who must be in the front seat due to exceptional circumstance, be properly restrained and as far away from the airbag as possible. By keeping room between your body and the front of the passenger compartment, the airbag can inflate fully and completely and provide supplemental protection in certain frontal collisions.

WARNING
Never let a child stand or kneel on any seat, particularly the front seat. Never let a child ride in the cargo area of your car. If a child is leaning forward, sitting sideways or out of position in any way, the child is more likely to be injured in a crash and will receive serious or fatal injuries if the child comes into contact with an airbag as it inflates.
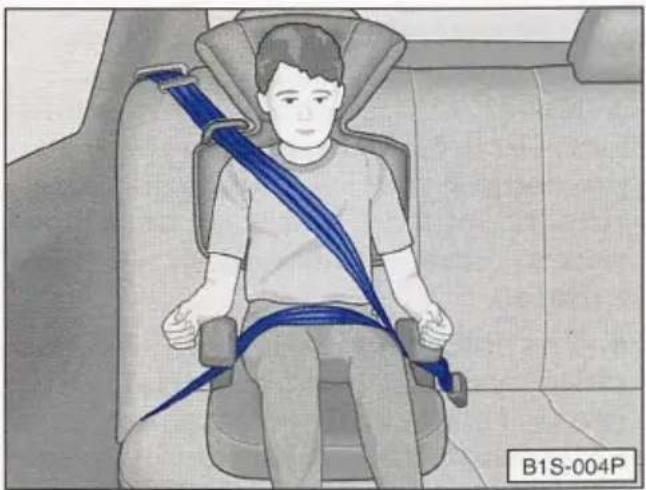
natural_image
Illustration of a person seated in a car seat with a blue safety harness, no text or symbols presentSeatbelts and older children
Children of average size of about 7 years of age and older may use the lap belt in exceptional circumstances if the proper use of three point belts is not possible. Always remember that children do not have the pronounced pelvic structure required for the proper function of lap belts. The child's safety absolutely requires that a lap belt be fastened snugly and as low as possible around the pelvis. Never let a lap belt pass over the child's stomach or abdomen.

WARNING
Failure to properly route safety belts over a child's body will cause severe injuries in an accident. The lap belt portion of the three point belt as well as any lap belt alone must always pass as low as possible across the pelvis, never over the stomach or abdomen.
Younger children should use a lap belt only in very exceptional situations and only if no child restraint system for the child's size and weight or safer alternative means of transportation of the child is available. In these exceptional situations, the use of a lap belt is better than permitting the child to remain totally unrestrained. But remember: a lap belt cannot provide the same level of protection as a proper child restraint. Also, using a lap belt for younger children, who should be using a child restraint, may violate laws in your state or province.

WARNING
● An improperly worn safety belt will not provide the best protection in an accident and may cause serious personal injury. Always make sure that children and other vehicle occupants properly wear available restraint systems. Carefully follow the instructions provided by the manufacturers of child restraints.
● Commercially available child seats are required to comply with U. S. Federal Motor Vehicle Safety Standard (FMVSS) 213 (in Canada CMVSS 213).
● These standards include installation requirements for using a lap belt or the lap portion of a combination lap-shoulder belt such as those installed in your vehicle.

Always read and heed all WARNINGS on next pages.

WARNING continued
- When buying a child restraint, select one that fits your child and vehicle.
- Only use child restraint systems that fully contact the flat portion of the seat cushion. The child seat must not tip or lean to either side. VOLKSWAGEN does not recommend using child seats that rest on legs or tube-like frames. They do not provide adequate contact with the seat.
- Improperly or inadequately installed child restraint systems can increase the risk of injury to children in accidents. Therefore, always carefully read and follow all instructions on installation and use that come with the system.
Securing a child seat with the outer rear seats
Convertible Locking Retractor
The retractors for the outer rear seat three-point safety belts and the front passenger three-point safety belt have a convertible locking feature in addition to the emergency locking feature.
If you need to install a child seat at an outer seating position, you must first activate the convertible locking feature. Then secure the child seat by using the seat belt.

WARNING
● Never install rear-facing child seats or infant carriers on the front passenger seat. A child will be seriously injured and can be killed when the passenger airbag inflates.
● The inflating airbag will hit the child seat or infant carrier with great force and will smash the child seat and child against the backrest, center arm rest, or door.
● Always install rear-facing child seats or infant carriers on the rear seat.
- Forward-facing child seats or infant carriers installed on the front passenger's seat may interfere with the deployment of the airbag and cause serious injury to the child. Allow a child to travel on the front passenger's seat only in a forward-facing child restraint system specifically designed and approved by the child restraint manufacturer for use in the front with airbags. Make sure the passenger seat is in the rearmost position. It is always safer to install a child seat in the rear.
Activating the convertible locking retractor
- Slowly pull the belt all the way out and route it around or through the child restraint belt path.
- Insert the belt tongue into the buckle for that seating position. Make sure that the orange release button is facing away so that the child safety belt can be unbuckled quickly if necessary.
● Pull on the belt to make sure the safety belt is properly fastened.
● Guide the remaining portion of the belt back in place with your hand. While doing so, you should hear a continuous clicking noise from the retractor. That means that the convertible locking feature has been activated. - Push and pull the child seat back and forth to make sure that it is correctly and securely installed.

WARNING
Always buckle the child seat firmly in place even if your child is not sitting in it. A loose child seat can fly around during a sudden stop or in a collision.
Deactivating the convertible locking retractor
The convertible locking retractor is deactivated by unfastening the safety belt (see page 13). Allow the safety belt to retract completely to its stowed position. The safety belt can now be used as an ordinary three-point safety belt without the additional locking feature.
If the convertible locking feature should be activated inadvertently, the safety belt must be unfastened to deactivate this feature. If the convertible locking feature is not deactivated, the safety belt will gradually become tighter and uncomfortable to wear. The convertible locking feature must be deactivated to restore normal belt operation and greater occupant comfort

WARNING
Never unfasten the safety belt to deactivate the convertible locking retractor while the vehicle is in motion. You would not be protected at all and could suffer serious injury in a collision.
Securing a child seat with the center rear seat
Securing a child seat with the rear center safety belt
- First make sure the seat backrest of the rear seat bench is in upright position and securely latched in place, Booklet 3.1, chapter "Rear seat".
- Then secure the child seat as described in this chapter "Child safety".
Be sure to follow the instructions provided by the manufacturer of the child restraint you are using.

WARNING
When transporting children on the rear seat bench, or if you are going to install a child restraint system on the rear seat bench, please remember:
● The rear center three point safety belt cannot help to protect an infant or a child in a child restraint if the seat backrest to which it is attached is not securely latched.
The child restraint would not be securely held in place and would move forward during sudden braking, in a sudden maneuver and especially in a collision. An infant or a child would be thrown forward together with the seat and would strike parts of the car's interior and could be seriously injured. See page 30.
● Always make sure that the rear seat backrest to which the rear center safety belt is attached is in upright position and securely latched into place so that it cannot fold forward whenever a child restraint is installed and especially when it is being used, Booklet 3.1, chapter "Rear seat".
What Types of CR Anchors are Available and How are They Related to Child Safety?
For years, CRs have been installed using the safety belts already present in every vehicle.
Since September 1, 1999, CR manufacturers have been providing tether straps that attach the top of the CR to the vehicles structure, on most of their forward-facing systems in order to comply with U.S. Federal regulations for CR performance in a crash. Vehicle manufacturers are required to phase-in tether anchorages for attachment of the tether strap in their U.S. vehicles beginning September 1, 1999.
The combination of the tether anchorages and the lower anchorages is now generally called the LATCH system for "Lower Anchors and Tethers for Children". In Canada, the terms "top tether" with "lower universal anchorages" (or "lower universal anchorage bars") are used to describe the system.
(The term "ISOFIX" regarding lower anchorages had been used by Volkswagen and other manufacturers in the past, but LATCH is now the standard name for the new child restraint anchorage system.)
Some CR manufacturers have been providing tether straps on certain models of their CRs, either as standard equipment or as a retrofit, for several years. Check with the manufacturer of the CR for tether strap availability.
To provide a simpler and more practicable way to attach the CR on the vehicle seat, U.S. Federal regulations require the phase-in of lower anchorages in vehicles and devices on new CRs to attach to the vehicle anchorages.
CR manufacturers will probably offer two kinds of lower anchorages on their child seats:
They could come with...
- ...hooks or other latches attached to adjustable straps
or - ...rigid latches on bars that extend out the back of the CR.
Where Can I Get Additional Information About CR Application and Usage?
There are a number of sources of additional information about CR selection, installation and usage:
NHTSA advises that the best child safety seat is the one that fits your child and fits in your vehicle, and that you will use correctly and consistently.
Try before you buy!
National Highway Traffic Safety Administration
(888) DASH-2-DOT
www.nhtsa.dot.gov
Center for Injury Prevention
(800) 344-7580
www.cipsafe.org
www.childsafety.org
National SAFE KIDS Campaign
(202) 662-0600
www.safekids.org
Safety BeltSafe U.S.A
(800) 745-SAFE (English)
(800) 747-SANO (Spanish)
www.carseat.org
Volkswagen Customer Relations
(800) 822-8987
Tether Anchors

WARNING
Improper installation of child restraints will increase the risk of injury in a crash.
- Improper use of child restraint anchors (tether anchors) could lead to injury in a collision. The anchors are designed to withstand only those loads imposed by correctly fitted child restraints.
● Never mount two child restraint seats on one anchor point.
● Always follow the instructions provided by the manufacturer of the child restraint that you intend to install in your VOLKSWAGEN.
● Never use child restraint tether anchorages to secure safety belts or other kinds of occupant restraints.
● Never attach a tether strap to a tie-down hook in the luggage compartment
● Never secure or attach any luggage or other items to the LATCH lower anchorages or to the tether anchors.

text_image
B1J-200KThe illustration shows the tether anchors for the rear seating positions:
Tether anchors for the three rear seating positions are located on the rear side of the rear seat back rest (arrows).
Beginning with model year 2000, Volkswagen vehicles have tether anchors as standard equipment.
Tether Strap
A tether is a straight or V-shaped strap that attaches the top part of a CR to special anchorage points in the vehicle – see illustration on next page.
The purpose of the tether is to reduce the forward movement of the CR in a crash, in order to help reduce the risk of head injury that could be caused by striking the vehicle interior.
Forward facing CRs manufactured after September 1, 1999, are required by U.S. federal regulations to comply with child head movement performance requirements.
These new performance requirements make a tether necessary on most new child seats.

WARNING
Improper installation of child restraints will increase the risk of injury in a crash.
● Never attach a tether strap to a tie-down hook in the luggage compartment
● Never secure or attach any luggage or other items to the LATCH lower anchorages or to the tether anchors.
Using Tethers on Rear Facing CRs
Currently, very few rear-facing CRs come with a tether. Please read and heed the CR manufacturer's instructions carefully to determine how to properly install the tether.
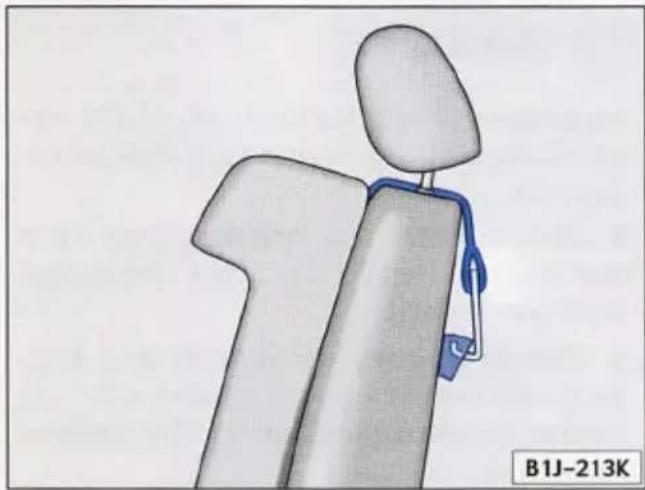
natural_image
3D rendered illustration of a person wearing a seatbelt, no text or symbols presentHow to install the upper tether strap to the anchorage point
-
Release or deploy the tether strap on the child restraint according to the child restraint manufacturer's usage instructions.
● Guide the upper tether strap under the rear head restraint (raise the head restraint if necessary). -
Guide the tether strap between the rear seat back and the luggage compartment cover (remove the luggage compartment cover if necessary, see "Luggage compartment cover", Booklet 3.1).
- Attach the tether strap anchorage hook into the opening of the tether anchorage.
● Tighten the tether strap firmly following the child restraint manufacturer's instructions. - To release the tether strap, loosen the tension following the child restraint manufacturer's instructions. Depress the spring catch on the hook and release it from the anchorage.
Lower Anchorages

text_image
B1S-027MThe lower anchorage attachment points are located between the rear seatback and rear seat cushion - see illustration.
The lower anchorages for the rear outboard seating positions are installed at the factory.
Lower anchorages secure the CR in the seat without using the vehicle's safety belts. Anchorages provide a secure and easy-to-use attachment and minimize the possibility of improper CR installation.
All CRs manufactured after September 1, 2002, must have lower anchorage attachments for the LATCH system (called "lower universal anchorages" or "lower universal anchorage bars" in Canada).
However, CR manufacturers have begun to provide such lower anchorages for the latch system in 2000 even before the required date.

WARNING
Improper installation of child restraints will increase the risk of injury in a crash.
● Never attach a tether strap to a tie-down hook in the luggage compartment
● Never secure or attach any luggage or other items to the LATCH lower anchorages or to the tether anchors.
Please remember that the lower anchorage points are only intended for installation and attachment of CRs specifically certified for use with LATCH lower anchorages.
CRs that are not equipped with the lower anchorage attachments can still be installed according to the CR manufacturer's instructions using vehicle safety belts.

natural_image
Close-up of a blue and white car seatbelt buckle securing a car (no text or symbols visible)Mounting the anchorage hook
● Install the guide fixtures as explained on page 46.
● Guide the anchorage hook into the guide fixture.
- Press the anchorage hook with the spring catch release onto the lower anchorage so that the anchorage hook locks into place.
Pull on the anchorage hook to make sure that it is properly attached to the lower anchorage – see illustration.
● Tighten the strap following the CR manufacturer's instructions.
Release the anchorage hook
- Loosen the tension on the strap following the CR manufacturer's instructions.
● Depress the spring catch on the hook. - Hold the spring catch in depressed position and move the hook in direction of the vehicle floor so that there is enough space to release the anchorage hook from the lower anchorage.
Using Lower Anchorages or Safety Belts

WARNING
- Improper installation of child restraints will increase the risk of injuries in a crash.
● Always refer to the CRs manufacturer's instructions for proper installation of the CR and correct use of tether straps as well as the lower anchorages or safety belts in your vehicle.
Seat Markings for Lower Anchorages

natural_image
Interior view of a car with a blue speech bubble containing a stylized human figure inside, no text or symbols present.Fig 1 The illustration above shows the location of the circular seat markings for the lower anchorages for the outboard rear seating positions.
The circular markings on the seat help you to locate the lower anchorages for the two rear outboard seating positions, see illustration.

WARNING
For installation of a child restraint in your Volkswagen, always refer to the instructions provided by the manufacturer of your child restraint.

text_image
B1S-027MFig 2 The illustration above shows the location of lower anchorages.
The lower anchorages are located between the rear seatback and the rear seat cushion - see Fig. 2.

WARNING
Improper installation of child restraints will increase the risk of injury in a crash.
● Always follow the CRs manufacturer's instructions for proper installation of the CR and correct use of tether straps as well as the lower anchorages or safety belts in your vehicle.
- Please be sure to read and heed the important information and WARNINGS about child safety and the installation of CRs in this Booklet.
Guide Fixtures for Lower Anchorages
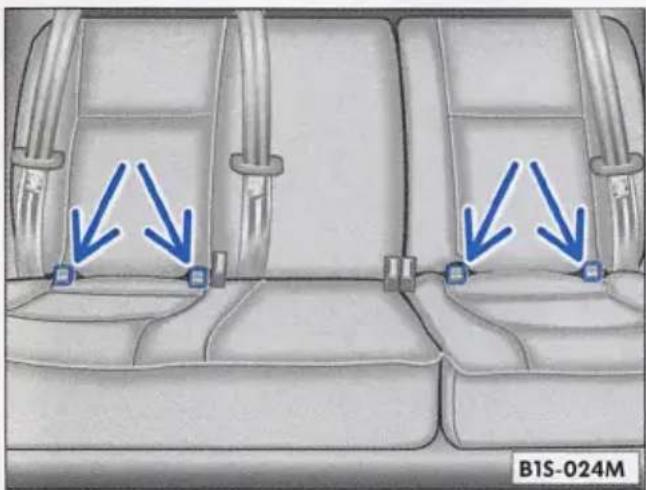
text_image
B1S-024MSpecial guide fixtures increase the convenience of the lower anchorages and help protect the seat material from possible damage when installing child restraints that have rigid lower anchorages and not straps with hooks. Your authorized Volkswagen dealer can supply these guidance fixtures.
Attach the guide fixtures to the lower anchorages as shown in illustrations on pages 44 and 46.
Note
You may find it easier to install CRs equipped with hooks attached to straps without the guide fixtures in place. If this is the case, remove the guide fixtures by pulling them off the anchorages. However, the guide fixtures help you to locate the anchorages positions.

natural_image
Close-up of a blue car seatbelt buckle with arrow indicating direction (no text or symbols on the belt)Installing the guide fixtures
First push the seat cushion down so that the lower anchorages are visible.
Hold the guide fixture with the part number facing downward and push it in direction of arrow onto the anchorage - see upper illustration.
The groove in the guide fixtures must snap into place over the lower anchorages installed in your Volkswagen.
Removing the guide fixtures
- Remove the CR according the CR manufacturer's instructions.
● Push the seat cushion down so that the lower anchorages are visible. - Pull the guide fixtures off of the lower anchorages and keep the guide fixtures in a safe place.
Notes
- On vehicles with folding rear backrests, the guide fixtures must be removed before folding the backrests to prevent damaging the seat cushion.
- Please keep the guide fixtures in a safe place with the vehicle when not in use.
- If you leave the guide fixtures installed for several days, this could leave a mark on the upholstery on the seat cushion and backrest in the area that the guide fixtures were installed. The upholstery would also be permanently stretched around the guide fixtures.
This applies especially to leather seats.
● Always remove the guide fixtures when not in use.

WARNING
Improper use of tether anchorages or lower anchorages can cause serious personal injury in an accident.
● Always follow the CR manufacturer's instructions for proper installation and use of child restraint systems.

WARNING continued
● Never use the LATCH or tether anchorages to attach safety belts or other kinds of occupant restraints.
● CR tether anchorages and the lower anchorages are only designed to secure a CR that has been equipped to use these anchorages.
● Tether anchorages and the lower anchorages are designed to withstand only those loads imposed by correctly fitted child restraints. Under no circumstances can they be used safely for adult or child seat belts or harnesses.
● Never mount more than one CR to a single tether or to a lower anchorage point. Attaching two child restraints to a single anchorage point can cause the anchorage to fail and cause serious personal injury in a crash.
● Never use the tether anchorages and lower anchorages to install three child restraints in your Volkswagen. If you must install three child restraints on the rear seat of a Volkswagen with three seating positions in the rear, you must use the vehicle safety belt to install the child restraint in the center seating position.
Installing a Child restraint using the LATCH system
Make sure the seat back of the rear seat bench is in the upright position and securely latched in place.
There are two possibilities to attach a LATCH-CR to the lower anchorages for the outboard seating position:
Rigid latches on bars that extend on the back of the CR:
● Install the guide fixtures, see pages 46 and 47.
- Insert the latches into the lower anchorages. Make sure you hear the CR click securely into place.
Pull on the CR once you've mounted it to make sure it's secure!
Connecting the attachments to adjustable straps:
- Both attaching straps with anchorage hooks on the CR must be securely attached to the lower anchorages and then pulled tight according to the CR manufacturer's instructions, - see also page 44.
Attaching the child restraint tether strap to the tether anchor:
- Release or deploy the tether strap and the child restraint according the CR manufacturer's instructions.
- Guide the upper tether strap under the rear head restraint (raise the head restraint if necessary) and attach the tether strap anchorage hook into the opening of the tether anchorage.
To locate the tether anchorages on your vehicle, see page 40.
1) In Canada, the terms "top tether" with "lower universal anchorages" (or "lower universal anchorage bars") are used to describe the system.
- Pull on the anchorage hooks to make sure that they are firmly attached to the anchorage by the spring catch of the hook.
● Tighten the tether strap firmly following the CR manufacturer's instructions.
Pull on the CR once you've mounted it to make sure it's secure!

WARNING
Improper installation of child restraints will increase the risk of injury in a crash.
- Always follow the CRs manufacturer's instructions for proper installation of the CR and correct use of tether straps as well as the lower anchorages or safety belts in your vehicle.
- Please be sure to read and heed the important information and WARNINGS about child safety and the installation of CRs in this Booklet.
Head restraints

natural_image
Illustration of a human skeleton in a car seat with a hand operating a device, showing skeletal structure and directional arrows (no text or symbols)The padded head restraints are adjustable. Position the head restraints according to the occupant's height. Properly positioned head restraints, with the use of safety belts, help to offer effective protection in most accident situations.
For maximum protection, the upper edge should be at least at eye level or higher – see left illustration.

WARNING
Head restraints are designed to help reduce injuries in an accident. Do not drive the vehicle without the head restraints in place and properly adjusted.
Height adjustment (arrow 1)
For height adjustment, grasp firmly with both hands and pull up or down. To push the front head restraints down, press the button (arrow 2).
Removal
Front head restraints
To remove the head restraints, pull the head restraint upward until it stops. Then press the button (arrow 2). While doing this, pull the head restraint upward and remove.

text_image
1 2 B1J-120D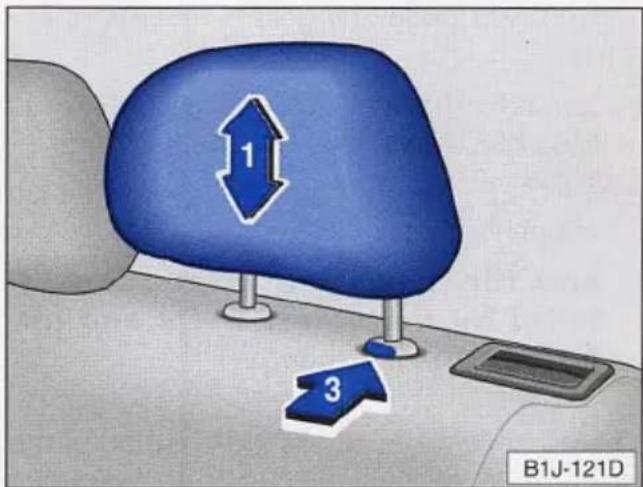
text_image
1 3 B1J-121DRear head restraints
To remove the head restraints, fold the rear backrest slightly forward and pull the head restraint upward until it stops. Then press the button (arrow 3) on the rod. While doing this, pull the head restraint upwards and remove.
Installation
Front head restraints
To reinstall, guide the two rods of the headrest into the guides, press the button (arrow 2) at the same time and push the headrest down into place.
Rear head restraints
To reinstall, push the two rods of the headrest into the guides and push the headrest down into place.
Front seats

natural_image
Illustration of a human skeleton in a car seat with a blue tool, no text or symbols presentThe correct positioning of the seats is important:
- so that you can reach all the controls on the vehicle quickly and safely;
- so that you can drive or ride relaxed which helps reduce fatigue
- and for maximum protection offered by the safety belts and airbag system.
Therefore, always adjust the position of the front seats as described on the following pages and in the chapter "Front seats", Booklet 3.1.
Remember to adjust the seats before fastening the safety belts and before driving off. Always be sure to follow these general guidelines:

WARNING
● Always sit as far away from the steering wheel and the instrument panel as possible.
● Never sit less than 10 inches (25 cm) from the steering wheel and the instrument panel.
- Do not adjust seats while the vehicle is moving. Your seat may move unexpectedly, causing sudden loss of vehicle control and personal injury.
● Passengers must always keep their feet on the floor whenever the vehicle is moving. Never place feet on the dashboard or on top of the seats. In an accident, serious personal injury can result from an improper seating position.
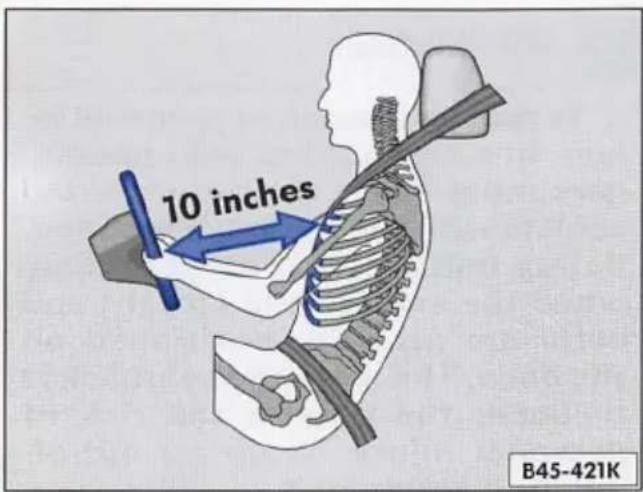
text_image
10 inches B45-421KDriver's seat
To avoid contact with the airbag while it is unfolding, the driver must not sit any closer to the steering wheel than necessary and always properly wear the three point safety belt provided.
We recommend that you adjust the driver's seat as follows:
- adjust the seat in fore and aft direction so that you can easily push the pedals all the way while keeping your knee slightly bent.
- adjust the seatback so that when you sit with your back against the seatback, you can still grasp the top of the steering wheel.
- adjust the steering wheel so that the distance from the center of your breastbone to the center of the airbag cover on the steering wheel must be at least 10 inches (25 cm) or more.
See illustration above and chapter "Front seats", Booklet 3.1.
WARNING
● Never sit closer than 10 inches (25 cm) to the steering wheel.
- If you cannot sit more than 10 inches (25 cm) from the steering wheel, we recommend that you investigate whether adaptive equipment may be available to help you reach the pedals and increase your seating distance from the steering wheel.
- If it is impossible for you to sit at least 10 inches (25 cm) or more from the steering wheel, the National Highway Traffic Safety Administration (NHTSA) may permit you to have an on/off switch for the airbag installed. For address and telephone number of NHTSA - see below:
To contact NHTSA, you may either call the Auto Safety Hotline toll-free at:
1-800-424-9393
(or 366-0123 in Washington, D.C. area) or write to:
NHTSA,
U.S. Department of Transportation, Washington, D.C. 20590.
Front passenger's seat
To avoid contact with the airbag while it is unfolding, the adult front seat passenger must not sit any closer to the instrument panel than necessary and always properly wear available three point belts.
We recommend that you adjust the passenger's seat as follows:
- backrest upright (never reclined)
- place your feet on the floor in front of the passenger's seat
- adjust the passenger's seat as far as possible to the rear of the fore and aft adjustment range.
For safety information on transporting children on the front passenger seat - see page 30.

WARNING
● Always keep both feet on the floor in front of the seat.
● Never place your feet on the instrument panel or on the seat. If the airbag inflates and your feet are on the instrument panel or on the seat, your could receive serious personal injuries.

WARNING
- To reduce the risk of personal injury in a crash, front seat passengers must never ride in a moving vehicle with the seatback reclined. Safety belts offer protection only when the seatback is upright and belts are properly positioned on the body. The more the seatback is reclined, the greater the risk of personal injury from an out-of-position safety belt.
- For driver's and passenger's protection, make sure front seats and seatbacks are securely locked in place.
● Never store items under the seats. Loose objects can interfere with the seat latching mechanism and can also cause personal injury in a crash.
ALPHABETICAL INDEX
A
Adjusting
- Head restraints 49
- Seats 50
Air bag system 17
- Care, service and disposal .... 29
-Front airbags 23
-Headairbags 28 - How many airbags does my vehicle have? 17
- How the Airbag system works? 24
- Importance of proper seating position 19
- Side airbags 25
- System components ..... 18
- What happens when the airbags deploy? 19
- When must the system be inspected? 18
-Where are my airbags located?17
Anchors for a child restraint system 39
Auto Safety Hotline 21
B
Belt tensioner 13
- What happens when the belt tensioner is activated? ... 13
Booster seats 33
C
Center safety belt on the rear seat 14
Child restraint (CR) Anchors ..... 39
Child restraint anchorages ..... 43
Child restraints
- Important information about child restraints and the front seat 22
- Securing on the rear seat using the center safety belt ..... 38
Child safety 30
Child seat – Installing a rear facing child seat 22
Child seats - Older children ..... 35
Comfort clips 8
Convertible child seats 32
Convertible locking feature ..... 9
Convertible locking retractor ..... 36
-Activating 37
- Deactivating 37
CR (Child Restraint) 39
D
Dirty safety belts 9
Driver's seat
-Adjusting 20
- Proper position 51
ALPHABETICAL INDEX
E
Extenders for the safety belt ..... 15
G
Guide fixtures 46
F
Fastening and unfastening
- Booster seats 33
- Center safety belt on the rear seat 9,14
- Child seat on the center position on the rear seat ..... 38
- Child seats on the outer rear seat position 36
- Convertible child seats ..... 32
- Infant seats 31
- LATCH system 39
-Safety belt extender 16
-Safety belts 10,13
Fastening your safety belt ..... 10
Forward facing child seat, - Precautions 22
Front airbags 23
Front passenger's seat, – Proper position .... 52
Front seats 50
- How to adjust? 50
H
Head airbags 28
Head restraints 49
– Proper position for maximum protection .... 49
-Removing and Installing ..... 49
Heavy clothing and safety belts ... 8
Height adjustors 11
How can I adjust the height of my safety belt? 11
How can I tell when the safety belt is securely locked? ..... 10
How many airbags does my vehicle have? 17
How to attach the tether strap to your vehicle? 42
How to fasten the rear center safety belt? 9
How to use this Manual? 2
How to wear safety belts properly? 8
ALPHABETICAL INDEX
|
Important information about this Manual 2
Indicator light
-Air bag system 18
- What should I do if the airbag indicator light comes on and stays on? 18
Infant seats 31
Installing
- Booster seats 33
- Child seat on the outer rear seat position 36
-Child seat to LATCH system..48
- Child seat to lower anchorage point 43
- Child seat using the LATCH system 39
- Convertible child seats ..... 32
-Infant seats 31
- Tether strap to anchorage point on your vehicle ..... 42
Installing a child restraint 48
K
Keep this manual with your vehicle 2
L
Lap-shoulder belt 9
LATCH (Lower Anchor and Tether for Children) ..... 39
LATCH system 48
- Attaching a child restraint to the LATCH system ..... 48
- Seat markings 45
Locking retractor 36
Lower Anchor and Tether for Children (LATCH) 39
Lower anchorages 43
-Guide fixtures 46
- Seat markings 45
N
Number of seats 9
P
Passenger's seat, - Proper position 52
Pregnant women, - Special considerations when wearing a safety belt ..... 12
ALPHABETICAL INDEX
R
Rear center safety belt 14
-How to fasten? 9
- Making sure the rear seatback is securely latched ... 9
-Precautions 14
Rear-facing child seat, - Precautions 22
Release button on the buckle .... 13
Retractors 9
S
Safety belt, - Lap-shoulder belt ... 9
Safety belt extenders 15
-Fastening 16
- Precautions your should take when using 15
- Use with a child restraint ..... 15
Safety belt height adjustors ..... 11
Safety belt warning light 7
Safety belts 3
- Extender 15
- How can I adjust the height of my safety belt? 11
- How can I tell when the belt is securely locked? 10
-How to fasten? 10
- How to wear properly? ..... 8
- Making sure all passengers are correctly restrained ..... 9
-Older children 35
-Precautions 8
- Retractors - how they work ... 9
- Special considerations for pregnant women ..... 12
- Torn or frayed 8
- Unfastening 13
- Warning system 7
- What can happen if you do not wear your safety belt? ..... 4
- What happens if you wear your safety belt too loose? .... 12
- When must safety belts be replaced? 9
- When would a safety belt lock up? 9
- Why safety belts protect? ..... 6
Safety first 2
Seat belts 3
Seating capacity of your vehicle ... 9
Seating position – Distance between the driver and the steering wheel ..... 21
Seat markings for lower anchorages 45
Securing a child seat ..... 36, 38
Side airbags 17,25,28
Side Curtain Protection ..... 17, 28
Steering wheel – Distance between the driver and steering wheel ..... 21
ALPHABETICAL INDEX
T
Tensioner for the safety belt - Function 13
Tether anchors 40
Tether strap 41 - How to attach to your vehicle. 42
Torn safety belts 8
U
Unfastening your safety belt ..... 13
W
Warning light in the instrument cluster 7
Warning system 7
What can happen if you do not wear your safety belt? 4
What happens if you wear your safety belt too loose? 12
What happens when the airbags deploy? 19
What happens when the belt tensioner is activated? 13
What should I do if the airbag indicator light comes on and stays on? 18
When must safety belts be replaced? 9
When would a safety belt lock up? 9
Where are my airbags located? .. 17
Why safety belts protect? 6
It has always been VOLKSWAGEN's policy to continuously improve its products. VOLKSWAGEN, therefore, reserves the right to make changes in design and specifications, and to make additions or improvements to its products without incurring any obligation to install them on products previously manufactured.
Text, illustrations and specifications in this manual are based on information and knowledge available at the time of printing. All rights reserved. May not be reproduced or translated in whole or in part without the written consent of VOLKSWAGEN Brazil. Specifications are subject to change without notice.
© VOLKSWAGEN Brazil
Printed on environmentally friendly paper (bleached without chlorine, recyclable). Printed in Brazil

natural_image
Close-up of a metallic panel with circular holes and warm lighting (no text or symbols visible)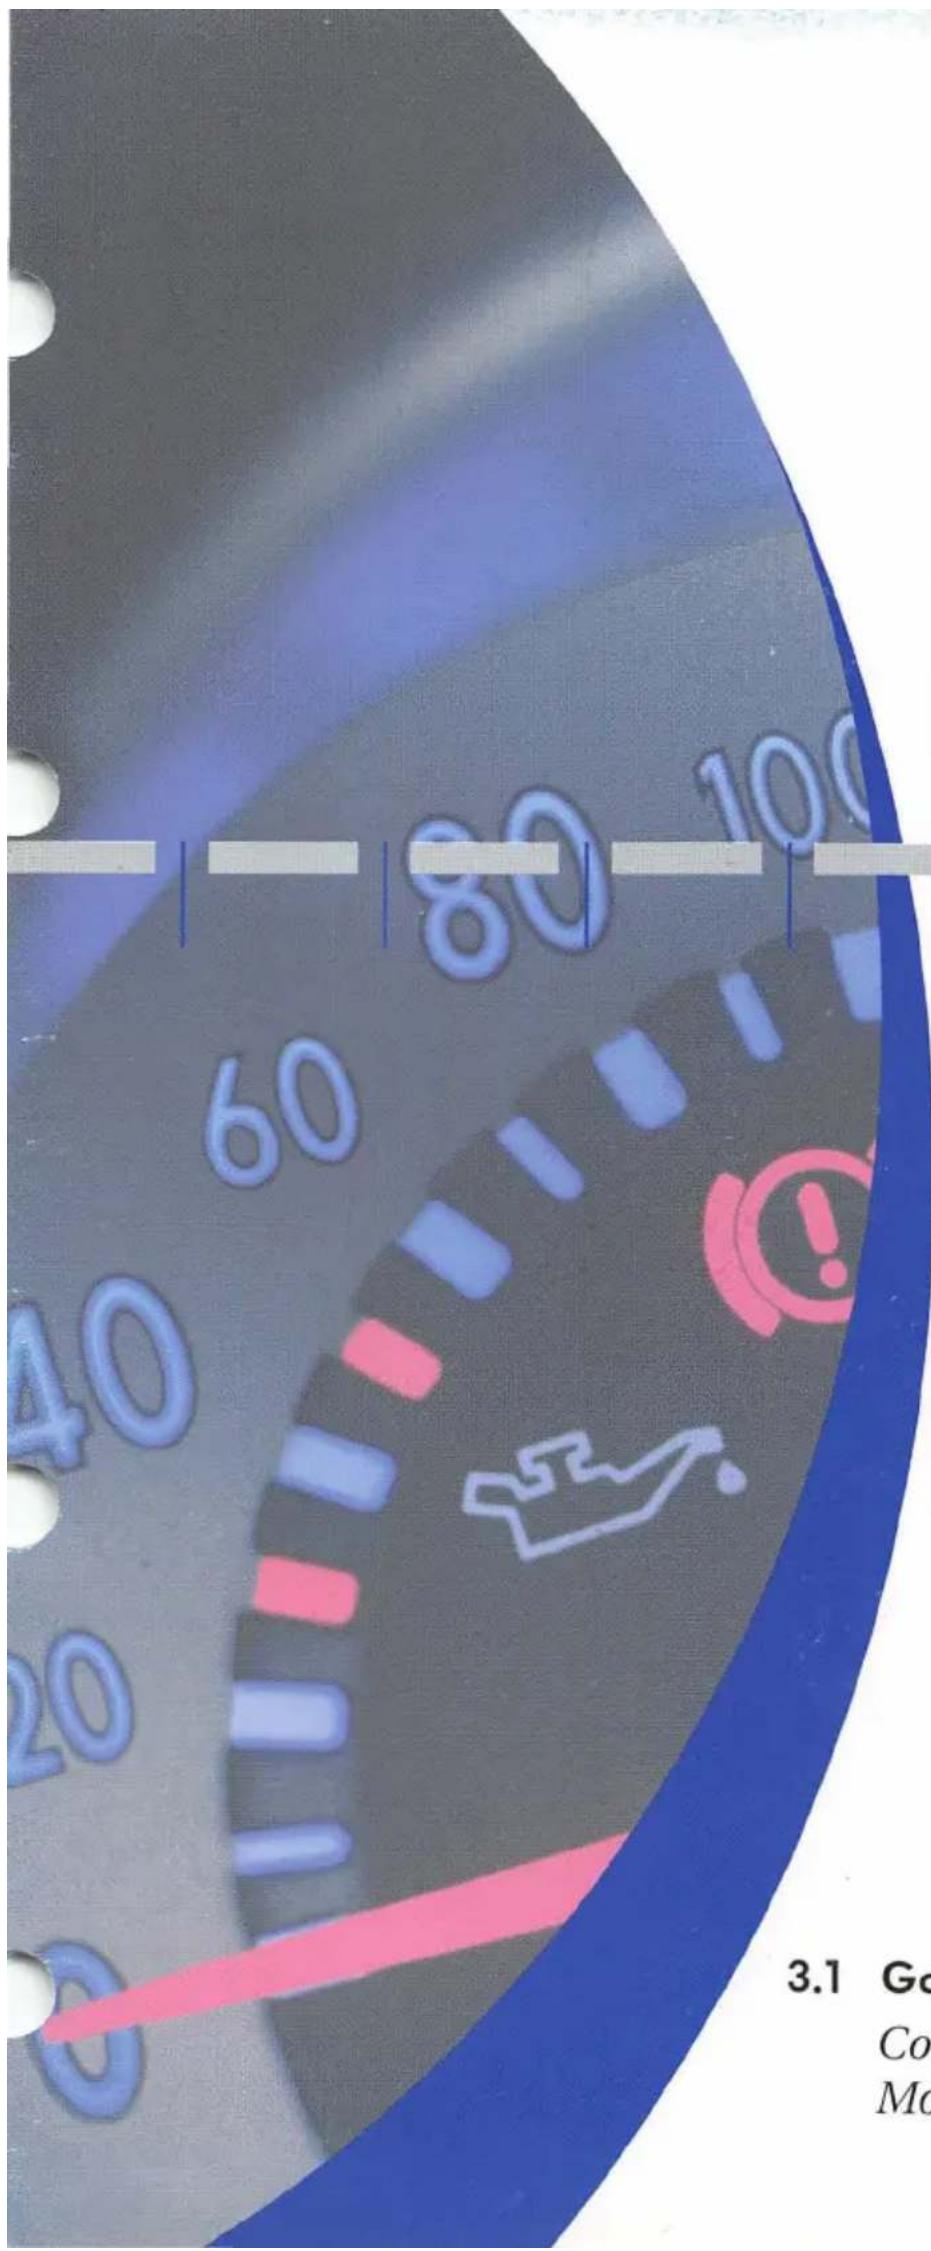
text_image
80 100 60 40 20 3.1 Go Co Mo
natural_image
Close-up of three metallic jet engines with visible branding (no text or symbols)3.1 Golf
Controls and Equipment
Model year 2005
Please read this important information before reading your booklet.
Vehicle Equipment
This manual describes all the equipment intended to be offered at the time of printing. Some of the equipment may be available at a later date or not at all.

Please note that items marked with an asterisk may be standard on certain models, optional on others or available on your model.
Notes about Environment

Texts identified by this symbol and written in italics are important notes regarding the environment and how you can help protect it.
Illustrations
Each illustration in the manual shows a feature and / or equipment which your vehicle may or may not have, depending on the model. The illustrations are simply to show you how a feature looks and its function.
Alphabetical Index
At the back of this book, you will find an extensive Alphabetical Index. This will help you to find information quickly by using key words.
Table of Contents
On the following page, you will find the Table of Contents which describes all the features of your vehicle in the order they appear in this manual.
Indication of directions
Whenever a direction is specified (for example: left, right, forward, backward, etc.), you should imagine yourself as sitting in the vehicle facing in the driving direction. If something is explained which is different from this position, it will be clearly identified.
WARNINGS

WARNINGS
concern safety and are highlighted like this throughout this manual.
Texts printed in bold type refer to possible damage to your vehicle, or to other important information.

If one of the Warning and indicator lights marked with a STOP-sign illuminates while you are driving, move a safe distance off the road, turn off the engine, turn on the emergency flasher and use other warning devices to alert other motorists. Go to listed page in your booklet for explanations.
TABLE OF CONTENTS
INSTRUMENT PANEL AND CONTROLS
General illustration 3
Warning and indicator lights ..... 6
Instrument cluster 8
Warning / Indicator lights ..... 15
Multi-function steering wheel .... 24
OPENING AND CLOSING
Keys 25
Remote control 27
Anti-theft alarm system 30
Doors, Power locks 31
Rear lid 34
Power windows 36
Power roof 40
CLEAR VISION
Switches 42
Turn signals / High beam lever ... 45
Wiper and washer system ..... 46
Wiper blades 48
Interior lights 49
Mirrors 50
Coat hooks / Assist handles ..... 53
Sun visors 53
SEATS AND STORAGE
Head restraints 54
Front seats 55
Adjustable steering column ..... 58
Armrest 59
Pedals 60
Rear seat 61
Luggage compartment 63
Luggage compartment cover .... 65
Roof rack 66
Cup holder 68
Socket / Cigarette lighter 69
Ashtray 70
Glove compartment 71
HEATING, VENTILATION AND AIR CONDITIONING
Air conditioning 72
Climatronic 78
ON THE ROAD
4-speed automatic transmission . 84
5-speed automatic transmission (Tiptronic®) 90
Manual transmission 96
Parking brake lever 97
Ignition switch 98
Power steering 99
Starting procedures 100
Stopping engine 102
Engine compartment 103
Cruise control 104
TABLE OF CONTENTS
TABLE OF CONTENTS
CONTROLS AND EQUIPMENT
CONTROLS AND EQUIPMENT
General illustration

text_image
Diagram of a Volkswagen car interior with numbered labels pointing to various controls and dashboard areas.
Pos. Page
1 - Release handle
2 - Outside mirrors adjustor ..... 50
3 - Power window switches ..... 36
4 - Power locking switch ..... 32
5 - Instrument cluster illumination ... 42
6 - Air vents 74
7 - Switch for lights 42
8 - Turn signals / High beam lever .... 45 with knobs for cruise control* ... 104
9 - Instrument cluster:
Instruments ..... 8
Warning and Indicator lights ..... 15
10 - Horn ( works only when the ignition is switched on )
11 - Windshield wiper / washer lever .. 46 with knobs for multi-function indicator* ..... 11
12 - Switch for heated driver's seat 44
13 - Switch for Electronic Stabilization Program or Anti-Slip Regulation ..... 43
14 - Switch for emergency flasher ... 43
15 - Switch for rear window defogger . 43
16 - Switch for heated front passenger's seat 44
17 - Radio ^1)
18 - Climate controls for...
.. air conditioning .... 72
..climatronic .... 78
1) A separate instructions brochure is provided for your factory-installed radio. If you replace your radio, please be sure to read the notes in the chapter "Do-it-yourself Service", Booklet 3.2.
Pos. Page
19 - Front passenger's airbag .... Booklet 2.1
20 -Glove compartment 71
21 - Switch for fuel filler flap release 44
22 - Switch for rear lid release ..... 34
23 - Release lever for
engine hood .... Booklet 3.2
24 - Fuse panel .... Booklet 3.2
25 - Data Link Connector (DLC) for On Board Diagnostics (OBD) ..... 23
26 - Lever for adjustable steering wheel 58
27 -Driver's airbag .... Booklet 2.1
28 - Steering lock / ignition /
starter switch 98
29 - Ashtray .... 70
Cigarette lighter* .... 69
30 - Selector lever
( automatic transmission ) ..... 84
Gearshift lever
( manual transmission ) ..... 96
31 - Parking brake lever ..... 97
32 - Storage compartment for Owner's manual 71
Notes
- Some features mentioned are standard equipment on some models only and options on others.
- For technical reasons, the arrangement of the switches and indicator/warning lights may differ. The governing factor is the symbol on the switch itself.
Warning and indicator lights
| Symbol | Symbol color | Name | Page |
 | Yellow | Airbag system | 16 |
 | Green | Automatic Shift Lock (ASL) | 16 |
 | Green | Turn signals | 17 |
 | Red | Engine oil pressure | 22 |
 | Red | Generator | 19 |
 | Red | Brake (US models) | 18 |
 | Red | Brake (Canada models) | 18 |
| [GBAG] | Blue | High beam | 17 |
| [S25W] | Red | Safety belt | 19 |
 | Red | Engine coolant level, temperature | 20 |
 | Yellow | Malfunction Indicator Lamp (MIL) | 23 |
 | Yellow | Anti-Lock Brake System (US models) | 17 |
 | Yellow | Anti-Lock Brake System (Canada models) | 17 |
 | Yellow | Fuel filler cap | 23 |
 | Yellow | Electronic immobilizer | 18 |
| [dcxg] | Yellow | Fuel level too low | 23 |
 | Red | Door / rear lid open | 22 |
| [22X7] | Red | Emergency flasher | 43 |
 | Yellow | Rear window defogger | 43 |
 | Yellow | Anti-Slip Regulation*(ASR) or Electronic Stabilization Program* (ESP) | 17 |
| EPC | Yellow | Electronic Power Control*(Gasoline models only) | 16 |
 | Yellow | Glow plug (Diesel models only)* | 16 |
 | Yellow | Front brake pads worn* | 22 |
| [yzon] | Yellow | Windshield washer fluid level too low | 22 |
| CRUISE | Green | Cruise control | 104 |
Notes
If one of the lights marked with comes on while you are driving, move a safe distance off the road. Turn off the engine, turn the emergency flasher on and use other warning devices to alert other motorists. Go to listed page in your booklet for explanations.

Some of the lights mentioned are on certain models only and may be options on other models.
Instrument cluster
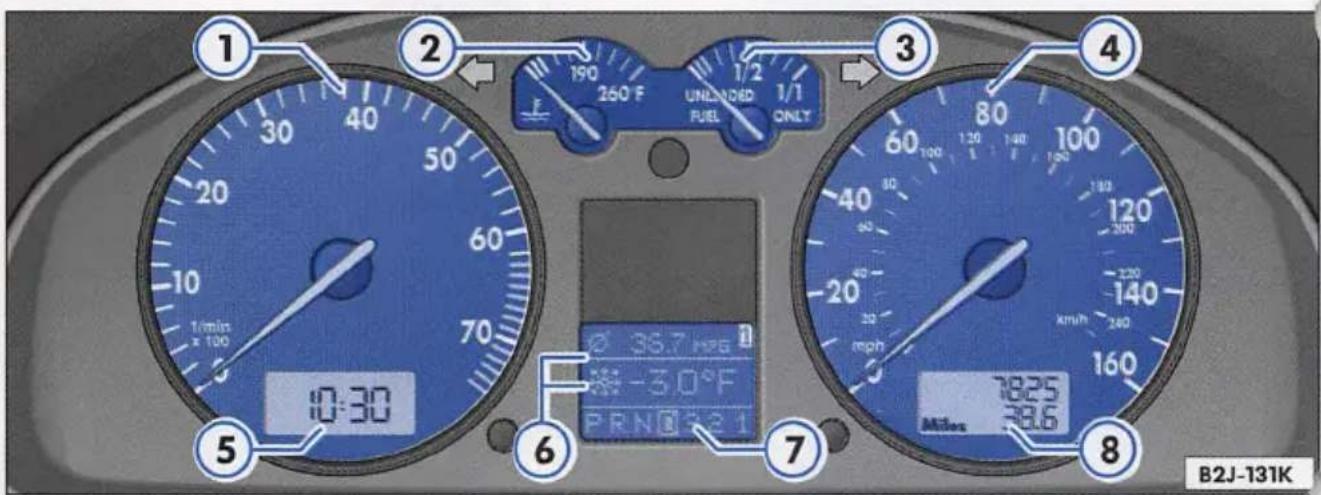
text_image
1 2 3 4 5 1/min x 100 190 260 F UNDADED FUEL 1/1 ONLY 6 36.7 MPa -3.0°F PRN 2:2 1 7825 38.6 Miles B2J-131KThe arrangement of the instruments in the cluster may vary depending on model and engine version.
The illustration shows the arrangement of the instrument cluster in a U.S. vehicle.
Pos. Page
1 - Tachometer 8
2 - Engine coolant
temperature gauge .... 9
3 - Fuel gauge 10
4 - Speedometer 10
5 - Digital clock 10
6 - Display for Multi-Function Indicator 11
7 - Display for Selector lever position (only vehicles with automatic transmission) 14
8 - Odometer / trip odometer ..... 14
Warning / indicator lights 15
1 - Tachometer
The red area at the end of the scale indicates maximum permissible engine RPM (revolutions per minute) for all gears after the break-in period. Before reaching this area, select the next higher gear or selector lever position "D," or ease your foot off the accelerator pedal.

Upshifting early saves fuel and reduces engine noise.
Shift to the next lower gear when engine RPM drops below 1,500 RPMs.
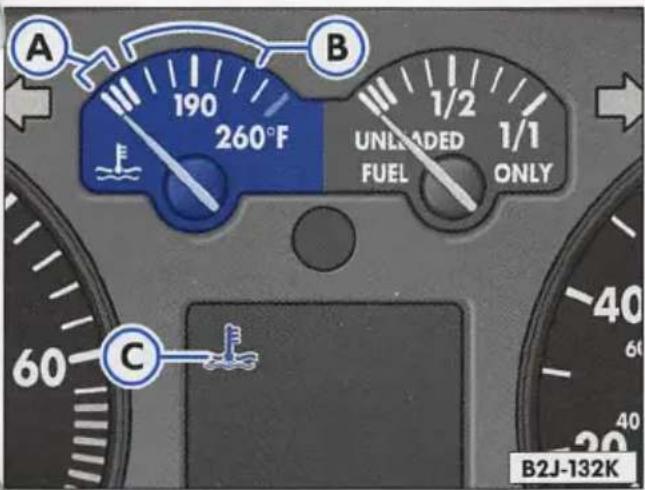
text_image
A 190 260°F B 1/2 1/1 UNLEADED FUEL ONLY C 60 40 60 40 B2J-132K2 - Engine coolant temperature gauge

The needle in the coolant temperature gauge will indicate the temperature of the coolant shortly after the ignition is switched on.
When the ignition is switched on, the warning light (C) illuminates for a few seconds as a functional check.
A - Engine cold
Avoid high engine speeds and heavy throttle when the needle is at the lower end of the dial.
B - Normal temperature
During normal running, the needle will stay somewhere in the middle of the dial. If the engine is working hard at high outside temperatures, the needle may also go farther upwards. This is no cause for concern as long as the coolant temperature warning light does not start illuminating.
If the coolant gauge needle approaches the right end of the scale and the engine appears to be overheating, turn off the air conditioner.
C - Warning light
If the light illuminates when driving, first check the coolant temperature gauge.
If the needle is in the normal range, add coolant at the next opportunity.
If the needle is in the warning range, the coolant temperature is too high.
Move the vehicle a safe distance off the road, stop the engine and depress the emergency flasher switch.
Notes
- Do not install accessories (fog lights or insect screens, for example) underneath or on top of the front bumper. They may restrict engine cooling and cause engine damage.
- The front spoiler also functions as a duct for cooling air. If the spoiler is damaged or torn off (driving over a curb), this could cause engine overheating. Contact the nearest authorized VOLKSWAGEN dealer for assistance.

text_image
190 260°F UNLOADED FUEL 1/2 1/1 ONLY D B2J-133K3 - Fuel gauge

When the ignition is on, the needle on the fuel gauge will display the fuel level in the tank.
The fuel tank capacity is approximately 14.5 gallons (55 liters).
When the needle reaches the red area (arrow), the warning light D will illuminate, (see illustration).
When the warning light illuminates, there are approximately 1.9 U.S. gallons (7 liters) of fuel left in the tank. Time to refuel.
4 - Speedometer / odometer
Refer to "Break-In Period" before driving off Booklet 3.2.
The speedometer indicates the speed of the vehicle.
- On U.S. models, the outer row of numbers (large numbers) indicates the vehicle speed in miles per hour (mph).
- The inner row (small numbers) indicates the vehicle speed in kilometres per hour (km/h).
Do not exceed maximum engine speed under any circumstances.
Upshift into the next higher gear before reaching the red area at the end of the tachometer scale.
Excessive engine speeds are automatically reduced.

text_image
1/min x 100 10:30 1 2 B2J-134K5 - Digital clock
To set the time on the digital clock, use the knob next to the tachometer.
● To set the hours, turn the knob counterclockwise and hold (arrow 1). If you turn the knob quickly and then release, you can set the individual hour.
● To set the minutes, turn the knob clockwise and hold (arrow 2). If you turn the knob quickly and then release, you can set the individual minute.
You can set the clock time exactly to the second using the minute button:
● Turn the knob to the right until it is just one minute before the actual correct time.
- Then turn the knob to the next full minute when, for example, you hear the time signal in the radio.

text_image
Ø 36.7 MPE -3.0°F PRN 321 B2J-135K6 - Multi-Function Indicator\*
The MFA (Multi-Funktions-Anzeige) or Multi-Function Indicator display shows the following useful information:
● Outside temperature
● Momentary fuel consumption
● Average fuel consumption
- Distance driven
● Average driving speed
- Time driven
● Miles or kilometres to empty
- Icy road warning
With the exception of time, the symbol for the function shown appears at the upper edge of the display. The illustration shows the average fuel consumption.
Note
If a warning/indicator light illuminates, additional text will appear in the Multi-Function Indicator* display in order to provide you with further information. The previous MFA information will return after approximately 10 seconds.

text_image
RESET A B B2J-185KBy repeatedly depressing button B in the windshield wiper lever with the ignition switched on, the additional information is displayed.
- Press the upper part of button B to display each individual function in sequence.
- Press the bottom part of button B to display each individual function in reverse sequence.
The memories
The system is equipped with two automatic memories:
The single trip memory\* ("1" shown on the upper right side of the display
- see left illustration) accumulates and stores the following data from the time you switch on the ignition until you switch it off: driving time, distance driven and the amount of fuel used.
When the ignition is turned on again, accumulation and computations continue. However, if the ignition remains off for two hours or longer, stored information is automatically deleted.
The total trip memory ("2" shown on the upper right side of the display) stores accumulated data covering any number of successive trips, regardless of how long the ignition is off between trips. Storage capacity of the total trip memory is:
Driving time - 100 hours
Distance driven - 9,999 miles (9 999 km)
Fuel consumed - 999 gallons (999 liters).
To recall information, press switch A, located on the windshield wiper lever, to select the desired memory:
1 - Single trip memory
2 - Total trip memory
The following data can be recalled for display:
● Average fuel consumption
- Distance driven
● Average driving speed.
- Driving time
If one of the stored values is exceeded, then the total trip memory will be erased and recalculated. Unlike the single trip memory, the total trip memory won't be erased if you have stopped for more than two hours.
Erasing the memories
With the ignition on, you can separately erase each memory. Press and hold button A for longer than 2 seconds in order to erase the selected function.
If you disconnect the battery, all stored information will be erased.
The displays
When the ignition is on, 1 or 2 will appear in the display, according to which memory is turned on.
Press the rocker switch B on the windshield wiper lever to return to the previously displayed function.
All displayed temperatures are momentary. They are not stored in the memory.
After you switch off the ignition, the last temperature displayed will remain in the memory for up to 45 minutes. If you switch on the ignition after this period, or if you drive the vehicle faster than about 20 mph or 30 km/h within the 45 minute period, the new actual outside temperature will be displayed.
Outside temperature
°F (C)

The displayed temperature will range between -40^ and +136^ ( -40^ and +58^ ).
When the vehicle is not moving, or when you are driving at very low speeds, the displayed temperature may be slightly higher than the outside temperature. This is caused by heat radiated from the engine.
If the outside temperatures are between +21°F and +39°F (-7°C and +4°C), an ice crystal symbol also appears in the display (icy road warning).
This symbol first flashes for about 5 seconds, then stays on until the outside temperature climbs above +39°F (+4°C) or drops below +21°F (-7°C).
Note
If an icy road warning occurs, the multi-function display will switch from the currently displayed function to the outside temperature display (icy road warning).

WARNING
If you are going to use the outside temperature display to determine frost conditions, remember that roads can even ice over at temperatures above 39^ F (+4°C).
MPG (l/100 km) - Momentary fuel consumption
The fuel consumption at the moment will be indicated in mpg (l/100 km).
The consumption is calculated about every 30 yards (metres). If you stop your vehicle, the last value calculated will stay in the display. You can use this information to adapt your driving to match the fuel consumption you want.
If you display fuel consumption just after starting the engine, then the average consumption for the first 30 - 40 yards (meters) will be shown.
MPG (l/100 km) - Average fuel consumption
This mode displays average fuel consumption, not momentary fuel consumption. When the ignition has been switched on or the existing memory erased, the average fuel consumption is indicated, after about 10 of seconds of driving and a distance of 30 yards (meters). Up to this point, a dash appears instead of a number. During the trip, the indicated value is updated every 5 seconds.
In position 1 ("1" shown in the display) the average consumption for the current trip is indicated - see page 11 "Single trip memory".
In position 2 ("2" shown in the display) the average consumption indicated is for all trips since the last time the memory was erased - see also "Total trip memory" on page 11.
Note
The amount of fuel consumed will not be displayed.
mi (km) - Distance covered
In position 1 ("1" shown in the display), the distance covered from the time you switched on the ignition until you switch it off is displayed - see "single trip."
In position 2 ("2" shown in the display), the distance covered for all single trips is displayed - see "single trip."
Maximum distance covered: 9,999 miles (9,999 km). If you exceed this, the display will go back to zero.
MPH (km / h) - Average speed
The information under "average fuel consumption" also applies to "average speed."
min - Driving time
Maximum driving time display: 99 hours and 59 minutes. When you exceed this, the display will go back to zero.
mi (km) -
Miles or kilometres to empty
The displayed information (indicated in stages of 5 miles or 10 kilometers) is based on the average fuel consumption computed during the last 20 miles or kilometers.
This feature informs the driver how many miles or kilometers of normal and smooth driving can be covered with whatever amount of fuel remains in the tank. Fuel economy is the result of good driving habits.
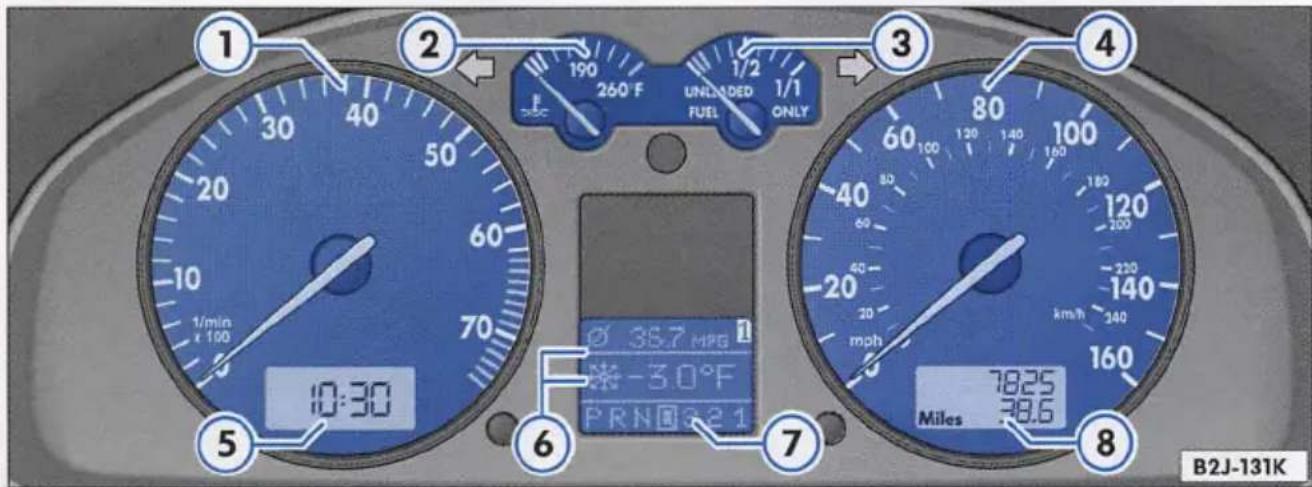
text_image
1 2 3 4 1/2 UNLIDED FUEL ONLY 1/min x 100 260°F 190 1/1 1/2 50 70 10:30 Ø 35.7 MPG -30°F PRNO 321 6 7825 Miles 38.6 B2J-131K7 - Selector lever position display\*
For Automatic Transmission
When the ignition is switched on, the engaged selector lever position will appear bright against a dark background while the other positions appear just the opposite.
If all the positions appear bright against a dark background at the same time, there may be a malfunction in the electronic system. See page 85 for more information on the display.
8 - Odometer / Trip odometer
The odometer indicates distances.
USA models: .... miles Canada models: .... Kilometres
The upper odometer indicates the total distance driven. The lower odometer indicates the distance driven since the last time the trip odometer was reset. You can use the trip odometer to record the distance covered on a single trip.
On the trip odometer, the last digit in indicates either 110 of a mile or 100 metres.
You can set the trip odometer back to zero by pressing the reset knob next to the speedometer.
To record a distance, reset the trip odometer to zero by pressing and holding the button for longer than 1 second.
Warning / Indicator lights

text_image
1 2 3 4 5 6 7 8 9 10 11 12 13 CRIUSE EPC 190 260°F UNDEASED FUEL ONLY ABS BRATE MFA 14:3 15 16 17 18 19 20 21 B9B-026BYour vehicle is equipped with several important warning and indicator lights to help you monitor the continued reliable operation of your vehicle. Please be sure to get to know these lights so if one should come on you know what to do.

WARNING
● Failure to heed warning lights and other important vehicle information may result in serious personal injury or vehicle damage.
- Whenever stalled or stopped for repair, move the vehicle a safe distance off the road, stop the engine, and turn on the emergency flasher - see page 43.
- The engine compartment of any motor vehicle is a potentially hazardous area. Before you check anything in the engine compartment, stop the engine and let it cool down. Always exercise extreme caution when working under the engine hood. Always heed all WARNINGS on page 94, chapter "Engine compartment" in this booklet and chapter "CHECKING AND FILLING" Booklet 3.2.
Pos. Page
1 - Airbag-System 16
2 - Cruise control* 16
3 - Anti Shift Lock (ASL) 16
4 - Glow plugs (Diesel models only) .. 16
5 - Electronic power control ..... 16
6 - Turn signals 17
7 - High beam 17
8 - ASR*/ESP* 17
9 - Anti-lock brake system (ABS) ..... 17
10 - Electronic immobilizer ..... 18
11 - Brakes 18
12 - Generator 19
13 - Safety belts 19
14 - Engine coolant temperature / level 20
15 - Engine oil pressure 22
16 - Front brake pads worn 22
17 - Door / rear lid open 22
18 - Windshield washer 22
19 - Fuel filler cap 23
20 - Fuel level too low 23
21 - Malfunction indicator lamp ..... 23
Note
If a Warning / Indicator light comes on, an additional text will be shown in the Multi-Function Indicator* display to provide you with further information. The previous MFA-Information will return after approximately 10 seconds.

text_image
1 2 3 4 5 6 7 8 9 10 11 12 13 CRIUSE EPC 1/2 1/1 260°F UNLOCKED PUE ONLY ABS BRAZ 14:3 15 16 17 18 19 20 21 MFA 14:3 miles B9B-026B1 - Airbag System

The indicator light must illuminate when the ignition is switched on and turn off after a few seconds. If the light doesn't turn off, or if it illuminates while you're driving, there is a fault in the airbag system.
If the indicator light does not illuminate when the ignition is switched on, this also indicates a system malfunction. If any of these conditions occur, have the airbag system inspected immediately by your authorized VOLKSWAGEN dealer. See chapter "AIRBAG-SYSTEM" Booklet 2.1. for more details.
2 - Cruise control\*
CRUISE
The indicator light comes on when the cruise control system is switched on and goes out when the system is switched off.
3 - Automatic Shift Lock\* (ASL)

Your VOLKSWAGEN is equipped with an automatic Shift Lock (ASL). The ASL is an electromechanical device that locks the selector lever in the P (Park) and N (Neutral) positions when the ignition is on.
You must press the brake pedal before the selector lever can be moved out of either position. See page 85 for details.
4 - Glow Plugs\*

(diesel engines only)
When the engine is cold the warning lamp comes on when key is turned to Drive position (ignition on).
If the warning lamp does not come on, there is a defect in the glow plug system - contact an authorized VOLKSWAGEN dealer for assistance.
When the lamp goes out, start the engine immediately - see page 101.
When the engine is warm the glow plug lamp does not come on - the engine can be started right away.
Any faults in the engine management system of the Diesel engines which occur while driving will be indicated by a flashing warning lamp - the engine must be checked by a Volkswagen dealer as soon as possible.
5 - Electronic power control\*
EPC
(gasoline engines only)
If a malfunction in the engine electronics should occur, the EPC indicator light will blink. The engine control automatically switches to a back-up program. You will notice, however, a reduction in engine power. Please contact an authorized VOLKS-WAGEN dealer as soon as possible.
6 - Turn signals

See "Turn signals / High beam lever" on page NO TAG for details.
7 - High beam

The indicator lamp lights up when the high beams are switched on or when the head-light flasher is used.
See "Turn signals / Headlight dimmer switch lever" on page NO TAG for details.
8 - ASR\*/ESP\*

The warning light illuminates when the ignition is switched on and goes out again after about 2 seconds.
The light will start flashing when the vehicle is moving if the Anti-Slip Regulation (ASR) or the Electronic Stabilization Program (ESP) is activated.
The warning light will light up continuously if the system is switched off manually, or if a malfunction should occur.
Since the ASR/ESP operates together with the Anti-lock Brake System (ABS), the ASR/ESP warning light will also come on if a fault should occur in the ABS.
See chapter "OPTIMAL TECHNOLOGY", Booklet 3.2. for more information.
9 - Anti-lock brake system ^1)
ABS
This warning light monitors the ABS and EDL (Electronic Differential Lock)* systems.
The light will come on for a few seconds when the ignition is switched on. The light will go out after an automatic check sequence.
1) On Canada vehicles, this warning light will indicate a malfunction in the ABS system. (ABS)

WARNING
If the ABS warning light does not go out, or if it comes on while driving, the ABS system is not working properly. The vehicle can then be stopped only with the standard brakes (without ABS). You won't have the protection ABS provides. Contact your VOLKSWAGEN dealer as soon as possible.
For additional information on the ABS system, see chapter "OPTIMAL TECHNOLOGY" → Booklet 3.2.
If an ABS problem exists:
● The ABS warning light illuminates. The vehicle can still be braked, however, the ABS will not work. Go to your authorized VOLKSWAGEN dealer as soon as possible.
● The ABS warning light and the brake warning light illuminate together. The ABS will not work and you will notice a change in braking characteristics and performance.
Electronic differential lock (EDL)\*
The EDL system works together with the ABS. The ABS warning light will illuminate if there is a malfunction in the EDL system. See your authorized VOLKSWAGEN dealer as soon as possible.

Always heed all WARNINGS on the next page.
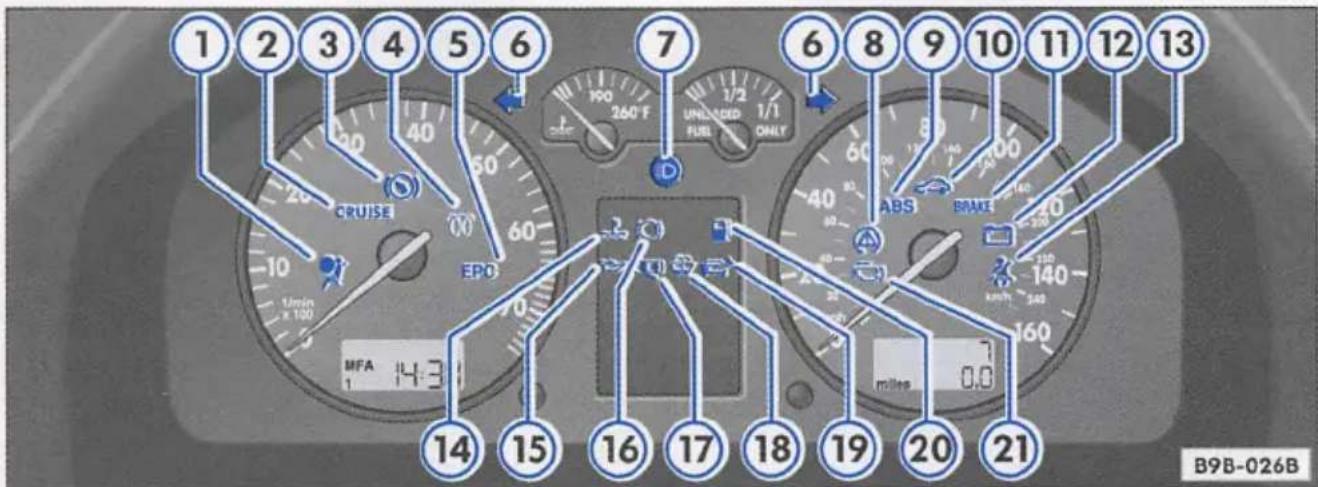
text_image
1 2 3 4 5 6 7 UNLACED FUEL ONLY 1/2 260°F 1/1 1/min x 100 CRUISE EPO D ABS BRAKE 14 15 16 17 18 19 20 21 miles B9B-026B10 - Electronic immobilizer

When the ignition is switched on an automatic key data test takes place. This data test is confirmed when the warning light illuminates and then turns off after about 2 seconds. If a non-authorized key is used the warning light will blink continuously. The engine will not start. See also page 100.
11 - Brake ^1)
BRAKE
The indicator light illuminates when the ignition is switched on and turns off after a few seconds when the parking brake is fully released. This is your assurance that the brake warning light is functioning properly.

WARNING
- Please be very careful and be sure to remember that after several brake applications, you will need greater pressure on the brake pedal to stop your vehicle. Consequently, you must allow for increased braking distances. Trying to brake as quickly as usual could lead to an accident.
1) On Canada vehicles, this warning light will indicate a malfunction in the ABS system. (!)
WARNING (continued)
- If both warning lights (ABS and BRAKE warning light) come on at the same time, the rear wheels could lock up first under hard braking. Rear wheel brake lock-up can cause loss of vehicle control and an accident. Have your vehicle repaired immediately by your authorized VOLKSWAGEN dealer or a qualified workshop. Drive slowly and avoid sudden, hard brake application.
- If the brake warning light does not go out after a few seconds and the parking brake released, or lights up while you are driving, the fluid level in the brake fluid reservoir is too low. If you believe that it is safe to do so, proceed immediately at low speed to the nearest authorized VOLKSWAGEN dealer or qualified workshop and have the brake system inspected.
Note
The daytime running lights work only when the parking brake lever is fully released.
12 - Generator

This light illuminates when the ignition is turned on and turns off after the engine is started. If the light does not go out after starting and revving up the engine momentarily or illuminates while driving, there may be a malfunction in the electrical system, or the belts driving the alternator may be loose or broken.

If the warning light illuminates while driving, stop the vehicle turn off the engine. Inspect the s.

Always heed all WARNINGS on page 103, chapter
"Engine compartment" in this booklet and chapter "CHECKING AND FILLING" Booklet 3.2.
If the belt for the generator is broken or loose, you can still drive to the nearest authorized VOLKSWAGEN dealer, since the engine coolant pump is driven by a separate belt. However, since the battery will start to discharge, you should switch off all unnecessary electrical equipment.
13 - Safety belts

Your vehicle has a warning system for the driver to remind you about the importance of buckling-up.
After the ignition is switched on, the warning tone will come on for about 6 seconds along with a warning light in the instrument cluster if the driver has not fastened his or her safety belt. As soon as the driver has fastened his or her belt, the warning tone will stop and the warning light will go out. If the driver has not buckled-up within about 24 seconds after the warning tone has stopped, the warning tone will sound again for about 6 seconds. The warning tone will sound repeatedly for about 6 seconds at 24 second intervals until the driver has buckled-up. The safety belt warning system is active for about 5 minutes and during this time the warning light in the instrument cluster will stay on.
Fasten your safety belt now and make sure that your passengers also properly put on their safety belts.
Please be sure to read the chapter "Safety belts" Booklet 2.1.
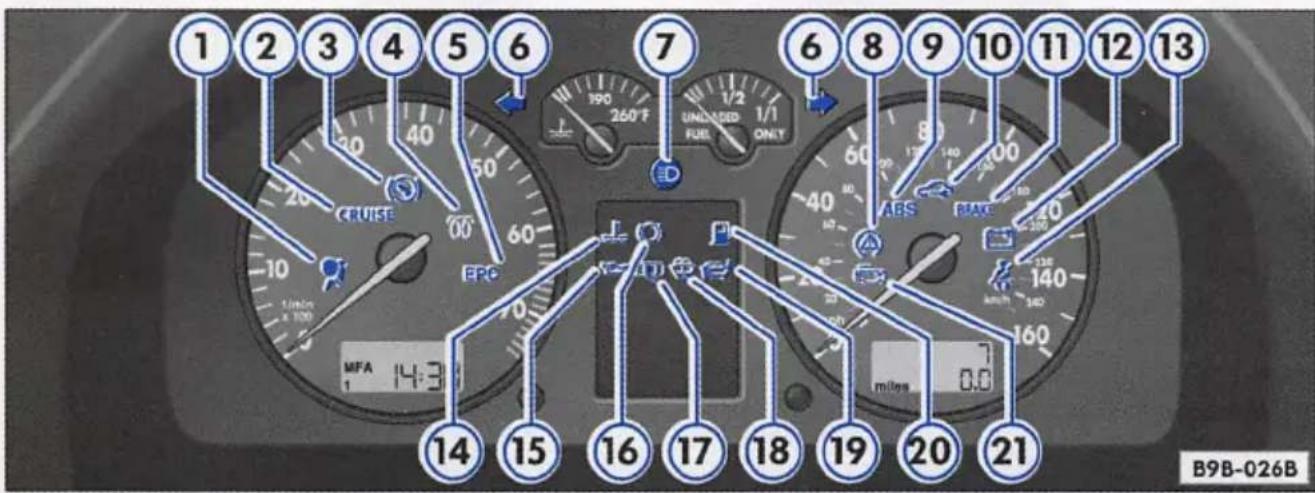
text_image
1 2 3 4 5 6 7 8 9 10 11 12 13 CRIUSE EPC 1/2 1/1 UNLESSID FUEL ONLY ABS BACK 14 15 16 17 18 19 20 21 MFA 14:3 miles 0.0 B9B-026B14 - Engine coolant temperature / level

This light illuminates for a few seconds just as a functional check when you switch on the ignition.
If the light does not turn off afterwards, or starts to blink while you are driving, either the coolant temperature is too high, or the coolant level is too low.
Move the vehicle a safe distance off the road, stop the engine, depress the emergency flasher switch, turn off the engine and let it cool down.
Check coolant level. Top up as necessary (see "Cooling system," chapter "CHECKING AND FILLING" Booklet 3.2.).

WARNING
- The engine compartment of any motor vehicle is a potentially hazardous area. Before you check anything in the engine compartment, stop the engine and let it cool down. Always exercise extreme caution when working under the engine hood. Heed all of the WARNINGS on page 94, chapter "Engine compartment" in this booklet and chapter "CHECKING AND FILLING" Booklet 3.2.
- To reduce the risk of being burned, never open the hood if you see or hear steam or coolant escaping from the engine compartment. Wait until no steam or coolant can be seen or heard before carefully opening the hood.
● Never touch the radiator fan. It is temperature controlled and can switch on suddenly - even when the ignition is off and the key is removed.

WARNING continued
- Reduce the risk of scalding from hot coolant by following these steps:
- If the coolant reservoir cap must be removed, wait until the engine has cooled down.
- Protect face, hands, and arms from escaping fluid and steam by covering the cap with a large, thick rag.
- Turn the cap slowly and very carefully in a counter-clockwise direction while applying light, downward pressure on the top of the cap.
- To help avoid being burned, do not spill antifreeze or coolant on the exhaust system or hot engine parts. Under some conditions, the ethylene glycol in engine coolant can catch fire.

Always heed all WARNINGS on page 94, chapter "Engine compartment" in this booklet and chapter "CHECKING AND FILLING" Booklet 3.2.

If the fuse is not blown, the belt driving the water pump is not taken and the warning light still is not turn off, do not continue being because serious engine date can occur. See your VOLKS-GEN dealer.
- If the coolant level and the V-belt are normal, the fuse is not blown and the warning light has gone out, the malfunction may be in the radiator fan. You can continue driving to the nearest authorized VOLKSWAGEN dealer. The wind from the moving vehicle will be enough to keep the engine cool. However, avoid idling for a long time or driving very slowly.
Refer to "Coolant temperature gauge" on page 9 for details.
Notes
- Do not install accessories (fog lights or insect screens, for example) underneath or on top of the front bumper. They may restrict engine cooling and cause engine damage.
● The front spoiler also serves as a duct for cooling air. If the spoiler should be damaged or even torn off (for example when driving over a curb), this could cause engine overheating. Contact your authorized VOLKSWAGEN dealer.
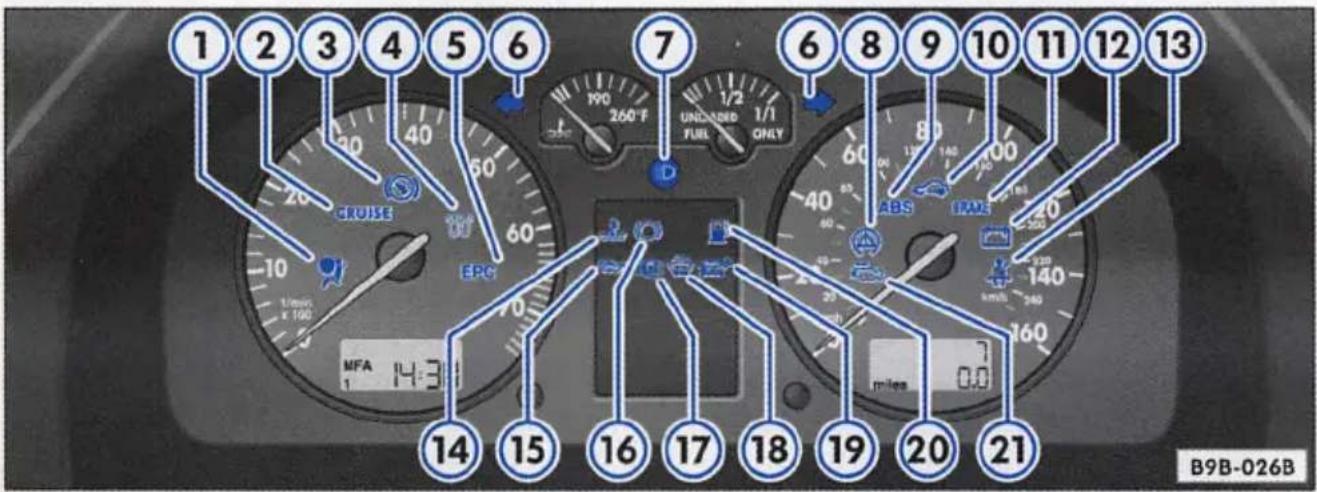
text_image
1 2 3 4 5 6 7 8 9 10 11 12 13 CROUSE EPC 1/1/2 FUEL ONLY ABS ITMS 14 15 16 17 18 19 20 21 MFA 14.3 B9B-026B15 - Engine oil pressure

When the ignition is turned on, the oil pressure warning light comes on for a few seconds for a bulb check.
If the warning light does not go out or flashes while driving (above 1500 engine RPM) a buzzer will sound. It indicates that the oil pressure is too low. Stop the engine immediately, check the engine oil level and add oil if necessary.
If the engine oil level is normal but the light continues to flash, do not continue to operate the vehicle. Engine damage may occur.
Turn off the engine and contact the nearest authorized VOLKSWAGEN dealer for assistance.
The oil pressure light is not an indicator for low engine oil level. To check the oil level, always use the dipstick - see "Engine oil", chapter "CHECKING AND FILLING" Booklet 3.2.
Make it a habit to have the engine oil level checked with every fuel filling.

Always heed all WARNINGS on page 94, chapter "Engine compartment" in this booklet and chapter "CHECKING AND FILLING" Booklet 3.2.
16 - Front brake pads worn\*

Have the front brake pads inspected by a VOLKSWAGEN workshop. We recommend that you have the rear brake pads or linings inspected at the same time.
17 - Door / rear lid open

The warning light comes on when the ignition is on and a door or the rear lid is open. Additionally a warning tone will sound and a warning text is shown in the display of the instrument cluster. This is to remind you to close the door or the rear lid.
The light should go out when the door or the rear lid is closed properly.
18 - Windshield washer fluid level too low\*

The warning light will come on when the windshield washer fluid level gets too low. Additionally a warning tone will sound and a text is shown in the display of the instrument cluster. This is to remind you to fill up the fluid container.
Refill the windshield washer fluid container - see "Windshield/headlight washer container," chapter "CHECKING AND FILLING" Booklet 3.2.
19 - Fuel filler cap not closed properly

A warning light in the instrument cluster will come on if the fuel filler cap is not properly closed.
If the warning light comes on, you should turn off the engine and close the fuel filler cap properly.
Once the cap is properly closed all the way, the warning light will go out when the ignition is turned on again and the check cycle is complete. The completion of the check cycle depends on how you drive.
If the warning light has been on for at least 5 minutes it will go out only when the ignition is turned off and on again.
Note
Always make sure the fuel cap is crewed on all the way. This prevents fuel from spilling out or evaporating.

Always read and heed all WARNINGS in Booklets 3.1 and 3.2 when refuelling.
20 - Fuel level too low

The warning light will come on when the fuel level gets too low. Time to refuel. Additionally a warning tone will sound and a text is shown in the display of the instrument cluster. This is to remind you to fill up the tank.
See "Fuel tank," chapter "FILLING YOUR TANK", Booklet 3.2.
21 - Malfunction Indicator Lamp (MIL)

The Malfunction Indicator Lamp (MIL) is part of the On Board Diagnostic system (OBD). The MIL is a required indicator to alert the driver of an emission related malfunction.
The light comes on when the ignition is switched on and will go out after the engine is started and the idle has stabilized. This is to assure you that the MIL is working properly.
If the lamp does not go out after the engine is started, or if it comes on while you're driving, there is a malfunction in the engine system.
If the lamp starts blinking, the catalytic converter could be damaged.
Continue driving with reduced power and have the cause corrected right away by an authorized VOLKSWAGEN dealer or a qualified workshop.
Data Link Connector (DLC) for On Board Diagnostic System (OBD)
The On Board Diagnostics in your vehicle monitors the various components of your emission control system. Each controlled component in your engine system has been coded. In case of a malfunction the respective component in question will be identified and the fault stored in the form of a code in the control module's memory.
The stored data can only be displayed with special testing equipment (generic scan tool for OBD) to assure an accurate diagnosis.
To connect the special testing equipment, push the plug into the Data Link Connector (DLC) located to the right of the release lever for engine hood.
Your authorized VOLKSWAGEN dealer or a qualified workshop can interpret the code and make the necessary correction.
Multi-function steering wheel\*
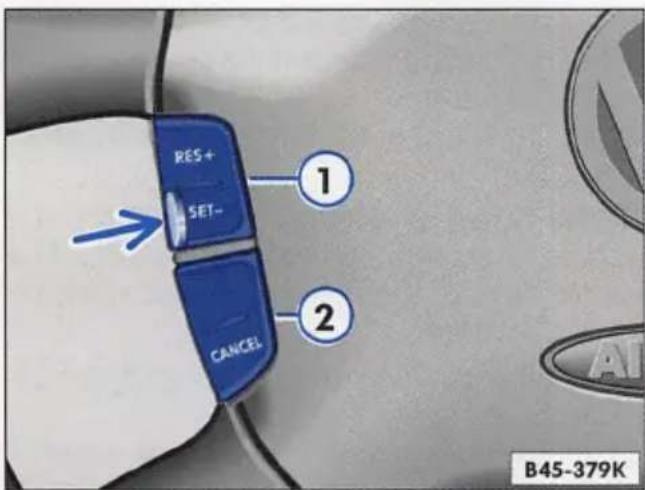
text_image
RES+ SET- ① ② CANCEL B45-379KCruise control system\*
Rocker switch 1
Lower surface SET - :
Press once - the current speed will be stored.
Press twice - delay.
The speed will be reduced as long as the surface is held down. The speed at the moment the surface is released will be stored.
Upper surface RES + :
Press once - resume stored speed.
Press twice - accelerate.
The speed will increase as long as the surface is held down. The speed at the moment the surface is released will be stored.
Rocker switch 2
Lower surface CANCEL :
Press once - the cruise control system* is switched off temporarily. The speed to be maintained is stored. Press RES + once in order to resume the stored speed.
Further notes on page 104.
Note
To switch On or Off the cruise control system completely, please refer to page 104.
However vehicles with the multifunction steering wheel do not come with the button B on the turn signal lever.

text_image
3 VOL + VOL - 4 B45-380KRadio system\*
Rocker switch 3
Press the upper half of the switch VOL + - to increase the volume
Press the lower half of the switch VOL - to decrease the volume
Rocker switch 4
△ Press upper surface:
- Station seek up (Radio)
- TIM reports up (Navigation system* / Radio)
- Fast forward (Cassette operation*)
- Track search forwards (CD operation*)
Press lower surface:
- Station seek down (Radio)
- TIM reports down (Navigation system* / Radio)
- Fast rewind (Cassette operation*)
- Track search backwards (CD operation*)
Lighting
There is a button on the left hand side (see arrow) to switch the button lighting of the multi-function steering wheel* on and off.
Keys
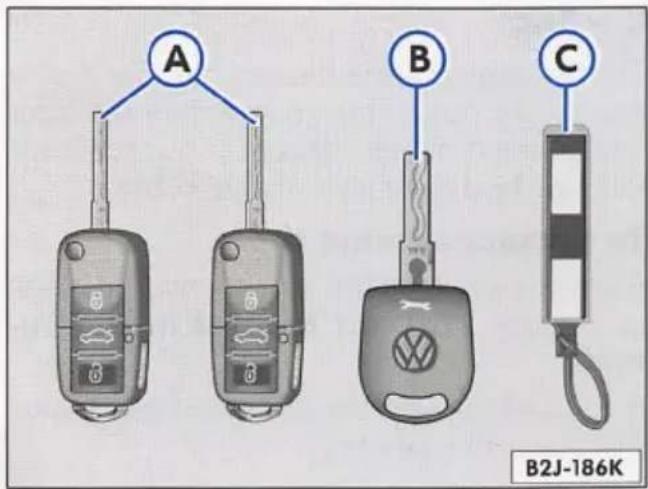
text_image
A B C B2J-186KThree keys and a key tag are provided with your VOLKSWAGEN.
A - Two folding master keys with remote control
B - One valet key
C - One tag

WARNING
Do not leave your vehicle unattended with the key in the ignition lock. Entry by unauthorized persons could endanger you or harm the vehicle. Always lock all doors and take the key.
The Master keys and the valet key can be inserted into locks either way.
Note
If you open the driver's door with the key left in the ignition lock, a chime will sound. This is your reminder to remove the key and lock the door.
A - Master key with Remote control
This key fits all locks on the vehicle. This key allows you to open/close your vehicle and to set the anti-theft alarm system. To fold the key out, press the release button – see page 28.
To fold the key back in, press the release button again
Push the red button, to activate the panic function. The horn sounds and the turn signals will flash for approximately 30 seconds.
For more information see page 27.

WARNING
Do not leave children unattended in the vehicle especially with access to the remote control. The remote control could be used to lock the doors delaying access to the children in an emergency.
To replace batteries of the remote control:
Your authorized VOLKSWAGEN dealer can change the batteries for you.

text_image
A B C B2J-186KB - Valet key
This key is for the driver's door and the steering / ignition lock only.
The lockable glove compartment (located underneath the passenger airbag) and the rear lid cannot be opened with this key.
If you have to leave a key with somebody else, it may be advisable to give them this key only.

WARNING
- Do not leave children unattended in the vehicle, especially with access to vehicle keys. Unsupervised use of the keys can result in starting of the engine or use of vehicle systems such as the power windows*, etc. which could result in serious injury.
- Do not remove key from steering lock while you are driving or as the vehicle is rolling to a stop. The steering column will lock up and you will not be able to steer the vehicle.
C - Tag
The key tag contains the key number that is needed to obtain replacement keys. Your Volkswagen dealer can order replacement keys only if they have this number.
To protect against theft:
Record and keep the key number in a secure place. Do not keep it in the vehicle.
If you sell the vehicle, you should also give the buyer this key tag.
Key replacement
For security reasons, replacement keys are only available from Volkswagen dealers.
If you need a duplicate key, provide the key number to your VOLKSWAGEN dealer.
Remote control
General description
The remote control allows you to do the following without having to use your key:
- Lock or unlock your vehicle via the power locking system (at the same time, activating or deactivating the anti-theft alarm system)
- Use the selective unlock feature (open the driver's door only)
- Switch on the interior lights
- Unlock the rear lid
- Activating the "panic function."
The remote transmitter and the batteries are located in the key. The receiver for the signal is inside the passenger compartment. Your authorized VOLKSWAGEN dealer can change the batteries for you.
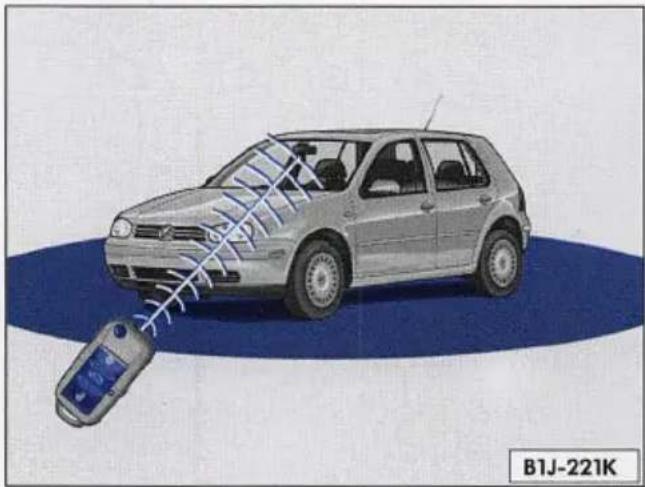
natural_image
Illustration of a car with a handheld sensor emitting sound waves, no text or symbols presentThe operating range (blue) for the remote control is shown in the illustration. Maximum range of effectiveness depends on several things. If the batteries are weak, the range will decrease.
Note
In exceptional cases, the remote control could be activated unintentionally, even if you are out of the operating range. Please use the remote control only if you attempt to use one of the functions.
WARNING
Do not leave children unattended in the vehicle especially with access to the remote control. The remote control could be used to lock the doors delaying access to the children in an emergency.

text_image
A B C E PANIC D B45-603KHow the remote control works
Button A unlocks the vehicle. After unlocking the vehicle, you have 30 seconds to open a door. If you wait longer than 30 seconds, the vehicle will automatically lock itself once again. This prevents you from unintentionally unlocking the vehicle while you are standing within the range of effectiveness of the remote control.
The anti-theft alarm system is turned off for these 30 seconds. If the vehicle locks itself again, the alarm system will be reactivated.
Unfolding / folding the master key
If you want to lock or unlock your vehicle using your key, you have to unfold your key first by pushing button E. To fold the key back into place, press the button again.
Unlocking and locking
Unlocking
Stand near the vehicle (inside the effective range), point the key toward the vehicle and press button A one time:
Just the driver's door will be unlocked and the anti-theft alarm system* is switched off.
Press button A two times and you unlock all the doors.
The anti-theft alarm system* is switched off.
Locking
To lock, press button C.
Switching on / off the anti-theft alarm system
The alarm system is switched on automatically whenever you lock the vehicle and all doors are closed. This will be confirmed with one beep and one flash of all turn signals as well as the indicator lights of the turn signals in the instrument cluster.
The system switches off when you unlock the vehicle. This will be confirmed with two flashes of all turn signals as well as the indicator lights of the turn signals in the instrument cluster.
Remote rear lid release
To unlock, stand near the vehicle (inside the effective range), point the key toward the vehicle, press and hold button B for about three seconds.
This will be confirmed with two flashes of all turn signals as well as the indicator lights of the turn signals in the instrument cluster.
After unlocking the rear lid, you have about two minutes to open the rear lid.
PANIC switch (button D)
By pushing the red button D you will engage the "panic function." The horn sounds and the turn signals will flash for approximately 30 seconds.
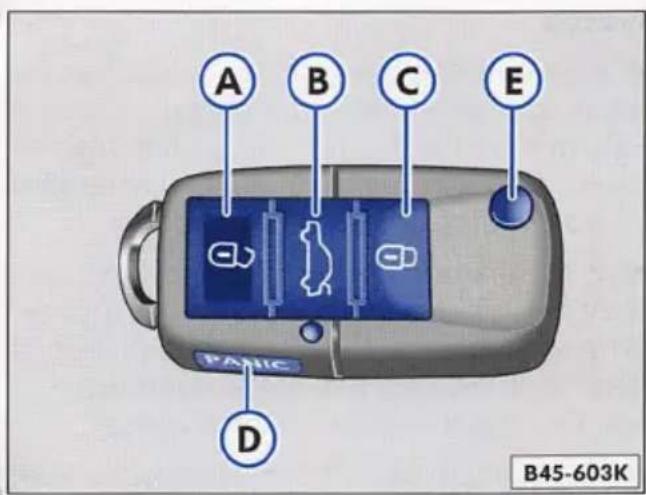
text_image
A B C E PANIC D B45-603KPress button D again to switch off the "panic function."
Remember – the panic function can be seen and heard by other motorists and / or persons near your vehicle. Do not use it unnecessarily.
Use the panic function only if you are in an emergency situation.
Resetting the remote control
If your vehicle will not unlock using the remote control, it could be that the code for the control unit and key needs to be reset. This can occur if you frequently use the remote control while standing outside of the effective range.
If this happens, then you need to reset (synchronize) the remote control.
Resetting the key
1 - Press button A or button C one time for one second. The vehicle remains locked. The control unit recognizes only one key code via the master key.
2 - Lock or unlock the vehicle with the master key.
The resetting procedure is now complete.
The key code is part of the master key. When you insert the master key, a new code is created between the control unit and the key.
Manually programming the remote control
If you need an additional remote control for your vehicle, then your authorized VOLKS-WAGEN dealer must program it for you.
It is possible to have a maximum of four remote controls for your vehicle.
The key must be programmed in order to fully use the remote control feature.
See your authorized VOLKSWAGEN dealer for more information.
Programming the remote control
1 - Insert the master key into the ignition lock and switch on the ignition (don't start the engine!)
2 - Lock the vehicle from the outside manually using the second master key or valet key.
3 - Press button A or button C on the remote control one time and then wait at least 2 seconds.
4 - Press either button once again one time.
5 - Switch off the ignition and remove the key from the ignition lock.
The manual programming procedure is complete. The remote control is functional again.
Notes
● You have only 30 seconds to perform steps 2 through 4.
● Each new key must also be programmed as described here.
Anti-theft alarm system
The anti-theft alarm system makes it difficult for someone to break into your vehicle. The system triggers an audible alarm and switches on the emergency flasher if it senses unauthorized interference with the vehicle.
You can turn on the system using either your key or the remote control.
When you lock the vehicle, you turn on the alarm system automatically. Simply turn the key to the lock position or use the remote control.
The alarm sounds when (on a locked vehicle)
- a door,
● the engine hood, or
● the rear lid is forced open,
● or when the ignition is switched on.
The horn will sound and the emergency flashers will blink for about 30 seconds.
Notes
- If you must leave your vehicle parked for a long period of time, the system warning light in the driver's door will go out after 28 days. This is meant to conserve battery power. The system is still operating.
- If the alarm has sounded one time, and then the vehicle is forced open again (for example, someone tries to forcibly open a door, and then tries to force open the rear lid), the signal will sound once again.
- You can turn on / off the alarm system using your remote control. For more details, see "Remote Control" on page 27.
Doors, Power locks
The power locking system simultaneously-locks or unlocks the doors
- To lock and unlock the vehicle from the outside, turn the key in the lock of the driver's door.
● To lock and unlock the vehicle from the inside, press the power locking switch in the front doors. See page 32. - You can also lock and unlock the vehicle using the remote control.
- The anti-theft alarm system switches on or off whenever you lock or unlock the vehicle with the key or remote control.
Unlocking with key
1 - Insert the key into the driver's door.
2 - Turn the key one time only:
Just the driver's door is unlocked (selective unlock feature).
The anti-theft alarm system is turned off and the interior lights will come on for about 20 seconds (see page 49).
3 - Turn the key two times:
All the vehicle doors are unlocked and the anti-theft alarm system* is turned off immediately.
If your power locking system should not work, you can still open your vehicle manually using the key. The locks themselves are still functional.
To open all windows (vehicles equipped with power windows):
1 - Insert your key into the lock in the driver's door.
2 - Turn clockwise and hold the key in the open position.
Locking with key
1 - Insert the ley into the lock in the driver's door.
2 - Turn the key clockwise once.
When you lock the vehicle:
- all doors are locked, (the locking knobs in all doors will lower),
- the anti-theft alarm system is immediately activated,
- the vehicle interior lights turn off, and
- the anti-theft alarm system* readiness light near the driver's door locking knob will start to blink.

WARNING
When you lock your vehicle from the outside, nobody - especially children - should remain inside the vehicle. Remember, when you lock the vehicle from the outside the windows cannot be opened from the inside (in vehicles with power windows) - see page 37.
If your vehicle is equipped with power windows and / or a power sunroof*, you can also close any open windows and / or the sunroof when you lock your vehicle. Insert the key into the driver's lock, turn it to the lock position and hold until the windows and sunroof are completely closed.
By depressing the locking knobs in the doors, you can also lock the vehicle, however the anti-theft alarm system will not be turned on.
If the driver's door is open, or not closed properly, you will not be able to lock the vehicle.
Notes
If you have locked your vehicle you can still unlock each door from the inside individually: Pull the front door handle once and the rear door handle twice to open the door.
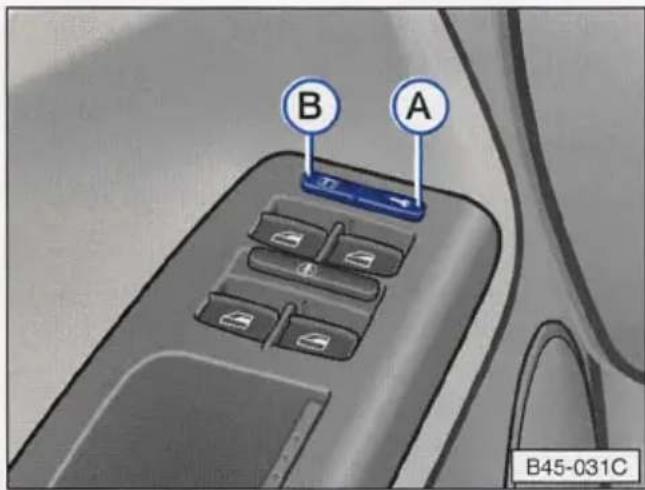
text_image
B A B45-031CPower locking switch
The entire vehicle can be locked / unlocked from the inside by using the power locking switch in the driver's or in the front passenger's door.
The switches also work when the ignition is off.
- To lock all doors simultaneously, press part A of power locking switch (the left illustration shows the switch in the driver's door on vehicles with power windows and the right illustration shows the passenger's door).
If the driver's door is open, it will not lock. This prevents you from locking yourself out of your vehicle.
If you use the power locking switch, the anti-theft alarm system is not activated.
● To unlock all doors at the same time, press part B of the switch.
Notes
If you have locked your vehicle you can still unlock each door from the inside individually: Pull the front door handle once and the rear door handle twice to open the door.

text_image
B A B45-252CWARNING
- If you use the power locking switch, remember that all the vehicle doors will lock.
Locking doors from the inside can help prevent inadvertent door opening during an accident and can also prevent unwanted entry from the outside. Locked doors can, however, delay assistance to vehicle occupants and rescue from the outside in an accident or other emergency.
- Do not leave children inside the vehicle unsupervised. If the locking knobs of all doors are depressed, the vehicle will be locked. In an emergency it would be impossible to open the doors from the outside without the key.
Automatic locking at vehicle speed higher than 10 mph (15 km/h)
After driving off, the vehicle automatically locks itself after you've reached of higher than 10 mph (15 km/h). You will hear the locking knobs go down when the vehicle locks. This sound is normal and no need to panic.
Of course you can always open the vehicle using the power locking switch or by pulling the front door handle once and the rear door handle twice.
Contact the nearest authorized VOLKS-WAGEN dealer for more information.
Child safety lock for rear doors
To prevent children in the back seat from accidentally opening the rear doors, a safety mechanism is provided on each rear door.
Using the child safety lock
Using a key from your vehicle, move the slot of the lock in the direction of the arrow – refer to A. The inside door opening handle is blocked and door can only be opened from the outside. Make sure the door locking knob is in the up position.
Deactivating the child safety lock
Again, using a key or other suitable object, move the slot of the lock in the opposite way—refer to B. You can now open the door from the inside. Remember that the locking knob must be in the up position.
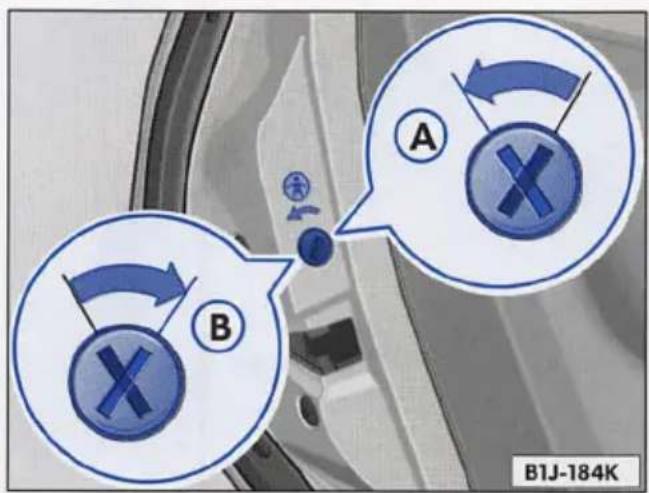
text_image
B A B B1J-184KDriver's side rear door
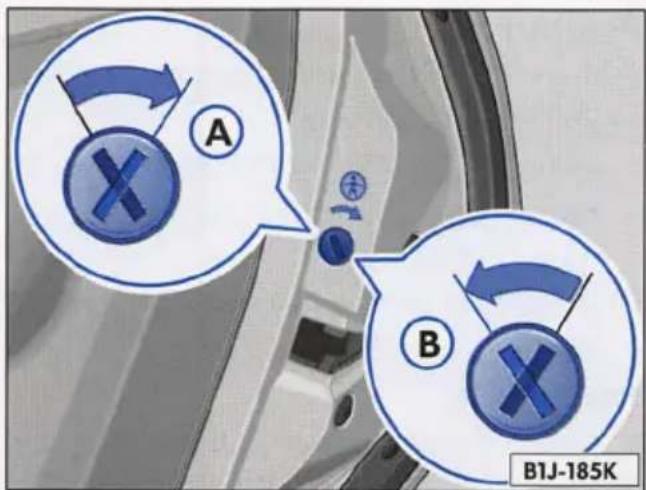
text_image
A B B1J-185KPassenger's side rear door
Rear lid

text_image
A I B B1J-220KLock positions:
Position A:
With the key slot in vertical position, the rear lid can be unlocked by:
- using the remote control (see page 27)
- the switch on the driver's door panel (see right illustration)
- using your vehicle key. Turn key to position B.
Position B:
If a fault should appear in the locking system, or if the vehicle's battery is discharged, it is still possible to open the rear lid manually.
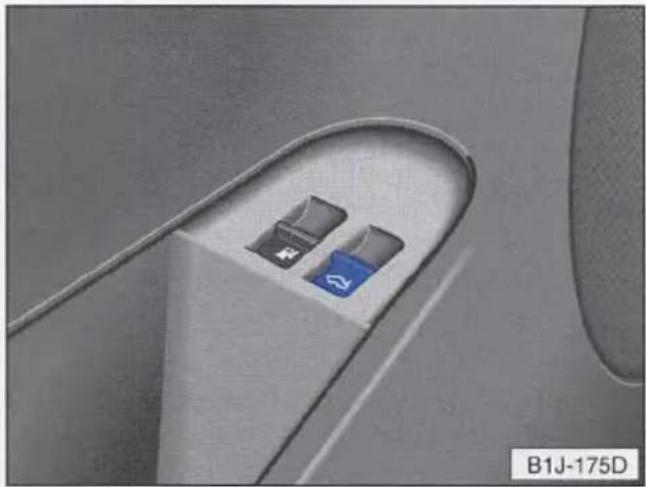
natural_image
Close-up of a car interior showing two blue USB flash drives on a curved tray (no text or symbols visible)To release the rear lid from the inside
Pull the switch (see right illustration) on the driver's door panel. The switch also works with the ignition switched off.
After unlocking the rear lid, you have about two minutes to open the rear lid.
Opening and closing the rear lid
To open, pull the release handle (see left illustration) of the rear lid and lift the it open.
A warning light (see also page 22) in the instrument cluster comes on when the ignition is on and the rear lid is open. Additionally a warning tone will sound and a warning text is displayed on the instrument cluster. This is a reminder to close the rear lid. The light should go out when the rear lid is closed properly.
To close, swing the lid down until it closes.
There is an opening for your hand inside the trim panel which makes it easier to grab the lid and pull it down.

Always heed all WARNINGS on next page.

WARNING
● Never push on the glass to close the rear lid. The glass pane could shatter and cause serious injury to you or to anyone in close proximity.
● After closing the rear lid, always pull up on it to make sure that it is properly closed. Otherwise it could open suddenly when the vehicle is moving, even though the key has been turned to the locked position.
● To help prevent poisonous exhaust gas from being drawn into the vehicle, always keep the rear lid closed while driving. Never transport objects larger than those fitting completely into the luggage area, because the rear lid cannot be fully closed.
● Never leave your vehicle unattended espacially with the rear lid left open. A child could crawl into the vehicle through the luggage compartment and pull the lid shut becoming trapped and unable to get out. To reduce the risk of personal injury, never let children play in or around your vehicle. Always keep the rear lid, as well the vehicle doors, closed when not in use.
For further information see "Luggage compartment" on page 63.
Power windows\*
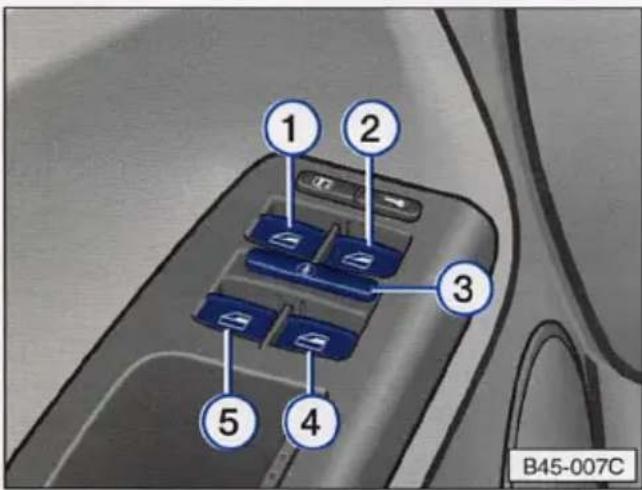
text_image
1 2 3 4 5 B45-007CThe switches are located in the driver's door. Also, the front passenger's door and each rear door has its own power window switch
Following switches are located in the driver's door (see illustration):
1 - Driver's door
2 - Front passenger's door
3 - Safety switch
4 - Right rear door
5 - Left rear door.
The switches 1 and 2 in the armrest on the driver's door are "dual function" switches.
If the respective switch is pushed or pulled to the first detent, the front window will open or close only as long as you push / pull the switch.
If the respective switch is pushed up or down all the way briefly, the window will open or close automatically (one-touch up feature, one-touch down feature).
All windows are equipped with pinch protection.
This means that if something should block the window while it is closing, it will stop automatically and then immediately open again.
Please note that when closing the windows from the outside, using the key, the function of the "Pinch protection" is switched off. The window will close regardless of any obstacles.

WARNING
Be careful when closing the windows. Check to see that no one is in the way, or serious injury could result.
The safety switch (3) in the armrest on the driver's door can turn off the rear power windows. This feature has been provided for the safety of small children riding in the rear of the vehicle.
Safety switch in "unlatched (up) position":
...the switches in the rear doors are on and the power windows work.
Safety switch in "latched (depressed) position":
...the switches in the rear doors are switched off, the rear power windows cannot be raised or lowered with the rear switches.

Always heed all WARNINGS on next page.

WARNING
- Do not leave children unattended in the vehicle, especially with access to vehicle keys. Unsupervised use of the keys can result in starting of the engine and use of vehicle systems such as power windows, power sunroof, etc. which could result in serious injury.
● Remember also that the power windows will continue to operate until the ignition key has been removed and one of the front doors has been opened.
● Be careful when closing the windows. Check to see that no one is in the way, or serious injury could result! - Switch off the power to the rear windows – if necessary – using the safety switch 3 (see illustration on page 36).
● Always remove the ignition key whenever you leave your vehicle. - If you lock your vehicle from the outside, no one especially children should remain in the vehicle. The windows will not open in case of an emergency.
- Do not stick anything on the windows or the windshield that may interfere with the driver's vision.
Using power windows, ignition On
Opening
Switches in the armrest on the driver's door
- Front windows
- Press switch on upper edge down to first detent. The window will open as long as the switch is pressed down. Press switch down all the way briefly. The window will open automatically (one-touch down feature). If you press the switch while the window is opening, the window will stop where it is.
- Rear windows
- Press switch on upper edge down. The window will open as long as the switch is pressed down.
Switch in the passenger's door
- Press lower edge of rocker switch. The window will open as long as the switch is pressed.
Switches in the rear doors
- Press lower edge of rocker switch. The respective window will open as long as the switch is pressed.
Closing

WARNING
- Be careful when closing the windows.
- Check to see that no one is in the way, or serious injury could result.
Switches in the driver's door
- Front windows :
- Pull switch on upper edge up to first detent. The window will close as long as you pull the switch. Pull switch on upper edge up all the way briefly, (one-touch up feature). The window will close automatically. If you press the switch while the window is opening, the window will stop where it is.
- Rear windows:
- Pull switch on upper edge. The window will close as long as you pull the switch.
Switch in the passenger door
- Push switch on upper edge. The window will close as long as you push the switch.
Switches in the rear doors
- Push switch on upper edge. The window will close as long as you push the switch.
"Pinch Protection"
1 - If something interferes with a power window while it is closing, it will stop and then immediately open again.
2 - After the window has opened, you have to lift the switch within 10 seconds to try to close it again. The window will now move upwards with greater force. If the window is still prevented from closing, it will stay open.
3 - If the window stays open, you have to lift the switch again within 5 seconds in order to close the window. The pinch protection is now switched off. The window will now close with maximum force.
Note
If you wait longer than 10 respectively 5 seconds between the steps described above, the window will open completely when you press the switch again.

WARNING
- Be careful when closing the windows while overriding the pinch protection!
- Check to see that no one is in the way, or serious injury could result.
Using power windows, ignition Off
You can still use the power windows for about 10 minutes after the ignition is switched off even if the ignition key has been removed as long as the driver's door or passenger's door are not opened.
The automatic closing feature (one-touch-up) does not work once the ignition has been switched off. The window can only be closed as long as the switch is activated.
If the driver's or the front passenger's windows are hard to close because of stiffness or are obstructed by an object when closing (pinch protection) the window will open immediately.
In this case the window can be closed again only when the ignition is switched on.
The windows can also be closed or opened from the outside. To do this, the key must be held in the close or open position in the lock on the driver's door.
The window closes without pinch protection.
Notes
If the vehicle battery is disconnected and then reconnected, or, if the battery becomes completely discharged, the automatic closing and opening function will be deactivated and will no longer work.
To reactivate this feature, do the following:
- Lock the vehicle via the driver's door. Make sure that all the doors and windows are completely closed.
- Unlock the vehicle one more time.
- Turn the key to the lock position a second time and hold the key in the lock position for at least 1 second.
Automatic closing / opening is now reactivated.
Power roof\*

text_image
C B D A B9B-015BThe power roof is opened and closed with the ignition on by turning the rotary switch.
You can still open or close the roof for approximately 10 minutes after switching off the ignition - even if the key has been removed - as long as the driver's door or front passenger's door hasn't been opened.
Always close the roof completely if you are going to park your vehicle and leave.

WARNING
- Be careful when closing the sun-roof/tilt roof. Not paying attention could cause you or others to be caught and injured as the roof closes. To help avoid injuries caused by closing the roof, always take your key whenever you leave your vehicle.
Opening
Turn the rotary switch clockwise to the desired position. In position C, the roof opens to the "Comfort" position.
If you still want to open the roof past the "Comfort" position, turn the switch to position B and hold it there. When the roof has opened as far as you want, let go of the switch. The power roof will stop opening and the switch will return to position C.
If you want to open the power roof all the way, turn the switch to position B and hold it there. Once the roof is opened, let go of the switch.
The switch will return to position C.
Closing:
Turn the switch to position A.
The power roof also has the "pinch protection feature". If something interferes with a power roof while it is closing, it will stop and then immediately open again.
To re-close the power roof turn the switch to position A and hold it there until the roof is completely closed. The pinch protection is now switched off. The power roof will now close with maximum force.

WARNING
- Be careful when closing the power roof while overriding the pinch protection!
- Check to see that no one is in the way, or serious injury could result.
Roof, Raising
Turn the switch to position D.
Closing
Turn the switch to position A.
The power roof closes, however the pinch protection is off.
Notes
● The rotary switch can be set to any intermediate position, except between B and C positions.
- When the glass roof opens, the sun visor used to keep out strong sunlight is also opened automatically. If desired, the visor can be slid shut manually when the power roof is closed.
Convenience closing
You can also close the sunroof from the outside when locking your vehicle:
Hold the key in the close position in the driver's door.
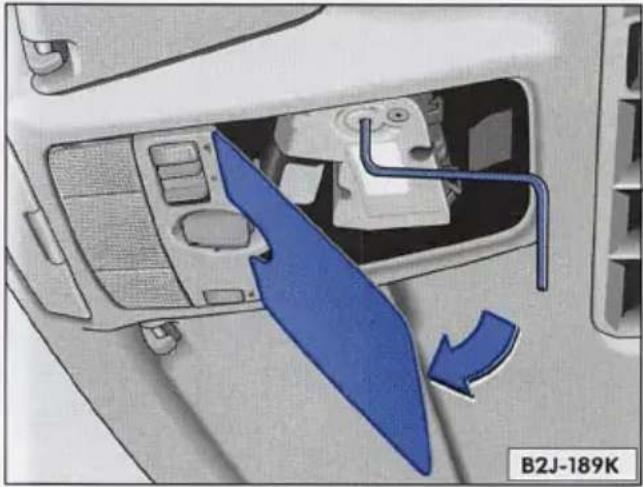
natural_image
Interior view of a car showing the intake manifold and airflow direction (no text or symbols)Emergency closing
If you cannot close the roof with the electric switch, you can still close the roof manually.
- Remove the plastic cover from the rear side (arrow) using a screwdriver.
- Remove the crank from the holder, insert it into the hole until it seats (overcoming the spring force) and turn the crank to close the roof.
- Put the crank back in the holder and reinstall the cover.
Note
If you are unable to close the roof manually, contact your authorized VOLKSWAGEN dealer for assistance.
Switches
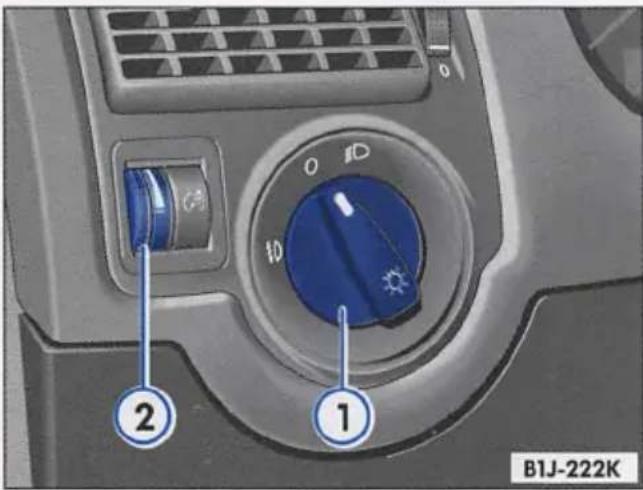
text_image
B1J-222K
WARNING
Accidents can happen when you cannot see the road ahead and when you cannot be seen by other motorists.
- Never use daytime running lights to see where you're going. They are not bright enough and won't let you see for enough ahead for safety, especially at dusk or when it's dark.
- Rear tail lights do not light up when daytime running lights are on. A vehicle without rear tail lights turned on cannot be seen by others in bad weather at dusk or when it is dark.
- Always turn on the headlights so that you can see ahead and so that others can see your vehicle from the back.
1 - Lights

- Daytime running lights
When the ignition is switched on and the hand brake is not pulled up, the headlights (low beam with reduced brightness) will automatically come on. No other lights on the outside of your vehicle will be on and the instrument lights will also be off.

- Low and high beam
The headlights work only when the ignition is switched on.
For Information on high beam, low beam and headlight flasher, see page 45.
If the headlight switch is left on and the ignition key is removed a chime will sound when the driver's door is opened. This is your reminder to switch off the lights before leaving the vehicle.
Front fog lights\*

With the light switch turned to the low/high beam position, pull the switch out to the first detent point.
The indicator light next to the fog light symbol comes on.
2 - Instrument illumination

With the lights switched on, turn the thumb wheel to adjust the brightness of the instruments.

text_image
B9B-027B3 - Electrically heated driver's seat\*

With the ignition on, the seat cushion and backrest of the driver's seat can be heated.
The heating elements in the seats can be turned on and regulated with the thumbwheel switch.
To switch off the seat heating, turn the thumbwheel switch to the detent position.
4 - ESP\* or ASR\* with Electronic Differential Lock (EDL)
The ESP/ASR with EDL is switched on automatically when the engine is started. If required, it can also be switched on and off manually by briefly pressing the switch.
When the system is switched off, the warning light comes on. See page 17.
See "Electronic Stability Program (ESP)", "Anti-Slip Regulation (ASR)" and "Electronic Differential Lock (EDL)" chapter "OPTIMAL TECHNOLOGY", Booklet 3.2.) for further details.
5 - Emergency flasher

The emergency flasher works when the ignition is off or on.
If your vehicle is disabled or parked under emergency conditions, depress the switch to make all turn signals flash at the same time. The warning light in the switch and the indicator lights in the instrument cluster flash too.

WARNING
To avoid being struck by another vehicle, move your vehicle a safe distance off the road when stalled or stopped for repairs. Do not park or operate the vehicle in areas where the hot exhaust system may come in contact with dry grass, brush, fuel spill or other material that can cause fire.
6 - Rear window defogger

The rear window defogger works only with the ignition on.
Press the switch to turn on the rear window defogger.
The control light in the switch will light up to remind you that the defogger is switched on.
Remember that you have to manually switch off the rear window defogger. Do not forget to do this after the rear window is free of snow or ice.
For more information see next page.

text_image
3 4 5 6 7 B9B-027BSwitch off the defogger when the rear window is clear. When you save electricity, you use less fuel. See "Operate you vehicle economically and minimize pollution," chapter "DRIVING AND PROTECTING OUR ENVIRONMENT" Booklet 3.2.
The rear window defogger is not designed to melt snow. Therefore, always remove heavy snow and ice accumulations before driving off.
7 - Electrically heated passenger seat\*
With the ignition on, the seat cushion and backrest of the passenger's seat can be heated.
The heating elements in the seats can be turned on and regulated with the thumb wheel switch.
To switch off the seat heating, turn the thumbwheel switch to the detent position (O).
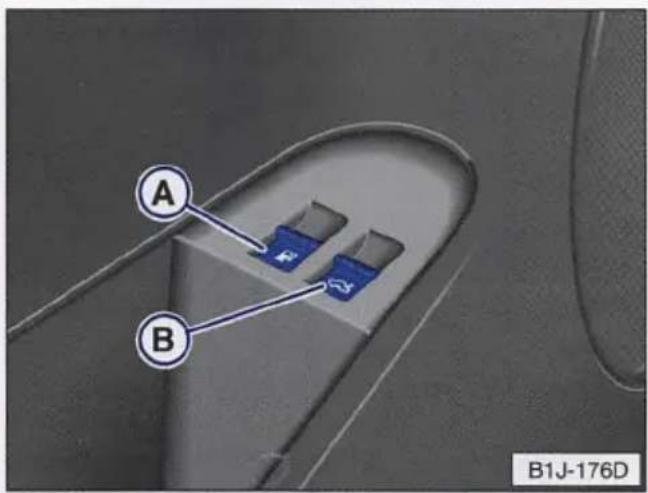
text_image
A B B1J-176DSwitches in the driver's door panel
A - Fuel filler flap release

Pull up the switch to unlock the fuel filler flap. The switch also works with the ignition off.
B - Rear lid release

Pull up the switch to unlock the rear lid. The switch also works with the ignition off.
A warning light in the instrument cluster comes on when the ignition is on and the rear lid is open. Additionally a warning tone* will sound and a warning text* is shown in the display of the instrument cluster. This is to remind you to close the rear lid. The light should go out when the rear lid is closed properly.
Turn signals / High beam lever
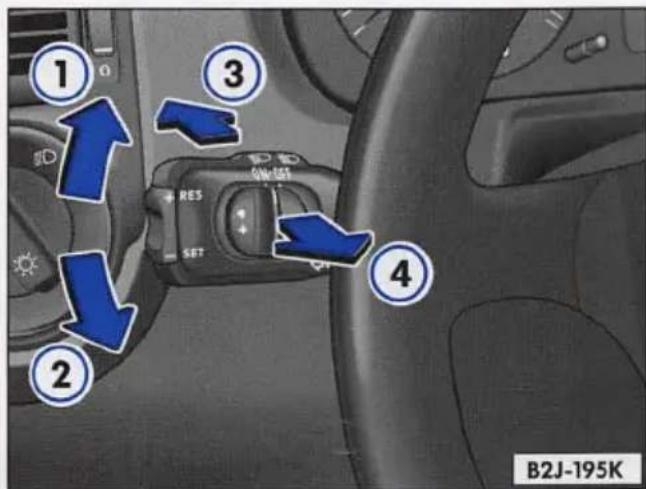
text_image
① ② ③ ④ B2J-195KTurn signals
The turn signal indicator light flashes when you operate the lever (ignition on).
Lever up (1) - right turn signal
Lever down (2) - left turn signal.
The turn signals are cancelled automatically when you have completed a turn (for example, when turning a corner), and the steering wheel returns to the straight ahead position.
If a turn signal fails, the indicator light flashes about twice as fast as usual. A light bulb may have to be replaced.
Lane changer
Move the lever up (1) or down (2) just to the point of resistance – the indicator light must also flash at the same time. The lever will return to its normal position when released.
High beam On / Off
The headlights work only when the ignition is switched on.
Switching on:
With the headlights on, push the lever forward (3).
The blue indicator light in the instrument cluster will come on.
The headlights still stay on when you switch on the high beam.
Switching off:
Pull the lever (3) towards you.
Headlight flasher
You can signal with your high beams by pulling the lever toward the steering wheel (position 4).
When flashing the high beams, the blue indicator light in the instrument cluster will come on.
Wiper and washer system
The wiper and washer system works only when the ignition is on.
The heated* washer jets do not have a separate switch. Depending on the outside temperature, the heated washer jets will operate when the ignition is on.
To prevent damage to the wiping system, always loosen blades frozen to glass before operating wipers.
Notes
- Filling washer container, see "Windshield washer container", chapter "CHECKING AND FILLING"
Booklet 3.2. for further details.
● Replacing wiper blades, see page 46.

WARNING
Always heed WARNINGS on page 47.
Windshield
- Wiper off:
Lever in position 0
- Intermittent wiping:
Lever in position 1
You can adjust to wiping intervals to four different settings using the small lever A.
Turn the small lever A
to the right - shorter intervals
Turn the small lever A
to the left - longer intervals
In each setting, the intervals are also controlled by the speed of the vehicle.
- Low wiper speed
Lever in position 2
- High wiper speed
Lever in position 3

text_image
A 5 B2J-142K- One-tap wiping
Lever in position 4
● Automatic wiper / washer
Pull lever toward steering wheel and hold - wipers and washer work (position 5).
Release lever - washer stops and the wipers keep going for about four seconds.
Rain sensor\*
The rain sensor is part of the intermittent wiping function. When you have the intermittent wiping function switched on, the rain sensor automatically either shortens or lengthens the pause between wipes depending on how hard it's raining.
Use switch A on the wiper lever to adjust the sensitivity level of the rain sensor.
Intermittent wiping and rain sensor functions are deactivated when the ignition is turned off, and reactivated when the intermittent wiping switch is turned on again.

WARNING
Always heed WARNINGS on next page.

text_image
7 6 B2J-143KRear window
- Interval wiper
Switching on:
Lever at position 6.
The wipers work approximately every 6 seconds.
Switching off:
Pull the lever towards the steering wheel. The wiper blade may continue to wipe for a short period if you have switched off during the wiping procedure.
- Washer / Wiper
Switching on:
Push the lever all the way forward 7 – the washer / wiper system will operate for as long as the lever is held in this position.
Switching off:
Release the lever – the washer system will stop and the wiper continues to work at intervals.

WARNING
● Worn or dirty wiper blades will reduce visibility, making driving hazardous. Clean blades regularly to remove road film and car wash wax buildup. Use an alcohol base cleaning solution, a lint free cloth and wipe along the blade.
● Clean all inside and outside window glass regularly. Use an alcohol base cleaning solution and wipe dry with a lint free or a chamois.
- Do not use the wiper/washer in freezing weather without first warming the windshield with the defrosters. The washer solution may freeze on the windshield and reduce visibility.
● To prevent scratching the glass, avoid running the wiper blades over a dry windshield. A scratched windshield will reduce visibility and increase glare at night.
Wiper blades
Wiper blades must be in good condition so that you can see clearly through the wind-shield.
Clean your wiper blades regularly with a windshield washer solution to prevent streaking. If the blades are very dirty, for example with insects, carefully clean the blades with a sponge or a soft brush.
If the wiper blades begin to streak the wind-shield, this could be caused by residue left on the windshield by automatic car washes.
Fill the windshield washer container with a special solution available at your VOLKS-WAGEN dealer to remove the residue.
To prevent damage to the wiping system, always loosen blades frozen to glass before operating wipers.
Be sure to inspect the condition of your wiper blades regularly. For safety reasons, replace your wiper blades once or twice a year if necessary. See your VOLKSWAGEN dealer for replacement blades.
Notes
● Commercial hot waxes applied by automatic car washes affect the cleanability of the windshield.
● To prevent damage to wiper blades, do not use gasoline, kerosene, paint thinner, or other solvents on or near the wiper blades.
● To prevent damage to the wiper arms or other components, do not attempt to move the wipers by hand.
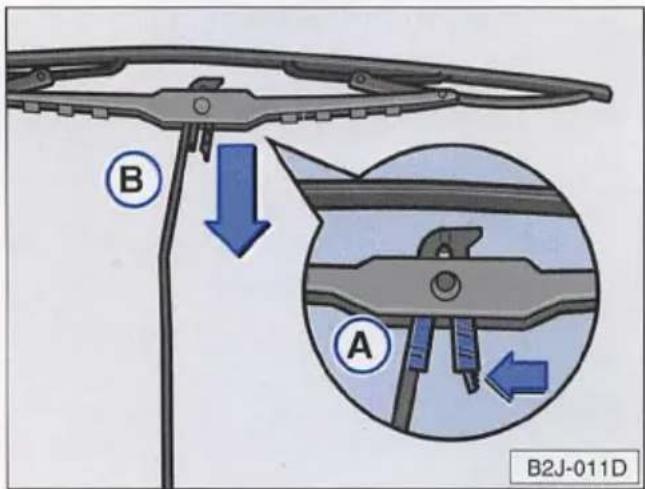
text_image
B A B2J-011DReplacing wiper blades
- Raise the wiper arm and hold wiper blade horizontally.
● Depress locking spring A and remove blade by pulling it towards the windshield B.
Installing new wiper blades
● The locking spring must click into place on the wiper arm.
When installing wiper blades with molded wind deflectors on the driver's side, always make sure the deflector points down.