ZDF 501 - Dishwasher ZANUSSI - Free user manual and instructions
Find the device manual for free ZDF 501 ZANUSSI in PDF.

User questions about ZDF 501 ZANUSSI
0 question about this device. Answer the ones you know or ask your own.
Ask a new question about this device
Download the instructions for your Dishwasher in PDF format for free! Find your manual ZDF 501 - ZANUSSI and take your electronic device back in hand. On this page are published all the documents necessary for the use of your device. ZDF 501 by ZANUSSI.
USER MANUAL ZDF 501 ZANUSSI
natural_image
Front view of a white appliance with lid and control panel (no visible text or symbols)Content
Safety information - - - - - - - - - - - - - - - - - - - - - - - - - - - - - - - - - - - - - - 3
Control panel and functions - - - - - - - - - - - 5
Programme table - - - - - - - - - - - - - - - - - - - - - - - - - - - - - - - - - - - - - 8
Before the first use - - - - - - - - - - - - - - - - - - - - - - - - - - - - - - - - - 9
Setting the water softener - - - - - - - - - - - - - 9
Filling with dishwasher salt - - - - - - - - - - 12
Filling with rinse aid 13
Adjusting the dosage of rinse aid - - - - - - 13
Loading cutlery and dishes ----14
Filling with detergent 17
Unloading the dishwasher - - - - - - - - - - - 17
Cleaning and care 18
Environmental concerns 19
Something not working- - - - - - - - - - - 20
Technical data- - - - - - - - - - - - - - - - 22
Consumption values 22
Hints for test institutes - - - - - - - - - - - - 23
Installation - - - - - - - - - - - - - - - - 24
Service and spare parts - - - - - - - - - - 27
Guarantee conditions - - - - - - - - - - - 28
European guarantee 29
Safety information
In the interest of your safety and to ensure the correct use, before installing and first using the appliance, read this user manual carefully, including its hints and warnings. To avoid unnecessary mistakes and accidents, it is important to ensure that all people using the appliance are thoroughly familiar with its operation and safety features. Save these instructions and make sure that they remain with the appliance if it is moved or sold, so that everyone using it through its life will be properly informed on appliance use and safety.
Correct use
- This dishwasher is only intended for washing household utensils suitable for machine washing.
- Do not put any solvents in the dishwasher. This could cause an explosion.
- Knives and other items with sharp points must be loaded in the cutlery basket with their points down or placed in a horizontal position in the upper basket.
- Only use products (detergent, salt and rinse aid) suitable for dishwashers.
- Avoid opening the door whilst the appliance is in operation, hot steam may escape.
- Do not take any dishes out of the dishwasher before the end of the dishwashing cycle.
• After use, isolate the appliance from the power supply and turn off the water supply.
- This product should be serviced only by an authorised service engineer, and only genuine spare parts should be used.
General safety
- Dishwasher detergents can cause chemical burns to eyes, mouth and throat. Could endanger life! Comply with the safety instructions of the dishwasher detergent
instructions of the dishwasher detergent manufacturer. - The water in your dishwasher is not for drinking. Detergent residues may still be present in your machine.
- Ensure that the door of the dishwasher is always closed when it is not being loaded or unloaded. In this way you will avoid anybody tripping over the open door and hurting themselves.
- Do not sit or stand on the open door.
Child safety
- This appliance is designed to be operated by adults. Don't allow children to use the dishwasher unsupervised.
- Keep all packaging well away from children. There is risk of suffocation.
- Keep all detergents in a safe place out of children's reach.
- Keep children well away from the dishwasher when the door is open.
Installation
- Check your dishwasher for any transport damage. Never connect a damaged machine. If your dishwasher is damaged contact your supplier.
- All packaging must be removed before use.
- Any electrical and plumbing work required to install this appliance must be carried out by a qualified and competent person.
- For safety reasons it is dangerous to alter the specifications or attempt to modify this product in any way.
- Never use the dishwasher if the electrical supply cable and water hoses are damaged; or if the control panel, work top or plinth area are damaged such that the inside of the appliance is freely accessible. Contact your local Service Force centre, in order to avoid hazard.
- All sides of the dishwasher must never be drilled to prevent damage to hydraulic and electric components.

WARNING!
For electrical and water connection carefully follow the instructions given in specific paragraphs.
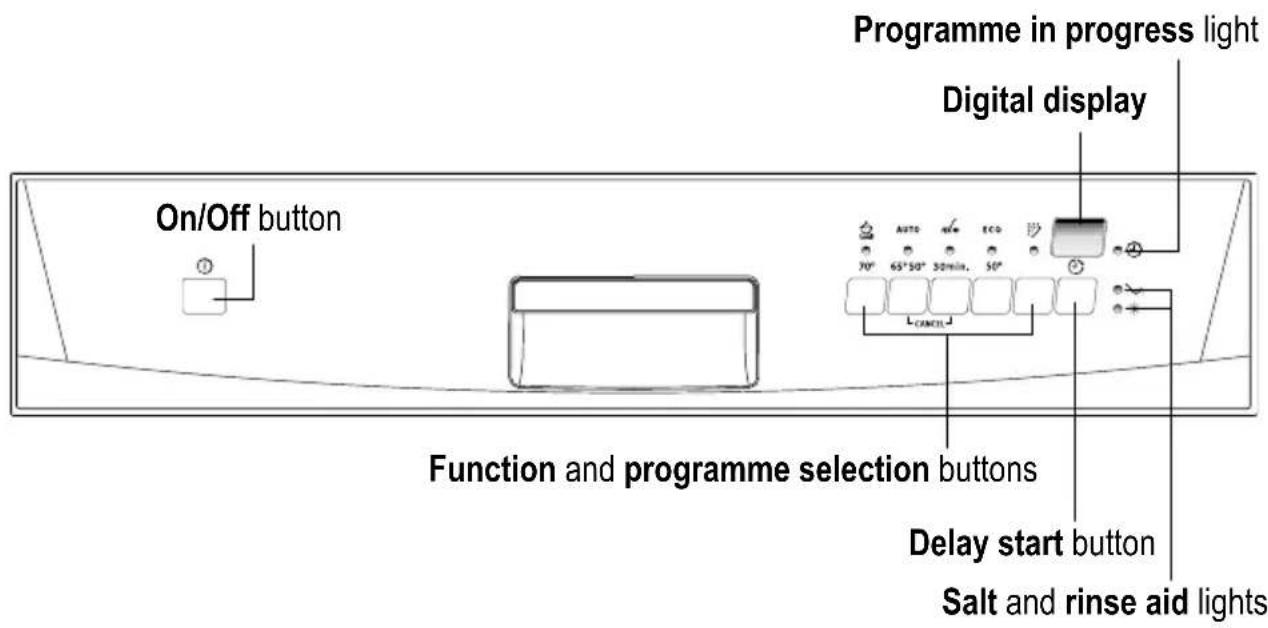
Control panel and functions
text_image
Programme in progress light Digital display On/Off button Function and programme selection buttons Delay start button Salt and rinse aid lightsIMPORTANT!
Always remember that when performing operations such as:
- selecting a washing programme,
- setting the water softener,
the appliance MUST be in setting mode:
- Press On/Off button, ALL programme selection button lights are illuminated = appliance in setting mode.
- Press On/Off button, ONLY a programme button light is illuminated = last performed programme still set.
In this case the programme has to be cancelled (see instructions "Cancel a washing programme in progress").
Function buttons
In addition to the dishwashing programme selection, the following functions can also be set with the help of these buttons.
- the setting of the water softener,
- the cancelling of a programme in progress.
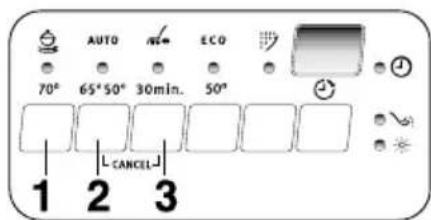
text_image
AUTO 70° 65°50° 30min. 50° L CANCEL 1 2 3Digital display
In the digital display is indicated:
- the level of hardness to which the water softener is set,
- the approximate remaining time of the running programme,
- the end of the programme (a zero is visible),
- the countdown of the delay start,
- fault codes concerning malfunction of the appliance.
IMPORTANT!
Select the washing programme and the delay start with the door slightly opened. The start of the programme or the countdown of the delay start will occur only after the closure of the door. Until that moment it is possible to modify the set made.
Programme selection buttons
• Starting the washing programme:
- Press the On/Off button.
- Press the button corresponding to the required programme, the corresponding light remains illuminated while the other programme lights turn off. In the digital display will appear, flashing, the running time of the programme (in minutes).
- The programme in progress light illuminates.
- Close the dishwasher's door, the programme will start automatically. In the digital display the running time of the programme is no longer flashing and the programme in progress light remains illuminated.
IMPORTANT!
Once the programme has started, if you want to change the selection made you must cancel the washing programme in progress.
- Cancel the washing programme in progress:
- Press and hold simultaneously function buttons 2 and 3 until ALL programme button lights will illuminate.
- Release function buttons 2 and 3.
- Switch off the machine by pressing the On/Off button or select a new washing programme (check that there is detergent in the detergent dispenser.
Delay start button

This option allows the start of the programme to be delayed from 1 to 19 hours. After having selected the washing programme press the delay start button until the flashing number of the hours for the delay start will appear in the digital display.
Close the dishwasher's door, the countdown starts automatically.
Once the countdown has elapsed the washing programme will start automatically.
- Cancel the delay start in progress:
To cancel a delay start in progress you have to reset the dishwasher; follow the same instructions given in "Cancel the washing programme in progress".
IMPORTANT!
Cancelling a delay start involves also the cancelling of the washing programme set. In this case you have to select the washing programme again.
IMPORTANT!
The selection of the washing programme and delay start can occur also with the door closed. Keep in mind that in this way, once a washing programme button is pressed you have ONLY 3 seconds in which you can choose another programme or select a delay start, after which the selected programme will start automatically.
Programme in progress light

Illuminates when the washing programme has been set.
When the delay start has been set, this light turns off and will come on again once the countdown has elapsed and the washing programme has started.
Salt refilling light

Illuminates when special salt needs to be filled.
It can remain illuminated several hours after the salt has been filled.
Rinse aid refilling light

Illuminates when rinse aid needs to be filled.
Programme table
| Programme Use Cycle description | ||
| Intensive Heavy soil. Prewash - Main wash70°Crockery, cutlery, pots and pans 2 intermediate rinses - Final rinseDry | ||
| Auto Normal / Light soil. Prewash - Main wash65°50°Crockery and cutlery 1 or 2 intermediate rinsesFinal rinse - Dry | ||
30 min. Light soil. | Main wash - Final rinseCrockery and cutlery | |
| Eco50°Crockery and cutlery 1 intermediate rinse - Final rinseDry | Prewash - Main washDry | |
| Rinse and Any PrewashHold Partial load (to be completed later in the day). This programme does not require the use of detergent. | ||
"AUTO" washing programme
During the "AUTO" washing programme the amount of soil on the dishes is determined by how cloudy the water is.
If the appliance is partially loaded and the dishes lightly soiled, the "prewash", "main wash", and "rinse" phases of the programme are shorter and the water consumption level is lower.
If the appliance is fully loaded and the dishes heavily soiled, the "prewash", "main wash", and "rinse" phases of the programme are longer and the water consumption level is higher.
For this reason the programme duration, water and energy consumption levels can vary within the stated range for AUTO programme (see "Washing programmes chart").
During the "AUTO" programme the temperature of the main wash water is also automatically adjusted between 50°C and 65°C depending on the amount of soil on the dishes.
Before the first use
When using separate special (dishwasher) salt, rinse aid and detergent:
- set the water softener
- add special (dishwasher) salt
- fill up with rinse aid
When using tablets that integrate rinse aid and detergent:
there is no need to fill up with rinse aid
- set the water softener
- add special (dishwasher) salt
When using tablets that integrate rinse aid, detergent, salt function and other additives:
there is no need to fill up with special salt or rinse aid.
Check whether these detergents are suitable for your water hardness. Follow the manufacturers instructions.
- Set the water hardness to level 1.
IMPORTANT!
If the drying results are not satisfactory we recommend that you:
- Fill up the rinse aid dispenser with rinse aid.
- Set the rinse aid dosage to position 2.
If you decide in future to use separated detergents, we advise that you:
- Fill up the salt and rinse aid container.
- Adjust the water hardness setting to the highest level and perform 1 normal washing programme without loading any dishes.
- Adjust the water hardness setting according to the hardness of the water in your area.
- Adjust the rinse aid dosage
Setting the water softener
The dishwasher is equipped with a water softener designed to remove minerals and salts from the water supply, which would have a detrimental or adverse effect on the operation of the appliance.
The softener should be adjusted according to the hardness of the water in your area. Your local Water Authority can advise you on the hardness of the water in your area.
IMPORTANT!
The water softener must be set in both ways: manually and electronically.
| Water hardness Level indicated on | Adjustment of the | ||||
| the digital display | water hardness setting | ||||
| Clarke^1) | in °TH2) | in mmol/l3) | manually | electronically | |
| 64 - 88 91 - 125 9,0 - 12,5 2 level 10 | 10 L | ||||
| 53 - 63 76 - 90 7,6 - 8,9 2 level 9 | 9 L | ||||
| 46 - 52 65 - 75 6,5 - 7,5 2 level 8 | 8 L | ||||
| 36 - 45 51 - 64 5,1 - 6,4 2 level 7 | 7 L | ||||
| 28 - 35 40 - 50 4,0 - 5,0 2 level 6 | 6 L | ||||
| 23 - 27 33 - 39 3,3 - 3,9 2 level 5 | 5 L | factory setting | |||
| 18 - 22 26 - 32 2,6 - 3,2 1 level 4 | 4 L | ||||
| 13 - 17 19 - 25 1,9 - 2,5 1 level 3 | 3 L | ||||
| 5 | - | 12 | 7 | 13 L | 0,7 |
| < 5 < 7 < 0,7 1 level 1 | 1 L | no salt necessary | |||
1) Clarke degree, measure of the water hardness.
2) (°TH) French degree, measure of the water hardness.
3) (mmol/l) millimol per litre, international unit for water hardness
Setting the water softener manually (see table)
natural_image
Line drawing of a 3D printer with a circular inset showing a disc (no text or symbols)
natural_image
Technical diagram showing mechanical components with no visible text or symbolsSet switch to position 1 or 2
The water softener is factory set at position 2.
Setting the water softener electronically (see table)
The water softener is factory set at position 5.
text_image
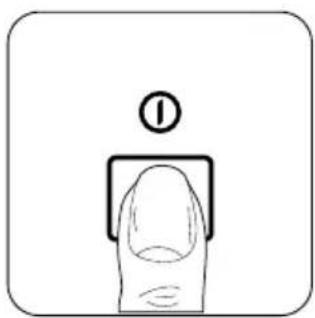
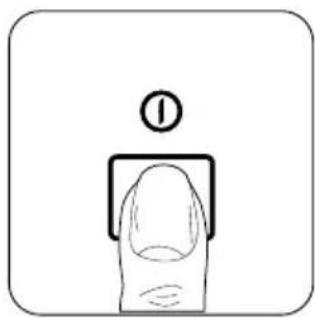
Diagram showing a finger pressing a button labeled with circled number 1, likely indicating a step or state in a process.The dishwasher must be switched off. Switch on the dishwasher by pressing the On/Off button.
text_image
1 70° AUTO 65° 50° 30min. 2 3Press and hold simultaneously function buttons 2 and 3 until the lights of function buttons 1, 2 and 3 start flashing.

text_image
1 70° 2 AUTO 65° 50° 30min. 3 CANCELRelease the buttons and then press function button 1; the lights of function buttons 2 and 3 turn off while function button 1 goes on flashing.

text_image
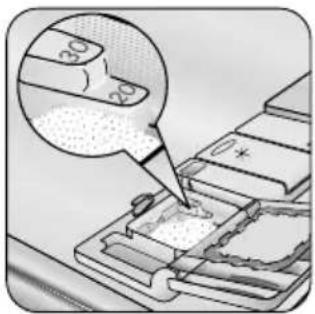
5LThe digital display indicates the current level.

text_image
1 2 AUTO 3 70° 65° 50° 30min. CANCELTo change the level, press function button 1. Each time the button is pressed the level increases. (For the selection of the new level see the chart).

text_image
6LThe digital display indicates the new level set. (Level 1 follows level 10).
natural_image
Simple line drawing of a finger pressing a button with a numbered label (no text or symbols beyond the number)To memorise the operation, switch off the dishwasher by pressing the On/Off button.
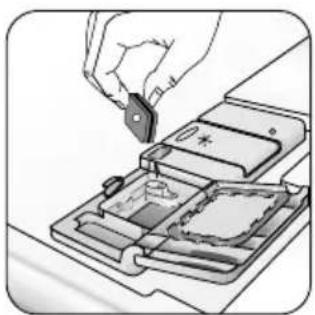
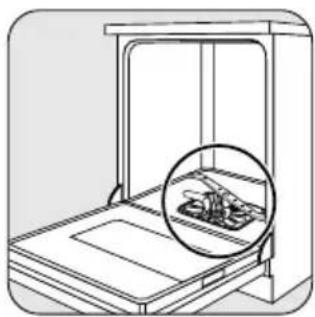
Filling with dishwasher salt

CAUTION!
Use only special salt suitable for dishwashers

natural_image
Technical line drawing of a mechanical assembly with a circular component inserted into a housing (no text or symbols)
natural_image
Mechanical assembly diagram showing gear and shaft components (no text or symbols)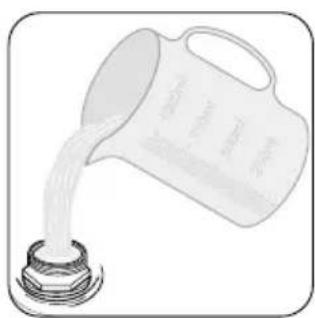
natural_image
Illustration of a pitcher pouring liquid from a container into a bulb (no text or symbols)
text_image
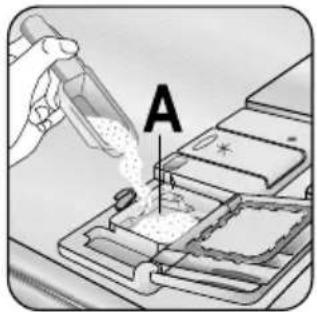
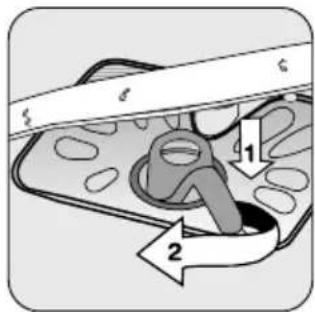
SALT ZOUT SALT SALZ SELUnscrew the cap. Only before filling with salt for the first time, fill the salt container with water
Using the funnel provided, pour in the salt until the container is filled with salt.
IMPORTANT!
Water will overflow from the container as salt is added.
natural_image
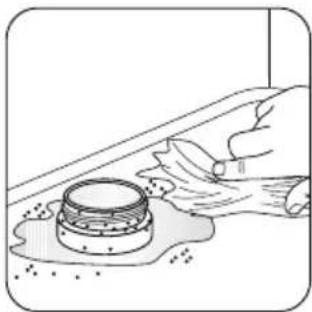
Illustration of a hand cleaning a wall with a container and surface debris (no text or symbols)Remove any trace of salt.

natural_image
Diagram showing a mechanical assembly with a rotating component and a housing, no text or symbols present.Replace the cap tightly turning it clockwise until it stops with a click.
IMPORTANT!
Immediately start a complete programme.
IMPORTANT!
Top up the special salt when the light on the control panel illuminates.
Filling with rinse aid

natural_image
Line drawing of a storage cabinet with an inset showing a small object inside (no text or symbols)
natural_image
Illustration of a hand pressing down on a card with arrows indicating motion (no text or symbols)
text_image
maxOpen the lid. Fill up with rinse aid.
The maximum level for filling is indicated by "max".

natural_image
Illustration of a hand using a tool to clean or fabricate material on a device (no text or symbols visible)Clean up any rinse aid which overflows. Close the lid and press until it locks.
IMPORTANT!
Top up the rinse aid when the light on the control panel illuminates.

CAUTION!
Never fill the rinse aid dispenser with any other substances (e.g. dishwasher cleaning agent, liquid detergent). This would damage the appliance.
Adjusting the dosage of rinse aid
Increase the dose if there are drops of water or lime spots on the dishes after washing.
Reduce the dose if there are whitish streaks on the dishes or a bluish film on glassware or knife blades.

natural_image
Line drawing of a 3D printer or scanner unit with an inset close-up showing a small object inside (no text or symbols)
natural_image
Illustration of a hand pressing down on a device with arrows indicating motion (no text or symbols)
natural_image
Hand pressing a button on a device with an arrow indicating rotation (no text or symbols visible)
natural_image
Illustration of a smartphone with a scroll wheel and a small logo, no text or symbols presentOpen the lid. Set the dosage level.
(The dose is factory set in position 4).
Close the lid and press until it locks.
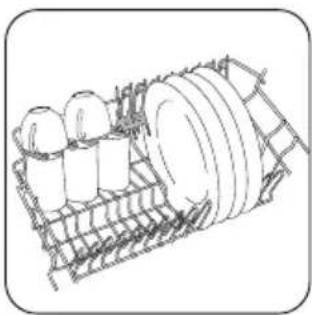
Loading cutlery and dishes
- The following items are not suitable for use in the dishwasher:
- Cutlery with wooden, horn, china or mother-of-pearl handles
- Plastic items that are not heat resistant
- Older cutlery with glued parts that are not temperature resistant
- Bonded cutlery items or dishes
- Pewter or copper items
- Lead crystal glass
- Steel items prone to rusting
- Wooden platters
-
Items made from synthetic fibres
-
When loading the dishwasher, make sure that you:
- Remove all left over food and debris.
- Soften remnants of burnt food in pans
- Load hollow items such as cups, glasses, pans, etc. with the opening downwards so that water cannot collect in the container or a deep base.
- Dishes and items of cutlery must not lie inside one another, or cover each other.
- To avoid damage to glasses, they must not touch.
- Lay small objects in the cutlery basket.
- Plastic items and pans with teflon have a tendency to retain water drops; these items will not dry as well as porcelain and steel items.
IMPORTANT!
Before closing the door, ensure that the spray arms can rotate freely.

natural_image
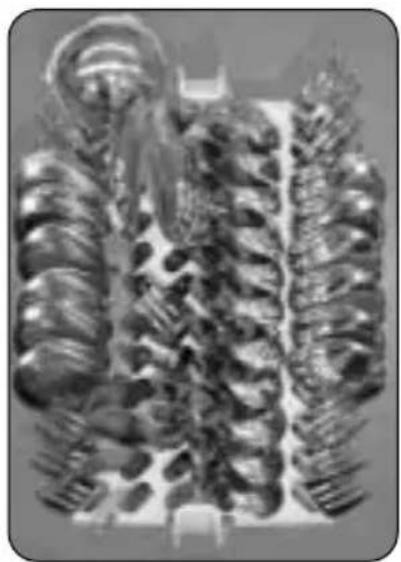
Illustration of a food kit with cutlery and utensils (no text or symbols)Load cutlery. For best results we recommend you to use the cutlery grid provided (if the size and dimensions of the cutlery allow it.

text_image
Safety warning symbols for electrical circuitry, including X, Y, and checkmark signsPlace knives and other items of cutlery with sharp points or edges with their handles facing upwards.
Risk of injury!
natural_image
Illustration of a fork and knife inside a battery tray with cutlery (no text or symbols)Load cutlery. For best results we recommend you to use the cutlery grid provided (if the size and dimensions of the cutlery allow it.

text_image
Safety warning symbols for electrical components including battery, switch, and warning signPlace knives and other items of cutlery with sharp points or edges with their handles facing upwards. Risk of injury!

natural_image
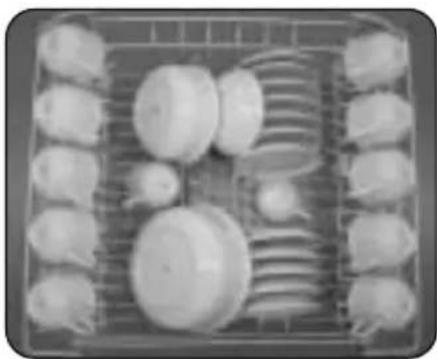
Illustration of a basket filled with vegetables, no text or symbols presentLoad the lower basket. Arrange serving dishes and large lids around the edge of the basket.
natural_image
Technical line drawing of a mechanical assembly with gears and shafts (no text or symbols)
natural_image
Line drawing of a basket filled with various items, no text or symbols presentLoad upper basket. Light items (plastic bowls etc.) must be loaded in the upper basket and arranged so they do not move.
natural_image
Technical line drawing of a mechanical assembly with cylindrical components and a grid base (no text or symbols)For taller items, the cup racks can be folded upwards.
natural_image
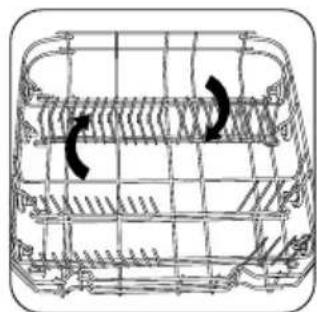
Technical line drawing of a wire mesh structure with two curved arrows indicating rotation (no text or symbols)The two rows of prongs on the lower basket can be easily lowered to allow you to load pots, pans and bowls.
natural_image
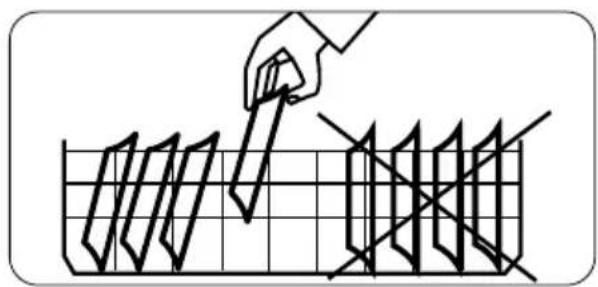
Diagram showing a hand using a tool to cut or mark a grid pattern with intersecting lines (no text or symbols)If plates are to be loaded in the upper basket:
load them starting from the rear positions; tilting them slightly forwards and avoiding the front positions near the door.
Adjusting the height of the upper basket
If washing very large plates you can load them in the lower basket after moving the upper basket to the higher position.
Maximum height of the dishes in:
upper basket lower basket
With upper basket raised 20 cm 31 cm
With upper basket lowered 24 cm 27 cm
To move to the higher position proceed as follows:
- Pull out the basket until it stops.
- Carefully lift both sides upwards until the mechanism is engaged and the basket is stable.
To lower the basket to the original position proceed as follows:
- Pull out the basket until it stops.
- Carefully lift both sides upwards and then allow the mechanism to drop back down slowly, keeping hold of it.
IMPORTANT!
Never lift or lower the basket on one side only
IMPORTANT!
When the basket is in the higher position you will not be able to use the cup racks.

natural_image
Cross-sectional diagram of a mechanical component with two upward arrows indicating direction (no text or symbols)Filling with detergent
IMPORTANT!
Only use detergents suitable for dishwashers. Observe the manufacturer's dosing and storage recommendations.
natural_image
Line drawing of a storage cabinet with an inset showing a small rectangular component (no text or symbols)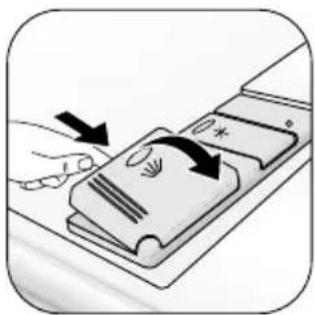
natural_image
Illustration of a hand pressing down on a smartphone screen with directional arrows indicating action (no text or symbols)Open the lid.
text_image
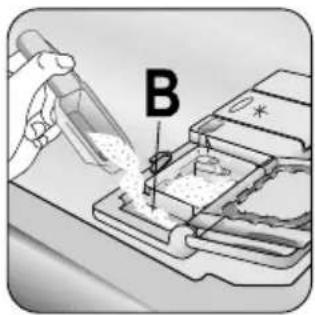
AFill in the detergent in compartment A.
text_image
Diagram showing a device with labeled parts and a magnified inset highlighting '30' and '20' regions.Observe the dosing levels.
text_image
BFor programmes with prewash add an additional detergent dose in compartment B.
natural_image
Illustration of a hand inserting a small electronic component into a device tray (no text or symbols visible)When using detergent tablets: place detergent tablets in compartment A.

natural_image
Illustration of a device with a scroll wheel and directional arrow (no text or symbols)Close the lid.
Unloading the dishwasher
IMPORTANT!
Open the dishwasher's door, leave it ajar and wait a few minutes before removing the dishes; hot dishes are sensitive to knocks. In this way they will be cooler and the drying will be improved.
- Empty the lower basket first and then the upper one; this will avoid water dripping from the upper basket onto the dishes in the lower one.
- Water may appear on the sides and the door of the dishwasher as the stainless steel will eventually become cooler than the dishes.
Cleaning and care
Cleaning the filters
IMPORTANT!
NEVER use the dishwasher without filters.
Incorrect repositioning and fitting of the filters will produce poor washing results.
natural_image
Line drawing of a mechanical device with an inset showing a component (no text or symbols)The dishwasher must be switched off

text_image
C B AClean filters A, B and C thoroughly under running water.
text_image
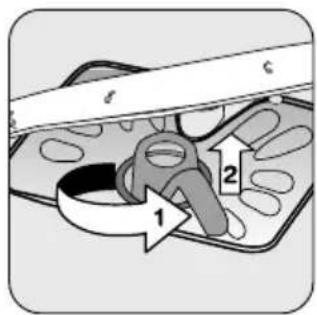
Diagram illustrating a mechanical or biological process with labeled components and directional arrowsTurn the handle about 14 turn anticlockwise and remove filters B and C.
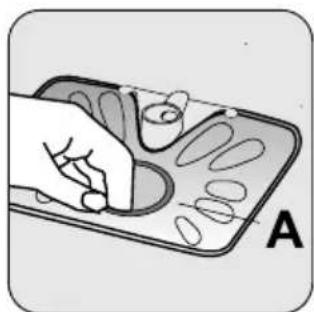
natural_image
Illustration of a hand using a stylus to interact with a tray labeled 'A' (no text or symbols on the diagram itself)Remove filter A from the base of the washing compartment.

text_image
D APut the flat filter A back in the base of the washing compartment and ensure that it fits perfectly under the two guides D.
text_image
Diagram showing a mechanical or fluid system with labeled components and directional arrows, likely illustrating a process or flow.Replace the filters and lock by turning the handle clockwise to the stop.
IMPORTANT!
NEVER try to remove the spray arms.
If residues of soil have clogged the holes in the upper spray arm, remove them with a toothpick.
External cleaning
Clean the external surfaces of the machine and control panel with a damp soft cloth. If necessary use only neutral detergents. Never use abrasive products, scouring pads or solvent (acetone, trichloroethylene etc....).
Ensure that the seals around the door, the detergent and rinse aid dispensers are cleaned regularly with a damp cloth.
We recommend every 3 months to run a 65°C wash programme without dishes using detergent.
Prolonged periods of non-operation
If you are not using the machine for any period of time you are advised to:
- Unplug the appliance and then turn off the water.
- Leave the door ajar to prevent the formation of any unpleasant smells.
- Leave the inside of the machine clean.
Environmental concerns
Packaging material
The packaging materials are environmentally friendly and can be recycled. The plastic components are identified by markings, e.g. >PE<, >PS<, etc. Please dispose of the packaging materials in the appropriate container at the community waste disposal facilities.

WARNING!
When a unit is no longer being used:
- Pull the plug out of the socket.
- Cut off the cable and plug and dispose of them.
- Dispose of the door catch. This prevents children from trapping themselves inside and endangering their lives.
Frost precautions
Avoid placing the machine in a location where the temperature is below 0^ C. If this is unavoidable, empty the machine, close the appliance door, disconnect the water inlet pipe and empty it.
Moving the machine
If you have to move the machine (moving house etc....):
- Unplug it.
- Turn the water tap off.
- Remove the water inlet and discharge hoses.
- Pull the machine out together with the hoses.
- Only transport the dishwasher in an upright position, otherwise salt water may run out.
Old appliance
The symbol on the product or on its packaging indicates that this product may not be treated as household waste. Instead it shall be handed over to the applicable collection point for the recycling of electrical and electronic equipment. By ensuring this product is disposed of correctly, you will help prevent potential negative consequences for the environment and human health, which could otherwise be caused by inappropriate waste handling of this product.
For more detailed information about recycling of this product, please contact your local city office, your household waste disposal service or the shop where you purchased the product.
Something not working
IMPORTANT!
The dishwasher will not start or stops during operation.
Certain problems are due to the lack of simple maintenance or oversights, which can be solved with the help of the indications described in the chart, without calling out an engineer.
Switch off the dishwasher, open the door and carry out the following suggested corrective actions.
| Fault code / malfunction Possible cause Solution | ||
| The dishwasher does not fill with water. - continuous flashing of the light of the running programme - appears in the digital display | The water tap is blocked Clean the water tap. or furred with limescale. The water tap is turned off. Turn the water tap on. The filter (where present) Clean the filter in the. in the threaded hose fitting at threaded hose fitting. the water inlet valve is blocked. The water inlet hose has Check the water inlet hose not been correctly laid or it is connection. bent or squashed. | |
| The dishwasher will not drain. - continuous flashing of the light of the running programme - appears in the digital display | The sink spigot is blocked. Clean out the sink spigot. The water drain hose has Check the water drain hose not been correctly laid or it is connection. bent or squashed. | |
| - continuous flashing of the light of the running programme - appears in the digital display | Anti-flood device is activated. Close the water tap and contact your local Service Force Centre. | |
| The programme does not start. | The dishwasher door has not been properly closed. The main plug is not plugged in. The fuse has blown in the Replace the fuse. household fuse box. Delay start has been selected | Close the door Insert the mains plug If dishes are to be washed immediately, cancel the delay start. |
Once these checks have been carried out; close the dishwasher's door and switch on the appliance. Press the button of the programme that was running before the intervention of the alarm. The programme will continue from the point at which it was interrupted. If the malfunction or fault code reappears contact the Service Force Centre. For other fault codes not described in the above chart, please contact your Service Force Centre.
The wash results are not satisfactory
| The dishes are not clean | ·The wrong washing programme has been selected. ·The dishes were arranged in such a way as to stop water reaching all parts of the surface. The baskets must not be overloaded. ·The spray arm do not rotate freely due to incorrect arrangement of the load. ·The filters in the base of the washing compartment are dirty or incorrectly positioned. ·Too little or no detergent has been used. ·Where there are limescale deposits on the dishes; the salt container is empty or the incorrect level of the water softener has been set. ·The drain hose connection is not correct. ·The salt container cap is not properly closed. |
| The dishes are wet and dull | ·Rinse aid was not used. ·The rinse aid dispenser is empty. |
| There are streaks, milky spots or a bluish coating on glasses and dishes | ·Decrease rinse aid dosing. |
| Water drops have dried onto glasses and dishes | ·Increase rinse aid dosing. ·The detergent may be the cause, Contact the detergent manufacturer's consumer care line. |
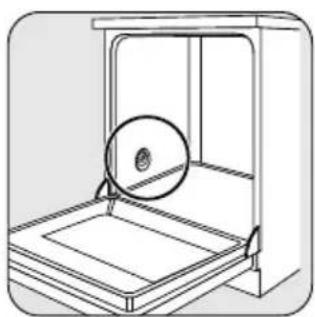
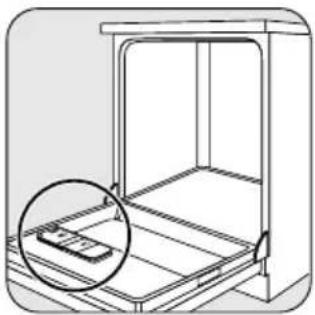
If after all these checks, the problem persists, contact your local Service Force Centre, quoting the model (Mod.), product number (PNC) and serial number (S.N.).
This information can be found on the rating plate located on the side of the dishwasher door (see picture).
So that you always have these numbers at hand, we recommend you to make a note of them here:
Mod.:
PNC:
S.N.:

natural_image
Line drawing of a kitchen appliance with a tray and side panel, no text or symbols presentTechnical data
| Dimensions Width 60 cm | Height 85 cmDepth. 61 cm | |
| Electrical connection Information on the electrical connection is given on the rating plate on Voltage - Overall power - Fuse the inner edge of the dishwasher's door. | ||
| Water supply pressure Minimum 0,05 MPa (0.5 bar)Maximum 0,8 MPa (8 bar) | ||
| Capacity 12 place settings | ||
| Max. weight 41 kg | ||
| Noise level 47 dB (A) | ||
Consumption values
The consumption values are intended as a guide and depends on the pressure and the temperature of the water and also by the variations of the power supply and the amount of dishes.
| Programme Programme duration Energy (minutes) | Water (kWh) | (litres) | |
| Intensive 70° | * | 1,7 - 1,9 | 23 - 25 |
| Auto 65°50° | * | 1,1 - 1,5 | 12 - 25 |
| 30 min. | * | 0,8 | 9 |
| Eco 50°(Test programme for Test Institutes) | * | 1,05 | 15 |
| Rinse and Hold | * | < 0,1 | 4 |
* The programme duration is visible in the digital display when the washing programme is selected.
Hints for test institutes
Testing in accordance with EN 60704 must be carried out with appliance fully loaded and using the test programme (see "Consumption values").
Test in accordance with EN 50242 must be carried out when the salt container and rinse aid dispenser have been filled with salt and rinse aid respectively and using the test programme (see "Consumption values").
Full load: 12 standard place settings
Amount of detergent required: 5 g + 25 g (Type B)
Rinse aid setting: position 4 (Type III)
natural_image
Overhead view of a tray with multiple circular objects arranged in rows (no visible text or symbols)Upper basket
natural_image
Black-and-white photo of a traditional Chinese architectural facade with vertical columns and decorative elements (no visible text or symbols)Cutlery basket

natural_image
Close-up of a cylindrical mechanical component with ribbed texture and a perforated side panel (no visible text or symbols)Lower basket

text_image
US77 A BCup racks: position A
Installation

WARNING!
Any electrical and/or plumbing work required to install this appliance should be carried out by a qualified electrician and/or plumber or competent person.
Water connection

WARNING!
The dishwasher must not be connected to open water appliances or instantaneous water heaters. This dishwasher may be fed with either hot (max. 60°) or cold water. Nevertheless we advise you a cold water supply.

WARNING!
Only use, for connection to the water mains, new hose-set; old hose-set must not be reused.

CAUTION!
If the machine is connected to new pipes or pipes which have not been used for a long time, you should run the water for a few minutes before connecting the inlet hose.

natural_image
Diagram of a faucet with a funnel and valve, connected to a tap (no text or symbols)
natural_image
Diagram of a mechanical device with rotating components and a dotted pattern, no text or symbols present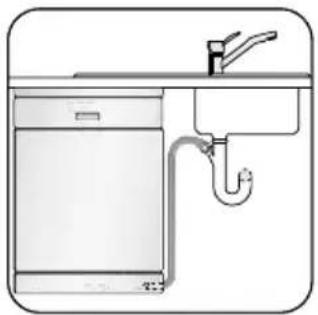
natural_image
Line drawing of a kitchen sink with faucet and pipe (no text or symbols)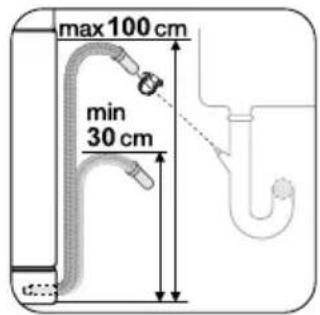
text_image
max 100 cm min 30 cmInlet hose
Connect the inlet hose to a water tap with an external thread of 3/4".
The inlet hose can be turned either to the left or the right to suit the installation by means of the locknut.
The locknut must be correctly fitted to avoid water leaks.
Drain hose
- Connect drain hose to the sink. Secure it with the supplied hose clamp.
- Required height: 30 to 100 cm above bottom of the dishwasher.
- If you use a drain hose extension the total length should not be longer than 4 metres. Likewise the internal diameter of the couplings used for connections to the waste outlet must be no smaller than the diameter of the hose provided.

text_image
Diagram showing chromosome with a warning symbol and two crossed chromosomes, indicating genetic risk or experimental conditions.Ensure that the hoses are not kinked, crushed or entangled.
CAUTION!
Always be sure, that there is no water leakage from hoses and their connections after the installation.
Electrical connection
! WARNING!
Safety standards require the appliance to be earthed. The manufacturer accepts no liability for failure to observe the above safety precautions.
Prior to using the appliance for the first time, ensure that the rated voltage and type of supply on the rating plate match that of the supply where the appliance is to be installed. The fuse rating is also to be found on the rating plate.
Always plug the mains plug into a correctly installed shockproof socket.
WARNING!
Multi-way plugs, connectors and extension cables must not be used. This could constitute a fire hazard through overheating.
If necessary, have the domestic wiring system socket replaced. In case that the electrical cable has to be replaced, contact your local Service Force centre.
The plug must be accessible after the appliance has been installed.
Never unplug the appliance by pulling on the cable. Always pull the plug.
Fitting under a counter
By removing the dishwasher's worktop, you can install it under a close fitting sink unit or a pre-existing top.
Be sure that once the appliance has been installed, it is easily accessible for the service engineer in the event that a repair is required.

text_image
600 mm 820 mm 600 mm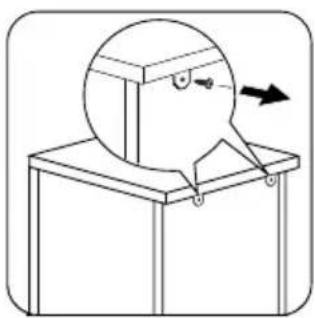
natural_image
Simple line drawing of a mechanical device with a circular component and an arrow indicating direction (no text or symbols)Unscrew the two screws at the rear.

natural_image
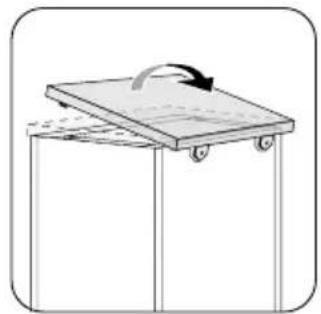
Simple line drawing of a rectangular object with a downward arrow, no text or symbols presentPush the top backwards about 1 cm.
natural_image
Simple line drawing of a wooden crate with a curved arrow indicating rotation (no text or symbols)Lift top at the front and remove it.
Levelling
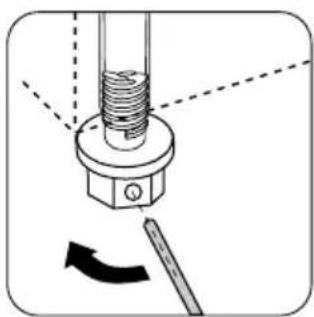
Good levelling is essential for correct closure and sealing of the door. When the appliance is correctly levelled, the door will not catch on either side of the cabinet.

natural_image
Illustration of a white rectangular kitchen appliance with a handle and top panel, shown against a tiled wall (no text or symbols)Check if the dishwasher is levelled.
natural_image
Mechanical diagram showing a bolt and nut assembly with a rotating tool (no text or symbols)If not, loosen or tighten the adjustable feet until the appliance is perfectly levelled.
Service and spare parts
SERVICEFORCE
In the event of your appliance requiring service, or if you wish to purchase spare parts please contact your local Service Force Centre by telephoning:
08705 929929
Your telephone call will be automatically routed to the Service Force Centre covering your post code area.
For the address of your local Service Force Centre and further information about Service Force, please visit the website at www.serviceforce.co.uk
Before calling out an engineer, please ensure you read the details under the heading "Something not working".
When you contact the Service Force Centre you will need to give the following details:
- Your name, address and post code
- Your telephone number
- Clear and concise details of the fault
- The model and serial number of the appliance (found on the rating plate)
- The purchase date
Please note that a valid purchase receipt or guarantee documentation is required for in-guarantee service calls.
For Customer Service in The Republic of Ireland please contact us at the address below:
Electrolux Group (Irl) Ltd
Long Mile Road
Dublin 12
Republic of Ireland
Tel: + 353 (0)1 4090751
Email: service.eid@electrolux.ie
Customer Care Department
For general enquiries concerning your Zanussi-Electrolux appliance or for further information on Zanussi-Electrolux products please contact our Customer Care Department by letter or telephone at the address below or visit our website at www.zanussi-electrolux.co.uk
Customer Care Department
Major Appliances
Zanussi-Electrolux
Addington Way
Luton
Bedfordshire
LU4 9QQ
Tel: 08705 727727 (*)
* calls to this number may be recorded for training purposes
To buy accessories, consumables and spare parts at our online shop please visit: http://www.zanussi-electrolux.co.uk
Guarantee conditions
Standard Guarantee Conditions
We, Zanussi-Electrolux, undertake that if within 12 months of the date of purchase this ZANUSSI-ELECTROLUX appliance or any part thereof is proved to be defective by reason only of faulty workmanship or materials, we will, at our option repair or replace the same FREE OF CHARGE for labour, materials or carriage on condition that:
- The appliance has been correctly installed and used only on the electricity supply stated on the rating plate.
- The appliance has been used for normal domestic purposes only, and in accordance with the manufacturer's instructions.
- The appliance has not been serviced, maintained repaired, taken apart or tampered with by any person not authorised by us.
- All service work under this guarantee must be undertaken by a Service Force Centre.
- Any appliance or defective part replaced shall become the Company's property.
- This guarantee is in addition to your statutory and other legal rights.
Home visits are made between 8.30am and 5.30pm Monday to Friday. Visits may be available outside these hours in which case a premium will be charged.
Exclusions
This guarantee does not cover:
- Damage or calls resulting from transportation, improper use or neglect, the replacement of any light bulbs or removable parts of glass or plastic.
- Costs incurred for calls to put right an appliance which is improperly installed or calls to appliances outside the United Kingdom.
- Appliances found to be in use within a commercial environment, plus those which are subject to rental agreements.
- Products of Zanussi-Electrolux manufacture which are not marketed by Zanussi-Electrolux.
European guarantee
This appliance is guaranteed by Electrolux, in each of the countries listed in the following page, for the period specified in the appliance guarantee or otherwise by law. If you move from one of these countries to another of these countries the appliance guarantee will move with you subject to the following qualifications:
- The appliance guarantee starts from the date you first purchased the appliance which will be evidenced by production of a valid purchase document issued by seller of the appliance.
- The appliance guarantee is for the same period and to the same extent for labour and parts as exists in your country of residence for this particular model or range of appliances.
- The appliance guarantee is personal to the original purchaser of the appliance and cannot be transferred to another user.
- The appliance is installed and used in accordance with instructions issued by Electrolux and is only used within the home, i.e. is not used for commercial purposes.
- The appliance is installed in accordance with all relevant regulations in force within your new country of residence.
www.electrolux.com
 |  |  |
| Albania +35 5 4 261 450 Rr. Pjeter Bogdani Nr. 7 Tirane | ||
| Belgique/België/Belgien +32 2 363 04 44 Bergensesteenweg 719, 1502 Lembeek | ||
| Česká republika | +420 2 61 12 61 12 | Budějovická 3, Praha 4, 140 21 |
| Danmark +45 70 11 74 00 Sjællandsgade 2, 7000 Fredericia | ||
| Deutschland | +49 180 32 26 622 | Muggenhofer Str. 135, 90429 Nürnberg |
| Eesti +37 2 66 50 030 Mustamäe tee 24, 10621 Tallinn | ||
| España | +34 902 11 63 88 | Carretera M-300, Km. 29,900 Alcalá de Henares Madrid |
| France www.electrolux.fr | ||
| Great Britain | +44 8705 929 929 | Addington Way, Luton, Bedfordshire LU4 9QQ |
| Hellas +30 23 10 56 19 70 4 Limnou Str., 54627 Thessaloniki | ||
| Hrvatska +385 1 63 23 338 Slavonska avenija 3, 10000 Zagreb | ||
| Ireland +353 1 40 90 753 Longmile Road Dublin 12 | ||
| Italia | +39 (0) 434 558500 | C.so Lino Zanussi, 26 - 33080 Porcia (PN) |
| Latvija +37 17 84 59 34 Kr. Barona iela 130/2, LV-1012, Riga | ||
| Lituania | +370 5 27 80 609 Verkiu 29, 09108 Vilnius, Lithuania | |
| Luxembourg | +35 2 42 43 13 01 | Rue de Bitbourg, 7, L-1273 Hamm |
| Magyarország | +36 1 252 1773 | H-1142 Budapest XIV, Erzsébet királyné útja 87 |
| Nederland | +31 17 24 68 300 Vennootsweg 1, 2404 CG - Alphen aan den Rijn | |
| Norge | +47 81 5 30 222 Risløkkvn. 2, 0508 Oslo | |
| Österreich | +43 18 66 400 | Herziggasse 9, 1230 Wien |
| Polska | +48 22 43 47 300 ul. Kolejowa 5/7, Warsaw | |
| Portugal | +35 12 14 40 39 39 | Quinta da Fonte - Edificio Gonçalves Zarco - Q 35 2774 - 518 Paço de Arcos |
| Romania | +40 21 44 42 581 B-dul Timisoara 90, S6, Bucharest | |
| Schweiz/Suisse/Svizzera | +41 62 88 99 111 | Industriestrasse 10, CH-5506 Mägenwil |
| Slovenija | +38 61 24 25 731 | Tržaška 132, 1000 Ljubljana |
| Slovensko | +421 2 43 33 43 22 | Electrolux Slovakia s.r.o., Electrolux Domáce spotrebiče SK, Seberíniho 1, 821 03 Bratislava |
| Suomi | +35 8 26 22 33 00 | Konepajanranta 4, 28100 Pori |
| Sverige | +46 (0)771 76 76 76 | Electrolux Service, S:t Göransgatan 143, S-105 45 Stockholm |
| Türkiye | +90 21 22 93 10 25 | Tarlabași caddesi no : 35 Taksim Istanbul |
| Россия | +7 095 937 7837 | 129090 Москва, Олимпийский проспект, 16 БЦ „Олимпик” |
Notes
www.electrolux.com
www.zanussi-electrolux.co.uk