Aficio MP C4500 - Printer RICOH - Free user manual and instructions
Find the device manual for free Aficio MP C4500 RICOH in PDF.

User questions about Aficio MP C4500 RICOH
0 question about this device. Answer the ones you know or ask your own.
Ask a new question about this device
Download the instructions for your Printer in PDF format for free! Find your manual Aficio MP C4500 - RICOH and take your electronic device back in hand. On this page are published all the documents necessary for the use of your device. Aficio MP C4500 by RICOH.
USER MANUAL Aficio MP C4500 RICOH
natural_image
Exterior view of a white electronic printer with open door and paper filter (no visible text or symbols)Aficio™
IKON
Document Efficiency
At Work.
Table of Contents
Making a Copy....3
Duplexing 5
Finishing 8
Accessing the PCL Driver 9
Duplexing 10
Finishing/Stapling 11
Printing Job Type 12
Printing a Locked Print File 14
Faxing....15
Faxing
For Immediate Fax Transmission:
- Check that the Immediate Transmission Indicator is lit. (If it is not lit, press the Transmission Mode key).
text_image
Event Start OK Finish Event Start OK Finish Event Finish Event Finish Event Finish Event Finish Event Finish Event Finish Event Finish Event Finish Event Finish Event Finish Event Finish Event Finish Event Finish Event Finish Event Finish Event Finish Event Finish Event Finish Event Finish Event Finish Event Finish Event Finish Event Finish Event Finish Event Finish 1/2- Set your original on the Document Feeder. Select the scan settings you require.

text_image
Text Standard Auto Direct Scan Settings Auto Send Select Options Original and Low 1000 File Type Fox Internet Fax E-mail Page No. Manual Entry Report Selection Project: AB CD EF GH LK External Branch External Data EBITDA/INTC XCF External Data NEW YORK U FTICE External Data HOLD COMP SACT External Data HOLD COMP SACT External Data HOLD COMP SACT External Data HOLD COMP SACT-
Dial. If you make a mistake, press the Clear/Stop key and enter the correct number again.
-
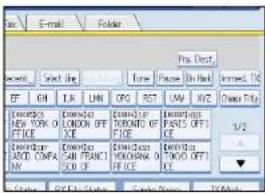
Press the Start key. The machine calls the destination. While it is dialing, the number or name which is programmed as

text_image
Fax Internet Fax E-mail Folder Add G3* 0312345678_ Reg. No. Edit Dest. Recent Select Line Tone F Frequent AB CD EF GH UK LMN OPQ RST C:\WINDOWS\BRANCH BEPLIN OFFICE NEW YORK OFFICE LONDON OFFICE TORONTO OFFICE DETROIT FACTORY LOS ANGELES FACT ADD COMPANY SAN FRANCISCO OF VYKOHANA OFFICE TV File Status: TV File Status: Send Outthe Own Name or Own Fax Number in the machine of the other party is shown on the display. When connected, the machine starts scanning the original.
- After transmission, the machine will return to standby mode.
Printing a Locked Print File
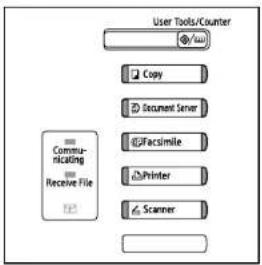
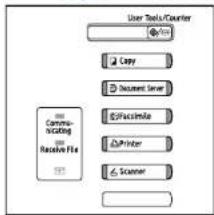
- On the machine's control panel, press the Printer key to display the Printer Screen.
text_image
User Tools/Counter Copy Document Server Facsimile Printer Scanner Communicating Receive File- Press View Locked Print Jobs.

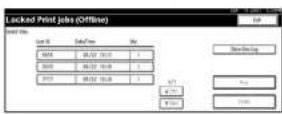
A list of the locked print files stored in the machine is displayed.
-
Select the file you want to print by pressing on it.
-
Enter the password; then press OK.
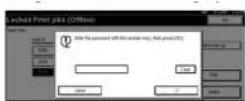
- Press Yes.
Making a Copy
- Press Copy on the Control Panel to access the copier functions.
text_image
User Tools Counter Copy Document Server Certificate Printer Scanner
text_image
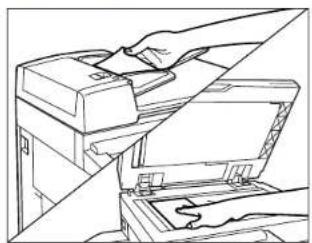
Ready Audio Color Select Full Color Audio & Volumes Tall Color Audio & Volumes 100% 1 2 3 4 5 6 7 8x11 1x17 8x11 1x17 9.5% 10.5% 100% Create Maps Auto Tools Text Tools Cover/Share Sheet Edit / Color Data/Video/Share Debug/Actions- Place your original.
natural_image
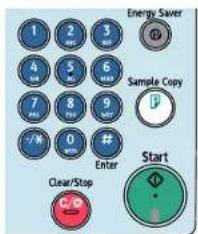
Line drawing of a printer being inserted into a paper airplane (no text or symbols)- Enter the number of copies required.
text_image
Energy Saver Sample Copy Clear/Stop StartMaking a Copy continued
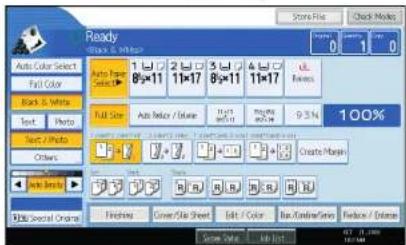
- You can manually select desired paper size.

text_image
Ready- Or select Auto. Press the Start key.

text_image
Ready brush or pixels Auto Color Select Full Color Black & white Text Photo Text / Photo Others Auto Brush 100% Auto Paper Select 1 8×11 2 11×17 3 8×11 4 11×17 Basic Full Size Auto Radius / Beige By: 0.05-1.0 Beige Beige Beige 9.3% Create Margin Finish Cover/Box Sheet Edit / Color Out/Close/Sens Reduce / Enlace Write Time Get ListPrinting Job Type continued
Document Server Print
Select to send a file to the Document Server. The file will be stored in the Document Server for future editing or printing. To optionally enter a user ID, file name, password or user name for the file, click the [Details] button.
When printing the file stored in the Document Server, the following features settings need to be set on the printer's operation panel. These features settings are not available on the printer driver when the [Document Server] is selected in the [Job Type] list box: Duplex, Collate, Copies, Staple, Paper Source (Paper Selection), Output Tray, Media Type.
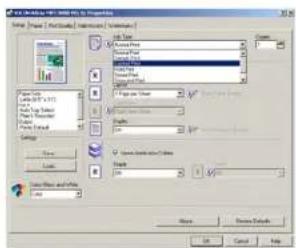
Printing Job Type
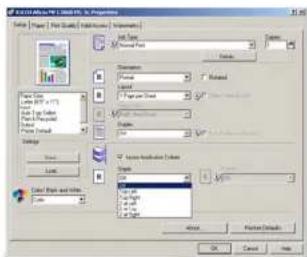
- In the Print dialog box, Select Properties and then select the Setup tab.
Select the type of print job in the Job Type box.
Normal
text_image
File Type (FCA) - Default Name: C:\Users\Documents\Documents\1 File Type: C:\Users\Files Size: 100% Width: 100% Size: 100% Color: 100% Size: 100% Color: 100% Size: 100% Color: 100% Size: 100% Color: 100% Size: 100% Color: 100% Size: 100% Color: 100% Size: 100% Color: 100% Size: 100% Color: 100% Size: 100% Color: 10 Cancel HelpSelect this for normal printing. The print job starts immediately after a print command is given. To optionally enter a user ID, click the [Details] button.
Locked (Confidential) Print
Select to send the print job to the printer and save it on the printer hard disk. The printer does not start printing the saved job until the user ID and password are entered from the printer's operation panel. Enter the user ID and password in the [Locked Print Details] dialog box opened by clicking the [Details] button.
Duplexing
This function enables you to make two-sided copies from one- or two-sided originals or one-sided copies from two-sided originals.
- Making Two-sided Copies from One-sided Originals (1 - 2 sided) This feature enables your to make two-sided copies from one-sided originals.
- Making Two-sided Copies from Two-sided Originals (2- 2 sided) This mode makes two-sided copies from two-sided originals.
Making Two-sided Copies from One-sided Originals
This feature enables you to make two-sided copies from one-sided originals.

flowchart
graph LR
    A["1"] --> B["2"]
    B --> C["1"]
    C --> D["2"]
- Press the 1 - 2 Sided Key.
text_image
Ready Black & White Auto Color Select Full Color Black & White Text Photo Next / Auto Orders Auto Blend Auto Special Origin 1 2 3 4 5 8x11 11x17 8x11 11x17 Full Size Auto Blend / Auto 9.5% 100% Create Margin Finishing Cover/Share Sheet Edit / Color Back/Outer/Menu Finish / Continue-
Place the originals in the Feeder.
-
Press Start.
Finishing/Stapling
-
In the Print dialog box, Select Properties and then select the Setup tab.
-
Select the stapling position. Stapling positions in the list box vary depending on the type of optional finish
text_image
EXTRADELA/NTC REGULARS - In Properties Name Project File Size Layout Name Parameters Current Data Current Data Properties Current Data Current Data Current Data Current Data Current Data Current Data Current Data Current Data Current Data Current Data Current Data Current Data Current Data Current Data Current Data Current Data Current Data Current Data Current Data Current Data Current Data Current Data Current Data Current Data Current Data Current Data Current Data Current Data Current Data Current Data Current Data Current Data Current Data Current DataNote: When stapling multiple sets ensure that the collate box in the print dialog screen is not checked. Otherwise the entire print job may be stapled together.
If the document being printed and stapled contains pages different in size or direction, those sheets printed will not get stapled in the job.
Duplexing
-
In the Print dialog box, Select Properties and then select the Setup tab.
-
Select a Duplex setting.

text_image
C:\DATA\BBS\100\100\100\100\100\100\100\100 Name: [Image] (File/Map) [User] [Environment] [ ] [ ] [ ] [ ] [ ] [ ] [ ] [ ] [ ] [ ] [ ] [ ] [ ] [ ] [ ] [ ] [ ] [ ] [ ] [ ] [ ] [ ] [ ] [ ] [ ] [ ] [ ] [ ] [ ] [ ] [ ] [ ] [ ] [ ] [ ] [ ] [ ] [ ] [ ] [ ] [ ] [ ] [ ] [ ] [ ] [ ] [ ] [ ] [ ] [ ] [ ][ ]Off
Disables Duplex Printing
Open to Left
Prints output so that you can open it to the left when bound along the left edge like a book.
Open to Top
Prints output so that you can open it to the top when bound along the top like a calendar.
Booklet
Prints output so that you can fold it into a booklet. Two document pages are reduced and printed side by side on each side of each sheet. For example, an 11 x 17 document will be printed as two 8 1/2 x 11 images on each side of the 11 x 17 sheet. A Letter size document will be printed as two 5 1/2" x 8 1/2" images on each side of Letter size sheets.
Note: Booklet printing is not available when more than one page per sheet is selected in [Layout], or [Fit to Print Size] is selected on the [Paper] tab.
- Click the OK button.
Making Two-sided Copies from Two-sided Originals
This feature enables you to copy two-sided originals on the front and back sides of the paper.

text_image
1 2 → 1 2- Press the 2 - 2 key.

text_image
Ready Color & White Auto Color Select Full Color Text & White Text Photo Text / Photo Others Auto Black Auto Redraw / D以前 1x17 8x11 1x17 1x17 9.5% 100% Create Manager Auto Black Auto Redraw / D以前 1x17 8x11 1x17 1x17 9.5% 100% Auto Black Auto Redraw / D以前 1x17 8x11 1x17 1x17 9.5% 100% Auto Black Auto Redraw / D以前 1x17 8x11 1x17 1x17 9.5% 100% Auto Black Auto Redraw / D以前 1x17 8x11 1x16 1x17 1x17 9.5% 100% Auto Black Auto Redraw / D以前 1x17 8x11 1x16 1x17 1x17 9.5% 100% Auto Black Auto Redraw / D以前 1x17 8x11 1x16 1x17 1x17 9.3% 100% Auto Black Auto Redraw / D以前 1x17 8x11 1x16 1x17 1x17 9.3% 100% Auto Black Auto Redraw / D以前 1x17 8x11 1x16 1x17 1x17 9.3% 100% Auto Black Auto Redraw / D前 1x17 8x11 1x16 1x17 1x17 9.3% 100% Auto Black Auto Redraw / D前 1x17 8x11 1x16 1x17 1x17 9.3% 100% Auto Black Auto Redraw / D前 1x17 8x11 1x 6 1x 6 2x 2x 2x 2x 2x 2x 2x 2x 2x 2x 2x 2x 2x 2x 2x 2x 2x 2x 2x 2x 2x 2x 2x 2x 2x 2x 2x 2x 2x 2x 2x 2x 2x 2x 50% Auto Black-
Place the originals in the Feeder.
-
Press Start.
Finishing
Each copy set can be stapled together.
- Select one of the Stapling positions.
text_image
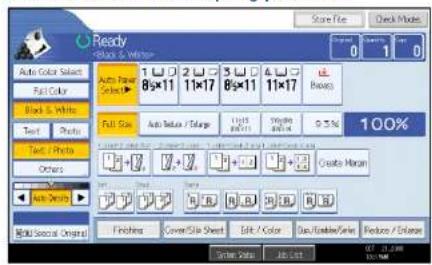
Ready Blacks & White Auto Color Select Full Color Block & White Text Photo Text / Photo Others Auto Show Multi-Sector Original 1 2 3 4 5 8x11 11x17 8x11 11x17 Auto Size Auto Radius / Range Width Width 0.5% 100% Create Margin Finishing Cover/Side Sheet Edit / Color Data/Video/Series Preview / Release Score Flow Check Mode 0 1 0- Enter the number of copy sets with the number keys.
- Place your originals, then press the start key.
PCL Print driver
To access the print driver,
- In the application with the document open, select File/Print to print your document.
- In the Print dialog box, select your printer name from the Name drop down box, and then click the Properties button. The Properties dialog box opens.
- Specify the various print settings in the Properties dialog box. To switch between sheets, click the tabs for the Setup, Paper, Print Quality, Statistics and Watermarks.
- After all the print settings are specified, click the OK button in the Properties dialog box.

text_image
File Edit View Help Properties Name: Paper & Print (Edit) Options Format: Size: 100 px Opacity: 100% Quality: Normal Balance: 50% Balance: 50% Balance: 50% Balance: 50% Balance: 50% Balance: 50% Balance: 50% Balance: 50% Balance: 50% Balance: 50% Balance: 50% Balance: 50% Balance: 50% Balance: 50% Balance: 50% Balance: 50% Balance: 50% Balance: 30% Balance: 30% Balance: 30% Balance: 30% Balance: 30% Balance: 30% Balance: 30% Balance: 30% Balance: 30% Balance: 30% Balance: 30% Balance: 30% Balance: 30% Balance: 30% Balance: 30% Balance: 30% Balance: 30% Balance : 100%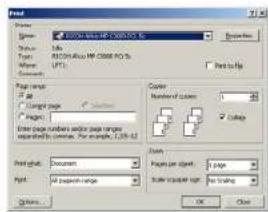
text_image
Format Name: 100000000000000000000000000000000000000000000000000000000000000000000000000000000000000000 Type: 164 Page Range: 164 Page Count: 164 Page Range: 164 Page Range: 164 Page Range: 164 Page Range: 164 Page Range: 164 Page Range: 164 Page Range: 164 Page Range: 164 Page Range: 164 Page Range: 164 Page Range: 164 Page Range: 164 Page Range: 128 Page Range: 128 Page Range: 128 Page Range: 128 Page Range: 128 Page Range: 128 Page Range: 128 Page Range: 128 Page Range: 128 Page Range: 128 Page Range: 128 Page Range: 128 Page Range: 128 Page Range: Page Range: Page Range: Page Range: Page Range: Page Range: Page Range: Page Range: Page Range: Page Range: Page Range: Page Range: Page Range: Page Range: Page Range: Page Range: Page Range: Page Range: Page Range: Page Range: Page Range: Page Range: Page Range: Page Range: Page Range: Page Range: Page Range: Page Range: Page Range: Page Range: Page Range: Page Range: Page Range: Page Range: PPT: PPT: PPT: PPT: PPT: PPT: PPT: PPT: PPT: PPT: PPT: PPT: PPT: PPT: PPT: PPT: PPT: PPT: PPT: PPT: PPT: PPT: PPT: PPT: PPT: PPT: PPT: PPT: PPT: PPT: PPT: PPT: PPT: PPT:- Click the OK button in the Print dialog box. The document is printed under the settings you specified.