B970 - Router HUAWEI - Free user manual and instructions
Find the device manual for free B970 HUAWEI in PDF.

User questions about B970 HUAWEI
0 question about this device. Answer the ones you know or ask your own.
Ask a new question about this device
Download the instructions for your Router in PDF format for free! Find your manual B970 - HUAWEI and take your electronic device back in hand. On this page are published all the documents necessary for the use of your device. B970 by HUAWEI.
USER MANUAL B970 HUAWEI
Wonderful Communication, Mobile Life.
Welcome to HUAWEI 3G Wireless Gateway.
HUAWEI 3G Wireless Gateway
User Guide
Copyright © 2008 Huawei Technologies Co., Ltd.
All Rights Reserved
No part of this manual may be reproduced or transmitted in any form or by any means without prior written consent of Huawei Technologies Co., Ltd.
Trademarks

HUAWEI and HUAWEI are trademarks of Huawei Technologies Co., Ltd. All other trademarks and trade names mentioned in this manual are the property of their respective holders.
Notice
The information in this manual is subject to change without notice. Every effort has been made in the preparation of this manual to ensure accuracy of the contents, but all statements, information, and recommendations in this manual do not constitute the warranty of any kind, expressed or implied.
Safety Precautions
Read the safety precautions carefully to ensure the correct and safe use of your wireless device. For detailed information, see "Warnings and Precautions."
 | Do not switch on your device when the device use is prohibited or when the device use may cause interference or danger. |
 | Do not use your device while driving. |
 | Follow the rules or regulations in hospitals and health care facilities. Switch off your device near medical apparatus. |
 | Switch off your device in an aircraft. The device may cause interference to control signals of the aircraft. |
 | Switch off your device near high-precision electronic devices. The device may affect the performance of these devices. |
 | Do not attempt to disassemble your device or its accessories. Only qualified personnel are allowed to service or repair the device. |
 | Do not place your device or its accessories in containers with strong electromagnetic field. |
 | Do not place magnetic storage media near your device. Radiation from the device may erase the information stored on them. |
 | Do not put your device in a high-temperature place or use it in a place with flammable gas such as a gas station. |
 | Keep your device and its accessories away from children. Do not allow children to use your device without guidance. |
 | Use approved accessories only to avoid explosion. |
 | Observe the laws or regulations on device use. Respect others' privacy and legal rights when using your device. |
Table of Contents
1 Using the Gateway Configuration Page....3
Logging in to the Management Page....3
Describing the Management Page....4
Using the Quick Setup Wizard....5
Connecting to the Internet 5
Validating the PIN Code....6
Viewing the Gateway Configuration Information....6
2 Quick Setup....7
Configuring PPP Profile Settings....7
Selecting the PPP Connection Mode....7
Configuring the WLAN Setting....7
Configuring the WLAN Encryption Mode ....8
Validating Quick Setup....9
3 Configuring Your Computer ....10
Wireless Configuration....10
Configuring the PC Network....11
4 Advanced Settings Overview....14
5 System Management....16
Modifying the Password....16
Upgrading the Gateway....16
Restoring Factory Defaults....17
Restarting the Device 17
Viewing the Version Information ....17
6 SIM Card Settings....18
Enabling or Disabling the PIN Code....18
Unlocking the PIN Code ....18
Modifying the PIN Code....19
7 UMTS Settings....20
Choose the Preferred Mode and Band....20
Configuring the Mode for Searching Network....21
8 Dial-up Settings....22
Configuring PPP Settings....22
Managing the Profile List....23
9 DHCP Settings 25
10 WLAN Settings 26
Enabling or Disabling the WLAN....26
Configuring WLAN Settings....26
Advanced WLAN Settings....27
Configuring the MAC Filter....28
11 Security Settings (Optional)....30
Firewall Switch....30
LAN MAC Filter 31
LAN IP Filter....31
Virtual Server....32
DMZ Service ....33
UPnP Setting....34
Remote Web Management....34
12 Typical Networking Example ....35
13 Troubleshooting....36
14 Warnings and Precautions....40
15 Abbreviations ....43
1
Using the Gateway Configuration Page

Note:
The supported functions and displayed appearance are subject to your product purchased. Pictures posted for illustration purpose only. Please refer to the product for actual appearance. For details of your product selection, consult your service provider.
Logging in to the Management Page
- Start the IE browser, and then enter the address http://192.168.1.1 in the address bar.
- Select User Type, enter Password, and then click
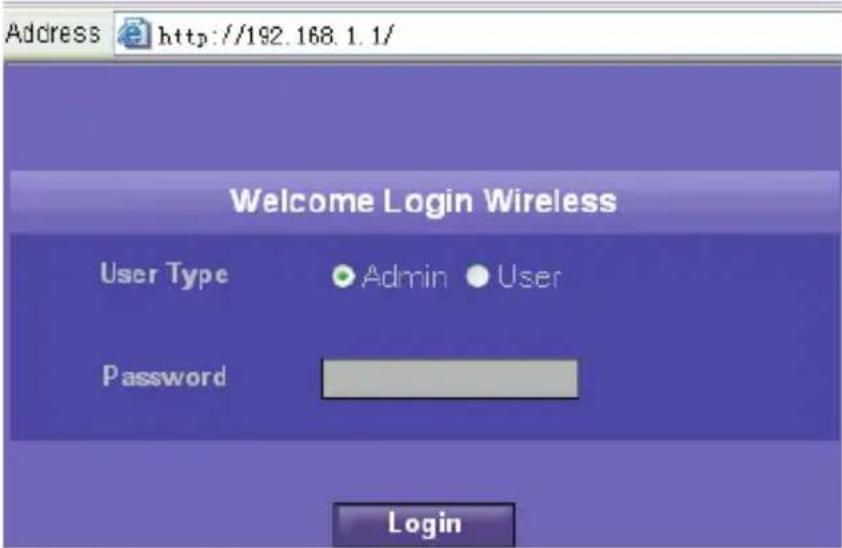
text_image
Address http://192.168.1.1/ Welcome Login Wireless User Type Admin User Password Login- Admin: Has the rights to view and modify the configurations. The default password is admin;
- User: Has the right to view only the basic information. The default password is user.

Note:
To avoid the configuration conflict, only one user can log in to the gateway management page at a time.
Describing the Management Page
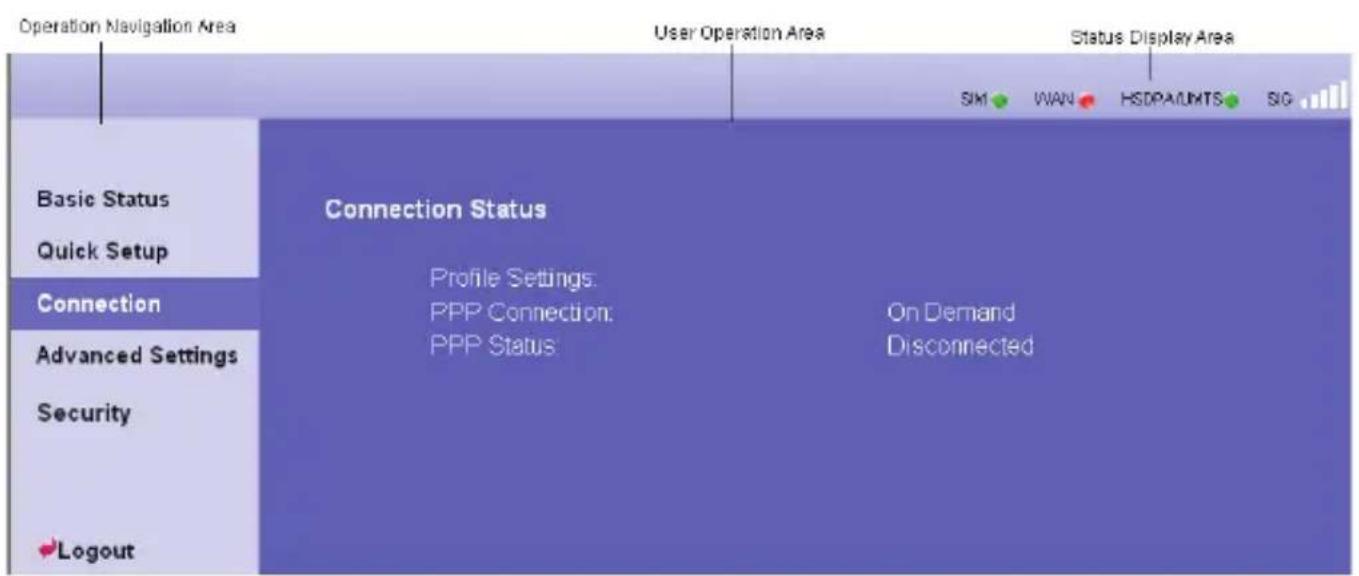
text_image
Operation Navigation Area User Operation Area Status Display Area SIM WAN HSDPAUMTS SIG Basic Status Quick Setup Connection Advanced Settings Security Logout Connection Status Profile Settings: PPP Connection: PPP Status On Demand Disconnected• Operation Navigation Area: Shows the main functions of the management console.
- User Operation Area: Shows configuration information, data information, help information, and function operation area of the gateway. The user operation window varies with different function operations.
- Status Display Area: Shows the network mode, PPP dial-up status, network signal strength, and SIM card status in real-time.
Operation Functions
The following table shows the main operations in the gateway management page.
| Item Description | |
| Basic Status | Displays the parameter configuration status of the gateway. For details, see "Viewing the Gateway Configuration Information." |
| Quick Setup | Configures the gateway quickly. For details, see "Quick Setup ." |
| Connection Displays the network connection status and connects to the network. For details, see "Connecting to the Internet." | |
| Advanced Settings Configures the advanced settings of the gateway, which includes the following settings: system, SIM card, UMTS, dial-up, DHCP, and WLAN. For details, see "Advanced Settings." | |
| Security (Optional) Configures the Security settings of the gateway, For details, see “Security Settings”. | |
| Logout Log out of the gateway page | |
Gateway Status
The following table shows the gateway status information.
| Item Description | |||
| SIM |  | The SIM card is valid. |  The SIM card is not inserted or invalid. The SIM card is not inserted or invalid. |
| WAN |  | The PPP dial-up connection is successful. |  The PPP dial-up connection is failed. The PPP dial-up connection is failed. |
| WCDMA |  | The WCDMA network is connected. |  The WCDMA network is unavailable. The WCDMA network is unavailable. |
 | Note:If the gateway is registered with other network modes, the corresponding network connection status is displayed. | ||
Note:
SIG The signal strength from weak to strong is shown as follows:

Using the Quick Setup Wizard
The quick setup wizard guides you to configure the most important settings of the gateway.
If you are using the gateway configuration page for the first time, the system displays the quick setup wizard page by default after you log in. You can configure the basic parameters quickly by following the prompts. For details, refer to "Quick Setup."
Connecting to the Internet
Accessing the Connection Status Page
- Click Connection to access the page.
- After you log in to the management page again, you can automatically access the connection status page.
Connecting to the Internet
-
If the PIN code protection is enabled, the system prompts you to validate the PIN code. For details, see "Validating the PIN Code."
-
If PPP Connection is Auto or Demand, refresh the page to view the current network connection status.
-
If PPP Connection is Manual, click Connect or Disconnect to connect or disconnect from the network.
-
Wait for several minutes, if you are prompted that the connection is successful, you can start the IE browser and enter the website address to access the Internet.
Validating the PIN Code
If the PIN code protection is enabled, you are prompted to validate the PIN code when you restart the gateway and log in to the management page.
- Enter the correct PIN code, and then click Apply
Note:
- For the initial PIN code, consult your service provider.
- If you enter wrong PIN codes for three successive times, the PIN is locked. For details, see "Unlocking the PIN Code."
-
If the PIN validation fails, you cannot use the network-related functions.
-
When you succeed in validating the PIN code, click Continue to access the network connection page.
Viewing the Gateway Configuration Information
On the gateway configuration page, you can view the current parameter configuration information of the gateway and the network connection status. The network connection status includes WAN, LAN, and WLAN.
- Click Basic Status in the operation navigation area.
- Click Advanced... on the right part of the page to view the status of the gateway.
- Click page. Refresh to view the current status of the gateway on the advanced status
2
Quick Setup
You can use the quick setup wizard to configure and maintain the basic parameters of the gateway. Click Quick Setup in the operation navigation to access the welcome page. Click Next> to access the PPP profile setting page following the page prompts.
Configuring PPP Profile Settings
- Profile Name: Enter the profile name when the text box is null.
- Dial-up Number/PPP User Name/PPP Password: Enter these three parameters provided by the internet service provider (ISP). The dial-up number is used to initiate the network call; and the PPP user name and password is used to gain the service authorization provided by the ISP.
- APN/IP Address: Select the mode for obtaining the APN or IP address. If the carrier provides the relevant parameters, select Static and enter the APN and IP address. Otherwise, you need to select Dynamic and the gateway automatically obtains them.
Selecting the PPP Connection Mode
PPP Connection: It is used to select the dial-up access mode.
- Auto: After the gateway is switched on, it automatically connects to the Internet and will not disconnect regardless of the data transmission.
- On Demand: The gateway automatically connects to the Internet when there is data transmission. When the duration of no data transmission exceeds the Max Idle Time, it automatically closes the connection.
- Manual: Manual dial-up. For details, see "Connecting to the Internet."
PPP Authentication: The service is provided by your Internet Service Provider (ISP). For details, consult your ISP.
Configuring the WLAN Setting
SSID: Enter a name for your WLAN.
The service set identifier (SSID) is used to identify a WLAN. A wireless terminal (such as a PC) and the wireless gateway can perform normal data communication only when they have the same SSIDs. To ensure the WLAN security, do not use the default SSID. You can
enter a character string as the SSID, such as MyHome.
SSID Broadcast: Enable or disable the SSID broadcast.
- Enabled: The gateway broadcasts the SSID of the WLAN, and users can easily access the WLAN. Unauthorized users, however, can also easily access the WLAN because the SSID is broadcasted.
- Disabled: The gateway does not broadcast the SSID of the WLAN. Before accessing the WLAN, the user must obtain the SSID of the WLAN. Thus, the WLAN security is improved.

Note:
For the convenience of the client accessing the WLAN, you can select Enabled for SSID Broadcast when you configure the WLAN setting. Once you finish setting up the WLAN, you can disable the SSID broadcast to improve the security of the WLAN.
Configuring the WLAN Encryption Mode
To access the wireless network, you must set the wireless security key of your PC be consistent with that of the wireless gateway.
No Encryption
For the convenience of the client accessing the WLAN, you can set the Encryption mode to NO ENCRYPTION when you set up a WLAN. In daily use, however, this option is not recommended for the security of the WLAN.
WPA-PSK/WPA2-PSK
- WPA-PSK is a 256-bit data encryption method that can automatically change the key.
- WPA2-PSK is a more secure version of WPA-PSK, and it supports the IEEE 802.11 standard.
- WPA Encryption is algorithms for selecting the WPA data encryption. There are three algorithms: TKIP, AES, and TKIP+AES.
- WPA Pre-Shared Key: You can enter 64-character hexadecimal value or 8–63-char ASCII value as the key. The ASCII value contains all characters that can be entered through the PC keyboard, and the hexadecimal value contains numbers of 0–9 and characters of A–F. For example, you can enter the ASCII value of 1234abcde as the key.
- Network Key Rotation Interval: It is used to set how long a network key is dynamically changed. By default, it is 0. To disable this function, you can set the value to 0 or Null.
WEP
Wireless Equivalent Privacy, a 64-bit or 128-bit data encryption method. The 128-bit WEP encryption provides higher security level.
Network key 1: You can enter 5 ASCII characters or 10-character hexadecimal numeral to
form a 64-bit key. You can also enter 13 ASCII characters or 26-character hexadecimal numeral to form a 128-bit key.
Validating Quick Setup
The last page of the wizard displays the all settings you have configured.
- To acc, click ept settings Finish to submit the information.
- To make changes, click <Back to return.
- Click Cancel to quit the settings.
3
Configuring Your Computer
In this part, take the Window XP operating system (OS) as an example to describe how to configure your computer. For other OSs, the configuration may be different; thus, you need to configure it according to the actual situation.
Wireless Configuration
The wireless configuration enables your PC connect to the gateway through the wireless network. If you need only the Ethernet to connect your PC, you do not need to configure this.
Configuration Requirements
- To set up wireless network connection, your PC must have been configured with the WLAN adapter that supports the IEEE 802.11 b/g protocol.
- If the encryption function is enabled, you need to ensure that all PCs connecting to the gateway use the same key with the gateway.
- For the use of WLAN adapter, refer to the WLAN adapter user guide provided by the manufacturer.
- See "Configuring the WLAN Encryption Mode" for the encryption configuration.
- See "Configuring the WLAN Setting" for SSID parameters configuration.
Configuring the Wireless Network Connection
- Select Start > Control Panel > Network Connections > Wireless Network Connection.
- Click Show Wireless Networks to display the wireless network connection list.
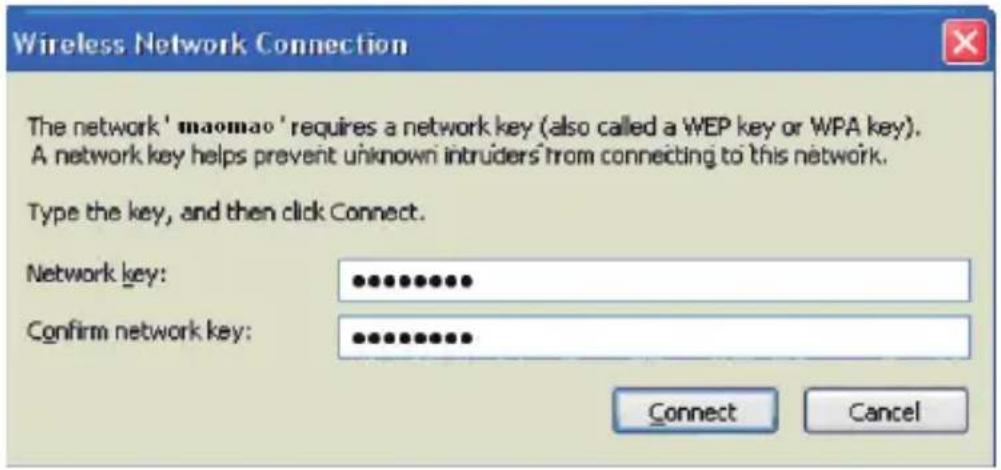
- Select the network connection that the SSID is consistent with that in the gateway WEB configuration, and then click Connect.

text_image
Wireless Network Connection Choose a wireless network Click an item in the list below to connect to a wireless network in range or to get more information. Network Tasks Refresh network list Set up a wireless network for a home or small office Related Tasks Learn about wireless networking Change the order of preferred networks Change advanced settings maomao Not connected Unsecured wireless network Connect- If the encryption parameter is set for the gateway, the Wireless Network Connection dialog box is displayed and requires the network key and confirmation. The value you entered must be consistent with the WPA Pre-Shared Key or Network Key of the gateway.
text_image
Wireless Network Connection The network 'maomao' requires a network key (also called a WEP key or WPA key). A network key helps prevent unknown intruders from connecting to this network. Type the key, and then click Connect. Network key: Confirm network key: Connect Cancel- Wait for several minutes after you enter the correct network key. The wireless connection icon displays in the status area in the lower right corner of the screen. Then, your PC can automatically connect to the gateway.
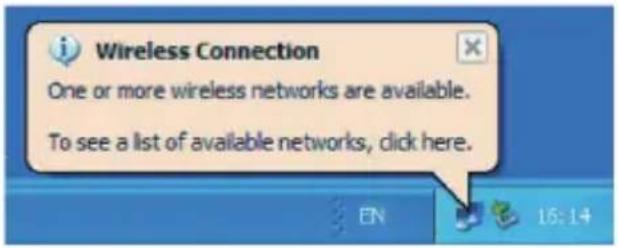
text_image
Wireless Connection One or more wireless networks are available. To see a list of available networks, click here.Configuring the PC Network
The recommended configurations of the gateway are as follows:
- Obtain an IP address automatically.
• Deselect Use a proxy server for your LAN.
Configuring the Network Connection
- Select My Network Places > Properties > Local Area Connection.
- Right-click the Local Area Connection icon and select Properties from the shortcut menu.

My Network Places
Open
Explore
Search for Computers...
Map Network Drive...
Disconnect Network Drive...
Create Shortcut
Delete
Rename
Properties

Local Area Connection
Enabled
Intel(R) PRO/100 VE Network ...
Disable
Status
Repair
Bridge Connections
Create Shortcut
Delete
Rename
Properties
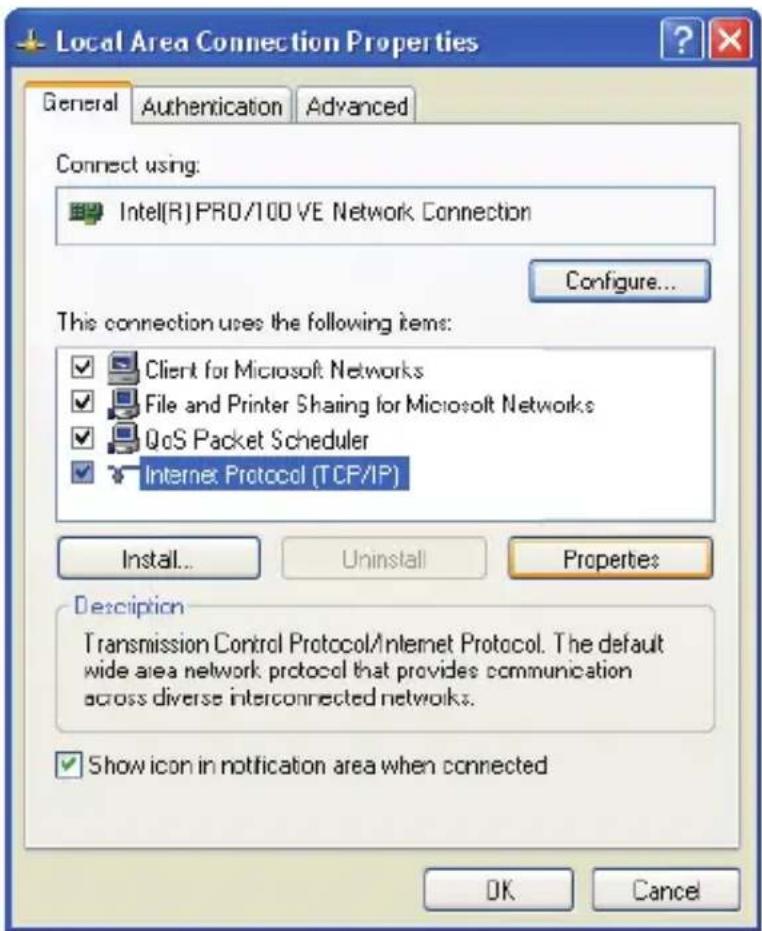
- In the Local Area Connection Properties dialog box, select Internet Protocol (TCP/IP) in the This connection uses the following items list box, and then click Properties.
text_image
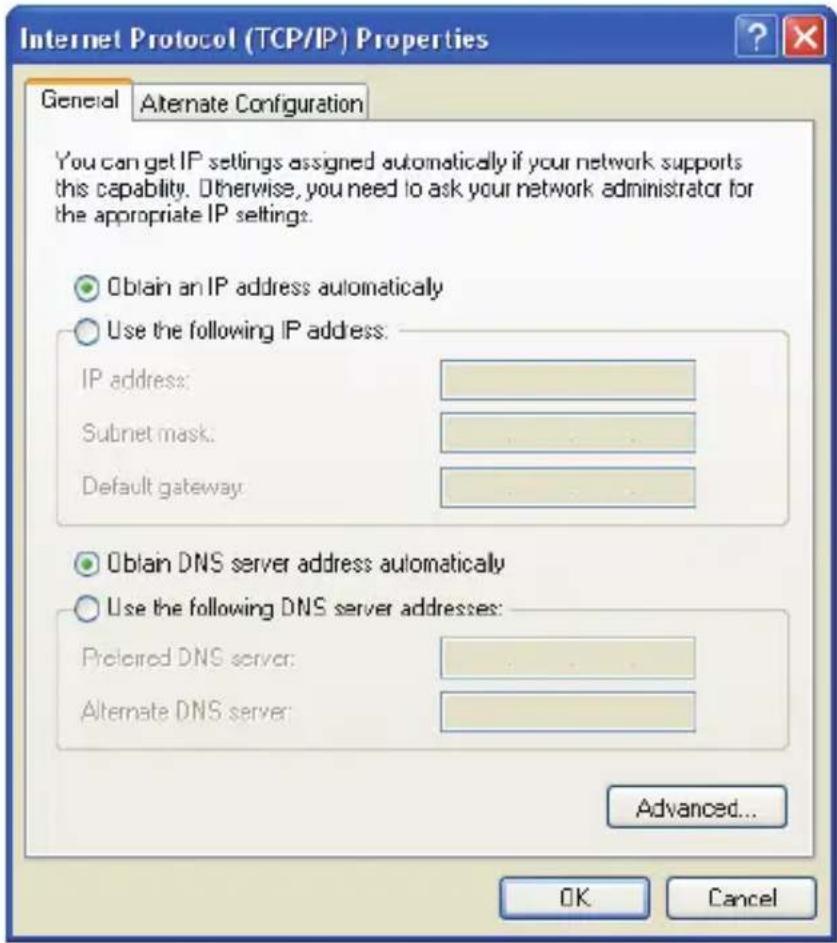
Local Area Connection Properties General Authentication Advanced Connect using: Intel(R)PRO/100 VE Network Connection Configure... This connection uses the following items: ✓ Client for Microsoft Networks ✓ File and Printer Sharing for Microsoft Networks ✓ QoS Packet Scheduler ✓ Internet Protocol (TCP/IP) Install... Uninstall Properties Description Transmission Control Protocol/Internet Protocol. The default wide area network protocol that provides communication across diverse interconnected networks. ✓ Show icon in notification area when connected OK Cancel- Select Obtain an IP address automatically and Obtain DNS server address automatically in the Internet Protocol (TCP/IP) Properties dialog box, and then click OK.
text_image
Internet Protocol (TCP/IP) Properties General Alternate Configuration You can get IP settings assigned automatically if your network supports this capability. Otherwise, you need to ask your network administrator for the appropriate IP settings. Obtain an IP address automatically Use the following IP address: IP address: Subnet mask: Default gateway: Obtain DNS server address automatically Use the following DNS server addresses: Preferred DNS server: Alternate DNS server: Advanced... OK CancelDisabling Proxy Settings
- Start the IE browser, and then select Tools > Internet Options.
- Select the Connections tab, and then click LAN Settings.
- In the LAN Settings dialog box, deselect Use a proxy server for your LAN.
4
Advanced Settings Overview
In the Advanced Settings page, you can configure the basic attributes and advanced parameters of the gateway, and perform routine maintenance and management to the gateway.
In the operation navigation area, click Advanced Settings to access the page
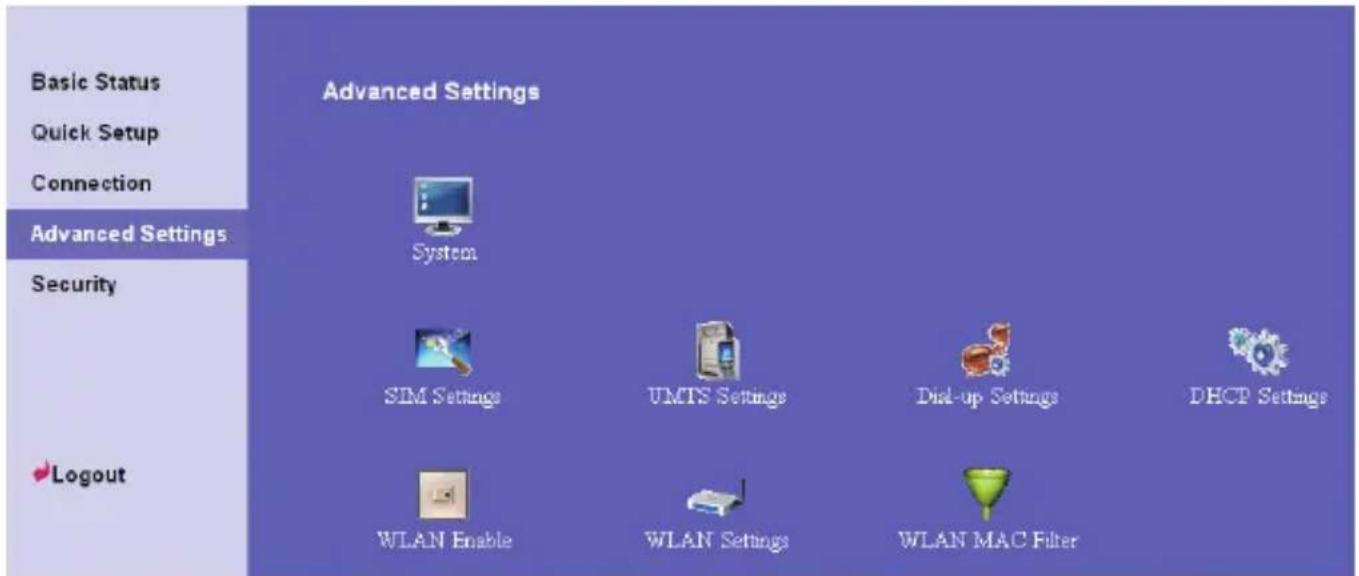
text_image
Basic Status Quick Setup Connection Advanced Settings Security Logout Advanced Settings System SIM Settings UMTS Settings Dial-up Settings DHCP Settings WLAN Enable WLAN Settings WLAN MAC FilterT wing the follo able describes shortcut icons.
| Icon Description | |
 | Open the system management interface to modify the password, upgrade software, restore the factory default, restart the device, and view the version information. |
 | Open the SIM card setting interface to manage the PIN code operation. |
 | Open the UMTS setting interface to configure the network search mode and band. |
 | Open the dial-up setting interface to configure PPP dial-up properties and manage the profile list. |
 | Open the DHCP setting interface to choose the IP address assignment mode. |
 | Open the interface to enable or disable the WLAN. |
 | Open the WLAN setting interface. |
 | Open the MAC address filter setting window. |
5
System Management
On the system management page, you can modify the password, upgrade the software, restore fact defaults, restart the device, and view the version information.
Click to access the system management page, as shown in the following figure.
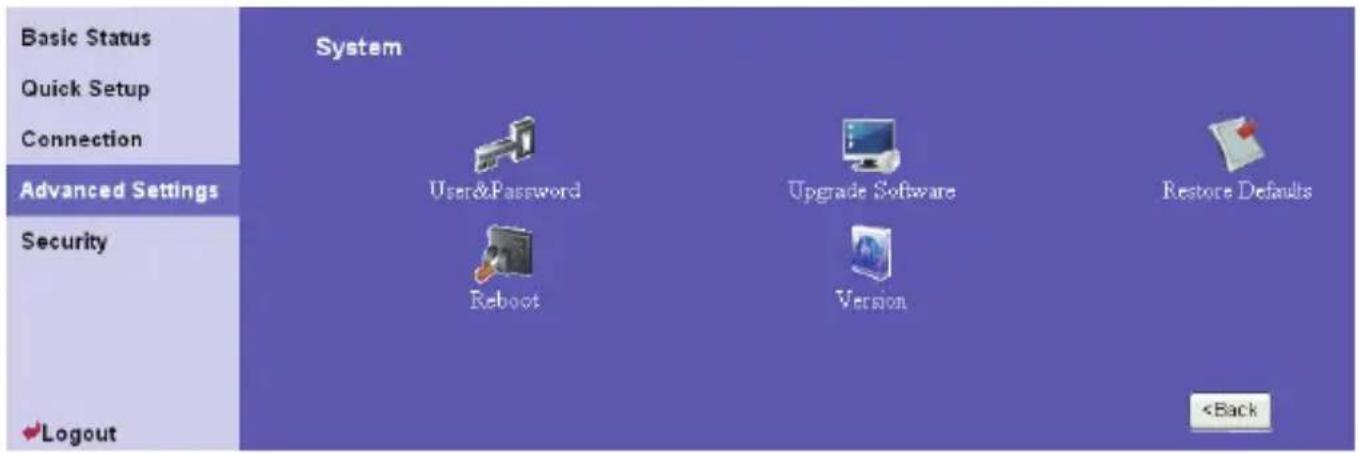
text_image
Basic Status Quick Setup Connection Advanced Settings Security ✓Logout System User&Password Reboot Upgrade Software Version Restore Defaultshe Password Modifying t
You can modify login password to prevent unauthorized users from logging in to the management e. 1. Click to modify the Mword window. 2. aEsword, eand kentfprnaid then enter the new passwor 3. Click Modify to save the modification, clickCaution:
• After the system is upgraded, the system automatically restarts. The whole process takes two to three minutes. - The software programs for upgrading must come from the official website of Huawei or the official website of the carrier. - The system upgrading does not change the configuration of the client.Restoring Factory Defaults
If you need to reconstruct the network or you forget the changes of some parameters, you can choose to restore factory defaults and reconfigure the gateway. Click to open the Restore Defaults window, and then click Restore. Note: After this operation, all configurations restore to the defaults.Restarting the Device
1. Click  2. Click to open the Reboot window. to restart the gateway.Viewing the Version Information
Click to display the System Version page. You can view the hardware version, software version, release time, and the hardware version and software version of the wireless module. 6
SIM Card Settings
You can manage the PIN code on the SIM card settings window, including the following operations: - Enabling the PIN code - Disabling the PIN code - Modifying the PIN code - Unlocking the PIN codeNote:
- If you enter the wrong PIN code for three successive times, the PIN code is locked. You need to enter the PUK code to unlock it. • TheaPInotodowest, be 4–8 numerals, and letter Click  to open the SIM card setting window.Enabling or Disabling the PIN Code
If the PIN code protection is enabled, you need to validate the PIN code each time when you restart the gateway and log in to the management page; if the PIN code protection is disabled, you do not need to validate the PIN code. 1. Select enable/disable in the PIN Code Operation list box. 2. Enter the correct PIN code. 3. Click Apply 4. If the PIN code is wrong, the system prompts you to reset it.ing the PIN Code Unlock
If the PIN code is locked, you need to enter correct PUK code and set the new PIN code to unlock it.Nde:
- If you forgot the PUK code, consult your carrier. - If you enter the wrong PUK code for successive 10 times, the SIM card is locked. You need to consult your carrier to unlock the SIM card. 1. Enter the correct PUK code. 2. Enter the new PIN code and confirm it. 3. Click Apply to submit the setting.Modifying the PIN Code
When the PIN code protection is enabled, you can reset the PIN code. 1. Select modify in the PIN Code Operation list box. 2. Enter the current PIN code. 3. Enter the new PIN code and confirm it. 4. Click Apply to submit the setting.7
UMTS Settings
On the UMTS settings window, you can set the priority of connection modes and bands in searching a network. Click  to open the UMTS Settings window, as shown in the following figure. text_image
Basic Status Quick Setup Connection Advanced Settings Security ✓Logout UMTS Settings Network Settings Searching Networkand Choos he Preferre
 1. Click 📋 to open the Network Settings window. 2. eSelect the prefer e of connection mode in thePrisebred Me following table shows the details of connection modes.Network Mode Description
3G preferred The gateway automatically selects the data service mode based on the network signal strength. The high-speed data service mode is preferred. GPRS preferred sed on The gateway automatically selects the data service mode ba the network signal strength. The low-speed data service mode is preferred. 3G only The gateway works only in high-speed data service mode. GPRS only The gateway works only in low-speed data service mode.Note:
- If he is said, provides only the GPRS service and the Prefe configured as 3G only, you cannot access the Internet. - Preferred Modly provides only the 3G service and configured as GPRS only, you cannot access the Internet. - If the carrier provides neither the 3G nor GPRS service, you cannot access the Internet regardless of the Preferred Mode. 3. Select the band to search the network in the Band list box. You can select from the following: - All Band • GSM900/D800/W00 - GSM1900 - GSM850 4. Click Apply to submit settings.Configuring the Mode for Searching Network
 1. Click to open the Searching Network window. 2. Select ohscrandung network. • Auto: The gateway automatically searches the network and registers with it. \- Manual: You need to manually search the network and register with it. 3. Click Apply to submit the setting. 4. In Manual mode, select the searched network and click Log on8
Dial-up Settings
In the Dial-Up Settings window, you can configure PPP settings and manage profile settings.Click
 to open the Dial-Up Settings window, as shown in the following figure. text_image
Basic Status Quick Setup Connection Advanced Settings Security ✓Logout Dial-up Settings PPP Settings Profile SettingsConfiguring PPP Settings
 1. Click to open the PPP Settings window. 2. Enter the correct parameters. - Profile List: Select a profile from the established dial-up connection list. If the drop-down list is null, you need to create a profile list. - PROSection: S elect the dial-up connection mode. Dial-up Mode Description| Auto | After the gateway is switched on, it automatically connects to the Internet and will not disconnect regardless of the data transmission. |
| On Demand | The gateway automatically connects to the Internet when there is data transmission. When the duration of no data transmission exceeds the Max Idle Time, it automatically closes the connection. |
| Manual | Manual dial-up. |
Managing the Profile List
Click to open the Pro a dial-up connection list.  file settings window and you can create, edit, save, and delete I escripnterface D tion| Parameter Description | |
| Profile List Include all created profile names. | |
| Profile Name | Enter the name of the selected or created profile. |
| Dial-up Number | Enter the character string for PPP dial-up number. It is provided by the network carrier. |
| PPP User Name | The user name used in PPP communication. It is provided by the network carrier. |
| PPP Password | the The password used in PPP communication. It is provided by network carrier. |
| APN | Select the mode for obtaining the APN:Dynamic: The network dynamically assigns the APN.Static: Manually enter the APN provided by the network carrier. |
| IP Address | Select the mode for assigning IP addresses:Dynamic: The network dynamically assigns the IP address.Static: Manually enter the IP address provided by the network carrier. |
Creating a Profile
1. Enter the profile information in the text box based on prompts. 2. Click Save to save the new profile.Modifying a Profile
1. Select a profile to be modified in the Profile List drop-down list. Relevant information is displayed in the corresponding text box. 2. Enter the profile information. 3. Click Save to save the modified profile.De ting aleProfile
1. Select a profile to be deleted in the Profile List drop-down list. 2. Click Delete to delete the selected profile.9
DHCP Settings
In the dynamic host configuration protocol (DHCP) settings page, you can set the mode for assigning IP addresses in a LAN. DHCP automatically assigns IP addresses to the network devices. If you are using the DHCP server, you need to do the following configurations on the PC connecting with the gateway. For details, refer to "Configuring the PC Network."  to open the DHCP setting page. Click - IP Address: The default IP address of the gateway is 192.168.1.1. - Subnet Mask: The combination of the subnet mask and IP address enables the flexible subnetting. By default, the subnet mask is 255.255.255.0. - DHCP Server: It is used to assign IP addresses dynamically. If the DHCP server is Enabled, it can automatically assign IP addresses for PCs. It is recommended to select Disabled for the DHCP server. - Start IP Address& End IP Address: It is used to define the IP address range that the host can use during the IP address assignment. For example, in the network segment 192.168.1.0/24, the default IP address of the gateway is 192.168.1.1. The host IP address can range from 192.168.1.2 to 192.168.1.254. The minimum range is a single IP address. - DHCP Lease Time: The DHCP server automatically assigns an IP address to each device connected to the network. When the leased time expires, the DHCP server checks whether the device is connected to the network. If the device is disconnected from the network, the server assigns the IP address to another device. Thus, the IP address is not wasted. Note:
- The Start IP Address must be smaller than or equal to the End IP Address. - If the DHCP Server is Enabled, the configurations of Start IP Address, End IP address, and DHCP Lease Time are valid; otherwise, you cannot configure them.10
WLAN Settings
Enabling or Disabling the WLAN
 1. Click to open the WLAN Module Settings window. 2. Enable or disable the WLAN module. \- EnableEnable the can use the WLAN function and configure relevant parameters. \- Disable: Disable the WLAN module. You cannot use the WLAN function and configure relevant parameters. 3. Click Apply to submit the setting.Configuring WLAN Settings
Click  to open the WLAN Settings window.Selecting Interface IDs
Wireless Interface: It refers to the SSID and MAC address, and is used to identify the wireless gateway.SSID
SSID: The service set identifier (SSID) is used to identify a WLAN. A wireless terminal (such as a PC) and the wireless gateway can perform normal data communication only when they have the same SSIDs. To ensure the WLAN security, do not use the default SSID. You can enter a character string as the SSID, such as MyHome.Enabling or Disabling the SSID Broadcast
- Enabled: Enable the SSID broadcast. The gateway broadcasts the SSID of the WLAN, and users can easily access the WLAN. Unauthorized users, however, can also easily access the WLAN. - Disabled: Disable the SSID broadcast. The gateway does not broadcast the SSID of the WLAN. Before accessing the WLAN, the user must obtain the SSID of the WLAN. Thus, the WLAN security is improved.Enabling or Disabling the AP Isolation
- On: The terminals (PCs) connecting to the gateway through the WLAN cannot access each other. - Off: The terminals (PCs) connecting to the gateway through the WLAN can access each other.Selecting the Country
Country: It is used to identify the country. Different countries have different standards on channel usage.Selecting the WLAN Channel
Channel: It refers to the channel that the gateway works with. If you do not know which channel to select, select Auto and the gateway can automatically search for the channel.Configuring02.11 Mode
There available modes, as shown in the following table.| Mode Description |
| 54g Auto The WLAN has the best compatibility in this mode. |
| 54g Performance The WLAN has the best performance in this mode. |
| 54g LRS lties in comIfith gatingwaythalediffisuconforming to the IEEE 802.11b standards, select this mode. |
| 802.11b Only The gateway can only work in the low performance 802.11b standard network mode. |
Configuring the Transmission Rate
1. Select Auto, the gateway automatically searches the transmission rate. 2. Click Apply to submit the setting. 3. Click Advanced to configure the advanced WLAN setting.tings Advanced WLAN Set
You can configure the security and Network Bridge.Configuring Security Key
A security key can protect your WLAN from illegal data attacking. The security key of your wireless gateway must be consistent with that of the PC.Configuring the 802.11 Authentication
- Open: Open system authentication. A user accessing the WLAN can choose WEP, WPA-PSK, or WPA2-PSK key to pass the authentication or choose No encryption to skip the authentication. - Shared: Shared key authentication. It can use only WEP. The user accessing the WLAN must use the WEP to authenticate.Configuring the Encryption Mode
There are four encryption modes: No Encryption, WPA-PSK, WPA2-PSK, and WEP. For details, refer to "Configuring the WLAN Encryption Mode."Configuring Access Attributes of the Client
You can set the Preamble Type, Max Associations Limit, Mode, and enable or disable the peer MAC address through the Bridge Restriction. - Preamble Type: It has two options: Long and Short. In the case that the client (PC) supports the Short type, the WLAN can have a better performance if it is Short. - MAXAssociatedLimit: It refers to the maximum number of con set the maximum number of concurrent WLAN users on the gateway. - ModesItarefe the WLAN accessing mode. The gateway can work in two mod shown in the following table. The default value is Access Point.Mode Description
Wireless Bridge It is used to connect two or more access points. Access Point The access points meeting the IEEE 802.11b/g standard or the wireless terminals can connect the wireless gateway. - Bridge Restriction: It refers to the limitation to the peer MAC addresses. When it is Disabled, the gateway can access all the remote bridges; when it is Enabled, the gateway can only access the remote bridges that the addresses are in the address list. - Bridges: It refers to the physical address of the remote peer bridge. The gateway supports the point-to-multipoint (PTM) bridge mode, and a wireless gateway can connect four remote peer bridges at the same time. - Peer MAC Address: It refers to the physical address list of the remote peer bridges. It contains a maximum of four physical addresses. - Link Status: Up shows the successful connection and Down shows the failed connection.Configuring the MAC Filter
Click  to open the Wlan MAC Filter Settings window. You can control and manage the closing the WLAN, and improve the WLAN security performance.MAC Restrict Mode
The ifgllable lists the MAC address filter modes:| Value Description | |
| Disabled The MAC address filter function is disabled. | |
| Allow The clients with addresses in the MAC Address list are allowed to connect with the gateway through the WLAN. | |
| Deny | The clients with addresses in the MAC Address list are not allowed to connect with the gateway through the WLAN. |