Town Car (2007) - Car Lincoln - Free user manual and instructions
Find the device manual for free Town Car (2007) Lincoln in PDF.

User questions about Town Car (2007) Lincoln
0 question about this device. Answer the ones you know or ask your own.
Ask a new question about this device
Download the instructions for your Car in PDF format for free! Find your manual Town Car (2007) - Lincoln and take your electronic device back in hand. On this page are published all the documents necessary for the use of your device. Town Car (2007) by Lincoln.
USER MANUAL Town Car (2007) Lincoln
Warning lights and chimes 10
Gauges 13
Entertainment Systems 15
AM/FM stereo with CD 15
AM/FM stereo cassette with CD 18
AM/FM stereo with cassette and in-dash six CD 24
Navigation system 30
Climate Controls 93
Dual automatic temperature control 93
Rear window defroster 96
Lights 97
Headlamps 97
Turn signal control 101
Bulb replacement 101
Driver Controls 108
Windshield wiper/washer control 108
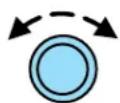
Steering wheel adjustment 109
Power windows 111
Mirrors 113
Speed control 114
Moon roof 119
Message center 124
Locks and Security 138
Locks 138
Anti-theft system 149
Table of Contents
Seating and Safety Restraints 155
Seating 155
Safety restraints 160
Airbags 175
Child restraints 187
Tires, Wheels and Loading 199
Tire information 199
Vehicle loading 213
Trailer towing 219
Recreational towing 222
Driving 223
Starting 223
Brakes 227
Traction ControlTM 229
Air suspension 231
Transmission operation 231
Roadside Emergencies 239
Getting roadside assistance 239
Hazard flasher switch 241
Fuel pump shut-off switch 241
Fuses and relays 242
Changing tires 248
Lug nut torque 255
Jump starting 255
Wrecker towing 260
Customer Assistance 261
Reporting safety defects (U.S. only) 267
Table of Contents
Cleaning 269
Maintenance and Specifications 276
Engine compartment 278
Engine oil 280
Battery 283
Engine coolant 285
Fuel information 291
Air filter(s) 306
Maintenance product specifications and capacities 309
Engine data 312
Accessories 315
Index 317
All rights reserved. Reproduction by any means, electronic or mechanical including photocopying, recording or by any information storage and retrieval system or translation in whole or part is not permitted without written authorization from Ford Motor Company. Ford may change the contents without notice and without incurring obligation.
Copyright © 2006 Ford Motor Company
Introduction
CALIFORNIAProposition65Warning

WARNING: Engine exhaust, some of its constituents, and certain vehicle components contain or emit chemicals known to the State of California to cause cancer and birth defects or other reproductive harm. In addition, certain fluids contained in vehicles and certain products of component wear contain or emit chemicals known to the State of California to cause cancer and birth defects or other reproductive harm.
CONGRATULATIONS
Congratulations on acquiring your new Lincoln. Please take the time to get well acquainted with your vehicle by reading this handbook. The more you know and understand about your vehicle, the greater the safety and pleasure you will derive from driving it.
For more information on Ford Motor Company and its products visit the following website:
• In the United States: www.ford.com
• In Canada: www.ford.ca
• In Mexico: www.ford.com.mx
• In Australia: www.ford.com.au
Additional owner information is given in separate publications.
This Owner'sGuidedescribes every option and model variant available and therefore some of the items covered may not apply to your particular vehicle. Furthermore, due to printing cycles it may describe options before they are generally available.
Remember to pass on the Owner's Guide when reselling the vehicle. It is an integral part of the vehicle.

Fuelpumpshut-offswitch: In the event of an accident the safety switch will automatically cut off the fuel supply to the e. The switch can also be activated through sudden vibration (e.g. on when parking). To reset the switch, refer to the Fuelpump offswitch in the RoadsideEmergencieschapter.
SAFETY AND ENVIRONMENT PROTECTION

Warning symbols in this guide
How can you reduce the risk of personal injury to yourself or others? In this guide, answers to such questions are contained in comments highlighted by the warning triangle symbol. These comments should be read and observed.

Warning symbols on your vehicle
When you see this symbol, it is imperative that you consult the relevant section of this guide before touching or attempting adjustment of any kind.

Protecting the environment
We must all play our part in protecting the environment. Correct vehicle usage and the authorized disposal of waste, cleaning and lubrication materials are significant steps towards this aim. Information in this respect is highlighted in this guide with the tree symbol.

BREAKING-IN YOUR VEHICLE
Your vehicle does not need an extensive break-in. Try not to drive continuously at the same speed for the first 1,000 miles (1,600 km) of new vehicle operation. Vary your speed frequently in order to give the moving parts a chance to break in.
Drive your new vehicle at least 500 miles (800 km) before towing a trailer. For more detailed information about towing a trailer, refer to Trailertowing in the Tires, Wheels and Loading chapter.
Do not add friction modifier compounds or special break-in oils since these additives may prevent piston ring seating. See Engineoil in the Maintenance and Specifications chapter for more information on oil usage.
SPECIAL NOTICES
New Vehicle Limited Warranty
For a detailed description of what is covered and what is not covered by your vehicle's New Vehicle Limited Warranty, refer to the Warranty Guide that is provided to you along with your Owner's Guide.
Introduction
Special instructions
For your added safety, your vehicle is fitted with sophisticated electronic controls.

Please read the section Supplementalrestraintsystem(SRS) in the SeatingandSafetyRestraintschapter. Failure to follow specific warnings and instructions could result in personal injury.

Front seat mounted rear-facing child or infant seats should NEVERbe placed in front of an active passenger airbag.
Service Data Recording
Service data recorders in your vehicle are capable of collecting and storing diagnostic information about your vehicle. This potentially includes information about the performance or status of various systems and modules in the vehicle, such as engine, throttle, steering or brake systems. In order to properly diagnose and service your vehicle, Ford Motor Company, Ford of Canada, and service and repair facilities may access vehicle diagnostic information through a direct connection to your vehicle when diagnosing or servicing your vehicle.
EventDataRecording
Other modules in your vehicle — event data recorders — are capable of collecting and storing data during a crash or near crash event. The recorded information may assist in the investigation of such an event. The modules may record information about both the vehicle and the occupants, potentially including information such as:
- how various systems in your vehicle were operating;
- whether or not the driver and passenger seatbelts were buckled;
- how far (if at all) the driver was depressing the accelerator and/or the brake pedal;
• how fast the vehicle was traveling; and - where the driver was positioning the steering wheel.
To access this information, special equipment must be directly connected to the recording modules. Ford Motor Company and Ford of Canada do not access event data recorder information without obtaining consent, unless pursuant to court order or where required by law enforcement, other government authorities or other third parties acting with lawful
Introduction
authority. Other parties may seek to access the information independently of Ford Motor Company and Ford of Canada.
Cell phone use
The use of Mobile Communications Equipment has become increasingly important in the conduct of business and personal affairs. However, drivers must not compromise their own or others' safety when using such equipment. Mobile Communications can enhance personal safety and security when appropriately used, particularly in emergency situations. Safety must be paramount when using mobile communications equipment to avoid negating these benefits.
Mobile Communication Equipment includes, but is not limited to cellular phones, pagers, portable email devices, in-vehicle communications systems, telematics devices and portable two-way radios.
A driver's first responsibility is the safe operation of the vehicle. The most important thing you can do to prevent a crash is to avoid distractions and pay attention to the road. Wait until it is safe to operate Mobile Communications Equipment.
Middle East/North Africa vehicle specific information
For your particular global region, your vehicle may be equipped with features and options that are different from the ones that are described in this Owner's Guide; therefore, a supplement has been supplied that complements this book. By referring to the pages in the provided supplement, you can properly identify those features, recommendations and specifications that are unique to your vehicle. Refertothis Owner's Guide for all other required information and warnings.
Introduction
These are some of the symbols you may see on your vehicle.
VehicleSymbolGlossary
Safety Alert

See Owner's Guide
Fasten Safety Belt Airbag -

Airbag - Side Child Seat

Child Seat Installation Warning

Child Seat Lower Anchor
Child Seat Tether Anchor

Brake System
Anti-Lock Brake System

Brake Fluid - Non-Petroleum Based
Powertrain Malfunction Speed Control
Master Lighting Switch Hazard Warning Flasher
Fog Lamps-Front Fuse Compartment
Fuel Pump Reset Windshield Wash/Wipe
Windshield Defrost/Demist

Rear Window Defrost/Demist


VehicleSymbolGlossary
| Power Windows Front/Rear | Power Window Lockout | ||
| Child Safety Door Lock/Unlock | Interior Luggage Compartment Release Symbol | ||
| Panic Alarm Engine Oil | |||
| Engine Coolant | Engine Coolant Temperature | ||
| Do Not Open When Hot Battery | |||
| Avoid Smoking, Flames, or Sparks | Battery Acid | ||
| Explosive Gas Fan Warning | |||
| Power Steering Fluid | Maintain Correct Fluid Level | ||
| Emission System Engine Air Filter | |||
| Passenger Compartment Air Filter | Jack | ||
| Check Fuel Cap | Low Tire Pressure Warning |
Instrument Cluster
WARNING LIGHTS AND CHIMES
text_image
MPH 0 km/h 60 80 120 140 160 180 100 120 P R N D 21 RPM 1000 3 2 1 0 7 GND OFFWarning lights and gauges can alert you to a vehicle condition that may become serious enough to cause expensive repairs. A warning light may illuminate when a problem exists with one of your vehicle's functions. Many lights will illuminate when you start your vehicle to make sure the bulb works. If any light remains on after starting the vehicle, refer to the respective system warning light for additional information.
Serviceenginesoon:The Service
enginesoonindicator light illuminates when the ignition is first turned to the ON position to check
the bulb. Solid illumination after the engine is started indicates the On Board Diagnostics System (OBD-II) has detected a malfunction. Refer to Onboarddiagnostics(OBD-II) in the Maintenance and Specifications chapter. If the light is blinking, engine misfire is occurring which could damage your catalytic converter. Drive in a moderate fashion (avoid heavy acceleration and deceleration) and have your vehicle serviced immediately by your authorized dealer.

Under engine misfire conditions, excessive exhaust temperatures could damage the catalytic converter, the fuel system, interior floor coverings or other vehicle components, possibly causing a fire.
Instrument Cluster
Brakesystemwarninglight:To
confirm the brake system warning light is functional, it will
momentarily illuminate when the ignition is turned to the ON position
when the engine is not running, or in a position between ON and START, or by applying the parking brake when the ignition is turned to the ON position. If the brake system warning light does not illuminate at this time, seek service immediately from your authorized dealer. Illumination after releasing the parking brake indicates low brake fluid level and the brake system should be inspected immediately by your authorized dealer.

BRAKE
Driving a vehicle with the brake system warning light on is dangerous. A significant decrease in braking performance may occur. It will take you longer to stop the vehicle. Have the vehicle checked by your authorized dealer.
Anti-lockbrakesystem: If the
ABS light stays illuminated or continues to flash, a malfunction has been detected, have the system serviced immediately by your
authorized dealer. Normal braking is still functional unless the brake warning light also is illuminated.
Airbagreadiness: If this light fails to illuminate when ignition is turned to ON, continues to flash or remains on, have the system serviced
immediately by your authorized dealer. A chime will also sound when a malfunction in the supplemental restraint system has been detected.
Safetybelt: Reminds you to fasten your safety belt. A BeltMinder®
chime will also sound to remind you to fasten your safety belt. Refer to the Seatingandsafetyrestraints
chapter to activate/deactivate the BeltMinder®chime feature.
Chargingsystem: Illuminates when the battery is not charging properly.
ABS


Instrument Cluster
Engineoilpressure: Illuminates when the oil pressure falls below the normal range, refer to Engineoil in the Maintenance and Specificationschapter.
Tractioncontrol ^™ active: Flashes when the Traction control ^™ system is active. If the light remains on, have the system serviced immediately, refer to the Driving chapter for more information.
O/Doff: Illuminates when the overdrive function of the transmission has been turned OFF, refer to the Drivingchapter. If the light does not illuminate, have the transmission serviced soon, or damage may occur.
Speedcontrol: Illuminates when the speed control is activated. Turns off when the speed control system is deactivated.


Turnsignal: Illuminates when the left or right turn signal or the hazard lights are turned on. If the indicators stay on or flash faster, check for a burned out bulb.
Highbeams: Illuminates when the high beam headlamps are turned on.

Headlampsonwarningchime: Sounds when the headlamps or parking lamps are on, the ignition is off (the key is not in the ignition) and the driver's door is opened.
Key-in-ignitionwarningchime: Sounds when the key is left in the ignition in the OFF/LOCK or ACCESSORY position and the driver's door is opened.
Turnsignalchime(ifequipped): Sounds when the turn signal lever has been activated to signal a turn and not turned off after the vehicle is driven more than 0.8 km (1/2 mile).
GAUGES
text_image
MPH P R N D 21 RPM 1000 6 7 3 4 5 6 F E H C 0 0 0 0 0 0 0 0 0 0 0 0 0 0 0 0 0 0 0 0 0 0 0 0 0 0 0 0 0 0 0 0 0 0 0 0 0 0 0 0 0 0 0 0 0 0 0 0 0 0 M PHSpeedometer: Indicates the current vehicle speed.
Enginecoolanttemperature
gauge:Indicates engine coolant temperature. At normal operating temperature, the needle will be in the normal range (between "H" and
"C"). Ifitenterstheredsection, theengineisoverheating. Stop thevehicleassoonassafely
possible, switchofftheengineandlettheenginecool, refer to What you should know about fail-safe cooling in the Maintenance and specifications chapter.
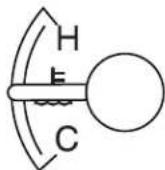

Never remove the coolant reservoir cap while the engine is running or hot.
Instrument Cluster
Odometer: Registers the total miles (kilometers) of the vehicle.
Refer to MessageCenter in the DriverControls chapter on how to switch the display from Metric to English and the odometer to the speedometer.
NW 000000.0 mi
Tripodometer: Registers the miles (kilometers) of individual journeys. Press and release the message center INFO button until "TRIP" appears in the display (this represents the trip mode). Press the control again to select Trip A and Trip B features. Press and hold the RESET button to reset.
Tachometer: Indicates the engine speed in revolutions per minute. Driving with your tachometer pointer continuously at the top of the scale may damage the engine.
TRIP A
# # # . # mi
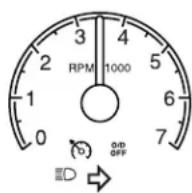
Fuelgauge:Indicates
approximately how much fuel is left in the fuel tank (when the ignition is in the ON position). The fuel gauge may vary slightly when the vehicle is in motion or on a grade.
The arrow near the fuel pump icon indicates which side of the vehicle the fuel filler door is located.

Refer to Filling the tank in the Maintenance and Specifications chapter for more information.
Entertainment Systems
AUDIO SYSTEMS
AM/FM Stereo Single CD Premium audio system (if equipped)

text_image
13 14 15 16 1 2 3 4 5 AM FM SHUF SCAN SEEK TUNE MUTE CD BASS BAL TREB FADE 1 2 3 4 5 6 MENU SEL 10 9 8Accessorydelay: Your vehicle is equipped with accessory delay. With this feature, the window switches, radio and moon roof (if equipped) may be used for up to ten minutes after the ignition is turned off or until any door is opened.
- CDslot: Insert a CD, label side up. With the ignition on, the radio will begin to play a CD once
inserted. If the ignition and audio system are off, press CD prior to inserting a disc. Do not force a disc into the system as damage could result.
- SEEK: Press to access the next/previous radio station or CD
track. Press and hold to advance/reverse in the current CD track.


Entertainment Systems
- TUNE: Press to manually go up or down the radio frequency.

- MUTE: Press to mute the playing media. Press again to return to the playing media or turn the volume control to adjust the volume.

- Eject: Press to eject the CD. If the disc is not removed within the allotted time, the system will

automatically reload the CD and begin play. Note: The eject function will work when the ignition is turned off.
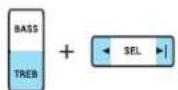
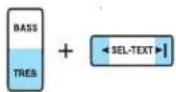
- BASS: Press BASS; then
press ◀ SEL ▶
decrease/increase the level of bass output.

TREB(Treble):Press TREB; then press ◀ SEL ▶
decrease/increase the level of treble output.
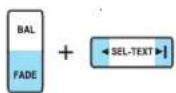
- BAL(Balance):Press BAL; then press ◀ SEL ▶ shift sound to the left/right speakers.
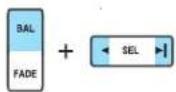
FADE:Press FADE; then press ◀ SEL ▶ shift sound to the rear/front speakers.
- SEL: Use with Bass, Treble, Balance, Fade and other menu functions.

- Menu: Press MENU to access the following functions:

Compression:Brings soft and loud CD passages together for a more consistent listening level when in CD mode. Press MENU until compression status is displayed. Press
Entertainment Systems
SEL to enable the compression feature when COMPRESS OFF is
displayed. Press ◀ SEL ▶ again to disable the feature when
COMPRESS ON is displayed. When activated, the compression icon will appear in the display.
Autoset: Allows you to set the strongest local radio stations without losing your original manually set preset stations for AM/FM1/FM2. Press
MENU until AUTOSET appears in the display. Press ◀ SEL ▶
toggle ON/OFF. When the six strongest stations are filled, the station stored in preset 1 will begin playing. If there are less than six strong stations, the system will store the last one in the remaining presets.
When activated, AUTOSET will momentarily appear in the display when any of the preset controls are pressed.
Speedsensitivevolume: Radio volume changes automatically and slightly with vehicle speed to compensate for road and wind noise.
Recommended level is 1–3. Level 0 turns the feature off and level 7 is the maximum setting.
Press MENU to access and use ◀ SEL ▶ adjust the volume setting.
The level will appear in the display.
Note: The menu selections will remain in the display for approximately 10 seconds, at which time the display will return to the previous mode. You may also exit the menu options by pressing any other audio control.
Settingtheclock: Your vehicle is equipped with an in-dash clock. Refer to Clock in the Driver Controls chapter for instructions on how to set the time.
-
Memorypresets: To set a station: Select frequency band, tune to a station, press and hold a preset button until sound returns.
-
On/Off/Volume: Push to turn on/off; turn to adjust the volume levels.
Note: With the ignition turned off, you may press the volume control to momentarily view the clock.
- CD:Press to enter CD mode if a CD is already present in the system. In radio mode, the CD icon will appear in the display if a CD is loaded into the system.

Entertainment Systems
- AM: Press to select the AM frequency.

- FM: Press to select the FM frequency. Press repeatedly to toggle between FM1 and FM2.

- SHUF(Shuffle): Press to play all tracks on the current CD in random order. Press again to stop.

- SCAN: Press SCAN to hear a brief sampling of radio stations or CD tracks. Press again to stop.

Premium Satellite Compatible AM/FM Stereo Single CD/Cassette system (if equipped)

flowchart
graph TD
    A["CD TAPE"] --> B["SAT"]
    B --> C["AM FM"]
    C --> D["SCAN"]
    D --> E["SEEK"]
    E --> F["TUNE-CAT"]
    F --> G["BASS"]
    G --> H["FADE"]
    H --> I["BASS"]
    I --> J["FADE"]
    J --> K["SEL-TEXT"]
    K --> L["FADE"]
    L --> M["BASS"]
    M --> N["FADE"]
    N --> O["SEL-TEXT"]
    O --> P["BASS"]
    P --> Q["FADE"]
    Q --> R["BASS"]
    R --> S["FADE"]
    S --> T["BASS"]
    T --> U["FADE"]
    U --> V["BASS"]
    V --> W["FADE"]
    W --> X["BASS"]
    X --> Y["FADE"]
    Y --> Z["BASS"]
    Z --> AA["FADE"]
    AA --> AB["BASS"]
    AB --> AC["FADE"]
    AC --> AD["BASS"]
    AD --> AE["FADE"]
    AE --> AF["BASS"]
    AF --> AG["FADE"]
Entertainment Systems
AudiophileSatelliteCompatibleAM/FMStereoSingleCD/Cassette system(ifequipped)
flowchart
graph TD
    A["CD TAPE"] --> B["SAT"]
    B --> C["AM FM"]
    C --> D["SCAN"]
    D --> E["SEEK"]
    E --> F["TUNE-CAT"]
    F --> G["BASS TREB"]
    G --> H["BAL FADE"]
    H --> I["SEL-TEXT"]
    I --> J["MENU"]
    J --> K["10"]
    K --> L["11"]
    L --> M["12"]
    M --> N["13"]
    N --> O["14"]
    O --> P["15"]
    P --> Q["16"]
    Q --> R["17"]
    R --> S["18"]
    S --> T["19"]
    T --> U["20"]
    U --> V["1"]
    V --> W["SOUR 20000"]
    W --> X["2"]
    X --> Y["3"]
    Y --> Z["4"]
    Z --> AA["5"]
    AA --> AB["6"]
    AB --> AC["7"]
    AC --> AD["8"]
    AD --> AE["9"]
    AE --> AF["10"]
    AF --> AG["11"]
    AG --> AH["12"]
    AH --> AI["13"]
    AI --> AJ["14"]
Accessorydelay: Your vehicle is equipped with accessory delay. With this feature, the window switches, radio and moon roof (if equipped) may be used for up to ten minutes after the ignition is turned off or until any door is opened.
- CDslot: Insert a CD, label side up. With the ignition on, the radio will begin to play a CD once
inserted. If the ignition and audio system are off, press CD prior to inserting a disc. Do not force a disc into the system as damage could result.
- CDeject: Press to eject a CD. If the disc is not removed within the allotted time, the system will
automatically reload the CD and begin play. Note: The eject function will work when the ignition and audio systems are turned off.


Entertainment Systems
- BASS:Press BASS; then
press ◀ SEL-TEXT ▶
decrease/increase the level of bass output.
TREB(Treble):Press TREB; then
press ◀ SEL-TEXT ▶
decrease/increase the level of treble output.
- BAL(Balance): Press BAL; then
press ◀ SEL-TEXT to shift
sound to the left/right speakers.
FADE:Press FADE; then press
SEL-TEXT to shift sound to the rear/front speakers.
-
Phone/mute: Press to mute the playing media. Press again to return to the playing media, or turn the volume control to adjust the volume.
-
SEL/TEXT: Use with Bass,
Treble, Balance, Fade and other menu functions.


TEXT: TEXT is only available when equipped with Satellite radio. Your Audiophile radio is quipped with Satellite ready capability. The kit to enable Satellite reception is available through your authorized dealer. Detailed Satellite instructions are included with the dealer installed kit. Checkwithyourauthorizeddealerforavailability.
- MENU:Press MENU repeatedly
to access RDS on/off. Use SEL to toggle RDS on/off. Press MENU
again to access Program type mode or Show Type/Name mode. (MENU must be pressed within 10 seconds to proceed to the next RDS mode.)
The Federal Communications Commission (FCC) and the Canadian Radio and Telecommunications Commission (CRTC) recommend that FM radio broadcasters use RDS technology to transmit information. FM radio stations are independently operated and individually elect to use RDS technology to transmit station ID and program type as desired.
Entertainment Systems
FINDProgramtype: Allows you to search RDS-equipped stations for a certain category of music format: Classic, Country, Info, Jazz, Oldies, R&B, Religious, Rock, Soft, Top 40.
With RDS ON, press MENU until the program type menu is displayed. One of the various program types will appear. Press ◀ SEL-TEXT ▶ to scroll through music types. Press SEEK or SCAN to search for a station playing the requested music category.
ShowTYPE: Selects between displaying the station's call letters or music format when RDS is enabled. Press and hold MENU until SHOW XX appears in the display. Press ◀ SEL-TEXT ▶ select NAME or TYPE.
Compression:Brings soft and loud CD passages together for a more consistent listening level when in CD mode. Press MENU repeatedly until COMP (compression) is displayed. Press ◀ SEL-TEXT ▶ enable the compression feature when COMPRESS OFF is displayed.
Press ▶ SEL-TEXT ▶ gain to disable the feature when COMPRESS ON is displayed. When activated, the compression icon will appear in the display.
Occupancy mode: (Available only on Audiophile audios): Press MENU repeatedly until occupancy mode appears in the display.
Press ◀ SEL-TEXT ▶ select ALL, DRIVER or REAR SEAT occupancy mode.
Autoset: Allows you to set the strongest local radio stations without losing your original manually set preset stations for AM/FM1/FM2. Press MENU repeatedly until AUTOSET appears in the display.
Press ◀ SEL-TEXT ▶ toggle ON/OFF. When the six strongest stations are filled, the station stored in preset 1 will begin playing. If there are less than six strong stations, the system will store the last one in the remaining presets.
Speedsensitivevolume:Radio volume changes automatically and slightly with vehicle speed to compensate for road and wind noise. Recommended level is 1–3. Level 0 turns the feature off and level 7 is the maximum setting.
Press MENU to access and ◀ SEL-TEXTNo adjust the volume setting. The level will appear in the display.
Dolby:Works in tape mode to reduces tape noise and hiss. Press MENU until DOLBY XX appears in the display. Press SEL/TEXT to toggle ON/OFF.
Entertainment Systems
The Dolby® noise reduction system is manufactured under license from Dolby Laboratories Licensing Corporation. Dolby® and the double-D symbol are registered trademarks of Dolby Laboratories Licensing Corporation.
Armrest(ifequipped): If your vehicle is equipped with Rear Seat Audio controls, this feature will be listed in Menu mode.
Press ◀ SEL-TEXT ▶ toggle ON/OFF. When the feature is turned ON, rear seat passengers can adjust the settings of the front audio stem. For further information, refer to RearConsoleAudioControls(if equipped)later in this chapter.
Note: The menu selections will remain in the display for approximately 10 seconds, at which time the display will return to the previous mode. You may also exit the menu options by pressing any other audio control.
Settingtheclock: Your vehicle is equipped with a separate in-dash clock. Refer to Clock in the Driver Controls chapter for instructions on how to set the time.
-
Cassette: Insert a cassette facing to the right.
-
TUNE: Press to manually go up or down the radio frequency.

CAT:CAT is only available when equipped with Satellite Radio. Your vehicle may be equipped with Satellite ready capability. The kit to enable Satellite reception is available through your authorized dealer. Detailed Satellite instructions are included with the dealer installed kit. Checkwithyourauthorizeddealerforavailability.
- Side1-2: Press to access the next side of the cassette tape. The display will indicate whether TAPE 1 or TAPE 2 is playing.

- SEEK: Press to access the next/previous radio station, tape selection or CD track. Press and hold to advance/reverse in the current CD track.

- REW(Rewind):Press to rewind in tape or CD mode.

Entertainment Systems
FF(Fastforward): Press to fast forward in tape or CD mode.

- SCAN: Press SCAN to hear a brief sampling of radio stations, selections or CD tracks. Press again to stop.

- SHUF(Shuffle): Press to play the tracks on the current CD in random order. Press again to stop.

- Memorypresets: To set a station: Select frequency band, tune to a station, press and hold a preset button until sound returns.

- AM/FM: Press to toggle between AM/FM1/FM2 modes.

- Tapeeject: Press to eject the tape.

- CD/TAPE:Press to toggle between CD and TAPE mode. In radio mode, the CD icon will appear in the display if a CD is loaded into the system.

- SAT: Your system may be equipped with Satellite Ready capability. The kit to enable the

Satellite reception is available through your authorized dealer. Detailed satellite instructions are included with the dealer installed kit. Checkwithyourauthorizeddealerforavailability.
- On/Off/Volume: Push to turn on/off; turn to adjust the volume levels.

Entertainment Systems
Audiophile Satellite Compatible AM/FM Stereo In-dash Six CD sound system (if equipped)

text_image
13 14 15 16 1 2 3 4 5 AM FM CD SAT SCAN SHUF SEEK TUNE-CAT WUE LOAD CD-6 BASS BAL TREB FADE 1 2 3 4 5 6 MENU SEL-TEXT 10 9 8Accessorydelay: Your vehicle is equipped with accessory delay. With this feature, the window switches, radio and moon roof (if equipped) may be used for up to ten minutes after the ignition is turned off or until any door is opened.
-
CDslot: To insert a CD, press LOAD. When the system is ready, insert a CD, label side up. With the ignition on, the radio will begin to play a CD once inserted. If the ignition and audio system are off, press CD prior to inserting a disc. Do not force a disc into the system as damage could result.
-
SEEK: Press to access the next/previous radio station or CD track. Press and hold to advance/reverse in the current CD track.
-
TUNE/CAT: Press to manually go up or down the radio frequency.


Entertainment Systems
CAT is only available when equipped with Satellite radio. Your vehicle may be equipped with Satellite ready capability. The kit to enable Satellite reception is available through your authorized dealer. Detailed Satellite instructions are included with the dealer installed kit. Check with your authorized dealer for availability.
- MUTE: Press to mute the playing media. Press again to return to the playing media or turn the volume control to adjust the volume.

- Eject: Press to eject CD(s) when the ignition is on or off. Numbers will illuminate in the display

indicating which CD slots are loaded with CDs. To eject a specific CD, press eject and the corresponding preset number. If no preset is selected, the system will eject the currently selected CD. Press and hold to eject all loaded discs.
Note: If the CD is not removed within approximately 15 seconds, the system will reload the disc and begin play if the system is on.
- BASS: Press BASS; then
press ◀ SEL-TEXT ▶
decrease/increase the level of bass output.
TREB(Treble):Press TREB; then press ◀ SEL-TEXT ▶
decrease/increase the level of treble output.
- BAL(Balance): Press BAL; then
press ◀ SEL-TEXT ▶ shift sound to the left/right speakers.

FADE:Press FADE; then
press ◀ SEL-TEXT ▶ shift sound to the rear/front speakers.
- SEL-TEXT: Use with Bass, Treble, Balance, Fade and other menu functions.

Entertainment Systems
TEXT: TEXT is only available when equipped with Satellite radio. Your vehicle may be equipped with Satellite ready capability. The kit to enable Satellite reception is available through your authorized dealer. Detailed Satellite instructions are included with the dealer installed kit. Check with your authorized dealer for availability.
- MENU: Press MENU repeatedly to access RDS on/off.

Use ◀ SEL-TEXT ▶ toggle
RDS on/off. Press MENU again to access Program type mode or Show Type mode. (MENU must be pressed within 10 seconds to proceed to the next RDS mode.)
The Federal Communications Commission (FCC) and the Canadian Radio and Telecommunications Commission (CRTC) recommend that FM radio broadcasters use RDS technology to transmit information. FM radio stations are independently operated and individually elect to use RDS technology to transmit station ID and program type as desired.
FINDProgramtype: Allows you to search RDS-equipped stations for a certain category of music format: Classic, Country, Info, Jazz, Oldies, R&B, Religious, Rock, Soft, Top 40.
In FM mode, with RDS ON, press MENU until the program type menu is displayed. One of the various program types will appear.
Press SEL-TEXT to scroll through music types. Press SEEK or SCAN to search for a station playing the requested music category.
ShowTYPE: Selects between displaying the station's call letters or music format when RDS is enabled. Press and hold MENU until SHOW XX appears in the display. Press ◀ SEL-TEXT ▶ select NAME or TYPE.
Compression:Brings soft and loud CD passages together for a more consistent listening level when in CD mode. Press MENU until compression status is displayed. Press ◀ SEL-TEXT ▶ enable the compression feature when COMPRESS OFF is displayed.
Press ◀ SEL-TEXT gain to disable the feature when COMPRESS ON is displayed. When activated, the compression icon will illuminate in the display.
Occupancy mode: (Available on Audiophile audios only): Press MENU until occupancy mode appears in the display. Press SEL-TEXT select ALL, DRIVER or REAR SEAT occupancy mode.
Autoset: Allows you to set the strongest local radio stations without losing your original manually set preset stations for AM/FM1/FM2. Press
Entertainment Systems
MENU until AUTOSET appears in the display. Press SEL-TEXT

to toggle ON/OFF. When the six strongest stations are filled, the station stored in preset 1 will begin playing. If there are less than six strong stations, the system will store the last one in the remaining presets. When activated, AUTOSET will appear in the display when any of the preset controls are pressed.
Speedsensitivevolume:Radio volume changes automatically and slightly with vehicle speed to compensate for road and wind noise. Recommended level is 1–3. Level 0 turns the feature off and level 7 is the maximum setting.
Press MENU to access and use ◀ SEL-TEXT ▶ adjust the volume setting. The level will appear in the display.
Settingtheclock: Your vehicle is equipped with an in-dash clock. Refer to Clock in the Driver Controls chapter for instructions on how to set the time.
- Memorypresets: To set a station: Select frequency band, tune to a station, press and hold a preset button until sound returns.

- On/Off/Volume: Push to turn on/off; turn to adjust the volume levels.
Note: With the ignition and audio system off, you may press the volume control to momentarily view the clock.
- LOAD:Press to load a CD. Press LOAD and a specific preset to load in that particular slot. Available slots are indicated by small flashing indicators in the display. When the system is ready to accept a disc, LOAD CD X will appear in the display. Load the CD. Press and hold to autoload up to six discs.
Note: Ensure that the system is ready to accept the CD and do not try to force the disc into the CD slot as damage could result.
- AM/FM: Press repeatedly to toggle between AM/FM1/FM2 mode.


Entertainment Systems
- CD:Press to enter CD mode. Press CD and a preset to select a specific CD to play.

-
SAT: SAT is only available when equipped with Satellite radio. Your vehicle may be equipped with Satellite ready capability. The kit to enable Satellite reception is available through your authorized dealer. Detailed Satellite instructions are included with the dealer installed kit. Check with your authorized dealer for availability.
-
SHUF/SCAN: Press SCAN to hear a brief sampling of radio stations or CD tracks. Press again to stop.
SHUF(Shuffle): Press and hold to play the CD tracks in random order for the CD currently being played. Press again to stop.
Rear console audio controls (if equipped)
- NEXT:Press to access the next radio memory preset, the next CD track or the next tape selection.
- VOL:Press the up arrow to increase the volume or the down arrow to decrease the volume.
- MODE:Press to toggle through AM, FM1, FM2, TAPE or CD (if equipped) modes.

text_image
NEXT MODE VOL TEMP FANGENERAL AUDIO INFORMATION
Radiofrequencies: AM and FM frequencies are established by the Federal Communications Commission (FCC) and the Canadian Radio and Telecommunications Commission (CRTC). Those frequencies are:
AM - 530, 540–1700, 1710 kHz
FM-87.7, 87.9–107.7, 107.9 MHz
Radioreceptionfactors: There are three factors that can affect radio reception:
- Distance/strength: The further you travel from a station, the weaker the signal and the weaker the reception.
- Terrain: Hills, mountains, tall buildings, power lines, electric fences, traffic lights and thunderstorms can interfere with your reception.
- Station overload: When you pass a broadcast tower, a stronger signal may overtake a weaker one and play while the weak station frequency is displayed.
Entertainment Systems
Cassette/playercare:
Do:
- Use only cassettes that are 90 minutes long or less.
- Tighten very loose tapes by inserting a finger or pencil into the hole and turning the hub.
- Remove loose labels before inserting tapes.
- Allow tapes which have been subjected to extreme heat, humidity or cold to reach a moderate temperature before playing.
- Clean the cassette player head with a cassette cleaning cartridge after 10–12 hours of play to maintain good sound/operation.
Don't:
- Expose tapes to direct sunlight, extreme humidity, heat or cold.
- Leave tapes in the cassette player for a long time when not being played.
CD/CDplayercare:
Do:
- Handle discs by their edges only. Never touch the playing surface.
- Inspect discs before playing. Clean only with an approved CD cleaner and wipe from the center out.
Don't:
- Expose discs to direct sunlight or heat sources for extended periods of time.
- Clean using a circular motion.
CDunitsaredesignedtoplaycommerciallypressed4.75in(12 cm)audiocompactdiscsonly.Duetotechnicalincompatibility, certainrecordableandre-recordablecompactdiscsmaynot functioncorrectlywhenusedinFordCDplayers.Dirty,warped ordamaged CDs,irregularshaped CDs,CDswithascratch protectionfilmattached,andCDswithhomemadepaper (adhesive)labelsshouldnotbeinsertedintotheCDplayer.The labelmaypeelandcausetheCDtobecomejammed.Itis recommendedthathomemade CDsbeidentifiedwithpermanent felttipmarkerratherthanadhesivelabels.Ballpointpensmay damage CDs.Pleasecontactyourauthorizeddealerforfurther information.
Audiosystemwarrantyandservice:Refer to the WarrantyGuide for audio system warranty information. If service is necessary, see your dealer or qualified technician.
Entertainment Systems
LINCOLN NAVIGATION SYSTEM (IF EQUIPPED)
Your vehicle may be equipped with a Lincoln Navigation System which allows you to listen to the radio, play CDs and also navigate the vehicle using a navigation DVD.
THXaudiosystem(ifequipped)
Your vehicle may be equipped with the THX ^® certified premium audio system. This system creates optimal acoustic quality for all seating positions and road conditions.
The system offers an advanced speaker system, amplifier, subwoofer and equalizer.

text_image
THX® CERTIFIEDYour Lincoln Navigation System has a large range of features, yet is easy to use. Guidance is shown on the display screen and is supplemented with voice prompts. The display screen provides full information for operating the system through use of menus, text screens and map displays. Screen selections are made by touching the desired selection on the screen.
Entertainment Systems
text_image
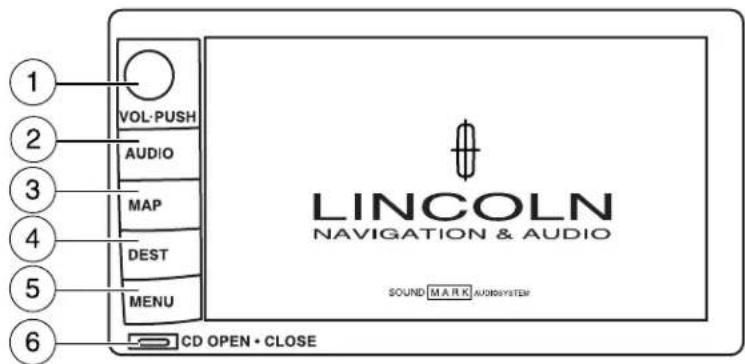
1 2 3 4 5 6 VOL-PUSH AUDIO MAP DEST MENU CD OPEN • CLOSE LINCOLN NAVIGATION & AUDIO SOUND MARK AUDIOSYSTEM- VOL-PUSH: Press to turn the system ON/OFF. Turn to adjust the audio volume level.
- AUDIO: Press to enter audio mode and access radio, CD, CDDJ, DVD (if equipped) settings.
- MAP: Press to enter map mode and view your current vehicle position on the map. Press and hold to obtain additional position information. This will not function without a map DVD loaded.
- DEST: Press to enter Destination Entry mode. This allows you to enter a destination and route to it. With an active route, pressing DEST allows the user to request a Detour, display entire route, select route preferences, or change or cancel the destination. This will not function without a map DVD loaded.
- MENU: Press to access system settings such as display, brightness, clock mode (if equipped), etc.
- CDOPENCLOSE: Press to open/close the display screen and access the CD player.
Coldtemperatureadvisory
When operating the system below 32^ Fahrenheit ( 0^ Celsius), the display screen requires 20–30 minutes warm-up to achieve maximum brightness. Ensure that the system display setting is set to DAY mode until maximum brightness is achieved (refer to Menumodesection). Once maximum brightness is achieved, revert to AUTO mode display setting.
Entertainment Systems
Initialmapdisplay
After pressing AGREE to the initial WARNING screen, you will move into the initial map screen which shows the current vehicle location. Pressing the globe icon will take you to the user settings — audible feedback, navigation units, language and clock (if equipped).

text_image
WARNING Most functions are unavailable while vehicle is in motion. Please read the owners manual for operating instructions. Always drive safely and obey traffic laws. AgreeQuick Start — How to get going
Toplayaradiostation:
- Ensure that the vehicle ignition is on.
- Press AUDIO.

text_image
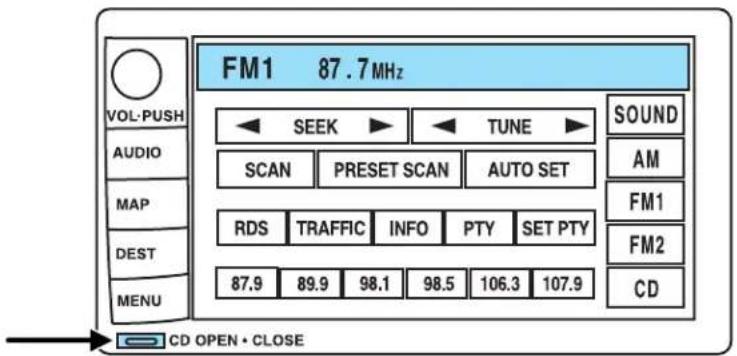
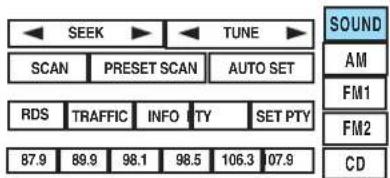
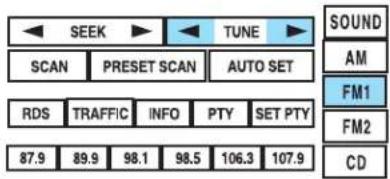
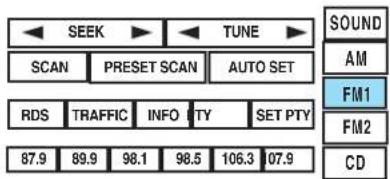
FM1 87.7MHz VOL-PUSH AUDIO MAP DEST MENU CD OPEN • CLOSE SEEK ▶ TUNE ▶ SCAN PRESET SCAN AUTO SET RDS TRAFFIC INFO PTY SET PTY 87.9 89.9 98.1 98.5 106.3 107.9 SOUND AM FM1 FM2 CD- Select AM, FM1 or FM2.
- Press TUNE to adjust manually up (▶) or down () the frequency band.
- Press SEEK to find the next strong station up (▶) or down (◀)
Note: If PTY (program type) is selected, the station selection will be limited. Refer to ProgramType(PTY) for further information.
Entertainment Systems
ToplayapreviouslyloadedCD:
- Ensure that the vehicle ignition is on.
- Press AUDIO.
- Press CD to select a CD which is already loaded. (NO CD will appear in the display if there are no CDs loaded into the system). Use the controls (1–6) to select the desired CD.
- CD will begin to play.
ToloadCDs:
text_image
FM1 87.7MHz VOL-PUSH AUDIO MAP DEST MENU CD OPEN • CLOSE SEEK TUNE SCAN PRESET SCAN AUTO SET RDS TRAFFIC INFO PTY SET PTY 87.9 89.9 98.1 98.5 106.3 107.9 SOUND AM FM1 FM2 CD- Press CD OPEN CLOSE at the bottom of the screen to load a CD. (The screen will open).
- Press LOAD and select the desired slot. Or, press and hold LOAD to auto load all available slots. The slot indicator lights blink rate will increase when the system is ready to accept a disc. Push CD OPEN CLOSE to close the screen. Once closed, the CD will begin to play.
- Use the touch controls to advance tracks, scan, pause, etc.
TousetheNavigationsystem:
- Ensure that the vehicle ignition is on, and the navigation DVD is loaded into the navigation DVD player. Refer to LoadingthemapDVDor Navigationsystem—DVDlocation in the Index for your vehicle's navigation DVD location.
Entertainment Systems

text_image
VOL-PUSH AUDIO MAP DEST MENU WARNING Most functions are unavailable while vehicle is in motion. Please read the owners manual for operating instructions. Always drive safely and obey traffic laws. Agree CD OPEN • CLOSE- Press DEST. The warning screen will appear. After reading, press AGREE. The screen will show a map with your current location. Press DEST again.
- Select the desired type of destination entry. You may select "Address", "Point of Interest", "Emergency" or "Previous Dest" from the first screen.

text_image
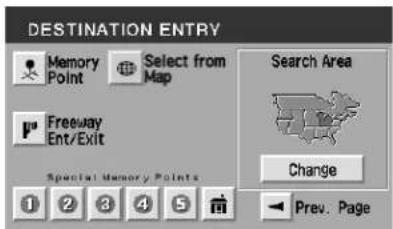
DESTINATION ENTRY Address Emergency Point of Interest Previous Dest. Special Memory Points Search Area Change Next PageOr, press "▶ Next Page" to access selections of "Memory Point", "Select from map", "Freeway Ent/Exit" and "Special Memory Points." After making your selection, enter any required information.
text_image
DESTINATION ENTRY Memory Point Select from Map Search Area Freeway Ent/Exit Special Memory Points Change Prev. PageEntertainment Systems
- Press DEST at the bottom of the map screen.
- Choose the desired route by pressing the NEXT button (if it appears). There can be up to three alternative routes.
- Press START to begin the navigation guidance.

text_image
20000 ROTUNDA DR Info. Return Zoom Route Preferences Minimize Time Use Major Roads Use Toll Roads Use Terriers Change Set as: Dest. or Way Pt.Toadjustthevoiceguidancevolume:
text_image
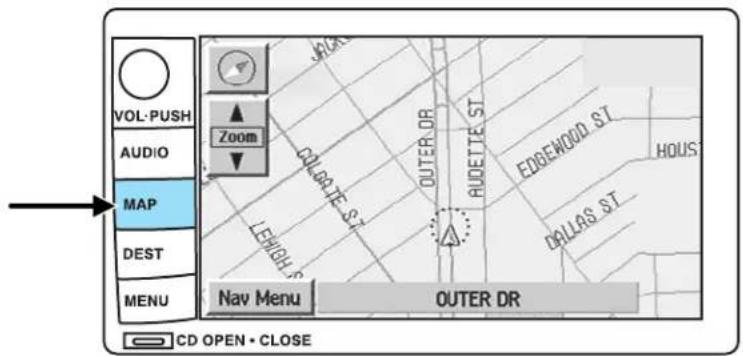
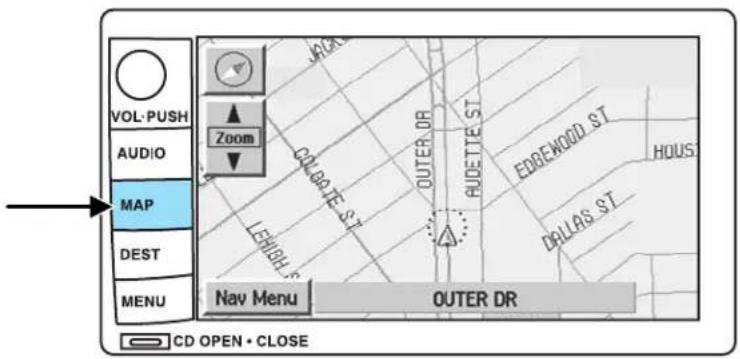
VOL-PUSH AUDIO MAP DEST MENU Zoom COLGATE ST. LEHIGH ST. OUTER DR AUDETTE ST. EDREWOOD ST. HOUS DALLAS ST. NAV MENU OUTER DR CD OPEN • CLOSE- Press the MAP hard key.
- Press "Nav Menu" at the bottom left hand corner of the screen.
- Press On/Off to turn the voice guidance option on/off. Use the numeric keys (1–7) to determine the volume level of the guidance voice prompts.

Voice activated commands (if equipped)
Your Lincoln Navigation System (LNS) may be equipped with a voice activated feature which allows you to "speak" certain commands to the system. Speaking clearly will help to ensure that the system correctly responds to your commands. Ensure that the commands are spoken in English (not any other language) and that they are spoken exactly as they are written, or they may not function.
Entertainment Systems
Press VOICE briefly (on your steering wheel controls) and the voice icon _e^2 appears on the Navigation display. Press the REPEAT button or arrow on your steering wheel controls to hear the previous command repeated from the navigation system.
The voice activated command feature will not operate if a map DVD is not inserted into the navigation DVD unit.
At any time, you may say these commands to change modes:
- Radio - Audio on
- AM - Audio off
- FM1 • Power off
• FM2 • CD Changer (if equipped) - CD • DVD (if equipped)
- Power on
During normal radio operation, you may say:
- Seek up - Seek down
Disc operation commands you may say when using a rear seat DVD (if equipped):
- Track up • Track down
- Previous track -Disc up
- Disc down - Next disc
- Previous disc
During CDDJ or in-dash CD play, you may say:
- Track up - Track down
- Previous track -Disc up
- Next disc •Disc down
- Previous disc
To change the screen display, you may say the following commands:
- Screen off • Screen day mode
- Day mode on •Screen night mode
- Night mode on •Screen auto mode
- Auto mode on
Note: If you say "Screen off", you must touch the screen in order to activate the screen again. The screen will not turn on again with a voice command.
Entertainment Systems
Commands that jump over screens:
- Current position • Current location
•Map
While in navigation map mode, the following commands are available:
- Zoom in - Zoom out
- Minimum scale • Maximum scale
- North up • Change to North up
- Heading up - Change to heading up
- Map direction • Change map direction
- Mark this point - Mark
While in navigation POI mode, the following commands are available by voice activation:
• Automobile club • AAA (Triple A)
- Auto service & maintenance • Auto service
- Gas station -Gas
- Parking garage • Parking lot
- ATM - Bank
- City hall • Civic center
- Community center • Convention center
• Exhibition center
• Higher education
• College
- Library
•School
- Casino
- Marina
- Park & recreation
- Performing arts
• Skiing
• Stadium • Tourist attraction
- Winery
• I'm hungry
• American food
- Court house
- University
• Hospital - Police station
- Amusement park
- Golf course
• Museum - Parks & recreation
- Ski resort
- Sports complex
- Restaurant
• American restaurant - Chinese restaurant
Entertainment Systems
- Chinese food • Continental restaurant
- Continental food -French restaurant
- French food
- Italian restaurant
- Italian food
- Japanese restaurant
- Japanese food • Mexican restaurant
- Mexican food • Seafood restaurant
- Seafood • Other restaurant
- Other food • Shopping
- Shopping mall • Grocery store
- Airport • Bus station
- Ferry terminal • Historical monument
- Hotel • Park and ride
• Rental car agency • Rest area - Rest stop • Tourist information
- Train station • Business facility
- City center
- POI off
• Commuter rail station
While in navigation destination (DEST) mode, the following commands are available:
- Home - Go home
- Previous starting point
- Go starting point
- Next way point map
- First way point map
- Second way point map
- Third way point map
- Fourth way point map
- Fifth way point map
- Destination map
- Delete destination
- Cancel destination
While in navigation guidance mode, the following commands are available by voice activation:
- Repeat guidance • Repeat voice
- Louder
- Softer
- Voice guidance off
- Voice guidance on
- Open guidance screen
- Close guidance screen
- Arrow guidance
- Arrow guide
Entertainment Systems
- Change to arrow guidance
- Change to arrow guide
- Turn list guidance
- Turn list guide
- Change to turn list guidance
- Change to turn list guide
- Entire route map
- Entire route
- Route overview
- Reroute
- Detour • Detour entire route
Navigation help commands you may speak at any time:
- Help - Map
- Destination • Guidance
- Radio -Disc
- Map help
- Destination help
•Guidance help •Radio help - Disc help
Audio mode
text_image
VOL-PUSH AUDIO MAP DEST MENU CD OPEN • CLOSE LINCOLN NAVIGATION & AUDIOYour Lincoln Navigation Audio System has many features including a full range of audio functions. To access these functions, press AUDIO on the main bezel. This will take you into audio mode.
Entertainment Systems
Volume/powercontrol
Press knob to turn the audio system on/off. Turn to raise or lower volume. The levels will be displayed on the screen.
To activate the navigation mode, press MAP or DEST.

To adjust the navigation voice output level, select the NAV MENU button via the map screen.
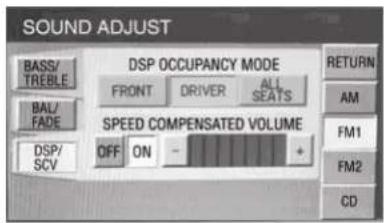
Speedcompensatedvolume(SCV)
With this feature, radio volume changes automatically with vehicle speed to compensate for road and wind noise. To engage the SCV feature:

text_image
VOL-PUSH AUDIO MAP DEST MENU LINCOLN NAVIGATION & AUDIO CD OPEN • CLOSE- Press AUDIO.
- Press SOUND.
text_image
SEEK TUNE SCAN PRESET SCAN AUTO SET RDS TRAFFIC INFO PTY SET PTY 87.9 89.9 98.1 98.5 106.3 07.9 SOUND AM FM1 FM2 CDEntertainment Systems
- SCV is located in the middle of the screen. Press to turn on.
- Select setting 1 to 7 or turn off.
text_image
SOUND ADJUST BASS/ TREEBLE DSP OCCUPANCY MODE FRONT DRIVER ALL SEATS BAL/FADE SPEED COMPENSATED VOLUME DSP/SCV OFF ON - RETURN AM FM1 FM2 CDThe recommended level for the speed compensated volume is from level 1 through level 3. When activated, level 1 is the minimum setting and level 7 is the maximum setting.
AM/FMselect
The AM/FM control works in radio, CD and navigation modes.
AM/FMselectinradiomode
Press AM/FM1/FM2 to switch between AM/FM1/FM2 memory preset stations.
AM/FMselectinCDmode
Press to stop CD play and begin radio play.
AM/FMselectinnavigationmode
The radio will continue to play in the background of the navigation screens. To access, press AUDIO then AM/FM1/FM2.
Seek
- Press ▶ /◀ find the next listenable station up/down the frequency band.
- Press ▶ /→ advance to the next/previous track on a CD.

text_image
SEEK TUNE SOUND AM SCAN PRESET SCAN AUTO SET RDS TRAFFIC INFO PTY SET PTY 87.9 89.9 98.1 98.5 106.3 107.9 FM1 FM2 CDEntertainment Systems
Tuneadjust
Press TUNE to manually move down/up (◀/▶) the frequency band.
In CD mode, press TRACK to select the previous/next (◀/▶).
text_image
SEEK TUNE SOUND AM SCAN PRESET SCAN AUTO SET RDS TRAFFIC INFO PTY SET PTY 87.9 89.9 98.1 98.5 106.3 107.9 FM1 FM2 CDAutosetmemorypreset
Autoset allows you to set strong radio stations without losing your original manually set preset stations. This feature is helpful on trips when you travel between cities with different radio stations.
Startingautosetmemorypreset
- Select a frequency band using AM/FM1/FM2.
text_image
SEEK TUNE SCAN PRESET SCAN AUTO SET RDS TRAFFIC INFO PTY SET PTY 87.9 89.9 98.1 98.5 106.3 07.9 SOUND AM FM1 FM2 CD-
Press AUTO SET.
-
When the first six strong stations are filled, the station stored in memory preset control 1 will start playing.
If there are less than six strong stations available on the frequency band, the remaining memory preset controls will all store the last strong station available.

text_image
SEEK TUNE SCAN PRESET SCAN AUTO SET RDS TRAFFIC INFO PTY SET PTY 87.9 89.9 98.1 98.5 106.3 107.9 SOUND AM FM1 FM2 CDTo deactivate autoset and return to your audio system's manually set memory stations, press the AUTO SET again.
Entertainment Systems
Scan
Press SCAN for a brief sampling of all listenable stations and CD tracks. Press again to disable and remain on the current selection.

text_image
SEEK TUNE SCAN PRESET SCAN AUTO SET RDS TRAFFIC INFO PTY SET PTY 87.9 89.9 98.1 98.5 106.3 107.9 SOUND AM FM1 FM2 CDPresetscan
Press PRESET SCAN to scan the stations stored in the memory presets.

text_image
SEEK TUNE SOUND AM SCAN PRESET SCAN AUTO SET RDS TRAFFIC INFO PTY SET PTY 87.9 89.9 98.1 98.5 106.3 07.9 FM1 FM2 CDRadiodatasystem(RDS)feature
This feature allows your audio system to receive text information from RDS-equipped FM radio stations such as station call letters, program type, etc. When in FM mode, press RDS to activate/deactivate.
text_image
FM1 105.9MHz CoolR&B SEEK TUNE SCAN PRESET SCAN AUTO SET RDS TRAFFIC INFO PTV SET PTV 97.9 93.7 92.7 99.5 103.5 107.9 SOUND AM FM1 FM2 CD DVDTrafficfunction
Select TRAFFIC for traffic information broadcast from certain stations which will automatically interrupt radio or CD playback at a preset volume level.

text_image
SEEK TUNE SCAN PRESET SCAN AUTO SET RDS TRAFFIC INFO PTY SET PTY 87.9 89.9 98.1 98.5 106.3 07.9 SOUND AM FM1 FM2 CDEntertainment Systems
TrafficinformationnotavailableinmostU.S.markets.
Informationfeature
Press INFO to view the frequency, call letters and PTY category of the selected FM station.

text_image
SEEK TUNE SOUND AM SCAN PRESET SCAN AUTO SET RDS TRAFFIC INFO PTY SET PTY 87.9 89.9 98.1 98.5 106.3 07.9 FM1 FM2 CDNote: Not all stations support INFO function.
Programtype(PTY)
This feature allows you to search for Radio Data System (RDS) stations selectively by their program type.
Ensure that the RDS function is turned on. Press PTY to turn the feature on/off.

text_image
SEEK TUNE SOUND AM SCAN PRESET SCAN AUTO SET RDS TRAFFIC INFO PTY SET PTY 87.9 89.9 98.1 98.5 106.3 107.9 FM1 FM2 CDToset/changePTY:
Ensure that the RDS function is turned on. Press SET PTY to select from the following program types:
text_image
SEEK TUNE SCAN PRESET SCAN AUTO SET RDS TRAFFIC INFO PTY SET PTY 87.9 89.9 98.1 98.5 106.3 07.9 SOUND AM FM1 FM2 CD• All
•Classical
• Country
• Information
• Jazz
•Religious
• Rock
- Soft
• Top 40
text_image
SET PROGRAM TYPE (PTY) ALL CLASSICAL COUNTRY INFORMATION RETURN AM FM1 SAT3 CD DVDEntertainment Systems
Once PTY has been programmed, press SEEK ( / ) or SCAN to
initiate a search up or down the frequency.
Preset scan and Autoset also initiate PTY searches. The search will stop when the desired program type has been reached. If no program type is found, a message will display.
Note: Not all stations support PTY information.
Soundfunctions
To access settings for Bass, Treble, Balance, Fade, DSP (Digital Signal Programming), SCV (Speed Compensated Volume), and Occupancy modes:
text_image
FM1 87.7 MHz VOL-PUSH AUDIO MAP DEST MENU CD OPEN • CLOSE SEEK TUNE SCAN PRESET SCAN AUTO SET RDS TRAFFIC INFO PTY SET PTY 87.9 89.9 98.1 98.5 106.3 107.9 SOUND AM FM1 FM2 CD- Press AUDIO.
- Press SOUND.
- Select from Bass/Treb; Bal/Fade; DSP/SCV.
- Press +/- to increase/decrease the levels.
Bass: Allows you to increase or decrease the audio system's bass output.
Treble: Allows you to raise or lower the audio system's treble output.

text_image
SOUND ADJUST BASS/ TREBLE BAL/ FADE DSP/ SCV BASS - TREBLE - RETURN AM FM1 FM2 CDEntertainment Systems
Fade: Allows you to adjust the amount of sound emitted from the front and rear speakers.
Balance: Allows you to adjust the sound distribution between the right and left speakers.
text_image
SOUND ADJUST BASS/ TREBLE FRONT BAL/ FADE REAR CNTR DSP/ SCV L R RETURN AM FM1 FM2 CDSCV(Speed Compensated Volume): Automatically compensates for road wind and noise. Refer to Speed compensated volume earlier in this chapter.
DSPOcupancymode: Use to optimize the sound based upon the occupants in the vehicle. Select from ALL SEATS, REAR SEATS or DRIVER SEAT.

text_image
SOUND ADJUST BASS/ TREELE BAL/ FADE DSP/ SCV DSP OCCUPANCY MODE FRONT DRIVER ALL SEATS SPEED COMPENSATED VOLUME OFF ON - RETURN AM FM1 FM2 CDSettingmemorypresetstations
The radio is equipped with six station memory preset controls. These controls can be used to select up to six preset AM stations and twelve FM stations (six in FM1 and six in FM2).
- Select the frequency band with the AM/FM1/FM2 touch controls.
- Select a station.
- Press and hold a memory preset until the sound returns. The frequency will appear in the preset.
Entertainment Systems
Satellitereadycapability
Your Lincoln navigation system comes equipped with Satellite ready capability. The kit to enable Satellite reception is available through your Lincoln dealer. Detailed Satellite instructions are included with the dealer installed kit.

text_image
CHANNEL SAT1 8 I-80 CHANNEL ▶ SCAN GUIDE PRESET SCAN KEYPAD TEXT CAT SET CAT 5 24 25 45 53 66 ENTERTAIN SOUND AM FM1 SAT1 CDCD mode
CDunitsaredesignedtoplaycommerciallypressed4.75in(12 cm)audiocompactdiscsonly.Duetotechnicalincompatibility, certainrecordableandre-recordablecompactdiscsmaynot functioncorrectlywhenusedinFordCDplayers.Irregular shapedCDs,CDswithascratchprotectionfilmattached,andCDs withhomemadepaper(adhesive)labelsshouldnotbeinserted intotheCDplayer.ThelabelmaypeelandcausetheCDto becomejammed.ItisrecommendedthathomemadeCDsbe identifiedwithpermanentfelttipmarkerratherthanadhesive labels.BallpointpensmaydamageCDs.Pleasecontactyour authorizeddealerforfurtherinformation.
PlayingapreviouslyloadedCD:
To begin CD play (if a CD is already loaded), press AUDIO hard button and then CD.
text_image
SEEK TUNE SCAN PRESET SCAN AUTO SET RDS TRAFFIC INFO PTY SET PTY 87.9 89.9 98.1 98.5 106.3 07.9 SOUND AM FM1 FM2 CDEntertainment Systems
Press CD. CD play will begin where it stopped last.
LoadingaCD:

text_image
TRACK SCAN SHUFFLE COMPRESS PAUSE RDS TRAFFIC 1 • 2 • 3 ○ 4 ○ 5 • 6 ○ SOUND AM FM1 FM2 CD
text_image
FM1 87.7 MHz VOL-PUSH AUDIO MAP DEST MENU SEEK TUNE SCAN PRESET SCAN AUTO SET RDS TRAFFIC INFO PTY SET PTY 87.9 89.9 98.1 98.5 106.3 107.9 SOUND AM FM1 FM2 CD CD OPEN • CLOSE- Press CD OPEN CLOSE on the bezel.
Entertainment Systems

text_image
LOAD 1 2 3 4 5 6- The navigation screen will fold down, allowing you access to the in-dash six CD system.
- Press LOAD and the desired CD slot number. The indicator light will blink slowly at first, then quickly, signaling the system is ready.
- Insert a disc.
- Toloadmorethanonedisc, press and hold LOAD. This will initiate autoload and will allow you to load all open CD slots.
After an allotted time, the screen will close automatically or you may press CD OPEN CLOSE on the bezel again. - Once the screen closes, the system will start playing the last CD loaded.
Track
Press ▶ /← advance to the next/previous track.
| TRACK | REW/FF | ||
| SCAN | SHUFFLE | COMPRESS | PAUSE |
| RDS | TRAFFIC | ||
| 1 • | 2 • | 3 • | 4 • |
Entertainment Systems
Rewind/fastforwardinCDmode
Press to reverse or advance (◀/▶) in the current CD track.

text_image
TRACK SCAN SHUFFLE COMPRESS PAUSE RDS TRAFFRIC 1 • 2 • 3 • 4 • 5 • 6 • SOUND AM FM1 FM2 CDScanfeatureinCDmode
Press SCAN to hear a brief sampling of all tracks on the current CD. Press again to disengage and remain with the current track.

text_image
TRACK REW/FF SCAN SHUFFLE COMPRESS PAUSE RDS TRAFFIC 1 • 2 • 3 • 4 • 5 • 6 • SOUND AM FM1 FM2 CDShufflefeatureinCDmode
When in CD (or CDDJ mode), press SHUFFLE to engage the shuffle feature. Press to select from shuffling between tracks (SHUFFLE TRACK) on the current CD or between all tracks on all CDs (SHUFFLE DISC). All tracks will be played in random order. Press again to disengage (SHUFFLE OFF).

text_image
TRACK REW / FF SCAN SHUFFLE COMPRESS PAUSE RDS TRAFFRIC 1 • 2 • 3 • 4 • 5 • 6 • SOUND AM FM1 FM2 CDCompressionfeature
The compression feature works in CD mode and boosts more quiet music and lowers louder music to minimize the need for volume adjustments.
text_image
TRACK REW/FF SCAN SHUFFLE COMPRESS PAUSE RDS TRAFFRIC 1 • 2 • 3 • 4 • 5 • 6 • SOUND AM FM1 FM2 CDWhen in CD or CDDJ mode, press COMPRESS to engage or disengage the compression feature.
Entertainment Systems
Pause
In CD mode, press PAUSE to pause the current track. Press again to continue playing.
text_image
TRACK REW / FF SCAN SHUFFLE COMPRESS PAUSE RDS TRAFFRIC 1 • 2 • 3 • 4 • 5 • 6 • SOUND AM FM1 FM2 CDMap mode
Mapdisplayinformation
text_image
VOL-PUSH AUDIO MAP DEST MENU Zoom COLBATE ST LEHOLD ST OUTER DR RADETTE ST EDBENOOD ST HOUS DALLAS ST NAV MENU OUTER DR CD OPEN • CLOSETo access the map display, press MAP on the bezel.
Once pressed, the current map display will appear on the screen showing the current vehicle location.

Zoomcontrol
When 'Zoom' is pressed, the scale indicator is shown on the screen. The scale markings are: 1/32, 1/16, 1/4, 1/8, 1/2, 1, 2, 4, 8, 16, 32, 64, 128 miles. The control can be used in a number of ways:
- Touch and hold one of the arrow buttons for the map to be displayed again at each zoom level.
Entertainment Systems
- Touch one of the arrow buttons repeatedly for the map to be displayed again at the final zoom level.
- Touch one of the segments of the scale indicator for the map to be displayed at the selected zoom level.
Additionalmapfunctionbuttons
To initiate the display of additional map function buttons, tap the map anywhere on the screen or press the MAP hard key. These additional features will disappear from the screen within five seconds unless pressed.
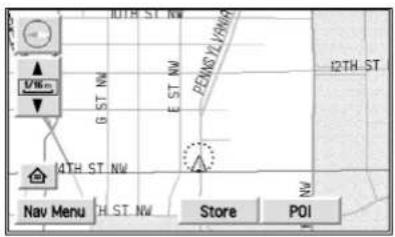
text_image
UWm GST NW EST NW PENNO YLYNW 12TH ST 4TH ST NW Nav Menu H.ST NW Store POI- STORE - stores current vehicle location as a memory point. Refer to MemoryPoints for further information.
- POI (Point of Interest)- brings up the Quick POI menu which allows the user to perform two functions:
Display POI icons on the map for one category.
Select local map area POIs as destinations or waypoints. The list of local area POIs can be sorted by distance, name, or icon. Refer to PointsofInterestfor further information.
If home has been previously programmed in the "Nav Menu", the home icon (house) will appear on the screen and is able to be selected as a destination.
To delete POI icons from the map, touch the map again and press the POI off button.
Entertainment Systems
Routepreferences
After entering a destination, the Route preferences will appear on the screen showing what is currently selected. You may choose to activate/deactivate selections which the system will factor in when calculating your route. Those options are:
- Minimize Time/Distance
- Use Major Roads
- Use Toll Roads
- Use Ferries

text_image
20000 ROTUNDA DIR Info. Return Zoom Route Preferences Minimize Time Use Major Roads Use Toll Roads Use Furlies Change Set as: Dest. or Way Pt.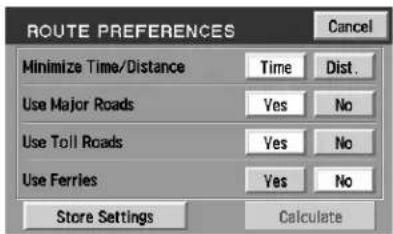
text_image
ROUTE PREFERENCES Cancel Minimize Time/Distance Time Dist. Use Major Roads Yes No Use Toll Roads Yes No Use Ferries Yes No Store Settings CalculateInformationfunction
INFO will appear on the screen when you have calculated a destination. Press INFO for more information about the current destination, if available.

text_image
20000 ROTUNDA DR Info. Return Route Preferences Minimize Time Use Major Roads Use Toll Roads Use Ferries Change Set as: Dest. or Way Pt.Entertainment Systems
You will be able to view with information (if available) as well as choose to store the destination as a memory point by pressing OK.
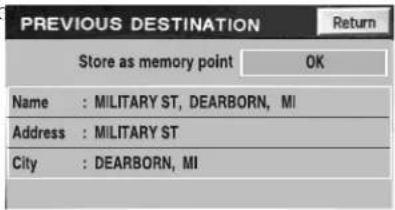
text_image
PREVIOUS DESTINATION Store as memory point OK Name : MILITARY ST, DEARBORN, MI Address : MILITARY ST City : DEARBORN, MIScreensymbols
Navigationsymbol—Indicates the current vehicle position and points to the direction in which the vehicle is currently traveling.
Destinationsymbol— Indicates the current route destination.
Nextturnsymbol— Shows the next maneuver that will need to be taken on the current route.
Northupbutton— Indicates that the map is displayed with north to the top of the screen. Press to toggle between "North up" and "Heading up" map display states.
Headingupbutton— Indicates that the map is displayed with the vehicle heading to the top of the screen. The position of the pointer indicates the direction of north on the map. Press to toggle between "North up" and "Heading up" map display states.


Entertainment Systems
Avoidareasorpoints— The "X" symbol indicates a point. to be avoided in route calculations.
If the avoid point is enlarged to an avoid area, it will appear on the screen as a shaded box.
Waypointsymbol— Indicates the location of a way point (locations you wish to visit in route to your ultimate destination) on the map.
Homepositionsymbol— Indicates the location on the map, currently stored as the home position.
Storedlocationsymbol— Indicates the location of a memory point. This is the default symbol used when the point is stored. (If desired, an icon of your own choice available.) Refer to Choosingfrom
GPSsymbol— Indicates that insufficient GPS satellite signals are being received for accurate map positioning. The symbol is not displayed under normal operation.
Speakericonsymbol— Press to turn voice guidance on/off.
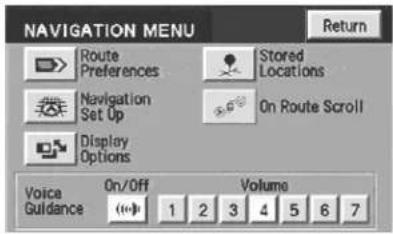
Navigationmenu
To access the Navigation Menu, press NAV MENU at the bottom of the map screen.


Entertainment Systems
Once pressed, the Navigation Menu will display showing the following options:
- Route Options/Preferences
- Navigation Set Up
- Display Options
- Stored Locations
- On Route Scroll
• Voice Guidance/Volume

text_image
NAVIGATION MENU Route Preferences Stored Locations Navigation Set Up On Route Scroll Display Options Voice Guidance On/Off Volume 1 2 3 4 5 6 7Depending upon whether or not a route is active will determine if route options/route preferences is contained on the Navigation Menu.
Routeoptions(destinationentered)
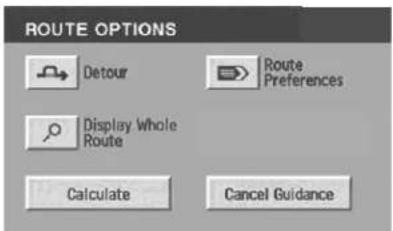
Once in navigation mode and a route is currently active, press "Chng. route" to access the ROUTE OPTIONS screen. Choose from the following selections:
- Detour: Press to select a detour around the current route. Refer to Detouroptionslater in this chapter for further information.
text_image
ROUTE OPTIONS Detour Route Preferences Display Whole Route Calculate Cancel Guidance- RoutePreferences: When creating a destination, select from: Minimize Time/Distance, Use Major Roads, Use Toll Roads, Use Ferries.
- DisplayWholeRoute: Will enter MAP mode and display your entire chosen route.
Note: Route preference appears on the Nav menu when no destination is entered.
While driving under route guidance, only follow an instruction when it is safe to do so as the system cannot be aware of changing conditions. Use voice guidance as much as possible, and only view the display when driving conditions permit.
Entertainment Systems
Ensure that you follow highway code restrictions and do not take any risks. For example, if you are unable to make a U-turn, continue on your journey. The navigation system will recalculate your route to get you back to an appropriate road to your destination.
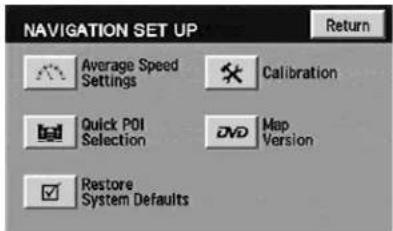
Navigationsetup
The Navigation Set up screen will allow you to make adjustments to the navigation displays.
text_image
NAVIGATION SET UP Return Average Speed Settings Calibration Quick POI Selection DVD Map Version Restore System DefaultsAveragespeedsettings
Allows you to set approximate speeds you drive. These speeds enable the navigation system to aid in calculating timing for routes.

text_image
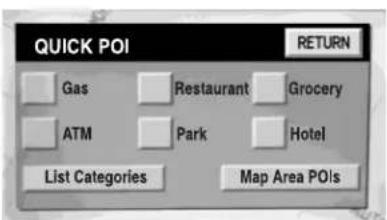
AVERAGE SPEED Residential Main Road Freeway 20 40 60 Default OK CancelQuickPOI(PointofInterest)
Allows you to change the Quick POI menu settings. Select the desired Quick POI (Gas, ATM, etc.) and then press 'List Categories' for further categories, or 'Map Area POIs' to show the desired POIs on your current map.
text_image
QUICK POI RETURN Gas Restaurant Grocery ATM Park Hotel List Categories Map Area POIsEntertainment Systems
Restoresystemdefaults
Resets all system user-selectable options to the default (automatic) values (i.e. guidance, voice, search area and route preferences).
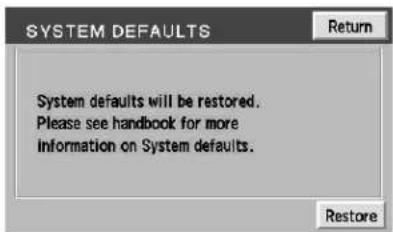
text_image
SYSTEM DEFAULTS System defaults will be restored. Please see handbook for more information on System defaults. RestoreCalibration
This feature is helpful if the car has been towed, or if you notice it is not registering at the correct vehicle location on the map.
Press "Position" to reposition the vehicle location. Press the screen to scroll the map to the desired location and press OK to confirm. Press "Distance" to calibrate by distance and improve the navigation accuracy. It is recommended to
activate this function after every tire replacement. When the button is highlighted, calibration is in process and will turn off automatically when complete.
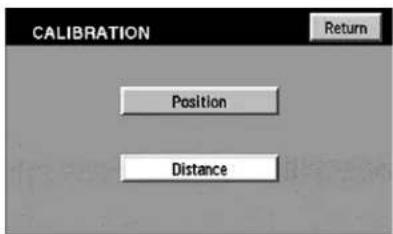
text_image
CALIBRATION Return Position DistanceDVDmapversion
Displays the version of the inserted navigation DVD. Refer to Ordering additionalmapDVDs for further information.
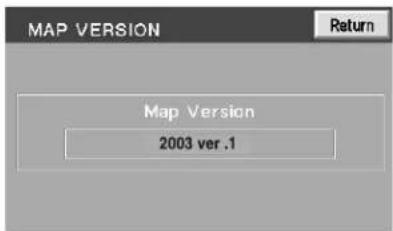
text_image
MAP VERSION Return Map Version 2003 ver .1Entertainment Systems
DisplayOptions
The Display Options screen will allow you make adjustments to the navigation display screen. You can choose from:
- Map Mode (Dual or Full)
• Guidance Mode (Arrows or Turn list)
• Guidance Display (On or Off)
• Time to destination (Show or Hide)
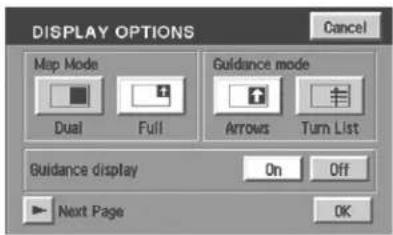
text_image
DISPLAY OPTIONS Cancel Map Mode Guidance mode Dual Full Arrows Turn List Guidance display On Off Next Page OK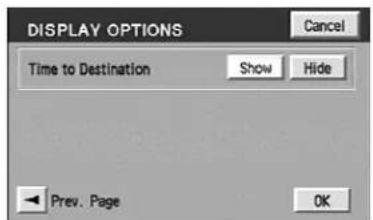
text_image
DISPLAY OPTIONS Cancel Time to Destination Show Hide Prev. Page OKStoredlocations
The Stored locations screen will allow you to choose from destinations that have been saved into the navigation system.
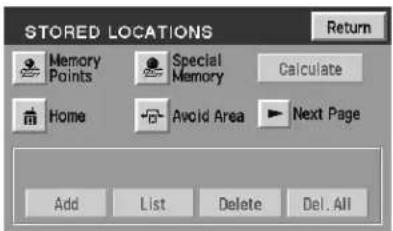
text_image
STORED LOCATIONS Memory Points Special Memory Calculate Home Avoid Area Next Page Add List Delete Del. AllEntertainment Systems
In this screen, you can select from Memory Points, Special Memory Points, Home, Avoid Area, Destination and Way Point, or Previous Destination. Please refer to the Destinationmenusection for a complete description of the functions.
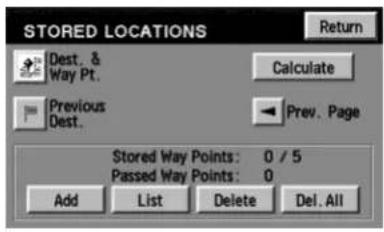
text_image
STORED LOCATIONS Return Dest. & Way Pt. Calculate Previous Dest. Prev. Page Stored Way Points: 0 / 5 Passed Way Points: 0 Add List Delete Del. AllOnroutescroll
The system automatically scrolls through the entire planned navigation route either forwards or backwards. To activate, press the arrow buttons at the bottom left of the map screen.
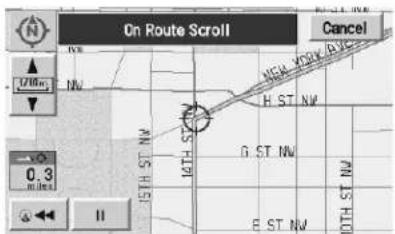
text_image
On Route Scroll Cancel 1/10m NW H ST NW G ST NW E ST NW 0.3 miles IIVoiceguidance/volume
Allows you to turn the voice guidance option on/off and to determine the volume level of the guidance voice prompts. To adjust:
Entertainment Systems

text_image
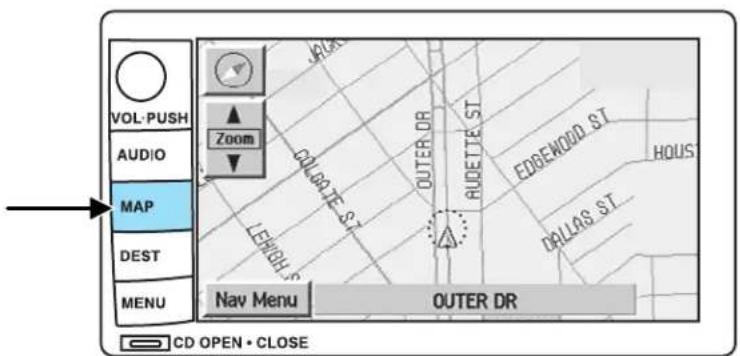
VOL-PUSH AUDIO MAP DEST MENU Zoom COLGATE ST. LEIGH ST. OUTER DR RADETTE ST. EDBEWOOD ST. HOUS DALLAS ST. NAV MENU OUTER DR CD OPEN • CLOSE- Press the MAP hard key.
-
Press "Nav Menu" at the bottom left hand corner of the screen.
-
Press the speaker icon to turn the voice guidance option on/off. Press the desired number to select the volume level for the voice prompts.

Home
To set home for the first time:
Entertainment Systems
text_image
VOL-PUSH AUDIO MAP DEST MENU Zoom COLGATE ST. LEIGH ST. OUTER DR RADETTE ST. EDBEWOOD ST. HOUS DRILLAS ST. NAV MENU OUTER DR CD OPEN • CLOSE- Press MAP.
- Press "Nav. Menu".
- Press "Stored Locations".

text_image
NAVIGATION MENU Route Preferences Stored Locations Navigation Set Up On Route Scroll Display Options Voice Guidance On/Off Volume 1 2 3 4 5 6 7- Press "Home".
- Press "Add".

text_image
STORED LOCATIONS Return Memory Points Special Memory Calculate Home Avoid Area Next Page Add List Delete Del. AllEntertainment Systems
-
Select the desired menu item you wish to set as Home (Address, Memory Point, Point of Interest, Previous Destination).
-
Enter the required details.
-
Press OK to set the home position.
To view home, press the home icon (house) on the Destination Entry screen.

text_image
SET HOME RETURN Address + Emergency Point of Interest = Previous Dest. Special Memory Points Search Area Change ▶ Next Page
text_image
20000 ROTUNDA DR Cancel Home stored. SET ALUMDO DR ST. QUB OK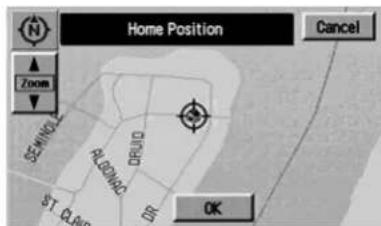
text_image
Home Position Cancel Zoom SEWIND R.O.BILOC DRJID ST. QUID OKEntertainment Systems
Toviewthesethomeposition

text_image
VOL-PUSH AUDIO MAP DEST MENU Zoom COLSATE ST. LEHIGH ST. OUTER DR. RADETTE ST. EDBEWOOD ST. HOUS DELLAS ST. NAV MENU OUTER DR CD OPEN • CLOSE- Press MAP.
- Press "Nav. Menu".
-
Press "Stored Locations".
-
Press "Home".
- Press "List".
text_image
NAVIGATION MENU Route Preferences Stored Locations Navigation Set Up On Route Scroll Display Options Voice Guidance On/Off Volume 1 2 3 4 5 6 7
text_image
STORED LOCATIONS Memory Points Special Memory Calculate Home Avoid Area Next Page Add List Delete Del AllEntertainment Systems
Deletingahomelocation

text_image
VOL-PUSH AUDIO MAP DEST MENU Zoom COLSATE ST. LEHIGH ST. OUTER DR. RADETTE ST. EDBEWOOD ST. HOUS DELLAS ST. NAV MENU OUTER DR CD OPEN • CLOSE- Press MAP.
- Press "Nav. Menu".
-
Press "Stored Locations".
-
Press "Home".
-
Press "Delete".

text_image
NAVIGATION MENU Route Preferences Stored Locations Navigation Set Up On Route Scroll Display Options Voice Guidance On/Off Volume 1 2 3 4 5 6 7
text_image
STORED LOCATIONS Memory Points Special Memory Calculate Home Avoid Area Next Page Add List Delete Del AllEntertainment Systems
- Press YES to confirm.

text_image
Home Position Return Delete Home Position? Yes NoSpecialmemorypoints
There are five possible special memory points that you can set.
Tosetamemorypoint:

text_image
Special Memory Points 1 2 3 4 5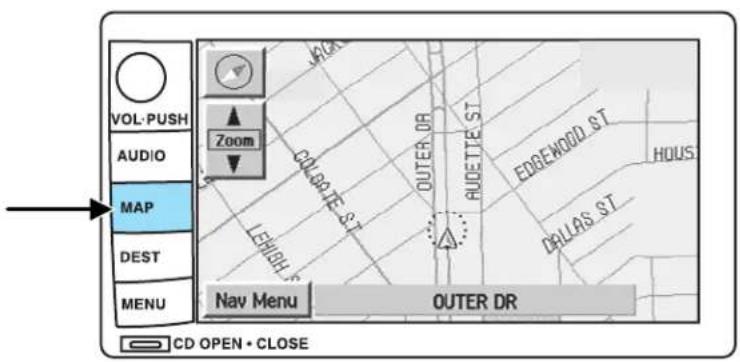
text_image
VOL-PUSH AUDIO MAP DEST MENU Zoom COLLATE ST LEHIGH ST OUTER DR RADETTE ST EDBENODD ST HOUS DRILLAS ST NAV MENU OUTER DR CD OPEN • CLOSE- Press the MAP hard key.
- Press "Nav. Menu".
Entertainment Systems
- Press "Stored Locations".

text_image
NAVIGATION MENU Route Preferences Stored Locations Navigation Set Up On Route Scroll Display Options Voice Guidance On/Off Volume 1 2 3 4 5 6 7 Return- Press "Special Memory".
- Press "Add" and select a position.
- Select point 1–5.
- Input a destination.
- Press OK.

text_image
STORED LOCATIONS Return Memory Points Special Memory Calculate Home Avoid Area Next Page Add List Delete Del. AllOnce all five special memory points are entered, the "Add" control will read as "Full". You must delete points before more can be added.
Todeleteamemorypoint:
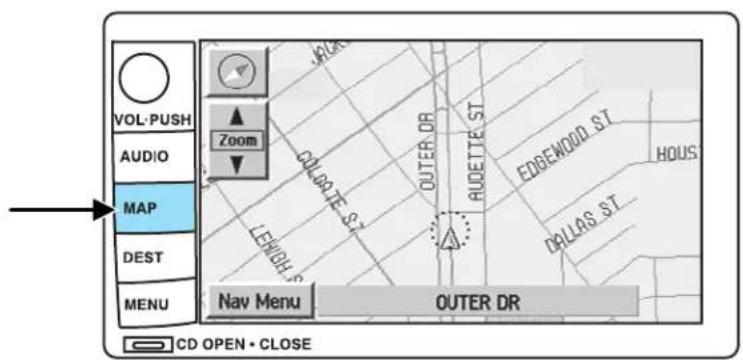
text_image
VOL-PUSH AUDIO MAP DEST MENU Zoom COLGATE ST. LEHGBLS OUTER DR RAUDETTE ST. EDBWOOD ST. HOUS DRILLAS ST. NAV MENU OUTER DR CD OPEN • CLOSE- Press the MAP hard key.
- Press "Nav. Menu".
Entertainment Systems
- Press "Stored Locations".
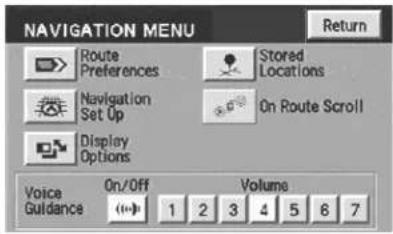
text_image
NAVIGATION MENU Route Preferences Stored Locations Navigation Set Up On Route Scroll Display Options Voice Guidance On/Off Volume 1 2 3 4 5 6 7 Return- Press "Special Memory".
- Press "Delete". The list will display.
- Select the special memory point to delete.
- Press "Del. all" to delete all entered special memory points.
- Press "Yes" to confirm.
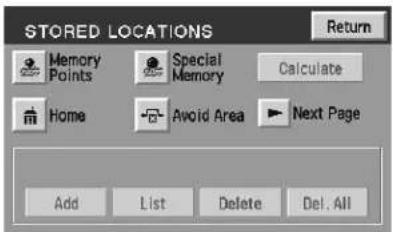
text_image
STORED LOCATIONS Return Memory Points Special Memory Calculate Home Avoid Area Next Page Add List Delete Del. AllDetouroptions
You may engage the detour option once a route has already been calculated by the system. To access the detour option:

text_image
VOL-PUSH AUDIO MAP DEST MENU Zoom COLBATE ST. LEHIGH ST. OUTER DR AUDETTE ST. EDBWOOD ST. HOUS DALLAS ST. NAV MENU OUTER DR CD OPEN • CLOSE- Press the MAP hard key
- Press "Chg. Route".
Entertainment Systems
Press DETOUR to activate. Use the soft controls to select and enter the number of miles you want to deviate off of the current road.
Press DETOUR to confirm the selection and to activate the detour around the specified areas.

text_image
ROUTE OPTIONS Detour Route Preferences Display Whole Route Calculate Cancel GuidancePress NEW ROUTE if you would like the system to plan a different route. The system may calculate an entirely new route, depending on what is available.
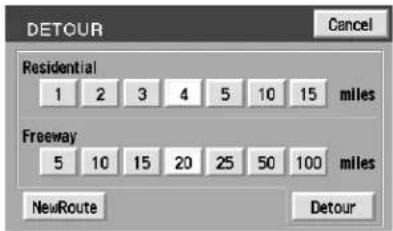
text_image
DETCUR Cancel Residential 1 2 3 4 5 10 15 miles Freeway 5 10 15 20 25 50 100 miles NewRoute DetourRouteinterruptions
In the course of your destination, you may decide to temporarily leave your planned route for gas, food, etc. If you turn off the ignition, the option to continue the route guidance will be displayed when the ignition is turned on again. The route can be accessed once again after you press "Agree" on the warning screen.
Routealterationsorcancellations
To cancel or change your current route from the map, press DEST. You may then select from Detour, Display whole route, Route preferences, Destination Entry, Calculate or Cancel Guidance.

text_image
ROUTE OPTIONS Detour Route Preferences Display Whole Route Calculate Cancel GuidanceEntertainment Systems
Avoidinganareawhileunderguidance
For one reason or another, you may choose to avoid a certain area while in route to your destination. To select the area to avoid:
- From the MAP screen, press Nav Menu.
- Select Route Options, then Display Whole Route
- Press Turn List
- Press Avoid next to the street to be avoided
- Choose OK to confirm
- Press Reroute to activate
text_image
STORE AVOID AREA Address + Emergency Point of Interest - Previous Dest. Special Memory Points Search Area Change Next PageThe new area is added to the list of stored avoid areas.
Note: In some circumstances, it may not be possible to avoid all selected areas.
Listingareastoavoid
You can list all areas noted as "avoid".
- Press "Nav Menu".
- Press "Stored locations".
- Press "Avoid area".
- Press LIST to view all previously stored selections.
- Select the desired one. The map screen will be displayed, showing the location and address of the selected area.

text_image
EDIT AVOID AREA HOLIDAY INN EISENHOWER DR, FORT MYER MEMORIAL DR, WASHINGTON ELLIPSE RD NW, WASHINGTON 281 ASH ST, OLAY TWP, MIPress Enlarge or Reduce to adjust the size of the visible area. Scroll the map as required.
Entertainment Systems
Deletingareastoavoid
To delete a selection from the "Avoid area" list:
- From the stored locations menu, select "Avoid area".
- Press DELETE
- Select the desired area to be deleted.
- Press DEL. ALL to delete all stored areas.
- Press YES to confirm.

text_image
DELETE AVOID AREA Return HOLIDAY INN EISENHOWER DR, FORT MYER MEMORIAL DR, WASHINGTON ELLIPSE RD NW, WASHINGTON 281 ASH ST, CLAY TWP, MIDestination menu

text_image
VOL-PUSH AUDIO MAP DEST MENU CD OPEN • CLOSE LINCOLN NAVIGATION & AUDIOPress DEST on the main bezel to access the navigation mode.
Entertainment Systems
Initialmapdisplay
After pressing AGREE to the initial WARNING screen, you will move into the initial map screen which shows the current vehicle location. Pressing the globe icon will take you to the user settings — audible feedback, navigation units, language and clock (if equipped).
Note: There may be a slight time delay between the soft key and the hard key functions.
Destinationentry
Searcharea
The mapped areas covered by your map DVD are reflected in the Search Area map that is displayed on the Destination Entry screen. Your navigation system uses a regional search area. This area is the area from which navigational directions will be used.
To check your area or reset, press CHANGE under the search area listing. The map will open and allow you to select another regional area. Ensure that your search area is correct prior to setting your destination.
text_image
WARNING Most functions are unavailable while vehicle is in motion. Please read the owners manual for operating instructions. Always drive safely and obey traffic laws. Agree
text_image
SEARCH AREA Cancel US1 US2 US3 US4 US5 US6 US7 US8 US9 US10 CAN CAN IL, IN, KY, MI, OH, WI OKEntertainment Systems
Selectingadestination
Press DEST to set a destination. From this menu, you may select from the following options:
- Address— Use to select a destination based on a known street address.
- PointofInterest—Use to select a destination that is a point of interest location (i.e., airport, restaurant, hospital).
- Previous Destination — Use to select a destination from among the last 20 entered destinations
- Emergency— Use to select the Emergency screen which will give you the location of the closest Hospital, Police Station and Dealer.
text_image
DESTINATION ENTRY Address Emergency Point of Interest Previous Dest. Special Memory Points Search Area Change Next PagePress ▶ 'Next Page' to access more selections:
- Memorypoint— Use to select from a memory point.
- Freewayexit/entrance— Use to select a certain freeway exit or entrance.
- Selectfrommap—Use to select a place on the map.
- SpecialMemoryPoints—Use to select a destination from previously stored entries.
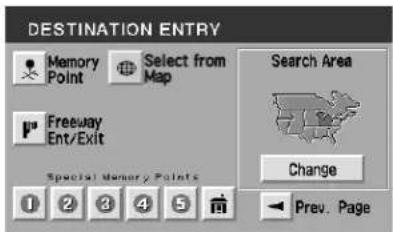
text_image
DESTINATION ENTRY Memory Point Select from Map Search Area Freeway Ent/Exit Special Memory Points Change Prev. PageAddress
- From the destination entry screen, select "Address".

text_image
DESTINATION ENTRY Address Emergency Point of Interest Previous Dest. Special Memory Points Search Area Change Next PageEntertainment Systems
- Input the house/building number and press OK.
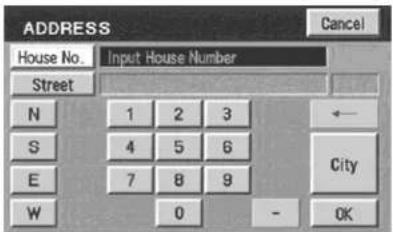
text_image
ADDRESS House No. Input House Number Street N 1 2 3 S 4 5 6 E 7 8 9 W 0 - OK City- Use the keyboard to type in the street name. When you are typing the street name, the system may bring up possible roads that you can select from. Use the arrows to scroll up or down to select the desired street.
text_image
ADDRESS House No. 272 Street PUL 57 A B C D E F G H ← I J K L M N O P City Q R S T U V W X Y Z - & Others Sym. List- Once the address is entered, the system will pull up some possible city and state matches. If one of those is correct, select it. If not, you may press either "5 near cities" for another listing of five possible cities and states (if available). Or, press "Input City Name".

text_image
ADDRESS PIONEER VILLAGE, KY PIONEER TWP, MI ZEELAND, MI LANSING, MI DEARBORN, MI 5 near Cities Input City Name ReturnEntertainment Systems
- You may use the keyboard to input the desired city.

text_image
ADDRESS City Input City Name 9688 A B C D E F G H ← I J K L M N O P Q R S T U V W X Y Z ~ - & Others Sym. ListPointsofinterest(POI)
Select "Point of Interest" from the Destination Entry Menu. In this next menu, you will have the following options:
- ByName— Enter POI name on the keyboard. Touch "List" to display the list of matching points of interest. If there are too many matches being listed, try entering the town name first.
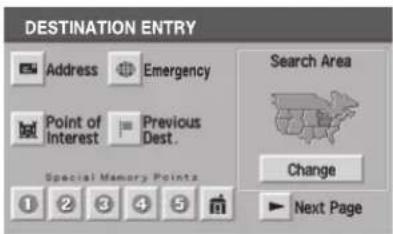
text_image
DESTINATION ENTRY Address Emergency Point of Interest Previous Dest. Special Memory Points Search Area Change Next Page- By Category — Press "Category". Scroll down the list to select the category, then sub-category desired. Once you have selected a category, your entry of the POI will be restricted to that category.
Previousdestination
Press "Previous Destination" on the Destination Entry Menu.
-
Select (touch) the desired item from the list of destinations previously reached. The item details will be listed.
-
Confirm destination details.

text_image
PREVIOUS DESTINATION HOLIDAY INN 928 WESLEV PL SW, WASHINGTON > 9TH ST NW, WASHINGTON, DC 150 SEMINOLE, CLAY TWP, MI 213 FLETCHER ST Previous Start Point ReturnEntertainment Systems
Deletingstoredlocations
Your navigation system allows you to delete any stored locations (previous destinations, memory points, special memory points, home, avoid areas, destination and way points, etc.) To delete any of these stored locations:

text_image
VOL-PUSH AUDIO MAP DEST MENU Zoom LANX CALETTA ST. LEHUIF OUTER DR AUDETTE ST. EDBENOOO ST. HOUS DRILLAS ST. DALLAS ST. Nav Menu OUTER DR CD OPEN • CLOSE- Press the MAP hard key.
- Press "Nav Menu" in the bottom left hand corner of the screen.
- Press "Stored locations".


text_image
NAVIGATION MENU Route Preferences Stored Locations Navigation Set Up On Route Scroll Display Options Voice Guidance On/Off Volume 1 2 3 4 5 6 7Entertainment Systems
- Select the desired item you wish to delete (previous destination, memory point, etc.).
-
Press "Delete" at the bottom of the screen.
-
The list of stored locations will be displayed.
- Select (touch) the entry to be deleted. The item details will be listed.
- Press YES to confirm the deletion.
- Press DELETE ALL to delete all stored locations.
Emergency
Your navigation system is equipped with a separate Emergency screen. To access the Emergency screen, press "Emergency".
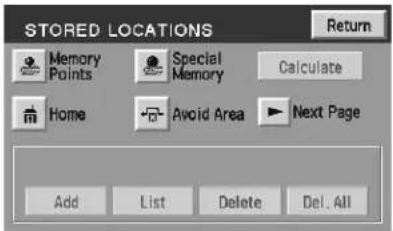
text_image
STORED LOCATIONS Return Memory Points Special Memory Calculate Home Avoid Area Next Page Add List Delete Del. All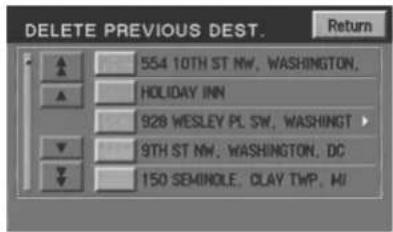
text_image
DELETE PREVIOUS DEST. Return 554 10TH ST NW, WASHINGTON, HOLIDAY INN 928 WESLEY PL SW, WASHINGTON 9TH ST NW, WASHINGTON, DC 150 SEMINOLE, CLAY TWP, MI
