Lacrosse (2010) - Car Buick - Free user manual and instructions
Find the device manual for free Lacrosse (2010) Buick in PDF.

User questions about Lacrosse (2010) Buick
0 question about this device. Answer the ones you know or ask your own.
Ask a new question about this device
Download the instructions for your Car in PDF format for free! Find your manual Lacrosse (2010) - Buick and take your electronic device back in hand. On this page are published all the documents necessary for the use of your device. Lacrosse (2010) by Buick.
USER MANUAL Lacrosse (2010) Buick
SafetyBelts......2-10
AirbagSystem......2-25
ChildRestraints......2-39
Storage....3-1
StorageCompartments......3-1
AdditionalStorageFeatures...3-2
InstrumentsandControls....4-1
InstrumentPanelOverview....4-4
Controls....4-6
WarningLights, Gauges, and Indicators....4-11
InformationDisplays......4-25
VehicleMessages......4-33
VehiclePersonalization......4-38
OnStar® System......4-43
UniversalRemoteSystem....4-45
Lighting....5-1
ExteriorLighting......5-1
InteriorLighting......5-5
LightingFeatures......5-5
InfotainmentSystem......6-1
Introduction......6-1
Radio......6-12
AudioPlayers......6-20
RearSeatInfotainment......6-34
Phone......6-42
ClimateControls....7-1
ClimateControlSystems.....7-1
AirVents....7-8
Maintenance....7-8
DrivingandOperating......8-1
DrivingInformation......8-2
StartingandOperating......8-17
EngineExhaust......8-26
AutomaticTransmission......8-27
DriveSystems......8-30
Brakes......8-31
RideControlSystems......8-34
CruiseControl......8-37
ObjectDetectionSystems....8-40
Fuel....8-48
Towing......8-53
ConversionsandAdd-Ons...8-60
2010BuickLaCrosseOwnerManual
VehicleCare....9-1
GeneralInformation......9-2
VehicleChecks......9-4
HeadlampAiming......9-31
BulbReplacement......9-34
ElectricalSystem......9-40
WheelsandTires......9-48
JumpStarting....9-77
Towing....9-81
AppearanceCare......9-84
ServiceandMaintenance...10-1
GeneralInformation......10-1
ScheduledMaintenance.....10-2
RecommendedFluids,
Lubricants, and Parts.....10-7
MaintenanceRecords......10-10
TechnicalData....11-1
VehicleIdentification......11-1
VehicleData....11-2
CustomerInformation.....12-1
CustomerInformation......12-1
ReportingSafetyDefects....12-14
VehicleDataRecordingand
Privacy......12-15
Index......i-1


GENERALMOTORS, GM, the GMEblem, BUICK, the BUICK Emblem, and thename La Crosse areregistered trademark of General Motors.
Thismanualdescribesfeaturesthat mayormaynotbeonyourspecific vehicleeitherbecausetheyare optionsthatyoudidnotpurchase orduetochangessubsequentto theprintingofthisownermanual. Pleaserefertothepurchase documentationrelatingtoyour specificvehicletocoufimreach of thefeaturesfoundonyourvehicle.
ForvehiclesfirstsoldinCanada, substitutethename "General Motors of Canada Limited" for Buick Motor Division wherever it appears in this manual.

Manufacturedunderlicense underU.S.Patent#'s:5,451,942; 5,956,674;5,974,380;5,978,762; 6,487,535&otherU.S.and worldwidepatentsissued& pending.DTSandDTSDigital Surroundareregisteredtrademarks andtheDTSlogosandSymbol aretrademarksofDTS,Inc.© 1996-2007DTS,Inc.AllRights Reserved.


Manufacturedunderlicensefrom DolbyLaboratories.Dolbyandthe double-Dsymbolaretrademarks ofDolbyLaboratories.Copyright 1992-1997DolbyLaboratories. Allrightsreserved.
Thisproductincorporatescopyright protectiontechnologythatis protectedbyU.S.patentsandother intellectualpropertyrights.Useof thiscopyrightprotectiontechnology mustbeauthorizedbyMacrovision, andisintendedforhomeandother limitedviewingusesonlyunless
LithoinU.S.A.
PartNo.20923540AFirstPrinting
©2009GeneralMotors.AllRightsReserved.
ivIntroduction
otherwiseauthorizedby Macrovision.Reverseengineering ordisassemblyisprohibited.

"MadeforiPod"meansthatan electronicaccessoryhasbeen designedtoconnectspecifically toiPodandhasbeencertified bythedevelopertomeetApple performancestandards.iPodisa trademarkofAppleComputer,Inc., registeredintheU.S.andother countries.
CanadianVehicleOwners
AFrenchlanguagecopyofthis manualcanbeobtainedfromyour dealer/retailerorfrom:
Danger,Warnings, and Cautions
Warning messages found on vehicle labels and this manual describe hazards and what to avoid or reduce them.
Dangerindicatesahazardwitha highlevelofriskwhichwillresultin seriousinjuryordeath.
WarningorCautionindicates a hazard that could result in injury or death.

WARNING
These mean there is something that could hurt you or other people.
Notice: This mean there is something that could result in property or vehicle damage. This would not be covered by the vehicle's warranty.

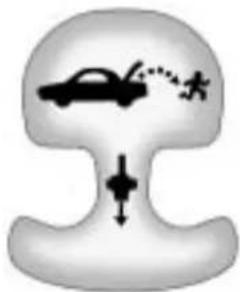
Acirclewithaslashthroughit isasafetysymbolwhichmeans "DoNot," "Donotdothis" or "Donotletthishappen."
Symbols
The vehicle has components and label that uses symbols instead of text. Symbols are shown along with the text describing the operation or information relating to as specific component, control, message, gauge, or indicator.
:Thissymbolisshownwhen youneedtoseeyouownermanual foradditionalinstructionsor information.
☐: Thissymbolisshownwhen youneedtoseeaservicemanual foradditionalinstructionsor information.
VehicleSymbolChart
Herearesomeadditionalsymbols that may be found on the vehicle and what they mean. Form more information on the symbol, refer to the index.
AirbagReadinessLight
AirConditioning
(ABS):AntilockBrakeSystem(ABS)
:AudioSteeringWheelControls orOnStar®
(①):BrakeSystemWarningLight
- + : ChargingSystem
:CruiseControl
EngineCoolantTemperature
vilntroduction
ExteriorLamps
D:FogLamps
:FuelGauge
Fuses
:HeadlampHigh/Low-Beam
Changer
LATCHSystemChild
Restraints
MalfunctionIndicatorLamp
OilPressure
Power
Ω:RemoteVehicleStart
SafetyBeltReminders
!:TirePressureMonitor
: TractionControl
:WindshieldWasherFluid
Keys, Doors and Windows
KeysandLocks
Keys......1-2
RemoteKeylessEntry(RKE)
System......1-3
RemoteKeylessEntry(RKE)
SystemOperation
(KeyAccess)......1-4
RemoteKeylessEntry(RKE)
SystemOperation
(KeylessAccess)......1-5
RemoteVehicleStart......1-8
DoorLocks......1-10
PowerDoorLocks......1-10
SafetyLocks....1-11
Doors
Trunk......1-11
VehicleSecurity
VehicleSecurity......1-13
Anti-TheftAlarmSystem.....1-13
Immobilizer......1-13
ImmobilizerOperation
(KeyAccess)......1-13
ImmobilizerOperation
(KeylessAccess)......1-14
ExteriorMirrors
PowerMirrors......1-15
FoldingMirrors....1-15
HeatedMirrors......1-16
ParkTiltMirrors......1-16
InteriorMirrors
ManualRearviewMirror.....1-16
Windows
Windows....1-17
PowerWindows......1-17
SunVisors....1-19
Roof
Sunroof....1-19
1-2Keys, DoorsandWindows
KeysandLocks
Keys

WARNING
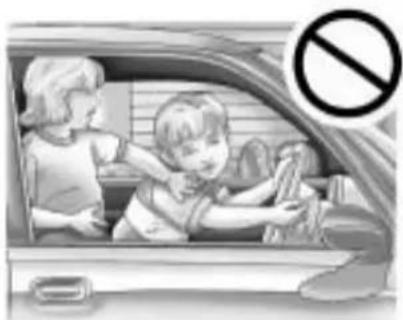
Leavingchildreninavehiclewith theignitionkeyisdangerousfor manyreasons,childrenorothers couldbebadlyinjuredoreven killed. Theycouldoperatethe powerwindowsorothercontrols orevenmakethevehiclemove. Thewindowswillfunctionwiththe keysintheignitionandchildren couldbeseriouslyinjuredorkilled ifcaughtinthepathofaclosing window.Donotleavethekeysin avehiclewithchildren.

WARNING
Leavingchildreninavehiclewith thekeylessaccesstransmitteris dangerousformanyreasons, childrenorotherscouldbebadly injuredorevenkilled. They could operatethepowerwindows or othercontrolsorevenmakethe vehiclemove. Thewindowswill functionwiththekeylessaccess transmitterinthevehicleandthey couldbeseriouslyinjuredorkilled ifcaughtinthepathofaclosing window. Donotleavethekeyless accesstransmitterinavehicle withchildren.
natural_image
Illustration of a car with two children inside, showing a child cleaning the window while another child watches (no text or symbols)Thekey, thatispartoftheRemote KeylessEntry(RKE)transmitter, canbeusedfortheignitionandall locksifthevehicleisakeyaccess vehicle. Ifthevehiclehasthe keylessignition,thekeycanbe usedforthelocks.

natural_image
Close-up of a flip phone with a handle and keypad (no visible text or symbols)PressthebuttonontheRKE transmittertoextendthekey. Pressthebuttonandthekey bladetoretractthekey.
Seeyourdealer/retailerifanewkey isneeded.
Notice: If you ever lock your keys in the vehicle, you may have to damage the vehicle to get in. Besure you have spare keys.
If you are locked out of the vehicle, see Roadside Assistance Program on page 12-6 or On Star ^® System on page 4-43.
RemoteKeylessEntry (RKE)System
SeeRadioFrequencyStatement on page12-17 forinformation regardingPart15oftheFederal CommunicationsCommission(FCC) RulesandRSS-210/211ofIndustry Canada.
Changesormodificationsto thissystembyotherthanan authorizedservicefacilitycould voidauthorizationousethis equipment.
If thereisadecreaseintheRKE operatingrange:
- Checkthedistance. Thetransmittermaybe toofarfromthevehicle.
- Checkthelocation. Other vehiclesorobjectsmaybe blockingthesignal.
- Checkthetransmitter's battery. See "BatteryReplacement" later in this section.
- Ifthetransmitterisstillnot workingcorrectly,seeyour dealer/retaileroraqualified technicianforservice.
RemoteKeylessEntry (RKE)SystemOperation (KeyAccess)
The transmitter functions will work up to 20m (65 feet) away from the vehicle. On vehicles with remote start the distance will begreater.
Keepinmindthatotherconditions, suchasthosepreviouslystated, canimpacttheperformanceofthe transmitter.

natural_image
Illustration of a flip phone with keypad and antenna (no text or symbols)RKEwithoutRemoteStartShown
The following maybe available:
(Lock):Presstolockalldoors.
The turnsignal indicators may flash and/or the horn maysound to indicate locking, see "Locking Feedback" under Vehicle Personalization on page 4-38
If the driverdoor is open when pressed, all doors lock except the driver door, if enabled through the vehicle personalization.

If the passenger door is open when ispressed, all doors lock.
Pressing 🔒 may also arm the theft-deterrent system. See Anti-Theft Alarm System on page 1-13.
(Unlock):Presstounlock thedriverdoororalldoors,see "DoorUnlockOptions" under VehiclePersonalization on page 4-38.
Theturnsignalindicatorsmayflash and/orthehornmaysoundto indicateunlocking,see"Unlock Feedback"underVehicle Personalization onpage4-38.
Pressing will disarm thetheft-deterrentsystem. SeeAnti-TheftAlarmSystem on page 1-13.
(Remote Trunk Release): Pressandholdtounlockthetrunk.
(VehicleLocator/Panic Alarm): Pressandrelease onetimetolocatethevehicle. Theexteriorlampsflashandthe hornchirps.
Pressandhold ☑foratleast twosecondstosoundthepanic alarm. Thehornsoundsandthe turnsignalsflashuntil ☑dispressed againorthevehicleisstarted.
Ω(RemoteVehicleStart):For vehicleswiththisfeature,press andthenpressandholdΩwithin fivesecondstostarttheenginefrom outsidethevehicleusingtheRKE transmitter.SeeRemoteVehicle Start on page 1-8 foradditional information.
ProgrammingTransmittersto theVehicle
OnlyRKEtransmittersprogrammed tothisvehiclewillwork.lfa transmitterislostorstolen,a replacementcanbepurchased and programmedthroughyourdealer/ retailer.Whenthereplacement transmitterisprogrammedtothis vehicle,allremainingtransmitters mustalsobereprogrammed. Anylostorstolentransmitters willnolongerworkoncethe newtransmitterisprogrammed.
BatteryReplacement
ReplacethebatteryiftheReplace BatteryinRemoteKeymessage displaysintheDIC.See"Replace BatteryinRemoteKey"underKey andLockMessagesonpage4-36.
The battery is not rechargeable. Se your dealer/retailertoreplace the battery.
RemoteKeylessEntry (RKE)SystemOperation (KeylessAccess)
TheKeylessAccessSystemlets youlockandunlockthedoorsand accessthetrunkwithoutremoving theremotetransmitterfromyour pocket,purse,briefcase,etc. Thekeylessaccesstransmitter shouldbewithin1m(3feet)of thedoorortrunkbeingopened.
KeylessUnlocking
Withthekeylessaccesstransmitter within1m(3feet),approachthe frontdoorandpullthehandleto unlockandopenthedoor.Ifthe transmitterisrecognized,thedoor willunlockandopen.
Enteringanydoorotherthanthe driverdoorwillalwayscauseallof thedoorstounlock. Thisisnot customizable.
1-6Keys, DoorsandWindows
Tocustomizewhichdoorsunlock whenthdriver'sdoorisopened, see "DoorUnlockOptions" under VehiclePersonalization on page4-38.
LockSensor

natural_image
Close-up of a white hand handle with a black arrow pointing to it, on a curved surface (no text or symbols visible)Whenalldoorsareclosedandthe ignitionisoff,thevehiclecanbe lockedbypassingthisareaonthe doorhandle.Thisfeaturewillbe availableforseveralminutesafter thevehiclehasbeenturnedoff.
KeylessTrunkOpening
Liftuponthetouchpadlocated abovethelicenseplatetoopen thetrunkifthekeylessaccess transmitteriswithinrange.
TransmitterButtons
Seetheinformationonhowthe transmitterbuttonsfunctionearlier inthissectionunder"Remote KeylessTransmitterOperation (KeyAccess)".
ProgrammingTransmittersto theVehicle
Onlykeylessaccesstransmitters programmedtothevehiclewillwork. Ifatransmitterislostorstolen, areplacementcanbepurchased andprogrammedthroughyour dealer/retailer.Thevehiclecanbe reprogrammedsothatlostorstolen transmittersnolongerwork.Any remainingtransmitterswillneedto bereprogrammed.Eachvehiclecan haveuptofivetransmittersmatched toit.
ProgrammingwithaRecognized Transmitter
Anewtransmittercanbe programmedtothevehicle whentherearetworecognized transmittersavailable.Ifthereare nottworecognizedtransmitters availableseeyourdealer/retailer. Toprogram,thevehiclemustbe offandallofthetransmitters,both currentlyrecognizedandnew,must bewithyou.
-
Placetherecognized transmittersinthecupholder.
-
Insert the vehicle key of thenew transmitter into the keylock cylinder located on the outside of the riverdoor and turn the key to the unlock position five times with intenseconds.
TheDriverInformationCenter (DIC)displaysReadyFor Remote#2,3,4or5.
-
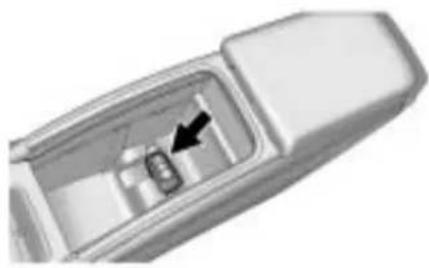
Placethenewtransmitter intothetransmitterpocket. Thetransmitterpocketis locatedinsidethecenter consolestorageareaunder thecupholder. Thecupholder willneedtobepulledoutto accessthetransmitterpocket.
-
Presstheignition. When the transmitter is learned the DIC will display will show that it is ready to program then next transmitter.
-
Removethetransmitterfromthe transmitterpocketandpressthe unlockbutton.
Toprogramadditional transmitters,repeatSteps3 through5.
When all additional transmitters are programmed, press and hold the ignition for 5 second to exit programming mode.
StartingtheVehiclewithaLow TransmitterBattery
If the transmitter battery is weak, the DIC may display No Remote Detected when you try to start the vehicle. The Replace Battery in Remote Key message may also be displayed at this time.
natural_image
Close-up of a mechanical component with an arrow pointing to a small internal feature (no text or symbols visible)Tostartthevehicle:
-
Removethecupholderfromthe centerconsolestoragearea.
-
Placethetransmitterin the transmitterpocketwiththe buttonsfacingup.
-
With the vehicle in P (Park) or N (Neutral), pressthebrake pedalandtheignition control. See Starting the Engine on page 8-20, for additional information about the vehicle's keylessignition with pushstart. Replacethetransmitter battery as soon as possible.
BatteryReplacement
Replace the battery if the Replace Battery in Remote Key message displays in the DIC. See "Replace Battery in Remote Key" under key and Lock Messages on page 4-36.
Thebatteryisnotrechargeable. Seeyourdealer/retailertoreplace thebattery.
RemoteVehicleStart
If available, this feature allows the enginetobestarted from outside the vehicle.
Thisbutton ΩwillbeontheRKE transmitterifthevehiclehasremote start.
Toenableanddisableremotestart, see "RemoteVehicleStart" under VehiclePersonalization on page 4-38.
Lawsinsomelocalcommunities may restrict the use of remote starters. Forexample, somelaws may require person using remote start to have the vehicle in view. Check local regulations for any requirements.
StartingtheEngineUsingRemote Start
Tostarttheengineusingtheremote startfeature:
-
Press 📞 ontheRKEtransmitter. The vehicle's doors will be locked.
-
Withinfiveseconds, press and hold Q until the turn signal lampsflash. This confirms therequest to remotestart the vehicle has been received. Oncethe vehicle is started, the parking lampswill turn on and remain on as long asthe engine is running.
-
Turntheignition to ON/RUN (KeyAccess), or select the ON/RUN/START ignition position (Keyless Access), to drivethe vehicle.
Theenginewillshutoffafter 10minutesunlessatime extensionisdoneortheignition isputinON/RUN(KeyAccess) orON/RUN/START(Keyless Access).
Vehicleswithanautomaticclimate controlsystemwilldefaulttoa heatingorcoolingmodedepending ontheoutsidetemperatureduringa remotestart.Whenthekeyisturned toON/RUN(KeyAccess),orthe ON/RUN/STARTignitionposition isselected(KeylessAccess),the climatecontrolsystemwillturnon atthesettingthevehiclewassetto whenthevehiclewaslastturnedoff.
Vehicleswithheatedorheatedand ventilatedfrontseatscanhavethis featureturnonautomaticallyduring aremotestartsee"RemoteStart HeatedSeats"and"RemoteStart VentedSeats"underVehicle Personalization onpage4-38 formoreinformation.
ExtendingEngineRunTime
Fora10minuteextension,repeat Steps1and2whiletheengineis stillrunning. Theremotestartcan onlybeextendedonce.
When theremotestartisextended, thesecond 10minuteswillstart immediately.
Forexample, if the vehicle has been running for five minutes, and 10 minutes are added, the engine will run for total of 15 minutes.
A maximumoftworemotestartsor remotestartattemptsareallowed betweenignitioncycles.
The vehicle'signitionmust be turnedonandthenbackoffbefore theremotestartprocedurecanbe usedagain.
ShuttingtheEngineOffAftera RemoteStart
Toshutofftheengine:
- PressQuntiltheparkinglamps turnoff.
• Turnonthehazardwarning flashers.
• Turntheignitiononandthen backoff.
ConditionsinWhichRemoteStart WillNotWork
Theremotestartwillnotoperateif:
• Thekeyisintheignition (KeyAccess)ortheignition isinanypositionotherthan OFF(KeylessAccess).
- Thetransmitterisinthevehicle (KeylessAccess).
• Thehoodisnotclosed.
- Thehazardwarningflashers areon.
- Thereisanemissioncontrol systemmalfunction.
• Theenginecoolanttemperature istoohigh.
• Theoilpressureislow.
- Tworemotevehiclestartshave alreadybeenused.
• ThevehicleisnotinP(Park).
DoorLocks

WARNING
Unlockeddoorscan be dangerous.
- Passengers, especially children, caneasily open the doors and fallout of famoving vehicle. The chance of being thrown out of the vehicle in acrash is increased if the doors are not locked. So, all passengers should wear safety belts properly and the door should be locked whenever the vehicle is driven.
- Youngchildrenwhogetinto unlockedvehiclesmaybe unabletogetout.Achildcan beovercomebyextremeheat andcansufferpermanent injuriesorevendeathfrom heatstroke.Alwayslockthe vehiclewheneverleavingit.
(Continued)
WARNING(Continued)
- Outsiderscaneasilyenter throughan unlockeddoor whenyouslowdownorstop your vehicle. Locking your doorscanhelpprevent this from happening.
Tolockandunlockthedoor, use the RemoteKeylessEntry(RKE) transmitterorthekeyfromthe outsideandthedoorlockknob orswitchfromtheinside.
Frominsidethevehiclewiththe doorslocked,pullonceonthedoor handletounlockit,andasecond timetoopenit.
Manuallylockingthedriverdoor alsoautomaticallylocksallother doors.Ifthedriverdoorisopen, orthekeyisintheignitionthedriver doorunlocks.
Formoreinformationsee:
- RemoteKeylessEntry(RKE) SystemOperation(KeyAccess) on page 1-4 or Remote KeylessEntry(RKE)System Operation(KeylessAccess) on page 1-5
• PowerDoorLocks on page 1-10
• VehiclePersonalization on page4-38
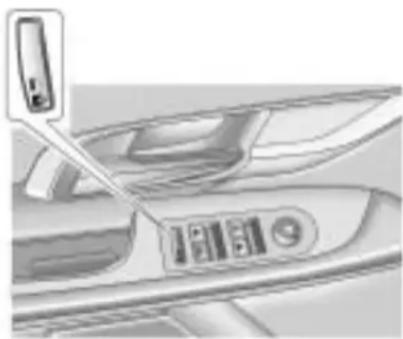
PowerDoorLocks
The powerdoorlockswitches are located on the center of the instrument panel.
(Unlock): Presstounlockthe doors.
(Lock): Presstolockthedoors.
See Vehicle Personalization on page 4-38 formoreinformation.
SafetyLocks
natural_image
Close-up of a car interior showing a door and seat with a small electronic device attached (no visible text or symbols)Pressthebuttononthedriverdoor armresttoactivatethesafetylocks onthepassengerreardoors.
This switch alsos disablestherear powerwindows.
Onceactivated, the light, located on the switch, illuminates and goes out when deactivated.
Ifthelightflashesthefeaturemay notbeworkingproperly.
Doors
Trunk
WARNING
Exhaustgasescanenterthe vehicleifitisdrivenwiththe liftgate,trunk/hatchopen,orwith anyobjectsthatpassthroughthe sealbetweenthebodyandthe trunk/hatchorliftgate.Engine exhaustcontainsCarbon Monoxide(CO)whichcannotbe seenorsmelled.Itcancause unconsciousnessandevendeath.
(Continued)
WARNING(Continued)
If the vehicle must be driven with the lift gate, or trunk/hatch open:
- Closeallofthewindows.
- Fullyopentheairoutletson orundertheinstrument panel.
- AdjusttheClimateControl systemtoasettingthat bringsinonlyoutsideair andsetthefanspeedtothe highestsetting.SeeClimate ControlSystemintheIndex.
- If the vehicle has a power lift gate, disable the power lift gate function.
Formoreinformationabout carbonmonoxide,seeEngine Exhaustonpage8-26.
1-12Keys, DoorsandWindows
RemoteTrunkRelease
Toopenthetrunkfromtheoutside thevehicle,pressthe buttonon theRemoteKeylessEntry(RKE) transmitter,orbypressingthe touchpadabovethelicenseplate.
Emergency Trunk Release Handle
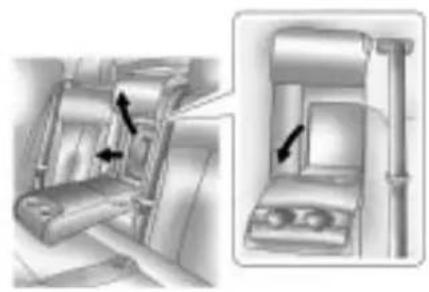
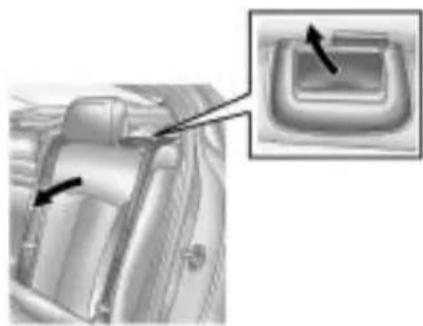
Notice: Donotusethe emergencytrunkreleasehandle asatie-downoranchorpoint whensecuringitemsinthetrunk asitcoulddamagethehandle. Theemergencytrunkrelease handleisonlyintendedtoaida persontrappedinalatchedtrunk, enablingthemtoopenthetrunk fromtheinside.
natural_image
Diagram showing a car with motion indicators and a downward arrow, no text or symbols presentThereisanemergencytrunk releasehandlelocatedinsidethe trunkonthetrunklatch.Onsome vehicles,thereleasehandlecanbe accessedbyfoldingtherearseat centerseatback.SeeRearSeats on page 2-9 .Pulltherelease handletoopenthetrunkfromthe inside.
RearSeatPass-Through
natural_image
Mechanical assembly diagram showing a belt drive mechanism with arrows indicating motion (no text or symbols present)Thevehiclehasasmalldoorinthe rearseat. Thisdoorallowsaccess tothetrunkfrominsidethevehicle.
Therearseatarmrestmustbedown forthepass-throughdoortoopen. Toreleasethepass-throughdoor, pullthereleasehandle.Toclosethe door,raiseitandpushituntil latches.
VehicleSecurity
Vehicletheftisbigbusiness, especiallyinsomecities. Thisvehiclehastheft-deterrent features,however,theydonot makeitimpossibletosteal.
Anti-TheftAlarmSystem
This vehicle has an anti-theftalarm system.
ArmingtheSystem
Toarmthesystem, press on the RKEtransmitter.
Thealarmautomaticallyarmsafter about30seconds. Theseurity light, located on the instrument panel, flashes.
Press 📄 ontheRKEtransmitterto openthetrunkwithoutsettingoffthe alarm. Thesystemrearmswhenthe trunkisclosed.
DisarmingtheSystem
Todisarmthesystem,dooneofthe following:
- Press on the RKE transmitter.
- Approachthevehiclewiththe RKEtransmitter(Keyless Access).
- Starttheengine.
Thealarmautomaticallydisarms.
HowtoDetectaTamper Condition
If ispressed and the horn sounds, an attempted break-in has occurred while the system was armed.
If the alarm has been activated, the Theft Attempted message will appear on the DIC. See Key and Lock Messages on page 4-36 for additional information.
Immobilizer
SeeRadioFrequencyStatement on page12-17 forinformation regardingPart15oftheFederal CommunicationsCommission(FCC) RulesandRSS-210/211ofIndustry Canada.
ImmobilizerOperation (KeyAccess)
This vehicle has a passive theft-deterrent system.
Thesystemdoesnothavetobe manuallyarmedordisarmed.
The vehicle is automatically immobilized when the key is removed from the ignition.
Thesystemisautomatically disarmedwhenthevehicleis startedwiththecorrectkey.
1-14Keys, DoorsandWindows
The key uses at transponder that matches an immobilizer control unit in the vehicle and automatically disarmsthesystem. Only the correct keystartsthe vehicle. The vehicle may not start if the key is damaged.

Thesecuritylight, located in the instrument panel cluster, comes on if there is a problem with arming or disarming the theft-deterrent system.
Whentryingtostartthevehicle, the securitylightcomesonbrieflywhen theignitionisturnedon.
If theenginedoesnotstartandthe securitylightstaysonthereisa problemwiththesystem.Turnthe ignitionoffandtryagain.
Iftheenginestilldoesnotstart, and thekeyappearstobeundamaged orthelightcontinuestostayon, try anotherignitionkey.
Iftheenginestilldoesnotstartwith theotherkey,thevehicleneeds service.Ifthevehicledoesstart,the firstkeymaybedamaged.Seeyour dealer/retailerwhocanservicethe theft-deterrentsystemandhavea newkeymade.
Donotleavethekeyordevicethat disarmsordeactivatestheft deterrentsysteminthevehicle.
ImmobilizerOperation (KeylessAccess)
This vehicle has a passive theft-deterrent system.
Thesystemdoesnothavetobe manuallyarmedordisarmed.
The vehicle is automatically immobilized when the transmitter leaves the vehicle.
Theimmobilizationsystemis disarmedwhentheignitionbuttonis pushedinandavalidtransmitteris foundinthevehicle.
Thesecuritylight, located in the instrument panel cluster, comes on if there is a problem with arming or disarming the theft-deterrent system.
Thesystemhasoneormore transmittersthatarematchedto animmobilizercontrolunitinyour vehicle. Onlyacorrectlymatched transmitterwillstartthevehicle. Ifthetransmitteriseverdamaged, youmaynotbeabletostartyour vehicle.
Whentryingtostartthevehicle, the securitylightcomesonbrieflywhen theignitionisturnedon.
If theenginedoesnotstartandthe securitylightstaysonthereisa problemwiththesystem.Turnthe ignitionoffandtryagain.
Ifthekeylessaccesstransmitter appearstobeundamaged,try anotherkeylessaccesstransmitter. Or,youmaytryplacingthe transmitterinthetransmitterpocket locatedinthecenterconsole.See "NoRemoteDetected"underKey andLockMessagesonpage4-36.
Iftheenginedoesnotstartwith theothertransmitterorwhenthe transmitterisonthepocketinthe centerconsole,yourvehicleneeds service.Seeyourdealer/retailer whocanservicethetheft-deterrent systemandhaveanewtransmitter programmedtothevehicle.
Donotleavethekeyordevicethat disarmsordeactivatestheft deterrentsysteminthevehicle.
ExteriorMirrors
PowerMirrors
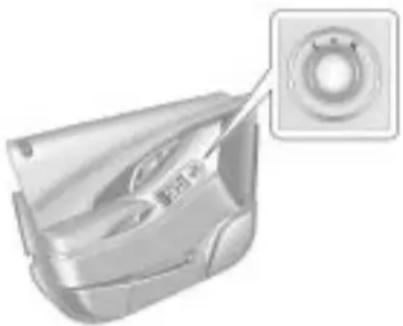
natural_image
3D rendering of a mechanical component with a circular inset showing a ring detail (no text or symbols visible)Toadjustthemirrors:
-
Turnthecontrolknobtothe L(left)orR(right)selectingthe driverorpassengermirror.
-
Push the control knob to the left, right, up, down to adjust the mirror.
Vehicleswiththememoryfeature canstoreapreferredmirrorposition. See "MemorySeats" under Power Seat Adjustment on page 2-4 for more information.
FoldingMirrors
ManualFoldawayMirrors
Vehicleswithmanualfoldedmirrors arefoldedinwardtoprevent damagewhengoingthroughan automaticcarwash.Tofold,pullthe mirrortowardthevehicle.Pushthe mirroroutward,toreturnittothe originalposition.
AutomaticDimmingFeature
The driver outside mirror automatically adjusts for the glare of the headlamps behind you.
TurnSignalIndicator
The vehicle might have turnsignal indicator lamp that is built into the mirror housing. The turnsign allamp flashes with the use of the vehicle's turnsign and hazard flashers.
HeatedMirrors
Forvehicleswithheatedmirrors:
(RearWindowDefogger):
Presstoheatthemirrors.
See "RearWindowDefogger" under Automatic Climate Control System on page 7-1 formoreinformation.
ParkTiltMirrors
If the vehicle has the memory package, the outside mirrors have a park tilt feature. This feature automatically tilts the outside mirror to a preselected position when the vehicle is in R (Reverse). This allows the divert view the curb for parallel parking.
Thepassengeranddrivermirrors returntotheiroriginalposition whenthevehicleisshiftedoutof R(Reverse),ortheignitionisturned offortoOFF/LOCK.
This feature can be turned on or off through the Driver Information Center (DIC). See Vehicle Personalization on page 4-38 form more information.
InteriorMirrors
ManualRearviewMirror
Adjustthismirrorforaclearviewof theareabehindthevehicle.Hold themirrorinthecentertomoveit up,down,orside-to-side.Toreduce headlampglareduringnight-time use,movetheleveratthebottomof themirrortotheright.
VehicleswithOnStar ^® havethree additionalcontrolbuttonslocatedat thebottomofthemirror.Seeyour dealer/retailerformoreinformation onthesystemandhowtosubscribe toOnStar.SeeOnStar ^® System on page 4-43 formoreinformation abouttheservicesOnStarprovides.
Windows

WARNING
Leavingchildren, helplessadults, orpetsinavehiclewiththe windowsclosedisdangerous. Theycanbeovercomebythe extremeheatandsuffer permanentinjuriesorevendeath fromheatstroke.Neverleavea child,ahelplessadult,orapet aloneinavehicle,especiallywith thewindowsclosedinwarmor hotweather.

natural_image
Illustration of a child in a car seat with a no-smoking symbol overlay (no text or symbols on the diagram itself)PowerWindows

natural_image
Interior view of a car showing the front panel and side panel with a close-up of the door (no visible text or symbols)Thepowerwindowswitcheslocated onthedriverdoorcontrolallfour windows. Thepassengerdooronly hasawindowswitchthatcontrols thatwindow.Pushtheswitchdown toopenthewindow.Pullthefrontof theswitchuptocloseit.
Theswitchesworkwhentheignition isinON/RUN,ACC/ACCESSORY, orinRetainedAccessoryPower (RAP).SeeRetainedAccessory Power(RAP)onpage8-20.
ExpressWindowOperation
Windowswithanexpress-upor downfeatureallowthewindowtobe loweredorraisedwithoutholding theswitch. Rearwindowsonlyhave expressdown. Pullawindowswitch uporpushitdownalltheway, releaseit, andthewindowgoes downorupautomatically. Stopthe windowbypushingorpullingthe switch.
RearWindowLockout
Therearwindowlockout button islocatedonthedriver doornearthewindowswitches. Pressthebuttontodisabletherear windowcontrols. Thelightonthe buttonilluminates, indicating the featureisinuse. Therearwindows
stillcanberaisedorloweredusing thedriverwindowswitcheswhen thelockoutfeatureisactive. Torestorepowertotherear windows,pressthebuttonagain. Thelightonthebuttonwillgoout. Ifthelightflashes,thefeaturemay notbeworkingproperly.
This switch also activates the Safety Locks. See Power Door Locks on page 1-10 form more information.
ProgrammingthePower Windows
If the battery on the vehicle has been recharged, disconnected, orisnotworking, you will need to reprogram each front power window for the express-up feature to work. Before reprogramming, replace or recharge the vehicle's battery.
Toprogrameachfrontwindow, followthesesteps:
-
With the ignition in ACC/ACCESSORY, ON/RUN, or when Retained Accessory Power (RAP) is active, close alldoors.
-
Pressandholdthepower windowswitchuntilthewindow isfullyopen.
-
Pullthepowerwindowswitchup untilthewindowisfullyclosed.
-
Continue holding the switchup for approximately two seconds after the window is completely closed.
Thewindowisnowreprogrammed. Repeattheprocessfortheother windows.
SunVisors
Pullthesunvisortowardyouor moveittothesidetoreduceglare.
RearWindowSunshade
Onvehicleswiththisfeaturethe switch islocatedonthecenter console,totherightoftheshifter.
Iftheshadeisup, and the vehicle is shifted into R (Reverse) it will automatically lower. When the vehicle is shifted out of R (Reverse) it does not automatically raise itself. Toraisethesunshade, press the front of the switch.
Roof
Sunroof

text_image
B C A DOnvehicleswithasunroof, the switchislocatedontheoverhead console.
Thesunroofonlyoperateswhen theignitionisinON/RUN,ACC/ACCESSORY,orifRetained AccessoryPower(RAP)isactive. SeeRetainedAccessoryPower (RAP)onpage8-20.
Vent
Thesunroofhasanexpress-vent openfeature.Fromtheclosed position,presstherearofthe sunroofswitch(A)toventthe sunroof.Tostopthesunroof partway,presstheswitchasecond time.Toclosethesunroof,press andholdthefrontofthesunroof switch(B).Tostopthesunroof partway,releasetheswitch.
1-20Keys, DoorsandWindows
Express-Open/Express-Close
Toexpress-openthesunroof from theclosedorventposition, fully pressandreleasetherearofthe switch(A). Thesunroofopens automatically. Tostopthesunroof partway, presstheswitchasecond time. Toexpress-closethesunroof, fullypressandreleasethefrontof theswitch(B). Thesunroofcloses automatically. Tostopthesunroof partway, presstheswitcha secondtime.
If the sunshade is closed, it opens automatically with the sunroof but can also be express-opened/express-closed by using the sunshade control (C)(D). The sunshade cannot be fully closed with the sunroof open.
Notice: Forcing the sunshade forward of the sliding glass panel may caused damage and the sunroof may not operate properly. Always closet the glass panel before closing the sunshade.
Thesunroofglasspanelcannot be openedorclosedifthevehiclehas anelectricalfailure.
Anti-PinchFeature
Ifanobjectisinthepathofthe sunroofwhileitisclosing,the anti-pinchfeaturewilldetect theobjectandstopthesunroof fromclosingatthepointofthe obstruction.Thesunroof,and sunshadewillthenreturntothe openorventposition.Toclose thesunroofoncetheobstruction hasbeenremoved,refertothe "Express-Open/Express-Close" functionsdescribedpreviously.
Donotkeepthesunroofopenfor longperiodsoftimewhilethe vehicleisnotinuse.Debriscan collectinthetracks,damagethe sunroofoperationandplugthe waterdrainingsystem.
Seatsand Restraints
HeadRestraints HeadRestraints......2-2
FrontSeats SeatAdjustment.....2-3 PowerSeatAdjustment.....2-4 LumbarAdjustment.....2-5 RecliningSeatbacks.....2-6 HeatedFrontSeats.....2-7 HeatedandVentilatedFront Seats.....2-8
RearSeats RearSeats......2-9
SafetyBelts SafetyBelts.....2-10 HowtoWearSafetyBelts Properly.....2-13
Lap-ShoulderBelt....2-19 SafetyBeltUseDuring Pregnancy....2-23 SafetyBeltExtender....2-23 SafetySystemCheck....2-24 SafetyBeltCare....2-24 ReplacingSafetyBeltSystem PartsAfteraCrash....2-24
AirbagSystem AirbagSystem.....2-25 WhereAretheAirbags?.....2-27 WhenShouldanAirbag Inflate?.....2-28 WhatMakesanAirbag Inflate?.....2-30 HowDoesanAirbag Restrain?.....2-30 WhatWillYouSeeAfteran AirbagInflates?.....2-30 PassengerSensing System.....2-32 ServicingtheAirbag-Equipped Vehicle.....2-36
AddingEquipmenttothe Airbag-EquippedVehicle...2-37 AirbagSystemCheck.....2-38 ReplacingAirbagSystem PartsAfteraCrash.....2-38
ChildRestraints OlderChildren.....2-39 InfantsandYoung Children.....2-41 ChildRestraintSystems.....2-43 WheretoPuttheRestraint...2-45 LowerAnchorsandTethers forChildren (LATCHSystem).....2-47 ReplacingLATCHSystem PartsAfteraCrash.....2-53 SecuringChildRestraints (RearSeat).....2-54 SecuringChildRestraints (FrontSeat).....2-56
2-2 Seats and Restraints
HeadRestraints
The vehicle's frontseat have adjustable head restraints in the outboard seating positions.
The vehicle's rearseatshave adjustable headrestsinthe outboardseatingpositions.

WARNING
Withheadrestraintsthatarenot installedandadjustedproperly, thereisagreaterchancethat occupantswillsufferaneck/spinalinjuryinacrash.Donot driveuntiltheheadrestraintsfor allooccupantsareinstalled and adjustedproperly.

natural_image
Side profile illustration of a person seated in a car seat, viewed from the side (no text or symbols visible)Adjusttheheadrestraintsothatthe topoftherestraintisatthesame heightasthetopoftheoccupant's head. Thispositionreducesthe chanceofaneckinjuryinacrash.
FrontSeat

natural_image
3D model of a car headrest with a black arrow pointing to the nose area (no text or symbols)Toraiseorlowertheheadrestraint, pressthereleasebuttonlocatedon thesideoftheheadrestraintand pulluporpushtheheadrestraint downandreleasethebutton.
Pullandpushontheheadrestraint afterthebuttonisreleasedtomake surethatitislockedinplace.
RearSeat
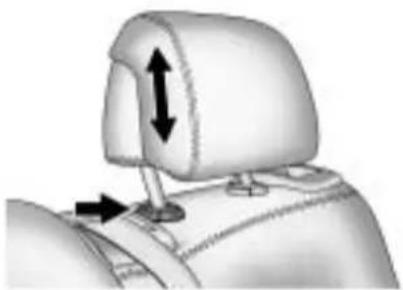
natural_image
Mechanical component diagram showing a neck and side arm with directional arrows indicating movement (no text or symbols)Pulltheheadrestuptoraiseit. Tolowertheheadrest, press the releasebutton, located on the head restpost on the top of these at back, while you push the head rest down.
Pushdownontheheadrestafter thebuttonisreleasedtomakesure thatitislockedinplace.
Thisvehicle'sheadrestraintsand headrestsarenotdesignedtobe removed.
FrontSeats
SeatAdjustment
ManualSeatAdjustment
natural_image
Illustration of a car seat with seatbelt and driver seat (no text or symbols)
WARNING
Youcanlosecontrolofthe vehicleifyoutrytoadjusta manualdriver'sseatwhilethe
(Continued)
WARNING(Continued)
vehicleismoving. Thesudden movementcouldstartleand confuseyou,ormakeyoupusha pedalwhenyoudonotwantto. Adjustthedriver'sseatonlywhen thevehicleisnotmoving.
Toadjusttheseatposition:
- Pullthehandlelocatedatthe frontoftheseat.
2.Movetheseatforwardor backwardtoadjusttheseat position. - Releasethehandletostopthe seatfrommoving.
2-4 Seats and Restraints
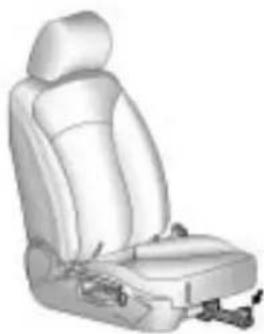
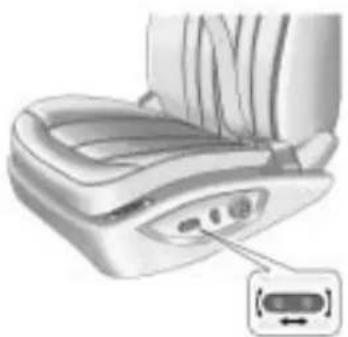
PowerSeatAdjustment
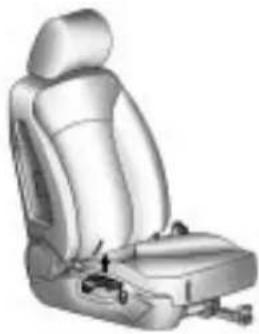
natural_image
Illustration of a car seatbelt device with a close-up inset showing a cable connector (no text or symbols present)Toadjustapowerseat,doanyof thefollowing:
- Movetheseatforwardor rearwardbyslidingthecontrol forwardorrearward.
- Raiseorlowerthefrontpartof theseatcushionbymovingthe frontofthecontrolupordown.
- Raiseorlowertheentireseat bymovingtheentirecontrolup ordown.
MemorySeats

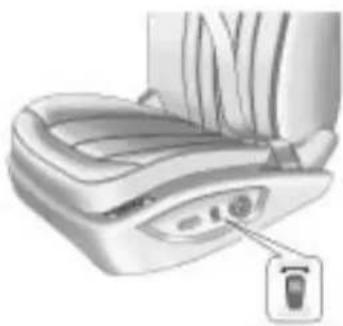
natural_image
Illustration of a car seat with control buttons and a small illuminated component (no text or symbols)The vehicle may have an memory function which allows seat settings to be saved and recalled.
Tosaveyourpositionsinmemory:
- Adjustthedriverseat, including theseatbackreclinerandboth outsidemirrorstoacomfortable position.
- PressandholdMEMand button1untilthebeepletsyou knowthatthepositionhasbeen stored.
Asecondseatingandmirror positioncanbeprogrammedby repeatingtheabovestepsand pressingbutton2.
Torecallthememorypositions, pressandholdeitherbutton1or button2correspondingtothe desireddrivingposition. Theseat andoutsidemirrorsmoveto thepositionpreviouslystored. Releasingthebuttonbeforethe storedpositionisreachedcancels therecall.
UsingtheRemoteKeyless Entry(RKE)transmittertoenter thevehiclewiththeremoterecall memoryfeatureoncauses automaticseatandmirror adjustmentassociatedwiththat transmitter.Thereisnoadjustment whenthepositionhasnotbeen changedbyanotherseating position.
Tostoprecallmovementofthe memoryfeatureatanytime,press oneofthepowerseatcontrols, memorybuttons,orpowermirror buttons.
If something has blocked the driver seat while recalling an memory position, the driver seat recall may stop working. If this happens, press the appropriate control for the area that is not recalling for two seconds, after the obstruction is removed. Thentry recalling the memory position again by pressing the appropriatenemory button. If the memory position is still not being recalled, see your dealer/retailer for service.
EasyExitSeat
With this feature, the driver seat automatically moves back to give the driver more room to exit when the ignition is turned to OFF and the driver door is opened.
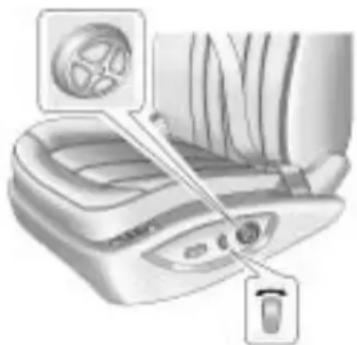
LumbarAdjustment
natural_image
Diagram of a car interior showing dashboard, steering wheel, and seatbelt (no text or labels)To increase or decrease lumbar support, press and hold the frontor rear of the round control knob.
Toraiseorlowerlumbarsupport, pressandholdthetoporbottomoftheroundcontrolknob.
Releasethecontrolknobwhenthe seatbackreachesthedesiredlevel oflumbarsupport.
SeePowerSeatAdjustment on page 2-4 formoreinformation.
2-6 Seats and Restraints
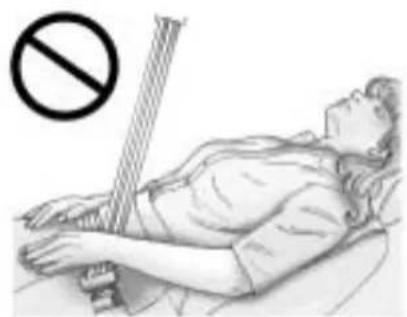
RecliningSeatbacks

WARNING
Youcanlosecontrolofthe vehicleifyoutrytoadjustthe seatwhilethevehicleismoving. Thesuddenmovementcould startleandconfuseyou,ormake youpushapedalwhenyoudo notwantto.Adjustthedriver's seatonlywhenthevehicleisnot moving.
natural_image
Illustration of a person lying in bed with a no-smoking symbol above, no text or labels present.
WARNING
Sittinginareclinedpositionwhen thevehicleisinmotioncanbe dangerous.Evenwhenbuckled up,thesafetybeltscannotdo theirjobwhenreclinedlikethis.
Theshoulderbeltcannotdoits jobbecauseitwillnotbeagainst yourbody.Instead,itwillbein frontofyou.Inacrash,youcould gointoit,receivingneckorother injuries.
Thelapbeltcannotdoitsjob either. Inacrash, thebelt could goupoveryourabdomen. The beltforceswouldbethere, notat yourpelvicbones. This could cause serious internal injuries.
Forproperprotectionwhenthe vehicleisinmotion,havethe seatbackupright.Thensitwell backintheseatandwearthe safetybeltproperly.
ManualRecliningSeatbacks
natural_image
Illustration of a car seatbelt with a small car seat and belt switch (no text or symbols)Onvehicleswithmanualreclining seatbacks,thecontrolleveris locatedontheoutboardsideof theseat.
Toreclinetheseatback:
- Liftthereclinelever.
- Movetheseatbacktothe desiredposition, thenrelease thelevertolocktheseatback inplace.
- Pushandpullontheseatbackto makesureitislocked.
Toreturntheseatbacktoanupright position:
-
Lifttheleverfullywithout applyingpressureto the seatbackandtheseatbackwill returntotheprightposition.
-
Pushandpullontheseatbackto makesureitislocked.
PowerRecliningSeatbacks
natural_image
Illustration of a medical device with a labeled connector (no text or symbols present)Onvehicleswithpowerreclining seatbackstheverticalcontrolis locatedontheoutboardsideof theseat.
• Toreclinetheseatback, press the controltowardtherearofthe vehicle.
- Toraisetheseatback, press the controltowardthefrontofthe vehicle.
HeatedFrontSeats
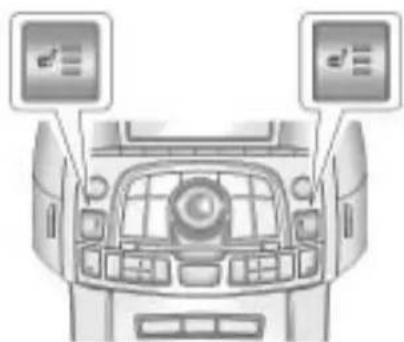
natural_image
Top-down view of a car dashboard with two mounted monitors (no visible text or symbols)Onvehicleswithheatedseats, the buttonsarelocatedneartheclimate controls.
Theignitionmustbeontousethis feature.
Pressthebuttontoheattheseat cushionandseatback.Alighton thatbuttonindicateshefeature ison.
2-8 Seats and Restraints
Therearethreetemperature settings:
- High=threelights
• Medium=twolights - Low=onelight
Theheatcomesonatthehighest setting.Eachpressofthebutton decreasessthetemperaturesetting byone.
Toturnthefeatureoff, press the button until the display lights turnoff.
If the vehicle has remote vehicle start and started by using the Remote Keyless Entry (RKE) transmitter, the front heated seats will be turned onto the high setting if it is cold outside. When the key is inserted into the ignition and the ignition is turned on, the heated seat feature will turn off. To turn the heated seat feature back on, press the desired button.
HeatedandVentilated FrontSeats
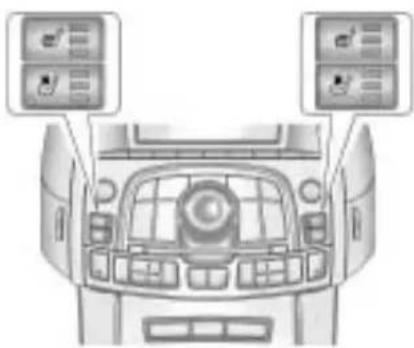
natural_image
Top-down view of a car dashboard with two mounted air conditioners (no visible text or symbols)Onvehiclewiththeheatedand ventilatedcooledseatfeaturethe buttonsarelocatedneartheclimate controls.
Tousethisfeaturetheignitionmust beon.
Pressabuttontoturnonthe desiredfeature.Alightonthat buttonindicatesthefeatureison.
Therearethreetemperature settingsforeachfeature:
- High=three
- Medium=two
- Low=one
Pressabuttontoturnthefeature onatthemaximumsetting.Each pressofthebuttonchangesthe temperatureonesetting.
Turnthefeatureoffbypassing thebuttonuntilthedisplaylights turnoff.
Ifthevehiclehasremotevehicle startandisstartedbyusingthe remotekeylessentrytransmitter,the heatedandventilatedseatsturnon atthemaximumsettingaccordingto thetemperatureoutside.Whenthe keyisinsertedintotheignitionand theignitionisturnedon,theheated orcooledseatfeatureturnsoff. Toturnthisfeaturebackon,press thedesiredbutton.
RearSeats
Thevehicle'srearseatcanbe foldeddowntoallowformorecargo spaceoritcanbeplacedbackinto alockeduprightposition.Adjustthe seatbackonlywhenthevehicleis notmoving.
Tofoldtheseatbackdown:

natural_image
Close-up of a mechanical component with a clamping mechanism (no visible text or symbols)- Besurethesafetybeltisinthe retainerclip.
natural_image
Interior view of a car seatbelt with a close-up inset showing a button (no text or symbols visible)- Pullontheleverlocated on the topoftheoftheseatback to unlockit.
- Foldtheseatbackdown.
Toraisetheseatback:
- Pushtheseatbackup and pushitbacktolockitintoplace. Makesurethesafetybeltisin theretainerclipanddoesnot gettwistedorcaughtinthe seatback.
- Atabonthehandlepopsdown toindicatetheseatbackhas beenlocked.
3.Pushandpullthetopofthe seatbacktobesureitislocked intoposition.
SafetyBelts
Thissectionofthemanual describeshowtousesafetybelts properly. Italsodescribessome thingsnottodowithsafetybelts.

WARNING
Donotletanyoneridewhere asafetybeltcannotbeworn properly. Inacrash, ifyouoryour passenger(s) are not wearing safetybelts, the injuries can be much worse. You can hit things inside the vehicle harder or be ejected from the vehicle. You and your passenger(s) can be seriously injured or killed. In the same crash, you might not be, if you are buckled up. Always fasten your safety belt, and check that your passenger(s) are restrained properly too.

WARNING
Itisextremelydangeroustoride inacargoarea,insideoroutside ofavehicle.Inacollision,people ridingintheseareasaremore likelytobeseriouslyinjuredor killed.Donotallowpeopletoride inanyareaofyourvehiclethat isnotequippedwithseatsand safetybelts.Besureeveryonein yourvehicleisinaseatandusing asafetybeltproperly.
This vehicle has indicators as a remindertobucklethesafetybelts. See Safety Belt Reminders on page 4-14 for additional information.
InmoststatesandinallCanadian provinces,thelawrequireswearing safetybelts.Hereiswhy:
Youneverknowifyouwillbein acrash.Ifyoudohaveacrash, youdonotknowifitwillbea seriousone.
Afewcrashesaremild, and some crashescanbesoseriousthateven buckledup, apersonwouldnot survive. But most crashes are in between. In many of them, people whobuckleupcansurvive and sometimes walk away. Without safety belt sthey could have been badly hurtorkilled.
Aftermorethan40yearsofsafety beltsinvehicles, thefactsareclear. Inmostcrashesbucklingupdoes matter...alot!
WhySafetyBeltsWork
Whenyourideinoronanything, yougoasfastasitgoes.
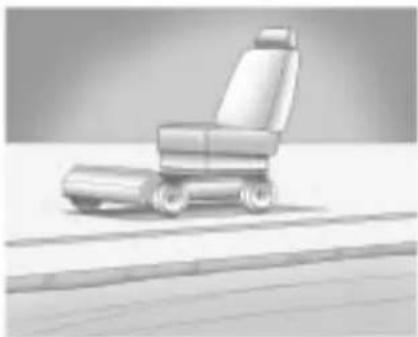
natural_image
3D rendering of a car seat with wheels and roof, no visible text or symbolsTakethesimplestvehicle. Suppose itisjustaseatonwheels.

natural_image
Illustration of a person sitting on a car in motion, possibly driving or riding a vehicle (no text or symbols visible)Putsomeoneonit.Getituptospeed.Thenstopthe

natural_image
Illustration of a person sitting on a vehicle with motion lines indicating speed or motion (no text or symbols)vehicle.Theriderdoesnotstop.
2-12SeatsandRestraints
natural_image
Illustration of a person sitting on a vehicle, viewed from above (no text or symbols visible)Thepersonkeepsgoinguntil stoppedbysomething.Inareal vehicle,itcouldbethewindshield...

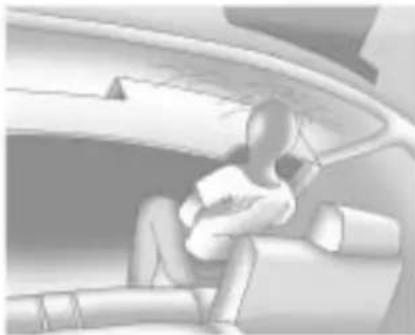
natural_image
Interior view of a car showing two people seated in the seat (no visible text or symbols)ortheinstrumentpanel...orthesafetybelts!

natural_image
Illustration of a person seated in a car, wearing a helmet and holding a tablet (no visible text or symbols)Withsafetybelts, youslowdown asthevehicledoes. Yougetmore timetostop. Youstopovermore distance, and your strongest bones taketheforces. That is why safety belts makes such goodsense.
QuestionsandAnswersAbout SafetyBelts
Q: Willlbetrappedinthevehicle afteracrashiflamwearinga safetybelt?
A: You could be—whether you are wearing as safety belt or not. But your chance of being conscious during and after an accident, so you can unbuckle and get out, is much greater if you are belted. And you can unbuckle as safety belt, even if you are upsidedown.
Q: If my vehicle has air bags, why should have to wear safety belts?
A: Airbagsaresupplemental systemsonly; sotheyworkwith safetybelts—notinsteadof them. Whetherornotanairbag isprovided, allooccupantsstill havetobuckleuptogetthe mostprotection. Thatistrue notonlyinfrontalcollisions, butespeciallyinsideand othercollisions.
Q: Iflamagooddriver, and I neverdrive far from home, why shouldl wears safety belts?
A: You may bean excellent driver, but if you are in acrash—even on that is not your fault—you and your passenger(s) can be hurt. Being a good driver does not protect you from things beyond your control, such as baddrivers.
Mostaccidentsoccurwithin 40km(25miles)ofhome. Andthegreatestnumber of seriousinjuriesanddeaths occuratspeedsoflessthan 65km/h(40mph).
Safetybeltsareforeveryone.
HowtoWearSafetyBelts Properly
Thissectionisonlyforpeopleof adultsize.
Beawarethattherearespecial thingstoknowaboutsafetybelts andchildren.Andtherearedifferent rulesforsmallerchildrenand infants.Ifachildwillberidingin thevehicle,seeOlderChildren on page 2-39 orInfantsandYoung Children onpage 2-41 .Follow thoserulesforeveryone's protection.
It is very important for allooccupants to buckle up. Statisticsshow that unbelted people are hurt more often incrashesthan those who are wearing safety belts.
Occupants who are not buckled up can be thrown out of the vehicle in a crash. And they can strike others in the vehicle who are wearing safety belts.
2-14SeatsandRestraints
First, before you or your passenger(s) wear safety belt, there is important information you should know.

natural_image
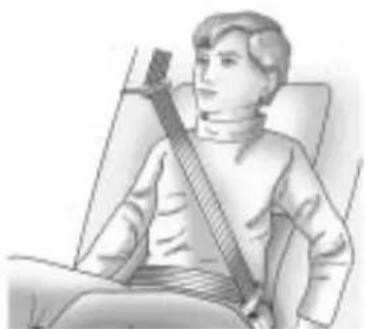
Side-by-side anatomical illustration of human torso and neck with surgical bandages, no text or symbols presentSitupstraightandalwayskeep yourfeetonthefloorinfrontofyou. Thelappartofthebeltshouldbe
wornlowandsnugonthehips, just touchingthethighs. Inacrash, this appliesforcetothestrongpelvic bonesandyouwouldbelesslikely toslideunderthelapbelt. If you slidunderit, thebeltwouldapply forceonyourabdomen. This could cause seriousorevenfatalinjuries. Theshoulderbeltshouldgoover theshoulderandacrossthechest. These part of thebody are best abletotakebeltrestrainingforces.
Theshoulderbeltlocksifthereisa suddenstoporcrash.
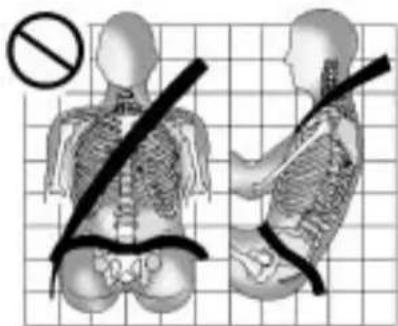
Q: Whatiswrongwiththis?
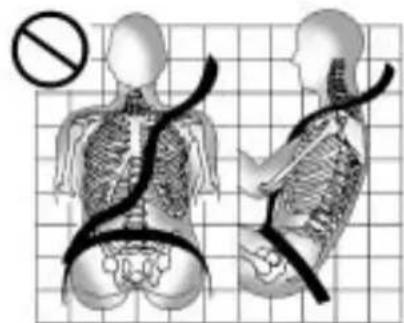
natural_image
Medical illustration showing human torso and spine with surgical tubing, set against a grid background (no text or labels)A: Theshoulderbeltistooloose. It will not give as much protection this way.

WARNING
Youcanbeseriouslyhurtifyour shoulderbeltistooloose.Ina crash,youwouldmoveforward toomuch,whichcouldincrease injury.Theshoulderbeltshouldfit snuglyagainstyourbody.
Q:Whatiswrongwiththis?
text_image
Medical illustration showing a person with a diagonal band and a no-smoking symbol, likely illustrating a surgical or orthopedic procedure.A: Thelapbeltistooloose. It will not given nearly a much protection this way.

WARNING
Youcanbeseriouslyhurtifyour lapbeltistooloose.Inacrash, youcouldslideunderthelap beltandapplyforceonyour abdomen.Thiscouldcause seriousorevenfatalinjuries. Thelapbeltshouldbewornlow andsnugonthehips,just touchingthethighs.
2-16SeatsandRestraints
Q:Whatiswrongwiththis?

text_image
Safety warning sign with a crosshair and a prohibition symbol, indicating no protection or no injury.A: Thebeltisbuckledinthewrong buckle.
WARNING
Youcanbeseriouslyinjuredif yourbeltisbuckledinthewrong placelikethis.Inacrash,thebelt wouldgoupoveryourabdomen. Thebeltforceswouldbethere, notonthepelvicbones.This couldcauseseriousinternal injuries.Alwaysbuckleyourbelt intothebucklenearestyou.
Q:Whatiswrongwiththis?

text_image
Medical diagram showing a human skeleton with a no-smoking symbol and surgical force lines, overlaid on a grid background.A: Thebeltisoveranarmrest.

WARNING
Youcanbeseriouslyinjuredif yourbeltgoesoveranarmrest likethis.Thebeltwouldbemuch toohigh.Inacrash,youcanslide underthebelt.Thebeltforce wouldthenbeappliedonthe abdomen,notonthepelvic bones,andthatcouldcause seriousorfatalinjuries.Besure thebeltgoesunderthearmrests.
Q: Whatiswrongwiththis?

natural_image
Side-by-side anatomical illustrations of human torso and pelvis with a no-smoking symbol, set against a grid background (no text or labels)A: Theshoulderbeltiswornunder thearm. It shouldbewornover theshoulderatalltimes.

WARNING
Youcanbeseriouslyinjuredif youweartheshoulderbeltunder yourarm.Inacrash,yourbody wouldmovetoofarforward, whichwouldincreasethechance ofheadandneckinjury.Also, thebeltwouldapplytoomuch forcetotheribs,whicharenot asstrongassshoulderbones. Youcouldalsoseverelyinjure internalorganslikeyourliveror spleen.Theshoulderbeltshould goovertheshoulderandacross thechest.
2-18SeatsandRestraints
Q:Whatiswrongwiththis?
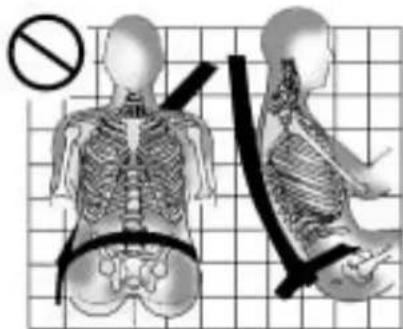
natural_image
Medical illustration showing human skeletal anatomy with a no-smoking symbol (no text or labels present)A: Thebeltisbehindthebody.
WARNING
Youcanbeseriouslyinjured by notwearingthelap-shoulderbelt properly. Inacrash, you would not berestrained by the shoulder belt. Your body could movetoo far forward increasing the chance of head and neck injury. You might also slide under the lap belt. The belt force would then be applied right on the abdomen. That could cause serious or fatal injuries. Theshoulder belt should go over the shoulder and across the chest.
Q: Whatiswrongwiththis?

natural_image
Illustration of human skeletal anatomy with a no-smoking symbol, showing front and side views (no text or labels)A: Thebeltistwistedacross thebody.
WARNING
Youcanbeseriouslyinjuredbya twistedbelt.Inacrash,youwould nothavethefullwidthofthebelt tospreadimpactforces.Ifabelt istwisted,makeitstraightsoit canworkproperly,oraskyour dealer/retailertofixit.
Lap-ShoulderBelt
Allseatingpositionsinthevehicle havealap-shoulderbelt.
The following instructionsexplain howtowearalap-shoulderbelt properly.
- Adjusttheseat, if theseatis adjustable, so you cansit up straight. Toseehow, see "Seats" in the Index.
natural_image
Medical illustration of a person's seatbelt being adjusted for a bandage, with a black arrow indicating the bandage direction (no text or symbols present)- Pickupthelatchplateandpull thebeltacrossyou.Donotletit gettwisted.
Thelap-shoulderbeltmaylockif youpullthebeltacrossyouvery quickly. If this happens, let the beltgobackslightlytounlockit. Then pullthebeltacrossyou moreslowly.
Iftheshoulderportionofa passengerbeltispulledout alltheway,thechildrestraint lockingfeaturemaybeengaged. Ifthishappens,letthebeltgo backallthewayandstartagain.

natural_image
Close-up of a hand using a belt buckle to adjust the seat (no text or symbols visible)- Pushthelatchplate into the buckle until it clicks.
Pulluponthelatchplateto makesureitissecure.Ifthebelt isnotlongenough,see Safety BeltExtender onpage2-23.
Positionthereleasebuttonon thebucklesothatthesafetybelt couldbequicklyunbuckledif necessary.
Ifequippedwithashoulderbelt heightadjuster,moveittothe heightthatisrightforyou. See"ShoulderBeltHeight
2-20SeatsandRestraints
Adjustment"laterinthissection forinstructionsonuseand importantsafetyinformation.
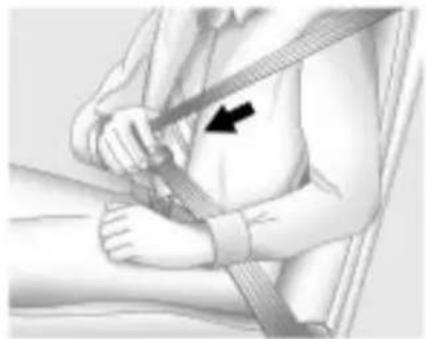
- Tomakethelapparttight, pull upontheshoulderbelt.
It may be necessary to pull stitching on the safety belt through the latch plate to fully tight enthalapelton smaller occupants.

natural_image
Medical illustration showing hands performing a medical procedure with a black arrow pointing to a specific area (no text or symbols present)Tounlatchthebelt, pushthebutton onthebuckle. Thebelt should return to its stowed position.
Slidethelatchplateupthesafety beltwebbing,whenthesafetybeltis notinuse. Thelatchplateshould restonthestitchingonthesafety belt,neartheguidelooponthe sidewall.
Beforeadoorisclosed, besurethe safetybeltisoutoftheway. Ifa doorisslammedagainstasafety belt, damagecanoccurtoboththe safetybeltandthevehicle.
ShoulderBeltHeightAdjuster
The vehicle has a shoulder belt height adjuster forth the driver and right front passenger seating positions.
Adjusttheheightsothatthe shoulderportionofthebeltis centeredontheshoulder.Thebelt shouldbeawayfromthefaceand neck,butnotfallingoffofthe shoulder.Impropershoulderbelt heightadjustmentcouldreducethe effectivenessofthesafetybeltina crash.

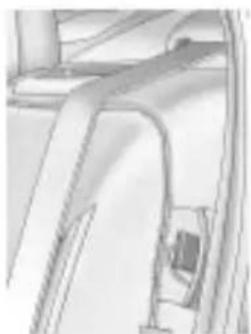
natural_image
Medical illustration of a surgical instrument with labeled component A (no text or symbols beyond label)Pressthereleasebutton(A)and movetheheightadjustertothe desiredposition.Theadjustercan bemovedupbypushingtheslide/ trimup.Aftertheadjusterissetto thedesiredposition,trytomoveit downwithoutpushingtherelease buttonomakesureithaslocked intoposition.
SafetyBeltPretensioners
This vehicle hassafety belt pretensioners for front outboard occupants. Although the safety belt pretensioners cannot be seen, they are part of the safety belt assembly. They can help tighten the safety belts during the early stages of a moderate to severe frontal and near frontal crash if the threshold conditions for pretensioner activation are met.
Pretensionersworkonlyonce. Ifthepretensionersactivateina crash, theywillneedtobereplaced, andprobablyothernewpartsfor thevehicle'ssafetybeltsystem. SeeReplacingSafetyBeltSystem PartsAfteraCrashonpage2-24.
RearSafetyBeltComfort Guides
This vehicle may have a shoulder belt comfort guides. If not, they are available through your dealer/retailer. The guides may provide added safety belt comfort for older children who have outgrown booster seats and for some adults. When installed and properly adjusted, the comfort guide position she belt away from the neck and head.
Thereisoneguideforeachoutside passengerpositionintherearseat. Hereishowtoinstallacomfort guidetothesafetybelt:
natural_image
Technical line drawing of a mechanical component or bracket (no text or symbols visible)- Removetheguidefromits storagepocketonthesideof theseat.
2-22SeatsandRestraints

natural_image
Close-up of hands holding a thin metal object with a curved handle (no text or symbols visible)- Placetheguideoverthebelt, andinsertthetwoedgesofthe beltintotheslotsoftheguide.

natural_image
Close-up of a metallic clamp securing a rope or cable (no text or symbols visible)- Besurethatthebeltis nottwistedanditliesflat. Theelasticcordmustbeunder thebeltandtheguideontop.

WARNING
Asafetybeltthatisnotproperly wornmaynotprovidethe protectionneededinacrash. Thepersonwearingthebeltcould beseriouslyinjured. Theshoulder beltshouldgoovertheshoulder andacrossthechest. Theseparts ofthebodyarebestabletotake beltrestrainingforces.
natural_image
Illustration of a person sitting in a chair wearing a stringed bag (no text or symbols visible)- Buckle, position, and release the safety belt as described previously in this section. Make sure that the shoulder belt crossestheshoulder.
SafetyBeltUseDuring Pregnancy
Safetybeltsworkforeveryone, includingpregnantwomen.Likeall occupants,theyaremorelikelyto beseriouslyinjurediftheydonot wearsafetybelts.
natural_image
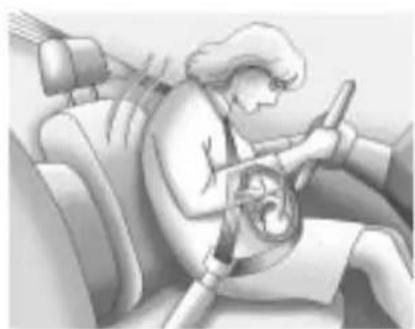
Illustration of a person sitting in a car, wearing a steering wheel and driving a steering wheel (no text or symbols visible)Apregnantwomanshouldwear alap-shoulderbelt, and the lap portions should bewornas low as possible, below therounding, throughout the pregnancy.
The best way to protect the fetus is to protect them other. When as safety belt is worn properly, it is more likely that the fetus will not be hurt in a crash. For pregnant women, as for anyone, the key to makings safety belt effective is wearing them properly.
SafetyBeltExtender
If the vehicle's safety belt will fasten around you, you should use it.
Butifasafetybeltisnotlong enough,yourdealer/retailerwill orderyouanextender.Whenyou gointoorderit,taketheheaviest coatyouwillwear,sotheextender willbelongenoughforyou.Tohelp avoidpersonalinjury,donotlet someoneelseuseit,anduseit onlyfortheseatitismadetofit. Theextenderhasbeendesigned foradults.Neveruseitforsecuring childseats.Towearit,attachitto theregularsafetybelt.Formore information,seetheinstruction sheetthatcomeswiththeextender.
2-24SeatsandRestraints
SafetySystemCheck
Nowandthen, check that the safety belt reminder light, safety belts, buckles, latch plates, retractors and anchorages are working properly. Look for any other loose ordamaged safety belts system parts that might keep safety belts system from doing its job. See your dealer/retailert have it repaired. Tornor frayed safety belts may not protect you in acrash. They can ripapart under impact forces. Ifabeltistorn or frayed, get anewoneright away.
Makesurethesafetybeltreminder lightisworking.SeeSafetyBelt Reminders onpage4-14 formore information.
Keepsafetybeltscleananddry. See SafetyBeltCare on page 2-24.
SafetyBeltCare
Keepbeltscleananddry.

WARNING
Donotbleachordyesafetybelts. Itmayseverelyweakenthem. Inacrash, they might not be able to provide adequate protection. Cleansafetybeltsonly with mild soap and lukewarmwater.
ReplacingSafetyBelt SystemPartsAftera Crash

WARNING
Acrashcandamagethesafety beltsysteminthevehicle. Adamagedsafetybeltsystem may not properly protect the person using it, resulting in serious injury overvendeathin acrash. To help makes sure the
(Continued)
WARNING(Continued)
safetybeltsystemsareworking properlyafteracrash,havethem inspectedandanynecessary replacementsmadeassoonas possible.
Afteraminorcrash, replacement of safetybeltsmaynotbenecessary. Butthesafetybeltasembliesthat were used during an acrash may have been stressed or damaged. Seeyourdealer/retailertohavethe safetybeltassemblies inspected or replaced.
Newpartsandrepairsmaybe necessaryevenifthesafetybelt systemwasnotbeingusedatthe timeofthecrash.
Havethesafetybeltpretensioners checkedifthevehiclehasbeenina crash,oriftheairbagreadinesslight staysonafteryoustartthevehicle orwhileyouaredriving.SeeAirbag ReadinessLightonpage4-15.
AirbagSystem
The vehicle hasthe following airbags:
• Afrontalairbagforthedriver.
- Afrontalairbagfortherightfront passenger.
- Aseat-mountedsideimpact airbagforthedriver.
- Aseat-mountedsideimpact airbagfortherightfront passenger.
- Aroof-railairbagforthedriver and the passenger seated directly behind the driver.
- Aroof-railairbagfortheright frontpassengerandthe passengerseateddirectly behindtherightfrontpassenger.
The vehicle may have the following airbags:
- Aseat-mountedsideimpact airbagfortherearseat passengerseateddirectly behindthedriver.
- Aseat-mountedsideimpact airbagfortherearseat passengerseateddirectly behindtherightfrontpassenger.
Alloftheairbagsinthevehiclewill havethewordAIRBAGembossed inthetrimoronanattachedlabel nearthedeploymentopening.
Forfrontalairbags, theword AIRBAG will appear on them middle part of the steering wheel for the driver and on the instrument panel for the right front passenger.
Withseat-mountedsideimpact airbags, thewordAIRBAGwill appearonthesideoftheseatback closesttothedoor.
Withroof-railairbags, theword AIRBAG will appear along the headlinerortrim.
Airbagsaredesignedtosupplement theprotectionprovidedbysafety belts. Eventhoughtoday'sairbags arealsodesignedtohelpreduce theriskofinjuryfromtheforceofan inflatingbag,allairbagsmustinflate veryquicklytodotheirjob.
2-26SeatsandRestraints
Herearethemostimportantthings toknowabouttheairbagsystem:

WARNING
Youcanbeseverelyinjuredor killedinacrashifyouarenot wearingyoursafetybelt—evenif youhaveairbags.Airbagsare designedtoworkwithsafety belts,butdonotreplacethem. Also,airbagsarenotdesignedto deployineverycrash.Insome crashessafetybeltsareyouronly restraint.SeeWhenShouldan AirbagInflate?onpage2-28.
Wearingyoursafetybeltduringa crashhelpsreduceyourchance ofhittingthingsinsidethevehicle orbeingejectedfromit.Airbags are"supplementalrestraints"to thesafetybelts.Everyoneinyour vehicleshouldwearasafetybelt properly—whetherornotthereis anairbagforthatperson.

WARNING
Airbagsinflatewithgreatforce, fasterthantheblinkofaneye. Anyonewhoisupagainst,orvery closeto,anyairbagwhenit inflatescanbeseriouslyinjured orkilled.Donotsitunnecessarily closetotheairbag,asyouwould beifyouweresittingontheedge ofyourseatorleaningforward. Safetybeltshelpkeepyouin positionbeforeandduringa crash.Alwayswearyoursafety belt,evenwithairbags.Thedriver shouldsitasfarbackaspossible whilestillmaintainingcontrolof thevehicle.
Occupantsshouldnotleanonor sleepagainstthedoororside windowsinseatingpositionswith seat-mountedsideimpactairbags and/orroof-railairbags.

WARNING
Childrenwhoareupagainst, orverycloseto,anyairbag whenitinflatescanbeseriously injuredorkilled.Airbagsplus lap-shoulderbeltsofferprotection foradultsandolderchildren,but notforyoungchildrenandinfants. Neitherthevehicle'ssafetybelt systemnoritsairbagsystem isdesignedforthem.Young childrenandinfantsneedthe protectionthatachildrestraint systemcanprovide.Always securechildrenproperlyin yourvehicle.Toreadhow,see OlderChildren onpage2-39 or InfantsandYoungChildren on page 2-41 .

Thereisanairbagreadinesslight ontheinstrumentpanelcluster, whichshowstheairbagsymbol. Thesystemcheckstheairbag electricalsystemformalfunctions. Thelighttellsyouifthereisan electricalproblem.SeeAirbag ReadinessLight onpage4-15 formoreinformation.
WhereAretheAirbags?

natural_image
Sketch of two abstract geometric shapes resembling a stylized face or mask, with no visible text or symbols.Thedriverfrontalairbagisinthe middleofthesteeringwheel.
Therightfrontpassengerfrontal airbagisintheinstrumentpanel on thepassenger'sside.
natural_image
Illustration of a car interior with dashboard and steering wheel (no text or symbols)DriverSideshown, Passenger Sidesimilar
Theseat-mountedsideimpact airbagsforthedriverandrightfront passengerareinthesideofthe seatbacksclosesttothedoor.
Theroof-railairbagsforthedriver, rightfrontpassenger,andsecond rowoutboardpassengersareinthe ceilingabovethesidewindows.
2-28SeatsandRestraints

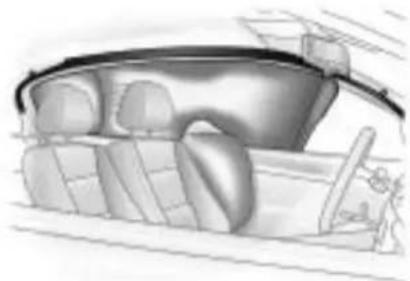
natural_image
Simple line drawing of a rectangular object with a curved base, placed on a grid-like surface (no text or symbols)RearSeatDriverSideShown, PassengerSideSimilar
Ifthevehiclehassecondrowseat-mountedsideimpactairbags,they areinthesidesoftherearseatback closesttothedoor.

WARNING
If something is between an occupant and an airbag, the airbag might not inflate properly or might for the object into
(Continued)
WARNING(Continued)
thatpersoncausingsevereinjury orevendeath. Thepathofan inflatingairbagmustbekept clear. Donotputanything betweenanoccupantandan airbag, anddonotattachorput anythingonthesteeringwheel huboronornearanyother airbagcovering.
Donotuseseataccessories thatblocktheinflationpathofa seat-mountedsideimpactairbag.
Neversecureanythingtotheroof ofvehiclewithroof-railairbags byroutingaropeortiedown throughanydoororwindow opening. If youdo, thepathof aninflatingroof-railairbagwill beblocked.
WhenShouldanAirbag Inflate?
Frontalairbagsaredesignedto inflateinmoderatetoseverefrontal ornear-frontalcrashestohelp reducethepotentialforsevere injuriesmainlytothedriver'sor rightfrontpassenger'sheadand chest.However,theyareonly designedtoinflateiftheimpact exceedsapredetermined deploymentthreshold.Deployment thresholdsareusedtopredicthow severeacrashislikelytobeintime fortheairbagstoinflateandhelp restraintheoccupants.
Whether the frontal air bags will or should deploy is not based on how fast your vehicle is traveling. It depends largely on what you hit, the direction of the impact, and how quickly your vehicles slows down.
Frontalairbagsmayinflate atdifferentcrashspeeds. Forexample:
- Ifthevehiclehitsastationary object, theairbagscouldinflate atadifferentcrashspeedthanif thevehiclehitsamovingobject.
- Ifthevehiclehitsanobjectthat deforms,theairbagscould inflateatadifferentcrashspeed thanifthevehiclehitsanobject thatdoesnotdeform.
- Ifthevehiclehitsanarrowobject (likeapole), theairbags could inflate at different crash speed than if the vehicle hits a wide object (likeawall).
- Ifthevehiclegoesintoanobject atanangle, theairbags could inflate at different crash speed than if the vehiclegoes straight into the object.
Thresholdscanalsovarywith specificvehicledesign.
Frontalairbagsarenotintendedto inflateduringvehiclerollovers, rear impacts, orinmanysideimpacts.
Inaddition, the vehicle has dual-stage frontal airbags. Dual-stage airbags adjust the restraint according to crash severity. The vehicle has electronic frontal sensors, which help the sensing system distinguish between a moderate frontal impact and more severe frontal impact. Form moderate frontal impacts, dual-stage airbags inflate at level less than full deployment. Form more severe frontal impacts, full deployment occurs.
The vehicle has seat-mounted side impact and roof-rail air bags. See Airbag System on page 2-25. Seat-mounted side impact and roof-rail air bags are intended to inflate in moderate to severe crashes. In addition, the seroof-rail air bags are intended to inflate during a rollover or inasevere frontal impact. Seat-mounted side impact and roof-rail air bags will inflate if the crash severity is above
thesystem'sdesignedthreshold level. Thethresholdlevelcanvary withspecificvehicledesign.
Roof-railairbagsarenotintendedto inflateinrearimpacts. Bothroof-rail airbagswilldeploywheneitherside ofthevehicleisstruckorifthe sensingsystempredictsthatthe vehicleisabouttorollover, orin aseverefrontalimpact.
Inanyparticularcrash, noonecan saywhetheranairbagshouldhave inflatedsimplybecauseofthe damagetoavehicleorbecause ofwhattherepaircostswere. Forfrontalairbags, inflationis determinedbywhatthevehiclehits, theangleoftheimpact,andhow quicklythevehicleslowsdown. Forseat-mountedsideimpactand roof-railairbags, deploymentis determinedbythelocationand severityofthesideimpact.
Inarolloverevent, roof-railairbag deployment is determined by the direction of the roll.
WhatMakesanAirbag Inflate?
Inadeploymentevent,thesensing systemsendsanelectricalsignal triggeringareleaseofgasfromthe inflator.Gasfromtheinflatorfills the airbagcausingthebagtobreakout ofthecoveranddeploy.Theinflator, theairbag,andrelatedhardwareare allpartoftheairbagmodule.
Frontalairbagmodulesarelocated insidethesteeringwheel and instrumentpanel. For vehicles with seat-mounted side impact airbags, there are airbag modules in the side of the front seat back close to the door. For vehicles with roof-rail airbags, there are airbag modules in the ceiling of the vehicle, near the sidewindow sthathave occupant seating positions.
HowDoesanAirbag Restrain?
Inmoderatetoseverefrontalor nearfrontalcollisions, evenbelted occupantscancontactthesteering wheelortheinstrumentpanel. In moderatetoseveresidecollisions, evenbeltedoccupantscancontact theinsideofthevehicle.
Airbagssupplementtheprotection providedbysafetybelts. Frontal airbagsdistributetheforceofthe impactmoreevenlyoverthe occupant'supperbody, stopping theoccupantmoregradually. Seat-mountedsideimpactand roof-railairbagsdistributetheforce oftheimpactmoreevenlyoverthe occupant'supperbody.
Butairbagswouldnothelpin manytypesofcollisions,primarily becausetheoccupant'smotionis nottowardthoseairbags.SeeWhen ShouldanAirbagInflate? on page2-28 formoreinformation.
Airbagsshouldneverberegarded asanythingmorethanasupplement tosafetybelts.
WhatWillYouSeeAfter anAirbagInflates?
Afterthefrontalairbagsand seat-mountedsideimpactairbags inflate,theyquicklydeflate,so quicklythatsomepeoplemaynot evenrealizeanairbaginflated. Roof-railairbagsmaystillbeatleast partiallyinflatedforsometimeafter theydeploy.Somecomponentsof theairbagmodulemaybehotfor severalminutes.Forlocationofthe airbagmodules,seeWhatMakes anAirbagInflate?onpage2-30.
Thepartsoftheairbagthat comeintocontactwithyoumaybe warm,butnottoohottotouch.
Theremaybesomesmoke and dustcomingfromtheventsinthe deflatedairbags.Airbaginflation doesnotpreventthedriverfrom seeingoutofthewindshieldor beingabletosteerthevehicle,nor doesitpreventpeoplefromleaving thevehicle.

WARNING
Whenanairbaginflates,there maybedustintheair. Thisdust couldcausebreathingproblems forpeoplewithahistoryof asthmaorotherbreathingtrouble. Toavoidthis,everyoneinthe vehicleshouldgetoutassoonas (Continu
WARNING(Continued)
itissafetodoso. If you have breathing problems but cannot get out of the vehicle after an air bag inflates, then get fresh hair by opening a window or door. If you experience breathing problems following an air bag deployment, you should seek medical attention.
The vehicle has a safe feature that may automatically unlock the doors, turn on the interior lamps and hazard warning flashers, and should the fuel system after the air bags inflate. You can lock the doors, turn off the interior lamps and hazard warning flashers by using the controls for those features.

WARNING
Acrashsevereenoughtoinflate theairbagsmayhavealso damagedimportantfunctions inthevehicle,suchasthefuel system,brakeandsteering systems,etc.Evenifthevehicle appearstobedrivableaftera moderatecrash,theremaybe concealeddamagethatcould makeitdifficulttosafelyoperate thevehicle.
Usecautionifyoushouldattempt torestarttheengineafteracrash hasoccurred.
Inmanycrashessevereenoughto inflatetheairbag, windshieldsare brokenbyvehicledeformation.
2-32SeatsandRestraints
Additional windshieldbreakage may also occur from the right front passenger airbag.
- Airbagsaredesignedtoinflate onlyonce.Afteranairbag inflates,youwillneedsome newpartsfortheairbagsystem. Ifyoudonotgetthem,the airbagsystemwillnotbethere tohelpprotectyouinanother crash.Anewsystemwillinclude airbagmodulesandpossibly otherparts.Theservicemanual foryourvehiclecoverstheneed toreplaceotherparts.
- Thevehiclehasacrashsensing anddiagnosticmodulewhich recordsinformationaftera crash.SeeVehicleData RecordingandPrivacy on page12-15 andEventData Recordersonpage12-16.
- Letonlyqualifiedtechnicians workontheairbagsystems. Improperservicecanmeanthat
anairbagsystemwillnotwork properly. Seeyourdealer/retailer forservice.
PassengerSensing System
The vehicle has a passenger sensing system for the right front passenger position. The passenger airbag status indicator will be visible on the instrument panel when the vehicle is started.

text_image
PASS AIR BAG ON OFF 2ThewordsONandOFFwillbe visibleduringthesystemcheck. Ifyouareusingremotestart, ifequipped,tostartthevehiclefrom adistanceyoumaynotseethe systemcheck.Whenthesystem
checkiscomplete, eithertheword ONorthewordOFFwillbevisible. See PassengerAirbagStatus Indicatoronpage4-15.
Thepassengersensingsystem turnsofftherightfrontpassenger frontalairbagundercertain conditions. Thedriverairbags, seat-mountedsideimpactairbags, androof-railairbagsarenotaffected bythepassengersensingsystem.
Thepassengersensingsystem workswithsensorsthatarepart oftherightfrontpassengerseat. Thesensorsaredesignedtodetect thepresenceofaproperly-seated occupantanddetermineiftheright frontpassengerfrontalairbag shouldbeenabled(mayinflate) ornot.
According to accident statistics, children are safer when properly secured in a rearseatin the correct child restraint for their weight and size.
Werecommendthatchildrenbe securedinarearseat,including:an infantorachildridingina rear-facingchildrestraint;achild ridinginaforward-facingchildseat; anolderchildridinginabooster seat;andchildren,whoarelarge enough,usingsafetybelts.
Alabelonthesunvisorsays, "Neverputarear-facingchildseat inthefront." Thisisbecausetherisk totherear-facingchildissogreat, iftheairbagdeploys.

WARNING
Achildinarear-facingchild restraintcanbeseriously injuredorkillediftheright frontpassengerairbaginflates. Thisisbecausethebackofthe rear-facingchildrestraintwould beveryclosetotheinflating airbag.Achildinaforward-facing childrestraintcanbeseriously (Continued)
WARNING(Continued)
injuredorkillediftherightfront passengerairbaginflatesandthe passengerseatisinaforward position.
Evenifthepassengersensing systemhasturnedofftheright frontpassengerfrontalairbag, nosystemisfail-safe. Noone canguaranteethatanairbagwill notdeployundersomeunusual circumstance, even though the airbagisturnedoff.
Securerear-facingchild restraintsinarearseat,evenif theairbagisoff.Ifyousecurea forward-facingchildrestraintin therightfrontseat,alwaysmove thefrontpassengerseatasfar backasitwillgo.Itisbetterto securethechildrestraintina rearseat.
Thepassengersensingsystemis designedtoturnofftherightfront passengerfrontalairbagif:
• Therightfrontpassengerseatis unoccupied.
- Thesystemdeterminesthatan infantispresentinarear-facing infantseat.
- Thesystemdeterminesthata smallchilddispresentinachild restraint.
- Thesystemdeterminesthat asmallchilddispresentina boosterseat.
- Arightfrontpassengertakes his/herweightoffoftheseatfor aperiodoftime.
- Therightfrontpassengerseatis occupied byasmallerperson, suchasachildwhohas outgrownchildrestraints.
- Or, if there is a critical problem with the air bagsystem or the passengersensingsystem.
2-34SeatsandRestraints
Whenthepassengersensing systemhasturnedofftheright frontpassengerfrontalairbag,the offindicatorwilllightandstaylitto remindyouthattheairbagsareoff. SeePassengerAirbagStatus Indicatoronpage4-15.
Thepassengersensingsystemis designedtoturnon(mayinflate)the rightfrontpassengerfrontalairbag anytimethesystemsensesthata personofadultsizeissitting properlyintherightfrontpassenger seat.Whenthepassengersensing systemhasallowedtheairbagtobe enabled,theonindicatorwilllight andstaylittoremindyouthatthe airbagisactive.
Forsomechildrenwhohave outgrownchildrestraintsandfor verysmalladults,thepassenger
sensingsystemmayormaynot turnofftherightfrontpassenger frontalairbag,dependinguponthe person'sseatingpostureandbody build.Everyoneinthevehicle whohasoutgrownchildrestraints shouldwearasafetybelt properly—whetherornot thereisanairbagforthatperson.

WARNING
If the airbagreadinesslightever comeson and stayson, it means that something may be wrong with the airbagsystem. To help avoid injury to your self for others, have the vehicles serviced right away. See Airbag Readiness Light on page 4-15 form more information, including important safety information.
IftheOnIndicatorisLitfora ChildRestraint
Ifachildrestrainthasbeeninstalled andtheonindicatorislit:
- Turnthevehicleoff.
- Removethechildrestraint from the vehicle.
- Remove any additional items from these seats such as blankets, cushions, seat covers, seat heaters, or seat massagers.
-
Reinstall the child restraint following the directions provided by the child restraint manufacturer and referto Securing Child Restraints (Rear Seat) on page 2-54 or Securing Child Restraints (Front Seat) on page 2-56.
-
If, afterreinstalling the child restraint and restarting the vehicle, the onindicatoris still lit, turn the vehicle off. Thenslightly reclin the vehicle seat back and adjust these at cushion, if adjustable, to make sure that the vehicle seat back is not pushing the child restraint into these at cushion.
Alsomakesurethechild restraintisnottrappedunder thevehicleheadrestraint. Ifthishappens,adjustthehead restraint.SeeHeadRestraints on page 2-2 .
6.Restartthevehicle.
Iftheonindicatorisstilllit, securethechildinthechild restraintinarearseatpositionin thevehicle,andcheckwithyour dealer/retailer.
IftheOffIndicatorisLitforan Adult-SizeOccupant

natural_image
Interior view of a car showing a person seated in the driver's seat, with dashboard and steering wheel visible (no text or symbols)Ifapersonofadult-sizeissittingin therightfrontpassengerseat, but theoffindicatorislit, itcouldbe because that person is not sitting properly in theseat. If this happens,
usethefollowingstepstoallowthe systemtodetectthatpersonand enabletherightfrontpassenger frontalairbag:
-
Turnthevehicleoff.
-
Remove any additional material from these seat, such as blankets, cushions, seat covers, seat heaters, or seat massagers.
-
Placetheseatbackinthefully uprightposition.
-
Havethepersonsituprightin theseat, centeredontheseat cushion, with legscomfortably extended.
-
Restart the vehicle and have the person remain in this position for two to three minutes after the conductor is lit.
2-36SeatsandRestraints
AdditionalFactorsAffecting SystemOperation
Safetybeltshelpkeepthe passengerinpositiononthe seatduringvehiclemaneuvers andbraking,whichhelpsthe passengersensingsystemmaintain thepassengerairbagstatus. See“SafetyBelts”and“Child Restraints”inthelIndexfor additionalinformationaboutthe importanceofproperrestraintuse.
Athicklayerofadditionalmaterial, suchasablanketorcushion, oraftermarketequipmentsuch asseatcovers,seatheaters,and seatmassagerscanaffecthow wellthepassengersensingsystem operates.Werecommendthat younotuseseatcoversorother aftermarketequipmentexceptwhen
approvedbyGMforyourspecific vehicle.SeeAddingEquipmentto theAirbag-EquippedVehicle on page 2-37 formoreinformation aboutmodificationsthatcanaffect howthesystemoperates.

WARNING
Stowingofarticlesunderthe passengerseatorbetweenthe passengerseatcushionand seatbackmayinterferewiththe properoperationofthepassenger sensingsystem.
Servicingthe Airbag-EquippedVehicle
Airbags affect how the vehicle should be serviced. There are part of the air bagsystem in several places around the vehicle.
Yourdealer/retailerandtheservice manualhaveinformationabout servicingthevehicleandtheairbag system.Topurchaseaservice manual,seeServicePublications OrderingInformationonpage 12-13.

WARNING
Forupto10secondsafterthe ignitionisturnedoffandthe batteryisdisconnected,anairbag canstillinflateduringimproper service.Youcanbeinjuredifyou areclosetoanairbagwhenit inflates.Avoidyellowconnectors. Theyareprobablypartofthe airbagsystem.Besuretofollow properserviceprocedures,and makesurethepersonperforming workforyouisqualifiedtodoso.
AddingEquipmenttothe Airbag-EquippedVehicle
Q: Isthereanythinglmightadd toorchangeaboutthevehicle thatcouldkeeptheairbags fromworkingproperly?
A: Yes. If you add things that changethe vehicle's frame, bumpersystem, height, frontend or sidesheet metal, they may keep the air bags system from working properly. Changing or moving any part of the front seats, safety belts, the airbag sensing and diagnostic module, steering wheel, instrument panel, roof-rail air bag modules, ceiling headliner or pillargarnish trim, frontsensors, side impact sensors, or air bag wiring can affect the operation of the air bag system.
Inaddition, the vehicle has a passengersensingsystem fortherightfrontpassenger
position, which includessensors that are part of the passenger seat. The passengers sensing system may not operate properly if the original seat trim is replaced with non-GM covers, upholstery ortrim, or with GM covers, upholstery ortrim designed for different vehicle. Any object, such as an aftermarket seat theater or a comfort-enhancing pador device, installed under or on top of these at fabric, could also interfere with the operation of the passengers sensing system. This could either prevent proper deployment of the passenger airbag(s) or prevent the passengers sensing system from properly turning off the passenger airbag(s). See Passenger Sensing System on page 2-32. If you have questions, call Customer Assistance. The phonenumbers and
addressesforCustomer AssistanceareinStepTwo oftheCustomerSatisfaction Procedureinthismanual. SeeCustomerSatisfaction Procedureonpage 12-1.
Q: Because have adisability, Ihavetogetmy vehicle modified. How can find out whether this will affect my air bagsystem?
A: If you have questions, call Customer Assistance. The phonenumbers and addresses for Customer Assistance are in Step Two of the Customer Satisfaction Procedure in this manual. See Customer Satisfaction Procedure on page 12-1.
Inaddition, your dealer/retailer and the servicemanual have information about the location of the airbag sensors, sensing and diagnostic module and airbag wiring.
AirbagSystemCheck
The airbagsystemdoesnotneed regularly scheduled maintenance or replacement. Makesure the airbagreadinesslightisworking. See AirbagReadinessLight on page 4-15 formoreinformation.
Notice:Ifanairbagcoverings damaged,opened,orbroken, theairbagmaynotworkproperly. Donotopenorbreaktheairbag coverings.Ifthereareany openedorbrokenairbagcovers, havetheairbagcoveringand/or airbagmodulereplaced.Forthe locationoftheairbagmodules, seeWhatMakesanAirbag Inflate? onpage2-30 .Seeyour dealer/retailerforservice.
ReplacingAirbagSystem PartsAfteraCrash

WARNING
Acrashcandamagethe airbagsystemsinyourvehicle. Adamagedairbagsystem maynotworkproperly and maynotprotectyouandyour passenger(s)inacrash, resulting inseriousinjuryorevendeath. Tohelpmakesureyourairbag systemsareworkingproperly afteracrash,havethem inspectedandanynecessary replacementsmadeassoon aspossible.
Ifanairbaginflates,youwillneed toreplaceairbagsystemparts. Seeyourdealer/retailerforservice.
If the airbag readiness light stay on after the vehicle is started or comes on when you are driving, the airbag system may not work properly. Have the vehicles serviced right away. See Airbag Readiness Light on page 4-15 for more information.
ChildRestraints OlderChildren

natural_image
Illustration of two children sitting side by side, wearing matching outfits (no text or symbols)Olderchildrenwhohaveoutgrown boosterseatsshouldwearthe vehicle'ssafetybelts.
Themanufacturer'sinstructionsthat comewiththeboosterseat,state theweightandheightlimitationsfor thatbooster.Useaboosterseat withalap-shoulderbeltuntilthe childpassesthebelowfittest:
- Sitallthewaybackontheseat. Dothekneesbendattheseat edge?Ifyes,continue.Ifno, returntotheboosterseat.
- Bucklethelap-shoulderbelt. Doestheshoulderbeltreston theshoulder?Ifyes,continue. Ifno,thenreturntothe boosterseat.
- Doesthelapbeltfitlowand snugonthehips,touchingthe thighs?lfyes,continue.lfno, returntotheboosterseat.
• Canpropersafetybeltfitbe maintainedforthelengthofthe trip?Ifyes,continue.Ifno, returntotheboosterseat.
Q:Whatistheproperwayto wearsafetybelts?
A: Anolderchildshouldwearalap-shoulderbeltandgettheadditionalrestraintashoulderbeltcanprovide. Theshoulderbeltshouldnotcrossthefaceorneck. Thelapbeltshouldfitsnuglybelowthehips, justtouchingthetopofthethighs.Thisappliesbeltforcetothechild'spelvicbonesinacrash.Itshouldneverbewornovertheabdomen,whichcouldcausesevereorevenfatalinternalinjuriesinacrash.
According to accident statistics, children and infants are safer when properly restrained in a child restraintsystemor infant restraint system secured in a rearseating position.
2-40SeatsandRestraints
Inacrash, children who are not buckled up can strike other people who are buckled up, or can be thrown out of the vehicle. Older children need to use safety belts properly.

WARNING
Neverdothis.
Neverallowtwochildrentowear thesamesafetybelt. Thesafety belt cannot properly spread the impact forces. Inacrash, the two children can be crushed together and seriously injured. As safety belt must be used by only one person at time.

natural_image
Illustration of three people seated in a car, facing each other with a no-smoking symbol (no text or labels present)
WARNING
Neverdothis.
Neverallowachildtowearthe safetybeltwiththeshoulderbelt behindtheirback.Achildcanbe seriouslyinjuredbynotwearing thelap-shoulderbeltproperly. Inacrash,thechildwouldnotbe restrainedbytheshoulderbelt. Thechildcouldmovetoofar forwardincreasingthechanceof (Continued)
WARNING(Continued)
headandneckinjury. Thechild mightalsoslideunderthelap belt. Thebeltforcewouldthenbe appliedrightontheabdomen. Thatcouldcauseseriousorfatal injuries. Theshoulderbeltshould goovertheshoulderandacross thechest.
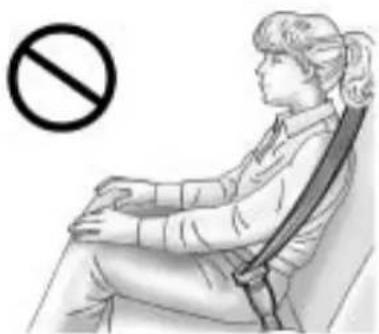
natural_image
Illustration of a person sitting in a chair with a no-smoking symbol (no text or labels present)InfantsandYoung Children
Everyoneinavehicleneeds protection! Thisincludesinfantsand allotherchildren. Neither the distancetravelednortheage and sizeofthetravelerchangesthe need,foreveryone,tousesafety restraints. Infact,thelawinevery stateintheUnitedStatesandin everyCanadianprovincesays childrenuptosomeagemustbe restrainedwhileinavehicle.

WARNING
Childrencanbeseriouslyinjured orstrangledifashoulderbeltis wrappedaroundtheirneckand thesafetybeltcontinuesto tighten.Neverleavechildren unattendedinvehicleandnever allowchildrentoplaywiththe safetybelts.
Airbagspluslap-shoulderbeltsoffer protectionforadultsandolder children,butnotforyoungchildren andinfants.Neitherthevehicle's safetybeltsystemnoritsairbag systemisdesignedforthem.Every timeinfantsandyoungchildrenride invehicles,theyshouldhavethe protectionprovidedbyappropriate childrestraints.
Childrenwhoarenotrestrained properlycanstrikeotherpeople, orcanbethrownoutofthevehicle.

WARNING
Neverdothis.
Neverholdaninfantorachild whileridinginavehicle.Dueto crashforces,aninfantorachild willbecomesoheavyitisnot possibletoholditduringacrash.
(Continued)
WARNING(Continued)
Forexample, inacrashatonly 40km/h (25mph), a5.5kg (12lb) infantwillsuddenlybecomea 110kg (240lb) forceonaperson's arms. Aninfantshouldbe securedinanappropriate restraint.

natural_image
Illustration of a person sleeping on a bed with a no-smoking symbol overlay (no text or symbols on the figure)2-42SeatsandRestraints

WARNING
Neverdothis.
Childrenwhoareupagainst, orverycloseto,anyairbagwhen itinflatescanbeseriouslyinjured orkilled.Neverputarear-facing childrestraintintherightfront seat.Securearear-facingchild restraintinarearseat.Itisalso bettertosecureaforward-facing childrestraintinarearseat.Ifyou mustsecureaforward-facing childrestraintintherightfront seat,alwaysmovethefront passengerseatasfarbackasit willgo.
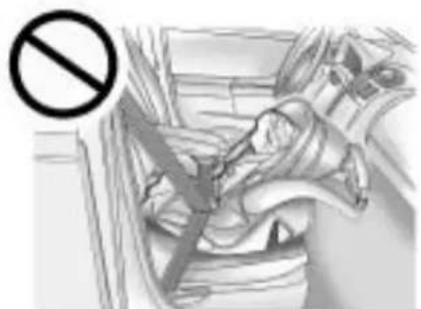
natural_image
Medical illustration showing a surgical procedure with a no-smoking symbol (no text or labels present)Q: Whatarethedifferenttypes of add-onchildrestraints?
A: Add-onchildrestraints, which are purchased by the vehicle's owner, are available in four basic types. Selection of particular restraint should take into consideration not only the child's weight, height, and age but also whether or not the restraint will be compatible with the motor vehicle in which it will be used.
Formostbasictypesofchild restraints,therearemany differentmodelsavailable. Whenpurchasingachild restraint,besureitisdesigned tobeusedinamotorvehicle. Ifitis,therestraintwillhavea labelsayingthatitmeetsfederal motorvehiclesafetystandards.
Therestraintmanufacturer's instructionsthatcomewiththe restraintstatetheweightand heightlimitationsforaparticular childrestraint.Inaddition,there aremanykindsofrestraints availableforchildrenwith specialneeds.

WARNING
Toreducetheriskofneck and headinjury during acrash, infants need completes support. This is because an infant's neck is not fully developed and its head weighssomuch compared with therestofits body. In acrash, an infant in a rear-facing child restraint settles into the restraint, so the crash forces can be distributed across the strongest part of an infant's body, the back and shoulders. Infants should always be secured in rear-facing child restraints.

WARNING
Ayoungchild'shipbonesarestill sosmallthatthevehicle'sregular safetybeltmaynotremainlow onthehipbones,asitshould. Instead,itmaysettleuparound thechild'sabdomen.Inacrash, thebeltwouldapplyforceona bodyareathatisunprotectedby anybonystructure.Thisalone couldcauseseriousorfatal injuries.Toreducetheriskof seriousorfatalinjuriesduringa crash,youngchildrenshould alwaysbesecuredinappropriate childrestraints.
ChildRestraintSystems
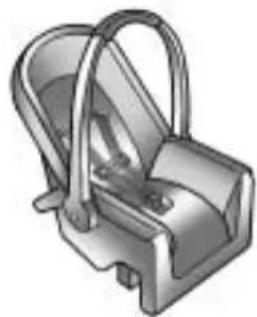
natural_image
3D rendered illustration of a mechanical component with handle and base (no text or symbols)(A)Rear-FacingInfantSeat
Arear-facinginfantseat(A) provides restraint with these seating surface against the back of the infant.
Theharnesssystemholdstheinfant inplaceand,inacrash,actsto keeptheinfantpositionedinthe restraint.
2-44SeatsandRestraints
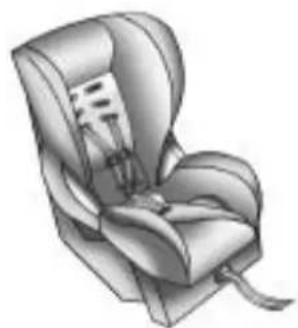
natural_image
Illustration of a car seat with straps and seatbelt (no text or symbols)(B)Forward-FacingChildSeat
Aforward-facingchildseat(B) provides restraint for the child's body with the harness.

natural_image
Two 3D-rendered car seat illustrations, one with a folded seat and the other a full seat (no text or symbols)(C)BoosterSeats
Aboosterseat(C)isachildrestraint designedtoimprovethefitofthe vehicle'ssafetybeltsystem. Aboosterseatcanalsohelp achildtoseeoutthewindow.
SecuringanAdd-OnChild RestraintintheVehicle

WARNING
Achildcanbeseriouslyinjured orkilledinacrashifthechild restraintisnotproperlysecured inthevehicle.Securethechild restraintproperlyinthevehicle usingthevehicle'ssafetybeltor LATCHsystem,followingthe instructionsthatcamewiththat childrestraintandtheinstructions inthismanual.
Tohelpreducethechanceofinjury, thechildrestraintmustbesecured inthevehicle. Childrestraint systemsmustbesecuredin vehicleseatsbylapbeltsorthe lapbeltportionofalap-shoulder belt, orbytheLATCHsystem.
SeeLowerAnchorsandTethersfor Children(LATCHSystem) on page 2-47 formoreinformation. Childrencanbeendangeredina crashifthechildrestraintisnot properlysecuredinthevehicle.
Whensecuringanadd-onchild restraint, refertotheinstructions that comewiththerestraint which maybeontherestraintitselforina booklet, or both, and to this manual. The childrestraint instructions are important, so if they are not available, obtain are replacement copy from the manufacturer.
Keepinmindthatanunsecured childrestraintcanmovearoundina collisionorsuddenstopandinjure peopleinthevehicle.Besureto properlysecureanychildrestraintin thevehicle—evenwhennochildis init.
SecuringtheChildWithinthe ChildRestraint

WARNING
Achildcanbeseriouslyinjured orkilledinacrashifthechild isnotproperlysecuredinthe childrestraint.Securethechild properlyfollowingtheinstructions thatcamewiththatchildrestraint.
WheretoPutthe Restraint
According to accident statistics, children and infants are safer when properly restrained in a child restraint system or infant restraint system secured in a rearseating position.
Werecommendthatchildrenand childrestraintsbesecuredinarear seat,including:aninfantorachild ridinginarear-facingchildrestraint; achildridinginaforward-facing childseat;anolderchildridingina boosterseat;andchildren,whoare largeenough,usingsafetybelts.
2-46SeatsandRestraints
Alabelonyoursunvisorsays, "Neverputarear-facingchildseatin thefront." Thisisbecausetheriskto therear-facingchildissogreat, iftheairbagdeploys.

WARNING
Achildinarear-facingchild restraintcanbeseriouslyinjured orkillediftherightfront passengerairbaginflates. Thisisbecausethebackofthe rear-facingchildrestraintwould beveryclosetotheinflating airbag.Achildinaforward-facing childrestraintcanbeseriously injuredorkillediftherightfront passengerairbaginflatesandthe passengerseatisinaforward position.
Evenifthepassengersensing systemhasturnedofftheright frontpassengerfrontalairbag, nosystemisfail-safe. Noonecan
(Continued)
WARNING(Continued)
guaranteethatanairbagwillnot deployundersomeunusual circumstance, eventhoughitis turnedoff.
Securerear-facingchildrestraints inarearseat, evenifthe airbagisoff. Ifyousecurea forward-facingchildrestraintin therightfrontseat, alwaysmove thefrontpassengerseatasfar backasitwillgo. Itisbetterto securethechildrestraintina rearseat.
See Passenger Sensing System on page 2-32 for additional information.
Whensecuringachildrestraintin arearseatingposition,studythe instructionsthatcamewithyour childrestrainttomakesureitis compatiblewiththisvehicle.
Ifachildrestraintissecuredinthe centerrearseatingposition,the safetybeltsandthechildrestraint LATCHanchorsfortherearoutside seatingpositionswillnotbe accessible.Childrestraintsor passengerswillnotbeabletoride intherearoutsideseatingpositions. Iftwochildrestraintsaresecuredin therearoutsideseatingpositions, thesafetybeltforthecenterrear seatpositionwillnotbeaccessible. Childrestraintsorpassengerswill notbeabletorideinthecenterrear seatingposition.
Whereveryouinstallachild restraint, besuretosecurethe childrestraintproperly.
Keepinmindthatanunsecured childrestraintcanmovearoundina collisionorsuddenstopandinjure peopleinthevehicle.Besureto properlysecureanychildrestraintin yourvehicle—evenwhennochild isinit.
ConfigurationsforUseofChild Restraints
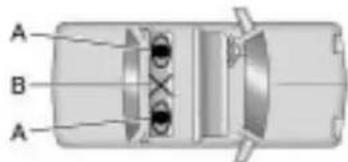
text_image
A B AA. ChildrestraintusingLATCH
B. Childrestraintoroccupant prohibited
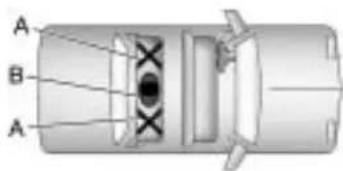
text_image
A B AA. Childrestraintoroccupant prohibited
B. ChildrestraintusingLATCH
LowerAnchorsand TethersforChildren (LATCHSystem)
TheLATCHsystemholdsachild restraintduringdrivingorinacrash. Thissystemisdesignedtomake installationofachildrestrainteasier. TheLATCHsystemusesanchorsin thevehicleandattachmentsonthe childrestraintthataremadeforuse withtheLATCHsystem.
MakesurethataLATCH-compatible childrestraintisproperlyinstalled usingtheanchors,orusethe vehicle'ssafetybeltstosecurethe restraint,followingtheinstructions thatcamewiththatrestraint,and alsotheinstructionsinthismanual.
Wheninstallingachildrestraintwith atoptether,youmustalsouse eithertheloweranchorsorthe safetybeltstoproperlysecurethe childrestraint.Achildrestraintmust neverbeinstalledusingonlythetop tetherandanchor.
InordertousetheLATCHsystem inthevehicle,youneedachild restraintthathasLATCH attachments.Thechildrestraint manufacturerwillprovideyou withinstructionsonhowtouse thechildrestraintandits attachments.Thefollowingexplains howtoattachachildrestraintwith theseattachmentsinthevehicle.
Notallvehicleseatingpositions orchildrestraintshavelower anchorsandattachmentsortop tetheranchorsandattachments.
2-48SeatsandRestraints
LowerAnchors
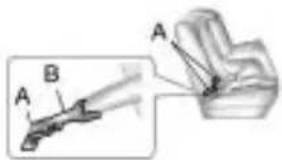
text_image
Technical diagram showing labeled components A and B with a magnified view of a mechanical or electrical component.Loweranchors(A)aremetalbars builtintothevehicle.Thereare twoloweranchorsforeach LATCHseatingpositionthatwill accommodateachildrestraint withlowerattachments(B).
TopTetherAnchor
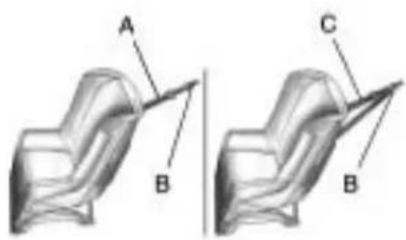
text_image
A B C BAtoptether(A,C)anchorsthe topofthechildrestrainttothe vehicle. Atoptetheranchorisbuilt intothevehicle. Thetoptether attachment(B)onthechildrestraint connectstothetoptetheranchorin thevehicleinordertoreducethe forwardmovementandrotationof thechildrestraintduringdrivingor inacrash.
Thechildrestraint may have asingletether(A)oradual tether(C).Either will have a single attachment(B)tosecurethetop tethertotheanchor.
Somechildrestraintsthathave atoptetheraredesignedforuse withorwithoutthetoptetherbeing attached.Othersrequirethetop tetheralwaystobeattached. InCanada,thelawrequiresthat forward-facingchildrestraintshave atoptether,andthatthetether beattached.Besuretoreadand followtheinstructionsforthechild restraint.
LowerAnchorandTopTether AnchorLocations

natural_image
Three identical grayscale icons of walking figures inside a vehicle cab, no text or symbols presentRearSeat
(TopTetherAnchor): Seating positions with toptetheranchors.
⑦(LowerAnchor): Seating positions with twolower anchors.

Toassistyouinlocatingthe loweranchors,eachrearanchor positionhasalabel,nearthecrease betweentheseatbackandtheseat cushion.
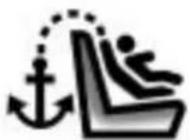
Toassistyouinlocatingthetop tetheranchors, thetoptetheranchor symbolislocatedonthecover.
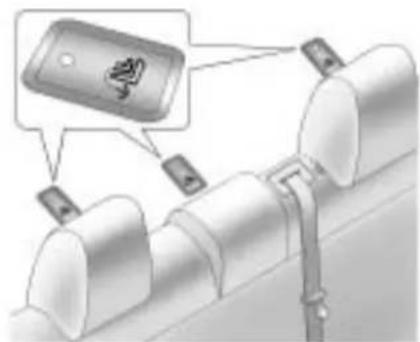
text_image
Diagram showing a device with a lock icon and labeled components, likely illustrating a mechanical or electrical setup.Thetoptetheranchorsarelocated underthecovers,behindtherear seat,onthefillerpanel.Besureto useananchorlocatedonthesame sideofthevehicleastheseating positionwherethechildrestraintwill beplaced.
Donotsecureachildrestraintina positionwithoutatoptetheranchor ifanationalorlocallawrequires thatthetoptetherbeattached,orif theinstructionsthatcomewiththe childrestraintsaythatthetoptether mustbeattached.
2-50SeatsandRestraints
Accidentstatisticsshowthat childrenaresaferiftheyare restrainedintherearratherthan thefrontseat.SeeWheretoPutthe Restraint onpage2-45 for additionalinformation.
SecuringaChildRestraint DesignedfortheLATCH System

WARNING
IfaLATCH-typechildrestraintis notattachedtoanchors,thechild restraintwillnotbeabletoprotect thechildcorrectly.Inacrash,the childcouldbeseriouslyinjured orkilled.InstallaLATCH-type childrestraintproperlyusingthe anchors,orusethevehicle's safetybeltstosecurethe restraint,followingtheinstructions thatcamewiththechildrestraint andtheinstructionsinthis manual.

WARNING
Donotattachmorethanone childrestrainttoasingleanchor. Attachingmorethanonechild restrainttoasingleanchorcould causetheanchororattachment tocomelooseorevenbreak duringacrash.Achildorothers couldbeinjured.Toreducethe riskofseriousorfatalinjuries duringacrash,attachonlyone childrestraintperanchor.

WARNING
Childrencanbeseriouslyinjured orstrangledifashoulderbeltis wrappedaroundtheirneckand thesafetybeltcontinuesto tighten.Buckleanyunusedsafety (Continued)
WARNING(Continued)
beltsbehindthechildrestraint sochildrencannotreachthem. Pulltheshoulderbeltalltheway outoftheretractortosetthelock, ifyourvehiclehasone,afterthe childrestrainthasbeeninstalled.
Notice: DonotlettheLATCH attachmentsrubagainstthe vehicle'ssafetybelts. This may damage these parts. If necessary, move buckledsafetybeltsto avoid rubbing the LATCH attachments.
Donotfoldtheemptyrear seatwithasafetybeltbuckled. Thiscoulddamagethesafetybelt ortheseat.Unbuckleandreturn thesafetybelttoitsstowed position,beforefoldingtheseat.
If you need to secure more than one child restraint in there are seat, see Where to Put the Restraint on page 2-45. Depending on where you place the child restraint, you may not be able to access certain safety belt assemblies or LATCH anchors for additional passengers or child restraints.
Youcannotsecurethreechild restraintsusingtheLATCHanchors intherearseatatthesametime, butyoucaninstalltwoofthem. Ifyouwantodothis,installone LATCHchildrestraintinthe passenger-sideposition,and installtheotheroneeitherinthe driver-sidepositionorinthecenter position.Refertothefollowing illustrationtolearnwhichanchors touse.
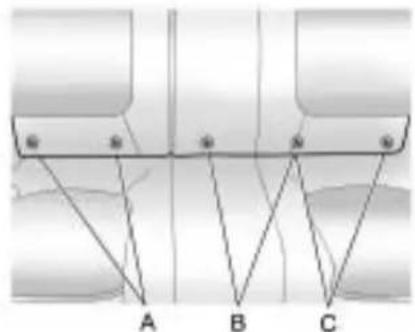
text_image
A B CA.PassengerSideRearSeat LowerAnchors
B. CenterRearSeatLower Anchors
C.DriverSideRearSeatLower Anchors
Makesuretoattachthechild restraintattheproperanchor location.
This system is designed to make installation of child restraint easier. When using lower anchors, do not use the vehicle's safety belts.
Insteadusethevehicle'sanchors andchildrestraintattachments tosecuretherestraints. Some restraintsalsouseanothervehicle anchortosecureatoptether.
- Attachandtightenthelower attachmentstothelower anchors. If the child restraint does nothavelower attachmentsorthedesired seating positiondoes nothave lower anchors, secure the child restraint with the toptether and the safety belts. Referto the child restraint manufacturer instructions and the instructions in this manual.
1.1. Findtheloweranchors forthedesiredseating position.
1.2. Putthechildrestraint on theseat.
1.3. Attachandtightenthelower attachmentsonthechild restrainttothelower anchors.
2-52SeatsandRestraints
- If the child restraint manufacturer recommend that the toptether be attached, attach and tighten the toptetherto the toptether anchor, if equipped. Referto the child restraint instructions and the following steps:
2.1. Findthetoptetheranchor. Openthecovertoexpose theanchor.
2.2. Route, attach, and tighten the toptether according to the child restraint instructions and the following instructions:

natural_image
Mechanical assembly diagram showing a tool inserted into a pipe (no text or symbols visible)If the position you are using does not have ahead rest or head restraint and you are using a single tether, routethetether over the seat back.
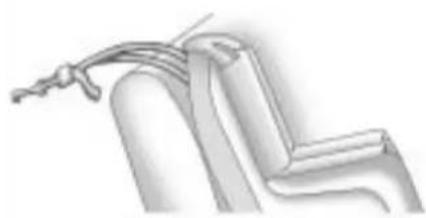
natural_image
Pure mechanical component diagram without any text, numbers, or symbolsIf the position you are using does not have ahead rest or head restraint and you are using adualtether, routethetether over the seat back.
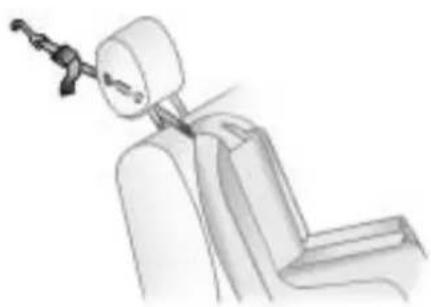
natural_image
Line drawing of a mechanical assembly or connector inserted into a seated chair (no text or symbols)If the position you are using has an adjustable headrest or headrestraint and you are using a single tether, routethether under the headrestor headrestraint and in between the headrestor headrestraint posts. See Head Restraints on page 2-2.

natural_image
Illustration of a robotic arm gripping a cylindrical object (no text or symbols)If the position you are using has an adjustable headrest or head restraint and you are using adualtether routethetether around the headrestorhead restraint.
3. Pushandpullthechildrestraint indifferentdirectionstobesure itissecure.
ReplacingLATCHSystem PartsAfteraCrash

WARNING
AcrashcandamagetheLATCH systeminthevehicle.Adamaged LATCHsystemmaynotproperly securethechildrestraint, resultinginseriousinjuryoreven deathinacrash.Tohelpmake suretheLATCHsystemis workingproperlyafteracrash, seeyourdealer/retailertohave thesysteminspectedandany necessaryreplacementsmadeas soonaspossible.
IfthevehiclehastheLATCHsystem anditwasbeingusedduringa crash,newLATCHsystemparts maybeneeded.
Newpartsandrepairsmaybe necessaryeveniftheLATCH systemwasnotbeingusedatthe timeofthecrash.
SecuringChildRestraints (RearSeat)
Whensecuringachildrestraintin arearseatingposition,studythe instructionsthatcamewiththe childrestrainttomakesureitis compatiblewiththisvehicle.
If the child restraint that the LATCH system, see Lower Anchors and Tethers for Children (LATCH System) on page 2-47 for how and where to install the child restraint using LATCH. If a child restraint is secured in the vehicle using a safety belt and it uses to optether, see Lower Anchors and Tethers for Children (LATCH System) on page 2-47 for optether anchor locations.
Donotsecureachildseatina positionwithoutatoptetheranchor ifanationalorlocallawrequires
thatthetoptetherbeanchored, orif theinstructionsthatcomewiththe childrestraintsaythatthetopstrap mustbeanchored.
If the child restraint does not have the LATCH system, you will be using the safety belt to secure the child restraint in this position. Besure to follow the instructions that camewith the child restraint. Secure the child in the child restraint when and asthe instruction say.
If more than one child restraint need to be installed in therear seat, besuretoread Where to Put the Restrainton page 2-45.
- Putthechildrestraint on theseat.
- Pickup the latch plate, and run the lap and shoulder portions of the vehicle's safety belt through or around therestraint. The child restraint instructions will show you how.

natural_image
Illustration of a person's hand using a belt switch to adjust the seat area (no text or symbols visible)- Pushthelatchplate into the buckle until it clicks.
Positionthereleasebuttonon thebucklesothatthesafetybelt couldbequicklyunbuckledif necessary.
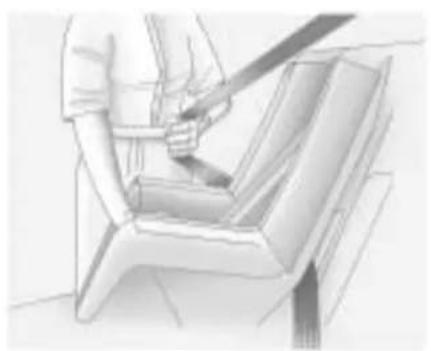
natural_image
Sketch of a person using a tool to lift a chair (no text or symbols visible)- Pulltherestoftheshoulderbelt allthewayoutoftheretractorto setthelock.

natural_image
Illustration of a person using a tool to lift a seatbelt (no text or symbols visible)-
Totightenthebelt, pushdown onthechildrestraint, pullthe shoulderportionofthebelt to tightenthalapportionofthebelt andfeedtheshoulderbeltback intotheretractor. Wheninstalling aforward-facingchildrestraint, itmaybehelpfultouseyour kneetopushdownonthechild restraintasyoutightenthebelt.
-
If the child restraint has a top tether, follow the child restraint manufacturer's instructions regarding the use of the top tether. See Lower Anchors and Tethers for Children (LATCH System) on page 2-47 form more information.
-
Pushandpullthechildrestraint indifferentdirectionstobesure itissecure.
Toremovethechildrestraint, unbucklethevehiclesafetybeltand letitreturntothestowedposition. Ifthetoptetherisattachedtoatop tetheranchor, disconnectit.
SecuringChildRestraints (FrontSeat)
Thisvehiclehasairbags. Arear seatisasaferplacetosecure aforward-facingchildrestraint. See Where to Put the Restraint on page 2-45.
Inaddition, the vehicle has a passengersensingsystem which is designed to turn off the right front passenger frontal air bag under certain conditions. See Passenger Sensing System on page 2-32 and Passenger Airbag Status Indicator on page 4-15 form more information, including important safety information.
Alabelonthesunvisorsays, "Neverputarear-facingchildseat inthefront." Thisisbecausetherisk totherear-facingchildissogreat, iftheairbagdeploys.
WARNING
Achildinarear-facingchild restraintcanbeseriously injuredorkillediftheright frontpassengerairbaginflates. Thisisbecausethebackofthe rear-facingchildrestraintwould beveryclosetotheinflating airbag.Achildinaforward-facing childrestraintcanbeseriously injuredorkillediftherightfront passengerairbaginflatesandthe passengerseatisinaforward position.
Evenifthepassengersensing systemhasturnedofftheright frontpassengerfrontalairbag, no systemisfail-safe. Noonecan guaranteeethatanairbagwillnot deployundersomeunusual circumstance, eventhoughitis turnedoff.
(Continued)
WARNING(Continued)
Securerear-facingchildrestraints inarearseat, even if the airbagisoff. If you secure a forward-facing child restraint in therightfrontseat, always move thefrontpassenger seat as far backasitwill go. It is better to secure the child restraint in rearseat.
See Passenger Sensing System on page 2-32 for additional information.
If the child restraint that the LATCH system, see Lower Anchors and Tethers for Children (LATCH System) on page 2-47 for how and where to install the child restraint using LATCH. If a child restraint is secured using safety belt and it uses at option, see Lower Anchors and Tethers for Children (LATCH System) on page 2-47 for option tether anchor locations.
Donotsecureachildseatina positionwithoutatoptetheranchor ifanationalorlocallawrequires thatthetoptetherbeanchored,orif theinstructionsthatcomewiththe childrestraintsaythatthetopstrap mustbeanchored.
InCanada, the law requires that forward-facing childrestraints have adopted, and that the tether be attached.
Youwillbeusingthelap-shoulder belttosecurethechildrestraintin thisposition.Followtheinstructions thatcamewiththechildrestraint.
- Movetheseatasfarbackas itwillgobeforesecuringthe forward-facingchildrestraint.
Whenthepassengersensing systemhasturnedofftheright frontpassengerfrontalairbag, theoffindicatoronthe passengerairbagstatus indicatorshouldlightandstay litwhenyoustartthevehicle. SeePassengerAirbagStatus Indicatoronpage4-15.
- Putthechildrestraint on theseat.
- Pickupthelatchplate, and run the lap and shoulder portions of the vehicle's safety belt through or around therestraint. The child restraint instructions will show you how.
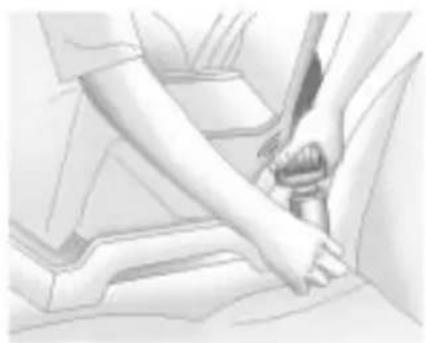
natural_image
Illustration of a person's seatbelt being adjusted for a car (no text or symbols visible)- Pushthelatchplateintothe buckleuntilclicks.
Positionthereleasebuttonon thebucklesothatthesafetybelt couldbequicklyunbuckledif necessary.

natural_image
Sketch of a person using a belt to lift a chair (no text or symbols visible)- Pulltherestoftheshoulderbelt allthewayoutoftheretractor to setthelock.
2-58SeatsandRestraints
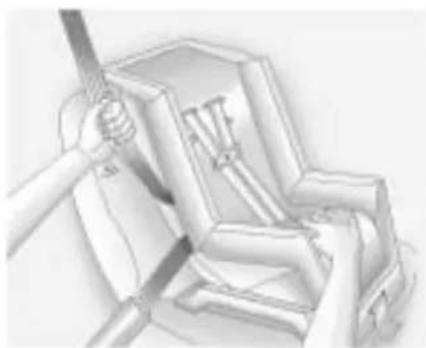
natural_image
Illustration of a hand using a tool to interact with mechanical components (no text or symbols visible)-
Totightenthebelt, pushdown onthechildrestraint, pullthe shoulderportionofthebelt to tightenthalapportionofthebelt andfeedtheshoulderbeltback intotheretractor. Wheninstalling aforward-facingchildrestraint, itmaybehelpfultouseyour kneetopushdownonthechild restraintasyoutightenthebelt.
-
Pushandpullthechildrestraint indifferentdirectionstobesure itissecure.
Iftheairbagsareoff,theoff indicatorinthepassengerairbag statusindicatorwillcomeonand stayonwhenthevehicleisstarted. Ifachildrestrainhasbeeninstalled andtheonindicatorislit,see "IftheOnIndicatorisLitfora ChildRestraint"underPassenger SensingSystem onpage2-32 for moreinformation.
Toremovethechildrestraint, unbucklethevehiclesafetybeltand letitreturntothestowedposition.
Storage
StorageCompartments
GloveBox......3-1
Cupholders....3-1
FrontStorage....3-2
CenterConsoleStorage.....3-2
AdditionalStorageFeatures
ConvenienceNet......3-2
Storage Compartments
GloveBox
Thegloveboxislocatedonthe passengersideoftheinstrument panel.Liftuponthelevertoopenit.
Cupholders
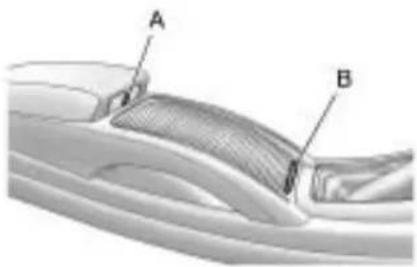
text_image
A BThereareremovablecupholders locatedinthecenterconsole. Slidethecover(B)toaccessthe cupholders.Cupholdersarealso locatedintherearmrest.
3-2Storage
FrontStorage
The driver's storage compartment is located near the left side of the steering column on the bottom of the instrument panel. Pull the cover downto open.
CenterConsoleStorage

natural_image
Diagram of a car interior showing labeled parts A and B (no text or symbols present)Atwotieredstorageareaisunder thefrontadjustablearmrest.
Pushthebutton(A)onthe undersideofthefrontedge ofthecovertoopen.
AccessoryPowerOutletisinthe lowerarea.
Some vehicles might also have input jacks for auxiliary audio devices. See Auxiliary Devices under Audio Players form more information.
AdditionalStorage Features
ConvenienceNet
Usetheconveniencenetlocatedin thetrunktostoresmallloadsasfar forwardaspossible. Thenetshould notbeusedtostoreheavyloads. Attachtheloopsoneachcornerof thenettothehookslocatedonthe sidesofthetrunk.
Instruments and Controls
InstrumentPanelOverview
InstrumentPanelOverview....4-4
Controls
SteeringWheelAdjustment...4-6
SteeringWheelControls.....4-6
HeatedSteeringWheel......4-7
Horn....4-7
WindshieldWiper/Washer.....4-7
Compass......4-8
Clock(WithoutDate
Display)......4-8
Clock(WithDateDisplay).....4-9
PowerOutlets......4-10
WarningLights, Gauges, and Indicators
WarningLights, Gauges, and Indicators....4-11
InstrumentCluster......4-12
Speedometer....4-13
Odometer....4-13
Tachometer....4-13
FuelGauge......4-13
EngineCoolantTemperature Gauge....4-14
SafetyBeltReminders.....4-14
AirbagReadinessLight.....4-15
PassengerAirbagStatus Indicator....4-15
ChargingSystemLight.....4-16
Malfunction IndicatorLamp......4-17
BrakeSystemWarning Light....4-19
ElectricParkingBrake
Light......4-20
AntilockBrakeSystem(ABS)
WarningLight......4-21
TractionOffLight......4-21
ElectronicStabilityControl (ESC)IndicatorLight.....4-22
ElectronicStabilityControl (ESC)/TractionControl System(TCS)Indicator/WarningLight....4-22
TirePressureLight......4-22
EngineOilPressureLight....4-23
LowFuelWarningLight.....4-24
SecurityLight......4-24
High-BeamonLight......4-24
FogLampLight......4-25
TaillampIndicatorLight.....4-25
CruiseControlLight......4-25
4-2 InstrumentsandControls
InformationDisplays
DriverInformation
Center(DIC)......4-25
Head-UpDisplay(HUD).....4-29
VehicleMessages
VehicleMessages......4-33
BatteryVoltageandCharging
Messages......4-33
BrakeSystemMessages....4-33
CompassMessages......4-34
CruiseControlMessages....4-34
DoorAjarMessages......4-34
EngineCoolingSystem
Messages......4-35
EngineOilMessages......4-35
EnginePowerMessages....4-36
FuelSystemMessages.....4-36
KeyandLockMessages.....4-36
LampMessages......4-36
RideControlSystem
Messages......4-37
Anti-TheftAlarmSystem
Messages......4-37
TireMessages......4-37
TransmissionMessages.....4-38
WindowMessages......4-38
VehiclePersonalization
VehiclePersonalization.....4-38
OnStar® System
OnStar® System......4-43
UniversalRemoteSystem
UniversalRemoteSystem...4-45
UniversalRemoteSystem
Programming......4-46
UniversalRemoteSystem
Operation......4-49
NOTES
InstrumentPanelOverview
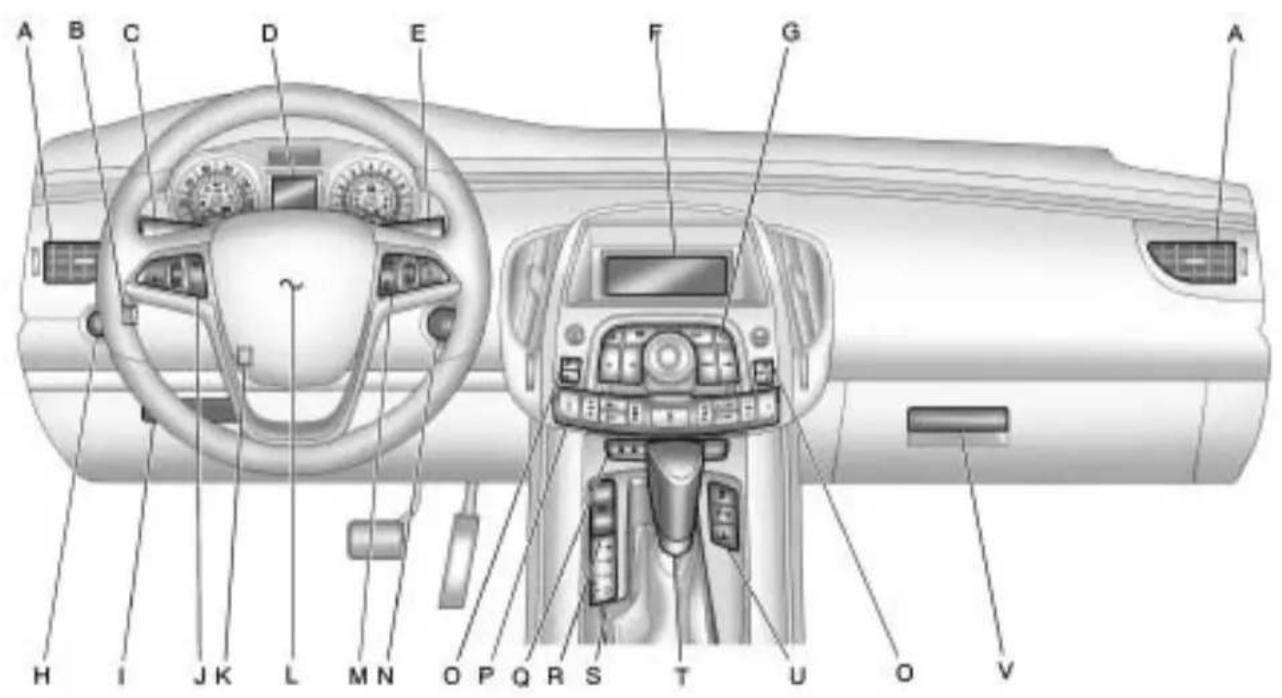
text_image
A B C D E F G A H I J K L M N O P Q R S T U O VA. AirVentsonpage7-8.
B.Head-UpDisplay(HUD) on page4-29 (IfEquipped).
C. TurnandLane-ChangeLever.
See TurnandLane-Change Signals on page 5-4 .Driver InformationCenterButtons.See DriverInformationCenter(DIC) onpage 4-25 .
D. InstrumentCluster on page 4-12 .DriverInformation CenterDisplay.SeeDriver InformationCenter(DIC) on page 4-25 .
E. Windshield Wiper/Washer on page 4-7.
F.Info-Display.
G.AM-FMRadioonpage6-12.
H. Exterior Lamp Controls on page 5-1 . Fog Lamps on page 5-4 (IfEquipped). Instrument Panel Illumination Control on page 5-5.
- FrontStorageonpage3-2.
J. CruiseControl on page 8-37. Heated Steering Wheel on page 4-7.
K. Steering Wheel Adjustment on page 4-6.
L.Hornonpage4-7.
M. Steering Wheel Controls on page 4-6.
N. IgnitionPositions(Keyless Access) onpage 8-18 or IgnitionPositions(KeyAccess) onpage 8-19 .
O.HeatedandVentilatedFront Seatsonpage2-8.
P. Automatic Climate Control System on page 7-1 or Dual Automatic Climate Control System on page 7-4.
Q.PowerDoorLocks on page 1-10 .HazardWarning Flashers on page 5-3 . PassengerSensingSystem on page 2-32 .
R. Parking Brakeonpage8-32.
S.PRNDL.SeeAutomatic Transmissiononpage8-27.
T.ShiftLever.SeeShiftingInto Parkonpage8-24.
U. TractionControlSystem(TCS) onpage 8-34 .Electronic StabilityControl(ESC) on page 8-35 .UltrasonicParking Assist onpage 8-40 .Power RearSunshade.
V. GloveBoxonpage3-1.
Controls
SteeringWheel Adjustment

natural_image
Interior view of a car showing steering wheel and dashboard (no visible text or symbols)The adjustment lever is located on the left side of the steering column.
Toadjustthesteeringwheel:
-
Pulltheleverdown.
2.Movethesteeringwheelup ordownandinorouttoa comfortableposition. -
Pulltheleveruptolock thesteeringwheelin place.
Donotadjustthesteeringwheel whiledriving.
SteeringWheelControls

natural_image
Diagram of a car steering wheel with a close-up inset showing the dashboard (no text or symbols)Forvehicleswithaudiosteering wheelcontrols, someaudiocontrols canbeadjustedatthesteering wheel.
^1 (Push to Talk): For vehicles with an OnStar ^® , Bluetooth ^® , or navigation system, pressto interact with those systems. See OnStar ^® System on page 4-43, Bluetooth(Overview) on page 6-42 or Bluetooth(Infotainment Controls) on page 6-43 or Bluetooth(Voice Recognition) on page 6-46 or Bluetooth(Navigation) on page 6-58, ortheseparate navigation manual form more information.
/ (End Call / Mute): Press tosilencethevehiclespeakers only.Pressagaintoturnthesound on.ForvehicleswithOnStaror Bluetoothsystems,presstoreject anincomingcall,orenda currentcall.
△ SRC ∇ (Rotary Control): Press toselectanaudiosource.
Toggleupordowntoselectthenext orpreviousfavoriteradiostationor CDtrack,DVD,ifequipped,track, orMP3track.
+-(Volume):Press+to increase the volume, press-to decrease the volume.
HeatedSteeringWheel
Forvehicleswithaheatedsteering wheel,thebuttonforthisfeatureis locatedontheclimatecontrol system.
:Presstoturntheheated steeringwheelonoroff.Alighton thebuttondisplayswhenthefeature isturnedon.
Thesteeringwheeltakesabout threeminutestostartheating.
Horn
Pressnearthehornsymbolsor pressonthesteeringwheelpadto soundthehorn.
WindshieldWiper/Washer
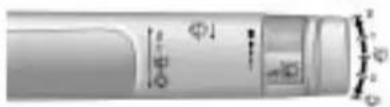
natural_image
Pure electrical circuit lines without any symbolsThewindshieldwiperleverisonthe sideofthesteeringcolumn.With theignitioninACC/ACCESSORYor ON/RUN,movethewindshield wiperlevertoselectthewiper speed.
2:Fastwipes.
1:Slowwipes.
(AdjustableIntervalWipes): Turnthebandupformorefrequent wipesordownforlessfrequent wipes.
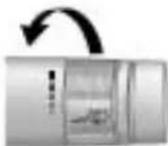
○(Off):Turnsthewindshield wipersoff.
(Mist): Singlewipe, briefly movethewiperleverdown. Several wipes, holdthewiperleverdown.
Cleariceandsnowfromthewiper bladesbeforeusingthem.Iffrozen tothewindshield,carefullyloosenor thawthem.Damagedwiperblades shouldbereplaced.See Wiper Blade Replacementpage9-30.
Heavysnoworicecanoverloadthe wipers.Acircuitbreakerstopsthem untilthemotorcools.
WipeParking
If the ignition is turned LOCK/OFF
whilethewipersareon1,2or theywillimmediatelystop.

Ifthewindshieldwiperleveristhen movedtoOFFbeforethedriver doorisopenedorwithin10minutes, thewiperswillrestartandmoveto thebaseofthewindshield.
If the ignition is turned to LOCK/OFF while the dewipers are performing wipes dueto windshield wash, the dewipers continue or until they reach the base of the windshield.
WindshieldWasher
Pullthewindshieldwiperleverto spraywindshieldwasherfluid and activatethewipers.
Thewiperswillcontinueuntilthe leverisreleasedorthemaximum washtimeisreached.
Whenthewindshieldwiperleveris released, additional wipes may occur depending on how long the
windshieldwasherhadbeen activated. See WasherFluid on page 9-24 for informationonfilling the windshieldwasherfluid reservoir.

WARNING
Infreezingweather, donotuse yourwasher until the windshield is warmed. Otherwisethewasher fluid can form mice on the windshield, blocking your vision.
Compass
The vehicle may have a compass display on the Driver Information Center (DIC). The compass receives its heading and other information from Global Positioning System (GPS) antenna, Stabili Trak, and vehiclespeed information.
AvoidcoveringtheGPSantenna forlongperiodsoftimewithobjects thatmayinterferewiththeantenna's abilitytoreceiveasatellitesignal.
SeeBackglassAntenna on page 6-19 andSatelliteRadio Antenna onpage 6-19 forthe locationofthevehicle'santennas. Thecompasssystemisdesignedto operateforacertainnumberof milesordegreesofturnbefore needingasignalfromtheGPS satellites.Whenthecompass displayshowsCAL,drivethe vehicleforashortdistanceinan openareawhereitcanreceivea GPSsignal.Thecompasssystem willautomaticallydeterminewhen GPSsignalisrestoredandprovide aheadingagain.SeeCompass Messages onpage 4-34 formore informationonthemessagesthat maybedisplayedforthecompass.
Clock(WithoutDate Display)
Theinfotainmentsystemcontrols areusedtoaccessthetimeand datesettingsthroughthemenu system.SeeOperation on page 6-7 forinformationabout howtousethemenusystem.
SettingtheTime
- PresstheCONFIGbutton and selectTimeSettings, or press the ⏻ button.
- SelectSetTime.
- TurntheMenuknobtoadjust thehighlightedvalue.
- PresstheSELECTbutton to selectthenextvalue.
- Tosavethetimeandreturnto the TimeSettingsmenu, press the ←BACKbuttonatanytime orpresstheSELECTbutton afteradjustingtheminutes.
Settingthe12/24HourFormat
- PresstheCONFIGbutton and selectTimeSettings, or press the ⏻ button.
- Highlight12/24HourFormat.
- PresstheSELECTbutton to selectthe12houror24hour displayformat.
Clock(WithDateDisplay)
Theinfotainmentsystemcontrols areusedtoaccessthetimeand datesettingsthroughthemenu system.SeeOperation on page 6-7 forinformationabout howtousethemenusystem.
SettingtheTimeandDate
- PresstheCONFIGbutton and selectTimeandDateSettings, orpressthe ⏻button.
- SelectSetTimeorSetDate.
- TurntheMenuknobtoadjust thehighlightedvalue.
- PresstheSELECTbutton to selectthenextvalue.
- Tosavethetimeordate andreturntotheTimeand DateSettingsmenu, press the ←BACKbuttonatanytime orpresstheSELECTbutton afteradjustingtheminutes oryear.
Settingthe12/24HourFormat
- PresstheCONFIGbutton and selectTimeandDateSettings, orpressthe ⏻button.
- HighlightSetTimeFormat.
- PresstheSELECTbutton to select the 12hour or 24 hour display format.
SettingtheMonth&Day Format
- PresstheCONFIGbutton and selectTimeandDateSettings, orpressthe button.
- HighlightSetDateFormat.
- PresstheSELECTbutton toselectMM/DD/YY (month/day/year) or DD/MM/YY(day/month/year).
Theaccessorypoweroutletscan beusedtoconnectelectrical equipment, such asacellular phone.
There are two accessory power outlets, one is located inside the center console storage and other on there are of the center floor console.
Opentheprotectivecovertousethe accessorypoweroutlet.
Certain electrical accessories may not be compatible with the accessory power outlets and could result in blown vehicle or adapter fuses. If you experience a problem,
seeyourdealer/retailerfor additionalinformationonthe accessorypoweroutlet.
Notice: Adding any electrical equipment to the vehicle can damage it or keep other components from working as they should. There pairs would not be recovered by the vehicle warranty. Donot use equipment exceeding maximum amperage rating of 20 amperes. Check with your dealer/retailer before adding electrical equipment.
When adding electrical equipment, besuretofollowtheinstallation instructionsincludedwiththe equipment.
Notice:Improperuseofthe poweroutletcancausedamage notcoveredbythevehicle warranty.Donothanganytype ofaccessoryoraccessory bracketfromtheplugbecause thepoweroutletsaredesigned foraccessorypowerplugsonly.
PowerOutlet120VoltAlternating Current
The vehicle may have a power outlet that can be used to plugin electric equipment that uses a maximum limit of 150 watts.

natural_image
Top-down view of a car air vent with a small internal component and an upward arrow indicating direction (no text or symbols)The power outlet is located on the rear of the center console.
Anindicatorlightontheoutletturns ontoshowitisinuse. Thelight comesonwhentheignitionisin ON/RUNandequipmentrequiring lessthan150wattsispluggedinto theoutlet, andnosystemfaultis detected.
The indicator light does not come on when the ignition is in LOCK/OFF for if no equipment is plugged into the outlet.
If you try to connect equipment using more than 150 watts or asystem fault is detected, the equipment may operate for a short period and turn itself off. A protection circuit shut so off the powersupply and the indicator light turn so off. To reset the circuit, unplug the item and plug it back in turn the Remote Accessory Power (RAP) off and then back on. See Retained Accessory Power (RAP) on page 8-20. Prolonged usage of the power outlet at the maximum load of 150 watts, may cause the outlet to overheat and automatically shutdown. The power restarts when equipment that operates within the limit is plugged into the outlet and a system fault is not detected.
The power outlet is not designed for the following electrical equipment and may not work properly if these items are plugged into the power outlet:
- Equipmentwithhighinitialpeak wattagesuchas: compressor-drivenrefrigerators andelectricpowertools.
- Otherequipmentrequiringan extremelystablepowersupply suchas: microcomputer-controlled electricblankets,touchsensor lamps,etc.
WarningLights, Gauges,and Indicators
Warninglightscomeonwhenthere couldbeaproblemwithvehicle function. Somewarninglightscome onbrieflywhentheengineisstarted toindicatetheyareworking.
Gaugescanindicatewhenthere couldbeaproblemwithvehicle function.Oftengaugesandwarning lightsworktogethertoindicatea problemwiththevehicle.
Whenoneofthewarninglights comesonandstaysonwhile driving,orwhenoneofthegauges showstheremaybeaproblem, checkthesectionthatexplainswhat todo.Followthismanual'sadvice. Waitingtodorepairscanbecostly andevendangerous.
InstrumentCluster
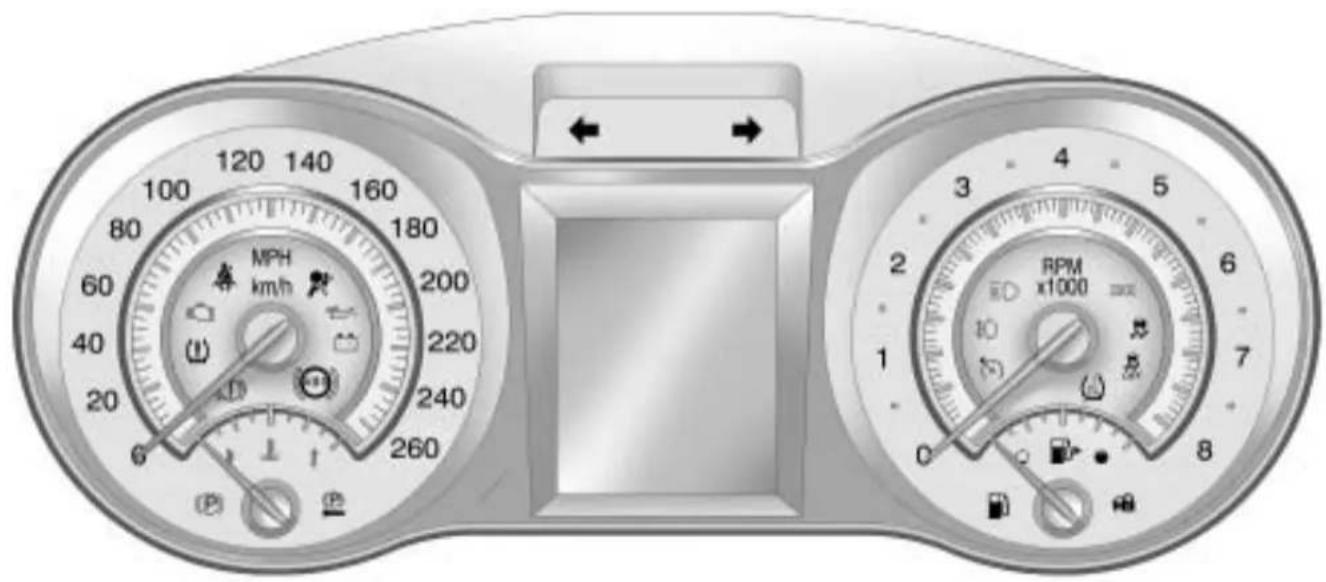
text_image
MPH km/h 260 180 160 140 120 100 80 60 40 20 0 RPM x1000 3 2 1 0 8 5 4 3 2 ← →Speedometer
Thespeedometershowsthe vehicle'sspeedinbothkilometers perhour(km/h)andmilesper hour(mph).
Odometer
Theodometershowshowfarthe vehiclehasbeendriven,ineither kilometersormiles.
This vehicle has atamper-resistant odometer. If the vehicleneedsa new odometer installed, thenew oneissettothemileage of the old odometer. If this is not possible, it is set at zero and a label is put on the driver's doortoshow the old mileagereading.
Tachometer
Thetachometerdisplaythe enginespeedinrevolutionsper minute(rpm).
Notice: If the engine is operated with the tachometer in the shaded warning area, the vehicle could be damaged, and the damages would not be covered by the vehicle warranty. Donot operate the engine with the tachometer in the shaded warning area.
FuelGauge
Whentheignitionison, thefuel gauge indicates how much fuel is left in the tank.
Anarrowonthefuelgauge indicatesthesideofthevehiclethe fueldoorison.
When the indicator nearsempty, the low fuellight comes on. Therestillis alittle fuel left, but the fuel tank should filled soon.
Herearefourthingsthatsome ownersaskabout.Noneofthese showaproblemwiththefuelgauge:
- Attheservicestation, the fuel pumpshutsoffbeforethegauge readsfull.
- Ittakesalittlemoreorless fueltofillupthanthegauge indicated. Forexample, the gaugemayhaveindicatedthe tankwashalffull, butitactually tookalittlemoreorlessthan halfthetank'scapacitytofill thetank.
- Thegaugemovesalittlewhile turningacornerorspeedingup.
4-14 InstrumentsandControls
- Thegaugetakesafewseconds tostabilizeaftertheignitionis turnedon, and goes back to empty when theignitionis turnedoff.
EngineCoolant TemperatureGauge
text_image
Diagram of a gauge or meter with labeled indicators and a pointer, showing measurement markings.Thisgaugeshowstheengine coolanttemperature.
Ifthegaugepointmovestowards theshadedarea, theengineis toohot.
Thisreadingindicatesthesame thingasthewarninglight.Itmeans thattheenginecoolanthas overheated.Ifthevehiclehasbeen operatingundernormaldriving conditions,pullofftheroad,stopthe vehicle,andturnofftheengineas soonaspossible.SeeEngine Overheating onpage 9-21 formore information.
SafetyBeltReminders
DriverSafetyBeltReminder Light
Thereisadriversafetybelt reminderlightontheinstrument panelcluster.

Whenthevehicleisstartedthislight flashesandachimemaycomeon toreminddriverstofastentheir
safetybelts. Thenthelightstays onsoliduntilthebeltisbuckled. Thiscyclemaycontinue several timesifthedriverremainsor becomes unbuckledwhile the vehicleismoving.
Ifthedriversafetybeltisbuckled, neitherthelightnorchimecomeon.
PassengerSafetyBelt ReminderLight
Whenthevehicleisstartedthislight flashesandachimecomesonto remindpassengerstofastentheir safetybelt. Thenthelightstayson soliduntilthebeltisbuckled. This cyclecontinuesseveraltimesifthe passengerremainsorbecomes unbuckledwhilethevehicleis moving.
Ifthepassengersafetybeltis buckled, neitherthechimenorthe lightcomeson.
Thefrontpassengersafetybelt warninglightandchimemayturnon ifanobjectisputontheseatsuch asabriefcase,handbag,grocery bag,laptoporotherelectronic device.Toturnoffthewarninglight andorchime,removetheobject fromtheseatorbucklethe safetybelt
AirbagReadinessLight
Thislightshowsifthereisan electricalproblem.Thesystem checkincludestheairbagsensor, thepretensioners,theairbag modules,thewiringandthecrash sensinganddiagnosticmodule. Formoreinformationontheairbag system,seeAirbagSystem on page 2-25.

Theairbagreadinesslightcomes onsolidandstaysonforseveral secondswhenthevehicleisstarted. Thenthelightgoesout.
Ifitstaysonsolidafterthevehicle hasbeenstartedorcomesonwhile driving,theairbagsystemmaynot workproperly.Havethevehicle servicedrightaway.
WARNING
If the airbagreadinesslightstays on after the vehicle is started or comes on while driving, it means the air bagsystem might not be working properly. The airbags in the vehicle might not inflate a crash, or they could even inflate
(Continued)
WARNING(Continued)
withoutacrash. To help avoid injury, havethe vehicles serviced rightaway.
PassengerAirbagStatus Indicator
The vehicle has a passenger sensing system. See Passenger Sensing System on page 2-32 for important safety information. The instrument panel has a passenger airbag status indicator.

text_image
PASS AIR BAG ON OFF 2Whenthevehicleisstarted, the passengerairbagstatusindicator willlightthewordsONandOFFfor severalsecondsasasystemcheck.
If you are using remotestart, if equipped, to start the vehicle from adistance you may not see the system check. Then, after several more seconds, the status indicator will light either the word ON or OFF to let you know the status of the right front passenger frontal airbag.
IfthewordONislitonthe passengerairbagstatusindicator, itmeansthattherightfront passengerfrontalairbagis enabled(mayinflate).
IfthewordOFFislitontheairbag statusindicator, itmeansthatthe passengersensingsystemhas turnedofftherightfrontpassenger frontalairbag.
If,afterseveralseconds,bothstatus indicatorlightsremainon,orifthere arenolightsatall,theremaybea problemwiththelightsorthe passengersensingsystem.See yourdealer/retailerforservice.
WARNING
If the airbagreadiness light ever comes on and stay on, it means that something may be wrong with the air bags system. To help avoid injury to yourself for others, have the vehicles serviced right away. See Airbag Readiness Light on page 4-15 form more information, including important safety information.
ChargingSystemLight
Thechargingsystemlightcomeson brieflywhentheignitionisturned on,buttheengineisnotrunning,as achecktoshowthelightisworking.
Thelightturnsoffwhenthe engineisstarted.Ifitdoesnot, havethevehicleservicedbyyour dealer/retailer.
Ifthelightstayson,orcomeson whiledriving,therecouldbea problemwiththeelectricalcharging system.Haveitcheckedbyyour dealer/retailer.Drivingwhilethis lightisoncoulddrainthebattery.
ThislightandaTransportOn messagedisplaywhenthevehicle isinTransportMode.Formore information,seeKeyandLock Messagesonpage4-36.
Ifashortdistancemustbedriven withthelighton,besuretoturnoff allaccessories,suchastheradio andairconditioner.
Malfunction IndicatorLamp
AcomputersystemcalledOBDII (On-BoardDiagnostics-Second Generation) monitors operation of the fuel, ignition, and emission control systems. It ensures that emissions are at acceptable levels for the life of the vehicle, helping to produce a cleaner environment.
Thislightcomesonwhenthe ignitionison,buttheengineis notrunning,asachecktoshow itisworking.lfitdoesnot,have thevehicleservicedbyyour dealer/retailer.
If the check engine light comes on and stay on, while the engine is running, this indicates that there is an OBDI problem and service is required.
Malfunctionsoftenareindicated by thesystembeforeanyproblemis apparent. Beingawareofthelight canpreventmoreseriousdamage tothevehicle. Thissystemassists theservicetechnicianincorrectly diagnosinganymalfunction.
Notice: If the vehicle is continually driven with this light on, after awhile, the emission control might not work as well, the vehicle's fueleconomymight not be as good, and the engine might not run a smoothly. This could lead to costly repair that might not be covered by the vehicle warranty.
Notice: Modificationsmadetothe engine, transmission, exhaust, intake, orfuelsystemofthe vehicleorthereplacement of the original tires with other than those of the same Tire Performance Criteria (TPC) can affect the vehicle's emission controls and can cause this light to come on. Modification to the system could lead to costly repairs not covered by the vehicle warranty. This could also result in a failure to pass are required. Inspection/Maintenance test. See Accessories and Modifications page 9-3.
Thislightcomesonduringa malfunctioninoneoftwoways:
LightFlashing: Amisfirecondition has been detected. Amisfire increases vehicle emissions and could damage the emission control system on the vehicle. Diagnosis and servicemight berequired.
4-18 InstrumentsandControls
The following can prevent more serious damage to the vehicle:
- Reducevehiclespeed.
- Avoidhardaccelerations.
- Avoidsteepuphillgrades.
- Iftowingatrailer, reducethe amountofcargobeinghauledas soonasitispossible.
Ifthelightcontinuestoflash,when itissafetodoso,stopthevehicle. Findasafeplacetoparkthe vehicle.Turnthevehicleoff,waitat least10seconds,andrestartthe engine.Ifthelightisstillflashing, followthepreviousstepsandsee yourdealer/retailerforserviceas soonaspossible.
LightOnSteady: Anemission controlsystemmalfunctionhas beendetectedonthevehicle. Diagnosisandservicemightbe required.
Anemissionsystemmalfunction mightbecorrected.
- Makesurethefuelcapisfully installed.SeeFillingtheTank on page 8-52 .Thediagnostic systemcandetermineifthe fuelcaphasbeenleftoffor improperlyinstalled.Alooseor missingfuelcapallowsfuelto evaporateintotheatmosphere. Afewdrivingtripswiththecap properlyinstalledshouldturnthe lightoff.
- Ifthevehiclehasbeendriven throughadeeppuddleofwater, thevehicle'selectricalsystem mightbewet. Theconditionis usuallycorrectedwhenthe electricalsystemdriesout. Afewdrivingtripsshouldturn thelightoff.
- Makesuretofuelthevehicle withqualityfuel.Poorfuelquality causestheenginenottorunas efficientlyasdesignedandmay cause:stallingafterstart-up, stallingwhenthevehicleis changedintogear,misfiring, hesitationonacceleration, orstumblingonacceleration. Theseconditionsmightgoaway oncetheengineiswarmedup.
Ifoneormoreofthese conditionsoccurs,changethe fuelbrandused.Itwillrequireat leastonefulltankoftheproper fueltoturnthelightoff.
See Gasoline Specifications on page 8-49.
If none of the above havemade the light turnoff, your dealer/retailer can check the vehicle. The dealer/retailer has the proper test equipment and diagnostic tool to fix an mechanical electrical problem that might have developed.
EmissionsInspection and MaintenancePrograms
Somestate/provincialandlocal governmentshaveormightbegin programstoinspecttheemission controlequipmentonthevehicle. Failuretopasthisinspection couldpreventgettingavehicle registration.
Herearesomethingstoknowto helpthevehiclepassaninspection:
- The vehicle will not pass this inspection if the check engine light is on with the engine running, or if the ignition is placed on RUN and the light is not on.
- Thevehiclewillnotpassthis inspectioniftheOBDII (on-boarddiagnostic)system determinesthatcriticalemission controlsystemshavenotbeen completelydiagnosedbythe system. Thevehiclewouldbe considerednotreadyfor inspection. Thiscanhappenif thebatteryhasrecentlybeen replacedorifthebatteryhasrun down. Thediagnosticsystemis designedtoevaluatecritical emissioncontrolsystemsduring normaldriving. Thiscantake severaldaysofroutinedriving. Ifthishasbeendoneandthe vehiclestilldoesnotpassthe inspectionforlackofOBDII systemreadiness,yourdealer/retailercanpreparethevehicle forinspection.
BrakeSystemWarning Light
The vehicle's hydraulic brake system is divided into two parts. If one part is not working, the other part can still work and stop the vehicle. For good braking both parts need to working.
If the warning light comes on, there is a brake problem. Have your brake system inspected right away.

Ifthevehiclehasantilockbrakes, thislightshouldcomeonwhenthe keyisplacedinSTART.Ifitdoes not,havethevehicleservicedby yourdealer/retailer.
Ifthelightcomesonwhiledriving, pullofftheroadandstopcarefully. Thepedalmaybehardertopushor itcangoclosertothefloor.Itmay takelongertostop.Tryturningoff andrestartingthevehicleoneor twotimes,ifthelightisstillon,have thevehicletowedforservice.See AntilockBrakeSystem(ABS) WarningLight onpage4-21 and TowingtheVehicleonpage9-81.

WARNING
Thebrakesystemmightnotbe workingproperlyifthebrake systemwarninglightison. Drivingwiththebrakesystem warninglightoncanleadtoa crash.Ifthelightisstillonafter thevehiclehasbeenpulledoff theroadandcarefullystopped, havethevehicletowedfor service.
ElectricParkingBrake Light

ForvehicleswiththeElectricPark Brake(EPB),theparkbrakestatus lightcomesonwhenthebrakeis applied.Ifthelightcontinues flashingaftertheparkbrakeis released,orwhiledriving,thereisa problemwiththeElectricParking Brakesystem.AServiceParking Brakemessagecanalsodisplayin theDriverInformationCenter(DIC). SeeBrakeSystemMessages on page 4-33 formoreinformation.
Ifthelightdoesnotcomeon, orremainsflashing,seeyour dealer/retailer.

ForvehicleswiththeElectricPark Brake(EPB),theparkbrake warninglightshouldcomeonbriefly whenignitionisplacedinON/RUN. Ifitdoesnotcomeon,thenhaveit fixedsoitwillbereadytowarnif thereisaproblem.
If this light comes on, there is a problem with asystem on the vehicle that is causing the park brakes system to work at a reduced level. The vehicle can still be driven, but should be takento a dealer/retailer as soon as possible. See Parking Brake on page 8-32 for more information.
Forvehicleswiththeuplevelcluster, thistelltaledisplaysintheDriver InformationCenter(DIC)screen.
AntilockBrakeSystem (ABS)WarningLight
Thislightcomesonbrieflywhenthe engineisstarted.
Ifthelightdoesnotcomeon,haveit fixedsoitwillbereadytowarnif thereisaproblem.
If the ABSlightstayson, turn the ignitionoff.
Ifthelightcomesonwhiledriving, stopassoonasitissafely possibleandturnoffthevehicle.
Thenstarttheengineagaintoreset thesystem.IftheABSlightstays on,orcomesonagainwhiledriving, thevehicleneedsservice.Achime mayalsosoundwhenthelight comesonsteady.
If the ABSlightistheonlylighton, the vehicle has regular brakes, but the antilockbrakes are not functioning.
lfbothlightsareon,thevehicle's antilockbrakesarenotfunctioning andthereisaproblemwiththe regularbrakes.Seeyourdealer/retailerforservice.
SeeBrakeSystemWarningLight onpage4-19.
SeeBrakeSystemMessages on page4-33 forallbrakerelatedDIC messages.
TractionOffLight

Thislightcomesonwhenthe TractionControlSystem(TCS)has been turnedoffbypassing and releasing the traction control button.
Thislightalsocomesonandthe systemturnsoffifthereisaproblem withthetractioncontrolsystem.
If the light comes on and stay on for an extended period of timewhile the systemisturned on, the vehicle needsservice.
See TractionControlSystem(TCS) on page 8-34 and Electronic StabilityControl(ESC) on page 8-35 formoreinformation.
ElectronicStability Control(ESC)Indicator Light

Thislightcomesonbrieflywhile startingtheengine.
Ifitdoesnot,havethevehicle servicedbyyourdealer/retailer. Ifthesystemisworkingnormally theindicatorlightthengoesoff.
Ifthelightcomesonandstayson whiledriving,therecouldbea problemwiththeESCandthe vehiclemightneedservice.When thiswarninglightison,theESCis offanddoesnotlimitwheelspin.
Thelightflashesifthesystemis activeandisworkingtoassistthe driverwithdirectionalcontrolofthe vehicleindifficultdrivingconditions.
Forvehicleswiththeuplevelcluster, thislightisshownintheDriver InformationCenter(DIC)screen.
See Electronic Stability Control (ESC) on page 8-35 formore information.
ElectronicStability Control(ESC)/Traction ControlSystem(TCS) Indicator/WarningLight

Thislightcomesonwhenthe ElectronicStabilityControl(ESC) systemisturnedoff.Whenthe ESCisofftheTractionControl System(TCS)isalsooff,wheelspin isnotlimited.IftheESCisoff,the systemdoesnotassistincontrolling
thevehicle.SwitchontheTCSand theESCandthewarninglight turnsoff.
See TractionControlSystem(TCS) on page 8-34 and Electronic StabilityControl(ESC) on page 8-35 formoreinformation
TirePressureLight

Forvehicleswithatirepressure monitoringsystem, thislightcomes onbrieflywhentheengineis started. Itprovidesinformation abouttirepressuresandtheTire PressureMonitoringSystem.
WhentheLightisOnSteady
This indicates that one or more of the tires are significantly underinflated.
Atirepressuremessageinthe DriverInformationCenter(DIC), canaccompanythelight.See Tire Messages onpage4-37 formore information.Stopassoonas possible, andinflatethetirestothe pressurevalueshownonthetire loadinginformationlabel.See Tire Pressure onpage9-56 formore information.
WhentheLightFlashesFirstand ThenisOnSteady
This indicates that the emergency problem with the Tire Pressure Monitor System. The light flashes for about a minute and stay on steady for the remainder of the ignition cycle. This sequence repeats with every ignition cycle. See Tire Pressure Monitor Operation on page 9-59 form more information.
EngineOilPressureLight

WARNING
Donotkeepdrivingiftheoil pressureislow.Theenginecan becomesohotthatitcatchesfire. Someonecouldbeburned.Check theoilassoonaspossibleand havethevehicleserviced.
Notice:Lackofproperengineoil maintenanceandamagethe engine.Therepairswouldnotbe coveredbythevehiclewarranty. Alwaysfollowthemaintenance scheduleinthismanualfor changingengineoil.
Theoilpressurelightshouldcome onbrieflyastheengineisstarted. Ifitdoesnotcomeonhavethe vehicleservicedbyyourdealer/retailer.
If the light comes on and stays on, it means that is not flowing through the engine properly. The vehicle could below on oil and might have some others system problem. See your dealer/retailer.
Forvehicleswiththeuplevelcluster thistelltaledisplaysintheDriver InformationCenter(DIC)screen.
LowFuelWarningLight

Thislight, below the fuel gauge, comes on briefly when the engine is started.
If it does not come on have the vehicles serviced by your dealer/retailer. If the system is working normally the indicator light then goes off.
Thislightalsocomesonwhenthe fueltankislowonfuel.Whenfuelis addedthelightshouldgooff.Ifit doesnot,haveyourvehicle serviced.
Forvehicleswiththeuplevelcluster, thistelltaledisplaysintheDriver InformationCenter(DIC)screen.
SecurityLight

Thislightflasheswhenthesecurity systemisactivated.
Formoreinformation, see Vehicle Security on page 1-13.
Forvehicleswiththeuplevelcluster thistelltaledisplaysintheDriver InformationCenter(DIC)screen.
High-BeamonLight

Thislightcomesonwhenthe high-beamheadlampsareinuse.
SeeHeadlampHigh/Low-Beam Changer on page 5-2 formore information.
FogLampLight

Forvehicleswithfoglamps,this lightcomesonwhentheoglamps areinuse.
Thelightgoesoutwhenthefog lampsareturnedoff.SeeFog Lamps on page 5-4 formore information.
TaillamplndicatorLight
Thislightcomesonwhenthe taillampsareinuse.
CruiseControlLight
Thislightiswhitewheneverthe cruisecontrolissetandturnsgreen whenthecruisecontrolisactive.
Thelightgoesoutwhenthecruise controlisturnedoff.SeeCruise Control onpage 8-37 formore information.
Forvehicleswiththeuplevelcluster thistelltalewillbeshowninthe DriverInformationCenter(DIC) screen.
InformationDisplays
DriverInformation Center(DIC)
TheDriverInformationCenter(DIC) displaysinformationaboutthe vehicle. Italsodisplayswarning messagesifasystemproblemis detected.See VehicleMessages on page 4-33 formoreinformation. AllmessagesappearintheDIC displaylocatedinthecenterofthe instrumentpanelcluster.
Onsomemodels,theDICmayhave somewarninglightsorindicators showninthetopportionofthe display.SeeWarningLights, Gauges,andIndicators on page4-11 formoreinformation.
The vehicle may also have features that can be customized through the control sontheradio. See Vehicle Personalization on page 4-38 for more information.
DICOperationandDisplays
The DIChasdifferentdisplays whichcanbeaccessedbyusing the DICbuttonslocatedontheturn signalleverlocatedontheleftside ofthesteeringwheel. The DIC displaystrip, fuel, vehiclesystem information, and warning messages ifasystemproblemisdetected.
ThebottomoftheDICdisplay showswhatpositiontheshiftlever isin,theodometer,andthedirection thevehicleisdriving.
IncoldweathertheDICdisplay maychangeslowly. Thisisnormal andwillmovemorequicklyasthe vehicle'sinteriortemperaturerises.
DICButtons
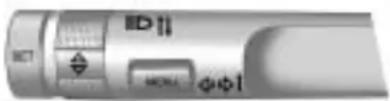
MENU: Presstogettothe Trip/FuelMenuandtheVehicle InformationMenu.
△▽(Thumbwheel):Usetoscroll throughtheitemsineachmenu. Asmallmarkerwillmoveacrossthe bottomofthepageasyouscroll throughtheitems.Thisshows whereeachpageisinthemenu.
SET(Set/Clear): Presstosetor clearthemenuitemwhenitis displayed.
Trip/FuelMenultems
PressMENUontheturnsignal leveruntilTrip/FuellInformation Menuisdisplayed. Use △▽to scrollthroughthefollowingmenu items:
- DigitalSpeedometer
- Trip1
- Trip2
- FuelRange
• AverageFuelEconomy
• AverageVehicleSpeed - Timer
- Turn-by-Turn
DigitalSpeedometer
Thespeedometershowshowfast thevehicleismovingineither kilometersperhour(km/h)ormiles perhour(mph). Thespeedometer cannotbereset.
Trip1andTrip2
Thisdisplayshowsthecurrent distancetraveled,ineither kilometers(km)ormiles(mi),since thelastresetforthetripodometer. Thetripodometercanberesetto zerobypressingSETwhilethetrip odometerdisplayisshowing.
FuelRange
Thisdisplayshowstheapproximate distancethevehiclecanbedriven withoutrefueling. Thefuelrange estimateisbasedonanaverageof thevehicle'sfueleconomyover recentdrivinghistoryandthe amountoffuelremaininginthefuel tank.Fuelrangecannotbereset.
AverageFuelEconomy
Thisdisplayshowstheapproximate averagelitersper100kilometers (L/100km)ormilesper gallon(mpg).Thisnumberis calculatedbasedonthenumberof L/100km(mpg)recordedsincethe lasttimethismenuitemwasreset.
Thefueleconomycanberesetby pressingSETwhiletheAverage FuelEconomydisplayisshowing.
AverageVehicleSpeed
Thisdisplayshowstheaverage speedofthevehicleinmilesper hour(mph)orkilometersper hour(km/h). Thisaverageis calculatedbasedonthevarious vehiclespeedsrecordedsincethe lastresetofthisvalue. Theaverage speedcanberesetbypassingSET whiletheAverageVehicleSpeed displayisshowing.
Timer
Thisdisplaycanbeusedasatimer. Tostartthetimer, pressSETwhile Timerisdisplayed. Thedisplaywill showtheamountoftimethathas passedsincethetimerwaslast reset, notincludingtimetheignition isoff. Timewillcontinuetobe countedaslongastheignitionis on, evenifanotherdisplayisbeing shownontheDIC. Thetimerwill
recordupto99hours,59minutes and59seconds(99:59:59)after whichthedisplaywillreturntozero. Tostopthetimer,pressSETbriefly whileTimerisdisplayed.Toreset thetimertozero,pressand holdSET.
Turn-by-Turn
ThisdisplayisusedfortheOnStar orNavigationSystemTurn-by-Turn guidance.SeeOnStar® System on page4-43 ortheNavigation manual,ifthevehiclehas navigation,formoreinformation.
Vehicle Information Menu Items
PressMENUontheturnsignal leveruntilVehicleInformationMenu isdisplayed. Use △▽toscroll throughthefollowingmenuitems:
- Unit
- TirePressure
- RemainingOilLife
Unit
Move △▽toswitchbetween MetricorUSwhentheUnitdisplay isactive.PressSETtoconfirm thesetting.Thiswillchangethe displaysontheclusterandDICto eithermetricorEnglish(US) measurements.
TirePressure
Thedisplaywillshowavehiclewith theapproximatepressuresofall fourtires. Tirepressureisdisplayed ineitherkilopascal(kPa)orpounds persquareinch(psi).See Tire PressureMonitorSystem on page 9-57 and TirePressure MonitorOperation onpage 9-59 formoreinformation.
RemainingOilLife
Thisdisplayshowsanestimate oftheoil'sremainingusefullife. IfRemainingOilLife99%is displayed,thatmeans99%ofthe currentoilliferemains.
When the remaining oil life is slow, the CHANGE ENGINE OIL SOON messagewill appear on the display. See Engine Oil Messages on page 4-35. The oil should be changed as soon as possible. See Engine Oil on page 9-11. In addition to the engine oil lifesystem monitoring the oil life, additional maintenance is recommended in the Maintenance Schedule in this manual. See Scheduled Maintenance on page 10-2 form more information.
Remember, the Oil Lifedisplay must beresetaftereachoilchange. It will not reset itself. Also, be careful not to reset the Oil Lifedisplay accidentally at any time other than when the oil has just been changed. It cannot be reset accurately until then ex to il change. To reset the engine oil lifesystem press SET while the Oil Lifedisplay is active. See Engine Oil Life System on page 9-13.
Compass
The vehicle may have a compass display in the Driver Information Center(DIC). See Compass on page 4-8 form more information.
Head-UpDisplay(HUD)

WARNING
IftheHUDimageistoobrightor toohighinyourfieldofview,it maytakeyoumoretimetosee thingsyouneedtoseewhenitis darkoutside.Besuretokeepthe HUDimagedimandplacedlowin yourfieldofview.
ForvehicleswiththeHead-Up Display(HUD), some information concerning the operation of the vehicle is projected onto the windshield. This includes the speedometer reading, RPM reading, transmission position, outside air temperature, compassheading and abrief display of the current radio station, including XMinformation or CDtrack. It will also display turn-by-turn navigation information if the vehicle has an navigation radio.
Theimagesareprojectedthrough theHUDlenslocatedonthedriver's sideoftheinstrumentpanel.
Notice: If you try to set the HUD image as a parking aid, you may misjudged distance and damage your vehicle. Donot use the HUD image as a parking aid.
Thetapshiftgearwillalsoappear ontheHUDifthevehiclehastap shiftanditisactive.
TheHUDinformationcanbe displayedinoneofthreelanguages, English, French, or Spanish. The speedometerreading and other numerical values can be displayed in either Englishometric units.
Thelanguageselectionischanged throughtheradioandtheunitsof measurementischangedthrough thetripcomputerintheDriver InformationCenter(DIC).See AM-FMRadio onpage6-12 and DriverInformationCenter(DIC) on page4-25.

text_image
+ 6D NM 0 H/1 82VHUDDisplayontheVehicle Windshield
TheHUDinformationappearsasan imagefocusedouttowardthefront ofthevehicle.
When the ignition key is turned to ON/RUN, the HUD will display an introductory message for a short time, until the HUD is ready.
4-30InstrumentsandControls
The following indicator lightscome on the instrument panel when activated and also appear on the HUD:
- TurnSignalIndicators
• High-BeamIndicatorSymbol
TheHUDtemporarilydisplayssome vehiclewarnings,suchasCHECK TIREPRESSUREandFUEL LEVELLOWwhenthesemessages areontheDICtripcomputer.
TheHUDalsodisplaysthefollowing messagesonvehicleswiththese systems,whentheyareactive:
• TRACTIONCONTROLACTIVE
• STABILITRAKACTIVE
WhentheHUDison, the speedometerreadingiscontinually displayed. The currentradio stationorCDtracknumberwill displayforashortperiodoftime aftertheradioorCDtrackstatus changes. This happens whenever radioinformation is changed.
Thespeedometersizeisreduced whenradio, CDinformation, warnings, orturn-by-turnnavigation information are displayed on the HUD.
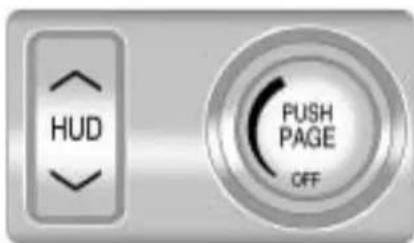
text_image
HUD PUSH PAGE OFFTheHUDcontrolislocatedtothe leftofthesteeringwheel.
ToadjusttheHUDimagesothat itemsareproperlydisplayed,dothe following:
- Adjustthedriver'sseattoa comfortable position.
2.Starttheengine. - Adjust the HUD controls.
Usethefollowingsettingstoadjust theHUD.
OFF: ToturnHUDoff, turntheHUD dimmingknobfullycounterclockwise until the HUD displayturnsoff.
Brightness: Turnthedimmingknob clockwiseorcounterclockwiseto brightenordimthedisplay.
^ (Up): ∨ (Down): Press the up ordownarrowstocentertheHUD imageinyourview.TheHUDimage canonlybeadjustedupanddown, notsidetoside.
PAGE:Presstoselectthedisplay formats.Releasethepagebutton whentheformatnumberwiththe desireddisplayisshownonthe HUD.Ifvehiclemessagesare displayed,pressingPAGE,may clearthemessage.
Thethreeformatsareasfollows:
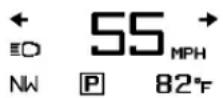
FormatOne: This display gives the speedometer reading (in English or metric units), turnsignal indication, high beam indication, transmission positions, outside air temperature, and compass heading.
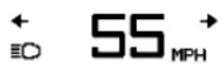
FormatTwo: This display includes the information in FormatOne without the transmission information, the outside air temperature, and compassheading.

text_image
3 4 5 6 2 7 1 0 55 MPHFormatThree: This display includes all the information in FormatOne along with a circular tachometer, but without outside air temperature and compass heading.
Allformatswillshowthe turn-by-turnnavigationinformation andprovidedetailsaboutthenext drivingmaneuvertobemade. Whenyounearyourdestination, theHUDwilldisplayadistance barthatwilemptythecloser yougettoyourdestination.
Allnavigationinformationis providedtotheHUDbythe navigationradioorOnStar® service,forvehiclesthathave thesefeatures.
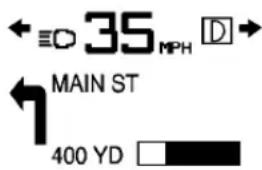
text_image
← 35 MPH MAIN ST 400 YDTheHUDimagedisplayedonthe windshieldwillautomaticallydim andbrightentocompensatefor outsidelighting. However, the HUD brightnesscontrolcanstillbe adjustedasneeded.
TheHUDimagecantemporarily lightupdependingontheangleand positionofthesunlightontheHUD display. Thisisnormalandwill changewhentheangleofthe sunlighttheHUDdisplay changes.
Polarized sunglassescouldmake the HUDimagehardertosee.
CareoftheHUD
Cleantheinsideofthewindshield asneededtoremoveanydirtorfilm thatcouldreducethesharpnessor clarityoftheHUDimage.
TocleantheHUDlens,useasoft, cleancloththathashouseholdglass cleanersprayedonit.Wipethe HUDlensgently,thendryit.Donot spraycleanerdirectlyonthelens because the cleanercouldleak into the unit.
IfYouCannotSeetheHUD ImageWhenthelIgnitionIsOn
• Isanythingcoveringthe HUDlens?
- IstheHUDdimmersettingbright enough?
- IstheHUDimageadjustedto theproperheight?
- Areyouwearingpolarized sunglasses?
- StillnoHUDimage?Checkthe fuseintheinstrumentpanelfuse block.SeeInstrumentPanel FuseBlockonpage9-44.
IftheHUDImagesNotClear
- IstheHUDimagetoobright?
- ArethewindshieldandHUD lensclean?
If the HUDimage is not correct, contact your dealer/retailer.
Keepinmindthatthewindshieldis partoftheHUDsystem.
VehicleMessages
MessagesaredisplayedontheDIC tonotifythedriverthatthestatusof thevehiclehaschangedandthat someactionmaybeneededbythe drivertocorrectthecondition. Multiplemessagesmayappearone afteranother.
Somemessagesmaynotrequire immediateaction,butyoucanpress SETtoacknowledgethatyou receivedthemessagesandto clearthemfromthedisplay.Some messagescannotbeclearedfrom theDICdisplaybecausetheyare moreurgent.Thesemessages requireactionbeforetheycanbe cleared.Youshouldtakeany messagesthatappearonthe displayseriouslyandremember thatclearingthemessageswillonly makethemessagesdisappear,not correcttheproblem.Youwillfind thepossiblemessagesthatcanbe displayedandsomeinformation aboutthemgroupedbysubjectin thefollowinginformation.
BatteryVoltage and ChargingMessages
BatterySaverActive
Thismessagedisplayswhenthe vehiclehasdetectedthatthebattery voltageisdroppingbeyonda reasonablepoint.Thebatterysaver systemstartsreducingcertain featuresofthevehiclethatyoumay beabletonotice.Atthepointthat featuresaredisabled,thismessage isdisplayed.Itmeansthatthe vehicleistryingtosavethecharge inthebattery.Turnoffunnecessary accessoriestoallowthebatteryto recharge.
LowBattery
Thismessageisdisplayedwhenthe batteryvoltageislow.SeeBattery onpage9-27 formoreinformation.
ServiceBatteryCharging System
Thismessageisdisplayedwhen thereisafaultinthebattery chargingsystem. Takethevehicle toyourdealer/retailerforservice.
BrakeSystemMessages
BrakeFluidLow
Thismessageisdisplayedwhenthe brakefluidlevelislow.SeeBrake Fluidonpage9-26.
PressBrakePedalToRelease ParkBrake
Thismessageisdisplayedifyou attempttoreleasetheelectric parkingbrakewithoutthebrake pedalapplied.SeeParkingBrake onpage 8-32 formoreinformation.
ReleaseParkBrakeSwitch
Thismessageisdisplayedifthe electricparkingbrakeisonwhile thevehicleisinmotion.Releaseit beforeyouattempttodrive.See ParkingBrake onpage8-32 for moreinformation.
ServiceParkingBrake
Thismessageisdisplayedwhen thereisaproblemwiththeelectric parkingbrake.SeeParkingBrake onpage8-32 formoreinformation. Takethevehicletoyourdealer/ retailer.
CompassMessages
CAL
Thismessageisdisplayedwhenthe compassneedstobecalibrated. SeeCompassonpage4-8.
Threedasheswillbedisplayedifthe compassneedsservice.Seeyour dealer/retailerforservice.
CruiseControlMessages
ApplyBrakesBeforeCruise
If this messaged displays when attempting to activate cruise control, apply the brake and thentry again.
CruiseSettoXXX
Thismessage will display when the cruise control lisset and it will show the speed edit wassetto. See Cruise Control on page 8-37 for more information.
DoorAjarMessages
DriverDoorOpen
Thismessage will display when the driverdoor is open. Closethedoor completely.
HoodOpen
Thismessagewilldisplaywhen thehoodisopen.Closethehood completely.
LeftRearDoorOpen
Thismessage will display when the driversiderearpassengerdooris open. Closethedoor completely.
PassengerDoorOpen
Thismessagewilldisplaywhenthe passengerdoorisopen.Closethe doorcompletely.
RightRearDoorOpen
Thismessagewilldisplaywhenthe passengersiderearpassengerdoor isopen.Closethedoorcompletely.
TrunkOpen
Thismessagewilldisplaywhenthe trunkisopen.Closethetrunk completely.
EngineCoolingSystem Messages
A/COffDuetoHigh EngineTemp
Thismessagedisplayswhen theenginecoolantbecomes hotterthanthenormaloperating temperature.Toavoidaddedstrain onahotengine,theairconditioning compressorautomaticallyturnsoff. Whenthecoolanttemperature returnstonormal,theair conditioningcompressorturns backon.Youcancontinueto drivethevehicle.
If this message continues to appear, havethesystem repaired by your dealer/retailer as soon as possible to avoid damage to the engine.
CoolantLevelLowAdd Coolant
Thismessagewilldisplayifthe coolantislow,seeEngineCoolant onpage9-18.
EngineOverheated—Idle Engine
Thismessagedisplayswhenthe enginecoolanttemperatureistoo hot.Stopandallowthevehicleto idleuntilcoolsdown.
EngineOverheated—Stop Engine
Thismessagedisplaysanda continuouschimesoundsifthe enginecoolingsystemreaches unsafetemperaturesforoperation. Stopandturnoffthevehicleas soonasitissafetodosotoavoid severedamage. Thismessage clearswhentheenginehascooled toasafeoperatingtemperature.
HighCoolantTemperature
Thismessagedisplaysifthecoolant temperatureishot,seeEngine Overheatingonpage9-21.
EngineOilMessages
ChangeEngineOilSoon
Thismessagedisplayswhenthe engineoilneedstobechanged. Whenyouchangetheengineoil,be suretoresettheOilLifeSystem. SeeEngineOilLifeSystem on page9-13 andDriverInformation Center(DIC) onpage4-25 for informationonhowtoresetthe system.SeeEngineOil on page9-11 andScheduled Maintenance onpage10-2 for moreinformation.
EngineOilHot,IdleEngine
Thismessagedisplayswhenthe engineoiltemperatureistoohot. Stopandallowthevehicletoidle untiltcoolsdown.
EngineOilLow-AddOil
Thismessagedisplayswhenthe engineoillevelistoolow.Check theoillevel.SeeEngineOil on page9-11.
OilPressureLow-Stop Engine
Thismessagedisplaysiflowoil pressurelevelsoccur. Stopthe vehicleassoonassafelypossible anddonotoperateituntilthecause ofthelowoilpressurehasbeen corrected. Checktheoilassoonas possibleandhaveyourvehicle servicedbyyourdealer/retailer.
EnginePowerMessages
EnginePowerIsReduced
Thismessagedisplayswhenthe vehicle'senginepowerisreduced. Reducedenginepowercanaffect thevehicle'sabilitytoaccelerate. Ifthismessageison,butthere isnoreductioninperformance, proceedtoyourdestination. The performancemaybereducedthe nexttimethevehicleisdriven. Thevehiclemaybedrivenata reducedspeedwhilethismessage ison,butmaximumacceleration andspeedmaybereduced.
Anytimethismessagestayson, the vehicles should betakentoyour dealer/retailerforserviceassoon as possible.
FuelSystemMessages
FuelLevelLow
Thismessagedisplayswhenthe vehicleislowonfuel.Refuelas soonaspossible.
TightenGasCap
Thismessagedisplayswhenthe fuelcapisnotontight.Tightenthe fuelcap.
KeyandLockMessages
NoRemoteDetected
Thismessagedisplayswhenthe transmitterbatteryisweakon vehicleswithKeylessAccess.See "StartingtheVehiclewithaLow Battery" under"RemoteKeyless TransmitterOperation(Keyless Access)"formoreinformation.
ReplaceBatteryInRemoteKey
Thismessagedisplayswhenthe batteryintheRemoteKeyless Entry(RKE)transmitterneedsto bereplaced.
TransportModeOn
Thismessagedisplayswhenthe ignitionisheldinSTART,orwhen theSTARTbuttonispressedfor 15seconds.Thebatterylightmay alsobeflashingwhenthismessage isdisplayed.Toturnthismessage off,startthevehicleandholdthe keyintheSTARTposition,orpress theSTARTbuttonfor15seconds.
LampMessages
AFL(AdaptiveForward Lighting)LampsNeedService
This message displays when the Adaptive Forward Lighting (AFL) system is disabled and needs service. See your dealer/retailer. See Adaptive Forward Lighting (AFL) on page 5-3 for more information.
RideControlSystem Messages
ServiceRearAxle
Thismessagedisplayswhenthere isaproblemwiththeAll-Wheel Drive(AWD)System.Seeyour dealer/retailerforservice.
ServiceTractionControl
Thismessagedisplayswhenthere isaproblemwiththeTraction ControlSystem(TCS).Whenthis messageisdisplayed,thesystem willnotlimitwheelspin.Adjust yourdrivingaccordingly.Seeyour dealer/retailerforservice.
ServiceStabiliTrak
Thismessagedisplaysifthereis aproblemwiththeStabiliTrak® system.Ifthismessageappears,try toresetthesystem.Stop;turnoff theengineforatleast15seconds; thenstarttheengineagain.Ifthis messagestillcomeson,itmeans thereisaproblem.Seeyour dealer/retailerforservice.
Thevehicleissafetodrive, however,youdonothavethe benefitofStabiliTrak,soreduce yourspeedanddriveaccordingly.
SportModeOn
Thismessagedisplayswhenusing theselectiveridecontrol.See SelectiveRideControl on page8-36 formoreinformation.
TractionControlOff
Thismessagedisplayswhenthe TractionControlSystem(TCS)is turnedoff.Adjustyourdriving accordingly.
Anti-TheftAlarmSystem Messages
TheftAttempted
Thismessagedisplaysifthevehicle detectsatampercondition.
TireMessages
CheckXXXTirePressureor AddAirToTire
Thismessagedisplaysifthevehicle detectslowpressureinoneormore tires. Thetirewiththelowpressure willbeshowninthemessage. Checkthetirepressures.
ServiceTireMonitorSystem
Thismessagedisplaysifthereisa problemwiththeTirePressure MonitorSystem(TPMS).See Tire PressureMonitorOperation on page 9-59 formoreinformation.
TireLearningActive
Thismessagedisplayswhenthe systemmislearningnewtires.See TirePressureMonitorOperation page9-59 formoreinformation.
on
TransmissionMessages
ServiceTransmission
Thismessagedisplaysifthereisa problemwiththetransmission.See yourdealer/retailer.
ShiftToPark
Thismessagedisplayswhenthe transmissionneedstobeshiftedto P(Park). This may appear when attempting to removethe key from the ignition if the vehicle is not in P(Park).
TransmissionHot–Idle Engine
Thismessagedisplaysandachime soundsifthetransmissionfluidin thevehiclegetshot.Drivingwiththe transmissionfluidtemperaturehigh cancausedamagetothevehicle. Stopthevehicleandletitidleto allowthetransmissiontocool.This messageclearswhenthefluid temperaturereachesasafelevel.
WindowMessages
Open, ThenCloseDriver Window
Thismessageisdisplayedwhenthe windowneedstobereprogrammed. Ifthevehicle'sbatteryhasbeen rechargedordisconnected,you willneedtoreprogrameachfront windowfortheexpressupfeature towork.SeePowerWindows on page 1-17 formoreinformation.
Open, ThenClosePassenger Window
Thismessageisdisplayedwhenthe windowneedstobereprogrammed. Ifthevehicle'sbatteryhasbeen rechargedordisconnected,you willneedtoreprogrameachfront windowfortheexpressupfeature towork.SeePowerWindows on page 1-17 formoreinformation.
Vehicle Personalization
Theaudiosystemcontrolsareused toaccessthepersonalization menusforcustomizingvehicle features.
CONFIG(Configuration):Press toaccesstheConfiguration SettingsMenu.
MENU/SELECTKnob:Pressthe centerofthisknobtoenterthe menusandselectmenuitems. Turntheknobtoscrollthroughthe menus.
←BACK:Presstoexitormove backwardsinamenu.
EnteringthePersonalization Menus
- PressCONFIGtoaccessthe ConfigurationSettingsmenu.
- TurntheMENU/SELECTknob tohighlightVehicleSettings.
- Pressthecenterofthe MENU/SELECTknobtoselect theVehicleSettingsmenu.
The followinglistofmenuitemswill beavailable:
• ClimateandAirQuality
• ComfortandConvenience
• Collision/DetectionSystems
- Language
- Lighting
- PowerDoorLocks
- RemoteLock/Unlock/Start
• ReturntoFactorySettings
TurntheMENU/SELECTknobto highlightthemenu.Presstheknob toselectit.Eachofthemenusis detailedinthefollowinginformation.
ClimateandAirQuality
SelecttheClimateandAirQuality menuandthefollowingwillbe displayed:
- AutoFanControl
- AirQualityControl
- AutoHeatedSeats
- RemoteStartHeatedSeats
- RemoteStartCooledSeats
- AutoDefog
- AutoRearDefog
AutoFanControl
This will allow you to select the automatic fans speed it can be adjusted for unlower or higher than normal.
PresstheMENU/SELECTknob whenAutoFanControlis highlightedtoopenthemenu. TurntheknobtohighlightHigh, Medium, or Low. Presstheknobto confirmtheselectionandmove backtothelastmenu.
AirQualityControl
This will allowy outoselect the whether the system will operate at high or low sensitivity. Only vehicles with the dual zone climate control will have this option.
PresstheMENU/SELECTknob whenAirQualityControlis highlightedtoopenthemenu. TurntheknobtohighlightHighor Low.Presstheknobtoconfirmthe selectionandmovebacktothe lastmenu.
RemoteStartHeatedSeats
Whenon, this feature will turn the heated seat on when using remote start on cold days.
PresstheMENU/SELECTknob whenRemoteStartHeatedSeatsis highlighted.Turntheknobtoselect OnorOff.Presstheknobtoconfirm andgobacktothelastmenu.
RemoteStartCooledSeats
Whenon, this feature will turn the cooled seatson when using remote starton warmdays.
PresstheMENU/SELECTknob whenRemoteStartCooledSeats is highlighted.Turntheknobtoselect OnorOff.Presstheknobtoconfirm andgobacktothelastmenu.
AutoDefog
This will allow you to turn the auto defogonoroff. Only vehicles with the dual zone climate control will have this option.
PresstheMENU/SELECTknob whenAutoDefogishhighlightedto openthemenu.Turntheknobto highlightOnorOff.Presstheknob toconfirmtheselectionandmove backtothelastmenu.
AutoRearDefog
Thiswillallowyoutoturntheauto reardefogonoroff. Thisfeaturewill automaticallyturnontherear defoggerwhenitiscoldoutside.
PresstheMENU/SELECTknob whenAutoRearDefogis highlightedtoopenthemenu. TurntheknobtohighlightOnor Off.Presstheknobtoconfirmthe selectionandmovebacktothe lastmenu.
ComfortandConvenience
SelecttheComfortand Conveniencemenuandthe followingwillbedisplayed:
- ChimeVolume
• PersonalizationbyDriver - DriverSeatEasyExit
- ParkingTiltMirrors
ChimeVolume
Thisallowstheselectionofthe chimevolumelevel.
PresstheMENU/SELECTknob whenChimeVolumeishhighlighted. TurntheknobtoselectNormalor High.Presstheknobtoconfirmand gobacktothelastmenu.
PersonalizationbyDriver
Thisallowstheselectionofifthe personalizationsettingsarespecific toeachdriverorthesamenomatter whichkeywasusedtoenterand startthevehicle.
PresstheMENU/SELECTknob whenPersonalizationbyDriveris highlighted.Turntheknobtoselect OnorOff.Presstheknobtoconfirm andgobacktothelastmenu.
DriverSeatEasyExit
Thisallowsyoutoturntheeasyexit seatfeatureonoroff.
PresstheMENU/SELECTknob whenDriverSeatEasyExitis highlighted.Turntheknobtoselect OnorOff.Presstheknobtoconfirm andgobacktothelastmenu.
ParkTiltMirrors
Thisallowsyoutoturntheparktilt mirrorsfeatureonoroff.
PresstheMENU/SELECTknob whenParkTiltMirrorsishhighlighted. TurntheknobtoselectDriver& PassengerorOff.Presstheknobto confirmandgobacktothe lastmenu.
Collision/DetectionSystems
SelecttheCollision/Detection Systemsmenuandthefollowing willbedisplayed:
- ParkAssist
ParkAssist
ThisallowstheUltrasonicParking Assistfeaturetobeturnedonoroff.
PresstheMENU/SELECTknob whenParkAssistishhighlighted. TurntheknobtoselectOnorOff. Presstheknobtoconfirmandgo backtothelastmenu.
Language
SelecttheLanguagemenuandthe followingwillbedisplayed:
- English
- French
- Spanish
TurntheMENU/SELECTknobto selectthelanguage.Pressthe knobtoconfirmandgobacktothe lastmenu.
Lighting
SelecttheLightingmenuandthe followingwillbedisplayed:
- ExitLighting
- VehicleLocatorLights
ExitLighting
This allow these selection of how long the exterior lamps stay on when leaving the vehicle when it is dark outside.
PresstheMENU/SELECTknob whenExitLightingishhighlighted. TurntheknobtoselectOff, 30Seconds, 1Minute, or2Minutes. Presstheknobtoconfirmandgo backtothelastmenu.
VehicleLocatorLights
Thisallowsthevehiclelocatorlights tobeturnedonoroff.
PresstheMENU/SELECTknob whenVehicleLocatorLightsis highlighted.Turntheknobtoselect OnorOff.Presstheknobtoconfirm andgobacktothelastmenu.
PowerDoorLocks
SelectPowerDoorLocksandthe followingwillbedisplayed:
- UnlockedDoorAntiLockOut
- AutoDoorUnlock
- DelayedDoorLock
UnlockedDoorAntiLockOut
Whenon, thisfeaturewillkeepthe driverdoorfromlockingwhenthe doorisopen.Ifoffisselected,the DelayedDoorLockmenuwillbe availableandthedoorwilllockas programmedthroughthismenu.
PresstheMENU/SELECTknob whenAutoDoorUnlockis highlighted.Turntheknobto selectOnorOff.Presstheknob toconfirmandgobacktothe lastmenu.
DelayedDoorLock
Whenon, thisfeaturewilldelay thelockingofthedoorsuntil fivesecondsafterthelastdooris closed. Youwillhearthreechimes tosignaldelayedlockingisinuse. Pressingeitherthepowerlock buttonorthelockbuttononthe RKEtransmittertwicewillooverride thedelayedlockingfeatureand immediatelylockallofthedoors.
PresstheMENU/SELECTknob whenDelayedDoorLockis highlighted.Turntheknobtoselect OnorOff.Presstheknobtoconfirm andgobacktothelastmenu.
AutoDoorUnlock
This allows selection of which of the doors will automatically unlock when the vehicle is shifted into P (Park).
PresstheMENU/SELECTknob whenAutoDoorUnlockis highlighted.Turntheknobto selectAllDoors,DriverDoor, orOff.Presstheknobtoconfirm andgobacktothelastmenu.
RemoteLock/Unlock/Start
SelectRemoteLock/Unlock/Start and the following will be displayed:
- UnlockFeedback(Lights)
- LockingFeedback
- DoorUnlockOptions
- RemoteVehicleStart
- RemoteRecall
UnlockFeedback(Lights)
Whenon, the exterior lampswill flash when unlocking the vehicle with the RKE transmitter.
PresstheMENU/SELECTknob whenUnlockFeedback(Lights)is highlighted.Turntheknobtoselect FlashLightsorOff.Presstheknob toconfirmandgobacktothe lastmenu.
LockingFeedback
This allows selection of what type of feedback is given when locking the vehicle with the RKE transmitter.
PresstheMENU/SELECTknob whenLockingFeedbackis highlighted.Turntheknobto selectLightsandHorn,Lights Only,HornOnly,orOff.Pressthe knobtoconfirmandgobacktothe lastmenu.
DoorUnlockOptions
This allows selection of which doors will unlock when pressing the unlock button on the RKE transmitter.
PresstheMENU/SELECTknob whenDoorUnlockOptionsis highlighted.Turntheknobtoselect AllDoorsorDriverDoorOnly.When settoDriverDoorOnly,thedriver doorwillunlockthefirsttimethe unlockbuttonispressedandall doorswillunlockwhenthebuttonis pressedasecondtime.Whensetto AllDoors,allofthedoorswillunlock atthefirstpressoftheunlock button.Presstheknobtoconfirm andgobacktothelastmenu.
RemoteVehicleStart
This allows the Remote Vehicle Starttobeturnedonoroff, if the vehicle has this feature.
PresstheMENU/SELECTknob whenRemoteVehicleStartis highlighted.Turntheknobtoselect OnorOff.Presstheknobtoconfirm andgobacktothelastmenu.
RemoteRecall
ThisallowstheRemoteRecall featuretobeturnedonoroff. RemoteRecalliswhenthe memorizedsettingswillberecalled asyouunlockandenterthevehicle.
PresstheMENU/SELECTknob whenRemoteRecallishhighlighted. TurntheknobtoselectOnorOff. Presstheknobtoconfirmandgo backtothelastmenu.
ReturntoFactorySettings
SelectReturntoFactorySettings toreturnallofthevehicle personalizationtothedefault settings.TurntheknobtoselectYes orNo.Presstheknobtoconfirm andgobacktothelastmenu.
OnStar® System
OnStar ^® usesseveralinnovative technologiesandliveadvisorsto provideawiderangeofsafety, security,navigation,diagnostics, andcallingservices.
AutomaticCrashResponse
Inacrash, builtinsensors can automatically alert an OnStar advisor who is immediately connected to the vehicle to see if you need help.
HowOnStarServiceWorks
:Thisbluebuttonconnectsyou toaspeciallytrainedOnStaradvisor toverifyyouraccountinformation andtoanswerquestions.
:Pushthisredemergency buttontogetpriorityhelpfrom speciallytrainedOnStaremergency advisors.
:Pushthisbuttonforhands-free, voice-activatedcallingandtogive voicecommandsforturn-by-turn navigation.
CrisisAssist, StolenVehicle Assistance, Vehicle Diagnostics, Remote Door Unlock, Roadside Assistance, Turn-by-Turn Navigation and Hands-Free Calling are available on most vehicles. Not all OnStarservices are available on all vehicles. Form more information seethe OnStar Owner's Guide or visit www.onstar.com (U.S.) or www.onstar.ca (Canada), contact OnStarat1-888-4-ONSTAR (1-888-466-7827) or TTY1-877-248-2080, or
press 🟢 tospeakwithan OnStaradvisor24hoursaday, 7daysawek.
ForafulldescriptionofOnStar servicesandsystemlimitations,see theOnStarOwner'sGuideinthe glovebox.
OnStarserviceissubjecttothe OnStartermsandconditions includedintheOnStarSubscriber Information.
OnStarservicecannotworkunless thevehicleisinaplacewhere OnStarhasanagreementwitha wirelessserviceproviderforservice inthatarea.OnStarservicealso cannotworkunlessthevehicleisin aplacewherethewirelessservice providerOnStarhashiredforthat areahascoverage, network capacityandreceptionwhenthe serviceisneeded,andtechnology that iscompatiblewiththeOnStar service.Notallservicesare availableeverywhere,particularlyin remoteorenclosedareas,oratall times.
TheOnStarsystemcanrecordand transmitvehicleinformation. This informationisautomaticallysentto anOnStarcallcenterwhen
pressed, ispressed, orifthe airbagsorACRsystemdeploy. This information usually includes the vehicle's GPS location and, in the event of a crash, additional information regarding the crash that the vehicle was involved (e.g. the direction from which the vehicle was hit). When the virtual advisor feature of OnStar hands-free calling is used, the vehicle also sends OnStar the vehicle's GPS location so they can provide services where it is located.
Locationinformationaboutthe vehicleisonlyavailableiftheGPS satellitesignalsareunobstructed andavailable.
The vehicle must have a working electrical system, including adequate battery power, for the OnStarequipment to operate. There are other problems on Star cannot control that may prevent OnStar from providing OnStars service at any particular time or place. Some examples are damaged to important part of the vehicle in acrash, hills, tall buildings, tunnels, weather or wireless phonenetwork congestion.
OnStarSteeringWheel Controls
This vehicle may have a Talk/Mute button that can be used to interact with On Starhands-free calling. See Steering Wheel Controls on page 4-6 form more information.
Onsomevehicles, themutebutton can be used to find numbers into voicemails systems, ortodialphone extensions. See the OnStar Owner's Guide form more information.
YourResponsibility
Increase the volume of the radio if the OnStar advisor cannot be heard.
IfthelightnexttotheOnStar buttonisred,thesystemmay notbefunctioningproperly.
Press 📄 andrequestvehicle diagnostic. If the light appears clear (nolightisappearing), your OnStar subscription has expired and all services have been deactivated.
Press ⓄtoconfirmthattheOnStar equipmentisactive.
UniversalRemote System
SeeRadioFrequencyStatement on page12-17 forinformation regardingPart15oftheFederal CommunicationsCommission(FCC) RulesandRSS-210/211ofIndustry Canada.
UniversalRemoteSystem Programming
natural_image
Simple diagram of three switches on a panel (no text or labels)Ifthevehiclehasthisfeature,you willseethesebuttonswithone squareLightEmittingDiode(LED) indicatorlightnexttotheminthe headliner.
This system provides a way to replace up three re-remote control transmitters used to activate devices such as a aged door openers, security systems, and home automation devices.
DonotusetheUniversalHome Remotewithanygaragedoor openerthatdoesnothavethestop andreversefeature. This includes anygaragedooropenermodel manufacturedbeforeApril 1, 1982.
Readtheinstructionscompletely beforeattemptingtoprogramthe UniversalHomeRemote.Because ofthestepsinvolved,itmaybe helpfultohaveanotherperson availabletoassistyouwith programmingtheUniversalHome Remote.
Keeptheoriginalhand-held transmitterforuseinothervehicles aswellasforfutureUniversalHome Remoteprogramming. It is also recommended that uponthesale of the vehicle, the programmed UniversalHomeRemotebuttons should be erased for security purposes. See "Erasing Universal HomeRemoteButtons" later in this section.
When programmingagaragedoor, parkoutsideofthegarage.Park directlyinlinewithandfacingthe garagedooropenermotor-header gatemotor-head.Besurethat peopleandobjectsareclearofthe garagedoororgatethatisbeing programmed.
It is recommended that anew battery be installed in your hand-held transmitter for quicker and more accurate transmission of the radio-frequency signal.
ProgrammingtheUniversal HomeRemoteSystem
Forquestionsorhelpprogramming theUniversalHomeRemote System, call 1-800-355-3515orgo towww.homelink.com.
Programmingagaragedooropener involvestime-sensitive actions, so readtheentireprocedurebefore starting. Otherwise, the device will timeout and the procedure will have to be repeated.
Toprogramuptothreedevices:
-
Hold the end of your hand-held transmitter about 3 to 8 cm (1 to 3 inches) away from the Universal Home Remote buttons while keeping the indicator light in view. The hand-held transmitter was supplied by the manufacturer of your garage door opener receiver (motor-head unit).
-
Atthesametime, press and hold both the hand-held transmitter button and one of the three Universal Home Remote button to be used to operate the garagedoor. Donot release the Universal Home Remote button or the hand-held transmitter button until the indicator light changes from a slow to a rapidly flashing light. You now may release both buttons.
Someentrygatesandgarage dooropenersmayrequire substitutionofStep2withthe procedurenotedin"Gate OperatorandCanadian Programming"laterinthis section.
- Pressandholdforfiveseconds thenewly-trainedUniversal HomeRemotebutton(selected buttonfromStep2)while observingtheindicatorlight andgaragedooractivation.
- Iftheindicatorlightstays oncontinuouslyorthe garagedoorstartstomove whentheUniversalHome Remotebuttonispressed andreleased,thenthe programmingiscomplete. Thereisnoneedto continueprogramming Steps4through6.
- IftheUniversalHome Remoteindicatorlight blinksrapidlyfor twoseconds, thenturnsto aconstantlightandthe garagedoordoesnot move, continuewiththe programmingSteps4 through6.
Itmaybehelpfultohave anotherpersonontoassist withtheremainingSteps4 through6.
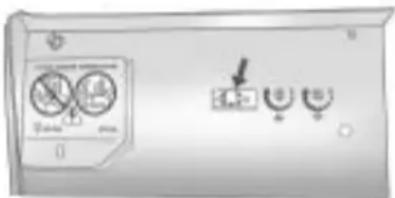
text_image
Control panel interface with icons for battery, switch, and meters"Learn" or "Smart" Buttons
- AfterSteps1 through 3 have been completed, locatethe "Learn" or "Smart" button inside the garage on the garagedoor opener receiver (motor-head unit). Thename and color of the button may vary by manufacturer.
- Firmlypressandreleasethe "Learn" or "Smart" button. After youpressthisbutton, youwill have30secondstocomplete Step6.
6.Immediatelyreturntothe vehicle.Firmlypressandhold fortwosecondstheUniversal HomeRemotebutton,selected inStep2tocontrolthegarage door,andthenreleaseit.Ifthe garagedoordoesnotmoveor thelamponthegaragedoor openerreceiver(motor-head unit)doesnotflash,press andholdthesamebuttona secondtimefortwoseconds, andthenreleaseit.Again,if thedoordoesnotmoveorthe garagedoorlampdoesnot flash,pressandholdthe samebuttonathirdtimefor twoseconds,andthenrelease.
TheUniversalHomeRemoteshould nowactivatethegaragedoor.
Toprogramtheremaining twoUniversalHomeRemote buttons, beginwithStep1 of "ProgrammingtheUniversal HomeRemoteSystem".
GateOperatorandCanadian Programming
If you have questions or need help programming the Universal Home Remote System, call 1-800-355-3515 orgoto www.homelink.com.
Canadianradio-frequencylaws requiretransmittersignalstotime outorquitafterseveralseconds oftransmission. Thismaynotbe longenoughforUniversalHome Remotetopickupthesignalduring programming. Similarly, someU.S. gateoperatorsaremanufacturedto timeoutinthesamemanner.
IfyouliveinCanada,oryouare havingdifficultyprogrammingagate operatororgaragedooropenerby usingthe"ProgrammingUniversal HomeRemote"procedures, regardlessofwhereyoulive, replaceStep2under"Programming UniversalHomeRemote"withthe following:
- Continuetopressandhold theUniversalHomeRemote buttonwhileyoupressandrelease everytwoseconds(cycle)the hand-heldtransmitterbuttonuntil thefrequencysignalhasbeen successfullyacceptedbythe UniversalHomeRemote.The UniversalHomeRemoteindicator lightwillflashslowlyatfirstandthen rapidly.ProceedwithStep3under "ProgrammingUniversalHome Remote"tocomplete.
UniversalRemoteSystem Operation
UsingUniversalHomeRemote
Pressandholdtheappropriate UniversalHomeRemotebutton for at least half of a second. The indicator light will come on while the signal is being transmitted.
ErasingUniversalHome RemoteButtons
Allprogrammedbuttonsshouldbe erasedwhenthevehicleissoldor theleaseends.
Toeraseallprogrammedbuttonson theUniversalHomeRemotedevice:
-
Pressandholddownthe twooutsidebuttonsuntilthe indicatorlightbeginstoflash, after10seconds.
-
Releasebothbuttons.
ReprogrammingaSingle UniversalHomeRemote Button
Toreprogramanyofthethree UniversalHomeRemotebuttons:
- Pressandholdthedesired UniversalHomeRemotebutton. Donotreleasethebutton.
- The indicator light will begin to flash after 20 seconds. Without releasing the button, proceed with Step 1 of these section "Programming Universal Home Remote".
If you have questions or need help programming the Universal Home Remote System, call 1-800-355-3515 orgoto www.homelink.com. You may also call the customer assistance phone number under Customer Assistance Offices on page 12-3.
4-50 InstrumentsandControls
NOTES
Lighting
ExteriorLighting
ExteriorLampControls......5-1
ExteriorLampsOff
Reminder......5-2
HeadlampHigh/Low-Beam
Changer....5-2
Flash-to-Pass......5-2
DaytimeRunning
Lamps(DRL)....5-2
AutomaticHeadlamp
System......5-3
AdaptiveForward
Lighting(AFL)......5-3
HazardWarningFlashers.....5-3
TurnandLane-Change
Signals......5-4
FogLamps....5-4
InteriorLighting
InstrumentPanelIllumination
Control......5-5
DomeLamps....5-5
ReadingLamps......5-5
SunVisorLamps....5-5
LightingFeatures
EntryLighting......5-5
ExitLighting....5-6
BatteryLoadManagement....5-6
BatteryPowerProtection.....5-7
ExteriorLighting
ExteriorLampControls
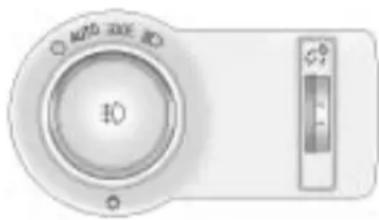
natural_image
Close-up of a white industrial control panel with circular dial and indicator gauge (no readable text or symbols)The exterior lamp control is located on the instrument panel on the outboard side of the steering wheel.
Turnthecontroltothefollowing positions:
(Off): Turnsofftheexterior lamps. Theknobreturnstothe AUTOpositionafteritisreleased. Turntooffagaintoreactivatethe AUTOmode.
5-2Lighting
AUTO(Automatic): Automatically turnstheexteriorlampsonandoff, dependingonoutsidelighting.
ThecurrentstatusoftheAUTO systemisdisplayedintheDriver InformationCenter(DIC)uplevel display.SeeDriverInformation Center(DIC)onpage4-25.
(ParkingLamps): Turnsonthe parkinglampstogetherwiththe following:
- SidemarkerLamps
- Taillamps
- LicensePlateLamps
• InstrumentPanelLights
ID(Headlamps): Turnsonthe headlampstogetherwiththe following:
- SidemarkerLamps
- Taillamps
- LicensePlateLamps
• InstrumentPanelLights - ParkingLamps
ExteriorLampsOff Reminder
Awarningchimesounds, if the driverdoorisopenedwhile the ignitionisoffandtheexteriorlamps areon.
HeadlampHigh/Low-BeamChanger
HeadlampHigh/LowBeam Changer: Push the turn signal/lane change lever away from you and release, to turn the high beamson. Toretturn to low beams, push the lever again or pull it towards you and release.
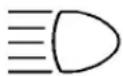
This indicator light turn on the instrument panel cluster when the high beam head lamps are on.
Flash-to-Pass
Toflashthehighbeams, pull the turnsignal/lanechangelever towardsyou, and release.
DaytimeRunning Lamps(DRL)
DaytimeRunningLamps(DRL)can makeiteasierforotherstoseethe frontofyourvehicleduringtheday. Fullyfunctionaldaytimerunning lampsarerequiredonallvehicles firstsoldinCanada.
The DRL system turns on the low-beam headlamps are reduced brightness or for vehicles with High Intensity Discharge (HID) headlamps, the dedicated DRL lightswill come on when the following conditions are met:
• Theengineisrunning,
• The exterior lamp bandisin AUTO, and
- Thelightsensordeterminesitis daytime.
WhentheDRLareon,the low-beamheadlampswillbeon. Thetaillamps,sidemarker, instrumentpanellightsandother lampswillnotbeon.
TheDRLturnoffwhenthe headlampsareturnedto ignitionisoff.
AutomaticHeadlamp System
Whentheexteriorlampcontrolis settoAUTOanditisdarkenough outside,theheadlampscomeon automatically.
Thereisalightsensorlocatedon topoftheinstrumentpanel.Donot coverthesensorortheheadlamps willcomeonwhentheyarenot needed.
Thesystemmayalsoturnonthe headlampswhendrivingthrougha parkinggarageortunnel.
Whenitisbrightenoughoutside theheadlampswillturnofformay changetodaytimerunning lamps(DRL).
Theautomaticheadlampsystem turnsoffwhentheexteriorlamp controlisturnedto 📍ortheignition isoff.
AdaptiveForward Lighting(AFL)
TheAdaptiveForwardLighting System(AFL)pivotstheheadlamps horizontallytoprovidegreaterroad illuminationwhileturning.Toenable AFL,settheexteriorlampswitch totheAUTOposition.Movingthe switchoutoftheAUTOposition deactivatesthesystem.AFL operateswhenthevehiclespeed isgreaterthan3km/h(2mph). AFLdoesnotoperatewhenthe transmissionisinR(Reverse).
AFLisnotimmediatelyoperable afterstartingthevehicle;drivinga shortdistanceisrequiredto calibratetheAFL.SeeExterior LampControlsonpage5-1.
HazardWarningFlashers
HazardWarningFlasher: Pressthisbuttonlocatedonthe instrumentpanelbelowtheclimate controlsystem,tomakethefront andrearturnsignallampsflashon andoff.Pressagaintoturnthe flashersoff.
Thehazardwarningflashersturnon automaticallyiftheairbagsdeploy.
TurnandLane-Change Signals

Movetheleverallthewayupor downtosignalaturn.
Anarrowontheinstrumentpanel clusterflashesinthedirectionofthe turnorlanechange.
Raiseorlowertheleveruntilthe arrowstartstoflashtosignalalane change.Holditthereuntilthelane changeiscompleted.Iftheleveris brieflypressedandreleased,the turnsignalflashestreetimes.
The turnandlane-changesignal can be turned off manually by moving the leverback to its original position.
Ifaftersignalingaturnorlane changethearrowflashesrapidlyor doesnotcomeon,asignalbulb mightbeburnedout.
Havethebulbsreplaced.Ifthebulb isnotburnedout,checkthefuse. SeeFusesandCircuitBreakers on page9-40.
FogLamps
Forvehicleswithfoglamps,the buttonislocatedontheexterior lampcontrol,ontheoutboardside ofthesteeringwheel.
Toturnonthefoglamps, theignition andtheheadlampsorparkinglamps mustbeon.
If the foglamps are turned on while the exterior lamp switch in the AUTO position, the head lamps come on automatically.
^10 :Presstoturnonoroff.An indicatorlightontheinstrument panelclustercomesonwhenthe foglampsareon.
Somelocalitieshavelawsthat requiretheheadlampstobeon alongwiththefoglamps.
InteriorLighting
InstrumentPanel IlluminationControl
The brightness of the instrument panellighting and steering wheel controlscanbe adjusted. Use the thumbwheellocated next to the exterior lamps control on the outboardside of the steering wheel.
6:Movethethumbwheelupor downtobrightenordimthelights.
DomeLamps
The interior lamps controlled in the overhead console controls both the front and rear interior lamps.
Tooperate, pressthefollowing buttons:
(Off):Turnsthelampoff.
Door: Turnsthelamponwhen anydoorisopened.
ON:Keepsthelamponall thetime.
ReadingLamps
Therearefrontandrearreading lamps.
Thefrontreadinglampsarelocated intheoverheadconsole.
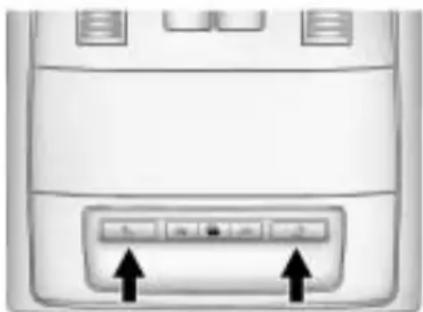
natural_image
Front view of a computer monitor with two buttons and an arrow pointing to the button (no text or symbols visible):Presstoturneachlampon oroff.
SunVisorLamps
Thislampturnsonwhenthecover isopened.
LightingFeatures
EntryLighting
Theheadlamps, taillamps, license platelamps, reversalamps, dome lamps, and most of the interior lights turnon briefly, when the Remote KeylessEntry(RKE) ispressed, or whent hedor handle is pulled on a KeylessAccess Vehicle. See Ignition Positions(KeylessAccess) on page 8-18 or Ignition Positions (KeyAccess) on page 8-19 . After about 30 second sthe exterior lamps turnoff, and thentedome and remaining interior lights will dim to off. Entry lighting can be disabled manually by changing the ignition out of the OFF position, or by pressing the Remote Keyless Entry(RKE) button.
5-6Lighting
Thisfeaturecanbeactivatedor deactivatedinthemenuSETTINGS intheInfoDisplay.PressCONFIG ontheinfotainmentsystemtocall upthemenu.See Vehicle Personalizationonpage4-38.
ExitLighting
Theheadlamps, taillamps, parking lamps, reversalamps, and license platelamps comeon at night, orin areas with limited lighting, when the key is removed from the ignition. Thedomelamps also come on when the key is removed from the ignition. The exterior lights and domelamps remain on after the door is closed for a set amount of time, then automatically turn off.
ForvehiclewithKeylessAccess, the exteriorlightsanddomelamps automaticallyturnonwhenadooris openedaftertheignitionisturned off. SeeIgnitionPositions(Keyless Access) onpage8-18 orIgnition Positions(KeyAccess) on page 8-19 .
The exterior lightsturnoff immediately by turning the exterior lamps control to OFF.
Theexitlightingfeaturecanbe activated, deactivated, orthe timeframe forthelightingcanbe changedinthemenuSettingsinthe Info.Display.PressCONFIGonthe Infotainmentsystemtoaccessthe menu.SeeVehiclePersonalization onpage4-38.
BatteryLoad Management
The vehicle has Electric Power Management (EPM) that estimates the battery's temperature and state of charge. It then adjust the voltage for best performance and extended life of the battery.
Whenthebattery'sstateofcharge islow,thevoltageisraisedslightly toquicklybringthechargebackup. Whenthestateofchargeishigh, thevoltageisloweredslightlyto preventovercharging.Ifthevehicle hasavoltmetergaugeoravoltage displayontheDriverInformation Center(DIC),youmayseethe voltagemoveupordown.This is normal.Ifthereisaproblem,an alertwillbedisplayed.
The battery can be discharged at idle if the electrical loads are very high. This is true for all vehicles. This because the generator (alternator) may not be spinning fast enough that lidetoproduce all the power that is needed for very high electrical loads.
Ahighelectricloadoccurswhen severalofthefollowingareon,such as:headlamps,highbeams,fog lamps,rearwindowdefogger, climatecontrolfanathighspeed, heatedseats,enginecoolingfans, trailerloads,andloadspluggedinto accessorypoweroutlets.
EPMworkstoppreventexcessive dischargeofthebattery.ltdoesthis bybalancingthegenerator'soutput andthevehicle'selectricalneeds. Itcanincreaseengineidlespeedto generatemorepower,whenever needed.Itcantemporarilyreduce thepowerdemandsofsome accessories.
Normally, these actions occur in steps or levels, without being noticeable. In rare cases at the highest level of corrective action, this action may be notice able to the driver. If so, a Driver Information Center (DIC) message might be displayed, such as BATTERY SAVERACTIVE, BATTERY VOLTAGELOW, or LOWBATTERY.
Ifoneofthesemessagesdisplays, itisrecommendedthatthedriver reducetheelectricalloadsasmuch aspossible.SeeDriverInformation Center(DIC)onpage4-25.
BatteryPowerProtection
The battery saverfeature is designed to protect the vehicle's battery.
If the exterior lamps or any interior light is left on and the ignition is turned off, the battery rundown protection system automatically turnsthe lamp of after about 10 minutes.
5-8Lighting
NOTES
Infotainment System
Introduction
Introduction......6-1
Theft-DeterrentFeature......6-2
Overview(RadiowithCD).....6-3
Overview(RadiowithCD/DVD
andMEM)......6-5
Operation......6-7
Radio
AM-FMRadio......6-12
SatelliteRadio......6-15
RadioReception......6-18
BackglassAntenna......6-19
SatelliteRadioAntenna.....6-19
AudioPlayers
CDPlayer......6-20
CD/DVDPlayer......6-22
MassStorage
Media(MEM)......6-25
Auxiliary Devices(Radio
withCD)......6-29
Auxiliary Devices(Radiowith
CD/DVDandMEM)......6-32
RearSeatInfotainment
RearSeatEntertainment
(RSE)System......6-34
Phone
Bluetooth(Overview)......6-42
Bluetooth(Infotainment
Controls)......6-43
Bluetooth(Voice
Recognition)......6-46
Bluetooth(Navigation)......6-58
Introduction
Readthefollowingpagesto becomefamiliarwiththeaudio system'sfeatures.

WARNING
Takingyoureyesofftheroad forextendedperiodscouldcause acrashresultingininjuryor deathtoyouorothers.Donot giveextendedattentionto entertainmenttaskshwiledriving.
This system provides access to many audio and nonaudiolistings.
Tominimizetakingyoureyesoffthe roadwhiledriving,dothefollowing whilethevehicleisparked:
- Becomefamiliarwiththe operationandcontrolsofthe audiosystem.
- Setupthetone, speaker adjustments, and presetradio stations.
6-2InfotainmentSystem
Formoreinformation,seeDefensive Drivingonpage8-3.
Notice: Contact your dealer/ retailer before adding any equipment.
Addingaudioorcommunication equipmentcouldinterferewith theoperationofthevehicle's engine,radio,orothersystems, andcoulddamagethem.Follow federalrulescoveringmobile radioandtelephoneequipment.
The vehicle has retained Accessory Power (RAP). With RAP, the audiosystem can be played even after the ignitionisturned off. See Retained Accessory Power (RAP) on page 8-20 form more information.
Navigation/RadioSystem
Forvehicleswithanavigationradio system,seetheseparateNavigation Systemmanual.
Theft-DeterrentFeature
Thetheft-deterrentfeatureworks bylearningaportionoftheVehicle IdentificationNumber(VIN)to theinfotainmentsystem.The infotainmentsystemdoesnot operateifitisstolenormovedtoa differentvehicle.
Overview(RadiowithCD)A.VOL/
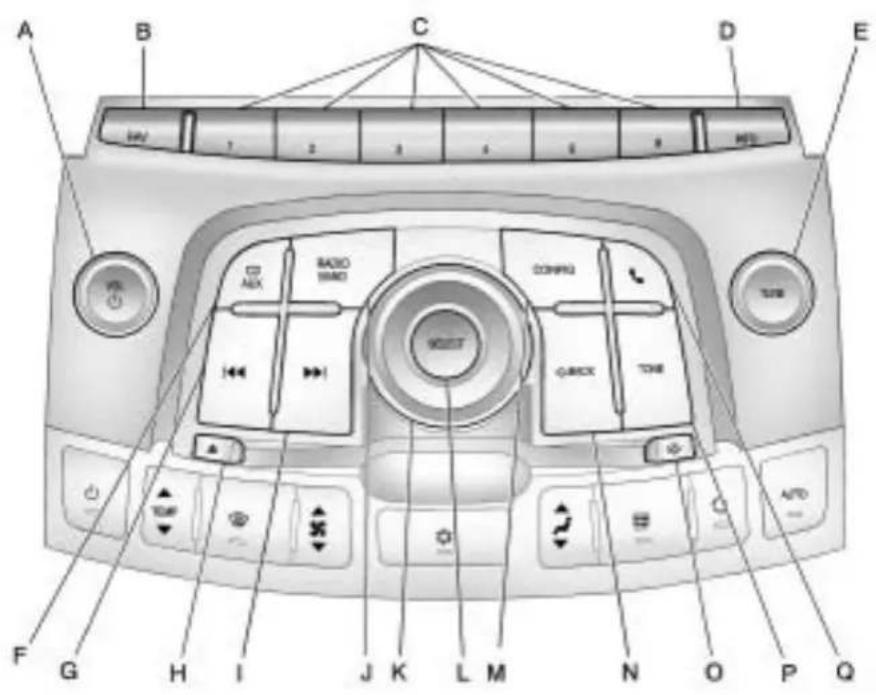
text_image
A B C D E 1 2 3 4 5 6 7 8 9 10 11 12 13 14 15 16 17 18 19 20 21 22 23 24 25 26 27 28 29 30 31 32 33 34 35 36 37 38 39 40 41 42 43 44 45 46 47 48 49 50 51 52 53 54 55 56 57 58 59 60 61 62 63 64 65 66 67 68 69 70 71 72 73 74 75 76 77 78 79 80 81 82 83 84 85 86 87 88 89 90 91 92 93 94 95 96 97 98 99 100• Turnsthesystemonoroff and adjuststhevolume.
B.FAV
• Radio:Opensthe favoriteslist.
C. Buttons1 to 6
• Radio:Savesandselects favoritestations.
D.INFO
• Radio: Shows available information about the current station.
• CD:Showsavailable informationaboutthe currenttrack.
E.TUNE
• Radio: Manually selects radiostations.
• CD:Selectstracks.
6-4InfotainmentSystem
F.CD/AUX
- SelectstheCDplayeroran externalaudiosource.
G.
• Radio: Seekstheprevious station.
• CD: Select the previous track or re windswithina track.
H. △CDEject
- Removesadiscfromthe CDslot.
1.
• Radio:Seeksthenext station.
• CD:Selectthenexttrackor fastforwardswithinatrack.
J.RADIO/BAND
• Changesthebandwhile listeningtotheradio.
- Selectstheradiowhen listeningtoadifferentaudio source.
K.MenuKnob
- Opensmenus, highlights menuitems, orsets numericvalueswhilein amenu.
L.SELECT
- Selectsmenuitems.
M.CONFIG
- Opensthesettingsmenu.
N. ←BACK
- Menu: Moves onelevelback.
• CharacterInput: Deletes thelastcharacter.
0. ⏱
- Openstheclockmenu.
P.TONE
- Opensthetonemenu.
Q.
- Opensthephone mainmenu.
- Mutestheaudiosystem.
Overview(RadiowithCD/DVDandMEM)A.VOL/

text_image
A B C D E F G H I J K L M N O P Q R S CAN 1 2 3 4 5 6 NET• Turnsthesystemonoroff and adjuststhevolume.
B.FAV
• Radio:Opensthe favoriteslist.
• MEM:Opensthe favoriteslist.
C. Buttons1to6
• Radio:Savesandselects favoritestations.
• MEM:Savesandselects favoritetracksandplaylists.
D.INFO
• Radio: Shows available information about the current station.
• CD:Showsavailable informationaboutthe currenttrack.
E.TUNE/▶/II
• Manuallyselectsradio stationsandpausestime shiftedcontent.
• CD/DVD:Selecttracks, pauses playback, and stops playback.
• MEM:Selecttracksand pauses playback.
F.RADIO/BAND
• Changesthebandwhile listeningtotheradio.
- Selectstheradiowhen listeningtoadifferentaudio source.
G.
• Radio:Seekstheprevious station.
• CD:Selectstheprevious trackorrewindswithina track.
• MEM: Selectstheprevious trackorrewindswithina track.
H. △CDEject
- Removesadiscfromthe CDslot.
I.REC

- AUX:Recordscontentfrom audioCDs,MP3/WMA CDs,andUSBmass storagedevices.
J.DEL
• MEM:Deletesthecurrent trackfromMEM.
K.
• Radio:Seeksthenext station.
• CD:Selectsthenexttrack orfastforwardswithina track.
• MEM:Selectsthenext trackorfastforwardswithin atrack.
L.SELECT
- Selectsmenuitems.
M.MenuKnob
- Opensmenus, highlights menuitems, orsets numericvalueswhilein amenu.
N. ←BACK
- Menu: Movesone levelback.
• CharacterInput: Deletes thelastcharacter.
O.TONE
- Opensthetonemenu.
P. ⏱
- Openstheclockmenu.
Q.CONFIG
- Opensthesettingsmenu.
R.
- Opensthephone mainmenu.
- Mutestheaudiosystem.
S.MEM/DVD/AUX
- SelectsMEM, CD/DVD, USB, or a connected front or rearauxillary audio source.
Operation
Controls
Theinfotainmentsystemisoperated byusingthepushbuttons, multifunctionknobs, menusthatare shownonthedisplay, andsteering wheelcontrols, ifequipped.
TurningtheSystemOnorOff
VOL/ (Volume/Power): Pressto turnthesystemonandoff.
AutomaticSwitch-Off
If the infotainmentsystem has been turned on after the ignition is turned off, the system will turn off automatically after ten minutes.
VolumeControl
VOL/(Volume/Power):Turnto adjustthevolume.
(Phone/Mute): For vehicles with OnStar ^® , press and hold to mutetheinfotainmentsystem.
Pressandhold 📞again,orturn theVOL/ ⏻knobtocancelmute.
ForvehicleswithoutOnStar ^® , press 🔔tomutetheinfotainment system.Press 🔔again,orturn theVOL/ 🔊knobtocancelmute.
MenuSystem
Controls
TheMenuknob, SELECTbutton, andthe ←BACKbuttonareusedto navigatethemenusystem.
MenuKnob:Turnto:
- Enterthemenusystem.
• Highlightamenuoption. - Selectavalue.
SELECT:Pressto:
- Selectoractivatethehighlighted menuoption.
- Confirmasetvalue.
• Turnasystemsettingonoroff.
←BACK:Pressto:
- Exitamenu.
- Returnfromasubmenuscreen tothepreviousmenuscreen.
- Deletethelastcharacterina sequence.
6-8InfotainmentSystem
SelectingaMenuOption
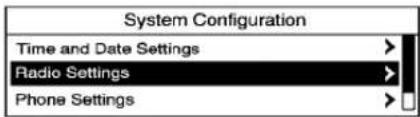
text_image
System Configuration Time and Date Settings Radio Settings Phone Settings- TurntheMenuknobtomovethe highlightedbar.
- PresstheSELECTbutton to select the highlighted option.
Submenus

text_image
System Configuration Time and Date Settings Radio Settings Phone SettingsAnarrowontheright-handedgeof themenuindicatesthatithasa submenuwithotheroptions.
ActivatingaSetting
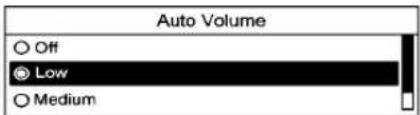
text_image
Auto Volume ○ Off ● Low ○ Medium- TurntheMenuknobtohighlight thesetting.
- PresstheSELECTbutton to activate the setting.
SettingaValue

text_image
Set time: 12: 15 PM- TurntheMenuknobtochange thecurrentvalueofthesetting.
- PresstheSELECTbutton to confirm the setting.
TurningaFunctionOnorOff
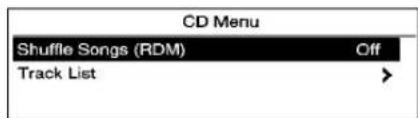
text_image
CD Menu Shuffle Songs (RDM) Off Track List >- TurntheMenuknobtohighlight thefunction.
- PresstheSELECTbuttontoturn thefunctiononoroff.
EnteringaCharacterSequence

text_image
Enter Number 1234 0 1 2 3 4 5 6 7 8 9 + * # | 4 | 5 | Cir | PS | Cell- TurntheMenuknobtohighlight thecharacter.
- PresstheSELECTbutton to select the character.
Pressthe BACKbuttontodelete thelastcharacterinthesequence orpressandholdtodeletethe entirecharactersequence.
AudioSettings
The audiosettingscanbesetfor eachradiobandandeachaudio playersource.
Toquicklyresetanaudiosetting valueto0:
- PresstheTONEbutton.
- Selecttheaudiosetting.
- PressandholdtheSELECT buttonuntilthevalue changesto0.
Pressthe ←BACKbuttontogo backtotheToneSettingsmenu.
AdjustingtheTreble, Midrange, and Bass

text_image
Tone EQ Sound Settings Treble: 0 Midrange: 0 Bass: 0- PresstheTONEbutton.
- SelectTreble, Midrange, orBass.
- Selectthevalue.
Pressthe ←BACKbuttontogo backtotheToneSettingsmenu.
AdjustingtheFaderandBalance

text_image
Tone EQ Sound Settings Bass: 0 EQ: Off Fader: F5- PresstheTONEbutton.
- SelectFaderorBalance.
- Selectthevalue.
Pressthe ←BACKbuttontogo backtotheToneSettingsmenu.
AdjustingtheEQ(Equalizer)
Forvehiclesthathaveanequalizer:

text_image
EQ Presets ○ Off: ○ Pop: ● ROCK:- PresstheTONEbutton.
- SelectEQ.
- Selectthesetting.
Pressthe ←BACKbuttontogo backtotheToneSettingsmenu.
DSP(DigitalSignalProcessing) Settings
ForvehicleswithDSP, it is used to provide a choice of different listening experiences.
TheDSPsettingsfortheRadiowith CDare:
- normal-Selectthissettingto adjusttheaudioforstereo mode. Thisprovidesthebest soundqualityforthedriversseat first, withthefrontpassenger second.
- hksurround-Selecttoenable hksurround. This produces a true 6.1 matrix surround from any two channel digitalsource. This feature is not available in AM/FMradiomode.
TheDSPsettingsfortheRadiowith CD/DVDandMEMare:
- 2.0normal-Selectthissetting toadjusttheaudioforstereo mode. Thisprovidesthebest soundqualityforthedriversseat first, withthefrontpassenger second.
- hksurround-Selecttoenable hksurround. This produces a true 6.1 matrix surround from any two channeldigital source. This feature is not available in AM/FMradiomode.
ToadjusttheDSPsettings:
- Pressthe TONEbutton.
- SelectDSP.
- Selectthesetting.
Pressthe ←BACKbuttontogo backtotheToneSettingsmenu.
SystemSettings
ConfiguringtheNumberof FavoritePages

text_image
Radio Favorites ○ 1 FAV Page ○ 2 FAV Page ○ 3 FAV PageToconfigurethenumberofavailable favoritepages:
- PresstheCONFIGbutton.
- SelectRadioSettings.
- SelectRadioFavorites.
- Selectthenumberofavailable favoritepages.
5.Pressthe ←BACKbutton togobacktotheSystem Configurationmenu.
AutoVolume
Theautovolumefeature automaticallyadjuststheradio volumetocompensateforroadand windnoiseasthevehiclespeedsup orslowsdown,sothatthevolume levelisconsistent.
The level of volume compensation can be selected, or the autovolume feature can be turned off.

text_image
Auto Volume ○ Off ● Low ○ Medium- PresstheCONFIGbutton.
- SelectRadioSettings.
- SelectAutoVolume.
- Selectthesetting.
5.Pressthe ←BACKbuttonto gobacktotheSystem Configurationmenu.
MaximumStartupVolume
Themaximumvolumeplayedwhen theRadiowithCDisfirstturnedon canbeset.
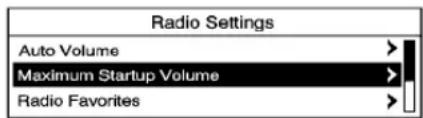
text_image
Radio Settings Auto Volume > Maximum Startup Volume > Radio Favorites >- PresstheCONFIGbutton.
- SelectRadioSettings.
- SelectMaximumStartup Volume.
- Selectthesetting.
5.Pressthe ←BACKbutton togobacktotheSystem Configurationmenu.
Radio
AM-FMRadio
ControlButtons
Thebuttonsusedtocontrolthe radioare:
RADIO/BAND: Presstoturnthe radioonandchoosebetweenAM, FM, and XM™, ifequipped.
MenuKnob: Turntonavigatethe availablemenus.
TUNE: Turntosearchforstations.
INFO: Presstodisplayadditional informationthatmaybeavailablefor thecurrentsong.
◀◀/▶▶:Presstosearchfor stations.
FAV: Presstoopenthefavorites listandselectthefavoritespage.
1to6:Presstoselectpreset stations.
▶/ll(Play/Pause):Presstopause timeshiftedcontent,ifequipped.
RDS(RadioSubsystem)
TheradiomayhaveRDS. The RDS feature is available for use only on FMstation that broadcast RDS information. This feature only works when the information from the radio station is available. In rare cases, aradiostation could broadcast incorrect information that cause the radio feature to work improperly. If this happens, contact the radio station.
Whiletheradioistunedtoan FM-RDSstation,thestationname orcalllettersdisplay.
RadioMenus
Radiomenus are available for AM and FM.
Turnthemenuknobtoopenthe mainradiomenuforthatband.
SelectingaBand
PresstheRADIO/BANDbutton tochooseAM,FM,orXM™, ifequipped. Thelaststationthat wasplayingstartsplayingagain.
SelectingaStation
SeekTuning(RadiowithCD)
Iftheradiostationisnotknown:
Brieflypress ◄◀or▶.To automaticallysearchforthenext availablestation.Ifastationisnot found,theradioswitchestoamore sensitivesearchlevel.Ifastation stillisnotfound,thefrequencythat waslastactivebeginstoplay.
Iftheradiostationisknown:
Pressandhold ▶or▶untilthe stationonthedisplayisreached, thenreleasethebutton.
SeekTuning(RadiowithCD/DVD andMEM)
Brieflypress ◀◀or▶◀, to automaticallysearchforthenext availablestation. Ifastationisnot found,theradioswitchestoamore sensitivesearchlevel. Ifastation stillisnotfound, thefrequencythat waslastactivebeginstoplay.
ManualTuning
TurntheTUNEknobtoselectthe frequencyonthedisplay.
FavoritesList
- Turnthemenuknob.
- SelectFavoritesList.
- Selectthestation.
StationLists
- Turnthemenuknob.
- SelectAMorFMStationList. All receivablestationsinthecurrent receptionareaaredisplayed. Ifa stationlisthasnotbeencreated, anautomaticstationsearch isdone.
- Selectthestation.
CategoryLists
Moststationsthatbroadcastan RDSprogramtypecodespecifythe typeofprogrammingtransmitted. Somestationschangetheprogram typecodedependingonthe content. Thesystemstoresthe RDSstationssortedbyprogram typeintheFMcategorylist.
Tosearchforaprogrammingtype determinedbystation:
- Turnthemenuknob.
- SelectFMcategorylist.Alistof allprogrammingtypesavailable displays.
-
Select the programming type. Alistofstation that transmit programming of these selected typedefsplays.
-
Selectthestation. Thecategorylistsareupdated whenthestationlistsare updated.
UpdatingStation&CategoryLists
Ifstationsstoredinthestationlist cannolongerbereceived.
- Turnthemenuknob.
- SelectUpdateAMorFMStation List, ifthestationsstored in thestationlistarenolonger received. Astationsearchwill be completed and the first station in the updated list will play.
Tocancelthestationsearch, press theSELECTbutton.
StoringaStationasaFavorite
Stationsfromallbandscanbe storedinanyorderinthefavorite pages.
Uptosixstationscanbestoredin eachfavoritepageandthenumber ofavailablefavoritepagescan beset.
6-14 Infotainment System
StoringStations
Tostorethestationtoapositionin thelist,pressthecorresponding button1to6untilabeepisheard.
RetrievingStations
PresstheFAVbuttontoopena favoritepageortoswitchtoanother favoritepage.Brieflypressoneof the1to6buttonstoretrievethe station.
TimeShifting(Radiowith CD/DVDandMEM)
TheradiowithMEMtimeshift featurecanrewind20minutesof FM/AMcontent.Whilelisteningto theradio,thecontentfromthe currentstationisalwaysbeing buffered.
Pressthe ▶/llbuttontopausethe radio. Theradiodisplaysthetime shiftstatusbar. Thestatusbar showstheamountofcontentthatis storedinthebufferandthecurrent pausepoint.
Toresume playback from the current pause point, press the ▶/□ button again. Theradio isnolonger live, but played from the timeshift buffer. A status bar displays below the station number.
Pressandholdthe ▶or ◀buttonstofastforwardor rewindthroughthetimeshift buffer.Hold ▶luntiltheendof therecordedbufferresumeslive playback.
Pressandreleasethe ▶for buttonstojumpforwardor back30secondsinthetimeshift buffer.
Whentheradiostationis changed,thebufferiscleared andautomaticallyrestartedfor thecurrentstation.Contentfroma previouslytunedstationisnolonger available.
Thetimeshiftfeatureisnot availablewhilerecordingorwith othersourcesofplayback.
PausingAM/FMwiththeVehicle TurnedOff
IfAM/FMispausedwhenthe vehicleisturnedoff,theradio continuestobufferthecurrentradio stationforupto20minutes.Ifthe vehicleisturnedbackonwithin 20minutes,theradioresumes playbackfromthepausedpoint.
SatelliteRadio
VehicleswithanXM™ Satellite RadiotunerandavalidXMSatellite RadiosubscriptioncanreceiveXM programming.
XMSatelliteRadioService
XMisasatelliteradioservice thatisbasedinthe48contiguous UnitedStatesand10Canadian provinces.XMSatelliteRadiohas awidevarietyofprogramming andcommercial-freemusic, coast-to-coast, andindigital-quality sound.Aservicefeeisrequired toreceivetheXMservice.For moreinformation, contactXM atwww.xmradio.comorcall 1-800-929-2100intheU.S. andwww.xmradio.caorcall 1-877-438-9677inCanada.
ControlButtons
ThebuttonsusedtocontroltheXM radioare:
RADIO/BAND: Presstoturnthe radioonandchoosebetweenAM, FM, and XM™, ifequipped.
|◀/▶:Presstogotothe previousornextchannel.
FAV: Presstoopenthe favoriteslist.
1to6:Presstoselectafavorite.
TUNE: Turntoselectchannel.
INFO: Presstodisplayadditional informationthatmaybeavailable aboutthecurrentsong.
▶/ll(Play/Pause):Presstopause timeshiftedcontent,ifequipped.
SelectingtheXMBand
PresstheRADIO/BANDbuttonto choosebetweentheAM,FMandXMbands. Thelastchannelplayed inthatbandbeginstoplaywhen thatbandisselected.
XMCategories
XMchannelsareorganizedin categories.
RemovingorAddingCategories
Channelsinacategorythathave beenremovedcanstillbeaccessed byusingthe ◀◀or▶▶buttons, ortheTUNEknob.
Toaddorremovecategories:
-
PresstheCONFIGbutton.
-
SelectRadioSettings.
-
SelectXMCategories.
-
TurntheMenuknobtohighlight thecategory.
-
PresstheSELECTbutton to removeoraddthecategory.
SelectinganXMChannel
XMchannelscanbeselectedby using [◀,▶], the TUNEknob, orthemenusystem.
SelectingaChannelUsing
|◀or▶>(RadiowithCD)
- Pressandrelease◀◀or▶▶to gotothepreviousornext channel.
- Pressandhold◀◀or▶▶to scrollthroughthepreviousor nextchanneluntilthechannelis reached.
SelectingaChannelUsing
or(RadiowithCD/DVD andMEM)
Pressandrelease ▶or▶togoto thepreviousornextchannel.
SelectingaChannelUsingthe TUNEKnob
ToselectanXMchannelusingthe TUNEknob:
TurntheTUNEknobtohighlightan XMchannel,thechannelisselected afterashortdelay.
Toselectachannelusingthemenu:
- Turnthemenuknobandselect ChannelList.
- Selectthedesiredchannel.
SelectingaChannelUsingthe MenuSystem
- Turnthemenuknob.
- SelectXMCategoryList.
- Select the category.
- Selectthechannel.
StoringanXMChannelasa Favorite
Channelsfromallbandscanbe storedinanyorderinthefavorite pages.
Uptosixchannelscanbestoredin eachfavoritepageandthenumber ofavailablefavoritepagescan beset.
StoringaChannelasaFavorite
Tostorethechanneltoaposition inthelist, pressandholdthe corresponding 1 to 6 button until the channel can be heard again.
RetrievingChannels
PresstheFAVbuttontoopena favoritepageortochangeto anotherfavoritepage.Brieflypress oneofthe1to6buttonstoretrieve thechannel.
TimeShifting(Radiowith CD/DVDandMEM)
TheradiowithMEMtimeshift featurecanrewind20minutesof XMcontent. Whilelisteningtothe radio, thecontentfromthecurrent channelisalwaysbeingbuffered.
Pressthe ▶/Ilbuttontopausethe radio. Theradiodisplaysthetime shiftstatusbar. Thestatusbar showstheamountofcontentthatis storedinthebufferandthecurrent pausepoint.
Toresumeplaybackfromthe currentpausepoint, press the ▶/llbuttonagain. Theradioisno longerlive, butplayedfromthetime shiftbuffer.Astatusbardisplays belowthechannelnumber.
Pressandholdthe ▶for ◀buttonstofastforwardor rewindthroughthetimeshift buffer.Hold ▶luntiltheendof therecordedbufferresumeslive playback.
Pressandreleasethe ▶for buttonstogotothenextor previousssonginthetimeshift buffer.
Whenthechannelischanged, the bufferisclearedandautomatically restartedforthecurrentchannel. Contentfromapreviouslytuned stationisnolongeravailable.
Thetimeshiftfeatureisnot availablewhilerecordingorwith othersourcesof playback.
PausingXMwiththeVehicle TurnedOff
If XMisp paused when the vehicle is turned off, theradio continues to buffer the current radiostation for up to 20 minutes. If the vehicle is turned back on within 20 minutes, ther radio resumes playback from the paused point.
XMMessages
XL(ExplicitLanguage
Channels): These channels, or any others, can be blocked by request, by calling 1-800-852-XMXM(9696).
XMUdating:Theencryptioncode inthereceiverisbeingupdated,no actionisrequired.Thisprocess shouldtakenolongerthan 30seconds.
LoadingXM: The audiosystemis acquiring and processing audio and text data, no action is needed. This messages should disappear shortly.
ChannelOffAir: Thischannelis notcurrentlyinservice. Tuneinto anotherchannel.
ChannelUnauth: Thischannelis blockedorcannotbereceivedwith yourXMSubscriptionpackage.
ChannelUnavailable: This previously assigned channel is no longer assigned. Tuneto another station.
NoArtistInfo: Thesystemis workingproperly. Noartist informationisavailableatthis timeonthischannel.
NoTitleInfo: Thesystemis workingproperly. Nosongtitle informationisavailableatthistime onthischannel.
NoCATInfo: Thesystemis workingproperly. Nocategory informationisavailableatthistime onthischannel.
Nolnformation: Thesystemis workingproperly. Notextor informationalmessagesare availableatthistimeonthis channel.
6-18 Infotainment System
NoXMSignal: Thesystemis workingproperly. The vehicle may beinalocationthatwheretheXM signalisbeingblocked. Whenthe vehicle is moved into an open area, the signal should return.
CATNotFound: Thesystemis workingproperly. There are no channels available for these selected category.
XMRadioID: Iftunedtochannel0, thismessagealternateswiththe XMRadio8digitradiolDlabel. This labelisneededtoactivatethe service.
Unknown: If this message is received when tuned to channel 0, there could be a receiver fault. Consult with your dealer/retailer.
CheckAntenna: If this message does not clear within a short period of time, there are ever could have a fault. Consult with your dealer/retailer.
XMNotAvailable: If this message does not clear within a short period of time, there are ever could have a fault. Consult with your dealer/retailer.
RadioReception
Frequencyinterferenceandstatic canoccurduringnormalradio receptionifitemssuchascellphone chargers,vehicleconvenience accessories,andexternalelectronic devicesarepluggedintothe accessorypoweroutlet.Ifthereis interferenceorstatic,unplugthe itemfromtheaccessorypower outlet.
FM
FMsignalsonlyreachabout 16to65km(10to40miles). Althoughtheradiohasabuilt-in electroniccircuitthatautomatically workstoreduceinterference, some staticcanoccur,especiallyaround tallbuildingsorhills,causingthe soundtofadeinandout.
AM
TherangeformostAMstationsis greaterthanforFM,especiallyat night. Thelongerrangecancause stationfrequenciestointerfere witheachother.Forbetterradio reception,mostAMradiostations boostthepowerlevelsduringthe day,andthenreducetheselevels duringthenight.Staticcanalso occurwhenthingslikestormsand powerlinesinterferewithradio reception.Whenthishappens,try reducingthetrebleontheradio.
XM™SatelliteRadioService
XMSatelliteRadioServicegives digitalradioreceptionfrom coast-to-coastinthe48contiguous UnitedStates,andinCanada.Just aswithFM,tallbuildingsorhillscan interferewithsatelliteradiosignals, causingthesoundtofadeinand out.Inaddition,travelingorstanding underheavyfoliage,bridges, garages,ortunnelsmaycauseloss oftheXMsignalforaperiodoftime.
CellularPhoneUsage
Cellularphoneusagemaycause interferencewiththevehicle'sradio. Thisinterferencemayoccurwhen makingorreceivingphonecalls, chargingthephone'sbattery, orsimplyhavingthephoneon. This interferencecancauseanincreased levelofstaticwhilelisteningtothe radio.Ifstaticisreceivedwhile listeningtotheradio,unplugthe cellularphoneandturnitoff.
BackglassAntenna
TheAM-FMantennaisintegrated withtherearwindowdefogger, locatedintherearwindow.Make surethattheinsidesurfaceofthe rearwindowisnotscratchedand thatthelinesontheglassarenot damaged.Iftheinsidesurfaceis damaged,itcouldinterferewith radioreception.Forproperradio reception,theantennaconnector needstobeproperlyattachedtothe postontheglass.
Ifacellulartelephoneantenna needstobeattachedtotheglass, makesurethatthegridlinesforthe AM-FMantennaarenotdamaged. Thereisenoughspacebetween thegridlinestoattachacellular telephoneantennawwithout interferingwithradioreception.
Notice: Usingarazorbladeor sharpobjecttocleartheinside rearwindowcandamagetherear windowantennaand/ortherear windowdefogger. Repairswould notbecoveredbythevehicle warranty. Donotcleartheinside rearwindowwithsharpobjects.
Notice: Donotapplyaftermarket glasstintingwithmetallicfilm. Themetallicfilminsometinting materialswillinterferewithor distorttheincomingradio reception. Anydamagecausedto yourbackglassantennadueto metallictintingmaterialswillnot recoveredbythevehicle warranty.
SatelliteRadioAntenna
ForvehicleswithXM™ satellite radioservice, the antennaislocated ontheroofofthevehicle. Keep the antennaclearofobstructions for clearradioreception.
AudioPlayers
CDPlayer
TheCDplayercanplayaudioCDs andMP3CDs.
The CD player will not play 8cm(3in.) CDs.
CareofCDs
Soundqualitycanbereduceddue todiscquality,recordingmethod, qualityofthemusicrecorded,and howthedischasbeenhandled. Handlediscscarefullyandstore themintheiroriginalcasesorother protectivecasesawayfromdirect sunlightaddust.Ifthebottom surfaceofadiscisdamaged,the discmaynotplayproperlyoratall. Donottouchthebottomsurface of adiscwhilehandlingit;thiscould damagethesurface.Pickupdiscs bygraspingtheouteredgesorthe edgeoftheholeandtheouteredge.
If the bottomsurface of adiscis dirty, take asoft lint freecloth, ordampenacleansoft clothina mild neutral detergents solution mixed with water, and clean it. Wipethedisc from the centerto the outer edge.
CareoftheCDPlayer
Donotaddalabeltoadisc, as itcouldgetcaughtintheCD player. Ifalabelisneeded, label thetopoftherecordeddiscwith amarkingpen.
Donotusedisclenscleaners because they could contaminate the lensofthediscopticsanddamage the CDplayer.
Notice:Ifalabelisaddedtoa CD,ormorethanoneCDis insertedintotheslotatatime, oranattemptismadetoplay scratchedordamagedCDs,the CDplayercouldbedamaged.
While using the CD player, use only CDsingood condition without any label, load one CD atime, and keep the CD player and the loadingslot free of foreign materials, liquids, and debris.
ControlButtons
ThebuttonsusedtocontroltheCD playerare:
CD/AUX: PresstousetheCD player.
▶▶/◀◀: Press to select tracks or tofastforwardorrewindwithina track.
INFO: Presstodisplayadditional informationaboutthecurrenttrack thatmaybeavailable.
TUNE:Turntoselecttracks.
MenuKnob: Turntoenter themenu.
SELECT:Presstoselectanitem.
(Eject):Presstoejectthedisc.
InsertingaCD
With the printed side facing up, insert ad disc into the CD slot until it is drawn in.
RemovingaCD
Pressthe△button.
Thediscispushedoutofthe CDslot.
If the disc is not removed after it is ejected, it is pulled back in after a few seconds.
PlayingaCDorMP3CD
PresstheCD/AUXbuttonifthereis adiscintheplayer,itbegins playing.
Informationaboutthediscand currenttrackisshownonthe displaydependingonthedata stored.
SelectingaCDTrack
Using the control buttons:
- Pressthe◀◀or▶◀lbuttonto selectthepreviousornexttrack.
- TurntheTUNEknob.
UsingtheCDMenu:
- Turnthemenuknob.
- SelectTrackslist.
- Selectthetrack.
PlayingTracksinRandomOrder
Turnthemenuknobandthenset ShuffleSongstoOn.
FastForwardandRewind
Pressandhold ▶lon◀tofast forwardorrewindwithinthecurrent track.
SelectinganMP3Track
Using the control buttons:
- Pressthe◀◀or▶◀button to select the previous or next track.
- TurntheTUNEknob.
UsingtheCDMenu:
- Turnthemenuknob.
- SelectPlaylists/Folders.
- Selecttheplaylistorfolder.
- Selectthetrack.
SearchingforMP3Tracks
Thesearchfeaturemaytake some timetodisplaytheinformationafter readingthediscduetotheamount ofinformationstoredonthedisc. FMautomaticallyplayswhilethe discisbeingread.
Trackscanbesearchedby:
- Playlists
- Artists
- Albums
- SongTitles
- Genres
- FolderView
Tosearchfortracks:
- Turnthemenuknob.
- SelectSearch.
- Select: Playlists, Artists, Albums, SongTitles, Genres, or FolderView.
- Selectthetrack.
CD/DVDPlayer
The CD/DVD player can play CDs, DVD-As, MP3/WMACDs, MP3/WMADVDs, and DVD-Vs.
TheCD/DVDplayerwillnotplay 8cm(3in.)discs.
CareofCDsandDVDs
Soundqualitycanbereduceddue todiscquality,recordingmethod, qualityofthemusicrecorded,and howthedischasbeenhandled. Handlediscscarefullyandstore themintheiroriginalcasesorother protectivecasesawayfromdirect sunlightanddust.Ifthebottom surfaceofadiscisdamaged,the discmaynotplayproperlyoratall. Donottouchthebottomsurface of adiscwhilehandlingit;thiscould damagethesurface.Pickupdiscs bygraspingtheouteredgesorthe edgeoftheholeandtheouteredge.
If the bottomsurface of adiscis dirty, take asoft lint free cloth, ordampenaclean soft clothina mild neutral detergents solution
mixedwithwater, andcleanit. Wipe thediscfromthecentertothe outeredge.
CareoftheCD/DVDPlayer
Donotaddalabeltoadisc, asit couldgetcaughtintheCD/DVD player. Ifalabelisneeded, labelthe topoftherecordeddiscwitha markingpen.
Donotusedisclenscleaners because they could contaminate the lensofthediscoptics and damage the CD/DVD player.
Notice:Ifalabelisaddedtoa CD,ormorethanoneCDis insertedintotheslotatatime, oranattemptismadetoplay scratchedordamagedCDs,the CDplayercouldbedamaged. WhileusingtheCDplayer,use onlyCDsingoodcondition withoutanylabel,loadoneCDat atime,andkeeptheCDplayer andtheloadingslotfreeof foreignmaterials,liquids,and debris.
ControlButtons
Thebuttonsusedtocontrolthe CD/DVDplayerare:
MEM/DVD/AUX: Presstochoose between the MEM, CD/DVD, and AUX.
▶▶/◀◀: Press to select tracks or tofastforwardorrewindwithina track.
INFO: Presstodisplayadditional informationaboutthediscthatmay beavailable.
TUNE: Turntoselecttracks.
MenuKnob: Turntoenter themenu.
SELECT:Presstoselectanitem.
(Eject):Presstoejectthedisc.
▶/II: PresstopauseaCD, DVD-A, or DVD-V, pressagaintoresume playback. Pressandholdtostopa DVD-Vdisc.
InsertingaCDorDVD
With the printed side facing up, insert ad disc into the slot until it is drawn in.
RemovingaCDorDVD
Pressthe△button.
Thediscispushedoutofthe CD/DVDslot.
Ifthediscisnotremovedafteritis ejected, itispulledbackinaftera fewseconds.
PlayingaCDorDVD-ADisc
PresstheMEM/DVD/AUXbutton ifthereisadiscintheplayer,it beginsplaying.
Informationaboutthediscand currenttrackisshownonthe displaydependingonthedata stored.
SelectingCDorDVD-ATracks
Using the control buttons:
- Pressthe◀◀or▶◀button to select the previous or next track.
- TurntheTUNEknob.
Usingthemenu:
-
Turnthemenuknob.
-
SelectTracksList.
-
Selectthetrack.
PausingaCDorDVD-ATrack
Pressthe ▶/llbuttontopauseaCD orDVD-Atrack.Pressthe ▶/llbutton againtocontinueplayingthetrack.
PlayingCDorDVD-ATracksin RandomOrder
Turnthemenuknobandthenset ShuffleSongstoOn.
FastForwardandRewind
Pressandhold ▶lor◀tofast forwardorrewindwithinthecurrent track.
PlayinganMP3CDorDVD
Filesthatarenotstoredin foldersaredisplayedintheroot directory(disc).
Thesearchrateincreasesifthe menuknobiscontinuouslyturned whilesearchinginalist.
SelectinganMP3Track
Using the control buttons:
- Press◀◀or▶▶toselectthe previousornexttrack.
• TurntheTUNEknob.
UsingtheCDorDVDMenu:
- Turnthemenuknob.
- SelectFolderList.
- Selectthefolder.
- Selectthetrack.
SearchingforMP3sonaCD orDVD
Itisnormalforthesearchfeature totakesometimetodisplaythe informationafterreadingthedisc duetotheamountofinformation storedonthedisc.Theinfotainment systemautomaticallyswitchesto FMwhilethediscisbeingread.
Filesthatdonothaveanymeta datastoredintheID3tagdisplay asUnknown.
Trackscanbesearchedforby:
- Playlists
- Artists
- Albums
- SongTitles
- Genres
Thenumberofobjectsineach categoryisshowninparentheses afterthecategory.
Tosearchfortracks:
- Turnthemenuknob.
- SelectSearch.
- Select: Playlists, Artists, Albums, SongTitles, or Genres.
- Selectthetrack. Thesearchrate increasesifthemenuknobis continuouslyturnedwhile searchinginalist.
PlayingMP3TracksinRandom Order
Turnthemenuknobandthenset ShuffleSongstoOn.
RecordinganAudioorMP3 CDtoMEM
SeeMassStorageMedia(MEM) on page6-25 formoreinformation.
PlayingaDVD-V
SeeRearSeatEntertainment(RSE) System onpage6-34 for informationabouthowtocontrola VideoDVDusingthewireless remotecontrol.
SelectingaChapter
Using the control buttons:
- Press◀◀or▶◀Itoselectthe previousornextchapter.
- TurntheTUNEknob.
UsingDVDMenu:
- Turnthemenuknob.
- SelectChapterList.
- Select the chapter.
SelectingaTitle
- Turnthemenuknob.
- SelectTitleList.
- Selectthetitle.
ChangingtheAudioStream
- Turnthemenuknob.
- SelectAudioStream.
- SelectChangeAudioStream.
- PressSELECTtochangethe selection.
SelectCanceltoexitthemenu.
PausingaDVD
- Turnthemenuknob.
- SelectPause, topausethe disc. Selectunpausetostart playback.
NavigatingtheDVD-VDiscMenu
Usethefollowingactionsto navigatethetitlemenuona DVD-VDisc.
- Select/Enter
- CursorUP
- CursorDOWN
- CursorRIGHT
- CursorLEFT
- UpMenu
Usethefollowingactionsto navigatethemenuonaDVD-V Discwhileplayingchapters.
- Pause(Play)
- ChapterList
- TitleList
-
DVD/DVD
-
DVD/AUX
- AUX/DVD
- AUX/AUX
Tonavigatethemenu:
- Turnthemenuknob.
- Select the action.
MassStorage Media(MEM)
InfotainmentsystemswithMEM storageareabletorecordupto
1.1GB(gigabyte)ofmusicfrom AudioCDs,MP3/WMA/AACdiscs, andUSBstoragedevices.TheMEM playercanalsotimeshiftaudiofrom AM,FM,andXM™radio.
Musicorcontentthatisstoredin MEMthatyoudidnotcreate, orhavetherighttodistribute, must bedeletedbeforethesaleorendof theleaseofthevehicle.
ControlButtons
Thebuttonsusedtocontrolthe MEMplayerare:
MEM/DVD/AUX: Presstoselect the MEM player.
▶▶/◀◀: Press to select tracks or tofastforwardorrewindwithina track.
INFO: Presstodisplayadditional informationabouttheMEMtrack thatmaybeavailable.
▶/II/TUNE: Presstopausethe trackcurrentlyplaying, pressagain toresume playback. Turntoselect tracks.
●REC:Presstorecordmusic fromaCDorUSBdrive.
DEL: Presstodeletethecurrent trackfromMEM.
FAV(Favorites):Presstodisplay MEMfavorites.
1to6: Presstoselectatrackor playliststoredinthatnumeric position.
RecordingFromAudioCDs
Theinfotainmentsystemcanrecord thecurrentsongplayingorallsongs fromanaudioCDtoMEM.Astatus barappearsonthetopofthe displaywhentherecordingprocess startsanddisappearswhenthe processhasended.Copyprotected CDscannotberecordedtoMEM.
RecordingtoMEM
Press ●REC, thenselectRecord CurrentSongorRecordAllSongs onDisc. If the track has started playing, the system will restart the track and begin recording from the beginning of the track. When the song recording is completed, the message Song Recorded to MEM displays, and there may be as light pause.
SongsrecordedtoMEMarestored asthecurrentdate, discandtrack number.
Re-recordingaPreviously RecordedDisc
Ifthediscortrackhasalreadybeen recordedtoMEM, themessage TheSong(s)isAlreadyRecorded displays.
StoppingtheRecording
Pressthe ●RECbuttonwhile recordingfromanaudioCDto displaythestoprecordingoption. SelectStopRecordingSong toMEM.
RenamingRecordedDiscs
Discsthathavebeenrecorded to MEMcanberenamed.
- Turnthemenuknob.
- SelectRenameRecordedDiscs.
- Selectthedisc.
- SelectAlbumorArtisttorename eitherone.
- Usethemenuknobtoenter thecharactersequence. See Operation on page 6-7 for moreinformation.
RecordingFromMP3/WMA DiscsorUSBStorageDevices
USBHostSupport
TheUSBconnectorusestheUSB standards,1.1and2.0.
USBSupportedDevices
- USBFlashDrives
- PortableUSBHardDrives
RecordingtoMEM
Press ●REC,thenselectRecord CurrentSongorRecordCurrent Folder.
TheinformationstoredbyMEMis titledaccordingtotheID3tag associatedwithit.
Re-recordingaPreviously RecordedDisc
If the discortrack has already been recorded to MEM, the message The Song(s) is Already Recorded displays.
StoppingtheRecording
Pressthe ●RECbuttonwhile recordingfromanMP3/WMACDor USBstoragedevicetodisplaythe stoprecordingoption.SelectStop RecordingSongtoMEM.
DeletingTracksFromMEM
Individualtracksandalltrackscan bedeletedfromMEM.
Todeleteindividualtracks, press andreleasetheDELbuttonwhile thetrackisplaying.
TodeletealltracksfromMEM, pressandholdtheDELbuttonwhile atrackisplaying.
PlayingFromMEM
PlayingBackaPreviously RecordedCD
TurntheTUNEknobtoselecta trackifMEMisalreadyplayingfrom thepreviouslyrecordeddisc.
- SelectRecordedDiscList.
- Selectthedisc.
- Selectthetrack.
SearchingForaTrack
Trackscanbesearchedforby:
- Playlists
- Artists
- Albums
- SongTitles
- Genres
Thenumberofobjectsineach categoryisshowninparentheses afterthecategory.
6-28InfotainmentSystem
Tosearchfortracks:
- Turnthemenuknob.
- SelectSearch.
- Select: Playlists, Artists, Albums, SongTitles, or Genres.
- Selectthetrack. Thesearchrate increasesifthemenuknobis continuouslyturnedwhile searchinginalist.
ShuffleSongs
SelecttheShuffleSongsoption from the MEMmenutorandomly playbacktracksstoredinMEM.
ConfiguringMEMFavorites
DuringMEM playback, press the FAV button to change between favorite categories. The favorite categories are:
- Playlists
- Artists
- Albums
- Genres
ToremoveMEMfavorites categories:
- PresstheCONFIGbutton.
- SelectRadioSettings.
- SelectMEMFavorites.
- Removethecheckmark from theboxtoremovethatMEM favoritecategory.
Replacethecheckmarktore-add theremovedcategory.
SavingMEMTracksas Favorites
Favoritescanbesavedby pressingandholdingoneof the1to6buttons.Favorites canbestoredaccordingtothe followinglist:
Playlist:Addscurrentlyplaying tracktotheplaylistsselected.
Artist: Savestheartist associated with the currently playing track in the indicated favorites position.
Album: Savesthealbum associated with the currently playing trackintheindicatedfavorites position.
Genre: Savesthegenreassociated with the currently playing track in the indicated favorites position.
CreatingPlaylists
Tocreateaplaylistusingtracks storedinMEM:
- SelectPlaylistfromtheMEM favorites.
- Selectthetracktobestoredin theplaylist.
- Pressandholdoneofthe 1to6buttonsuntilthetrackcan beheardagaintostorethe track.
4.Repeatsteps1 though3 to store additional tracks in the playlist.
Auxiliary Devices (RadiowithCD)
TheoptionalAUXinputallows portabledevicestoconnecttothe vehicleusingthe3.5mm(1/8in) inputjackortheUSBport.
Portabledevicesarecontrolledby usingthemenusystemdescribedin Operationonpage6-7.
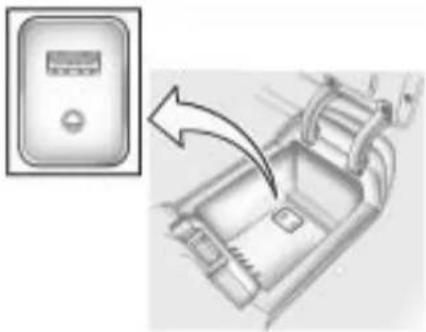
natural_image
Diagram showing a device with a control panel and an arrow pointing to a component inside a container (no text or symbols present)TheAUXinputislocatedinthe centerconsole.
3.5mmJack
Connecta3.5mm(1/8in)cableto theauxiliaryinputjacktousea portableaudioplayer.
Playbackofanaudiodevicethatis connectedtothe3.5mmjackcan onlybecontrolledusingthecontrols onthedevice.
AdjustingtheVolume
TurntheVOL/ ☐knobtoadjustthe volumeoftheinfotainmentsystem afterthevolumelevelhasbeenset ontheportableaudiodevice.
USBPort
ForvehicleswithaUSBport, the following devices may be connected and controlled by the infotainment system.
- iPod's
- PlaysForSureDevices(PFD)
- USBDrives
- Zune's
NotalliPod's, PFD's, USBDrives, and Zune's are compatible with the infotainmentsystem.
ConnectingandControlling aniPod™
NotalliPod'scanbecontrolledby theinfotainmentsystem.
ConnectinganiPod
ConnecttheiPodtotheUSBport.
SearchingForaTrack
Trackscanbesearchedforby:
- Playlists
- Artists
- Albums
- SongTitles
- Podcasts
- Genres
- Audiobooks
- Composers
6-30InfotainmentSystem
Tosearchfortracks:
- Turnthemenuknob.
- SelectSearch.
- Select: Playlists, Artists, Albums, SongTitles, Podcasts, Genres, Audiobooks, or Composers.
- Selectthetrack.
Shuffle
TurnthemenuknobandsetShuffle Songs(Random)toOnorOff, then pressthe ←BACKbuttontoreturn themainscreen.
On:Playstracksinthecurrent folderinrandomorder.
Off: Playstracksinthecurrent folderinsequentialorder.
Repeat
Turnthemenuknobandset RepeattoOnorOff, then press the ◇BACKbuttontoreturnthe mainscreen.
On: Repeatsthecurrenttrack.
Off:Playbackstartsfromthe beginningofthecurrenttrackafter thelasttrackfinishes.
ConnectingandControllinga PlaysForSureDevice(PFD) orZune™
ConnectingaPFDorZune
ConnectthePFDorZunetothe USBport.
SearchingForaTrack
Trackscanbesearchedforby:
- Playlists
- Artists
- Albums
- SongTitles
- Podcasts
- Genres
Tosearchfortracks:
- Turnthemenuknob.
- SelectSearch.
- Select: Playlists, Artists, Albums, Song Titles, Podcasts, or Genres.
- Selectthetrack.
ShuffleFunctionality
TurnthemenuknobandsetShuffle Songs(Random)toOnorOff.
On:Playscurrenttracksinrandom order.
Off: Playscurrenttracksin sequentialorder.
RepeatFunctionality
TurnthemenuknobandsetRepeat toOnorOff.
RepeatOn:Repeatsthecurrent track.
RepeatOff:Playbackstartsfrom thebeginningofthecurrenttrack afterthelasttrackfinishes.
ConnectingandControllinga USBDrive
Theinfotainmentsystemcanonly playback.mp3and.wmafilesfrom aUSBdrive.
Onlythefirst2,500songsare recognizedonthedevice.
Whenadeviceisnotsupported,the message"Nosupporteddatafound. Youcansafelydisconnectthe device"appears.
ConnectingaUSBDrive
ConnecttheUSBdrivetothe USBport.
SearchingForaTrack
Itisnormalforthesearchfeature totakesometimetodisplaythe informationafterreadingthedevice duetotheamountofinformation stored.
Filesthatdonothaveanymeta datastoredintheID3tagdisplayas Unknown.
Trackscanbesearchedforby:
- Playlists*
- Artists
- Albums
- SongTitles
- Genres
- FolderView
*Thisonlydisplaysifaplaylistis foundonthedevice.
Tosearchfortracks:
-
Turnthemenuknob.
-
SelectSearch.
-
Select: Playlists, Artists, Albums, Song Titles, Genres, or FolderView.
-
Selectthetrack.
ShuffleFunctionality
TurnthemenuknobandsetShuffle Songs(Random)toOnorOff.
On: Playscurrenttracksinrandom order.
Off: Playscurrenttracks in sequential order.
RepeatFunctionality
TurnthemenuknobandsetRepeat toOnorOff.
RepeatOn: Repeatsthecurrent track.
RepeatOff:Playbackstartsfrom thebeginningofthecurrenttrack afterthelasttrackfinishes.
Auxiliary Devices(Radio with CD/DVD and MEM)
TheoptionalAUXinputallows portabledevicestobeconnected usingthe3.5mm(1/8in.)inputjack ortheUSBport.
Portabledevicesarecontrolledby usingthemenusystemdescribedin Operationonpage6-7.

natural_image
Diagram showing a device with a control panel and a 3D layout of internal compartments (no text or symbols)TheAUXinputislocatedinthe centerconsole.
3.5mmJack
Connecta3.5mm(1/8in.)cableto theauxiliaryinputjacktousea portableaudioplayer.
Playbackofanaudiodevicethatis connectedtothe3.5mmjackcan onlybecontrolledusingthecontrols onthedevice.
AdjustingtheVolume
TurntheVOL/ ☐knobtoadjustthe volumeoftheinfotainmentsystem afterthevolumelevelhasbeenset ontheportableaudiodevice.
USBPort
The following devices maybe connected to the USB port and controlled by the infotainment system.
- iPod's
• USBMassStorageDevices
NotalliPod'sorUSBMassStorage Devicesarecompatiblewiththe infotainmentsystem.
ConnectingandControlling aniPod™
NotalliPod'scanbecontrolledby theinfotainmentsystem.
ConnectinganiPod
ConnecttheiPodtotheUSBport.
SelectingaTrack
Usingthecontrolbuttons:
- Press◀SEEKor▶SEEKto selectthepreviousornexttrack.
• TurntheTUNEknobtoselecta trackinthecurrentsubmenu. Thetrackwillstarttoplay.
PlayingTracksinRandomOrder
TurnthemenuknobandsetShuffle SongstoOnorOff.
ShuffleOn:Playscurrenttracksin randomorder.
ShuffleOff:Playscurrenttracksin sequentialorder.
SearchingForaTrack
Trackscanbesearchedforby:
- Playlists
- Artists
- Albums
- SongTitles
- Genres
- Composers
- Audiobooks
Thenumberofobjectsineach categoryisshowninparentheses afterthecategory.
Tosearchfortracks:
- Turnthemenuknob.
- SelectSearch.
- Select: Playlists, Artists, Albums, Song Titles, Genres, Composers, or Audiobooks.
- Selectthetrack. Thesearchrate increasesifthemenuknobis continuouslyturnedwhile searchinginalist.
ConnectingandControllinga USBDrive
Filesthatarenotstoredin foldersaredisplayedintheroot directory(USB).
ConnectingaUSBDrive
ConnecttheUSBdrivetothe USBport.
DisconnectingaUSBDrive
AUSBdriveshouldbeejected from the USBportbeforedisconnecting it. ToejectaUSBdrive:
- Turnthemenuknob.
- SelectUSBEject.
PlayingTracksinRandomOrder
Turnthemenuknobandthenset ShuffleSongstoOn.
SelectingaTrack
Using the control buttons:
- Press◀◀or▶▶Itoselectthe previousornexttrack.
- TurntheTUNEknobtoselecta trackinthecurrentsubmenu. Thetrackwillstarttoplay.
Selectingatrackinadifferent folder:
- Turnthemenuknob.
- SelectFolderList.
- Selectthefolder.
- Selectthetrack.
SearchingforTracks
Itisnormalforthesearchfeature totakesometimetodisplaythe informationafterreadingthedevice duetotheamountofinformation stored.
Filesthatdonothaveanymeta datastoredintheID3tagdisplayas Unknown.
Trackscanbesearchedby:
- Playlists
- Artists
- Albums
- SongTitles
- Genres
Thenumberofobjectsineach categoryisshowninparentheses afterthecategory.
Tosearchfortracks:
- Turnthemenuknob.
- SelectSearch.
- Select: Playlists, Artists, Albums, SongTitles, or Genres.
- Selectthetrack. Thesearchrate increasesifthemenuknobis continuouslyturnedwhile searchinginalist.
RecordingTrackstoMEM
SeeMassStorageMedia(MEM) on page 6-25 formoreinformation.
RearSeat Infotainment
RearSeatEntertainment (RSE)System
The vehicle may have a DVD Rear Seat Entertainment (RSE) system. The RSE system works with the vehicle's infotainment system. The DVD player is part of the frontradio. The RSE system includes a radio with a DVD player, two or more seat videodisplayscreens, audio/video jacks, two wireless headphones, and a remote control. See CD/DVD Player on page 6-22 or the separatenavigationsystem manual form more information on the vehicle's DVD system.
BeforeDriving
TheRSEisforrearseat passengersonly. Thedrivercannot safelyviewthevideoscreenwhile driving.
Insevereorextremeweather conditions, the RSEsystemmay not work until the temperature is within the operating range. The operating range is above -20^(-4^) and below 60^(140^) . If the temperature is outside of this range, heater cool the vehicle until it is within the operating range.
GlobalOff
Dependingontheinfotainment system,theRSEsystemmayhave aGlobalOfffeature.TheGlobalOff featuredisablesallRSEsystem features.Pressandholdtheradio powerbuttonformorethan threesecondsforGlobalOffto disabletheRSEfeatures.Onsome infotainmentsystems,theGlobal Offfeaturecanbeturnedoffby performingoneofthefollowing:
- Pressandholdtheradiopower buttonformorethan threeseconds.
- Insertorejectanydisc.
-
InsertaDVDvideodisc.
-
PresstheRemoteControlpower button.
- PresstheMEM/DVD/AUXbutton orthe ▶/llbuttonwhenaDVD videodiscisintheplayer.
- PresstheSRCbuttononthe steeringwheelwhenaDVD videodiscisintheplayer.
- Cycletheignition.
Headphones
RSEincludestwo2-channel wirelessheadphones.Channel1is dedicatedtotheDVDplayer,and Channel2isdedicatedtoany externalauxiliarydeviceconnected totheA/Vjacks.Theheadphones areusedtolistentovarious multi-media.Thewireless headphoneshaveanOn/Offbutton, channel1/2switch,andavolume control.Turntheheadphonesoff whennotinuse.
PushtheOn/Offbuttontoturnon theheadphones.Alightonthe headphonescomeson.Ifthelight doesnotcomeon,checkthe batteries.Intermittentsoundorstatic canalsoindicateweakbatteries. See "BatteryReplacement"laterin thissectionformoreinformation.
Infraredtransmittersareonthetop oftheleftseatbackvideoscreen. Theheadphonesshutoff automaticallytosavethebattery poweriftheRSEsystemisshutoff oriftheheadphonesareoutof rangeofthetransmittersformore thanthreeminutes.Movingtoofar forwardorsteppingoutofthe vehicle,cancausetheheadphones tolosethesignalorhavestatic.
Theheadphonesmayautomatically turnoffafterfourhoursof continuoususe.
Toadjustthevolumeonthe headphones, usethevolume control.
Forbestaudioperformance, the headphonesmustbeworncorrectly, withtheheadbandoverthetopof thehead.L(Left)andR(Right) areabovetheearpadsand areindicatorsastohowthe headphoneesshouldbeplacedon thehead.
Notice: Donotstorethe headphonesinheatordirect sunlight. This could damage the headphones and repairs will not be covered by the warranty. Storage in extreme cold can weaken the batteries. Keep the headphones stored in a cool, dry place.
If the foamear padsbecomeworn ordamaged, they can be replaced separately from the headphones. Se your dealer/retailer form more information.
6-36InfotainmentSystem
BatteryReplacement
Tochangethebatteries:
- Loosenthescrewtothebattery doorlocatedontheleftsideof theheadphones.
2.Slidethebatterydooropen. - ReplacethetwoAAAbatteries.
- Replacethebatterydoorand tightenthescrew.
Removethebatteriesifthe headphonesarenotgoingtobe usedforalongperiodoftime.
Audio/Video(A/V)Jacks
Ifavailable,theA/Vjacksare locatedontherearofthefloor console.Theyallowaudiovideo cablestobeconnectedfroman auxiliarydevicesuchasa camcorderoravideogamesystem.
TheA/Vjacksarecolorcoded:
- Yellowforvideoinput.
• Whiteforleftaudioinput.
• Redforrightaudioinput.
Powerforauxiliarydevicesisnot suppliedbytheradiosystem.
Tousetheauxiliaryinputsofthe RSEsystem:
- Connecttheauxiliarydevice cablestotheA/Vjacks.
- Poweronboththeauxiliary deviceandtheRSEvideo screen.
ChangingtheSourceontheVideo DisplayScreens
The image from the auxiliary device can be switched between the video displayscreens.
Tochangethedisplay:
- PresstheAUXbuttononthe remotecontroltochangethe sourceofbothvideoscreens fromtheDVDplayertothe auxiliarydevice.
-
PresstheAUXbuttonasecond timetochangetheleftvideo screensourcetotheDVDplayer andtherightvideoscreentothe auxiliarydevice.
-
PresstheAUXbuttonathird timetochangetheleftvideo screensourcetotheauxiliary deviceandtherightvideo screentotheDVDplayer.
- PresstheAUXbuttonafourth timetochangetesourceof bothvideoscreenstotheDVD player.
HowtoChangetheRSEVideo ScreenSettings
Thescreendisplaymode, brightness, and language can be changed from the setup menu using theremote control. To change a setting:
- Press □.
- Use ▲, ▼, ◀, ▶ and ← to selectthesettings.
- Press □againtoexitthe setupmenu.
AudioOutput
AudiofromtheDVDplayeror auxiliaryinputscanbeheard throughthefollowing:
- WirelessHeadphones
- VehicleSpeakers
TheRSEsystemtransmits the audiosignaltothewireless headphonesifanaudiosignalis available.See"Headphones"earlier inthissectionformoreinformation.
Thefrontseatpassengersare abletolistentoplaybackfrom theA/Vjacksthroughthevehicle speakersbyselectingRearA/Vas thesourceontheradio.
VideoScreens
The videoscreens are located in the back of the driver and front passenger seats.
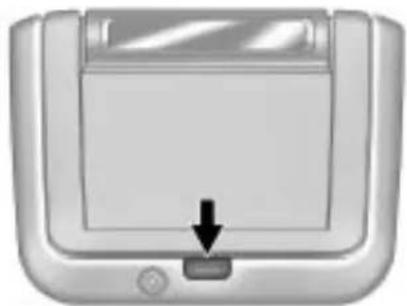
natural_image
Top-down view of a computer mouse with a black arrow pointing to the button (no text or symbols visible)Tousethevideoscreen:
- Pushthereleasebuttonlocated ontheseatbackconsole.
- Movethescreentothedesired viewingposition.
Pushthevideoscreendownintoits lockedpositionwhenitisnotinuse, thescreenturnsoffautomatically.
OnlytheleftRSEseatbackconsole containstheinfraredtransmittersfor thewirelessheadphones,theymay bevisibleaseightilluminatedLEDs. TheseLEDsarenotontheright videoscreen.Bothseatback consolescontainaninfrared receiverfortheremotecontrol. Theyarelocatedatthetopofeach console.
Notice: Avoid directly touching the videoscreen, as damagemay occur. See "CleaningtheVideo Screen" later in this section for more information.
VideoScreenInputJack
Eachvideoscreenisequipped withavideoinputjacktoallow videocablestobeconnectedfrom anauxiliarydevicesuchasa camcorderoravideogamesystem. Thissignalwilloverrideanyvideo providedbytheRSEsystem;either theDVDorAuxiliaryA/Vjack source.TheRSEsystemmustbe onforthisinputtooperate.
RemoteControl
Tousetheremotecontrol,aimitat thetransmitterwindowateither seatbackconsoleandpressthe button.Directsunlightorverybright lightcouldaffecttheabilityofthe RSEtransmittertoreceivesignals fromtheremotecontrol.Check thebatteriesiftheremotecontrol doesnotseemtobeworking.See "BatteryReplacement"laterinthis section.Objectsblockngthelineof sightcouldalsoaffectthefunction oftheremotecontrol.
IfaCD,DVD,orMP3discisinthe RadioDVDslot,theremotecontrol 📍buttoncanbeusedtoturnonthe videoscreendisplayandstartthe disc.Theinfotainmentsystemcan alsoturnonthevideoscreen display.SeeCD/DVDPlayer on page6-22 ortheseparate navigationsystemmanualformore information.
Notice: Storingtheremote controlinahotareaorindirect sunlightcandamageit, and the repairs will not be recovered by the warranty. Storage in extreme cold can weaken the batteries. Keep theremote control stored in cool, dry place.
RemoteControlButtons
(Power): Presstoturnthe videoscreensonandoff.
(Illumination): Presstoturnthe remotecontrolbacklighton. The backlighttimesoutafterseveral secondsifnootherbuttonis pressed.
(Title): Presstoreturntothe mainmenuoftheDVD. This function could varyforeachdisc.
(MainMenu):Presstoaccess theDVDmenu.TheDVDmenuis differentoneveryDVD.Usethe navigationarrowstomovethe cursor.Aftermakingaselection presstheenterbutton.Thisbutton onlyoperateswhenusingaDVD.
▲, ▼, ◀, ▶ (Menu Navigation Arrows): Usethearrowbuttonsto navigateethroughamenu.
◀(Enter):Presstoselectthe highlightedchoiceinanymenu.
□(DisplayMenu):Pressto adjustthebrightness, screen displaymode, and displaythe languagemenu.
(Return): Presstoexitthe currentactivemenuandreturnto thepreviousmenu. Thisbutton operatesonlywhenthedisplay menuoraDVDmenuisactive.
■(Stop):Presstostopplaying, rewinding, orfastforwardingaDVD. Presstwicetoreturntothe beginningoftheDVD.
▶ ||(Play/Pause):Presstostart playingaDVD.Presstopausea DVDwhileitisplaying.Pressagain tocontinueplaying.
Dependingontheinfotainment systeminthevehicle,DVD playbackmaybesloweddownby pressing ▶ ||then▶.Reverseslow playbypressing ▶ ||then◀.Press ▶ ||againtocancelslowplay.
◀(PreviousTrack/Chapter): Presstogotothestartofthe currenttrackorchapter.Press againtogototheprevioustrackor chapter.Thisbuttonmaynotwork whentheDVDdisplayingthe copyrightinformationorthe previews.
▶(NextTrack/Chapter):Press togotothebeginningofthenext chapterortrack. Thisbuttonmight notworkwhentheDVDDisplaying thecopyrightinformationorthe previews.
◀(FastReverse):Pressto quicklyreversetheDVDorCD. TostopfastreversingaDVDvideo, press ▶ ||Tostopfastreversinga DVDaudioorCD, release ◀. This buttonmightnotworkwhenthe DVDdisplayingthecopyright informationorthepreviews.
▶(FastForward):Presstofast forwardtheDVDorCD.Tostopfast forwardingaDVDvideo,press ▶II. TostopfastforwardingaDVDaudio orCD,release ▶Thisbuttonmight notworkwhentheDVDdisplaying thecopyrightinformationorthe previews.
(Audio): Presstochangeaudio tracksonDVDsthathavethis featurewhentheDVDdisplaying.
☐(Subtitles):Presstoturn ON/OFFsubtitlesandtomove throughsubtitleoptionswhena DVDdisplaying.
AUX(Auxiliary):Presstoswitch thevideodisplaybetweentheDVD playerandanauxiliarysource.
(Camera): Presstochangethe cameraangleonDVDsthathave thisfeaturewhentheDVDis playing.
☒(Clear)(IfAvailable):Pressthis buttonwithinthreesecondsafter inputtinganumericselection,to clearallnumericinputs.
≥10(DoubleDigitEntries) (IfAvailable):Presstthisbutton to selectchapterortracknumbers greater than 9. Presstthisbutton before inputting then number.
1through0(NumericKeypad): Thenumberedkeypadprovidesthe capabilityofdirectchapterortrack numberselection.
ReplacingtheRemoteControl
Iftheremotecontrolbecomeslost ordamaged, anewuniversal remotecontrolcanbepurchased. UseaToshiba ^® codesetfor replacementuniversalremote controls.
BatteryReplacement
Tochangetheremotecontrol batteries:
- Slidebacktherearcoveronthe remotecontrol.
- Replacethetwobatteriesinthe compartment.
- Replacethebatterycover.
Removethebatteriesfromthe remotecontrolifunusedforan extendedperiodoftime.
TipsandTroubleshootingChart
| ProblemRecommended | dAction |
| Nopower.Theignitionmightnotbeturnedto | ON/RUNorinACC/ACCESSORY. |
| Thepicturedoesnotfillthescreen.Thereareblackbordersonthetopandbottomoronbothsidesoritlooksstretchedout. | Checkthedisplaymodesettingsinthesetupmenubypressingthedisplaymenubuttonontheremotecontrol. |
| Inauxiliarymode,thepicturemovesorscrolls. | Checktheauxiliaryinputconnectionsatbothdevices. |
| Theremotecontroldoesnotwork.Check | tomakesurethereisnoobstructionbetweentheremotecontrolandthetransmitterwindow.Checkthebatteriestomakesuretheyarenotdeadorinstalledincorrectly. |
| Afterstoppingtheplayer,IpushPlaybutsometimestheDVDstartswherelleftfandsometimesatthebeginning. | Ifthestopbuttonwaspressedonetime,theDVDplayerresumesplayingwheretheDVDwasstopped.IfthestopbuttonwaspressedtwotimestheDVDplayerbeginstoplayfromthebeginningoftheDVD. |
TipsandTroubleshootingChart(cont'd)
| ProblemRecommended | dAction |
| Theauxiliarysourceisrunningbut thereisnopictureorsound. | CheckthattheRSEvideoscreen isintheauxiliarysourcemodeby pressingtheAUXbuttononthe remotecontrol.Checktheauxiliaryinput connectionsatbothdevices. |
| Sometimesthewirelessheadphone audiocutsoutorbuzzes. | Checkforobstructions,low batteries,receptionrange,and interferencefromcellulartelephone towersorbyusingacellular telephoneinthevehicle.Checkthattheheadphonesare oncorrectlyusingtheL(left)and R(right)ontheheadphones.Checkthattheheadphonesare positionedproperlywiththe headbandacrossthetopof thehead. |
| Ilosttheremoteand/orthe headphones. | Seeyourdealer/retailerfor assistance. |
| TheDVDdisplaying,butthereisno pictureorsound. | CheckthattheRSEvideoscreen issourcedtotheDVDplayerby pressingtheAUXbuttononthe remotecontrol. |
DVDDisplayErrorMessages
TheDVDdisplayerrormessage dependsonwhichradiothevehicle has.Thevideoscreenmaydisplay oneofthefollowing:
DiscLoad/EjectErroror
MechanicalError: Therearedisc loadorejectproblems.
DiscFormatErrororUnknown
Format: Thediscisinserted with thedisclabelwrongsideup, orif thediscisdamaged.
DiscRegionErrororDiscError:
Thediscisnotfromacorrect region.
NoDisclInserted:Nodiscis
presentwhenthe △EJECTor MEM/DVD/AUXbuttonispressed ontheradio.
DVDDistortion
Videodistortioncanoccurwhen operatingcellularphones, scanners, CBradios, GlobalPositionSystems (GPS) ^* , two-wayradios, mobilefax, orwalkietalkies.
Itmightbenecessarytoturnoffthe DVDplayerwhenoperatingoneof thesedevicesinornearthevehicle.
*ExcludestheOnStar ^® System.
CleaningtheRSESeatback Console
Useonlyacleanclothdampened withcleanwatertocleantheRSE seatbackconsolesurface.
CleaningtheVideoScreen
Useonlyacleanclothdampened withcleanwater. Usecarewhen touchingorcleaningthescreenas damagecouldresult.
Phone
Bluetooth(Overview)
VehicleswithaBluetoothsystem canuseaBluetoothcapablecell phonewithaHands-FreeProfileto makeandreceivephonecalls. The infotainmentsystemandvoice recognitionareusedtocontrolthe system. Thesystemcanbeused whiletheignitionisinON/RUNor ACC/ACCESSORY. Therangeof theBluetoothsystemcanbeupto 9.1m(30ft.). Notallphonessupport allfunctionsandnotallphoneswork withtheBluetoothsystem.See www.gm.com/bluetoothformore informationaboutcompatible phones.
BluetoothControls
Usethebuttonslocatedonthe infotainmentsystemandthe steeringwheeltooperatethe Bluetoothsystem.
SteeringWheelControls
/ _^* (Push To Talk): Press to answerincomingcalls,toconfirm systeminformation,andtostart voicerecognition.
☑ / ☑ (Mute/End Call): Press to endacall, rejectacall, ortocancel anoperation.
InfotainmentSystemControls
Forinformationabouthowto navigatethemenusystemusingthe infotainmentcontrols,seeOperation on page 6-7 .
(Phone):Presstoenterthe Phonemainmenu.
VoiceRecognition
Thevoicerecognitionsystemuses commandstocontrolthesystem anddialphonenumbers.
Noise: Thesystemmaynot recognizevoicecommandsifthere istoomuchbackgroundnoise.
WhentoSpeak: Atonesoundsto indicate that the system is ready for avoice command. Wait forthetone and then speak.
HowtoSpeak: Speak clearly in a calmand natural voice.
AudioSystem
When using the Bluetooth system, soundcomesthroughthe vehicle's frontaudiosystemspeakers and overridestheaudiosystem. Use the VOL/ ☐knobduringacallto changethevolumelevel. The adjusted volume level remains in memory for later calls. Thesystem maintains a minimum volume level.
OtherInformation
TheBluetooth ^® wordmark and logosareowned by the Bluetooth SIG, Inc. and any use of such marks by General Motors is under license. Other trademarks and tradenames are those of their respective owners.
SeeRadioFrequencyStatement on page12-17 forFCCinformation.
Bluetooth(Infotainment Controls)
Forinformationabouthowto navigatethemenusystemusingthe infotainmentcontrols,seeOperation on page 6-7 .
Pairing
ABluetoothenabledcellphone mustbepairedtotheBluetooth systemfirstandthenconnectedto thevehiclebeforeitcanbeused. Seethecellphonemanufacturer userguideforBluetoothfunctions beforepairingthecellphone.Ifa Bluetoothphoneisnotconnected, callswillbemadeusingOnStar Hands-FreeCalling,ifavailable. RefertotheOnStarOwner'sGuide formoreinformation.
Thepairingprocesscanbestarted byusingthevoicerecognition systemorthecontrolsonthe infotainmentsystem.
PairingInformation:
- Uptofivecellphonescanbe pairedtotheBluetoothsystem.
- Thepairingprocessisdisabled whenthevehicleismoving.
- TheBluetoothsystemlinkswith thefirstavailablepairedcell phoneintheorderthephone waspaired.
- Onlyonepairedcellphonecan beconnectedtotheBluetooth systematatime.
- Pairingshouldonlyneedtobe completedonce,unlesschanges tothepairinginformationhave beenmadeorthephoneis deleted.
Tolinktoadifferentpairedphone, see "LinkingtoaDifferentPhone" laterinthissection.
PairingaPhone
- PresstheCONFIGbutton.
- SelectPhoneSettings.
- SelectBluetooth.
6-44InfotainmentSystem
- SelectPairDevice(Phone). AfourdigitPINnumberappears onthedisplay.
- Start the pairing process on the cell phonethat will be paired to the vehicle. Referenc the cell phonemanufacturers user guide for information on this process. Locatethedevicenamed "General Motors" in the list on the cell phone and follow the instructions on the cell phoneto enter the four digit PIN number provided by the system.
- Thesystem prompts for an name for the phone and confirm the name provided. This name is used to indicate which phone is connected.
- Thesystemrespondswith "
hasbeen successfullypaired"afterthe pairingprocessiscomplete. - RepeatSteps1 through 7 topair additional phones.
ListingAllPairedandConnected Phones
- PresstheCONFIGbutton.
- SelectPhoneSettings.
- SelectBluetooth.
- SelectDeviceList.
DeletingaPairedPhone
- PresstheCONFIGbutton.
- SelectPhoneSettings.
- SelectBluetooth.
- SelectDeviceList.
- Select the phonetodelete and follow the on screen prompts.
LinkingtoaDifferentPhone
Tolinktoadifferentphone, thenew phonemustbeinthevehicleand availabletobeconnectedtothe bluetoothsystembeforetheprocess isstarted.
- PresstheCONFIGbutton.
-
SelectPhoneSettings.
-
SelectBluetooth.
- SelectDeviceList.
- Selectthenewphonetolinkto and followtheonscreen prompts.
Ifdeleteisselected, the highlightedphonewillbe deleted.
MakingaCall
RadiowithCD
-
Pressthe buttontwice.
2.Enterthecharactersequence. See "EnteringaCharacter Sequence" in Operation on page 6-7 formoreinformation. -
SelectCalltostartdialingthe number.
RadiowithCD/DVDandMEM
- Pressthe button.
- SelectEnternumber.
- Enterthecharactersequence. See "EnteringaCharacter Sequence" in Operation on page 6-7 formoreinformation.
- SelectCalltostartdialingthe number.
AcceptingorDecliningaCall
Whenacallisreceived,the infotainmentsystemmutesanda ringtoneisheardinthevehicle.
AcceptingaCall
TurnthemenuknobtoAnswerand presstheSELECTbutton.
DecliningaCall
TurnthemenuknobtoDeclineand presstheSELECTbutton.
CallWaiting
Callwaitingmustbesupported on the bluetooth phone and enabled by the wireless service carriertowork.
AcceptingaCall
TurnthemenuknobtoAnswerand presstheSELECTbutton.
DecliningaCall
TurnthemenuknobtoDeclineand presstheSELECTbutton.
SwitchingBetweenCalls (CallWaitingCallsOnly)
Toswitchbetweencalls:
- Turnthemenuknob.
- SelectSwitchCallfrom themenu.
ConferenceCalling
Conferencecallingandthreeway callingmustbesupportedonthe bluetoothphoneandenabledbythe wirelessservicecarriertowork.
Tostartaconferencewhileina currentcall:
- Turnthemenuknob.
- SelectEnterNumber.
3.Enterthecharactersequence thenselectcall.See"Entering aCharacterSequence"in Operation on page 6-7 for moreinformation. - Afterthecallhasbeenplaced, turnthemenuknobbutton and chooseMergeCalls.
- To add more caller to the conference call, repeat steps 1 through 4. The amount of caller that can be added are limited by your wireless service carrier.
EndingaCall
Turnthemenuknobandselect HangUp.
MutingaCall
ToMuteaCall
Turnthemenuknobandselect MuteCall.
ToCancelMute
Turnthemenuknobandselect MuteCall.
DualToneMulti-Frequency (DTMF)Tones
Thein-vehicleBluetoothsystemcan sendnumbersduringacall. This is usedwhencallingamenudriven phonesystem.
- Turnthemenuknobandselect EnterNumber.
- Enterthecharactersequence, see "EnteringaCharacter Sequence" in Operation on page 6-7 formoreinformation.
Bluetooth (VoiceRecognition)
Pairing
ABluetoothcellphonemustbe pairedtotheBluetoothsystemand thenconnectedtothevehiclebefore itcanbeused.Seethecellphone manufacturersuserguidefor Bluetoothfunctionsbeforepairing thecellphone.IfaBluetoothphone isnotconnected,callswillbemade usingOnStar® Hands-FreeCalling, ifavailable.RefertotheOnStar owner'sguideformoreinformation.
Thepairingprocesscanbestarted byusingthevoicerecognition systemorthecontrolsonthe infotainmentsystem.
PairingInformation:
• Uptofivecellphonescanbe pairedtotheBluetoothsystem.
• Thepairingprocessisdisabled whenthevehicleismoving.
- TheBluetoothsystemlinkswith thefirstavailablepairedcell phoneintheorderthephone waspaired.
- Onlyonepairedcellphonecan beconnectedtotheBluetooth systematatime.
- Pairingonlyneedstobe completedonce, unless the pairinginformationchangesor thephoneisdeleted.
Tolinktoadifferentpairedphone, seeLinkingtoaDifferentPhone laterinthissection.
PairingaPhone
-
Press Ⓜ/山
-
Forvehicleswithouta navigationsystem,the systemresponds"Ready", followedbyatone.
-
Forvehicleswitha navigationsystem, the systemrespondswitha tone. Afterthetonesay "HandsFree". Thesystem responds "Ready", followed byatone.
-
Say "Bluetooth". Thesystem responds "Bluetoothready", followed by atone.
-
Say "Pair". Thesystemresponds withinstructionsandafour-digit PINnumber.ThePINnumber willbeusedinStep4.
-
Start the pairing process on the cell phonethat will be paired to the vehicle. Referenc the cell phonemanufacturers user guide for information on this process. Locat the device named "General Motors" in the list on the cell phone and follow the instructions on the cell phoneto enter the four-digit PIN number that was provided in Step 3.
- Thesystem prompts for an a name for the phone. This nam will be used to indicate which phone is connected. Thesystem confirms then a name.
- Thesystemrespondswith "
hasbeen successfullypaired"afterthe pairingprocessiscomplete. - RepeatSteps1 through 7 for additional phonestobepaired.
ListingAllPairedandConnected Phones
-
Press
-
Forvehicleswithouta navigationsystem,the systemresponds"Ready", followedbyatone.
-
Forvehicleswitha navigationsystem, the systemrespondswitha tone. Afterthetonesay "HandsFree". Thesystem responds"Ready", followed byatone.
-
Say "Bluetooth". Thesystem responds "Bluetoothready", followed by atone.
- Say "List". Thesystemlistsall thepairedBluetoothdevices. Thesystemwillrespond"is connected"ifaphoneis connectedtothevehicle.
DeletingaPairedPhone
1. Press
- Forvehicleswithouta navigationsystem,the systemresponds"Ready", followedbyatone.
-
Forvehicleswitha navigationsystem, the systemrespondswitha tone. Afterthetonesay "HandsFree". Thesystem responds "Ready", followed byatone.
-
Say "Bluetooth". Thesystem responds "Bluetoothready", followed by atone.
-
Say "Delete". Thesystemasks which phonetodelete followed byatone.
-
Saythenameofthephoneto bedeleted. If the phonename is unknown, use the "List" command foralistofallpaired phones. Thesystem responds "Would you liketodelete
? Yes or No", followed by at one. - Say "Yes" to delet the phone.
Thesystem responds "OK, deleting
"
LinkingtoaDifferentPhone
1. Press Ⓞ/山
- Forvehicleswithouta navigationsystem,the systemresponds"Ready", followedbyatone.
-
Forvehicleswitha navigationsystem,the systemrespondswitha tone.Afterthetonesay "HandsFree".Thesystem responds"Ready",followed byatone.
-
Say "Bluetooth". Thesystem responds "Bluetoothready", followed by atone.
- Say "Changephone". The system responds "Please wait while search for other phones".
- Ifanotherphoneisfound, theresponsewillbe "
• Ifanotherphoneisnot found, theoriginalphone remainsconnected.
StoringNameTags
Thesystemcanstoreupto thirtyphonenumberzasname tagsthataresharedbetweenthe BluetoothandOnStarsystems.
Thesystemusesthefollowing commandstostoreandretrieve phonenumber:
- Store
- DigitStore
- Directory
UsingtheStoreCommand
Thestorecommandallowsaphone numbertobestoredwithout enteringthedigitsindividually.
-
Press
-
Forvehicleswithouta navigationsystem,the systemresponds"Ready", followedbyatone.
-
Forvehicleswitha navigationsystem,the systemrespondswitha tone.Afterthetonesay "HandsFree".Thesystem responds"Ready",followed byatone.
-
Say "Store". Thesystem responds "Store, number please", followed by atone.
-
Say the complete phonenumber to bestored at once with no pauses.
- Ifthesystemrecognizes thenumber,theresponseis "OK,Storing".
- Ifthesystemdoesnot recognizethephone number,theresponseis "Store
-
After the system store the phonenumber, it responds "Pleasesaythenametag", followed by atone.
-
Sayanametagforthephone number. Thenametagis recordedandthesystem responds "Abouttostore
. Doesthat soundOK?". -
Ifthenametagdoesnot soundcorrect, say "No" and repeatStep5.
- Ifthenametagsounds correct, say "Yes" and the nametagisstored. After thenumberisstored the systemreturnstothe mainmenu.
UsingtheDigitStoreCommand
Thedigitstorecommandallowsa phonenumbertobestoredby enteringthedigitsindividually.
-
Press
-
Forvehicleswithouta navigationsystem,the systemresponds"Ready", followedbyatone.
-
Forvehicleswitha navigationsystem, the systemrespondswitha tone. Afterthetonesay "HandsFree". Thesystem responds "Ready", followed byatone.
-
Say "DigitStore". Thesystem responds with "Pleasesaythe first digit to store", followed by atone.
-
Saythefirstdigittobestored. Thesystemwillrepeatbackthe digititheardfollowedbyatone. Continueenteringdigitsuntilthe numbertobestorediscomplete.
- Ifanunwantednumberis recognizedbythesystem, say "Clear"atanytimeto clearthelastnumber.
• Tohearallofthenumbers recognizedbythesystem, say "Verify"atanytime.
-
After the completenumber has been entered, say "Store". The system responds "Pleasesay thenametag", followed by atone.
-
Sayanametagforthephone number. Thenametagis recordedandthesystem responds "Abouttostore
. Doesthat soundOK?". -
Ifthenametagdoesnot soundcorrect, say "No" and repeatStep5.
- Ifthenametagsounds correct, say "Yes" and the nametagisstored. After thenumberisstored the systemreturnstothe mainmenu.
UsingtheDirectoryCommand
The directorycommandlistsallof thenametagsstoredbythesystem. Tousethedirectorycommand:
-
Press
-
Forvehicleswithouta navigationsystem,the systemresponds"Ready", followedbyatone.
-
Forvehicleswitha navigationsystem, the systemrespondswitha tone. Afterthetonesay "HandsFree". Thesystem responds "Ready", followed byatone.
-
Say "Directory". Thesystem responds "Directory" and lists all storenametags. Thesystem return to themainmenu when the list is complete.
DeletingNameTags
Thesystemusesthefollowing commandstodeletenametags:
- Delete
- Deleteallnametags
UsingtheDeleteCommand
Thedeletecommandisusedto deletespecificnametags.
Todeletenametags:
-
Press ♂/山
-
Forvehicleswithouta navigationsystem,the systemresponds"Ready", followedbyatone.
-
Forvehicleswitha navigationsystem, the systemrespondswitha tone. Afterthetonesay "HandsFree". Thesystem responds "Ready", followed byatone.
-
Say "Delete". Thesystem responds "Delete, please say thenametag", followed by atone.
- Saythenametagtobedeleted. Thesystemresponds"Would youliketodelete,
? Pleasesayyesorno".
- Ifthenametagiscorrect, say "Yes" todeletethe nametag. Thesystem respondswith "OK, deleting
- Ifthenametagisincorrect, say“No”. Thesystem respondswith“No.OK, let's tryagain, pleasesaythe nametag.”
UsingtheDeleteAllNameTags Command
TheDeleteAllNameTags commanddeletesallstoredphone booknametagsandroutename tagsforOnStar,ifstored.
Todeleteallnametags:
-
Press
-
Forvehicleswithouta navigationsystem,the systemresponds"Ready", followedbyatone.
-
Forvehicleswitha navigationsystem, the systemrespondswitha tone. Afterthetonesay "HandsFree". Thesystem responds "Ready", followed byatone.
-
Say "Deleteallnametags". The system responds "You are about to delete all nametags stored in your phonedirectory and your routed destination directory. Are you sure you want to do this? Pleasesayyesorno."
-
Say"Yes"todeleteall nametags.
- Say“No”tocancelthe functionandreturntothe mainmenu.
MakingaCall
Callscanbemadeusingthe followingcommands:
- Dial
- DigitDial
- Call
- Re-dial
UsingtheDialCommand
-
Press
-
Forvehicleswithouta navigationsystem,the systemresponds"Ready", followedbyatone.
-
Forvehicleswitha navigationsystem, the systemrespondswitha tone. Afterthetonesay "HandsFree". Thesystem responds "Ready", followed byatone.
-
Say "Dial". Thesystemresponds "Dialusing
. "Numberplease", followed by atone. -
Saytheentirenumberwithout pausing.
-
Ifthesystemrecognizes thenumber,itresponds with"OK,Dialing"anddials thenumber.
- Ifthesystemdoesnot recognizesethenumber, it confirmsthenumbers followedbyatone. If the numberiscorrect, say "Yes". Thesystemresponds "OK, Dialing" anddialsthe number. If thenumberis notcorrect, say "No". The systemwillaskforthe numberagain.
UsingtheDigitDialCommand
-
Press Ⓞ/山
-
Forvehicleswithouta navigationsystem,the systemresponds"Ready", followedbyatone.
-
Forvehicleswitha navigationsystem,the systemrespondswitha tone.Afterthetonesay "HandsFree".Thesystem responds"Ready",followed byatone.
-
Say "DigitDial". Thesystem responds "Digitdialusing
, pleasesaythe firstdigitodial", followed by atone. -
Saythedigitstobedialedoneat atime. Thesystemrepeatsback thedigititheardfollowedby atone.
- Continueenteringdigitsuntilthe numbertobedialediscomplete. Afterthewholenumberhas beenentered, say "Dial". The systemresponds"OK,Dialing" anddialsthenumber.
- Ifanunwantednumberis recognizedbythesystem, say "Clear"atanytimeto clearthelastnumber.
• Tohearallofthenumbers recognizedbythesystem, say "Verify"atanytime.
UsingtheCallCommand
1. Press
- Forvehicleswithouta navigationsystem,the systemresponds"Ready", followedbyatone.
-
Forvehicleswitha navigationsystem, the systemrespondswitha tone. Afterthetonesay "HandsFree". Thesystem responds "Ready", followed byatone.
-
Say "Call". Thesystemresponds "Callusing
. Pleasesaythenametag", followedbyatone.
3. Saythenametagoftheperson tocall.
- Ifthesystemrecognizes thenametagitresponds "OK, calling,
" anddialsthenumber. - Ifthesystemdoesnot
recognizethenametag, it
confirmsthenametag
followedbyatone. Ifthe
nametagiscorrect, say
"Yes". Thesystemresponds
with "OK, calling,
" anddialsthenumber. Ifthenametagisnot correct, say "No". The systemwillaskforthe nametagagain.
Onceconnected, thepersoncalled willbeheardthroughtheaudio speakers.
UsingtheRe-dialCommand
1. Press
- Forvehicleswithouta navigationsystem,the systemresponds"Ready", followedbyatone.
-
Forvehicleswitha navigationsystem, the systemrespondswitha tone. Afterthetonesay "HandsFree". Thesystem respondswith"Ready", followedbyatone.
-
Afterthetone, say "Re-dial". The system responds "Re-dialusing
" and dial the last number called from the connected Bluetooth phone.
Onceconnected, thepersoncalled willbeheardthroughtheaudio speakers.
ReceivingaCall
When an incoming call is received, the audiosystemmutes and aring tone is heardin the vehicle.
- Press Photoanswerthecall.
- Press/☑toignoreacall.
CallWaiting
Callwaitingmustbesupported on theBluetoothphoneandenabledby thewirelessservicecarrier.
- Press ⓦwɛtoansweran incomingcallwhenanothercall isactive.Theoriginalcallis placedonhold.
- Press?eagaintoreturntothe originalcall.
• Toignoretheincomingcall, no actionisrequired. - Press/√todisconnectthe currentcallandswitchtothecall onhold.
Three-WayCalling
Three-way calling must be supported on the Bluetooth phone and enabled by the wireless service carrier.
- Whileonacall, press 📂. The systemrespondswith "Ready", followedbyatone.
- Say "Three-waycall". Thesystemrespondswith "Three-waycall, please saydialorcall".
- Usethedialorcallcommandto dialthenumberofthethirdparty tobecalled.
- Oncethecallisconnected, press Ⓞw ^1 tolinkallthecallers together.
EndingaCall
Press/✉toendacall.
MutingaCall
During acall, all sounds from inside the vehicle can be muted so that the person on the other end of the call can not hear them.
ToMuteacall
- Press 📄. Thesystem responds "Ready", followed by atone.
- Say "MuteCall". Thesystem responds "Callmuted".
ToCancelMute
- Press 📂. Thesystem responds "Ready", followed by atone.
- Afterthetone, say "MuteCall". Thesystemresponds "Resumingcall".
TransferringaCall
Audiocanbetransferredbetween their-vehicleBluetoothsystem and thecellphone.
ToTransferAudiototheCell Phone
During acallwiththeaudiointhe vehicle:
-
Press _W^L . Thesystem responds "Ready", followed by atone.
-
Say "TransferCall." Thesystem responds "Transferringcall" and the audiotransferstothecell phone.
ToTransferAudiototheln-Vehicle BluetoothSystem
Thecellphonemustbepaired andconnectedwiththeBluetooth systembeforeacallcanbe transferred.Theconnectionprocess cantakeuptotwominutesafterthe ignitionisturnedtoON/RUNor ACC/ACCESSORY.
For vehicles without an navigation system, press _w during a call with the audio on the cell phone, the audiotransfer to the vehicle.
For vehicles with an navigation system, press P during acall with the audio on the cell phone. If the audiodoes not transferto the vehicle, use the audiotransfer feature on the cell phone. Se the cell phonemanufacturers user guide for more information.
VoicePass-Thru
Voicepass-thruallowsaccesstothe voicerecognitioncommandsonthe cellphone.Seethecellphone manufacturersuserguidetoseeif thecellphonesupportsthisfeature.
Toaccesscontactsstoredinthecell phone:
- Press
- Forvehicleswithouta navigationsystem,the systemresponds"Ready", followedbyatone.
- Forvehicleswitha navigationsystem, the systemrespondswitha tone. Afterthetonesay "HandsFree". Thesystem responds "Ready", followed byatone.
-
Say "Bluetooth". Thesystem responds "Bluetoothready", followed by atone.
-
Say "Voice". Thesystem responds "OK, accessing
"
- Thecellphone'snormal promptmessageswillgo throughitscycleaccording to the phone'soperating instructions.
DualToneMulti-Frequency (DTMF)Tones
Thein-vehicleBluetoothsystemcan sendnumbersandthenumbers storedasnametagsduringacall. Usethisfeaturewhencallinga menudrivenphonesystem.Account numberscanalsobestoredforuse.
SendingaNumberDuringaCall
- Press 📞. Thesystem responds "Ready", followed by atone.
- Say "Dial". Thesystemresponds "Sayanumbertosendtones", followedbyatone.
- Saythenumbertosend.
- If the system recognizes thenumber, it responds "OK, SendingNumber" and the dialtoesaresent and the call continues.
- Ifthesystemdoesnot recognizesethenumber, it responds "DialNumber, pleasesayyesorno?", followedbyatone.Ifthe numberiscorrect,say "Yes".Thesystemresponds "OK,SendingNumber" and thedialtonesaresentand thecallcontinues.
SendingaStoredNameTag DuringaCall
- Press ⓄW ^2 . Thesystem responds "Ready", followed by atone.
- Say "Sendnametag." The system responds "Sayaname tagtosendtones", followed by atone.
- Saythenametagtosend.
- If the system recognizes thenumber, it responds "OK, Sending
- Ifthesystemdoesnot recognizesethenametag, it responds "Dial
ClearingtheSystem
Unlessinformationisdeletedoutof their-vehicleBluetoothsystem, it willberetainedindefinitely. This includesallsavednametagsinthe phonebookandphonepairing information. Forinformationonhow todeletethisinformation, seethe previoussectionsonDeletinga PairedPhoneandDeleting NameTags.
Bluetooth(Navigation)
Forinformationabouthowto navigatethemenusystemusing theinfotainmentcontrols,see "Overview"underIntroduction,in theNavigationsupplement.
BluetoothPairing
TomakecallswithaBluetoothcell phonethroughyourvehicle, it must bepaired to the vehicle's Bluetooth system first and then connected to the vehicle before it can be used. Referto the cell phone manufacturer's user guide for Bluetooth pairing instructions. If a Bluetooth phone is off or not connected, call will automatically be made using the OnStar Hands-Free Calling feature, if available. Referto the OnStar owner's guide for more information about OnStar Hands-Free Calling.
Thepairingprocesscanbestarted byusingthevoicerecognition systemorthetcontrolsonthe infotainmentsystem.
PairingInformation:
• Uptofivecellphonescanbe pairedtotheBluetoothsystem.
- Thepairingprocessisdisabled whenthevehicleismoving.
• TheBluetoothsystem automaticallylinkswiththe pairedcellphoneintheorder thephoneswerepaired.
- Onlyonepairedcellphonecan beconnectedtothevehicle's Bluetoothsystematatime.
• Pairingshouldonlyneedtobe completedonce.
PairingaPhone
- PresstheCONFIGhardkey repeatedly until the Phonemenu is shown to touch the Phonetab on the screen.
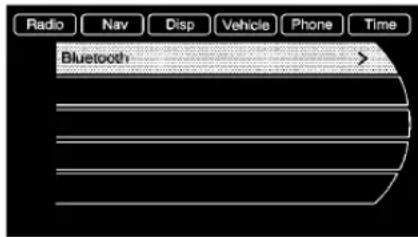
text_image
Radio Nav Disp Vehicle Phone Time Bluetooth >- SelecttheBluetoothsubmenu.

text_image
Bluetooth Device List > Add new Phone > Add new GPS device >- Select "AddNewPhone", the pairing process will begin searching for Bluetooth devices on your cellularpone. Seethe cellphonemanufacturer's user guide for information on this process.
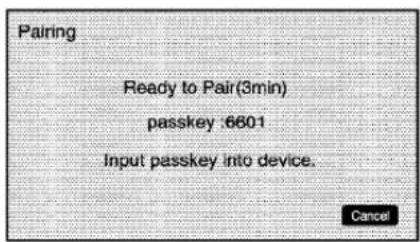
text_image
Pairing Ready to Pair(3min) passkey :6601 Input passkey into device. CancelOnthecellphone,locatethe devicenamed"GeneralMotors". Followtheinstructionsgivenon thecellphoneorfollowthevoice prompts,toenterthefourdigit PINnumberthathasbeen provided.
-
Thesystemvoiceprompt requeststhatyousaythename youwantusedforthephonethat isbeingpaired.Useanamethat bestdescribesthephone.The systemvoicepromptthen repeatsthenameyouprovided forconfirmation,say"Yes".
-
Thesystemrespondswith "phonenumberhasbeen successfullypaired"afterthe pairingprocessiscomplete.
ListingAllPairedandConnected Phones
- PresstheCONFIGhardkey repeatedly until the Phonemenu is shown out touch the Phonetab displayed on the screen.
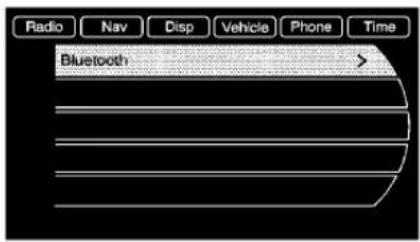
text_image
Radio Nav Disp Vehicle Phone Time Bluetooth >- SelecttheBluetoothsubmenu.
6-60InfotainmentSystem
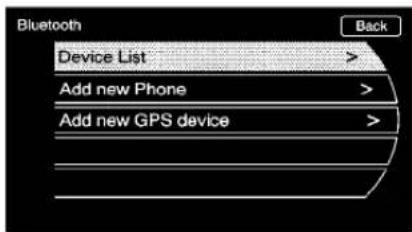
text_image
Bluetooth Device List > Add new Phone > Add new GPS device >- SelecttheDeviceListsubmenu.Alistofallpreviouslypairedphones willbedisplayed.Ifthereisa currentlypairedphone,acheck markwillappearontherightsideof thePhonenumber.
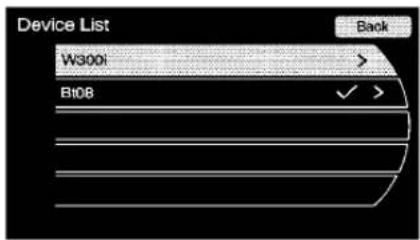
text_image
Device List W300i B108 BackDeletingaPairedPhone
- PresstheCONFIGhardkey repeatedly until the Phonemenu is shown to touch the Phonetab on the screen.

text_image
Radio Nav Disp Vehicle Phone Time Bluetooth >- SelecttheBluetoothsubmenu.
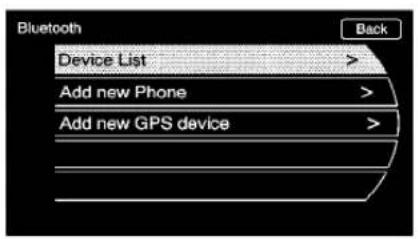
text_image
Bluetooth Back Device List > Add new Phone > Add new GPS device >- Selectthe"DeviceList submenu.

text_image
Device List W300i B108 Back- Select the phonetobedeleted and then follow the on screen prompt to delete the device from the system.

text_image
Device Name: W300i Profile :Hands-Free Back Connect Delete5.Onceaphonehasbeendleted, theonlywaytoconnectback to thatphoneistopairthephone again.See"BluetoothPairing" earlierbeforetheprocessis started.
6-62InfotainmentSystem
PairingaPhoneintheDeviceList
Inordertopairtoanotherphone, thenewphoneintheDeviceList, makesurethephoneyouwouldlike topairisinthevehicleandavailable tobeconnectedtotheBluetooth systembeforetheprocessis started.
- PresstheCONFIGhardkey repeatedly until the Phonemeenu is shown to touch the Phonetab on the screen.
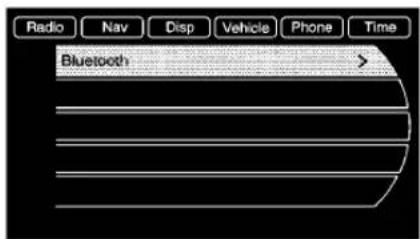
text_image
Radio Nav Disp Vehicle Phone Time Bluetooth >- SelecttheBluetoothsubmenu.

text_image
Bluetooth Device List > Add new Phone > Add new GPS device >- SelecttheDeviceListsubmenu.4. Selectthephonetobepaired and then follow theonscreen prompts.
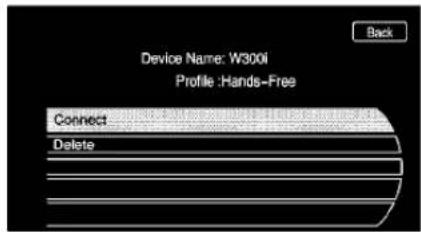
text_image
Device Name: W300i Profile :Hands-Free Back Connect Delete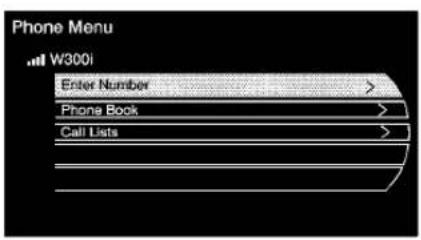
text_image
Phone Menu W300i Enter Number > Phone Book > Call Lists >- The Phonemenu will be displayed with the name of the phone paired.
AcceptingorDecliningan IncomingCall
When an incoming call is received, the infotainment system mutes any audiobeing played and sounds a ringtone.
AcceptingaCall
Press ☐ on the steering wheel control to answer the incoming call, or touch the Answer option to answer the call.
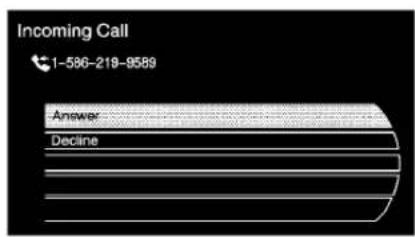
text_image
Incoming Call 1-586-218-9589 Answer DeclineDecliningaCall
Pressthe ☐/☑onthesteering wheelcontrolsorselecttheDecline optiontodeclinethecall.
CallWaiting
Callwaitingmustbesupported on theBluetoothphoneandenabledby thewirelessservicecarriertowork.
SwitchingCalls(OnlyAvailable withCallWaiting)
This features allows youtoswitch between callsmaking one call active and placing the other on hold.

text_image
Connected Time 586 492 1431 Unknown Hang Up Enter Number > Switch Call Merge Calls Mute Call6-64InfotainmentSystem
ConferenceCalling
Conferenceandthreewaycalling mustbesupportedontheBluetooth phoneandenabledbythewireless servicecarriertowork.
Tostartaconferencewhileina currentcall:
1.Pressthe
hardkeyonthe
faceplateuntilthePhonemain screenisshownwiththecurrent activecall.

text_image
Connected 586-215-9583 Hang Up Enter Number > Muto Call- Selectthe "EnterNumber" option.
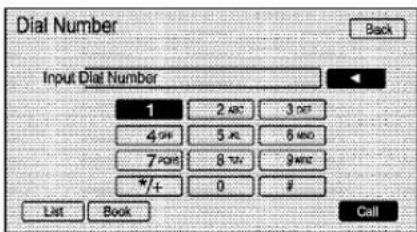
text_image
Dial Number Back Input Dial Number 1 2 ABC 3 DEF 4 OFF 5 XL 6 MNC 7 POS 8 TAV 9 MNC *+ 0 # List Book Call-
Makeanothercall. The first call will be placed on hold while the second call is dialing and connected.
-
Tomakeaconferencecall, selectthe"Merge"optionwhich willmergebothcallsintoone conferencecall.
-
To add more caller to the conference call, repeat Steps2 and 4. The amount of caller that can be added are limited by your wireless service carrier.
EndingaCall

text_image
Connected 586-215-9583 Hang Up Enter Number > Mute CallThereareafewwaysthatacallcan beended:
1.Pressthe
hardkey.
- SelectHangUp.
MuteorUnMuteaCall
- Pressthe hardkey.
- SelecttheMutecalloption to mutethecall.
- Select the Mutecal option again tounmutethecall.
DualToneMulti-Frequency (DTMF)Tones
Thein-vehicleBluetoothsystemcan sendnumbersduringacallfor "Dial1or2", forphonenumber extensions, orvoicemailboxes.
- Pressthe hardkey.
- Select "EnterNumber" option and enter then number sequence.
6-66InfotainmentSystem
NOTES
ClimateControls
ClimateControlSystems
AutomaticClimateControl
System......7-1
DualAutomaticClimateControl
System....7-4
AirVents
AirVents....7-8
Maintenance
AirlIntake....7-8
PassengerCompartmentAir
Filter....7-8
ClimateControlSystems
AutomaticClimateControlSystem
Theheating, cooling, and ventilation for the vehicle can be controlled with this system.

text_image
A B C D E F G H IA.Power
B. TemperatureControl
C.FanControl
D. AirDeliveryModeControl
E. Recirculation
F.AUTO
G.Defrost
H.AirConditioning
I. RearWindowDefogger
7-2ClimateControls
AutomaticOperation
Thesystemautomatically controls the fanspeed, airdelivery, air conditioning and recirculation in ordertoheatorcoolthevehicle to the desired temperature.
WhentheAUTOindicatorlightis on, the system is in full automatic operation. If the air delivery mode, fanspeed, recirculation or air conditioning setting is adjusted, the AUTO indicator turn soff and the selected settings will appear on the display.
Toplacethesysteminautomatic modedothefollowing:
-
PressAUTO.
-
Set the temperature. Allow the system timetostabilize. Adjust the temperature as needed for best comfort.
▲/▼(TemperatureControl): Presstoincreaseordecreasethe temperature.
ManualOperation
(OPower): Presstoturnthefan onoroff.
* (FanControl): Pressto increase or decrease the fanspeed. The fanspeed setting appear on themaindisplay. Pressing either button cancels automatic fan control and the fan can be controlled manually. Press AUTO to return to automatic operation.
(AirDeliveryMode
Control): Presstochangethe directionoftheairflow. The current modeappearsinthedisplayscreen. Pressingeitherbuttoncancels automaticairdeliverycontrol and thedirectionoftheairflowcanbe controlledmanually. PressAUTOto returntoautomaticoperation.
Tochangethecurrentmode, select oneofthefollowing:
(Vent):Airisdirectedtothe instrumentpaneloutlets.
(Bi-Level):Airisdivided betweentheinstrumentpanel outletsandtheflooroutlets.
(Tri-Level):Airisdivided betweenthewindshield,instrument panel,andflooroutlets.
(Floor):Airisdirectedtothe flooroutlets.
(Defog): Clearstehindowsof fogormoisture. Airisdirectedtothe windshieldandflooroutlets.
(Defrost): Clear the windshield of fogor frost more quickly. Air is directed to the windshield. Selecting defrost will disable automatic control.
Forbestresults, clearallsnow andicefromwindshieldbefore defrosting.
(AirConditioning): Pressto turn the air conditioningsystem on or off. If the fanisturned off for the outside temperature falls below freezing, the air conditioningsystem will not run.
Pressingthisbuttoncancels automaticairconditioningandturns offtheairconditioner.PressAUTO toreturntoautomaticoperation andtheairconditionerruns automaticallyasneeded.When theindicatorlightison,theair conditionerrunsautomatically to cooltheairinsidethevehicleorto drytheairneededtodefogthe windshieldfaster.
(Recirculation): Pressto alternate between recirculating air inside the vehicle or pulling in outside air. When the indicator light is on, air is being recirculated inside the vehicle. This helpsto quickly cool the air inside the vehicle or prevent outside air and donors from entering.
Pressingthisbuttoncancels automaticrecirculation.PressAUTO toreturntoautomaticoperationand recirculationrunsautomaticallyas needed.
RearWindowDefogger
(RearWindowDefogger): Presstoturntherearwindow defoggeronoroff.
Therearwindowdefoggerturns offautomaticallyafterabout 10minutes.Ifturnedonagainit runsforabout5minutesbefore turningoff.Thedefoggercanalso beturnedoffbyturningtheignition toACC/ACCESSORYor LOCK/OFF.
Therearwindowdefoggercanbe settoautomaticoperation,see ClimateandAirQualityunder VehiclePersonalization on page 4-38 .Whenautoreardefog isselected,therearwindow defoggerturnsonautomatically whentheinteriortemperatureis coldandtheoutsidetemperatureis about40°Fandbelow.Theauto reardefoggerturnsoffautomatically afterabout10minutes,orafter 5minutesiftheoutsidetemperature isnotascold.
Forvehicleswithheatedoutside rearviewmirrors,theyturnonwhen therearwindowdefoggerbuttonis onandhelpstoclearfogorfrost fromthesurfaceofthemirror.See HeatedMirrorsonpage1-16.
Notice: Donottrytoclearfrost orothermaterialfromtheinside ofthefrontwindshieldandrear windowwitharazorbladeor anythingelsethatissharp. This maydamagetherearwindow defoggergridandaffectyour radio'sabilitytopickupstations clearly. Therepairswouldn'tbe coveredbyyourwarranty.
RemoteStartClimateControl Operation: For vehicles with the remote vehicle start feature, the climate control system may run when the vehicle is started remotely. Thesystem use sthedriver's previous setting to heater cool the inside of the vehicle. See Remote Vehicle Start on page 1-8.
Therearwindowdefoggerturnson ifitiscoldoutside.
7-4ClimateControls
Sensors
Thesolarsensorlocatedontopof theinstrumentpanelnearthe windshieldmonitorsthesolarheat.
Theclimatecontrolsystemuses thesensorinformationtoadjust thetemperature,fanspeed, recirculation,andairdelivery modeforbestcomfort.
Donotcoverthesensorsorthe automaticclimatecontrolsystem maynotworkproperly.
DualAutomaticClimateControlSystem
Theheating, cooling, and ventilation for the vehicle can be controlled with this system.
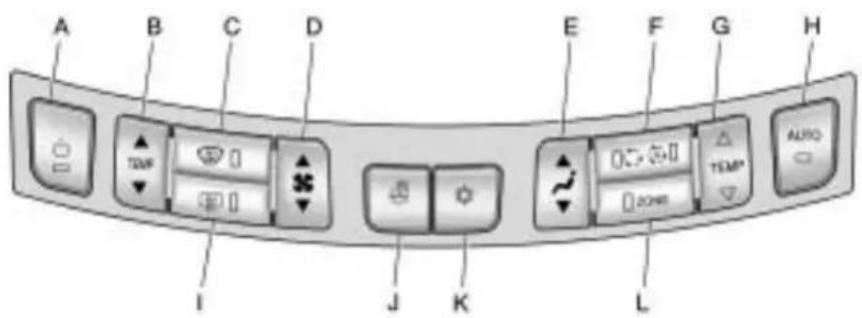
text_image
A B C D E F G H I J K L TEMP AUTOA.Power
B.DriverTemperatureControl
C.Defrost
D.FanControl
E.AirDeliveryModeControl
F. Recirculation/Automatic Recirculation
G.PassengerTemperatureControl
H.AUTO
I. RearWindowDefogger
J.HeatedSteeringWheel
K.AirConditioning
L.ZONE
AutomaticOperation
Thesystemautomatically controls the fanspeed, airdelivery, air conditioning and recirculation in ordertoheatorcoolthevehicle to the desired temperature.
WhentheAUTOindicatorlightis on, thesystemisinfullautomatic operation. If theairdeliverymode, fanspeed, recirculationorair conditioningsettingisadjusted, the AUTOindicatorturnsoffand the selectedsettingswillappearonthe display.
Toplacethesysteminautomatic modedothefollowing:
- PressAUTO.
- Set the temperature. Allow the system timetostabilize. Adjust the temperature as needed for best comfort.
▲/▼(DriverandPassenger TemperatureControl): The temperature can be adjusted separately forth the driver and the passenger. Presstoincreaseo decrease the temperature.
ZONE: Presstolinkallclimate zonesettingstothedriver's settings. The ZONE indicatorlight will turn off. Whenthepassenger settings are adjusted, the ZONE indicatorlight is on.
ManualOperation
(Power): Presstoturnthefan offoron.
^* (FanControl): Pressto increase or decrease the fanspeed. The fanspeed setting appear on themaindisplay. Pressing either button cancels automatic fan control and the fan is controlled manually. Press AUTO to return to automatic operation.
(AirDeliveryMode Control): Presstochangethe directionoftheairflow. The current modeappearsinthedisplayscreen. Pressingeitherbuttoncancels automaticairdeliverycontrol and thedirectionoftheairflow is controlledmanually. PressAUTOto returntoautomaticoperation.
Tochangethecurrentmode, select oneofthefollowing:
(Vent):Airisdirectedtothe instrumentpaneloutlets.
(Bi-Level):Airisdivided betweentheinstrumentpanel outletsandtheflooroutlets.
(Tri-Level):Airisdivided betweenthewindshield,instrument panel,andflooroutlets.
(Floor):Airisdirectedtothe flooroutlets.
(Defog): Clearstehindowsof fogormoisture. Airisdirected to the windshield and floor outlets.
7-6ClimateControls
(Defrost): Clear the windshield of fogor frost more quickly. Air is directed to the windshield.
Forbestresults, clearallsnow andicefromwindshieldbefore defrosting.
(AirConditioning): Pressto turntheairconditioningsystemon oroff. If the fanisturned off for the outside temperature falls below freezing, the air conditioner will not run.
Pressingthisbuttoncancels automaticairconditioningandturns offtheairconditioner.PressAUTO toreturntoautomaticoperation andtheairconditionerruns automaticallyasneeded.When theindicatorlightison,theair conditionerrunsautomatically to cooltheairinsidethevehicleorto drytheairneededtodefogthe windshieldfaster.
○/(Recirculation/Auto Recirculation): Presstochangeto automaticcontrolofairrecirculation insidethevehicle. Whentheauto recirculationindicatorlightison, the airisautomaticallyrecirculatedas neededtohelpquicklycooltheair insidethevehicle.
Inautorecirculationcontrol,theAir QualityControlsystemmayoperate whenpollutionisdetected.Toadjust thesensitivityoftheAirQuality Control,seeClimateandAirQuality underVehiclePersonalization on page4-38.
When the Oindicatorlightison, air is recirculated inside the vehicle. If both indicator lights are off, outside air will flow into the vehicle. Press AUTO or to return to automatic operation.
AutoDefog: The climate control system may have asensorto automatically detect high humidity inside the vehicle. When high humidity is detected, the climate control system may adjust to outside air supply and turn on the air conditioner. The fanspeed may slightly increase to help prevent fogging. If the climate control system does not detect possible window fogging, it returnstonormal operation. To turn Auto Defog offer on, see Climate and Air Quality under Vehicle Personalization on page 4-38.
RearWindowDefogger
(RearWindowDefogger): Presstoturntherearwindow defoggeronoroff.
Therearwindowdefoggerturns offautomaticallyafterabout 10minutes.Ifturnedonagainit runsforabout5minutesbefore turningoff.Thedefoggercanalso beturnedoffbyturningtheignition toACC/ACCESSORYor LOCK/OFF.
Therearwindowdefoggercanbe settoautomaticoperation,see ClimateandAirQualityunder VehiclePersonalization on page 4-38 .Whenautoreardefogis selected,therearwindowdefogger turnsonautomaticallywhenthe interiortemperatureiscoldandthe outsidetemperatureisabout40°F andbelow.Theautoreardefogger turnsoffautomaticallyafterabout 10minutes,orafter5minutesifthe outsidetemperatureisnotascold.
Forvehicleswithheatedoutside rearviewmirrors,theyturnonwhen therearwindowdefoggerbuttonis onandhelpstoclearfogorfrost fromthesurfaceofthemirror.See HeatedMirrorsonpage1-16.
Notice: Donottrytoclearfrost orothermaterialfromtheinside ofthefrontwindshieldandrear windowwitharazorbladeor anythingelsethatissharp. This maydamagetherearwindow defoggergridandaffectyour radio'sabilitytopickupstations clearly. Therepairswouldn'tbe coveredbyyourwarranty.
(HeatedSteeringWheel): For vehicles with this feature, pressto turnonoroff. See HeatedSteering Wheelonpage 4-7.
RemoteStartClimateControl Operation: For vehicles with the remote vehicle start feature, the climate control system may run when the vehicle is started remotely. Thesystem use sth driver's previous setting to heater cool the inside of the vehicle. See Remote Vehicle Start on page 1-8.
Therearwindowdefoggerturnson ifitiscoldoutside.
Sensors
Thesolarsensor, located on top of the instrument panel near the windshield monitor sthesolar heat.
Theclimatecontrolsystemuses thesensorinformationtoadjust thetemperature,fanspeed, recirculation,andairdeliverymode forbestcomfort.
Donotcoverthesensorsorthe automaticclimatecontrolsystem maynotworkproperly.
AirVents
Usethelouverslocatedontheair ventstochangethedirectionofthe airflow.
Toopenthevent, movethe thumbwheelto |. Toclosethevent, moveththumbwheelto ○.
OperationTips
- Keepalloutletsopenwhenever possibleforbestsystem performance.
- Keepthepathunderallseats clearofobjectstohelpcirculate theairinsidethevehiclemore effectively.
• Useofnon-GMapprovedhood deflectorscanadverselyaffect theperformanceofthesystem.
Maintenance
AirlIntake
Clearawayanyice, snow, or leaves from the air intake at the base of the windshield that can block the flow of air into the vehicle.
PassengerCompartment AirFilter
The filter removes dust, pollen, and other airborne irritants from outside airthatispulled into the vehicle.
Thefiltershouldbereplacedaspart ofroutinescheduledmaintenance. SeeScheduledMaintenance on page 10-2 forreplacement intervals.Tofindoutwhattypeof filtertouse,seeMaintenance ReplacementPartsonpage 10-9.
The passenger compartmentair filter can be accessed by removing the entire glovebox.
- Openthepassengersidedoor. Removetheendcoverlocated onthesideoftheinstrument panelinthetoprightcorner. Removethescrewaffixedtothe sideoftheglovebox.
- Openthegloveboxdoor and removetheattachedscrews fromaroundtheglovebox.
- Lowertheloosenedglovebox housing.
- Unplugbothwirecablesand removetheglovebox.
- Pullthethreetabstorelease andopenthefilterdoor.

natural_image
3D rendering of a mechanical component with internal grid structure and directional arrows (no text or symbols)
text_image
Diagram of a refrigerator with Chinese text labels indicating internal components and a downward arrow pointing to the component.-
Removetheoldairfilter. 7. Installthenewairfilter.
-
Reinstalltheairfilterdoor. Re-installtheglovebox.
Seeyourdealer/retailerifadditional assistanceisneeded.
7-10ClimateControls
NOTES
Driving and Operating
DrivingInformation
DrivingforBetterFuel
Economy......8-2
DefensiveDriving......8-3
DrunkDriving......8-3
ControlofaVehicle......8-4
Braking......8-4
Steering......8-5
Off-RoadRecovery......8-6
LossofControl......8-7
DrivingonWetRoads......8-8
HighwayHypnosis......8-8
HillandMountainRoads.....8-9
WinterDriving......8-9
IftheVehicleisStuck......8-12
VehicleLoadLimits......8-12
StartingandOperating
NewVehicleBreak-In.....8-17
IgnitionPositions
(KeylessAccess)......8-18
IgnitionPositions
(KeyAccess)......8-19
RetainedAccessory
Power(RAP)......8-20
StartingtheEngine......8-20
EngineHeater......8-23
ShiftingIntoPark......8-24
ShiftingOutofPark......8-25
ParkingOverThings
ThatBurn......8-25
EngineExhaust
EngineExhaust......8-26
RunningtheVehicleWhile
Parked....8-26
AutomaticTransmission
AutomaticTransmission.....8-27
ManualMode......8-29
DriveSystems
All-WheelDrive......8-30
Brakes
AntilockBrake
System(ABS)......8-31
ParkingBrake......8-32
BrakeAssist......8-34
RideControlSystems
TractionControl
System(TCS)......8-34
ElectronicStability
Control(ESC)......8-35
Limited-SlipDifferential.....8-36
SelectiveRideControl......8-36
CruiseControl
CruiseControl......8-37
ObjectDetectionSystems
UltrasonicParkingAssist....8-40
SideBlindZone
Alert(SBZA)......8-42
RearVision
Camera(RVC)......8-45
8-2DrivingandOperating
Fuel
Fuel....8-48
RecommendedFuel......8-49
GasolineSpecifications.....8-49
CaliforniaFuel
Requirements......8-50
FuelsinForeignCountries...8-50
FuelAdditives......8-50
FillingtheTank......8-52
FillingaPortableFuel
Container......8-53
Towing
GeneralTowing
Information......8-53
DrivingCharacteristicsand
TowingTips......8-54
TrailerTowing
(2.4LL4Engine)......8-58
TrailerTowing
(3.0Land3.6L
V6Engines)......8-58
TowingEquipment......8-59
ConversionsandAdd-Ons
Add-On Electrical
Equipment......8-60
DrivingInformation
DrivingforBetterFuel Economy
Drivinghabitscanaffectfuel mileage. Herearesomedrivingtips togetthebestfueleconomy possible.
- Avoidfaststartsandaccelerate smoothly.
- Brakegraduallyandavoid abruptstops.
- Avoididlingtheengineforlong periodsoftime.
- When road and weather conditions are appropriate, use cruise control, if equipped.
• Alwaysfollowpostedspeed limitsordrivemoreslowlywhen conditionsrequire.
- Keepvehicletiresproperly inflated.
- Combineseveraltripsintoa singletrip.
- Replacethevehicle'stireswith thesameTPCSpecnumber moldedintothetire'ssidewall nearthesize.
- Followrecommended scheduled maintenance.
DefensiveDriving
Defensivedrivingmeans“always expecttheunexpected.”Thefirst stepindrivingdefensivelyistowear yoursafetybelt,see SafetyBelts on page 2-10.

WARNING
Assumethatotherroadusers (pedestrians, bicyclists, and other drivers) are going to be careless and make mistakes. Anticipate what they might do and beready. In addition:
- Allowenoughfollowing distancebetweenyouand thedriverinfrontofyou.
- Focusonthetaskofdriving.
Driverdistractioncancause collisionsresultinginjuryor possibledeath. Thesesimple defensivedrivingtechniques couldsaveyourlife.
DrunkDriving

WARNING
Drinkingandthendrivingisvery dangerous.Yourreflexes, perceptions, attentiveness, and judgmentcanbeaffectedbyeven asmallamountofalcohol.You canhaveaserious—oreven fatal—collisionifyoudriveafter drinking.Donotdrinkanddriveor ridewithadriverwhohasbeen drinking.Ridehomeinacab;orif youarewithagroup,designatea driverwhowillnotdrink.
Deathandinjuryassociatedwith drinkinganddrivingisaglobal tragedy.
Alcohol affects four things that anyone need stodrive a vehicle: judgment, muscular coordination, vision, and attentiveness.
Policerecordsshowthat almost40percentofallmotor vehicle-relateddeathsinvolve alcohol.Inmostcases,these deathsaretheresultofsomeone whowasdrinkinganddriving. Inrecentyears,morethan 17,000annualmotorvehicle-related deathshavebeenassociatedwith theuseofalcohol,withabout 250,000peopleinjured.
Forpersonsunder21,itisagainst thelawineveryU.S.statetodrink alcohol.Therearegoodmedical, psychological,anddevelopmental reasonsfortheselaws.
Theobviouswaytoeliminate the leadinghighwaysafetyproblemis forpeoplenevertodrinkalcohol andthendrive.
8-4DrivingandOperating
Medicalresearchshowsthat alcoholinaperson'ssystemcan makecrashinjuriesworse, especiallyinjuriestothebrain, spinalcord,orheart. Thismeans thatwhenanyonewhohasbeen drinking—driverorpassenger—is inacrash,thatperson'schanceof beingkilledorpermanentlydisabled ishigherthanifthepersonhadnot beendrinking.
ControlofaVehicle
The following three systems helpto control the vehicle while driving—brakes, steering, and accelerator. Attimes, as when driving on snow orice, it is easy to ask more of those control systems than the tires and road can provide. Meaning, you can lose control of the vehicle. See Traction Control System (TCS) on page 8-34.
Addingnon-dealer/non-retailer accessoriescanaffective vehicle performance. See Accessories and Modifications on page 9-3.
Braking
SeeBrakeSystemWarningLight onpage4-19.
Brakingactioninvolvesperception timeandreactiontime.Decidingto pushthebrakepedalisperception time.Actuallydoingitis reactiontime.
Averagereactiontimeisabout three-fourthsofasecond. But that is only an average. It might be less with one driver and as long as two or three seconds more with another. Age, physical condition, alertness, coordination, and eyesight all play apart. Sodo alcohol, drugs, and frustration. But even in three-fourth sofasecond, a vehicle moving at 100 km/h (60 mph) travels 20 m (66 ft). That could be a lot of distance in an emergency, so keeping enough space between the vehicle and others is important.
And, of course, actual stopping distances vary greatly with the surface of the road, whether it is pavement or gravel; the condition of the road, whether it is wet, dry, or icy; tiretread; the condition of the brakes; the weight of the vehicle; and the amount of brake force applied.
Avoidneedlessheavy braking.Somepeopledrivein spurts—heavyacceleration followedbyheavybraking—rather thankeepingpacewithtraffic.This isamistake.Thebrakesmightnot havetimetocoolbetweenhard stops.Thebrakeswillwearout muchfasterwithalotofheavy braking.Keepingpacewiththe trafficandallowingrealisticfollowing distanceseliminatesalotof unnecessarybraking.Thatmeans betterbrakingandlongerbrakelife.
Iftheengineeverstopswhilethe vehicleisbeingdriven,brake normallybutdonotpumpthe brakes.Ifthebrakesarepumped, thepedalcouldgethardertopush down.Iftheenginestops,therewill stillbesomepowerbrakeassistbut itwillbeusedwhenthebrakeis applied.Oncethepowerassistis usedup,itcantakelongertostop andthebrakepedalwillbeharder topush.
Addingnon-dealer/non-retailer accessoriescanaffective vehicle performance. See Accessories and Modifications on page 9-3.
Steering
PowerSteering
Ifpowersteeringassistislost because the engine stops the powersteeringsystem is not functioning, the vehicle can be steered but it will take more effort.
SpeedVariableAssistSteering
The vehicle has a steering system that varies the amount of effort required to steer the vehicle in relation to the speed of the vehicle.
Theamountofsteeringeffort requiredislessatslower speedstomakethevehiclemore maneuverableandeasiertopark. Atfasterspeeds, thesteeringeffort increasestoprovideasport-likefeel tothesteering. Thisprovides maximumcontrolandstability.
If the vehicle seem shardert to steer thannormal when parking or driving slowly, ther may be a problem with the system. You will still have power steering, but steering will bestiffer than normal at slows speeds. See your dealer/retailer for service.
SteeringTips
Itisimportanttotakecurvesata reasonablespeed.
Tractioninacurvedependsonthe conditionofthetiresandtheroad surface,theangleatwhichthe curveisbanked,andvehiclespeed. Whileinacurve,speedistheone factorthatcanbecontrolled.
If there is aneedtoreducespeed, doit before entering the curve, while the front wheels are straight.
Trytoadjustthespeedsoyoucan drivethroughthecurve.Maintaina reasonable,steadyspeed.Waitto accelerateuntiloutofthecurve,and thenaccelerategentlyintothe straightaway.
8-6DrivingandOperating
SteeringinEmergencies
Therearetimeswhensteeringcan bemoreeffectivethanbraking. For example, youcomeoverahilland findatruckstoppedinyourlane, oracarsuddenlypullsoutfrom nowhere, orachilddartsoutfrom betweenparkedcarsandstopsright infrontofyou. Theseproblemscan beavoidedbybraking—if youcan stopintime. But sometimesyou cannotstopintimebecausethereis noroom. Thatisthetimefor evasiveaction—steeringaround theproblem.
Thevehiclecanperformverywellin emergencieslikethese.Firstapply thebrakes.SeeBraking on page 8-4 .Itisbettertoremoveas muchspeedaspossiblefroma collision.Thensteeraroundthe problem,totheleftorright dependingonthespaceavailable.
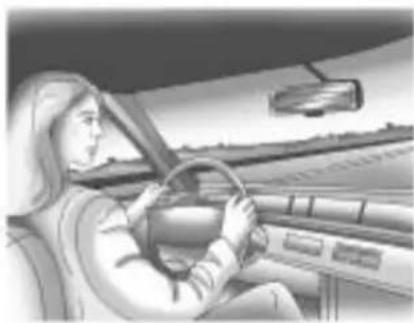
natural_image
Interior view of a car showing a person seated at the wheel, with dashboard and steering wheel visible (no text or symbols)Anemergencylikethisrequires closeattentionandaquickdecision. Ifholdingthesteeringwheelatthe recommended9and3o'clock positions, itcanbeturnedafull 180degreesveryquicklywithout removingeitherhand. Butyouhave toactfast, steerquickly, andjustas quicklystraightentthewheelonce youhaveavoidedtheobject.
Thefactthatsuchemergency situationsarealwayspossibleisa goodreasontopracticedefensive drivingatalltimesandwearsafety beltsproperly.
Off-RoadRecovery
Thevehicle'srightwheelscandrop offtheedgeofaroadontothe shoulderwhiledriving.
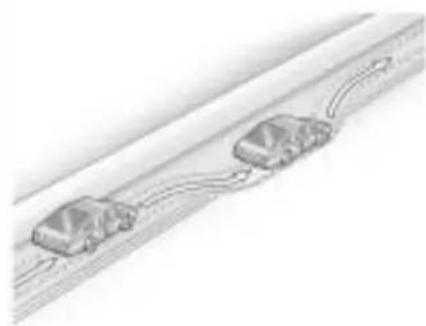
natural_image
Illustration of two cars driving on a road with curved trails (no text or symbols)Iftheleveloftheshoulderisonly slightlybelowthepavement, recoveryshouldbefairlyeasy. Easeofftheacceleratorandthen, ifthereisnothingintheway, steer sothatthevehiclestraddlesthe edgeofthepavement.
Turnthesteeringwheel8to13cm (3to5inches),aboutone-eighth turn,untiltherightfronttirecontacts thepavementedge.Thenturnthe steeringwheeltogostraightdown theroadway.
LossofControl
Letusreviewwhatdrivingexperts sayaboutwhathappenswhenthe threecontrolsystems—brakes, steering,andacceleration—donot haveenoughfrictionwherethetires meettheroadtodowwhatthedriver hasasked.
Inanyemergency, donotgiveup. Keeptryingtosteerandconstantly seekanescaperouteorareaof lessdanger.
Skidding
Inaskid, adrivercanlosecontrol of the vehicle. Defensivedrivers avoid most kids by taking reasonable caresuited to existing conditions, and by not overdriving those conditions. But kids are always possible.
Thethreetypesofskidscorrespond tothevehicle'sthreecontrol systems.Inthebrakingskid,the wheelsarenotrolling.Inthe steeringorcorneringskid,toomuch speedorsteeringinacurvecauses tirestoslipandlosecorneringforce. Andintheaccelerationskid,too muchthrottlecausesthedriving wheelstospin.
Ifthevehiclestartstoslide,ease yourfootofftheacceleratorpedal andquicklysteerthewayyouwant thevehicletogo.Ifyoustart steeringquicklyenough,thevehicle maystraightenout.Alwaysbeready forasecondskidifitoccurs.
Ofcourse, traction is reduced when water, snow, ice, gravel, or other material is on theroad. Forsafety, slowdown and adjust your driving to these conditions. It is important to slowdown nonslippery surfaces because stopping distance is longer and vehicle control more limited.
Whiledrivingonasurfacewith reducedtraction,tryyourbestto avoidsuddensteering,acceleration, orbraking,includingreducing vehiclespeedbyshiftingtoalower gear.Anysuddenchangescould causethetirestoslide.Youmight notrealizethesurfaceisslippery untilthevehicleisskidding.Learnto recognizewarningclues—suchas enoughwater,ice,orpackedsnow ontheroadtomakeamirrored surface—andslowdownwhenyou haveanydoubt.
Remember: Antilockbrakeshelp avoidonlythebrakingskid.
DrivingonWetRoads
Rainandwetroadscanreduce vehicletractionandaffectyour abilitytostopandaccelerate. Alwaysdriveslowerinthesetypes ofdrivingconditionsandavoid drivingthroughlargepuddlesand deep-standingorflowingwater.

WARNING
Wetbrakescancausecrashes. Theymightnotworkaswellina quickstopandcouldcause pullingtooneside.Youcould losecontrolofthevehicle.
Afterdrivingthroughalarge puddleofwateroracar/vehicle wash, lightlyapplythebrake pedaluntilthebrakeswork normally.
(Continued)
WARNING(Continued)
Flowingorrushingwatercreates strongforces.Drivingthrough flowingwatercouldcauseyour vehicletobecarriedaway.Ifthis happens,youandothervehicle occupantscoulddrown.Donot ignorepolicewarningsandbe verycautiousabouttryingtodrive throughflowingwater.
Hydroplaning
Hydroplaningisdangerous.Water canbuildupundryourvehicle's tiressotheyactuallyrideonthe water.Thiscanhappeniftheroadis wetenoughandyouaregoingfast enough.Whenyourvehicleis hydroplaning,ithaslittleorno contactwiththeroad.
Thereisnohardandfastruleabout hydroplaning. Thebestadviceisto slowdownwhentheroadiswet.
OtherRainyWeatherTips
Besidesslowingdown,otherwet weatherdrivingtipsinclude:
- Allowextrafollowingdistance.
- Passwithcaution.
- Keepwindshieldwiping equipmentingoodshape.
- Keepthewindshieldwasherfluid reservoirfilled.
- Havegoodtireswithproper treaddepth.See Tires on page 9-48.
• Turnoffcruisecontrol.
HighwayHypnosis
Alwaysbealertandpayattentionto yoursurroundingswhiledriving. Ifyoubecometiredorsleepy,finda safeplacetoparkyourvehicle andrest.
Otherdrivingtipsinclude:
- Keepthevehiclewellventilated.
- Keepinteriortemperaturecool.
- Keepyoureyesmoving—scan theroadaheadandtothesides.
- Checktherearviewmirrorand vehicleinstrumentsoften.
HillandMountainRoads
Drivingonsteephillsorthrough mountainsisdifferentthandriving onflatorrollingterrain. Tipsfor drivingintheseconditionsinclude:
- Keepthevehicleservicedandin goodshape.
- Checkallfluidlevelsandbrakes, tires,coolingsystem,and transmission.
- Goingdownsteeporlonghills, shifttoalowergear.
WARNING
If you donot shift down, the brakes could get so hot that they would not work well. You would then have poor braking over no going down a hill. You could crash. Shift downtolet the engine assist the brakes on a steep downhill slope.
WARNING
CoastingdownhillinN(Neutral) orwiththeignitionoffis dangerous. Thebrakeswillhave todoalltheworkofslowingdown andtheycouldgetsohotthat theywouldnotworkwell.You wouldthenhavepoorbrakingor evennonegoingdownahill.You couldcrash.Alwayshavethe engineerunningandthevehiclein gearwhengoingdownhill.
- Stayinyourownlane.Donot swingwideorcutacrossthe centeroftheroad.Driveat speedsthatletyoustayinyourownlane.
- Topofhills: Bealert—somethingcouldbeinyour lane(stalledcar, accident).
- Payattentiontospecialroad signs(fallingrocksarea,winding roads,longgrades,passingor no-passingzones)andtake appropriateaction.
WinterDriving
DrivingonSnoworIce
Drivecarefullywhenthereissnow oricebetweenthetiresandthe road,creatinglesstractionor grip.Weticecanoccuratabout 0°C(32°F)whenfreezingrain beginstofall,resultinginevenless traction.Avoiddrivingonweticeor infreezingrainuntilroadscanbe treatedwithsaltorsand.
8-10DrivingandOperating
Drivewith caution, whatever the condition. Accelerategently so traction is not lost. Accelerating too quickly cause the wheel stospin and make the surface under the tiresslick, so there is even less traction.
Trynottobreakthefragiletraction. If you accelerate at toofast, the drive wheels will spin and polish the surface under the tire seven more.
TheAntilockBrakeSystem(ABS) onpage8-31 improves vehicle stability during hardstopson slipperyroads, but apply the brakes sooner than when nondrypavement.
Allowgreaterfollowingdistanceon anyslipperyroadandwatchfor slipperyspots.lcypatchescan occuronotherwiseclearroadsin shadedareas.Thesurfaceofa
curveoranoverpasscanremainicy whenthesurroundingroadsare clear. Avoidsuddensteering maneuversandbrakingwhile once.
Turnoffcruisecontrol, ifequipped, onslippery surfaces.
BlizzardConditions
Beingstuckinsnowcanbeina seriousssituation.Staywiththe vehicleunlesssthereishelpnearby. Ifpossible,usetheRoadside AssistanceProgram onpage 12-6 . Togethelpandkeepeveryonein thevehiclesafe:
• Turnonthehazardwarning flashers.
- Tiearedclothtoanoutside mirror.

WARNING
Snowcantrapengineexhaust underthevehicle. This may cause exhaust gas to get inside. Engine exhaust contains carbon monoxide (CO) which cannot be seen or smelled. It can cause unconsciousness and even death.
Ifthevehicleisstuckinthesnow:
- Clearawaysnowfromaround thebaseofyourvehicle, especiallyanythatisblocking theexhaustpipe.
- Checkagainfromtimeto timetobesuresnowdoes notcollectthere.
- Openawindowabout5cm (twoinches)onthesideof thevehiclethatisawayfrom thewindtobringinfreshair.
(Continued)
WARNING(Continued)
- Fullyopentheairoutletson orundertheinstrument panel.
- AdjusttheClimateControl systemtoasettingthat circulatestheairinsidethe vehicleandsetthefanspeed tothehighestsetting.See ClimateControlSysteminthe Index.
Formoreinformationabout carbonmonoxide,seeEngine Exhaustonpage8-26.
(Continued)
WARNING(Continued)
Snowcantrapexhaustgases underyourvehicle. This can causedeadlyCO(carbon monoxide)gastogetinside.CO couldovercomeyouandkillyou. Youcannotseeitorsmellit,so youmightnotknowitisinyour vehicle.Clearawaysnowfrom aroundthebaseofyourvehicle, especiallyanythatisblockingthe exhaust.
Runtheengineforshortperiods onlyasneededtokeepwarm,but becareful.
Tosavefuel, runtheengine for only short periods as needed to warm the vehicle and thenshut the engine off and closet hewindow most of the way to save heat. Repeat this until help arrives but only when you feel really uncomfortable from the cold. Moving about to keep warm also helps.
Ifittakessometimeforhelpto arrive,nowandthenwhenyourun theengine,pushtheaccelerator pedalslightlysotheengine runs fasterthantheidlespeed.This keepsthebatterychargedtorestart thevehicleandtosignalforhelp withtheheadlamps.Dothisaslittle aspossibletosavefuel.
IftheVehicleisStuck
Slowlyandcautiouslyspinthe wheelstofreethevehiclewhen stuckinsand,mud,ice,orsnow.
Ifstucktooseverelyforthetraction systemtofreethevehicle,turnthe tractionsystemoffandusethe rockingmethod.

WARNING
If the vehicle's tiresspinathigh speed, they can explode, and you or others could be injured. The vehicle can overheat, causing an engine compartment fire or other damage. Spin the wheels as little as possible and avoid going above 55 km/h (35 mph) as shown on the speedometer.
Forinformationaboutusingtire chainsonthevehicle,see Tire Chainsonpage9-70.
RockingtheVehicletoGet itOut
Turnthesteeringwheelleftand righttocleartheareaaroundthe frontwheels.Turnoffanytraction system.Shiftbackandforth betweenR(Reverse)andaforward gear,spinningthewheelsaslittleas possible.Topreventtransmission wear,waituntilthewheelsstop spinningbeforeshiftinggears. Releasetheacceleratorpedalwhile shifting,andpresslightlyonthe acceleratorpedalwhenthe transmissionisingear.Slowly spinningthewheelsintheforward andreversedirectionscausesa rockingmotionthatcouldfreethe vehicle.Ifthatdoesnotgetthe vehicleoutafterafewtries,itmight needtobetowedout.Ifthevehicle doesneedtobetowedout,see TowingtheVehicleonpage9-81.
VehicleLoadLimits
It is very important to know how much weight the vehicle can carry. This weight is called the vehicle capacity weight and include the weight of all occupants, cargo and all nonfactory - installed options. Twolabelson the vehicles show how much weight it may properly carry, the Tire and Loading Information label and the Certification label.

WARNING
Donotloadthevehicleany heavierthantheGross VehicleWeightRating (GVWR),oreitherthe maximumfrontorrearGross AxleWeightRating(GAWR). Ifyoudo,partsonthevehicle canbreak,anditcanchange thewaythevehiclehandles. Thesecouldcauseyoutolose controlandcrash.Also, overloadingcanshortenthe lifeofthevehicle.
TireandLoadingInformation Label

text_image
TITLE AND LOADING INFORMATION INFORMATION OF THE ITEMS OF THE ITEMS DOCUMENTS DOCUMENTS ITEMS NO. 10000000000000000000000000000000000000000000000000000000000000000000000000000000000000000000000000000 TITLE POST ITEMS NO. XOOO XXXXXX XOO XXXXXX XOO XXXXXX XOO XXXXXX XOO XXXXXX XOO XXXXXX XOO XXXXXX XOO XXXXXX XOO XXXXXX XOO XXXXXX XOO XXXXXX XOO XXXXXX XOO XXXXXX XOO XXXXXX XOO XXXXXX XOO XXXXXX XOO XXXXXX XOO XXXXXX XOO XXXXXX XOO XXXXXX XOO XXXXXX Xoo XXXXXX Xoo XXXXXX Xoo XXXXXX Xoo XXXXXX Xoo XXXXXX Xoo XXXXXX Xoo XXXXXX Xoo XXXXXX Xoo XXXXXX Xoo XXXXXX Xoo XXXXXX Xoo XXXXXX Xoo XXXXXX Xoo XXXXXX Xoo XXXXXX Xoo XXXXXX Xoo XXXXXX Xoo XXXXXX Xoo XXXXXX Xoo XXXXXX XoXX XXXXXX Xoo XXXXXX Xoo XXXXXX Xoo XXXXXX Xoo XXXXXX Xoo XXXXXX Xoo XXXXXX Xoo XXXXXX Xoo XXXXXX Xoo XXXXXX Xoo XXXXXX Xoo XXXXXX Xoo XXXXXX Xoo XXXXXX Xoo XXXXXX Xoo XXXXXX Xoo XXXXXX Xoo XXXXXX Xoo XXXXXX Xoo XXXXXX Xool XXXXXX Xool XXXXXX Xool XXXXXX Xool XXXXXX Xool XXXXXX Xool XXXXXX Xool XXXXXX Xool XXXXXX Xool XXXXXX Xool XXXXXX Xool XXXXXX Xool XXXXXX Xool XXXXXX Xool XXXXXX Xool XXXXXX Xool XXXXXX Xool XXXXXX Xool XXXXXX Xool XXXXXX Xool XXXXXX XoXX XXXXXX XoXX XXXXXX XoXX XXXXXX XoXX XXXXXX XoXX XXXXXX XoXX XXXXXXLabelExample
AvehiclespecificTireand LoadingInformationlabelis attachedtothevehicle'scenter pillar(B-pillar).Withthedriver's dooropen,youwillfindthelabel attachedbelowthedoorlock post.TheTireandLoading Informationlabelshowsthe
numberofoccupantseating positions(A),andthemaximum vehiclecapacityweight(B)in kilogramsandpounds.
The Tire and Loading Information label also shows the tiresize of the original equipment tires (C) and the recommended cold tire inflation pressures (D). Formore information on tires and inflation see Tires on page 9-48 and Tire Pressure on page 9-56.
Thereisalsoimportantloading informationontheCertification label.IttellsyoutheGross VehicleWeightRating(GVWR) andtheGrossAxleWeight Rating(GAWR)forthefrontand rearaxle.See"Certification Label"laterinthissection.
StepsforDeterminingCorrect LoadLimit
- Locatethestatement "Thecombinedweightof occupantsandcargoshould neverexceedXXXkgor XXXlbs" onyourvehicle's placard.
- Determinethecombined weightofthedriverand passengersthatwillbe ridinginyourvehicle.
- Subtract the combined weight of the driver and passengers from XXXkg or XXXlbs.
- Theresultingfigureequals theavailableamountofcargo andluggageloadcapacity. Forexample, ifthe "XXX" amountequals1400lbsand therewillbefive150lb passengersinyourvehicle,
theamountofavailablecargo andluggageloadcapacity is650lbs(1400-750 (5x150)=650lbs).
- Determinethecombined weightofluggageandcargo beingloadedonthevehicle. Thatweightmaynotsafely exceedtheavailablecargo andluggageloadcapacity calculatedinStep4.
- If your vehicle will betowing a trailer, the load from your trailer will be transferred to your vehicle. Consult this manual to determine how this reduces the available cargo and luggage load capacity of your vehicle.
See Trailer Towing(2.4LL4
Engine) onpage8-58 or Trailer Towing(3.0Land3.6L
V6Engines) onpage8-58 for
importantinformationontowing atrailer,towingsafetyrulesand traileringtips.

text_image
A - B = CExample1
A. VehicleCapacityWeightfor Example1=453kg (1,000lbs).
B. SubtractOccupantWeight@68kg(150lbs)×2=136kg (300lbs).
C. Available Occupant and Cargo Weight=317kg (700lbs).

text_image
A - B = CExample2
A. VehicleCapacityWeightfor Example2=453kg (1,000lbs).
B. SubtractOccupantWeight@68kg(150lbs)×5=340kg (750lbs).
C. Available Cargo Weight=113kg(250lbs).
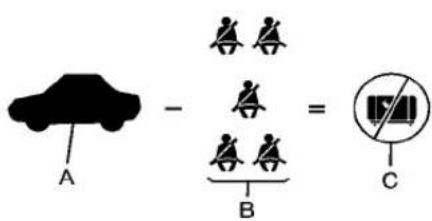
text_image
A - B = CExample3
A. VehicleCapacityWeightfor Example3=453kg (1,000lbs).
B. SubtractOccupantWeight@91kg(200lbs)×5=453kg (1,000lbs).
C. Available Cargo Weight = 0kg(0lbs).
Refertothevehicle's Tire and Loading Information label for specific information about the vehicle's capacity weight and
seatingpositions. The combined weight of the driver, passengers, and cargoshould never exceed the vehicle's capacity weight.
CertificationLabel
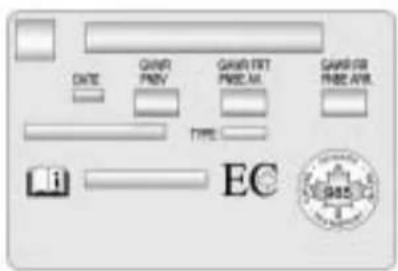
text_image
DATE GART PREV GART INT PREM.11 GART FOR PREM.11 TYPE ECLabelExample
AvehiclespecificCertification labelisattachedtothedriver sidecenterpillar. Thelabeltells thegrossweightcapacityofthe vehicle, calledtheGrossVehicle WeightRating(GVWR).
8-16DrivingandOperating
TheGVWRincludestheweight ofthevehicle,allocupants, fuel,andcargo.Neverexceed theGVWRforthevehicle,orthe GrossAxleWeightRating (GAWR)foreitherthefrontor rearaxle.
And, if there is a heavy load, it should be spread out. See "Steps for Determining Correct Load Limit" earlier in this section.

WARNING
Donotloadthevehicleany heavierthantheGross VehicleWeightRating (GVWR),oreitherthe maximumfrontorrearGross AxleWeightRating(GAWR).
(Continued)
WARNING(Continued)
If you do, part son the vehicle can break, and it can change the way the vehicle handles. These could cause out to lose control and crash. Also, overloading can shorten the life of the vehicle.
If you put things insid the vehicle—likesuit cases, tools, packages, or anything else—they will go as fast as the vehicle goes. If you havet to stop or turn quickly, or if there is a crash, they will keep going.

WARNING
Thingsyouputinsidethe vehiclecanstrikeandinjure peopleinasuddenstopor turn, orinacrash.
- Putthingsinthecargo areaofthevehicle.Inthe cargoarea,putthemas farforwardasyoucan. Trytospreadtheweight evenly.
- Neverstackheavier things,likesuitcases, insidethevehiclesothat someofthemareabove thetopsoftheseats.
(Continued)
WARNING(Continued)
- Donotleavean unsecuredchildrestraint inthevehicle.
- Whenyoucarrysomething insidethevehicle, secure itwheneveryoucan.
- Donotleaveaseatfolded downunlessyouneedto.
Starting and Operating
NewVehicleBreak-In
Notice: The vehicle does not need an elaborate break-in. But it will perform better in the long run if you follow these guidelines:
- Donotdriveatanyone constantspeed, fastorslow, forthefirst805km (500miles).Donotmake full-throttlestarts.Avoid downshiftingtobrakeor slowthevehicle.
- Duringthefirst1000km (600miles), avoid using more than moderate acceleration in lower gears and avoid vehiclespeeds above 110km/h(68mph).
- Between the first 1000 km (600 miles) and 5000 km (3,000 miles), heavy acceleration in lower gears
canbeused.Vehiclespeeds above110km/h(68mph) shouldbelimitedto fiveminutesperuse.
- Avoidmakinghardstopsfor thefirst322km(200miles)or so.Duringthistimethenew brakeliningsarenotyet brokenin.Hardstopswith newliningscanmean prematurewearandearlier replacement.Followthis breaking-inguidelineevery timeyougetnewbrake linings.
- Donottowatrailerduring break-in.SeeDriving CharacteristicsandTowing Tips onpage8-54 forthe trailertowingcapabilitiesof yourvehicleandmore information.
Followingbreak-in, enginespeed and load can be gradually increased.
IgnitionPositions (KeylessAccess)
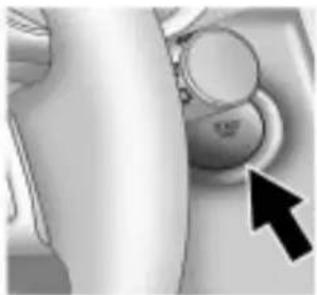
natural_image
Close-up of a car's wheel and dashboard with a black arrow pointing to the button (no visible text or symbols)The vehicle has an electronic keylessignition with push-button start.
Pressingthebuttoncyclesitthrough threepositions, ACC/ACCESSORY, ON/RUN/STARTandOFF.
Thetransmittermustbeinthe vehicleforthesystemtooperate. Ifthepush-buttonstartisnot working, thevehiclemaybeneara strongradioantennasignalcausing interferencetothekeylessaccess system. See Remote KeylessEntry (RKE) SystemOperation(Key Access) on page 1-4 or Remote KeylessEntry(RKE) System Operation(KeylessAccess) on page 1-5 formoreinformation.
ToshiftoutofP(Park),thevehicle mustbeinACC/ACCESSORYor ON/RUNandthebrakepedalmust beapplied.
OFF: Whenthisbutton is pressed with the engineer running, the engine will be turned off.
If the vehicle is in P (Park), the ignition will turn off, and Retained Accessory Power (RAP) will remain active. See Retained Accessory Power (RAP) on page 8-20 for more information.
IfthevehicleisnotinP(Park),the ignitionwillreturntoACC/ ACCESSORYanddisplaythe messageSHIFTTOPARKinthe DriverInformationCenter(DIC). SeeDriverInformationCenter(DIC) onpage4-25 formoreinformation. Whenthevehicleisshiftedinto P(Park),theignitionsystemwill switchtoOFF.
ACC/ACCESSORY: This position allows you outouses one electrical accessories when the engine is off.
Withtheignitionoff,pressingthe buttononetimewithoutthebrake pedalapplied,willplacetheignition systeminACC/ACCESSORY.
Theignitionwillswitchfrom ACC/ACCESSORYtoOFFafter fiveminutestopreventbattery rundown.
ON/RUN/START: This position is for driving and starting. With the ignition off, and the brake pedal applied, pressing the button once will placetheignition system in ON/RUN/START. Once engine cranking begins, releasethe button. Engine cranking will continue until the engine starts. See Starting the Engine on page 8-20 form more information. The ignition will then remain in ON/RUN.
ToplacetheignitioninON/RUN/STARTfromOFFwithoutstarting theengine,pressthebuttontwo timeswithoutyourfootonthebrake pedal.
The battery could bed trained if you leave the ignition in the ON/RUN/START position with the engine off. You may not be able to start the vehicle if the battery is allowed to drain for an extended period of time.
IgnitionPositions(Key Access)
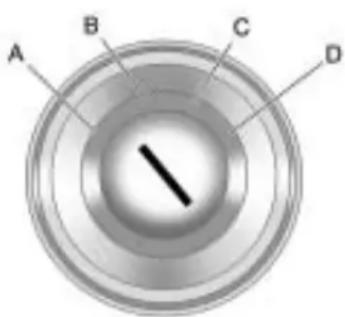
text_image
A B C DTheignitionswitchhasfourdifferent positions.
Notice: Using a tool to forc the key to turn in the ignition could caused damage to the switchor break the key. Use the correct key, makes sure it is all the way in, and turn it only with your hand. If the key cannot be turned by hand, see your dealer/retailer.
ToshiftoutofP(Park), turn the ignition to ON/RUN and apply the brake pedal.
A(LOCK/OFF): This is the only position from which the key can be removed. This lock the ignition and automatic transmission.
TheshiftlevermustbeinP(Park) toturntheignitionswitchtothe LOCK/OFFposition.
Theignitionswitchcanbindinthe LOCK/OFFpositionwiththewheels turnedoffcenter.Ifthishappens, movethesteeringwheelfromright toleftwhileturningthekeytoACC/ACCESSORY.Ifthisdoesnotwork, thenthevehicleneedsservice.
B(ACC/ACCESSORY): This positionprovidespowertosome of the electrical accessories. It unlocks the ignition. The transmission is all unlocked in this position on automatic transmission vehicles. Tomovethekey from ACC/ACCESSORY to LOCK/OFF, the shiftlevermustbein P(Park).
C(ON/RUN): Theignitionswitch staysinthispositionwhenthe engineisrunning. Thispositioncan beusedtooperatetheelectrical accessories, including the ventilationfanand12voltpower outlet, aswellastodisplaysome warningandindicatorlights.
The battery could bed trained if the key is left in the ACC/ACCESSORY or ON/RUN position with the engine off. The vehicle might not restart if the battery is allowed to drain for an extended period of time.
D(START): Thispositionstarts theengine. Whentheenginestarts, releasethekey. Theignitionswitch willreturntoON/RUNfornormal driving.
Awaringtonesoundswhenthe driverdoorisopenedwhenthe ignitionisstillinACC/ACCESSORY andthekeyisintheignition.
RetainedAccessory Power(RAP)
These vehicle accessories can be used for up to 10 minutes after the engine is turned off:
- AudioSystem
- PowerWindows
- Sunroof(ifequipped)
• AuxiliaryPowerOutlet
Powertotheaudiosystemwill continuetooperateforupto 10minutesoruntilthedriverdooris opened.
Powertothepowerwindowsand sunroofwillcontinuetooperatefor upto10minutesoruntilanydooris opened.
All these features will work when the ignition is in ON/RUN or ACC/ACCESSORY.
StartingtheEngine
MovetheshiftlevertoP(Park)or N(Neutral).Theenginewillnotstart inanyotherposition. Torestartthe enginewhenthevehicleisalready moving,useN(Neutral)only.
Notice: Donottrytoshiftto P(Park)ifthevehicleismoving. If youdo, you could damage the transmission. ShifttoP(Park) only when the vehicle is stopped.
Notice:Theengineisdesigned toworkwiththeelectronicsin thevehicle.Ifyouaddelectrical partsoraccessories,youcould changethewaytheengine operates.Beforeaddingelectrical equipment,checkwithyour dealer/retailer.Ifyoudonot, theenginemightnotperform properly.Anyresultingdamage wouldnotbecoveredbythe vehiclewarranty.
StartingProcedure(KeyAccess)
- With your footoff the accelerator pedal, turn the ignition key to START. When the engine starts, let go of the ignition.
Theidlespeedwillgodownas yourenginegetswarm.Donot racetheengineimmediately afterstartingit.Operatethe engineandtransmissiongently toallowtheoiltowarmupand lubricateallmovingparts.
The vehicle has a Computer-Controlled Cranking System. This feature assists in starting the engine and protects components. If the ignition key is turned to the START position, and then released when the engine begins cranking, the engine will continue cranking for afew seconds or until the vehicle starts. If the engine does
notstartandthekeyisheldin STARTformanyseconds, crankingwillbestoppedafter 15secondstopreventcranking motordamage.Topreventgear damage, thissystemalso preventscrankingiftheengine isalreadyrunning.Engine crankingcanbestoppedby turningtheignitionswitchto ACC/ACCESSORYor LOCK/OFF.
Notice:Crankingtheenginefor longperiodsoftime,byreturning thekeytotheSTARTposition immediatelyaftercrankinghas ended,canoverheatanddamage thecrankingmotor,anddrainthe battery.Waitatleast15seconds betweeneachtry,toletthe crankingmotorcooldown.
- If theenginedoesnotstartafter 5-10 seconds, especially in very cold weather (below - 18°C or 0°F), it could be flooded with too much gasoline. Try pushing the accelerator pedal all the way to the floor and holding it there as you hold the key in START, or press the START button, for up to a maximum of 15 seconds. Wait at least 15 seconds between each try, to allow the cranking motortocooldown. When the engine starts, let go of the key or button, and the accelerator. If the vehicle starts briefly but then stops again, do the something. This clear the extragasoline from the engine. Donotracethe engine immediately after starting it. Operat the engine and transmissionently until the oil warmsup and lubricates all moving parts.
StartingProcedure (KeylessAccess)
- If the vehicle has the key less access system, the transmitter must be in the vehicle. Put your foot on the brake pedal and push the START button. When the engine begins cranking, let go of the button.
Theidlespeedwillgodownas yourenginegetswarm.Donot racetheengineimmediately afterstartingit.Operatethe engineandtransmissiongently toallowtheoiltowarmupand lubricateallmovingparts.
If the transmitter is not in the vehicle or something is interfering with the transmitter, the Driver Information Center (DIC) will display NO REMOTE DETECTED. See Driver Information Center (DIC) on page 4-25 form more information.
If the battery in the keyless access transmitter needs replacing, the DIC displays REPLACE BATTERY IN REMOTE KEY. The vehicle can still be driven. See Starting the Vehicle with a Low Transmitter Battery in Remote Keyless Entry (RKE) System Operation (Key Access) on page 1-4 or Remote Keyless Entry (RKE) System Operation (Keyless Access) on page 1-5 form more information.
Thevehiclehasa Computer-ControlledCranking System. Thisfeatureassistsin startingtheengineandprotects components. IftheSTART buttonispressed, and then releasedwhentheengine beginscranking, theenginewill continuecrankingforafew secondsoruntilthevehicle starts. Iftheenginedoesnot startandthebuttonispressed formanyseconds, crankingwill
bestoppedafter15secondsto preventcrankingmotordamage. Topreventgeardamage,this systemalsopreventscrankingif theengineisalreadyrunning. Enginecrankingcanbestopped bypassingtheSTARTbuttona secondtime.
Notice:Crankingtheenginefor longperiodsoftime,byreturning thekeytotheSTARTposition immediatelyaftercrankinghas ended,canoverheatanddamage thecrankingmotor,anddrainthe battery.Waitatleast15seconds betweeneachtry,toletthe crankingmotorcooldown.
- If the engine does not start after 5-10 seconds, especially in very cold weather (below -18°C or 0°F), it could be flooded with too much gasoline. Try pushing the accelerator pedal all the way to the floor and holding it there as you hold the key in START, or press the START button, for up to a maximum of 15 seconds.
Waitatleast15seconds betweeneachtry,toallowthe crankingmotortocooldown. Whentheenginestarts,letgoof thekeyorbutton,andthe accelerator.Ifthevehiclestarts brieflybutthenstopsagain,do thesamething.Thisclearsthe extragasolinefromtheengine. Donotracetheengine immediatelyafterstartingit. Operatetheengineand transmissiongentlyuntilthe oilwarmsupandlubricatesall movingparts.
EngineHeater
Theenginecoolantheater, ifavailable, can help in cold weather conditionsator below -18^(0^) foreasier starting and better fuel economy during enginewarm-up. Plugin the coolant an theater at least four hours before starting the vehicle. An internal thermostat the plug end of the cord will prevent engine coolant an theater operation at temperatures above -18^(0^) .
ToUseTheEngineCoolant Heater
- Turnofftheengine.
- Openthehood and unwrap the electrical cord.

natural_image
Illustration of a handheld device with a black arrow pointing to a component (no text or symbols visible)The electrical cordislocated on the riverside of the engine compartment, between the fender and the engine compartment fuse block.
- Plugitintoanormal, grounded 110-voltACoutlet.
WARNING
Pluggingthecordintoan ungroundedoutletcouldcausean electricalshock.Also,thewrong kindofextensioncordcould overheatandcauseafire.You couldbeseriouslyinjured.Plug thecordintoaproperlygrounded three-prong110-voltACoutlet. Ifthecordwillnotreach,usea heavy-dutythree-prongextension cordratedforatleast15amps.
- Beforestartingtheengine, be suretounplugandstorethe cordasitwasbeforetokeepit awayfrommovingengineparts.
Thelengthoftimetheheatershould remainpluggedindependson severalfactors.Askadealer/retailer intheareawhereyouwillbe parkingthevehicleforthebest adviceonthis.
ShiftingIntoPark

WARNING
Itcanbedangeroustogetoutof thevehicleiftheshiftleverisnot fullyinP(Park)withtheparking brakefirmlyset. Thevehiclecan roll. If you have left the engine running, the vehicle can move suddenly. You or others could be injured. Tobesure the vehicle will not move, even when you are on fairly level ground, us the steps that follow.
- Holdthebrakepedaldownand settheparkingbrake.
See Parking Brake on page 8-32 formoreinformation. - MovetheshiftleverintoP(Park) bypushingtheleveralltheway towardthefrontofthevehicle.
- Turntheignitionoff.
LeavingtheVehicleWiththe EngineRunning

WARNING
Itcanbedangeroustoleavethe vehiclewiththeengine running. The vehiclecouldmovesuddenly iftheshiftleverisnotfully in P(Park)withtheparkingbrake firmlyset.And,ifyouleavethe vehiclewiththeengine running,it couldoverheatandevencatch fire.Youorotherscouldbe injured.Donotleavethevehicle withtheengine running.
If you havetoleavethe vehicle with the engineer running, besure the vehicle is in P (Park) and the parking brake is firmly set before you leave it. After you have moved the shift lever into P (Park), hold down there regular brake pedal.
Seeifyoucanmovetheshiftlever awayfromP(Park)withoutfirst pullingittowardyou.Ifyoucan,it meansthattheshiftleverwasnot fullylockedintoP(Park).
TorqueLock
Torquelockiswhentheweight ofthevehicleputstoomuch forceontheparkingpawlinthe transmission. This happens when parkingonahillandshifting the transmission into P(Park) is not done properly and then it is difficult to shift out of P(Park). Toprevent torque lock, set the parking brake and thenshift into P(Park). To find out how, see "Shifting Into P(Park)" listed previously.
Iftorquelockdoesoccur,your vehiclemayneedtobepushed uphillbyanothervehicletorelieve theparkingpawlpressure,soyou canshiftoutofP(Park).
ShiftingOutofPark
AutomaticTransmission ShiftLock
The vehicle has an electronic shift lock releases system. Theshiftlock release is designed to:
• Preventignitionkeyremoval unlessstheshiftleverisin P(Park).
- Preventmovementoftheshift leveroutofP(Park), unless the ignitionisinON/RUNandthe brakepedalisapplied.
Theshiftlockisalwaysfunctional exceptinthecaseofaan unchargedorlowvoltage(less than9volt)battery.
If the vehicle has an uncharged battery or a battery with low voltage, trcharging or jump starting the battery. See Jump Starting on page 9-77.
If the console shift lever cannot be moved out of P(Park):
- Apply and maintain the regular brakes.
- TurntheignitiontoON/RUN position. SeeIgnitionPositions (KeylessAccess) onpage8-18 orIgnitionPositions(Key Access) onpage8-19 formore information.
-
Letupontheshiftlever and makesuretheshiftleveris pushedallthewayintoP(Park).
-
Presstheshiftleverbutton
- Then, movetheshiftleverinto thedesired gear.
If you still cannot movetheshift lever from P (Park), consult your dealer/retailer or professional towingservice.
ParkingOverThings ThatBurn

WARNING
Thingsthatcanburncouldtouch hotexhaustpartsunderthe vehicleandignite.Donotpark overpapers,leaves,drygrass, orotherthingsthatcanburn.
EngineExhaust

WARNING
EngineexhaustcontainsCarbon Monoxide(CO)whichcannot be seenorsmelled.ExposuretoCO cancauseunconsciousnessand evendeath.
Exhaustmayenterthevehicleif:
- The vehicle idles in areas with poor ventilation (parking garages, tunnels, deep snow that may block under body airflow or tail pipes).
• Theexhaustsmellsor soundsstrangeordifferent.
• Theexhaustsystemleaks duetocorrosionordamage.
(Continued)
WARNING(Continued)
- The vehicle's exhaust system has been modified, damaged or improperly repaired.
- Thereareholesoropenings inthevehiclebodyfrom damageorafter-market modificationsthatarenot completelysealed.
Ifunusualfumesaredetectedor ifitissuspectedthatexhaustis comingintothevehicle:
- Driveitonlywiththewindows completelydown.
- Havethevehiclerepaired immediately.
Neverparkthevehiclewiththe engineerunninginanenclosed areasuchasagarageora buildingthathasnofreshair ventilation.
RunningtheVehicle WhileParked
Itisbetternottoparkwiththe engine running. Butifyoueverhave to,herearesomethingstoknow.

WARNING
Idlingvehicleinanenclosed areawithpoorventilationis dangerous.Engineexhaustmay enterthevehicle.Engineexhaust containsCarbonMonoxide(CO) whichcannotbeseenorsmelled. Itcancauseunconsciousness andevendeath.Neverrunthe engineinanenclosedareathat hasnofreshairventilation.For moreinformation,seeEngine Exhaustonpage8-26.

WARNING
Itcanbedangeroustogetoutof thevehicleiftheautomatic transmissionshiftleverisnotfully inP(Park)withtheparkingbrake firmlyset.Thevehiclecanroll.Do notleavethevehiclewhenthe engineisrunningunlessyou haveto.Ifyouhaveleftthe enginerunning,thevehiclecan movesuddenly.Youorothers couldbeinjured.Tobesurethe vehiclewillnotmove,evenwhen youareonfairlylevelground, alwayssettheparkingbrakeand movetheshiftlevertoP(Park).
Follow the proper step to be sure the vehicle will not move. See Shifting Into Park on page 8-24.
Ifparkingonahillandpullinga trailer, seeDrivingCharacteristics and TowingTipsonpage8-54.
Automatic Transmission
The automatic transmission has a shift leverlocated on the console between these seats.
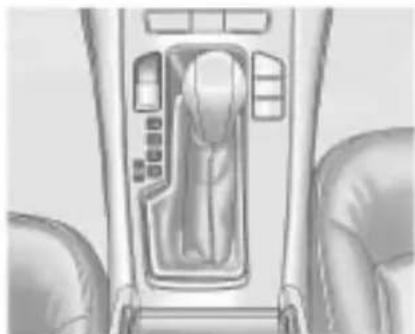
natural_image
Interior view of a car gear shift control panel showing mode dial and seat (no text or symbols)P(Park): This position lock the front wheels. It is the best position to use when starting the engine because the vehicle cannot move easily.

WARNING
It is dangerous to get out of the vehicle if the shift lever is not fully in P (Park) with the parking brake firmly set. The vehicle can roll.
Donotleavethevehiclewhenthe engineisrunningunlessyou haveto.Ifyouhaveleftthe engineerunning,thevehiclecan movesuddenly.Youorothers couldbeinjured.Tobesurethe vehiclewillnotmove,evenwhen youareonfairlylevelground, alwayssettheparkingbrakeand movetheshiftlevertoP(Park). SeeShiftingIntoPark on page 8-24 .Ifyouarepullinga trailer,seeDrivingCharacteristics and TowingTipsonpage 8-54.
Makesuretheshiftleveris fullyinP(Park)beforestarting theengine. Thevehiclehasan automatictransmissionshift lockcontrolsystem.
Theregularbrakemustbefully appliedfirstandthentheshiftlever buttonpressedbeforeshiftingfrom P(Park)whentheignitionkeyisin ON/RUN.Ifyoucannotshiftoutof P(Park),easepressureontheshift lever,thenpushtheshiftleverall thewayintoP(Park)asyou maintainbrakeapplication.Then presstheshiftleverbutton and movetheshiftleverintoanother gear.SeeShiftingOutofPark on page 8-25.
R(Reverse):Usethisgearto backup.
Notice: ShiftingtoR(Reverse) while the vehicle is moving forward could damage the transmission. There pairs would not be recovered by the vehicle warranty. Shift to R(Reverse) only after the vehicle is stopped.
Torockthevehiclebackandfortho getoutofsnow,iceorsandwithout damagingthetransmission,seelf the Vehicleis Stuckonpage8-12.
N(Neutral):Inthisposition,the enginedoesnotconnectwiththe wheels.Torestarttheenginewhen thevehicleisalreadymoving,use N(Neutral)only.Also,use N(Neutral)whenthevehicleis beingtowed.

WARNING
Shifting into a drive gear while the engine is running at high speed is dangerous. Unless your foot is firmly on the brake pedal, the vehicle could move very rapidly. You could lose control and hit people or objects. Donot shift into a drive gear while the engine is running at high speed.
Notice: ShiftingoutofP(Park) or N(Neutral) with the engine running at high speed may damage the transmission. The repairs would not be covered by the vehicle warranty. Besure the engine is not running at high speed when shifting the vehicle.
D(Drive): This position is for normal driving. It provides the best fuel economy. If more power is needed for passing, and the vehicle is:
- Goinglessthan35mph (56km/h), pushtheaccelerator pedalabouthalfwaydown.
- Goingabout35mph(56km/h)or more,pushtheacceleratorall thewaydown.
Notice: If the vehicle seem to accelerate slowly or not shift gears when you go faster, and you continue to driv the vehicle that way, you could damage the transmission. Have the vehicle serviced right away. You can drive in L (Low) when you are driving less than 56 km/h (35 mph) and D (Drive) for higher speeds until then.
ManualMode: Thispositionis shownontheshifterasa+/-. Itallowsthedrivertoselectthe gearsappropriateforcurrentdriving conditions. See Manual Mode on page 8-29 formoreinformation.
ManualMode
DriverShiftControl(DSC)
Notice: If you drivethe vehicle at high RPMs without upshifting while using Driver Shift Control (DSC), you could damage the vehicle. Always upshift when necessary while using DSC.
DriverShiftControl(DSC) allows youtoshiftanautomatic transmissionsimilartoamanual transmission. TousetheDSC feature:
WithSelectiveRideControl
- Movetheshiftlevertotheleft fromD(Drive). ThevehiclewillbeinSport Mode. Thegearindicatorinthe DICwillstilldisplayaDfor Drive, and theSportModeOn messagewillbedisplayed momentarily. SeeDriver InformationCenter(DIC) on page 4-25. Whenyouarein SportMode, thevehiclewillstill
shiftautomatically, butchassis tuning is modified. See Selective RideControl on page 8-36. If you movetheshift lever forward or rearward, the transmission will enter Manual Mode, and the DIC gear indicator will changetoan M followed by an number representing the gear the vehicle is currently in.
- In Manual Mode, presstheshift leverforwardtoupshiftor rearwardtodownshift.
WithoutSelectiveRideControl
-
Movetheshiftlevertotheleft fromD(Drive). The transmissionwillenter ManualMode.TheDICgear indicatorwillchangetoanM followedbyanumber representingthegearthe vehicleiscurrentlyin.
-
In Manual Mode, presstheshift leverforwardtoupshiftor rearwardtodownshift.
8-30DrivingandOperating
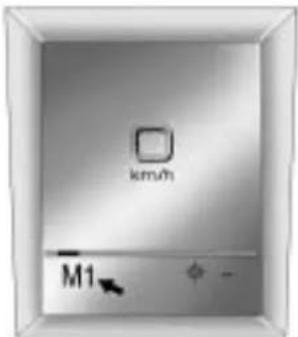
text_image
km/h M1UplevelDisplayShown, Base ModelSimilar
Thedisplayontheinstrumentpanel clusterwillshowwhichgearthe vehicleisin. Thenumberindicates therequestedgearrangewhen movingtheshiftleverforwardor rearward.
The transmission will only allow youtoshiftintogears appropriate for the vehicles speed and engine Revolutions Per Minute (RPM). The transmission will not automatically shift to then next lower gear if the engine RPM misto high, norto the nexthighergear when the maximum engine RPM misreached.
WhileintheDSCmode,the transmissionwillautomatically downshiftwhenthevehiclecomes toastop. Thiswillallowformore powerduringtake-off.
When accelerating the vehicle from astopinsnowyandicy conditions, you may want to shift into second gear. Higher gear allows you to gain more traction on slippery surfaces.
DriveSystems
All-WheelDrive
With this feature, engine power is always sent to all four wheels. It is fully automatic, and adjusts itself as needed for road conditions.
When using a compact spare tire on an AWD vehicle, the system automatically detect the compact spare and disables AWD. To restore AWD operation and prevent excessive wear on system, replace the compact spare with a full-size tire as soon as possible. See Compact Spare Tire on page 9-76 form more information.
Brakes
AntilockBrake System(ABS)
This vehicle has the Antilock Brake System (ABS), an advanced electronic braking system that helps prevent abrakingskid.
Whentheengineisstartedandthe vehiclebeginstodriveaway,ABS checksitself.Amomentarymotoror clickingnoisemightbeheardwhile thistestisgoingon,anditmight evenbenoticedthatthebrake pedalmovesalittle.Thisisnormal.
If there is a problem with ABS, this warning light stays on. See Antilock Brake System (ABS) Warning Light on page 4-21.
Ifdrivingsafelyonawetroadandit becomesnecessarytoslamonthe brakesandcontinuebrakingto avoidasuddenobstacle,a computersensesthatthewheels areslowingdown.Ifoneofthe wheelsisabouttostoprolling,the computerwillseparatelyworkthe brakesateachwheel.
ABScanchangethebrakepressure toeachwheel, asrequired, faster thananydrivercould. Thiscanhelp thedriversteeraroundtheobstacle whilebrakinghard.
Asthebrakesareapplied, the computerkeepsreceivingupdates onwheelspeedandcontrols brakingpressureaccordingly.
Remember:ABSdoesnotchange thetimeneededtogetafootupto thebrakepedaloralwaysdecrease stoppingdistance.Ifyougettoo closetothevehicleinfrontofyou,
therewillnotbeenoughtimeto applythebrakesifthatvehicle suddenlyslowsorstops.Always leaveenoughroomupaheadto stop,evenwithABS.
UsingABS
Donotpumpthebrakes.Justhold thebrakepedaldownfirmlyandlet ABSwork.TheABSpumpormotor mightbeheardoperating,andthe brakepedalmightbefelttopulsate, butthisisnormal.
BrakinginEmergencies
ABSallowsthedrivertosteerand brakeatthesametime.Inmany emergencies,steeringcanhelp morethaneventheverybest braking.
ParkingBrake

natural_image
Interior view of a vehicle airway with a directional arrow pointing to the down compartment (no text or symbols visible)ThevehiclehasanElectricParking Brake(EPB).Theswitchforthe EPBisinthecenterconsole.The EPBcanalwaysbeactivated,even iftheignitionisOFF.Toprevent drainingthebattery,avoidrepeated cyclesoftheEPBsystemwhenthe engineisnotrunning.
ThesystemhasaParkBrake StatuslightandaParkBrake Warninglight.SeeElectricParking BrakeLight onpage4-20.
TherearealsothreeDriver InformationCenter(DIC)messages. SeeBrakeSystemMessages on page4-33 formoreinformation.In caseofinsufficientelectricalpower, theEPBcannotbeappliedor released.
Beforeleavingthevehicle, check theparkbrakestatuslamptoinsure theparkbrakeisapplied.
EPBApply
TheEPBcanbeappliedanytime thevehicleisstopped.TheEPBis appliedbymomentarilyliftingupon theEPBswitch.Oncefullyapplied, theparkbrakestatuslightwillbe on.Whilethebrakeisbeingapplied, thestatuslampwillflashuntilfull applyisreached.Ifthelightdoes notcomeon,orremainsflashing, youneedtohavethevehicle serviced.Donotdrivethevehicleif theparkbrakestatuslightis flashing.Seeyourdealer/retailer. SeeElectricParkingBrakeLight on page4-20 formoreinformation.
IftheEPBisappliedwhilethe vehicleisinmotion,achimewill sound,andtheDICmessage RELEASEPARKBRAKESWITCH willbedisplayed.Thevehiclewill decelerateaslongastheswitchis heldintheupposition.Releasing theEPBswitchduringthe decelerationwillreleasetheparking brake.Iftheswitchisheldintheup positionuntilthevehiclecomestoa stop,theEPBwillremainapplied.
Iftheparkbrakestatuslightflashes continuously,theEPBisonly partiallyappliedorreleased, orthereisaproblemwiththeEPB. TheDICmessageSERVICEPARK BRAKEwillbedisplayed.Ifthislight flashescontinuously,releasethe EPB,andattempttoapplyitagain. Ifthislightcontinuestoflash,donot drivethevehicle.Seeyourdealer/ retailer.
Iftheparkbrakewarninglightison, theEPBhasdetectedanerrorin another system and is operating with reduced functionality. To apply the EPBwhenthislightison, liftup on the EPB switch and hold it in the up position. Full application of the parking brake by the EPB system may take longer period of time than normal when this light is on. Continuetohold the switch until the parkbrake status light remains on. Iftheparkbrakewarninglightison, see your dealer/retailer.
If the EPB fail to apply, there are wheel should be blocked to prevent vehicle movement.
EPBRelease
ToreleasetheEPB, placethe ignitionintheON/RUNposition, applyandholdthebrakepedal, and pushdownmomentarilyontheEPB switch. If you attempt to releasethe EPB without thebrakepedal applied, achimewillsound, and the DICmessage PRESSBRAKE PEDALTORELEASEPARK BRAKE will be displayed. The EPB is released when the park brake status light is off.
Iftheparkbrakewarninglightison, theEPBhasdetectedanerrorin anothersystemandisoperating withreducedfunctionality.To releasetheEPBwhenthislightis on,pushdownontheEPBswitch andholditinthedownposition. EPBreleasemaytakealonger periodoftimethannormalwhenthis lightison.Continuetoholdthe switchuntiltheparkbrakestatus lightisoff.Ifthelightison,seeyour dealer/retailer.
Notice: Driving with the parking brake on can over heat the brake system and cause premature wear ordamagetobrakesystem parts. Makes sure that the parking brake is fully released and the brakewarning light is off before driving.
AutomaticEPBRelease
TheEPBwillautomaticallyreleaseif thevehicleisrunning,placedinto gearandanattemptismadeto driveaway.Avoidrapidacceleration whentheEPBisapplied,to preserveparkbrakelininglife.
FormaximumEPBforcewhen towingatrailerorparkingonahill, pulltheEPBswitchtwice.Ifyouare towingatrailerandparkingonahill, seeDrivingCharacteristicsand TowingTips onpage8-54 formore information.
BrakeAssist
This vehicle has a brake assist feature designed to assist the driver instopping or decreasing vehicle speed in emergency driving conditions. This feature uses the stability system hydraulic brake control module to supplement the power brakesystem under conditions where the driver has quickly and forcefully applied the brake pedal in an attempt to quickly stoporslowdown the vehicle. The stability system hydraulic brake control module increases brake pressure at each corner of the vehicle until the ABS activates. Minor brake pedal pulsations or pedalmovement during this time is normal and the drivers should continueto apply the brake pedal asthedriving situation dictates. The brake assist feature will automatically disengag when the brake pedal is released or brake pedal pressure is quickly decreased.
RideControlSystems
TractionControl System(TCS)
The vehicle has attraction control system that limits wheel spin. This is especially useful in slippery road conditions. On a front-wheel-drive vehicle, the system operates if its sense that one or both of the front wheels are spinning or beginning to lose traction. On all-Wheel-Drive (AWD) vehicle, the system will operate if its sense that any of the wheels are spinning or beginning to lose traction. Whent his happens, the system brakes the spinning wheel(s) and/or reduces engine power limit wheel spin.
Thesystemmaybeheardorfelt whileitisworking, butthisis normal.

The TCS/Stabili Trak warning light flashesto indicate that the extraction control system is active.
This warning light comes on if there is a problem with the extraction control system.
See TractionOffLight on page 4-21. Whenthiswarning lightison, thesystemdoesnot limitwheelspin. Adjust your driving accordingly.
TCSautomaticallycomeson wheneverthevehicleisstarted. Tolimitwheelspin,especiallyin slipperyroadconditions,thesystem shouldalwaysbelefton.But,TCS canbeturnedoffifneeded.
Notice: Donotrepeatedlybrake oraccelerateheavilywhenTCSis off. The vehicle's driveline could be damaged.

The TCSofflightcomesonto indicate that the tetraction control system has been turned off.
When TCSisswitchedoffonAWD vehicles, thesystemmaystillmake noise. This is normal and necessary with the AWD hardware on the vehicle.
Itmightbenecessarytoturnthe systemoffifthevehiclegetsstuck insand,mudorsnowandrocking thevehicleisrequired.Seelfthe VehicleisStuck onpage8-12 for moreinformation.SeealsoWinter
Driving on page 8-9 for informationonusingTCSwhen drivinginsnowyoricyconditions.

Toturnthesystemoff, press ^20 located on the console to other right of the shifter.
Pressandrelease off andthetraction controlsystemturnsoffandthe tractioncontrolsystemwarninglight comeson.Press off againtoturnthe systembackon.Forinformationon turningStabiliTrakoffandon,see StabiliTrakSystemfollowinginthis section.
Addingnon-GMacaccessoriescan affectthevehicle'sperformance. SeeAccessoriesandModifications on page 9-3 formoreinformation.
ElectronicStability Control(ESC)
The vehicle has a vehicle stability enhancement system called Stabili Trak. It is an advanced computer controlled system that assists with directional control of the vehicle in difficult driving conditions.
StabiliTrakactivateswhenthe computersensesadifference between the intended path and the direction the vehicle is actually traveling. StabiliTrakselectively applies braking pressure at anyone of the vehicle's brakestohelp steer the vehicle in the intended direction.

When the stability control system activates, the Traction Control System (TCS)/Stabili Traklight flashes on the instrument panel.
This also occurs when extraction control is activated. Anoisemight be heard or vibration might be felt in the brake pedal. This is normal. Continuet osteer the vehicle in the intended direction.
If thereisaproblemdetected with StabiliTrak, the TCS/StabiliTraklight comes on and the system is not operational. See Electronic Stability Control (ESC)/Traction Control System (TCS) Indicator/Warning Light on page 4-22. Drivings should be adjusted accordingly.
StabiliTrakcomesonautomatically wheneverthevehicleisstarted.To assistwithdirectionalcontrolofthe vehicle,thesystemshouldalways belefton.

OFF
StabiliTrakcanbeturnedoffif neededbypassingandholding untiltheStabiliTrakOfflightcomes ontheinstrumentpanel. For informationonturningTCSoffand on,seeTractionControlSystem (TCS)inthissection.
Ifcruisecontrolisbeingusedwhen StabiliTrakactivates, the cruise controlautomatically disengages. Pressthecruisecontrolbutton to reengagewhenroadconditions allow. See Cruise Control on page 8-37 formoreinformation.
CF
Limited-SlipDifferential
Vehicleswithalimited-slip differentialcangivemoretractionon snow,mud,ice,sandorgravel. Itworkslikeastandarddifferential mostofthetime,butwhentraction islow,thisfeatureallowsthedrive wheelwiththemosttractionto movethevehicle.
SelectiveRideControl
The vehicle may have a ride control system called Selective Ride Control. The system provides the following performance benefits:
• ReducedImpactHarshness
• ImprovedRoadIsolation
• ImprovedHigh-SpeedStability
• ImprovedHandlingResponse
• BetterControlofBodyRide Motions
ToswitchfromTOURtoSPORT mode, movetheshiftlevertothe leftwhilethetransmissionisin D(Drive).
TOUR: Usefornormalcity and highway driving. This setting providesasmooth,softride.
SPORT: Usewhereroadconditions orpersonalpreferencedemand morecontrol. Thissettingprovides more "feel", orresponsetoroad conditionsthroughincreased steeringeffortandsuspension tuning.
Thesettingcanbechangedatany time. Basedonroadconditions, steeringwheelangleandthe vehiclespeed, thesystem automaticallyadjuststoprovidethe besthandlingwhileprovidinga smoothride. The TourandSport modeswillfeelsimilarona smoothroad.
CruiseControl
Withcruisecontrol, the vehicle can maintain as speed of about 40 km/h (25 mph) or more without keeping your foot on the accelerator. Cruise control does not work at speeds below 40 km/h (25 mph).
OnvehicleswiththeTraction ControlSystem(TCS)orElectronic StabilityControl(ESC),thesystem maybegintolimitwheelspinwhile youareusingcruisecontrol.Ifthis happens,thecruisecontrolwill automaticallydisengage.See TractionControlSystem(TCS) on page8-34 orElectronicStability Control(ESC)onpage8-35.

WARNING
Cruisecontrolcanbedangerous whereyoucannotdrivesafelyat asteadyspeed.So,donotuse thecruisecontrolonwinding roadsorinheavytraffic.
Cruisecontrolcanbedangerous onslipperyroads. Onsuchroads, fastchangesintiretraction can cause excessivewheelslip, and you could lose control. Donotuse cruise control on slippery roads.
8-38DrivingandOperating
SettingCruiseControl

WARNING
If you leave your cruise control on when you are not using cruise, you might hit a button and go into cruise when you don't want to. You could best stand and even lose control. Keep the cruise control switch until you want to use cruise control.
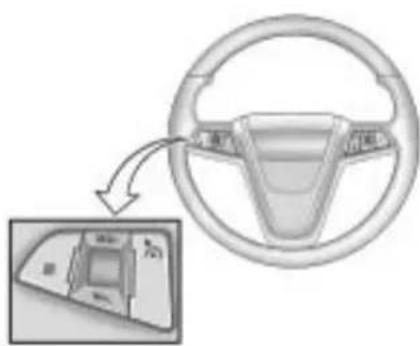
natural_image
Diagram of a car steering wheel with a close-up inset showing the dashboard (no text or symbols)Thecruisecontrolbuttonsare locatedonthesteeringwheel.
On/Off: Presstoturnthe cruisecontrolsystemonandoff. Anindicatorlightwillturnonoroffin theinstrumentpanelcluster.
☒(Cancel):Presstocancelcruise controlwithouterasingtheset speedfrommemory.
RES/+(Resume/Accel):Movethe thumbwheeluptoresumeaset speedortoacceleratetoahigher speed.
SET/-(Set/Coast):Movethe thumbwheeldowntosetaspeedor todecreasethespeed.
Tosetaspeed:
-
Press *oturnthecruise controlsystemon.Theindicator lightintheinstrumentpanel clustercomeson.
-
Gettothespeeddesired.
-
Movethethumbwheeldown towardSET/-andreleaseit. Thedesiredsetspeedbriefly appearsintheinstrumentpanel cluster.
-
Take your foot off the accelerator pedal.
Whenthebrakesareapplied, the cruisecontrolshutsoff.
ResumingaSetSpeed
Ifthebrakesareappliedorthe Cancelbuttonispressedwhilethe cruisecontrolisatetspeed,the cruisecontroldisengageswithout erasingthesetspeedfrommemory.
Oncethevehiclereachesabout 40km/h(25mph)ormore,movethe thumbwheeluptowardRES/+ briefly. Thevehiclereturnstothe speedselectedpreviouslyandstays there.
IncreasingSpeedWhileUsing CruiseControl
Ifthecruise control system is already engaged,
- Movethenthumbwheeluptoward RES/+andholdituntilthe vehicleacceleratestothe desiredspeed,andthen releaseit.
- Toincreasethespeedinsmall amounts, movethethumbwheel uptoward RES/+briefly and thenreleaseit. Each timethesis done, the vehiclegoes about 1.6km/h (1mph) faster.
ReducingSpeedWhileUsing CruiseControl
Ifthecruise control system is already engaged,
- Movethethumbwheeltoward SET/-andholduntilthedesired lowerspeedisreached, then releaseit.
- Toslowdowninverysmall amounts, movethethumbwheel towardSET/-brieflyandthen releaseit. Eachtimethisis done, the vehiclegoes about 1.6km/h(1mph)slower.
PassingAnotherVehicleWhile UsingCruiseControl
Usetheacceleratorpedalto increasethevehicle'sspeed.When youtakeyourfootoffthepedal,the vehiclewillslowdowntothe previouslysetcruisecontrolspeed.
UsingCruiseControlonHills
Howwellthecruise control works on hills depends upon the vehicle's speed, load, and the steepness of the hills. Whenging up steephills, you might havet ostepon the accelerator pedal to maintain the vehicle's speed. Whenging downhill, you might havet brake or shift to lower gear to maintain the vehicle's speed. Whenthe brakes are applied the cruise control shut soff.
EndingCruiseControl
Therearethreewaystodisengage thecruisecontrol:
- Steplightlyonthebrakepedal orclutch;whencruisecontrol disengages,theindicatorlight willnotbelit.
- Press⊗.
- Press ☑toturnthecruise controlsystemoffcompletely. Thecruisecontrolcannot be resumed.
ErasingSpeedMemory
Thecruisecontrolsetspeed memoryiserasedwhenthecruise controlortheignitionisturnedoff.
ObjectDetection Systems
UltrasonicParkingAssist
ForvehicleswiththeUltrasonic RearParkingAssist(URPA)system, itassiststhedriverwithparking andavoidingobjectswhilein R(Reverse).URPAoperatesat speedslessthan8km/h(5mph), andthesensorsontherearbumper detectobjectsupto2.5m(8ft.) behindthevehicle,andatleast 20cm(8in.)offtheground.
WARNING
The Ultrasonic Rear Parking Assist (URPA) system does not replaced rivervision. It cannot detect:
- Objectsthatarebelowthe bumper,underneaththe vehicle,oriftheyaretoo closeorfarfromthevehicle
• Children, pedestrians, bicyclists, orpets.
If you donot use proper care before and while backing; vehicle damage, injury, or death could occur. Even with URPA, always check behind the vehicle before backing up. While backing, be sure to look for objects and check the vehicle's mirrors.
HowtheSystemWorks
URPA comeson automatically whentheshiftleverismovedinto R(Reverse). Asingletonesounds to indicate the systemisworking.
URPAoperatesonlyatspeedsless than8km/h(5mph).
Anobstacleisindicatedbyaudible beeps. Theintervalbetweenthe beepsbecomesshorterasthe vehiclegetsclosertotheobstacle. Whenthedistanceislessthan 30cm(12in.)thebeepsare continuous.
Tobedetected, objectsmustbeat least20cm(8in.)offtheground and belowtrunklevel. Objectsmust alsobewithin2.5m(8ft.)fromthe rearbumper. Thedistanceobjects can bedetectedmaybelessduring warmerorhumidweather.
PARKASSISTOFFdisplaysonthe DriverInformationCenter(DIC)to indicate that URPAisoff. The message disappears after a short period of time.
TurningtheSystemOnandOff
TheURPAsystemcanbeturnedon andoffusingtheparkassistbutton locatednexttotheshiftlever.

Theparkassistbuttonlightsup whenthesystemisonandturnsoff whenithasbeendisabled.
URPAdefaultstotheonsetting eachtimethevehicleisstarted.
WhentheSystemDoesNot SeemtoWorkProperly
SERVICEPARKASSIST: If this message occurs, takethe vehicle to your dealer/retailertorepair the system.
PARKASSISTOFF: If the URPA system does not activate duetoa temporary condition, the message displays on the DIC, see Driver Information Center (DIC) on page 4-25 formoreinformation. This can occur under the following conditions:
- Thedriverhasdisabledthe system.
-
Theultrasonicsensorsarenot clean.Keepthevehicle'srear bumperfreeofmud,dirt,snow, iceandslush.Forcleaning instructions,see ExteriorCare onpage 9-84 .
-
Anobjectwashangingoutofthe trunkduringthelastdrivecycle. Oncetheobjectisremoved, URPAwillreturntonormal operation.
- Thevehicle'sbumperis damaged. Takethevehicleto yourdealer/retailertorepairthe system.
- Otherconditionsmayaffect systemperformance,suchas vibrationsfromajackhammeror thecompressionofairbrakeson averylargetruck.
If the system is still disabled, after driving forward at least 40 km/h (25 mph), tak the vehicle to your dealer/retailer.
SideBlindZone Alert(SBZA)
The vehicle may have a Side Blind Zone Alert (SBZA) system. Read this entire section before using the system.

WARNING
SBZAisonlyalanechangingaid anddoesnotreplacedriver vision.SBZAdoesnotdetect:
• Vehiclesoutsidetheside blindzoneswhichmaybe rapidlyapproaching.
- Pedestrians, bicyclists, oranimals.
(Continued)
WARNING(Continued)
Failuretousepropercarewhen changinglanesmayresultin damagetothevehicle,injury, ordeath.Alwayscheckthe outsideandrearviewmirrors, glanceoveryourshoulder,and usetheturnsignalbefore changinglanes.
Whenthesystemdetectsavehicle inthesideblindzone,amberSBZA displayswilllightupintheside mirrors. This indicates that it may be unsafetochangelanes. Before making alane change, always check the SBZA display, check the outside and rear view mirrors, look over your shoulder for vehicles and hazards, and usetheturnsignal.
SBZADetectionZones
The SBZAsensorcoversazoneof approximatelyonelaneoverfrom bothsidesofthevehicle,
3.5m(11ft.). Thiszonestartsat eachsidemirrorandgoesback approximately 5.0m(16ft.). The heightofthezoneisapproximately between 0.5m(1.5ft.) and
2.0m(6ft.)offtheground.
The SBZAdetectionzonesdonot changeifthevehicleistowinga trailer.Sobeextracarefulwhen changinglaneswhiletowinga trailer.
HowtheSystemWorks

natural_image
Two identical icons with double arrow symbols inside, no text or labels presentLeftSideMirror
Display
RightSideMirror
Display
Whenthevehicleisstarted,both outsidemirrordisplayswillbriefly comeontoindicatethatthesystem isoperating. Whiledrivingforward, theleftorrightsidemirrorSBZA displaywilllightupifavehicleis detectedinthatblindzone. Ifyou activateaturnsignalandavehicle hasbeendetectedonthesame side,theSBZAdisplaywillflashto giveyouextrawarningnotto changelanes.
SBZAdisplaysdonotcomeon whilethevehicleisapproachingor passingothervehicles. Atspeeds greaterthan32km/h(20mph), SBZAdisplaysmaycomeonwhen avehicleyouhavepassedremains inordropsbackintothe detectionzone.
SBZAcanbedisabledthrough VehiclePersonalization.See VehiclePersonalization on page4-38 formoreinformation. IftheSBZAisdisabledbythe driver,theSBZAmirrorddisplayswill notlightupduringnormaldriving.
WhentheSystemDoesNotSeem ToWorkProperly
OccasionalmissedAlertscanoccur undernormalcircumstancesandwill increaseinwetconditions.The systemdoesnotneedtobe servicedduetoanoccasional missedalert.Thenumberofmissed alertswillincreasewithincreased rainfallorroadspray.
IftheSBZAdisplaysdonotlightup whenthesystemisonandvehicles areintheblindzone,thesystem mayneedservice.Takethevehicle toyourdealer/retailer.
SBZAisdesignedtoignore stationaryobjects;however,the systemmayoccasionallylightup duetoguardrails,signs,trees, shrubs,andotherstationaryobjects. Thisisnormalsystemoperation,the vehicledoesnotneedservice.
8-44DrivingandOperating
SBZAdoesnotoperatewhenthe leftorrightcornersoftherear bumperarecoveredwithmud,dirt, snow,ice,slush,orinheavy rainstorms.Forcleaning instructions,seeExteriorCare on page9-84 .Iftheinfotainment displaystillshowstheSIDEBLIND ZONESYS.UNAVAILABLE messageaftercleaningthebumper, seeyourdealer/retailer.
TheSBZAdisplaysmayremainon ifatrailerisattachedtothevehicle, orabicycleorobjectisextending outtoeithersideofthevehicle.
WhenSBZAisdisabledforany reasonotherthanthedriverturning itoff,thedriverwillnotbeableto turnSBZAbackonusingVehicle Personalization.TheSIDEBLIND ZONEALERTONoptionwillnotbe selectableiftheconditionsfor normalsystemoperationarenot met.Untilnormaloperating conditionsforSBZAaremet,you shouldnotrelyuponSBZAwhile driving.
SBZAErrorMessages
The following messages may appear on the infotainment display:
SIDEBLINDZONEALERT SYSTEMOFF: Thismessage indicates that the driver has turned the system off.
SIDEBLINDZONESYS.
UNAVAILABLE: This message indicates that the SBZAsystemis disabled because the sensoris blocked and cannot detect vehicles in the blind zone. Thesensormay be blocked by mud, dirt, snow, ice, slush, oreven heavy rain storms. This message may also activate during heavy rain on du et or road spray. The vehicle does not need service. For cleaning, see Exterior Care on page 9-84.
SERVICESIDEBLINDZONE
ALERTSYSTEM: If this message appears, both SBZA displays will remain on indicating there is a problem with the SBZAsystem. If these displays remain on after continued driving, the system needs service. Takethe vehicle to your dealer/retailer.
FCCInformation
SeeRadioFrequencyStatement on page12-17 forFCCinformation.
RearVision Camera(RVC)
This vehicle may have an RVC system. Read this entire section before using it.
TheRVCsystemcanassistthe driverwhenbackingupby displayingaviewoftheareabehind thevehicle.
WARNING
TheRearVisionCamera(RVC) systemdoesnotreplacedriver vision.RVCdoesnot:
- Detectobjectsthatare outsidethecamera'sfieldof view,belowthebumper, orunderneaththevehicle.
• Detectchildren, pedestrians, bicyclists, orpets.
Donotbackthevehiclebyonly lookingattheRVCscreen,oruse thescreenduringlonger,higher speedbackingmaneuversor wheretherecouldbecross-traffic. Yourjudgeddistancesusingthe screenwilldifferfromactual distances.
Soifyoudonotusepropercare beforebackingup,youcouldhita vehicle,child,pedestrian, bicyclist,orpet,resultingin vehicledamage,injury,ordeath.
(Continued)
WARNING(Continued)
Eventhoughthevehiclehas the RVCsystem,alwayscheck carefullybeforebackingupby checkingbehindandaroundthe vehicle.
Animageappearsonthenavigation screenwiththemessageCheck SurroundingsforSafetywhenthe vehicleisshiftedintoR(Reverse). Thenavigationscreengoestothe previoussscreenafterapproximately 10secondsoncethevehicleis shiftedoutofR(Reverse).
Tocancelthedelay,dooneofthe following:
- Pressingahardkeyonthe navigationsystem.
- ShiftingintoP(Park).
- Reachavehiclespeedof 8km/h(5mph).
TurningtheRearVisionCamera SystemOnorOff
ToturntheRVCsystemonoroff:
- ShiftintoP(Park).
- PresstheCONFIGbutton to enter the configure menu options.
- SelectDisplay.
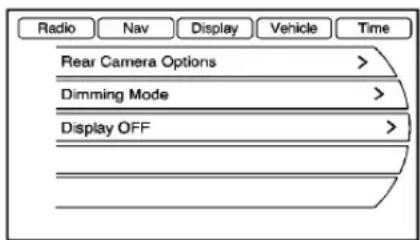
text_image
Radio Nav Display Vehicle Time Rear Camera Options > Dimming Mode > Display OFF >- SelectRearCameraOptions.
- SelectCamera.Whenacheck markappearsnexttothe Cameraoption,thentheRVC systemison.
Symbols
Thenavigationsystemmayhavea featurethatletsthedriverview symbolsonthenavigationscreen whileusingtheRVC.TheUltrasonic RearParkAssist(URPA)system mustnotbedisabledtousethe cautionsymbols.Theerrormessage RearParkingAssistSymbols UnavailablemaydisplayifURPA hasbeendisabledandthesymbols havebeenturnedon.See UltrasonicParkingAssist on page 8-40.
Thesymbolsappearandmaycover anobjectwhenviewingthe navigationscreenwhenanobjectis detectedbytheURPAsystem.
Toturnthesymbolsonoroff:
- ShiftintoP(Park).
- PresstheCONFIGbutton to enter the configure menu options.
- SelectDisplay
- SelectRearCameraOptions.
- SelectSymbols.Whenacheck markappearsnexttothe Symbolsoption,symbolswill appear.
Guidelines
TheRVCsystemhasaguideline overlaythatcanhelpthedriveralign thevehiclewhenbackingintoa parkingspot.
Toturntheguidelinesonoroff:
- ShiftintoP(Park).
-
PresstheCONFIGbutton to enter the configure menu options.
-
SelectDisplay
- SelectRearCameraOptions.
- SelectGuidelines. When a checkmarkappearsnexttothe Guidelinesoption, guidelineswill appear.
RearVisionCameraError Messages
ServiceRearVisionCamera
System: Thismessagecandisplay whenthesystemisnotreceiving informationitrequiresfromother vehiclesystems.
Ifanyotherproblemocursorifa problempersists, seeyourdealer/retailer.
RearVisionCameraLocation

text_image
000 000Thecameraislocatedabove the licenseplate.
Theareadisplayedbythecamerais limited,itdoesnotdisplayobjects thatareclosetoeithercorneror underthebumperandcanvary dependingonvehicleorientationor roadconditions.Thedistanceofthe imagethatappearsonthescreenis differentfromtheactualdistance.
The following illustrations show the field of view that the camera provides.

text_image
Diagram showing car motion with trajectory and vehicle positions, including labeled points A and BA.Viewdisplayedbythecamera. B.Corneroftherearbumper.
WhentheSystemDoesNot SeemToWorkProperly
TheRVCsystemmaynotwork properlyordisplayaclearimageif:
- TheRVCisturnedoff.See "TurningtheRearCamera SystemOnorOff"earlierinthis section.
- Itisdark.
• Thesunorthebeamof headlampsareshiningdirectly intothecameralens. - Ice, snow, mud, or anything else builds upon the cameralens. Cleanthelens, rinse it with water, and wipe it with as soft cloth.
- Thebackofthevehicleisinan accident, theposition and mountingangleofthecamera canchangeorthecameracan beaffected. Besuretohavethe cameraanditspositionand mountinganglecheckedatyour dealer/retailer.
Fuel
Useoftherecommendedfuelisan importantpartoftheproper maintenanceofthisvehicle.Tohelp keeptheenginecleanandmaintain optimumvehicleperformance,we recommendtheuseofgasoline advertisedasTOPTIERDetergent Gasoline.
LookfortheTOPTIERlabelonthe fuelpumptoensuregasolinemeets enhanceddetergencystandards developedbyautocompanies.Alist ofmarketersprovidingTOPTIER DetergentGasolinecanbefoundat www.toptiergas.com.

text_image
TOP TIER® Detergent Gasoline
text_image
CATEGORIE SUPERIÉURE™ Essences DétergentesThe8thdigitoftheVehicle IdentificationNumber(VIN)shows thecodeletterornumberthat identifiesthevehicle'sengine. TheVINisatthetopleftofthe instrumentpanel.See Vehicle IdentificationNumber(VIN) on page 11-1.
RecommendedFuel
Ifthevehiclehasa2.4LL4engine (VINCodeC)orthe3.0LV6engine (VINCodeG),useregularunleaded gasolinewithapostedoctanerating of87orhigher.Iftheoctanerating islessthan87,anaudibleknocking noise,commonlyreferredtoas sparkknock,mightbeheardwhen driving.Ifthisoccurs,usea gasolineratedat87octaneor higherassoonaspossible.Ifheavy knockingisheardwhenusing gasolineratedat87octaneor higher,theengineneedsservice.
Ifthevehiclehasthe3.6LV6engine (VINCodeV), usepremium unleaded gasolinewithaposted octaneratingof91orhigher.You canalsouseregularunleaded gasolineratedat87octaneor higher,butthevehicle'sacceleration couldbeslightlyreduced,anda slightaudibleknockingnoise, commonlyreferredtoasspark knock,mightbeheard.Iftheoctane islessthan87,aheavyknocking noisemightbeheardwhendriving. Ifthisoccurs,useagasolinerated at87octaneorhigherassoonas possible.Otherwise,youcould damagetheengine.Ifheavy knockingisheardwhenusing gasolineratedat87octaneor higher,theengineneedsservice.
GasolineSpecifications
Ataminimum, gasolines should meet ASTM specification D4814 in the United States or CAN/CGSB-3.5 or 3.511 in Canada. Some gasolines contain an octane-enhancing additive called methylcyclopentadienylmanganese tricarbonyl (MMT). Were recommend against the use of gasolines containing MMT. See Fuel Additives on page 8-50 for additional information.
CaliforniaFuel Requirements
Ifthevehicleiscertifiedtomeet CaliforniaEmissionsStandards,itis designedtooperateonfuelsthat meetCaliforniaspecifications.See theunderhoodemissioncontrol label.Ifthisfuelisnotavailablein statesadoptingCaliforniaemissions standards,thevehiclewilloperate satisfactorilyonfuelsmeeting federalspecifications,butemission controlsystemperformancemight beaffected.Themalfunction indicatorlampcouldturnonandthe vehiclemightfailasmog-checktest. SeeMalfunctionIndicatorLamp on page4-17 .Ifthisoccurs,returnto yourauthorizeddealer/retailerfor diagnosis.Ifitisdeterminedthatthe conditioniscausedbythetypeof fuelused,repairsmightnotbe coveredbythevehiclewarranty.
FuelsinForeign Countries
If you plan on driving in another country outside the United States or Canada, the proper fuel might be hard to find. Never use leaded gasoline or any other fuel not recommended in the previous text on fuel. Costly repairs caused by use of improper fuel would not be covered by the vehicle warranty.
Tocheckthefuelavailability, askan autoclub, or contact a major oil company that does business in the country where you will be driving.
FuelAdditives
Toprovidecleanerair, allgasolines intheUnitedStatesarenow required to contain additivesthat help prevent engine and fuel system deposits from forming, allowing the emission control system to work properly. In most cases, nothing should havet be added to the fuel. However, some gasolines contain only the minimum amount of additiverequired to meet U.S. Environmental Protection Agency regulations. To help keep fuel injectors and intake valves clean, or if the vehicle experiences problems duetodirty injectors or valves, look for gasolinethatis advertised as TOPTIER Detergent Gasoline. Look for the TOPTIER label on the fuel pump to ensure gasoline meets enhanced detergencystandards developed by the autocompanies. A list of marketers providing TOPTIER Detergent Gasoline can be found at www.toptiergas.com.
ForcustomerswhodonotuseTOP TIERDetergentGasolineregularly, onebottleofGMFuelSystem TreatmentPLUS,addedtothefuel tankateveryengineoilchange,can helpcleandepositsfromfuel injectorsandintakevalves.GMFuel SystemTreatmentPLUSistheonly gasolineadditiverecommendedby GeneralMotors.Itisavailableat yourdealer/retailer.
Gasolinescontainingoxygenates, suchasethersandethanol,and reformulatedgasolinesmightbe availableinyourarea.We recommendthatyouusethese gasolines,iftheycomplywiththe specificationsdescribedearlier.
However, E85(85%ethanol) and other fuels containing more than 10% ethanol must not be used in vehicle that were not designed for those fuels.
Notice: This vehicle was not designed for fuel that contains methanol. Donotuse fuel containing methanol. It can corrode metal parts in the fuel system and also damage plastic and rubber parts. That damage would not be covered under the vehicle warranty.
Somegasolinesthatarenot reformulatedforlow emissionscancontainan octane-enhancingadditivecalled methylcyclopentadienyl manganesetricarbonyl(MMT);ask theattendantwhereyoubuy gasolinewhetherthefuelcontains MMT.Werecommendagainstthe useofsuchgasolines.Fuels containingMMT canreducethelife ofsparkplugsandtheperformance oftheemissioncontrolsystemcould beaffected. Themalfunction indicatorlampmightturnon.Ifthis occurs,returntoyourdealer/retailer forservice.
FillingtheTank

WARNING
Fuelvaporburnsviolentlyanda fuelfirecancausebadinjuries. Tohelpavoidinjuriestoyouand others,readandfollowallthe instructionsonthefuelpump island.Turnofftheenginewhen refueling.Donotsmokenearfuel orwhenrefuelingthevehicle.Do notusecellularphones.Keep sparks,flames,andsmoking materialsawayfromfuel.Donot leavetheuelpumpunattended whenrefuelingthevehicle.Thisis againstthelawinsomeplaces. Donotre-enterthevehiclewhile pumpingfuel.Keepchildrenaway fromthefuelpump;neverlet childrenpumpfuel.
Thetetheredfuelcapsbehind thefueldooronthevehicle's passengerside.Turnthefuelcap counterclockwisetoremove.While refueling,hangthetetheredfuelcap fromthediskontheendofthefuel captothematingfeatureonthefuel doorhinge.Reinstallthecapby turningitclockwiseuntilitclicks

WARNING
Fuelcansprayoutonyouifyou openthefuelcaptooquickly. Ifyouspillfuelandthen somethingignitesit,youcouldbe badlyburned.Thisspraycan happenifthetankisnearlyfull, andismorelikelyinhotweather. Openthefuelcapslowlyandwait foranyhissnoisetostop.Then unscrewthecapalltheway.
Donottopofforoverfillthetankand waitafewsecondsbeforeremoving thenozzle.Cleanfuelfrompainted surfacesassoonaspossible.See ExteriorCareonpage9-84.

WARNING
Ifafirestartswhileyouare refueling, donotremovethe nozzle. Shutofftheflowoffuelby shuttingoffthepumporby notifyingthestationattendant. Leavetheareaimmediately.
Notice: Ifanewfuelcaps is needed, besuretogether the right type of cap from your dealer/retailer. The wrong type fuel cap might not fit properly, might cause them malfunction indicator lamptolight, and could damage the fuel tank and demissions system. See Malfunction Indicator Lamponpage 4-17.
FillingaPortableFuel Container

WARNING
Neverfillaportablefuelcontainer whileitisinthevehicle.Static electricitydischargefromthe containercanignitethefuel vapor.Youcanbebadlyburned andthevehicledamagedifthis occurs.Tohelpavoidinjurytoyou andothers:
- Dispensefuelonlyinto approvedcontainers.
- Donotfillacontainerwhileit isinsideavehicle,ina vehicle'strunk,pickupbed, oronanysurfaceotherthan theground.
(Continued)
WARNING(Continued)
- Bringthefillnozzleincontact withtheinsideofthefill openingbeforeoperatingthe nozzle.Contactshouldbe maintaineduntilthefillingis complete.
- Donotsmokewhile pumpingfuel.
- Donotuseacellularphone whilepumpingfuel.
Towing
GeneralTowing Information
Onlyusetowingequipmentthathas beendesignedforthevehicle. Contactyourdealer/retaileror traileringretailerforassistancewith preparingthevehiclefortowinga trailer.
Seethefollowingtrailertowing informationinthissection:
- Forinformationondrivingwhile towingatrailer,see"Driving Characteristicsand TowingTips".
- Formaximumvehicleandtrailer weights,see"TrailerTowing".
- Forinformationonequipmentto towatrailer,see“Towing Equipment”.
Forinformationontowingadisabled vehicle, see Towingthe Vehicle on page 9-81. Forinformationon towingthevehiclebehindanother vehicle—suchasamotorhome, see RecreationalVehicleTowing on page 9-81.
DrivingCharacteristics and TowingTips

WARNING
Thedrivercanlosecontrolwhen pullingatrailerifthecorrect equipmentisnotusedorthe vehicleisnotdrivenproperly. Forexample,ifthetraileristoo heavy,thebrakesmaynotwork well—orevenatall. Thedriver andpassengerscouldbe seriouslyinjured. Thevehicle mayalsobedamaged;the resultingrepairswouldnotbe coveredbythevehiclewarranty.
(Continued)
WARNING(Continued)
Pullatraileronlyifallthestepsin thissectionhavebeenfollowed. Askyourdealer/retailerforadvice andinformationabouttowinga trailerwiththevehicle.
The vehicle cantowatrailer when equipped with the proper trailer towing equipment. Fortrailer ing capacity, see Trailer Towing (2.4LL4Engine) on page 8-58 or Trailer Towing (3.0Land3.6L V6 Engines) on page 8-58. Trailering changeshandling, acceleration, braking, durability and fueleconomy. With the added weight, the engine, transmission, wheel assemblies and tires are forced to work harder and under greater loads. The trailer also adds wind resistance, increasing the pulling requirements. Forsafe trailering, correctly set the proper trailing equipment.
The following information has important trailering tips and rules for yoursafety and that of your passengers. Read this section carefully before pulling at a trailer.
PullingATrailer
Herearesomeimportantpoints:
- Therearemanylaws, including speedlimitrestrictionsthatapply totrailering. Checkforlegal requirementswithstateor provincialpolice.
- Donottowatraileratallduring thefirst1600km(1,000miles) thenewvehicleisdriven. The engine,axleorotherpartscould bedamaged.
- Duringthefirst800km (500miles)thatatraleris towed,donotdriveover80km/h (50mph)andonotmakestarts atfullthrottle.Thisreduceswear onthevehicle.
-
ThevehiclecantowinD(Drive). Usealowergearifthe transmissionshiftstoooften.
-
DonotusetheFuelSaverMode whentowing.
- Obeyspeedlimitrestrictions. Donotdrivefasterthanthe maximumpostedspeedfor trailers,ornomorethan90km/h (55mph),toreducewearonthe vehicle.
DrivingwithaTrailer
Towingatrailerrequiressexperience. Getfamiliarwithhandling and brakingwiththeaddedtrailer weight. Thevehicleisnowlonger andnotasresponsiveasthe vehicleisbyitself.
Checkalltrailerhitchpartsand attachments,safetychains, electricalconnectors,lamps,tires andmirroradjustments.Ifthetrailer haselectricbrakes,startthevehicle andtrailermovingandthenapply thetrailerbrakecontrollerbyhand tobesurethebrakesareworking.
Duringthetrip, checkregularlytobe surethattheloadissecure, and the lampsandtrailerbrakesareworking properly.
TowingwithaStabilityControl System
Whentowing, the sound of the stability control system might be heard. Thesystem is reacting to the vehicle movement caused by the trailer, which mainly occurs during cornering. This is normal when towing heavier trailers.
FollowingDistance
Stayatleasttwiceasfarbehindthe vehicleaheadasyouwouldwhen drivingthevehiclewithoutatrailer. Thiscanhelptoavoidsituations thatrequireheavybrakingand suddenturns.
Passing
Morepassingdistanceisneeded whentowingatrailer.Because the rigislonger,itisnecessarytogo fartherbeyondthepassedvehicle beforereturningtothelane.
BackingUp
Holdthebottomofthesteering wheelwithonehand.Tomovethe trailertotheleft,movethathandto theleft.Tomovethetrailertothe right,moveyourhandtotheright. Alwaysbackupslowlyand, ifpossible,havesomeone guideyou.
MakingTurns
Notice: Making very sharp turns while trailering could cause the trailertocome in contact with the vehicle. The vehicle could be damaged. Avoid making very sharp turns while trailering.
Whenturningwithatrailer,make widerturnsthannormalsothe trailerwillnotstrikesoftshoulders, curbs,roadsigns,treesorother objects.Usetheturnsignalwellin advanceandavoidjerkyorsudden maneuvers.
TurnSignalsWhenTowinga Trailer
Theturnsignalindicatorsonthe instrumentpanelflashwhenever signalingaturnorlanechange. Properlyhookedup,thetrailer lampsalsoflash,tellingother driversthevehicleisturning, changinglanesorstopping.
Whentowingatraler, thearrowson theinstrumentpanelflashforturns evenifthebulbsonthetrailerare burnedout. Checkoccasionally to besurethetrailerbulbsarestill working.
DrivingOnGrades
Reducespeedandshifttoa lowergearbeforestartingdowna longorsteepdowngrade.Ifthe transmissionisnotshifteddown,the brakesmighthavetobeusedso muchthattheywouldgethotandno longerworkwell.
ThevehiclecantowinD(Drive). Usealowergearifthetransmission shiftstoooften.
Whentowingathighaltitudeon steepuphillgrades,enginecoolant boilsatalowertemperaturethanat normalaltitudes.lftheengineis turnedoffimmediatelyaftertowing athighaltitudeonsteepuphill grades,thevehiclecouldshow signssimilartoengineoverheating. Toavoidthis,lettheengineerun whileparked,preferablyonlevel ground,withthetransmissionin P(Park)forafewminutesbefore turningtheengineoff.lfthe overheatwarningcomeson,see EngineOverheatingonpage9-21.
ParkingonHills

WARNING
Parkingthevehicleonahillwith thetrailerattachedcanbe dangerous.Ifsomethinggoes wrong,therigcouldstarttomove. Peoplecanbeinjured,andboth thevehicleandthetrailercanbe damaged.Whenpossible,always parktherigonaflatsurface.
Ifparkingtherigonahill:
- Pressthebrakepedal, but do not shift into P(Park) yet. Turn the wheels into the curbing facing downhill or to traffic iff facing uphill.
-
Havesomeoneplacechocks underthetrailerwheels.
-
Whenthewheelchocksarein place, releasethebrakepedal untilthechocksabsorbtheload.
- Reapplythebrakepedal. Then apply the parking brake and shift into P(Park).
- Releasethebrakepedal.
LeavingAfterParkingonaHill
-
Apply and hold the brake pedal while you:
-
Starttheengine.
-
Shiftintoagear.
• Releasetheparkingbrake. -
Letuponthebrakepedal.
- Driveslowlyuntilthetraileris clearofthechocks.
- Stopandhavesomeonepickup andstorethechocks.
MaintenanceWhenTrailer Towing
The vehicle need servicemore often when pulling at trailer. Seeths manual's Maintenance Schedule or Index form more information. Things that are especially important in trailer operation area automatic transmission fluid, engine oil, axle lubricant, belts, cooling system and brakesystem. Inspect these before and during the trip.
Checkperiodicallytoseethatall hitchnutsandboltsaretight.
EngineCoolingWhenTrailer Towing
Thecoolingsystemmaytemporarily overheatduringsevereoperating conditions.SeeEngineOverheating onpage9-21.
TrailerTowing (2.4LL4Engine)
Vehicleswithafourcylinderengine areneitherdesignednorintendedto towatrailer.
TrailerTowing(3.0Land 3.6LV6Engines)
Beforepullingatrailer,thereare threeimportantconsiderationsthat havetodowithweight:
• Theweightofthetrailer.
• Theweightofthetrailertongue.
• Thetotalweightonyour vehicle'stires.
WeightoftheTrailer
Howheavycanatrailersafelybe?
ForavehiclewithaV6engine, it shouldneverweighmorethan 454kg(1,000lbs). Buteventhat canbetoheavy.
Itdependsonhowtherigisused. Forexample, speed, altitude, road grades, outsidetemperature and howmuchthevehicleisusedtopull atrailerareallimportant.Itcan dependonanyspecialequipment onthevehicle,andtheamountof tongueweightthevehiclecancarry. See"WeightoftheTrailerTongue" laterinthissectionformore information.
Maximum trailerweightiscalculated assuming only the driver is in the tow vehicle and it has all the required trailering equipment. The weight of additional optional equipment, passengers and cargoin the tow vehicle must be subtracted from the maximum trailer weight.
Askyourdealer/retailerfortrailering informationoradvice,orwriteusat ourCustomerAssistanceOffices. SeeCustomerAssistanceOffices (US,Can) onpage 12-3 formore information.
WeightoftheTrailerTongue
Thetongueload(A)ofanytraileris animportantweighttomeasure becauseitafectsthetotalgross weightofthevehicle.TheGross VehicleWeight(GVW)includesthe curbweightofthevehicle,any cargocarriedinit,andthepeople whowillberidinginthevehicle. Iftherearealotofoptions, equipment,passengersorcargoin thevehicle,itwillreducethetongue weightthevehiclecancarry,which willalsoreducethetrailerweightthe vehiclecantow.Iftowingatrailer, thetongueloadmustbeaddedto theGVWbecausethevehiclewill becarryingthatweight,too.See VehicleLoadLimits onpage 8-12 formoreinformation.
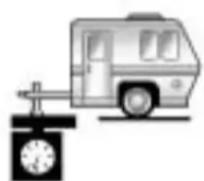
A
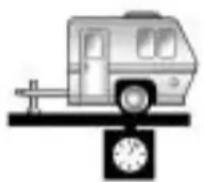
B
Thetrailertongue(A)shouldweigh 10-15percentofthetotalloaded trailerweight(B).
Afterloadingthetrailer, weighthe trailerandthenthetongue, separately, toseeiftheweightsare proper. If they are not, adjustments might be made by moving some items around in the trailer.
TotalWeightonYour Vehicle'sTires
Besurethevehicle'stiresare inflatedtotheupperlimitforcold tires. Thesenumberscanbefound ontheTire-LoadingInformation label.SeeVehicleLoadLimits on page 8-12 .Makesurenottogo overtheGVWlimitforthevehicle, includingtheweightofthetrailer tongue.
TowingEquipment
Hitches
Usethecorrecthitchequipment. Seeyourdealer/retailerorahitch dealerforassistance.
- Therearbumperonthevehicle isnotintendedforhitches.Do notattachrentalhitchesorother bumper-typehitchestoit.Use onlyaframe-mountedhitchthat doesnotattachtothebumper.
- Willanyholesbemadeinthe bodyofthevehiclewhenthe trailerhitchisinstalled? Ifthere are,sealtheholeswhenthe hitchisremoved. Iftheholesare notsealed,dirt,water,and deadlycarbonmonoxide(CO) fromtheexhaustcangetintothe vehicle.SeeEngineExhaust on page 8-26.
SafetyChains
Alwaysattachchainsbetweenthe vehicleandthetrailer.Crossthe safetychainsunderthetongueof thetrailertohelppreventthetongue fromcontactingtheroadifit becomesseparatedfromthehitch. Leaveenoughslacksotherigcan turn.Neverallowsafetychainsto dragontheground.
TrailerBrakes
Doesthetrailerhaveitsown brakes? Besuretoreadandfollow theinstructionsforthetralerbrakes sotheyareinstalled, adjusted and maintained properly.
Because the vehicle has an tilock brakes, don't tap into the vehicle's brakesystem. If this is done, both brakes systems will not work well, or at all.
Conversionsand Add-Ons
Add-On Electrical Equipment
Notice: Donotaddanything electrical to the vehicle unless you check with your dealer/ retailer first. Some electrical equipment and damage the vehicle and the damage would not be recovered by the vehicle's warranty. Some add-one electrical equipment can keep other components from working as they should.
Add-onequipmentcandrainthe vehiclebattery, evenifthevehicleis notoperating.
The vehicle has an air bags system. Before attempting to add anything electrical to the vehicle, see Servicing the Airbag-Equipped Vehicle on page 2-36 and Adding Equipment to the Airbag-Equipped Vehicle on page 2-37.
VehicleCare
GeneralInformation
GeneralInformation......9-2
CaliforniaProposition 65Warning......9-3
CaliforniaPerchlorateMaterials Requirements....9-3
Accessories and Modifications....9-3
VehicleChecks
DoingYourOwn ServiceWork......9-4
Hood....9-5
EngineCompartment Overview......9-6
EngineOil....9-11
EngineOilLifeSystem.....9-13
AutomaticTransmission Fluid....9-14
EngineAirCleaner/Filter.....9-15
CoolingSystem......9-17
EngineCoolant......9-18
EngineOverheating......9-21
OverheatedEngineProtection OperatingMode......9-23
PowerSteeringFluid......9-23
WasherFluid......9-24
Brakes....9-25
BrakeFluid....9-26
Battery....9-27
StarterSwitchCheck......9-28
AutomaticTransmissionShift LockControlSystem Check....9-29
IgnitionTransmissionLock Check....9-29
ParkBrakeandP(Park) MechanismCheck......9-30 WiperBladeReplacement...9-30
HeadlampAiming
HeadlampAiming......9-31
BulbReplacement
BulbReplacement......9-34
HalogenBulbs....9-34
HighIntensityDischarge(HID) Lighting......9-35
Headlamps, FrontTurnSignal and Parking Lamps......9-35
FogLamps....9-37
Taillamps, TurnSignal, Stoplamps, and Back-Up Lamps....9-37
LicensePlateLamp......9-38
ReplacementBulbs......9-39
ElectricalSystem
ElectricalSystem Overload....9-40
FusesandCircuit Breakers....9-40
EngineCompartmentFuse Block....9-41
InstrumentPanelFuse Block......9-44
RearCompartmentFuse Block....9-46
9-2 VehicleCare
WheelsandTires
Tires....9-48
WinterTires....9-48
TireSidewallLabeling......9-49
TireDesignations......9-51
TireTerminology and Definitions....9-52
TirePressure....9-56
TirePressureMonitor System....9-57
TirePressureMonitor Operation....9-59
TireInspection......9-62
TireRotation....9-62
When It Is Time for New Tires....9-63
BuyingNewTires......9-64
DifferentSizeTiresand Wheels....9-66
UniformTireQuality Grading....9-67
WheelAlignmentandTire
Balance....9-68
WheelReplacement......9-69
TireChains....9-70
IfaTireGoesFlat......9-70
TireChanging......9-72
CompactSpareTire......9-76
JumpStarting
JumpStarting......9-77
Towing
TowingtheVehicle......9-81
Recreational Vehicle
Towing....9-81
AppearanceCare
Forserviceandpartsneeds,visit yourdealer/retailer.Youwillreceive genuineGMpartsandGM-trained andsupportedservicepeople.
GenuineGMpartshaveoneof thesemarks:


CaliforniaProposition 65Warning
Mostmotorvehicles, including this one, contain and oremit chemicals known to the State of California cause cancer and birth defect or other reproductive harm. Engine exhaust, many parts and systems, many fluids, and some component wear by-products contain and/or emitthes Chemicals.
CaliforniaPerchlorate MaterialsRequirements
Certain types of automotive applications, such as airbag initiators, seat belt pretensioners, and lithium batteries contained in remote keyless transmitters, may contain perchloratematerials. Special handling may be necessary. For additional information, see www.dtsc.ca.gov/hazardous waste/perchlorate.
Accessories and Modifications
Adding non-dealer/non-retailer accessoriesto the vehicle can affect vehicle performance and safety, including such things as airbags, braking, stability, ride and handling, emission systems, aerodynamics, durability, and electronics systems like antilock brakes, traction control, and stability control. Some of these accessories could deven cause malfunctionordamagenotcovered by the vehicle warranty.
Damageetovehiclecomponents resultingfromtheinstallationoruse ofnon-GMcertifiedparts,including controlmodulemodifications,isnot coveredunderthetermsofthe vehiclewarrantyandmayaffect remainingwarrantycoveragefor affectedparts.
9-4 VehicleCare
GMAccessoriesaredesignedto complementandfunctionwithother systemsonthevehicle.YourGM dealer/retailercanaccessorizethe vehicleusinggenuineGM Accessories.Whenyougotoyour GMdealer/retailerandaskforGM Accessories,youwillknowthat GM-trainedandsupportedservice technicianswillperformthework usinggenuineGMAccessories.
Also, see Adding Equipment to the Airbag-Equipped Vehicle on page 2-37.
VehicleChecks
DoingYourOwn ServiceWork

WARNING
Youcanbeinjuredandthe vehiclecouldbedamagedifyou trytodoserviceworkonavehicle withoutknowingenoughaboutit.
- Besureyouhavesufficient knowledge,experience, theproperreplacement parts,andtoolsbefore attemptinganyvehicle maintenancetask.
- Besuretousetheproper nuts, bolts, and other fasteners. Englishandmetric fastenerscanbeeasily confused. Ifthewrong fastenersareused, parts canlaterbreakorfalloff. Youcouldbehurt.
If doingsome of your own service work, us the properservice manual. It tells you much more about how to servicethe vehicle than this manual can. To order the properservicemanual, see Service Publications Ordering Information on page 12-13.
Thisvehiclehasanairbagsystem. Beforeattemptingtodayyourown servicework,seeAirbagSystem Checkonpage2-38.
Keeparecordwithallpartsreceipts andlistthemileageandthedate ofanyserviceworkperformed. SeeMaintenanceRecords on page10-10.
Hood
Toopenthehood, dothefollowing:

natural_image
Diagram of a mechanical component with an arrow indicating direction (no text or symbols present)- Pulltheinteriorhoodrelease handlelocatedtotheleftofthe steeringcolumnbelowthe instrumentpanel.

natural_image
Mechanical component diagram showing internal structure with no visible text or symbols-
Pushthesecondaryhood releaselever, located under the center of the hood abovethe grille, totherighttodisengageit.
-
Liftthehood. Beforeclosingthehood, makesure allthefillercapsareproperly secured. Pullthehooddown and closeitfirmly.
EngineCompartmentOverview
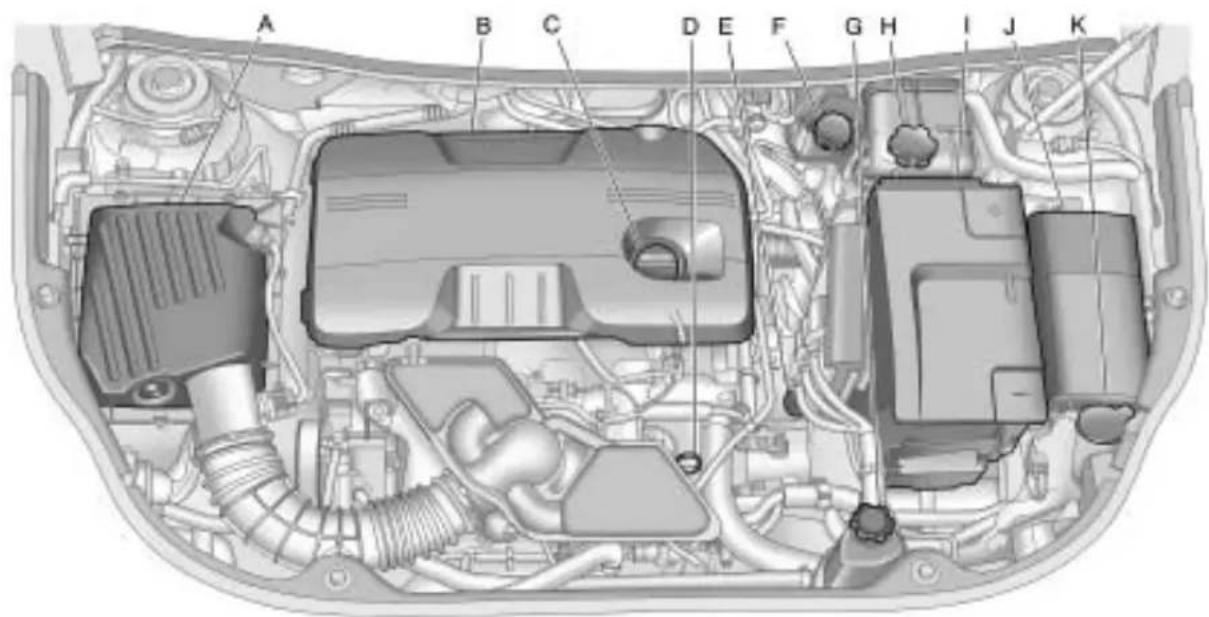
text_image
A B C D E F G H I J K2.4LL4Engine
A. EngineAirCleaner/Filter on page 9-15.
B. EngineCover.
C. EngineOilFillCap. See Engine Oilonpage9-11.
D. EngineOilDipstick.SeeEngine Oilonpage9-11.
E. TransmissionFluidCapand Dipstick.SeeAutomatic TransmissionFluid on page9-14.
F.BrakeMasterCylinder
Reservoir.SeeBrakes on
page 9-25.
G.PowerSteeringReservoirand Cap.SeePowerSteeringFluid onpage9-23.
H. Engine Coolant Reservoir and Pressure Cap. See Engine Coolanton page 9-18.
I.BatteryCover.SeeBattery on page9-27.
J.EngineCompartmentFuse
Blockonpage9-41.
K. Windshield Washer Fluid
Reservoir. See Washer Fluid on page 9-24.
9-8VehicleCare

text_image
A B C D E F G H I J K3.0LV6Engine
A. EngineAirCleaner/Filter on page 9-15.
B. PowerSteeringReservoir and Cap. See PowerSteeringFluid on page 9-23.
C. EngineOilFillCap. See Engine Oilonpage9-11.
D. EngineOilDipstick(Outof View). SeeEngineOil on page 9-11.
E.EngineCover.
F. TransmissionFluidCapand Dipstick.SeeAutomatic TransmissionFluid on page 9-14.
G.BrakeMasterCylinder
Reservoir.SeeBrakes on
page9-25.
H. Engine Coolant Reservoir and Pressure Cap. See Engine Coolanton page 9-18.
I.BatteryCover.SeeBattery on page9-27.
J.EngineCompartmentFuse
Blockonpage9-41.
K. Windshield Washer Fluid
Reservoir. See Washer Fluid on page 9-24.
9-10VehicleCare
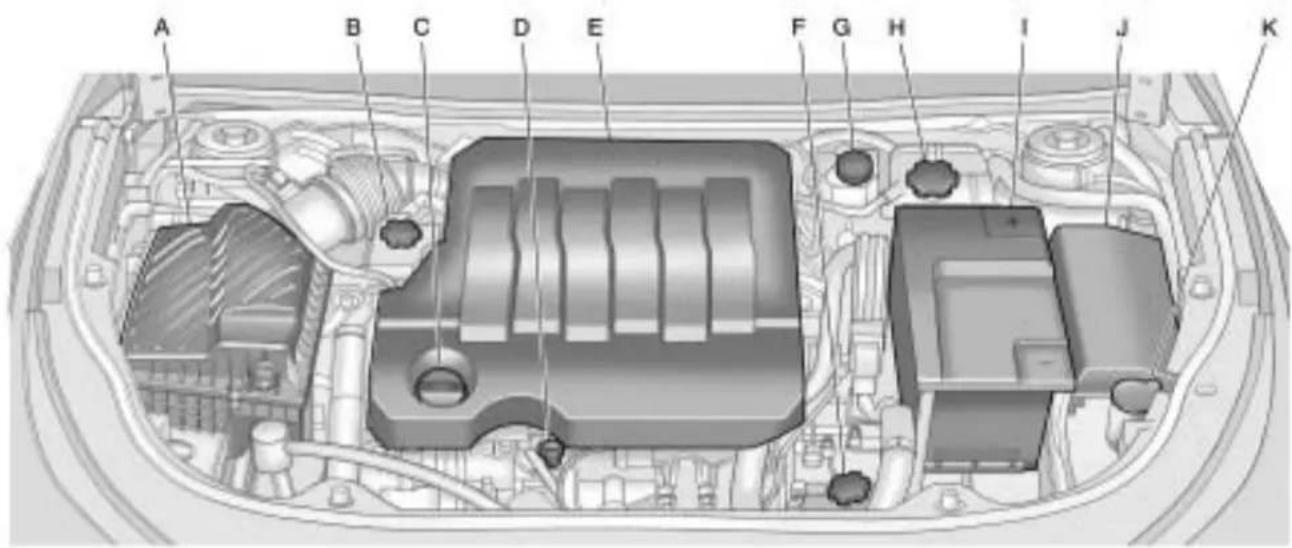
text_image
A B C D E F G H I J K3.6LV6Engine
A. EngineAirCleaner/Filter on page 9-15.
B. PowerSteeringReservoir and Cap. See PowerSteeringFluid on page 9-23.
C. EngineOilFillCap. See Engine Oilonpage9-11.
D. EngineOilDipstick(Outof View). SeeEngineOil on page 9-11.
E.EngineCover.
F. TransmissionFluidCapand Dipstick.SeeAutomatic TransmissionFluid on page 9-14.
G.BrakeMasterCylinder
Reservoir.SeeBrakes on
page9-25.
H. EngineCoolantReservoir and PressureCap. SeeEngine Coolantonpage9-18.
I.BatteryCover.SeeBattery on page9-27.
J.EngineCompartmentFuse
Blockonpage9-41.
K. Windshield Washer Fluid
Reservoir. See Washer Fluid on page 9-24.
EngineOil
CheckingEngineOil
Itisagoodideatochecktheengine oillevelateachfuelfill.Inorderto getanaccuratereading,theoil mustbewarmandthevehiclemust beonlevelground.
Theengineoidipstickhandle isayellowloop.SeeEngine CompartmentOverview on page 9-6 forthelocationofthe engineoidipstick.
- Turnofftheengineandgivethe oilseveralminutestodrainback intotheoilpan.Ifthisisnot done,theoildipstickmightnot showtheactuallevel.
- Pulloutthedipstickandcleanit withapapertowelorcloth, then pushitbackinalltheway. Removeitagain, keepingthetip down, and checkthelevel.
WhentoAddEngineOil

Iftheoilisbelowthecross-hatched areaatthetipofthedipstick, addatleastoneliter/quartofthe recommendedoil. Thissection explainswhatkindofoiltouse. Forengineoilcrankcasecapacity, seeCapacitiesandSpecifications onpage 11-2 .
Notice: Donotaddtoomuchoil. If the engine hassomuchoil that the oil level gets abovethe cross-hatched areathat shows the proper operating range, the engine could bedamaged.
SeeEngineCompartmentOverview on page 9-6 forthelocationofthe engineoilfillcap.
Addenoughoiltoputthelevel somewhereintheproperoperating range.Pushthedipstickalltheway backinwhenthrough.
WhatKindofEngineOiltoUse
Lookforthreethings:
- GM6094M
UseonlyanoilthatmeetsGM StandardGM6094M. - SAE5W-30
SAE5W-30isbestforthe vehicle. Thesenumbersonan oilcontainershowitsviscosity, orthickness. Donotuse otherviscosityoilssuchas SAE20W-50.
• AmericanPetroleumInstitute (API)starburstsymbol

Oilsmeetingtheserequirements should havethe starburst symbol on the container. This symbol indicates that the oil has been certified by the American Petroleum Institute (API).
Notice: Useonlyengineoil identifiedasmeetingGM StandardGM6094Mandshowing theAmericanPetroleumInstitute CertifiedForGasolineEngines starburstsymbol.Failuretouse therecommendedoilcanresult inenginedamagenotcoveredby thevehiclewarranty.
ColdTemperatureOperation
Ifinanareaofextremecold,where thetemperaturefallsbelow-29°C (-20°F),useeitheranSAE5W-30 syntheticoiloranSAE0W-30 engineoil.Bothprovideeasiercold startingfortheengineatextremely lowtemperatures.Alwaysuse anoilthatmeetstherequired specification,GM6094M.
EngineOilAdditives/Engine OilFlushes
Donotaddanythingtotheoil. Therecommendedoilswiththe starburstsymbolthatmeetGM standardsareallthatisneededfor goodperformanceandengine protection.
Engineoilsystemflushesarenot recommendedandcouldcause enginedamagenotcoveredbythe vehiclewarranty.
EngineOilLifeSystem
WhentoChangeEngineOil
This vehicle has a computer system that indicates when to change the engine oil and filter. This is based on engine revolutions and engine temperature, and not on mileage. Based on driving conditions, the mileage at which an oil change is indicated can vary considerably. For the oil ifesystemtowork properly, the system must be reset every time the oil is changed.
Whenthesystemhascalculated thatoillifehasbeendiminished, it indicates thatanoilchangeis necessary. A "ChangeEngine OilSoon" message comes on. See Engine Oil Messages on page 4-35. Changetheoilassoon
aspossiblewithinthenext1000km (600miles).Itispossiblethat, ifdrivingunderthebestconditions, theoillifesystemmightnotindicate thatanoilchangeisnecessaryfor overayear. However, theengineoil andfiltermustbechangedatleast onceayearandatthistimethe systemmustbereset. Yourdealer/ retailerhastrainedservicepeople whowillperformthisworkusing genuinepartsandresetthesystem. Itisalsoimportanttochecktheoil regularlyandkeepitattheproper level.
If the system is ever reset accidentally, the oil must be changed at 5000 km (3,000 miles) sincethelast oil change. Rememberto reset the oil life system whenever the oil is changed.
HowtoResettheEngineOil LifeSystem
Resetthesystemwheneverthe engineoilischangedsothatthe systemcancalculatethenext engineoilchange.Toresetthe system:
- TurntheignitiontoON/RUNwith theengineoff.
- PresstheDICmenubuttonon theturnsignallevertoscroll throughthemenuitemsonthe DICscreen.
- Pressthesetbuttontoclearthe "ChangeEngineOilSoon" messageand/orrestorethe "RemainingOilLife100%" message.
- TurntheignitiontoLOCK/OFF.
Thesystemisresetwhenthe "ChangeEngineOilSoon"message isoffandthe"RemainingOilLife 100%"messageisisdisplayed.
WhattoDowithUsedOil
Usedengineoilcontainscertain elementsthatcanbeunhealthyfor yourskinandcouldevencause cancer.Donotletusedoilstayon yourskinforverylong.Cleanyour skinandnailswithsoapandwater, oragoodhandcleaner.Washor properlydisposeofclothingorrags containingusedengineoil.Seethe manufacturer'swarningsaboutthe useanddisposalofoilproducts.
Usedoilcanbeathreattothe environment. If you change your own oil, besuretodrainall the oil from the filter before disposal. Never dispose of oil by putting it in the trash, pouring it on the ground, into sewers, or intostreams or bodies of water. Recycle it by taking it to a placethat collects used oil.
AutomaticTransmission Fluid
HowtoCheckAutomatic TransmissionFluid
Itisnotnecessarytocheck thetransmissionfluidlevel. Atransmissionfluidleakistheonly reasonforfluidloss.Ifaleak occurs,takethevehicletoyour dealer/retailerservicedepartment andhaveitrepairedassoonas possible.
Thereisaspecialprocedurefor checkingandchangingthe transmissionfluid.Becausethis procedureisdifficult,youshould havethisdoneatyourdealer/retailerservicedepartment.Contact yourdealer/retailerforadditional informationortheprocedurecan befoundintheservicemanual. Topurchaseaservicemanual,see ServicePublicationsOrdering Informationonpage12-13.
Changethefluidandfilteratthe intervalslistedinScheduled Maintenance onpage 10-2 ,and besuretousethefluidlistedin RecommendedFluidsand Lubricantsonpage 10-7.
EngineAirCleaner/Filter
Theengineaircleaner/filteris locatedintheenginecompartment onthedriver'ssideofthevehicle. SeeEngineCompartmentOverview on page 9-6 formoreinformation onlocation.
WhentolnspecttheEngineAir Cleaner/Filter
Inspecttheaircleaner/filteratthe MaintenanceIintervalsandreplace itatthefirstoilchangeaftereach 80000km(50,000mile)interval. SeeScheduledMaintenance on page10-2 formoreinformation. Ifyouaredrivingindusty/dirty conditions,inspectthefilterat eachengineoilchange.
HowtoInspecttheEngineAir Cleaner/Filter
Toinspecttheaircleaner/filter, removethefilterfromthevehicle andlightlyshakethefiltertorelease loosedustanddirt. If thefilter remainscakedwithdirt, anewfilter isrequired.
Toinspectorreplacetheengineair cleaner/filterdothefollowing:
2.4LL4Engine

natural_image
Mechanical component diagram showing a meshed housing with a black arrow pointing to a small component (no text or symbols visible)- Removethescrewsontopof theengineaircleaner/filter housing.
9-16VehicleCare
- Lift the filter cover housing away from the engine.
3.Pulloutthefilter. - Inspectorreplacetheengineair cleaner/filter.
- Lowerthefiltercoverhousing towardtheengine.
- Install the crew to the top of the housing to lock the cover in place.
3.0LV6Engineshown, 3.6LV6Enginesimilar
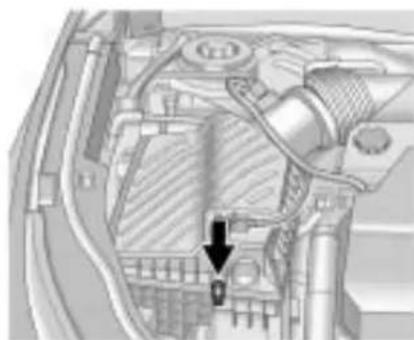
natural_image
Technical diagram of a mechanical assembly with no visible text or symbols- Removethescrewsontopof theengineaircleaner/filter housing.
- Lift the filter cover housing away from the engine.
3.Pulloutthefilter. -
Inspectorreplacetheengineair cleaner/filter.
-
Lower the filter coverhousing toward the engine.
- Install the crew to the top of the housing to lock the cover in place.
WARNING
Operatingtheenginewiththeair cleaner/filteroffcancauseyouor otherstobeburned. Theair cleanernotonlycleanstheair; it helpstostopflamesiftheengine backfires. Usecautionwhen workingontheengineanddonot drivewiththeaircleaner/filteroff.
Notice: If the aircleaner/filter is off, dirtcaneasilygetinto the engine, which could damage it. Always havethe aircleaner/filter in place when you are driving.
CoolingSystem
Thecoolingsystemallowsthe enginetomaintainthecorrect workingtemperature.
Whenitissafetoliftthehood:
2.4LL4Engine
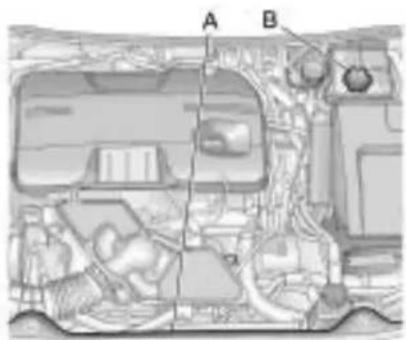
text_image
A BA. ElectricEngineCoolingFan
B. Coolant Recovery Tank and Pressure Cap
3.0LV6Engineshown, 3.6LV6Enginesimilar
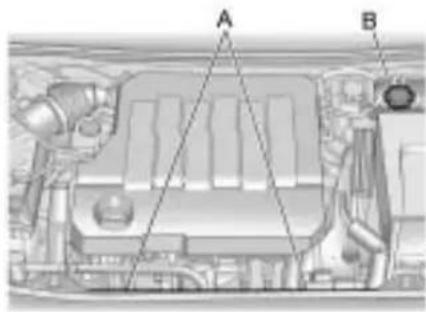
text_image
Technical diagram of a vehicle engine compartment with labeled parts A and BA. ElectricEngineCoolingFans
B. CoolantRecoveryTankand PressureCap
WARNING
Anelectricenginecoolingfan underthehoodcanstartupeven whentheengineisnotrunning andcancauseinjury.Keep hands,clothing,andtoolsaway fromanyunderhoodelectricfan.
WARNING
Heaterandradiatorhoses, and otherengineparts, can be very hot. Donottouchthem. If you do, you can be burned.
Donotruntheengineifthereisa leak.Ifyouruntheengine,it couldloseallcoolant.Thatcould causeanenginefire,andyou couldbeburned.Getanyleak fixedbeforeyoudrivethevehicle.
Notice: Using coolant other than DEX-COOL ^® can cause premature engine, heater core, or radiator corrosion. In addition, the engine coolant could require changing sooner, at 50000 km (30,000 miles) or 24 months, whichever occurs first. Any repairs would not be covered by the vehicle warranty. Always use DEX-COOL ^® (silicate-free) coolant in the vehicle.
EngineCoolant
Thecoolingsysteminthevehicleis filledwithDEX-COOL ^® engine coolant. Thiscoolantisdesigned to remaininthevehicleforfiveyears or240000km(150,000miles), whicheveroccursfirst.
The following explainsthecooling systemandhowtocheckandadd coolantwhenitislow.Ifthereisa problemwithengineoverheating, seeEngineOverheating on page 9-21.
WhattoUse
WARNING
Addingonlyplainwatertothe coolingsystemcanbe dangerous.Plainwater,orsome otherliquidsuchasalcohol,can boilbeforethepropercoolant mixturewill.Thevehicle'scoolant warningsystemissetforthe propercoolantmixture.Withplain waterorthewrongmixture,the enginecouldgettoohotbutyou wouldnotgettheoverheat warning.Theenginecouldcatch fireandyouorotherscouldbe burned.Usea50/50mixtureof clean,drinkablewaterand DEX-COOL® coolant.
Usea50/50mixtureofclean, drinkablewaterandDEX-COOL® coolant.Ifusingthismixture, nothingelseneedstobeadded. Thismixture:
• Givesfreezingprotectiondown to -37^(-34^) , outside temperature.
• Givesboilingprotectionupto 129°C(265°F), engine temperature.
- Protectsagainstrustand corrosion.
• Willnotdamagealuminumparts.
- Helpskeeptheproperengine temperature.
Notice: If an improper coolant mixture is used, the engine could overheat and be badly damaged. Therepair cost would not be covered by the vehicle warranty. To much water in them mixture can freeze and crack the engine, radiator, heater core, and other parts.
CheckingCoolant
The vehicle must be on a level surface when checking the coolant level.
Checktoseeifcoolantisvisiblein thecoolantrecoverytank.Ifthe coolantinsidethecoolantrecovery tankisboiling,donotdoanything elseuntilcoolsdown.Ifcoolantis visiblebutthecoolantlevelisnotat orabovethemarkpointedto,adda 50/50mixtureofclean,drinkable waterandDEX-COOL® coolantat thecoolantrecoverytank,butbe surethecoolingsystemiscool beforethisisdone.
Ifnocoolantisvisibleinthesurge tank, addcoolantasfollows:
HowtoAddCoolanttothe RecoveryTank

WARNING
Youcanbeburnedifyouspill coolantonhotengineparts. Coolantcontainsethyleneglycol anditwillburniftheengineparts arehotenough.Donotspill coolantonahotengine.
Notice: This vehicle has a specific coolant fill procedure. Failure to follow this procedure could cause the engine to overheat and be severely damaged.

WARNING
Anelectricenginecoolingfan underthehoodcanstartupeven whentheengineisnotrunning andcancauseinjury.Keep hands,clothing,andtoolsaway fromanyunderhoodelectricfan.

WARNING
Steamandscaldingliquidsfroma hotcoolingsystemcanblowout andburnyoubadly. They are underpressure, and if you turn the surgetank pressure cap—even alittle—they can come out at high speed. Never turn the cap when the cooling system, including the surgetank pressure cap, ishot. Wait for the coolingsystem and surgetank pressure capt to cool if you ever havet to turn the pressure cap.

Thecoolantsurgetankpressure capcanberemovedwhenthe coolingsystem,includingthesurge tankpressurecapandupper radiatorhose,isnolongerhot.
-
Turn the pressure capslowly counterclockwise. If a his is heard, wait forth that stop. Ah is mean there is still some pressure left.
-
Then keep turning the cap and remove it.

natural_image
Diagram of a mechanical component with internal features and directional arrows (no text or symbols)-
Fill the coolantsurgetank with the proper mixture to them mark pointed to on the front of the coolantsurgetank.
-
With the coolantsurgetankcap off, start the engine and let it run until the upper radiator hose starts getting hot. Watch out for the engine cooling fan(s). By this time, the coolant level inside the coolantsurgetank may be lower. If the level is lower, add more of the proper mixture to the coolantsurgetank until the level reaches the mark pointed to on the front of the coolant surgetank.
-
Replacethecap. Besurethe capishand–tightandfull seated.
Notice: If the pressure cap is not tightly installed, coolant loss and possible engine damage may occur. Besure the cap is properly and tightly secured.
Ifcoolantisneeded,addtheproper DEX-COOL® coolantmixtureatthe coolantrecoverytank.
EngineOverheating
The vehicle has several indicators to warn of engine overheating.
Thereisacoolanttemperature gaugeandawarninglightonthe instrumentpanelclusterthat indicateanoverheatedengine condition.SeeEngineCoolant TemperatureGauge onpage 4-14 formoreinformation.
Youmaydecidenottoliftthehood whenthiswarningappears,but insteadgetservicehelprightaway. SeeRoadsideAssistanceProgram onpage 12-6 .
If youdodecidetoliftthehood, makesurethevehicleisparkedon alevelsurface.
Thenchecktoseeiftheengine coolingfansarerunning. If the engineisoverheating, thefan(s) shouldberunning. If they are not, donotcontinuetoruntheengine and havethevehicleserviced.
Notice: Enginedamage from running the engine without coolant is not covered by the warranty.
IfSteamIsComingFromThe EngineCompartment
See Overheated Engine Protection Operating Mode on page 9-23 for information on driving to as safe place in an emergency.
IfNoSteamIsComingFrom TheEngineCompartment
Ifanengineoverheatwarningis displayedbutnosteamcanbeseen orheard,theproblemmightnotbe tooserious.Sometimesheengine cangetalittletoohotwhenthe vehicle:
• Climbingalonghillonahotday.
- Stoppingafterhigh-speed driving.
• Idlingforlongperiodsintraffic.
- Towingatraler.
If the overheat warning displays with nosignofsteam:
- Turntheairconditioningoff.
- Turntheheaterontothehighest temperature and tothehighest fanspeed. Openthewindowsas necessary.
- In heavy traffic, let the engine idle in N (Neutral) while stopped. If it is a fast to do so, pulloff the road, shift to P (Park) or N (Neutral) and let the engine idle.
If the temperature overheat gauge isn longer in the overheat zone or an overheat warning nolonger displays, the vehicle can be driven. Continuetodrivethe vehicles slow for about 10 minutes. Keep as safe vehicledistance from the vehicle in front. If the warning does not come back on, continued or driven normally.
If the warning continues, pullover, stop, and park the vehicle right away.
Ifthereisnosignofsteam,idlethe engineforthreeminuteswhile parked.Ifthewarningisstill displayed,turnofftheengineuntil coolsdown.Also,see"Overheated EngineProtectionOperatingMode" laterinthissection.
Overheated Engine Protection Operating Mode
Thisemergencyoperatingmode allowsthevehicletobedriven toasafeplaceinanemergency situation. Ifanoverheatedengine conditionexists, anoverheat protectionmodewhichalternates firinggroupsofcylindershelps preventenginedamage. In this mode, thereissignificantlossin powerandengineperformance. Theenginecoolanttemperature warninglightcomesonthe instrumentpanel, toindicate the vehiclehasenteredoverheated engineprotectionoperatingmode. Thetemperaturegaugealso indicatesanoverheatcondition exists. Drivingextendedkm(miles) and/ortowingatrailerinthe overheatprotectionmodeshould beavoided.
Power Steering Fluid

SeeEngineCompartmentOverview on page 9-6 forinformationonthe locationofthepowersteeringfluid reservoir.
When to Check Power Steering Fluid
Itisnotnecessarytoregularly checkpowersteeringfluidunlessa leakissuspectedinthesystemor anunusualnoiseisheard.Afluid lossinthissystemcouldindicatea problem.Havethesysteminspected andrepaired.
How to Check Power Steering Fluid
Checkthelevelafterthevehicle hasbeendrivenforatleast twentyminutessothefluidiswarm.
Tocheckthepowersteeringfluid:
- TurntheignitiontoLOCK/OFF andlettheenginecompartment cooldown.
- Wipethecapandthetopofthe reservoirclean.
- Unscrewthecapandpullit straightup.
- Wipethedipstickwitha cleanrag.
- Replacethecapandcompletely tightenit.
- Removethecapagainandlook atthefluidlevelonthedipstick.

Whentheengineishot, thelevel shouldbeatthehotMAXlevel. Whentheengineiscold, thefluid levelshouldbebetweenMINand MAXonthedipstick.
WhattoUse
Todeterminewhatkindoffluidto use,seeRecommendedFluidsand Lubricants onpage10-7 .Always usetheproperfluid.
WasherFluid
WhattoUse
When windshieldwasherfluid is needed, besuretoread the manufacturer instructions before use. If operating the vehicle in an areawherethetemperature can fall below freezing, use a fluid that hassufficient protection against freezing.
AddingWasherFluid

Openthecapwiththewasher symbolonit.Addwasherfluid untilthetankisfull.SeeEngine CompartmentOverview on page 9-6 forreservoirlocation.
Notice:
- When using concentrated washer fluid, follow the manufacturer's instructions for adding water.
- Donotmixwaterwith ready-to-usewasherfluid. Watercancausethesolution tofreezeanddamagethe washerfluidtankandother partsofthewashersystem. Also,waterdoesnotcleanas wellaswasherfluid.
- Fillthewasherfluidtankonly three-quartersfullwhenitis verycold. This allows for fluidexpansioniffreezing occurs, which could damagethetankifitis completely full.
- Donotuseenginecoolant (antifreeze)inthewindshield washer.ltcandamagethe vehicle'swindshieldwasher systemandpaint.
Brakes
Thisvehiclehasdiscbrakes.Disc brakepadshavebuilt-inwear indicatorsthatmakeahigh-pitched warningsoundwhenthebrakepads arewornandnewpadsareneeded. Thesoundcancomeandgoorbe heardallthetimethevehicleis moving,exceptwhenapplyingthe brakepedalfirmly.

WARNING
Thebrakewearwarningsound meansthatsoonthebrakeswill notworkwell. Thatcouldleadto anaccident. Whenthebrake wearwarningsoundisheard, havethevehicleserviced.
Notice:Continuingtodrivewith worn-outbrakepadscouldresult incostlybrakerepair.
Somedrivingconditionsorclimates cancauseabrakesquealwhenthe brakesarefirstappliedorlightly applied. Thisdoesnotmean somethingiswrongwiththebrakes.
Properlytorquedwheelnutsare necessarytohelppreventbrake pulsation. Whentiresarerotated, inspectbrakepadsforwear and evenlytightenwheelnutsinthe propersequencetotorque specificationsinCapacitiesand Specificationsonpage11-2.
Brakeliningsshouldalwaysbe replacedascompleteaxlesets.
BrakePedalTravel
Seeyourdealer/retailerifthebrake pedaldoesnotreturntonormal height,orifthereisarapidincrease inpedaltravel.Thiscouldbea signthatbrakeservicemightbe required.
BrakeAdjustment
Everytimethebrakesareapplied, withorwithoutthevehiclemoving, thebrakesadjustforwear.
ReplacingBrakeSystemParts
Thebrakingsystemonavehicleis complex. Itsmanypartshavetobe oftopqualityandworkwelltogether ifthevehicleistohavereallygood braking. Thevehiclewasdesigned andtestedwithtop-qualitybrake parts. Whenpartsofthebraking systemarereplaced, besuretoget new, approvedreplacementparts. Ifthisisnotdone, thebrakesmight notworkproperly. Forexample, installingdiscbrakepadsthatare wrongforthevehicle, canchange thebalancebetweenthefrontand rearbrakes—fortheworse. The brakingperformanceexpectedcan changeinmanyotherwaysifthe wrongreplacementbrakepartsare installed.
BrakeFluid
Thebrakemastercylinderreservoir isfilledwithDOT3brakefluidas indicatedonthereservoircap.See EngineCompartmentOverview on page 9-6 forthelocationofthe reservoir.
Thereareonlytworeasonswhythe brakefluidlevelinthereservoir mightgodown:
- Thebrakefluidlevelgoesdown becauseofnormalbrakelining wear.Whennewliningsare installed,thefluidlevelgoes backup.
- Afluidleakinthebrake hydraulicsystemcanalsocause alowfluidlevel.Havethebrake hydraulicsystemfixed,sincea leakmeansthatsoonerolater thebrakeswillnotworkwell.
Donottopoffthebrakefluid. Addingfluiddoesnotcorrectaleak. Iffluidisaddedwhenthelinings areworn,therewillbetoomuch fluidwhennewbrakeliningsare installed.Addorremovebrakefluid, asnecessary,onlywhenworkis doneonthebrakehydraulicsystem.

WARNING
Iftoomuchbrakefluidisadded, it canspillontheengineandburn, iftheengineishotenough. You orotherscouldbeburned, and thevehiclecouldbedamaged. Addbrakefluidonlywhenworkis doneonthebrakehydraulic system.
Whenthebrakefluidfallstoalow level,thebrakewarninglightcomes on.SeeBrakeSystemWarning Lightonpage4-19.
WhattoAdd
UseonlynewDOT3brake fluidfromasealedcontainer. SeeRecommendedFluidsand Lubricantsonpage 10-7.
Alwayscleanthebrakefluid reservoircapandtheareaaround thecapbeforeremovingit. This helpskeepdirtfromenteringthe reservoir.

WARNING
Withthewrongkindoffluidin thebrakehydraulicsystem,the brakesmightnotworkwell.This couldcauseacrash.Alwaysuse theproperbrakefluid.
Notice:
- Usingthewrongfluid canbadlydamagebrake hydraulicsystemparts. Forexample,justafew dropsofmineral-basedoil, suchasengineoil,inthe brakehydraulicsystemcan damagebrakehydraulic systempartssobadlythat theywillhavetobereplaced. Donotletsomeoneputin thewrongkindoffluid.
- Ifbrakefluidisspilledon thevehicle'spainted surfaces,thepaintfinishcan bedamaged.Becarefulnot tospillbrakefluidonthe vehicle.Ifyoudo,washitoff immediately.
Battery
Refertothereplacementnumberon theoriginalbatterylabelwhena newbatteryisneeded.

DANGER
Batteryposts,terminals,and relatedaccessoriescontainlead andleadcompounds,chemicals knowntotheStateofCaliforniato causecancerandreproductive harm.Washhandsafterhandling.
If the battery has a very low charge or is dead, it might not be possible to remove the ignition key from the ignition switch or shift out of P (Park). See Shifting Out of Park on page 8-25.
VehicleStorage

WARNING
Batterieshaveacidthatcanburn youandgasthatcanexplode. Youcanbebadlyhurtifyouare notcareful.SeeJumpStarting on page9-77 fortipsonworking aroundabatterywithout gettinghurt.
InfrequentUsage:Removethe black,negative(−)cablefromthe batterytokeepthebatteryfrom runningdown.
Extended Storage: Removethe black, negative(−)cable from the battery or use abattery trickle charger.
StarterSwitchCheck

WARNING
Whenyouaredoingthis inspection,thevehiclecould movesuddenly.Ifthevehicle moves,youorotherscouldbe injured.
-
Before starting this check, be sure there is enoughroom around the vehicle.
-
Firmly apply both the parking brake and theregular brake. See Parking Brake on page 8-32.
Donotusetheaccelerator pedal, and bereadytoturnoff theengineimmediatelyifit starts.
- Trytostarttheengineineach gear. The vehicles should start only in P(Park) or N(Neutral). If the vehicle starts in any other position, contact your dealer/retailer for service.
AutomaticTransmission ShiftLockControl SystemCheck

WARNING
Whenyouaredoingthis inspection,thevehiclecould movesuddenly.Ifthevehicle moves,youorotherscouldbe injured.
-
Before starting this check, be sure there is a ten thousand hours around the vehicle. It should be parked on a level surface.
-
Firmly apply the parking brake.
SeeParkingBrake on page 8-32.
Bereadytoapplytheregular brakeimmediatelyifthevehicle beginstomove. - With the engine off, turn the ignition to ON/RUN, but do not start the engine. Without applying theregular brake, try to movetheshiftleverout of P(Park) with normaleffort. If the shift lever moves out of P(Park), contact your dealer/retailer for service.
IgnitionTransmission LockCheck
Whileparked, and with the parking brakeset, try to turn the ignition to LOCK/OFFineachshift lever position.
• Theignitionshouldturnto LOCK/OFFonlywhentheshift leverisinP(Park).
- Withthekeyaccessignition system, the ignition key should come out only in LOCK/OFF.
Contactyourdealer/retailerif serviceisrequired.
ParkBrakeandP(Park) MechanismCheck

WARNING
Whenyouaredoingthischeck, thevehiclecouldbegintomove. Youorotherscouldbeinjured andpropertycouldbedamaged. Makesurethereisroominfront ofthevehicleincaseitbeginsto roll. Bereadytoapplytheregular brakeatonceshouldthevehicle begintomove.
Parkonafairlysteephill, with the vehiclefacingdownhill. Keeping yourfootontheregularbrake, set theparkingbrake.
- Tochecktheparkingbrake's holdingability:Withtheengine runningandthetransmissionin N(Neutral),slowlyremovefoot pressurefromtheregularbrake pedal.Dothisuntilthevehicle is heldbytheparkingbrakeonly.
- TochecktheP(Park) mechanism'sholdingability: Withtheengine running, shiftto P(Park). Then releasethe parkingbrake followed by the regularbrake.
Contactyourdealer/retailerif serviceisrequired.
WiperBladeReplacement
Windshieldwiperbladesshouldbe inspectedforwearandcracking. SeeScheduledMaintenance on page 10-2 formoreinformation.
Replacementbladescomein differenttypesandareremoved indifferentways.Forproperty andlength,seeMaintenance ReplacementPartsonpage10-9.
Toreplacethewindshieldwiper blade:
- Pullthewindshieldwiper assemblyawayfromthe windshield.

natural_image
Technical illustration of a medical or surgical tool with an arrow indicating direction (no text or symbols present)-
Liftuponplasticlatchinthe middleofthewiperbladewhere thewiperarmattaches.
-
With the latch open, pull the wiper bladed downtoward the windshieldfarenoughtorelease it from the J-hookedendof the wiper arm.
- Removethewiperblade.
Allowingthewiperbladearmto touchthewindshieldwhenno wiperbladeisinstalledcould damagethewindshield.Any damagethatoccurswouldnot recoveredbythevehicle warranty.Donotallowthewiper bladetotouchthewindshield.
- ReverseSteps1 through 3 for wiperbladereplacement.
HeadlampAiming
Theheadlampaimingsystemhas beenpresetatthefactory.
If the vehicle is damaged in an accident, the aim of the headlamps may be affected and adjustment may be necessary.
It is recommended that a dealer/retailer adjust the headlamps. Tore-aim the headlamps yourself, us the following procedure.
The vehicles should be properly prepared as follows:
- The vehicles should be placed so the headlamps are 7.6m (25ft.) from alight colored wall.
• The vehicle must have all four tireson levelsurface which is level all the way to the wall.
9-32VehicleCare
• The vehicles should be placed so it is perpendicular to the wall or other flatsurface.
• The vehicles should not have any snow, ice, ormudonit.
- The vehicles should be fully assembled and all other work stopped while headlampaiming is being performed.
• The vehicles should be normally loaded with a full tank off fuel and one person or 75 kg (160 lbs) sitting in the driver's seat.
• Tiresshouldbeproperlyinflated.
Headlampaiming is done with the vehicle's slow-beam headlamps. The high-beam headlamp will be correctly aimed if the low-beam headlamps are aimed properly.
Toadjusttheverticalaim,dothe following:
- Openthehood. See Hood on page 9-5.
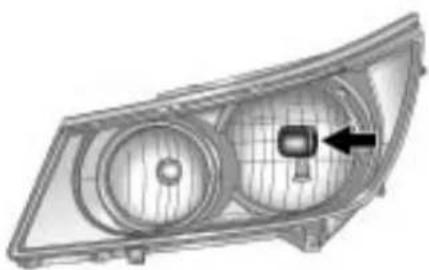
natural_image
Technical illustration of a car headlight component with no visible text or symbolsBase
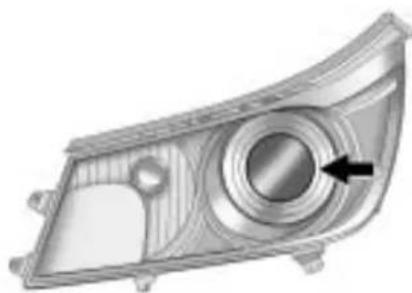
natural_image
Technical illustration of a car headlight component with a circular dial and arrow indicating a specific area (no text or symbols present)Up-Level
- Locatetheaimdotonthelensof thelow-beamheadlamp.
- Measurethedistancefromthe groundtotheaimdotonthe low-beamheadlamp.Recordthe distance.
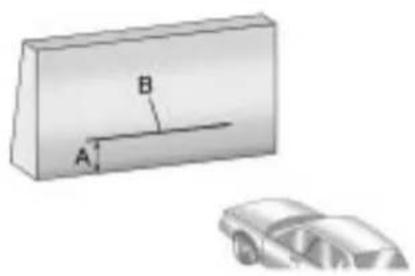
text_image
A B-
Atthewallmeasurefromthe groundupward(A)tothe recordeddistancefrom Step3andmarkit.
-
Drawortapeahorizontalline(B) onthewallthewidthofthe vehicleattheheightofthemark inStep4.
Notice: Donotcoveraheadlamp toimprovebeamcut-offwhen aiming. Coveringaheadlampmay causeexcessiveheatbuild-up whichmaycausedamagetothe headlamp.
- Turnonthelow-beam headlampsandplaceapieceof cardboardorequivalentinfront oftheheadlampnotbeing adjusted. Thisallowsonlythe beamoflightfromtheheadlamp beingadjustedtobeseenonthe flatsurface.

natural_image
Close-up of a mechanical component with two flanged parts and a black arrow indicating direction (no text or symbols)Base
9-34VehicleCare
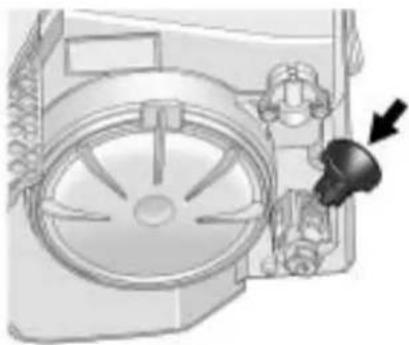
natural_image
Mechanical assembly diagram showing a fan blade and gear mechanism (no text or labels)Up-Level
- Locatetheverticalheadlamp aimingscrews, which are under the hoodneareachheadlamp assembly.
Theadjustmentscrewcanbe turnedwithaE8Torx ^® socket.
- Turntheverticalaimingscrew untiltheheadlampbeam isaimedtothehorizontal tapeline. Turnitclockwiseor counterclockwisetoraiseor lowertheangleofthebeam.

natural_image
Illustration of a car emitting exhaust from a rectangular device labeled A and B (no text or symbols on the device itself)- Makesure that the light from the headlamp is positioned at the bottom edge of the horizontal tap line. Thelamp on the left (A) show the correct headlamp aim. Thelamp on the right (B) show the incorrect headlamp aim.
10.RepeatSteps7through9for theoppositeheadlamp.
BulbReplacement
Forthepropertyofreplacement bulbs,seeReplacementBulbs on page9-39.
Foranybulbchangingprocedure notlistedinthissection,contact yourdealer/retailer.
HalogenBulbs

WARNING
Halogenbulbshavepressurized gasinsideandcanburstifyou droporscratchthebulb.Youor otherscouldbeinjured.Besure toreadandfollowtheinstructions onthebulbpackage.
HighIntensityDischarge (HID)Lighting

WARNING
Thelowbeamhighintensity dischargelightingsystem operatesataveryhighvoltage. Ifyoutrytoserviceanyofthe systemcomponents,youcouldbe seriouslyinjured.Haveyour dealer/retaileroraqualified technicianservicethem.
Theup-levelvehiclehasHID headlamps. Theparklampfunction isalsoafunctionoftheHID headlamp. AfteranHIDheadlamp bulbhasbeenreplaced, thebeam mightbeaslightlydifferentshade thanitwasoriginally. Thisisnormal.
Headlamps, FrontTurn SignalandParking Lamps
BaseHeadlampAssembly
Thebasemodelvehiclehasa halogenhigh-beamheadlamp, a low-beam/DaytimeRunningLamp (DRL)headlampandaturnsignal/parkinglampontheheadlamp assembly.
Toreplaceoneofthesebulbs:
- Openthehood. See Hood on page 9-5.
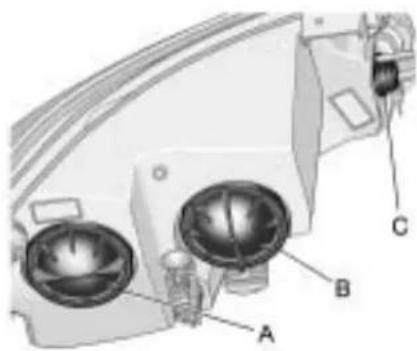
natural_image
Technical diagram of a mechanical device with labeled components A, B, and C (no text or symbols beyond labels)A.Low-BeamHeadlamp/DRL B.High-BeamHeadlamp C.Parking/TurnSignalLamp
- Ifreplacingaheadlampbulb, removethedustcoverfromthe backoftheheadlamphousing byturningcounterclockwise aquarterturn.
9-36VehicleCare
- Removethebulbsocketfrom theheadlampbyturning counterclockwiseaquarterturn.
- Removethebulbfromthe socket.
- Installthenewbulbinthe socket.
- Install the bulb socket by turning clockwise a quarter turn.
- Ifaheadlampbulbwas replaced, Installthedustcover inthebackoftheheadlamp housingbyturningclockwise aquarterturn.
Up-LevelHeadlampAssembly
Theup-levelmodelvehiclehasa highintensitydischarge(HID)high/lowbeam,adedicatedDRLanda turnsignallampontheheadlamp assembly. Theparklampisalso thefunctionoftheHIDheadlamp. SeeHighIntensityDischarge(HID) Lighting onpage9-35 formore information.
Toreplaceoneofthesebulbs:
- Openthehood. See Hood on page 9-5.

natural_image
Technical diagram of a mechanical device with labeled parts A and B (no text or symbols beyond labels)A.DRLLamp
B. TurnSignalLamp
- Turnthebulbsocket counterclockwisetoremoveit fromtheheadlampassembly.
- Pullthebulbstraightoutfrom thesocket.
- Pushthenewbulbintothe socketandreinstallthesocket intotheheadlampassembly by turningitclockwise.
FogLamps
Toreplaceoneofthesebulbs:

natural_image
Technical line drawing of a mechanical component with no visible text or symbols- Locatethebulbassemblyunder thefrontfacia.
-
Disconnect the bulb socket from the electrical connector and pull out the bulb assembly.
-
Removetheoldbulbfromthe bulbsocketandpushthenew bulbstraightintothebulbsocket until connects.
- Push the bulb socket into the bulb assembly to lock it into place.
- Reconnectthebulbsockettothe electricalconnector.
Taillamps, TurnSignal, Stoplamps, and Back-Up Lamps

natural_image
Technical illustration of a car headlight component with labeled parts A and B (no text or symbols beyond labels)A. TurnSignalLamp
B. Back-Up Lamp
Toreplaceoneoftheselamps:
- Openthetrunk. See Trunk on page 1-11.
2.Pullbackthetrunktrim. - Removethefourplasticwing nutsretainingthetaillamp assemblyinplace.
9-38VehicleCare
- Pulloutthetaillampassembly and disconnectthewiring harness.
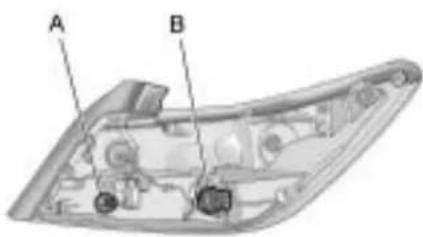
text_image
A BA. Back-up Lamp
B. TurnSignalLamp
-
Turnthebulbsocket counterclockwisetoremoveit.
-
Pulltheoldbulbstraightoutof thebulbsocket.
-
Pushthenewbulbstraightinto thebulbsocketuntilitclicks.
-
Turnthebulbsocketclockwise toreinstall.
-
Reconnectthewiringharness.
-
Pushthetaillampassembly backintoplaceonthevehicle.
-
Turnthefourwingnuts clockwisetoreinstallthem.
-
Placethetrunktrimtoits original allocation.
LicensePlateLamp
Thelicenceplatelampsforthis vehicleareonthetrunklid.
Toreplaceoneofthesebulbs:
- Openthetrunk. See Trunk on page 1-11 formoreinformation.

natural_image
Technical diagram showing a mechanical component with arrows indicating direction, no visible text or symbols- Push the endone either of the lampassemblies (passenger sideshown) and then move the lampassembly downtoremove it from trunklid.

natural_image
Exploded view diagram of a mechanical device with labeled parts A, B, and C (no text or symbols beyond labels)A.BulbSocket
B.LampAssembly
C.Bulb
-
Turnthebulbsocket(A) counterclockwisetoremovefrom lampassembly(C).
-
Pullthebulb(B) straightout of the bulbsocket.
-
Pushthereplacementbulb straightintothebulbsocketand turnthebulbsocketclockwiseto installintolampassembly.
-
Movethelampassembly into the trunklidengagingtheclip sidefirst.
-
Pushonthelampsideopposite theclipuntilthelampassembly snapsintoplace.
ReplacementBulbs
| ExteriorLamp | Bulb Number |
| Back-UpLampW16W | |
| DaytimeRunning Lamp(Up-Level) | 3157K |
| FogLampH11LL | |
| FrontTurnSignal/ ParkLamp | 3757NAK |
| HeadlampHigh Beam(Base) | H9 |
| HeadlampLow Beam(Base) | H11LL |
| LicensePlateLampW5 | WLL |
| RearTurnSignal3757AK | |
Forreplacementbulbsnotlisted here,contactyourdealer/retailer.
ElectricalSystem
ElectricalSystem Overload
The vehicle has fuses and circuit breaker stop protect against electrical system overload.
When the current electrical load is too heavy, the circuit breaker opens and closes, protecting the circuit until the current load return to normal or the problem is fixed.
This greatly reduces the chance of circuit overload and fire caused by electrical problems.
Fusesandcircuitbreakersprotect the followinginthevehicle:
- HeadlampWiring
• WindshieldWiperMotor
• PowerWindowsandother PowerAccessories
HeadlampWiring
Anelectricaloverloadmaycause thelampstogoonandoff,orin somecasestoremainoff.Havethe headlampwiringcheckedrightaway ifthelampsgoonandoffor remainoff.
WindshieldWipers
Ifthewipermotoroverheatsdueto heavysnoworice, the windshield wiperswillstopuntilthemotorcools and will then restart.
Although the circuit is protected from electrical overload, overload duetoheavysnoworice, may cause wiperlinkaged damage. Always clear rice and heavysnow from the windshield before using the windshield wipers.
If the overload is caused by an electrical problem and not snow or ice, besuretogetit fixed.
FusesandCircuit Breakers
Thewiringcircuitsinthevehicleare protectedfromshortcircuitsbya combinationoffusesandcircuit breakers. Thisgreatlyreducesthe chanceofdamagecausedby electricalproblems.
Tocheckafuse, lookatthe silver-coloredbandinsidethefuse. Ifthebandisbrokenormelted, replacethefuse. Besuretoreplace abadfusewithanewoneofthe identicalsizeandrating.
Fusesofthesameamperagecan betemporarilyborrowedfrom anotherfuselocation,ifafusegoes out.Replacethefuseassoonas possible.
To identify and check fuses, circuit breakers, and relays, see Engine CompartmentFuseBlock on page 9-41, InstrumentPanelFuse Block on page 9-44, and Rear CompartmentFuseBlock on page 9-46.
EngineCompartment
FuseBlock
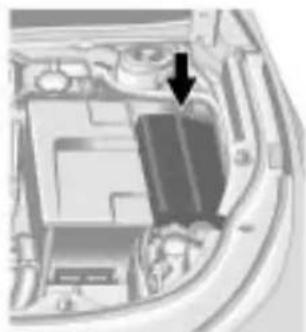
natural_image
Interior view of a car showing engine compartment with a black arrow pointing to a component (no visible text or symbols)Toremovethefuseblockcover, squeezethreeretainingclipson thecoverandliftitstraightup.
Notice: Spilling liquidon any electrical components on the vehicle may damage it. Always keep the cover on any electrical component.

text_image
Diagram with numbered circular and rectangular blocks, possibly representing a layout or layout of labeled items or components.EngineCompartmentFuseBlock
| J-Case Fuses | Usage |
| 6Wiper | |
| 12Starter | |
| 21 | RearPower Windows |
| J-Case Fuses | Usage |
| 22Sunroof | |
| 24 | FrontPower Windows |
| 26 | AntilockBrake SystemPump |
9-42VehicleCare
| J-Case Fuses | Usage |
| 27ElectricParkBrake | |
| 28 | RearWindow Defogger |
| 41 | Brake VacuumPump |
| 42CoolingFanK2 | |
| 45CoolingFanK1 | |
| MiniFusesUsage | |
| 1 | TransmissionControlModule |
| 2 | EngineControlModuleBattery |
| 5 | EngineControlModuleIgnition |
| 8Ignition | Coils-Even |
| MiniFusesUsage | |
| 9Ignition | Coils-Odd |
| 10 | EngineControl Module |
| 11 | PostCatalytic ConverterOxygen SensorHeater |
| 13 | TransIgnition/Fuel SystemControl Module |
| 16MAF | |
| 17Airbag | Module |
| 18SBZIgnition | |
| 23 | VariableEffort Steering |
| 29Power | Lumbar,Left |
| 32 | BodyControl Module |
| MiniFusesUsage | |
| 33HeatedSeat | |
| 34 | AntilockBrakeSystemValves |
| 35Amplifier | |
| 36AFLIgnition | |
| 37RightHighBeam | |
| 38LeftHighBeam | |
| 46CoolingFanRelay | |
| 47 | PreCatalyticConverterOxygenSensorHeater |
| 48FogLamps | |
| 49 | RightHighIntensityDischargeHeadlamp |
| 50 | LeftHighIntensityDischargeHeadlamp |
| 51Horn | |
| 52ClusterIgnition | |
| 53 | InsideRearviewMirror,RearVisionCamera,VacuumPump |
| 54 | Heating,VentilationandAirConditioning |
| 55 | OutsideRearViewMirror,UniversalGarageDoorOpener,WindowSwitch |
| MiniFusesUsage | |
| 56WindshieldWasher | |
| 60HeatedMirror | |
| 62CanisterVent | |
| 64AFLBattery | |
| 65TheftDeterrentHorn | |
| 67 | FuelSystemControl Module |
| 69 | RegulatedVoltage ControlSensor |
| MiniRelaysU | sage |
| 7 | EngineControl Module |
| 9CoolingFan | |
| MiniRelaysUsage | |
| 13CoolingFan | |
| 15Run/Crank | |
| 17 | RearWindowDefogger |
| Micro Relays | Usage |
| 2Starter | |
| 4WiperSpeed | |
| 5WiperControl | |
| 10CoolingFan | |
| 14 | HeadlampLowBeam |
InstrumentPanelFuse Block
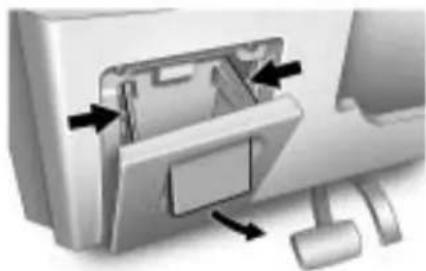
natural_image
Diagram of a computer monitor internal structure showing internal components and directional arrows (no text or symbols)Theinstrumentpanelfuseblockis locatedintheinstrumentpanel,on theriversideofthevehicle.To accessthefuses,openthefuse paneldoorbypullingdownat thetop.
Pressinonthesidesofthedoorto releaseitfromtheinstrumentpanel.
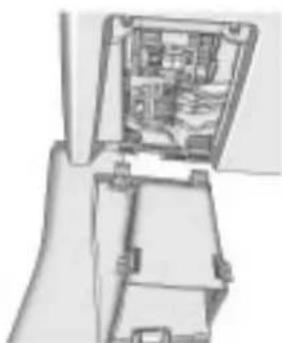
natural_image
Cross-sectional diagram of a mechanical device showing internal components (no text or symbols)Pullthedoortowardyoutorelease itfromthehinge.
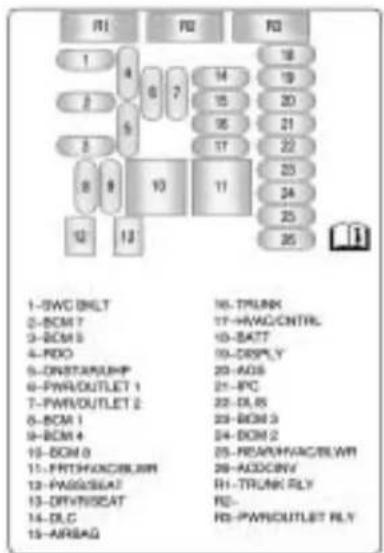
text_image
1-SWC INLT 2-BCM 7 3-BCM 5 4-RDO 5-ONSTAN/UPF 6-PWR/OUTLET 1 7-PWR/OUTLET 2 8-BCM 1 9-BCM 4 10-BCM 0 11-FRT/PHONS/BLAM 12-PASS/SEA7 13-DIV/INSAT 14-DLC 15-AIR/AG 16-TRUNK 17-HW/CNTRL 18-BATT 19-DRPLY 20-ADS 21-RTC 22-DRIN 2 23-REACH/ACCELW 24-ADCINV 25-TRUNK RLY 26-RWR/OUTLET RLYInstrumentPanelFuseBlock
| FusesUsage | |
| 1 | SteeringWheelControlsBacklight |
| 2 | BodyControlModule7 |
| 3 | BodyControlModule5 |
| 4Radio | |
| 5 | OnStar® UniversalHandsFreePhone |
| 6Power | Outlet1 |
| 7Power | Outlet2 |
| 8 | BodyControlModule1 |
| 9 | BodyControlModule4 |
| 10 | BodyControlModule8 |
| FusesUsage | |
| 11 | FrontHeaterVentilationAirConditioning/Blower |
| 12PassengerSeat | |
| 13Driver | Seat |
| 14 | DiagnosticLinkConnector |
| 15Airbag | |
| 16Trunk | |
| 17 | HeaterVentilationAirConditioningController |
| 18 | Radio,OnStar®,UniversalHandsFreePhone |
| 19Display | |
| 20 | AutomaticOccupantSensing |
| FusesUsage | |
| 21 | InstrumentPanel Cluster |
| 22 | DiscreteLogic IgnitionSwitch |
| 23 | BodyControl Module3 |
| 24 | BodyControl Module2 |
| 25 | RearHeater VentilationAir Conditioning/Blower |
| 26AC/DC | Inverter |
| RelaysUsage |
| R1TrunkRelay |
| R2NotUsed |
| R3PowerOutletRelay |
RearCompartmentFuse Block

natural_image
Close-up of a car door handle and seat area showing a curved seat and handle (no text or symbols visible)Therearcompartmentfuseblockis locatedontheleftsideofthetrunk behindacover.
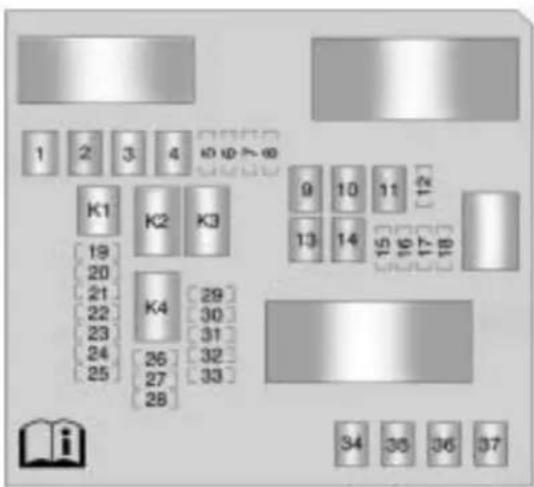
text_image
1 2 3 4 10 (φ) > 60 K1 K2 K3 9 10 11 12 13 14 15 16 17 18 19 20 21 22 23 24 25 26 27 28 K4 29 30 31 32 33 34 35 36 37| MiniFusesUsage | |
| 5NotUsed | |
| 6 | HeatedSteeringWheel |
| 7NotUsed | |
| MiniFusesUsage |
| 8NotUsed |
| 12NotUsed |
| 15NotUsed |
| MiniFusesUsage | |
| 16 | SideBlindZone,UltrasonicRearParkAssist |
| 17NotUsed | |
| 18PEPS | |
| 19NotUsed | |
| 20 | RearSunshade,VentilatedSeats |
| 21NotUsed | |
| 22NotUsed | |
| 23NotUsed | |
| 24NotUsed | |
| 25NotUsed | |
| 26NotUsed | |
| 27NotUsed | |
| 28NotUsed | |
| MiniFusesUsage | |
| 29NotUsed | |
| 30NotUsed | |
| 31 | Electronic SuspensionControl |
| 32 | RearSeat Infotainment |
| 33All-WheelDrive | |
| J-Case Fuses | Usage |
| 1NotUsed | |
| 2NotUsed | |
| 3NotUsed | |
| 4NotUsed | |
| 9NotUsed | |
| 10NotUsed | |
| 11NotUsed |
| J-Case Fuses | Usage |
| 13NotUsed | |
| 14NotUsed | |
| 34NotUsed | |
| 35PEPS | |
| 36NotUsed | |
| 37NotUsed |
| RelaysUsage | |
| K1NotUsed | |
| K2 | SeatVentilation, Sunshade |
| K3 | HeatedSteering Wheel |
| K4NotUsed | |
WheelsandTires
Tires
Yournewvehiclecomeswith high-qualitytiresmadebya leadingtiremanufacturer.Ifyou everhavequestionsaboutyour tirewarrantyandwhereto obtainservice,seeyourvehicle Warrantybookletfordetails. Foradditionalinformationrefer tothetiremanufacturer.

WARNING
Poorly maintained and improperly used tires are dangerous.
• Overloadingyourtirescan causeoverheatingasaresult oftoomuchflexing. You couldhaveanair-outanda seriousaccident.See Vehicle LoadLimitsonpage8-12.
(Continued)
WARNING(Continued)
- Underinflatedtiresposethe samedangerasoverloaded tires. Theresultingaccident couldcauseseriousinjury. Checkalltiresfrequently to maintaintherecommended pressure. Tirepressure shouldbecheckedwhen yourtiresarecold.See Tire Pressureonpage9-56.
• Overinflatedtiresaremore likelytobecut, punctured orbrokenbyasudden impact—suchaswhenyou hitapothole. Keep tiresat therecommended pressure. - Worn, oldtirescancause accidents. If yourtreadis badly worn, orify our tires have been damaged, replacethem.
WinterTires
If you expect to drive on snow orice covered road soften, you may want to get wintertires for your vehicle. All season tires provide good overall performance on most surfaces but they may not offer the extraction you would like or the same level of performance as wintertires snow orice covered roads.
Wintertires, ingeneral, are designed for increased traction on snow and ice covered roads. With wintertires, therem maybe decreased dry road traction, increased road noise, and shortertread life. After switching to wintertires, be alert for changes in vehicle handling and braking.
Seeyourdealer/retailerfordetails regardingwintertireavailabilityand propertireselection.Also,see BuyingNewTiresonpage9-64.
If you choosetousewintertires:
- Usetiresofthesamebrandand treadtypeonallfourwheel positions.
• Useonlyradialplytiresofthe samesize,loadrange,and speedratingastheoriginal equipmenttires.
Wintertireswiththesamespeed ratingasyouroriginalequipment tiresmaynotbeavailableforH,V, W,Y,andZRspeedratedtires. Ifyouchoosewintertireswitha lowerspeedrating,neverexceed thetire'smaximumspeedcapability.
TireSidewallLabeling
Usefulinformationaboutatireis moldedintoitssidewall. The examplesbelowshowatypical passengervehicletireanda compactsparetiresidewall.
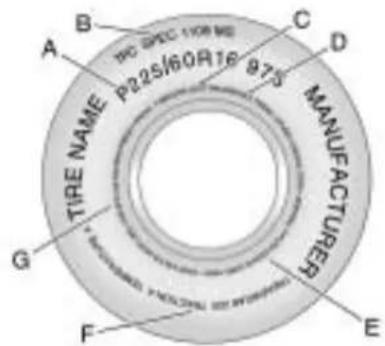
text_image
A B C D TIRE NAME P22S/60R16 875 MANUFACTURER G F EPassenger(P-Metric)TireExample
(A)TireSize: Thetiresizeis acombinationoflettersand numbersusedtodefinea particulartire'swidth,height, aspectratio,constructiontype,
andservicedescription.Seethe "TireSize"illustrationalterinthis sectionformoredetail.
(B)TPCSpec(Tire PerformanceCriteria Specification):Original equipmenttiresdesignedto GM'sspecificireperformance criteriahaveaTPCspecification codemoldedontothesidewall. GM'sTPCspecificationsmeetorexceedallfederalsafety guidelines.
(C)DOT(Departmentof Transportation): The DepartmentofTransportation (DOT)codeindicatesthat thetireisincompliance withtheU.S.Departmentof TransportationMotorVehicle SafetyStandards.
(D) TireIdentificationNumber (TIN): The letters and numbers following the DOT (Department of Transportation) code is the TireIdentificationNumber (TIN). The TIN shows the manufacturer and plant code, tiresize, and datethetire was manufactured. The TIN is molded on both sides of the tire, although only ones idem may have the date of manufacture.
(E)TirePlyMaterial :Thetype ofcordandnumberofpliesin thesidewallandunderthetread.
(F)UniformTireQuality Grading(UTQG) :Tire manufacturersarerequired to gradetiresbasedonthree performancefactors:treadwear, traction,andtemperature resistance.Formoreinformation seeUniformTireQuality Grading onpage9-67.
(G)MaximumColdInflation LoadLimit :Maximumload thatcanbecarriedandthe maximumpressureneededto supportthatload.

text_image
TEMPORARY USE ONLY UNITS/CLARE UNITS TO 50 PSICompactSpareTireExample
(A)TirePlyMaterial:The typeofcordandnumberofplies inthesidewallandunderthe tread.
(B)TemporaryUseOnly :The compactsparetireortemporary usetirehasatreadlifeof approximately5000km (3,000miles)andshouldnotbe drivenatspeedsover105km/h (65mph). Thecompactspare tireisforemergencyusewhen aregularroadtirehaslostair andgoneflat. Ifyourvehicle hasacompactsparetire, seeCompactSpareTire on page9-76 andIfaTireGoesFlat onpage9-70 .
(C) TireIdentificationNumber (TIN): Thelettersandnumbers followingtheDOT(Department ofTransportation)codeis the TireIdentificationNumber (TIN). The TINshowsthe manufacturerandplantcode, tiresize, and datethetirewas manufactured. The TINis moldedontobothsidesofthe tire, althoughonlyonesidemay havethedateofmanufacture.
(D)MaximumColdInflation LoadLimit :Maximumload thatcanbecarriedandthe maximumpressureneededto supportthatload.
(E)TireInflation :The temporaryusetireorcompact sparetireshouldbeinflated to420kPa(60psi).Formore informationontirepressure and inflationsee TirePressure on page9-56.
(F)TireSize :A combination of letters and numbers define a tire's width, height, aspect ratio, construction type, and service description. The letter Tasthe first character in the tiresize meansthetire is for temporary use only.
(G)TPCSpec(Tire PerformanceCriteria Specification):Original equipmenttiresdesignedto GM'sspecificireperformance criteriahaveaTPCspecification codemoldedontothesidewall. GM'sTPCspecificationsmeet orexceedallfederalsafety guidelines.
TireDesignations
TireSize
The following illustrations shows an example of atypical passenger vehicle tiresize.

text_image
P225/60R16 97S A B C D E F(A) Passenger(P-Metric) Tire: TheUnitedStatesversionofa metrictriesizingsystem. The letterPasthefirstcharacterin thetiresizemeansapassenger vehicletireengineeredto standardssetbytheU.S.Tire andRimAssociation.
(B)TireWidth : Thethree-digit numberindicatesthetiresection widthinmillimetersfrom sidewalltosidewall.
(C)AspectRatio:Atwo-digit numberthatindicatesthetire height-to-widthmeasurements. Forexample,ifthetiresize aspectratiois60,asshownin itemCoftheillustration,itwould meanthatthetire'ssidewallis 60percentashighasitiswide.
(D)ConstructionCode :A lettercodeisusedtoindicate thetypeofplyconstructionin thetire.TheletterRmeans radialplyconstruction;the letterDmeansdiagonalor biasplyconstruction;andthe letterBmeansbelted-biasply construction.
(E)RimDiameter :Diameterof thewheelininches.
(F)ServiceDescription :These charactersrepresenttheload indexandspeedratingofthe tire. Theloadindexrepresents theloadcarrycapacityatireis certifiedtocarry. Thespeed ratingisthemaximumspeeda tireiscertifiedtocarryaload.
TireTerminology and Definitions
AirPressure: The amount of airinsidethetirepressing outwardoneachsquareinch of the tire. Airpressure is expressed in psi (pounds per square inch) or kPa (kilopascal).
AccessoryWeight :This meansthecombinedweight ofoptionalaccessories. Someexamplesofoptional accessoriesare,automatic transmission,powersteering, powerbrakes,powerwindows, powerseats,andair conditioning.
AspectRatio :Therelationship ofatire'sheighttoitswidth.
Belt: Arubbercoatedlayerof cordsthatislocatedbetween thepliesandthetread. Cords maybemadefromsteelorother reinforcingmaterials.
Bead: Thetirebead contains steelwireswrapped by steel cordsthathold the tire onto therim.
BiasPlyTire :Apneumatictire inwhichthepliesarelaidat alternateangleslessthan 90degreestothecenterlineof thetread.
ColdTirePressure :The amountofairpressureinatire, measuredinpsi(poundsper squareinch)orkPa(kilopascal) beforeatirehasbuiltupheat fromdriving.SeeTirePressure onpage9-56.
CurbWeight : The weight of a motor vehicle with standard and optionalequipment including the maximum capacity off fuel, oil, and coolant, but without passengers and cargo.
DOTMarkings :Acodemolded intothesidewallofatire signifyingthatthetireisin compliancewiththeU.S. DepartmentofTransportation (DOT)motorvehiclesafety standards.TheDOTcode includestheTireIdentification Number(TIN),analphanumeric designatorwhichcanalso identifythetiremanufacturer, productionplant,brand,and dateofproduction.
GVWR: Gross Vehicle Weight Rating. See Vehicle Load Limits on page 8-12 .
GAWRFRT : GrossAxle WeightRatingforthefrontaxle. See VehicleLoadLimits on page8-12.
GAWRRR : Gross Axle Weight Rating for therear axle. See Vehicle Load Limits on page 8-12 .
IntendedOutboardSidewall : Thesideofanasymmetricaltire, thatmustalwaysfaceoutward whenmountedonavehicle.
Kilopascal(kPa) : Thematic unitforairpressure.
LightTruck(LT-Metric)Tire:A tireusedonlightdutytrucksand somemultipurposepassenger vehicles.
LoadIndex : Anassigned numberranging from 1 to 279 that correspond stotheload carrying capacity of atire.
Maximum Inflation Pressure : Themaximumairpressure to which acoldtire can be inflated. Themaximumair pressure is molded onto the sidewall.
MaximumLoadRating :The loadratingforatireatthe maximumpermissibleinflation pressureforthattire.
MaximumLoadedVehicle Weight: Thesumofcurb weight, accessoryweight, vehiclecapacityweight, and productionoptionsweight.
NormalOccupantWeight :The numberofoccupantsavehicle isdesignedtoseatmultipliedby 68kg(150lbs).See Vehicle LoadLimits onpage8-12 .
OccupantDistribution : Designatedseatingpositions.
OutwardFacingSidewall :The sideofanasymmetricaltirethat hasaparticularsidethatfaces outwardwhenmountedona vehicle. Thesideofthetirethat containsawhitewall,bears whitelettering,orbears
manufacturer, brand, and/or modelnamemolding that is higher or deeper than the same molding on the others sidewall of the tire.
Passenger(P-Metric)Tire :A tireusedonpassengercarsand somelightdutytrucksand multipurposevehicles.
Recommended Inflation Pressure: Vehicle manufacturer's recommended tireinflation pressure as shown on the tire placard. See Tire Pressure on page 9-56 and Vehicle Load Limits on page 8-12.
RadialPlyTire :Apneumatic tireinwhichtheplycordsthat extendtothebeadsarelaidat 90degreestothecenterlineof thetread.
Rim: Ametalsupportforatire anduponwhichthetirebeads areseated.
Sidewall: The portion of atire between the read and the bead.
SpeedRating :An alphanumericcodeassigned toatireindicatingthemaximum speedatwhichatirecan operate.
Traction: Thefrictionbetween thetireandtheroadsurface. Theamountofgripprovided.
Tread: The portion of atire that comes into contact with theroad.
TreadwearIndicators :Narrow bands,sometimescalledwear bars,thatshowacrossthe treadofatirewhenonly1.6mm (1/16inch)oftreadremains. SeeWhenItIsTimeforNew Tires onpage9-63 .
UTQGS(UniformTireQuality GradingStandards) :Atire informationsystemthatprovides consumerswithratingsfora tire'straction,temperature, andtreadwear.Ratings aredeterminedbytire manufacturersusing governmenttestingprocedures. Theratingsaremoldedinto thesidewallofthetire. SeeUniformTireQuality Grading onpage9-67 .
VehicleCapacityWeight : Thenumberofdesignated seatingpositionsmultipliedby 68kg(150lbs)plustherated cargoload.SeeVehicleLoad Limits onpage8-12 .
VehicleMaximumLoadonthe Tire:Loadonanindividualtire duetocurbweight,accessory weight,occupantweight,and cargoweight.
VehiclePlacard :Alabel permanentlyattachedtoa vehicleshowingthevehicle's capacityweightandtheoriginal equipmenttiresizeand recommendedinflationpressure. See "TireandLoading InformationLabel" under Vehicle LoadLimits onpage8-12 .
TirePressure
Tiresneedthecorrectamount of airpressuretooperate effectively.
Notice: Donotletanyonetell youthatunder-inflationor over-inflationisallright. It is not. If your tires donothave enough hair (under-inflation), you can get the following:
- Toomuchflexing
- Toomuchheat
- Tireoverloading
• Prematureor irregularwear - Poorhandling
- Reducedfueleconomy
If your tireshavetoomuchair (over-inflation), you can get the following:
- Unusualwear
- Poorhandling
- Roughride
- Needlessdamagefrom roadhazards
Avehiclespecific Tire and Loading Information label is attached to your vehicle. This label shows your vehicle's originalequipment tires and the correct inflation pressures for your tires when they are cold. There recommended cold tire inflation pressure, shown on the label, istheminimum amount of air pressure needed to support your vehicle's maximum load carrying capacity.
For additional information regarding how much weight your vehicle can carry, and an example of the Tire and Loading Information label, see Vehicle Load Limits on page 8-12. How you load your vehicle affects vehicle handling and ride comfort. Never load your vehicle with more weight than it was designed to carry.
WhentoCheck
Check your tires once a month ormore. Donot forget to check the compact spare tire, if the vehicle has one. The compact spa should be 60 psi (420 kPa). For additional information regarding the compact spare tire, see Compact Spare Tire on page9-76.
HowtoCheck
Useagoodqualitypocket-type gaugetochecktirepressure. Youcannottellifyourtiresare properlyinflatedsimplyby lookingatthem.Radialtiresmay lookproperlyinflatedevenwhen theyareunder-inflated.Check thetire'sinflationpressurewhen thetiresarecold.Coldmeans yourvehiclehasbeensittingfor atleastthreehoursordrivenno morethan1.6km(1mile).
Removethevalvecapfromthe tirevalvestem.Pressthetire gaugefirmlyontothevalveto getapressuremeasurement.
If the cold tire inflation pressure match there recommended pressure on the Tire and Loading Information label, no further adjustment is necessary. If the inflation pressure is slow, add air until you reach the recommended amount.
If you overfill the tire, release air bypassing on themetal stem in the center of the tire valve. Re-check the tire pressure with the tire gauge.
Besuretoputthevalvecaps backonthevalvestems. They helppreventleaksbykeeping outdirtandmoisture.
TirePressureMonitor System
The TirePressureMonitorSystem (TPMS) uses radio and sensor technology to check tire pressure levels. The TPMS sensors monitor the air pressure in your vehicle's tires and transmittire pressure reading to are receiver located in the vehicle.
Eachtire, including the spare (if provided), should be checked monthly when cold and inflated to the inflation pressurerecommended by the vehicle manufacturer on the vehicle placardortire inflation pressure label. (If your vehicle has tires of different sizing thanthesize indicated on the vehicle placardor tire inflation pressure label, you should determinethe propertire inflation pressure forthosetires.)
9-58VehicleCare
Asanadded safety feature, your vehicle has been equipped with a tire pressure monitoringsystem (TPMS) that illuminates a low tire pressure telltale when none or more of your tires significantly under-inflated.
Accordingly, whentelowtire pressuretelltaleilluminates, you shouldstopandcheckyourtiresas soonaspossible, andinflatethem totheproperpressure. Drivingon asignificantlyunder-inflatedtire causesthetiretooverheatandcan leadtotirefailure. Under-inflation alsoreducesfuelefficiency and tiretreadlife, andmayaffectthe vehicle'shandlingandstopping ability.
PleasenotethattheTPMSis notasubstituteforpropertire maintenance, anditisthedriver's responsibility to maintain incorrect tire pressure, even if under-inflation has not reached the level to trigger illumination of the TPMSlow tire pressure telltale.
Yourvehiclehasalsobeen equippedwithaTPMSmalfunction indicatortoindicatewhenthe systemisnotoperatingproperly. TheTPMSmalfunctionindicatoris combinedwiththelowtirepressure telltale.Whenthesystemdetectsa malfunction,thetelltalewillflashfor approximatelyoneminuteandthen remaincontinuouslyilluminated. Thissequencewillcontinueupon subsequentvehiclestart-upsas longasthemalfunctionexists.
Whenthemalfunctionindicatoris illuminated, thesystemmaynotbe abletodetectorsignallowtire pressureasintended. TPMS malfunctionsmayoccurforavariety ofreasons, includingtheinstallation ofreplacementoralternatetiresor wheelsonthevehiclethatprevent theTPMSfromfunctioningproperly.
AlwayschecktheTPMSmalfunction telltaleafterreplacingoneormore tiresorwheelsonyourvehicleto ensurethatthereplacementor alternatetiresandwheelsallow theTPMStocontinuetofunction properly.
See TirePressureMonitor Operation onpage9-59 for additional information.
FederalCommunications Commission(FCC)and IndustryCanada
SeeRadioFrequencyStatement on page12-17 forinformation regardingPart15oftheFederal CommunicationsCommission(FCC) RulesandRSS-210/211ofIndustry Canada.
TirePressureMonitor Operation
This vehicle may have a Tire Pressure Monitor System (TPMS). The TPMS is designed to warn the driver when alow tire pressure condition exists. TPMS sensors are mounted on to each tire and wheel assembly, excluding the spare tire and wheel assembly. The TPMS sensors monitor the air pressure in the vehicle's tires and transmits the tire pressurereading to are receiver located in the vehicle.

When alow tire pressure condition is detected, the TPMS illuminates the low tire pressure warning light located on the instrument panel cluster. If the warning light comes on, stop as soon as possible and
inflatethetirestotherecommended pressureshownonthetireloading informationlabel.See VehicleLoad Limitsonpage8-12.
Atthesametimeamessageto checkthepressureinaspecifictire appearontheDriverInformation Center(DIC)display. Thelowtire pressurewarninglightandtheDIC warningmessagecomeonateach ignitioncycleuntilthetiresare inflatedtothecorrectinflation pressure. UsingtheDIC, tire pressurelevelscanbeviewedby thedriver. Foradditionalinformation anddetailsabouttheDICoperation anddisplaysseeDriverInformation Center(DIC)onpage4-25.
Thelowtirepressurewarninglight maycomeonincoolweatherwhen thevehicleisfirststarted,andthen turnoffasyoustarttodrive.This couldbeanearlyindicatorthatthe airpressureinthetire(s)aregetting lowandneedtobeinflatedtothe properpressure.
ATireandLoadingInformation label,attachedtoyourvehicle, showsthesizeofyourvehicle's originalequipmenttiresandthe correctinflationpressureforyour vehicle'stireswhentheyarecold. SeeVehicleLoadLimits on page 8-12 ,foranexampleofthe TireandLoadingInformationlabel anditslocationonyourvehicle. AlsoseeTirePressure on page 9-56 .
Yourvehicle's TPMScanwarnyou aboutalowtirepressurecondition butitdoesnotreplacenormaltire maintenance.See TireInspection onpage9-62 ,TireRotation on page 9-62 and Tiresonpage9-48.
Notice: Liquidtire sealants could damage the Tire Pressure Monitor System (TPMS) sensors. Sensor damage caused by using atire sealant is not covered by your warranty. Donotus liquid tire sealants.
TPMSMalfunctionLightand Message
The TPMS will not function properly if one or more of the TPMS sensors are missing or in operable. When the system detects a malfunction, the low tire warning light flashes for about on minute and then stay on forward remainder of the ignition cycle. ADIC warning message is also displayed. The low tire warning light and DIC warning message come on at each ignition cycle until the problem is corrected. Some of the condition that can cause the malfunction light and DIC message to come on are:
- Oneoftheroadtireshasbeen replacedwiththesparetire. Thesparetiredoesnothave aTPMSsensor.TheTPMS malfunctionlightandDIC messageshouldgooffonce youre-installtheroadtire containingtheTPMSsensor.
- TheTPMSsensormatching processwasstartedbutnot completedornotcompleted successfullyafterrotatingthe vehicle'stires.TheDICmessage andTPMSmalfunctionlight shouldgooffoncetheTPMS sensormatchingprocessis performedsuccessfully.See "TPMSSensorMatching Process"laterinthissection.
-
OneormoreTPMSsensorsare missingordamaged.TheDIC messageandtheTPMS malfunctionlightshouldgooff whentheTPMSsensorsare installedandthesensor matchingprocessisperformed successfully.Seeyourdealer/retailerforservice.
-
Replacementtiresorwheelsdo notmatchyourvehicle'soriginal equipmenttiresorwheels. Tires andwheelsotherthanthose recommendedforyourvehicle couldpreventtheTPMSfrom functioningproperly.SeeBuying NewTiresonpage9-64.
- Operatingelectronicdevicesor beingnearfacilitiesusingradio wavefrequenciessimilartothe TPMScouldcausetheTPMS sensorstomalfunction.
If the TPMS is not functioning it cannot detectorsignal alowtire condition. Se your dealer/retailer for service if the TPMS malfunction light and DIC message comes on and stay on.
TPMSSensorMatching Process
EachTPMSsensorhasaunique identificationcode.Anytimeyou rotateyourvehicle'stiresorreplace oneormoreoftheTPMSsensors, theidentificationcodeswillneedto bematchedtothenewtire/wheel position.Thesensorsarematched tothetire/wheelpositionsinthe followingorder:driversidefronttire, passengersidefronttire,passenger sidereartire,anddriversiderear tireusingaTPMSdiagnostictool. Seeyourdealer/retailerforservice.
The TPMSsensorscanalsobe matchedtoeachtire/wheelposition byincreasingordecreasingthe tire'sairpressure.lfincreasingthe tire'sairpressure,donotexceed themaximuminflationpressure indicatedonthetire'ssidewall.
Todecreaseair-pressureoutofa tireyoucanusethepointedendof thevalvecap,apencil-styleair pressuregage,orakey.
Youhavetwominutestomatch thefirsttire/wheelposition,and fiveminutesoveralltomatchall fourtire/wheelpositions.Ifittakes longerthantwominutes,tomatch thefirsttireandwheel,ormorethan fiveminutestomatchallfourtire andwheelpositionsthematching processstopsandyouneedto startover.
The TPMSsensormatching process is outlined below:
-
Settheparkingbrake.
-
TurntheignitiontoON/RUNwith theengineoff.
-
UsetheMENUbuttontoselect theVehicleInformationMenu intheDriverInformation Center(DIC).
-
Usethethumbwheeltoscrollto the TirePressureMenuItem screen.
-
PresstheSET/CLRbutton to beginthesensormatching process.
Amessageaskingifyouare sureyouwanttobeginthis processshouldappear.
- PresstheSET/CLRbuttonagain to confirm these selection.
Thehornsoundstwicetosignal thereceiverisinrelearnmode andtheTIRELEARNING ACTIVEmessagedisplayson theDICscreen.
-
Startwiththedriverside fronttire.
-
Removethevalvecapfromthe valvecapstem. Activatethe TPMSsensorbyincreasingor decreasingthetire'sairpressure forfiveseconds,oruntilahorn chirpsounds. Thehornchirp, whichmaytakeupto 30secondstosound, confirms thatthesensoridentification codehasbeenmatchedtothis tireandwheelposition.
-
Proceed to the passengerside front tire, and repeat the procedure in Step 8.
- Proceed to the passengerside reartire, and repeat the procedure in Step 8.
- Proceedtothedriversiderear tire, and repeat the procedure in Step8. The hornsoundstwo timesto indicate the sensor identification code has been matched to the driversiderear tire, and the TPMS sensor matching process is no longer active. The TIRELEARNING ACTIVE message on the DIC displayscreen goes off.
- TurntheignitiontoLOCK/OFF.
- Setallfourtirestothe recommendedairpressure levelasindicatedontheTire andLoadingInformationlabel.
- Putthevalvecapsbackonthe valvestems.
TireInspection
Werecommendthatyou regularlyinspectyourvehicle's tires,includingthesparetire, ifthevehiclehasone,forsigns ofwearordamage.SeeWhenIt IsTimeforNewTires on page9-63 formoreinformation.
TireRotation
Tiresshouldberotatedevery 8000to13000km(5,000to 8,000miles). SeeScheduled Maintenance onpage10-2.
The purpose of a regulartire rotationistoachieveauniform wearforalltiresonthevehicle. This will ensure that the vehicle continues to perform most like it did when the tires werenew.
Anytimeyounoticeunusual wear,rotatethetiresassoon aspossibleandcheckwheel alignment.Alsocheckfor damagedtiresorwheels.See WhenItIsTimeforNewTires onpage9-63 andWheel Replacement onpage9-69.
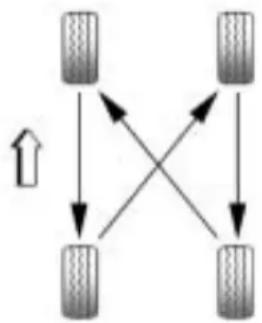
flowchart
graph TD
    A["Terr 1"] --> B["Terr 2"]
    B --> C["Terr 3"]
    C --> D["Terr 4"]
    D --> A
    A --> B
    B --> C
    C --> D
    D --> A
Whenrotatingthevehicle'stires, alwaysusethecorrectrotation patternshownhere.
Donotincludethecompact spare tireinthetirerotation.
Afterthetireshavebeen rotated,adjustthefrontandrear inflationpressuresasshownon theTireandLoadingInformation label.SeeTirePressure on page9-56 andVehicleLoad Limits onpage8-12.
ResettheTirePressureMonitor System.SeeTirePressure MonitorOperation onpage9-59.
Makecertainthatallwheelnuts areproperlytightened.See "WheelNutTorque" under CapacitiesandSpecifications on page11-2.
WARNING
Rustordirtonawheel,oronthe partstowhichitisfastened,can makewheelnutsbecomeloose aftertime. Thewheelcouldcome offandcauseanaccident.When changingawheel,removeany rustordirtfromplaceswherethe wheelattachestothevehicle.In anemergency,useaclothora papertoweltodothis;butbesure touseascraperorwirebrush later,ifneeded,togetalltherust ordirtoff.Seelfa Tire GoesFlat onpage 9-70 .
WhenItIsTimeforNew Tires
Various factors, such as maintenance, temperatures, driving speeds, vehicle loading, android conditions influence when you need new tires.
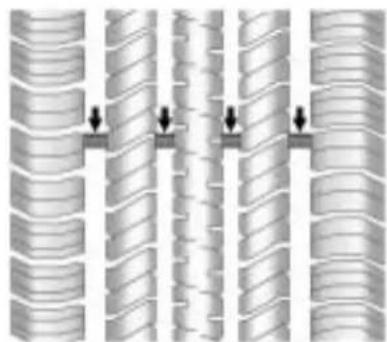
natural_image
Diagram of layered cylindrical structures with directional arrows indicating movement or force (no text or symbols)Onewaytotellwhenitistimefor newtiresistocheckthetreadwear indicators,whichappearwhenthe tireshaveonly1.6mm(1/16inch)or lessoftreadremaining.
Thevehicleneedsnewtiresifany ofthefollowingstatementsaretrue:
- Youcanseetheindicatorsat threeormoreplacesaround thetire.
- Youcanseecordorfabric showingthroughthetire's rubber.
- Thetreadorsidewalliscracked, cut,orsnaggeddeepenoughto showcordorfabric.
- Thetirehasabump,bulge,orsplit.
- Thetirehasapuncture, cut, orotherdamagethatcannot be repairedwellbecauseofthesize orlocationofthedamage.
Therubberintiresdegradesover time. This is alsotrueforthespare tire, if the vehicle has one, even if it is not being used. Multiple conditions affect how fast this aging takes place, including temperatures, loading conditions, and inflation pressure maintenance. With proper care and maintainancetirestypically wear out before they degraded to age. If you are unsure about the need to replace the tires as they get older, consult the tire manufacturer for more information.
BuyingNewTires
GMhasdevelopedandmatched specificiresforyourvehicle. Theoriginalequipmenttires installedonyourvehicle, whenitwasnew,werdesigned tomeetGeneralMotors TirePerformanceCriteria Specification(TPCSpec) systemrating.Ifyouneed replacementtires,GMstrongly recommendsthatyougettires withthesameTPCSpecrating. Thisway,yourvehiclewill continuetohavetiresthatare designedtogivethesame performanceandvehiclesafety, duringnormaluse,asthe originaltires.
GM's exclusive TPCSpec system considers over a dozen critical specifications that impact the overall performance of your vehicle, including brakesystem performance, ride and handling, traction control, and tire pressure monitoring performance. GM's TPCSpec number is molded onto the tire's sidewall near the tiresize. If the tires have an all-season tread design, the TPCSpec number will be followed by an MS for mud and snow. See Tire Sidewall Labeling on page 9-49 for additional information.
GMrecommendsreplacingtires insetsoffour. Thisisbecause uniformtreaddepthonalltires willhelpkeepyourvehicle performingmostlikeitdidwhen thetireswerenew. Replacing lessthanafullsetoftirescan affectthebrakingandhandling performanceofyourvehicle.
See Tire Inspection on page 9-62 and Tire Rotation on page 9-62 for information on propertire rotation.

WARNING
Mixingtirescouldcauseyou tolosecontrolwhiledriving. Ifyoumixtiresofdifferent sizes,brands,ortypes(radial andbias-beltedtires),the vehiclemaynothandle properly,andyoucouldhave acrash.Usingtiresofdifferent sizes,brands,ortypesmay alsocausedamagetoyour vehicle.Besuretousethe correctsize,brand,andtype oftiresonallwheels.Itisall righttodrivewithyour compactsparetemporarily,as itwasdevelopedforuseon yourvehicle.SeeCompact SpareTire onpage9-76 .

WARNING
If you use bias-ply tires on the vehicle, the wheel rim flanges could develop cracks after many miles of driving. Atire and/or wheel could fail suddenly, causing a crash. Use only radial-ply tires with the wheels on the vehicle.
If you must replace your vehicle's tires with those that do no have a TPCSpec number, makes sure they are the same size, load range, speed rating, and construction type (radial and bias-belted tires) as your vehicle's original tires.
Vehiclesthathaveatire pressuremonitoringsystem couldgiveaninaccurate low-pressurewarningifnon-TPC Specratedtiresareinstalled onyourvehicle.Non-TPC Specratedtiresmaygivea low-pressurewarningthatis higherorlowerthantheproper warninglevelyouwouldgetwith TPCSpecratedtires.SeeTire PressureMonitorSystem on page9-57.
Yourvehicle'soriginal equipmenttiresarelisted on the Tire and Loading Information Label. See Vehicle Load Limits on page 8-12 , formore information about the Tire and Loading Information Label and its location on your vehicle.
DifferentSizeTiresand Wheels
If you add wheels sortire sthatarea different sizeth anyour original equipment wheels and tires, this could affect the way your vehicle performs, including its braking, ride and handling characteristics, stability, and resistancetorollover. Additionally, if your vehicle has electronics system such as anti-lock brakes, rolloverairbags, traction control, and electronic stability control, the performance of these system scan be affected.

WARNING
If you adddifferentsized wheels, your vehicle may not provide an acceptable level of performance and safety if it is not recommended forthose wheels are selected. You may increase the chancethat you will crash and suffer serious injury. Only use GM specific wheel and tires systems developed for your vehicle, and have them properly installed by a GM certified technician.
SeeBuyingNewTires on page 9-64 and Accessories and Modifications on page 9-3 for additional information.
UniformTireQuality Grading
Qualitygradescanbefound whereapplicableonthetire sidewallbetweentreadshoulder andmaximumsectionwidth. Forexample:
Treadwear200TractionAA TemperatureA
The following information relates to the system developed by the United States National Highway Traffic Safety Administration (NHTSA), which gradestires by treadwear, traction, and temperature performance. This applies only to vehicles sold in the United States. The grades are molded on the sidewall of most passenger car tires. The Uniform Tire Quality
Grading(UTQG)systemdoes notapplytodeeptread, winter-typesnowtires, space-saver,ortemporaryuse sparetires,tireswithnominal rimdiametersof10to12inches (25to30cm),ortosome limited-productiontires.
While the tires available on General Motors passengers cars and light trucks may vary with respect to these grades, they must also conform to federal safety requirements and additional General Motors Tire Performance Criteria (TPC) standards.
All Passenger Car Tires Must Conform to Federal Safety Requirements In Addition To These Grades.
Treadwear
Thetreadweargradeisa comparativeratingbasedonthe wearrateofthetirewhentested undercontrolledconditionson aspecifiedgovernmenttest course. Forexample, atire graded150wouldwearoneand ahalf(1½)timesaswellonthe governmentcourseasatire graded100. Therelative performanceoftiresdepends upontheactualconditionsof theiruse, however, and may departsignificantlyfromthe normduetovariationsin drivinghabits, servicepractices anddifferencesinroad characteristicsandclimate.
Traction-AA,A,B,C
Thetractiongrades, from highesttolowest, are AA, A, B, and C. Those grades represent the tire's ability to stop on wet pavement as measured under controlled condition on specified government test surfaces of asphalt and concrete. At remarked C may have poor traction performance. Warning: Thetraction grade assigned to histire is based on straight-ahead braking traction tests, and does not include acceleration, cornering, hydroplaning, or peak traction characteristics.
Temperature-A,B,C
ThetemperaturegradesareA (thehighest), B, and C, representing the tire's resistance to the generation of heat and its ability to dissipate heat when tested under controlled condition as specified indoor laboratory test wheel. Sustained hightemperature can cause thematerial of the tire to degenerate and reduce tire life, and excessively temperature can lead to sudden tire failure. The grade Corresponded level of performance which all passengercartires must meet under the Federal Motor Safety Standard No. 109. Grades Band Are present higher level sof performance on the laboratory test wheel than the minimum required by law. Warning: The temperature grade for the tire is established for atirethatis
properlyinflatedandnot overloaded.Excessivespeed, underinflation,orexcessive loading,eitherseparatelyorin combination,cancauseheat buildupandpossibletirefailure.
WheelAlignmentandTire Balance
Thetiresandwheelsonthevehicle werealignedandbalancedcarefully atthefactorytogivethelongesttire lifeandbestoverallperformance. Adjustmentstowheelalignment and tirebalancingwillnotbenecessary onaregularbasis.However,ifthere isunusualtirewearorthevehicle pullstoonesideortheother,the alignmentshouldbechecked.Ifthe vehiclevibrateswhendrivingona smoothroad,thetiresandwheels mightneedtoberebalanced.See yourdealer/retailerforproper diagnosis.
WheelReplacement
Replaceanywheelthatisbent, cracked,orbadlyrustedor corroded.Ifwheelnutskeepcoming loose,thewheel,wheelbolts,and wheelnutsshouldbereplaced. Ifthewheelleaksair,replaceit (exceptsomealuminumwheels, whichcansometimesberepaired). Seeyourdealer/retailerifanyof theseconditionsexist.
Yourdealer/retailerwillknowthe kindofwheelyouneed.
Eachnewwheelshouldhavethe sameload-carryingcapacity, diameter,width,offset,andbe mountedthesamewayasthe oneitreplaces.
If you need to replace any of the wheels, wheel bolts, wheel nuts, or Tire Pressure Monitor System (TPMS) sensors, replacethemonly with new GM originalequipment parts. This way, you will be sure to have better right wheel, wheel bolts, wheel nuts, and TPMS sensors for the vehicle.
WARNING
Using the wrong replacement wheels, wheel bolts, or wheel nutson your vehicle can be dangerous. It could affect the braking and handling of your vehicle, make your tires lose air and make you lose control. You could have a collision in which you or others could be injured. Always use the correct wheel, wheel bolts, and wheel nuts for replacement.
Notice: The wrong wheel can also cause problems with bearing life, brake cooling, speedometer orodometeralibration, headlampaim, bumper height, vehicleground clearance, and tire ortirechain clearance to the body and chassis.
SeelfaTireGoesFlat on page9-70 formoreinformation.
UsedReplacementWheels
WARNING
Puttingausedwheelonthe vehicleisdangerous.Youcannot knowhowithasbeenusedor howfarithasbeendriven. Itcouldfailsuddenlyandcausea crash.Ifyouhavetoreplacea wheel,useanewGMoriginal equipmentwheel.
TireChains

WARNING
Donotusetirechains. Thereis notenoughclearance. Tirechains usedonavehiclewithoutthe properamountofclearancecan causedamagetothebrakes, suspensionorothervehicelparts. Theareadamagedbythetire chainscouldcauseyoutolose controlofthevehicleandyouor othersmaybeinjuredinacrash.
Useanothertypeofraction deviceonlyifitsmanufacturer recommendsitforuseonthe vehicleandtiresizecombination androadconditions.Followthat manufacturer'sinstructions.To helpavoiddamagetothevehicle, driveslowly,readjustorremove thedeviceifitiscontactingthe vehicle,andonotspinthe (Continued)
WARNING(Continued)
vehicle'swheels.Ifyoudofind tractiondevicesthatwillfit,install themonthefronttires.
IfaTireGoesFlat
Itisunusualforatiretoblowout whileyouaredriving,especiallyif youmaintainyourvehicle'stires properly.lfairgoesoutofatire,itis muchmorelikelytoleakoutslowly. Butifyoushouldeverhavea blowout,hereareafewtipsabout whattoexpectandwhattodo:
Ifafronttirefails,theflattire createsadragthatpullsthevehicle towardthatside.Takeyourfootoff theacceleratorpedalandgripthe steeringwheelfirmly.Steerto maintainlaneposition,andthen gentlybraketoastopwelloutofthe trafficlane.
Arearblowout, particularlyona curve, actsmuchlikeaskid and may require the same correction you would use in a skid. In any rear blow out remove your foot from the accelerator pedal. Get the vehicle under control by steering the way you want the vehicle to go. It may be very bumpy and noisy, but you can still steer. Gently braketoa stop, wello fther oad if possible.

WARNING
Liftingvehicleandgettingunder ittodomaintenanceorrepairs isdangerouswithoutthe appropriatesafetyequipment and training. Ifajackisprovidedwith thevehicle, itisdesignedonlyfor changingaflattire. Ifitisusedfor anythingelse, youorotherscould bebadlyinjuredorkilledifthe vehicleslipsoffthejack. Ifajack isprovidedwiththevehicle, only useitforchangingaflattire.
Ifatiregoesflat, avoidfurthertire andwheeldamagebydrivingslowly toalevelplace. Turnonthehazard warningflashers.SeeHazard WarningFlashersonpage5-3.

WARNING
Changingatirecanbe dangerous. The vehiclecanslip offthejackandrolloverorfallon youorotherpeople. Youandthey couldbebadlyinjuredoreven killed. Findalevelplaceto changeyourtire. Tohelpprevent thevehiclefrommoving:
- Settheparkingbrakefirmly.
- Putan automatic transmissionshiftleverin P(Park), or shifttamanual transmission to 1 (First) or R (Reverse).
(Continued)
WARNING(Continued)
-
Turnofftheengineanddo notrestartwhilethevehicle israised.
-
Donotallowpassengersto remaininthevehicle.
Tobecertainthevehiclewillnot move,putblocksatthefrontand rearofthetirefarthestawayfrom theonebeingchanged.That wouldbethetireontheother side,attheoppositeendofthe vehicle.
Whenthevehiclehasaflattire(B), usethefollowingexampleasa guidetoassistyouintheplacement ofwheelblocks(A).

flowchart
graph TD
    A["A"] --> B["B"]
    A --> C[" "]
    B --> C
    style A fill:#f9f,stroke:#333
    style B fill:#bbf,stroke:#333
    style C fill:#dfd,stroke:#333
A.WheelBlock
B.FlatTire
The following information explains how to repair or change atire.
TireChanging
RemovingtheSpareTireand Tools
Theequipmentyouneedislocated inthetrunk.
- Openthetrunk.
- Removethesparetirecover.
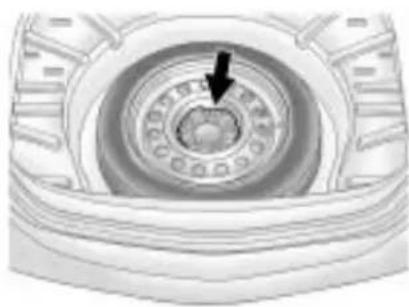
natural_image
Close-up of a mechanical component with concentric rings and a black arrow pointing to a specific feature (no text or symbols visible)-
Turntheretainernut counterclockwise and remove thesparetire.
-
Placethesparetirenexttothe tirebeingchanged.
- Thejackandtoolsarestored belowthesparetire. Remove themfromtheircontainerand placethemnearthetirebeing changed.
RemovingtheFlatTireand InstallingtheSpareTire
- Doasafetycheckbefore proceeding. Seelfa Tire Goes Flat onpage 9-70 formore information.
- Turnthewheelwrench counterclockwisetoloosenand removethewheelnutcaps.
Ifneeded, finish loosening them by hand. Thenutcaps will not come off of the wheel cover.
Theedgeofthewheelcover couldbesharp, sodonottryto removethecoverwithyourbare hands. Donotdropthecapor layitfacedown, asitcould becomescratchedordamaged.
Storethewheelcoverinthe trunkuntilyouhavetheflattire repairedorreplaced.
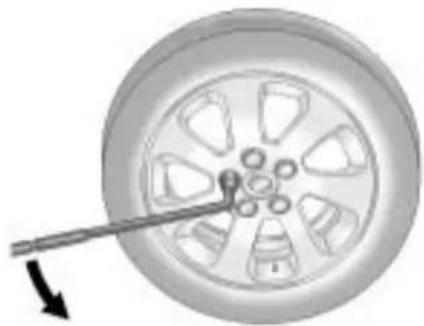
natural_image
Close-up of a car wheel with a tool inserted, showing the wheel rim and hub (no text or symbols visible)- Turnthewheelwrench counterclockwisetoloosenall thewheelnuts, but donot removethemyet.
Notice: Makesurethatthejack liftheadisinthecorrectposition oryoumaydamageyourvehicle. Therepairswouldnotbecovered byyourwarranty.

natural_image
Diagram of a sedan above its side view, showing front and side views of the dashboard (no text or symbols present)- Position the jackhead, asshown Set the jack to then necessary height before positioning it below the jacking point.
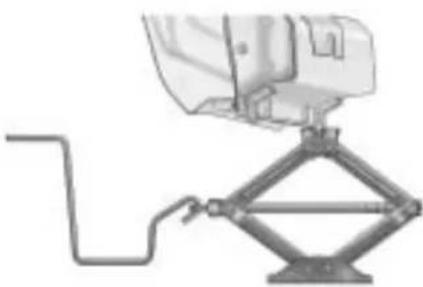
natural_image
Mechanical device with attached lever and connecting rod (no visible text or symbols)- Attachthejackhandle.
WARNING
Gettingunderavehiclewhenitis jackedupisdangerous.Ifthe vehicleslipsoffthejack,you couldbebadlyinjuredorkilled. Nevergetunderavehiclewhenit issupportedonlybyajack.
WARNING
Raisingyourvehiclewiththe jackimproperlypositionedcan damagethevehicleandeven makethevehicelfall. To help avoidpersonalinjuryandvehicle damage, besuretofitthejacklift headintotheproperlocation beforeraisingthevehicle.
WARNING
Liftingvehicleandgetting underittodomaintenanceor repairsidangerouswithoutthe appropriatesafetyequipmentand training.Ifajackisprovidedwith thevehicle,itisdesignedonlyfor changingaflattire.Ifitisusedfor anythingelse,youorotherscould bebadlyinjuredorkilledifthe vehicleslipsoffthejack.Ifajack isprovidedwiththevehicle,only useitforchangingaflattire.

natural_image
Technical illustration of a car wheel and a mechanical bracket assembly (no text or symbols)- Turnthejackhandleclockwise toraisethevehiclefarenough offthegroundforthecompact sparetofitunderthevehicle.

natural_image
Illustration of a hand adjusting a car wheel rim with screw fasteners (no text or symbols)-
Remove allofthewheelnuts.
-
Removetheflattire.

WARNING
Rustordirtonawheel, oronthe partstowhichitisfastened, can makewheelnutsbecomeloose aftertime. Thewheelcouldcome offandcauseanaccident. When changingawheel, removeany rustordirtfromplaceswherethe wheelattachestothevehicle. In anemergency, useaclothora (Continued)
WARNING(Continued)
papertoweltodothis;butbesure touseascraperorwirebrush later,ifneeded,togetalltherust ordirtoff.Seelfa Tire Goes Flat onpage9-70.
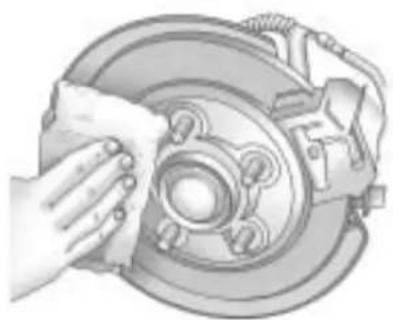
natural_image
Illustration of a hand cleaning a car brake disc (no text or symbols)- Remove any rustordirt from the wheel bolts, mountingsurfaces, and spare wheel.
- Install the compact spare tire.

WARNING
Neveruseoilorgreaseonbolts ornutsbecausethenutsmight comeloose. Thevehicle'swheel couldfalloff, causingacrash.
- Putthewheelnutsbackon withtheroundedendofthe nutstowardthewheel. Turn eachnutclockwisebyhand untilthewheelisheldagainst thehub.
- Lowerthevehicleby turningthejackhandle counterclockwise. Lower thejackcompletely.

WARNING
Wheelnutsthatareimproperlyor incorrectlytightenedcancause thewheelstobecomelooseor comeoff. Thewheelnutsshould beightenedwithatorquewrench
(Continued)
WARNING(Continued)
tothepropertorquespecification afterreplacing.Followthetorque specificationsuppliedbythe aftermarketmanufacturerwhen usingaccessorylockingwheel nuts.SeeCapacitiesand Specifications onpage 11-2 for originalequipmentwheelnut torquespecifications.
Notice:Improperlytightened wheelnutscanleadtobrake pulsationandrotordamage. Toavoidexpensivebrakerepairs, evenlytightenthewheelnutsin thepropersequenceandtothe propertorquespecification.See CapacitiesandSpecifications on page11-2 forthewheelnut torquespecification.
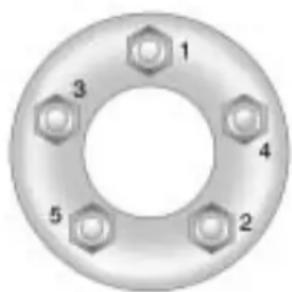
text_image
1 3 4 5 2- Tightenthewheelnutsfirmlyin acrisscrosssequence, as shown.
- Lowerthejackalltheway and removethejackfromunderthe vehicle.
- Tightenthewheelnutsfirmly withthewheelwrench.
Notice: Wheelcoverswillnotfit onyourvehicle'scompactspare. Ifyoutrytoputawheelcoveron thecompactspare, thecoveror the spare could bedamaged.
StoringaFlatorSpareTire andTools

WARNING
Storingajack, atire, or other equipment in the passenger compartment of the vehicle could cause injury. In sudden stop or collision, loose equipment could strike someone. Store all these in the proper place.
Tostoretheflatorsparetire and tools:
- Placethejackandtoolsinthe rearstoragecompartment.
- Placetheflatorsparetire in the storage compartment below the floor covering.
Secureitwiththeretainernut.
Ifthewheelislargerthanthe spare, placethefloorcoveron theprojectingwheel.
Thecompactspareisfortemporary useonly.Replacethecompact spare tirewithafull-sizetireas soonasyoucan.
CompactSpareTire

WARNING
Drivingwithmorethanone compactsparetireatatimecould resultinlossofbrakingand handling. This could lead to a crash and you or others could be injured. Use only one compact sparetire at time.
If this vehicle has a compact spare tire it was fully inflated when the vehicle was new, however, it can lose air after time. Check the inflation pressureregularly. It should be 420kPa (60psi).
Afterinstallingthecompactspare onthevehicle,stopassoonas possibleandmakesurethespare tireiscorrectlyinflated.The compactspareismadetoperform wellatspeedsupto105km/h (65mph)fordistancesupto 5000km(3,000miles),soyoucan finishyourtripandhavethefull-size tirerepairedorreplacedatyour convenience.Ofcourse,itisbestto replacethesparewithafull-sizetire assoonaspossible.Thesparetire willlastlongerandbeingood shapeincaseitisneededagain.
Notice: Whenthecompactspare is installed, donottakethe vehiclethroughanautomatic carwashwithguiderails. The compactsparecangetcaughton therailswhichcandamagethe tire, wheelandotherpartsofthe vehicle.
Donotusethecompactspareon othervehicles.
Donotmixthecompactsparetire orwheelwithotherwheelsortires. Theywillnotfit.Keepthesparetire anditswheeltogether.
Notice: Tirechains will not fit the compact spare. Using them can damagethe vehicle and can damagethe chain too. Donot usetire chains on the compact spare.
JumpStarting
If the battery has rundown, try to use another vehicle and some jumpercable start your vehicle. Besuretousethe following step to do its safely.
WARNING
Batteriescanhurtyou. They can be dangerous because:
• They contain acid that can burn you.
• Theycontaingasthatcan explodeorignite.
• Theycontainenough electricitytoburnyou.
If you donot follow these steps exactly, some or all of these things can hurt you.
Notice: Ignoring the seven steps could result in costly damage to the vehicle that would not be covered by the warranty.
Trying to start the vehicle by pushing or pulling it will not work, and it could damage the vehicle.
Thejumpstartpositive(A)is locatedunderatrimcoverinthe enginecompartmentonthedriver sideofthevehicle.

natural_image
Close-up of a mechanical component with an arrow pointing to a specific area (no visible text or symbols)Thispostisusedinsteadofadirect connectiontothebattery.
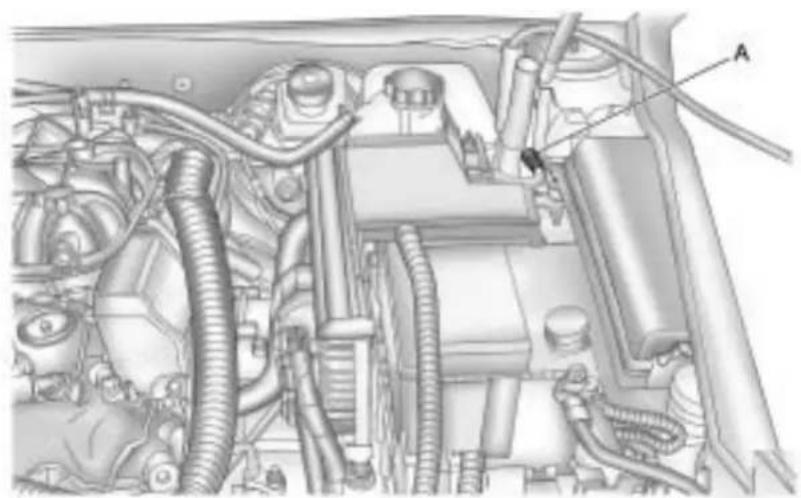
natural_image
Technical diagram of an automotive engine bay with hoses and components (no visible text or labels)- Check the other vehicle. It must have a 12-volt battery with a negative ground system.
Notice: If the other vehicle's system is not a 12-voltsystem with an negative ground, both vehicles can be damaged. Only use vehicles with 12-voltsystems with negative ground to jump start your vehicle.
- Positionthetwovehiclessothat theyarenottouching.
- Settheparkingbrakefirmly and puttheshiftleverinP(Park). See ShiftingIntoPark on page 8-24.
Notice: If you leave a weather or other accessories on during the jump starting procedure, they could be damaged. There pairs would not be recovered by the warranty. Always turn off the radio and other accessories when jumping starting the vehicle.
- TurntheignitiontoLOCK/OFF andswitchoffalllightsand accessoriesinbothvehicles, exceptthehazardwarning flashersifneeded.

WARNING
Anelectricfancanstartupeven whentheengineisnotrunning andcaninjureyou.Keephands, clothingandtoolsawayfromany underhoodelectricfan.

WARNING
Usingamatchnearabatterycan causebatterygastoexplode. Peoplehavebeenhurtdoingthis, andsomehavebeenblinded. Useaflashlightifyouneedmore light.
Besurethebatteryhasenough water.Youdonotneedtoadd watertothebatteryinstalledin yournewvehicle.Butifabattery hasfillercaps,besuretheright amountoffluidisthere.Ifitislow, addwatertotakecareofthat first.Ifyoudon't,explosivegas couldbepresent.
Batteryfluidcontainsacidthat canburnyou.Donotgetiton you.Ifyouaccidentallygetitin youreyesoronyourskin,flush theplacewithwaterandget medicalhelpimmediately.

WARNING
Fansorothermovingengine partscaninjureyoubadly.Keep yourhandsawayfrommoving partsoncetheengineisrunning.

text_image
B θ A θ O C D-
Connectoneendofthered positive(+)cabletothejump startpositive(+)post(A).Usea remotepositive(+)terminalifthe vehiclehasone.
-
Donotlettheotherendofthe redpositive(+)cabletouch metal. Connectittothe positive(+)terminalofthe goodbattery(B). Usearemote positive(+)terminalifthevehicle hasone.
-
Connectone end of the black negative (-) cable to the negative (-) terminal of the good battery (C). Use a remote negative (-) terminal if the vehicle has one.
Donotlettheotherendtouch anythinguntilthenextstep. Theotherendofthenegative(−) cabledoesnotgotothedead battery.Itgoestoaheavy, unpaintedmetalenginepartor toaremotenegative(−)terminal onthevehiclewiththedead battery.
9-80VehicleCare
- Connect the other end of the black negative (−) cable to an unpainted heavymetal engine part (D) away from the dead battery, but not a re engine part that move.
- Start the engine in the vehicle with the good battery and run the engine at idlespeed for at least four minutes.
- Trytostartthevehiclethathad thedeadbattery.Ifitwillnot startafterafewtries,it probablyneedsservice.
Notice: If the jumpercables are connected or removed in the wrong order, electrical shorting may occur and damage the vehicle. There pairs would not be covered by the vehicle warranty. Always connect and remove the jumpercables in the correct order, makingsure that the cables donottouche achother or other metal.

flowchart
graph TD
    A["Component A"] -->|①| B["Component B"]
    B -->|②| C["Component C"]
    B -->|③| D["Component D"]
    C -->|④| E["Component E"]
    style A fill:#f9f,stroke:#333
    style B fill:#ccf,stroke:#333
    style C fill:#cfc,stroke:#333
    style D fill:#fcc,stroke:#333
    style E fill:#cff,stroke:#333
JumperCableRemoval
A. Heavy, Unpainted Metal Engine Partor Remote Negative(−) Terminal
B. GoodBatteryorRemote Positive(+)andRemote Negative(-)Terminals
C. DeadBatteryorRemote Positive(+)Terminal
Todisconnectthejumpercables frombothvehicles:
- Disconnecttheblack negative(-)cablefromthe vehiclethathadthedead battery.
- Disconnecttheblack negative(-)cablefromthe vehiclewiththegoodbattery.
- Disconnectthered positive(+) cable from the vehicle with the good battery.
- Disconnecttheredpositive(+) cablefromtheothervehicle.
- Returnthecapsoverthe positive(+)andnegative(-) terminalstotheiroriginal positions.
Towing
TowingtheVehicle
Toavoiddamage, the disabled vehicles should be towed with all four wheel soff the ground. Consult your dealer/retailer or a professional towingservice if the disabled vehicle must be towed. See Roadside Assistance Program on page 12-6.
Totowthevehiclebehind anothervehicleforrecreational purposes—suchasbehinda motorhome,seeRecreational VehicleTowingfollowing.
Recreational Vehicle Towing
Recreationalvehicletowingmeans towingthevehiclebehindanother vehicle—suchasbehinda motorhome. Thetwomostcommon typesofrecreationalvehicletowing areknownasdinghytowingand dollytowing.Dinghytowingis towingthevehiclewithallfour wheelsontheground.Dollytowing istowingthevehiclewithtwo wheelsonthegroundandtwo wheelsuponadeviceknown asadolly.
Herearesomeimportantthingsto considerbeforerecreationalvehicle towing:
- Whatisthetowingcapacity ofthetowingvehicle? Besuretoreadthetow vehiclemanufacturer's recommendations.
- Whatisthedistancethatwillbe travelled?Somevehicleshave restrictionsonhowfarandhow longtheycantow.
- Isthepropertowingequipment goingtobeused? Seeyour dealer/retailerortrailering professionalforadditional adviceandequipment recommendations.
- Isthevehiclereadytobe towed?Justaspreparingthe vehicleforalongtrip,makesure thevehicleispreparedtobe towed.
DinghyTowingFromtheFront
Whendinghytowing, the vehicle should berunatthe beginning of each day and date each RV fuel stop for about five minutes. This will ensure proper lubrication of transmission components.
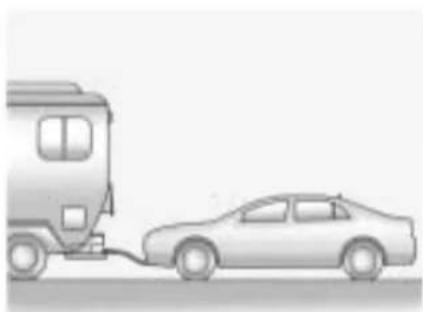
natural_image
Illustration of a bus connected to a car, showing a vehicle being charged (no text or symbols present)Usethefollowingprocedureto dinghytowthevehiclefromthefront withallfourwheelsontheground:
-
Position the vehicle being towed behind the tow vehicle and shift the transmission to P (Park).
-
Turntheengineoffandfirmlyset theparkingbrake.
- Following the manufacturer's instructions, securely attach the vehicle being towed to the tow vehicle.
- TurntheignitiontoACC/ACCESSORYandshiftthe transmissiontoN(Neutral).
- Releasetheparkingbrakeonly afterthevehiclebeingtowedis firmlyattachedtothetowing vehicle.
Whentowingthevehiclefor extendedperiodsoftime,startthe vehicleasoftenaspossibleto preventbatterydrain.Thisshould bedonewhenthetowvehicleis parked.
DinghyTowingFromtheRear
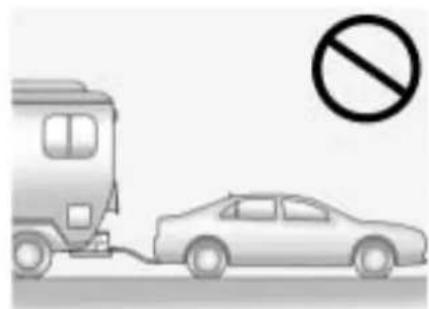
natural_image
Illustration of a bus connected to a car with a no-smoking symbol (no text or labels)The vehicle was not designed to be towed from therear with all four wheels on the ground.
DollyTowingFromtheFront
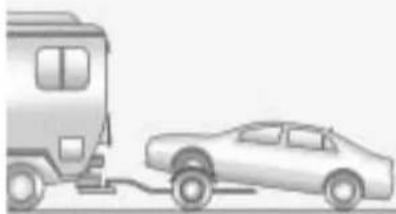
natural_image
Illustration of a car being towed from a van (no text or symbols)• Vehicleswithfront-wheeldrive canbedollytowedfromthe front.
- Vehicleswithall-wheeldrivecan bedollytowedfromthefront withamaximumspeednotto exceedthelegallimiter50km/h (30mph).
Usethefollowingproceduredolly towthevehiclefromthefront:
- Attach the dolly to the tow vehicle following the dolly manufacturer's instructions.
- Drivethefrontwheelsontothe dolly.
- Shiftthetransmission to P(Park).
- Firmlysettheparkingbrake.
- Use an adequate clamping device designed for towing to ensure that the front wheels are locked into the straight ahead position.
- Secure the vehicle to the Holly following the manufacturer's instructions.
- Releasetheparkingbrakeonly afterthevehiclebeingtowedis firmlyattachedtothetowing vehicle.
- TurntheignitiontoLOCK/OFF.
DollyTowingFromtheRear
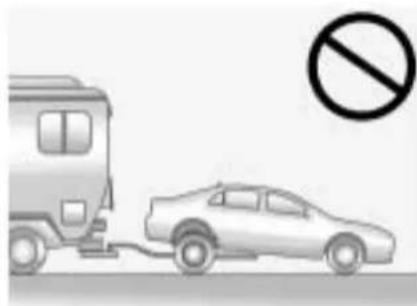
natural_image
Illustration of a car being pulled off by a bus, with a no-smoking symbol above (no text or labels)The vehicle cannot bedollytowed from therear.
AppearanceCare
ExteriorCare
CleaningExteriorLamps/Lenses
Useonlylukewarmorcoldwater, a softclothandacarwashingsoap to cleanexteriorlampsandlenses. Followinstructionsunder"Washing theVehicle"laterinthissection.
FinishCare
Occasionalwaxingormildpolishing ofthevehiclebyhandmaybe necessarytoremoveresiduefrom thepaintfinish.Approvedcleaning productscanbeobtainedfromyour dealer/retailer.
If the vehicle has a basecoat/ clearcoat paint finish, the clearcoat gives more depth and gloss to the colored basecoat. Always use waxes and polish the sthatare non-abrasive and made fora basecoat/clearcoat paint finish.
Notice: Machine compounding or aggressive polishing on a basecoat/clearcoat paint finish may damage it. Use only non-abrasivewaxes and polishes that are made for a basecoat/clearcoat paint finish on the vehicle.
Foreignmaterialssuchascalcium chlorideandothersalts, icemelting agents, roadoilandtar, treesap, birddroppings, chemicalsfrom industrialchimneys, etc., can damagethevehicle's finishifthey remainonpaintedsurfaces. Wash thevehicleassoonaspossible. If necessary, usenon-abrasive cleanersthataremarkedsafefor paintedsurfacestoremoveforeign matter.
Exteriorpaintedsurfacesare subjecttoaging,weatherand chemicalfalloutthatcantaketheir tolloveraperiodofyears.Tokeep thepaintfinishlookingnew,keep thevehiclegaragedorcovered wheneverpossible.
Protecting Exterior Bright Metal Parts
Brightmetalpartsshouldbe cleanedregularlytokeeptheir luster.Washwithwateroruse chromepolishonchromeor stainlesssteeltrim,ifnecessary.
Usespecialcarewithaluminum trim.Toavoiddamagingprotective trim,neveruseautoorchrome polish,steamorcausticsoapto cleanaluminum.Acoatingof wax,rubbedtohighpolish,is recommendedforallbrightmetal parts.
WashingtheVehicle
Topreservethevehicle'sfinish, keepitcleanbywashingitoften.
Donotwashthevehicleindirect sunlightanduseacar washingsoap.
Notice: Certaincleanerscontain chemicalsthatcandamagethe emblemsornameplatesonthe vehicle.Checkthecleaning productlabel.Ifitstatesthatit shouldnotbeusedonplastic parts,donotuseitonthevehicle ordamagemayoccurandit wouldnotbecoveredbythe warranty.
Donotusecleaningagentsthatare petroleumbasedorthatcontain acidorabrasives,astheycan damagethepaint,metalorplastic onthevehicle.Approvedcleaning productscanbeobtainedfrom yourdealer/retailer.Followall manufacturerdirectionsregarding correctproductusage,necessary safetyprecautionsandappropriate disposalofanyvehiclecare product.
Rinsethevehiclewell, before washing and aftertoremove all cleaning agents completely. If they are allowed today on the surface, they could stain.
Drythefinishwithasoft, clean chamoisoranall-cottontowelto avoidsurfacescratchesandwater spotting.
Highpressurecarwashescould causewatertoenterthevehicle. Avoidusinghighpressurewashes closerthan30cm(12inches)tothe surfaceofthevehicle.Useofpower washersexceeding8,274kPa (1,200psi)canresultindamageor removalofpaintanddecals.
Notice: Conveyorsystemson some automatic car washescould damage the vehicle. Theremay not been enough clearance for the undercarriage. Check with the car wash manager before using the automatic car wash.
Weatherstrips
Siliconegreaseonweatherstripswill makethemlastlonger,sealbetter, andnotstickorsqueak.Apply siliconegreasewithacleancloth. Duringverycold,dampweather frequentapplicationmaybe required.SeeRecommendedFluids andLubricantsonpage10-7.
WheelsandTrim—Aluminum orChrome
The vehicle may have either aluminum or chrome-plated wheels.
Keepthewheelscleanusingasoft cleanclothwithmildsoapand water.Rinsewithcleanwater.After rinsingthoroughly,drywithasoft cleantowel.Awaxmaythenbe applied.
Notice: Chromewheels and other chrometrimmaybedamaged if the vehicle is not washed after driving on road sthathave been sprayed with magnesium, calcium or sodium chloride. These chlorides are used on roads for condition such as ice and dust. Always wash the vehicle's chromewith soap and water after exposure.
Notice: Using strong soaps, chemicals, abrasive polishes, cleaners, brushes, or cleaners that contain acidonaluminum or chrome-plated wheels, could damage the surface of the wheel(s). There pairs would not be recovered by the vehicle warranty. Use only approved cleanersonaluminum or chrome-plated wheels.
Thesurfaceofthesewheelsis similartothepaintedsurfaceofthe vehicle.Donotusestrongsoaps, chemicals,abrasivepolishes, abrasivecleaners,cleanerswith acid,orabrasivecleaningbrushes onthembecausethesurfacecould bedamaged.Donotusechrome polishonaluminumwheels.
Notice: Using chromepolishon aluminum wheels could damage the wheels. There pairs would not be recovered by the vehicle warranty. Use chromepolishon chromewheel only.
Usechromepolishonlyon chrome-platedwheels, but avoid any painted surface of the wheel, and buffoff immediately after application.
Notice: Driving the vehicle through an automatic car wash that hassiliconecarbidetire cleaning brushes, could damage the aluminum or chrome-plated wheels. There pairs would not be covered by the vehicle warranty. Never drive a vehicle that has aluminum or chrome-plated wheel through an automatic car wash that uses siliconic carbide tire cleaning brushes.
WindshieldandWiperBlades
Cleantheoutsideofthewindshield withglasscleaner.
Cleantherubberbladesusingalint freeclothorpapertowelsoaked withwindshieldwasherfluidora milddetergent.Washthewindshield thoroughlywhencleaningthe blades.Bugs,roadgrime,sap, andabuildupofvehiclewash/waxtreatmentsmaycausewiper streaking.Replacethewiperblades iftheyarewornordamaged.
Wiperscanbedamagedby:
• Extremedustyconditions
- Sandandsalt
- Heatandsun
- Snowandice, without proper removal
Tires
Useastiffbrushwithtirecleanerto cleanthetires.
Notice: Using petroleum-based tiredressing product on the vehicle may damage the paint finish and/or tires. When applying atiredressing, always swipe off any overspray from all painted surfaces on the vehicle.
SheetMetalDamage
If the vehicle is damaged and requires sheet metal repair or replacement, makes sure the body repair shop applies anti-corrosion material to parts repaired or replaced to restore corrosion protection.
Original manufacturer replacement partswillprovidethe corrosion protectionwhilemaintainingthe vehiclewarranty.
FinishDamage
Anystonechips, fracturesordeep scratchesinthefinishshouldbe repairedrightaway. Baremetalwill corrodequicklyandmaydevelop intomajorrepairexpense.
Minorchipsandscratchescanbe repairedwithtouch-upmaterials availablefromyourdealer/retailer. Largerareasoffinishdamagecan becorrectedinyourdealer's/retailer'sbodyandpaintshop.
UnderbodyMaintenance
Chemicalsusedforiceandsnow removalanddustcontrolcancollect ontheunderbody. If these are not removed, corrosion and trust can develop on the underbody parts such as fuellines, frame, floorpan, and exhaust system even though they have corrosion protection.
Atleasteveryspring, flush these materials from the underbody with plainwater. Clean any areas where mud and debris can collect. Dirt packed in close areas of the frame should be loosened before being flushed. Your dealer/retailer or an under body car washingsystem can do this.
ChemicalPaintSpotting
Somewatherandatmospheric conditionscancreateachemical fallout.Airbornepollutantscanfall uponandattackpaintedsurfaceson thevehicle.Thisdamagecantake twoforms:blotchy,ring-shaped discolorations,andsmall,irregular darkspotsetchedintothepaint surface.
InteriorCare
The vehicle's interior will continueto looks best if it is cleaned often. Dust and dirt can accumulate on the upholstery and caused damage to the carpet, fabric, leather, and plastics surfaces. Stain should be removed quickly as extreme heat could cause them to set rapidly.
Lightercoloredinteriorsmay require more frequent cleaning. Newspapers and garments that can transfer color to home furnishings can also transfer color to the vehicle's interior.
Removedustfromsmallbuttons andknobswithasmallbrushwith softbristles.
Yourdealer/retailerhasproductsfor cleaningthevehicle'sinterior.When cleaningthevehicle'sinterior,only usecleanersspecificallydesigned forthesurfacesthatarebeing cleaned.Permanentdamagecan resultfromusingcleanerson surfacesforwhichtheywerenot intended.Applythecleanerdirectly tothecleaningclothtoprevent over-spray.Removeanyaccidental over-sprayfromothersurfaces immediately.
Notice: Using abrasive cleaners when cleaning glass surfaces on the vehicle, could scratch the glass and/or caused damage to the rear window defogger. When cleaning the glass on the vehicle, use only as soft cloth and glass cleaner.
Cleanerscancontainsolventsthat canbecomeconcentratedinthe vehicle'sinterior. Beforeusing cleaners, read and adhereto all safety instructions on the label. While cleaning the vehicle's interior, maintain adequate ventilation by opening the vehicle's doors and windows.
Donotcleantheinteriorusingthe followingcleanersortechniques:
- Neveruseaknifeoranyother sharpobjecttoremoveasoil fromanyinteriorsurface.
-
Neveruseastiffbrush.Itcan causedamagetothevehicle's interiorsurfaces.
-
Neverapplyheavypressureor rubaggressivelywithacleaning cloth.Useofheavypressurecan damagetheinterioranddoes notimprovetheeffectiveness of soilremoval.
- Useonlymild,neutral-pHsoaps. Avoidlaundrydetergentsor dishwashingsoapswith degreasers.Usingtoomuch soapwillleavearesiduethat leavesstreaksandattractsdirt. Forliquidcleaners,about 20dropsper3.78L(1gal)of waterisagoodguide.
- Donotheavilysaturatethe upholsterywhilecleaning.
- Damagetothevehicle'sinterior mayresultfromtheuseofmany organicsolventssuchasnaptha, alcohol,etc.
Fabric/Carpet
Useavacuumcleanerwithasoft brushattachmenttoremovedust andloosedirt.Acanistervacuum withabeaterbarinthenozzlemay onlybeusedonfloorcarpetand carpetedfloormats.Forsoils, alwaystrytoremovethemfirstwith plainwaterorclubsoda.Before cleaning,gentlyremoveasmuchof thesoilaspossibleusingoneofthe followingtechniques:
- Forliquids:gentlyblotthe remainingsoilwithapaper towel.Allowthesoiltoabsorb intothepapertoweluntilno morecanberemoved.
- Forsoliddrysoils:removeas muchaspossibleandthen vacuum.
Toclean:
- Saturatealint-free, cleanwhite cloth with water or clubs soda.
- Remove excess moisture.
- Startontheoutsideedgeofthe soilandgentlyrubtowardthe center.Continuecleaning,using acleanareaoftheclotheach timeitbecomessoiled.
- Continuetogentlyrub the soiledarea.
- If the soil is not completely removed, use a mild soap solution and repeat the cleaning process with plain water.
Ifanyofthesoilremains, a commercialfabriccleanerorspot liftermaybenecessary.Testasmall hiddenareaforcolorfastnessbefore usingacommercialupholstery cleanerorspotlifter.Ifthelocally cleanedareagivesanyimpression thataringformationmayresult, cleantheentiresurface.
Apapertowelcanbeusedtoblot excessmoisturefromthefabricor carpetafterthecleaningprocess.
Leather
Toremovedust, asoftcloth dampened with water can be used. If a more thorough cleaning is necessary, asoft cloth dampened with a mild soap solution can be used. Allow the leathert dry naturally. Donot use heat, steam, or spot lifters or spot removers, or shoepolish on leather. Many commercial leather cleaners and coating that a red to preserve and protect leather may permanently changethe appearance and feel of the leather and are not recommended. Donot uses silicone or wax-based products, orthose containing organic solvent stoclean the vehicle's interior because they can alter the appearance by increasing the gloss in an on-uniform manner.
InstrumentPanel, Vinyl, and OtherPlasticSurfaces
Toremovedust, asoftcloth dampenedwithwatercanbe used. Ifamorethoroughcleaning isnecessary, acleansoftcloth dampenedwithamildsoapsolution canbeusedtogentlyremove dustanddirt. Neverusespotlifters orremoversonplasticsurfaces. Manycommercialcleaners and coatingsthataresoldtopreserve and protectsoftplasticsurfaces may permanently changethe appearance and feel of the interior and are not recommended. Donot uses siliconeorwax-based products, orthose containing organicsolvents to clean the vehicle's interior because they can alter the appearance by increasing the glossinanon-uniformmanner.
Some commercial products may increase gloss on the instrument panel. The increase in gloss may cause annoying reflections in the windshield and even make it difficult to see through the windshield under certain conditions.
CareofSafetyBelts
Keepbeltscleananddry.

WARNING
Donotbleachordyesafetybelts. Itmayseverelyweakenthem. Inacrash, they might not be able to provide adequate protection. Cleansafetybeltsonly with mild soap and lukewarmwater.
9-92VehicleCare
NOTES
Service and Maintenance
GeneralInformation
GeneralInformation......10-1
ScheduledMaintenance
ScheduledMaintenance.....10-2
RecommendedFluids, Lubricants,andParts
RecommendedFluidsand Lubricants....10-7
MaintenanceReplacement Parts....10-9
MaintenanceRecords
MaintenanceRecords.....10-10
GeneralInformation
Notice: Maintenance intervals, checks, inspections, recommended fluids, and lubricants are necessary to keep this vehicle in good working condition. Damage caused by failure to follows scheduled maintenance might not be covered by the vehicle warranty.
Propervehiclemaintenancehelps tokeepthevehicleingoodworking condition, improvesfueleconomy, and reducesvehicleemissions for betterairquality.
Becauseofallthedifferentways peopleusevehicles,maintenance needsvary.Thevehiclemightneed morefrequentchecksandservices.
Pleasereadtheinformationunder ScheduledMaintenance.Tokeep thevehicleingoodcondition,see yourdealer/retailer.
Themaintenancescheduleisfor vehiclesthat:
- Carrypassengersandcargo withinrecommendedlimitson the TireandLoadingInformation label.SeeVehicleLoadLimits onpage 8-12.
- Aredrivenonreasonableroad surfaceswithinlegaldriving limits.
- Usetherecommendedfuel. SeeRecommendedFuel on page 8-49.

WARNING
Performingmaintenanceworkcan bedangerous.Somejobscan causeseriousinjury.Perform maintenanceworkonlyifyou havetherequiredknow-howand thepropertoolsandequipment. Ifindoubt,seeyourdealer/ retailertohaveaqualified techniciandothework. SeeDoingYourOwnService Workonpage9-4.
AtyourGeneralMotorsdealer/retailer,youcanbecertainthatyouwillreceivethehighestlevelofserviceavailable.Yourdealer/retailerhasspeciallytrainedservice
technicians, usesgenuineGM replacementparts, aswellas, upto datetoolsandequipmenttoensure fastandaccuratediagnostics.
Theproperreplacementparts, fluids, and lubricantstouse are listed in Recommended Fluids and Lubricants on page 10-7 and Maintenance Replacement Parts on page 10-9. Were recommend the use of genuine parts from your dealer/ retailer.
RotationofNewTires
Tomaintainride, handling, and performance of the vehicle, it is important that the first rotation service for new tires be performed when they have 8000 to 13000 km (5,000 to 8,000 miles). See Tire Rotation on page 9-62.
Scheduled Maintenance
WhentheChangeEngineOil SoonMessageDisplays
Changeengineoilandfilter. SeeEngineOil onpage9-11 . AnEmissionControlService.
Whenthe"ChangeEngineOil Soon"messagedisplays,serviceis requiredforthevehicleassoonas possible,withinthenext1000km/600miles. Ifdrivingunderthebest conditions,theengineoillifesystem mightnotindicatetheneedfor vehicleserviceformorethanayear. Theengineoilandfiltermustbe changedatleastonceayearand theoillifesystemmustbereset. Yourdealer/retailerhastrained servicetechnicianswhowillperform thisworkandresetthesystem.
If the engine oil lifesystem is reset accidentally, servicethe vehicle within 5000 km/3,000 miles since the last service. Reset the oil life system whenever the oil is changed. See Engine Oil Life System on page 9-13.
Whenthe"ServiceEngineOil" messagedisplays,certainservices, checks,andinspectionsare required.Theservicesdescribed forMaintenanceIshouldbe performedateveryengineoil change.Theservicesdescribed forMaintenanceIIshouldbe performedwhen:
- MaintenanceIwasperformed thelasttimetheengineoilwas changed.
- Ithasbeen10monthsormore sincethe"ServiceEngineOil" messagehasdisplayedsince thelastservice.
MaintenanceI
- Changeengineoilandfilter. SeeEngineOil onpage9-11 . AnEmissionControlService.
• Enginecoolantlevelcheck. SeeEngineCoolant on page9-18. - Windshieldwasherfluidlevel check.SeeWasherFluid on page9-24.
• Tireinflationcheck.See Tire Pressureonpage9-56. - Tirewearinspection.SeeTire Inspectiononpage9-62.
- Rotatetires.SeeTireRotation onpage 9-62 .
-
Fluidsvisualeakcheck (orevery12months,whichever occursfirst).Aleakinany systemmustberepaired andthefluidlevelchecked.
-
Engineaircleanerfilter inspection(vehiclesdriven industryconditionsonly). SeeEngineAirCleaner/Filter on page9-15.
- Brakesysteminspection (orevery12months, whichever occursfirst).
MaintenanceII
• Performallservicesdescribedin MaintenanceI.
• Steeringandsuspension inspection. Visualinspection fordamaged, loose, or missing partsorsignsofwear.
• Enginecoolingsystem inspection. Visualinspection of hoses, pipes, fittings, and clamps and replacement, if needed.
10-4ServiceandMaintenance
- Windshieldwiperblade inspectionforwear,cracking, orcontaminationandwindshield andwiperbladecleaning, ifcontaminated.See Exterior Care onpage 9-84 .Worn ordamagedwiperblade replacement.See WiperBlade Replacementonpage 9-30.
-
Bodyhingesandlatches, keylockcylinders,folding seathardware,andsunroof (ifequipped)lubrication.See RecommendedFluidsand Lubricants onpage 10-7. Morefrequentlubricationmay berequiredwhenvehicleis exposedtoacorrosive environment.Applyingsilicone greaseonweatherstripswitha cleanclothmakesthemlast longer,sealbetter,andnot stickorsqueak.
-
Restraintsystemcomponent check.SeeSafetySystem Checkonpage2-24.
- Automatictransmissionfluid levelcheckandaddingfluid, ifneeded.SeeAutomatic TransmissionFluid on page 9-14.
• Engineaircleanerfilter inspection. SeeEngineAir Cleaner/Filteronpage9-15. - Passengercompartment airfilterreplacement(orevery 12months,whicheveroccurs first).Morefrequentreplacement mayberequiredifvehicleis drivenregularlyunderdusty conditions.
AdditionalRequiredServices
AtEachFuelStop
• Engineoillevelcheck.
SeeEngineOilonpage9-11.
• Enginecoolantlevelcheck.See EngineCoolantonpage9-18.
- Windshieldwasherfluidlevel check.See WasherFluid on page 9-24.
OnceaMonth
- Tireinflationcheck.SeeTire Pressureonpage9-56.
- Tirewearinspection.See Tire Inspectiononpage9-62.
OnceaYear
• SeeStarterSwitchCheck on page9-28.
• SeeAutomaticTransmissionShiftLockControlSystemCheckonpage9-29.
• SeelgnitionTransmissionLock Checkonpage9-29.
• SeeParkBrakeandP(Park) MechanismCheck on page9-30.
- Enginecoolingsystem and pressurecappressurecheck. Radiatorandairconditioning condenseroutsidecleaning. SeeCoolingSystem on page9-17.
- Exhaustsystemandnearbyheat shieldsinspectionforlooseor damagedcomponents.
- Acceleratorpedalcheckfor damage, higheffort, orbinding. Replace if needed.
FirstEngineOilChangeAfter Every40000km/25,000Miles
- Fuelsysteminspectionfor damageorleaks.
FirstEngineOilChangeAfter Every80000km/50,000Miles
• Engineaircleanerfilter replacement.SeeEngineAir Cleaner/Filteronpage9-15.
- Automatictransmissionfluid change(severeservice)for vehiclesmainlydrivenin heavycitytrafficinhotweather, inhillyormountainousterrain, whenfrequentlytowinga trailer,orusedfortaxi, police,ordeliveryservice. SeeAutomaticTransmission Fluidonpage9-14.
FirstEngineOilChangeAfter Every160000km/100,000Miles
• Automatic transmission fluid change(normalservice). SeeAutomatic Transmission Fluidonpage9-14.
- Sparkplugreplacementand sparkplugwiresinspection. AnEmissionControlService.
FirstEngineOilChangeAfter Every240000km/150,000Miles
- Enginecoolingsystemdrain, flush, and refill, cooling system and cappressure check, and cleaning of outside of radiator and air conditioning condenser (orevery 5 years, whichever occurs first). See Cooling System on page 9-17. An Emission Control Service.
- Engineaccessorydrivebelt inspectionforfraying,excessive cracks,orobviousdamage and replacement,ifneeded.An EmissionControlService.
10-6ServiceandMaintenance
| ServiceMaintenance1 | Maintenance II | |
| Changeengineoilandfilter.Resetoillifesystem.** | ||
| Enginecoolantlevelcheck.** | ||
| Windshieldwasherfluidlevelcheck.** | ||
| Tireinflationpressurescheck.** | ||
| Tirewearinspection.** | ||
| Rotatetires.** | ||
| Fluidsvisualleakcheck.** | ||
| Engineaircleanerfilterinspection(vehiclesdrivenindustyconditionsonly).** | ||
| Brakesysteminspection.** | ||
| Steeringandsuspensioninspection.** | ||
| Enginecoolingsysteminspection. | • | |
| Windshieldwiperbladesinspection. | • | |
| Bodycomponentslubrication. | • | |
| Restraintsystemcomponentscheck. | • | |
| Automatictransmissionfluidlevelcheck. | • | |
| Engine air cleaner filter inspection (vehicles not driven in dusty conditions). | • | |
| Passengercompartmentairfilterreplacement. | • |
RecommendedFluids,Lubricants,andParts RecommendedFluidsandLubricants
| UsageFluid/Lubricant | |
| EngineOil | EngineoilwhichmeetsGMStandardGM6094ManddisplaystheAmericanPetroleumInstituteCertifiedforGasolineEnginesstarburstsymbol.Todeterminetheproperviscosityforthevehicle'sengine,seeEngineOilonpage9-11. |
| EngineCoolant | 50/50mixtureofclean,drinkablewateranduseonlyDEX-COOL® Coolant.SeeEngineCoolantonpage9-18. |
| HydraulicBrakeSystem | DOT3HydraulicBrakeFluid(GMPartNo.U.S.88862806,inCanada88862807). |
| WindshieldWasherOptikleen | ® WasherSolvent. |
| HydraulicPowerSteeringSystemDEX | RON® -VIAutomaticTransmissionFluid. |
10-8ServiceandMaintenance
UsageFluid/Lubricant
| AutomaticTransmissionDEXRON | ®-VIAutomaticTransmissionFluid. |
| KeyLockCylinders | Multi-PurposeLubricant,Superlube(GMPartNo.U.S.12346241, inCanada10953474). |
| dLatchAssembly,Secondary h,Pivots,SpringAnchor,and ReleasePawl | LubriplateLubricantAerosol(GMPartNo.U.S.12346293,in Canada992723)orlubricantmeetingrequirementsofNLGI#2, CategoryLBorGC-LB. |
| HoodandDoorHinges | Multi-PurposeLubricant,Superlube(GMPartNo.U.S.12346241, inCanada10953474). |
| WeatherstripConditioning | WeatherstripLubricant(GMPartNo.U.S.3634770,inCanada10953518) orDielectricSiliconeGrease(GMPartNo.U.S.12345579,in Canada992887). |
MaintenanceReplacementParts
Replacementpartsidentifiedbelowbyname, partnumber, orspecification can be obtained from your retailer.
| PartGMPartNumberACDelcoPartNumber | ||
| EngineAirCleaner/Filter55560894A3128C | ||
| EngineOilFilter | ||
| 2.4LL4Engine12605566PF457G | ||
| 3.0LV6Engine89017524PF48 | ||
| 3.6LV6Engine89017524PF48 | ||
| PassengerCompartmentAirFilterElement13271191CF176 | ||
| SparkPlugs | ||
| 2.4LL4Engine12620540 41–108 | ||
| 3.0LV6Engine12622561 41–109 | ||
| 3.6LV6Engine12622561 41–109 | ||
| WiperBlades | ||
| Driver Side – 65 cm (25.6 in) | 25892079 — | |
| Passenger Side – 45 cm (17.7 in) | 25892080 — | |
MaintenanceRecords
After the scheduled services are performed, record the date, odometer reading, who performed the service, and the type of services performed in the boxes provided. Retain all maintenance receipts.
MaintenanceRecord
| Date | Odometer Reading | ServicedByServices | Performed |
MaintenanceRecord(cont'd)
| Date | Odometer Reading | ServicedByServices | Performed |
10-12ServiceandMaintenance
MaintenanceRecord(cont'd)
| Date | Odometer Reading | ServicedByServices | Performed |
TechnicalData
VehicleIdentification
VehicleIdentification
Number(VIN)......11-1
ServicePartsIdentification
Label.....11-1
VehicleData
Capacitiesand
Specifications......11-2
EngineDriveBeltRouting....11-4
VehicleIdentification
VehicleIdentification Number(VIN)

text_image
GIM SAMPLE4UX1M072675 GIMThislegalidentifierisinthefront corneroftheinstrumentpanel,on theleftsideofthevehicle.Itcanbe seenthroughthewindshieldfrom outside.TheVINalsoappearson theVehicleCertificationandService Partslabelsandcertificatesoftitle andregistration.
Engineldentification
TheeighthcharacterintheVIN istheenginecode. Thiscode identifiesthevehicle'sengine, specifications, and replacement parts. See "EngineSpecifications" under Capacities and Specifications on page 11-2 for the vehicle's enginecode.
ServiceParts IdentificationLabel
Thislabel,inthetrunk,hasthe followinginformation:
• VehicleIdentification Number(VIN)
- Modeldesignation
- Paintinformation
• Productionoptionsandspecial equipment
Donotremovethislabelfromthe vehicle.
VehicleData
CapacitiesandSpecifications
| Application | Capacities | |
| MetricEnglish | ||
| AirConditioningRefrigerantR134a | Fortheairconditioningsystemrefrigerantcharge amount,seetherefrigerantcautionlabellocated underthehood.Seeyourdealer/retailerformore information. | |
| EngineCoolingSystem | ||
| 2.4LL4Engine7.1L7.5qt | ||
| 3.0LV6Engine9.4L9.9qt | ||
| 3.6LV6Engine9.4L9.9qt | ||
| EngineOilwithFilter | ||
| 2.4LL4Engine4.7L5.0qt | ||
| 3.0LV6Engine5.7L6.0qt | ||
| 3.6LV6Engine5.2L5.5qt | ||
| FuelTank | ||
| AWD74.0L19.5gal | ||
| FWD | 70.5L18.6gal | |
| TransmissionFluid*(DrainandRefill) | ||
| 2.4LL4Engine,6-SpeedAutomatic8.0L8.5qt | ||
| 3.0LV6Engine,AllWheelDrive,6-SpeedAutomatic9.0L9.5qt | ||
| 3.0LV6Engine,FrontWheelDrive,6-SpeedAutomatic9.0L9.5qt | ||
| 3.6LV6Engine,6-SpeedAutomatic9.0L9.5qt | ||
| WheelNutTorque150N•m110ftlb | ||
| *SeeAutomaticTransmissionFluid onpage 9-14 forinformationoncheckingfluidlevel. | ||
| All capacities are approximate. When adding, be sure to fill to the approximate level, as recommended in this manual. Recheckfluidlevelafterfilling. | ||
Engine Specifications
| Engine | VIN Code | Transmission | Spark Plug Gap |
| 2.4L L4 Engine | C | Automatic | 0.9 mm (0.035 in) |
| 3.0L V6 Engine | G | Automatic | 1.10 mm (0.043 in) |
| 3.6L V6 Engine | V | Automatic | 1.10 mm (0.043 in) |
11-4 Technical Data
EngineDriveBeltRouting

natural_image
Diagram of a pulley system with multiple spheres connected by ropes and a directional arrow (no text or labels)2.4LL4Engine (ElectricPowerSteering)
natural_image
Abstract diagram of interconnected spheres with connecting lines (no text or symbols)2.4LL4Engine (HydraulicPowerSteering)
natural_image
Abstract diagram of interconnected spheres with connecting lines, no text or symbols present3.0L,3.6LV6Engines
Customer Information
CustomerInformation
CustomerSatisfaction
Procedure......12-1
CustomerAssistanceOffices
(US,Can)....12-3
CustomerAssistanceforText
Telephone(TTY)Users
(US,Can)....12-4
OnlineOwnerCenter......12-4
GMMobilityReimbursement
Program......12-5
Roadside Assistance
Program......12-6
SchedulingService
Appointments......12-8
CourtesyTransportation
Program......12-8
CollisionDamageRepair...12-10
ServicePublications
OrderingInformation.....12-13
ReportingSafetyDefects
Reporting Safety Defectsto
theUnitedStates
Government......12-14
ReportingSafetyDefectsto
theCanadian
Government......12-15
ReportingSafetyDefectsto
GeneralMotors......12-15
VehicleDataRecordingand Privacy
VehicleDataRecordingand
Privacy......12-15
EventDataRecorders.....12-16
OnStar ^® 12-16
NavigationView......12-17
RadioFrequency
Identification(RFID)......12-17
RadioFrequency
Statement......12-17
CustomerInformation
CustomerSatisfaction Procedure
Yoursatisfactionandgoodwillare importanttoyourdealerandto Buick.Normally,anyconcerns withthesalestransactionorthe operationofyourvehiclewillbe resolvedbyyourGMdealer'ssales orservicedepartments.Sometimes, however,despitethebestintentions ofallconcerned,misunderstandings canoccur.Ifyourconcernhasnot beenresolvedoyoursatisfaction, thefollowingstepsshouldbetaken:
STEPONE: Discuss your concern with a member of dealership management. Normally, concerns can be quickly resolved at that level. If thematter has already been reviewed with the sales, service, or parts manager, contact the owner of the dealership or the general manager.
12-2 CustomerInformation
STEPTWO: If after contacting a member of dealership management, it appears your concern cannot be resolved by the dealership without further help, in the U.S., contact the Buick Customer Assistance Center by calling 1-800-521-7300. In Canada, contact General Motors of Canada Customer Communication Centre by calling 1-800-263-3777 (English) or 1-800-263-7854 (French).
Weencourageyoutocallthe toll-freenumberinordertogiveyour inquirypromptattention.Please havethefollowinginformation availabletogivetheCustomer AssistanceRepresentative:
- VehicleIdentificationNumber. Thisisavailablefromthevehicle registrationortitle,ortheplate atthetopleftoftheinstrument panel.
• Dealershipnameandlocation
• Vehicledeliverydate and presentmileage
WhencontactingBuick, please remember that your concern will likely be resolved at a dealer's facility. That is why wesuggest you follow Step One first if you have a concern.
STEPTHREE—U.S.Owners: BothGeneralMotorsandyour dealerarecommittedtomaking sureyouarecompletely satisfied withyournewvehicle. However, in theUnitedStates, ifyoucontinueto remainunsatisfied after following theprocedureoutlinedinStepsOne and Two, youcanfilewiththeBBB AutoLineProgramtoenforceyour rights.
TheBBBAutoLineProgramisan outofcourtprogramadministered bytheCouncilofBetterBusiness Bureaustosettleautomotive disputesregardingvehiclerepairsor theinterpretationoftheNewVehicle LimitedWarranty.Althoughyoumay berequiredtoresorttothisinformal disputeresolutionprogrampriorto filingacourtaction,useofthe programisfreeofchargeandyour
casewillgenerallybeheardwithin 40days.Ifyoudonotagreewiththe decisiongiveninyourcase,you mayrejectitandproceedwithany othervenueforreliefavailable toyou.
YoumaycontacttheBBBAuto LineProgramusingthetoll-free telephonenumberorwritethem atthefollowingaddress:
BBBAutoLineProgram CouncilofBetterBusiness Bureaus,Inc. 4200WilsonBoulevard Suite800
Arlington, VA22203-1838
Telephone:1-800-955-5100 dr.bbb.org/goauto
Thisprogramisavailableinall 50statesandtheDistrictof Columbia. Eligibilityislimitedby vehicleage, mileageandother factors. General Motorsreserves the righttochangeeligibility limitationsand/ordiscontinueits participationinthisprogram.
STEPTHREE—Canadian
Owners: In the event that you donot feely our concern have been addressed after following the procedure outlined in Stepsone and two, General Motors of Canada Limited wants youtobe aware of its participation in nano-charge Mediation/Arbitration program. General Motors of Canada Limited has committed to binding arbitration of owner disputes involving factory-related vehicles service claims. The program provides for the review of the facts involved by anim partial third party arbiter, and may include an informal hearing before the arbiter. The program is designed so that the entire dispute settlement process, from the time you file your complaint to the final decision, should be completed in approximately 70 days. We believe our impartial program offers advantages over courts in most jurisdictions because it is informal, quick, and free of charge.
For further information concerning eligibility in the Canadian Motor Vehicle Arbitration Plan (CAMVAP), call toll-free 1-800-207-0685. Alternatively you may call the General Motors Customer Communication Centre, 1-800-263-3777 (English), 1-800-263-7854 (French), or you may writ to the Mediation/Arbitration Program at the following address. Your inquiry should be accompanied by your Vehicle Identification Number (VIN).
Mediation/ArbitrationProgram c/oCustomerCommunication Centre General Motors of Canada Limited Mail Code: CA1-163-005 1908 Colonel Sam Drive Oshawa, Ontario L1H8P7
CustomerAssistance Offices
Buickencouragescustomerstocall thetoll-freenumberforassistance. However,ifacustomerwishesto writeore-mailBuick,theletter shouldbeaddressedto:
UnitedStates—Customer Assistance
BuickCustomerAssistanceCenter P.O.Box33136 Detroit, MI48232-5136 www.Buick.com
1-800-521-7300 1-800-832-8425(ForText Telephonedevices(TTYs)) RoadsideAssistance: 1-800-252-1112
FromPuertoRico: 1-800-496-9992(English) 1-800-496-9993(Spanish)
From U.S. Virgin Islands 1-800-496-9994
Canada—Customer Assistance
General Motors of Canada Limited Customer Communication Centre, CA1-163-005
1908ColonelSamDrive
Oshawa,OntarioL1H8P7
www.gmcanada.com
1-800-263-3777(English)
Roadside Assistance:
1-800-268-6800
Overseas—Customer Assistance
PleasecontactthelocalGeneral MotorsBusinessUnit.
Mexico, Central America and Caribbean Islands/Countries (Except Puerto Rico and U.S. Virgin Islands)—Customer Assistance
GeneralMotorsdeMexico, S.deR.L.deC.V. CustomerAssistanceCenter PaseodelaReforma#2740
Col.LomasdeBezares C.P.11910,Mexico,D.F.
01-800-508-0000 LongDistance:011-52-53290800
CustomerAssistancefor TextTelephone(TTY) Users
Toassistcustomerswhoaredeaf, hardofhearing,orspeech-impaired andwhouseTextTelephones (TTYs),BuickhasTTYequipment availableatitsCustomerAssistance Center.AnyTTYusercan communicatewithBuickbydialing: 1-800-83-BUICK.TTYusersin Canadacandial1-800-263-3830.
OnlineOwnerCenter
OnlineOwnerCenter(U.S.)—www.gmownercenter.com/buick
Information and services customized for your specific vehicle—all in one convenient place.
• Digitalownermanual, warranty information, and more
- Onlineserviceandmaintenance records
• FindBuickdealersforservice nationwide
• Exclusiveprivilegesandoffers
- Recallnoticesforyourspecific vehicle
- OnStar® and GMCardmember ServicesEarningssummaries
OtherHelpfulLinks:
Buick—www.buick.com
BuickMerchandise— www.buickmerchandise.com
HelpCenter—www.buick.com/helpcenter
- FAQ
- ContactUs
MyGMCanada (Canada)—www.gm.ca
MyGMCanadaisa password-protectedsectionof www.gm.cawhereyoucansave informationonGMvehicles,get personalizedoffers,andusehandy toolsandformswithgreaterease.
Hereareafewofthevaluable toolsandservicesyouwillhave accesso:
• MyShowroom: Findandsave informationonvehiclesand currentoffersinyourarea.
• MyDealers/Retailers: Save detailssuchasaddressand phonenumberforeachofyour preferredGMdealers/retailers.
- MyDriveway:Accessquick linkstopartsandservice estimates,checktrade-in values,orscheduleaservice appointmentbyaddingthe vehiclesyouowntoyour drivewayprofile.
• MyPreferences: Manage your profile and set tools and forms with greater ease.
Tosignup, visit the My GM Canada section within www.gm.ca.
GMMobility ReimbursementProgram
GM MOBILITY
Thisprogram, available to qualified applicants, can reimburse you up to \$1,000 of the cost of eligible aftermarket adaptive equipment required for your vehicle, such as handcontrol or raw wheelchair/ scooter lift.
Theofferisavailableforavery limitedperiodoftimefromthe dateofvehiclepurchase/lease. Formoredetails,ortodetermine yourvehicle'seligibility,visit gmmobility.comorcalltheGM MobilityAssistanceCenterat 1-800-323-9935.Texttelephone (TTY)users,call1-800-833-9935.
12-6 Customer Information
GeneralMotorsofCanada alsohasaMobilityProgram. Call1-800-GM-DRIVE(463-7483) fordetails.TTYuserscall 1-800-263-3830.
Roadside Assistance Program
For U.S. purchased vehicles, call 1-800-252-1112; (TextTelephone (TTY): 1-888-889-2438).
For Canadian purchased vehicles, call 1-800-268-6800.
Serviceisavailable24hoursaday, 365daysayear.
CallingforAssistance
WhencallingRoadsideAssistance, havethefollowinginformation ready:
- Yourname,homeaddress,and hometelephonenumber
• Telephonenumberofyour location - Locationofthevehicle
• Model, year, color, and license platenumberofthevehicle - Odometerreading, Vehicle IdentificationNumber(VIN), and deliverydateofthevehicle
• Descriptionoftheproblem
Coverage
Servicesareprovidedupto5years/160000km(100,000miles), whichevercomesfirst.
IntheU.S.,anyonedrivingthe vehicleiscovered.InCanada,a persondrivingthevehiclewithout permissionfromtheownerisnot covered.
RoadsideAssistanceisnotapartof theNewVehicleLimitedWarranty. BuickandGeneralMotors of CanadaLimitedreservetherightto makeanychangesordiscontinue theRoadsideAssistanceprogram atanytimewithoutnotification.
BuickandGeneralMotorsof CanadaLimitedreservetheright to limits services or payment to an owner or driver if they decide the claims are made too often, or the sametype of claim is mademany times.
ServicesProvided
• EmergencyFuelDelivery: Deliveryofenoughfuelforthe vehicletogettothenearest servicestation.
- Lock-OutService:Serviceis providedtounlockthevehicleif youarelockedout.Aremote unlockmaybeavailableifyou haveOnStar®.Forsecurity reasons,thedrivermustpresent identificationbeforethisservice isgiven.
- EmergencyTowFromaPublic RoadorHighway: Towto thenearestBuickdealerfor warrantyservice, orifthevehicle wasinacrashandcannotbe driven. Assistanceisalsogiven whenthevehicleisstuckin sand, mud, orsnow.
- FlatTireChange:Serviceis providedtochangeaflattire withthesparetire. Thespare tire, ifequipped, mustbeingood conditionandproperlyinflated. Itistheowner'sresponsibilityfor therepairorreplacementofthe tireifitisnotcoveredbythe warranty. - BatteryJumpStart:Serviceis providedtojumpstartadead battery.
ServicesNotIncludedin RoadsideAssistance
• Impoundtowingcausedby violationofanylaws.
- Legalfines.
- Mounting, dismounting or changing of snowtires, chains, or other traction devices.
- Towingorservicesforvehicles drivenonanon-publicroador highway.
ServicesSpecifictoCanadian PurchasedVehicles
- Fueldelivery:Reimbursement isapproximately\$5Canadian. Dieselfueldeliverymaybe restricted.Propaneandother fuelsarenotprovidedthrough thisservice.
- Lock-OutService: Vehicle registration is required.
- TripRoutingService:Detailed mapsofNorthAmericaare providedwhenrequestedeither withthemostdirectrouteorthe mostscenicroute.Thereisa sixrequestlimitperyear. Additionaltravelinformation isalsoavailable.Allowthree weeksfordelivery.
12-8 Customer Information
- TriplnterruptionBenefitsand Assistance:Mustbeover 250kilometresfromwhere yourtripwasstartedto qualify.GeneralMotorsof CanadaLimitedrequires pre-authorization,original detailedreceipts,andacopy oftherepairorders.Once authorizationhasbeenreceived, theRoadsideAssistanceadvisor willhelpyoumakearrangements andexplainhowtoreceive payment.
• AlternativeService: If assistance cannot be provided rightaway, the Roadside Assistance advisormay give you permission to get local emergency road service. You will receive payment, upto \$100, aftersending the original receipt to Roadside Assistance. Mechanical failures maybe covered, however any cost for parts and labor for repairs not covered by the warranty are the owner responsibility.
SchedulingService Appointments
When your vehiclerequires warranty service, contact your dealer/retailer and requestan appointment. Byschedulinga service appointment and advising your service consultant of your transportation needs, your dealer/retailercan help minimize your inconvenience.
If your vehicle cannot be scheduled into the serviced department immediately, keep driving it until it can be scheduled for service, unless, of course, the problem is safety-related. If it is, please call your dealership/retailer, let them know this, and ask for instructions.
If the dealer/retailer requests y outo bring the vehicle for service, you are urged to do so a early in the work day as possible to allow for the sameday repair.
Courtesy Transportation Program
Toenhanceyourownership experience,weandourparticipating dealersareproudtoofferCourtesy Transportation,acustomersupport programforvehicleswiththe BumpertoBumper(BaseWarranty CoverageperiodinCanada)and extendedpowertrain,andhybrid specificwarrantyinboththeU.S. andCanada.
Severalcourtesytransportation optionsareavailabletoassistin reducingyourinconveniencewhen warrantyrepairsarerequired.
Courtesy Transportation is not a part of the New Vehicle Limited Warranty. A separate booklet entitled "Warranty and Owner Assistance Information" furnished with each new vehicle provides detailed warranty coverage information.
TransportationOptions
Warrantyservicecangenerally becompletedwhileyouwait. However, if you are unable to wait, GM help to minimize your inconvenience by providing several transportation options. Depending on the circumstances, your dealer can offer you one of the following:
ShuttleService
Shuttleserviceisthepreferred meansofofferingCourtesy Transportation.Dealersmayprovide youwithshuttleservicetogetyou toyourdestinationwithminimal interruptionofyourdailyschedule. Thisincludesone-wayorroundtrip shuttleservicewithinreasonable timeanddistanceparametersofthe dealer'sarea.
PublicTransportationorFuel Reimbursement
If your vehiclerequires overnight warranty repairs, and public transportation is used instead of the dealer's shuttleservice, the expense must be supported by original receipts and canonly be up to the maximum amount allowed by GM for shuttleservice. In addition, for U.S. customers, should you arrange transportation through a friend or relative, limited reimbursement for reasonable fee expenses may be available. Claim amounts should reflect actual costs and supported by original receipts. Se your dealer for information regarding the allowance amounts for reimbursement off fuel or other transportation costs.
CourtesyRentalVehicle
Yourdealermayarrangeto provideyouwithacourtesy rentalvehicleorreimburseyou forarentalvehiclethatyouobtain ifyourvehicleiskeptforan overnightwarrantyrepair.Rental reimbursementwillbelimitedand mustbesupportedbyoriginal receipts. Thisrequiresthatyousign andcompletearentalagreement andmeetstate/provincial,local,and rentalvehicleproviderrequirements. Requirementsvaryandmayinclude minimumagerequirements, insurancecoverage,creditcard, etc.Youareresponsibleforfuel usagechargesandmayalsobe responsiblefortaxes,levies,usage fees,excessiveemileage,orrental usagebeyondthecompletionofthe repair.
Itmaynotbepossibletoprovide a like-vehicleasacourtesyrental.
AdditionalProgram Information
Allprogramoptions,suchasshuttle service,maynotbeavailableat everydealer.Pleasecontactyour dealerforspecificinformation aboutavailability.AllCourtesy Transportationarrangementswill beadministeredbyappropriate dealerpersonnel.
General Motors reserve theright tounilaterally modify, change or discontinue Courtesy Transportation at any time and to resolve all question of claim eligibility pursuant to the terms and conditions described herein at its soled discretion.
CollisionDamageRepair
If your vehicle is involved in a collision and it is damaged, havethedamagerepaired by a qualified technician using the proper equipment and quality replacement parts. Poorly performed collision repairs diminish your vehicle's resale value, and safety performance can be compromised in subsequent collisions.
CollisionParts
GenuineGMCollisionpartsare newpartsmadewiththesame materialsandconstructionmethods asthepartswithwhichyourvehicle wasoriginallybuilt.GenuineGM Collisionpartsareyourbestchoice toensurethatyourvehicle's designedappearance,durability, andsafetyarepreserved.Theuse of GenuineGMpartscanhelp maintainyourGMNewVehicle Warranty.
Recycledoriginalequipment partsmayalsobeusedforrepair. Thesepartsaretypicallyremoved fromvehiclesthatweretotallosses inpriorcrashes.Inmostcases, thepartsbeingrecycledarefrom undamagedsectionsofthevehicle. ArecycledoriginalequipmentGM part,maybeanacceptablechoice tomaintainyourvehicle'soriginally designedappearanceandsafety performance,however,thehistoryof thesepartsisnotknown.Suchparts arenotcoveredbyyourGMNew VehicleLimitedWarranty,andany relatedfailuresarenotcoveredby thatwarranty.
Aftermarketcollisionpartsare alsoavailable. Thesearemade bycompaniesotherthanGMand maynothavebeentestedforyour vehicle.Asaresult,theseparts mayfitpoorly,exhibitpremature durability/corrosionproblems, andmaynotperformproperly insubsequentcollisions. Aftermarketpartsarenotcovered byyourGMNewVehicleLimited Warranty,andanyvehiclefailure relatedtosuchpartsarenot coveredbythatwarranty.
RepairFacility
Werecommendthatyouchoosea collisionrepairfacilitythatmeets yourneedsbeforeyoueverneed collisionrepairs. Yourdealer/retailer mayhaveacollisionrepaircenter withGM-trainedtechniciansand stateoftheartequipment,orbe abletorecommendacollision repaircenterthathasGM-trained techniciansandcomparable equipment.
InsuringYourVehicle
Protect your investment in your GM vehicle with comprehensive and collision insurance coverage. There are significant differences in the quality of coverage afforded by various insurance policy terms.
Manyinsurancepoliciesprovide reducedprotectiontoyourGM vehiclebylimitingcompensation fordamagerepairsbyusing aftermarketcollisionparts. Some insurancecompanieswillnot specifyaftermarketcollisionparts. Whenpurchasinginsurance,we recommendthatyouassureyour vehiclewillberepairedwithGM originalequipmentcollisionparts. Ifsuchinsurancecoverageis notavailablefromyourcurrent insurancecarrier,considerswitching toanotherinsurancecarrier.
If your vehicle is leased, the leasing company may require you to have insurance that assures repairs with Genuine GM Original Equipment Manufacturer (OEM) parts or Genuine Manufacturer replacement parts. Ready your lease carefully, as you maybe charged at the end of your lease for poor quality repairs.
IfaCrashOccurs
Iftherehasbeenaninjury,call emergencyservicesforhelp.Donot leavethesceneofacrashuntilall mattershavebeentakencareof. Movethevehicleonlyifitsposition putsyouindanger,oryouare instructedtomoveitbyapolice officer.
Giveonlythenecessaryinformation topoliceandotherpartiesinvolved inthecrash.
ForemergencytowingseeWhat WillYouSeeAfteranAirbag Inflates?onpage2-30.
Gatherthefollowinginformation:
- Driver'sname, address, phone number
• Driver'slicensenumber - Owner'sname, address, phone number
- Vehiclelicenseplate
• Vehiclemake, modeland modelyear
• VehicleIdentification Number(VIN)
• Insurancecompanyandpolicy number - Generaldescriptionofthe damagetotheothervehicle
Choose areputablerepairfacility that uses quality replacement parts. See "CollisionParts" earlier in this section.
If the airbag has inflated, see What Will You See After an Airbag Inflates? on page 2-30.
ManagingtheVehicleDamage RepairProcess
Intheeventthatyourvehicle requiresdamagerepairs,GM recommendsthatyoutakean activeroleinitsrepair.Ifyouhave apre-determinedrepairfacility of choice,takeyourvehiclethere, orhaveittowedthere.Specifyto thefacilitythatanyrequired replacementcollisionpartsbe originalequipmentparts,either newGenuineGMpartsorrecycled originalGMparts.Remember, recycledpartswillnotbecovered byyourGMvehiclewarranty.
Insurancepaysthebillfortherepair, butyoumustlivewiththerepair. Dependingonyourpolicylimits,
yourinsurancecompanymay initiallyvaluetherepairusing aftermarketparts.Discussthiswith yourrepairprofessional,andinsist onGenuineGMparts.Rememberif yourvehicleisleasedyoumaybe obligatedtohavethevehicle repairedwithGenuineGMparts, evenifyourinsurancecoverage doesnotpaythefullcost.
Ifanotherparty'sinsurance companyispayingfortherepairs, youarenotobligatedtoaccepta repairvaluationbasedonthat insurancecompany'scollision policyrepairlimits,asyouhaveno contractuallimitswiththatcompany. Insuchcases,youcanhavecontrol oftherepairandpartschoicesas longascoststayswithinreasonable limits.
ServicePublications OrderingInformation
ServiceManuals
ServiceManualshavethediagnosis andrepairinformationonengines, transmission, axle, suspension, brakes, electrical, steering, body, etc.
ServiceBulletins
ServiceBulletinsgiveadditional technicalserviceinformation neededtoknowledgeablyservice GeneralMotorscarsandtrucks. Eachbulletincontainsinstructions toassistinthediagnosisand serviceofyourvehicle.
OwnerInformation
Ownerpublicationsarewritten specificallyforownersandintended toprovidebasicoperational informationaboutthevehicle. Theownermanualincludesthe MaintenanceScheduleforall models.
In-Portfolio: IncludesaPortfolio, OwnerManual, and Warranty Booklet.
RETAILSELLPRICE: \$35.00(U.S.)plusprocessingfee WithoutPortfolio:Owner Manualonly.
RETAILSELLPRICE: \$25.00(U.S.)plusprocessingfee
CurrentandPastModelOrder Forms
TechnicalServiceBulletinsand Manualsareavailableforcurrent andpastmodelGMvehicles. Torequestanorderform,specify yearandmodelnameofthevehicle.
ORDERTOLLFREE:
1-800-551-4123Monday-Friday
8:00AM-6:00PMEasternTime
ForCreditCardOrdersOnly
(VISA-MasterCard-Discover), visit
Helm, Inc. on the World Wide Web
at:helminc.com
Oryoucanwriteto:
Helm, Incorporated
P.O.Box07130
Detroit, MI48207
Pricesaresubjecttochange
withoutnoticeandwithoutincurring obligation.Allowampletimefor delivery.
NotetoCanadianCustomers:All listedpricesarequotedinU.S.
funds.Canadianresidentsareto
makecheckspayableinU.S.funds.
ReportingSafety Defects
ReportingSafetyDefects totheUnitedStates Government
If you believethat your vehicle has a defect which could cause acrashor could cause injury or death, you should immediately inform the National Highway Traffic Safety Administration (NHTSA) in addition to notifying General Motors.
IfNHTSAreceivessimilar complaints, it may open an investigation, and if it finds that as safety defect exists in groupofvehicles, itmayorder arecallandremedycampaign.
However,NHTSAcannot becomeinvolvedinindividual problemsbetweenyou,your dealer,orGeneralMotors.
TocontactNHTSA,youmay calltheVehicleSafetyHotline toll-freeat1-888-327-4236
(TTY:1-800-424-9153);goto http://www.safecar.gov;or writeto:
Administrator, NHTSA
1200NewJerseyAvenue,S.E.
Washington, D.C. 20590
Youcanalsoobtainother informationaboutmotor vehiclesafetyfrom
http://www.safecar.gov.
ReportingSafetyDefects totheCanadian Government
IfyouliveinCanada, and you believethatyourvehiclehasa safetydefect, notify Transport Canada immediately, in addition to notifying General Motors of Canada Limited. Call themat 1-800-333-0510 or writeto:
TransportCanada RoadSafetyBranch 2780SheffieldRoad Ottawa,OntarioK1B3V9
ReportingSafetyDefects toGeneralMotors
In addition to notifying NHTSA (or Transport Canada) in asituation like this, please notify General Motors.
Call1-800-521-7300, orwrite:
BuickCustomerAssistanceCenter P.O.Box33136 Detroit, MI48232-5136
InCanada, call 1-800-263-3777 (English) or 1-800-263-7854 (French), or write:
GeneralMotorsofCanadaLimited CustomerCommunicationCentre, CA1-163-005 1908ColonelSamDrive Oshawa,OntarioL1H8P7
VehicleData Recordingand Privacy
YourGMvehiclehasanumberof sophisticatedcomputersthatrecord informationaboutthevehicle's performanceandhowitisdriven. Forexample,yourvehicleuses computermodulestomonitorand controlengineandtransmission performance,tomonitorthe conditionsforairbagdeployment anddeployairbagsinacrashand, ifsoequipped,toprovideantilock brakingtohelpthedrivercontrolthe vehicle.Thesemodulesmaystore datatohelpyourdealer/retailer technicianserviceyourvehicle. Somemodulesmayalsostoredata abouthowyouoperatethevehicle, suchasrateoffuelconsumptionor averagespeed.Thesemodulesmay alsoretaintheowner'spersonal preferences,suchasradiopre-sets, seatpositions,andtemperature settings.
EventDataRecorders
ThisvehiclehasanEventData Recorder(EDR). Themainpurpose of an EDRistorecord, incertain crashornearcrash-likesituations, such as an airbag deploymentor hitting a road obstacle, datathat will assist in understanding how a vehicle's systems performed. The EDR is designed to record data related to vehicled dynamics and safety systems for a short period of time, typically 30 seconds or less. The EDR in this vehicle is designed to record such data as:
• Howvariousystemsinyour vehiclewereoperating
• Whetherornotthedriverand passengersafetybeltswere buckled/fastened
• Howfar, ifatall, thedriver was pressing the accelerator and/or brake pedal
• Howfastthevehiclewas traveling
This data can help provide better understanding of the circumstances in which crashes and injuries occur.
Important: EDRdataisrecorded by your vehicle only if an on-trivial crashes situation occurs; nodatais recorded by the EDR under normal driving conditions and no personal data (e.g., name, gender, age, and crash location) is recorded. However, other parties, such as law enforcement, could combine the EDR data with the type of personally identifying datar routinely acquired during a crash investigation.
ToreaddatarecordedbyanEDR, specialequipmentisrequired,and accesstothevehicleortheEDRis needed.Inadditiontothevehicle manufacturer,otherparties,such aslawenforcement,thathavethe specialequipment,canreadthe informationiftheyhaveaccessto thevehicleortheEDR.
GMwillnotaccessthisdataor shareitwithothersexcept:withthe consentofthevehicleowneror, ifthevehicleisleased, withthe consentofthelessee;inresponse toanofficialrequestofpoliceor similargovernmentoffice;aspartof GM'sdefenseoflitigationthrough thediscoveryprocess;or, as requiredbylaw.DatathatGM collectsorreceivesmayalsobe usedforGMresearchneedsormay bemadeavailabletoothersfor researchpurposes,whereaneedis shownandthedataisnottiedtoa specificvehicleorvehicleowner.
OnStar®
If your vehicle has On Star and you subscribe the On Starservices, pleasereferto the On Star Terms and Conditions for information on data collection and use. See also OnStar® System on page 4-43 in this manual form more information.
NavigationSystem
If your vehicle has an navigation system, use of the system may result in the storage of destinations, addresses, telephonenumber, and other trip information. Referto the navigationsystem operating manual for information on stored data and for deletion instructions.
RadioFrequency Identification(RFID)
RFIDtechnologyisusedinsome vehiclesforfunctionssuchastire pressuremonitoringandignition systemsecurity,aswellasin connectionwithconveniences suchaskeyfobsforremotedoor locking/unlockingandstarting,and in-vehicletransmittersforgarage dooropeners.RFIDtechnologyin GMvehiclesdoesnotuseorrecord personalinformationorlinkwith anyotherGMsystemcontaining personalinformation.
RadioFrequency Statement
This vehicle hassystems that operate on a radio frequency that comply with Part 15 of the Federal Communications Commission (FCC) Rules and with RSS-210/211 of Industry Canada.
Operationissubjecttothefollowing twoconditions:
- Thedevicemaynotcause interference.
- The device must accept any interference received, including interference that may cause undesired operation of the device.
Changesormodificationstoanyof thesesystemsbyotherthanan authorizedservicefacilitycouldvoid authorizationtousethisequipment.
12-18 Customer Information
NOTES
A
Accessoriesand
Modifications....9-3
AccessoryPower......8-20
AdaptiveForward
Lighting(AFL)....5-3
Add-OnElectrical
Equipment......8-60
AddingEquipmenttothe
Airbag-EquippedVehicle.....2-37
Adjustments
Lumbar, FrontSeats......2-5
AirCleaner/Filter,Engine.....9-15
AirFilter, Passenger
Compartment......7-8
AirlIntake....7-8
AirVents....7-8
AirbagSystem
Check....2-38
HowDoesanAirbag
Restrain?......2-30
PassengerSensing
System......2-32
AirbagSystem(cont.)
WhatMakesanAirbag Inflate?......2-30
WhatWillYouSeeAfter anAirbagInflates?......2-30
WhenShouldanAirbag Inflate?......2-28
WhereAretheAirbags?.....2-27
Airbags
AddingEquipmenttothe Vehicle....2-37
PassengerStatusIndicator...4-15
ReadinessLight......4-15
ServicingAirbag-Equipped Vehicles....2-36
SystemCheck......2-25
AlarmSystem
Anti-Theft....1-13
All-WheelDrive....8-30
AM-FMRadio......6-12
Antenna
SatelliteRadio......6-19
Anti-Theft
AlarmSystem......1-13
AlarmSystemMessages.....4-37
AntilockBrake
System(ABS)......8-31
WarningLight......4-21
AppearanceCare
Exterior......9-84
Interior......9-88
AssistanceProgram,
Roadside....12-6
AudioPlayers......6-20
CD....6-20
AudioSystem
BackglassAntenna......6-19
RadioReception......6-18
Theft-DeterrentFeature......6-2
Automatic
HeadlampSystem......5-3
AutomaticClimateControl
System......7-1
AutomaticTransmission......8-27
Fluid....9-14
ManualMode......8-29
ShiftlockControlSystem
Check....9-29
AuxiliaryDevices......6-29,6-32
i-2INDEX
B
Battery....9-27
JumpStarting....9-77
LoadManagement......5-6
PowerProtection....5-7
VoltageandCharging
Messages......4-33
BladeReplacement,Wiper....9-30
Bluetooth....6-42,6-43,6-46,6-58
Brakes....9-25
Antilock....8-31
Assist......8-34
Fluid....9-26
Parking......8-32
SystemMessages......4-33
Braking....8-4
Break-In, NewVehicle......8-17
BulbReplacement....9-39
FogLamps....5-4,9-37
HalogenBulbs....9-34
HeadlampAiming......9-31
Headlamps....9-34
Headlamps, FrontTurn
SignalandParking
Lamps....9-35
BulbReplacement(cont.)
HighIntensityDischarge
(HID)Lighting....9-35
LicensePlateLamps......9-38
Taillamps, TurnSignal,
Stoplamps,andBack-Up
Lamps....9-37
BuyingNewTires......9-64
C
Calibration......4-8
California
FuelRequirements......8-50
PerchlorateMaterials
Requirements......9-3
Warning....9-3
Camera,RearVision......8-45
CanadianVehicleOwners......iv
Capacitiesand
Specifications....11-2
CarbonMonoxide
EngineExhaust......8-26
Trunk......1-11
WinterDriving......8-9
Cautions, Danger, and
Warnings......iv
CD
DVDPlayer......6-22
CDPlayer....6-20
CenterConsoleStorage......3-2
Chains, Tire......9-70
ChargingSystemLight......4-16
Check
EngineLamp......4-17
IgnitionTransmissionLock...9-29
ChildRestraints
InfantsandYoung
Children....2-41
LowerAnchorsand
TethersforChildren.....2-47
OlderChildren......2-39
Securing....2-54,2-56
Systems....2-43
WheretoPuttheRestraint...2-45
CircuitBreakers......9-40
Cleaning
Cluster,IP......4-12
CollisionDamageRepair.....12-10
CompactSpareTire......9-76
Compass......4-8
CompassMessages......4-34
ControlofaVehicle......8-4
ConvenienceNet......3-2
Coolant
Engine....9-18
EngineTemperature
Gauge......4-14
CoolingSystem......9-17
EngineMessages......4-35
CourtesyTransportation
Program......12-8
CruiseControl......8-37
Light....4-25
Messages......4-34
Cupholders....3-1
CustomerAssistance......12-4
Offices....12-3
TextTelephone(TTY)
Users......12-4
CustomerInformation
ServicePublications
Ordering Information.....12-13
CustomerSatisfaction
Procedure......12-1
D
DamageRepair,Collision.....12-10
Danger,Warnings, and
Cautions......iv
DataRecorders, Event.....12-16
DaytimeRunning
Lamps(DRL)....5-2
DefensiveDriving......8-3
Devices,Auxiliary......6-29,6-32
Differential,Limited-Slip......8-36
Displays
Head-Up......4-29
DomeLamps....5-5
Door
AjarMessages......4-34
Locks....1-10
PowerLocks....1-10
DriveSystems
All-WheelDrive......8-30
DriverInformation
Center(DIC)......4-25
Driving
BetterFuelEconomy......8-2
Characteristicsand
Towing Tips......8-54
Defensive....8-3
Drunk......8-3
HighwayHypnosis......8-8
HillandMountainRoads......8-9
IftheVehicleisStuck......8-12
LossofControl......8-7
Off-RoadRecovery......8-6
VehicleLoadLimits......8-12
Winter....8-9
i-4INDEX
DualAutomaticClimate
ControlSystem......7-4
DVD
RearSeatEntertainment
System......6-34
DVD/CDPlayer......6-22
E
ElectricParkingBrakeLight...4-20
Electrical Equipment,
Add-On....8-60
ElectricalSystem
EngineCompartmentFuse
Block....9-41
FusesandCircuit
Breakers....9-40
InstrumentPanelFuse
Block....9-44
Overload....9-40
RearCompartmentFuse
Block....9-46
ElectronicStabilityControl.....8-35
ElectronicStabilityControl
IndicatorLight......4-22
Engine
AirCleaner/Filter......9-15
CheckandServiceEngine
SoonLamp......4-17
CompartmentOverview......9-6
Coolant....9-18
Coolant Temperature
Gauge......4-14
CoolingSystem......9-17
CoolingSystemMessages...4-35
DriveBeltRouting......11-4
Exhaust......8-26
OverheatedProtection
OperatingMode......9-23
Overheating....9-21
PowerMessages......4-36
PressureLight......4-23
RunningWhileParked......8-26
Starting......8-20
EngineOil
LifeSystem......9-13
Messages......4-35
EntryLighting....5-5
Equipment, Towing......8-59
EventDataRecorders.....12-16
ExitLighting....5-6
Extender, SafetyBelt.....2-23
ExteriorLampControls......5-1
ExteriorLampsOffReminder...5-2
F
Filter
EngineAirCleaner......9-15
Flash-to-Pass......5-2
Flashers,HazardWarning.....5-3
FlatTire....9-70
FlatTire,Changing .....9-72
Fluid
AutomaticTransmission .....9-14
Brakes....9-26
PowerSteering......9-23
Washer....9-24
FogLamps
BulbReplacement.....5-4,9-37
Light......4-25
FoldingMirrors....1-15
FrontSeats
Adjustment 2-3
Heated....2-7
HeatedandVentilated......2-8
FrontStorage....3-2
Fuel......8-48
Additives......8-50
EconomyDriving......8-2
FillingaPortableFuel Container.....8-53
FillingtheTank......8-52
FuelsinForeignCountries....8-50
GasolineSpecifications.....8-49
Gauge......4-13
LowFuelWarningLight.....4-24
Recommended......8-49
Requirements, California.....8-50
SystemMessages......4-36
Fuses
EngineCompartmentFuse Block....9-4
FusesandCircuit Breakers....9-40
InstrumentPanelFuse Block....9-44
RearCompartmentFuse Block....9-46
G
GarageDoorOpener......4-45
Programming......4-46
Gasoline
Specifications......8-49
Gauges
EngineCoolant Temperature......4-14
Fuel....4-13
Odometer....4-13
Speedometer....4-13
Tachometer....4-13
WarningLightsand Indicators......4-11
GeneralInformation
ServiceandMaintenance.....10-1
Towing....8-53
VehicleCare....9-2
GloveBox....3-1
GMMobilityReimbursement
Program....12-5
H
HalogenBulbs....9-34
HazardWarningFlashers.....5-3
HeadRestraints......2-2
Head-UpDisplay(HUD)......4-29
Headlamps
AdaptiveForward Lighting(AFL)......5-3
Aiming....9-31
Automatic....5-3
BulbReplacement......9-34
DaytimeRunning Lamps(DRL)....5-2
Flash-to-Pass......5-2
HighIntensityDischarge (HID)Lighting....9-35
High-BeamOnLight......4-24
High/LowBeamChanger.....5-2
Heated
SteeringWheel....4-7
HeatedandVentilatedFront
Seats......2-8
i-6INDEX
HeatedFrontSeats......2-7
HeatedMirrors....1-16
High-BeamOnLight......4-24
HighwayHypnosis......8-8
HillandMountainRoads......8-9
Hood....9-5
Horn....4-7
HowtoWearSafetyBelts Properly....2-13
|
IgnitionPositions......8-18,8-19
IgnitionTransmissionLock Check....9-29
Immobilizer....1-13
InfantsandYoungChildren, Restraints....2-41
InstrumentCluster......4-12
InstrumentPanelOverview.....4-4
Introduction......iii,6-1
J
JumpStarting....9-77
K
KeyandLockMessages......4-36
KeylessEntry
Remote(RKE)System...1-4,1-5
KeylessEntrySystem......1-3
Keys......1-2
L
Labeling, TireSidewall.....9-49
LampMessages......4-36
Lamps
DaytimeRunning(DRL)......5-2
Dome....5-5
ExteriorControls....5-1
ExteriorLampsOff
Reminder......5-2
Headlamps, FrontTurn
SignalandParking
Lamps....9-35
LicensePlate....9-38
MalfunctionIndicator......4-17
Reading....5-5
SunVisor....5-5
Lap-ShoulderBelt......2-19
LATCHSystem
ReplacingPartsAftera Crash......2-53
Latch, LowerAnchorsand TethersforChildren.....2-47
Light
ElectricParkingBrake......4-20
Lighting
AdaptiveForward......5-3
Entry....5-5
Exit......5-6
IlluminationControl......5-5
Lights
AirbagReadiness......4-15
AntilockBrakeSystem (ABS)Warning......4-21
ChargingSystem......4-16
CruiseControl....4-25
EngineOilPressure......4-23
Flash-to-Pass......5-2
FogLamps....4-25
Lights(cont.)
High-BeamOn....4-24
High/LowBeamChanger.....5-2
LowFuelWarning......4-24
SafetyBeltReminders......4-14
Security......4-24
Taillamplndicator......4-25
TirePressure......4-22
TractionOff....4-21
Limited-SlipDifferential......8-36
Locks
Door....1-10
PowerDoor....1-10
Safety....1-11
LossofControl......8-7
LowFuelWarningLight.....4-24
LowerAnchorsandTethers
forChildren(LATCH
SYSTEM)......2-47
LumbarAdjustment.....2-5
FrontSeats......2-5
M
Maintenance
Records......10-10
MaintenanceSchedule
RecommendedFluidsand
Lubricants.....10-7
ScheduledMaintenance.....10-2
MalfunctionIndicatorLamp....4-17
ManualMode......8-29
MassStorageMedia(MEM)...6-25
Messages
Anti-TheftAlarmSystem.....4-37
BatteryVoltageand
Charging......4-33
BrakeSystem......4-33
Compass......4-34
DoorAjar......4-34
EngineCoolingSystem......4-35
EngineOil....4-35
EnginePower......4-36
FuelSystem......4-36
KeyandLock......4-36
Messages(cont.)
Lamp....4-36
RideControlSystem......4-37
Tire....4-37
Transmission......4-38
Vehicle 4-33
Window......4-38
Mirrors
Folding....1-15
Heated 1-16
ManualRearview......1-16
ParkTilt....1-16
Power....1-15
MonitorSystem, Tire
Pressure....9-57
N
NavigationSystem
VehicleDataRecording
andPrivacy......12-17
Net, Convenience ......3-2
NewVehicleBreak-In......8-17
i-8INDEX
0
ObjectDetection, SideBlind ZoneAlert(SBZA)......8-42
Odometer....4-13
Off-Road Recovery....8-6
Oil Engine....9-11 EngineOilLifeSystem.....9-
Messages......4-35
PressureLight......4-23
OlderChildren, Restraints.....2-39
OnlineOwnerCenter......12-4
OnStar® System......4-43
Operation, Infotainment System....6-7
Outlets Power......4-10
OverheatedEngine ProtectionOperatingMode...9-23
Overheating,Engine......9-21
Overview InstrumentPanel......4-4
Overview, Infotainment System....6-3, 6-5
P
Park ShiftingInto.....8-24 ShiftingOutof.....8-25
ParkTiltMirrors....1-16
Parking Assist, Ultrasonic....8-40 Brake....8-32
BrakeandP(Park) MechanismCheck......9-30 OverThingsThatBurn......8-25
PassengerAirbagStatus Indicator....4-15
PassengerCompartmentAir Filter....7-8
PassengerSensingSystem...2-32
PerchlorateMaterials Requirements, California.....9-3
Phone Bluetooth......6-42,6-43, 6-46,6-58
Power DoorLocks......1-10
Mirrors....1-15 Outlets....4-10
Protection, Battery......5-7
Power(cont.) RetainedAccessory(RAP)...8-20
SeatAdjustment.....2-4
SteeringFluid....9-23
Windows....1-17
Pregnancy, Using Safety Belts....2-23
Privacy RadioFrequency Identification(RFID).....12-17
Program CourtesyTransportation.....12-8
Proposition65Warning, California....9-3
R
RadioFrequency Identification(RFID)......12-17 Statement......12-17
Radios AM-FMRadio......6-12
CD/DVDPlayer......6-22
Reception......6-18
Satellite....6-15
ReadingLamps....5-5
RearSeatEntertainment System....6-34
RearSeats......2-9
RearVisionCamera(RVC)....8-45
RearviewMirrors......1-16
RecliningSeatbacks......2-6
RecommendedFluidsand Lubricants....10-7
RecommendedFuel......8-49
Records Maintenance.....10-10
Recreational Vehicle Towing...9-81
ReimbursementProgram, GMMobility....12-5
RemoteKeylessEntry (RKE)System......1-3-1-5
RemoteVehicleStart......1-8
ReplacementBulbs......9-39
ReplacementParts Airbags....2-38 Maintenance....10-9
ReplacingAirbagSystem.....2-38
ReplacingLATCHSystem PartsAfteraCrash....2-53
ReplacingSafetyBelt
SystemPartsAftera Crash....2-24
Reporting Safety Defects Canadian Government.....12-15 General Motors.....12-15 U.S. Government.....12-14
RetainedAccessory Power(RAP)......8-20
RideControlSystems....8-35 ElectronicStability(ESC)....8-35 EnhancedTraction System(ETS)....8-36 Messages....4-37 Selective....8-36
Roadside Assistance Program....12-6
Roof Sunroof....1-19
Rotation, Tires.....9-62 Routing, EngineDriveBelt.....11-4
RunningtheVehicleWhile Parked......8-26
s
SafetyBelts....2-10
Care....2-24
Extender....2-23
HowtoWearSafetyBelts Properly....2-13
Lap-ShoulderBelt 2-19
Reminders......4-14
ReplacingAfteraCrash.....2-24
UseDuringPregnancy......2-23
SafetyDefectsReporting CanadianGovernment.....12-15 GeneralMotors.....12-15 U.S.Government.....12-14
SafetyLocks....1-11 SafetySystemCheck.....2-24
SatelliteRadio....6-15 ScheduledMaintenance.....10-2
SchedulingAppointments.....12-8 Seats
Adjustment, Front.....2-3 HeadRestraints.....2-2 HeatedandVentilatedFront...2-8
i-10INDEX
Seats(cont.)
HeatedFront......2-7
LumbarAdjustment, Front.....2-5
PowerAdjustment, Front.....2-4
Rear....2-9
RecliningSeatbacks......2-6
SecuringChild
Restraints....2-54,2-56
Security
Light......4-24
Vehicle....1-13
SelectiveRideControl......8-36
Service
Accessoriesand
Modifications......9-3
DoingYourOwnWork......9-4
EngineSoonLamp......4-17
MaintenanceRecords.....10-10
Maintenance, General
Information......10-1
PartsIdentificationLabel.....11-1
Service(cont.)
PublicationsOrdering
Information......12-13
SchedulingAppointments.....12-8
Servicingthe
Airbag-Equipped Vehicle.....2-36
Shifting
IntoPark......8-24
OutofPark......8-25
SideBlindZoneAlert.....8-42
Signals, Turnand
Lane-Change....5-4
SpareTire
Compact....9-76
Specificationsand
Capacities....11-2
Speedometer....4-13
StartVehicle, Remote......1-8
StarterSwitchCheck......9-28
StartingtheEngine......8-20
Steering....8-5
Fluid, Power....9-23
HeatedWheel....4-7
WheelAdjustment......4-6
WheelControls....4-6
StoplampsandBack-UpLamps
BulbReplacement......9-37
Storage
MassMedia(MEM)......6-25
StorageAreas
CenterConsole......3-2
ConvenienceNet......3-2
Front....3-2
GloveBox....3-1
StuckVehicle......8-12
SunVisorLamps....5-5
SunVisors....1-19
Sunroof....1-19
Symbols......v
SystemCheck
AutomaticTransmission
ShiftlockControl......9-29
T
Tachometer....4-13
TaillampIndicatorLight......4-25
Taillamps
BulbReplacement......9-37
TextTelephone(TTY)Users...12-4
Theft-Deterrent
Systems......1-13,1-14
Immobilizer....1-13
Time....4-8,4-9
Tires
BuyingNewTires......9-64
Chains....9-70
Changing....9-72
CompactSpare....9-76
Designations....9-51
DifferentSize......9-66
IfaTireGoesFlat......9-70
InflationMonitorSystem.....9-59
Inspection....9-62
Messages......4-37
PressureLight......4-22
PressureMonitorSystem.....9-57
Rotation 9-62
SidewallLabeling......9-49
Tires(cont.)
Terminologyand
Definitions....9-52
UniformTireQuality
Grading....9-67
WheelAlignmentandTire
Balance....9-68
WheelReplacement......9-69
When It Is Time for New
Tires....9-63
Winter....9-48
Towing
DrivingCharacteristics......8-54
Equipment......8-59
GeneralInformation......8-53
Recreational Vehicle......9-81
Trailer....8-58
Vehicle 9-81
Traction
ControlSystem(TCS) .....8-34
Limited-SlipDifferential.....8-36
OffLight......4-21
SelectiveRideControl......8-36
TrailerTowing....8-58
Transmission
Automatic....8-27
Fluid,Automatic 9-14
Messages......4-38
TransportationProgram,
Courtesy....12-8
Trunk......1-11
TurnandLane-Change
Signals......5-4
TurnSignal
BulbReplacement......9-37
U
UltrasonicParkingAssist.....8-40
UniformTireQuality
Grading....9-67
UniversalRemoteSystem.....4-45
Operation......4-49
Programming......4-46
UsingthisManual ......iv
i-12INDEX
V
Vehicle
CanadianOwners......iv
Control......8-4
LoadLimits......8-12
Messages......4-33
Personalization......4-38
RemoteStart....1-8
Security......1-13
Towing....9-81
VehicleCare
TirePressure....9-56
VehicleIdentification
Number(VIN)......11-1
ServicePartsIdentification
Label......11-1
Ventilation,Air....7-8
Visors....1-19
W
WarningLights, Gauges,
and Indicators......4-11
Warnings......iv
CautionsandDanger......iv
HazardFlashers....5-3
WasherFluid....9-24
Wheels
AlignmentandTire
Balance....9-68
DifferentSize......9-66
Replacement....9-69
When It Is Time for New
Tires....9-63
WheretoPuttheChild
Restraint....2-45
Windows....1-17
Messages......4-38
Power....1-17
Windshield
Wiper/Washer......4-7
WinterDriving......8-9
WinterTires....9-48
WiperBladeReplacement.....9-30