XAV1501 - Powerline Adapter NETGEAR - Free user manual and instructions
Find the device manual for free XAV1501 NETGEAR in PDF.

User questions about XAV1501 NETGEAR
0 question about this device. Answer the ones you know or ask your own.
Ask a new question about this device
Download the instructions for your Powerline Adapter in PDF format for free! Find your manual XAV1501 - NETGEAR and take your electronic device back in hand. On this page are published all the documents necessary for the use of your device. XAV1501 by NETGEAR.
USER MANUAL XAV1501 NETGEAR
February 2011 202-10641-01 v1.0
©2011 NETGEAR, Inc. All rights reserved.
No part of this publication may be reproduced, transmitted, transcribed, stored in a retrieval system, or translated into any language in any form or by any means without the written permission of NETGEAR, Inc.
Technical Support
Thank you for choosing NETGEAR. To register your product, get the latest product updates, or get support online, visit us at http://support.netgear.com.
Phone (US & Canada only): 1-888-NETGEAR
Phone (Other Countries): See http://support.netgear.com/app/answers/detail/a_id/984.
Trademarks
NETGEAR, the NETGEAR logo, ReadyNAS, ProSafe, Smart Wizard, Auto Uplink, X-RAID2, and NeoTV are trademarks or registered trademarks of NETGEAR, Inc. Microsoft, Windows, Windows NT, and Vista are registered trademarks of Microsoft Corporation. Other brand and product names are registered trademarks or trademarks of their respective holders.
Statement of Conditions
To improve internal design, operational function, and/or reliability, NETGEAR reserves the right to make changes to the products described in this document without notice. NETGEAR does not assume any liability that may occur due to the use, or application of, the product(s) or circuit layout(s) described herein.
Contents
Chapter 1 Getting Started
Hardware Features....4
Product Details 5
Powerline Adapter in a Home Network. 7
Powerline Network Security 8
Use the Security Button to Set the Encryption Key 8
Chapter 2 Powerline Utility
Install the Powerline Utility ....11
Device Settings Tab 12
Add a Device to a Powerline Network .....13
Security....15
Change the Network Encryption Key 15
Set Up a Custom Network Encryption Key....16
Return to the Default Network Encryption Key....17
Quality of Service (QoS)....18
Prioritize by General Application Type .....18
Diagnostics....20
Factory Reset 20
Chapter 3 Troubleshooting
Basic Functioning ..... 22
Troubleshooting Tips .....22
LEDs. 22
If You Do Not See All Your Devices with the Powerline Utility . . . . . . . . . .23
Appendix A Supplementary Information
Technical Specifications....24
Safety Information 25
Appendix B Notification of Compliance
This chapter describes your Powerline AV+ 200 Adapter Kit XAVB1501, and how your adapters can fit into a home network.
Hardware Features
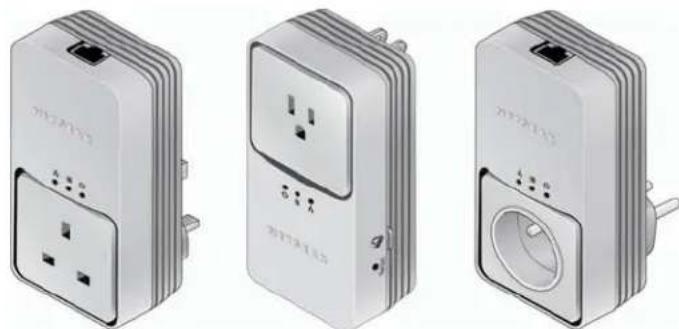
The package includes two adapters and two Ethernet cables. The appearance of your adapter depends on the country in which it was sold.

natural_image
Two identical gray electrical devices with attached cable, shown from different angles (no text or symbols visible)Your adapters may look like one of these:
natural_image
Three white electrical wall connectors with socket and plug symbols, shown from different angles (no text or labels visible)Figure 1. Adapters can vary in appearance
Product Details
The following figure shows the adapter in detail:

text_image
Filtered AC Socket Power LED NEFGEAR Ethernet LED Powerline LED Security/Power Factory Reset Ethernet portFigure 2. Adapter filtered AC socket, LEDs, and buttons
Filtered AC Socket
The filtered AC socket can remove some electrical noise that can affect Powerline performance. Plugging the power plugs of nearby devices into the filtered AC socket may improve performance.
Buttons
Two buttons are located on the side of the adapter:
• Security/Power. This button serves a dual function:
- Set the Power Mode: The Powerline adapter's normal state is Power On. When you first plug it into an electrical outlet, it is in Power On mode. To go to Power Off (power saving mode), press and hold the button for 5 – 10 seconds. Pressing the button again for less than 2 seconds returns it to Power On. You can also unplug and plug in the adapter to restore it to Power On.
- Set Security: Press and hold this button for 2 – 4 seconds. If you are setting up two XAV1501 devices, press the button on each device for 2 – 4 seconds within 2 minutes. The two devices connect automatically and the Power LED starts blinking.
- Factory Reset. Press the Factory Reset button for 1 second, then release to return the Powerline adapter to its factory default settings.
LEDs
| Item Description | |||
Power LED | Solid green. The electrical power is on.Blinking green. The adapter is in the process of restarting or setting up security.Amber. The adapter is in power saving mode.Off. There is no electrical power. | ||
Powerline LED | Solid. The adapter is connected to a Powerline network.Blinking. The adapter is sending or receiving data.Off. The adapter has not found any other compatible Powerline devices using the same encryption key. | ||
| The Pick A Plug feature lets you pick the electrical outlet with the strongest link rate, indicated by the color displayed by the LED: | |||
| Green:Link rate >80 Mbps (best) | Amber:Link rate >50 and < 80 Mbps (better) | Red:Link rate < 50 Mbps (good) | |
Ethernet LED | Solid. The Ethernet port is linked, but there is no activity.Blinking. There is traffic on the Ethernet port.Off. There is no Ethernet connection. | ||
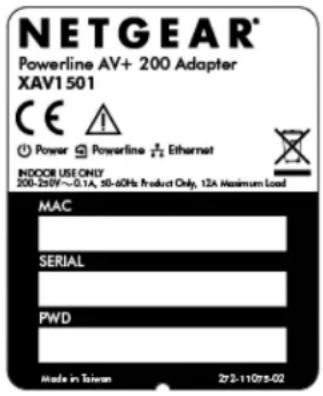
Powerline Adapter Label
The product label shows unique details specific to your adapter. The product label is located on the back:
Product name and model ____
MAC address ____
Serial number ____
Password ____
text_image
NETGEAR® Powerline AV+ 200 Adapter XAV1501 CE Power Powerline ½ Ethernet INDOOR USE ONLY 200-24W~0.1A, 30-60Hz Product Only, 12A Maximum Load MAC SERIAL PWD Made in Taiwan 27/3-11079-02Figure 3. Adapter product label
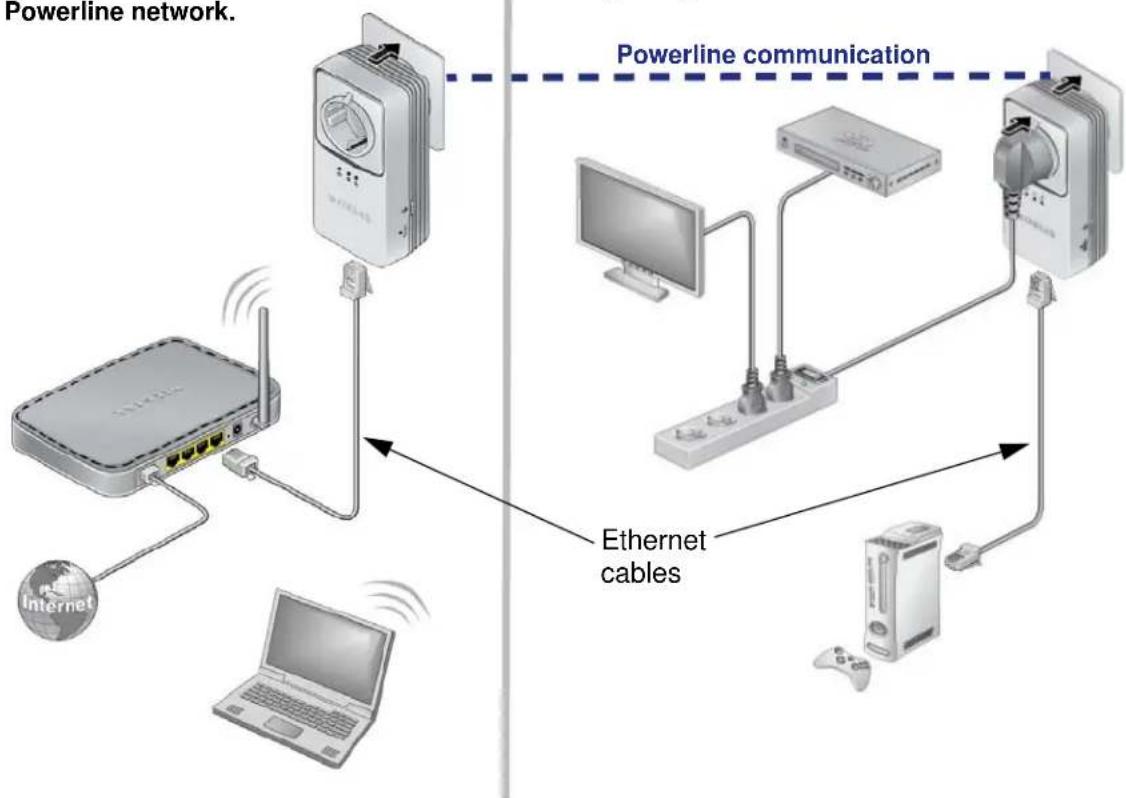
Powerline Adapter in a Home Network
You can use Powerline Adapters to extend your Ethernet network anywhere in your home using your existing electrical power lines.
Here, an Ethernet cable connects the router to the Powerline network.
In another room, an Ethernet cable connects a gaming console to the Powerline network.
flowchart
graph TD
    A["Powerline network"] --> B["Powerline communication"]
    B --> C["Ethernet cables"]
    C --> D["Internet"]
    C --> E["Laptop"]
    C --> F["Desktop"]
    C --> G["Server"]
    style A fill:#f9f,stroke:#333
    style B fill:#ccf,stroke:#333
    style C fill:#cfc,stroke:#333
    style D fill:#fcc,stroke:#333
    style E fill:#cff,stroke:#333
    style F fill:#ffc,stroke:#333
    style G fill:#fcc,stroke:#333
Figure 4. Powerline network with two Powerline adapters
For best performance, plan the location of your Powerline devices (to make a Powerline network, you need at least two Powerline devices):
- Use an electrical outlet that is not controlled by a wall switch to avoid someone unknowingly turning off the power to the outlet.
- Do not plug in Powerline products to a power strip, extension cord, or surge protector as this might prevent them from working correctly, or reduce the network performance.
- Avoid plugging Powerline products into electrical outlets located near an appliance that uses a lot of power, such as a washer or dryer, or a refrigerator. This could potentially prevent the adapters from working correctly, or reduce network performance.
Different Powerline adapter models can share the network. All Powerline NETGEAR AV products (models XAV101, XAV1004, XAV2001, XAV2501, and XAVN2001) are compatible.
To set up your Powerline network:
- Make sure that your home router is up and running and that Ethernet wired connections are working.
- Install the first Powerline adapter based on the installation instructions that came in the package.
- Install the second Powerline adapter, which finds the adapter you just installed. The two Powerline devices form a Powerline network.
- Install any additional Powerline adapters that you plan to use.
- Test to make sure that the computer or peripheral can access the Powerline network.
For example, on a computer, use the Internet. Another way to test this is to install the Powerline Utility and use it to view all devices on the Powerline network. - NETGEAR recommends that you secure your Powerline network from unauthorized access, especially in settings such as apartment buildings. See Powerline Network Security.
Powerline Network Security
A Powerline network consists of two or more Powerline adapters using the same network encryption key. Securing your network protects the information you send over the Powerline network from unwanted access. If you do not set up security on your network, anyone nearby with a Powerline network can potentially use his or her connection to gain access to your network and information you send over the Internet. This is especially relevant in settings such as apartment buildings, office buildings, dorm rooms, and other populated areas.
There are two ways to secure your Powerline network.
• Use the Security button to automatically generate a random encryption key.
- Use the Powerline Utility to specify an encryption key for your Powerline network. If you already have a Powerline network, you need to use the Powerline Utility, which is located on your Resource CD. See Chapter 2, Powerline Utility.
- To return the Powerline Adapter to its factory default settings, press its Factory Reset button for 1 second, then release.
Use the Security Button to Set the Encryption Key
Note: An adapter can generate a private key only once. If you want to replace a private key, first reset the adapters to their factory settings. To do this either press the Factory Reset button for 1 second, then release, or use the Powerline Utility factory defaults feature (see Return to the Default Network Encryption Key on page 17).
You can use the Security button to change the default encryption key and set a private encryption key instead. The default encryption key is HomePlugAV.
- Verify that all the Powerline adapters to be configured are plugged in.

WARNING!
Do not press the Security button on the Powerline adapter until installation is complete and all adapters on your network are plugged in and communicating with each other. Pressing the Security button too soon can temporarily disable Powerline communication. If this should occur, reset the Powerline adapter to its factory default settings (press the Reset button for 1 second, then release).
- Press the Powerline adapter Security button for 2 seconds.
• The Power LED starts blinking after you release the button.
- The adapter automatically creates a new, randomly generated network encryption key that each Powerline adapter on the network will use.
At this point, the other adapters in your network cannot communicate with each other.
- Within 2 minutes of pressing the Security button on the Powerline adapter, press the Security button on the second adapter for 2 seconds.
In order to pair the devices, you need to press both buttons within 2 minutes.
This securely configures your Powerline network with the same network encryption key.
- If your network has more than two adapters, press the Security button on the next adapter for 2 seconds, then press the Security button on any additional adapters in your network for 2 seconds. The adapters retain security settings even if they are unplugged.
This chapter explains how to install and use the Powerline Utility. The Powerline Utility works with Powerline AV products model XAV101v2 and XAV1501. These Powerline models are compatible and can share the same Powerline network.
You can use the Powerline Utility to access a local Powerline device that is connected to your computer with an Ethernet cable and also to access remote Powerline devices. Remote devices are on the Powerline network, but are not directly cabled to the computer on which you are using the Powerline Utility.
You can use the NETGEAR Powerline Utility to:
• Set up encryption for your Powerline network
• Perform diagnostics and monitor performance
• Set up Quality of Service (QoS)
- Restore a device to default configuration settings
Install the Powerline Utility
This utility allows you to set your own unique Powerline network encryption key, and prioritize traffic passing through your Powerline network.
All devices on a Powerline network can be managed from one computer. If you add another Powerline device, you can install the Powerline Utility on the computer connected locally to the new adapter, or open the utility on the computer originally used to set up the Powerline network encryption key. You can use any computer to manage the network, but this section assumes that you are working from the computer that is connected to a Powerline adapter.
To download and install the Powerline Utility:
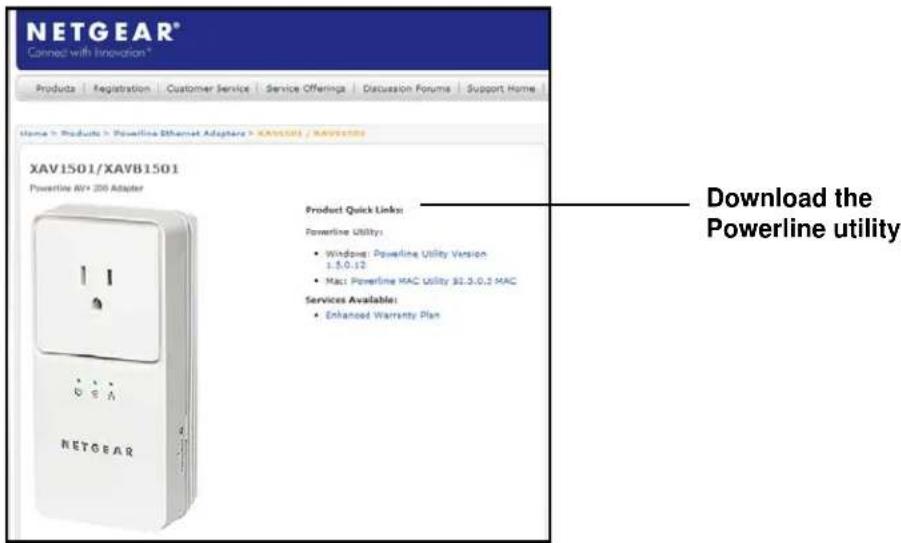
- From your browser, go to this URL link:
http://kb.netgear.com/app/products/model/a_id/17963 to display the following screen:
text_image
NETGEAR® Connect with Innovation * Products Registration Customer Service Service Offerings Discussion Forums Support Home Home: Products > Powerline Ethernet Adapters > XAVB1501 / XAVB1501 XAV1501/XAVB1501 Powerline A1+ 200 Adapter Product Quick Links: Powerline Utility: • Windows: Powerline Utility Version 1.5.0.12 • Mac: Powerline MAC Utility $1.5.0.5 MAC Services Available: • Enhanced Warranty Plan Download the Powerline utility- Click the link and followi the instructions to download and install the Powerline utility.
-
Follow the wizard prompts, and click Finish when the wizard is done.
-
There are two ways to launch the XAVB1501 Powerline Utility:

text_image
NETGEAR Powerline Utility Desktop Shortcut Icon Powerline Utility Landing Page Device Settings Advanced Settings About Available Devices Device Name Model Wireless Setting MAC Address Quality (Mbps) LED Status Device 01 XAV2001 N/A 85.24.82.13.9F 7E 0% 0% Retouch Additional Info of Device 01 Firmware Version: NETGEAR XAV201 v0.2.0.3NA Sub-Version: INT6000-MAC-4-1-4100-00-367520000724FINAL8 Close- Click the XAVB1501 Powerline Utility shortcut icon located on your desktop.
- Navigate to Start > Programs > NETGEAR > NETGEAR Powerline Utility.
Device Settings Tab
When launched, the Powerline Utility opens to the Device Settings tab. If all devices are not shown, click the Refresh button to detect all Powerline adapters on your network.

text_image
NETGEAR Device Settings Advanced Settings About Available Devices Device Name Victoria Wireless Setting MAC Address Quality (Mbps) LED Status Device 01 XAV2001 N/A 00:24:82:53:9F:7B 168 Device 02 XAVN2001 80:24:82:59:06:7B 124 Device 03 XAV1004 N/A 00:22:3F:5D:53:82 82 Addkonal Info of Device 01 Firmware Version: NETGEAR XAV2001 v0.2.0.3NA Sub-Version: INT6000 MAC-4-1-4100-00-3679-20090724 FINAL B CloseYou might see a message at the bottom of the screen regarding the power saving feature. If the unit goes into power saving mode, the Powerline Utility does not find it. Keeping a connected Ethernet cable plugged into the device keeps it active.
By clicking the LED status light you can toggle the LED between on and off.
The following table describes the features on the Device Settings Tab.
Table 1. Powerline Utility Device Settings Tab
| Field or Button Description | |
| Device Names This lists the Powerline devices detected on the network after the utility completes a scan for devices. The device name is initially set by the utility, but can be changed to reflect your specific adapter. For example, “Office” or “Master Bedroom”. | |
| Model This identifies the model number of the Powerline Adapter. | |
| MAC Address The MAC address for the Powerline device. This is also on the product label, which might not be visible when the device is plugged in. | |
| Quality (Mbps) This indicates the type of traffic that can be handled smoothly and the link rate for each Powerline device: HD Video, SD/DVD Video, or Data. • HD Video. The device can handle high-definition video traffic smoothly. This status will be shown if the transmit and receive link speed is greater than 80 Mbps. • SD/DVD Video. The transmit and receive link speed is greater than 50 Mbps or less than 80 Mbps. • Data. The device cannot handle video data smoothly. This status will be shown if the transmit or receive link speed is less than 50 Mbps. | |
| LED On/Off button Enable | or disable the LEDs for a Powerline device. The LEDs are enabled by default. |
Add a Device to a Powerline Network
If you are adding a device to a Powerline network, and the network encryption key has been left at its default setting, all you need to do is plug the new device into a power outlet.
If the network encryption key has been customized, there are two ways to set the security:
- You can use the Security button to add the new device to your network. See Adding Adapters to Your Network on page 6.
- You can use the XAVB1501 Powerline Utility to add the new device to the network, as described in the following sections.
The procedure for setting the network encryption key depends on whether the computer running the XAVB1501 Powerline Utility is connected directly to the new adapter (local) or is connected to a different device in the Powerline network (remote).
To add a local Powerline device:
A local Powerline device is connected to your computer with an Ethernet cable.
- Plug the new adapter into an available AC power outlet.
-
Connect the Ethernet cable that came with the adapter to the adapter's Ethernet port and an Ethernet port on the computer.
-
Start the Powerline Utility. This displays the Device Settings tab. Wait for the utility to detect the new device.
- Select the Advanced tab, and click the Security arrow.
- From the Device Name column select the device.
- Type the network encryption key into the Create a New Encryption Key field.
- Click the Apply Security to Selected Devices button.
- Select the Device Settings tab to perform a scan.
Verify that the devices in the Powerline network appear in the device list. It may take a minute or two for all devices in the network to be detected.
To add a remote Powerline device:
Remote devices are on the Powerline network, but are not directly cabled to the computer on which you are using the Powerline Utility.
If you are using a custom network encryption key, set all the devices to the default network encryption key of HomePlugAV so that they can communicate with each other. Then set all the devices to the network encryption key that you want to use.
-
To change the encryption key for a remote device, you must enter the password for the device. The password is printed on the product label.
-
Click the device name for a remote Powerline device to highlight it in blue.
Note: Be sure to change the password of remote devices before changing it on the local device so that you can maintain connectivity throughout this process.
- Click Enter Password.
- Enter the device password, and then click OK.
The device password is located on the product label.
- From the Device Name column, select the device.
- Type the network encryption key into the Apply the Encryption Key field.
- Click the Apply Security to Selected Devices button.
- Select the Device Settings tab. This will perform a automatic scan.
Verify that the devices in the Powerline network appear in the device list. It may take a minute or two for all devices in the network to be detected.
Security
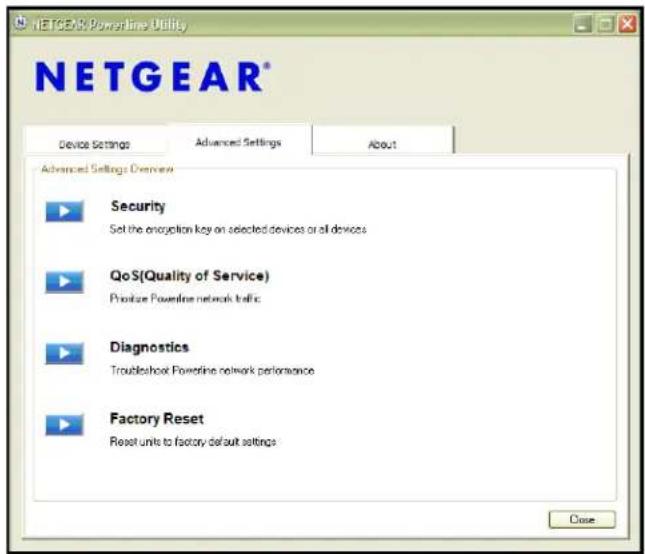
Click the Advanced Settings tab to display the following screen:
text_image
NETGEAR Powerline Utility Device Settings Advanced Settings About Advanced Settings Details Security Set the encryption key on selected devices or all devices QoS(Quality of Service) Priorize Powerline network traffic Diagnostics Troubleshoot Powerline network performance Factory Reset Reset units to factory default settings CloseFrom this screen you can perform a number of security tasks, such as:
• Change the network encryption key
- Set up a custom network encryption key
• Return to the factory default network encryption key
• Change the network encryption key for one unit at a time
Change the Network Encryption Key
You can specify the network encryption key from the Security tab.
1. Select Advanced Settings > Security.
When all the devices are set to the default network encryption key and are plugged in, they are listed on the Device Settings tab.
2. Select the check box for each device name that you want to add encryption for.
Here you have two options:
a. Use the Default Encryption Key option
When you click this option, the factory default encryption key of HomePlugAV is automatically put into the field.
b. Create your own Encryption Key
This option lets you set your own network encryption key. Type your network encryption key in the field provided.
- Apply the changes by clicking the Apply Security to Selected Devices button.
When completed, the utility displays a message indicating that the operation was successful.
- Click OK.

text_image
NETGEAR Wireless Utility Device Settings Advanced Settings About Security Step 1 Select Devices Device Name Model MAC Address Device Password Device 01 XAY2001 00:24:8.2:53:8F:7E 00:01:00:00:00:00:00 Step 2 Select a Encryption Key Create a new Encryption Key OR Use default Encryption Key Step 3 Apply Changes Apply Security to Selected Devices Back Close Information Encryption Key was changed successfully. OKSet Up a Custom Network Encryption Key
When all the devices are set to the default network encryption key and are plugged in, they are listed on the Device Settings tab.
To set up a custom network encryption key for all the Powerline devices:
-
Select the Device Settings tab to automatically perform a scan to detect the adapter status.
Wait for the new device to be listed. A new device can be identified by its MAC address. -
Select Advanced Settings > Security, and select the check boxes next to each device in the Device Name column.
-
Type your network encryption key in the Create a New Encryption Key field.
-
Click Apply Security to Selected Devices.
The utility displays a message indicating that the operation was successful.
- Select the Device Settings tab to perform a scan.
Verify that all devices are detected with your network encryption key.
Note: If one or more of your Powerline devices are not listed, see Quality of Service (QoS) on page 18.
Return to the Default Network Encryption Key
- Plug the new device into an AC power outlet.
-
Start the Powerline Utility
-
Wait for the utility to detect the devices in your Powerline network.
- Check that all the devices in the established network are displayed on the Device Settings tab.
Note: Before you can reset a remote device, you must enter its password. The password is printed on the product label located on the back of the adapter.
- Select Advanced Settings > Security, and in the Device Name column, select the check box next to each device you want to set.
- Click the Use Default Encryption Key button.
The default encryption key, HomePlugAV, displays in the encryption field.
- Click Apply Security to Selected Devices.

text_image
NETGEAR® Device Settings Advanced Settings About Security Step 1 Select Devices Device Name Model MAC Address Device Password ✓ Device 01 XAV2001 00:24:82:53:6F.7E 00:24:82:53:6F.7E 0% Refresh Step 2 Select a Encryption Key Create a new Encryption Key OR Use default Encryption Key Step 3 Apply Changes Apply Security to Selected Devices < Back CloseQuality of Service (QoS)
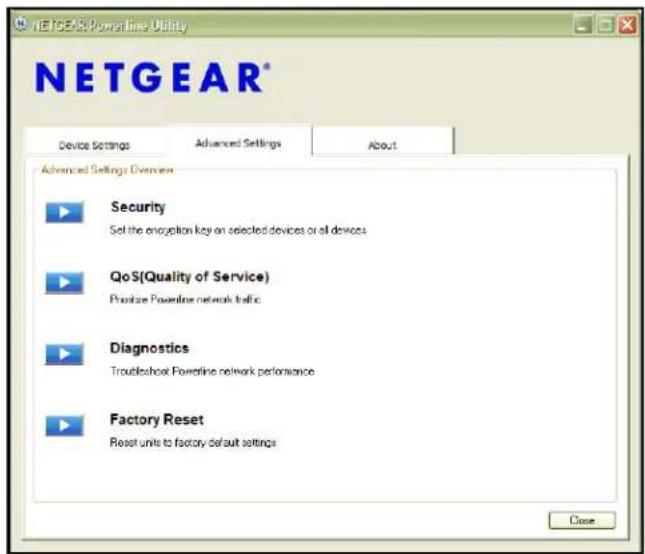
Select Advanced Settings > QoS (Quality of Service) to go to the QoS screen to prioritize your Powerline network traffic.
text_image
NETGEAR® Device Settings Advanced Settings About Advanced Settings Overview Security Set the encryption key on selected devices or all devices QoS(Quality of Service) Priorise Powerline network traffic Diagnostics Troubleshoot Powerline network performance Factory Reset Reset units to factory default settings CloseBy default, all types of traffic on the Powerline network are assigned the same priority. For most applications, this works fine. However, there are situations where performance improves if you assign a higher priority to certain types of traffic, such as multimedia files.
Prioritize by General Application Type
If your network traffic is a mix of multimedia and document/database traffic you might want to give priority to a particular traffic type. If it is important that your multimedia playback is smooth, even while document files are being transferred over the network, then give priority to multimedia traffic. Conversely, if it is more important for your network to be responsive to database applications, give priority to this type of application over multimedia applications.
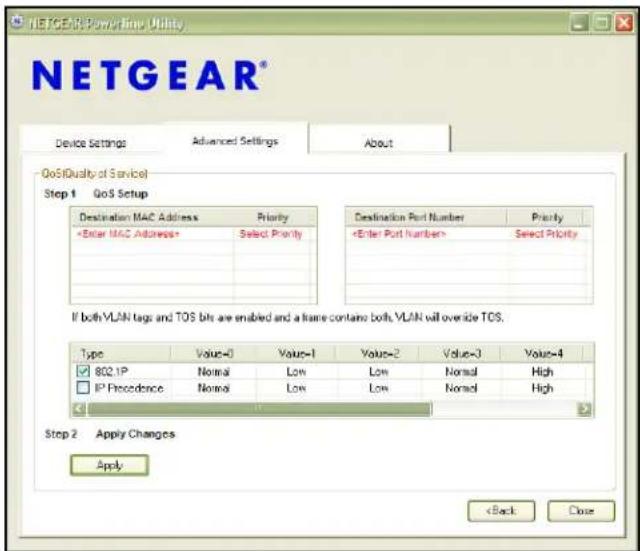
The adapter supports the following:
- MAC address
IP port - VLAN tags
• ToS bits (Type of Service routing)
To set the priority of data transfers by the type of protocol:
- Start the XAVB1501 Powerline Utility and wait for the utility to detect the adapters connected to the network.
-
Select Advanced Settings > QoS (Quality of Service).
-
To set the traffic prioritization rule into the selected adapter device, specify the priority in the QoS Setup section of the screen.
text_image
NETGEAR® Device Settings Advanced Settings About QoS(Quality of Service) Step 1 QoS Setup Destination MAC Address Priority Destination Port Number PriorityDiagnostics
Select Advanced Settings > Diagnostics to display the diagnostics to help you diagnose and troubleshoot performance issues. Using this feature you can delete a device from the device history, save a report, or print a report. text_image
NETGEAR® Device Settings Advanced Settings About Diagnostics System Information On NIC #1 MAC = 00.14A5E36P8C HomePlug Device #1 MAC = 00.26B2543E2E Firmware: NETGEAR XAV2501 v0.2.0.3NA On NIC #2 MAC = 00.16.387D:F18E No HomePlug Device Connected Computer network name: STARPOINT User name: Donno Microprocessor: 586 OS Platform: WinXP V5.1, Build 3600 NETGEAR Powerline Utility: 0.1.50.7 Library: PLCUB S2.DLL: V5.50, Build 18.5 Driver: window1system22 driversVPLONDS32.SYS V5.50, Build 18.5 Driver: window1system22 driversVPLONPS32.SYS Not Present Save Report Print Report < Back CloseFactory Reset
The Factory Reset option returns the network encryption key to its factory default setting of HomePlugAV. Only one device at a time can be reset. 1. Select Advanced Settings > Factory Reset to display the following screen: text_image
NETGEAR Power/Time Delta Device Settings Advanced Settings About Factory Reset Step 1 Select Devices Device Name Model MAC Address Device 01 NAV2001 00.24.8.2.53 OF 7E 0% Refresh Step 2 Revert to factory default settings Perform Factory Reset on Selected Devices iBlock CloseBasic Functioning
After you plug in the Powerline adapter, the following sequence of events should occur: 1. The Power LED lights up. 2. After approximately 10 seconds, verify that: a. The Power LED is solid green. b. The Powerline LED is lit. c. The Ethernet LED lights or blinks.Troubleshooting Tips
The Reset and Security buttons are located on the side panel of the adapter. - Pressing the Factory Reset button longer than 2 seconds does not reset the device. - Pressing the Security button longer than 2 seconds does not activate security.LEDs
The LEDs indicate activity, and can be used for troubleshooting.LEDs Are Off When the Adapter Is Plugged In
- First check to make sure that the electrical outlet has power. - If power is supplied and the LEDs stay off, someone might have used the Powerline Utility to turn off the LEDs. Use the Powerline Utility to see if that is the case. If so, then use the Powerline Utility to turn them back on.Power LED
- Off. Make sure that power is supplied to the electrical outlet, and that the Powerline devices are not plugged into an extension cord, power strip, or surge protector. • Amber. Power saving mode occurs when the Ethernet LED is off. This can occur when: - the Ethernet cable is unplugged. - the device connected through the Ethernet cable is turned off. - the adapter is idle for 10 minutes. The adapter returns to normal mode within 2 seconds once the Ethernet link is up.Powerline LED
- Off. The Powerline devices cannot find each other. Make sure that the Powerline devices are plugged into outlets with power, and that they use the same network encryption key. - Move the Powerline device to a location closer to the computer or devices. - If you have set up network security, make sure that all Powerline devices are using the same encryption key. - If the problem occurred after you changed the network encryption key, reset each device to its factory default settings. Then you can customize the encryption key. - Amber or red. Move the Powerline device to a closer location.Ethernet LED Does Not Blink
There is no data traffic. Make sure that: - Your router and modem are switched on. - The adapter's cable is securely connected to a router LAN port. - The PC connected directly to the router can access the Internet. \- Press the Factory Reset button on each Powerline device for 1 second to return the Powerline adapter to its factory default settings.If You Do Not See All Your Devices with the Powerline Utility
If you click Refresh on the main screen of the Powerline Utility, and do not see all the devices you expect, it could be that a Powerline adapter is in power saving mode or is set to use a different encryption key. - Power saving mode. You might see a message at the bottom of the screen regarding the power saving feature. If a unit goes into power saving mode, the Powerline Utility does not find it. Keeping a connected Ethernet cable plugged into the device keeps it active so that it does not go in to power saving mode. - Encryption keys are different. To fix this, you can do one of the following: \- Reset your Powerline adapters to their factory settings and default encryption key. Then set the encryption for all of your Powerline adapters. \- Connect your computer to each Powerline device and set up the network encryption key for one adapter at a time. Technical Specifications| Feature Specification | |
| Data and routing protocols IEEE 80 | 2.3 (10BASE-T), IEEE 802.3u (100BASE-Tx) |
| AC input for product only • 00-125V~, 0.1A (Max;NA)• 200-250V~, 0.1A (Max;others), | |
| Power consumption 3W | |
| Dimensions 138 x 65 x 40 mm (5.48 x 2.56 x 1.57 in.) | |
| Weight 0.235 kg (0.518 lb.) each | |
| Operating temperature: 0° to 40°C | (32° to 104°F) |
| Operating humidity: 10–90% maximum relative humidity, noncondensing | |
| Storage humidity | 5–95% maximum relative humidity, noncondensing |
| Encryption type | 128-bit AES |
| MAC addresses | 64: number of nodes that can be added to a single network |
| Bandwidth | 200 Mbps |
| Compatibility | HomePlug AV |
| Data transfer rate | Up to 200 Mbps with real throughput greater than 80 Mbps |
| Frequency band | 2-30 Mbps |
| Modulation type | OFDM symbol modulation |
| Electromagnetic emissions | FCC Part 15 Class B; CE-EMC Class B; 3-home FCC Certificate; HomePlug |
| Meets requirements of | UL Listed (UL 1950) /cUL IEC950; CE LVD; TUV CB; GS |