AVH-P8450BT - Receiver PIONEER - Free user manual and instructions
Find the device manual for free AVH-P8450BT PIONEER in PDF.

User questions about AVH-P8450BT PIONEER
0 question about this device. Answer the ones you know or ask your own.
Ask a new question about this device
Download the instructions for your Receiver in PDF format for free! Find your manual AVH-P8450BT - PIONEER and take your electronic device back in hand. On this page are published all the documents necessary for the use of your device. AVH-P8450BT by PIONEER.
USER MANUAL AVH-P8450BT PIONEER
ThankyouforpurchasingthisPIONEERproduct.
Toensureproperuse, pleasereadthroughthismanualbeforeusingthisproduct. It is especially important that you read and observe WARNINGS and CAUTIONS in thismanual.Pleasekeepthemanualinasafeandaccessibleplaceforfuturereference.

Besuretoreadthis
• DVDvideodiscregionnumbers6
- Handlingguidelines107

Precautions
IMPORTANTSAFEGUARDS4
Toensuresafedriving4
Toavoidbatteryexhaustion5

Beforeyoustart
Aboutthisunit6
Operatingenvironment6
Incaseoftrouble6
Adjustingtheresponsepositionsofthe touchpanels(TouchPanelCalibration)6
Useandcareoftheremotecontrol6

What'swhat
Headunit8
Remotecontrol9

Basicoperations
Basicoperations11
USB/iPod1andUSB/iPod213
Operatingthescrolliconandthescrubber bar13
Activatingthetouchpanelkeys14
Commonoperationsformenusettings/lists14
AdjustingtheLCDpanelangle14
Ejectingadisc14
EjectinganSD15
Removingthefrontpanel15
Attachingthefrontpanel15
Settingtheclock16
Resettingthemicroprocessor16
Demomode16

Tuner
Introductionoftuneroperations17
IntroductionofTVtuneroperations18

Playingmovingimages
Introductionofvideoplayback operations19

Playingaudio
Introductionofsound playback operations22

AdvancedAppMode
IntroductionofAdvancedAppMode operation26

UsingMIXTRAX
IntroductionofMIXTRAXoperation28 IntroductionofMIXTRAXEZoperation28

Playingstillimages
Introductionofstillimage playback operations29

Bluetooth telephone
Introduction of Bluetooth telephone operations31

Detailedinstructions
Storingandrecallingstations33
Displayingradiotext33
Storingandrecallingradiotext33
Storingthestrongeststations33
Tuningintostrongsignals33
Receivingtrafficannouncements34
UsingPTYfunctions34
Switchingthemediafiletype35
OperatingtheDVDmenu35
Operatingthisunit'siPodfunctionfromyour iPod36
Randomplay(shuffle)36
Repeating playback36
PlayingvideosfromyouriPod37
PlayingvideosfromUSBstoragedeviceand SD37
Browsingforavideo/musicontheiPod37
Resume playback(Bookmark)38
Frame-by-frame playback38
Slowmotionplayback39
Searchingforthepartyouwanttoplay39
Changingaudiolanguageduring playback (Multi-audio)39
Changing the subtitle language during playback (Multi-subtitle) 39
Changingtheviewingangleduring playback (Multi-angle)40
Returntothespecifiedscene40
Selectingaudiooutput40
PBCplayback40
Selectingtracksfromthetracktitlelist40
Selectingfilesfromthefilenamelist41
Usingsoundretriever41
Changingaudiobookspeed41
Displayinglistsrelatedtothecurrently playingsong(LinkSearch)41
SettingtheAdvancedDisplayResolution41
MusicBrowsemode41
PlayingDivX®VODcontent42
CaptureanimationJPEGfiles42
Changingthewidescreenmode42
Callinganumberinthephonebook43
Selectinganumberbyalphabetsearch mode43
Invertingnamesinphonebook44
Using themissed, received and dialed call lists44
Settingautomaticanswering45
Adjustingtheotherparty'slistening volume45
Switchingtheringtone45
Usingthepresetdiallists45
Makingacallbyenteringphonenumber46
Settingtheprivatemode46
13 Menuoperations
Introductionofmenuoperations47
Audioadjustments48
DigitalSignalProcessor51
SettinguptheVideoplayer61
Systemsettings65
Favoritemenu73
IntroductionofBluetoothconnectionmenu operations74
IntroductionofThemesettingmenu operations76
14 Otherfunctions
Settingrearmonitoroutput78
Adjustingtheresponsepositionsofthe touchpanels(TouchPanel Calibration)78
UsinganAUXsource78
Usinganexternalunit79
15 Installation
Connectingtheunits81
Installation94
Additionalinformation
Troubleshooting98
Errormessages100
UnderstandingautoEQerror messages104
Understandingmessages104
Indicatorlist105
Handlingguidelines107
Compressedaudiocompatibility(disc,USB, SD)110
iPodcompatibility111
Sequenceofaudiofiles111
Usingthedisplaycorrectly112
Bluetoothprofiles113
Copyrightandtrademark113
LanguagecodechartforDVD117
Specifications118
IMPORTANTSAFEGUARDS
Pleasereadalloftheseinstructionsregarding yourdisplayandretainthemforfuturereference.
1 Readthismanualfullyandcarefullybeforeoperatingyourdisplay.
2 Keep this manual handy as a reference for operating procedures and safety information.
3Paycloseattentiontoallwarningsinthis manualandfollowtheinstructionscarefully.
4 Donotallowotherpersonstousethissystemuntiltheyhavereadandunderstood theoperatinginstructions.
5 Donotinstallthedisplaywhereitmay(i) obstructthedriver'svision,(ii)impairthe performanceofanyofthevehicle'soperatingsystemsorsafetyfeatures,includingairbags,hazardlampbutton sor(iii) impairthedriver'sabilitytosafelyoperatethevehicle.
6 Donotoperatethisdisplayifdoingsoin anywaywilldivertyourattentionfrom thesafeoperationofyourvehicle.Always observesafedrivingrulesandfollowwall existingtrafficregulations.Ifyouexperiencedifficultyinoperatingthesystemor readingthedisplay,parkyourvehicleina safelocationandmakenecessaryadjustments.
7 Pleaseremembertowearyourseatbeltat alltimeswhileoperatingyourvehicle.If youareeverinanaccident,yourinjuries canbeconsiderablymoresevereifyour seatbeltisnotproperlybuckled.
8Neveruseheadphoneswhiledriving.
9 Topromotesafety, certain functions are disabled unless the parking brakeison, and the vehicle is not in motion.
10 Neversetthevolumeofyourdisplayso highthatyoucannothearoutsidetravfic andemergencyvehicles.
WARNING
Donotattempttoinstallorserviceyourdisplaybyyourself.Installationorservicingofthedisplaybypersonswithouttrainingandexperienceinelectronicequipmentandautomotiveaccessoriesmaybedangerousandcouldexposeyoutotheriskofelectricshockorotherhazards.
Toensuresafedriving
WARNING
•LIGHTGREENLEADATPOWERCON-NECTORISDESIGNEDTODETECT PARKEDSTATUSANDMUSTBECON- NECTEDTOTHEPOWERSUPPLYSIDE OFTHEPARKINGBRAKESWITCH.IM- PROPERCONNECTIONORUSEOF THISLEADMAYVIOLATEAPPLICABLE LAWANDMAYRESULTINSERIOUSIN- JURYORDAMAGE.
• To avoid the risk of damage and injury and the potential violation of applicable laws, this unit is not for use with videoscreen that is visible to the driver.
• To avoid the risk of accident and the potential violation of applicable laws, noviewing of frontseat videos should ever occur while the vehicle is being driven. Also, reardisplays should not be in a location where they are visibly distracting to the driver.
- Insomecountriesorstatestheviewingof imagesonadisplayinsideavehicleevenby personsotherthanthedrivermaybeillegal. Wheresuchregulationsapply,theymustbe obeyedandthisunit'svideofteaturesshould notbeused.
When you attempt to watch a video image while driving, the warning "Viewing off front seat videos from whiledriving is strictly prohibited." will appear on the front display. Towatch a video image on the front display, park your vehicle in as a safe place and apply the parking brake.
Whenusingadisplay connectedtoVOUT
PassengersintherearseatcanalsowatchvideosortheTVifyouconnectthisunittoadisplayusingtheVOUT.

WARNING
NEVER install thereard displayinalocation wherethedriver can watch videos or the TV while driving.
When using therearviewcamera
Withanoptionalrearviewcamera,thisunit canbeusedasanaidtokeepaneyeontrailers,orwhenbackingintoatightparkingspot.

WARNING
- SCREENIMAGEMAYAPPEARRE- VERSED.
- USEINPUTONLYFORREVERSEOR MIRRORIMAGEREARVIEWCAMERA. OTHERUSEMAYRESULTININJURY ORDAMAGE.

CAUTION
- Therearviewcamerafunctionistobeused asanaidtokeepaneyontrailers,orwhile backingup.Donotuseforentertainmentpurposes.
- Plesenotethattheedgesoftherearview cameraimagesmaydifferslightlyaccording towhetherfullscreenimagesaredisplayed whenbackingup,andwhethertheimagesare usedforcheckingtherearwhenthevehicleis movingforward.
Toavoidbatteryexhaustion
Keepthevehicleengine running when using this unit to avoid draining the battery power.
- Whennopowerissuppliedtothisunit, suchaswhenthevehiclebatteryisbeing replaced,themicrocomputerofthisunitre-
turnstoitsinitialcondition.Werecommendthatyoutranscribetheaudio adjustmentdata.

WARNING
Donotusewithvehiclesthatdonotfeaturean ACCposition.
Aboutthisunit
CAUTION
Thisproductisaclass1 laserproductclassifiedundertheSafetyoflaserproducts,IEC 60825-1:2007,andcontainsaclass1Mlaser module.Toensurecontinuedsafety,donotremoveanycoversorattempttogainaccessto theinsideoftheproduct.Referallservicingto qualifiedpersonnel.
CLASS 1 LASER PRODUCT
CAUTION—CLASS 1M VISIBLE AND INVISIBLE LASER RADIATION WHEN OPEN, DO NOT VIEW DIRECTLY WITH OPTICAL INSTRUMENTS.
CAUTION:
USEOFCONTROLRADJUSTMENTOR PERFORMANCEOFPROCEDURES OTHERTHANTHOSESPECIFIEDHEREIN MAYRESULTINHAZARDOUSRADIATION EXPOSURE. CAUTION: THEUSEOFOPTICALINSTRUMENTS WITHTHISPRODUCTWILLINCREASE EYEHAZARD.

CAUTION
- Donotallowthisunittocomeintocontact with liquids. Electricalshockcouldresult. Also, damagetothisunit, smoke, andoverheatingcouldresultfromcontactwithliquids.
- Keep this manual handy for futuristic reference.
• Always keep the volumelowen ought to hear outsidesounds. - Avoidexposuretomoisture.
- If the battery is disconnected, any preset memory will be erased.
Operatingenvironment
Thisunitshouldbeusedwithinthetemperaturerangesshownbelow. Operatingtemperaturerange: -10^ Cto+60°C EN300328ETCtesttemperature: -20^ Cand +55°C
Incaseoftrouble
Should this product fail to operate properly, please contact your dealer or nearest authorized Pioneer Service Station.
Adjustingtheresponse positionsofthetouchpanels (TouchPanelCalibration)
If you feel that the touch panel key on the screendeviate from the actual position that respond to your touch, adjust the response position of the touch panel. Referto Adjusting the response position of the touch panels (Touch Panel Calibration) on page 78.
Useandcareoftheremote control
Installingthebattery
Slidethetrayonthebackoftheremotecontroloutandinsertthebatterywiththeplus(+) andminus(-)polesalignedproperly. - Whenusingforthefirsttime,pulloutthe filmprotrudingfromthetray.

natural_image
Diagram of a sewing machine needle stitching a circular component with a handle, showing force direction arrows (no text or symbols)
WARNING
- Keepthebatteryoutofthereachofchildren. Shouldthebatterybeswallowed,consulta doctorimmediately.
- Batteries(batterypackorbatteriesinstalled) must not be exposed to excessive heats such as sunshine, fireorthelike.

CAUTION
• UseoneCR2025(3V) lithium battery.
- Removethebatteryiftheremotecontrolisnot usedforamonthorlonger.
- Thereisadangerofexplosionifthebatteryis incorrectlyreplaced.Replaceonlywiththe sameorequivalenttype.
- Donothandlethebatterywithmetallictools.
- Donotstorethebatterywithmetallicobjects.
- If the battery leaks, wipetheremote control completely clean and install anew battery.
- Whendisposingofusedbatteries,comply withgovernmentalregulationsorenvironmentalpublicinstitutions'rulesthatapplyinyour country/area.
Usingtheremotecontrol
Pointtheremotecontrolinthedirectionofthe frontpaneltooperate.
• Theremotecontrol may not function properly indirect sunlight.

Important
- Donotstoretheremotecontrolinhighttemperaturesordirectsunlight.
- Donotlettheremotecontrolfallontothe floor,whereitmaybecomejammedunderthe brakeoracceleratorpedal.
Headunit

text_image
Preaser ①②③④⑤⑥⑦⑧
text_image
Diagram of a device rear panel with numbered labels pointing to components like ventilation ducts and fan base.AtrimringisavailableforMiddleEastAsian andSouthAfricanmodels.
| PartPart | |||
| 1 | RESET | 7 | ◄/► (TRK) |
| 2SRC/OFF8 | ▲(eject)RefertoEjectinga disconpage14.RefertoEjectingan SDonpage15.RefertoAdjusting theLCDpanelangle onpage14.RefertoRemoving thefrontpanelon page15. | ||
| 3 | +/- (VOLUME/VOL) | 9 | AutoEQmicro-phoneinputjack Usetoconnectan autoEQmicro-phone. |
| 4MUTE10Discloadingslot | |||
PartPart
HOME Displayingthe HOMEdisplay. Thedisplayreturns totheLauncher screenwhilea3rd- partyapplicationis beingusedinAd- vancedAppMode. Doubleclickingthe iconontheLaunch- erscreenreturns thedisplaytothe HOMEdisplay.
⑪
SDmemorycard slot
MODE ⑥ Turningtheinformationdisplayoff.

CAUTION
- Donotuseunauthorizedproducts.
- WheninsertinganSDcardintothecardslot, makesurethatthelabelisfacingupand pressthecarduntilitclicksandcompletely locksintoplace.
Notes
- Whenthenavigationsystemisconnected, pressMODEtoswitchtothenavigationdisplay.PressMODEandholdtoturnthedisplay off. PressMODEagaintoturnthedisplayon.
- Fordetailsonhowtooperateanavigationsystemfromthisunit, refertoitsoperationmanual. WhenaniPhonethatisrunninganapplicationthatsupportsAdvancedAppModeisconnected, pressMODEtoswitchtothe applicationdisplay. Youcanusetheapplicationbytouchingthedisplay.
- AboutthewaytoconnecttheUSBportable audioplayer/USBmemorytothisunit,referto WhenconnectingwithoptionalICD-IU201V cableonpage87.
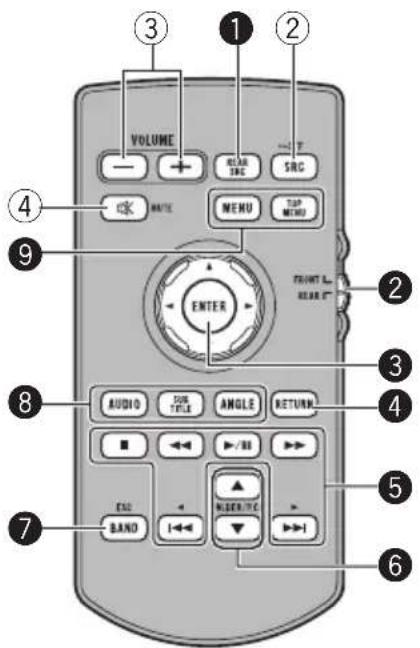
Remotecontrol
text_image
VOLUME RANGE SRC MENU TOP MENI FRONT L. RANGE ENTER AUDIO TUBE ANGLE RETURN BAND MUSICALS 1 2 3 4 5 6 7 8 9 ① ② ③ ④ ⑤PartOperation
| 1REARSRC | Presstocyclethrough alltheavailablerear sources. Pressandholdtoturn therearsourceoff. | |
| 2 | Sourcemodeselect switch | Usetoswitchthe sourcemodebetween thefrontsourceand therearsource. |
| 3 | Thumbpad | Usetoselectamenu ontheDVDmenu. |
| 4 | RETURN | Presstodisplaythe PBC( playbackcontrol)menuduringPBC playback. |
PartOperation
| ▶/II | Presstopauseorresumeplayback. | |
| ◀◀ | Presstoperformfast reverse.Presstochangethe fastreversespeed. | |
| 5 | ▶▶ | Presstoperformfast forward.Presstochangethe fastforwardspeed. |
| |◀◀ | Presstoreturntothe previoustrack(chapter). | |
| ▶▶| | Presstogotothenext track(chapter). | |
| ■ | Presstostopplay-back.Ifyouresumeplay-back, playbackwill startfromthepoint whereyoustopped.Touchthekeyagainto stopplaybackcompletely. | |
| 6 | ▲/▼(FOLDER/P.CH) | Presstoselectthe next/previousdisc/folder.Presstorecallradio stationfrequenciesassignedtopresettuningkeys. |
| 7BAND/ESC | Presstoselectthe tunerbandwhen tunerisselectedasa source.Alsousedto cancelthecontrol modeoffunctions.Presstoswitchbetweenmodeswhen playingfromdiscsorexternalstoragede-vices(USB,SD)with compressedaudio andaudiodata(CD-DA)suchaswithCD-EXTRAandMIXED-MODECDs. | |
| PartOperation | ||
| AUDIO | Presstochangethe audiolanguageduring DVD playback.Presstoswitchaudio outputforDivX/MPEG-4. | |
| 8 | SUBTITLE | Presstochangethe subtitlelanguageduringDVD/DivX/MPEG-4 playback. |
| ANGLE | Presstochangethe viewingangleduring DVD playback. | |
| 9 | MENU | Presstodisplaythe DVDmenuduring DVD playback. |
| TOPMENU | Presstoreturntothe topmenuduringDVD playback. | |

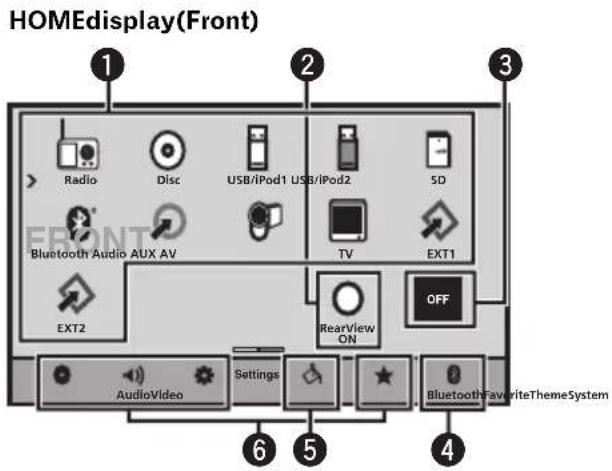
Basicoperations
text_image
HOMEdisplay(Front) 1 Radio Disc USB/iPod1 USB/iPod2 SD Bluetooth Audio AUX AV TV EXT1 EXT2 RearView ON OFF AudioVideo Settings Bluetooth FavoriteThemeSystem 6 5 4HOMEdisplay(Rear)

text_image
1 DiscMirror SDSB/iPod1 AV 3 REAR OFF AudioVideo Settings Bluetooth Favorite ThemeSystem 4 5 6Flick/dragtheicontoswitchbetweenFront andRearforHOMEdisplay.Makesureto touchthedisplaytoflick/dragthem. Thefollowingsectiondescribeshowtoswitch theoutputsourcefortherear monitor.Referto Settingrearmonitoroutputonpage78.
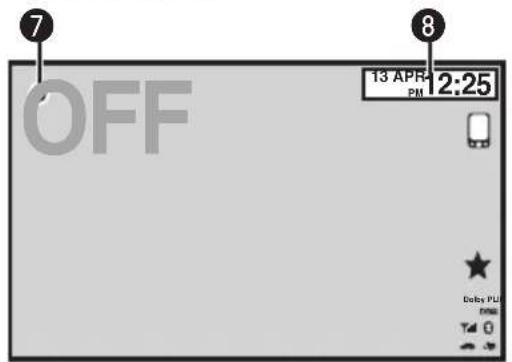
Sourceoffdisplay
text_image
7 OFF 13 APR PM 2:25 8 Delta PM TIME T4 0Sourceondisplay
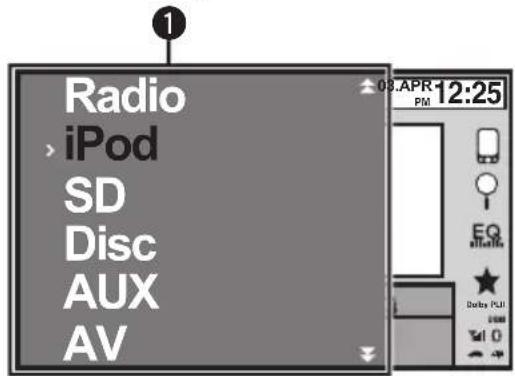
text_image
Radio > iPod SD Disc AUX AVTouch panel keys
1
text_image
Radio RadioSourceicon
Selectingafavoritesource. Whenthesourceiconisnot displayed, itcanbedisplayed bypassingthehomekeyor touching ♥.
Displayingtherearview imagebyturningtherear viewimageon. Whentherearviewimageis displayed,youcanswitchto thesourcedisplaybytouchingthedisplay.Youcanoperatefromthesourcedisplay temporarilyatthistime.If youdonotperformanyoperationswithinafewseconds,thedisplaywillreturn totherearviewimage. Toturnofftherearview image,pressHOMEtore-turntotheHOMEdisplay andthenpressthetouchkey again. Thisunitcanbesetuptodisplaytherearviewimage automaticallywhenyou movetheshiftlevertothe REVERSE(R)position.For detailsaboutthesettings, refertoSettingtherearview camera(backupcamera)on page68.
2

Turningthesourceoff.
| 4 |  | DisplayingtheBluetooth connectionmenu. RefertoIntroductionof Bluetoothconnectionmenu operationsonpage74. |
| 5 |  | DisplayingtheThememenu. RefertoIntroductionof Themesettingmenuoperationsonpage76. |
| 6 |  | Displayingthemenu. RefertoMenuoperationson page47. |
| 7 |  | Displayingthesourcemenu. |
| 8 |  | Switchingtoclockadjust-mentdisplay. RefertoSettingtheclockon page16. |
| SwitchingtoHOMEdisplay1PressHOMEwhenyouwanttoswitchthedis-play. |
| Turningthesourceonusingthebuttons1PressSRC/OFFtoturnthesourceon. |
| Turningthesourceoffusingthebuttons1PressSRC/OFFandholduntilthesourceturns off. |
| Selectingasourceusingthebuttons1PressSRC/OFFtocyclethroughthesources listedbelow:Selectingasourceusingthetouchpanelkeys1Touchthesourceiconandthentouchthedesired sourcename.Radio-RadioDisc-Built-inDVDplayerUSB/iPod1-USB/iPod1USB/iPod2-USB/iPod2SD-SDmemorycardBluetoothAudio-Built-inBluetoothaudioAUX-AUXAV-AVinputTV-TVtunerEXT1-Externalunit1EXT2-Externalunit2Whenthesourceiconisnotdisplayed,itcanbe displayedbytouchingthescreen.Whileoperatingthemenu,youcannotselecta sourcebytouchingthesourceicon. |
| Adjustingthevolume1Press+/- (VOLUME/VOL) to adjust the volume. |
Notes
- Inthismanual,iPodandiPhonewillbereferredtoas"iPod".
• TheUSB/iPod1orUSB/iPod2iconwill changeasfollows:
—USB1isdisplayedwhenaUSBstoragedeviceisconnectedtoUSBinput1.
—iPod1isdisplayedwhenaniPodisconnectedtoUSBinput1.
—USB2isdisplayedwhenaUSBstoragedeviceisconnectedtoUSBinput2.
—iPod2isdisplayedwhenaniPodisconnectedtoUSBinput2.
—STEEZisdisplayedwhena STEEZPORTABLE(Pioneerproduct)is connectedtoUSBinput1orUSBinput2.
—USB/iPod1orUSB/iPod2isdisplayed whennodeviceisconnected.
Basicoperations
- AnexternalunitreferstoaPioneerproduct, suchasthosewhichwillbeavailableinthefuture.Althoughhincompatibleasasource,the basicfunctionsofuptotwoexternalunitscan becontrolledwiththisunit.Whentwoexternalunitsareconnected,theexternalunitsare automaticallyallocatedtoexternalunit1or externalunit2.
USB/iPod1andUSB/iPod2
ThisunithasUSB/iPod1andUSB/iPod2 sources.
InUSB/iPod2, the following functions are not available.
—AdvancedAppMode
—Rearmonitoroutput
Operatingthescrollicon andthescrubberbar
text_image
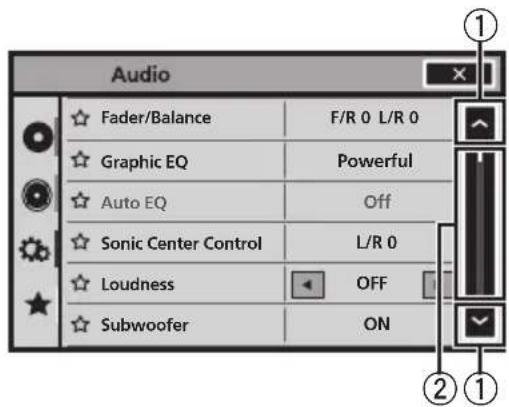
Audio Fader/Balance F/R 0 L/R 0 Graphic EQ Powerful Auto EQ Off Sonic Center Control L/R 0 Loudness OFF Subwoofer ON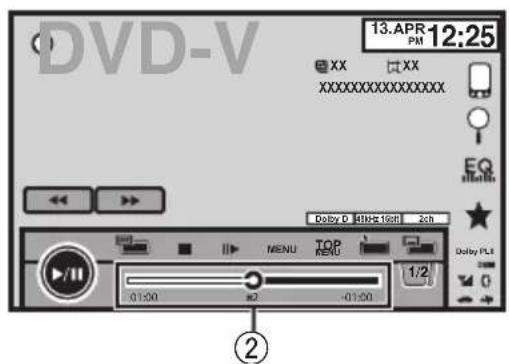
text_image
DVD-V 13.APR 12:25 XX XX XXXXXXXXXXXXX EQ Dolby D 4MHz 1GHz 2ch MENU TOP MENU 1/2 0:1:00 #2 -01:00 Dolby PLS ②①Scrollicon
Appearswhenselectableitemsarehidden.
② Scrubberbar
Appearswhenitemscannotbedisplayedona singlepageonly.
Viewing the hidden items
1 Touch the scroll icon or drag the scrubber bar to view any hidden items.
- Also, you can drag the list to view any hidden items.
Specifying the playback point
1 Drag the scrubber bar on the screen. (Not available when the scrubber bar is grayed out.)

Activatingthetouchpanel keys

text_image
DVD-V 13.APR 12:25 XX XX XXXXXXXXXXXXX Dally D 24Hz 16Hz 2ch 1/2 01:00 2 -0.00 MENU TOP MENU 1/2 01:00 2 -0.00 Return 1/2 01:00 2 -0.00Touch panel keys
1

text_image
1/2 2/2Switching the touch keys on the display.

Commonoperationsfor menusettings/lists

Starting the Bluetooth telephone menu.
Refer to Introduction of Bluetooth telephone operations on page 31.

Displaying the list menu. Starting the search function.

Displaying the EQ (Audio function menu).
Refer to Using the equalizer on page 48.

Displaying the Favorite menu. Refer to Favorite menu on page 73.

AdjustingtheLCDpanelangle

CAUTION
Keep hands and fingers clear of the unit when opening, closing, or adjusting the LCD panel. Be especially cautious of children's hands and fingers.
1 Press ▲(eject) to display the ejecting menu.
2 Adjust the LCD panel to an easily viewable angle.

Laying the panel down.

Returning the panel to the upright position.
- As the set angle is saved, the LCD panel will automatically be adjusted to the same position the next time the LCD panel is opened.
Ejectingadisc

CAUTION
Keep hands and fingers clear of the unit when opening, closing, or adjusting the LCD panel. Be especially cautious of children's hands and fingers.
1 Press ▲(eject) to display the ejecting menu.
Basicoperations
2Ejectadisc.

Ejectingadisc.

EjectinganSD
1Press▲(eject)todisplaytheejecting menu.
2EjectanSD.

EjectinganSD.
3PressanSDtoeject.

Removingthefrontpanel

CAUTION
- Donotattempttodetachthefrontpanelwhile DISC/SDisintheejectposition.
- Donotattempttodetachthefrontpanelwhile dataisbeingwrittentoUSB/SD. Doingsomaycausethedatatobecomecorrupted.
- Afterthefrontpanelhasbeendetached,the attachingplatewillmovebacktoitsoriginal positionautomatically. Becarefulnottolethandsorotherobjects getcaughtbehindthemonitorasitismoving back.
- Pleasemakesurethatthefrontpanelisinits originalpositionwhilethevehicleisinmotion. Itisdangeroustodrivewiththefrontpanel stickingout.
- Donotplacebeveragesorotherobjectson topofthefrontpanelwhileitisfullyopen.

Important
- Handlegentlywhenremovingorattaching thefrontpanel.
- Avoid subjecting the front panel to excessive shock.
- Keepthefrontpaneloutofdirectsunlightand hightemperatures.
- Ifremoved, replacethefrontpanelontheunit beforestartingupyourvehicle.
1Press△(eject)toreleasethefront panel.
2Touchthedetachkey.

Thefrontpanelautomatically slidestowardyou.
3Slidethedialatthebottomofthefront paneltotheright,andliftupthefront panelwhilepushingdownonthedial.
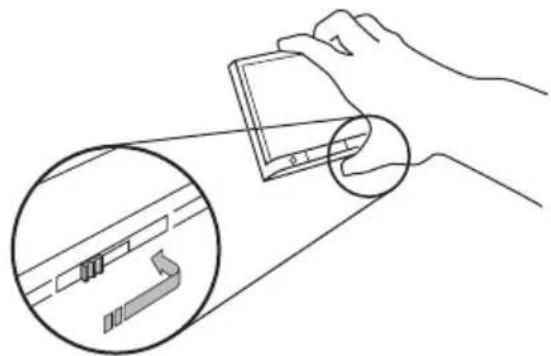
natural_image
Illustration of a hand holding a device with an inset close-up showing internal components (no text or symbols)4Putthefrontpanelintotheprovided protectivecaseforsafekeeping.
Attachingthefrontpanel
1Slidethefrontpanelintothetopofthe unitandpushitintoplace.
Slidetheinserteronthefrontpanelintotheinsertionslotontopoftheunitandpushitinto place.

natural_image
Technical line drawing of a mechanical assembly with no visible text or symbols2Pushonthebottomofthefrontpanel untilitclicksintoplace.

natural_image
Line drawing of a computer monitor with an arrow pointing to it (no text or symbols present)
Settingtheclock
1SwitchtoClockAdjustmentdisplay.
RefertoBasicoperationsonpage11.
Resettingthemicroprocessor
BypassingRESET, you can reset them micro-processortoits initial settings without changing the bookmark information.
Themicroprocessormustberesetinthefollowingsituations:
- Before using this unit for the first time after installation
- Iftheunitfailstooperateproperly
- Whenstrangeorincorrectmessagesappearonthedisplay
1TurntheignitionswitchOFF.
2PressRESETwithapentiporother pointedinstrument.
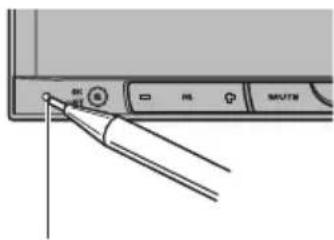
text_image
Diagram showing a device interface with labeled buttons and a pen tip pointing to a button labeled 'OK', 'OK', 'RE', 'MUTE'RESETbutton
Note
SwitchyourengineONorsettheignitionswitch toACCONbeforepressingRESETinthefollowingsituations:
• Aftercompletingconnections
- Whenerasingallstoredsettings
- When resetting the unit to its initial (factory) settings
Demomode
Thefeatureddemoautomaticallystartswhen youselectOffforthesourceandcontinues whiletheignitionswitchissettoACCorON. Tocancelthefeaturedemo,pressandhold MUTE.PressandholdMUTEagaintorestart.
Operating the featured demowhilethecarengineisturnedoffitmaydrainthebattery power.
Important
Failuretoconnecttheredlead(ACC)ofthisunit toaterminalcoupledwithignitionswitchon/off operationsmayleadtobatterydrain.
Introductionoftuner operations

text_image
Radio 1 FM 1 AM 13 ARP PM 12:25 EQ EQ Stereo Daily PLL 87.50 MHz TATocal News OPTION 9 8 7 6 5 4 3Touchpanelkeys
| 1 | FM1 | Selectingaband(FM1,FM2 orFM3)bytouchingtheleft icon.SwitchingtotheAM bandbytouchingtheright icon.Theiconfortheselectedband ishighlighted. |
| AM | ||
| 2 | DisplayingthePTYinformationRefertoUsingPTYfunctions onpage34. | |
| 3 | Text | DisplayingradiotextRefertoDisplayingradiotext onpage33.Storingandrecallingradiotext.RefertoStoringandrecalling radiotextonpage33. |
| 4 | News | Turningnewsprograminterruptiononoroff.RefertoUsingnewsprogram interruptiononpage34. |
| 5 | TA | TurningTA(trafficannouncementstandby)onoroff.RefertoReceivingtrafficannouncementsonpage34. |
| 6 | Local | Settingthelocalseeklevel.RefertoTuningintostrong signalsonpage33. |
7

natural_image
Two black right-pointing triangles above a horizontal line, no text or symbols presentTuningupordownmanually. Touchandholdformorethan twosecondstoskipstations. Seektuningstartsassoonas yourelease.Touchagainto cancelseektuning.
Displayingthepresetchannellist. RefertoStoringandrecallingstationsonpage33. RefertoStoringthestrongeststationsonpage 33.
⑨Selectapresetchannel.
Switchingpresetchannelsusingthebuttons |1| Press ◀ or ▶ (TRK).
Seektuningusingthebuttons [1] Press and hold ◀ or ▶ (TRK).
Notes
- ListeningAMradiowhileaniPodischarged from this unit may generate noise. In this case, disconnect theiPod from this unit.
- Touch panel keys not listed under Introduction oftuneroperationsmayappearonthedisplay. Referto Indicatorlistonpage105.
IntroductionofTVtuner operations

text_image
TV 1 13 ARP PM 12:25 1 AAAAAA BBBBB CCCCC 2/2 DDDDDD EEEEE FFFFFF BSM CH 888 P.CH only Pull 6 5 4 3 2You can use this unit to control a TV tuner, such as the GEX-P5750TVP (sold separately).
For details concerning operation, refer to the TV tuner's operation manual. This section provides information on TV operations with this unit, which differs from that described in the TV tuner's operation manual.
Touch panel keys
| 1 |  | Selecting a band. |
| 2 |  | Tuning up or down manually.Touch and hold for more than two seconds to skip stations. Seek tuning starts as soon as you release. Touch again to cancel seek tuning. |
| 3 |  | Changing the screen mode.Refer to Changing the wide screen mode on page 42. |
| 4 |  | Touch to turn BSSM on.Refer to Storing the strongest stations on page 33. |
| 5 | Displaying the preset screen.Refer to Storing and recalling stations on page 33.Refer to Storing the strongest stations on page 33. | |
| 6 | Select a preset channel. | |
| Switching preset channels using the buttons1 Press ▲ or ▶ (TRK). |
| Seek tuning using the buttons|1 Press and hold ▲ or ▶ (TRK). |
Notes
• Refer to Setting the video signal on page 69 to set the TV signal.
• Refer to Selecting the area group on page 70 to select the area group.
- Touch panel keys not listed under Introduction of TV tuner operations may appear on the display.
Refer to Indicator list on page 105.
Playingmovingimages
Introductionofvideo playbackoperations
YoucanviewDVD/DVD-R/DVD-RW/CD/CD-R/CD-RW/USB/SD/iPod.
- DependingonyouriPod,theremaynotbe anyoutputunlessyouuseCD-IU201S/CD-IU201V(soldseparately).Besuretouse CD-IU201S/CD-IU201Vtoconnectyour iPod.
DVDvideo
text_image
DVD-V 13.APR 12:25 XX XX XXXXXXXXXXXXXX Doby 64Wkts 1kb 01:00 MENI TOP MENU 01:00 1:2 0 3 Return 2/2 01:00 1:00 16 15 14 13 12 11 10 9 8 7 6 5 4 By PLLVideoCD
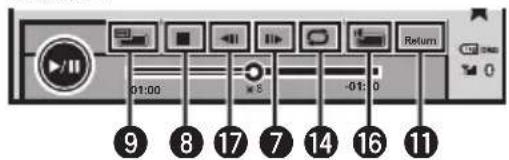
text_image
01:00 -01:0 Return 9 8 17 7 14 16 11iPodvideo
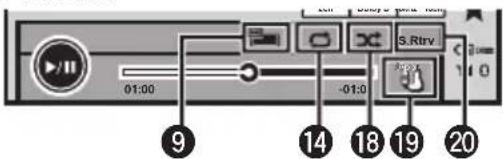
text_image
01:00 -01:0 S.Rtrv 9 14 18 19 20Whenplayingadisccontainingamixture ofvariousmediafiletypes
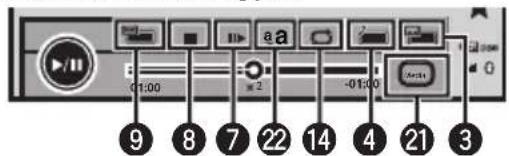
text_image
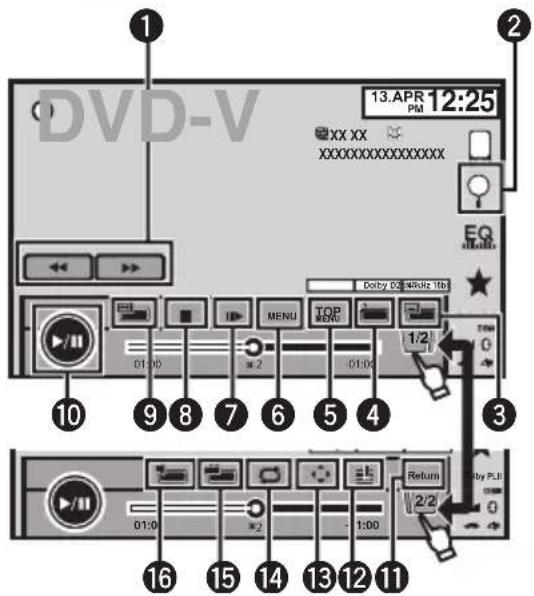
01:00 aa -01:00 9 8 7 22 14 4 21 3Touchpanelkeys
| 1 |  | Fastforwardingorreversing Presstochangethefastforwardandreverspeed. |
| 2 |  | Startingthesearchfunction.RefertoSearchingforthepartyouwanttoplayonpage39.RefertoSelectingfilesfrom thefilenamelistonpage41.DisplayingiPodmenus.RefertoPlayingvideosfrom youriPodonpage37and Browsingforavideo/music ontheiPodonpage37. |
| 3 |  | Switchingbetweenensubtitlelanguagesduring playback.RefertoChangingthesubti-tleanguageduring playback (Multi-subtitle)onpage39. |
| 4 |  | Switchingbetweenlan-guages/audiosystemsdur-ing playback.RefertoChangingaudiolan-guageduring playback(Multi-audio)onpage39. |
| 5 |  | Returningtothetopmenu duringDVD playback. |
| 6 |  | DisplayingtheDVDmenu duringDVD playback.RefertoOperatingtheDVD menuonpage35. |
| 7 |  | Movingaheadoneframeata timeduring playback.RefertoFrame-by-frameplay-backonpage38.Touchandholdformore thantwosecondstoslow downplaybackspeed.Speedinguptheplayback speedinfourstepsduring slowmotionplaybackon DVDvideo/VideoCD. |
Playingmovingimages
| 8 |  | Stopping playback.Ifyouresume playback, play-backwill start from the pointwhere you stopped. Touchthe key again to stop play-back completely. | 18 | Playing the video on youriPodinarandom order.Referto Random play (shuffle) on page 36. |
| 9 |  | Changing the screen mode.Referto Changing the wide screen mode on page 42. | 19 | Conducting operation from youriPod and listening to it using your car speakers.Referto Operating this unit's iPod function from youriPod on page 36. |
| 10 |  | Pausing playback.Returnington normal play-back during paused, slow motion, or frame-by-frame playback. | 20 | Switching the S. Rtrv (sound retriever) function setting when playing audio.Referto Usingsound retriever on page 41. |
| 11 |  | Returning to the specified scenetow which the DVD currently being played has been preprogrammed to return.Referto Return to the specific scene on page 40. | 21 | Switching between media filetypest play on DVD/CD/USB/SD.Referto Switching the media filetype on page 35. |
| 12 |  | During playback, touch the point at which you want to resume playback then next time the disc is loaded.Referto Resume playback(Bookmark) on page 38. | 22 | Adjusting the images on the display. Ford details, referto Setting the Advanced Display Resolution on page 41. |
| 13 |  | Displaying arrow keystooperat the DVD menu.Referto Using the arrow keys on page 35. | ||
| 14 |  | Selecting there repeat range.Referto Repeating playback on page 36. | ||
| 15 |  | Switching among viewing angles during playback.Referto Changing the viewing angled during playback (Multi-angle) on page 40. | ||
| 16 |  | Switching the audio output, when playing videodiscs recorded with LPCM audio.Referto Selecting audio output on page 40. | ||
| 17 |  | Speeding down the playback speed in four steps, during slow motion playback on DVD video/Video CD. |
Playingmovingimages
Playingbackvideos
①Insertthediscintothediscloadingslotwiththe labelsideup. Playbackwillautomaticallystart.
- If you are playing a DVD or Video CD, amenu may appear. Referto Operating the DVD menu on page 35 and PBC playback on page 40.
- When the automatic playback function is on, the unit will skip the DVD menu and automatically start playback from the first chapter of the first title. Referto Automatic playback of DVD on page 64.
- WhileaniPodisconnectedtothisunit, PIONEER, AccessoryAttachedor √ (checkmark)isdisplayontheiPod.
- Whenthesourceiconisnotdisplayed, it can be displayed by touching the screen.
- DisconnectheadphonesfromtheiPodbefore connectingittothisunit.
- DependingontheiPodmodelandtheamountof datastoredintheiPod.itmaytakesometimefor playbacktobegin.
- UsethetouchpanelkeystoselecttheiPodafter connectingittothisunit.
- NoDevice is displayed when disconnecting the iPod.
- IfamessageisdisplayafterloadingadiscontainingDivXVODcontent,touchPlay. RefertoPlayingDivX ^® VODcontentonpage42.
Ejectingadisc/SD
• RefertoEjectingadisconpage14.
• RefertoEjectinganSDonpage15.
Selectingachapterusingthebuttons
1 Press ◀ or ▶ (TRK).
Fastforwardingorreversingusingthebuttons
1 Press and hold ◀ or ▶ (TRK).
- Fastforward/fastreversemaynotalwaysbepossibleonsomediscs.Insuchcases,normalplay-backwillautomaticallyresume.
- Thefastforward/fastreversespeeddependson thelengthoftimeyoupressandholldown ◀or ▶ (TRK). This function is not available for Video CD.
Notes
- ThisDVDplayercanplaybackaDivXfilere-cordedonCD-R/RW,DVD-R/RW,orMPEG-1/MPEG-2/MPEG-4.(Pleaseseethefollowing sectionforfilesthatcanbeplayedback.Refer toDivXvideofilesonpage109.)
- DonotinsertanythingotherthanaDVD-R/RWorCD-R/RWintothediscloadingslot.
- Ifthebookmarkfunctionison,DVD playback resumes from these selected point.Formore details,refertoResume playback(Bookmark) on page38.
- Someoperationsmaynotbeavailablewhile watchingamediaduetotheprogramming of thedisc.Insuchcases,the iconappears onthescreen.
- Toensureproperoperation,connectthedock connectorcablefromtheiPoddirectlytothis unit.
- While theiPodisconnectedtothisunit, the iPodcannotbeturnedonoroff.
- TouchpanelkeysnotlistedunderIntroduction ofvideoplaybackoperationsmayappearon thedisplay.
RefertoIndicatorlistonpage105.
Introductionofsound playbackoperations
YoucanlistentoDVD-R/DVD-RW/CD/CD-R/CD-RW/USB/SD/iPodsoundfiles.
AudioCD
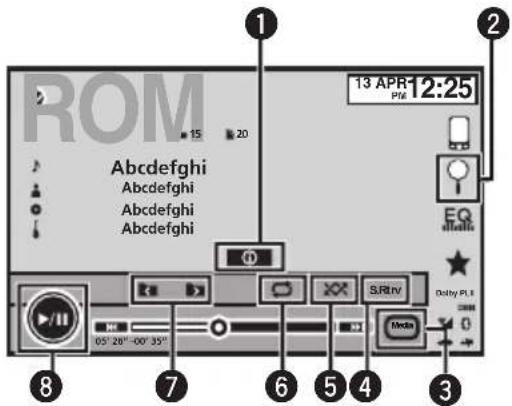
text_image
ROM 13 APR 12:25 15 20 1 2 Abcdefghi Abcdefghi Abcdefghi Abcdefghi EQ Dolby PL 8 7 6 5 4 3 05' 20" -00' 35" S.R.Rnv MediaiPodaudio(ControlAudio)
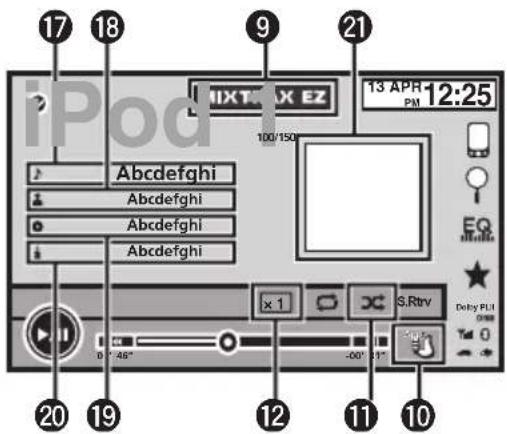
text_image
17 18 iPod 9 21 13 APR PM 12:25 100/150 Abcdefghi Abcdefghi Abcdefghi Abcdefghi x 1 S.Rtrv Delay PLI 0° 46° -00° 31° 20 19 12 11 10iPodaudio(AppMode)

text_image
14 13USB/SDaudio
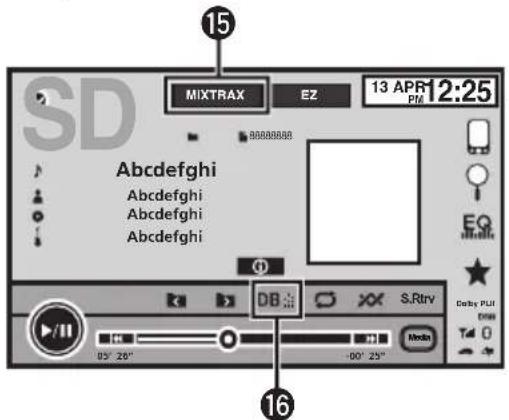
text_image
15 MIXTRAX EZ 13 APR 12:25 98888888 Abcdefghi Abcdefghi Abcdefghi Abcdefghi DB S.Rtrv 05" 20" -00" 25" Audio Derby PLI T4 0- Depending on your iPod, there may not be any output unless you use CD-IU201S/CD-IU201V(sold separately). Besuretouse CD-IU201S/CD-IU201V to connect your iPod.
BluetoothAudio

text_image
05" 40" 80" 25" Delay: PUT T4 0- Depending on the Bluetooth audioplayer connected to this unit, the available operations will be limited to the following two levels:
—A2DPprofile(AdvancedAudio DistributionProfile): Youcanonly playback songsonyouraudioplayer.
—AVRCPprofile (Audio/VideoRemote ControlProfile): Youcanperformplay-back, pause playback, selectsongs, etc.
- SincethereareanumberofBluetooth audioplayersavailableonthemarket,availableoperationswillvaryextensively. When operatingyourplayer withthisunit,referto theinstructionmanualthatcamewithyour Bluetoothaudioplayeraswellasthismanual.
- Asthesignalfromyourcellularphonemay causenoise, avoid using it when you are listening to song son your Bluetooth audio player.
Playingaudio
- Whenacallisprogressonthecellular phoneconnectedtothisunitviaBluetooth wirelesstechnology,thesoundofthe Bluetoothaudioplayerconnectedtothis unitismuted.
• The playtimemaynotdisplaycorrectly. - DependingonthetypeofBluetoothaudio playeryouhaveconnectedtothisunit,operationandinformationdisplaymaynotbe availableforsomefunctions.
Touchpanelkeys
| 1 | SwitchingthetextinformationtodisplayonthisunitwhenplayingMP3/WMA/AAC/WAVfiles. | |
| 2 | Displayingalistoftracktitles/filenamestoselectsongsonaCD.RefertoSelectingtracksfromthetracktitlelistonpage40.Displayingthefilenamelisttoselectthefiles.RefertoSelectingfilesfromthefilenamelistonpage41.DisplayingiPodmenus.RefertoBrowsingforavideo/musicontheiPodonpage37. | |
| 3 | SwitchingbetweenmediafiletypesonaDVD/CD/USB/SD.RefertoSwitchingthemediafiletypeonpage35. | |
| 4 | SwitchingtheS.Rtrv(soundretriever)functionsettingwhenplayingaudio.RefertoUsingsoundretrieveronpage41. | |
| 5 | Playingsongsinrandomorder.RefertoRandomplay(shuffle)onpage36. | |
| 6 | Selectingtherepeatrange.RefertoRepeatingplay-backonpage36. |
| 7 | Selectingafolder. | |
| 8 | Pausingandstarting playback. | |
| 9 | MIXTRAX EZ | StartingMIXTRAXEZ.Referto/Introductionof MIXTRAXEZoperationon page28. |
| 10 | Conductingoperation fromyouriPodandlisten-ingtoitusingyourcar's speakers.RefertoOperatingthis unit'siPodfunctionfrom youriPodonpage36. | |
| 11 | Playingsongsonthe iPodinrandomorder.RefertoRandomplay (shuffle)onpage36. | |
| 12 | Changingthespeedof audiobookplaybackon theiPod.RefertoChangingaudio-bookspeedonpage41. | |
| 13 | Performingoperations fromthisunitandlisten-ingtothemusiconyour iPodusingyourcar's speakers. | |
| 14 | Changingthescreen mode.RefertoChangingthe widescreenmodeon page42. | |
| 15 | DisplayingtheMIXTRAX screen.Referto/Introductionof MIXTRAXoperationon page28. | |
| 16 | StartMusicbrowse mode.RefertoMusicBrowse modeonpage41. |
Textinformation
| 17 | DisplayingtheSongslist ontheiPod. Thisfunctionisavailable forUSB/SDwhenusing Musicbrowsemode. RefertoSearchingfora video/musicbycategory onpage38. | |
| 18 | DisplayingtheArtistslist ontheiPod. Thisfunctionisavailable forUSB/SDwhenusing Musicbrowsemode. RefertoSearchingfora video/musicbycategory onpage38. | |
| 19 | DisplayingtheAlbums listontheiPod. Thisfunctionisavailable forUSB/SDwhenusing Musicbrowsemode. RefertoSearchingfora video/musicbycategory onpage38. | |
| 20 | DisplayingtheGenres listontheiPod. Thisfunctionisavailable forUSB/SDwhenusing Musicbrowsemode. RefertoSearchingfora video/musicbycategory onpage38. |
Artworkdisplay
| 21 | StartingAlbumLinkSearchonyouriPod whenyoutouchtheartworkdisplay. ThisfunctionisavailableforUSB/SDwhen usingMusicbrowsemode. RefertoDisplayinglistsrelatedtothecurrentlyplayingsong(LinkSearch)onpage41. |
| Playingbacksound1Insertthediscintothediscloadingslotwiththe labelsideup.Playbackwillautomaticallystart.·WhileaniPodisconnectedtothisunit,PIONEER,AccessoryAttachedor √ (checkmark)isdisplayontheiPod.·Whenthesourceiconisnotdisplayed,itcanbe displayedbytouchingthescreen.·DisconnectheadphonesfromtheiPodbefore connectingittothisunit.·DependingontheiPodmodelandtheamountof datastoredintheiPod,itmaytakesometimefor playbacktobegin.·UsethetouchpanelkeystoselecttheiPodafter connectingittothisunit.·NoDeviceisdisplayedwhendisconnectingthe iPod. |
| Ejectingadisc/SD·RefertoEjectingadisconpage14.·RefertoEjectinganSDonpage15. |
| Selectingatrackusingthebuttons1 Press ◀ or ▶ (TRK). |
| Fastforwardingorreversingusingthebuttons1 Press and hold ◀ or ▶ (TRK). |
Note
TouchpanelkeysnotlistedunderIntroductionof soundplaybackoperationsmayappearonthedisplay.
Referto/Indicatorlistonpage105.
SettingupforBluetoothaudio
BeforeyoucanusetheBluetoothaudiofunctionyoumustestablishaBluetoothwireless connectionbetweentheunitandyour Bluetoothaudioplayer.
1 Connection
First,youneedtoconnectaBluetoothaudioto thisunit.
Fordetailedinstructionsonconnectingyour BluetoothaudiotothisunitviaBluetoothwireless technology,seeIntroductionofBluetoothconnectionmenuoperationsonpage74.
Playingaudio
Notes
- WhenplayingbackfilesrecordedasVBR (variablebitrate)files,theplaytimewillnotbe correctlydisplayediffastforwardorreverse operationsareused.
- Toensureproperoperation,connectthedock connectorcablefromtheiPoddirectlytothis unit.
- While theiPodisconnectedtothisunit, the iPodcannotbeturnedonoroff.
- If the characters recorded on the disc are not compatible with this unit, those characters will not be displayed.
- Textinformationmaynotbecorrectlydisplayeddependingontherecordedenvironment.
- DisconnecttheUSBportableaudioplayer/USBmemorywhenyouaredoneusingit.
- WhenyouselectSpeanaonSelectingthe backgrounddisplayonpage77,theartworkis notdisplayed.
IntroductionofAdvanced AppModeoperation
ThissystemcanswitchtotheAdvancedApp Mode, whichyoucandisplayandoperatethe applicationforiPhoneonthescreen. InAdvancedAppMode, youcanoperateapplicationswithfingergesturessuchastapping, dragging, scrollingorflickingonthescreenof thesystem.
- Pioneerisnotliableforanyissuesthatmay arisefromincorrectorflawedapp-based content.
•Thecontentandfunctionalityofthesupportedapplicationsaretheresponsibilityof theAppproviders. - InAdvancedAppMode, functionality through the product is limited while driving, with available functions determined by the Appproviders.
- AvailabilityofAdvancedAppModefunctionalityisdeterminedbytheAppprovider, andnotdeterminedbyPioneer.
- AdvancedAppModeallowsaccesstoapplicationsotherthanthoselisted(subject tolimitationswhiledriving),buttheextent towhichcontentcanbeusedisdetermined bytheAppproviders.
AdvancedAppModeiscompatiblewiththe followingiPodmodels.
- iPhone4S
- iPhone4
- iPodtouch4thgeneration
—Applicationsoperablebyswitchingthis systemtoAdvancedAppModeareonly thoseavailableforAdvancedAppMode.
—PleasecheckiPhoneapplicationssupportedAdvancedAppModeat http://www.pioneerelectronics.com/AppRadio

Important
- Use the CD-IU201S (sold separately) when you use this function.
- TheportthatsupportsAdvancedAppMode willonlybeUSBinput1.
- Whenyousethisfunction, settheRGBinput toiPhone. Fordetails, refertoSettingtheRGB Inputonpage65.
- Dependingontheapplication,youcaninput textonthedisplay.
- When using application which allows you to input text on the keyboard, set the language setting of this unit and youriPod. Ford details, refer to Setting the Keyboard on then next page.
- When listening to music and sounds from applications simultaneously, seethefollowing section. Referto Setting the Appsound mixing on page 65.

CAUTION
- Whiledriving, you cannot enter text on your iPod.
- UsetheconnectediPodtoopenanapplication.
Startingprocedure
1SetRGBInputtoiPhone.
Whenyouusethisfunction,settheRGBinput toiPhone.Fordetails,refertoSettingtheRGB Inputonpage65.
2StartanapplicationavailableforAdvancedAppModefromtheiPhone.
Animageoftheapplicationisdisplayedon thescreenofthissystem.
- Youcanstartanapplicationavailablefor AdvancedAppModealsofromalauncher application.
3TouchMODEtohidetheAVsource iconsorwaituntilthesourceiconsdisappear.
- If the source icons are displayed, you cannot conduct the operation of application on the screen.
4Operatetheapplication.
SettingtheKeyboard

CAUTION
Foryoursafety, thekeyboard functionality is only available when the vehicle is stopped and the parking brake is engaged.
Dependingontheapplication,youcaninput textonthedisplay.Inordertoinputtextcorrectlyusingkeyboardwhichappearsonthis unit,youneedtosethelanguagesettingin thisfunction.
When the Advanced App Mode is used, the languagesetting for the keyboard set for the function and the language setting for the iPhone keyboard need to be the same.
- KeyboardisavailableonlyinAdvanced AppMode.
WhenyoutapatextinputareaofanapplicationforiPhone,akeyboardwillbedisplayed on-screen.Youcaninputthedesiredtextdirectlyfromthissystem. - Thelanguagepreferenceforthekeyboard ofthissystemshouldbesameasthesettingonyouriPhone. Ifthesettingsforthisproductandthe iPhonearedifferent,youmaynotbeableto entercharactersproperly.
1Displaythesystemmenu.
RefertoIntroductionofmenuoperationson page47.
2TouchKeyboardontheSystemmenu toselectdesiredlanguage.
3Touchthedesiredlanguage.
French (French)—German (German)—Greek (Greek)—Russian (Russian)—English (English)—English (UK) (English)—Dutch (Dutch)
—Italian (Italian)—Norwegian (Norwegian)
—Swedish (Swedish)—Finnish (Finnish)—
Spanish(Spanish)—Portuguese(Portuguese)
4TapthetextinputareaontheapplicationscreenoftheiPhone.
Touch ↓ tohidethekeyboard.
IntroductionofMIXTRAX operation
YoucanplaytheaudiofilesofUSB/SD.
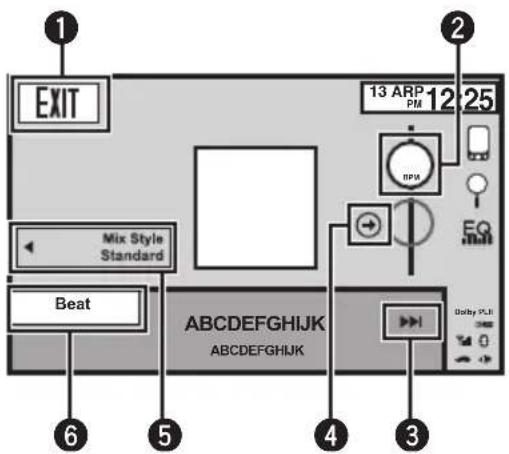
text_image
EXIT Mix Style Standard Beat 13 ARP PM 12 25 RPM EQ + - 6 5 4 3 angles PLU ABCDEFGHIJK ABCDEFGHIJKMIXTRAXisoriginaltechnologyforcreating non-stopmixesofselectionsfromyouraudio library,completewithDJeffectsthatmake themsoundasifaDJisrighttherewithyou playingthemusic.
UsingMIXTRAX
Youcanenjoyyourmusicfilesbyinstallingthe MIXTRAXsoftwaretoyourcomputerand usingthesoftwaretotransferthefilestoUSB devicesandSDcards.
The MIXTRAX software can be downloaded from the website below.
http://www.mixtraxnet.com
FordetailsonhowtousetheMIXTRAXsoftware,refertotheonlinemanual.

Important
The artwork display can be moved based on the music type. For details, refer to Setting the Art-work Dance on page 70.
Touch panel keys
| 1 | EXIT | Switching to the audio mode of USB/SD. |
| 2 | BPM | Changing the BPM (Beats Per Minute). |
| 3 | Starting playback of the next song. | |
| 4 | Switching to the original BPM (Beats Per Minute). The original BPM (Beats Per Minute) does not display during playback. | |
| 5 | Mix Style | Switching to the Mix style display. You can select the desired Mix style in the display. |
| 6 | Beat | Switching to the Mix play. You can select the desired Mix play. |
Starting playback of the next song. 1 Press ▶ (TRK).

IntroductionofMIXTRAX EZoperation
YoucanplaytheaudiofilesofiPod/USB/SD. MIXTRAXEZisusedtoaddavarietyofsound effectsbetweensongsforarrangingthe pausesbetweensongs.Itallowsyoutoenjoy listeningtomusicnonstop.
- This function is only available when a file on an external storage device (USB, SD) or asongonaniPodis being played.
- ThisfunctionisnotavailablewhenthecontrolmodeissettoAppMode.
- Dependingonthefile/song, soundeffects may not been enabled for adding.
- Dependingonthefile/song, non-stopplay-backmaynotbeavailable.
Introductionofstillimage playbackoperations
YoucanviewstillimagessavedinUSB/SD.
Stillimage
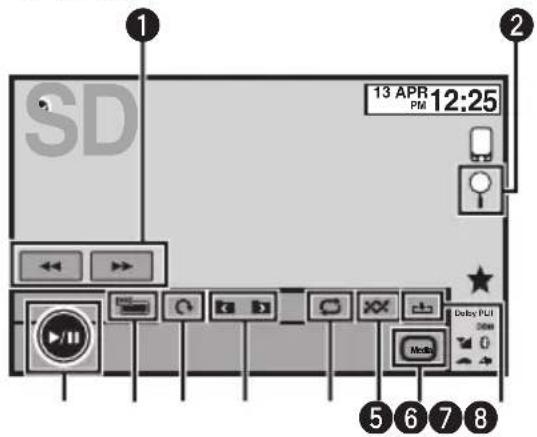
text_image
13 APR PM 12:25 SD Delay PUI 0 Media 5 6 7 8WhenloadingaUSB/SDcontainingJPEGpicturefiles,thisunitstartsaslideshowfromthe firstfolder/pictureonthedevice.
Thetablebelowshowsthecontrolsforviewing aslideshow.
Touch panel keys

text_image
1Selectingapicture. 2 Displayingthefilename listtoselectthefiles. RefertoSelectingfiles fromthefilenameliston page41. 3 Capturinganimagein JPEGfiles. RefertoCapturean imageinJPEGfileson page42.| 4 | Media | Switchingbetween mediafiletypeswhen thereismorethanone mediafiletypesavedto theUSBorSDdevice. Thiskeydoesnotappear ifthereisonlyonemedia filetypesavedtotheUSB orSDdevice. RefertoSwitchingthe mediafiletypeonpage 35. |
| 5 | Playingfilesinarandom order. RefertoRandomplay (shuffle)onpage36. | |
| 6 | Selectingtherepeat range. RefertoRepeatingplay-backonpage36. | |
| 7 | Selectingafolder. | |
| 8 | Rotatingthedisplayed picture90°clockwise. | |
| 9 | Changingthescreen mode. RefertoChangingthe widescreenmodeon page42. | |
| 10 | Startingorpausingthe slideshow. |
| layingstillimagesConnecttheUSB/SDdevice.Playbackwillautomaticallystart.Whenthesourceiconisnotdisplayed,itcanbe displayedbytouchingthescreen. |
| jectinganSDRefertoEjectinganSDonpage15. |
Selectingafileusingthebuttons
1 Press ◀ or ▶ (TRK).
Fastfilesearching
1 Press and hold ◀ or ▶ (TRK).
- Youcansearch10JPEGfilesatatime.
Notes
- Filesareplayedbackinfilenumberorderand foldersareskippediftheycontainnofiles.(If folder1(ROOT)containsnofiles, playback commenceswithfolder2.)
- TouchpanelkeysnotlistedunderIntroduction ofstillimageplaybackoperationsmayappear onthedisplay.
RefertoIndicatorlistonpage105.

IntroductionofBluetooth telephoneoperations
YoucanuseBluetoothtelephone.
Telephonestandbydisplay
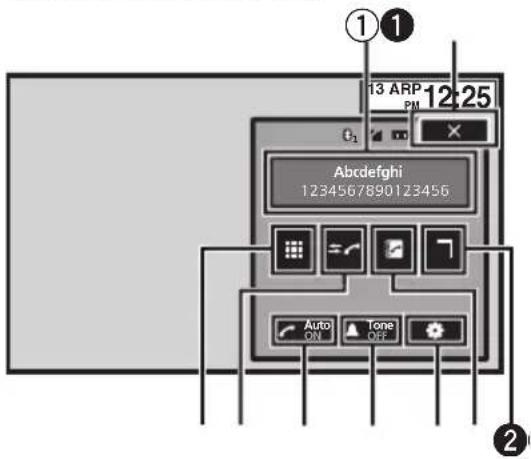
text_image
13 ARP PM 12:25 E1 Abdefghi 12345678901Z3456 Auto ON Tone OFFWhenswitchingtotheenteringphone
numbermode
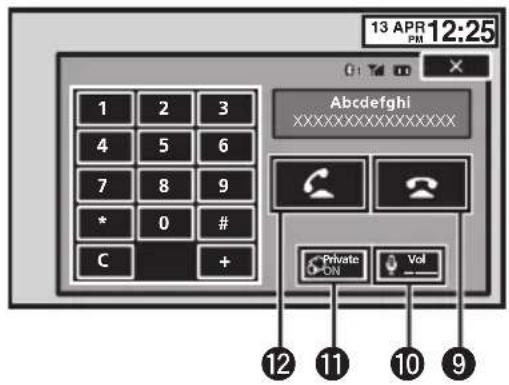
text_image
13 APR 12:25 1 2 3 4 5 6 7 8 9 * 0 # C + Abcdefghi XXXXXXXXXXXXX Private ON Vol 12 11 10 9
Important
- Sincethisunitisonstandbytoconnectwith yourcellularphoneviaBluetoothwireless technology, usingitwithouttheengine runningcandrainthebatterypower.
- Advancedoperationsthatrequireattention suchasdialingnumbersonthemonitor,etc., areprohibitedwhiledriving.Parkyourvehicle inasafeplacewhenusingtheseadvanced operations.
- Bluetoothconnectionmenucannotbeselectedwhiledriving.
-
Operationsavailablemaybelimiteddependingonthecellularphoneconnectedtothis unit.
-
Besuretoparkyourvehicleinasafeplace andapplytheparkingbrakewhenperforming thisoperation.
- If you are unable to complete the connection using this unit, use the device to connect to the unit.
- If you connect more than one device at a time, connected device may not operate properly. Connecting one device at a time is recommended.
①Incomingcallnotice
Indicatesthatanincomingcallhasbeenreceivedandhasnotbeencheckedyet.
- Notdisplayedforcallsmadewhenyour cellularphoneisdisconnectedfromthis unit.
Touchpanelkeys
| 1 | × | Displayisclosed. |
| 2 | Displayingthepresetdial screen.RefertoUsingthe presetdial lists onpage45. | |
| 3 | Switching tothephonebook mode.Refer toCallinga numberin the phonebookonpage43.Refer toSelectinganumber by alphabetsearch modeon page 43. | |
| 4 | Displayingthe Bluetooth connectionmenu.Refer totheinstructions from page74topage76. | |
| 5 | Tone | Turning theringtonefor in-coming callsonoroff.Refer toSwitchingthering tone onpage45. |
| 6 | Auto | Turning automatic answering on oroff.Refer to Setting automatic an-sweringon page45. |
Bluetoothhtelephone
| 7 |  | Switchingtothecallhistory list. RefertoUsingthemissed,receivedanddialedcalllistson page44. |
| 8 |  | Switchingthemodetoenter thephonenumberdirectly. RefertoMakingacallbyenteringphonenumberonpage 46. |
| 9 |  | Endingacall. Rejectinganincomingcall. Cancelingcallwaiting. |
| 10 |  | Adjustingtheotherparty's listeningvolume. RefertoAdjustingtheother party'slisteningvolumeon page45. |
| 11 |  | Turningprivatemodeonor off. RefertoSettingtheprivate modeonpage46. |
| 12 |  | Acceptinganincomingcall. Makingaphonecall,when selectingaphonenumber. Switchingbetweencallerson hold. |
Notes
- Privatemodecanonlybeoperatedwhileyou aretalkingonthephone.
• Toendthecall, bothyouandtheothercaller musthangupyourphones. - Touchpanelkeysnotlistedunder/Introduction ofBluetoothtelephoneoperationsmayappear onthedisplay.
Referto/Indicatorlistonpage105.
Settingupforhands-freephoning
Beforeyoucanusethehands-freephoning functionyoumustsetuptheunitforusewith yourcellularphone. Thisentailsestablishinga Bluetoothwirelessconnectionbetween this unitandyourphone, registeringyourphone withthisunit,andadjustingthevolumelevel.
1Connection
First,youneedtoconnectaBluetoothtelephone tothisunit.
Fordetailedinstructionsonconnectingyour phonetothisunitviaBluetoothwirelesstechnology,seefollowingsection.UsingaBluetoothdevicetopaironpage75andPairingfromthisunit onpage74.
2 Volumeadjustment
Adjusttheearpiecevolumeofyourcellularphone toyourpreference.Theunitwillrecordthead-justedvolumelevelasthedefaultsetting.
• The volume of the caller's voice and ringtone may vary depending on the type of cellular phone.
- If there is a large volumed difference between theringtone and caller's voice, the overall volume level may become unstable.
- Makesuretoadjustthevolumetoaproper levelbeforedisconnectingthecellularphone fromtheunit.Ifthevolumeismuted(zero level)onyourcellularphone,thevolumelevel ofyourcellularphoneremainsmutedeven afterthecellularphoneisdisconnected.

Storingandrecallingstations
Youcaneasilystoreuptosix(fortuner)/12(for TV)stationsforeachbandaspresets.
1Displaythepresetscreen.
Referto/Introductionoftuneroperationson page17. Referto/IntroductionofTVtuneroperationson page18. Thepresetscreenappearsinthedisplay.
2Touchandholdoneofthepresettuningkeystostoretheselectedfrequencyin thememory.
Theselectedradio/TVstationfrequencyhas beenstoredinthememory.
3Touchoneofthepresettuningkeysto selectthedesiredstation.
Displayingradiotext
RadiotextdatatransmittedbyRDSstations, suchasstationinformation, thenameofthe currentlybroadcastsongandthenameofthe artist, canbedisplayedonthistuner.
- Whennoradiotextisreceived, NoTextappearsinthedisplay.
Storingandrecallingradio text
You can stored data fromuptosixradiotext transmission to the Memo1 to Memo6 keys.
1Displaytheradiotextyouwantto storeinthememory.
RefertoIntroductionoftuneroperationson page17.
2Touchandholdoneofthekeystostore theselectedradiotext.
Thememorynumberisdisplayedandthese-lectedradiotextwillbestoredinthememory.
Thenexttimeyoupressthesamekeyinradio textdisplaythestoredtextwillberecalled fromthememory.
Storingthestrongeststations
BSM(beststationsmemory)automatically storesthesix(fortuner)/12(forTV)strongest stations.
StoringbroadcastfrequencieswithBSMmay replacebroadcastfrequenciesyouhavesaved usingthepresettuningkeys.
1Displaythepresetscreen.
RefertoIntroductionoftuneroperationson page17. RefertoIntroductionofTVtuneroperationson page18. Thepresetscreenappearsinthedisplay.
2TouchBSM/BSSMtoturnBSMon.
Thesix(fortuner)/12(forTV)strongestbroadcastfrequencieswillbestoredunderpreset tuningkeysinorderoftheirsignalstrength.
■Tocancelthestorageprocess,touch Cancel.
Tuningintostrongsignals
Localseektuningletsyoutuneintoonly thoseradiostationswithsufficientlystrong signalsforgoodreception.

text_image
FM:Off— AM:Off—The highest level setting allows reception of only the strongest stations, while lower levels allow thereception of weaker stations.
Receivingtraffic announcements
Regardless of the source you are listening to, you can receive traffic announcements automatically with TA (traffic announcement standby).
1TuneintoaTPorenhancedothernet-work'sTPstation.

indicatorlightsup.
2TurnTrafficannouncement.
RefertoIntroductionoftuneroperationson page17.
■IftheTAfunctionisturnedonwhenyouare nottunedintoaTPorenhancedothernetwork's TPstation,the indicatorlightsupdimly.
3Press+/-(VOLUME/VOL)toadjustthe TAvolumewhenatrafficannouncement begins.
Thenewlysetvolumeisstoredinthememory andwillberecalledforsubsequenttrafficannouncements.
4Turnofftheannouncementwhilea trafficannouncementisbeingreceived.
Referto/Introductionoftuneroperationson page17.
ThetunerreturnstotheoriginalsourcebutremainsintheTAfunctionstandbymodeuntil theiconistouchedagain.
UsingPTYfunctions
YoucantuneintoastationusingPTY(programtype)information.
SearchingforanRDSstationby PTYinformation
Youcansearchforgeneraltypesofbroadcastingprograms,suchasthoselistedinthefollowingsection.Refertothispage.
1Displaythepresetscreen.
RefertoIntroductionoftuneroperationson page17.
2TouchPTY.
3Touch▲or▼toselectaprogramtype.
Therearefourprogramtypes: News&Info—Popular—Classics—Others
4TouchStarttobeginthesearch.
Theunitsearchesforastationbroadcasting thattypeofprogram.Whenastationisfound, itsprogramservicenameisdisplayed.
PTY(programtype)informationislistedinthe followingsection.Refertothispage.
■Tocancelthesearch,touchCancel.
■The program of somestations may differ from that indicated by the transmitted PTY.
■Ifnostationisbroadcastingthetypeofprogramyousearchedfor,NotFoundisdisplayed forabouttwosecondsandthenthetunerreturns totheoriginalstation.
Usingnewsprograminterruption
Whenanewsprogramisbroadcastfroma PTYcodenewsstation,theunitcanswitch fromanystationtothenewsbroadcaststation.Whenthenewsprogramends,reception ofthepreviousprogramresumes.
PTYlist
News&Info
News (News), Affairs (Current affairs), Info (Information), Sport (Sports), Weather (Weather), Finance (Finance)
Popular
PopMus(Popularmusic), RockMus(Rockmusic), EasyMus(Easylistening), OthMus(Othermusic), Jazz (Jazz), Country (Country music), Nat Mus (Nationalmusic), Oldies(Oldiesmusic), FolkMus(Folk music)
Classics
L.Class(Lightclassical), Classic(Classical)
Others
Educate (Education), Drama (Drama), Culture (Culture), Science (Science), Varied (Varied), Children (Children's), Social (Social affairs), Religion (Religion), Phone In (Phone in), Touring (Travel), Leisure (Leisure), Document (Documentaries)

Switchingthemediafiletype
When playing digital media containing a mixture of various media file types, such as DivX, MPEG-1, MPEG-2, MPEG-4 and MP3, you can switch between media file type to play.
Audiodata(CD-DA)andJPEGpicturefileson DVD-R/RW/ROMcannotbeplayedbackon thisunit.
CD(audiodata(CD-DA))—Music/ROM(compressedaudio)—Video(DivX,MPEG-1,MPEG-2,MPEG-4videofiles)—Photo(JPEG picturefiles)
OperatingtheDVDmenu
(FunctionforDVDvideo)
SomeDVDsallowyoutomakeaselection fromthedisccontentsusingamenu.
Usingthearrowkeys
1DisplayarrowkeystooperatetheDVD menu.
RefertoPlayingmovingimagesonpage19.
2Selectthedesiredmenuitem.

text_image
Vertical arrangement of four arrow symbols: up, down, <, and >Selectingthedesiredmenuitem.

Starting playback from these- lected menu item.

OperatingtheDVDmenubydirectlytouchingthemenuitem.

BacktoPreviousdisplay.
■WhenoperatingtheDVDmenubydirectly touchingthemenuitem,touchtheicontooperate.

ReturningtothenormalDVDvideo display.

Displayingarrowkeys.
■Waystodisplaythemenuwilldifferdependingonthedisc.
■ Depending on the content so the DVD disc, this function may not work properly. In such cases, usethetouch panel keystoo operat the DVD menu.
Operatingthisunit'siPod functionfromyouriPod
YoucanlistentothesoundfromyouriPodapplicationsusingyourcar'sspeakers,when AppModeisselected.
This function is not compatible with the following iPod models.
- iPodnano1stgeneration
- iPodwithvideo
- While this function is in use, the Pod will not turn off even if the ignition key is turned off. Operatethei Pod to turn off the power.
1SwitchthecontrolmodetoAppMode.
RefertoIntroductionofvideoplaybackoperationsonpage19.
RefertoIntroductionofsoundplaybackoperationsonpage22.
2OperatetheconnectediPodtoselecta video/songandplay.
Notes
- The following functions are still accessible from the uniteven if the control mode is set to AppMode.
However, the operation will depend on your applications.
—Playing/pausing
—Fastforwarding/reversing
—Trackingup/down
—Movingtoachapterup/down
- AppMode is compatible with the following iPodmodels.
—iPodtouch4thgeneration
—iPodtouch3rdgeneration
—iPodtouch2ndgeneration
—iPodtouch1stgeneration
—iPodclassic160GB
—iPodclassic120GB
—iPodclassic
—iPodnano6thgeneration
—iPodnano5thgeneration
—iPodnano4thgeneration
—iPodnano3rdgeneration
—iPodnano2ndgeneration
—iPhone4S
—iPhone4
—iPhone3GS
—iPhone3G
—iPhone
Randomplay(shuffle)
iPod-videos/songscanbeplayedbackinrandomorder.
- Songs—Playbackvideos/songsinthese-lectedlistinrandomorder.
• Albums—Playbackvideos/songsfroma randomlyselectedalbuminorder. - Folder-Playbacksongs/tracksinthese-lectedfolderinrandomorder.
- Disc-Playbacksongs/tracksinthese-lecteddiscinrandomorder.
- On-Playbackfilesinrandomorderwithin therepeatrange, FolderandDisc.
- Off-Cancelrandomplay.
Repeating playback
•Disc-Playthroughthecurrentdisc
- Chapter–Repeat the current chapter
•Title—Repeat the current title
- Track–Repeat the current track
- File—Repeatthecurrentfile
- Folder–Repeat the current folder
•One—Repeatjustthecurrentvideo/song
- All-Repeatallvideos/songsinthese-lectedlistontheiPod
- This function cannot be operated during VideoCD playback featuring PBC (playback control).
- If you perform chapter search, fast forward/ reverse, frame-by-frame playback slow motion playback, therepeat play will stop.
Detailedinstructions
- When playing discswithcompressed audio and audiodata(CD-DA), playback is repeated within the type of data currently playing even if Disc is selected.
- If you select another folder during repeat play, therepeat play range changesto Disc. If you select USB or SD source, therepeat play range changesto All.
- If you perform track search or fast forward/ reversed during File, therepeat play range changesto Folder.
- Ifyouperformtitle/chaptersearchorfast forward/reverseduringChapter,therepeat playissettooffautomatically.
- If you perform track search forward/ reversed during Track, therepeat play range changesto Disc.
- WhenFolderisselected, it is not possible to playback as subfolder of that folder.
PlayingvideosfromyouriPod
(FunctionforiPod)
VideoscanbeplayedonthisunitifaniPod withvideocapabilitiesisconnected.
- This unit can play back "Movies", "Music videos", "Video Podcast" and "TV show" which are downloaded from the iTunes store.
1DisplaytheiPodmenus.
RefertoPlayingmovingimagesonpage19.
2SwitchtoiPodvideomode.
text_image
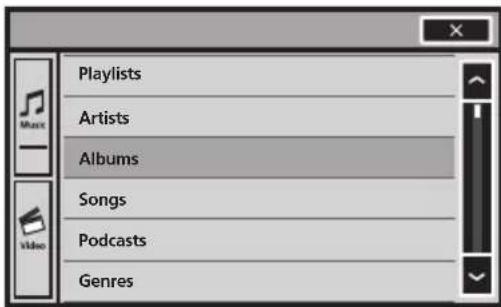
Playlists Artists Albums Songs Podcasts Genres■IfyouwanttoswitchtoiPodvideomode, touchtheicon.

SwitchingtoiPodvideomode.
3PlaythevideofromtheiPod.

text_image
Video Playlists Movies Music Videos Video Podcasts TV Shows Rentals■ IfyouwanttoswitchtoiPodmusicmode, touchtheicon.

SwitchingtoiPodmusicmode.

PlayingvideosfromUSB storagedeviceandSD
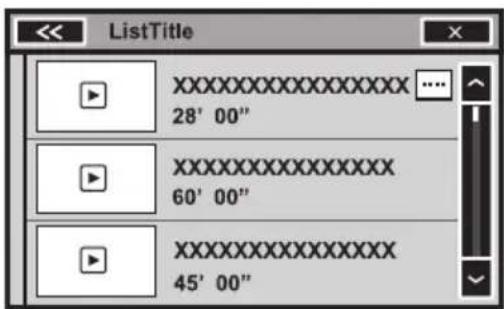
text_image
ListTitle XXXXXXXXXXXXXX 28' 00" XXXXXXXXXXXXXX 60' 00" XXXXXXXXXXXXXX 45' 00"Touchtheplaybacksignofthethumnailto previewthefile.Touchthetitletostart playback.
Browsingforavideo/music ontheiPod
(FunctionforiPod)
Detailedinstructions
Tomakeoperatingandsearchingeasy,operationstocontrolaniPodwiththisunitaredesignedtobeassimilartotheiPodaspossible.
Searchingforavideo/musicby category
1DisplaytheiPodmenus.
RefertoPlayingmovingimagesonpage19.
RefertoPlayingaudioonpage22.
2Touchoneofthecategoriesinwhich youwanttosearchforavideo/music.
• VideoPlaylists(videoplaylists)
- Movies(movies)
• MusicVideos(musicvideos)
• VideoPodcasts(videopodcasts)
•TVShows(TVshows)
•Rentals(rentals)
- Playlists(playlists)
- Artists(artists)
- Albums(albums)
- Songs(songs)
- Podcasts(podcasts)
- Genres(genres)
• Composers(composers)
• Audiobooks(audiobooks)
3Touchthetitleofthelistthatyouwant toplay.
Repeat this operation until you find the desired video/music.
Notes
- YoucanplayplaylistscreatedwiththePCapplication(MusicSphere).Theapplicationwill beavailableonourwebsite.
- PlayliststhatyoucreatedwiththePCapplication(MusicSphere)aredisplayedinabbreviatedform.
Searchingthelistbyalphabet
(FunctionforiPod)
1Selectacategory.
RefertoSearchingforavideo/musicbycategoryonthispage.
2Switchtoalphabetsearchmode.
ABC
Switchingtoalphabetsearch mode.
Alphabetsearchmodeisdisplayed.
3Touchthefirstletterofthetitleofthe video/songyouarelookingfor.
Whilesearching,touchpanelkeyoperationis notavailable.
■Torefinethesearchwithadifferentletter, touchCancel.
4Touchthetitleofthelistthatyouwant toplay.
Repeatthisoperationuntilyoufindthedesiredsong/video.
Resume playback(Bookmark)
(FunctionforDVDvideo)
By using the Bookmark function, you can resume playback from a selected scene then next timethedisloaded.
Theselectedscenewillbebookmarkedsothat playbackresumesfromthatpointnexttime.
- Toclearthebookmarkonadisc,touchand holdthekeyduringplayback.
- Theoldestbookmarkisreplacedbythe newone.
Frame-by-frame playback
(FunctionforDVDvideo/videoCD/DivXfile/MPEG-1/MPEG-2/MPEG-4)
Note
Imagesduringframe-by-frame playbackmaybe unclearforsomediscs.
Slowmotion playback
Notes
- Thereisnosoundduringslowmotionplayback.
- Imagesduringslowmotionplaybackmaybe unclearforsomediscs.
- Reverseslowmotion playback is not available.
Searchingforthepartyou wanttoplay
Youcanusethesearchfunctiontofindthe partyouwanttoplay.
ForDVDvideos,youcanselectTitle(title),
Chapter(chapter)or10key(numerickeypad).
ForvideoCDs,youcanselectTrack(track)or
10key(numerickeypad).
- Chaptersearchisnotavailablewhendisc playbackisstopped.
- This function cannot be operated during some DVD videos or Video CD playback featuring PBC (playback control).
1Startthesearchfunction.
RefertoPlayingmovingimagesonpage19.
2Touchthedesiredsearchoption(e.g., Chapter).
3Touch0to9toinputthedesirednumber.
■Tocanceltheenterednumbers,touchC.
4Start playback from these selected part.

Registeringthenumbersandstart-ing playback.
Note
Withdiscsfeaturingamenu,youcanalsouse theDVDmenutomakeyourselection.
RefertoPlayingmovingimagesonpage19.

Changingaudiolanguage during playback(Multi-audio)
WithDVDs/DivXfilesthatprovidesaudioplaybackindifferentlanguagesanddifferent audiosystems(DolbyDigital,DTS,etc.),you canswitchbetweenlanguages/audiosystems during playback.
Notes
- WithsomeDVDs, switching between languages/audiosystems may only be possible using amenudisplay.
- Youcanalsoswitchbetweenlanguages/audio systemsusingVideoSetupmenu.Fordetails, referetoSettingtheaudiolanguageonpage61.
- Dependingonthesetting, thevideomaynot beplayedbackwiththeaudiosystemusedto recordtheDVD.
- Youwillreturntonormal playback if you changetheAudio during fastforward/fastreverse, pauseorslowmotion playback.
Changingthesubtitle languageduring playback (Multi-subtitle)
With DVDs/DivXfilesfeaturingmulti-subtitle recordings,youcanswitchbetweensubtitle languagesduring playback.
Notes
- WithsomeDVDs, switching between subtitle languages may only be possible using a menu display.
- YoucanalsoswitchbetweensubtitlelanguagesusingVideoSetupmenu.Fordetails, refertoSettingthesubtitlelanguageonpage 61.
- Youwillreturntonormal playback if you changethe Subtitle during fast forward/fast reverse, pauseorslowmotion playback.
Changingtheviewingangle during playback(Multi-angle)
With DVDsfeaturingmulti-angle(scenesshot from multipleangles)recordings,youcan switchamongviewinganglesduringplay-back.
- During playbackofasceneshotfrommultipleangles,theangleiconisdisplayed. UsetheVideoSetupmenutoturnthe angleicondisplayonoroff.Fordetails, refertoSettingthemulti-angleDVDdisplay onpage61.
Note
Youwillreturntonormalplaybackifyouchange theviewingangleduringfastforward/fastreverse.pauseorslowmotionplayback.
Returntothespecifiedscene
(FunctionforDVDvideo)
Thisfunctioncannotbeusedifaspecified scenehasnotbeenpreprogrammedonthe DVDdisc.
Selectingaudiooutput
WhenplayingDVDvideodiscsrecordedwith LPCMaudio,youcanswitchtheaudiooutput. WhenplayingvideoCDs,youcanswitchbetweenstereoandmonauralaudiooutput.
- Thisfunctionisnotavailablewhendisc playbackisstopped.
•L+R—Leftandright
- Left-Left
- Right-Right
- Mix-Mixingleftandright
Note
Youmaynotbeabletoselectorusethisfunction dependingonthediscandthe playback location.
PBCplayback
(FunctionforVideoCDs)
During playback of Video CDs featuring PBC (playback control), PBCOn is displayed.
1Startthesearchfunction.
RefertoPlayingmovingimagesonpage19.
2Touch10keytodisplaythenumeric keypad.
3Touch0to9correspondingtoamenu number.
4Start playback from these selected part.

Registeringthenumbersandstart-ing playback.
Notes
- YoucandisplaythemenubytouchingReturn duringPBC playback. Fordetails, refertothe instructionsprovidedwiththedisc.
- PBC playback of a VideoCD cannot be canceled.
- During playback of Video CDs featuring PBC (playback control), you cannot select there-peat play range or use these search function.

Selectingtracksfromthe tracktitlelist
Youcanselecttrackstopaybackusingthe tracktitlelistwhichisalistofthetracksrecordedonadisc.
1Displaythetracktitlelist.
RefertoPlayingaudioonpage22.
2Touchyourfavoritetracktitle.
Playbackbegins.
Selectingfilesfromthefile namelist
(Functionforcompressedaudio/DivX/MPEG-1/MPEG-2/MPEG-4)
Filenamelistisalistoffilenames(orfolder names)fromwhichyoucanselectafile(or folder)toplayback.
1Displaythefile(orfolder)namelist.
RefertoPlayingaudioonpage22.
RefertoIntroductionofstillimageplaybackoperationsonpage29.
2Touchyourfavoritefile(orfolder) name.
■Whenyouhaveselectedafolder,alistofthe namesofthefiles(orthefolders)initcanbe viewed.Repeatthisoperationtoselectthedesiredfilename.
■Iffolder1(ROOT)containsnofiles, playback commenceswithfolder2.
Note
If part of therecorded information does not display, asc roll key appears on the right side of list.
Touchthescrollkeytoscroll.
Usingsoundretriever
Automaticallyenhancescompressedaudio andrestoresrichsound.
Off— ■ — ■ ■
- ismoreeffectivethan.

Changingaudiobookspeed
(FunctionforiPod)
- × 2 -Playbackataspeedfasterthannormal
- ×1 –Playbackatnormalspeed
- × 1/2 -Playbackataspeedslowerthannormal
Displayinglistsrelatedto thecurrentlyplayingsong (LinkSearch)
(FunctionforiPod/USB/SD)
1Touchtheartworkdisplay.
RefertoIntroductionofsoundplaybackoperationsonpage22.
2Touchthetitleofthelistthatyouwant toplay.
Notes
- If part of the recorded information does not display, ascroll key appears on the right side of list. Touch the scroll key to scroll.
- ThisfunctionisavailableforUSB/SDwhen usingMusicbrowsemode.
SettingtheAdvanced DisplayResolution
(FunctionforUSB/SD)
Youcanincreasetheresolutionofmoving imagesonyourUSB/SDstoragedevice.
OFF—1—2
- With some pictures, display adjustment may not be possible.
- Theremaynotbeanyeffectobserved in somecasesdependingontheimages beingplayedback.
MusicBrowsemode
(FunctionforUSB/SD)
Thisunitcreatesanindexinordertofacilitate browsingforasong.YoucansearchbythecategoriessuchasAlbumsandArtists.

CAUTION
- ThisfunctionisnotavailablewhentheUSB/SDstoragedeviceislocked.
- Thisfunctionisnotavailablewhenthefree spaceofUSB/SDstoragedeviceis5MB.
Detailedinstructions
- While this unit creates an index, don't turn the unit off. It may cause loss of data on your USB/SD storage device.
1CreatethedatabaseinMusicbrowse mode.
RefertoIntroductionofsoundplaybackoperationsonpage22.
2When"SavetheDabasetomemory?" isdisplayed, touch"Yes"
Savingofthedatabaseiscompleted.Ifyoudo notsaveit,touch"No". Whenthesavingiscompleted,"Database savetomemorywascompleted."appears.
3Displayalistandtouchthetagkey.
4Selectafile.
Musicbrowsemodewillstart.

PlayingDivX® VODcontent
SomeDivXvideoondemand(VOD)content mayonlybeplayableafixednumberoftimes. Whenyouloadadisccontainingthistypeof content,thenumberoftimesithasbeen playedwillbeshownon-screen.Youcanthen decidewhetherornottoplaythedisc.
- If there is no limit to the number of times the Div XVOD content can be viewed, then you may load the disc into your player and play the content as often as you like, and nomessagewill bed displayed.
- Youcanconfirmthenumberoftimesthat thecontentcanbeplayedbycheckingthe numberdisplayedafterThisDivXrental hasused □□ outofviews.

Important
- InordertoplayDivXVODcontentsonthis unit,youfirstneedtoregistertheunitwith yourDivXVODcontentsprovider.Fordetails onyourregistrationcode,refertoDisplaying theDivX® VODregistrationcodeonpage64.
- DivXVODcontentisprotectedbyaDRM(DigitalRightsManagement)system. Thisre-
strictsplaybackofcontenttospecific, registereddevices.
- Ifamessageisdisplayedafterloading adiscontainingDivXVODcontent,touch Play.
PlaybackoftheDivXVODcontentwillstart.
■ Toskiptothenextfile,touchNextPlay.
■ If you donot want to play the Div XVOD content, touch Stop.
CaptureanimageinJPEGfiles
Youcancaptureimagedataanduseitaswall-paper. Imagescanbestoredandrecalledea-silyinthisunit.
- Onlyoneimagecanbestoredonthisunit. Oldimageisoverwrittenwiththenewone.
1Pausetheslideshowwhenthedesired imageisdisplayed.
RefertoIntroductionofstillimageplaybackoperationsonpage29.
2Capturetheimage.
RefertoIntroductionofstillimageplaybackoperationsonpage29.
3When "Doyousavethisimage?" is displayed, touch Yes.
Whilestoringtheimagetothisunit, "Saving theimage.Don'tswitchoffthebattery." is displayed. Whentheprocessisfinished, "Imagesaved." isdisplayed.
■Tocancelthestorageprocess,touchNo.

Changingthewidescreen mode
Youcanselectadesiredmodeforenlarginga 4:3picturetoa16:9picture.
1Displaythescreenmode.
Referto/Introductionofvideoplaybackoperationsonpage19.
RefertoIntroductionofstillimageplaybackoperationsonpage29.
2Touchthedesiredwidemodesetting.
FULL(fullscreen)
The4:3pictureisenlargedinthehorizontaldirectiononly,givingyoua4:3TVpicture(normalpicture)withoutanyomissions.
ZOOM(zoom)
The4:3pictureisenlargedinthesameproportion bothverticallyandhorizontally;idealforacinema sizedpicture(widescreenpicture).
NORMAL(normal)
The4:3pictureisdisplayedasitis, giving you no sense of disparity since its proportions are the same asthatofthenormalpicture.
TRIMMING(trimming)
The image is displayed across the entire screen with the horizontal-to-vertical ratio left of it. If the horizontal-to-vertical ratio differs between the display and the image, the image may be displayed partly cutoff either at the top/bottom or sides.
Notes
- You cannot operate this function while driving.
- Differentsettingscanbestoredforeachvideo source.
- Whenavideoisviewedinawidescreenmode thatdoesnotmatchitsoriginalaspectratio,it mayappeardifferent.
- Remember that using the widest mode feature of this system for commercial or public viewing purposes may constitute an infringement on the author's rights protected by the Copyright Law.
- Thevideoimagewillappearcoarserwhen viewedinZOOMmode.
- FULL/ZOOM/NORMAL is used for videos. NORMAL/TRIMMING is used for JPEGimages.
Callinganumberinthe phonebook
Thephonebookinyourcellularphonewillbe transferredautomaticallywhenthephoneis connectedtothisunit.
Afterfindingthenumberyouwanttocallin thephonebook,youcanselecttheentryand makethecall.
1Switchtophonebookmode.
RefertoIntroductionofBluetoothtelephoneoperationsonpage31.
Thephonebookdisplayappears.
2Selectthephonenumberlist.
Thedetailedphonenumberlistoftheselected entryisdisplayed.
3Selectthephonenumber.
■Ifyouwanttostorethephonenumber,touch andholdthelist.
4Makethecall.
RefertoIntroductionofBluetoothtelephoneoperationsonpage31.
5Endthecall.
RefertoIntroductionofBluetoothhtelephoneoperationsonpage31.
Note
Dependingonthecellularphone,thephonebook maynotbetransferredautomatically.Inthis case,operateyourcellularphonetotransferthe phonebook.Thevisibilityofthisunitshouldbe on.RefertoSwitchingvisibleunitonpage75.

Selectinganumberby alphabetsearchmode
Ifalotofnumbersareregisteredinthephone book,youcansearchforthephonenumberby alphabetsearchmode.
Detailedinstructions
1Switchtophonebookmode.
RefertoIntroductionofBluetoothtelephoneoperationsonpage31.
Thephonebookdisplayappears.
2TouchABCtoswitchtoalphabetsearch mode.
3Touchthefirstletteroftheentryyou arelookingfor.
ThePhoneBookentriesstartingwiththatletter (e.g. "Ben", "Brian" and "Burt" when "B" is selected)willbedisplayed.
■ If you want to chan get the character to Russian, touch the icon. Toreturn to English, touch the icon again.
АБВ
ChangingthecharactertoRussian.
■Theorderofthefirstnameandlastnamemay bedifferentfromthatofthecellularphone.
4Touchthelisttodisplaythephone numberlistoftheselectedentry.
■Ifseveralphonenumberareincludedinan entry,selectonebytouchingthelist.
■Ifyouwanttoswitchtothecallhistorylist, touchtheicon.

Switchingtothecallhistorylist.
5Makethecall.
RefertoIntroductionofBluetoothtelephoneoperationsonpage31.
6Endthecall.
RefertoIntroductionofBluetoothhtelephoneoperationsonpage31.
Invertingnamesinphone book
When your cellular phone is connected to this unit, the first and last names of your contacts may be registered to the phone book in reverse order. You can us this function to change the order back. (Inverting then names in the phone book)
1Switchtophonebookmode.
Referto/IntroductionofBluetoothtelephoneoperationsonpage31. Thephonebookdisplayappears.
2Invertnamesinphonebooks.

Invertingnamesinphonebooks.
3"Wouldyouliketoinvertallnames?" appears.TouchYestocontinue.
While then names are inverted, is displayed. ■ If the inversion fails, "Invert Name Error" appears. In such cases, try again from the beginning.
Note
Invertingthenamesofyourcontactsfromthis unitdoesnotaffectthedataonyourBluetooth device.
Usingthemissed, received anddialedcalllists
The80mostrecentcallsdialed, received, and missedarestoredinthememory. You can browse them and call numbers from these lists.
1Switchtothecallhistorylist.
RefertoIntroductionofBluetoothtelephoneoperationsonpage31.
2SelectMissedCalls,DialledCallsor ReceivedCalls.

Displayingthereceivedcalllist.

Displayingthedialedcalllist.

Displayingthemissedcalllist.
3Touchthelistnumbertoselectaphone number.
Nameandphonenumberaredisplayedinthe detailedlist.
■Ifyouwanttostorethephonenumber,touch andholdthelist.
4Makethecall.
RefertoIntroductionofBluetoothhtelephoneoperationsonpage31.
5Endthecall.
RefertoIntroductionofBluetoothhtelephoneoperationsonpage31.
Settingautomaticanswering
If this function is on, this unit automatically answers all incoming calls.
●Turnautomaticansweringonoroff.
RefertoIntroductionofBluetoothhtelephoneoperationsonpage31.
Adjustingtheotherparty's listeningvolume
Tomaintainthegoodsoundquality,thisunit canadjusttheotherparty'slisteningvolume. Ifthevolumeisnotloudenoughfortheother party,usethisfunction.
- SelectFar-EndVOL.
RefertoIntroductionofBluetoothtelephoneoperationsonpage31.
1—2—3
■Thisfunctioncanbeperformedevenwhile talkingon thephone.
■ Settingscanbestoredforeachdevice.

Switchingtheringtone
Youcanselectwhetherornottousethis unit'sringtone.Ifthisfunctionissettoon,theringtoneforthisunitwillsound.
1Connectyourcellularphonetothis unit.
2Turnringtononoroff.
RefertoIntroductionofBluetoothhtelephoneoperationsonpage31.
Usingthepresetdiallists
Youcaneasilystoreuptosixphonenumbers aspresets.
1Displaythepresetscreen.
RefertoIntroductionofBluetoothtelephoneoperationsonpage31.
2Touchoneofpresetdialkeystoselect thedesiredphonenumber.
■ If you want to delete apreset phonenumber, touch and hold the preset dial key.
3Makethecall.
RefertoIntroductionofBluetoothtelephoneoperationsonpage31.
4Endthecall.
RefertoIntroductionofBluetoothtelephoneoperationsonpage31.
Makingacallbyentering phonenumber

text_image
13 APR PM 12:25 1 2 3 4 5 6 7 8 9 * 0 # C + Abcdefghi XXXXXXXXXXXXXX Private ON Vol
Important
Besuretoparkyourvehicleinasafeplaceand applytheparkingbrakewhenperformingthisoperation.
1Switchtotheenteringphonenumber mode.
RefertoIntroductionofBluetoothtelephoneoperationsonpage31.
2Touchthenumbericonstoinputthe numbers.
■Upto24digitscanbeentered.
3Makethecall.
RefertoIntroductionofBluetoothtelephoneoperationsonpage31.
4Endthecall.
RefertoIntroductionofBluetoothtelephoneoperationsonpage31.
Note
EnteringphonenumbermodecannotbeoperatedunlessaBluetoothtelephoneisconnectedtothisunit.
Settingtheprivatemode
Duringaconversation,youcanswitchtoprivatemode(talkdirectlyonyourcellular phone). RefertoIntroductionofBluetoothtelephoneoperationsonpage31.
Introductionofmenu operations

text_image
Audio Fader/Balance F/R 0 L/R 0 Graphic EQ Powerful Auto EQ Off Sonic Center Control L/R 0 Loudness OFF Subwoofer ON1Displaymenus.
RefertoBasicoperationsonpage11.
2Touchanyofthefollowingtouchpanel keystoselectthemenutobeadjusted.
Touchpanelkeys
| 1 |  | VideoSetupmenuRefertoSettinguptheVideoplayeronpage61. |
| 2 |  | AudiofunctionmenuRefertoAudioadjustmentsonthenextpage. |
| 3 |  | SystemmenuRefertoSystemsettingspage65. |
| 4 |  | FavoritemenuYoucanchoosemenuswith-ineachmenu(Audiofunc-tionmenu,etc.)andregisterthemtothisfavoritemenu.RefertoFavoritemenuonpage73. |
| 5 |  | Returningtothecurrentsourcedisplay |
Notes
- YoucandisplaytheVideoSetupmenuwhen aDisc,USBorSDsourceisselected.
- If you start the VideoSetupmenu, playback is stopped.
- YoucannotdisplaytheAudiofunctionmenu whenthemutefunctionisonoraJPEGfileis playing.
Audioadjustments
Usingfader/balanceadjustment
Youcanchangethefader/balancesettingto provideanideallisteningenvironmentforall oftheoccupiedseats.
1Displaytheaudiofunctionmenu.
RefertoIntroductionofmenuoperationson thepreviouspage.
2TouchFader/Balanceontheaudiofunctionmenu.
3Touch▲or▼toadjustthefront/rear speakerbalance.
Range:Front15toRear15
■SelectF/ROL/RO whenonlyusingtwo speakers.
■Thefront/rearspeakerbalancecannotbeadjustedwhentherearoutputsettingis
Subwoofer. RefertoSettingtherearoutput and subwoofercontrolleronpage65.
4Touch◀or▶toadjusttheleft/right speakerbalance.
Range: Left15 to Right15
Note
Youcanalsosetthefader/balancebydragging thedotonthedisplayedtable.
Usingtheequalizer
Youcanadjusttheequalizationtomatchthe car'sinterioracousticcharacteristicsasdesired.
Recallingequalizercurves
Therearesevenstoreequalizercurveswhich youcaneasilyrecallatanytime.Hereisalist oftheequalizercurves.
DisplayEqualizercurve
| Powerful | Powerful |
| Natural | Natural |
| Vocal | Vocal |
DisplayEqualizercurve
FlatFlat
| Custom1 | Custom1 |
Custom2Custom2
S.Bass
Superbass
- The equalizer curves for Custom1 and Custom2 can be adjusted.
- You cannot select Custom1 and Custom2 when using the auto-equalizer.
- When Flat, no changes are made to the sound. You can check the effect of the equalizer curves by switching alternatively between Flat and another equalizer curve.
1Displaytheaudiofunctionmenu.
RefertoIntroductionofmenuoperationson thepreviouspage.
2TouchGraphicEQontheaudiofunction menu.
■Youcannotselectoradjusttheequalizer curvesofCustom1andCustom2whenusingthe auto-equalizer.
3Touchthedesiredsetting.
S.Bass—Powerful—Natural—Vocal—Flat—Custom1—Custom2
Adjusting the 8-band graphicequalizer
You can adjust the level of each band for the equalizer curves.
- AseparateCustom1curvecanbecreated foreachsource.Ifyoumakeadjustments whenacurveotherthan Custom2isselected,theequalizercurvesettingswillbe storedinCustom1.
- A Custom2 curve that is common for all sourcescanbecreated. If you makeadjustmentswhentheCustom2curveisselected,theCustom2curvewillbeupdated.
1Displaytheaudiofunctionmenu.
RefertoIntroductionofmenuoperationson thepreviouspage.
Menuoperations
2TouchGraphicEQontheaudiofunction menu.
3Touchthedesiredsetting.
S.Bass—Powerful—Natural—Vocal—Flat—Custom1—Custom2
4Touchthetabletoadjustthelevelof theequalizerband.
Range:+12dBto-12dB
Usingtheauto-equalizer
Theauto-equalizerisanequalizercurvecreatedbyautoEQ(refertoAutoEQ(auto-equalizing)onpage71).
Youcanturntheauto-equalizeronoroff. If you connect an optionalmicrophoneto this unit, you can usethis function.
1Displaytheaudiofunctionmenu.
RefertoIntroductionofmenuoperationson page47.
2TouchAutoEQtoturntheauto-equalizeronoroff.
■YoucannotusethisfunctionifautoEQhas notbeencarriedout.
Usingsoniccentercontrol
Soundthatissuitedforthelisteningposition caneasilybecreatedwiththisfunction.
1Displaytheaudiofunctionmenu.
RefertoIntroductionofmenuoperationson page47.
2TouchSonicCenterControlonthe audiofunctionmenu.
3Touch◀or▶ toselectalisteningposition.
Range: Left7 to Right7
Adjustingloudness
Loudnesscompensatesfordeficienciesinthe low-frequencyandhigh-frequencyrangesat lowvolume.
1Displaytheaudiofunctionmenu.
RefertoIntroductionofmenuoperationson page47.
2Touch◄or►toselectadesiredlevel forloudness.
Off (off)—Low (low)—Mid (mid)—High (high)
Usingsubwooferoutput
Thisunitisequippedwithasubwooferoutput whichcanbeturnedonoroff.
- Thecut-offfrequencyandoutputlevelcan beadjustedwhenthesubwooferoutputis on.
1Displaytheaudiofunctionmenu.
RefertoIntroductionofmenuoperationson page47.
2TouchSubwooferontheaudiofunction menu.
3TouchOnorOffnexttoSubwooferto turnthesubwooferoutputonoroff.
4TouchNormalorReversenexttoPhase toselectthephaseofsubwooferoutput.
5Touch◄or►nexttoLeveltoadjust theoutputlevelofthesubwoofer.
Range:+6to-24
6Touch◀or▶nexttoFrequencytose-lectthecut-offfrequency.
50Hz—63Hz—80Hz—100Hz—125Hz
Only frequencies lower than those in these selected range are outputted from the subwoofer.
Boostingthebass
Youcanboostthebasslevel.
1Displaytheaudiofunctionmenu.
Referto/Introductionofmenuoperationson page47.
2Touch◄or►toselectadesiredlevel.
Range:0to+6
Usingthehighpassfilter
When you donotwantlowsounds from the subwoofer output frequency rangetoplay from the frontorrearspeakers, turn on the HPF (high pass filter). Only frequencies higher than those in these selected range are output from the frontorrearspeakers.
1Displaytheaudiofunctionmenu.
RefertoIntroductionofmenuoperationson page47.
2Touch◀or▶nexttothefrequency to selectcut-offfrequency.
Off (off)—50Hz—63Hz—80Hz—100Hz—125Hz
Only frequencies higher than those in these selected range are output from the front or rear speakers.
Adjustingsourcelevels
With SLA(sourceleveladjustment), the volume level so each source can be adjusted to prevent significant differences between sources.
- SettingsarebasedontheFMvolumelevel, whichremainsunchanged.
1Displaytheaudiofunctionmenu.
Referto/Introductionofmenuoperationson page47.
2ComparetheFMvolumelevelwiththe levelofthesourceyouwishtoadjust.
3TouchSourceLevelAdjusteronthe audiofunctionmenu.
4Touch▲or▼toadjustthesourcevolume.
Range:+4to-4
Notes
- WhenselectingFMasthesource,youcannot switchtoSourceLevelAdjuster.
• The AM volume level can also be adjusted with this function. - VideoCD, CD, compressedaudio, DivX, MPEG-1, MPEG-2 and MPEG-4 are automatically settothesamesourcelevel adjustment volume.
- WhenaniPodandaUSBstoragedeviceare connectedtoUSBinput1orUSBinput2,the sourceleveladjustmentvolumeforeachis automaticallysettothesamelevelforeach USBinput.USBinput1andUSBinput2are notautomaticallysettothesamesetting.
- Externalunit1andexternalunit2areaautomaticallysettothesamesourceleveladjustment volume.
DigitalSignalProcessor
IntroductionofDSPadjustments
YoucanusethisunittocontrolaDEQ-P6600/
DEQ-P7650multi-channelprocessor(soldseparately).
Bycarryingoutthefollowingsettings/adjustmentsintheordershown,youcaneffortlessly createafinely-tunedsoundfield.
1Settingthespeakersetting
2Usingthepositionselector
3AutoTAandEQ(auto-timealignmentandauto-equalizing)
4Adjustingtimealignment
5Adjustingthespeakeroutputlevelsusinga testtone
6Selectingacross-overfrequency
7Adjustingthespeakeroutputlevels
8Adjustingthe3-bandparametricequalizer
Notes
- You cannot us the audio functions when playing discs recorded data sampling frequency higher than 96kHz. The equalizer curvesetting, Position, AutoEQ and AutoTA will also be canceled.
- Soundisonlyemittedfromfrontspeakers whenplayingdiscsrecordedatasampling frequencyhigherthan96kHz.
- WhenselectingFMasthesource,youcannot switchtoSourceLevelAdjuster.
- Youcanonlyswitchto DynamicRangeControlwhenyouareplayingDVDdiscs.
- YoucanonlyswitchtoTimeAlignmentwhen eitherFront-LorFront-Risselectedin Position.
- Whenthespeakersettingforboththecenter andrearspeakersaresettoOFF,youcannot switchtoDolbyProLogicll.
- Whenthemulti-channelprocessor(DEQ-P6600/DEQ-P7650)isconnectedtothisunit, youcannotuseMUTEfunction.
Using the position selector
Onewaytoassureamorenaturalsoundisto optimizethestereoimageandplaceyouright inthecenterofthesoundfield.Withthepositionselectorfunction,youcanautomatically adjustthespeakeroutputlevelsandinserta delaytimetomatchthenumberandposition oftheoccupiedseats.WhenusedinconjunctionwiththeSFC,thisfeaturewillmakethe soundimagemorenaturalandofferapanoramicsoundthatenvelopsyou.
1DisplaytheDSPfunctionmenu.
Referto/Introductionofmenuoperationson page47.
2TouchPositionontheDSPfunction menu.
3 Touch ◀/▶/▲/▼ to select a listening position.
KeyDisplayPosition
| ◀Front-LLeftfrontseat | |
| ▶Front-R | Rightfrontseat |
| ▲Front | Frontseats |
| ▼All | Allseats |
■Tocanceltheselectedposition,touchthe samekeyagain.
Note
Whenadjustmentsaremadetothelisteningposition,thespeakeroutputsareaautomaticallyset totheappropriatelevels.Totailorthelevelsmore precisely,refertoAdjustingthespeakeroutputlevelsusingatesttoneonpage56orAdjustingthe speakeroutputlevelsonpage55.
Usingfader/balanceadjustment
Youcanchangethefader/balancesettingto provideanideallisteningenvironmentforall oftheoccupiedseats.
Menuoperations
1DisplaytheDSPfunctionmenu.
Referto/Introductionofmenuoperationson page47.
2TouchFader/BalanceontheDSPfunctionmenu.
3Touch▲or▼toadjustthefront/rear speakerbalance.
Range:Front25toRear25
■SelectF/ROL/RO whenonlyusingtwo speakers.
4Touch◀or▶toadjusttheleft/right speakerbalance.
Range: Left25 to Right25
Usingsoundfieldcontrol
The SFC function creates the sensation of a live performance.
- Theacousticsofperformancespacesdiffer dependingontheextentandcontourof spacethroughwhichsoundwavescan moveandonhowthecreatedsounds bounceoffthestage,walls,floorsandceilings.Ataliveperformanceyouhearmusic inthreestages:directsound,earlyreflections,andlatereflections,orreverberations.Thesefactorsareprogrammedinto theSFCcircuitrytorecreatetheacoustics ofvariousperformancesettings.
1DisplaytheDSPfunctionmenu.
Referto/Introductionofmenuoperationson page47.
2TouchSFContheDSPfunctionmenuto selectthesetting.
Musical(Musical)—Drama(Drama)—Action
(Action)—Jazz(Jazz)—Hall(Hall)—Club(Club)—Off(Off)
Note
If the source is a channel LPCMorDol by Digital audiosource, were recommend turning Dol by Pro Logic II on when selecting SFC effect that are most suitable for 5.1-channel audiosources
(suchasMusical,DramaorAction).
Ontheotherhand,whenselectingSFCeffects thataresuitablefor2-channelaudiosources (such as Jazz, Hall or Club), we recommend turningDolbyProLogicIloff.
Adjustingsourcelevels
WithSLA(sourceleveladjustment),thevolumelevelsofeachsourcecanbeadjustedto preventsignificantdifferencesbetween sources.
- SettingsarebasedontheFMvolumelevel, whichremainsunchanged.
1 Compare the FM volume level with the level of the source you wish to adjust.
2DisplaytheDSPfunctionmenu.
Referto/Introductionofmenuoperationson page47.
3TouchSourceLevelAdjusterontheDSP functionmenu.
4Touch▲or▼toadjustthesourcevolume.
Notes
• The AM volume level can also be adjusted with this function.
- VideoCD, CD, compressed audio and DivX are automatically set to the same source level adjustment volume.
- Externalunit1andexternalunit2areautomaticallysettothesamesourceleveladjustment volume.
Usingdynamicrangecontrol
Thedynamicrangereferstothedifferencebetweenthesmallestandlargestsounds emitted. Dynamicrangecontrolcompresses thisdifferencesothatthesoundscanbe heardclearlyevenatlowvolumelevels.
- Thedynamicrangecontrolisonlyeffective forDolbyDigitalsound.
- Youcanonlyswitchto DynamicRangeControlwhenyouare playingDVDdiscs.
1DisplaytheDSPfunctionmenu.
RefertoIntroductionofmenuoperationson page47.
2TouchDynamicRangeControlonthe DSPfunctionmenu.
3Touch▶toturndynamicrangecontrol on.
■Toturndynamicrangecontroloff,touch◀.
Usingthedown-mixfunction
Multi-channelaudiocanbeplayedbackin2-channelswiththedown-mixfunction.
1DisplaytheDSPfunctionmenu.
RefertoIntroductionofmenuoperationson page47.
2TouchDownMixontheDSPfunction menu.
3Touch◀or▶toselectthedesiredlevel.
- Lo/Ro–Stereomixingtheoriginalaudio datathatdoesnotcontainchannelmodes suchassurroundsoundcomponents.
- Lt/Rt-Downmixingsothatthesurround soundcomponentscanberestored(decoded).
Usingdirectcontrol
Youcanoverridetheaudiosettingstocheck theireffectiveness.
- Whendirectcontrolison, allaudiofunctionsexceptVOLUME/VOLand DolbyProLogicllarelocked.
1DisplaytheDSPfunctionmenu.
RefertoIntroductionofmenuoperationson page47.
2TouchDigitalDirectontheDSPfunctionmenu.
3Touch▶toturnthedirectcontrolon.
■Toturndirectcontroloff,touch◀.
UsingDolbyProLogicII
DolbyProLogicllcreatesfivefull-bandwidth outputchannelsfromtwo-channelsourcesto achievehigh-puritymatrixsurroundsound.
- DolbyProLogicllsupportsstereosources withasamplingrateofupto48kHzand hasnoeffectonothertypesofsources.
- WhenthespeakersettingforboththecenterandrearspeakersaresettoOFF, you cannotswitchtoDolbyProLogicll.
1DisplaytheDSPfunctionmenu.
RefertoIntroductionofmenuoperationson page47.
2TouchDolbyProLogicll.
3Touchanyofthefollowingtouchpanel keystoselectthedesiredmode.
- Movie-Suitableformovieplayback
• Music-Suitableformusicplayback - Matrix-SuitablewhenFMradioreception isweak
- MusicAdjust—Enablesadjustingthe Musicmode
- Off-TurnsDolbyProLogicIloff
■YoucanonlyoperateMusicAdjustwhen Musichasbeenselected.
Adjustingthemusicmode
You can adjust them music modewith the following three controls.
Menuoperations
- Panorama(Panorama)extendsthefront stereoimagetoincludethesurround speakersforanexciting "wraparound" effect.
- Dimension(Dimension)gradually adjusts the soundfieldeithertowardsthefrontor rear.
- Centerwidthcontrol(CenterWidth)positionscenter-channelsoundsbetweenthe center,leftandrightspeakers.Itimproves theleft-center-rightstagepresentationfor boththedriverandfrontpassenger.
1DisplaytheDSPfunctionmenu.
RefertoIntroductionofmenuoperationson page47.
2TouchDolbyProLogicII.
3TouchMusicandthentouch MusicAdjust.
■YoucanonlyoperateMusicAdjustwhen Musichasbeenselected.
4Touch▲or▼toselectPanorama(panorama).
Panorama(panorama)—Dimension(dimension)—CenterWidth(centerwidth)
5Touch▶toturnpanoramacontrolon.
■Toturnpanoramacontroloff,touch◀.
6Touch▼toselectDimensionandthen touch◄or►toadjustthefront/rear speakerbalance.
Range:+3to-3
7Touch▼toselectCenterWidthand thentouch◄or►toadjustthecenter image.
Range:0to7
Thedefaultsettingis3andisrecommended formostrecordings.Whensetto0,allcenter soundisplacedinthecenterspeaker.When setto7,centersoundisequallyplacedinthe leftandrightspeakers.
Settingthespeakersetting
Besuretoadjustthespeakersettings,such assize(basscapacity),accordingtothe speakersinstalled.SetthesizetoLarge (large)ifthespeakeriscapableofreproducing soundsofabout100Hzandbelow. Otherwise, selectSmall(small).
- Lowfrequencysoundisnotemittedifthe subwooferissettoOffandthefrontand rearspeakersaresettoSmallorOff.
- Itisimperativethatspeakersthatarenot installedbesettoOff.
- SetthefrontorrearspeakertoLargeifthe speakeriscapableofreproducingbass content,orifnosubwooferisinstalled.
1DisplaytheDSPfunctionmenu.
RefertoIntroductionofmenuoperationson page47.
2TouchSpeakerSetting.
3Touch▲or▼toselectthespeakerto beadjusted.
Front(frontspeakers)—Center(centerspeaker)—Rear (rear speakers)—Subwoofer (subwoofer)—Phase(subwoofersetting)
■YoucanonlyswitchtoPhasewhenthesub-wooferhasbeensettoOn.
4Touch◀or▶toselectthecorrectsize fortheselectedspeaker.
Off (off)—Small (small)—Large (large)
■YoucannotselectOffwhenFront(front speakers)hasbeenselected.
- You can select On or Off when Subwoofer (subwoofer)hasbeenselected.
■YoucanswitchReverse(reversephase)or Normal(normalphase)whenPhase(subwoofer setting)hasbeenselected.
Correctingthesubwoofer'sphase
Ifboostingthebassoutputfromthesubwooferisnoteffectiveoryoufeelthatthebassis becominglessclear,thesubwooferoutput andbasscontentemittedfromtheother speakersmaybecancelingeachotherout.
Menuoperations
1DisplaytheDSPfunctionmenu.
RefertoIntroductionofmenuoperationson page47.
2TouchSpeakerSetting.
3Touch▲or▼toselectSubwoofer(subwoofer).
Front(frontspeakers)—Center(centerspeaker)—Rear (rear speakers)—Subwoofer (subwoofer)—Phase(subwoofersetting)
4Touch▶toturnsubwooferoutputon.
■Toturnsubwooferoutputoff,touch◀.
5Touch▼andthentouch◄or►tose-lectthephaseofsubwooferoutput. Reverse—Normal
Note
Whenplayinga2-channelmonosourcewith DolbyProLogicIturnedon:
- NosoundisemittedifthecenterspeakersettingisSmallorLargeandnocenterspeaker isinstalled.
- Soundisonlyemittedthroughthecenter speakerifitisinstalledandsettoSmallor Large.
Adjustingthespeakeroutput levels
Fineadjustmentsofthespeakeroutputlevel canbemadebylisteningtoaudiooutput.
First, usethetesttonetoadjustthespeakerto anapproximatelevel, and thenusethisfunctiontomakefineadjustments.
1DisplaytheDSPfunctionmenu.
Referto/Introductionofmenuoperationson page47.
2TouchSpeakerLevel.
3Touch▲or▼toselectthespeakerto beadjusted.
Front-L(leftfrontspeaker)—Center(center speaker)—Front-R(rightfrontspeaker)—
Rear-R(rightrearspeaker)—Rear-L(leftrear speaker)—Subwoofer(subwoofer)
■SpeakerswiththesizesettoOffcannotbeselected.(RefertoSettingthespeakersettingonthe previouspage.)
4Touch◀or▶toadjustthespeakeroutputlevel.
Range:+10to-10
Note
Youwillgetthesameresultswhetheryouadjust thespeakeroutputlevelswiththismodeorwith TestTone.
Selectingacross-overfrequency
The frequency under which sounds are produced through has subwoofer can be selected. Forexample, if theseize of one of the installed speakers is set to Small, you can select the frequency under which sounds will bere produced through as speakers set to Large or a subwoofer.
1DisplaytheDSPfunctionmenu.
RefertoIntroductionofmenuoperationson page47.
2TouchCrossOver.
3Touch▲or▼toselectthespeakerto beadjusted.
Front(frontspeakers)—Center(centerspeaker)—Rear (rear speakers)—Subwoofer (subwoofer)
4Touch◀or▶toselectthecross-over frequency.
When you select across over frequency, you are setting the cross-over frequency for the subwoofer's LPF (low-pass filter) and the Small speaker's HPF (high-pass filter). The cross-over frequency setting has no effect if the subwoofer is set to Off and others speakers are set to Large or Off.
Adjustingthespeakeroutput levelsusingatesttone
Youcaneasilygettherightoverallbalance amongthespeakerswiththisfunction.
1DisplaytheDSPfunctionmenu.
RefertoIntroductionofmenuoperationson page47.
2TouchTestTone.
3TouchStarttostarttesttoneoutput.
Thetesttoneisemittedfromeachspeakerin thefollowingsequenceatintervalsofabout twoseconds. Thecurrentsettingsforthe speakeremittingthetesttonewillbeshown onthedisplay.
Front-L(leftfrontspeaker)—Center(center speaker)—Front-R(rightfrontspeaker)—Rear-R(rightrearspeaker)—Rear-L(leftrear speaker)—Subwoofer(subwoofer) Checkeachspeakeroutputlevel.Ifnoadjustmentsareneeded,performstep5tostopthe testtone.
■Thesettingsforspeakerswiththesizesetto Offwillnotbedisplayed.(RefertoSettingthe speakersettingonpage54.)
4Touch◀or▶toadjustthespeakeroutputlevel.
Range:+10to-10
■Thetesttonewillbeemittedfromthenext speakerafterabouttwosecondsafterthelastoperation.
5TouchStoptoendtesttoneoutput.
Notes
- If necessary, selects speakers and adjust their 'absolute' output levels. (RefertoAdjusting the speaker output level on the previous page.)
- Youwillgetthesameresultswhetheryouadjustthespeakeroutputlevelswiththismode orwithSpeakerLevel.
Usingtimealignment
Thedistancebetweenthelisteningposition andeachspeakercanbeadjustedwiththis function.
1DisplaytheDSPfunctionmenu.
RefertoIntroductionofmenuoperationson page47.
2TouchTimeAlignment.
3Touchanyofthefollowingtouchpanel keystoselectthetimealignment.
- Initial – Initial time alignment (factory setting)
- AutoTA-Timealignmentcreatedbyauto TAandEQ.(RefertoAutoTAandEQ(auto-timealignmentandauto-equalizing)on page58.)
- Custom-Adjustedtimealignmentthat youcancreate
- Adjustment—Enablesadjustingthetime alignmentasdesired
- Off-TurnsTimeAlignmentoff
■YoucannotselectAutoTAifautoTAandEQ havenotbeencarriedout.
■Adjustmentcanonlybeselectedwheneither
Front-LorFront-RisselectedinPosition.
Adjustingtimealignment
Thedistancebetweentheselectedposition andeachspeakercanbeadjusted.
- Theadjustedtimealignmentisstoredin Custom.
Menu operations
1DisplaytheDSPfunctionmenu.
RefertoIntroductionofmenuoperationson page47.
2TouchTimeAlignmentandthentouch Adjustment.
■Adjustmentcanonlybeselectedwheneither Front-LorFront-RisselectedinPosition.
3Touch▲or▼toselectthespeakerto beadjusted.
Front-L(leftfrontspeaker)—Center(center speaker)—Front-R(rightfrontspeaker)—Rear-R(rightrearspeaker)—Rear-L(leftrear speaker)—Subwoofer(subwoofer)
■SpeakerswiththesizesettoOffcannotbeselected.(RefertoSettingthespeakersettingon page54.)
4Touch◄or►toadjustthedistancebetweentheselectedspeakerandthelisteningposition.
Range:0.0cm to 500.0cm
Usingtheequalizer
Youcanadjusttheequalizationtomatchthe car'sinterioracousticcharacteristicsasdesired.
Recallingequalizercurves
Therearesevenstoredequalizercurveswhich youcaneasilyrecallatanytime.Hereisalist oftheequalizercurves.
DisplayEqualizercurve
| PowerfulPowerful |
| NaturalNatural |
| VocalVocal |
| FlatFlat |
| Custom1Custom1 |
| Custom2Custom2 |
| S.BassSuperbass |
- TheequalizercurvesforCustom1and Custom2canbeadjusted.
- When Flat, no changes are made to the sound. You can check the effect so the equalizer curves by switching alternatively between Flat and another equalizer curve.
- WhenDigitalDirectison, theequalizer curveisfixedtoFlat.
1DisplaytheDSPfunctionmenu.
RefertoIntroductionofmenuoperationson page47.
2TouchParametricEQ.
3Touch▲or▼toselecttheEQ(equalizer).
4Touch▶toselecttheequalizer.
Powerful—Natural—Vocal—Flat—Custom1—Custom2—S.Bass
Adjustingthe3-bandparametric equalizer
ForCustom1andCustom2equalizercurves, youcanadjustthefront, rearandcenter equalizercurvesseparatelybyselectingacenterfrequency, anequalizerlevelandaQfactor foreachband.
- AseparateCustom1curvecanbecreated foreachsource.
- ACustom2curvethatiscommonforall sourcescanbecreated.
- Thecenterspeakerlargelydeterminesthe soundimageandgettingthebalanceright isnoteasy.Werecommendthatyoufirst adjustthebalanceamongallofthespeakersexceptthecenterspeaker,byplaying2-channelaudio(aCD,forexample).Then, play5.1-channelaudio(DolbyDigitalor DTS)andadjustthecenterspeakeroutput tomatchthebalancealreadycreated amongtheotherspeakers.
1DisplaytheDSPfunctionmenu.
RefertoIntroductionofmenuoperationson page47.
2TouchParametricEQ.
3Touch▲or▼toselectthedesireditem.
EQ (equalizer)—SP-Select (speakers)—Band (bands)—Frequency(centerfrequency)—Level(equalizerlevel)—Q.Factor(Qfactor)
4Touch▶toselecttheequalizer.
Powerful—Natural—Vocal—Flat—Custom1—Custom2—S.Bass
5Touch▼andthentouch◄or►toselectthespeakertobeadjusted.
Rear(rearspeakers)—Center(centerspeaker)—Front(frontspeakers)
■SpeakerswiththesizesettoOffcannotbeselected.(RefertoSettingthespeakersettingon page54.)
6Touch▼andthentouch◄or►toselecttheequalizerbandtobeadjusted.
Low (low)—Mid (mid)—High (high)
7Touch▼andthentouch◄or►tose-lectthecenterfrequencyofselectedband.
Narrow(narrow)—Wide(wide)
■Adjusttheparametersofeachbandforthe otherspeakersinthesameway.
Note
Acenterfrequencycanbeselectedforeach bandandcanbechangedin1/3-octavesteps. However, the interval between these selected center frequencies cannot be shorter than 1 octave.
Usingtheauto-equalizer
Theauto-equalizeristheequalizercurvecreatedbyautoTAandEQ(refertoAutoTAandEQ(auto-timealignmentandauto-equalizing) onthispage). Youcanturntheauto-equalizeronoroff.
1DisplaytheDSPfunctionmenu.
Referto/Introductionofmenuoperationson page47.
2TouchAutoEQ.
■YoucannotusethisfunctionifautoTAandEQhavenotbeencarriedout.
3Touch▶toturntheauto-equalizeron.
■Toturntheauto-equalizeroff,touch◀.
AutoTAandEQ(auto-time alignmentandauto-equalizing)
Auto-timealignmentautomaticallyadjuststhe timealignmentaccordingtothedistancebetweenthelisteningpositionandeachspeaker. Theauto-equalizerautomaticallymeasures thecar'sinterioracousticcharacteristics,and thencreatesanauto-equalizercurvebasedon thatinformation.

WARNING
Asaloudtone(noise)maybeemittedfromthe speakerswhenmeasuringthecar'sinterior acousticcharacteristics,neverperformautoTA orautoEQwhiledriving.

CAUTION
- ThoroughlychecktheconditionsbeforeperformingautoTAandEQasthespeakersmay bedamagedifthesefunctionsareperformed when:
—Thespeakersareincorrectlyconnected. (Forexample,whenarearspeakerisconnectedasasubwooferoutput.)
—Aspeakerisconnectedtoapowerampdeliveringoutputhigherthanthespeaker's maximuminputpowercapability.
Menuoperations
- Ifthemicrophoneisplacedinanunsuitable positionthemeasurementtonemaybecome loudandmeasurementmaytakealongtime, resultinginbatterydrainage.Besuretoplace themicrophoneinthespecifiedlocation.
BeforeoperatingtheautoTAandEQ function
- PerformautoTAandEQinaquietplace, withboththecarengineandairconditioningswitchedoff.Alsoturnoffanycar phonesorportabletelephonesinthecar,or removethemfromthecar.Soundsother thanthemeasurementtone(suchassurroundingsounds,enginesound,telephonesringing)maypreventcorrect measurementofthecar'sinterioracoustic characteristics.
- BesuretoperformautoTAandEQusing theoptionalmicrophone.Usinganother microphonemaypreventmeasurement,or resultinincorrectmeasurementofthe car'sinterioracousticcharacteristics.
- InordertoperformautoTAandEQ,the frontspeakermustbeconnected.
- Whenthisunitisconnectedtoapower ampwithinputlevelcontrol,autoTAand EQmaynotbepossibleifthepoweramp's inputlevelissetbelowthestandardlevel.
- Whenthisunitisconnectedtoapower ampwithanLPF,turnthisLPFoffbefore performingautoTAandEQ.Alsosetthe cut-offfrequencyforthebuilt-inLPFofan activesubwoofertothehighestfrequency.
- Thetimealignmentvalueresultingfrom autoTAandEQhasbeencalculatedbya computerandistheoptimumdelaytime thatwillgiveaccurateresults.Besureto usetheresultingvaluealthoughitmaydifferfromtheactualdistancewhen:
—Thereflectedsoundwithinthecaris stronganddelaysoccur. —TheLPFonactivesubwoofersorexternalampsdelaythelowersounds.
• AutoTAandEQchangestheaudiosettings asfollows:
—Thefader/balancesettingsreturntothe centerposition.(RefertoUsingfader/balanceadjustmentonpage51.)
—TheequalizercurveswitchestoFlat. (RefertoRecallingequalizercurveson page48.)
—Thefront, centerandrearspeakerswill automaticallybeadjustedtoahigh passfiltersetting.
- PrevioussettingsforautoTAandEQwillbe overwritten.
PerformingautoTAandEQ
Fordetailsconcerningoperation, refertothe operationmanualforthemulti-channelprocessor.
1Stopthecarinaplacethatisquiet, closeallthedoors, windowsandsunroof, andthenturntheengineoff.
If the engine is left running, enginenoisem may prevent correct autoEQ.
2Fixtheoptionalmicrophoneinthecenteroftheheadrestofthedriver'sseat, facingforward.
TheautoEQmaydifferdependingonwhere youplacethemicrophone.lfdesired,place themicrophoneonthefrontpassengerseatto carryoutautoEQ.
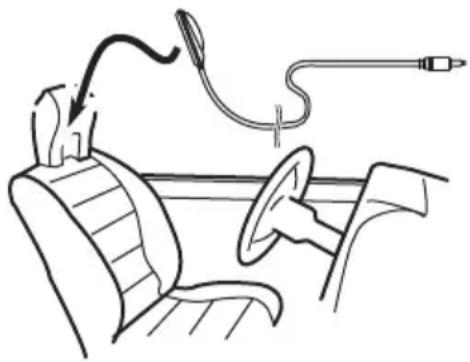
natural_image
Line drawing of a car interior with steering wheel, dashboard, and cable (no text or symbols)3TurntheignitionswitchtoONorACC.
Ifthecar'sairconditionerorheateristurned on,turnitoff. Noisefromthefanintheair conditionerorheatermaypreventcorrectauto EQ.
Menuoperations
■ If this unit is turned off, press SRC/OFF to turn the source on.
4Selectthepositionfortheseaton whichthemicrophoneisplaced.
RefertoUsingthepositionselectoronpage 51.
■ Ifnopositionisselectedbeforeyoustartauto EQ, Front-Lisselectedautomatically.
5Turntheunitoff.
RefertoBasicoperationsonpage11.
6Displaythesystemmenu.
Referto/Introductionofmenuoperationson page47.
7TouchA-EQ&TAMeasurementtoenter autoEQandTAmeasurementmode.
8Plugthemicrophoneintothemicrophoneinputjack.
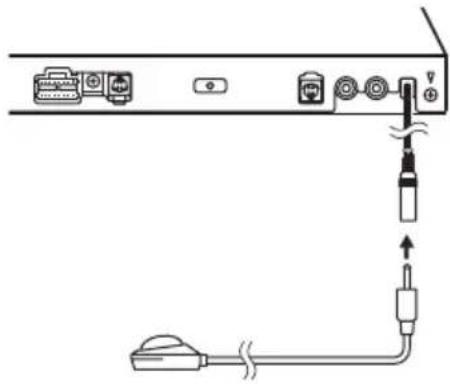
natural_image
Diagram of a device connection showing ports, cables, and a plug inserted into a cable (no text or labels)9TouchStarttostartautoEQ.
10Whenthe10-secondcountdownstarts, getoutofthecarandclosethedoorwithin 10seconds.
Ameasurementtone(noise)isemittedfrom thespeakers, andautoEQmeasurementbegins.
WhenautoEQiscompleted, Themeasurementhasfinished. Pleasedisconnectthe microphoneandthenpushHOMEkey.is displayed.
Whenthecar'sinterioracousticcharacteristicscannotbemeasuredcorrectly,anerror
messagewillbedisplayed.(RefertoUnderstandingautoEQerrormessagesonpage104.)
■IttakesaboutnineminutesforautoEQmeasurementtobecompletedwhenallthespeakers areconnected.
■TostopautoEQ,touchStop.
■TocancelautoEQmeasurementmodeduring thisprocedure,touchthefollowingtouchpanel key.

CancelingautoEQmeasurement mode.
11Storethemicrophonecarefullyinthe glovecompartmentoranothersafeplace.
Ifthemicrophoneissubjectedtodirectsun-lightforanextendedperiod,highttemperaturesmaycausedistortion,colorchangeor malfunction.
SettinguptheVideoplayer Settingthesubtitlelanguage
Youcansetadesiredsubtitlelanguage.When available,thesubtitleswillbedisplayedinthe selectedlanguage.
1DisplaytheVideoSetupmenu.
RefertoIntroductionofmenuoperationson page47.
2TouchSubtitleLanguageonthe VideoSetupmenu.
Asubtitlelanguagemenuisdisplayed.
3Touchthedesiredlanguage.
Thesubtitlelanguageisset.
■ If you have selected Others, refer to When you select Others on this page.
Notes
- If these selected language is not available, the languages specified on the discis displayed.
- Youcanalsoswitchthesubtitlelanguageby touchingtheiconduring playback.(Referto Playingmovingimagesonpage19.)
- Thesettingmadeherewillnotbeaffected evenifthesubtitlelanguageisswitchedduringplaybackusingSubtitle.
WhenyouselectOthers
Alanguagecodeinputdisplayisshownwhen
Othersisselected.RefertoLanguagecode chartforDVDonpage117.
- Touch0to9toinputthelanguage code.
■Tocanceltheenterednumbers,touchC.
■Toregisterthecode,touchthefollowingtouch panelkey.

Registeringthecode.
Settingtheaudiolanguage
Youcansetthepreferredaudiolanguage.
1DisplaytheVideoSetupmenu.
Referto/Introductionofmenuoperationson page47.
2TouchAudioLanguageontheVideo Setupmenu.
Anaudiolanguagemenuisdisplayed.
3Touchthedesiredlanguage.
Theaudiolanguageisset.
■ If you have selected Others, refer to When you selectOthersonthispage.
Notes
- If these selected language is not available, the languages specified on the discussed.
- Youcanalsoswitchtheaudiolanguageby touchingAudioduring playback.(Referto Playingmovingimagesonpage19.)
- Thesettingmadeherewillnotbeaffected eveniftheaudiolanguageiisswitchedduring playbackusingAudio.
Settingthemenulanguage
Youcansetthepreferredlanguageinwhich themenusrecordedonadiscaredisplayed.
1DisplaytheVideoSetupmenu.
RefertoIntroductionofmenuoperationson page47.
2TouchMenuLanguageonthe VideoSetupmenu.
Amenulanguagemenuisdisplayed.
3Touchthedesiredlanguage.
Themenulanguageisset.
■ If you have selected Others, refer to When you selectOthersonthispage.
Note
If these selected language is not available, the languages specified on the disc is displayed.
Settingthemulti-angleDVD display
Theangleiconcanbesetsoitappearson sceneswheretheanglecanbeswitched.
1DisplaytheVideoSetupmenu.
Referto/Introductionofmenuoperationson page47.
2TouchMultiAngleontheVideoSetup menutoturnangleicondisplayonoroff.
Settingtheaspectratio
Therearetwokindsofdisplay:awidescreen displaythathasawidth-to-heightratio(TVaspect ratio)of16:9,andregulardisplaythathas aTVaspectof4:3.Besuretoselectthecorrect TVaspectforthedisplayconnectedtoVOUT.
- When using regular display, select either LetterBoxorPanScan.Selecting 16:9 may result in an unnatural picture.
- If you select the TVaspect ratio, the unit's display will change to these names setting.
1DisplaytheVideoSetupmenu.
RefertoIntroductionofmenuoperationson page47.
2TouchTVAspectontheVideoSetup menutoselecttheTVaspectratio.
TouchTVAspect repeatedly until the desired aspect ratio appears.
• 16:9–Widescreenpicture(16:9)isdis-playedasis(initialsetting)
- LetterBox—Thepictureistheshapeofa letterboxwithblackbandsonthetopand bottomofthescreen
- PanScan–Thepictureiscutshortonthe rightandleftsidesofthescreen
Notes
- Whenplayingdiscsthatdonotspecify PanScan,thediscisplayedbackin LetterBoxdisplayevenifyouselectthe PanScansetting. Confirmwhetherthedisc packagebearsthe 16:9 B mark.
- TheTVaspectratiocannotbechangedfor somediscs.Fordetails,refertothedisc's instructions.
Settingtheslideshowinterval
JPEGfilescanbeviewedasaslideshowon thisunit.Inthissetting,theintervalbetween eachimagecanbeset.
1DisplaytheVideoSetupmenu.
RefertoIntroductionofmenuoperationson page47.
2TouchTimePerPhotoSlideonthe VideoSetupmenutoselecttheslideshow interval.
TouchTimePerPhotoSliderrepeatedlyuntil thedesiredsettingappears.
- 5sec-JPEGimagesswitchatintervalsof5 seconds
- 10sec-JPEGimagesswitchatintervalsof 10seconds
- 15sec-JPEGimagesswitchatintervalsof 15seconds
- Manual-JPEGimagescanbeswitched manually
Settingparentallock
SomeDVDvideodiscsletyouuseparental locktorestrictchildrenfromviewingviolent andadult-orientedscenes.Youcansetparentallocktothedesiredlevel.
- When you have a parental lock level set and play adiscfeaturing parental lock, codenumberinput indications may be displayed. Insuch cases, playback will begin when the correct codenumber is entered.
Settingthecodenumberandlevel
Acodenumbermustberegisteredinorderto playbackdiscswithparentallock.
1DisplaytheVideoSetupmenu.
RefertoIntroductionofmenuoperationson page47.
2TouchParentalontheVideoSetup menu.
3Touch0to9toinputafourdigitcode number.
■Tocanceltheenterednumbers,touchC.
Menuoperations
■Toregisterthecode,touchthefollowingtouch panelkey.

Registeringthecode.
Thecodenumberisset, and the level can now be set.
4Touch1to8toselectthedesiredlevel.
5TouchEnter.
Theparentallocklevelisset.
- 8-Playbackoftheentirediscispossible (initialsetting)
- 7 to 2 – Playback of discs for children and non-adult-orienteddiscsispossible
- 1-Playbackofdiscsforchildrenonlyis possible
Notes
- Werecommendtokeeparecordofyourcode numberincaseyouforgetit.
- Theparentallocklevelisstoredonthedisc. Lookforthelevelindicationwrittenonthe discpackage,includedliteratureoronthe discitself.Parentallockofthisunitisnotpossibleifaparentallocklevelisnotstoredon thedisc.
- Withsomediscs, theparentallockmaybeactiveonlyforcertainlevelsofscenes. Theplaybackofthosesceneswillbeskipped. For details, refertotheinstructionmanualthat camewiththedisc.
Changingthelevel
Youcanchangethesetparentallocklevel.
1DisplaytheVideoSetupmenu.
RefertoIntroductionofmenuoperationson page47.
2TouchParentalontheVideoSetup menu.
3Touch0to9toinputtheregistered codenumber.
4Registeringthecode.

Registeringthecode.
Thissetsthecodenumber, and the level can now be changed.
■ If you enter an incorrect codenumber, the icon is displayed. Touch Candenter the correct codenumber.
■Ifyouforgetyourcodenumber, referto/fyou forgetyourcodenumber on this page.

5Touch1to8toselectthedesiredlevel.
6TouchEnter.
Thenewparentallocklevelisset.
Ifyouforgetyourcodenumber
PressRESET.
SettingtheDivXsubtitlefile
You can select whether or not to display DivX external subtitles.
- TheDivXsubtitleswillbedisplayedeven whenCustomisselectedifnoDivXexternalsubtitlefilesexist.
1DisplaytheVideoSetupmenu.
Referto/Introductionofmenuoperationson page47.
2TouchDivX® Subtitleonthe VideoSetupmenutoselectthedesired subtitlesetting.
• Original-DisplaytheDivXsubtitles
- Custom-DisplaytheDivXexternalsubtitles
Notes
- Upto42characterscanbedisplayedonone line.Ifmorethan42charactersareset,the linebreaksandthecharactersaredisplayed onthenextline.
- Upto126characterscanbedisplayedonone screen.Ifmorethan126charactersareset, theexcesscharacterswillnotbedisplayed.
DisplayingtheDivX ^ VOD registrationcode
InordertoplayDivXVOD(videoondemand) contentsonthisunit,theunitmustfirstberegisteredwithaDivXVODcontentsprovider. Forregistration.generateaDivXVODregistrationcodeandsubmitittoyourprovider.
- Keeparecordofthecodeasyouwillneed itwhenyouregisteryourunittotheDivX VODprovider.
1DisplaytheVideoSetupmenu.
Referto/Introductionofmenuoperationson page47.
2TouchDivX®VODontheVideoSetup menu.
RegistrationCode and DeregistrationCode appear.
3TouchRegistrationCode.
Yourregistrationcodeisdisplayed.
Displayingthederegistrationcode
If your device is already registered, deregister it by entering the deregistration code.
1DisplaytheVideoSetupmenu.
Referto/Introductionofmenuoperationson page47.
2TouchDivX®VODontheVideoSetup menu.
3TouchDeregistrationCode.
■Tocancelderegistration,touchCancel.
4TouchOK.
Thederegistrationiscomplete.
Settingfordigitaloutput
Audiowhichisoutputtedfromdigitaloutput ofthisunitcanbeselected.Normally,setto
Stream. If this unit's digital output is not used, thereisnoneedtochangesettings.
1DisplaytheVideoSetupmenu.
Referto/Introductionofmenuoperationson page47.
2TouchDigitalOutputontheVideo setupmenutoselectthedesireddigital outputsetting.
- Stream-TheDolbyDigital/DTSsignalis outputasitis(initialsetting)
- LinearPCM–TheDolbyDigital/DTSsignal is converted to and output as linear PCM signal
AutomaticplaybackofDVDs
WhenaDVDdiscwithaDVDmenuisinserted, thisunitwillcancelthemenuautomaticallyandstart playbackfromthefirstchapterofthefirsttitle.
- SomeDVDsmaynotoperateproperly. If thisfunctionisnotfullyoperated,turnthis functionoffandstartplayback.
1DisplaytheVideoSetupmenu.
RefertoIntroductionofmenuoperationson page47.
2TouchDVDAutoPlaytoturnautomatic playback.
■Toturnautomaticplaybackoff,touch
DVDAutoPlayagain.
Systemsettings
Switchingtheauxiliarysetting
Activate this setting when using an auxiliary device connected to this unit.
1Displaythesystemmenu.
RefertoIntroductionofmenuoperationson page47.
2TouchAUXInputonthesystemmenu toturnAUXInputonoroff.
SettingAVinput
Activate this setting when using an external videocomponent connected to this unit.
1Displaythesystemmenu.
RefertoIntroductionofmenuoperationson page47.
2TouchAVInputonthesystemmenuto turnAVInputonoroff.
SettingtheRGBInput
YoucanswitchthesettingofRGBinput.
1Displaythesystemmenu.
Referto/Introductionofmenuoperationson page47.
2TouchRGBInputonthesystemmenu toturniPhoneorNAVI.
Note
If you use Advanced App Mode, set to iPhone.
SettingtheAppsoundmixing
YoucannotturnonoroffMixingwhenthis unitisplayingasongofiPod.
ThesoundofapplicationduringAdvanced AppModecanbeadjusted.
Enablethissettingwhenyouwanttomixthe Appsoundwiththesoundfromabuilt-in source(suchastheradio).Thevolumeofthe Appsoundcanbeselectedfrom3levels.
1Displaythesystemmenu.
RefertoIntroductionofmenuoperationson page47.
2TouchAppsoundmixingontheSystem menutoselectdesiredsetting.
OFF (off)—Low (low)—Mid (mid)—High (high)
Settingtherearoutputand subwoofercontroller
Thisunit'srearoutput(rearspeakerleadsoutputandRCArearoutput)canbeusedforfull-rangespeaker(Full)orsubwoofer
(Subwoofer)connection.Ifyouswitchthe rearoutputsettingtoSubwoofer,youcan connectarearspeakerleaddirectlytoasubwooferwithoutusinganauxiliaryamp. Initially,theunitissetforarearfull-range speakerconnection(Full).
1Turntheunitoff.
RefertoBasicoperationsonpage11.
2PressHOMEtoswitchtotheHOMEdisplay.
3TouchSystemkey.
Systemmenuisdisplayed.
4TouchRearSpeakeronthesystem menutoswitchthesubwooferoutputor full-rangespeaker.
■ Whennosubwooferisconnectedtotherear output, selectFull(full-rangespeaker).
■Whenasubwooferisconnectedtotherear output,selectSubwoofer(subwoofer).
Notes
- Evenifyouchangethissetting,therewillbenooutputunlessyouturnthesubwooferoutputon(refertoUsingsubwooferoutputonpage49).
- BothrearspeakerleadoutputsandRCArear outputareswitchedsimultaneouslyinthis setting.
SettingtheFMtuningstep
- Thetuningstepremainsat50kHz during manualtuning.
1Turntheunitoff.
RefertoBasicoperationsonpage11.
2Displaythesystemmenu.
Referto/Introductionofmenuoperationson page47.
3TouchFMSteponthesystemmenuto selecttheFMtuningstep.
TouchingFMStepwillswitchtheFMtuning stepbetween50kHzand100kHz.These-lectedFMtuningstepwillappear.
SettingtheAMtuningstep
- TouchAMStepontheinitialmenuto selecttheAMtuningstep.
TouchingAMStepwillswitchtheAMtuning stepbetween9kHzand10kHz.Theselected AMtuningstepwillappearinthedisplay.
RDSsetting
Limitingstationstoregional programming
When AFisused, theregionalfunctionlimits theselectionofstationstothosebroadcasting regionalprograms.
1Turntheunitoff.
RefertoBasicoperationsonpage11.
2Displaythesystemmenu.
RefertoIntroductionofmenuoperationson page47.
3TouchRDSSetuponthesystemmenu.
4TouchRegionalonthemenutoturn theregionalfunctionon.
■Toturntheregionalfunctionoff,touch Regionalagain.
Selectingalternativefrequencies
Whenthetunercannotgetagoodreception, theunitautomaticallysearchesforadifferent stationinthesamenetwork.
1Turntheunitoff.
RefertoBasicoperationsonpage11.
2Displaythesystemmenu.
Referto/Introductionofmenuoperationson page47.
3TouchRDSSetuponthesystemmenu.
4TouchAlternativeFREQtoturnAFon.
■ToturnAFoff,touchAlternativeFREQagain.
Note
Soundmaybetemporarilyinterruptedbyanother programduringanAFfrequencysearch.
SwitchingAutoPISeek
The unit can automatically search for different station with the same programming, even during preset recall.
1Turntheunitoff.
RefertoBasicoperationsonpage11.
2Displaythesystemmenu.
Referto/Introductionofmenuoperationson page47.
3TouchAutoPlonthesystemmenuto turnAutoPISeekon.
■ToturnAutoPISeekoff,touchAutoPlagain.
Switchingsoundmuting/attenuation
Soundfromthissystemisautomatically mutedorattenuatedwhenasignalfrom equipmentwithamutefunctionisreceived.
- Soundfromthissystemreturnstonormal whenthemutingorattenuationiscanceled.
1Displaythesystemmenu.
Referto/Introductionofmenuoperationson page47.
2TouchMute/ATTuntilthedesiredsettingappears.
TouchMute/ATTuntilthedesiredsettingappearsinthedisplay.
- Mute-Muting
- ATT -20dB – Attenuation (ATT -20dB has a strongereffect than ATT-10dB)
• ATT-10dB – Attenuation - Off-Turnsthesoundmuting/attenuation off
Notes
- WhenMuteisdisplayed,thesoundisturned offandnoaudioadjustmentscanbemade.
- WhenATTisdisplayed,thesoundisattenuatedandonlythevolumecanbeadjusted. (Nootheraudioadjustmentscanbemade.)
• Operation returnstonormalwhenthephone connectionisended.
Selectingthemenulanguage
(ForSouthAmericanandOceanianmodels/SoutheastAsianmodels)
Themenulanguagecanbeselectedfromnine languages.
(ForMiddleEastAsianandSouthAfrican models)
Themenulanguagecanbeselectedfromten languages.
Iftextinformationsuchasthetitlename,artist nameoracommentisembeddedinaEuropeanlanguage,theycanalsobedisplayed onthisunit.
- Thelanguagecanbechangedforthefollowing:
—Systemmenu
—VideoSetupmenu
—Bluetoothmenu
—On-screendisplay
—MultilanguagesettingforDivX
—Languageforcautions
Someoperationsonthisunitareprohibitedfromusewhiledrivingorrequire carefulattentionwhenoperated.In suchcases,acautionwillappearonthe display.Youcanchangethelanguage forcautionmessageswiththissetting.
- If the embedded language and these selected languages setting are not the same, text information may not display properly.
- Somecharactersmaynotbedisplayed properly.
1Displaythesystemmenu.
RefertoIntroductionofmenuoperationson page47.
2TouchSystemLanguageonthesystem menutoselectthedesiredlanguage.
3Touchthedesiredlanguage.
(ForSouthAmericanandOceanianmodels/SoutheastAsianmodels)
English (English)—Portugues (Portuguese)—Español (Spanish)—Français (French)—Deutsch (German)—الله (Thai)—Русский (Russian)—中文 (Simplified Chinese)—الله (Hebrew) (ForMiddleEastAsianandSouthAfrican models)
English (English)—Português (Portuguese)—Español (Spanish)—Français (French)—فارسی (Persian)—Deutsch (German)—ไทย (Thai)—Русский (Russian)—العربية (Arabic)—הַרְׁבָ (Hebrew)
Settingtheeverscroll
WheneverscrollissettoOn, recordedtextinformationscrollscontinuouslyinthedisplay. SettoOffifyouprefertheinformationto scrolljustonce.
1Displaythesystemmenu.
RefertoIntroductionofmenuoperationson page47.
2TouchEverScrollonthesystemmenu toturneverscrollonoroff.
SettingtheBluetoothaudio
YouneedtoactivatetheBluetoothAudio sourceinordertouseaBluetoothaudio player.
1Displaythesystemmenu.
Referto/Introductionofmenuoperationson page47.
2TouchBluetoothAudioonthesystem menutoturnBluetoothaudioonoroff.
ClearingBluetoothmemory

Important
NeverturntheunitoffwhiletheBluetoothmemoryisbeingcleared.
1Turntheunitoff.
RefertoBasicoperationsonpage11.
2PressHOMEtoswitchtotheHOMEdisplay.
3TouchSystemkey.
Systemmenuisdisplayed.
4TouchBluetoothMemoryClearonthe systemmenu.
5TouchClear.
Afterselectingadesireditem, a confirmation display appears. Touch OK to deletethememory.
■ If you donot want to clear them memory, touch Cancel.
UpdatingBluetoothconnection software
Thisfunctionisusedtoupdatethisunitwith the latest bluetoothsoftware.Foraboutbluetoothsoftwareandupdating,refertoourwebsite.

Important
Neverturntheunitoffandneverdisconnectthe phonewhilethesoftwareisbeingupdated.
1Turntheunitoff.
RefertoBasicoperationsonpage11.
2PressHOMEtoswitchtotheHOMEdisplay.
3TouchSystemkey.
Systemmenuisdisplayed.
4TouchBTSoftwareUpdate.
5TouchStarttodisplaythedatatransfer mode.
■ Followtheon-screen instruction to finish up- dating the bluetooth software.
DisplayingtheBluetooth systemversion
If this unit fail to operate properly, you may need to consult your dealer for repair. In such cases, you maybe asked to specify the system version. Perform the following procedure to check the version on this unit.
1Turntheunitoff.
RefertoBasicoperationsonpage11.
2PressHOMEtoswitchtotheHOMEdisplay.
3TouchSystemkey.
Systemmenuisdisplayed.
4TouchBluetoothVersionInformationto displaytotheversionoftheBluetooth moduleofthisunit.
Settingtherearviewcamera (backupcamera)

CAUTION
Pioneerrecommendstheuseofacamera whichoutputsmirror-reversedimages. Otherwise, the screenimagewillappearreversed.
Thisunitfeaturesafunctionthatautomatically switchestotherearviewcameravideo(R.C IN)whenarearviewcameraisinstalledon yourcarandtheshiftleverismovedtotheRE-VERSE(R)position.(Formoredetails,consultyourdealer.)
- Afteryousetuptherearviewcamerasetting, movetheshiftleverto REVERSE(R) and confirm that therearviewcamera videoisshownonthedisplay.
- Changethissettingifthedisplayswitches totherearviewcameravideobyerrorwhile youaredrivingforward.
- Tostopwatchingtherearviewcamera videoandreturntothesourcedisplay, pressandholdMUTE.
- TouchtheRearViewsourceicontodisplay therearviewcameraimagewhiledriving. Touchthesourceiconagaintoturnthe rearviewcameraoff. Fordetails, refertoSelectingasourceusingthetouchpanelkeys onpage12.
1Displaythesystemmenu.
RefertoIntroductionofmenuoperationson page47.
2TouchCameraPolarityonthesystem menutoselecttheappropriatesetting.
- Battery–Whenthepolarityoftheconnectedleadispositivewhiletheshiftlever isinREVERSE(R)position
- Ground–Whenthepolarityoftheconnectedleadisnegativewhiletheshiftlever isinREVERSE(R)position
- Off-Whenarearviewcameraisnotconnectedtothisunit
Note
Youcanalsoswitchtherearviewimagebypassingthetouchkey,regardlessofthe
CameraPolaritysettingonthesystemmenu.
RefertoBasicoperationsonpage11.
Selectingthevideoformat
YoucanswitchthevideooutputformatofV OUTbetweenNTSCandPAL.
1Displaythesystemmenu.
RefertoIntroductionofmenuoperationson page47.
2TouchVideoOutputFormatonthesystemmenutoselectthevideooutputformat.
NTSC—PAL
Note
Youcanswitchthevideooutputformatonlyfor thesourcefromthisunit.
Settingthevideosignal
When you connect this unit to an AV equipment to this unit, select these suitable videos signal setting.
- AsthisfunctionisinitiallysettoAuto, the unitwillautomaticallyadjustthevideosignalsetting.
- Youcanoperatethisfunctiononlyforthe videosignalinputintotheAVinput.
1Displaythesystemmenu.
RefertoIntroductionofmenuoperationson page47.
2TouchVideoSignalSettingonthefunctionmenu.
VideoSignalSettingitemsaredisplayed.
- AV-AdjuststheAVvideosignal
• AUX-AdjuststheAUXvideosignal - Camera—Adjuststherearviewcamera videosignal
3Touch◀or▶toselectthedesired videosignalappears.
Auto—PAL—NTSC—PAL-M—PAL-N—SECAM
SettingtheArtworkDance
WhenasongisplayedbyMIXTRAX, theartworkdisplaycanbemovedbasedonthe musictype.
1Displaythesystemmenu.
Referto/Introductionofmenuoperationson page47.
2TouchArtworkDancesettingonthe systemmenutoturnOnorOff.
Selectingtheareagroup
1SelecttheTVsource.
RefertoBasicoperationsonpage11.
2Displaythesystemmenu.
RefertoIntroductionofmenuoperationson page47.
3TouchTVCountryGrouponthefunctionmenu.
4Touch◀or▶untilthedesiredarea groupappears.
Country1(CCIRchannel)—Country2(IN
channel)—Country3(CHNchannel)—
Country4(U.K.channel)—Country5(OIRT
channel)—Country6(AUSTRALIAchannel)—
Country7(SAFchannel)
Changing the picture adjustment
YoucanadjusttheBrightness(brightness),
Contrast (contrast), Color (color), Hue (hue),
Dimmer(dimmer), and Temperature(temperature)foreachsourceandrearviewcamera.
- YoucannotadjustColor,Hueand
Contrastfortheaudiosource.
1Displaythesystemmenu.
Referto/Introductionofmenuoperationson page47.
2Ifyouareadjustingthe
PictureAdjustment, selecttheunit.

flowchart
graph TD
    A["NAVI"] --> B["Apps"]
CompletingPictureAdjustment fortheNavigationsystemwhen theRGBinputsettingissetto NAVI.
CompletingPictureAdjustment fortheAdvancedAppMode whentheRGBinputsettingis settoiPhone.

AdjustingthePictureAdjustmentfortherearviewcamera.

AdjustingthePictureAdjustmentforthesource.
3Touchanyofthefollowingtouchpanel keystoselectthefunctiontobeadjusted.
PictureAdjustmentitemsaredisplayed.
- Brightness—Adjuststheblackintensity
- Contrast—Adjuststhecontrast
•Color-Adjuststhecolorsaturation - Hue-Adjuststhetoneofcolor(redor greenisemphasized)
- Dimmer-Adjuststhebrightnessofthedisplay
- Temperature—Adjuststhecolortemperature, resulting in a better white balance
■YoucanadjustHueonlywhenthecolorsystemissettoNTSC.
■Withsomerearviewcameras,pictureadjustmentmaynotbepossible.
4Touch◄or►toadjusttheselected item.
Eachtimeyoutouch◀or▶, thelevelofthe selecteditemincreasesordecreases.
■ Dimmer can be adjusted from +1 to +48.
■ Temperature can be adjusted from +3 to -3.
Notes
- You cannot operate this function while driving.
- Different Brightness/Contrast/Dimmer settingscanbesetforwhentheillumination switchisonandwhenitisoff.
- Toperformthisfunction, dedicated microphone (e.g. CD-MC20) is required.

WARNING
Asaloudtone(noise)maybeemittedfromthe speakerswhenmeasuringthecar'sinterior acousticcharacteristics,neverperformautoTA orautoEQwhiledriving.

CAUTION
- ThoroughlychecktheconditionsbeforeperformingautoEQasthespeakersmaybedamagedifthesefunctionsareperformedwhen:
—Thespeakersareincorrectlyconnected. (Forexample,whenarearspeakerisconnectedasasubwooferoutput.)
—Aspeakerisconnectedtoapowerampdeliveringoutputhigherthanthespeaker's maximuminputpowercapability.
- Ifthemicrophoneisplacedinanunsuitable positionthemeasurementtonemaybecome loudandmeasurementmaytakealongtime, resultinginbatterydrainage.Besuretoplace themicrophoneinthespecifiedlocation.
BeforeoperatingtheautoEQfunction
- CarryoutautoEQinasquietaplaceas possible, with the care engine and air conditionings switched off. Also cut power to car phones or portable telephones in the car, or remove them from the car before carrying out auto EQ. Sound sother than theme measurement tone (surroundings sounds, enginesound, telephones ringing etc.) may prevent correct measurement of the car interior acoustic characteristics.
- BesuretocarryoutautoEQusingtheop-tionalmicrophone.Usinganothermicro-phonemaypreventmeasurement,orresult
inincorrectmeasurementofthecarinterioracousticcharacteristics.
- InordertoperformautoEQ, thefront speaker must be connected.
- Whenthisunitisconnectedtoapower ampwithinputlevelcontrol,autoEQmay notbepossibleifthepoweramp'sinput levelissetbelowthestandardlevel.
- Whenthisunitisconnectedtoapower ampwithanLPF,turnthisLPFoffbefore performingautoEQ.Alsosetthecut-offfrequencyforthebuilt-inLPFofanactivesub-woofertothehighestfrequency.
- Thedistancehasbeencalculatedbycomputertobetheoptimumdelaytogiveaccurateresultsforthecircumstances,so pleasecontinuetousethisvalue.
—Thereflectedsoundwithinthecaris stronganddelaysoccur.
—TheLPFonactivesubwoofersorexternalampsdelaythelowersounds. - AutoEQchangestheaudiosettingsasfollows:
—Thefader/balancesettingsreturntothe centerposition.(RefertoUsingfader/balanceadjustmentonpage48.)
—TheequalizercurveswitchestoFlat. (RefertoRecallingequalizercurveson page48.)
—Thefront, centerandrearspeakerswill automaticallybeadjustedtoahigh passfiltersetting. - PrevioussettingsforautoEQwillbeoverwritten.
PerformingautoEQ
1Stopthecarinaplacethatisquiet, closeallthedoors, windowsandsunroof, andthenturntheengineoff.
If the engine is left running, enginenois may prevent correct autoEQ.
2Fixtheoptionalmicrophoneinthecenteroftheheadrestofthedriver'sseat, facingforward.
TheautoEQmaydifferdependingonwhere youplacethemicrophone.lfdesired,place themicrophoneonthefrontpassengerseatto carryoutautoEQ.

natural_image
Line drawing of a car interior with steering wheel, dashboard, and cable (no text or symbols)3TurntheignitionswitchtoONorACC.
Ifthecar'sairconditionerorheateristurned on,turnitoff. Noisefromthefanintheair conditionerorheatermaypreventcorrectauto EQ.
4Displaythesystemmenu.
RefertoIntroductionofmenuoperationson page47.
5TouchAutoEQMeasurementtoenter autoEQmeasurementmode.
6Plugthemicrophoneintothemicrophoneinputjackonthisunit.
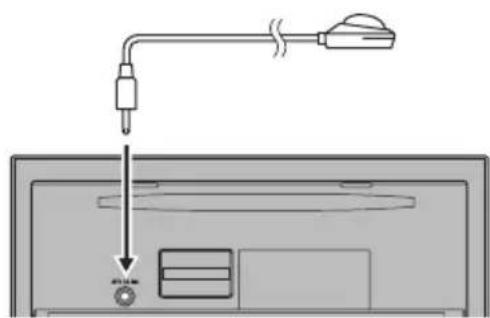
text_image
Diagram showing a device with a plug and cable connected to a screen, with a magnified view of the screen's internal components.AtrimringisavailableforMiddleEastAsian andSouthAfricanmodels.
7TouchStarttostartautoEQ.
8Whenthe10-secondcountdownstarts, getoutofthecarandclosethedoorwithin 10seconds.
Ameasurementtone(noise)isemittedfrom thespeakers, andautoEQmeasurementbegins.
WhenautoEQiscompleted, Themeasurementhasfinished. Pleasedisconnectthe microphoneandthenpushHOMEkey.is displayed.
Whenthecar'sinterioracousticcharacteristicscannotbemeasuredcorrectly,anerror messagewillbedisplayed.(RefertoUnderstandingautoEQerrormessagesonpage104.)
■IttakesaboutnineminutesforautoEQmeasurementtobecompletedwhenallthespeakers areconnected.
■TostopautoEQ,touchStop.
9Storethemicrophonecarefullyinthe glovecompartmentoranothersafeplace.
Ifthemicrophoneissubjectedtodirectsunlightforanextendedperiod,highttemperaturesmaycausedistortion,colorchangeor malfunction.
10Press▲(eject)toclosethepanel.
Correctingdistortedsound
WhenlisteningtoaCDorothersourceon whichtherecordinglevelishigh,settingthe levelofeachfrequencytohighmayresultin distortion.Youcanswitchthedigitalattenua-tortolowtoreducedistortion.
- Soundqualityisbetteratthehighsetting sothissettingisusuallyused.
1Displaythesystemmenu.
Referto/Introductionofmenuoperationson page47.
2TouchDigitalATT.
3TouchDigitalATTonthesystemmenu toselectthedigitalattenuatorlevel.
High—Low
Menuoperations
Resettingtheaudiofunctions
Youcanresetallaudiofunctions.
1Displaythesystemmenu.
RefertoIntroductionofmenuoperationson page47.
2TouchAudioReset.
3TouchReset.
Readytoreset.Areyousure?appearsinthe display.
■Tocancelthisfunctionontheway,touch Cancel.
4TouchResetagain.
Theresetendwascarriedout.appearsin thedisplayandaudiofunctionsarereset.

Favoritemenu
1Displaymenucolumnstoregister.
Referto/Introductionofmenuoperationson page47.
■Youcancustomizemenusexcept
VideoSetupmenu.
2Touchandholdthemenucolumnto registerit.
■Tocancelregistration,touchandholdthe menucolumnagain.
3Displaythefavoritemenuandchoosea registeredmenu.
RefertoIntroductionofmenuoperationson page47.
Note
Youcanregisterupto12columns.

IntroductionofBluetooth connectionmenuoperations
RefertoBasicoperationsonpage11. Ifyouareusingacellularphonethatcanbe connectedviaBluetoothwirelesstechnology, werecommendthatyouuseyourphoneto searchforthisunitandestablishaconconnection betweenitandyourphone.ThePINcodeis setto0000asdefault.Theproductnamefor thisunitwilldisplayonyourphoneasthede- vicename.Fordetails,refertoEnteringPIN codeforBluetoothwirelessconnectiononpage 76.Forfurtherdetailsconcerningtheproce- duresforestablishingBluetoothwirelesscon- nections,refertotheinstructionmanualfor thephone.
Pairingfromthisunit

text_image
Connection 01: Phone1 02: Phone2 03: Phone31DisplaytheBluetoothConnection Menu.
RefertoIntroductionofBluetoothtelephoneoperationsonpage31.
2TouchConnectiontoselectadevice.
3Starttosearch.

Startingtosearch.
Whilesearching, is displayed and when available devices are found, the device names or Bluetooth device addresses (if names cannot be obtained) are displayed.
■ If you want to switch between the device names and Bluetooth device addresses, touch the icon.

Switchingbetweenthedevice namesandBluetoothdeviceaddresses.
■Tocancelsearching,touchStop.
■ If three devices are already impaired,
MemoryFullisdisplayedandpairingcannotbe performed.Insuchcases,deleteapaireddevice first.Refertothispage.
■Ifnodevicecanbefound,NotFound is displayed. Insuchcases, checkthestatusof the Bluetooth device and search again.
4Touchadevicenametoselectthede- viceyouwanttoconnectto.
Whileconnecting, Pairing is displayed. If the connection is established, Paired is displayed.
- If your devices support SSP (SecureSimple Pairing), 6-digit number appear on the display of this unit. Once the connection is established, this number disappears.
■ If the connection fails, Error is displayed. In such cases, try again from the beginning.
■ThePINcodeissetto0000asthedefault,but canbechanged.RefertoEnteringPINcodefor Bluetoothwirelessconnectiononpage76.
■Oncetheconnectionisestablished, thedevicenameisdisplayed.
Touchthedevicenametodisconnect.
■ If you want to delete a paired Bluetooth telephone, display Delete OK? Touch Yes to delete the device.

Deletingapaireddevice.
■ Neverturntheunitoffwhilethepaired Bluetoothtelephoneisbeingdeleted.
UsingaBluetoothdevicetopair
If you cannot open the connection between your Bluetooth device and this unit from your Bluetooth device, you can us this function to establish a connection.
1DisplaytheBluetoothConnection Menu.
RefertoIntroductionofBluetoothtelephoneoperationsonpage31.
2TouchSpecialDevicetoselectthespecialdevice.
- Bluetooth devices that are difficult to establish a connection with are called special devices. If your Bluetooth device is listed as a special device, select the appropriate one.
3Touchthespecialdevicelisttoopenthe connection.
This unit is now on stand by for a connection with the Bluetooth device.
■ If threeeedevices are already impaired,
MemoryFull is displayed and pairing cannot be performed. Insuch cases, delete apaired device first. Referto the previous page.
4UseyourBluetoothdevicetoestablish aconnection.
The connection method is different depending on the Bluetooth device. Refertothemanual for your Bluetooth device to establish a connection.
Whileconnecting, Pairyourphone is displayed. If the connection is established, Paired is displayed.
- Iftheconnectionfails,Errorisdisplayed.In suchcases,tryagainfromthebeginning. - YoumayalsoneedtoenteraPINcodeinto thisunit.IfyourtelephonerequiresaPINcodeto establishaconnection,lookforthecodeonthe telephoneorinitsaccompanyingdocumentation.
■ThePINcodeissetto0000asthedefault, but canbechanged. RefertoEnteringPINcodefor Bluetoothwirelessconnectiononthenextpage.
ConnectingtoaBluetooth deviceautomatically
If this function is settoon, a connection between your Bluetooth device and this unit will take place automatically as soon as the two devices are less than a few meters apart. Initially, this function is settoon.
1DisplaytheBluetoothConnection Menu.
RefertoIntroductionofBluetoothtelephoneoperationsonpage31.
2TouchAutoConnecttoturnautomatic connectionon.
If your Bluetooth device is ready for a Bluetooth wireless connection, a connection to this unit will automatically be established.
■Toturnautomaticconnectionoff,touch AutoConnectagain. Ifconnectionfails,"Autoconnectionfailed. Retry?"appears.TouchYestoreconnect.
3Onceyouturnyourvehicle'sACC switchonagain, a connectionisestab-lishedautomatically.
Switchingvisibleunit
Thisfunctionsetswhetherornottomakethis unitvisibletotheotherdevice. Initially,thisfunctionissettoon.
1DisplaytheBluetoothConnection Menu.
RefertoIntroductionofBluetoothhtelephoneoperationsonpage31.
2TouchVisibilitytoselectvisibilityoff.
■ Toturnvisibilityon,touchVisibilityagain.
DisplayingBluetoothDevice address
ThisunitdisplaysitsBluetoothdeviceaddress.
1DisplaytheBluetoothConnection Menu.
RefertoIntroductionofBluetoothtelephoneoperationsonpage31.
2TouchDeviceInformationtodisplaydeviceinformation.
TheBluetoothdeviceaddressisdisplayed.
EnteringPINcodeforBluetooth wirelessconnection
ToconnectyourBluetoothdevicetothisunit viaBluetoothwirelesstechnology,youneedtoenteraPINcodeonyourBluetoothdeviceto verifytheconnection.Thedefaultcodeis 0000,butyoucanchangeitwiththisfunction.
1DisplaytheBluetoothConnection Menu.
RefertoIntroductionofBluetoothtelephoneoperationsonpage31.
2TouchPINCodeInputtoselect PINCodeInput.
3Touch0to9toinputpincode.
4AfterinputtingPINcode(upto8digits),storeinthisunit.

StoringthePINcodeinthisunit.

IntroductionofTheme settingmenuoperations
RefertoBasicoperationsonpage11.
Selectingtheilluminationcolor
This unit is equipped with multiple-color illumination.
Directselectionfrompreset illuminationcolors
Youcanselectanilluminationcolorfromthe colorlist.
1DisplaytheThememenu.
RefertoBasicoperationsonpage11.
2Touchllluminationandthentoucha coloronthelist.
Customizingtheilluminationcolor
1DisplaytheThememenu.
RefertoBasicoperationsonpage11.
2TouchIlluminationandthentouch Custom.
3Displaythecustomizingmenu.

Displayingthecustomizingmenu.
4Touchthecolorbartocustomizethe color.
5Touch◄or►tofine-tunethecolor.
6Touchtheiconandholdtostorethe customizedcolorinthememory.
Memo
Storingthecustomizedcolorin thememory.
Thecustomizedcolorhasbeenstoredinthe memory.
Thesetcolorwillberecalledfromthememory thenexttimeyoutouchthesameicon.
Menuoperations
SelectingtheOSD(on-screen display)color
TheOSDcolorcanbechanged.
1DisplaytheThememenu.
RefertoBasicoperationsonpage11.
2TouchScreen.
3Touchoneofthecolorsonthelist.
Selectingthebackgrounddisplay
Youcanswitchthebackgroundthatisdis-playedwhenlisteningtoasource.
1DisplaytheThememenu.
RefertoBasicoperationsonpage11.
2TouchBackground.
3Touchthedesiredsetting.
■IfnoJPEGimagesarestoredinthisunit,you cannotselectphoto.TostoreaJPEGimageto thisunit,refertoCaptureanimationJPEGfiles onpage42.
■IfyouwanttodeletethecapturedJPEG image,touchandholdthekeyoftheJPEG image.
■Youcanviewthehiddensettingsbydragging/flickingthedisplay.
Settingrearmonitoroutput
The output source for therear monitor can be switched to the following:
- Mirror-Thesourceonthefrontscreenof thisunit
Disc—Thevideoandsoundfromthedisc
USB/iPod1—Thevideoandsoundfrom theUSBstoragedevice
SD–ThevideoandsoundfromtheSD card
AV–ThevideoandsoundfromAVinput
Off-Nosource
Notes
- YoucannotplayDivXfilesontherearand frontmonitorsatthesametime.
- Theportthatsupportstherearmonitorwill onlybeUSBinput1.
- USB/iPod1andSDarecompatibleDivX/MPEG-4/WMV/H.264only.
- You cannot usethisfunctionwhile using MIX-TRAX. If you use MIXTRAX while this function is in use, this function will turn off.
Adjustingtheresponse positionsofthetouchpanels (TouchPanelCalibration)
If you feel that the touch panel key on the screendeviate from the actual position that respond to your touch, adjust the response position of the touch panel. There are two adjustment methods: 4-point adjustment, in which you touch four corners of the screen; and 16-point adjustment, in which you make fine-adjustment on the entire screen.
- Parkyourcarinasafeplaceandusethis function.Donotoperateitwhiledriving.
- Touchthescreengentlyforadjustment. Forcefullypressingthetouchpanelmaydamagethetouchpanel.Donotuseasharp pointedtoolsuchasaballpointpenormechanicalpen.Doingsomaydamagethe screen.
- Ifthetouchpanelcannotbeadjustedproperly,consultyourlocalPioneerdealer.
1Turntheunitoff.
RefertoBasicoperationsonpage11.
2PressandholdHOMEtostartTouch PanelCalibration.
The4-pointtouchpaneladjustmentsscreenappears.When2-pointappearsatonce,touch both.
3Toucheachofthearrowsonthefour cornersofthescreen.
■Tocanceltheadjustment,pressandhold HOME.
4PressHOME to complete 4-point adjustment.
Datafortheadjustedpositionissaved.
■ Donotturnofftheenginewhilethedatais beingsaved.
5PressHOMEtoproceedto16-pointadjustment.
The16-pointtouchpaneladjustmentscreen appears.
■Tocanceltheadjustment,pressandhold HOME.
6Gentlytouchthecenterofthe+mark displayedonthescreen.
Afteryoutouchallthemarks, the data for the adjusted position is saved.
■ Donotturnofftheenginewhilethedatais beingsaved.
7PressandholdHOMEtocompletethe adjustment.
UsinganAUXsource
Aseparatelysoldauxiliarydevicesuchasa VCRorportabledevicecanbeconnectedto thisunit.Whenconnected,theauxiliarydevice isautomaticallyrecognizedasanAUXsource andisassignedtoAUX.
AboutAUXconnectionmethods
Youcanconnectauxiliarydevicestothisunit.
Minipinplugcable(AUX)
When connecting an auxiliary device using a miniplugcable
iPodsandportableaudio/videoplayerscanbe connectedtothisunitviaminiplugcable.
- IfaniPodwithvideocapabilitiesisconnectedtothisunitvia3.5mmplug(4pole) cable(suchastheCD-V150M),youcan enjoythevideocontentsoftheconnected iPod.
- Aportableaudio/videoplayercanbeconnectedbyusinga3.5mmplug(4pole)withanRCAcable(soldseparately).However,dependingonthecable,areverseconnectionbetweenthed(rightsideaudio)cableandyellow(video)cablemayberequiredinorderforthesoundandvideoimagetobereproducedcorrectly.
- Insertthestereominiplugintothe AUXinputjackonthisunit.
RefertoConnectingtheunitsonpage81.
RefertoWhat'swhatonpage8.
Usinganexternalunit
AnexternalunitreferstoaPioneerproduct, suchasthosewhichwillbeavailableinthefuture.Althoughincompatibleasasource,the basicfunctionsofuptotwoexternalunitscan becontrolledwiththisunit.Whentwoexternal unitsareconnected,theexternalunitsare automaticallyallocatedtoexternalunit1orex-ternalunit2.
The basic operation of the external unit are explained below. The allocated functions will differ depending on the connected external unit. Ford details concerning these functions, referto the owner's manual for the external unit.
Basicoperations
The functions allocated to the following operations will differ depending on the connected external unit. Ford details concerning these
functions, refertotheowner's manual for the connected external unit.

Switchingtoautoormanual.

Switchingtovideooraudio.
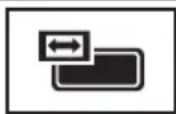
Changingthescreenmode. RefertoChangingthewidescreen modeonpage42.

Switchingtheequalizercurves. RefertoUsingtheequalizeron page48.
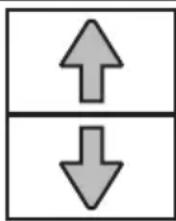
Actionswilldifferdependingon theconnectedexternalunit.
| F1 |
| F2 |
| F3 |
| F4 |
Function1to4 Actionswilldifferdependingon theconnectedexternalunit.
14 Otherfunctions
Band
Actionswilldifferdependingon theconnectedexternalunit.
1
2
3
4
5
6
Actionswilldifferdependingon theconnectedexternalunit.


WARNING
•LIGHTGREENLEADATPOWERCON-NECTORISDESIGNEDTODETECT PARKEDSTATUSANDMUSTBECON-NECTEDTOTHEPOWERSUPPLYSIDE OFTHEPARKINGBRAKESWITCH.IM-PROPERCONNECTIONORUSEOF THISLEADMAYVIOLATEAPPLICABLE LAWANDMAYRESULTINSERIOUSIN-JURYORDAMAGE.
Connectingtheunits

WARNING
• To avoid the risk of accident and the potential violation of applicable laws, noviewing of front seat videos should ever occur while the vehicle is being driven. Also, reard displays should not be in a location where they are visibly distracting to the driver.
- Insomecountriesorstatesheviewingof imagesonadisplayinsideavehicleevenby personsotherthanthedrivermaybeillegal. Wheresuchregulationsapply,theymustbe obeyedandthisunit'sDVDfeaturesshould notbeused.

CAUTION
- PIONEERdoesnotrecommendthatyouinstallorserviceyourdisplayunityourself.Installingorservicingtheproductmayexposeyutoriskofelectricshockorotherhazards.ReferallinstallationandservicingofyourdisplayunittoauthorizedPioneerservicepersonnel.
- Secureallwiringwithcableclampsorelectricaltape.Donotallowanybarewiringtore-mainexposed.
- Donotdrillaholeintotheenginecompartmenttoconnecttheyellowcableofthedisplayunittothevehiclebattery.Engine vibrationmayeventuallycausetheinsulation tofailatthepointwherethewirepassesfrom thepassengercompartmentintotheengine
compartment.Takeextracareinsecuringthe wireatthispoint.
- Itisextremelydangeroustoallowthemicrophoneleadtobecomewoundaroundthe steeringcolumnorshiftlever.Besuretoinstalltheunitinsuchawaythatitwillnotobstructdriving.
- Makesurethatcableswillnotinterferewith movingpartsofthevehicle,suchastheshift lever,parkingbrakeorseatslidingmechanism.
- Donotshortenancables.Ifyoudo,theprotectioncircuitmayfailtoworkproperly.

WARNING
- Usespeakersover50W(outputvalue)andbetween4Ωto8Ω(impedancevalue).Donot use1Ωto3Ωspeakersforthisunit.
- Theblackcableisground.Wheninstalling thisunitorpoweramp(soldseparately),make suretoconnectthegroundwirefirst.Make surethatthegroundcableisproperlyconnectedtometalpartsofthecarbodyusinga spadeterminalsoldcommercially.Theground wireofthepowerampandtheoneofthisunit oranyotherdevicemustbeconnectedtothe carseparatelywithdifferentscrews.Ifthe screwforthegroundwireloosensorfallsout, itcouldresultinfire,generationofsmokeor malfunction.

text_image
Ground wire *1 POWER AMPOther devices
(Another electronic
device in the car)
Metal parts of car's body
"Non supplied for this unit."

Important
- This unit cannot be installed in a vehicle without ACC (accessory) position on the ignition switch.

ACC position

No ACC position
- Usethisunitwitha12-voltbatteryandnegativegroundingonly.Failuretodosomayresultinafireormalfunction.
- Topreventashort-circuit, overheatingormal-function, besuretofollowthedirections below.
—Disconnectthenegativeterminalofthe batterybeforeinstallation.
—Securethewiringwithcableclampsoradhesivetape.Wrapadhesivetapearound wiringthatcomesintocontactwithmetal partstoprotectthewiring.
—Placeallcablesawayfrommovingparts, suchastheshiftleverandseatrails.
—Placeallcablesawayfromhotplaces, suchasneartheheateroutlet.
—Donotconnecttheyellowcabletothebatterybypassingitthroughtheholetothenginecompartment.
—Coveranydisconnectedcableconnectors withinsulatingtape.
—Donotshortenanycables.
—Nevercuttheinsulationofthepowercable ofthisunitinordertosharethepower withotherdevices.Thecurrentcapacityof thecableislimited.
—Useafuseoftheratingprescribed.
—Neverwirethenegativespeakercabledirectlytoground.
—Neverbandtogethernegativecablesof multiplespeakers.
- Whenthisunitison, controlsignalsaresent throughtheblue/whitecable. Connect this cabletothesystemremotecontrolofanexternalpoweramporthevehicle'sauto-antenna relaycontrolterminal(max.300mA12VDC). Ifthevehicleisequippedwithaglassanten-
na,connectittotheantennaboosterpower supplyterminal.
- Neverconnecttheblue/whitecabletothe powerterminalofanexternalpoweramp. Also,neverconnectittothepowerterminalof theautoantenna.Doingsomayresultinbatterydrainoramalfunction.
- IP-BUSconnectorsarecolor-coded.Besure toconnectconnectorsofthesamecolor.
Installation
Connectingthepowercord

text_image
Microphone input Antenna input This product Fuse (10 A) AUX jack (3.5 Φ) Use a mini plug cable to connect with auxiliary device. Yellow Connect to the constant 12 V supply terminal. Orange/white Connect to lighting switch terminal. Red Connect to terminal controlled by ignition switch (12 V DC). Black (chassis ground) Connect to a clean, paint-free metal location. Left Right Front speaker Front speaker White Gray/blackWhite/black Green Violet Rear speaker or Subwoofer (4 Ω) Green/black Violet/black Rear speaker or Subwoofer (4 Ω) When using a subwoofer of 70 W (2 Ω), be sure to connect with Violet and Violet/black leads of this unit. Do not connect anything to Green and Green/black leads. Not used. Green Violet Green/black Violet/black Subwoofer (4 Ω) × 24m

Microphone
Wired remote input
Hard-wired remote control adaptor can be connected (sold separately).
Violet/white
Of the two lead wires connected to the back lamp, connect the one in which the voltage changes when the gear shift is in the REVERSE (R) position. This connection enables the unit to sense whether the car is moving forwards or backwards.
Yellow/black
If you use an equipment with Mute function, wire this lead to the Audio Mute lead on that equipment. If not, keep the Audio Mute lead free of any connections.
Connection method

- Clamp the lead.


- Clamp firmly with needle-nosed pliers.
Note:
The position of the parking brake switch depends on the vehicle model. For details, consult the vehicle Owner's Manual or dealer.
Light green
Used to detect the ON/OFF status of the parking brake. This lead must be connected to the power supply side of the parking brake switch.
Power supply side
Parking brake switch
Ground side
Blue/white
Connect to system control terminal of the power amp or auto-antenna relay control terminal (max. 300 mA 12 V DC).
With a 2 speaker system, do not connect anything to the speaker leads that are not connected to speakers.
When you connect the separately sold multi-channel processor (e.g., DEQ-P6600/DEQ-P7650) to this unit, do not connect anything to the speaker leads and system remote control (blue/white).
Note:
- Change the initial setting of this unit. The subwoofer output of this unit is monaural.
Whenconnectingtoseparatelysoldpoweramp
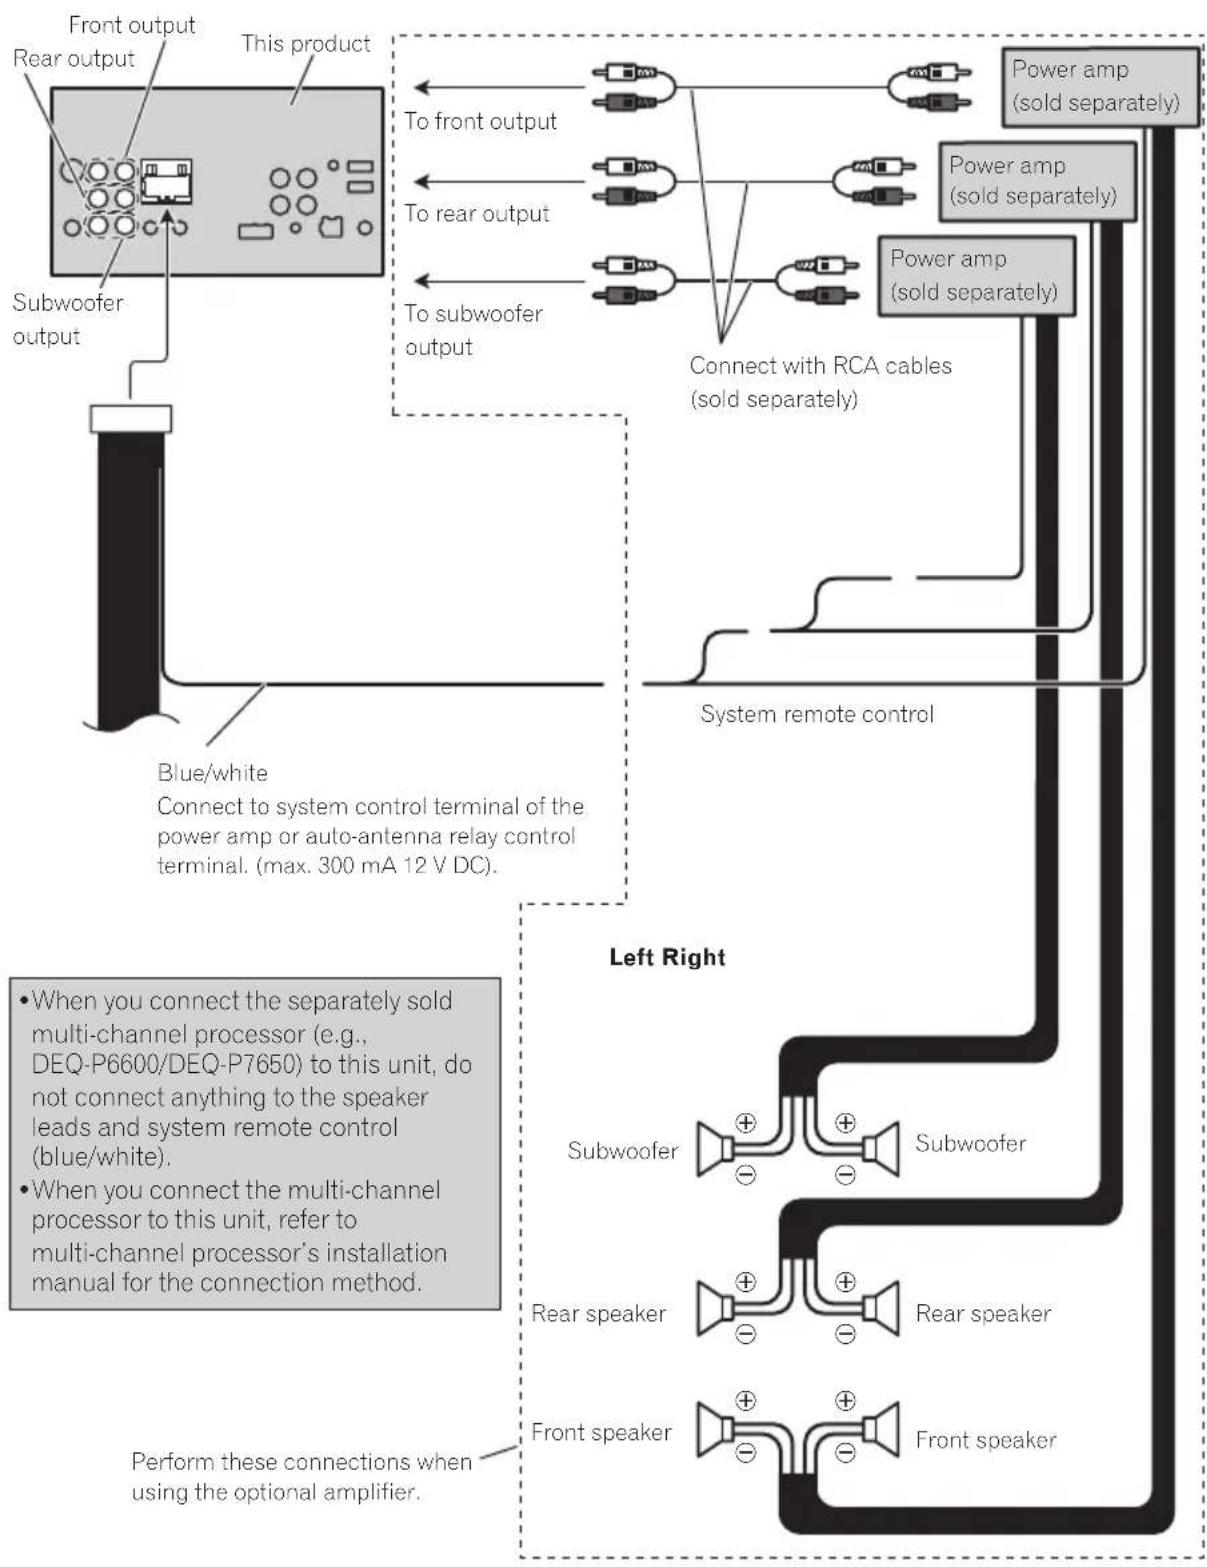
flowchart
graph TD
    A["Front output"] --> B["Subwoofer output"]
    C["Rear output"] --> B
    D["This product"] --> E["To front output"]
    D --> F["To rear output"]
    D --> G["To subwoofer output"]
    H["Power amp (sold separately)"] --> I["Power amp (sold separately)"]
    J["Power amp (sold separately)"] --> K["Power amp (sold separately)"]
    L["Connect with RCA cables (sold separately)"] --> M["System remote control"]
    N["Blue/white Connect to system control terminal of the power amp or auto-antenna relay control terminal. (max. 300 mA 12 V DC)."] --> O["Left Right"]
    P["When you connect the separately sold multi-channel processor (e.g., DEQ-P6600/DEQ-P7650) to this unit, do not connect anything to the speaker leads and system remote control (blue/white)."] --> Q["When you connect the multi-channel processor to this unit, refer to multi-channel processor's installation manual for the connection method."]
    R["Perform these connections when using the optional amplifier."] --> S["Subwoofer"]
    R --> T["Rear speaker"]
    R --> U["Front speaker"]
WhenconnectingwithoptionalCD-IU201Vcable
USB/iPod input 2
Remove the cover before use.
refer to USB/iPod input 1 and USB/iPod input 2

text_image
This product AUX input (AUX) USB/iPod input 1 1.5 m USB cable (Supplied with this unit) Connect to separately sold USB device. Interface cable (CD-IU201V) (sold separately) Dock connector iPod with video capabilities (sold separately) 2 mWhenconnectingwithoptionalCD-IU201Scable
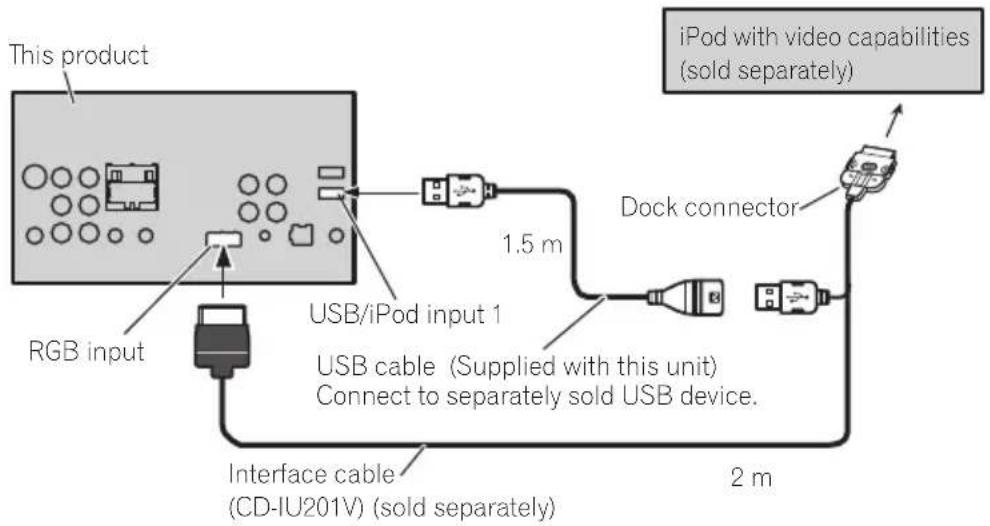
text_image
This product RGB input USB/iPod input 1 USB cable (Supplied with this unit) Connect to separately sold USB device. 1.5 m Dock connector 2 m Interface cable (CD-IU201V) (sold separately)Whenconnectingwithamulti-channelprocessor

text_image
IP-BUS cable (supplied with multi-channel processor) This product Optical output ToSWR IP-BUS input ToSWL Black Optical cable connection box (CD-DD25) (DEQ-P6600 :supplied with multi-channel processor) (DEQ-P7650 : sold separately) RCA cable (supplied with multi-channel processor) Optical cable (supplied with multi-channel processor) Blue Multi-channel processor (DEQ-P6600/DEQ-P7650) (sold separately) BlackWhenconnectingtheexternalvideocomponentandthedisplay
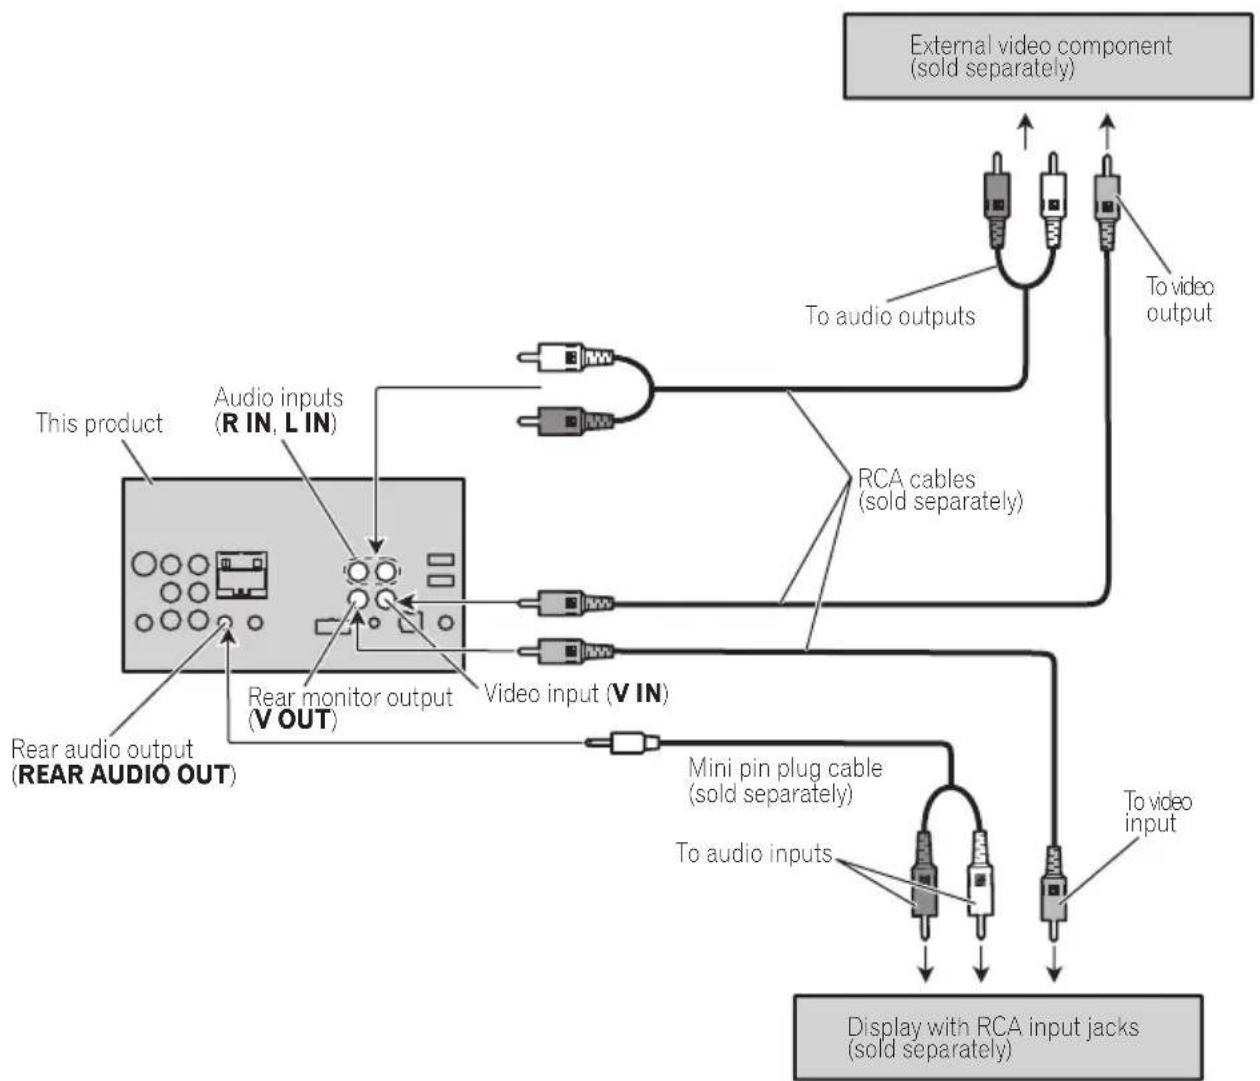
flowchart
graph TD
    A["This product"] --> B["Rear audio output (REAR AUDIO OUT)"]
    B --> C["Audio inputs (R IN, L IN)"]
    C --> D["Rear monitor output (V OUT)"]
    D --> E["Video input (V IN)"]
    E --> F["Mini pin plug cable (sold separately)"]
    F --> G["Display with RCA input jacks (sold separately)"]
    G --> H["External video component (sold separately)"]
    H --> I["To audio outputs"]
    H --> J["To video output"]
    I --> K["To audio inputs"]
    J --> L["To video input"]
    K --> M["RCA cables (sold separately)"]
    L --> M
- ItisnecessarytochangeAVInputinthe systemmenuwhenconnectingtheexternalvideocomponent. RefertoSettingAVinputonpage65.
When using adisplay connected to rear video output
Thisproduct'srearvideooutputandrear audiooutputareforconnectionofadisplayto enablepassengersintherearseatstowatch theDVD,etc.

WARNING
- Neverinstallthedisplayinalocationwhereit isvisibletothedriverwhiledriving.
Whenconnectingwitharear viewcamera
WhentheshiftleverisswitchedtoREVERSE (R), thedisplayonthisunitautomatically switchestotherearviewimage.Youneedto settheCameraPolarityproperlyinthesystemmenu.Fordetailsaboutthesettings, refer toSettingtherearviewcamera(backupcamera)onpage68.
Youcanalsoswitchtherearviewimageby pressingthetouchkey.Fordetails,referto Basicoperationsonpage11.

WARNING
USEINPUTONLYFORREVERSEORMIRRORIMAGEREARVIEWCAMERA.OTHER USEMAYRESULTININJURYORDAMAGE.

CAUTION
- Youmustuseacamerawhichoutputsmirrorreversedimages.
- Thescreenimagemayappearreversed.
- Therearviewcamerafunctionistobeused asanaidtokeepaneyontrailers,orwhile backingup.Donotuseforentertainmentpurposes.
- Objectsintherearviewmayappearcloseror moredistantthantheyactuallyare.
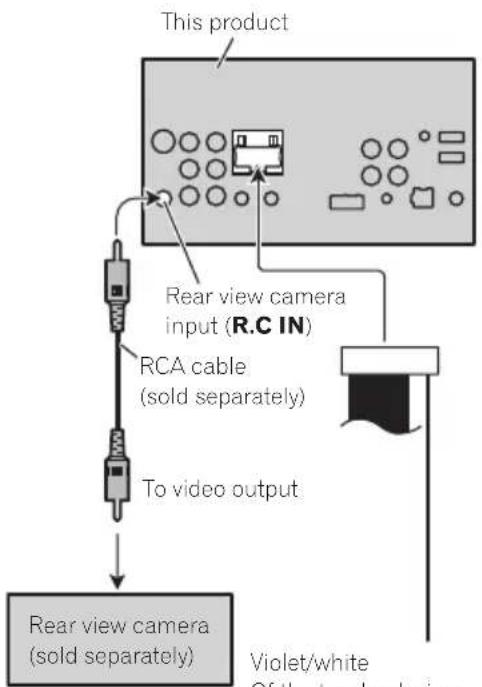
flowchart
graph TD
    A["This product"] --> B["Rear view camera input (R.C IN)"]
    B --> C["RCA cable (sold separately)"]
    C --> D["To video output"]
    D --> E["Rear view camera (sold separately)"]
    E --> F["Violet/white Of the two lead drives"]
Violet/white
Of the two lead wires connected to the back lamp, connect the one in which the voltage changes when the gear shift is in the REVERSE (R) position. This connection enables the unit to sense whether the car is moving forwards or backwards.
Connecting and installing the optical cable connection box

WARNING
- Avoid installing the optical cable connection box locations where the operation of safety devices such as air bags is prevented by this unit. Otherwise, there is an danger of fatal accident.
- Avoidinstallingtheopticalcableconnection boxinlocationswheretheoperationofthe brakemaybeprevented. Otherwise,itmayresultinatrafficaccident.
- Fixtheopticalcableconnectionboxsecurely with the hook and loop fastener or locktie. If the unit is loose, it disturbs driving stability, which may result in atraffic accident.

CAUTION
• Install this unit using only the part supply with this unit. If other parts are used, this unit may be damaged or could dismount itself, which lead to an accident or other problems.
- Donotinstallthisunitnearthedoorwhere rainwaterislikelytobespilledontheunit.In-cursionofwaterintotheunitmaycause smokeorfire.
Connectingtheopticalcable
1Connecttheopticalcableandground leadtothemainunit.
Connecttheopticalcablesothatitdoesnot protrudefromthemainunit,asshowninthe illustration.Fastenthegroundleadtotheprotrusiononthebackofthemainunit.

text_image
Diagram showing a cable being inserted into a device with numbered label (1) pointing to the cable.①Screw
2Connecttheopticalcabletotheoptical cableconnectionbox.
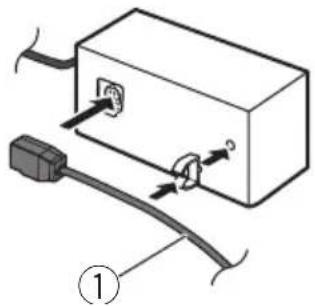
text_image
Diagram showing cable installation with labeled components, including a connector and cable attachment mechanism①Opticalcable
Installingtheopticalcable connectionbox
- Wheninstallingtheopticalcableconnectionboxwiththehookandloopfastener.
Installtheopticalcableconnectionboxusing thehookandloopfastenerintheamplespace oftheconsolebox.

text_image
Diagram showing a mechanical assembly with labeled parts 1 and 2, likely illustrating a procedure or process.①Hookfastener
②Loopfastener
- Wheninstallingtheopticalcableconnectionboxwiththelocktie.
Wraptheopticalcableandconnectionbox with the protection tape and fasten with the powercode using the locktie.
Installation
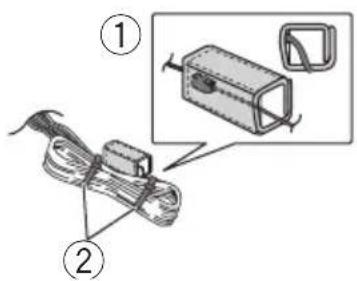
text_image
Diagram showing two labeled components of a device with a magnified inset highlighting a component detail.①Wrapwiththeprotectiontape
②Fastenwiththelocktie
Installation
Notes
- Checkall connectionsandsystemsbefore finalinstallation.
- Donotuseunauthorizedpartsasthismay cause malfunctions.
- Consultyourdealerifinstallationrequiresdrillingofholesorothermodificationstothevehicle.
- Donotinstallthisunitwhere: —itmayinterferewithoperationofthevehicle. —itmaycauseinjurytoapassengerasaresultofasuddenstop.
- Donotinstallthedisplaywhereitmay(i)obstructthedriver'svision,(ii)impairtheperformanceofanyofthevehicle'soperating systemsorsafetyfeatures,includingairbags, hazardlampbuttonsonor(iii)impairthedriver's abilitytosafelyoperatethevehicle.
- These semiconductor laser will be damaged if it overheats. Install this unit away from hot places such as near the heater outlet.
- Optimum performance is obtained when the unitis installed at an angle of less than 30^ .
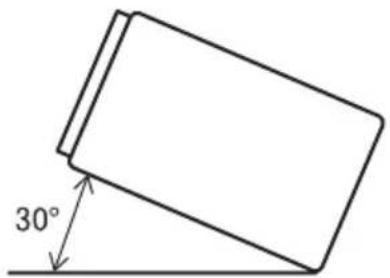
text_image
30°- Wheninstalling,toensureproperheatdispersalwhenusingthisunit,makesureyouleave amplespacebehindtherearpanelandwrap anyloosecablessotheyarenotblockingthe vents.

text_image
Leave ample space 5 cm 5 cm- Tosometypesofvehicles, this unit cannot be properly installed. Insuch case, use the optional installation kit (ADT-VA133).
Beforeinstallingthisunit
forMiddleEastAsianandSouthAfricanmodels
- Removetheholder.
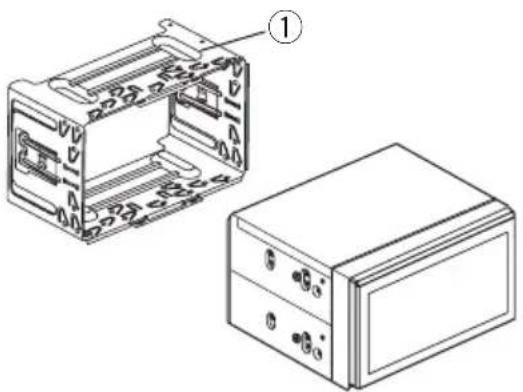
natural_image
Technical line drawing of a device housing and its internal components (no text or symbols)①Holder
(factory-suppliedpart)
Installationwiththeholder
forMiddleEastAsianandSouthAfricanmodels
1Installtheholderintothedashboard.
Afterinsertingtheholderintothedashboard, selectandbendthetabsappropriatetothe thicknessofthedashboardmaterial.(Install thisunitasfirmlyaspossibleusingthetop andbottomtabs.Tosecurethisunit,bendthe tabs90degrees.)

text_image
① 182 112 ②① Dashboard
②Holder
(factory-suppliedpart)
2Installthisunit.

natural_image
Diagram showing a device with internal components and a separate labeled box (no text or symbols present)① Dashboard
Installationusingthescrew holesonthesideoftheunit
●Fasteningtheunittothefactoryradio-mountingbracket.
Positiontheunitsothatitsscrewholesare alignedwiththescrewholesofthebracket, andtightenthescrewsat3locationsoneach side.
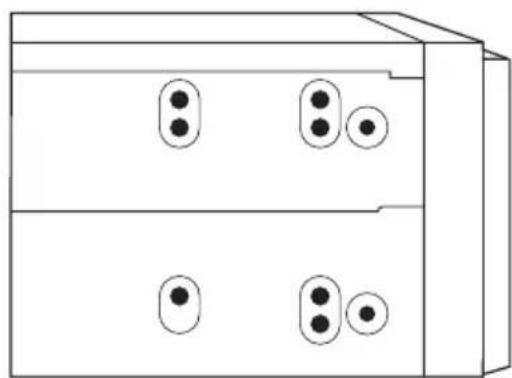
natural_image
Simple line drawing of a two-tier electronic device with four circular ports and three leads (no text or symbols)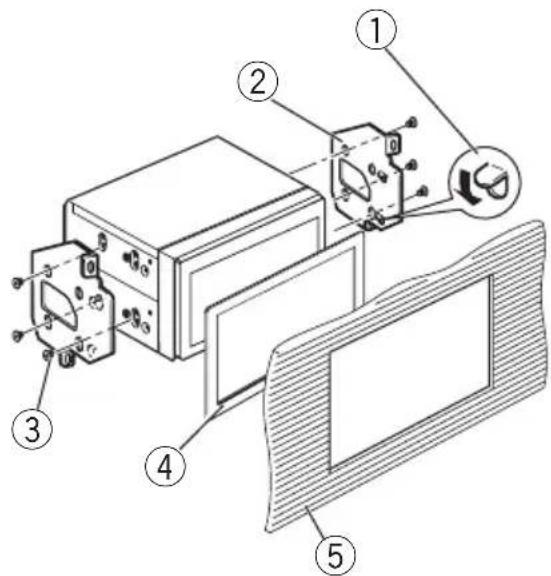
text_image
Technical diagram of an electronic device with numbered components and labeled parts①Ifthepawlgetsintheway,benditdown.
②Factoryradiomountingbracket
③Truss(5mm×8mm)screws
④Frame
Insometypesofvehicles,discrepancymay occurbetweentheunitandthedashboard. Ifthishappens,usethesuppliedframeto fillthegap.
⑤ Dashboardorconsole
Removingtheunit
forMiddleEastAsianandSouthAfricanmodels
1Removethetrimring.

text_image
Technical diagram showing a mechanical assembly with labeled parts and an inset detail view①Trimring
- Releasingthefrontpanelallowseasieraccesstothetrimring.
2Insertthesuppliedextractionkeysinto bothsidesoftheunituntiltheyclickinto place.
3Pulltheunitoutofthedashboard.

natural_image
Diagram showing a mechanical device being processed into a box, with hands using a tool (no text or symbols present)Installingthemicrophone

CAUTION
Itisextremelydangeroustoallowthemicrophoneleadtobecomewoundaroundthesteeringcolumnorshiftlever.Besuretoinstallthe unitinsuchawaythatitwillnotobstructdriving.
Note
Installthemicrophoneinapositionandorientationthatwillenableittopickupthevoiceofthe personoperatingthesystem.
Wheninstallingthemicrophoneon thesunvisor
1Installthemicrophoneonthemicro-phoneclip.

text_image
Diagram of a handheld device with labeled parts, showing a drill bit and base mechanism.①Microphone
②Microphoneclip
2Installthemicrophonecliponthesun visor.
With the sunvisorup, install the microphone clip. (Lowering the sunvisor reduce the voice recognition rate.)
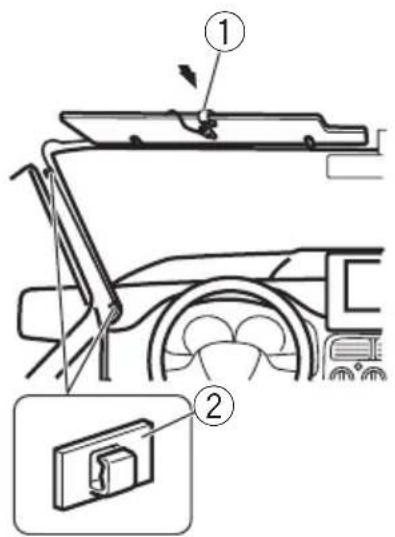
text_image
Diagram showing car interior components with numbered parts and a close-up inset of the lower panel.①Microphoneclip
②Clamp
Useseparatelysoldclampstosecurethe leadwherenecessaryinsidethevehicle.
Wheninstallingthemicrophone on thesteeringcolumn
1Installthemicrophoneonthemicro-phoneclip.
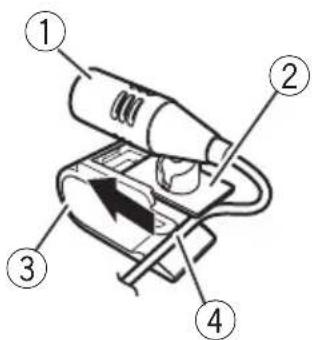
text_image
Diagram of a hairdryer with numbered parts labeled 1 to 4①Microphone
②Microphonebase
③Microphoneclip
④Fitthemicrophoneleadintothegroove.
■Microphonecanbeinstalledwithoutusing microphoneclip.Inthiscase,detachthemicrophonebasefromthemicrophoneclip.Todetach themicrophonebasefromthemicrophoneclip, slidethemicrophonebase.
2Installthemicrophoneclipontherear sideofthesteeringcolumn.

text_image
Diagram showing a car seatbelt switch mechanism with labeled component 1
text_image
Diagram showing car steering wheel and battery compartment with numbered annotation①Double-sidedtape
②Clamp
Useseparatelysoldclampstosecurethe leadwherenecessaryinsidethevehicle.
Adjustingthemicrophoneangle

natural_image
Illustration of a plug-in connector with a cable and connector, no text or symbols presentThemicrophoneanglecanbeadjusted.

Additionalinformation
Troubleshooting
Common
| SymptomCauseAction(Refer-encepage) | ||
| Thepowerwill notturnon. Theunitwill notoperate. | Leadsandcon-nectorsareincor-rectlyconnected. | Confirmmoncemore thatallconnec-tionsarecorrect. |
| Thefuseis blown. | Rectifythecause andthenreplace thefuse.Besureto installafusewith thesamerating. | |
| Noiseand/or otherfactorsare causingthebuilt-inmicroproces-sortooperatein-correctly. | PressRESET.(Page 16) | |
| Operationwith theremote controlisnot possible. Theunitdoes notoperate correctlyeven whentheap-propriatere-motecontrol buttonsare pressed. | Batterypoweris low. | Loadanewbattery. |
| Someoperations areprohibited withcertain discs. | Tryoperatingwith anotherdisc. | |
| Playbackisnot possible. | Thediscisdirty.Cleanthedisc. | |
| Thetypeofdisc loadedcannotbe playedonthis unit. | Checkthedisc type. | |
| Thedisloaded isnotcompatible withthisvideo system. | Changethediscto onethatiscompati- tiblewithyour videosystem. | |
| Thereisno sound. Thevolume levelwillnot rise. | Cablesarenot connectedcor-rectly. | Connectthecables correctly. |
| Theunitisper-formingstill, slowmotionor frame-by-frame playback. | Thereisnosound duringstill,slow motionorframe-by-frame playback. | |
| SymptomCauseAction(Refer-encepage) | ||
| Thereisno imagedis-played. | Theparking brakecableis notconnected. | Connectthepark-ingbrakecable, andapplythepark-ingbrake. |
| Theparking brakeisnotap-plied. | Connectthepark-ingbrakecable, andapplythepark-ingbrake. | |
| Theiconis displayed,and operationisnot possible. | Theoperationis prohibitedforthe disc. | Thisoperationis notpossible. |
| Theoperationis notcompatible withtheconfig-urationofthe disc. | Thisoperationis notpossible. | |
| Theimagedis-playedstops (pauses)and theunitcannot beoperated. | Thedatacould nolongerbe readduringplay-back. | Stopplayback once,andstart playbackagain. |
| Thereisno sound. | Thevolumelevel islow. | Adjustthevolume level. |
| Thevolume levelislow. | Theattenuatoris on. | Turntheattenuator off. |
| Thesoundand videoskip. | Theunitisnot firmlysecured. | Firmlysecurethe unit. |
| Filesizeand transmissionrate areaboverecom-mendedrates. | CreateaDivXfile thatiswithinthe recommendedsize andtransmission rate. | |
| Theaspect ratioisincor-rectandthe imageis stretched. | Theaspectratio settingisincor-rectforthedis-play. | Selecttheappro-priatesettingfor yourdisplay.(Page 62) |
| Themotor soundswhen theignition switchis turnedON(or isturnedto ACC). | Theunitiscon-firmingwhether ornotadiscis loaded. | Thisisanormal operation. |
Additionalinformation
SymptomCauseAction(Refer-
encepage)
| Nothingisdis-played. Thetouch panelkeyscan-notbeused. | Therearview camerasnot connected. | Connectarear viewcamera. |
| CameraPolarity isatincorrect setting. | Pressandhold HOME to return to the source display and then select the correct setting for CameraPolarity. (Page69) | |
| Noxxxxap-pearswhena displayischan-ged(NoTitle,forexample). | Thereisnoem-beddedtextinfor-mation. | Switchthedisplay orplayanother track/file. |
| Subfolderscan-notbeplayed back. | Folderrepeat playhasbeense-lected. | Selecttherepeat rangeagain. |
| Therepeat rangechanges automatically. | Anotherfolder wasselectedddur-ingrepeatplay. | Selecttherepeat rangeagain. |
| Tracksearchor fastforward/re-versewasper-formedduring filerepeatplay. | Selecttherepeat rangeagain. |
DVD
SymptomCauseAction(Refer-
encepage)
| Playbackisnot possible. | Theloadeddisc hasadifferentregionnumber fromthisunit. | Replacethedisc withonefeaturing thesameregion numberasthis unit. |
| Aparentallock messageisdisplayand playbackisnot possible. | Parentallockis activated. | Turnparentallock offorchangethe level.(Page62) |
| Parentallock cannotbecanceled. | Thecodenumber isincorrect. | Enterthecorrect codenumber. (Page62) |
| Youhaveforgot-tenyourcode number. | PressRESET. (Page 16) |
SymptomCauseAction(Refer-
encepage)
| Dialoglanguage(and subtitlelanguage)cannot beswitched. | TheDVDbeing playeddoesnot featuremultiple linguagerecordings. | Thelanguagecan-notbeswitchedif theyarenotre-cordedonthedisc. |
| Youcanonly switchbetween itemsindicated inthediscmenu. | Switchthelan-guageusingthe discmenu. | |
| Nosubtitles aredisplayed. | TheDVDbeing playeddoesnot featuresubtitles. | Subtitlesarenot displayedifthey arenotrecorded onthedisc. |
| Youcanonly switchbetween itemsindicated inthediscmenu. | Switchthelan-guageusingthe discmenu. | |
| Playbackisnot performedwith theaudiolan-guageandsub-titlelanguage settingsse-lectedinVideo Setupmenu. | TheDVDbeing playeddoesnot featuredialogor subtitlesinthe selectedlan-guage. | Thelanguagecan-notbeswitchedif theselectedlan-guageisnotre-cordedonthedisc. |
| Theviewing anglecannot beswitched. | TheDVDbeing playeddoesnot featurescenes shotfrommulti-pleangles. | Theviewingangle cannotbe switchedifthe DVDdoesnotfea-turescenesre-cordedfrom multipleangles. |
| Youaretryingto switchtomulti-angleviewingfor ascenethatwas notrecorded frommultiplean-gles. | Switchbetween multipleangles whenwatching scenesrecorded frommultiplean-gles. |
Additionalinformation
SymptomCauseAction(Refer-
encepage)
| Theimageis extremely unclear/distorted anddarkduring playback. | Somediscsfeatureasignalto prohibitcopying. | Sincethisunitis compatiblewith theanalogcopy generationmanagementsystem, whenplayinga discthathasasignalprohibiting copying,horizontal stripesorotherim-perfectionsmay appearwhen viewedonsome displays.This is notamalfunction. |
VideoCD
SymptomCauseAction
| ThePBC(play-backcontrol) menucannot becalledup. | TheVideoCD beingplayed doesnotfeature PBC. | Thisoperationis notavailablefor VideoCDsthatdo notfeaturePBC. |
| Repeatplay andtrack/time searcharenot possible. | TheVideoCD beingplayedfeaturesPBC. | Thisoperationis notavailablefor VideoCDsthatfeaturePBC. |
iPod
SymptomCauseAction
| TheiPoddoes notoperate correctly. | Thecablesarein-correctlyconnected. | Disconnectthe cablefromthe iPod.Oncethe iPod'smainmenu isdisplayed,reconnecttheiPodand resetit. |
| TheiPodversion isold. | UpdatetheiPod version. | |
| Soundfromthe iPodcannotbe heard. | Theaudiooutput directionmay switchautomaticallywhenthe Bluetooth and USBconnections areusedatthe sametime. | UsetheiPodto changetheaudio outputdirection. |
Bluetoothaudio/telephone
| SymptomCauseAction | ||
| Thesound fromthe Bluetooth audiosourceis notplayed back. | Thereisacallin progressona Bluetoothconnectedcellular phone. | Thesoundwillbe playedbackwhen thecallisterminated. |
| ABluetoothconnectedcellular phoneiscurrentlybeingoperated. | Donotoperatethe cellularphoneat thistime. | |
| Acallwasmade withaBluetooth connectedcellularphoneand thenimmediately terminated.Asa result,communicationbetween thisunitandthe cellularphone wasnottermi-natedproperly. | Reconnectthe Bluetoothconnec-tionbetweenthis unitandthecellu-larphone. | |
Multi-channelprocessor
| SymptomCauseAction(Refer-encepage) | ||
| Thereisno sound. Thevolume levelwillnot rise. | Theoptical cablesarenot connectedcor-rectly. | Connectthecables correctly. |
| Audiooutputis 2-channel audioeven thoughmulti-channelaudio isselected. | Thedigitaloutput settingissetto LinearPCM. | Normally,setthe digitaloutputset-tingtoStream. (Page64) |

Errormessages
Whenyoucontactyourdealeroryournearest PioneerServiceCenter,besuretonotethe errormessage.
Additional information
Tuner
| MessageCauseAction | ||
| NoDataProvided | Thisunitcannot receiveartist name/songtitle information. | Movetothedesirablelocationwithgoodreception. |
| NoDataThisunitcannot receiveprogram servicenameinformation. | Movetothedesirablelocationwithgoodreception. | |
DVD
| MessageCauseAction | ||
| DifferentRegionDisc | Thediscdoesnot havethesame regionnumber asthisunit. | ReplacetheDVD withonebearing thecorrectregion number. |
| Error-02-XX/FF-FF | Thediscisdirty.Cleanthedisc. | |
| Thediscis scratched. | Replacethedisc. | |
| Thediscis loadedupside down. | Checkthatthedisc isloadedcorrectly. | |
| Thereisanelectricalormechanicalerror. | PressRESET. (Page 16) | |
| Unplayable Disc | Thistypeofdisc cannotbeplayed onthisunit. | Replacethedisc withonethatcan beplayedonthis unit. |
| Theinserteddisc doesnotcontain anyplayable files. | Replacethedisc. | |
| ProtectAllthefileson theinserteddisc areembedded withDRM. | Replacethedisc. | |
| SkippedTheinserteddisc containsDRM protectedfiles. | Playanaudiofile notembeddedwith WindowsMedia DRM9/10. | |
| TEMPThetemperature oftheunitisout-sidethenormal operatingrange. | Waituntiltheunit returnstoatem-peraturewithinthe normaloperating limits. | |
MessageCauseAction
| ThisDivXren-talhasex-pired. | Theinserteddisc containsexpired DivXVODcontent. | Selectafilethat canbeplayed. |
| Videoresolu-tionnotsup-ported | Theinserteddisc containsahigh definitionDivX/ MPEG-1/ MPEG-2/MPEG-4 file. | Selectafilethat canbeplayed. |
| Itisnotpossi-bletowriteit intheflash. | Thisunit'sflash memoryusedas thetemporary storageareas full. | Selectafilethat canbeplayed. |
| Yourdeviceis notauthor-izedtoplay thisDivXpro-tectedvideo. | Thisunit'sDivX registrationcode hasnotbeen authorizedbythe DivXVODcontentsprovider. | Registerthisunit totheDivXVOD contentsprovider. |
| Unplayable File | Thistypeoffile cannotbeplayed onthisunit. | Selectafilethat canbeplayed. |
| FormatRead | Sometimesthere isadelaybe-tweenthestartof playbackand whenyoustartto hearanysound. | Waituntilthemes-sagedisappears andyouhear sound. |
| Videoframe ratenotsup-ported | DivXfile'sframe rateismorethan 30 fps. | Selectafilethat canbeplayed. |
| AudioFormat notsupported | Histypeoffileis notsupportedon thisunit. | Selectafilethat canbeplayed. |
Additionalinformation
Externalstoragedevice(USB,SD)
| MessageCauseAction | ||
| Unplayable File | Thistypeoffile cannotbeplayed onthisunit. | Selectafilethat canbeplayed. |
| Thereareno songs. | Transfertheaudio filestotheUSB portableaudio player/USBmemoryandconnect. | |
| Securityforthe connectedUSB memoryisen-abled. | FollowtheUSB memoryinstructionstodisablesecurity. | |
| FormatRead | Sometimesthere isadelaybetweenthestartof playback and whenyoustartto hearanysound. | Waituntilthemessagedisappears andyouhear sound. |
| Skipped | Theconnected USBportable audioplayer/USBmemory containsWMA filesthatareprotectedby WindowsMediaTMDRM9/10. | Playanaudiofile notembeddedwith WindowsMedia DRM9/10. |
| Protect | Allthefileson theconnected USBportable audioplayer/USBmemoryare protectedby WindowsMedia DRM9/10. | Transferaudiofiles notprotectedby WindowsMedia DRM9/10tothe USBportable audioplayer/USB memoryandconnect. |
| Incompatible USB | TheUSBdevice connectedtois notsupportedby thisunit. | ConnectaUSB portableaudio playerorUSB memorythatis USBMassStorage Classcompliant. |
| TheUSBdevice isnotformatted withFAT12, FAT16orFAT32. | Theconnected USBdeviceshould beformattedwith FAT12,FAT16or FAT32. | |
| MessageCauseAction | ||
| Incompatible SD | UnsupportedSD cardisinserted. | Usethesupported SDcard. |
| Non-compatible SDstoragede-vice | Removeyourde-viceandreplaceit withacompatible SDstoragedevice. | |
| TheSDdeviceis notformatted withFAT12, FAT16orFAT32. | TheconnectedSD deviceshouldbe formattedwith FAT12,FAT16or FAT32. | |
| CheckUSBTheUSBconnec-tororUSBcable hasshort-circuited. | Checkthatthe USBconnectoror USBcableisnot caughtinsome-thingordamaged. | |
| Theconnected USBportable audioplayer/ USBmemory consumesmore thanmaximum allowablecur-rent. | ||
| Error-02-9X/-DX | Communication failed. | Performoneofthe followingopera-tions.-Turntheignition switchOFFand backON.-Disconnectthe USBportable audioplayer/USB memory.-Changetoadif-ferentsource. Then,returntothe USBportable audioplayer/USB memory. |
| ThisDivXren-talhasex-pired. | Theinsertedex-ternalstoragede-vicecontains expiredDivX VODcontent. | Selectafilethat canbeplayed. |
Additionalinformation
MessageCauseAction
| Videoresolutionnotsupported | TheinsertedexternalstoragedevicecontainsahighdefinitionDivX/MPEG-1/MPEG-2/MPEG-4file. | Selectafilethatcanbeplayed. |
| Itisnotpossibletowriteitintheflash. | Thisunit'sflashmemoryusedasthetemporarystorageareaisfull. | Selectafilethatcanbeplayed. |
| Yourdeviceis notauthorizedtoplay thisDivXprotectedvideo. | Thisunit'sDivXregistrationcodehasnotbeenauthorizedbytheDivXVODcontentsprovider. | Registerthisunit totheDivXVODcontentsprovider. |
| FormatRead | Sometimesthereisadelaybeteenthestartof playbackandwhenyoustarttohearanysound. | Waituntilthemessagedisappears andyouhear sound. |
| Videoframe ratenotsupported | DivXfile'sframerateismorethan30fps. | Selectafilethatcanbeplayed. |
| AudioFormat notsupported | Thistypeoffileis notsupportedon thisunit. | Selectafilethat canbeplayed. |
iPod
MessageCauseAction
| FormatRead | Sometimesthereisadelaybeteenthestartof playbackandwhenyoustartto hearanysound. | Waituntilthemessagedisappears andyouhearsound. |
MessageCauseAction
| Error-02-6X/-9X/-DX | Communication failed. | Disconnectthe cablefromthe iPod.Oncethe iPod'smainmenu isdisplayed,reconnecttheiPodand resetit. |
| iPodfailure.Disconnectthe | ||
| cablefromthe iPod.Oncethe iPod'smainmenu isdisplayed,reconnecttheiPodand resetit. | ||
| Error-02-67TheiPodfirm-wareversionis old. | UpdatetheiPod version. | |
| StopThereareno songs. | Transfersongsto theiPod. | |
| Thereareno songsinthecur-rentlist. | ||
| NotFoundNorelated songs. | Transfersongsto theiPod. | |
Bluetooth
MessageCauseAction
| Error-10Thepowerfailed fortheBluetooth moduleofthis unit. | Turntheignition switchOFFand thentoACCorON. Iftheerrormes-sageisstilldis-playedafter performingthe aboveaction, pleasecontact yourdealeroran authorizedPioneer ServiceStation. |

Additionalinformation
UnderstandingautoEQ errormessages
Whencorrectmeasurementofthecar'sinterioracousticcharacteristicsisnotpossible usingautoEQ,anerrormessagemayappear onthedisplay.Insuchcases,refertothetable belowtoseewhattheproblemisandhowit maybecorrected.Afterchecking,tryagain.
MessageCauseAction
| Pleaseconnectthemicrophonefor measurement.Whenfinished,please pushHOME key. | Themicrophone isnotconnected. | Plugtheoptional microphonese-curelyintothe jack. |
| Error.Please checkxxxx speaker. | Themicrophone cannotpickup themeasuring toneofaspeaker. | •Confirmthatthe speakersarecon- nectedcorrectly.•Correcttheinput levelsettingofthe powerampcon- nectedtothe speakers.•Plugthemicro- phonesecurely intothejack. |
| Error.Please checknoise. | Thesurrounding noiselevelistoo high. | •Stopyourcarin aplacethatis quiet,andswitch offtheengine,air conditionerand heater.•Setthemicro- phonecorrectly. |
| Error.Please checkbattery. | Powerisnot beingsupplied fromthebattery tothisunit. | •Connectthebat- terycorrectly.•Checkthebattery voltage. |
Understandingmessages
MessagesTranslation
| Screenimagemayappearreversed. | Pioneer recommends theuseofacamera which outputs mirror-reversedimages. Otherwise,thescreen imagewillappearreversed. |

Additionalinformation
Indicatorlist

text_image
Area1Area2 Area3Area1
| Vol. | Indicatesthatthevolumeisadjusted. |
| MUTE | Indicatestathemutefunctionis on. |
| ATT | Indicatesthatthesoundisattenuated. |
Area2
| Showswhenradiosignalisreceived. | |
| STEREO | Indicatesthattheselectedfrequencyisbeingbroadcastin stereo. |
| Dolby D | Indicatesthatthedigitalformatis DolbyDigital. |
| MPEG-A | Indicatesthatthedigitalformatis MPEGAudio. |
| LPCM | Indicatesthatthedigitalformatis LinearPCM. |
| 48k16 | Indicatesthesamplingfrequency. |
| DTS | Indicatesthatthedigitalformatis DTS. |
| 1 ch | Indicatestheaudiochannel. |
| 1+1ch | |
| 2 ch | |
| Multi ch | |
| PBCOn | IndicatesthatadiscwithPBCOn isbeingplayed. |
| ·Indicatestatacellularphone isconnected.·Indicatestatanincomingcall hasbeenreceivedandhasnot beencheckedyet. | |
| Indicatesthebatterystrengthof thecellularphone.·Thelevelshownontheindica-tormaydifferfromtheactual batterystrength.·Ifthebatterystrengththisnot available,nothingisdisplayed inthebatterystrengthindica-torarea. | |
| Indicatesthattheconnected Bluetoothdevicesupportsboth Bluetoothtelephoneand Bluetoothaudio. | |
| Indicatesthattheconnected Bluetoothdeviceonlysupports Bluetoothtelephone. | |
| Indicatesthattheconnected Bluetoothdeviceonlysupports Bluetoothaudio. |
Additionalinformation

Showswhilesearchingasong/videoinalphabetsearchmode.

ShowsthedisctitleoftheCDtext disccurrentlybeingplayed.

Showsthesongtitlewhenreceivingthetaginformation. Showsthetracktitleofthetrack currentlybeingplayedforCDtext discs. Showsthesongtitleofthesong currentlybeingplayedforMP3/WMA/AACfiles.

Showsthecommentcurrently beingplayed.

Showsthestationnamecurrently tunedinto.

Showstheartistnamewhenreceivingthetaginformation. Showstheartistnameofthetrack/songcurrentlybeingplayedforCD textdiscs. Showstheartistnameoftheartist currentlybeingplayedforMP3/WMA/AACfiles.

Showscellularphoneinformation.
Showsgeneralphoneinformation.

Showshomephoneinformation.

Showsofficephoneinformation.

Showsotherphoneinformation.

Showsteholdernameofthe foldercontainingtheMP3/WMA/ AACfilecurrentlybeingplayed.

ShowsthefilenameoftheMP3/WMA/AACfilecurrentlybeing played.

Showsthepresetnumberofthe stationcurrentlybeingtunedinto.

Showsthetitlenumbercurrently beingplayed.
Showsthechapternumbercurrentlybeingplayed.

Showsthegenreofthetrack/song currentlybeingplayed.
Area3

TouchtoturnBSMon.

IndicatesthatAutoEQison.

IndicatesthatDolbyProLogicllison.

Showswhencreatingthedatabase inMusicbrowsemode.

Showswhensavingthedatabase inMusicbrowsemode.

Indicatesthesignalstrengthofthe cellularphone.

IndicatesthataBluetoothtele-phoneisconnected.

Indicate that TA (traffican-nouncement standby) is on.

Indicatesthatthenewsprogram interruptionison.

Handlingguidelines
Discsandplayer
Useonlydiscsfeaturinganyoffollowinglogos.


Use12-cmdiscs.Donotuse8-cmdiscsoranadapter for8-cmdiscs.
Useonlyconventional,fullycirculardiscs.Donotuse shapeddiscs.


DonotinsertanythingotherthanaDVD-R/RWorCD-R/RWintothediscloadingslot.
Donotusecracked, chipped, warped, or otherwise damaged discsastheymaydamagetheplayer.
UnfinalizedCD-R/RWdiscscannotbeplayedback.
Donottouchtherecordedsurfaceofthediscs.
Storediscsintheircaseswhennotinuse.
Donotattachlabels, writeonorapplychemicalsto thesurfaceofthediscs.
Tocleanadisc,wipethediscwithasoftclothoutwardfromthecenter.
Condensationmaytemporarilyimpairtheplayer's performance.Letitrestforaboutonehourtoadjust toawarmertemperature.Also,wipeanydampdiscs offwithasoftcloth.
Playbackofdiscsmaynotbepossiblebecauseof disccharacteristics, discformat, recordedapplication, playbackenvironment, storageconditions, and soon.
Roadshocksmayinterruptdiscplayback.
Read the precautions for discs before using them.
Additionalinformation
CertainfunctionsmaynotbeavailableforsomeDVD videodiscs.
ItmaynotbepossibletopplaybacksomeDVDvideo discs.
ItisnotpossibletoplaybackDVD-RAMdiscs.
Thisunitisnotcompatiblewithdiscsrecordedin AVCHD(AdvancedVideoCodecHighDefinition) format.DonotinsertAVCHDdiscsasyoumaynotbe abletoejectthedisc.
When using discsthatcan be printed on labelsurfaces, check the instructions and the warning of the discs. Depending on the discs, inserting and rejecting may not be possible. Using such discsmay result in damage to this equipment. Donot attach commercially available labels or other material stothediscs.
• Thediscsmaywarpmakingthediscunplayable.
- Thelabelsmaycomeoffduringplaybackandpreventejectionofthediscs,whichmayresultindamagetotheequipment.
Externalstoragedevice(USB,SD)
Dependingontheexternalstoragedevice(USB,SD), thefollowingproblemsmayoccur.
- Operationsmayvary.
- Thestoragedevicemaynotberecognized.
- Filesmaynotbeplayedbackproperly.
USBstoragedevice
ConnectionsviaUSBhubarenotsupported.
DonotconnectanythingotherthanaUSBstorage device.
FirmlysecuretheUSBstoragedevicewhendriving. DonotlettheUSBstoragedevicefallontothefloor, whereitmaybecomejammedunderthebrakeoracceleratorpedal.
DependingontheUSBstoragedevice, thedevice maycausenoisetooccurintheradio.
CopyrightprotectedfilesthatarestoredintheUSB devicescannotbeplayedback.
You cannot connect a USB portable audioplayer/USB memory to this unit via USB hub.
PartitionedUSBmemoryisnotcompatiblewiththis unit.
DependingonthekindofUSBportableaudioplayer/USBmemoryyouuse,thedevicemaynotberecognizedoraudiofilesmaynotbeplayedbackproperly.
DonotleavetheUSBportableaudioplayer/USB memoryindirectsunlightforextendedamountsoft time.Doingsomaycausethedevicetomalfunction fromtheextremeriseintemperature.
SDmemorycard
This unitsupportsonlythefollowingtypesofSD memorycards.
•SD
•SDHC
KeeptheSDmemorycardoutofthereachofchildren.ShouldtheSDmemorycardbeswallowed,consultadoctorimmediately.
DonottouchtheconnectorsoftheSDmemorycard directlywithyourfingersorwithanymetaldevice.
DonotinsertanythingotherthananSDmemorycard intotheSDcardslot.Ifametalobject(suchasa coin)isinsertedintotheslot,theinternalcircuitsmay breakandcausemalfunctions.
DonotinsertadamagedSDmemorycard(e.g. warped, labelpeeledoff)asitmaynotbeejected fromtheslot.
DonottrytoforceanSDmemorycardintotheSD cardslotasthecardorthisunitmaybedamaged.
WhenejectinganSDmemorycard,pressitandhold ituntilclicks.Itisdangerousforyoutoreleaseyour fingerimmediatelyafteryoupressonthecardasthe cardmayshootoutoftheslotandhityouintheface, etc.Ifthecardshootsoutoftheslot,itmaybecome lost.
iPod
Toensureproperoperation,connectthedockconnectorcablefromtheiPoddirectlytothisunit.
FirmlysecuretheiPodwhendriving.Donotletthe iPodfallontothefloor,whereitmaybecomejammed underthebrakeoracceleratorpedal.
Additionalinformation
AboutiPodsettings
- WhenaniPodisconnected, this unitchangesthe EQ(equalizer) setting of the iPodtooffinorderto optimizetheacoustics. When you disconnect the iPod, the EQ return to the original setting.
- You cannot set Repeat to off theiPod when using this unit. Repeats automatically changed to all when theiPod is connected to this unit.
IncompatibletextsavedontheiPodwillnotbedisplayedbytheunit.
DVD-R/RWdiscs
UnfinalizedDVD-R/RWdiscswhichhavebeenrecordedintheVideoformat(videomode)cannotbe playedback.
PlaybackofDVD-R/RWdiscsmaynotbepossible, duetodisc characteristics,scratchesordirtonthe disc,ordirt,condensation,etc.onthelensofthis unit.
Depending on the application settings and the environment, playback of discs recorded on a personal computer may not be possible. (Fordetails, contact the manufacturer of the application.)
CD-R/RWdiscs
When CD-R/RWdiscsareused, playback is possible only for discs which have been finalized.
PlaybackofCD-R/RWdiscsrecordedonamusicCD recorderorapersonalcomputermaynotbepossible duetodisc characteristics,scratchesordirtonthe disc,ordirt,condensation,etc.,onthelensofthis unit.
Depending on the application settings and the environment, playback of discs recorded on a personal computer may not be possible. (Ford details, contact them manufacturer of the application.)
PlaybackofCD-R/RWdiscsmaybecomeimpossible incaseofdirectexposureosunlight,highttemperatures,orthestorageconditionsinthevehicle.
TitlesandothertextinformationrecordedonaCD-R/RWdiscmaynotbedisplayedbythisunit(inthe caseofaudiodata(CD-DA)).
DualDiscs
DualDiscsaretwo-sideddiscsthathavearecordable CDforaudioononesideandarecordableDVDfor videoontheother.
PlaybackoftheDVDsideispossiblewiththisunit. However, sincetheCDsideofDualDiscsisnotphysicallycompatiblewiththegeneralCDstandard, it may not be possible to play the CDsidewith this unit.
FrequentloadingandejectingofaDualDiscmayresultinscratchesonthedisc.Seriousscratchescan leadtoplaybackproblemsonthisunit.Insome cases,aDualDiscmaybecomestuckinthediscloudingslotandwillnoteject.Topreventthis,werecommendyourefrainfromusingDualDiscwiththisunit.Pleaserefertotheinformationfromthediscmanufacturerformoredetailedinformationabout DualDiscs.
JPEGpicturefiles
JPEGisshortforJointPhotographicExpertsGroup andreferstoastillimagecompressiontechnology standard.
FilearecompatiblewithBaselineJPEGandEXIF2.1 stillimagesuptoaresolutionof4092×4092.(EXIF formatisusedmostcommonlywithdigitalstillcameras.)
PlaybackofEXIFformatfilesthatwereprocessedbya personalcomputermaynotbepossible.
ThereisnoprogressiveJPEGcompatibility.
DivXvideofiles
Depending on the composition of the file information, such asthenumberofaudiostreamsorfilesize, theremaybeaslightdelaywhenplayingbackdiscs.
Somespecialoperationsmaybeprohibiteddueto thecompositionoftheDivXfiles.
OnlyDivXfilesdownloadedfromaDivXpartnersite areguaranteeforproperoperation.Unauthorized DivXfilesmaynotoperateproperly.
DRMrentalfiles cannot be operated until playback is started.
Recommendedfilesize:2GBorlesswithatransmissionrateof2Mbpsorless.
TheIDcodeofthisunitmustberegisteredtoaDivXVODproviderinordertoplaybackDivXVODfiles. For informationonIDcodes,refertoDisplayingtheDivXVODregistrationcodeonpage64.
FormoredetailsaboutDivX,visitthefollowingsite: http://www.divx.com/
MPEG-1/MPEG-2/MPEG-4videofiles
Elapsed playbacktime may not be displayed correctly.
Additionalinformation

Important
- WhennamingaJPEGimagefile,addthecor- respondingfilenameextension(.jpg,.jpeg, .jpeor.jfif).
- Thisunitplaysbackfileswiththesefilename extensions(.jpg,.jpeg,.jpeor.jfif)asaJPEG imagefile.Topreventmalfunctions,donot usetheseextensionsforfilesotherthanJPEG imagefiles.
Compressedaudio compatibility(disc,USB,SD)
WMA
| Fileextension:.wma |
| Bitrate:5kbpsto320kbps(CBR),VBR |
| Samplingfrequency:8kHzto48kHz |
| WindowsMediaAudioProfessional,Lossless,Voice/DRMStream/Streamwithvideo:Notcompatible |
MP3
| Fileextension:.mp3 |
| Bitrate:8kbpsto320kbps(CBR),VBR |
| Samplingfrequency:8kHzto48kHz(32kHz,44.1kHz, 48kHzforeemphasis) |
| CompatibleID3tagversion:1.0,1.1,2.2,2.3(ID3tag Version2.xisgivenpriorityoverVersion1.x.) |
| M3uplaylist:Notcompatible |
| MP3i(MP3interactive),mp3PRO:Notcompatible |
AAC
| Compatibleformat: AACencodedbyiTunes |
| Fileextension:.m4a |
| Samplingfrequency:8kHzto44.1kHz |
| Bitrate:8kbpsto576kbps |
| AppleLossless:Notcompatible |
| AACfileboughtfromtheiTunesStore(.m4pfileextension):Notcompatible |
DivXcompatibility
| Compatibleformat:DivXvideoformatimplementedin relationtoDivXstandards |
| Fileextensions:.avior.divx |
| DivXUltraformat:Notcompatible |
| DivXHDformat:Notcompatible |
| DivXfileswithoutvideodata:Notcompatible |
| DivXplus:Notcompatible |
| Compatibleaudiocode:MP2,MP3.DolbyDigital |
| LPCM:Compatible |
| Bitrate:8kbpsto320kbps(CBR),VBR |
| Samplingfrequency:8kHzto48kHz |
| Compatibleexternalsubtiflefileextension:.srt |
MPEG-1/MPEG-2/MPEG-4video
| Fileextensions:.mpgor.mpeg(MPEG-1/MPEG-2),.avi (MPEG-4) |
| Compatibleaudiocode:MP2(MPEG-1/MPEG-2), MP2,MP3,DolbyDigital(MPEG-4) |
| H.264(MPEG-4AVC):Compatible |
| LPCM:Notcompatible |
| Bitrate:8kbpsto320kbps(CBR).VBR |
| Samplingfrequency:8kHzto48kHz |
Supplementalinformation
| Somecharactersinafilename(includingthefileextension)orafoldernamemaynotbedisplayed. |
| Thisunitmaynotoperatecorrectlydependingonthe applicationusedtoencodeWMAfiles. |
| Theremaybeaslightdelayatthestartofplaybackof audiofileseembeddedwithimagedataoraudiofiles storedonanexternalstoragedevice(USB/SD)that hasnumerousfolderhierarchies. |
Disc
| Playablefolders:upto700 |
| Playablefiles:upto999forCD-R/RW |
| Playablefiles:upto3500forDVD-R/RW |
Additionalinformation
Filesystem:ISO9660Level1and2,Romeo,Joliet, UDF1.02(DVD-R/RW)
Multi-session playback: Compatible
Packetwritedatatransfer: Notcompatible
Regardless of the length of blank sections between the songs from the original recording, compressed audiodiscs play with short pause between songs.
Externalstoragedevice(USB,SD)
| Playablefolders:upto3000(upto700forDivX/MPEG-1/MPEG-2/MPEG-4) |
playablefiles:upto15000
Playbackofcopyright-protectedfiles:Notcompatible
Partitionedexternalstoragedevice(USB,SD):Only thefirstplayablepartitioncanbeplayed.
ThereisnocompatibilityforMultiMediaCards (MMC).
CompatibilitywithallSDmemorycardsisnotguaranteed.
ThisunitisnotcompatiblewithSD-Audio/SD-Video.

CAUTION
- Pioneeracceptsnoresponsibilityfordatalost ontheUSBmemory/USBportableaudio player/SDmemorycardevenifthatdatais lostwhileusingthisunit.
- Pioneercannotguaranteecompatibilitywith allUSBmassstoragedevicesandassumes noresponsibilityforanylossofdataonmedia players,smartphones,orotherdeviceswhile usingthisproduct.
- Donotleavethediscs/externalstoragedevice (USB,SD)oriPodinplaceswithhigh temperatures.
iPodcompatibility
This units supports only the following iPod models. SupportediPodsoftwareversionsareshown below. Olderversionsmaynotbesupported. Madefor
- iPodtouch4thgeneration(softwareversion5.0.1)
- iPodtouch3rdgeneration(softwareversion5.0.1)
- iPodtouch2ndgeneration(softwareversion4.2.1)
- iPodtouch1stgeneration(softwareversion3.1.3)
- iPodclassic160GB(softwareversion2.0.4)
- iPodclassic120GB(softwareversion2.0.1)
- iPodclassic(softwareversion1.1.2)
- iPodwithvideo(softwareversion1.3)
- iPodnano6thgeneration(softwareversion1.2)
- iPodnano5thgeneration(softwareversion1.0.2)
- iPodnano4thgeneration(softwareversion1.0.4)
- iPodnano3rdgeneration(softwareversion1.1.3)
- iPodnano2ndgeneration(softwareversion1.1.3)
- iPodnano1stgeneration(softwareversion1.3.1)
- iPhone4S(softwareversion5.0.1)
- iPhone4(softwareversion5.0.1)
- iPhone3GS(softwareversion5.0.1)
- iPhone3G(softwareversion4.2.1)
- iPhone(softwareversion3.1.3)
Depending on the generation or version of the iPod, some functions may not be available.
OperationsmayvarydependingonthesoftwareversionofiPod.
When using aniPod, aniPodDockConnectortoUSB Cable is required.
WhenyouusePioneerCD-IU51V/CD-IU201Vinterface cable, consult your dealer for details.
About the file / format compatibility, referto thei Pod manuals.
Audiobook, Podcast: Compatible

CAUTION
Pioneeracceptsnoresponsibilityfordataloston theiPod, even if that data is lost while this unit is used.
Sequenceofaudiofiles
Theusercannotassignfoldernumbersand specify playbacksequenceswiththisunit.
Additionalinformation
Exampleofahierarchy
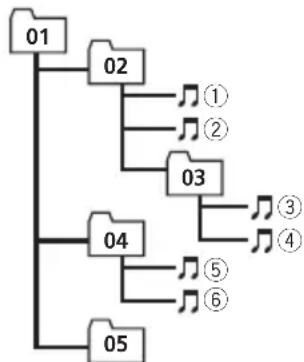
flowchart
graph TD
    01 --> 02
    02 --> ①
    02 --> ②
    03 --> 04
    04 --> ③
    04 --> ④
    04 --> ⑤
    04 --> ⑥
    05 --> 04
    05 --> ⑤
    05 --> ⑥
Level 1 Level 2 Level 3 Level 4
:Folder
Compressed audiofile
01to05:Folder number
①to⑥:Playback sequence
Disc
Folderselectionsequenceorotheroperation may differ depending on the encoding or writing software.
Externalstoragedevice(USB,SD)
The playback sequence is the same as therecorded sequence in the external storage device (USB, SD). Tospecify the playback sequence, the following method is recommended.
1 Createafilenamethatincludesnumbersthat specifytheplaybacksequence(e.g., 001xxx.mp3and099yyy.mp3).
2 Putthosefilesintoafolder.
3 Savethefolderthatcontainsthefilestothe externalstoragedevice(USB,SD).
However, depending on the system environment, you may not be able to specify the playback sequence.
ForUSBportableaudioplayers,thesequence isdifferentanddependsontheplayer.
Usingthedisplaycorrectly

CAUTION
- Ifliquidorforeignmattersshouldgetinside thisunit,turnoffthepowerimmediately and consultyourdealerorthenearestauthorized PIONEERServiceStation.Donotusetheunit inthisconditionbecausedoingsomayresult infire.electricshock,orotherfailure.
- Ifyounoticesmoke, astrangenoiseorsmell, oranyotherabnormalsignsfromthedisplay,
turnoffthepowerimmediatelyandconsult yourdealerorthenearestauthorized PIONEERServiceStation.Usingthisunitin thisconditionmayresultinpermanentdamagetothesystem.
- Donotdisassembleormodifythisunit, as therearehigh-voltagecomponentsinside whichmaycauseelectricshock.Besureto consultyourdealerorthenearestauthorized PIONEERServiceStationforinternalinspection,adjustments,orrepairs.
Handlingthedisplay
- Nevertouchthescreenwithanythingbesidesyourfingerwhenoperatingthetouch panelfunction.Thescreencanscratchea-sily.
- Whenthedisplayissubjectedtodirectsunlightforalongperiodoftime,itwillbecomeveryhotresultinginpossible damagetotheLCDscreen.Youshould avoidexposingthedisplayunittodirect sunlightasmuchaspossible.
- Thedisplayshouldbeusedwithinthetemperaturerangeof–10°Cto+60°C. Attemperatureshigherorlowerthanthis operatingtemperaturerange,thedisplay maynotoperatenormally.
- The LCD screen is exposed in order to increase its visibility within the vehicle. Do not press it strongly on its may damage it.
- DonotpushtheLCDscreenforcefullyas thismayscratchit.
Liquidcrystaldisplay(LCD)screen
- HeatfromtheheatermaydamagetheLCD screen, and coolairfromthecoolermay causemoisturetoforminsidethedisplay resulting in possible damage.
- Smallblackdotsorwhitedots(brightdots) mayappearontheLCDscreen.Theseare duetothecharacteristicsoftheLCD screenanddonotindicateamalfunction.
Additionalinformation
- When using acellular phone, keep the antenna away from the display to prevent disruption of the video image by the appearance of spots, colored stripes, etc.
LED(light-emittingdiode) backlight
- Atlowtemperatures, using the LED backlight may increase image lag and degrade the image quality dueto the characteristics of the LCD screen. Image quality will improve with an increase in temperature.
- ToprotecttheLEDbacklight,thedisplay willdarkeninthefollowingenvironments: —Inthedirectsunlight —Neartheheatervent
• The product lifetime of the LED backlight is more than 10000 hours. However, it may decrease if used in high temperatures. - If the LED backlightreachestheendofits product lifetime, the screen will become dark and the image will no longer be projected. In such cases, please consult your dealer orthenearest authorized PIONEER Service Station.
Keepingthedisplayingood condition
- When removing dust from the screen or cleaning the display, first turn the system power off, then wipewith as of dry cloth.
- Whenwipingthescreen,takecarenotto scratchthesurface.Donotuseharshor abrasivechemicalcleaners.
Bluetoothprofiles
InordertouseBluetoothwirelesstechnology, devicesmustbeableointerpretcertainprofiles. Thisunitiscompatiblewiththefollowing profiles.
• GAP(GenericAccessProfile)
• SDP(ServiceDiscoveryProtocol)
- OPP(ObjectPushProfile)
• HFP(HandsFreeProfile)
• HSP(HeadSetProfile)
• PBAP(PhoneBookAccessProfile)
- A2DP(AdvancedAudioDistributionProfile)
- AVRCP(Audio/VideoRemoteControlProfile)1.3
Copyrightandtrademark
ThisitemincorporatescopyprotectiontechnologythatisprotectedbyU.S.patentsandotherintellectualpropertyrightsofRoviCorporation.Reverseengineeringanddisassemblyareprohibited.
Bluetooth
TheBluetooth® wordmarkandlogosareregisteredtrademarkssownedbyBluetoothSIG,Inc. andanyuseofsuchmarksbyPIONEERCORPORATIONisunderlicense.Othertrademarks andtradenamesarethoseoftheirrespective owners.
- Bluetoothisashort-rangewirelessradio connectivitytechnologythatisdeveloped asacablereplacementformobilephones, handheldPCsandotherdevices.Bluetooth operatesin2.4GHzfrequencyrangeand transmitsvoiceanddataatspeedsupto1 megabitpersecond.Bluetoothwas launchedbyaspecialinterestgroup(SIG) thatcomprisesofEricssonInc.,IntelCorp., NokiaCorp.,ToshibaandIBMin1998,and itiscurrentlydevelopedbynearly2000 companiesworldwide.
DVDvideo
isattrademarkofDVDFormat/Logo LicensingCorporation.
iTunes
AppleandiTunesaretrademarksofAppleInc., registeredintheU.S.andothercountries.
Additionalinformation
MP3
Supplyofthisproductonlyconveysalicense forprivate,non-commercialuseanddoesnot conveyalicensenorimplyanyrighttouse thisproductinanycommercial(i.e.revenue-generating)realtimebroadcasting(terrestrial, satellite,cableand/oranyothermedia),broadcasting/streamingviainternet,intranetsand/orothernetworksorinotherelectroniccontentdistributionsystems,suchaspay-audioor audio-on-demandapplications.Anindependentlicenseforsuchuseisrequired.Fordetails,pleasevisit http://www.mp3licensing.com.
WMA
WindowsMediaiseitheraregisteredtrademarkortrademarkofMicrosoftCorporationin theUnitedStatesand/orothercountries. Thisproductincludestechnologyownedby MicrosoftCorporationandcannotbeusedor distributedwithoutalicensefromMicrosoft Licensing,Inc.
SDmemorycard
SDLogoisattrademarkofSD-3C,LLC. SDHCLogoisattrademarkofSD-3C,LLC.
iPod&iPhone
iPhone,iPod,iPodclassic,iPodnano,and iPodtoucharetrademarksofAppleInc.,registeredintheU.S.andothercountries. "Made for iPod" and "Made for iPhone" mean thatanelectronicaccessoryhasbeende-signedtoconnectspecificallytoiPodor iPhone,respectively,andhasbeencertifiedby thedevelopertomeetAppleperformance standards.Appleisnotresponsiblefortheoperationofthisdeviceoritscompliancewith safetyandregulatorystandards.Plesenote thattheuseofthisaccessorywithiPodor iPhonemayaffectwirelessperformance.
DolbyProLogicII
ManufacturedunderlicensefromDolby Laboratories. "Dolby", "Pro Logic", and the double-DsymbolaretrademarksofDolby Laboratories.
DivX
DivX ^® , DivXCertified ^® and associated logos aretrademarksofRoviCorporationoritssubsidiariesandareusedunderlicense.
ABOUTDIVXVIDEO:DivX ^® isadigital videoformatcreatedbyDivX,LLC,asubsidiary ofRoviCorporation.ThisisanofficialDivX Certified ^® devicethatplaysDivXvideo.Visit divx.comformoreinformationandsoftware toolstoconvertyourfilesintoDivXvideos.
ABOUTDIVXVIDEO-ON-DEMAND:This DivXCertified ^® device must be registered in ordertoplaypurchasedDivXVideo-on-Demand(VOD)movies.Toobtainyourregistrationcode,locatheDivXVODsectionin Menuoperations.Gotovod.divx.comformore informationonhowtocompleteyourregistration.
MIXTRAX
MIXTRAXisattrademarkofthePIONEERCOR- PORATION.
libpng
PleasebeawareinadvancethatPioneerwill notrespondtoquestionsconcerningthecontentsofthesourcecode.
This licence was originally written in English and translated here only to help there reader understand its content. Therefore, please note that translated licence is NOT legally identified with the original English text.
Thiscopyofthelibpngnoticesisprovidedfor yourconvenience.Incaseofanydiscrepancy betweenthiscopyandthenoticesinthefile png.hthatisincludedinthelibpngdistribution,thelattershallprevail.
COPYRIGHTNOTICE, DISCLAIMER, and LICENSE:
If you modify libpngyou may insert additional notices immediately following this sentence. This code is released under the libpng license.
Additionalinformation
libpngversions1.2.6, August 15, 2004, through
1.5.0, January 6, 2011, are Copyright (c) 2004, 2006-2010 Glenn Randers-Pehrson, and are distributed according to the same disclaimer and license as libpng - 1.2.5 with the following individual added to the list of Contributing
Authors
CosminTruta
libpngversions1.0.7, July 1, 2000, through
1.2.5-October3,2002,areCopyright(c)2000-2002GlennRanders-Pehrson,andaredistributedaccordingtothesamedisclaimerandlicenseaslibpng-1.0.6withthefollowingindividualsaddedtothelistofContributing
Authors
Simon-PierreCadieux
EricS.Raymond
GillesVollant
andwiththefollowingadditionstothedisclaimer:
Thereisnowarrantyagainstinterferencewith youenjoymentofthelibraryoragainstinfringement.Thereisnowarrantythatourefforts orthelibrarywillfulfillanyofyourparticular purposesoreneeds.Thislibraryisprovided withallfaults,andtheentireriskofsatisfactoryquality,performance,accuracy,andeffort iswiththeuser.
libpngversions0.97, January1998, through
1.0.6, March 20, 2000, are Copyright (c) 1998, 1999 Glenn Randers-Pehrson, and a redistribu- ted according to the samed disclaimer and li- censeaslibpng - 0.96, with the following individuals added to the list of Contributing
Authors:
TomLane
GlennRanders-Pehrson
WillemvanSchaik
libpngversions0.89,June1996,through0.96,
May1997, areCopyright(c)1996, 1997AndreasDilgerDistributedaccordingtothe samedisclaimerandlicenseaslibpng-0.88, withthefollowingindividualsaddedtothelist ofContributingAuthors:
JohnBowler
KevinBracey
SamBushell
MagnusHolmgren
GregRoelofs
TomTanner
libpngversions0.5,May1995,through0.88,
January1996, areCopyright(c)1995, 1996Guy EricSchalnat, Group42, Inc.
Forthepurposesofthiscopyrightandlicense,
"ContributingAuthors"isdefinedasthefollowingsetofindividuals:
AndreasDilger
DaveMartindale
GuyEricSchalnat
PaulSchmidt
TimWegner
ThePNGReferenceLibraryissupplied"ASIS".
The Contributing Authors and Group 42, Inc. disclaim all warranties, expressed or implied, including, without limitation, the warranties of merchantability and off fitness for any purpose.
The Contributing Authors and Group 42, Inc. assumenoliability for direct, indirect, incidental, special, exemplary, or consequential damages, which may result from the use of the PNG Reference Library, even if advised of the possibility of such damage.
Permissionisherebygrantedtouse,copy, modify,anddistributethissourcecode,orportionshereof,foranypurpose,withoutfee,subjecttothefollowingrestrictions:
-
The origin of this source codemust not be misrepresented.
-
Altered versions must be plainly marked as such and must not be represented as being the original source.
-
This Copyrightnoticemaynotberemoved oralteredfromanysourceoralteredsource distribution.
TheContributingAuthorsandGroup42,Inc. specificallypermit,withoutfee,andencourage theuseofthissourcecodeasacomponentto supportingthePNGfileformatincommercial products.Ifyouusethissourcecodeinapro-duct,acknowledgmentisnotrequiredbut wouldbeappreciated.
A"png_get_copyright"functionisavailable,for convenientusein"about"boxesandthelike: printf("%s",png_get_copyright(NULL));
Additionalinformation
Also,thePNGlogo(inPNGformat,ofcourse) issuppliedinthefiles"pngbar.png"and "pngbar.jpg(88x31)and"pngnow.png"(98x31). LibpngisOSICertifiedOpenSourceSoftware. OSICertifiedOpenSourceisacertification markoftheOpenSourceInitiative. GlennRanders-Pehrson glennrpatusers.sourceforge.net January6,2011
LanguagecodechartforDVD
| Language(code),inputcode | ||||
| Japanese (ja), 1001 | Dzongkha (dz), 0426 | Kurdish (ku), 1121 | Kinyarwanda (rw), 1823 | |
| English (en), 0514 | Ewe (ee), 0505 | Komi (kv), 1122 | Sanskrit (sa), 1901 | |
| French (fr), 0618 | Esperanto (eo), 0515 | Cornish (kw), 1123 | Sardinian (sc), 1903 | |
| Spanish (es), 0519 | Estonian (et), 0520 | Kirghiz, Kyrgyz (ky), 1125 | Sindhi (sd), 1904 | |
| German (de), 0405 | Basque (eu), 0521 | Latin (la), 1201 | Northern Sami (se), 1905 | |
| Italian (it), 0920 | Persian (fa), 0601 | Luxembourgish (lb), 1202 | Sangho (sg), 1907 | |
| Chinese (zh), 2608 | Fulah (ff), 0606 | Ganda (lg), 1207 | Sinhala (si), 1909 | |
| Dutch, Flemish (nl), 1412 | Finnish (fi), 0609 | Limburgan (li), 1209 | Slovak (sk), 1911 | |
| Portuguese (pt), 1620 | Fijian (fj), 0610 | Lingala (ln), 1214 | Slovenian (sl), 1912 | |
| Swedish (sv), 1922 | Faroese (fo), 0615 | Lao (lo), 1215 | Samoan (sm), 1913 | |
| Russian (ru), 1821 | Western Frisian (fy), 0625 | Lithuanian (lt), 1220 | Shona (sn), 1914 | |
| Korean (ko), 1115 | Irish (ga), 0701 | Luba-Katanga (lu), 1221 | Somali (so), 1915 | |
| Greek (el), 0512 | Gaelic (gd), 0704 | Latvian (lv), 1222 | Albanian (sq), 1917 | |
| Afar (aa), 0101 | Galician (gl), 0712 | Malagasy (mg), 1307 | Serbian (sr), 1918 | |
| Abkhazian (ab), 0102 | Guarani (gn), 0714 | Marshallese (mh), 1308 | Swati (ss), 1919 | |
| Avestan (ae), 0105 | Gujarati (gu), 0721 | Maori (mi), 1309 | Sotho, Southern (st), 1920 | |
| Afrikaans (af), 0106 | Manx (gv), 0722 | Macedonian (mk), 1311 | Sundanese (su), 1921 | |
| Akan (ak), 0111 | Hausa (ha), 0801 | Malayalam (ml), 1312 | Swahili (sw), 1923 | |
| Amharic (am), 0113 | Hebrew (he), 0805 | Mongolian (mn), 1314 | Tamil (ta), 2001 | |
| Aragonese (an), 0114 | Hindi (hi), 0809 | Marathi (mr), 1318 | Telugu (te), 2005 | |
| Arabic (ar), 0118 | Hiri Motu (ho), 0815 | Malay (ms), 1319 | Tajik (tg), 2007 | |
| Assamese (as), 0119 | Croatian (hr), 0818 | Maltese (mt), 1320 | Thai (th), 2008 | |
| Avaric (av), 0122 | Haitian (ht), 0820 | Burmese (my), 1325 | Tigrinya (ti), 2009 | |
| Aymara (ay), 0125 | Hungarian (hu), 0821 | Nauru (na), 1401 | Turkmen (tk), 2011 | |
| Azerbaijani (az), 0126 | Armenian (hy), 0825 | Bokmal (nb), 1402 | Tagalog (tl), 2012 | |
| Bashkir (ba), 0201 | Herero (hz), 0826 | Ndebele, North (nd), 1404 | Tswana (tn), 2014 | |
| Belarusian (be), 0205 | Interlingua (ia), 0901 | Nepali (ne), 1405 | Tonga (to), 2015 | |
| Bulgarian (bg), 0207 | Indonesian (id), 0904 | Ndonga (ng), 1407 | Turkish (tr), 2018 | |
| Bihari (bh), 0208 | Interlingue (ie), 0905 | Nynorsk (nn), 1414 | Tsonga (ts), 2019 | |
| Bislama (bi), 0209 | Igbo (ig), 0907 | Norwegian (no), 1415 | Tatar (tt), 2020 | |
| Bambara (bm), 0213 | Sichuan Yi (ii), 0909 | Ndebele, South (nr), 1418 | Twi (tw), 2023 | |
| Bengali (bn), 0214 | Inupiaq (ik), 0911 | Navajo, Navaho (nv), 1422 | Tahitian (ty), 2025 | |
| Tibetan (bo), 0215 | Ido (io), 0915 | Chichewa (ny), 1425 | Uighur, Uyghur (ug), 2107 | |
| Breton (br), 0218 | Icelandic (is), 0919 | Occitan (oc), 1503 | Ukrainian (uk), 2111 | |
| Bosnian (bs), 0219 | Inuktitut (iu), 0921 | Ojibwa (oj), 1510 | Urdu (ur), 2118 | |
| Catalan (ca), 0301 | Javanese (jv), 1022 | Oromo (om), 1513 | Uzbek (uz), 2126 | |
| Chechen (ce), 0305 | Georgian (ka), 1101 | Oriya (or), 1518 | Venda (ve), 2205 | |
| Chamorro (ch), 0308 | Kongo (kg), 1107 | Ossetian (os), 1519 | Vietnamese (vi), 2209 | |
| Corsican (co), 0315 | Kikuyu, Gikuyu (ki), 1109 | Panjabi,Punjabi(pa), 1601 | Volapük(vo),2215 | |
| Cree (cr), 0318 | Kuanyama (kj), 1110 | Pali (pi), 1609 | Walloon (wa), 2301 | |
| Czech (cs), 0319 | Kazakh (kk), 1111 | Polish (pl), 1612 | Wolof (wo), 2315 | |
| Church Slavic (cu), 0321 | Kalaallisut (kl), 1112 | Pashto, Pushto (ps), 1619 | Xhosa (xh), 2408 | |
| Chuvash (cv), 0322 | Central Khmer (km), 1113 | Quechua (qu), 1721 | Yiddish (yi), 2509 | |
| Welsh (cy), 0325 | Kannada (kn), 1114 | Romansh (rm), 1813 | Yoruba (yo), 2515 | |
| Danish (da), 0401 | Kanuri (kr), 1118 | Rundi (rn), 1814 | Zhuang,Chuang(za), 2601 | |
| Divehi (dv), 0422 | Kashmiri (ks), 1119 | Romanian (ro), 1815 | Zulu (zu), 2621 | |

Additionalinformation
Specifications
General
Powersource....14.4VDC(12.0Vto14.4V allowable)
Groundingsystem......Negativetype
Maximumcurrentconsumption 10.0A
Dimensions(W×H×D): DIN (ForMiddleEastAsianandSouthAfricanmodels) Chassis....178mm×100mm× 157mm Nose....188mm×118mm× 29mm
D
Chassis....178mm×100mm×165mm
Nose....171mm×97mm×21mm
Weight....2.1kg
Display
Screensize/aspectratio.....6.95inchwide/16:9 (effectivedisplayarea: 156.6mm×81.6mm)
Pixels....3072000(2400×480)
Displaymethod......TFTactivematrix,driving type
Colorsystem....NTSC/PAL/PAL-M/PAL-N/SECAMcompatible
Durabletemperaturerange(poweroff) -20^ to +80^
Audio
Maximumpoweroutput.....50W×4 70W×1/2Ω(forsubwoo- fer)
Continuouspoweroutput..22W×4(50Hzto 15000Hz,5%THD, 4Ωload,bothchannelsdriven)
Load impedance ....4Ω (4Ω to 8Ω (2Ω for 1 ch) allowable)
Preoutmaximumoutputlevel 4.0V
Equalizer(8-BandGraphicEqualizer): Frequency.....40Hz/80Hz/200Hz/400Hz/ 1kHz/2.5kHz/8kHz/10kHz Gain.....±12dB
HPF: Frequency.....50Hz/63Hz/80Hz/100Hz/ 125Hz Slope.....-12dB/oct
Subwoofer(mono): Frequency.....50Hz/63Hz/80Hz/100Hz/ 125Hz Slope.....-18dB/oct Gain.....+6dBto-24dB Phase.....Normal/Reverse
Bassboost: Gain.....+12dBto0dB
DVDPlayer
System......DVDvideo,VideoCD,CD, WMA,MP3,AAC,DivX, JPEG,MPEGsystem
System......DVDvideo,VideoCD,CD, WMA,MP3,AAC,DivX, MPEGsystem
Usablediscs......DVDvideo,VideoCD,CD, CD-R/RW,DVD-R/RW/RDL
Regionnumber......2 (ForMiddleEastAsianandSouthAfricanmodels) Regionnumber......3
(ForSoutheastAsianmodels) Regionnumber......4
(ForSouthAmericanandOceanianmodels)
Frequencyresponse......5Hz to 44000 Hz (with DVD, at sampling frequency 96 kHz)
Signal-to-noiseratio....96dB(1kHz)(IEC-Anetwork)(RCAlevel)
Outputlevel: Video.....1.0Vp-p/75Ω(±0.2V)
Numberofchannels......2(stereo) MP3decodingformat......MPEG-1&2AudioLayer3
WMAdecodingformat......Ver.7,7.1,8,9,10,11,12 (2chaudio) (WindowsMediaPlayer)
AACdecodingformat......MPEG-4AAC(iTunesen-codedonly)(.m4a) (Ver.9.0.3andearlier)
DivXdecodingformat......HomeTheaterVer.3,4,5.2,6(.avi,.divx)
MPEGvideodecodingformat ....MPEG-1(.mpg,.mpeg,.dat) MPEG-2PS(.mpg,.mpeg) MPEG-4Part2(Visual),MS- MPEG-4Ver.3(.avi)
USB
USBstandardspecification ....USB1.1,USB2.0high speed
Maximumcurrentsupply....1.0A
Additionalinformation
USBClass....MSC(MassStorageClass) iPod(AudioClass,HID Class)
Filesystem.....FAT12,FAT16,FAT32
MP3decodingformat......MPEG-1&2AudioLayer3, MPEG-2.5Audio
WMAdecodingformat......Ver.7,7.1,8,9,10,11,12 (2chaudio)
(WindowsMediaPlayer)
AACdecodingformat......MPEG-4AAC(iTunesencodedonly) (Ver.9.0.3andearlier)
WAVEsignalformat....LinearPCM,MSADPCM(.wav)
SamplingFrequency....Linear PCM:16,22.05,24,32,44.1,48 [kHz] MSADPCM:22.05/44.1[kHz]
DivXdecodingformat......HomeTheaterVer.4.xx,5.xx, 6.xx(Ultra&HDareex- cluded)(.avi,.divx)
MaxBitRate......8000kbps
MaxFrameRate....30fps(Incaseofresolution 720×480.MAX25fpsin caseof720×576)
AudioCodec....MP2,MP3,LinearPCM/MSADPCM,AC-3
DecodeSize....MAX:720(H)x480(W),MIN: 48(H)x48(W)
H.264decodingformat......BaseLineProfile(.mp4)
MaxBitRate......8000kbps
MaxFrameRate....30fps
AudioCodec......AAC
DecodeSize....MAX:720(H)×1280(W), MIN:48(H)×48(W)
WMVdecodingformat......MainProfile(.wmv)
MaxBitRate......8000kbps
MaxFrameRate....30fps
AudioCodec......WMA
DecodeSize....MAX:720(H)x1280(W), MIN:48(H)x48(W)
MPEG-4videodecodingformat ......SimpleProfileL0/L1/L2/L3, AdvancedSimpleProfile(. mp4)
MaxBitRate......8000kbps
MaxFrameRate....30fps
AudioCodec......AAC
DecodeSize....MAX:720(H)x1280(W), MIN:48(H)x48(W)
JPEGdecodingformat......BaseLine(.jpeg,.jpg,.jpe,.jfif)
PixelSampling....4:2:2,4:2:0
DecodeSize....MAX:4092(H)x4092(W), MIN:16(H)x16(W)
MaxFileSize......8MByte
SD
Compatiblephysicalformat Version1.1
Filesystem.....FAT12,FAT16,FAT32
MP3decodingformat......MPEG-1&2AudioLayer3, MPEG-2.5Audio
WMAdecodingformat......Ver.7,7.1,8,9,10,11,12 (2chaudio) (WindowsMediaPlayer)
AACdecodingformat......MPEG-4AAC(iTunesen codedonly) (Ver.9.0.3andearlier)
WAVEsignalformat....LinearPCM,MSADPCM(.wav)
SamplingFrequency....Linear PCM:16,22.05,24,32,44.1,48 [kHz] MSADPCM:22.05/44.1[kHz]
DivXdecodingformat......HomeTheaterVer.4.xx,5.xx, 6.xx(Ultra&HDareex- cluded)(.avi,.divx)
MaxBitRate......8000kbps
MaxFrameRate....30fps(Incaseofresolution 720×480.MAX25fpsin caseof720×576)
AudioCodec....MP2,MP3,LinearPCM/MSADPCM.AC-3
DecodeSize....MAX:720(H)x480(W),MIN: 48(H)x48(W)
H.264decodingformat......BaseLineProfile(.mp4)
MaxBitRate......8000kbps
MaxFrameRate....30fps
AudioCodec......AAC
DecodeSize....MAX:720(H)x1280(W), MIN:48(H)x48(W)
WMVdecodingformat......MainProfile(.wmv)
MaxBitRate......8000kbps
MaxFrameRate....30fps
AudioCodec......WMA
DecodeSize....MAX:720(H)x1280(W), MIN:48(H)x48(W)
Additionalinformation
MPEG-4videodecodingformat
......SimpleProfileL0/L1/L2/L3,
AdvancedSimpleProfile(.mp4)
MaxBitRate 8000kbps
MaxFrameRate....30fps
AudioCodec......AAC
DecodeSize....MAX:720(H)x1280(W), MIN:48(H)x48(W)
JPEGdecodingformat......BaseLine(.jpeg,.jpg,.jpe, .jfif)
PixelSampling....4:2:2,4:2:0
DecodeSize....MAX:4092(H)x4092(W), MIN:16(H)x16(W)
MaxFileSize....8MByte
FMtuner
Frequencyrange....87.5MHzto108.0MHz
Usable sensitivity ....9 dBf (0.8μV/75Ω, mono, S/N:30dB)
Signal-to-noiseratio....72dB(IEC-Anetwork)
AMtuner
Frequencyrange....530kHz to 1640kHz (10kHz)
Signal-to-noiseratio......62dB(IEC-Anetwork)
Bluetooth
Version......Bluetooth3.0certified
Outputpower....+4dBmMaximum
(Powerclass2)
Note
Specificationsandthedesignaresubjecttomod-
ificationswithoutnotice.

natural_image
Simple horizontal line with rounded ends and a small black rounded rectangle on the right end (no text or symbols)

natural_image
Simple horizontal line with rounded ends and a small black rounded rectangle on the right end (no text or symbols)Visit us on the World Wide Web at
http://pioneer.jp/group/index-e.html
Pioneer Gulf.FZE
http://www.pioneer-uae.com
Pioneer Electronics Australia. Pty.Ltd
http://www.pioneer.com.au/
Pioneer Electronics Asiacentre.Pte
http://www.pioneer.com.sg
Pioneer (HK) Ltd.
http://www.pioneerhongkong.com.hk
Pioneer High Fidelity Taiwan Co., Ltd.
http://www.pioneer-twn.com.tw
Pioneer International Latin America S.A.
http://www.pioneer-latin.com
PIONEERCORPORATION
1-1, Shin-ogura, Saiwai-ku, Kawasaki-shi,
Kanagawa212-0031, JAPAN
PIONEERELECTRONICS(USA)INC.
P.O.Box1540, LongBeach, California90801-1540, U.S.A.
TEL:(800)421-1404
PIONEEREUROPENV
Haven1087, Keetberglaan1, B-9120Melsele, Belgium/Belgique
TEL:(0)3/570.05.11
PIONEERELECTRONICSASIACENTREPTE.LTD.
253AlexandraRoad,#04-01,Singapore159936
TEL:65-6472-7555
PIONEERELECTRONICSAUSTRALIAPTY.LTD.
5ArcoLane,Heatherton,Victoria,3202Australia
TEL:(03)9586-6300
PIONEERELECTRONICSOFCANADA, INC.
340FerrierStreet, Unit2, Markham, OntarioL3R2Z5, Canada
TEL:1-877-283-5901
TEL:905-479-4411
PIONEERELECTRONICSDEMEXICO,S.A.deC.V.
Blvd.ManuelAvilaCamacho13810piso
Col.LomasdeChapultepec,Mexico,D.F.11000
TEL:55-9178-4270
先鋒股份有限公司
台北市內湖區瑞光路407號8樓
電話:886-(0)2-2657-3588
先鋒電子(香港)有限公司
香港九龍長沙灣道909號5樓
電話:852-2848-6488
©2011PIONEERCORPORATION.
Allrightsreserved.