Photoshop CC - Audio and/or video software ADOBE - Free user manual and instructions
Find the device manual for free Photoshop CC ADOBE in PDF.

User questions about Photoshop CC ADOBE
0 question about this device. Answer the ones you know or ask your own.
Ask a new question about this device
Download the instructions for your Audio and/or video software in PDF format for free! Find your manual Photoshop CC - ADOBE and take your electronic device back in hand. On this page are published all the documents necessary for the use of your device. Photoshop CC by ADOBE.
USER MANUAL Photoshop CC ADOBE
What's New in Photoshop CC....2
Warp perspective | Photoshop CC....18
Print 3D objects | Photoshop CC....24
Create Smart Objects | CC, CS6....28
Generate image assets from layers | Photoshop CC.... 34
Reduce camera shake blurring | Photoshop CC.... 39
Share your work on Behance | Photoshop CC....45
Photoshop getting started tutorials....49
Workspace and workflow....50
Share your work on Behance | Photoshop CC....51
Sync settings using Adobe Creative Cloud | Photoshop CC....55
Tool galleries....57
Workspace basics....59
Panels and menus....67
Preferences....72
Default keyboard shortcuts....74
Using tools....104
Undo and history....108
Specifying columns for an image....114
Show or hide non-printing Extras....115
Run Photoshop in 32-bit mode (64-bit MacOS only)....116
Rulers....117
Positioning with the Ruler tool.... 119
Positioning elements with snapping....121
Placing Photoshop images in other applications....122
Placing files....126
Metadata and notes....129
Grid and guides....132
Companion apps....135
Customizing keyboard shortcuts....144
Plug-ins....146
Productivity enhancements (JDI's) in CS6....148
Key shortcuts....152
Presets....154
Image and color basics....158
Resizing images | CC, CS6....159
Image essentials....162
Image size and resolution....165
Acquiring images from cameras and scanners....171
Creating, opening, and importing images....174
Viewing images....179
Viewing multiple images....184
Image information....186
High dynamic range images....190
Customizing indexed color tables....198
Customizing color pickers and swatches....200
Converting between color modes....203
Color and monochrome adjustments using channels 208
Color modes....211
About color....214
Choosing colors in the Color and Swatchespanels....217
Choosing colors....219
Blending modes....226
Adding a conditional mode changeto an action....230
Add swatches from HTML CSS and SVG.... 231
Merging images to HDR 232
Convert an image to Bitmap mode....238
Understanding color management....242
Layers....244
Layer basics....245
Generate image assets from layers | Photoshop CC 250
Create Smart Objects | CC, CS6....255
Managing layers....261
Selecting, grouping, and linking layers....265
Copy CSS from layers | CC, CS6....268
Nondestructive editing....269
Moving, stacking, and locking layers....270
Layer opacity and blending....273
Layer effects and styles....277
Layer comps....287
Knockout to reveal content from other layers 290
Create and manage layers and groups.... 292
Combine images with Auto-Blend Layers....295
Blending modes....297
Applying Smart Filters....301
Aligning layers....306
Load selections from a layer or layer mask's boundaries....309
Editing layer masks....310
Masking layers with vector masks....311
Revealing layers with clipping masks....313
Combining multiple images into a group portrait.... 315
Masking layers....316
Selecting....322
Making selections....323
Adjusting pixel selections....325
Moving, copying, and deleting selected pixels....333
Saving selections and alpha channel masks....338
Selecting with the lasso tools....343
Selecting with the marquee tools....347
Extract an object from its background.... 349
Duplicate, split, and merge channels....352
Create a temporary quick mask....355
Channel calculations....358
Channel basics....361
Selecting a color range in an image.... 364
Making quick selections....367
Image adjustments.... 370
Warp perspective | Photoshop CC.... 371
Reduce camera shake blurring | Photoshop CC....377
Adjusting image sharpness and blur | CC, CS6.... 383
Understanding color adjustments....390
Levels adjustment....397
Targeting images for press....400
Viewing histograms and pixel values....403
Matching, replacing, and mixing colors....410
Making quick tonal adjustments....417
High dynamic range images....421
Applying special color effectsto images....429
Applying the Color Balance adjustment....432
Apply a Brightness/Contrast adjustment....434
Adjustment and fill layers....435
Adjust color and tone with Levels and Curves eyedroppers....439
Curves adjustment....441
Adjusting image color and tone....445
Adjust shadow and highlight detail....447
Convert a color image to black and white....449
Adjusting hue and saturation....450
Adjust HDR exposure and toning.... 454
Dodge or burn image areas....456
Camera Raw 457
What's new in ACR 8.x....458
Introduction to Camera Raw....460
Automatic perspective correction in Camera Raw | Photoshop CC.... 466
Radial Filter in Camera Raw | Photoshop CC.... 469
Enhanced Spot Removal Tool in Camera Raw | Photoshop CC....472
Make color and tonal adjustments in Camera Raw 476
Manage Camera Raw settings.... 482
Rotate, crop, and adjust images in Camera Raw....487
Adjust color rendering for your camera in Camera Raw....490
Vignette and grain effects in CameraRaw....492
Navigate, open, and save imagesin Camera Raw....494
Correct lens distortions in Camera Raw 497
Process versions in Camera Raw....501
Sharpening and noise reduction in Camera Raw....502
Make local adjustments in Camera Raw....504
Repair and restoration....509
Content-Aware Patch and Move....510
Retouching and repairing images....512
Correcting image distortion and noise....520
Reshaping and transforming....524
Transforming objects....525
Adjusting crop, rotation, and canvas....534
Crop and straighten photos | CC, CS6....541
Warp images, shapes, and paths....545
Vanishing Point....549
Liquify filter....564
Free transformations of images, shapes, and paths....572
Create panoramic images with Photomerge....574
Content-aware scaling....578
Drawing and painting....580
Modify shapes | CC, CS6....581
About drawing....583
Drawing shapes....585
Painting tools....590
Creating and modifying brushes....593
Managing paths....600
Gradients....603
Generate a pattern using the Pattern Maker....609
Filling and stroking selections, layers, and paths....611
Drawing with the Pen tools....616
Converting between paths and selection borders....623
Brush presets....625
Blending modes....628
Adding color to paths....632
Editing paths....635
Creating textured brushes....645
Adding dynamic elements to brushes....647
Drawing or painting with a graphics tablet....651
Painting with the Mixer Brush....652
Painting with a pattern....654
Painting stylized strokes with the Art History Brush....655
Erasing parts of an image....656
Managing pattern libraries and presets....659
Creating patterns....661
Text....662
Formatting Characters....663
Formatting paragraphs....669
Line and character spacing....676
Fonts....679
Editing text....683
Creating type effects....689
Creating type....695
Asian type....700
Arabic and Hebrew type | CC, CS6....708
Video and animation....712
Video editing | CC, CS6....713
Editing video and animation layers....716
Previewing video and animations....722
Painting frames in video layers....726
Importing video files and image sequences....729
Creating timeline animations....733
Creating images for video....740
Creating frame animations....745
Video and animation overview....754
Saving and exporting video and animations....760
Filters and effects....769
Filter effects reference | CC, CS6....770
Add Lighting Effects | CC, CS6....780
Photographic blur gallery....785
Adaptive wide angle filter....788
Oil Paint filter....790
Layer effects and styles....791
Filter basics....801
Applying specific filters....806
Smudge image areas....810
Add Lighting Effects (CS5)....811
Saving and exporting....816
Supported file formats....817
Saving PDF files....819
Saving images....827
Saving files in graphics formats....832
File formats....837
Digimarc copyright protection....844
Printing....847
Print 3D objects | Photoshop CC....848
Printing from Photoshop | CC, CS6....852
Printing with color management....856
Contact Sheets and PDF Presentations....859
Print photos in a picture package layout....860
Printing spot colors....864
Printing images to a commercialprinting press....868
Duotones....873
Printing with color management | CS5....877
Printing from Photoshop CS5....881
Automation....885
Scripting....886
Processing a batch of files....887
Playing and managing actions....892
Creating data-driven graphics....896
Creating actions....902
Adding a conditional mode changeto an action....907
About actions and the Actions panel....908
Adding conditional actions | CC, CS6....910
Recording tools in actions | CC, CS6....911
Web graphics....912
Copy CSS from layers | CC, CS6....913
Working with web graphics....914
Slicing web pages....917
Modifying slice layout....921
HTML options for slices....926
Creating web photo galleries....930
Optimizing images....939
Output settings for web graphics....944
Web graphics optimization options....946
3D and technical imaging....955
Print 3D objects | Photoshop CC....956
3D painting | CC, CS6....960
3D panel enhancements | Photoshop CC....965
Essential 3D concepts and tools....968
3D workflow | CC, CS6....973
Adjust HDR exposure and toning....977
Photoshop and MATLAB (Photoshop Extended)......979
Measurement (Photoshop Extended)....983
Image Stacks (Photoshop Extended)....991
DICOM files (Photoshop Extended)....994
Counting objects in an image (Photoshop Extended)....998
Combining and converting 3D objects....1000
3D texture editing....1002
Creating 3D objects and animations....1006
3D rendering and saving....1012
3D panel settings....1017
Color management....1030
Understanding color management....1031
Keeping colors consistent....1033
Color settings....1036
Working with color profiles....1039
Color-managing documents for online viewing....1043
Color-managing documents when printing.... 1044
Color-managing imported images....1046
Proofing colors....1048
System requirements....1051
Memory and performance....1052
What's new

Adobe® Photoshop® CC ships with several new features and enhancements that enrich your digital imaging experience. Read on for a quick introduction to new features and links to resources offering more information.
Note: If you're upgrading from Photoshop CS5, see What's New in Photoshop CS6 for an overview of new features in Photoshop CS6 and Photoshop 13.1 for Adobe Creative Cloud.
Photoshop CC | January 2014
Photoshop CC | September 2013
Photoshop CC | June 2013
To the top
Photoshop CC | January 2014
Warp perspective

New in Photoshop CC | January 2014
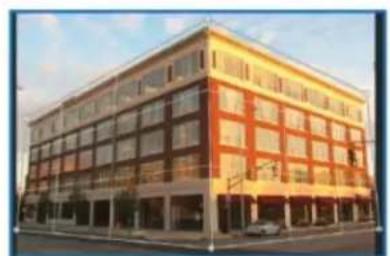
Photoshop lets you easily adjust perspective in images. This feature is particularly useful for images having straight lines and flat surfaces—for example, architectural images and images of buildings. You can also use this feature to composite objects having different perspectives in a single image.
For more information, see Warp perspective.
natural_image
Exterior view of a modern multi-story building with red and yellow facade (no visible signage or text)A

natural_image
Exterior view of a multi-story building with red and yellow facade, featuring windows and parked cars (no visible text or signage)B
A. Define planes in the Layout mode B. Adjust perspective in the Warp mode
Print 3D objects

New in Photoshop CC | January 2014
With Photoshop, you can print any compatible 3D model without worrying about 3D printer limitations. In preparation for printing, Photoshop automatically makes 3D models watertight. Photoshop also generates the necessary support structures—scaffolding and rafts—to ensure that your 3D prints are successful.
For details, see Print 3D objects.

natural_image
3D model of a rocket inside a transparent cube, with labeled axes A, B, and C (no text or symbols on the model itself)Printing a 3D model
A. 3D model B. Print plate C. Printer volume overlay
3D imaging

Enhanced in Photoshop CC | January 2014
- You can now share 3D layers using Sketchfab, a Web service to publish and display interactive 3D models. In Photoshop, select 3D > Share 3D Layer On Sketchfab.
- You can now regenerate UV maps for objects and materials in the selected 3D layer. This option is particularly useful for reparameterizing 3D objects downloaded from the Internet. In Photoshop, select 3D > Regenerate UVs.
- You can now easily group all objects in a scene. In Photoshop, select 3D > Group All Objects In Scene.
- You can now apply a cross section to a 3D model. For details, see this FAQ.
- The 3D menu now features a handy option to unify all elements of a 3D scene and make the scene watertight. Select 3D > Unify Scene For 3D Printing.
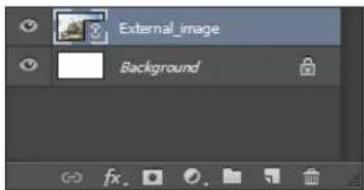
Linked smart objects
You can now create linked smart objects whose contents are referenced from external image files. The contents of a linked smart object are updated when its source image file changes. With linked smart objects, you can use a shared source file across multiple Photoshop documents. Linked smart objects are particularly useful for teams or in cases where assets must be reused across designs.
Linked smart objects are displayed in the Layers panel with a link icon (☐).
For more information, see Create linked smart objects.

text_image
External_image BackgroundA linked smart object in the Layers panel
Adobe Camera Raw

Enhanced in Photoshop CC | January 2014
Adobe Camera Raw now offers the following enhancements:
• Automatic straightening of an image through one of the following three interactions:
- Double-click the Straighten tool ( ) in the toolbar.
- With the Straighten tool selected, double-click anywhere in the preview image.
-
With the Crop tool selected, press the Command key (on Mac) or Ctrl key (on Windows) to temporarily switch to the Straighten tool. Now, double-click anywhere within the preview image.
-
Whites and Blacks now support Auto Levels-like functionality when you double-click the sliders while keeping the Shift key pressed (Shift-double-click).
- Auto Temperature and Auto Tint functionality. Shift-double-click within the image preview to invoke this functionality.
- Option to choose a background color for the work area and toggle the visibility of the hairline frame around the image. Right-click outside the image in the work area and select an option from the popup menu.
- Option-click shortcut support for the Synchronize, New Preset, Save Settings, and Copy/Paste (Bridge) dialog boxes. When you option-click a checkbox, it is selected exclusively. You can option-click again to toggle to the previous checkbox state.
See What's New in ACR 8.x.
Other enhancements
• Improved font transformations
• Stability improvements to the Photoshop Generator feature
• Improved selection of shapes using the Direct Selection tool (
• A single click on the Lock icon (now unlocks a background layer
• + You can now set a custom background color in the New Document dialog
• Better negative number support while making curve adjustments
• You can now see recent colors in the Swatches panel
• Clear All option for the Color Sampler tool
• 10 color samplers instead of 4. You can now change all color samplers in the Info palette at the same time
• The Missing Fonts dialog has a Do Not Show Again option now
• + Share On Behance is now available for more languages
• Improved history states for editing text, and editing and applying character/paragraph styles
• Mercury Graphics Engine performance boost (Smart Sharpen on GPU)
• Enhanced scripted patterns and fills (trees, previews, and other improvements)
- Photoshop Generator can now export padding in image assets using layer masks
• Layer names can now be as long as 255 characters
• + Narrow Options Bar for small displays
• Bug fix: Photoshop Generator now rescales Adobe Illustrator smart objects exported after scaling up
To the top
Photoshop CC | September 2013
Generate image assets from layers
+ New in Photoshop CC | September 2013
You can generate JPEG, PNG, or GIF image assets from the contents of a layer or layer group in a PSD file. Assets are automatically generated when you append a supported image format extension to a layer name or a layer group name. Optionally, you can also specify quality and size parameters for the generated image assets.
Generating image assets from a PSD file is particularly useful for multidevice web design.
For more information, see Generate image assets from layers.

text_image
Simulted_3damples.png 10000.png DiPage_1 DiPage_2.pdf DiPage_3 DiPage_4.pdf DiPage_5 DiPage_6.pdf DiPage_7 DiPage_8.pdf DiPage_9.pdf DiPage_10.pdf DiPage_11.pdf DiPage_12.pdf DiPage_13.pdf DiPage_14.pdf DiPage_15.pdf DiPage_16.pdf DiPage_17.pdf DiPage_18.pdf DiPage_19.pdf DiPage_20.pdf DiPage_21.pdf DiPage_22.pdf DiPage_23.pdf DiPage_24.pdf DiPage_25.pdf DiPage_26.pdf DiPage_27.pdf DiPage_28.pdf DiPage_29.pdf DiPage_30.pdf DiPage_31.pdf DiPage_32.pdf DiPage_33.pdf DiPage_34.pdf DiPage_35.pdf DiPage_36.pdf DiPage_37.pdf DiPage_38.pdf DiPage_39.pdf DiPage_40.pdf DiPage_41.pdf DiPage_42.pdf DiPage_43.pdf DiPage_44.pdf DiPage_45.pdf DiPage_46.pdf DiPage_47.pdf DiPage_48.pdf DiPage_49.pdf DiPage_50.pdf DiPage_51.pdf DiPage_52.pdf DiPage_53.pdf DiPage_54.pdf DiPage_55.pdf DiPage_56.pdf DiPage_57.pdf DiPage_58.pdf DiPage_59.pdf DiPage_60.pdf DiPage_61.pdf DiPage_62.pdf DiPage_63.pdf DiPage_64.pdf DiPage_65.pdf DiPage_66.pdf DiPage_67.pdf DiPage_68.pdf DiPage_69.pdf DiPage_70.pdf DiPage_71.pdf DiPage_72.pdf DiPage_73.pdf DiPage_74.pdf DiPage_75.pdf DiPage_76.pdf DiPage_77.pdf DiPage_78.pdf DiPage_79.pdf DiPage_80.pdf DiPage_81.pdf DiPage_82.pdf DiPage_83.pdf DiPage_84.pdf DiPage_85.pdf DiPage_86.pdf DiPage_87.pdf DiPage_88.pdf DiPage_89.pdf DiPage_90.pdf DiPage_91.pdf DiPage_92.pdf DiPage_93.pdf DiPage_94.pdf DiPage_95.pdf DiPage_96.pdf DiPage_97.pdf DiPage_98.pdf DiPage_99.pdf DiPage_100.pdfImage assets generated from layers/layer groups
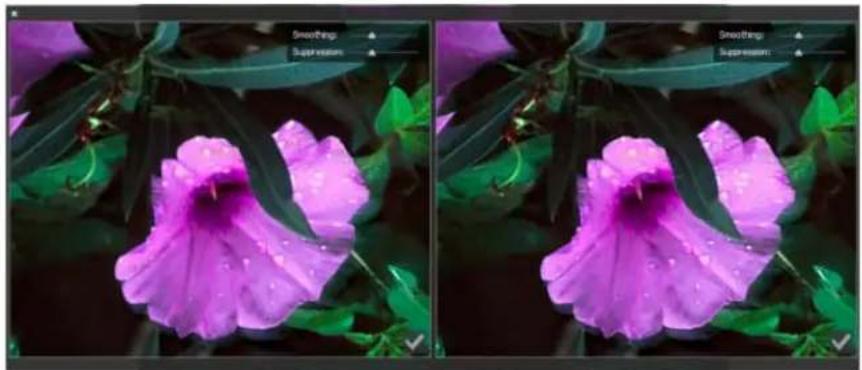
Camera shake reduction improvements
Enhanced in Photoshop CC | September 2013
- User interface enhancements for productivity gains
- Option to disable artifact suppression
• HiDPI preview support for retina display
• Improved performance on large screens
For more information, see Reduce camera shake blurring.
natural_image
Two side-by-side photos of a purple flower with green leaves, showing water droplets on petals (no text or symbols)Camera shake reduction UI improvements
Other enhancements
• Increased stability while saving files to network locations
- Photoshop-Behance integration is now available for several languages. See Share your work on Behance.
• + Native read-only PSDX file format support
• + New controls to modify the range and fuzziness for Shadows, Highlights, and Midtones
• Improved performance and stability while using content-aware features
• Increased limit for number of measurements: 700 to 10,000
- Improved anchor point selection: Clicking a selected anchor point now selects that anchor point and deselects other anchor points
• 32-bit support for 24 filters. See Filter effects reference.
- Crash prevention through improved GPU detection and disabling
• + New option to select All Layers/Active Layers for Path and Direct Selection tools
• Isolation mode changes:
- Custom keyboard shortcut support for entering/exiting the Isolation mode
- Option to enter the Isolation mode by double-clicking is now unavailable in the Active Layers mode
- Instead of turning filtering off, exiting the Isolation mode now resets the Layer Filter to default values
- New option in the Properties panel flyout menu to control the display of the panel during shape layer creation
• Path point selection is now no longer retained while switching between layers
To the top
Photoshop CC | June 2013
Reduce camera shake blurring
+ New in Photoshop CC
Photoshop features an intelligent mechanism to automatically reduce image blurring caused by camera motion. If necessary, you can adjust advanced settings to further sharpen the image. The camera shake reduction feature can reduce blurring resulting from several types of camera motion; including linear motion, arc-shaped motion, rotational motion, and zigzag motion.

natural_image
Close-up of a pink morning glory flower with dewdrops, surrounded by green leaves (no text or symbols visible)Original image
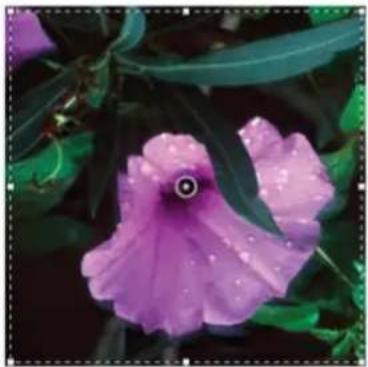
natural_image
Close-up of a pink morning glory flower with dewdrops, surrounded by green leaves (no text or symbols)After camera shake reduction
Camera shake reduction | A before/after example
Images suitable for camera shake reduction
The camera shake reduction feature works best with decently lit still camera images having low noise. The following types of still images are particularly suitable for shake reduction:
- Indoor or outdoor images captured using a lens with a long focal length
- Indoor images of a static scene taken with a slow shutter speed and no flash
In addition, shake reduction can help sharpen blurred text in images affected by camera motion.
For more information, see Reduce camera shake blurring.
Image resizing improvements

Enhanced in Photoshop CC
The Image Size command now includes a method to Preserve Details and provide better sharpness while enlarging images. In addition, the Image Size dialog box has been updated for ease of use:
- A window displays the preview image from the resizing parameters. Resizing the dialog box resizes the preview window.
- The Scale Styles option is turned on and off from inside the gear menu in the upper right corner of the dialog box.
• From the Dimensions pop-up menu, choose different units of measurement to display the dimensions of the final output. - Click the link icon to toggle the constrain proportions option on and off.
- The resample menu options are arranged by usage, including the new edge-preserving method.
For more information, see Resizing images.

natural_image
Street scene with yellow flowers, palm trees, and modern buildings under a clear blue sky (no visible text or symbols)Original uncropped image
natural_image
Close-up of a vibrant yellow flower with detailed petals and stamens, surrounded by green foliage (no text or symbols visible)Sharp resized image with details preservation
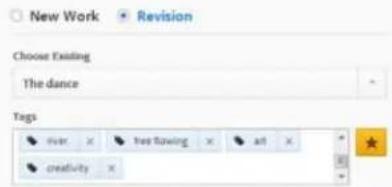
Share your work on Behance

New in Photoshop CC
&

You can upload your creative images as work-in-progress to Behance directly from within Photoshop. Behance is the leading online platform to showcase and discover creative work. Using Behance, you can create a portfolio of your work and broadcast it widely and efficiently to get feedback. You can upload fresh images as well as revisions of images you've uploaded earlier.
Note: Behance integration with Photoshop CC is not available in France and Japan for now.
1. Enter Information > 2. Select Cover Image > 3. Share
PREVIEW
Image size: 710x710px
text_image
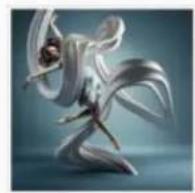
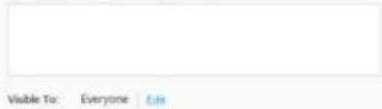
New Work Revision Choose Existing The dance Tags over x tree flowing x art x creativity xPost a comment to start the conversation
text_image
Visible To: Everyone Edit
Uploading revisions to Behance...
Share your work from within Photoshop in one of the following ways:
- With a document open, select File > Share On Behance.
- With a document open, click the Share On Behance button (the lower-left corner of the document window.
You can either start a new Behance portfolio using your Adobe ID or link your existing Behance account with your Adobe ID.
For more information about Photoshop-Behance integration, see Share your work on Behance. For more information about using Behance, see this FAQ.

You must be 13 years of age or older to sign up for Behance.
Note: You can share images of dimensions 320 x 320 pixel or higher.
Sync settings using Adobe Creative Cloud

New in Photoshop CC

When you work on multiple computers, managing and syncing preferences across the computers can be time-consuming, complex, and prone to error.
The new Sync Settings feature enables you to sync preferences and settings via Creative Cloud. If you use two computers, the Sync Settings feature makes it easy for you to keep those settings synchronized across the two computers. The syncing happens via your Adobe Creative Cloud account. Settings are uploaded to your Creative Cloud account and are then downloaded and applied on the other computer.
Choose Edit > Sync Settings and then select the relevant options. For more information, see Sync Settings Using Adobe Creative Cloud | CC.
3D imaging

Enhanced in Photoshop CC
Note: Also see 3D features | Creative Cloud-only for Creative Cloud-only features added to Photoshop CS6. These features are also available in Photoshop CC.
3D painting
Photoshop CC features several enhancements that let you paint 3D models with finer control and greater accuracy. When you paint in the default Live 3D Painting mode, you can see your brush strokes update in real time in both the 3D model view and the texture view. The Live 3D Painting mode also offers significant performance gains and minimizes distortion.
Projection Painting, the default 3D painting method in Photoshop CS5 and CS6, remains available in Photoshop CC. You can switch to this 3D painting method by selecting 3D > Use Projection Painting.
Besides Live 3D Painting, Photoshop CC features the following enhancements to 3D painting functionality:
- When you target different texture types for painting, you can see the paint target in both the 3D model and the target texture view.
- You can choose to paint your 3D objects in the unlit mode. This mode ignores any lighting in your scene and wraps raw texture data of the appropriate type around your 3D objects. Painting in the unlit mode lets you paint without shading and with greater color accuracy.
Available 3D painting methods
Different painting methods are appropriate for different use cases. Photoshop CC provides the following 3D painting methods:

Live 3D Painting: (Default in Photoshop CC) Brush strokes made in the 3D model view or the texture view are reflected in real time in the other view. This 3D painting method offers high performance and minimum distortion.

Layer Projection Painting: (Enhanced in Photoshop CC) The Gradient tool and filters use this painting method. The Layer Projection Painting method involves merging a painted layer with the underlying 3D layer. During the merge operation, Photoshop automatically projects the target onto the appropriate target textures.
Projection Painting: (Only method in Photoshop CS6) Projection Painting is suitable for painting multiple textures simultaneously or for painting the seam between two textures. However, in general, it is a lower-performance painting method and may result in cracks when you're painting complex 3D objects.
Texture Painting: You can open the 2D texture and paint it directly.
For more information, see 3D painting.
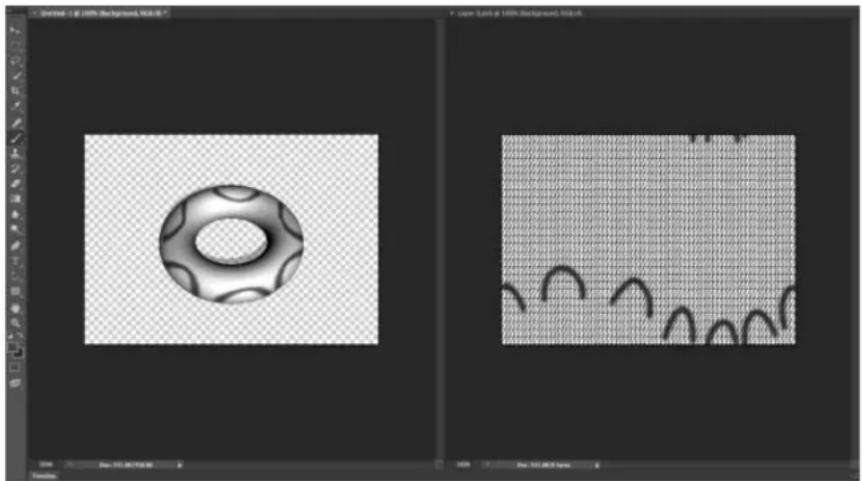
natural_image
Two grayscale images showing a donut-shaped object on the left and a grid-patterned surface with wavy lines on the right, displayed in a software interface (no text or symbols)Live 3D Painting in Photoshop
3D panel
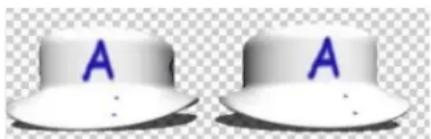
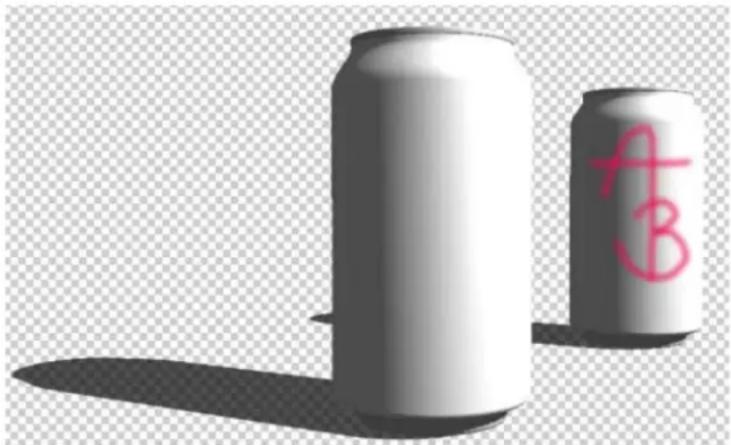
Photoshop CC features a revamped 3D panel that makes it easier for you to work with 3D objects. Modeled after the Layers panel, the redesigned 3D panel is structured as a scene graph/tree having root objects and child objects.
You can interact with 3D objects in the scene graph in several ways:
- Delete objects
- Reorder objects
- Reverse object order
- Insert objects
- Duplicate objects
- Make instances of objects (linked instances or decoupled instances)
- Group objects
You can access these interactions from the context menu associated with a 3D object. Right click an object to access its context menu on Windows. To access the context menu on Mac OS, click the object with the Control key held down.
Some interactions are not available for certain types of 3D objects.
For more information, see 3D panel enhancements | Photoshop CC.
natural_image
Two identical white hats with blue letter 'A' on each side, isolated on transparent background (no text or symbols beyond the lettering)Linked instance: Changes made to the object reflect on the instance
natural_image
Two white beverage cans with pink handwritten letters 'A' and 'B' on their faces, casting shadows (no text or symbols on the cans themselves)Instance decoupled from the original object
Filters

Enhanced in Photoshop CC
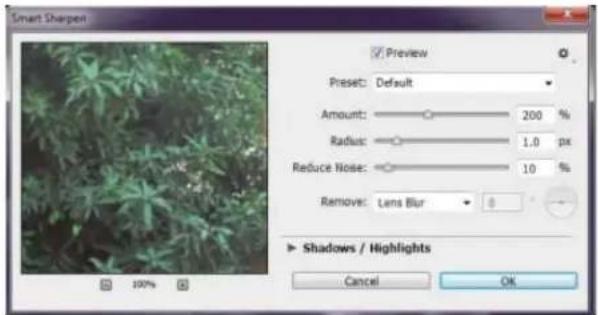
Smart Sharpen filter enhancements
The enhanced Smart Sharpen filter empowers you to produce high-quality results through adaptive sharpening technology that minimizes noise
and halo effects.
The streamlined UI design for this filter offers optimized controls for targeted sharpening. Use the sliders for quick adjustments and advanced controls to fine-tune your results.
For more information, see Filter effects reference and Adjusting image sharpness and blur.
text_image
Smart Sharpen Preview Preset: Default Amount: 200 % Radius: 1.0 px Reduce Noise: 10 % Remove: Lens Blur Shadows / Highlights Cancel OKSmart Sharpen dialog box
Minimum and Maximum filter enhancements
The Maximum and Minimum filters have been updated. You can now choose from the Preserve menu to favor squareness or roundness as you specify the radius value. Radius values can now be entered as decimals.
For more information, see Filter effects reference.

text_image
Maximum OK Cancel Preview 100% Radius: 1.0 Pixels Preserve: Squareness Squareness RoundnessPreserve squareness or roundness
Adobe Camera Raw as a filter
+ New in Photoshop CC
In Photoshop CC, Adobe Camera Raw is available as a filter as well. When you process an image in Photoshop, you can choose to apply the Camera Raw Filter (Filter > Camera Raw Filter) on images that are already open in Photoshop. This means that you can apply Camera Raw adjustments to more file types like PNG, video clips, TIFF, JPEG, and more. The images processed with the Camera Raw Filter can be on any layer.
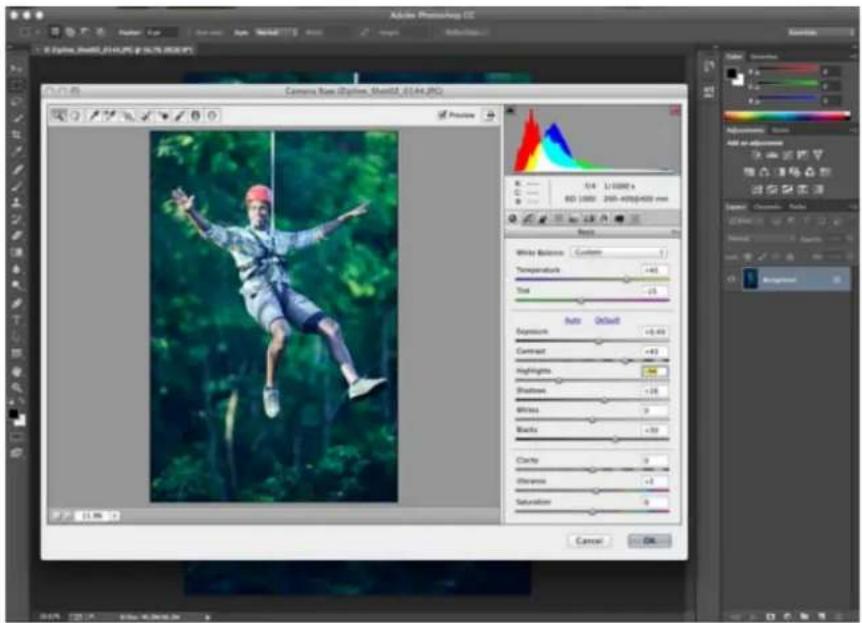
text_image
Adobe Photoshop 3D File Edit View Tools Help ⬆ Format Edit Options Help Camera Base (Cylinder, Sketch2_0144.JPG) Preview R: 0.0 1/1000 x B: 1000 200-600x600 mm Auto Default Balance Current Temperature +5 Tsd -5 Auto Default Exposure +0.49 Contrast +52 Highlights +58 Shadow +16 Wides +9 Blacks +50 Clarity +9 Chronic +3 Saturation +9 Cancel OKCamera Raw Filter (Shift + Ctrl/Cmd + A) in Photoshop
For more information, see this video on using Camera Raw as a filter in Photoshop.
Adobe Camera Raw
For information on the recent improvements in Camera Raw, see the video overview of Adobe Camera Raw 8.
JPEG and TIFF file-handling preferences

New in Photoshop CC
New preferences are available to determine how Photoshop handles JPEG and TIFF files. These settings are particularly useful if your workflows include the use of Camera Raw each time you process an image, or would like to call Camera Raw selectively. For example, a photographer may want to process each image with the Camera Raw dialog before opening it in Photoshop. However, a retoucher or a compositor may want to open the Camera Raw dialog only for images that have previously been processed using Camera Raw.
To modify the preferences in Photoshop, click Preferences > File Handling > File Compatibility section > Camera Raw Preferences > JPEG and TIFF Handling section. You can choose if opening a JPEG or TIFF automatically calls the Camera Raw dialog or not. For example, choose from the JPEG dropdown:
- Disable JPEG support. When you open a JPEG file in Photoshop, the Camera Raw dialog does not open.
- Automatically open JPEGs with settings. When you open a JPEG file in Photoshop, the Camera Raw dialog is opened only if the JPEG file has previously been processed using Adobe Camera Raw
• Automatically open all supported JPEGS. The Camera Raw dialog is opened each time you open a JPEG file.
Use the TIFF dropdown to make a similar choice for TIFF files.
Spot Removal tool

Enhanced in Photoshop CC
The new behavior of the Spot Removal (Camera Raw dialog > Spot Removal tool, or keyboard shortcut B) tool is similar to the Healing Brush in Photoshop. Use the Spot Removal tool to paint over an element in your photo, select a source area that could be used on your selected area, and the tool does the rest for you. You can press the forward slash (/) key to let Camera Raw pick the source area for you.

natural_image
Three-panel image showing a red vertical pole with green circular markers against a mountainous landscape background (no text or symbols)A zip-line that needs to be cleaned up (left), is identified, selected, and matched with a source area (center), and then removed (right)
While the Spot Removal tool enables you to remove visible imperfections, some flaws in the photo may not be visible in the normal view (for example, sensor dust, or spots or blemishes on a portrait). The Visualize Spots option in the Spot Removal tool enables you to see smaller and less-visible imperfections. When you select the Visualize Spots checkbox, the image appears inverted. You can vary the contrast levels of the inverted image to see imperfections more clearly. You can then use the Spot Removal tool in this view to remove any imperfections.
For more information, see the article on the enhanced Spot Removal tool in Photoshop CC.
Radial Filter
+ New in Photoshop CC
The new Radial Filter tool (Camera Raw dialog > Radial Filter tool, or keyboard shortcut J) enables you to define elliptical marquees, and then apply localized corrections to these areas. The corrections can be applied within or outside the marquee areas. You can place multiple Radial Filters on an image, and apply a different set of adjustments to each Radial Filter.
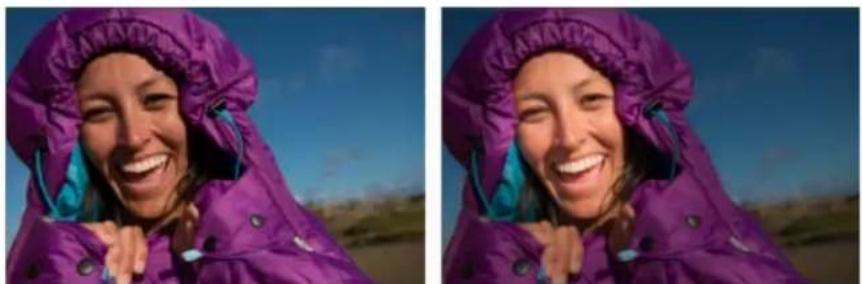
natural_image
Two side-by-side photos of a smiling woman wearing a purple hooded jacket, outdoors under a clear blue sky (no text or symbols visible)The image as shot (left), and the subject brought into focus using a vignette-like effect using Radial Filters (right)
For example, a vignette-like effect has been simulated in the image above. Two overlapping Radial Filter areas were defined over the face of the subject, one slightly larger than the other. Using the larger Radial Filter area, adjustments were made to subdue the regions behind the face. The second, smaller Radial filter area was adjusted to brighten and highlight the face.
For more information, see the article on the Radial Filter tool.
Upright modes
+ New in Photoshop CC
The Upright feature (Camera Raw dialog > Lens Correction > Manual tab) in Camera Raw enables you to automatically straighten image content. The Upright mode automatically corrects the perspective of the elements in a photograph. The feature has four settings that you can choose from:
• Auto: Balanced perspective corrections
• Level: Perspective corrections are weighted toward horizontal details
• Vertical: Perspective corrections are weighted toward vertical details
• Full: Combination of Level, Vertical, and Auto perspective corrections
You can apply one setting, cycle through the others, and then choose the setting that is best for your photograph.

natural_image
Cityscape at dusk with illuminated skyscrapers and a river, no visible text or signage
natural_image
Evening aerial view of a modern cityscape with illuminated skyscrapers and a river, no visible text or signage.Sample image before applying perspective correction (left) and after using the Auto setting in the Upright feature (right)
Also, a new slider - Aspect has been to the existing set. The Aspect slider lets you modify the aspect of the image horizontally or vertically. Sliding the control left modifies the horizontal aspect, and sliding it right modifies the vertical aspect of the photo.
For more information, see the article on Automatic perspective correction in Camera Raw.
Multiple selection of paths

Enhanced in Photoshop CC
New enhancements in Photoshop CC let you work with multiple paths. You can apply commands to multiple paths from the Paths panel menu. Specifically users will be happy to hear they can select more than one path and delete them all at once.
You can now perform the following actions:
- Shift-click to select multiple paths in the Paths panel
- Ctrl-click (Windows) or Command-click (Mac OS) to select non-contiguous paths
- Drag either the Path Selection tool and the Direct Selection tool over multiple paths to manipulate them, even if the paths are on different layers.
- Alt-drag (Windows) or Option-drag (Mac OS) a path in the Paths panel duplicates it
- Reorder a path by dragging in the Paths panel. You can only reorder paths that are not shape, type, or vector mask paths.
- Delete multiple selected paths at once.
For more information, see Editing paths.
Modify rectangles and rounded rectangles

Enhanced in Photoshop CC
You can adjust dimensions, placement, and the corner radii of a rectangle or rounded rectangle shape after it has been created. Each corner can be adjusted independently and adjustments can be simultaneously made to rectangles on multiple layers.
For more information, see Modify shapes.
Support for Indic languages

New in Photoshop CC
You can now type text in 10 Indic languages into your Photoshop documents: Bengali, Gujarati, Hindi, Kannada, Malayalam, Marathi, Oriya, Punjabi, Tamil, and Telugu.
To enable Indic language support, select Preferences > Type > Middle Eastern And South Asian. Changes take effect for the next document that you create.
When you enable Indic support, two additional composers are enabled in the flyout menu of the Paragraph panel:
- Single-line Composer
- Every-line Composer
Note: You can enable either Middle Eastern And South Asian support or East Asian support in a document.
System anti-aliasing option for type

Enhanced in Photoshop CC
The new system anti-aliasing option for type gives you a realistic preview of how your type will appear on the web. This new option closely matches the anti-aliasing options in popular browsers for both Windows and Mac-based rendering.
Other enhancements

Significantly improved performance for the Blur Gallery. The Blur Gallery now uses OpenCL for previews as well as the final result.

Several enhancements to the preset migration functionality:
- Presets are now migrated from the user library folder as well as the application presets folder
• Active presets are now migrated along with non-loaded presets - Only presets for the immediate past version are migrated. For example, CS6 presets are migrated while CS5 presets are ignored from a migration standpoint.
- A system restart is not required after migrating presets.
• Changes to Windows Open/Save dialog boxes:
• Changes to the ordering and placement of some controls
- The Use Lower Case option has been removed. You can change file extension upper/lower case setting in the Preferences dialog box.
- Warning icons and the warning text info box have been replaced with the Warning button appearing next to the Save and Cancel buttons. When you click this Warning button, Photoshop displays a message capturing the reason for the warning. If a document has no warnings, the Warning button is hidden.

The Warning button

An angle control widget for brushes is now available from the options bar as well as the context menu.
• The View Print Size option has been restored.
• The gamma value for text is now automatically set for new system options.
• Improved performance when you save your work to network shares on Mac OS X
• Metadata and ICC profiles are now included when you save a document as PNG.
• You can now export CSS (Cascading Style Sheet) code directly from layers or groups. Select Layer > Copy CSS.
• Copy CSS improvements:
• Copy CSS units are now always pixel (px)
• Copy CSS transparency now works in gradients
- Improved placement of transformed text
- Width is no longer generated for non-paragraph text
• You can now select and delete multiple type styles
• + You can now use the Shift key modifier while creating paths.
Product-level changes
- All features in Photoshop Extended CS6 are now available in Photoshop CC. Photoshop CC does not have a separate Extended offering.
-
The following applications are no longer installed by default with Photoshop CC:
-
Bridge CC; to see a list of new features, see What's New in Adobe Bridge CC
- Extension Manager
- ExtendScriptToolkit
Note: To download Bridge CC, Extension Manager, or ExtendScriptToolkit; log in to Adobe Creative Cloud, navigate to Apps, and then download the desired application.
- New system requirements for Photoshop CC:
• Support for Mac OS X 10.7 (Lion) and 10.8 (Mountain Lion)
- Mac OS X 10.6 (Snow Leopard) is not officially supported. In particular, you cannot work with video files on Mac OS X 10.6. You can create a timeline with stills and add effects like transitions. However, you can export this work only using the File > Export > Render Video > Photoshop Image Sequence option.

- The Lighting Effects filter (Filter > Render > Lighting Effects) works only with 8-bit RGB images in Photoshop CC.
Twitter™ and Facebook posts are not covered under the terms of Creative Commons.
Legal Notices | Online Privacy Policy
Background
Prerequisite: Enable the graphics processor
Adjust perspective
FAQ
Photoshop lets you easily adjust perspective in images. This feature is particularly useful for images having straight lines and flat surfaces—for example, architectural images and images of buildings. You can also use this feature to composite objects having different perspectives in a single image.
To the top
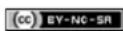
Background
Sometimes, an object may look different in an image from how it appears in real life. This mismatch is due to perspective distortion. Images of the same object captured from different camera distances and angles of view exhibit different perspective distortion.
natural_image
3D rendering of a white cube on a grid background with blue sky (no text or symbols)Perspective distortion in images of the same object captured from different distances and angles
(Creative Commons image courtesy: SharkD)
To the top
Prerequisite: Enable the graphics processor
Photoshop requires at least 512 MB of video RAM (VRAM) to run the perspective warp feature. For details, see Photoshop CC GPU FAQ.
As a prerequisite to adjusting perspective, ensure that the graphics processor is enabled in your Photoshop preferences.
- Select Edit > Preferences > Performance.
- In the Graphics Processor Settings area, select Use Graphics Processor.
- Click Advanced Settings. Ensure that Use Graphics Processor To Accelerate Computation is selected.
- Click OK.
To the top
Adjust perspective
Define planes
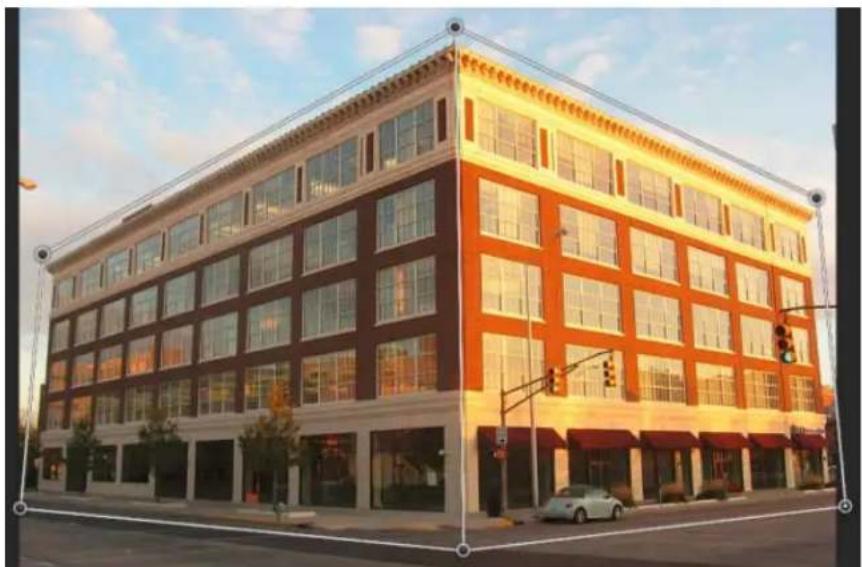
Before you adjust perspective, you must define the planes of the architecture in the image.
- Open the image in Photoshop.
- Select Edit > Perspective Warp. Review the onscreen tip and close it.
- Draw quads along the planes of the architecture in the image. While drawing the quads, try to keep their edges parallel to the straight lines in the architecture.

natural_image
Exterior view of a multi-story building with red and orange facade, featuring large windows and parked cars under a clear sky (no signage or text visible)Draw the edges of the quads roughly parallel to the lines in the architecture. As depicted in the illustration, you can snap two planes together. Here is a set of planes defined for a building.
Manipulate the planes
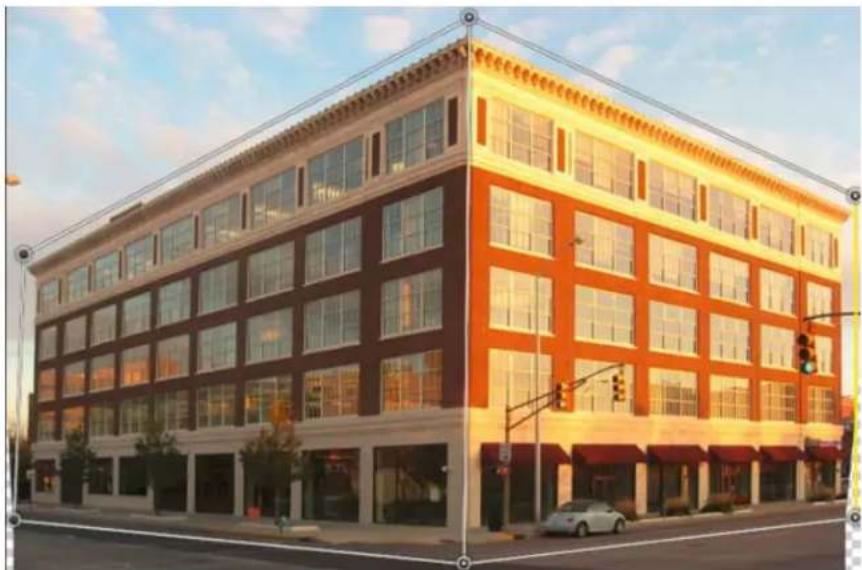
- Switch to the Warp mode from the Layout mode.
natural_image
Exterior view of a multi-story brick building with large windows under a clear sky (no signage or text visible)Warp mode
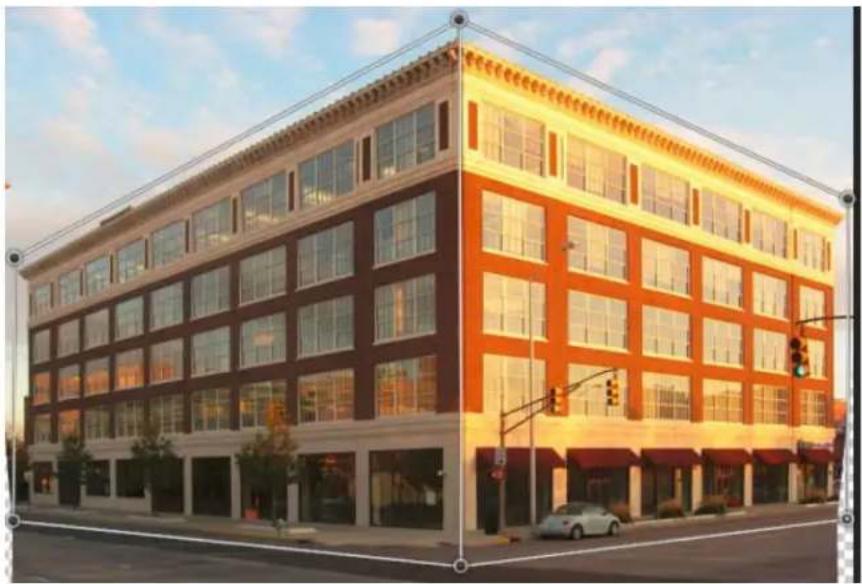
- Manipulate perspective in one of the several available ways:
- Move around the corners of the quads (pins) as appropriate. For example, you can adjust the perspective of this image, such that the two sides of the building exhibit foreshortening in equal measures. The resulting perspective would approximate a direct view of the building from a corner.

natural_image
Exterior view of a multi-story building with large windows and brick facade, under clear sky (no signage or text visible)Adjusting the perspective, such that the two sides of the building are equally foreshortened
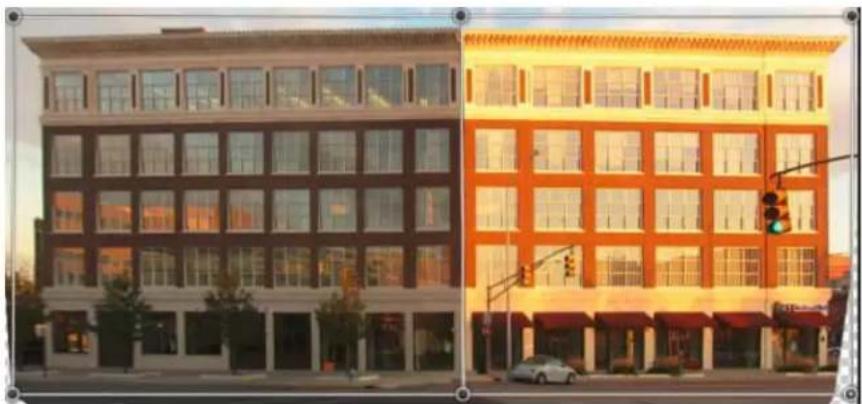
- Shift-click an individual edge of a quad to straighten it and keep it straight during further perspective manipulation. Such a straightened edge is highlighted in yellow in the Warp mode. You can manipulate the corners of the quads (pins) for finer control while adjusting perspective.

natural_image
Exterior view of a multi-story brick building with orange and red facade, under a clear sky (no signage or text visible)Shift-click to straighten an individual edge of a quad and keep it straight during further perspective manipulation. The rightmost selected edge in this image is highlighted in yellow.
natural_image
Exterior view of a multi-story building with red and orange facade, featuring large windows and parked cars (no signage or text visible)The selected edge is straightened. Also, the straightening of the edge is preserved during further perspective manipulation.

Shift-click the edge again if you don't want to preserve its straightening.
- In the Warp mode, you can click the following icons for automatic perspective adjustment:

Automatically level near horizontal lines

natural_image
Exterior view of a two-story building with orange and brown facade, featuring windows and parked cars (no signage)Level horizontally

Automatically straighten near vertical lines
natural_image
Exterior view of a multi-story brick building with large windows and orange accents, under a clear sky (no signage or text visible)Straighten vertically
# Automatically straighten both vertically and horizontally
natural_image
Exterior view of a multi-story building with large windows and adjacent street traffic lights (no visible signage or text)Straighten horizontally and vertically
- Once you're done adjusting the perspective, click the Commit Perspective Warp icon (√).
Keyboard shortcuts
The following keyboard shortcuts make it easier to adjust perspective:
Arrow keys Slightly move a corner of a quad (pin)
H Hides the grid when you're working in the Warp mode
L Switches to the Layout mode
W Switches to the Warp mode
Enter key In the Layout mode, you can press the Enter key to quickly switch to the Warp mode. In the Warp mode, the Enter key commits the current changes to the perspective.
Shift-click (Warp mode) Straightens an individual edge of a quad and keeps it straight during further perspective manipulation. If you don't want to preserve the straightening of the edge, Shift-click it again.
Shift-(drag an edge) (Warp mode) Constrains the shape of a plane while lengthening it
To the top
FAQ
Can I edit different perspectives in the same image?
The onscreen tips are no longer displaying. How do I bring them back?
Can I define different sets of planes for the same architecture?

Twitter™ and Facebook posts are not covered under the terms of Creative Commons.
Legal Notices | Online Privacy Policy
Preparing to print 3D objects
Previewing and printing the 3D object
3D print utilities
FAQ
See also
With Photoshop, you can print any compatible 3D model without worrying about 3D printer limitations. In preparation for printing, Photoshop automatically makes 3D models watertight. Photoshop also generates the necessary support structures—scaffolding and rafts—to ensure that your 3D prints are successful.
To the top
Preparing to print 3D objects
- Select Window > Workspace > 3D to switch to the 3D workspace.
- Open the 3D model in Photoshop. If necessary, customize the size of the 3D model while opening it.
- Select 3D > 3D Print Settings.

text_image
Properties 3D Print Settings Print To: Local Printer: 3D Systems Cube Printer Volume Centimeters Detail Level: High (0.10mm) Show Printer Volume Overlay Printer Volume X: 11.3 Y: 11.3 Z: 17.3 Scene Volume X: 9.481 Y: 25 Z: 7.799 Scale To Print Volume Surface Detail Normal Maps Bump Maps Opacity Support Structures Scaffolding Raft3D Print Settings
- In the 3D Print Settings panel, choose whether you want to print to a printer connected to your computer through a USB port (local printer) or use an online 3D printing service, such as Shapeways.com.
Note: Shapeways.com is a leading 3D printing marketplace and community. Shapeways.com provides you with various printer profiles that you can leverage while printing your 3D models. See this FAQ for more information.

To refresh the list of supported printers or Shapeways.com profiles, select Get Latest Printers from the Print To pop-up menu.
- Select a local printer or a Shapeways.com printer profile.
To view estimated prices for printing the 3D model using available Shapeways.com profiles, select Printer > Estimate Price.
- Select a unit for the printer volume—inch, centimeter, millimeter, or pixel. The unit is reflected in the Printer Volume dimensions as well as the print plate measurements.

natural_image
3D model of a rocket inside a transparent cube with labeled axes (A, B, C) and no visible text or symbols on the model itself.A. 3D model B. Print plate C. Printer volume overlay
- Select a Detail Level—Low, Medium, or High—for the 3D print. The time required to print the 3D object depends on the detail level that you choose.
- If you don't want to see the 3D printer volume overlaid on the 3D model, deselect Show Printer Volume Overlay.
- Adjust the Scene Volume dimensions to specify the desired size of the printed 3D object. When you change a value (X, Y, or Z), the other two values are scaled proportionately. As you modify the Scene Volume dimensions, notice that the print plate under the 3D model scales in proportion.
You can scrub the value of a Scene Volume dimension by clicking the dimension label (X, Y, or Z) and then dragging the mouse left or right. Hold down the Shift key to make the value scrub faster.
| Scene Volume | ||||
| X: | 9.481 | Y: | 25 | Z: 7.799 |
- Choose Scale To Print Volume if you want Photoshop to auto-scale your 3D model, such that it fills up the available print volume of the selected printer.
- If the 3D model has normal maps, bump maps, or opacity maps; you can choose to ignore one of more types of these maps while printing the model. You'll notice that the 3D model updates in real time when you change these Surface Detail settings.
- You may choose to not print the support structures (scaffolds or rafts) required for the 3D object. Use this option with caution, since the printing of the 3D model may fail if you don't print a necessary support structure.
- If your printer supports multiple materials, choose the material that you want to use for printing the 3D object.
Previewing and printing the 3D object
Once you're done specifying the 3D print settings, follow these steps:
- Click the Start Print icon (☐) or select 3D > 3D Print. Photoshop unifies the 3D scene and prepares it for the printing process.
- If you chose to print using a Shapeways.com profile, Photoshop prompts you that the actual cost of printing may differ from the displayed estimates. Click OK.
- In the preview window that appears, use the 3D camera tools to rotate, zoom, or move the 3D object.
Rotate the 3D camera
Roll the 3D camera
Pan the 3D camera
Slide the 3D camera
Reset the 3D camera to its original location

text_image
Photoshop 3D Print Settings 3D Print Preview Support Structures Scaffolding: ✓ Raft: ✓ Summary Print To: Local Printer: 3D Systems Cube Estimated Time: Print Size: 5.04cm x 12.61cm x 4.39cm Scaffolding: Yes Raft: Yes Show Raft ✓ Show Print Volume ✓ Show Mesh ✓ Show Scaffold ✓ Show Cleaning Tower ✓ Show Size Cancel Print Export3D print preview; notice the support structures
- If you want to export the 3D print settings to an STL file, click Export and save the file to an appropriate location on your computer. You can upload the STL file to an online service, such as Shapeways.com, or put it on an SD card for local printing.
- Review the 3D print summary and click Print.
You can cancel an in-progress 3D print by selecting 3D > Cancel 3D Print.
To the top
3D print utilities
Photoshop provides interactive wizard-based utilities that you can use for configuring, calibrating, and maintaining your 3D printer. You can use these utilities only when the 3D printer is powered on and connected to your computer.
- Select 3D > 3D Printer Utilities.
- Select the utility that you want to launch.
Calibrate Print Plate Helps level the print plate. This utility performs the following broad steps:
- Prompts you to remove any leftover printing material from the 3D printer
- Initializes the print head
- Lets you adjust/finetune the gap between the print plate and the print head for nine nozzle positions
You can use this utility in the wizard mode or in the manual mode.
Load Filament Helps load a filament into a fused deposition modeling (FDM) 3D printer. Photoshop initiates the head-heating process and the filament-loading mechanism for easy filament loading.
Remove Filament Helps remove a filament from an FDM 3D printer. Photoshop initiates the head-heating process and the filament-loading mechanism for easy filament removal.
Change Filament Helps replace the filament of an FDM 3D printer with a new filament. Photoshop initiates the head-heating process and the filament-loading mechanism for easy filament changing.
- Follow the onscreen instructions.
To the top
FAQ
What 3D printers are supported?
Can I apply a cross section to a 3D model before printing it?
Can I apply bump/opacity/normal maps to a 3D model before printing it?
Can I print 3D models in two colors?
How are 3D models having multiple layers printed?
To the top
See also
• 3D Painting | CC, CS6
• 3D panel enhancements | Photoshop CC
- Photoshop 3D documentation
Twitter™ and Facebook posts are not covered under the terms of Creative Commons.
Legal Notices | Online Privacy Policy
Understanding Smart Objects
Create embedded Smart Objects | CC, CS6
Create linked smart objects | Photoshop CC
Filter the Layers panel by smart objects | Photoshop CC
Duplicate an embedded smart object
Edit the contents of a Smart Object
Replace the contents of a Smart Object
Convert an embedded or linked Smart Object to a layer
Export the contents of an embedded Smart Object
To the top
Understanding Smart Objects
Smart Objects are layers that contain image data from raster or vector images, such as Photoshop or Illustrator files. Smart Objects preserve an image's source content with all its original characteristics, enabling you to perform nondestructive editing to the layer.
In Photoshop CC and CS6, you can embed the contents of an image into a Photoshop document. In Photoshop CC, you can also create linked smart objects whose contents are referenced from external image files. The contents of a linked smart object are updated when its source image file changes.
Linked smart objects are distinct from duplicated instances of a smart object within a Photoshop document. With linked smart objects, you can use a shared source file across multiple Photoshop documents.
With Smart Objects, you can:
- Perform nondestructive transforms. You can scale, rotate, skew, distort, perspective transform, or warp a layer without losing original image data or quality because the transforms don't affect the original data.
• Work with vector data, such as vector artwork from Illustrator, that otherwise would be rasterized in Photoshop. - Perform nondestructive filtering. You can edit filters applied to Smart Objects at any time.
- Edit one Smart Object and automatically update all its linked instances.
- Apply a layer mask that's either linked or unlinked to the Smart Object layer.
- Try various designs with low-resolution placeholder images that you later replace with final versions.
You can't perform operations that alter pixel data—such as painting, dodging, burning, or cloning—directly to a Smart Object layer, unless it is first converted into a regular layer, which will be rasterized. To perform operations that alter pixel data, you can edit the contents of a Smart Object, clone a new layer above the Smart Object layer, edit duplicates of the Smart Object, or create a new layer.
Note: When you transform a Smart Object that has a Smart Filter applied to it, Photoshop turns off filter effects while the transform is being performed. Filter effects are applied again after the transform is complete. See About Smart Filters.

text_image
Vector Smart Object Layer 1 BackgroundRegular layer and Smart Object in Layers panel. Icon in lower right corner of thumbnail indicates Smart Object.
text_image
External_image Background(Photoshop CC) A linked Smart Object in the Layers panel
To the top
Create embedded Smart Objects | CC, CS6
You can create embedded Smart objects using several methods: by using the Open As Smart Object command; placing a file (CS6) or placing a file as embedded (CC, CS6), pasting data from Illustrator; or converting one or more Photoshop layers to Smart Objects.
- Do any of the following:
- (CC) Choose File > Place Embedded to import files as Smart Objects into an open Photoshop document.
- Choose File > Open As Smart Object, select a file, and click Open.
- (CS6) Choose File> Place to import files as Smart Objects into an open Photoshop document.
Although you can place JPEG files, it's better to place PSD, TIFF, or PSB files because you can add layers, modify pixels, and resave the file without loss. (Saving a modified JPEG file requires you to flatten new layers and recompress the image, causing image quality degradation).
- Choose Layer > Smart Object > Convert to Smart Object to convert a selected layer into a Smart Object.
- In Bridge, choose File > Place > In Photoshop to import a file as a Smart Object into an open Photoshop document.
An easy way to work with camera raw files is to open them as Smart Objects. You can double-click the Smart Object layer containing the raw file at any time to adjust the Camera Raw settings.
- Select one or more layers and choose Layer > Smart Objects > Convert To Smart Object. The layers are bundled into one Smart Object.
- Drag PDF or Adobe Illustrator layers or objects into a Photoshop document.
- Paste artwork from Illustrator into a Photoshop document, and choose Smart Object in the Paste dialog box. For the greatest flexibility, enable both PDF and AICB (No Transparency Support) in the File Handling & Clipboard section of the Preferences dialog box in Adobe Illustrator.
To the top
Create linked smart objects | Photoshop CC
Note: The Linked Smart Object feature is available in Photoshop versions 14.2 (Photoshop CC | January 2014) and later.
In Photoshop CC, you can create linked smart objects. The contents of linked smart objects are updated when the source image file changes. Linked smart objects are particularly useful for teams or in cases where assets must be reused across designs.
Follow these steps to create a linked smart object:
- Choose File > Place Linked.
- Select an appropriate file and click Place.
The linked smart object is created and is displayed in the Layers panel with a link icon ( ☐).
You can also create a linked smart object in an open document by dragging-and-dropping the appropriate file while keeping the following key pressed:
(Windows) Alt key (Mac) Opt key
To change this default behavior, turn off Preferences > General > Always Create Smart Objects While Placing.
Update linked Smart Objects
If an external source file changes while a Photoshop document referencing it is open, the relevant linked smart object is automatically updated. However, when you open a Photoshop document containing out-of-synch linked smart objects, you can update the smart objects:
- Right-click a linked smart object layer and select Update Modified Content.
- Select Layer > Smart Objects > Update Modified Content.
Linked smart objects whose source images have changed are visually highlighted in the Layers panel:

Out-of-synch linked smart objects are highlighted in the Layers panel
You can update all linked Smart Objects in the current Photoshop document by selecting Layer > Smart Objects > Update All Modified Content.

Linked smart objects with missing external source files are highlighted in the Layers panel
Resolve a broken smart object link
To resolve a linked smart object with a missing external source, follow these steps:
- Right-click the linked smart object layer icon and select Resolve Broken Link.
- Navigate to the new location of the missing object.
- Click Place.
View linked smart object properties
With a linked smart object layer selected in the Layers panel, select Windows > Properties.
The following properties are displayed:
- The path of the external source file for the linked smart object
• The linked smart object size and positional coordinates (X, Y)
You can perform the following actions directly from within the Properties panel:
- Edit the contents of the external image file. If necessary, Photoshop opens an external application that can handle the source image file. For example, Photoshop opens Adobe Illustrator if the external source image is a .ai file.
- Embed the linked smart object within the current document.
Embed linked smart objects
Do one of the following:
- Right-click a linked smart object layer in the Layers panel and select Embed Linked.
- Select Layer > Smart Objects > Embed Linked.
- In the Properties panel, click Embed.
Select Layer > Smart Objects > Embed All Linked to embed all linked smart objects in the Photoshop document.
Filter the Layers panel by smart objects | Photoshop CC
- In the Layers panel, select Smart Objects from the filtering pop up menu.

text_image
Layers Smart Ob... Kind Name Effect Mode Attribute Color Smart Object SelectedFilter layers by smart objects
- Click one of the following icons:
• Filter for up-to-date linked smart objects
Filter for out-of-synch linked smart objects
• Filter for missing linked smart objects
Filter for embedded smart objects
You can use the toggle switch () to turn layer filtering off.
To the top
Duplicate an embedded smart object
- In the Layers panel, select a Smart Object layer, and do one of the following:
- To create a duplicate Smart Object that is linked to the original, choose Layer > New > Layer Via Copy, or drag the Smart Object layer to the Create A New Layer icon at the bottom of the Layers panel. Edits you make to the original affect the copy and vice versa.
- To create a duplicate Smart Object that isn't linked to the original, choose Layer > Smart Objects > New Smart Object Via Copy. Edits you make to the original don't affect the copy.
A new Smart Object appears in the Layers panel with the same name as the original and "copy" as a suffix.
To the top
Edit the contents of a Smart Object
When you edit a Smart Object, the source content is opened in either Photoshop (if the content is raster data or a camera raw file) or the application that handles the placed format by default (for example, Adobe Illustrator or Adobe Acrobat). When you save changes to the source content, the edits appear in all linked instances of the Smart Object in the Photoshop document.
-
Select the Smart Object from the Layers panel, and do one of the following:
-
Choose Layer > Smart Objects > Edit Contents.
- Double-click the Smart Objects thumbnail in the Layers panel.
• In the Properties panel, click Edit Contents.
-
Click OK to close the dialog box.
-
Make edits to the source content file, then choose File > Save.
Photoshop updates the Smart Object to reflect the changes you made. (If you don't see the changes, make the Photoshop document containing the Smart Object active).
To the top
Replace the contents of a Smart Object
You can replace the image data in one Smart Object or multiple linked instances. This feature lets you quickly update a visual design, or replace low-resolution placeholder images with final versions.
Note: When you replace a Smart Object, any scaling, warping, or effects that you applied to the first Smart Object are maintained.
- Select the Smart Object, and choose Layer > Smart Objects > Replace Contents.
- Navigate to the file you want to use, and click Place.
- Click OK.
The new content is placed in the Smart Object.
To the top
Convert an embedded or linked Smart Object to a layer
Converting a Smart Object to a regular layer rasterizes the content at the current size. Convert a Smart Object to a regular layer only if you no longer need to edit the Smart Object data. Transforms, warps, and filters applied to a Smart Object are no longer editable after the Smart Object is rasterized.
- Select the Smart Object, and choose Layer > Smart Objects > Rasterize.
If you want to re-create the Smart Object, reselect its original layers and start from scratch. The new Smart Object won't retain transforms you applied to the original Smart Object.
To the top
Export the contents of an embedded Smart Object
- Select the Smart Object from the Layers panel, and choose Layer > Smart Objects > Export Contents.
- Choose a location for the contents of the Smart Object, then click Save.
Photoshop exports the Smart Object in its original placed format (JPEG, AI, TIF, PDF, or other formats). If the Smart Object was created from layers, it is exported in PSB format.
Adobe also recommends
Legal Notices | Online Privacy Policy
Video: Using Generator
Generate image assets from layers or layer groups
A web design use case
Specify quality and size parameters
Disable image asset generation for all documents
FAQ
You can generate JPEG, PNG, or GIF image assets from the contents of a layer or layer group in a PSD file. Assets are automatically generated when you append a supported image format extension to a layer name or a layer group name. Optionally, you can also specify quality and size parameters for the generated image assets.
Generating image assets from a PSD file is particularly useful for multidevice web design.
To the top
Generate image assets from layers or layer groups
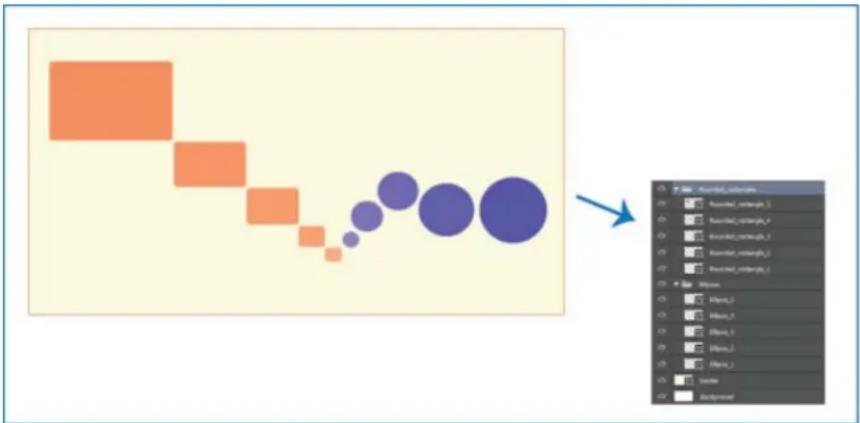
To understand the image asset generator better, consider a simple PSD file (download from this link) with the following layer hierarchy:
flowchart
graph TD
    A["Orange Square"] --> B["Orange Square"]
    B --> C["Orange Square"]
    C --> D["Orange Square"]
    D --> E["Purple Circle"]
    E --> F["Purple Circle"]
    F --> G["Blue Circle"]
    G --> H["Blue Circle"]
    H --> I["Blue Circle"]
    I --> J["Blue Circle"]
    J --> K["Blue Circle"]
    K --> L["Blue Circle"]
    L --> M["Blue Circle"]
    M --> N["Blue Circle"]
    N --> O["Blue Circle"]
    O --> P["Blue Circle"]
    P --> Q["Blue Circle"]
    Q --> R["Blue Circle"]
    R --> S["Blue Circle"]
    S --> T["Blue Circle"]
    T --> U["Blue Circle"]
    U --> V["Blue Circle"]
    V --> W["Blue Circle"]
    W --> X["Blue Circle"]
    X --> Y["Blue Circle"]
Example PSD file and its layer hierarchy
The layer hierarchy for this file has two layer groups—Rounded_rectangles and Ellipses. Each of these layer groups contains five layers.
Follow these steps to generate image assets from this PSD file:
- With the PSD file open, select File > Generate > Image Assets.
- Append appropriate file format extensions (.jpg, .png, or .gif) to the names of the layers or layer groups from which you want to generate image assets. For example, rename the layer groups, Rounded_rectangles and Ellipses, as Rounded_rectangles.jpg and Ellipses.png; and the layer, Ellipse_4 as Ellipse_4.gif.
Note: The special characters /, :, and * are not supported in layer names.
Photoshop generates the image assets and saves them in a subfolder alongside the source PSD file. If the source PSD file is not saved yet, Photoshop saves the generated assets in a new folder on your Desktop.
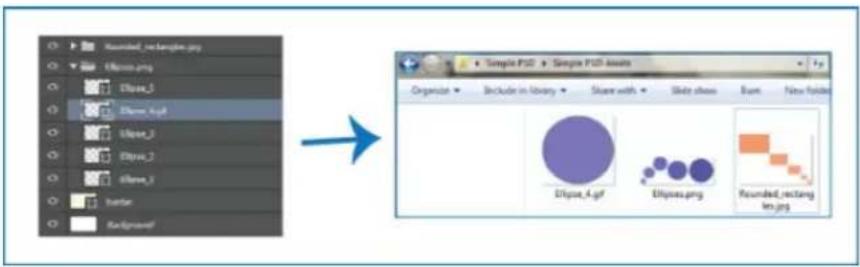
text_image
Rounded_netangle.png Elyase_0 Elyase_1 Elyase_2 Elyase_3 Elyase_4.gf Elyase_5 Elyase_6 Elyase_7 Elyase_8 Elyase_9 Elyase_10 Elyase_11 Elyase_12 Elyase_13 Elyase_14 Elyase_15 Elyase_16 Elyase_17 Elyase_18 Elyase_19 Elyase_20 Elyase_21 Elyase_22 Elyase_23 Elyase_24 Elyase_25 Elyase_26 Elyase_27 Elyase_28 Elyase_29 Elyase_30 Elyase_31 Elyase_32 Elyase_33 Elyase_34 Elyase_35 Elyase_36 Elyase_37 Elyase_38 Elyase_39 Elyase_40 Elyase_41 Elyase_42 Elyase_43 Elyase_44 Elyase_45 Elyase_46 Elyase_47 Elyase_48 Elyase_49 Elyase_50 Elyase_51 Elyase_52 Elyase_53 Elyase_54 Elyase_55 Elyase_56 Elyase_57 Elyase_58 Elyase_59 Elyase_60 Elyase_61 Elyase_62 Elyase_63 Elyase_64 Elyase_65 Elyase_66 Elyase_67 Elyase_68 Elyase_69 Elyase_70 Elyase_71 Elyase_72 Elyase_73 Elyase_74 Elyase_75 Elyase_76 Elyase_77 Elyase_78 Elyase_79 Elyase_80 Elyase_81 Elyase_82 Elyase_83 Elyase_84 Elyase_85 Elyase_86 Elyase_87 Elyase_88 Elyase_89 Elyase_90 Elyase_91 Elyase_92 Elyase_93 Elyase_94 Elyase_95 Elyase_96 Elyase_97 Elyase_98 Elyase_99 Elyase_100Image asset names are generated from layer names/layer group names
Image asset generation is enabled for the current document. Once enabled, the feature remains available whenever the document is opened next. In order to disable image asset generation for the current document, deselect File > Generate > Image Assets.
Generate multiple assets from a layer or layer group
To generate multiple assets from a layer/layer group, separate the asset names with the comma symbol (). For example, the following layer name generates three assets:
Ellipse_4.jpg, Ellipse_4b.png, Ellipse_4c.png
To the top
A web design use case
Generating image assets from a PSD file is particularly useful for multidevice web design. Consider the following web design and its layer structure:

text_image
NE LEON MATH SARS VINDLES OF NATURE NATURE COULING WORKS CARE 200 Huebe Featured Location Global Hotspots (Edge Animals) Heading GLOBAL HOT SPOTS Color Fill 1 Location Text Hotspots Top Row Hotspots Bottom Row Shop Posts / Join a Club Field Reports FinderA web design and its layer hierarchy
Let's extract the icon on top and the top row of the Global Hotspots image grid as image assets:
- Append image format extensions to the appropriate layer names.

text_image
AdventureCo Logo.jpg Logo T ADVENTURE CO.
text_image
Hotspots Top Row.jpg Hotspot1Hiking Hotspot2Kayak Hotspot3Zipline Hotspot4PaddleboardRename the appropriate layers/layer groups
Note: A single image asset is generated from the contents of a layer/layer group. For example, the AdventureCo Logo layer group in the screenshot above contains a shape layer and a live text layer. These layers are flattened when an image asset is generated from the layer group.
Photoshop generates the assets and saves them in the same location as the source PSD file.
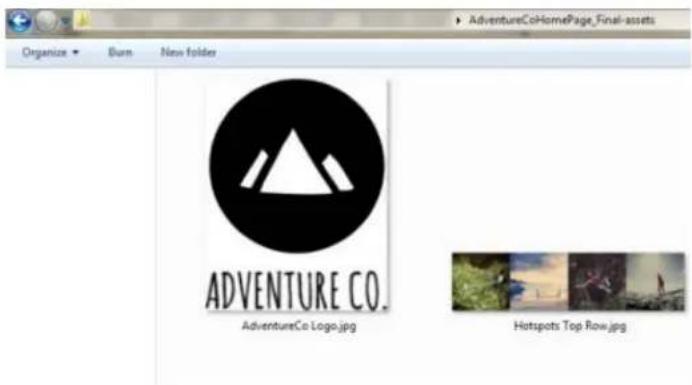
text_image
AdventureCoHomePage_Final-assets Organize Burn New folder ADVENTURE CO. AdventureCo Logo.jpg Hotspots Top Row.jpgGenerated image assets
To the top
Specify quality and size parameters
JPG assets are generated at 90% quality by default. PNG assets are generated as 32-bit images by default. GIF assets are generated with basic alpha transparency.
While renaming layers or layer groups in preparation for asset generation, you can customize quality and size.
Parameters for JPG assets
- Add the desired output quality as a suffix to the asset name—.jpg (1-10) or .jpg (1-100%). For example:
- Ellipse_4.jpg5
- Ellipse_4.jpg50%
- Add the desired output image size (relative or in supported formats—px, in, cm, and mm) as a prefix to the asset name. Photoshop scales the image accordingly. For example:
• 200% Ellipse_4.jpg
• 300 x 200 Rounded_rectangle_3.jpg
• 10in x 200mm Rounded_rectangle_3.jpg
Note: Remember to add a space character between the prefix and the asset name. If you're specifying the size in pixels, you can omit the unit. For example, 300 x 200.
As illustrated, you can mix different units and pixels while specifying the desired output image size. For example, 4in x 100 Rounded_rectangle_3.jpg is a valid layer name for asset generation.
Parameters for PNG assets
- Add the desired output quality as a suffix to the asset name—8, 24, or 32. For example:
- Ellipse_4.png24
- Add the desired output image size (relative or in supported formats—px, in, cm, and mm) as a prefix to the asset name. Photoshop scales the image accordingly. For example:
• 42% Ellipse_4.png
• 300mm x 20cm Rounded_rectangle_3.png
• 10in x 50cm Rounded_rectangle_3.png
Note: Remember to add a space character between the prefix and the asset name. If you're specifying the size in pixels, you can omit the unit. For example, 300 x 200.
As illustrated, you can mix different units and pixels while specifying the desired output image size. For example, 4in x 100 Rounded_rectangle_3.png is a valid layer name for asset generation.
Parameters for GIF assets
- Add the desired output image size (relative or in supported formats—px, in, cm, and mm) as a prefix to the asset name. For example:
- 42% Ellipse_4.gif
- 300mm x 20cm Rounded_rectangle_3.gif
- 20in x 50cm Rounded_rectangle_3.gif
Note: Remember to add a space character between the prefix and the asset name. If you're specifying the size in pixels, you can omit the unit. For example, 300 x 200.
As illustrated, you can mix different units and pixels while specifying the desired output image size. For example, 4in x 100 Rounded_rectangle_3.gif is a valid layer name for asset generation.
Quality parameters are not available for GIF assets.
Construct complex layer names
You can specify multiple asset names with parameters while naming a layer for asset generation. For example:
120% Delicious.jpg, 42% Delicious.png24, 100x100 Delicious_2.jpg90%, 250% Delicious.gif
Photoshop generates the following assets from this layer:
• Delicious.jpg (an 8-quality JPG image scaled 120%)
• Delicious.png (a 24-bit PNG image scaled 42%)
- Delicious_2.jpg (a 90%-quality JPG image that has an absolute size of 100x100 px)
• Delicious.gif (a GIF image scaled 250%)
To the top
Disable image asset generation for all documents
You can disable image asset generation globally for all Photoshop documents by modifying your Preferences.
- Select Edit > Preferences > Plug-Ins.
- Deselect Enable Generator.
- Click OK.
Note: The File > Generate menu command is unavailable when you disable image asset generation from Preferences. The feature can be enabled again only in the Preferences dialog box.
To the top
FAQ
Do I need to specify unique asset names?
What is the default quality level at which image assets are generated?
Does Photoshop generate image assets from layers with transparency and other effects?
How are image assets generated from layers that bleed off the canvas?
Is the comma the only permitted separator between image asset names?
See also
• A closer look at the Photoshop Generator syntax

Twitter™ and Facebook posts are not covered under the terms of Creative Commons.
Legal Notices | Online Privacy Policy
Video | Using the camera shake reduction filter
Images suitable for camera shake reduction
Use automatic camera shake reduction
Use multiple blur traces for camera shake reduction
Advanced blur trace settings
Photoshop features an intelligent mechanism to automatically reduce image blurring caused by camera motion. If necessary, you can adjust advanced settings to further sharpen the image. The Shake Reduction filter in the Filter > Sharpen menu can reduce blurring resulting from several types of camera motion; including linear motion, arc-shaped motion, rotational motion, and zigzag motion.

natural_image
Close-up of a purple flower with dewdrops, surrounded by green foliage (no text or symbols)Original image
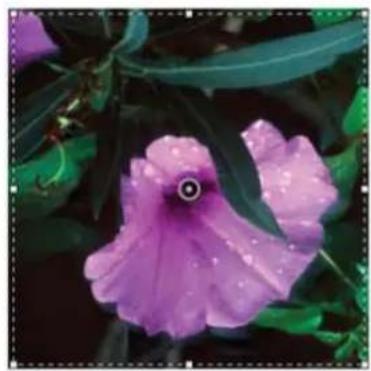
natural_image
Close-up of a purple morning glory flower with dewdrops, surrounded by green leaves (no text or symbols)After camera shake reduction
Camera shake reduction | A before/after example
To the top
Images suitable for camera shake reduction
The camera shake reduction feature works best with decently lit still camera images having low noise. The following types of still images are particularly suitable for shake reduction:
- Indoor or outdoor images captured using a lens with a long focal length
- Indoor images of a static scene taken with a slow shutter speed and no flash
In addition, shake reduction can help sharpen blurred text in images affected by camera motion.
To the top
Use automatic camera shake reduction
- Open the image.
- Select Filter > Sharpen > Shake Reduction. Photoshop automatically analyzes the region of the image best suited for shake reduction, determines the nature of the blur, and extrapolates the appropriate corrections to the entire image. The corrected image is displayed for your review in the Shake Reduction dialog.
The Detail loupe in the lower-right pane lets you closely examine the region in focus. If necessary, zoom in or zoom out on an image element. As you drag the Hand tool over the Detail loupe to examine an image region, release the mouse button to see a quick preview of the shake reduction changes for that region.
Note: If no corrections seem to be applied to the image in the Shake Reduction dialog, ensure that the Preview option in the right-pane is enabled.
To the top
Use multiple blur traces for camera shake reduction
A blur trace represents the shape and extent of the blur that affects a selected region of the image. Different regions of the image may have differently shaped blurs. Automatic camera shake reduction takes into account the blur trace for just the default region of the image that Photoshop has determined as most suitable for blur estimation. To further fine-tune the image, you can have Photoshop compute and consider blur traces for multiple regions.
Available blur traces are listed in the Advanced panel of the Shake Reduction dialog. You can click a blur trace to zoom in on it.
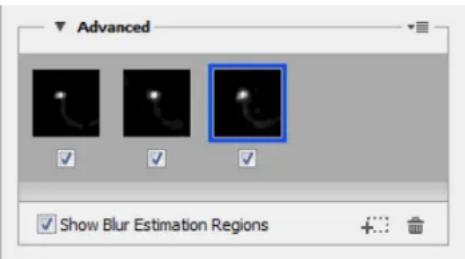
text_image
Advanced Show Blur Estimation RegionsMultiple blur traces listed in the Advanced panel
Create and modify blur traces
Photoshop provides several ways to create and modify blur traces. For best results, create blur traces in regions of the image that have edge contrast. For example, the region labeled A in the illustration below is better suited for blur estimation than the region labeled B.

Due to texture contrasts, A is more suitable for blur estimation than B
Resize/reposition the boundaries of the current region in focus
You can simply resize the boundaries of the region in focus to update the associated blur trace. To shift focus to a different region, drag the center pin of the region currently in focus.
Have Photoshop suggest a new region for blur estimation
- Click the Add Suggested Blur Trace icon (✗) in the Advanced panel in the right-pane. Photoshop highlights a new region of the image suitable for blur estimation and creates its blur trace.
- Add more blur traces if necessary.
Click the trash can icon () to delete one or more selected blur traces.
Manually select a new image region
- Click the Blur Estimation Tool icon (图标) in the upper-left corner of the Shake Reduction dialog.
-
Draw a selection rectangle anywhere on the image. Photoshop automatically creates a blur trace for the region you selected.
-
Add more blur traces if necessary.
Create a blur trace using the Blur Direction Tool
- Select the Blur Direction Tool (☐) from the left panel.
- Draw a straight line representing the blur direction on the image.
- If necessary, adjust the Blur Trace Length and Blur Trace Direction.
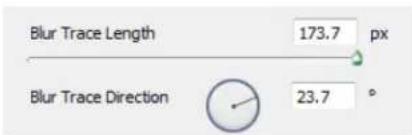
text_image
Blur Trace Length 173.7 px Blur Trace Direction 23.7 °Blur Trace Length and Blur Trace Direction
Modify a blur trace using the Detail loupe
- Using the Detail loupe, focus on a new image region suitable for camera shake reduction.
- Click the Enhance At Loupe Location icon (☐) to move focus in the left-pane to the region highlighted in the Detail loupe. The blur trace for the region displayed earlier in the Detail loupe is automatically updated.
The keyboard shortcut q lets you dock/undock the Detail loupe.
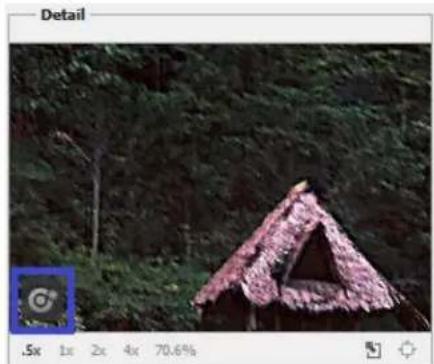
natural_image
Exterior view of a thatched hut surrounded by dense green forest (no signage or text)Modify a blur trace using the Detail loupe
Preview and apply multiple blur traces
Once you've added the required blur traces, you can select one or more blur traces in the Advanced panel to apply them to the image.
Preview and compare the results of two blur traces
- With the Ctrl key (Windows) or the Command key (Mac) held down, select the blur traces in the Advanced panel. Photoshop displays the multiple preview pane for the selected blur traces.
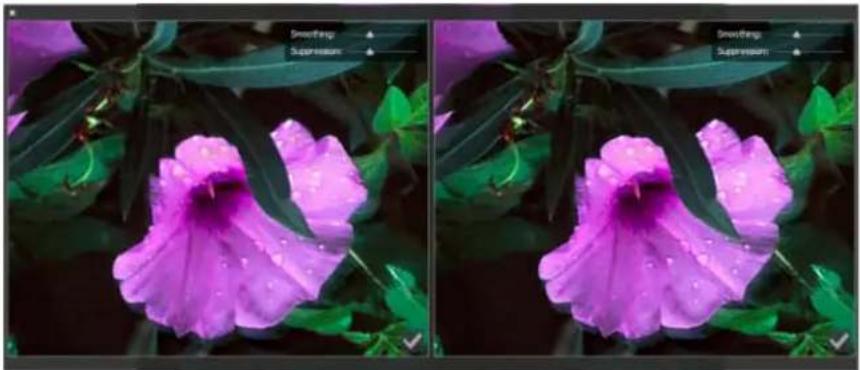
natural_image
Two side-by-side photos of a purple flower with green leaves, showing water droplets on petals (no text or symbols)Results for two blur traces displayed side-by-side
While previewing the results for two blur traces side-by-side, you can quickly adjust Smoothing and Artifact Suppression and check how your changes affect the image. See Smoothing and Artifact Suppression.
Duplicate a blur trace
- Drag a blur trace onto the Add Suggested Blur Trace icon (★)
Photoshop creates a copy of the blur trace and locks the duplicate copy.
Creating duplicate copies of blur traces is helpful when you want to quickly adjust Smoothing and Artifact Suppression, and preview how your changes affect the image. See Smoothing and Artifact Suppression.
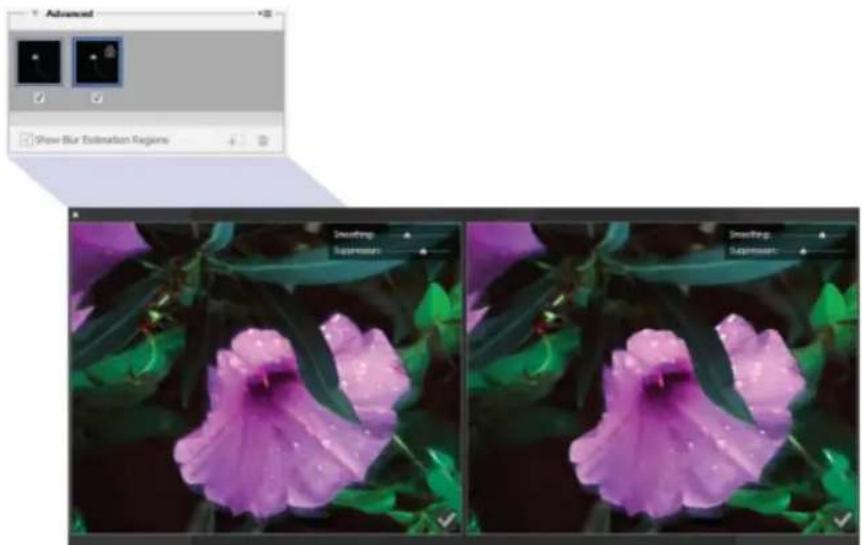
natural_image
Close-up of purple flowers with green leaves, captured in two panels (no text or symbols visible)Working with duplicate blur traces
Reuse blur traces
Once you've created blur traces; you can save them, so that they can be applied to different images.
- Select one or more blur traces.
- Select Save Blur Trace from the Advanced panel flyout menu. You can save blur traces in two formats—KNL and PNG.
When you want to reuse the saved blur traces for a different image, you can use the Load option in the Advanced panel flyout menu.

text_image
Advanced Load... Save Workspace... Save Blur Trace... Show Blur Estimation RegionsSaving and loading blur traces
To the top
Advanced blur trace settings
Advanced blur trace settings help you further fine-tune camera shake reduction.
Blur trace bounds
The Blur Trace Bounds setting represents the bound size of the blur trace. You can adjust this value if necessary.
Source Noise
Photoshop automatically estimates the amount of noise in the image. If necessary, select a different value (Auto/Low/Medium/High).
Smoothing
Smoothing reduces high-frequency sharpening noise. You can move the slider to a value different from the default 30%. It is recommended that you keep smoothing low.
Artifact Suppression
Sometimes, in the course of sharpening the image, you may observe some noticeable noise artifacts. Follow these steps to suppress these artifacts:
- Select Artifact Suppression.
Note: When Artifact Suppression is not turned on, Photoshop generates coarse previews. Coarse previews are sharper, but they also have more noise artifacts.
- Adjust the Artifact Suppression slider to a higher value. 100% artifact suppression yields the original image, while 0% artifact suppression does not suppress any noise artifacts.

Artifact suppression works best to suppress medium-frequency noise.

text_image
Preview Artifact Suppression Blur Trace Settings Blur Trace Bounds 78 px Source Noise Auto Smoothing 30.0 % Artifact Suppression 30.0 %Artifact suppression

natural_image
Close-up of three vibrant purple flowers with green foliage in the background (no text or symbols visible)
natural_image
Ringsby thatched on a small structure surrounded by autumn foliage (no visible text or symbols)Noise artifacts

Twitter™ and Facebook posts are not covered under the terms of Creative Commons.
Legal Notices | Online Privacy Policy
You can upload your creative images as work-in-progress to Behance directly from within Photoshop. Behance is the leading online platform to showcase and discover creative work. Using Behance, you can create a portfolio of your work and broadcast it widely and efficiently to get feedback.
Note: Behance integration with Photoshop CC is not available in France and Japan for now.
You can share your work from within Photoshop in one of the following ways:
- With a document open, select File > Share On Behance.
- With a document open, click the Share On Behance icon (the lower-left corner of the document window.
For more information about using Behance, see the Behance Help Center.
Note: You can share images of dimensions 320 x 320 pixel or higher.
You must be 13 years of age or older to sign up for Behance.
To the top
Share an image on Behance
- With the image open in Photoshop, select Share On Behance.
-
Do one of the following:
-
If you don't have a Behance account, click Start Your Public Profile and create a Behance account.
- If you use same email address for your Behance account and your Creative Cloud membership, link the two accounts by entering your Behance password.
-
If you use a different email address for your Behance account and your Creative Cloud membership, fill in the details under I Have a Behance Portfolio.
-
On the Enter Information screen, specify a title and some tags for the image you're sharing. You can also post a comment to start the conversation around your work.
-
Enter Information > 2. Select Cover Image > 3. Share
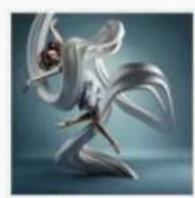
PREVIEW
Image size: 710x710px

text_image
New Work Revision Title 40 The dance Tags dance x rhythm x existence x river x free flowing x Pod a comment to start the conversation The dance of existence Visible To: Everyone Edit
Specify a title and some tags for the image
- If you have a feedback circle on Behance, you can choose to share your work just with the members of that circle.

text_image
Visible To: Feedback Circle Everyone Feedback Circle- On the Select Cover Image screen, crop the image to create a cover image for your work.
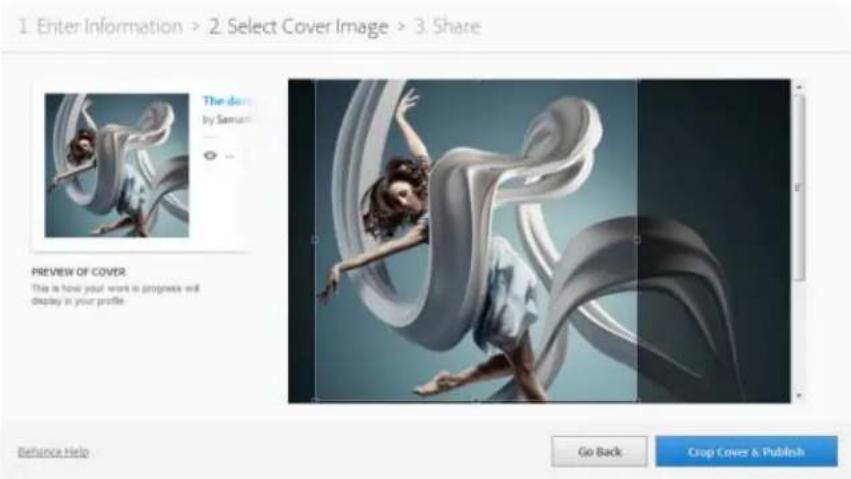
text_image
1. Enter Information > 2. Select Cover Image > 3. Share The dress by Samuel Preview OF COVER This is how your work in progress will display in your profile. Balance Help Go Back Crop Covers & PublishCrop to select a cover image
- Click Crop Cover & Publish. Behance uploads your image as work-in-progress and makes it available for feedback and comments.

natural_image
Illustration of a dancer in flowing white flowing ribbons against a solid blue background (no text or symbols)Your Work is Live!
http://www.bhavance.net/msp/144123/200695
Visit Behance to view feedback on your work and share on Twitter, Facebook, and more.
View & Share on Balance
Close
Work-in-progress uploaded and live on Behance
- Click View & Share On Behance to sync with social networks, such as Twitter, Facebook, and LinkedIn. The next time you upload an image, you can choose to share it on Twitter, Facebook, and LinkedIn directly from within Photoshop.

text_image
Your Work in Progress has been successfully uploaded Request Feedback: Give me feedback on "The draft", a work-in-progress on @Enhance http://a.net/swp/144138/208725 Sign is with Twitter Sign is with Facebook in Sign is with LinkedIn All characters left Contains SkipRequest feedback through social networks
-
As you work further on the image, you can upload revisions to Behance.
-
Enter Information > 2. Select Cover Image > 3. Share

PREVIEW Image size: 210x710px

text_image
New Work Revision Choose Existing The dance Tags river free flowing all creativityPost a comment to start the conversation.

text_image
Visible To: Everyone Use
Upload revisions to Behance
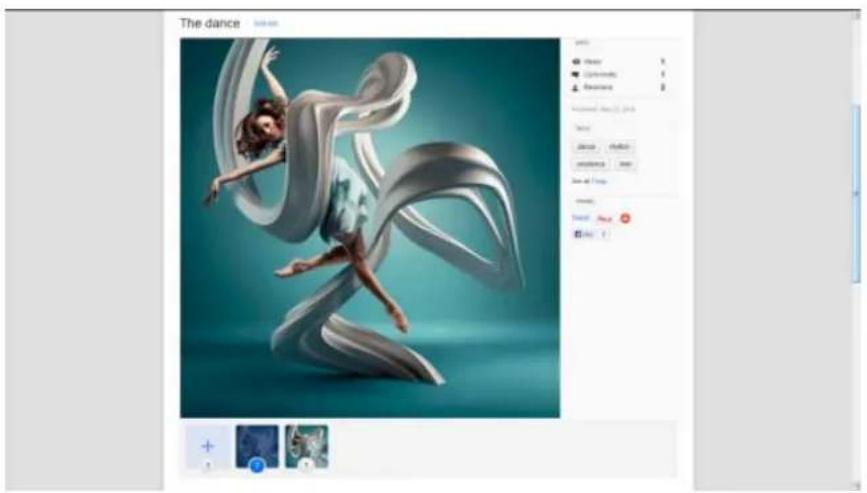
natural_image
Digital artwork of a dancer in flowing white ribbons against a teal background, displayed within an image editing interface (no text or symbols on the artwork itself)Your work-in-progress as it appears on Behance
Note: Panorama images of dimensions 3200 x 320 or 320 x 3200 px are supported. A maximum aspect ratio of 10:1 is supported for panoramas.
To the top
See also
• Publish to Behance from Creative Cloud

Twitter™ and Facebook posts are not covered under the terms of Creative Commons.
Legal Notices | Online Privacy Policy
Photoshop getting started tutorials
LevelUp for Photoshop
article (Jan. 15, 2014)
LevelUp for Photoshop is a game of missions, points, and rewards, that guides you along the way of learning basic Photoshop CC skills.
Install Adobe Tutorial Player
Tutorial Player for Photoshop is an interactive iPad app. It tracks your progress as you complete steps in a tutorial and helps you when you get stuck.
Learn Photoshop CC video tutorials
Adobe TV (May. 17, 2013)
video-tutorial
Video | Photoshop introduction
video-tutorial (Jan. 15, 2014)
Video | Adobe Camera Raw as a filter
video-tutorial (Jan. 15, 2014)
Video | Syncing Presets in Photoshop CC
video-tutorial (Jun. 17, 2013)
Video | 3D Painting - The next level
video-tutorial (Jun. 17, 2013)
Video | Using the Camera Shake Reduction filter
video-tutorial (Jun. 17, 2013)
Workspace and workflow
How to tune Photoshop for peak performance
Jeff Tranberry (Jan. 15, 2014)
article
Background-save and Auto-recover
Kelby (May. 7, 2012)
video-tutorial
Protect precious image data.
Preset migration and sharing
Kelby (May. 7, 2012)
video-tutorial
Apply common settings across workgroups.

You can upload your creative images as work-in-progress to Behance directly from within Photoshop. Behance is the leading online platform to showcase and discover creative work. Using Behance, you can create a portfolio of your work and broadcast it widely and efficiently to get feedback.
Note: Behance integration with Photoshop CC is not available in France and Japan for now.
You can share your work from within Photoshop in one of the following ways:
- With a document open, select File > Share On Behance.
- With a document open, click the Share On Behance icon (the lower-left corner of the document window.
For more information about using Behance, see the Behance Help Center.
Note: You can share images of dimensions 320 x 320 pixel or higher.
You must be 13 years of age or older to sign up for Behance.
To the top
Share an image on Behance
- With the image open in Photoshop, select Share On Behance.
-
Do one of the following:
-
If you don't have a Behance account, click Start Your Public Profile and create a Behance account.
- If you use same email address for your Behance account and your Creative Cloud membership, link the two accounts by entering your Behance password.
-
If you use a different email address for your Behance account and your Creative Cloud membership, fill in the details under I Have a Behance Portfolio.
-
On the Enter Information screen, specify a title and some tags for the image you're sharing. You can also post a comment to start the conversation around your work.
-
Enter Information > 2. Select Cover Image > 3. Share

PREVIEW Image size: 710x710px
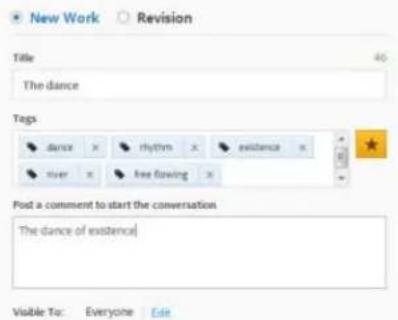
text_image
New Work Revision Title 40 The dance Tags dance x rhythm x existence x river x free flowing x Pod a comment to start the conversation The dance of existence Visible To: Everyone Edit
Specify a title and some tags for the image
- If you have a feedback circle on Behance, you can choose to share your work just with the members of that circle.

text_image
Visible To: Feedback Circle Everyone Feedback Circle- On the Select Cover Image screen, crop the image to create a cover image for your work.

text_image
1. Enter Information > 2. Select Cover Image > 3. Share The dress by Samuel Preview OF COVER This is how your work in progress will display in your profile. Balance Help Go Back Crop Covers & PublishCrop to select a cover image
- Click Crop Cover & Publish. Behance uploads your image as work-in-progress and makes it available for feedback and comments.
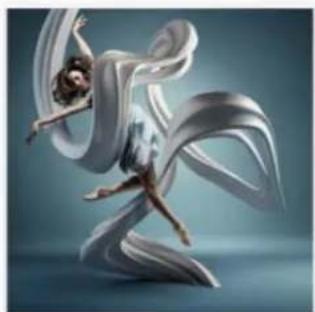
natural_image
Illustration of a dancer in flowing white flowing ribbons against a solid blue background (no text or symbols)Your Work is Live!
http://www.bhavance.net/msp/144123/200695
Visit Behance to view feedback on your work and share on Twitter, Facebook, and more.
View & Share on Balance
Close
Work-in-progress uploaded and live on Behance
- Click View & Share On Behance to sync with social networks, such as Twitter, Facebook, and LinkedIn. The next time you upload an image, you can choose to share it on Twitter, Facebook, and LinkedIn directly from within Photoshop.
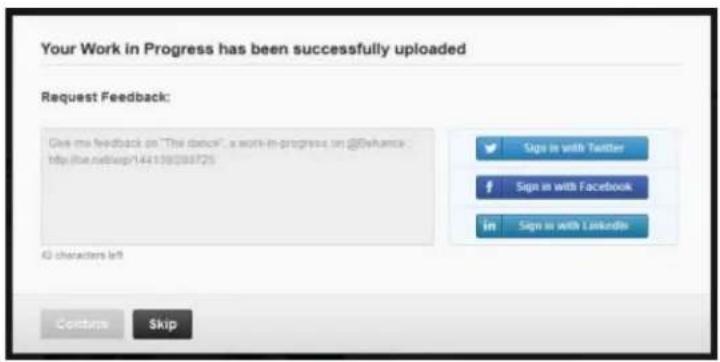
text_image
Your Work in Progress has been successfully uploaded Request Feedback: Give me feedback on "The draft", a work-in-progress on @Enhance http://a.net/swp/144138/208725 Sign is with Twitter Sign is with Facebook in Sign is with LinkedIn All characters left Contains SkipRequest feedback through social networks
-
As you work further on the image, you can upload revisions to Behance.
-
Enter Information > 2. Select Cover Image > 3. Share
PREVIEW Image size: 210x710px

text_image
New Work Revision Choose Existing The dance Tags river free flowing all creativityPost a comment to start the conversation.

text_image
Visible To: Everyone Use
Upload revisions to Behance

natural_image
Digital artwork of a dancer in flowing white ribbons against a teal background, displayed within an image editing interface (no text or symbols on the artwork itself)Your work-in-progress as it appears on Behance
Note: Panorama images of dimensions 3200 x 320 or 320 x 3200 px are supported. A maximum aspect ratio of 10:1 is supported for panoramas.
To the top
See also
• Publish to Behance from Creative Cloud

Twitter™ and Facebook posts are not covered under the terms of Creative Commons.
Legal Notices | Online Privacy Policy
Sync settings using Adobe Creative Cloud | Photoshop CC
Video | Syncing presets in Photoshop CC
Sync settings
Manage Sync settings
See also
When you work on multiple computers, managing and syncing preferences among the computers can be time-consuming, complex, and prone to error.
The new Sync Settings feature enables you to sync preferences and settings via Creative Cloud. If you use two computers, the Sync Settings feature makes it easy for you to keep those settings synchronized across the computers.
The syncing happens via your Adobe Creative Cloud account. Settings are uploaded to your Creative Cloud account and then are downloaded and applied on the other computer.
You can initiate the sync manually; it does not happen automatically and it cannot be scheduled.
To the top
Sync settings
To initiate the sync, choose one of the following:
• (Windows) Edit > [your Adobe ID] > Sync Settings Now.
• (Mac) Photoshop > [your Adobe ID] > Sync Settings Now.
To the top
Manage Sync settings
To change what data gets synchronized, choose one of the following:
• (Windows) Edit > [your Adobe ID] > Manage Sync Settings.
• (Mac) Photoshop > [your Adobe ID] > Manage Sync Settings.
Alternatively, click Sync Settings in the Preferences dialog box (Edit > Preferences).

text_image
Preferences General Interface Sync Settings File Handling Performance Currents Transparency & Gamud Units & Rulers Guides, Grid & Shoes Plug-in Type ID Adobe ID Signed in as: Last sync: Today at 12:51 PM Sync Settings Preferences Swatches Custom Shapes Tool Presets Actions Styles Patterns Brushes Gradients Contours When Conflicts Occut: Always AskManage Sync Settings
You can change the sync options and also choose what to do in case of conflict. Select the options to sync preferences and settings. Synchronizable preferences refer to preferences that are not dependent on computer or hardware settings.
- Select the preferences to sync.
• Synchronizable Preferences
- Swatches
- Custom Shapes
- Tool Presets
- Actions
- Styles
- Patterns
- Brushes
- Gradients
- Contours
- When Conflicts Occur: Specify an action to take when a conflict is detected:
- Always Ask
- Keep Local Settings
- Keep Remote Settings
Note: To sync your settings successfully, change the settings only from within the application. The sync settings feature does not sync any file that is manually placed in a folder location.
To the top
See also
- Creative Cloud Help | Sync Settings with Creative Cloud

Twitter™ and Facebook posts are not covered under the terms of Creative Commons.
Legal Notices | Online Privacy Policy
When you start Photoshop, the Tools panel appears at the left of the screen. Some tools in the Tools panel have options that appear in the context-sensitive options bar.
You can expand some tools to show hidden tools beneath them. A small triangle at the lower right of the tool icon signals the presence of hidden tools.
You can view information about any tool by positioning the pointer over it. The name of the tool appears in a tool tip below the pointer.
Tools panel overview

text_image
A B C D E F GA Selection tools
■+Move (V)
■ □ Rectangular Marquee (M)
Elliptical Marquee (M)
-
Single Column Marques
-
Single Column Marques
- single now Marquee
■ Lasso (L)
Polygonal Lasso (L)
13 Magnetic Lasso (L)
■ Quick Selection (W)
- Magic Window (W)
- Magic World (IV)
B Crop and slice tools
■ 每 Crop (C)
Slice (C)
Slice Select (C)
© Measuring tools
Eyedropper (I)
Color Sampler (I)
Rule (1)
Note (1)
123 Count (I)†
D Retouching tools
Spot Healing Brush (J)
Healing Brush (J)
Patch (J)
Red Eye (J)
- 1 Clone Stamp (S)
Pattern Stamp (S)
■ Indicates default tool * Keyboard shortcuts appear in parenthesis ↑ Extended only
Eraser (E)
Background Eraser (E)
Magic Eraser (E)
■ Blur
△ Sharpen
Smudge
Dodge (O)
Burn (O)
Sponge (O)
E Painting tools
■ Brush (B)
Pencil (B)
Color Replacement (B)
√ Mixer Brush (B)
■2 History Brush (Y)
Art History Brush (Y)
■ Gradient (G)
Paint Bucket (G)
F Drawing and
type tools
Pen (P)
Freeform Pen (P)
Add Anchor Point
Delete Anchor Point
Convert Point
■ T Horizontal Type (T)
!T Vertical Type (T)
Horizontal Type Mask (T)
Vertical Type Mask (T)
■ Path Selection (A)
Direct Selection (A)
■ Rectangle (U)
Rounded Rectangle (U)
Ellipse (U)
Polygon (U)
Line (U)
Custom Shape (U)
G Navigation & 3D tools
■ 3D Object Rotate (K)†
3D-Object Roll (K)
b. 3D-ObjectPan /Kit
3D object part (A)
3D Object Slide (K)†
3D Object Scale (K)†
■ 3D Rotate Camera (N)†
3D Roll Camera (N)
3D Pao Camera (N)†
3D Walk Camera (N)
- 2017年1月1日
■ Hand (H)
Rotate View (R)
■ Zoom (Z)
Note: If you're looking for general information on how to use tools in Photoshop, see Using tools.
To the top
Tool galleries
Selection tools gallery
Crop and slice tools gallery
Retouching tools gallery
Painting tools gallery
Drawing and type tools gallery
Navigation, notes, and measuring tools gallery

Twitter™ and Facebook posts are not covered under the terms of Creative Commons.
Legal Notices | Online Privacy Policy
Photoshop workspace
Workspace overview
Manage windows and panels
Save and switch workspaces
Hide tool tips
To the top
Photoshop workspace
The Photoshop workspace is easy to use and includes a number of usability features:
- Different brightness levels: Choose Edit > Preference (Windows) or Photoshop > Preferences (Mac OS) and select a Color Theme swatch in the Interface section.
Note: To quickly decrease brightness, press Shift + 1; to increase brightness, press Shift + 2. (On Mac OS, it's necessary to also press the FN key.)
- On-image displays: Stay informed as you use your favorite tools. On-image displays show selection dimensions, transformation angles, and more. To change the placement of the displays, choose an option from the Show Transformation Values in the Interface preferences.
- New Mini Bridge: The new Mini Bridge gallery offers easier access to images and documents. Choose Window > Extensions > Mini Bridge.
- Maximized screen space: Click the button at the bottom of the toolbar to switch between Standard and Fullscreen display modes.
To the top
Workspace overview
You create and manipulate your documents and files using various elements, such as panels, bars, and windows. Any arrangement of these elements is called a workspace. The workspaces of the different applications in Adobe® Creative Suite® 5 share the same appearance so that you can move between the applications easily. You can also adapt each application to the way you work by selecting from several preset workspaces or by creating one of your own.
Although the default workspace layout varies in different products, you manipulate the elements much the same way in all of them.
- The Application bar across the top contains a workspace switcher, menus (Windows only), and other application controls. On the Mac for certain products, you can show or hide it using the Window menu.
- The Tools panel contains tools for creating and editing images, artwork, page elements, and so on. Related tools are grouped.
- The Control panel displays options for the currently selected tool. In Illustrator, the Control panel displays options for the currently selected object. (In Adobe Photoshop® this is known as the Options bar. In Adobe Flash®, Adobe Dreamweaver®, and Adobe Fireworks® this is known as the Property Inspector and includes properties of the currently selected element.)
- The Document window displays the file you're working on. Document windows can be tabbed and, in certain cases, grouped and docked.
- Panels help you monitor and modify your work. Examples include the Timeline in Flash, the Brush panel in Illustrator, the Layers panel in Adobe Photoshop®, and the CSS Styles panel in Dreamweaver. Panels can be grouped, stacked, or docked.
- The Application frame groups all the workspace elements in a single, integrated window that lets you treat the application as a single unit. When you move or resize the Application frame or any of its elements, all the elements within it respond to each other so none overlap. Panels don't disappear when you switch applications or when you accidentally click out of the application. If you work with two or more applications, you can position each application side by side on the screen or on multiple monitors.
If you are using a Mac and prefer the traditional, free-form user interface, you can turn off the Application frame. In Adobe Illustrator®, for example, select Window > Application Frame to toggle it on or off. (In Flash, the Application frame is on permanently for Mac, and Dreamweaver for Mac does not use an Application frame.)
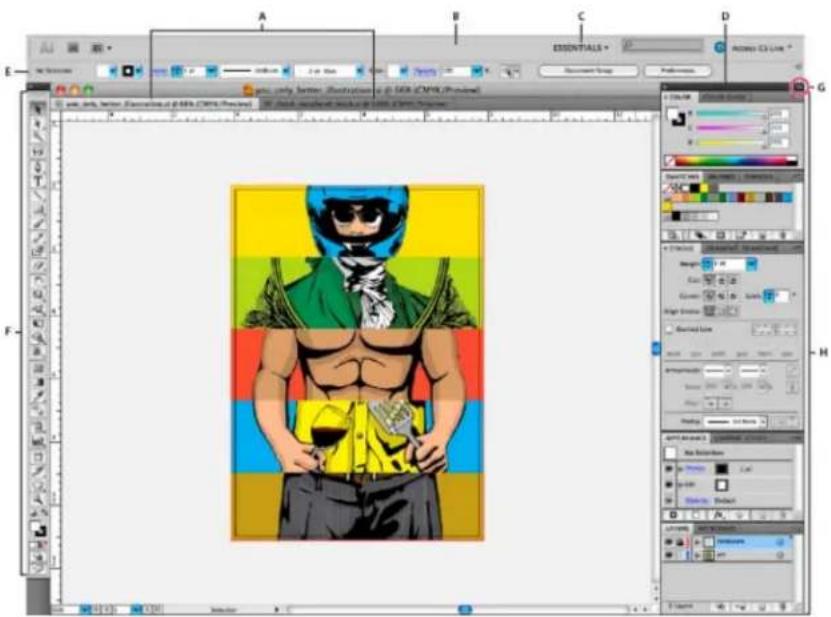
text_image
A B C D E E:\Users\CD Line G F ESSENTIALS 1.000 2.000 3.000 4.000 5.000 6.000 7.000 8.000 9.000 10.000 11.000 12.000 13.000 14.000 15.000 16.000 17.000 18.000 19.000 20.000 21.000 22.000 23.000 24.000 25.000 26.000 27.000 28.000 29.000 30.000 31.000 32.000 33.000 34.000 35.000 36.000 37.000 38.000 39.000 40.000 41.000 42.000 43.000 44.000 45.000 46.000 47.000 48.000 49.000 50.000 51.000 52.000 53.000 54.000 55.000 56.000 57.000 58.000 59.000 60.000 61.000 62.000 63.000 64.000 65.000 66.000 67.000 68.000 69.000 70.000 71.000 72.000 73.000 74.000 75.000 76.000 77.000 78.000 79.000 80.000 81.000 82.000 83.000 84.000 85.000 86.000 87.000 88.000 89.0Default Illustrator workspace
A. Tabbed Document windows B. Application bar C. Workspace switcher D. Panel title bar E. Control panel F. Tools panel G. Collapse To Icons button H. Four panel groups in vertical dock
Hide or show all panels
- (Illustrator, Adobe InCopy®, Adobe InDesign®, Photoshop, Fireworks) To hide or show all panels, including the Tools panel and Control panel, press Tab.
- (Illustrator, InCopy, InDesign, Photoshop) To hide or show all panels except the Tools panel and Control panel, press Shift+Tab.
You can temporarily display hidden panels if Auto-Show Hidden Panels is selected in Interface preferences. It's always on in Illustrator. Move the pointer to the edge of the application window (Windows®) or to the edge of the monitor (Mac OS®) and hover over the strip that appears.
- (Flash, Dreamweaver, Fireworks) To hide or show all panels, press F4.
Display panel options
- Click the panel menu icon - the upper-right corner of the panel.
You can open a panel menu even when the panel is minimized.
In Photoshop, you can change the font size of the text in panels and tool tips. In the Interface preferences, choose a size from the UI Font Size menu.
(Illustrator) Adjust panel brightness
- In User Interface preferences, move the Brightness slider. This control affects all panels, including the Control panel.
Reconfigure the Tools panel
You can display the tools in the Tools panel in a single column, or side by side in two columns. (This feature is not available in the Tools panel in Fireworks and Flash.)
In InDesign and InCopy, you also can switch from single-column to double-column (or single-row) display by setting an option in Interface preferences.
- Click the double arrow at the top of the Tools panel.
To the top
Manage windows and panels
You can create a custom workspace by moving and manipulating Document windows and panels. You can also save workspaces and switch among them. For Fireworks, renaming custom workspaces can lead to unexpected behavior.
Note: The following examples use Photoshop for demonstration purposes. The workspace behaves the same in all the products.
Rearrange, dock, or float document windows
When you open more than one file, the Document windows are tabbed.
- To rearrange the order of tabbed Document windows, drag a window's tab to a new location in the group.
- To undock (float or untab) a Document window from a group of windows, drag the window's tab out of the group.
Note: In Photoshop you can also choose Window > Arrange > Float in Window to float a single Document window, or Window > Arrange > Float All In Windows to float all of the Document windows at once. See tech note kb405298 for more information.
Note: Dreamweaver does not support docking and undocking Document windows. Use the Document window's Minimize button to create floating windows (Windows), or choose Window > Tile Vertically to create side-by-side Document windows. Search "Tile Vertically" in Dreamweaver Help for more information on this topic. The workflow is slightly different for Macintosh users.
• To dock a Document window to a separate group of Document windows, drag the window into the group.
- To create groups of stacked or tiled documents, drag the window to one of the drop zones along the top, bottom, or sides of another window. You can also select a layout for the group by using the Layout button on the Application bar.
Note: Some products do not support this functionality. However, your product may have Cascade and Tile commands in the Window menu to help you lay out your documents.
- To switch to another document in a tabbed group when dragging a selection, drag the selection over the document's tab for a moment.
Note: Some products do not support this functionality.
Dock and undock panels
A dock is a collection of panels or panel groups displayed together, generally in a vertical orientation. You dock and undock panels by moving them into and out of a dock.
- To dock a panel, drag it by its tab into the dock, at the top, bottom, or in between other panels.
- To dock a panel group, drag it by its title bar (the solid empty bar above the tabs) into the dock.
• To remove a panel or panel group, drag it out of the dock by its tab or title bar. You can drag it into another dock or make it free-floating.
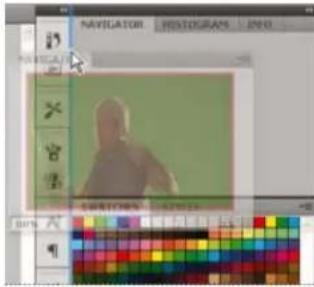
text_image
NAVIGATOR POSTERS JND 100% 20%Navigator panel being dragged out to new dock, indicated by blue vertical highlight
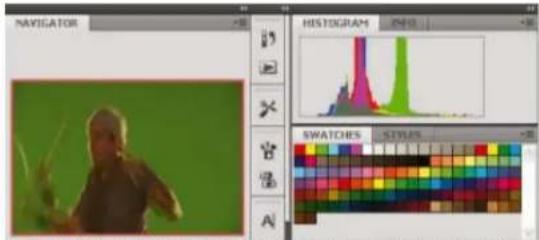
text_image
NAVIGATOR HISTOGRAM SWATCHES STYLESNavigator panel now in its own dock
You can prevent panels from filling all the space in a dock. Drag the bottom edge of the dock up so it no longer meets the edge of the workspace.
Move panels
As you move panels, you see blue highlighted drop zones, areas where you can move the panel. For example, you can move a panel up or down in a dock by dragging it to the narrow blue drop zone above or below another panel. If you drag to an area that is not a drop zone, the panel floats freely in the workspace.
Note: The position of the mouse (rather than the position of the panel), activates the drop zone, so if you can't see the drop zone, try dragging the mouse to the place where the drop zone should be.
- To move a panel, drag it by its tab.
• To move a panel group, drag the title bar.
text_image
A B COLOR SWATCHER STYLES C LAYER Normal Lock: Opacity: 100% OK: 100%Narrow blue drop zone indicates Color panel will be docked on its own above the Layers panel group.
A. Title bar B. Tab C. Drop zone
Press Ctrl (Windows) or Command (Mac OS) while moving a panel to prevent it from docking. Press Esc while moving the panel to cancel the operation.
Add and remove panels
If you remove all panels from a dock, the dock disappears. You can create a dock by moving panels to the right edge of the workspace until a drop
zone appears.
• To remove a panel, right-click (Windows) or Control-click (Mac) its tab and then select Close, or deselect it from the Window menu.
• To add a panel, select it from the Window menu and dock it wherever you want.
Manipulate panel groups
- To move a panel into a group, drag the panel's tab to the highlighted drop zone in the group.

text_image
HISTOGRAM INFO SWATCHES * SWATCHES STYLESAdding a panel to a panel group
- To rearrange panels in a group, drag a panel's tab to a new location in the group.
• To remove a panel from a group so that it floats freely, drag the panel by its tab outside the group.
• To move a group, drag the title bar (the area above the tabs).
Stack floating panels
When you drag a panel out of its dock but not into a drop zone, the panel floats freely. The floating panel allows you to position it anywhere in the workspace. You can stack floating panels or panel groups so that they move as a unit when you drag the topmost title bar.

Free-floating stacked panels
• To stack floating panels, drag a panel by its tab to the drop zone at the bottom of another panel.
• To change the stacking order, drag a panel up or down by its tab.
Note: Be sure to release the tab over the narrow drop zone between panels, rather than the broad drop zone in a title bar.
• To remove a panel or panel group from the stack, so that it floats by itself, drag it out by its tab or title bar.
Resize panels
- To minimize or maximize a panel, panel group, or stack of panels, double-click a tab. You can also double-click the tab area (the empty space next to the tabs).
• To resize a panel, drag any side of the panel. Some panels, such as the Color panel in Photoshop, cannot be resized by dragging.
Collapse and expand panel icons
You can collapse panels to icons to reduce clutter on the workspace. In some cases, panels are collapsed to icons in the default workspace.
Panels collapsed to icons

Panels expanded from icons
- To collapse or expand all panel icons in a column, click the double arrow at the top of the dock.
• To expand a single panel icon, click it. - To resize panel icons so that you see only the icons (and not the labels), adjust the width of the dock until the text disappears. To display the icon text again, make the dock wider.
- To collapse an expanded panel back to its icon, click its tab, its icon, or the double arrow in the panel's title bar.
In some products, if you select Auto-Collapse Icon Panels from the Interface or User Interface Options preferences, an expanded panel icon collapses automatically when you click away from it.
- To add a floating panel or panel group to an icon dock, drag it in by its tab or title bar. (Panels are automatically collapsed to icons when added to an icon dock.)
- To move a panel icon (or panel icon group), drag the icon. You can drag panel icons up and down in the dock, into other docks (where they appear in the panel style of that dock), or outside the dock (where they appear as floating icons).
To the top
Save and switch workspaces
By saving the current size and position of panels as a named workspace, you can restore that workspace even if you move or close a panel. The names of saved workspaces appear in the workspace switcher in the Application bar.
Save a custom workspace
-
With the workspace in the configuration you want to save, do one of the following:
-
(Illustrator) Choose Window > Workspace > Save Workspace.
- (Photoshop, InDesign, InCopy) Choose Window > Workspace > New Workspace.
• (Dreamweaver) Choose Window > Workspace Layout > New Workspace. - (Flash) Choose New Workspace from the workspace switcher in the Application bar.
(Fireworks) Choose Save Current from the workspace switcher in the Application bar.
-
Type a name for the workspace.
-
(Photoshop, InDesign) Under Capture, select one or more options:
Panel Locations Saves the current panel locations (InDesign only).
Keyboard shortcuts Saves the current set of keyboard shortcuts (Photoshop only).
Menus or Menu Customization Saves the current set of menus.
Display or switch workspaces
- Select a workspace from the workspace switcher in the Application bar.
In Photoshop, you can assign keyboard shortcuts to each workspace to navigate among them quickly.
Delete a custom workspace
- Select Manage Workspaces from the workspace switcher in the Application bar, select the workspace, and then click Delete. (The option is not available in Fireworks.)
- (Photoshop, InDesign, InCopy) Select Delete Workspace from the workspace switcher.
- (Illustrator) Choose Window > Workspace > Manage Workspaces, select the workspace, and then click the Delete icon.
- (Photoshop, InDesign) Choose Window > Workspace >Delete Workspace, select the workspace, and then click Delete.
Restore the default workspace
- Select the Default or Essentials workspace from the workspace switcher in the application bar. For Fireworks, see the article http://www.adobe.com/devnet/fireworks/articles/workspace_manager_panel.html.
Note: In Dreamweaver, Designer is the default workspace.
- For Fireworks (Windows), delete these folders:
Windows Vista
\Users\
Windows XP
\Documents and Settings\
- (Photoshop, InDesign, InCopy) Select Window > Workspace > Reset [Workspace Name].
(Photoshop) Restore a saved workspace arrangement
In Photoshop, workspaces automatically appear as you last arranged them, but you can restore the original, saved arrangement of panels.
- To restore an individual workspace, choose Window > Workspace > Reset Workspace Name.
- To restore all the workspaces installed with Photoshop, click Restore Default Workspaces in the Interface preferences.

To rearrange the order of workspaces in the application bar, drag them.
To the top
Hide tool tips
When you position the pointer over most tools and options, descriptions appear in tool tips by default. If you find tool tips visually distracting, you can hide them.
• In the Interface preferences, deselect Show Tool Tips.
Note: Tool tips are not available in some dialog boxes.
Adobe also recommends
- Adobe Bridge

Twitter™ and Facebook posts are not covered under the terms of Creative Commons.
Legal Notices | Online Privacy Policy
Enter values in panels, dialog boxes, and the options bar
Working with sliders
Working with pop-up panels
Display and define menus
To the top
Enter values in panels, dialog boxes, and the options bar
- Do any of the following:
- Type a value in the text box, and press Enter (Windows) or Return (Mac OS).
- Drag the slider.
- Move the pointer over the title of a slider or pop-up slider. When the pointer turns to a pointing finger, drag the scrubby slider to the left or right. This feature is available only for selected sliders and pop-up sliders.
- Drag the dial.
- Click the arrow buttons in the panel to increase or decrease the value.
- (Windows) Click the text box and then use the Up Arrow key and the Down Arrow key on the keyboard to increase or decrease the value.
- Select a value from the menu associated with the text box.
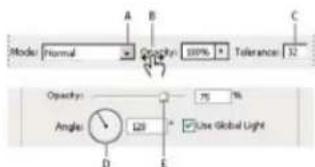
text_image
Model: Normal Opacity: 100% Tolerance: 32 Opacity: 75 % Angle: 120° Tube Global Light D EWays to enter values
A. Menu arrow B. Scrubby slider C. Text box D. Dial E. Slider
To the top
Working with sliders
About pop-up sliders
Some panels, dialog boxes, and options bars contain settings that use pop-up sliders (for example, the Opacity option in the Layers panel). If there is a triangle next to the text box, you can activate the pop-up slider by clicking the triangle. Position the pointer over the triangle next to the setting, hold down the mouse button, and drag the slider or angle radius to the desired value. Click outside the slider box or press Enter to close the slider box. To cancel changes, press the Esc key.
To increase or decrease values in 10% increments when the pop-up slider box is open, hold down Shift and press the Up Arrow or Down Arrow key.

Using different kinds of pop-up sliders
A. Click to open pop-up slider box. B. Drag slider or angle radius.

You can also "scrub" some pop-up sliders. For example, if you hold the pointer over the word "Fill" or "Opacity" in the Layers panel, the pointer changes to the Hand icon. Then you can move the pointer left or right to change the fill or opacity percentage.
About scrubby sliders
In some panels, dialog boxes, and options bars, you can drag scrubby sliders to change option values. Scrubby sliders are hidden until you position the pointer over the title of sliders and pop-up sliders. When the pointer changes to a pointing finger, you drag to the left or right. Holding down the Shift key while dragging accelerates the scrubbing by a factor of 10.

Hovering over the title of a slider or pop-up slider shows the scrubby slider
To the top
Working with pop-up panels
Pop-up panels provide easy access to available options for brushes, swatches, gradients, styles, patterns, contours, and shapes. You can customize pop-up panels by renaming and deleting items and by loading, saving, and replacing libraries. You can also change the display of a pop-up panel to view items by their names, as thumbnail icons, or with both names and icons.
Click a tool thumbnail in the options bar to show its pop-up panel. Click an item in the pop-up panel to select it.
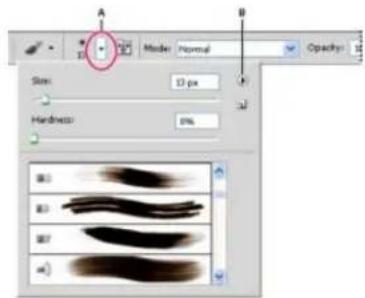
text_image
A B Model Normal Opacity Size: 13 px Hardness: 0% B3 B3 B7 M1Viewing the Brush pop-up panel in the options bar
A. Click to show the pop-up panel. B. Click to view the pop-up panel menu.
Rename or delete an item in a pop-up panel
- Select an item, click the triangle in the upper right corner of the pop-up panel, and choose one of the following:
Rename Tool Preset Lets you enter a new name for the item.
Delete Tool Preset Deletes an item in the pop-up panel.
Note: You can also delete an item in a pop-up panel by holding down Alt (Windows) or Option (Mac OS) and clicking the item.
Customize the list of items in a pop-up panel
- Click the triangle in the upper right corner of the pop-up panel to view the panel menu.
- To return to the default library, choose the Reset Tool Presets command. You can either replace the current list or add the default library to the current list.
-
To load a different library, do one of the following:
-
Choose the Load Tool Presets command to add a library to the current list. Then select the library file you want to use, and click Load.
- Choose the Replace Tool Presets command to replace the current list with a different library. Then select the library file you want to use, and click Load.
-
Choose a library file (displayed at the bottom of the panel menu). Then click OK to replace the current list, or click Append to add it to the current list.
-
To save the current list as a library for later use, choose the Save Tool Presets command. Then enter a name for the library file, and click Save.

(Mac OS) Include the extension of the library file name so that you can easily share the libraries across operating systems. Select Append File Extension Always in the File Handling Preferences to append extensions to file names.
Change the display of items in a pop-up panel
- Click the triangle in the upper right corner of the pop-up panel to view the panel menu.
- Select a view option: Text Only, Small List, and Large List.
To the top
Display and define menus
Display context menus
Context menus display commands relevant to the active tool, selection, or panel. They are distinct from the menus across the top of the workspace.

Viewing the context menu for the Eyedropper tool
- Position the pointer over an image or panel item.
- Right-click (Windows) or Control-click (Mac OS).
Define a set of menus
-
Do one of the following:
-
Choose Edit > Menus.
-
Choose Window > Workspace > Keyboard Shortcuts & Menus and click the Menus tab.
-
In the Keyboard Shortcuts and Menus dialog box, choose a set of menus from the Set drop-down menu. For information on creating a new set, see Customizing keyboard shortcuts.
-
Choose a type from the Menu For menu:
Application Menus Lets you show, hide, or add color to items in the application menus.
Panel Menus Lets you show, hide, or add color to items in panel menus.
-
Click the triangle next to a menu or panel name.
-
Do one of the following:
• To hide a menu item, click the Visibility button
• To show a menu item, click the empty Visibility button.
• To add color to a menu item, click the color swatch (if no color is assigned, it will say None) and choose a color.
-
When you finish changing the menus, do one of the following:
-
To save all changes to the current set of menus, click the Save Set button 📋. Changes to a custom set are saved. If you're saving changes to the Photoshop Defaults set, the Save dialog box opens. Enter a name for the new set and click Save.
- To create a new set based on the current set of menus, click the Save Set As button.
Note: If you haven't saved the current set of changes, you can click Cancel to discard all changes and close the dialog box.
- In the Save dialog box, enter a name for the set and click Save.

text_image
Panel Menu Command Visibility Color Info Panel Options... Color Samplers Close Close Tab Group Layer Comps Layers Measurement Log Red None Red Orange Yellow Green Blue Violet GrayChoosing a color for a menu item using the Keyboard Shortcuts & Menus dialog box
Delete a set of menus
-
Do one of the following:
-
Choose Edit > Menus.
-
Choose Window > Workspace > Keyboard Shortcuts & Menus and click the Menu tab.
-
In the Keyboard Shortcuts & Menus dialog box, choose a set of menus from the Set menu.
- Click the Delete Set icon 🔒.
Temporarily show hidden menu items
It's possible to temporarily show items that you've hidden in a menu. After the menu closes, the items return to their hidden state.
- Do one of the following:
• From a menu with hidden items, choose Show All Menu Items.
- Ctrl-click (Windows) or Command-click (Mac OS) a menu with hidden items.
To permanently reveal all menu items, select Window > Workspace > Essentials.
Turn menu colors on or off
- In Interface preferences, select or deselect Show Menu Colors.

Twitter™ and Facebook posts are not covered under the terms of Creative Commons.
Legal Notices | Online Privacy Policy
About preferences
Numerous program settings are stored in the Adobe Photoshop Prefs file, including general display options, file-saving options, performance options, cursor options, transparency options, type options, and options for plug-ins and scratch disks. Most of these options are set in the Preferences dialog box. Preference settings are saved each time you quit the application.
Unexpected behavior may indicate damaged preferences. If you suspect damage to preferences, restore preferences to their default settings.

Detailed information about specific preference settings appears in task-specific topics. For example, search Help for “Transparency preferences” to see those settings discussed in the context of related features such as layers.
Open a preferences dialog box
-
Do one of the following:
-
(Windows) Choose Edit > Preferences and choose the desired preference set from the submenu.
• (Mac OS) Choose Photoshop > Preferences, and then choose the desired preference set from the submenu. -
To switch to a different preference set, do one of the following:
-
Choose the preference set from the menu at the left of the dialog box.
- Click Next to display the next preference set in the list; click Prev to display the previous set.
For information on a specific preference option, search Help.
To manually restore preferences to default:
- Find the preference file that you want to reset and move it to another location. When you restart Photoshop a new preference file will be created in the original location. See Preference filenames and locations.
To restore preferences quickly using a keyboard short cut:
- Press and hold Alt+Control+Shift (Windows) or Option+Command+Shift (Mac OS) as you start Photoshop. You are prompted to delete the current settings. The new preferences files are created the next time you start Photoshop.
Note: Using the keyboard shortcut, preference files for custom shortcuts, workspaces, and color settings will also be reset to default.
Disable and enable warning messages
Sometimes you will see messages containing warnings or prompts. You can suppress the display of these messages by selecting the Don't Show Again option in the message. You can also globally redisplay all messages that have been suppressed.
- Do one of the following:
• (Windows) Choose Edit > Preferences > General.
• (Mac OS) Choose Photoshop > Preferences > General.
- Click Reset All Warning Dialogs, and click OK.
More Help Topics

Twitter™ and Facebook posts are not covered under the terms of Creative Commons.
Legal Notices | Online Privacy Policy
Download | Photoshop CC keyboard shortcut reference (PDF)
Keys for selecting tools
Keys for viewing images
Keys for Puppet Warp
Keys for the Filter Gallery
Keys for Liquify
Keys for Vanishing Point
Keys for the Camera Raw dialog box
Keys for the Black-and-White dialog box
Keys for Curves
Keys for selecting and moving objects
Keys for transforming selections, selection borders, and paths
Keys for editing paths
Keys for painting
Keys for blending modes
Keys for selecting and editing text
Keys for formatting type
Keys for slicing and optimizing
Keys for using panels
Keys for the Actions panel
Keys for adjustment layers
Keys for the Animation panel in Frames mode
Keys for the Animation panel in Timeline Mode (Photoshop Extended)
Keys for the Brush panel
Keys for the Channels panel
Keys for the Clone Source panel
Keys for the Color panel
Keys for the History panel
Keys for the Info panel
Keys for the Layers panel
Keys for the Layer Comps panel
Keys for the Paths panel
Keys for the Swatches panel
Keys for 3D tools (Photoshop Extended)
Keys for measurement (Photoshop Extended)
Keys for DICOM files (Photoshop Extended)
Keys for Extract and Pattern Maker (optional plug-ins)
Function keys
To the top
Download | Photoshop CC keyboard shortcut reference (PDF)
PDF

Download this useful reference that Marijan Tompa from the Photoshop user community has put together... Read More
http://adobe.ly/181G9SM

by Marijan Tompa
http://tomaxxi.com/
Graphic Designer from Subotica (Serbia). Adobe Creative Cloud guru. Also an Adobe IDUG Chapter representative; JS, AS3, Flex developer; and InDesign script/panel developer.
Contribute your expertise to Adobe Community Help
Keys for selecting tools
Holding down a key temporarily activates a tool. Letting go of the key returns to the previous tool. To customize shortcuts, see Define new keyboard shortcuts. To view keyboard shortcuts for features that were introduced in Photoshop CS6, see Key shortcuts for CS6 features.
Note: In rows with multiple tools, repeatedly press the same shortcut to toggle through the group.
| Result Windows Mac OS | ||
| Cycle through tools with the same shortcut key | Shift-press shortcut key (if Use Shift Key for Tool Switch preference is selected) | Shift-press shortcut key (if Use Shift Key for Tool Switch preference is selected) |
| Cycle through hidden tools Alt-click + tool (except add anchor point, delete anchor point, and convert point tools) | Option-click + tool (except add anchor point, delete anchor point, and convert point tools) | |
| Move tool V V | ||
| Rectangular Marquee tool ^ Elliptical Marquee tool | M | M |
| Lasso tool Polygonal Lasso tool Magnetic Lasso tool | L | L |
| Magic Wand tool Quick Selection tool | W | W |
| Crop tool Slice tool Slice Select tool | C | C |
| Eyedropper tool ^ Color Sampler tool Ruler tool Note tool Count tool* | I | I |
| Spot Healing Brush tool Healing Brush tool Patch tool Red Eye tool | J | J |
| Brush tool Pencil tool Color Replacement tool Mixer Brush tool | B | B |
| Clone Stamp tool Pattern Stamp tool | S | S |
| History Brush tool Art History Brush tool | Y | Y |
| Eraser tool†Background Eraser toolMagic Eraser tool | E | E |
| Gradient toolPaint Bucket tool | G | G |
| Dodge toolBurn toolSponge tool | O | O |
| Pen toolFreeform Pen tool | P | P |
| Horizontal Type toolVertical Type toolHorizontal Type mask toolVertical Type mask tool | T | T |
| Path Selection toolDirect Selection tool | A | A |
| Rectangle toolRounded Rectangle toolEllipse toolPolygon toolLine toolCustom Shape tool | U | U |
| 3D Object Rotate tool*3D Object Roll tool*3D Object Pan tool*3D Object Slide tool*3D Object Scale tool* | K | K |
| 3D Camera Rotate tool*3D Camera Roll tool*3D Camera Pan tool*3D Camera Walk tool*3D Camera Zoom* | N | N |
| Hand tool†H H | ||
| Rotate View tool R R | ||
| Zoom tool†Z Z | ||
| †Use same shortcut key for Liquify*Photoshop Extended only | ||
To the top
Keys for viewing images
This partial list provides shortcuts that don't appear in menu commands or tool tips.
| Result Windows Mac OS | ||
| Cycle through open documents Control + Tab | Control + Tab | |
| Switch to previous document Shift + Control + | Tab Shift + Command + ` | |
| Close a file in Photoshop and open Bridge | Shift-Control-W Shift-Command-W | |
| Toggle between Standard mode and Quick Mask mode | Q | Q |
| Toggle (forward) between Standard screen mode, Full screen mode with menu bar, and Full screen mode | F | F |
| Toggle (backward) between Standard screen mode, Full screen mode with menu bar, and Full screen mode | Shift + F Shift + F | |
| Toggle (forward) canvas color Space + F (or right-click canvas background and select color) | Space + F (or Control-click canvas background and select color) | |
| Toggle (backward) canvas color Space + Shift + F Space + Shift + F | ||
| Fit image in window Double-click Hand tool | Double-click Hand tool | |
| Magnify 100% | Double-click Zoom tool or Ctrl + 1 | Double-click Zoom tool or Command + 1 |
| Switch to Hand tool (when not in text-edit mode) | Spacebar | Spacebar |
| Simultaneously pan multiple documents simultaneously with Hand tool | Shift-drag Shift-drag | |
| Switch to Zoom In tool | Control + spacebar | Command + spacebar |
| Switch to Zoom Out tool | Alt + spacebar | Option + spacebar |
| Move Zoom marquee while dragging with the Zoom tool | Spacebar-drag | Spacebar-drag |
| Apply zoom percentage, and keep zoom percentage box active | Shift + Enter in Navigator panel zoom percentage box | Shift + Return in Navigator panel zoom percentage box |
| Zoom in on specified area of an image | Control-drag over preview in Navigator panel | Command-drag over preview in Navigator panel |
| Temporarily zoom into an image | Hold down H and then click in the image and hold down the mouse button | Hold down H and then click in the image and hold down the mouse button |
| Scroll image with Hand tool | Spacebar-drag, or drag view area box in Navigator panel | Spacebar-drag, or drag view area box in Navigator panel |
| Scroll up or down 1 screen | Page Up or Page Down† | Page Up or Page Down† |
| Scroll up or down 10 units Shift + Page Up or Page Down Shift + Page Up or Page Down | † |
| Move view to upper-left corner or lower right corner | Home or End Home or End |
| Toggle layer mask on/off as rubylith (layer mask must be selected) | \ (backslash) \ (backslash) |
| †Hold down Ctrl (Windows) or Command (Mac OS) to scroll left (Page Up) or right (Page Down) | |
To the top
Keys for Puppet Warp
This partial list provides shortcuts that don't appear in menu commands or tool tips.
| Result Windows Mac OS | ||
| Cancel completely Esc Esc | ||
| Undo last pin adjustment Ctrl + Z Command + Z | ||
| Select all pins Ctrl + A Command + A | ||
| Deselect all pins Ctrl + D Command + D | ||
| Select multiple pins | Shift-click | Shift-click |
| Move multiple selected pins | Shift-drag Shift-drag | |
| Temporarily hide pins | H | H |
To the top
| Result Windows Mac OS | ||
| Open the Refine Edge dialog box | Control + Alt + R | Command + Option + R |
| Cycle (forward) through preview modes | F | F |
| Cycle (backward) through preview modes | Shift + F | Shift + F |
| Toggle between original image and selection preview | X | X |
| Toggle between original selection and refined version | P | P |
| Toggle radius preview on and off | J | J |
| Toggle between Refine Radius and Erase Refinements tools | Shift + E | Shift + E |
Keys for the Filter Gallery
| Result Windows Mac OS | ||
| Apply a new filter on top of selected Alt-click a filter Option-click a filter | ||
| Open/close all disclosure triangles Alt-click a disclosure triangle Option-click a disclosure triangle | ||
| Change Cancel button to Default Control Command | ||
| Change Cancel button to Reset Alt Option | ||
| Undo/Redo Control + Z Command + Z | ||
| Step forward Control + Shift + Z Command + Shift + Z | ||
| Step backward | Control + Alt + Z | Command + Option + Z |
Keys for Liquify
| Result Windows Mac OS | ||
| Forward Warp tool | W | W |
| Reconstruct tool | R | R |
| Twirl Clockwise tool | C | C |
| Pucker tool S | S | |
| Bloat tool | B | B |
| Push Left tool | O | O |
| Mirror tool | M | M |
| Turbulence tool | T | T |
| Freeze Mask tool | F | F |
| Thaw Mask tool | D | D |
| Reverse direction for Bloat, Pucker, Push Left, and Mirror tools | Alt + tool | Option + tool |
| Continually sample the distortion | Alt-drag in preview with Reconstruct tool, Displace, Amplitwist, or Affine mode selected | Option-drag in preview with reconstruct tool, Displace, Amplitwist, or Affine mode selected |
| Decrease/increase brush size by 2, or density, pressure, rate, or turbulent jitter by 1 | Down Arrow/Up Arrow in Brush Size, Density, Pressure, Rate, or Turbulent Jitter text box† | Down Arrow/Up Arrow in Brush Size, Density, Pressure, Rate, or Turbulent Jittertext box† |
| Decrease/increase brush size by 2, or density, pressure, rate, or turbulent jitter by 1 | Left Arrow/Right Arrow with Brush Size, Density, Pressure, Rate, or Turbulent Jitter slider showing | Left Arrow/Right Arrow with Brush Size, Density, Pressure, Rate, or Turbulent Jitter slider showing |
| Cycle through controls on right from top | Tab Tab | |
| Cycle through controls on right from bottom | Shift + Tab Shift + Tab | |
| Change Cancel to Reset Alt Option | ||
| Hold down Shift to decrease/increase by 10 | ||
To the top
Keys for Vanishing Point
| Result Windows Mac OS | ||
| Zoom 2x (temporary) X X | ||
| Zoom in Control + + (plus) Command + + (plus) | ||
| Zoom out Control + - (hyphen) Command + - (hyphen) | ||
| Fit in view Control + 0 (zero), Double-click Hand tool | Command + 0 (zero), Double-click Hand tool | |
| Zoom to center at 100% Double-click Zoom tool | Double-click Zoom tool | |
| Increase brush size (Brush, Stamp tools) | ] | ] |
| Decrease brush size (Brush, Stamp tools) | [ | [ |
| Increase brush hardness (Brush, Stamp tools) | Shift + ] | Shift + ] |
| Decrease brush hardness (Brush, Stamp tools) | Shift + [ | Shift + [ |
| Undo last action | Control + Z | Command + Z |
| Redo last action | Control + Shift + Z | Command + Shift + Z |
| Deselect all | Control + D | Command + D |
| Hide selection and planes | Control + H | Command + H |
| Move selection 1 pixel | Arrow keys Arrow keys | |
| Move selection 10 pixels Shift + arrow keys | Shift + arrow keys | |
| Copy | Control + C | Command + C |
| Paste | Control + V | Command + V |
| Repeat last duplicate and move | Control + Shift + T | Command + Shift + T |
| Create a floating selection from the current selection | Control + Alt + T | |
| Fill a selection with image under the pointer | Control-drag Command-drag | |
| Create a duplicate of the selection as a floating selection | Control + Alt-drag Command + Option-drag | |
| Constrain selection to a 15° rotation Alt + Shift to rotate Option + Shift to rotate | ||
| Select a plane under another selected plane | Control-click the plane Command-click the plane | |
| Create 90 degree plane off parent plane | Control-drag Command-drag | |
| Delete last node while creating plane Backspace Delete | ||
| Make a full canvas plane, square to the camera | Double-click the Create Plane tool Double-click the Create Plane tool | |
| Show/hide measurements (Photoshop Extended only) | Control + Shift + H Command + Shift + H | |
| Export to a DFX file (Photoshop Extended only) | Control + E Command + E | |
| Export to a 3DS file (Photoshop Extended only) | Control + Shift + E Command + Shift + E | |
To the top
Keys for the Camera Raw dialog box
Note: Holding down a key temporarily activates a tool. Letting go of the key returns to the previous tool.
| Result Windows Mac OS | ||
| Zoom tool Z Z | ||
| Hand tool | H | H |
| White Balance tool | I | I |
| Color Sampler tool | S | S |
| Crop tool | C | C |
| Straighten tool | A | A |
| Spot Removal tool | B | B |
| Red Eye Removal tool | E | E |
| Basic panel | Ctrl+Alt+1 Command+Option+1 | |
| Tone Curve panel | Ctrl+Alt+2 Command+Option+2 | |
| Detail panel | Ctrl+Alt+3 Command+Option+3 | |
| HSL/Grayscale panel | Ctrl+Alt+4 Command+Option+4 | |
| Split Toning panel Ctrl+Alt+5 Command+Option+5 | ||
| Lens Corrections panel Ctrl+Alt+6 Command+Option+6 | ||
| Camera Calibration panel Ctrl+Alt+7 Command+Option+7 | ||
| Presets panel Ctrl+Alt+8 Command+Option+8 (Mac OS) | Universal Access zoom shortcut must be disabled in System Preferences) | |
| Open Snapshots panel Ctrl+Alt+9 Command+Option+9 | ||
| Parametric Curve Targeted Adjustment tool | Ctrl+Alt+Shift+T Command+Option+Shift+T | |
| Hue Targeted Adjustment tool Ctrl+Alt+Shift+H Command+Option+Shift+H | ||
| Saturation Targeted Adjustment tool Ctrl+Alt+Shift+S Command+Option+Shift+S | ||
| Luminance Targeted Adjustment tool Ctrl+Alt+Shift+L Command+Option+Shift+L | ||
| Grayscale Mix Targeted Adjustment tool | Ctrl+Alt+Shift+G Command+Option+Shift+G | |
| Last-used Targeted Adjustment tool | T | T |
| Adjustment Brush tool | K | K |
| Graduated Filter tool | G | G |
| Increase/decrease brush size | ]/[ | ]/[ |
| Increase/decrease brush feather | Shift + ] / Shift + [ | Shift + ] / Shift + [ |
| Increase/decrease Adjustment Brush tool flow in increments of 10 | = (equal sign) / - (hyphen) | = (equal sign) / - (hyphen) |
| Temporarily switch from Add to Erase mode for the Adjustment Brush tool, or from Erase to Add mode | Alt | Option |
| Increase/decrease temporary Adjustment Brushtool size | Alt + ] / Alt + [ | Option + ] / Option + [ |
| Increase/decrease temporary Adjustment Brushtool feather | Alt + Shift + ] / Alt + Shift + [ | Option + Shift + ] / Option + Shift + [ |
| Increase/decrease temporary Adjustment Brushtool flow in increments of 10 | Alt + = / Alt + - | Option = / Option + - |
| Switch to New mode from Add or Erase mode of the Adjustment Brush tool or the Graduated Filter | N | N |
| Toggle Auto Mask for Adjustment Brush tool | M | M |
| Toggle Show Mask for Adjustment Brush tool | Y | Y |
| Toggle pins for Adjustment Brush tool | V | V |
| Toggle overlay for Graduated Filter, Spot Removaltool, or Red EyeRemoval tool. | V | V |
| Rotate image left L or Ctrl + ] L or Command + ] | ||
| Rotate image right R or Ctrl + [ R or Command + [ | ||
| Zoom in Ctrl + + (plus) Command + + (plus) | ||
| Zoom out Ctrl + - (hyphen) Command + - (hyphen) | ||
| Temporarily switch to Zoom In tool(Doesn't work when Straighten tool is selected. If Crop tool is active, temporarily switches to Straighten tool.) | Ctrl Command | |
| Temporarily switch to Zoom Out tool and change the Open Image button to Open Copy and the Cancel button to Reset. | Alt Option | |
| Toggle preview P P | ||
| Full screen mode F F | ||
| Temporarily activate the White Balance tool and change the Open Image button to Open Object.(Does not work if Crop tool is active.) | Shift Shift | |
| Select multiple points in Curves panel | Click the first point; Shift-click additional points | Click the first point; Shift-click additional points |
| Add point to curve in Curves panel | Control-click in preview | Command-click in preview |
| Move selected point in Curves panel (1 unit) | Arrow keys | Arrow keys |
| Move selected point in Curves panel (10 units) | Shift-arrow | Shift-arrow |
| Open selected images in Camera Raw dialog box from Bridge | Ctrl + R | Command + R |
| Open selected images from Bridge bypassing Camera Raw dialog box | Shift + double-click image | Shift + double-click image |
| Display highlights that will be clipped in Preview | Alt-drag Exposure, Recovery, or Black sliders | Option-drag Exposure, Recovery, or Black sliders |
| Highlight clipping warning | O | O |
| Shadows clipping warning | U | U |
| (Filmstrip mode) Add 1 - 5 star rating | Ctrl+1 - 5 Command+1 - 5 | |
| (Filmstrip mode) Increase/decrease rating | Ctrl+. (period) / Ctrl+, (comma) | Command+. (period) / Command+, (comma) |
| (Filmstrip mode) Add red label | Ctrl+6 | Command+6 |
| (Filmstrip mode) Add yellow label | Ctrl+7 | Command+7 |
| (Filmstrip mode) Add green label | Ctrl+8 | Command+8 |
| (Filmstrip mode) Add blue label Ctrl+9 Command+9 | |
| (Filmstrip mode) Add purple label Ctrl+Shift+0 Command+Shift+0 | |
| Camera Raw preferences Ctrl + K Command + K | |
| Deletes Adobe Camera Raw preferences | Ctrl + Alt (on open) Option + Shift (on open) |
To the top
Keys for the Black-and-White dialog box
| Result Windows Mac OS | ||
| Open the Black-and-White dialog box Shift + Control + Alt + B Shift + Command + Option+ B | ||
| Increase/decrease selected value by 1% | Up Arrow/Down Arrow Up Arrow/Down Arrow | |
| Increase/decrease selected value by 10% | Shift + Up Arrow/Down Arrow Shift + Up Arrow/Down Arrow | |
| Change the values of the closest color slider | Click-drag on the image Click-drag on the image | |
To the top
Keys for Curves
| Result Windows Mac OS | ||
| Open the Curves dialog box | Control + M | Command + M |
| Select next point on the curve | + (plus) | + (plus) |
| Select the previous point on the curve | - (minus) | - (minus) |
| Select multiple points on the curve | Shift-click the points | Shift-click the points |
| Deselect a point | Control + D | Command + D |
| To delete a point on the curve | Select a point and press Delete | Select a point and press Delete. |
| Move the selected point 1 unit | Arrow keys | Arrow keys |
| Move the selected point 10 units | Shift + Arrow keys | Shift + Arrow keys |
| Display highlights and shadows that will be clipped | Alt-drag black/white point sliders | Option-drag black/white point sliders |
| Set a point to the composite curve | Control-click the image | Command-click the image |
| Set a point to the channel curves | Shift + Control-click the image | Shift + Command-click the image |
| Toggle grid size | Alt-click the field | Option-click the field |
Keys for selecting and moving objects
This partial list provides shortcuts that don't appear in menu commands or tool tips.
| Result Windows Mac OS | ||
| Reposition marquee while selecting Any marquee tool (except single column and single row) + spacebar-drag | Any marquee tool (except single column and single row) + spacebar-drag | |
| Add to a selection Any selection tool + Shift-drag Any selection tool + Shift-drag | ||
| Subtract from a selection Any selection tool + Alt-drag Any selection tool + Option-drag | ||
| Intersect a selection Any selection tool (except Quick Selection tool) + Shift-Alt-drag | Any selection tool (except Quick Selection tool) + Shift-Option-drag | |
| Constrain marquee to square or circle (if no other selections are active)‡ | Shift-drag Shift-drag | |
| Draw marquee from center (if no other selections are active)‡ | Alt-drag Option-drag | |
| Constrain shape and draw marquee from center‡ | Shift + Alt-drag Shift + Option-drag | |
| Switch to Move tool Control (except when Hand, Slice, Path, Shape, or any Pen tool is selected) | Command (except when Hand, Slice, Path, Shape, or any Pen tool is selected) | |
| Switch from Magnetic Lasso tool to Lasso tool | Alt-drag Option-drag | |
| Switch from Magnetic Lasso tool to polygonal Lasso tool | Alt-click Option-click | |
| Apply/cancel an operation of the Magnetic Lasso | Enter/Esc or Control + . (period) Return/Esc or Command + . (period) | |
| Move copy of selection Move tool + Alt-drag selection | Move tool + Option-drag selection‡ | |
| Move selection area 1 pixel | Any selection + Right Arrow, Left Arrow, Up Arrow, or Down Arrow† | Any selection + Right Arrow, Left Arrow, Up Arrow, or Down Arrow† |
| Move selection 1 pixel | Move tool + Right Arrow, Left Arrow, Up Arrow, or Down Arrow†‡ | Move tool + Right Arrow, Left Arrow, Up Arrow, or Down Arrow†‡ |
| Move layer 1 pixel when nothing selected on layer | Control + Right Arrow, Left Arrow, Up Arrow, or Down Arrow† | Command + Right Arrow, Left Arrow, Up Arrow, or Down Arrow† |
| Increase/decrease detection width | Magnetic Lasso tool + [ or ] | Magnetic Lasso tool + [ or ] |
| Accept cropping or exit cropping Crop tool + Enter or Esc | Crop tool + Return or Esc | |
| Toggle crop shield off and on | /(forward slash) | /(forward slash) |
| Make protractor | Ruler tool + Alt-drag end point | Ruler tool + Option-drag end point |
| Snap guide to ruler ticks (except when | Shift-drag guide | Shift-drag guide |
| View > Snap is unchecked) | ||
| Convert between horizontal and vertical guide | Alt-drag guide Option-drag guide | |
| †Hold down Shift to move 10 pixels‡Applies to shape tools | ||
To the top
Keys for transforming selections, selection borders, and paths
This partial list provides shortcuts that don't appear in menu commands or tool tips.
| Result Windows Mac OS | ||
| Transform from center or reflect Alt Option | ||
| Constrain Shift Shift | ||
| Distort Control Command | ||
| Apply Enter Return | ||
| Cancel Control + . (period) or Esc Command + . (period) or Esc | ||
| Free transform with duplicate data Control + Alt + T | Command + Option + T | |
| Transform again with duplicate data | Control + Shift + Alt + T | Command + Shift + Option + T |
To the top
Keys for editing paths
This partial list provides shortcuts that don't appear in menu commands or tool tips.
| Result Windows Mac OS | ||
| Select multiple anchor points | Direct selection tool + Shift-click | Direct selection tool + Shift-click |
| Select entire path | Direct selection tool + Alt-click | Direct selection tool + Option-click |
| Duplicate a path | Pen (any Pen tool), Path Selection or Direct Selection tool + Control + Alt-drag | Pen (any Pen tool), Path Selection or Direct Selection tool+ Command + Option-drag |
| Switch from Path Selection, Pen, Add Anchor Point, Delete Anchor Point, or Convert Point tools, to Direct Selection tool | Control Command | |
| Switch from Pen tool or Freeform Pen tool to Convert Point tool when pointer is over anchor or direction point | Alt Option |
| Close path Magnetic Pen tool-double-click Magnetic Pen tool-double-click | |
| Close path with straight-line segment Magnetic Pen tool + Alt-double-click Magnetic Pen tool | + Option-double-click |
To the top
Keys for painting
This partial list provides shortcuts that don't appear in menu commands or tool tips.
| Result Windows Mac OS | ||
| Select foreground color from color picker | Any painting tool + Shift + Alt + right-click and drag | Any painting tool + Control + Option + Command and drag |
| Select foreground color from image with Eyedropper tool | Any painting tool + Alt or any shape tool + Alt (except when Paths option is selected) | Any painting tool + Option or any shape tool + Option (except when Paths option is selected) |
| Select background color Eyedropper tool + Alt-click Eyedropper tool + Option-click | ||
| Color sampler tool Eyedropper tool + Shift Eyedropper tool + Shift | ||
| Deletes color sampler Color sampler tool + Alt-click Color sampler tool + Option-click | ||
| Sets opacity, tolerance, strength, or exposure for painting mode | Any painting or editing tool + number keys (e.g., 0 = 100%, 1 = 10%, 4 then 5 in quick succession = 45%) (When airbrush option is enabled, use Shift + number keys) | Any painting or editing tool + number keys (e.g., 0 = 100%, 1 = 10%, 4 then 5 in quick succession = 45%) (When airbrush option is enabled, use Shift + number keys) |
| Sets flow for painting mode Any painting or editing tool + Shift + number keys (e.g., 0 = 100%, 1 = 10%, 4 then 5 in quick succession = 45%) (When airbrush option is enabled, omit Shift) | Any painting or editing tool + Shift + number keys (e.g., 0 = 100%, 1 = 10%, 4 then 5 in quick succession = 45%) (When airbrush option is enabled, omit Shift) | |
| Mixer Brush changes Mix setting Alt + Shift + number Option + Shift + number | ||
| Mixer Brush changes Wet setting | Number keys | Number key |
| Mixer Brush changes Wet and Mix to zero | 00 | 00 |
| Cycle through blending modes | Shift + + (plus) or - (minus) | Shift + + (plus) or - (minus) |
| Open Fill dialog box on background or standard layer | Backspace or Shift + Backspace Delete or Shift + Delete | |
| Fill with foreground or background color | Alt + Backspace or Control + Backspace ^ | Option + Delete or Command + Delete ^ |
| Fill from history | Control + Alt + Backspace ^ | Command + Option + Delete ^ |
| Displays Fill dialog box | Shift + Backspace Shift + Delete | |
| Lock transparent pixels on/off | /(forward slash) | /(forward slash) |
| Connects points with a straight line | Any painting tool + Shift-click | Any painting tool + Shift-click |
Keys for blending modes
| Result Windows Mac OS | ||
| Cycle through blending modes Shift + + (plus) | or - (minus) Shift + + (plus) or - (minus) | |
| Normal Shift + Alt + N Shift + Option + N | ||
| Dissolve Shift + Alt + I Shift + Option + I | ||
| Behind (Brush tool only) Shift + Alt + Q Shift + Option + Q | ||
| Clear (Brush tool only) Shift + Alt + R Shift + Option + R | ||
| Darken Shift + Alt + K Shift + Option + K | ||
| Multiply Shift + Alt + M Shift + Option + M | ||
| Color Burn | Shift + Alt + B Shift + Option + B | |
| Linear Burn | Shift + Alt + A Shift + Option + A | |
| Lighten | Shift + Alt + G Shift + Option + G | |
| Screen | Shift + Alt + S Shift + Option + S | |
| Color Dodge | Shift + Alt + D Shift + Option + D | |
| Linear Dodge | Shift + Alt + W | Shift + Option + W |
| Overlay | Shift + Alt + O Shift + Option + O | |
| Soft Light | Shift + Alt + F | Shift + Option + F |
| Hard Light | Shift + Alt + H Shift + Option + H | |
| Vivid Light | Shift + Alt + V Shift + Option + V | |
| Linear Light | Shift + Alt + J | Shift + Option + J |
| Pin Light | Shift + Alt + Z | Shift + Option + Z |
| Hard Mix | Shift + Alt + L | Shift + Option + L |
| Difference | Shift + Alt + E Shift + Option + E | |
| Exclusion | Shift + Alt + X Shift + Option + X | |
| Hue | Shift + Alt + U Shift + Option + U | |
| Saturation | Shift + Alt + T | Shift + Option + T |
| Color | Shift + Alt + C Shift + Option + C | |
| Luminosity | Shift + Alt + Y Shift + Option + Y | |
| Desaturate | Sponge tool + Shift + Alt + D | Sponge tool + Shift + Option + D |
| Saturate Sponge tool + Shift + Alt + S Sponge tool + Shift + Option + S | |
| Dodge/burn shadows Dodge tool/Burn tool + Shift + Alt + S Dodge tool/Burn tool + Shift + Option + S | |
| Dodge/burn midtones Dodge tool/Burn tool + Shift + Alt + M Dodge tool/Burn tool + Shift + Option + M | |
| Dodge/burn highlights Dodge tool/Burn tool + Shift + Alt + H Dodge tool/Burn tool + Shift + Option + H | |
| Set blending mode to Threshold for bitmap images, Normal for all other images | Shift + Alt + N Shift + Option + N |
To the top
Keys for selecting and editing text
This partial list provides shortcuts that don't appear in menu commands or tool tips.
| Result Windows Mac OS | ||
| Move type in image Control-drag type when Type layer is selected | Command-drag type when Type layer is selected | |
| Select 1 character left/right or 1 line down/up, or 1 word left/right | Shift + Left Arrow/Right Arrow or Down Arrow/Up Arrow, or Control + Shift + Left Arrow/Right Arrow | Shift + Left Arrow/Right Arrow or Down Arrow/Up Arrow, or Command + Shift + Left Arrow/Right Arrow |
| Select characters from insertion point to mouse click point | Shift-click Shift-click | |
| Move 1 character left/right, 1 line down/up, or 1 word left/right | Left Arrow/Right Arrow, Down Arrow/Up Arrow, or Control + Left Arrow/Right Arrow | Left Arrow/Right Arrow, Down Arrow/Up Arrow, or Command + Left Arrow/Right Arrow |
| Create a new text layer, when a text layer is selected in the Layers panel | Shift-click Shift-click | |
| Select a word, line, paragraph, or story Double-click, triple-click, quadruple-click, or quintuple-click | Double-click, triple-click, quadruple-click, or quintuple-click | |
| Show/Hide selection on selected type | Control + H | Command + H |
| Display the bounding box for transforming text when editing text, or activate Move tool if cursor is inside the bounding box | Control | Command |
| Scale text within a bounding box when resizing the bounding box | Control-drag a bounding box handle | Command-drag a bounding box handle |
| Move text box while creating text box | Spacebar-drag | Spacebar-drag |
To the top
Keys for formatting type
This partial list provides shortcuts that don't appear in menu commands or tool tips.
| Result Windows Mac OS | ||
| Align left, center, or right Horizontal Type tool | + Control + Shift+ L, C, or R | Horizontal Type tool + Command +Shift + L, C, or R |
| Align top, center, or bottom Vertical Type tool | + Control + Shift +L, C, or R | Vertical Type tool + Command + Shift+ L, C, or R |
| Choose 100% horizontal scale Control + Shift | + X Command + Shift + X | |
| Choose 100% vertical scale Control + Shift + Alt + X Command + Shift + Option + X | ||
| Choose Auto leading Control + Shift + Alt + A | Command + Shift + Option + A | |
| Choose 0 for tracking Control + Shift + Q Command + Control + Shift + Q | ||
| Justify paragraph, left aligns last line Control + Shift + J Command + Shift + J | ||
| Justify paragraph, justifies all Control + Shift + F | Command + Shift + F | |
| Toggle paragraph hyphenation on/off | Control + Shift + Alt + H | Command + Control + Shift + Option+ H |
| Toggle single/every-line composeron/off | Control + Shift + Alt + T | Command + Shift + Option + T |
| Decrease or increase type size ofselected text 2 points or pixels | Control + Shift + < or > † | Command + Shift + < or > † |
| Decrease or increase leading 2 pointsor pixels | Alt + Down Arrow or Up Arrow ‡Option + Down | Arrow or Up Arrow ‡† |
| Decrease or increase baseline shift 2points or pixels | Shift + Alt + Down Arrow or UpArrow†† | Shift + Option + Down Arrow or UpArrow†† |
| Decrease or increase kerning/tracking20/1000 ems | Alt + Left Arrow or Right Arrow ‡† | Option + Left Arrow or Right Arrow ‡† |
| †Hold down Alt (Win) or Option (Mac OS) to decrease/increase by 10††Hold down Ctrl (Windows) or Command (Mac OS) to decrease/increase by 10 | ||
To the top
Keys for slicing and optimizing
| Result Windows Mac OS | ||
| Toggle between Slice tool and Slice Selection tool | Control | Command |
| Draw square slice | Shift-drag Shift-drag | |
| Draw from center outward | Alt-drag | Option-drag |
| Draw square slice from center outward | Shift + Alt-drag | Shift + Option-drag |
| Reposition slice while creating slice Spacebar-drag Spacebar-drag | |
| Open context-sensitive menu Right-click slice Control-click slice |
To the top
Keys for using panels
This partial list provides shortcuts that don't appear in menu commands or tool tips.
| Result Windows Mac OS | ||
| Set options for new items (except for Actions, Animation, Styles, Brushes, Tool Presets, and Layer Comps panels) | Alt-click New button Option-click New button | |
| Delete without confirmation (except for the Brush panel) | Alt-click Delete button Option-click Delete button | |
| Apply value and keep text box active Shift + Enter Shift + Return | ||
| Show/Hide all panels Tab Tab | ||
| Show/Hide all panels except the toolbox and options bar | Shift + Tab Shift + Tab | |
| Highlight options bar Select tool and press Enter | Select tool and press Return | |
| Increase/decrease selected values by 10 | Shift + Up Arrow/Down Arrow | Shift + Up Arrow/Down Arrow |
To the top
Keys for the Actions panel
| Result Windows Mac OS | ||
| Turn command on and all others off, or turns all commands on | Alt-click the check mark next to a command. | Option-click the check mark next to a command. |
| Turn current modal control on and toggle all other modal controls | Alt-click | Option-click |
| Change action or action set options | Alt + double-click action or action set | Option + double-click action or action set |
| Display Options dialog box for recorded command | Double-click recorded command | Double-click recorded command |
| Play entire action | Control + double-click an action | Command + double-click an action |
| Collapse/expand all components of an action | Alt-click the triangle | Option-click the triangle |
| Play a command | Control-click the Play button | Command-click the Play button |
| Create new action and begin recording without confirmation | Alt-click the New Action button Option-click the New Action button |
| Select contiguous items of the same kind | Shift-click the action/command Shift-click the action/command |
| Select discontinuous items of the same kind | Control-click the action/command Command-click the action/command |
To the top
Keys for adjustment layers
If you prefer channel shortcuts starting with Alt/Option + 1 for red, choose Edit > Keyboard Shortcuts, and select Use Legacy Channel Shortcuts. Then restart Photoshop.
| Result Windows Mac OS | ||
| Choose specific channel for adjustment | Alt + 3 (red), 4 (green), 5 (blue) Option + 3 (red), 4 (green), 5 (blue) | |
| Choose composite channel for adjustment | Alt + 2 Option + 2 | |
| Delete adjustment layer Delete or Backspace | Delete | |
| Define Auto options for Levels or Curves | Alt-click Auto button Option-click Auto button |
To the top
Keys for the Animation panel in Frames mode
| Result Windows Mac OS | ||
| Select/deselect multiple contiguous frames | Shift-click second frame Shift-click second frame | |
| Select/deselect multiple discontinuous frames | Control-click multiple frames Command-click multiple frames | |
| Paste using previous settings without displaying the dialog box | Alt + Paste Frames command from the Panel pop-up menu | Option + Paste Frames command from the Panel pop-up menu |
To the top
Keys for the Animation panel in Timeline Mode (Photoshop Extended)
Note: To enable all shortcuts, choose Enable Timeline Shortcut Keys from the Animation (Timeline) panel menu.
| Result Windows Mac OS | ||
| Start playing the timeline or Animation Spacebar Spacebarpanel | ||
| Switch between timecode and frame numbers (current time view) | Alt + click the current-time display in the upper-left corner of the timeline. | Option + click the current-time display in the upper-left corner of the timeline. |
| Expand and collapse list of layers Alt + click Option + click on list triangles | ||
| Jump to the next/previous whole second in timeline | Hold down the Shift key when clicking the Next/Previous Frame buttons (on either side of the Play button). | Hold down the Shift key when clicking the Next/Previous Frame buttons (on either side of the Play button) |
| Increase playback speed Hold down the Shift key while dragging the current time. | Hold down the Shift key while dragging the current time. | |
| Decrease playback speed Hold down the Control key while dragging the current time. | Hold down the Command key while dragging the current time. | |
| Snap an object (keyframe, the current time, layer in point, and so on) to the nearest object in timeline | Shift-drag Shift-drag | |
| Scale (evenly distribute to condensed or extended length) a selected group of multiple keyframes | Alt-drag (first or last keyframe in the selection) | Option-drag (first or last keyframe in the group) |
| Back one frame Left Arrow or Page Up Left Arrow or Page Up | ||
| Forward one frame Right Arrow or Page Down Right Arrow or Page Down | ||
| Back ten frames Shift + Left Arrow or Shift + Page Up Shift + Left Arrow or Shift Page Up | ||
| Forward ten frames Shift + Right Arrow or Shift + Page Down | Shift + Right Arrow or Shift + Page Down | |
| Move to the beginning of the timeline Home Home | ||
| Move to the end of the timeline | End | End |
| Move to the beginning of the work area | Shift + Home | Shift + Home |
| Move to the end of the work area | Shift + End | Shift + End |
| Move to In point of the current layer | Up Arrow | Up Arrow |
| Move to the Out point of the current layer | Down Arrow | Down Arrow |
| Back 1 second | Shift + Up Arrow | Shift + Up Arrow |
| Foward 1 second | Shift + Down Arrow Shift + Down Arrow | |
| Return a rotated document to its original orientation | Esc | Esc |
To the top
Keys for the Brush panel
| Result | Windows Mac OS | |
| Delete brush Alt-click brush Option-click brush | ||
| Rename brush Double-click brush Double-click brush | ||
| Change brush size Alt + right click + drag left or right Ctrl + Option + drag left or right | ||
| Decrease/increase brush softness/hardness | Alt + right click + drag up or down Ctrl + Option + drag up or down | |
| Select previous/next brush size , (comma) or . (period) , (comma) or . (period) | ||
| Select first/last brush Shift + , (comma) or . (period) Shift + , (comma) or . (period) | ||
| Display precise cross hair for brushes Caps Lock or Shift + Caps Lock Caps Lock | ||
| Toggle airbrush option Shift + Alt + P Shift + Option + P |
To the top
Keys for the Channels panel
If you prefer channel shortcuts starting with Ctrl/Command + 1 for red, choose Edit > Keyboard Shortcuts, and select Use Legacy Channel Shortcuts.
| Result | Windows | Mac OS |
| Select individual channels | Ctrl + 3 (red), 4 (green), 5 (blue) | Command + 3 (red), 4 (green), 5 (blue) |
| Select composite channel | Ctrl + 2 | Command + 2 |
| Load channel as selection | Control-click channel thumbnail, or Alt + Ctrl + 3 (red), 4 (green), 5 (blue) | Command-click channel thumbnail, or Option + Command + 3 (red), 4 (green), 5 (blue) |
| Add to current selection | Control + Shift-click channel thumbnail. | Command + Shift-click channel thumbnail |
| Subtract from current selection | Control + Alt-click channel thumbnail | Command + Option-click channel thumbnail |
| Intersect with current selection | Control + Shift + Alt-click channel thumbnail | Command + Shift + Option-click channel thumbnail |
| Set options for Save Selection As Channel button | Alt-click Save Selection As Channel button | Option-click Save Selection As Channel button |
| Create a new spot channel | Control-click Create New Channel button | Command-click Create New Channel button |
| Select/deselect multiple color-channel selection | Shift-click color channel | Shift-click color channel |
| Select/deselect alpha channel and show/hide as a rubylith overlay | Shift-click alpha channel | Shift-click alpha channel |
| Display channel options | Double-click alpha or spot channel thumbnail | Double-click alpha or spot channel thumbnail |
| Toggle composite and grayscale mask in Quick Mask mode | ~ (tilde) | ~ (tilde) |
Keys for the Clone Source panel
| Result Windows Mac OS | ||
| Show Clone Source (overlays image) Alt + Shift Opt + Shift | ||
| Nudge Clone Source Alt + Shift + arrow keys Opt + Shift + arrow keys | ||
| Rotate Clone Source Alt + Shift + < or > Opt + Shift + < or > | ||
| Scale (increase or reduce size) Clone Source | Alt + Shift + [ or ] Opt + Shift + [ or ] |
Keys for the Color panel
| Result Windows Mac OS | ||
| Select background color Alt-click color in color bar Option-click color in color bar | ||
| Display Color Bar menu Right-click color bar Control-click color bar | ||
| Cycle through color choices Shift-click color bar Shift-click color bar |
Keys for the History panel
| Result Windows Mac OS | ||
| Create a new snapshot Alt + New Snapshot | Option + New Snapshot | |
| Rename snapshot | Double-click snapshot name | Double-click snapshot name |
| Step forward through image states | Control + Shift + Z | Command + Shift + Z |
| Step backward through image states | Control + Alt + Z | Command + Option + Z |
| Duplicate any image state, except the current state | Alt-click the image state Option-click the image state | |
| Permanently clear history (no Undo) | Alt + Clear History (in History panel pop-up menu) | Option + Clear History (in History panel pop-up menu) |
Keys for the Info panel
| Result Windows Mac OS | ||
| Change color readout modes Click eyedropper icon Click eyedropper icon | ||
| Change measurement units Click crosshair icon Click crosshair icon |
To the top
Keys for the Layers panel
| Result Windows Mac OS | ||
| Load layer transparency as a selection Control-click layer thumbnail Command-click layer thumbnail | ||
| Add to current selection Control + Shift-click layer thumbnail. Command + Shift-click layer thumbnail. | ||
| Subtract from current selection Control + Alt-click layer thumbnail. Command + Option-click layer thumbnail. | ||
| Intersect with current selection Control + Shift + Alt-click layer thumbnail. | Command + Shift + Option-click layer thumbnail. | |
| Load filter mask as a selection | Control-click filter mask thumbnail | Command-click filter mask thumbnail |
| Group layers | Control + G | Command + G |
| Ungroup layers | Control + Shift + G | Command-Shift + G |
| Create/release clipping mask | Control + Alt + G | Command-Option + G |
| Select all layers | Control + Alt + A | Command + Option + A |
| Merge visible layers | Control + Shift + E | Command + Shift + E |
| Create new empty layer with dialog box | Alt-click New Layer button | Option-click New Layer button |
| Create new layer below target layer | Control-click New Layer button | Command-click New Layer button |
| Select top layer | Alt + . (period) | Option + . (period) |
| Select bottom layer | Alt + , (comma) | Option + , (comma) |
| Add to layer selection in Layers panel | Shift + Alt + [ or ] | Shift + Option + [ or ] |
| Select next layer down/up | Alt + [ or ] | Option + [ or ] |
| Move target layer down/up | Control + [ or ] | Command + [ or ] |
| Merge a copy of all visible layers into target layer | Control + Shift + Alt + E | Command + Shift + Option + E |
| Merge layers | Highlight layers you want to merge, then Control + E | Highlight the layers you want to merge, then Command + E |
| Move layer to bottom or top Control + Shift + [ or ] | Command + Shift + [ or ] | |
| Copy current layer to layer below | Alt + Merge Down command from the Panel pop-up menu | Option + Merge Down command from the Panel pop-up menu |
| Merge all visible layers to a new layer above the currently selected layer | Alt + Merge Visible command from the Panel pop-up menu | Option + Merge Visible command from the Panel pop-up menu |
| Show/hide this layer/layer group only or all layers/layer groups | Right-click the eye icon Control-click the eye icon | |
| Show/hide all other currently visible layers | Alt-click the eye icon Option-click the eye icon | |
| Toggle lock transparency for target layer, or last applied lock | /(forward slash) / (forward slash) | |
| Edit layer effect/style, options Double-click layer effect/style Double-click layer effect/style | ||
| Hide layer effect/style Alt-double-click layer effect/style Option-double-click layer effect/style | ||
| Edit layer style Double-click layer Double-click layer | ||
| Disable/enable vector mask Shift-click vector mask thumbnail Shift-click vector mask thumbnail | ||
| Open Layer Mask Display Options dialog box | Double-click layer mask thumbnail Double-click layer mask thumbnail | |
| Toggle layer mask on/off Shift-click layer mask thumbnail Shift-click layer mask thumbnail | ||
| Toggle filter mask on/off Shift-click filter mask thumbnail Shift-click filter mask thumbnail | ||
| Toggle between layer mask/composite image | Alt-click layer mask thumbnail | Option-click layer mask thumbnail |
| Toggle between filter mask/composite image | Alt-click filter mask thumbnail Option-click filter mask thumbnail | |
| Toggle rubylith mode for layer mask on/off | backslash , or Shift + Alt-click | backslash , or Shift + Option-click |
| Select all type; temporarily select Type tool | Double-click type layer thumbnail | Double-click type layer thumbnail |
| Create a clipping mask | Alt-click the line dividing two layers | Option-click the line dividing two layers |
| Rename layer | Double-click the layer name | Double-click the layer name |
| Edit filter settings | Double-click the filter effect | Double-click the filter effect |
| Edit the Filter Blending options | Double-click the Filter Blending icon | Double-click the Filter Blending icon |
| Create new layer group below current layer/layer set | Control-click New Group button | Command-click New Group button |
| Create new layer group with dialog box | Alt-click New Group button | Option-click New Group button |
| Create layer mask that hides all/selection | Alt-click Add Layer Mask button | Option-click Add Layer Mask button |
| Create vector mask that reveals all/path area | Control-click Add Layer Mask button | Command-click Add Layer Mask button |
| Create vector mask that hides all or displays path area | Control + Alt-click Add Layer Mask button | Command + Option-click Add Layer Mask button |
| Display layer group properties | Right-click layer group and choose Group Properties, or double-clickgroup click group | Control-click the layer group and choose Group Properties, or double- |
| Select/deselect multiple contiguous layers | Shift-click Shift-click | |
| Select/deselect multiple discontinuous layers | Control-click Command-click | |
Note: If Kotoeri is your Japanese language input method, the "Toggle rubylith mode for layer mask on/off" shortcut starts an action in Kototeri. Please switch to another mode (for example, "U.S.") to enable this shortcut.
To the top
Keys for the Layer Comps panel
| Result Windows Mac OS | ||
| Create new layer comp without the New Layer Comp box | Alt-click Create New Layer Comp button | Option-click Create New Layer Comp button |
| Open Layer Comp Options dialog box Double-click layer comp Double-click layer comp | ||
| Rename in-line Double-click layer comp name Double-click layer comp name | ||
| Select/deselect multiple contiguous layer comps | Shift-click Shift-click | |
| Select/deselect multiple discontinuous layer comps | Control-click Command-click |
To the top
Keys for the Paths panel
| Result Windows Mac OS | ||
| Load path as selection Control-click pathname | Command-click pathname | |
| Add path to selection Control + Shift-click pathname | Command + Shift-click pathname | |
| Subtract path from selection Control + Alt-click | pathname Command + Option-click pathname | |
| Retain intersection of path as selection | Control + Shift + Alt-click pathname | Command + Shift + Option-click pathname |
| Hide path | Control + Shift + H | Command + Shift + H |
| Set options for Fill Path with Foreground Colorbutton, Stroke Path with Brush button, Load Path as a Selection button, Make Work Path from Selection button, and Create New Path button | Alt-click button | Option-click button |
To the top
Keys for the Swatches panel
| Result Windows Mac OS | ||
| Create new swatch from foreground color | Click in empty area of panel Click in empty area of panel | |
| Set swatch color as background color Control-click swatch Command-click swatch | ||
| Delete swatch Alt-click swatch Option-click swatch | ||
To the top
Keys for 3D tools (Photoshop Extended)
| Result Windows Mac OS | ||
| Enable 3D object tools K K | ||
| Enable 3D camera tools N N | ||
| Hide nearest surface Alt + Ctrl + X Option + Command + X | ||
| Show all surfaces Alt + Shift + Ctrl + X | Option + Shift + Command + X | |
| 3D Object Tool | Right-click (Windows) / Control-click (Mac OS) | Alt (Windows) / Option (Mac OS) |
| Rotate | Changes to Drag tool | Changes to Roll tool |
| Roll | Changes to Slide tool | Changes to Rotate tool |
| Drag | Changes to Orbit tool | Changes to Slide tool |
| Slide | Changes to Roll tool | Changes to Drag tool |
| Scale | Scales on the Z plane | Scales on the Z plane |

To scale on the Y plane, hold down the Shift key.
| Camera Tool | Right-click (Windows) / Control-click (Mac OS) | Alt (Windows) / Option (Mac OS) |
| Orbit | Changes to Drag tool | Changes to Roll tool |
| Roll | Changes to Slide tool | Changes to Rotate tool |
| Pan | Changes to Orbit tool | Changes to Slide tool |
| Walk | Changes to Roll tool | Changes to Drag tool |
Keys for measurement (Photoshop Extended)
| Result Windows Mac OS | ||
| Record a measurement Shift + Control + M Shift + Command + M | ||
| Deselects all measurements Control + D Command + D | ||
| Selects all measurements Control + A Command + A | ||
| Hide/show all measurements Shift + Control + H Shift + Command + H | ||
| Removes a measurement Backspace Delete | ||
| Nudge the measurement Arrow keys Arrow keys | ||
| Nudge the measurement in increments Shift + arrow keys Shift + arrow keys | ||
| Extend/shorten selected measurement | Ctrl + left/right arrow key | Command + left/right arrow key |
| Extend/shorten selected measurement in increments | Shift + Ctrl + left/right arrow key | Shift +Command + left/right arrow key |
| Rotate selected measurement | Ctrl + up/down arrow key | Command + up/down arrow key |
| Rotate selected measurement in increments | Shift + Ctrl + up/down arrow key | Shift + Command + up/down arrow key |
To the top
Keys for DICOM files (Photoshop Extended)
| Result Windows Mac OS | ||
| Zoom tool | Z | Z |
| Hand tool | H | H |
| Window Level tool | W | W |
| Select all frames | Control + A Command + A | |
| Deselect all frames except the current frame | Control + D | Command + D |
| Navigate through frames | Arrow keys Arrow keys |
To the top
Keys for Extract and Pattern Maker (optional plug-ins)
| Result (Extract and Pattern Maker) | Windows Mac OS | |
| Fit in window Control + 0 Command + 0 | ||
| Zoom in Control + + (plus) Command + + (plus) | ||
| Zoom out Control + - (hyphen) Command + - (hyphen) | ||
| Cycle through controls on right from top | Tab Tab | |
| Cycle through controls on right from bottom | Shift + Tab Shift + Tab | |
| Temporarily activate Hand tool Spacebar Spacebar | ||
| Change Cancel to Reset Alt Option | ||
| Result (Extract only) Windows Mac OS | ||
| Edge Highlighter tool | B | B |
| Fill tool | G | G |
| Eyedropper tool | I | I |
| Cleanup tool | C | C |
| Edge Touchup tool | T | T |
| Toggle between Edge Highlighter tool and Eraser tool | Alt + Edge Highlighter/Eraser tool | Option + Edge Highlighter/Eraser tool |
| Toggle Smart Highlighting | Control with Edge Highlighter tool selected | Command with Edge Highlighter tool selected |
| Remove current highlight | Alt + Delete | Option + Delete |
| Highlight entire image Control + Delete | Command + Delete | |
| Fill foreground area and preview extraction | Shift-click with Fill tool selected | Shift-click with Fill tool selected |
| Move mask when Edge Touchup tool is selected | Control-drag | Command-drag |
| Add opacity when Cleanup tool is selected | Alt-drag | Option-drag |
| Toggle Show menu options in preview between Original and Extracted | X | X |
| Enable Cleanup and Edge Touchup tools before preview | Shift + X | Shift + X |
| Cycle through Display menu in preview from top to bottom | F | F |
| Cycle through Display menu in preview from bottom to top | Shift + F | Shift + F |
| Decrease/increase brush size by 1 | Down Arrow/Up Arrow in Brush Size text box† | Down Arrow or Up Arrow in Brush Size text box† |
| Decrease/increase brush size by 1 | Left Arrow/Right Arrow with Brush Size Slider showing† | Left Arrow/Right Arrow with Brush Size Slider showing† |
| Set strength of Cleanup or Edge Touch-up tool | 0-9 0-9 | |
| ^ Hold down Shift to decrease/increase by 10 | ||
| Result (Pattern Maker only) Windows Mac OS | ||
| Delete current selection Control + D Command + D | ||
| Undo a selection move Control + Z Command + Z | ||
| Generate or generate again Control + G Command + G | ||
| Intersect with current selection Shift + Alt + select Shift + Option + select | ||
| Toggle view: original/generated pattern X X | ||
| Go to first tile in Tile History Home | Home | |
| Go to last tile in Tile History | End | End |
| Go to previous tile in Tile History | Left Arrow, Page Up | Left Arrow, Page Up |
| Go to next tile in Tile History | Right Arrow, Page Down | Right Arrow, Page Down |
| Delete current tile from Tile History | Delete | Delete |
| Nudge selection when viewing the original | Right Arrow, Left Arrow, Up Arrow, or Down Arrow | Right Arrow, Left Arrow, Up Arrow, or Down Arrow |
| Increase selection nudging when viewing the original | Shift + Right Arrow, Left Arrow, Up Arrow, or Down Arrow | Shift + Right Arrow, Left Arrow, Up Arrow, or Down Arrow |
To the top
Function keys
| Result | Windows Mac OS | |
| Start Help | F1 | Help key |
| Undo/Redo | F1 | |
| Cut | F2 | F2 |
| Copy | F3 | F3 |
| Paste | F4 | F4 |
| Show/Hide Brush panel | F5 | F5 |
| Show/Hide Color panel F6 | F6 | |
| Show/Hide Layers panel | F7 | F7 |
| Show/Hide Info panel | F8 | F8 |
| Show/Hide Actions panel | F9 | Option + F9 |
| Revert | F12 | F12 |
| Fill Shift + F5 Shift + F5 | ||
| Feather Selection Shift + F6 Shift + F6 | ||
| Inverse Selection Shift + F7 Shift + F7 |

EV-NO-SR
Twitter™ and Facebook posts are not covered under the terms of Creative Commons.
Legal Notices | Online Privacy Policy
Selecting and displaying tools
Using the options bar
Tool presets
When you start Photoshop, the Tools panel appears at the left of the screen. Some tools in the Tools panel have options that appear in the context-sensitive options bar.
You can expand some tools to show hidden tools beneath them. A small triangle at the lower right of the tool icon signals the presence of hidden tools.
You can view information about any tool by positioning the pointer over it. The name of the tool appears in a tool tip below the pointer.
For a pictorial overview of the different tools in Photoshop, see Tool galleries.
To the top
Selecting and displaying tools
Select a tool
- Do one of the following:
- Click a tool in the Tools panel. If there is a small triangle at a tool's lower right corner, hold down the mouse button to view the hidden tools. Then click the tool you want to select.
- Press the tool's keyboard shortcut. The keyboard shortcut is displayed in its tool tip. For example, you can select the Move tool by pressing the V key.
Pressing and holding a keyboard shortcut key lets you temporarily switch to a tool. When you let go of the shortcut key, Photoshop returns to the tool you were using before the temporary switch.
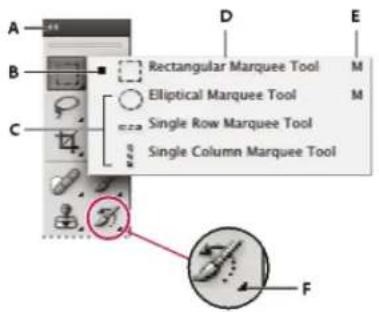
text_image
A B C D E Rectangular Marquee Tool M Elliptical Marquee Tool M Single Row Marquee Tool Single Column Marquee Tool FAccessing tools
A. Tools panel B. Active tool C. Hidden tools D. Tool name E. Tool shortcut F. Hidden tool triangle
Cycle through hidden tools
By default, you cycle through a set of hidden tools by holding down Shift and repeatedly pressing a tool shortcut key. If you prefer to cycle through tools without holding down Shift, you can disable this preference.
- Choose Edit > Preferences > General (Windows) or Photoshop > Preferences > General (Mac OS).
- Deselect Use Shift Key For Tool Switch.
Change tool pointers
Each default pointer has a different hotspot, where an effect or action in the image begins. With most tools, you can switch to precise cursors, which appear as cross hairs centered around the hotspot.
In most cases, the pointer for a tool is the same as the icon for that tool; you see that pointer when you select the tool. The default pointer for the marquee tools is the cross-hair pointer +; for the text tool, the default pointer is the I-beam 1; and for the painting tools the default pointer is the Brush Size icon.
- Choose Edit > Preferences > Cursors (Windows) or choose Photoshop > Preferences > Cursors (Mac OS).
- Choose tool pointer settings under Painting Cursors or Other Cursors:
Standard Displays pointers as tool icons.
Precise Displays pointers as cross hairs.
Normal Brush Tip The pointer outline corresponds to approximately 50% of the area that the tool will affect. This option shows the pixels that would be most visibly affected.
Full Size Brush Tip The pointer outline corresponds to nearly 100% of the area that the tool will affect, or nearly all the pixels that would be affected.
Show Crosshair In Brush Tip Displays cross hairs in the center of the brush shape.
Show Only Crosshair While Painting Improves performance with large brushes.
- Click OK.
The Painting Cursors options control the pointers for the following tools:
Eraser, Pencil, Paintbrush, Healing Brush, Clone Stamp, Pattern Stamp, Quick Selection, Smudge, Blur, Sharpen, Dodge, Burn, and Sponge tools
The Other Cursors options control the pointers for the following tools:
Marquee, Lasso, Polygonal Lasso, Magic Wand, Crop, Slice, Patch, Eyedropper, Pen, Gradient, Line, Paint Bucket, Magnetic Lasso, Magnetic Pen, Freeform Pen, Measure, and Color Sampler tools
To toggle between standard and precise cursors in some tool pointers, press Caps Lock.
Visually resize or change hardness of painting cursors
You can resize or change the hardness of a painting cursor by dragging in the image. As you drag, the painting cursor previews your changes. (Previews require OpenGL. See GPU, OpenGL support.
- To resize a cursor, press Alt + right-click (Windows) or Control + Option (Mac OS), and drag left or right. To change hardness, drag up or down.
Using the options bar
The options bar appears below the menu bar at the top of the workspace. The options bar is context sensitive—it changes as you select different tools. Some settings in the options bar (such as painting modes and opacity) are common to several tools, and some are specific to one tool.
You can move the options bar in the workspace by using the gripper bar, and you can dock it at the top or bottom of the screen. Tool tips appear when you position the pointer over a tool. To show or hide the options bar, choose Window > Options.
text_image
A B Add to selection Feather: 0 px Anti-alias Refine EdLasso options bar
A. Gripper bar B. Tool tip
To return tools to their default settings, right-click (Windows) or Control-click (Mac OS) the tool icon in the options bar, and then choose Reset Tool or Reset All Tools from the context menu.
For more information on setting options for a specific tool, search for the tool's name in Photoshop Help.
To the top
Tool presets
Tool presets let you save and reuse tool settings. You can load, edit, and create libraries of tool presets using the Tool Preset picker in the options bar, the Tool Presets panel, and the Preset Manager.
To choose a tool preset, click the Tool Preset picker in the options bar, and select a preset from the pop-up panel. You can also choose Window > Tool Presets and select a preset in the Tools Presets panel.
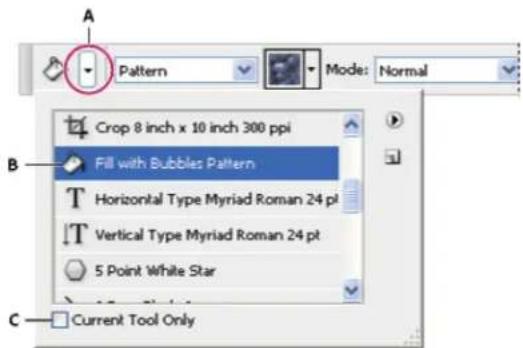
text_image
Pattern Mode: Normal Crop 8 inch x 10 inch 300 ppi Fill with Bubbles Pattern Horizontal Type Myriad Roman 24 pt Vertical Type Myriad Roman 24 pt 5 Point White Star Current Tool OnlyViewing the Tool Preset picker
A. Click the Tool Preset picker in the options bar to show the Tool Preset pop-up panel. B. Select a preset to change the tool's options to the preset, which applies each time you select the tool until you choose Reset Tool from the panel menu. C. Deselect to show all tool presets; select to show presets for only the tool selected in the toolbox.
Create a tool preset
- Choose a tool, and set the options you want to save as a tool preset in the options bar.
-
Do one of the following:
-
Click the Tool Preset button next to the tool at the left of the options bar.
-
Choose Window > Tool Presets to display the Tool Presets panel.
-
Do one of the following:
-
Click the Create New Tool Preset button
-
Choose New Tool Preset from the panel menu.
-
Enter a name for the tool preset, and click OK.
Change the list of tool presets
- Click the triangle to open the Tool Presets pop-up panel menu and choose one of the following:
Show All Tool Presets Shows all loaded presets.
Sort By Tool Sorts the presets by tool.
Show Current Tool Presets Shows only the loaded presets for the active tool. You can also select the Current Tool Only option in the Tool Presets pop-up panel.
Text Only, Small List, or Large List Determines how presets are displayed in the pop-up panel.
Note: To create, load, and manage libraries of tool presets, see Work with the Preset Manager.

Twitter™ and Facebook posts are not covered under the terms of Creative Commons.
Legal Notices | Online Privacy Policy
Use the Undo or Redo commands
Revert to the last saved version
Restore part of an image to its previously saved version
Cancel an operation
Receive notification when an operation is completed
Using the History panel
Make a snapshot of an image
Paint with a state or snapshot of an image
To the top
Use the Undo or Redo commands
The Undo and Redo commands let you undo or redo operations. You can also use the History panel to undo or redo operations.
- Choose Edit > Undo or Edit > Redo.
If an operation can't be undone, the command is dimmed and changes to Can't Undo.
To the top
Revert to the last saved version
- Choose File > Revert.
Note: Revert is added as a history state in the History panel and can be undone.
To the top
Restore part of an image to its previously saved version
- Do one of the following:
- Use the History Brush tool to paint with the selected state or snapshot on the History panel.
- Use the Eraser tool with the Erase To History option selected.
- Select the area you want to restore, and choose Edit > Fill. For Use, choose History, and click OK.
Note: To restore the image with a snapshot of the initial state of the document, choose History Options from the Panel menu and make sure that the Automatically Create First Snapshot option is selected.
To the top
Cancel an operation
- Hold down Esc until the operation in progress has stopped. In Mac OS, you can also press Command+period.
To the top
Receive notification when an operation is completed
A progress bar indicates that an operation is being performed. You can interrupt the operation or have the program notify you when it has finished the operation.
- Do one of the following:
• (Windows) choose Edit > Preferences > General.
• (Mac OS) choose Photoshop > Preferences > General.
-
Select Beep When Done.
-
Click OK.
To the top
Using the History panel
You can use the History panel to jump to any recent state of the image created during the current working session. Each time you apply a change to an image, the new state of that image is added to the panel.
For example, if you select, paint, and rotate part of an image, each of those states is listed separately in the panel. When you select one of the states, the image reverts to how it looked when that change was first applied. You can then work from that state.
You can also use the History panel to delete image states and, in Photoshop, to create a document from a state or snapshot.
To display the History panel, choose Window > History, or click the History panel tab.
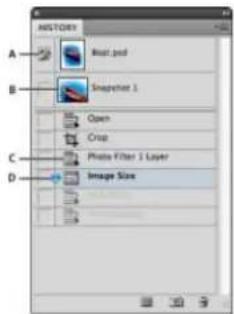
text_image
HISTORY A B C D Map1 pad Snapshot 1 Open Crop Photo Filter 1 Layer Image SizePhotoshop History panel
A. Sets the source for the history brush B. Thumbnail of a snapshot C. History state D. History state slider
Keep the following in mind when using the History panel:
- Program-wide changes, such as changes to panels, color settings, actions, and preferences, are not reflected in the History panel, because they are not changes to a particular image.
- By default, the History panel lists the previous 20 states. You can change the number of remembered states by setting a preference under Preferences > Performance. Older states are automatically deleted to free more memory for Photoshop. To keep a particular state throughout your work session, make a snapshot of the state.
- Once you close and reopen the document, all states and snapshots from the last working session are cleared from the panel.
- By default, a snapshot of the initial state of the document is displayed at the top of the panel.
• States are added to the bottom of the list. That is, the oldest state is at the top of the list, the most recent one at the bottom.
• Each state is listed with the name of the tool or command used to change the image. -
By default, when you select a state, the states below it are dimmed. This way you can easily see which changes will be discarded if you continue working from the selected state.
-
By default, selecting a state and then changing the image eliminates all states that come after it.
- If you select a state and then change the image, eliminating the states that came after, you can use the Undo command to undo the last change and restore the eliminated states.
- By default, deleting a state deletes that state and those that came after it. If you choose the Allow Non-Linear History option, deleting a state deletes only that state.
Revert to a previous image state
- Do any of the following:
- Click the name of the state.
- Choose Step Forward or Step Backward from the History panel menu or the Edit menu to move to the next or previous state.
Delete one or more image states
- Do one of the following:
- Click the name of the state, and choose Delete from the History panel menu to delete that change and those that came after it.
- Drag the state to the Delete icon 📋 to delete that change and those that came after it.
- Choose Clear History from the panel menu to delete the list of states from the History panel, without changing the image. This option doesn't reduce the amount of memory used by Photoshop.
- Hold down Alt (Windows) or Option (Mac OS), and choose Clear History from the panel menu to purge the list of states without changing the image. If you get a message that Photoshop is low on memory, purging states is useful, because the command deletes the states from the Undo buffer and frees up memory. You can't undo the Clear History command.
- Choose Edit > Purge > Histories to purge the list of states for all open documents. You can't undo this action.
Create or replace a document with an image state
- Do one of the following:
- Drag a state or snapshot onto the Create a New Document From Current State button in the History panel. The history list for the newly created document contains only the Duplicate State entry.
- Select a state or snapshot, and click the Create a New Document From Current State button. The history list for the newly created document contains only the Duplicate State entry.
- Select a state or snapshot, and choose New Document from the History panel menu. The history list for the newly created document contains only the Duplicate State entry.
- Drag a state onto an existing document.
To save one or more snapshots or image states for use in a later editing session, create a new file for each state you save, and save each in a separate file. When you reopen your original file, plan to open the other saved files also. You can drag each file's initial snapshot to the original image to access the snapshots again from the original image's History panel.
Set history options
You can specify the maximum number of items to include in the History panel and set other options to customize the panel.
-
Choose History Options from the History panel menu.
-
Select an option:
Automatically Create First Snapshot Automatically creates a snapshot of the initial state of the image when the document is opened.
Automatically Create New Snapshot When Saving Generates a snapshot every time you save.
Allow Non-Linear History Makes changes to a selected state without deleting the states that come after. Normally, when you select a state and change the image, all states that come after the selected one are deleted. In this way, the History panel can display a list of the editing steps in the order that they were made. By recording states in a nonlinear way, you can select a state, make a change to the image, and delete just that state. The change is appended at the end of the list.
Show New Snapshot Dialog By Default Forces Photoshop to prompt you for snapshot names even when you use the buttons on the panel.
Make Layer Visibility Changes Undoable By default, turning layer visibility on or off is not recorded as a history step and therefore can't be undone. Select this option to include layer visibility changes in history steps.
Set Edit History Log options
You may need to keep careful track of what's been done to a file in Photoshop, either for your own records, client records, or legal purposes. The Edit History Log helps you keep a textual history of changes made to an image. You can view the Edit History Log metadata using Adobe Bridge or the File Info dialog box.
You can choose to export the text to an external log file, or you can store the information in the metadata of edited files. Storing many editing operations as file metadata increases file size; such files may take longer than usual to open and save.
If you need to prove that the log file hasn't been tampered with, keep the edit log in the file's metadata, and then use Adobe Acrobat to digitally sign the log file.
By default, history log data about each session is saved as metadata embedded in the image file. You can specify where the history log data is saved and the level of detail contained in the history log.
-
Choose Edit > Preferences > General (Windows) or Photoshop > Preferences > General (Mac OS).
-
Click the History Log preference to toggle from on to off or vice versa.
-
For the Save Log Items To option, choose one of the following:
Metadata Saves the history log as metadata embedded in each file.
Text File Exports the history log to a text file. You are prompted to name the text file and choose a location in which to store it.
Both Stores metadata in the file and creates a text file.
Note: If you want to save the text file in a different location or save another text file, click the Choose button, specify where to save the text file, name the file if necessary, and click Save.
- From the Edit Log Items menu, choose one of the following options:
Sessions Only Keeps a record of each time your start or quit Photoshop and each time you open and close files (each image's filename is included). Does not include any information about edits made to the file.
Concise Includes the text that appears in the History panel in addition to the Sessions information.
Detailed Includes the text that appears in the Actions panel in addition to the Concise information. If you need a complete history of all changes made to files, choose Detailed.
To the top
Make a snapshot of an image
The Snapshot command lets you make a temporary copy (or snapshot) of any state of the image. The new snapshot is added to the list of snapshots at the top of the History panel. Selecting a snapshot lets you work from that version of the image.
Snapshots are similar to the states listed in the History panel, but they offer additional advantages:
- You can name a snapshot to make it easy to identify.
- Snapshots can be stored for an entire work session.
- You can compare effects easily. For example, you can take a snapshot before and after applying a filter. Then select the first snapshot, and try the same filter with different settings. Switch between the snapshots to find the settings you like best.
- With snapshots, you can recover your work easily. When you experiment with a complex technique or apply an action, take a snapshot first. If you're not satisfied with the results, you can select the snapshot to undo all the steps.
Note: Snapshots are not saved with the image—closing an image deletes its snapshots. Also, unless you select the Allow Non-Linear History option, selecting a snapshot and changing the image deletes all of the states currently listed in the History panel.
Create a snapshot
-
Select a state and do one of the following:
-
To automatically create a snapshot, click the Create New Snapshot button 📄 on the History panel, or if Automatically Create New Snapshot When Saving is selected in the history options, choose New Snapshot from the History panel menu.
-
To set options when creating a snapshot, choose New Snapshot from the History panel menu, or Alt-click (Windows) or Option-click (Mac OS) the Create New Snapshot button.
-
Enter the name of the Snapshot in the Name text box.
-
Choose the snapshot contents from the From menu:
Full Document Makes a snapshot of all layers in the image at that state
Merged Layers Makes a snapshot that merges all layers in the image at that state
Current Layer Makes a snapshot of only the currently selected layer at that state
Work with snapshots
- Do one of the following:
- To select a snapshot, click the name of the snapshot or drag the slider at the left of the snapshot up or down to a different snapshot.
- To rename a snapshot, double-click the snapshot and enter a name.
- To delete a snapshot, select the snapshot and either choose Delete from the panel menu, click the Delete icon ☑, or drag the snapshot to the Delete icon.
To the top
Paint with a state or snapshot of an image
The History Brush tool 📋 lets you paint a copy of one image state or snapshot into the current image window. This tool makes a copy, or sample, of the image and then paints with it.
For example, you might make a snapshot of a change you made with a painting tool or filter (with the Full Document option selected when you create the snapshot). After undoing the change to the image, you could use the History Brush tool to apply the change selectively to areas of the image. Unless you select a merged snapshot, the History Brush tool paints from a layer in the selected state to the same layer in another state.
The History Brush tool copies from one state or snapshot to another, but only at the same location. In Photoshop, you can also paint with the Art History Brush tool to create special effects.
- Select the History Brush tool 2.
-
Do one of the following in the options bar:
-
Specify the opacity and blending mode.
-
Choose a brush and set brush options.
-
In the History panel, click the left column of the state or snapshot to be used as the source for the History Brush tool.
- Drag to paint with the History Brush tool.
Adobe also recommends

Twitter ^™ and Facebook posts are not covered under the terms of Creative Commons.
Legal Notices | Online Privacy Policy
Specify columns for an image
To the top
Specify columns for an image
Columns help you position images or elements precisely. The New, Image Size, and Canvas Size commands let you specify image width in terms of columns. Using columns is convenient when you plan to import an image into a page-layout program, such as Adobe InDesign®, and you want the image to fit exactly within a certain number of columns.
- Choose Edit > Preferences > Units & Rulers (Windows) or Photoshop > Preferences > Units & Rulers (Mac OS).
- Enter values for Width and Gutter.
- Use the File > New command to create a new image, select Columns for the Width value, and enter the number of columns you need for the new document. You can also resize an open image to the number of columns required by the page layout using the Image > Image Size or Image > Canvas Size commands.
Adobe also recommends

Twitter™ and Facebook posts are not covered under the terms of Creative Commons.
Legal Notices | Online Privacy Policy
Show or hide Extras
To the top
Show or hide Extras
Guides, grids, selection edges, slices, and text baselines are examples of nonprinting Extras that help you select, move, or edit objects. You can enable or disable any combination of Extras without affecting the image. You can also show or hide enabled Extras to clean up the workspace.
- Do one of the following:
- To show or hide all enabled Extras, choose View > Extras. (A check mark appears next to enabled Extras in the Show submenu.)
- To enable and show an individual Extra, choose View > Show, and select the Extra from the submenu.
• To enable and show all available Extras, choose View > Show > All. - To disable and hide all Extras, choose View > Show > None.
- To enable or disable groups of Extras, choose View > Show > Show Extra Options.
Note: Color samplers are affected by the Extras, All, and None commands, though they are not an option in the Show submenu.
Adobe also recommends
Twitter™ and Facebook posts are not covered under the terms of Creative Commons.
Legal Notices | Online Privacy Policy
Run Photoshop in 32-bit mode (64-bit Mac OS only)
In 64-bit versions of Mac OS 10.5 and later, some older, optional plug-ins are available only if Photoshop is running in 32-bit mode:
- In the Finder, choose Go > Applications.
- Expand the Photoshop folder. Then right-click the Photoshop application icon, and choose Get Info.
- In the General section of the Info window, select Open In 32-bit Mode.
- Close the Info window, and restart Photoshop.

For more information, see 64-bit operating system benefits and limitations in Photoshop.

BY-NC-SA
Twitter™ and Facebook posts are not covered under the terms of Creative Commons.
Legal Notices
Online Privacy Policy
About rulers
Change a ruler's zero origin
Change the unit of measurement
To the top
About rulers
Rulers help you position images or elements precisely. When visible, rulers appear along the top and left side of the active window. Markers in the ruler display the pointer's position when you move it. Changing the ruler origin (the (0, 0) mark on the top and left rulers) lets you measure from a specific point on the image. The ruler origin also determines the grid's point of origin.
To show or hide rulers, choose View > Rulers.
To the top
Change a ruler's zero origin
-
(Optional) Choose View > Snap To, then choose any combination of options from the submenu. This snaps the ruler origin to guides, slices, or document bounds. You can also snap to the grid.
-
Position the pointer over the intersection of the rulers in the upper-left corner of the window, and drag diagonally down onto the image. A set of cross hairs appears, marking the new origin on the rulers.

You can hold down Shift as you drag to make the ruler origin snap to the ruler ticks.
To reset a ruler's origin to its default value, double-click the upper-left corner of the ruler.

natural_image
Two-panel diagram showing a window with blue and white panels, one with an arrow pointing to a vertical line (no text or symbols)Dragging to create new ruler origin
To the top
Change the unit of measurement
-
Do one of the following:
-
Double-click a ruler.
• (Windows) Choose Edit > Preferences > Units & Rulers, or right-click the ruler and then choose a new unit from the context menu. -
(Mac OS) Choose Photoshop > Preferences > Units & Rulers, or Control-click the ruler and then choose a new unit from the context menu.
-
For Rulers, choose a unit of measurement.
Note: Changing the units on the Info panel automatically changes the units on the rulers.
- For Point/Pica Size, choose from the following options:
PostScript (72 points per inch) Sets a unit size compatible for printing to a PostScript device.
Traditional Uses 72.27 points per inch, as traditionally used in printing.
- Click OK.
Adobe also recommends
Twitter™ and Facebook posts are not covered under the terms of Creative Commons.
Legal Notices | Online Privacy Policy
Position with the Ruler tool
To the top
Position with the Ruler tool
The Ruler tool helps you position images or elements precisely. The Ruler tool calculates the distance between any two points in the workspace. When you measure from one point to another, a nonprinting line is drawn, and the options bar and Info panel show the following information:
• The starting location (X and Y)
- The horizontal (W) and vertical (H) distances traveled from the x and y axes
• The angle measured relative to the axis (A)
• The total length traveled (D1)
- The two lengths traveled (D1 and D2), when you use a protractor
All measurements except the angle are calculated in the unit of measure currently set in the Units & Rulers preference dialog box. If your document has an existing measuring line, selecting the Ruler tool causes it to be displayed.
Measure between two points
- Select the Ruler tool 📂. (If the Ruler isn't visible, hold down the Eyedropper tool.)
- Drag from the starting point to the ending point. Hold down the Shift key to constrain the tool to 45^ increments.
- To create a protractor from an existing measuring line, Alt-drag (Windows) or Option-drag (Mac OS) at an angle from one end of the measuring line, or double-click the line and drag. Hold down the Shift key to constrain the tool to multiples of 45^ .
Edit a measuring line
- Select the Ruler tool .
-
Do one of the following:
-
To resize the line, drag one end of an existing measuring line.
- To move the line, place the pointer on the line away from either endpoint, and drag the line.
- To remove the line, place the pointer on the line away from either endpoint, and drag the line out of the image, or click Clear in the tool options bar.
Note: You can drag out a measure line on an image feature that should be horizontal or vertical, and then choose Image > Image Rotation > Arbitrary. The correct angle of rotation required to straighten the image is automatically entered into the Rotate Canvas dialog box.
Adobe also recommends
Legal Notices | Online Privacy Policy
Use snapping
To the top
Use snapping
Snapping helps with precise placement of selection edges, cropping marquees, slices, shapes, and paths. However, if snapping prevents you from correctly placing elements, you can disable it.
Enable or disable snapping
- Choose View > Snap. A check mark indicates that snapping is enabled.
To temporarily disable snapping while using the Move tool, hold down Ctrl.
Specify what to snap to
- Choose View > Snap To, and choose one or more options from the submenu:
Guides Snaps to guides.
Grid Snaps to the grid. You cannot select this option when the grid is hidden.
Layer Snaps to the content in the layer.
Slices Snaps to slice boundaries. You cannot select this option when slices are hidden.
Document Bounds Snaps to the edges of the document.
All Selects all Snap To options.
None Deselects all Snap To options.
A check mark indicates that the option is selected and snapping is enabled.
If you want to enable snapping for only one option, make sure the Snap command is disabled, and then choose View > Snap To and choose an option. This automatically enables snapping for the selected option, and deselects all other Snap To options.
Adobe also recommends

Twitter™ and Facebook posts are not covered under the terms of Creative Commons.
Legal Notices | Online Privacy Policy
Prepare images for page-layout programs
Use Photoshop artwork in Adobe Illustrator
Create transparency using image clipping paths
Printing image clipping paths
Export paths to Adobe Illustrator
Link or embed an image using OLE (Windows only)
Photoshop provides a number of features to help you use images in other applications. Because of the tight integration between Adobe products, many Adobe applications can directly import Photoshop (PSD) format files and use Photoshop features like layers, layer styles, masks, transparency, and effects.
To the top
Prepare images for page-layout programs
How you prepare an image for a page-layout program depends upon the file formats the program recognizes:
- Adobe InDesign 2.0 and later can place Photoshop PSD files. You do not need to save or export your Photoshop image to a different file format. Transparent areas are displayed and printed as expected.
- Most other page-layout programs require you to save the image as a TIFF or EPS file. However, if the image contains fully transparent areas, you must first define those areas using a clipping path. Check the documentation for your page-layout program to determine the best format for importing Photoshop images.
If the page-layout program cannot place Photoshop PSD files, follow these steps:
- If your image contains a transparent background or areas that you want to be transparent, create a clipping path around the opaque areas of the image. Even if you have deleted the background around the image, you must define the area with a clipping path before converting the file to TIFF or EPS format. Otherwise, areas that are transparent may appear as white in the page-layout program.
- Choose File > Save As.
- In the Save As dialog box, choose the appropriate format from the Format menu. The format you choose depends on the final output for the document. For printing to non-PostScript printers, choose TIFF. For printing to PostScript printers, choose Photoshop EPS. Then click Save.
-
In the TIFF Options or EPS Options dialog box, set the following options. Leave any remaining options at their default settings, and click OK.
-
TIFF Options dialog box: set Image Compression to None.
- EPS Options dialog box (Windows): set Preview to TIFF (8 bits/pixel) and Encoding to ASCII85.
- EPS Options dialog box (Mac OS): set Preview to Mac (8 bits/pixel) and Encoding to ASCII85.
If the layout program displays transparent areas as white, try printing the document. Some layout programs do not display clipping paths properly but print them as expected.
To the top
Adobe Illustrator can both open or place Photoshop files; you do not need to save or export your Photoshop image to a different file format. If you place an image into an open Illustrator file, you can incorporate the image as if it were any other element in the artwork, or you can maintain a link to the original file. Although you can't edit a linked image within Illustrator, you can jump back to Photoshop, using the Edit Original command, to revise it. Once saved, any changes you make are reflected in the version in Illustrator.
- If the image file is open in Photoshop, save it as a Photoshop (PSD) file, and close the file.
-
In Adobe Illustrator, do one of the following:
-
To open the file directly in Illustrator, choose File > Open. Locate the image in the Open File dialog box, and click Open.
- To incorporate the image into an existing Illustrator file, choose File > Place. Locate the file in the Place dialog box, make sure the Link option is not selected, and click Place.
-
To place the image into a file but maintain a link to the original, choose File > Place. In the Place dialog box, locate the file, select the Link option, and click Place. Illustrator centers the image in the open illustration. A red X through the image indicates it is linked and not editable.
-
If you opened or placed the image without linking, the Photoshop Import dialog box appears. Choose the appropriate option as follows, and click OK:
-
Convert Photoshop Layers To Objects to convert the layers to Illustrator objects. This option preserves masks, blending modes, transparency, and (optionally) slices and image maps. However, it does not support Photoshop adjustment layers and layer effects.
- Flatten Photoshop Layers To A Single Image to merge all the layers into a single layer. This option preserves the look of the image, but you can no longer edit individual layers.
To the top
Create transparency using image clipping paths
You can use image clipping paths to define transparent areas in images you place in page-layout applications. In addition, Mac OS users can embed Photoshop images in many word-processor files.
You may want to use only part of a Photoshop image when printing it or placing it in another application. For example, you may want to use a foreground object and exclude the background. An image clipping path lets you isolate the foreground object and make everything else transparent when the image is printed or placed in another application.
Note: Paths are vector-based; therefore, they have hard edges. You cannot preserve the softness of a feathered edge, such as in a shadow, when creating an image clipping path.

Image imported into Illustrator or InDesign without image clipping path (left), and with image clipping path (right)
- Draw a work path that defines the area of the image you want to show.
If you've already selected the area of the image you want to show, you can convert the selection to a work path. See Convert a selection to a path for instructions.
- In the Paths panel, save the work path as a path.
-
Choose Clipping Path from the Paths panel menu, set the following options, and click OK:
-
For Path, choose the path you want to save.
-
For Flatness, leave the flatness value blank to print the image using the printer's default value. If you experience printing errors, enter a flatness value to determine how the PostScript interpreter approximates the curve. The lower the flatness value, the greater the number of straight lines used to draw the curve and the more accurate the curve. Values can range from 0.2 to 100. In general, a flatness setting from 8 to 10 is recommended for high-resolution printing (1200 dpi to 2400 dpi), and a setting from 1 to 3 for low-resolution printing (300 dpi to 600 dpi).
-
If you plan to print the file using process colors, convert the file to CMYK mode.
-
Save the file by doing one of the following:
-
To print the file using a PostScript printer, save in Photoshop EPS, DCS, or PDF format.
• To print the file using a non-PostScript printer, save in TIFF format and export to Adobe InDesign, or to Adobe PageMaker® 5.0 or later.
To the top
Printing image clipping paths
Sometimes an imagesetter cannot interpret image clipping paths, or an image clipping path is too complex for a printer, resulting in a Limitcheck error or a general PostScript error. Sometimes you can print a complex path on a low-resolution printer without difficulty but run into problems when printing the same path on a high-resolution printer. This is because the lower-resolution printer simplifies the path, using fewer line segments to describe curves than the high-resolution printer does.
You can simplify an image clipping path in the following ways:
- Manually reduce the number of anchor points on the path.
- Increase the tolerance setting used to create the path. To do this, load the existing path as a selection, choose Make Work Path from the Paths panel menu, and increase the tolerance setting (4 to 6 pixels is a good starting value). Then re-create the image clipping path.
To the top
Export paths to Adobe Illustrator
The Paths To Illustrator command lets you export Photoshop paths as Adobe Illustrator files. Exporting paths in this way simplifies the task of combining Photoshop and Illustrator artwork or using Photoshop features with Illustrator artwork. For example, you may want to export a pen tool path and stroke it to use as a trap with a Photoshop clipping path you are printing in Illustrator. You can also use this feature to align Illustrator text or objects with Photoshop paths.
- Draw and save a path or convert an existing selection into a path.
- Choose File > Export > Paths To Illustrator.
- Choose a location for the exported path, and enter a filename. Make sure Work Path is chosen from the Path menu to export the path.
- Click Save.
- Open the file in Adobe Illustrator. You can manipulate the path or use the path to align Illustrator objects that you add to the file.
Note that the crop marks in Adobe Illustrator reflect the dimensions of the Photoshop image. The position of the path within the Photoshop image is maintained, provided you don't change the crop marks or move the path.
To the top
Link or embed an image using OLE (Windows only)
Photoshop is an OLE 2.0 server, which means it supports embedding or linking an image in an OLE container application (usually a word-processing or page-layout program). For example, you can insert Photoshop files and selections into other OLE applications, such as Adobe PageMaker, Adobe FrameMaker, and Microsoft Word, using copy and paste or other methods.
- Linking lets you place a link in the OLE container file that refers to the Photoshop file on the hard drive.
- Embedding lets you insert the Photoshop file into the OLE container file.
After the image is in the container application, you can double-click it for editing in Photoshop. When you close the image in Photoshop, it is updated in the container application.
Link or embed a selection or image in an OLE application
- Do one of the following:
- Copy a selection in Photoshop, and insert it in your OLE container application using the application's Paste Special command. Refer to your word-processing or page-layout application documentation for more instructions. Pasted selections can only be embedded, not linked.
- Use your OLE container application's Insert Object command to insert a new Photoshop image or existing Photoshop file as an OLE-embedded or OLE-linked object. Refer to your word-processing or page-layout application documentation for instructions.
Insert an unlinked screen-resolution bitmap into an OLE application
- With the Move tool ⬆, drag a selection to the OLE container application. When you drop the object, it appears as a 72-ppi bitmap, which cannot be automatically updated in Photoshop.
Modify and update a linked or embedded image in an OLE application
- Double-click the linked or embedded image in your word-processing or page-layout application to start Photoshop (if it is not already running), and open the image for editing.
- Modify the image as desired.
-
Do one of the following:
-
For embedded images, close the file, or choose File > Update or File > Close & Return to [application name].
- For linked images, save and close the file.
Note: You can also modify linked files without first opening the container document. The linked image is updated the next time you open the document in its OLE container application.
Adobe also recommends
• Working with Photoshop and After Effects
• Working with Photoshop and Flash
• Working with Photoshop and Dreamweaver
- Add or delete anchor points
Place a file in Photoshop
Place PDF or Illustrator files in Photoshop
Paste Adobe Illustrator art into Photoshop
The Place command adds a photo, art, or any Photoshop-supported file as a Smart Object to your document. Smart Objects can be scaled, positioned, skewed, rotated, or warped without degrading the image.
To the top
Place a file in Photoshop
- Open the Photoshop document that is the destination for the placed art or photo.
- Do one of the following:
- (Photoshop) Choose File > Place, select the file you want to place, and click Place.

You can also drag a file from Windows or Mac OS onto an open Photoshop image.
• (Bridge) Select the file and choose File > Place > In Photoshop.
- If you are placing a PDF or Illustrator (AI) file, the Place PDF dialog box appears. Select the page or image you want to place, set the Crop options, and click OK. For more information on the Place PDF dialog box options, see Place PDF or Illustrator files in Photoshop.
The placed artwork appears inside a bounding box at the center of the Photoshop image. The artwork maintains its original aspect ratio; however, if the artwork is larger than the Photoshop image, it is resized to fit.
Note: In addition to the Place command, you can also add Adobe Illustrator art as a Smart Object by copying and pasting the art from Illustrator into a Photoshop document. See Paste Adobe Illustrator art into Photoshop.
-
(Optional) Reposition or transform the placed artwork by doing any of the following:
-
To reposition the placed art, position the pointer inside the bounding box of the placed artwork and drag, or in the options bar, enter a value for X to specify the distance between the center point of the placed artwork and the left edge of the image. Enter a value for Y to specify the distance between the center point of the placed artwork and the top edge of the image.
- To scale the placed art, drag one of the corner handles of the bounding box or enter values for W and H in the options bar. When dragging, hold down the Shift key to constrain proportions.
-
To rotate the placed art, position the pointer outside the bounding box (the pointer turns into a curved arrow) and drag, or enter a value (in degrees) for the Rotation option △ in the options bar. The artwork rotates around the center point of the placed artwork. To adjust the center point, drag it to a new location, or click a handle on the Center Point icon in the options bar.
-
To skew the placed art, hold down Ctrl (Windows) or Command (Mac OS) and drag a side handle of the bounding box.
-
To warp the placed art, choose Edit > Transform > Warp and then choose a warp from the Warp Style pop-up menu in the options bar. If you choose Custom from the Warp Style pop-up menu, drag the control points, a segment of the bounding box or mesh, or an area within the mesh to warp the image.
-
If you're placing a PDF, EPS, or Adobe Illustrator file, set the Anti-alias option in the options bar as desired. To blend edge pixels during
rasterization, select the Anti-alias option. To produce a hard-edged transition between edge pixels during rasterization, deselect the Anti-alias option.
-
Do one of the following:
-
Click Commit √ in the options bar or press Enter (Windows) or Return (Mac OS) to commit the placed artwork to a new layer.
- Click Cancel In the options bar, or press Esc to cancel the placement.
To the top
Place PDF or Illustrator files in Photoshop
When you place a PDF or Adobe Illustrator file, use the Place PDF dialog box to set options for placing the artwork.
- With the destination Photoshop document open, place a PDF or Adobe Illustrator file.
- Under Select in the Place PDF dialog box, select Page or Image, depending on what elements of the PDF document you want to import. If the PDF file has multiple pages or images, click the thumbnail of the page or file you want to place.
Note: Use the Thumbnail Size menu to adjust the thumbnail view in the preview window. The Fit Page option fits one thumbnail in the preview window. A scroll bar appears if there are multiple items. - Under Options, choose from the Crop To menu to specify what part of the PDF or Illustrator (AI) document to include:
Bounding Box Crops to the smallest rectangular region that includes all the text and graphics of the page. This option eliminates extraneous white space.
Media Box Crops to the original size of the page.
Crop Box Crops to the clipping region (crop margins) of the PDF file.
Bleed Box Crops to the region specified in the PDF file for accommodating limitations inherent in production processes such as cutting, folding, and trimming.
Trim Box Crops to the region specified for the intended finished size of the page.
Art Box Crops to the region specified in the PDF file for placing the PDF data into another application.
- Click OK to close the Place PDF dialog box.
- If necessary, set any positioning, scaling, skewing, rotating, warping, or anti-aliasing options in the options bar.
- Click Commit √ to place the artwork as a Smart Object on a new layer of the destination document.
To the top
Paste Adobe Illustrator art into Photoshop
You can copy art from Adobe Illustrator and paste it into a Photoshop document.
-
In Adobe Illustrator, specify preferences for the copy-and-paste behavior:
-
To automatically rasterize the art when pasting it into a Photoshop document, turn off the PDF and the AICB (No Transparency Support) options in the File Handling & Clipboard preferences.
-
To paste the art as a Smart Object, rasterized image, path, or shape layer, turn on the PDF and the AICB (No Transparency Support) options in the File Handling & Clipboard preferences.
-
Open a file in Adobe Illustrator, select the art you want to copy, and choose Edit > Copy.
-
In Photoshop, open the document that you want to paste the Adobe Illustrator art into and then choose Edit > Paste.
Note: If the PDF and the AICB (No Transparency Support) options are turned off in the File Handling & Clipboard preferences of Adobe Illustrator, the art is automatically rasterized as it's pasted into the Photoshop document. You can skip the rest of the steps in this procedure.
- In the Paste dialog box, select how you want to paste the Adobe Illustrator art and then click OK:
Smart Object Pastes the art as a Vector Smart Object that can be scaled, transformed, or moved without degrading the image. As the art is placed, its file data is embedded in the Photoshop document on a separate layer.
Pixels Pastes the art as pixels that can be scaled, transformed, or moved before it is rasterized and placed on its own layer in the Photoshop document.
Path Pastes the art as a path that can be edited with the pen tools, Path Selection tool, or Direct Selection tool. The path is pasted into the layer that's selected in the Layers panel.
Shape Layer Pastes the art as a new shape layer (a layer containing a path filled with the foreground color).
- If you selected Smart Object or Pixels in the Paste dialog box, make any transformations you wish, and then click Enter or Return to place the art.
Adobe also recommends
- Adobe Bridge
- Mini Bridge
• Path segments, components, and points

Twitter™ and Facebook posts are not covered under the terms of Creative Commons.
Legal Notices | Online Privacy Policy
About metadata Notes
To the top
About metadata
Metadata is a set of standardized information about a file, such as author name, resolution, color space, copyright, and keywords applied to it. For example, most digital cameras attach some basic information to an image file, such as height, width, file format, and time the image was taken. You can use metadata to streamline your workflow and organize your files.
About the XMP standard
Metadata information is stored using the Extensible Metadata Platform (XMP) standard, on which Adobe Bridge, Adobe Illustrator, Adobe InDesign, and Adobe Photoshop are built. Adjustments made to images with Photoshop® Camera Raw are stored as XMP metadata. XMP is built on XML, and in most cases the metadata is stored in the file. If it isn't possible to store the information in the file, metadata is stored in a separate file called a sidecar file. XMP facilitates the exchange of metadata between Adobe applications and across publishing workflows. For example, you can save metadata from one file as a template, and then import the metadata into other files.
Metadata that is stored in other formats, such as Exif, IPTC (IIM), GPS, and TIFF, is synchronized and described with XMP so that it can be more easily viewed and managed. Other applications and features (for example, Adobe Drive) also use XMP to communicate and store information such as version comments, which you can search using Adobe Bridge.
In most cases, the metadata remains with the file even when the file format changes (for example, from PSD to JPG). Metadata also remains when files are placed in an Adobe document or project.
If you're a C++ or Java developer, use the XMP Toolkit SDK to customize the processing and exchange of metadata. If you're an Adobe Flash or Flex developer, use the XMP File Info SDK to customize the File Info dialog box. For more information, visit the Adobe website.
Working with metadata in Adobe Bridge and Adobe Creative Suite components
Many of the powerful Adobe Bridge features that allow you to organize, search, and keep track of your files and versions depend on XMP metadata in your files. Adobe Bridge provides two ways of working with metadata: through the Metadata panel and through the File Infodialog box.
In some cases, multiple views exist for the same metadata property. For example, a property may be labeled Author in one view and Creator in another, but both refer to the same underlying property. Even if you customize these views for specific workflows, they remain standardized through XMP.
To the top
Notes
You can attach notes to an image in Photoshop. This is useful for associating review comments, production notes, or other information with the image. Notes appear as small non-printable icons on the image. They are associated with a location on the image rather than with a layer. You can hide or show notes, or open notes to view or edit their contents.
Add notes
You can add notes anywhere on your Photoshop image canvas. When you create a note, an icon appears on the image.
-
Select the Note tool in the toolbox. (If the tool isn't visible, hold down the Eyedropper.)
-
In the Options bar, enter or specify the following as needed:
Author Specifies the note author's name.
Color Selects the color for the note icon. Clicking the color box opens the Adobe Color Picker so you can select a color.
-
Click where you want to place the note.
-
The cursor will automatically be active
Show or hide notes
To show or hide notes, do one of the following:
- Choose View > Show > Notes.
- Choose View > Extras. This command also shows or hides grids, guides, selection edges, target paths, and slices.
Open and edit notes
- Using the Note tool, double-click the note icon in the image. The text editing area appears in the Notes panel.
- Choose Window > Notes to display the Notes panel, and click the back and forward arrows to toggle through all notes in the active image.
Import notes from a flattened PDF version of a multilayer image
When you open a PDF file, Photoshop automatically imports any notes it contains. You may want to import notes separately, however, if they were added to a flattened PDF version of a multilayer image. This approach lets reviewers who lack Photoshop provide comments, while letting you view comments in the context of the multilayer design.
- Choose File > Import > Notes.
- Select a PDF or FDF file that contains notes, and then click Load.
The annotations appear in the locations where they were saved in the source document.
Delete notes
- Select the Note tool, and then do either of the following:
- To delete an individual note, click it in the image, and then click the Delete Note icon in the Notes panel.
• To delete all notes, click Clear All in the options bar.
Adobe also recommends
- Add metadata using the File Info dialog box
• Work with metadata templates
- Import metadata into a document

Twitter™ and Facebook posts are not covered under the terms of Creative Commons.
Legal Notices | Online Privacy Policy
Position with guides and the grid
To the top
Position with guides and the grid
Guides and the grid help you position images or elements precisely. Guides appear as nonprinting lines that float over the image. You can move and remove guides. You can also lock them so that you don't move them by accident.
Smart Guides help you align shapes, slices, and selections. They appear automatically when you draw a shape, or create a selection or slide. You can hide Smart Guides if you need to.
The grid is useful for laying out elements symmetrically. The grid appears by default as nonprinting lines but can also be displayed as dots.
Guides and grids behave in similar ways:
- Selections, selection borders, and tools snap to a guide or the grid when dragged within 8 screen (not image) pixels. Guides also snap to the grid when moved. You can turn this feature on and off.
- Guide spacing, along with guide and grid visibility and snapping, is specific to an image.
- Grid spacing, along with guide and grid color and style, is the same for all images.
Show or hide a grid, guides, or smart guides
- Do one of the following:
- Choose View > Show > Grid.
- Choose View > Show > Guides.
• View > Show > Smart Guides. - Choose View > Extras. This command also shows or hides layer edges, selection edges, target paths, and slices.
Place a guide
- If the rulers are not visible, choose View > Rulers.
Note: For the most accurate readings, view the image at 100% magnification or use the Info panel.
-
Do one of the following to create a guide:
-
Choose View > New Guide. In the dialog box, select Horizontal or Vertical orientation, enter a position, and click OK.
- Drag from the horizontal ruler to create a horizontal guide.
text_image
1 2 3 4 5 6 7 8 9 10 11 12 13 14 15 16 17 18 19 20 21 22 23 24 25 26 27 28 29 30 31 32 33 34 35 36 37 38 39 40 41 42 43 44 45 46 47 48 49 50 51 52 53 54 55 56 57 58 59 60 61 62 63 64 65 66 67 68 69 70 71 72 73 74 75 76 77 78 79 80 81 82 83 84 85 86 87 88 89 90 91 92 93 94 95 96 97 98 99 100Dragging to create a horizontal guide
- Hold down Alt (Windows) or Option (Mac OS), and drag from the vertical ruler to create a horizontal guide.
- Drag from the vertical ruler to create a vertical guide.
- Hold down Alt (Windows) or Option (Mac OS), and drag from the horizontal ruler to create a vertical guide.
- Hold down Shift and drag from the horizontal or vertical ruler to create a guide that snaps to the ruler ticks. The pointer changes to a double-headed arrow when you drag a guide.
- (Optional) If you want to lock all guides, choose View > Lock Guides.
Move a guide
- Select the Move tool ⬆, or hold down Ctrl (Windows) or Command (Mac OS) to activate the Move tool.
- Position the pointer over the guide (the pointer turns into a double-headed arrow).
-
Move the guide in any of the following ways:
-
Drag the guide to move it.
- Change the guide from horizontal to vertical, or vice versa, by holding down Alt (Windows) or Option (Mac OS) as you click or drag the guide.
- Align the guide with the ruler ticks by holding down Shift as you drag the guide. The guide snaps to the grid if the grid is visible and View > Snap To > Grid is selected.
Remove guides from the image
- Do one of the following:
• To remove a single guide, drag the guide outside the image window.
• To remove all guides, choose View > Clear Guides.
Set guide and grid preferences
- Do one of the following:
• (Windows) Choose Edit > Preferences > Guides, Grid, & Slices.
• (Mac OS) Choose Photoshop > Preferences > Guides, Grid, & Slices.
- For Color, choose a color for the guides, the grid, or both. If you choose Custom, click the color box, choose a color, and click OK.
- For Style, choose a display option for guides or the grid, or both.
- For Gridline Every, enter a value for the grid spacing. For Subdivisions, enter a value by which to subdivide the grid.
If desired, change the units for this option. The Percent option creates a grid that divides the image into even sections. For example, choosing 25 for the Percent option creates an evenly divided 4-by-4 grid.
- Click OK.
Adobe also recommends

Twitter™ and Facebook posts are not covered under the terms of Creative Commons.
Legal Notices | Online Privacy Policy
Connecting Photoshop companion apps to Photoshop
Using Adobe Nav
Using Adobe Color Lava
Using Adobe Eazel
Note: To troubleshoot issues with companion apps, please visit the Adobe companion apps user forum. Phone support is not provided. Ask questions, request features, and report problems at feedback.photoshop.com.
To the top
Connecting Photoshop companion apps to Photoshop
Adobe® Photoshop® communicates with Adobe Nav for Photoshop, Adobe Color Lava for Photoshop, and Adobe Eazel for Photoshop using a wireless network. Photoshop and the apps must be on the same wireless network to connect. To check your wireless network, do the following:
- On Mac OS, click the Wi-Fi icon in the OS menu bar to choose a wireless network.
• In Windows XP, choose Start > Control Panel > Network And Internet Connections > Network Connections > Wireless Network Connection.
• In Windows Vista/Windows 7, choose Start > Control Panel > Network And Internet Connections > Network And Sharing Center. - On the iPad, tap Settings and then tap Wi-Fi.
Note: For more information about connecting Photoshop and its companion apps, see the support document Troubleshoot companion app connectivity problems | Photoshop or watch Getting started with Photoshop companion apps for Photoshop CS5 on Adobe TV. For general information on setting up and troubleshooting wireless networks, visit Apple Support or Microsoft Windows Help & How-To.
Photoshop connection settings
Note: Using Photoshop with Adobe Nav, Adobe Color Lava, and Adobe Eazel requires Photoshop 12.0.4 or later. If necessary, choose Help > Updates to install the latest version of Photoshop.
Establish Photoshop as a remote connection to the apps.
- In Photoshop, choose Edit > Remote Connections.
text_image
Remote Connections Service Name: Photoshop Server Password: ****** Password must be six characters or longer. Enable Remote Connections Enable the remote connections service to allow remote devices or applications to connect to Photoshop. You should only enable this option if you plan to use this service with a remote device or application. Hostname: IPv4 Address: Address not avail.Create a remote connection in Photoshop.
-
In the Service Name field of the Remote Connections dialog box, enter a descriptive name.
-
In the Password field, enter a six-digit password.
- Select Enable Remote Connections and then click OK.
Companion app wireless connection settings
- In Adobe Nav, Adobe Color Lava, or Adobe Eazel, tap the PS icon Ps in the lower-right corner of the app.
- In the Connections window, tap your Photoshop service.
- Enter the six-digit password and tap Connect.
When the connection is established, the PS icon turns blue Ps.
Companion app IP connections
If a wireless network is unavailable, you can create a direct IP connection between Adobe Nav, Adobe Color Lava, or Adobe Eazel and Photoshop.
- In Adobe Nav, Adobe Color Lava, or Adobe Eazel, tap the PS icon Ps in the lower-right corner of the app.
- In the Connections window, tap New.
- Enter the IP address and password from the Photoshop Remote Connections dialog box.
- Click Connect.
When the connection is established, the PS icon turns blue Ps.
Note: For help troubleshooting IP connections, see the support document Troubleshoot companion app connectivity problems | Photoshop.
To the top
Using Adobe Nav
Adobe Nav for Photoshop allows you to select and manage Photoshop tools on the iPad. Adobe Nav also allows you to browse open Photoshop documents using the iPad while you are working in Photoshop on your computer. Using Adobe Nav to access tools and documents gives you more space and flexibility for working on your images in Photoshop.
Note: Adobe Nav is available in English, French, German, and Japanese. Other language versions of Photoshop can connect to Adobe Nav, but only in those languages. Adobe Nav requires Photoshop 12.0.4 or later. To download the latest version of Photoshop, choose Help > Updates.
For a video tutorial on using Adobe Nav, visit the Adobe CS5.5 update page of the NAPP website. Or see Russell Brown's Photoshop apps update video for information about new Adobe Nav features for the iPad 2.
Connect to Photoshop
Adobe Nav must be connected to Photoshop. For instructions on how to connect Adobe Nav to Photoshop, see Connecting Photoshop companion apps to Photoshop.
Adobe Nav Tools mode
Adobe Nav Tools mode allows you to select and work with Photoshop tools. Adobe Nav displays up to 16 tools at a time. You can customize Tools mode to include the tools you most commonly use, or the tools you use for a particular task, such as painting.

text_image
A B C D E F Screen Mode Actual PixelsAdobe Nav Tools mode.
A. Tool buttons B. Edit options C. Switch to Tools mode D. Switch to Document mode E. Connect to Photoshop F. Toolbox
• To enter Tools mode, tap the bottom of the app.
• To select a tool to use in Photoshop, tap it. The selected tool has a white background.
Note: To specify tool options, use the Options bar in Photoshop.
• To display a 100% view of the active image, tap the Actual Pixels button.
• To cycle through screen modes, tap the Screen Mode button. See Change the screen mode for more information.
- To reverse the foreground and background colors, tap the Switch Colors icon 📋. To restore the defaults, tap the Default Colors icon 📋.
Note: The toolbox in Adobe Nav shows the selected foreground and background colors. To actually select foreground or background colors, use the toolbox in Photoshop. See Choose colors in the toolbox.
- To add, delete, or move tools, tap Edit. Then, do one of the following:
• To move a tool, drag it.
• To delete a tool, tap the X in the upper-left corner of the tool button.
• To add a tool, drag it from the menu at right onto the grid.
Tools that are in the grid are blue in the menu.
• To return to Tools mode, tap Done.
Adobe Nav Document mode
Document mode allows you to select, view, and open new Photoshop documents from Adobe Nav.

text_image
GJ-400 + 2.jpg GJ-400 + 2.jpg GJ-300 - day Info Davon: 76.85 V Index: 679.1 Duration: 140 seconds Transocean: 0.000 seconds Frequency: 3.000 seconds Transocean: 0.000 seconds 3M: Max: 2 MHz/10000Adobe Nav Document mode displays image files that are currently open in Photoshop.
• To enter Document mode, tap the bottom of the app.
The blue dot to the left of the filename indicates the active document.
• To make a different document active in Photoshop, tap its thumbnail.
• To view information about a document, including size and resolution, tap its thumbnail twice. Tap twice again to return to thumbnail view.
- To create a new, untitled document in Photoshop, tap New or tap the new document placeholder thumbnail.
New documents are 1024 x 768 pixels, 72 dpi, and sRGB.
• To duplicate a document, drag its thumbnail to the new document placeholder thumbnail.
• To zoom in on a thumbnail, pinch it open up to four times. To return to thumbnail view, pinch closed.
• To rearrange documents, drag a thumbnail to a new location.
To the top
Using Adobe Color Lava
Adobe Color Lava for Photoshop lets you create themed color swatches on the iPad. When Adobe Color Lava is connected to Photoshop, you can set Adobe Color Lava swatches as the foreground color. You can also add Adobe Color Lava colors to the Photoshop Swatches panel as you work. Or, you can e-mail Adobe Color Lava themes as swatch libraries to share them with other people on other computers.
Note: Adobe Color Lava is available in English, French, German, and Japanese. Other language versions of Photoshop can connect to Adobe Color Lava, but only in those languages. Adobe Color Lava requires Photoshop 12.0.4 or later. To download the latest version of Photoshop, choose Help > Updates.
For a video tutorial on using Adobe Color Lava, visit the Adobe CS5.5 update page of the NAPP website. Or see Russell Brown's Photoshop apps update video for information about new Adobe Color Lava features for the iPad 2.
text_image
A B C D E F GAdobe Color Lava Mixer mode.
A. Clean finger well B. Canvas C. Color wells D. Swatches E. Connect to Photoshop F. Switch to Theme Library mode G. Load a photo
Mix colors in Adobe Color Lava
To mix colors in Adobe Color Lava, select colors from the sample wells and then "paint" with your finger on the canvas.
- To load a color, tap its color well. The selected color has a thicker white border.
- To switch between RGB and grayscale, tap the inner ring of the color wells.
- To edit hue, saturation, and brightness values, double-tap a color well. To accept the HSB settings, tap 🎨.
• To remove color from your fingertip, tap the clean finger well once or twice.
• To reset the color wells to their defaults, tap .
• To erase the canvas, tap .
• To create a new theme, tap the New button. - To load a photo into the canvas, tap the camera icon . Then, choose an image from an iPad photo album.
Work with swatches in Adobe Color Lava
Swatch sets appear on the right side of the Adobe Color Lava app. The active, or selected, swatch is larger than the other four swatches.
• To select a swatch, tap it. When you mix colors, Adobe Color Lava replaces the color in the selected swatch with the color you are painting.
• To set a swatch as the foreground color in Photoshop, tap it.
• To edit swatch sets, tap the Theme Library mode button
Manage themes in Adobe Color Lava
Theme Library mode allows you to work with up to 300 swatch sets, or themes.
text_image
A bolded-3 orange-green purple-inset B C DAdobe Color Lava Theme Library mode.
A. Color themes B. Edit themes C. Switch to Color Mixer mode D. Connect to Photoshop
• To select a theme, tap it.
• To edit the selected theme, tap the Color Mixer mode button
- To set a swatch in a theme as the foreground color in Photoshop, tap it.
• To see the RGB, HSL, and hexadecimal values for each swatch in a theme, double-tap the theme.

heatmap
purple mountains Feb 08, 2011 | Color | R | H | S | |---|---|---|---| | Purple | 135 | H | 69% | | Purple | G | B | 100% | | Purple | B | 138 | 50% | | Pink | R | 191 | H | | Pink | G | 118 | S | | Pink | B | 192 | 75% | | Light Blue | R | 189 | H | | Light Blue | G | 131 | S | | Light Blue | B | 216 | B | | Blue | R | 1 | H | | Blue | G | 8 | S | | Blue | B | 253 | 99% | | Grey | R | 177 | H | | Grey | G | 177 | E | | Grey | B | 177 | S | #B00065 #B074C0 #A09D2 #B10BFE #B151B1Adobe Color Lava theme details.
• To rename or delete a theme, tap the Edit button or touch and hold a theme. Then, do one of the following:
- Tap the X in the upper-left corner of a theme to delete it.
- Tap a theme name to rename it.
Share Adobe Color Lava themes
For instructions on how to connect Photoshop and Adobe Color Lava, see Connecting Photoshop companion apps to Photoshop.
-
When you are connected to Photoshop, tap 📄 to enter Theme Library mode.
-
Tap a theme twice to open the theme details. Then, tap either of the following buttons:
Send To Photoshop Theme colors appear in the Swatches panel.
E-mail Opens an e-mail message so you can send the theme to someone. The e-mail includes a .png preview of the theme, a .png preview of the canvas, and a .ase swatch library file. For instructions on loading a swatch library in Photoshop, see Manage swatch libraries.
To the top
Using Adobe Eazel
Adobe Eazel for Photoshop lets you paint watercolor pictures on a canvas. Each stroke goes on "wet" and takes a few seconds to "dry." The paints blend according to the options you choose and the wetness of the previous stroke. You can save Eazel artwork to the iPad photo gallery, and can bring it into Photoshop for further editing or compositing.
Note: Adobe Eazel is available in English, French, German, and Japanese. Other language versions of Photoshop can connect to Adobe Eazel, but only in those languages. Adobe Eazel requires Photoshop 12.0.4 or later. To download the latest version of Photoshop, choose Help > Updates.
For a video tutorial on using Adobe Eazel, visit the Adobe CS5.5 update page of the NAPP website.
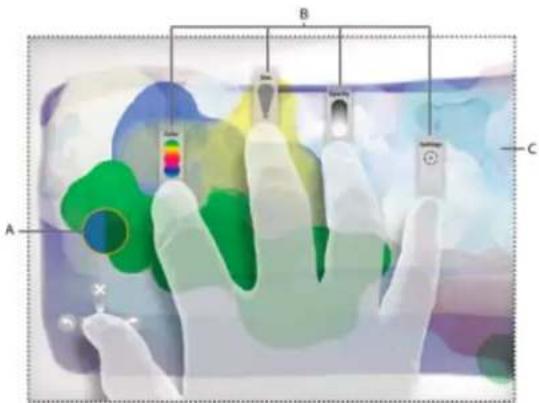
text_image
A B CAdobe Eazel for Photoshop.
A. Brush sample B. Finger controls C. Canvas
Note: Adobe Eazel automatically detects right and left hands.
Brush sample Shows the color, size, and opacity of the current brush.
Thumb control Undo, redo, and erase all.
Index finger control Choose a color.
Third finger control Adjust the brush size.
Fourth finger control Change paint opacity.
Fifth finger control Save artwork and send it to Photoshop.
Adobe Eazel work modes
Adobe Eazel offers two work modes: persistent and ephemeral. In persistent mode, all five finger controls stay visible onscreen while you specify options. To work in persistent mode, do the following:
- Touch all five fingers to canvas at once, then lift.
- Tap, or touch and drag, a setting to adjust it.
-
Touch the canvas to accept the change.
-
Touch the canvas again to set another option, or tap a second time to start painting.
In ephemeral mode, only one control appears onscreen at a time. The control appears only for as long as your finger interacts with it. To work in ephemeral mode, do the following:
- Place all five fingers on the canvas and lift all but the finger whose options you want to adjust.
-
Drag the finger to adjust the setting or, with the fifth finger, tap to select an option.
-
Touch the canvas again to set another option or start painting.
Choose colors in Adobe Eazel
Adobe Eazel keeps five color swatches in a palette available under your index finger. The selected swatch has a flashing border.
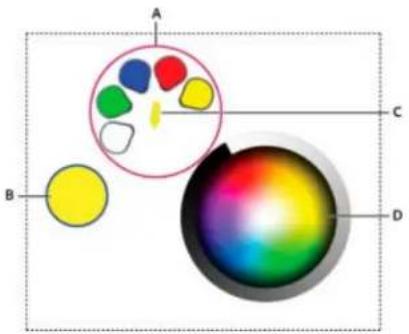
text_image
A B C DChoosing a color in Eazel.
A. Color swatches B. Brush sample C. Current color D. Color wheel
• To choose a swatch, drag your index finger to it and lift.
• To change a swatch, drag your index finger to it to select it. Continue to drag to the color wheel or to a color in the artwork on the canvas.
Specify stroke size and opacity in Adobe Eazel
- To make the brush larger, drag up with your third finger. To make the brush smaller, drag down with your third finger. The brush sample updates as you drag.
- To make the paint more opaque, drag up with your fourth finger. To make the paint more transparent, drag down with your fourth finger. The brush sample updates as you drag.
Undo, redo, and erase in Adobe Eazel
• To undo your last stroke, use your thumb to choose or swipe from right to left.
• To redo your last stroke, use your thumb to choose or swipe from left to right.
• To erase the canvas, use your thumb to choose or swipe up.
Save Adobe Eazel artwork and send it to Photoshop
You can save Adobe Eazel artwork to the iPad gallery as .jpeg photo. Then, you can use the Photos app to e-mail it to someone, use it as wallpaper, or print it. You can also send Adobe Eazel artwork to Photoshop, where you can open it for additional editing or compositing.
Note: For instructions on how to connect Photoshop and Adobe Eazel, see Connecting Photoshop companion apps to Photoshop.
- To save artwork to the iPad, choose Settings with your fifth finger and then tap the Save To Photos button.
• To send artwork to Photoshop, choose Settings with your fifth finger and then tap the Transmit to Photoshop button.
Adobe Eazel sends image data to Photoshop, which opens the artwork at 4096-x-3092 resolution. In Photoshop, you can save Adobe Eazel artwork in any supported file format.
Note: Adobe Eazel artwork may look slightly different in Photoshop. Due to rendering, minor geometrical differences occur.
Twitter ^™ and Facebook posts are not covered under the terms of Creative Commons.
Legal Notices | Online Privacy Policy
Define new keyboard shortcuts
Clear shortcuts from a command or tool
Delete a set of shortcuts
View a list of current shortcuts
Note: For detailed instructions, click the links below. To ask questions, request features, or report problems, visit feedback.photoshop.com.
Photoshop lets you view a list of all shortcuts, and edit or create shortcuts. The Keyboard Shortcuts dialog box serves as a shortcut editor, and includes all commands that support shortcuts, some of which aren't addressed in the default shortcut set.

In addition to using keyboard shortcuts, you can access many commands using context-sensitive menus that are relevant to the active tool, selection, or panel. To display a context-sensitive menu, right-click in the document window or panel.
To the top
Define new keyboard shortcuts
-
Do one of the following:
-
Choose Edit > Keyboard Shortcuts.
-
Choose Window > Workspace > Keyboard Shortcuts & Menus and click the Keyboard Shortcuts tab.
-
Choose a set of shortcuts from the Set menu at the top of the Keyboard Shortcuts & Menus dialog box.
-
Choose a shortcut type from the Shortcuts For menu:
Application Menus Lets you customize keyboard shortcuts for items in the menu bar.
Panel Menus Lets you customize keyboard shortcuts for items in panel menus.
Tools Lets you customize keyboard shortcuts for tools in the toolbox.
-
In the Shortcut column of the scroll list, select the shortcut you want to modify.
-
Type a new shortcut.
If the keyboard shortcut is already assigned to another command or tool in the set, an alert appears. Click Accept to assign the shortcut to the new command or tool and erase the previously assigned shortcut. After you reassign a shortcut, you can click Undo Changes to undo the change, or click Accept and Go To Conflict to assign a new shortcut to the other command or tool.
-
When you're finished changing shortcuts, do one of the following:
-
To save all changes to the current set of keyboard shortcuts, click the Save Set button ^2 . Changes to a custom set are saved. If you're saving changes to the Photoshop Defaults set, the Save dialog box opens. Enter a name for the new set and click Save.
• To create a new set based on the current set of shortcuts, click the Save Set As button 📋. In the Save dialog box, enter a name for
the new set in the Name text box, and click Save. The new keyboard shortcut set will appear in the pop-up menu under the new name.
- To discard the last saved change without closing the dialog box, click Undo.
• To return a new shortcut to the default, click Use Default. - To discard all changes and exit the dialog box, click Cancel.
Note: If you haven't saved the current set of changes, you can click Cancel to discard all changes and exit the dialog box.
To the top
Clear shortcuts from a command or tool
- Choose Edit > Keyboard Shortcuts.
- In the Keyboard Shortcuts dialog box, select the command or tool name whose shortcut you want to delete.
- Click Delete Shortcut.
To the top
Delete a set of shortcuts
- Choose Edit > Keyboard Shortcuts.
- In the Set pop-up menu, choose the shortcut set that you want to delete.
- Click the Delete icon 🔒 and then click OK to exit the dialog box.
To the top
View a list of current shortcuts
To view a list of current shortcuts, export them to an HTML file, which you can display or print with a web browser.
- Choose Edit > Keyboard Shortcuts.
- From the Shortcuts For menu, choose a shortcut type: Application Menus, Panel Menus, or Tools.
- Click Summarize.

Twitter™ and Facebook posts are not covered under the terms of Creative Commons.
Legal Notices | Online Privacy Policy
About plug-in modules
Plug-in modules are software programs developed by Adobe Systems and by other software developers in conjunction with Adobe Systems to add features to Photoshop. A number of importing, exporting, and special-effects plug-ins come with your program. They are automatically installed in folders inside the Photoshop Plug-ins folder.
You can select an additional Plug-ins folder for compatible plug-ins stored with another application. You can also create a shortcut (Windows) or an alias (Mac OS) for a plug-in stored in another folder on your system. You can then add the shortcut or alias to the plug-ins folder and use that plug-in with Photoshop.
Once installed, plug-in modules appear as options in the Import or Export menu; as file formats in the Open, and Save As dialog boxes; or as filters in the Filter submenus. Photoshop can accommodate a large number of plug-ins. However, if the list of installed plug-in modules becomes too long, Photoshop may not be able to display all the plug-ins in their appropriate menus. If so, newly installed plug-ins appear in the Filter > Other submenu.
Install a plug-in module
In Mac OS, you cannot run Photoshop in the Classic environment. Plug-ins originally intended to work on Mac OS 9 won't appear.
• Do one of the following:
- To install an Adobe Systems plug-in module, use the plug-in installer, if provided. In Windows, you can also install or copy the module into the appropriate Plug-ins folder in the Photoshop program folder. In Mac OS, drag a copy of the module to the appropriate Plug-Ins folder in the Photoshop program folder. Make sure that the files are uncompressed.
- To install a third-party plug-in module, follow the installation instructions that came with the plug-in module. If you cannot run a third-party plug-in, it may require a legacy Photoshop serial number.
Select an additional plug-ins folder
- Choose Edit > Preferences > Plug-ins (Windows) or choose Photoshop > Preferences > Plug-ins (Mac OS).
- Select Additional Plug-ins Folder.
- Click Choose, and select a folder or directory from the list. Make sure that you do not select a location inside the Plug-ins folder. To display the contents of a folder, double-click the directory (Windows) or click Open (Mac OS).
- When you have highlighted the additional plug-ins folder, click OK (Windows) or Choose (Mac OS).
- Restart Photoshop for the plug-ins to take effect.
Suppress the loading of plug-ins
- Add a tilde \~ character at the beginning of the plug-in name, folder, or directory. That file (or all files in the folder) will be ignored by the application.
View information about installed plug-ins
- Do one of the following:
- (Windows) Choose Help > About Plug-in and choose a plug-in from the submenu.
• (Mac OS) Choose Photoshop > About Plug-in, and then choose a plug-in from the submenu.
More Help Topics

Twitter™ and Facebook posts are not covered under the terms of Creative Commons.
Legal Notices | Online Privacy Policy
Photoshop CS6 introduces over 60 productivity enhancements, also known as Just Do It (JDI) features. These small improvements address longtime customer requests and collectively can greatly increase your productivity.
Note: For information about new features and enhancements in Photoshop CC, see What's New in Photoshop CC.
To the top
Automation
- Contact Sheet II restored as an Automate option
• PDF Presentation restored as an Automate option
• Layer Comps to PDF restored as a Scripts option
To the top
Brushes
- Record brush strokes in actions with Allow Tool Recording option in Actions panel menu. (Because brush strokes are often unique to each project, be sure to disable this option after recording actions that require it.)
- Brightness/contrast slider for textures when painting
- Brush tip cursor reflects brush pose and jitter for round and captured tips
• Brush projection for static tips
• Color dynamics remain consistent for each stroke by default
Note: For details about brush pose, projection, and color dynamics options, see Painting and patterns.
- The heads-up display (HUD) for changing brush size and hardness can also change opacity: Press Control+Alt (Windows) or Command+Option (Mac OS), and drag up or down. (In the General preferences, you must deselect Vary Round Brush Hardness Based on HUD Vertical Movement.)
- Increased maximum brush size to 5000 pixels
To the top
Channels
- Enabled Split Channels for documents with single layer (so you can split simple transparency)
To the top
Color Picker
- Allows pasting into hexadecimal field with # (for example, #aabbcc) or 0x (for example, 0xAABBCC)
- Allows shortcut hexadecimal values (for example, #123)
To the top
Eyedropper
Added option to ignore adjustment layers to Sample menu in options bar
- Added option to sample from current layer and below to Sample menu
• Sample size options now appear in context menu for various Eyedropper tools (black point and white point in Levels, and so forth)
To the top
File formats
- Reads more bit depths in TIFF files
- Adds options for addressing OpenEXR transparency when opening and saving
- Reads BIGTIFF format (TIFF files over 4 Gig)
- Reads common stereo image pair formats (JPS, MPO, PNS)
To the top
GPU
- Increased stability by prequalifying detected GPUs before use
To the top
Image resizing
- Bicubic Automatic option auto-selects the best resample method based on the type of resize
To the top
Importing
• (Mac OS) ImageKit scanner and camera support to import images from more devices
To the top
Layers
- Added Interpolation menu to options bar for Free Transform command
- Added dither option to Gradient Overlay and Gradient Stroke layer styles
- Added 00 and Shift + 00 shortcuts to set layer and fill opacity to 0%
- Simultaneously change locking, blend mode, or color label for multiple selected layers
- Ctrl/Command + J duplicates selected layer groups (in addition to layers)
• Layer tool tips include layer name - New Rasterize Layer Style command merges layer effects into layer
- Reordered layer styles to reflect the order in which they are applied (placing drop shadow, for example, below the other effects)
• Show Blend If/Blending Options badge on layer if Layer Style blending options have been customized - Alt/Opt + click FX toggle arrows shows or hides all layer effects
- Correct opacity and blend mode displayed for hidden layers
- When renaming layers, pressing Tab goes to next layer; Shift + Tab goes to previous.
- Shape layer names reflect the tool name (for example, "Rectangle 1")
To the top
Liquify
- Added GPU video card acceleration
- Added Basic and Advanced user interface modes
• Improved Mac cursor visibility - Added option to load last mesh
- Increased maximum Liquify brush size to 15,000
- (English only) Resize Liquify brush with bracket-key [] shortcuts, which now match increments elsewhere in Photoshop
- Ctrl (Windows) / Command (Mac OS) switches to magnifying glass
- Alt + right click + drag changes brush size (Windows)
- Ctrl + Alt + click + drag changes brush size (Mac OS)
To the top
Masks
- Enable Invert and Threshold adjustments for masks in 32-bit/channel images
To the top
Plug-ins
- Hold down Shift during startup to disable Optional and 3rd party plug-ins
To the top
Presets
- Added New Document presets for common devices (for example, iPhone, iPad, and so forth)
- Added new Gradient Map presets for traditional print toning and split-toning
• Reorganized tool presets remain after restart
• New HDR Pro presets from RC Concepcion and Scott Kelby
To the top
Printing
- Added Edit button for description field in Print dialog
- Allow Print dialog and print preview window to be resized
- Allow customizable preview background color in the Print dialog
- Allow manual repositioning of the printed area on page
- Hide color profiles that are inappropriate for currently selected printer when using Photoshop Manages Color
- Reintroduced Print Selected Area; you can modify selection in Print dialog
To the top
Saving
- Warning message indicates that 16-bit images cannot display their file size in the Save as JPEG dialog
To the top
SDK
- Added ability to access tool name associated with the tool preset name via scripting
- Added the ability to return an array of guides in a document from the scripting SDK
Selections
• Support for decimal feather values for Marquee tool, Lasso tool, and Mask panel (like the Feather dialog)
• Feather radius recalled in Make Selection from path dialog
To the top
Transform
- Layer thumbnail continues to show Smart Object icon when transforming a layer
- Improved dragging of vector curves
- Can rotate 90 degrees with even x odd pixel dimension to avoid landing on a half-pixel position. (To enable this behavior, Snap Vector Tools And Transforms To Pixel Grid must be selected in the General preferences.)
- Added File Handling > Ignore Rotation Metadata preference to disable automatic rotation of images based on file metadata
To the top
Type
- Added Type > Paste Lorem Ipsum command to quickly insert placeholder text
- Added Blend Text Colors Using Gamma setting to blend text layers using a gamma setting distinct from the document color space. To access this option, choose Edit > Color Settings, and click More Options at right. The default setting, 1.45, blends text more correctly than previous Photoshop versions, better matching other applications.
Note: When you select Blend Text Colors Using Gamma, text layers from Photoshop CS6 will look different in earlier versions of Photoshop.
To the top
User interface
- New/Open document commands available by context-clicking document tabs (longtime Mac OS feature now on Windows too)
- Added "Don't show again" checkbox to Purge warnings
- Removed the app bar and reduced the draggable title bar over 30%

Twitter™ and Facebook posts are not covered under the terms of Creative Commons.
Legal Notices | Online Privacy Policy
Blur gallery (Field, Iris, Tilt-Shift)
Liquify
Crop tool
Adaptive Wide Angle
This list covers some helpful shortcuts for some Photoshop features.
To the top
To clear print settings, hold down the spacebar while selecting File > Print.
To the top
Blur gallery (Field, Iris, Tilt-Shift)
H: Temporarily hide on-canvas UI
M: Temporarily show blur mask
To the top
Liquify
M: Load Last Mesh
X: Mirror Tool
To the top
Crop tool
Double-click inside crop box, or press Enter or Return Commit crop
| Esc Cancel crop | |
| X | Switch crop box orientation between portrait and landscape |
| I | (Creative Cloud only) Front Image for Crop tool and Perspective Crop tool |
| Backspace or Delete Reset crop box | |
| O Cycle overlay options | |
| Shift + O | Cycle overlay orientation for Triangle and Golden Spiral overlays |
| Forward slash (/) Hide and show cropped area | |
| Shift + drag Create new crop box | |
| Shift + drag corner handle Constrain proportions | |
Control (Windows) or Command (Mac OS) Invoke Straighten tool
Control + rotate Prevent crop box from shrinking
Shift + rotate Restrict to 15-degree increments
Shift + drag image Restrict to 45-degree axes
Control + drag Temporarily disable snapping to edge
To the top
Adaptive Wide Angle
Tool shortcuts
C: Constraint tool
Y: Polygon Constraint tool
M: Move tool
H: Hand tool
Z: Zoom tool
Control shortcuts
P: Preview
W: Show Constraint
E: Show Mesh
T: Correction
S: Scale
F: Focal Length
R: Crop Factor
A: As Shot
Hidden shortcuts not visible in interface
L: Toggle transparent matte
X: Temporary zoom
E: Revert the last-added polygon corner
For more keyboard shortcuts
- Default keyboard shortcuts
Twitter ^™ and Facebook posts are not covered under the terms of Creative Commons.
Legal Notices | Online Privacy Policy
Migrate presets from earlier versions of Photoshop From an expert: Migrating presets into Photoshop CS6 Work with the Preset Manager
To the top
Migrate presets from earlier versions of Photoshop
You can migrate presets from earlier versions of Photoshop into newer versions. The Migrate Presets command lets you automatically migrate brushes, swatches, gradients, patterns, and more.
- Choose Edit > Presets > Migrate Presets.
- Click Yes when prompted to import presets from an earlier version of Photoshop.
- Click OK.
To the top
Work with the Preset Manager
About the Preset Manager
The Preset Manager lets you manage the libraries of preset brushes, swatches, gradients, styles, patterns, contours, custom shapes, and preset tools that come with Photoshop. For example, you can use the Preset Manager to change the current set of preset items or create new libraries. After you load a library in the Preset Manager, you can access the library's items in locations such as the options bar, panels, dialog boxes, and so on.
In general, when you change a preset, Photoshop prompts you to save the changes as a new preset so that both the original and changed preset remain available.
Each type of library has its own file extension and default folder. Preset files are installed on your computer inside the Presets folder in the Adobe Photoshop application folder.
To open the Preset Manager, choose Edit > Presets > Preset Manager. Choose an option from the Preset Type menu to switch to a specific preset type.
You can adjust the configuration of presets by clicking the panel menu button and choosing a display mode from the top section of the menu:
Text Only Displays the name of each preset item.
Small Thumbnail or Large Thumbnail Displays a thumbnail of each preset item.
Small List or Large List Displays the name and thumbnail of each preset item.
Stroke Thumbnail Displays a sample brush stroke and brush thumbnail of each brush preset. (This option is available for brush presets only.) To rearrange the list of items, drag an item up or down in the list.
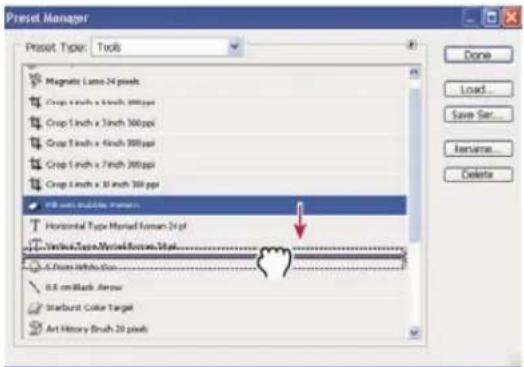
text_image
Preset Manager Preset Type: Tools Magnetic Lasso 24 pixels Crop 1 inch x 3 inch 300 dpi Crop 1 inch x 3 inch 300 dpi Crop 1 inch x 4 inch 300 dpi Crop 1 inch x 7 inch 300 dpi Crop 1 inch x 8 inch 300 dpi PIE with bubble markers Horizontal Type Marked from 24 pt Vertical-Tape-Minical-Surface-Mix 4-Flow Influa-Box... U.S. cm/Black Arrow Starburst Color Target Art History Brush 20 pixels Done Load... Save Ser... Rename... DeleteRearranging tool presets in the Preset Manager
Note: To delete a preset in the Preset Manager, select the preset and click Delete. You can always use the Reset command to restore the default items in a library.
Load a library of preset items
- Do one of the following:
- Click the triangle to the right of the Preset Type pop-up menu and then choose a library file from the bottom of the panel menu. Click OK to replace the current list, or click Append to add the current list.
• To add a library to the current list, click Load, select the library file you want to add, and click Load. - To replace the current list with a different library, choose Replace [Preset Type] from the panel menu. Select the library file you want to use, and click Load.
Note: Each type of library has its own file extension and default folder.
Manage preset items
You can rename or delete preset items, as well as create or restore libraries of presets.
Rename preset items
- Select a preset item. Shift-click to select multiple items.
-
Do one of the following:
-
Click Rename, and then enter a new name for the brush, swatch, and so on.
- If the Preset Manager currently displays presets as thumbnails, double-click a preset, enter a new name, and click OK.
- If the Preset Manager currently displays presets as a list or text only, double-click a preset, enter a new name inline, and press Enter (Windows) or Return (Mac OS).
Delete preset items
- Do one of the following:
- Select a preset item, and click Delete.
- Alt-click (Windows) or Option-click (Mac OS) the items you want to delete.
Create a new library of presets
- Do one of the following:
• To save all the presets in the list as a library, make sure that all items are selected.
• To save a subset of the current list as a library, hold down Shift, and select the items you want to save.
- Click Save Set, choose a location for the library, enter a file name, and click Save.
You can save the library anywhere. However, if you place the library file in the appropriate Presets folder in the default preset location, the library name will appear at the bottom of the panel menu after you restart Photoshop.
Restore the default library of preset items
- Choose Reset from the panel menu. You can either replace the current list or append the default library to the current list.
Default preset locations
-
The default location for saving/loading/replacing presets depends on your operating system.
-
Windows 7 and Windows Vista: [Drive]:\Users\
\AppData\Roaming\Adobe\Adobe Photoshop [version_number]\Presets. - Mac:
/Library/Application Support/Adobe/AdobePhotoshop [version_number]/Presets. -
Windows XP: [Drive]:\Document and Settings\
\Application Data\Adobe\AdobePhotoshop [version_number]\Preset. -
Presets that ship with Adobe Photoshop are stored in the Photoshop program folder.
Displaying Hidden Files in Windows
The default locations for saving/loading/replacing presets are hidden by default in Windows.
- To display hidden files in Windows XP:
a. Go to Start > Control Panel > Folder Options.
b. In the View tab, under Hidden files and folders, select Show hidden files and folders.
c. Click OK.
- To display hidden files in Windows Vista:
a. Go to Start > Control Panel > Appearance and Personalization > Folder Options.
b. In the View tab, under Hidden files and folders, select Show hidden files and folders.
c. Click OK.

Twitter ^™ and Facebook posts are not covered under the terms of Creative Commons.
Legal Notices | Online Privacy Policy
Image and color basics
The Image Size command in Photoshop CC includes a method to preserve details and provide better sharpness while enlarging images.
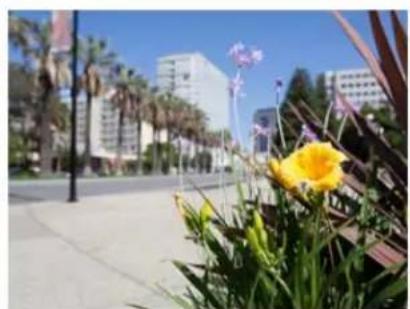
natural_image
Street scene with yellow flowers and palm trees, modern buildings in background (no visible text or symbols)Original uncropped image
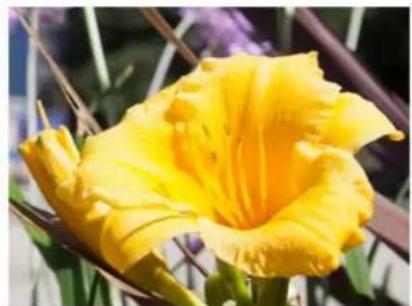
natural_image
Close-up of a vibrant yellow flower with visible petals and stem, surrounded by green foliage (no text or symbols)Sharp resized image with details preservation
In addition, the Photoshop CC Image Size dialog box has been updated for ease of use:
- A window displays the preview image from the resizing parameters.
- Resizing the dialog box resizes the preview window.
- The Scale Styles option is turned on and off from inside the gear menu in the upper right corner of the dialog box.
- From the Dimensions pop-up menu, choose different units of measurement to display the dimensions of the final output.
- Click the link icon to toggle the constrain proportions option on and off.
To the top
Resize images
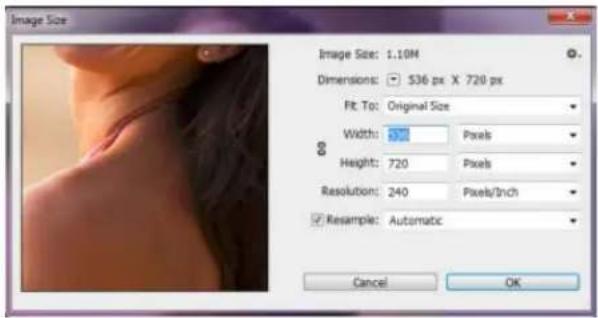
text_image
Image Size Image Size: 1.10M Dimensions: 536 px X 720 px Fit To: Original Size Width: 50 Pixels Height: 720 Pixels Resolution: 240 Pixels/Inch ✓ Resample: Automatic Cancel OKResizing images
- Choose Image > Image Size.
- Do any of the following to modify the image preview:
• To change the size of the preview window, drag a corner of the Image Size dialog box and resize it.
• To view a different area of the image, drag within the preview.
• To change the preview magnification, Ctrl-click (Windows) or Command-click (Mac OS) in the preview image to increase magnification.
Alt-click (Windows) or Option-click (Mac OS) to reduce the magnification. After clicking, the percentage of magnification briefly appears near the bottom of the preview image.
-
To change the unit of measurement for the pixel dimension, click the triangle next to Dimensions and choose from the menu.
-
To maintain the original ratio of width to height measurement, make sure that the Constrain Proportions option is enabled. If you want to scale the width and height independently of each other, click the Constrain Proportions icon to unlink them.
Note: You can change the unit of measurement for width and height by choosing from the menus to the right of the Width and Height text boxes.
-
Do any of the following:
-
To change the image size or resolution and allow the total number of pixels to adjust proportionately, make sure that Resample is selected, and if necessary, choose an interpolation method from the Resample menu.
• To change the image size or resolution without changing the total number of pixels in the image, deselect Resample. -
(Optional) From the Fit To menu:
-
Choose a preset to resize the image.
-
Choose Auto Resolution to resize the image for a specific printing output. In the Auto Resolution dialog box, specify the Screen value and select a Quality. You can change the unit of measurement by choosing from the menu to the right of the Screen text box.
-
Enter values for Width and Height. To enter values in a different unit of measurement, choose from the menus next to the Width and Height text boxes.
The new image file size appears at the top of the Image Size dialog box, with the old file size in parentheses.
-
To change the Resolution, enter a new value. (Optional) You can also choose a different unit of measurement.
-
If your image has layers with styles applied to them, select Scale Styles from the gear icon to scale the effects in the resized image. This option is available only if you selected the Constrain Proportions option.
-
When you finish setting options, do any of the following:
- Click OK.
To restore the initial values displayed in the Image Size dialog box, either choose Original Size from the Fit To menu, or hold down Alt (Windows) or Option (Mac OS), and click Reset.
Resampling options | Photoshop CC
Automatic Photoshop chooses the resampling method based on the document type and whether the document is scaling up or down.
Preserve Details (enlargement) When this method is chosen, a Noise reduction slider becomes available for smoothing out noise as you upscale the image.
Bicubic Smoother (enlargement) A good method for enlarging images based on Bicubic interpolation but designed to produce smoother results.
Bicubic Sharper (reduction) A good method for reducing the size of an image based on Bicubic interpolation with enhanced sharpening. This method maintains the detail in a resampled image. If Bicubic Sharper oversharpens some areas of an image, try using Bicubic.
Bicubic (smoother gradients) A slower but more precise method based on an examination of the values of surrounding pixels. Using more
complex calculations, Bicubic produces smoother tonal gradations than Nearest Neighbor or Bilinear.
Nearest Neighbor (hard edges) A fast but less precise method that replicates the pixels in an image. This method preserves hard edges and produces a smaller file in illustrations containing edges that are not anti-aliased. However, this method can produce jagged effects, which become apparent when you distort or scale an image or perform multiple manipulations on a selection.
Bilinear A method that adds pixels by averaging the color values of surrounding pixels. It produces medium-quality results.
For more information
• Image size and resolution

Twitter™ and Facebook posts are not covered under the terms of Creative Commons.
Legal Notices | Online Privacy Policy
About bitmap images
About vector graphics
Combining vector graphics and bitmap images
Color channels
Bit depth
Convert between bit depths
Note: For detailed instructions, click the links below. To ask questions, request features, or report problems, visit feedback.photoshop.com.
To the top
About bitmap images
Bitmap images—technically called raster images—use a rectangular grid of picture elements (pixels) to represent images. Each pixel is assigned a specific location and color value. When working with bitmap images, you edit pixels rather than objects or shapes. Bitmap images are the most common electronic medium for continuous-tone images, such as photographs or digital paintings, because they can more efficiently represent subtle gradations of shades and color.
Bitmap images are resolution-dependent—that is, they contain a fixed number of pixels. As a result, they can lose detail and appear jagged if they are scaled to high magnifications on-screen or if they are printed at a lower resolution than they were created for.

natural_image
Side view of a bicycle with front wheel and side seat, shown with two circular inset images (3:1 and 24:1) indicating details.Example of a bitmap image at different levels of magnification
Bitmap images sometimes require large amounts of storage space, and often need to be compressed to keep file sizes down when used in certain Creative Suite components. For instance, you compress an image file in its original application before you import it into a layout.
Note: In Adobe Illustrator, you can create bitmap effects in your artwork using effects and graphic styles.
To the top
About vector graphics
Vector graphics (sometimes called vector shapes or vector objects) are made up of lines and curves defined by mathematical objects called vectors, which describe an image according to its geometric characteristics.
You can freely move or modify vector graphics without losing detail or clarity, because they are resolution-independent—they maintain crisp edges when resized, printed to a PostScript printer, saved in a PDF file, or imported into a vector-based graphics application. As a result, vector graphics are the best choice for artwork, such as logos, that will be used at various sizes and in various output media.
The vector objects you create using the drawing and shape tools in Adobe Creative Suite are examples of vector graphics. You can use the Copy and Paste commands to duplicate vector graphics betweenCreative Suite components.
To the top
Combining vector graphics and bitmap images
When combining vector graphics and bitmap images in a document, it's important to remember that how your artwork looks on-screen isn't always
how it will look in its final medium (whether commercially printed, printed on a desktop printer, or viewed on the web). The following factors influence the quality of your final artwork:
Transparency Many effects add partially transparent pixels to your artwork. When your artwork contains transparency, Photoshop performs a process called flattening before printing or exporting. In most cases, the default flattening process produces excellent results. However, if your artwork contains complex, overlapping areas and you require high-resolution output, you will probably want to preview the effects of flattening.
Image Resolution The number of pixels per inch (ppi) in a bitmap image. Using too low a resolution for a printed image results in pixelation—output with large, coarse-looking pixels. Using too high a resolution (pixels smaller than what the output device can produce) increases the file size without increasing the quality of the printed output, and slows the printing of the artwork.
Printer resolution and screen frequency The number of ink dots produced per inch (dpi) and the number of lines per inch (lpi) in a halftone screen. The relationship between image resolution, printer resolution, and screen frequency determines the quality of detail in the printed image.
To the top
Color channels
Every Photoshop image has one or more channels, each storing information about color elements in the image. The number of default color channels in an image depends on its color mode. By default, images in Bitmap, Grayscale, Duotone, and Indexed Color mode have one channel; RGB and Lab images have three; and CMYK images have four. You can add channels to all image types except Bitmap mode images. For more information, see Color modes.
Channels in color images are actually grayscale images that represent each of the color components of an image. For example, an RGB image has separate channels for red, green, and blues color values.
In addition to color channels, alpha channels, can be added to an image for storing and editing selections as masks, and spot color channels can be added to add spot color plates for printing. For more information, see Channel basics.
To the top
Bit depth
Bit depth specifies how much color information is available for each pixel in an image. The more bits of information per pixel, the more available colors and more accurate color representation. For example, an image with a bit depth of 1 has pixels with two possible values: black and white. An image with a bit depth of 8 has 2^8 , or 256, possible values. Grayscale mode images with a bit depth of 8 have 256 possible gray values.
RGB images are made of three color channels. An 8-bit per pixel RGB image has 256 possible values for each channel which means it has over 16 million possible color values. RGB images with 8-bits per channel (bpc) are sometimes called 24-bit images (8 bits x 3 channels = 24 bits of data for each pixel).
In addition to 8-bpc images, Photoshop can also work with images that contain 16-bpc or 32-bpc. Images with 32-bpc are also known as high dynamic range (HDR) images.
Photoshop support for 16-bit images
Photoshop provides the following support for working with 16-bpc images:
- Working in Grayscale, RGB Color, CMYK Color, Lab Color, and Multichannel, modes.
- All tools in the toolbox, except the Art History Brush tool, can be used with 16-bpc images.
• Color and tonal adjustment commands are available - You can work with layers, including adjustment layers, in 16-bpc images.
- Many Photoshop filters can be used with 16-bpc images.
To take advantage of certain Photoshop features, such as some filters, you can convert a 16-bpc image to an 8-bpc image. It's best if you do a Save As and convert a copy of the image file so the original file retains the full 16-bpc image data.
Understanding bit depth

text_image
123Learn more with this excerpt from Adobe Photoshop for Photographers.... Read More http://goo.gl/hu3Qn

by Martin Evening http://www.martinevening.c...
Contribute your expertise to Adobe Community Help
To the top
Convert between bit depths
- Do any of the following:
• To convert between 8 bpc and 16 bpc, Choose Image > Mode > 16 Bits/Channel or 8 Bits/Channel.
• To convert from 8 bpc or 16 bits to 32 bpc, choose Image > Mode > 32 Bits/Channel.
Adobe also recommends
Twitter™ and Facebook posts are not covered under the terms of Creative Commons.
Legal Notices | Online Privacy Policy
About pixel dimensions and printed image resolution
File size
About monitor resolution
About printer resolution
Determine a suggested resolution for an image
View the print size on-screen
Resampling
Change pixel dimensions of an image
Change the print dimensions and resolution
What affects file size?
For detailed instructions, click the links below. To ask questions, request features, or report problems, visit feedback.photoshop.com.
To the top
About pixel dimensions and printed image resolution
Pixel dimensions measure the total number of pixels along an image's width and height. Resolution is the fineness of detail in a bitmap image and is measured in pixels per inch (ppi). The more pixels per inch, the greater the resolution. Generally, an image with a higher resolution produces a better printed image quality.
natural_image
Close-up of a red bicycle with chrome handle and black strap, shown in profile view (no visible text or symbols)
natural_image
Close-up of a red bicycle frame with chrome handle and silver frame (no visible text or symbols)Same image at 72-ppi and 300-ppi; inset zoom 200%
Unless an image is resampled (see Resampling), the amount of image data remains constant as you change either the print dimensions or resolution. For example, if you change the resolution of a file, its width and height change accordingly to maintain the same amount of image data.
In Photoshop, you can see the relationship between image size and resolution in the Image Size dialog box (choose Image >Image Size). Deselect Resample Image, because you don't want to change the amount of image data in your photo. Then change width, height, or resolution. As you change one value, the other two values change accordingly. With the Resample Image option selected, you can change the resolution, width, and height of the image to suit your printing or on-screen needs.
text_image
Image Size Pixel Dimensions: 791.0K Width: 500 pixels Height: 540 pixels Document Size: Width: 2 inches Height: 2.16 inches Resolution: 20 pixels/inch A Width: 500 pixel Height: 540 pixel Document Size: Width: 5 inch Height: 5.4 inch Resolution: 0 pixels Document Size: Width: 2 inch Height: 2.16 inch Resolution: 0 pixels Scale Styles Constrain Proportions Resample Image: Scale Styles Constrain Proportions Resample Image: B CPixel dimensions equal document (output) size times resolution.
A. Original dimensions and resolution B. Decreasing the resolution without changing pixel dimensions (no resampling) C. Decreasing the resolution at same document size decreases pixel dimensions (resampling).
Quickly display the current image size
If you want to quickly display a document's current image size, use the information box at the bottom of the document window.
- Position the pointer over the file information box, and hold down the mouse button.
To the top
File size
The file size of an image is the digital size of the image file, measured in kilobytes (K), megabytes (MB), or gigabytes (GB). File size is proportional to the pixel dimensions of the image. Images with more pixels may produce more detail at a given printed size, but they require more disk space to store and may be slower to edit and print. Image resolution thus becomes a compromise between image quality (capturing all the data you need) and file size.
Another factor that affects file size is file format. Because of the varying compression methods used by GIF, JPEG, PNG, and TIFF file formats, file sizes can vary considerably for the same pixel dimensions. Similarly, color bit-depth and the number of layers and channels in an image affect file size.
Photoshop supports a maximum pixel dimension of 300,000 by 300,000 pixels per image. This restriction places limits on the print size and resolution available to an image.
To the top
About monitor resolution
Your monitor's resolution is described in pixel dimensions. For example, if your monitor resolution and your photo's pixel dimensions are the same size, the photo will fill the screen when viewed at 100%. How large an image appears on-screen depends on a combination of factors—the pixel dimensions of the image, the monitor size, and the monitor resolution setting. In Photoshop, you can change the image magnification on-screen, so you can easily work with images of any pixel dimensions.

text_image
15° 832 x 624 / 640 x 480 20° 1024 x 768 / 640 x 480A 620- by 400-pixel image displayed on monitors of various sizes and resolutions.
When preparing images for viewing on-screen, you should consider the lowest monitor resolution that your photo is likely to be viewed on.
To the top
About printer resolution
Printer resolution is measured in ink dots per inch, also known as dpi. Generally, the more dots per inch, the finer the printed output you'll get. Most inkjet printers have a resolution of approximately 720 to 2880 dpi. (Technically, inkjet printers produce a microscopic spray of ink, not actual dots like imagesetters or laser printers.)
Printer resolution is different from, but related to image resolution. To print a high quality photo on an inkjet printer, an image resolution of at least 220 ppi should provide good results.
Screen frequency is the number of printer dots or halftone cells per inch used to print grayscale images or color separations. Also known as screen ruling or line screen, screen frequency is measured in lines per inch (lpi)—or lines of cells per inch in a halftone screen. The higher the resolution of the output device, the finer (higher) a screen ruling you can use.
The relationship between image resolution and screen frequency determines the quality of detail in the printed image. To produce a halftone image of the highest quality, you generally use an image resolution that is from 1.5 to at most 2 times the screen frequency. But with some images and output devices, a lower resolution can produce good results. To determine your printer's screen frequency, check your printer documentation or consult your service provider.
Note: Some imagesetters and 600-dpi laser printers use screening technologies other than halftoning. If you are printing an image on a nonhalftone printer, consult your service provider or your printer documentation for the recommended image resolutions.
natural_image
Close-up of scattered US dollar coins and silver coins in four quadrants (A–G), no visible text or symbols on the coins themselves.Screen frequency examples
A. 65 lpi: Coarse screen typically used to print newsletters and grocery coupons B. 85 lpi: Average screen typically used to print newspapers C. 133 lpi: High-quality screen typically used to print four-color magazines D. 177 lpi: Very fine screen typically used for annual reports and images in art books
To the top
Determine a suggested resolution for an image
If you plan to print your image using a halftone screen, the range of suitable image resolutions depends on the screen frequency of your output device. Photoshop can determine a recommended image resolution based on the screen frequency of your output device.
Note: If your image resolution is more than 2.5 times the screen ruling, an alert message appears when you try to print the image. This means that the image resolution is higher than necessary for the printer. Save a copy of the file, and then reduce the resolution.
-
Choose Image > Image Size.
-
Click Auto.
-
For Screen, enter the screen frequency for the output device. If necessary, choose a different unit of measurement. Note that the screen value is used only to calculate the image resolution, not to set the screen for printing.
-
For Quality, select an option:
Draft Produces a resolution that is the same as the screen frequency (no lower than 72 pixels per inch).
Good Produces a resolution 1.5 times the screen frequency.
Best Produces a resolution 2 times the screen frequency.
To the top
View the print size on-screen
- Do one of the following:
- Choose View > Print Size.
- Select the Hand tool or Zoom tool, and click Print Size in the options bar.
The image is redisplayed in its approximate printed size, as specified in the Document Size area of the Image Size dialog box. The size and resolution of your monitor affect the on-screen print size.
Note: The Print Size command is not available in the Creative Cloud version.
To the top
Resampling
Resampling is changing the amount of image data as you change either the pixel dimensions or the resolution of an image. When you downsample (decrease the number of pixels), information is deleted from the image. When you resample up (increase the number of pixels, or upsample), new pixels are added. You specify an interpolation method to determine how pixels are added or deleted.
natural_image
Three-panel image showing a person wearing a mesh hat, with close-ups of the face and body (no visible text or symbols)Resampling pixels
A. Downsampled B. Original C. Resampled up (selected pixels displayed for each set of images)
Keep in mind that resampling can result in poorer image quality. For example, when you resample an image to larger pixel dimensions, the image loses some detail and sharpness. Applying the Unsharp Mask filter to a resampled image can help refocus the image details.
You can avoid the need for resampling by scanning or creating the image at a sufficiently high resolution. If you want to preview the effects of changing pixel dimensions on-screen or to print proofs at different resolutions, resample a duplicate of your file.
Photoshop resamples images using an interpolation method to assign color values to any new pixels based on the color values of existing pixels. You can choose which method to use in the Image Size dialog box.
Nearest Neighbor A fast but less precise method that replicates the pixels in an image. This method is for use with illustrations containing edges that are not anti-aliased, to preserve hard edges and produce a smaller file. However, this method can produce jagged effects, which become apparent when you distort or scale an image or perform multiple manipulations on a selection.
Bilinear A method that adds pixels by averaging the color values of surrounding pixels. It produces medium-quality results.
Bicubic A slower but more precise method based on an examination of the values of surrounding pixels. Using more complex calculations, Bicubic produces smoother tonal gradations than Nearest Neighbor or Bilinear.
Bicubic Smoother A good method for enlarging images based on Bicubic interpolation but designed to produce smoother results.
Bicubic Sharper A good method for reducing the size of an image based on Bicubic interpolation with enhanced sharpening. This method maintains the detail in a resampled image. If Bicubic Sharper oversharpens some areas of an image, try using Bicubic.
You can specify a default interpolation method to use whenever Photoshop resamples image data. Choose Edit > Preferences > General (Windows) or Photoshop > Preferences > General (Mac OS), and then choose a method from the Image Interpolation Methods menu.
To the top
Change pixel dimensions of an image
Changing an image's pixel dimensions affects not only its on-screen size but also its image quality and its printed characteristics—either its printed dimensions or its image resolution.
- Choose Image > Image Size.
- To maintain the current ratio of pixel width to pixel height, select Constrain Proportions. This option automatically updates the width as you change the height, and vice versa.
- Under Pixel Dimensions, enter values for Width and Height. To enter values as percentages of the current dimensions, choose Percent as the unit of measurement. The new file size for the image appears at the top of the Image Size dialog box, with the old file size in parentheses.
- Make sure that Resample Image is selected, and choose an interpolation method.
- If your image has layers with styles applied to them, select Scale Styles to scale the effects in the resized image. This option is available only if you selected Constrain Proportions.
- When you finish setting options, click OK.
For best results when you produce a smaller image, downsample and apply the Unsharp Mask filter. To produce a larger image, rescan the image at a higher resolution.
To the top
Change the print dimensions and resolution
When creating an image for print media, it's useful to specify image size in terms of the printed dimensions and the image resolution. These two measurements, referred to as the document size, determine the total pixel count and therefore the file size of the image; document size also determines the base size at which an image is placed into another application. You can further manipulate the scale of the printed image using the Print command; however, changes you make using the Print command affect only the printed image, not the document size of the image file.
If you turn on resampling for the image, you can change print dimensions and resolution independently (and change the total number of pixels in the image). If you turn off resampling, you can change either the dimensions or the resolution—Photoshop adjusts the other value automatically to preserve the total pixel count. For the highest print quality, it's generally best to change the dimensions and resolution first, without resampling. Then resample only as necessary.
- Choose Image > Image Size.
-
Change the print dimensions, image resolution, or both:
-
To change only the print dimensions or only the resolution and adjust the total number of pixels in the image proportionately, select Resample Image and then choose an interpolation method.
• To change the print dimensions and resolution without changing the total number of pixels in the image, deselect Resample Image. -
To maintain the current ratio of image width to image height, select Constrain Proportions. This option automatically changes the width as you change the height, and vice versa.
-
Under Document Size, enter new values for the height and width. If desired, choose a new unit of measurement. Note that for Width, the Columns option uses the width and gutter sizes specified in the Units & Rulers preferences.
-
For Resolution, enter a new value. If desired, choose a new unit of measurement.
To restore the initial values displayed in the Image Size dialog box, hold down Alt (Windows) or Option (Mac OS), and click Reset.
To the top
What affects file size?
File size depends on the pixel dimensions of an image and the number of layers it contains. Images with more pixels may produce more detail when printed, but they require more disk space to store and may be slower to edit and print. You should keep track of your file sizes to make sure the files are not becoming too large for your purposes. If the file is becoming too large, reduce the number of layers in the image or change the image size.
You can view the file size information for an image at the bottom of the application window.
Adobe also recommends
- Managing layers
• Image information

Twitter™ and Facebook posts are not covered under the terms of Creative Commons.
Legal Notices | Online Privacy Policy
Acquiring digital images from cameras Import images from a digital camera using WIA (Windows only) Importing scanned images
To the top
Acquiring digital images from cameras
You can copy images to your computer by connecting your camera or a media card reader to your computer.
- Use theGet Photos From Camera command in Adobe® Bridge® to download photos, and to organize, rename, and apply metadata to them.
- If your camera or the card reader appears as a drive on your computer, copy images directly to your hard disk or into Adobe Bridge.
- Use the software that came with your camera, Windows Image Acquisition (WIA), or Image Capture (Mac OS). For more information on using Windows Image Acquisition or Image Capture, see your computer documentation.
To the top
Import images from a digital camera using WIA (Windows only)
Certain digital cameras import images using Windows Image Acquisition (WIA) support. When you use WIA, Photoshop works with Windows and your digital camera or scanner software to import images directly into Photoshop.
- Choose File > Import > WIA Support.
- Choose a destination in which to save your image files on your computer.
- Make sure that Open Acquired Images in Photoshop is selected. If you are importing a large number of images, or if you want to edit the images later, deselect Open Acquired Images.
-
To save the imported images directly into a folder whose name is the current date, select Unique Subfolder.
-
Click Start.
-
Select the digital camera from which to import images.
Note: If the name of your camera does not appear in the submenu, verify that the software and drivers were properly installed and that the camera is connected.
-
Choose the image or images you want to import:
-
Click the image from the list of thumbnails to import the image.
- Hold down Shift and click multiple images to import them at the same time.
-
Click Select All to import all available images.
-
Click Get Picture to import the image.
Importing scanned images
To import scanned images, either open TIFF files saved from separate scanning software, or use a TWAIN or WIA interface directly in Photoshop. In either case, make sure to install the software necessary for your scanner. For installation instructions, see the documentation provided by the scanner manufacturer.
Note: Scanner drivers are supported by the scanner manufacturer, not Adobe. If you have problems with scanning, make sure that you are using the latest version of the scanner driver and software.
Import images from a separate scanning application
Most scanners come with software you can run outside of Photoshop, providing identical scanning options and quality. This method avoids issues caused by outdated TWAIN drivers. It can also improve efficiency, letting you edit images in Photoshop while scanning continues in the background.
- Start the scanning software, and set options as desired. (In Mac OS, you can also use the Image Capture utility.)
- Save scanned images in TIFF format.
- In Photoshop, open the saved TIFF files.
Some scanner software lets you designate Photoshop as the external editor for an image after a scanning is completed.
Import images using a TWAIN interface
TWAIN is a cross-platform interface for acquiring images captured by certain scanners, digital cameras, and frame grabbers.
- Install the TWAIN software provided by the device manufacturer.
- Download the Photoshop TWAIN plug-in for Windows or Mac OS.
The plug-in supports 32-bit Windows and Mac OS. It also supports 64-bit Mac OS 10.6 if the scanner manufacturer provides 64-bit drivers. (Very few do, so most Mac OS users must run Photoshop in 32-bit mode.)
- Choose File > Import, and select the device you want to use from the submenu.
Import images using a WIA interface (Windows only)
- Choose File > Import > WIA Support.
- Choose a destination on your computer for saving your image files.
-
Click Start.
-
Select Open Acquired Images In Photoshop (unless you have a large number of images to import, or if you want to edit the images at a later time).
-
Select Unique Subfolder if you want to save imported images in a folder named with the current date.
- Select the scanner that you want to use.
Note: If the name of your scanner does not appear in the submenu, verify that the software and drivers were properly installed and that the scanner is connected.
- Choose the kind of image you want to scan: Color Picture, Grayscale Picture, or Black And White Picture or Text.

To specify custom settings, select Adjust The Quality Of The Scanned Picture.
- Click Preview. If necessary, drag the handles of the bounding box to adjust the size of the crop.
- Click Scan.
The scanned image is saved in BMP format.
Adobe also recommends
• Get photos from a digital camera or card reader into Adobe Bridge
- Navigate, open, and save images in Camera Raw
- About plug-in modules

BY-NC-SA
Twitter™ and Facebook posts are not covered under the terms of Creative Commons.
Legal Notices | Online Privacy Policy
Create an image
Duplicate an image
Open files
Open PDF files
Open an EPS file
For detailed instructions, click the links below. To ask questions, request features, or report problems, visit feedback.photoshop.com.
To the top
Create an image
- Choose File > New.
- In the New dialog box, type a name for the image.
- (Optional) Choose document size from the Preset menu.
Note: To create a document with the pixel dimensions set for a specific device, click the Device Central button.
- Set the width and height by choosing a preset from the Size menu or entering values in the Width and Height text boxes.
To match the width, height, resolution, color mode, and bit depth of the new image to that of any open image, choose a filename from the bottom section of the Preset menu.
- Set the Resolution, Color Mode, and bit depth.
If you've copied a selection to the clipboard, the image dimensions and resolution are automatically based on that image data.
- Select a canvas color option:
White Fills the background layer with white, the default background color.
Background Color Fills the background layer with the current background color.
Transparent Makes the first layer transparent, with no color values. The resulting document has a single, transparent layer as its contents.
- (Optional) If necessary, click the Advanced button to display more options.
- (Optional) Under Advanced, choose a color profile, or choose Don't Color Manage This Document. For Pixel Aspect Ratio, choose Square unless you're using the image for video. In that case, choose another option to use non-square pixels.
- When you finish, you can save the settings as a preset by clicking Save Preset, or you can click OK to open the new file.
To the top
Duplicate an image
You can duplicate an entire image (including all layers, layer masks, and channels) into available memory without saving to disk.
- Open the image you want to duplicate.
- Choose Image > Duplicate.
- Enter a name for the duplicated image.
- If you want to duplicate the image and merge the layers, select Duplicate Merged Layers Only. To preserve the layers, make sure this option is deselected.
- Click OK.
To the top
Open files
You can open files using the Open command and Open Recent command. You can also open files into Photoshop from Adobe Bridge or Adobe® Photoshop® Lightroom™.
When opening certain files, such as camera raw and PDF, you specify settings and options in a dialog box before the files completely open in Photoshop.
In addition to still images, Photoshop® Extended users can open and edit 3D files, video and image sequence files. For more information, see Importing video files and image sequences (Photoshop Extended).
Note: Photoshop uses plug-in modules to open and import many file formats. If a file format does not appear in the Open dialog box or in the File > Import submenu, you may need to install the format's plug-in module.
Sometimes Photoshop may not be able to determine the correct format for a file. This can happen, for example, because the file has been transferred between two operating systems. Sometimes a transfer between Mac OS and Windows can cause the file format to be mislabeled. In such cases, you must specify the correct format in which to open the file.
You can retain (where possible) layers, masks, transparency, compound shapes, slices, image maps, and editable type when bringing your Illustrator art into Photoshop. In Illustrator, export the art in the Photoshop (PSD) file format. If your Illustrator art contains elements that Photoshop doesn't support, the appearance of the artwork is preserved, but the layers are merged and the artwork is rasterized.
Open a file using the Open command
- Choose File > Open.
- Select the name of the file you want to open. If the file does not appear, select the option for showing all files from the Files Of Type (Windows) or Enable (Mac OS) pop-up menu.
- Click Open. In some cases, a dialog box appears, letting you set format-specific options.
Note: If a color profile warning message appears, specify whether to use embedded profile as the working space, convert the document color to working space, or reverse the embedded profile. For more information, see Color-managing imported images.
Open a recently used file
- Choose File > Open Recent, and select a file from the submenu.
Note: To specify the number of files listed in the Open Recent menu, change the Recent File List Contains option in the File Handling preferences. Choose Edit > Preferences > File Handling (Windows), or Photoshop > Preferences > File Handling (Mac OS).
Specify the file format in which to open a file
If a file was saved with an extension that doesn't match its true format (for example, a PSD file saved with a .gif extension), or has no extension, Photoshop may not be able to open the file. Selecting the correct format will allow Photoshop to recognize and open the file.
- Do one of the following:
- (Windows) Choose File > Open As, and select the file you want to open. Then choose the desired format from the Open As pop-up menu, and click Open.
- (Mac OS) Choose File > Open, and choose All Documents from the Show pop-up menu. Then select the file you want to open, choose the desired file format from the Format pop-up menu, and click Open.
Note: If the file does not open, then the chosen format may not match the file's true format, or the file may be damaged.
To the top
Open PDF files
Adobe Portable Document Format (PDF) is a versatile file format that can represent both vector and bitmap data. It has electronic document search and navigation features. PDF is the primary format for Adobe Illustrator and Adobe Acrobat.
Some PDF files contain a single image, and others contain multiple pages and images. When you open a PDF file in Photoshop, you can choose which pages or images to open and specify rasterization options.
You can also import PDF data using the Place command, the Paste command, and the drag-and-drop feature. The page or image is placed on a separate layer as a Smart Object.
Note: The following procedure is only for opening generic PDF files in Photoshop. You don't need to specify options in the Import PDF dialog box, when opening Photoshop PDF files.
- Do one of the following:
• (Photoshop) Choose File > Open.
• (Bridge) Select the PDF file and choose File >Open With >Adobe Photoshop. Skip to step 3.
- In the Open dialog box, select the name of the file, and click Open.
- Under Select in the Import PDF dialog box, select Pages or Images, depending on what elements of the PDF document you want to import.
- Click the thumbnails to select the pages or images you want to open. Shift-click to select more than one page or image. The number of selected items appears under the preview window. If you're importing images, skip to step 8.
Note: Use the Thumbnail Size menu to adjust the thumbnail view in the preview window. The Fit Page option fits one thumbnail in the preview window. A scroll bar appears if there are multiple items.
- To give the new document a name, type it in the Name text box. If you're importing more than one page or image, multiple documents open with the base name followed by a number.
- Under Page Options, choose from the Crop To menu to specify what part of the PDF document to include:
Bounding Box Crops to the smallest rectangular region that includes all the text and graphics of the page. This option eliminates extraneous white space and any document elements outside the Trim Box.
Note: Bounding Box will not crop white space that is part of a background created by the source application.
Media Box Crops to the original size of the page.
Crop Box Crops to the clipping region (crop margins) of the PDF file.
Bleed Box Crops to the region specified in the PDF file for accommodating limitations inherent in production processes such as cutting, folding, and trimming.
Trim Box Crops to the region specified for the intended finished size of the page.
Art Box Crops to the region specified in the PDF file for placing the PDF data into another application.
-
Under Image Size, enter values (if necessary) for Width and Height:
-
To preserve the aspect ratio of the pages as they're scaled to fit within the rectangle defined by the Width and Height values, select Constrain Proportions.
- To scale the pages exactly to the Width and Height values, deselect Constrain Proportions. Some distortion might occur when the pages are scaled.
When more than one page is selected, the Width and Height text boxes display the maximum width and height values of the selected pages. All pages are rendered at their original size if Constrain Proportions is selected and you don't change the Width and Height values. Changing the values will scale all pages proportionately as they're rasterized.
- Specify the following options under Image Size:
Resolution Sets the resolution for the new document. See also About pixel dimensions and printed image resolution.
Mode Sets the color mode for the new document. See also Color modes.
Bit Depth Sets the bit depth for the new document. See also Bit depth.
The Width and Height values plus the Resolution determine the final pixel dimension of resulting document.
-
To suppress color profile warnings, select Suppress Warning.
-
Click OK.
To the top
Open an EPS file
Encapsulated PostScript (EPS) can represent both vector and bitmap data and is supported by virtually all graphic, illustration, and page-layout programs. The Adobe application that primarily produces PostScript artwork is Adobe Illustrator. When you open an EPS file containing vector art, it is rasterized—the mathematically defined lines and curves of the vector artwork are converted into the pixels or bits of a bitmap image.
You can also bring PostScript artwork into Photoshop using the Place command, the Paste command, and the drag-and-drop feature.
-
Choose File > Open.
-
Select the file you want to open, and click Open.
- Indicate the desired dimensions, resolution, and mode. To maintain the same height-to-width ratio, select Constrain Proportions.
- To minimize jagged lines at the edges of artwork, select Anti-aliased.
Adobe also recommends
- Adobe Bridge
- Mini Bridge
- About plug-in modules
• Processing images with Camera Raw

Twitter™ and Facebook posts are not covered under the terms of Creative Commons.
Legal Notices | Online Privacy Policy
Change the screen mode View another area of an image Use the Rotate View tool Disable trackpad gestures (Mac OS) Use the Navigator panel Zoom in or out
To the top
Change the screen mode
You can use the screen mode options to view images on your entire screen. You can show or hide the menu bar, title bar, and scroll bars.
Press the F key to quickly cycle through screen modes.
- Do one of the following:
- To display the default mode (menu bar at the top and scroll bars on the side), choose View > Screen Mode > Standard Screen Mode. Or, click the Screen Mode button in the Application bar, and select Standard Screen Mode from the pop-up menu.
- To display a full-screen window with a menu bar and a 50% gray background, but no title bar or scroll bars, choose View > Screen Mode > Full Screen Mode With Menu Bar. Or, click the Screen Mode button in the Application bar, and select Full Screen Mode With Menu Bar from the pop-up menu.
- To display a full-screen window with only a black background (no title bar, menu bar, or scroll bars), choose View > Screen Mode > Full Screen Mode. Or, click the Screen Mode button in the Application bar, and select Full Screen Mode from the pop-up menu.
To the top
View another area of an image
- Do one of the following:
- Use the window scroll bars.
- Select the Hand tool and drag to pan over the image. To use the Hand tool while another tool is selected, hold down the spacebar as you drag in the image.
If your computer has OpenGL, you can use the Hand tool to flick the image in the direction you want to view. After a quick mouse gesture, the image will move as if you were continuously dragging. Enable this feature by choosing Edit > Preferences > General (Windows) or Photoshop > Preferences > General (Mac OS) and then select Enable Flick Panning.
natural_image
Two identical wooden boats on a clear blue sky, one with a hand icon and arrow, the other with a hand icon (no text or symbols)Dragging the Hand tool to view another area of an image
- Drag the colored box (proxy view area) in the Navigator panel.
To the top
Use the Rotate View tool
You use the Rotate View tool to rotate the canvas non-destructively; it does not transform the image. Rotating the canvas can be useful for any number of reasons, including facilitating easier painting or drawing. (OpenGL is required.)

You can also use rotate gestures on MacBook computers with multi-touch trackpads.
- In the toolbox, select the Rotate View tool 📄. (If the tool isn't visible, hold down the Hand tool.)
-
Do any of the following:
-
Drag in the image. A compass will indicate north in the image, regardless of the current canvas angle.
- In the options bar, enter degrees in the Rotation Angle field.
-
Click or drag the circular Set Angle of Rotation control.
-
To restore the canvas to the original angle, click Reset View.
For a video on the Rotate View tool and other workspace tips, see www.adobe.com/go/lrvid4001_ps. (Discussion of the Rotate View tool begins at the 5:10 mark.)
To the top
Disable trackpad gestures (Mac OS)
If you have a MacBook computer with a multi-touch trackpad, you can use the trackpad to flick, rotate, or zoom images. This functionality can greatly increase your efficiency, but you can disable it if inadvertent changes occur.
- Choose Photoshop > Preferences > Interface (Mac OS).
- In the General section, deselect Enable Gestures.
To the top
Use the Navigator panel
You use the Navigator panel to quickly change the view of your artwork using a thumbnail display. The colored box in the Navigator (called the proxy view area) corresponds to the currently viewable area in the window.
- Do one or more of the following:
- To display the Navigator panel, select Window > Navigator.
- To change the magnification, type a value in the text box, click the Zoom Out or Zoom In button, or drag the zoom slider.
- To move the view of an image, drag the proxy view area in the image thumbnail. You can also click the image thumbnail to designate the viewable area.
To simultaneously set the size and position of the proxy area, Control-drag (Windows) or Command-drag (Mac OS) in the image thumbnail.
- To change the color of the proxy view area, select Panel Options from the panel menu. Select a preset color from the Color pop-up menu, or click the color box to choose a custom color.
text_image
NAVOCATOR +12 A B C +48.17% D E F GNavigator panel
A. Panel menu button B. Thumbnail display of artwork C. Proxy preview area D. Zoom text box E. Zoom Outbutton F. Zoom slider G. Zoom Inbutton
To the top
Zoom in or out
Use the Zoom tool or the View menu commands to zoom in or zoom out of an image. When you use the Zoom tool, each click magnifies or reduces the image to the next preset percentage and centers the display around the point you click. When the image has reached its maximum magnification level of 3200% or minimum size of 1 pixel, the magnifying glass appears empty.
To view images most accurately, precisely revealing sharpening, layer effects, and other adjustments, see Display images at 100%.
Set Zoom tool preferences
- Choose Edit > Preferences > Performance (Windows) or Photoshop > Preferences > Performance (Mac OS). In the GPU Settings section, select Enable OpenGL Drawing.
Note: Some Zoom tool preferences require OpenGL. If Enable OpenGL Drawing is unavailable, your video card does not support this technology.
- In the General preferences, select any of the following:
Animated Zoom Enables continuous zooming while holding down the Zoom tool
Zoom Resizes Windows See Automatically resize the window when zooming.
Zoom With Scroll Wheel Enables zooming with the scroll wheel on your mouse.
Zoom Clicked Point To Center Centers the zoom view on the clicked location.
Zoom a preset amount
- Do any of the following:
- Select the Zoom tool 🔒, and click either the Zoom In 🔒 or Zoom Out button 🔒 in the options bar. Then, click the area you want to zoom in or out.
To quickly switch to zoom out mode, hold down Alt (Windows) or Option (Mac OS).
- Choose View > Zoom In or View > Zoom Out. The Zoom In or Zoom Out command becomes unavailable when the maximum image magnification or reduction is reached.
- Set the zoom level at the lower left corner of the document window or in the Navigator panel.
Display images at 100%
A zoom setting of 100% provides the most accurate view, because each image pixel is displayed by one monitor pixel. (At other zoom settings, image pixels are interpolated to a different amount of monitor pixels.)
- Do one of the following:
• Double-click the Zoom tool in the toolbox.
- (Creative Cloud) Choose View > 100% or, click 100% in either the Zoom tool or Hand tool options bar.
- Choose View > Actual Pixels or, click Actual Pixels in either the Zoom tool or Hand tool options bar.
- Enter 100% in the Status Bar and press Enter (Windows) or Return (Mac OS).
The 100% view of an image displays an image as it will appear in a web browser (at the current monitor resolution).
Zoom continuously
To zoom continuously, your video card must support OpenGL, and Animated Zoom must be selected in the General preferences.
- Select the Zoom tool, and then do any of the following:
- Click and hold in the image to zoom in. Press Alt (Windows) or Option (Mac OS) to zoom out.
- In the options bar, select Scrubby Zoom. Then drag to the left in the image to zoom out, or to the right to zoom in.
Magnify a specific area
- Select the Zoom tool.
- Drag over the part of the image that you want to magnify.

natural_image
Two views of a wooden boat with visible hull and side arm, shown from different angles (no text or symbols)Dragging the Zoom tool to magnify the view of an image
The area inside the zoom marquee is displayed at the highest possible magnification. To move the marquee around the artwork in Photoshop, begin dragging a marquee and then hold down the spacebar.
Temporarily zoom an image
- Hold down the H key, and then click in the image and hold down the mouse button.
The current tool changes to the Hand tool, and the image magnification changes as follows:
- If the entire image originally fit within the document window, the image zooms in to fit the window.
-
If only a portion of the image was originally visible, the image zooms out. Drag the zoom marquee to magnify a different part of the image.
-
Release the mouse button and then the H key.
The image returns to the previous magnification and tool.
Automatically resize the window when zooming
- With the Zoom tool active, select Resize Windows To Fit in the options bar. The window is resized when you magnify or reduce the view of the image.
When Resize Windows To Fit is deselected (the default), the window maintains a constant size regardless of the image magnification. This can be helpful when using smaller monitors or working with tiled views.
Note: To automatically resize the window when using keyboard shortcuts for zooming, choose Edit > Preferences > General (Windows) or Photoshop > Preferences > General (Mac OS). Then select the Zoom Resizes Windows.
Fit an image to the screen
- Do one of the following:
- Double-click the Hand tool in the toolbox.
- Choose View > Fit On Screen.
- Select a zoom tool or the Hand tool, and click the Fit On Screen button in the options bar.
These options scale both the zoom level and the window size to fit the available screen space.
Hide the pixel grid
Over 500% magnification, the image's pixel grid becomes visible by default. To hide the grid, do the following.
- Choose View > Show, and deselect Pixel Grid.
Adobe also recommends

Twitter™ and Facebook posts are not covered under the terms of Creative Commons.
Legal Notices | Online Privacy Policy
View images in multiple windows
Match zoom and location in multiple images
To the top
View images in multiple windows
The document window is where your images appear. You can open multiple windows to display different images or different views of the same one. A list of open windows appears in the Window menu. To bring an open image to the front, choose the file name from the bottom of the Window menu. Available memory may limit the number of windows per image.
- Choose Window > Arrange > New Window For [Image File Name].
- If you want to arrange the windows, choose Window > Arrange and then choose one of the following:
Cascade Displays undocked windows stacked and cascading from the upper-left to the lower right of the screen.
Tile Displays windows edge to edge. As you close images, the open windows are resized to fill the available space.
Float in Window Allows image to float freely.
Float All in Windows Floats all images.
Consolidate All to Tabs Shows one image in full screen and minimizes the other images to tabs.
You can use the Hand tool's Scroll All Windows option to scroll through all open images. Select it in the options bar and drag in one image to scroll through all visible images.
To the top
Match zoom and location in multiple images
Match only zoom
- Open one or more images, or open one image in multiple windows.
- Choose Window > Arrange > Tile to display the images edge to edge.
-
Select the Zoom tool, and then do one of the following:
-
Select Zoom All Windows in the options bar, and then click one of the images. The other images zoom in or out the same relative amount.
- Choose Window > Arrange > Match Zoom. Hold down the Shift key and click one of the images. The other images zoom in or out at the same magnification.
Match only location
- Open one or more images, or open one image in multiple windows.
- Choose Window > Arrange > Tile.
-
Do either of the following:
-
Choose Window > Arrange > Match Location.
- Select the Hand tool, select Scroll All Windows in the options bar, and then drag to view another area in one of the images. (To temporarily enable this option, hold down the Shift key while dragging with the Hand tool.)
Note: Photoshop automatically scrolls to the same relative location on the horizontal and vertical axes. You may need to manually scroll to reveal the edges of images.
Match zoom and location
- Open one or more images, or open one image in multiple windows.
- Choose Window > Arrange > Tile.
- Choose Window > Arrange > Match All.

natural_image
Four-panel image collage showing a red fish and a small boat, each with a software interface overlay (no readable text or symbols)Without Match All command (top), and with Match All command (bottom) selected
-
Select the Zoom tool or the Hand tool.
-
Select one of the images, hold down the Shift key, and click in or drag an area of an image. The other images are magnified to the same percentage and snap to the area you clicked.
Adobe also recommends
Twitter™ and Facebook posts are not covered under the terms of Creative Commons.
Legal Notices
Online Privacy Policy
Work with the Info panel
Display file information in the document window
To the top
Work with the Info panel
The Info panel shows the color values beneath the pointer and, depending on the tool in use, gives other useful information. The Info panel also displays a hint on using the selected tool, gives document status information, and can display 8-bit, 16-bit, or 32-bit values.
The Info panel displays the following information:
- Depending on the option you specify, the Info panel displays 8-bit, 16-bit, or 32-bit values.
- When displaying CMYK values, the Info panel displays an exclamation point next to the CMYK values if the color beneath the pointer or color sampler is out of the printable CMYK color gamut.
- When a marquee tool is being used, the Info panel displays the x and y coordinates of the pointer position and the width (W) and height (H) of the marquee as you drag.
- When the Crop tool or Zoom tool is being used, the Info panel displays the width (W) and height (H) of the marquee as you drag. The panel also shows the angle of rotation of the crop marquee.
- When the Line tool, the Pen tool, or Gradient tool is being used, or when a selection is being moved, the Info panel displays the x and y coordinates of your starting position, the change in X (DX), the change in Y (DY), the angle (A), and the length (D) as you drag.
- When a two-dimensional transformation command is being used, the Info panel displays the percentage change in width (W) and height (H), the angle of rotation (A), and the angle of horizontal skew (H) or vertical skew (V).
- When any color adjustment dialog box (for example, Curves) is being used, the Info panel displays before-and-after color values for the pixels beneath the pointer and beneath color samplers.
- If the Show Tool Hints option is enabled, you see hints for using the tool selected in the toolbox.
- Depending on the options selected, the Info panel displays status information, such as document size, document profile, document dimensions, scratch sizes, efficiency, timing, and current tool.
Use the Info panel
The Info panel displays file information about an image and also provides feedback about the color values as you move a tool pointer over an image. Make sure the Info panel is visible in your workspace if you want to view information while dragging in the image.
-
(Optional) Do one of the following if you need to display the Info panel:
-
Click the Info panel tab if it's docked with other panels.
-
Choose Window > Info. File information about the image is displayed at the bottom of the Info panel. You can change the information displayed by clicking the triangle in the upper right corner of the panel and choosing Panel Options from the panel menu.
-
Set the options for the information you want displayed in the Info Panel by doing any of the following:
-
Choose Panel Options from the Info panel menu and specify options in the Info Panel Options dialog box.
- Click an eyedropper icon and choose display options from the pop-up menu. You can also use the pop-up menu to specify whether the Info panel displays 8-bit, 16-bit, or 32-bit values.
- Click the cursor coordinates icon and choose a unit of measurement.
-
Select a tool.
-
Move the pointer in the image, or drag in the image to use the tool. The following information may appear, depending on which tool you're using:
Displays the numeric values for the color beneath the pointer.
Displays the x and y coordinates of the pointer.
Displays the width (W) and height (H) of a marquee or shape as you drag, or the width and height of an active selection.
Change the Info panel options
-
Click the triangle in the upper right corner to open the Info panel menu and choose Panel Options.
-
In the Info Panel Options dialog box, for First Color Readout, choose one of the following display options:
Actual Color Displays values in the current color mode of the image.
Proof Color Displays values for the output color space of the image.
A color mode Displays the color values in that color mode.
Total Ink Displays the total percentage of all CMYK ink at the pointer's current location, based on the values set in the CMYK Setup dialog box.
Opacity Displays the opacity of the current layer. This option does not apply to the background.
You can also set the readout options by clicking the eyedropper icon in the Info panel. In addition to the First Color Readout options, you can also display 8-bit, 16-bit, or 32-bit values.
- For Second Color Readout, choose a display option from the list in step 2. For the second readout, you can also click the eyedropper icon in the Info panel and choose readout options from the pop-up menu.

text_image
Info Actual Color Proof Color Grayscale RGB Color Web Color HSB Color CMYK Color Lab Color Total Ink OpacityClicking an eyedropper icon and choosing a readout mode from the pop-up menu
-
For Ruler Units, choose a unit of measurement.
-
Under Status information, select from the following to display file information in the Info panel:
Document Sizes Displays information on the amount of data in the image. The number on the left represents the printing size of the image—approximately the size of the saved, flattened file in Adobe Photoshop format. The number on the right indicates the file's approximate
size including layers and channels.
Document Profile Displays the name of the color profile used by the image.
Document Dimensions Displays the dimensions of the image.
Scratch Sizes Displays information on the amount of RAM and the scratch disk used to process the image. The number on the left represents the amount of memory that is currently being used by the program to display all open images. The number on the right represents the total amount of RAM available for processing images.
Efficiency Displays the percentage of time spent performing an operation instead of reading or writing to the scratch disk. If the value is below 100%, Photoshop is using the scratch disk and is therefore operating more slowly.
Timing Displays the amount of time it took to complete the last operation.
Current Tool Displays the name of the active tool.
Measurement Scale Displays the scale of the document.
-
(Optional) Select Show Tool Hints to display a hint for using a selected tool at the bottom of the Info panel.
-
Click OK.

To change measurement units, click the crosshair icon in the Info panel and choose from the menu.
To the top
Display file information in the document window
The status bar is located at the bottom of every document window and displays useful information—such as the current magnification and file size of the active image, and brief instructions for using the active tool.
Note: You can also view copyright and authorship information that has been added to the file. This information includes standard file information and Digimarc watermarks. Photoshop automatically scans opened images for watermarks using the Digimarc Detect Watermark plug-in. If a watermark is detected, Photoshop displays a copyright symbol in the image window's title bar and updates the Copyright fields of the File Info dialog box.
- Click the triangle in the bottom border of the document window.
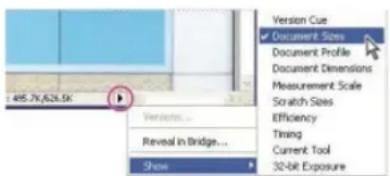
text_image
495.7K/628.5K Version Cue Document Size Document Profile Document Dimensions Measurement Scale Scratch Sizes Efficiency Timing Current Tool 32-bit ExposureFile information view options when Version Cue is enabled
- Choose a view option from the pop-up menu:
Note: If you have Version Cue enabled, choose from the Show submenu.
Version Cue Displays the Version Cue workgroup status of your document, such as open, unmanaged, unsaved, and so forth. This option
is available only if you have Version Cue enabled.
document size:viewingDocument Sizes Information on the amount of data in the image. The number on the left represents the printing size of the image—approximately the size of the saved, flattened file in Adobe Photoshop format. The number on the right indicates the file's approximate size, including layers and channels.
Document Profile The name of the color profile used by the image.
document dimension, viewingDocument Dimensions The dimensions of the image.
Measurement Scale The scale of the document.
scratch size, viewingScratch Sizes Information on the amount of RAM and the scratch disk used to process the image. The number on the left represents the amount of memory currently being used by the program to display all open images. The number on the right represents the total amount of RAM available for processing images.
Efficiency The percentage of time actually spent performing an operation instead of reading or writing to the scratch disk. If the value is below 100%, Photoshop is using the scratch disk and is therefore operating more slowly.
Timing The time it took to complete the last operation.
tools:viewing currentCurrent Tool The name of the active tool.
32-bit Exposure Option for adjusting the preview image for viewing 32-bits-per-channel high dynamic range (HDR) images on your computer monitor. The slider is available only when the document window displays an HDR image.
Click the file information area of the status bar to display document width, height, channels, and resolution. Control-click (Windows) or Command-click (Mac OS), to display tile width and height.
Adobe also recommends
Twitter ^™ and Facebook posts are not covered under the terms of Creative Commons.
Legal Notices | Online Privacy Policy
About high dynamic range images
Take photos for HDR images
Features that support 32-bpc HDR images
Merge images to HDR
Adjust displayed dynamic range for 32-bit HDR images
About the HDR Color Picker
Paint on HDR images
To the top
About high dynamic range images
The dynamic range (ratio between dark and bright regions) in the visible world far exceeds the range of human vision and of images that are displayed on a monitor or printed. But whereas human eyes can adapt to very different brightness levels, most cameras and computer monitors can reproduce only a fixed dynamic range. Photographers, motion picture artists, and others working with digital images must be selective about what's important in a scene because they are working with a limited dynamic range.
High dynamic range (HDR) images open up a world of possibilities because they can represent the entire dynamic range of the visible world. Because all the luminance values in a real-world scene are represented proportionately and stored in an HDR image, adjusting the exposure of an HDR image is like adjusting the exposure when photographing a scene in the real world.

natural_image
Interior architectural view of a modern building with colorful geometric wall art and staircases (no visible text or symbols)Merging images of different exposures to create an HDR image
A. Image with shadow detail but highlights clipped B. Image with highlight detail but shadows clipped C. HDR image containing the dynamic range of the scene
In Photoshop, the luminance values of an HDR image are stored using a floating-point numeric representation that's 32 bits long (32-bits-per-channel). The luminance values in an HDR image are directly related to the amount of light in a scene. By contrast, non-floating point 16- and 8-bpc image files store luminance values only from black to paper white, reflecting an extremely small segment of dynamic range in the real world.
In Photoshop, the Merge To HDR Pro command lets you create HDR images by combining multiple photographs captured at different exposures. Because an HDR image contains brightness levels that far exceed the display capabilities of a standard 24-bit monitor, Photoshop lets you adjust the HDR preview. If you need to print or use tools and filters that don't work with HDR images, you can convert them to 16- or 8-bpc images.
Take photos for HDR images
Keep the following tips in mind when you take photos to be combined with the Merge To HDR Pro command:
- Secure the camera to a tripod.
- Take enough photos to cover the full dynamic range of the scene. You can try taking at least five to seven photos, but you might need to take more exposures depending on the dynamic range of the scene. The minimum number of photos should be three.
- Vary the shutter speed to create different exposures. Changing the aperture changes the depth of field in each exposure and can produce lower-quality results. Changing the ISO or aperture may also cause noise or vignetting in the image.
- In general, don't use your camera's auto-bracket feature, because the exposure changes are usually too small.
- The exposure differences between the photos should be one or two EV (exposure value) steps apart (equivalent to about one or two f-stops apart).
- Don't vary the lighting; for instance, don't use a flash in one exposure but not the next.
• Make sure that nothing is moving in the scene. Exposure Merge works only with differently exposed images of the identical scene.
To the top
Features that support 32-bpc HDR images
You can use the following tools, adjustments, and filters with 32-bpc HDR images. (To work with more Photoshop features, convert a 32-bpc image to a 16-bpc or an 8-bpc image. To preserve the original image, create a copy with the Save As command.)
Adjustments Levels, Exposure, Hue/Saturation, Channel Mixer, Photo Filter.
Note: Although the Exposure command can be used with 8- and 16-bpc images, it is designed for making exposure adjustments to 32-bpc HDR images.
Blend Modes Normal, Dissolve, Darken, Multiply, Lighten, Darker Color, Linear Dodge (Add), Lighter Color, Difference, Subtract, Divide, Hue, Saturation, Color, and Luminosity.
Create new 32-bpc documents In the New dialog box, 32 bit is an option in the bit depth pop-up menu to the right of the Color Mode pop-up menu.
Edit menu commands All commands including Fill, Stroke, Free Transform, and Transform.
File Formats Photoshop (PSD, PSB), Radiance (HDR), Portable Bit Map (PBM), OpenEXR, and TIFF.
Note: Although Photoshop cannot save an HDR image in the LogLuv TIFF file format, it can open and read a LogLuv TIFF file.
Filters Average, Box Blur, Gaussian Blur, Motion Blur, Radial Blur, Shape Blur, Surface Blur, Add Noise, Clouds, Difference Clouds, Lens Flare, Smart Sharpen, Unsharp Mask, Emboss, De-Interlace, NTSC Colors, High Pass, Maximum, Minimum, and Offset.
Image commands Image Size, Canvas Size, Image Rotation, Crop, Trim, Duplicate, Apply Image, Calculations, and Variables.
View Pixel Aspect Ratio (Custom Pixel Aspect Ratio, Delete Pixel Aspect Ratio, Reset Pixel Aspect Ratio, etc.)
Layers New layers, duplicate layers, adjustment layers (Levels, Vibrance, Hue/Saturation, Channel Mixer, Photo Filter, and Exposure), fill layers, layer masks, layer styles, supported blending modes, and Smart Objects.
Modes RGB Color, Grayscale, conversion to 8 Bits/Channel or 16 Bits/Channel.
Pixel Aspect Ratio Support for square and non-square documents.
Selections Invert, Modify Border, Transform Selection, Save Selection and Load Selection.
Tools All tools in the toolbox except: Magnetic Lasso, Magic Wand, Spot Healing Brush, Healing Brush, Red Eye, Color Replacement, Art History Brush, Magic Eraser, Background Eraser, Paint Bucket, Dodge, Burn, and Sponge. Some tools work with supported blend modes only.
To the top
Merge images to HDR
The Merge To HDR Pro command combines multiple images with different exposures of the same scene, capturing the full dynamic range in a single HDR image. You can output the merged image as a 32-, 16-, or 8-bpc file. However, only a 32-bpc file can store all the HDR image data. HDR merging works best when photos are optimized for the process. For recommendations, see Take photos for HDR images.
Video tutorial: The best new feature in CS5: HDR Pro

text_image
123Take image tones from vivid to surreal....
Read More
http://goo.gl/uPzlj

by Deke McClelland
http://www.deke.com/
Contribute your expertise to
Adobe Community Help
Book excerpt: Create HDR images from bracketed exposures
text_image
123Walk through the HDR process from camera to computer.... Read More
http://goo.gl/uhlrB

by Conrad Chavez
http://www.conradchavez.co...
Contribute your expertise to
Adobe Community Help
Book excerpt: Remove ghosting from HDR images

text_image
123Eliminate blur from moving objects in a scene.... Read More
http://goo.gl/z4hhB

by Scott Kelby
http://www.peachpit.com/au...
Contribute your expertise to
Adobe Community Help
Video tutorial: Explore the enhancements to HDR Pro

text_image
123Take a tour through all the new features.... Read More
http://www.adobe.com/go/lrvid5004_ps_en

by Jan Kabili
http://www.lynda.com/Jan-K...
Contribute your expertise to Adobe Community Help
-
Do one of the following:
-
(Photoshop) Choose File > Automate > Merge To HDR Pro.
-
(Bridge) Select the images you want to use and choose Tools > Photoshop > Merge To HDR Pro. Skip to step 5.
-
In the Merge To HDR Pro dialog box, click Browse to select specific images, click Add Open Files, or choose Use > Folder. (To remove a particular item, select it in files list, and click Remove.)
- (Optional) Select Attempt To Automatically Align Source Images if you held the camera in your hands when you photographed the images.
- Click OK.
Note: If images lack exposure metadata, enter values in the Manually Set EV dialog box.
A second Merge To HDR Pro dialog box displays thumbnails of the source images, and a preview of the merged result.
- To the upper right of the preview, choose a bit depth for the merged image.

Choose 32 Bit if you want the merged image to store the entire dynamic range of the HDR image. 8-bit and (non-floating point) 16-bit image files cannot store the entire range of luminance values in an HDR image.
- To adjust the tonal range, see Options for 32-bit images or Options for 16- or 8-bit images.
- (Optional) To save your tonal settings for future use, choose Preset > Save Preset. (To later reapply the settings, choose Load Preset.)
Options for 32-bit images
Move the slider below the histogram to adjust the white point preview of the merged image. Moving the slider adjusts the image preview only; all HDR image data remains in the merged file.
The preview adjustment is stored in the HDR file and applied whenever you open the file in Photoshop. To readjust the white point preview at any time, choose View > 32-Bit Preview Options.
Options for 16- or 8-bit images
HDR images contain luminance levels that far exceed the dynamic range that 16- or 8-bpc images can store. To produce an image with the dynamic range you want, adjust exposure and contrast when converting from 32-bpc to lower bit depths.
Choose one of the following tone-mapping methods:
Local Adaptation Adjusts HDR tonality by adjusting local brightness regions throughout the image.
Edge Glow Radius specifies the size of the local brightness regions. Strength specifies how far apart two pixels' tonal values must be before they're no longer part of the same brightness region.
Tone and Detail Dynamic range is maximized at a Gamma setting of 1.0; lower settings emphasize midtones, while higher settings emphasize highlights and shadows. Exposure values reflect f-stops. Drag the Detail slider to adjust sharpness and the Shadow and Highlight sliders to brighten or darken these regions.
Color Vibrance adjusts the intensity of subtle colors, while minimizing clipping of highly saturated colors. Saturation adjusts the intensity of all colors from -100 (monochrome) to +100 (double saturation).
Toning Curve Displays an adjustable curve over a histogram showing luminance values in the original, 32-bit HDR image. The red tick marks along the horizontal axis are in one EV (approximately one f-stop) increments.
Note: By default, the Toning Curve and Histogram limit and equalize your changes from point to point. To remove the limit and apply more extreme adjustments, select the Corner option after inserting a point on the curve. When you insert and move a second point, the curve becomes angular.

text_image
√ Correl A BToning Curve and Histogram adjustment using the Corner option
A. Inserting a point and selecting the Corner option. B. Adjusting new point makes the curve angular at the point where the Corner option is used.
Equalize Histogram Compresses the dynamic range of the HDR image while trying to preserve some contrast. No further adjustments are necessary; this method is automatic.
Exposure and Gamma Lets you manually adjust the brightness and contrast of the HDR image. Move the Exposure slider to adjust gain and the Gamma slider to adjust contrast.
Highlight Compression Compresses the highlight values in the HDR image so they fall within the luminance values range of the 8- or 16-bpc image file. No further adjustments are necessary; this method is automatic.
Compensate for moving objects
If images have different content due to moving objects like cars, people, or foliage, select Remove Ghosts in the Merge To HDR Pro dialog box. Photoshop displays a green outline around the thumbnail with the best tonal balance, identifying the base image. Moving objects found in other images are removed. (If movement occurs in very light or dark areas, click a different thumbnail where moving objects are better exposed to improve results.)

For a tutorial on the Remove Ghosts option, see this video. (Discussion of Remove Ghosts begins at 3:00.)
Save or load camera response curves
Response curves indicate how camera sensors interpret different levels of incoming light. By default, the Merge To HDR Pro dialog box automatically calculates a camera response curve based on the tonal range of images you are merging. You can save the current response curve and later apply it to another group of merged images.
- In the upper-right corner of the Merge to HDR Pro dialog box, click the response curve menu ▼, and then choose Save Response Curve. (To later reapply the curve, choose Load Response Curve.)
Convert from 32 bits to 16 or 8 bpc
If you originally created a 32-bit image during the Merge to HDR Pro process, you can later convert it to a 16- or 8-bit image.
- Open a 32-bpc image in Photoshop, and choose Image > Mode > 16 Bits/Channel or 8 Bits/Channel.
- Adjust exposure and contrast to produce an image with the dynamic range you want. (See Options for 16- or 8-bit images.)
- Click OK to convert the 32-bit image.
To the top
Adjust displayed dynamic range for 32-bit HDR images
The dynamic range of HDR images exceeds the display capabilities of standard computer monitors. When you open an HDR image in Photoshop, it can look very dark or washed out. Photoshop lets you adjust the preview so that the monitor displays an HDR image whose highlights and shadows aren't washed out or too dark. The preview settings are stored in the HDR image file (PSD, PSB, and TIFF only) and are applied whenever the file is opened in Photoshop. Preview adjustments don't edit the HDR image file; all the HDR image information remains intact. Use the Exposure adjustment (Image > Adjustments > Exposure) to make exposure edits to the 32-bpc HDR image.
To view 32-bit readouts in the Info panel, click the Eyedropper icon in the Info panel and choose 32-Bit from the pop-up menu.
- Open a 32-bpc HDR image in Photoshop, and choose View > 32-Bit Preview Options.
- In the 32-bit Preview Options dialog box, choose an option from the Method menu:
Exposure And Gamma Adjusts the brightness and contrast.
Highlight Compression Compresses the highlight values in the HDR image so they fall within the luminance values range of the 8- or 16-bpc image file.
-
If you chose Exposure And Gamma, move the Exposure and Gamma sliders to adjust the brightness and contrast of the image preview.
-
Click OK.
You can also adjust the preview of an HDR image open in Photoshop by clicking the triangle in the status bar of the document window and choosing 32-Bit Exposure from the pop-up menu. Move the slider to set the white point for viewing the HDR image. Double-click the slider to return to the default exposure setting. Since the adjustment is made per view, you can have the same HDR image open in multiple windows, each with a different preview adjustment. Preview adjustments made with this method are not stored in the HDR image file.
To the top
About the HDR Color Picker
The HDR Color Picker allows you to accurately view and select colors for use in 32-bit HDR images. As in the regular Adobe Color Picker, you select a color by clicking a color field and adjusting the color slider. The Intensity slider allows you to adjust the brightness of a color to match the intensity of the colors in the HDR image you're working with. A Preview area lets you view swatches of a selected color to see how it will display at different exposures and intensities.
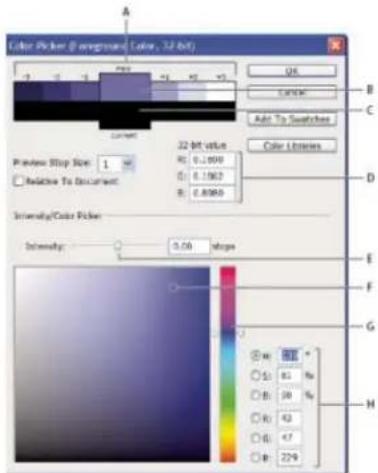
text_image
Color Picker (RGB/CM) [Color, 32-bit] Current Preview Stop Size: 1 Relative To Document 22-bit value R: 0.1890 S: 0.1662 B: 0.8980 Interior/Color Picker Interior: 0.06 pixels H Add To Switches Color Colors B C D E F G H M S: B: R: S: B: 22%HDR Color Picker
A. Preview area B. Adjusted color C. Original color D. 32-bit floating point values E. Intensity slider F. Picked color G. Color slider H. Color values
Display the HDR Color Picker
- With a 32-bpc image open, do one of the following:
- In the toolbox, click the foreground or background color selection box.
- In the Color panel, click the Set Foreground Coloror Set Background Color selection box.
The Color Picker is also available when features let you choose a color. For example, by clicking the color swatch in the options bar for some tools, or the eyedroppers in some color adjustment dialog boxes.
Choose colors for HDR images
The lower part of the HDR Color Picker functions like the regular Color Picker does with 8- or 16-bit images. Click in the color field to select a color and move the color slider to change hues, or use the HSB or RGB fields to enter numeric values for a particular color. In the color field, brightness increases as you move from bottom to top, and saturation increases as you move from left to right.
Use the Intensity slider to adjust the brightness of the color. The color value plus the intensity value are converted to 32-bit floating point number values in your HDR document.
- Select a color by clicking in the color field and moving the color slider, or by entering HSB or RGB numeric values, as in the Adobe Color Picker.
- Adjust the Intensity slider to boost or reduce the color's brightness. The new color swatch in the Preview scale at the top of the Color Picker shows the effect of increasing or decreasing stops for the selected color.
The Intensity Stops correspond inversely to exposure setting stops. If you boost the Exposure setting of the HDR image two stops, reducing the Intensity stops by two will maintain the same color appearance as if the HDR image exposure and the color intensity were both set to 0.
If you know the exact 32-bit RGB values for the color you want, you can enter them directly in the 32-bit value RGB fields.
- (Optional) Adjust settings for the Preview area.
Preview Stop Size Sets the stop increments for each preview swatch. For example, a setting of 3 results in swatches of -9, -6, -3, +3, +6, +9. These swatches let you preview the appearance of your selected color at different exposure settings.
Relative to Document Select to adjust the preview swatches to reflect the current exposure setting for the image. For example, if the document exposure is set higher, the new preview swatch will be lighter than the color selected in the Color Picker's color field, to show the effect of the higher exposure on the selected color. If the current exposure is set to 0 (the default), checking or unchecking this option will not change the new swatch.
- (Optional) Click Add to Swatches to add the selected color to the Swatches panel.
- Click OK.
To the top
Paint on HDR images
You can edit and add effects to HDR/32-bpc images using any of the following Photoshop tools: Brush, Pencil, Pen, Shape, Clone Stamp, Pattern Stamp, Eraser, Gradient, Blur, Sharpen, Smudge, and History Brush. You can also use the Text tool to add 32-bpc text layers to an HDR image.
When editing or painting on HDR images, you can preview your work at different exposure settings using either the 32-Bit Exposure slider in the document info area or the 32-Bit Preview Options dialog box (View > 32-Bit Preview Options). The HDR Color Picker also lets you preview your selected foreground color at different intensity settings, to match different exposure settings in an HDR image.
- Open an HDR image.
- (Optional) Set the exposure for the image. See Adjust displayed dynamic range for 32-bit HDR images.
- For the Brush or Pencil tools, click the foreground color to open the HDR Color Picker and select a color. For the Text tool, click the color chip in the Text tool options bar to set the text color.
The Preview area of the HDR Color Picker helps you select and adjust a foreground color in relation to different exposure settings in the HDR image. See About the HDR Color Picker.
By default, the Toning Curve and Histogram limit and equalize your changes from point to point. To remove the limit and apply more extreme adjustments, select the Corner option after inserting a point on the curve. When you insert and move a second point, the curve becomes angular.
Adobe also recommends
- Adjust HDR exposure and toning

Twitter™ and Facebook posts are not covered under the terms of Creative Commons.
Legal Notices | Online Privacy Policy
Customize indexed color tables
To the top
Customize indexed color tables
The Color Table command lets you make changes to the color table of an indexed-color image. These customization features are particularly useful with pseudocolor images—images displaying variations in gray levels with color rather than shades of gray, often used in scientific and medical applications. However, customizing the color table can also produce special effects with indexed-color images that have a limited number of colors.
Note: To shift colors simply in a pseudocolor image, choose Image > Adjustments, and use the color adjustment commands in the submenu.
Edit colors and assign transparency with a color table
You can edit colors in the color table to produce special effects, or assign transparency in the image to a single color in the table.
- Open the indexed-color image.
- Choose Image > Mode > Color Table.
- To change a single color, click the color and choose a new color in the Color Picker.
- To change a range of colors, drag in the table to choose the range of colors you want to change. In the Color Picker, choose the first color you want in the range and click OK. When the color picker redisplays, choose the last color you want in the range and click OK.
The colors you selected in the Color Picker are placed in the range you selected in the Color Table dialog box. - To assign transparency to a color, select the Eyedropper tool in the Color Table dialog box, and click the color in the table or in the image. The sampled color is replaced with transparency in the image.
- Click OK in the Color Table dialog box to apply the new colors to the indexed-color image.
Choose a predefined color table
-
Open the indexed-color image.
-
Do one of the following:
-
Choose Image > Mode >Color Table.
-
Choose Image > Mode > Indexed Color. In the Indexed Color dialog box, choose Custom from the Panel pop-up menu. This opens the Color Table dialog box.
-
In the Color Table dialog box, choose a predefined table from the Table menu.
Custom Creates a palette you specify.
Black Body Displays a palette based on the different colors a black body radiator emits as it is heated—from black to red, orange, yellow, and white.
Grayscale Displays a palette based on 256 levels of gray—from black to white.
Spectrum Displays a palette based on the colors produced as white light passes through a prism—from violet, blue, and green to yellow, orange, and red.
System (Mac OS) Displays the standard Mac OS 256-color system palette.
System (Windows) Displays the standard Windows 256-color system palette.
Save and load color tables
You use the Save and Load buttons in the Color Table dialog box to save your indexed color tables for use with other Adobe Photoshop images. After you load a color table into an image, the colors in the image change to reflect the color positions they reference in the new color table.
Note: You can also load saved color tables into the Swatches panel.
Adobe also recommends
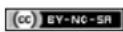
Twitter™ and Facebook posts are not covered under the terms of Creative Commons.
Legal Notices | Online Privacy Policy
Customizing color pickers and swatches
Change the Color Picker Add and delete color swatches Manage swatch libraries Share swatches between applications
To the top
Change the Color Picker
Instead of using the Adobe Color Picker, you can choose colors from your computer operating system's standard Color Picker or from a third party Color Picker.
- Choose Edit > Preferences > General (Windows) or Photoshop > Preferences > General (Mac OS).
- Choose a Color Picker from the Color Picker menu, and click OK.
For more information, see your operating system documentation.
To the top
Add and delete color swatches
Color swatches can be added or deleted from the Swatches panel.

You can also add a color swatch from the Color Picker by clicking the Add To Swatches button.
Add a color to the Swatches panel
- Decide which color you want to add and make it the foreground color.
-
Do one of the following:
-
Click the New Swatch button in the Swatches panel. Alternatively, choose New Swatch from the Swatches panel menu.
- Position the pointer over an empty space in the bottom row of the Swatches panel (the pointer turns into the Paint Bucket tool), and click to add the color. Enter a name for the new color and click OK.

natural_image
Close-up of a stylized, ornate mask with a bird-like face and a keyhole (no text or symbols visible)
text_image
Swatches ×Color selected from image (left), and added to Swatches panel (right)
- (Creative Cloud only) Choose Load Swatches from the panel menu. Then, in the Load window, navigate to an HTML, CSS, or SVG file and click OK. Photoshop will read the color values specified in the documents.
Note: New colors are saved in the Photoshop preferences file so that they persist between editing sessions. To permanently save a color, save it in a library.
Delete a color from the Swatches panel
- Do one of the following:
- Drag a swatch to the Delete icon
- Hold down Alt (Windows) or Option (Mac OS), position the pointer over a swatch (the pointer turns into scissors), and click.
To the top
Manage swatch libraries
Swatch libraries provide an easy way to access different sets of colors. Custom sets of swatches can be saved as a library for reuse. Swatches can also be saved in a format for sharing in other applications.
Load or replace a library of swatches
- Choose one of the following from the Swatches panel menu:
Load Swatches Adds a library to the current set of swatches. Select the library file you want to use, and click Load.
Replace Swatches Replaces the current list with a different library. Select the library file you want to use, and click Load. Photoshop gives your the option of saving the current set of swatches before replacing them.
Name of a color library Loads a specific color system listed in the lower part of the Swatches panel menu. You can either replace or append the current set of colors with the library you're loading.
Save a set of swatches as a library
- Choose Save Swatches from the Swatches panel menu.
- Choose a location for the swatch library, enter a file name, and click Save.
You can save the library anywhere. However, if you place the library file in the Presets/Swatches folder in the default presets location, the library name will appear at the bottom of the Swatches panel menu after you restart the application.
Return to the default library of swatches
- Choose Reset Swatches from the Swatches panel menu. You can either replace or append the current set of colors with the default swatch library.
To the top
Share swatches between applications
You can share the solid swatches you create in Photoshop, Illustrator, and InDesign by saving a swatch library for exchange. The colors appear exactly the same across applications as long as your color settings are synchronized.
- In the Swatches panel, create the process and spot-color swatches you want to share, and remove any swatches you don't want to share.
Note: You cannot share the following types of swatches between applications: patterns, gradients, and the Registration swatch from Illustrator or InDesign; and book color references, HSB, XYZ, duotone, monitorRGB, opacity, total ink, and webRGB swatches from Photoshop. These types of swatches are automatically excluded when you save swatches for exchange.
- Select Save Swatches For Exchange from the Swatches panel menu, and save the swatch libraries in an easily accessible location.
- Load the swatch library into the Swatches panel for Photoshop, Illustrator, or InDesign.
Adobe also recommends
- Add swatches from HTML, CSS, and SVG files | Creative Cloud

Twitter ^™ and Facebook posts are not covered under the terms of Creative Commons.
Legal Notices | Online Privacy Policy
Convert an image to another color mode
Convert an image to Bitmap mode
Convert a color photo to Grayscale mode
Convert a Bitmap mode image to Grayscale mode
Convert a grayscale or RGB image to indexed color
To the top
Convert an image to another color mode
You can change an image from its original mode (source mode) to a different mode (target mode). When you choose a different color mode for an image, you permanently change the color values in the image. For example, when you convert an RGB image to CMYK mode, RGB color values outside the CMYK gamut (defined by the CMYK working space setting in the Color Settings dialog box) are adjusted to fall within gamut. As a result, some image data may be lost and can't be recovered if you convert the image from CMYK back to RGB.
Before converting images, it's best to do the following:
- Do as much editing as possible in the original image mode (usually RGB for images from most scanners or digital cameras, or CMYK for images from traditional drum scanners or imported from a Scitex system).
- Save a backup copy before converting. Be sure to save a copy of your image that includes all layers so that you can edit the original version of the image after the conversion.
- Flatten the file before converting it. The interaction of colors between layer blending modes changes when the mode changes.
Note: In most cases, you'll want to flatten a file before converting it. However, it isn't required and, in some cases, it isn't desirable (for example, when the file has vector text layers).
- Choose Image > Mode and the mode you want from the submenu. Modes not available for the active image appear dimmed in the menu.
Images are flattened when converted to Multichannel, Bitmap, or Indexed Color mode, because these modes do not support layers.
To the top
Convert an image to Bitmap mode
Converting an image to Bitmap mode reduces the image to two colors, greatly simplifying the color information in the image and reducing its file size.
When converting a color image to Bitmap mode, first convert it to Grayscale mode. This removes the hue and saturation information from the pixels and leaves just the brightness values. However, because only a few editing options are available for Bitmap mode images, it's usually best to edit the image in Grayscale mode and then convert it to Bitmap mode.
Note: Images in Bitmap mode are 1 bit per channel. You must convert a 16- or 32-bits-per-channel image to 8-bit Grayscale mode before converting it to Bitmap mode.
-
Do one of the following:
-
If the image is in color, choose Image > Mode > Grayscale. Then choose Image > Mode > Bitmap.
-
If the image is grayscale, choose Image > Mode > Bitmap.
-
For Output, enter a value for the output resolution of the Bitmap mode image, and choose a unit of measurement. By default, the current
image resolution appears as both the input and the output resolutions.
- Choose one of the following bitmap conversion methods from the Use pop-up menu:
50% Threshold Converts pixels with gray values above the middle gray level (128) to white and pixels with gray values below that level to black. The result is a very high-contrast, black-and-white representation of the image.
Pattern Dither Converts an image by organizing the gray levels into geometric configurations of black and white dots.
Diffusion Dither Converts an image by using an error-diffusion process, starting at the pixel in the upper-left corner of the image. If the pixel's value is above middle gray (128), the pixel is changed to white—if below it, to black. Because the original pixel is rarely pure white or pure black, error is inevitably introduced. This error is transferred to surrounding pixels and diffused throughout the image, resulting in a grainy, film-like texture.
Halftone Screen Simulates the appearance of halftone dots in the converted image. Enter values in the Halftone Screen dialog box:
- For Frequency, enter a value for the screen frequency, and choose a unit of measurement. Values can range from 1.000 to 999.999 for lines per inch and from 0.400 to 400.00 for lines per centimeter. You can enter decimal values. The screen frequency specifies the ruling of the halftone screen in lines per inch (lpi). The frequency depends on the paper stock and type of press used for printing. Newspapers commonly use an 85-line screen. Magazines use higher resolution screens, such as 133-lpi and 150-lpi. Check with your print shop for correct screen frequencies.
- Enter a value for the screen angle in degrees from -180 to +180. The screen angle refers to the orientation of the screen. Continuous-tone and black-and-white halftone screens commonly use a 45° angle.
- For Shape, choose the dot shape you want.
Note: The halftone screen becomes part of the image. If you print the image on a halftone printer, the printer will use its own halftone screen as well as the halftone screen that is part of the image. On some printers, the result is a moiré pattern.
Custom Pattern Simulates the appearance of a custom halftone screen in the converted image. Choose a pattern that lends itself to thickness variations, typically one with a variety of gray shades.
To use this option, you first define a pattern and then screen the grayscale image to apply the texture. To cover the entire image, the pattern must be as large as the image. Otherwise, the pattern is tiled. Photoshop comes with several self-tiling patterns that can be used as halftone screen patterns.

To prepare a black-and-white pattern for conversion, first convert the image to grayscale and then apply the Blur More filter several times. This blurring technique creates thick lines tapering from dark gray to white.


Original grayscale image, and 50% Threshold conversion method

Pattern Dither conversion method, and Diffusion Dither conversion method
To the top
Convert a color photo to Grayscale mode
- Open the photo you want to convert to black-and-white.
-
Choose Image > Mode > Grayscale.
-
Click Discard. Photoshop converts the colors in the image to black, white, and shades of gray.
Note: The technique above minimizes file size but discards color information and can convert adjacent colors to the exact same shade of gray. Using a Black & White adjustment layer increases file size but retains color information, letting you map colors to shades of gray.
To the top
Convert a Bitmap mode image to Grayscale mode
You can convert a Bitmap mode image to Grayscale mode in order to edit it. Keep in mind that a Bitmap mode image edited in Grayscale mode may not look the same when you convert it back to Bitmap mode. For example, suppose a pixel that is black in Bitmap mode is edited to a shade of gray in Grayscale mode. When the image is converted back to Bitmap mode, that pixel is rendered as white if its gray value is above the middle gray value of 128.
- Choose Image > Mode > Grayscale.
- Enter a value between 1 and 16 for the size ratio.
The size ratio is the factor for scaling down the image. For example, to reduce a grayscale image by 50%, enter 2 for the size ratio. If you enter a number greater than 1, the program averages multiple pixels in the Bitmap mode image to produce a single pixel in the grayscale image. This process lets you generate multiple shades of gray from an image scanned on a 1-bit scanner.
To the top
Convert a grayscale or RGB image to indexed color
Converting to indexed color reduces the number of colors in the image to at most 256—the standard number of colors supported by the GIF and PNG-8 formats and many multimedia applications. This conversion reduces file size by deleting color information from the image.
To convert to indexed color, you must start with an image that is 8 bits per channel and in either Grayscale or RGB mode.
- Choose Image > Mode > Indexed Color.
Note: All visible layers will be flattened; any hidden layers will be discarded.
For grayscale images, the conversion happens automatically. For RGB images, the Indexed Color dialog box appears.
- Select Preview in the Indexed Color dialog box to display a preview of the changes.
- Specify conversion options.
Conversion options for indexed-color images
When converting an RGB image to indexed color, you can specify a number of conversion options in the Indexed Color dialog box.
Palette Type A number of palette types are available for converting an image to indexed color. For the Perceptual, Selective, and Adaptive
options, you can choose using a local palette based on the current image's colors. These are the available palette types:
Exact Creates a palette using the exact colors appearing in the RGB image—an option available only if the image uses 256 or fewer colors. Because the image's palette contains all colors in the image, there is no dithering.
System (Mac OS) Uses the Mac OS default 8-bit palette, which is based on a uniform sampling of RGB colors.
System (Windows) Uses the Windows system's default 8-bit palette, which is based on a uniform sampling of RGB colors.
Web Uses the 216-color palette that web browsers, regardless of platform, use to display images on a monitor limited to 256 colors. This palette is a subset of the Mac OS 8-bit palette. Use this option to avoid browser dither when viewing images on a monitor display limited to 256 colors.
Uniform Creates a palette by uniformly sampling colors from the RGB color cube. For example, if Photoshop takes six evenly-spaced color levels each of red, green, and blue, the combination produces a uniform palette of 216 colors (6 cubed = 6 x 6 x 6 = 216). The total number of colors displayed in an image corresponds to the nearest perfect cube (8, 27, 64, 125, or 216) that is less than the value in the Colors text box.
Local (Perceptual) Creates a custom palette by giving priority to colors for which the human eye has greater sensitivity.
Local (Selective) Creates a color table similar to the Perceptual color table, but favoring broad areas of color and the preservation of web colors. This option usually produces images with the greatest color integrity.
Local (Adaptive) Creates a palette by sampling the colors from the spectrum appearing most commonly in the image. For example, an RGB image with only the colors green and blue produces a palette made primarily of greens and blues. Most images concentrate colors in particular areas of the spectrum. To control a palette more precisely, first select a part of the image containing the colors you want to emphasize. Photoshop weights the conversion toward these colors.
Master (Perceptual) Creates a custom palette by giving priority to colors for which the human eye has greater sensitivity. Applies when you have multiple documents open; takes all open documents into account.
Master (Selective) Creates a color table similar to the Perceptual color table, but favoring broad areas of color and the preservation of web colors. This option usually produces images with the greatest color integrity. Applies when you have multiple documents open; takes all open documents into account.
Master (Adaptive) Creates a palette by sampling the colors from the spectrum appearing most commonly in the image. For example, an RGB image with only the colors green and blue produces a palette made primarily of greens and blues. Most images concentrate colors in particular areas of the spectrum. To control a palette more precisely, first select a part of the image containing the colors you want to emphasize. Photoshop weights the conversion toward these colors. Applies when you have multiple documents open; takes all open documents into account.
Custom Creates a custom palette using the Color Table dialog box. Either edit the color table and save it for later use or click Load to load a previously created color table. This option also displays the current Adaptive palette, which is useful for previewing the colors most often used in the image.
Previous Uses the custom palette from the previous conversion, making it easy to convert several images with the same custom palette.
Number Of Colors For the Uniform, Perceptual, Selective, or Adaptive palette, you can specify the exact number of colors to be displayed (up to 256) by entering a value for Colors. The Colors text box controls only how the indexed color table is created. Adobe Photoshop still treats the image as an 8-bit, 256-color image.
Color Inclusion And Transparency To specify colors to be included in the indexed color table or to specify transparency in the image, choose from the following options:
Forced Provides options to force the inclusion of certain colors in the color table. Black And White adds a pure black and a pure white to
the color table; Primaries adds red, green, blue, cyan, magenta, yellow, black, and white; Web adds the 216 web-safe colors; and Custom lets you define custom colors to add.
Transparency Specifies whether to preserve transparent areas of the image during conversion. Selecting this option adds a special index entry in the color table for transparent colors. Deselecting this option fills transparent areas with the matte color, or with white if no matte color is chosen.
Matte Specifies the background color used to fill anti-aliased edges that lie adjacent to transparent areas of the image. When Transparency is selected, the matte is applied to edge areas to help blend the edges with a web background of the same color. When Transparency is deselected, the matte is applied to transparent areas. Choosing None for the matte creates hard-edged transparency if Transparency is selected; otherwise, all transparent areas are filled with 100% white. The image must have transparency for the Matte options to be available.
Dithering Unless you're using the Exact color table option, the color table may not contain all the colors used in the image. To simulate colors not in the color table, you can dither the colors. Dithering mixes the pixels of the available colors to simulate the missing colors. Choose a dither option from the menu, and enter a percentage value for the dither amount. A higher amount dithers more colors but may increase file size. You can choose from the following dither options:
None Does not dither colors but instead uses the color closest to the missing color. This tends to result in sharp transitions between shades of color in the image, creating a posterized effect.
Diffusion Uses an error-diffusion method that produces a less-structured dither than the Pattern option. To protect colors in the image that contain entries in the color table from being dithered, select Preserve Exact Colors. This is useful for preserving fine lines and text for web images.
Pattern Uses a halftone-like square pattern to simulate any colors not in the color table.
Noise Helps to reduce seam patterns along the edges of image slices. Choose this option if you plan to slice the image for placement in an HTML table.
Adobe also recommends
- About color working spaces

Twitter™ and Facebook posts are not covered under the terms of Creative Commons.
Legal Notices | Online Privacy Policy
Mix color channels
To the top
Mix color channels
Using the Channel Mixer adjustment, you can create high-quality grayscale, sepia tone, or other tinted images. You can also make creative color adjustments to an image. To create high-quality grayscale images, choose the percentage for each color channel in the Channel Mixer adjustment. To convert a color image to grayscale and add tinting to the image, use the Black & White command (see Convert a color image to black and white).
The Channel Mixer adjustment options modify a targeted (output) color channel using a mix of the existing (source) color channels in the image. Color channels are grayscale images representing the tonal values of the color components in an image (RGB or CMYK). When you use the Channel Mixer, you are adding or subtracting grayscale data from a source channel to the targeted channel. You are not adding or subtracting colors to a specific color component as you do with the Selective Color adjustment.
Channel Mixer presets are available from the Preset menu in the Properties panel (CC, CS6) or Adjustments panel (CS5). Use the default Channel Mixer presets to create, save, and load custom presets.
Mix color channels
- In the Channels panel, select the composite color channel.
-
To access the Channel Mixer adjustment, do one of the following:
-
Click the Channel Mixer icon in the Adjustments panel.
- Choose Layer > New Adjustment Layer > Channel Mixer. Click OK in the New Layer dialog box.
• (CS5) Click a Channel Mixer preset in the Adjustments panel.
Note: You can also choose Image > Adjustments > Channel Mixer. But keep in mind that this method makes direct adjustments to the image layer and discards image information.
-
Do one of the following:
-
In the Properties panel (CC, CS6) or Adjustments panel (CS5), choose a channel from the Output Channel menu in which to blend one or more existing channels.
- (CC, CS6) In the Properties panel, choose a Channel Mixer preset from the Preset menu.
Choosing an output channel sets the source slider for that channel to 100% and all other channels to 0%. For example, choosing Red as the output channel sets the Source Channels sliders to 100% for Red, and to 0% for Green and Blue (in an RGB image).
- To decrease the channel's contribution to the output channel, drag a source channel slider to the left. To increase the channel's contribution, drag a source channel slider to the right or enter a value between -200% and +200% in the box. Using a negative value inverts the source channel before adding it to the output channel.
Photoshop displays the total value of the source channels in the Total field. If the combined channel values are above 100%, Photoshop displays a warning icon next to the total.
- Drag the slider or enter a value for the Constant option.
This option adjusts the grayscale value of the output channel. Negative values add more black, and positive values add more white. A -200% value makes the output channel black, and a +200% value makes the output channel white.
You can save Channel Mixer dialog box settings for reuse on other images. See Save adjustment settings and Reapply adjustment settings.
Create monochrome images from RGB or CMYK images
Monochrome images display color channels as gray values. Adjust the percentage of each source channel to fine-tune the overall grayscale image.
- In the Channels panel, select the composite color channel.
- Apply a Channel Mixer adjustment.
-
In the Adjustments panel (CS5) or the Properties panel (CC, CS6) do one of the following:
-
Select Monochrome.
- Select one of the default presets from the Channel Mixer menu:
Black & White Infrared (RGB)
Red=-70%, Green=200%, Blue=-30%
Black & White With Blue Filter (RGB)
Red=0%, Green=0%, Blue=100%
Black & White With Green Filter (RGB)
Red=0%, Green=100%, Blue=0%
Black & White With Orange Filter (RGB)
Red=50%, Green=50%, Blue=0%
Black & White With Red Filter (RGB)
Red=100%, Green=0%, Blue=0%
Black & White With Yellow Filter (RGB)
Red=34%, Green=66%, Blue=0%
- To control the amount of detail and contrast in the images before you convert them to grayscale, use the source channel sliders.
Before adjusting the percentages of the source channels, view how each source channel affects the monochrome image. For example, in RGB, view the image with the Red channel set to +100% and the Green and Blue source channels set to 0%. Then, view the image with the Green source channel set to +100% and the other two channels set to 0%. Finally, view the image with Blue source channel set to +100% and the other channels set to 0%.
The Total value displays the total percentage of the source channels. For best results, adjust the source channels so the combined values equal 100%. If the combined values are above 100%, a warning icon appears next to the total, indicating that the processed image will be brighter than the original, possibly removing highlight detail.
- (Optional) Drag the slider or enter a value for the Constant option.
This option adjusts the grayscale value of the output channel. Negative values add more black, and positive values add more white. A -200% value makes the output channel black; a +200% value makes the output channel white.
Create a hand-tinted appearance for specific image elements
- In the Channels panel, select the composite color channel.
-
Apply a Channel Mixer adjustment.
-
In the Adjustments panel (CS5) or the Properties panel (CC, CS6), select and then deselect Monochrome.
-
Choose an Output Channel option, and adjust the source channel sliders. (Repeat this step as desired for each output channel.)

natural_image
Three-panel image showing a purple and pink iris flower in natural setting, labeled A, B, C (no text or symbols on the flowers themselves)A. Original color image B. Selecting Monochrome creates grayscale image C. Deselecting Monochrome and mixing channels tints elements of grayscale image
Adobe also recommends

Twitter™ and Facebook posts are not covered under the terms of Creative Commons.
Legal Notices
Online Privacy Policy
RGB Color mode
CMYK Color mode
Lab Color mode
Grayscale mode
Bitmap mode
Duotone mode
Indexed Color mode
Multichannel mode
To the top
RGB Color mode
Photoshop RGB Color mode uses the RGB model, assigning an intensity value to each pixel. In 8-bits-per-channel images, the intensity values range from 0 (black) to 255 (white) for each of the RGB (red, green, blue) components in a color image. For example, a bright red color has an R value of 246, a G value of 20, and a B value of 50. When the values of all three components are equal, the result is a shade of neutral gray. When the values of all components are 255, the result is pure white; when the values are 0, pure black.
RGB images use three colors, or channels, to reproduce colors on screen. In 8-bits-per-channel images, the three channels translate to 24 (8 bits x 3 channels) bits of color information per pixel. With 24-bit images, the three channels can reproduce up to 16.7 million colors per pixel. With 48-bit (16-bits-per-channel) and 96-bit (32-bits-per-channel) images, even more colors can be reproduced per pixel. In addition to being the default mode for new Photoshop images, the RGB model is used by computer monitors to display colors. This means that when working in color modes other than RGB, such as CMYK, Photoshop converts the CMYK image to RGB for display on screen.
Although RGB is a standard color model, the exact range of colors represented can vary, depending on the application or display device. The RGB Color mode in Photoshop varies according to the working space setting that you specify in the Color Settings dialog box.
To the top
CMYK Color mode
In the CMYK mode, each pixel is assigned a percentage value for each of the process inks. The lightest (highlight) colors are assigned small percentages of process ink colors; the darker (shadow) colors higher percentages. For example, a bright red might contain 2% cyan, 93% magenta, 90% yellow, and 0% black. In CMYK images, pure white is generated when all four components have values of 0%.
Use the CMYK mode when preparing an image to be printed using process colors. Converting an RGB image into CMYK creates a color separation. If you start with an RGB image, it's best to edit first in RGB and then convert to CMYK at the end of your editing process. In RGB mode, you can use the Proof Setup commands to simulate the effects of a CMYK conversion without changing the actual image data. You can also use CMYK mode to work directly with CMYK images scanned or imported from high-end systems.
Although CMYK is a standard color model, the exact range of colors represented can vary, depending on the press and printing conditions. The CMYK Color mode in Photoshop varies according to the working space setting that you specify in the Color Settings dialog box.
To the top
Lab Color mode
The CIE L*a*b* color model (Lab) is based on the human perception of color. The numeric values in Lab describe all the colors that a person with normal vision sees. Because Lab describes how a color looks rather than how much of a particular colorant is needed for a device (such as a monitor, desktop printer, or digital camera) to produce colors. Lab is considered to be a device-independent color model. Color management systems use Lab as a color reference to predictably transform a color from one color space to another color space.
The Lab Color mode has a lightness component (L) that can range from 0 to 100. In the Adobe Color Picker and Color panel, the a component (green-red axis) and the b component (blue-yellow axis) can range from +127 to -128.
Lab images can be saved in Photoshop, Photoshop EPS, Large Document Format (PSB), Photoshop PDF, Photoshop Raw, TIFF, Photoshop DCS 1.0, or Photoshop DCS 2.0 formats. You can save 48-bit (16-bits-per-channel) Lab images in Photoshop, Large Document Format (PSB),
Photoshop PDF, Photoshop Raw, or TIFF formats.
Note: The DCS 1.0 and DCS 2.0 formats convert the file to CMYK when opened.
To the top
Grayscale mode
Grayscale mode uses different shades of gray in an image. In 8-bit images, there can be up to 256 shades of gray. Every pixel of a grayscale image has a brightness value ranging from 0 (black) to 255 (white). In 16 and 32-bit images, the number of shades in an image is much greater than in 8-bit images.
Grayscale values can also be measured as percentages of black ink coverage (0% is equal to white, 100% to black).
Grayscale mode uses the range defined by the working space setting that you specify in the Color Settings dialog box.
To the top
Bitmap mode
Bitmap mode uses one of two color values (black or white) to represent the pixels in an image. Images in Bitmap mode are called bitmapped 1-bit images because they have a bit depth of 1.
To the top
Duotone mode
Duotone mode creates monotone, duotone (two-color), tritone (three-color), and quadtone (four-color) grayscale images using one to four custom inks.
To the top
Indexed Color mode
Indexed Color mode produces 8-bit image files with up to 256 colors. When converting to indexed color, Photoshop builds a color lookup table (CLUT), which stores and indexes the colors in the image. If a color in the original image does not appear in the table, the program chooses the closest one or uses dithering to simulate the color using available colors.
Although its palette of colors is limited, indexed color can reduce file size yet maintain the visual quality needed for multimedia presentations, web pages, and the like. Limited editing is available in this mode. For extensive editing, you should convert temporarily to RGB mode. Indexed color files can be saved in Photoshop, BMP, DICOM (Digital Imaging and Communications in Medicine), GIF, Photoshop EPS, Large Document Format (PSB), PCX, Photoshop PDF, Photoshop Raw, Photoshop 2.0, PICT, PNG, Targa®, or TIFF formats.
To the top
Multichannel mode
Multichannel mode images contain 256 levels of gray in each channel and are useful for specialized printing. Multichannel mode images can be saved in Photoshop, Large Document Format (PSB), Photoshop 2.0, Photoshop Raw, or Photoshop DCS 2.0 formats.
These guidelines apply when converting images to Multichannel mode:
- Layers are unsupported and therefore flattened.
• Color channels in the original image become spot color channels in the converted image. - Converting a CMYK image to Multichannel mode creates cyan, magenta, yellow, and black spot channels.
- Converting an RGB image to Multichannel mode creates cyan, magenta, and yellow spot channels.
- Deleting a channel from an RGB, CMYK, or Lab image automatically converts the image to Multichannel mode, flattening layers.
• To export a multichannel image, save it in Photoshop DCS 2.0 format.
Note: Indexed Color and 32-bit images cannot be converted to Multichannel mode.
Adobe also recommends
• About color working spaces
- Soft-proof colors

BY-NC-SA
Twitter™ and Facebook posts are not covered under the terms of Creative Commons.
Legal Notices | Online Privacy Policy
Understanding color
Color models, spaces, and modes
Adjusting color hue, saturation, and brightness
Note: For detailed instructions, click the links below. To ask questions, request features, or report problems, visit feedback.photoshop.com.
To the top
Understanding color
Knowing how colors are created and how they relate to each other lets you work more effectively in Photoshop. Instead of achieving an effect by accident, you'll produce consistent results thanks to an understanding of basic color theory.
Primary colors
Additive primaries are the three colors of light (red, green, and blue) that produce all the colors in the visible spectrum when added together in different combinations. Adding equal parts of red, blue, and green light produces white. The complete absence of red, blue, and green light results in black. Computer monitors are devices that use the additive primaries to create color.
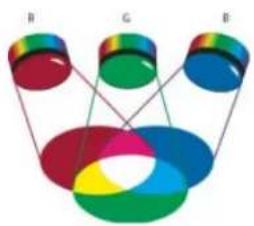
natural_image
Color mixing diagram showing three colored circles (red, green, blue) connected by lines, no text or symbols presentAdditive colors (RGB)
A. Red B. Green C. Blue
Subtractive primaries are pigments, which create a spectrum of colors in different combinations. Unlike monitors, printers use subtractive primaries (cyan, magenta, yellow, and black pigments) to produce colors through subtractive mixing. The term "subtractive" is used because the primary colors are pure until you begin mixing them together, resulting in colors that are less pure versions of the primaries. For example, orange is created through the subtractive mixing of magenta and yellow together.
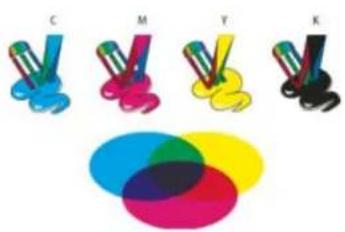
natural_image
Colorful CMYK brush icons labeled C, M, Y, K above a colorful overlapping circle (no text or symbols on the brush itself)Subtractive colors (CMYK)
A. Cyan B. Magenta C. Yellow D. Black
The color wheel
If you're new to adjusting color components, it helps to keep a standard color wheel diagram on hand when you work on color balance. You can
use the color wheel to predict how a change in one color component affects other colors and also how changes translate between RGB and CMYK color models.

radar
| Angle (°) | Value | |---|---| | O | 360 | | R | | | Y | | | G | | | C | | | B | | | M | | | 270 | | | 90 | |Color wheel
A. Red B. Yellow C. Green D. Cyan E. Blue F. Magenta
For example, you can decrease the amount of any color in an image by increasing the amount of its opposite on the color wheel—and vice versa. Colors that lie opposite each other on the standard color wheel are known as complementary colors. Similarly, you can increase and decrease a color by adjusting the two adjacent colors on the wheel, or even by adjusting the two colors adjacent to its opposite.
In a CMYK image, you can decrease magenta either by decreasing the amount of magenta or by increasing its complement, which is green (the color on the opposite side of the color wheel from magenta). In an RGB image, you can decrease magenta by removing red and blue or by adding green. All of these adjustments result in an overall color balance containing less magenta.
To the top
Color models, spaces, and modes
A color model describes the colors we see and work with in digital images. Each color model, such as RGB, CMYK, or HSB, represents a different method (usually numeric) for describing color.
A color space is a variant of a color model and has a specific gamut (range) of colors. For example, within the RGB color model are a number of color spaces: Adobe RGB, sRGB, ProPhoto RGB, and so on.
Each device, like your monitor or printer, has its own color space and can only reproduce colors in its gamut. When an image moves from one device to another, image colors may change because each device interprets the RGB or CMYK values according to its own color space. You can use color management when moving images to ensure that most colors are the same or similar enough so they appear consistent. See Why colors sometimes don't match.
In Photoshop, a document's color mode determines which color model is used to display and print the image you're working on. Photoshop bases its color modes on the color models that are useful for images used in publishing. You can choose from RGB (Red, Green, Blue), CMYK (Cyan, Magenta, Yellow, Black), Lab Color (based on CIE L* a* b*), and Grayscale. Photoshop also includes modes for specialized color output such as Indexed Color and Duotone. Color modes determine the number of colors, the number of channels, and the file size of an image. Choosing a color mode also determines which tools and file formats are available. See Color modes.
When you work with the colors in an image, you are adjusting numerical values in the file. It's easy to think of a number as a color, but these numerical values are not absolute colors in themselves—they only have a color meaning within the color space of the device that is producing the color.
To the top
Adjusting color hue, saturation, and brightness
Based on the human perception of color, the HSB model describes three fundamental characteristics of color:
Hue Color reflected from or transmitted through an object. It is measured as a location on the standard color wheel, expressed as a degree between 0^ and 360^ . In common use, hue is identified by the name of the color, such as red, orange, or green.
Saturation Strength or purity of the color (sometimes called chroma). Saturation represents the amount of gray in proportion to the hue, measured as a percentage from 0% (gray) to 100% (fully saturated). On the standard color wheel, saturation increases from the center to the edge.
Brightness Relative lightness or darkness of the color, usually measured as a percentage from 0% (black) to 100% (white).

text_image
H 360 100 S B OHSB color model
A. Hue B. Saturation C. Brightness
Adobe also recommends
• Understanding color management
Twitter™ and Facebook posts are not covered under the terms of Creative Commons.
Legal Notices | Online Privacy Policy
Color panel overview
Select a color in the Color panel
Select a color in the Swatches panel
To the top
Color panel overview
The Color panel (Window > Color) displays the color values for the current foreground and background colors. Using the sliders in the Color panel, you can edit the foreground and background colors using different color models. You can also choose a foreground or background color from the spectrum of colors displayed in the color ramp at the bottom of the panel.
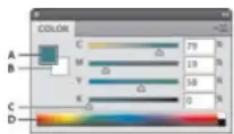
Color panel
A. Foreground color B. Background color C. Slider D. Color ramp
The Color panel may display the following alerts when you select a color:
- An exclamation point inside a triangle ⚠️ appears above the left side of the color ramp when you choose a color that cannot be printed using CMYK inks.
- A square appears above the left side of the color ramp when you choose a color that is not web-safe.
Change the color model of the Color panel sliders
- Choose a Sliders option from the Color panel menu.
Change the spectrum displayed in the Color panel
-
Choose an option from the Color panel menu:
-
RGB Spectrum, CMYK Spectrum, or Grayscale Ramp to display the spectrum of the specified color model.
-
Current Colors to display the spectrum of colors between the current foreground color and the current background color.
-
To display only web-safe colors, choose Make Ramp Web Safe.

To change the spectrum of the color ramp quickly, Shift-click in the color ramp until you see the spectrum you want.
Select a color in the Color panel
- In the Color panel, click the foreground or background color box to make it active (outlined in black).
When the background color box is active in the Color panel, the Eyedropper tool changes the background color by default.
-
Do one of the following:
-
Drag the color sliders. By default, the slider colors change as you drag. You can turn off this feature to improve performance by deselecting Dynamic Color Sliders in the General section of the Preferences dialog box.
- Enter values next to the color sliders.
- Click the color selection box, choose a color using the Color Picker and click OK.
- Position the pointer over the color ramp (the pointer becomes the eyedropper), and click to sample a color. Alt-click to apply the sample to the non-active color selection box.
To the top
Select a color in the Swatches panel
The Swatches panel (Window > Swatches) stores colors that you use often. You can add or delete colors from the panel or display different libraries of colors for different projects.
• To choose a foreground color, click a color in the Swatches panel.
• To choose a background color, Ctrl-click (Windows) or Command-click (Mac OS) a color in the Swatches panel.
Note: Change how swatches are displayed by choosing an option from the Swatches panel menu.
Adobe also recommends

Twitter™ and Facebook posts are not covered under the terms of Creative Commons.
Legal Notices | Online Privacy Policy
About foreground and background colors
Choose colors in the toolbox
Choose colors with the Eyedropper tool
Adobe Color Picker overview
Choose a color with the Adobe Color Picker
Choose a color while painting
Choose web-safe colors
Choose a CMYK equivalent for a non-printable color
Choose a spot color
To the top
About foreground and background colors
Photoshop uses the foreground color to paint, fill, and stroke selections and the background color to make gradient fills and fill in the erased areas of an image. The foreground and background colors are also used by some special effects filters.
You can designate a new foreground or background color using the Eyedropper tool, the Color panel, the Swatches panel, or the Adobe Color Picker.
The default foreground color is black, and the default background color is white. (In an alpha channel, the default foreground is white, and the background is black.)
To the top
Choose colors in the toolbox
The current foreground color appears in the upper color selection box in the toolbox; the current background color appears in the lower box.

Foreground and background color boxes in toolbox
A. Default Colors icon B. Switch Colors icon C. Foreground color box D. Background color box
• To change the foreground color, click the upper color selection box in the toolbox, and then choose a color in the Adobe Color Picker.
• To change the background color, click the lower color selection box in the toolbox, and then choose a color in the Adobe Color Picker.
• To reverse the foreground and background colors, click the Switch Colors icon in the toolbox.
- To restore the default foreground and background colors, click the Default Colors icon in the toolbox.
To the top
Choose colors with the Eyedropper tool
The Eyedropper tool samples color to designate a new foreground or background color. You can sample from the active image or from anywhere else on the screen.
- Select the Eyedropper tool
- In the options bar, change the sample size of the eyedropper by choosing an option from the Sample Size menu:
Point Sample Reads the precise value of the pixel you click.
3 by 3 Average, 5 by 5 Average, 11 by 11 Average, 31 by 31 Average, 51 by 51 Average, 101 by 101 Average Reads the average value of the specified number of pixels within the area you click.
natural_image
Close-up of a painted bird's face with striped patterns and facial features (no text or symbols visible)A

B

Selecting a foreground color with the Eyedropper tool
- Choose one of the following from the Sample menu:
All Layers Samples color from all layers in the document.
Current Layer Samples color from the currently active layer.
-
To circle the Eyedropper tool with a ring that previews the sampled color above the current foreground color, select Show Sampling Ring. (This option requires OpenGL. See Enable OpenGL and optimize GPU settings.)
-
Do one of the following:
- To select a new foreground color, click in the image. Alternatively, position the pointer over the image, press the mouse button, and drag anywhere on the screen. The foreground color selection box changes dynamically as you drag. Release the mouse button to pick the new color.
- To select a new background color, Alt-click (Windows) or Option-click (Mac OS) in the image. Alternatively, position the pointer over the image, press Alt (Windows) or Options (Mac OS), press the mouse button, and drag anywhere on the screen. The background color selection box changes dynamically as you drag. Release the mouse button to pick the new color.

To use the Eyedropper tool temporarily to select a foreground color while using any painting tool, hold down Alt (Windows) or Option (Mac OS).
To the top
Adobe Color Picker overview
In the Adobe Color Picker, you choose colors using four color models: HSB, RGB, Lab, and CMYK. Use the Adobe Color Picker to set the foreground color, background color, and text color. You can also set target colors for different tools, commands, and options.
You can configure the Adobe Color Picker to let you choose only colors that are part of the web-safe palette or choose from specific color systems. Photoshop Extended users can access an HDR (high dynamic range) picker to choose colors for use in HDR images.
The Color field in the Adobe Color Picker displays color components in HSB color mode, RGB color mode, and Lab color mode. If you know the numeric value of the color you want, you can enter it into the text fields. You can also use the color slider and the color field to preview a color to choose. As you adjust the color using the color field and color slider, the numeric values are adjusted accordingly. The color box to the right of the color slider displays the adjusted color in the top section and the original color in the bottom section. Alerts appear if the color is not a web-safe color 📋 or is out of gamut for printing (non-printable) ⚠
text_image
Color Picker (Background Color) A B C D E OK Cancel Add to switches Color Libraries Mn: 257 ° Pm: 168 % Qm: 91 % Rm: 74 % Sb: 320 % F: 230 % H: 167.0 ° Class: 50 Class: 1 Class: 56 C: 70 % M: 40 % I: 8 % K: 0 % Only White Colors. F G H IAdobe Color Picker
A. Picked color B. Original color C. Adjusted color D. Out-of-gamut alert icon E. Not a web-safe color alert icon F. Displays only web-safe colors G. Color field H. Color slider I. Color values
When you select a color in the Adobe Color Picker, it simultaneously displays the numeric values for HSB, RGB, Lab, CMYK, and hexadecimal numbers. This is useful for viewing how the different color models describe a color.
Although Photoshop uses the Adobe Color Picker by default, you can use a different Color Picker than the Adobe Color Picker by setting a preference. For example, you can use the built-in color picker of your computer's operating system or a third-party plug-in Color Picker.
Display the Color Picker
- In the toolbox, click the foreground or background color selection box.
- In the Color panel, click the Set Foreground Color or Set Background Color selection box.
The Color Picker is also available when features let you choose a color. For example, by clicking the color swatch in the options bar for some tools, or the eyedroppers in some color adjustment dialog boxes.
To the top
Choose a color with the Adobe Color Picker
You can choose a color by entering color component values in HSB, RGB, and Lab text boxes, or by using the color slider and the color field.
To choose a color with the color slider and color field, click in the color slider or move the color slider triangle to set one color component. Then move the circular marker or click in the color field. This sets the other two color components.
As you adjust the color using the color field and color slider, the numeric values for the different color models adjust accordingly. The rectangle to the right of the color slider displays the new color in the top half and the original color in the bottom. Alerts appear if the color is not a web-safe color 🧑 or is out of gamut ⚠
You can choose a color outside the Adobe Color Picker window. Moving the pointer over the document window changes it to the Eyedropper tool. You can then select a color by clicking in the image. The selected color is displayed in the Adobe Color Picker. You can move the Eyedropper tool anywhere on your desktop by clicking in the image and then holding down the mouse button. You can select a color by releasing the mouse button.
Choose a color using the HSB model
Using the HSB color model, the hue is specified in the color field, as an angle from 0^ to 360^ that corresponds to a location on the color wheel. Saturation and brightness are specified as percentages. In the color field, the hue saturation increases from left to right and the brightness increases from the bottom to top.
-
In the Adobe Color Picker, select the H option and then enter a numeric value in the H text box or select a hue in the color slider.
-
Adjust the saturation and brightness by clicking in the color field, moving the circular maker, or entering numeric values in the S and B text boxes.
-
(Optional) Select either the S option or B option to display the color's saturation or brightness in the color field for making further adjustments.
Choose a color using the RGB model
Choose a color by specifying its red, green, and blue components.
- In the Adobe Color Picker, enter numeric values in the R, G, and B text boxes. Specify component values from 0 to 255 (0 is no color, and 255 is the pure color).
- To visually select a color using the color slider and color field, click either R, G, or B and then adjust the slider and color field.
The color you click appears in the color slider with 0 (none of that color) at the bottom and 255 (maximum amount of that color) at the top. The color field displays the range of the other two components, one on the horizontal axis and one on the vertical axis.
Choose a color using the Lab model
When choosing a color based on the Lab color model, the L value specifies the luminance of a color. The A value specifies how red or green a color is. The B value specifies how blue or yellow a color is.
- In the Adobe Color Picker, enter values for L (from 0 to 100), and for A and B (from -128 to +127).
- (Optional) Use the color slider or color field to adjust the color.
Choose a color using the CMYK model
You can choose a color by specifying each component value as a percentage of cyan, magenta, yellow, and black.
- In the Adobe Color Picker, enter percentage values for C, M, Y, and K, or use the color slider and color field to choose a color.
Choose a color by specifying a hexadecimal value
You can choose a color by specifying a hexadecimal value that defines the R, G, and B components in a color. The three pairs of numbers are expressed in values from 00 (minimum luminance) to ff (maximum luminance). For example, 000000 is black, ffffff is white, and ff0000 is red.
- In the Adobe Color Picker, enter a hexadecimal value in the # text box.
To the top
Choose a color while painting
The heads-up-display (HUD) color picker lets you quickly choose colors while painting in the document window, where image colors provide helpful context.
Note: The HUD color picker requires OpenGL. (See Enable OpenGL and optimize GPU settings.)
Choose the type of HUD color picker
- Choose Edit > Preferences > General (Windows) or Photoshop > Preferences > General (Mac OS).
- From the HUD Color Picker menu, choose Hue Strip to display a vertical picker or Hue Wheel to display a circular one.
Choose a color from the HUD color picker
- Select a painting tool.
- Press Shift + Alt + right-click (Windows) or Control + Option + Command (Mac OS).
- Click in the document window to display the picker. Then drag to select a color hue and shade.
After clicking in the document window, you can release the pressed keys. Temporarily press the spacebar to maintain the selected shade while you select another hue, or vice versa.

natural_image
Gradient color bar transitioning from cyan to magenta with a curved arrow pointing to the left (no text or symbols)Choosing color with HUD picker A. Shade B. Hue
To instead select a color from the image, hold down Alt (Windows) or Option (Mac OS) to access the Eyedropper tool.
To the top
Choose web-safe colors
The web-safe colors are the 216 colors used by browsers regardless of the platform. The browser changes all colors in the image to these colors when displaying the image on an 8-bit screen. The 216 colors are a subset of the Mac OS 8-bit color palettes. By working only with these colors, you can be sure that art you prepare for the web will not dither on a system set to display 256 colors.
Select web-safe colors in the Adobe Color Picker
- Select the Only Web Colors option in the lower left corner of the Adobe Color Picker. Any color you pick with this option selected is web-safe.
Change a non-web color to a web-safe color
If you select a non-web color, an alert cube 📋 appears next to the color rectangle in the Adobe Color Picker.
- Click the alert cube to select the closest web color. (If no alert cube appears, the color you chose is web-safe.)
Select a web-safe color using the Color panel
-
Click the Color panel tab, or choose Window > Color to view the Color panel.
-
Choose an option for selecting a web-safe color:
-
Choose Make Ramp Web Safe from the Color panel menu. Any color you pick with this option selected is web-safe.
- Choose Web Color Sliders from the Color panel menu. By default, web color sliders snap to web-safe colors (indicated by tick marks) when you drag them. To override web-safe color selection, Alt-drag (Windows) or Option-drag (Mac OS) the sliders.
If you choose a non-web color, an alert cube 📋 appears above the color ramp on the left side of the Color panel. Click the alert cube to select the closest web color.
To the top
Choose a CMYK equivalent for a non-printable color
Some colors in the RGB, HSB, and Lab color models cannot be printed because they are out-of-gamut and have no equivalents in the CMYK model. When you choose a non-printable color in either the Adobe Color Picker or the Color panel, a warning alert triangle appears. A swatch below the triangle displays the closest CMYK equivalent.
Note: In the Color panel, the alert triangle is not available if you are using Web Color Sliders.
- To choose the closest CMYK equivalent, click the alert triangle 📄 the Color Picker dialog box or the Color panel.
Printable colors are determined by the current CMYK working space defined in the Color Settings dialog box.
To the top
Choose a spot color
The Adobe Color Picker lets you choose colors from the PANTONE MATCHING SYSTEM®, the Trumatch® Swatching System™, the Focoltone® Colour System, the Toyo Color Finder™ 1050 system, the ANPA-Color™ system, the HKS® color system, and the DIC Color Guide.
To ensure that the final printed output is the color you want, consult your printer or service bureau and choose your color based on a printed color swatch. Manufacturers recommend that you get a new swatch book each year to compensate for fading inks and other damage.
Note: Photoshop prints spot colors to CMYK (process color) plates in every image mode except Duotone. To print true spot color plates, create spot color channels.
- Open the Adobe Color Picker, and click Color Libraries.
The Custom Colors dialog box displays the color closest to the color currently selected in the Adobe Color Picker.
-
For Book, choose a color library. See below for descriptions of the color libraries.
-
Locate the color you want by entering the ink number or by dragging the triangles along the scroll bar.
-
Click the desired color patch in the list.
Spot color libraries
The Adobe Color Picker supports the following color systems:
ANPA-COLOR Commonly used for newspaper applications. The ANPA-COLOR ROP Newspaper Color Ink Book contains samples of the ANPA colors.
DIC Color Guide Commonly used for printing projects in Japan. For more information, contact Dainippon Ink & Chemicals, Inc., in Tokyo, Japan.
FOCOLTONE Consists of 763 CMYK colors. Focoltone colors help avoid prepress trapping and registration problems by showing the overprints that make up the colors. A swatch book with specifications for process and spot colors, overprint charts, and a chip book for marking up layouts are available from Focoltone. For more information, contact Focoltone International, Ltd., in Stafford, United Kingdom.
HKS swatches Used for printing projects in Europe. Each color has a specified CMYK equivalent. You can select from HKS E (for continuous stationery), HKS K (for gloss art paper), HKS N (for natural paper), and HKS Z (for newsprint). Color samplers for each scale are available. HKS Process books and swatches have been added to the color system menu.
PANTONE® Colors used for spot-color reproduction. The PANTONE MATCHING SYSTEM can render 1,114 colors. PANTONE color guides and chip books are printed on coated, uncoated, and matte paper stocks to ensure accurate visualization of the printed result and better on-press control. You can print a solid PANTONE color in CMYK. To compare a solid PANTONE color to its closest process color match, use the PANTONE solid to process guide. The CMYK screen tint percentages are printed under each color. For more information, contact Pantone, Inc., Carlstadt, NJ (www.pantone.com).
TOYO Color Finder 1050 Consists of more than 1000 colors based on the most common printing inks used in Japan. The TOYO Process Color Finder book and swatches have been added to the color system menu. The TOYO Color Finder 1050 Book contains printed samples of Toyo colors and is available from printers and graphic arts supply stores. For more information, contact Toyo Ink Manufacturing Co., Ltd., in Tokyo, Japan.
TRUMATCH Provides predictable CMYK color matching with more than 2000 achievable, computer-generated colors. Trumatch colors cover the visible spectrum of the CMYK gamut in even steps. The Trumatch Color displays up to 40 tints and shades of each hue, each originally created in four-color process and each reproducible in four colors on electronic imagesetters. In addition, four-color grays using different hues are included. For more information, contact Trumatch Inc., in New York City, New York.
Adobe also recommends
- Customize color settings
Twitter™ and Facebook posts are not covered under the terms of Creative Commons.
Legal Notices | Online Privacy Policy
Blending mode descriptions Blending mode examples
The blending mode specified in the options bar controls how pixels in the image are affected by a painting or editing tool. It's helpful to think in terms of the following colors when visualizing a blending mode's effect:
- The base color is the original color in the image.
- The blend color is the color being applied with the painting or editing tool.
• The result color is the color resulting from the blend.
To the top
Blending mode descriptions
Choose from the Mode pop-up menu in the options bar.
Note: Only the Normal, Dissolve, Darken, Multiply, Lighten, Linear Dodge (Add), Difference, Hue, Saturation, Color, Luminosity, Lighter Color, and Darker Color blending modes are available for 32-bit images.
Normal Edits or paints each pixel to make it the result color. This is the default mode. (Normal mode is called Threshold when you're working with a bitmapped or indexed-color image.)
Dissolve Edits or paints each pixel to make it the result color. However, the result color is a random replacement of the pixels with the base color or the blend color, depending on the opacity at any pixel location.
Behind Edits or paints only on the transparent part of a layer. This mode works only in layers with Lock Transparency deselected and is analogous to painting on the back of transparent areas on a sheet of acetate.
Clear Edits or paints each pixel and makes it transparent. This mode is available for the Shape tools (when fill region □ is selected), Paint Bucket tool ⏻, Brush tool ⏻, Pencil tool ⏻, Fill command, and Stroke command. You must be in a layer with Lock Transparency deselected to use this mode.
Darken Looks at the color information in each channel and selects the base or blend color—whichever is darker—as the result color. Pixels lighter than the blend color are replaced, and pixels darker than the blend color do not change.
Multiply Looks at the color information in each channel and multiplies the base color by the blend color. The result color is always a darker color. Multiplying any color with black produces black. Multiplying any color with white leaves the color unchanged. When you're painting with a color other than black or white, successive strokes with a painting tool produce progressively darker colors. The effect is similar to drawing on the image with multiple marking pens.
Color Burn Looks at the color information in each channel and darkens the base color to reflect the blend color by increasing the contrast between the two. Blending with white produces no change.
Linear Burn Looks at the color information in each channel and darkens the base color to reflect the blend color by decreasing the brightness. Blending with white produces no change.
Lighten Looks at the color information in each channel and selects the base or blend color—whichever is lighter—as the result color. Pixels
darker than the blend color are replaced, and pixels lighter than the blend color do not change.
Screen Looks at each channel's color information and multiplies the inverse of the blend and base colors. The result color is always a lighter color. Screening with black leaves the color unchanged. Screening with white produces white. The effect is similar to projecting multiple photographic slides on top of each other.
Color Dodge Looks at the color information in each channel and brightens the base color to reflect the blend color by decreasing contrast between the two. Blending with black produces no change.
Linear Dodge (Add) Looks at the color information in each channel and brightens the base color to reflect the blend color by increasing the brightness. Blending with black produces no change.
Overlay Multiplies or screens the colors, depending on the base color. Patterns or colors overlay the existing pixels while preserving the highlights and shadows of the base color. The base color is not replaced, but mixed with the blend color to reflect the lightness or darkness of the original color.
Soft Light Darkens or lightens the colors, depending on the blend color. The effect is similar to shining a diffused spotlight on the image. If the blend color (light source) is lighter than 50% gray, the image is lightened as if it were dodged. If the blend color is darker than 50% gray, the image is darkened as if it were burned in. Painting with pure black or white produces a distinctly darker or lighter area, but does not result in pure black or white.
Hard Light Multiplies or screens the colors, depending on the blend color. The effect is similar to shining a harsh spotlight on the image. If the blend color (light source) is lighter than 50% gray, the image is lightened, as if it were screened. This is useful for adding highlights to an image. If the blend color is darker than 50% gray, the image is darkened, as if it were multiplied. This is useful for adding shadows to an image. Painting with pure black or white results in pure black or white.
Vivid Light Burns or dodges the colors by increasing or decreasing the contrast, depending on the blend color. If the blend color (light source) is lighter than 50% gray, the image is lightened by decreasing the contrast. If the blend color is darker than 50% gray, the image is darkened by increasing the contrast.
Linear Light Burns or dodges the colors by decreasing or increasing the brightness, depending on the blend color. If the blend color (light source) is lighter than 50% gray, the image is lightened by increasing the brightness. If the blend color is darker than 50% gray, the image is darkened by decreasing the brightness.
Pin Light Replaces the colors, depending on the blend color. If the blend color (light source) is lighter than 50% gray, pixels darker than the blend color are replaced, and pixels lighter than the blend color do not change. If the blend color is darker than 50% gray, pixels lighter than the blend color are replaced, and pixels darker than the blend color do not change. This is useful for adding special effects to an image.
Hard Mix Adds the red, green and blue channel values of the blend color to the RGB values of the base color. If the resulting sum for a channel is 255 or greater, it receives a value of 255; if less than 255, a value of 0. Therefore, all blended pixels have red, green, and blue channel values of either 0 or 255. This changes all pixels to primary additive colors (red, green, or blue), white, or black.
Note: For CMYK images, Hard Mix changes all pixels to the primary subtractive colors (cyan, yellow, or magenta), white, or black. The maximum color value is 100.
Difference Looks at the color information in each channel and subtracts either the blend color from the base color or the base color from the blend color, depending on which has the greater brightness value. Blending with white inverts the base color values; blending with black produces no change.
Exclusion Creates an effect similar to but lower in contrast than the Difference mode. Blending with white inverts the base color values. Blending with black produces no change.
Subtract Looks at the color information in each channel and subtracts the blend color from the base color. In 8- and 16-bit images, any resulting negative values are clipped to zero.
Divide Looks at the color information in each channel and divides the blend color from the base color.
Hue Creates a result color with the luminance and saturation of the base color and the hue of the blend color.
Saturation Creates a result color with the luminance and hue of the base color and the saturation of the blend color. Painting with this mode in an area with no (0) saturation (gray) causes no change.
Color Creates a result color with the luminance of the base color and the hue and saturation of the blend color. This preserves the gray levels in the image and is useful for coloring monochrome images and for tinting color images.
Luminosity Creates a result color with the hue and saturation of the base color and the luminance of the blend color. This mode creates the inverse effect of Color mode.
Lighter Color Compares the total of all channel values for the blend and base color and displays the higher value color. Lighter Color does not produce a third color, which can result from the Lighten blend, because it chooses the highest channel values from both the base and blend color to create the result color.
Darker Color Compares the total of all channel values for the blend and base color and displays the lower value color. Darker Color does not produce a third color, which can result from the Darken blend, because it chooses the lowest channel values from both the base and the blend color to create the result color.
To the top
Blending mode examples
These examples show the result of painting part of the image's face using each blending mode.
For a video on blending modes, see www.adobe.com/go/vid0012.

Original Image

natural_image
Close-up of a stylized bird face with black and yellow patterns (no text or symbols)Normal, 100% opacity Normal, 50% opacity Dissolve, 50% opacity
natural_image
Close-up of a stylized bird face with black and yellow patterns (no text or symbols visible)
natural_image
Close-up of a painted bird face with detailed facial features and black-and-yellow patterns (no text or symbols visible)
natural_image
Close-up of a stylized bird's face with yellow and black patterns (no text or symbols)Behind

natural_image
Close-up of a penguin's face with black and white markings (no text or symbols visible)Clear Darken Multiply
natural_image
Close-up of a painted face with yellow and green markings (no text or symbols visible)
natural_image
Close-up of a stylized painted face with yellow and black patterns (no text or symbols)
natural_image
Close-up of a painted folk face with yellow and black patterns (no text or symbols visible)Color Burn

natural_image
Close-up of a painted bird face with yellow and black markings (no text or symbols visible)Linear Burn Lighten Screen

natural_image
Close-up of a painted bird's face with black and yellow patterns (no text or symbols)
natural_image
Close-up of a painted bird's face with yellow and black patterns (no text or symbols)
natural_image
Close-up of a painted bird's face with yellow and black markings (no text or symbols visible)Color Dodge
natural_image
Close-up of a painted penguin face with yellow and black markings (no text or symbols visible)Linear Dodge (Add) Overlay Soft Light
natural_image
Close-up of a stylized bird face with black and yellow patterns (no text or symbols)
natural_image
Close-up of a painted bird's face with stylized facial features (no text or symbols visible)
natural_image
Close-up of a painted bird face with yellow and black markings (no text or symbols visible)Hard Light

natural_image
Close-up of a painted bird face with yellow and black markings (no text or symbols visible)Vivid Light Linear Light Pin Light

natural_image
Close-up of a painted bird face with yellow and black markings (no text or symbols visible)
natural_image
Close-up of a painted bird face with orange and yellow patterns (no text or symbols)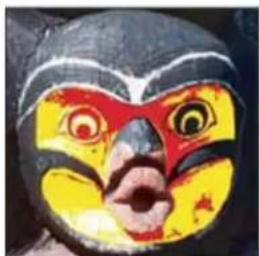
natural_image
Close-up of a painted bird face with red, yellow, and black facial features (no text or symbols visible)Hard Mix

natural_image
Close-up of a colorful painted mask featuring stylized facial features (no text or symbols visible)Difference Exclusion Subtract
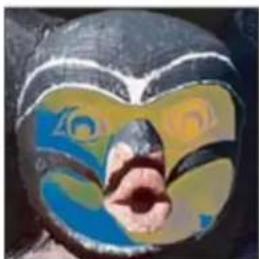
natural_image
Close-up of a painted folk face with colorful abstract patterns (no text or symbols visible)
natural_image
Close-up of a painted bird face with blue and black coloring (no text or symbols visible)
natural_image
Close-up of a painted penguin face with blue and white coloring (no text or symbols visible)Divide

natural_image
Close-up of a stylized bird face with detailed facial features and pointed eyes (no text or symbols visible)Hue Saturation Color

natural_image
Close-up of a painted bird face with black, white, and blue markings (no text or symbols visible)
natural_image
Close-up of a stylized bird face with detailed facial features and pointed beak (no text or symbols visible)
natural_image
Close-up of a painted bird's face with stylized black and white patterns (no text or symbols visible)Luminosity, 80% opacity

natural_image
Close-up of a stylized bird face with orange and black patterns (no text or symbols)Lighter Color Darker Color

natural_image
Close-up of a painted folk mask featuring stylized facial features and geometric patterns (no text or symbols visible)
BY-NC-SA
Twitter™ and Facebook posts are not covered under the terms of Creative Commons.
Legal Notices
Online Privacy Policy
Add a conditional mode change to an action
To the top
Add a conditional mode change to an action
You can specify conditions for a mode change so that the conversion can occur during an action, which is a series of commands applied sequentially to a single file or a batch of files. When a mode change is part of an action, an error can occur if the file being opened is not in the source mode specified in the action. For example, suppose one step in an action is to convert an image with a source mode of RGB to a target mode of CMYK. Applying this action to an image in Grayscale mode, or any other source mode besides RGB, results in an error.
When you record an action, you can use the Conditional Mode Change command to specify one or more modes for the source mode and a mode for the target mode.
- Start recording an action.
- Choose File > Automate > Conditional Mode Change.
- In the Conditional Mode Change dialog box, select one or more modes for the source mode. Use the All or None buttons to select all possible modes or no mode.
- Choose a target mode from the Mode pop-up menu.
- Click OK. The conditional mode change appears as a new step in the Actions panel.
Adobe also recommends
- Adding conditional actions | Creative Cloud

Twitter™ and Facebook posts are not covered under the terms of Creative Commons.
Legal Notices | Online Privacy Policy
Note: This feature was introduced in the Creative Cloud release for Photoshop CS6.
You can add all colors specified in an HTML, CSS, or SVG document to the Swatches panel. If a color value is repeated in a document, only one instance of the color is added not duplicates. This feature recognizes the following HTML/CSS color syntax: #112233, #123, rgb(1,2,3), rgba(1,2,3,4), hsb(1,2,3), and hsba(1,2,3,4).
-
In the Swatches panel, do one of the following:
-
Choose Load Swatches from the panel menu.
-
Choose Replace Swatches from the panel menu.
-
In the Load window, navigate to the HTML, CSS, or SVG file, select it, and then, click Load.
For more information, see Customizing color pickers and swatches.
Twitter ^™ and Facebook posts are not covered under the terms of Creative Commons.
Legal Notices | Online Privacy Policy
High dynamic range images
About high dynamic range images
Take photos for HDR images
Features that support 32-bpc HDR images
Merge images to HDR
Adjust displayed dynamic range for 32-bit HDR images
About the HDR Color Picker
Paint on HDR images
About high dynamic range images
To the top
The dynamic range (ratio between dark and bright regions) in the visible world far exceeds the range of human vision and of images that are displayed on a monitor or printed. But whereas human eyes can adapt to very different brightness levels, most cameras and computer monitors can reproduce only a fixed dynamic range. Photographers, motion picture artists, and others working with digital images must be selective about what's important in a scene because they are working with a limited dynamic range.
High dynamic range (HDR) images open up a world of possibilities because they can represent the entire dynamic range of the visible world. Because all the luminance values in a real-world scene are represented proportionately and stored in an HDR image, adjusting the exposure of an HDR image is like adjusting the exposure when photographing a scene in the real world.

natural_image
Interior architectural view of a modern building with large colorful glass panels and railings, showing outdoor lighting and structural elements (no visible text or symbols)Merging images of different exposures to create an HDR image
A. Image with shadow detail but highlights clipped B. Image with highlight detail but shadows clipped C. HDR image containing the dynamic range of the scene
In Photoshop, the luminance values of an HDR image are stored using a floating-point numeric representation that's 32 bits long (32-bits-per-channel). The luminance values in an HDR image are directly related to the amount of light in a scene. By contrast, non-floating point 16- and 8-bpc image files store luminance values only from black to paper white, reflecting an extremely small segment of dynamic range in the real world.
In Photoshop, the Merge To HDR Pro command lets you create HDR images by combining multiple photographs captured at different exposures. Because an HDR image contains brightness levels that far exceed the display capabilities of a standard 24-bit monitor, Photoshop lets you adjust the HDR preview. If you need to print or use tools and filters that don't work with HDR images, you can convert them to 16- or 8-bpc images.
Take photos for HDR images
To the top
Keep the following tips in mind when you take photos to be combined with the Merge To HDR Pro command:
- Secure the camera to a tripod.
- Take enough photos to cover the full dynamic range of the scene. You can try taking at least five to seven photos, but you might need to take more exposures depending on the dynamic range of the scene. The minimum number of photos should be three.
- Vary the shutter speed to create different exposures. Changing the aperture changes the depth of field in each exposure and can produce lower-quality results. Changing the ISO or aperture may also cause noise or vignetting in the image.
- In general, don't use your camera's auto-bracket feature, because the exposure changes are usually too small.
- The exposure differences between the photos should be one or two EV (exposure value) steps apart (equivalent to about one or two f-stops apart).
- Don't vary the lighting; for instance, don't use a flash in one exposure but not the next.
• Make sure that nothing is moving in the scene. Exposure Merge works only with differently exposed images of the identical scene.
Features that support 32-bpc HDR images
To the top
You can use the following tools, adjustments, and filters with 32-bpc HDR images. (To work with more Photoshop features, convert a 32-bpc image to a 16-bpc or an 8-bpc image. To preserve the original image, create a copy with the Save As command.)
Adjustments Levels, Exposure, Hue/Saturation, Channel Mixer, Photo Filter.
Note: Although the Exposure command can be used with 8- and 16-bpc images, it is designed for making exposure adjustments to 32-bpc HDR images.
Blend Modes Normal, Dissolve, Darken, Multiply, Lighten, Darker Color, Linear Dodge (Add), Lighter Color, Difference, Subtract, Divide, Hue, Saturation, Color, and Luminosity.
Create new 32-bpc documents In the New dialog box, 32 bit is an option in the bit depth pop-up menu to the right of the Color Mode pop-up menu.
Edit menu commands All commands including Fill, Stroke, Free Transform, and Transform.
File Formats Photoshop (PSD, PSB), Radiance (HDR), Portable Bit Map (PBM), OpenEXR, and TIFF.
Note: Although Photoshop cannot save an HDR image in the LogLuv TIFF file format, it can open and read a LogLuv TIFF file.
Filters Average, Box Blur, Gaussian Blur, Motion Blur, Radial Blur, Shape Blur, Surface Blur, Add Noise, Clouds, Difference Clouds, Lens Flare, Smart Sharpen, Unsharp Mask, Emboss, De-Interlace, NTSC Colors, High Pass, Maximum, Minimum, and Offset.
Image commands Image Size, Canvas Size, Image Rotation, Crop, Trim, Duplicate, Apply Image, Calculations, and Variables.
View Pixel Aspect Ratio (Custom Pixel Aspect Ratio, Delete Pixel Aspect Ratio, Reset Pixel Aspect Ratio, etc.)
Layers New layers, duplicate layers, adjustment layers (Levels, Vibrance, Hue/Saturation, Channel Mixer, Photo Filter, and Exposure), fill layers, layer masks, layer styles, supported blending modes, and Smart Objects.
Modes RGB Color, Grayscale, conversion to 8 Bits/Channel or 16 Bits/Channel.
Pixel Aspect Ratio Support for square and non-square documents.
Selections Invert, Modify Border, Transform Selection, Save Selection and Load Selection.
Tools All tools in the toolbox except: Magnetic Lasso, Magic Wand, Spot Healing Brush, Healing Brush, Red Eye, Color Replacement, Art History Brush, Magic Eraser, Background Eraser, Paint Bucket, Dodge, Burn, and Sponge. Some tools work with supported blend modes only.
Merge images to HDR
To the top
The Merge To HDR Pro command combines multiple images with different exposures of the same scene, capturing the full dynamic range in a single HDR image. You can output the merged image as a 32-, 16-, or 8-bpc file. However, only a 32-bpc file can store all the HDR image data.
HDR merging works best when photos are optimized for the process. For recommendations, see Take photos for HDR images.
Adobe recommends
i Have a tutorial you would like to share?

Video tutorial: The best new feature in CS5: HDR Pro
Deke McClelland
Take image tones from vivid to surreal.

Book excerpt: Create HDR images from bracketed exposures
Conrad Chavez
Walk through the HDR process from camera to computer.

Book excerpt: Remove ghosting from HDR images
Scott Kelby
Eliminate blur from moving objects in a scene.

Video tutorial: Explore the enhancements to HDR Pro
Jan Kabili
Take a tour through all the new features.
- Do one of the following:
• (Photoshop) Choose File > Automate > Merge To HDR Pro.
- (Bridge) Select the images you want to use and choose Tools > Photoshop > Merge To HDR Pro. Skip to step 5.
-
In the Merge To HDR Pro dialog box, click Browse to select specific images, click Add Open Files, or choose Use > Folder. (To remove a particular item, select it in files list, and click Remove.)
-
(Optional) Select Attempt To Automatically Align Source Images if you held the camera in your hands when you photographed the images.
-
Click OK.
Note: If images lack exposure metadata, enter values in the Manually Set EV dialog box.
A second Merge To HDR Pro dialog box displays thumbnails of the source images, and a preview of the merged result.
- To the upper right of the preview, choose a bit depth for the merged image.
Choose 32 Bit if you want the merged image to store the entire dynamic range of the HDR image. 8-bit and (non-floating point) 16-bit image files cannot store the entire range of luminance values in an HDR image. - To adjust the tonal range, see Options for 32-bit images or Options for 16- or 8-bit images.
- (Optional) To save your tonal settings for future use, choose Preset > Save Preset. (To later reapply the settings, choose Load Preset.)
Options for 32-bit images
Move the slider below the histogram to adjust the white point preview of the merged image. Moving the slider adjusts the image preview only; all HDR image data remains in the merged file.
The preview adjustment is stored in the HDR file and applied whenever you open the file in Photoshop. To readjust the white point preview at any time, choose View > 32-Bit Preview Options.
Options for 16- or 8-bit images
HDR images contain luminance levels that far exceed the dynamic range that 16- or 8-bpc images can store. To produce an image with the dynamic range you want, adjust exposure and contrast when converting from 32-bpc to lower bit depths.
Choose one of the following tone-mapping methods:
Local Adaptation Adjusts HDR tonality by adjusting local brightness regions throughout the image.
Edge Glow Radius specifies the size of the local brightness regions. Strength specifies how far apart two pixels' tonal values must be before they're no longer part of the same brightness region.
Tone and Detail Dynamic range is maximized at a Gamma setting of 1.0; lower settings emphasize midtones, while higher settings emphasize highlights and shadows. Exposure values reflect f-stops. Drag the Detail slider to adjust sharpness and the Shadow and Highlight sliders to brighten or darken these regions.
Color Vibrance adjusts the intensity of subtle colors, while minimizing clipping of highly saturated colors. Saturation adjusts the intensity of all colors from -100 (monochrome) to +100 (double saturation).
Toning Curve Displays an adjustable curve over a histogram showing luminance values in the original, 32-bit HDR image. The red tick marks along the horizontal axis are in one EV (approximately one f-stop) increments.
Note: By default, the Toning Curve and Histogram limit and equalize your changes from point to point. To remove the limit and apply more extreme adjustments, select the Corner option after inserting a point on the curve. When you insert and move a second point, the curve becomes angular.
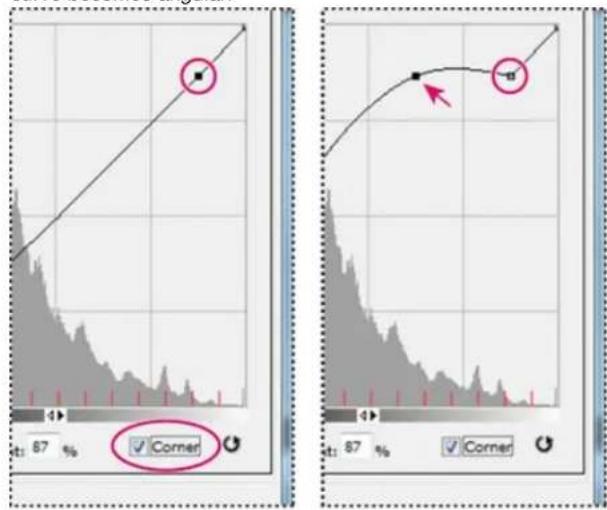
text_image
Corner 87 % Corner 87 %A
Toning Curve and Histogram adjustment using the Corner option
A. Inserting a point and selecting the Corner option. B. Adjusting new point makes the curve angular at the point where the Corner option is used.
Equalize Histogram Compresses the dynamic range of the HDR image while trying to preserve some contrast. No further adjustments are necessary; this method is automatic.
Exposure and Gamma Lets you manually adjust the brightness and contrast of the HDR image. Move the Exposure slider to adjust gain and the Gamma slider to adjust contrast.
Highlight Compression Compresses the highlight values in the HDR image so they fall within the luminance values range of the 8- or 16-bpc image file. No further adjustments are necessary; this method is automatic.
Compensate for moving objects
If images have different content due to moving objects like cars, people, or foliage, select Remove Ghosts in the Merge To HDR Pro dialog box.
Photoshop displays a green outline around the thumbnail with the best tonal balance, identifying the base image. Moving objects found in other images are removed. (If movement occurs in very light or dark areas, click a different thumbnail where moving objects are better exposed to improve results.)
For a tutorial on the Remove Ghosts option, see this video. (Discussion of Remove Ghosts begins at 3:00.)
Save or load camera response curves
Response curves indicate how camera sensors interpret different levels of incoming light. By default, the Merge To HDR Pro dialog box automatically calculates a camera response curve based on the tonal range of images you are merging. You can save the current response curve and later apply it to another group of merged images.
In the upper-right corner of the Merge to HDR Pro dialog box, click the response curve menu ▼, and then choose Save Response Curve. (To later reapply the curve, choose Load Response Curve.)
Convert from 32 bits to 16 or 8 bpc
If you originally created a 32-bit image during the Merge to HDR Pro process, you can later convert it to a 16- or 8-bit image.
- Open a 32-bpc image in Photoshop, and choose Image > Mode > 16 Bits/Channel or 8 Bits/Channel.
- Adjust exposure and contrast to produce an image with the dynamic range you want. (See Options for 16- or 8-bit images.)
- Click OK to convert the 32-bit image.
Adjust displayed dynamic range for 32-bit HDR images
To the top
The dynamic range of HDR images exceeds the display capabilities of standard computer monitors. When you open an HDR image in Photoshop, it can look very dark or washed out. Photoshop lets you adjust the preview so that the monitor displays an HDR image whose highlights and shadows aren't washed out or too dark. The preview settings are stored in the HDR image file (PSD, PSB, and TIFF only) and are applied whenever the file is opened in Photoshop. Preview adjustments don't edit the HDR image file; all the HDR image information remains intact. Use the Exposure adjustment (Image > Adjustments > Exposure) to make exposure edits to the 32-bpc HDR image.
To view 32-bit readouts in the Info panel, click the Eyedropper icon in the Info panel and choose 32-Bit from the pop-up menu.
- Open a 32-bpc HDR image in Photoshop, and choose View > 32-Bit Preview Options.
- In the 32-bit Preview Options dialog box, choose an option from the Method menu:
Exposure And Gamma Adjusts the brightness and contrast.
Highlight Compression Compresses the highlight values in the HDR image so they fall within the luminance values range of the 8- or 16-bpc image file.
- If you chose Exposure And Gamma, move the Exposure and Gamma sliders to adjust the brightness and contrast of the image preview.
- Click OK.
You can also adjust the preview of an HDR image open in Photoshop by clicking the triangle in the status bar of the document window and choosing 32-Bit Exposure from the pop-up menu. Move the slider to set the white point for viewing the HDR image. Double-click the slider to return to the default exposure setting. Since the adjustment is made per view, you can have the same HDR image open in multiple windows, each with a different preview adjustment. Preview adjustments made with this method are not stored in the HDR image file.
About the HDR Color Picker
To the top
The HDR Color Picker allows you to accurately view and select colors for use in 32-bit HDR images. As in the regular Adobe Color Picker, you select a color by clicking a color field and adjusting the color slider. The Intensity slider allows you to adjust the brightness of a color to match the intensity of the colors in the HDR image you're working with. A Preview area lets you view swatches of a selected color to see how it will display at different exposures and intensities.

text_image
Color Picker (Foreground Color, 32-bit) -3 -2 -1 new +1 +2 +3 current Preview Stop Size: 1 Relative To Document 32-bit value R: 0.1690 G: 0.1862 B: 0.8980 Color Libraries D Intensity/Color Picker Intensity: 0.00 stops E F G H: 235 ° S: 81 % B: 90 % R: 43 G: 47 B: 229 HHDR Color Picker
A. Preview area B. Adjusted color C. Original color D. 32-bit floating point values E. Intensity slider F. Picked color G. Color slider H. Color values
Display the HDR Color Picker
With a 32-bpc image open, do one of the following:
- In the toolbox, click the foreground or background color selection box.
- In the Color panel, click the Set Foreground Coloror Set Background Color selection box.
The Color Picker is also available when features let you choose a color. For example, by clicking the color swatch in the options bar for some tools, or the eyedroppers in some color adjustment dialog boxes.
Choose colors for HDR images
The lower part of the HDR Color Picker functions like the regular Color Picker does with 8- or 16-bit images. Click in the color field to select a color and move the color slider to change hues, or use the HSB or RGB fields to enter numeric values for a particular color. In the color field, brightness increases as you move from bottom to top, and saturation increases as you move from left to right.
Use the Intensity slider to adjust the brightness of the color. The color value plus the intensity value are converted to 32-bit floating point number values in your HDR document.
- Select a color by clicking in the color field and moving the color slider, or by entering HSB or RGB numeric values, as in the Adobe Color Picker.
-
Adjust the Intensity slider to boost or reduce the color's brightness. The new color swatch in the Preview scale at the top of the Color Picker shows the effect of increasing or decreasing stops for the selected color.
The Intensity Stops correspond inversely to exposure setting stops. If you boost the Exposure setting of the HDR image two stops, reducing the Intensity stops by two will maintain the same color appearance as if the HDR image exposure and the color intensity were both set to 0. If you know the exact 32-bit RGB values for the color you want, you can enter them directly in the 32-bit value RGB fields. -
(Optional) Adjust settings for the Preview area.
Preview Stop Size Sets the stop increments for each preview swatch. For example, a setting of 3 results in swatches of -9, -6, -3, +3, +6, +9. These swatches let you preview the appearance of your selected color at different exposure settings.
Relative to Document Select to adjust the preview swatches to reflect the current exposure setting for the image. For example, if the document exposure is set higher, the new preview swatch will be lighter than the color selected in the Color Picker's color field, to show the effect of the higher exposure on the selected color. If the current exposure is set to 0 (the default), checking or unchecking this option will not change the new swatch.
-
(Optional) Click Add to Swatches to add the selected color to the Swatches panel.
-
Click OK.
Paint on HDR images
To the top
You can edit and add effects to HDR/32-bpc images using any of the following Photoshop tools: Brush, Pencil, Pen, Shape, Clone Stamp, Pattern Stamp, Eraser, Gradient, Blur, Sharpen, Smudge, and History Brush. You can also use the Text tool to add 32-bpc text layers to an HDR image.
When editing or painting on HDR images, you can preview your work at different exposure settings using either the 32-Bit Exposure slider in the document info area or the 32-Bit Preview Options dialog box (View > 32-Bit Preview Options). The HDR Color Picker also lets you preview your selected foreground color at different intensity settings, to match different exposure settings in an HDR image.
- Open an HDR image.
- (Optional) Set the exposure for the image. See Adjust displayed dynamic range for 32-bit HDR images.
- For the Brush or Pencil tools, click the foreground color to open the HDR Color Picker and select a color. For the Text tool, click the color chip in the Text tool options bar to set the text color.
The Preview area of the HDR Color Picker helps you select and adjust a foreground color in relation to different exposure settings in the HDR image. See About the HDR Color Picker.
To view the effects of painting at different HDR exposures, use the Window > Arrange > New Window command to open simultaneous views of the same HDR image, then set each window to a different exposure using the Exposure slider in the document status bar area.
More Help topics
Curves overview
Adobe Color Picker overview
Adjust HDR exposure and toning
Legal Notices | Online Privacy Policy
Convert an image to another color mode
Convert an image to Bitmap mode
Convert a color photo to Grayscale mode
Convert a Bitmap mode image to Grayscale mode
Convert a grayscale or RGB image to indexed color
Convert an image to another color mode
To the top
You can change an image from its original mode (source mode) to a different mode (target mode). When you choose a different color mode for an image, you permanently change the color values in the image. For example, when you convert an RGB image to CMYK mode, RGB color values outside the CMYK gamut (defined by the CMYK working space setting in the Color Settings dialog box) are adjusted to fall within gamut. As a result, some image data may be lost and can't be recovered if you convert the image from CMYK back to RGB.
Before converting images, it's best to do the following:
- Do as much editing as possible in the original image mode (usually RGB for images from most scanners or digital cameras, or CMYK for images from traditional drum scanners or imported from a Scitex system).
- Save a backup copy before converting. Be sure to save a copy of your image that includes all layers so that you can edit the original version of the image after the conversion.
- Flatten the file before converting it. The interaction of colors between layer blending modes changes when the mode changes.
Note: In most cases, you'll want to flatten a file before converting it. However, it isn't required and, in some cases, it isn't desirable (for example, when the file has vector text layers).
Choose Image > Mode and the mode you want from the submenu. Modes not available for the active image appear dimmed in the menu. Images are flattened when converted to Multichannel, Bitmap, or Indexed Color mode, because these modes do not support layers.
Convert an image to Bitmap mode
To the top
Converting an image to Bitmap mode reduces the image to two colors, greatly simplifying the color information in the image and reducing its file size.
When converting a color image to Bitmap mode, first convert it to Grayscale mode. This removes the hue and saturation information from the pixels and leaves just the brightness values. However, because only a few editing options are available for Bitmap mode images, it's usually best to edit the image in Grayscale mode and then convert it to Bitmap mode.
Note: Images in Bitmap mode are 1 bit per channel. You must convert a 16- or 32-bits-per-channel image to 8-bit Grayscale mode before converting it to Bitmap mode.
-
Do one of the following:
-
If the image is in color, choose Image > Mode > Grayscale. Then choose Image > Mode > Bitmap.
-
If the image is grayscale, choose Image > Mode > Bitmap.
-
For Output, enter a value for the output resolution of the Bitmap mode image, and choose a unit of measurement. By default, the current image resolution appears as both the input and the output resolutions.
- Choose one of the following bitmap conversion methods from the Use pop-up menu:
50% Threshold Converts pixels with gray values above the middle gray level (128) to white and pixels with gray values below that level to black. The result is a very high-contrast, black-and-white representation of the image.
Pattern Dither Converts an image by organizing the gray levels into geometric configurations of black and white dots.
Diffusion Dither Converts an image by using an error-diffusion process, starting at the pixel in the upper-left corner of the image. If the pixel's value is above middle gray (128), the pixel is changed to white—if below it, to black. Because the original pixel is rarely pure white or pure black, error is inevitably introduced. This error is transferred to surrounding pixels and diffused throughout the image, resulting in a grainy, film-like texture.
Halftone Screen Simulates the appearance of halftone dots in the converted image. Enter values in the Halftone Screen dialog box:
- For Frequency, enter a value for the screen frequency, and choose a unit of measurement. Values can range from 1.000 to 999.999 for lines per inch and from 0.400 to 400.00 for lines per centimeter. You can enter decimal values. The screen frequency specifies the ruling of the halftone screen in lines per inch (lpi). The frequency depends on the paper stock and type of press used for printing. Newspapers commonly use an 85-line screen. Magazines use higher resolution screens, such as 133-lpi and 150-lpi. Check with your print shop for
correct screen frequencies.
- Enter a value for the screen angle in degrees from -180 to +180. The screen angle refers to the orientation of the screen. Continuous-tone and black-and-white halftone screens commonly use a 45° angle.
• For Shape, choose the dot shape you want.
Important: The halftone screen becomes part of the image. If you print the image on a halftone printer, the printer will use its own halftone screen as well as the halftone screen that is part of the image. On some printers, the result is a moiré pattern.
Custom Pattern Simulates the appearance of a custom halftone screen in the converted image. Choose a pattern that lends itself to thickness variations, typically one with a variety of gray shades.
To use this option, you first define a pattern and then screen the grayscale image to apply the texture. To cover the entire image, the pattern must be as large as the image. Otherwise, the pattern is tiled. Photoshop comes with several self-tiling patterns that can be used as halftone screen patterns.

To prepare a black-and-white pattern for conversion, first convert the image to grayscale and then apply the Blur More filter several times. This blurring technique creates thick lines tapering from dark gray to white.

natural_image
Close-up of a cluster of round, round objects resembling grapes or berries (no text or symbols visible)
natural_image
Black and white abstract pattern resembling clustered grapes or fruits (no text or symbols)Original grayscale image, and 50% Threshold conversion method

natural_image
Pixelated grayscale image of abstract shapes on a grid background (no text or symbols)
natural_image
Microscopic view of circular particles or cells with varying sizes and surface textures (no text or symbols visible)Pattern Dither conversion method, and Diffusion Dither conversion method
Convert a color photo to Grayscale mode
To the top
- Open the photo you want to convert to black-and-white.
- Choose Image > Mode > Grayscale.
- Click Discard. Photoshop converts the colors in the image to black, white, and shades of gray.
Note: The technique above minimizes file size but discards color information and can convert adjacent colors to the exact same shade of gray. Using a Black & White adjustment layer increases file size but retains color information, letting you map colors to shades of gray.
Convert a Bitmap mode image to Grayscale mode
To the top
You can convert a Bitmap mode image to Grayscale mode in order to edit it. Keep in mind that a Bitmap mode image edited in Grayscale mode may not look the same when you convert it back to Bitmap mode. For example, suppose a pixel that is black in Bitmap mode is edited to a shade of gray in Grayscale mode. When the image is converted back to Bitmap mode, that pixel is rendered as white if its gray value is above the middle gray value of 128.
- Choose Image > Mode > Grayscale.
- Enter a value between 1 and 16 for the size ratio.
The size ratio is the factor for scaling down the image. For example, to reduce a grayscale image by 50%, enter 2 for the size ratio. If you enter a number greater than 1, the program averages multiple pixels in the Bitmap mode image to produce a single pixel in the grayscale image. This process lets you generate multiple shades of gray from an image scanned on a 1-bit scanner.
Convert a grayscale or RGB image to indexed color
To the top
Converting to indexed color reduces the number of colors in the image to at most 256—the standard number of colors supported by the GIF and PNG-8 formats and many multimedia applications. This conversion reduces file size by deleting color information from the image.
To convert to indexed color, you must start with an image that is 8 bits per channel and in either Grayscale or RGB mode.
- Choose Image > Mode > Indexed Color.
Note: All visible layers will be flattened; any hidden layers will be discarded.
For grayscale images, the conversion happens automatically. For RGB images, the Indexed Color dialog box appears.
-
Select Preview in the Indexed Color dialog box to display a preview of the changes.
-
Specify conversion options.
Conversion options for indexed-color images
When converting an RGB image to indexed color, you can specify a number of conversion options in the Indexed Color dialog box.
Palette Type A number of palette types are available for converting an image to indexed color. For the Perceptual, Selective, and Adaptive options, you can choose using a local palette based on the current image's colors. These are the available palette types:
Exact Creates a palette using the exact colors appearing in the RGB image—an option available only if the image uses 256 or fewer colors. Because the image's palette contains all colors in the image, there is no dithering.
System (Mac OS) Uses the Mac OS default 8-bit palette, which is based on a uniform sampling of RGB colors.
System (Windows) Uses the Windows system's default 8-bit palette, which is based on a uniform sampling of RGB colors.
Web Uses the 216-color palette that web browsers, regardless of platform, use to display images on a monitor limited to 256 colors. This palette is a subset of the Mac OS 8-bit palette. Use this option to avoid browser dither when viewing images on a monitor display limited to 256 colors.
Uniform Creates a palette by uniformly sampling colors from the RGB color cube. For example, if Photoshop takes six evenly-spaced color levels each of red, green, and blue, the combination produces a uniform palette of 216 colors (6 cubed = 6 x 6 x 6 = 216). The total number of colors displayed in an image corresponds to the nearest perfect cube (8, 27, 64, 125, or 216) that is less than the value in the Colors text box.
Local (Perceptual) Creates a custom palette by giving priority to colors for which the human eye has greater sensitivity.
Local (Selective) Creates a color table similar to the Perceptual color table, but favoring broad areas of color and the preservation of web colors. This option usually produces images with the greatest color integrity.
Local (Adaptive) Creates a palette by sampling the colors from the spectrum appearing most commonly in the image. For example, an RGB image with only the colors green and blue produces a palette made primarily of greens and blues. Most images concentrate colors in particular areas of the spectrum. To control a palette more precisely, first select a part of the image containing the colors you want to emphasize. Photoshop weights the conversion toward these colors.
Master (Perceptual) Creates a custom palette by giving priority to colors for which the human eye has greater sensitivity. Applies when you have multiple documents open; takes all open documents into account.
Master (Selective) Creates a color table similar to the Perceptual color table, but favoring broad areas of color and the preservation of web colors. This option usually produces images with the greatest color integrity. Applies when you have multiple documents open; takes all open documents into account.
Master (Adaptive) Creates a palette by sampling the colors from the spectrum appearing most commonly in the image. For example, an RGB image with only the colors green and blue produces a palette made primarily of greens and blues. Most images concentrate colors in particular areas of the spectrum. To control a palette more precisely, first select a part of the image containing the colors you want to emphasize. Photoshop weights the conversion toward these colors. Applies when you have multiple documents open; takes all open documents into account.
Custom Creates a custom palette using the Color Table dialog box. Either edit the color table and save it for later use or click Load to load a previously created color table. This option also displays the current Adaptive palette, which is useful for previewing the colors most often used in the image.
Previous Uses the custom palette from the previous conversion, making it easy to convert several images with the same custom palette.
Number Of Colors For the Uniform, Perceptual, Selective, or Adaptive palette, you can specify the exact number of colors to be displayed (up to 256) by entering a value for Colors. The Colors text box controls only how the indexed color table is created. Adobe Photoshop still treats the image as an 8-bit, 256-color image.
Color Inclusion And Transparency To specify colors to be included in the indexed color table or to specify transparency in the image, choose from the following options:
Forced Provides options to force the inclusion of certain colors in the color table. Black And White adds a pure black and a pure white to the color table; Primaries adds red, green, blue, cyan, magenta, yellow, black, and white; Web adds the 216 web-safe colors; and Custom lets you define custom colors to add.
Transparency Specifies whether to preserve transparent areas of the image during conversion. Selecting this option adds a special index entry in the color table for transparent colors. Deselecting this option fills transparent areas with the matte color, or with white if no matte color is chosen.
Matte Specifies the background color used to fill anti-aliased edges that lie adjacent to transparent areas of the image. When Transparency is selected, the matte is applied to edge areas to help blend the edges with a web background of the same color. When Transparency is deselected, the matte is applied to transparent areas. Choosing None for the matte creates hard-edged transparency if Transparency is selected; otherwise, all transparent areas are filled with 100% white. The image must have transparency for the Matte options to be available.
Dithering Unless you're using the Exact color table option, the color table may not contain all the colors used in the image. To simulate colors not in the color table, you can dither the colors. Dithering mixes the pixels of the available colors to simulate the missing colors. Choose a dither option from the menu, and enter a percentage value for the dither amount. A higher amount dithers more colors but may increase file size. You can choose from the following dither options:
None Does not dither colors but instead uses the color closest to the missing color. This tends to result in sharp transitions between shades of color in the image, creating a posterized effect.
Diffusion Uses an error-diffusion method that produces a less-structured dither than the Pattern option. To protect colors in the image that contain entries in the color table from being dithered, select Preserve Exact Colors. This is useful for preserving fine lines and text for web images.
Pattern Uses a halftone-like square pattern to simulate any colors not in the color table.
Noise Helps to reduce seam patterns along the edges of image slices. Choose this option if you plan to slice the image for placement in an HTML table.
More Help topics
Customizing indexed color tables
Adding a conditional mode change to an action

About color working spaces
Legal Notices | Online Privacy Policy
Why colors sometimes don't match
What is a color management system?
Do you need color management?
Creating a viewing environment for color management
A color management system reconciles color differences among devices so that you can confidently predict the colors your system ultimately produces. Viewing color accurately allows you to make sound color decisions throughout your workflow, from digital capture through final output. Color management also allows you to create output based on ISO, SWOP, and Japan Color print production standards.
Why colors sometimes don't match
To the top
No device in a publishing system is capable of reproducing the full range of colors viewable to the human eye. Each device operates within a specific color space that can produce a certain range, or gamut, of colors.
A color model determines the relationship between values, and the color space defines the absolute meaning of those values as colors. Some color models (such as CIE L*a*b) have a fixed color space because they relate directly to the way humans perceive color. These models are described as being device-independent. Other color models (RGB, HSL, HSB, CMYK, and so forth) can have many different color spaces. Because these models vary with each associated color space or device, they are described as being device-dependent.
Because of these varying color spaces, colors can shift in appearance as you transfer documents between different devices. Color variations can result from differences in image sources; the way software applications define color; print media (newsprint paper reproduces a smaller gamut than magazine-quality paper); and other natural variations, such as manufacturing differences in monitors or monitor age.
text_image
RGB CMYK A B CColor gamuts of various devices and documents
A. Lab color space B. Documents (working space) C. Devices
What is a color management system?
To the top
Color-matching problems result from various devices and software using different color spaces. One solution is to have a system that interprets and translates color accurately between devices. A color management system (CMS) compares the color space in which a color was created to the color space in which the same color will be output, and makes the necessary adjustments to represent the color as consistently as possible among different devices.
A color management system translates colors with the help of color profiles. A profile is a mathematical description of a device's color space. For example, a scanner profile tells a color management system how your scanner "sees" colors. Adobe color management uses ICC profiles, a format defined by the International Color Consortium (ICC) as a cross-platform standard.
Because no single color-translation method is ideal for all types of graphics, a color management system provides a choice of rendering intents, or translation methods, so that you can apply a method appropriate to a particular graphics element. For example, a color translation method that preserves correct relationships among colors in a wildlife photograph may alter the colors in a logo containing flat tints of color.
Note: Don't confuse color management with color correction. A color management system won't correct an image that was saved with tonal or color balance problems. It provides an environment where you can evaluate images reliably in the context of your final output.
Do you need color management?
To the top
Without a color management system, your color specifications are device-dependent. You might not need color management if your production process is tightly controlled for one medium only. For example, you or your print service provider can tailor CMYK images and specify color values for a known, specific set of printing conditions.
The value of color management increases when you have more variables in your production process. Color management is recommended if you anticipate reusing color graphics for print and online media, using various kinds of devices within a single medium (such as different printing presses), or if you manage multiple workstations.
You will benefit from a color management system if you need to accomplish any of the following:
- Get predictable and consistent color output on multiple output devices including color separations, your desktop printer, and your monitor. Color management is especially useful for adjusting color for devices with a relatively limited gamut, such as a four-color process printing press.
- Accurately soft-proof (preview) a color document on your monitor by making it simulate a specific output device. (Soft-proofing is subject to the limitations of monitor display, and other factors such as room lighting conditions.)
- Accurately evaluate and consistently incorporate color graphics from many different sources if they also use color management, and even in some cases if they don't.
- Send color documents to different output devices and media without having to manually adjust colors in documents or original graphics. This is valuable when creating images that will eventually be used both in print and online.
- Print color correctly to an unknown color output device; for example, you could store a document online for consistently reproducible on-demand color printing anywhere in the world.
Creating a viewing environment for color management
To the top
Your work environment influences how you see color on your monitor and on printed output. For best results, control the colors and light in your work environment by doing the following:
- View your documents in an environment that provides a consistent light level and color temperature. For example, the color characteristics of sunlight change throughout the day and alter the way colors appear on your screen, so keep shades closed or work in a windowless room. To eliminate the blue-green cast from fluorescent lighting, you can install D50 (5000° Kelvin) lighting. You can also view printed documents using a D50 lightbox.
- View your document in a room with neutral-colored walls and ceiling. A room's color can affect the perception of both monitor color and printed color. The best color for a viewing room is neutral gray. Also, the color of your clothing reflecting off the glass of your monitor may affect the appearance of colors on-screen.
- Remove colorful background patterns on your monitor desktop. Busy or bright patterns surrounding a document interfere with accurate color perception. Set your desktop to display neutral grays only.
- View document proofs in the real-world conditions under which your audience will see the final piece. For example, you might want to see how a housewares catalog looks under the incandescent light bulbs used in homes, or view an office furniture catalog under the fluorescent lighting used in offices. However, always make final color judgements under the lighting conditions specified by the legal requirements for contract proofs in your country.
More Help topics
|
Layers
Layers 101
Infinite Skills (Aug. 9, 2012)
video-tutorial
Introduction to layers and the Layers panel
About Photoshop layers
Photoshop Layers panel overview
Convert background and Photoshop layers
Duplicate Photoshop layers
Sample from all visible Photoshop layers
Change transparency preferences
Top 10 Time Saving Enhancements to Photoshop layers

text_image
123Adobe Digital Imaging Evangelist Julieanne Kost shares the top 10 enhancements in the Layers Panel introduced in Photoshop CS6.... Read More
http://tv.adobe.com/watch/photoshop-cs6-featu...

by Julieanne Kost
Contribute your expertise to Adobe Community Help
Photoshop layers 101

text_image
123How do you use layers? Infinite Skills author, Andy Anderson shows you the basic options and features of the Layers panel.... Read More
http://adobe.ly/NsCSWN

by Andy Anderson
Contribute your expertise to Adobe Community Help
To the top
About Photoshop layers
Photoshop layers are like sheets of stacked acetate. You can see through transparent areas of a layer to the layers below. You move a layer to position the content on the layer, like sliding a sheet of acetate in a stack. You can also change the opacity of a layer to make content partially transparent.
natural_image
Abstract composition of overlapping rectangular panels with natural textures and color swatches (no text or symbols)Transparent areas on a layer let you see layers below.
You use layers to perform tasks such as compositing multiple images, adding text to an image, or adding vector graphic shapes. You can apply a layer style to add a special effect such as a drop shadow or a glow.
See a Video tutorial: Understanding layers for an overview on working with Layers.
Organizing Photoshop layers
A new image has a single layer. The number of additional layers, layer effects, and layer sets you can add to an image is limited only by your computer's memory.
You work with layers in the Layers panel. Layer groups help you organize and manage layers. You can use groups to arrange your layers in a logical order and to reduce clutter in the Layers panel. You can nest groups within other groups. You can also use groups to apply attributes and masks to multiple layers simultaneously.
Photoshop layers for non-destructive editing
Sometimes layers don't contain any apparent content. For example, an adjustment layer holds color or tonal adjustments that affect the layers below it. Rather than edit image pixels directly, you can edit an adjustment layer and leave the underlying pixels unchanged.
A special type of layer, called a Smart Object, contains one or more layers of content. You can transform (scale, skew, or reshape) a Smart Object without directly editing image pixels. Or, you can edit the Smart Object as a separate image even after placing it in a Photoshop image. Smart Objects can also contain smart filter effects, which allow you to apply filters non-destructively to images so that you can later tweak or remove the filter effect. See Nondestructive editing.
Video layers
You can use video layers to add video to an image. After importing a video clip into an image as a video layer, you can mask the layer, transform it, apply layer effects, paint on individual frames, or rasterize an individual frame and convert it to a standard layer. Use the Timeline panel to play the video within the image or to access individual frames. See Supported video and image sequence formats (Photoshop Extended).
To the top
Photoshop Layers panel overview
The Layers panel in Photoshop lists all layers, layer groups, and layer effects in an image. You can use the Layers panel to show and hide layers, create new layers, and work with groups of layers. You can access additional commands and options in the Layers panel menu.

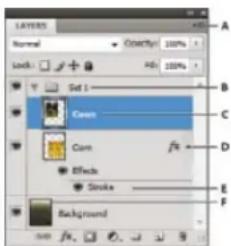
text_image
Layers Normal Opacity: 100% Lock: Fill: 100% Solid 1 Cass C Corn Effect Stroke Background A B C D E FPhotoshop Layers panel
A. Layers panel menu B. Layer Group C. Layer D. Expand/Collapse Layer effects E. Layer effect F. Layer thumbnail
Display the Photoshop Layers panel
- Choose Window > Layers.
Choose a command from the Photoshop Layers panel menu
Click the triangle in the upper right corner of the panel.
Change the size of Photoshop layer thumbnails
- Choose Panel Options from the Layers panel menu, and select a thumbnail size.
Change thumbnail contents
- Choose panel Options from the Layers panel menu, and select Entire Document to display the contents of the entire document. Select Layer Bounds to restrict the thumbnail to the object's pixels on the layer.

Turn off thumbnails to improve performance and save monitor space.
Expand and collapse groups
- Click the triangle to the left of a group folder. See View layers and groups within a group.
Filter Photoshop layers (CC, CS6)
At the top of the Layers panel, the filtering options help you find key layers in complex documents quickly. You can display a subset of layers based on name, kind, effect, mode, attribute, or color label.
Filter layers options in the Layers panel
- Choose a filter type from the popup menu.
- Select or enter the filter criteria.
- Click the toggle switch to switch layer filtering on or off.
To the top
Convert background and Photoshop layers
When you create a new image with a white background or a colored background, the bottommost image in the Layers panel is called Background. An image can have only one background layer. You cannot change the stacking order of a background layer, its blending mode, or its opacity. However, you can convert a background into a regular layer, and then change any of these attributes.
When you create a new image with transparent content, the image does not have a background layer. The bottommost layer is not constrained like the background layer; you can move it anywhere in the Layers panel and change its opacity and blending mode.
Convert a background into a Photoshop layer
- Double-click Background in the Layers panel, or choose Layer > New > Layer From Background.
-
Set layer options. (See Create layers and groups.)
-
Click OK.
Convert a Photoshop layer into a background
- Select a Photoshop layer in the Layers panel.
- Choose Layer > New > Background From Layer.
Any transparent pixels in the layer are converted to the background color, and the layer drops to the bottom of the layer stack.
Note: You cannot create a background by giving a regular layer the name, Background—you must use the Background From Layer command.
To the top
Duplicate Photoshop layers
You can duplicate layers within an image or into another or a new image.
Duplicate a Photoshop layer or group within an image
- Select a layer or group in the Layers panel.
-
Do one of the following:
-
Drag the layer or group to the Create a New Layer button
- Choose Duplicate Layer or Duplicate Group from the Layers menu or the Layers panel menu. Enter a name for the layer or group, and click OK.
Duplicate a Photoshop layer or group in another image
- Open the source and destination images.
- From the Layers panel of the source image, select one or more layers or a layer group.
-
Do one of the following:
-
Drag the layer or group from the Layers panel to the destination image.
- Select the Move tool ⬆, and drag from the source image to the destination image. The duplicate layer or group appears above the active layer in the Layers panel of the destination image. Shift-drag to move the image content to the same location it occupied in the source image (if the source and destination images have the same pixel dimensions) or to the center of the document window (if the source and destination images have different pixel dimensions).
- Choose Duplicate Layer or Duplicate Group from the Layers menu or the Layers panel menu. Choose the destination document from the Document pop-up menu, and click OK.
- Choose Select > All to select all the pixels on the layer, and choose Edit > Copy. Then choose Edit > Paste in the destination image. (This method copies only pixels, excluding layer properties such as blending mode.)
Create a new document from a Photoshop layer or group
- Select a layer or group from the Layers panel.
- Choose Duplicate Layer or Duplicate Group from the Layers menu or the Layers panel menu.
- Choose New from the Document pop-up menu, and click OK.
To the top
Sample from all visible Photoshop layers
The default behavior of the Mixer Brush, Magic Wand, Smudge, Blur, Sharpen, Paint Bucket, Clone Stamp, and Healing Brush tools is to sample color only from pixels on the active layer. This means you can smudge or sample in a single layer.
- To smudge or sample pixels from all visible layers with these tools, select Sample All Layers from the options bar.
To the top
Change transparency preferences
- In Windows, choose Edit > Preferences > Transparency & Gamut; in Mac OS, choose Photoshop > Preferences > Transparency & Gamut.
- Choose a size and color for the transparency checkerboard, or choose None for Grid Size to hide the transparency checkerboard.
- Click OK.
Adobe also recommends

Twitter™ and Facebook posts are not covered under the terms of Creative Commons.
Legal Notices | Online Privacy Policy
Video: Using Generator
Generate image assets from layers or layer groups
A web design use case
Specify quality and size parameters
Disable image asset generation for all documents
FAQ
You can generate JPEG, PNG, or GIF image assets from the contents of a layer or layer group in a PSD file. Assets are automatically generated when you append a supported image format extension to a layer name or a layer group name. Optionally, you can also specify quality and size parameters for the generated image assets.
Generating image assets from a PSD file is particularly useful for multidevice web design.
To the top
Generate image assets from layers or layer groups
To understand the image asset generator better, consider a simple PSD file (download from this link) with the following layer hierarchy:

flowchart
graph TD
    A["Orange Square"] --> B["Orange Square"]
    B --> C["Orange Square"]
    C --> D["Orange Square"]
    D --> E["Blue Circle"]
    E --> F["Blue Circle"]
    F --> G["Blue Circle"]
    G --> H["Blue Circle"]
    H --> I["Blue Circle"]
    I --> J["Blue Circle"]
    J --> K["Blue Circle"]
    K --> L["Blue Circle"]
    L --> M["Blue Circle"]
    M --> N["Blue Circle"]
    N --> O["Blue Circle"]
    O --> P["Blue Circle"]
    P --> Q["Blue Circle"]
    Q --> R["Blue Circle"]
    R --> S["Blue Circle"]
    S --> T["Blue Circle"]
    T --> U["Blue Circle"]
    U --> V["Blue Circle"]
    V --> W["Blue Circle"]
    W --> X["Blue Circle"]
    X --> Y["Blue Circle"]
    Y --> Z["Blue Circle"]
Example PSD file and its layer hierarchy
The layer hierarchy for this file has two layer groups—Rounded_rectangles and Ellipses. Each of these layer groups contains five layers.
Follow these steps to generate image assets from this PSD file:
- With the PSD file open, select File > Generate > Image Assets.
- Append appropriate file format extensions (.jpg, .png, or .gif) to the names of the layers or layer groups from which you want to generate image assets. For example, rename the layer groups, Rounded_rectangles and Ellipses, as Rounded_rectangles.jpg and Ellipses.png; and the layer, Ellipse_4 as Ellipse_4.gif.
Note: The special characters /, :, and * are not supported in layer names.
Photoshop generates the image assets and saves them in a subfolder alongside the source PSD file. If the source PSD file is not saved yet, Photoshop saves the generated assets in a new folder on your Desktop.

text_image
Rounded_netangle.png Elyase_0 Elyase_1 Elyase_2 Elyase_3 Elyase_4.gf Elyase_5 Elyase_6 Elyase_7 Elyase_8 Elyase_9 Elyase_10 Elyase_11 Elyase_12 Elyase_13 Elyase_14 Elyase_15 Elyase_16 Elyase_17 Elyase_18 Elyase_19 Elyase_20 Elyase_21 Elyase_22 Elyase_23 Elyase_24 Elyase_25 Elyase_26 Elyase_27 Elyase_28 Elyase_29 Elyase_30 Elyase_31 Elyase_32 Elyase_33 Elyase_34 Elyase_35 Elyase_36 Elyase_37 Elyase_38 Elyase_39 Elyase_40 Elyase_41 Elyase_42 Elyase_43 Elyase_44 Elyase_45 Elyase_46 Elyase_47 Elyase_48 Elyase_49 Elyase_50 Elyase_51 Elyase_52 Elyase_53 Elyase_54 Elyase_55 Elyase_56 Elyase_57 Elyase_58 Elyase_59 Elyase_60 Elyase_61 Elyase_62 Elyase_63 Elyase_64 Elyase_65 Elyase_66 Elyase_67 Elyase_68 Elyase_69 Elyase_70 Elyase_71 Elyase_72 Elyase_73 Elyase_74 Elyase_75 Elyase_76 Elyase_77 Elyase_78 Elyase_79 Elyase_80 Elyase_81 Elyase_82 Elyase_83 Elyase_84 Elyase_85 Elyase_86 Elyase_87 Elyase_88 Elyase_89 Elyase_90 Elyase_91 Elyase_92 Elyase_93 Elyase_94 Elyase_95 Elyase_96 Elyase_97 Elyase_98 Elyase_99 Elyase_100Image asset names are generated from layer names/layer group names
Image asset generation is enabled for the current document. Once enabled, the feature remains available whenever the document is opened next. In order to disable image asset generation for the current document, deselect File > Generate > Image Assets.
Generate multiple assets from a layer or layer group
To generate multiple assets from a layer/layer group, separate the asset names with the comma symbol (). For example, the following layer name generates three assets:
Ellipse_4.jpg, Ellipse_4b.png, Ellipse_4c.png
To the top
A web design use case
Generating image assets from a PSD file is particularly useful for multidevice web design. Consider the following web design and its layer structure:

text_image
NE LEON MEATCH SARS DRUGES OF NATURE NATURE COULINA WORKS CARELLA 200 Huebe Featured Location Global Hotspots (Edge Animals) Heading GLOBAL HOT SPOTS Color Fill 1 Location Text Hotspots Top Row Hotspots Bottom Row Shop Posts / Join a Club Field Reports FlankerA web design and its layer hierarchy
Let's extract the icon on top and the top row of the Global Hotspots image grid as image assets:
- Append image format extensions to the appropriate layer names.

text_image
AdventureCo Logo.jpg Logo T ADVENTURE CO.
text_image
Hotspots Top Row.jpg Hotspot1Hiking Hotspot2Kayak Hotspot3Zipline Hotspot4PaddleboardRename the appropriate layers/layer groups
Note: A single image asset is generated from the contents of a layer/layer group. For example, the AdventureCo Logo layer group in the screenshot above contains a shape layer and a live text layer. These layers are flattened when an image asset is generated from the layer group.
Photoshop generates the assets and saves them in the same location as the source PSD file.

text_image
AdventureCoHomePage_Final-assets Organize Burn New folder ADVENTURE CO. AdventureCo Logo.jpg Hotspots Top Row.jpgGenerated image assets
To the top
Specify quality and size parameters
JPG assets are generated at 90% quality by default. PNG assets are generated as 32-bit images by default. GIF assets are generated with basic alpha transparency.
While renaming layers or layer groups in preparation for asset generation, you can customize quality and size.
Parameters for JPG assets
- Add the desired output quality as a suffix to the asset name—.jpg (1-10) or .jpg (1-100%). For example:
- Ellipse_4.jpg5
- Ellipse_4.jpg50%
- Add the desired output image size (relative or in supported formats—px, in, cm, and mm) as a prefix to the asset name. Photoshop scales the image accordingly. For example:
• 200% Ellipse_4.jpg
• 300 x 200 Rounded_rectangle_3.jpg
• 10in x 200mm Rounded_rectangle_3.jpg
Note: Remember to add a space character between the prefix and the asset name. If you're specifying the size in pixels, you can omit the unit. For example, 300 x 200.
As illustrated, you can mix different units and pixels while specifying the desired output image size. For example, 4in x 100 Rounded_rectangle_3.jpg is a valid layer name for asset generation.
Parameters for PNG assets
- Add the desired output quality as a suffix to the asset name—8, 24, or 32. For example:
- Ellipse_4.png24
- Add the desired output image size (relative or in supported formats—px, in, cm, and mm) as a prefix to the asset name. Photoshop scales the image accordingly. For example:
• 42% Ellipse_4.png
• 300mm x 20cm Rounded_rectangle_3.png
• 10in x 50cm Rounded_rectangle_3.png
Note: Remember to add a space character between the prefix and the asset name. If you're specifying the size in pixels, you can omit the unit. For example, 300 x 200.
As illustrated, you can mix different units and pixels while specifying the desired output image size. For example, 4in x 100 Rounded_rectangle_3.png is a valid layer name for asset generation.
Parameters for GIF assets
- Add the desired output image size (relative or in supported formats—px, in, cm, and mm) as a prefix to the asset name. For example:
- 42% Ellipse_4.gif
- 300mm x 20cm Rounded_rectangle_3.gif
- 20in x 50cm Rounded_rectangle_3.gif
Note: Remember to add a space character between the prefix and the asset name. If you're specifying the size in pixels, you can omit the unit. For example, 300 x 200.
As illustrated, you can mix different units and pixels while specifying the desired output image size. For example, 4in x 100 Rounded_rectangle_3.gif is a valid layer name for asset generation.
Quality parameters are not available for GIF assets.
Construct complex layer names
You can specify multiple asset names with parameters while naming a layer for asset generation. For example:
120% Delicious.jpg, 42% Delicious.png24, 100x100 Delicious_2.jpg90%, 250% Delicious.gif
Photoshop generates the following assets from this layer:
• Delicious.jpg (an 8-quality JPG image scaled 120%)
• Delicious.png (a 24-bit PNG image scaled 42%)
- Delicious_2.jpg (a 90%-quality JPG image that has an absolute size of 100x100 px)
• Delicious.gif (a GIF image scaled 250%)
To the top
Disable image asset generation for all documents
You can disable image asset generation globally for all Photoshop documents by modifying your Preferences.
- Select Edit > Preferences > Plug-Ins.
- Deselect Enable Generator.
- Click OK.
Note: The File > Generate menu command is unavailable when you disable image asset generation from Preferences. The feature can be enabled again only in the Preferences dialog box.
To the top
FAQ
Do I need to specify unique asset names?
What is the default quality level at which image assets are generated?
Does Photoshop generate image assets from layers with transparency and other effects?
How are image assets generated from layers that bleed off the canvas?
Is the comma the only permitted separator between image asset names?
See also
• A closer look at the Photoshop Generator syntax
Twitter™ and Facebook posts are not covered under the terms of Creative Commons.
Legal Notices | Online Privacy Policy
Understanding Smart Objects
Create embedded Smart Objects | CC, CS6
Create linked smart objects | Photoshop CC
Filter the Layers panel by smart objects | Photoshop CC
Duplicate an embedded smart object
Edit the contents of a Smart Object
Replace the contents of a Smart Object
Convert an embedded or linked Smart Object to a layer
Export the contents of an embedded Smart Object
To the top
Understanding Smart Objects
Smart Objects are layers that contain image data from raster or vector images, such as Photoshop or Illustrator files. Smart Objects preserve an image's source content with all its original characteristics, enabling you to perform nondestructive editing to the layer.
In Photoshop CC and CS6, you can embed the contents of an image into a Photoshop document. In Photoshop CC, you can also create linked smart objects whose contents are referenced from external image files. The contents of a linked smart object are updated when its source image file changes.
Linked smart objects are distinct from duplicated instances of a smart object within a Photoshop document. With linked smart objects, you can use a shared source file across multiple Photoshop documents.
With Smart Objects, you can:
- Perform nondestructive transforms. You can scale, rotate, skew, distort, perspective transform, or warp a layer without losing original image data or quality because the transforms don't affect the original data.
• Work with vector data, such as vector artwork from Illustrator, that otherwise would be rasterized in Photoshop. - Perform nondestructive filtering. You can edit filters applied to Smart Objects at any time.
- Edit one Smart Object and automatically update all its linked instances.
- Apply a layer mask that's either linked or unlinked to the Smart Object layer.
- Try various designs with low-resolution placeholder images that you later replace with final versions.
You can't perform operations that alter pixel data—such as painting, dodging, burning, or cloning—directly to a Smart Object layer, unless it is first converted into a regular layer, which will be rasterized. To perform operations that alter pixel data, you can edit the contents of a Smart Object, clone a new layer above the Smart Object layer, edit duplicates of the Smart Object, or create a new layer.
Note: When you transform a Smart Object that has a Smart Filter applied to it, Photoshop turns off filter effects while the transform is being performed. Filter effects are applied again after the transform is complete. See About Smart Filters.
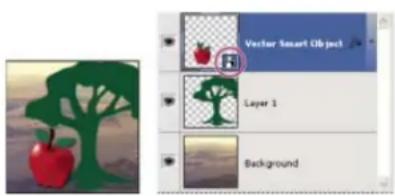
text_image
Vector Smart Object Layer 1 BackgroundRegular layer and Smart Object in Layers panel. Icon in lower right corner of thumbnail indicates Smart Object.

text_image
External_image Background(Photoshop CC) A linked Smart Object in the Layers panel
To the top
Create embedded Smart Objects | CC, CS6
You can create embedded Smart objects using several methods: by using the Open As Smart Object command; placing a file (CS6) or placing a file as embedded (CC, CS6), pasting data from Illustrator; or converting one or more Photoshop layers to Smart Objects.
- Do any of the following:
- (CC) Choose File > Place Embedded to import files as Smart Objects into an open Photoshop document.
- Choose File > Open As Smart Object, select a file, and click Open.
- (CS6) Choose File> Place to import files as Smart Objects into an open Photoshop document.
Although you can place JPEG files, it's better to place PSD, TIFF, or PSB files because you can add layers, modify pixels, and resave the file without loss. (Saving a modified JPEG file requires you to flatten new layers and recompress the image, causing image quality degradation).
- Choose Layer > Smart Object > Convert to Smart Object to convert a selected layer into a Smart Object.
- In Bridge, choose File > Place > In Photoshop to import a file as a Smart Object into an open Photoshop document.
An easy way to work with camera raw files is to open them as Smart Objects. You can double-click the Smart Object layer containing the raw file at any time to adjust the Camera Raw settings.
- Select one or more layers and choose Layer > Smart Objects > Convert To Smart Object. The layers are bundled into one Smart Object.
- Drag PDF or Adobe Illustrator layers or objects into a Photoshop document.
- Paste artwork from Illustrator into a Photoshop document, and choose Smart Object in the Paste dialog box. For the greatest flexibility, enable both PDF and AICB (No Transparency Support) in the File Handling & Clipboard section of the Preferences dialog box in Adobe Illustrator.
To the top
Create linked smart objects | Photoshop CC
Note: The Linked Smart Object feature is available in Photoshop versions 14.2 (Photoshop CC | January 2014) and later.
In Photoshop CC, you can create linked smart objects. The contents of linked smart objects are updated when the source image file changes. Linked smart objects are particularly useful for teams or in cases where assets must be reused across designs.
Follow these steps to create a linked smart object:
- Choose File > Place Linked.
- Select an appropriate file and click Place.
The linked smart object is created and is displayed in the Layers panel with a link icon ( ☐).
You can also create a linked smart object in an open document by dragging-and-dropping the appropriate file while keeping the following key pressed:
(Windows) Alt key (Mac) Opt key
To change this default behavior, turn off Preferences > General > Always Create Smart Objects While Placing.
Update linked Smart Objects
If an external source file changes while a Photoshop document referencing it is open, the relevant linked smart object is automatically updated. However, when you open a Photoshop document containing out-of-synch linked smart objects, you can update the smart objects:
- Right-click a linked smart object layer and select Update Modified Content.
- Select Layer > Smart Objects > Update Modified Content.
Linked smart objects whose source images have changed are visually highlighted in the Layers panel:

Out-of-synch linked smart objects are highlighted in the Layers panel
You can update all linked Smart Objects in the current Photoshop document by selecting Layer > Smart Objects > Update All Modified Content.

Linked smart objects with missing external source files are highlighted in the Layers panel
Resolve a broken smart object link
To resolve a linked smart object with a missing external source, follow these steps:
- Right-click the linked smart object layer icon and select Resolve Broken Link.
- Navigate to the new location of the missing object.
- Click Place.
View linked smart object properties
With a linked smart object layer selected in the Layers panel, select Windows > Properties.
The following properties are displayed:
- The path of the external source file for the linked smart object
• The linked smart object size and positional coordinates (X, Y)
You can perform the following actions directly from within the Properties panel:
- Edit the contents of the external image file. If necessary, Photoshop opens an external application that can handle the source image file. For example, Photoshop opens Adobe Illustrator if the external source image is a .ai file.
- Embed the linked smart object within the current document.
Embed linked smart objects
Do one of the following:
- Right-click a linked smart object layer in the Layers panel and select Embed Linked.
- Select Layer > Smart Objects > Embed Linked.
- In the Properties panel, click Embed.
Select Layer > Smart Objects > Embed All Linked to embed all linked smart objects in the Photoshop document.
Filter the Layers panel by smart objects | Photoshop CC
- In the Layers panel, select Smart Objects from the filtering pop up menu.
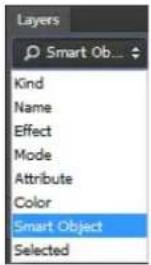
text_image
Layers Smart Ob... Kind Name Effect Mode Attribute Color Smart Object SelectedFilter layers by smart objects
- Click one of the following icons:
• Filter for up-to-date linked smart objects
• Filter for out-of-synch linked smart objects
• Filter for missing linked smart objects
Filter for embedded smart objects
You can use the toggle switch () to turn layer filtering off.
To the top
Duplicate an embedded smart object
- In the Layers panel, select a Smart Object layer, and do one of the following:
- To create a duplicate Smart Object that is linked to the original, choose Layer > New > Layer Via Copy, or drag the Smart Object layer to the Create A New Layer icon at the bottom of the Layers panel. Edits you make to the original affect the copy and vice versa.
- To create a duplicate Smart Object that isn't linked to the original, choose Layer > Smart Objects > New Smart Object Via Copy. Edits you make to the original don't affect the copy.
A new Smart Object appears in the Layers panel with the same name as the original and "copy" as a suffix.
To the top
Edit the contents of a Smart Object
When you edit a Smart Object, the source content is opened in either Photoshop (if the content is raster data or a camera raw file) or the application that handles the placed format by default (for example, Adobe Illustrator or Adobe Acrobat). When you save changes to the source content, the edits appear in all linked instances of the Smart Object in the Photoshop document.
-
Select the Smart Object from the Layers panel, and do one of the following:
-
Choose Layer > Smart Objects > Edit Contents.
- Double-click the Smart Objects thumbnail in the Layers panel.
• In the Properties panel, click Edit Contents.
-
Click OK to close the dialog box.
-
Make edits to the source content file, then choose File > Save.
Photoshop updates the Smart Object to reflect the changes you made. (If you don't see the changes, make the Photoshop document containing the Smart Object active).
To the top
Replace the contents of a Smart Object
You can replace the image data in one Smart Object or multiple linked instances. This feature lets you quickly update a visual design, or replace low-resolution placeholder images with final versions.
Note: When you replace a Smart Object, any scaling, warping, or effects that you applied to the first Smart Object are maintained.
- Select the Smart Object, and choose Layer > Smart Objects > Replace Contents.
- Navigate to the file you want to use, and click Place.
- Click OK.
The new content is placed in the Smart Object.
To the top
Convert an embedded or linked Smart Object to a layer
Converting a Smart Object to a regular layer rasterizes the content at the current size. Convert a Smart Object to a regular layer only if you no longer need to edit the Smart Object data. Transforms, warps, and filters applied to a Smart Object are no longer editable after the Smart Object is rasterized.
- Select the Smart Object, and choose Layer > Smart Objects > Rasterize.
If you want to re-create the Smart Object, reselect its original layers and start from scratch. The new Smart Object won't retain transforms you applied to the original Smart Object.
To the top
Export the contents of an embedded Smart Object
- Select the Smart Object from the Layers panel, and choose Layer > Smart Objects > Export Contents.
- Choose a location for the contents of the Smart Object, then click Save.
Photoshop exports the Smart Object in its original placed format (JPEG, AI, TIF, PDF, or other formats). If the Smart Object was created from layers, it is exported in PSB format.
Adobe also recommends
Legal Notices | Online Privacy Policy
Rename a layer or group
Assign a color to a layer or group
Rasterize layers
Delete a layer or group
Export layers
Merging layers
To the top
Rename a layer or group
As you add layers to an image, it's helpful to give them names that reflect their content. Descriptive names make layers easy to identify in the panel.
- Do one of the following:
- Double-click the layer name or group name in the Layers panel, and enter a new name.
- Press Alt (Windows) or Option (Mac OS), and double-click the layer (not its name or thumbnail) in the Layers panel. Enter a new name in the Name text box, and click OK.
- Select a layer or group, and choose Layer Properties or Group Properties from the Layers menu or the Layers panel menu. Enter a new name in the Name text box, and click OK.
To the top
Assign a color to a layer or group
Color coding layers and groups helps you locate related layers in the Layers panel.
- (CC, CS6) Right-click the layer or group and choose a color.
- (CS5) Select a layer or group, choose Layer Properties or Group Properties from the Layers menu. Then choose a color from the Color pop-up menu, and click OK.
To the top
Rasterize layers
You cannot use the painting tools or filters on layers that contain vector data (such as type layers, shape layers, vector masks, or Smart Objects) and generated data (such as fill layers). However, you can rasterize these layers to convert their contents into a flat, raster image.
- Select the layers you want to rasterize, choose Layer > Rasterize, and then choose an option from the submenu:
Type Rasterizes the type on a type layer. It does not rasterize any other vector data on the layer.
Shape Rasterizes a shape layer.
Fill Content Rasterizes the fill of a shape layer, leaving the vector mask.
Vector Mask Rasterizes the vector mask on a layer, turning it into a layer mask.
Smart Object Converts a Smart Object into a raster layer.
Video Rasterizes the current video frame to an image layer.
3D (Extended only) Rasterizes the current view of 3D data into a flat raster layer.
Layer Rasterizes all vector data on the selected layers.
All Layers Rasterizes all layers that contain vector and generated data.
Note: To rasterize linked layers, select a linked layer, choose Layer > Select Linked Layers, and then rasterize the selected layers.
To the top
Delete a layer or group
Deleting layers you no longer need reduces the size of your image file.

To quickly delete empty layers, choose File > Scripts > Delete All Empty Layers.
- Select one or more layers or groups from the Layers panel.
-
Do one of the following:
-
To delete with a confirmation message, click the Delete icon Ⓥ. Alternatively, choose Layers > Delete > Layer or Delete Layer or Delete Group from the Layers panel menu.
- To delete the layer or group without confirmation, drag it to the Delete icon ⚙️, Alt-click (Windows) or Option-click (Mac OS) the Delete icon, or press the Delete key.
- To delete hidden layers, choose Layers > Delete > Hidden Layers.
To delete linked layers, select a linked layer, choose Layer > Select Linked Layers, and then delete the layers.
To the top
Export layers
You can export all layers or visible layers to separate files.
- Choose File > Scripts > Export Layers To Files.
To the top
Merging layers
When you have finalized the content of layers, you can merge them to reduce the size of your image files. When you merge layers, the data on the top layers replaces any data it overlaps on the lower layers. The intersection of all transparent areas in the merged layers remains transparent.
Note: You cannot use an adjustment or fill layer as the target layer for a merge.
In addition to merging layers, you can stamp them. Stamping allows you to merge the contents of more than one layer into a target layer while leaving the other layers intact.
Note: When you save a merged document, you cannot revert back to the unmerged state; the layers are permanently merged.
Merge two layers or groups
- Make sure that the layers and groups you want to merge are visible.
- Select the layers and groups you want to merge.
- Choose Layer > Merge Layers.
Note: You can merge two adjacent layers or groups by selecting the top item and then choosing Layer > Merge Layers. You can merge linked layers by choosing Layer > Select Linked Layers, and then merging the selected layers. You can merge two 3D layers by choosing Layer > Merge Layers; they will share the same scene and the top layer will inherit the bottom layer 3D properties (the camera views must be the same for this to be enabled).
Merge layers in a clipping mask
- Hide any layers that you do not want to merge.
- Select the base layer in the clipping mask. The base layer must be a raster layer.
- Choose Merge Clipping Mask from the Layers menu or the Layers panel menu.
For more information on clipping masks, see Mask layers with clipping masks.
Merge all visible layers and groups in an image
- Choose Merge Visible from the Layers panel or the Layers panel menu. All layers showing an eye icon are merged.
Note: A visible layer must be selected to enable the Merge Visible command.
Stamp multiple layers or linked layers
When you stamp multiple selected layers or linked layers, Photoshop creates a new layer containing the merged content.
- Select multiple layers.
- Press Ctrl+Alt+E (Windows) or Command+Option+E (Mac OS).
Stamp all visible layers
-
Turn visibility on for the layers you want to merge.
-
Press Shift+Ctrl+Alt+E (Windows) or Shift+Command+Option+E (Mac OS).
Photoshop creates a new layer containing the merged content.
Flatten all layers
Flattening reduces file size by merging all visible layers into the background and discarding hidden layers. Any transparent areas that remain are filled with white. When you save a flattened image, you cannot revert back to the unflattened state; the layers are permanently merged.
Note: Converting an image between some color modes flattens the file. Save a copy of your file with all layers intact if you want to edit the original image after the conversion.
- Make sure that all the layers you want to keep are visible.
- Choose Layer > Flatten Image, or choose Flatten Image from the Layers panel menu.
More Help Topics
• Display file information in the document window
Twitter™ and Facebook posts are not covered under the terms of Creative Commons.
Legal Notices | Online Privacy Policy
Select layers
Group and link layers
Show layer edges and handles
To the top
Select layers
You can select one or more layers to work on them. For some activities, such as painting or making color and tonal adjustments, you can work on only one layer at a time. A single selected layer is called the active layer. The name of the active layer appears in the title bar of the document window.
For other activities, such as moving, aligning, transforming, or applying styles from the Styles panel, you can select and work on multiple layers at a time. You can select layers in the Layers panel or with the Move tool.
You can also link layers. Unlike multiple layers selected at the same time, linked layers stay linked when you change the selection in the Layers panel. See Link and unlink layers.

If you don't see the desired results when using a tool or applying a command, you may not have the correct layer selected. Check the Layers panel to make sure that you're working on the correct layer.
Select layers in the Layers panel
- Do one of the following:
- Click a layer in the Layers panel.
- To select multiple contiguous layers, click the first layer and then Shift-click the last layer.
- To select multiple noncontiguous layers, Ctrl-click (Windows) or Command-click (Mac OS) them in the Layers panel.
Note: When selecting, Ctrl-click (Windows) or Command-click (Mac OS) the area outside the layer thumbnail. Ctrl-clicking or Command-clicking the layer thumbnail selects the nontransparent areas of the layer.
• To select all layers, choose Select > All Layers.
- To select all layers of a similar type (for example all type layers), select one of the layers, and choose Select > Similar Layers.
- To deselect a layer, Ctrl-click (Windows) or Command-click (Mac OS) the layer.
• To have no layer selected, click in the Layers panel below the background or bottom layer, or choose Select > Deselect Layers.
Select layers in the document window
-
Select the Move tool .
-
Do one of the following:
-
In the options bar, select Auto Select, then choose Layer from the drop-down menu, and click in the document on the layer you want to select. The top layer containing pixels under the cursor is selected.
- In the options bar, select Auto Select, then choose Group from the drop-down menu, and click in the document on the content you want to select. The top group containing pixels under the cursor is selected. If you click an ungrouped layer, it becomes selected.
- Right-click (Windows) or Control-click (Mac OS) in the image, and choose a layer from the context menu. The context menu lists all the layers that contain pixels under the current pointer location.
Select a layer in a group
- Click the group in the Layers panel.
- Click the triangle to the left of the folder icon ☐.
- Click the individual layer in the group.
To the top
Group and link layers
Group and ungroup layers
- Select multiple layers in the Layers panel.
-
Do one of the following:
-
Choose Layer > Group Layers.
-
Alt-drag (Windows) or Option-drag (Mac OS) layers to the folder icon □ at the bottom of the Layers panel to group the layers.
-
To Ungroup the layers, select the group and choose Layer > Ungroup Layers.
Add layers to a group
- Do one of the following:
- Select the group in the Layers panel and click the Create a New Layer button .
- Drag a layer to the group folder.
- Drag a group folder into another group folder. The group and all of its layers move.
- Drag an existing group to the New Group button
Link and unlink layers
You can link two or more layers or groups. Unlike multiple layers selected at the same time, linked layers retain their relationship until you unlink them. You can move or apply transformations to linked layers.
- Select the layers or groups in the Layers panel.
- Click the link icon 📞 at the bottom of the Layers panel.
-
To unlink layers do one of the following:
-
Select a linked layer, and click the link icon.
- To temporarily disable the linked layer, Shift-click the Link icon for the linked layer. A red X appears. Shift-click the link icon to enable the link again.
- Select the linked layers and click the Link icon. To select all linked layers, select one of the layers and then choose Layer > Select Linked Layers.
To the top
Show layer edges and handles
Showing the boundary or edges of the content in a layer can help you move and align the content. You can also display the transform handles for selected layers and groups so that you can resize or rotate them.
Layer content with edges showing (left) and with transform mode selected (right)
Display the edges of content in a selected layer
- Choose View > Show > Layer Edges.
Display transform handles in a selected layer
-
Select the Move tool
-
From the options bar, select Show Transform Controls.
You can resize and rotate layer content using the transform handles. See Transform freely.
Adobe also recommends
Twitter™ and Facebook posts are not covered under the terms of Creative Commons.
Legal Notices | Online Privacy Policy
Copy CSS generates Cascading Style Sheet (CSS) properties from shape or text layers. The CSS is copied to the clipboard and can be pasted into a style sheet. For shapes it captures values for the following:
- size
- position
- stroke color
• fill color (including gradients) - drop shadow
For text layers, Copy CSS also captures the following values:
- font family
- font size
- font weight
- line height
- underline
- strikethrough
- superscript
- subscript
- text alignment
Copying CSS from a layer group containing shapes or text creates a class for each layer as well as a Group class. The Group class represents a parent div containing child divs that correspond to the layers in the group. The top/left values for the child divs are in relation to the parent div.
Note: The Copy CSS command does not work with Smart Objects or when selecting multiple shape/text layers that are not grouped.
-
In the Layers panel, do one of the following:
-
Right-click a shape/text layer or layer group and choose Copy CSS from the context menu.
-
Select a shape/text layer or layer group and choose Copy CSS from the Layers panel menu.
-
Paste the code into your style sheet document.
For more information on creating web pages with Photoshop, see Slicing web pages.
Twitter™ and Facebook posts are not covered under the terms of Creative Commons.
Legal Notices | Online Privacy Policy
Techniques for nondestructive editing
To the top
Techniques for nondestructive editing
Nondestructive editing allows you to make changes to an image without overwriting the original image data, which remains available in case you want to revert to it. Because nondestructive editing doesn't remove data from an image, the image quality doesn't degrade when you make edits. You can perform nondestructive editing in Photoshop in several ways:
Working with adjustment layers Adjustment layers apply color and tonal adjustments to an image without permanently changing pixel values.
Transforming with Smart Objects Smart Objects enable nondestructive scaling, rotating, and warping.
Filtering with Smart Filters Filters applied to Smart Objects become Smart Filters and allow for nondestructive filter effects.
Adjusting variations, shadows, and highlights with Smart Objects Shadow/Highlight and Variations commands can be applied to a Smart Object as Smart Filters.
Retouching on a separate layer Clone Stamp, Healing Brush, and Spot Healing Brush tools let you retouch non-destructively on a separate layer. Be sure to select Sample All Layers from the options bar (select Ignore Adjustment Layers to ensure that adjustment layers won't affect the separate layer twice). You can discard unsatisfactory retouching, if necessary.
Editing in Camera Raw Adjustments to batches of raw, JPEG, or TIFF images preserve the original image data. Camera Raw stores adjustment settings on a per-image basis separately from the original image files.
Opening Camera Raw files as Smart Objects Before you can edit Camera Raw files in Photoshop, you must configure settings for them with Camera Raw. Once you edit a Camera Raw file in Photoshop, you can't reconfigure Camera Raw settings without losing the changes. Opening Camera Raw files in Photoshop as Smart Objects enables you to reconfigure Camera Raw settings at any time, even after you edit the file.
Cropping non-destructively After you create a cropping rectangle with the Crop tool, select Hide from the options bar to preserve the cropped area in a layer. Restore the cropped area anytime by choosing Image > Reveal All or by dragging the Crop tool beyond the edge of the image. The Hide option is unavailable for images that contain only a background layer.
Masking Layer and vector masks are nondestructive because you can re-edit the masks without losing the pixels they hide. Filter masks let you mask out the effects of Smart Filters on Smart Object layers.
Adobe also recommends
- About Camera Raw
- Adjusting image color and tone

Twitter ^™ and Facebook posts are not covered under the terms of Creative Commons.
Legal Notices | Online Privacy Policy
Change the stack order of layers and groups
Move the content of layers
Rotate a layer
Lock layers
To the top
Change the stack order of layers and groups
- Do one of the following:
- Drag the layer or group up or down in the Layers panel. Release the mouse button when the highlighted line appears where you want to place the layer or group.
- To move a layer into a group, drag a layer to the group folder. If the group is closed, the layer is placed at the bottom of the group.
- Select a layer or group, choose Layer > Arrange, and choose a command from the submenu. If the selected item is in a group, the command applies to the stacking order within the group. If the selected item is not in a group, the command applies to the stacking order within the Layers panel.
- To reverse the order of selected layers, choose Layer > Arrange > Reverse. These options appear dimmed if you do not have at least two layers selected.
Note: By definition, the background layer is always at the bottom of the stacking order. Therefore, the Send To Back command places the selected item directly above the background layer.
To the top
Move the content of layers
- From the Layers panel, select the layers containing the objects you want to move.
- Select the Move tool ✝.
You can select the layers that you want to move directly in the document window. In the Move tool's options bar, select Auto Select, the choose Layer from the drop-down menu. Shift-click to select multiple layers. Select Auto Select, then choose Group, to select the entire group when you select one layer in the group.
-
Do one of the following:
-
In the document window, drag any object onto one of the selected layers. (All objects on the layer will move together.)
- Press an arrow key on the keyboard to nudge the objects by 1 pixel.
- Hold down Shift and press an arrow key on the keyboard to nudge the objects by 10 pixels.
To the top
Rotate a layer
- From the Layers panel, select the layer you want to rotate.
-
If anything is currently selected in the image, choose Select > Deselect.
-
Choose Edit > Transform > Rotate. A box defining the boundaries of the layer (called a bounding box) appears.
- Move the pointer outside of the bounding box (the pointer becomes a curved, two-sided arrow), and then drag. Press Shift to constrain the rotation to 15^ increments.
- When you're satisfied with the results, press Enter (Windows) or Return (Mac OS), or click the check mark in the options bar. To cancel the rotation, press Esc, or click the Cancel Transform icon on the options bar.
To the top
Lock layers
You can lock layers fully or partially to protect their contents. For instance, you may want to lock a layer fully when you finish with it. You may want to lock a layer partially if it has the correct transparency and styles, but you are still deciding on positioning. When a layer is locked, a lock icon appears to the right of the layer name. The lock icon is solid when the layer is fully locked and hollow when the layer is partially locked.
Lock all properties of a layer or group
- Select a layer or group.
- Click the Lock All 🔒 option in the Layers panel.
Note: Layers in a locked group display a dimmed lock icon 🔒.
Partially lock a layer
- Select a layer.
- Click one or more lock options in the Layers panel.
Lock Transparent Pixels Confines editing to the opaque portions of the layer. This option is equivalent to the Preserve Transparency option in earlier versions of Photoshop.
Lock Image Pixels Prevents modification of the layer's pixels using the painting tools.
Lock Position Prevents the layer's pixels from being moved.
Note: For type and shape layers, Lock Transparency and Lock Image are selected by default and cannot be deselected.
Apply lock options to selected layers or a group
- Select multiple layers or a group.
- Choose Lock Layers or Lock All Layers In Group from the Layers menu or the Layers panel menu.
- Select lock options, and click OK.
Adobe also recommends
Legal Notices | Online Privacy Policy
Specify overall and fill opacity for selected layers
Specify a blending mode for a layer or group
Group blend effects
Exclude channels from blending
Specify a tonal range for blending layers
Filling new layers with a neutral color
Blending Modes 101

text_image
123Blending modes determine how the pixels in a layer blend with pixels on underlying layers. Infinite Skills author, Andy Anderson, takes you on a tour of working with blending modes and layers.... Read More
http://adobe.ly/NsBIKV

by Andy Anderson
Contribute your expertise to Adobe Community Help
To the top
Specify overall and fill opacity for selected layers
A layer's overall opacity determines to what degree it obscures or reveals the layer beneath it. A layer with 1% opacity appears nearly transparent, whereas one with 100% opacity appears completely opaque.
In addition to overall opacity, which affects layer styles and blending modes applied to a layer, you can specify fill opacity. Fill opacity affects only pixels, shapes, or text on a layer without affecting the opacity of layer effects such as drop shadows.
Note: You cannot change the opacity of a background layer or a locked layer. To convert a background layer into a regular layer that supports transparency, see Convert background and layers.
-
In the Layers panel, select one or more layers or groups.
-
Change the Opacity and Fill values. (If you selected a group, only Opacity is available.)

To view all blending options, choose Blending Options from the Add A Layer Style icon at the bottom of the Layers panel.
To the top
Specify a blending mode for a layer or group
A layer's blending mode determines how its pixels blend with underlying pixels in the image. You can create a variety of special effects using blending modes.
By default, the blending mode of a layer group is Pass Through, which means that the group has no blending properties of its own. When you choose a different blending mode for a group, you effectively change the order in which the image components are put together. All of the layers in the group are put together first. The composite group is then treated as a single image and blended with the rest of the image using the selected blending mode. Thus, if you choose a blending mode other than Pass Through for the group, none of the adjustment layers or layer blending modes inside the group will apply to layers outside the group.
Note: There is no Clear blending mode for layers. For Lab images, the Color Dodge, Color Burn, Darken, Lighten, Difference, Exclusion, Subtract, and Divide modes are unavailable. For HDR images, see Features that support 32-bpc HDR images.
- Select a layer or group from the Layers panel.
-
Choose a blending mode:
-
From the Layers panel, choose an option from the Blend Mode pop-up menu.
- Choose Layer > Layer Style > Blending Options, and then choose an option from the Blend Mode pop-up menu.
For a video on using blending modes, see www.adobe.com/go/vid0012.
Descriptions and examples of each mode
To the top
Group blend effects
By default, layers in a clipping mask are blended with the underlying layers using the blending mode of the bottommost layer in the group. However, you can choose to have the blending mode of the bottommost layer apply only to that layer, allowing you to preserve the original blending appearance of the clipped layers. (See Mask layers with clipping masks.)
You can also apply the blending mode of a layer to layer effects that modify opaque pixels, such as Inner Glow or Color Overlay, without changing layer effects that modify only transparent pixels, such as Outer Glow or Drop Shadow.
- Select the layer that you want to affect.
- Double-click a layer thumbnail, choose Blending Options from the Layers panel menu, or choose Layer > Layer Style > Blending Options.
Note: To view blending options for a text layer, choose Layer > Layer Style > Blending Options, or choose Blending Options from the Add A Layer Style button at the bottom of the Layers panel menu.
-
Specify the scope of blending options:
-
Select Blend Interior Effects As Group to apply the blending mode of the layer to layer effects that modify opaque pixels, such as Inner Glow, Satin, Color Overlay, and Gradient Overlay.
- Select Blend Clipped Layers As Group to apply the blending mode of the base layer to all layers in the clipping mask. Deselecting this option, which is always selected by default, maintains the original blending mode and appearance of each layer in the group.
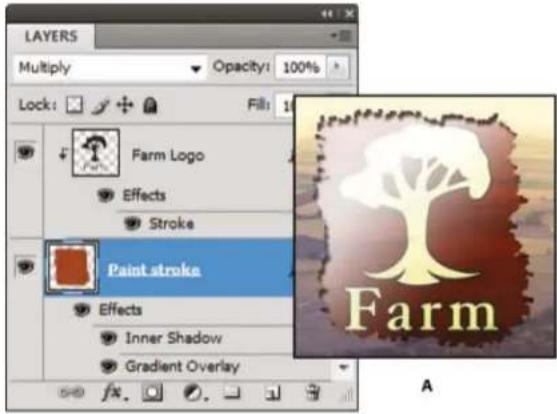
text_image
LAYERS Multiply Opacity: 100% Lock: Fill: Farm Logo Effects Stroke Paint stroke Effects Inner Shadow Gradient Overlay Farm A
text_image
Farm B Farm CAdvanced blending options
- Select Transparency Shapes Layers to restrict layer effects and knockouts to opaque areas of the layer. Deselecting this option, which is always selected by default, applies these effects throughout the layer.
- Select Layer Mask Hides Effects to restrict layer effects to the area defined by the layer mask.
-
Select Vector Mask Hides Effects to restrict layer effects to the area defined by the vector mask.
-
Click OK.
To the top
Exclude channels from blending
You can restrict blending effects to a specified channel when you blend a layer or group. By default, all channels are included. When using an RGB image, for example, you can choose to exclude the red channel from blending; in the composite image, only the information in the green and blue channels is affected.
-
Do one of the following:
-
Double-click a layer thumbnail.
- Choose Layer > Layer Style > Blending Options.
- Choose Blending Options from the Add A Layer Style icon at the bottom of the Layers panel.
Note: To view blending options for a text layer, choose Layer > Layer Style > Blending Options, or choose Blending Options from the Add A Layer Style button at the bottom of the Layers panel menu.
- From the Advanced Blending area of the Layer Style dialog box, deselect any channels you do not want to include when the layer is blended.
To the top
Specify a tonal range for blending layers
The sliders in the Blending Options dialog box control which pixels from the active layer and the underlying visible layers appear in the final image. For example, you can drop dark pixels out of the active layer or force bright pixels from the underlying layers to show through. You can also define a range of partially blended pixels to produce a smooth transition between blended and unblended areas.
- Double-click a layer thumbnail, choose Layer > Layer Style > Blending Options, or choose Add A Layer Style > Blending Options from the Layers panel menu.
Note: To view blending options for a text layer, choose Layer > Layer Style > Blending Options, or choose Blending Options from the Add A Layer Style button at the bottom of the Layers panel menu.
-
In the Advanced Blending area of the Layer Style dialog box, choose an option from the Blend If pop-up menu.
-
Choose Gray to specify a blending range for all channels.
-
Select an individual color channel (for example, red, green, or blue in an RGB image) to specify blending in that channel.
-
Use the This Layer and Underlying Layer sliders to set the brightness range of the blended pixels—measured on a scale from 0 (black) to 255 (white). Drag the white slider to set the high value of the range. Drag the black slider to set the low value of the range.
To define a range of partially blended pixels, hold down Alt (Windows) or Option (Mac OS), and drag one half of a slider triangle. The two values that appear above the divided slider indicate the partial blending range.
Keep the following guidelines in mind when specifying blending ranges:
- Use the This Layer sliders to specify the range of pixels on the active layer that will blend, and therefore appear, in the final image. For example, if you drag the white slider to 235, pixels with brightness values higher than 235 will remain unblended and will be excluded from the final image.
- Use the Underlying Layer sliders to specify the range of pixels in the underlying visible layers that will blend in the final image. Blended pixels are combined with pixels in the active layer to produce composite pixels, whereas unblended pixels show through overlying areas of the active layer. For example, if you drag the black slider to 19, pixels with brightness values lower than 19 will remain unblended and will show through the active layer in the final image.
To the top
Filling new layers with a neutral color
You can't apply certain filters (such as the Lighting Effects filter) to layers with no pixels. Selecting Fill With (Mode)-Neutral Color in the New Layer dialog box resolves this problem by first filling the layer with a preset, neutral color. This invisible, neutral color is assigned according to the layer's blending mode. If no effect is applied, filling with a neutral color has no effect on the remaining layers. The Fill With Neutral Color option is not available for layers that use the Normal, Dissolve, Hard Mix, Hue, Saturation, Color, or Luminosity modes.
Adobe also recommends
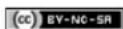
Twitter ^™ and Facebook posts are not covered under the terms of Creative Commons.
Legal Notices | Online Privacy Policy
About layer effects and styles
Apply preset styles
Layer Style dialog box overview
Apply or edit a custom layer style
Layer style options
Modify layer effects with contours
Set a global lighting angle for all layers
Display or hide layer styles
Copy layer styles
Scale a layer effect
Remove layer effects
Convert a layer style to image layers
Create and manage preset styles
To the top
About layer effects and styles
Photoshop provides a variety of effects—such as shadows, glows, and bevels—that change the appearance of a layer's contents. Layer effects are linked to the layer contents. When you move or edit the contents of the layer, the same effects are applied to the modified contents. For example, if you apply a drop shadow to a text layer and then add new text, the shadow is added automatically to the new text.
A layer style is one or more effects applied to a layer or layer group. You can apply one of the preset styles provided with Photoshop or create a custom style using the Layer Style dialog box. The layer effects icon fx appears to the right of the layer's name in the Layers panel. You can expand the style in the Layers panel to view or edit the effects that compose the style.

text_image
Layers Normal Opacity: 100% Lock: Fill: 100% Layer 1 Large Effects Drop Shadow Save and Emboss Pattern Overlay Background A B C FarmLayers panel showing layer with multiple effects applied A. Layer effects icon B. Click to expand and show layer effects C. Layer effects
When you save a custom style, it becomes a preset style. Preset styles appear in the Styles panel and can be applied to a layer or group with a single click.
To the top
Apply preset styles
You can apply preset styles from the Styles panel. The layer styles that come with Photoshop are grouped into libraries by function. For example, one library contains styles for creating web buttons; another library contains styles adding effects to text. To access these styles, you need to load the appropriate library. For information on loading and saving styles, see Create and manage preset styles.
Note: You cannot apply layer styles to a background, locked layer, or group.
Display the Styles panel
- Choose Window > Styles.
Apply a preset style to a layer
Normally, applying a preset style replaces the current layer style. However, you can add the attributes of a second style to those of the current style.
- Do one of the following:
- Click a style in the Styles panel to apply it to the currently selected layers.
- Drag a style from the Styles panel onto a layer in the Layers panel.
- Drag a style from the Styles panel to the document window, and release the mouse button when the pointer is over the layer content to which you want to apply the style.
Note: Hold down Shift as you click or drag to add (rather than replace) the style to any existing effects on the destination layer.
- Choose Layer > Layer Style > Blending Options, and click the word Styles in the Layer Style dialog box (top item in the list on the left side of the dialog box). Click the style you want to apply, and click OK.
- When using a Shape tool or Pen tool in shape layers mode, select a style from the pop-up panel in the options bar before drawing the shape.
Apply a style from another layer
- In the Layers panel, Alt-drag (Windows) or Option-drag (Mac OS) the style from a layer's effect list to copy it to another layer.
- In the Layers panel, click-drag the style from a layer's effect list to move it to another layer.
Change how preset styles are displayed
- Click the triangle in the Styles panel, Layer Style dialog box, or Layer Style pop-up panel in the options bar.
- Choose a display option from the panel menu:
• Text Only to view the layer styles as a list.
- Small Thumbnail or Large Thumbnail to view the layer styles as thumbnails.
- Small List or Large List to view the layer styles as a list, with a thumbnail of the selected layer style displayed.
To the top
Layer Style dialog box overview
You can edit styles applied to a layer or create new styles using the Layer Style dialog box.

text_image
Layer Style Styles Blending Options: Default Drop Shadow Inner Shadow Outer Glow Inner Glow Bevel and Emboss Contour Outer Glow Structure Blend Mode: Screen Opacity: Noise: Elements Technique: SofterLayer Style dialog box. Click a check box to apply the current settings without displaying the effect's options. Click an effect name to display its options.
You can create custom styles using one or more of the following effects:
Drop Shadow
Adds a shadow that falls behind the contents on the layer.
Inner Shadow
Adds a shadow that falls just inside the edges of the layer's content, giving the layer a recessed appearance.
Outer Glow and Inner Glow
Add glows that emanate from the outside or inside edges of the layer's content.
Bevel and Emboss
Add various combinations of highlights and shadows to a layer.
Satin
Applies interior shading that creates a satiny finish.
Color, Gradient, and Pattern Overlay
Fills the layer's content with a color, gradient, or pattern.
Stroke
Outlines the object on the current layer using color, a gradient, or a pattern. It is particularly useful on hard-edged shapes such as type.
To the top
Apply or edit a custom layer style
Note: You cannot apply layer styles to a background layer, a locked layer, or a group. To apply a layer style to a background layer, first convert it into a regular layer.
- Select a single layer from the Layers panel.
-
Do one of the following:
-
Double-click the layer, outside the layer name or thumbnail.
- Click the Add a Layer Style icon at the bottom of the Layers panel and choose an effect from the list.
- Choose an effect from the Layer > Layer Style submenu.
-
To edit an existing style, double-click an effect displayed below the layer name in the Layers panel. (Click the triangle next to the Add a Layer Style icon f x to display the effects contained in the style.)
-
Set effect options in the Layer Style dialog box. See Layer style options.
-
Add other effects to the style, if desired. In the Layer Style dialog box, click the check box to the left of the effect name to add the effect without selecting it.
You can edit multiple effects without closing the Layer Style dialog box. Click the name of an effect on the left side of the dialog box to display its options.
Change style defaults to custom values
- In the Layer Style dialog box, customize settings as desired.
- Click Make Default.
When you next open the dialog box, your custom defaults are automatically applied. If you adjust settings and want to return to your custom defaults, click Reset To Default.

To return to Photoshop's original defaults, see Restore all preferences to default settings.
To the top
Layer style options
Altitude For the Bevel and Emboss effect, sets the height of the light source. A setting of 0 is equivalent to ground level, 90 is directly above the layer.
Angle Determines the lighting angle at which the effect is applied to the layer. You can drag in the document window to adjust the angle of a Drop Shadow, Inner Shadow, or Satin effect.
Anti-alias Blends the edge pixels of a contour or gloss contour. This option is most useful on small shadows with complicated contours.
Blend Mode Determines how the layer style blends with the underlying layers, which may or may not include the active layer. For example, an inner shadow blends with the active layer because the effect is drawn on top of that layer, but a drop shadow blends only with the layers beneath the active layer. In most cases, the default mode for each effect produces the best results. See Blending modes.
Choke Shrinks the boundaries of the matte of an Inner Shadow or Inner Glow prior to blurring.
Color Specifies the color of a shadow, glow, or highlight. You can click the color box and choose a color.
Contour With solid-color glows, Contour allows you to create rings of transparency. With gradient-filled glows, Contour allows you to create variations in the repetition of the gradient color and opacity. In beveling and embossing, Contour allows you to sculpt the ridges, valleys, and bumps that are shaded in the embossing process. With shadows, Contour allows you to specify the fade. For more information, see Modify layer effects with contours.
Distance Specifies the offset distance for a shadow or satin effect. You can drag in the document window to adjust the offset distance.
Depth Specifies the depth of a bevel. It also specifies the depth of a pattern.
Use Global Light This setting allows you to set one “master” lighting angle that is then available in all the layer effects that use shading: Drop Shadow, Inner Shadow, and Bevel and Emboss. In any of these effects, if Use Global Light is selected and you set a lighting angle, that angle becomes the global lighting angle. Any other effect that has Use Global Light selected automatically inherits the same angle setting. If Use Global Light is deselected, the lighting angle you set is “local” and applies only to that effect. You can also set the global lighting angle by choosing Layer Style > Global Light.
Gloss Contour Creates a glossy, metallic appearance. Gloss Contour is applied after shading a bevel or emboss.
Gradient Specifies the gradient of a layer effect. Click the gradient to display the Gradient Editor, or click the inverted arrow and choose a gradient from the pop-up panel. You can edit a gradient or create a new gradient using the Gradient Editor. You can edit the color or opacity in the Gradient Overlay panel the same way you edit them in the Gradient Editor. For some effects, you can specify additional gradient options. Reverse flips the orientation of the gradient, Align With Layer uses the bounding box of the layer to calculate the gradient fill, and Scale scales the application of the gradient. You can also move the center of the gradient by clicking and dragging in the image window. Style specifies the shape of the gradient.
Highlight or Shadow Mode Specifies the blending mode of a bevel or emboss highlight or shadow.
Jitter Varies the application of a gradient's color and opacity.
Layer Knocks Out Drop Shadow Controls the drop shadow's visibility in a semitransparent layer.
Noise Specifies the number of random elements in the opacity of a glow or shadow. Enter a value or drag the slider.
Opacity Sets the opacity of the layer effect. Enter a value or drag the slider.
Pattern Specifies the pattern of a layer effect. Click the pop-up panel and choose a pattern. Click the New Preset button ☑ to create a new preset pattern based on the current settings. Click Snap To Origin to make the origin of the pattern the same as the origin of the document (when Link With Layer is selected), or to place the origin at the upper-left corner of the layer (if Link With Layer is deselected). Select Link With Layer if you want the pattern to move along with the layer as the layer moves. Drag the Scale slider or enter a value to specify the size of the pattern. Drag a pattern to position it in the layer; reset the position by using the Snap To Origin button. The Pattern option is not available if no patterns are loaded.
Position Specifies the position of a stroke effect as Outside, Inside, or Center.
Range Controls which portion or range of the glow is targeted for the contour.
Size Specifies the radius and size of blur or the size of the shadow.
Soften Blurs the results of shading to reduce unwanted artifacts.
Source Specifies the source for an inner glow. Choose Center to apply a glow that emanates from the center of the layer's content, or Edge to apply a glow that emanates from the inside edges of the layer's content.
Spread Expands the boundaries of the matte prior to blurring.
Style Specifies the style of a bevel: Inner Bevel creates a bevel on the inside edges of the layer contents; Outer Bevel creates a bevel on the outside edges of the layer contents; Emboss simulates the effect of embossing the layer contents against the underlying layers; Pillow Emboss simulates the effect of stamping the edges of the layer contents into the underlying layers; and Stroke Emboss confines embossing to the boundaries of a stroke effect applied to the layer. (The Stroke Emboss effect is not visible if no stroke is applied to the layer.)
Technique Smooth, Chisel Hard, and Chisel Soft are available for bevel and emboss effects; Softer and Precise apply to Inner Glow and Outer Glow effects.
Smooth
Blurs the edges of a matte slightly and is useful for all types of mattes, whether their edges are soft or hard. It does not preserve detailed features at larger sizes.
Chisel Hard
Uses a distance measurement technique and is primarily useful on hard-edged mattes from anti-aliased shapes such as type. It preserves detailed features better than the Smooth technique.
Chisel Soft
Uses a modified distance measurement technique and, although not as accurate as Chisel Hard, is more useful on a larger range of mattes. It preserves features better than the Smooth technique.
Softer
Applies a blur and is useful on all types of mattes, whether their edges are soft or hard. At larger sizes, Softer does not preserve detailed features.
Precise
Uses a distance measurement technique to create a glow and is primarily useful on hard-edged mattes from anti-aliased shapes such as type. It preserves features better than the Softer technique.
Texture Applies a texture. Use Scale to scale the size of the texture. Select Link With Layer if you want the texture to move along with the layer as the layer moves. Invert inverts the texture. Depth varies the degree and direction (up/down) to which the texturing is applied. Snap To Origin makes the origin of the pattern the same as the origin of the document (if Link With Layer is deselected) or places the origin in the upper-left corner of the layer (if Link With Layer is selected). Drag the texture to position it in the layer.
To the top
Modify layer effects with contours
When you create custom layer styles, you can use contours to control the shape of Drop Shadow, Inner Shadow, Inner Glow, Outer Glow, Bevel and Emboss, and Satin effects over a given range. For example, a Linear contour on a Drop Shadow causes the opacity to drop off in a linear transition. Use a Custom contour to create a unique shadow transition.
You can select, reset, delete, or change the preview of contours in the Contour pop-up panel and Preset Manager.
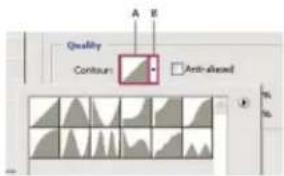
text_image
Quality Contours Anti-BlendedDetail of Layer Style dialog box for Drop Shadow effect
A. Click to display the Contour Editor dialog box. B. Click to display the pop-up panel.
Create a custom contour
- Select the Drop Shadow, Inner Shadow, Inner Glow, Outer Glow, Bevel and Emboss, Contour, or Satin effect in the Layer Style dialog box.
- Click the contour thumbnail in the Layer Style dialog box.
- Click the contour to add points, and drag to adjust the contour. Or enter values for Input and Output.
- To create a sharp corner instead of a smooth curve, select a point and click Corner.
- To save the contour to a file, click Save and name the contour.
- To store a contour as a preset, choose New.
- Click OK. New contours are added at the bottom of the pop-up panel.
Load a contour
- Click the contour in the Layer Style dialog box, and in the Contour Editor dialog box, and then choose Load. Go to the folder containing the contour library you want to load and click Open.
Delete a contour
- Click the inverted arrow next to the currently selected contour to view the pop-up panel. Press Alt (Windows) or Option (Mac OS), and click the contour you want to delete.
To the top
Set a global lighting angle for all layers
Using global light gives the appearance of a common light source shining on the image.
- Do one of the following:
- Choose Layer > Layer Style > Global Light. In the Global Light dialog box, enter a value or drag the angle radius to set the angle and altitude, and click OK.
- In the Layer Style dialog box for Drop Shadow, Inner Shadow, or Bevel, select Use Global Light. For Angle, enter a value or drag the radius, and click OK.
The global lighting applies to each layer effect that uses the global lighting angle.
To the top
Display or hide layer styles
When a layer has a style, an "fx" icon /appears to the right of the layer's name in the Layers panel.
Hide or show all layer styles in an image
- Choose Layer > Layer Style > Hide All Effects or Show All Effects.
Expand or collapse layer styles in the Layers panel
- Do one of the following:
- Click the triangle next to the Add a Layer Style icon to expand the list of layer effects applied to that layer.
- Click the triangle to collapse the layer effects.
- To expand or collapse all of the layer styles applied within a group, hold down Alt (Windows) or Option (Mac OS), and click the triangle or inverted triangle for the group. The layer styles applied to all layers within the group expand or collapse correspondingly.
To the top
Copy layer styles
Copying and pasting styles is an easy way to apply the same effects to multiple layers.
Copy layer styles between layers
- From the Layers panel, select the layer containing the style you want to copy.
- Choose Layer > Layer Style > Copy Layer Style.
- Select the destination layer from the panel, and choose Layer > Layer Style > Paste Layer Style.
The pasted layer style replaces the existing layer style on the destination layer or layers.
Copy layer styles between layers by dragging
- Do one of the following:
- In the Layers panel, Alt-drag (Windows) or Option-drag (Mac OS) a single layer effect from one layer to another to duplicate the layer effect, or drag the Effects bar from one layer to another to duplicate the layer style.
- Drag one or more layer effects from the Layers panel to the image to apply the resulting layer style to the highest layer in the Layers panel that contains pixels at the drop point.
To the top
Scale a layer effect
A layer style may have been fine-tuned for a target resolution and features of a given size. Using Scale Effects allows you to scale the effects in the layer style without scaling the object to which the layer style is applied.
- Select the layer in the Layers panel.
- Choose Layer > Layer Style > Scale Effects.
- Enter a percentage or drag the slider.
- Select Preview to preview the changes in the image.
- Click OK.
To the top
Remove layer effects
You can remove an individual effect from a style applied to a layer, or remove the entire style from the layer.
Remove an effect from a style
- In the Layers panel, expand the layer style to see its effects.
- Drag the effect to the Delete icon 🔒.
Remove a style from a layer
- In the Layers panel, select the layer containing the style you want to remove.
-
Do one of the following:
-
In the Layers panel, drag the Effects bar to the Delete icon .
- Choose Layer > Layer Style > Clear Layer Style.
- Select the layer, and then click the Clear Style button at the bottom of the Styles panel.
To the top
Convert a layer style to image layers
To customize or fine-tune the appearance of layer styles, you can convert the layer styles to regular image layers. After you convert a layer style to
image layers, you can enhance the result by painting or applying commands and filters. However, you can no longer edit the layer style on the original layer, and the layer style no longer updates as you change the original image layer.
Note: The layers produced by this process may not result in artwork that exactly matches the version using layer styles. You may see an alert when you create the new layers.
- In the Layers panel, select the layer containing the layer style that you want to convert.
- Choose Layer > Layer Style > Create Layers.
You can now modify and restack the new layers in the same way as regular layers. Some effects—for example, Inner Glow—convert to layers within a clipping mask.
To the top
Create and manage preset styles
You can create a custom style and save it as a preset, which is then available from the Styles panel. You can save preset styles in a library and load or remove them from the Styles panel as you need them.
Create a new preset style
- From the Layers panel, select the layer containing the style that you want to save as a preset.
-
Do one of the following:
-
Click an empty area of the Styles panel.
- Click the Create New Style button at the bottom of the Styles panel.
- Choose New Style from the Styles panel menu.
-
Choose Layer > Layer Style > Blending Options, and click New Style in the Layer Style dialog box.
-
Enter a name for the preset style, set style options, and click OK.
Rename a preset style
- Do one of the following:
- Double-click a style in the Styles panel. If the Styles panel is set to display styles as thumbnails, enter a new name in the dialog box and click OK. Otherwise, type a new name directly in the Styles panel and press Enter (Windows) or Return (Mac OS).
- Select a style in the Styles area of the Layer Style dialog box. Then choose Rename Style from the pop-up menu, enter a new name, and click OK.
- When using a shape or Pen tool, select a style from the Style pop-up panel in the options bar. Then choose Rename Style from the pop-up panel menu.
Delete a preset style
- Do one of the following:
- Drag a style to the Delete icon at the bottom of the Styles panel.
- Press Alt (Windows) or Option (Mac OS), and click the layer style in the Styles panel.
- Select a style in the Styles area of the Layer Style dialog box. (See Apply preset styles.) Then choose Delete Style from the pop-up menu.
- When using a shape or Pen tool, select a style from the Layer Style pop-up panel in the options bar. Then choose Delete Style from the pop-up panel menu.
Save a set of preset styles as a library
-
Do one of the following:
-
Choose Save Styles from the Styles panel menu.
- Select Styles on the left side of the Layer Style dialog box. Then choose Save Styles from the pop-up menu.
-
When using a shape or Pen tool, click the layer style thumbnail in the options bar. Then choose Save Styles from the pop-up panel menu.
-
Choose a location for the style library, enter a file name, and click Save.
You can save the library anywhere. However, if you place the library file in the Presets/Styles folder inside the default presets location, the library name will appear at the bottom of the Styles panel menu when you restart the application.
Note: You can also use the Preset Manager to rename, delete, and save libraries of preset styles.
Load a library of preset styles
- Click the triangle in the Styles panel, Layer Style dialog box, or Layer Style pop-up panel in the options bar.
-
Do one of the following:
-
Choose Load Styles to add a library to the current list. Then select the library file you want to use, and click Load.
- Choose Replace Styles to replace the current list with a different library. Then select the library file you want to use, and click Load.
-
Choose a library file (displayed at the bottom of the panel menu). Then click OK to replace the current list, or click Append to append the current list.
-
To return to the default library of preset styles, choose Reset Styles. You can either replace the current list or append the default library to the current list.
Note: You can also use the Preset Manager to load and reset style libraries. See About the Preset Manager.

Twitter™ and Facebook posts are not covered under the terms of Creative Commons.
Legal Notices | Online Privacy Policy
About layer comps
Create a layer comp
Apply and view layer comps
Change and update a layer comp
Clear layer comp warnings
Delete a layer comp
Export layer comps
To the top
About layer comps
Designers often create multiple compositions or comps of a page layout to show clients. Using layer comps, you can create, manage, and view multiple versions of a layout in a single Photoshop file.
A layer comp is a snapshot of a state of the Layers panel. Layer comps record three types of layer options:
• Layer visibility—whether a layer is showing or hidden.
• Layer position in the document.
- Layer appearance—whether a layer style is applied to the layer and the layer's blending mode.
Note: Unlike layer effects, Smart Filter settings cannot be changed across layer comps. Once a Smart Filter is applied to a layer, it appears in all layer comps for the image.
text_image
A LAYER COMPS Last Document State Layer Comp 1 Layer Comp 2 Layer Comp 3 Layer Comp 4 Layer Comp 5 B C DLayer Comps panel
A. Apply Layer Comp icon B. Last Document State C. Selected comps D. Layer Comp Cannot Be Fully Restored icon
To the top
Create a layer comp
- Choose Window > Layer Comps to display the Layer Comps panel.
- Click the Create New Layer Comp button at the bottom of the Layer Comps panel. The new comp reflects the current state of layers in the Layers panel.
-
In the New Layer Comp dialog box, name the comp, add descriptive comments, and choose options to apply to layers: Visibility, Position, and Appearance.
-
Click OK. The options you chose are stored as defaults for your next comp.

To duplicate a comp, select a comp in the Layer Comps panel and drag the comp to the New Comps button.
To the top
Apply and view layer comps
• In the Layer Comp panel, do any of the following:
- To view a layer comp, you first need to apply it. Click the Apply Layer Comp icon next to a selected comp.
- To cycle through a view of all layer comps, use the Previous ◀ and Next ▶ buttons at the bottom of the panel. (To cycle through specific comps, first select them.)
- To restore the document to its state before you chose a layer comp, click the Apply Layer Comp icon ☐ next to Last Document State at the top of the panel.
To the top
Change and update a layer comp
If you change the configuration of a layer comp, you need to update it.
- Select the layer comp in the Layer Comps panel.
- Make changes to the layer's visibility, position, or style. You may need to change the layer comp's options to record these changes.
- To change your comp options, select Layer Comp Options from the panel menu and select additional options to record layer position and style.
- Click the Update Layer Comp button ⬆ at the bottom of the panel.
To the top
Clear layer comp warnings
Certain actions create a state where the layer comp can no longer be fully restored. This happens when you delete a layer, merge a layer, or convert a layer to a background. In such instances, a caution icon 🔒 appears next to the layer comp name.
- Do one of the following:
- Ignore the warning, which may result in the loss of one or more layers. Other saved parameters may be preserved.
- Update the comp, which results in the loss of the previously captured parameters, but brings the comp up to date.
- Click the caution icon to see the message explaining that the layer comp can't be restored properly. Choose Clear to remove the alert icon and leave the remaining layers unchanged.
- Right-click (Windows) or Control-click (Mac OS) the caution icon to see the pop-up menu that lets you choose either the Clear Layer Comp Warning or the Clear All Layer Comp Warnings command.
To the top
Delete a layer comp
- Do one of the following:
- Select the layer comp in the Layer Comps panel and click the Delete icon 📋 in the panel, or choose Delete Layer Comp from the panel menu.
- Drag it to the Delete icon in the panel.
To the top
Export layer comps
You can export layer comps to individual files.
- Choose File > Scripts > Layer Comps to Files and then choose the file type and set the destination.
Note: Note, you can also export to a Web Photo Gallery (WPG), but you must have the optional Web Photo Gallery plug-in installed on your computer. You can find the plug-in on in the Goodies folder on your installation disc.

Twitter™ and Facebook posts are not covered under the terms of Creative Commons.
Legal Notices | Online Privacy Policy
Create a knockout
To the top
Create a knockout
Knockout options let you specify which layers "punch through" to reveal content from other layers. For example, you can use a text layer to knock out a color adjustment layer and reveal a portion of the image using the original colors.
As you plan your knockout effect, you need to decide which layer will create the shape of the knockout, which layers will be punched through, and which layer will be revealed. If you want to reveal a layer other than the Background, you can place the layers you want to use in a group or clipping mask.
text_image
LAYERS Normal Opacity: 100% Lock: Fill: 100% Farm Logo Layer 1 BackgroundFarm logo with shallow knockout to Background layer
-
Do one of the following in the Layers panel:
-
To reveal the background, position the layer that will create the knockout above the layers that will be punched through, and make sure the bottom layer in the image is a Background layer. (Choose Layer > New > Background From Layer to convert a regular layer into a Background layer.)
- To reveal a layer above the background, place the layers you want to punch through in a group. The top layer in the group will punch through the grouped layers to the next layer below the group.
-
To reveal the base layer of a clipping mask, place the layers you want to use in a clipping mask. (See Mask layers with clipping masks.) Make sure that the Blend Clipped Layers As Group option is selected for the base layer. (See Group blend effects.)
-
Select the top layer (the layer that will create the knockout).
-
To display blending options, either double-click the layer (anywhere outside the layer name or thumbnail), choose Layer > Layer Style > Blending Options, or choose Blending Options from the Layers panel menu.
Note: To view blending options for a text layer, choose Layer > Layer Style > Blending Options, or choose Blending Options from the Add A Layer Style button at the bottom of the Layers panel menu.
-
Choose an option from the Knockout pop-up menu:
-
Select Shallow to knock out to the first possible stopping point, such as the first layer after the layer group or the base layer of the clipping mask.
- Select Deep to knock out to the background. If there is no background, Deep knocks out to transparency.
Note: If you are not using a layer group or clipping mask, either Shallow or Deep creates a knockout that reveals the background layer (or
transparency, if the bottom layer is not a background layer).
-
To create the knockout effect, do one of the following:
-
Lower the fill opacity.
• Using the choices in the Blend Mode menu, change the blending mode to reveal the underlying pixels. -
Click OK.
Adobe also recommends
Twitter™ and Facebook posts are not covered under the terms of Creative Commons.
Legal Notices | Online Privacy Policy
Create layers and groups
View layers and groups within a group
Show or hide a layer, group, or style
To the top
Create layers and groups
A new layer appears either above the selected layer or within the selected group in the Layers panel.
Create a new layer or group
-
Do one of the following:
-
To create a new layer or group using default options, click the Create a New Layer button or New Group button in the Layers panel.
- Choose Layer > New > Layer or choose Layer > New > Group.
- Choose New Layer or New Group from the Layers panel menu.
- Alt-click (Windows) or Option-click (Mac OS) the Create a New Layer button or New Group button in the Layers panel to display the New Layer dialog box and set layer options.
-
Ctrl-click (Windows) or Command-click (Mac OS) the Create a New Layer button or New Group button in the Layers panel to add a layer below the currently selected layer.
-
Set layer options, and click OK:
Name Specifies a name for the layer or group.
Use Previous Layer to Create Clipping Mask This option is not available for groups. (See Mask layers with clipping masks.)
Color Assigns a color to the layer or group in the Layers panel.
Mode Specifies a blending mode for the layer or group. (See Blending modes.)
Opacity Specifies an opacity level for the layer or group.
Fill With Mode-Neutral Color Fills the layer with a preset, neutral color.
Note: To add currently selected layers to a new group, choose Layer > Group Layers, or Shift-click the New Group button at the bottom of the Layers Panel.
Create a layer from an existing file
-
Drag the file icon from Windows or Mac OS onto an open image in Photoshop.
-
Move, scale, or rotate the imported image. (See Place a file in Photoshop.)
-
Press Enter or Return.
By default, Photoshop creates a Smart Object layer. To create standard layers from dragged files, deselect Place Or Drag Raster Images As Smart Objects in the General preferences.
If the placed file is a multilayer image, a flattened version appears on the new layer. To instead copy separate layers, duplicate them in another image. (See Duplicate layers.)
Create a layer with effects from another layer
-
Select the existing layer in the Layers panel.
-
Drag the layer to the Create a New Layer button at the bottom of the Layers panel. The newly created layer contains all the effects of the existing one.
Convert a selection into a new layer
-
Make a selection.
-
Do one of the following:
-
Choose Layer > New > Layer Via Copy to copy the selection into a new layer.
- Choose Layer > New > Layer Via Cut to cut the selection and paste it into a new layer.
Note: You must rasterize Smart Objects or shape layers to enable these commands.
To the top
View layers and groups within a group
- Do one of the following to open the group:
- Click the triangle to the left of the folder icon
- Right-click (Windows) or Control-click (Mac OS) the triangle to the left of the folder icon and choose Open This Group.
- Alt-click (Windows) or Option-click (Mac OS) the triangle to open or close a group and the groups nested within it.
To the top
Show or hide a layer, group, or style
- Do one of the following in the Layers panel:
- Click the eye icon ➤ next to a layer, group, or layer effect to hide its content in the document window. Click in the column again to redisplay the content. To view the eye icon for styles and effects, click the Reveal Effects In panel icon ▼.
- Choose Show Layers or Hide Layers from the Layers menu.
- Alt-click (Windows) or Option-click (Mac OS) an eye icon 🔗 to display only the contents of that layer or group. Photoshop remembers the visibility states of all layers before hiding them. If you don't change the visibility of any other layer, Alt-clicking (Windows) or Option-
clicking (Mac OS) the same eye icon restores the original visibility settings.
- Drag through the eye column to change the visibility of multiple items in the Layers panel.
Note: Only visible layers are printed.
Adobe also recommends

Twitter™ and Facebook posts are not covered under the terms of Creative Commons.
Legal Notices | Online Privacy Policy
Auto blend layers
To the top
Auto blend layers
Use the Auto-Blend Layers command to stitch or combine images with smooth transitions in the final composite image. Auto-Blend Layers applies layer masks as needed to each layer to mask out over- or underexposed areas or content differences. Auto-Blend layers is only available for RGB or Grayscale images. It does not work with Smart Objects, video layers, 3D layers, or background layers.
Among the many uses of the Auto-Blend Layers command, you can blend multiple images of a scene with different areas in focus to achieve a composite image with an extended depth of field. Similarly, you can create a composite by blending multiple images of a scene with different illuminations. In addition to combining images of a scene, you can stitch together images into a panorama. (Although, it might be better to use the Photomerge command to produce panoramas from multiple images.)
Auto-Blend Layers applies layer masks as needed to each layer to mask out over- or underexposed areas or content differences and create a seamless composite.
Depth of field blending
text_image
123Learn more with this excerpt from Adobe Photoshop for Photographers.... Read More http://goo.gl/KfWYG

by Martin Evening http://www.martinevening.c...
Contribute your expertise to Adobe Community Help
- Copy or place the images you want to combine into the same document.
Each image will be in a separate layer. See Duplicate layers.
-
Select the layers you want to blend.
-
(Optional) Align the layers.
You can align layers manually or by using the Auto-Align Layers command. See Automatically align image layers.
-
With the layers still selected, choose Edit > Auto-Blend Layers.
-
Select the Auto-Blend Objective:
Panorama Blends overlapping layers into a panorama image.
Stack Images Blends the best details in each corresponding area. This options works best with aligned layers.
Note: Stack Images lets you blend multiple images of a scene with different areas in focus or different illuminations, to achieve the best results of all the images (you must auto-align the images first).
- Select Seamless Tones And Colors to adjust the color and tonality for blending.
- Click OK.
For a video on using Auto-Align and Auto-Blend to create a panorama and increase depth of field, see www.adobe.com/go/lrvid4120_ps.
Adobe also recommends
Twitter™ and Facebook posts are not covered under the terms of Creative Commons.
Legal Notices | Online Privacy Policy
Blending mode descriptions Blending mode examples
The blending mode specified in the options bar controls how pixels in the image are affected by a painting or editing tool. It's helpful to think in terms of the following colors when visualizing a blending mode's effect:
- The base color is the original color in the image.
- The blend color is the color being applied with the painting or editing tool.
• The result color is the color resulting from the blend.
To the top
Blending mode descriptions
Choose from the Mode pop-up menu in the options bar.
Note: Only the Normal, Dissolve, Darken, Multiply, Lighten, Linear Dodge (Add), Difference, Hue, Saturation, Color, Luminosity, Lighter Color, and Darker Color blending modes are available for 32-bit images.
Normal Edits or paints each pixel to make it the result color. This is the default mode. (Normal mode is called Threshold when you're working with a bitmapped or indexed-color image.)
Dissolve Edits or paints each pixel to make it the result color. However, the result color is a random replacement of the pixels with the base color or the blend color, depending on the opacity at any pixel location.
Behind Edits or paints only on the transparent part of a layer. This mode works only in layers with Lock Transparency deselected and is analogous to painting on the back of transparent areas on a sheet of acetate.
Clear Edits or paints each pixel and makes it transparent. This mode is available for the Shape tools (when fill region □ is selected), Paint Bucket tool ⏻, Brush tool ⏻, Pencil tool ⏻, Fill command, and Stroke command. You must be in a layer with Lock Transparency deselected to use this mode.
Darken Looks at the color information in each channel and selects the base or blend color—whichever is darker—as the result color. Pixels lighter than the blend color are replaced, and pixels darker than the blend color do not change.
Multiply Looks at the color information in each channel and multiplies the base color by the blend color. The result color is always a darker color. Multiplying any color with black produces black. Multiplying any color with white leaves the color unchanged. When you're painting with a color other than black or white, successive strokes with a painting tool produce progressively darker colors. The effect is similar to drawing on the image with multiple marking pens.
Color Burn Looks at the color information in each channel and darkens the base color to reflect the blend color by increasing the contrast between the two. Blending with white produces no change.
Linear Burn Looks at the color information in each channel and darkens the base color to reflect the blend color by decreasing the brightness. Blending with white produces no change.
Lighten Looks at the color information in each channel and selects the base or blend color—whichever is lighter—as the result color. Pixels
darker than the blend color are replaced, and pixels lighter than the blend color do not change.
Screen Looks at each channel's color information and multiplies the inverse of the blend and base colors. The result color is always a lighter color. Screening with black leaves the color unchanged. Screening with white produces white. The effect is similar to projecting multiple photographic slides on top of each other.
Color Dodge Looks at the color information in each channel and brightens the base color to reflect the blend color by decreasing contrast between the two. Blending with black produces no change.
Linear Dodge (Add) Looks at the color information in each channel and brightens the base color to reflect the blend color by increasing the brightness. Blending with black produces no change.
Overlay Multiplies or screens the colors, depending on the base color. Patterns or colors overlay the existing pixels while preserving the highlights and shadows of the base color. The base color is not replaced, but mixed with the blend color to reflect the lightness or darkness of the original color.
Soft Light Darkens or lightens the colors, depending on the blend color. The effect is similar to shining a diffused spotlight on the image. If the blend color (light source) is lighter than 50% gray, the image is lightened as if it were dodged. If the blend color is darker than 50% gray, the image is darkened as if it were burned in. Painting with pure black or white produces a distinctly darker or lighter area, but does not result in pure black or white.
Hard Light Multiplies or screens the colors, depending on the blend color. The effect is similar to shining a harsh spotlight on the image. If the blend color (light source) is lighter than 50% gray, the image is lightened, as if it were screened. This is useful for adding highlights to an image. If the blend color is darker than 50% gray, the image is darkened, as if it were multiplied. This is useful for adding shadows to an image. Painting with pure black or white results in pure black or white.
Vivid Light Burns or dodges the colors by increasing or decreasing the contrast, depending on the blend color. If the blend color (light source) is lighter than 50% gray, the image is lightened by decreasing the contrast. If the blend color is darker than 50% gray, the image is darkened by increasing the contrast.
Linear Light Burns or dodges the colors by decreasing or increasing the brightness, depending on the blend color. If the blend color (light source) is lighter than 50% gray, the image is lightened by increasing the brightness. If the blend color is darker than 50% gray, the image is darkened by decreasing the brightness.
Pin Light Replaces the colors, depending on the blend color. If the blend color (light source) is lighter than 50% gray, pixels darker than the blend color are replaced, and pixels lighter than the blend color do not change. If the blend color is darker than 50% gray, pixels lighter than the blend color are replaced, and pixels darker than the blend color do not change. This is useful for adding special effects to an image.
Hard Mix Adds the red, green and blue channel values of the blend color to the RGB values of the base color. If the resulting sum for a channel is 255 or greater, it receives a value of 255; if less than 255, a value of 0. Therefore, all blended pixels have red, green, and blue channel values of either 0 or 255. This changes all pixels to primary additive colors (red, green, or blue), white, or black.
Note: For CMYK images, Hard Mix changes all pixels to the primary subtractive colors (cyan, yellow, or magenta), white, or black. The maximum color value is 100.
Difference Looks at the color information in each channel and subtracts either the blend color from the base color or the base color from the blend color, depending on which has the greater brightness value. Blending with white inverts the base color values; blending with black produces no change.
Exclusion Creates an effect similar to but lower in contrast than the Difference mode. Blending with white inverts the base color values. Blending with black produces no change.
Subtract Looks at the color information in each channel and subtracts the blend color from the base color. In 8- and 16-bit images, any resulting negative values are clipped to zero.
Divide Looks at the color information in each channel and divides the blend color from the base color.
Hue Creates a result color with the luminance and saturation of the base color and the hue of the blend color.
Saturation Creates a result color with the luminance and hue of the base color and the saturation of the blend color. Painting with this mode in an area with no (0) saturation (gray) causes no change.
Color Creates a result color with the luminance of the base color and the hue and saturation of the blend color. This preserves the gray levels in the image and is useful for coloring monochrome images and for tinting color images.
Luminosity Creates a result color with the hue and saturation of the base color and the luminance of the blend color. This mode creates the inverse effect of Color mode.
Lighter Color Compares the total of all channel values for the blend and base color and displays the higher value color. Lighter Color does not produce a third color, which can result from the Lighten blend, because it chooses the highest channel values from both the base and blend color to create the result color.
Darker Color Compares the total of all channel values for the blend and base color and displays the lower value color. Darker Color does not produce a third color, which can result from the Darken blend, because it chooses the lowest channel values from both the base and the blend color to create the result color.
To the top
Blending mode examples
These examples show the result of painting part of the image's face using each blending mode.
For a video on blending modes, see www.adobe.com/go/vid0012.

Original Image

natural_image
Close-up of a painted penguin face with yellow and black markings (no text or symbols)Normal, 100% opacity Normal, 50% opacity Dissolve, 50% opacity
natural_image
Close-up of a stylized bird face with painted patterns (no text or symbols visible)
natural_image
Close-up of a painted traditional bird face with detailed facial features and patterns (no text or symbols visible)
natural_image
Close-up of a stylized bird's face with yellow and black patterns (no text or symbols)Behind

natural_image
Close-up of a penguin's face with stylized black and white patterns (no text or symbols visible)Clear Darken Multiply
natural_image
Close-up of a painted bird face with yellow and black markings (no text or symbols visible)
natural_image
Close-up of a stylized painted face with yellow and black patterns (no text or symbols)
natural_image
Close-up of a painted folk face with yellow and black patterns (no text or symbols visible)Color Burn

natural_image
Close-up of a stylized painted face with yellow and black patterns (no text or symbols)Linear Burn Lighten Screen
natural_image
Close-up of a painted bird's face with black, yellow, and white patterns (no text or symbols visible)
natural_image
Close-up of a painted bird's face with yellow and black patterns (no text or symbols)
natural_image
Close-up of a painted bird face with yellow and black markings (no text or symbols visible)Color Dodge

natural_image
Close-up of a painted penguin face with yellow and black markings (no text or symbols visible)Linear Dodge (Add) Overlay Soft Light

natural_image
Close-up of a stylized bird face with black and yellow patterns (no text or symbols)
natural_image
Close-up of a painted bird's face with stylized black and yellow patterns (no text or symbols visible)
natural_image
Close-up of a painted bird face with yellow and black markings (no text or symbols visible)Hard Light

natural_image
Close-up of a painted bird face with yellow and black markings (no text or symbols visible)Vivid Light Linear Light Pin Light

natural_image
Close-up of a painted bird face with yellow and black markings (no text or symbols visible)
natural_image
Close-up of a painted bird face with orange and yellow patterns (no text or symbols)
natural_image
Close-up of a painted bird face with red, yellow, and black facial features (no text or symbols visible)Hard Mix

natural_image
Close-up of a colorful painted mask featuring stylized facial features (no text or symbols visible)Difference Exclusion Subtract

natural_image
Close-up of a painted folk face with colorful abstract patterns (no text or symbols)
natural_image
Close-up of a painted bird's face with blue and black coloring (no text or symbols visible)
natural_image
Close-up of a painted penguin face with blue and white coloring (no text or symbols visible)Divide
natural_image
Close-up of a stylized bird face with detailed facial features and pointed eyes (no text or symbols visible)Hue Saturation Color

natural_image
Close-up of a painted bird face with expressive eyes and vibrant colors (no text or symbols)
natural_image
Close-up of a stylized bird face with detailed facial features and pointed beak (no text or symbols visible)
natural_image
Close-up of a painted bird's face with detailed facial features and beak (no text or symbols visible)Luminosity, 80% opacity
natural_image
Close-up of a stylized bird face with orange and black patterns (no text or symbols visible)Lighter Color Darker Color
natural_image
Close-up of a painted folk mask featuring stylized facial features and geometric patterns (no text or symbols visible)
BY-NC-SA
Twitter™ and Facebook posts are not covered under the terms of Creative Commons.
Legal Notices
Online Privacy Policy
About Smart Filters
Apply a Smart Filter
Edit a Smart Filter
Hide Smart Filters
Reorder, duplicate, or delete Smart Filters
Mask Smart Filters
To the top
About Smart Filters
Any filter applied to a Smart Object is a Smart Filter. Smart Filters appear in the Layers panel below the Smart Object layer to which they are applied. Because you can adjust, remove, or hide Smart Filters, they are nondestructive.
You can apply any Photoshop filter (that have been enabled to work with Smart Filters)—except for Extract, Liquify, Pattern Maker, and Vanishing Point—as a Smart Filter. In addition, you can apply the Shadow/Highlight and Variations adjustments as Smart Filters.
To work with Smart Filters, select a Smart Object layer, choose a filter, and then set filter options. After you apply a Smart Filter, you can adjust, reorder, or delete it.
To expand or collapse the view of Smart Filters, click the triangle next to the Smart Filter icon, displayed to the right of the Smart Object layer in the Layers panel. (This technique also shows or hides Layer Style.) Or, choose Layers panel Options from the Layers panel menu, then select Expand New Effects in the dialog box.
Use filter masks to selectively mask Smart Filter effects.
Visual examples: Smart Filters

text_image
123Learn more with this excerpt from Adobe Photoshop for Photographers.... Read More http://goo.gl/jh9rS

by Martin Evening http://www.martinevening.c...
Contribute your expertise to Adobe Community Help
To the top
Apply a Smart Filter

For a video on applying smart filters, see www.adobe.com/go/vid0004.
-
Do one of the following:
-
To apply a Smart Filter to an entire Smart Object layer, select the layer in the Layers panel.
- To constrain the effects of the Smart Filter to a selected area of a Smart Object layer, make a selection.
-
To apply a Smart Filter to a regular layer, select the layer, and choose Filter > Convert For Smart Filters, and click OK.
-
Do one of the following:
-
Choose a filter from the Filter menu. You can choose any filter, including third-party filters that support Smart Filters, except Extract, Liquify, Pattern Maker, and Vanishing Point.
- Choose Image > Adjustments > Shadow/Highlight or Image > Adjustments > Variations.
Note: If you apply one or more filters using the Filter Gallery, they appear as a group in the Layers panel named "Filter Gallery." You can edit individual filters by double-clicking a Filter Gallery entry.
- Set filter options and click OK.
The Smart Filter appears under the Smart Filters line in the Layers panel beneath the Smart Object layer. If you see a warning icon next to a Smart Filter in the Layers panel, the filter doesn't support the image's color mode or depth.
After you apply a Smart Filter, you can drag it (or an entire group of Smart Filters) onto another Smart Object layer in the Layers panel; press Alt-drag (Windows) or Option-drag (Mac OS) Smart Filters. You can't drag Smart Filters onto regular layers.
To the top
Edit a Smart Filter
If a Smart Filter contains editable settings, you can edit it at any time. You can also edit blending options for Smart Filters.
Note: When you edit a Smart Filter, you can't preview filters stacked above it. After you finish editing the Smart Filter, Photoshop again displays the filters stacked above it.
Edit Smart Filter settings
- Double-click the Smart Filter in the Layers panel.
- Set filter options, and click OK.
Edit Smart Filter blending options
Editing Smart Filter blending options is similar to using the Fade command when applying a filter to a traditional layer.
- Double-click the Edit Blending Options icon ≈ next to the Filter in the Layers panel.
- Set blending options, and click OK.
To the top
Hide Smart Filters
- Do one of the following:
- To hide a single Smart Filter, click the eye icon ➕ next to the Smart Filter in the Layers panel. To show the Smart Filter, click in the column again.
- To hide all Smart Filters applied to a Smart Object layer, click the eye icon ⚙ next to the Smart Filters line in the Layers panel. To show the Smart Filters, click in the column again.
To the top
Reorder, duplicate, or delete Smart Filters
You can reorder Smart Filters in the Layers panel, duplicate them, or delete Smart Filters if you no longer want to apply them to a Smart Object.
Reorder Smart Filters
- In the Layers panel, drag a Smart Filter up or down in the list. (Double-click Filter Gallery to reorder any gallery filters.)
Photoshop applies Smart Filters from the bottom up.
Duplicate Smart Filters
- In the Layers panel, Alt-drag (Windows) or Option-drag (Mac OS) the Smart Filter from one Smart Object to another, or to a new location in the Smart Filters list.
Note: To duplicate all Smart Filters, Alt-drag (Windows) or Option-drag (Mac OS) the Smart Filters icon that appears next to the Smart Object layer.
Delete Smart Filters
- To delete an individual Smart Filter, drag it to the Delete icon at the bottom of the Layers panel.
- To delete all Smart Filters applied to a Smart Object layer, select the Smart Object layer and choose Layer > Smart Filter > Clear Smart Filters.
To the top
Mask Smart Filters
When you apply a Smart Filter to a Smart Object, Photoshop displays an empty (white) mask thumbnail on the Smart Filters line in the Layers panel under the Smart Object. By default, this mask shows the entire filter effect. (If you made a selection before applying the Smart Filter, Photoshop displays the appropriate mask instead of an empty mask on the Smart Filters line in the Layers panel.)
Use filter masks to selectively mask Smart Filters. When you mask Smart Filters, the masking applies to all Smart Filters—you can't mask individual Smart Filters.
Filter masks work much like layer masks, and you can use many of the same techniques with them. Like layer masks, filter masks are stored as alpha channels in the Channels panel, and you can load their boundaries as a selection.
Like layer masks, you can paint on a filter mask. Areas of the filter that you paint in black are hidden; areas you paint in white are visible; and areas you paint in shades of gray appear in various levels of transparency.
Use the controls in the Masks panel to change the filter mask density, add feathering to the edges of the mask, or invert the mask.
Note: By default, layer masks are linked to regular layers or Smart Object layers. When you move the layer mask or the layer using the Move tool, they move as a unit.
Mask Smart Filter effects
- Click the filter mask thumbnail in the Layers panel to make it active.
A border appears around the mask thumbnail.
-
Select any of the editing or painting tools.
-
Do one of the following:
-
To hide portions of the filter, paint the mask with black.
• To show portions of the filter, paint the mask with white.
• To make the filter partially visible, paint the mask with gray.
You can also apply image adjustments and filters to filter masks.
Change filter mask opacity or feather mask edges
- Click the filter mask thumbnail or select the Smart Object layer in the Layers panel, and then click the Filter Mask button in the Masks panel.
- In the Masks panel, drag the Density slider to adjust the mask opacity, and the Feathering slider to apply feathering to the mask edges. See Adjust mask opacity or edges.
Note: The Mask Edge option is not available for filter masks.
Invert a filter mask
- Click the filter mask thumbnail in the Layers panel, then click Invert in the Masks panel.
Display only the filter mask
- Alt-click (Windows) or Option-click (Mac OS) the filter mask thumbnail in the Layers panel. To show the Smart Object layer, Alt-click or Option-click the filter mask thumbnail again.
Move or copy filter masks
• To move the mask to another Smart Filter Effect, drag the mask to the other Smart Filter Effect.
• To copy the mask, Alt-drag (Windows) or Option-drag (Mac OS) the mask to another Smart Filter Effect.
Disable a filter mask
- Do one of the following:
- Shift-click the filter mask thumbnail in the Layers panel.
- Click the filter mask thumbnail in the Layers panel, then click the Disable/Enable Mask button 📄 the Masks panel.
- Choose Layer > Smart Filter > Disable Filter Mask.
A red X appears over the filter mask thumbnail when the mask is disabled, and the Smart Filter appears without masking. To re-enable the mask, Shift-click the Smart Filter mask thumbnail again.
Delete a Smart Filter mask

Click the filter mask thumbnail in the Layers panel, then click the Delete icon in the Masks panel.
- Drag the filter mask thumbnail in the Layers panel to the Delete icon.
- Select the Smart Filter Effect, and choose Layer > Smart Filters > Delete Filter Mask.
Add a filter mask
If you delete a filter mask, you can subsequently add another mask.
• To add an empty mask, select the Smart Object layer, and then click the Filter Mask button in the Masks panel.
- To add a mask based on a selection, make a selection, and then right-click (Windows) or Control-click (Mac OS) the Smart Filters line in the Layers panel, and choose Add Filter Mask.
Adobe also recommends
Twitter™ and Facebook posts are not covered under the terms of Creative Commons.
Legal Notices | Online Privacy Policy
Align objects on different layers Distribute layers and groups evenly Automatically align image layers
To the top
Align objects on different layers
You can align the content of layers and groups using the Move tool. (See Move the content of layers.)
-
Do one of the following:
-
To align multiple layers, select the layers with the Move tool or in the Layers panel, or select a group.
-
To align the content of one or more layers to a selection border, make a selection in the image, and then select the layers in the Layers panel. Use this method to align to any specified point in the image.
-
Choose Layer > Align or Layer > Align Layers To Selection, and choose a command from the submenu. These same commands are available as Alignment buttons in the Move tool options bar.
Top Edges Aligns the top pixel on the selected layers to the topmost pixel on all selected layers, or to the top edge of the selection border.
Vertical Centers Aligns the vertical center pixel on each selected layers to the vertical center pixel of all the selected layers, or to the vertical center of the selection border.
Bottom Edges Aligns the bottom pixel on the selected layers to the bottommost pixel on selected layers, or to the bottom edge of the selection border.
Left Edges Aligns the left pixel on the selected layers to the left pixel on the leftmost layer, or to the left edge of the selection border.
Horizontal Centers Aligns the horizontal center pixel on the selected layers to the horizontal center pixel of all the selected layers, or to the horizontal center of the selection border.
Right Edges Aligns the right pixel on the linked layers to the rightmost pixel on all selected layers, or to the right edge of the selection border.
To the top
Distribute layers and groups evenly
-
Select three or more layers.
-
Choose Layer > Distribute and choose a command. Alternatively, select the Move tool ⬆ and click a distribution button in the options bar.
Top Edges Spaces the layers evenly, starting from the top pixel of each layer.
Vertical Centers Spaces the layers evenly, starting from the vertical center pixel of each layer.
Bottom Edges Spaces the layers evenly, starting from the bottom pixel of each layer.
Left Edges Spaces the layers evenly, starting from the left pixel of each layer.
Horizontal Centers Spaces the layers evenly, starting from the horizontal center of each layer.
Right Edges Spaces the layers evenly, starting from the right pixel on each layer.
To the top
Automatically align image layers
The Auto-Align Layers command can automatically align layers based on similar content in different layers, such as corners and edges. You assign one layer as a reference layer, or let Photoshop automatically choose the reference layer. Other layers are aligned to the reference layer so that matching content overlays itself.
Using the Auto-Align Layers command, you can combine images in several ways:
- Replace or delete parts of images that have the same background. After aligning the images, use masking or blending effects to combine parts of each image into one image.
- Stitch images together that share overlapping content.
-
For video frames shot against a static background, you can convert frames into layers, then add or delete content across multiple frames.
-
Copy or place the images you want to align into the same document.
Each image will be in a separate layer. See Duplicate layers.

You can load multiple images into layers using a script. Choose File > Scripts > Load Files into Stack.
-
(Optional) In the Layers panel, create a reference layer by locking it. See Lock layers. If you do not set a reference layer, Photoshop will analyze all the layers and select the one at the center of the final composition as the reference.
-
Select the remaining layers you want to align.
To select multiple adjacent layers from the panel, Shift-click; To select noncontiguous layers, Ctrl-Click (Windows) or Command-click (Mac OS).
Note: Do not select adjustment layers, vector layers, or Smart Objects which do not contain information needed for alignment.
- Choose Edit > Auto-Align Layers, and choose an alignment option. For stitching together multiple images that share overlapping areas—for example, to create a panorama—use the Auto, Perspective, or Cylindrical options. To align scanned images with offset content, use the Reposition Only option.
Auto Photoshop analyzes the source images and applies either a Perspective or Cylindrical layout, depending on which produces a better composite.
Perspective Creates a consistent composition by designating one of the source images (by default, the middle image) as the reference image. The other images are then transformed (repositioned, stretched, or skewed, as necessary) so that overlapping content across layers is matched.
Cylindrical Reduces the "bow-tie" distortion that can occur with the Perspective layout by displaying individual images as on an unfolded cylinder. Overlapping content across layers is still matched. The reference image is placed at the center. Best suited for creating wide panoramas.
Spherical Aligns images with wide fields of view (vertical and horizontal). Designates one of the sources images (the middle image, by default) as the reference image and spherically transforms the other images so that overlapping content is matched.
Scene Collage Aligns layers and matches overlapping content, without changing the shape of the objects in the image (for example, a circle will still be a circle).
Reposition Only Aligns the layers and matches overlapping content, but does not transform (stretch or skew) any of the source layers.
Lens Correction Automatically corrects for lens defects:
Vignette Removal
Compensates for a lens defect that causes the edges, especially the corners, of an image to be darker than the center.
Geometric Distortion
Compensates for barrel, pincushion, or fisheye distortion.
Note: Geometric Distortion will try to take into account the radical distortion to improve the result of the alignment, except with fish eye lens; when fish eye metadata is detected, Geometric Distortion will align the images for fish eye
After auto-aligning, you can use Edit > Free Transform to fine tune the alignment or make tonal adjustments to even out exposure differences between layers, then combine the layers into one composite image.

For a video on using Auto-Align and Auto-Blend to create a panorama and increase depth of field, see www.adobe.com/go/lrvid4120_ps.
Adobe also recommends

BY-NC-SA
Twitter™ and Facebook posts are not covered under the terms of Creative Commons.
Legal Notices | Online Privacy Policy
Loading a layer or layer mask's boundaries as a selection
You can select all the non-transparent areas on a layer, or, if a layer mask exists, all the unmasked areas. Selecting these areas is useful when you want to select text or image content that is surrounded by or contains transparent areas, or to create a selection that excludes masked areas on a layer.
-
Do one of the following:
-
To select only the non-transparent areas on an unmasked layer, Ctrl-click (Windows) or Command-click (Mac OS) the layer thumbnail in the Layers panel.
-
To select the unmasked areas on a layer that has a layer mask, Ctrl-click (Windows) or Command-click (Mac OS) the layer mask thumbnail in the Layers panel.
-
If a selection already exists, you can do any of the following:
-
To add the pixels to an existing selection, press Ctrl+Shift (Windows) or Command+Shift (Mac OS), and click the layer thumbnail or layer mask thumbnail in the Layers panel.
- To subtract the pixels from an existing selection, press Ctrl+Alt (Windows) or Command+Option (Mac OS), and click the layer thumbnail or layer mask thumbnail in the Layers panel.
- To load the intersection of the pixels and an existing selection, press Ctrl+Alt+Shift (Windows) or Command+Option+Shift (Mac OS), and click the layer thumbnail or layer mask thumbnail in the Layers panel.

If you want to move all the contents of a layer, use the Move tool without loading a transparency mask.
More Help Topics
• About masks and alpha channels
- Applying filters video
Twitter™ and Facebook posts are not covered under the terms of Creative Commons.
Legal Notices
Online Privacy Policy
- In the Layers panel, select the layer containing the mask you want to edit.
- Do one of the following:
- (CC, CS6) Click the Mask thumbnail in the Layers panel
• (CS5) Click the Pixel Mask button in the Masks panel
- Select any of the editing or painting tools.
Note: The foreground and background colors assume default grayscale values when the mask is active.
-
Do one of the following:
-
To subtract from the mask and reveal the layer, paint the mask with white.
- To make the layer partially visible, paint the mask with gray. Darker grays make the level more transparent, lighter grays make it more opaque.
• To add to the mask and hide the layer or group, paint the mask with black. The layers below become visible.
To edit the layer instead of the layer mask, select it by clicking its thumbnail in the Layers panel. A border appears around the layer thumbnail.

To paste a copied selection into a layer mask, Alt-click (Windows) or Option-click (Mac OS) the layer mask thumbnail in the Layers panel to select and display the mask channel. Choose Edit > Paste, then Select > Deselect. The selection is converted to grayscale and added to the mask. Click the layer thumbnail in the Layers panel to deselect the mask channel.
More Help Topics
- About masks and alpha channels
- Applying filters video

BY-NC-SA
Twitter™ and Facebook posts are not covered under the terms of Creative Commons.
Legal Notices
Online Privacy Policy
Add and edit vector masks
A vector mask is a resolution independent path that clips out the contents of the layer. You create vector masks with the pen or shapes tools. For more information on working with the pen or shapes tools, see Drawing.
Add a vector mask that shows or hides the entire layer
- In the Layers panel, select the layer you want to add the vector mask to.
-
Do one of the following:
-
To create a vector mask that reveals the entire layer, choose Layer > Vector Mask > Reveal All.
- To create a vector mask that hides the entire layer, choose Layer > Vector Mask > Hide All.
Add a vector mask that shows the contents of a shape
- In the Layers panel, select the layer to which to add a vector mask.
- Select a path, or use one of the shape or Pen tools to draw a work path.
Note: To create a path with a Shape tool, click the Paths icon in the Shape tool options bar.
- Click the Vector Mask button in the Masks panel, or choose Layer > Vector Mask > Current Path.
Edit a vector mask
- In the Layers panel, select the layer containing the vector mask you want to edit.
- Click the Vector Mask button in the Properties panel (CC, CS6) or Masks panel (CS5) or the thumbnail in the Paths panel. Then change the shape using the shape, pen, or Direct Selection tools. See Editing paths.
Change vector mask opacity or feather mask edges
- In the Layers panel, select the layer containing the vector mask.
- In the Properties panel (CC, CS6) or Masks panel (CS5), click the Vector Mask button.
- Drag the Density slider to adjust mask opacity, or the Feathering slider to feather mask edges. For more information, see Change mask opacity or refine edges.
Remove a vector mask
- In the Layers panel, select the layer containing the vector mask.
-
Click the Vector Mask button in the Masks panel.
-
In the Properties panel (CC, CS6) or Masks panel (CS5), click the Delete Mask button ⚡.
Disable or enable a vector mask
- Do one of the following:
- Select the layer containing the vector mask you want to disable or enable, and click the Disable/Enable Mask button ⚙ in the Properties panel (CC, CS6) or Masks panel (CS5).
- Shift-click the vector mask thumbnail in the Layers panel.
- Select the layer containing the vector mask you want to disable or enable, and choose Layer > Vector Mask > Disable or Layer > Vector Mask > Enable.
A red X appears over the mask thumbnail in the Layers panel when the mask is disabled, and the layer's content appears without masking effects.
Convert a vector mask to a layer mask
- Select the layer containing the vector mask you want to convert, and choose Layer > Rasterize > Vector Mask.
Note: After you rasterize a vector mask, you can't change it back into a vector object.
More Help Topics
- About masks and alpha channels
- Applying filters video
Twitter™ and Facebook posts are not covered under the terms of Creative Commons.
Legal Notices | Online Privacy Policy
Revealing layers with clipping masks
A clipping mask lets you use the content of a layer to mask the layers above it. The masking is determined by the content of the bottom or base layer. The non-transparent content of the base layer clips (reveals), the content of the layers above it in the clipping mask. All other content in the clipped layers is masked out.

natural_image
Stylized illustration of a red tree with golden trunk against green hills background (no text or symbols)
text_image
LAYERS Normal Opacity: 100% Lock: Fill: 100% Potatoes Logo FieldClipping mask: content of the clipped layer (Potatoes) is only visible within the content of the base layer (Logo)
You can use multiple layers in a clipping mask, but they must be successive layers. The name of the base layer in the mask is underlined, and the thumbnails for the overlying layers are indented. The overlying layers display a clipping mask icon.
The Blend Clipped Layers As Group option in the Layer Style dialog box determines whether the blending mode of the base affects the whole group or just the base. (See Group blend effects.)
Create a clipping mask
- Arrange the layers in the Layers panel so that the base layer with the mask is below the layers that you want to mask.
-
Do one of the following:
-
Hold down Alt (Windows) or Option (Mac OS), position the pointer over the line in the Layers panel dividing the base layer and the first layer above it that you want to include in the clipping mask (the pointer changes to two overlapping circles ⚙), and click.
-
Select the first layer above the base layer in the Layers panel, and choose Layer > Create Clipping Mask.
-
To add additional layers to the clipping mask, use either method in step 2, and work your way upward one level at a time in the Layers panel.
Note: If you create a new layer between layers in a clipping mask, or drag an unclipped layer between layers in a clipping mask, the layer becomes part of the clipping mask.
Layers in the clipping mask are assigned the opacity and mode attributes of the base layer.
Remove a layer from a clipping mask
- Do one of the following:
- Hold down Alt (Windows) or Option (Mac OS), position the pointer over the line separating two grouped layers in the Layers panel (the pointer changes to two overlapping circles and click.
- In the Layers panel, select a layer in the clipping mask, and choose Layer > Release Clipping Mask. This command removes the selected layer and any layers above it from the clipping mask.
Release all layers in a clipping mask
- In the Layers panel, select the clipping mask layer just above the base layer.
- Choose Layer > Release Clipping Mask.
More Help Topics
- About masks and alpha channels
- Applying filters video

Twitter™ and Facebook posts are not covered under the terms of Creative Commons.
Legal Notices | Online Privacy Policy
You can use the Auto-Align Layers command from the Edit menu to make a composite photo from a pair of nearly identical images that may contain some unwanted areas. For example, one shot of a group portrait is ideal except that one of the subjects has her eyes closed. In another shot her eyes are open. Using Auto-Align Layers and layer masking, you can combine these shots and eliminate the flaw in the final image.
- Open the two images you want to combine.
- Create a new image (File > New) with the same dimensions as the two source images.
- In the Layers panel for each source image, select the layer that contains the image content, and drag it to the new image window. The Layers panel for the new image now contains two new layers, one for each source image.
- In the Layers panel of the new image, arrange the new layers so the layer that contains the content you want to correct (portrait with eyes closed) is on top of the layer that contains the correct content (portrait with eyes open).
- Select the two new layers, and choose Edit > Auto-Align Layers.
- Select Reposition Only, then click OK. Photoshop finds the common areas in each layer and aligns them so that identical areas overlap.
- Click the top layer to select only that layer.
-
Add a blank layer mask to the layer:
-
Click Add Layer Mask in the Layers panel.
-
Choose Layer > Layer Mask > Reveal All.
-
Set the foreground color to black, choose a brush tip and size, and zoom in if necessary to focus on the part of the image you want to correct.
-
Using the brush tool, add to the layer mask by painting over the top layer. Painting with black completely masks out the top layer, while grayscale creates partial transparency to the layer below, and white restores the top layer. See Edit a layer mask. Continue editing the layer mask until you successfully blend the two layers to create one unified image.
Note: Make sure that the layer mask thumbnail, not the image thumbnail, is selected in the Layers panel during the masking operation.
- To allow further editing, save the layered and masked version of the image, and make another copy that you can flatten to produce a single-layer version with a smaller file size.
More Help Topics
- About masks and alpha channels
- Applying filters video
• Automatically align layers
About layer and vector masks
Add layer masks
Unlinking layers and masks
Disable or enable a layer mask
Apply or delete a layer mask
Select and display the layer mask channel
Change the layer mask rubylith color or opacity
Adjusting mask opacity and edges
You can add a mask to a layer and use the mask to hide portions of the layer and reveal the layers below. Masking layers is a valuable compositing technique for combining multiple photos into a single image or for making local color and tonal corrections.
To the top
About layer and vector masks
You can use masks to hide portions of a layer and reveal portions of the layers below. You can create two types of masks:
- Layer masks are resolution-dependent bitmap images that are edited with the painting or selection tools.
- Vector masks are resolution independent and are created with a pen or shape tool.
Layer and vector masks are nondestructive, which means you can go back and re-edit the masks later without losing the pixels they hide.
In the Layers panel, both the layer and vector masks appear as an additional thumbnail to the right of the layer thumbnail. For the layer mask, this thumbnail represents the grayscale channel that is created when you add the layer mask. The vector mask thumbnail represents a path that clips out the contents of the layer.
Note: To create a layer or vector mask on the Background layer, first convert it to a regular layer (Layer > New > Layer from Background).
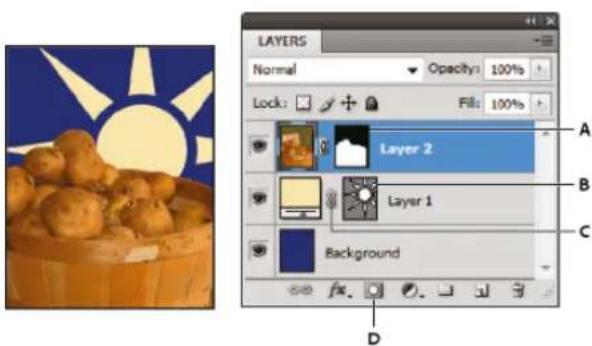
text_image
LAYERS Normal Opacity: 100% Lock: Fill: 100% Layer 2 Layer 1 Background A B C DMasking layer
A. Layer mask thumbnail B. Vector mask thumbnail C. Vector Mask Link icon D. Add Mask
You can edit a layer mask to add or subtract from the masked region. A layer mask is a grayscale image, so areas you paint in black are hidden, areas you paint in white are visible, and areas you paint in shades of gray appear in various levels of transparency.

natural_image
Basket filled with potatoes and red peppers, no visible text or symbols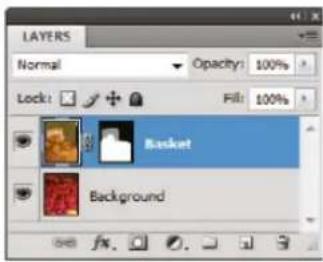
text_image
LAYERS Normal Opacity: 100% Lock: Fill: 100% Basket BackgroundBackground painted with black; description card painted with gray; basket painted with white
A vector mask creates a sharp-edged shape on a layer and is useful anytime you want to add a design element with clean, defined edges. After you create a layer with a vector mask, you can apply one or more layer styles to it, edit them if needed, and instantly have a usable button, panel, or other web-design element.
The Properties panel (CC, CS6) or the Masks panel (CS5) provide additional controls to adjust a mask. You can change the opacity of mask to let more or less of the masked content show through, invert the mask, or refine the mask borders, as with a selection area.

text_image
A B C MASKS Filter Mask Density: 35% Feather: 49 px Refine: Mask Edge... Color Range... Invert E F G Properties Masks Layer Mask Density: 100% Feather: 0.0 px Refines: Mask Edge... Color Range... InvertMasks panel (CS5) and Properties panel (CC, CS6)
A. Select the filter mask. B. Add a pixel mask. C. Add a vector mask. D. Panel menu. E. Apply Mask F. Layer mask G. Vector mask
To the top
Add layer masks
When you add a layer mask, you can hide or show all of the layer, or base the mask on a selection or transparency. Later, you'll paint on the mask to precisely hide portions of the layer, revealing the layers beneath.
Add a mask that shows or hides the entire layer
- Make sure that no part of your image is selected. Choose Select > Deselect.
- In the Layers panel, select the layer or group.
- Do one of the following:
- To create a mask that reveals the entire layer, click the Add Layer Mask button in the Layers panel, or choose Layer > Layer Mask > Reveal All.
- To create a mask that hides the entire layer, Alt-click (Windows) or Option-click (Mac OS) the Add Layer Mask button, or choose Layer > Layer Mask > Hide All.

In CS5, you can also use the Masks panel (Window > Masks).
Add a layer mask that hides part of a layer
- In the Layers panel, select the layer or group.
-
Select the area in the image, and do one of the following:
-
Click the New Layer Mask button 📄 the Layers panel to create a mask that reveals the selection.
- Alt-click (Windows) or Option-click (Mac OS) the Add Layer Mask button in the Layers panel, to create a mask that hides the selection.
- Choose Layer > Layer Mask > Reveal Selection or Hide Selection.
Create a mask from layer transparency
If you want to directly edit layer transparency, create a mask from this data. This technique is helpful for video and 3D workflows.
- In the Layers panel, select the layer.
- Choose Layer > Layer Mask > From Transparency.
Photoshop converts transparency into an opaque color, hidden by the newly created mask. The opaque color varies greatly, depending upon the filters and other processing previously applied to the layer.
Apply a layer mask from another layer
- Do one of the following:
• To move the mask to another layer, drag the mask to the other layer.
- To duplicate the mask, Alt-drag (Windows) or Option-drag (Mac OS) the mask to other layer.
To the top
Unlinking layers and masks
By default, a layer or group is linked to its layer mask or vector mask, as indicated by the link icon between the thumbnails in the Layers panel.
The layer and its mask move together in the image when you move either one with the Move tool ✦. Unlinking them lets you move them independently and shift the mask's boundaries separately from the layer.
- To unlink a layer from its mask, click the link icon in the Layers panel.
- To reestablish the link between a layer and its mask, click between the layer and mask path thumbnails in the Layers panel.
To the top
Disable or enable a layer mask
- Do one of the following:
- Select the layer containing the layer mask you want to disable or enable, and click the Disable/Enable Mask button ⚙ in the Properties panel (CC, CS6) or the Masks panel (CS5).
- Shift-click the layer mask thumbnail in the Layers panel.
- Select the layer containing the layer mask you want to disable or enable, and choose Layer > Layer Mask > Disable or Layer > Layer Mask > Enable.
A red X appears over the mask thumbnail in the Layers panel when the mask is disabled, and the layer's content appears without masking effects.
To the top
Apply or delete a layer mask
You can apply a layer mask to permanently delete the hidden portions of a layer. Layer masks are stored as alpha channels, so applying and deleting layer masks can help reduce file size. You can also delete a layer mask without applying the changes.
- In the Layers panel, select the layer containing the layer mask.
- In the Masks panel, click the Pixel Mask button.
-
Do one of the following:
-
To remove the layer mask after applying it permanently to the layer, click the Apply Mask icon ✿ at the bottom of the Properties panel (CC, CS6) and Masks panel (CS5).
- To remove the layer mask without applying it to the layer, click the Delete button at the bottom of the Masks panel, and then click Delete.
You can also apply or delete layer masks using the Layer menu.
Note: You cannot apply a layer mask permanently to a Smart Object layer when deleting the layer mask.
To the top
Select and display the layer mask channel
For easier editing of a layer mask, you can display the grayscale mask by itself or as a rubylith overlay on the layer.
• In the Layers panel, do one of the following:
- Alt-click (Windows) or Option-click (Mac OS) the layer mask thumbnail to view only the grayscale mask. To redisplay the layers, Alt-click or Option-click the layer mask thumbnail. Alternatively, click the eye icon ⚙ in the Properties panel (CC, CS6) or the Masks panel (CS5).
- Hold down Alt+Shift (Windows) or Option+Shift (Mac OS), and click the layer mask thumbnail to view the mask on top of the layer in a rubylith masking color. Hold down Alt+Shift or Option+Shift, and click the thumbnail again to turn off the color display.
Change the layer mask rubylith color or opacity
- Do one of the following:
• (CS5) Double-click the layer mask thumbnail.
- Double-click the layer mask channel in the Channels panel.
-
To choose a new mask color, in the Layer Mask Display Options dialog box, click the color swatch and choose a new color.
-
To change the opacity, enter a value between 0% and 100%.
Both the color and opacity settings affect only the appearance of the mask and have no effect on how underlying areas are protected. For example, you may want to change these settings to make the mask more easily visible against the colors in the image.
- Click OK.
To the top
Adjusting mask opacity and edges
Use the Properties panel (CC, CS6) or the Masks panel(CS5) to adjust the opacity of a selected layer or vector mask. The Density slider controls mask opacity. Feather lets you soften mask edges.
Additional options are specific to layer masks. The Invert option reverses masked and unmasked areas. The Mask Edge option gives you various controls to modify the mask edges, such as Smooth and Contract/Expand. For information on the Color Range option, see Confine adjustment and fill layers to specific areas.
Change mask density
- In the Layers panel, select the layer containing the mask you want to edit.
-
Do one of the following:
-
(CC, CS6) In the Layers panel click the Mask thumbnail. A border appears around the thumbnail.
-
(CS5) In the Masks panel, click the Pixel Mask button or the Vector Mask button.
-
In the Properties panel (CC, CS6) or the Masks panel (CS5), drag the Density slider to adjust the mask opacity.
At 100% density, the mask is completely opaque and blocks out any underlying area of the layer. As you lower the density, more of the area under the mask becomes visible.
Feather mask edges
- In the Layers panel, select the layer containing the mask you want to edit.
-
Do one of the following:
-
(CC, CS6) In the Layers panel click the Mask thumbnail. A border appears around the thumbnail.
• (CS5) In the Masks panel, click the Pixel Mask button or the Vector Mask button. -
Drag the Feather slider to apply feathering to the mask edges.
Feathering blurs the edges of the mask to create a softer transition between the masked and unmasked areas. Feathering is applied from the edges of the mask outward, within the range of pixels you set with the slider.
Refine mask edges
- In the Layers panel, select the layer containing the mask you want to edit.
- Do one of the following:
- (CC, CS6) In the Layers panel click the Mask thumbnail. A border appears around the thumbnail. - (CS5) In the Masks panel, click the Pixel Mask button or the Vector Mask button.
- Click Mask Edge. You can modify mask edges with the options in the Refine Mask dialog box and view the mask against different backgrounds. For a description of options, see Refine selection edges.
- Click OK to close the Refine Mask dialog box and apply your changes to the layer mask.
More Help Topics
- About masks and alpha channels
- Applying filters video

BY-NC-SA
Twitter™ and Facebook posts are not covered under the terms of Creative Commons.
Legal Notices | Online Privacy Policy
Selecting
Refine a selection
Infinite Skills (Aug. 9, 2012)
video-tutorial
Refine a selection or mask edge
Selecting areas of a photo
video2brain (May. 7, 2012)
video-tutorial
Discover the basic building block of image editing.
About selecting pixels
Select, deselect, and reselect pixels
To the top
About selecting pixels
A selection isolates one or more parts of your image. By selecting specific areas, you can edit and apply effects and filters to portions of your image while leaving the unselected areas untouched.
The easiest way to select pixels in your image is to use the quick selection tools. You can also select areas of a certain shape with the marquee tools or use the lasso tools to make a selection by tracing an element in your image. It's also possible to make selections based on a range of colors in an image. There are commands in the Select menu to select, deselect, or reselect all pixels.
In addition to pixels, vector data can be used to make selections. Use the pen or shape tools to produce precise outlines called paths. Paths can be converted to selections.
Selections can be copied, moved, and pasted, or saved and stored in an alpha channel. Alpha channels store selections as grayscale images called masks. A mask is like the inverse of a selection: it covers the unselected part of the image and protects it from any editing or manipulations you apply. You can convert a stored mask back into a selection by loading the alpha channel into an image.
Note: While paths can be converted to selections, selections can also be converted to paths.
To the top
Select, deselect, and reselect pixels
If a tool is not working as expected, you may have a hidden selection. Use the Deselect command and try the tool again.
Select all pixels on a layer within the canvas boundaries
- Select the layer in the Layers panel.
- Choose Select > All.
Deselect selections
- Do one of the following:
- Choose Select > Deselect.
- If you are using the Rectangle Marquee tool, the Elliptical Marquee tool, or the Lasso tool, click anywhere in the image outside the selected area.
Reselect the most recent selection
- Choose Select > Reselect.
More Help Topics
- Convert paths to selection borders
• Saving selections and alpha channel masks
Twitter ^™ and Facebook posts are not covered under the terms of Creative Commons.
Legal Notices | Online Privacy Policy
Move, hide, or invert a selection
Adjust selections manually
Expand or contract a selection by a specific number of pixels
Create a selection around a selection border
Expand a selection to include areas with similar color
Clean up stray pixels in a color-based selection
Refine selection edges
Soften the edges of selections
Remove fringe pixels from a selection
To the top
Move, hide, or invert a selection
You can move a selection border around an image, hide a selection border, and invert a selection so that the previously unselected part of the image is selected.
Note: To move the selection itself, not the selection border, use the Move tool. See Move a selection.
Move a selection border
- Using any selection tool, select New Selection □ from the options bar, and position the pointer inside the selection border. The pointer changes □ to indicate that you can move the selection.
- Drag the border to enclose a different area of the image. You can drag a selection border partly beyond the canvas boundaries. When you drag it back, the original border reappears intact. You can also drag the selection border to another image window.
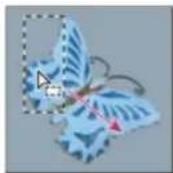

Original selection border (left), and selection border moved (right)

You can apply geometric transformations to change the shape of a selection border. (See Apply transformations.)
Control the movement of a selection
• To constrain the direction to multiples of 45^ , begin dragging, and then hold down Shift as you continue to drag.
- To move the selection in 1-pixel increments, use an arrow key.
• To move the selection in 10-pixel increments, hold down Shift, and use an arrow key.
Hide or show selection edges
Do one of the following:
- Choose View > Extras. This command shows or hides selection edges, grids, guides, target paths, slices, annotations, layer borders, count, and smart guide.
- Choose View > Show > Selection Edges. This toggles the view of the selection edges and affects the current selection only. The selection edges reappear when you make a different selection.
Select the unselected parts of an image
- Choose Select > Inverse.
You can use this option to select an object placed against a solid-colored background. Select the background using the Magic Wand tool and then invert the selection.
To the top
Adjust selections manually
You can use the selection tools to add to or subtract from existing pixel selections.
Before manually adding to or subtracting from a selection, you may want to set the feather and anti-aliasing values in the options bar to the same settings used in the original selection.
Add to a selection or select an additional area
- Make a selection.
-
Using any selection tool, do one of the following:
-
Select the Add To Selection option in the options bar, and drag to add to the selection.
- Hold down Shift, and drag to add to the selection.
A plus sign appears next to the pointer when you're adding to a selection.
Subtract from a selection
- Make a selection.
-
Using any selection tool, do one of the following:
-
Select the Subtract From Selection option in the options bar, and drag to intersect with other selections.
- Hold down Alt (Windows) or Option (Mac OS), and drag to subtract another selection.
A minus sign appears next to the pointer when you're subtracting from a selection.
Select only an area intersected by other selections
-
Make a selection.
-
Using any selection tool, do one of the following:
-
Select the Intersect With Selection option in the options bar, and drag.
- Hold down Alt+Shift (Windows) or Option+Shift (Mac OS) and drag over the portion of the original selection that you want to select.
An "x" appears next to the pointer when you're selecting an intersected area.

Intersected selections
To the top
Expand or contract a selection by a specific number of pixels
- Use a selection tool to make a selection.
- Choose Select > Modify > Expand or Contract.
- For Expand By or Contract By, enter a pixel value between 1 and 100, and click OK.
The border is increased or decreased by the specified number of pixels. (Any portion of the selection border running along the canvas's edge is unaffected by the Expand command.)
To the top
Create a selection around a selection border
The Border command lets you select a width of pixels inside and outside an existing selection border. This can be useful when you need to select a border or band of pixels around an image area, rather than the area itself, for example to clean up a halo effect around a pasted object.

Original selection (left), and after Border command: 5 pixels (right)
- Use a selection tool to make a selection.
- Choose Select > Modify > Border.
- Enter a value between 1 and 200 pixels for the border width of the new selection, and click OK.
The new selection frames the original selected area, and is centered on the original selection border. For example, a border width of 20
Expand a selection to include areas with similar color
Do one of the following:
- Choose Select > Grow to include all adjacent pixels falling within the tolerance range specified in the Magic Wand options.
- Choose Select > Similar to include pixels throughout the image, not just adjacent ones, falling within the tolerance range.
To increase the selection in increments, choose either command more than once.
Note: You cannot use the Grow and Similar commands on Bitmap mode images or 32-bits-per-channel images.
To the top
Clean up stray pixels in a color-based selection
- Choose Select > Modify > Smooth.
- For Sample Radius, enter a pixel value between 1 and 100, and click OK.
For each pixel in the selection, Photoshop examines the pixels around it, to the distance you specify in the radius setting. If more than half of these surrounding pixels are selected, the pixel remains in the selection, and the unselected pixels around it are added to the selection. If less than half the surrounding pixels are selected, the pixel is removed from the selection. The overall effect is to reduce patchiness and smooth sharp corners and jagged lines in the selection.
To the top
Refine selection edges
The Refine Edge option improves the quality of selection edges, letting you extract objects with ease. You can also use Refine Edge options to refine a layer mask. (See Adjust mask opacity or edges.)
Video tutorial: Extracting objects in Photoshop CS5
text_image
123Extract with speed and precision using Refine Edge.... Read More http://tv.adobe.com/watch/the-russell-brown-s...

by Russell Brown http://tv.adobe.com/show/t...
Contribute your expertise to Adobe Community Help
Video tutorial: Precisely selecting portraits
Easily select whispy hair to place portraits on new backgrounds.... Read More http://goo.gl/NHWnq

by Deke McClelland http://www.deke.com/
Contribute your expertise to Adobe Community Help
text_image
123Video tutorial: Quickly creating refined selections

text_image
123Combine the Quick Selection and edge refinement tools to maximize your efficiency.... Read More
http://goo.gl/wkXix

by Martin Evening
http://www.martinevening.c...
Contribute your expertise to Adobe Community Help
Video tutorial: Using improved selecting and masking

text_image
123Take a tour through the all the enhancements to selections and masks.... Read More
http://www.adobe.com/go/lrvid5002_ps_en

by Jan Kabili
http://www.lynda.com/Jan-K...
Contribute your expertise to Adobe Community Help
- Create a selection with any selection tool.
- Click Refine Edge in the options bar, or choose Select > Refine Edge. Then set the following options:
View Mode From the pop-up menu, choose a mode to change how the selection is displayed. For information about each mode, hover the pointer over it until a tool tip appears. Show Original displays the original selection for comparison. Show Radius displays the selection border where edge refinement occurs.
Refine Radius and Erase Refinements tools

Let you precisely adjust the border area in which edge refinement occurs. To quickly toggle from one tool to the other, press Shift+E. To change the brush size, press the bracket keys.

Brush over soft areas such as hair or fur to add fine details to the selection.
Smart Radius Automatically adjusts the radius for hard and soft edges found in the border region. Deselect this option if the border is uniformly hard- or soft-edged, or if you want to control the Radius setting and refinement brushes more precisely.
Radius Determines the size of the selection border in which edge refinement occurs. Use a small radius for sharp edges, and a large one for softer edges.
Smooth Reduces irregular areas ("hills and valleys") in the selection border to create a smoother outline.
Feather Blurs the transition between the selection and surrounding pixels.
Contrast When increased, soft-edged transitions along the selection border become more abrupt. Typically, the Smart Radius option and refinement tools are more effective.
Shift Edge Moves soft-edged borders inward with negative values or outward with positive ones. Shifting these borders inward can help remove unwanted background colors from selection edges.
Decontaminate Colors Replaces color fringes with the color of fully selected pixels nearby. The strength of color replacement is proportionate to the softness of selection edges.
Note: Because this option changes pixel color, it requires output to a new layer or document. Retain the original layer so you can revert back to it if needed. (To easily see changes in pixel color, choose Reveal Layer for the View Mode.)
Amount Changes the level of decontamination and fringe replacement.
Output To Determines whether the refined selection becomes a selection or mask on the current layer, or produces a new layer or document.
To the top
Soften the edges of selections
You can smooth the hard edges of a selection by anti-aliasing and by feathering.
Anti-aliasing Smooths the jagged edges of a selection by softening the color transition between edge pixels and background pixels. Because only the edge pixels change, no detail is lost. Anti-aliasing is useful when cutting, copying, and pasting selections to create composite images. Anti-aliasing is available for the Lasso tool, the Polygonal Lasso tool, the Magnetic Lasso tool, the Elliptical Marquee tool, and the Magic Wand tool. (Select a tool to display its options bar.)
Note: You must specify this option before using these tools. After a selection is made, you cannot add anti-aliasing.
Feathering Blurs edges by building a transition boundary between the selection and its surrounding pixels. This blurring can cause some loss of detail at the edge of the selection.
You can define feathering for the Marquee tools, the Lasso tool, the Polygonal Lasso tool, or the Magnetic Lasso tool as you use the tool, or you can add feathering to an existing selection.
Note: Feathering effects become apparent only after you move, cut, copy, or fill the selection.
Video tutorial: Flexible feathering

text_image
123For superior results, feather masks rather than selections.... Read More
http://goo.gl/z5r9g

by video2brain - Tim Grey
http://www.video2brain.com...
Contribute your expertise to Adobe Community Help
Select pixels using anti-aliasing
- Select the Lasso tool, the Polygonal Lasso tool, the Magnetic Lasso tool, the Elliptical Marquee tool, or the Magic Wand tool.
- Select Anti-aliased in the options bar.
Define a feathered edge for a selection tool
- Select any of the lasso or marquee tools.
- Enter a Feather value in the options bar. This value defines the width of the feathered edge and can range from 0 to 250 pixels.
Define a feathered edge for an existing selection
- Choose Select > Modify > Feather.
- Enter a value for the Feather Radius, and click OK.
Note: A small selection made with a large feather radius may be so faint that its edges are invisible and thus not selectable. If you see the message "No pixels are more than 50% selected," either decrease the feather radius or increase the size of the selection. Or click OK to accept the mask at its current setting and create a selection in which you cannot see the edges.
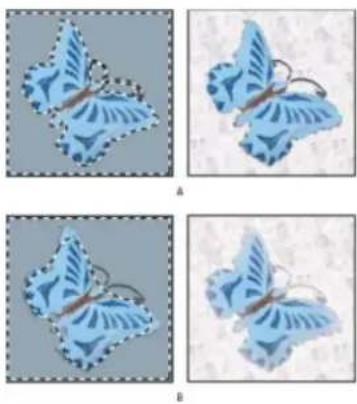
Selection without feathering and with feathering.
A. Selection with no feather, same selection filled with pattern B. Selection with feather, same selection filled with pattern
To the top
Remove fringe pixels from a selection
When you move or paste an anti-aliased selection, some of the pixels surrounding the selection border are included with the selection. This can result in a fringe or halo around the edges of the pasted selection. These Layer > Matting commands let you edit unwanted edge pixels:
• Color Decontaminate replaces background colors in fringe pixels with the color of fully selected pixels nearby.
- Defringe replaces the color of fringe pixels with the color of pixels farther in from the edge of the selection that lack the background color.
- Remove Black Matte and Remove White Matte are useful when a selection is anti-aliased against a white or black background and you want to paste it onto a different background. For example, anti-aliased black text on a white background has gray pixels at the edges, which are visible against a colored background.
You can also remove fringe areas by using the Advanced Blending sliders in the Layer Styles dialog box to remove, or make transparent, areas
from the layer. In this case, you would make the black or white areas transparent. Alt-click (Windows) or Option-click (Mac OS) the sliders to separate them; separating the sliders allows you to remove fringe pixels and retain a smooth edge.
Decrease fringe on a selection
- Choose Layer > Matting > Defringe.
- Enter a value in the Width box to specify the area in which to search for replacement pixels. In most cases, a distance of 1 or 2 pixels is enough.
- Click OK.
Remove a matte from a selection
- Choose Layer > Matting > Remove Black Matte or Layer > Matting > Remove White Matte.
Adobe also recommends

Twitter™ and Facebook posts are not covered under the terms of Creative Commons.
Legal Notices | Online Privacy Policy
Moving, copying, and deleting selected pixels
Move a selection
Copy selections
Copy between applications
Delete selected pixels
To the top
Move a selection
-
Select the Move tool
-
Move the pointer inside the selection border, and drag the selection to a new position. If you have selected multiple areas, all move as you drag.

Original selection (left), and after the selection is moved with the Move tool (right)
To the top
Copy selections
You can use the Move tool to copy selections as you drag them within or between images, or you can copy and move selections using the Copy, Copy Merged, Cut, and Paste commands. Dragging with the Move tool saves memory because the clipboard isn't used.
When a selection or layer is pasted between images with different resolutions, the pasted data retains its pixel dimensions. This can make the pasted portion appear out of proportion to the new image. Use the Image Size command to make the source and destination images the same resolution before copying and pasting, or use the Free Transform command to resize the pasted content.
Note: Depending on your color management settings and the color profile associated with the file (or imported data), you may be prompted to specify how to handle color information in the file (or imported data).
Understanding the copy and paste commands
Copy Copies the selected area on the active layer.
Copy Merged Makes a merged copy of all the visible layers in the selected area.
Paste Pastes a copied selection into another part of the image or into another image as a new layer. If you have a selection, the Paste command places the copied selection over the current selection. Without an active selection, Paste places the copied selection in the middle of the view area.
Paste In Place If the clipboard contains pixels copied from another Photoshop document, pastes the selection into the same relative location in the target document as it occupied in the source.
Paste Into or Paste Outside Pastes a copied selection into or outside another selection in any image. The source selection is pasted onto a new layer, and the destination selection border is converted into a layer mask.
Copy a selection
-
Select the area you want to copy.
-
Choose Edit > Copy, or Edit > Copy Merged.
Copy a selection while dragging
-
Select the Move tool ⬆, or hold down Ctrl (Windows) or Command (Mac OS) to activate the Move tool.
-
Hold down Alt (Windows) or Option (Mac OS), and drag the selection you want to copy and move.
When copying between images, drag the selection from the active image window into the destination image window. If nothing is selected, the entire active layer is copied. As you drag the selection over another image window, a border highlights the window if you can drop the selection into it.

natural_image
Two-panel image showing a butterfly on pink flowers, one with blue stripes and the other with patterned wings (no text or symbols)Dragging a selection into another image
Create multiple copies of a selection within an image
-
Select the Move tool ⬆, or hold down Ctrl (Windows) or Command (Mac OS) to activate the Move tool.
-
Copy the selection:
- Hold down Alt (Windows) or Option (Mac OS), and drag the selection.
• To copy the selection and offset the duplicate by 1 pixel, hold down Alt or Option, and press an arrow key.
- To copy the selection and offset the duplicate by 10 pixels, press Alt+Shift (Windows) or Option+Shift (Mac OS), and press an arrow key.
As long as you hold down Alt or Option, each press of an arrow key creates a copy of the selection and offsets it by the specified distance from the last duplicate. In this case, the copy is made on the same layer.
Paste one selection into or outside another
-
Cut or copy the part of the image you want to paste.
-
In the same image or another, select the area you want to paste into or outside.
Note: If you're pasting outside, select an area smaller than the copied selection.
-
Do either of the following:
-
Choose Edit > Paste Special > Paste Into. The contents of the source selection appear within the destination selection.
- Choose Edit > Paste Special > Paste Outside. The contents of the source selection appear around the destination selection.
The Paste Into or Paste Outside command adds a layer and layer mask to the image. In the Layers panel, the new layer contains a layer thumbnail for the pasted selection next to a layer mask thumbnail. The layer mask is based on the selection you pasted into: the selection is unmasked (white), the rest of the layer is masked (black). The layer and layer mask are unlinked—that is, you can move each one independently.
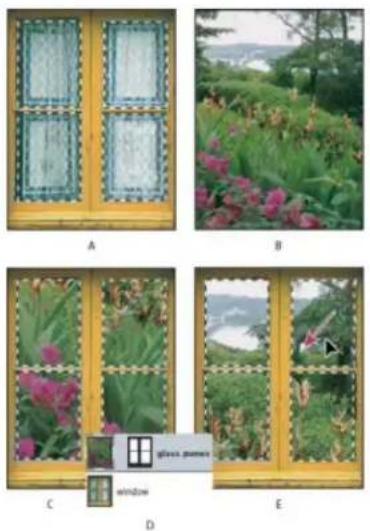
natural_image
Four-panel image showing a window with petal-like cutouts, a garden scene with pink flowers, and a small window labeled 'glass power' (no text or symbols on main objects)Using the Paste Into command
A. Window panes selected B. Copied image C. Paste Into command D. Layer thumbnails and layer mask in Layers panel E. Pasted image repositioned
-
Select the Move tool ✝, or hold down the Ctrl (Windows) or Command (Mac OS) key to activate the Move tool. Then drag the source contents until the part you want appears through the mask.
-
To specify how much of the underlying image shows through, click the layer mask thumbnail in the Layers panel, select a painting tool, and edit the mask:
-
To hide more of the image underlying the layer, paint the mask with black.
• To reveal more of the underlying image, paint the mask with white.
• To partially reveal the underlying image, paint the mask with gray. -
If you are satisfied with your results, you can choose Layer > Merge Down to merge the new layer and layer mask with the underlying layer and make the changes permanent.
To the top
Copy between applications
You can use the Cut, Copy, or Paste commands to copy selections from Photoshop and paste them into other applications, or to paste artwork from other applications into Photoshop. The cut or copied selection remains on the clipboard until you cut or copy another selection. You can also
copy artwork between Photoshop and Illustrator by dragging and dropping.
In some cases, the contents of the clipboard are converted to a raster image. Photoshop prompts you when vector artwork will be rasterized.
Note: The image is rasterized at the resolution of the file into which you paste it. Vector Smart Objects are not rasterized.
Paste PostScript artwork from another application
-
In the supporting application, select your artwork, and choose Edit > Copy.
-
Select the image into which you'll paste the selection.
-
Choose Edit > Paste.
-
In the Paste dialog box, select from the following Paste As options:
Smart Object Places the artwork in a new layer as a smart object.
Pixels Rasterizes the artwork as it is pasted. Rasterizing converts mathematically-defined vector artwork to pixels.
Paths Pastes the copy as a path in the Paths panel. When copying type from Illustrator, you must first convert it to outlines.
Shape Layer Creates a new shape layer that uses the path as a vector mask.
Note: When copying artwork from Adobe Illustrator, the default clipboard preferences in Illustrator may prevent the Paste dialog box from appearing in Photoshop. Select AICB in the File Handling and Clipboard area of the Preferences dialog box in Illustrator if you want the Paste options to appear when you paste the artwork into Photoshop.
- If you chose Paste As Pixels in the previous step, you can choose Anti-aliased in the options bar to make a smooth transition between the edges of the selection and the surrounding pixels.
Note: You can use the Matting commands if you have already merged data and are trying to reextract the rasterized data.
Save clipboard contents when you quit Photoshop
- Do one of the following:
• (Windows) Choose Edit > Preferences > General.
• (Mac OS) Choose Photoshop > Preferences > General.
- Select Export Clipboard to save any Photoshop contents to the clipboard when you quit Photoshop.
Copy artwork by dragging and dropping
- Do one of the following:
- Drag one or more Illustrator vector objects into an open image in Photoshop. This creates a vector Smart Object layer in the image Choose Layer > Smart Objects > Edit Content to reopen the content in Illustrator for editing.
• To copy the vector object as a path in Photoshop, hold down Ctrl (Windows) or Command (Mac OS) as you drag from Illustrator.
- To copy the contents of the currently selected layer in Photoshop to Illustrator, use the Move tool to drag the content from the Photoshop window into an open Illustrator document.
To the top
Delete selected pixels
- Choose Edit > Clear, or press Backspace (Windows) or Delete (Mac OS). To cut a selection to the clipboard, choose Edit > Cut.
Deleting a selection on a background layer replaces the original color with the background color. Deleting a selection on a standard layer replaces the original color with layer transparency.
Adobe also recommends
- Set up color management

Twitter ^™ and Facebook posts are not covered under the terms of Creative Commons.
Legal Notices | Online Privacy Policy
Saving selections and alpha channel masks
About masks and alpha channels Create and edit alpha channel masks Save and load selections
To the top
About masks and alpha channels
When you select part of an image, the area that is not selected is masked, or protected from editing. So, when you create a mask, you isolate and protect areas of an image as you apply color changes, filters, or other effects to the rest of the image. You can also use masks for complex image editing such as gradually applying color or filter effects to an image.

Examples of masks
A. Opaque mask used to protect the background and edit the butterfly B. Opaque mask used to protect the butterfly and color the background C. Semitransparent mask used to color the background and part of the butterfly
Masks are stored in alpha channels. Masks and channels are grayscale images, so you can edit them like any other image with painting tools, editing tools and filters. Areas painted black on a mask are protected, and areas painted white are editable.
Use Quick Mask mode to convert a selection to a temporary mask for easier editing. The Quick Mask appears as a colored overlay with adjustable opacity. You can edit the Quick Mask using any painting tool or modify it with a filter. Once you exit Quick Mask mode the mask is converted back to a selection on the image.
To save a selection more permanently, you can store it as an alpha channel. The alpha channel stores the selection as an editable grayscale mask in the Channels panel. Once stored as an alpha channel, you can reload the selection at any time or even load it into another image.
Selection saved as an alpha channel in Channels panel
Note: You can mask or hide parts of a layer using a layer mask.
To the top
Create and edit alpha channel masks
You can create a new alpha channel and then use painting tools, editing tools, and filters to create a mask from the alpha channel. You can also save an existing selection in a Photoshop image as an alpha channel that appears in the Channels panel. See Save and load selections.
Book excerpt: Using the Masks panel

text_image
123Quickly fine-tune masks with one consolidated set of options.... Read More http://goo.gl/p8Ox3

by Conrad Chavez
http://www.conradchavez.co...
Contribute your expertise to Adobe Community Help
Create an alpha channel mask using current options
- Click the New Channel button ☐ at the bottom of the Channels panel.
- Paint on the new channel to mask out image areas.
Select areas of the image before you create the channel for the mask. Then paint on the channel to refine the mask.
Create an alpha channel mask and set options
- Alt-click (Windows) or Option-click (Mac OS) the New Channel button at the bottom of the Channels panel, or choose New Channel from the Channels panel menu.
- Specify options in the New Channel dialog box.
- Paint on the new channel to mask out image areas.
Channel options
To change options for an existing channel, double-click the channel thumbnail in the Channels panel or select Channel options from the Channels panel menu.
Options available in the New Channel and Channel Options dialog boxes:
Masked areas Sets masked areas to black (opaque) and selected areas to white (transparent). Painting with black increases the masked area; painting with white increases the selected area. When this option is selected, the Quick Mask button in the toolbox becomes a white circle on a gray background ☐.
Selected Areas Sets masked areas to white (transparent) and selected areas to black (opaque). Painting with white increases the masked area; painting with black increases the selected area. When this option is selected, the Quick Mask button in the toolbox becomes a gray circle on a white background ☐.
Spot Color Converts an alpha channel to a spot color channel. Only available for existing channels.
Color Sets the color and opacity of the mask. Click the color field to change the color. The color and opacity settings affect only the appearance of the mask and have no effect on how underlying areas are protected. Changing these settings may make the mask more easily visible against the colors in the image.
Paint on a channel to mask image areas
When the new channel appears at the bottom of the Channels panel, it is the only channel visible in the image window. Click the eye icon 🤔 for the composite color channel (RGB, CMYK) to display the image with a color overlay showing the mask.
- Select the brush or an editing tool and do one of the following to add or subtract from the mask created from the alpha channel:
• To remove areas in the new channel, paint with white.
• To add areas in the new channel, paint with black.
- To add or remove areas using opacities less than 100%, set the Opacity in the options bar of the painting or editing tool and then paint with white or black. You can also paint with a color to achieve lower opacities.
To the top
Save and load selections
You can save any selection as a mask in a new or existing alpha channel and later reload the selection from the mask.
You can use a selection as a layer mask by loading the selection to make it active, then adding a new layer mask.
Save a selection to a new channel
- Select the area or areas of the image you want to isolate.
- Click the Save Selection button ☐ at the bottom of the Channels panel. A new channel appears, named according to the sequence in which it was created.
Save a selection to a new or existing channel
- Use a selection tool to select the area or areas of the image you want to isolate.
- Choose Select > Save Selection.
- Specify the following in the Save Selection dialog box, and click OK:
Document Chooses a destination image for the selection. By default, the selection is placed in a channel in your active image. You can choose to save the selection to a channel in another open image with the same pixel dimensions or to a new image.
Channel Chooses a destination channel for the selection. By default, the selection is saved in a new channel. You can choose to save the selection to any existing channel in the selected image or to a layer mask if the image contains layers.
- If you're saving the selection as a new channel, type a name for the channel in the Name text box.
- If you're saving the selection to an existing channel, select how to combine the selections:
Replace Channel optionselections: replacing in channelReplace Channel Replaces the current selection in the channel.
selections: adding to channel Add to Channel Adds the selection to the current channel contents.
selections: subtracting from channelSubtract From Channel Deletes the selection from the channel contents.
Intersect With Channel optionselections: intersecting in channel Intersect With Channel Keeps the areas of the new selection that intersect with the channel contents.
You can select the channel from the Channels panel to see the saved selection displayed in grayscale.
Load a saved selection from the Channels panel
You can reuse a previously saved selection by loading it into an image. You can also load the selection into an image after you finish modifying an alpha channel.
- Do one of the following in the Channels panel:
- Select the alpha channel, click the Load Selection button ○ at the bottom of the panel, and then click the composite color channel near the top of the panel.
- Drag the channel containing the selection you want to load onto the Load Selection button.
- Ctrl-click (Windows) or Command-click (Mac OS) the channel containing the selection you want to load.
• To add the mask to an existing selection, press Ctrl+Shift (Windows) or Command+Shift (Mac OS), and click the channel.
• To subtract the mask from an existing selection, press Ctrl+Alt (Windows) or Command+Option (Mac OS), and click the channel. - To load the intersection of the saved selection and an existing selection, press Ctrl+Alt+Shift (Windows) or Command+Option+Shift (Mac OS), and select the channel.

You can drag a selection from one open Photoshop image into another.
Load a saved selection
Note: If you are loading a saved selection from another image, make sure to open it. Also, make sure your destination image is active.
- Choose Select > Load Selection.
- Specify the Source options in the Load Selection dialog box:
Document Chooses the source to load.
Channel Chooses the channel containing the selection you want to load.
Invert Selects the non-selected areas.
- Select an Operation option to specify how to combine the selections if the image already has a selection:
New Selection Adds the loaded selection.
Add To Selection Adds the loaded selection to any existing selections in the image.
Subtract From Selection Subtracts the loaded selection from existing selections in the image.
Intersect With Selection Saves a selection from an area intersected by the loaded selection and existing selections in the image.

You can drag a selection from one open Photoshop image into another.
Adobe also recommends

BY-NC-SA
Twitter ^™ and Facebook posts are not covered under the terms of Creative Commons.
Legal Notices | Online Privacy Policy
Select with the Lasso tool Select with the Polygonal Lasso tool Select with the Magnetic Lasso tool
To the top
Select with the Lasso tool
The Lasso tool is useful for drawing freeform segments of a selection border.
-
Select the Lasso tool ♀, and set feathering and anti-aliasing in the options bar. (See Soften the edges of selections.)
-
To add to, subtract from, or intersect with an existing selection, click the corresponding button in the options bar.

Selection options
A. New B. Add To C. Subtract From D. Intersect With
-
Do either of the following:
-
Drag to draw a freehand selection border.
-
To switch between freehand and straight-edged segments, press Alt (Windows) or Option (Mac OS), and click where segments should begin and end. (To erase recently drawn straight segments, hold down the Delete key.)
-
To close the selection border, release the mouse without holding down Alt or Option.
-
(Optional) Click Refine Edge to further adjust the selection boundary. See Refine selection edges.
To the top
Select with the Polygonal Lasso tool
The Polygonal Lasso tool is useful for drawing straight-edged segments of a selection border.
- Select the Polygonal Lasso tool ↗, and select options.
- Specify one of the selection options in the options bar.

Selection options
A. New B. Add To C. Subtract From D. Intersect With
- (Optional) Set feathering and anti-aliasing in the options bar. See Soften the edges of selections.
- Click in the image to set the starting point.
-
Do one or more of the following:
-
To draw a straight segment, position the pointer where you want the first straight segment to end, and click. Continue clicking to set endpoints for subsequent segments.
- To draw a straight line at a multiple of 45^ , hold down Shift as you move to click the next segment.
-
To draw a freehand segment, hold down Alt (Windows) or Option (Mac OS), and drag. When you finish, release Alt or Option and the mouse button.
• To erase recently drawn straight segments, press the Delete key. -
Close the selection border:
-
Position the Polygonal Lasso tool pointer over the starting point (a closed circle appears next to the pointer), and click.
-
If the pointer is not over the starting point, double-click the Polygonal Lasso tool pointer, or Ctrl-click (Windows) or Command-click (Mac OS).
-
(Optional) Click Refine Edge to further adjust the selection boundary. See Refine selection edges.
To the top
Select with the Magnetic Lasso tool
When you use the Magnetic Lasso tool, the border snaps to the edges of defined areas in the image. The Magnetic Lasso tool is not available for 32-bits-per-channel images.
The Magnetic Lasso tool is especially useful for quickly selecting objects with complex edges set against high-contrast backgrounds.
- Select the Magnetic Lasso tool.
- Specify one of the selection options in the options bar.

Selection options
A. New B. Add To C. Subtract From D. Intersect With
-
(Optional) Set feathering and anti-aliasing in the options bar. See Soften the edges of selections.
-
Set any of these options:
Width To specify a detection width, enter a pixel value for Width. The Magnetic Lasso tool detects edges only within the specified distance from the pointer.
To change the lasso pointer so that it indicates the lasso width, press the Caps Lock key. You can change the pointer while the tool is selected but not in use. Press the right bracket (j) to increase the Magnetic Lasso edge width by 1 pixel; press the left bracket (j) to decrease the width by 1 pixel.
Contrast To specify the lasso's sensitivity to edges in the image, enter a value between 1% and 100% for Contrast. A higher value detects only edges that contrast sharply with their surroundings; a lower value detects lower-contrast edges.
Frequency To specify the rate at which the lasso sets fastening points, enter a value between 0 and 100 for Frequency. A higher value anchors the selection border in place more quickly.
On an image with well-defined edges, try a higher width and higher edge contrast, and trace the border roughly. On an image with softer edges, try a lower width and lower edge contrast, and trace the border more precisely.
Stylus Pressure If you are working with a stylus tablet, select or deselect the Stylus Pressure option. When the option is selected, an increase in stylus pressure decreases the edge width.
-
Click in the image to set the first fastening point. Fastening points anchor the selection border in place.
-
Release the mouse button or keep it depressed, and then move the pointer along the edge you want to trace.
The most recent segment of the selection border remains active. As you move the pointer, the active segment snaps to the strongest edge in the image, based on the detection width set in the options bar. Periodically, the Magnetic Lasso tool adds fastening points to the selection border to anchor previous segments.
- If the border doesn't snap to the desired edge, click once to add a fastening point manually. Continue to trace the edge, and add fastening points as needed.
natural_image
Decorative bottle with purple floral pattern and a small handle (no text or symbols visible)
natural_image
Illustration of a decorative blue floral-patterned bottle with a cap (no text or symbols)Fastening points anchor selection border to edges
- To switch temporarily to the other lasso tools, do one of the following:
• To activate the Lasso tool, hold down Alt (Windows) or Option (Mac OS), and drag with the mouse button depressed.
• To activate the Polygonal Lasso tool, hold down Alt (Windows) or Option (Mac OS), and click.
-
To erase recently drawn segments and fastening points, press the Delete key until you've erased the fastening points for the desired segment.
-
Close the selection border:
-
To close the border with a magnetic segment, double-click, or press Enter or Return. (To manually close the border, drag over the starting point and click.)
-
To close the border with a straight segment, hold down Alt (Windows) or Option (Mac OS), and double-click.
-
(Optional) Click Refine Edge to further adjust the selection boundary. See Refine selection edges.
More Help Topics
• Saving selections and alpha channel masks
- Convert paths to selection borders
- Selection tools gallery
Twitter™ and Facebook posts are not covered under the terms of Creative Commons.
Legal Notices | Online Privacy Policy
The marquee tools let you select rectangles, ellipses, and 1-pixel rows and columns.
- Select a marquee tool:
Rectangular Marquee

Makes a rectangular selection (or a square, when used with the Shift key).
Elliptical Marquee

Makes an elliptical selection (or a circle, when used with the Shift key).
Single Row or Single Column Marquee Defines the border as a 1-pixel-wide row or column.
- Specify one of the selection options in the options bar.
Selection options
A. New B. Add To C. Subtract From D. Intersect With
-
Specify a feathering setting in the options bar. Turn anti-aliasing on or off for the Elliptical Marquee tool. See Soften the edges of selections.
-
For the Rectangle Marquee tool or the Elliptical Marquee tool, choose a style in the options bar:
Normal Determines marquee proportions by dragging.
Fixed Ratio Sets a height-to-width ratio. Enter values (decimal values are valid) for the aspect ratio. For example, to draw a marquee twice as wide as it is high, enter 2 for the width and 1 for the height.
Fixed Size Specifies set values for the marquee's height and width. Enter pixel values in whole numbers.

In addition to pixels (px) you can also use specific units such as inches (in) or centimeters (cm) in height and width values.
- For aligning your selection to guides, a grid, slices, or document bounds, do one of the following to snap your selection:
- Choose View > Snap, or choose View > Snap To and choose a command from the submenu. The marquee selection can snap to a document boundary or to a variety of Photoshop Extras, controlled in the Snap To submenu.
- Do one of the following to make a selection:
- With the Rectangle Marquee tool or the Elliptical Marquee tool, drag over the area you want to select.
- Hold down Shift as you drag to constrain the marquee to a square or circle (release the mouse button before you release Shift to keep
the selection shape constrained).
- To drag a marquee from its center, hold down Alt (Windows) or Option (Mac OS) after you begin dragging.

Dragging a marquee from the corner of an image (left), and from the center of an image (right) by pressing Alt/Option as you drag
- With the Single Row or Single Column Marquee tool, click near the area you want to select, and then drag the marquee to the exact location. If no marquee is visible, increase the magnification of your image view.
To reposition a rectangle or elliptical marquee, first drag to create the selection border, keeping the mouse button depressed. Then hold down the spacebar and continue to drag. Release the spacebar, but keep the mouse button depressed, if you need to continue adjusting the selection border.
More Help Topics
• Saving selections and alpha channel masks
- Convert paths to selection borders
- Selection tools gallery
Twitter™ and Facebook posts are not covered under the terms of Creative Commons.
Legal Notices | Online Privacy Policy
Use the more effective and flexible Refine Edge command Use the older, optional Extract plug-in (Windows only)
When you extract an object, Photoshop erases its background to transparency. Pixels on the edge of the object lose the color components derived from the background, so they can blend with a new background without producing a color halo.
To the top
Use the more effective and flexible Refine Edge command
For superior results and nondestructive processing, use the Select > Refine Edge command. See Refine selection edges for instructions and links to additional helpful tutorials.
The Refine Edge command is particularly impressive with highly complex edge content such as wispy hair. Unlike the older Extract plug-in, which permanently erases pixel data, the Refine Edge command creates selection masks that you can later readjust and fine-tune.
To the top
Use the older, optional Extract plug-in (Windows only)
Note: The Extract plug-in is not available for Mac OS because it is incompatible with recent versions of that operating system, and the Refine Edge command produces better extractions.
Selected area highlighted and filled, and extracted object
-
Because the Refine Edge command is superior, the Extract plug-in is not installed with Photoshop. Download the optional Windows plug-in here.
-
In the Layers palette, select the layer containing the object you want to extract. If you select a background layer, it becomes a normal layer after the extraction. If the layer contains a selection, the extraction erases the background only in the selected area.
To avoid losing the original image information, duplicate the layer or make a snapshot of the original image state.
- Choose Filter > Extract, and then specify tool options:
Brush Size Enter a value, or drag the slider to specify the width of the Edge Highlighter tool. You also use the Brush Size option to specify the width of the Eraser, Cleanup, and Edge Touchup tools.
Highlight Choose a preset color option for the highlight that appears around objects when you use the Edge Highlighter tool, or choose Other to pick a custom color for the highlight.
Fill Choose a preset color option, or choose Other to pick a custom color for the area covered by the Fill tool.
Smart Highlighting Select this option if you are highlighting a well-defined edge. The option helps you keep the highlight on the edge, and applies a highlight that is just wide enough to cover the edge, regardless of the current brush size.
Note: If you use Smart Highlighting to mark an object edge that's near another edge, decrease the brush size if conflicting edges pull the highlight off the object edge. If the object edge has a uniform color on one side and high-contrast edges on the other side, keep the object edge within the brush area but center the brush on the uniform color.
Specify Extraction options:
Textured Image Select this option if the foreground or background of your image contains a lot of texture.
Smooth Enter a value or drag the slider to increase or decrease the smoothness of the outline. It's usually best to begin with zero or a small value to avoid unwanted blurring of details. If there are sharp artifacts in the extraction result, you can increase the Smooth value to help remove them in the next extraction.
Channel Choose the alpha channel from the Channel menu to base the highlight on a selection saved in an alpha channel. The alpha channel should be based on a selection from the edge boundary. If you modify a highlight based on a channel, the channel name in the menu changes to Custom. Your image must have an alpha channel for the Channel option to be available.
Force Foreground Select this option if the object is especially intricate or lacks a clear interior.
- Select the Edge Highlighter tool ⬤, and draw to define the edge of the object you want to extract. Drag so that the highlight slightly overlaps both the foreground object and its background. Use a large brush to cover wispy, intricate edges where the foreground blends into the background, as with hair or trees.

Use either the Zoom tool or the Hand tool to adjust the view as needed.
If you need to erase the highlight, select the Eraser tool ☐, and drag it over the highlight. To erase the entire highlight, press Alt+Backspace (Windows) or Option+Delete (Mac OS).
If the object has a well-defined interior, make sure the highlight forms a complete enclosure. You do not need to highlight areas where the object touches the image boundaries. If the object lacks a clear interior, highlight the entire object.
Note: You can't highlight the entire object if you've selected Textured Image or Force Foreground.
-
Define the foreground area by doing one of the following:
-
If the object has a well-defined interior, select the Fill tool 🔊. Click inside the object to fill its interior. Clicking a filled area again with the Fill tool removes the fill.
-
If you've selected Force Foreground, select the Eyedropper tool ⚙️, and click inside the object to sample the foreground color, or click in the Color text box and use a Color Picker to select the foreground color. This technique works best with objects that contain tones of a single color.
-
(Optional) Click Preview to preview the extracted object. Zoom in as needed.
Show Choose a menu option to switch between views of the original and the extracted image.
Display Choose a menu option to preview the extracted object against a colored matte background or a grayscale background. To display a transparent background, choose None.
-
(Optional) Improve the extraction by doing one of the following:
-
Choose new Highlight and Fill options and draw again with the Edge Highlighter tool. Define the foreground area once more, and then preview the extracted object.
- Specify new Extraction settings (Smooth, Force Foreground, or Color) and then preview the extracted object.
When you are satisfied with the extraction, you can do the final touchups.
-
Touch up the extraction results by doing one of the following:
-
To erase background traces in the extracted area, use the Cleanup tool. The tool subtracts opacity and has a cumulative effect. You can also use the Cleanup tool to fill gaps in the extracted object. Hold down Alt (Windows) or Option (Mac OS) while dragging to add back opacity.
- To edit the edge of the extracted object, use the Edge Touchup tool. The tool sharpens edges and has a cumulative effect. If there is no clear edge, the Edge Touchup tool adds opacity to the object or subtracts opacity from the background.
You can also clean up the image after an extraction by using the Background Eraser and History Brush tools in the toolbox.
- Click OK to apply the final extraction. On the layer, all pixels outside the extracted object are erased to transparency.
After an extraction, you can add opacity back to the background and create other effects by choosing Edit > Fade Extract.

Twitter™ and Facebook posts are not covered under the terms of Creative Commons.
Legal Notices | Online Privacy Policy
Duplicate channels
Split channels into separate images
Merge channels
To the top
Duplicate channels
You can copy a channel and use it in the current image or another image.
Duplicate a channel
If you are duplicating alpha channels between images, the channels must have identical pixel dimensions. You cannot duplicate a channel to a Bitmap-mode image.
- In the Channels panel, select the channel to duplicate.
- Choose Duplicate Channel from the Channels panel menu.
- Type a name for the duplicate channel.
-
For Document, do one of the following:
-
Choose a destination. Only open images with pixel dimensions identical to the current image are available. To duplicate the channel in the same file, select the channel's current file.
-
Choose New to copy the channel to a new image, creating a multichannel image containing a single channel. Type a name for the new image.
-
To reverse the selected and masked areas in the duplicate channel, select Invert.
Duplicate a channel in an image
- In the Channels panel, select the channel you want to duplicate.
- Drag the channel onto the Create New Channel button ☐ at the bottom of the panel.
Duplicate a channel in another image
- In the Channels panel, select the channel you want to duplicate.
- Make sure that the destination image is open.
Note: The destination image does not have to have the same pixel dimensions as the duplicated channel.
-
Do one of the following:
-
Drag the channel from the Channels panel into the destination image window. The duplicated channel appears at the bottom of the Channels panel.
- Choose Select > All, and then choose Edit > Copy. Select the channel in the destination image and choose Edit > Paste. The pasted channel overwrites the existing channel.
To the top
Split channels into separate images
You can split channels of flattened images only. Splitting channels is useful when you want to retain individual channel information in a file format that doesn't preserve channels.
- To split channels into separate images, choose Split Channels from the Channels panel menu.
The original file is closed, and the individual channels appear in separate grayscale image windows. The title bars in the new windows show the original filename plus the channel. You save and edit the new images separately.
To the top
Merge channels
Multiple grayscale images can be combined as the channels of a single image. The images you want to merge must be in grayscale mode, be flattened (have no layers), have the same pixel dimensions, and be open. The number of grayscale images you have open determines the color modes available when merging channels. For example, if you have three images open, you can merge them into an RGB image; if you have four images open, they can become a CMYK image.
If you are working with DCS files that have accidentally lost their links (and so cannot be opened, placed, or printed), open the channel files, and merge them into a CMYK image. Then re-save the file as a DCS EPS file.
- Open the grayscale images containing the channels you want to merge, and make one of the images active.
You must have more than one image open for the Merge Channels option to be available.
-
Choose Merge Channels from the Channels panel menu.
-
For Mode, choose the color mode you want to create. The number of channels appropriate for the mode appears in the Channels text box.
-
If necessary, enter a number in the Channels text box.
If you enter a number that is incompatible with the selected mode, Multichannel mode is automatically selected. This creates a multichannel image with two or more channels.
-
Click OK.
-
For each channel, make sure the image you want is open. If you change your mind about the image type, click Mode to return to the Merge Channels dialog box.
-
If you are merging channels into a multichannel image, click Next, and select the remaining channels.
Note: All channels of a multichannel image are alpha channels or spot channels.
- When you have finished selecting channels, click OK.
The selected channels are merged into a new image of the specified type, and the original images are closed without any changes. The new image appears in an untitled window.
Note: You cannot split and recombine (merge) an image with spot color channels. The spot color channel will be added as an alpha channel.
Adobe also recommends

Twitter™ and Facebook posts are not covered under the terms of Creative Commons.
Legal Notices | Online Privacy Policy
Creating and editing a quick mask Change Quick Mask options
To the top
Creating and editing a quick mask
To use Quick Mask mode, start with a selection and then add to or subtract from it to make the mask. You can also create the mask entirely in Quick Mask mode. Color differentiates the protected and unprotected areas. When you leave Quick Mask mode, the unprotected areas become a selection.
Note: A temporary Quick Mask channel appears in the Channels panel while you work in Quick Mask mode. However, you do all mask editing in the image window.
- Using any selection tool, select the part of the image you want to change.
- Click the Quick Mask mode button in the toolbox.
A color overlay (similar to a rubylith) covers and protects the area outside the selection. Selected areas are left unprotected by this mask. By default, Quick Mask mode colors the protected area using a red, 50% opaque overlay.
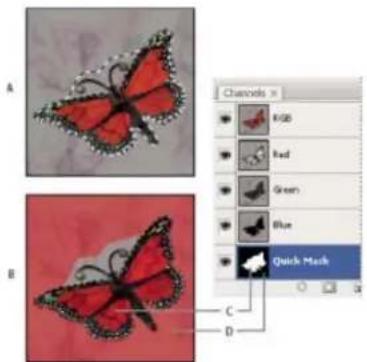
text_image
A B C D Channels RGB Red Green Blue Quick MaskSelecting in Standard mode and Quick Mask mode
A. Standard mode B. Quick Mask mode C. Selected pixels appear as white in channel thumbnail D. Rubylith overlay protects area outside selection, and unselected pixels appear as black in channel thumbnail
- To edit the mask, select a painting tool from the toolbox. The swatches in the toolbox automatically become black and white.
- Paint with white to select more of an image (the color overlay is removed from areas painted with white). To deselect areas, paint over them with black (the color overlay covers areas painted with black). Painting with gray or another color creates a semitransparent area, useful for feathering or anti-aliased effects. (Semitransparent areas may not appear to be selected when you exit Quick Mask Mode, but they are.)
Painting in Quick Mask mode
A. Original selection and Quick Mask mode with green chosen as mask color B. Painting with white in Quick Mask mode adds to the selection C. Painting with black in Quick Mask mode subtracts from the selection
- Click the Standard Mode button ☐ in the toolbox to turn off the quick mask and return to your original image. A selection border now surrounds the unprotected area of the quick mask.
If a feathered mask is converted to a selection, the boundary line runs halfway between the black pixels and the white pixels of the mask gradient. The selection boundary indicates the transition between pixels that are less than 50% selected and those that are more than 50% selected.
-
Apply the desired changes to the image. Changes affect only the selected area.
-
Choose Select > Deselect to deselect the selection, or save the selection by choosing Select > Save Selection.
You can convert this temporary mask to a permanent alpha channel by switching to standard mode and choosing Select > Save Selection.
To the top
Change Quick Mask options
-
Double-click the Quick Mask Mode button in the toolbox.
-
Choose from the following display options:
Masked Areas Sets masked areas to black (opaque) and selected areas to white (transparent). Painting with black increases the masked area; painting with white increases the selected area. When this option is selected, the Quick Mask button in the toolbox becomes a white circle on a gray background ☐.
Selected Areas Sets masked areas to white (transparent) and selected areas to black (opaque). Painting with white increases the masked area; painting with black increases the selected area. When this option is selected, the Quick Mask button in the toolbox becomes a gray circle on a white background.
To toggle between the Masked Areas and Selected Areas options for quick masks, Alt-click (Windows) or Option-click (Mac OS) the Quick Mask Mode button.
-
To choose a new mask color, click the color box, and choose a new color.
-
To change the opacity, enter a value between 0% and 100%.
Both the color and opacity settings affect only the appearance of the mask and have no effect on how underlying areas are protected. Changing these settings may make the mask more easily visible against the colors in the image.
Adobe also recommends

Twitter™ and Facebook posts are not covered under the terms of Creative Commons.
Legal Notices | Online Privacy Policy
Blending layers and channels
Blend channels with the Apply Image command
Blend channels with the Calculations command
Add and Subtract blending modes
To the top
Blending layers and channels
You can use the blending effects associated with layers to combine channels within and between images into new images. You can use either the Apply Image command (on single and composite channels) or the Calculations command (on single channels). These commands offer two additional blending modes not available in the Layers panel—Add and Subtract. Although it's possible to create new combinations of channels by copying channels to layers in the Layers panel, you may find it quicker to use the calculation commands to blend channel information.
The calculation commands perform mathematical operations on the corresponding pixels of two channels (the pixels with identical locations in the image) and then combine the results in a single channel. Two concepts are fundamental to understanding how the calculation commands work.
- Each pixel in a channel has a brightness value. The Calculations and Apply Image commands manipulate these values to produce the resulting composite pixels.
• These commands overlay the pixels in two or more channels. Thus, the images used for calculations must have the same pixel dimensions.
To the top
Blend channels with the Apply Image command
The Apply Image command lets you blend one image's layer and channel (the source) with a layer and channel of the active image (the destination).
- Open the source and destination images, and select the desired layer and channel in the destination image. The pixel dimensions of the images must match for image names to appear in the Apply Image dialog box.
Note: If the color modes of the two images differ (for example, one image is RGB and the other is CMYK), you can apply a single channel (but not the source's composite) to the destination layer's composite channel.
-
Choose Image > Apply Image.
-
Choose the source image, layer, and channel you want to combine with the destination. To use all layers in the source image, select Merged For Layer.
-
To preview the results in the image window, select Preview.
-
To use the negative of the channel contents in the calculation, select Invert.
-
For Blending, choose a blending option.
For information on the Add and Subtract options, see Add and Subtract blending modes. For information on other blending options, see Blending mode descriptions.
- Enter an Opacity value to specify the effect's strength.
- To apply the results only to opaque areas in the result layer, select Preserve Transparency.
- If you want to apply the blending through a mask, select Mask. Then choose the image and layer containing the mask. For Channel, you can choose any color or alpha channel to use as the mask. You can also use a mask based on the active selection or the boundaries of the chosen layer (Transparency). Select Invert to reverse the masked and unmasked areas of the channel.
To the top
Blend channels with the Calculations command
The Calculations command lets you blend two individual channels from one or more source images. You can then apply the results to a new image or to a new channel or selection in the active image. You cannot apply the Calculations command to composite channels.
- Open the source image or images.
Note: If you are using more than one source image, the images must have the same pixel dimensions. - Choose Image > Calculations.
- To preview the results in the image window, select Preview.
- Choose the first source image, layer, and channel. To use all the layers in the source image, choose Merged For Layer.
- To use the negative of the channel contents in the calculation, select Invert. For Channel, choose Gray if you want to duplicate the effect of converting the image to grayscale.
- Choose the second source image, layer, and channel, and specify options.
- For Blending, choose a blending mode.
For information on the Add and Subtract options, see Add and Subtract blending modes. For information on other blending options, see Blending mode descriptions.
- Enter an Opacity value to specify the effect's strength.
- If you want to apply the blending through a mask, select Mask. Then choose the image and layer containing the mask. For Channel, you can choose any color or alpha channel to use as the mask. You can also use a mask based on the active selection or the boundaries of the chosen layer (Transparency). Select Invert to reverse the masked and unmasked areas of the channel.
- For Result, specify whether to place the blending results in a new document or in a new channel or selection in the active image.
To the top
Add and Subtract blending modes
The Add and Subtract blending modes are available only for the Apply Image and Calculations commands.
Add
Adds the pixel values in two channels. This is a good way to combine non-overlapping images in two channels.
Because higher pixel values represent lighter colors, adding channels with overlapping pixels lightens the image. Black areas in both channels remain black (0 + 0 = 0) . White in either channel results in white (255 + any value = 255 or greater) .
Add mode divides the sum of the pixel values by the Scale amount, and then adds the Offset value to the sum. For example, to find the average of the pixels in two channels, add them, divide by 2, and enter no Offset value.
The Scale factor may be any number between 1.000 and 2.000. Entering a higher Scale value darkens the image.
The Offset value lets you lighten or darken the pixels in the destination channel by any brightness value between +255 and -255. Negative values darken the image; positive values lighten the image.
Subtract
Subtracts the pixel values in the source channel from the corresponding pixels in the target channel. As with Add mode, the result is then divided by the Scale factor and added to the Offset value.
The Scale factor may be any number between 1.000 and 2.000. The Offset value lets you lighten or darken the pixels in the destination channel by any brightness value between +255 and -255.

Twitter™ and Facebook posts are not covered under the terms of Creative Commons.
Legal Notices | Online Privacy Policy
About channels
Channels panel overview
Show or hide a channel
Show color channels in color
Select and edit channels
Rearrange and rename alpha and spot channels
Delete a channel
To the top
About channels
Channels are grayscale images that store different types of information:
- Color information channels are created automatically when you open a new image. The image's color mode determines the number of color channels created. For example, an RGB image has a channel for each color (red, green, and blue) plus a composite channel used for editing the image.
- Alpha channels store selections as grayscale images. You can add alpha channels to create and store masks, which let you manipulate or protect parts of an image. (See About masks and alpha channels.)
- Spot color channels specify additional plates for printing with spot color inks. (See About spot colors.)
An image can have up to 56 channels. All new channels have the same dimensions and number of pixels as the original image.
The file size required for a channel depends on the pixel information in the channel. Certain file formats, including TIFF and Photoshop formats, compress channel information and can save space. The size of an uncompressed file, including alpha channels and layers, appears as the right-most value in the status bar at the bottom of the window when you choose Document Sizes from the pop-up menu.
Note: As long as you save a file in a format supporting the image's color mode, the color channels are preserved. Alpha channels are preserved only when you save a file in Photoshop, PDF, TIFF, PSB, or raw formats. DCS 2.0 format preserves only spot channels. Saving in other formats may cause channel information to be discarded.
To the top
Channels panel overview
The Channels panel lists all channels in the image—composite channel first (for RGB, CMYK, and Lab images). A thumbnail of the channel's contents appears to the left of the channel name; the thumbnail is automatically updated as you edit the channel.
text_image
CHANNELS Gray Red Blue Gray Gray Gray Gray Gray Gray Gray Gray Gray Gray Gray Gray Gray Gray Gray Gray Gray Gray Gray Gray Gray Gray Gray Gray Gray Gray Gray Gray Gray Gray Gray Gray Gray Gray Gray Gray Gray Gray Gray Gray Gray Gray Gray Gray Gray Gray Gray Gray Gray Gray Grey Grey Grey Grey Grey Grey Grey Grey Grey Grey Grey Grey Grey Grey Grey Grey Grey Grey Grey Grey Grey Grey Grey Grey Grey Grey Grey Grey Grey Grey Grey Grey Grey Grey Grey Grey Grey Grey Grey Grey Grey GreyChannel types
A. Color channels B. Spot channels C. Alpha channels
Display the Channels panel
- Choose Windows > Channels.
Resize or hide channel thumbnails
- Choose Panel Options from the Channels panel menu. Click a thumbnail size or click None to turn off the display of thumbnails.
Viewing thumbnails is a convenient way of tracking channel contents; however, turning off the display of thumbnails can improve performance.
To the top
Show or hide a channel
You can use the Channels panel to view any combination of channels in the document window. For example, you can view an alpha channel and the composite channel together to see how changes made in the alpha channel relate to the entire image.
- Click in the eye column next to the channel to show or hide that channel. (Click the composite channel to view all default color channels. The composite channel is displayed whenever all the color channels are visible.)

To show or hide multiple channels, drag through the eye column in the Channels panel.
To the top
Show color channels in color
Individual channels are displayed in grayscale. In RGB, CMYK, or Lab images, you can view the individual channels in color. (In Lab images, only the a and b channels appear in color.) If more than one channel is active, the channels always appear in color.
You can change the default to show the individual color channels in color. When a channel is visible in the image, an eye icon 🔗 appears to its left in the panel.
- Do one of the following:
• In Windows, choose Edit > Preferences > Interface.
- In Mac OS, choose Photoshop > Preferences > Interface.
- Select Show Channels in Color, and click OK.
To the top
Select and edit channels
You can select one or more channels in the Channels panel. The names of all selected, or active, channels are highlighted.
text_image
EXAMPLE 5 RGB Red Green Blue PANTONE DATA C Alpha 1 Color Color Color Color Color Color Color Color Color Color Color Color Color Color Color Color Color Color Color Color Color Color Color Color Color Color Color Color Color Color Color Color Color Color Color Color Color Color Color Color Color Color Color Color Color Color Color Color ColorSelecting multiple channels
A. Not visible or editable B. Visible but not selected for editing C. Selected for viewing and editing D. Selected for editing but not viewing
• To select a channel, click the channel name. Shift-click to select (or deselect) multiple channels.
- To edit a channel, select it and then use a painting or editing tool to paint in the image. You can paint on only one channel at a time. Paint with white to add the selected channel's color at 100% intensity. Paint with a value of gray to add the channel's color at a lower intensity. Paint with black to fully remove the channel's color.
To the top
Rearrange and rename alpha and spot channels
You can move alpha or spot channels above the default color channels only if the image is in Multichannel mode (Image > Mode > Multichannel). For information about that mode's limitations, see Multichannel mode.
- To change the order of alpha or spot channels, drag the channel up or down in the Channels panel. When a line appears in the position you want, release the mouse button.
Note: Spot colors are overprinted in the order of their appearance from top to bottom in the Channels panel.
- To rename an alpha or spot channel, double-click the channel's name in the Channels panel, and enter a new name.
For more information, see Create a new spot channel.
To the top
Delete a channel
You may want to delete spot or alpha channels you no longer need before saving an image. Complex alpha channels can substantially increase the disk space required for an image.
- In Photoshop, select the channel in the Channels panel and do one of the following:
- Alt-click (Windows) or Option-click (Mac OS) the Delete icon .
- Drag the channel name in the panel to the Delete icon.
- Choose Delete Channel from the Channels panel menu.
- Click the Delete icon at the bottom of the panel, and then click Yes.
Note: When you delete a color channel from a file with layers, visible layers are flattened and hidden layers are discarded. This is done because removing a color channel converts the image to Multichannel mode, which does not support layers. An image isn't flattened when you delete an alpha channel, a spot channel, or a quick mask.
Adobe also recommends
Twitter™ and Facebook posts are not covered under the terms of Creative Commons.
Legal Notices | Online Privacy Policy
Select a range of colors
From an expert: Adjusting skin tones
Save Skin Tones settings as a preset | Creative Cloud only
To the top
Select a range of colors
The Color Range command selects a specified color or color range within an existing selection or an entire image. If you want to replace a selection, be sure to deselect everything before applying this command. The Color Range command is not available for 32-bits-per-channel images.
To refine an existing selection, use the Color Range command repeatedly to select a subset of colors. For example, to select the green areas in a cyan selection, select Cyans in the Color Range dialog box, and click OK. Then reopen the Color Range dialog box, and select Greens. (The results are subtle because this technique selects parts of colors within a color mix.)
In Photoshop CC and Photoshop CS6, you can also select skin tones, and automatically detect faces to select them. To create a selection that preserves skin tones while you adjust the color of everything else, select Invert below the eyedropper samplers.
- Choose Select > Color Range.
You can also use Color Range to refine a layer mask. See Change mask opacity or refine edges.
-
From the Select menu, choose one of the following:
-
(CC and CS6 only) Choose Skin Tones to select colors that resemble common skin tones. Enable Detect Faces for more accurate skin tone selection. See Selecting Skin Tones for a quick video demonstration by Peachpit.
- Choose Sampled Colors to enable the Eyedropper tool and pick sample colors from the image. If you are selecting multiple color ranges in the image, select Localized Color Clusters to build a more accurate selection.
-
Choose a color or tonal range. You won't be able to adjust the selection if you use this option.
-
Select one of the display options:
Selection Previews the selection that will result from the colors you sample in the image. By default, white areas are selected pixels, black areas are unselected, and gray areas are partially selected.
Image Previews the entire image. For example, you might want to sample from a part of the image that isn't on-screen.
To toggle between the Image and Selection previews in the Color Range dialog box, press Ctrl (Windows) or Command (Mac OS).
- For sampled colors, position the Eyedropper pointer over the image or preview area, and click to sample the colors you want included.
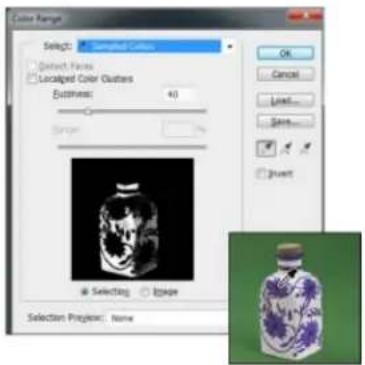
text_image
Color Range Select: Sampled Colors Deselect Faces Localized Color Clusters Bustness: 40 Select OK Cancel Lift... Save... Shunt Selecting Escape Selection Preview: NoneSampling color
To adjust the selection:
• To add colors, select the plus eyedropper, and click in the preview area or image.
- To remove colors, select the minus eyedropper, and click in the preview area or image.
To activate the plus eyedropper temporarily, hold down Shift. Hold down Alt (Windows) or Option (Mac OS) to activate the minus eyedropper.
- Adjust the range of colors selected using the Fuzziness slider or by entering a value. The Fuzziness setting controls how wide a range of colors is in the selection, and increases or decreases the amount of partially selected pixels (gray areas in the selection preview). Set a low Fuzziness value to restrict the color range, a higher value to increase the range.

Increasing fuzziness expands selection
If you selected Localized Color Clusters, use the Range slider to control how far or near a color must be from the sample points to be included in the selection. For example, your image contains a patch of yellow flowers in both the foreground and the background, but you want to select just the foreground flowers. Sample the colors in the foreground flowers and reduce the Range so that the similarly colored flowers in the background are not selected.
- To preview the selection in the image window, choose a Selection Preview option:
None Shows the original image.
Grayscale shows white for completely selected pixels, gray for partially selected ones, and black for unselected ones.
Black Matte Shows the original image for selected pixels, and black for unselected ones. This option is good for bright images.
White Matte Shows the original image for selected pixels, and white for unselected ones. This option is good for dark images.
Quick Mask shows unselected areas as a rubylith overlay (or a custom color you've specified in the Quick Mask Options dialog box).
- To revert to the original selection, hold down Alt (Windows) or Option (Mac OS), and click Reset.
- To save and load color range settings, use the Save and Load buttons in the Color Range dialog box to save and reuse the current settings. (Creative Cloud only) Skin Tones selection settings can now be saved as a preset.
Note: If you see the message "No pixels are more than 50% selected," the selection border will not be visible. You may have picked a color choice from the Select menu, such as Reds, when the image didn't contain any red hues with high enough saturation.
To the top
Save Skin Tones settings as a preset | Creative Cloud only
The Color Range selections command now saves Skin Tones selections as a preset. It can also save the setting for the Detect Faces option when Skin Tones or Sampled Colors are selected.
To save Skin Tones settings as a preset:
- Choose Select > Color Range.
- In the Color Range dialog box, choose Skin Tones from the Select menu.
- For more accurate skin tone selection, select Detect Faces and then adjust the Fuzziness slider or enter a value. To help you make your selections, make sure the display option is set to Selection and choose a Selection Preview to view your selections in the document window.
- Click the Save button and in the Save window, type a file name for the skin tone preset and then click Save.
To load a skin tones preset:
- In the Color Range dialog box, click the Load button.
- In the Load window, select the preset file you want and then, click Load.
More Help Topics
• Saving selections and alpha channel masks
- Convert paths to selection borders
- Selection tools gallery

Twitter™ and Facebook posts are not covered under the terms of Creative Commons.
Legal Notices | Online Privacy Policy
Select with the Quick Selection tool Select with the Magic Wand tool
To the top
Select with the Quick Selection tool
You can use the Quick Selection tool to quickly "paint" a selection using an adjustable round brush tip. As you drag, the selection expands outward and automatically finds and follows defined edges in the image.
-
Select the Quick Selection tool 📋. (If the tool isn't visible, hold down the Magic Wand tool.)
-
In the options bar, click one of the selection options: New, Add To, or Subtract From.
New is the default option if nothing is selected. After making the initial selection, the option changes automatically to Add to.
- To change the brush tip size, click the Brush pop-up menu in the options bar, and type in a pixel size or drag the slider. Use the Size pop-up menu options to make the brush tip size sensitive to pen pressure or a stylus wheel.
When creating a selection, press the right bracket (j) to increase the Quick Selection tool brush tip size; press the left bracket (l) to decrease the brush tip size.
- Choose Quick Selection options.
Sample All Layers Creates a selection based on all layers instead of just the currently selected layer.
Auto-Enhance Reduces roughness and blockiness in the selection boundary. Auto-Enhance automatically flows the selection further toward image edges and applies some of the edge refinement you can apply manually in the Refine Edge dialog with the Contrast and Radius options.
- Paint inside the part of the image you want to select.
The selection grows as you paint. If updating is slow, continue to drag to allow time to complete work on the selection. As you paint near the edges of a shape, the selection area extends to follow the contours of the shape edge.

Painting with the Quick Selection tool to extend the selection
If you stop dragging and then click or drag in a nearby area, the selection will grow to include the new area.
- To subtract from a selection, click the Subtract from option in the options bar, then drag over the existing selection.
- To temporarily switch between add and subtract modes, hold down the Alt (Windows) or Option (Mac) key.
-
To change the tool cursor, choose Edit > Preferences > Cursors > Painting Cursors (Windows) or Photoshop > Preferences > Cursors > Painting Cursors (Mac OS). Normal Brush Tip displays the standard Quick Selection cursor with a plus or minus sign to show the selection mode.
-
(Optional) Click Refine Edge to further adjust the selection boundary. See Refine selection edges.
To the top
Select with the Magic Wand tool
The Magic Wand tool lets you select a consistently colored area (for example, a red flower) without having to trace its outline. You specify the selected color range, or tolerance, relative to the original color you click.
You cannot use the Magic Wand tool on an image in Bitmap mode or on 32-bits-per-channel images.
-
Select the Magic Wand tool. (If the tool isn't visible, access it by holding down the Quick Selection tool.)
-
Specify one of the selection options in the options bar. The Magic Wand tool's pointer changes depending on which option is selected.
Selection options
A. New B. Add To C. Subtract From D. Intersect With
- In the options bar, specify any of the following:
Tolerance Determines the color range of selected pixels. Enter a value in pixels, ranging from 0 to 255. A low value selects the few colors very similar to the pixel you click. A higher value selects a broader range of colors.
Anti-aliased Creates a smoother-edged selection.
Contiguous Selects only adjacent areas using the same colors. Otherwise, all pixels in the entire image using the same colors are selected.
Sample All Layers Selects colors using data from all the visible layers. Otherwise, the Magic Wand tool selects colors from the active layer only.
- In the image, click the color you want to select. If Contiguous is selected, all adjacent pixels within the tolerance range are selected. Otherwise, all pixels in the tolerance range are selected.
- (Optional) Click Refine Edge to further adjust the selection boundary or view the selection against different backgrounds or as a mask. See Refine selection edges.
More Help Topics
• Saving selections and alpha channel masks
- Convert paths to selection borders
- Selection tools gallery

Twitter™ and Facebook posts are not covered under the terms of Creative Commons.
Legal Notices | Online Privacy Policy
Image adjustments
Auto color corrections
Kelby (May. 7, 2012)
video-tutorial
One-click corrections to common image issues.
Using adjustment layers
video2brain (May. 7, 2012)
video-tutorial
Change color and tone with total flexibility.
Background
Prerequisite: Enable the graphics processor
Adjust perspective
FAQ
Photoshop lets you easily adjust perspective in images. This feature is particularly useful for images having straight lines and flat surfaces—for example, architectural images and images of buildings. You can also use this feature to composite objects having different perspectives in a single image.
To the top
Background
Sometimes, an object may look different in an image from how it appears in real life. This mismatch is due to perspective distortion. Images of the same object captured from different camera distances and angles of view exhibit different perspective distortion.
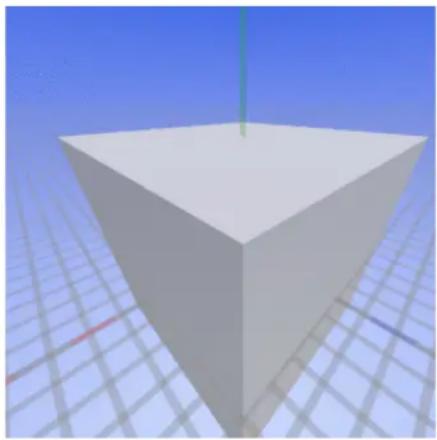
natural_image
3D rendered cube with a vertical green line on top, set against a blue grid background (no text or symbols)Perspective distortion in images of the same object captured from different distances and angles
(Creative Commons image courtesy: SharkD)
To the top
Prerequisite: Enable the graphics processor
Photoshop requires at least 512 MB of video RAM (VRAM) to run the perspective warp feature. For details, see Photoshop CC GPU FAQ.
As a prerequisite to adjusting perspective, ensure that the graphics processor is enabled in your Photoshop preferences.
- Select Edit > Preferences > Performance.
- In the Graphics Processor Settings area, select Use Graphics Processor.
- Click Advanced Settings. Ensure that Use Graphics Processor To Accelerate Computation is selected.
- Click OK.
To the top
Adjust perspective
Define planes
Before you adjust perspective, you must define the planes of the architecture in the image.
- Open the image in Photoshop.
- Select Edit > Perspective Warp. Review the onscreen tip and close it.
- Draw quads along the planes of the architecture in the image. While drawing the quads, try to keep their edges parallel to the straight lines in the architecture.
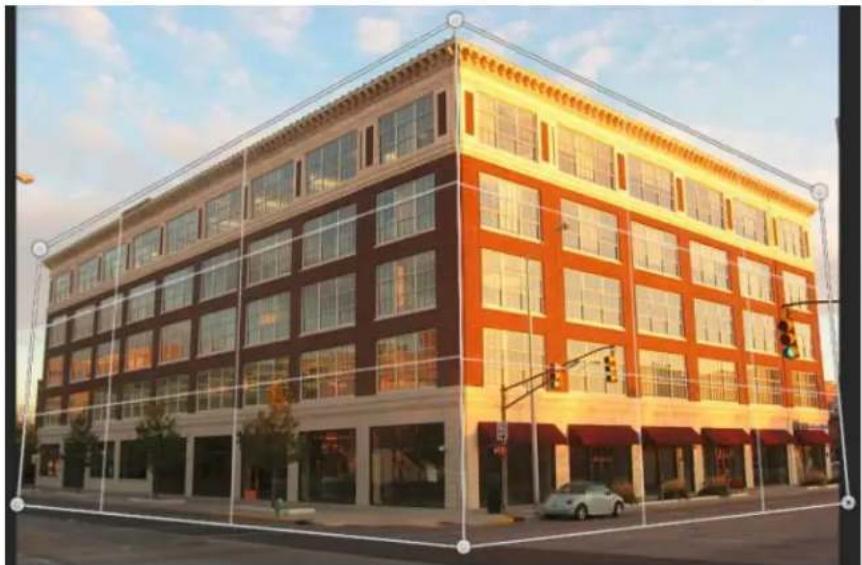
natural_image
Exterior view of a multi-story building with red and orange facade, featuring large windows and parked cars under a clear sky (no signage or text visible)Draw the edges of the quads roughly parallel to the lines in the architecture. As depicted in the illustration, you can snap two planes together. Here is a set of planes defined for a building.
Manipulate the planes
- Switch to the Warp mode from the Layout mode.

natural_image
Exterior view of a multi-story brick building with large windows under a clear sky (no signage or text visible)Warp mode
- Manipulate perspective in one of the several available ways:
- Move around the corners of the quads (pins) as appropriate. For example, you can adjust the perspective of this image, such that the two sides of the building exhibit foreshortening in equal measures. The resulting perspective would approximate a direct view of the building from a corner.
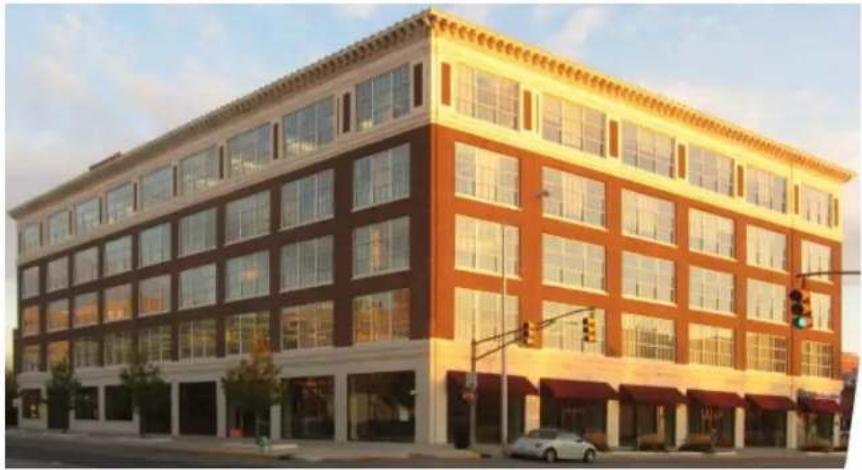
natural_image
Exterior view of a multi-story building with large windows and brick facade, under clear sky (no signage or text visible)Adjusting the perspective, such that the two sides of the building are equally foreshortened
- Shift-click an individual edge of a quad to straighten it and keep it straight during further perspective manipulation. Such a straightened edge is highlighted in yellow in the Warp mode. You can manipulate the corners of the quads (pins) for finer control while adjusting perspective.
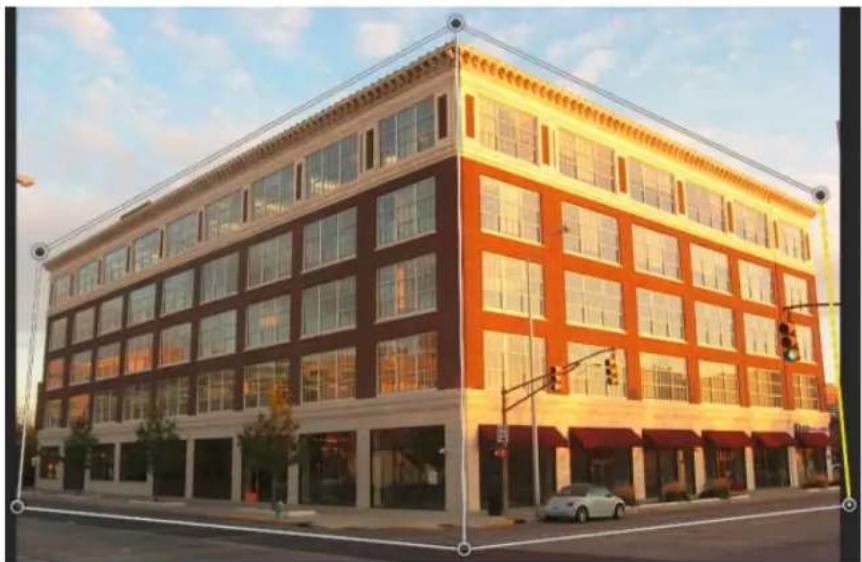
natural_image
Exterior view of a multi-story brick building with orange and red facade, under a clear sky (no signage or text visible)Shift-click to straighten an individual edge of a quad and keep it straight during further perspective manipulation. The rightmost selected edge in this image is highlighted in yellow.

natural_image
Exterior view of a multi-story building with red and orange facade, featuring large windows and parked cars (no signage or text visible)The selected edge is straightened. Also, the straightening of the edge is preserved during further perspective manipulation.

Shift-click the edge again if you don't want to preserve its straightening.
- In the Warp mode, you can click the following icons for automatic perspective adjustment:

Automatically level near horizontal lines
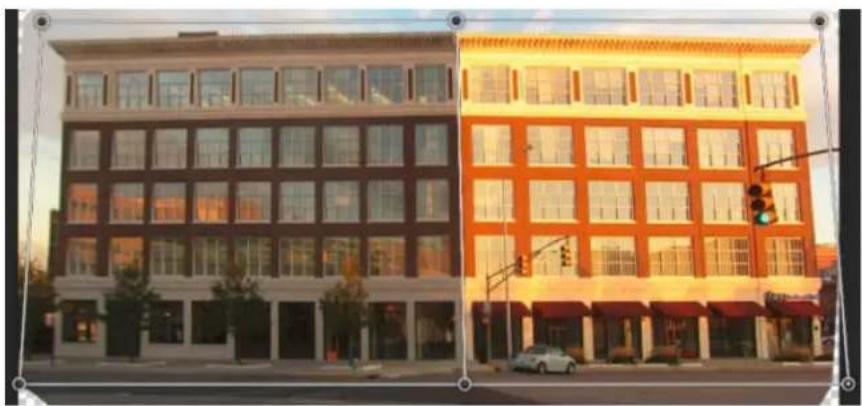
natural_image
Exterior view of a multi-story building with glass windows and orange accents, featuring street traffic lights and storefronts (no visible signage or text)Level horizontally

Automatically straighten near vertical lines

natural_image
Exterior view of a multi-story building with orange and maroon facade, featuring large windows and parked cars (no signage)Straighten vertically
# Automatically straighten both vertically and horizontally

natural_image
Exterior view of a multi-story building with large windows and adjacent street traffic lights (no visible signage or text)Straighten horizontally and vertically
- Once you're done adjusting the perspective, click the Commit Perspective Warp icon (√).
Keyboard shortcuts
The following keyboard shortcuts make it easier to adjust perspective:
Arrow keys Slightly move a corner of a quad (pin)
H Hides the grid when you're working in the Warp mode
L Switches to the Layout mode
W Switches to the Warp mode
Enter key In the Layout mode, you can press the Enter key to quickly switch to the Warp mode. In the Warp mode, the Enter key commits the current changes to the perspective.
Shift-click (Warp mode) Straightens an individual edge of a quad and keeps it straight during further perspective manipulation. If you don't want to preserve the straightening of the edge, Shift-click it again.
Shift-(drag an edge) (Warp mode) Constrains the shape of a plane while lengthening it
To the top
FAQ
Can I edit different perspectives in the same image?
The onscreen tips are no longer displaying. How do I bring them back?
Can I define different sets of planes for the same architecture?
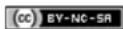
Twitter™ and Facebook posts are not covered under the terms of Creative Commons.
Legal Notices | Online Privacy Policy
Video | Using the camera shake reduction filter
Images suitable for camera shake reduction
Use automatic camera shake reduction
Use multiple blur traces for camera shake reduction
Advanced blur trace settings
Photoshop features an intelligent mechanism to automatically reduce image blurring caused by camera motion. If necessary, you can adjust advanced settings to further sharpen the image. The Shake Reduction filter in the Filter > Sharpen menu can reduce blurring resulting from several types of camera motion; including linear motion, arc-shaped motion, rotational motion, and zigzag motion.
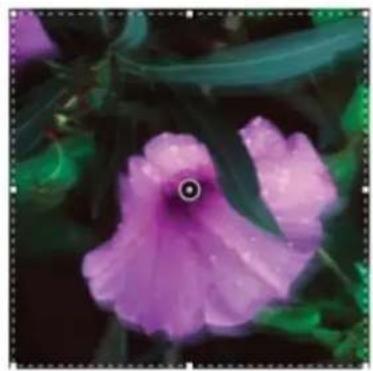
natural_image
Close-up of a purple flower with dewdrops, surrounded by green foliage (no text or symbols)Original image

natural_image
Close-up of a purple morning glory flower with dewdrops, surrounded by green leaves (no text or symbols)After camera shake reduction
Camera shake reduction | A before/after example
To the top
Images suitable for camera shake reduction
The camera shake reduction feature works best with decently lit still camera images having low noise. The following types of still images are particularly suitable for shake reduction:
- Indoor or outdoor images captured using a lens with a long focal length
- Indoor images of a static scene taken with a slow shutter speed and no flash
In addition, shake reduction can help sharpen blurred text in images affected by camera motion.
To the top
Use automatic camera shake reduction
- Open the image.
- Select Filter > Sharpen > Shake Reduction. Photoshop automatically analyzes the region of the image best suited for shake reduction, determines the nature of the blur, and extrapolates the appropriate corrections to the entire image. The corrected image is displayed for your review in the Shake Reduction dialog.
The Detail loupe in the lower-right pane lets you closely examine the region in focus. If necessary, zoom in or zoom out on an image element. As you drag the Hand tool over the Detail loupe to examine an image region, release the mouse button to see a quick preview of the shake reduction changes for that region.
Note: If no corrections seem to be applied to the image in the Shake Reduction dialog, ensure that the Preview option in the right-pane is enabled.
To the top
Use multiple blur traces for camera shake reduction
A blur trace represents the shape and extent of the blur that affects a selected region of the image. Different regions of the image may have differently shaped blurs. Automatic camera shake reduction takes into account the blur trace for just the default region of the image that Photoshop has determined as most suitable for blur estimation. To further fine-tune the image, you can have Photoshop compute and consider blur traces for multiple regions.
Available blur traces are listed in the Advanced panel of the Shake Reduction dialog. You can click a blur trace to zoom in on it.

text_image
Advanced Show Blur Estimation RegionsMultiple blur traces listed in the Advanced panel
Create and modify blur traces
Photoshop provides several ways to create and modify blur traces. For best results, create blur traces in regions of the image that have edge contrast. For example, the region labeled A in the illustration below is better suited for blur estimation than the region labeled B.

Due to texture contrasts, A is more suitable for blur estimation than B
Resize/reposition the boundaries of the current region in focus
You can simply resize the boundaries of the region in focus to update the associated blur trace. To shift focus to a different region, drag the center pin of the region currently in focus.
Have Photoshop suggest a new region for blur estimation
- Click the Add Suggested Blur Trace icon (✗) in the Advanced panel in the right-pane. Photoshop highlights a new region of the image suitable for blur estimation and creates its blur trace.
- Add more blur traces if necessary.
Click the trash can icon () to delete one or more selected blur traces.
Manually select a new image region
- Click the Blur Estimation Tool icon (图标) in the upper-left corner of the Shake Reduction dialog.
-
Draw a selection rectangle anywhere on the image. Photoshop automatically creates a blur trace for the region you selected.
-
Add more blur traces if necessary.
Create a blur trace using the Blur Direction Tool
- Select the Blur Direction Tool (☐) from the left panel.
- Draw a straight line representing the blur direction on the image.
- If necessary, adjust the Blur Trace Length and Blur Trace Direction.

text_image
Blur Trace Length 173.7 px Blur Trace Direction 23.7 °Blur Trace Length and Blur Trace Direction
Modify a blur trace using the Detail loupe
- Using the Detail loupe, focus on a new image region suitable for camera shake reduction.
- Click the Enhance At Loupe Location icon (☐) to move focus in the left-pane to the region highlighted in the Detail loupe. The blur trace for the region displayed earlier in the Detail loupe is automatically updated.
The keyboard shortcut q lets you dock/undock the Detail loupe.

natural_image
Exterior view of a thatched hut surrounded by dense green forest (no signage or text)Modify a blur trace using the Detail loupe
Preview and apply multiple blur traces
Once you've added the required blur traces, you can select one or more blur traces in the Advanced panel to apply them to the image.
Preview and compare the results of two blur traces
- With the Ctrl key (Windows) or the Command key (Mac) held down, select the blur traces in the Advanced panel. Photoshop displays the multiple preview pane for the selected blur traces.

natural_image
Two side-by-side photos of a purple flower with green leaves, showing water droplets on petals (no text or symbols)Results for two blur traces displayed side-by-side
While previewing the results for two blur traces side-by-side, you can quickly adjust Smoothing and Artifact Suppression and check how your changes affect the image. See Smoothing and Artifact Suppression.
Duplicate a blur trace
- Drag a blur trace onto the Add Suggested Blur Trace icon (★)
Photoshop creates a copy of the blur trace and locks the duplicate copy.
Creating duplicate copies of blur traces is helpful when you want to quickly adjust Smoothing and Artifact Suppression, and preview how your changes affect the image. See Smoothing and Artifact Suppression.

natural_image
Close-up of purple flowers with green leaves, captured in two panels (no text or symbols visible)Working with duplicate blur traces
Reuse blur traces
Once you've created blur traces; you can save them, so that they can be applied to different images.
- Select one or more blur traces.
- Select Save Blur Trace from the Advanced panel flyout menu. You can save blur traces in two formats—KNL and PNG.
When you want to reuse the saved blur traces for a different image, you can use the Load option in the Advanced panel flyout menu.

text_image
Advanced Load... Save Workspace... Save Blur Trace... Show Blur Estimation RegionsSaving and loading blur traces
To the top
Advanced blur trace settings
Advanced blur trace settings help you further fine-tune camera shake reduction.
Blur trace bounds
The Blur Trace Bounds setting represents the bound size of the blur trace. You can adjust this value if necessary.
Source Noise
Photoshop automatically estimates the amount of noise in the image. If necessary, select a different value (Auto/Low/Medium/High).
Smoothing
Smoothing reduces high-frequency sharpening noise. You can move the slider to a value different from the default 30%. It is recommended that you keep smoothing low.
Artifact Suppression
Sometimes, in the course of sharpening the image, you may observe some noticeable noise artifacts. Follow these steps to suppress these artifacts:
- Select Artifact Suppression.
Note: When Artifact Suppression is not turned on, Photoshop generates coarse previews. Coarse previews are sharper, but they also have more noise artifacts.
- Adjust the Artifact Suppression slider to a higher value. 100% artifact suppression yields the original image, while 0% artifact suppression does not suppress any noise artifacts.

Artifact suppression works best to suppress medium-frequency noise.
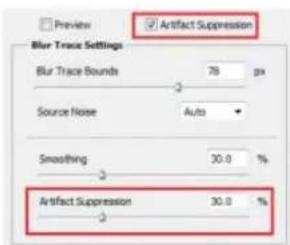
text_image
Preview Artifact Suppression Blur Trace Settings Blur Trace Bounds 78 px Source Noise Auto Smoothing 30.0 % Artifact Suppression 30.0 %Artifact suppression

natural_image
Close-up of three purple flowers with green foliage in the background (no text or symbols visible)
natural_image
Ringsby thatched on a small structure surrounded by autumn foliage (no visible text or symbols)Noise artifacts

Twitter™ and Facebook posts are not covered under the terms of Creative Commons.
Legal Notices | Online Privacy Policy
Video | Sharpening in Photoshop CC
Sharpening recommendations
Sharpen using Smart Sharpen
Sharpen using Unsharp Mask
Sharpen selectively
Add lens blur
Blur image areas
Sharpen image areas
To the top
Sharpening recommendations
Sharpening enhances the definition of edges in an image. Whether your images come from a digital camera or a scanner, most images can benefit from sharpening. The degree of sharpening needed varies depending on the quality of the digital camera or scanner. Keep in mind that sharpening cannot correct a severely blurred image.
Tips for better sharpening:
- Sharpen your image on a separate layer so that you can resharpen it later to output to a different medium.
- If you sharpen your image on a separate layer, set the layer's blending mode to Luminosity to avoid color shifts along edges.
- Sharpening increases image contrast. If you find that highlights or shadows are clipped after you sharpen, use the layer blending controls (if you sharpen a separate layer) to prevent sharpening in highlights and shadows. See Specify a tonal range for blending layers.
- Reduce image noise before sharpening so that you don't intensify the noise.
- Sharpen your image multiple times in small amounts. Sharpen the first time to correct blur caused by capturing your image (scanning it or taking it with your digital camera). After you've color corrected and sized your image, sharpen it again (or a copy of it) to add the appropriate amount of sharpening for your output medium.
• If possible, judge your sharpening by outputting it to the final medium. The amount of sharpening needed varies among output media.
Use the Unsharp Mask (USM) filter or the Smart Sharpen filter for better control when sharpening your images. Although Photoshop also has the Sharpen, Sharpen Edges, and Sharpen More filter options, these filters are automatic and do not provide controls and options.
You can sharpen your entire image or just a portion using a selection or mask. Because the Unsharp Mask and Smart Sharpen filters can be applied to only one layer at a time, you might need to merge layers or flatten your file to sharpen all image layers in a multilayered file.
Note: The name Unsharp Mask comes from a darkroom technique used in traditional film-based photography. The filter sharpens images rather than the opposite.
To the top
Sharpen using Smart Sharpen
The Smart Sharpen filter has sharpening controls not available with the Unsharp Mask filter. You can set the sharpening algorithm or control the amount of sharpening that occurs in shadow and highlight areas.
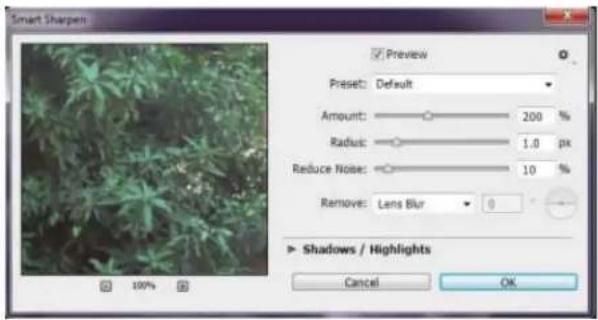
text_image
Smart Sharpen Preview Preset: Default Amount: 200 % Radius: 1.0 px Reduce Noise: 10 % Remove: Lens Blur Shadows / Highlights Cancel OK(Photoshop CC) Smart Sharpen dialog
- Zoom the document window to 100% to get an accurate view of the sharpening.
- Choose Filter > Sharpen > Smart Sharpen.
- Set the controls in the Sharpen tabs:
Amount Sets the amount of sharpening. A higher value increases the contrast between edge pixels, giving the appearance of greater sharpness.
Radius Determines the number of pixels surrounding the edge pixels affected by the sharpening. The greater the radius value, the wider the edge effects and the more obvious the sharpening.
Reduce Noise (Photoshop CC only) Reduce unwanted noise while keeping important edges unaffected.
Remove Sets the sharpening algorithm used to sharpen the image.
Gaussian Blur is the method used by the Unsharp Mask filter.
Lens Blur detects the edges and detail in an image, and provides finer sharpening of detail and reduced sharpening halos.
Motion Blur attempts to reduce the effects of blur due to camera or subject movement. Set the Angle control if you choose Motion Blur.
Angle Sets the direction of motion for the Motion Blur option of the Remove control.
More Accurate (CS6 only) Processes the file slowly for a more accurate removal of blurring.
- Adjust sharpening of dark and light areas using in the Shadow and Highlight tabs. (Click the Advanced button to display the tabs). If the dark or light sharpening halos appear too strong you can reduce them with these controls, which are only available for 8-bits and 16-bits-per-channel images:
Fade Amount Adjusts the amount of sharpening in the highlights or shadows.
Tonal Width Controls the range of tones in the shadows or highlights that are modified. Move the slider to the left or right to decrease or increase the Tonal Width value. Smaller values restrict the adjustments to only the darker regions for shadow correction and only the lighter regions for highlight correction.
Radius Controls the size of the area around each pixel that is used to determine whether a pixel is in the shadows or highlights. Moving the slider to the left specifies a smaller area, and moving it to the right specifies a larger area.
Sharpen using Unsharp Mask
The Unsharp Mask sharpens an image by increasing contrast along the edges in an image. The Unsharp Mask does not detect edges in an image. Instead, it locates pixels that differ in value from surrounding pixels by the threshold you specify. It then increases the contrast of neighboring pixels by the amount you specify. So, for neighboring pixels the lighter pixels get lighter and the darker pixels get darker.
In addition, you specify the radius of the region to which each pixel is compared. The greater the radius, the larger the edge effects.

Original image, and Unsharp Mask applied
The degree of sharpening applied to an image is often a matter of personal choice. Keep in mind that oversharpening an image produces a halo effect around the edges.

Oversharpening an image produces a halo effect around the edges.
The effects of the Unsharp Mask filter are more pronounced on-screen than in high-resolution output. If your final destination is print, experiment to determine what settings work best for your image.
- (Optional) If your image is multilayered, select the layer containing the image you want to sharpen. You can apply Unsharp Mask to only one layer at a time, even if layers are linked or grouped. You can merge the layers before applying the Unsharp Mask filter.
- Choose Filter > Sharpen > Unsharp Mask. Make sure the Preview option is selected.
Click the image in the preview window and hold down the mouse to see how the image looks without the sharpening. Drag in the preview window to see different parts of the image, and click + or - to zoom in or out.
Although there is a preview window in the Unsharp Mask dialog box, it's best to move the dialog box so you can preview the effects of the filter in the document window.
- Drag the Radius slider or enter a value to determine the number of pixels surrounding the edge pixels that affect the sharpening. The greater the radius value, the wider the edge effects. And the wider the edge effects, the more obvious the sharpening.
The Radius value varies according to the subject matter, the size of the final reproduction, and the output method. For high-resolution images, a Radius value between 1 and 2 is usually recommended. A lower value sharpens only the edge pixels, whereas a higher value sharpens a wider band of pixels. This effect is much less noticeable in print than on-screen, because a 2-pixel radius represents a smaller area in a high-resolution printed image.
-
Drag the Amount slider or enter a value to determine how much to increase the contrast of pixels. For high-resolution printed images, an amount between 150% and 200% is usually recommended.
-
Drag the Threshold slider or enter a value to determine how different the sharpened pixels must be from the surrounding area before they are considered edge pixels and sharpened by the filter. For instance, a threshold of 4 affects all pixels that have tonal values that differ by a value of 4 or more, on a scale of 0 to 255. So, if adjacent pixels have tonal values of 128 and 129, they are not affected. To avoid introducing noise or posterization (in images with flesh tones, for example), use an edge mask or try experimenting with Threshold values between 2 and 20. The default Threshold value (0) sharpens all pixels in the image.
If applying Unsharp Mask makes already bright colors appear overly saturated, choose Edit > Fade Unsharp Mask and choose Luminosity from the Mode menu.
To the top
Sharpen selectively
You can sharpen parts of your image by using a mask or a selection to prevent sharpening in certain parts of your image. For example, you can use an edge mask with the Unsharp Mask filter on a portrait to sharpen the eyes, mouth, nose, and outline of the head, but not the texture of the skin.


Using an edge mask to apply the Unsharp Mask only to specific features in an image
Sharpen a selection
-
With the image layer selected in the Layers panel, draw a selection.
-
Choose Filter > Sharpen > Unsharp Mask. Adjust the options and click OK.
Only the selection is sharpened, leaving the rest of the image untouched.
Sharpen an image using an edge mask
- Create a mask to apply sharpening selectively. There are many ways to create an edge mask. Use your favorite method, or try this one:
- Open the Channels panel and select the channel that displays the grayscale image with the greatest contrast in the document window. Often, this is the green or the red channel.

natural_image
Close-up black-and-white photo of a goat's head and neck (no text or symbols visible)
text_image
CHANNELS RGB Ctrl+nv Red Ctrl+1 Green Ctrl+2 Blue Ctrl+3Selecting a channel with the greatest contrast
- Duplicate the selected channel.
- With the duplicate channel selected, choose Filter > Stylize > Find Edges.
- Choose Image > Adjustments > Invert to invert the image.

Find Edges filter applied and image inverted
- With the inverted image still selected, choose Filter > Other > Maximum. Set the radius to a low number and click OK to thicken the edges and randomize the pixels.
- Choose Filter > Noise > Median. Set the radius to a low number and click OK. This averages the neighboring pixels.
- Choose Image > Adjustment > Levels and set the black point high to get rid of random pixels. If necessary, you can also paint with black to retouch the final edge mask.
Setting the black point high in Levels to eliminate random pixels in the edge mask
- Choose Filter > Blur > Gaussian Blur to feather the edges.
Note: The Maximum, the Median, and the Gaussian Blur filters soften the edge mask so that the sharpening effects blend better in the final image. Although all three filters are used in this procedure, you can experiment using only one or two.
-
In the Channels panel, Ctrl-click (Windows) or Command-click (Mac OS) the duplicate channel to make the edge mask a selection.
-
In the Layers panel, select the image layer. Make sure the selection is still visible on the image.
-
Choose Select > Inverse.
-
With the selection active on the image layer, choose Filter > Sharpen > Unsharp Mask. Set the desired options and click OK.
To view your results, select the RGB channel in the Channels panel and deselect the selection in the image.
You can create an action to conveniently apply all the steps in the procedure.
Add lens blur
Adds blur to an image to give the effect of a narrower depth of field so that some objects in the image stay in focus and others areas are blurred. You can use a simple selection to determine which areas are blurred, or you can provide a separate alpha channel depth map to describe exactly how you want the blur added.
The Lens Blur filter uses the depth map to determine the position of pixels in an image. With a depth map selected, you can also use the crosshair cursor to set the starting point of a given blur. You can use alpha channels and layer masks to create depth maps; black areas in an alpha channel are treated as though they're at the front of the photo, and white areas are treated as if they're far in the distance.
For a gradual blurring effect (none at the bottom to maximum at the top), create a new alpha channel and apply a gradient so that the channel is white at the top of the image and black at the bottom. Then select the Lens Blur filter and choose the alpha channel from the Source pop-up menu. To change the direction of the gradient, select the Invert check box.
The way the blur appears depends on the iris shape you choose. The number of blades determines the iris shape. You can change blades of an iris by curving them (making them more circular) or rotating them. You can also reduce or magnify the preview by clicking the minus button or the plus button.
- Choose Filter > Blur > Lens Blur.
- For Preview, Choose Faster to generate quicker previews. Choose More Accurate to view the final version of the image. More Accurate previews take longer to generate.
- For Depth Map, choose a source (if you have one) from the Source pop-up menu. Drag the Blur Focal Distance slider to set the depth at which pixels are in focus. For example, if you set focal distance to 100, pixels at 1 and at 255 are completely blurred, and pixels closer to 100 are blurred less. If you click in the preview image, the Blur Focal Distance slider changes to reflect the clicked location and brings the depth of the clicked location into focus.
- To invert the selection or alpha channel you're using as the depth map source, select Invert.
- Choose an iris from the Shape pop-up menu. If you wish, drag the Blade Curvature slider to smooth the edges of the iris, or drag the Rotation slider to rotate it. To add more blur, drag the Radius slider.
- For Specular Highlight, drag the Threshold slider to select a brightness cutoff; all pixels brighter than the cutoff value are treated as specular highlights. To increase the brightness of the highlights, drag the Brightness slider.
- To add noise to an image, choose Uniform or Gaussian. To add noise without affecting color, choose Monochromatic. Drag the Amount slider to increase or decrease noise.
Blurring removes film grain and noise from the original image. To make the image look realistic and unretouched, you can return some of the removed noise to the image. - Click OK to apply the changes to your image.
To the top
Blur image areas
The Blur tool softens hard edges or reduces detail in an image. The more you paint over an area with the tool, the blurrier it becomes.
-
Select the Blur tool 🔒.
-
Do the following in the options bar:
Choose a brush tip and set options for the blending mode and strength in the options bar.
- Select Sample All Layers in the options bar to blur using data from all visible layers. Deselect this option and the tool uses data from only the active layer.
- Drag over the part of the image you want to blur.
To the top
Sharpen image areas
The Sharpen tool increases contrast along edges to increase apparent sharpness. The more you paint over an area with the tool, the more sharpening increases.
- Select the Sharpen tool △. (If the tool isn't visible, hold down the Blur tool.)
-
Do the following in the options bar:
-
Choose a brush tip and set options for the blending mode and strength.
- Select Sample All Layers to sharpen using data from all visible layers. If this is deselected, the tool uses data from only the active layer.
-
Select Protect Detail to enhance details and minimize pixelated artifacts. Deselect this option if you want to produce more exaggerated sharpening effects.
-
Drag over the part of the image you want to sharpen.

Twitter™ and Facebook posts are not covered under the terms of Creative Commons.
Legal Notices | Online Privacy Policy
Before making color and tonal adjustments
Correcting images
Adjustments panel overview
Color adjustment commands
Make a color adjustment
Save adjustment settings
Reapply adjustment settings
Correcting colors in CMYK and RGB
Identify out-of-gamut colors
To the top
Before making color and tonal adjustments
The powerful tools in Photoshop can enhance, repair, and correct the color and tonality (lightness, darkness, and contrast) in an image. Here are some items to consider before making color and tonal adjustments.
- Work with a monitor that's calibrated and profiled. For critical image editing, calibration and profiling are essential. Otherwise, the image you see on your monitor looks different on other monitors or when printed.
- Plan to use adjustment layers to adjust the tonal range and color balance of your image. Adjustment layers let you go back and make successive tonal adjustments without discarding or permanently modifying data from the image layer. Keep in mind that using adjustment layers adds to the file size of the image and demands more RAM from your computer. Accessing the color and tonal commands in the Adjustments panel automatically creates adjustment layers.
- If you don't want to use adjustment layers, you can apply adjustments directly to an image layer. Remember that some image information is discarded, when making a color or tonal adjustment directly to an image layer.
- For critical work and maximum preservation of image data, it's best if the image you work with is 16 bits per channel (16-bit image) rather than 8 bits per channel (8-bit image). Data is discarded when you make tonal and color adjustments. The loss of image information is more critical in an 8-bit image than a 16-bit image. Generally, 16-bit images have a larger file size than 8-bit images.
- Duplicate or make a copy of the image file. Working on a copy of your image preserves the original in the event you want to use the image in its original state.
- Remove any flaws such as dust spots, blemishes, and scratches from the image before making color and tonal adjustments.
- Open the Info or Histogram panel in Expanded view. As you evaluate and correct the image, both panels display invaluable feedback on your adjustments.
- You can make a selection or use a mask to confine your color and tonal adjustments to part of an image. Another way to apply color and tonal adjustments selectively is to set up your document with image components on different layers. Color and tonal adjustments are applied to only one layer at a time. Only the image components on the targeted layer are affected.
To the top
Correcting images
Here is the general workflow you follow when you correct the tonality and color of an image:
- Use the histogram to check the quality and tonal range of the image.
-
Make sure that the Adjustments panel is open to access color and tonal adjustments. Click an icon to access the adjustments described in the following steps. Applying corrections from the Adjustments panel creates an adjustment layer, which gives you more flexibility and doesn't discard image information. See Adjustments panel overview and About adjustment layers and fill layers.
-
Adjust the color balance to remove unwanted color casts or to correct oversaturated or undersaturated colors. See Color adjustment commands.
-
Adjust the tonal range, using either the Levels or Curves adjustments.
Begin tonal corrections by adjusting the values of the extreme highlight and shadow pixels in the image, setting an overall tonal range for the image. This process is known as setting the highlights and shadows or setting the white and black points. Setting the highlights and shadows typically redistributes the midtone pixels appropriately. However, you might need to adjust your midtones manually.
To adjust the tonality in just shadow and highlight areas, use the Shadow/Highlight command. See Improve shadow and highlight detail.
- (Optional) Make other color adjustments.
After you correct the overall color balance of your image, you can make optional adjustments to enhance colors or produce special effects.
- Sharpen the edges in the image.
As one of the final steps, use the Unsharp Mask or the Smart Sharpen filter to sharpen the clarity of edges in the image. The amount of sharpening required for an image varies according to the image quality produced by the digital camera or scanner you use. See Sharpen images.
- (Optional) Target the image for printer or press characteristics.
You can use options in the Levels or Curves adjustments to import highlight and shadow information into the gamut of an output device, like a desktop printer. This procedure can also be done if you are sending your image to a printing press, and know the characteristics of the press.
Because sharpening increases the contrast of neighboring pixels, it's possible that some pixels in critical areas might become unprintable on the printer or press that you're using. For this reason, it's best to fine-tune the output settings after sharpening. For more information on adjusting the output settings, see Setting highlight and shadow target values.
To the top
Adjustments panel overview
The tools for making color and tonal adjustments can be found in the Adjustments panel. Clicking a tool icon both selects an adjustment and automatically creates an adjustment layer. The adjustments you make using the controls and options in the Adjustments panel create nondestructive adjustment layers. See About adjustment layers and fill layers.
In Photoshop CC and CS6, the Properties panel has a Presets menu with the adjustment presets. In Photoshop CS5, the Adjustments panel has a list of adjustment presets that apply common image corrections. Presets are available for Levels, Curves, Exposure, Hue/Saturation, Black & White, Channel Mixer, and Selective Color. Clicking a preset applies it to the image using an adjustment layer. You can always save adjustment settings as a preset, which is added to the presets list.
Clicking an adjustment icon or a preset displays the settings options for the specific adjustment.
For a video, see An Introduction to Adjustment Layers.
Apply a correction using the Adjustments panel
-
In the Adjustments panel, click an adjustment icon or choose an adjustment from the panel menu. In CS5, you can also click an adjustment preset.
-
Use the controls and options in the Properties panel (CC, CS6) or Adjustments panel (CS5) to apply the settings you want.
-
(Optional) Do any of the following:
-
To toggle the visibility of the adjustment, click the Toggle Layer Visibility button .
- To return the adjustment to its original settings, click the Reset button.
- To discard an adjustment, click the Delete This Adjustment Layer button .3
- To expand the width of the Adjustment panel, in Photoshop CC and Photoshop CS6, drag a bottom corner of the panel. In Photoshop CS5, click the Expand View button.
- (CS5) To add another adjustment layer above the current one, click the arrow ↗. This procedure returns the Adjustments panel to the display of adjustment icons and presets list. In Photoshop CC and CS6, the adjustment icons are always visible in the Adjustments panel.
- (CS5) To return to the current adjustments settings options from the adjustment icons and presets in the Adjustments panel, click the arrow ↗.
Apply a correction to only the layer below
- In the Adjustments panel, click an adjustment icon or choose an adjustment from the panel menu. In CS5, you can also click an adjustment preset.
- In the Properties panel (CC, CS6) or the Adjustments panel (CS5), click the Clip to Layer button 📄. Click the icon again to make the adjustment apply to all layers below it in the Layers panel.
Save and apply adjustment presets
In Photoshop CC and Photoshop CS6, the Properties panel has a Preset menu with the adjustment presets for the tool that you clicked in the Adjustments panel. In Photoshop CS5, the Adjustments panel has a list of presets for common color and tonal adjustments. Additionally, you can save and apply presets for Levels, Curves, Exposure, Hue/Saturation, Black & White, Channel Mixer, and Selective Color. When you save a preset, it's added to the presets list.
- To save adjustment settings as a preset, choose the Save Preset option from the Properties panel menu (CC, CS6) or the Adjustments panel menu (CS5).
- (CC, CS6) To apply an adjustment preset, choose a preset from the Preset menu in the Properties panel.
- (CS5) To apply an adjustment preset, click the triangle to expand the list of presets for a specific adjustment and then click a preset. Alt-click (Windows) or Option-click (Mac OS) a triangle to expand all presets.
Automatically select text fields or the targeted adjustment tool
If you often change adjustment parameters using text fields or the targeted adjustment tool, maximize your efficiency by automatically selecting these items.
- From the Properties panel menu (CC, CS6) or the Adjustments panel menu (CS5), select Auto-Select Parameter or Auto-Select Targeted Adjustment Tool.
If you prefer to select text fields as needed, press Shift-Enter (Windows) or Shift-Return (Mac OS).
Color adjustment commands
You can choose from the following color adjustment commands:
Adjust Levels Auto Quickly corrects the color balance in an image. Although its name implies an automatic adjustment, you can fine-tune how the Auto Color command behaves. See Remove a color cast using Auto Color.
Levels command Adjusts color balance by setting the pixel distribution for individual color channels. See Adjust color using Levels.
Curves command Provides up to 14 control points for highlight, midtone, and shadow adjustments for individual channels. See Curves overview.
Exposure command Adjusts tonality by performing calculations in a linear color space. Exposure is primarily for use in HDR images. See Adjust Exposure for HDR images.
Vibrance command Adjusts color saturation so clipping is minimized. See Adjust color saturation using Vibrance.
Photo Filter command Makes color adjustments by simulating the effects of using a Kodak Wratten or Fuji filter in front of a camera lens. See Change the color balance using the Photo Filter command.
Color Balance command Changes the overall mixture of colors in an image. See Apply the Color Balance adjustment.
Hue/Saturation command Adjusts the hue, saturation, and lightness values of the entire image or of individual color components. See Adjust hue and saturation.
Match Color command Matches the color: from one photo to another photo, from one layer to another layer, and from a selection in an image to another selection in the same image or a different image. This command also adjusts the luminance and color range and neutralizes color casts in an image. See Match the color in different images.
Replace Color command Replaces specified colors in an image with new color values. See Replace the color of objects in an image.
Selective Color command Adjusts the amount of process colors in individual color components. See Make selective color adjustments.
Channel Mixer command Modifies a color channel and makes color adjustments not easily done with other color adjustment tools. See Mix color channels.
To the top
Make a color adjustment
All Photoshop color adjustment tools work essentially the same way; they map an existing range of pixel values to a new range of values. The difference between the tools is the amount of control they provide. Color adjustment tools and their option settings are accessed in the Adjustments panel. For an overview of the color adjustment tools, see Color adjustment commands.
You can adjust the color in an image in different ways. The most flexible method is to use an adjustment layer. When you select a color adjustment tool in the Adjustments panel, Photoshop automatically creates an adjustment layer. Adjustment layers let you experiment with color and tonal adjustments without permanently modifying the pixels in the image. The color and tonal changes reside within the adjustment layer, which acts as a veil through which the underlying image layers appear.
- If you want to make adjustments to a portion of your image, select that portion. If you make no selection, the adjustment is applied to the entire image.
-
Do one of the following:
-
Click an adjustment icon in the Adjustments panel. In CS5, you can also select an adjustment preset in the Adjustments panel.
- Create an adjustment layer. See Create and confine adjustment and fill layers.
- Double-click the thumbnail of an existing adjustment layer in the Layers panel.
Note: You can also choose Image > Adjustments, and choose a command from the submenu to apply adjustments directly to the image layer. Keep in mind that this method discards image information.
A new adjustment layer includes a layer mask, which by default is empty (or white), meaning that your adjustment is applied to the entire image. (If you have an active selection on the image when you add an adjustment layer, the initial layer mask masks out the unselected area in black.) Using the Brush tool, you can paint black areas on the mask where you don't want the adjustment to affect the image. See Edit a layer mask.
- To toggle the view of your image with and without adjustments, click the Toggle Layer Visibility icon ☑ in the Properties panel (CC, CS6) or the Adjustments panel (CS5).

To cancel changes, click the Reset button.
To the top
Save adjustment settings
You can save your color adjustment settings and apply them to other images. Once a setting is saved, it can be accessed in either the Preset menu in the Properties panel (CC, CS6) or the presets list of the Adjustments panel (CS5). You can also choose the Load Preset option from an adjustment dialog box menu. If you are saving color adjustment settings using the Match Color command, see Match the color in different images.
- To save a setting in the Preset menu (CC, CS6) or the Adjustments panel (CS5), choose the Save Preset option from the panel menu. This option is only available for Levels, Curves, Exposure, Hue/Saturation, Black & White, Channel Mixer, and Selective Color.
- To save a setting in the Shadows/Highlights or Replace Color image adjustment dialog box, click Save. In the Levels, Curves, Exposure, Hue/Saturation, Black & White, Channel Mixer, or Selective Color image adjustment dialog box, choose Save Preset from the panel menu. Enter a name for the setting, then click Save.
To the top
Reapply adjustment settings
Once an adjustment setting is saved, it's stored as a preset and can be reapplied.
- (CC, CS6) Choose an adjustment preset from the Preset menu in the Properties panel.
• (CS5) In the Adjustments panel, expand a set of adjustment presets and select from the menu list. - In an adjustment dialog box, click Load. Locate and load the saved adjustment file. In the Curves, Black & White, Exposure, Hue/Saturation, Selective Color, Levels, or Channel Mixer dialog boxes, saved presets appear in the Presets menu. Choose Load Preset from the Preset option to load a preset not shown on the Preset pop-up menu from a different location.
To remove default presets, navigate to the following folders, move the presets out of the folders, and restart Photoshop.
- Windows: [startup drive]/Program Files/Adobe/Adobe Photoshop [version_number]/Presets/[adjustment type]/[preset name]
• Mac OS: [startup drive]/Applications/Adobe Photoshop [version_number]/Presets/[adjustment type]/[preset name]
To the top
Correcting colors in CMYK and RGB
Although you can perform all color and tonal corrections in RGB mode and most adjustments in CMYK mode, choose a mode carefully. Avoid multiple conversions between modes, because color values are rounded and lost with each conversion. Don't convert RGB images to CMYK mode if they are meant for on-screen display. For CMYK images that are separated and printed, do not make color corrections in RGB mode.
If you must convert your image from one mode to another, perform most of your tonal and color corrections in RGB mode. You can then use CMYK mode for fine-tuning. The advantages of working in RGB mode are:
- RGB has fewer channels. As a result, your computer uses less memory.
- RGB has a wider range of colors than CMYK, and more colors are likely to be preserved after adjustments.
You can soft proof colors to see an on-screen preview of how your document's colors will look when reproduced on a particular output device. See About soft-proofing colors.
You can edit an image in RGB mode in one window and view the same image in CMYK colors in another window. Choose Window > Arrange > New Window For (Filename) to open a second window. Select the Working CMYK option for Proof Setup, then choose the Proof Color command to turn on the CMYK preview in one of the windows.
To the top
Identify out-of-gamut colors
A gamut is the range of colors that a color system can display or print. A color that can be displayed in RGB could be out of gamut, and therefore unprintable, for your CMYK setting.
In RGB mode, you can tell whether a color is out of gamut in the following ways:
- In the Info panel, an exclamation point appears next to the CMYK values whenever you move the pointer over an out-of-gamut color.
- In both the Color Picker and the Color panel, an alert triangle appears. When you select an out-of-gamut color, the closest CMYK equivalent is displayed. To select the CMYK equivalent, click the triangle or the color patch.
Photoshop automatically brings all colors into gamut when you convert an RGB image to CMYK. Note that some detail in the image may be lost, depending on your conversion options. You can identify the out-of-gamut colors in an image or correct them manually before converting to CMYK. You can use the Gamut Warning command to highlight out-of-gamut colors.
Find out-of-gamut colors
- Choose View > Proof Setup, then choose the proof profile on which you want to base the gamut warning.
- Choose View > Gamut Warning.
All pixels outside the gamut of the current proof profile space are highlighted in gray.
Change the gamut warning color
- Do one of the following:
• (Windows) Choose Edit > Preferences > Transparency & Gamut.
• (Mac OS) Choose Photoshop > Preferences > Transparency & Gamut.
- Under Gamut Warning, click the color box to display the Color Picker. Then choose a new warning color, and click OK.
For best results, use a color that is not already present in the image.
- Enter a value in the Opacity box, then click OK.
Use this option to reveal more or less of the underlying image through the warning color. Values can range from 1% to 100%.
natural_image
Traditional Chinese architectural detail with red walls, ornate eaves, and a lantern (no visible text or symbols)
natural_image
Traditional Chinese architectural detail with ornate roof and decorative elements (no visible text or symbols)Original image, and out-of-gamut colors preview with blue selected for gamut warning color

Twitter™ and Facebook posts are not covered under the terms of Creative Commons.
Legal Notices | Online Privacy Policy
Levels overview
From an expert: Levels command
Adjust tonal range using Levels
Adjust color using Levels
Add contrast to a photo with Levels
To the top
Levels overview
You use the Levels adjustment to correct the tonal range and color balance of an image by adjusting intensity levels of image shadows, midtones, and highlights. The Levels histogram is a visual guide for adjusting the image key tones. For more information on how to read a histogram, see About histograms.
You can save Levels settings as a preset, then apply them to other images. See Save adjustment settings and Reapply adjustment settings.
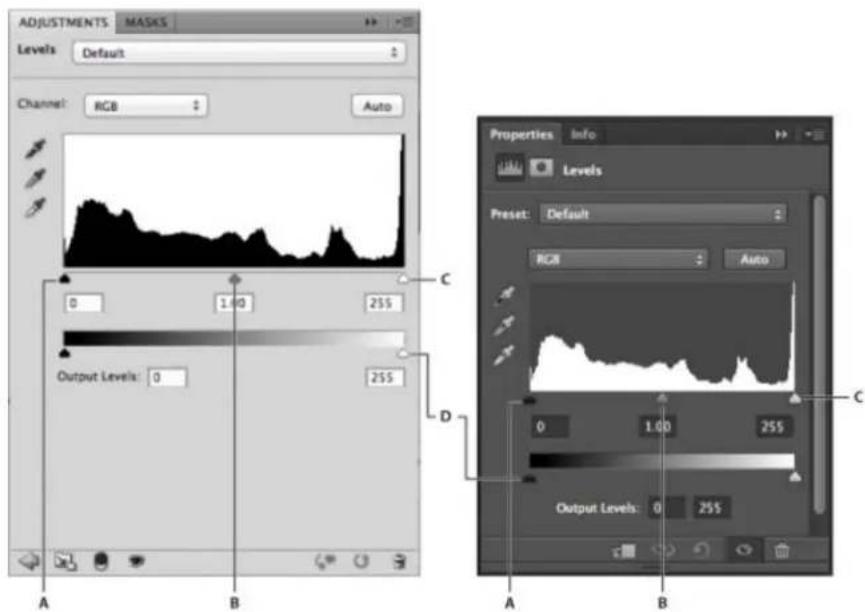
text_image
ADJUSTMENTS MASKS Levels Default Channel: RGB Auto 0 1.00 255 Output Levels: 0 255 A B Properties Info Levels Preset: Default RGB Auto C D 0 1.00 255 Output Levels: 0 255 A BAdjusting levels
A. Shadows B. Midtones C. Highlights D. Output Level sliders
Video tutorials
For more tutorials about the Levels command, see:
Correcting a color cast with Levels (2:05).
Adjusting Levels per Channel (3:59). This tutorial also demonstrates how to use an adjustment layer mask to isolate your adjustment.
To the top
Adjust tonal range using Levels
The outer two Input Levels sliders map the black point and white point to the settings of the Output sliders. By default, the Output sliders are at level 0, where the pixels are black, and level 255, where the pixels are white. With the Output sliders in the default positions, moving the black input slider maps the pixel value to level 0 and moving the white point slider maps the pixel value to level 255. The remaining levels are redistributed between levels 0 and 255. This redistribution increases the tonal range of the image, in effect increasing the overall contrast of the image.
Note: When shadows are clipped, the pixels are black, with no detail. When highlights are clipped, the pixels are white, with no detail.
The middle Input slider adjusts the gamma in the image. It moves the midtone (level 128) and changes the intensity values of the middle range of gray tones without dramatically altering the highlights and shadows.
-
Do one of the following:
-
Click the Levels icon in the Adjustments panel, or choose Levels from the panel menu.
• (CS5) Click a Levels preset in the Adjustments panel. - Choose Layer > New Adjustment Layer > Levels. Click OK in the New Layer dialog box.
Note: Choosing Image > Adjustments > Levels makes direct adjustments to the image layer and discards image information.
- (Optional) To adjust tones for a specific color channel, choose an option from the Channel menu.
- (Optional) To edit a combination of color channels at the same time, Shift-select the channels in the Channels panel before choosing the Image > Adjustments > Levels command. (This method does not work in a Levels adjustment layer.) The Channel menu then displays the abbreviations for the target channels—for example, CM for cyan and magenta. The menu also contains the individual channels for the selected combination. Edit spot channels and alpha channels individually.
- To adjust the shadows and highlights manually, drag the black and white Input Levels sliders to the edge of the first group of pixels at either end of the histogram.
For example, if you move the black point slider to the right at level 5, Photoshop maps all the pixels at level 5 and lower to level 0. Similarly, if you move the white point slider to the left at level 243, Photoshop maps all pixels at level 243 and higher to level 255. The mapping affects the darkest and lightest pixels in each channel. The corresponding pixels in the other channels are adjusted proportionately to avoid altering the color balance.
Note: You can also enter values directly into the first and third Input Levels text boxes.
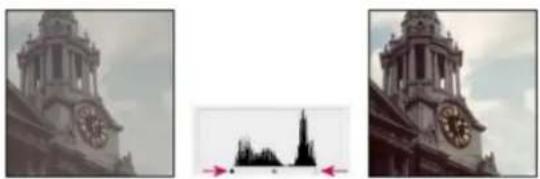
natural_image
Two exterior views of a historic clock tower with ornate clock face and city skyline silhouette (no visible text or symbols)Adjusting black and white points with Levels Input sliders
-
(Optional) To identify areas in the image that are being clipped (completely black or completely white), do one of the following:
-
Hold down Alt (Windows) or Option (Mac OS) as you drag the black point and white point sliders.
-
Choose Show Clipping For Black/White Points from the panel menu.
-
To adjust midtones, use the middle Input slider to make a gamma adjustment.
Moving the middle Input slider to the left makes the overall image lighter. This slider adjustment maps a lower (darker) level up to the midpoint level between the Output sliders. If the Output sliders are in their default position (0 and 255), the midpoint is level 128. In this example, the shadows expand to fill the tonal range from 0 to 128, and the highlights are compressed. Moving the middle Input slider to the right has the opposite effect, making the image darker.
Note: You can also enter a gamma adjustment value directly in the middle Input Levels box.
You can view the adjusted histogram in the Histogram panel.
To the top
Adjust color using Levels
- In the Adjustments panel, click the Levels icon 🎨 or choose Levels from the panel menu.
- In the Properties panel (CC, CS6) or the Adjustments panel (CS5), do one of the following to neutralize a color cast:
- Click the eyedropper tool to set the gray point. Then click in a part of the image that is neutral gray.
- Click Auto to apply the default automatic levels adjustment. To experiment with other automatic adjustment options, choose Auto Options from the Properties panel menu (CC, CS6) or the Adjustments panel menu (CS5), then change Algorithms in the Auto Color Corrections Options dialog box.
In general, assign equal color component values to achieve a neutral gray. For example, assign equal red, green, and blue values to produce a neutral gray in an RGB image.
To the top
Add contrast to a photo with Levels
If the image needs overall contrast because it doesn't use the full tonal range, click the Levels icon in the Adjustments panel. Then drag the Shadow and Highlight input sliders inward until they touch the ends of the histogram.

text_image
A BImage layer doesn't extend to the ends of the graph, indicating that the image is not using the full tonal range.
A. Shadow Input slider B. Highlight Input slider
For more information
- Adjusting image tone and color in CS6
Twitter™ and Facebook posts are not covered under the terms of Creative Commons.
Legal Notices | Online Privacy Policy
Setting highlight and shadow target values
Using Levels to preserve highlight and shadow details for printing
Set target values using the eyedroppers
To the top
Setting highlight and shadow target values
Assigning (targeting) highlight and shadow values of an image is necessary because most output devices (usually printing presses) cannot print detail in the blackest shadow values (near level 0) or the whitest highlight values (near level 255). Specifying the minimum shadow level and maximum highlight level helps to bring the important shadow and highlight details within the gamut of the output device.
If you are printing an image on a desktop printer and your system is color-managed, don't set target values. The Photoshop color management system automatically makes adjustments to the image you see on the screen so that it prints properly on your profiled desktop printer.
To the top
Using Levels to preserve highlight and shadow details for printing
The Output Levels sliders let you set the shadow and highlight levels to compress the image into a range less than 0 to 255. Use this adjustment to preserve the shadow and highlight details when an image is being printed on a press whose characteristics you know. For example, suppose there are important image details in the highlights with a value of 245, and the printing press that you're using won't hold a dot smaller than 5%. You can pull the highlight slider to level 242 (which is a 5% dot on the press) to shift the highlight detail from 245 to 242. Now, the highlight detail can safely print on that press.
Generally, it is not a good idea to use the Output Levels sliders to target images with specular highlights. Your specular highlight will look gray rather than blow out to pure white. Use the highlight eyedropper for images with specular highlights.
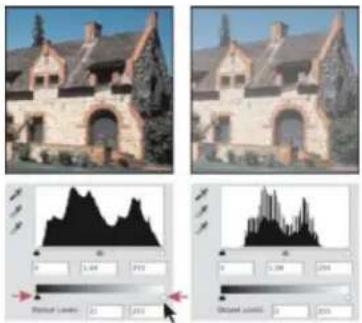
Targeting shadows and highlights with Output Levels sliders
To the top
Set target values using the eyedroppers
-
Select the Eyedropper tool in the toolbox. You can choose 3 by 3 Average from the Sample Size menu in the Eyedropper tool options. This ensures a representative sample of an area rather than the value of a single screen pixel.
-
Click the Levels 🎨 or Curves icon 📊 in the Adjustments panel.
When you select Levels or Curves, the Eyedropper tool is active outside the Properties panel (CC, CS6) or Adjustments panel (CS5). You still have access to the scroll controls, the Hand tool, and the Zoom tool through keyboard shortcuts.
-
Do one of the following to identify areas of highlights and shadows that you want to preserve in the image:
-
Move the pointer around the image, and look at the Info panel to find the lightest and darkest areas that you want preserved (not clipped to pure black or white). (See View color values in an image.)
- Drag the pointer in the image, and look at Curves in the Properties panel (CC, CS6) or Adjustments panel (CS5) to find the lightest and darkest points you want to preserve. This method does not work if the Curves adjustment is set to the CMYK composite channel.
When identifying the lightest highlight details that you want targeted to a printable (lower) value, don't include specular highlights. Specular highlights such as the highlight glint in jewelry or a spot of glare are meant to be the brightest points in an image. It's desirable to clip specular highlight pixels (pure white, no detail) so that no ink is printed on the paper.
You can also use the Threshold command to identify representative highlights and shadows before accessing Levels or Curves. (See Create a two-valued black and white image.)
- To assign highlight values to the lightest area of the image, double-click the Set White Point Eyedropper tool in the Levels or Curves adjustment to display the Color Picker. Enter the values you want to assign to the lightest area in the image, and click OK. Then click the highlight you identified in step 3.
If you accidentally click the wrong highlight, click the Reset button in the Adjustments panel.
Depending on the output device, you can achieve a good highlight in an average-key image using CMYK values of 5, 3, 3, and 0, respectively, when you are printing on white paper. An approximate RGB equivalent is 244, 244, 244, and an approximate grayscale equivalent is a 4% dot. You can approximate these target values quickly by entering 96 in the Brightness (B) box under the HSB area of the Color Picker.
With a low-key image, you may want to set the highlight to a lower value to avoid too much contrast. Experiment with Brightness values from 96 through 80.
The pixel values are adjusted throughout the image proportionately to the new highlight values. Any pixels lighter than the area you clicked are clipped (adjusted to level 255, pure white). The Info panel shows the values both before and after the color adjustment.

text_image
H current H: 0 * S: 0 % B: 94 % R: 240 G: 240 R: 240
Setting the target value for the Set White Point Eyedropper tool and then clicking a highlight to assign it the target value
- To assign shadow values to the darkest area of the image that you want preserved, double-click the Set Black Point Eyedropper tool in the Properties panel (CC, CS6) or Adjustments panel (CS5) to display the Color Picker. Enter the values you want to assign to the darkest area in the image, and click OK. Then click the shadow you identified in step 3.
When you're printing on white paper, you can usually achieve a good shadow in an average-key image using CMYK values of 65, 53, 51, and 95. An approximate RGB equivalent is 10, 10, 10, and an approximate grayscale equivalent is a 96% dot. You can approximate these
values quickly by entering 4 in the Brightness (B) box under the HSB area of the Color Picker.

With a high-key image, you may want to set the shadow to a higher value to maintain detail in the highlights. Experiment with Brightness values from 4 through 20.
Adobe also recommends

BY-NC-SA
Twitter™ and Facebook posts are not covered under the terms of Creative Commons.
Legal Notices
Online Privacy Policy
About histograms
Histogram panel overview
View the histogram for a multilayered document
Preview histogram adjustments
Refresh the histogram display
View color values in an image
View color information while adjusting color
Adjusting color samplers
To the top
About histograms
A histogram illustrates how pixels in an image are distributed by graphing the number of pixels at each color intensity level. The histogram shows detail in the shadows (shown in the left part of the histogram), midtones (shown in the middle), and highlights (shown in the right part) A histogram can help you determine whether an image has enough detail to make a good correction.
The histogram also gives a quick picture of the tonal range of the image, or the image key type. A low-key image has detail concentrated in the shadows. A high-key image has detail concentrated in the highlights. And, an average-key image has detail concentrated in the midtones. An image with full tonal range has some pixels in all areas. Identifying the tonal range helps determine appropriate tonal corrections.
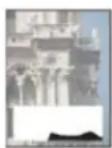
A

B
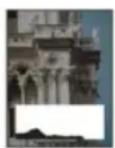
C
How to read a histogram
A. Overexposed photo B. Properly exposed photo with full tonality C. Underexposed photo
The Histogram panel offers many options for viewing tonal and color information about an image. By default, the histogram displays the tonal range of the entire image. To display histogram data for a portion of the image, first select that portion.

You can view an image histogram as an overlay in the Curves dialog box by selecting the histogram option under Curve Display Options, and in the Curves Properties panel (CC, CS6) or the Curves Adjustment panel (CS5), or by choosing Curve Display Options from the panel menu, then Histogram.
To the top
Histogram panel overview
- Choose Window > Histogram or click the Histogram tab to open the Histogram panel. By default, the Histogram panel opens in Compact View with no controls or statistics, but you can adjust the view.

text_image
Histogram Channel: 8.08 Direction: Smooth Image Mean: 111.07 Std Dev: 60.27 Median: 96 Pixels: 356240 Count: Percentile: Cache Level: 2Histogram panel (Expanded view)
A. Channel menu B. panel menu C. Uncached Refresh button D. Cached Data Warning icon E. Statistics
Adjust the view of the Histogram panel
- Choose a view from the Histogram panel menu.
Expanded View Displays the histogram with statistics. It also displays: controls for choosing the channel represented by the histogram, viewing options in the Histogram panel, refreshing the histogram to display uncached data, and choosing a specific layer in a multilayered document.
Compact View Displays a histogram with no controls or statistics. The histogram represents the entire image.
All Channels View Displays individual histograms of the channels in addition to all the options of the Expanded View. The individual histograms do not include alpha channels, spot channels, or masks.

text_image
Histogram Channel: RGB Source: Entire Image Red Green BlueHistogram panel with all channels displayed in color and statistics hidden
View a specific channel in the histogram
If you chose the Expanded View or All Channels View of the Histogram panel, you can choose a setting from the Channel menu. Photoshop remembers the channel setting if you switch from either Expanded View or All Channels View back to Compact View.
- Choose an individual channel to display a histogram of the channel, including color channels, alpha channels, and spot channels.
- Depending on the color mode of the image, choose RGB, CMYK, or Composite to view a composite histogram of all the channels.
- If the image is RGB or CMYK, choose Luminosity to display a histogram representing the luminance or intensity values of the composite channel.
- If the image is RGB or CMYK, choose Colors to display a composite histogram of the individual color channels in color. This option is the default view for RGB and CMYK images when you first choose Expanded View or All Channels View.
In the All Channels View, choosing from the Channels menu affects only the topmost histogram in the panel.
View channel histograms in color
• From the Histogram panel, do one of the following:
- In the All Channels View, choose Show Channels In Color from the panel menu.
- In Expanded View or All Channels View, choose an individual channel from the Channel menu and choose Show Channels In Color from the panel menu. If you switch to Compact View, the channel continues to be shown in color.
- In Expanded View or All Channels View, choose Colors from the Channel menu to show a composite histogram of the channels in color. If you switch to Compact View, the composite histogram continues to be shown in color.
View histogram statistics
By default, the Histogram panel displays statistics in the Expanded View and All Channels View.
- Choose Show Statistics from the Histogram panel menu.
- Do one of the following:
- To view information about a specific pixel value, place the pointer in the histogram.
- To view information about a range of values, drag in the histogram to highlight the range.
The panel displays the following statistical information below the histogram:
Mean Represents the average intensity value.
Std Dev (Standard deviation) Represents how widely intensity values vary.
Median Shows the middle value in the range of intensity values.
pixels:histogram display ofPixels Represents the total number of pixels used to calculate the histogram.
Level Displays the intensity level of the area underneath the pointer.
Count Shows the total number of pixels corresponding to the intensity level underneath the pointer.
Percentile Displays the cumulative number of pixels at or below the level underneath the pointer. This value is expressed as a percentage of all the pixels in the image, from 0% at the far left to 100% at the far right.
Cache Level Shows the current image cache used to create the histogram. When the cache level is higher than 1, the histogram is displayed faster. In this case, the histogram is derived from a representative sampling of pixels in the image (based on the magnification). The original image is cache level 1. At each level above level 1, four adjacent pixels are averaged to arrive at a single pixel value. So, each level is half the dimensions (has 1/4 the number of pixels) of the lower level. When Photoshop makes a quick approximation, it can use one of the upper levels. Click the Uncached Refresh button to redraw the histogram using the actual image layer.
To the top
View the histogram for a multilayered document
-
Choose Expanded View from the Histogram panel menu.
-
Choose a setting from the Source menu. (The Source menu is not available for single-layered documents.)
Entire Image Displays a histogram of the entire image, including all layers.
Selected Layer Displays a histogram of the layer that's selected in the Layers panel.
Adjustment Composite Displays a histogram of an adjustment layer selected in the Layers panel, including all the layers below the adjustment layer.
To the top
Preview histogram adjustments
You can preview the effect on the histogram of any color and tonal adjustments.
- Select the Preview option in the dialog boxes of any color or tonal adjustment command.
When Preview is selected, the Histogram panel shows how the adjustment affects the histogram.
Note: When making adjustments using the Adjustments panel, changes are automatically reflected in the Histogram panel.

Preview of histogram adjustment in the Histogram panel
A. Original histogram B. Adjusted histogram C. Shadows D. Midtones E. Highlights
To the top
Refresh the histogram display
When a histogram is read from a cache instead of the current state of the document, the Cached Data Warning icon ⚠️ appears in the Histogram panel. Histograms based on the image cache are displayed faster and are based on a representative sampling of pixels in the image. You can set the maximum cache level (from 2 to 8) in the Performance preference.
Note: A higher cache level setting will increase the redraw speed for large, multi-layer files, but requires additional usage of system RAM. If RAM is limited or you work mainly with smaller images, use lower cache level settings
• To refresh the histogram so that it displays all of the pixels of the original image in its current state, do one of the following:
• Double-click anywhere in the histogram.
- Click the Cached Data Warning icon
- Click the Uncached Refresh button
- Choose Uncached Refresh from the Histogram panel menu.
For information about cache level, see Histogram panel overview.
To the top
View color values in an image
You can use the Info panel to see the color value of pixels as you make color corrections. When you work with the Properties panel (CC, CS6) or the Adjustments panel (CS5), the Info panel displays two sets of color values for the pixels under the pointer. The value in the left column is the original color value. The value in the right column is the color value after the adjustment is made.
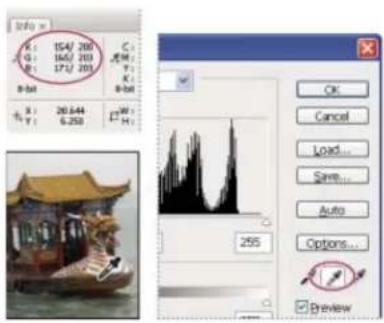
Using Levels and Info panel to neutralize the tone of an image
You can view the color of a single location using the Eyedropper tool. You can also use up to four Color Samplers to display color information for one or more locations in the image. These samplers are saved in the image, so you can refer to them repeatedly as you work, even if you close and reopen the image.

Color samplers and Info panel
- Choose Window > Info to open the Info panel.
- Select (then Shift-click) the Eyedropper tool or Color Sampler tool and if necessary, choose a sample size in the options bar. Point Sample reads the value of a single pixel, other options read the average of a pixel area.

- If you selected the Color Sampler tool , place up to four color samplers on the image. Click where you want to place a sampler.
To the top
View color information while adjusting color
You can view color information for specific pixels in the image while adjusting color in the Properties panel (CC, CS6) or the Adjustments panel (CS5).
-
Add an adjustment using the Adjustments panel.
-
Make adjustments in the Properties panel (CC, CS6) or the Adjustments panel (CS5). As you make adjustments, view the before and after color values in the Info panel. Move the pointer over the image to view color values at the pointer location.
Note: If you are using a command from the Image > Adjustments menu, the Eyedropper tool is activated (and other tools temporarily disabled) when you move the pointer over the image. You still have access to the scroll controls and to the Hand and Zoom tools using keyboard shortcuts.
- If you've placed color samplers on the image, the color values under the color samplers appear in the lower half of the Info panel. To add new color samplers, select the Color Sampler tool and click in the image, or select the Eyedropper tool and Shift-click in the image.
To the top
Adjusting color samplers
Once you've added a color sampler, you can move or delete it, hide it, or change the color sampler information displayed in the Info panel.
Move or delete a color sampler
- Select the Color Sampler tool

- Do one of the following:
• To move a color sampler, drag the sampler to the new location.
- To delete a color sampler, drag the sampler out of the document window. Alternatively, hold down Alt (Windows) or Option (Mac OS) until the pointer becomes a scissors and click the sampler.
• To delete all color samplers, click Clear in the options bar.
- To delete a color sampler while an adjustment dialog box is open, hold down Alt+Shift (Windows) or Option+Shift (Mac OS), and click the sampler.
Hide or show color samplers in an image
- Choose View > Extras. A check mark indicates that color samplers are visible.
Change the display of color sampler information in the Info panel
- To display or hide color sampler information in the Info panel, choose Color Samplers from the panel menu. A check mark indicates that the color sampler information is visible.
- To change the color space in which a color sampler displays values, move the pointer onto the color sampler icon ✗ in the Info panel. Then, hold down the mouse button, and choose another color space from the menu.

BY-NC-SA
Twitter™ and Facebook posts are not covered under the terms of Creative Commons.
Legal Notices | Online Privacy Policy
Matching colors
Replacing colors
Mixing colors selectively
To the top
Matching colors
Match the color in different images
The Match Color command matches colors between multiple images, between multiple layers, or between multiple selections. It also lets you adjust the colors in an image by changing the luminance, changing the color range, and neutralizing a color cast. The Match Color command works only in RGB mode.
When you use the Match Color command, the pointer becomes the Eyedropper tool. Use the Eyedropper tool while adjusting the image to view the color pixel values in the Info panel. This panel gives you feedback about changes in color values as you use the Match Color command. See View color values in an image.
The Match Color command matches the colors in one image (the source image) with colors in another image (the target image). Match Color is useful when you're trying to make the colors in different photos consistent, or when certain colors (such as skin tones) in one image must match the colors in another image.
In addition to matching the color between two images, the Match Color command can match the color between different layers in the same image.
Match the color between two images
- (Optional) Make a selection in the source and target images.
If you don't make a selection, then the Match Color command matches the overall image statistics between images.
- Make the image that you want to change active, and then choose Image > Adjustments > Match Color.
If you're applying the Match Color command to a specific layer in the target image, make sure that layer is active when you choose the Match Color command.
- From the Source menu in the Image Statistics area of the Match Color dialog box, choose the source image whose colors you'll be matching in the target image. Choose None when you don't want to reference a different image to calculate the color adjustment. With None chosen, the target image and the source image are the same.
If necessary, use the Layer menu to choose the layer from the source image whose colors you want to match. You can also choose Merged from the Layer menu to match the colors from all the layers in the source image.
- If you made a selection in the image, do one or more of the following:
- In the Destination Image area, select Ignore Selection When Applying Adjustment if you're applying the adjustment to the entire target image. This option ignores the selection in the target image and applies the adjustment to the entire target image.
In the Image Statistics area, select Use Selection In Source To Calculate Colors if you made a selection in the source image and want to use the colors in the selection to compute the adjustment. Deselect this option to ignore the selection in the source image, and use the colors from the entire source image to compute the adjustment.
In the Image Statistics area, select Use Selection In Target To Calculate Adjustment if you made a selection in the target image and want to use the colors in the selection to calculate the adjustment. Deselect this option to ignore the selection in the target image and compute the adjustment by using the colors of the entire target image.
- To automatically remove a color cast in the target image, select the Neutralize option. Make sure that the Preview option is selected so that your image is updated as you make adjustments.
- To increase or decrease the brightness in the target image, move the Luminance slider. Alternatively, enter a value in the Luminance box. The maximum value is 200, the minimum is 1, and the default is 100.
- To adjust the color saturation in the target image, adjust the Color Intensity slider. Alternatively, enter a value in the Color Intensity box. The maximum value is 200, the minimum is 1 (which produces a grayscale image), and the default is 100.
- To control the amount of adjustment applied to the image, move the Fade slider. Moving the slider to the right reduces the adjustment.
- Click OK.
Match the color of two layers in the same image
- (Optional) Make a selection in the layer you want to match. Use this method when matching a color region (for example, facial skin tones) in one layer with a region in another.
If you don't make a selection, then the Match Color matches the colors of the entire source layer.
- Make sure that the layer you want to target (apply the color adjustment to) is active, and then choose Image > Adjustments > Match Color.
- From the Source menu in the Image Statistics area of the Match Color dialog box, make sure that the image in the Source menu is the same as the target image.
- Use the Layer menu to choose the layer whose colors you want to match. You can also choose Merged from the Layer menu to match the colors from all the layers.
- If you made a selection in the image, do one or more of the following:
In the Destination Image area, select Ignore Selection When Applying Adjustment if you're applying the adjustment to the entire target layer. This option ignores the selection in the target layer and applies the adjustment to the entire target layer.
In the Image Statistics area, select Use Selection In Source To Calculate Colors if you made a selection in the source image and want to use the color in the selection to compute the adjustment. Deselect this option to ignore the selection in the source layer and use the colors in the entire source layer to compute the adjustment.
In the Image Statistics area, select Use Selection In Target To Calculate Adjustment if you want to use only the colors in the selected area of the target layer to compute the adjustment. Deselect this option to ignore the selection and use the colors of the entire target layer to compute the adjustment.
- To automatically remove a color cast in the target layer, Select the Neutralize option. Make sure that the Preview option is selected so that your image is updated as you make adjustments.
-
To increase or decrease the brightness in the target layer, move the Luminance slider. Alternatively, enter a value in the Luminance box. The maximum value is 200, the minimum is 1, and the default is 100.
-
To adjust the range of color pixel values in the target layer, adjust the Color Intensity slider. Alternatively, enter a value in the Color Intensity box. The maximum value is 200, the minimum is 1 (which produces a grayscale image), and the default is 100.
- To control the amount of adjustment applied to the image, adjust the Fade slider. Moving the slider to the right reduces the amount of adjustment.
- Click OK.
Save and apply settings in the Match Color command
- In the Image Statistics area of the Match Color dialog box, click the Save Statistics button. Name and save the settings.
- In the Image Statistics area of the Match Color dialog box, click the Load Statistics button. Locate and load the saved settings file.
To the top
Replacing colors
Replace the color of objects in an image
Photoshop provides several techniques that let you replace the colors of objects. For great flexibility and results, apply a Hue/Saturation adjustment to selected objects. For less flexibility but a convenient grouping of options, use the Replace Color dialog box. For speed but less precision, try the Color Replacement tool.
Video tutorial: Comparing color replacement techniques

text_image
123See two approaches for convincing color changes.... Read More
http://goo.gl/L8G5A

by Dave Cross
http://davecrossworkshops....
Contribute your expertise to Adobe Community Help
Video tutorial: Precisely select and replace colors

text_image
123Target and tweak a specific color range.... Read More
http://goo.gl/SNxFI

by Deke McClelland
http://www.deke.com/
Contribute your expertise to Adobe Community Help
Apply a Hue/Saturation adjustment to selected objects
In most cases, this flexible technique best replaces colors. Because masks and adjustment layers are non-destructive, you can later fine-tune the results with complete freedom. A unique Colorize option makes absolute, rather than relative, color changes (avoiding tinting from original colors).
-
Select the object you want to change. The Quick Selection tool ⚙ often produces good results. For additional techniques, see Select a color range and Refine selection edges.
-
In the Adjustments panel, click the Hue/Saturation icon.
The selection becomes a mask on the adjustment layer.
- In the Properties panel (CC, CS6) or Adjustments panel (CS5), change Hue and Saturation settings to replace the object's color. If original color tints the new color, select Colorize, and readjust settings. (See Adjust hue and saturation.)
Leave the Lightness setting at zero to maintain contrast. To maintain both contrast and saturation, select the Hue blending mode for the adjustment layer.
- If necessary, enlarge or reduce the affected area by painting on the mask with white or black. (See Edit a layer mask.)
For more information, see Adjustments panel overview.
Use the Replace Color dialog box
The Replace Color dialog box combines tools for selecting a color range with HSL sliders for replacing that color. You can also choose the replacement color in the Color Picker.
Replace Color lacks the Colorize option from the Hue/Saturation adjustment, which may be needed for a complete color change. You may also find the adjustment layer technique easier for changing specific objects. However, the Replace Color command is good for global color changes—especially changing out-of-gamut colors for printing.
Book excerpt: Using the Replace Color command

text_image
123Learn with examples from the Photoshop Visual QuickStart Guide.... Read More http://goo.gl/SY4Sc

by Elaine Weinmann and Peter Lourekas http://www.peachpit.com/au...
Contribute your expertise to Adobe Community Help
-
Choose Image > Adjustments > Replace Color.
-
(Optional) If you are selecting similar, contiguous colors in the image, select Localized Color Clusters to build a more accurate mask.
-
Select a preview option:
Selection Displays the mask in the preview box. Masked areas are black, and unmasked areas are white. Partially masked areas (areas covered with a semitransparent mask) appear as varying levels of gray according to their opacity.
Image Displays the image in the preview box. This option is useful when you are working with a magnified image or have limited screen space.
- To select the colors that you want to replace, use the Eyedropper tool 📋 to click in the image or in the preview box to select the areas
exposed by the mask.
-
To refine the selection, do any of the following:
-
Shift-click or use the Add To Sample Eyedropper tool to add areas.
- Alt-click (Windows), Option-click (Mac OS), or use the Subtract From Sample Eyedropper tool to remove areas.
-
Click the Selection Color swatch to open the Color Picker. Use the Color Picker to target the color you want replaced. As you select a color in the Color Picker, the mask in the preview box is updated.
-
Drag the Fuzziness slider or enter a Fuzziness value to control the degree to which related colors are included in the selection.
-
Specify a Replacement color by doing either of the following:
-
Drag the Hue, Saturation, and Lightness sliders (or enter values in the text boxes).
- Double-click the Result swatch and use the Color Picker to select the replacement color.
Note: You cannot replace pure gray, black, or white with a color. However, you can change the Lightness setting. (The Hue and Saturation settings are relative to existing color, so they have no effect.)
- (Optional) Click Save to store settings you will later load for other images.
For a video on dodging and burning with the Replace Color command, see www.adobe.com/go/lrvid4119_ps. (Discussion of Replace Color begins at the 5:30 mark.)
Use the Color Replacement tool
The Color Replacement tool paints over a targeted color with a replacement color. While this tool is good for quick edits, it often proves unsatisfactory, particularly with dark colors and black. If you don't get good results after experimenting with tool options, see Apply a Hue/Saturation adjustment to selected objects.
The Color Replacement tool doesn't work in Bitmap, Indexed, or Multichannel color mode.
Book excerpt: Using the Color Replacement tool

text_image
123Walk through the process step by step.... Read More
http://goo.gl/QfW5x

by Elaine Weinmann and Peter Lourekas
http://www.peachpit.com/au...
Contribute your expertise to Adobe Community Help
- Select the Color Replacement tool 📋. (If the tool isn't visible, access it by holding down the Brush tool.)
- In the options bar, choose a brush tip. Generally, you should keep the blending mode set to Color.
- For the Sampling option, choose one of the following:
Continuous Samples colors continuously as you drag.
Once Replaces the targeted color only in areas containing the color that you first click
Background Swatch Replaces only areas containing the current background color.
- From the Limits menu, select one of the following:
Discontiguous Replaces the sampled color wherever it occurs under the pointer.
Contiguous Replaces colors that are contiguous with the color immediately under the pointer
Find Edges Replaces connected areas containing the sampled color while better preserving the sharpness of shape edges.
-
For Tolerance, choose a low percentage to replace colors very similar to the pixel you click, or raise the percentage to replace a broader range of colors.
-
To produce a smooth edge in the corrected areas, select Anti-aliased.
-
Choose a foreground color to replace the unwanted color. (See Choose colors in the toolbox.)
-
Click the color you want to replace in the image.
-
Drag in the image to replace the targeted color.
If the range of replaced colors is too small, increase the Tolerance setting in the options bar.
To the top
Mixing colors selectively
Make selective color adjustments
Selective color correction is a technique used by high-end scanners and separation programs to change the amount of process colors in each of the primary color components in an image. You can modify the amount of a process color in any primary color selectively—without affecting the other primary colors. For example, you can use selective color correction to dramatically decrease the cyan in the green component of an image while leaving the cyan in the blue component unaltered.
Even though Selective Color uses CMYK colors to correct an image, you can use it on RGB images.
- Make sure that the composite channel is selected in the Channels panel. The Selective Color adjustment is available only when you're viewing the composite channel.
-
Do one of the following:
-
Click the Selective Color icon in the Adjustments panel.
- Choose Layer > New Adjustment Layer > Selective Color. Click OK in the New Layer dialog box.
• (CS5) Click a Selective Color preset in the Adjustments panel.
Note: You can also choose Image > Adjustments > Selective Color. But keep in mind that this method makes direct adjustments to the image layer and discards image information.
-
Do one of the following:
-
In Photoshop CC and CS6, choose the color you want to adjust from the Colors menu in the Properties panel. You can also choose a Preset that you've saved.
- In CS5, choose the color you want to adjust from the Colors menu in the Adjustments panel.
-
(CC, CS6) In the Properties panel, choose a Selective Color preset from the Preset menu.
-
Select a method in the Properties panel (CC, CS6) or choose a method from the Adjustments panel menu (CS5):
Relative Changes the existing amount of cyan, magenta, yellow, or black by its percentage of the total. For example, if you start with a pixel that is 50% magenta and add 10%, 5% is added to the magenta (10% of 50% = 5%) for a total of 55% magenta. (This option cannot adjust pure specular white, which contains no color components.)
Absolute Adjusts the color in absolute values. For example, if you start with a pixel that is 50% magenta and add 10%, the magenta ink is set to a total of 60%.
Note: The adjustment is based on how close a color is to one of the options in the Colors menu. For example, 50% magenta is midway between white and pure magenta and receives a proportionate mix of corrections defined for the two colors.
- Drag the sliders to increase or decrease the components in the selected color.
You can also save the settings you make for the Selective Color adjustment and reuse the settings on other images.
Adobe also recommends
Twitter™ and Facebook posts are not covered under the terms of Creative Commons.
Legal Notices | Online Privacy Policy
Apply the Auto Contrast adjustment
Remove a color cast using Auto Color
Set Auto adjustment options
Using the Equalize command
Adjust black and white points with the Auto option
To the top
Apply the Auto Contrast adjustment
The Auto Contrast command adjusts image contrast automatically. Because Auto Contrast does not adjust channels individually, it does not introduce or remove color casts. It clips the shadow and highlight values in an image and then maps the remaining lightest and darkest pixels in the image to pure white (level 255) and pure black (level 0). This makes the highlights appear lighter and shadows appear darker.
By default, when identifying the lightest and darkest pixels in an image, Auto Contrast clips the white and black pixels by 0.5%—that is, it ignores the first 0.5% of either extreme. You can change this default using the Auto Color Correction Options found in the Levels and the Curves dialog boxes.
Auto Contrast can improve the appearance of many photographic or continuous-tone images. It does not improve flat-color images.
-
Do one of the following:
-
Click the Levels or Curves icon in the Adjustments panel.
- Choose Layer > New Adjustment Layer and choose either Levels or Curves. Click OK in the New Layer dialog box.
Note: You can also choose Image > Auto Contrast to apply the adjustment directly to the image layer. Keep in mind that this method discards image information and its application is automatic. You cannot adjust any of the options in the following steps.
- In the Properties panel (CC, CS6) or Adjustments panel (CS5), Alt-click (Windows) or Option-click (Mac OS) the Auto button.
- Under Algorithms in the Auto Color Correction Options dialog box, select the Enhance Monochromatic Contrast option.
- Specify the shadows and highlights that are clipped, and adjust the target color for the midtones.
- Click OK to apply Auto Contrast.
To the top
Remove a color cast using Auto Color
Auto Color adjusts the contrast and color of an image by searching the image to identify shadows, midtones, and highlights. By default, Auto Color neutralizes the midtones using a target color of RGB 128 gray and clips the shadows and highlight pixels by 0.5%. You can change these defaults in the Auto Color Correction Options dialog box.
-
Do one of the following:
-
Click the Levels or Curves icon in the Adjustments panel.
- Choose Layer > New Adjustment Layer and choose either Levels or Curves. Click OK in the New Layer dialog box.
Note: You can also choose Image > Auto Color to apply the adjustment directly to the image layer. Keep in mind that this method discards image information and is automatic. You cannot adjust any of the options in the following steps.
- In the Properties panel (CC, CS6) or Adjustments panel (CS5), Alt-click (Windows) or Option-click (Mac OS) the Auto button.
- Under Algorithms in the Auto Color Correction Options dialog box, select the Find Dark & Light colors option.
- Select the Snap Neutral Midtones option.
- Specify the shadows and highlights that are clipped, and adjust the target color for the midtones.
- Click OK to apply Auto Color.
To the top
Set Auto adjustment options
The Auto Color Correction options control the automatic tone and color corrections available in both Levels and Curves. It also controls the settings for the Auto Tone, Auto Contrast, and Auto Color commands. The Auto Color Correction options let you specify shadow and highlight clipping percentages, and assign color values to shadows, midtones, and highlights.
You can apply the settings during a single use of the Levels or Curves adjustment, or you can save the settings as default values when applying Auto Tone, Auto Contrast, Auto Color, and the Auto option for Levels and Curves.
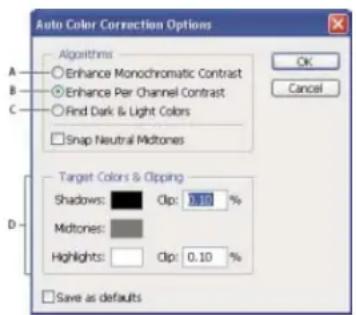
text_image
Auto Color Correction Options Algorithms Enhance Monochromatic Contrast Enhance Per Channel Contrast Find Dark & Light Colors Snap Neutral Midtones Target Colors & Clipping Shadows: Clip: 0.10 % Midtones: Highlights: Clip: 0.10 % Save as defaultsAuto Color Correction Options dialog box
A. Auto Contrast option B. Auto Levels option C. Auto Color option D. Set target colors, black point, and white point
- Click the Levels or Curves icon in the Adjustments panel.
- Alt-click (Windows) or Option-click (Mac OS) the Auto button in the Properties panel (CC, CS6) or Adjustments panel (CS5).
- Specify the algorithm you want Photoshop to use to adjust the overall tonal range of an image:
Enhance Monochromatic Contrast Clips all channels identically. This preserves the overall color relationship while making highlights appear lighter and shadows appear darker. The Auto Contrast command uses this algorithm.
Auto Levels command:aboutEnhance Per Channel Contrast Maximizes the tonal range in each channel to produce a more dramatic correction. Because each channel is adjusted individually, Enhance Per Channel Contrast may remove or introduce color casts. The Auto Tone command uses this algorithm.
Auto Color command:aboutFind Dark & Light Colors Finds the average lightest and darkest pixels in an image and uses them to maximize contrast while minimizing clipping. The Auto Color command uses this algorithm.
-
Select Snap Neutral Midtones if you want Photoshop to find an average nearly-neutral color in an image and then adjust the gamma (midtone) values to make the color neutral. The Auto Color command uses this algorithm.
-
To specify how much to clip black and white pixels, enter percentages in the Clip text boxes. A value between 0.0% and 1% is recommended.
By default, Photoshop clips the black and white pixels by 0.1%—that is, it ignores the first 0.1% of either extreme when identifying the lightest and darkest pixels in the image. Because of the better output quality of modern scanners and digital cameras, these default clipping percentages might be too high.
-
To assign (target) color values to the darkest, neutral, and lightest areas of an image, click a color swatch.
-
Do one of the following:
-
To use the settings in the current Levels or Curves adjustment, click OK. If you then click the Auto button, Photoshop reapplies the same settings to the image.
- To save the settings as the default, select Save as Defaults, and then click OK. The next time you access Levels or Curves in the Adjustments panel, you can apply the same setting by clicking the Auto button. The Auto Tone, Auto Contrast, and Auto Color commands also use the default clipping percentages.
Note: When you save the Auto Color Correction options as defaults for Auto Color, Auto Tone, and Auto Contrast, it does not matter what algorithm you select in step 2. The three auto-correction commands use only those values that you set for the target colors and clipping. The only exception is that the Auto Color command also uses the Snap Neutral Midtones option.
Auto Corrections

text_image
123Photoshop expert Corey Barker explains how to use Auto Corrections in Photoshop to process your images faster.... Read More http://tv.adobe.com/watch/learn-photoshop-cs6...

by Corey Barker http://planetphotoshop.com...
Contribute your expertise to Adobe Community Help
To the top
Using the Equalize command
The Equalize command redistributes the brightness values of the pixels in an image so that they more evenly represent the entire range of brightness levels. Equalize remaps pixel values in the composite image so that the brightest value represents white, the darkest value represents black, and intermediate values are evenly distributed throughout the grayscale.
You can use the Equalize command when a scanned image appears darker than the original and you want to balance the values to produce a lighter image. Using Equalize together with the Histogram panel lets you see before-and-after brightness comparisons.
Keep in mind that the Equalize command applies adjustments directly to the image layer and deletes image information. For nondestructive adjustments, use adjustment layers or edit in Adobe Camera Raw.
- (Optional) Select an area of the image to equalize.
-
Choose Image > Adjustments > Equalize.
-
If you selected an area of the image, select what to equalize in the dialog box, and click OK:
Equalize Selected Area Only Evenly distributes only the pixels in the selection.
Equalize Entire Image Based On Selected Area Evenly distributes all image layers based on those in the selection.
To the top
Adjust black and white points with the Auto option
The Auto option for Levels and Curves and the Auto Tone command automatically adjust the black point and white point in an image. This clips a portion of the shadows and highlights in each channel and maps the lightest and darkest pixels in each color channel to pure white (level 255) and pure black (level 0). The intermediate pixel values are redistributed proportionately. As a result, using the Auto option or Auto Tone increases the contrast in an image because the pixel values are expanded. Because the Auto option and Auto Tone adjust each color channel individually, it may remove color or introduce color casts.
The Auto option and Auto Tone give good results in certain images with an average distribution of pixel values that need a simple increase in contrast.
By default, the Auto option and the Auto Tone command clip the white and black pixels by 0.1%—that is, it ignores the first 0.1% of either extreme when identifying the lightest and darkest pixels in the image. The default settings for the Auto option can be changed in the Auto Color Correction Options dialog box.
-
Do one of the following:
-
Click the Levels or Curves icon in the Adjustments panel.
- Choose Layer > New Adjustment Layer and choose either Levels or Curves. Click OK in the New Layer dialog box.
Note: You can choose Image > Auto Tone to apply the adjustment directly to the image layer. Keep in mind that this method discards image information and is automatic. You cannot adjust any of the options in the following steps.
- In the Properties panel (CC, CS6) or Adjustments panel (CS5), Alt-click (Windows) or Option-click (Mac OS) the Auto button.
- Under Algorithms in the Auto Color Correction Options dialog box, select Enhance Per Channel Contrast.
- Adjust the amount of shadow and highlight values that are clipped, and adjust the target color for the midtones.
- Click OK to apply the Auto option settings.
Adobe also recommends
- Adjusting image color and tone
- Adjust color using Levels
- Adjusting image color and tone

Twitter ^™ and Facebook posts are not covered under the terms of Creative Commons.
Legal Notices | Online Privacy Policy
About high dynamic range images
Take photos for HDR images
Features that support 32-bpc HDR images
Merge images to HDR
Adjust displayed dynamic range for 32-bit HDR images
About the HDR Color Picker
Paint on HDR images
To the top
About high dynamic range images
The dynamic range (ratio between dark and bright regions) in the visible world far exceeds the range of human vision and of images that are displayed on a monitor or printed. But whereas human eyes can adapt to very different brightness levels, most cameras and computer monitors can reproduce only a fixed dynamic range. Photographers, motion picture artists, and others working with digital images must be selective about what's important in a scene because they are working with a limited dynamic range.
High dynamic range (HDR) images open up a world of possibilities because they can represent the entire dynamic range of the visible world. Because all the luminance values in a real-world scene are represented proportionately and stored in an HDR image, adjusting the exposure of an HDR image is like adjusting the exposure when photographing a scene in the real world.
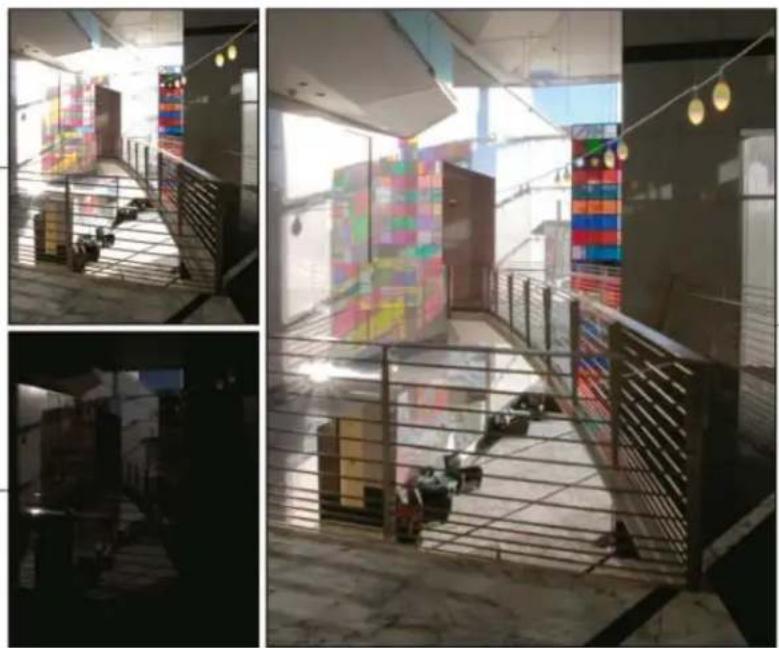
natural_image
Interior architectural view of a modern building with colorful geometric wall art and staircases (no visible text or symbols)Merging images of different exposures to create an HDR image
A. Image with shadow detail but highlights clipped B. Image with highlight detail but shadows clipped C. HDR image containing the dynamic range of the scene
In Photoshop, the luminance values of an HDR image are stored using a floating-point numeric representation that's 32 bits long (32-bits-per-channel). The luminance values in an HDR image are directly related to the amount of light in a scene. By contrast, non-floating point 16- and 8-bpc image files store luminance values only from black to paper white, reflecting an extremely small segment of dynamic range in the real world.
In Photoshop, the Merge To HDR Pro command lets you create HDR images by combining multiple photographs captured at different exposures. Because an HDR image contains brightness levels that far exceed the display capabilities of a standard 24-bit monitor, Photoshop lets you adjust the HDR preview. If you need to print or use tools and filters that don't work with HDR images, you can convert them to 16- or 8-bpc images.
Take photos for HDR images
Keep the following tips in mind when you take photos to be combined with the Merge To HDR Pro command:
- Secure the camera to a tripod.
- Take enough photos to cover the full dynamic range of the scene. You can try taking at least five to seven photos, but you might need to take more exposures depending on the dynamic range of the scene. The minimum number of photos should be three.
- Vary the shutter speed to create different exposures. Changing the aperture changes the depth of field in each exposure and can produce lower-quality results. Changing the ISO or aperture may also cause noise or vignetting in the image.
- In general, don't use your camera's auto-bracket feature, because the exposure changes are usually too small.
- The exposure differences between the photos should be one or two EV (exposure value) steps apart (equivalent to about one or two f-stops apart).
- Don't vary the lighting; for instance, don't use a flash in one exposure but not the next.
• Make sure that nothing is moving in the scene. Exposure Merge works only with differently exposed images of the identical scene.
To the top
Features that support 32-bpc HDR images
You can use the following tools, adjustments, and filters with 32-bpc HDR images. (To work with more Photoshop features, convert a 32-bpc image to a 16-bpc or an 8-bpc image. To preserve the original image, create a copy with the Save As command.)
Adjustments Levels, Exposure, Hue/Saturation, Channel Mixer, Photo Filter.
Note: Although the Exposure command can be used with 8- and 16-bpc images, it is designed for making exposure adjustments to 32-bpc HDR images.
Blend Modes Normal, Dissolve, Darken, Multiply, Lighten, Darker Color, Linear Dodge (Add), Lighter Color, Difference, Subtract, Divide, Hue, Saturation, Color, and Luminosity.
Create new 32-bpc documents In the New dialog box, 32 bit is an option in the bit depth pop-up menu to the right of the Color Mode pop-up menu.
Edit menu commands All commands including Fill, Stroke, Free Transform, and Transform.
File Formats Photoshop (PSD, PSB), Radiance (HDR), Portable Bit Map (PBM), OpenEXR, and TIFF.
Note: Although Photoshop cannot save an HDR image in the LogLuv TIFF file format, it can open and read a LogLuv TIFF file.
Filters Average, Box Blur, Gaussian Blur, Motion Blur, Radial Blur, Shape Blur, Surface Blur, Add Noise, Clouds, Difference Clouds, Lens Flare, Smart Sharpen, Unsharp Mask, Emboss, De-Interlace, NTSC Colors, High Pass, Maximum, Minimum, and Offset.
Image commands Image Size, Canvas Size, Image Rotation, Crop, Trim, Duplicate, Apply Image, Calculations, and Variables.
View Pixel Aspect Ratio (Custom Pixel Aspect Ratio, Delete Pixel Aspect Ratio, Reset Pixel Aspect Ratio, etc.)
Layers New layers, duplicate layers, adjustment layers (Levels, Vibrance, Hue/Saturation, Channel Mixer, Photo Filter, and Exposure), fill layers, layer masks, layer styles, supported blending modes, and Smart Objects.
Modes RGB Color, Grayscale, conversion to 8 Bits/Channel or 16 Bits/Channel.
Pixel Aspect Ratio Support for square and non-square documents.
Selections Invert, Modify Border, Transform Selection, Save Selection and Load Selection.
Tools All tools in the toolbox except: Magnetic Lasso, Magic Wand, Spot Healing Brush, Healing Brush, Red Eye, Color Replacement, Art History Brush, Magic Eraser, Background Eraser, Paint Bucket, Dodge, Burn, and Sponge. Some tools work with supported blend modes only.
To the top
Merge images to HDR
The Merge To HDR Pro command combines multiple images with different exposures of the same scene, capturing the full dynamic range in a single HDR image. You can output the merged image as a 32-, 16-, or 8-bpc file. However, only a 32-bpc file can store all the HDR image data. HDR merging works best when photos are optimized for the process. For recommendations, see Take photos for HDR images.
Video tutorial: The best new feature in CS5: HDR Pro

text_image
123Take image tones from vivid to surreal....
Read More
http://goo.gl/uPzlj

by Deke McClelland
http://www.deke.com/
Contribute your expertise to
Adobe Community Help
Book excerpt: Create HDR images from bracketed exposures

text_image
123Walk through the HDR process from camera to computer.... Read More
http://goo.gl/uhlrB

by Conrad Chavez
http://www.conradchavez.co...
Contribute your expertise to
Adobe Community Help
Book excerpt: Remove ghosting from HDR images

text_image
123Eliminate blur from moving objects in a scene.... Read More
http://goo.gl/z4hhB

by Scott Kelby
http://www.peachpit.com/au...
Contribute your expertise to
Adobe Community Help
Video tutorial: Explore the enhancements to HDR Pro

text_image
123Take a tour through all the new features.... Read More
http://www.adobe.com/go/lrvid5004_ps_en

by Jan Kabili
http://www.lynda.com/Jan-K...
Contribute your expertise to Adobe Community Help
-
Do one of the following:
-
(Photoshop) Choose File > Automate > Merge To HDR Pro.
-
(Bridge) Select the images you want to use and choose Tools > Photoshop > Merge To HDR Pro. Skip to step 5.
-
In the Merge To HDR Pro dialog box, click Browse to select specific images, click Add Open Files, or choose Use > Folder. (To remove a particular item, select it in files list, and click Remove.)
- (Optional) Select Attempt To Automatically Align Source Images if you held the camera in your hands when you photographed the images.
- Click OK.
Note: If images lack exposure metadata, enter values in the Manually Set EV dialog box.
A second Merge To HDR Pro dialog box displays thumbnails of the source images, and a preview of the merged result.
- To the upper right of the preview, choose a bit depth for the merged image.

Choose 32 Bit if you want the merged image to store the entire dynamic range of the HDR image. 8-bit and (non-floating point) 16-bit image files cannot store the entire range of luminance values in an HDR image.
- To adjust the tonal range, see Options for 32-bit images or Options for 16- or 8-bit images.
- (Optional) To save your tonal settings for future use, choose Preset > Save Preset. (To later reapply the settings, choose Load Preset.)
Options for 32-bit images
Move the slider below the histogram to adjust the white point preview of the merged image. Moving the slider adjusts the image preview only; all HDR image data remains in the merged file.
The preview adjustment is stored in the HDR file and applied whenever you open the file in Photoshop. To readjust the white point preview at any time, choose View > 32-Bit Preview Options.
Options for 16- or 8-bit images
HDR images contain luminance levels that far exceed the dynamic range that 16- or 8-bpc images can store. To produce an image with the dynamic range you want, adjust exposure and contrast when converting from 32-bpc to lower bit depths.
Choose one of the following tone-mapping methods:
Local Adaptation Adjusts HDR tonality by adjusting local brightness regions throughout the image.
Edge Glow Radius specifies the size of the local brightness regions. Strength specifies how far apart two pixels' tonal values must be before they're no longer part of the same brightness region.
Tone and Detail Dynamic range is maximized at a Gamma setting of 1.0; lower settings emphasize midtones, while higher settings emphasize highlights and shadows. Exposure values reflect f-stops. Drag the Detail slider to adjust sharpness and the Shadow and Highlight sliders to brighten or darken these regions.
Color Vibrance adjusts the intensity of subtle colors, while minimizing clipping of highly saturated colors. Saturation adjusts the intensity of all colors from -100 (monochrome) to +100 (double saturation).
Toning Curve Displays an adjustable curve over a histogram showing luminance values in the original, 32-bit HDR image. The red tick marks along the horizontal axis are in one EV (approximately one f-stop) increments.
Note: By default, the Toning Curve and Histogram limit and equalize your changes from point to point. To remove the limit and apply more extreme adjustments, select the Corner option after inserting a point on the curve. When you insert and move a second point, the curve becomes angular.
text_image
A BToning Curve and Histogram adjustment using the Corner option
A. Inserting a point and selecting the Corner option. B. Adjusting new point makes the curve angular at the point where the Corner option is used.
Equalize Histogram Compresses the dynamic range of the HDR image while trying to preserve some contrast. No further adjustments are necessary; this method is automatic.
Exposure and Gamma Lets you manually adjust the brightness and contrast of the HDR image. Move the Exposure slider to adjust gain and the Gamma slider to adjust contrast.
Highlight Compression Compresses the highlight values in the HDR image so they fall within the luminance values range of the 8- or 16-bpc image file. No further adjustments are necessary; this method is automatic.
Compensate for moving objects
If images have different content due to moving objects like cars, people, or foliage, select Remove Ghosts in the Merge To HDR Pro dialog box. Photoshop displays a green outline around the thumbnail with the best tonal balance, identifying the base image. Moving objects found in other images are removed. (If movement occurs in very light or dark areas, click a different thumbnail where moving objects are better exposed to improve results.)

For a tutorial on the Remove Ghosts option, see this video. (Discussion of Remove Ghosts begins at 3:00.)
Save or load camera response curves
Response curves indicate how camera sensors interpret different levels of incoming light. By default, the Merge To HDR Pro dialog box automatically calculates a camera response curve based on the tonal range of images you are merging. You can save the current response curve and later apply it to another group of merged images.
- In the upper-right corner of the Merge to HDR Pro dialog box, click the response curve menu ▼, and then choose Save Response Curve. (To later reapply the curve, choose Load Response Curve.)
Convert from 32 bits to 16 or 8 bpc
If you originally created a 32-bit image during the Merge to HDR Pro process, you can later convert it to a 16- or 8-bit image.
- Open a 32-bpc image in Photoshop, and choose Image > Mode > 16 Bits/Channel or 8 Bits/Channel.
- Adjust exposure and contrast to produce an image with the dynamic range you want. (See Options for 16- or 8-bit images.)
- Click OK to convert the 32-bit image.
To the top
Adjust displayed dynamic range for 32-bit HDR images
The dynamic range of HDR images exceeds the display capabilities of standard computer monitors. When you open an HDR image in Photoshop, it can look very dark or washed out. Photoshop lets you adjust the preview so that the monitor displays an HDR image whose highlights and shadows aren't washed out or too dark. The preview settings are stored in the HDR image file (PSD, PSB, and TIFF only) and are applied whenever the file is opened in Photoshop. Preview adjustments don't edit the HDR image file; all the HDR image information remains intact. Use the Exposure adjustment (Image > Adjustments > Exposure) to make exposure edits to the 32-bpc HDR image.
To view 32-bit readouts in the Info panel, click the Eyedropper icon in the Info panel and choose 32-Bit from the pop-up menu.
- Open a 32-bpc HDR image in Photoshop, and choose View > 32-Bit Preview Options.
- In the 32-bit Preview Options dialog box, choose an option from the Method menu:
Exposure And Gamma Adjusts the brightness and contrast.
Highlight Compression Compresses the highlight values in the HDR image so they fall within the luminance values range of the 8- or 16-bpc image file.
-
If you chose Exposure And Gamma, move the Exposure and Gamma sliders to adjust the brightness and contrast of the image preview.
-
Click OK.
You can also adjust the preview of an HDR image open in Photoshop by clicking the triangle in the status bar of the document window and choosing 32-Bit Exposure from the pop-up menu. Move the slider to set the white point for viewing the HDR image. Double-click the slider to return to the default exposure setting. Since the adjustment is made per view, you can have the same HDR image open in multiple windows, each with a different preview adjustment. Preview adjustments made with this method are not stored in the HDR image file.
To the top
About the HDR Color Picker
The HDR Color Picker allows you to accurately view and select colors for use in 32-bit HDR images. As in the regular Adobe Color Picker, you select a color by clicking a color field and adjusting the color slider. The Intensity slider allows you to adjust the brightness of a color to match the intensity of the colors in the HDR image you're working with. A Preview area lets you view swatches of a selected color to see how it will display at different exposures and intensities.

text_image
Color Picker (RGB/CM) [Color, 32-bit] Current Preview Stop Size: 1 Relative To Document 22-bit value R: 0.1890 S: 0.1662 B: 0.8980 Interior/Color Picker Interior: 0.06 pixels H A B C Add To Switches Color Colors D E F G H M S: B: R: S: B: 22%HDR Color Picker
A. Preview area B. Adjusted color C. Original color D. 32-bit floating point values E. Intensity slider F. Picked color G. Color slider H. Color values
Display the HDR Color Picker
- With a 32-bpc image open, do one of the following:
- In the toolbox, click the foreground or background color selection box.
- In the Color panel, click the Set Foreground Coloror Set Background Color selection box.
The Color Picker is also available when features let you choose a color. For example, by clicking the color swatch in the options bar for some tools, or the eyedroppers in some color adjustment dialog boxes.
Choose colors for HDR images
The lower part of the HDR Color Picker functions like the regular Color Picker does with 8- or 16-bit images. Click in the color field to select a color and move the color slider to change hues, or use the HSB or RGB fields to enter numeric values for a particular color. In the color field, brightness increases as you move from bottom to top, and saturation increases as you move from left to right.
Use the Intensity slider to adjust the brightness of the color. The color value plus the intensity value are converted to 32-bit floating point number values in your HDR document.
- Select a color by clicking in the color field and moving the color slider, or by entering HSB or RGB numeric values, as in the Adobe Color Picker.
- Adjust the Intensity slider to boost or reduce the color's brightness. The new color swatch in the Preview scale at the top of the Color Picker shows the effect of increasing or decreasing stops for the selected color.
The Intensity Stops correspond inversely to exposure setting stops. If you boost the Exposure setting of the HDR image two stops, reducing the Intensity stops by two will maintain the same color appearance as if the HDR image exposure and the color intensity were both set to 0.
If you know the exact 32-bit RGB values for the color you want, you can enter them directly in the 32-bit value RGB fields.
- (Optional) Adjust settings for the Preview area.
Preview Stop Size Sets the stop increments for each preview swatch. For example, a setting of 3 results in swatches of -9, -6, -3, +3, +6, +9. These swatches let you preview the appearance of your selected color at different exposure settings.
Relative to Document Select to adjust the preview swatches to reflect the current exposure setting for the image. For example, if the document exposure is set higher, the new preview swatch will be lighter than the color selected in the Color Picker's color field, to show the effect of the higher exposure on the selected color. If the current exposure is set to 0 (the default), checking or unchecking this option will not change the new swatch.
- (Optional) Click Add to Swatches to add the selected color to the Swatches panel.
- Click OK.
To the top
Paint on HDR images
You can edit and add effects to HDR/32-bpc images using any of the following Photoshop tools: Brush, Pencil, Pen, Shape, Clone Stamp, Pattern Stamp, Eraser, Gradient, Blur, Sharpen, Smudge, and History Brush. You can also use the Text tool to add 32-bpc text layers to an HDR image.
When editing or painting on HDR images, you can preview your work at different exposure settings using either the 32-Bit Exposure slider in the document info area or the 32-Bit Preview Options dialog box (View > 32-Bit Preview Options). The HDR Color Picker also lets you preview your selected foreground color at different intensity settings, to match different exposure settings in an HDR image.
- Open an HDR image.
- (Optional) Set the exposure for the image. See Adjust displayed dynamic range for 32-bit HDR images.
- For the Brush or Pencil tools, click the foreground color to open the HDR Color Picker and select a color. For the Text tool, click the color chip in the Text tool options bar to set the text color.
The Preview area of the HDR Color Picker helps you select and adjust a foreground color in relation to different exposure settings in the HDR image. See About the HDR Color Picker.
By default, the Toning Curve and Histogram limit and equalize your changes from point to point. To remove the limit and apply more extreme adjustments, select the Corner option after inserting a point on the curve. When you insert and move a second point, the curve becomes angular.
Adobe also recommends
- Adjust HDR exposure and toning
Twitter™ and Facebook posts are not covered under the terms of Creative Commons.
Legal Notices | Online Privacy Policy
Applying special color effects to images
Desaturate colors
Invert colors
Create a two-valued black and white image
Posterize an image
Apply a gradient map to an image
To the top
Desaturate colors
The Desaturate command converts a color image to grayscale values, but leaves the image in the same color mode. For example, it assigns equal red, green, and blue values to each pixel in an RGB image. The lightness value of each pixel does not change.
Keep in mind that the Desaturate command permanently alters the original image information in the background layer. This command has the same effect as setting Saturation to -100 in the Hue/Saturation adjustment. For nondestructive editing, use a Hue/Saturation adjustment layer.
Note: If you are working with a multilayer image, Desaturate converts the selected layer only.
- Choose Image > Adjustments > Desaturate.
To the top
Invert colors
The Invert adjustment inverts the colors in an image. You can use Invert as part of the process of making an edge mask to apply sharpening and other adjustments to selected areas of an image.
Note: Because color print film contains an orange mask in its base, the Invert adjustment cannot make accurate positive images from scanned color negatives. Be sure to use the proper settings for color negatives when scanning film.
When you invert an image, the brightness value of each pixel in the channels is converted to the inverse value on the 256-step color-values scale. For example, a pixel in a positive image with a value of 255 is changed to 0, and a pixel with a value of 5 is changed to 250.
Do one of the following:
- Click the Invert icon (CS5) or (COS6) in the Adjustments panel.
- Choose Layer > New Adjustment Layer > Invert. Click OK in the New Layer dialog box.
Note: You can also choose Image > Adjustments > Invert. But keep in mind that this method makes direct adjustments to the image layer and discards image information.
To the top
Create a two-valued black and white image
The Threshold adjustment converts grayscale or color images to high-contrast, black-and-white images. You can specify a certain level as a threshold. All pixels lighter than the threshold are converted to white; all pixels darker are converted to black.
-
Do one of the following:
-
Click the Threshold icon in the Adjustments panel.
- Choose Layer > New Adjustment Layer > Threshold. Click OK in the New Layer dialog box.
The Properties panel (CC, CS6) or Adjustments panel (CS5) displays a histogram of the luminance levels of the pixels in the current selection.
Note: You can also choose Image > Adjustments > Threshold. But keep in mind that this method makes direct adjustments to the image layer and discards image information.
- In the Properties panel (CC, CS6) or Adjustments panel (CS5), drag the slider below the histogram until the threshold level you want appears. As you drag, the image changes to reflect the new threshold setting.
To the top
Posterize an image
The Posterize adjustment lets you specify the number of tonal levels (or brightness values) for each channel in an image and then maps pixels to the closest matching level. For example, choosing two tonal levels in an RGB image gives six colors: two for red, two for green, and two for blue. This adjustment is useful for creating special effects, such as large, flat areas in a photograph. Its effects are most evident when you reduce the number of gray levels in a grayscale image, but it also produces interesting effects in color images.
If you want a specific number of colors in your image, convert the image to grayscale and specify the number of levels you want. Then convert the image back to the previous color mode, and replace the various gray tones with the colors you want.
-
Do one of the following:
-
Click the Posterize icon in the Adjustments panel.
- Choose Layer > New Adjustment Layer > Posterize.
Note: You can also choose Image > Adjustments > Posterize. But keep in mind that this method makes direct adjustments to the image layer and discards image information.
- In the Properties panel (CC, CS6) or Adjustments panel (CS5), move the Levels slider or enter the number of tonal levels you want.
To the top
Apply a gradient map to an image
The Gradient Map adjustment maps the equivalent grayscale range of an image to the colors of a specified gradient fill. If you specify a two-color gradient fill, for example, shadows in the image are mapped to one of the endpoint colors of the gradient fill, highlights are mapped to the other endpoint color, and midtones are mapped to the gradations in between.
-
Do one of the following:
-
Click the Gradient Map icon in the Adjustments panel.
- Choose Layer > New Adjustment Layer > Gradient Map. Click OK in the New Layer dialog box.
Note: You can also choose Image > Adjustments > Gradient Map. But keep in mind that this method applies the adjustment directly to the image layer and discards image information.
-
In the Properties panel (CC, CS6) or Adjustments panel (CS5), specify the gradient fill you want to use:
-
To choose from a list of gradient fills, click the triangle to the right of the gradient fill. Click to select the desired gradient fill, and then click in a blank area of the Properties panel (CC, CS6) or Adjustments panel (CS5) to dismiss the list. For information on customizing the gradient fill list, see Work with the Preset Manager.
- To edit the currently-displayed gradient fill, click the gradient fill, and then modify the existing gradient fill or create a gradient fill in the Gradient Editor. (See Create a smooth gradient.)
By default, the shadows, midtones, and highlights of the image are mapped respectively to the starting (left) color, midpoint, and ending (right) color of the gradient fill.
- Select either, none, or both of the Gradient options:
Dither Adds random noise to smooth the appearance of the gradient fill and reduces banding effects.
Reverse Switches the direction of the gradient fill, reversing the gradient map.
Adobe also recommends
• Adjusting hue and saturation

BY-NC-SA
Twitter™ and Facebook posts are not covered under the terms of Creative Commons.
Legal Notices | Online Privacy Policy
Apply the Color Balance adjustment
Change the color balance using the Photo Filter command
To the top
Apply the Color Balance adjustment
The Color Balance command changes the overall mixture of colors in an image for generalized color correction.
- Make sure that the composite channel is selected in the Channels panel. This command is available only when you're viewing the composite channel.
-
Do one of the following:
-
Click the Color Balance icon in the Adjustments panel.
- Choose Layer > New Adjustment Layer > Color Balance. Click OK in the New Layer dialog box.
Note: You can also choose Image > Adjustments > Color Balance. But keep in mind that this method makes direct adjustments to the image layer and discards image information.
- In the Properties panel (CC, CS6) or Adjustments panel (CS5), select Shadows, Midtones, or Highlights to select the tonal range in which you want to focus the changes.
- (Optional) Select Preserve Luminosity to prevent changing the luminosity values in the image while changing the color. This option maintains the tonal balance in the image.
- Drag a slider toward a color that you want to increase in the image; drag a slider away from a color that you want to decrease in the image.
The values above the color bars show the color changes for the red, green, and blue channels. (For Lab images, the values are for the A and B channels.) Values can range from -100 to +100.
To the top
Change the color balance using the Photo Filter command
The Photo Filter adjustment mimics the technique of placing a colored filter in front of the camera lens to adjust the color balance and color temperature of the light transmitted through the lens and exposing the film. Photo Filter also lets you choose a color preset to apply a hue adjustment to an image. If you want to apply a custom color adjustment, the Photo Filter adjustment lets you specify a color using the Adobe Color Picker.
-
Do one of the following:
-
Click the Photo Filter icon (CS5) or (CS, CS6) in the Adjustments panel.
- Choose Layer > New Adjustment Layer > Photo Filter. Click OK in the New Layer dialog box.
Note: You can also choose Image > Adjustments > Photo Filter. But keep in mind that this method makes direct adjustments to the image layer and discards image information.
- In the Properties panel (CC, CS6) or Adjustments panel (CS5), choose the filter color, either a custom filter or a preset. For a custom filter, select the Color option, click the color square, and use the Adobe Color Picker to specify a color for a custom color filter. For a preset filter, select the Filter option and choose one of the following presets from the Filter menu:
Warming Filter (85 and LBA) and Cooling Filter (80 and LBB) Color conversion filters that tune the white balance in an image. If an image was photographed with a lower color temperature of light (yellowish), the Cooling Filter (80) makes the image colors bluer to compensate for the lower color temperature of the ambient light. Conversely, if the photo was taken with a higher color temperature of light (bluish), the Warming Filter (85) makes the image colors warmer to compensate for the higher color temperature of the ambient light.
Warming Filter (81) and Cooling Filter (82) Use light-balancing filters for minor adjustments in the color quality of an image. The Warming Filter (81) makes the image warmer (more yellow), and the Cooling Filter (82) makes the image cooler (bluer).
Individual Colors Apply a hue adjustment to the image depending on the color preset you choose. Your choice of color depends on how you're using the Photo Filter adjustment. If your photo has a color cast, you can choose a complementary color to neutralize the color cast. You can also apply colors for special color effects or enhancements. For example, the Underwater color simulates the greenish blue color cast in underwater photos.
Make sure that Preview is selected to view the results of using a color filter. If you don't want the image darkened by adding the color filter, be sure that the Preserve Luminosity option is selected.
- To adjust the amount of color applied to the image, use the Density slider or enter a percentage in the Density box. A higher density results in a stronger color adjustment.
Adobe also recommends
- Adjusting image color and tone
Twitter ^™ and Facebook posts are not covered under the terms of Creative Commons.
Legal Notices | Online Privacy Policy
Apply the Brightness/Contrast adjustment
To the top
Apply the Brightness/Contrast adjustment
The Brightness/Contrast adjustment lets you make simple adjustments to the tonal range of an image. Moving the brightness slider to the right increases tonal values and expands image highlights, to the left decreases values and expands shadows. The contrast slider expands or shrinks the overall range of tonal values in the image.
In normal mode, Brightness/Contrast applies proportionate (nonlinear) adjustments to image layer, as with Levels and Curves adjustments. When Use Legacy is selected, Brightness/Contrast simply shifts all pixel values higher or lower when adjusting brightness. Since this can cause clipping or loss of image detail in highlight or shadow areas, using Brightness/Contrast in Legacy mode is not recommended for photographic images (but can be useful for editing masks or scientific imagery).
Note: Use Legacy is automatically selected when editing Brightness/Contrast adjustment layers created with previous versions of Photoshop.
-
Do one of the following:
-
Click the Brightness/Contrast icon in the Adjustments panel.
- Choose Layer > New Adjustment Layer > Brightness/Contrast. Click OK in the New Layer dialog box.
Note: You can also choose Image > Adjustments > Brightness/Contrast. But keep in mind that this method makes direct adjustments to the image layer and discards image information.
- In the Properties panel (CC, CS6) or Adjustments panel (CS5), drag the sliders to adjust the brightness and contrast.
Dragging to the left decreases the level, and dragging to the right increases it. The number at the right of each slider reflects the brightness or contrast value. Values can range from -150 to +150 for Brightness, -50 to +100 for Contrast.
Adobe also recommends
• Adjusting image color and tone

Twitter™ and Facebook posts are not covered under the terms of Creative Commons.
Legal Notices | Online Privacy Policy
About adjustment and fill layers
Create and confine adjustment and fill layers
Edit or merge adjustment and fill layers
To the top
About adjustment and fill layers
An adjustment layer applies color and tonal adjustments to your image without permanently changing pixel values. For example, rather than making a Levels or Curves adjustment directly to your image, you can create a Levels or Curves adjustment layer. The color and tonal adjustments are stored in the adjustment layer and apply to all the layers below it; you can correct multiple layers by making a single adjustment, rather than adjusting each layer separately. You can discard your changes and restore the original image at any time.
Fill layers let you fill a layer with a solid color, a gradient, or a pattern. Unlike adjustment layers, fill layers do not affect the layers underneath them.
Adjustment layers provide the following advantages:
- Nondestructive edits. You can try different settings and re-edit the adjustment layer at any time. You can also reduce the effect of the adjustment by lowering the opacity of the layer.
- Selective editing. Paint on the adjustment layer's image mask to apply an adjustment to part of an image. Later you can control which parts of the image are adjusted by re-editing the layer mask. You can vary the adjustment by painting on the mask with different tones of gray.
- Ability to apply adjustments to multiple images. Copy and paste adjustment layers between images to apply the same color and tonal adjustments.
Adjustment layers have many of the same characteristics as other layers. You can adjust their opacity and blending mode, and you can group them to apply the adjustment to specific layers. Likewise, you can turn their visibility on and off to apply or preview the effect.

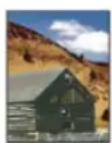

Original (left); adjustment layer applied to barn only (center), which brings out detail in the barn; and adjustment layer applied to entire image (right), which lightens the entire image and pixelates the clouds

Because adjustment layers contain adjustment data rather than pixels, they increase file size far less than standard pixel layers. If you are working with an unusually large file, however, you may want to reduce file size by merging adjustment layers into pixel layers.
To the top
Create and confine adjustment and fill layers
Adjustment and fill layers have the same opacity and blending mode options as image layers. You can rearrange, delete, hide, and duplicate them just as you do image layers.
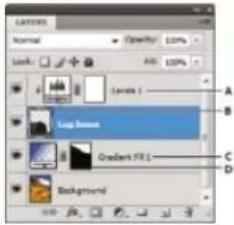
text_image
Layers Normal Opacity: 100% Lock: Fill: 100% Layer 1 Log Drop Gradient Fill Background A B C DAdjustment and fill layers
A. Adjustment layer confined to "Log home" layer only B. Layer thumbnail C. Fill layer D. Layer mask
Create an adjustment layer
- Do one of the following:
- Click the New Adjustment Layer button at the bottom of the Layers panel, and choose an adjustment layer type.
- Choose Layer > New Adjustment Layer, and choose an option. Name the layer, set layer options, and click OK.
- (Photoshop CS5) Click an adjustment icon or select an adjustment preset in the Adjustments panel.
To confine the effects of an adjustment layer to specific image layers, select the image layers, choose Layer > New > Group From Layers, and change the Mode from Pass Through to any other blending mode. Then place the adjustment layer at the top of the layer group.
Create a fill layer
- Do one of the following:
- Choose Layer > New Fill Layer, and choose an option. Name the layer, set layer options, and click OK.
- Click the New Adjustment Layer button at the bottom of the Layers panel, and choose a fill layer type.
Solid Color
Fills the adjustment layer with the current foreground color. Use the Color Picker to select a different a fill color.
Gradient
Click the gradient to display the Gradient Editor, or click the inverted arrow and choose a gradient from the pop-up panel. Set additional options if desired. Style specifies the shape of the gradient. Angle specifies the angle at which the gradient is applied. Scale changes the size of the gradient. Reverse flips the orientation of the gradient. Dither reduces banding by applying dithering to the gradient. Align With Layer uses the bounding box of the layer to calculate the gradient fill. You can drag in the image window to move the center of the gradient.
Pattern
Click the pattern, and choose a pattern from the pop-up panel. Click Scale, and enter a value or drag the slider. Click Snap To Origin to make the origin of the pattern the same as the origin of the document. Select Link With Layer if you want the pattern to move along with the layer as the layer moves. When Link With Layer is selected, you can drag in the image to position the pattern while the Pattern Fill dialog box is open.
Confine adjustment and fill layers to specific areas
To confine adjustment and fill layers to specific areas, use layer masks. By default, adjustment and fill layers automatically have layer masks, indicated by the mask icon to the right of the layer thumbnail. (To create adjustment layers without masks, deselect Add Mask by Default in the Adjustments panel menu.)
To change the shape of a mask on an existing layer, see Edit a layer mask. To create a new adjustment or fill layer with a mask of specific shape, complete one of the following procedures.
Create an adjustment or fill layer mask using a selection or path
- In the Layers panel, select the layer to which you want to apply the adjustment or fill layer.
- In the image, create a pixel selection, or create and select a closed path.
- Create an adjustment or fill layer.
A selection confines the new adjustment or fill layer with a layer mask. A path confines the new adjustment or fill layer with a vector mask.
Create an adjustment layer mask using a color range
The Color Range feature, which is useful for creating a selection area based on sampled colors in an image, can also be used to create an adjustment layer mask. For more information, see Select a color range.
- In the Layers panel, select the layer to which you want to apply the adjustment layer.
- Choose Layer > New Adjustment Layer, and choose an adjustment type.
- In the Masks panel (CS5) or the Masks section of the Properties panel (CC, CS6), click Color Range.
- In the Color Range dialog box, choose Sampled Colors from the Select menu.
- Select Localized Color Clusters to build a mask based on different color ranges in the image.
-
Set the display option to Selection, and Selection Preview to None.
-
Click on a color area in the image.
To sample multiple areas, hold down Shift to activate the plus eyedropper. Hold down Alt (Windows) or Option (Mac OS) to activate the minus eyedropper.
As you click on image areas, you can preview the mask in the Color Range dialog box. White areas are unmasked pixels, black areas masked, and gray areas partially masked.
-
Use the Fuzziness slider to increase or decrease the range of colors around your sample colors that are included in the masked area. Use the Range slider to control how far or near a color must be from the sample points to be included in the mask. After adjusting the mask, click OK to close the Color Range dialog box.
-
Modify the adjustment as needed in the Properties panel (CC, CS6) or Adjustments panel (CS5).
The adjustment is only applied to the unmasked (or partially masked) areas of the image. If necessary click Color Range again to make further adjustments to the adjustment layer mask.
To the top
Edit or merge adjustment and fill layers
Editing adjustment and fill layers
You can edit an adjustment or fill-layer setting. You can also edit the mask of an adjustment or fill layer to control the effect that the layer has on the image. By default, all areas of an adjustment or fill layer are “unmasked” and are therefore visible. (See About layer and vector masks.)
Change adjustment and fill layer options
-
Do one of the following:
-
Double-click the adjustment or fill-layer thumbnail in the Layers panel.
-
Choose Layer > Layer Content Options.
-
Make the desired changes in the Properties panel (CC, CS6) or Adjustments panel (CS5).
Note: Inverted adjustment layers do not have editable settings.
Merging adjustment or fill layers
You can merge an adjustment or fill layer several ways: with the layer below it, with the layers in its own grouped layer, with other selected layers, and with all other visible layers. You cannot, however, use an adjustment or fill layer as the target layer for a merge. When you merge an adjustment or fill layer with the layer below it, the adjustments are rasterized and become permanently applied within the merged layer. You can also rasterize a fill layer without merging it. (See Rasterize layers.)
Adjustment and fill layers whose masks contain only white values do not add significantly to the file size, so it is not necessary to merge these adjustment layers to conserve file space.
Adobe also recommends
• Make local adjustments in Camera Raw
- Adjusting image color and tone
Twitter ^™ and Facebook posts are not covered under the terms of Creative Commons.
Legal Notices | Online Privacy Policy
Adjust color and tone with Levels and Curves eyedroppers
Set black and white points using the Eyedropper tools Color correct using the eyedroppers
To the top
Set black and white points using the Eyedropper tools
Keep in mind that using the eyedroppers undoes any previous adjustment you made in Levels or Curves. If you plan to use the eyedroppers, it's best to use them first and then fine-tune your adjustments with the Levels sliders or Curves points.
- Apply a Curves or Levels adjustment.
-
In the Adjustments panel (CS5) or Properties panel (CS6), do any of the following:
Double-click the Set Black Point eyedropper tool to set the black point.
Double-click the Set White Point eyedropper tool to set the white point. -
In the Adobe Color Picker, determine the values you want for the darkest and lightest tones in the image:
To set the black point value to pure black, type 0 for R, G, and B.
To set the white point value to pure white, type 255 for R, G, and B.
To specify a shade of gray for either the black or white point, type identical values (between 0 and 255) for R, G, and B. The lower the values, the darker the gray. The higher the values, the lighter the gray.
- Do one of the following to adjust the tonal areas to the black or white points you specified in Step 2:
With the Set Black Point eyedropper, click an image area that represents the black point (area with the lowest tonal values).
With the Set White Point eyedropper, click an image area that represents the white point (area with the lightest tonal values).
To the top
Color correct using the eyedroppers
You can use the eyedroppers in the Levels or Curves adjustment to correct a color cast such as an unwanted tint from an excess of color (red, green, blue, or cyan, magenta, yellow). It's easier to color-balance an image by first identifying an area that you want to be neutral and then removing the color cast from that area. Depending on the image, you can use one or all three of the eyedroppers. The Set Gray Point eyedropper works best on images that don't require large adjustments and have easily identified neutrals.
Keep in mind that using the eyedroppers undoes any previous adjustment you made in Levels or Curves. If you plan to use the eyedroppers, it's best to use them first and then fine-tune your adjustments with the Levels sliders or Curves points.
Note: The eyedropper tool that sets the gray point images is used primarily for color correction and is unavailable when you work with grayscale
-
Before applying an adjustment, identify an area in the image that you want to be neutral gray. For example, a paved road.
Use a color sampler to mark a neutral area so that you can click it with an eyedropper later. -
Click the Levels or Curves icon in the Adjustments panel.
-
In the Adjustments panel (CS5) or the Properties panel (CS6), double-click the Set Gray Point tool ↗.
- In the Adobe Color Picker, verify that the currently selected color has identical R, G, and B values for a neutral gray (for example, 128, 128, 128). If necessary, type the identical values for R, G, and B. Photoshop asks whether you want to save the new target color as a default.
- With the Set Gray Point eyedropper tool, click the neutral area that you identified in Step 1. This should reset midtones and remove the color cast from the image.
- (Optional) Make final Levels or Curves adjustments in the Adjustments panel (CS5) or Properties panel (CS6).
For more information
- Adjusting image color and tone in CS6
Twitter™ and Facebook posts are not covered under the terms of Creative Commons.
Legal Notices | Online Privacy Policy
Curves overview
From an expert: Working with Curves
Adjust image color and tone with Curves
Add contrast to the midtones of a photo with Curves
Keyboard shortcuts: Curves
To the top
Curves overview
In the Curves adjustment, you adjust points throughout an image's tonal range. Initially, the image's tonality is represented as a straight diagonal line on a graph. When adjusting an RGB image, the upper-right area of the graph represents the highlights and the lower-left area represents the shadows. The horizontal axis of the graph represents the input levels (original image values) and the vertical axis represents the output levels (new adjusted values). As you add control points to the line and move them, the shape of the curve changes, reflecting your image adjustments. The steeper sections of the curve represent areas of higher contrast while flatter sections represent areas of lower contrast.
You can save Curves adjustment settings as presets. See Save adjustment settings and Reapply adjustment settings.
Note: The Curves adjustment can also be applied to CMYK, LAB, or Grayscale images. For CMYK images, the graph displays percentages of ink/pigment. For LAB and Grayscale images, the graph displays light values.
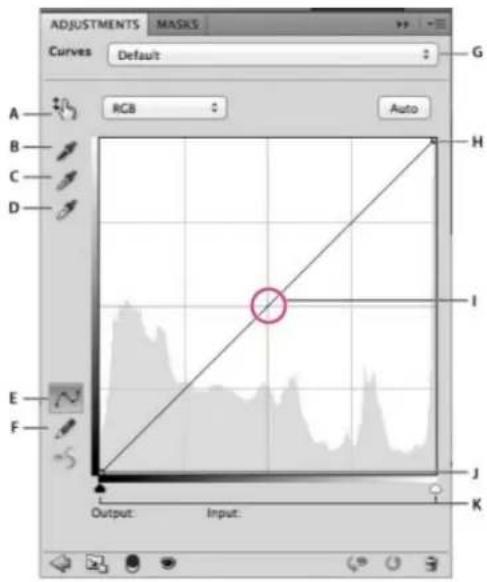
text_image
ADJUSTMENTS MASKS Curves Default: RGB Auto A B C D H I E F J K Output: Input: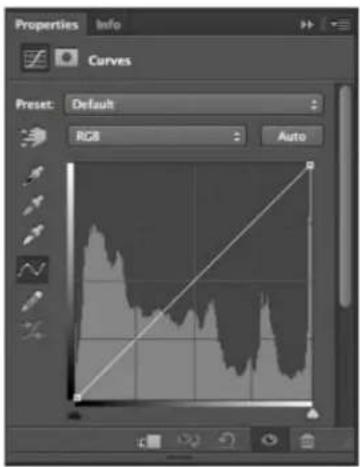
text_image
Properties Info Curves Preset: Default RGB AutoCurves options in the Adjustment panel (CS5) and Properties panel (CC, CS6)
A. On-image adjustment tool B. Sample in image to set black point. C. Sample in image to set gray point. D. Sample in image to set white point. E. Edit points to modify the curve. F. Draw to modify the curve. G. Curves presets menu H. Set black point. I. Set gray point. J. Set white point. K. Show clipping.
To the top
Adjust image color and tone with Curves
Moving a point in the top portion of the curve adjusts the highlights. Moving a point in the center of the curve adjusts the midtones, and moving a point in the bottom section of the curve adjusts the shadows. To darken highlights, move a point near the top of the curve downward. Moving a point either down or to the right maps the Input value to a lower Output value, and the image darkens. To lighten the shadows, move a point near
the bottom of the curve upward. Moving a point either up or to the left maps a lower Input value to a higher Output value, and the image lightens.
-
To apply a Curves adjustment, do one of the following:
-
Click the Curves icon in the Adjustments panel.
- Choose Layer > New Adjustment Layer > Curves. Click OK in the New Layer dialog box.
• (CS5) Select a Curves preset in the Adjustments panel.
Note: Choosing Image > Adjustments > Curves applies the adjustment directly to the image layer and discards image information.
- (Optional) To adjust the color balance, in the the Properties panel (CC, CS6) or the Adjustments panel, choose the channel you want to adjust from the menu to the left of the Auto button.
-
In the Properties panel (CC, CS6) or the Adjustments panel (CS5), do any of the following:
-
Click directly on the curve line and then drag the control point to adjust a tonal area.
- Select the On-image adjustment tool and then drag in the area of the image you want to adjust.
- Select the On-image adjustment tool and click the tonal areas in the image that you want to adjust. This places control points along the curve line.
• (CC, CS6) Choose a preset from the Preset menu.
Dragging a control point up or down lightens or darkens the tonal area you're adjusting. Dragging a control point left or right increases or decreases the contrast. You can add up to 14 control points to the curve. To remove a control point, drag it off the graph. As you adjust the tonality, the graph continues displaying the original diagonal baseline and image histogram as references. These options can be turned off, see Set Curves Display Options.
-
(Optional) Do any of the following to modify the adjustment:
-
Add more points directly to the curve to adjust different tonal areas.
- Click the On-image adjustment tool in other areas of the image, and drag up or down.
- Move the Set Black and White Point sliders or use the Eyedropper tools to specify the darkest and lightest values in the image.
- Click a point on the curve, and enter values in the Input and Output text boxes.
- Select the pencil icon and draw a new curve over the existing one. When you have finished, click the Smooth the Curve Values icon or to smooth the curve you drew. Clicking more than once continues to smooth the curve further.
Points on the curve remain anchored until you move them. You can make an adjustment in one tonal area without affecting other areas.


Clicking the On-image adjustment tool in the image adds control points to the curve. Moving the control points adjusts the tonality of the image.
Removing control points from a curve
To remove a control point, do any of the following:
- Drag the control point off the graph.
- Select the control point and press Delete.
- Ctrl-click (Windows) or Command-click (Mac OS) the control point.
Set Curve display options
You can control the curve grid display using the Curve display options.
- Apply a Curves adjustment.
- In the the Properties panel (CC, CS6) or the Adjustments panel (CS5), choose Curves Display Options from the panel menu.
Note: If you chose Image > Adjustments > Curves, expand the Curve Display Options in the Curves dialog box.
- In the Curves Display Options dialog box, select any of the following:
Light (0-255) Displays the intensity values for RGB images in a range from 0 to 255, with black (0) at the lower-left corner. Pigment/Ink % Displays the percentages for CMYK images are displayed in a range from 0 to 100, with highlights (0%) at the lower-left corner.
Simple Grid Displays gridlines in 25% increments.
Detailed Grid Displays gridlines in 10% increments.
Show Channel Overlays Displays color channel curves superimposed on the composite curve.
Histogram Displays a histogram of the original image tonal values behind the graph.
Baseline Displays the original image color and tonality as a 45-degree angle line for reference,
Intersection Line Displays horizontal and vertical lines to help you align control points as your drag them relative to the histogram or grid.

To change the gridline increment, Alt-click (Windows) or Option-click (Mac OS) the grid.
Apply an Auto correction in Curves
- Click Auto in the Properties panel (CC, CS6) or the Adjustments panel (CS5).
Auto applies an automatic color correction using the current default setting. To change the default setting, choose Auto Options from the Properties panel menu (CC, CS6) or the Adjustment panel menu (CS5) and set the options in the Auto Color Correction Options dialog box. You can apply an Auto Color, Auto Contrast, or Auto Tone correction to an image. For more information on these options, see Set Auto adjustment options.
Set black and white points using the black point and white point sliders
When applying a Curves adjustment, use the black and white sliders to quickly set the black and white points (pure black and pure white values) in the image.
- Drag the black and white point sliders to any point along the horizontal axis. Note that the Input value changes as your drag.
- To preview clipping as you adjust black and white points, do one of the following:
- Hold down Alt (Windows) or Option (Mac OS).
- Choose Show Clipping For Black/White Points from the panel menu.
Add contrast to the midtones of a photo with Curves
If the image uses the full tonal range, but needs midtone contrast, Click the Curves icon in the Adjustments panel. Drag the curve into an S shape.
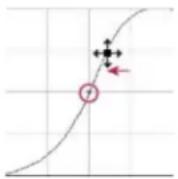
Increasing the slope in the middle of the curve increases contrast in the midtones.
To the top
Keyboard shortcuts: Curves
You can use these keyboard shortcuts for Curves:
- To set a point on the curve for the selected color in each color component channel (but not in the composite channel), Shift+Ctrl-click (Windows) or Shift+Command-click (Mac OS) in the image.
- To select multiple points, Shift-click points on the curve. Selected points are filled with black.
- To deselect all points on the curve, click in the grid, or press Ctrl-D (Windows) or Command-D (Mac OS).
- To select the next higher point on the curve, press the plus key; to select the next lowest, press the minus key.
• To move selected points on the curve, press the arrow keys. - (Curves dialog box) To set a point on the curve for the current channel, Ctrl-click (Windows) or Command-click (Mac OS) in the image.
If you're instead using the Curves adjustment, simply click in the image with the On-image adjustment tool.
For more information
- Adjusting image color and tone

Twitter ^™ and Facebook posts are not covered under the terms of Creative Commons.
Legal Notices | Online Privacy Policy
Overview of adjusting image color and tone Adjusting image color and tone with adjustment layers Adjusting image color and tone in Camera Raw
To the top
Overview of adjusting image color and tone
Two ways to adjust image tone and color are to use adjustment layers or to edit in Adobe Camera Raw. Both offer a wide range of control and flexibility, without permanently altering or damaging the original image information. The integrity of your original images is preserved. This nondestructive editing gives you the flexibility to make further changes, start over with a different editing approach, or undo the adjustments even after you've saved the edits.
With adjustment layers, you apply edits on a separate layer in the image file, leaving the original image (background layer) intact. The easiest way to access the adjustment layer tools is clicking an icon in the Adjustments panel. You can add more than one adjustment layer for more complex image editing. You can also use a mask to apply the adjustment to a specific part of the image. For more information, see Masking layers.
Adobe Camera Raw is a Photoshop plug-in for making color and tonal adjustments. In its editing window, there is a large preview image and the adjustment tools are laid out in the order that you would normally use them. Despite its name, Adobe Camera Raw can edit JPEGs and TIFFs in addition to camera raw files. If you want to apply the same adjustment to multiple images, you can save the settings as a preset and apply as needed.
Note: Unless a specific adjustment isn't available as an adjustment layer or in Camera Raw, it is recommended that you do not use the commands in the Image > Adjustments menu. The adjustments under the Image menu permanently alter or delete pixel information in your image.
To the top
Adjusting image color and tone with adjustment layers
-
In the Adjustments panel, click the tool icon for the adjustment you want to make:
-
For tonality and color, click Levels or Curves.
- For adjusting color, click Color Balance or Hue/Saturation.
-
For converting a color image to black and white, click Black & White.
-
In the Properties panel, adjust the adjustment layer tool settings.
For more information on adjustment layers
- Adjustment and fill layers
To the top
Adjusting image color and tone in Camera Raw
- Choose File > Open.
- In the Open window, select one or more camera raw files, TIFFs, or JPEGs, and then choose Camera Raw from the Format menu.
-
Click Open.
-
Use the controls in Adobe Camera Raw to adjust the settings. You can use the Adjustment brush to apply edits to specific areas of the image. For more information, see Make color and tonal adjustments in Camera Raw.
Note: You can set preferences to always open JPEGs and TIFFs in Camera Raw.
Tip: Why You Should Set Photoshop to Open Your JPGs in Adobe Camera RAW - video tutorial by Terry White (8:07)
Enable editing of JPEGs and TIFFs in Camera Raw
- Choose (Windows) Edit > Preferences > Camera Raw or (Mac OS) Photoshop > Preferences > Camera Raw.
-
In the JPEG and TIFF Handling section of the Camera Raw Preferences dialog box, do any of the following:
-
In the JPEG menu, choose Automatically Open All Supported JPEGs.
- In the TIFF menu, choose Automatically Open All Supported TIFFs from the TIFF menu.
For more information about Adobe Camera Raw
• Adobe Camera Raw topics
- Photoshop Tutorial: Open a JPEG in Camera Raw by Brodie Butler
• Amazing Wonders of Adobe Camera Raw 7.0 in Photoshop CS6 by Russell Preston Brown
In addition to the two workflows described above, you can also use Smart Objects for editing layers nondestructively. Watch an Introduction to using Smart Objects video by expert Colin Smith of the No Stupid Questions series.

BY-NC-SR
Twitter™ and Facebook posts are not covered under the terms of Creative Commons.
Legal Notices | Online Privacy Policy
To the top
Improve shadow and highlight detail
The Shadow/Highlight command is one method for correcting photos with silhouetted images due to strong backlighting or correcting subjects that have been slightly washed out because they were too close to the camera flash. The adjustment can also be used for brightening areas of shadow in an otherwise well-lit image. The Shadow/Highlight command does not simply lighten or darken an image; it lightens or darkens based on the surrounding pixels (local neighborhood) in the shadows or highlights. For this reason, there are separate controls of the shadows and the highlights. The defaults are set to fix images with backlighting problems.
The Shadow/Highlight command also has a Midtone Contrast slider, Black Clip option, and White Clip option for adjusting the overall contrast of the image, and a Color Correction slider for adjusting saturation.
Note: Keep in mind that the Shadow/Highlight command applies adjustments directly to the image and will discard image information. For nondestructive image editing, it is recommended that you use adjustment layers or Camera Raw. See Adjustment and fill layers and Introduction to Camera Raw.
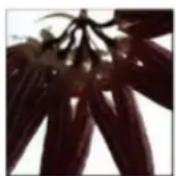

Original image, and Shadow/Highlight Correction applied
Adjust image shadows and highlights
- Choose Image > Adjustments > Shadow/Highlight.
Make sure that the Preview option is selected in the dialog box if you want the image to be updated as you make adjustments.
- Adjust the amount of lighting correction by moving the Amount slider or entering a value in the Shadows or Highlights percentage box. Larger values provide either greater lightening of shadows or greater darkening of highlights. You can adjust both Shadows and Highlights in an image.
- For finer control, select Show More Options to make the additional adjustments.
Note: To increase shadow detail in an otherwise well-exposed image, try values in the 0-25% range for Shadows Amount and Shadows Tonal Width.
- (Optional) Click the Save As Defaults button to save your current settings and make them the default settings for the Shadow/Highlights command. To restore the original default settings, hold down the Shift key while clicking the Save As Defaults button.
Note: You can reuse Shadow/Highlight settings by clicking the Save button to save the current settings to a file and later using the Load button to reload them. For more information on saving and loading settings, see Save adjustment settings.
- Click OK.
Shadow/Highlight command options
Amount Controls (separately for the highlight and shadow values in the image) how much of a correction to make.
Note: Extreme Amount values may lead to a crossover, where what started as a highlight becomes darker than something that started as a shadow; this can make the adjusted images look 'unnatural'.
Tonal Width Controls the range of tones in the shadows or highlights that are modified. Smaller values restrict the adjustments to the darker regions for shadow correction and the lighter regions for highlight correction. Larger values increase the range of tones that are adjusted further into the midtones. For example, at 100% the shadow tonal width slider affects the shadows the most, the midtones are partially affected, but the brightest highlights are not affected. Tonal width varies from image to image. Too large a value may introduce halos around dark or light edges. The default settings attempt to reduce these artifacts. Halos may also occur when the Shadow or Highlight Amount values are too large.
Tonal Width is set to 50% by default. If you find that you are trying to lighten a dark subject but the midtones or lighter regions are changing too much, try reducing Shadow Tone Width toward zero so that only the darkest regions are lightened. If, however, you want to brighten the midtones as well as the shadows, increase Shadows Tonal Width toward 100%
Radius Controls the size of the local neighborhood around each pixel. Neighboring pixels are used to determine whether a pixel is in the shadows or highlights. Moving the slider to the left specifies a smaller area, and moving it to the right specifies a larger area. The optimum local neighborhood size depends on the image. It's best to experiment with the adjustment. If the radius is too large, the adjustment tends to brighten (or darken) the whole image rather than brightening the subject only. It's best to set the radius to roughly the size of the subjects of interest in the image. Experiment with different Radius settings to obtain the best balance between subject contrast and differential brightening (or darkening) of the subject compared to the background.
Brightness Adjusts the brightness in a grayscale image. This adjustment is available only for grayscale images. Moving the Brightness slider to the left darkens a grayscale image, and moving the slider to the right lightens a grayscale image.
Midtone Contrast Adjusts the contrast in the midtones. Move the slider to the left to reduce the contrast and to the right to increase the contrast. You can also enter a value in the Midtone Contrast box. A negative value reduces contrast, and a positive value increases contrast. Increasing midtone contrast produces greater contrast in the midtones while tending to darken the shadows and lighten the highlights.
Black Clip And White Clip Specifies how greatly the shadows and highlights are clipped to the new extreme shadow (level 0) and highlight (level 255) colors in the image. Larger values produce an image with greater contrast. Be careful not to make the clipping values too large, because doing so reduces detail in the shadows or highlights (the intensity values are clipped and rendered as pure black or pure white).
For more information

Twitter™ and Facebook posts are not covered under the terms of Creative Commons.
Legal Notices | Online Privacy Policy
The Black & White adjustment lets you convert a color image to grayscale while maintaining full control over how individual colors are converted. You can also tint the grayscale by applying a color tone to the image, for example to create a sepia effect.
- Do one of the following:
- Click the Black & White icon (CS5) or (CS6) in the Adjustments panel.
• (CS5) Click a Black & White preset in the Adjustments panel.
- Choose Layer > New Adjustment Layer > Black & White. In the New Layer dialog box, type a name for the adjustment layer and then click OK.
Photoshop applies a default grayscale conversion.
Note: You can also choose Image > Adjustments > Black & White. But keep in mind that this method makes direct adjustments to the image layer and discards image information.
-
(Optional) In CS6, choose a Black & White preset from the Preset menu in the Properties panel.
-
In the Adjustments panel (CS5) or the Properties panel (CS6), manually adjust the conversion using the color sliders, apply an Auto conversion, or select a previously saved custom mix.
Preset menu Select a predefined grayscale mix or a previously saved mix. To save a mix, choose Save Black & White Preset from the panel menu.
Auto Sets a grayscale mix based on the color values of the images, maximizing the distribution of gray values. The Auto mix often produces excellent results, or can be used as the starting point for tweaking gray values using the color sliders.
Color Sliders Adjust the gray tones of specific colors in an image. Drag a slider left to darken or right to lighten the gray tones of an image's original color.
- To adjust a particular color component, select the On-image adjustment tool and then click in the image. Drag left or right to modify the color slider for the predominant color at that location, making it darker or brighter in the image.
- Click the Reset button to reset all color sliders to the default grayscale conversion.
Preview Deselect to view the image in its original color mode.
- To apply a color tone, select Tint. To fine-tune the tint color, click the color swatch to open the Color Picker.
For more information
• Adjusting image color and tone in CS6
Twitter™ and Facebook posts are not covered under the terms of Creative Commons.
Apply a Hue/Saturation adjustment Adjust color saturation using Vibrance Adjust color saturation in image areas
Hue/Saturation lets you adjust the hue, saturation, and lightness of a specific range of colors in an image or simultaneously adjust all the colors in an image. This adjustment is especially good for fine-tuning colors in a CMYK image so that they are in the gamut of an output device.
You can save Hue/Saturation settings in the Adjustments panel (CS5) or the Properties panel (CS6), and then load them for reuse in other images. For more information, see Save adjustment settings and Reapply adjustment settings.
For more information on image adjustments, see Adjusting image color and tone in CS6.
To the top
Apply a Hue/Saturation adjustment
1. Do one of the following:
- Click the Hue/Saturation icon in the Adjustments panel.
• (CS5) Click a Hue/Saturation preset in the Adjustments panel.
- Choose Layer > New Adjustment Layer > Hue/Saturation. Click OK in the New Layer dialog box.
The two color bars in the dialog box represent the colors in their order on the color wheel. The upper color bar shows the color before the adjustment; the lower bar shows how the adjustment affects all of the hues at full saturation.
Note: You can also choose Image > Adjustments > Hue/Saturation. But keep in mind that this method makes direct adjustments to the image layer and discards image information.
2. In the Adjustments panel (CS5) or the Properties panel (CS6), choose from the menu to the right of the On-image adjustment tool
- Choose Master to adjust all colors at once.
- Choose one of the other preset color ranges listed for the color you want to adjust. To modify the color range, see Specify the range of colors adjusted using Hue/Saturation.
• (CS6) Choose a Hue/Saturation preset from the Preset menu.
3. For Hue, enter a value or drag the slider until you are satisfied with the colors.
The values displayed in the box reflect the number of degrees of rotation around the wheel from the original color of the pixel. A positive value indicates clockwise rotation; a negative value, counterclockwise rotation. Values can range from -180 to +180.

pie
| Segment | Value | |---|---| | A | 270 | | B | 90 | | C | 180 | | D | 0-360 |Color wheel
A. Saturation B. Hue
You can also select the On-image adjustment tool in the Adjustments panel (CS5) or the Properties panel (CS6), and then Ctrl-click (Windows) or Command-click (Mac OS) a color in the image. Drag left or right in the image to modify the hue value.
- For Saturation, enter a value or drag the slider to the right to increase the saturation or to the left to decrease it.
The color shifts away from or toward the center of the color wheel. Values can range from -100 (percentage of desaturation, duller colors) to +100 (percentage of saturation increase).
You can also, select the On-image adjustment tool in the Adjustments panel (CS5) or the Properties panel (CS6), and click a color in the image. Drag left or right in the image to decrease or increase saturation of the color range that includes the pixel you clicked.
- For Lightness, enter a value or drag the slider to the right to increase the lightness (add white to a color) or to the left to decrease it (add black to a color). Values can range from -100 (percentage of black) to +100 (percentage of white).
Note: Click the Reset button ⬆ to undo a Hue/Saturation setting in the Adjustments panel (CS5) or the Properties panel (CS6).
Specify the range of colors adjusted using Hue/Saturation
-
Apply a Hue/Saturation adjustment.
-
In the Adjustments panel (CS5) or the Properties panel (CS6), choose a color from the menu to the right of the On-image adjustment button
Four color wheel values (in degrees) appear in the Adjustments panel (CS5) or the Properties panel (CS6). They correspond to the adjustment sliders that appear between the color bars. The two inner vertical sliders define the color range. The two outer triangle sliders show where the adjustments on a color range "fall off" (fall-off is a feathering or tapering of the adjustments instead of a sharply defined on/off application of the adjustments).
-
Use either the eyedropper tools or the adjustment sliders to modify the range of colors.
-
Click or drag in the image with the Eyedropper tool 📁 to select a color range. To expand the range, click or drag in the image with the Add To Sample Eyedropper tool ⚠. To reduce the range of color, click or drag in the image with the Subtract From Sample Eyedropper tool ⚠. While an eyedropper tool is selected, you can also press Shift to add to the range, or Alt (Windows) or Option (Mac OS) to subtract from it.
- Drag one of the white triangle sliders to adjust the amount of color fall-off (feathering of adjustment) without affecting the range.
- Drag the area between the triangle and the vertical bar to adjust the range without affecting the amount of fall-off.
- Drag the center area to move the entire adjustment slider (which includes the triangles and vertical bars) to select a different color area.
- Drag one of the vertical white bars to adjust the range of the color component. Moving a vertical bar from the center of the adjustment slider and closer to a triangle increases the color range and decreases the fall-off. Moving a vertical bar closer to the center of the adjustment slider and away from a triangle decreases the color range and increases the fall-off.
- Ctrl-drag (Windows) or Command-drag (Mac OS) the color bar so that a different color is in the center of the bar.
text_image
314°/345° 14°/45° A B C D E D C BHue/Saturation adjustment slider
A. Hue slider values B. Adjusts fall-off without affecting range C. Adjusts range without affecting fall-off D. Adjusts range of color and fall-off E. Moves entire slider
If you modify the adjustment slider so that it falls into a different color range, the name in the Edit menu changes to reflect this change. For example, if you choose Yellow and alter its range so that it falls in the red part of the color bar, the name changes to Red 2. You can convert up to six of the individual color ranges to varieties of the same color range (for example, Red through Red 6).
By default, the range of color selected when you choose a color component is 30^ wide, with 30^ of fall-off on either side. Setting the fall-off too low can produce banding in the image.
Colorize a grayscale image or create a monotone effect
-
(Optional) If you are colorizing a grayscale image, choose Image > Mode > RGB Color to convert the image to RGB.
-
Apply a Hue/Saturation adjustment.
-
In the Adjustments panel (CS5) or the Properties panel (CS6), select the Colorize option. If the foreground color is black or white, the image is converted to a red hue (0°). If the foreground color is not black or white, the image is converted to the hue of the current foreground color. The lightness value of each pixel does not change.
-
(Optional) Use the Hue slider to select a new color. Use the Saturation and Lightness sliders to adjust the saturation and lightness of the pixels.
To the top
Adjust color saturation using Vibrance
Vibrance adjusts the saturation so that clipping is minimized as colors approach full saturation. This adjustment increases the saturation of less-saturated colors more than the colors that are already saturated. Vibrance also prevents skintones from becoming over saturated.
-
Do one of the following:
-
In the Adjustments panel, click the Vibrance icon .
- Choose Layer > New Adjustment Layer > Vibrance. In the New Layer dialog box, type a name for the Vibrance adjustment layer and click OK.
Note: You can also choose Image > Adjustments > Vibrance. But keep in mind that this method makes direct adjustments to the image layer and discards image information.
-
In the Adjustments panel (CS5) or the Properties panel (CS6), drag the Vibrance slider to increase or decrease color saturation without clipping when colors become more saturated. Then, do one of the following:
-
To apply more adjustment to less saturated colors and prevent colors clipping as they reach total saturation, move the Vibrance slider to the right.
- To apply the same amount of saturation adjustment to all colors regardless of their current saturation, move the Saturation slider. In some situations, this may produce less banding than the Saturation slider in the Hue/Saturation Adjustments panel or Hue/Saturation dialog box.
- To decrease saturation, move either the Vibrance or the Saturation slider to the left.
To the top
Adjust color saturation in image areas
The Sponge tool subtly changes the color saturation of an area. When an image is in Grayscale mode, the tool increases or decreases contrast by moving gray levels away from or toward the middle gray.
- Select the Sponge tool
- Choose a brush tip and set brush options in the options bar.
- In the options bar, choose the way you want to change the color from the Mode menu:
Saturate Intensifies the color's saturation
Desaturate Dilutes the color's saturation
- Specify the flow for the Sponge tool.
- Select the Vibrance option to minimize clipping for fully saturated or desaturated colors.
- Drag over the part of the image you want to modify.
For more information
• Applying the Color Balance adjustment

Twitter ^™ and Facebook posts are not covered under the terms of Creative Commons.
Legal Notices | Online Privacy Policy
Note: In Photoshop CS5 and Photoshop CS6, 3D functionality was part of Photoshop Extended. All features in Photoshop Extended are part of Photoshop CC. Photoshop CC does not have a separate Extended offering.
The Exposure and HDR Toning adjustments are primarily designed for 32-bit HDR images, but you can also apply them to 16- and 8-bit images to create HDR-like effects.
For a video about applying HDR effects to16- or 8-bit images, see www.adobe.com/go/lrvid5011_ps_en
Adjust HDR exposure
Exposure works by performing calculations in a linear color space (gamma 1.0) rather than the current color space.
-
Do one of the following:
-
Click the Exposure icon 📋 an Exposure preset in the Adjustments panel.
- Choose Layer > New Adjustment Layer > Exposure.
Note: You can also choose Image > Adjustments > Exposure. But keep in mind that this method makes direct adjustments to the image layer and discards image information.
- In the Adjustments panel, set any of the following options:
Exposure Adjusts the highlight end of the tonal scale with minimal effect in the extreme shadows.
With 32-bit images, you can also access the Exposure slider at the bottom of the image window.
Offset Darkens the shadows and midtones with minimal effect on the highlights.
Gamma Adjusts the image gamma, using a simple power function. Negative values are mirrored around zero (that is, they remain negative but still get adjusted as if they are positive).
The eyedroppers adjust the luminance values of images (unlike the Levels eyedroppers that affect all color channels).
- The Set Black Point eyedropper sets the Offset, shifting the pixel you click to zero.
- The Set White Point eyedropper sets the Exposure, shifting the point you click to white (1.0 for HDR images).
- The Midtone eyedropper sets the Exposure, making the value you click middle gray.
Adjust HDR toning
The HDR Toning command lets you apply the full range of HDR contrast and exposure settings to individual images.
Note: HDR toning requires flattened layers.
- Open a 32-, 16-, or 8-bit image in RGB or Grayscale color mode.
- Choose Image > Adjustments > HDR Toning.
For detailed information about each setting, see Options for 16- or 8-bit images. (In the HDR Toning dialog box, these options apply to images of all bit depths.)
For more information about HDR
• High dynamic range images

BY-NC-SA
Twitter™ and Facebook posts are not covered under the terms of Creative Commons.
Legal Notices | Online Privacy Policy
The Dodge tool and the Burn tool lighten or darken areas of the image. These tools are based on a traditional darkroom technique for regulating exposure on specific areas of a print. Photographers hold back light to lighten an area on the print (dodging) or increase the exposure to darken areas on a print (burning). The more you paint over an area with the Dodge or Burn tool, the lighter or darker it becomes.
Note: Applying the Dodge tool or Burn tool to the background layer permanently alters the image information. To edit your images nondestructively, work on a duplicate layer. For information on duplicating layers, see Layer Basics.
- Select the Dodge tool or the Burn tool
- Choose a brush tip and set brush options in the options bar.
- In the options bar, select one of the following from the Range menu:
Midtones Changes the middle range of grays
Shadows Changes the dark areas
Highlights Changes the light areas
- Specify the exposure for the Dodge tool or the Burn tool.
- Click the airbrush button ⚫ to use the brush as an airbrush. Alternatively, select the Airbrush option in the Brush panel.
- Select the Protect Tones option to minimize clipping in the shadows and highlights. This option also tries to keep colors from shifting hue.
- Drag over the part of the image you want to lighten or darken.
For more information
Twitter™ and Facebook posts are not covered under the terms of Creative Commons.
Legal Notices | Online Privacy Policy
Camera Raw
Camera Raw 7 plug-in
Kelby (May. 7, 2012)
video-tutorial
Tap into the latest noise, color, and dynamic range controls.
Enhancing Raw images
video2brain (May. 7, 2012)
video-tutorial
Draw upon the full range of image data.
ACR 8.3
ACR 8.1 and 8.2
+ New feature
Enhanced feature
To the top
ACR 8.3
Adobe Camera Raw now offers the following enhancements:
+ Automatic straightening of an image through one of the following three interactions:
- Double-click the Straighten tool ( ) in the toolbar.
- With the Straighten tool selected, double-click anywhere in the preview image.
- With the Crop tool selected, press the Command key (on Mac) or Ctrl key (on Windows) to temporarily switch to the Straighten tool. Now, double-click anywhere within the preview image.
Whites and Blacks now support Auto Levels-like functionality when you double-click the sliders while keeping the Shift key pressed (Shift-double-click).
Auto Temperature and Auto Tint functionality. Shift-double-click within the image preview to invoke this functionality.
Option to choose a background color for the work area and toggle the visibility of the hairline frame around the image. Right-click outside the image in the work area and select an option from the popup menu.
Option-click shortcut support for the Synchronize, New Preset, Save Settings, and Copy/Paste (Bridge) dialog boxes. When you option-click a checkbox, it is selected exclusively. You can option-click again to toggle to the previous checkbox state.
To the top
ACR 8.1 and 8.2
Note: For detailed information about the enhancements in this section, see this Help article.
+ Soft proofing from within the ACR dialog. You can now choose an ICC color profile and simulate additional factors like rendering intent and the paper and ink. These options can now be applied to the photograph through the ACR dialog, even before you open it in Photoshop.
ICC-based color spaces support from within the ACR dialog. The ACR dialog now allows you to preview your photographs with arbitrary ICC-based output color spaces. Available color spaces include grayscale, RGB, Lab, and CMYK color spaces.
Image sizing is now more flexible, with the ACR dialog providing multiple options to resize a photograph. These options are placed within the Image Sizing section, immediately beneath the Color Space section.
+ Presets. Store commonly used settings as a preset. Save frequently-applied settings from the Workflow Options or Save Options dialog as a preset, and then apply the preset on multiple photos with ease.
Cropping follows a modified workflow with the introduction of the new Image Sizing workflow. Use the Image Sizing option in the Workflow Options and Save Options dialogs to specify a desired absolute image size.
Legal Notices | Online Privacy Policy
About camera raw files
About Camera Raw
About the Digital Negative (DNG) format
Processing images with Camera Raw
Camera Raw dialog box overview
Work with the Camera Raw cache in Adobe Bridge
Work with Camera Raw and Lightroom
To the top
About camera raw files
A camera raw file contains unprocessed, uncompressed grayscale picture data from a digital camera's image sensor, along with information about how the image was captured (metadata). Photoshop® Camera Raw software interprets the camera raw file, using information about the camera and the image's metadata to construct and process a color image.
Think of a camera raw file as your photo negative. You can reprocess the file at any time, achieving the results that you want by making adjustments for white balance, tonal range, contrast, color saturation, and sharpening. When you adjust a camera raw image, the original camera raw data is preserved. Adjustments are stored as metadata in an accompanying sidecar file, in a database, or in the file itself (in the case of DNG format).
When you shoot JPEG files with your camera, the camera automatically processes the JPEG file to enhance and compress the image. You generally have little control over how this processing occurs. Shooting camera raw images with your camera gives you greater control than shooting JPEG images, because camera raw does not lock you into processing done by your camera. You can still edit JPEG and TIFF images in Camera Raw, but you will be editing pixels that were already processed by the camera. Camera raw files always contain the original, unprocessed pixels from the camera.
To shoot camera raw images, you must set your camera to save files in its own camera raw file format.
Note: The Photoshop Raw format (.raw) is a file format for transferring images between applications and computer platforms. Don't confuse Photoshop raw with camera raw file formats. File extensions for camera raw files vary depending on the camera manufacturer.
Digital cameras capture and store camera raw data with a linear tone response curve (gamma 1.0). Both film and the human eye have a nonlinear, logarithmic response to light (gamma greater than 2). An unprocessed camera raw image viewed as a grayscale image would seem very dark, because what appears twice as bright to the photosensor and computer seems less than twice as bright to the human eye.
For a list of supported cameras and for more information about Camera Raw, see Digital camera raw file support.
To see a list of cameras and which version of Camera Raw each camera requires, see Camera Raw plug-in | Supported cameras.
To the top
About Camera Raw
Camera Raw software is included as a plug-in with Adobe After Effects® and Adobe Photoshop, and also adds functionality to Adobe Bridge. Camera Raw gives each of these applications the ability to import and work with camera raw files. You can also use Camera Raw to work with JPEG and TIFF files.
Note: Camera Raw supports images up to 65,000 pixels long or wide and up to 512 megapixels. Camera Raw converts CMYK images to RGB upon opening. For a list of supported cameras, see Digital camera raw file support.
You must have Photoshop or After Effects installed to open files in the Camera Raw dialog box from Adobe Bridge. However, if Photoshop or After Effects is not installed, you can still preview the images and see their metadata in Adobe Bridge. If another application is associated with the image file type, it's possible to open the file in that application from Adobe Bridge.
Using Adobe Bridge, you can apply, copy, and clear image settings, and you can see previews and metadata for camera raw files without opening them in the Camera Raw dialog box. The preview in Adobe Bridge is a JPEG image generated using the current image settings; the preview is not the raw camera data itself, which would appear as a very dark grayscale image.
note: A caution icon 🔒 appears in the thumbnails and preview image in the Camera Raw dialog box while the preview is generated from the camera raw image.
You can modify the default settings that Camera Raw uses for a particular model of camera. For each camera model, you can also modify the defaults for a particular ISO setting or a particular camera (by serial number). You can modify and save image settings as presets for use with other images.
When you use Camera Raw to make adjustments (including straightening and cropping) to a camera raw image, the image's original camera raw data is preserved. The adjustments are stored in either the Camera Raw database, as metadata embedded in the image file, or in a sidecar XMP file (a metadata file that accompanies a camera raw file). For more information, see Specify where Camera Raw settings are stored.
After you process and edit a camera raw file using the Camera Raw plug-in, an icon 📋 appears in the image thumbnail in Adobe Bridge.
If you open a camera raw file in Photoshop, you can save the image in other image formats, such as PSD, JPEG, Large Document Format (PSB), TIFF, Cineon, Photoshop Raw, PNG, or PBM. From the Camera Raw dialog box in Photoshop, you can save the processed files in Digital Negative (DNG), JPEG, TIFF, or Photoshop (PSD) formats. Although Photoshop Camera Raw software can open and edit a camera raw image file, it cannot save an image in a camera raw format.
As new versions of Camera Raw become available, you can update this software by installing a new version of the plug-in. You can check for updates to Adobe software by choosing Help > Updates.
Different camera models save camera raw images in many different formats, and the data must be interpreted differently for these formats. Camera Raw includes support for many camera models, and it can interpret many camera raw formats.
If you have trouble opening Camera Raw files, see Why doesn't my version of Photoshop or Lightroom support my camera?
To the top
About the Digital Negative (DNG) format
The Digital Negative (DNG) format is a non-proprietary, publicly documented, and widely supported format for storing raw camera data. Hardware and software developers use DNG because it results in a flexible workflow for processing and archiving camera raw data. You may also use DNG as an intermediate format for storing images that were originally captured using a proprietary camera raw format.
Because DNG metadata is publicly documented, software readers such as Camera Raw do not need camera-specific knowledge to decode and process files created by a camera that supports DNG. If support for a proprietary format is discontinued, users may not be able to access images stored in that format, and the images may be lost forever. Because DNG is publicly documented, it is far more likely that raw images stored as DNG files will be readable by software in the distant future, making DNG a safer choice for archival storage.
Metadata for adjustments made to images stored as DNG files can be embedded in the DNG file itself instead of in a sidecar XMP file or in the Camera Raw database.
You can convert camera raw files to the DNG format by using the Adobe DNG Converter or the Camera Raw dialog box. For more information on the DNG format and DNG Converter, see the Digital Negative (DNG) product page. To download the latest DNG Converter, go to the Adobe downloads page.
To the top
Processing images with Camera Raw
Copy camera raw files to your hard disk, organize them, and (optionally) convert them to DNG.
Before you do any work on the images that your camera raw files represent, transfer them from the camera's memory card, organize them, give them useful names, and otherwise prepare them for use. Use the Get Photos From Camera command in Adobe Bridge to accomplish these tasks automatically.
Open the image files in Camera Raw.
You can open camera raw files in Camera Raw from Adobe Bridge, After Effects, or Photoshop. You can also open JPEG and TIFF files in Camera Raw from Adobe Bridge. (See Open images.)
For a video tutorial on importing raw images from a digital camera into Adobe Bridge CS4 or CS5 using Adobe Photo Downloader, watch Download photos from a camera into Adobe Bridge by Lynda.com.
Adjust color.
Color adjustments include white balance, tone, and saturation. You can make most adjustments on the Basic tab, and then use controls on the other tabs to fine-tune the results. If you want Camera Raw to analyze your image and apply approximate tonal adjustments, click Auto on the Basic tab.
To apply the settings used for the previous image, or to apply the default settings for the camera model, camera, or ISO settings, choose the appropriate command from the Camera Raw Settings menu ≡ (See Apply saved Camera Raw settings.)
For a video tutorial on making nondestructive color adjustments to photos in Camera Raw, watch Recovering detail in raw images by Richard Harrington or Adobe Camera Raw workflow by Russell Brown.
Make other adjustments and image corrections.
Use other tools and controls in the Camera Raw dialog box to perform such tasks as sharpening the image, reducing noise, correcting for lens defects, and retouching.
(Optional) Save image settings as a preset or as default image settings.
To apply the same adjustments to other images later, save the settings as a preset. To save the adjustments as the defaults to be applied to all images from a specific camera model, a specific camera, or a specific ISO setting, save the image settings as the new Camera Raw defaults. (See Save, reset, and load Camera Raw settings.)
Set workflow options for Photoshop.
Set options to specify how images are saved from Camera Raw and how Photoshop should open them. You can access the Workflow Options settings by clicking the link beneath the image preview in the Camera Raw dialog box.
Save the image, or open it in Photoshop or After Effects.
When you finish adjusting the image in Camera Raw, you can apply the adjustments to the camera raw file, open the adjusted image in Photoshop or After Effects, save the adjusted image to another format, or cancel and discard adjustments. If you open the Camera Raw dialog box from After Effects, the Save Image and Done buttons are unavailable.
Save Image Applies the Camera Raw settings to the images and saves copies of them in JPEG, PSD, TIFF, or DNG format. Press Alt (Windows) or Option (Mac OS) to suppress the Camera Raw Save Optionsdialog box and save the files using the last set of save options. (See Save a camera raw image in another format.)
Open Image or OK Opens copies of the camera raw image files (with the Camera Raw settings applied) in Photoshop or After Effects. The original camera raw image file remains unaltered. Press Shift while clickingOpen Image to open the raw file in Photoshop as a Smart Object. At any time, you can double-click the Smart Object layer that contains the raw file to adjust the Camera Raw settings.
Done Closes the Camera Raw dialog box and stores file settings either in the camera raw database file, in the sidecar XMP file, or in the DNG file.
Cancel Cancels the adjustments specified in the Camera Raw dialog box.
To the top
Camera Raw dialog box overview

text_image
Camera 10.00 x Default A B C D E F G C:\Users\Adobe\Adobe\Adobe\Adobe\Adobe\Adobe\Adobe\Adobe\Adobe\Adobe\Adobe\Adobe\Adobe\Adobe\Adobe\Adobe\Adobe\Adobe\Adobe\Adobe\Adobe\Adobe\Adobe\Adobe\Adobe\Adobe\Adobe\Adobe\Adobe\Adobe\Adobe\Adobe\Adobe\Adobe\Adobe\Adobe\Adobe\Adobe\Adobe\Adobe\Adobe\Adobe\Adobe\Adobe\Adobe\Adobe\Adobe\Adobe\Adobe\Adobe\Autosat C:\Users\Adobe\Adobe\Adobe\Adobe\Adobe\Adobe\Adobe\Adobe\Adobe\Adobe\Adobe\Adobe\Adobe\Adobe\Adobe\Adobe\Adobe\Adobe\Adobe\Adobe\Adobe\Adobe\Adobe\Adobe\Adobe\Adobe\Adobe\Adobe\Adobe\Adobe\Adobe\Adobe\Adobe\Adobe\Adobe\Adobe\Adobe\Adobe\Adobe\Adobe\Adobe\Adobe\Adobe\Adobe\Adobe\Adobe\Adobe\Autosat Save Image Add how to add new image files (e.g., 3D, 2D, 1D, 5D, 2D, 1D) H I J K OK: Copy OK Cancel Paste Default Exposure: 6 Highlight: 9 Blacks: 5 Brightness: +82 Contrast: +25 Clarity: 5 Variance: 5 Saturation: 5 Open Copy Reset ChaseCamera Raw dialog box
A. Filmstrip B. Toggle Filmstrip C. Camera name or file format D. Toggle full-screen mode E. Image adjustment tabs F. Histogram G. Camera Raw Settings menu H. Zoom levels I. Workflow options J. Navigation arrows K. Adjustment sliders
Note: Some controls, such as the Workflow Options link, that are available when you open the Camera Raw dialog box from Adobe Bridge or Photoshop are not available when you open the Camera Raw dialog box from After Effects.
You can invoke the Auto Temperature and Auto Tint functionality by Shift-double-clicking within the image preview.
- To open the Camera Raw Settings menu, click the button ≡ in the upper-right corner of any of the image adjustment tabs. Several of the commands in this menu are also available from the Edit >Develop Settings menu in Adobe Bridge.
• The Camera Raw zoom controls are:
Zoom tool
Sets the preview zoom to the next higher preset value when you click the preview image. Alt-click (Windows) or Option-click (Mac OS) to use the next lower zoom value. Drag the Zoom tool in the preview image to zoom in on a selected area. To return to 100%, double-click the Zoom tool.
Hand tool
Moves the image in the preview window if the preview image is set at a zoom level higher than 100%. Hold down the spacebar to temporarily activate the Hand tool while using another tool. Double-click the Hand tool to fit the preview image to the window.
Select Zoom Level
Choose a magnification setting from the menu or click theSelect Zoom Level buttons.
Preview
Displays a preview of the image adjustments made in the current tab, combined with the settings in the other tabs. Deselect to show the image with the original settings of the current tab combined with the settings in the other tabs.
RGB
Shows the red, green, and blue values of the pixel under the pointer in the preview image.
Shadows and Highlights
Displays shadow and highlight clipping using the buttons at the top of the Histogram. Clipped shadows appear in blue, and clipped highlights appear in red. Highlight clipping is shown if any one of the three RGB channels is clipped (fully saturated with no detail). Shadow clipping is shown if all three RGB channels are clipped (black with no detail).
• The Camera Raw image adjustment tabs are:
Basic
Adjust white balance, color saturation, and tonality.
Tone Curve
Fine-tune tonality using a Parametric curve and a Point curve.
Detail
Sharpen images or reduce noise.
HSL / Grayscale
Fine-tune colors using Hue, Saturation, and Luminance adjustments.
Split Toning
Color monochrome images or create special effects with color images.
Lens Corrections
Compensate for chromatic aberration, geometric distortions, and vignetting caused by the camera lens.
Effects fx
Simulate film grain or apply a postcrop vignette.
Camera Calibration
Apply camera profiles to raw images to correct color casts and adjust non-neutral colors to compensate for the behavior of a camera's image sensor.
Presets
Save and apply sets of image adjustments as presets.
Snapshots
Create versions of a photo that record its state at any point during the editing process.
To the top
Work with the Camera Raw cache in Adobe Bridge
When you view camera raw files in Adobe Bridge, the thumbnails and previews use either the default settings or your adjusted settings. The Adobe Bridge cache stores data for the file thumbnails, metadata, and file information. Caching this data shortens the loading time when you return to a previously viewed folder in Adobe Bridge. The Camera Raw cache speeds the opening of images in Camera Raw and rebuilds of previews in Adobe Bridge when image settings change in Camera Raw.
Because caches can become very large, you may want to purge the Camera Raw cache or limit its size. You can also purge and regenerate the cache if you suspect that it is corrupted or old.
Note: The Camera Raw cache holds data for about 200 images for each gigabyte of disk storage allocated to it. By default, the Camera Raw cache is set to a maximum size of 1 GB. You can increase its limit in the Camera Raw preferences.
- In Adobe Bridge, choose Edit >Camera Raw Preferences (Windows) or Bridge > Camera Raw Preferences (Mac OS). Or, with the Camera Raw dialog box open, click the Open Preferences Dialog button ≡.
-
Do any of the following:
-
To change the cache size, enter a Maximum Size value.
- To purge the camera raw cache, click the Purge Cachebutton.
• To change the location of the camera raw cache, click Select Location.
To the top
Work with Camera Raw and Lightroom
Camera Raw and Lightroom share the same image-processing technology to ensure consistent and compatible results across applications. For Camera Raw to view image adjustments made in the Develop module of Lightroom, metadata changes must be saved to XMP in Lightroom.
Adjustments made in Camera Raw are also displayed in the Adobe Bridge Content and Preview panels.
To view Lightroom changes in Camera Raw, and to ensure that Camera Raw adjustments can be viewed in Lightroom and Adobe Bridge, do the following:
- In Adobe Bridge, choose Edit >Camera Raw Preferences (Windows) or Bridge > Camera Raw Preferences (Mac OS). Or, with the Camera Raw dialog box open, click the Open Preferences Dialog button ≡.
- Choose Save Image Settings In > Sidecar ".XMP" Files, and deselect Ignore Sidecar ".XMP" Files.
- After applying adjustments to a photo in Camera Raw, save them by clicking Done or Open Image.
Note: Camera Raw reads only the current settings for the primary image in the Lightroom catalog. Adjustments made to virtual copies are not displayed or available in Camera Raw.
Twitter ^™ and Facebook posts are not covered under the terms of Creative Commons.
Legal Notices | Online Privacy Policy
Automatic Perspective Correction in Camera Raw | Photoshop CC
Straighten geometrical shapes that appear skewed because of lens distortion
Using an incorrect lens, or camera shake can cause the perspective of photographs to be tilted or skewed. The perspective may be distorted, and is more evident in photographs containing continuous vertical lines or geometric shapes.
Adobe Camera Raw has Upright modes - four settings that can be used to automatically fix perspective. The ability to manually apply corrections continues to be available. After applying an Upright mode, you can adjust the image further by manually modifying the available slider-based settings.
Note: It is recommended that you apply any lens correction profiles available for your camera and lens combination, before you apply one of the four new presets. Applying the lens correction profile prepares the image to be analyzed better for distortion correction.
To the top
Manually correcting lens distortion using Upright presets
-
Do one of the following:
-
Open a camera raw file, or,
-
With an image open in Photoshop, click Filter > Camera Raw Filter.
-
In the Camera Raw window, navigate to the Lens Corrections tab.
-
(Optional) In the Lens Corrections > Profile tab, select the Enable Lens Profile Corrections checkbox.

Enabling Lens profile correction based on your camera and lens combination is highly recommended, before processing the photo with the Upright presets.
- In Lens Corrections > Manual tab, there are four Upright modes available. Click a mode to apply the correction to the photo.
Auto Applies a balanced set of perspective corrections.
Level Applies perspective correction to ensure that the image is level.
Vertical Applies level and vertical perspective corrections.
Full Applies level, vertical, and horizontal perspective corrections on the image.
Caution: While trying out the four Upright modes, if you select or clear the Enable Lens Profile Correction checkbox (Lens Correction > Profile), click the Reanalyze link below the Upright preset buttons.
text_image
Lens Corrections Profile Color Manual Upright Sync Results Reanalyze Transform Distortion 0 Vertical 0 Horizontal 0 Rotate 0.0 Scale 100 Aspect 0 Lens Vignetting Amount 0 Midpoint Show GridChoose an Upright mode, and make further adjustments with the sliders
- Cycle through the Upright modes until you find the most preferable setting.
The four Upright modes correct and manage distortion and perspective errors. There is no recommended or preferable setting. The best setting varies from one photo to another. Experiment with the four Upright modes before deciding on the best possible Upright mode for your photo.
-
Use the Transform sliders to make any further modifications, as necessary. A new slider (Aspect) has been introduced in Camera Raw.
-
Move the Aspect slider left, to adjust the horizontal perspective of the photo.
- Move the Aspect slider right, to adjust the vertical perspective of the photo.
To the top
Sample images

natural_image
Aerial night view of a modern cityscape with high-rise buildings and a central road (no visible text or signage)
natural_image
Aerial night view of a modern cityscape with illuminated skyscrapers and a central road (no visible text or signage)
natural_image
Cityscape at dusk with illuminated streets and high-rise buildings in the background (no visible text or signage)Image with no correction (left), image with Auto correction (middle), and image with Level correction (right).

natural_image
Aerial night view of a modern cityscape with high-rise buildings and a central road (no visible text or signage)
natural_image
Aerial night view of a modern cityscape with high-rise buildings and a river, featuring illuminated roads and streetlights (no visible text or signage)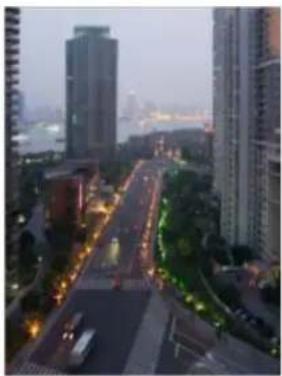
natural_image
Aerial night view of a modern cityscape with high-rise buildings and a central road lined with traffic (no visible text or signage)Image with no correction (left), image with Vertical correction (middle), and image with Full correction (right).
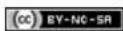
Twitter™ and Facebook posts are not covered under the terms of Creative Commons.
Legal Notices | Online Privacy Policy
Radial Filter in Camera Raw | Photoshop CC
Highlight portions of a photo, or enhance specific regions with localized corrections
Applying a Radial Filter to enhance a photo
Keyboard shortcuts and modifiers for the Radial Filter tool
To fully control where a viewer's attention is drawn to on a photo, highlight the subject of the image. Some filters that create a vignetting effect help you achieve that purpose. However, such filters require the main subject to be in the center of the photo.
Radial filters in Adobe Camera Raw 8.0 enable you to direct attention to specific portions of the image to where you want the viewer to focus attention. For example, you can use the Radial Filter tool to draw an elliptical shape around the subject, and increase the exposure and clarity of the area within the shape to bring more attention to the subject. The subject can be off-center, or anywhere in the photography.
The main workflow to modify a photo with Radial Filters is outlined below:
- Open a photo in the Adobe Camera Raw plug-in.
- Identify one or more subjects that must attract the viewer's attention
- Set up:
• (Optional) A Radial filter to weaken focus on the background
• A Radial filter to highlight the subject
• Additional Radial filters, if you have more than one subject to highlight
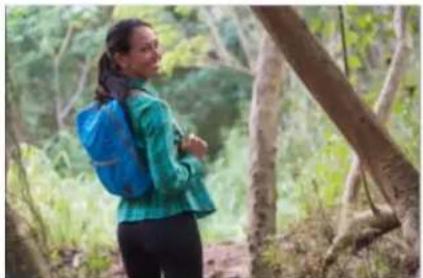
natural_image
Woman in a forest wearing a blue jacket and backpack, standing near tree branches (no visible text or symbols)
natural_image
Woman in a green jacket standing in a dense forest, holding a briefcase (no visible text or symbols)The subject of the photo is not clearly visible in the original photo (left), but is highlighted using a Radial Filter (right)
To the top
Applying a Radial Filter to enhance a photo
-
Do one of the following:
-
Open a camera raw file, or,
-
With an image open in Photoshop, click Filter > Camera Raw Filter.
-
Select the Radial Filter tool from the toolbar.

Press J to toggle the Radial Filter tool.
- Use the New and Edit radio button options to choose whether you want to create a filter, or edit an existing filter.
- Do one of the following:
To create a Radial Filter, click and drag the mouse across the region, and draw a circular or elliptical shape. This shape determines the area that is affected or excluded from the alterations you are about to perform.
- To edit a Radial Filter, click any of the gray handles on the photo. When selected, the handle turns red.
-
To determine what area of the photo is modified, choose an Effect option (located below the sliders).
-
Outside. All modifications are applied outside the selected area.
-
Inside. All modifications are applied to the selected area.
-
Adjust the size (width and height) and orientation of the Radial Filter added. Select a filter, and:
-
Click and drag the center of the filter to move and reposition it.
• Hover the pointer any of the four filter handles, and when the pointer icon changes, click and drag to change the size of the filter. - Hover the pointer close to the edge of the filter, and when the pointer icon changes, click and drag the edge of the filter to change the orientation.
natural_image
Woman in green plaid shirt and blue backpack standing outdoors with blurred green foliage background (no text or symbols visible)The Radial Filter is represented by an elliptical marquee
- Use the sliders to modify the selected Radial Filter area. The Feather slider adjusts the falloff of the applied effect.
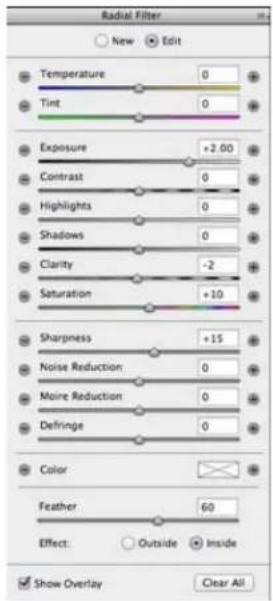
text_image
Radial Filter New Edit Temperature 0 Tint 0 Exposure +2.00 Contrast 0 Highlights 0 Shadows 0 Clarity -2 Saturation +10 Sharpness +15 Noise Reduction 0 Moine Reduction 0 Defringe 0 Color Feather 60 Effect: Outside Inside Show Overlay Clear AllThe Radial Filter tool options allow you to apply effects to an elliptical mask.
-
Follow steps 3 through 6 to continue adding or editing Radial Filters.
-
Clear the Show Overlay checkbox, to show how the finished photo appears. If you want to delete all the Radial Filters and start from scratch, click Clear All (this action cannot be undone).
To the top
Keyboard shortcuts and modifiers for the Radial Filter tool
New adjustments
- Press and hold Shift + drag, to create an adjustment that is constrained to a circle
- While dragging, press and hold the spacebar to move the ellipse; release the spacebar to resume defining the shape of the new adjustment
Editing adjustments
- While dragging inside an adjustment to move it, press and hold the Shift key to constrain the movement in the horizontal or vertical direction
- While dragging one of the four handles to resize an adjustment, press and hold the Shift key, to preserve the aspect ratio of the adjustment shape.
- While dragging the boundary of an adjustment to rotate it, press and hold the Shift key to snap the rotation to 15-degree increments.
- While an adjustment is selected, press the X key to flip the effect direction (for example, from outside to inside)
Deleting adjustments
- While an adjustment is selected, press the Delete key to delete the adjustment
- Press Option/Alt + click an existing adjustment to delete it
Adjustments with maximum coverage
- Press Command/Control and double-click on an empty area, to create an adjustment that is centered and covers the cropped image area
- Press Command/Control and double-click within an existing adjustment, to expand that adjustment to cover the cropped image area

Twitter™ and Facebook posts are not covered under the terms of Creative Commons.
Legal Notices | Online Privacy Policy
Enhanced Spot Removal Tool in Camera Raw | Photoshop CC Remove any unwanted aspects of a photo in simple steps, with the Spot Removal Tool that now behaves like the Healing Brush
Using the Spot Removal tool
Cleaning up a photo with the Visualize Spots feature
The Spot Removal tool in Camera Raw lets you repair a selected area of an image by sampling from a different area of the same image. The tool is similar to the Healing Brush available in Photoshop. The default behavior for the Spot Removal tool is to be able to mark areas to touch up, by dragging the brush across the photo. For example, remove a portion of the wire (connecting the helmet and the overhead wire) that is distracting the view of the blue sky.
Using the Spot Removal tool on a raw image means that you are processing the raw image data directly. Working with raw image data directly can provide cleaner matches for retouching (healing or cloning) actions. Also, since any edits and modifications to camera raw images are stored in sidecar files, this process is non-destructive.

natural_image
Person wearing a red helmet and holding a pole, with green hills in the background (no visible text or symbols)
natural_image
Person wearing a red helmet and holding a pole, against a forested hillside with mountains in the background (no visible text or symbols)The zipline that appears to be connecting the wire and the helmet (image left) has been removed (image right)
To the top
Using the Spot Removal tool
-
Do one of the following:
-
Open a camera raw file, or,
-
With an image open in Photoshop, click Filter > Camera Raw Filter.
-
Select the Spot Removal tool

from the toolbar.
- Select one of the following from the Type menu:
Heal Matches the texture, lighting, and shading of the sampled area to the selected area. Clone Applies the sampled area of the image to the selected area.
- (Optional) In the Spot Removal tool options area under the Histogram, drag the Size slider to specify the size of the area that the Spot Removal tool affects.

Use the bracket keys on your keyboard to change brush size
• Left bracket (I), reduces the tool radius size
• Right bracket (J), increases the tool radius size.
-
In the photo, click and drag the part of the photo to retouch.
-
A red-and-white marquee area (red handle) designates your selection.
- A green-and-white marquee area (green handle) designates the sampled area.
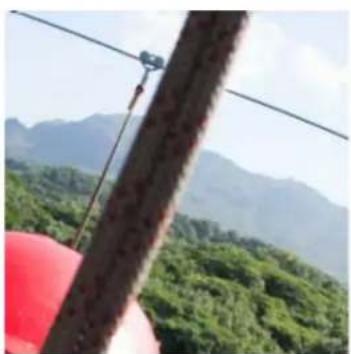
natural_image
Person holding a red object viewed from behind, overlooking a forested mountain range under a clear sky (no text or symbols visible)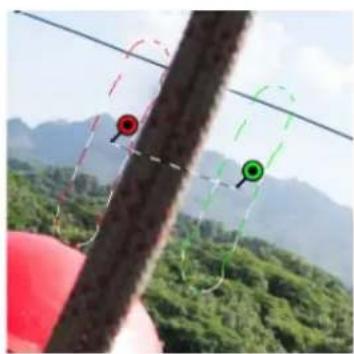
natural_image
Close-up of a cable car with red and green circular markers against a mountainous landscape background (no text or symbols visible)Identify the part of the image to heal, and then use the Spot Removal tool, to paint the area. Use the green and red handles (image right) to reposition the selected and sample areas
-
(Optional) To change the sampled area that is selected by default, do one of the following:
-
Automatically. Click the handle of a selected area, and press the forward slash key (/). A new area is sampled. Press the forward slash key until you find a sample area that fits best.
- Manually. Use the green handle to reposition the sampled area.
When you select larger portions of an image using longer strokes, the right sample area match is not found immediately. To experiment with various options, click the forward slash (/), and the tool auto-samples more areas for you.
- To remove all the adjustments made using the Spot Removal tool, click Clear All.
Keyboard shortcuts and modifiers
Circular spot:
- Control/Command + click to create a circular spot; drag to set the source of the spot.
- Command/Control + Option/Alt + click to create a circular spot; drag to set the size of the spot.
Rectangular selection:
- Click Option/Alt + drag to define a rectangular selection. All spots within that selection (highlighted in red) are deleted once the mouse is released.
Extend a selected area or spot:
- Shift + click to extend an existing selected spot in "connect the dots" fashion.
Delete a selected area or spot:
- Select a red or green handle, and press Delete to delete a selected adjustment.
- Press Option/Alt and click a handle to delete it.
To the top
Cleaning up a photo with the Visualize Spots feature
While working on a computer screen, you may be able to identify and remove most visible spots or imperfections. However, when you print a photo at its full resolution, the printed output may contain many imperfections that were not visible on a computer screen. These imperfections could be of many types - dust on a camera sensor, blemishes on a model's skin in a portrait, tiny wisps of clouds on blue skies. At full resolution, these imperfections are visually distracting.
The new Visualize Spots feature lets you search for imperfections that may not be immediately visible. When you select the Visualize Spots
checkbox (found in the options for the Spot Removal tool), the image is inverted. You can then use the Spot Removal tool in the Visualize Spots mode, to clean up the image further.
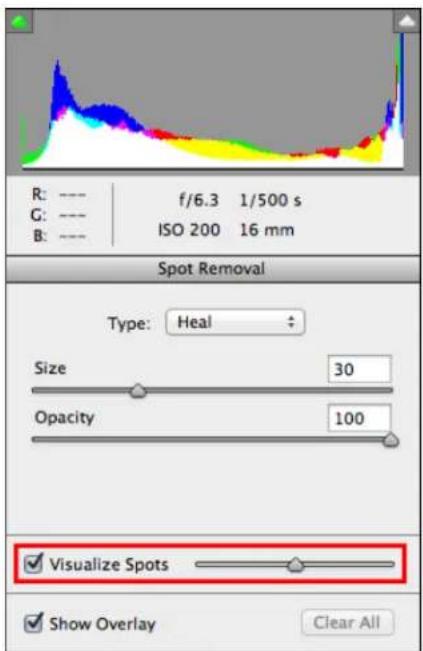
text_image
R: ---- f/6.3 1/500 s G: ---- ISO 200 16 mm Spot Removal Type: Heal Size 30 Opacity 100 ✓ Visualize Spots ✓ Show Overlay Clear AllThe Visualize Spots checkbox is a Spot Removal tool option
-
Do one of the following:
-
Open a camera raw file, or,
-
With an image open in Photoshop CC, click Filter > Camera Raw Filter.
-
Select the Spot Removal tool from the toolbar, and then select the Visualize Spots checkbox.
The image is inverted, and the outlines of the elements of the image are visible.
Below, Visualize Spots view is on, and unnecessary elements like wispy clouds (left) have been removed (right)
natural_image
Black-and-white aerial view of a coastal landscape with branching structures and a diagonal line (no text or symbols)
natural_image
Black-and-white abstract image with a diagonal line and cloud-like shapes against a dark background (no text or symbols)
natural_image
Person using a cable to ride a rope against a blue sky with scattered clouds (no text or symbols visible)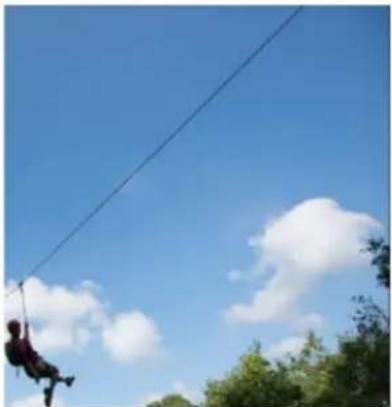
natural_image
Person using a rope against a clear blue sky with scattered clouds (no text or symbols visible)Above, Visualize Spots view is off, and unnecessary elements like wispy clouds (left) have been removed (right)
- Use the Visualize Spots slider to vary the contrast threshold of the inverted image. Move the slider to different contrast levels, to view imperfections like sensor dust, dots, or other unwanted elements.

When the Spot Visualization checkbox is selected, to change the visualization threshold:
- Increase: Press . (period)
- Increase (in larger steps): Press Shift + .
- Reduce: Press, (comma)
-
Reduce (in larger steps): Press Shift + ,
-
Use the Spot Removal tool to clone or heal out unwanted elements in the photo. Uncheck the Visualize Spots checkbox to view the resulting image.
- Repeat steps 2, 3, and 4.

BY-NO-SR
Twitter™ and Facebook posts are not covered under the terms of Creative Commons.
Legal Notices
Online Privacy Policy
Make color and tonal adjustments in Camera Raw
Histogram and RGB levels
Preview highlight and shadow clipping
White balance controls
Adjust tone
Fine-tune tone curves
Clarity, Vibrance, and Saturation controls
HSL / Grayscale controls
Adjust color or tone using the Targeted Adjustment tool
Tone a grayscale image
Editing HDR images in Camera Raw
To the top
Histogram and RGB levels
A histogram is a representation of the number of pixels at each luminance value in an image. A histogram that has nonzero values for each luminance value indicates an image that takes advantage of the full tonal scale. A histogram that doesn't use the full tonal range corresponds to a dull image that lacks contrast. A histogram with a spike at the left side indicates shadow clipping; a histogram with a spike on the right side indicates highlight clipping.

Select Shadows or Highlights to see in the preview image which pixels are being clipped. For more information, see Preview highlight and shadow clipping in Camera Raw.
One common task for adjusting an image is to spread out the pixel values more evenly from left to right on the histogram, instead of having them bunched up at one end or the other.
A histogram is made up of three layers of color that represent the red, green, and blue color channels. White appears when all three channels overlap. Yellow, magenta, and cyan appear when two of the RGB channels overlap (yellow equals the red + green channels, magenta equals the red + blue channels, and cyan equals the green + blue channels).
The histogram changes automatically as you adjust the settings in the Camera Raw dialog box.
The RGB values of the pixel under the pointer (in the preview image) appear below the histogram.
Note: You can also use the Color Sampler tool to place up to nine color samplers in the preview image. The RGB values appear above the preview image. To remove a color sampler, Alt-click (Windows) or Option-click (Mac OS) it. To clear the color samplers, click Clear Samplers.

area
| Category | Value | |---|---| | R | 218 | | G | 140 | | B | 91 | | f/2.5 | 1/125 s | | ISO 400 | 50 mm |The Camera Raw dialog box displays the RGB values of the pixel under the pointer.
To the top
Preview highlight and shadow clipping
Clipping occurs when the color values of a pixel are higher than the highest value or lower than the lowest value that can be represented in the image. Over bright values are clipped to output white, and over dark values are clipped to output black. The result is a loss of image detail.
- To see which pixels are being clipped with the rest of the preview image, select Shadows or Highlights options at the top of the histogram. Or press U to see shadow clipping, O to see highlight clipping.
- To see only the pixels that are being clipped, press Alt (Windows) or Option (Mac OS) while dragging the Exposure, Recovery, or Blacks sliders.
For the Exposure and Recovery sliders, the image turns black, and clipped areas appear white. For the Blacks slider, the image turns white and clipped areas appear black. Colored areas indicate clipping in one color channel (red, green, blue) or two color channels (cyan, magenta, yellow).
Note: In some cases, clipping occurs because the color space that you are working in has a gamut that is too small. If your colors are being clipped, consider working in a color space with a large gamut, such as ProPhoto RGB.
To the top
White balance controls
To adjust the white balance, identify which objects in the image you want to be neutral-colored (white or gray), and then adjust the colors to make those objects neutral. A white or gray object in a scene takes on the color cast by the ambient light or flash used to shoot the picture. When you use the White Balance tool 🔒 to specify an object that you want white or gray, Camera Raw can determine the color of the light in which the scene was shot and then adjust for scene lighting automatically.
Color temperature (in Kelvins) is used as a measure of scene lighting. Natural and incandescent light sources give off light in a predictable distribution according to their temperature.
A digital camera records the white balance at the time of exposure as a metadata entry. The Camera Raw plug-in reads this value and makes it the initial setting when you open the file in the Camera Raw dialog box. This setting usually yields the correct color temperature, or nearly so. You can adjust the white balance if it is not right.
Note: Not all color casts are a result of incorrect white balance. Use the DNG Profile Editor to correct a color cast that remains after the white balance is adjusted. See Adjust color rendering for your camera in Camera Raw.
The Basic tab in the Camera Raw dialog box has three controls for correcting a color cast in an image:
White Balance Camera Raw applies the white balance setting and changes the Temperature and Tint properties in the Basic tab accordingly. Use these controls to fine-tune the color balance.
As Shot Uses the camera's white balance settings, if they are available.
Auto Calculates the white balance based on the image data.
Camera raw and DNG files also have the following white balance settings: Daylight, Cloudy, Shade, Tungsten, Fluorescent, and Flash.
Note: If Camera Raw doesn't recognize the white balance setting of a camera, choosing As Shot is the same as choosing Auto.
Temperature Sets the white balance to a custom color temperature. Decrease Temperature to correct a photo taken with a lower color temperature of light; the Camera Raw plug-in makes the image colors bluer to compensate for the lower color temperature (yellowish) of the ambient light. Conversely, increase Temperature to correct a photo taken with a higher color temperature of light; the image colors become warmer (yellowish) to compensate for the higher color temperature (bluish) of the ambient light.
Note: The range and units for the Temperature and Tint controls are different when you are adjusting a TIFF or JPEG image. For example, Camera Raw provides a true-temperature adjustment slider for raw files from 2,000 Kelvin to 50,000 Kelvin. For JPEG or TIFF files, Camera Raw attempts to approximate a different color temperature or white balance. Because the original value was already used to alter the pixel data in the file, Camera Raw does not provide the true Kelvin temperature scale. In these instances, an approximate scale of -100 to 100 is used in place of the temperature scale.

text_image
White Balance: As Shot Temperature 2800 White Balance: As Shot Temperature 7650 White Balance Custom Temperature 0.00Correcting the white balance
A. Moving the Temperature slider to the right corrects a photo taken with a higher color temperature of light B. Moving the Temperature slider to the left corrects a photo taken with a lower color temperature of light C. Photo after color temperature adjustment
Tint Sets the white balance to compensate for a green or magenta tint. Decrease Tint to add green to the image; increase Tint to add magenta.
To adjust the white balance quickly, select the White Balance tool and then click an area in the image that you want to be a neutral gray. The Temperature and Tint properties adjust to make the selected color exactly neutral (if possible). If you're clicking whites, choose a highlight area that contains significant white detail rather than a specular highlight. You can double-click the White Balance tool to reset White Balance to As Shot.
To the top
Adjust tone
You adjust the image tonal scale using the tone controls in the Basic tab.
When you click Auto at the top of the tone controls section of the Basic tab, Camera Raw analyzes the image and makes automatic adjustments to the tone controls.
You can also apply automatic settings separately for individual tone controls. To apply an automatic adjustment to an individual tone control, such as Exposure or Contrast, press Shift and double-click the slider. To return an individual tone control to its original value, double-click its slider.
When you adjust tone automatically, Camera Raw ignores any adjustments previously made in other tabs (such as fine-tuning of tone in the Tone Curves tab). For this reason, apply automatic tone adjustments first—if at all—to get an initial approximation of the best settings for your image. If you are careful during shooting and have deliberately shot with different exposures, you probably don't want to undo that work by applying automatic tone adjustments. On the other hand, you can always try clicking Auto and then undo the adjustments if you don't like them.
Previews in Adobe® Bridge use the default image settings. If you want the default image settings to include automatic tone adjustments, select Apply Auto Tone Adjustments in the Default Image settings section of the Camera Raw preferences.
Note: If you are comparing images based on their previews in Adobe Bridge, leave the Apply Auto Tone Adjustments preference deselected, which is the default. Otherwise, you'll be comparing images that have already been adjusted.
As you make adjustments, keep an eye on the end points of the histogram, or use the shadow and highlight clipping previews.
While moving the tone controls sliders, hold down Alt (Windows) or Option (Mac OS) to preview where highlights or shadows are clipped. Move the slider until clipping begins, and then reverse the adjustment slightly. (For more information, see Preview highlight and shadow clipping in Camera Raw.)
- To manually adjust a tone control, drag the slider, type a number in the box, or select the value in the box and press the Up or Down arrow key.
• To reset a value to its default, double-click the slider control.
Note: The tone controls that appear in the Basic panel depend on whether you are working in Process Version PV2012, PV2010, or PV2003, as noted.
Exposure (All) Adjusts the overall image brightness. Adjust the slider until the photo looks good and the image is the desired brightness. Exposure values are in increments equivalent to aperture values (f-stops) on a camera. An adjustment of +1.00 is similar to opening the aperture 1 stop. Similarly, an adjustment of -1.00 is like closing the aperture 1 stop.
Contrast (All) Increases or decreases image contrast, mainly affecting midtones. When you increase contrast, the middle-to-dark image areas become darker, and the middle-to-light image areas become lighter. The image tones are inversely affected as you decrease contrast.
Highlights (PV2012) Adjusts bright image areas. Drag to the left to darken highlights and recover "blown out" highlight details. Drag to the right to brighten highlights while minimizing clipping.
Shadows (PV2012) Adjusts dark image areas. Drag to the left to darken shadows while minimizing clipping. Drag to the right to brighten shadows and recover shadow details.
Whites (PV2012) Adjusts white clipping. Drag to the left to reduce clipping in highlights. Drag to the right to increase highlight clipping. (Increased clipping may be desirable for specular highlights, such as metallic surfaces.)
Blacks (PV2012) Adjusts black clipping. Drag to the left to increase black clipping (map more shadows to pure black). Drag to the right to reduce shadow clipping.
Blacks (PV2010 and PV2003) Specifies which image values map to black. Moving the slider to the right increases the areas that become black, sometimes creating the impression of increased image contrast. The greatest effect is in the shadows, with much less change in the midtones and highlights.
Recovery (PV2010 and PV2003) Attempts to recover details from highlights. Camera Raw can reconstruct some details from areas in which one or two color channels are clipped to white.
Fill Light (PV2010 and PV2003) Attempts to recover details from shadows, without brightening blacks. Camera Raw can reconstruct some details from areas in which one or two color channels are clipped to black. Using Fill Light is like using the shadows portion of the Photoshop® Shadow/Highlight filter or the After Effects® Shadow/Highlight effect.
Brightness (PV2010 and PV2003) Adjusts the brightness or darkness of the image, much as the Exposure property does. However, instead of clipping the image in the highlights or shadows, Brightness compresses the highlights and expands the shadows when you move the slider to the right. Often, the best way to use this control is to set the overall tonal scale by first setting Exposure, Recovery, and Blacks; then set Brightness. Large Brightness adjustments can affect shadow or highlight clipping, so you may want to readjust the Exposure, Recovery, or Blacks property after adjusting Brightness.
Learn More: Watch the video tutorial What's New in Camera Raw by Matt Kloskowski. See also, Why You Should Set Photoshop to Open Your JPGs in Adobe Camera RAW - video tutorial by Terry White (8:07).
To the top
Fine-tune tone curves
Use the controls in the Tone Curve tab to fine-tune images after you've made tone adjustments in the Basic tab. The tone curves represent changes made to the tonal scale of an image. The horizontal axis represents the original tone values of the image (input values), with black on the left and progressively lighter values toward the right. The vertical axis represents the changed tone values (output values), with black on the bottom and progressing to white at the top.
If a point on the curve moves up, the output is a lighter tone; if it moves down, the output is a darker tone. A straight, 45-degree line indicates no changes to the tone response curve: the original input values exactly match the output values.
Use the tone curve in the nested Parametric tab to adjust the values in specific tonal ranges in the image. The areas of the curve affected by the region properties (Highlights, Lights, Darks, or Shadows) depend on where you set the split controls at the bottom of the graph. The middle region properties (Darks and Lights) mostly affect the middle region of the curve. The Highlight and Shadows properties mostly affect the ends of the tonal range.
• To adjust tone curves, do any of the following:
- Drag the Highlights, Lights, Darks, or Shadows slider in the nested Parametric tab. You can expand or contract the curve regions that the sliders affect by dragging the region divider controls along the horizontal axis of the graph.
- Drag a point on the curve in the nested Point tab. As you drag the point, the Input and Output tonal values are displayed beneath the tone curve.
- Choose an option from the Curve menu in the nested Point tab. The setting you choose is reflected in the Point tab, but not in the settings in the Parametric tab. Medium Contrast is the default setting.
- Select the Parametric Curve Targeted Adjustment tool in the toolbar and drag in the image. The Parametric Curve Targeted Adjustment tool adjusts the Highlights, Lights, Darks, or Shadows curve region based on the values in the image where you click.
Note: The Targeted Adjustment tool does not affect point curves.
To the top
Clarity, Vibrance, and Saturation controls
You can change the color saturation of all colors by adjusting the Clarity, Vibrance, and Saturation controls on the Basic tab. (To adjust saturation for a specific range of colors, use the controls on the HSL / Grayscale tab.)
Clarity Adds depth to an image by increasing local contrast, with greatest effect on the midtones. This setting is like a large-radius unsharp mask. When using this setting, it is best to zoom in to 100% or greater. To maximize the effect, increase the setting until you see halos near the edge details of the image and then reduce the setting slightly.
Vibrance Adjusts the saturation so that clipping is minimized as colors approach full saturation. This setting changes the saturation of all lower-saturated colors with less effect on the higher-saturated colors. Vibrance also prevents skin tones from becoming oversaturated.
Saturation Adjusts the saturation of all image colors equally from -100 (monochrome) to +100 (double the saturation).
To the top
HSL / Grayscale controls
You can use the controls in the HSL / Grayscale tab to adjust individual color ranges. For example, if a red object looks too vivid and distracting, you can decrease the Reds values in the nested Saturation tab.
The following nested tabs contain controls for adjusting a color component for a specific color range:
Hue Changes the color. For example, you can change a blue sky (and all other blue objects) from cyan to purple.
Saturation Changes how vivid or pure the color. For example, you can change a blue sky from gray to highly saturated blue.
Luminance Changes the brightness of the color range.
If you select Convert To Grayscale, you see only one nested tab:
Grayscale Mix Use controls in this tab to specify the contribution of each color range to the grayscale version of the image.
To the top
Adjust color or tone using the Targeted Adjustment tool
The Targeted Adjustment tool allows you to make tonal and color corrections by dragging directly on a photo. Using the Targeted Adjustment tool, you can drag down on a blue sky to desaturate it, for example, or drag up on a red jacket to intensify its hue.
- To make color adjustments with the Targeted Adjustment tool 📋, click it in the toolbar and choose the type of correction you want to make: Hue, Saturation, Luminance, or Grayscale Mix. Then, drag in the image.
Dragging up or right increases values; dragging down or left decreases values. Sliders for more than one color may be affected when you drag with the Targeted Adjustment tool. Selecting the Grayscale Mix Targeted Adjustment tool converts the image to grayscale.
- To make tone curve adjustments using the Targeted Adjustmenttool 📋, click it in the toolbar and choose Parametric Curve. Then, drag in the image.
The Parametric Curve Targeted Adjustment tool adjusts the Highlights, Lights, Darks, or Shadows curve region based on the values in the image where you click.
The keyboard shortcut T toggles the last Targeted Adjustment tool you used.
To the top
Tone a grayscale image
Use the controls in the Split Toning tab to color a grayscale image. You can add one color throughout the tonal range, such as a sepia appearance, or create a split tone result, in which a different color is applied to the shadows and the highlights. The extreme shadows and highlights remain black and white.
You can also apply special treatments, such as a cross-processed look, to a color image.
- Select a grayscale image. (It can be an image that you converted to grayscale by selecting Convert To Grayscale in the HSL / Grayscale tab.)
- In the Split Toning tab, adjust the Hue and Saturation properties for the highlights and shadows. Hue sets the color of the tone; Saturation sets the magnitude of the result.
- Adjust the Balance control to balance the influence between the Highlight and Shadow controls. Positive values increase the influence of the Highlight controls; negative values increase the influence of the Shadow controls.
To the top
Editing HDR images in Camera Raw
In Camera Raw 7.1 or later, you can work with 16-, 24-, and 32-bit floating point images--often referred to as HDR (high dynamic range images). Camera Raw opens TIFF and DNG format HDR images. Make sure that the images are in process version 2012. (See Process Versions.)
You can use the Basic tab controls to edit HDR images. The Basic tab Exposure control has an expanded range when working with HDR images (+10 to -10).
When you are done editing, click Done or Open Image to open the image in Photoshop. The image opens as a 16-bit or 8-bit image, depending on how you have the Workflow Options set.
To open an HDR image in Camera Raw:
- In Bridge, select the image and choose File > Open In Camera Raw. In mini-Bridge, right-click the image (Ctrl-click on Mac) and choose Open With > Camera Raw.
For more information about HDR images, see High dynamic range images in Photoshop Help.
Twitter™ and Facebook posts are not covered under the terms of Creative Commons.
Legal Notices | Online Privacy Policy
Save image states as snapshots
Save, reset, and load Camera Raw settings
Specify where Camera Raw settings are stored
Copy and paste Camera Raw settings
Apply saved Camera Raw settings
Export Camera Raw settings and DNG previews
Specify Camera Raw workflow options
To the top
Save image states as snapshots
You can record the state of an image at any time by creating a snapshot. Snapshots are stored renditions of an image that contain the complete set of edits made up until the time the snapshot is created. By creating snapshots of an image at various times during the editing process, you can easily compare the effects of the adjustments that you make. You can also return to an earlier state if you want to use it at another time. Another benefit of snapshots is that you can work from multiple versions of an image without having to duplicate the original.
Snapshots are created and managed using the Snapshots tab of the Camera Raw dialog box.
-
Click the New Snapshot button ☐ at the bottom of the Snapshots tab to create a snapshot.
-
Type a name in the New Snapshot dialog box and click OK.
The snapshot appears in the Snapshots tab list.
When working with snapshots, you can do any of the following:
- To rename a snapshot, right-click (Windows) or Control-click (Mac OS) it and choose Rename.
- Click a snapshot to change the current image settings to those of the selected snapshot. The image preview updates accordingly.
- To update, or overwrite, an existing snapshot with the current image settings, right-click (Windows) or Control-click (Mac OS) the snapshot and choose Update With Current Settings.
• To undo changes made to a snapshot, click Cancel.
Note: Use caution when clicking Cancel to undo snapshot changes. All image adjustments made during the current editing session are also lost.
- To delete a snapshot, select it and click the Trash button ⚙ at the bottom of the tab. Or, right-click (Windows) or Control-click (Mac OS) the snapshot and choose Delete.
Snapshots applied in Photoshop Lightroom appear and can be edited in the Camera Raw dialog box. Similarly, snapshots created in Camera Raw appear and can be edited in Lightroom.
To the top
Save, reset, and load Camera Raw settings
You can reuse the adjustments that you've made to an image. You can save all of the current Camera Raw image settings, or any subset of them, as a preset or as a new set of defaults. The default settings apply to a specific camera model, a specific camera serial number, or a specific ISO setting, depending on the settings in the Default Image Settings section of the Camera Raw preferences.
Presets appear by name in the Presets tab, in the Edit > Develop Settings menu in Adobe Bridge, in the context menu for camera raw images in Adobe Bridge, and in the Apply Presets submenu of the Camera Raw Settings menu in the Camera Raw dialog box. Presets are not listed in
these locations if you don't save them to the Camera Raw settings folder. However, you can use the Load Settings command to browse for and apply settings saved elsewhere.
You can save and delete presets using the buttons at the bottom of the Presets tab.
- Click the Camera Raw Settings menu button and choose a command from the menu:
Save Settings Saves the current settings as a preset. Choose which settings to save in the preset, and then name and save the preset.
Save New Camera Raw Defaults Saves the current settings as the new default settings for other images taken with the same camera, with the same camera model, or with the same ISO setting. Select the appropriate options in the Default Image Settings section of the Camera Raw preferences to specify whether to associate the defaults with a specific camera's serial number or with an ISO setting.
Reset Camera Raw Defaults Restores the original default settings for the current camera, camera model, or ISO setting.
Load Settings Opens the Load Raw Conversion Settings dialog box, in which you browse to the settings file, select it, and then click Load.
To the top
Specify where Camera Raw settings are stored
Choose a preference to specify where the settings are stored. The XMP files are useful if you plan to move or store the image files and want to retain the camera raw settings. You can use the Export Settings command to copy the settings in the Camera Raw database to sidecar XMP files or embed the settings in Digital Negative (DNG) files.
When a camera raw image file is processed with Camera Raw, the image settings are stored in one of two places: the Camera Raw database file or a sidecar XMP file. When a DNG file is processed in Camera Raw, the settings are stored in the DNG file itself, but they can be stored in a sidecar XMP file instead. Settings for TIFF and JPEG files are always stored in the file itself.
Note: When you import a sequence of camera raw files in After Effects, the settings for the first file are applied to all files in the sequence that do not have their own XMP sidecar files. After Effects does not check the Camera Raw database.
You can set a preference to determine where settings are stored. When you reopen a camera raw image, all settings default to the values used when the file was last opened. Image attributes (target color space profile, bit depth, pixel size, and resolution) are not stored with the settings.
-
In Adobe Bridge, choose Edit > Camera Raw Preferences (Windows) or Bridge > Camera Raw Preferences (Mac OS). Or, in the Camera Raw dialog box, click the Open Preferences Dialog button ≡. Or, in Photoshop, choose Edit > Preferences > Camera Raw (Windows) or Photoshop > Preferences > Camera Raw (Mac OS).
-
In the Camera Raw Preferences dialog box, choose one of the following from the Save Image Settings In menu:
Camera Raw Database Stores the settings in a Camera Raw database file in the folder Document and Settings/[user name]/Application Data/Adobe/CameraRaw (Windows) or Users/[user name]/Library/Preferences (Mac OS). This database is indexed by file content, so the image retains camera raw settings even if the camera raw image file is moved or renamed.
Sidecar “.XMP” Files Stores the settings in a separate file, in the same folder as the camera raw file, with the same base name and an .xmp extension. This option is useful for long-term archiving of raw files with their associated settings, and for the exchange of camera raw files with associated settings in multiuser workflows. These same sidecar XMP files can store IPTC (International Press Telecommunications Council) data or other metadata associated with a camera raw image file. If you open files from a read-only volume such as a CD or DVD, be sure to copy the files to your hard disk before opening them. The Camera Raw plug-in cannot write an XMP file to a read-only volume and writes the settings to the Camera Raw database file instead. You can view XMP files in Adobe Bridge by choosing View >Show Hidden Files.
Note: If you are using a revision control system to manage your files and are storing settings in sidecar XMP files, keep in mind that you
must check your sidecar files in and out to change camera raw images; similarly, you must manage (e.g., rename, move, delete) XMP sidecar files together with their camera raw files. Adobe Bridge, Photoshop, After Effects, and Camera Raw take care of this file synchronization when you work with files locally.

If you store the camera raw settings in the Camera Raw database and plan to move the files to a different location (CD, DVD, another computer, and so forth), you can use the Export Settings To XMP command to export the settings to sidecar XMP files.
- If you want to store all adjustments to DNG files in the DNG files themselves, select Ignore Sidecar ".XMP" Files in the DNG File Handling section of the Camera Raw Preferences dialog box.
To the top
Copy and paste Camera Raw settings
In Adobe Bridge, you can copy and paste the Camera Raw settings from one image file to another.
-
In Adobe Bridge, select a file and choose Edit >Develop Settings > Copy Camera Raw Settings.
-
Select one or more files and choose Edit >Develop Settings > Paste Camera Raw Settings.

You can also right-click (Windows) or Control-click (Mac OS) image files to copy and paste using the context menu.
- In the Paste Camera Raw Settings dialog box, choose which settings to apply.
To the top
Apply saved Camera Raw settings
-
In Adobe Bridge or in the Camera Raw dialog box, select one or more files.
-
In Adobe Bridge, choose Edit > Develop Settings, or right-click a selected file. Or, in the Camera Raw dialog box, click the Camera Raw Settings menu ≡
-
Choose one of the following:
Image Settings Uses the settings from the selected camera raw image. This option is available only from the Camera Raw Settings menu in the Camera Raw dialog box.
Camera Raw Defaults Uses the saved default settings for a specific camera, camera model, or ISO setting.
Previous Conversion Uses the settings from the previous image of the same camera, camera model, or ISO setting.
Preset name Uses the settings (which can be a subset of all image settings) saved as a preset.
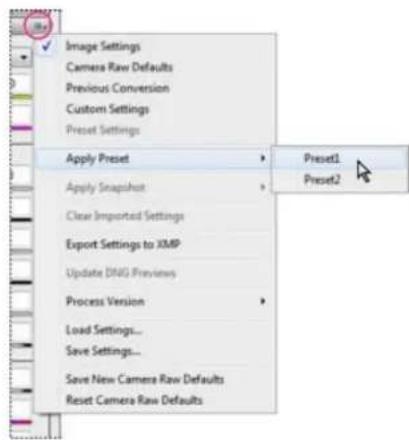
text_image
Image Settings Camera Raw Defaults Previous Conversion Custom Settings Preset Settings Apply Preset Apply Snapshot Clear Imported Settings Export Settings to XMP Update DNG Previews Process Version Load Settings... Save Settings... Save New Camera Raw Defaults Reset Camera Raw Defaults Preset1 Preset2Applying a preset
Note: You can also apply presets from the Presets tab.
To the top
Export Camera Raw settings and DNG previews
If you store file settings in the Camera Raw database, you can use the Export Settings To XMP command to copy the settings to sidecar XMP files or embed them in DNG files. This is useful for preserving the image settings with your camera raw files when you move them.
You can also update the JPEG previews embedded in DNG files.
- Open the files in the Camera Raw dialog box.
- If you are exporting settings or previews for multiple files, select their thumbnails in the Filmstrip view.
- In the Camera Raw Settings menu ☐ chooseExport Settings To XMP or Update DNG Previews.
The sidecar XMP files are created in the same folder as the camera raw image files. If you saved the camera raw image files in DNG format, the settings are embedded in the DNG files themselves.
To the top
Specify Camera Raw workflow options
Workflow options specify settings for all files output from Camera Raw, including the color bit depth, color space, output sharpening, and pixel dimensions. Workflow options determine how Photoshop opens these files but not how After Effects imports a camera raw file. Workflow options settings do not affect the camera raw data itself.
You can specify workflow options settings by clicking the underlined text at the bottom of the Camera Raw dialog box.
Space Specifies the target color profile. Generally, set Space to the color profile you use for your Photoshop RGB working space. The source profile for camera raw image files is usually the camera-native color space. The profiles listed in the Space menu are built in to Camera Raw. To use a color space that's not listed in the Space menu, choose ProPhoto RGB, and then convert to the working space of your choice when the file opens in Photoshop.
Depth Specifies whether the file opens as an 8-bpc or 16-bpc image in Photoshop.
Size Specifies the pixel dimensions of the image when imported into Photoshop. The default pixel dimensions are those used to photograph the image. To resample the image, use the Crop Size menu.
For square-pixel cameras, choosing a smaller-than-native size can speed processing when you are planning a smaller final image. Picking a larger
size is like upsampling in Photoshop.
For non-square pixel cameras, the native size is the size that most closely preserves the total pixel count. Selecting a different size minimizes the resampling that Camera Raw performs, resulting in slightly higher image quality. The best quality size is marked with an asterisk (*) in the Size menu.
Note: You can always change the pixel size of the image after it opens in Photoshop.
Resolution Specifies the resolution at which the image is printed. This setting does not affect the pixel dimensions. For example, a 2048 x 1536 pixel image, when printed at 72 dpi, is approximately 28-1/2 x 21-1/4 inches. When printed at 300 dpi, the same image is approximately 6-3/4 x 5-1/8 inches. You can also use the Image Size command to adjust resolution in Photoshop.
Sharpen For Allows you to apply output sharpening for Screen, Matte Paper, or Glossy Paper. If you apply output sharpening, you can change the Amount pop-up menu to Low or High to decrease or increase the amount of sharpening applied. In most cases, you can leave the Amount set to the default option, Standard.
Open In Photoshop As Smart Objects Causes Camera Raw images to open in Photoshop as a Smart Object layer instead of a background layer when you click the Open button. To override this preference for selected images, press Shift when clicking Open.

Twitter™ and Facebook posts are not covered under the terms of Creative Commons.
Legal Notices | Online Privacy Policy
Rotate images
Straighten images
Crop images
Remove red-eye
Remove spots
To the top
Rotate images
- Click the Rotate Image 90° Counter Clockwise button (or press L).
- Click the Rotate Image 90° Clockwise button (or press R).
Note: Using commands in the Edit menu, you can also rotate images in Adobe Bridge without opening the Camera Raw dialog box.
To the top
Straighten images
- In the Camera Raw dialog box, select the Straighten tool (in Creative Cloud and in Creative Suite 6). Alternatively, press the A key.
- Drag the Straighten tool in the preview image to baseline horizontal and vertical.
Note: The Crop tool becomes active immediately after you use the Straighten tool.
Automatically straighten an image | Creative Cloud only
You can automatically straighten an image in one of the following three ways:
- Double-click the Straighten tool ( ) in the toolbar.
- With the Straighten tool selected, double-click anywhere in the preview image.
- With the Crop tool selected, press the Command key (on Mac) or Ctrl key (on Windows) to temporarily switch to the Straighten tool. Now, double-click anywhere within the preview image.
To the top
Crop images
- In the Camera Raw dialog box, select the Crop tool 4 (or press C).
To constrain the initial crop area to a specific aspect ratio, hold the mouse button down as you select the Crop tool and choose an option from the menu. To apply a constraint to a previously applied crop, Ctrl-click (Mac OS) or right-click (Windows) on the crop.
- Drag in the preview image to draw the crop area box.
- To move, scale, or rotate the crop area, drag the crop area or its handles.
Note: To cancel the crop operation, press Esc with the Crop tool active, or click and hold the Crop tool button and choose Clear Crop from the menu. To cancel the crop and close the Camera Raw dialog box without processing the camera raw image file, click the Cancel button or deselect the Crop tool and press Esc.
- When you are satisfied with the crop, press Enter (Windows) or Return (Mac OS).
The cropped image resizes to fill the preview area, and the workflow options link under the preview area displays the updated image size and dimensions.
To the top
Remove red-eye
-
Zoom the image in to at least 100%.
-
In the toolbar, select the Red Eye Removal tool 🚪 (or press E).
-
Drag a selection in the photo around the red eye.
Camera Raw sizes the selection to match the pupil. You can adjust the size of the selection by dragging its edges.
-
In the tool options under the Histogram, drag the Pupil Size slider to the right to increase the size of the area corrected.
-
Drag the Darken slider to the right to darken the pupil area within the selection and the iris area outside the selection.
Deselect Show Overlay to turn off the selection and check your correction.
Note: Move between multiple selected red eye areas by clicking the selection.
To the top
Remove spots
The Spot Removal tool 2. lets you repair a selected area of an image with a sample from another area.
-
Select the Spot Removal tool from the toolbar.
-
Select one of the following from the Type menu:
Heal Matches the texture, lighting, and shading of the sampled area to the selected area.
Clone Applies the sampled area of the image to the selected area.
-
(Optional) In the tool options under the Histogram, drag the Radius slider to specify the size of the area that the Spot Removal tool affects.
-
Move the Spot Removal tool into the photo and click the part of the photo to retouch. A red-and-white dashed circle appears over the selected area. The green-and-white dashed circle designates the sampled area of the photo used to clone or heal.
-
Do any of the following:
-
To specify the sampled area, drag inside the green-and-white circle to move it to another area of the image.
- To specify the selected area being cloned or healed, drag inside the red-and-white circle.
- To cancel the operation, press Backspace (Windows) or Delete (Mac OS).
- To adjust the size of the circles, move the pointer over the edge of either circle until it changes to a double-pointing arrow, and then drag to make both circles larger or smaller.
Repeat this procedure for each area of the image that needs retouching. To remove all sample areas and start over, click the Clear All button in the tool options.

Twitter™ and Facebook posts are not covered under the terms of Creative Commons.
Legal Notices | Online Privacy Policy
Apply a camera profile
Specify a default camera profile
Apply a profile to a group of images
Create a camera profile preset
Customize profiles using the DNG Profile Editor
For each camera model it supports, Camera Raw uses color profiles to process raw images. These profiles are produced by photographing color targets under standardized lighting conditions and are not ICC color profiles.
ACR version These profiles are compatible with older versions of Camera Raw and Lightroom. The version corresponds to the version of Camera Raw in which the profile first appeared. ACR profiles offer consistent behavior with legacy photos.
Adobe Standard Standard profiles significantly improve color rendering, especially in warm tones such as reds, yellows, and oranges, from earlier Adobe camera profiles.
Camera Matching Camera Matching profiles attempt to match the camera manufacturer's color appearance under specific settings. Use Camera Matching profiles if you prefer the color rendering offered by your camera manufacturer's software.
BothAdobe Standard and Camera Matching camera profiles are intended to serve as a starting point for further image adjustments. Therefore, use the profiles in conjunction with the color and tone controls in the Basic, Tone Curve, HSL / Grayscale, and other image adjustment tabs.
To manually install camera profiles, place them in the following locations:
Windows XP C:\Documents and Settings\All Users\Application Data\Adobe\CameraRaw\CameraProfiles
Windows Vista C:\ProgramData\Adobe\CameraRaw\CameraProfiles
Windows 7 C:\ProgramData\Adobe\CameraRaw\CameraProfiles
Mac OS /Library/Application Support/Adobe/CameraRaw/CameraProfiles
To the top
Apply a camera profile
• To apply a camera profile, select it from the Camera Profile pop-up menu in the Camera Calibration tab of the Camera Raw dialog box.
The Adobe Standard profile for a camera is named Adobe Standard. Camera Matching profiles include the prefix Camera in the profile name. The Camera Profile pop-up menu displays only profiles for your camera.
If the only profile in the Camera Profilemenu is Embedded, it means that you have selected a TIFF or JPEG image. Adobe Standard and Camera Matching profiles work only with raw images.
Note: If you have selected a raw file and Adobe Standardand Camera Matching profiles do not appear in the Camera Profilepop-up menu, download the latest Camera Raw update from the Digital camera raw file support page.
To the top
Specify a default camera profile
- Select a profile from the Camera Profilepop-up menu in the Camera Calibration tab of the Camera Raw dialog box.
- Click the Camera Raw Settings menu button ≡ and choose Save New Camera Raw Defaults from the menu.
To the top
Apply a profile to a group of images
- Select the images in the Filmstrip.
- Choose a profile from the Camera Profile pop-up menu in the Camera Calibration tab of the Camera Raw dialog box.
- Click the Synchronize button.
- In the Synchronize dialog box, choose Synchronize >Camera Calibration, and then click OK.
To the top
Create a camera profile preset
If you find yourself often applying the same profile, you can work more efficiently by creating and applying a preset.
- Choose a profile from the Camera Profile pop-up menu in the Camera Calibration tab of the Camera Raw dialog box.
- Click the Camera Raw Settings menu button, and choose Save Settings from the menu.
- In the Save Settings dialog box, choose Subset >Camera Calibration, and then click OK.
- Name your preset and click Save.
- To apply the preset to a group of images, select the images and then choose Apply Preset > Preset Name from the Camera Raw Settings menu.
To the top
Customize profiles using the DNG Profile Editor
To improve color rendering or customize a camera profile, use the standalone DNG Profile Editor utility. For example, use the DNG Profile Editor to correct an unwanted color cast in a profile or to optimize colors for a specific application, such as studio portraits or fall foliage.
The DNG Profile Editor and documentation for it are available on Adobe Labs.
Note: Leave the Camera Calibration tab sliders set to 0 when adjusting camera profiles with the DNG Profile Editor.
- Save, reset, and load Camera Raw settings
- Apply saved Camera Raw settings

Twitter ^™ and Facebook posts are not covered under the terms of Creative Commons.
Legal Notices | Online Privacy Policy
Vignette and grain effects in Camera Raw
Simulate film grain
The Grain section of the Effects tab has controls for simulating film grain for a stylistic effect reminiscent of particular film stocks. You can also use the Grain effect to mask enlargement artifacts when making large prints.
Together, the Size and Roughness controls determine the character of the grain. Check grain at varying zoom levels to ensure that the character appears as desired.
For a video tutorial about using the Grain effect in Camera Raw, see The new Grain feature in CS5 by Matt Kloskowski or Black and white film grain in Photoshop and Lightroom by Dan Moughamian.
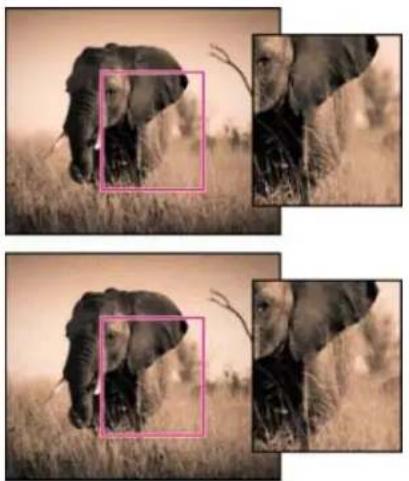
No grain applied (top), grain effect applied (bottom).
Amount Controls the amount of grain applied to the image. Drag to the right to increase the amount. Set to zero to disable grain.
Size Controls grain particle size. At sizes of 25 or greater, the image may appear slightly blurred.
Roughness Controls the regularity of the grain. Drag to the left to make the grain more uniform; drag to the right to make the grain more uneven.
To the top
To apply a vignette to a cropped image for artistic effect, use the Post Crop Vignetting feature.
For a video tutorial about creating postcrop vignettes in Camera Raw, see Vignetting in Camera Raw CS5 by Matt Kloskowski.
-
Crop your image. See Crop images.
-
In the Post Crop Vignetting area of the Effects tab, choose a Style.
Highlight Priority Applies the postcrop vignette while protecting highlight contrast but may lead to color shifts in darkened areas of an image. Appropriate for images with important highlight areas.
Color Priority Applies the postcrop vignette while preserving color hues but may lead to loss of detail in bright highlights.
Paint Overlay Applies the postcrop vignette by blending original image colors with black or white. Appropriate when a soft effect is desired but may reduce highlight contrast.
- Refine the effect by adjusting any of the following sliders:
Amount Positive values lighten the corners, negative values darken them.
Midpoint Higher values restrict the adjustment to the area closer to the corners, lower values apply the adjustment to a larger area away from the corners.
Roundness Positive values make the effect more circular, negative values make the effect more oval.
Feather Higher values increase the softening between the effect and its surrounding pixels, lower values reduce the softening between the effect and its surrounding pixels.
Highlights (Available for a Highlight Priority or Color Priority effect when Amount is a negative value) Controls the degree of highlight "punch" in bright areas of an image, such as in the glow of a streetlight or other bright light source.

Twitter™ and Facebook posts are not covered under the terms of Creative Commons.
Legal Notices | Online Privacy Policy
Process, compare, and rate multiple images
Automating image processing
Open images
Save a camera raw image in another format
To the top
Process, compare, and rate multiple images
The most convenient way to work with multiple camera raw images is to use the Filmstrip view in Camera Raw. Filmstrip view opens by default when you open multiple images in Camera Raw from Adobe Bridge.
Note: The Filmstrip view is not available when importing multiple images into After Effects.
Images can have three states in Filmstrip pane: deselected, selected (but not active), and active (also selected). In general, adjustments are applied to all selected images.
You can also synchronize settings to apply settings from the active image to all selected images. You can quickly apply a set of adjustments to an entire set of images—such as all shots taken under the same conditions—and then fine-tune the individual shots later, after you've determined which you'll use for your final output. You can synchronize both global and local adjustment settings.
- To select an image, click its thumbnail. To select a range of images, Shift-click two thumbnails. To add an image to a selection, Ctrl-click (Windows) or Command-click (Mac OS) its thumbnail.
- To change which image is active without changing which images are selected, click a navigation arrow at the bottom of the preview pane.
- To apply settings from the active image to all selected images, click the Synchronize button at the top of the Filmstrip pane and choose which settings to synchronize.
• To apply a star rating, click a rating under the image thumbnail. - To mark selected images for deletion, click Mark For Deletion
A red X appears in the thumbnail of an image marked for deletion. The file is sent to the Recycle Bin (Windows) or Trash (Mac OS) when you close the Camera Raw dialog box. (If you decide to keep an image that you marked for deletion, select it in the Filmstrip pane and click Mark For Deletion again, before you close the Camera Raw dialog box.)
For a tutorial on synchronizing edits across multiple Camera Raw photos, see Synchronizing edits in Adobe Camera Raw by Dan Moughamian.
To the top
Automating image processing
You can create an action to automate the processing of image files with Camera Raw. You can automate the editing process, and the process of saving the files in formats such as PSD, DNG, JPEG, Large Document Format (PSB), TIFF, and PDF. In Photoshop, you can also use the Batch command, the Image Processor, or the Create Droplet command to process one or more image files. The Image Processor is especially useful for saving image files in different file formats during the same processing session.
Here are some tips for automating the processing of camera raw image files:
- When you record an action, first select Image Settings from the Camera Raw Settings menu in the Camera Raw dialog box. In this way, the settings particular to each image (from the Camera Raw database or sidecar XMP files) are used to play back the action.
- If you plan to use the action with the Batch command, you may want to use the Save As command and choose the file format when saving the camera raw image.
- When you use an action to open a camera raw file, the Camera Raw dialog box reflects the settings that were in effect when the action was recorded. You may want to create different actions for opening camera raw image files with different settings.
- When using the Batch command, select Override Action "Open" Commands. Any Open commands in the action will then operate on the batched files rather than the files specified by name in the action. Deselect Override Action "Open" Commands only if you want the action to operate on open files or if the action uses the Open command to retrieve needed information.
- When using the Batch command, select Suppress File Open Options Dialogs to prevent the display of the Camera Raw dialog box as each camera raw image is processed.
- When using the Batch command, select Override Action "Save As" Commands if you want to use the Save As instructions from the Batch command instead of the Save As instructions in the action. If you select this option, the action must contain a Save As command, because the Batch command does not automatically save the source files. Deselect Override Action "Save As" Commands to save the files processed by the Batch command in the location specified in the Batch dialog box.
- When creating a droplet, select Suppress File Open Options Dialogs in the Play area of the Create Droplet dialog box. This prevents the display of the Camera Raw dialog box as each camera raw image is processed.
To the top
Open images
- To process raw images in Camera Raw, select one or more camera raw files in Adobe Bridge, and then choose File > Open In Camera Raw or press Ctrl+R (Windows) or Command+R (Mac OS). When you finish making adjustments in the Camera Raw dialog box, click Done to accept changes and close the dialog box. You can also click Open Image to open a copy of the adjusted image in Photoshop.
- To process JPEG or TIFF images in Camera Raw, select one or more JPEG or TIFF files in Adobe Bridge, and then choose File > Open In Camera Raw or press Ctrl+R (Windows) or Command+R (Mac OS). When you finish making adjustments in the Camera Raw dialog box, click Done to accept changes and close the dialog box. You can specify whether JPEG or TIFF images with Camera Raw settings are automatically opened in Camera Raw in the JPEG and TIFF Handling section of the Camera Raw preferences.
- To import camera raw images in Photoshop, select one or more camera raw files in Adobe Bridge, and then choose File > Open With > Adobe Photoshop CS5. (You can also choose the File > Open command in Photoshop, and browse to select camera raw files.) When you finish making adjustments in the Camera Raw dialog box, click Open Image to accept changes and open the adjusted image in Photoshop. Press Alt (Windows) or Option (Mac OS) to open a copy of the adjusted image and not save the adjustments to the original image's metadata. Press Shift while clicking Open Image to open the image as a Smart Object in Photoshop. At any time, you can double-click the Smart Object layer that contains the raw file to adjust the Camera Raw settings.
Tip: Shift-double-click a thumbnail in Adobe Bridge to open a camera raw image in Photoshop without opening the Camera Raw dialog box. Hold down Shift while choosing File > Open to open multiple selected images. - To import camera raw images in After Effects using Adobe Bridge, select one or more camera raw files in Adobe Bridge, and then choose File > Open With > Adobe After Effects CS5. (You can also choose a File > Import command in After Effects and browse to select camera raw files.) When you finish making adjustments in the Camera Raw dialog box, click OK to accept changes.
- To import TIFF and JPEG files into After Effects using Camera Raw, select the File > Import command in After Effects, and then select All Files from the Enable menu (Mac OS) or Files Of Type menu (Windows) in the After Effects Import File dialog box. Select the file to import, select Camera Raw from the Format menu, and click Open.
- To import Camera Raw images into After Effects as a sequence, choose File > Import in After Effects. Select the images, check the Camera Raw Sequence box, and click Open. Camera Raw settings applied to the first camera raw file upon import are applied to the remaining files in the sequence unless an XMP sidecar file is present for any subsequent file in the sequence. In that case, the settings in the XMP file or in the DNG file are applied to that specific frame in the sequence. All other frames use the settings that the first file in the sequence specifies.
If you have trouble opening Camera Raw files, see Why doesn't my version of Photoshop or Lightroom support my camera?
To the top
Save a camera raw image in another format
You can save camera raw files from the Camera Raw dialog box in PSD, TIFF, JPEG, or DNG format.
When you use the Save Image command in the Camera Raw dialog box, files are placed in a queue to be processed and saved. This is useful if you are processing several files in the Camera Raw dialog box and saving them in the same format.
- In the Camera Raw dialog box, click the Save Imagebutton in the lower-left corner of the dialog box.

Alt-click (Windows) or Option-click (Mac OS) Save to suppress the Camera Raw Save Options dialog box when saving a file.
- In the Save Options dialog box, specify the following options:
Destination Specifies where to save the file. If necessary, click the Select Folder button and navigate to the location.
File Naming Specifies the filename using a naming convention that includes elements such as date and camera serial number. Using informative filenames based on a naming convention helps you keep image files organized.
- Choose a file format from the Format menu.
Digital Negative Saves a copy of the camera raw file in the DNG file format.
Compatibility
Specifies the versions of Camera Raw and Lightroom that can read the file.
If you choose Custom, specify whether you want compatibility with DNG 1.1 or DNG 1.3. By default, the conversion uses lossless compression, which means no information is lost while reducing file size. Choosing Linear (Demosaiced) stores the image data in an interpolated format. That means other software can read the file even if that software does not have a profile for the digital camera that captured the image.
JPEG Preview
Embeds a JPEG preview in the DNG file. If you decide to embed a JPEG preview, you can choose the preview size. If you embed JPEG previews, other applications can view the contents of the DNG file without parsing the camera raw data.
Embed Original Raw File
Stores all of the original camera raw image data in the DNG file.
JPEG Saves copies of the camera raw files in JPEG (Joint Photographic Experts Group) format. To specify the amount of compression, enter a value from 0 to 12 or choose from the menu. Entering a higher value, or choosing High or Maximum, applies less compression and increases file size and image quality. JPEG format is commonly used to display photographs and other continuous-tone images in web photo galleries, slide shows, presentations, and other online services.
TIFF Saves copies of the camera raw files as TIFF (Tagged-ImageFile Format) files. Specify whether to apply no compression, or LZW or ZIP file compression. TIFF is a flexible bitmap image format supported by virtually all paint, image-editing, and page-layout applications. TIFF provides greater compression and compatibility with other applications than does PSD format.
Photoshop Saves copies of the camera raw files in the PSD file format. You can specify whether to preserve cropped pixel data in the PSD file.
- Click Save.

BY-NC-SA
Twitter™ and Facebook posts are not covered under the terms of Creative Commons.
Legal Notices
Online Privacy Policy
Correct lens distortions in Camera Raw
About lens corrections
Correct image perspective and lens flaws automatically
From an expert:
Correct image perspective and lens flaws manually
Correcting Chromatic Aberration in Camera Raw 7.1
To the top
About lens corrections
Camera lenses can exhibit different types of defects at certain focal lengths, f-stops, and focus distances. You can correct for these apparent distortions and aberrations using the Lens Corrections tab of the Camera Raw dialog box.
Vignetting causes the edges, especially the corners, of an image to be darker than the center. Use controls in the Lens Vignetting section of the Lens Corrections tab to compensate for vignetting.
Barrel distortion causes straight lines to appear to bow outward.
Pincushion distortion causes straight lines to appear to bend inward.
Chromatic aberration is caused by the failure of the lens to focus different colors to the same spot. In one type of chromatic aberration, the image from each color of light is in focus, but each image is a slightly different size. Another type of chromatic artifact affects the edges of specular highlights, such as those found when light reflects off water or polished metal. This situation usually results in a purple fringe around each specular highlight.
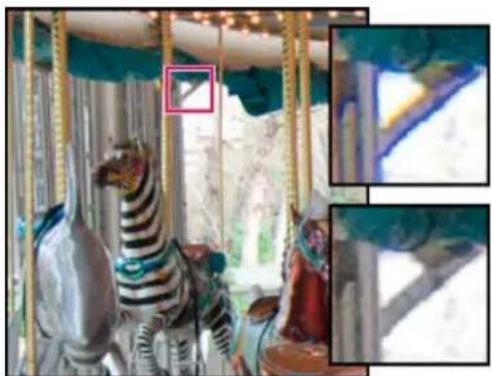
natural_image
Close-up of a zebra-dotted amusement park ride with ornate carvings and blue umbrellas (no visible text or symbols)Original image (top), and after fixing chromatic aberration (bottom)
To the top
Correct image perspective and lens flaws automatically
The options in the nested Profile tab of the Lens Corrections tab of the Camera Raw dialog box correct distortions in common camera lenses. The profiles are based on Exif metadata that identifies the camera and lens that captured the photo, and the profiles compensate accordingly.
To the top
From an expert:
Russell Brown demonstrates how to apply lens corrections and noise reduction in

by Russell Brown
- In the nested Profile tab of the Lens Corrections tab, select Enable Lens Profile Corrections.
- If Camera Raw does not find a suitable profile automatically, select a Make, Model, and Profile.
Note: Some cameras have only one lens, and some lenses have only one profile. The lenses that are available depend on whether you're adjusting a raw or a non-raw file. For a list of supported lenses, see the support article Lens profile support | Lightroom 3, Photoshop CS5, Camera Raw 6. To create custom profiles, use the Adobe Lens Profile Creator.
- If desired, customize the correction applied by the profile by using the Amount sliders:
Distortion The default value 100 applies 100% of the distortion correction in the profile. Values over 100 apply greater correction to the distortion; values under 100 apply less correction to the distortion.
Chromatic Aberration The default value 100 applies 100% of the chromatic aberration correction in the profile. Values over 100 apply greater correction to color fringing; values under 100 apply less correction to color fringing.
Vignetting The default value 100 applies 100% of the vignetting correction in the profile. Values over 100 apply greater correction to vignetting; values under 100 apply less correction to vignetting.
- (Optional) To apply your changes to the default profile, choose Setup > Save New Lens Profile Defaults.
To the top
Correct image perspective and lens flaws manually
Transform and vignette corrections can be applied to original and cropped photos. Lens vignettes adjust exposure values to brighten dark corners.
- Click the nested Manual tab of the Lens Corrections tab of the Camera Raw dialog box.
- Under Transform, adjust any of the following:
Distortion Drag to the right to correct barrel distortion and straighten lines that bend away from the center. Drag to the left to correct pincushion distortion and straighten lines that bend toward the center.
Vertical Corrects perspective caused by tilting the camera up or down. Makes vertical lines appear parallel.
Horizontal Corrects perspective caused by angling the camera left or right. Makes horizontal lines parallel.
Rotate Corrects for camera tilt.
Scale Adjusts the image scale up or down. Helps to remove empty areas caused by perspective corrections and distortions. Displays areas
of the image that extend beyond the crop boundary.
- Under Chromatic Aberration, adjust any of the following:
Fix Red/Cyan Fringe Adjusts the size of the red channel relative to the green channel.
Fix Blue/Yellow Fringe Adjusts the size of the blue channel relative to the green channel.
Zoom in on an area that contains very dark or black detail against a very light or white background. Look for color fringing. To more clearly see the color fringing, press Alt (Windows) or Option (Mac OS) as you move a slider to hide any color fringe corrected by the other color slider.
Defringe Choose All Edges to correct color fringing for all edges, including any sharp change in color values. If choosing All Edges results in thin gray lines or other undesired effects, choose Highlight Edges to correct color fringing only in the edges of highlighting where fringing is most likely to occur. Choose Off to turn off defringing.
- Under Lens Vignetting adjust the following:
Amount Move the Amount slider to the right (positive values) to lighten the corners of the photo. Move the slider to the left (negative values) to darken the corners of the photo.
Midpoint Drag the Midpoint slider to the left (lower value) to apply the Amount adjustment to a larger area away from the corners. Drag the slider to the right (higher value) to restrict the adjustment to an area closer to the corners.
To the top
Correcting Chromatic Aberration in Camera Raw 7.1
Camera Raw 7.1 provides a checkbox to automatically correct blue-yellow and red-green fringes (lateral chromatic aberration). Slider controls correct purple/magenta and green aberration (axial chromatic aberration). Axial chromatic aberration often occurs in images made with large apertures.
Remove red-green and blue-yellow color shifts
- In the Color tab of the Lens Correction panel, select the Remove Chromatic Aberration checkbox.
Remove global purple/magenta and green fringes
In the Color tab of the Lens Correction panel, adjust the purple and green Amount sliders. The higher the amount, the more color defringing. Take care not apply an adjustment that affects purple or green objects in your image.
You can adjust the affected purple or green hue range using the Purple Hue and the Green Hue sliders. Drag either end-point control to expand or decrease the range of affected colors. Drag between the end point controls to move the hue range. The minimum space between end points is ten units. The default spacing for the green sliders is narrow to protect green/yellow image colors, like foliage.
Note: You can protect edges of purple and green objects using the local adjustment brush.
Press the Alt/Option key as you drag any of the sliders to help visualize the adjustment. The fringe color becomes neutral as you drag to remove the color.
Remove local color fringes
Local brush and gradient adjustments remove fringes of all colors. Local defringe is available for Process Version 2012 only.
- Select the brush or gradient tools and drag in the image.
- Adjust the Defringe slider. A plus value removes the color fringe. Minus values protect image areas from defringing that you apply globally. Minus 100 protects the area from any defringing. For example, applying a strong global purple defringe can desaturate or alter edges of purple objects in your image. Painting with Defringe -100 over those areas protects them and keep them at their original color.
For best results, perform any Transform lens corrections before applying local color defringe adjustments.
Twitter™ and Facebook posts are not covered under the terms of Creative Commons.
Legal Notices | Online Privacy Policy
Process versions in Camera Raw
The process version is the technology that Camera Raw uses to adjust and render photos. Depending on which process version you use, different options and settings area available to you in the Basic tab and when you make local adjustments.
Process Version 2012 Images edited for the first time in Camera Raw 7 use process version 2012. PV2012 offers new tone controls and new tone-mapping algorithms for high-contrast images. With PV2012, you can adjust Highlights, Shadows, Whites, Blacks, Exposure, and Contrast in the Basic panel. You can also apply local corrections for white balance (Temp and Tint), Highlights, Shadows, Noise, and Moiré.
Process Version 2010 Images edited in Camera Raw 6 used PV2010 by default. PV2010 offers improved sharpening and noise-reduction from the previous process version, PV2003.
Process Version 2003 The original processing engine, used by Camera Raw versions 5.x and earlier.
To take advantage of the newer processing, you can update previously edited photos to the current process version.
To update a photo to the Camera Raw 7 process (PV2012), do either of the following:
- Click the Update to Current Process button (the exclamation-point icon) in the lower-right corner of the image preview.
• In the Camera Calibration tab, choose Process > 2012 (Current).
To apply an older process version to a photo, go to the Camera Calibration tab and choose Process > 2010 or Process > 2003.
Video tutorial
• What's new in Camera Raw 7
Twitter™ and Facebook posts are not covered under the terms of Creative Commons.
Legal Notices | Online Privacy Policy
Sharpen photos
Reduce noise
To the top
Sharpen photos
The sharpening controls on the Detail tab adjust edge definition in the image. The Adjustment Brush tool and Graduated Filter tool use the Radius, Detail, and Masking values when local sharpening is applied.
Use the Apply Sharpening To option in the Camera Raw preferences to specify whether sharpening is applied to all images or just to previews.
To open preferences from within Camera Raw, click the Open Preferences Dialog button in the toolbar.
- Zoom the preview image to at least 100%.
- In the Detail tab, adjust any of these controls:
Amount Adjusts edge definition. Increase the Amount value to increase sharpening. A value of zero (0) turns off sharpening. In general, set Amount to a lower value for cleaner images. The adjustment is a variation of Unsharp Mask, which locates pixels that differ from surrounding pixels based on the threshold you specify and increases the pixels' contrast by the amount you specify. When opening a camera raw image file, the Camera Raw plug-in calculates the threshold to use based on camera model, ISO, and exposure compensation.
Radius Adjusts the size of the details that sharpening is applied to. Photos with fine details generally need a lower setting. Photos with larger details can use a larger radius. Using too large a radius generally results in unnatural-looking results.
Detail Adjusts how much high-frequency information is sharpened in the image and how much the sharpening process emphasizes edges. Lower settings primarily sharpen edges to remove blurring. Higher values are useful for making the textures in the image more pronounced.
Masking Controls an edge mask. With a setting of zero (0), everything in the image receives the same amount of sharpening. With a setting of 100, sharpening is mostly restricted to those areas near the strongest edges. Press Alt (Windows) or Option (Mac OS) while dragging this slider to see the areas to be sharpened (white) versus the areas masked out (black).
- (Optional) To apply the newest sharpening algorithms to images, click the Update To Current Process (2012) button in the lower-right corner of the image preview.
To the top
Reduce noise
The Noise Reduction section of the Detail tab has controls for reducing image noise, the extraneous visible artifacts that degrade image quality. Image noise includes luminance (grayscale) noise, which makes an image look grainy, and chroma (color) noise, which is visible as colored artifacts in the image. Photos taken with high ISO speeds or less-sophisticated digital cameras can have noticeable noise.
Note: When making noise reduction adjustments, first zoom in on the preview image to at least 100% to see the noise reduction previewed.
text_image
PORTSMEN LNN STAURA PAR VV NC VV NCAdjusting the Color and Color Detail sliders reduces chroma noise while preserving color detail (lower right).
Note: If the Luminance Detail, Luminance Contrast, and Color Detail sliders are dimmed, click the Update To Current Process (2012) button in the lower-right corner of the image.
Luminance Reduces luminance noise.
Luminance Detail Controls the luminance noise threshold. Useful for noisy photos. Higher values preserve more detail but can produce noisier results. Lower values produce cleaner results but also remove some detail.
Luminance Contrast Controls the luminance contrast. Useful for noisy photos. Higher values preserve contrast but can produce noisy blotches or mottling. Lower values produce smoother results but can also have less contrast.
Color Reduces color noise.
Color Detail Controls the color noise threshold. Higher values protect thin, detailed color edges but can result in color specking. Lower values remove color speckles but can result in color bleeding.
For video tutorials about reducing noise in Camera Raw, see:
- Better noise reduction in Photoshop® CS5 by Matt Kloskowski
- Lens correction and noise reduction with Adobe® Camera Raw by Russell Brown
• Photoshop CS5 - Camera Raw 6.0 by Justin Seeley
Twitter™ and Facebook posts are not covered under the terms of Creative Commons.
Legal Notices | Online Privacy Policy
About local adjustments
Apply local adjustments with the Adjustment Brush tool in Camera Raw
Apply local adjustments with the Graduated Filter tool in Camera Raw
Save and apply local adjustment presets
To the top
About local adjustments
The controls in the image adjustment tabs of Camera Raw affect the color and tone of an entire photo. To adjust a specific area of a photo, like dodging and burning, use the Adjustment Brush tool 📋 and the Graduated Filter tool 🌐 in Camera Raw.
The Adjustment Brush tool lets you selectively apply Exposure, Brightness, Clarity, and other adjustments by "painting" them onto the photo.
The Graduated Filter tool lets you apply the same types of adjustments gradually across a region of a photo. You can make the region as wide or as narrow as you like.
You can apply both types of local adjustments to any photo. You can synchronize local adjustment settings across multiple selected images. You can also create local adjustment presets so that you can quickly reapply an effect that you use frequently.
Getting local adjustments "right" in Camera Raw takes some experimentation. The recommended workflow is to select a tool and specify its options, and then apply the adjustment to the photo. Then you can go back and edit that adjustment, or apply a new one.
As with all other adjustments applied in Camera Raw, local adjustments are nondestructive. They are never permanently applied to the photo. Local adjustments are saved with an image in an XMP sidecar file or in the Camera Raw database, depending on what's specified in Camera Raw preferences.
To the top
Apply local adjustments with the Adjustment Brush tool in Camera Raw
- Select the Adjustment Brush tool from the toolbar (or press K).
Camera Raw opens the Adjustment Brush tool options under the Histogram and sets the mask mode to New.
- Choose the type of adjustment you want to make in the Adjustment Brush tool options by dragging an effects slider.
Note: The effects that are available depend on whether you are working in Process Version 2012, 2010, or 2003, as noted. To update a photo to PV2012, click the exclamation-point icon in the lower-right corner of the image preview.
Temp (PV2012) Adjusts the color temperature of an area of the image, making it warmer or cooler. A graduated filter temperature effect can improve images captured in mixed-lighting conditions.
Tint (PV2012) Compensates for a green or magenta color cast.
Exposure (All) Sets the overall image brightness. Applying an Exposure local correction can achieve results similar to traditional dodging and burning.
Highlights (PV2012) Recovers detail in overexposed highlight areas of an image.
Shadows (PV2012) Recovers detail in underexposed shadow areas of an image.
Brightness (PV2010 and PV2003) Adjusts the image brightness, with a greater effect in the midtones.
Contrast (All) Adjusts the image contrast, with a greater effect in the midtones.
Saturation (All) Changes the vividness or purity of the color.
Clarity (All) Adds depth to an image by increasing local contrast.
Sharpness (All) Enhances edge definition to bring out details in a photo. A negative value blurs details.
Noise Reduction (PV2012) Reduces luminance noise, which can become apparent when shadow areas are opened.
Moiré Reduction (PV2012) Removes moiré artifacts, or color aliasing.
Defringe (PV2012) Removes fringe colors along edges. See Remove local color fringes.
Color (All) Applies a tint to the selected area. Select the hue by clicking the color sample box to the right of the effect name.
Click the Plus icons (+) or the Minus icons (-) to increase or decrease the effect by a preset amount. Click multiple times to select a stronger adjustment. Double-click the slider to reset the effect to zero.
- Specify brush options:
Size Specifies the diameter of the brush tip, in pixels.
Feather Controls the hardness of the brush stroke.
Flow Controls the rate of application of the adjustment.
Density Controls the amount of transparency in the stroke.
Auto Mask Confines brush strokes to areas of similar color.
Show Mask Toggles visibility of the mask overlay in the image preview.
- Move the Adjustment Brush tool over the image.
The cross hair indicates the application point. The solid circle indicates the brush size. The black-and-white dashed circle indicates the feather amount.
Note: If the Feather is set to 0, the black-and-white circle indicates the brush size. With very small feather amounts, the solid circle may not be visible.
- Paint with the Adjustment Brush tool in the area of the image that you want to adjust.
When you release the mouse, a pin icon 📋 appears at the application point. In the Adjustment Brush tool options, the mask mode changes
to Add.
-
(Optional) Refine the adjustment by doing any of the following:
-
Drag any of the effect sliders in the Adjustment Brush tool options to customize the effect in the image.
- Press V to hide or show the pin icon.
- To toggle visibility of the mask overlay, use the Show Mask option, press Y, or position the pointer over the pin icon.
To customize the color of the mask overlay, click the color swatch next to the Show Mask option. Then, choose a new color from the Color Picker.
- To undo part of the adjustment, click Erase in the Adjustment Brush tool options and paint over the adjustment.
To create an eraser brush that has different characteristics from the current Adjustment Brush tool, click the Local Adjustment Settings menu button and choose Separate Eraser Size. Then, specify the Size, Feather, Flow, and Density you want for the eraser.
- Remove the adjustment completely by selecting the pin and pressing Delete.
- Press Ctrl+Z (Windows) or Command+Z (Mac OS) to undo your last adjustment.
- Click Clear All at the bottom of the tool options to remove all Adjustment Brush tool adjustments and set the mask mode to New.
- (Optional) Click New to apply an additional Adjustment Brush tool adjustment, and refine it as desired using the techniques in step 6.
Note: When working with multiple Adjustment Brush adjustments, make sure you're in Add mode to switch between them. Click a pin icon to select that adjustment and refine it.
To the top
Apply local adjustments with the Graduated Filter tool in Camera Raw
- Select the Graduated Filter tool ☐ from the toolbar (or press G).
Camera Raw opens the Graduated Filter tool options under the Histogram and sets the mask mode to New.
- Choose the type of adjustment you want to make in the Graduated Filter tool options by dragging the slider for any of the following effects:
Note: The effects that are available depend on whether you are working in Process Version 2012, 2010, or 2003, as noted. To update a photo to PV2012, click the exclamation-point icon in the lower-right corner of the image preview.
Temp (PV2012) Adjusts the color temperature of an area of the image, making it warmer or cooler. A graduated filter temperature effect can improve images captured in mixed-lighting conditions.
Tint (PV2012) Compensates for a green or magenta color cast.
Exposure (All) Sets the overall image brightness. Applying an Exposure graduated filter can achieve results similar to traditional dodging and burning.
Highlights (PV2012) Recovers detail in overexposed highlight areas of an image.
Shadows (PV2012) Recovers detail in underexposed shadow areas of an image.
Brightness (PV2010 and PV2003) Adjusts the image brightness, with a greater effect in the midtones.
Contrast (All) Adjusts the image contrast, with a greater effect in the midtones.
Saturation (All) Changes the vividness or purity of the color.
Clarity (All) Adds depth to an image by increasing local contrast.
Sharpness (All) Enhances edge definition to bring out details in the photo. A negative value blurs details.
Noise Reduction (PV2012) Reduces luminance noise, which can become apparent when shadow areas are opened.
Moiré Reduction (PV2012) Removes moiré artifacts, or color aliasing.
Defringe (PV 2012) Removes fringe color along edges. See Remove local color fringes.
Color (All) Applies a tint to the selected area. Select the hue by clicking the color sample box to the right of the effect name.
Click the Plus icon (+) or the Minus icon (-) to increase or decrease the effect by a preset amount. Double-click the slider to reset the effect to zero.
- Drag in the photo to apply a graduated filter across a region of the photo.
The filter starts at the red dot and red dotted line, and it continues past the green dot and green dotted line.
The mask mode switches to Edit in the Graduated Filter tool options.
- (Optional) Refine the filter by doing any of the following:
- Drag any of the effect sliders in the Graduated Filter tool options to customize the filter.
- Toggle visibility of the guide overlays by selecting the Show Overlay option (or press V).
- Drag the green or red dot to freely expand, contract, and rotate the effect.
- Drag the black-and-white dotted line to shift the effect.
- Position the pointer over the green-and-white or red-and-white dotted line, near the green or red dot, until a double-pointing arrow appears. Then, drag to expand or contract the effect at that end of the range.
- Position the pointer over the green-and-white or red-and-white dotted line, away from the green or red dot, until a curved double-pointing arrow appears. Then, drag to rotate the effect.
- Remove the filter by pressing Delete.
- Press Ctrl+Z (Windows) or Command+Z (Mac OS) to undo your last adjustment.
- Click Clear All at the bottom of the tool options to remove all Graduated Filter tool effects and set the mask mode to New.
- (Optional) Click New to apply an additional Graduated Filter tool effect, and refine it as desired using the techniques in step 4.
Note: When working with multiple Graduated Filter effects, click an overlay to select that effect and refine it.
To the top
Save and apply local adjustment presets
You can save local adjustments as presets so that you can quickly apply the effects to other images. You create, select, and manage local adjustment presets using the Camera Raw Settings menu in the Adjustment Brush or Graduated Filter tool options. You apply local adjustment presets using the Adjustment Brush tool or the Graduated Filter tool
Note: Local adjustments cannot be saved with Camera Raw image presets.
- In the Adjustment Brush or Graduated Filter tool options in the Camera Raw dialog box, click the Camera Raw Settings menu button ≡. Then, choose one of the following commands:
New Local Correction Setting Saves the current local adjustment effect settings as a preset. Type a name and click OK. Saved presets appear in the Local Adjustment Settings menu and can be applied to any image that is opened in Camera Raw.
Delete "preset name" Deletes the selected local adjustment preset.
Rename "preset name" Renames the selected local adjustment preset. Type a name and click OK.
Preset name Select a preset to apply its settings with the Adjustment Brush tool or the Graduated Filter tool.
When using local adjustment presets, keep in mind the following:
- Only one local adjustment preset can be selected at a time.
- When applying a local adjustment preset with the Adjustment Brush tool, you can still customize the brush options, including Size, Feather, Flow, and Density. The preset applies the effect settings at the specified brush size.
• After a local adjustment preset is applied, you can refine it as desired. - The same effect settings are available for the Adjustment Brush tool and the Graduated Filter tool. As a result, local adjustment presets can be applied using either tool, regardless of which tool was used to create the preset.
Video tutorial
• What's new in Camera Raw 7
Twitter™ and Facebook posts are not covered under the terms of Creative Commons.
Legal Notices | Online Privacy Policy
Repair and restoration
Using Content-Aware Patch
Lynda.com (May. 7, 2012)
video-tutorial
Seamlessly repair imperfections.
Using Content-Aware Move and Extend
Lynda.com (May. 7, 2012)
video-tutorial
Recompose images with these simple steps.
Content-Aware Patch
Content-Aware Move
For information about using the Patch tool in versions earlier than Photoshop CS6, see Patch an area.
To the top
Content-Aware Patch
The Patch tool is used to remove unwanted image elements. The Content-Aware option in the Patch tool synthesizes nearby content for seamless blending with the surrounding content.
The results are similar to content-aware fill, but using this tool gives you the flexibility to choose the source area.
- In the toolbar, hold down the Spot Healing Brush
and select the Patch tool
- In the options bar, do the following:

Content-Aware Patch options
Patch Choose Content-Aware to select the content-aware option.
Adaptation Choose a value for how closely the patch reflects the existing image patterns.
Sample All Layers Enable this option to create the result of the move in another layer using information from all layers. Select the target layer in the Layers panel.
-
Select an area to replace on the image. You can use the Patch tool to draw a selection, or use any of the other Selection tools as well.
-
Drag the selection over the area you want to generate a fill from.
To the top
Content-Aware Move
Use the Content-Aware Move tool to select and move a part of a picture. The image is recomposed and the hole left behind is filled using matching elements from the picture. You do not need to carry out intensive edits involving layers and complex selections.
You can use the Content-Aware Move tool in two modes:
- Use the Move mode to place objects in different locations (most effectively when the background remains similar).
-
Use the Extend mode to expand or contract objects such as hair, trees, or buildings. To best extend architectural objects, use photos shot on a parallel plane, rather than at an angle.
-
In the toolbar, hold down the Spot Healing Brush and select the Content-Aware Move tool

- In the options bar, do the following:

Content-Aware Move Options
Mode Use the Move mode to place selected objects at at a different location. Use the Extend mode to expand or contract objects.
Adaptation Choose a value for how closely the results reflect the existing image patterns.
Sample All Layers Enable this option to use information from all layers to create the result of the move in the selected layer. Select the target layer in the Layers panel.
-
Select an area to move or extend. You can use the Move tool to draw a selection, or use any of the other selection tools as well.
-
Drag the selection to the area you want to place the object.
Learn more
• Content-Aware Move video tutorial by Lesa Snider
- Recomposing Picture Elements with Content-Aware Move and Patch Tools by Dan Moughamian
(cc) BY-NC-SR Twitter™ and Facebook posts are not covered under the terms of Creative Commons.
Legal Notices | Online Privacy Policy
Retouching and repairing images
About the Clone Source panel Retouch with the Clone Stamp tool Set sample sources for cloning and healing Retouch with the Healing Brush tool Retouch with the Spot Healing Brush tool Patch an area Remove red eye
To the top
About the Clone Source panel
The Clone Source panel (Window > Clone Source) has options for the Clone Stamp tools or Healing Brush tools. You can set up to five different sample sources and quickly select the one you need without resampling each time you change to a different source. You can view an overlay of your sample source to make it easier to clone the source in a specific location. You can also scale or rotate the sample source to better match the size and orientation of the cloning destination.
(Photoshop Extended) For timeline-based animations, the Clone Source panel also has options for specifying the frame relationship between the sample source video/animation frame and the target video/animation frame. See also Cloning content in video and animation frames (Photoshop Extended)
For a video on the Clone Source panel, see www.adobe.com/go/vid0011.
To the top
Retouch with the Clone Stamp tool
The Clone Stamp tool 📁 paints one part of an image over another part of the same image or over another part of any open document that has the same color mode. You can also paint part of one layer over another layer. The Clone Stamp tool is useful for duplicating objects or removing a defect in an image.
(Photoshop Extended) You can also use the Clone Stamp tool to paint content on video or animation frames. See also Cloning content in video and animation frames (Photoshop Extended).
To use the Clone Stamp tool, you set a sampling point on the area you want to copy (clone) the pixels from and paint over another area. To paint with the most current sampling point whenever you stop and resume painting, select the Aligned option. Deselect the Aligned option to paint starting from the initial sampling point no matter how many times you stop and resume painting.
You can use any brush tip with the Clone Stamp tool, which gives you precise control over the size of the clone area. You can also use opacity and flow settings to control the paint application to the cloned area.
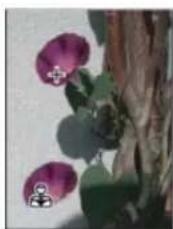
natural_image
Close-up of purple flowers with green leaves hanging from a tree trunk (no text or symbols visible)
natural_image
Close-up of purple flowers with green leaves on a tree trunk (no text or symbols visible)Altering an image with the Clone Stamp tool
- Select the Clone Stamp tool

-
Choose a brush tip and set brush options for the blending mode, opacity, and flow in the options bar.
-
To specify how you want to align the sampled pixels and how to sample data from the layers in your document, set any of the following in the options bar:
Aligned Samples pixels continuously, without losing the current sampling point, even if you release the mouse button. Deselect Aligned to continue to use the sampled pixels from the initial sampling point each time you stop and resume painting.
Sample Samples data from the layers you specify. To sample from the active layer and visible layers below it, choose Current And Below. To sample only from the active layer, choose Current Layer. To sample from all visible layers, choose All Layers. To sample from all visible layers except adjustment layers, choose All Layers and click the Ignore Adjustment Layers icon to the right of the Sample pop-up menu.
- Set the sampling point by positioning the pointer in any open image and Alt-clicking (Windows) or Option-clicking (Mac OS).
Note: Make sure you are not working on an adjustment layer. The Clone Stamp tool does not work on adjustment layers.
- (Optional) In the Clone Source panel, click a clone source button and set an additional sampling point.
You can set up to five different sampling sources. The Clone Source panel saves the sampled sources until you close the document.
- (Optional) Do any of the following in the Clone Source panel:
- To scale or rotate the source that you're cloning, enter a value for W (width), H (height), or the rotation in degrees .
• To reverse the direction of the source (good for mirroring features like eyes), click the Flip Horizontal 🔒 or Flip Vertical ⏻ buttons.
- To show an overlay of the source that you're cloning, select Show Overlay and specify the overlay options.
Note: Select Clipped to clip the overlay to the brush size.
- Drag over the area of the image you want to correct.
To the top
Set sample sources for cloning and healing
Using the Clone Stamp or Healing Brush tool, you can sample sources in the current document or any open document in Photoshop.
(Photoshop Extended) When cloning video or animation, you can set sampling points in the current frame you're painting or sample sources in a different frame, even if the frame is in a different video layer or in a different open document.
You can set up to five different sampling sources at a time in the Clone Source panel. The Clone Source panel saves the sampling sources until you close the document.
-
(Photoshop Extended only) To clone video or animation frames, open the Animation panel (if you're not cloning video or animation frames, skip to step 2). Select the timeline animation option and move the current-time indicator to the frame with the source you want to sample.
-
To set the sampling point, select the Clone Stamp tool and Alt-click (Windows) or Option-click (Mac OS) in any open document window.
-
(Optional) To set another sampling point, click a different Clone Source button 📋 in the Clone Source panel.
You can change the sampling source for a Clone Source button by setting a different sampling point.
Scale or rotate the sample source
-
Select the Clone Stamp or Healing Brush tool and set one or more source samples.
-
In the Clone Source panel, select a clone source and then do any of the following:
-
To scale the sample source, enter a percentage value for W (width) or H (height) or scrub W or H. The default is to constrain proportions. To adjust the dimensions independently or restore the constrain option, click the Maintain Aspect Ratio button 8.
- To rotate the sample source, enter a degree value or scrub the Rotate The Clone Source icon .
- To reset the sample source to its original size and orientation, click the Reset Transform button ⬆.
Adjust the sample source overlay options
Adjust the sample source overlay options to see the overlay and underlying images better when painting with the Clone Stamp and Healing Brush tools.

To temporarily display the overlay while painting with the Clone Stamp tool, press Alt+Shift (Windows) or Option+Shift (Mac OS). The brush changes temporarily to the Move Source Overlay tool. Drag to move the overlay to another location.
- In the Clone Source panel, select Show Overlay and do any of the following:
- To hide the overlay while you apply the paint strokes, select Auto Hide.
- To clip overlay to the brush size, enable the Clipped option.
- To set the opacity of the overlay, enter a percentage value in the Opacity text box.
• To invert the colors in the overlay, select Invert.
- To set the appearance of the overlay, choose either the Normal, Darken, Lighten, or Difference blending mode from the pop-up menu at the bottom of the Clone Source panel.

To help align identical areas in the source overlay and underlying image, set Opacity to 50%, select Invert, and deselect Clipped. Matching image areas will appear solid gray when aligned.
Specify the clone source offset
When using the Clone Stamp tool or Healing Brush tool, you can paint with the sampled source anywhere in the target image. The overlay options help you visualize where you want to paint. However, if you paint in a specific location relative to the sampling point, you can specify the x and y pixel offset.
- In the Clone Source panel, select the source you want to use and enter the x and y pixel values for the Offset option.
To the top
Retouch with the Healing Brush tool
The Healing Brush tool lets you correct imperfections, causing them to disappear into the surrounding image. Like the cloning tools, you use the Healing Brush tool to paint with sampled pixels from an image or pattern. However, the Healing Brush tool also matches the texture, lighting,
transparency, and shading of the sampled pixels to the pixels being healed. As a result, the repaired pixels blend seamlessly into the rest of the image.
(Photoshop Extended) The Healing Brush tool can be applied to video or animation frames.
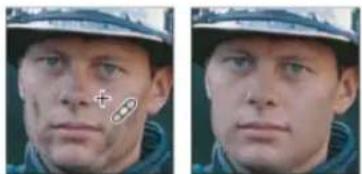
natural_image
Close-up comparison of a person's facial features, showing neutral expression with no visible text or symbolsSampled pixels and healed image
-
Select the Healing Brush tool
-
Click the brush sample in the options bar and set brush options in the pop-up panel:
Note: If you're using a pressure-sensitive digitizing tablet, choose an option from the Size menu to vary the size of the healing brush over the course of a stroke. Choose Pen Pressure to base the variation on the pen pressure. Choose Stylus Wheel to base the variation on the position of the pen thumbwheel. Choose Off if you don't want to vary the size.
Mode Specifies the blending mode. Choose Replace to preserve noise, film grain, and texture at the edges of the brush stroke when using a soft-edge brush.
Source Specifies the source to use for repairing pixels. Sampled to use pixels from the current image, or Pattern to use pixels from a pattern. If you chose Pattern, select a pattern from the Pattern pop-up panel.
Aligned Samples pixels continuously, without losing the current sampling point, even if you release the mouse button. Deselect Aligned to continue to use the sampled pixels from the initial sampling point each time you stop and resume painting.
Sample Samples data from the layers you specify. To sample from the active layer and visible layers below it, choose Current And Below. To sample only from the active layer, choose Current Layer. To sample from all visible layers, choose All Layers. To sample from all visible layers except adjustment layers, choose All Layers and click the Ignore Adjustment Layers icon to the right of the Sample pop-up menu.
- Set the sampling point by positioning the pointer over an area of the image and Alt-clicking (Windows) or Option-clicking (Mac OS).
Note: If you are sampling from one image and applying to another, both images must be in the same color mode unless one of the images is in Grayscale mode.
- (Optional) In the Clone Source panel, click a clone source button and set an additional sampling point.
You can set up to 5 different sampling sources. The Clone Source panel remembers the sampled sources until you close the document you're editing.
-
(Optional) In the Clone Source panel, click a clone source button to select the sampled source you want.
-
(Optional) Do any of the following in the Clone Source panel:
- To scale or rotate the source that you're cloning, enter a value for W (width), H (height), or the rotation in degrees .
- To show an overlay of the source that you're cloning, select Show Overlay and specify the overlay options.
- Drag in the image.
The sampled pixels are melded with the existing pixels each time you release the mouse button.
If there is a strong contrast at the edges of the area you want to heal, make a selection before you use the Healing Brush tool. The selection should be bigger than the area you want to heal and precisely follow the boundary of contrasting pixels. When you paint with the Healing Brush tool, the selection prevents colors from bleeding in from the outside.
To the top
Retouch with the Spot Healing Brush tool
The Spot Healing Brush tool quickly removes blemishes and other imperfections in your photos. The Spot Healing Brush works similarly to the Healing Brush: it paints with sampled pixels from an image or pattern and matches the texture, lighting, transparency, and shading of the sampled pixels to the pixels being healed. Unlike the Healing Brush, the Spot Healing Brush doesn't require you to specify a sample spot. The Spot Healing Brush automatically samples from around the retouched area.
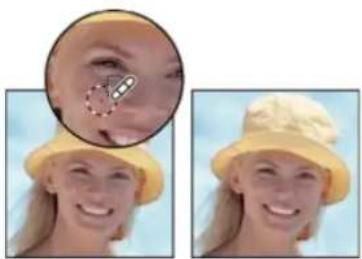
natural_image
Close-up of a smiling person wearing a yellow hat, with a circular inset showing a close-up of the eye area (no text or symbols visible)Using the Spot Healing Brush to remove a blemish
For retouching a large area or for more control over the source sampling, you can use the Healing Brush instead of the Spot Healing Brush.
- Select the Spot Healing Brush tool from the toolbox. If necessary, click either the Healing Brush tool, Patch tool, or Red Eye tool to show the hidden tools and make your selection.
- Choose a brush size in the options bar. A brush that is slightly larger than the area you want to fix works best so that you can cover the entire area with one click.
- (Optional) Choose a blending mode from the Mode menu in the options bar. Choose Replace to preserve noise, film grain, and texture at the edges of the brush stroke when using a soft-edge brush.
- Choose a Type option in the options bar:
Proximity Match Uses pixels around the edge of the selection to find an area to use as a patch.
Create Texture Uses pixels in the selection to create a texture. If the texture doesn't work, try dragging through the area a second time.
Content-Aware Compares nearby image content to seamlessly fill the selection, realistically maintaining key details such as shadows and object edges.
The create a larger or more precise selection for the Content-Aware option, use the Edit > Fill command. (See Content-aware, pattern, or history fills.)
-
Select Sample All Layers in the options bar to sample data from all visible layers. Deselect Sample All Layers to sample only from the active layer.
-
Click the area you want to fix, or click and drag to smooth over imperfections in a larger area.
Patch an area
The Patch tool lets you repair a selected area with pixels from another area or a pattern. Like the Healing Brush tool, the Patch tool matches the texture, lighting, and shading of the sampled pixels to the source pixels. You can also use the Patch tool to clone isolated areas of an image. The Patch tool works with 8-bits or 16-bits-per-channel images.

When repairing with pixels from the image, select a small area to produce the best result.
For information about using the Content-Aware Patch tool options, see Content-Aware Patch and Move.

natural_image
Scenic view of a European town with colorful buildings and a lake, showing a highlighted route marked '6.1' (no readable text or symbols)Using the Patch tool to replace pixels

natural_image
Scenic riverside town with historic buildings and a church, surrounded by green hills (no visible text or symbols)Patched image
Repair an area using sampled pixels
-
Select the Patch tool
-
Do one of the following:
-
Drag in the image to select the area you want to repair, and select Source in the options bar.
- Drag in the image to select the area from which you want to sample, and select Destination in the options bar.
Note: You can also make a selection prior to selecting the Patch tool.
-
To adjust the selection, do one of the following:
-
Shift-drag in the image to add to the existing selection.
- Alt-drag (Windows) or Option-drag (Mac OS) in the image to subtract from the existing selection.
-
Alt+Shift-drag (Windows) or Option+Shift-drag (Mac OS) in the image to select an area intersected by the existing selection.
-
To extract texture with a transparent background from the sampled area, select Transparent. Deselect this option if you want to fully replace the target area with the sampled area.
The Transparent option works best for solid or gradient backgrounds with clearly distinct textures (such as a bird in a blue sky).
-
Position the pointer inside the selection, and do one of the following:
-
If Source is selected in the options bar, drag the selection border to the area from which you want to sample. When you release the mouse button, the originally selected area is patched with the sampled pixels.
- If Destination is selected in the options bar, drag the selection border to the area you want to patch. When you release the mouse button, the newly selected area is patched with the sampled pixels.
Repair an area using a pattern
- Select the Patch tool
- Drag in the image to select the area you want to repair.
Note: You can also make a selection prior to selecting the Patch tool.
- If desired, complete steps 3-4 above to adjust the selection and apply pattern texture with a transparent background.
- Select a pattern from the Pattern panel in the options bar, and click Use Pattern.
To the top
Remove red eye
The Red Eye tool removes red eye in flash photos of people or animals.
- In RGB Color mode, select the Red Eye tool ⚙. (The Red Eye tool is in the same group as the Spot Healing Brush tool . Hold down a tool to display additional tools in the group.)
- Click in the red eye. If you are not satisfied with the result, undo the correction, set one or more of the following options in the options bar, and click the red eye again:
Pupil Size Increases or decreases the area affected by the Red Eye tool.
Darken Amount Sets the darkness of the correction.
A reflection of the camera flash in the subject's retina causes red eye. You'll see it more often when taking pictures in a darkened room because the subject's iris is wide open. To avoid red eye, use the camera's red eye reduction feature. Or, better yet, use a separate flash unit that you can mount on the camera farther away from the camera's lens.
For more information
- Blending modes
- Blur filters
- Sharpen filters
- Select a preset brush
Legal Notices | Online Privacy Policy
About lens distortion
Correct lens distortion and adjust perspective
Reduce image noise and JPEG artifacts
To the top
About lens distortion
Barrel distortion is a lens defect that causes straight lines to bow out toward the edges of the image. Pincushion distortion is the opposite effect, where straight lines bend inward.

Examples of barrel distortion (left) and pincushion distortion (right)
Vignetting is a defect that darkens the corners of an image due to light falloff around the perimeter of the lens. Chromatic aberration appears as a color fringe along the edges of objects, caused by the lens focusing on different colors of light in different planes.
Some lenses exhibit different defects at certain focal lengths, f-stops, and focus distances. With the Lens Correction filter, you can specify the combination of settings used to make the image.
To the top
Correct lens distortion and adjust perspective
The Lens Correction filter fixes common lens flaws such as barrel and pincushion distortion, vignetting, and chromatic aberration. The filter works only with 8- and 16-bit-per-channel images in RGB or Grayscale mode.
You can also use the filter to rotate an image or fix image perspective caused by vertical or horizontal camera tilt. The filter's image grid makes these adjustments easier and more accurate than using the Transform command.
Automatically correct image perspective and lens flaws
Using lens profiles, the default Auto Correction option quickly and accurately fixes distortion. For proper automatic correction, Photoshop requires Exif metadata that identifies the camera and lens that created the image, and a matching lens profile on your system.
- Choose Filter > Lens Correction.
- Set the following options:
Correction Select the problems you want to fix. If corrections undesirably extend or contract the image beyond original dimensions, select Auto Scale Image.
The Edge menu specifies how to handle blank areas that result from pincushion, rotation, or perspective corrections. You can fill blank areas with transparency or a color, or you can extend the edge pixels of the image.
Search Criteria Filters the Lens Profiles list. By default, profiles based on image sensor size appear first. To list RAW profiles first, click the pop-up menu ▼, and select Prefer RAW Profiles.
Lens Profiles Select a matching profile. By default, Photoshop displays only profiles that match the camera and lens used to create the image. (The camera model does not have to match perfectly.) Photoshop also automatically selects a matching sub-profile for the selected lens based on focal length, f-stop and focus distance. To change the automatic selection, right-click the current lens profile, and select a different sub-profile.
If you find no matching lens profile, click Search Online to acquire additional profiles created by the Photoshop community. To store online profiles for future use, click the pop-up menu ▼, and choose Save Online Profile Locally.

To create your own profiles, download the free Adobe Lens Profile Creator from the Adobe website.
Manually correct image perspective and lens flaws
You can apply manual correction alone or use it to refine automatic lens correction.
- Choose Filter > Lens Correction.
- In the upper-right corner of the dialog box, click the Custom tab.
- (Optional) Choose a preset list of settings from the Settings menu. Lens Default uses settings that you previously saved for the camera, lens, focal length, f-stop, and focus distance used to create the image. Previous Conversion uses the settings used in your last lens correction. Any group of custom settings you saved are listed at the bottom of the menu. (See Save settings and set camera and lens defaults.)
- Set any of the following options to correct your image.
Remove Distortion Corrects lens barrel or pincushion distortion. Move the slider to straighten horizontal and vertical lines that bend either away from or toward the center of the image. You can also use the Remove Distortion tool ☐ to make this correction. Drag toward the center of the image to correct for barrel distortion and toward the edge of the image to correct for pincushion distortion. To compensate for any blank image edges that result, adjust the Edge option on the Auto Correction tab.
Fix Fringe settings Compensate for fringing by adjusting the size of one color channel relative to another.

Zoom in on the image preview to get a closer view of the fringing as you make the correction.
Vignette Amount Sets the amount of lightening or darkening along the edges of an image. Corrects images that have darkened corners caused by lens faults or improper lens shading.

You can also apply vignetting for a creative effect.
Vignette Midpoint Specifies the width of area affected by the Amount slider. Specify a lower number to affect more of the image. Specify a higher number to restrict the effect to the edges of the image.
Vertical Perspective Corrects image perspective caused by tilting the camera up or down. Makes vertical lines in an image parallel.
Horizontal Perspective Corrects image perspective, making horizontal lines parallel.
Angle Rotates the image to correct for camera tilt or to make adjustments after correcting perspective. You can also use the Straighten tool to make this correction. Drag along a line in the image that you want to make vertical or horizontal.
Note: To avoid unintended scaling when adjusting perspective or angle settings, deselect Auto Scale Image on the Auto Correction tab.
Scale Adjusts the image scale up or down. The image pixel dimensions aren't changed. The main use is to remove blank areas of the image caused by pincushion, rotation, or perspective corrections. Scaling up effectively results in cropping the image and interpolating up to the original pixel dimensions.
Adjust the Lens Correction preview and grid
Adjust the preview magnification and grid lines to better judge the necessary amount of correction.
• To change the image preview magnification, use the Zoom tool or the zoom controls in the lower left side of the preview image.
- To move the image in the preview window, select the Hand tool and drag in the image preview.
- To use the grid, select Show Grid at the bottom of the dialog box. Use the Size control to adjust the grid spacing and the Color control to change the color of the grid. You can move the grid to line it up with your image using the Move Grid tool 🔊.
Save settings and set camera and lens defaults
You can save the settings in the Lens Correction dialog box to reuse with other images made with the same camera, lens, and focal length. Photoshop saves both Auto Correction settings and Custom settings for distortion, chromatic aberration, and vignetting. Perspective correction settings are not saved because they typically vary from one image to another.
You can save and reuse settings in two ways:
- Manually save and load settings. Set options in the dialog box, and then choose Save Settings from the Settings menu ▼. To use the saved settings, choose them from the Settings menu. (If you save settings outside the default folder, they don't appear in the menu; use the Load Settings command to access them.)
- Set a lens default. If your image has EXIF metadata for the camera, lens, focal length, and f-stop, you can save the current settings as a lens default. To save the settings, click the Set Lens Default button. When you correct an image that matches the camera, lens, focal length, and f-stop, the Lens Default option becomes available in the Settings menu. This option is not available if your image doesn't have EXIF metadata.
To the top
Reduce image noise and JPEG artifacts
Image noise appears as random extraneous pixels that aren't part of the image detail. Noise can be caused by photographing with a high ISO setting on a digital camera, underexposure, or shooting in a dark area with a long shutter speed. Low-end consumer cameras usually exhibit more image noise than high-end cameras. Scanned images may have image noise caused by the scanning sensor. Often, the film's grain pattern appears in the scanned image.
Image noise can appear in two forms: luminance (grayscale) noise, which makes an image look grainy or patchy, and color noise, which is usually visible as colored artifacts in the image.
Luminance noise may be more pronounced in one channel of the image, usually the blue channel. You can adjust the noise for each channel separately in Advanced mode. Before opening the filter, examine each channel in your image separately to see if noise is prevalent in one channel. You preserve more image detail by correcting one channel rather than making an overall correction to all channels.
- Choose Filter > Noise > Reduce Noise.
- Zoom in on the preview image to get a better view of image noise.
- Set options:
Strength Controls the amount of luminance noise reduction applied to all image channels.
Preserve Details Preserves edges and image details such as hair or texture objects. A value of 100 preserves the most image detail, but reduces luminance noise the least. Balance the Strength and Preserve Details controls to fine-tune noise reduction.
Reduce Color Noise Removes random color pixels. A higher value reduces more color noise.
Sharpen Details Sharpens the image. Removing noise reduces image sharpness. Use the sharpening control in the dialog box or use one of the other Photoshop sharpening filters later to restore sharpness.
Remove JPEG Artifacts Removes blocky image artifacts and halos caused by saving a image using a low JPEG quality setting.
- If luminance noise is more prevalent in one or two color channels, click the Advanced button and then choose the color channel from the Channel menu. Use the Strength and Preserve Details controls to reduce noise in that channel.
More Help Topics
- Correct lens distortion and noise in Camera Raw
Twitter™ and Facebook posts are not covered under the terms of Creative Commons.
Legal Notices | Online Privacy Policy
Reshaping and transforming
New Crop tool
Lynda.com (Oct. 7, 2012)
video-tutorial
Interactive previews help you precisely trim images down to size.
Wide-angle lens correction
Kelby (Oct. 7, 2012)
video-tutorial
Quickly compensate for lens quirks, drawing from a detailed database.
Correcting perspective
video2brain (May. 7, 2012)
video-tutorial
Fix photo angles fast.
Straightening a crooked image
video2brain (May. 7, 2012)
video-tutorial
Define the horizon line.
From an expert: Free Transform command
Apply transformations
Select an item to transform
Set or move the reference point for a transformation
Scale, rotate, skew, distort, apply perspective, or warp
Flip or rotate precisely
Repeat a transformation
Duplicate an item when transforming it
Transform freely
Warp an item
Puppet Warp
To the top
Apply transformations
Transforming scales, rotates, skews, stretches, or warps an image. You can apply transformations to a selection, an entire layer, multiple layers, or a layer mask. You can also apply transformations to a path, a vector shape, a vector mask, a selection border, or an alpha channel. Transforming affects image quality when you manipulate the pixels. To apply non-destructive transformations to raster images, use Smart Objects. (See About Smart Objects.) Transforming a vector shape or path is always non-destructive because you're only changing the mathematical calculations producing the object.
To make a transformation, first select an item to transform and then choose a transformation command. If necessary, adjust the reference point before manipulating the transformation. You can perform several manipulations in succession before applying the cumulative transformation. For example, you can choose Scale and drag a handle to scale, and then choose Distort and drag a handle to distort. Then press Enter or Return to apply both transformations.
Photoshop uses the interpolation method selected in the General area of the Preferences dialog box to calculate the color values of pixels that are added or deleted during transformations. This interpolation setting directly affects the speed and quality of the transformation. Bicubic interpolation, the default, is slowest but yields the best results.
Note: You can also warp and distort raster images using the Liquify filter.

natural_image
Illustration of a green abstract shape on a textured beige background, with purple circular shapes below (no text or symbols)A
natural_image
Illustration of a green abstract shape on textured beige background with purple border (no text or symbols)B

natural_image
Diagram showing cellular structures with arrows and a scale bar, no readable text or symbols presentC
natural_image
Illustration of a green snake climbing over a textured surface with a pink arrow and arrow overlay (no text or symbols)D
Transforming an image
A. Original image B. Layer flipped C. Selection border rotated D. Part of object scaled
Transform submenu commands
Scale Enlarges or reduces an item relative to its reference point, the fixed point around which transformations are performed. You can scale horizontally, vertically, or both horizontally and vertically.
Rotate Turns an item around a reference point. By default, this point is at the center of the object; however, you can move it to another location.
Skew Slants an item vertically and horizontally.
Distort Stretches an item in all directions.
Perspective Applies one-point perspective to an item.
Warp Manipulates the shape of an item.
Rotate 180, Rotate 90 CW, Rotate 90 CCW Rotates the item by the specified number of degrees, either clockwise or counterclockwise.
Flip Flips the item vertically or horizontally.
To the top
Select an item to transform
- Do one of the following:
• To transform an entire layer, make the layer active, and make sure nothing is selected.
Note: You cannot transform the background layer. To transform it, first convert it to a regular layer.
• To transform part of a layer, select the layer in the Layers panel, and then select part of the image on that layer.
- To transform multiple layers, do either of the following in the Layers panel: link the layers together, or select multiple layers by Ctrl-clicking (Windows) or Command-clicking (Mac OS) more than one layer. In the Layers panel, you can also Shift-click to select contiguous layers. (See Selecting, grouping, and linking layers.)
- To transform a layer mask or a vector mask, unlink the mask and select the mask thumbnail in the Layers panel.
- To transform a path or vector shape, use the Path Selection tool to select the entire path or the Direct Selection tool to select part of the path. If you select one or more points on a path, only those path segments connected to the points are transformed. (See Select a path.)
- To transform a selection border, make or load a selection. Then choose Select > Transform Selection.
• To transform an alpha channel, select the channel in the Channels panel.
To the top
Set or move the reference point for a transformation
All transformations are performed around a fixed point called the reference point. By default, this point is at the center of the item you are transforming. However, you can change the reference point or move the center point to a different location using the reference point locator in the options bar.
- Choose a transformation command. A bounding box appears in the image.
-
Do one of the following:
-
In the options bar, click a square on the reference point locator. Each square represents a point on the bounding box. For example, to move the reference point to the upper-left corner of the bounding box, click the top left square on the reference point locator.
- In the transform bounding box that appears in the image, drag the reference point ⚙. The reference point can be outside the item you want to transform.
To the top
Scale, rotate, skew, distort, apply perspective, or warp
- Select what you want to transform.
- Choose Edit > Transform > Scale, Rotate, Skew, Distort, Perspective, or Warp.
Note: If you are transforming a shape or entire path, the Transform menu becomes the Transform Path menu. If you are transforming multiple path segments (but not the entire path), the Transform menu becomes the Transform Points menu.
- (Optional) In the options bar, click a square on the reference point locator
-
Do one or more of the following:
-
If you chose Scale, drag a handle on the bounding box. Press Shift as you drag a corner handle to scale proportionately. When positioned over a handle, the pointer becomes a double arrow.
- If you chose Rotate, move the pointer outside the bounding border (it becomes a curved, two-sided arrow), and then drag. Press Shift to constrain the rotation to 15^ increments.
- If you chose Skew, drag a side handle to slant the bounding box.
- If you chose Distort, drag a corner handle to stretch the bounding box.
- If you chose Perspective, drag a corner handle to apply perspective to the bounding box.
- If you chose Warp, choose a warp from the Warp Style pop-up menu in the options bar, or to perform a custom warp, drag the control points, a line, or an area within the mesh to change the shape of the bounding box and mesh.
-
For all types of transformations, enter a value in the options bar. For example, to rotate an item, specify degrees in the rotation text box.
-
(Optional) If desired, switch to a different type of transformation by selecting a command from the Edit > Transform submenu.
Note: When you transform a bitmap image (versus a shape or path), the image becomes slightly less sharp each time you commit a transformation; therefore, performing multiple commands before applying the cumulative transformation is preferable to applying each transformation separately.
-
(Optional) If you want to warp the image, click the Switch Between Free Transform And Warp Mode button ☑ in the options bar.
-
When you finish, do one of the following:
-
Press Enter (Windows) or Return (Mac OS), click the Commit button √ in the options bar, or double-click inside the transformation marquee.
- To cancel the transformation, press Esc or click the Cancel button Ⓤ in the options bar.
To the top
Flip or rotate precisely
-
Select what you want to transform.
-
Choose Edit > Transform and choose one of the following commands from the submenu:
-
Rotate to specify degrees in the options bar
- Rotate 180^ to rotate by a half-turn
- Rotate 90^ CW to rotate clockwise by a quarter-turn
- Rotate 90^ CCW to rotate counterclockwise by a quarter-turn
- Flip Horizontal to flip horizontally, along the vertical axis
- Flip Vertical to flip vertically, along the horizontal axis
Note: If you are transforming a shape or entire path, the Transform command becomes the Transform Path command. If you are transforming multiple path segments (but not the entire path), the Transform command becomes the Transform Points command.
To the top
Repeat a transformation
- Choose Edit > Transform > Again, Edit > Transform Path > Again, or Edit > Transform Points > Again.
To the top
Duplicate an item when transforming it
- Hold down Alt (Windows) or Option (Mac OS) when selecting the Transform command.
To the top
Transform freely
The Free Transform command lets you apply transformations (rotate, scale, skew, distort, and perspective) in one continuous operation. You can also apply a warp transformation. Instead of choosing different commands, you simply hold down a key on your keyboard to switch between transformation types.
Note: If you are transforming a shape or entire path, the Transform command becomes the Transform Path command. If you are transforming multiple path segments (but not the entire path), the Transform command becomes the Transform Points command.
-
Select what you want to transform.
-
Do one of the following:
-
Choose Edit > Free Transform.
- If you are transforming a selection, pixel-based layer, or selection border, choose the Move tool ✝. Then select Show Transform Controls in the options bar.
-
If you are transforming a vector shape or path, select the Path Selection tool. Then select Show Transform Controls in the options bar.
-
Do one or more of the following:
-
To scale by dragging, drag a handle. Press Shift as you drag a corner handle to scale proportionately.
- To scale numerically, enter percentages in the Width and Height text boxes in the options bar. Click the Link icon 8 to maintain the aspect ratio.
- To rotate by dragging, move the pointer outside the bounding border (it becomes a curved, two-sided arrow), and then drag. Press Shift to constrain the rotation to 15^ increments.
- To rotate numerically, enter degrees in the rotation text box in the options bar.
- To distort relative to the center point of the bounding border, press Alt (Windows) or Option (Mac OS), and drag a handle.
- To distort freely, press Ctrl (Windows) or Command (Mac OS), and drag a handle.
- To skew, press Ctrl+Shift (Windows) or Command+Shift (Mac OS), and drag a side handle. When positioned over a side handle, the pointer becomes a white arrowhead with a small double arrow.
- To skew numerically, enter degrees in the H (horizontal skew) and V (vertical skew) text boxes in the options bar.
- To apply perspective, press Ctrl+Alt+Shift (Windows) or Command+Option+Shift (Mac OS), and drag a corner handle. When positioned over a corner handle, the pointer becomes a gray arrowhead.
- To warp, click the Switch Between Free Transform And Warp Modes button in the options bar. Drag control points to manipulate the shape of the item or choose a warp style from the Warp pop-up menu in the options bar. After choosing from the Warp pop-up menu, a square handle is available for adjusting the shape of the warp.
- To change the reference point, click a square on the reference point locator in the options bar.
- To move an item, enter values for the new location of the reference in the X (horizontal position) and Y (vertical position) text boxes in the options bar. Click the Relative Positioning button to specify the new position in relation to the current position.
To undo the last handle adjustment, choose Edit > Undo.
-
Do one of the following:
-
Press Enter (Windows) or Return (Mac OS), click the Commit button √ in the options bar, or double-click inside the transformation marquee.
- To cancel the transformation, press Esc or click the Cancel button in the options bar.
Note: When you transform a bitmap image (versus a shape or path), the image becomes slightly less sharp each time you commit a transformation; therefore, performing multiple commands before applying the cumulative transformation is preferable to applying each transformation separately.
To the top
Warp an item
The Warp command lets you drag control points to manipulate the shape of images, shapes, or paths, and so on. You can also warp using a shape in the Warp Style pop-up menu in the options bar. Shapes in the Warp Style pop-up menu are also malleable; drag their control points. When using the control points to distort an item, choosing View > Extras shows or hides the warp mesh and control points.
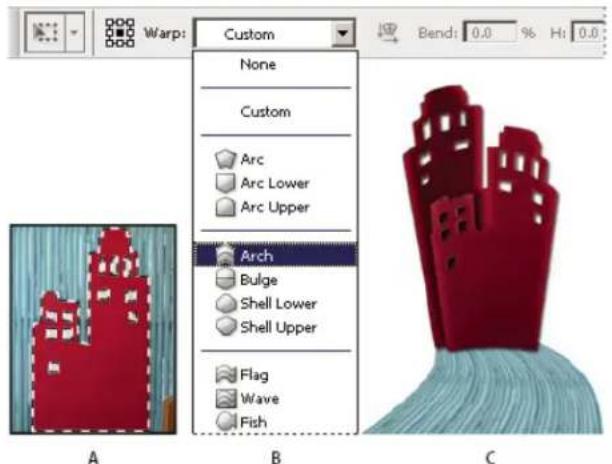
text_image
Warp: Custom None Custom Arc Arc Lower Arc Upper Arch Bulge Shell Lower Shell Upper Flag Wave Fish A B C Bend: 0.0 % H: 0.0Using Warp
A. Selecting the shape to be warped B. Choosing a warp from the Warp Style pop-up menu in the options bar C. Result using several warp options
- Select what you want to warp.
-
Do one of the following:
-
Choose Edit > Transform > Warp.
-
If you chose a different transform command or the Free Transform command, click the Switch Between Free Transform And Warp Modes button ⚙ in the options bar.
-
Do one or more of the following:
• To warp using a specific shape, choose a warp style from the Warp pop-up menu in the options bar.
Dragging a control point to warp the mesh
- To the manipulate the shape, drag the control points, a segment of the bounding box or mesh, or an area within the mesh. When adjusting a curve, use the control point handles. This is similar to adjusting the handles in the curved segment of a vector graphic.

To undo the last handle adjustment, choose Edit > Undo.

natural_image
Grid of blue rectangular panels with black outlines, no text or symbols presentA
natural_image
Abstract blue wavy line pattern with grid lines and a pink arrow pointing to a circular highlight (no text or symbols)B
Manipulating the shape of a warp
A. Original warp mesh B. Adjusting the handles, mesh segments, and areas within the mesh
- To change the orientation of a warp style that you chose from the Warp menu, click the Change The Warp Orientation button in the options bar.
• To change the reference point, click a square on the Reference point locator in the options bar. -
To specify the amount of warp using numeric values, enter the values in the Bend (set bend), X (set horizontal distortion) and Y (set vertical distortion) text boxes in the options bar. You can't enter numeric values if you have chosen None or Custom from the Warp Style pop-up menu.
-
Do one of the following:
-
Press Enter (Windows) or Return (Mac OS), or click the Commit button in the options bar.
- To cancel the transformation, press Esc or click the Cancel button Ⓜ the options bar.
Note: When you warp a bitmap image (versus a shape or path), the image becomes slightly less sharp each time you commit a transformation; therefore, performing multiple commands before applying the cumulative transformation is preferable to applying each transformation separately.
To the top
Puppet Warp
Puppet Warp provides a visual mesh that lets you drastically distort specific image areas, while leaving other areas intact. Applications range from subtle image retouching (such as shaping hair) to total transformations (such as repositioning arms or legs).
In addition to image layers, you can apply Puppet Warp to layer and vector masks. To nondestructively distort images, use Smart Objects. (See Create Smart Objects.)
- In the Layers panel, select the layer or mask you want to transform.
- Choose Edit > Puppet Warp.
- In the options bar, adjust the following mesh settings:
Mode Determines the overall elasticity of the mesh.

Choose Distort for a highly elastic mesh good for warping wide-angle images or texture maps.
Density Determines the spacing of mesh points. More Points increases precision but requires more processing time; Fewer Points does the opposite.
Expansion Expands or contracts the outer edge of the mesh.
Show Mesh Deselect to show only adjustment pins, providing a clearer preview of your transformations.

To temporarily hide adjustment pins, press the H key.
- In the image window, click to add pins to areas you want to transform and areas you want to anchor in place.
natural_image
Blue plush toy with a bear-like head and red accents, shown in motion with an arrow indicating direction (no text or symbols)Moving a pin on the puppet mesh. Adjoining pins keep nearby areas intact.
-
To reposition or remove pins, do any of the following:
-
Drag pins to warp the mesh.
- To reveal a mesh area you've overlapped with another, click the Pin Depth buttons in the options bar.
- To remove selected pins, press Delete. To remove other individual pins, place the cursor directly over them, and press Alt (Windows) or Option (Mac OS); when the scissors icon ✗ appears, click.
- Click the Remove All Pins button in the options bar.
To select multiple pins, Shift-click them or choose Select All Pins from the context menu.

-
To rotate the mesh around a pin, select it, and then do either of the following:
-
To rotate the mesh a fixed number of degrees, press Alt (Windows) or Option (Mac OS), and position the cursor near to, but not over the pins. When a circle appears, drag to visually rotate the mesh.
The degree of rotation appears in the options bar.
• To rotate the mesh automatically based on the selected Mode option, choose Auto from the Rotate menu in the options bar.

- When your transformation is complete, press Enter or Return.
natural_image
Blue handmade sock toy with a pointing arm and motion arrow (no text or symbols)Press Alt (Windows) or Option (Mac OS) to rotate the mesh around a selected pin.

Twitter™ and Facebook posts are not covered under the terms of Creative Commons.
Legal Notices | Online Privacy Policy
Crop images
Transform perspective while cropping | CS5
Crop and straighten scanned photos
Straighten an image
Rotate or flip an entire image
Change the canvas size
Make a frame
To the top
Crop images
Cropping is the process of removing portions of an image to create focus or strengthen the composition. You can crop an image using the Crop tool 14 and the Crop command. You can also trim pixels using the Crop And Straighten and the Trim commands.

To learn how to use the Cropping tools introduced in CS6, see Crop and Straighten Photos.


Using the Crop tool
Crop an image using the Crop tool | CS5
- Select the Crop tool .4
-
(Optional) Set resample options in the options bar.
-
To crop the image without resampling (default), make sure that the Resolution text box in the options bar is empty. You can click the Clear button to quickly clear all text boxes.
- To resample the image during cropping, enter values for height, width, and resolution in the options bar. To switch the height and width dimensions, click the Swaps Height And Width icon ↩.
- To resample an image based on the dimensions and resolution of another image, open the other image, select the Crop tool, and click Front Image in the options bar. Then make the image you want to crop active.
Resampling while cropping uses the default interpolation method set in the General preferences.

To select or create a resampling preset, click the triangle next to the Crop tool icon in the options bar. (See Create and use tool presets.)
-
Drag over the part of the image you want to keep to create a marquee.
-
If necessary, adjust the cropping marquee:
-
To move the marquee to another position, place the pointer inside the bounding box and drag.
• To scale the marquee, drag a handle. To constrain the proportions, hold down Shift as you drag a corner handle. -
To rotate the marquee, position the pointer outside the bounding box (the pointer turns into a curved arrow), and drag. To move the center point around which the marquee rotates, drag the circle at the center of the bounding box. (The marquee can't be rotated in Bitmap mode.)
-
In the options bar, set the following:
Cropped Area Select Hide to preserve the cropped area in the image file. You can make the hidden area visible by moving the image with the Move tool ✦. Select Delete to discard the cropped area.
Note: The Hide option is not available for images that contain only a background layer; you must convert the background to a regular layer.
Crop Guide Overlay Select Rule Of Thirds to add guides that help you place compositional elements at 1/3 increments. Select Grid to display fixed guidelines with spacing that depends upon crop size.
Shield The cropping shield shades the image area that will be deleted or hidden. When Shield is selected, you can specify color and opacity for the shield. When Shield is deselected, the area outside the cropping marquee is revealed.
-
Do one of the following:
-
To complete the crop, press Enter (Windows) or Return (Mac OS), click the Commit button √ in the options bar, or double-click inside the cropping marquee.
- To cancel the cropping operation, press Esc or click the Cancel button Ⓞ the options bar.
Crop an image using the Crop command
- Use a selection tool to select the part of the image you want to keep.
- Choose Image > Crop.
Crop an image using the Trim command
The Trim command crops an image by removing unwanted image data in different ways than the Crop command. You can crop an image by trimming surrounding transparent pixels, or background pixels of the color you specify.
- Choose Image > Trim.
-
In the Trim dialog box, select an option:
-
Transparent Pixels to trim away transparency at the edges of the image, leaving the smallest image containing nontransparent pixels.
- Top Left Pixel Color to remove an area the color of the upper-left pixel from the image.
- Bottom Right Pixel Color to remove an area the color of the lower right pixel from the image.
- Select one or more areas of the image to trim away: Top, Bottom, Left, or Right.
To the top
Transform perspective while cropping | CS5
To learn how to transform perspective in Photoshop CC and CS6, see Transform perspective while cropping.
The Crop tool has an option that lets you transform the perspective in an image. Transforming the perspective is useful when working with images that contain keystone distortion. Keystone distortion occurs when an object is photographed from an angle rather than from a straight-on view. For example, if you take a picture of a tall building from ground level, the edges of the building appear closer to each other at the top than they do at the bottom.

Steps to transform perspective
A. Draw initial cropping marquee B. Adjust cropping marquee to match the object's edges C. Extend the cropping bounds D. Final image
-
Select the Crop tool 4 and set the crop mode.
-
Drag the cropping marquee around an object that was rectangular in the original scene (although it doesn't appear rectangular in the image). You'll use the edges of this object to define the perspective in the image. The marquee doesn't have to be precise—you'll adjust it later.
Note: You must select an object that was rectangular in the original scene or Photoshop might not produce the perspective transformation you expected.
-
Select Perspective in the options bar, and set the other options as desired.
-
Move the corner handles of the cropping marquee to match the object's edges. This defines the perspective in the image, so it is important to precisely match the object's edges.
-
Drag the side handles to extend the cropping bounds while preserving the perspective.
Do not move the center point of the cropping marquee. The center point needs to be in its original position in order to perform perspective correction.
-
Do one of the following:
-
Press Enter (Windows) or Return (Mac OS), click the Commit button √ in the options bar, or double-click inside the cropping marquee.
- To cancel the cropping operation, press Esc or click the Cancel button in the options bar.
To the top
Crop and straighten scanned photos
You can place several photos on your scanner and scan them in one pass, which creates a single image file. The Crop and Straighten Photos command is an automated feature that can create separate image files from the multiple-image scan.
For best results, keep 1/8 inch between the images in your scan, and the background (typically the scanner bed) should be a uniform color with little noise. The Crop and Straighten Photos command works best on images with clearly delineated outlines. If the Crop and Straighten Photos command cannot properly process the image file, use the Crop tool.
- Open the scanned file that contains the images you want to separate.
- Select the layer that contains the images.
- (Optional) Draw a selection around the images you want to process.
- Choose File > Automate > Crop And Straighten Photos. The scanned images are processed, and then each image opens in its own window.
If the Crop And Straighten Photos command incorrectly splits one of your images, make a selection border around the image and some background, and then hold down Alt (Windows) or Option (Mac OS) as you choose the command. The modifier key indicates that only one image should be separated from the background.
To the top
Straighten an image
The Ruler tool provides a Straighten option that quickly aligns images with horizon lines, building walls, and other key elements.
- Select the Ruler tool 📄. (If necessary, click and hold the Eyedropper tool to reveal the Ruler.)
- In the image, drag across a key horizontal or vertical element.
- In the options bar, click Straighten.
Photoshop straightens the image and automatically crops it. To reveal image areas that extend beyond the new document boundaries, choose Edit > Undo.

To entirely avoid automatic cropping, hold down Alt (Windows) or Option (Mac OS) when you click Straighten.
To the top
Rotate or flip an entire image
The Image Rotation commands let you rotate or flip an entire image. The commands do not work on individual layers or parts of layers, paths, or selection borders. If you want to rotate a selection or layer, use the Transform or Free Transform commands.

A

B

C
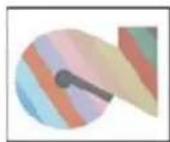
D

E
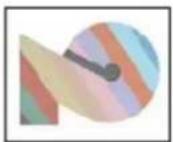
F
Rotating images
A. Flip Horizontal B. Original image C. Flip Vertical D. Rotate 90° CCW E. Rotate 180° F. Rotate 90° CW
- Choose Image > Image Rotation, and choose one of the following commands from the submenu:
180° Rotates the image by a half-turn.
90° CW Rotates the image clockwise by a quarter-turn.
90° CCW Rotates the image counterclockwise by a quarter-turn.
Arbitrary Rotates the image by the angle you specify. If you choose this option, enter an angle between -359.99 and 359.99 in the angle text box. (In Photoshop, you can select °CW or °CCW to rotate clockwise or counterclockwise.) Then click OK.
Flip Canvas Horizontal or Vertical Flips the image along the corresponding axis.
Note: Image Rotation is destructive editing and actually modifies the file information. If you want to non-destructively rotate the image for viewing, use the Rotation tool.
To the top
Change the canvas size
The canvas size is the full editable area of an image. The Canvas Size command lets you increase or decrease an image's canvas size. Increasing the canvas size adds space around an existing image. Decreasing an image's canvas size crops into the image. If you increase the canvas size of an image with a transparent background, the added canvas is transparent. If the image doesn't have a transparent background, there are several options for determining the color of the added canvas.
- Choose Image > Canvas Size.
-
Do one of the following:
-
Enter the dimensions for the canvas in the Width and Height boxes. Choose the units of measurement you want from the pop-up menus next to the Width and Height boxes.
-
Select Relative, and enter the amount you want to add or subtract from the image's current canvas size. Enter a positive number to add to the canvas, and enter a negative number to subtract from the canvas.
-
For Anchor, click a square to indicate where to position the existing image on the new canvas.
-
Choose an option from the Canvas Extension Color menu:
• Foreground to fill the new canvas with the current foreground color
• Background to fill the new canvas with the current background color
- White, Black, or Gray to fill the new canvas with that color
• Other to select a new canvas color using the Color Picker
Note: You can also click the white square to the right of the Canvas Extension Color menu to open the Color Picker.
The Canvas Extension Color menu isn't available if an image doesn't contain a background layer.
- Click OK.
text_image
Anchor: Canvas extension color: Foreground
natural_image
Exterior view of a beige building with an arched window and decorative balconies (no visible text or symbols)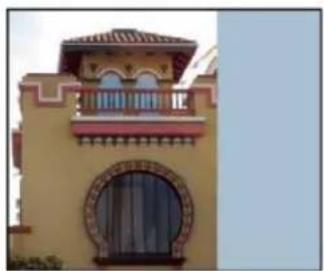
natural_image
Exterior view of a historic-style building with arched windows and balconies (no visible text or symbols)Original canvas, and canvas added to right side of image using the foreground color
To the top
Make a frame
You can make a photo frame by increasing the canvas size and filling it with a color.
You can also use one of the prerecorded actions to make a styled photo frame. It's best work on a copy of your photo.
- Open the Actions panel. Choose Window >Actions.
- Choose Frames from the Actions panel menu.
- Choose one of the frame actions from the list.
- Click the Play Selection button.
The action plays, creating the frame around your photo.
More Help Topics
- Rotate, Crop, and retouch images in Camera Raw

Twitter™ and Facebook posts are not covered under the terms of Creative Commons.
Legal Notices | Online Privacy Policy
Crop or remove part of an image
Crop tool updates | Creative Cloud only
Straighten an image
Transform perspective while cropping
Resize the canvas using the Crop tool
Cropping is the process of removing portions of an image to create focus or strengthen the composition. Use the Crop tool to crop and straighten images in Photoshop. The Crop tools in Photoshop CC and CS6 are non-destructive and you can choose to retain the cropped pixels to optimize the crop boundaries later. The Crop tool also provides intuitive methods to straighten the image while cropping.
For all operations, visual guides provide an interactive preview. When you crop or straighten photos, real-time feedback helps you visualize the final result.
To the top
Crop or remove part of an image
- From the toolbar, select the Crop Tool ☐ Crop borders display on the edges of the image.
- Draw a new cropping area or drag the corner and edge handles to specify the crop boundaries in your image.
- (Optional) Specify the Crop options using the Control bar.

text_image
Unconstrained B C D E F G Start Straighten View Golden Ratio Delete Cropped PixelsA. Active tool B. Size and proportions C. Rotate crop box D. Straighten image E. View F. Crop options G. Delete Cropped Pixels
Size and proportions Choose a ratio or size for the crop box. You can also choose a preset, enter your own, or even define your own preset values for later use.
View Choose a view to display overlay guides while cropping. Guides such as Rule of Thirds, Grid, and Golden Ratio are available. To cycle through all the options, press O.
Crop Options Click the Settings menu to specify additional crop options.
Use Classic mode Enable this option if you want to use the Crop tool like it was in previous versions of Photoshop. See Adjusting crop, rotation, and canvas for information on using the Crop tool in classic mode.
Auto-center preview Enable this option to place the preview in the center of the canvas.
Show Cropped Area Enable this option to display the area that is cropped. If this option is disabled, only the final area is previewed.
Enable crop shield Use the crop shield to overlay the cropped areas with a tint. You can specify a color and opacity. If you Enable
Auto Adjust Opacity, the opacity is reduces when you edit the crop boundaries.
Delete cropped pixels Disable this option to apply a non-destructive crop and retain pixels outside the crop boundaries. Non-destructive cropping does not remove any pixels. You can later click the image to see areas outside current crop borders.
Enable this option to delete any pixels that are outside the crop area. These pixels are lost and are not available for future adjustments.

Right-click the Crop box and access common crop options from the context menu.
- Press Enter (Windows) or Return (Mac OS) to crop the photo.
For information on cropping and straightening, see Newly redesigned Crop tool by Julieanne Kost.
To the top
Crop tool updates | Creative Cloud only
Note: These features were introduced in the Creative Cloud release for Photoshop CS6.
Updates to the Crop tool include numerous bug fixes and enhancements, including:
- Front Image and new presets in the Aspect Ratio menu.
- Clicking the double-arrow icon changes the crop orientation by swapping the Width and Height values. This icon replaces the Rotate Crop Box button.
- Choosing W x H x Resolution from the Aspect Ratio menu displays a Resolution field in the options bar and auto-fills the Width and Height values.
- Clicking the Clear button clears the values in the Width and Height fields in the option bar. If displayed, the value in the Resolution field is also cleared.
- The keyboard shortcut for Front Image has changed from F to I for both the Crop tool and the Perspective Crop tool.

text_image
A B C Ratio Clear Left Straighten Delete Cropped PixelsCreative Cloud Crop tool options bar
A. Aspect Ratio menu B. Swap Width and Height values C. Overlay Options
To the top
Straighten an image
You can straighten an image while cropping. The image is rotated and aligned to straighten it. The image canvas is automatically resized to accommodate the rotated pixels.
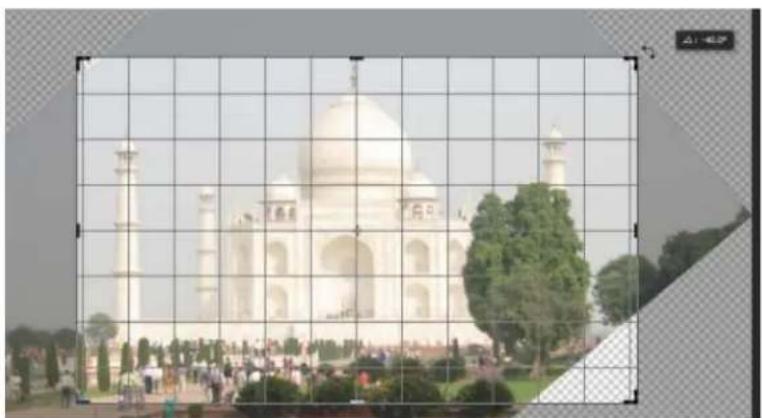
natural_image
Exterior view of the Taj Mahal in Delhi, India, with a large white dome and surrounding greenery (no signage or text visible)Rotate the image using the crop tool to straighten it
• To straighten an image do one of the following:
- Place the pointer a little outside the corner handles and drag to rotate the image. A grid displays inside the crop box and the image rotates behind it.
- Click Straighten in the control bar and then using the Straighten tool, draw a reference line to straighten the photo. For example, draw a line along the horizon or an edge to straighten the image along it.
See Straightening a Crooked Image to watch a video explaining straightening an image using the Crop tool.
To the top
Transform perspective while cropping
The Perspective Crop tool lets you transform the perspective in an image while cropping. Use the Perspective Crop tool when working with images that contain keystone distortion. Keystone distortion occurs when an object is photographed from an angle rather than from a straight-on view. For example, if you take a picture of a tall building from ground level, the edges of the building appear closer to each other at the top than they do at the bottom.
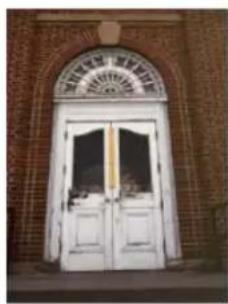
natural_image
Exterior view of a historic brick building with arched door and window (no signage or text visible)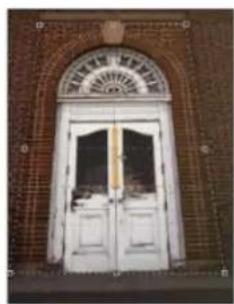
natural_image
Exterior view of a historic brick building with arched door and glass windows (no signage or text visible)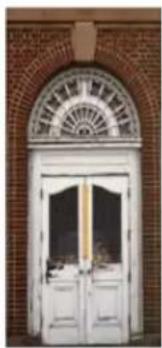
natural_image
Exterior view of a brick building with arched window and two white doors (no signage or text visible)Steps to transform perspective
A. Original image B. Adjust cropping marquee to match the object's edges C. Final image
- To correct image perspective, hold down the Crop tool and select the Perspective Crop tool
- Draw a marquee around the distorted object. Match the edges of the marquee to the rectangular edges of the object.
- Press Enter (Windows) or Return (Mac OS) to complete the perspective crop.
To the top
Resize the canvas using the Crop tool
You can use the Crop tool to resize the image canvas.
-
From the toolbar, select the Crop Tool ☐. Crop borders display on the edges of the image.
-
Drag the crop handles outwards to enlarge the canvas. Use the Alt/Option modifier key to enlarge from all sides.
- Press Enter (Windows) or Return (Mac OS) to confirm the action.
To resize the canvas, you can also choose Image > Canvas Size. See Change the Canvas size.
Twitter™ and Facebook posts are not covered under the terms of Creative Commons.
Legal Notices | Online Privacy Policy
Warp an item Puppet Warp
To the top
Warp an item
The Warp command lets you drag control points to manipulate the shape of images, shapes, or paths, and so on. You can also warp using a shape in the Warp Style pop-up menu in the options bar. Shapes in the Warp Style pop-up menu are also malleable; drag their control points. When using the control points to distort an item, choosing View > Extras shows or hides the warp mesh and control points.
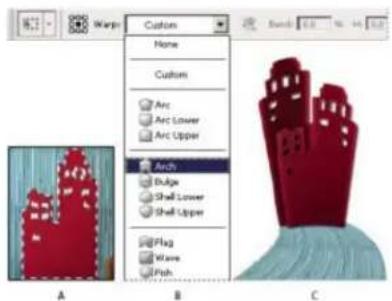
text_image
Warp Custom None Custom Arc Arc Lower Arc Upper Archs Bulge Shell Lower Shell Upper Flag Wave Fish A B CUsing Warp
A. Selecting the shape to be warped B. Choosing a warp from the Warp Style pop-up menu in the options bar C. Result using several warp options
- Select what you want to warp.
-
Do one of the following:
-
Choose Edit > Transform > Warp.
-
If you chose a different transform command or the Free Transform command, click the Switch Between Free Transform And Warp Modes button in the options bar.
-
Do one or more of the following:
• To warp using a specific shape, choose a warp style from the Warp pop-up menu in the options bar.
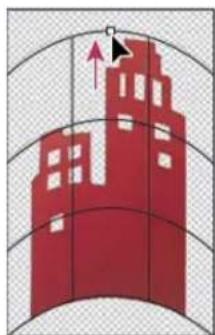
natural_image
Red stylized cityscape illustration with curved grid lines and a black arrow pointing upward (no text or symbols)Dragging a control point to warp the mesh
- To the manipulate the shape, drag the control points, a segment of the bounding box or mesh, or an area within the mesh. When adjusting a curve, use the control point handles. This is similar to adjusting the handles in the curved segment of a vector graphic.

To undo the last handle adjustment, choose Edit > Undo.

natural_image
Blue grid pattern with vertical lines and corner markers (no text or symbols)A
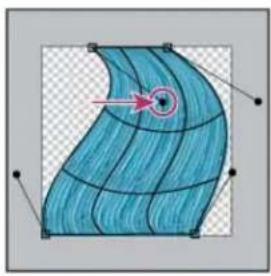
natural_image
Abstract blue wavy surface with grid lines and a pink arrow pointing to a circular highlight (no text or symbols)B
Manipulating the shape of a warp
- To change the orientation of a warp style that you chose from the Warp menu, click the Change The Warp Orientation button in the options bar.
- To change the reference point, click a square on the Reference point locator in the options bar.
-
To specify the amount of warp using numeric values, enter the values in the Bend (set bend), X (set horizontal distortion) and Y (set vertical distortion) text boxes in the options bar. You can't enter numeric values if you have chosen None or Custom from the Warp Style pop-up menu.
-
Do one of the following:
-
Press Enter (Windows) or Return (Mac OS), or click the Commit button in the options bar.
- To cancel the transformation, press Esc or click the Cancel button Ⓜ the options bar.
Note: When you warp a bitmap image (versus a shape or path), the image becomes slightly less sharp each time you commit a transformation; therefore, performing multiple commands before applying the cumulative transformation is preferable to applying each transformation separately.
To the top
Puppet Warp
Puppet Warp provides a visual mesh that lets you drastically distort specific image areas, while leaving other areas intact. Applications range from subtle image retouching (such as shaping hair) to total transformations (such as repositioning arms or legs).
In addition to image layers, you can apply Puppet Warp to layer and vector masks. To nondestructively distort images, use Smart Objects. (See Create Smart Objects.)
- In the Layers panel, select the layer or mask you want to transform.
- Choose Edit > Puppet Warp.
- In the options bar, adjust the following mesh settings:
Mode Determines the overall elasticity of the mesh.

Choose Distort for a highly elastic mesh good for warping wide-angle images or texture maps.
Density Determines the spacing of mesh points. More Points increases precision but requires more processing time; Fewer Points does the opposite.
Expansion Expands or contracts the outer edge of the mesh.
Show Mesh Deselect to show only adjustment pins, providing a clearer preview of your transformations.

To temporarily hide adjustment pins, press the H key.
- In the image window, click to add pins to areas you want to transform and areas you want to anchor in place.
natural_image
Blue cartoon character with red accents and a red arrow pointing to its head (no text or symbols)Moving a pin on the puppet mesh. Adjoining pins keep nearby areas intact.
- To reposition or remove pins, do any of the following:
- Drag pins to warp the mesh.
- To reveal a mesh area you've overlapped with another, click the Pin Depth buttons in the options bar.
- To remove selected pins, press Delete. To remove other individual pins, place the cursor directly over them, and press Alt (Windows) or Option (Mac OS); when the scissors icon ✗ appears, click.
- Click the Remove All Pins button in the options bar.

To select multiple pins, Shift-click them or choose Select All from the context menu.
- To rotate the mesh around a pin, select it, and then do either of the following:
- To rotate the mesh a fixed number of degrees, press Alt (Windows) or Option (Mac OS), and position the cursor near to, but not over the pins. When a circle appears, drag to visually rotate the mesh.

The degree of rotation appears in the options bar.
• To rotate the mesh automatically based on the selected Mode option, choose Auto from the Rotate menu in the options bar.
- When your transformation is complete, press Enter or Return.

Press Alt (Windows) or Option (Mac OS) to rotate the mesh around a selected pin.
Twitter™ and Facebook posts are not covered under the terms of Creative Commons.
Legal Notices | Online Privacy Policy
Vanishing Point dialog box overview
Work in Vanishing Point
Export measurements, textures, and 3D information
About perspective planes and the grid
Define and adjust perspective planes in Vanishing Point
Render grids to Photoshop
About selections in Vanishing Point
Fill selections with another area of an image
Copy selections in Vanishing Point
Paste an item into Vanishing Point
Paint with a color in Vanishing Point
Paint with sampled pixels in Vanishing Point
Measure in Vanishing Point (Photoshop Extended)
Vanishing Point simplifies perspective-correct editing in images that contain perspective planes—for example, the sides of a building, walls, floors, or any rectangular object. In Vanishing Point, you specify the planes in an image, and then apply edits such as painting, cloning, copying or pasting, and transforming. All your edits honor the perspective of the plane you're working in. When you retouch, add, or remove content in an image, the results are more realistic because the edits are properly oriented and scaled to the perspective planes. After you finish working in Vanishing Point, you can continue editing the image in Photoshop. To preserve the perspective plane information in an image, save your document in PSD, TIFF, or JPEG format.

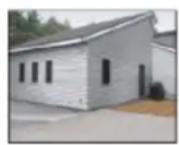
Making edits on the perspective planes in an image
Photoshop Extended users can also measure objects in an image, and export 3D information and measurements to DXF and 3DS formats for use in 3D applications.
For a video on using Vanishing Point, see www.adobe.com/go/vid0019.
To the top
Vanishing Point dialog box overview
The Vanishing Point dialog box (Filter > Vanishing Point) contains tools for defining the perspective planes, tools for editing the image, a measure tool (Photoshop Extended only), and an image preview. The Vanishing Point tools (Marquee, Stamp, Brush, and others) behave similarly to their counterparts in the main Photoshop toolbox. You can use the same keyboard shortcuts to set the tool options. Opening the Vanishing Point menu displays additional tool settings and commands.

natural_image
Exterior view of a modern metal cabin with a pool and water feature (no signage or text)Vanishing Point dialog box
A. Vanishing Point menu B. Options C. Toolbox D. Preview of vanishing point session E. Zoom options
For the keyboard shortcuts in Vanishing Point, see Keys for Vanishing Point.
Vanishing Point tools
Vanishing Point tools behave like their counterparts in the main Photoshop toolbox. You can use the same keyboard shortcuts for setting tool options. Selecting a tool changes the available options in the Vanishing Point dialog box.
Edit Plane tool

Selects, edits, moves, and resizes planes.
Create Plane tool

Defines the four corner nodes of a plane, adjusts the size and shape of the plane, and tears off a new plane.
Marquee tool Makes square or rectangular selections, and also moves or clones selections.

Double-clicking the Marquee tool in a plane selects the entire plane.
Stamp tool

Paints with a sample of the image. Unlike the Clone Stamp tool, the Stamp tool in Vanishing Point can't clone elements from another image. See also Paint with sampled pixels in Vanishing Point and Retouch with the Clone Stamp tool.
Brush tool

Paints a selected color in a plane.
Transform tool
Scales, rotates, and moves a floating selection by moving the bounding box handles. Its behavior is similar to using the Free Transform command on a rectangle selection. See also Transform freely.
Eyedropper tool

Selects a color for painting when you click in the preview image.
Measure tool

Measures distances and angles of an item in a plane. See also Measure in Vanishing Point (Photoshop Extended)
Zoom tool

Magnifies or reduces the view of the image in the preview window.
Hand tool Moves the image in the preview window.
Magnify or reduce the preview image
- Do any of the following:
- Select the Zoom tool in the Vanishing Point dialog box, and click or drag in the preview image to zoom in; hold down Alt (Windows) or Option (Mac OS), and click or drag to zoom out.
- Specify a magnification level in the Zoom text box at the bottom of the dialog box.
- Click the Plus sign (+) or Minus sign (-) button to zoom in or out, respectively.
- To temporarily zoom into the preview image, hold down the "x" key. This is especially helpful for placing the corner nodes when defining a plane, and for working on details.
Move the image in the preview window
- Do any of the following:
- Select the Hand tool in the Vanishing Point dialog box, and drag in the preview image.
- Hold down the spacebar with any tool selected, and drag in the preview image.
To the top
Work in Vanishing Point
1.(Optional) Prepare your image for work in Vanishing Point.
Before choosing the Vanishing Point command, do any of the following:
- To place the results of your Vanishing Point work in a separate layer, first create a new layer before choosing the Vanishing Point command. Placing the Vanishing Point results in a separate layer preserves your original image and you can use the layer opacity control, styles, and blending modes.
- If you plan to clone the content in your image beyond the boundaries of the current image size, increase the canvas size to accommodate the additional content. See also Change the canvas size
- If you plan to paste an item from the Photoshop clipboard into Vanishing Point, copy the item before choosing the Vanishing Point command. The copied item can be from a different Photoshop document. If you're copying type, you must rasterize the text layer before copying to the clipboard.
- To confine the Vanishing Point results to specific areas of your image, either make a selection or add a mask to your image before choosing the Vanishing Point command. See also Select with the marquee tools and About masks and alpha channels.
-
To copy something in perspective from one Photoshop document to another, first copy the item while in Vanishing Point in one document. When you paste the item in another document while in Vanishing Point, the item's perspective is preserved.
-
Choose Filter > Vanishing Point.
-
Define the four corner nodes of the plane surface.
By default, the Create Plane tool is selected. Click in the preview image to define the corner nodes. Try to use a rectangle object in the image as a guide when creating the plane.
To tear off additional planes, use the Create Plane tool and Ctrl-drag (Windows) or Command-drag (Mac OS) an edge node. For more information, see Define and adjust perspective planes in Vanishing Point.

Defining the four corner nodes with the Create Plane tool
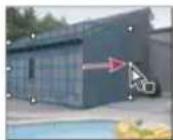
Ctrl-drag (Windows) or Command-drag (Mac OS) an edge node to tear off a plane.
4. Edit the image.
Do any of the following:
- Make a selection. Once drawn, a selection can be cloned, moved, rotated, scaled, filled, or transformed. For detailed information, see About selections in Vanishing Point.
- Paste an item from the clipboard. The pasted item becomes a floating selection, which conforms to the perspective of any plane that it's moved into. For detailed information, see also Paste an item into Vanishing Point.
- Paint with color or sampled pixels. For detailed information, see Paint with a color in Vanishing Point or Paint with sampled pixels in Vanishing Point.
- Scale, rotate, flip, flop, or move a floating selection. For detailed information, see About selections in Vanishing Point.
- Measure an item in a plane. Measurements can be rendered in Photoshop by choosing Render Measurements To Photoshop from the Vanishing Point menu. For detailed information, see Measure in Vanishing Point (Photoshop Extended).
5.(Photoshop Extended only) Export 3D information and measurements to DXF or 3DS format.
Textures are also exported to 3DS format. For detailed information, see Export measurements, textures, and 3D information.
6.Click OK.
Grids can be rendered to Photoshop by choosing Render Grids To Photoshop from the Vanishing Point menu before you click OK. For detailed information, see Render grids to Photoshop.
To the top
Export measurements, textures, and 3D information
3D information (planes), textures, and measurements created in Vanishing Point can be exported to a format for use in CAD, modeling, animation, and special effects applications. Exporting to DXF creates a file with 3D information and any measurements. Exported 3DS files contain rendered textures in addition to the geometric information.
- Open the Vanishing Point menu and choose either Export to DXF or Export To 3DS.
- In the Export DXF or Export 3DS dialog box, select a location for the saved file and click Save.
To the top
About perspective planes and the grid
Before you can make edits in Vanishing Point, you define rectangular planes that line up with the perspective in an image. The accuracy of the plane determines whether any edits or adjustments are properly scaled and oriented in your image.
After you establish the four corner nodes, the perspective plane is active and displays a bounding box and a grid. You can scale, move, or reshape to fine-tune the perspective plane. You can also change the grid size so it lines up with elements in the image. Sometimes, lining up the bounding box and grid with a texture or pattern in your image helps you accurately match the image's perspective. Adjusting the grid size can also make it easier for you to count items in the image.
Besides helping to line up the perspective planes with image elements, the grid is helpful for visualizing measurements when used with the Measure tool. An option is available to link the grid size to measurements you make with the Measure tool.
To the top
Define and adjust perspective planes in Vanishing Point
- In the Vanishing Point dialog box, select the Create Plane tool and click in the preview image to add the four corner nodes.
Try to use a rectangular object or a plane area in the image as a guide when creating the perspective plane. To help with node placement, hold down the "x" key to zoom into the preview image. As you add corner nodes, you can delete the last node if it's not correct by pressing the Backspace key (Windows) or Delete key (Mac OS). You can also reposition a node by dragging it.
-
Select the Edit Plane tool 📋 and do one or more of the following:
-
To reshape the perspective plane, drag a corner node.
- To adjust the grid, enter a value in the Grid Size text box or click the down arrow and move the slider. You can also adjust the grid size when the Create Plane tool is selected.
• To move the plane, click inside the plane and drag. - To scale the plane, drag an edge node in a segment of the bounding box.

natural_image
Exterior view of a modern building with a blue metal panel and red directional arrows (no signage or text)Dragging an edge node to increase the size of a plane to accommodate your edits
The bounding box and grid of a perspective plane is normally blue. If there's a problem with the placement of the corner nodes, the plane is invalid, and the bounding box and grid turn either red or yellow. When your plane is invalid, move the corner nodes until the bounding box and grid are blue.
If you have overlapping planes, Ctrl-click (Windows) or Command-click (Mac OS) to cycle through the overlapping planes.
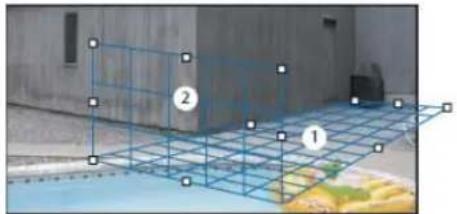
text_image
Diagram showing a 3D grid with labeled points and measurement lines, likely illustrating a structural or engineering concept.Overlapping planes
Create related perspective planes
After creating a plane in Vanishing Point, you can create (tear off) additional planes that share the same perspective. Once a second plane is torn off from the initial perspective plane, you can tear off additional planes from the second plane and so forth. You can tear off as many planes as you want. Although new planes tear off at 90^ angles, you can adjust them to any angle. This is useful for making seamless edits between surfaces, matching the geometry of a complex scene. For example, corner cabinets in a kitchen can be part of a continuous surface. In addition to adjusting the angles of a related perspective plane, you can always resize the plane using the Edit Plane tool.
- Select the Create Plane tool or Edit Plane tool and Ctrl-drag (Windows) or Command-drag (Mac OS) an edge node of an existing plane's bounding box (not a corner node).
The new plane is torn off at a 90° angle to the original plane.
Note: If a newly created plane does not properly line up with the image, select the Edit Plane tool and adjust a corner node. When you adjust one plane, a connected plane is affected. (Corner nodes are unavailable if more than two planes are connected.)
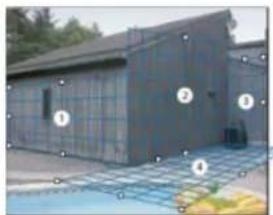
natural_image
Exterior view of a modern modular building with grid patterns and numbered annotations (no readable text or symbols)Tearing off multiple planes keeps the planes related to each other so your edits are scaled and oriented in the proper perspective.
-
(Optional) Do one of the following to change the angle of the newly torn off plane:
-
With either the Edit Plane tool or Create Plane tool selected, Alt-drag (Windows) or Option-drag (Mac OS) the center edge node on the side that's opposite from the axis of rotation.
- Enter a value in the Angle text box.
- Move the Angle slider.
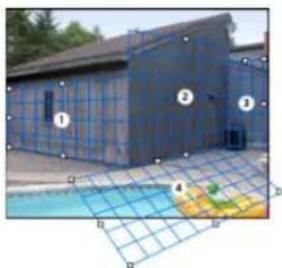
natural_image
Exterior view of a modern blue industrial building with a grid overlay showing a small colorful heatmap or heatmap on the right (no visible text or symbols)Changed plane angle.
Note: Once you create a new (child) plane from an existing (parent) plane, you can no longer adjust the angle of the parent plane.
Bounding box and grid alerts in Vanishing Point
The bounding box and grid change colors to indicate the plane's current condition. If your plane is invalid, move a corner node until the bounding box and grid are blue.
Blue Indicates a valid plane. Keep in mind that a valid plane doesn't guarantee results with the proper perspective. You must make sure that the bounding box and grid accurately line up with geometric elements or a plane area in the image.
Red Indicates an invalid plane. Vanishing Point cannot calculate the plane's aspect ratio.
Yellow Indicates an invalid plane. Some vanishing points of the plane cannot be resolved.
Note: Although it's possible to edit an invalid red or yellow plane, including tearing off perpendicular planes, the results will not be oriented properly.
Show or hide the grid, active selections, and perspective plane boundaries
- Choose Show Edges from the Vanishing Point menu.
Note: Selections temporarily show when they are resized or repositioned even if Show Edges is turned off.
Adjust the spacing of the perspective plane grid
- Do any of the following:
- Select the Edit Plane for the Create Plane tool, and then enter a Grid Size value in the tool options area.
- (Photoshop Extended only) Select the Measure tool and then select Link Measurements To Grid in the tool options area. Drag the Measure tool in a plane and enter a Length value in the tool options area.
To the top
Render grids to Photoshop
By default, the Vanishing Point grids are invisible when viewing an image in the Photoshop document window, even though the grids are preserved in the image and appear whenever you launch Vanishing Point. Grids can be rendered so when you finish working in Vanishing Point, they're visible in the Photoshop document window. The rendered grids are raster not vector.
- Open the Vanishing Point menu and choose Render Grids To Photoshop.
The Render Grids To Photoshop command must be chosen for each Vanishing Point session.
Create a new layer for your Vanishing Point results if you plan to render the grids to Photoshop. This keeps the grids on a separate layer from the main image.
To the top
About selections in Vanishing Point
Selections can be helpful when you're painting or retouching to correct flaws, add elements, or enhance an image. In Vanishing Point, making selections let you paint or fill specific areas in an image while honoring the perspective defined by the planes in the image. Selections can also be used to clone and move specific image content in perspective.
Using the Marquee tool in Vanishing Point, you draw a selection within a perspective plane. If you draw a selection that spans more than one plane, it wraps to conform to the perspective of each plane.
Once a selection is drawn, you can move it anywhere in the image and maintain the perspective established by the plane. If your image has multiple planes, the selection conforms to the perspective of the plane it's moved through.
Vanishing Point also lets you clone the image pixels in a selection as it is moved in an image. In Vanishing Point, a selection containing image pixels that you can move anywhere in the image is called a floating selection. Although not on a separate layer, the pixels in a floating selection seem to be a separate layer hovering above the main image. While active, a floating selection can be moved, rotated, or scaled.
Note: When you paste an item into Vanishing Point, the pasted pixels are in a floating selection.
Clicking outside a floating selection deselects it. Once deselected, a floating selection's content is pasted into the image, replacing the pixels that were below it. Cloning a copy of a floating selection also deselects the original.

natural_image
Two views of a modern concrete structure with a double door and window, no visible text or symbols.Pasted item in Vanishing Point.
Vanishing Point has another move option for selections. You can fill the selection with pixels from the area where the pointer is moved.
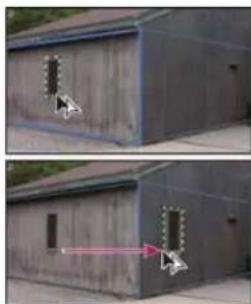
natural_image
Two-panel image showing a gray metal structure with a white arrow pointing to a dashed rectangle and a red arrow pointing to a smaller rectangle, both without any visible text or symbols.Copying a selection and moving a selection from one perspective plane to another
Make selections in Vanishing Point
-
Select the Marquee tool.
-
(Optional) In the tool options area, enter values for any of the following settings before making the selection:
Feather Specifies how much to blur the edges of the selection.
Opacity Specify this value if you plan to use the selection to move image content. This option determines how much the moved pixels
obscure or reveal the image underneath.
Heal menu Choose a blending mode if you plan to use a selection to move image content. This option determines how the moved pixels blend with the surrounding image:
- Choose Off so the selection doesn't blend with the colors, shadows, and textures of the surrounding pixels.
- Choose Luminance to blend the selection with the lighting of the surrounding pixels.
-
Choose On to blend the selection with the color, lighting, and shading of surrounding pixels.
-
Drag the tool in a plane. You can make a selection that spans more than one plane. Hold the Shift key to constrain the selection to a square that's in perspective.
natural_image
Exterior view of a modern concrete structure with a pool in the foreground (no signage or text visible)Selection spanning more than one plane
Note: To select an entire plane, double-click the Marquee tool in the plane.
Move selections in Vanishing Point
- Make a selection in a perspective plane.
- Choose one of the following from the Move Mode menu to determine the behavior when you move a selection:
• To select the area you move the selection marquee to, choose Destination.
- To fill the selection with the image pixels in the area where you drag the Selection tool pointer to (same as Ctrl-dragging or Command-dragging a selection), choose Source.
- Drag the selection. Hold down the Shift key to constrain the move so it is aligned with the grid of the perspective plane.
Move, rotate and scale floating selections
- Do any of the following:
• To move a floating selection, select the Marquee or Transform tool, click inside the selection and drag.
- To rotate a floating selection, select the Transform tool and move the pointer near a node. When the pointer changes to a curved double arrow, drag to rotate the selection. You can also select the Flip option to flip the selection horizontally along the vertical axis of the plane or select the Flop option to flip the selection vertically along the horizontal axis of the plane.

natural_image
Window with red flowers and a dashed border, mounted on a white wall (no text or symbols visible)A
natural_image
Interior view of a room with a window and red flower in the center (no text or symbols visible)B
natural_image
Exterior view of a modern office building (no signage)C
Transform tool options
- To scale a floating selection, make sure that it is in a perspective plane. Select the Transform tool and move the pointer on top of a node. When the pointer changes to a straight double arrow drag to scale the selection. Press the Shift key to constrain the aspect ratio as you scale. Press Alt (Windows) or Option (Mac OS) to scale from the center.
To the top
Fill selections with another area of an image
- Make a selection in a perspective plane.
- (Optional) Move the selection where you want it. Make sure the Move Mode is set to Destination, when you move the selection.
-
Do one of the following:
-
Ctrl-drag (Windows) or Command-drag (Mac OS) the pointer from inside the selection to the image area that you want to fill the selection.
- Choose Source from the Move Mode menu and drag the pointer from inside the selection to the image area that you want to fill the selection.
The filled selection becomes a floating selection that you can scale, rotate, move, or clone using the Transform tool, or move or clone using the Marquee tool.

a
B
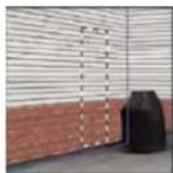
C
Ctrl-dragging (Windows) or Command-dragging (Mac OS) a selection
A. Original selection B. Moving the selection to the source image C. The source image fills the original selection
To the top
Copy selections in Vanishing Point
-
Make a selection in a perspective plane.
-
Alt -drag (Windows) or Option-drag (Mac OS) the selection with the Marquee tool to create a copy of the selection and its image pixels.
The copy becomes a floating selection, which seems to hover above the main image. You can move a floating selection, or you can select the Transform tool to scale or rotate the floating selection.
-
Do one of the following:
-
Click outside the floating selection to deselect it. The selection's content is pasted into the image, replacing the pixels that were below it.
- Click in the floating selection with either the Marquee or Transform tool and Alt-drag (Windows) or Option-drag (Mac OS) to make another copy. Once copied, the original floating selection is deselected and replaces the pixels that were below it.
Pressing Control+Shift+T (Windows) or Command+Shift+T (Mac OS) duplicates your last duplicating move. This is an easy way to clone content multiple times.
To the top
Paste an item into Vanishing Point
You can paste an item from the clipboard in Vanishing Point. The copied item can be from the same document or a different one. Once pasted into Vanishing Point, the item becomes a floating selection that you can scale, rotate, move or clone. When the floating selection moves into a selected plane, it conforms to the plane's perspective.
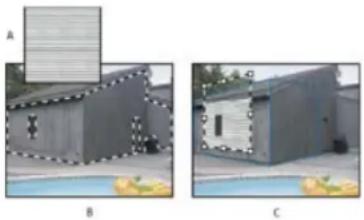
natural_image
Two-panel image showing a building interior with water and a pool, labeled A, B, and C (no text or symbols on the structures themselves)Pasting an item into Vanishing Point
A. Copied pattern from a separate document B. Image with selection (to confine results) created in Photoshop before opening Vanishing Point C. Pasted pattern in Vanishing Point is moved into the plane and honors the selection
For convenience, it's recommended that you create perspective planes in a previous Vanishing Point session.
- Copy an item to the clipboard. The copied item can be from the same or different document. Keep in mind that you can paste only a raster (not vector) item.
Note: If you're copying type, you must first rasterize it. Right-click the text layer, and choose Rasterize. Then choose Select > All and copy to the clipboard.
-
(Optional) Create a new layer.
-
Choose Filter > Vanishing Point.
-
If necessary, create one or more planes in the image.
-
Press Ctrl-V (Windows) or Command-V (Mac OS) to paste the item.
The pasted item is now a floating selection in the upper left corner of the preview image. By default, the Marquee tool is selected.
- Use the Marquee tool to drag the pasted image to a plane.
The image conforms to the perspective of the plane.
Note: After pasting the image in Vanishing Point, do not click anywhere in the image with the Marquee tool except to drag the pasted image to a perspective plane. Clicking anywhere else deselects the floating selection and permanently pastes the pixels into the image.
To the top
Paint with a color in Vanishing Point
- Select the Brush tool.
-
Specify a brush color by doing one of the following:
-
Select the Eyedropper tool and click a color in the preview image.
-
Click the Brush Color box to open the Color Picker to select a color.
-
In the tool options area, set the Diameter (brush size), Hardness (edge smoothness), and Opacity (the degree to which painting obscures the image below).
-
Choose a Healing mode:
-
To paint without blending with the color, lighting, and shading of the surrounding pixels, choose Off.
• To paint and blend the strokes with the lighting of the surrounding pixels while retaining the selected color, choose Luminance.
• To paint and blend with the colors, lighting, and shading of the surrounding pixels, choose On. -
(Optional) Specify the paint application options:
-
To paint continuously, automatically conforming to the perspective from one plane to another, open the Vanishing Point menu and choose Allow Multi-Surface Operations. Turning this option off lets you paint in the perspective of one plane at a time. You need to stop and then start painting in a different plane to switch perspective.
-
To confine painting to the active plane only, open the Vanishing Point menu and choose Clip Operations To Surface Edges. Turning this option off lets you paint in perspective beyond the boundaries of the active plane.
-
Drag in the image to paint. When painting in a plane, the brush size and shape scales and orients properly to the plane's perspective. Shift-drag constrains the stroke to a straight line that conforms to the plane's perspective. You can also click a point with the Brush tool and then Shift-click another point to paint a straight line in perspective.
The Brush tool honors marquee selections and can be used to paint a hard line along the edge of the selection. For example, if you select an entire plane, you can paint a line along the perimeter of the plane.
To the top
Paint with sampled pixels in Vanishing Point
In Vanishing Point, the Stamp tool paints with sampled pixels. The cloned image is oriented to the perspective of the plane you're painting in. The Stamp tool is useful for such tasks as blending and retouching image areas, cloning portions of a surface to "paint out" an object, or cloning an image area to duplicate an object or extend a texture or pattern.
- In Vanishing Point, select the Stamp tool 📋.
- In the tool options area, set the Diameter (brush size), Hardness (the amount of feathering on the brush), and Opacity (the degree that the
painting obscures or reveals the image beneath it).
-
Choose a blending mode from the Heal menu:
-
To prevent the strokes from blending with the colors, shadows, and textures of the surrounding pixels, choose Off.
• To blend the strokes with the lighting of the surrounding pixels, choose Luminance. -
To blend the strokes with the color, lighting, and shading of surrounding pixels, choose On.
-
To determine the sampling behavior of the Stamp tool:
-
Select Aligned to sample pixels continuously, without losing the current sampling point even when you release the mouse button.
-
Deselect Aligned to continue using the sampled pixels from the initial sampling point each time you stop and resume painting.
-
(Optional) Specify the paint application options:
• To paint continuously from one plane to another, open the Vanishing Point menu and choose Allow Multi-Surface Operations.
- To confine painting to the active plane only, open the Vanishing Point menu and choose Clip Operations To Surface Edges.
-
Move the pointer into a plane and Alt-click (Windows) or Option-click (Mac OS) to set the sampling point.
-
Drag over the area of the image you want to paint. Hold the Shift key down to drag a straight line that conforms to the plane's perspective. You can also click a point with the Stamp tool and then Shift-click another point to paint a straight line in perspective.
To the top
Measure in Vanishing Point (Photoshop Extended)
Users ranging from architects and interior decorators to forensic scientists and woodworkers often need to know the size of objects in an image. In Vanishing Point, the Measure tool lets you draw a measurement line over an object in a perspective plane that you know the size of. The Measure tool has an option for entering a length for the measurement. The measurement line displays two text boxes: one for the length and one showing the angle that the line was drawn relative to the perspective plane. Once the measurement and its length have been set, all subsequent measurements correctly scale to your initial measurement.
There's an option for linking the line's measurement length with the grid spacing of the perspective plane. For example, a measurement length of 5 causes the grid to display 5 spaces, when the link option is selected. This might be useful for visualizing sizes in the image or for counting objects in an image. When unlinked, the grid spacing can be adjusted independent of the measurement. This option is useful in such instances where you find that the grid spacing is too small and visually confusing when linked to the measurement.
The measurements you create can be rendered so they appear in the image after you close the Vanishing Point dialog box. You can also export your measurements and geometric information to formats that can be read by CAD applications.
Measure objects in an image
- In Vanishing Point, select the Measure tool and then click and drag over an object in a plane.
It's best to make your initial measurement of an object that you know the size of.
Note: Once you start creating a measurement from within a plane, it's possible to continue drawing the measurement beyond the plane boundaries.
-
With a measurement selected, enter a Length value to set its measured length.
-
(Optional) Draw additional measurements.
The size of these measurements are scaled to the size of your initial measurement.
-
(Optional) Do one of the following:
-
If you want the size of the grid to be independent of the Length value you assigned to the initial measurement, make sure Link Measurements To Grid is deselected. This is the default setting.
- If you want the size of the grid to adjust according to the Length value you assigned to the initial measurement, select Link Measurements To Grid.
Vanishing Point measurements in an image are preserved after closing the dialog box. They appear when you launch Vanishing Point again.
Automatically drawing a measurement in Vanishing Point
The Measure tool can automatically draw the length and width measurements of a surface that's defined by a perspective plane.
- Double-click the Measure tool in a perspective plane.
Move a measurement in Vanishing Point
In Vanishing Point, you can move a measurement line without changing its orientation (angle) or length.
- Select the Measure tool.
- Click anywhere along the length of an existing measurement and drag.
Change the length or orientation of a measurement
You can change the length or orientation (angle) of an existing measurement.
- Select the Measure tool and move it over the end point of an existing measurement line.
- Do any of the following:
• To change the orientation and length of a measurement, drag an end point.
- To change the length of a measurement and constrain its angle changes to 15 degree increments, Ctrl-drag (Windows) or Command-drag (Mac OS) an end point.
• To change the length of a measurement without changing its orientation, Alt-drag (Windows) or Option-drag (Mac OS) an end point.
• To change the orientation of a measurement without changing its length, Shift-drag an end point.
Delete a measurement in Vanishing Point
- Select a measurement and press Backspace (Windows only) or Delete.
Show or hide measurements in Vanishing Point
- Open the Vanishing Point menu and choose Show Measurements.
Render measurements in Photoshop
The Vanishing Point measurements are invisible when viewing an image in the Photoshop document window, even though the measurements are preserved in the image and appear whenever you launch Vanishing Point. Measurements can be rendered so when you finish working in Vanishing Point, they're visible in the Photoshop document window. The rendered measurements are raster not vector.
- Open the Vanishing Point menu and choose Render Measurements To Photoshop.
The Render Measurements To Photoshop command must be chosen for each Vanishing Point session.
Create a new layer for your Vanishing Point results if you plan to render the measurements to Photoshop. This keeps the measurements on a separate layer from the main image.
Adobe also recommends

Twitter™ and Facebook posts are not covered under the terms of Creative Commons.
Legal Notices | Online Privacy Policy
Liquify filter overview
Liquify filter enhancements | Creative Cloud only
Applying Liquify as a smart filter | Creative Cloud only
Distortion tools
Distort an image
Freeze and thaw areas
Work with meshes
Work with backdrops
Reconstruct distortions
To the top
Liquify filter overview
The Liquify filter lets you push, pull, rotate, reflect, pucker, and bloat any area of an image. The distortions you create can be subtle or drastic, which makes the Liquify command a powerful tool for retouching images as well as creating artistic effects. The Liquify filter can be applied to 8-bits-per-channel or 16-bits per-channel images.

Distorting an image using the Liquify filter
Tools, options, and an image preview for the Liquify filter are available in the Liquify dialog box. To display the dialog box, choose Filter > Liquify. In Photoshop CC and CS6, select Advanced Mode to access more options.
Using the Liquify filter to fix imperfections

text_image
123Professional photographer and educator, Eddie Tapp, walks you through the basic tools and options of the Liquify filter as he fixes imperfections in a clothing photo.... Read More
http://adobe.ly/y6JXza

by Eddie Tapp, Software
Cinema for Photographers
Contribute your expertise to Adobe Community Help
Magnify or reduce the preview image
- Select the Zoom tool in the Liquify dialog box, and click or drag in the preview image to zoom in; hold down Alt (Windows) or Option (Mac OS), and click or drag in the preview image to zoom out. Alternatively, you can specify a magnification level in the Zoom text box at the bottom of the dialog box.
Navigate in the preview image
- Select the Hand tool in the Liquify dialog box, and drag in the preview image. Alternatively, hold down the spacebar with any tool selected, and drag in the preview image.
To the top
Liquify filter enhancements | Creative Cloud only
In the Creative Cloud version of Photoshop, the Liquify filter is significantly faster than previous versions. The Liquify filter now supports Smart Objects, including Smart Object video layers, and is applied as a smart filter.
Another enhancement to the Liquify filter is an added behavior for the Reconstruct tool. If you hold down the alt (Windows) or Option (Mac OS) key while dragging the tool across a warp, the Reconstruct tool smooths a warp rather than scaling back or removing it.
To the top
Applying Liquify as a smart filter | Creative Cloud only
The Liquify filter supports Smart Objects, including Smart Object video layers, and is applied as a smart filter. When applying the Liquify filter to a Smart Object, meshes are now automatically saved into your document. Meshes applied to Smart Objects are compressed and re-editable when reapplying the Liquify filter. Keep in mind that the embedded meshes, even compressed ones, increase the file size.
To apply the Liquify filter as a smart filter:
- In the Layers panel, select a Smart Object layer.
- Choose Filter > Liquify.
To the top
Distortion tools
Several tools in the Liquify dialog box distort the brush area when you hold down the mouse button or drag. The distortion is concentrated at the center of the brush area, and the effect intensifies as you hold down the mouse button or repeatedly drag over an area.
Forward Warp tool ?
Pushes pixels forward as you drag.
Shift-click with the Warp tool, the Push Left tool, or the Mirror tool to create the effect of dragging in a straight line from the previous point you clicked.
Reconstruct tool
Reverses the distortion you've already added, as you hold down the mouse button and drag.
Twirl Clockwise tool ?
Rotates pixels clockwise as you hold down the mouse button or drag. To twirl pixels counterclockwise, hold down Alt (Windows) or Option (Mac OS) as you hold down the mouse button or drag.
Pucker tool

Moves pixels toward the center of the brush area as you hold down the mouse button or drag.
Bloat tool

Moves pixels away from the center of the brush area as you hold down the mouse button or drag.
Push Left tool ?
Moves pixels to the left when you drag the tool straight up (pixels move to the right if you drag down). You can also drag clockwise around an object to increase its size, or drag counterclockwise to decrease its size. To push pixels right when you drag straight up (or to move pixels left when you drag down), hold down Alt (Windows) or Option (Mac OS) as you drag.
(CS5) Mirror tool
Copies pixels to the brush area. Drag to mirror the area perpendicular to the direction of the stroke (to the left of the stroke). Alt-drag (Windows) or Option-drag (Mac OS) to mirror the area in the direction opposite to that of the stroke (for example, the area above a downward stroke). Usually, Alt-dragging or Option-dragging gives better results when you have frozen the area you want to reflect. Use overlapping strokes to create an effect similar to a reflection in water.
(CS5) Turbulence tool
Smoothly scrambles pixels. It is useful for creating fire, clouds, waves, and similar effects.
Distortion tool options
In the tool options area of the dialog box, set the following options:
Brush Size Sets the width of the brush you'll use to distort the image.
Brush Density Controls how a brush feathers at the edge. An effect is strongest in the center of the brush and lighter at the edge.
Brush Pressure Sets the speed at which distortions are made when you drag a tool in the preview image. Using a low brush pressure makes changes occur more slowly, so it's easier to stop them at exactly the right moment.
Brush Rate Sets the speed at which distortions are applied when you keep a tool (such as the Twirl tool) stationary in the preview image. The higher the setting, the greater the speed at which distortions are applied.
(CS5) Turbulent Jitter Control how tightly the Turbulence tool scrambles pixels.
(CS5) Reconstruct Mode Used for the Reconstruct tool, the mode you choose determines how the tool reconstructs an area of the preview image.
Stylus Pressure Uses pressure readings from a stylus tablet. (This option is available only when you are working with a stylus tablet.) When selected, the brush pressure for the tools is the stylus pressure multiplied by the Brush Pressure value.
To the top
Distort an image
Note: If a type layer or a shape layer is selected, you must rasterize the layer before proceeding, making the type or shape editable by the Liquify filter. To distort type without rasterizing the type layer, use the Warp options for the Type tool.
- Select the layer you want to distort. To change only part of the current layer, select that area.
- Choose Filter > Liquify.
- Freeze areas of the image that you don't want to alter.
- Choose any of the liquify tools to distort the preview image. Drag in the preview image to distort the image.
-
After distorting the preview image, you can:
-
Use the Reconstruct tool for Reconstruct Options to fully or partially reverse the changes.
-
Use other tools to change the image in new ways.
-
Do one of the following:
-
Click OK to close the Liquify dialog box and apply the changes to the active layer.
- Click Cancel to close the Liquify dialog box without applying changes to the layer.
- Hold down Alt (Windows) or Option (Mac OS) and click Reset to revert all distortions to the preview image and reset all options to their defaults.

You can use the Edit > Fade command to create additional effects.
To the top
Freeze and thaw areas
You can freeze areas that you don't want to modify or thaw frozen areas to make them editable again. You can also invert both frozen and thawed areas.
Freeze areas
By freezing areas of the preview image, you protect those areas from changes. Frozen areas are covered by a mask that you paint using the Freeze Mask tool 📋. You can also use an existing mask, selection, or transparency to freeze areas. You can view the mask in the preview image to help you apply distortions.
Using the Freeze Mask tool Select the Freeze Mask tool and drag over the area you want to protect. Shift-click to freeze in a straight line between the current point and the previously clicked point.
Using an existing selection, mask, or transparency channel If you're applying the Liquify filter to a layer with a selection, layer mask, transparency, or alpha channel, choose Selection, Layer Mask, Transparency, or Quick Mask from any of the five icons' pop-up menu in the Mask Options area of the dialog box. This determines how areas of the preview image are frozen or masked.
Freezing all thawed areas Click Mask All in the Mask Options area of the dialog box.
Inverting thawed and frozen areas Click Invert All in the Mask Options area of the dialog box.
Showing or hiding frozen areas Select or deselect Show Mask in the View Options area of the dialog box.
Changing the color of frozen areas Choose a color from the Mask Color pop-up menu in the View Options area of the dialog box.
Mask options with the Liquify filter
When you have an existing selection, transparency, or mask in an image, that information is retained when the Liquify dialog box opens. You can choose one of the following mask options:
Replace Selection ?
Shows the selection, mask, or transparency in the original image.
Add To Selection
Shows the mask in the original image, so that you can add to the selection using the Freeze Mask tool. Adds selected pixels in channel to the current frozen area.
Subtract From Selection
Subtracts pixels in channel from the current frozen area.
Intersect With Selection
Uses only pixels that are selected and currently frozen.
Invert Selection
Uses selected pixels to invert the current frozen area.
Note: If a selection exists, the filter limits the preview and processing to the rectangular area containing that selection. (For rectangular marquee selections, the selected area and preview are identical, so choosing Selection from the mask option menus above has no effect.)
Thaw areas
- To thaw frozen areas so they're editable, do any of the following:
- Select the Thaw Mask tool ☐, and drag over the area. Shift-click to thaw in a straight line between the current point and the previously clicked point.
• To thaw all frozen areas, click the None button in the Mask Options area of the dialog box. - To invert frozen and thawed areas, click Invert All in the Mask Options area of the dialog box.
To the top
Work with meshes
Using a mesh helps you see and keep track of distortions. You can choose the size and color of a mesh, and save the mesh from one image and apply it to other images.
- To show a mesh, select Show Mesh in the View Options area of the dialog box, and choose a mesh size and mesh color.
• To only show a mesh, select Show Mesh and then deselect Show Image. - To save a distortion mesh, after distorting the preview image, click Save Mesh. Specify a name and location for the mesh file, and click Save.
- To apply a saved distortion mesh, click Load Mesh, select the mesh file you want to apply, and click Open. If the image and distortion mesh aren't the same size, the mesh is scaled to fit the image.
- (CC, CS6) To apply the last saved distortion mesh, click Load Last Mesh.
• (Creative Cloud) Meshes are automatically saved in your document. Meshes applied to Smart Objects are compressed and re-editable.
Note: (Creative Cloud) Embedded meshes, even compressed ones, increase file size.
To the top
Work with backdrops
You can choose to show only the active layer in the preview image, or you can show additional layers in the preview image as a backdrop. Using the Mode options, you can position the backdrop in front of or behind the active layer to keep track of your changes, or to line up a distortion with another distortion made in a different layer.
Note: Only the active layer is distorted, even if other layers are displayed.
Showing the backdrop Select Show Backdrop, and then choose Background from the Use menu and an option from the Mode menu.
Showing changes to the target layer without showing the backdrop Select All Layers from the Use menu. Setting the Opacity to 0 shows only the target layer with the full effects of the Liquify filter. Setting the Opacity to a higher value shows less of the Liquify filter's effect on the target layer.
Changing the blending between the target layer and the backdrop Specify a Opacity value.
Determining how the target layer and the backdrop are combined in the image preview Choose an option from the Mode menu.
Hiding the backdrop Deselect Show Backdrop in the View Options area of the dialog box.
To the top
Reconstruct distortions
After you distort the preview image, you can use a variety of controls and reconstruction modes to reverse changes or redo the changes in new ways. Reconstructions can be applied two ways. You can apply a reconstruction to the entire image, smoothing out the distortion in unfrozen areas, or you can use the reconstruction tool to reconstruct specific areas. If you want to prevent reconstruction of distorted areas, you can use the Freeze Mask tool.
Reconstruction based on distortions in frozen areas.
A. Original image B. Distorted with frozen areas C. Reconstructed in Rigid mode (using button) D. Thawed, edges reconstructed in Smooth mode (using tool)
Reconstruct an entire image
- Do the following:
- (CC, CS6) Click Reconstruct in the Reconstruct Options area of the dialog box. Then, in the Revert Reconstruction dialog box, specify an amount and click OK.
- (CS5) Select a reconstruction mode from the Reconstruct Options area of the dialog box. Then, click Reconstruct in the Reconstruction Options area to apply the effect once. You can apply the reconstruction more than once to create a less distorted appearance.
Remove all distortions
- Click Restore All in the Reconstruct Option area of the dialog box. This removes distortions even in frozen areas.
Reconstruct part of a distorted image
- Freeze areas you want to keep distorted.
- Select the Reconstruct tool and specify brush options in the Tool Options area of the dialog box.
- (CS5 only) Choose an option from the Reconstruct Mode menu in the Tool Options area of the dialog box.
- Drag over the area you want to reconstruct. Pixels move more quickly at the brush center. Shift-click to reconstruct in a straight line between the current point and the previously clicked point.
(CS5 only) Repeat distortions sampled from a starting point
- After distorting the preview image, choose one of these reconstruction modes from the Mode menu in the Tool Options area of the dialog box.
- Select the Reconstruct tool, and drag from a starting point in the preview image.
This creates a copy of the distortion sampled at the starting point, much as the Clone tool does when you use it to paint a copy of an area. If there is no distortion, the effect is the same as using Revert mode. You can set new starting points and use the Reconstruct tool repeatedly to create a variety of effects.
(CS 5 only) Reconstruction modes
You can choose one of the following reconstruction modes:
Revert Scales back distortions uniformly without any kind of smoothing.
Rigid Maintains right angles in the pixel grid (as shown by the mesh) at the edges between frozen and unfrozen areas, sometimes producing near-discontinuities at the edges. This restores the unfrozen areas so that they approximate their original appearance. (To restore their original appearance, use Revert reconstruction mode.)
Stiff Acts like a weak magnetic field. At the edges between frozen and unfrozen areas, the unfrozen areas take on the distortions of the frozen areas. As the distance from frozen areas increases, the distortions lessen.
Smooth Propagates the distortions in frozen areas throughout unfrozen areas, with smoothly continuous distortions.
Loose Produces effects similar to Smooth, with even greater continuity between distortions in frozen and unfrozen areas.
To adjust the intensity of a reconstruction mode, select it from the unlabeled pop-up menu above the Mode menu. As you adjust intensity, the image previews your changes.
(CS5 only) Additional modes for the Reconstruct tool
The Reconstruct tool has three additional modes that use the distortion at the point where you first clicked the tool (start point) to reconstruct the area over which you use the tool. Every time you click, you set a new start point; so, if you want to extend an effect from one start point, don't release the mouse button until you finish using the Reconstruct tool.
Displace Reconstructs unfrozen areas to match the displacement at the start point for the reconstruction. You can use Displace to move all or part of the preview image to a different location. If you click and gradually spiral out from the start point, you displace or move a portion of the image to the area you brush over.
Amplitwist Reconstructs unfrozen areas to match the displacement, rotation, and overall scaling that exist at the start point.
Affine Reconstructs unfrozen areas to match all distortions that exist at the start point, including displacement, rotation, horizontal and vertical scaling, and skew.
Adobe also recommends
• Video on "Smart Object Support for Blur Gallery and Liquify"

Twitter ^™ and Facebook posts are not covered under the terms of Creative Commons.
Legal Notices | Online Privacy Policy
Transform freely
To the top
Transform freely
The Free Transform command lets you apply transformations (rotate, scale, skew, distort, and perspective) in one continuous operation. You can also apply a warp transformation. Instead of choosing different commands, you simply hold down a key on your keyboard to switch between transformation types.
Note: If you are transforming a shape or entire path, the Transform command becomes the Transform Path command. If you are transforming multiple path segments (but not the entire path), the Transform command becomes the Transform Points command.
- Select what you want to transform.
-
Do one of the following:
-
Choose Edit > Free Transform.
- If you are transforming a selection, pixel-based layer, or selection border, choose the Move tool ⬆. Then select Show Transform Controls in the options bar.
-
If you are transforming a vector shape or path, select the Path Selection tool. Then select Show Transform Controls in the options bar.
-
Do one or more of the following:
-
To scale by dragging, drag a handle. Press Shift as you drag a corner handle to scale proportionately.
- To scale numerically, enter percentages in the Width and Height text boxes in the options bar. Click the Link icon 8 to maintain the aspect ratio.
- To rotate by dragging, move the pointer outside the bounding border (it becomes a curved, two-sided arrow), and then drag. Press Shift to constrain the rotation to 15^ increments.
- To rotate numerically, enter degrees in the rotation text box in the options bar.
- To distort relative to the center point of the bounding border, press Alt (Windows) or Option (Mac OS), and drag a handle.
- To distort freely, press Ctrl (Windows) or Command (Mac OS), and drag a handle.
- To skew, press Ctrl+Shift (Windows) or Command+Shift (Mac OS), and drag a side handle. When positioned over a side handle, the pointer becomes a white arrowhead with a small double arrow.
- To skew numerically, enter degrees in the H (horizontal skew) and V (vertical skew) text boxes in the options bar.
- To apply perspective, press Ctrl+Alt+Shift (Windows) or Command+Option+Shift (Mac OS), and drag a corner handle. When positioned over a corner handle, the pointer becomes a gray arrowhead.
- To warp, click the Switch Between Free Transform And Warp Modes button in the options bar. Drag control points to manipulate the shape of the item or choose a warp style from the Warp pop-up menu in the options bar. After choosing from the Warp pop-up menu, a square handle is available for adjusting the shape of the warp.
- To change the reference point, click a square on the reference point locator in the options bar.
- To move an item, enter values for the new location of the reference in the X (horizontal position) and Y (vertical position) text boxes in the options bar. Click the Relative Positioning button to specify the new position in relation to the current position.
To undo the last handle adjustment, choose Edit>&Undo.
-
Do one of the following:
-
Press Enter (Windows) or Return (Mac OS), click the Commit button √ in the options bar, or double-click inside the transformation marquee.
- To cancel the transformation, press Esc or click the Cancel button ⓝ the options bar.
Note: When you transform a bitmap image (versus a shape or path), the image becomes slightly less sharp each time you commit a transformation; therefore, performing multiple commands before applying the cumulative transformation is preferable to applying each transformation separately.
Adobe also recommends

BY-NC-SA
Twitter™ and Facebook posts are not covered under the terms of Creative Commons.
Legal Notices | Online Privacy Policy
About Photomerge
Take pictures for Photomerge
Create a Photomerge composition
Create 360-degree panoramas (Photoshop Extended)
Book excerpt: Panoramas made easy

text_image
123Quickly master Photomerge with this excerpt from the Adobe Photoshop Book for Digital Photographers.... Read More
http://goo.gl/xhWmG

by Scott Kelby
http://www.peachpit.com/au...
Contribute your expertise to Adobe Community Help
To the top
About Photomerge
The Photomerge™ command combines several photographs into one continuous image. For example, you can take five overlapping photographs of a city skyline, and then merge them into a panorama. The Photomerge command can assemble photos that are tiled horizontally as well as vertically.
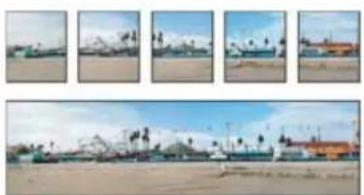
natural_image
Panoramic view of a coastal area with boats and palm trees under clear sky (no visible text or symbols)Source images (top), and completed Photomerge composition (bottom)
To create Photomerge compositions, choose File > Automate > Photomerge and then choose your source files and then specify layout and blending options. Your option choice depends on how you photographed the panorama. For example, if you've photographed images for a 360 degree panorama, the Spherical layout option is recommended. This option stitches the images and transforms them as if they were mapped to the inside of a sphere, which simulates the experience of viewing a 360 degree panorama.
For a video overview of Photomerge, see www.adobe.com/go/vid0013.
To the top
Take pictures for Photomerge
Your source photographs play a large role in panoramic compositions. To avoid problems, follow these guidelines when taking pictures for use with Photomerge:
Overlap images sufficiently Images should overlap by approximately 40%. If the overlap is less, Photomerge may not be able to automatically
assemble the panorama. However, keep in mind that the images shouldn't overlap too much. If images overlap by 70% or more, Photomerge may not be able to blend the images. Try to keep the individual photos at least somewhat distinct from each other.
Use one focal length If you use a zoom lens, don't change the focal length (zoom in or out) while taking your pictures.
Keep the camera level Although Photomerge can process slight rotations between pictures, a tilt of more than a few degrees can result in errors when the panorama is assembled. Using a tripod with a rotating head helps maintain camera alignment and viewpoint.
Stay in the same position Try not to change your position as you take a series of photographs, so that the pictures are from the same viewpoint. Using the optical viewfinder with the camera held close to the eye helps keep the viewpoint consistent. Or try using a tripod to keep the camera in the same place.
Avoid using distortion lenses Distortion lenses can interfere with Photomerge. However, the Auto option adjusts for images taken with fish-eye lenses.
Maintain the same exposure Avoid using the flash in some pictures and not in others. The blending features in Photomerge helps smooth out different exposures, but extreme differences make alignment difficult. Some digital cameras change exposure settings automatically as you take pictures, so you may need to check your camera settings to be sure that all the images have the same exposure.
To the top
Create a Photomerge composition
-
Do one of the following:
-
Choose File > Automate > Photomerge.
- In Adobe® Bridge, choose Tools > Photoshop > Photomerge from the Bridge menu bar. Skip to step 5.
Note: In Bridge, choosing the Photomerge command uses all images currently displayed in Bridge. If you only want specific images used, select them before choosing the Photomerge command.
- Under Source Files in the Photomerge dialog box, choose one of the following from the Use menu:
Files Generates the Photomerge composition using individual files.
Folders Uses all the images stored in a folder to create the Photomerge composition.
-
Specify which images to use by doing one of the following:
-
To select image files or a folder of images, click the Browse button and navigate to the files or folder.
- To use the images currently open in Photoshop, click Add Open Files.
-
To remove images from the Source File list, select the file and click the Remove button.
-
Select a Layout option:
For a video that shows the effect of each Layout option, see www.layersmagazine.com/photoshop-cs4-photomerge.html.
Auto Photoshop analyzes the source images and applies either a Perspective, Cylindrical, and Spherical layout, depending on which produces a better photomerge.
Perspective Creates a consistent composition by designating one of the source images (by default, the middle image) as the reference image. The other images are then transformed (repositioned, stretched or skewed as necessary) so that overlapping content across layers is
matched.
Cylindrical Reduces the "bow-tie" distortion that can occur with the Perspective layout by displaying individual images as on an unfolded cylinder. Overlapping content across files is still matched. The reference image is placed at the center. Best suited for creating wide panoramas.
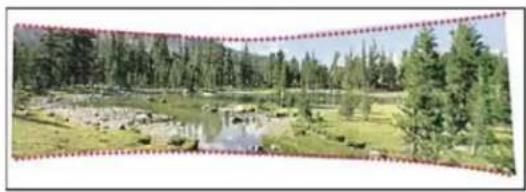
natural_image
Scenic landscape with a pond, green trees, and distant hills under a clear sky (no text or symbols visible)A
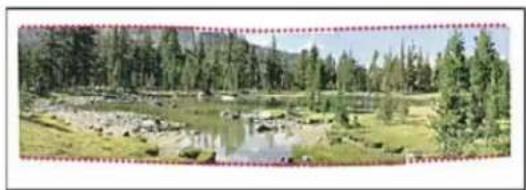
natural_image
Scenic landscape with a calm river, surrounded by dense green trees and distant hills (no text or symbols visible)B
Applying Cylindrical Mapping
Spherical Aligns and transforms the images as if they were for mapping the inside of a sphere. If you have taken a set of images that cover 360 degrees, use this for 360 degree panoramas. You might also use Spherical to produce nice panoramic results with other file sets.
Collage Aligns the layers and matches overlapping content and transforms (rotate or scale) any of the source layers.
Reposition Aligns the layers and matches overlapping content, but does not transform (stretch or skew) any of the source layers.
- Select any of the following options:
Blend Images Together Finds the optimal borders between the images and create seams based on those borders, and to color match the images. With Blend Images Together turned off, a simple rectangular blend is performed. This may be preferable if you intend to retouch the blending masks by hand.
Vignette Removal Removes and performs exposure compensation in images that have darkened edges caused by lens flaws or improper lens shading.
Geometric Distortion Correction Compensates for barrel, pincushion, or fisheye distortion.
- Click OK.
Photoshop creates one multi-layer image from the source images, adding layer masks as needed to create optimal blending where the images overlap. You can edit the layer masks or add adjustment layers to further fine tune the different areas of the panorama.
To replace empty areas around image borders, use a content-aware fill. (See Content-aware, pattern, or history fills.)
To the top
Create 360-degree panoramas (Photoshop Extended)
Combine Photomerge with 3D features to create a 360-degree panorama. First, you stitch together the images to create a panorama; then you use the Spherical Panorama command to wrap the panorama so it's continuous.
Be sure to photograph a full circle of images with sufficient overlap. Photographing with a pano head on a tripod helps produce better results.
For a video on creating a 360-degree panorama, see http://tv.adobe.com/#vi+f1577v1001.
- Choose File > Automate > Photomerge.
- In the Photomerge dialog box, add the images you want to use.
Do not include images that cover the top (zenith) or bottom (nadir) of the scene. You'll add these images later.
- Select Spherical for the Layout.
If you photographed with a fisheye lens, select the Auto layout and Geometric Distortion Correction. If Photoshop cannot automatically identify your lens, download the free Adobe Lens Profile Creator from the Adobe website.
-
(Optional) Select Vignette Removal or Geometric Distortion for the Lens Correction.
-
Click OK.
There might be transparent pixels on the edges of the panoramic image. These can prevent the final 360 panorama from wrapping correctly. You can either crop the pixels out or use the Offset filter to identify and remove the pixels.
-
Choose 3D > New Shape From Layer > Spherical Panorama.
-
(Optional) Manually add the top and bottom images into the sphere. You could also paint out any remaining transparent pixels in the 3D spherical panorama layer.
Adobe also recommends
Twitter™ and Facebook posts are not covered under the terms of Creative Commons.
Legal Notices | Online Privacy Policy
Resize images and protect content Preserve visual content when scaling images Specify content to protect when scaling
To the top
Resize images and protect content
Content-Aware Scale resizes an image without changing important visual content such as people, buildings, animals, and so forth. While normal scaling affects all pixels uniformly when resizing an image, content-aware scaling mostly affects pixels in areas that don't have important visual content. Content-Aware Scale lets you upscale or downscale images to improve a composition, fit a layout, or change the orientation. If you want to use some normal scaling when resizing your image, there is an option for specifying a ratio of content-aware scaling to normal scaling.
If you want to preserve specific areas when scaling an image, Content-Aware Scale lets you use an alpha channel to protect content during resizing.
Content-Aware Scaling works on layers and selections. Images can be in RGB, CMYK, Lab, and Grayscale color modes as well as all bit depths. Content-Aware Scaling doesn't work on adjustment layers, layer masks, individual channels, Smart Objects, 3D layers, Video layers, multiple layers simultaneously, or layer groups.

natural_image
Exterior view of a large arched gateway structure with people walking nearby under a cloudy sky (no signage or text visible)
natural_image
Exterior view of a large arched gateway structure under a cloudy sky (no signage or text visible)
natural_image
Exterior view of a large arched gateway structure with people visible on the ground (no signage or text)A. Original image B. Scaled narrower C. Scaled narrower, using content-aware scaling
For a video on content-aware scaling, see www.adobe.com/go/lrvid4120_ps. (Discussion of this feature begins at the four-minute mark.)
To the top
Preserve visual content when scaling images
- (Optional) Choose Select > All if you're scaling a Background layer.
- Choose Edit > Content-Aware Scale.
- Specify any of the following in the options bar:
Reference Point Location Click a square on the reference point locator to specify the fixed point around which the image is scaled. By default this point is at the center of the image.
Use Relative Positioning For Reference Point Click the button to specify the new position of the reference point in relation to its current position.
Reference Point Position Positions the reference point at the specific location. Enter X-axis and Y-axis pixel dimensions.
Scaling Percentage Specifies the image scaling as a percentage of the original size. Enter a percentage for the width (W) and height (H). If desired, click Maintain Aspect Ratio 0.
Amount Specifies the ratio of content-aware scaling to normal scaling. Specify a percentage for content-aware scaling by typing in the text box or clicking the arrow and moving the slider.
Protect Chooses an alpha channel that specifies an area to protect.
Protect Skin Tones Attempts to preserve regions that contain skin-tones.
-
Drag a handle on the bounding box to scale the image. Press Shift as you drag a corner handle to scale proportionately. When positioned over a handle, the pointer becomes a double arrow.
-
Click either Cancel Transform Ⓧ or Commit Transform
To the top
Specify content to protect when scaling
-
Make a selection around the content you want to protect and then, in the Channels panel, click Save Selection As Channel ?
-
(Optional) Choose Select > All if you're scaling a Background layer.
-
Choose Edit > Content-Aware Scale.
-
In the options bar, choose the alpha channel you created.
-
Drag a handle on the bounding border to scale the image.

Twitter™ and Facebook posts are not covered under the terms of Creative Commons.
Legal Notices | Online Privacy Policy
Drawing and painting
Vector Shapes
Infinite Skills (Oct. 7, 2012)
video-tutorial
Drawing shapes in CS6
New shape, type, and design tools
Lynda.com (May. 7, 2012)
video-tutorial
Genuine vector shapes, type styles, and more.
Modify rectangles and rounded rectangles Set shape stroke options
To the top
Modify rectangles and rounded rectangles
You can adjust dimensions and placement of a rectangle. In Photoshop CC, you can also modify the corner radii of rounded rectangle shapes after they have been drawn. Each corner can be adjusted independently and adjustments can be simultaneously made to rectangles on multiple layers.
Note: If you select multiple rectangles, the values for the top-most rectangle are displayed in the Properties panel. The values you type are applied to all selected rectangles.
- Use the Path Selection Tool to select one or more rectangles or rounded rectangles.
- To change the dimensions of the rectangle, type values in the W or H text boxes in the Properties panel or options bar.
If you do not want to constrain the ratio of the width and height, click the link icon in the options bar to unlink the width and height.
-
To change the placement of the rectangle, do any of the following:
-
Move the contents of the layer using the Move tool.
- Drag the rectangle using the Path Selection tool.
-
In the Properties panel, type the pixel coordinates into the X and Y text boxes.
-
In the Properties panel, do any of the following to modify the corner radius:
-
Type values in the text boxes to adjust the corner radii individually.
- Type a value in the Radius text box to adjust all corners to the same radius.

In the Properties panel, you can also place the pointer over a corner icon and scrub left or right to enter a radius value.
To the top
Set shape stroke options
- Use the Path Selection tool to select the shape whose path you want to modify.
- In the Properties panel or the tool options bar, click the Set Shape Stroke Type menu icon to open the Stroke Options panel.
-
In the Stroke Options panel, do any of the following:
-
Choose the type of stroke you want.
- Click the Align icon and choose an option to specify the position of the stroke relative to its path.
- Click the Caps icon and choose a cap style to specify the appearance of both ends of a path:
Butt cap Creates squared ends that abut (stop at) the endpoints.
Round cap Creates semicircular ends that extend half the stroke width beyond the endpoints.
Projecting cap Creates squared ends that extend half the stroke width beyond the endpoints. This option makes the stroke
weight extend evenly in all directions around the path.
Note: Keep in mind that the caps are not visible unless the path is opened. Also, cap styles are easier to see at thicker stroke weights.
- Click the Corner icon to the appearance of the stroke at corner points:
Miter join Creates pointed corners that extend beyond the endpoint when the miter's length is within the miter limit.
Round join Creates rounded corners that extend half the stroke width beyond the endpoints.
Bevel join Creates squared corners that abut the endpoints.
Note: Like caps, miters are easier to see at thicker stroke weights.
Save stroke settings
After specifying the shape stroke options in the Stroke Options panel, you can save your newly created stroke type for resue.
- Click the gear icon in the upper-right corner of the Stroke Options panel and choose Save Stroke.
Copy and paste shape stroke settings
After specifying shape stroke options, you can apply the settings to another shape by copying and pasting.
- Click the gear icon in the upper-right corner of the Stroke Options panel and then, choose Copy Stroke Details.
- Select the shape you want to modify.
- In the Properties panel or tool options bar, click the Set Shape Stroke Type menu icon to open the Stroke Options panel.
- Click the gear icon in the upper-right corner of the Stroke Options panel and choose Paste Stroke Details.
For more information
- Vector Shapes tutorial
Twitter™ and Facebook posts are not covered under the terms of Creative Commons.
Legal Notices | Online Privacy Policy
Understanding shapes and paths Drawing modes
To the top
Understanding shapes and paths
Drawing in Adobe Photoshop involves creating vector shapes and paths. In Photoshop, you can draw with any of the shape tools, the Pen tool, or the Freeform Pen tool. Options for each tool are available in the options bar.
Before you begin drawing in Photoshop, you must choose a drawing mode from the options bar. The mode you choose to draw in determines whether you create a vector shape on its own layer, a work path on an existing layer, or a rasterized shape on an existing layer.
Vector shapes are lines and curves you draw using the shape or pen tools. (See Drawing shapes and Drawing with the Pen tools.) Vector shapes are resolution-independent—they maintain crisp edges when resized, printed to a PostScript printer, saved in a PDF file, or imported into a vector-based graphics application. You can create libraries of custom shapes and edit a shape's outline (called a path) and attributes (such as stroke, fill color, and style).
Paths are outlines that you can turn into selections, or fill and stroke with color. You can easily change the shape of a path by editing its anchor points.
A work path is a temporary path that appears in the Paths panel and defines the outline of a shape.
You can use paths in several ways:
- Use a path as a vector mask to hide areas of a layer. (See About layer and vector masks.)
- Convert a path to a selection. (See Convert paths to selection borders.)
- Fill or stroke a path with color. (See Fill paths with color.)
Designate a saved path as a clipping path to make part of an image transparent when exporting the image to a page-layout or vector-editing application. (See Create transparency using image clipping paths.)
To the top
Drawing modes
When you work with the shape or pen tools, you can draw in three different modes. You choose a mode by selecting an icon in the options bar when you have a shape or pen tool selected.
Shape Layers Creates a shape on a separate layer. You can use either the shape tools or the pen tools to create shape layers. Because they are easily moved, resized, aligned, and distributed, shape layers are ideal for making graphics for web pages. You can choose to draw multiple shapes on a layer. A shape layer consists of a fill layer that defines the shape color and a linked vector mask that defines the shape outline. The outline of a shape is a path, which appears in the Paths panel.
Paths Draws a work path on the current layer that you can then use to make a selection, create a vector mask, or fill and stroke with color to create raster graphics (much as you would using a painting tool). A work path is temporary unless you save it. Paths appear in the Paths panel.
Fill Pixels Paints directly on a layer—much as a painting tool does. When you work in this mode, you're creating raster images—not vector graphics. You work with the shapes you paint just as you do with any raster image. Only the shape tools work in this mode.
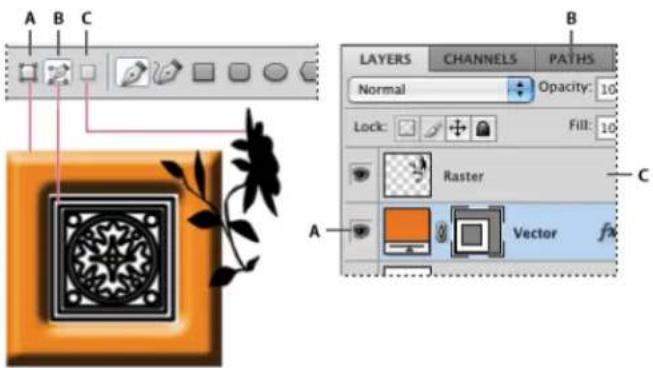
text_image
A B C LAYERS CHANNELS PATHS Normal Opacity: 16 Lock Fill: 10 Raster Vector fx A CDrawing options
A. Shape Layers B. Paths C. Fill Pixels
More Help Topics

Twitter™ and Facebook posts are not covered under the terms of Creative Commons.
Legal Notices | Online Privacy Policy
Create a shape on a shape layer
Creating, editing, and working with shape layers
Draw multiple shapes in a layer
Draw a wheel shape
Draw a custom shape
Save a shape or path as a custom shape
Create a rasterized shape
Shape tool options
Edit shapes

The shape tools provide an easy way to create buttons, navigation bars, and other items used on web pages. For an overview of all drawing features in Photoshop, see About drawing.
To the top
Create a shape on a shape layer
- Select a shape tool or a Pen tool. In Photoshop CC or CS6, make sure Shape is chosen from the menu in the options bar. In CS5, make sure that the Shape Layers button is selected.
- To choose the color of the shape, click the color swatch in the options bar, and then choose a color from the Color Picker.
- (Optional) Set tool options in the options bar. Click the inverted arrow next to the shape buttons to view additional options for each tool. (See Shape tool options.)
- (Optional) To apply a style to the shape, select a preset style from the Style pop-up menu in the options bar. (See Apply preset styles.)
-
Drag in your image to draw a shape:
-
To constrain a rectangle or rounded rectangle to a square, to constrain an ellipse to a circle, or to constrain the line angle to a multiple of 45 degrees, hold down Shift.
- To draw from the center out, position the pointer where you want the center of the shape to be, press Alt (Windows) or Option (Mac OS), and then drag diagonally to any corner or edge until the shape is the desired size.

Drawing from the corner (left) and drawing from the center (right)
Note: Drawing from the center out is the default behavior of the Star tool in Illustrator and the Polygon tool in Illustrator and Photoshop.
To the top
Photoshop team member Jeanne Rubbo shows you how to create, edit, and work with shape layers in a series of informative videos. Learn how to:
- Create a shape layer
• Edit the stroke and fill of a shape layer
• Edit multiple shape layers - Drag shape paths between layers
- Combine shapes
• Work with subpaths - Order subpaths
- Align subpaths
For more information, see Drawing and type tools gallery.
To the top
Draw multiple shapes in a layer
You can draw separate shapes on a layer, or use the Add, Subtract, Intersect, or Exclude options to modify the current shape on a layer.
- Select the layer to which you want to add shapes.
- Select a drawing tool and set tool-specific options (see Shape tool options).
- Choose one of the following in the options bar:
Add To Shape Area Adds the new area to the existing shapes or path.
Subtract From Shape Area Removes the overlapping area from the existing shapes or path.
Intersect Shape Areas Restricts the area to the intersection of the new area and the existing shapes or path.
Exclude Overlapping Shape Areas Excludes the overlap area in the consolidated new and existing areas.
- Draw in the image. You can easily switch between drawing tools by clicking a tool button in the options bar.
To the top
Draw a wheel shape
You cut out a shape within an existing shape so that the layers underneath show through. This procedure shows you how to create a doughnut shape, but you can use this technique with any combination of the shape tools, including custom shapes.
- Select the Ellipse tool in the toolbox. It may be hidden by one of the other shape tools or the Line tool.
- In the options bar at the top of the work area, select the Shape Layer button ☐.
- Drag in the document window to draw the shape. Hold down the Shift key while dragging to constrain the ellipse to a circle.
-
In the options bar, select the Subtract From Shape Area button ☐.
-
Drag within the new shape to create the cutout. When you release the mouse, the image underneath the new shape shows through.
-
To reposition either shape, click the Path Selection tool in the toolbox (it may be hidden by the Direct Selection tool), and select the path. Drag it to its new location or use the arrow keys on the keyboard to nudge it a pixel at a time.

Shift-click to select more than one path.
To the top
Draw a custom shape
You can draw custom shapes by using shapes from the Custom Shape pop-up panel, or save a shape or path to use as a custom shape.
-
Select the Custom Shape tool ⭐. (If the tool isn't visible, hold down the Rectangle tool near the bottom of the toolbox.)
-
Select a shape from the Custom Shape pop-up panel in the options bar.
If you don't find a shape you want in the panel, click the arrow in the upper right corner of the panel, and choose a different category of shapes. When asked to replace current shapes, click either Replace to view only the shapes in the new category or Append to add to the shapes already displayed.
- Drag in your image to draw the shape.
To the top
Save a shape or path as a custom shape
-
In the Paths panel, select a path—either a vector mask for a shape layer, a work path, or a saved path.
-
Choose Edit > Define Custom Shape, and enter a name for the new custom shape in the Shape Name dialog box. The new shape appears in the Shape pop-up panel in the options bar.
-
To save the new custom shape as part of a new library, select Save Shapes from the pop-up panel menu.
For more information, see Work with the Preset Manager.
To the top
Create a rasterized shape
When you create a rasterized shape, you're drawing and rasterizing a shape and filling it with the foreground color. You cannot edit a rasterized shape as a vector object. Raster shapes are created using the current foreground color.
-
Select a layer. You cannot create a rasterized shape on a vector-based layer (for example, a type layer).
-
Select a shape tool, and click the Fill Pixels button ☐ in the options bar.
-
Set the following options in the options bar:
Mode Controls how the shape will affect the existing pixels in the image. (See Blending modes.)
Opacity Determines to what degree the shape will obscure or reveal the pixels beneath it. A shape with 1% opacity appears nearly transparent, while one with 100% opacity appears completely opaque.
Anti-Aliased Smooths and blends the edge pixels with the surrounding pixels.
-
Set additional tool-specific options. See Shape tool options.
-
Draw the shape.
To the top
Shape tool options
Each shape tool provides a unique subset of the options below. To access these options, click the arrow to the right of the row of shape buttons in the options bar.

text_image
Weight: 1 px Arrowheads Start End Width: 500% Length: 1000% Concavity: 0%Accessing shape tool options in the options bar (Line options shown)
Arrowheads Start And End Adds arrowheads to a line. Select the Line tool and then select Start to add an arrow to the beginning of the line; select End to add an arrow to the end of the line. Select both options to add arrows to both ends. The shape options appear in the pop-up dialog box. Enter values for Width and Length to specify the proportions of the arrowhead as a percentage of the line width (10% to 1000% for Width, and 10% to 5000% for Length). Enter a value for the concavity of the arrowhead (from -50% to +50%). The concavity value defines the amount of curvature on the widest part of the arrowhead, where the arrowhead meets the line.
Note: You can also edit an arrowhead directly using the vector selection and drawing tools.
Circle Constrains an ellipse to a circle.
Defined Proportions Renders a custom shape based on the proportions with which it was created.
Defined Size Renders a custom shape based on the size at which it was created.
Fixed Size Renders a rectangle, rounded rectangle, ellipse, or custom shape as a fixed shape based on the values you enter in the Width and Height text boxes.
From Center Renders a rectangle, rounded rectangle, ellipse, or custom shape from the center.
Indent Sides By Renders a polygon as a star. Enter a percentage in the text box to specify the portion of the star's radius taken up by the points. A 50% setting creates points that are half the total radius of the star; a larger value creates sharper, thinner points; a smaller value creates fuller points.
Proportional Renders a rectangle, rounded rectangle, or ellipse as a proportional shape based on the values you enter in the Width and Height text boxes.
Radius For rounded rectangles, specifies the corner radius. For polygons, specifies the distance from the center of a polygon to the outer points.
Sides Specifies the number of sides in a polygon.
Smooth Corners or Smooth Indents Renders a polygon with smooth corners or indents.
Snap To Pixels Snaps edges of a rectangle or rounded rectangle to the pixel boundaries.
Square Constrains a rectangle or rounded rectangle to a square.
Unconstrained Lets you set the width and height of a rectangle, rounded rectangle, ellipse, or custom shape by dragging.
Weight Determines width, in pixels, for the Line tool.

To change stroke width for other shape tools, choose Layer > Layer Style > Stroke. (See Apply or edit a custom layer style.)
To the top
Edit shapes
A shape is a fill layer linked to a vector mask. You can easily change the fill to a different color, a gradient, or a pattern by editing the shape's fill layer. You can also edit the shape's vector mask to modify the shape outline, and apply a style to the layer.
- To change the color of a shape, double-click the shape layer's thumbnail in the Layers panel, and choose a different color using the Color Picker.
- To fill a shape with a pattern or gradient, select the shape layer in the Layers panel and choose Layer > Layer Style > Gradient Overlay.
- To change stroke width, select the shape layer in the Layers panel, and choose Layer >Layer Style >Stroke.
- To modify the outline of a shape, click the shape layer's vector mask thumbnail in the Layers panel or Paths panel. Then change the shape using the Direct Selection and pen tools.
- To move a shape without changing its size or proportions, use the Move tool.
For more information, see Adjust path components and Transform freely.

BY-NC-SA
Twitter™ and Facebook posts are not covered under the terms of Creative Commons.
Legal Notices | Online Privacy Policy
About painting tools, presets, and options
Paint with the Brush tool or Pencil tool
Paint tool options
Selecting a cursor preference
To the top
About painting tools, presets, and options
Adobe Photoshop provides several tools for painting and editing image color. The Brush tool and the Pencil tool work like a traditional drawing tool applying color with brush strokes. Tools like the Eraser tool, Blur tool, and Smudge tool modify the existing colors in the image. In the options bar for each of these painting tools, you can set how color is applied to an image and choose from preset brush tips. See Painting tools gallery.
Brush and tool presets
You can save a set of brush options as a preset so you can quickly access brush characteristics you use frequently. Photoshop includes several sample brush presets. You can start with these presets and modify them to produce new effects. Many original brush presets are available for download on the web.
You can quickly choose presets from the Brush Preset picker in the options bar, which lets you temporarily modify the size and hardness of a brush preset.
Save tool presets when you want to store customized brush tip characteristics along with settings from the options bar such as opacity, flow, and color. To learn more about tool presets, see Create and use tool presets.
Brush tip options
Along with settings in the options bar, brush tip options control how color is applied. You can apply color gradually, with soft edges, with large brush strokes, with various brush dynamics, with different blending properties, and with brushes of different shapes. You can apply a texture with your brush strokes to simulate painting on canvas or art papers. You can also simulate spraying paint with an airbrush. You use the Brush panel to set brush tip options. See Brush panel overview.
If you work with a drawing tablet, you can control how color is applied using pen pressure, angle, rotation, or a stylus wheel. You set options for drawing tablets in the Brush panel and options bar.
To the top
Paint with the Brush tool or Pencil tool
The Brush tool and the Pencil tool paint the current foreground color on an image. The Brush tool creates soft strokes of color. The Pencil tool creates hard-edged lines.
Note: The Rotation tool rotates the canvas, which can facilitate easier painting. See Use the Rotate View tool.
-
Choose a foreground color. (See Choose colors in the toolbox.)
-
Select the Brush tool or Pencil tool
-
Choose a brush from the Brush Presets panel. See Select a preset brush.
-
Set tool options for mode, opacity, and so on, in the options bar.
-
Do one or more of the following:
-
Click and drag in the image to paint.
- To draw a straight line, click a starting point in the image. Then hold down Shift, and click an ending point.
- When using the Brush tool as an airbrush, hold down the mouse button without dragging to build up color.
To the top
Paint tool options
Set the following in the options bar. Options available vary with each tool.
Mode Sets the method for blending the color you paint with the underlying existing pixels. Available modes change with the currently selected tool. Paint modes are similar to layer blending modes. See Blending modes.
Opacity Sets the transparency of color you apply. As you paint over an area, the opacity does not exceed the set level no matter how many times you move the pointer over the area, until you release the mouse button. If you stroke over the area again, you apply additional color, equivalent to the set opacity. Opacity of 100 percent is opaque.
Flow Sets the rate at which color is applied as you move the pointer over an area. As you paint over an area, keeping the mouse button down, the amount of color builds up based on the flow rate, up to the opacity setting. For example, if you set the opacity to 33% and the flow to 33%, each time you move over an area, its color moves 33% toward the brush color. The total will not exceed 33% opacity unless you release the mouse button and stroke over the area again.
Press a single number key to set a tool's opacity in multiples of 10% (pressing 1 sets it to 10%; pressing 0 sets it to 100%). Press two number keys to set a specific opacity. To set Flow, press Shift and number keys.
Airbrush

Simulates painting with an airbrush. As you move the pointer over an area, paint builds up as you hold down the mouse button. Brush hardness, opacity, and flow options control how fast and how much the paint is applied. Click the button to turn on or off this option.
Auto erase (Pencil tool only) Paints the background color over areas containing the foreground color. Select the foreground color you want to erase and the background color you want to change to. (See Auto Erase with the Pencil tool.)
Tablet pressure buttons

Use stylus pressure to override opacity and size settings in the Brush panel.
To the top
Selecting a cursor preference
The painting tools have three possible cursors: the standard cursor (the icon from the toolbox), a cross hair +, and a cursor that matches the size and shape of the currently selected brush tip.
- Choose Edit > Preferences > Cursors (Windows) or Photoshop > Preferences > Cursors (Mac OS).
- Select the desired cursors in both the Painting Cursors area and the Other Cursors area. The sample cursors change to reflect your choices. For a Brush Tip cursor, choose a size and whether to include a cross hair in the cursor.
Normal Brush Tip restricts the cursor size to areas of the brush stroke that have 50% or more opacity.
- Full Size Brush Tip sizes the cursor to the entire area affected by the brush stroke. For soft brushes, this produces a larger cursor size than the Normal setting, to include the areas of the brush stroke with lighter opacity.
To combine different types of cursors, select Show Crosshair in Brush Tip or Show Only Crosshair While Painting. Or, for the Pen and Brush tools, press the Caps Lock to toggle between the standard cursor and the cross hair.
More Help Topics

Twitter™ and Facebook posts are not covered under the terms of Creative Commons.
Legal Notices | Online Privacy Policy
Creating and modifying brushes
Brush panel overview
Create a brush tip from an image
Create a brush and set painting options
Standard brush tip shape options
Bristle tip shape options
Erodible tip options | CC, CS6
Airbrush tip options | CC, CS6
Brush pose options | CC, CS6
Other brush options
Brush scattering
Clear brush options
You can create brushes that apply paint to images in a variety of ways. You select an existing preset brush, a brush tip shape, or create a unique brush tip from part of an image. You choose options from the Brush panel to specify how the paint is applied.
To the top
Brush panel overview
In the Brush panel, you can select preset brushes from the Brush Presets panel, but you can also modify existing brushes and design new custom brushes. The Brush panel contains the brush tip options that determine how paint is applied to an image.
The brush stroke preview at the bottom of the panel shows how paint strokes look with the current brush options.

text_image
BRUSH Brush Presets Brush Tip Shape Shape Dynamics Scattering Texture Dual Brush Color Dynamics Transfer Noise Wet Edges Airbrush Smoothing Protect Texture 19 65 19 25 25 25 36 36 36 36 36 36 36 14 24 Size 19 px Flip X Flip Y Angle: 0° Roundness: 100% Hardness 0% Spacing 1% EBrush panel with Brush Tip Shape options displayed
A. Locked B. Unlocked C. Selected brush tip D. Brush settings E. Brush stroke preview F. pop-up menu G. Brush tip shapes (available when Brush Tip Shape option is selected) H. Brush options
Display the Brush panel and brush options
- Choose Window > Brush. Or, select a painting, erasing, toning, or focus tool, and click the panel button ☐ on the left side of the options bar.
- Select an option set on the left side of the panel. The available options for the set appear on the right side of the panel.
Click the check box to the left of the option set to enable or disable the options without viewing them.

To the top
Create a brush tip from an image
- Using any selection tool, select the image area you want to use as a custom brush. The brush shape can be up to 2500 pixels by 2500 pixels in size.
When painting, you can't adjust the hardness of sampled brushes. To create a brush with sharp edges, set Feather to zero pixels. To create a brush with soft edges, increase the Feather setting.
Note: If you select a color image, the brush tip image is converted to grayscale. Any layer mask applied to the image doesn't affect the definition of the brush tip. - Choose Edit > Define Brush Preset.
- Name the brush, and click OK.
To the top
Create a brush and set painting options
- Select a painting, erasing, toning, or focus tool. Then choose Window > Brush.
- In the Brush panel, select a brush tip shape, or click Brush Presets to choose an existing preset.
-
Select Brush Tip Shape on the left side of the Brush panel, and set options.
-
To set other options for the brush, see the following topics:
-
Adding dynamic elements to brushes
• Determining the scattering in a stroke - Creating textured brushes
• Determine how a brush changes dynamically -
Drawing or painting with a graphics tablet
-
To lock brush tip shape attributes (retaining them if you select another brush preset), click the unlock icon 🔒. To unlock the tip, click the lock icon 🔒.
-
To save the brush for use later, choose New Brush Preset from the Brush panel menu.
Note: To save your new brush permanently or distribute it to other users, you must save the brush as part of a set of brushes. Choose Save Brushes from the Brush Presets panel menu, and then save to a new set or overwrite an existing set. If you reset or replace the brushes in the Brush Presets panel without saving it in a set, you could lose your new brush.
To the top
Standard brush tip shape options
For standard brush tips, you can set the following options in the Brush panel:
Size Controls the size of the brush. Enter a value in pixels or drag the slider.

Brush strokes with different diameter values
Use Sample Size Resets the brush to its original diameter. This option is available only if the brush tip shape was created by sampling pixels in an image.
Flip X Changes the direction of a brush tip on its x axis.
A

B

C
Flipping a brush tip on its x axis.
A. Brush tip in its default position B. Flip X selected C. Flip X and Flip Y selected
Flip Y Changes the direction of a brush tip on its y axis.
A
B
C
Flipping a brush tip on its y axis.
A. Brush tip in its default position B. Flip Y selected C. Flip Y and Flip X selected
Angle Specifies the angle by which an elliptical or sampled brush's long axis is rotated from horizontal. Type a value in degrees, or drag the horizontal axis in the preview box.

natural_image
Two identical brown wavy line symbols side by side on a light background (no text or labels)Angled brushes create a chiseled stroke
Roundness Specifies the ratio between the brush's short and long axes. Enter a percentage value, or drag the points in the preview box. A value of 100% indicates a circular brush, a value of 0% indicates a linear brush, and intermediate values indicate elliptical brushes.
natural_image
Two identical abstract decorative swirl patterns on a light background (no text or symbols)Adjusting roundness to compress a brush tip shape
Hardness Controls the size of the brush's hard center. Type a number, or use the slider to enter a value that is a percentage of the brush diameter. You can't change the hardness of sampled brushes.
natural_image
Two identical abstract zigzag line patterns on a light background, no text or symbols present.Brush strokes with different hardness values
Spacing Controls the distance between the brush marks in a stroke. To change the spacing, type a number, or use the slider to enter a value that is a percentage of the brush diameter. When this option is deselected, the speed of the cursor determines the spacing.

natural_image
Two geometric shapes: a triangle composed of dots, one solid and one dotted (no text or symbols)Increasing the spacing makes the brush skip
While using a preset brush, press the [ key to decrease the brush width; press the ] key to increase the width. For hard round, soft round, and calligraphic brushes, press Shift+[ to decrease the brush hardness; press Shift+] to increase the brush hardness.
To the top
Bristle tip shape options
For a video about bristle tips, see www.adobe.com/go/lrvid5009_ps_en
Bristle tips let you specify precise bristle characteristics, creating highly realistic, natural-looking strokes. Set the following brush tip shape options in the Brush panel:
Shape Determines the overall arrangement of bristles.
Bristles Controls overall bristle density.
Length Changes bristle length.
Thickness Controls the width of individual bristles.
Stiffness Controls bristle flexibility. At low settings, brush shape deforms easily.
To vary stroke creation when using a mouse, adjust the stiffness setting.
Spacing Controls the distance between the brush marks in a stroke. To change the spacing, type a number or use the slider to specify a percentage of the brush diameter. When this option is deselected, the speed of the cursor determines the spacing.
Angle When painting with a mouse, determines the brush tip angle.
Brush preview

Shows brush tip that reflects changes to settings above, as well as current pressure and stroke angle. Click the preview window to see the brush from different sides.
Note: Bristle Brush previews require OpenGL. (See Enable OpenGL and optimize GPU settings.)
To the top
Erodible tip options | CC, CS6
Erodible tip brushes behave similar to pencils and crayons, and wear down naturally as you draw. You can see the amount of wear with the Live Brush Tip Preview to the upper left of the image.
Size Controls the size of the brush. Enter a value in pixels or drag the slider.
Softness Controls the rate of wear. Enter a value in percentage or drag the slider.
Shape Controls the shape of the tip. Choose from a variety of tip options.
Sharpen Tip Returns the tip to the original sharpness.
Spacing Controls the distance between the brush marks in a stroke. To change the spacing, type a number or use the slider to specify a percentage of the brush diameter. When this option is deselected, the speed of the cursor determines the spacing.
Brush preview

Shows brush tip that reflects changes to settings above, as well as current pressure and stroke angle. Click the preview window to see the brush from different sides.
To the top
Airbrush tip options | CC, CS6
Airbrush tips replicate spray cans with a 3D conical spray. With a stylus, you can alter the spread of sprayed strokes by changing pen pressure.
Size Controls the size of the brush. Enter a value in pixels or drag the slider.
Hardness Controls the size of the brush's hard center.
Distortion Controls the distortion to apply to the spray of paint.
Granularity Controls how grainy the paint drops look.
Spatter Size Controls the size of the paint droplets.
Spatter Amount Controls the number of paint droplets.
Spacing Controls the distance between the droplets. If this option is deselected, the speed of the cursor determines the spacing.
Brush preview

Shows brush tip that reflects changes to settings above, as well as current pressure and stroke angle. Click the preview window to see the brush from different sides.
To the top
Brush pose options | CC, CS6
Brush pose options let you achieve stylus-like effects and let you control the angle and position of the brush.
Tilt X Determines the tilt angle of the brush from left to right.
Tilt Y Determines the tilt angle of the brush from front to back.
Rotation Determines the rotation angle of the bristles.
Pressure Determines the pressure the brush applies on the canvas.
Enable Override options to maintain a static brush pose.
To the top
Other brush options
Noise Adds additional randomness to individual brush tips. This option is most effective when applied to soft brush tips (brush tips that contain gray values).
Wet Edges Causes paint to build up along the edges of the brush stroke, creating a watercolor effect.
Airbrush/Build-up Applies gradual tones to an image, simulating traditional airbrush techniques. The Airbrush option in the Brush panel corresponds to the Airbrush option in the options bar.
Smoothing Produces smoother curves in brush strokes. This option is most effective when you are painting quickly with a stylus; however, it may produce a slight lag time in stroke rendering.
Protect Texture Applies the same pattern and scale to all brush presets that have a texture. Select this option to simulate a consistent canvas texture when painting with multiple, textured brush tips.
To the top
Brush scattering
Brush scattering determines the number and placement of marks in a stroke.

Brush strokes without scattering (left) and with scattering (right)
Scatter and Control Specifies how brush marks are distributed in a stroke. When Both Axes is selected, brush marks are distributed in a radial direction. When Both Axes is deselected, brush marks are distributed perpendicular to the stroke path.
To specify the maximum percentage of scattering, enter a value. To specify how you want to control the scattering variance of brush marks, choose an option from the Control pop-up menu:
Off Specifies no control over the scattering variance of brush marks.
Fade Fades the scattering of brush marks from maximum scattering to no scattering in the specified number of steps.
Pen Pressure, Pen Tilt, Stylus Wheel, Rotation Varies the scattering of brush marks based on the pen pressure, pen tilt, position of the pen thumbwheel, or rotation of the pen.
Count Specifies the number of brush marks applied at each spacing interval.
Note: If you increase the count without increasing the spacing or scattering values, painting performance may decrease.
Count Jitter and Control Specifies how the number of brush marks varies for each spacing interval. To specify the maximum percentage of brush marks applied at each spacing interval, enter a value. To specify how you want to control the count variance of brush marks, choose an option from the Control pop-up menu:
Off Specifies no control over the count variance of brush marks.
Fade Fades the number of brush marks from the Count value to 1 in the specified number of steps.
Pen Pressure, Pen Tilt, Stylus Wheel, Rotation Varies the number of brush marks based on the pen pressure, pen tilt, position of the pen thumbwheel, or rotation of the pen.
To the top
Clear brush options
You can clear all options that you changed for a brush preset (except brush shape settings) at once.
- Choose Clear Brush Controls from the Brush panel menu.

Twitter™ and Facebook posts are not covered under the terms of Creative Commons.
Legal Notices | Online Privacy Policy
Paths panel overview
Create a new path in the Paths panel
Create a new work path
Manage paths
To the top
Paths panel overview
The Paths panel (Window >Paths) lists the name and a thumbnail image of each saved path, the current work path, and the current vector mask. Turning thumbnails off can improve performance. To view a path, you must first select it in the Paths panel.
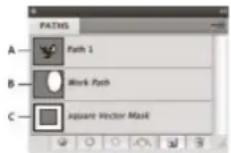
Paths panel
A. Saved path B. Temporary work path C. Vector mask path (appears only when shape layer is selected)
Select a path
- Click the path name in the Paths panel. Only one path can be selected at a time.
Deselect a path
- Click in a blank area of the Paths panel or press Esc.
Change the size of path thumbnails
Choose Panel Options from the Paths panel menu, and select a size, or select None to turn off the display of thumbnails.
Change a path's stacking order
- Select the path in the Paths panel, and drag the path up or down. When the heavy black line appears in the desired location, release the mouse button.
Note: You cannot change the order of vector masks or working paths in the Paths panel.
To the top
Create a new path in the Paths panel
- To create a path without naming it, click the Create New Path button at the bottom of the Paths panel.
- To create and name a path, make sure no work path is selected. Choose New Path from the Paths panel menu, or Alt-click (Windows) or Option-click (Mac OS) the New Path button at the bottom of the panel. Enter a name for the path in the New Path dialog box, and click OK.
To the top
Create a new work path
- Select a shape tool or a pen tool, and click the Paths button in the options bar.
- Set tool-specific options, and draw the path. For more information, see Shape tool options and About the Pen tools.
- Draw additional path components if desired. You can easily switch between drawing tools by clicking a tool button in the options bar. Choose a path area option to determine how overlapping path components intersect:
Add To Path Area Adds the new area to overlapping path areas.
Subtract From Path Area Removes the new area from the overlapping path area.
Intersect Path Areas Restricts the path to the intersection of the new area and the existing area.
Exclude Overlapping Path Areas Excludes the overlap area in the consolidated path.
While drawing with a shape tool, hold down Shift to temporarily select the Add To Path Area option; hold down Alt (Windows) or Option (Mac OS) to temporarily select the Subtract From Path Area option.
To the top
Manage paths
When you use a pen or shape tool to create a work path, the new path appears as the work path in the Paths panel. The work path is temporary; you must save it to avoid losing its contents. If you deselect the work path without saving it and start drawing again, a new path will replace the existing one.
When you use a pen or shape tool to create a new shape layer, the new path appears as a vector mask in the Paths panel. Vector masks are linked to their parent layer; you must select the parent layer in the Layers panel in order to list the Vector mask in the Paths panel. You can remove a Vector mask from a layer and convert a Vector mask to a rasterized mask. For more information, see Add and edit vector masks.
Paths saved with an image appear when you open it again. In Windows, JPEG, JPEG 2000, DCS, EPS, PDF, and TIFF formats support paths in Photoshop. In Mac OS, all available file formats support paths.
Note: Paths in formats other than those listed here generally don't survive a transition from Mac OS to Windows and back to Mac OS.
Save a work path
- To save without renaming, drag the work path name to the New Path button at the bottom of the Paths panel.
- To save and rename, choose Save Path from the Paths panel menu, enter a new path name in the Save Path dialog box, and click OK.
Rename a saved path
- Double-click the path name in the Paths panel, type a new name, and press Enter (Windows) or Return (Mac OS).
Delete a path
- Click the path name in the Paths panel.
-
Do one of the following:
-
Drag the path to the Delete icon at the bottom of the Paths panel.
- Choose Delete Path from the Paths panel menu.
- Click the Delete icon at the bottom of the Paths panel, and click Yes.
To delete a path without being asked to confirm, Alt-click (Windows) or Option-click (Mac OS) the Delete icon at the bottom of the Paths panel.

Twitter™ and Facebook posts are not covered under the terms of Creative Commons.
Legal Notices | Online Privacy Policy
The Gradient tool creates a gradual blend between multiple colors. You can choose from preset gradient fills or create your own.
Note: The Gradient tool cannot be used with bitmap or indexed-color images.
- To fill part of the image, select the desired area. Otherwise, the gradient fill is applied to the entire active layer.
- Select the Gradient tool ■. (If the tool isn't visible, hold down the Paint Bucket tool.)
-
In the options bar, choose a fill from the wide gradient sample:
-
Click the triangle next to the sample to pick a preset gradient fill.
- Click inside the sample to view the Gradient Editor. Select a preset gradient fill, or create a new gradient fill. (See Create a smooth gradient.)
The Neutral Density preset provides a helpful photographic filter for sunsets and other high-contrast scenes.
- Select an option to determine how the starting point (where the mouse is pressed) and ending point (where the mouse is released) affect gradient appearance.
Linear Gradient toolLinear gradient Shades from the starting point to the ending point in a straight line.

flowchart
graph LR
    A["Input Gradient"] --> B["Add Stripes"]
    B --> C{Stripes}
    C --> D["Output Segmentation"]
    D --> E["Final Output"]
Radial Gradient tool Radial gradient Shades from the starting point to the ending point in a circular pattern.

flowchart
graph LR
    A["Input Image"] --> B["Add Circle"]
    B --> C["Add Square"]
    C --> D["Output Image"]
    D --> E["Final Output"]
Angular Gradient toolAngle gradient Shades in a counterclockwise sweep around the starting point.

natural_image
Sequence of abstract geometric shapes including a gray rectangle, orange circle, blue rectangle, and gradient-filled squares (no text or symbols)Reflected Gradient toolReflected gradient Mirrors the same linear gradient on either side of the starting point.

natural_image
Sequence of abstract color swatches and shapes with no text or symbolsDiamond Gradient tool Diamond gradient Shades from the middle to the outer corners of a diamond pattern.

flowchart
graph LR
    A["Black Square"] --> B["Blue Diamond"]
    B --> C["Orange Gradient Rectangle"]
    C --> D["Orange Box with Line"]
    D --> E["Blue Box with Line"]
-
Do the following in the options bar:
-
Specify a blending mode and opacity for the paint. (See Blending modes.)
• To reverse the order of colors in the gradient fill, select Reverse.
• To create a smoother blend with less banding, select Dither.
• To use a transparency mask for the gradient fill, select Transparency. (See Specify the gradient transparency.) -
Position the pointer in the image where you want to set the starting point of the gradient, and drag to define the ending point. To constrain the line angle to a multiple of 45^ , hold down Shift as you drag.
To the top
Manage gradient presets
Gradient presets allow you to quickly apply gradients that you use often. You can manage your presets in the Gradient Picker, Presets Manager, or Gradient Editor.
Save a set of preset gradients as a library
- Click Save in the Gradient Editor dialog box, or choose Save Gradients from the Gradient Picker menu in the options bar.
- Choose a location for the gradient library, enter a file name, and click Save.
You can save the library anywhere. However, if you place the library file in the Presets/Gradients folder in the default preset location, the library name will appear at the bottom of the panel menu after you restart Photoshop.
Load a library of preset gradients
- Do one of the following in the Gradient Editor dialog box:
Click Load to add a library to the current list. Select the library file you want to use, and click Load.
- Choose Replace Gradients from the panel menu to replace the current list with a different library. Select the library file you want to use, and click Load.
- Choose a library file from the bottom of the panel menu. Click OK to replace the current list, or click Append to append the current list.
Note: You can also choose Load Gradients, Replace Gradients, or choose a library of gradients from the Gradient Picker menu in the options bar.
Return to the default library of preset gradients
- Choose Reset Gradients from the panel menu. You can either replace the current list or append the default library to the current list.
Change how preset gradients are displayed
- Choose a display option from the panel menu:
Text Only Displays the gradients as a list.
Small or Large Thumbnail Displays the gradients as thumbnails.
Small or Large List Displays the gradients as a list with thumbnails.
Rename a preset gradient
- If the panel is set to display gradients as thumbnails, double-click a gradient, enter a new name, and click OK.
- If the panel is set to display gradients as a list or text only, double-click a gradient, enter a new name inline, and press Enter (Windows) or Return (Mac OS).
To the top
Gradient Editor overview
To display the Gradient Editor dialog box, click the current gradient sample in the options bar. (When you hover over the gradient sample, a tool tip reading "Click to edit gradient" appears.)
The Gradient Editor dialog box lets you define a new gradient by modifying a copy of an existing gradient. You can also add intermediate colors to a gradient, creating a blend between more than two colors.

text_image
Gradient Editor Presets Name: Red, Blue, Green New Gradient Type: Solid Smoothness: 100 % B C Stops Opacity: 50 % Location: 50 % Color: Location 50 % D E OK Cancel Load... Save...Create a smooth gradient
- Select the Gradient tool

-
Click inside the gradient sample in the options bar to display the Gradient Editor dialog box.
-
To base the new gradient on an existing gradient, select a gradient in the Presets section of the dialog box.
-
Choose Solid from the Gradient Type pop-up menu.
-
To define the starting color of the gradient, click the left color stop indicating that the starting color is being edited.
under the gradient bar. The triangle above the stop turns black
- To choose a color, do one of the following:
- Double-click the color stop, or click the color swatch in the Stops section of the dialog box. Choose a color, and click OK.
- Choose an option from the Color pop-up menu in the Stops section of the dialog box.
- Position the pointer over the gradient bar (the pointer turns into the eyedropper), and click to sample a color, or click anywhere in the image to sample a color from the image.
-
To define the ending color, click the right color stop under the gradient bar. Then choose a color.
-
To adjust the location of the starting point or ending point, do one of the following:
- Drag the corresponding color stop left or right to the location you want.
- Click the corresponding color stop, and enter a value for Location in the Stops section of the dialog box. A value of 0% places the point at the far left end of the gradient bar; a value of 100%, at the far right end.
-
To adjust the location of the midpoint (where the gradient displays an even mix of the starting and ending colors), drag the diamond ◦ below the gradient bar to the left or right, or click the diamond, and enter a value for Location.
-
To add intermediate colors to a gradient, click below the gradient bar to define another color stop. Specify the color and adjust the location and midpoint for the intermediate point as you would for a starting or ending point.
-
To delete the color stop you are editing, click Delete, or drag the stop downwards until it disappears.
-
To control how gradual the transitions are between color bands in the gradient, enter a value in the Smoothness text box, or drag the Smoothness pop-up slider.
-
If desired, set transparency values for the gradient.
-
Enter a name for the new gradient.
-
To save the gradient as a preset, click New after you have finished creating the gradient.
Specify the gradient transparency
Each gradient fill contains settings that control the opacity of the fill at different locations on the gradient. For example, you can set the starting color to 100% opacity and have the fill gradually blend into an ending color with 50% opacity. The checkerboard pattern indicates the amount of transparency in the gradient preview.
- Create a gradient.
- To adjust the starting opacity, click the left opacity stop above the gradient bar. The triangle below the stop turns black, indicating that the starting transparency is being edited.
- In the Stops section of the dialog box, enter a value in the Opacity text box, or drag the Opacity pop-up slider.
- To adjust the opacity of the end point, click the right transparency stop above the gradient bar. Then set the opacity in the Stops section.
-
To adjust the location of the starting or ending opacity, do one of the following:
-
Drag the corresponding opacity stop to the left or right.
-
Select the corresponding opacity stop, and enter a value for Location.
-
To adjust the location of the midpoint opacity (the point midway between the starting and ending opacities), do one of the following:
-
Drag the diamond above the gradient bar to the left or right.
-
Select the diamond and enter a value for Location.
-
To delete the opacity stop you are editing, click Delete.
- To add an intermediate opacity to the mask, click above the gradient bar to define a new opacity stop. You can then adjust and move this opacity as you would for a starting or ending opacity. To remove an intermediate opacity, drag its transparency stop up and off the gradient bar.
- To create a preset gradient, enter a name in the Name text box, and click New. This creates a new gradient preset with the transparency setting you specified.
To the top
Create a noise gradient
A noise gradient is a gradient that contains randomly distributed colors within the range of colors that you specify.
text_image
A B CNoise gradient with different roughness values.
A. 10% roughness B. 50% roughness C. 90% roughness
-
Select the Gradient tool □.
-
Click in the gradient sample in the options bar to display the Gradient Editor dialog box.
-
To base the new gradient on an existing gradient, select a gradient in the Presets section of the dialog box.
-
Choose Noise from the Gradient Type pop-up menu, and set the following options:
Roughness Controls how gradual the transitions are between color bands in the gradient.
Color Model Changes the color components you can adjust. For each component, drag the sliders to define the range of acceptable values. For example, if you choose the HSB model, you can restrict the gradient to blue-green hues, high saturation, and medium brightness.
Restrict Colors Prevents oversaturated colors.
Add Transparency Adds transparency to random colors.
Randomize Randomly creates a gradient that conforms to the settings above. Click the button until you find a setting you like.
- To create a preset gradient with the settings you've specified, enter a name in the Name text box, and click New.
Adobe also recommends
• Work with the Preset Manager

Twitter ^™ and Facebook posts are not covered under the terms of Creative Commons.
Legal Notices | Online Privacy Policy

Pattern Maker is an optional plug-in that you can download for Windows or Mac OS.
The Pattern Maker filter slices and reassembles an image to make a pattern. The Pattern Maker works in two ways:
- Fills a layer or selection with a pattern. The pattern can be made of one large tile, or multiple duplicate tiles.
-
Creates tiles that you can save as a pattern preset and use with other images.
You can generate multiple patterns from the same sample until you find one that you like. -
Pattern Maker is an optional plug-in. Download and install it for Windows or Mac OS.
-
Run Photoshop in 32-bit mode (64-bit Mac OS only).
-
Do one of the following:
-
Select the layer that contains the area from which you want to generate the pattern. The layer you select will be replaced by the generated pattern, so it's a good idea to make a copy of the layer first.
-
To generate a pattern in a new layer or file, make a rectangular selection of the image you are using to generate the pattern, and choose Edit > Copy. Then add a layer to the image, or create a new file with the dimensions you want the final image to have.
-
Choose Filter > Pattern Maker.
-
Specify the source of the pattern.
-
Choose Use Clipboard As Sample to use the contents of the clipboard if you copied an image before you opened the Pattern Maker.
- Make a selection in the preview area with the Pattern Maker's Marquee tool [☐]. To move the selection marquee, drag it to a different location.
Note: You can use the Zoom and Hand tools to navigate in the preview area. Use Alt (Windows) or Option (Mac OS) with the Zoom tool to zoom out. The magnification appears at the bottom of the dialog box.
-
Specify the tile size.
-
Enter pixel dimensions in the Width and Height boxes.
-
Click Use Image Size to generate a pattern with one tile that fills the layer.
-
Click Generate. You can press Esc to cancel the generation.
The preview area is tiled with the generated pattern.
- To switch between the generated preview and the source image, choose an option from the Show menu.
- To view the boundary of individual tiles, click Tile Boundaries.
- To offset the tiles in the generated pattern, choose a direction from the Offset pop-up menu and specify an offset amount in the Amount text box. The offset amount is a percentage of the tile dimension in the specified direction. The offset has no effect on saved pattern
preset tiles.
- Click Generate Again to generate additional patterns using the same options, or adjust the options and then click Generate Again.
Smoothness Adjusts the sharp edges in the pattern. Increase the smoothness to reduce edges.
Sample Detail Specifies the size of pattern slices in the tile. A high value maintains more of the original detail in the pattern. A low value uses smaller slices in the tile. Tiles take longer to generate when you use a high value.
-
Navigate through the generated tiles in the Tile History panel to select the tile that you want to use to fill the layer or to save as a pattern preset.
-
To move through the tiles you've generated, click the First Tile button, Previous Tile button, Next Tile button, or Last Tile button. Or, type the number of the pattern preview you want to view, and press Enter (Windows) or Return (Mac OS).
- To view how the tile looks as a repeating pattern in the preview area, make sure that Update Pattern Preview is selected. If tile previewing is slow, deselect this option, find the tile you want, and then select the option.
- To delete a tile and pattern preview, navigate to the tile you want to delete, and click the Delete icon.
- To save a tile as a preset pattern, navigate to the tile you want to save, and click the Save Preset Pattern button. Enter a preset name, and click OK. When you save a tile as a preset pattern, only a single tile is saved, not the full, generated pattern.
Tile History buttons
A. Save Preset Pattern B. First Tile C. Previous Tile D. Next Tile E. Last Tile F. Delete icon
- When you are satisfied with a pattern preview and you have saved the tiles that you might want to use in the future, click OK to fill the layer or selection.
If you are creating preset patterns only, click Cancel to close the dialog box without filling the layer.

Twitter ^™ and Facebook posts are not covered under the terms of Creative Commons.
Legal Notices | Online Privacy Policy
Filling and stroking selections, layers, and paths javax.jcr.AccessDeniedException: /content/help/en/photoshop/using/filling-stroking-selections-layers- paths/jcr:content/jcr:title: not allowed to add or modify item
Fill with the Paint Bucket tool
Fill a selection or layer with color
Content-aware, pattern, or history fills
Fill the work canvas
Stroke a selection or layer with color
Draw a circle or square
You can fill the inside of a selection, path, or layer with a color or pattern. You can also add color to the outline of a selection or path, called stroking.
To the top
Fill with the Paint Bucket tool
The Paint Bucket tool fills adjacent pixels that are similar in color value to the pixels you click.
Note: The Paint Bucket tool cannot be used with images in Bitmap mode.
- Choose a foreground color. (See Choose colors in the toolbox.)
- Select the Paint Bucket tool 🔒.
Note: The Paint Bucket tool is grouped with the Gradient tool in the toolbar. If you can't find the Paint Bucket tool, click and hold the Gradient tool to access it.
- Specify whether to fill the selection with the foreground color or with a pattern.
- Specify a blending mode and opacity for the paint. (See Blending modes.)
- Enter the tolerance for the fill.
The tolerance defines how similar in color a pixel must be (to the pixel you click) to be filled. Values can range from 0 to 255. A low tolerance fills pixels within a range of color values very similar to the pixel you click. A high tolerance fills pixels within a broader range.
- To smooth the edges of the filled selection, select Anti-aliased.
- To fill only pixels contiguous to the one you click, select Contiguous; leave Contiguous unselected to fill all similar pixels in the image.
- To fill pixels based on the merged color data from all visible layers, select All Layers.
- Click the part of the image you want to fill. All specified pixels within the specified tolerance are filled with the foreground color or pattern.
If you're working on a layer and don't want to fill transparent areas, make sure that the layer's transparency is locked in the Layers panel. (See Lock layers.)
To the top
Fill a selection or layer with color
- Choose a foreground or background color. (See Choose colors in the toolbox.)
- Select the area you want to fill. To fill an entire layer, select the layer in the Layers panel.
- Choose Edit > Fill to fill the selection or layer. Or to fill a path, select the path, and choose Fill Path from the Paths panel menu.
- In the Fill dialog box, choose one of the following options for Use, or select a custom pattern:
Foreground Color, Background Color, Black, 50% Gray, or White Fills the selection with the specified color.
Note: If you fill a CMYK image using the Black option, Photoshop fills all the channels with 100% black. This may result in more ink than is allowable by the printer. For best results when filling a CMYK image, use the Foreground option with the foreground color set to an appropriate black.
Color Fills with a color you select from the Color Picker.
- Specify the blending mode and opacity for the paint. (See Blending modes.)
- If you're working in a layer and want to fill only areas containing pixels, choose Preserve Transparency.
- Click the OK button to apply the fill.
To apply a foreground color fill only to the areas that contain pixels, press Alt+Shift+Backspace (Windows) or Option+Shift+Delete (Mac OS). This preserves the transparency of the layer. To apply a background color fill only to the areas that contain pixels, press Ctrl+Shift+Backspace (Windows) or Command+Shift+Delete (Mac OS).
To the top
Content-aware, pattern, or history fills
Video tutorial: Content-aware fill
text_image
123Seamlessly replace image elements.... Read More
http://goo.gl/wR5jY

by Chris Orwig
http://www.chrisorwig.com/
Contribute your expertise to Adobe Community Help
Scripted patterns
Easily create geometric pattern fills.... Read More
http://kelbytv.com/askdave/2012/06/25/scripte...

by Dave Cross
http://www.dcross.com
text_image
123Contribute your expertise to Adobe Community Help
-
Select the part of the image you want to fill.
-
Choose Edit > Fill.
On the Background layer, press Delete or Backspace to quickly access the Fill dialog box.
- From the Use menu, select one of the following:
Content-Aware Seamlessly fills the selection with similar image content nearby. For the best results, create a selection that extends slightly into the area you want to replicate. (A quick lasso or marquee selection is often sufficient.)
Content-aware fills randomly synthesize similar image content. If you don't like your original results, choose Edit > Undo, and apply another Content-aware fill.
patterns:filling selections withPattern Click the inverted arrow next to the pattern sample, and select a pattern from the pop-up panel. You can load additional patterns using the pop-up panel menu. Select the name of a library of patterns, or choose Load Patterns and navigate to the folder containing the patterns you want to use.
(CC, CS6) You can also apply one of five included Scripted Patterns to easily create a variety of geometric fill patterns. Select Scripted Patterns at the bottom of the fill dialog box, and then choose a fill pattern from the Script pop-up menu.
Note: If Pattern is dimmed, you need to load a pattern library prior to making a selection. (See Manage pattern libraries and presets.)
History Restores the selected area to the source state or snapshot set in the History panel.
natural_image
A person standing in front of a stone wall with autumn foliage (no visible text or symbols)
natural_image
Close-up of a weathered stone wall with scattered orange shrubs at the bottom (no text or symbols visible)Content-aware fill
A. Create selection that extends slightly into area you want to replicate B. Seamlessly replace selection with Content-Aware fill
To the top
Fill the work canvas
The work canvas surrounds the image area. You can fill the canvas with a different color that contrasts better with a given image.
- Right-click the work canvas, and choose Gray, Black, or Custom. (To specify the custom color, choose Select Custom Color.)
Stroke a selection or layer with color
You can use the Stroke command to paint a colored border around a selection, path, or layer. When you create a border this way, it becomes a rasterized part of the current layer.
To create shape or layer borders that can be turned on or off like overlays and are anti-aliased to create softer-edged corners and edges, use the Stroke layer effect instead of the Stroke command. See Layer effects and styles.
- Choose a foreground color.
- Select the area or layer you want to stroke.
- Choose Edit > Stroke.
- In the Stroke dialog box, specify the width of the hard-edged border.
- For Location, specify whether to place the border inside, outside, or centered over the selection or layer boundaries.
Note: If the layer contents fill the entire image, a stroke applied outside the layer will not be visible. - Specify an opacity and a blending mode. (See Blending modes.)
- If you're working in a layer and want to stroke only areas containing pixels, select the Preserve Transparency option. (See Lock layers.)
To the top
Draw a circle or square
You can draw a circle or square using the elliptical or rectangular marquee tools, and then add a line (called a stroke) to the selection marquee. Stroking a selection is a quick way to add a border or frame around an object. You can stroke any selection you create with the selection tools.
- In the Layers panel, click the New Layer button to create a new layer for the circle or square. Isolating the circle or square on its own layer makes it easier to work with.
- Select the Elliptical Marquee tool ○ or the Rectangular Marquee tool in the toolbox.
- Drag in the document window to create the shape. Hold down the Shift key while dragging to constrain the shape to a circle or square.
- Choose Edit > Stroke.
- In the Stroke dialog box, type a value for Width, and then click the color swatch to display the Adobe Color Picker.
- In the Adobe Color Picker, locate the color range you want using the triangle sliders on the color spectrum bar, and then click the desired color in the color field. The color you select appears in the top half of the color swatch. The original color remains in the bottom half. Click OK.
- Set the location for the stroke in relationship to the marquee by choosing Inside, Center, or Outside. Adjust the other settings as desired, and click OK. Photoshop strokes the line using the color and stroke settings you set.
Adobe also recommends
Legal Notices | Online Privacy Policy
About the Pen tools
Draw straight line segments with the Pen tool
Draw curves with the Pen tool
Finish drawing a path
Draw with the Freeform Pen tool
Draw straight lines followed by curves
Draw curves followed by straight lines
Draw two curved segments connected by a corner
Draw using the magnetic pen options
To the top
About the Pen tools
Photoshop provides multiple Pen tools. The standard Pen tool draws with the greatest precision; the Freeform Pen tool draws paths as if you were drawing with pencil on paper, and the magnetic pen option lets you draw a path that snaps to the edges of defined areas in your image. You can use the pen tools in conjunction with the shape tools to create complex shapes. When you use the standard Pen tool, the following options are available in the options bar:
- Auto Add/Delete, which lets you add an anchor point when you click a line segment or delete an anchor point when you click it.
- Rubber Band, which lets you preview path segments as you move the pointer between clicks. (To access this option, click the pop-up menu to the right of the Custom Shape icon.)
Before drawing with the Pen tool, you can create a new path in the Paths panel to automatically save the work path as a named path.
Pen Tool 101
text_image
123A comprehensive video overview on how to use the Pen Tool in Photoshop... Read More http://bitcast-r.v1.sjc1.bitgravity.com/infin...

by Andy Anderson
http://www.infiniteskills....
Contribute your expertise to Adobe Community Help
For more information about the modes in which you can draw with the Pen tools, see Drawing modes.
To the top
Draw straight line segments with the Pen tool
The simplest path you can draw with the Pen tool is a straight line, made by clicking the Pen tool to create two anchor points. By continuing to click, you create a path made of straight line segments connected by corner points.

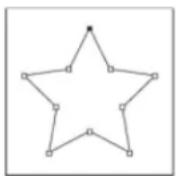
-
Select the Pen tool.
-
Position the Pen tool where you want the straight segment to begin, and click to define the first anchor point (do not drag).
Note: The first segment you draw will not be visible until you click a second anchor point. (Select the Rubber Band option in Photoshop to preview path segments.) Also, if direction lines appear, you've accidentally dragged the Pen tool; choose Edit > Undo, and click again.
-
Click again where you want the segment to end (Shift-click to constrain the angle of the segment to a multiple of 45^ ).
-
Continue clicking to set anchor points for additional straight segments.
The last anchor point you add always appears as a solid square, indicating that it is selected. Previously defined anchor points become hollow, and deselected, as you add more anchor points.
- Complete the path by doing one of the following:
- To close the path, position the Pen tool over the first (hollow) anchor point. A small circle appears next to the Pen tool pointer when it is positioned correctly. Click or drag to close the path.
Note: To close a path in InDesign, you can also select the object and choose Object > Paths > Close Path.
- To leave the path open, Ctrl-click (Windows) or Command-click (Mac OS) anywhere away from all objects.
To leave the path open, you can also select a different tool, or choose Select > Deselect in Illustrator or Edit >Deselect All in InDesign.
To the top
Draw curves with the Pen tool
You create a curve by adding an anchor point where a curve changes direction, and dragging the direction lines that shape the curve. The length and slope of the direction lines determine the shape of the curve.
Curves are easier to edit and your system can display and print them faster if you draw them using as few anchor points as possible. Using too many points can also introduce unwanted bumps in a curve. Instead, draw widely spaced anchor points, and practice shaping curves by adjusting the length and angles of the direction lines.
-
Select the Pen tool.
-
Position the Pen tool where you want the curve to begin, and hold down the mouse button.
The first anchor point appears, and the Pen tool pointer changes to an arrowhead. (In Photoshop, the pointer changes only after you've started dragging.)
- Drag to set the slope of the curve segment you're creating, and then release the mouse button.
In general, extend the direction line about one third of the distance to the next anchor point you plan to draw. (You can adjust one or both sides of the direction line later.)
Hold down the Shift key to constrain the tool to multiples of 45^ .
text_image
A B CDrawing the first point in a curve
A. Positioning Pen tool B. Starting to drag (mouse button pressed) C. Dragging to extend direction lines
- Position the Pen tool where you want the curve segment to end, and do one of the following:
- To create a C-shaped curve, drag in a direction opposite to the previous direction line. Then release the mouse button.
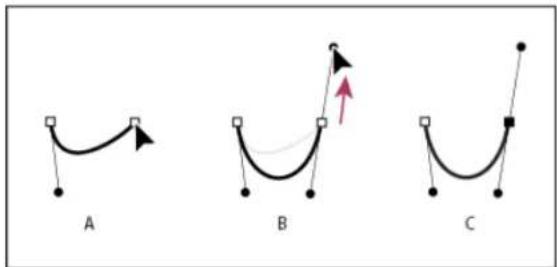
text_image
A B CDrawing the second point in a curve
• To create an S-shaped curve, drag in the same direction as the previous direction line. Then release the mouse button.

text_image
A B CDrawing an S curve
(Photoshop only) To change the direction of the curve sharply, release the mouse button, and then Alt-drag (Windows) or Option-drag (Mac OS) the direction point in the direction of the curve. Release the Alt (Windows) or Option (Mac OS) key and the mouse button, reposition the pointer where you want the segment to end, and drag in the opposite direction to complete the curve segment.
- Continue dragging the Pen tool from different locations to create a series of smooth curves. Note that you are placing anchor points at the beginning and end of each curve, not at the tip of the curve.
Alt-drag (Windows) or Option-drag (Mac OS) direction lines to break out the direction lines of an anchor point.
- Complete the path by doing one of the following:
- To close the path, position the Pen tool over the first (hollow) anchor point. A small circle appears next to the Pen tool pointer when it is positioned correctly. Click or drag to close the path.
Note: To close a path in InDesign, you can also select the object and choose Object > Paths > Close Path.
- To leave the path open, Ctrl-click (Windows) or Command-click (Mac OS) anywhere away from all objects.
To leave the path open, you can also select a different tool, or choose Select > Deselect in Illustrator or Edit >Deselect All in InDesign.
For a video on using the Pen tool in Illustrator, see www.adobe.com/go/vid0037.
Finish drawing a path
- Complete a path in one of the following ways:
- To close a path, position the Pen tool over the first (hollow) anchor point. A small circle appears next to the Pen tool pointer 0 when it is positioned correctly. Click or drag to close the path.
Note: To close a path in InDesign, you can also select the object and choose Object > Paths > Close Path.
• To leave a path open, Ctrl-click (Windows) or Command-click (Mac OS) anywhere away from all objects.
To leave the path open, you can also select a different tool, or choose Select > Deselect in Illustrator or Edit > Deselect All in InDesign.
To the top
Draw with the Freeform Pen tool
The Freeform Pen tool lets you draw as if you were drawing with a pencil on paper. Anchor points are added automatically as you draw. You do not determine where the points are positioned, but you can adjust them once the path is complete. To draw with greater precision, use the Pen tool.
- Select the Freeform Pen tool 📋.
- To control how sensitive the final path is to the movement of your mouse or stylus, click the inverted arrow next to the shape buttons in the options bar, and enter a value between 0.5 and 10.0 pixels for Curve Fit. A higher value creates a simpler path with fewer anchor points.
- Drag the pointer in the image. As you drag, a path trails behind the pointer. When you release the mouse, a work path is created.
- To continue the existing freehand path, position the pen pointer on an end point of the path, and drag.
- To complete the path, release the mouse. To create a closed path, drag the line to the initial point of the path (a circle appears next to the pointer when it is aligned).
To the top
Draw straight lines followed by curves
- Using the Pen tool, click corner points in two locations to create a straight segment.
- Position the Pen tool over the selected endpoint. In Illustrator and InDesign, a convert-point icon appears next to the Pen tool when it is positioned correctly (In Photoshop, a small diagonal line, or slash, appears next to the Pen tool). To set the slope of the curved segment you'll create next, click the anchor point, and drag the direction line that appears.

text_image
A B CDrawing a straight segment followed by a curved segment (part 1)
A. Straight segment completed B. Positioning Pen tool over endpoint (the Convert Point icon appears only in Illustrator and InDesign) C. Dragging direction point
- Position the pen where you want the next anchor point; then click (and drag, if desired) the new anchor point to complete the curve.
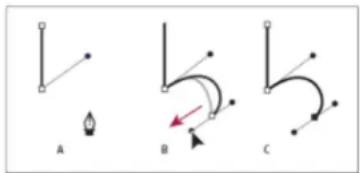
text_image
A B CDrawing a straight segment followed by a curved segment (part 2)
A. Positioning Pen tool B. Dragging direction line C. New curve segment completed
To the top
Draw curves followed by straight lines
- Using the Pen tool, drag to create the first smooth point of the curved segment, and release the mouse button.
- Reposition the Pen tool where you want the curved segment to end, drag to complete the curve, and release the mouse button.
- Select the Convert Point tool from the toolbox, and then click the selected end point to convert it from a smooth point to a corner point.
Press Alt (Windows) or Option (Mac OS) to temporarily change the Pen tool to the Convert Point tool. - Select the Pen tool from the toolbox, position the Pen tool where you want the straight segment to end, and click to complete the straight segment.

To the top
Draw two curved segments connected by a corner
- Using the Pen tool, drag to create the first smooth point of a curved segment.
- Reposition the Pen tool and drag to create a curve with a second smooth point; then press and hold Alt (Windows) or Option (Mac OS) and drag the direction line toward its opposing end to set the slope of the next curve. Release the key and the mouse button.
This process converts the smooth point to a corner point by splitting the direction lines. - Reposition the Pen tool where you want the second curved segment to end, and drag a new smooth point to complete the second curved segment.
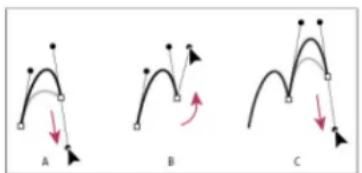
text_image
A B CDrawing two curves
A. Dragging a new smooth point B. Pressing Alt/Option to split direction lines while dragging, and swinging direction line up C. Result after repositioning and dragging a third time
Draw using the magnetic pen options
The Magnetic Pen is an option of the Freeform Pen tool that lets you draw a path that snaps to the edges of defined areas in your image. You can define the range and sensitivity of the snapping behavior, as well as the complexity of the resulting path. The Magnetic Pen and Magnetic Lasso tools share many of the same options.
-
To convert the Freeform Pen tool to the Magnetic Pen tool ⬆, select Magnetic in the options bar, or click the inverted arrow next to the shape buttons in the options bar, select Magnetic, and set the following:
-
For Width, enter a pixel value between 1 and 256. The Magnetic Pen detects edges only within the specified distance from the pointer.
- For Contrast, enter a percentage value between 1 and 100 to specify the contrast required between pixels for that area to be considered an edge. Use a higher value for low-contrast images.
- For Frequency, enter a value between 0 and 100 to specify the rate at which the Pen sets anchor points. A higher value anchors the path in place more quickly.
-
If you are working with a stylus tablet, select or deselect Pen Pressure. When this option is selected, an increase in pen pressure causes the width to decrease.
-
Click in the image to set the first fastening point.
-
To draw a freehand segment, move the pointer or drag along the edge you want to trace.
The most recent segment of the border remains active. As you move the pointer, the active segment snaps to the strongest edge in the image, connecting the pointer to the last fastening point. Periodically, the Magnetic Pen adds fastening points to the border to anchor previous sections.
Click to add fastening points, and continue tracing.
-
If the border doesn't snap to the desired edge, click once to add a fastening point manually and to keep the border from moving. Continue to trace the edge and add fastening points as needed. If you make a mistake, press Delete to remove the last fastening point.
-
To dynamically modify the properties of the Magnetic Pen, do one of the following:
-
Alt-drag (Windows) or Option-drag (Mac OS) to draw a freehand path.
- Alt-click (Windows) or Option-click (Mac OS) to draw straight segments.
-
Press the open square bracket key (I) to decrease the Magnetic Pen width by 1 pixel; press the close square bracket key (J) to increase the pen width by 1 pixel.
-
Complete the path:
-
Press Enter (Windows) or Return (Mac OS) to end an open path.
- Double-click to close the path with a magnetic segment.
- Hold down Alt (Windows) or Option (Mac OS), and double-click to close the path with a straight segment.
Adobe also recommends
• Path segments, components, and points

BY-NC-SA
Twitter™ and Facebook posts are not covered under the terms of Creative Commons.
Legal Notices | Online Privacy Policy
Convert paths to selection borders
Convert a selection to a path
To the top
Convert paths to selection borders
Paths provide smooth outlines that you can convert into precise selection borders. You also can convert selection borders into paths, using the Direct Selection tool for fine-tuning.
You can define any closed path as a selection border. A closed path can be added to, subtracted from, or combined with the current selection.
Convert a path to a selection border using the current settings
- Select the path in the Paths panel.
-
To convert the path, do one of the following:
-
Click the Load Path as a Selection button at the bottom of the Paths panel.
- Ctrl-click (Windows) or Command-click (Mac OS) the path thumbnail in the Paths panel.
Convert a path to a selection border and specify settings
- Select the path in the Paths panel.
-
Do one of the following:
-
Alt-click (Windows) or Option-click (Mac OS) the Load Path As A Selection button at the bottom of the Paths panel.
- Alt-drag (Windows) or Option-drag (Mac OS) the path to the Load Path As A Selection button.
-
Choose Make Selection from the Paths panel menu.
-
In the Make Selection dialog box, select a Rendering option:
Feather Radius Defines how far inside and outside the selection border the feather edge extends. Enter a value in pixels.
edges, smoothingsmoothing:selection edgesAnti-aliased Creates a finer transition between the pixels in the selection and the surrounding pixels. Make sure the Feather Radius is set to 0.
For more information on these options, see Soften the edges of selections.
- Select an Operation option:
New Selection Selects only the area defined by the path.
Add To Selection Adds the area defined by the path to the original selection.
Subtract From Selection Removes the area defined by the path from the current selection.
Intersect With Selection Selects the area common to both the path and the original selection. If the path and selection do not overlap, nothing is selected.
- Click OK.
To the top
Convert a selection to a path
Any selection made with a selection tool can be defined as a path. The Make Work Path command eliminates any feathering applied to the selection. It can also alter the shape of the selection, depending on the complexity of the path and the tolerance value you choose in the Make Work Path dialog box.
-
Make the selection, and do one of the following:
-
Click the Make Work Path button ⚙ at the bottom of the Paths panel to use the current tolerance setting, without opening the Make Work Path dialog box.
- Alt-click (Windows) or Option-click (Mac OS) the Make Work Path button at the bottom of the Paths panel.
-
Choose Make Work Path from the Paths panel menu.
-
Enter a Tolerance value or use the default value in the Make Work Path dialog box.
Tolerance values can range from 0.5 to 10 pixels and determine how sensitive the Make Work Path command is to slight changes in the selection shape. The higher the tolerance value, the fewer the anchor points used to draw the path and the smoother the path. If the path is used as a clipping path and you have problems printing the image, use a higher tolerance value. (See Printing image clipping paths.)
- Click OK. The path appears at the bottom of the Paths panel.

Twitter™ and Facebook posts are not covered under the terms of Creative Commons.
Legal Notices | Online Privacy Policy
Select a preset brush
Change how preset brushes are displayed
Load, save, and manage brush presets
Create a new preset brush
A preset brush is a saved brush tip with defined characteristics, such as size, shape, and hardness. You can save preset brushes with the characteristics you use often. You can also save tool presets for the Brush tool that you can select from the Tool Preset menu in the options bar.
When you change the size, shape, or hardness of a preset brush, the change is temporary. The next time you choose that preset, the brush uses its original settings. To make your changes permanent, you need to create a new preset. See Create a new preset brush.
To the top
Select a preset brush
- Select a painting or editing tool, and click the Brush pop-up menu in the options bar.
- Select a brush.
Note: You can also select a brush from the Brush panel. To view the loaded presets, click Brush Presets in the upper left of the panel.
- Change options for the preset brush.
Diameter Temporarily changes the brush size. Drag the slider or enter a value. If the brush has a dual tip, both the primary and dual brush tips are scaled.
Use Sample Size Uses the original diameter of the brush tip if the brush tip shape is based on a sample. (Not available for round brushes.)
Hardness (Available only for round and square brushes.) Temporarily changes the amount of anti-aliasing for the brush tool. At 100%, the brush tool paints with the hardest brush tip, but is still anti-aliased. The Pencil always paints a hard edge that is not anti-aliased.
To the top
Change how preset brushes are displayed
Choose a display option from the Brush Presets panel menu :
• Text Only to view the brushes as a list.
- Small or Large Thumbnail to view the brushes as thumbnails.
- Small or Large List to view the brushes as a list with thumbnails.
- Stroke Thumbnail to view a sample brush stroke with each brush thumbnail.
To dynamically preview brush strokes in the Brush panel, position the pointer over a brush in the Brush Presets panel until the tool tip appears. As you move the pointer over different brushes, the preview area at the bottom of the Brush panel will display sample brush strokes.
To the top
Load, save, and manage brush presets
You can manage libraries of preset brushes to keep your brushes organized.
Change the displayed library of preset brushes
-
To load a library of preset brushes, choose one of the following from the Brush Presets panel menu.
-
Load Brushes to add a library to the current list.
- Replace Brushes to replace the current list with a different library.
-
A library file (displayed at the bottom of the panel menu). Click OK to replace the current list, or click Append to append the current list.
-
To return to the default library of preset brushes, choose Reset Brushes from the Brush Presets panel menu. You can either replace the current list or append the default library to the current list.

You can also use the Preset Manager to load and reset brush libraries. For more information, see Work with the Preset Manager.
Save a set of preset brushes as a library
- Choose Save Brushes from the Brush Presets panel menu.
- Choose a location for the brush library, enter a file name, and click Save.
You can save the library anywhere. However, if you place the library file in the Presets/Brushes folder in the default preset location, the library name will appear at the bottom of the Brush Presets panel menu after you restart Photoshop.
Rename a preset brush
Do one of the following:
- Select a brush in the Brush Presets panel, and choose Rename Brush from the panel menu. Enter a new name, and click OK.
- In the Brush panel, double-click a brush tip, enter a new name, and click OK.
Delete a preset brush
In the Brush Presets panel, do any of the following:
- Alt-click (Windows) or Option-click (Mac OS) the brush you want to delete.
- Select a brush, and choose Delete Brush from the panel menu, or click the Delete icon.
To the top
Create a new preset brush
You can save a customized brush as a preset brush that appears in the Brush Presets panel and Preset Manager.
Note: New preset brushes are saved in a Preferences file. If this file is deleted or damaged, or if you reset brushes to the default library, the new presets will be lost. To permanently save new preset brushes, save them in a library.
-
Customize a brush.
-
Do one of the following in the Brush Presets panel:
-
Choose New Brush Preset from the panel menu, enter a name for the preset brush, and click OK.
- Click the Create New Brush button
Adobe also recommends

Twitter ^™ and Facebook posts are not covered under the terms of Creative Commons.
Legal Notices | Online Privacy Policy
Blending mode descriptions Blending mode examples
The blending mode specified in the options bar controls how pixels in the image are affected by a painting or editing tool. It's helpful to think in terms of the following colors when visualizing a blending mode's effect:
- The base color is the original color in the image.
- The blend color is the color being applied with the painting or editing tool.
• The result color is the color resulting from the blend.
To the top
Blending mode descriptions
Choose from the Mode pop-up menu in the options bar.
Note: Only the Normal, Dissolve, Darken, Multiply, Lighten, Linear Dodge (Add), Difference, Hue, Saturation, Color, Luminosity, Lighter Color, and Darker Color blending modes are available for 32-bit images.
Normal Edits or paints each pixel to make it the result color. This is the default mode. (Normal mode is called Threshold when you're working with a bitmapped or indexed-color image.)
Dissolve Edits or paints each pixel to make it the result color. However, the result color is a random replacement of the pixels with the base color or the blend color, depending on the opacity at any pixel location.
Behind Edits or paints only on the transparent part of a layer. This mode works only in layers with Lock Transparency deselected and is analogous to painting on the back of transparent areas on a sheet of acetate.
Clear Edits or paints each pixel and makes it transparent. This mode is available for the Shape tools (when fill region □ is selected), Paint Bucket tool ⏻, Brush tool ⏻, Pencil tool ⏻, Fill command, and Stroke command. You must be in a layer with Lock Transparency deselected to use this mode.
Darken Looks at the color information in each channel and selects the base or blend color—whichever is darker—as the result color. Pixels lighter than the blend color are replaced, and pixels darker than the blend color do not change.
Multiply Looks at the color information in each channel and multiplies the base color by the blend color. The result color is always a darker color. Multiplying any color with black produces black. Multiplying any color with white leaves the color unchanged. When you're painting with a color other than black or white, successive strokes with a painting tool produce progressively darker colors. The effect is similar to drawing on the image with multiple marking pens.
Color Burn Looks at the color information in each channel and darkens the base color to reflect the blend color by increasing the contrast between the two. Blending with white produces no change.
Linear Burn Looks at the color information in each channel and darkens the base color to reflect the blend color by decreasing the brightness. Blending with white produces no change.
Lighten Looks at the color information in each channel and selects the base or blend color—whichever is lighter—as the result color. Pixels
darker than the blend color are replaced, and pixels lighter than the blend color do not change.
Screen Looks at each channel's color information and multiplies the inverse of the blend and base colors. The result color is always a lighter color. Screening with black leaves the color unchanged. Screening with white produces white. The effect is similar to projecting multiple photographic slides on top of each other.
Color Dodge Looks at the color information in each channel and brightens the base color to reflect the blend color by decreasing contrast between the two. Blending with black produces no change.
Linear Dodge (Add) Looks at the color information in each channel and brightens the base color to reflect the blend color by increasing the brightness. Blending with black produces no change.
Overlay Multiplies or screens the colors, depending on the base color. Patterns or colors overlay the existing pixels while preserving the highlights and shadows of the base color. The base color is not replaced, but mixed with the blend color to reflect the lightness or darkness of the original color.
Soft Light Darkens or lightens the colors, depending on the blend color. The effect is similar to shining a diffused spotlight on the image. If the blend color (light source) is lighter than 50% gray, the image is lightened as if it were dodged. If the blend color is darker than 50% gray, the image is darkened as if it were burned in. Painting with pure black or white produces a distinctly darker or lighter area, but does not result in pure black or white.
Hard Light Multiplies or screens the colors, depending on the blend color. The effect is similar to shining a harsh spotlight on the image. If the blend color (light source) is lighter than 50% gray, the image is lightened, as if it were screened. This is useful for adding highlights to an image. If the blend color is darker than 50% gray, the image is darkened, as if it were multiplied. This is useful for adding shadows to an image. Painting with pure black or white results in pure black or white.
Vivid Light Burns or dodges the colors by increasing or decreasing the contrast, depending on the blend color. If the blend color (light source) is lighter than 50% gray, the image is lightened by decreasing the contrast. If the blend color is darker than 50% gray, the image is darkened by increasing the contrast.
Linear Light Burns or dodges the colors by decreasing or increasing the brightness, depending on the blend color. If the blend color (light source) is lighter than 50% gray, the image is lightened by increasing the brightness. If the blend color is darker than 50% gray, the image is darkened by decreasing the brightness.
Pin Light Replaces the colors, depending on the blend color. If the blend color (light source) is lighter than 50% gray, pixels darker than the blend color are replaced, and pixels lighter than the blend color do not change. If the blend color is darker than 50% gray, pixels lighter than the blend color are replaced, and pixels darker than the blend color do not change. This is useful for adding special effects to an image.
Hard Mix Adds the red, green and blue channel values of the blend color to the RGB values of the base color. If the resulting sum for a channel is 255 or greater, it receives a value of 255; if less than 255, a value of 0. Therefore, all blended pixels have red, green, and blue channel values of either 0 or 255. This changes all pixels to primary additive colors (red, green, or blue), white, or black.
Note: For CMYK images, Hard Mix changes all pixels to the primary subtractive colors (cyan, yellow, or magenta), white, or black. The maximum color value is 100.
Difference Looks at the color information in each channel and subtracts either the blend color from the base color or the base color from the blend color, depending on which has the greater brightness value. Blending with white inverts the base color values; blending with black produces no change.
Exclusion Creates an effect similar to but lower in contrast than the Difference mode. Blending with white inverts the base color values. Blending with black produces no change.
Subtract Looks at the color information in each channel and subtracts the blend color from the base color. In 8- and 16-bit images, any resulting negative values are clipped to zero.
Divide Looks at the color information in each channel and divides the blend color from the base color.
Hue Creates a result color with the luminance and saturation of the base color and the hue of the blend color.
Saturation Creates a result color with the luminance and hue of the base color and the saturation of the blend color. Painting with this mode in an area with no (0) saturation (gray) causes no change.
Color Creates a result color with the luminance of the base color and the hue and saturation of the blend color. This preserves the gray levels in the image and is useful for coloring monochrome images and for tinting color images.
Luminosity Creates a result color with the hue and saturation of the base color and the luminance of the blend color. This mode creates the inverse effect of Color mode.
Lighter Color Compares the total of all channel values for the blend and base color and displays the higher value color. Lighter Color does not produce a third color, which can result from the Lighten blend, because it chooses the highest channel values from both the base and blend color to create the result color.
Darker Color Compares the total of all channel values for the blend and base color and displays the lower value color. Darker Color does not produce a third color, which can result from the Darken blend, because it chooses the lowest channel values from both the base and the blend color to create the result color.
To the top
Blending mode examples
These examples show the result of painting part of the image's face using each blending mode.
For a video on blending modes, see www.adobe.com/go/vid0012.

Original Image
natural_image
Close-up of a painted penguin face with yellow and black markings (no text or symbols)Normal, 100% opacity Normal, 50% opacity Dissolve, 50% opacity

natural_image
Close-up of a stylized bird face with black and yellow patterns (no text or symbols visible)
natural_image
Close-up of a painted bird face with detailed facial features and patterns (no text or symbols visible)
natural_image
Close-up of a stylized bird's face with yellow and black patterns (no text or symbols)Behind

natural_image
Close-up of a penguin's face with stylized black and white patterns (no text or symbols visible)Clear Darken Multiply

natural_image
Close-up of a painted bird face with yellow and green markings (no text or symbols visible)
natural_image
Close-up of a stylized painted face with yellow and black patterns (no text or symbols)
natural_image
Close-up of a stylized painted face with yellow and black patterns (no text or symbols)Color Burn
natural_image
Close-up of a stylized painted face with yellow and black patterns (no text or symbols)Linear Burn Lighten Screen

natural_image
Close-up of a painted bird's face with black, yellow, and white patterns (no text or symbols)
natural_image
Close-up of a painted bird's face with yellow and black patterns (no text or symbols)
natural_image
Close-up of a painted bird face with yellow and black markings (no text or symbols visible)Color Dodge

natural_image
Close-up of a painted penguin face with yellow and black markings (no text or symbols visible)Linear Dodge (Add) Overlay Soft Light

natural_image
Close-up of a stylized bird face with black and yellow patterns (no text or symbols)
natural_image
Close-up of a painted bird's face with stylized facial features (no text or symbols visible)
natural_image
Close-up of a painted bird face with yellow and black markings (no text or symbols visible)Hard Light

natural_image
Close-up of a painted bird face with yellow and black markings (no text or symbols visible)Vivid Light Linear Light Pin Light
natural_image
Close-up of a painted bird face with yellow and black markings (no text or symbols visible)
natural_image
Close-up of a painted bird face with orange and yellow patterns (no text or symbols)
natural_image
Close-up of a painted bird face with red, yellow, and black facial features (no text or symbols visible)Hard Mix
natural_image
Close-up of a colorful painted mask featuring stylized facial features (no text or symbols visible)Difference Exclusion Subtract

natural_image
Close-up of a painted folk face with colorful abstract patterns (no text or symbols visible)
natural_image
Close-up of a painted bird face with blue and black coloring (no text or symbols visible)
natural_image
Close-up of a painted penguin face with blue and white coloring (no text or symbols visible)Divide

natural_image
Close-up of a stylized bird face with detailed facial features and pointed eyes (no text or symbols visible)Hue Saturation Color

natural_image
Close-up of a painted folk art mask featuring a stylized bird face with vibrant green and yellow details (no text or symbols visible)
natural_image
Close-up of a stylized bird face with detailed facial features and pointed nose (no text or symbols visible)
natural_image
Close-up of a painted bird's face with stylized facial features (no text or symbols visible)Luminosity, 80% opacity

natural_image
Close-up of a stylized bird face with orange and black patterns (no text or symbols visible)Lighter Color Darker Color

natural_image
Close-up of a painted folk mask featuring stylized facial features (no text or symbols visible)
BY-NC-SA
Twitter™ and Facebook posts are not covered under the terms of Creative Commons.
Legal Notices
Online Privacy Policy
Fill paths with color
Stroke paths with color
To the top
Fill paths with color
A path created with the Pen tool does not become an image element until you stroke or fill it. The Fill Path command fills a path with pixels using a specified color, a state of the image, a pattern, or a fill layer.


Path selected (left) and filled (right)
Note: When you fill a path, the color values appear on the active layer. Make sure that a standard or background layer is active before completing the steps below. (You cannot fill a path when a mask, text, fill, adjustment, or Smart Object layer is active.)
Fill a path using the current Fill Path settings
- Select the path in the Paths panel.
- Click the Fill Path button ● at the bottom of the Paths panel.
Fill a path and specify options
-
Select the path in the Paths panel.
-
Fill the path:
-
Alt-click (Windows) or Option-click (Mac OS) the Fill Path button at the bottom of the Paths panel.
- Alt-drag (Windows) or Option-drag (Mac OS) the path to the Fill Path button.
-
Choose Fill Path from the Paths panel menu. If the selected path is a path component, this command changes to Fill Subpath.
-
For Use, choose the contents for the fill. (See Fill a selection or layer with color.)
-
Specify an opacity for the fill. To make the fill more transparent, use a low percentage. A setting of 100% makes the fill opaque.
-
Choose a blending mode for the fill. (See Blending mode descriptions.)
The Mode list includes a Clear mode that lets you erase to transparency. You must be working in a layer other than the background to use this option.
-
Choose Preserve Transparency to limit the fill to layer areas that contain pixels. (See Lock layers.)
-
Select a Rendering option:
Feather Radius Defines how far inside and outside the selection border the feather edge extends. Enter a value in pixels.
Anti-aliased Creates a finer transition between the pixels in the selection and the surrounding pixels by partially filling the edge pixels of the selection.
For more information on these options, see Soften the edges of selections.
- Click OK.
To the top
Stroke paths with color
The Stroke Path command paints the border of a path. The Stroke Path command allows you to create a paint stroke (using the current settings for your painting tools) that follows any path. This command is completely different from the Stroke layer effect, which doesn't mimic the effect of any of the painting tools.
Note: When you stroke a path, the color values appear on the active layer. Make sure that a standard or background layer is active before completing the steps below. (You cannot stroke a path when a mask, text, fill, adjustment, or Smart Object layer is active.)

Path selected (left) and stroked (right)
Stroke a path using the current Stroke Path options
-
Select the path in the Paths panel.
-
Click the Stroke Path button ○ at the bottom of the Paths panel. Each click of the Stroke Path button builds up the opacity of the stroke and, depending upon the current brush options, makes it look thicker.
Stroke a path and specify options
-
Select the path in the Paths panel.
-
Select the painting or editing tool you want to stroke the path. In the options bar, set the tool options, and specify a brush.
For information on specific tool settings, see Smudge image areas and About painting tools, options, and panels.
-
To stroke the path, do one of the following:
-
Alt-click (Windows) or Option-click (Mac OS) the Stroke Path button at the bottom of the Paths panel.
- Alt-drag (Windows) or Option-drag (Mac OS) the path to the Stroke Path button.
-
Choose Stroke Path from the Paths panel menu. If the selected path is a path component, this command changes to Stroke Subpath.
-
In the Stroke Path dialog box, choose a tool if you did not select one in step 2. To simulate hand-painted strokes, select Simulate Pressure. Or, deselect this option to create more linear, even strokes.
-
Click OK.
Adobe also recommends

Twitter ^™ and Facebook posts are not covered under the terms of Creative Commons.
Legal Notices | Online Privacy Policy
Path segments, components, and points
Select a path
Reorder paths
Duplicate paths
Adjust path segments
Add or delete anchor points
Convert between smooth points and corner points
Adjust path components
To the top
Path segments, components, and points
A path consists of one or more straight or curved segments. Anchor points mark the end points of the path segments. On curved segments, each selected anchor point displays one or two direction lines, ending in direction points. The positions of direction lines and points determine the size and shape of a curved segment. Moving these elements reshapes the curves in a path.

text_image
A B C D EA path
A. Curved line segment B. Direction point C. Direction line D. Selected anchor point E. Unselected anchor point
A path can be closed, with no beginning or end (for example, a circle), or open, with distinct end points (for example, a wavy line).
Smooth curves are connected by anchor points called smooth points. Sharply curved paths are connected by corner points.

natural_image
Two abstract line diagrams with curved and straight lines, no text or symbols presentSmooth point and corner point
When you move a direction line on a smooth point, the curved segments on both sides of the point are adjusted simultaneously. By comparison, when you move a direction line on a corner point, only the curve on the same side of the point as the direction line is adjusted.

natural_image
Two abstract curved line diagrams with arrowheads, no text or symbols presentAdjusting a smooth point and a corner point
A path does not have to be one connected series of segments. It can contain more than one distinct and separate path components. Each shape in a shape layer is a path component, as described by the layer's clipping path.
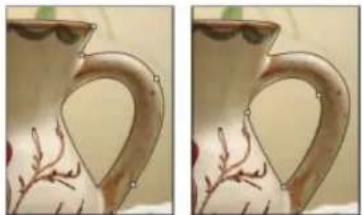
natural_image
Close-up of a ceramic pitcher with floral patterns and handle (no text or symbols visible)Separate path components selected
To the top
Select a path
Selecting a path component or path segment displays all of the anchor points on the selected portion, including any direction lines and direction points if the selected segment is curved. Direction handles appear as filled circles, selected anchor points as filled squares, and unselected anchor points as hollow squares.
-
Do one of the following:
-
To select a path component (including a shape in a shape layer), select the Path Selection tool, and click anywhere inside the path component. If a path consists of several path components, only the path component under the pointer is selected.
- To select a path segment, select the Direct Selection tool ↗, and click one of the segment's anchor points, or drag a marquee over part of the segment.

natural_image
Close-up of a ceramic pitcher with floral and fruit patterns, no visible text or symbols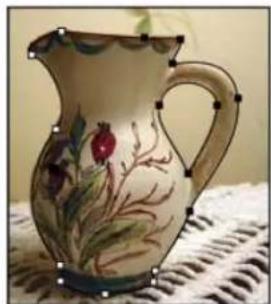
natural_image
Decorative ceramic pitcher with floral and red berry decoration, placed on a woven mat (no text or symbols visible)Drag a marquee to select segments.
- To select additional path components or segments, select the Path Selection tool or the Direct Selection tool, and then hold down Shift while selecting additional paths or segments.
When the Direct Selection tool is selected, you can select the entire path or path component by Alt-clicking (Windows) or Option-clicking (Mac OS) inside the path. To activate the Direct Selection tool when most other tools are selected, position the pointer over an anchor point, and press Ctrl (Windows) or Command (Mac OS).
Select multiple paths | Photoshop CC
You can select multiple paths on the same layer or across different layers.
-
In the Path panel, do any of the following to make the paths visible:
-
Shift-click to select contiguous paths.
-
Ctrl-click (Windows) or Command-click (Mac OS) to select non-contiguous paths.
-
Select the Path Selection tool or the Direct Selection tool and do any of the following:
-
Drag over the segments.
-
Shift-click the paths.
-
To select additional path components or segments, select the Path Selection tool or the Direct Selection tool, and then hold down the Shift key while selecting additional paths or segments.
Note: You can choose to work with paths in the isolation mode. To isolate only the layer containing a path, with the path active, double-click using a selection tool. You can also isolate single or multiple layers by using the Select/Isolate Layers menu item or by setting Layer Filtering to Selected.
You can exit the isolation mode in several ways, such as:
• Turning off Layer Filtering
- Switching Layer Filtering to something other than Selected
- Double-clicking away from a path using the path selection tools
To the top
Reorder paths
You can reorder saved paths that are not Shape, Type, or Vector Mask paths in the Paths panel.
- In the Path panel, drag the path to the position you want. In Photoshop CC, you can select and drag more than one path simultaneously.
To the top
Duplicate paths
-
In the Path panel, select the path you want to duplicate. In Photoshop CC, you can select more than one path.
-
Do any of the following:
-
Alt-drag (Windows) or Option-drag the paths.
- Choose Duplicate Path from the panel menu.
To the top
Adjust path segments
You can edit a path segment at any time, but editing existing segments is slightly different from drawing them. Keep the following tips in mind when editing segments:
- If an anchor point connects two segments, moving that anchor point always changes both segments.
- When drawing with the Pen tool, you can temporarily activate the Direct Selection tool so that you can adjust segments you've already drawn; press Ctrl (Windows) or Command (Mac OS) while drawing.
When you initially draw a smooth point with the Pen tool, dragging the direction point changes the length of the direction line on both sides of the point. However, when you edit an existing smooth point with the Direct Selection tool, you change the length of the direction line only on the side you're dragging.
Move straight segments
- With the Direct Selection tool ↗, select the segment you want to adjust.
- Drag the segment to its new position.
Adjust the length or angle of straight segments
- With the Direct Selection tool ↗, select an anchor point on the segment you want to adjust.
- Drag the anchor point to the desired position. Shift-drag to constrain the adjustment to multiples of 45^ .
Adjust the position or shape of curved segments
- With the Direct Selection tool ↗, select a curved segment, or an anchor point on either end of the curved segment. Direction lines appear, if any are present. (Some curved segments use just one direction line.)
- Do any of the following:
- To adjust the position of the segment, drag the segment. Shift-drag to constrain the adjustment to multiples of 45^ .
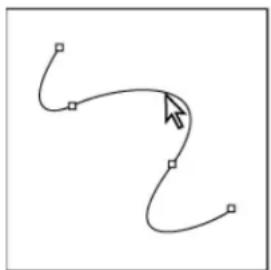
natural_image
Simple curved line diagram with no text or symbols, featuring three square nodes and an arrow pointing right (no text or labels)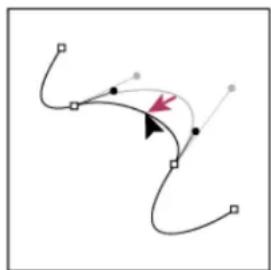
flowchart
graph TD
    A["Start"] --> B{Decision}
    B -->|Yes| C["Path 1"]
    B -->|No| D["Path 2"]
    C --> E["End"]
    D --> F["End"]
Click to select the curve segment. Then drag to adjust.
- To adjust the shape of the segment on either side of a selected anchor point, drag the anchor point or the direction point. Shift-drag to constrain movement to multiples of 45^ .

flowchart
graph TD
    A["Start"] --> B{Condition}
    B --> C["Path 1"]
    B --> D["Path 2"]
    B --> E["End"]
    C --> F["Down Arrow"]
    D --> G["Right Arrow"]
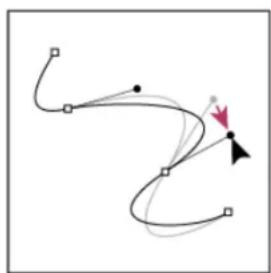
natural_image
Abstract curved line diagram with black and red markers (no text or symbols)Drag the anchor point, or drag the direction point.
Note: In Photoshop CC and CS6, adjusting a path segment also adjusts the related segments, letting you intuitively transform path shapes. To only edit segments between the selected anchor points, similar to earlier Photoshop versions, select Constrain Path Dragging in the options bar.
Note: You can also apply a transformation, such as scaling or rotating, to a segment or anchor point.
Delete a segment
- (Optional) If you're creating an opening in a closed path, select the Add Anchor Point tool ⬆ ^+ , and add two points where you want the cut to occur.
- Select the Direct Selection tool ↗, and select the segment you want to delete.
- Press Backspace (Windows) or Delete (Mac OS) to delete the selected segment. Pressing Backspace or Delete again erases the rest of the path.
Delete the direction line of an anchor point
- Using the Convert Anchor Point Tool, click the anchor point of the direction line.
The smooth point becomes a corner point. For more information, see Convert between smooth points and corner points.
Extend an open path
- Using the Pen tool, position the pointer over the endpoint of the open path you want to extend. The pointer changes when it's precisely positioned over the endpoint.
- Click the endpoint.
-
Do one of the following:
-
To create a corner point, position the Pen tool where you want to end the new segment, and click. If you are extending a path that ends at a smooth point, the new segment will be curved by the existing direction line.
• To create a smooth point, position the Pen tool where you want to end the new curved segment, and drag.
Connect two open paths
- Using the Pen tool, position the pointer over the endpoint of the open path that you want to connect to another path. The pointer changes when it's precisely positioned over the endpoint.
- Click the endpoint.
-
Do one of the following:
-
To connect the path to another open path, click an endpoint on the other path. When you precisely position the Pen tool over the other path's endpoint, a small merge symbol 🔊 appears next to the pointer.
- To connect a new path to an existing path, draw the new path near the existing path, and then move the Pen tool to the existing path's (unselected) endpoint. Click that endpoint when you see the small merge symbol that appears next to the pointer.
Move or nudge anchor points or segments using the keyboard
- Select the anchor point or path segment.
- Click or hold down any of the arrow keys on the keyboard to move 1 pixel at a time in the direction of the arrow.
Hold down the Shift key in addition to the arrow key to move 10 pixels at a time.
To the top
Add or delete anchor points
Adding anchor points can give you more control over a path or it can extend an open path. However, it's a good idea not to add more points than necessary. A path with fewer points is easier to edit, display, and print. You can reduce the complexity of a path by deleting unnecessary points.
The toolbox contains three tools for adding or deleting points: the Pen tool , the Add Anchor Point tool and the Delete Anchor Point tool .
By default, the Pen tool changes to the Add Anchor Point tool as you position it over a selected path, or to the Delete Anchor Point tool as you position it over an anchor point. You must select Auto Add/Delete in the options bar to enable the Pen tool to automatically change to the Add Anchor Point or Delete Anchor Point tool.
You can select and edit multiple paths simultaneously. You can also reshape a path while adding anchor points by clicking and dragging as you add.
Note: Don't use the Delete or Backspace keys or the Edit > Cut or Edit > Clear commands to delete anchor points. These keys and commands delete the point and line segments that connect to that point.
Add or delete anchor points
- Select the path you want to modify.
- Select the Pen tool, the Add Anchor Point tool, or the Delete Anchor Point tool.
- To add an anchor point, position the pointer over a path segment and click. To delete an anchor point, position the pointer over an anchor point and click.
Disable or temporarily override automatic Pen tool switching
You can override automatic switching of the Pen tool to the Add Anchor Point tool or the Delete Anchor Point tool. This is useful when you want to start a new path on top of an existing path.
- In Photoshop, deselect Auto Add/Delete in the options bar.
To the top
Convert between smooth points and corner points
- Select the path you want to modify.
- Select the Convert Point tool, or use the Pen tool and hold down Alt (Windows) or Option (Mac OS).
Note: To activate the Convert Point tool while the Direct Selection tool is selected, position the pointer over an anchor point, and press Ctrl+Alt (Windows) or Command+Option (Mac OS).
- Position the Convert Point tool over the anchor point you want to convert, and do one of the following:
• To convert a corner point to a smooth point, drag away from the corner point to make direction lines appear.

natural_image
Two abstract line diagrams with square markers and arrows, no text or symbols presentDragging a direction point out of a corner point to create a smooth point
• To convert a smooth point to a corner point without direction lines, click the smooth point.
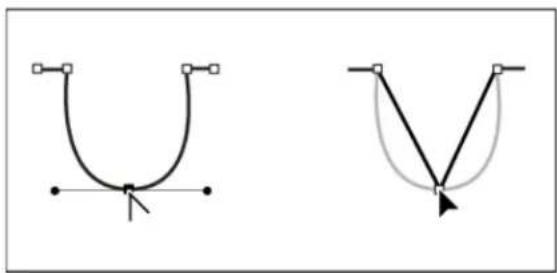
natural_image
Two abstract line diagrams showing curved and V-shaped paths with arrows, no text or symbols presentClicking a smooth point to create a corner point
- To convert a corner point without direction lines to a corner point with independent direction lines, first drag a direction point out of a corner point (making it a smooth point with direction lines). Release the mouse button only (don't release any keys you may have pressed to activate the Convert Anchor Point tool), and then drag either direction point.
• To convert a smooth point to a corner point with independent direction lines, drag either direction point.

natural_image
Two abstract curved line diagrams with directional arrows, no text or symbols presentConverting a smooth point to a corner point
To the top
Adjust path components
You can reposition a path component (including a shape in a shape layer) anywhere within an image. You can copy components within an image or between two Photoshop images. Using the Path Selection tool, you can merge overlapping components into a single component. All vector
objects, whether they are described by a saved path, work path, or vector mask, can be moved, reshaped, copied, or deleted.
You can also use the Copy and Paste commands to duplicate vector objects between a Photoshop image and an image in another application, such as Adobe Illustrator.
Change the overlap mode for the selected path component
-
Using the Path Selection tool, drag a marquee to select existing path areas.
-
In Photoshop CC and CS6, choose a shape area option from the Path Operations drop-down menu in the options bar, or in CS5, choose a shape area option in the options bar:
Combine Shapes (CC, CS6) or Add To Shape Area (CS5) Adds the path area to overlapping path areas.
Subtract From Shape Area Removes the path area from overlapping path areas.
Intersect Shape Areas Restricts the area to the intersection of the selected path area and overlapping path areas.
Exclude Overlapping Shape Areas Excludes the overlap area.
Show or hide the selected path component
Do one of the following:
- Choose View > Show > Target Path.
- Choose View > Extras. This command also shows or hides a grid, guides, selection edges, annotations, and slices.
Move a path or path component
- Select the path name in the Paths panel, and use the Path Selection tool to select the path in the image. To select multiple path components, Shift-click each additional path component to add it to the selection.
- Drag the path to its new location. If you move any part of a path beyond the canvas boundaries, the hidden part of the path is still available.

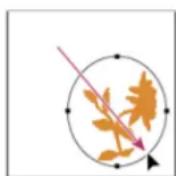
Dragging a path to a new location
Note: If you drag a path so that the move pointer is over another open image, the path is copied to that image.
Reshape a path component
-
Select the path name in the Paths panel, and use the Direct Selection tool to select an anchor point in the path.
-
Drag the point or its handles to a new location.
Merge overlapping path components
-
Select the path name in the Paths panel, and select the Path Selection tool.
-
Do the following to create a single component from all overlapping components:
• In Photoshop CC and CS6, choose Merge Shape Components from the Path Operations drop-down menu in the options bar
- In CS5 or earlier, click Combine in the options bar.
Copy a path component or path
Do any of the following:
- To copy a path component as you move it, select the path name in the Paths panel, and click a path component with the Path Selection tool. Then Alt-drag (Windows) or Option-drag (Mac OS) the selected path.
- To copy a path without renaming it, drag the path name in the Paths panel to the New Path button at the bottom of the panel.
- To copy and rename a path, Alt-drag (Windows) or Option-drag (Mac OS) the path in the Paths panel to the New Path button at the bottom of the panel. Or select the path to copy, and choose Duplicate Path from the Paths panel menu. Enter a new name for the path in the Duplicate Path dialog box, and click OK.
- To copy a path or path component into another path, select the path or path component you want to copy, and choose Edit > Copy. Then select the destination path, and choose Edit > Paste.
Copy path components between two Photoshop files
- Open both images.
- In the source image, use the Path Selection tool ↗ to select the entire path or the path components that you want to copy.
-
To copy the path component, do any of the following:
-
Drag the path component from the source image to the destination image. The path component is copied to the active path in the Paths panel.
- In the source image, select the path name in the Paths panel and choose Edit > Copy to copy the path. In the destination image, choose Edit > Paste. You can also use this method to combine paths in the same image.
- To paste the path component into the destination image, select the path component in the source image, and choose Edit > Copy. In the destination image, choose Edit > Paste.
Delete a path component
- Select the path name in the Paths panel, and click a path component with the Path Selection tool.
- Press Backspace (Windows) or Delete (Mac OS) to delete the selected path component.
Align and distribute path components
You can align and distribute path components that are described in a single path. For example, you can align the left edges of several shapes contained in a single layer or distribute several components in a work path along their horizontal centers.
Note: To align shapes that are on separate layers, use the Move tool.
- To align components, use the Path Selection tool to select the components you want to align. Then, in Photoshop CC or CS6, choose an option from the Path Alignment drop-down menu in the options bar, or in CS5, select an alignment option from the options bar.
Alignment options
- To distribute components, select at least three components you want to distribute. Then, in Photoshop CC or CS6, choose an option from the Path Arrangement drop-down menu in the options bar, or in CS5, select a distribute option from the options bar.

Distribute options
Twitter™ and Facebook posts are not covered under the terms of Creative Commons.
Legal Notices | Online Privacy Policy
Textured brush options
Copy textures between tools
Dual brushes
To the top
Textured brush options
A textured brush uses a pattern to make strokes look as if they are painted on textured canvas.

Brush strokes without texture (left) and with texture (right)
Click the pattern sample, and select a pattern from the pop-up panel. Set one or more of the following options:
Invert Inverts the high and low points in the texture based on the tones in the pattern. When Invert is selected, the lightest areas in the pattern are the low points in the texture and therefore receive the least paint; the darkest areas in the pattern are the high points in the texture and therefore receive the most paint. When Invert is deselected, the lightest areas in the pattern receive the most paint; the darkest areas in the pattern receive the least paint.
Scale Specifies the scale of the pattern. Type a number, or use the slider to enter a value that is a percentage of the pattern size.
Texture Each Tip Applies the selected texture individually to each brush mark in a brush stroke, rather than to the brush stroke as a whole (a brush stroke is made up of many brush marks, applied continuously as you drag the brush). You must select this option to make the Depth variance options available.
Mode Specifies the blending mode used to combine the brush and the pattern. (See Blending modes.)
Depth Specifies how deeply the paint penetrates into the texture. Type a number, or use the slider to enter a value. At 100%, the low points in the texture do not receive any paint. At 0%, all points in the texture receive the same amount of paint, therefore hiding the pattern.
Minimum Depth Specifies the minimum depth to which paint can penetrate when Depth Control is set to Fade, Pen Pressure, Pen Tilt, or Stylus Wheel, and Texture Each Tip is selected.
Depth Jitter and Control Specifies how the depth varies when Texture Each Tip is selected. To specify the maximum percentage of jitter, enter a value. To specify how you want to control the depth variance of brush marks, choose an option from the Control pop-up menu:
Off Specifies no control over the depth variance of brush marks.
Fade Fades from the Depth Jitter percentage to the Minimum Depth percentage in the specified number of steps.
Pen Pressure, Pen Tilt, Stylus Wheel, Rotation Varies the depth based on the pen pressure, pen tilt, position of the pen thumbwheel, or rotation of the pen.
To the top
Copy textures between tools
When you specify a texture for the current tool, you can copy the texture's pattern and scale to all tools that support textures. For example, you can copy the current texture pattern and scale for the Brush tool to the Pencil, Clone Stamp, Pattern Stamp, History Brush, Art History Brush, Eraser, Dodge, Burn, and Sponge tools.
- Choose Copy Texture to Other Tools from the Brush panel menu.
To the top
Dual brushes
A dual brush combines two tips to create brush marks. The second brush texture is applied within the brush stroke of the primary brush; only the areas where both brushstrokes intersect are painted. Set options for the primary tip in the Brush Tip Shape section of the Brush panel. Select a second brush tip from the Dual Brush section of the Brush panel, and set any of the following options.

A
B
C
A. Primary brush tip stroke (hard round 55). B. Secondary brush tip stroke (grass). C. Dual brush stroke (using both).
Mode Sets a blending mode to use when combining brush marks from the primary tip and the dual tip. (See Blending modes.)
Diameter Controls the size of the dual tip. Enter a value in pixels, drag the slider, or click Use Sample Size to use the original diameter of the brush tip. (The Use Sample Size option is available only if the brush tip shape was created by sampling pixels in an image.)
Spacing Controls the distance between the dual tip brush marks in a stroke. To change the spacing, type a number, or use the slider to enter a percentage of the tip diameter.
Scatter Specifies how dual tip brush marks are distributed in a stroke. When Both Axes is selected, dual tip brush marks are distributed in a radial direction. When Both Axes is deselected, dual tip brush marks are distributed perpendicular to the stroke path. To specify the maximum percentage of scattering, type a number or use the slider to enter a value.
Count Specifies the number of dual tip brush marks applied at each spacing interval. Type a number, or use the slider to enter a value.
More Help Topics

Twitter™ and Facebook posts are not covered under the terms of Creative Commons.
Legal Notices
Online Privacy Policy
Adding brush dynamics
Color dynamics brush options
Transfer brush options
To the top
Adding brush dynamics
The Brush panel provides many options for adding dynamic (or changing) elements to preset brush tips. For example, you can set options that vary the size, color, and opacity of brush marks over the course of a stroke.
You work with two components when adding dynamics elements to a brush:
- Jitter percentages specify the randomness of dynamic elements. At 0%, an element does not change over the course of a stroke; at 100%, an element has the maximum amount of randomness.
- Options in the Control pop-up menus specify how you want to control the variance of dynamic elements. You can choose not to control the variance of an element, to fade an element over the specified number of steps, or to vary an element based on pen pressure, pen tilt, position of the pen thumbwheel, or pen rotation.
Note: Pen controls are available only when you're using a pressure-sensitive digitizing tablet such as the Wacom tablet, and supported pens (for rotation control and thumbwheel). A warning icon appears if you select a pen control but have not installed a tablet or are using a pen that is missing the control feature.
Brush shape dynamics
Shape dynamics determine the variance of brush marks in a stroke.
Brush stokes without shape dynamics and with shape dynamics
Size Jitter and Control Specifies how the size of brush marks vary in a stroke. For more information, see Creating and modifying brushes.
To specify the maximum percentage of jittering, type a number or use the slider to enter a value. To specify how you want to control the size variance of brush marks, choose an option from the Control pop-up menu:
Off Specifies no control over the size variance of brush marks.
Fade Fades the size of brush marks between the initial diameter and the minimum diameter in the specified number of steps. Each step is equal to one mark of the brush tip. The value can range from 1 to 9999. For example, entering 10 steps produces a fade in 10 increments.
Pen Pressure, Pen Tilt, Stylus Wheel Varies the size of brush marks between the initial diameter and the minimum diameter based on the pen pressure, pen tilt, or position of the pen thumbwheel.
Minimum Diameter Specifies the minimum percentage by which brush marks can scale when Size Jitter or Size Control is enabled. Type a number, or use the slider to enter a value that is a percentage of the brush tip diameter.
Tilt Scale Specifies the scale factor applied to the height of the brush prior to rotation when Size Control is set to Pen Tilt. Type a number, or use the slider to enter a value that is a percentage of the brush diameter.
Angle Jitter and Control Specifies how the angle of brush marks varies in a stroke. To specify the maximum percentage of jittering, enter a value that is a percentage of 360 degrees. To specify how you want to control the angle variance of brush marks, choose an option from the Control pop-up menu:
Off Specifies no control over the angle variance of brush marks.
Fade Fades the angle of brush marks between 0 and 360 degrees in the specified number of steps.
Pen Pressure, Pen Tilt, Stylus Wheel, Rotation Varies the angle of brush marks between 0 and 360 degrees based on the pen pressure, pen tilt, position of the pen thumbwheel, or rotation of the pen.
Initial Direction Bases the angle of brush marks on the initial direction of the brush stroke.
Direction Bases the angle of brush marks on the direction of the brush stroke.
Roundness Jitter and Control Specifies how the roundness of brush marks varies in a stroke. To specify the maximum percentage of jittering, enter a percentage indicating the ratio between the brush's short and long axes. To specify how you want to control the roundness variance of brush marks, choose an option from the Control pop-up menu:
Off Specifies no control over the roundness variance of brush marks.
Fade Fades the roundness of brush marks between 100% and the Minimum Roundness value in the specified number of steps.
Pen Pressure, Pen Tilt, Stylus Wheel, Rotation Varies the roundness of brush marks between 100% and the Minimum Roundness value based on the pen pressure, pen tilt, position of the pen thumbwheel, or rotation of the pen.
Minimum Roundness Specifies the minimum roundness for brush marks when Roundness Jitter or Roundness Control is enabled. Enter a percentage indicating the ratio between the brush's short and long axes.
Brush Projection (CC, CS6) Specifies that as you paint with a stylus, changes to tilt and rotation alter the tip shape.
To the top
Color dynamics brush options
Color dynamics determine how the color of paint changes over the course of a stroke.

Brush strokes without color dynamics (left) and with color dynamics (right)
Apply per tip Specifies changing color for each distinct tip stamp in a stroke.
If unchecked, dynamic changes occur once at the beginning of each stroke. You can vary color between strokes, rather than within each individual stroke.
Foreground/Background Jitter and Control Specifies how paint varies between the foreground color and background color.
To specify a percentage by which the color of the paint can vary, type a number, or use the slider to enter a value. To specify how you want to control the color variance of brush marks, choose an option from the Control pop-up menu:
Off Specifies no control over the color variance of brush marks.
Fade Varies the color of paint between the foreground color and the background color in the specified number of steps.
Pen Pressure, Pen Tilt, Stylus Wheel, Rotation Varies the color of paint between the foreground color and the background color based on the pen pressure, pen tilt, position of the pen thumbwheel, or rotation of the pen.
Hue Jitter Specifies a percentage by which the hue of the paint can vary in a stroke. Type a number, or use the slider to enter a value. A lower value changes the hue while maintaining a close proximity to the hue of the foreground color. A higher value increases the difference between hues.
Saturation Jitter Specifies a percentage by which the saturation of the paint can vary in a stroke. Type a number, or use the slider to enter a value. A lower value changes the saturation while maintaining a close proximity to the saturation of the foreground color. A higher value increases the difference between saturation levels.
Brightness Jitter Specifies a percentage by which the brightness of the paint can vary in a stroke. Type a number, or use the slider to enter a value. A lower value changes the brightness while maintaining a close proximity to the brightness of the foreground color. A higher value increases the difference between brightness levels.
Purity Increases or decreases the saturation of the color. Type a number, or use the slider to enter a percentage between -100 and 100. At -100%, the color is fully desaturated; at 100%, the color is fully saturated.
To the top
Transfer brush options
Transfer brush options determine how paint changes over the course of a stroke.
Brush strokes without paint dynamics (left) and with paint dynamics (right)
Opacity Jitter and Control Specifies how the opacity of paint varies in a brush stroke, up to (but not exceeding) the opacity value specified in the options bar. To specify a percentage by which the opacity of the paint can vary, type a number or use the slider to enter a value. To specify how you want to control the opacity variance of brush marks, choose an option from the Control pop-up menu:
Off Specifies no control over the opacity variance of brush marks.
Fade Fades the opacity of paint from the opacity value in the options bar to 0, in the specified number of steps.
Pen Pressure, Pen Tilt, Stylus Wheel Varies the opacity of paint based on the pen pressure, pen tilt, or the position of the pen thumbwheel.
Flow Jitter and Control Specifies how the flow of paint varies in a brush stroke, up to (but not exceeding) the flow value specified in the options bar.
To specify a percentage by which the flow of the paint can vary, type a number or use the slider to enter a value. To specify how you want to control the flow variance of brush marks, choose an option from the Control pop-up menu:
Off Specifies no control over the flow variance of brush marks.
Fade Fades the flow of paint from the flow value in the options bar to 0 in the specified number of steps.
Pen Pressure, Pen Tilt, Stylus Wheel Varies the flow of paint based on the pen pressure, pen tilt, or position of the pen thumbwheel.
More Help Topics

BY-NC-SA
Twitter™ and Facebook posts are not covered under the terms of Creative Commons.
Legal Notices | Online Privacy Policy
Change brush size and opacity with pen pressure
If you work with a graphics drawing tablet, such as the Wacom® tablet, you can control painting tools with pen pressure, angle, rotation, or the stylus wheel.
- Select the Brush ♂, Pencil ♀ or other painting tool.
- In the options bar, do either of the following:
- Click the Tablet Pressure Controls Size button

- Click the Tablet Pressure Controls Opacity button

Note: Choose Window > Brush to access additional controls that vary the angle, flow, scatter, texture depth, and roundness of the stroke according to pen pressure.
More Help Topics

Twitter ^™ and Facebook posts are not covered under the terms of Creative Commons.
Legal Notices | Online Privacy Policy
Paint with the Mixer Brush
The Mixer Brush simulates realistic painting techniques such as mixing colors on the canvas, combining colors on a brush, and varying paint wetness across a stroke.
The Mixer Brush has two paint wells, a reservoir and a pickup. The reservoir stores the final color deposited onto the canvas and has more paint capacity. The pickup well receives paint only from the canvas; its contents are continuously mixed with canvas colors.

For a video about the Mixer Brush, see www.adobe.com/go/lrvid5001_ps_en
-
Select the Mixer Brush tool √. (If necessary, click and hold the standard Brush tool to reveal the Mixer Brush.)
-
To load paint into the reservoir, Alt-click (Windows) or Option-click (Mac OS) the canvas. Or, choose a foreground color.
When you load paint from the canvas, the brush tip reflects any color variation in the sampled area. If you prefer brush tips of uniform color, select Load Solid Colors Only from the Current Brush Load pop-up menu in the options bar.
-
Choose a brush from the Brush Presets panel. See Select a preset brush.
-
In the options bar, set tool options. For common options, see Paint tool options. For options unique to the Mixer Brush, see the following:
Current Brush Load swatch From the pop-up panel, click Load Brush to fill the brush with the reservoir color, or Clean Brush to remove paint from the brush. To perform these tasks after each stroke, select the automatic Load 📋 or Clean Options.
Preset pop-up menu Applies popular combinations of Wet, Load, and Mix settings.
Wet Controls how much paint the brush picks up from the canvas. Higher settings produce longer paint streaks.

A

B
Increasing paint wetness
A. 0% B. 100%
Load Specifies the amount of paint loaded in the reservoir. At low load rates, paint strokes dry out more quickly.
A
B
Increasing load rates
A. 1% B. 100%
Mix Controls the ratio of canvas paint to reservoir paint. At 100%, all paint is picked up from the canvas; at 0%, all paint comes from the reservoir. (The Wet setting, however, continues to determine how paints mix on the canvas.)
Sample All Layers Picks up canvas color from all visible layers.
-
Do one or more of the following:
-
Drag in the image to paint.
- To draw a straight line, click a starting point in the image. Then hold down Shift, and click an ending point.
- When using the Brush tool as an airbrush, hold down the mouse button without dragging to build up color.
More Help Topics
(cc) BY-NC-SR
Twitter™ and Facebook posts are not covered under the terms of Creative Commons.
Legal Notices | Online Privacy Policy
Set the following in the options bar. Options available vary with each tool.
To the top
Paint with a pattern
The Pattern Stamp tool paints with a pattern. You can select a pattern from the pattern libraries or create your own patterns.
- Select the Pattern Stamp tool ✗.
- Choose a brush from the Brush Presets panel. See Select a preset brush.
- Set tool options for mode, opacity, etc. in the options bar. See Paint tool options.
- Select Aligned in the options bar to maintain the pattern's continuity with your original start point, even if you release the mouse button and then continue painting. Deselect Aligned to restart the pattern each time you stop and start painting.
- Select a pattern from the Pattern pop-up panel in the options bar.
- If you'd like to apply the pattern with an impressionistic effect, select Impressionist.
- Drag in the image to paint it with the pattern.
More Help Topics
Twitter™ and Facebook posts are not covered under the terms of Creative Commons.
Legal Notices | Online Privacy Policy
Painting stylized strokes with the Art History Brush
The Art History Brush tool paints with stylized strokes, using the source data from a specified history state or snapshot. By experimenting with different paint style, size, and tolerance options, you can simulate the texture of painting with different colors and artistic styles.
Like the History Brush tool, the Art History Brush tool uses a specified history state or snapshot as the source data. The History Brush tool, however, paints by re-creating the specified source data, while the Art History Brush tool uses that data along with the options you set to create different colors and artistic styles.
For various visual effects, experiment with applying filters or filling an image with a solid color before painting with the Art History Brush tool. Also try increasing the size of the image by a factor of 4 to soften the details.
natural_image
Three identical close-up images of a stylized bird's face, labeled A, B, and C (no text or symbols on the faces themselves)Example of using the Art History Brush tool
A. Original B. Using a small brush C. Using a large brush
- In the History panel, click the left column of the state or snapshot to use as the source for the Art History Brush tool. A brush icon appears next to the source history state.
- Select the Art History Brush tool D.
-
Do the following in the options bar:
-
Choose a brush from the Brush Presets picker, and set brush options. (See Select a preset brush.)
- Choose a blending mode from the Mode menu. (See Blending modes.)
- Choose an option from the Style menu to control the shape of the paint stroke.
- For Area, enter a value to specify the area covered by the paint strokes. The greater the size, the larger the covered area and the more numerous the strokes.
-
For Tolerance, enter a value to limit the regions where paint strokes can be applied. A low tolerance lets you paint unlimited strokes anywhere in the image. A high tolerance limits paint strokes to areas that differ considerably from the color in the source state or snapshot.
-
Click and drag in the image to paint.
More Help Topics
- Changing the brush cursor
Twitter™ and Facebook posts are not covered under the terms of Creative Commons.
Legal Notices | Online Privacy Policy
Erase with the Eraser tool
Change similar pixels with the Magic Eraser tool
Change pixels to transparent with the Background Eraser tool
Auto Erase with the Pencil tool
To the top
Erase with the Eraser tool
The Eraser tool changes pixels to either the background color or to transparent. If you're working on a background or in a layer with transparency locked, the pixels change to the background color; otherwise, the pixels are erased to transparency.
You can also use the eraser to return the affected area to a state selected in the History panel.
-
Select the Eraser tool
-
Set the background color you want to apply if you are erasing in the background or a layer with locked transparency.
-
In the options bar, choose a Mode setting. Brush and Pencil set the eraser to act like those tools. Block is a hard-edged, fixed-sized square with no options for changing the opacity or flow.
-
For Brush and Pencil modes, choose a brush preset, and set Opacity and Flow in the options bar.
An opacity of 100% erases pixels completely. A lower opacity erases pixels partially. See Paint tool options.
- To erase to a saved state or snapshot of the image, click the left column of the state or snapshot in the History panel, and then select Erase To History in the options bar.
(Photoshop) To temporarily use the Eraser tool in Erase to History mode, hold down Alt (Windows) or Option (Mac OS) as you drag in the image.
- Drag through the area you want to erase.
To the top
Change similar pixels with the Magic Eraser tool
When you click in a layer with the Magic Eraser tool, the tool changes all similar pixels to transparent. If you're working in a layer with locked transparency, the pixels change to the background color. If you click in the background, it is converted to a layer and all similar pixels change to transparent.
You can choose to erase contiguous pixels only or all similar pixels on the current layer.

- Select the Magic Eraser tool

-
Do the following in the options bar:
-
Enter a tolerance value to define the range of colors that can be erased. A low tolerance erases pixels within a range of color values very similar to the pixel you click. A high tolerance extends the range of colors that will be erased.
- Select Anti-aliased to smooth the edges of the area you erase.
- Select Contiguous to erase only pixels contiguous to the one you click, or deselect to erase all similar pixels in the image.
- Select Sample All Layers to sample the erased color using combined data from all visible layers.
-
Specify an opacity to define the strength of the erasure. An opacity of 100% erases pixels completely. A lower opacity erases pixels partially.
-
Click in the part of the layer you want to erase.
To the top
Change pixels to transparent with the Background Eraser tool
The Background Eraser tool erases pixels on a layer to transparency as you drag. You can erase the background while maintaining the edges of an object in the foreground. By specifying different sampling and tolerance options, you can control the range of the transparency and the sharpness of the boundaries.

If you want to erase the background of an object with intricate or wispy edges, use QuickSelect.
The background eraser samples the color in the center of the brush, also called the hotspot, and deletes that color wherever it appears inside the brush. It also performs color extraction at the edges of any foreground objects, so that color halos are not visible if the foreground object is later pasted into another image.
Note: The background eraser overrides the lock transparency setting of a layer.
- In the Layers panel, select the layer containing the areas you want to erase.
-
Select the Background Eraser tool 📋. (If the tool isn't visible, hold down the Eraser tool , and choose the Background Eraser from the pop-up menu.)
-
Click the brush sample in the options bar, and set brush options in the pop-up panel:
-
Choose settings for the Diameter, Hardness, Spacing, Angle, and Roundness options (see Brush tip shape options).
-
If you're using a pressure-sensitive digitizing tablet, choose options from the Size and Tolerance menus to vary the size and tolerance of the background eraser over the course of a stroke. Choose Pen Pressure to base the variation on the pen pressure. Choose Stylus Wheel to base the variation on the position of the pen thumbwheel. Choose Off if you don't want to vary the size or tolerance.
-
Do the following in the options bar:
-
Choose a Limits mode for erasing: Discontiguous to erase the sampled color wherever it occurs under the brush; Contiguous to erase areas that contain the sampled color and are connected to one another; and Find Edges to erase connected areas containing the sampled color while better preserving the sharpness of shape edges.
- For Tolerance, enter a value or drag the slider. A low tolerance limits erasure to areas that are very similar to the sampled color. A high tolerance erases a broader range of colors.
- Select Protect Foreground Color to prevent the erasure of areas that match the foreground color in the toolbox.
-
Choose a Sampling option: Continuous to sample colors continuously as you drag; Once to erase only areas containing the color you first click; and Background Swatch to erase only areas containing the current background color.
-
Drag through the area you want to erase. The Background Eraser tool pointer appears as a brush shape with a cross hair indicating the tool's hot spot ⊕.
To the top
Auto Erase with the Pencil tool
The Auto Erase option for the Pencil tool lets you paint the background color over areas containing the foreground color.
- Specify foreground and background colors.
- Select the Pencil tool ↗.
- Select Auto Erase in the options bar.
- Drag over the image.
If the center of the cursor is over the foreground color when you begin dragging, the area is erased to the background color. If the center of the cursor is over an area that doesn't contain the foreground color when you begin dragging, the area is painted with the foreground color.
More Help Topics
Twitter™ and Facebook posts are not covered under the terms of Creative Commons.
Legal Notices | Online Privacy Policy
You can keep your patterns organized in libraries that you can load or remove from pattern pop-up panels.
Load a library of patterns
Choose one of the following from a Pattern pop-up panel menu:
- Load Patterns to add a library to the current list. Select the library file you want to use, and click Load.
- Replace Patterns to replace the current list with a different library. Select the library file you want to use, and click Load.
- A library file (displayed at the bottom of the panel menu). Click OK to replace the current list, or click Append to append the current list.
Save a set of preset patterns as a library
- Choose Save Patterns from a Pattern pop-up panel menu.
- Choose a location for the pattern library, enter a file name, and click Save.
You can save the library anywhere. However, if you place the library file in the Presets/Patterns folder in the default location, the library name will appear at the bottom of the Pattern pop-up panel menus after you restart Photoshop.
Return to the default library of patterns
- Choose Reset Patterns from a Pattern pop-up panel menu. You can either replace the current list or append the default library to the current list.
If you receive a Pattern Stamp tool preset that uses an undefined pattern, or if you erase the preset you're using by resetting or replacing the pattern library, choose New Pattern from the Pattern pop-up panel menu to redefine the pattern.
Rename a preset pattern
- Select the pattern you want to rename, and choose Rename Pattern from the panel menu.
- Enter a new name for the pattern, and click OK.
Delete a preset pattern
- Do one of the following:
- Select the pattern you want to delete, and choose Delete Pattern from the panel menu.
- Hold down Alt (Windows) or Option (Mac OS), position the pointer over a pattern (the pointer turns into scissors), and click.
The pattern is deleted only from the displayed group. To display the full library again, see Load a library of patterns.
More Help Topics
Twitter ^™ and Facebook posts are not covered under the terms of Creative Commons.
Legal Notices | Online Privacy Policy
A pattern is an image that is repeated, or tiled, when you use it to fill a layer or selection. Photoshop comes with various preset patterns.
You can create new patterns and save them in libraries for use with different tools and commands. Preset patterns are displayed in pop-up panels in the options bar for the Paint Bucket, Pattern Stamp, Healing Brush, and Patch tools, as well as in the Layer Style dialog box. You can change how patterns are displayed in the pop-up panels by choosing a display option from the pop-up panel menu. You can also manage pattern presets using the preset manager.
To the top
Define an image as a preset pattern
- Use the Rectangle Marquee tool ☐ on any open image to select an area to use as a pattern. Feather must be set to 0 pixels. Note that large images may become unwieldy.
- Choose Edit > Define Pattern.
- Enter a name for the pattern in the Pattern Name dialog box.
Note: If you are using a pattern from one image and applying it to another, Photoshop converts the color mode.
Photoshop comes with a set of Illustrator format files that you can use to define a preset pattern. Open the file, select any rendering option, and then define the pattern.
More Help Topics

Twitter™ and Facebook posts are not covered under the terms of Creative Commons.
Legal Notices | Online Privacy Policy
Text
Select characters
Character panel overview
About Dynamic Shortcuts
Specify type size
Change the type color
Change the color of individual letters
Underline or strike through text
Apply all caps or small caps
Specify superscript or subscript characters
Character styles | CC, CS6
Specifying default type styles | Creative Cloud only
You can set type attributes before you enter characters or reset them to change the appearance of selected characters in a type layer.
Before you can format individual characters, select them. You can select one character, a range of characters, or all characters in a type layer.
To the top
Select characters
- Select the Horizontal Type tool T or the Vertical Type tool ↓T.
- Select the type layer in the Layers panel, or click in the text to automatically select a type layer.
-
Position the insertion point in the text, and do one of the following:
-
Drag to select one or more characters.
- Click in the text, and then Shift-click to select a range of characters.
- Choose Select > All to select all the characters in the layer.
- Double-click a word to select it. Triple-click a line to select it. Quadruple-click a paragraph to select it. Quintuple-click anywhere in the text flow to select all characters in a bounding box.
-
To use the arrow keys to select characters, click in the text, and then hold down Shift and press the Right Arrow or Left Arrow key. To use the keys to select words, hold down Shift+Ctrl (Windows) or Shift+Command (Mac OS) and press the Right Arrow or Left Arrow key.
-
To select all the characters in a layer without positioning the insertion point in the text flow, select the type layer in the Layers panel, and then double-click the layer's type icon.
Note: Selecting and formatting characters in a type layer puts the Type tool into edit mode.
To the top
Character panel overview
The Character panel provides options for formatting characters. Some formatting options are also available from the options bar.
You can display the Character panel by doing one of the following:
- Choose Window > Character, or click the Character panel tab if the panel is visible but not active.
- With a type tool selected, click the Panel button in the options bar.
To set an option in the Character panel, choose a value from the pop-up menu on the right side of the option. For options with numeric values, you can also use the up and down arrows to set the value, or you can edit the value directly in the text box. When you edit a value directly, press Enter or Return to apply a value, Shift+Enter or Shift+Return to apply a value and then highlight the value just edited, or Tab to apply a value and move to the next text box in the panel.
text_image
CHARACTER A — Myriad Pro ▼ Regular ▼ H B — 12 pt ▼ (Auto) ▼ I C — 100% ▼ 100% ▼ J D — 0% E — 0 ▼ Metrics ▼ K F — Aa 0 pt Color: T T TT Tr T' T₁ T F G — English: USA ▼ a a Sharp ▼Character panel
A. Font Family B. Font Size C. Vertical Scale D. Set Tsume option E. Tracking F. Baseline Shift G. Language H. Font Style I. Leading J. Horizontal scale K. Kerning
Note: Select Show Asian Text Options in the Type preferences for the Set Tsume option to appear in the Character panel.
You can access additional commands and options in the Character panel menu. To use this menu, click the triangle in the upper right corner of the panel.
To the top
About Dynamic Shortcuts
Dynamic Shortcuts are keyboard shortcuts that are accessible only when you are entering point or paragraph type, when type is selected, or when the I-beam is in text. You can view Dynamic Shortcuts in the Character panel menu when they are accessible. Dynamic Shortcuts are available for type options such as Faux Bold, Faux Italic, All Caps, Small Caps, Superscript, Subscript, Underline, and Strikethrough.

text_image
Change Text Orientation ✓ Standard Vertical Roman Alignment OpenType Faux Bold Faux Italic All Caps Small Caps Superscript Subscript Underline Strikethrough ✓ Fractional Widths System LayoutDynamic shortcuts appear in the Character panel menu only when you are entering point or paragraph type, when type is selected, or when the I-beam is in text.
Specify type size
The type size determines how large the type appears in the image.
The default unit of measurement for type is points. One PostScript point is equal to 1/72 of an inch in a 72-ppi image; however, you can switch between using the PostScript and traditional definitions of point size. You can change the default unit of measurement for type in the Units & Rulers area of the Preferences dialog box.
Choose a type size
- In the Character panel or options bar, enter or select a new value for Size .T
To use an alternate unit of measurement, enter the unit (in, cm, mm, pt, px, or pica) after the value in the Font Size text box.
To change the unit of measurement for type, choose Edit > Preferences > Units & Rulers (Windows) or Photoshop > Preferences > Units & Rulers (Mac OS), and choose a unit of measurement from the Type menu.
Define the point size unit
- Choose Edit > Preferences > Units & Rulers (Windows) or Photoshop > Preferences > Units & Rulers (Mac OS).
- For Point/Pica Size, select from the following options:
PostScript (72 points/inch) Sets a unit size compatible for printing to a PostScript device.
Traditional (72.27 points/inch) Uses 72.27 points per inch, as traditionally used in printing.
- Click OK.
To the top
Change the type color
The type you enter is rendered in the current foreground color; however, you can change the color before or after you enter type. When editing existing type layers, you can change the color of individual, selected characters or of all type in a layer.
- Do one of the following:
- Click the Color selection box in the options bar or Character panel, and select a color using the Adobe Color Picker.
- Use fill shortcuts. To fill with the foreground color, press Alt+Backspace (Windows) or Option+Delete (Mac OS); to fill with the background color, press Ctrl+Backspace (Windows) or Command+Delete (Mac OS).
- Apply an overlay layer style to the type layer to apply a color, gradient, or pattern on top of the existing color. You can't apply an overlay layer style selectively; it affects all characters in the type layer.
- Click the foreground color selection box in the toolbox, and select a color using the Adobe Color Picker. Alternatively, click a color in the Color panel, or the Swatches panel. If you use this method to change the color of an existing type layer, you must first select characters
Change the color of individual letters
- Select the Horizontal Type tool . T
- In the Layers panel, select the layer containing the type.
- In the document window, select the characters you want to change.
- In the options bar at the top of the work area, click the color swatch.
- In the Adobe Color Picker, locate the color range you want using the triangle sliders on the color spectrum bar, and then click the desired color in the color field. The color you select appears in the top half of the color swatch in the Adobe Color Picker. The original color remains in the bottom half.
- Click OK. The new color replaces the original color in the options bar and in the selected characters.
Note: You won't see the new color in the characters until you deselect them or select something else.
To the top
Underline or strike through text
You can place a line under horizontal type, or to the left or right of vertical type. You can also place a line through horizontal or vertical type. The line is always the same color as the type color.
- Select the type you want to underline or strike through.
- To underline horizontal type, click the Underline button In the Character panel.
- To apply an underline to the left or right of vertical type, choose Underline Left or Underline Right from the Character panel menu. You can apply an underline to the left or right, but not to both sides. A check mark indicates that an option is selected.
Note: The Underline Left and Underline Right options appear in the Character panel menu only when a type layer containing vertical type is selected. When working with vertical Asian type, you can add an underline on either side of the type line.
- To apply a horizontal line through horizontal type or a vertical line through vertical type, click the Strikethrough button in the Character panel. You can also choose Strikethrough from the Character panel menu.
To the top
Apply all caps or small caps
You can enter or format type as uppercase characters, either all caps or small caps. When you format text as small caps, Photoshop automatically uses the small-cap characters designed as part of the font, if available. If the font does not include small caps, Photoshop generates faux small caps.
Cactus | class Magnoliophyta
CACTUS | CLASS MAGNOLIOPHYTA
Regular capital letters (top) compared to small-cap letters (bottom)
- Select the type you want to change.
-
Do one of the following:
-
Click the All Caps button for the Small Caps button in the Character panel.
- Choose All Caps or Small Caps from the Character panel menu. A check mark indicates that the option is selected.
To the top
Specify superscript or subscript characters
Superscript and subscript text (also called superior and inferior text) are reduced-size text that is raised or lowered in relation to a font's baseline. If the font does not include superscript or subscript characters, Photoshop generates faux superscript or subscript characters.
- Select the type you want to change.
-
Do one of the following:
-
Click the Superscript button for the Subscript button in the Character panel.
- Choose Superscript or Subscript from the Character panel menu. A check mark indicates that the option is selected.
To the top
Character styles | CC, CS6
A character style includes character formatting attributes, and can be applied to characters, a paragraph, even or range of paragraphs. You can create Character styles and then apply them later.
Choose Window > Character Styles to open the Character Styles panel.
• To apply a character style, select the text or text layer and click a character style.
Type styles are hierarchical: Manual overrides supersede any applied character styles, which in turn replace applied paragraph styles. This hierarchical approach lets you combine the efficiency of styles with the flexibility to customize your designs.
For a video overview, see Paragraph and Character Styles in Photoshop CS6 by Julieanne Kost.
Create a character style
- If you want to base a new style on the formatting of existing text, select that text.
- Choose New Character Style from the Character Styles panel menu.
Note: To create a style without first selecting text, click the Create New Style icon without applying it to text, select an image layer, such as the Background.
at the bottom of the Character Styles panel. To edit a style
Edit a character style
Double-click existing styles to edit them and update all associated text in the current document. Changing the style formatting updates all text to which the style has been applied with the new format.
To edit a character style, do the following:
- Double-click the style in the Character Styles panel.
- To specify the formatting attributes, click a category (such as Basic Character Formats) on the left, and specify the attributes to add to the style.
- When you've finished specifying the formatting attributes, click OK.
To the top
Specifying default type styles | Creative Cloud only
Note: This feature was introduced in the Photoshop CS6 Creative Cloud release.
Current character and paragraph styles can be saved as type defaults. These defaults are automatically applied to new Photoshop documents and can also be applied to existing documents that don't already contain type styles. For more information, see Paragraph styles.
To save the current character and paragraph styles as the type defaults, do any of the following:
- Choose Type > Save Default Type Styles.
- In the Character Styles or the Paragraph Styles panel, choose Save Default Type Styles from the panel menu.
To apply the default Character and Paragraph styles to a document:
-
Do any of the following:
-
Choose Type > Load Default Type Styles.
-
In the Character Styles or the Paragraph Styles panel, choose Load Default Type Styles from the panel menu.
-
If you are loading the default type styles into a document that already has an existing type style, the Import Paragraph Styles dialog box appears. You can choose whether or not to replace the existing type style with the default type style.
More Help Topics
• Line and character spacing
- Panels and menus
• About layer effects and styles
- Creating type
Twitter™ and Facebook posts are not covered under the terms of Creative Commons.
Legal Notices | Online Privacy Policy
Format paragraphs
Paragraph panel overview
Specify alignment
Specify justification for paragraph type
Adjust word and letter spacing in justified text
Indent paragraphs
Adjust paragraph spacing
Specify hanging punctuation for Roman fonts
Adjust hyphenation automatically
Prevent words from breaking
Composition methods
Paragraph styles | CC, CS6
To the top
Format paragraphs
For point type, each line is a separate paragraph. For paragraph type, each paragraph can have multiple lines, depending on the dimensions of the bounding box.
You can select paragraphs and then use the Paragraph panel to set formatting options for a single paragraph, multiple paragraphs, or all paragraphs in a type layer.
- Select the Horizontal Type tool or the Vertical Type tool . !T
• To apply formatting to a single paragraph, click in a paragraph.
• To apply formatting to multiple paragraphs, make a selection within a range of paragraphs.
• To apply formatting to all paragraphs in the layer, select the type layer in the Layers panel.
To the top
Paragraph panel overview
You use the Paragraph panel to change the formatting of columns and paragraphs. To display the panel, choose Window > Paragraph, or click the Paragraph panel tab if the panel is visible but not active. You can also select a type tool and click the Panel button in the options bar.
To set options with numeric values in the Paragraph panel, you can use the up and down arrows or edit the value directly in the text box. When you edit a value directly, press Enter or Return to apply a value, Shift+Enter or Shift+Return to apply a value and then highlight the value just edited, or Tab to apply a value and move to the next text box in the panel.

text_image
PARAGRAPH A B 0 pt 0 pt C 0 pt D 0 pt 0 pt E Hyphenate F GParagraph panel
A. Alignment and justification B. Left indent C. First line left indent D. Space before paragraph E. Hyphenation F. Right indent G. Space after paragraph
You can access additional commands and options in the Paragraph panel menu. To use this menu, click the triangle in the upper right corner of the panel.
To the top
Specify alignment
You can align type to one edge of a paragraph (left, center, or right for horizontal type; top, center, or bottom for vertical type). Alignment options are available only for paragraph type.
-
Do one of the following:
-
Select a type layer if you want all the paragraphs in that type layer to be affected.
-
Select the paragraphs you want affected.
-
In the Paragraph panel or options bar, click an alignment option.
The options for horizontal type are:
Left Align Text Aligns type to the left, leaving the right edge of the paragraph ragged.
Center Text Aligns type to the center, leaving both edges of the paragraph ragged.
Right Align Text Aligns type to right, leaving the left edge of the paragraph ragged.
The options for vertical type are:
Top Align Text Aligns type to the top, leaving the bottom edge of the paragraph ragged.
Center Text Aligns type to the center, leaving both the top and bottom edges of the paragraph ragged.
Bottom Align Text Aligns type to the bottom, leaving the top edge of the paragraph ragged.
To the top
Specify justification for paragraph type
Text is said to be justified when it is aligned with both edges. You can choose to justify all text in a paragraph excluding the last line, or you can justify text in a paragraph including the last line. The settings you choose for justification affect the horizontal spacing of lines and the aesthetic appeal of type on a page.
Justification options are available only for paragraph type and determine word, letter, and glyph spacing. Justification settings apply only to Roman characters; double-byte characters available in Chinese, Japanese, and Korean fonts are not affected by these settings.
-
Do one of the following:
-
Select a type layer if you want all the paragraphs in that type layer to be affected.
-
Select the paragraphs you want affected.
-
In the Paragraph panel, click a justification option.
The options for horizontal type are:
Justify Last Left Justifies all lines except the last, which is left aligned.
Justify Last Centered Justifies all lines except the last, which is center aligned.
Justify Last Right Justifies all lines except the last, which is right aligned.
Justify All Justifies all lines including the last, which is force justified.
The options for vertical type are:
Justify Last Top Justifies all lines except the last, which is top aligned.
Justify Last Centered Justifies all lines except the last, which is center aligned.
Justify Last Bottom Justifies all lines except the last, which is bottom justified.
Justify All Justifies all lines including the last, which is force justified.
Note: Justification (right, center, and left align, and justify all) for type on a path starts at the insertion point and ends at the end of the path.
To the top
Adjust word and letter spacing in justified text
You can precisely control how Photoshop spaces letters and words and scales characters. Adjusting spacing is especially useful with justified type, although you can also adjust spacing for unjustified type.
-
Select the paragraphs you want affected, or select a type layer if you want all the paragraphs in that type layer to be affected.
-
Choose Justification from the Paragraph panel menu.
-
Enter values for Word Spacing, Letter Spacing, and Glyph Scaling. The Minimum and Maximum values define a range of acceptable spacing for justified paragraphs only. The Desired value defines the desired spacing for both justified and unjustified paragraphs:
Word Spacing The space between words that results from pressing the spacebar. Word Spacing values can range from 0% to 1000%; at 100%, no additional space is added between words.
Letter Spacing The distance between letters, including kerning or tracking values. Letter Spacing values can range from -100% to 500%; at 0%, no space is added between letters; at 100%, an entire space width is added between letters.
Glyph Scaling The width of characters (a glyph is any font character). Values can range from 50% to 200%; at 100%, the height of characters is not scaled.

Spacing options are always applied to an entire paragraph. To adjust the spacing in a few characters, but not an entire paragraph, use the Tracking option.
To the top
Indent paragraphs
Indention specifies the amount of space between type and the bounding box or line that contains the type. Indention affects only the selected paragraph or paragraphs, so you can easily set different indentions for paragraphs.
-
Do one of the following:
-
Select a type layer if you want all the paragraphs in that type layer to be affected.
-
Select the paragraphs you want affected.
-
In the Paragraph panel, enter a value for an indentation option:
Indent Left Margin Indents from the left edge of the paragraph. For vertical type, this option controls the indentation from the top of the paragraph.
Indent Right Margin Indents from the right edge of the paragraph. For vertical type, this option controls the indentation from the bottom of the paragraph.
Indent First Line Indents the first line of type in the paragraph. For horizontal type, the first line indent is relative to the left indent; for vertical type, the first line indent is relative to the top indent. To create a first line hanging indent, enter a negative value.
To the top
Adjust paragraph spacing
- Select the paragraphs you want affected, or select a type layer if you want all the paragraphs in that type layer to be affected. If you don't insert the cursor in a paragraph or select a type layer, the setting applies to new text you create.
- In the Paragraph panel, adjust the values for Add Space Before Paragraph and Add Space After Paragraph
To the top
Specify hanging punctuation for Roman fonts
Hanging punctuation controls the alignment of punctuation marks for a specific paragraph. When Roman Hanging Punctuation is turned on, the following characters appear outside the margins: single quotes, double quotes, apostrophes, commas, periods, hyphens, em dashes, en dashes, colons, and semicolons. When a punctuation character is followed a quotation mark, both characters hang.
Keep in mind that the paragraph alignment determines the margin from which the punctuation hangs. For left-aligned and right-aligned paragraphs, punctuation hangs off the left and right margin, respectively. For top-aligned and bottom-aligned paragraphs, punctuation hangs off the top and bottom margin, respectively. For centered and justified paragraphs, punctuation hangs off both margins.
Paragraph without hanging punctuation (left) compared to paragraph with hanging punctuation (right)
-
Do one of the following:
-
Select a type layer if you want all the paragraphs in that type layer to be affected.
-
Select the paragraphs you want affected.
-
Choose Roman Hanging Punctuation from the Paragraph panel menu. A check mark indicates that the option is selected.
Note: Double-byte punctuation marks available in Chinese, Japanese, and Korean fonts in the selected range will not hang when you use Roman Hanging Punctuation. Instead, use either Burasagari Standard or Burasagari Strong. These items are available only if you select Show Asian Text Options in the Type preferences.
To the top
Adjust hyphenation automatically
The settings you choose for hyphenation affect the horizontal spacing of lines and the aesthetic appeal of type on a page. Hyphenation options determine whether words can be hyphenated and, if so, what breaks are allowable.
- To use automatic hyphenation, do any of the following:
• To turn automatic hyphenation on or off, select or deselect the Hyphenate option in the Paragraph panel.
• To apply hyphenation to specific paragraphs, first select only the paragraphs that you want to affect.
• To choose a hyphenation dictionary, choose a language from the Language menu at the bottom of the Character panel.
- To specify options, choose Hyphenation from the Paragraph panel menu, and specify the following options:
Words Longer Than _ Letters Specifies the minimum number of characters for hyphenated words.
After First _ Letters And Before Last _ Letters Specifies the minimum number of characters at the beginning or end of a word that can be broken by a hyphen. For example, by specifying 3 for these values, aromatic would be hyphenated as aromatic instead of aromatic or aromat- ic.
Hyphen Limit Specifies the maximum number of consecutive lines on which hyphenation may occur.
Hyphenation Zone Specifies a distance from the right edge of a paragraph, demarcating a portion of the line where hyphenation is not allowed. A setting of 0 allows all hyphenation. This option applies only when you use the Adobe Single-line Composer.
Hyphenate Capitalized Words Deselect to prevent capitalized words from being hyphenated.
Note: Hyphenation settings apply only to Roman characters; double-byte characters available in Chinese, Japanese, and Korean fonts are not affected by these settings.
To the top
Prevent words from breaking
You can prevent words from breaking at the end of lines—for example, proper names or words that could be misread when hyphenated. You can also keep multiple words or groups of words together—for example, clusters of initials and a last name.
-
Select the characters you want to prevent from breaking.
-
Choose No Break from the Character panel menu.
Note: If you apply the No Break option to too many adjacent characters, the text may wrap in the middle of a word. However, if you apply the No Break option to more than a single line of text, none of the text will appear.
To the top
Composition methods
The appearance of type on the page depends on a complex interaction of processes called composition. Using the word spacing, letterspacing, glyph spacing, and hyphenation options you've selected, Adobe applications evaluate possible line breaks and choose the one that best supports the specified parameters.
You can choose between two composition methods: the Adobe Every-line Composer and the Adobe Single-line Composer. Both methods evaluate possible breaks and choose the one that best supports the hyphenation and justification options you've specified for a given paragraph. The composition method affects only the selected paragraph or paragraphs, so you can easily set different composition methods for different paragraphs.
Every-line Composer
The Every-line Composer considers a network of break points for a range of lines and thus can optimize earlier lines in the paragraph in order to eliminate especially unattractive breaks later on.
The Every-line Composer approaches composition by identifying possible break points, evaluating them, and assigning a weighted penalty based on the following principles:
- For left-, right-, or center-aligned text, lines that fall closer to the right side are favored and have a lower penalty.
- For justified text, the highest importance is given to evenness of letter and word spacing.
• Hyphenation is avoided when possible.
Single-line Composer
The Single-line composer offers a traditional approach to composing type one line at a time. This option is useful if you want manual control over how lines break. The Single-line Composer uses the following principles when considering a breakpoint:
- Longer lines are favored over shorter lines.
- In justified text, compressed or expanded word spacing is preferable to hyphenation.
- In nonjustified text, hyphenation is preferable to compressed or expanded letterspacing.
- If spacing must be adjusted, compression is better than expansion.
To choose one of these methods, select it from the Paragraph panel menu. To apply the method to all paragraphs, first select the type object; to apply the method to the current paragraph only, first insert the cursor in that paragraph.
Paragraph styles | CC, CS6
A paragraph style includes both character and paragraph formatting attributes, and can be applied to a paragraph or range of paragraphs. You can create Paragraph styles and then apply them later.
Choose Window > Paragraph Styles to open the Paragraph Styles panel. By default, each new document contains a Basic Paragraph style that is applied to text you type. You can edit this style, but you can't rename or delete it. You can rename and delete styles that you create. You can also select a different default style to apply to text.
- To apply a paragraph style, select the text or text layer and click a paragraph style.
Type styles are hierarchical: Manual overrides supersede any applied character styles, which in turn replace applied paragraph styles. This hierarchical approach lets you combine the efficiency of styles with the flexibility to customize your designs.
For a video overview, see Paragraph and Character Styles in Photoshop CS6 by Julieanne Kost.
(Creative Cloud only) You can specify character and paragraph styles as default types styles. For more information see Specifying default type styles | Creative Cloud only.
Create a paragraph style
- If you want to base a new style on the formatting of existing text, select that text or place the insertion point in it.
- Choose New Paragraph Style from the Paragraph Styles panel menu.
Note: To create a style without first selecting text, click the Create New Style icon at the bottom of the Paragraph Styles panel. To edit a style without applying it to text, select an image layer, such as the Background.
Edit a paragraph style
Double-click existing styles to edit them and update all associated text in the current document. When you change the formatting of a style, all text to which the style has been applied will be updated with the new format.
To edit a paragraph style, do the following:
- Double -click the style in the Paragraph style panel.
- To specify the formatting attributes, click a category (such as Basic Character Formats) on the left, and specify the attributes to add to the style.
- When specifying a Character Color in the Style Options dialog box, you can create a new color by double-clicking the fill or stroke box.
- When you've finished specifying the formatting attributes, click OK.
More Help topics
• Line and character spacing
- Editing text
- Specify a burasagari option
• Display and set Asian type options
Twitter ^™ and Facebook posts are not covered under the terms of Creative Commons.
Legal Notices | Online Privacy Policy
Set leading
Kern and track
Shift the baseline
Turn fractional character widths off or on
To the top
Set leading
The vertical space between lines of type is called leading (rhymes with sledding). For Roman type, leading is measured from the baseline of one line of text to the baseline of the line above it. The baseline is the invisible line on which most letters sit. You can apply more than one leading amount within the same paragraph; however, the largest leading value in a line of type determines the leading value for that line.
Note: When working with horizontal Asian type, you can specify how leading is measured, either from baseline to baseline or from the top of one line to the top of the next.

text_image
Cartus class Magnetiophyta This group of the plant, thaliana, and capensis of the spores' species, shows in the following plant is angioplasts, angioplasts and chondrodial forms of cabbage, lettuce, broiler and canadion seed荚蒾ing. Cuc our spores and phloemFive-point type with 6-point leading (left) and with 12-point leading (right)
Set the leading
- Select the characters you want to change. If you don't select any text, the leading applies to new text you create.
- In the Character panel, set the Leading value.
Change the default auto leading percentage
- Choose Justification from the Paragraph panel menu.
- For Auto Leading, enter a new default percentage.
To the top
Kern and track
Kerning is the process of adding or subtracting space between specific pairs of characters. Tracking is the process of loosening or tightening the spacing between the characters in selected text or an entire block of text.
Note: Values for kerning and tracking affect Japanese text but normally these options are used to adjust the aki between Roman characters.
You can automatically kern type using metrics kerning or optical kerning. Metrics kerning (also called Auto kerning) uses kern pairs, which are included with most fonts. Kern pairs contain information about the spacing of specific pairs of letters. Some of these are: LA, P., To, Tr, Ta, Tu, Te, Ty, Wa, WA, We, Wo, Ya, and Yo. Metrics kerning is set as the default so that specific pairs are automatically kerned when you import or type text.
Some fonts include robust kern-pair specifications. However, when a font includes only minimal built-in kerning or none at all, or if you use two different typefaces or sizes in one or more words on a line, you may want to use the optical kerning option. Optical kerning adjusts the spacing between adjacent characters based on their shapes.
Walk in the wild
8 Walk in the wild
Walk in the wild
Walk in the wild
Walk in the wild
Kerning and tracking options
A. Original text B. Text with optical kerning C. Text with manual kerning between W and a D. Text with tracking E. Cumulative kerning and tracking
You can also use manual kerning, which is ideal for adjusting the space between two letters. Tracking and manual kerning are cumulative, so you can first adjust individual pairs of letters, and then tighten or loosen a block of text without affecting the relative kerning of the letter pairs.
When you click to place the insertion point between two letters, kerning values appear in the Character panel. Similarly, if you select a word or a range of text, the tracking values appear in the Character panel.
Tracking and kerning are both measured in 1/1000 em, a unit of measure that is relative to the current type size. In a 6-point font, 1 em equals 6 points; in a 10-point font, 1 em equals 10 points. Kerning and tracking are strictly proportional to the current type size.
Note: Values for kerning and tracking affect Japanese text, but normally these options are used to adjust the aki between roman characters.
Adjust kerning
- Do any of the following:
- To use a font's built-in kerning information for selected characters, select Metrics for the Kerning option in the Character panel.
- To automatically adjust the spacing between selected characters based on their shapes, select Optical for the Kerning option in the Character panel.
- To adjust kerning manually, place an insertion point between two characters, and set the desired value for the Kerning option in the Character panel. (Note that if a range of text is selected, you can't manually kern the text. Instead, use tracking.)
Press Alt+Left/Right Arrow (Windows) or Option+Left/Right Arrow (Mac OS) to decrease or increase the kerning between two characters.
• To turn off kerning for selected characters, set the Kerning option in the Character panel to 0 (zero).
Adjust tracking
- Select the range of characters or the type object that you want to adjust.
- In the Character panel, set the Tracking option.
To the top
Shift the baseline
Use Baseline Shift to move selected characters up or down relative to the baseline of the surrounding text. Shifting the baseline is especially useful when you're hand-setting fractions or adjusting the position of a picture font.
-
Select the characters or type objects you want to change. If you don't select any text, the shift applies to new text you create.
-
In the Character panel, set the Baseline Shift option. Positive values move the character's baseline above the baseline of the rest of the line; negative values move it below the baseline.
text_image
day day day day day -6 -2 0 2 6Type with different Baseline Shift values
To the top
Turn fractional character widths off or on
By default, the software uses fractional character widths between characters. This means that the spacing between characters varies, and will sometimes use only fractions of whole pixels.
In most situations, fractional character widths provide the best spacing for type appearance and readability. However, for type in small sizes (less than 20 points) displayed online, fractional character widths could cause type to run together or have too much extra space, making it difficult to read.
Turn off fractional widths when you want to fix type spacing in whole-pixel increments and prevent small type from running together. The fractional character width setting applies to all characters on a type layer—you cannot set the option for selected characters.
- Do any of the following:
- To set type spacing for the entire document in whole-pixel increments, choose System Layout from the Character panel menu.
- To re-enable fractional character widths, choose Fractional Widths from the Character panel menu.
Adobe also recommends

Twitter ^™ and Facebook posts are not covered under the terms of Creative Commons.
Legal Notices | Online Privacy Policy
About fonts
Previewing fonts
Choose a font family and style
Change the font on multiple layers
About missing fonts and glyph protection
OpenType fonts
Apply OpenType features
To the top
About fonts
A font is a complete set of characters—letters, numbers, and symbols—that share a common weight, width, and style, such as 10-pt Adobe Garamond Bold.
Typefaces (often called type families or font families) are collections of fonts that share an overall appearance, and are designed to be used together, such as Adobe Garamond.
A type style is a variant version of an individual font in a font family. Typically, the Roman or Plain (the actual name varies from family to family) member of a font family is the base font, which may include type styles such as regular, bold, semibold, italic, and bold italic. If a font doesn't include the style you want, you can apply faux styles—simulated versions of bold, italic, superscript, subscript, all caps, and small caps styles.
Typefaces include many characters in addition to the ones you see on your keyboard. Depending on the font, these characters can include ligatures, fractions, swashes, ornaments, ordinals, titling and stylistic alternates, superior and inferior characters, old-style figures, and lining figures. A glyph is a specific form of a character. For example, in certain fonts, the capital letter A is available in several forms, such as swash and small cap.
To make fonts available to Photoshop and other Adobe Creative Suite applications, install them in these system folders:
Windows Windows/Fonts
Mac OS Library/Fonts
To the top
Previewing fonts
You can view samples of a font in the font family and font style menus in the Character panel and other areas in the application from where you can choose fonts. The following icons are used to indicate different kinds of fonts:
- OpenType o
- Type 1 a
- TrueType T
- Multiple Master M
To turn off the preview feature or change the point size of font names, do one of the following:
- (CC, CS6) Choose Type > Font Preview Size, and choose an option.
• (CS5) In the Type preferences, either disable Font Preview Size or choose an option from the menu.
Choose a font family and style
- Choose a font family from the Font Family menu in the Character panel or options bar. If more than one copy of a font is installed on your computer, an abbreviation follows the font name: (T1) for Type 1 fonts, (TT) for TrueType fonts, or (OT) for OpenType fonts.
text_image
CHARACTER Myriad Pro Regular Myriad Pro Sample O Myriad Std Sample O Nina Sample O Nueva Std Sample O Hyala Sample O OCR A Extended Sample O OCR A Std Sample O Orator Std SAMPLE O Palatino Linotype Sample O Papyrus Sample O Perpetua Sample
text_image
Myriad Pro Mymad Pro Sample Myriad Std Hima Nueva Std Hyala OCB A Extended OCB A Std Sample 12 pt 3D View Untitled 1The Font Family menu in both the Character panel and the options bar shows a preview of available fonts.
You can choose a font family and style by typing its name in the text box. As you type, the name of the first font or style beginning with that letter appears. Continue typing until the correct font or style name appears.
-
To choose a font style, do one of the following:
-
Choose a font style from the Font Style menu in the Character panel or options bar.
- If the font family you chose does not include a bold or italic style, click the Faux Bold button T or the Faux Italic button T in the Character panel to apply a simulated style. Alternatively, choose Faux Bold or Faux Italic from the Character panel menu.
- Use a dynamic shortcut. Dynamic shortcuts are keyboard shortcuts that are available (in edit mode only) for Faux Bold, Faux Italic, All Caps, Small Caps, Superscript, Subscript, Underline, and Strikethrough.
Note: You cannot apply Faux Bold formatting to warped type.
To the top
Change the font on multiple layers
- In the Layers panel, select the type layers you want to change.
- In the Character panel, select type characteristics from the pop-up menus.
To the top
About missing fonts and glyph protection
If a document uses fonts that aren't installed on your system, you see an alert message when you open it. If you later try to edit type layers with missing fonts, Photoshop prompts you to substitute an available matching font. If many layers contain missing fonts, you can quicken the substitution process by choosing Type > Replace All Missing Fonts. (In CS5 this command is in the Layer > Type menu.)
Glyph protection protects against incorrect, unreadable characters that appear if you enter non-roman text (for example, Japanese or Cyrillic) after selecting a roman font. By default, Photoshop provides glyph protection by automatically selecting an appropriate font. To disable glyph protection, deselect Enable Missing Glyph Protection in the Type preferences.
OpenType fonts
OpenType fonts use a single font file for both Windows® and Macintosh® computers, so you can move files from one platform to another without worrying about font substitution and other problems that cause text to reflow. They may include a number of features, such as swashes and discretionary ligatures, that aren't available in current PostScript and TrueType fonts.

OpenType fonts display the icon.
When working with an OpenType font, you can automatically substitute alternate glyphs, such as ligatures, small capitals, fractions, and old style proportional figures, in your text.
text_image
A 1st, 2nd, and 3rd 1er, 2nd, and 3rd B octagonal stone octagonal stone C Quick Brown Foxes Quick Brown FoxesRegular (left) and OpenType (right) fonts
A. Ordinals B. Discretionary ligatures C. Swashes
OpenType fonts may include an expanded character set and layout features to provide richer linguistic support and advanced typographic control. OpenType fonts from Adobe that include support for central European (CE) languages include the word "Pro," as part of the font name in application font menus. OpenType fonts that don't contain central European language support are labeled "Standard," and have an "Std" suffix. All OpenType fonts can also be installed and used alongside PostScript Type 1 and TrueType fonts.
For more information on OpenType fonts, see www.adobe.com/go/opentype.
To the top
Apply OpenType features
- Make sure you have an OpenType font chosen when using the Type tool. If you don't select any text, the setting applies to new text you create.
- From the Character panel menu, choose one of the following from the OpenType submenu:
Standard Ligatures Are typographic replacements for certain pairs of characters, such as fi, fl, ff, ffi, and ffl.

Type with the Standard Ligatures and Discretionary Ligatures options unselected and selected
Contextual Alternates Are alternative characters included in some script typefaces to provide better joining behavior. For example, when using Caflisch Script Pro with contextual alternatives enabled, the letter pair "bl" in the word "bloom" is joined so that it looks more like handwriting.
Discretionary Ligatures Are typographic replacement characters for letter pairs, such as ct, st, and ft.
Note: Although the characters in ligatures appear to be joined, they are fully editable and do not cause the spelling checker to flag a word erroneously.
Swash Substitutes swash glyphs, stylized letterforms with extended strokes (exaggerated flourishes).
Old Style Are numerals shorter than regular numerals, with some old style numerals descending below the type baseline.
Stylistic Alternates Formats stylized characters that create a purely aesthetic effect.
Titling Alternatives Formats characters (usually all in capitals) designed for use in large-size settings, such as titles.
Ornaments Are devices that add a personal signature to the type family and can be used as title page decoration, paragraph markers, dividers for blocks of text, or as repeated bands and borders.
Ordinals Automatically formats ordinal numbers (such as 1 ^st and 2 ) with superscript characters. Characters such as the superscript in the Spanish words segunda and segundo (2 ^a and 2 ^o ) are also typeset properly.
Fractions Automatically formats fractions; numbers separated by a slash (such as 1/2) are converted to a shilling fraction (such as 12 ).
You can't preview OpenType features, such as contextual alternates, ligatures, and glyphs in Photoshop before you apply them. However, you can preview and apply OpenType features by using the Adobe Illustrator Glyphs panel. Copy and paste your text into Adobe Illustrator and use the Glyphs panel to preview and apply OpenType features. You can then paste the text back into Photoshop.
Adobe also recommends

Twitter™ and Facebook posts are not covered under the terms of Creative Commons.
Legal Notices | Online Privacy Policy
Edit text
Specify curly or straight quotes
Apply anti-aliasing to a type layer
Check and correct spelling
Find and replace text
Assign a language for text
Scaling and rotating type
Change the orientation of a type layer
Rasterize type layers
To the top
Edit text
- Select the Horizontal Type tool or the Vertical Type tool . ↓T
- Select the type layer in the Layers panel, or click in the text flow to automatically select a type layer.
-
Position the insertion point in the text, and do one of the following:
-
Click to set the insertion point.
-
Select one or more characters you want to edit.
-
Enter text as desired.
-
In the options bar, do one of the following:
-
Click the Commit button √to apply your changes to the type layer.
- Click the Cancel button or press ESC.
See also
To the top
Specify curly or straight quotes
Typographer's quotes, often called curly quotes or smart quotes, blend in with the curves of the font. Typographer's quotes are traditionally used for quotation marks and apostrophes. Straight quotes are traditionally used as abbreviations for feet and inches.
- Choose Edit > Preferences > Type (Windows) or Photoshop > Preferences > Type (Mac OS).
- Under Type Options, select or deselect Use Smart Quotes.
To the top
Apply anti-aliasing to a type layer
Anti-aliasing produces smooth-edged type by partially filling the edge pixels. As a result, the edges of the type blend into the background.

text_image
Cactus class Magnoliophyta a
text_image
Cactus class Magnetiophyta aAnti-aliasing set to None (left), and Strong (right)
When creating type for display on the web, consider that anti-aliasing greatly increases the number of colors in the original image. This limits your ability to reduce the number of colors in the image and thus to reduce the size of the image file. Anti-aliasing may also cause stray colors to appear along the edges of the type. When reducing file size and limiting the number of colors are most important, it may be preferable to avoid anti-aliasing, despite the jagged edges. Also, consider using larger type than you would use for print. Larger type is easier to view on the web and gives you more freedom in deciding whether to apply anti-aliasing.
Note: When you use anti-aliasing, type may be rendered inconsistently at small sizes and low resolutions (such as the resolution used for web graphics). To reduce this inconsistency, deselect the Fractional Width option in the Character panel menu.
-
Select the type layer in the Layers panel.
-
Choose an option from the anti-aliasing menu ^a a in the options bar or the Character panel. Or, choose Layer > Type, and choose an option from the submenu.
None Applies no anti-aliasing
Sharp Type appears at its sharpest
Crisp Type appears somewhat sharp
Strong Type appears heavier
Smooth Type appears smoother
To the top
Check and correct spelling
When you check the spelling in a document, Photoshop questions any words that aren't in its dictionary. If a questioned word is spelled correctly, you can confirm its spelling by adding the word to your personal dictionary. If a questioned word is misspelled, you can correct it.
-
If necessary, in the Character panel, choose a language from the pop-up menu at the bottom of the panel. This is the dictionary Photoshop uses to check spelling.
-
(Optional) Show or unlock type layers. The Check Spelling command does not check spelling in hidden or locked layers.
-
Do one of the following:
- Select a type layer.
• To check specific text, select the text.
• To check a word, place the insertion point in the word.
-
Choose Edit > Check Spelling.
-
If you selected a type layer and want to check the spelling of only that layer, deselect Check All Layers.
-
As Photoshop finds unfamiliar words and other possible errors, click one of the following:
Ignore Continues the spelling check without changing the text.
Ignore All Ignores the questioned word during the rest of the spelling check.
Change Corrects a misspelling. Make sure that the correctly spelled word is in the Change To text box and click Change. If the suggested word is not the word you want, select a different word in the Suggestions text box or enter the correct word in the Change To text box.
Change All Corrects all instances of the misspelling in the document. Make sure the correctly spelled word is in the Change To text box.
Add Stores the unrecognized word in the dictionary, so that subsequent occurrences are not flagged as misspellings.
To the top
Find and replace text
-
Do one of the following:
-
Select the layer containing the text you want to find and replace. Place the insertion point at the beginning of the text you want to search.
- Select a nontype layer if you have more than one type layer and you want to search all layers in the document.
Note: In the Layers panel, make sure the type layers you want to search are visible and unlocked. The Find And Replace Text command does not check spelling in hidden or locked layers.
-
Choose Edit > Find And Replace Text.
-
In the Find What box, type or paste the text you want to find. To change the text, type the new text in the Change To text box.
-
Select one or more options to refine your search.
Search All Layers Searches all layers in a document. This option is available when a nontype layer is selected in the Layers panel.
Forward Searches forward from an insertion point in the text. Deselect this option to search all the text in a layer, regardless of where the insertion point is placed.
Case Sensitive Searches for a word or words that exactly match the case of the text in the Find What text box. For example, with the Case Sensitive option selected, a search for "PrePress" does not find "Prepress" or "PREPRESS."
Whole Word Only Disregards the search text if it is embedded in a larger word. For example, if you are searching for "any" as a whole
word, "many" is disregarded.
-
Click Find Next to begin the search.
-
Click one of the following buttons.
Change Replaces the found text with the revised text. To repeat the search, select Find Next.
Change All Searches for and replaces all occurrences of the found text.
Change/Find Replaces the found text with the revised text, and then searches for the next occurrence.
To the top
Assign a language for text
Photoshop uses language dictionaries to check hyphenation. Language dictionaries are also used to check spelling. Each dictionary contains hundreds of thousands of words with standard syllable breaks. You can assign a language to an entire document or apply a language to selected text.
text_image
A Association of Cactophiles B Association of Cactophiles C Association des CactophilesExamples of hyphenation for different languages
A. "Cactophiles" in English USA B. "Cactophiles" in English UK C. "Cactophiles" in French
-
Do one of the following:
-
To enter text using a specific language dictionary, choose the dictionary from the pop-up menu in the bottom left corner of the Character panel. Then enter the text.
-
To change the dictionary of existing text, select the text and choose the dictionary from the pop-up menu in the bottom left corner of the Character panel.
-
In the Character panel, choose the appropriate dictionary from the pop-up menu in the bottom left corner of the panel.
Note: If you select text with multiple languages or if the type layer has multiple languages, the pop-up menu in the Character panel will be dimmed and it will display the word "Multiple."
To the top
Scaling and rotating type
Adjust the scale of type
You can specify the proportion between the height and width of the type, relative to the original width and height of the characters. Unscaled characters have a value of 100%. Some type families include a true expanded font, which is designed with a larger horizontal spread than the plain type style. Scaling distorts the type, so it is generally preferable to use a font that is designed as condensed or expanded, if one is available.
-
Select the characters or type objects you want to change. If you don't select any text, the scale applies to new text you create.
-
In the Character panel, set the Vertical Scaling option !T or the Horizontal Scaling option I
Rotate type
- Do the following:
- To rotate type, select the type layer and use any rotate command or the Free Transform command. For paragraph type, you can also select the bounding box and use a handle to rotate the type manually. - To rotate multiple characters in vertical Asian text, use the tate-chu-yoko.
See also
Rotate vertical type characters
When working with vertical type, you can rotate the direction of characters by 90^ . Rotated characters appear upright; unrotated characters appear sideways (perpendicular to the type line).
text_image
C Ses Magnellophyta CACTUS
text_image
iSes Magnoliophyta CACTUSOriginal type (left) and type without vertical rotation (right)
-
Select the vertical type you want to rotate or unrotate.
-
Choose Standard Vertical Roman Alignment from the Character panel menu. A check mark indicates that the option is selected.
Note: You cannot rotate double-byte characters (full-width characters available only in Chinese, Japanese, and Korean fonts). Any double-byte characters in the selected range will not be rotated.
To the top
Change the orientation of a type layer
The orientation of a type layer determines the direction of type lines in relation to the document window (for point type) or the bounding box (for paragraph type). When a type layer is vertical, the type flows up and down; when a type layer is horizontal, the type flows from left to right. Don't confuse the orientation of a type layer with the direction of characters in a type line.
-
Select the type layer in the Layers panel.
-
Do one of the following:
-
Select a type tool, and click the Text Orientation button in the options bar.
- Choose Layer > Type > Horizontal, or choose Layer > Type > Vertical.
- Choose Change Text Orientation from the Character panel menu.
To the top
Rasterize type layers
Some commands and tools—such as filter effects and painting tools—are not available for type layers. You must rasterize the type before applying the command or using the tool. Rasterizing converts the type layer into a normal layer and makes its contents uneditable as text. A warning message appears if you choose a command or tool that requires a rasterized layer. Some warning messages provide an OK button you can click to rasterize the layer.
- Select the type layer and choose Layer > Rasterize > Type.

BY-NC-SA
Twitter ^™ and Facebook posts are not covered under the terms of Creative Commons.
Legal Notices | Online Privacy Policy
Create type along or inside a path
Warp and unwarp type
Create a work path from type
Convert type to shapes
Create a type selection border
Add a drop shadow to text
Fill type with an image
You can perform various operations on type to change its appearance. For example, you can warp type, convert type to shapes, or add a drop shadow to type. One of the easiest ways to create type effects is to play the default Text Effects actions that come with Photoshop on a type layer. You can access these effects by choosing Text Effects from the Actions panel menu.
To the top
Create type along or inside a path
Video tutorial: Create type on a path

text_image
123Get a visual overview of several approaches.... Read More
http://goo.gl/MexQe

by Infinite Skills - Andy Anderson
http://infiniteskills.com/...
Contribute your expertise to Adobe Community Help
Book excerpt: Create type on a path

text_image
123Walk through the process step-by-step.... Read More
http://goo.gl/QQi8a

by Adobe Photoshop Classroom in a Book
http://www.peachpit.com/st...
Contribute your expertise to Adobe Community Help
You can enter type that flows along the edge of a work path created by a pen or a shape tool. When you enter type along a path, the type flows in the direction that anchor points were added to the path. Entering horizontal type on a path results in letters that are perpendicular to the baseline. Entering vertical type on a path results in text orientation parallel to the baseline.
You can also enter type inside a closed path. In this case, however, the type is always oriented horizontally, with line breaks occurring wherever the type reaches path boundaries.
As you move a path or change its shape, related type conforms to the new path location or shape.
text_image
cactus | echipticus cactus | echipticusHorizontal and vertical type on an open path.

natural_image
Two identical spiral-shaped objects with radial ridges, displayed against a blue background (no text or symbols visible)Horizontal and vertical type on a closed path created by a shape tool
Enter type along a path
-
Do one of the following:
-
Select the Horizontal Type tool or the Vertical Type tool. IT
-
Select the Horizontal Type Mask tool or the Vertical Type Mask tool.
-
Position the pointer so that the baseline indicator of the type tool is on the path and click. After you click, an insertion point appears on the path.
natural_image
Two abstract geometric diagrams: one with a dot pattern and ellipse, the other with a green C-shaped line intersecting it (no text or symbols)The baseline indicator of the Type tool (left) and the Type tool with its baseline indicator on a path (right)
- Enter the type. Horizontal type appears along the path, perpendicular to the baseline. Vertical type appears along the path, parallel to the baseline.
For more control over vertical alignment of type on a path, use the Baseline Shift option in the Character panel. For example, type a negative value in the Baseline Shift text box to lower the type.
Move or flip type along a path
- Select the Direct Selection tool or Path Selection tool and position it over the type. The pointer changes to an I-beam with an arrow.
• To move text, click and drag the type along the path. Be careful not to drag across the path.
• To flip text to the other side of the path, click and drag the type across the path.

Using the Direct Selection tool or Path Selection tool to move or flip type on a path.
To move type across a path without changing the direction of the type, use the Baseline Shift option in the Character panel. For example, if you created type that runs from left to right across the top of a circle, you can enter a negative number in the Baseline Shift text box to drop the type so that it flows inside the top of the circle.
Enter type inside a closed path
- Select the Horizontal Type tool . T
- Position the pointer inside the path.
- When the type tool is surrounded by dashed parentheses 1, click to insert text.
Move a path with type
- Select the Path Selection tool or the Move tool, and then click and drag the path to a new position. If you use the Path Selection tool, make sure that the pointer does not change to an I-beam with an arrow or you'll move the type along the path.
Change the shape of a path with type
- Select the Direct Selection tool
- Click an anchor point on the path and use the handles to change the shape of the path.
To the top
Warp and unwarp type
You can warp type to create a special type effect. For example, you can warp type in the shape of an arc or a wave. The warp style you select is an attribute of the type layer—you can change a layer's warp style at any time to change the overall shape of the warp. Warping options give you precise control over the orientation and perspective of the warp effect.
Note: You cannot warp type layers that include Faux Bold formatting or that use fonts without outline data (such as bitmap fonts).

text_image
Cactus
Example of type warped with Fish style.
Warp type
- Select a type layer.
-
Do one of the following:
-
Select a type tool, and click the Warp button in the options bar.
- Choose Type > Warp Text (CC, CS6) or Layer > Type > Warp Text (CS5).
Note: You can use the Warp command to warp text in a type layer. Choose Edit > Transform Path > Warp.
- Choose a warp style from the Style pop-up menu.
- Select the orientation of the warp effect—Horizontal or Vertical.
-
If desired, specify values for additional warping options:
-
Bend to specify how much warp is applied to the layer
• Horizontal Distortion or Vertical Distortion to apply perspective to the warp
Unwarp type
- Select a type layer that has warping applied to it.
- Select a type tool and click the Warp button ⚫ in the options bar, or choose Layer > Type > Warp Text.
- Choose None from the Style pop-up menu, and click OK.
To the top
Create a work path from type
You can work with type characters as vector shapes by converting them to a work path. A work path is a temporary path that appears in the Paths panel and defines the outline of a shape. After you create a work path from a type layer, you can save and manipulate it as you do any other path. You cannot edit characters in the path as text; however, the original type layer remains intact and editable.
- Select a type layer, and choose Type > Create Work Path (CC, CS6) or Layer > Type > Create Work Path (CS5).
Note: You cannot create work paths from fonts that don't include outline data (such as bitmap fonts).
To the top
Convert type to shapes
When you convert type to shapes, the type layer is replaced by a layer with a vector mask. You can edit the vector mask and apply styles to the layer; however, you cannot edit characters in the layer as text.
- Select a type layer, and choose Type > Convert To Shape (CC, CS6) or Layer > Type > Convert To Shape (CS5).
Note: You cannot create shapes from fonts that don't include outline data (such as bitmap fonts).
Create a type selection border
When you use the Horizontal Type Mask tool or Vertical Type Mask tool, you create a selection in the shape of the type. Type selections appear on the active layer, and can be moved, copied, filled, or stroked just like any other selection.
-
Select the layer on which you want the selection to appear. For best results, create the type selection border on a normal image layer, not a type layer. If you want to fill or stroke the type selection border, create it on a new blank layer.
-
Select the Horizontal Type Mask tool or the Vertical Type Mask tool
-
Select additional type options, and enter type at a point or in a bounding box.
A red mask appears over the active layer as you enter the type. After you click the Commit button √, the type selection border appears in the image on the active layer.
To the top
Add a drop shadow to text
Add a drop shadow to give depth to text in an image.
-
In the Layers panel, select the layer containing the text to which you want to add a drop shadow.
-
Click the Layer Style button fx at the bottom of the Layers panel and choose Drop Shadow from the list that appears.
-
If possible, position the Layer Style dialog box so that you can see the layer and its drop shadow.
-
Adjust the settings to your liking. You can change various aspects of the shadow, including the way it blends with the layers below it, its opacity (how much the underlying layers show through), the angle of the light, and its distance from the text or object.
-
When you're satisfied with the drop shadow, click OK.
To use the same drop shadow settings on another layer, Alt+drag the Drop Shadow layer in the Layers panel to the other layer. When you release the mouse button, Photoshop applies the drop shadow attributes to the layer.
To the top
Fill type with an image
You can fill type with an image by applying a clipping mask to an image layer placed above a type layer in the Layers panel.
-
Open the file containing the image you want to use inside the text.
-
Select the Horizontal Type tool T or the Vertical Type tool in the toolbox.
-
Click the Character tab to bring the Character panel to the front or, if the panel isn't open, choose Window > Character.
-
In the Character panel, select the font and other type attributes for the text. Large, bold, thick letters work best.
-
Click an insertion point in the document window and type the desired text. When you are satisfied with the text, press Ctrl+Enter (Windows) or Command+Return (Mac OS).
-
Click the Layers tab to bring the Layers panel to the front or, if the panel isn't open, choose Windows > Layers.
-
(Optional) If the image layer is the background layer, double-click the image layer in the Layers panel to convert it from a background layer into a regular layer.
Note: Background layers are locked and prevent you from moving them in the Layers panel. It's necessary to convert background layers to regular layers to unlock them.
-
(Optional) In the New Layer dialog box, you can rename the layer. Click OK to close the dialog box and convert the image layer.
-
In the Layers panel, drag the image layer so that it is immediately above the type layer.
-
With the image layer selected, choose Layer > Create Clipping Mask. The image appears inside the text.
-
Select the Move tool ✝, and then drag the image to adjust its placement within the text.
To move the text instead of the image, select the type layer in the Layers panel and then use the Move tool to move the text.
Adobe also recommends
• Path segments, components, and points

Twitter™ and Facebook posts are not covered under the terms of Creative Commons.
Legal Notices | Online Privacy Policy
About type layers
Entering type
Enter point type
Enter paragraph type
Paste lorem-ipsum placeholder text (CC, CS6)
Resize or transform a type bounding box
Convert between point type and paragraph type
Note: For detailed instructions, click the links below. To ask questions, request features, or report problems, visit feedback.photoshop.com.
Type in Adobe Photoshop consists of vector-based type outlines—mathematically defined shapes that describe the letters, numbers, and symbols of a typeface. Many typefaces are available in more than one format, the most common formats being Type 1 (also called PostScript fonts), TrueType, OpenType, New CID, and CID nonprotected (Japanese only).
Photoshop preserves vector-based type outlines and uses them when you scale or resize type, save a PDF or EPS file, or print the image to a PostScript printer. As a result, it's possible to produce type with crisp, resolution-independent edges.

If you import bitmap type layers created in older versions of Photoshop or Photoshop Elements, choose Type > Update All Text Layers to convert to vector type. (In CS5, this command is in the Layer > Type menu.)
Type 101

text_image
123Photoshop is primarily an image-editing application, but it also handles text. Infinite Skills author, Andy Anderson, will show you the basics of using text the creative way.... Read More
Contribute your expertise to Adobe Community Help
See also
To the top
About type layers
Note: Type layers aren't created for images in Multichannel, Bitmap, or Indexed Color mode, because these modes don't support layers. In these modes, type appears on the background as rasterized text.
When you create type, a new type layer is added to the Layers panel. After you create a type layer, you can edit the type and apply layer commands to it.
Once you make a change to a type layer that requires it to be rasterized, however, Photoshop converts the vector-based type outlines to pixels. Rasterized type no longer has vector outlines and is uneditable as type. See Editing text.
You can make the following changes to a type layer and still edit the type:
- Change the orientation of type.
- Apply anti-aliasing.
- Convert between point type and paragraph type.
- Create a work path from type.
- Apply transformation commands from the Edit menu, except for Perspective and Distort.
Note: To transform part of the type layer, you must first rasterize the type layer.
- Use layer styles.
• Use fill shortcuts (see Keys for painting). - Warp type to conform to a variety of shapes.
To the top
Entering type
There are three ways to create type: at a point, inside a paragraph, and along a path.
- Point type is a horizontal or vertical line of text that begins where you click in the image. Entering text at a point is a useful way to add a few words to your image.
- Paragraph type uses boundaries to control the flow of characters, either horizontally or vertically. Entering text this way is useful when you want to create one or more paragraphs, such as for a brochure.

text_image
Cactus | class Magnoliophyta This group of the plant kingdom comprises of the organisms generally known as the flowering plants or angiosperms. Angiosperms are characterized by roots, stems, leaves and vascular, or conducting tissue (xylem and phloem). The term angiosperm means "enclosed seed", since the ovules, which develop into seeds, are enclosed within an ovary. The flowering plants are the source of all agricultural crops, cereal grains and grasses, garden and roadside weeds, familiar broad-leaved shrubs and trees and most ornamentals.Type entered as point type (top) and in a bounding box (bottom)
- Type on a path flows along the edge of an open or a closed path. When you enter text horizontally, characters appear along the path perpendicular to the baseline. When you enter text vertically, characters appear along the path parallel to the baseline. In either case, the text flows in the direction in which points were added to the path.
If you enter more text that can fit within a paragraph boundary or along a path, a small box or circle containing a plus symbol (+) appears in place of a handle in the corner of the boundary or anchor point at the end of the path.
Clicking in an image with a type tool puts the type tool in edit mode. When the tool is in edit mode, you can enter and edit characters as well as perform some other commands from the various menus; however, certain operations require that you first commit changes to the type layer. To determine whether a type tool is in edit mode, look in the options bar—if you see the Commit button √ and the Cancel button √the type tool is in edit mode.
See also
To the top
Enter point type
When you enter point type, each line of type is independent—the line expands or shrinks as you edit it, but it doesn't wrap to the next line. The type you enter appears in a new type layer.
-
Select the Horizontal Type tool T or the Vertical Type tool ↓T
-
Click in the image to set an insertion point for the type. The small line through the I-beam marks the baseline of the type (the imaginary line on which type rests). For vertical type, the baseline marks the center axis of the characters.
-
Select additional type options in the options bar, Character panel, or Paragraph panel.
-
Enter the characters. To begin a new line, press Enter (Windows) or Return (Mac OS).
Note: You can also transform point type while in edit mode. Hold down the Ctrl (Windows) or Command (Mac OS) key. A bounding box appears around the type. You can grab a handle to scale or skew the type. You can also rotate the bounding box.
-
When you finish entering or editing the type, do one of the following:
-
Click the Commit button √ in the options bar.
- Press the Enter key on the numeric keypad.
- Press Ctrl+Enter (Windows) or Command+Return (Mac OS).
- Select any tool in the toolbox; click in the Layers, Channels, Paths, Actions, History, or Styles panel; or select any available menu command.
To the top
Enter paragraph type
When you enter paragraph type, the lines of type wrap to fit the dimensions of the bounding box. You can enter multiple paragraphs and select a paragraph justification option.
You can resize the bounding box, causing the type to reflow within the adjusted rectangle. You can adjust the bounding box while you enter type or after you create the type layer. You can also use the bounding box to rotate, scale, and skew type.
- Select the Horizontal Type tool T or the Vertical Type tool ↓T
- Do one of the following:
- Drag diagonally to define a bounding box for the type.
- Hold down Alt (Windows) or Option (Mac OS) as you click or drag to display the Paragraph Text Size dialog box. Enter values for Width and Height, and click OK.
- Select additional type options in the options bar, Character panel, Paragraph panel, or Layer > Type submenu.
- Enter the characters. To begin a new paragraph, press Enter (Windows) or Return (Mac OS). If you enter more type than can fit in the bounding box, the overflow icon □ appears on the bounding box.
- If desired, resize, rotate, or skew the bounding box.
- Commit the type layer by doing one of the following:
- Click the Commit button √ in the options bar.
- Press the Enter key on the numeric keypad.
- Press Ctrl+Enter (Windows) or Command+Return (Mac OS).
- Select any tool in the toolbox; click in the Layers, Channels, Paths, Actions, History, or Styles panel; or select any available menu command.
The type you enter appears in a new type layer.
To the top
Paste lorem-ipsum placeholder text (CC, CS6)
Lorem- ipsum placeholder text lets you quickly fill a text block for layout purposes.
- Select a type tool, and click to insert the cursor in an existing text line or box.
- Choose Type > Paste Lorem Ipsum.
To the top
Resize or transform a type bounding box
- Display the bounding box handles of paragraph type. With the Type tool T active, select the type layer in the Layers panel, and click in the text flow in the image.
Note: You can transform point type while in edit mode. Hold down the Ctrl (Windows) or Command (Mac OS) key, and a bounding box appears around the type.
- To resize the bounding box, position the pointer over a handle—the pointer turns into a double arrow —and drag. Shift-drag to maintain the proportions of the bounding box.
- To rotate the bounding box, position the pointer outside the bounding border—the pointer turns into a curved, two-sided arrow and drag. Shift-drag to constrain the rotation to 15^ increments. To change the center of rotation, Ctrl-drag (Windows) or Command-drag (Mac OS) the center point to a new location. The center point can be outside the bounding box.
- To skew the bounding box, hold down Ctrl (Windows) or Command (Mac OS) and drag one of the middle handles. The pointer turns into an arrowhead ▶.
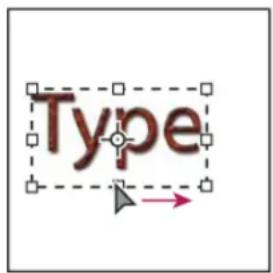
text_image
Type
text_image
TypeSkewing type using the bounding box
- To scale the type as you resize the bounding box, Ctrl-drag (Windows) or Command-drag (Mac OS) a corner handle.
- To resize the bounding box from the center point, Alt-drag (Windows) or Option-drag (Mac OS) a corner handle.
To the top
Convert between point type and paragraph type
You can convert point type to paragraph type to adjust the flow of characters within a bounding box. Alternatively, you can convert paragraph type to point type to make each text line flow independently from the others. When you convert from paragraph type to point type, a carriage return is added at the end of each line of type (with the exception of the last line).
- Select the type layer in the Layers panel.
- Choose Type > Convert To Point Text or Type > Convert To Paragraph Text. (In CS5 these commands are in the Layer > Type menu.)
Note: When you convert paragraph type to point type, all characters that overflow the bounding box are deleted. To avoid losing text, adjust the bounding box so that all type is visible prior to conversion.
Legal Notices | Online Privacy Policy
Display and set Asian type options
Reduce spacing around Asian type characters
Specify how leading is measured in Asian type
Use tate-chu-yoko
Align Asian characters with mojisoroe
Specify left and right underlining with Asian type
Set Asian OpenType font attributes
Asian OpenType options
Choose a mojikumi set
Set kinsoku shori options
Specify a burasagari option
Photoshop provides several options for working with Chinese, Japanese, and Korean type. Characters in Asian fonts are often referred to as double-byte characters.
Note: Your operating system must support the languages in which you wish to work. Consult your system software manufacturer for more information.
To the top
Display and set Asian type options
By default, non-Chinese, Japanese, or Korean versions of Photoshop hide options for Asian type that appear in the Character panel and Paragraph panel. To view and set options for working with Chinese, Japanese, and Korean type in these versions of Photoshop, you must select Show Asian Text Options in the Preferences dialog box. You can also control how font names are displayed—in English or in the native language.
-
Choose Edit > Preferences > Type (Windows) or Photoshop > Preferences > Type (Mac OS).
-
Select from the following options:
Show Font Names In English Displays Asian font names in English.
East Asian (CC, CS6) or Show Asian Text Options (CS5) Displays Asian type options in the Character and Paragraph panels.
To the top
Reduce spacing around Asian type characters
Tsume reduces the space around a character by a specified percentage value. As a result, the character itself is not stretched or squeezed. Instead, the space between the character's bounding box and the em box is compressed. When tsume is added to a character, spacing around both sides of the character is reduced by an equal percentage.
-
Select the characters you want to adjust.
-
In the Character panel, enter or select a percentage for Tsume. The greater the percentage, the tighter the compression between characters. At 100% (the maximum value), there is no space between the character's bounding box and its em box.
To the top
Specify how leading is measured in Asian type
- Select the paragraphs you want to adjust.
- Choose a leading option from the Paragraph panel menu.
bottom-to-bottom leadingtop-to-top leadingleading in Asian typeAsian type:leading inTop-to-top Leading Measures the spacing between lines of type from the top of one line to the top of the next line. When you use top-to-top leading, the first line of type in a paragraph is aligned flush with the top of the bounding box.
Bottom-to-bottom Leading For horizontal type, measures the space between lines of type from the type baseline. When you use bottom-to-bottom leading, space appears between the first line of type and the bounding box. A check mark indicates which option is selected.
Note: The leading option you choose does not affect the amount of leading between lines, only how the leading is measured.
To the top
Use tate-chu-yoko
Tate-chu-yoko (also called kumimoji and renmoji) is a block of horizontal type laid out within vertical type lines. Using tate-chu-yoko makes it easier to read half-width characters such as numbers, dates, and short foreign words in vertical text.
Numerals without tate-chu-yoko (left) compared to numerals rotated with tate-chu-yoko (right)
- Select the characters you want to rotate.
- Choose Tate-Chu-Yoko from the Character panel menu. A check mark indicates that the option is turned on.
Note: Using tate-chu-yoko does not prevent you from editing and formatting type; you can edit and apply formatting options to rotated characters just as you do to other characters.
To the top
Align Asian characters with mojisoroe
Mojisoroe is the alignment of characters in Asian type. When a line of text contains different sizes of characters, you can specify how to align text to the largest characters in the line: to the top, center, or bottom of the em box (right, center, and left for vertical frames), to the roman baseline, or to the top or bottom of the ICF box (right or left for vertical frames). ICF (Ideographic Character Space) is the average height and width used by the font designer to design the ideographic characters which comprise a font.
Character alignment options
A. Small characters aligned to the bottom B. Small characters aligned to the center C. Small characters aligned to the top
- In the Character panel menu, choose an option from the Character Alignment submenu:
Roman Baseline Aligns the small characters in a line to the large character.
Em box Top/Right, Em box Center, or Em box Bottom/Left Aligns the small characters in a line to the specified position of the large character's em box. In vertical text frames, Em box Top/Right aligns the text to the right of the em box, and Em box Bottom/Left aligns the text to the left of the em box.
ICF Top/Right and ICF Bottom/Left Aligns the small characters in a line to the ICF specified by the large characters. In vertical text frames, ICF Top/Right aligns the text to the right of the ICF, and ICF Bottom/Left aligns the text to the left of the ICF.
To the top
Specify left and right underlining with Asian type
-
Select vertical type.
-
Choose either Underline Left or Underline Right from the Character panel menu.
To the top
Set Asian OpenType font attributes
Asian OpenType fonts may include a number of features that aren't available in current PostScript and TrueType fonts. It is usually best to use any weights of KozMinPro and KozGoPro OpenType fonts. These fonts have the largest collection of glyphs of the Asian fonts produced by Adobe.
-
With the Type tool selected, do one of the following:
-
On an existing type layer, select the characters or type objects to which you want to apply the setting.
-
Click on the image to create a new type layer.
-
In the Character panel, make sure that an Asian OpenType Pro font is selected.
-
From the Character panel menu, choose an OpenType option.
-
Turn on the MSIME (Windows) or Kotoeri (Mac OS) input method. Do one of the following:
-
(Windows) From the Windows Start menu, choose Programs > Accessories > System Tools > Character Map.
• (Mac OS) From the Input pop-up menu at the right side of the menu bar, choose Show Character Viewer.
Note: (Mac OS) If the Input menu does not display in the menu bar, choose Apple menu > System Preferences > Language & Text, then click Input Sources, and select Keyboard & Character Viewer.
- Do one of the following:
- (Windows) In Character Map, select the Advanced View option, choose All from the Group By menu, and then choose Unicode for Character Set.
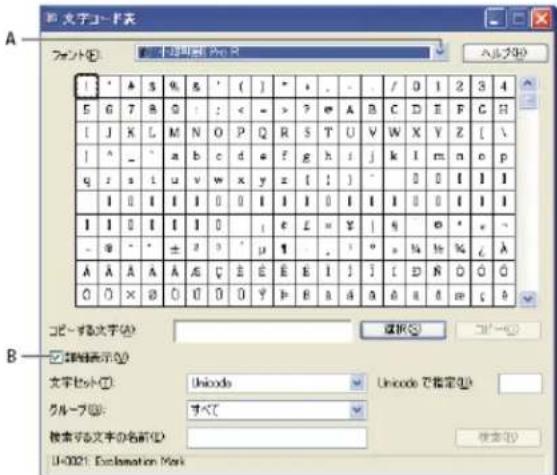
text_image
文字コード表 字体(1): 中文印刷(P):R ヘルプ(2) 1: ' A S % & ' ( ) * + - . / 0 1 2 3 4 5 G T B G : ; < = > ? e A B C D E F G H I J K L M N O P Q R S T U V W X Y Z [ \ I ^ - ' a b c d e f g h i j k I m n o p q i s i u v w x y z [ ! ] - 0 0 I I I I I I I I I I I I I I I I I I I I I I I I I I I I I I I I I I I - a - * ± 2 3 ' μ ¶ . ! ° - % % % λ A A A A A A E C E E E E I J i C D N O O O O O X O O O O O Y H B A A A B B A B C B コピーする文字(1) □ 邮略表示(2) 文字セット(1): Unicode Unicode で指定(1) グループ(3): すべて 按索する文字の名前(2) U=0021 Exclamation MarkCharacter Map
• (Mac OS) In the Kotoeri Character panel, select Glyph from the View menu.
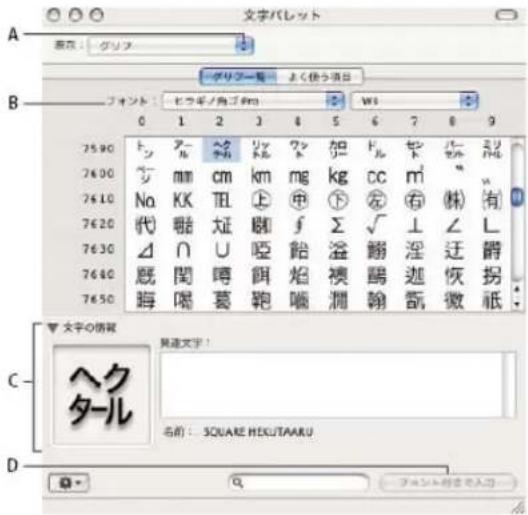
- Choose an Asian OpenType font from the Font menu.
-
Do one of the following:
-
(Windows) Select the character you want to use, click Select, click Copy, and then paste it in Photoshop.
• (Mac OS) Double-click the character you want to use to insert it into your document.
To the top
Asian OpenType options
Additional OpenType options are available, depending on the font.
Japanese 78 Substitutes the standard glyph with the jp78-variant glyph.
Japanese Expert Substitutes the standard glyph with the expert-variant glyphs.
Japanese Traditional Substitutes the standard glyph with the traditional-variant glyph.
Proportional Metrics Substitutes the half-width and the full-width glyphs with the proportional glyph.
Kana Substitutes the standard kana glyph with the horizontally optimized kana glyph for horizontal layout. However, the differences are often very subtle.
Roman Italics Substitutes the standard proportional glyph with the italic glyph.
For more information, see Apply OpenType features.
To the top
Choose a mojikumi set
Mojikumi specifies Japanese text composition for spacing of Japanese characters, roman characters, punctuation, special characters, line start, line end, and numbers. Photoshop includes several predefined mojikumi sets based on the Japanese Industrial Standard (JIS) X 4051-1995.
• In the Paragraph panel, choose an option from the Mojikumi pop-up menu:
None Turns off the use of mojikumi.
Mojikumi Set 1 Uses half-width spacing for punctuation.
Mojikumi Set 2 Uses full-width spacing for most characters except the last character in the line.
Mojikumi Set 1, and Mojikumi Set 2
Mojikumi Set 3 Uses full-width spacing for most characters and the last character in the line.
Mojikumi Set 4 Uses full-width spacing for all characters.
Mojikumi Set 3, and Mojikumi Set 4
To the top
Set kinsoku shori options
Kinsoku shori specifies line breaks for Japanese text. Characters that cannot begin a line or end a line are known as kinsoku characters. Photoshop includes weak and maximum kinsoku sets based on the Japanese Industrial Standard (JIS) X 4051-1995. Weak kinsoku sets omit long vowel symbols and small hiragana characters.
Disable or enable kinsoku shori for a paragraph
• In the Paragraph panel, choose an option from the Kinsoku Shori pop-up menu:
None Turns off the use of kinsoku shori.
JIS Weak or JIS Maximum Prevents the following characters from beginning or ending a line:
JIS Weak Set
Characters that can't begin a line

text_image
“”、。々〉》」』] >※・↘※!), . : ; ?] }Characters that can't end a line

text_image
"<<「」「[ [ [ [ {JIS Maximum Set
Characters that can't begin a line
Characters that can't end a line
( [ {£ \' " < « 「『【〒 [# \ (@ [ {¥
Specify a kinsoku line-breaking option
Kinsoku shori or mojikumi must be selected to use the following line-breaking options.
• From the Paragraph panel menu, choose Kinsoku Shori Type and then choose one of the following methods:
Push In First Moves characters up to the previous line to prevent prohibited characters from ending or beginning a line.
Push Out First Moves characters down to the next line to prevent prohibited characters from ending or beginning a line.
Push Out Only Always moves characters down to the next line to prevent prohibited characters from ending or beginning a line. A push-in is not attempted.
A check mark indicates which method is selected.
To the top
Specify a burasagari option
Burasagari lets single-byte periods, double-byte periods, single-byte commas, and double-byte commas fall outside the paragraph bounding box.
-
In the Paragraph panel, choose Burasagari from the panel menu.
-
Choose an option from the submenu:
None Turns off hanging punctuation.
Regular Turns on hanging punctuation without forcing ragged lines to the bounding box edge.
Force Forces punctuation outside the bounding box by spreading lines that end within the bounding box and end with one of the hanging characters.
Note: The Burasagari options are not available when Kinsoku Shori is set to None.

Twitter ^™ and Facebook posts are not covered under the terms of Creative Commons.
Legal Notices | Online Privacy Policy
How to access Arabic and Hebrew features in Photoshop
Enable Middle Eastern features
Text direction
Digit Types
Legacy font support
Default fonts
Automatic Kashida insertion
Ligatures (OpenType fonts)
Hyphenation
Diacritical marks
Justification alternates
To the top
Enable Middle Eastern features
To reveal Middle Eastern type options in the Photoshop interface, do the following:
- Choose Edit > Preferences > Type (Windows) or Photoshop > Preferences > Type (Mac OS).
- In the Choose Text Engine Options section, select Middle Eastern.
- Click OK, and restart Photoshop.
- Choose Type > Language Options > Middle Eastern features.
To the top
Text direction
To create content in Arabic and Hebrew, you can make the right-to-left (RTL) direction the default text direction. However, for documents that include left-to-right (LTR) text, you can now seamlessly switch between the two directions.
Select the paragraph direction from the Paragraph panel.

text_image
Paragraph Medium 0 mm 0 mm 0 mm 0 mm 0 mm 0 mm 0 mm 0 mm HyphenateParagraph direction selection (InDesign panel shown)
To the top
Digit Types
When you are working in Arabic or Hebrew, you can select the type of digits you want to use. You can choose between Arabic, Hindi, and Farsi.
By default, in Arabic versions of Photoshop, Hindi digits are auto-selected; in Hebrew versions, Arabic digits are selected. However, you can manually change digit types if necessary:
- Select the digits in the text.
- In the Character panel, use the Digits menu to select the appropriate font.
text_image
Character Adobe Hebrew Regular 12 pt (14.4 pt) Metrics 0 100% 100% 0 pt 0° Language: Hebrew -10 -5 Digits: Default Justification AlternateDigit type selection (InDesign panel shown)
To the top
Legacy font support
Fonts that have been traditionally used (for example, AXT fonts) can continue to be used in this release of the software. However, it is recommended that newer Open Type fonts be used for text-based elements.
Missing Glyph Protection (Edit > Preferences > Advanced Type) is enabled by default. Text is handled automatically, where glyphs are not available in the font you are using.
To the top
Default fonts
When you install a Middle Eastern or North African version, the default typing font is set to the installation-specific language, by default. For example, if you have installed the English/Arabic-enabled version, the default typing font is set to Adobe Arabic. Similarly, if you have installed the English/Hebrew-enabled version, the default typing font is set to Adobe Hebrew (or Myriad Hebrew in Photoshop).
To the top
Automatic Kashida insertion
In Arabic, text is justified by adding Kashidas. Kashidas are added to arabic characters to lengthen them. Whitespace is not modified. Use automatic Kashida insertion to justify paragraphs of arabic text.
Select the paragraph, and at the lower-right of the Paragraph panel, choose an option from the Insert Kashidas pop-up menu: None, Short, Medium, Long, or Stylistic.
Note: Kashidas are inserted only in paragraphs with fully justified margins.
To apply Kashidas to a group of characters, select the characters in the document, and then choose Type > Language Options > Kashidas.
To the top
Ligatures (OpenType fonts)
With some OpenType fonts, you can automatically apply ligatures to character pairs in Arabic and Hebrew. Ligatures are typographic replacement characters for certain letter pairs.
- Select text.
- In the Character panel, above the language and anti-aliasing menus, click the Standard or Discretionary Ligatures icon.
Discretionary ligatures provide more ornate options that some fonts support.
Hyphenation
Sentences that have more words that can fit into one line of text automatically wrap into the next line. The type of text justification when wrapping occurs sometimes causes unnecessary spaces to appear in the line that are not aesthetically pleasing or linguistically correct. Hyphenation enables you to split the word at the end of a line, using a hyphen. This fragmentation causes the sentence to wrap into the next line in a better way.
Mixed text: The Kashida insertion feature affects how hyphenation occurs in mixed text. When enabled, Kashidas are inserted where applicable, and non-Arabic text is not hyphenated. When the Kashida feature is disabled, only non-Arabic text is considered for hyphenation.
Hebrew text: Hyphenation is allowed. To enable hyphenation and customize settings, choose Paragraph panel > Panel menu > Hyphenation Settings.

text_image
Hyphenation Settings ✓ Hyphenate Words with at Least: 5 letters After First: 2 letters Before Last: 2 letters Hyphen Limit: 3 hyphens Hyphenation Zone: 12.7 mm Better Spacing Fewer Hyphens ✓ Hyphenate Capitalized Words ✓ Hyphenate Last Word ✓ Hyphenate Across Column OK Cancel PreviewHyphenation options (InDesign panel shown)
To the top
Diacritical marks
In the Arabic script, a diacritic or a diacritical mark is a glyph used to indicate consonant length or short vowels. A diacritical mark is placed above or below the script. For better styling of text, or improved readability of certain fonts, you can control the vertical or horizontal position of diacritical marks:
- Select text that has diacritical marks
- In the Character panel, modify the position of the diacritic marks relative to the script. Values you can change are, Adjust Horizontal Diacritic Position, and the Adjust Vertical Diacritic Position.
To the top
Justification alternates
A font can provide alternative shapes for certain letters, typically for stylistic or calligraphy purposes. In rare cases, justification alternates are used to justify and align paragraphs containing these shapes.
Justification alternates can be turned on at a character level, but only if a font supports this feature. At the bottom of the Character panel, select Justification Alternates.
These Arabic fonts contain justification alternates: Adobe Arabic, Myriad Arabic, and Adobe Naskh.
These Hebrew fonts contain justification alternates: Adobe Hebrew and Myriad Hebrew.
Legal Notices | Online Privacy Policy
Video and animation
Audio doesn't play in video files encoded with Dolby Digital AC3 troubleshooting (Jan. 22, 2013)
Video workflow
Kelby (May. 7, 2012)
video-tutorial
Intuitive editing for video DSLRs and other sources.
Video | Walk through a video project
Timeline video creation
Apply filters to video layers
Apply motion effects to text, still images, and Smart Objects
Import a wider range of file formats
Export final video with the Adobe Media Encoder
To the top
Timeline video creation
The redesigned, clip-based Timeline panel reflects video editors like Adobe Premiere, including transitions and effects that give finished videos professional polish.
Video tutorials:
Intuitive video Workflow: How to add video clips, trim video clips, add a music track, and render your movie for playback by your audience. By RC Conception (8:18)
How to edit video in Photoshop CS6. By Matthew Gore (10:42)
Slip editing to adjust the in and out points of a video without changing the clip duration. By Meredith Payne-Stotzner (1:20)
Frame skipping and caching to improve playback performance. By Meredith Payne-Stotzner (2:07)
Fixing over exposed video footage. By Richard Harrington (1:55)
Changing clip speed: Slow and Fast Motion. By Jeff Sengstack (9:45). Infinite Skills has made several videos available from their Photoshop video course.
Video Groups
Video Groups combine multiple video clips and other content such as text, images, and shapes on a single track in the Timeline.
Create a Video Group
- Import a video file; it's automatically added as a new Video Group.
- To create an empty group for adding content to, click a filmstrip icon 📄 on the left of the Timeline panel, and choose New Video Group from the pop-up menu.
Edit a Video Group
• To reposition clips, drag them in the Timeline.
• To change in and out points, drag clip borders in the Timeline.
• To move items from one group to another, drag them up or down in the Timeline or Layers panel.
- To divide a selected clip and edit the resulting parts separately, position the Timeline playhead 📋 where you want to split the clip. Then click the Split At Playhead button 📋 in the upper-left corner of the Timeline panel.
Audio tracks and controls
Separate audio tracks in the Timeline allow for easy editing and adjusting.
Adjust audio in clips
- Right-click audio clips to mute them, adjust volume, or fade in and out.
- Right-click video clips, and click the musical notes 📄 adjust audio they contain.
Adjusting audio: Video tutorial by Richard Harrington. (3:31)
Create or delete audio tracks
- To the right of audio track names in the Timeline, click the musical notes 📁, and select either New Audio Track or Delete Track.
Add, duplicate, delete, or replace audio clips
- To the right of audio track names in the Timeline, click the musical notes 📂. Then select Add Audio to place another clip on the track.
- Select an audio clip in the Timeline, and click the musical notes to the right of the track name. Then select Duplicate, Delete, or Replace Audio Clip.
Video transitions
Transitions create professional fade and cross-fade effects. Click the transitions icon ☑ in the upper left of the Timeline panel. Then choose a duration, and drag a transition type to the start or end of clips. (Place the transition between clips to crossfade.) Drag the edges of the transition preview in the Timeline to precisely set in and out points.
Right-click transitions in the Timeline to replace them with another transition type or specify a precise numeric duration.
Change video clip duration and speed
Right-click video clips to access Duration and Speed sliders. These controls interact; for example, a Speed of 400% limits the maximum duration to one-quarter of the original.
To the top
Apply filters to video layers
To apply filters across all frames in a video layer, first convert the layer into a Smart Object. Any subsequent filters you apply become Smart Filters, which provide total flexibility, letting you readjust filter settings at any time.
- Select the video layer in the Timeline or Layers panel.
- Choose Layer > Smart Objects > Convert to Smart Object.
- Apply filters from the Filter menu. To later readjust settings, view the Layers panel, and double-click the filter in the Smart Filters list for the video layer.
For more information, see Nondestructive editing.
To the top
Apply motion effects to text, still images, and Smart Objects
Right-click text, still-image, and Smart Object clips to access pan, zoom, and rotate presets, quickly applying sophisticated animation. Drag the
resulting Transform keyframes in the Timeline to fine-tune the results.

To create dramatic effects as you pan, scale, and rotate clips over time, convert your clip to a Smart Object and use Transform keyframes with the Free Transform tool.
Video Tutorials:
Transforming Layers over time. Julieanne Kost (3:52)
Creating masks to move over time. Julieanne Kost (3:17)
How to pan and zoom video in Photoshop CS6. Julieanne Kost (18:06)
Create animations with audio. Tutorial article by Rafiq Elmansy.
To the top
Import a wider range of file formats
With a redesigned video engine, you can import a wider range of video, audio, and image sequence files. Easily work with file types such as 3GP, 3G2, AVI, DV, FLV and F4V, MPEG-1, MPEG-4, QuickTime MOV (in Windows, full support requires separate QuickTime installation).
For the complete list, see Supported file formats.
To the top
Export final video with the Adobe Media Encoder
Choose File > Export > Render Video. From the first pop-up menu, select Adobe Media Encoder to choose from the following Format options:
- DPX (Digital Picture Exchange) format is designed primarily for frame sequences that you plan to incorporate into professional video projects using an editor such as Adobe Premiere Pro.
- H.264 (MPEG-4) format is the most versatile, including presets for high-definition and widescreen video, and output optimized for tablet devices or web delivery.
- QuickTime (MOV) format is required for export of alpha channels and uncompressed video. The Preset menu provides additional compression options.

BY-NC-SA
Twitter™ and Facebook posts are not covered under the terms of Creative Commons.
Legal Notices
Online Privacy Policy
Transform video layers
Create new video layers
Specify when a layer appears in a video or animation
Trim or move a video layer
Lift work area
Extract work area
Split video layers
Group layers in a video or animation
Rasterize video layers
To the top
Transform video layers
You can transform a video layer as you transform any other layer in Photoshop. However, you must convert video layers to Smart Objects before you can transform them.
- In the Timeline (CC, CS6), Animation (CS5), or Layers panel, select the video layer.
-
Do any of the following:
-
Choose Edit > Free Transform to use handles in the document window to transform the video.
- Choose Edit > Transform and choose a specific transformation from the submenu.
If the video layer is not a Smart Object, Photoshop asks you to convert it.
To the top
Create new video layers
You can create new video layers by adding a video file as a new layer or creating a blank layer.
For a video on working with video layers, see www.adobe.com/go/vid0027
Open a video file
- Choose File > Open, select a video file, and click Open.
The video appears on a video layer in a new document.
Add a video file as a new video layer
-
For the active document, make sure that the Timeline (CC, CS6) or Animation (CS5) panel is displayed in timeline mode.
-
Choose Layer > Video Layers > New Video Layer From File.
- Select a video or image sequence file and click Open.
Add a blank video layer
- For the active document, make sure that the Timeline (CC, CS6) or the Animation (CS5) panel is displayed in the timeline mode.
- Choose Layer > Video Layers > New Blank Video Layer.
To the top
Specify when a layer appears in a video or animation
You can use various methods to specify when a layer appears in a video or animation. For example, you can trim (hide) frames at the beginning or end of a layer. This changes the layer's start and end points in a video or animation. (The first frame to appear is called the In point, and the last frame is called the Out point.) You can also drag the entire layer duration bar to a different portion of the timeline.
- In the Timeline (CC, CS6) or Animation (Photoshop Extended CS5) panel, select the layer.
- Do any of the following:
- To specify the In and Out points of a layer, drag the beginning and end of the layer duration bar.
- Drag the layer duration bar to the section of the timeline where you want the layer to appear.
Note: For best results, drag the layer duration bar after the bar has been trimmed.

natural_image
Software interface screenshot showing a timeline with time markers (00:00 and 00:14) and a horizontal bar, no readable text or symbols present.Layers (In timeline mode) with the layer duration bar selected to drag (Photoshop Extended CS5)
- Move the current-time indicator to the frame you want as the new In or Out point, and from the panel menu, choose Trim Layer Start To Current Time or Trim Layer End To Current Time.
This shortens the layer duration by hiding the frames between the current-time indicator and either the start or the end of the layer. (Re-extending the ends of the layer duration bar reveals the hidden frames.) - Use keyframes to change the layer's opacity at specific times or frames.
Note: To delete footage in one or more layers, use the Lift Work Area command. To delete a specific duration from all video or animated layers, use the Extract Work Area command.
Trim or move a video layer
To hide frames at the start or end of a video or animation layer, trim the layer. To start or end video at a different time point, move the video layer.

If you move video layers, changes become permanent when you save the file. If you trim video, however, you can restore it by re-extending the ends of the layer duration bar.
- In the Timeline (CC, CS6), Animation (CS5), or Layers panel, select the layer you want to edit.
- Move the current-time indicator to the frame (or time) you want as the new In point or Out point.
- From the Timeline (CC, CS6) or Animation (CS5) panel menu, choose one of the following options:
Move Layer In Point To Current Time Permanently moves the start of the layer to the current-time indicator.
Move Layer End Point To Current Time Permanently moves the end of the layer to the current-time indicator.
Trim Layer Start To Current Time Temporarily hides section from the current-time indicator to the start of the layer.
Trim Layer End To Current Time Temporarily hides section from the current-time indicator to the end of the layer.
Note: You can also use the Lift Work Area command to hide frames in one or more layers, or the Extract Work Area command to hide a specific duration in all layers of a video or animation.
To the top
Lift work area
A section of the footage in selected layers can be deleted, leaving a gap of the same duration as the removed section.
- Select the layers you want to edit.
- In the Timeline (CC, CS6) or Animation (CS5) panel, set the work area to specify the duration of the selected layers you want to omit.
- From the panel menu, choose Lift Work Area.

text_image
ANIMATION (TIMELING) MEASUREMENT LOG 0:00:00:00 (30.00 fps) Comments Layer 2 Layer 1 Global LightingLayers before applying the Lift Work Area command (Photoshop Extended CS5)
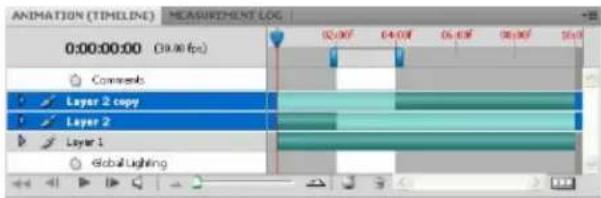
text_image
ANIMATION (TIMELING) MEASUREMENT LOG 0:00:00:00 (39.00 fps) Comments Layer 2 copy Layer 2 Layer 1 Global LightingLayers after applying the Lift Work Area command (Photoshop Extended CS5)
To the top
Extract work area
To delete portions of video and automatically remove the time gap, use the Extract Work Area command. The remaining content is copied to new video layers.
- Select the layers you want to edit.
- In the Timeline (CC, CS6) or Animation (CS5) panel, set the work area to specify the duration of the video or animation that you want to omit.
- From the panel menu, choose Extract Work Area.
To the top
Split video layers
A video layer can be split into two new video layers at the frame you specify.
- Select a video layer in the Timeline (CC, CS6) or Animation (CS5) panel.
- Move the current-time indicator to the time or frame number where you want to split the video layer.
- Click the panel menu icon and choose Split Layer.
The selected video layer is duplicated and appears immediately above the original in the Timeline (CC, CS6) or Animation (CS5) panel. The original layer is trimmed from the start to the current time, and the duplicate layer is trimmed from the end to the current time.
text_image
Timeline) × Measurement Log 0:00;13 (29.97 fps) 00 5F 01:00F 15F 02:00F Comments er 1 Global LightingOriginal layer before using the Split Layer command (Photoshop Extended CS5)
text_image
Timeline) × Measurement Log 0:00:13 (29.97 fps) Comments er 1 copy er 1 Global LightingResulting two layers after using the Split Layer command (Photoshop Extended CS5)
To the top
Group layers in a video or animation
As you add more layers to your video or animation, you might want to organize them into a hierarchy by grouping the layers. Photoshop preserves the frames in your video or animation in grouped layers.
You can also group a group of layers. Besides nesting your layers in a more complex hierarchy, grouping a group of layers lets you simultaneously animate the opacity of all the grouped layers. The Animation panel displays a group of grouped layers with a common opacity layer property.

Grouping video layers in Photoshop is similar to precomposing in Adobe After Effects.
- In the Layers panel, select two or more layers and do one of the following:
- Choose Layer > Group Layers.
- Choose Layer > Smart Objects > Convert to Smart Object.
To the top
Rasterize video layers
When you rasterize video layers, the selected layer is flattened to a composite of the current frame selected in the Animation panel. Although it's possible to rasterize more than one video layer at a time, you'll only be able to specify the current frame for the topmost video layer.
- In the Layers panel, select the video layer.
- In the Timeline (CC, CS6) or Animation (CS5) panel, move the current-time indicator to the frame that you want preserved when you rasterize the video layer.
-
Do either of the following:
-
Choose Layer > Rasterize > Video.
- Choose Layer > Rasterize > Layer.
Note: To rasterize more than one video layer at a time, select the layers in the Layers panel, set the current-time indicator to the frame you want to preserve in the topmost video layer, and then choose Layer > Rasterize > Layers.
- About Smart Objects
- Importing video files and image sequences (Photoshop Extended)
- Place a video or image sequence (Photoshop Extended)
- Replace footage in a video layer (Photoshop Extended)
Legal Notices | Online Privacy Policy
Preview a frame animation
Set the timeline area to preview
Previewing video or timeline animations
Preview your document on a video monitor
To the top
Preview a frame animation
-
Do one of the following:
-
Click the Play button in the Animation panel (Photoshop Extended CS5) or Timeline panel (CS6).
- Use the spacebar to play and pause the animation.
The animation is displayed in the document window. The animation repeats indefinitely unless you specified another repeat value in the Play Options dialog box.
-
To stop the animation, click the Stop button ■.
-
To rewind the animation, click the Selects First Frame button
Note: To see a more accurate preview of the animation and timing, preview the animation in a web browser. In Photoshop, open the Save For Web & Devices (Photoshop Extended CS5) or Save For Web (CS6) dialog box and click the Preview In Browser button. Use the browser's Stop and Reload commands to stop or replay the animation.
To the top
Set the timeline area to preview
- To set the timeline duration you want to export or preview, do any of the following in the Animation panel (Photoshop Extended CS5) or Timeline panel (CS6):
- Drag either end of work area bar.
text_image
Animation (Timeline) × Measurement Log 0:00:00:15 (29.97 fps) Comments Layer 1 Global LightingDragging an end of the work area bar (Photoshop Extended CS5)
- Drag the work area bar over the section you want to preview.
- (Photoshop Extended CS5) Move the current-time indicator to the time or frame you want. From the panel menu, choose either Set Start Of Work Area or Set End Of Work Area.
-
(CS6) Move the current-time indicator to the time or frame you want. From the panel menu, choose either Work Area > Set Start At Playhead or Work Area > Set End At Playhead.
-
(Optional in Photoshop Extended CS5) To remove the portions of the timeline not in the work area, choose Trim Document Duration To Work Area from the panel menu.
To the top
Previewing video or timeline animations
Your video or animation can be previewed in the document window. Photoshop uses RAM to preview the video or animation during your editing session. When you play or drag to preview frames, they are automatically cached for faster playback the next time they're played. The cached frames are indicated by the green bar in the work area of the Animation panel (Photoshop Extended CS5) or Timeline panel (CS6). The number of frames cached depends on the amount of RAM available to Photoshop.
Preview a video or timeline animation
- Do any of the following:
• In the timeline, drag the current-time indicator.
- Use the playback buttons at the bottom of the Animation panel (Photoshop Extended CS5) or Timeline panel (CS6).
- Press the spacebar to play or stop playback. For additional shortcuts, see Keys for the Animation panel in Timeline Mode (Photoshop Extended).
To see a more accurate preview of an animation created for the web, preview the animation in a web browser. Use the browser's Stop and Reload commands to stop or replay the animation. Open the Save For Web & Devices (Photoshop Extended CS5) or Save For Web (CS6) dialog box, and click the Preview In Browser button.
Preview audio for video layers
When you enable audio previews for video layers, Photoshop includes the audio in files exported to QuickTime Movie format. (See Export video files or image sequences.)
In the Animation panel (Photoshop Extended CS5) or Timeline panel (CS6), do either of the following:
• To enable or disable audio previews for a specific video layer, click the speaker icon for that layer.
- To enable or disable audio previews for an entire document, click the speaker icon to the right of the playback buttons at the bottom of the panel.
Enable frame skipping
Photoshop can skip uncached frames to achieve real-time playback.
- With the Animation panel (Photoshop Extended CS5) or Timeline panel (CS6) in timeline animation mode, choose Allow Frame Skipping from the panel menu.
To the top
Preview your document on a video monitor
The Video Preview plug-in lets you preview the current frame specified in the animation timeline (or any image open in Photoshop) through FireWire (IEEE 1394) on a display device, such as a video monitor. You can also adjust the aspect ratio for proper display of images.
Note: On 64-bit operating systems, you must use the 32-bit version of Photoshop to access the Video Preview plug-in.
The Video Preview plug-in supports RGB, grayscale, and indexed images. (The plug-in converts 16-bpc images to 8-bpc images.) The Video Preview plug-in does not support alpha channels. Transparency is displayed as black.
Note: The Video Preview plug-in does not lock the display device. When Photoshop is in the background on your computer and another application moves into the foreground, the preview turns off and the device is unlocked so other applications can use it for preview purposes.
- Connect a display device, such as a video monitor, to your computer via FireWire (IEEE 1394).
-
With a document open in Photoshop, do one of the following:
-
If you don't want to set output options for viewing your document on a device, choose File > Export > Send Video Preview To Device. You can skip the rest of the steps in this procedure.
- To set output options before viewing your document on the device, choose File > Export > Video Preview.
The Video Preview dialog box opens. If your document's pixel aspect ratio doesn't match the aspect ratio settings of the display device, you will see an alert.
Note: The Send Video Preview To Device command uses the previous settings in the Video Preview dialog box.
-
Under Device Settings, specify options for the device that will display the image:
-
(Mac OS) To specify an output mode, select NTSC or PAL. If the output mode and the device do not match (for example, specifying NTSC for the output mode and connecting to a device in PAL mode), black patches appear on previewing.
• To specify the aspect ratio of the display device, choose either Standard (4:3) or Widescreen (16:9) from the Aspect Ratio menu.
Note: The Aspect Ratio setting determines which placement options are available.
- Under Image Options, choose a placement option to determine how the image appears in the display device:
Center Places the center of the image at the center of the screen, cropping the portions that fall outside the display edges of the video preview device.
Pillarbox Displays a 4:3 image on a 16:9 display with the center of the image at the center of the screen and gray bands on the left and right sides of the image. This option is available only if you chose Widescreen (16:9) for the device aspect ratio.
Crop to 4:3 Displays a 16:9 image on a 4:3 display with the center of the image at the center of the screen and without distortion by cropping the left and right edges of the frame that fall outside the display edges of the video preview device. This option is available only if you chose Standard (4:3) for the device aspect ratio.
Letterbox Scales a 16:9 image to fit on a 4:3 display. Gray bands appear on the top and bottom of the image due the difference in aspect ratio between the 16:9 image and the 4:3 display. This maintains the display aspect ratio without cropping or distorting the image. This option is available only if you chose Standard (4:3) for the device aspect ratio.
Crop To 14:9/Letterbox Displays a widescreen image cropped to a 14:9 aspect ratio with black bands on either the top and bottom of the image (when viewed on a 4:3 display) or on the left and right sides (when viewed on a 16:9 display). This maintains the display aspect ratio without distorting the image.
- Choose an option from the Image Size menu to control whether the document pixels are scaled to the device display:
Do Not Scale Applies no vertical scaling to the image. The image is cropped if its height is greater than that of the video display.
Scale To Fit Within Frame Increases or decreases the image height and width proportionally to fit in the video frame. With this option, a
16:9 image appears on a 4:3 display as letterbox, and a 4:3 image appears on a 16:9 display as pillarbox.
- Select the Apply Pixel Aspect Ratio To Preview check box to display the image using the document's (nonsquare) pixel aspect ratio. Deselect this option to display the image as it appears on your computer (square pixel) monitor.
By default, the Apply Pixel Aspect Ratio To Preview check box is selected to maintain the image's pixel aspect ratio. In general, you would deselect this option if the document's pixel aspect ratio is assumed to be square and you want to view the image as it would appear on a computer (square pixel) monitor.
- Click OK to export the document to the device display.
Adobe also recommends
- Preview optimized images in a web browser

Twitter ^™ and Facebook posts are not covered under the terms of Creative Commons.
Legal Notices | Online Privacy Policy
Paint frames in video layers
Cloning content in video and animation frames
Restore frames in video layers
Managing color in video layers
To the top
Paint frames in video layers
You can edit or paint on individual video frames to create an animation, add content, or to remove unwanted details. In addition to using any brush tool, you can paint using the Clone Stamp, Pattern Stamp, Healing Brush, or Spot Healing Brush. You can also edit video frames using the Patch tool.
Note: Painting (or using any other tool) on video frames is often called rotoscoping; although traditionally, rotoscoping involves the frame-by-frame tracing of live action images for use in animation.
- In the Animation (Photoshop Extended CS5), Timeline (CS6), or Layers panel, select the video layer.
- Move the current time indicator to the video frame you want to edit.
- (Optional) If you want your edits to be on a separate layer, choose Layers > Video Layers > New Blank Video Layer.
- Select the brush tool that you want to use and apply your edits to the frame.
Painting on a video layer is nondestructive. To discard the altered pixels on a specific frame or video layer, choose the Restore Frame or Restore All Frames command. To toggle on and off the visibility of altered video layers, choose the Hide Altered Video command (or click the eyeball next to the altered video track in the timeline).
To the top
Cloning content in video and animation frames
In Photoshop Extended CS5 or Photoshop CS6, you can use the Clone Stamp and Healing Brush tools to retouch or duplicate objects in video or animation frames. Use the Clone Stamp to sample content from one part of a frame (the source) and paint it over another part of the same or different frame (the target). You can also use a separate document as the sampling source, instead of a frame. The Healing Brush includes options for blending the sampled content with the target frame.
Note: You can also clone content with the Spot Healing Brush and the Patch tools. However, the Clone Stamp and the Healing Brush tools let you store up to five samples in the Clone Source panel, and set overlay, scaling, and frame offset options.
After you sample content from a frame and paint with it, and then move to another frame, the source frame changes relative to the frame you initially sampled from. You can lock in the source frame you first sampled, or enter a frame offset value to change the source to a different frame, relative to the frame you first sampled.

For a video on cloning frames, see www.adobe.com/go/vid0025.
Clone video or animation content
-
Select the Clone Stamp tool 📋 or Healing Brush tool 🔒, and then set the tool options you want.
-
Do one of the following:
-
Select a video layer in the Layers panel, Animation panel (Photoshop Extended CS5), or Timeline panel (CS6), and then move the current-time indicator to the frame you want to sample.
-
Open the image you want to sample.
-
Position the pointer in an open image or frame, and Alt-click (Windows) or Option-click (Mac OS) to set the sampling point.
- To set additional sampling points, click each clone source button in the Clone Source panel.
- Select the target video layer and move the current-time indicator to the frame you want to paint.
If you want to paint on a separate layer, you can add a blank video layer. Make sure you choose the appropriate Sample option to clone content onto the blank video layer.
- If you have set multiple sampling points, select the source you want to use in the Clone Source panel.
-
Do any of the following in the Clone Source panel:
-
To scale or rotate the source that you're cloning, enter a value for W (width) or H (height), or the rotation in degrees .
- To show an overlay of the source that you're cloning, select Show Overlay and specify the overlay options. (The Clipped option restricts the overlay to the brush size. Deselect this option to overlay the entire source image).
To move the source overlay to an offset position, Shift + Alt-drag (Windows) or Shift + Option-drag (Mac OS). To temporarily show overlays, deselect Show Overlay, and press Shift + Alt (Windows) or Shift + Option (Mac OS).
- Drag over the area of the frame you want to paint.
Painting on a video layer is nondestructive. You can choose the Restore Frame or Restore All Frames command to discard the altered pixels on a specific frame or video layer.
Change frame offset for cloning or healing
• In the Clone Source panel:
- To always paint using the same frame you initially sampled from, select Lock Frame.
- To paint using a frame relative to the frame you initially sampled from, enter the number of frames in the Frame Offset box. If the frame you want to use is after the frame you initially sampled, enter a positive value. If the frame you want to use is before the frame you initially sampled, enter a negative value.
To the top
Restore frames in video layers
You can discard edits made to frame video layers and blank video layers.
• In the Animation panel (Photoshop Extended CS5) or Timeline panel (CS6), select a video layer and do one of the following:
- To restore a specific frame, move the current-time indicator to the video frame and choose Layer > Video Layers > Restore Frame.
- To restore all the frames in a video layer or blank video layer, choose Layer > Video Layers > Restore All Frames.
To the top
Managing color in video layers
In Photoshop Extended CS5 and Photoshop CS6, you can paint on video layers using tools such as the brush tool or the clone stamp tool. If no color profile is assigned to the video layer, these pixel edits are stored using the document file's color space, and the video footage itself is left unchanged. If the color space of the imported footage is different from the color space of your Photoshop document, you may need to make adjustments. For example, a standard definition video movie may be in SDTV 601 NTSC, while the Photoshop document is in Adobe RGB. Your final exported video or document might not have the colors you expect due to the color space mismatch.
Before investing a lot of time painting or editing video layers, test your complete workflow to understand your color management needs and find the approach that works best for your workflow.
Often, you can solve a mismatch by assigning a color profile to the document that corresponds to the imported footage, and leaving the video layer unmanaged. For example, with standard definition video, you can leave the video layer unmanaged and assign the document the SDTV (Rec. 601 NTSC) color profile. In this case, the imported frame pixels are stored directly in the video layer without color conversion.
Conversely, you can assign the document's color profile to the video layer using the Convert Edited Frame Content option (Layers > Video Layers > Interpret Footage). This option converts the pixel edits to the document's color space, but does not convert the colors of the video frames.
The Convert To Profile command (Edit > Convert To Profile) also converts all pixel edits to the document's color space. However, using the Assign Profile command (Edit > Assign Profile) does not convert the pixel edits to a video layer. Use the Assign Profile command with care, especially when you've painted on or edited video frames. If the video layer has a color profile, applying the Assign Profile command to the document may cause a color space mismatch between the pixel edits and the imported frames.
Some combinations of video footage and document color spaces require color conversion:
- A grayscale movie in an RGB, CMYK, or Lab mode document requires color conversion.
• Using 8- or 16-bpc footage in a 32-bpc document requires color conversion.
Adobe also recommends
• Create new video layers
• Understanding color management
- Assign or remove a color profile (Illustrator, Photoshop)
- Convert document colors to another profile (Photoshop)
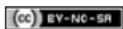
Twitter™ and Facebook posts are not covered under the terms of Creative Commons.
Legal Notices | Online Privacy Policy
Open or import a video file
Import image sequences
Place a video or image sequence
Reload footage in a video layer
Replace footage in a video layer
Interpreting video footage
To the top
Open or import a video file
In Photoshop CS6 and Photoshop Extended CS5, you can open a video file directly or add video to an open document. When you import video, the image frames are referenced in a video layer.

For a video on working with video layers, see www.adobe.com/go/vid0027
-
Do one of the following:
-
To open a video file directly, choose File > Open.
-
To import video into an open document, choose Layer > Video Layers > New Video Layer From File.
-
In the Open dialog box, for Files Of Type (Windows) or Enable (Mac OS), choose either All Readable Documents or QuickTime Movie.
-
Select a video file and then click Open.

You can also open video directly from Bridge: select a video file and then choose File > Open With > Adobe Photoshop.
To the top
Import image sequences
In Photoshop CS6 and Photoshop Extended CS5, when you import a folder of sequenced image files, each image becomes a frame in a video layer.

For a video on image sequences, see www.adobe.com/go/vid0026.
- Make sure that the image files are in one folder and are named sequentially.
The folder should contain only those images you want to use as frames. The resulting animation will be more successful if all files have the same pixel dimensions. To order frames correctly for the animation, name the files in alphabetical or numeric order. For example, filename001, filename002, filename003, and so forth.
-
Do one of the following:
-
To open an image sequence directly, choose File > Open.
-
To import an image sequence into an open document, choose Layer > Video Layers > New Video Layer From File.
-
In the Open dialog box, navigate to the folder with image sequence files.
-
Select one file, choose the Image Sequence option, and then click Open.
Note: Selecting more than one file in an image sequence disables the Image Sequence option.
- Specify the frame rate, and click OK.
To the top
Place a video or image sequence
In Photoshop CS6 or Photoshop Extended CS5, use the Place command if you want to transform the video or image sequence as you import it into a document. Once placed, the video frames are contained within a Smart Object. When video is contained by a Smart Object, you can navigate through the frames using the Animation panel, and you can also apply Smart Filters.
Note: You can't paint or clone directly on video frames contained by a Smart Object. However, you can add a blank video layer above the Smart Object, and paint on the blank frames. You can also use the Clone tool with the Sample All Layers option to paint on blank frames. This lets you use the video in the Smart Object as a cloning source.
- With a document open choose File > Place.
-
In the Place dialog box, do one of the following:
-
Select a video file and click Place.
- Select one image sequence file, select the Image Sequence option, and then click Place.
Note: Make sure all the image sequence files are in one folder.
- (Optional) Use the control points to scale, rotate, move, or warp the imported content.
- Click the Commit Transform button √ in the options bar to place the file.
You can also place video directly from Adobe Bridge. Select the video file and then choose File > Place > In Photoshop.
To the top
Reload footage in a video layer
If the source file for a video layer is modified in a different application, Photoshop CS6 and Photoshop Extended CS5 generally reloads and updates the footage, when you open the document containing the video layer referencing the changed source file. If your document is already open and the source file has been modified, use the Reload Frame command to reload and update the current frame in the Animation panel. Navigating through the video layer using the Previous/Next Frame or Play button in the Animation panel should also reload and update the footage.
To the top
Replace footage in a video layer
Photoshop CS6 and Photoshop Extended CS 5 tries to maintain the link between the video layer and source file even if you move or rename the source. If the link breaks for some reason, an alert icon 📄 appears on the layer in the Layers panel. To relink the video layer to the source file, use the Replace Footage command. This command can also replace the video or image sequence frames in a video layer with frames from a different video or image sequence source.
-
In the Animation (Photoshop Extended CS5), Timeline (CS6), or Layers panel, select the video layer that you want to relink to the source file or to replace the content.
-
Choose Layer > Video Layers > Replace Footage.
- In the Open dialog box, select a video or image sequence file, and then click Open.
To the top
Interpreting video footage
Interpret video footage
You can specify how Photoshop CS6 or Photoshop Extended CS5 interprets the alpha channel and frame rate of the video you've opened or imported.
- In the Animation (Photoshop Extended CS5), Timeline (CS6), or Layers panel, select the video layer that you want to interpret.
- Choose Layer > Video Layers > Interpret Footage.
-
In the Interpret Footage dialog box, do any of the following:
-
To specify how the alpha channel in the video layer is interpreted, select an Alpha Channel option. The footage must have an alpha channel for this option to be available. If Premultiplied-Matte is selected, you can specify the matte color with which the channels are premultiplied.
• To specify the number of video frames played per second, enter a Frame Rate.
• To color-manage the frames or images in a video layer, choose a profile from the Color Profile menu.
Alpha channel interpretation in video and image sequences
Video and image sequences with alpha channels can be straight or premultiplied. If you're working with video or image sequences containing alpha channels, it's important to specify how Photoshop interprets the alpha channel to get the results you expect. When premultiplied video or images are in a document with certain background colors, it's possible to get undesirable ghosting or halos. You can specify a matte color so the semi-transparent pixels blend (multiply) with the background without producing halos.
Ignore Ignores the alpha channel in the video.
Straight-Unmatted Interprets the alpha channel as straight alpha transparency. If the application you used to create the video doesn't premultiply the color channels, select this option.
Premultiplied-Matte Uses the alpha channel to determine how much of the matte color to mix with the color channels. If necessary, click the color swatch in the Interpret Footage dialog box to specify the matte color.


Item with premultiplied channels (top) appears with a black halo when interpreted as Straight-Unmatted (lower-left). When interpreted as
Premultiplied-Matte with black specified as background color, halo does not appear (lower-right).
Adobe also recommends
• Working with Image Sequences

Twitter™ and Facebook posts are not covered under the terms of Creative Commons.
Legal Notices | Online Privacy Policy
Timeline animation workflow
Use keyframes to animate layer properties
Create hand-drawn animations
Insert, delete, or duplicate blank video frames
Specify onion skin settings
Open a multilayer animation
To the top
Timeline animation workflow
To animate layer content in timeline mode, you set keyframes in the Animation panel (Photoshop Extended CS5) or Timeline panel (CS6), as you move the current-time indicator to a different time/frame, and then modify the position, opacity, or style of the layer content. Photoshop automatically adds or modifies a series of frames between two existing frames—varying the layer properties (position, opacity, and styles) evenly between the new frames to create the appearance of movement or transformation.
For example, if you want to fade out a layer, set the opacity of the layer in the starting frame to 100% and click the Opacity stopwatch for the layer. Then move the current-time indicator to the time/frame for the ending frame and set the opacity for the same layer to 0%. Photoshop automatically interpolates frames between the start and end frames, and the opacity of the layer is reduced evenly across the new frames.
In addition to letting Photoshop interpolate frames in an animation, you can also create a hand-drawn frame-by-frame animation by painting on a blank video layer.
If you want to create a SWF format animation, use Adobe Flash, Adobe After Effects, or Adobe Illustrator.
To create a timeline-based animation, use the following general workflow.
1. Create a new document.
Specify the size and background contents. Make sure the pixel aspect ratio and dimensions are appropriate for the output of your animation. The color mode should be RGB. Unless you have special reasons for making changes, leave the resolution at 72 pixels/inch, the bit depth at 8 bpc, and the pixel aspect ratio at square.
- (Photoshop Extended CS5) Make sure the Animation panel is open. If the Animation panel is in frame animation mode, click the Convert To Timeline Animation icon in the lower-right corner of the panel.
- (CS6) Make sure the Timeline panel is open. If necessary, click the downpointing arrow in the middle of the panel, choose Create Video Timeline from the menu, and then, click the button to the left of the arrow. If the Timeline panel is in frame animation mode, click the Convert To Video Timeline icon in the lower-left corner of the panel.
2. Specify the Document Timeline Settings (Photoshop Extended CS5) or Set Timeline Frame Rate (CS6) in the panel menu.
Specify the duration (Photoshop Extended CS5 only) and frame rate. See Specify timeline duration and frame rate.
3.Add a layer.
Background layers cannot be animated. If you want to animate content, either convert the background layer to a normal layer or add any of the following:
• A new layer for adding content.
- A new video layer for adding video content.
- A new blank video layer for cloning content to or creating hand-drawn animations.
3. Add content to the layer.
4.(Optional) Add a layer mask.
A layer mask can be used to reveal a portion of the layer's content. You can animate the layer mask to reveal different portions of the layer's content over time. See Add layer masks.
- Move the current time indicator to the time or frame where you want to set the first keyframe.
See Use keyframes to animate layer properties.
7. Turn on keyframing for a layer property.
Click the triangle next to the layer name. A down-pointing triangle displays the layer's properties. Then, click the stopwatch to set the first keyframe for the layer property you want to animate. You can set keyframes for more than one layer property at a time.
8. Move the current time indicator and change a layer property.
Move the current-time indicator to the time or frame where the layer's property changes. You can do one or more of the following:
- Change the position of the layer to make layer content move.
- Change layer opacity to make content fade in or out.
- Change the position of a layer mask to reveal different parts of the layer.
- Turn a layer mask on or off.
For some types of animation, such as changing the color of an object, or completely changing the content in a frame, you need additional layers with the new content.
Note: To animate shapes, you animate the vector mask not the shape layer, using the Time-Vary stopwatch for Vector Mask Position or Vector Mask Enable.
9. Add additional layers with content and edit their layer properties as needed.
- Move or trim the layer duration bar to specify when a layer appears in an animation.
See Specify when a layer appears in a video or animation and Set the timeline area to preview.
11. Preview the animation.
Use the controls in the Animation panel (Photoshop Extended CS5) or Timeline panel (CS6) to play the animation as you create it. Then preview the animation in your web browser. You can also preview the animation in the Save For Web & Devices (Photoshop Extended CS5) or Save For Web (CS6) dialog box. See Previewing video or timeline animations.
12.Save the animation.
You can save the animation as an animated GIF using the Save For Web & Devices (Photoshop Extended CS5) or Timeline panel (CS6)
command, or as an image sequence or video using the Render Video command. You can also save it in PSD format, which can be imported into Adobe After Effects.
To the top
Use keyframes to animate layer properties
You can animate different layer properties, such as Position, Opacity, and Style. Each change can occur independently of, or simultaneously with, other changes. If you want to animate different objects independently, it's best to create them on separate layers.

For a video on animating layer properties, see www.adobe.com/go/vid0024.
Here are some examples of how you can animate layer properties:
- You can animate position by adding a keyframe to the Position property, then moving the current time indicator and dragging the layer in the document window.
- You can animate a layer's opacity by adding a keyframe to the Opacity property, then moving the current time indicator and changing the layer's opacity in the Layers panel.
- You can animate 3D properties, such as object and camera position. (For more information, see Create 3D animations (Photoshop Extended).)
To animate a property using keyframes, you must set at least two keyframes for that property. Otherwise, changes that you make to the layer property remain in effect for the duration of the layer.
Each layer property has a Time-Vary stopwatch icon 🔗 that you click to begin animating. When the stopwatch is active for a specific property, Photoshop automatically sets new keyframes whenever you change the current time and the property value. When the stopwatch is inactive for a property, the property has no keyframes. If you type a value for a layer property while the stopwatch is inactive, the value remains in effect for the duration of the layer. If you deselect the stopwatch, you will permanently delete all of the keyframes for that property.
Choose interpolation method
Interpolation (sometimes called tweening) describes the process of filling in unknown values between two known values. In digital video and film, interpolation usually means generating new values between two keyframes. For example, to move a graphic element 50 pixels to the left in 15 frames, you'd set the position of the graphic in the first and 15th frames, and mark them both as keyframes. Photoshop interpolates the frames between the two keyframes. Interpolation between keyframes can be used to animate movement, opacity, styles, and global lighting.
In the Animation panel (Photoshop Extended CS5) or Timeline panel (CS6), the appearance of a keyframe depends on the interpolation method you choose for the interval between keyframes.
Linear keyframe

Evenly changes the animated property from one keyframe to another. (The one exception is the Layer Mask Position property which switches between enabled and disabled states abruptly.)
Hold keyframe

Maintains the current property setting. This interpolation method is useful for strobe effects, or when you want layers to appear or disappear suddenly.
To choose the interpolation method for a keyframe, do the following:
- In the Animation panel (Photoshop Extended CS5) or Timeline panel (CS6), select one or more keyframes.
- Do one of the following:
- Right-click a selected keyframe and choose either Linear Interpolation or Hold Interpolation from the Context menu.
- Open the Animation panel menu and choose either Keyframe Interpolation > Linear or Keyframe Interpolation > Hold.
Move the current-time indicator to a keyframe
After you set the initial keyframe for a property, Photoshop displays the keyframe navigator, which you can use to move from keyframe to keyframe or to set or remove keyframes. When the keyframe navigator diamond is active (yellow), the current-time indicator lies precisely at a keyframe for that layer property. When the keyframe navigator diamond is inactive (gray), the current-time indicator lies between keyframes. When arrows appear on each side of the keyframe navigator box, other keyframes for that property exist on both sides of the current time.
- In the Animation panel (Photoshop Extended CS5) or Timeline panel (CS6), click a keyframe navigator arrow. The arrow to the left moves the current-time indicator to the previous keyframe. The arrow to the right moves the current-time indicator to the next keyframe.
Select keyframes
- In the Animation panel (Photoshop Extended CS5) or Timeline panel (CS6), do any of the following:
• To select a keyframe, click the keyframe icon.
- To select multiple keyframes, Shift-click the keyframes or drag a selection marquee around the keyframes.
• To select all keyframes for a layer property, click the layer property name next to the stopwatch icon.
Move keyframes
- In the Animation panel (Photoshop Extended CS5) or Timeline panel (CS6), select one or more keyframes.
- Drag any of the selected keyframe icons to the desired time. (If you selected multiple keyframes, they move as a group and maintain the same time spacing.)
To expand or compress the spacing of multiple keyframes, Alt-drag (Windows) or Option-drag (Mac OS) the first or last keyframe in the selection. The keyframe at the opposite end of the selection remains in place as you drag, slowing down or speeding up the animation.
Copy and paste keyframes
You can copy keyframes for a property (such as Position) to the same property in any layer. When you paste keyframes, they reflect the copied offset from the current-time indicator.
You can copy keyframes from only one layer at a time. When you paste keyframes into another layer, they appear in the corresponding property in the destination layer. The earliest keyframe appears at the current time, and the other keyframes follow in relative order. The keyframes remain selected after pasting, so you can immediately move them in the timeline.
Note: You can copy and paste keyframes between more than one property at a time.
- In the Animation panel (Photoshop Extended CS5) or Timeline panel (CS6), display the layer property containing the keyframes you want to copy.
- Select one or more keyframes.
- Right -click a selected keyframe, and choose Copy Keyframes.
- In the Animation panel containing the destination layer, move the current-time indicator to the point in time where you want the keyframes to appear.
-
Select the destination layer.
-
Open the Animation panel menu and choose Paste Keyframes.
Delete keyframes
• In the Animation panel (Photoshop Extended CS5) or Timeline panel (CS6), select one or more keyframes and do one of the following:
- Right-click (Windows) or Control-click (Mac OS) a selected keyframe, and choose Delete Keyframes from the context menu.
• From the panel menu, choose Delete Keyframes.
To the top
Create hand-drawn animations
You can add a blank video layer to your document when you want to create frame-by-frame hand-drawn animations. Adding a blank video layer above a video layer and then adjusting the opacity of the blank video layer, allows you to see the contents of the video layer below. You can then rotoscope the video layer content by painting or drawing on the blank video layer. See also Paint frames in video layers.
Note: If you're animating several independent elements, create separate content on different blank video layers.
- Create a new document.
- Add a blank video layer.
- Paint or add content to the layer.
-
(Optional) In the Animation panel (Photoshop Extended CS5) or Timeline panel (CS6), enable the onion skin mode:
-
(Photoshop Extended CS5) Click the Toggle Onion Skins button to enable onion skinning.
• (CS6 and Photoshop Extended CS5) Choose Enable Onion Skins from the panel menu. -
Move the current-time indicator to the next frame.
-
Paint or add content to the layer in a slightly different position from the content in the previous frame.

You can add a blank video frame, duplicate a frame, or delete a frame from the blank video layer by choosing Layer > Video Layers and then choosing the appropriate command.
As you create more hand-drawn frames, you can either drag the current time indicator or use the playback controls to preview your animation.
To the top
Insert, delete, or duplicate blank video frames
A blank video frame can be added to or removed from a blank video layer. You can also duplicate existing (painted) frames in blank video layers.
- In the Animation panel (Photoshop Extended CS5) or Timeline panel (CS6), select the blank video layer and then move the current-time indicator to the desired frame.
- Choose Layer > Video Layers and then choose one of the following:
Insert Blank Frame Inserts a blank video frame in the selected blank video layer at the current time.
Delete Frame Deletes the video frame in the selected blank video layer at the current time.
Duplicate Frame Adds a copy of the video frame at the current time in the selected blank video layer.
To the top
Specify onion skin settings
Onion skin mode displays content drawn on the current frame plus content drawn on the surrounding frames. These additional frames appear at the opacity you specify to distinguish them from the current frame. Onion skin mode is useful for drawing frame-by-frame animations because it gives you reference points for stroke positions and other edits.
Onion skin settings specify how previous and later frames appear when Onion Skins are enabled. (See Animation panel overview.)
- Open the Animation panel menu (Photoshop Extended CS5) or Timeline panel (CS6) and choose Onion Skin Settings.
- Specify options for the following:
Onion Skin Count Specifies how many previous and forward frames are displayed. Enter the Frames Before (previous frames) and Frames After (forward frames) values in the text boxes.
Frame Spacing Specifies the number of frames between the displayed frames. For example, a value of 1 displays consecutive frames, and a value of 2 displays strokes that are two frames apart.
Max Opacity Sets the percentage of opacity for the frames immediately before and after the current time.
Min Opacity Sets the percentage of opacity for the last frames of the before and after sets of onion-skin frames.
Blend Mode Sets the appearance of the areas where the frames overlap.
natural_image
Three-panel sequence showing a person holding a circular object with green background, no text or symbols presentOnion skinning
A. Current frame with one frame after B. Current frame with both one frame before and after C. Current frame with one frame before
Open a multilayer animation
You can open animations that were saved in older versions of Photoshop as multilayer Photoshop (PSD) files. The layers are placed in the Animation panel (Photoshop Extended CS5) or Timeline panel (CS6) in their stacking order, with the bottom layer becoming the first frame.
-
Choose File > Open, and select the Photoshop file to open.
-
In the Layers panel, select the layers you want for the animation, and choose Make Frames From Layers from the Animation panel menu.
You can edit the animation, use the Save For Web & Devices (Photoshop Extended CS5) or Save For Web (CS6) command to save an animated GIF, or use the Render Video command to save the animation as a QuickTime movie.
Adobe also recommends
- Creating animations from shape tweens

Twitter™ and Facebook posts are not covered under the terms of Creative Commons.
Legal Notices | Online Privacy Policy
About creating images for video
Aspect ratio
Create an image for use in video
Load video actions
Adjust pixel aspect ratio
Prepare images for use in After Effects
To the top
About creating images for video
Photoshop can create images of various aspect ratios so that they appear properly on devices such as video monitors. You can select a specific video option (using the New dialog box) to compensate for scaling when the final image is incorporated into video.
Safe zones
The Film & Video preset also creates a document with nonprinting guides that delineate the action-safe and title-safe areas of the image. Using the options in the Size menu, you can produce images for specific video systems—NTSC, PAL, or HDTV.
Safe zones are useful when you edit for broadcast and videotape. Most consumer TV sets use a process called overscan, which cuts off a portion of the outer edges of the picture, allowing the center of the picture to be enlarged. The amount of overscan is not consistent across TVs. To ensure that everything fits within the area that most TVs display, keep text within the title-safe margins, and all other important elements within the action-safe margins.
text_image
A BVideo preset file size guides
A. Action safe area (outer rectangle) B. Title safe area (inner rectangle)
Note: If you are creating content for the web or for CD, the title-safe and action-safe margins do not apply to your project because the entire image is displayed in these media.
Preview options
To help you create images for video, Photoshop has a Pixel Aspect Ratio Correction viewing mode that displays images at the specified aspect ratio. For more accurate previews, Photoshop also has a Video Preview command that lets you immediately preview your work on a display device, such as a video monitor. To use this feature, you must have the device connected to your computer via FireWire (IEEE 1394). See also Preview your document on a video monitor. For more information on FireWire (IEEE 1394), see Apple's website.
Other considerations
Both Adobe AfterEffects and Adobe Premiere Pro support PSD files created in Photoshop. However, if you're using other film and video applications, you might consider these details when you create images for use in video:
- Some video-editing programs can import individual layers from a multilayer PSD file.
- If the file has transparency, some video-editing programs preserve it.
- If the file uses a layer mask or multiple layers, you might not have to flatten the layers, but you might want to include a flattened copy of the file in PSD format to maximize backward compatibility.
To the top
Aspect ratio
Frame aspect ratio describes the ratio of width to height in the dimensions of an image. For example, DV NTSC has a frame aspect ratio of 4:3 (or 4 width by 3 height) and a typical widescreen frame has a frame aspect ratio of 16:9. Some video cameras can record various frame aspect ratios. Many cameras that have a widescreen mode use the 16:9 aspect ratio. Many professional films have been shot using even wider aspect ratios.
text_image
4 3 16 94:3 frame aspect ratio (left), and wider 16:9 frame aspect ratio (right)
Pixel aspect ratio describes the ratio of width to height of a single pixel in a frame. Different video standards use different pixel aspect ratios. For example, many computer video standards define a 4:3 aspect ratio frame as 640 pixels wide by 480 pixels high, which results in square pixels. The computer video pixels in this example have a pixel aspect ratio of 1:1 (square), whereas the DV NTSC pixels have a pixel aspect ratio of 0.91 (nonsquare). DV pixels, which are always rectangular, are vertically oriented in systems producing NTSC video and horizontally oriented in systems producing PAL video.
If you display rectangular pixels on a square-pixel monitor without alteration, images appear distorted; for example, circles distort into ovals. However, when displayed on a broadcast monitor, the images appear correctly proportioned because broadcast monitors use rectangular pixels.
Note: When copying or importing images into a nonsquare pixel document, Photoshop automatically converts and scales the image to the pixel aspect ratio of the document. Images imported from Adobe Illustrator are also properly scaled.
natural_image
Three-panel diagram showing red ring-shaped objects on a grid, labeled A, B, and C (no text or symbols on the shapes themselves)Pixel and frame aspect ratios
A. 4:3 square-pixel image displayed on 4:3 square-pixel (computer) monitor B. 4:3 square-pixel image interpreted correctly for display on 4:3 non-square pixel (TV) monitor C. 4:3 square-pixel image interpreted incorrectly for display on 4:3 non-square pixel (TV) monitor
To the top
Create an image for use in video
-
Create a new document.
-
From the Preset menu in the New dialog box, choose the Film & Video preset.
- Choose the size that's appropriate for the video system on which the image will be shown.
- Click Advanced to specify a color profile and specific pixel aspect ratio.
Note: By default, nonsquare pixel documents open with Pixel Aspect Ratio Correction enabled. This setting scales the image so it appears as it would on the nonsquare-pixel output device (usually a video monitor).
- To view the image as it would appear on a computer monitor (square pixel), choose View > Pixel Aspect Ratio Correction.
natural_image
Abstract geometric design with concentric circles in black, purple, and green on a green background (no text or symbols)
natural_image
Abstract geometric design with concentric circles in green and black (no text or symbols)Circle in NTSC DV (720 x 480 pixels) document viewed on computer (square pixel) monitor with Pixel Aspect Ratio Correction turned on (top) and Pixel Aspect Ratio Correction turned off (bottom)
You can simultaneously view an image with the Pixel Aspect Ratio Correction turned on and off. With the nonsquare pixel image open and Pixel Aspect Ratio Correction enabled, choose Window > Arrange > New Window For [name of document]. With the new window active, choose View > Pixel Aspect Ratio Correction to turn off the correction.
-
If you have a display device, such as a video monitor, connected to your computer via FireWire, you can preview the document on the device:
-
To set output options before previewing the image, choose File > Export > Video Preview.
- To view the image without setting output options, choose File > Export > Send Video Preview To Device.
When creating images for video, you can load a set of video actions (included with Photoshop) that automate certain tasks—such as scaling images to fit video pixel dimensions and setting the pixel aspect ratio.
To the top
Load video actions
For video images, actions automate tasks such as constraining the luminance range and saturation levels to comply with broadcast standards, resizing and converting to nonsquare pixels for use in DVD slide shows (NTSC and PAL, standard and widescreen aspect ratios), creating an alpha channel from all currently visible layers, adjusting image areas (especially thin lines) that are likely to cause interlace flicker, and generating a title-safe overlay.
- Choose Window > Actions to display the Actions panel.
- Click the triangle in the upper right corner of the panel, and choose Video Actions from the menu.
To the top
Adjust pixel aspect ratio
You can create a custom pixel aspect ratio in existing documents, or delete or reset pixel aspect ratios previously assigned to a document.
Assign a pixel aspect ratio value to an existing document
- With a document open, choose View > Pixel Aspect Ratio and then choose a pixel aspect ratio that's compatible with the video format that you'll be using your Photoshop file with.
Create a custom pixel aspect ratio
-
With a document open, choose View > Pixel Aspect Ratio > Custom Pixel Aspect Ratio.
-
In the Save Pixel Aspect Ratio dialog box, enter a value in the Factor text box, name the custom pixel aspect ratio, and click OK.
The new custom pixel aspect ratio appears in both the Pixel Aspect Ratio menu of the New dialog box and in the View > Pixel Aspect Ratio menu.
Delete a pixel aspect ratio
-
With the document open, choose View > Pixel Aspect Ratio > Delete Pixel Aspect Ratio.
-
In the Delete Pixel Aspect Ratio dialog box, choose the item to delete from the Pixel Aspect Ratio menu, and click Delete.
Reset the pixel aspect ratios
-
With the document open, choose View > Pixel Aspect Ratio > Reset Pixel Aspect Ratios.
-
In the dialog box, choose one of the following:
Append Replaces the current pixel aspect ratios with the default values plus any custom pixel aspect ratios. This option is useful if you deleted a default value and want to restore it to the menu but also want to retain any custom values.
OK Replaces the current pixel aspect ratios with the default values. Custom pixel aspect ratios are discarded.
Cancel Cancels the command.
To the top
Prepare images for use in After Effects
You can import a Photoshop (PSD) file directly into an After Effects project with the option of preserving individual layers, layer styles, transparent areas and layer masks, and adjustment layers (preserving the individual elements for animation).
note: For best results, work in RGB mode, which After Effects uses. After Effects CS3 and later can convert files from CMYK to RGB. After Effects 7 and earlier cannot.
Before you export a layered Photoshop file for use in After Effects, do the following to reduce preview and rendering time and to avoid problems with importing and updating Photoshop layers.
- Organize and name layers. If you change a layer name or delete a layer in a Photoshop document after you import it into After Effects, After Effects won't be able to find the renamed or deleted layer. The After Effects Project panel lists that layer as missing. (You can also group layers into Smart Objects. For example: If you used a set of layers to make a foreground object and a set of layers to make a background, you can group them as one Smart Object each, and easily animate one to fly in front of the other).
- Make sure that each layer has a unique name. Duplicate layer names can cause confusion.
- Choose Always from the Maximize PSD And PSB File Compatibility menu in the File Handling Preferences dialog box.
- Use the appropriate pixel dimension preset for video and film in the New Document dialog box.
- Do any required color correction, scaling, cropping, or other edits in Photoshop so that After Effects doesn't have to do extra image-processing work. (You can also assign a color profile to the image that corresponds to the intended output type, such as Rec. 601 NTSC or Rec. 709. After Effects can read embedded color profiles and interpret the image's colors accordingly. For more information on color profiles, see Working with color profiles.
Adobe also recommends
• Preparing and importing Photoshop files

Twitter™ and Facebook posts are not covered under the terms of Creative Commons.
Legal Notices | Online Privacy Policy
Frame animation workflow Add frames to an animation Select animation frames Edit animation frames Unifying layer properties in animation frames Copy frames with layer properties Create frames using tweening Add a new layer for each new frame Hide layers in animation frames Specify a delay time in frame animations Choose a frame disposal method Specify looping in frame animations Delete an entire animation
To the top
Frame animation workflow
In Photoshop, you use the Animation panel (Photoshop Extended CS5) or Timeline panel (CS6) to create animation frames. Each frame represents a configuration of layers.
Note: In Photoshop Extended CS5 and Photoshop CS6, you can also create animations using a timeline and keyframes. See Creating timeline animations.
text_image
Layer 1 Layer 2 Layer 3 Acceleration Controls > [Measurement Line] 0.5x 1.0x 1.5x 2.0x 2.5x 3.0x 3.5x 4.0x 4.5x 5.0x 5.5x 6.0x 6.5x 7.0x 7.5x 8.0x 8.5x 9.0x 9.5x 10.0xIllustration of an animation. The unicycle image is on its own layer; the position of the layer changes in each frame of the animation.
To create frame-based animations in Photoshop, use the following general workflow.
Open a new document.
If they are not already visible, open the Animation (Photoshop Extended CS5), Timeline (CS6), and Layers panels. Make sure the Animation panel (Photoshop Extended CS5) or Timeline panel (CS6) is in frame animation mode:
- (Photoshop Extended CS5) Click the Convert to Frame Animation in the Animation panel.
- (CS6) In the middle of the Timeline panel, click the downpointing arrow to choose Create Frame Animation and then click the button next to the arrow.
Add a layer or convert the background layer.
Because a background layer cannot be animated, add a new layer or convert the background layer to a regular layer. See Convert background and layers.
Add content to your animation.
If your animation includes several objects that are animated independently, or if you want to change the color of an object or completely change the content in a frame, create the objects on separate layers.
Add a frame to the Animation panel (Photoshop Extended CS5) or Timeline panel (CS6).
See Add frames to an animation.
Select a frame.
See Select animation frames.
Edit the layers for the selected frame.
Do any of the following:
- Turn visibility on and off for different layers.
- Change the position of objects or layers to make layer content move.
- Change layer opacity to make content fade in or out.
- Change the blending mode of layers.
- Add a style to layers.
Photoshop provides tools for keeping characteristics of a layer the same across frames. See Unifying layer properties in animation frames.
Add more frames and edit layers as needed.
The number of frames you can create is limited only by the amount of system memory available to Photoshop.
You can generate new frames with intermediate changes between two existing frames in the panel using the Tween command. This is a quick way to make an object move across the screen or to fade in or out. See Create frames using tweening.
Set frame delay and looping options.
You can assign a delay time to each frame and specify looping so that the animation runs once, a certain number of times, or continuously. See Specify a delay time in frame animations and Specify looping in frame animations.
Preview the animation.
Use the controls in the Animation panel (Photoshop Extended CS5) or Timeline panel (CS6) to play the animation as you create it. Then use the Save For Web & Devices command to preview the animation in your web browser. See Preview optimized images in a web browser.
Optimize the animation for efficient download.
See Optimize animation frames.
Save the animation.
There are different options for saving your frame animation:
- Save as an animated GIF using the Save For Web & Devices (Photoshop Extended CS5) or Save For Web (CS6) command.
- Save in Photoshop (PSD) format so you can do more work on the animation later.
- Save an image sequence, QuickTime movie, or as separate files. See also Export video files or image sequences.
To the top
Add frames to an animation
Adding frames is the first step in creating an animation. If you have an image open, the Animation panel (Photoshop Extended CS5) or Timeline panel (CS6) displays the image as the first frame in a new animation. Each frame you add starts as a duplicate of the preceding frame. You then make changes to the frame using the Layers panel.
- Make sure the Animation panel (Photoshop Extended CS5) or Timeline panel (CS6) is in frame animation mode.
- Click the Duplicates Selected Frames button ☐ in the Animation panel.
To the top
Select animation frames
Before you can work with a frame, you must select it as the current frame. The contents of the current frame appear in the document window.
In the Animation panel (Photoshop Extended CS5) or Timeline panel (CS6), the current frame is indicated by a narrow border (inside the shaded selection highlight) around the frame thumbnail. Selected frames are indicated by a shaded highlight around the frame thumbnails.
Select one animation frame
- Do one of the following in the Animation panel (Photoshop Extended CS5) or Timeline panel (CS6):
- Click a frame.
- Click the Selects Next Frame button to select the next frame in the series as the current frame.
- Click the Selects Previous Frame button to select the previous frame in the series as the current frame.
- Click the Selects First Frame button to select the first frame in the series as the current frame.
Select multiple animation frames
- In the Animation panel (Photoshop Extended CS5) or Timeline panel (CS6), do one of the following:
- To select contiguous multiple frames, Shift-click a second frame. The second frame and all frames between the first and second are added to the selection.
- To select discontinuous multiple frames, Ctrl-click (Windows) or Command-click (Mac OS) additional frames to add those frames to the selection.
• To select all frames, choose Select All Frames from the panel menu. - To deselect a frame in a multiframe selection, Ctrl-click (Windows) or Command-click (Mac OS) that frame.
To the top
Edit animation frames
- In the Animation panel (Photoshop Extended CS5) or Timeline panel (CS6), select one or more frames.
- Do any of the following:
• To edit the content of objects in animation frames, use the Layers panel to modify the layers in the image that affect that frame.
- To change the position of an object in an animation frame, select the layer containing the object in the Layers panel and drag it to a new position.
Note: You can select and change the position of multiple frames. However, if you drag multiple discontinuous frames, the frames are placed contiguously in the new position.
- To reverse the order of animation frames, choose Reverse Frames from the panel menu.
Note: The frames you want to reverse do not have to be contiguous; you can reverse any selected frames.
- To delete selected frames, select Delete Frame from the Animation panel menu or click the Delete icon ☑, then click Yes to confirm the deletion. You can also drag the selected frame onto the Delete icon.
To the top
Unifying layer properties in animation frames
The unify buttons (Unify Layer Position, Unify Layer Visibility, and Unify Layer Style) in the Layers panel determine how the changes you make to attributes in the active animation frame apply to the other frames in the same layer. When a unify button is selected, that attribute is changed in all the frames in the active layer; when that button is deselected, changes apply to only the active frame.
The Propagate Frame 1 option in the Layers panel also determines how the changes you make to attributes in the first frame will apply to the other frames in the same layer. When it is selected, you can change an attribute in the first frame, and all subsequent frames in the active layer will change in relation to the first frame (and preserve the animation you have already created).
Unify layer properties
- In the Animation panel (Photoshop Extended CS5) or Timeline panel (CS6), change the attribute to one frame.
- In the Layers panel, click Unify Layer Position ⚠️, Unify Layer Visibility , or Unify Layer Style to have the changed attribute apply to all other frames in the active layer.
Propagate frame 1
- In the Layers panel, select the Propagate Frame 1 option.
- In the Animation panel (Photoshop Extended CS5) or Timeline panel (CS6), change the attribute for the first frame.
The changed attribute is applied (in relation) to all subsequent frames in a layer.
You can also propagate frames by Shift-selecting any consecutive group of frames in the layer and changing an attribute in any of the selected frames.
Show or hide Unify Layers buttons
- Choose Animation Options from the Layers panel menu, and then choose one of the following:
Automatic Displays the unify layers buttons when the Animation panel is open. In Photoshop Extended, the Animation panel must be in frame animation mode.
Always Show Displays the unify layers buttons whether the Animation panel is open or closed.
Always Hide Hides the unify layers buttons whether the Animation panel is open or closed.
To the top
Copy frames with layer properties
To understand what happens when you copy and paste a frame, think of a frame as a duplicate version of an image with a given layer configuration. When you copy a frame, you copy the configurations of layers (including each layer's visibility setting, position, and other properties). When you paste a frame, you apply that layer configuration to the destination frame.
- Select one or more frames you want to copy in the Animation panel (Photoshop Extended CS5) or Timeline panel (CS6).
- Choose Copy Frame(s) from the panel menu.
- Select a destination frame or frames in the current animation or another animation.
- Choose Paste Frame(s) from the panel menu.
- Select a Paste method:
Replace Frames Replaces the selected frames with the copied frames. No new layers are added. The properties of each existing layer in the destination frames are replaced by those of each copied layer. When you paste frames between images, new layers are added to the image; however, only the pasted layers are visible in the destination frames (the existing layers are hidden).
Paste Over Selection Adds the contents of the pasted frames as new layers in the image. When you paste frames into the same image, using this option doubles the number of layers in the image. In the destination frames, the newly pasted layers are visible, and the original layers are hidden. In the non-destination frames, the newly pasted layers are hidden.
Paste Before Selection or Paste After Selection Adds the copied frames before or after the destination frame. When you paste frames between images, new layers are added to the image; however, only the pasted layers are visible in the new frames (the existing layers are hidden).
- (Optional) To link pasted layers in the Layers panel, select Link Added Layers.
This option works only when pasting frames into another document. Select it when you plan to reposition the pasted layers as a unit.
- Click OK.
To the top
Create frames using tweening
The term tweening is derived from “in betweening,” the traditional animation term used to describe this process. Tweening (also called interpolating) significantly reduces the time required to create animation effects such as fading in or fading out, or moving an element across a frame. You can edit tweened frames individually after you create them.
You use the Tween command to automatically add or modify a series of frames between two existing frames—varying the layer properties
(position, opacity, or effect parameters) evenly between the new frames to create the appearance of movement. For example, if you want to fade out a layer, set the opacity of the layer in the starting frame to 100%; then set the opacity of the same layer in the ending frame to 0%. When you tween between the two frames, the opacity of the layer is reduced evenly across the new frames.
text_image
Rotation (Tens) 1 Unicycle 2 Unicycle 3 Unicycle 4 Unicycle 5 Faster 6 17:00 18:00 19:00 20:00 21:00 22:00 23:00 24:00 25:00 26:00 27:00 28:00 29:00 30:00 31:00 32:00 33:00 34:00 35:00 36:00 37:00 38:00 39:00 40:00 41:00 42:00 43:00 44:00 45:00 46:00 47:00 48:00 49:00 50:00 51:00 52:00 53:00 54:00 55:00 56:00 57:00 58:00 59:00 60:00 61:00 62:00 63:00 64:00 65:00 66:00 67:00 68:00 69:00 70:00 71:00 72:00 73:00 74:00 75:00 76:00 77:00 78:00 79:00 80:00 81:00 82:00 83:00 84:00 85:00 86:00 87:00 88:00 89:00 90:00 91:00 92:00 93:00 94:00 95:00 96:00 97:00 98:00 99:00 100:00Using tweening to animate text position
- To apply tweening to a specific layer, select it in the Layers panel.
-
Select a single frame or multiple contiguous frames.
-
If you select a single frame, you choose whether to tween the frame with the previous frame or the next frame.
- If you select two contiguous frames, new frames are added between the frames.
- If you select more than two frames, existing frames between the first and last selected frames are altered by the tweening operation.
-
If you select the first and last frames in an animation, these frames are treated as contiguous, and tweened frames are added after the last frame. (This tweening method is useful when the animation is set to loop multiple times.)
-
Do one of the following:
-
Click the Tweens button in the Animation panel (Photoshop Extended CS5) or Timeline panel (CS6).
-
Select Tween from the panel menu.
-
Specify the layer or layers to be varied in the added frames:
All Layers Varies all layers in the selected frame or frames.
Selected Layer Varies only the currently selected layer in the selected frame or frames.
- Specify layer properties to be varied:
Position Varies the position of the layer's content in the new frames evenly between the beginning and ending frames.
Opacity Varies the opacity of the new frames evenly between the beginning and ending frames.
Effects Varies the parameter settings of layer effects evenly between the beginning and ending frames.
- If you selected a single frame in step 2, choose where to add frames from the Tween With menu:
Next Frame Adds frames between the selected frame and the following frame. This option is not available when you select the last frame in the Animation (Photoshop Extended CS5) or Timeline (CS6) panel.
First Frame Adds frames between the last frame and first frame. This option is available only if you select the last frame in the Animation (Photoshop Extended CS5) or Timeline (CS6) panel.
Previous Frame Adds frames between the selected frame and the preceding frame. This option is not available when you select the first frame in the Animation (Photoshop Extended CS5) or Timeline (CS6) panel.
Last Frame Adds frames between the first frame and last frame. This option is available only if you select the first frame in the Animation (Photoshop Extended CS5) or Timeline (CS6) panel.
- In the Frames To Add box, enter a value, or use the Up or Down Arrow key to choose the number of frames. (This option is not available if you selected more than two frames.)
- Click OK.
To the top
Add a new layer for each new frame
The Create New Layer For Each New Frame command automatically adds a new layer visible in the new frame but hidden in other frames. This option saves time when you are creating an animation that requires you to add a new visual element to each frame.
- Choose Create New Layer For Each New Frame from the Animation panel menu (Photoshop Extended CS5) or Timeline panel menu (CS6).
A check mark indicates that the option is turned on.
To the top
Hide layers in animation frames
When you create a new layer, it is visible in all animation frames by default.
- To show new layers only in active frames, deselect New Layers Visible In All Frames from the Animation panel menu (Photoshop Extended CS5) or Timeline panel menu (CS6).
- To hide a layer in a specific frame, select the frame, and then hide the desired layer in the Layers panel.
To the top
Specify a delay time in frame animations
You can specify a delay—the time that a frame is displayed—for single frames or for multiple frames in an animation. Delay time is displayed in seconds. Fractions of a second are displayed as decimal values. For example, one-quarter of a second is specified as .25. If you set a delay on the current frame, every frame you create after that will remember and apply that delay value.
- Select one or more frames in the Animation panel (Photoshop Extended CS5) or Timeline panel (CS6).
- Click the Delay value below the selected frame to view the pop-up menu.
-
Specify the delay:
-
Choose a value from the pop-up menu. (The last value used appears at the bottom of the menu.)
- Choose Other, enter a value in the Set Frame Delay dialog box, and click OK. If you selected multiple frames, specifying a delay value for one frame applies the value to all frames.
To the top
Choose a frame disposal method
The frame disposal method specifies whether to discard the current frame before displaying the next frame. You select a disposal method for animations that include background transparency to specify whether the current frame will be visible through the transparent areas of the next frame.
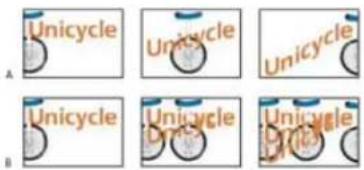
text_image
Unicycle Unicycle Unicycle Unicycle Unicycle Unicycle UnicycleFrame disposal methods
A. Frame with background transparency with Restore To Background option B. Frame with background transparency with Do Not Dispose option
The Disposal Method icon indicates whether the frame is set to Do Not Dispose or Dispose. (No icon appears when Disposal Method is set to Automatic.)
- (Photoshop Extended) Make sure the Animation panel is in frame animation mode.
- Select a frame or frames for which you want to choose a disposal method.
- Right-click (Windows) or Control-click (Mac OS) the frame thumbnail to view the Disposal Method context menu.
- Choose a disposal method:
automatic frame disposalAutomatic Determines a disposal method for the current frame automatically, discarding the current frame if the next frame contains layer transparency. For most animations, the Automatic option (default) yields the desired results.
Note: To preserve frames that include transparency, select the Automatic disposal option when you are using the Redundant Pixel Removal optimization option.
Do Not Dispose Preserves the current frame as the next frame is added to the display. The current frame (and preceding frames) may show through transparent areas of the next frame. Use a browser to see an accurate preview of an animation using the Do Not Dispose option.
Restore To Background optionDispose Discards the current frame from the display before the next frame is displayed. Only a single frame is displayed at any time (and the current frame does not appear through the transparent areas of the next frame).
To the top
Specify looping in frame animations
You select a looping option to specify how many times the animation sequence repeats when played.
- Click the Looping Option Selection box at the lower left corner of the Animation panel (Photoshop Extended CS5) or Timeline panel (CS6).
- Select a looping option: Once, 3 Times, Forever, or Other.
- If you selected Other, enter a value in the Set Loop Count dialog box, and click OK.
Note: Looping options can also be set in the Save For Web & Devices (Photoshop Extended CS5) or Save for Web (CS6) dialog box. For more information, see Save For Web & Devices overview.
Delete an entire animation
- Select Delete Animation from the Animation panel menu (Photoshop Extended CS5) or Timeline panel menu (CS6).
Adobe also recommends
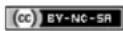
Twitter™ and Facebook posts are not covered under the terms of Creative Commons.
Legal Notices | Online Privacy Policy
About video layers
Supported video and image sequence formats
Animation panel overview
Switch animation modes
Specify timeline duration and frame rate
Note: For Photoshop versions earlier than Photoshop CC, some functionality discussed in this article may be available only if you have Photoshop Extended. Photoshop CC does not have a separate Extended offering. All features in Photoshop Extended are part of Photoshop CC.
To the top
About video layers
You can use Photoshop to edit individual frames of video and image sequence files. In addition to using any Photoshop tool to edit and paint on video, you can also apply filters, masks, transformations, layers styles, and blending modes. After making edits, you can save the document as a PSD file (that can be played back in other Adobe applications such as Premiere Pro and After Effects or accessed as a static file in other applications), or you can render it as a QuickTime movie or image sequence.

For a video on working with video layers, see www.adobe.com/go/vid0027.
Note: You can work only with the visual images in a video file, not the audio.
When you open a video file or image sequence in Photoshop, the frames are contained within a video layer. In the Layers panel, a video layer is identified with a filmstrip icon. Video layers let you paint and clone on individual frames using the brush tools and stamp tools. Like working with regular layers, you can create selections or apply masks to restrict your edits to specific areas of a frame. You navigate through the frames using the timeline mode in the Animation panel (Window > Animation).
Note: Video layers do not work when the Animation panel is in Frame mode.
You work with video layers just like regular layers by adjusting the blending mode, opacity, position, and layer style. You can also group video layers in the Layers panel. Adjustment layers let you apply color and tonal adjustments non-destructively to the video layers.
If you prefer to make your frame edits on a separate layer, you can create a blank video layer. Blank video layers also let you create hand-drawn animations.
Note: A video layer references the original file, so that edits to the video layer don't alter the original video or image sequence file. To maintain the link to the original file, ensure that it remains in the same location relative to the PSD file. For more information, see Replace footage in a video layer.
To the top
Supported video and image sequence formats
You can open video files and image sequences in the following formats.
QuickTime video formats
- MPEG-1 (.mpg or .mpeg)
- MPEG-4 (.mp4 or .m4v)
- MOV
• AVI - MPEG-2 is supported if an MPEG-2 encoder is installed on your computer.
Image sequence formats
- BMP
• DICOM - JPEG
- OpenEXR
- PNG
- PSD
- Targa
• TIFF
• Cineon and JPEG 2000 are supported if the plug-ins are installed.
For more information on plug-ins and how to install them, see Plug-ins.
Color mode and bit depth
Video layers can contain files in the following color modes and bits per channel (bpc):
• Grayscale: 8, 16, or 32 bpc
- RGB: 8, 16, or 32 bpc
• CMYK: 8 or 16 bpc
Lab: 8 or 16 bpc
To the top
Animation panel overview

For a video on the Animation panel, see www.adobe.com/go/vid0023.
An animation is a sequence of images, or frames, that is displayed over time. Each frame varies slightly from the preceding frame, creating the illusion of movement or other changes when the frames are viewed in quick succession.
In the standard edition of earlier versions of Photoshop, the Animation panel (Window > Animation) appears in frame mode, showing a thumbnail of each frame in your animation. Use the tools at the bottom of the panel to navigate through the frames, set looping options, add and delete frames, and preview the animation.
The Animation panel menu contains additional commands for editing frames or timeline durations, and for configuring the panel display. Click the panel menu icon to view available commands.

text_image
Animation (Frames) × 1 2 3 4 5 6 0.03 sec. 0.03 sec. 0.03 sec. 0.03 sec. 0.03 sec. Forever A B C D E F G H IAnimation panel (frame mode)
A. Selects the first frame B. Selects the previous frame C. Plays animation D. Selects the next frame E. Tweens animation frames F. Duplicates selected frames G. Deletes selected frames H. Converts to timeline mode I. Animation panel menu
You can use the Animation panel in either frame mode or timeline mode. Timeline mode shows the frame duration and animation properties for document layers. Use the tools at the bottom of the panel to navigate through frames, zoom the time display in or out, toggle onion skin mode, delete keyframes, and preview the video. You can use controls on the timeline itself to adjust frame duration for a layer, set keyframes for layer properties, and designate a section of the video as the working area.

text_image
00:00:00 (36.69 fps) Comments View 1 Position Opacity Style Global Lighting A B C D E F GAnimation panel (timeline mode)
A. Enable audio playback B. Zoom out C. Zoom slider D. Zoom in E. Toggle onion skins F. Delete keyframes G. Convert to frame animation
In timeline mode, the Animation panel displays each layer in a Photoshop document (except the background layer) and is synchronized with the Layers panel. Whenever a layer is added, deleted, renamed, grouped, duplicated, or assigned a color, the changes are updated in both panels.
Note: When animated layers are grouped as a Smart Object, the animation information from the Animation panel is stored in the Smart Object. See also About Smart Objects.
Frame mode controls
In frame mode, the Animation panel includes the following controls:
Looping Options Sets the number of times an animation plays when exported as an animated GIF file.
Frame Delay Time Sets the duration of a frame during playback.
Tween Animation Frames
Adds a series of frames between two existing frames, interpolating (varying) the layer properties evenly between the new frames.
Duplicate Selected Frames
Adds a frame to the animation by duplicating the selected frame in the Animation panel.
Convert To Timeline Animation

Converts a frame animation to timeline animation using keyframes to animate layer properties.
Timeline mode controls
In timeline mode, the Animation panel includes the following features and controls:
Cached frames indicator Displays a green bar to indicate the frames that are cached for playback.
Comments track Choose Edit Timeline Comment from the panel menu to insert a text comment at the current time. Comments appear as icons in the comments track. Move the pointer over these icons to display comments as tool tips. Double-click these icons to revise comments. To navigate from one comment to the next, click the Go To Previous or Go To Next buttons at the far left of the Comments track.
To create an HTML table listing the time, frame number, and text of each comment, choose Export Timeline Comments from the panel menu.
Convert To Frame Animation Converts a timeline animation using keyframes to frame animation.
Timecode Or frame number display Shows the timecode or frame number (depending on panel options) for the current frame.
Current-time indicator
Drag the current-time indicator to navigate frames or change the current time or frame.
Global Lighting track Displays keyframes where you set and change the master lighting angle for layer effects such as Drop Shadow, Inner Shadow, and Bevel and Emboss.
Keyframe navigator
Arrow buttons to the left of a track label move the current-time indicator to the previous or next keyframe from its current position. Click the center button to add or delete a keyframe at the current time.
Layer duration bar Specifies a layer's place in time within a video or animation. To move the layer to another place in time, drag the bar. To trim (adjust the duration of) a layer, drag either end of the bar.
Altered Video track For video layers, displays a duration bar for altered frames. To jump to altered frames, use the keyframe navigator to the left of the track label.
Time ruler Measures duration (or frame count) horizontally, according to the document's duration and frame rate. (Choose Document Settings from the panel menu to change duration or frame rate.) Tick marks and numbers appear along the ruler and change in spacing with the zoom setting of the timeline.
Time-Vary stopwatch
Enables or disables keyframing for a layer property. Select this option to insert a keyframe and enable keyframing for a layer property. Deselect to remove all keyframes and disable keyframing for a layer property.
Animation panel menu Includes functions affecting keyframes, layers, panel appearance, onion skinning, and document settings.
Work area indicators Drag the blue tab at either end of the topmost track to mark the specific portion of the animation or video that you want to preview or export.
Change thumbnail size
In the Animation panel, you can change the size of the thumbnails that represent each frame or layer.
- Choose Panel Options from the Animation panel menu.
-
Do one of the following:
-
Select a size option.
- In timeline mode, select None to display only layer names.
Switch timeline units
You can display the Animation panel timeline in either frame number or timecode units.
- To select units to display, choose Panel Options from the Animation panel menu and select Frame Numbers or Timecode.
- To toggle between units, Alt-click (Windows) or Option-click (Mac OS) the current-time display in the upper-left corner of the timeline.
Show or hide layer properties in the timeline
As you add layers to a document, they appear as tracks in the timeline. Expand layer tracks to show layer properties that can be animated.
- To show or hide layer properties, click the triangle to the left of the layer name.
Show or hide layers in the timeline
All document layers appear in the timeline by default. To show only a subset of layers, first set them as favorites.
- In timeline mode, select one or more layers from the Animation panel, then choose Show > Set Favorite Layers in the Animation panel menu.
- To specify which layers are displayed, choose Show from the Animation panel menu, then select All Layers or Favorite Layers.
Navigate the timeline
- With the Animation panel in timeline mode, do any of the following:
- Drag the current-time indicator
- Click a number or location in the time ruler where you want to position the current-time indicator.
- Drag the current-time display (in the upper-left corner of the timeline).
- Double-click the current-time display and enter a frame number or time in the Set Current Time dialog box.
- Use the playback controls in the Animation panel.
- Choose Go To in the Animation panel menu, and then choose a timeline option.
To the top
Switch animation modes
You can use the Animation panel in either frame or timeline animation mode. Frame mode shows each separate frame, letting you set unique duration and layer properties for each. Timeline mode shows frames in a continuous timeline, letting you animate properties with keyframes and play video layers.
Ideally, you should select the mode you want before starting an animation. However, it's possible to switch animation modes in an open document, converting a frame animation to a timeline animation, or vice versa.
Note: You may lose some interpolated keyframes when converting a timeline animation to a frame animation. The animation appearance doesn't change, however.
- In the Animation panel, do any of the following:
- Click the Convert To Frame Animation icon

- Click the Convert To Timeline Animation icon

- From the Animation panel menu, choose either Convert To Frame Animation or Convert To Timeline.
To the top
Specify timeline duration and frame rate
When you are working in timeline mode, you can specify the duration and frame rate of a document containing video or animation. Duration is the overall time length of the video clip, from the first frame you specify to the last. Frame rate or frames per second (fps), is usually determined by the type of output you produce: NTSC video has a frame rate of 29.97 fps; PAL video has a frame rate of 25 fps; and motion picture film has a frame rate of 24 fps. Depending on the broadcast system, DVD video can have the same frame rate as NTSC video or PAL video, or a frame rate of 23.976. Video intended for CD-ROM or the web typically has a frame rate of 10 to 15 fps.
When you create a new document, the default timeline duration is 10 seconds. The frame rate depends on the chosen document preset. For non-video presets (like International Paper), the default rate is 30 fps. For video presets, the rate is 25 fps for PAL and 29.97 for NTSC.
- From the Animation panel menu, choose Document Settings.
- Enter or choose values for Duration and Frame Rate.
Note: Reducing the duration of an existing video or animation has the effect of trimming frames (and any keyframes) from the end of the document.
- Creating images for video
- Load video actions
- Adjustment and fill layers
- Set the timeline area to preview
• Understanding the timeline mode video

Twitter™ and Facebook posts are not covered under the terms of Creative Commons.
Legal Notices | Online Privacy Policy
Video and animation export formats
Optimize animation frames
Flatten frames into layers
Export video files or image sequences
Specify QuickTime Movie settings (Photoshop Extended CS5)
Note: For Photoshop versions earlier than Photoshop CC, some functionality discussed in this article may be available only if you have Photoshop Extended. Photoshop CC does not have a separate Extended offering. All features in Photoshop Extended are part of Photoshop CC.
To the top
Video and animation export formats
You can save animations as GIF files for viewing on the web. Videos and animations can be saved as QuickTime movies or PSD files. If you're not rendering your work to video, then saving the file as PSD is best because it preserves the edits and saves the file in a format that's supported by Adobe digital video applications and many motion picture editing applications.
To the top
Optimize animation frames
After you complete your animation, optimize it for efficient download to a web browser. You optimize an animation in two ways:
- Optimize the frames to include only areas that change from frame to frame. This greatly reduces the file size of the animated GIF file.
- If you are saving your animation as a GIF image, optimize it as you would any GIF image. A special dithering technique is applied to animations to ensure that dither patterns are consistent across all frames and to prevent flickering during playback. Due to these additional optimization functions, more time may be required to optimize an animated GIF than to optimize a standard GIF.
When optimizing the colors in an animation, use the Adaptive, Perceptual, or Selective palette. This ensures that the colors are consistent across frames.
- Make sure that the Timeline panel (CC, CS6) or Animation panel (CS5) is in the frame animation mode.
- Choose Optimize Animation from the panel menu.
- Set the following options:
Bounding Box Crops each frame to the area that has changed from the preceding frame. Animation files created using this option are smaller but are incompatible with GIF editors that do not support the option. (This option is selected by default and is recommended.)
Redundant Pixel Removal Makes all pixels transparent in a frame that are unchanged from the preceding frame. The Transparency option in the Optimize panel must be selected for redundant pixel removal to work. (This option is selected by default and is recommended.)
Note: Set the frame disposal method to Automatic when using the Redundant Pixel Removal option. (See Choose a frame disposal method.)
- Click OK.
Flatten frames into layers
When you flatten frames into layers, a single layer is created for each frame in a video layer. This can be useful, for example, if you're exporting the individual video frames as separate image files, or if you're planning to use the video of a static object in an image stack.
- In the Timeline (CC, CS6), Animation (CS5), or Layers panel, select the video layer.
- In the Timeline (CC, CS6) or Animation (CS5) panel, choose Flatten Frames Into Layers from the panel menu.
To the top
Export video files or image sequences

For a video on image sequences, see www.adobe.com/go/vid0026
- Choose File > Export > Render Video.
- In the Render Video dialog box, enter a name for the video or image sequence.
- Click the Select Folder button, and navigate to the location for the exported files.
To create a folder to contain your exported file, select the Create New Subfolder option and enter a name for the subfolder.
-
Do one of the following to export a view or image sequence:
-
(CC, CS6) Choose either Adobe Media Encoder or Photoshop Image Sequence from the menu below the Location section of the Render Video dialog box. Then choose a file format from the pop-up menu. If you chose Adobe Media Encoder, you have the choice of CPS, H.264, and QuickTime formats.
-
(CS5) Under File Options, select either QuickTime Export or Image Sequence. Then choose a file format from the pop-up menu.
-
(Optional) Specify format-specific options:
-
(CC, CS6) Choose options from the menus below the file format menu.
• (CS5) Click the Settings button and set options in the Movie Settings dialog box. -
(Optional) If you chose Image Sequence in step 4, specify the Starting and Digits numbers. (These options specify the numbering system for the exported files.) Then do any of the following if necessary:
-
Choose from the Size pop-up menu to specify the pixel dimensions for the exported files.
- Click the Settings button and specify the format-specific options.
-
(CC, CS6) Choose a frame rate from the Document Frame Rate menu.
-
Under Range, select one of the following options:
All Frames Renders all the frames in the Photoshop document.
Start Frame and End Frame (CC, CS6) Specify the sequence of frames to render.
Work Area (CC, CS6) Renders the frames selected by the work area bar in the Timeline panel.
In Frame and Out Frame (Photoshop Extended CS5) Specify the sequence of frames to render.
Currently Selected Frames (Photoshop Extended CS5) Renders the frames selected by the work area bar in the Animation panel.
Note: The available Range options depend on the file format you chose.
- (Optional) Specify render options:
Alpha Channel Specifies how alpha channels are rendered. (This option is available only with formats that support alpha channels, such as PSD or TIFF). Select None to ignore the alpha channel, Straight-Unmatted to include the channel, or one of the Premultiplied options to mix a matte color with the color channels.
3D Quality (CC, CS6) Controls how surfaces are rendered if your project includes 3D objects. Interactive is suitable for video games and similar uses. Ray Traced Draft is low quality but lets the video render quickly. Ray Traced Final is high quality but the video takes a long time to render.
Frame Rate (Photoshop Extended CS5) Determines how many frames are created for each second of the video or animation. The Document Frame Rate option reflects the rate in Photoshop. If you're exporting to a different video standard (from NTSC to PAL, for example), choose the appropriate rate from the pop-up menu.
- Click Render.
QuickTime export file formats (Photoshop Extended CS5)
3G A file format developed for third-generation mobile devices.
FLC An animation format for playback of computer-generated animations on workstations, Windows, and Mac OS. This format is also referred to as FLI.
Flash Video (FLV) Adobe® Flash® Video is the Adobe format for streaming audio and video over the web and other networks. (To use this format, you must first install an FLV QuickTime encoder).
QuickTime Movie The Apple Computer multimedia architecture that includes a number of codecs. (To export audio, you must use this format.)
AVI Audio Video Interleave (AVI) is a standard format for audio and video data on Windows computers.
DV Stream A video format with intraframe compression that uses FireWire (IEEE 1394) interface to transfer video to nonlinear editing systems.
Image Sequence A sequence of still images that can reside within one folder and use the same numeric or alphabetic filename pattern (such as Sequence1, Sequence2, Sequence3, and so on).
MPEG-4 A multimedia standard for delivering audio and video streams over a range of bandwidths.
Note: Photoshop also supports other third-party formats such as Avid AVR codecs; however, the necessary QuickTime codecs must be installed.
Understanding QuickTime key frames
In QuickTime terminology, the term key frames refers to something different than the animation keyframes in Photoshop. In QuickTime, key frames occur at regular intervals in the movie and are stored as complete frames. Each intermediate frame that separates them is compared to the previous frame, and only changed data is stored. Using key frames greatly reduces movie size and greatly increases the memory required to edit and render a movie. Shorter intervals between key frames enable faster seeking and reverse playback, but can significantly increase the size of the file.
3G export settings (Photoshop Extended CS5)
For more information on 3G settings, search for 3G on the Apple Computer web site.
File Format 3GPP and 3GPP2 are standards for the creation, delivery, and playback of multimedia over third-generation high-speed wireless networks. 3GPP is for GSM networks and 3GPP2 is for CDMA 2000 networks. 3GPP (Mobile MP4), 3GPP2 (EZmovie), and AMC (EZmovie) are for specific networks. 3GPP (Mobile MP4) is for NTT DoCoMo's i-motion 3G service. 3GPP2 (EZmovie) is for KDDI's 3G network service. AMC (EZmovie) is for KDDI subscribers with AMC-capable phones.
Video Choose Video from the pop-up menu below the File Format menu and specify the following:
Video Format Selects the codec used during video export. If your source movie has only one video track and it is already compressed, you can choose Pass Through so that the video doesn't get compressed again.
Data Rate Specifies the kilobits per second (kbps) during playback. A higher kbps rate usually improves movie playback quality; however, don't choose a data rate higher than the available bandwidth.
Optimized For Specifies the intended delivery method if you choose H.264 from the Video Format menu, click Video Options, and select Best Quality. This setting tells the codec how much the data rate can vary above and below the data rate you choose.
Image Size Specifies a standard for sending the file to a mobile phone. Current maintains the source material size; the resulting file may not play on a mobile phone. Choose Custom to specify a size not listed in the menu.
Preserve Aspect Ratio Using Specifies an option when you're changing the image size and the movie must be scaled to the new dimensions. Letterbox scales the source proportionally to fit into the clean aperture, adding black bars to the top and bottom or sides as necessary. Crop centers, scales, and trims to the clean aperture.
Frame Rate Specifies the frames per second (fps) during playback. In most cases, your video looks better if you choose a number that your source fps is exactly divisible by. For example, if your source is captured at 30 fps, choose a frame rate of 10 or 15. Don't choose a rate larger than that of your source material.
Key Frame Specifies how frequently key frames are created in the exported video. A higher key frame rate (lower number) improves video quality, but increases the file size.
Video Options If available, click the Video Options button to open the 3G Advanced Video Settings dialog box. Depending on the video, you can specify whether to add re-sync markers inside the video frames to help with packet loss recovery when streaming. With H.264 video, you can also speed up the compression process (for preview purposes, for example) by choosing Faster Encode (Single-pass). The default option, Best Quality (Multi-pass), allows the codec to determine how many passes are needed to compress the data for the best quality.
Audio All audio options are disabled because Photoshop Extended does not include audio in exported 3G files.
Text All text options are disabled because Photoshop Extended does not include text tracks in exported 3G files.
Streaming Choose Streaming from the pop-up menu below the File Format menu and specify the following:
Enable Streaming Creates a file for RTSP streaming to QuickTime Player. This option creates a hint track (instructions necessary for streaming a file).
Optimize For Server Helps the server to process the file faster, but increases the file size.
Advanced Choose Advanced from the pop-up menu below the File Format menu and specify the following:
Restrict Distribution Specifies how many times the file can play back on the handset once downloaded. Also specifies file expiration options: set the file to expire in a number of days or enter a date. If your file is in Mobile MP4 or EZmovie format, you can restrict distribution so that once the file is on a handset it can't be sent or copied elsewhere.
Fragment Movie Enables the file to download via HTTP in small pieces so that playback can start faster and so that larger files can be played on the handset (only the fragment, not the entire movie, must fit on the handset at one time).
FLC export settings (Photoshop Extended CS5)
The following options are available in the FLC Export Settings dialog box:
Color Table Specifies the color table using the Windows system colors or Mac OS system colors in the exported movie.
Motion Sets the playback frame rate.
Specify AVI export settings (Photoshop Extended CS5)
- In the Render Video dialog box, select QuickTime Export and then choose AVI from the pop-up menu.
- Click the Settings button.
- In the AVI Settings dialog box, make sure Video is selected.
Note: Sound options are disabled because Photoshop Extended does not include audio in exported AVI files.
- Under Video, click the Settings button and set the following:
Compression Type Chooses the video compressor (codec) to compress your video.
Frame Per Second Specifies the number of individual images shown every second. NTSC is generally the standard video format and is 29.97 fps. PAL is a European video format that is 25 fps. The standard for film is 24 fps. QuickTime movies are sometimes created with a slower frame rate to reduce bandwidth and CPU requirements.
Movies with higher frame rates display motion better, but have larger file sizes. If you choose a frame rate that's lower than the movie's current frame rate, frames are deleted. If you choose a number that's higher than the movie's current frame rate, existing frames are duplicated (not recommended, since it increases file size without improving quality). In most cases, your video will look better if you choose a number that your source fps is exactly divisible by. For example, if your source is captured at 30 fps, choose a frame rate of 10 or 15. Don't choose a rate larger than that of your source material.
Key Frame Every Specifies the key frame frequency. A higher key frame rate (lower number) improves video quality, but increases the file size. With some compressors, an additional key frame is inserted automatically if too much of the image has changed from one frame to the next. In general, one key frame every 5 seconds (multiply the frames per second by 5) is usually sufficient. If you are creating a file for RTSP streaming and have concerns about the reliability of the delivery network, you may want to increase key frame frequency to one key frame every 1 or 2 seconds.
Limit Data Rate To Specifies the kilobits per second (kbps) during playback. A higher kbps rate usually improves movie playback quality; however, don't choose a data rate higher than the available bandwidth.
Depth Specifies the number of colors to include in video that you export. This menu is not available if the selected codec supports only one color depth.
Quality If available, drag the slider or type a value to adjust the exported video's picture quality and, consequently, its file size. If you are using the same codec to capture and export, and you've rendered previews of a sequence, you can save rendering time by matching the export quality setting with your original capture quality setting. Increasing quality above the original capture quality does not increase quality, but may result in longer rendering times.
Scan Mode Specifies whether the exported movie has fields (Interlaced) or no fields (Progressive).
Aspect Ratio Specifies a 4:3 or 16:9 aspect ratio for the exported movie.
Options (Intel Indeo® Video 4.4 only) Sets compression, transparency options, and access for the Intel Indeo® Video 4.4 codec.
DV Stream export settings (Photoshop Extended CS5)
The following options are available in the DV Export Settings dialog box:
DV Format Specifies either the DV or DVCPRO format for your exported video.
Video Format Specifies either NTSC or PAL video broadcast standard.
Scan Mode Specifies whether the exported video has interlaced fields or no fields (Progressive Scan).
Aspect Ratio Specifies an aspect ratio of 4:3 or 16:9.
Preserve Aspect Ratio Using Specifies an option if the movie is scaled to new pixel dimensions. Letterbox scales the source proportionally to fit into the clean aperture, adding black bars to the top and bottom or sides as necessary. Crop centers, scales, and trims to the clean aperture.
Note: Although the DV Export Settings dialog box has Audio Format options, Photoshop Extended does not export audio in DV files.
Image sequence settings for QuickTime export (Photoshop Extended CS5)
Typically, QuickTime is used to export video files. However, you can also select Image Sequence from the QuickTime Export pop-up menu. Click Settings to access the following options:
Format Chooses a file format for the exported images.
Frames Per Second Sets the frame rate for the image sequence.
Insert Space Before Number Inserts a space between the name and generated number in the image's filename.
Options If available, click the Options button and set format-specific options.
For more information on the specific file formats and their options, see also Saving and exporting images and File formats.
Specify MPEG-4 export settings (Photoshop Extended)
- In the Render Video dialog box, select QuickTime Export, and choose MPEG-4 from the pop-up menu. Then click Settings.
-
In the MPEG-4 Export Settings dialog box, choose MP4 or MP4 (ISMA) from the File Format menu. The MP4 (ISMA) format ensures operability with devices made by ISMA members.
-
Under Video, specify the following:
Video Format Chooses the codec to compress your video. For the highest quality at the lowest data rate (or the smallest file), H.264 is recommended. If you need the file to play on a device that supports MPEG-4 video, choose MPEG-4 Basic or MPEG-4 Improved, depending on the target device. If your source movie's video track is already compressed, you can choose Pass Through so that the video doesn't get compressed again.
Data Rate Specifies the kilobits per second (kbps) during playback. A higher kbps rate usually improves movie playback quality; however, don't choose a data rate higher than the available bandwidth.
Optimized For Specifies how much the data rate can vary above and below the data rate you choose. This option becomes available if you choose MP4 from the File Format menu, choose H.264 from the Video Format menu, click Video Options, and select Best Quality.
Image Size Specifies the pixel dimensions of your exported video. Current maintains the source material size. To specify a size not listed in the Image Size menu, choose Custom.
Preserve Aspect Ratio Using Specifies an option if the movie needs to be scaled to the new pixel dimensions. Letterbox scales the source proportionally to fit into the clean aperture, adding black bars to the top and bottom or sides as necessary. Crop centers, scales, and trims to the clean aperture. Fit Within Size adjusts to the destination size by fitting to the longest side, scaling if necessary.
Frame Rate Specifies the frame rate for the playback of your exported video. Usually, your video looks better if you choose a number that is exactly divisible by the frames per second (fps) of your source. For example, if your source is captured at 30 fps, choose a frame rate of 10 or 15. Don't choose a rate greater than that of your source material.
Key Frame Specifies that key frames are generated automatically or specifies how frequently key frames are created in the exported video. A higher key frame rate (lower number) improves video quality, but increases the file size.
- (MP4 file format only) Click the Video Options button and specify the following:
Re-sync Markers (MPEG-4 Basic and MPEG-4 Improved only) Uses re-sync markers in the video bit-stream. This can help regain synchronization due to transmission errors.
Restrict Profile(s) To (H.264 only) Selects profiles for playing video files on a device that conforms to one or more of the standard's profiles.
Encoding Mode (H.264 only) Specifies whether you want the best quality or faster encoding.
To the top
Specify QuickTime Movie settings (Photoshop Extended CS5)
- In the Render Video dialog box, select QuickTime Export and then choose QuickTime Movie from the pop-up menu.
- Click the Settings button.
- In the Movie Settings dialog box, make sure Video is selected.
Note: Although the Movie Settings dialog box displays Sound options, you cannot adjust the current audio settings. To include audio in exported files, see Preview audio for video layers (Photoshop Extended).
- Under Video, click the appropriate button to set the following:
Settings Opens the Standard Video Compression Settings dialog box so you can set the video compression and accompanying options.
Filter Opens the Choose Video Filter dialog box, where you can apply built-in QuickTime video effects.
Size Opens the Export Size Settings dialog box to specify pixel dimensions for your exported video.
- (Optional) If your movie is being delivered over the Internet, select Prepare For Internet Streaming and choose any of the following:
Fast Start Sets up the movie to start playing from a web server before the movie has completely downloaded to a user's computer hard drive.
Fast Start-Compressed Header Compresses the movie's header losslessly and sets up the movie to start playing from a web server before the movie has completely downloaded to a user's computer hard drive.
Hinted Streaming Sets up the movie to be streamed by a QuickTime Streaming Server.
QuickTime standard video compression settings (Photoshop Extended CS5)
The following options are available in the Standard Video Compression Settings dialog box:
Compression Type Choose the codec to apply when exporting a file.
Motion Specify the frame rate for your video by choosing the number of frames per second (fps). Some codecs support a specific set of frame rates. Increasing the frame rate may produce smoother motion (depending on the original frame rates of the source clips) but uses more disk space. If available, specify how often the key frames are generated. (See Understanding QuickTime key frames.)
Data Rate Select (if available for the selected compressor) and type a data rate to place an upper limit on the amount of video data produced by the exported video when it is played back.
Compressor Set compressor options specific to the selected codec. Click the Option button (if available) to specify further compressor options. If the Depth menu is available, choose the number of colors to include in exported video. (This menu is not available if the selected codec supports only one color depth.)
If the Quality slider is available under Compressor, drag the slider or type a value to adjust the exported video's picture quality and, consequently, its file size. If you are using the same codec to capture and export, and you've rendered previews of a sequence, you can save rendering time by matching the export quality setting with your original capture quality setting. Increasing quality above the original capture quality does not increase quality, but may result in longer rendering times.
Note: Compressor options are not available for the Component Video codec.
QuickTime movie size settings (Photoshop Extended CS5)
The following settings are available in the Export Size Settings dialog box:
Dimensions Specifies the frame size for your exported movie. If you want to specify a frame size not included in the Dimensions menu, choose Custom and enter values for Width and Height.
Preserve Aspect Ratio Using Specifies an option if the movie is scaled to a new frame size. Letterbox scales the source proportionally to fit into
the clean aperture, adding black bars to the top and bottom or sides as necessary. Crop centers, scales, and trims to the clean aperture. Fit Within Dimensions adjusts to the destination size by fitting to the longest side, scaling if necessary.
Deinterlace Source Video Deinterlaces the two fields in each interlaced video frame.
- Optimizing images
• Image stacks (Photoshop Extended) - Saving and exporting images
• Interpret video footage (Photoshop Extended)

BY-NC-SA
Twitter™ and Facebook posts are not covered under the terms of Creative Commons.
Legal Notices
Online Privacy Policy
Filters and effects
Blur gallery overview
Kelby (May. 7, 2012)
video-tutorial
Quick, creative control in a dedicated blur workspace.
Using the new three-part Blur Gallery
Lynda.com (May. 7, 2012)
video-tutorial
Focus the eye with precisely placed blurs.
List of filters supporting 16-bit/channel and 32-bit/channel documents
Artistic filters
Blur filters
Brush Stroke filters
Distort filters
Noise filters
Pixelate filters
Render filters
Sharpen filters
Sketch filters
Stylize filters
Texture filters
Video filters
Other filters
Digimarc filters
Vanishing Point
Note: Complete information on using some filters is available in other sections. Search Adobe Help for information on the sharpening, blurring, Lens Correction, Lens Blur, Noise Reduction, Liquify, and Vanishing Point filters.
To the top
List of filters supporting 16-bit/channel and 32-bit/channel documents
The following filters support 16-bit/channel and 32-bit/channel documents:
- All Blur filters (except for Lens Blur and Smart Blur)
- All Distort filters
• The Noise > Add Noise filter - All Pixelate filters
- All Render filters (except for Lighting Effects)
-
All Sharpen filters (except for Sharpen Edges)
• The following filters under Filter > Stylize: -
Diffuse
- Emboss
- Trace Contour
- All Video filters
• All filters under Filter > Other
To the top
Artistic filters
Filters from the Artistic submenu help you achieve painterly and artistic effects for a fine arts or commercial project. For example, use the Cutout filter for collages or typography. These filters replicate natural or traditional media effects. All the Artistic filters can be applied through the Filter Gallery.
Colored Pencil Draws an image using colored pencils on a solid background. Edges are retained and given a rough crosshatch appearance; the solid background color shows through the smoother areas.
For a parchment effect, change the background color just before applying the Colored Pencil filter to a selected area.
Cutout Makes an image appear as though it were constructed from roughly cut pieces of colored paper. High-contrast images appear as if in silhouette, and colored images are built up from several layers of colored paper.
Dry Brush Paints the edges of the image using a dry brush technique (between oil and watercolor). The filter simplifies an image by reducing its range of colors to areas of common color.
Film Grain Applies an even pattern to the shadow tones and midtones. A smoother, more saturated pattern is added to the lighter areas. This filter is useful for eliminating banding in blends and visually unifying elements from various sources.
Fresco Paints an image in a coarse style using short, rounded, and hastily applied daubs.
Neon Glow Adds various types of glows to the objects in an image. This filter is useful for colorizing an image while softening its look. To select a glow color, click the glow box, and select a color from the Color Picker.
Paint Daubs Lets you choose from various brush sizes (from 1 to 50) and types for a painterly effect. Brush types include Simple, Light Rough, Dark Rough, Wide Sharp, Wide Blurry, and Sparkle.
Palette Knife Reduces detail in an image to give the effect of a thinly painted canvas that reveals the texture underneath.
Plastic Wrap Coats the image in shiny plastic, accentuating the surface detail.
Poster Edges Reduces the number of colors in an image (posterizes it) according to the posterization option you set, and finds the edges of the image and draws black lines on them. Large broad areas have simple shading, and fine dark detail is distributed throughout the image.
Rough Pastels Applies strokes of pastel chalk on a textured background. In areas of bright color, the chalk appears thick with little texture; in darker areas, the chalk appears scraped off to reveal the texture.
Smudge Stick Softens an image using short diagonal strokes to smudge or smear the darker areas. Lighter areas become brighter and lose detail.
Sponge Creates images with highly textured areas of contrasting color, simulating the effect of sponge painting.
Underpainting Paints the image on a textured background, and then paints the final image over it.
Watercolor Paints the image in a watercolor style using a medium brush loaded with water and color, simplifying details. Where significant tonal changes occur at the edges, the filter saturates the color.
To the top
Blur filters
The Blur filters soften a selection or an entire image, and are useful for retouching. They smooth transitions by averaging the pixels next to the hard edges of defined lines and shaded areas in an image.

natural_image
Two-panel image showing a snow-capped mountain range with dense blue flowers in the foreground and a misty mountain range in the background (no text or symbols)Before (left) and after (right) using the Lens Blur filter; the background is blurred but the foreground stays sharp.
Note: To apply a Blur filter to the edges of a layer, deselect the Lock Transparent Pixel option in the Layers panel.
Average Finds the average color of an image or selection, and then fills the image or selection with the color to create a smooth look. For example, if you select an area of grass, the filter changes the area into a homogeneous patch of green.
Blur and Blur More Eliminate noise where significant color transitions occur in an image. Blur filters smooth transitions by averaging the pixels next to the hard edges of defined lines and shaded areas. The effect of the Blur More filter is three or four times stronger than that of the Blur filter.
Box Blur Blurs an image based on the average color value of neighboring pixels. This filter is useful for creating special effects. You can adjust the size of the area used to calculate the average value for a given pixel; a larger radius results in greater blurring.
Gaussian Blur Quickly blurs a selection by an adjustable amount. Gaussian refers to the bell-shaped curve that is generated when Photoshop applies a weighted average to the pixels. The Gaussian Blur filter adds low-frequency detail and can produce a hazy effect.
note: When Gaussian Blur, Box Blur, Motion Blur, or Shape Blur are applied to a selected image area, they will sometimes produce visually unexpected results near the edges of the selection. This is because these blur filters will use image data from outside the selected area to create the new, blurred pixels inside the selected area. For example, if the selection represents a background area that you want to blur while keeping the foreground sharp, the edges of the blurred background area will be contaminated with colors from the foreground, producing a fuzzy, muddy-looking outline around the foreground. To avoid this effect in such cases, you can use Smart Blur or Lens Blur.
Lens Blur Adds blur to an image to give the effect of a narrower depth of field so that some objects in the image stay in focus and others areas are blurred. See Add lens blur.
Motion Blur Blurs in the specified direction (from -360^ to +360^ ) and at a specified intensity (from 1 to 999). The filter's effect is analogous to taking a picture of a moving object with a fixed exposure time.
Radial Blur Simulates the blur of a zooming or rotating camera to produce a soft blur. Choose Spin to blur along concentric circular lines, and then specify a degree of rotation. Choose Zoom to blur along radial lines, as if zooming into or out of the image, and specify a value from 1 to 100. Blur quality ranges from Draft (for fast but grainy results) or Good and Best for smoother results, which are indistinguishable from each other except on a large selection. Specify the origin of the blur by dragging the pattern in the Blur Center box.
Shape Blur Uses the specified kernel to create the blur. Choose a kernel from the list of custom shape presets, and use the radius slider to adjust its size. You can load different shape libraries by clicking the triangle and choosing from the list. Radius determines the size of the kernel; the larger the kernel, the greater the blur.
Smart Blur Blurs an image with precision. You can specify a radius, a threshold, and a blur quality. The Radius value determines the size of the area searched for dissimilar pixels. The Threshold value determines how dissimilar the pixels must be before they are affected. You also can set a mode for the entire selection (Normal) or for the edges of color transitions (Edge Only and Overlay Edge). Where significant contrast occurs, Edge Only applies black-and-white edges, and Overlay Edge applies white.
Surface Blur Blurs an image while preserving edges. This filter is useful for creating special effects and for removing noise or graininess. The Radius option specifies the size of the area sampled for the blur. The Threshold option controls how much the tonal values of neighboring pixels must diverge from the center pixel value before being part of the blur. Pixels with tonal value differences less than the Threshold value are excluded from the blur.
To the top
Brush Stroke filters
Like the Artistic filters, the Brush Stroke filters give a painterly or fine-arts look using different brush and ink stroke effects. Some of the filters add grain, paint, noise, edge detail, or texture. All the Brush Stroke filters can be applied through the Filter Gallery.
Accented Edges Accentuates the edges of an image. When the edge brightness control is set to a high value, the accents resemble white chalk; when set to a low value, the accents resemble black ink.
Angled Strokes Repaints an image using diagonal strokes, with lighter and darker areas painted in strokes going in opposite directions.
Crosshatch Preserves the details and features of the original image while adding texture and roughening the edges of the colored areas with simulated pencil hatching. The Strength option (with values from 1 to 3) determines the number of hatching passes.
Dark Strokes Paints dark areas with short, tight, dark strokes, and lighter areas with long, white strokes.
Ink Outlines Redraws an image with fine narrow lines over the original details, in pen-and-ink style.
Spatter Replicates the effect of a spatter airbrush. Increasing the options simplifies the overall effect.
Sprayed Strokes Repaints an image, using its dominant colors, with angled, sprayed strokes of color.
Sumi-e Paints an image in Japanese style, as if with a fully saturated brush applied to rice paper. Sumi-e creates soft, blurred edges with rich, inky blacks.
To the top
Distort filters
The Distort filters geometrically distort an image, creating 3D or other reshaping effects. Note that these filters can be very memory-intensive. The Diffuse Glow, Glass, and Ocean Ripple filters can be applied through the Filter Gallery.
Diffuse Glow Renders an image as though it were viewed through a soft diffusion filter. The filter adds see-through white noise, with the glow fading from the center of a selection.
Displace Uses an image, called a displacement map, to determine how to distort a selection. For example, using a parabola-shaped displacement map, you can create an image that appears to be printed on a cloth held up by its corners.
Glass Makes an image appear as if it were being viewed through different types of glass. You can choose a glass effect or create your own glass surface as a Photoshop file and apply it. You can adjust scaling, distortion, and smoothness settings. When using surface controls with a file, follow the instructions for the Displace filter.
Ocean Ripple Adds randomly spaced ripples to the surface of the image so that it appears to be underwater.
Pinch Squeezes a selection. A positive value up to 100% shifts a selection toward its center; a negative value up to -100% shifts a selection outward.
Polar Coordinates Converts a selection from its rectangular to polar coordinates, and vice versa, according to a selected option. You can use this filter to create a cylinder anamorphosis—an art form popular in the 18th century—in which the distorted image appears normal when viewed in a mirrored cylinder.
Ripple Creates an undulating pattern on a selection, like ripples on the surface of a pond. For greater control, use the Wave filter. Options include the number and size of ripples.
Shear Distorts an image along a curve. Specify the curve by dragging the line in the box. You can adjust any point along the curve. Click Default to change the curve back to a straight line. In addition, you choose how to treat undistorted areas.
Spherize Gives objects a 3D effect by wrapping a selection around a spherical shape, distorting the image and stretching it to fit the selected curve.
Twirl Rotates a selection more sharply in the center than at the edges. Specifying an angle produces a twirl pattern.
Wave Works much as the Ripple filter does, but with greater control. Options include the number of wave generators, wavelength (distance from one wave crest to the next), height of the wave, and wave type: Sine (rolling), Triangle, or Square. The Randomize option applies random values. You can also define undistorted areas.
ZigZag Distorts a selection radially, depending on the radius of the pixels in your selection. The Ridges option sets the number of direction reversals of the zigzag from the center of the selection to its edge. You also specify how to displace the pixels: Pond Ripples displaces pixels to the upper-left or lower right, Out From Center displaces pixels toward or away from the center of the selection, and Around Center rotates pixels around the center.
To the top
Noise filters
The Noise filters add or remove noise, or pixels with randomly distributed color levels. This helps to blend a selection into the surrounding pixels. Noise filters can create unusual textures or remove problem areas, such as dust and scratches.
Add Noise Applies random pixels to an image, simulating the effect of shooting pictures on high-speed film. You can also use the Add Noise filter to reduce banding in feathered selections or graduated fills or to give a more realistic look to heavily retouched areas. Options for noise distribution include Uniform and Gaussian. Uniform distributes color values of noise using random numbers between 0 and plus or minus the specified value, creating a subtle effect. Gaussian distributes color values of noise along a bell-shaped curve, creating a speckled effect. The Monochromatic option applies the filter to only the tonal elements in the image without changing the colors.
Despeckle Detects the edges in an image (areas where significant color changes occur) and blurs all of the selection except those edges. This blurring removes noise while preserving detail.
Dust & Scratches Reduces noise by changing dissimilar pixels. To achieve a balance between sharpening the image and hiding defects, try various combinations of Radius and Threshold settings. Or apply the filter to selected areas in the image. See also Apply the Dust And Scratches filter.
Median Reduces noise in an image by blending the brightness of pixels within a selection. The filter searches the radius of a pixel selection for pixels of similar brightness, discarding pixels that differ too much from adjacent pixels, and replaces the center pixel with the median brightness value of the searched pixels. This filter is useful for eliminating or reducing the effect of motion on an image.
Reduce Noise Reduces noise while preserving edges based on user settings affecting the overall image or individual channels. See Reduce image noise and JPEG artifacts.
To the top
Pixelate filters
The filters in the Pixelate submenu sharply define a selection by clumping pixels of similar color values in cells.
Color Halftone Simulates the effect of using an enlarged halftone screen on each channel of the image. For each channel, the filter divides the image into rectangles and replaces each rectangle with a circle. The circle size is proportional to the brightness of the rectangle. See Apply the Color Halftone filter.
Crystallize Clumps pixels into a solid color in a polygon shape.
Facet Clumps pixels of solid or similar colors into blocks of like-colored pixels. You can use this filter to make a scanned image look hand-painted or to make a realistic image resemble an abstract painting.
Fragment Creates four copies of the pixels in the selection, averages them, and offsets them from each other.
Mezzotint Converts an image to a random pattern of black-and-white areas or of fully saturated colors in a color image. To use the filter, choose a dot pattern from the Type menu in the Mezzotint dialog box.
Mosaic Clumps pixels into square blocks. The pixels in a given block are the same color, and the colors of the blocks represent the colors in the selection.
Pointillize Breaks up the color in an image into randomly placed dots, as in a pointillist painting, and uses the background color as a canvas area between the dots.
To the top
Render filters
The Render filters create 3D shapes, cloud patterns, refraction patterns, and simulated light reflections in an image. You can also manipulate objects in 3D space, create 3D objects (cubes, spheres, and cylinders), and create texture fills from grayscale files to produce 3D-like effects for lighting.
Clouds Generates a soft cloud pattern using random values that vary between the foreground and the background colors. To generate a more stark cloud pattern, hold down Alt (Windows) or Option (Mac OS) as you choose Filter > Render > Clouds. When you apply the Clouds filter, the image data on the active layer is replaced.
Difference Clouds Uses randomly generated values that vary between the foreground and background color to produce a cloud pattern. The filter blends the cloud data with the existing pixels in the same way the Difference mode blends colors. The first time you choose this filter, portions of the image are inverted in a cloud pattern. Applying the filter several times creates rib and vein patterns that resemble a marble texture. When you apply the Difference Clouds filter, the image data on the active layer is replaced.
Fibers Creates the look of woven fibers using the foreground and background colors. You use the Variance slider to control how the colors vary (a low value produces long streaks of color, and a high value results in very short fibers with more varied distribution of color). The Strength slider controls how each fiber looks. A low setting produces a loose weave, and a high setting produces short, stringy fibers. Click the Randomize button to change how the pattern looks; you can click the button a number of times until you find a pattern you like. When you apply the Fibers filter, the image data on the active layer is replaced.
Try adding a gradient map adjustment layer to colorize the fibers.
Lens Flare Simulates the refraction caused by shining a bright light into a camera lens. Specify a location for the center of the flare by clicking anywhere inside the image thumbnail or by dragging its cross hair.
Lighting Effects Lets you produce myriad lighting effects on RGB images by varying 17 light styles, three light types, and four sets of light properties. You can also use textures from grayscale files (called bump maps) to produce 3D-like effects and save your own styles for use in other images. See Add Lighting Effects.
note: Lighting Effects is unavailable in 64-bit versions of Mac OS.
To the top
Sharpen filters
The Sharpen filters focus blurred images by increasing the contrast of adjacent pixels.
Sharpen and Sharpen More Focus a selection and improve its clarity. The Sharpen More filter applies a stronger sharpening effect than does the Sharpen filter.
Sharpen Edges and Unsharp Mask Find the areas in the image where significant color changes occur and sharpen them. The Sharpen Edges filter sharpens only edges while preserving the overall smoothness of the image. Use this filter to sharpen edges without specifying an amount. For professional color correction, use the Unsharp Mask filter to adjust the contrast of edge detail and produce a lighter and darker line on each side of the edge. This process emphasizes the edge and creates the illusion of a sharper image.
Smart Sharpen Sharpens an image by letting you set the sharpening algorithm or control the amount of sharpening that occurs in shadows and highlights. This is the recommended way to sharpen if you don't have a particular sharpening filter in mind. See Sharpen using Smart Sharpen.
In Photoshop CC, the enhanced Smart Sharpen filter empowers you to produce high-quality results through adaptive sharpening technology that minimizes noise and halo effects. The streamlined UI design for this filter offers optimized controls for targeted sharpening. Use the sliders for quick adjustments and advanced controls to fine-tune your results.
Smart sharpening in Photoshop CC supports CMYK. Additionally, you can sharpen arbitrary channels. For example, you can choose to sharpen just the blue channel, green channel, or the alpha channel.
text_image
Smart Sharpen Preview Preset: Default Amount: 200 % Radius: 1.0 px Reduce Noise: 10 % Remove: Lens Blur Shadows / Highlights Cancel OK(Photoshop CC) Enhanced Smart Sharpen filter UI
Here is a recommended approach to sharpening images with Photoshop CC:
- To begin, set Amount to a high value.
- Increase the Radius to a value that introduces a halo effect.
- Decrease the Radius until the halo effect disappears. You've arrived at the optimal value for Radius.
-
Now, decrease the value of Amount as necessary.
-
Adjust the Reduce Noise slider, such that the noise in the image looks similar to how it was before you began sharpening the image. Too much noise reduction can result in a plasticy look. Higher Amount values require greater noise reduction.
To the top
Sketch filters
Filters in the Sketch submenu add texture to images, often for a 3D effect. The filters also are useful for creating a fine-arts or hand-drawn look. Many of the Sketch filters use the foreground and background color as they redraw the image. All the Sketch filters can be applied through the Filter Gallery.
Bas Relief Transforms an image so that it appears carved in low relief and lit to accent the surface variations. Dark areas of the image take on the foreground color, and light colors use the background color.
Chalk & Charcoal Redraws highlights and midtones with a solid midtone gray background drawn in coarse chalk. Shadow areas are replaced with black diagonal charcoal lines. The charcoal is drawn in the foreground color; the chalk, in the background color.
Charcoal Creates a posterized, smudged effect. Major edges are boldly drawn, and midtones are sketched using a diagonal stroke. Charcoal is the foreground color, and the background is the color of the paper.
Chrome Renders the image as if it had a polished chrome surface. Highlights are high points, and shadows are low points in the reflecting surface. After applying the filter, use the Levels dialog box to add more contrast to the image.
Conté Crayon Replicates the texture of dense dark and pure white Conté crayons on an image. The Conté Crayon filter uses the foreground color for dark areas and the background color for light areas. For a truer effect, change the foreground color to one of the common Conté Crayon colors (black, sepia, or sanguine) before applying the filter. For a muted effect, change the background color to white, add some of the foreground color to the white background, and then apply the filter.
Graphic Pen Uses fine, linear ink strokes to capture the details in the original image. The effect is especially striking with scanned images. The filter replaces color in the original image, using the foreground color for ink and the background color for paper.
Halftone Pattern Simulates the effect of a halftone screen while maintaining the continuous range of tones.
Note Paper Creates an image that appears to be constructed of handmade paper. This filter simplifies images and combines the effects of the
Stylize > Emboss and Texture > Grain filters. Dark areas of the image appear as holes in the top layer of paper, revealing the background color.
Photocopy Simulates the effect of photocopying an image. Large dark areas tend to be copied only around their edges, and midtones fall away to either solid black or solid white.
Plaster Molds an image from 3D plaster, and then colorizes the result using the foreground and background color. Dark areas are raised, and light areas are recessed.
Reticulation Simulates the controlled shrinking and distortion of film emulsion to create an image that appears clumped in the shadows and lightly grained in the highlights.
Stamp Simplifies the image so that it appears to be created with a rubber or wood stamp. This filter is best used with black-and-white images.
Torn Edges Reconstructs the image so that it appears composed of ragged, torn pieces of paper, and then colorizes the image using the foreground and background colors. This filter is particularly useful for text or high-contrast objects.
Water Paper Uses blotchy daubs that appear painted onto fibrous, damp paper, causing the colors to flow and blend.
To the top
Stylize filters
The Stylize filters produce a painted or impressionistic effect on a selection by displacing pixels and by finding and heightening contrast in an image. After using filters like Find Edges and Trace Contour that highlight edges, you can apply the Invert command to outline the edges of a color image with colored lines or to outline the edges of a grayscale image with white lines.
Diffuse Shuffles pixels in a selection to soften focus according to the selected option: Normal moves pixels randomly (ignoring color values), Darken Only replaces light pixels with darker ones, and Lighten Only replaces dark pixels with lighter ones. Anisotropic shuffles pixels in the direction of the least change in color.
Emboss Makes a selection appear raised or stamped by converting its fill color to gray and tracing the edges with the original fill color. Options include an embossing angle (from -360^ to recess the surface, to +360^ to raise the surface), height, and a percentage (1% to 500%) for the amount of color within the selection. To retain color and detail when embossing, use the Fade command after applying the Emboss filter.
Extrude Gives a 3D texture to a selection or layer. See Apply the Extrude filter.
Find Edges Identifies the areas of the image with significant transitions and emphasizes the edges. Like the Trace Counter filter, Find Edges outlines the edges of an image with dark lines against a white background and is useful for creating a border around an image.
Glowing Edges Identifies the edges of color and adds a neon-like glow to them. This filter can be applied cumulatively.
Solarize Blends a negative and a positive image—similar to exposing a photographic print briefly to light during development.
Tiles Breaks up an image into a series of tiles, creating an offset between the selection and its original position. You can choose one of the following to fill the area between the tiles: the background color, the foreground color, a reverse version of the image, or an unaltered version of the image, which puts the tiled version on top of the original and reveals part of the original image underneath the tiled edges.
Trace Contour Finds the transitions of major brightness areas and thinly outlines them for each color channel, for an effect similar to the lines in a contour map. See Apply the Trace Contour filter.
Wind Places tiny horizontal lines in the image to create a windblown effect. Methods include Wind; Blast, for a more dramatic wind effect; and Stagger, which offsets the lines in the image.
To the top
Texture filters
Use the Texture filters to simulate the appearance of depth or substance, or to add an organic look.
Craquelure Paints an image onto a high-relief plaster surface, producing a fine network of cracks that follow the contours of the image. Use this filter to create an embossing effect with images that contain a broad range of color or grayscale values.
Grain Adds texture to an image by simulating different kinds of grain—Regular, Soft, Sprinkles, Clumped, Contrasty, Enlarged, Stippled, Horizontal, Vertical, and Speckle, available from the Grain Type menu.
Mosaic Tiles Renders the image so that it appears to be made up of small chips or tiles and adds grout between the tiles. (In contrast, the Pixelate > Mosaic filter breaks up an image into blocks of different-colored pixels.)
Patchwork Breaks up an image into squares filled with the predominant color in that area of the image. The filter randomly reduces or increases the tile depth to replicate the highlights and shadows.
Stained Glass Repaints an image as single-colored adjacent cells outlined in the foreground color.
Texturizer Applies a texture you select or create to an image.
To the top
Video filters
The Video submenu contains the De-Interlace and NTSC Colors filters.
De-Interlace Smooths moving images captured on video by removing either the odd or even interlaced lines in a video image. You can choose to replace the discarded lines by duplication or interpolation.
NTSC Colors Restricts the gamut of colors to those acceptable for television reproduction, to prevent oversaturated colors from bleeding across television scan lines.
To the top
Other filters
Filters in the Other submenu let you create your own filters, use filters to modify masks, offset a selection within an image, and make quick color adjustments.
Custom Lets you design your own filter effect. With the Custom filter, you can change the brightness values of each pixel in the image according to a predefined mathematical operation known as convolution. Each pixel is reassigned a value based on the values of surrounding pixels. This operation is similar to the Add and Subtract calculations for channels.
You can save the custom filters you create and use them with other Photoshop images. See Create a Custom filter.
High Pass Retains edge details in the specified radius where sharp color transitions occur and suppresses the rest of the image. (A radius of 0.1 pixel keeps only edge pixels.) The filter removes low-frequency detail from an image and has an effect opposite to that of the Gaussian Blur filter. It is helpful to apply the High Pass filter to a continuous-tone image before using the Threshold command or converting the image to Bitmap mode. The filter is useful for extracting line art and large black-and-white areas from scanned images.
Maximum and Minimum The Maximum and Minimum filters are useful for modifying masks. The Maximum filter has the effect of applying a spread (dilation)—spreading out white areas and choking in black areas. The Minimum filter has the effect of applying a choke (erosion)—shrinking white areas and spreading out the black areas. Like the Median filter, the Maximum and Minimum filters operate on selected pixels. Within a specified radius, the Maximum and Minimum filters replace the current pixel's brightness value with the highest or lowest brightness value of the surrounding pixels.
These filters, especially with larger radii, tend to promote either corners or curves in the image contours. In Photoshop CC, you can choose from the Preserve menu to favor squareness or roundness as you specify the radius value.
text_image
Maximum OK Cancel Preview 100% Radius: 1.0 Pixels Preserve: Squareness Squareness Roundness(Photoshop CC) Preserve squareness or roundness
Offset Moves a selection a specified horizontal or vertical amount, leaving an empty space at the selection's original location. You can fill the empty area with the current background color, with another part of the image, or with your choice of fill if the selection is near the edge of an image.
To the top
Digimarc filters
The Digimarc filters embed a digital watermark into an image to store copyright information.
Note: Digimarc plug-ins require a 32-bit operating system. They are unsupported in 64-bit versions of Windows and Mac OS.
To the top
Vanishing Point
The Vanishing Point feature preserves correct perspective in edits of images that contain perspective planes (for instance, the sides of a building or any rectangular object).
Adobe also recommends
- Adding digital copyright information
• Work in Vanishing Point
Twitter™ and Facebook posts are not covered under the terms of Creative Commons.
Legal Notices
Online Privacy Policy
Apply the Lighting Effects filter
From an Expert: Lighting Effects tutorials
Lighting Effects types
Adjust a Point light in the preview window
Adjust an Infinite light in the preview window
Adjust a Spot light in the preview window
Lighting Effects presets
Add or delete a light
Create, save, or delete a Lighting Effects preset
Apply a Texture channel
To the top
Apply the Lighting Effects filter
The Lighting Effects filter lets you produce myriad lighting effects on RGB images. You can also use textures from grayscale files (called bump maps) to produce 3D-like effects and save your own styles for use in other images.
Note: The Lighting Effects filter works only on 8-bit RGB images in Photoshop CC. You must have a supported video card to use Lighting Effects. For more information, see this FAQ.
- Choose Filter > Render > Lighting Effects.
- From the Presets menu at upper left, choose a style.
-
In the preview window, select individual lights you want to adjust. Then, in the upper half of the Properties panel, do any of the following:
-
Choose a light type (Spot, Infinite, or Point) from the top menu.
- Adjust color, intensity, and hotspot size.
To duplicate a light, Alt-drag (Windows) or Option-drag (Mac OS) the light within the preview window.
- In the lower half of the Properties panel, adjust the entire set of lights with these options:
Colorize Click to tint the overall lighting.
Exposure Controls highlight and shadow detail.
Gloss Determines how much surfaces reflects light.
Metallic Determines which is more reflective: the light or the object on which the light is cast.
Ambience Diffuses the light as if it were combined with other light in a room, such as sunlight or fluorescent light. Choose a value of 100 to use only the light source, or a value of -100 to remove the light source.
Texture Applies a texture channel.
From an Expert: Lighting Effects tutorials
Quickly master the dedicated Lighting Effects workspace. This tutorial from Dan Moughamian gives you a step-by-step tour.
Also, see this CS6 Lighting Effects overview video by Matt Kloskowski.
To the top
Lighting Effects types
You can choose from several lighting types:
Point Shines light in all directions from directly above the image—like a light bulb.
Infinite Shines light across an entire plane—like the sun.
Spot Casts an elliptical beam of light. The line in the preview window defines the light direction and angle, and the handles define the edges of the ellipse.
To the top
Adjust a Point light in the preview window
- In the Properties panel, choose Point from the top menu.
- In the preview window, adjust the light:
• To move the light, drag anywhere on the canvas.
• To change the spread of light (reflecting a light moving closer or farther away), drag the white section of the Intensity ring at the center.

An Intensity value of 100 is brightest, normal lighting is about 50, negative intensity takes away light, and -100 intensity produces no light.
To the top
Adjust an Infinite light in the preview window
- In the Properties panel, choose Infinite from the top menu.
-
Adjust the light:
-
To change the direction, drag the handle at the end of the line.
- To change brightness, drag the white section of the Intensity ring at the center of the light controls.
To the top
Adjust a Spot light in the preview window
- At the top of the Properties panel, choose Spot.
- In the preview window, adjust the light:
• To move the light, drag within the outer ellipse.
• To rotate the light, drag beyond the outer ellipse.
- To change the hotspot angle, drag the edge of the interior ellipse.
- To extend or shrink the ellipse, drag one of the four outer handles.
- To change how much of the ellipse is filled with light, drag the white section of the Intensity ring in the center.
To the top
Lighting Effects presets
Use the Presets menu in the Lighting Effects workspace to choose from 17 light styles. You can also create your own presets by adding lights to the Default setting. The Lighting Effects filter requires at least one light source. Only one light can be edited at a time, but all added lights are used to create the effect.
2 o'clock Spotlight A yellow spotlight of medium (17) intensity with a wide (91) focus.
Blue Omni A blue overhead omni light of full (85) intensity with no focus.
Circle Of Light Four spotlights. White has full (100) intensity and a concentrated (8) focus. Yellow has strong intensity (88) and a concentrated focus (3). Red has medium (50) intensity and a concentrated (0) focus. Blue has full (100) intensity and medium (25) focus.
Crossing A white spotlight of medium (35) intensity with a wide (69) focus.
Crossing Down Two white spotlights of medium (35) intensity with a wide (100) focus.
Default A white spotlight of medium intensity (35) with a wide focus (69).
Five Lights Down/Five Lights Up Five white spotlights, down or up, of full (100) intensity with a wide (60) focus.
Flashlight An omni yellow light of medium (46) intensity.
Flood Light A white spotlight of medium (35) intensity with a wide (69) focus.
Parallel Directional A directional blue light of full (98) intensity with no focus.
RGB Lights Red, blue, and green lights that produce a light of medium (60) intensity with a wide (96) focus.
Soft Direct Lights Two unfocused white and blue directional lights. White has a soft (20) intensity. Blue has a medium (67) intensity.
Soft Omni A soft omni light of medium (50) intensity.
Soft Spotlight A white spotlight of full (98) intensity with a wide (100) focus.
Three Down Three white spotlights of soft (35) intensity with a wide (96) focus.
Triple Spotlight Three spotlights of slight (35) intensity with a wide (100) focus.
To the top
Add or delete a light
• In the Lighting Effects workspace, do one of the following:
- At upper left, click the Lights icons to add Point, Spot, and Infinite types. Repeat as desired for a maximum of 16 lights.
- In the Lights panel (at lower right by default), drag a light to the Trash icon to delete it.
To the top
Create, save, or delete a Lighting Effects preset
- In the Lighting Effects dialog box, do one of the following:
- To create a preset, choose Custom from the Preset menu, and click the Lights icons to add Point, Spot, and Infinite types. Repeat as desired for a maximum of 16 lights.
- To save a preset, click Save, name the style, and click OK. Saved presets include all the settings for each light and appear in the Style menu whenever you open the image.
- To delete a preset, choose it, and then click Delete.
To the top
Apply a Texture channel
In the Lighting Effects workspace, the Texture channel lets you control lighting effects using grayscale images (called bump maps). You add bump maps to the image as alpha channels. You can add any grayscale image to your image as an alpha channel, or create an alpha channel and add texture to it. For an embossed text effect, use a channel with white text on a black background, or vice versa.
-
If necessary, add an alpha channel to your image. Do one of the following:
-
To use a texture based on another image (for example, fabric or water), convert that image to grayscale, then drag the grayscale channel from that image into the current image.
- Drag an existing alpha channel from another image into the current image.
-
Create an alpha channel in your image, then add texture to it.
-
In the Lighting Effects workspace, choose a channel from the Texture menu in the Properties dialog box. (Choose either an alpha channel you've added or the image's Red, Green, or Blue channel.)
-
Drag the Height slider to vary the texture from Flat (0) to Mountainous (100).
More Help topics
• Create and edit alpha channel masks

BY-NC-SA
Twitter ^™ and Facebook posts are not covered under the terms of Creative Commons.
Legal Notices
Online Privacy Policy
Field blur
Iris blur
Tilt-Shift
Blur effects
Applying Blur gallery effects as smart filters | Creative Cloud only
Use the Blur gallery to quickly create three distinct photographic blur effects with intuitive on-image controls.
Add Field Blur, Iris Blur, or a Tilt-Shift effect to a picture. Each blur tool provides intuitive overlay controls to apply and control the blur effect. With the blur adjustments complete, use the Bokeh controls to style the overall blur effect. Photoshop provides a full-size, live preview when you work with the blur gallery.
Choose Filter > Blur and then select Field Blur, Iris Blur, or Tilt-Shift.
For information on other blur effects, see Adjusting image sharpness and blur.

Press the M key, to view the blur mask applied to the image. The dark areas indicate sharp areas, while light areas indicate blurred areas.
To the top
Field blur
Use Field Blur to build a gradient of blurs, by defining multiple blur points with different amounts of blur. Add multiple pins to the image and specify a blur amount for each pin.
The final result is combined effect of all blur pins on the image. You can even add a pin outside the image, to apply the blur at corners.
- Choose Filter > Blur > Field Blur.
A Field blur pin is placed on the image. Click the image to add additional blur pins.
-
Click a pin to select it, and do one of the following:
-
Drag the blur handle to increase or decrease the blur. You can also use the Blur Tools panel to specify a blur value.
- Drag the pin to a new location.
- Press Delete to remove it.
A

Field blur pins
A. Unselected blur pin B. Selected blur pin
To the top
Iris blur
Use the Iris blur to simulate a shallow depth-of-field effect to your picture, irrespective of the camera or lens used. You can also define multiple
focus points, an effect almost impossible to achieve using traditional camera techniques.
- Choose Filter > Blur > Iris Blur.
The default Iris blur pin is placed on the image. Click the image to add additional blur pins.
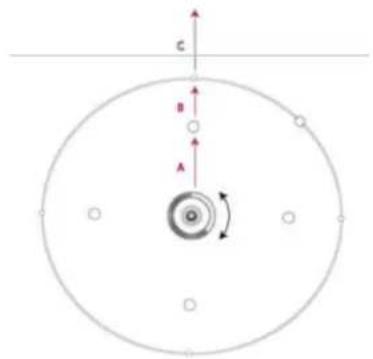
text_image
C B AA. Sharp area B. Fade area C. Blur area
- Drag the handles to move them to redefine the various areas.
- Drag the blur handle to increase or decrease the blur. You can also use the Blur Tools panel to specify a blur value.
To the top
Tilt-Shift
Use the Tilt-Shift effect to simulate an image taken with a tilt-shift lens. This special effect blur defines area of sharpness, and then fades to a blur at the edges. The Tilt-Shift effect can be used to simulate photos of miniature objects.
- Choose Filter > Blur > Tilt-Shift.
The default Tilt-Shift blur pin is placed on the image. Click the image to add additional blur pins.

text_image
C B A B CA. Sharp area B. Fade area C. Blur area
-
Drag the blur handle to increase or decrease the blur. You can also use the Blur Tools panel to specify a blur value.
-
To define the different areas, do the following:
• Drag the lines to move them
- Drag the handles and rotate
For more information on using Tilt-Shift, see this step-by-step text tutorial by Dan Moughamian.
To the top
Blur effects
You can enhance the overall picture, by controlling the appearance of out-of-focus or blurred parts. Specify the bokeh parameters to ensure an overall pleasing effect.
In the Blur Effects panel, specify a value for the following:
Light Bokeh Brightens the out of focus, or blurred areas in the picture.
Bokeh Color Adds more vivid color to lightened areas that are not blown out to white.
Light Range Determines the range of tones the settings affect.
To the top
Applying Blur gallery effects as smart filters | Creative Cloud only
The photographic blur effects in the Blur gallery now support Smart Objects and can be applied non-destructively as smart filters. This feature also supports Smart Object video layers. To apply a Blur gallery effect as a smart filter:
-
In the Layers panel, select a Smart Object layer.
-
Choose Filter > Blur, and then choose Field Blur, Iris Blur, or Tilt-Shift.
Click the following link to view a video by Photoshop Senior Product Manager, Zorana Gee, presenting the Smart Object support for the Blur Gallery and Liquify.
For more information about Smart Filters, see Applying Smart Filters.
Twitter™ and Facebook posts are not covered under the terms of Creative Commons.
Legal Notices | Online Privacy Policy
Use the Adaptive Wide Angle filter to correct lens distortions due to using wide angle lenses. You can quickly straighten lines that appear curved in panoramas, or photos taken with fish-eye and wide angle lenses. For example, buildings seem to be leaning inwards when captured using a wide-angle lens.
The filter detects the camera and lens model and uses the lens characteristics to straighten the images. You can add multiple constraints to indicate straight lines in different parts of the picture. Using this information the Adaptive Wide Angle filter, removes the distortions.
You can also use this filter on images that do not contain camera and lens information, though it's some extra work.
If you want to edit the filter settings later, convert the layer to a smart object. Select the layer and choose Layers > Smart Objects > Convert to Smart Object.
Focal Length Specify the focal length of the lens. This value is automatically populated if the lens information is detected in the photograph.
Crop Factor Specify a value to determine how the final image is cropped. Use this value in combination with Scale to compensate for any blank areas that are introduced while applying the filter.
- Choose Filter > Adaptive Wide Angle.
- Choose a correction type:
Fisheye corrects extreme curvature caused by a fisheye lens.
Perspective corrects converging lines caused by angle of view and camera tilt.
Panorama corrects a Photomerge panorama.
Full Spherical corrects 360 degree panoramas. The panoramas must have a 2:1 aspect ratio.
Auto detects the appropriate correction automatically.
- Specify additional settings for filter. If the image has lens data, these values are automatically detected, and some options are not displayed.
Scale Specify a value to scale the image. Use this value to minimize the blank areas that are introduced after applying the filter.
Focal Length Specify the focal length of the lens. This value is automatically populated if the lens information is detected in the photograph.
Crop Factor Specify a value to determine how the final image is cropped. Use this value in combination with Scale to compensate for any blank areas that are introduced while applying the filter.
As Shot Enable this option to use the values as defined in the lens profile. This option is disabled if no lens information is found.
- Define the constraints to indicate straight lines in the picture.
Do one of the following:
- Choose the Constraint tool, and drag a line across a key object to straighten.
- Choose the Polygon Constraint tool, and draw a polygon along the object to straighten.
The filter detects the curvature and draws a line that follows the contour of the object.

natural_image
Street scene with pedestrians crossing a city street, featuring buildings and a taxi in motion (no visible text or symbols)To constrain vertically or horizontally, press Shift while dragging the line. To define the orientation for an existing line, right-click constraint line in the image, and choose an orientation from the pop-up menu.
After the wide-angle correction is complete, the picture may have several blank areas. You can crop the image to remove such areas, or even use Content-aware fill to add content into that area.
Learn More
• Lens Aware Adjustments by RC Conception
• Adaptive Wide Angle filter by Russell Brown
Twitter™ and Facebook posts are not covered under the terms of Creative Commons.
Legal Notices | Online Privacy Policy
Use the Oil Paint filter gives an image the look of a classic painting.
- Choose Filter > Oil Paint.
- Experiment with the Brush and Lighting options.
- Click OK to apply the filter.
If the Oil Paint filter is not working, it's possible that you don't have a supported graphics card. Or, it could mean that your graphics card driver is out-of-date. For more information, see the GPU FAQ.

Twitter ^™ and Facebook posts are not covered under the terms of Creative Commons.
Legal Notices | Online Privacy Policy
About layer effects and styles
Apply preset styles
Layer Style dialog box overview
Apply or edit a custom layer style
Layer style options
Modify layer effects with contours
Set a global lighting angle for all layers
Display or hide layer styles
Copy layer styles
Scale a layer effect
Remove layer effects
Convert a layer style to image layers
Create and manage preset styles
To the top
About layer effects and styles
Photoshop provides a variety of effects—such as shadows, glows, and bevels—that change the appearance of a layer's contents. Layer effects are linked to the layer contents. When you move or edit the contents of the layer, the same effects are applied to the modified contents. For example, if you apply a drop shadow to a text layer and then add new text, the shadow is added automatically to the new text.
A layer style is one or more effects applied to a layer or layer group. You can apply one of the preset styles provided with Photoshop or create a custom style using the Layer Style dialog box. The layer effects icon fx appears to the right of the layer's name in the Layers panel. You can expand the style in the Layers panel to view or edit the effects that compose the style.
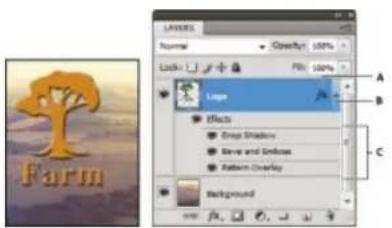
text_image
Layers Normal Opacity: 100% Lock: Fill: 100% Layer 1 Large Effects Drop Shadow Save and Emboss Pattern Overlay Background A B C FarmLayers panel showing layer with multiple effects applied A. Layer effects icon B. Click to expand and show layer effects C. Layer effects
When you save a custom style, it becomes a preset style. Preset styles appear in the Styles panel and can be applied to a layer or group with a single click.
To the top
Apply preset styles
You can apply preset styles from the Styles panel. The layer styles that come with Photoshop are grouped into libraries by function. For example, one library contains styles for creating web buttons; another library contains styles adding effects to text. To access these styles, you need to load the appropriate library. For information on loading and saving styles, see Create and manage preset styles.
Note: You cannot apply layer styles to a background, locked layer, or group.
Display the Styles panel
- Choose Window > Styles.
Apply a preset style to a layer
Normally, applying a preset style replaces the current layer style. However, you can add the attributes of a second style to those of the current style.
- Do one of the following:
- Click a style in the Styles panel to apply it to the currently selected layers.
- Drag a style from the Styles panel onto a layer in the Layers panel.
- Drag a style from the Styles panel to the document window, and release the mouse button when the pointer is over the layer content to which you want to apply the style.
Note: Hold down Shift as you click or drag to add (rather than replace) the style to any existing effects on the destination layer.
- Choose Layer > Layer Style > Blending Options, and click the word Styles in the Layer Style dialog box (top item in the list on the left side of the dialog box). Click the style you want to apply, and click OK.
- When using a Shape tool or Pen tool in shape layers mode, select a style from the pop-up panel in the options bar before drawing the shape.
Apply a style from another layer
- In the Layers panel, Alt-drag (Windows) or Option-drag (Mac OS) the style from a layer's effect list to copy it to another layer.
- In the Layers panel, click-drag the style from a layer's effect list to move it to another layer.
Change how preset styles are displayed
- Click the triangle in the Styles panel, Layer Style dialog box, or Layer Style pop-up panel in the options bar.
- Choose a display option from the panel menu:
• Text Only to view the layer styles as a list.
- Small Thumbnail or Large Thumbnail to view the layer styles as thumbnails.
- Small List or Large List to view the layer styles as a list, with a thumbnail of the selected layer style displayed.
To the top
Layer Style dialog box overview
You can edit styles applied to a layer or create new styles using the Layer Style dialog box.
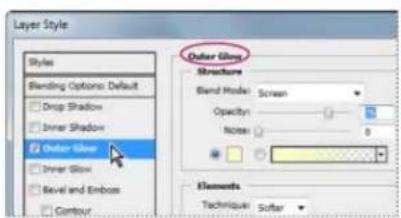
text_image
Layer Style Styles Blending Options: Default Drop Shadow Inner Shadow Outer Glow Inner Glow Bevel and Emboss Contour Outer Glow Structure Blend Mode: Screen Opacity: Noise: Elements Technique: SofterLayer Style dialog box. Click a check box to apply the current settings without displaying the effect's options. Click an effect name to display its options.
You can create custom styles using one or more of the following effects:
Drop Shadow
Adds a shadow that falls behind the contents on the layer.
Inner Shadow
Adds a shadow that falls just inside the edges of the layer's content, giving the layer a recessed appearance.
Outer Glow and Inner Glow
Add glows that emanate from the outside or inside edges of the layer's content.
Bevel and Emboss
Add various combinations of highlights and shadows to a layer.
Satin
Applies interior shading that creates a satiny finish.
Color, Gradient, and Pattern Overlay
Fills the layer's content with a color, gradient, or pattern.
Stroke
Outlines the object on the current layer using color, a gradient, or a pattern. It is particularly useful on hard-edged shapes such as type.
To the top
Apply or edit a custom layer style
Note: You cannot apply layer styles to a background layer, a locked layer, or a group. To apply a layer style to a background layer, first convert it into a regular layer.
- Select a single layer from the Layers panel.
-
Do one of the following:
-
Double-click the layer, outside the layer name or thumbnail.
- Click the Add a Layer Style icon at the bottom of the Layers panel and choose an effect from the list.
- Choose an effect from the Layer > Layer Style submenu.
-
To edit an existing style, double-click an effect displayed below the layer name in the Layers panel. (Click the triangle next to the Add a Layer Style icon fx to display the effects contained in the style.)
-
Set effect options in the Layer Style dialog box. See Layer style options.
-
Add other effects to the style, if desired. In the Layer Style dialog box, click the check box to the left of the effect name to add the effect without selecting it.
You can edit multiple effects without closing the Layer Style dialog box. Click the name of an effect on the left side of the dialog box to display its options.
Change style defaults to custom values
- In the Layer Style dialog box, customize settings as desired.
- Click Make Default.
When you next open the dialog box, your custom defaults are automatically applied. If you adjust settings and want to return to your custom defaults, click Reset To Default.

To return to Photoshop's original defaults, see Restore all preferences to default settings.
To the top
Layer style options
Altitude For the Bevel and Emboss effect, sets the height of the light source. A setting of 0 is equivalent to ground level, 90 is directly above the layer.
Angle Determines the lighting angle at which the effect is applied to the layer. You can drag in the document window to adjust the angle of a Drop Shadow, Inner Shadow, or Satin effect.
Anti-alias Blends the edge pixels of a contour or gloss contour. This option is most useful on small shadows with complicated contours.
Blend Mode Determines how the layer style blends with the underlying layers, which may or may not include the active layer. For example, an inner shadow blends with the active layer because the effect is drawn on top of that layer, but a drop shadow blends only with the layers beneath the active layer. In most cases, the default mode for each effect produces the best results. See Blending modes.
Choke Shrinks the boundaries of the matte of an Inner Shadow or Inner Glow prior to blurring.
Color Specifies the color of a shadow, glow, or highlight. You can click the color box and choose a color.
Contour With solid-color glows, Contour allows you to create rings of transparency. With gradient-filled glows, Contour allows you to create variations in the repetition of the gradient color and opacity. In beveling and embossing, Contour allows you to sculpt the ridges, valleys, and bumps that are shaded in the embossing process. With shadows, Contour allows you to specify the fade. For more information, see Modify layer effects with contours.
Distance Specifies the offset distance for a shadow or satin effect. You can drag in the document window to adjust the offset distance.
Depth Specifies the depth of a bevel. It also specifies the depth of a pattern.
Use Global Light This setting allows you to set one “master” lighting angle that is then available in all the layer effects that use shading: Drop Shadow, Inner Shadow, and Bevel and Emboss. In any of these effects, if Use Global Light is selected and you set a lighting angle, that angle becomes the global lighting angle. Any other effect that has Use Global Light selected automatically inherits the same angle setting. If Use Global Light is deselected, the lighting angle you set is “local” and applies only to that effect. You can also set the global lighting angle by choosing Layer Style > Global Light.
Gloss Contour Creates a glossy, metallic appearance. Gloss Contour is applied after shading a bevel or emboss.
Gradient Specifies the gradient of a layer effect. Click the gradient to display the Gradient Editor, or click the inverted arrow and choose a gradient from the pop-up panel. You can edit a gradient or create a new gradient using the Gradient Editor. You can edit the color or opacity in the Gradient Overlay panel the same way you edit them in the Gradient Editor. For some effects, you can specify additional gradient options. Reverse flips the orientation of the gradient, Align With Layer uses the bounding box of the layer to calculate the gradient fill, and Scale scales the application of the gradient. You can also move the center of the gradient by clicking and dragging in the image window. Style specifies the shape of the gradient.
Highlight or Shadow Mode Specifies the blending mode of a bevel or emboss highlight or shadow.
Jitter Varies the application of a gradient's color and opacity.
Layer Knocks Out Drop Shadow Controls the drop shadow's visibility in a semitransparent layer.
Noise Specifies the number of random elements in the opacity of a glow or shadow. Enter a value or drag the slider.
Opacity Sets the opacity of the layer effect. Enter a value or drag the slider.
Pattern Specifies the pattern of a layer effect. Click the pop-up panel and choose a pattern. Click the New Preset button ☑ to create a new preset pattern based on the current settings. Click Snap To Origin to make the origin of the pattern the same as the origin of the document (when Link With Layer is selected), or to place the origin at the upper-left corner of the layer (if Link With Layer is deselected). Select Link With Layer if you want the pattern to move along with the layer as the layer moves. Drag the Scale slider or enter a value to specify the size of the pattern. Drag a pattern to position it in the layer; reset the position by using the Snap To Origin button. The Pattern option is not available if no patterns are loaded.
Position Specifies the position of a stroke effect as Outside, Inside, or Center.
Range Controls which portion or range of the glow is targeted for the contour.
Size Specifies the radius and size of blur or the size of the shadow.
Soften Blurs the results of shading to reduce unwanted artifacts.
Source Specifies the source for an inner glow. Choose Center to apply a glow that emanates from the center of the layer's content, or Edge to apply a glow that emanates from the inside edges of the layer's content.
Spread Expands the boundaries of the matte prior to blurring.
Style Specifies the style of a bevel: Inner Bevel creates a bevel on the inside edges of the layer contents; Outer Bevel creates a bevel on the outside edges of the layer contents; Emboss simulates the effect of embossing the layer contents against the underlying layers; Pillow Emboss simulates the effect of stamping the edges of the layer contents into the underlying layers; and Stroke Emboss confines embossing to the boundaries of a stroke effect applied to the layer. (The Stroke Emboss effect is not visible if no stroke is applied to the layer.)
Technique Smooth, Chisel Hard, and Chisel Soft are available for bevel and emboss effects; Softer and Precise apply to Inner Glow and Outer Glow effects.
Smooth
Blurs the edges of a matte slightly and is useful for all types of mattes, whether their edges are soft or hard. It does not preserve detailed features at larger sizes.
Chisel Hard
Uses a distance measurement technique and is primarily useful on hard-edged mattes from anti-aliased shapes such as type. It preserves detailed features better than the Smooth technique.
Chisel Soft
Uses a modified distance measurement technique and, although not as accurate as Chisel Hard, is more useful on a larger range of mattes. It preserves features better than the Smooth technique.
Softer
Applies a blur and is useful on all types of mattes, whether their edges are soft or hard. At larger sizes, Softer does not preserve detailed features.
Precise
Uses a distance measurement technique to create a glow and is primarily useful on hard-edged mattes from anti-aliased shapes such as type. It preserves features better than the Softer technique.
Texture Applies a texture. Use Scale to scale the size of the texture. Select Link With Layer if you want the texture to move along with the layer as the layer moves. Invert inverts the texture. Depth varies the degree and direction (up/down) to which the texturing is applied. Snap To Origin makes the origin of the pattern the same as the origin of the document (if Link With Layer is deselected) or places the origin in the upper-left corner of the layer (if Link With Layer is selected). Drag the texture to position it in the layer.
To the top
Modify layer effects with contours
When you create custom layer styles, you can use contours to control the shape of Drop Shadow, Inner Shadow, Inner Glow, Outer Glow, Bevel and Emboss, and Satin effects over a given range. For example, a Linear contour on a Drop Shadow causes the opacity to drop off in a linear transition. Use a Custom contour to create a unique shadow transition.
You can select, reset, delete, or change the preview of contours in the Contour pop-up panel and Preset Manager.

text_image
Quality Contours Anti-BlendedDetail of Layer Style dialog box for Drop Shadow effect
A. Click to display the Contour Editor dialog box. B. Click to display the pop-up panel.
Create a custom contour
- Select the Drop Shadow, Inner Shadow, Inner Glow, Outer Glow, Bevel and Emboss, Contour, or Satin effect in the Layer Style dialog box.
- Click the contour thumbnail in the Layer Style dialog box.
- Click the contour to add points, and drag to adjust the contour. Or enter values for Input and Output.
- To create a sharp corner instead of a smooth curve, select a point and click Corner.
- To save the contour to a file, click Save and name the contour.
- To store a contour as a preset, choose New.
- Click OK. New contours are added at the bottom of the pop-up panel.
Load a contour
- Click the contour in the Layer Style dialog box, and in the Contour Editor dialog box, and then choose Load. Go to the folder containing the contour library you want to load and click Open.
Delete a contour
- Click the inverted arrow next to the currently selected contour to view the pop-up panel. Press Alt (Windows) or Option (Mac OS), and click the contour you want to delete.
To the top
Set a global lighting angle for all layers
Using global light gives the appearance of a common light source shining on the image.
- Do one of the following:
- Choose Layer > Layer Style > Global Light. In the Global Light dialog box, enter a value or drag the angle radius to set the angle and altitude, and click OK.
- In the Layer Style dialog box for Drop Shadow, Inner Shadow, or Bevel, select Use Global Light. For Angle, enter a value or drag the radius, and click OK.
The global lighting applies to each layer effect that uses the global lighting angle.
To the top
Display or hide layer styles
When a layer has a style, an "fx" icon /appears to the right of the layer's name in the Layers panel.
Hide or show all layer styles in an image
- Choose Layer > Layer Style > Hide All Effects or Show All Effects.
Expand or collapse layer styles in the Layers panel
- Do one of the following:
- Click the triangle next to the Add a Layer Style icon to expand the list of layer effects applied to that layer.
- Click the triangle to collapse the layer effects.
- To expand or collapse all of the layer styles applied within a group, hold down Alt (Windows) or Option (Mac OS), and click the triangle or inverted triangle for the group. The layer styles applied to all layers within the group expand or collapse correspondingly.
To the top
Copy layer styles
Copying and pasting styles is an easy way to apply the same effects to multiple layers.
Copy layer styles between layers
- From the Layers panel, select the layer containing the style you want to copy.
- Choose Layer > Layer Style > Copy Layer Style.
- Select the destination layer from the panel, and choose Layer > Layer Style > Paste Layer Style.
The pasted layer style replaces the existing layer style on the destination layer or layers.
Copy layer styles between layers by dragging
- Do one of the following:
- In the Layers panel, Alt-drag (Windows) or Option-drag (Mac OS) a single layer effect from one layer to another to duplicate the layer effect, or drag the Effects bar from one layer to another to duplicate the layer style.
- Drag one or more layer effects from the Layers panel to the image to apply the resulting layer style to the highest layer in the Layers panel that contains pixels at the drop point.
To the top
Scale a layer effect
A layer style may have been fine-tuned for a target resolution and features of a given size. Using Scale Effects allows you to scale the effects in the layer style without scaling the object to which the layer style is applied.
- Select the layer in the Layers panel.
- Choose Layer > Layer Style > Scale Effects.
- Enter a percentage or drag the slider.
- Select Preview to preview the changes in the image.
- Click OK.
To the top
Remove layer effects
You can remove an individual effect from a style applied to a layer, or remove the entire style from the layer.
Remove an effect from a style
- In the Layers panel, expand the layer style to see its effects.
- Drag the effect to the Delete icon 🔒.
Remove a style from a layer
- In the Layers panel, select the layer containing the style you want to remove.
-
Do one of the following:
-
In the Layers panel, drag the Effects bar to the Delete icon .
- Choose Layer > Layer Style > Clear Layer Style.
- Select the layer, and then click the Clear Style button at the bottom of the Styles panel.
To the top
Convert a layer style to image layers
To customize or fine-tune the appearance of layer styles, you can convert the layer styles to regular image layers. After you convert a layer style to
image layers, you can enhance the result by painting or applying commands and filters. However, you can no longer edit the layer style on the original layer, and the layer style no longer updates as you change the original image layer.
Note: The layers produced by this process may not result in artwork that exactly matches the version using layer styles. You may see an alert when you create the new layers.
- In the Layers panel, select the layer containing the layer style that you want to convert.
- Choose Layer > Layer Style > Create Layers.
You can now modify and restack the new layers in the same way as regular layers. Some effects—for example, Inner Glow—convert to layers within a clipping mask.
To the top
Create and manage preset styles
You can create a custom style and save it as a preset, which is then available from the Styles panel. You can save preset styles in a library and load or remove them from the Styles panel as you need them.
Create a new preset style
- From the Layers panel, select the layer containing the style that you want to save as a preset.
-
Do one of the following:
-
Click an empty area of the Styles panel.
- Click the Create New Style button at the bottom of the Styles panel.
- Choose New Style from the Styles panel menu.
-
Choose Layer > Layer Style > Blending Options, and click New Style in the Layer Style dialog box.
-
Enter a name for the preset style, set style options, and click OK.
Rename a preset style
- Do one of the following:
- Double-click a style in the Styles panel. If the Styles panel is set to display styles as thumbnails, enter a new name in the dialog box and click OK. Otherwise, type a new name directly in the Styles panel and press Enter (Windows) or Return (Mac OS).
- Select a style in the Styles area of the Layer Style dialog box. Then choose Rename Style from the pop-up menu, enter a new name, and click OK.
- When using a shape or Pen tool, select a style from the Style pop-up panel in the options bar. Then choose Rename Style from the pop-up panel menu.
Delete a preset style
- Do one of the following:
- Drag a style to the Delete icon at the bottom of the Styles panel.
- Press Alt (Windows) or Option (Mac OS), and click the layer style in the Styles panel.
- Select a style in the Styles area of the Layer Style dialog box. (See Apply preset styles.) Then choose Delete Style from the pop-up menu.
- When using a shape or Pen tool, select a style from the Layer Style pop-up panel in the options bar. Then choose Delete Style from the pop-up panel menu.
Save a set of preset styles as a library
-
Do one of the following:
-
Choose Save Styles from the Styles panel menu.
- Select Styles on the left side of the Layer Style dialog box. Then choose Save Styles from the pop-up menu.
-
When using a shape or Pen tool, click the layer style thumbnail in the options bar. Then choose Save Styles from the pop-up panel menu.
-
Choose a location for the style library, enter a file name, and click Save.
You can save the library anywhere. However, if you place the library file in the Presets/Styles folder inside the default presets location, the library name will appear at the bottom of the Styles panel menu when you restart the application.
Note: You can also use the Preset Manager to rename, delete, and save libraries of preset styles.
Load a library of preset styles
- Click the triangle in the Styles panel, Layer Style dialog box, or Layer Style pop-up panel in the options bar.
-
Do one of the following:
-
Choose Load Styles to add a library to the current list. Then select the library file you want to use, and click Load.
- Choose Replace Styles to replace the current list with a different library. Then select the library file you want to use, and click Load.
-
Choose a library file (displayed at the bottom of the panel menu). Then click OK to replace the current list, or click Append to append the current list.
-
To return to the default library of preset styles, choose Reset Styles. You can either replace the current list or append the default library to the current list.
Note: You can also use the Preset Manager to load and reset style libraries. See About the Preset Manager.
Twitter™ and Facebook posts are not covered under the terms of Creative Commons.
Legal Notices | Online Privacy Policy
Using filters
Apply a filter from the Filter menu
Filter Gallery overview
Apply filters from the Filter Gallery
Blend and fade filter effects
Tips for creating special effects
Improve filter performance
Note: For detailed instructions, click the links below. To ask questions, request features, or report problems, visit feedback.photoshop.com.
To the top
Using filters
You can use filters to clean up or retouch your photos, apply special art effects that give your image the appearance of a sketch or impressionistic painting, or create unique transformations using distortions and lighting effects. The filters provided by Adobe appear in the Filter menu. Some filters provided by third-party developers are available as plug-ins. Once installed, these plug-in filters appear at the bottom of the Filter menu.
Smart Filters, applied to Smart Objects, let you use filters non-destructively. Smart Filters are stored as layer effects in the Layers panel and can be readjusted at any time, working from the original image data contained in the Smart Object. For more information on Smart Filter Effects and nondestructive editing, see Nondestructive editing.
To use a filter, choose the appropriate submenu command from the Filter menu. These guidelines can help you in choosing filters:
- Filters are applied to the active, visible layer or a selection.
- For 8-bits-per-channel images, most filters can be applied cumulatively through the Filter Gallery. All filters can be applied individually.
- Filters cannot be applied to Bitmap-mode or indexed-color images.
• Some filters work only on RGB images. - All filters can be applied to 8-bit images.
- The following filters can be applied to 16-bit images: Liquify, Vanishing Point, Average Blur, Blur, Blur More, Box Blur, Gaussian Blur, Lens Blur, Motion Blur, Radial Blur, Surface Blur, Shape Blur, Lens Correction, Add Noise, Despeckle, Dust & Scratches, Median, Reduce Noise, Fibers, Clouds, Difference Clouds, Lens Flare, Sharpen, Sharpen Edges, Sharpen More, Smart Sharpen, Unsharp Mask, Emboss, Find Edges, Solarize, De-Interlace, NTSC Colors, Custom, High Pass, Maximum, Minimum, and Offset.
- The following filters can be applied to 32-bit images: Average Blur, Box Blur, Gaussian Blur, Motion Blur, Radial Blur, Shape Blur, Surface Blur, Add Noise, Clouds, Lens Flare, Smart Sharpen, Unsharp Mask, De-Interlace, NTSC Colors, Emboss, High Pass, Maximum, Minimum, and Offset.
- Some filters are processed entirely in RAM. If you don't have enough available RAM to process a filter effect, you may get an error message.
To the top
Apply a filter from the Filter menu
You can apply a filter to the active layer, or to a Smart Object. Filters applied to a Smart Object are nondestructive and can be readjusted at any time.
-
Do one of the following:
-
To apply a filter to an entire layer, make sure the layer is active or selected.
• To apply a filter to an area of a layer, select that area.
To apply a filter non-destructively so you can change your filter settings later, select the Smart Object that contains the image content you want to filter.
- Choose a filter from the submenus in the Filter menu.
If no dialog box appears, the filter effect is applied.
- If a dialog box or the Filter Gallery appears, enter values or select options, and then click OK.
Applying filters to large images can be time consuming, but you can preview the effect in the filter dialog box. Drag in the preview window to center a specific area of the image. In some filters, you can click in the image to center it where you click. Click the + or - button under the preview window to zoom in or out.
To the top
Filter Gallery overview
The Filter Gallery provides a preview of many of the special effects filters. You can apply multiple filters, turn on or off the effect of a filter, reset options for a filter, and change the order in which filters are applied. When you are satisfied with the preview, you can then apply it to your image. Not all filters in the Filter menu are available in the Filter Gallery.
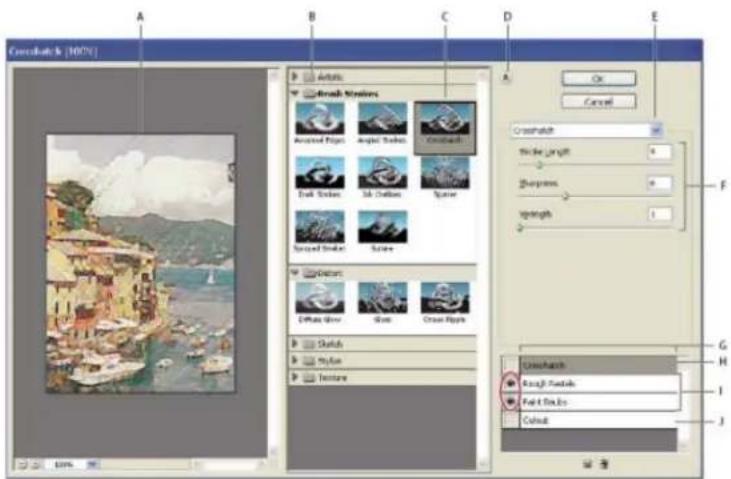
text_image
Corelatch & [307V] A B C D E Artistic Brush Steuers Mounted Pixels Angular Strikes Crosshatch Fruit Strikes Mk Strikes Sparse Squared Strikes Sparse Distorts Diffuse Glow Shiny Ocean Flights Sketchs Stylen Texture On Cancel Crosshatch Stride Length: 0 Sharpen: 0 Zoom: 1 G Crosshatch Rough Smooths Fold Dot Line Colour H I JFilter Gallery dialog box
A. Preview B. Filter category C. Thumbnail of selected filter D. Show/Hide filter thumbnails E. Filters pop-up menu F. Options for selected filter G. List of filter effects to apply or arrange H. Filter effect selected but not applied I. Filter effects applied cumulatively but not selected J. Hidden filter effect
Display the Filter Gallery
- Choose Filter > Filter Gallery. Clicking a filter category name displays thumbnails of available filter effects.
Zoom in or out of the preview
- Click the + or - button under the preview area, or choose a zoom percentage.
View another area of the preview
- Drag in the preview area with the Hand tool
Hide filter thumbnails
- Click the Show/Hide button at the top of the gallery
To the top
Apply filters from the Filter Gallery
Filter effects are applied in the order you select them. You can rearrange filters after you apply them by dragging a filter name to another position in the list of applied filters. Rearranging filter effects can dramatically change the way your image looks. Click the eye icon ➤ next to a filter to hide the effect in the preview image. You can also delete applied filters by selecting the filter and clicking the Delete Layer icon ⚙.
To save time when trying various filters, experiment by selecting a small, representative part of your image.
-
Do one of the following:
-
To apply a filter to an entire layer, make sure that the layer is active or selected.
• To apply a filter to an area of a layer, select that area. -
To apply a filter non-destructively, so you can change your filter settings later, select the Smart Object that contains the image content that you want to filter.
-
Choose Filter > Filter Gallery.
- Click a filter name to add the first filter. You may need to click the inverted triangle next to the filter category to see the complete list of filters. Once added, the filter appears in the applied filter list in the lower right corner of the Filter Gallery dialog box.
- Enter values or select options for the filter you selected.
-
Do any of the following:
-
To apply filters cumulatively, click the New Effect Layer icon ☑, and choose an additional filter to apply. Repeat this procedure to add more filters.
- To rearrange applied filters, drag the filter to a new position in the applied filter list in the lower right corner of the Filter Gallery dialog box.
-
To remove applied filters, select a filter in the applied filter list, and click the Delete Layer icon ⚙.
-
When you're satisfied with the results, click OK.
To the top
Blend and fade filter effects
The Fade command changes the opacity and blending mode of any filter, painting tool, erasing tool, or color adjustment. The Fade command blending modes are a subset of those in the painting and editing tools options (excluding the Behind and Clear modes). Applying the Fade command is similar to applying the filter effect on a separate layer and then using the layer opacity and blending mode controls.
Note: The Fade command can also modify the effects of using the Liquify command and Brush Strokes filters.
-
Apply a filter, painting tool, or color adjustment to an image or selection.
-
Choose Edit > Fade. Select the Preview option to preview the effect.
-
Drag the slider to adjust the opacity, from 0% (transparent) to 100%.
-
Choose a blending mode from the Mode menu.
Note: The Color Dodge, Color Burn, Lighten, Darken, Difference, and Exclusion blending modes do not work on Lab images.
- Click OK.
To the top
Tips for creating special effects
Creating edge effects You can use various techniques to treat the edges of an effect applied to only part of an image. To leave a distinct edge, simply apply the filter. For a soft edge, feather the edge, and then apply the filter. For a transparent effect, apply the filter, and then use the Fade command to adjust the selection's blending mode and opacity.
Applying filters to layers You can apply filters to individual layers or to several layers in succession to build up an effect. For a filter to affect a layer, the layer must be visible and must contain pixels—for example, a neutral fill color.
Applying filters to individual channels You can apply a filter to an individual channel, apply a different effect to each color channel, or apply the same filter but with different settings.
Creating backgrounds By applying effects to solid-color or grayscale shapes, you can generate a variety of backgrounds and textures. You might then blur these textures. Although some filters have little or no visible effect when applied to solid colors (for example, Glass), others produce interesting effects.
Combining multiple effects with masks or duplicate images Using masks to create selection areas gives you more control over transitions from one effect to another. For example, you can filter the selection created with a mask.
You can also use the History Brush tool to paint a filter effect onto part of the image. First, apply the filter to an entire image. Next, step back in the History panel to the image state before the filter was applied, and set the history brush source to the filtered state by clicking in the well at the left side of the history state. Then paint the image.
Improving image quality and consistency You can disguise faults, alter or enhance images, or create a relationship among images by applying the same effect to each. Use the Actions panel to record the steps you take to modify one image, and then apply this action to the other images.
To the top
Improve filter performance
Some filter effects can be memory-intensive, especially when applied to a high-resolution image.
- You can do any of the following to improve performance:
- Try out filters and settings on a small portion of an image.
- Apply the effect to individual channels—for example, to each RGB channel—if the image is large and you're having problems with insufficient memory. (With some filters, effects vary if applied to the individual channel rather than the composite channel, especially if the filter randomly modifies pixels.)
- Free up memory before running the filter by using the Purge command.
- Allocate more RAM to Photoshop. If necessary, exit other applications to make more memory available to Photoshop.
- Try changing settings to improve the speed of memory-intensive filters, such as Lighting Effects, Cutout, Stained Glass, Chrome, Ripple, Spatter, Sprayed Strokes, and Glass filters. (For example, with the Stained Glass filter, increase cell size. With the Cutout filter, increase Edge Simplicity, decrease Edge Fidelity, or both.)
- If you plan to print to a grayscale printer, convert a copy of the image to grayscale before applying filters. However, applying a filter to a color image, and then converting to grayscale, may not have the same effect as applying the filter to a grayscale version of the image.
Adobe also recommends
- About plug-in modules

BY-NC-SA
Twitter ^™ and Facebook posts are not covered under the terms of Creative Commons.
Legal Notices | Online Privacy Policy
Load images and textures for filters
Set texture and glass surface controls
Defining undistorted areas
Apply the Dust And Scratches filter
Apply the Displace filter
Apply the Color Halftone filter
Apply the Extrude filter
Apply the Trace Contour filter
Create a Custom filter
To the top
Load images and textures for filters
To produce their effects, some filters load and use other images, such as textures and displacement maps. These filters include the Conté Crayon, Displace, Glass, Lighting Effects, Rough Pastels, Texturizer, Underpainting, and Custom filters. Not all of these filters load images or textures in the same way.
- Choose the filter you want from the appropriate submenu.
- In the filter's dialog box, choose Load Texture from the Texture pop-up menu, and locate and open a texture image.
All textures must be in the Photoshop format. Most filters use only the grayscale information of a color file.
To the top
Set texture and glass surface controls
The Rough Pastels, Underpainting, Glass, Conté Crayon, and Texturizer filters have texturizing options. These options make images appear as if they were painted onto textures such as canvas and brick, or viewed through surfaces such as glass blocks or frosted glass.
- From the Filter menu, choose Artistic > Rough Pastels, Artistic > Underpainting, Distort > Glass, Sketch > Conté Crayon, or Texture > Texturizer.
- For Texture, choose a texture type or choose Load Texture to specify a Photoshop file.
- Drag the Scaling slider to increase or reduce the size of the texture pattern.
- Drag the Relief slider (if available) to adjust the depth of the texture's surface.
- Select Invert to reverse the shadows and highlights in the texture.
- For Light Direction (if available), indicate the direction from which the light source sheds light on the texture.
To the top
Defining undistorted areas
The Displace, Shear, and Wave filters in the Distort submenu and the Offset filter in the Other submenu let you treat areas undefined (or unprotected) by the filter in the following ways:
Wrap Around Fills the undefined space with content from the opposite edge of the image.
Repeat Edge Pixels Extends the colors of pixels along the edge of the image in the direction specified. Banding may result if the edge pixels are different colors.
Set To Background (Offset filter only) Fills the selected area with the current background color.
To the top
Apply the Dust And Scratches filter
- Choose Filter > Noise > Dust & Scratches.
- If necessary, adjust the preview zoom ratio until the area containing noise is visible.
- Drag the Threshold slider left to 0 to turn off the value so that all pixels in the selection or image can be examined.
The Threshold value determines how dissimilar the pixels should be before they are eliminated.
Note: The Threshold slider gives greater control for values between 0 and 128—the most common range for images—than for values between 128 and 255.
- Drag the Radius slider left or right, or enter a value in the text box from 1 to 16 pixels. The Radius value determines the size of the area searched for dissimilar pixels.
Increasing the radius blurs the image. Use the smallest value that eliminates the defects.
- Increase the threshold gradually by entering a value or by dragging the slider to the highest possible value that eliminates defects.
To the top
Apply the Displace filter
The Displace filter shifts a selection using a color value from the displacement map—0 is the maximum negative shift, 255 the maximum positive shift, and a gray value of 128 produces no displacement. If a map has one channel, the image shifts along a diagonal defined by the horizontal and vertical scale ratios. If the map has more than one channel, the first channel controls the horizontal displacement, and the second channel controls the vertical displacement.
The filter creates displacement maps using a flattened file saved in Adobe Photoshop format. (Bitmap mode images are unsupported.)
- Choose Filter > Distort > Displace.
- Enter the scale for the magnitude of the displacement.
When the horizontal and vertical scale are set to 100%, the greatest displacement is 128 pixels (because middle gray produces no displacement).
-
If the displacement map is not the same size as the selection, specify how the map fits the image—select Stretch To Fit to resize the map or Tile to fill the selection by repeating the map in a pattern.
-
Choose Wrap Around or Repeat Edge Pixels to determine how undistorted areas of the image are treated.
- Click OK.
- Select and open the displacement map. The distortion is applied to the image.
To the top
Apply the Color Halftone filter
- Choose Filter > Pixelate > Color Halftone.
- Enter a value in pixels for the maximum radius of a halftone dot, from 4 to 127.
-
Enter a screen-angle value (the angle of the dot from the true horizontal) for one or more channels:
-
For Grayscale images, use only channel 1.
- For RGB images, use channels 1, 2, and 3, which correspond to the red, green, and blue channels.
- For CMYK images, use all four channels, which correspond to the cyan, magenta, yellow, and black channels.
-
Click Defaults to return all the screen angles to their default values.
-
Click OK.
To the top
Apply the Extrude filter
- Choose Filter > Stylize > Extrude.
-
Choose a 3D type:
-
Blocks creates objects with a square front face and four side faces. To fill the front face of each block with the average color of the block, select Solid Front Faces. To fill the front face with the image, deselect Solid Front Faces.
-
Pyramids creates objects with four triangular sides that meet at a point.
-
Enter a value in the Size text box to determine the length of any side of the object's base, from 2 to 255 pixels.
- Enter a value in the Depth text box to indicate how far the tallest object appears to protrude from the screen, from 1 to 255.
-
Choose a depth option:
-
Random to give each block or pyramid an arbitrary depth.
-
Level-based to make each object's depth correspond to its brightness—bright protrudes more than dark.
-
Select Mask Incomplete Blocks to hide any object extending beyond the selection.
To the top
Apply the Trace Contour filter
- Choose Filter > Stylize > Trace Contour.
- Choose an Edge option to outline areas in the selection: Lower outlines areas where the color values of pixels fall below the specified level, and Upper outlines areas where the color values fall above.
- Enter a threshold (Level) for evaluating color values (tonal level), from 0 to 255. Experiment to see what values bring out the best detail in the image.
Use the Info panel in Grayscale mode to identify a color value that you want traced. Then enter the value in the Level text box.
To the top
Create a Custom filter
- Choose Filter > Other > Custom. The Custom dialog box displays a grid of text boxes into which you can enter numeric values.
- Select the center text box, which represents the pixel being evaluated. Enter the value by which you want to multiply that pixel's brightness value, from -999 to +999.
- Select a text box representing an adjacent pixel. Enter the value by which you want the pixel in this position multiplied.
For example, to multiply the brightness value of the pixel to the immediate right of the current pixel by 2, enter 2 in the text box to the immediate right of the center text box.
- Repeat steps 2 and 3 for all pixels to be included in the operation. You don't have to enter values in all the text boxes.
- For Scale, enter the value by which to divide the sum of the brightness values of the pixels included in the calculation.
- For Offset, enter the value to be added to the result of the scale calculation.
- Click OK. The custom filter is applied to each pixel in the image, one at a time.
Use the Save and Load buttons to save and reuse custom filters.
Adobe also recommends

Twitter ^™ and Facebook posts are not covered under the terms of Creative Commons.
Legal Notices | Online Privacy Policy
The Smudge tool simulates the effect you see when you drag a finger through wet paint. The tool picks up color where the stroke begins and pushes it in the direction you drag.
- Select the Smudge tool 📋.
- Choose a brush tip and options for the blending mode in the options bar.
- Select Sample All Layers in the options bar to smudge using color data from all visible layers. If this is deselected, the Smudge tool uses colors from only the active layer.
- Select Finger Painting in the options bar to smudge using the foreground color at the beginning of each stroke. If this is deselected, the Smudge tool uses the color under the pointer at the beginning of each stroke.
- Drag in the image to smudge the pixels.
Press Alt (Windows) or Option (Mac OS) as you drag with the Smudge tool to use the Finger Painting option.
For more information
- Retouching tools gallery
Twitter™ and Facebook posts are not covered under the terms of Creative Commons.
Legal Notices | Online Privacy Policy
Run Photoshop in 32-bit mode (64-bit Mac OS only)
Apply the Lighting Effects filter
Lighting Effects types
Adjust an Omni light
Adjust directional light using the preview window
Adjust the spotlight using the preview window
Lighting Effects styles
Add or delete a light
Create, save, or delete a Lighting Effects style
Use the Texture Channel in the Lighting Effects
To the top
Run Photoshop in 32-bit mode (64-bit Mac OS only)
In 64-bit versions of Mac OS, Lighting Effects is available only if Photoshop is running in 32-bit mode.
- In the Finder, choose Go > Applications.
- Expand the Photoshop folder. Then right-click the Photoshop application icon, and choose Get Info.
- In the General section of the Info window, select Open In 32-bit Mode.
- Close the Info window, and restart Photoshop.
For more information, see 64-bit operating system benefits and limitations in Photoshop.
To the top
Apply the Lighting Effects filter
The Lighting Effects filter lets you produce myriad lighting effects on RGB images. You can also use textures from grayscale files (called bump maps) to produce 3D-like effects and save your own styles for use in other images.
Note: The Lighting Effects filter works only on RGB images.
-
Choose Filter > Render > Lighting Effects.
-
For Style, choose a style.
-
For Light Type, choose a type. If you're using multiple lights, select and deselect On to turn individual lights on and off.
-
To change the color of the light, click the color box in the Light Type area of the dialog box.
The Color Picker chosen in the General Preferences dialog box opens.
- To set light properties, drag the corresponding slider for the following options:
Gloss Determines how much the surface reflects light (as on the surface of a piece of photographic paper), from Matte (low reflectance) to Shiny (high reflectance).
Material Determines which is more reflective: the light or the object on which the light is cast. Plastic reflects the light's color; Metallic reflects the object's color.
Exposure Increases (positive values) or decreases (negative values) light. A value of 0 has no effect.
Ambience Diffuses the light as if it were combined with other light in a room, such as sunlight or fluorescent light. Choose a value of 100 to use only the light source, or a value of -100 to remove the light source. To change the color of the ambient light, click the color box and use the Color Picker that appears.
To duplicate a light, Alt-drag (Windows) or Option-drag (Mac OS) the light within the preview window.
- To use a texture fill, choose a channel for Texture Channel.
To the top
Lighting Effects types
You can choose from several lighting types:
Omni Shines light in all directions from directly above the image—like a light bulb over a piece of paper.
Directional Shines light from far away so that the light angle doesn't change—like the sun.
Spotlight Casts an elliptical beam of light. The line in the preview window defines the light direction and angle, and the handles define the edges of the ellipse.
To the top
Adjust an Omni light
- Choose Filter > Render > Lighting Effects.
- For Light Type, choose Omni.
- Adjust the light:
• To move the light, drag the center circle.
- To increase or decrease the size of the light (like a light moving closer or farther away), drag one of the handles defining the edges of the effect.
To the top
Adjust directional light using the preview window
-
Choose Filter > Render > Lighting Effects.
-
For Light Type, choose Directional.
- Adjust the light:
• To move the light, drag the center circle.
- To change the direction of the light, drag the handle at the end of the line to rotate the light's angle. Ctrl-drag (Windows) or Command-drag (Mac OS) to keep the light's height (line length) constant.
- To change the height of the light, drag the handle at the end of the line. Shorten the line for a bright light, and lengthen it for a less intense one. A very short line produces pure white light; a very long one, no light. Shift-drag to keep the angle constant and change the height of the light (line length).
To the top
Adjust the spotlight using the preview window
- Choose Filter > Render > Lighting Effects.
- For Light Type, choose Spotlight.
- Adjust the light:
• To move the light, drag the center circle.
- To increase the light angle, drag the handle to shorten the line. To decrease the light angle, drag to lengthen the line.
- To stretch the ellipse or rotate the light, drag one of the handles. Shift-drag to keep the angle constant and change only the size of the ellipse. Ctrl-drag (Windows) or Command-drag (Mac OS) to keep the size constant and change the angle or direction of the spotlight.
- To set the light focus (or spotlight intensity) and control how much of an ellipse is filled with light, drag the Intensity slider: full intensity (a value of 100) is brightest, normal intensity is about 50, negative intensity takes away light, and -100 intensity produces no light. Use the Focus slider to control how much of the ellipse is filled with light.
To the top
Lighting Effects styles
Use the Style menu in the Lighting Effects dialog box to choose from 17 light styles. You can also create your own lighting style by adding lights to the Default setting. The Lighting Effects filter requires at least one light source. Only one light can be edited at a time, but all added lights are used to create the effect.
2 o'clock Spotlight A yellow spotlight of medium (17) intensity with a wide (91) focus.
Blue Omni A blue overhead omni light of full (85) intensity with no focus.
Circle Of Light Four spotlights. White has full (100) intensity and a concentrated (8) focus. Yellow has strong intensity (88) and a concentrated focus (3). Red has medium (50) intensity and a concentrated (0) focus. Blue has full (100) intensity and medium (25) focus.
Crossing A white spotlight of medium (35) intensity with a wide (69) focus.
Crossing Down Two white spotlights of medium (35) intensity with a wide (100) focus.
Default A white spotlight of medium intensity (35) with a wide focus (69).
Five Lights Down/Five Lights Up Five white spotlights, down or up, of full (100) intensity with a wide (60) focus.
Flashlight An omni yellow light of medium (46) intensity.
Flood Light A white spotlight of medium (35) intensity with a wide (69) focus.
Parallel Directional A directional blue light of full (98) intensity with no focus.
RGB Lights Red, blue, and green lights that produce a light of medium (60) intensity with a wide (96) focus.
Soft Direct Lights Two unfocused white and blue directional lights. White has a soft (20) intensity. Blue has a medium (67) intensity.
Soft Omni A soft omni light of medium (50) intensity.
Soft Spotlight A white spotlight of full (98) intensity with a wide (100) focus.
Three Down Three white spotlights of soft (35) intensity with a wide (96) focus.
Triple Spotlight Three spotlights of slight (35) intensity with a wide (100) focus.
To the top
Add or delete a light
• In the Lighting Effects dialog box, do one of the following:
• To add a light, drag the light icon at the bottom of the dialog box into the preview area. Repeat as desired for a maximum of 16 lights.
- To delete a light, drag the light by its center circle to the Delete icon at the lower right of the preview window.
To the top
Create, save, or delete a Lighting Effects style
• In the Lighting Effects dialog box, do one of the following:
- To create a style, choose Default for Style and drag the light bulb icon at the bottom of the dialog box into the preview area. Repeat as desired for a maximum of 16 lights.
- To save a style, click Save, name the style, and click OK. Saved styles include all the settings for each light and appear in the Style menu whenever you open the image.
• To delete a style, choose a style, and then click Delete.
To the top
Use the Texture Channel in the Lighting Effects
The Texture Channel in the Lighting Effects dialog box lets you control lighting effects using grayscale images (called bump maps) that you add to your image as alpha channels. You can add any grayscale image to your image as an alpha channel, or create a new alpha channel and add texture to it. For an embossed text effect, use a channel with white text on a black background, or vice versa.
-
If necessary, add an alpha channel to your image. Do one of the following:
-
To use a texture based on another image (for example, fabric or water), convert that image to grayscale, then drag the grayscale channel from that image into the current image.
- Drag an existing alpha channel from another image into the current image.
-
Create an alpha channel in your image, then add texture to it.
-
In the Lighting Effects dialog box, choose a channel from the Texture Channel menu: either an alpha channel you've added or the image's Red, Green, or Blue channel.
-
Select White Is High to raise the white parts of the channel from the surface. Deselect this option to raise the dark parts.
-
Drag the Height slider to vary the texture from Flat (0) to Mountainous (100).
More Help Topics
• Create and edit alpha channel masks

Twitter™ and Facebook posts are not covered under the terms of Creative Commons.
Legal Notices | Online Privacy Policy
Saving and exporting
Asterisks (*) indicate formats whose support was introduced in CS6.
Audio import formats
The following formats can now be opened in Photoshop Standard and Extended. (In Photoshop CS5 and prior, Extended was required.)
AAC*
AIFF*
M2A*
M4A*
MP2*
MP3*
Video import formats
.264*
3GP, 3GPP*
AVC*
AVI
F4V*
FLV*
MOV (QuickTime)
MPE*
MPEG-1
MPEG-4
MPEG-2 if a decoder is installed (for example, with an Adobe video suite)
MTS*
MXF*
R3D*
TS*
VOB*
Video export formats
DPX*
MOV (QuickTime)
MP4
Graphic file formats
Photoshop PSD
Large Document Format PSB
BMP
Cineon
CompuServe GIF
Photoshop DCS 1.0
Photoshop DCS 2.0
DICOM
Photoshop EPS
IFF format
JPEG
JPEG2000
OpenEXR
PCX
Photoshop PDF
Pixar
PNG
Portable Bit Map
Photoshop Raw
Scitex CT
Targa
TIFF
Wireless Bitmap
Photoshop 2.0 (Mac only)
PICT (read only)
PICT Resource (Mac only, can open only)
Radiance
3D-related formats
3D Studio (import only)
DAE (Collada)
Flash 3D* (export only)
JPS* (JPEG Stereo)
KMZ (Google Earth 4)
MPO* (Multi-Picture format)
U3D
Wavefront|OBJ

Twitter™ and Facebook posts are not covered under the terms of Creative Commons.
Legal Notices | Online Privacy Policy
About Photoshop PDF format
Save in Photoshop PDF format
Adobe PDF presets
About PDF/X and PDF/A standards
PDF compatibility levels
General options for Adobe PDF
Compression and downsampling options for Adobe PDF
Color management and PDF/X options for Adobe PDF
Adding security to PDF files
Save an Adobe PDF preset
Load, edit, or delete Adobe PDF presets
To the top
About Photoshop PDF format
You can use the Save As command to save RGB, indexed-color, CMYK, grayscale, Bitmap-mode, Lab color, and duotone images in Photoshop PDF format. Because the Photoshop PDF document can preserve Photoshop data, such as layers, alpha channels, notes, and spot color, you can open the document and edit the images in Photoshop CS2 or later.

You can quickly save a file as Photoshop PDF by playing the Save As Photoshop PDF action on the file. You can access this action by choosing Production from the Actions panel menu.
For advanced users, the Photoshop PDF format offers options for making the document PDF/X compliant, which is essential, for example, when you send your document to a large commercial press. PDF/X (Portable Document Format Exchange) is a subset of Adobe PDF that eliminates color, font, and trapping variables that lead to printing problems.
You can also specify security options for restricting access to the PDF document. The 128-bit RC4 (Acrobat 6 and later) encryption has an option for letting users view metadata and thumbnails in a secure PDF document using Adobe Bridge.
You can save your PDF settings as a PDF preset for creating consistent Photoshop PDF files. Adobe PDF presets and settings are shared across Adobe Creative Suite components, including Photoshop, InDesign®, Illustrator®, GoLive®, and Acrobat®.
To the top
Save in Photoshop PDF format
- Choose File > Save As, and then choose Photoshop PDF from the Format menu. You can select a Color option if you want to embed a color profile or use the profile specified with the Proof Setup command. You can also include layers, notes, spot color, or alpha channels. Click Save.
- In the Save Adobe PDF dialog box, choose an Adobe PDF preset specifying whether the Photoshop PDF file will be printed on a desktop printer or proofer, sent to a commercial printer, distributed by e-mail, displayed on the web, and so on. For details, see Adobe PDF presets.
Choosing a preset is the easiest way to set options for your Photoshop PDF file. After you choose a preset, click Save PDF to generate your Photoshop PDF file. If you want to add security options or fine-tune the saving options for the PDF, follow the remaining steps in this procedure. - (Optional) Choose options from the Standard menu and the Compatibility menu to specify the PDF/X compliance and the Acrobat version compatibility for the PDF document. For more information, see PDF compatibility levels.
- (Optional) Select General in the left pane of the Save Adobe PDF dialog box to set general PDF file saving options. For details of each option, see General options for Adobe PDF.
Note: Users of Photoshop 7.0 and earlier can open a Photoshop PDF as a generic PDF with flattened layers. Choose File > Open As and then choose Generic PDF from the Files Of Type menu (Windows), or choose File > Open and choose Generic PDF from the Format menu (Mac OS).
-
(Optional) Select Compression in the left pane of the Save Adobe PDF dialog box to specify the compression and downsampling options for the PDF file. For more information, see Compression and downsampling options for Adobe PDF.
-
(Optional) Select Output in the left pane of the Save Adobe PDF dialog box to specify color management and PDF/X options. For more information, see Color management and PDF/X options for Adobe PDF.
-
(Optional) To add security to your PDF document, select Security in the left pane of the Save Adobe PDF dialog box. Specify the password and permissions options for your PDF document. See also Adding security to PDF files.
Note: The Encryption Level depends on the Compatibility setting of your PDF document. Choose a different Compatibility setting to specify a higher or lower Encryption Level.
-
(Optional) Select Summary in the left pane of the Save Adobe PDF dialog box. You can review the options you specified.
-
(Optional) If you want to reuse the PDF save settings, click Save Preset and save your settings as a PDF preset. The new preset appears in the Adobe PDF Preset menu the next time you save a Photoshop PDF file and in any product in the Adobe Creative Suite. See also Save an Adobe PDF preset.
-
Click Save PDF. Photoshop closes the Save Adobe PDF dialog box and creates the PDF document file.
To the top
Adobe PDF presets
A PDF preset is a group of settings that affect the process of creating a PDF. These settings are designed to balance file size with quality, depending on how the PDF will be used. Most predefined presets are shared across Adobe Creative Suite components, including InDesign, Illustrator, Photoshop, and Acrobat. You can also create and share custom presets for your unique output requirements.
A few of the presets listed below are not available until you move them—as needed—from the Extras folder (where they are installed by default) to the Settings folder. Typically, the Extras and Settings folders are found in (Windows Vista and Windows 7) ProgramData\Adobe\AdobePDF, (Windows XP) Documents and Settings\All Users\Application Data\Adobe\Adobe PDF, or (Mac OS) Library/Application Support\Adobe PDF. Some presets are not available in some Creative Suite components.
The custom settings are found in (Windows XP) Documents and Settings/[username]/Application Data/Adobe/Adobe PDF/Settings, (Windows Vista and Windows 7) Users/[username]/AppData/Roaming/Adobe/Adobe PDF/Settings, or (Mac OS) Users/[username]/Library/Application Support/Adobe/Adobe PDF/Settings.
Review your PDF settings periodically. The settings do not automatically revert to the default settings. Applications and utilities that create PDFs use the last set of PDF settings defined or selected.
High Quality Print Creates PDFs for quality printing on desktop printers and proofing devices. This preset uses PDF 1.4, downsamples color and grayscale images to 300 ppi and monochrome images to 1200 ppi, embeds subsets of all fonts, leaves color unchanged, and does not flatten transparency (for file types capable of transparency). These PDFs can be opened in Acrobat 5.0 and Acrobat Reader 5.0 and later. In InDesign, this preset also creates tagged PDFs.
Illustrator Default (Illustrator only) Creates a PDF in which all Illustrator data is preserved. PDFs created with this preset can be reopened in Illustrator without any loss of data.
Oversized Pages (Acrobat only) Creates PDFs suitable for viewing and printing of engineering drawings larger than 200 x 200 inches. These PDFs can be opened in Acrobat and Reader 7.0 and later.
PDF/A-1b: 2005 (CMYK and RGB) (Acrobat only) Used for long-term preservation (archival) of electronic documents. PDF/A-1b uses PDF 1.4 and converts all colors to either CMYK or RGB, depending on which standard you choose. These PDFs can be opened in Acrobat and Reader versions 5.0 and later.
PDF/X-1a (2001 and 2003) PDF/X-1a requires all fonts to be embedded, the appropriate marks and bleeds to be specified, and color to appear as CMYK, spot colors, or both. Compliant files must contain information describing the printing condition for which they are prepared. PDF files created with PDF/X-1a compliance can be opened in Acrobat 4.0 and Acrobat Reader 4.0 and later.
PDF/X-1a uses PDF 1.3, downsamples color and grayscale images to 300 ppi and monochrome images to 1200 ppi, embeds subsets of all fonts, creates untagged PDFs, and flattens transparency using the High Resolution setting.
Note: The PDF/X1-a:2003 and PDF/X-3 (2003) presets are placed on your computer during installation but are not available until you move them from the Extras folder to the Settings folder.
PDF/X-3 This preset creates a PDF based on the ISO standard PDF/X-3:2002. The PDF created in this setting can be opened in Acrobat 4.0 and Acrobat Reader 4.0 or later.
PDF/X-4 (2008) This preset creating ISO PDF/X-4:2008 files supports live transparency (transparency is not flattened) and ICC color management. PDF files exported with this preset are in PDF 1.4 format. Images are downsampled and compressed and fonts are embedded in the same manner as with the PDF/X-1a and PDF/X-3 settings. You can create PDF/X-4:2008 compliant PDF files directly from Creative Suite 4 and 5 components including Illustrator, InDesign, and Photoshop. Acrobat 9 Pro provides facilities to validate and preflight PDF files for PDF/X-4:2008 compliance as well as convert non-PDF/X files to PDF/X-4:2008 if possible.
Adobe recommends PDF/X-4:2008 as the optimal PDF file format for reliable PDF print publishing workflows.
Press Quality Creates PDF files for high-quality print production (for example, for digital printing or for separations to an imagesetter or platesetter), but does not create files that are PDF/X-compliant. In this case, the quality of the content is the highest consideration. The objective is to maintain all the information in a PDF file that a commercial printer or print service provider needs in order to print the document correctly. This set of options uses PDF 1.4, converts colors to CMYK, downsamples color and grayscale images to 300 ppi and monochrome images to 1200 ppi, embeds subsets of all fonts, and preserves transparency (for file types capable of transparency).
These PDF files can be opened in Acrobat 5.0 and Acrobat Reader 5.0 and later.
Note: Before creating an Adobe PDF file to send to a commercial printer or print service provider, find out what the output resolution and other settings should be, or ask for a .joboptions file with the recommended settings. You might need to customize the Adobe PDF settings for a particular provider and then provide a .joboptions file of your own.
Rich Content PDF Creates accessible PDF files that include tags, hyperlinks, bookmarks, interactive elements, and layers. This set of options uses PDF 1.5 and embeds subsets of all fonts. It also optimizes files for byte serving. These PDF files can be opened in Acrobat 6.0 and Adobe Reader 6.0 and later. (The Rich Content PDF preset is in the Extras folder.)
Note: This preset was called eBook in earlier versions of some applications.
Smallest File Size Creates PDF files for displaying on the web, an intranet, or for email distribution. This set of options uses compression, downsampling, and a relatively low image resolution. It converts all colors to sRGB and embeds fonts. It also optimizes files for byte serving. For best results, avoid using this preset if you intend to print the PDF file.
These PDF files can be opened in Acrobat 5.0 and Acrobat Reader 5.0 and later.
Magazine Ads 2006 (Japan) This preset creates a PDF based on the creation rules designed by Digital Data Delivery committee.
Standard (Acrobat only) Creates PDF files to be printed to desktop printers or digital copiers, published on a CD, or sent to a client as a publishing proof. This set of options uses compression and downsampling to keep the file size down, but also embeds subsets of all (allowed) fonts used in the file, converts all colors to sRGB, and prints to a medium resolution. Note that Windows font subsets are not embedded by default. PDF files created with this settings file can be opened in Acrobat 5.0 and Acrobat Reader 5.0 and later.
For more information about shared PDF settings for Creative Suite components, see the PDF Integration Guide on the Creative Suite DVD.
To the top
About PDF/X and PDF/A standards
PDF/X and PDF/A standards are defined by the International Organization for Standardization (ISO). PDF/X standards apply to graphic content exchange; PDF/A standards apply to long-term archiving of electronic documents. During PDF conversion, the file that is being processed is checked against the specified standard. If the PDF will not meet the selected ISO standard, a message appears, asking you to choose between canceling the conversion or going ahead with the creation of a noncompliant file.
The most widely used standards for a print publishing workflow are several PDF/X formats: PDF/X-1a, PDF/X-3, and (in 2007) PDF/X-4. The most widely used standards for PDF archiving are PDF/A-1a, and PDF/A-1b (for less stringent requirements).
Note: For more information on PDF/X and PDF/A, see the ISO website and the Adobe website.
To the top
PDF compatibility levels
When you create PDFs, you need to decide which PDF version to use. You can change the PDF version by switching to a different preset or choosing a compatibility option when you save as PDF or edit a PDF preset.
Generally speaking, unless there's a specific need for backward compatibility, you should use the most recent version (in this case version 1.7). The latest version will include all the newest features and functionality. However, if you're creating documents that will be distributed widely, consider choosing Acrobat 5.0 (PDF 1.4) or Acrobat 6.0 (PDF 1.5) to ensure that all users can view and print the document.
The following table compares some of the functionality in PDFs created using the different compatibility settings.
Note: Acrobat 8.0 and 9.0 also use PDF 1.7.
| Acrobat 3.0 (PDF 1.3) Acrobat 5.0 (PDF 1.4) Acrobat 6.0 (PDF 1.5) | Acrobat 7.0 (PDF 1.6) and | Acrobat X (PDF 1.7) |
| PDFs can be opened with Acrobat 3.0 and Acrobat Reader 3.0 and later. | PDFs can be opened with Acrobat 3.0 and Acrobat Reader 3.0 and later.However, features specific to later versions may be lost or not viewable. | Most PDFs can be opened with Acrobat 4.0 and Acrobat Reader 4.0 and later. However, features specific to later versions may be lost or not viewable. |
| Cannot contain artwork that uses live transparency effects. Any transparency must be flattened prior to converting to PDF 1.3. | Supports the use of live transparency in artwork.(The Acrobat Distiller feature flattens transparency.) | Supports the use of live transparency in artwork.(The Acrobat Distiller feature flattens transparency.) |
| Layers are not supported. Layers are not supported. Preserves layers | when creating PDFs from applications that support the generation of layered PDF documents, such as Illustrator CS and later or InDesign CS and later. | Preserves layers when creating PDFs from applications that support the generation of layered PDF documents, such as Illustrator CS and later or InDesign CS and later. |
| DeviceN color space with 8 colorants is supported. | DeviceN color space with 8 colorants is supported. | DeviceN color space with up to 31 colorants is supported. |
| Multibyte fonts can be embedded. (Distiller converts the fonts when embedding.) | Multibyte fonts can be embedded. | Multibyte fonts can be embedded. |
| 40-bit RC4 security supported. | 128-bit RC4 security supported. | 128-bit RC4 security supported. |
To the top
You can set the following options in the General section of the Adobe PDF Options dialog box:
Description Displays the description from the selected preset, and provides a place for you to edit the description. You can paste a description from the clipboard. If you edit the description of a preset, the word “(Modified)” is added at the end of the preset name.
Preserve Photoshop Editing Capabilities Preserves Photoshop data in the PDF, such as layers, alpha channels, and spot colors. Photoshop PDF documents with this option can be opened only in Photoshop CS2 and later.
Embed Page Thumbnails Creates a thumbnail image of artwork.
Optimize For Fast Web View Optimizes the PDF file for faster viewing in a web browser.
View PDF After Saving Opens the newly created PDF file in the default PDF viewing application.
To the top
Compression and downsampling options for Adobe PDF
When saving artwork in Adobe PDF, you can compress text and line art, and compress and downsample bitmap images. Depending on the settings you choose, compression and downsampling can significantly reduce the size of a PDF file with little or no loss of detail and precision.
The Compression area of the Adobe PDF Options dialog box is divided into three sections. Each section provides the following options for compressing and resampling images in your artwork.
Downsampling If you plan to use the PDF file on the web, use downsampling to allow for higher compression. If you plan to print the PDF file at high resolution, do not use downsampling. Select the Do Not Downsample option to disable all downsampling options.
Downsampling refers to decreasing the number of pixels in an image. To downsample images, choose an interpolation method—average downsampling, subsampling, or bicubic downsampling—and enter the desired resolution (in pixels per inch). Then enter a resolution in the For Images Above box. All images with resolution above this threshold are downsampled.
The interpolation method you choose determines how pixels are deleted:
Average Downsampling To Averages the pixels in a sample area and replaces the entire area with the average pixel color at the specified resolution. Average downsampling is the same as Bilinear resampling.
Subsampling To Chooses a pixel in the center of the sample area and replaces the entire area with that pixel color. Subsampling significantly reduces the conversion time compared with downsampling but results in images that are less smooth and continuous. Subsampling is the same as Nearest Neighbor resampling.
Bicubic Downsampling To Uses a weighted average to determine pixel color, which usually yields better results than the simple averaging method of downsampling. Bicubic is the slowest but most precise method, resulting in the smoothest gradations.
Compression Determines the type of compression that is used.
ZIP compression Works well on images with large areas of single colors or repeating patterns, and for black-and-white images that contain repeating patterns. ZIP compression is lossless.
JPEG compression Is suitable for grayscale or color images. JPEG compression is lossy, which means that it removes image data and may reduce image quality; however, it attempts to reduce file size with a minimal loss of information. Because JPEG compression eliminates data, it can achieve much smaller file sizes than ZIP compression.
JPEG2000 Is the new international standard for the compression and packaging of image data. Like JPEG compression, JPEG2000 compression is suitable for grayscale or color images. It also provides additional advantages, such as progressive display and lossless compression not available with JPEG. JPEG2000 is only available if Acrobat 6 (PDF 1.5) or later is selected from the Compatibility menu.
Image Quality Determines the amount of compression that is applied. The available options depend on the compression method. For JPEG2000 compression, Photoshop provides Lossless, Maximum, High, Medium, Low, and Minimum options. For JPEG compression, Photoshop provides Minimum, Low, Medium, High, and Maximum options. For ZIP compression, Photoshop provides an 8-bit Image Quality option. The 8-bit Image Quality option is lossless; that is, data is not removed to reduce file size, so image quality is not affected.
Tile Size Specifies the size of the tiles used in images with JPEG 2000 compression. When low Image Quality values are used to optimize images smaller than 1024 x 1024 pixels, using the largest tile size produces better results. In general, a tile size of 1024 is best for most images. Lower tile sizes are generally used for images with small dimensions (for viewing on devices such as mobile phones).
Convert 16 Bit/Channel Image To 8 Bit/Channel Converts 16-bits-per-channel images to 8-bits-per-channel images (selected by default). ZIP is the only compression method available if the Convert 16 Bits option is unselected. If your document's Compatibility setting is Acrobat 5 (PDF 1.4) or earlier, the Convert 16 Bits option is unavailable, and images are automatically converted to 8 bits per channel.
To the top
Color management and PDF/X options for Adobe PDF
You can set the following options in the Output section of the Adobe PDF Options dialog box. Interactions between Output options change depending on whether Color Management is on or off and which PDF standard is selected.
Color Conversion Specifies how to represent color information in the Adobe PDF file. When you convert color objects to RGB or CMYK, also select a destination profile from the pop-up menu. All spot color information is preserved during color conversion; only the process color equivalents convert to the designated color space.
No Conversion Preserves color data as is.
Convert To Destination Converts all colors to the profile selected for Destination. Whether the profile is included or not is determined by the Profile Inclusion Policy.
Destination Describes the gamut of the final RGB or CMYK output device, such as your monitor or a SWOP standard. Using this profile, Photoshop converts the document's color information (defined by the source profile in the Working Spaces section of the Color Settings dialog box) to the color space of the target output device.
Profile Inclusion Policy Determines whether a color profile is included in the file.
Output Intent Profile Name Specifies the characterized printing condition for the document. An output intent profile is required for creating PDF/X-compliant files. This menu is available only if a PDF/X standard (or preset) is selected in the Adobe PDF Options dialog box.
Output Condition Describes the intended printing condition. This entry can be useful for the intended receiver of the PDF document.
Output Condition Identifier A pointer to more information on the intended printing condition. The identifier is automatically entered for printing conditions that are included in the ICC registry.
Registry Name Indicates the web address for more information on the registry. The URL is automatically entered for ICC registry names.
To the top
Adding security to PDF files
When saving as PDF, you can add password protection and security restrictions, limiting not only who can open the file, but also who can copy or extract contents, print the document, and more.
A PDF file can require passwords to open a document (document open password) and to change security settings (permissions password). If you set any security restrictions in your file, you should set both passwords; otherwise, anyone who opens the file could remove the restrictions. If a file is opened with a permissions password, the security restrictions are temporarily disabled.
The RC4 method of security from RSA Corporation is used to password-protect PDF files. Depending on the Compatibility setting (in the General
category), the encryption level will be high or low.
Note: Adobe PDF presets don't support passwords and security settings. If you select passwords and security settings in the Export Adobe PDF dialog box, and then click Save Preset, the passwords and security settings won't be preserved.
To the top
Save an Adobe PDF preset
Although the default PDF presets are based on best practices, you may discover that your workflow requires specialized PDF settings that aren't available using any of the built-in presets. In this case, you can create and save your own custom presets for reuse in Photoshop or any product in the Adobe Creative Suite.
In Photoshop, you can save the preset using the Adobe PDF Presets command or clicking the Save Preset button in the Save Adobe PDF dialog box. Adobe PDF presets are saved as files with a .joboptions extension. This is useful, for example, if you want your vendor or printer to send you a .joboptions file with the Adobe PDF presets that work best with their workflow.
-
Do one of the following:
-
Choose Edit > Adobe PDF Presets.
-
If you're saving a Photoshop PDF document, click the Save Preset button in the Save Adobe PDF dialog box after you specify your PDF settings. Skip steps 2 and 3.
-
If you chose the Adobe PDF Presets command, do one of the following in the Adobe PDF Presets dialog box:
-
To create a new preset, click the New button in the Adobe PDF Presets dialog box. In the New PDF Preset dialog box, type a name for the preset in the Preset text box.
-
To edit an existing custom preset, select the preset and click Edit. (You can't edit the default presets.)
-
Set the PDF options.
-
Save your preset by doing one of the following:
-
In the New PDF Preset or the Edit PDF Preset dialog box, click OK. The new preset appears in the Adobe PDF Presets list. Click Done when you finish creating presets.
- In the Save dialog box, type a name for the preset in the File Name text box and click Save.
Adobe PDF presets are stored in the following folders:
• (Windows Vista) Users/[user name]/AppData/Roaming/Adobe/Adobe PDF/Settings
• (Windows XP) Documents and Settings/[user name]/Application Data/Adobe/Adobe PDF/Settings
• (Mac OS) Users/[user name]/Library/Application Support/Adobe/Adobe PDF/Settings
All the Adobe PDF presets you save in these locations are available in your other Adobe Creative Suite applications.
Note: To save the PDF preset in a location other than the default, click the Save As button in the Adobe PDF Presets dialog box and browse to the destination, or in the Save dialog box, browse to the destination and click Save.
To the top
Load, edit, or delete Adobe PDF presets
Adobe PDF presets (creation settings) are available in Photoshop and other products in the Adobe Creative Suite. From the Adobe PDF Presets dialog box, you save, load, edit, or delete Adobe PDF presets.
- Choose Edit > Adobe PDF Presets and do any of the following:
• To save settings as a new preset, click the New button, specify settings in the New PDF Preset dialog box, and clic OK.
- To edit an Adobe PDF preset, select the preset in the Preset window, click the Edit button, and change settings in the Edit PDF Preset dialog box.
Note: Although you can't edit the Adobe PDF presets that were installed with Photoshop (the names of presets installed with Photoshop are enclosed in square brackets), you can select one of them and click the New button. In the New PDF Preset dialog box, you can modify the settings and save them as a new preset.
- To delete an Adobe PDF preset, select the preset in the Preset window and click the Delete button. You can't delete the Adobe PDF presets that were installed with Photoshop.
- To load an Adobe PDF preset, click the Load button, select the preset file, and click the Load button. The preset is added to the Presets window.

When you browse for an Adobe PDF preset to load, only files with the .joboptions extension are visible in the Load dialog box.
- To close the PDF Options Preset dialog box, click the Done button.
- To save a preset in a location other than the default, click the Save As button, give the preset a new name (if necessary), browse to the destination, and click Save.
Adobe also recommends
• Create a contact sheet (CS5)

Twitter ^™ and Facebook posts are not covered under the terms of Creative Commons.
Legal Notices | Online Privacy Policy
Save a file
Set file saving preferences
Save large documents
Export layers to files
Testing Photoshop images for mobile devices with Adobe Device Central (CS5)
Create mobile content with Adobe Device Central and Photoshop (CS5)
Note: For detailed instructions, click the links below. To ask questions, request features, or report problems, visit feedback.photoshop.com.
To the top
Save a file
Use the Save command to save changes to the current file or the Save As command to save changes to a different file.
Save changes to the current file
- Choose File > Save.
The file remains in the current format.
Save a file with a different name, location, or format
- Choose File > Save As.
Note: The Camera Raw plug-in can save camera raw image files in a different file format, such as Digital Negative (DNG).
- Choose a format from the Format menu.
Note: If you choose a format that does not support all the features of the document, a warning will appear at the bottom of the dialog box. If you see this warning, it's best to save a copy of the file in Photoshop format or in another format that supports all of the image data.
-
Specify a filename and location.
-
In the Save As dialog box, select saving options.
-
Click Save.
A dialog box appears for choosing options when saving in some image formats.

To copy an image without saving it to your hard disk, use the Duplicate command. To store a temporary version of the image in memory, use the History panel to create a snapshot.
File saving options
You can set a variety of file saving options in the Save As dialog box. The availability of options depends on the image you are saving and the selected file format.
As A Copy Saves a copy of the file while keeping the current file open on your desktop.
Alpha Channels Saves alpha channel information with the image. Disabling this option removes the alpha channels from the saved image.
Layers Preserves all layers in the image. If this option is disabled or unavailable, all visible layers are flattened or merged (depending on the selected format).
Notes Saves notes with the image.
Spot Colors Saves spot channel information with the image. Disabling this option removes spot colors from the saved image.
Use Proof Setup, ICC Profile (Windows), or Embed Color Profile (Mac OS) Creates a color-managed document.
Note: The following image preview and file extension options are available only if Ask When Saving is selected for the Image Previews and Append File Extension (Mac OS) options in the File Handling Preferences dialog box.
Thumbnail (Windows) Saves thumbnail data for the file.
Use Lower Case Extension (Windows) Makes the file extension lowercase.
Image Previews options (Mac OS) Saves thumbnail data for the file. Thumbnails appear in the Open dialog box.
File Extension options (Mac OS) Specifies the format for file extensions. Select Append to add the format's extension to a filename and Use Lower Case to make the extension lowercase.
To the top
Set file saving preferences
-
Do one of the following:
-
(Windows) Choose Edit > Preferences > File Handling.
• (Mac OS) Choose Photoshop > Preferences > File Handling. -
Set the following options:
Image Previews Choose an option for saving image previews: Never Save to save files without previews, Always Save to save files with specified previews, or Ask When Saving to assign previews on a file-by-file basis. In Mac OS, you can select one or more preview types. (See Mac OS image preview options.)
saving:specifying file extensions whenfilename extensions, preferences for savingFile Extension (Windows) Choose an option for the three-character file extensions that indicate a file's format: Use Upper Case to append file extensions using uppercase characters, or Use Lower Case to append file extensions using lowercase characters.
Append File Extension (Mac OS) File extensions are necessary for files that you want to use on or transfer to a Windows system. Choose an option for appending extensions to filenames: Never to save files without file extensions, Always to append file extensions to filenames, or Ask When Saving to append file extensions on a file-by-file basis. Select Use Lower Case to append file extensions using lowercase characters.
Save As to Original Folder When saving, defaults to the folder images originated from. Deselect this option to instead default to the folder you last saved in.
Save in Background (CC, CS6) Background saving lets you keep working in Photoshop after you choose a Save command. You don't have to wait for Photoshop to finish saving the file.
Automatically Save Recovery Information (CC, CS6) Photoshop automatically stores crash-recovery information at the interval that you specify. If you experience a crash, Photoshop recovers your work when you restart it.
Mac OS image preview options
In Mac OS, you can select one or more of the following preview types (to speed the saving of files and minimize file size, select only the previews you need).
Icon Uses the preview as a file icon on the desktop.
Full Size Saves a 72-ppi version of the file for use in applications that can open only low-resolution Photoshop images. For non-EPS files, this is a PICT preview.
Macintosh Thumbnail Displays the preview in the Open dialog box.
Windows Thumbnail Saves a preview that Windows systems can display.
To the top
Save large documents
Photoshop supports documents up to 300,000 pixels in either dimension and offers three file formats for saving documents with images having more than 30,000 pixels in either dimension. Keep in mind that most other applications, including versions of Photoshop earlier than Photoshop CS, cannot handle files larger than 2 GB or images exceeding 30,000 pixels in either dimension.
- Choose File > Save As, and choose one of the following file formats:
Large Document Format (PSB) Supports documents of any file size. All Photoshop features are preserved in PSB files (though some plugin filters are unavailable if documents exceed 30,000 pixels in width or height). Currently, PSB files are supported only by Photoshop CS and later.
Photoshop Raw Supports documents of any pixel dimension or file size, but does not support layers. Large documents saved in the Photoshop Raw format are flattened.
TIFF Supports files up to 4 GB in size. Documents larger than 4 GB cannot be saved in TIFF format.
To the top
Export layers to files
You can export and save layers as individual files using a variety of formats, including PSD, BMP, JPEG, PDF, Targa, and TIFF. Layers are named automatically as they are saved. You can set options to control the generation of names.
-
Choose File > Scripts > Export Layers To Files.
-
In the Export Layers To Files dialog box, under Destination, click Browse to select a destination for the exported files. By default, the generated files are saved in the sample folder as the source file.
- Enter a name in the File Name Prefix text box to specify a common name for the files.
- Select the Visible Layers Only option if you want to export only those layers that have visibility enabled in the Layers panel. Use this option if you don't want all the layers exported. Turn off visibility for layers that you don't want exported.
- Choose a file format from the File Type menu. Set options as necessary.
- Select the Include ICC Profile option if you want the working space profile embedded in the exported file. This is important for color-managed workflows.
- Click Run.
To the top
Testing Photoshop images for mobile devices with Adobe Device Central (CS5)
Device Central enables Photoshop users to preview how Photoshop files will look on a variety of mobile devices.
Creative professionals can create Photoshop files specifically for mobile devices and easily test the files. Users can create a document in Photoshop based on a targeted device.
For example, a user interface designer might use Photoshop to create mock-ups. The designer can test the mock-ups on a variety of handsets, make necessary adjustments, and pass the improved mock-ups to developers.
To the top
Create mobile content with Adobe Device Central and Photoshop (CS5)
- Start Photoshop.
- Select File > New.
- Click Device Central to close the dialog box in Photoshop and open Device Central.
- Select a content type.
The Online Library list on the left is updated and shows the devices that support the content type selected.
- Select one or more target devices from the Online Library list, and drag them to the Local Library list. Then, select a target device in the Local Library list.
Device Central lists proposed document sizes based on the device or devices you selected (if the devices have different display sizes). Depending on the design or content you are developing, you can create a separate mobile document for each display size or try to find one size appropriate for all devices. When choosing the second approach, you may want to use the smallest or largest suggested document size as a common denominator. You can even specify a custom size at the bottom of the tab.
- Click Create.
A blank PSD file with the specified size opens in Photoshop. The new file has the following parameters set by default:
• Color Mode: RGB/8bit
- Resolution: 72 ppi
• Color Profile: SRGB IEC61966-2.1
-
Fill the blank PSD file with content in Photoshop.
-
When you finish, select File > Save For Web& Devices.
-
In the Save For Web & Devices dialog box, select the desired format and change other export settings as desired.
-
Click Device Central.
A temporary file with the export settings specified is displayed in the Device Central Emulator tab. To continue testing, double-click the name of a different device in the Device Sets or Local Library list.
-
If, after previewing the file in Device Central, make changes to the file, go back to Photoshop.
-
In the Photoshop Save For Web & Devices dialog box, make adjustments, such as selecting a different format or quality for export.
-
To test the file again with the new export settings, click the Device Central button.
-
When you are satisfied with the results, click Save in the Photoshop Save For Web & Devices dialog box.
Note: To open Device Central from Photoshop (instead of creating and testing a file), select File > Device Central.
Adobe also recommends
- Save a camera raw image in another format
• About Adobe Device Central
Twitter™ and Facebook posts are not covered under the terms of Creative Commons.
Legal Notices | Online Privacy Policy
Save in TIFF format
Save in JPEG format
Save in PNG format
Save in GIF format
Save in Photoshop EPS format
Save in Photoshop DCS format
Save in Photoshop Raw format
Save in BMP format
Save in Cineon format (16-bit images only)
Save in Targa format
To the top
Save in TIFF format
TIFF is a flexible raster (bitmap) image format supported by virtually all paint, image-editing, and page-layout applications.
- Choose File > Save As, choose TIFF from the Format menu, and click Save.
- In the TIFF Options dialog box, select the options you want, and click OK.
Bit depth (32-bit only) Specifies the bit depth (16-, 24-, or 32-bit) of the saved image.
Image Compression Specifies a method for compressing the composite image data. If you're saving a 32-bit TIFF file, you can specify that the file be saved with predictor compression, but you don't have the option to use JPEG compression. Predictor compression offers improved compression by rearranging floating point values, and works with both LZW and ZIP compression.
Note: JPEG compression is available only for opaque RGB and grayscale images that are 8-bits-per-channel and no more than 30,000 pixels wide or high.
Pixel Order Writes the TIFF file with the channels data interleaved or organized by plane. Previously, Photoshop always wrote TIFF files with the channel order interleaved. Theoretically, the Planar order file can be read and written faster, and offers a little better compression. Both channel orders are backward compatible with earlier versions of Photoshop.
Byte Order Selects the platform on which the file can be read. This option is useful when you don't know what program the file may be opened in. Photoshop and most recent applications can read files using either IBM PC or Macintosh byte order.
Save Image Pyramid Preserves multiresolution information. Photoshop does not provide options for opening multiresolution files; the image opens at the highest resolution within the file. However, Adobe InDesign and some image servers provide support for opening multiresolution formats.
Save Transparency Preserves transparency as an additional alpha channel when the file is opened in another application. Transparency is always preserved when the file is reopened in Photoshop.
Layer Compression Specifies a method for compressing data for pixels in layers (as opposed to composite data). Many applications cannot read layer data and skip over it when opening a TIFF file. Photoshop, however, can read layer data in TIFF files. Although files that include layer data are larger than those that don't, saving layer data eliminates the need to save and manage a separate PSD file to hold the layer data. Choose Discard Layers And Save A Copy if you want to flatten the image.
Note: To have Photoshop prompt you before saving an image with multiple layers, select Ask Before Saving Layered TIFF Files in the File Handling area of the Preferences dialog box.
To the top
Save in JPEG format
You can use the Save As command to save CMYK, RGB, and grayscale images in JPEG (*.jpg) format. JPEG compresses file size by selectively discarding data. You can also save an image as one or more JPEG using the Save For Web & Devices command.
JPEG supports only 8-bit images. If you save a 16-bit image to this format, Photoshop automatically lowers the bit depth.
To quickly save a medium-quality JPEG, play the Save As JPEG Medium action on the file. You can access this action by choosing Production from the Actions panel menu.
-
Choose File > Save As, and choose JPEG from the Format menu.
-
In the JPEG Options dialog box, select the options you want, and click OK.
Matte Offers matte color choices to simulate the appearance of background transparency in images that contain transparency.
Image Options Specifies the image quality. Choose an option from the Quality menu, drag the Quality pop-up slider, or enter a value between 0 and 12 in the Quality text box.
Format Options Specifies the format of your JPEG file. Baseline ("Standard") uses a format recognized by most web browsers. Baseline Optimized creates a file with optimized color and a slightly smaller file size. Progressive displays a series of increasingly detailed versions of the image (you specify how many) as it downloads. (Not all web browsers support optimized and Progressive JPEG images.)
Note: Some applications may not be able to read a CMYK file saved in JPEG format. Likewise, if you find that a Java application can't read a JPEG file, try saving the file without a thumbnail preview.
To the top
Save in PNG format
You can use the Save As command to save RGB, Indexed Color, Grayscale, and Bitmap mode images in PNG format.
Note: You can also save an image as one or more PNG files using the Save For Web & Devices command.
-
Choose File > Save As, and choose PNG from the Format menu.
-
Select an Interlace option:
None Displays the image in a browser only when download is complete.
Interlaced Displays low-resolution versions of the image in a browser as the file downloads. Interlacing makes download time seem shorter, but it also increases file size.
- Click OK.
To the top
Save in GIF format
You can use the Save As command to save RGB, Indexed Color, Grayscale, or Bitmap mode images directly in CompuServe GIF (known as GIF)
format. The image is automatically converted to Indexed Color mode.
Note: GIF is only available when the image is 8 Bits/Channel (it only supports 8 Bit/Channel).
- Choose File > Save As, and choose CompuServe GIF from the Format menu.
- For RGB images, the Indexed Color dialog box appears. Specify conversion options and click OK.
- Select a row order for the GIF file, and click OK:
Normal Displays the image in a browser only when download is complete.
Interlaced Displays low-resolution versions of the image in a browser as the file downloads. Interlacing makes download time seem shorter, but it also increases file size.
Note: You can also save an image as one or more GIF files using the Save For Web & Devices command.
To the top
Save in Photoshop EPS format
Virtually all page-layout, word-processing, and graphics applications accept imported or placed EPS (Encapsulated PostScript) files. To print EPS files, you should use a PostScript printer. Non-PostScript printers will print only the screen-resolution preview.
- Choose File > Save As, and choose Photoshop EPS from the Format menu.
- In the EPS Options dialog box, select the options you want, and click OK:
Preview Creates a low-resolution image to view in the destination application. Choose TIFF to share an EPS file between Windows and Mac OS systems. An 8-bit preview is in color and a 1-bit preview is in black and white with a jagged appearance. An 8-bit preview creates a larger file size than a 1-bit preview. See also Bit depth.
Encoding Determines the way image data is delivered to a PostScript output device. Encoding options are described below.
Include Halftone Screen and Include Transfer Function Control print specifications for high-end commercial print jobs. Consult your printer before selecting these options.
Transparent Whites Displays white areas as transparent. This option is available only for images in Bitmap mode.
PostScript Color Management Converts file data to the printer's color space. Do not select this option if you plan to place the image in another color-managed document.
Note: Only PostScript Level 3 printers support PostScript Color Management for CMYK images. To print a CMYK image using PostScript Color Management on a Level 2 printer, convert the image to Lab mode before saving in EPS format.
Include Vector Data Preserves any vector graphics (such as shapes and type) in the file. However, vector data in EPS and DCS files is available only to other applications; vector data is rasterized if you reopen the file in Photoshop. This option is only available if your file contains vector data.
Image Interpolation Applies bicubic interpolation to smooth the low-resolution preview if printed.
Photoshop EPS encoding options
ASCII or ASCII85 Encodes if you're printing from a Windows system, or if you're experience printing errors or other difficulties.
Binary Produces a smaller file and leaves the original data intact. However, some page-layout applications and some commercial print spooling and network printing software may not support binary Photoshop EPS files.
JPEG Compresses the file by discarding some image data. You can choose the amount of JPEG compression from very little (JPEG Maximum Quality) to a lot (JPEG Low Quality). Files with JPEG encoding can be printed only on Level 2 (or later) PostScript printers and may not separate into individual plates.
To the top
Save in Photoshop DCS format
DCS (Desktop Color Separations) format is a version of EPS that lets you save color separations of CMYK or multichannel files.
- Choose File > Save As, and choose Photoshop DCS 1.0 or Photoshop DCS 2.0 from the Format menu.
- In the DCS Format dialog box, select the options you want, and click OK.
The dialog box includes all the options available for Photoshop EPS files. Additionally, the DCS menu gives you the option of creating a 72-ppi composite file that can be placed in a page-layout application or used to proof the image:
DCS 1.0 format Creates one file for each color channel in a CMYK image. You can also create a fifth file: a grayscale or color composite. To view the composite file, you must keep all five files in the same folder.
DCS 2.0 format Retains spot color channels in the image. You can save the color channels as multiple files (as for DCS 1.0) or as a single file. The single-file option saves disk space. You can also include a grayscale or color composite.
To the top
Save in Photoshop Raw format
The Photoshop Raw format is a file format for transferring images between applications and computer platforms. The Photoshop Raw format is not the same as camera raw.
- Choose File > Save As, and choose Photoshop Raw from the Format menu.
- In the Photoshop Raw Options dialog box, do the following:
• (Mac OS) Specify values for File Type and File Creator, or accept the default values.
- Specify a Header parameter.
- Select whether to save the channels in an interleaved or non-interleaved order.
To the top
Save in BMP format
The BMP format is an image format for the Windows operating system. The images can range from black-and-white (1 bit per pixel) up to 24-bit color (16.7 million colors).
- Choose File > Save As, and choose BMP from the Format menu.
- Specify a filename and location, and click Save.
- In the BMP Options dialog box, select a file format, specify the bit depth and, if necessary, select Flip Row Order. For more options, click Advanced Modes and specify the BMP options.
- Click OK.
To the top
Save in Cineon format (16-bit images only)
RGB images that are 16 bits per channel can be saved in Cineon format for use in the Kodak Cineon Film System.
- Choose File > Save As and choose Cineon from the Format menu.
To the top
Save in Targa format
The Targa (TGA) format supports bitmap and RGB images with 8 Bits/Channel. It is designed for Truevision® hardware, but it is also used in other applications.
- Choose File > Save As, and choose Targa from the Format menu.
- Specify a filename and location, and click Save.
- In the Targa Options dialog box, select a resolution, select the Compress (RLE) option if you want to compress the file, and then click OK.
Adobe also recommends
- Save For Web & Devices overview
Twitter ^™ and Facebook posts are not covered under the terms of Creative Commons.
Legal Notices | Online Privacy Policy
Choosing a file format
About file compression
Maximize compatibility for PSD and PSB files
Photoshop format (PSD)
Photoshop 2.0 format
Photoshop DCS 1.0 and 2.0 formats
Photoshop EPS format
Photoshop Raw format
Digital Negative format (DNG)
BMP format
Cineon format
DICOM format
GIF
IFF
JPEG format
Large Document Format (PSB)
OpenEXR format
PCX
PICT File
PICT Resource
Pixar format
PNG format
Portable Bit Map format
Radiance format
Scitex CT
Targa
TIFF
WBMP format
Note: If a supported file format does not appear in the appropriate dialog box or submenu, you may need to install the format's plug-in module.
To the top
Choosing a file format
Graphics file formats differ in the way they represent image data (as pixels or vectors), and support different compression techniques and Photoshop features. To preserve all Photoshop features (layers, effects, masks, and so on), save a copy of your image in Photoshop format (PSD).
Like most file formats, PSD supports files up to 2 GB in size. For files larger than 2 GB, save in Large Document Format (PSB), Photoshop Raw (flattened image only), TIFF (up to 4 GB), or DICOM format.
The standard bit depth for images is 8 bits per channel. To achieve greater dynamic range with 16- or 32-bit images, use the following formats:
Formats for 16-bit images (require Save As command)
Photoshop, Large Document Format (PSB), Cineon, DICOM, IFF, JPEG, JPEG 2000, Photoshop PDF, Photoshop Raw, PNG, Portable Bit Map, and TIFF.
Note: The Save For Web & Devices command automatically converts 16-bit images to 8-bit.
Formats for 32-bit images (require Save As command)
Photoshop, Large Document Format (PSB), OpenEXR, Portable Bitmap, Radiance, and TIFF.
About file compression
Many file formats use compression to reduce the file size of bitmap images. Lossless techniques compress the file without removing image detail or color information; lossy techniques remove detail. The following are commonly used compression techniques:
RLE (Run Length Encoding) Lossless compression; supported by some common Windows file formats.
LZW (Lemple-Zif-Welch) Lossless compression; supported by TIFF, PDF, GIF, and PostScript language file formats. Most useful for images with large areas of single color.
JPEG (Joint Photographic Experts Group) Lossy compression; supported by JPEG, TIFF, PDF, and PostScript language file formats. Recommended for continuous-tone images, such as photographs. JPEG uses lossy compression. To specify image quality, choose an option from the Quality menu, drag the Quality pop-up slider, or enter a value between 0 and 12 in the Quality text box. For the best printed results, choose maximum-quality compression. JPEG files can be printed only on Level 2 (or later) PostScript printers and may not separate into individual plates.
CCITT A family of lossless compression techniques for black-and-white images, supported by the PDF and PostScript language file formats. (CCITT is an abbreviation for the French spelling of International Telegraph and Telekeyed Consultive Committee.)
ZIP Lossless compression; supported by PDF and TIFF file formats. Like LZW, ZIP compression is most effective for images that contain large areas of single color.
To the top
Maximize compatibility for PSD and PSB files
If you work with PSD and PSB files in older versions of Photoshop or applications that don't support layers, you can add a flattened version of the image to the saved file.
Note: If you save an image in an earlier version of Photoshop, features that version doesn't support are discarded.
- Choose Edit > Preferences > File Handling (Windows) or Photoshop > Preferences > File Handling (Mac OS).
- From the Maximize PSD and PSB File Compatibility menu, choose any of the following:
Always Saves a composite (flattened) image along with the layers of your document.
Ask Asks whether to maximize compatibility when you save.
Never Saves only a layered image.

Choose Ask or Never if you want to significantly reduce file size.
To the top
Photoshop format (PSD)
Photoshop format (PSD) is the default file format and the only format, besides the Large Document Format (PSB), that supports all Photoshop features. Because of the tight integration between Adobe products, other Adobe applications, such as Adobe Illustrator, Adobe InDesign, Adobe Premiere, Adobe After Effects, and Adobe GoLive, can directly import PSD files and preserve many Photoshop features. For more information, see Help for the specific Adobe applications.
When saving a PSD, you can set a preference to maximize file compatibility. This saves a composite version of a layered image in the file so it can be read by other applications, including previous versions of Photoshop. It also maintains the appearance of the document, just in case future
versions of Photoshop change the behavior of some features. Including the composite also makes the image much faster to load and use in applications other than Photoshop, and may sometimes be required to make the image readable in other applications.
16-bits-per-channel and high dynamic range 32-bits-per-channel images can be saved as PSD files.
To the top
Photoshop 2.0 format
(Mac OS) You can use this format to open an image in Photoshop 2.0 or to export an image to an application supporting only Photoshop 2.0 files. Saving in Photoshop 2.0 format flattens your image and discards layer information.
To the top
Photoshop DCS 1.0 and 2.0 formats
Desktop Color Separations (DCS) format is a version of the standard EPS format that lets you save color separations of CMYK images. You can use DCS 2.0 format to export images containing spot channels. To print DCS files, you must use a PostScript printer.
To the top
Photoshop EPS format
Encapsulated PostScript (EPS) language file format can contain both vector and bitmap graphics and is supported by virtually all graphics, illustration, and page-layout programs. EPS format is used to transfer PostScript artwork between applications. When you open an EPS file containing vector graphics, Photoshop rasterizes the image, converting the vector graphics to pixels.
EPS format supports Lab, CMYK, RGB, Indexed Color, Duotone, Grayscale, and Bitmap color modes, and does not support alpha channels. EPS does support clipping paths. Desktop Color Separations (DCS) format, a version of the standard EPS format, lets you save color separations of CMYK images. You use DCS 2.0 format to export images containing spot channels. To print EPS files, you must use a PostScript printer.
Photoshop uses the EPS TIFF and EPS PICT formats to let you open images saved in file formats that create previews but are not supported by Photoshop (such as QuarkXPress®). You can edit and use an opened preview image just as any other low-resolution file. An EPS PICT preview is available only in Mac OS.
Note: EPS TIFF format and EPS PICT format are more relevant to earlier versions of Photoshop. The current version of Photoshop includes rasterization features for opening files that include vector data.
To the top
Photoshop Raw format
The Photoshop Raw format is a flexible file format for transferring images between applications and computer platforms. This format supports CMYK, RGB, and grayscale images with alpha channels, and multichannel and Lab images without alpha channels. Documents saved in the Photoshop Raw format can be of any pixel or file size, but they cannot contain layers.
The Photoshop Raw format consists of a stream of bytes describing the color information in the image. Each pixel is described in binary format, with 0 representing black and 255 white (for images with 16-bit channels, the white value is 65535). Photoshop designates the number of channels needed to describe the image, plus any additional channels in the image. You can specify the file extension (Windows), file type (Mac OS), file creator (Mac OS), and header information.
In Mac OS, the file type is generally a four-character ID that identifies the file—for example, TEXT identifies the file as an ASCII text file. The file creator is also generally a four-character ID. Most Mac OS applications have a unique file creator ID that is registered with the Apple Computer Developer Services group.
The Header parameter specifies how many bytes of information appear in the file before actual image information begins. This value determines the number of zeroes inserted at the beginning of the file as placeholders. By default, there is no header (header size = 0). You can enter a header when you open the file in Raw format. You can also save the file without a header and then use a file-editing program, such as HEdit (Windows) or Norton Utilities® (Mac OS), to replace the zeroes with header information.
You can save the image in an interleaved or non-interleaved format. If you choose interleaved, the color values (red, green, and blue, for example) are stored sequentially. Your choice depends on requirements of the application that will open the file.
Note: A Photoshop Raw image is not in the same file format as a camera raw image file from a digital camera. A camera raw image file is in a camera-specific proprietary format that is essentially a “digital negative,” with no filtering, white balance adjustments, or other in-camera
Digital Negative format (DNG)
Digital Negative (DNG) is a file format that contains the raw image data from a digital camera and metadata that defines what the data means. DNG, Adobe's publicly available, archival format for camera raw files, is designed to provide compatibility and decrease the current proliferation of camera raw file formats. The Camera Raw plug-in can save camera raw image data in the DNG format. For more information about the Digital Negative (DNG) file format, visit www.adobe.com and search on the term "Digital Negative." You'll find comprehensive information and a link to a user forum.
BMP format
BMP is a standard Windows image format on DOS and Windows-compatible computers. BMP format supports RGB, Indexed Color, Grayscale, and Bitmap color modes. You can specify either Windows or OS/2® format and a bit depth of 8 bits/channel. For 4-bit and 8-bit images using Windows format, you can also specify RLE compression.
BMP images are normally written bottom to top; however, you can select the Flip Row Order option to write them from top to bottom. You can also select an alternate encoding method by clicking Advanced Modes. (Flip Row Order and Advanced Modes are most relevant to game programmers and others using DirectX®.)
Cineon format
Developed by Kodak, Cineon is a 10-bits-per-channel digital format suitable for electronic composition, manipulation, and enhancement. Using the Cineon format, you can output back to film with no loss of image quality. The format is used in the Cineon Digital Film System, which transfers images originated on film to the Cineon format and back to film.
DICOM format
The DICOM (Digital Imaging and Communications in Medicine) format is commonly used for the transfer and storage of medical images, such as ultrasounds and scans. DICOM files contain both image data and headers, which store information about the patient and the medical image. You can open, edit, and save DICOM files in Photoshop Extended.
GIF
Graphics Interchange Format (GIF) is the file format commonly used to display indexed-color graphics and images in Hypertext Markup Language (HTML) documents over the World Wide Web and other online services. GIF is an LZW-compressed format designed to minimize file size and electronic transfer time. GIF format preserves transparency in indexed-color images; however, it does not support alpha channels.
IFF
IFF (Interchange File Format) is a general-purpose data storage format that can associate and store multiple types of data. IFF is portable and has extensions that support still-picture, sound, music, video, and textual data. The IFF format includes Maya IFF and IFF (formerly Amiga IFF).
JPEG format
Joint Photographic Experts Group (JPEG) format is commonly used to display photographs and other continuous-tone images in hypertext markup language (HTML) documents over the World Wide Web and other online services. JPEG format supports CMYK, RGB, and Grayscale color modes, and does not support transparency. Unlike GIF format, JPEG retains all color information in an RGB image but compresses file size by selectively discarding data.
A JPEG image is automatically decompressed when opened. A higher level of compression results in lower image quality, and a lower level of compression results in better image quality. In most cases, the Maximum quality option produces a result indistinguishable from the original.
To the top
Large Document Format (PSB)
The Large Document Format (PSB) supports documents up to 300,000 pixels in any dimension. All Photoshop features, such as layers, effects, and filters, are supported. (With documents larger than 30,000 pixels in width or height, some plug-in filters are unavailable.)
You can save high dynamic range, 32-bits-per-channel images as PSB files. Currently, if you save a document in PSB format, it can be opened only in Photoshop CS or later. Other applications and earlier versions of Photoshop cannot open documents saved in PSB format.
Note: Most other applications and older versions of Photoshop cannot support documents with file sizes larger than 2 GB.
To the top
OpenEXR format
OpenEXR (EXR) is a file format used by the visual effects industry for high dynamic range images. The film format has high color fidelity and a dynamic range suitable for use in motion picture production. Developed by Industrial Light and Magic, OpenEXR supports multiple lossless or lossy compression methods. An OpenEXR file supports transparency and only works with 32 bits/channel images; the file format stores the values as 16 bits/channel floating point.
To the top
PCX
PCX format is commonly used by IBM PC-compatible computers. Most PC software supports version 5 of PCX format. A standard VGA color palette is used with version 3 files, which do not support custom color palettes.
PCX format supports Bitmap, Grayscale, Indexed Color, and RGB color modes, and does not support alpha channels. PCX supports the RLE compression method. Images can have a bit depth of 1, 4, 8, or 24.
To the top
Portable Document Format (PDF) is a flexible, cross-platform, cross-application file format. Based on the PostScript imaging model, PDF files accurately display and preserve fonts, page layouts, and both vector and bitmap graphics. In addition, PDF files can contain electronic document search and navigation features such as electronic links. PDF supports 16-bits-per-channel images. Adobe Acrobat also has a Touch Up Object tool for minor editing of images in a PDF. For more information about working with images in PDFs, see Acrobat Help.
Note: The Touch Up Object tool is mainly for last-minute revisions to images and objects. It's best to do image editing in Photoshop before saving as PDF.
Photoshop recognizes two types of PDF files:
Photoshop PDF files Created when Preserve Photoshop Editing Capabilities is selected in the Save Adobe PDF dialog box. Photoshop PDF files can contain only a single image.
Photoshop PDF format supports all color modes (except Multichannel) and features that are supported in standard Photoshop format. Photoshop PDF also supports JPEG and ZIP compression, except for Bitmap-mode images, which use CCITT Group 4 compression.
Standard PDF files Created when Preserve Photoshop Editing Capabilities is deselected in the Save Adobe PDF dialog box, or by using another application such as Adobe Acrobat or Illustrator. Standard PDF files can contain multiple pages and images.
When you open a standard PDF file, Photoshop rasterizes vector and text content, while preserving pixel content.
To the top
PICT File
PICT format is used in Mac OS graphics and page-layout applications as an intermediary file format for transferring images between applications. PICT format supports RGB images with a single alpha channel and Indexed Color, Grayscale, and Bitmap mode images without alpha channels.
Though Photoshop can open raster PICT files, it cannot open QuickDraw PICTs or save to PICT format.
To the top
PICT Resource
(Mac OS) A PICT resource is a PICT file but takes a name and resource ID number. The PICT Resource format supports RGB images with a single alpha channel, and Indexed Color, Grayscale, and Bitmap mode images without alpha channels.
You can use the Import command or the Open command to open a PICT resource. However, Photoshop cannot save to this format.
To the top
Pixar format
The Pixar format is designed specifically for high-end graphics applications, such as those used for rendering three-dimensional images and animation. Pixar format supports RGB and grayscale images with a single alpha channel.
To the top
PNG format
Developed as a patent-free alternative to GIF, Portable Network Graphics (PNG) format is used for lossless compression and for display of images on the web. Unlike GIF, PNG supports 24-bit images and produces background transparency without jagged edges; however, some web browsers do not support PNG images. PNG format supports RGB, Indexed Color, Grayscale, and Bitmap mode images without alpha channels. PNG preserves transparency in grayscale and RGB images.
To the top
Portable Bit Map format
The Portable Bit Map (PBM) file format, also known as Portable Bitmap Library and Portable Binary Map, supports monochrome bitmaps (1 bit per pixel). The format can be used for lossless data transfer because many applications support this format. You can even edit or create such files within a simple text editor.
The Portable Bit Map format serves as the common language of a large family of bitmap conversion filters including Portable FloatMap (PFM), Portable Graymap (PGM), Portable Pixmap (PPM), and Portable Anymap (PNM). While the PBM file format stores monochrome bitmaps, PGM additionally stores grayscale bitmaps, and PPM can also store color bitmaps. PNM is not a different file format in itself, but a PNM file can hold PBM, PGM, or PPM files. PFM is a floating-point image format that can be used for 32-bits-per-channel HDR files.
To the top
Radiance format
Radiance (HDR) is a 32-bits-per-channel file format used for high dynamic range images. This format was originally developed for the Radiance system, a professional tool for visualizing lighting in virtual environments. The file format stores the quantity of light per pixel instead of just the colors to be displayed on-screen. The levels of luminosity accommodated by the Radiance format are far higher than the 256 levels in 8-bits-per-channel image file formats. Radiance (HDR) files are often used in 3D modeling.
Scitex CT
Scitex Continuous Tone (CT) format is used for high-end image processing on Scitex computers. Contact Creo to obtain utilities for transferring files saved in Scitex CT format to a Scitex system. Scitex CT format supports CMYK, RGB, and grayscale images and does not support alpha channels.
CMYK images saved in Scitex CT format often have extremely large file sizes. These files are generated for input using a Scitex scanner. Images saved in Scitex CT format are printed to film using a Scitex rasterizing unit, which produces separations using a patented Scitex halftoning system. This system produces very few moiré patterns and is often demanded in professional color work—for example, ads in magazines.
To the top
Targa
The Targa (TGA) format is designed for systems using the Truevision video board and is commonly supported by MS-DOS color applications. Targa format supports 16-bit RGB images (5 bits x 3 color channels, plus one unused bit), 24-bit RGB images (8 bits x 3 color channels), and 32-bit RGB images (8 bits x 3 color channels plus a single 8-bit alpha channel). Targa format also supports indexed-color and grayscale images without alpha channels. When saving an RGB image in this format, you can choose a pixel depth and select RLE encoding to compress the image.
To the top
TIFF
Tagged-Image File Format (TIFF, TIF) is used to exchange files between applications and computer platforms. TIFF is a flexible bitmap image format supported by virtually all paint, image-editing, and page-layout applications. Also, virtually all desktop scanners can produce TIFF images. TIFF documents have a maximum file size of 4 GB. Photoshop CS and later supports large documents saved in TIFF format. However, most other applications and older versions of Photoshop do not support documents with file sizes greater than 2 GB.
TIFF format supports CMYK, RGB, Lab, Indexed Color, and Grayscale images with alpha channels and Bitmap mode images without alpha channels. Photoshop can save layers in a TIFF file; however, if you open the file in another application, only the flattened image is visible. Photoshop can also save notes, transparency, and multiresolution pyramid data in TIFF format.
In Photoshop, TIFF image files have a bit depth of 8, 16, or 32 bits per channel. You can save high dynamic range images as 32-bits-per-channel TIFF files.
To the top
WBMP format
WBMP format is the standard format for optimizing images for mobile devices, such as cell phones. WBMP supports 1-bit color, which means that WBMP images contain only black and white pixels.
Adobe also recommends
- About plug-in modules
- Save a camera raw image in another format
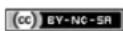
Twitter ^™ and Facebook posts are not covered under the terms of Creative Commons.
Legal Notices | Online Privacy Policy
Read a Digimarc watermark
Adding digital copyright information
Before adding a digital watermark
Embed a watermark
Using the Watermark Durability setting
Check the signal strength meter
Note: Digimarc plug-ins require a 32-bit operating system. They are unsupported in 64-bit versions of Windows and Mac OS.
To the top
Read a Digimarc watermark
- Choose Filter > Digimarc > Read Watermark. If the filter finds a watermark, a dialog box displays the Digimarc ID, creator information, and image attributes.
- Click OK, or for more information, click Web Lookup. The Digimarc website is displayed in your web browser, where contact details appear for the given creator ID.
To the top
Adding digital copyright information
You can add copyright information to Photoshop images and notify users that an image is copyright protected via a digital watermark that uses Digimarc ImageBridge technology. The watermark—a digital code added as noise to the image—is virtually imperceptible to the human eye. The Digimarc watermark is durable in both digital and printed forms, surviving typical image edits and file format conversions.
Embedding a digital watermark in an image lets viewers obtain information about the creator of the image. This feature is particularly valuable to image creators who license their work to others. Copying an image with an embedded watermark also copies the watermark and any information associated with it.
For more detailed information on embedding Digimarc digital watermarks, refer to the Digimarc website at www.digimarc.com.
To the top
Before adding a digital watermark
Keep in mind the following considerations before embedding a digital watermark in your image.
Color variation The image must contain some degree of variation or randomness in color to embed the digital watermark effectively and imperceptibly. The image cannot consist mostly or entirely of a single flat color.
Pixel dimensions The Digimarc technology requires a minimum number of pixels to work. Digimarc recommends the following minimum pixel dimensions for the image to be watermarked:
- 100 pixels by 100 pixels if you don't expect the image to be modified or compressed prior to its actual use.
- 256 pixels by 256 pixels if you expect the image to be cropped, rotated, compressed, or otherwise modified after watermarking.
- 750 pixels by 750 pixels if you expect the image to appear ultimately in printed form at 300 dpi or greater.
There is no upper limit on pixel dimensions for watermarking.
File compression In general, a Digimarc watermark will survive lossy compression methods, such as JPEG, though it is advisable to favor image
quality over file size (a JPEG compression setting of 4 or higher works best). In addition, the higher the Watermark Durability setting you choose when embedding the watermark, the better the chances that the digital watermark will survive compression.
Workflow Digital watermarking should be one of the very last tasks you perform on an image, except for file compression.
Use the following recommended workflow:
• Make all necessary modifications to your image until you are satisfied with its final appearance (this includes resizing and color correction).
- Embed the Digimarc watermark.
- If needed, compress the image by saving it in JPEG or GIF format.
- If the image is intended for printed output, perform the color separation.
- Read the watermark and use the signal strength meter to verify that the image contains a watermark of sufficient strength for your purposes.
• Publish the digital watermarked image.
To the top
Embed a watermark
To embed a digital watermark, you must first register with Digimarc Corporation—which maintains a database of artists, designers, and photographers and their contact information—to get a unique Digimarc ID. You can then embed the Digimarc ID in your images, along with information such as the copyright year or a restricted-use identifier.
- Open the image that you want to watermark. You can embed only one digital watermark per image. The Embed Watermark filter won't work on an image that has been previously watermarked.
If you're working with a layered image, you should flatten the image before watermarking it; otherwise, the watermark will affect the active layer only.
Note: You can add a digital watermark to an indexed-color image by first converting the image to RGB mode, embedding the watermark, and then converting the image back to Indexed Color mode. However, the results may be inconsistent. To make sure that the watermark was embedded, run the Read Watermark filter.
-
Choose Filter > Digimarc > Embed Watermark.
-
If you are using the filter for the first time, click the Personalize button. Get a Digimarc ID by clicking Info to launch your web browser and visit the Digimarc website at www.digimarc.com. Enter your PIN and ID number in the Digimarc ID text box, and click OK.
After you enter a Digimarc ID, the Personalize button becomes a Change button, allowing you to enter a new Digimarc ID.
-
Enter a copyright year, transaction ID, or image ID for the image.
-
Select any of the following image attributes:
Restricted Use Limits the use of the image.
Do Not Copy Specifies that the image should not be copied.
Adult Content Labels the image contents as suitable for adults only. (Within Photoshop, this option does not limit access to adult-only images, but future versions of other applications may limit their display.)
-
For Watermark Durability, drag the slider or enter a value, as described in the next section.
-
Select Verify to automatically assess the watermark's durability after it is embedded.
Using the Watermark Durability setting
The default Watermark Durability setting is designed to strike a balance between watermark durability and visibility in most images. However, you can adjust the Watermark Durability setting yourself to suit the needs of your images. Low values are less visible in an image but less durable, and may be damaged by applying filters or by performing some image editing, printing, and scanning operations. High values are more durable but may display some visible noise in the image.
Your setting should depend on the intended use of the image and the goals you've set for your watermarks. For example, it may be quite acceptable to use a higher Watermark Durability setting with JPEG images posted on a website. The higher durability helps to ensure the persistence of the watermark, and the increased visibility often is not noticeable with medium-resolution JPEG images. Digimarc recommends experimenting with various settings as part of your testing process to determine which setting works best for the majority of your images.
To the top
Check the signal strength meter
The signal strength meter helps you determine whether a watermark is durable enough to survive the intended use of the image.
- Choose Filter > Digimarc > Read Watermark. The signal strength meter appears at the bottom of the dialog box. You can also display the meter automatically by selecting Verify while embedding the watermark.
The signal strength meter is available only for images containing digital watermarks that you yourself have embedded.
Digimarc recommends that you check the signal strength meter before publishing your images. For example, if you often compress watermarked images for inclusion in a website, check the meter before posting the images. You can also use the signal strength meter to gauge the effectiveness of different Watermark Durability settings that you are experimenting with.

Twitter ^™ and Facebook posts are not covered under the terms of Creative Commons.
Legal Notices | Online Privacy Policy
Printing
Preparing to print 3D objects
Previewing and printing the 3D object
3D print utilities
FAQ
See also
With Photoshop, you can print any compatible 3D model without worrying about 3D printer limitations. In preparation for printing, Photoshop automatically makes 3D models watertight. Photoshop also generates the necessary support structures—scaffolding and rafts—to ensure that your 3D prints are successful.
To the top
Preparing to print 3D objects
- Select Window > Workspace > 3D to switch to the 3D workspace.
- Open the 3D model in Photoshop. If necessary, customize the size of the 3D model while opening it.
- Select 3D > 3D Print Settings.

text_image
Properties 3D Print Settings Print To: Local Printer: 3D Systems Cube Printer Volume Centimeters Detail Level: High (0.10mm) Show Printer Volume Overlay Printer Volume X: 11.3 Y: 11.3 Z: 17.3 Scene Volume X: 9.481 Y: 25 Z: 7.799 Scale To Print Volume Surface Detail Normal Maps Bump Maps Opacity Support Structures Scaffolding Raft3D Print Settings
- In the 3D Print Settings panel, choose whether you want to print to a printer connected to your computer through a USB port (local printer) or use an online 3D printing service, such as Shapeways.com.
Note: Shapeways.com is a leading 3D printing marketplace and community. Shapeways.com provides you with various printer profiles that you can leverage while printing your 3D models. See this FAQ for more information.

To refresh the list of supported printers or Shapeways.com profiles, select Get Latest Printers from the Print To pop-up menu.
- Select a local printer or a Shapeways.com printer profile.
To view estimated prices for printing the 3D model using available Shapeways.com profiles, select Printer > Estimate Price.
- Select a unit for the printer volume—inch, centimeter, millimeter, or pixel. The unit is reflected in the Printer Volume dimensions as well as the print plate measurements.
natural_image
3D model of a rocket inside a transparent cube with labeled axes (A, B, C) and no visible text or symbols on the model itself.A. 3D model B. Print plate C. Printer volume overlay
7. Select a Detail Level—Low, Medium, or High—for the 3D print. The time required to print the 3D object depends on the detail level that you choose.
8. If you don't want to see the 3D printer volume overlaid on the 3D model, deselect Show Printer Volume Overlay.
9. Adjust the Scene Volume dimensions to specify the desired size of the printed 3D object. When you change a value (X, Y, or Z), the other two values are scaled proportionately. As you modify the Scene Volume dimensions, notice that the print plate under the 3D model scales in proportion.
You can scrub the value of a Scene Volume dimension by clicking the dimension label (X, Y, or Z) and then dragging the mouse left or right. Hold down the Shift key to make the value scrub faster.
| Scene Volume | ||||
| X: | 9.481 | Y: | 25 | Z: 7.799 |
- Choose Scale To Print Volume if you want Photoshop to auto-scale your 3D model, such that it fills up the available print volume of the selected printer.
- If the 3D model has normal maps, bump maps, or opacity maps; you can choose to ignore one of more types of these maps while printing the model. You'll notice that the 3D model updates in real time when you change these Surface Detail settings.
- You may choose to not print the support structures (scaffolds or rafts) required for the 3D object. Use this option with caution, since the printing of the 3D model may fail if you don't print a necessary support structure.
- If your printer supports multiple materials, choose the material that you want to use for printing the 3D object.
Previewing and printing the 3D object
Once you're done specifying the 3D print settings, follow these steps:
- Click the Start Print icon (☐) or select 3D > 3D Print. Photoshop unifies the 3D scene and prepares it for the printing process.
- If you chose to print using a Shapeways.com profile, Photoshop prompts you that the actual cost of printing may differ from the displayed estimates. Click OK.
- In the preview window that appears, use the 3D camera tools to rotate, zoom, or move the 3D object.
Rotate the 3D camera
Roll the 3D camera
Pan the 3D camera
Slide the 3D camera
Reset the 3D camera to its original location

text_image
Photoshop 3D Print Settings 3D Print Preview Support Structures Scaffolding: ✓ Raft: Summary Print To: Local Printer: 3D Systems Cube Estimated Time: Print Size: 5.04cm x 12.61cm x 4.39cm Scaffolding: Yes Raft: Yes Show Raft ✓ Show Print Volume ✓ Show Mesh ✓ Show Scaffold ✓ Show Cleaning Tower ✓ Show Size Cancel Print Export3D print preview; notice the support structures
- If you want to export the 3D print settings to an STL file, click Export and save the file to an appropriate location on your computer. You can upload the STL file to an online service, such as Shapeways.com, or put it on an SD card for local printing.
- Review the 3D print summary and click Print.
You can cancel an in-progress 3D print by selecting 3D > Cancel 3D Print.
To the top
3D print utilities
Photoshop provides interactive wizard-based utilities that you can use for configuring, calibrating, and maintaining your 3D printer. You can use these utilities only when the 3D printer is powered on and connected to your computer.
- Select 3D > 3D Printer Utilities.
- Select the utility that you want to launch.
Calibrate Print Plate Helps level the print plate. This utility performs the following broad steps:
- Prompts you to remove any leftover printing material from the 3D printer
- Initializes the print head
- Lets you adjust/finetune the gap between the print plate and the print head for nine nozzle positions
You can use this utility in the wizard mode or in the manual mode.
Load Filament Helps load a filament into a fused deposition modeling (FDM) 3D printer. Photoshop initiates the head-heating process and the filament-loading mechanism for easy filament loading.
Remove Filament Helps remove a filament from an FDM 3D printer. Photoshop initiates the head-heating process and the filament-loading mechanism for easy filament removal.
Change Filament Helps replace the filament of an FDM 3D printer with a new filament. Photoshop initiates the head-heating process and the filament-loading mechanism for easy filament changing.
- Follow the onscreen instructions.
To the top
FAQ
What 3D printers are supported?
Can I apply a cross section to a 3D model before printing it?
Can I apply bump/opacity/normal maps to a 3D model before printing it?
Can I print 3D models in two colors?
How are 3D models having multiple layers printed?
To the top
See also
• 3D Painting | CC, CS6
• 3D panel enhancements | Photoshop CC
- Photoshop 3D documentation

Twitter™ and Facebook posts are not covered under the terms of Creative Commons.
Legal Notices | Online Privacy Policy
Printing basics
About desktop printing
Print images
Position and scale images
Print part of an image
Print vector data
To the top
Printing basics
Whether you are printing an image to your desktop printer or sending it to a prepress facility, knowing a few basics about printing makes the print job go more smoothly and helps ensure that the finished image appears as intended.
Types of printing For many Photoshop users, printing a file means sending the image to an inkjet printer. Photoshop can send your image to a variety of devices to be printed directly onto paper or converted to a positive or negative image on film. In the latter case, you can use the film to create a master plate for printing by a mechanical press.
Types of images The simplest images, such as line art, use only one color in one level of gray. A more complex image, such as a photograph, has varying color tones. This type of image is known as a continuous-tone image.
Color separation Artwork intended for commercial reproduction and containing more than one color must be printed on separate master plates, one for each color. This process, called color separation, generally calls for the use of cyan, magenta, yellow, and black (CMYK) inks. In Photoshop, you can adjust how the various plates are generated.
Quality of detail The detail in a printed image depends on image resolution (pixels per inch) and printer resolution (dots per inch). Most PostScript laser printers have a resolution of 600 dpi, while PostScript imagesetters have a resolution of 1200 dpi or higher. Inkjet printers produce a microscopic spray of ink, not actual dots, resulting in an approximate resolution of 300 to 720 dpi.
To the top
About desktop printing
Unless you work in a commercial printing company or service bureau, you probably print images to a desktop printer, such as an inkjet, dye sublimation, or laser printer, not to an imagesetter. Photoshop lets you control how your image is printed.
Monitors display images using light, whereas desktop printers reproduce images using inks, dyes, or pigments. For this reason, a desktop printer can't reproduce all the colors displayed on a monitor. However, by incorporating certain procedures (such as a color management system) into your workflow, you can achieve predictable results when printing your images to a desktop printer. Keep these considerations in mind when working with an image you intend to print:
- If your image is in RGB mode, do not convert the document to CMYK mode when printing to a desktop printer. Work entirely in RGB mode. As a rule, desktop printers are configured to accept RGB data and use internal software to convert to CMYK. If you send CMYK data, most desktop printers apply a conversion anyway, with unpredictable results.
- If you want to preview an image as printed to any device for which you have a profile, use the Proof Colors command.
- To reproduce screen colors accurately on the printed page, you must incorporate color management into your workflow. Work with a monitor that is calibrated and characterized. Ideally, you should also create a custom profile specifically for your printer and the paper you print on, though the profile supplied with your printer can produce acceptable results.
To the top
Print images
Photoshop provides the following printing commands in the File menu:
Print Displays the Print dialog box, where you can preview the print and set options. (Customized settings are saved as new defaults when you click Done or Print.)
Print One Copy Prints one copy of a file without displaying a dialog box.
For maximum efficiency, you can include the Print command in actions. (Photoshop provides all print settings in one dialog box.)
Set Photoshop print options and print
-
Choose File > Print.
-
Select the printer, number of copies, and layout orientation.
-
In the preview area at left, visually adjust the position and scale of the image relative to the selected paper size and orientation. Or to the right, set detailed options for Position And Size, Color Management, Printing Marks, and so on.
For more details, see Position and scale images and Printing with color management from Photoshop.
In Mac OS, expand the Color Management section, and select Send 16-bit Data to produce the highest possible quality in subtle graduated tones, such as bright skies.
- Do one of the following:
• To print the image, click Print.
- To close the dialog box without saving the options, click Cancel.
- To preserve the options and close the dialog box, click Done.
To the top
Position and scale images
You can adjust the position and scale of an image using options in the Print dialog box. The shaded border at the edge of the paper represents the margins of the selected paper; the printable area is white.
The base output size of an image is determined by the document size settings in the Image Size dialog box. Scaling an image in the Print dialog box changes the size and resolution of the printed image only. For example, if you scale a 72-ppi image to 50% in the Print dialog box, the image will print at 144 ppi; however, the document size settings in the Image Size dialog box will not change. In the Print dialog box, the Print Resolution field at the bottom of the Position And Size section shows the print resolution at the current scaling setting.
Many third-party printer drivers provide a scaling option in the Print Settings dialog box. This scaling affects everything on the page, including the size of all page marks, such as crop marks and captions, whereas the scaling percentage provided by the Print command affects only the size of the printed image (and not the size of page marks).
Note: To avoid inaccurate scaling, specify scaling using the Print dialog box rather than the Print Settings dialog box; do not enter a scaling percentage in both dialog boxes.
Reposition an image on the paper
- Choose File > Print, and expand the Position And Size settings at right. Then do one of the following:
• To center the image in the printable area, select Center Image. - To position the image numerically, deselect Center Image, and then enter values for Top and Left.
- Deselect Center Image, and drag the image in the preview area.
Scale the print size of an image
- Choose File > Print, and expand the Position And Size settings at right. Then do one of the following:
- To fit the image within the printable area of the selected paper, click Scale To Fit Media.
• To rescale the image numerically, deselect Scale To Fit Media, then enter values for Scale, Height and Width.
• To achieve the desired scale, drag the bounding box around the image in the preview area.
Note: If you get a warning that your image is larger than the printable area of the paper, click Cancel. Then choose File > Print, expand the Position And Size settings at right, and select Scale To Fit Media.
To the top
Print part of an image
- With the Rectangle Marquee tool, select the part of the image you want to print.
- Choose File > Print, and select Print Selected Area.
- If desired, adjust the selected area by dragging the triangular handles on the perimeter of the print preview.
- Click Print.
To the top
Print vector data
If an image includes vector graphics, such as shapes and type, Photoshop can send the vector data to a PostScript printer. When you choose to include vector data, Photoshop sends the printer a separate image for each type layer and each vector shape layer. These additional images are printed on top of the base image, and clipped using their vector outline. Consequently, the edges of vector graphics print at the printer's full resolution, even though the content of each layer is limited to the resolution of your image file.
Note: Some blending modes and layer effects required rasterized vector data.
- Choose File > Print.
- In the options box at right, scroll to the bottom, and expand PostScript Options.
- Select Include Vector Data.
More Help Topics
• Image size and resolution
- About soft-proofing colors
- About color profiles
Legal Notices | Online Privacy Policy
Let Photoshop determine printed colors
Let printer determine printed colors
Print a hard proof

To better understand color management concepts and workflows, see Understanding Color Management.
To the top
Let Photoshop determine printed colors
If you have a custom color profile for a specific printer, ink, and paper combination, letting Photoshop manage colors often produces better results than letting the printer manage colors.
- Choose File > Print.
- Expand the Color Management section at right.
- For Color Handling, choose Photoshop Manages Colors.
-
(Optional) Set any of the following options:
-
For Printer Profile, select the profile that best matches your output device and paper type. If there are any profiles associated with the current printer, they are placed at the top of the menu, with the default profile selected.
The more accurately the profile describes the behavior of the output device and printing conditions (such as paper type), the more accurately the color management system can translate the numeric values of the actual colors in a document. (See Install a color profile.)
Rendering Intent Specifies how Photoshop converts colors to the destination color space. (See About rendering intents.)
Black Point Compensation Preserves the shadow detail in the image by simulating the full dynamic range of the output device.
- (Optional) Below the print preview, select any of the following:
Match Print Colors Select to view image colors in the preview area as they will actually print.
Gamut Warning Enabled when Match Print Colors is selected. Select to highlight out-of-gamut colors in the image, as determined by the selected printer profile. A gamut is the range of colors that a color system can display or print. A color that can be displayed in RGB may be out of gamut for your current printer profile.
Show Paper White Sets the color white in the preview to the color of the paper in the selected printer profile. This produces a more accurate print preview if you're printing on off-white paper such as newsprint or art papers that are more beige than white. Since absolute white and black create contrast, less white in the paper will lower the overall contrast of your image. Off-white paper can also change the overall color cast of the image, so yellows printed on beige paper may appear more brown.
-
Access the color management options for the printer driver from the Print Settings dialog box, which automatically appears after you click Print.
-
In Windows, click the Print Settings button to access the printer driver options.
-
In Mac OS, use the pop-up menu from the Print Settings dialog box to access the printer driver options.
-
Turn off color management for the printer, so the printer profile settings won't override your profile settings.
Every printer driver has different color management options. If it's not clear how to turn off color management, consult your printer documentation.
- Click Print.
To the top
Let printer determine printed colors
If you don't have a custom profile for your printer and paper type, you can let the printer driver handle the color conversion.
- Choose File > Print.
-
Expand the Color Management section at right.
Note: The Document Profile entry shows the profile embedded in the image. -
For Color Handling, choose Printer Manages Colors.
-
(Optional) For Rendering Intent, specify how to convert colors to the destination color space. A summary of each option appears in the Description area at bottom.
Many non-PostScript printer drivers ignore this option and use the Perceptual rendering intent. (For more information, see About rendering intents.)
-
Access the color management options for the printer driver from the Print Settings dialog box, which automatically appears after you click Print:
-
In Windows, click Print Settings to access the printer driver options.
- In Mac OS, use the pop-up menu from the Print Settings dialog box to access the printer driver options.
Every printer driver has different color management options. If it's not clear how to turn on color management, consult your printer documentation.
- Click Print.
To the top
Print a hard proof
A hard proof (sometimes called a proof print or match print) is a printed simulation of your final output on a printing press. A hard proof is produced on an output device that's less expensive than a printing press. Some inkjet printers have the resolution necessary to produce inexpensive prints that can be used as hard proofs.
- Choose View > Proof Setup, and select the output conditions you want to simulate. You can do this using a preset or by creating a custom proof setup. See Soft-proof colors.
The view changes automatically according to the proof you choose. Choose Custom to create custom proof settings, which you must save so you can select them in the Proof Setup menu of the Print dialog box.
-
After you select a proof, choose File > Print.
-
Expand the Color Management section at right.
-
For Color Handling, choose Photoshop Manages Colors.
-
For Printer Profile, select the profile for your output device.
-
From the menu above the Proof Setup menu or Rendering Intent menu, select Hard Proofing.
The Proofing Profile entry below should match the proof setup you selected earlier.
- (Optional) Set any of the following options.
Proof Setup Choose any customized proofs that exist locally on your hard drive.
Simulate Paper Color Simulates what colors look like on the paper of the simulated device. Using this option produces the most accurate proof, but it is not available for all profiles.
Simulate Black Ink Simulates the brightness of dark colors for the simulated device. Using this option results in more accurate proofs of dark colors, but it is not available for all profiles.
-
Access the color management options for the printer driver from the Print Settings dialog box, which automatically appears after you click Print.
-
In Windows, click the Preferences button to access the printer driver options.
-
In Mac OS, use the pop-up menu from the Print Settings dialog box to access the printer driver options.
-
Turn off color management for the printer so that the printer profile settings don't override your profile settings.
Every printer driver has different color management options. If it's not clear how to turn off color management, consult your printer documentation.
- Click Print.

Twitter™ and Facebook posts are not covered under the terms of Creative Commons.
Legal Notices | Online Privacy Policy
Contact Sheet II and PDF Presentation plug-ins in Photoshop CS6 and Photoshop CC are 64-bit compatible for optimal performance on modern systems.
Some procedures in this article are applicable to Adobe Bridge. Adobe Bridge is not installed by default with Photoshop CC. You can download Bridge CC by logging in to Adobe Creative Cloud and then navigating to Apps.
To the top
Creating a contact sheet
-
Do either of the following:
-
(Photoshop) Choose File > Automate > Contact Sheet II.
-
(Bridge) Select a folder of images or specific image files. From the Bridge menu, choose Tools > Photoshop > Contact Sheet II. Unless you select specific images, the contact sheet will include all the images currently displayed in Adobe Bridge. You can select a different images after the Contact Sheet II dialog box opens.
-
In the Contact Sheet II dialog box, specify the images to include by choosing an option from the Use menu.
Note: If you select Bridge, all images currently in Bridge are used unless you selected images before choosing the Contact Sheet II command. Images in subfolders are not included.
- In the Document area, specify the dimensions and color data for the contact sheet. Select Flatten All Layers to create a contact sheet with all images and text on a single layer. Deselect Flatten All Layers to create a contact sheet in which each image is on a separate layer and each caption is on a separate text layer.
- In the Thumbnails area, specify layout options for the thumbnail previews.
- For Place, choose whether to arrange thumbnails across first (from left to right, then top to bottom) or down first (from top to bottom, then left to right).
- Enter the number of columns and rows that you want per contact sheet.
- Select Use Auto-Spacing to let Photoshop automatically space the thumbnails in the contact sheet. If you deselect Use Auto-Spacing, you can specify the vertical and horizontal space around the thumbnails.
- Select Rotate For Best Fit to rotate the images, regardless of their orientation, so they fit efficiently on a contact sheet.
-
Select Use Filename As Caption to label the thumbnails using their source image filenames. Use the menu to specify a caption font and font size.
-
Click OK.
To the top
Creating a PDF presentation
The PDF Presentation command lets you use a variety of images to create a multipage document or slide show presentation.
- Choose File > Automate > PDF Presentation.
- In the PDF Presentation dialog box, click Browse and navigate to add files to the PDF presentation. Select Add Open Files to add files already open in Photoshop.
Note: Drag files up or down to reorder them in the presentation. If you want a file to appear more than once, select the file and click Duplicate.
- Set Output and Presentation options. Then click Save.
Note: PDF presentations are saved as generic PDF files, not Photoshop PDF files, and are rasterized when you reopen them in Photoshop.

Twitter™ and Facebook posts are not covered under the terms of Creative Commons.
Place multiple photos into a picture package Customize a picture package layout
Flexible picture packages with Smart Objects

text_image
123Lay out a custom package template in Photoshop CS5.... Read More http://goo.gl/UywKR

by Michael Hoffman http://www.hoffmanartdesig...
Contribute your expertise to Adobe Community Help
To the top
Place multiple photos into a picture package
To use the optional Picture Package plug-in described below, first download it for Windows or Mac OS. You can also create picture and custom packages in Photoshop Lightroom, if you have it. See Choose a print template in Lightroom Help.
With the optional Picture Package plug-in, you can place multiple copies of an image on a single page, much as portrait studios do with school photos. You can also place different images on the same page. You can choose from a variety of size and placement options to customize your package layout.

natural_image
Close-up of a child wearing a floral head covering, captured in six frames (no text or symbols visible)A picture package layout
- Picture Package is an optional plug-in. Download and install it for Windows or Mac OS.
- Run Photoshop in 32-bit mode (64-bit Mac OS only).
-
Do one of the following:
-
(Photoshop) Choose File > Automate > Picture Package. If you have multiple images open, Picture Package uses the frontmost image.
- (Bridge) Choose Tools > Photoshop > Picture Package. The Picture Package command uses the first image listed in Bridge unless you select a specific image before giving the Picture Package command.
If you're using only the frontmost image or a selected image from Bridge, skip to step 3.
-
Add one or more images to the layout by doing one of the following:
-
In the Source Images area of the Picture Package dialog box, choose either File or Folder from the Use menu and click Browse (Windows) or Choose (Mac OS). If you choose Folder, you can select Include All Subfolders to include images inside any subfolders.
- Click a placeholder in the preview layout and browse to select an image.
text_image
Picture Package Source Images Use: File Browse... Include All Substriders Document Page Size: 9.0 x 10.0 in Layout: (2)4x5 (4)2.5x3.5 Resolution: 72 pixels/inch Mode: RGB Color Flatten All Layers Layout Click to select a custom file.Click a placeholder in the Picture Package preview layout, then browse to select an image.
- Drag an image from the desktop or a folder into a placeholder.
text_image
Layout images File Edit View Image09Add an image to a picture package by dragging the image from the desktop into a placeholder.
You can change any image in the layout by clicking a placeholder and browsing to select an image.
- In the Document area of the Picture Package dialog box, select page size, layout, resolution, and color mode. A thumbnail of the chosen layout appears on the right side of the dialog box.
- Select Flatten All Layers to create a picture package with all images and label text on a single layer. Deselect Flatten All Layers to create a picture package with separate image layers and text layers (for labels). If you place each image and label on a separate layer, you can update your picture package after it's been saved. However, the layers increase the file size of your picture package.
-
In the Label area, choose the source for label text from the Content menu or choose None. If you choose Custom Text, enter the text for the label in the Custom Text field.
-
Specify font, font size, color, opacity, position, and rotation for the labels.
-
Click OK.
To the top
Customize a picture package layout
You can modify existing layouts or create new layouts using the Picture Package Edit Layout feature. Custom layouts are saved as text files and stored in the Layouts folder inside the Presets folder. You can then reuse your saved layouts. The Picture Package Edit Layout feature uses a graphic interface that eliminates the need to write text files to create or modify layouts.
- Do one of the following:
• (Photoshop) Choose File > Automate > Picture Package.
• (Bridge) Choose Tools > Photoshop > Picture Package.
-
In the Picture Package dialog box, choose a layout from the Layout menu if you're creating a layout or customizing an existing one.
-
Click the Edit Layout button.
-
In the Picture Package Edit Layout dialog box, enter a name for the custom layout in the Name text box.
-
(Optional) In the Layout area of the Picture Package Edit Layout dialog box, choose a size from the Page Size menu or enter values in the Width and Height text boxes. You can use the Units menu to specify inches, centimeters, pixels, or millimeters.

natural_image
Simple geometric diagram with a red arrow pointing to a black cross symbol inside a square frame (no text or labels)Dragging a placeholder to a new location in the Picture Package layout
-
In the Grid area of the Picture Package Edit Layout dialog box, select the Snap To option to display a grid to help you position the elements in the custom layout. Enter a value in the Size text box to change the appearance of the grid.
-
To add or delete a placeholder, do one of the following:
-
Click Add Zone to add a placeholder to the layout.
-
Select a placeholder and click Delete Zone to delete it from the layout.
-
To modify a placeholder, select a placeholder and do any of the following:
-
Enter values in the Width and Height text boxes to resize a placeholder.
- Click and drag a handle to resize a placeholder. If you resize a rectangle placeholder with an image in it, Picture Package will snap the image within the vertical or horizontal placeholder, depending on the way the zone is being resized.
- Enter values in the X and Y text boxes to move a placeholder.
-
Click and drag a placeholder to the location you want in the layout.
-
Click Save.
Legal Notices | Online Privacy Policy
About spot colors
Create a new spot channel
Convert an alpha channel to a spot channel
Edit a spot channel to add or remove color
Change a spot channel's color or solidity
Merge spot channels
Adjust overlapping spot colors
To the top
About spot colors
Spot colors are special premixed inks used instead of, or in addition to, the process color (CMYK) inks. Each spot color requires its own plate on the press. (Because a varnish requires a separate plate, it is considered a spot color, too.)
If you are planning to print an image with spot colors, you need to create spot channels to store the colors. To export spot channels, save the file in DCS 2.0 format or PDF.
Note the following when working with spot colors:
- For spot color graphics that have crisp edges and knock out the underlying image, consider creating the additional artwork in a page layout or illustration application.
- To apply spot color as a tint throughout an image, convert the image to Duotone mode and apply the spot color to one of the duotone plates. You can use up to four spot colors, one per plate.
- The names of the spot colors are printed on the separations.
- Spot colors are overprinted on top of the fully composited image. Each spot color is printed in the order it appears in the Channels panel, with the topmost channel printing as the topmost spot color.
- You cannot move spot colors above a default channel in the Channels panel except in Multichannel mode.
- Spot colors cannot be applied to individual layers.
- Printing an image with a spot color channel to a composite color printer will print the spot color at an opacity indicated by the Solidity setting.
- You can merge spot channels with color channels, splitting the spot color into its color channel components.
To the top
Create a new spot channel
You can create a new spot channel or convert an existing alpha channel to a spot channel.
- Choose Window > Channels to display the Channels panel.
- To fill a selected area with a spot color, make or load a selection.
-
Do one of the following to create a channel:
-
Ctrl-click (Windows) or Command-click (Mac OS) the New Channel button in the Channels panel.
- Choose New Spot Channel from the Channels panel menu.
If you made a selection, that area is filled with the currently specified spot color.
- In the New Spot Channel dialog box, click the Color box. Then in the Color Picker, click Color Libraries to choose from a custom color system such as PANTONE or TOYO and choose a color. See Choose a spot color.
If you select a custom color, your print service provider can more easily provide the proper ink to reproduce the image.
- Enter a name for the spot channel. If you choose a custom color, the channel automatically takes the name of that color.
Be sure to name spot colors so they'll be recognized by other applications reading your file. Otherwise the file might not print.
- For Solidity, enter a value between 0% and 100%.
This option lets you simulate on-screen the density of the printed spot color. A value of 100% simulates an ink that completely covers the inks beneath (such as a metallic ink); 0% simulates a transparent ink that completely reveals the inks beneath (such as a clear varnish). You can also use this option to see where an otherwise transparent spot color (such as a varnish) will appear.

text_image
GARDEN
text_image
GARDENSolidity at 100% and solidity at 50%.
Note: The Solidity and color choice options affect only on-screen previews and composite prints. They have no effect on printed separations.
To the top
Convert an alpha channel to a spot channel
- If a selection is active in the image, choose Select > Deselect.
-
Do one of the following:
-
Double-click the alpha channel thumbnail in the Channels panel.
-
Select the alpha channel in the Channels panel, and choose Channel Options from the panel menu.
-
Select Spot Color.
- Click the color box, then choose a color in the Color Picker or click Color Libraries and choose a custom color. Click OK.
- Rename the channel if needed.
- Click OK.
The areas of the channel containing grayscale values are converted to spot color.
- To apply the color to the selected area of the channel, choose Image > Adjustments > Invert.
To the top
Edit a spot channel to add or remove color
-
Select the spot channel in the Channels panel.
-
Use a painting or editing tool to paint in the image. Paint with black to add more spot color at 100% opacity; paint with gray to add spot color with lower opacity.
Note: Unlike the Solidity option in the Spot Channel Options dialog box, the Opacity option in the painting or editing tool's options determines the actual density of ink used in the printed output.
To the top
Change a spot channel's color or solidity
-
Double-click the spot channel thumbnail in the Channels panel.
-
Click the color box, and choose a color. Click Color Libraries to choose from a custom color system such as PANTONE or TOYO.
-
Enter a Solidity value between 0% and 100% to adjust ink opacity for the spot color.
Note: The Solidity and color choice options affect only on-screen previews and composite prints. They have no effect on printed separations.
To the top
Merge spot channels
In RGB or CMYK color mode, you can remove spot channels and merge them into the standard color channels. When you merge spot channels in CMYK mode, the resulting colors usually don't precisely match the original spot colors, because CMYK inks can't produce the range of colors available from spot color inks.
-
Select the spot channel in the Channels panel.
-
Choose Merge Spot Channel from the panel menu.
The spot color is converted to and merged with the color channels. The spot channel is deleted from the panel.
Merging spot channels flattens layered images. The merged composite reflects the preview spot color information, including the Solidity settings. For example, a spot channel with a solidity of 50% will produce different merged results than the same channel with a solidity of 100%.
To the top
Adjust overlapping spot colors
To prevent overlapping spot colors from either printing over or knocking out the underlying spot color, remove one of the spot colors where they overlap.
Use a printed sample of the overprinted inks to adjust your screen display to help you predict how colors will look when printed.
Note: In some cases, such as when you use varnish and bump plates, you may want colors to overprint.
-
In the Channels panel, select the spot channel with the color you want to print.
-
Choose Select > Load Selection.

To quickly select an image in a channel, hold down Ctrl (Windows) or Command (Mac OS), and click the channel in the Channels panel.
-
For Channel, choose the spot channel from step 1, and click OK.
-
To create a trap when knocking out the underlying color, choose Select > Modify > Expand or Contract, depending on whether the overlapping spot color is darker or lighter than the spot color beneath it. In the Channels panel, select the underlying spot channel that contains the areas you want to knock out. Press Backspace (Windows) or Delete (Mac OS).

This method can be used to knock out areas from any channels under a spot color, such as the CMYK channels.
- If a spot color in one channel overlaps more than one other spot color, repeat this process for each channel that contains the areas you want removed.
Adobe also recommends

BY-NC-SA
Twitter ^™ and Facebook posts are not covered under the terms of Creative Commons.
Legal Notices | Online Privacy Policy
Printing images to a commercial printing press
Preparing images for press
Set output options
Print separations from Photoshop
Prepare an image with spot channels for printing from another application
Create a color trap
Determine scan resolution for printing
To the top
Preparing images for press
From Photoshop, you can prepare image files for offset lithography, digital printing, gravure, and other commercial printing processes.
Generally, your workflow depends on the capabilities of the prepress facility. Before you begin a workflow for commercial printing, contact the prepress staff to learn their requirements. For example, they may not want you to convert to CMYK at any point because they may need to use prepress-specific settings. Here are some possible scenarios for preparing your image files to achieve predictable printing results:
- Work entirely in RGB mode and make sure that the image file is tagged with the RGB working space profile. If your printer or prepress staff use a color management system, they should be able to use your file's profile to make an accurate conversion to CMYK before producing the film and printing plates.
- Work in RGB mode until you finish editing your image. Then convert the image to CMYK mode and make any additional color and tonal adjustments. Especially check the highlights and shadows of the image. Use Levels, Curves, or Hue/Saturation adjustment layers to make corrections. These adjustments should be very minor. Flatten the file if necessary, then send the CMYK file to the professional printer.
- Place your RGB or CMYK image in Adobe InDesign or Adobe Illustrator. In general, most images printed on a commercial press are not printed directly from Photoshop but from a page-layout program like Adobe InDesign or an illustration program like Adobe Illustrator. For more information on importing Photoshop files into Adobe InDesign or Adobe Illustrator, see Adobe InDesign Help or the Adobe Illustrator Help.
Here are a few issues to keep in mind when you work on an image intended for commercial printing:
- If you know the characteristics of the press, you can specify the highlight and shadow output to preserve certain details.
- If you use a desktop printer to preview the appearance of the final printed piece, keep in mind that a desktop printer cannot faithfully replicate the output of a commercial printing press. A professional color proof gives a more accurate preview of the final printed piece.
- If you have a profile from a commercial press, you can choose it with the Proof Setup command and then view a soft proof using the Proof Colors command. Use this method to preview the final printed piece on your monitor.
Note: Some printers may prefer to receive your documents in PDF format, especially if the documents need to conform to PDF/X standards. See Save in Photoshop PDF format.
To the top
Set output options
If you are preparing your images for commercial printing directly from Photoshop, you can select and preview a variety of page marks and other output options using the Print command. Generally, these output options should be specified only by prepress professionals or people knowledgeable about the commercial printing process.

text_image
A B C D Old No. Mouse 1775pt 45° yuan maganda Black E F G H Carnival seriesPage marks
A. Gradient tint bar B. Label C. Registration marks D. Progressive color bar E. Corner crop mark F. Center crop mark G. Description H. Star target
- Choose File > Print.
- Choose Output from the pop-up menu.
- Set one or more of the following options:
Calibration Bars Prints an 11-step grayscale, a transition in density from 0 to 100% in 10% increments. With a CMYK color separation, a gradient tint bar is printed to the left of each CMYK plate, and a progressive color bar to the right.
Note: Calibration bars, registration marks, crop marks, and labels are printed only if the paper is larger than the printed image.
Registration Marks Prints registration marks on the image (including bull's-eyes and star targets). These marks are used primarily for aligning color separations on PostScript printers.
Corner Crop Marks Prints crop marks where the page is to be trimmed. You can print crop marks at the corners. On PostScript printers, selecting this option will also print star targets.
Center Crop Marks Prints crop marks where the page is to be trimmed. You can print crop marks at the center of each edge.
Description Prints any description text entered in the File Infodialog box, up to about 300 characters. Description text is always printed in 9-point Helvetica plain type.
Labels Prints the file name above the image. If printing separations, the separation name is printed as part of the label.
Emulsion Down Makes type readable when the emulsion is down—that is, when the photosensitive layer on a piece of film or photographic paper is facing away from you. Normally, images printed on paper are printed with emulsion up, with type readable when the photosensitive layer faces you. Images printed on film are often printed with emulsion down.
Negative Prints an inverted version of the entire output, including all masks and any background color. Unlike the Invert command in the Image menu, the Negative option converts the output, not the on-screen image, to a negative. If you print separations directly to film, you probably want a negative, although in many countries film positives are common. Check with your print shop to determine which is required. To determine the emulsion side, examine the film under a bright light after it has been developed. The dull side is the emulsion; the shiny side is the base. Check whether your print shop requires film with positive emulsion up, negative emulsion up, positive emulsion down, or negative emulsion down.
Background Selects a background color to be printed on the page outside the image area. For example, a black or colored background may be desirable for slides printed to a film recorder. To use this option, click Background, and then select a color from the Color Picker. This is a printing option only; it does not affect the image itself.
Border Prints a black border around an image. Type a number and choose a unit value to specify the width of the border.
Bleed Prints crop marks inside rather than outside the image. Use this option to trim the image within the graphic. Type a number and choose a unit value to specify the width of the bleed.
Interpolation Reduces the jagged appearance of a low-resolution image by automatically resampling up while printing (on PostScript printers). Resampling may reduce the sharpness of the image quality.
For information on the Include Vector Data option, see Print vector data.
To the top
Print separations from Photoshop
When preparing your image for prepress and working with CMYK images or images with spot colors, you can print each color channel as a separate page.
Note: Separations from CMYK, Duotone, or multi-channel documents printed on non-PostScript printers may not be identical to those printed on PostScript printers.
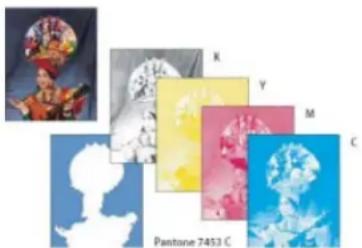
text_image
R Y M C Pantone 7453 CEach color channel printed as a separate page.
Note: If you are printing an image from another application and want to print spot channels to spot color plates, you must first save the file in DCS 2.0 format. DCS 2.0 preserves spot channels. This format is supported by applications such as Adobe InDesign and QuarkXPress.
- Make sure that your document is in CMYK Color, Multichannel, or Duotone mode, and then choose File > Print.
- Choose Separations from the Color Handling drop-down menu.
Note: Depending on the designated printer and printer drivers on your computer, these options may also appear in the Print Settings dialog box. In Windows, click the Properties button to access the printer driver options; in Mac OS, use the pop-up menu in the Print Settings dialog box that appears.
- Click Print. Separations are printed for each of the colors in the image.
To the top
Prepare an image with spot channels for printing from another application
- If the image is a duotone, convert it to Multichannel color mode.
-
Save the image in DCS 2.0 format.
-
In the DCS 2.0 Format dialog box, deselect the Include Halftone Screen and the Include Transfer Function options.
-
Open or import the image in Photoshop, and set your screen angles. Make sure that you've communicated to the printer the spot color you want for each of the color plates.
Note: You can place a PSD file containing spot colors directly in Illustrator or InDesign without special preparation.
To the top
Create a color trap
A trap is an overlap that prevents tiny gaps in the printed image caused by a slight misregistration on press. Contact your service provider before you do any trapping. In most cases, your print shop determines whether trapping is needed. If so, the print shop staff will tell you what values to enter in the Trap dialog box.
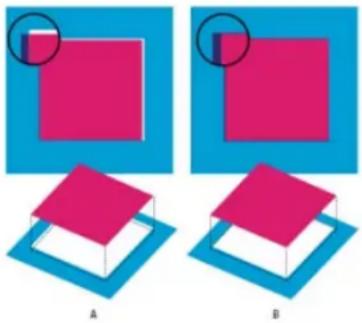
natural_image
Two 3D geometric shapes (a pink square and a blue square) with no text or symbols, shown in two different configurations labeled A and B (no text or symbols on the shapes themselves)Trapping to correct misalignment
A. Misregistration with no trap B. Misregistration with trap
Trapping is intended to correct the misalignment of solid colors. In general, you don't need traps for continuous-tone images such as photographs. Excessive trapping may produce an outline effect. These problems may not be visible on-screen and might show up only in print. Photoshop uses standard rules for trapping:
• All colors spread under black.
• Lighter colors spread under darker colors.
• Yellow spreads under cyan, magenta, and black.
- Pure cyan and pure magenta spread under each other equally.
- Choose Edit > Convert To Profile to view the image in the color space of the output device. See Convert document colors to another profile (Photoshop).
- Choose Image > Trap.
- For Width, enter the trapping value provided by your print shop. Then select a unit of measurement, and click OK. Consult your print shop to determine how much misregistration to expect.
To the top
Determine scan resolution for printing
You can use a number of techniques to determine the resolution at which to scan a photograph. If you are scanning photos to be printed, and you know the exact size and the printing screen frequency, you can use the following techniques to determine the scanning resolution. Often it is easiest to scan at your scanner's maximum optical resolution and then resize the image in Photoshop later.
Estimate scan resolution
You can determine the resolution for your scan using the original and final image dimensions and the resolution of your output device. Scan resolution translates into image resolution when you open the scanned image in Photoshop.
-
Do one of the following:
-
For laser printers and imagesetters, multiply the printer's screen frequency by 2. To determine your printer's screen frequency, check your printer documentation or consult your service provider.
-
For inkjet printers, check your printer documentation for the optimal resolution. Many dye sublimation printers and devices that print directly onto photographic paper have an optimal resolution of 300 to 400 dpi.
-
Determine the ratio of the final image dimensions to the original image dimensions. For example, the ratio of a 6-by-9-inch final image to a 2-by-3-inch original image is 3:1.
-
Multiply the result of step 1 by the result of step 2.
For example, suppose you are printing to an imagesetter with a screen frequency of 85 lpi and the ratio of the final image to the original is 3:1. First multiply 85 (the screen frequency) by 2 to get 170. Then multiply 170 by 3 to get a scan resolution of 510 ppi. If you are printing to an inkjet printer with an optimal resolution of 300 dpi, multiply 300 by 3 to get a scan resolution of 900.
Note: Different color separation procedures might require different ratios of image resolution to screen frequency. It's a good idea to check with your service provider or print shop before you scan the image.
Calculate the file size before scanning an image
You can create a dummy file to predict the file size needed for the final output of your scan.
-
In Photoshop, choose File > New.
-
Enter the width, height, and resolution of your final printed image. The resolution should be 1.5 to 2 times the screen frequency you will use to print. Make sure that the mode you plan to scan in is selected. The New dialog box displays the file size.
For example, suppose you want the final image to be 4 inches wide and 5 inches high. You plan to print it with a 150-line screen using a 2:1 ratio, so you set the resolution to 300. The resulting file size is 5.15 MB.
To produce the scan, enter the resulting file size in your scanner settings. Don't worry about resolution or image dimensions. After you have scanned the image and imported it into Photoshop, use the Image Size command (with the Resample Image option deselected) to enter the correct width and height for the image.
Adobe also recommends
- Soft-proof colors

Twitter ^™ and Facebook posts are not covered under the terms of Creative Commons.
Legal Notices | Online Privacy Policy
About duotones
Convert an image to duotone
Modify the duotone curve for a given ink
Specifying overprint colors
Adjust the display of overprint colors
Saving and loading duotone settings
View the individual colors of a duotone image
Printing duotones
Exporting duotone images to other applications
To the top
About duotones
In Photoshop, duotone refers to monotones, tritones, and quadtones as well as duotones. Monotones are grayscale images printed with a single, non-black ink. Duotones, tritones, and quadtones are grayscale images printed with two, three, and four inks. In these images, colored inks, rather than different shades of gray, are used to reproduce tinted grays.
Duotones increase the tonal range of a grayscale image. Although a grayscale reproduction can display up to 256 levels of gray, a printing press can reproduce only about 50 levels of gray per ink. For this reason, a grayscale image printed with only black ink can look significantly coarser than the same image printed with two, three, or four inks, each individual ink reproducing up to 50 levels of gray.
Sometimes duotones are printed using a black ink and a gray ink—the black for shadows and the gray for midtones and highlights. More frequently, duotones are printed using a colored ink for the highlight color. This technique produces an image with a slight tint and significantly increases the dynamic range of the image. Duotones are ideal for two-color print jobs with a spot color (such as a PANTONE Color) used for accent.
Because duotones use different color inks to reproduce different gray levels, they are treated in Photoshop as single-channel, 8-bit, grayscale images. In Duotone mode, you do not have direct access to the individual image channels (as in RGB, CMYK, and Lab modes). Instead, you manipulate the channels through the curves in the Duotone Options dialog box.
To the top
Convert an image to duotone
-
Convert the image to grayscale by choosing Image > Mode > Grayscale. Only 8-bit grayscale images can be converted to duotones.
-
Choose Image > Mode > Duotone.
-
In the Duotone Options dialog box, select Preview to preview the image.
-
For the Type option, select Monotone, Duotone, Tritone, or Quadtone.
-
Click the color box (the solid square) to open the color picker, then click the Color Libraries button and select an ink book and color from the dialog box.
Note: To produce fully saturated colors, specify inks in descending order—darkest at the top, lightest at the bottom.
-
Click the curve box next to the color ink box and adjust the duotone curve for each ink color.
-
Set overprint colors, if necessary.
-
Click OK.

To apply a duotone effect to only part of an image, convert the duotone image to Multichannel mode—this converts the duotone curves to spot channels. You can then erase part of the spot channel for areas that you want printed as standard grayscale.
To the top
Modify the duotone curve for a given ink
In a duotone image, each ink has a separate curve that specifies how the color is distributed across the shadows and highlights. This curve maps each grayscale value in the original image to a specific ink percentage.
- To preview any adjustments, select the Preview option in the Duotones Options dialog box.
- Click the curve box next to the ink color box.
The default duotone curve, a straight diagonal line, indicates that the grayscale values in the original image map to an equal percentage of ink. At this setting, a 50% midtone pixel is rendered with a 50% tint of the ink, a 100% shadow is rendered in 100% color, and so on.
-
Adjust the duotone curve for each ink by dragging a point on the graph or by entering values for the different ink percentages.
-
In the curve graph, the horizontal axis moves from highlights (at the left) to shadows (at the right). Ink density increases as you move up the vertical axis. You can specify up to 13 points on the curve. When you specify two values along the curve, Photoshop calculates intermediate values. As you adjust the curve, values are automatically entered in the percentage text boxes.
-
The value you enter in the text box indicates the percentage of the ink color used to represent the grayscale value in the original image. For example, if you enter 70 in the 100% text box, a 70% tint of that ink color is used to print the 100% shadows.
-
Click Save in the Duotone Curve dialog box to save curves created with this dialog box.
-
Click Load to load these curves or curves created in the Curves dialog box, including curves created using the Arbitrary Map option.
You can use the Info panel to display ink percentages when you're working with duotone images. Set the readout mode to Actual Color to determine what ink percentages will be applied when the image is printed. These values reflect any changes you've entered in the Duotone Curve dialog box.
To the top
Specifying overprint colors
Overprint colors are two unscreened inks printed on top of each other. For example, when you print a cyan ink over a yellow ink, the resulting overprint color is green. The order in which inks are printed, as well as variations in the inks and paper, can significantly affect the final results.
To predict how colors will look when printed, use a printed sample of the overprinted inks and adjust your screen display accordingly. Keep in mind that this adjustment affects only how the overprint colors appear on-screen, not when printed. Before adjusting these colors, make sure to calibrate your monitor.
To the top
Adjust the display of overprint colors
- Choose Image > Mode > Duotone.
-
Click Overprint Colors. The Overprint Colors dialog box shows how the combined inks will look when printed.
-
Click the color swatch of the ink combination that you want to adjust.
- Select the desired color in the Color Picker, and click OK.
- Repeat steps 3 and 4 until you are satisfied with the ink combination. Then click OK.
To the top
Saving and loading duotone settings
Use the Save button in the Duotone Options dialog box to save a set of duotone curves, ink settings, and overprint colors. Use the Load button to load a set of duotone curves, ink settings, and overprint colors. You can then apply these settings to other grayscale images.
Photoshop includes several sample sets of duotone, tritone, and quadtone curves. These sets include some commonly used curves and colors. Use these sets as starting points when you create your own combinations.
To the top
View the individual colors of a duotone image
Because duotones are single-channel images, your adjustments to individual printing inks are displayed as part of the final composite image. In some cases, you may want to view the individual “printing plates” to see how the individual colors will separate when printed (as you can with CMYK images).
- After specifying your ink colors, choose Image > Mode > Multichannel.
The image is converted to Multichannel mode, with each channel represented as a spot color channel. The contents of each spot channel accurately reflect the duotone settings, but the on-screen composite preview may not be as accurate as the preview in Duotone mode.
Note: If you make any changes to the image in Multichannel mode, you can't revert to the original duotone state (unless you can access the duotone state in the History panel). To adjust the distribution of ink and view its effect on the individual printing plates, make the adjustments in the Duotone Curves dialog box before converting to Multichannel mode.
- Select the channel you want to examine in the Channels panel.
- Choose Edit > Undo Multichannel to revert to Duotone mode.
To the top
Printing duotones
When creating duotones, keep in mind that both the order in which the inks are printed and the screen angles you use have a significant effect on the final output. (If needed, change the halftone screen angles on the printer's RIP.)
You do not have to convert duotone images to CMYK to print separations—simply choose Separations from the Profile pop-up menu in the Color Managementsection of the Print dialog box (for setting printer options). Converting to CMYK mode converts any custom colors to their CMYK equivalents.
To the top
Exporting duotone images to other applications
To export a duotone image to a page-layout application, you must first save the image in EPS or PDF format. (However, if the image contains spot channels, convert it to Multichannel mode and save it in DCS 2.0 format.) Remember to name custom colors using the appropriate suffix so that the importing application can recognize them. Otherwise, the application may not print the colors correctly, or it may not print the image at all.
Adobe also recommends
Legal Notices | Online Privacy Policy
Let Photoshop determine printed colors
Let printer determine printed colors
Print a hard proof
To better understand color management concepts and workflows, see Understanding Color Management.
To the top
Let Photoshop determine printed colors
If you have a custom color profile for a specific printer, ink, and paper combination, letting Photoshop manage colors often produces better results than letting the printer manage colors.
- Choose File > Print.
- Choose Color Management from the pop-up menu.
- For Color Handling, choose Photoshop Manages Colors.
-
(Optional) Set any of the following options.
-
For Printer Profile, select the profile that best matches your output device and paper type. If there are any profiles associated with the current printer, they are placed at the top of the menu, with the default profile selected.
The more accurately the profile describes the behavior of the output device and printing conditions (such as paper type), the more accurately the color management system can translate the numeric values of the actual colors in a document. (See Install a profile.)
Rendering Intent Specifies how Photoshop converts colors to the destination color space. (See About rendering intents.)
Black Point Compensation Preserves the shadow detail in the image by simulating the full dynamic range of the output device.
Match Print Colors Enabled when you let Photoshop manage color. Select to view image colors in the preview area as they will actually print.
Gamut Warning Enabled when Match Print Colors is selected. Select to highlight out-of-gamut colors in the image, as determined by the selected printer profile. A gamut is the range of colors that a color system can display or print. A color that can be displayed in RGB may be out of gamut for your current printer profile.
Show Paper White Sets the color white in the preview to the color of the paper in the selected printer profile. This produces a more accurate print preview if you're printing on off-white paper such as newsprint or art papers that are more beige than white. Since absolute white and black create contrast, less white in the paper will lower the overall contrast of your image. Off-white paper can also change the overall color cast of the image, so yellows printed on beige paper may appear more brown.
-
Access the color management options for the printer driver from the Print Settings dialog box, which automatically appears after you click Print. In Windows, click the Preferences button to access the printer driver options. In Mac OS, use the pop-up menu from the Print Settings dialog box to access the printer driver options.
-
Turn off color management for the printer, so the printer profile settings won't override your profile settings.
Every printer driver has different color management options. If it's not clear how to turn off color management, consult your printer documentation.
- Click Print.
Note: If you get a warning that your image is larger than the printable area of the paper, click Cancel, choose File > Print, and select the Scale To Fit Media box. To make changes to your paper size and layout, click Print Settings, and attempt to print the file again.
To the top
Let printer determine printed colors
If you don't have a custom profile for your printer and paper type, you can let the printer driver handle the color conversion.
- Choose File > Print.
- Choose Color Management from the pop-up menu in the upper-right corner.
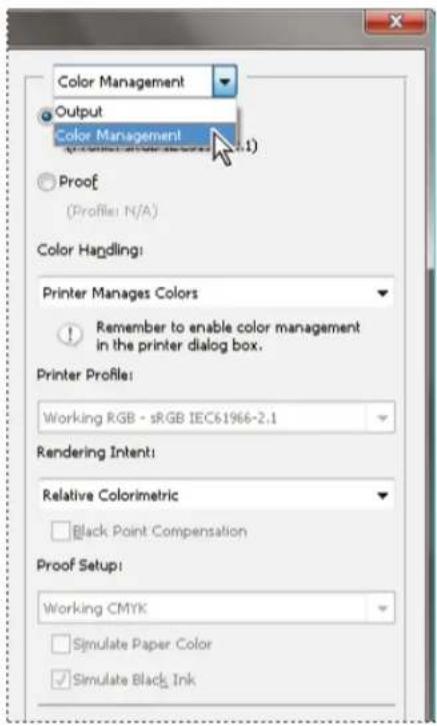
text_image
Color Management Output Color Management (1) Proof (Profile: N/A) Color Handling: Printer Manages Colors Remember to enable color management in the printer dialog box. Printer Profile: Working RGB - sRGB IEC61966-2.1 Rendering Intent: Relative Colorimetric Black Point Compensation Proof Setup: Working CMYK Simulate Paper Color Simulate Black InkChoose Color Management to display additional options.
- Select Document.
The profile is displayed in parentheses on the same line.
- For Color Handling, choose Printer Manages Colors.
- (Optional) Choose a rendering intent for converting colors to the destination color space.
Many non-PostScript printer drivers ignore this option and use the Perceptual rendering intent. (For more information, see About rendering intents.)
-
Access the color management options for the printer driver from the Print Settings dialog box, which automatically appears after you click Print. In Windows, click Print Settings to access the printer driver options. In Mac OS, use the pop-up menu from the Print Settings dialog box to access the printer driver options.
-
Specify the color management settings to let your printer driver handle the color management during printing.
Every printer driver has different color management options. If it's not clear how to turn on color management, consult your printer documentation.
- Click Print.
Note: If you get a warning that your image is larger than the printable area of the paper, and you don't want to exceed that area, click Cancel, choose File > Print, and select the Scale To Fit Media box. To make changes to your paper size and layout, click Print Settings, and attempt to print the file again.
To the top
Print a hard proof
A hard proof (sometimes called a proof print or match print) is a printed simulation of what your final output on a printing press will look like. A hard proof is produced on an output device that's less expensive than a printing press. Some inkjet printers have the resolution necessary to produce inexpensive prints that can be used as hard proofs.
- Choose View > Proof Setup, and select the output conditions you want to simulate. You can do this using a preset or by creating a custom proof setup. See Soft-proof colors.
The view changes automatically according to the proof you choose, unless you choose Custom. In this case, the Customize Proof Condition dialog box appears. You must save custom proof settings for them to appear in the Proof Setup Preset menu of the Print dialog box. Follow the instructions to customize a proof.
-
After you select a proof, choose File > Print.
-
Choose Color Management from the pop-up menu.
-
Select Proof.
The profile that appears in parentheses, should match the proof setup you selected earlier.
-
For Color Handling, choose Photoshop Manages Colors.
-
For Printer Profile, select the profile for your output device.
-
(Optional) Set any of the following options.
Proof Setup This option is available if you select Proof from the Print area. From the pop-up menu, choose any customized proofs that exist locally on your hard drive.
Simulate Paper Color Simulates what colors look like on the paper of the simulated device. Using this option produces the most accurate proof, but it is not available for all profiles.
Simulate Black Ink Simulates the brightness of dark colors for the simulated device. Using this option results in more accurate proofs of dark colors, but it is not available for all profiles.
-
Access the color management options for the printer driver from the Print Settings dialog box, which automatically appears after you click Print. In Windows, click the Preferences button to access the printer driver options. In Mac OS, use the pop-up menu from the Print Settings dialog box to access the printer driver options.
-
Turn off color management for the printer so that the printer profile settings don't override your profile settings.
Every printer driver has different color management options. If it's not clear how to turn off color management, consult your printer documentation.
- Click Print.
Note: If you get a warning that your image is larger than the printable area of the paper, click Cancel, choose File > Print, and select the Scale To Fit Media box. To make changes to your paper size and layout, click Print Settings, and attempt to print the file again.
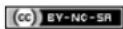
Twitter ^™ and Facebook posts are not covered under the terms of Creative Commons.
Legal Notices | Online Privacy Policy
Printing basics
About desktop printing
Print images
Position and scale images
Print vector data
To the top
Printing basics
Whether you are printing an image to your desktop printer or sending it to a prepress facility, knowing a few basics about printing makes the print job go more smoothly and helps ensure that the finished image appears as intended.
Types of printing For many Photoshop users, printing a file means sending the image to an inkjet printer. Photoshop can send your image to a variety of devices to be printed directly onto paper or converted to a positive or negative image on film. In the latter case, you can use the film to create a master plate for printing by a mechanical press.
Types of images The simplest images, such as line art, use only one color in one level of gray. A more complex image, such as a photograph, has varying color tones. This type of image is known as a continuous-tone image.
Color separation Artwork intended for commercial reproduction and containing more than one color must be printed on separate master plates, one for each color. This process, called color separation, generally calls for the use of cyan, magenta, yellow, and black (CMYK) inks. In Photoshop, you can adjust how the various plates are generated.
Quality of detail The detail in a printed image depends on image resolution (pixels per inch) and printer resolution (dots per inch). Most PostScript laser printers have a resolution of 600 dpi, while PostScript imagesetters have a resolution of 1200 dpi or higher. Inkjet printers produce a microscopic spray of ink, not actual dots, resulting in an approximate resolution of 300 to 720 dpi.
To the top
About desktop printing
Unless you work in a commercial printing company or service bureau, you probably print images to a desktop printer, such as an inkjet, dye sublimation, or laser printer, not to an imagesetter. Photoshop lets you control how your image is printed.
Monitors display images using light, whereas desktop printers reproduce images using inks, dyes, or pigments. For this reason, a desktop printer can't reproduce all the colors displayed on a monitor. However, by incorporating certain procedures (such as a color management system) into your workflow, you can achieve predictable results when printing your images to a desktop printer. Keep these considerations in mind when working with an image you intend to print:
- If your image is in RGB mode, do not convert the document to CMYK mode when printing to a desktop printer. Work entirely in RGB mode. As a rule, desktop printers are configured to accept RGB data and use internal software to convert to CMYK. If you send CMYK data, most desktop printers apply a conversion anyway, with unpredictable results.
- If you want to preview an image as printed to any device for which you have a profile, use the Proof Colors command.
- To reproduce screen colors accurately on the printed page, you must incorporate color management into your workflow. Work with a monitor that is calibrated and characterized. Ideally, you should also create a custom profile specifically for your printer and the paper you print on, though the profile supplied with your printer can produce acceptable results.
To the top
Print images
Photoshop provides the following printing commands:
Print Displays the Print dialog box, where you can preview the print and set options. (Customized settings are saved as new defaults when you click Done or Print.)
Print One Copy Prints one copy of a file without displaying a dialog box.
For maximum efficiency, you can include the Print command in actions. (Photoshop provides all print settings in one dialog box.)
Set Photoshop print options and print
- Choose File > Print.
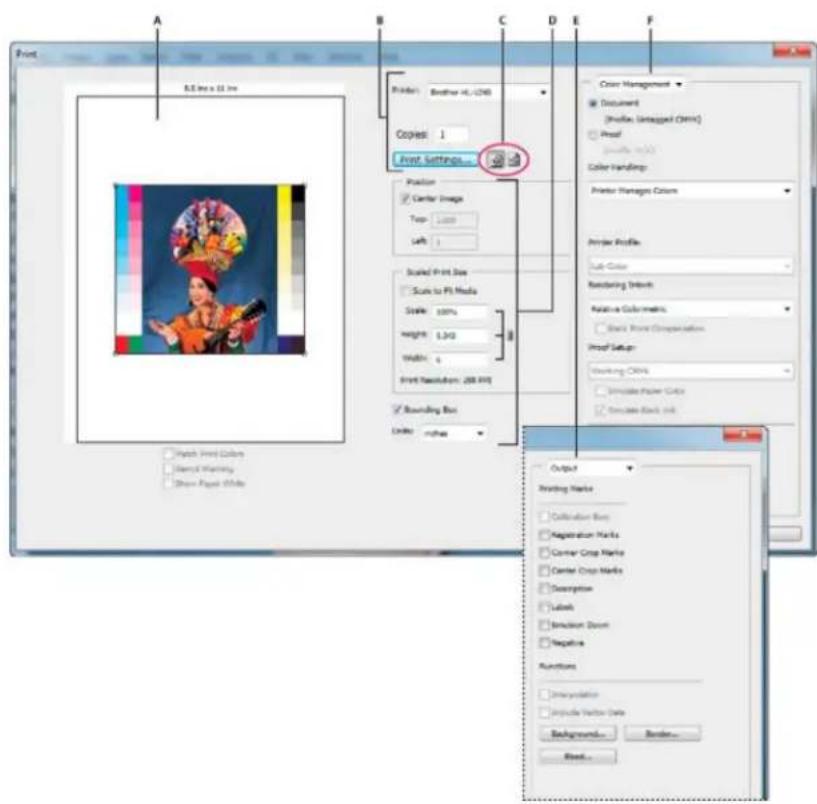
text_image
A B C D E F Print 8.5 mm x 12.1 mm Browser: Brother HL (276) Copies: 1 Front Settings... Position Center Image Top: 1000 Left: 1 Scaled Print Size Scale to PI Media Scale: 100% Height: 3.342 Width: 6 Print Resolution: 200 MHz Bounding Box Units: inches Color Management Document [Profiles Untagged CMY] Proof Details (X/Y) Color Handling: Printer Manage Colors Printer Profile: Sub Color Rendering Interval Relative Coormatics: Back Power Comparison Proof Settings: Blocking CMYs Simulate Filter Grids Disclose Back Unit Output Printing Marks Diffraction Bars Registration Marks Corner Crop Marks Center Crop Marks Description Label Stream Down Negative Functions Interpolation Interact Vector Date Background... Balance... Print...Print dialog box
A. Preview print B. Set printer and print job options C. Set paper orientation D. Position and scale image E. Specify prepress output options F. Specify color management and proofing options
- Select the printer, number of copies, and paper orientation.
In Mac OS, send 16-bit data to the printer to produce the highest possible quality in subtle graduated tones, such as bright skies.
-
Adjust the position and scale of the image in relation to the selected paper size and orientation. See Position and scale images.
-
Set Color Management and Output options, which you access from the pop-up menu in the upper-right corner.
-
Do one of the following:
• To print the image, click Print.
- To close the dialog box without saving the options, click Cancel.
- To preserve the options and close the dialog box, click Done.
Note: If you get a warning that your image is larger than the printable area of the paper, click Cancel, choose File > Print, and select the Scale To Fit Media box. To make changes to your paper size and layout, click Print Settings, and attempt to print the file again.
Set printer options
-
In the Print dialog box, click Print Settings.
-
Set paper size, source, and page orientation as desired.
The available options depend on your printer, printer drivers, and operating system.
To the top
Position and scale images
You can adjust the position and scale of an image using options in the Print dialog box. The shaded border at the edge of the paper represents the margins of the selected paper; the printable area is white.
The base output size of an image is determined by the document size settings in the Image Size dialog box. Scaling an image in the Print dialog box changes the size and resolution of the printed image only. For example, if you scale a 72-ppi image to 50% in the Print dialog box, the image will print at 144 ppi; however, the document size settings in the Image Size dialog box will not change. The Print Resolution field below the Scaled Print Size area shows the print resolution at the current scaling setting.
Many third-party printer drivers provide a scaling option in the Print Settings dialog box. This scaling affects everything on the page, including the size of all page marks, such as crop marks and captions, whereas the scaling percentage provided by the Print command affects only the size of the printed image (and not the size of page marks).
Note: The Print dialog box may not reflect accurate values for Scale, Height, and Width if you set a scaling percentage in the Print Settings dialog box. To avoid inaccurate scaling, specify scaling using the Print dialog box rather than the Print Settings dialog box; do not enter a scaling percentage in both dialog boxes.
Reposition an image on the paper
- Choose File > Print, and do one of the following:
• To center the image in the printable area, select Center Image.
• To position the image numerically, deselect Center Image, and then enter values for Top and Left.
- Deselect Center Image, and drag the image in the preview area.
Scale the print size of an image
- Choose File > Print, and do one of the following:
To fit the image within the printable area of the selected paper, click Scale To Fit Media.
- To rescale the image numerically, deselect Scale To Fit Media, then enter values for Height and Width.
• To achieve the desired scale, select Bounding Box, and drag a bounding box handle in the preview area.
To the top
Print vector data
If an image includes vector graphics, such as shapes and type, Photoshop can send the vector data to a PostScript printer. When you choose to include vector data, Photoshop sends the printer a separate image for each type layer and each vector shape layer. These additional images are printed on top of the base image, and clipped using their vector outline. Consequently, the edges of vector graphics print at the printer's full resolution, even though the content of each layer is limited to the resolution of your image file.
Note: Some blending modes and layer effects required rasterized vector data.
- Choose File > Print.
- Choose Output from the pop-up menu.
- Select the Include Vector Data option.
- Click Print.
Note: If you get a warning that your image is larger than the printable area of the paper, click Cancel, choose File > Print, and select the Scale To Fit Media box. To make changes to your paper size and layout, click Print Settings, and attempt to print the file again.
More Help Topics
• Image size and resolution
- About soft-proofing colors
- About color profiles

Twitter ^™ and Facebook posts are not covered under the terms of Creative Commons.
Legal Notices | Online Privacy Policy
Automation
Batch Actions
Infinite Skills (Aug. 9, 2012)
video-tutorial
Run a JavaScript
Set scripts and actions to run automatically
Photoshop supports external automation through scripting. In Windows, you can use scripting languages that support COM automation, such as VB Script. In Mac OS, you can use languages such as AppleScript that allow you to send Apple events. These languages are not cross-platform but can control multiple applications such as Adobe Photoshop, Adobe Illustrator, and Microsoft Office. In Mac OS, you can also use Apple's Photoshop Actions for Automator to control tasks in Photoshop.
You can also use JavaScript on either platform. JavaScript support lets you write Photoshop scripts that run on either Windows or Mac OS.
Note: Refer to the scripting documentation installed in the Photoshop CS5/Scripting/Documents folder. The Scriptlistener Plug-In can be found in Photoshop CS5/Scripting/Utilities.
To the top
Run a JavaScript
- Choose File > Scripts and then select the script from the list. The scripts list includes all the script files saved with a .js or .jsx extension and saved in the Photoshop CS5/Presets/Scripts folder. To run a script saved in another location, choose File > Scripts > Browse and navigate to the script.
To the top
Set scripts and actions to run automatically
You can have an event, such as opening, saving, or exporting a file in Photoshop, trigger a JavaScript or a Photoshop action. Photoshop provides several default events, or you can have any scriptable Photoshop event trigger the script or action. See the Photoshop CS5 Scripting Guide for more information on scriptable events.
- Choose File > Scripts > Script Events Manager.
- Select Enable Events To Run Scripts/Actions.
- From the Photoshop Event menu, choose the event that will trigger the script or action.
- Select either Script or Action, and then choose the script or action to run when the event occurs.
Photoshop has several sample scripts you can choose. To run a different script, choose Browse and then navigate to the script. For actions, choose the action set from the first pop-up menu and an action from that set in the second menu. The action must be loaded in the Actions panel to appear in these menus.
- Click Add. The event and its associated script or action are listed in the dialog box.
- To disable and remove individual events, select the event in the list and click Remove. To disable all events, but keep them in the list, deselect Enable Events To Run Scripts/Actions.
Convert files with the Image Processor
Process a batch of files
Create a droplet from an action
Batch and droplet processing options
To the top
Convert files with the Image Processor
The Image Processor converts and processes multiple files. Unlike the Batch command, the Image Processor lets you process files without first creating an action. You can do any of the following in the Image Processor:
- Convert a set of files to either JPEG, PSD, or TIFF format; or convert files simultaneously to all three formats.
- Process a set of camera raw files using the same options.
- Resize images to fit within specified pixel dimensions.
- Embed a color profile or convert a set of files to sRGB and save them as JPEG images for the web.
- Include copyright metadata into the converted images.
The Image Processor works with Photoshop (PSD), JPEG, and camera raw files.
- Do any of the following:
- Choose File > Scripts > Image Processor (Photoshop)
- Choose Tools > Photoshop > Image Processor (Bridge)
-
Select the images you want to process. You can choose to process any open files, or select a folder of files to process.
-
(Optional) Select Open First Image To Apply Settings to apply the same settings to all the images.
If you are processing a group of camera raw files taken under the same lighting conditions, you can adjust the setting in the first image to your satisfaction and then apply the same settings to the remaining images.
Use this option with PSD or JPEG source images if the file's color profile does not match your working profile. You can choose a color profile in which to convert the first image and all images in the folder.
Note: The settings you apply with the Image Processor are temporary and used only with the Image Processor. The image's current camera raw settings are used to process the image, unless you change them in the Image Processor.
- Select the location where you want to save the processed files.
If you process the same file multiple times to the same destination, each file is saved with its own file name and not overwritten.
- Select the file types and options to save.
Save As JPEG Saves images in JPEG format within a folder called JPEG in the destination folder.
Quality Sets the JPEG image quality between 0 and 12.
Resize To Fit Resizes the image to fit within the dimensions you enter in Width and Height. The image retains its original proportions.
Convert Profile To sRGB Converts the color profile to sRGB. Make sure that Include ICC Profile is selected if you want to save the profile with the image.
Save As PSD Saves images in Photoshop format within a folder called PSD in the destination folder.
Maximize Compatibility Saves a composite version of a layered image within the target file for compatibility with applications that can't read layered images.
Save As TIFF Saves images in TIFF format within a folder called TIFF in the destination folder.
LZW Compression Saves the TIFF file using the LZW compression scheme.
- Set other processing options.
Run Action Runs a Photoshop action. Choose the action set from the first menu and the action from the second menu. The action set must be loaded in the Actions panel before they appear in these menus.
Copyright Info Includes any text you enter in the IPTC copyright metadata for the file. Text you include here overwrites the copyright metadata in the original file.
Include ICC Profile Embeds the color profile with the saved files.
- Click Run.
Before you process your images, click Save to save the current settings in the dialog box. The next time you need to process files using this group of settings, click Load, and navigate to your saved Image Processor settings.
To the top
Process a batch of files
The Batch command runs an action on a folder of files. If you have a digital camera or a scanner with a document feeder, you can also import and process multiple images with a single action. Your scanner or digital camera may need an acquire plug-in module that supports actions.
Note: If the third-party plug-in wasn't written to import multiple documents at a time, it may not work during batch-processing or if used as part of an action. Contact the plug-in's manufacturer for further information.
You can also import PDF images from Acrobat Capture or other software.
When batch-processing files, you can leave all the files open, close and save the changes to the original files, or save modified versions of the files to a new location (leaving the originals unchanged). If you are saving the processed files to a new location, you may want to create a new folder for the processed files before starting the batch.
To batch-process using multiple actions, create a new action that plays all the other actions, and then batch-process using the new action. To batch-process multiple folders, create aliases within a folder to the other folders you want to process, and select the Include All Subfolders option.
For better batch performance, reduce the number of saved history states and deselect the Automatically Create First Snapshot option in the History panel.
Batch-process files
-
Do one of the following:
-
Choose File > Automate > Batch (Photoshop)
-
Choose Tools > Photoshop > Batch (Bridge)
-
Specify the action you want to use to process files from the Set and Action pop-up menus. The menus display actions available in the Actions panel. You may need to choose a different set or load a set in the panel if you don't see your action.
-
Choose the files to process from the Source pop-up menu:
Folder Processes files in a folder you specify. Click Choose to locate and select the folder.
Import Processes images from a digital camera, scanner, or a PDF document.
Opened Files Processes all open files.
Bridge Processes selected files in Adobe Bridge. If no files are selected, the files in the current Bridge folder are processed.
- Set processing, saving, and file naming options. For descriptions of the Batch dialog box settings see Batch and droplet processing options.
Batch-process files in nested folders into different formats
-
Process your folders as you would normally, until the Destination step.
-
Choose Save And Close for the destination. You can specify options for Override Action "Save As" Commands to do the following:
-
If the "Save As" step in the action contains a file name, this name is overridden by the name of the document being saved; all "Save As" steps are treated as if they were recorded without a file name.
- The folder you specified in the "Save As" action step is overridden by the document's original folder.
Note: You must have a "Save As" step in the action; the Batch command does not automatically save files.
You can use this procedure, for example, to sharpen, resize, and save images as JPEGs in their original folders. You create an action that has a sharpen step, a resize step, and then a "Save As JPEG" step. When you batch-process this action, you select Include All Subfolders, make the destination Save And Close, and select Override Action "Save As" Commands.
To the top
Create a droplet from an action
A droplet applies an action to one or more images, or a folder of images, that you drag onto the Droplet icon. You can save a droplet on the desktop or to another location on disk.

Actions are the basis for creating droplets—you must create the desired action in the Actions panel before creating a droplet. (See Creating actions.)
- Choose File > Automate > Create Droplet.
- Specify where to save the droplet. Click Choose in the Save Droplet In section of the dialog box and navigate to the location.
- Select the Action Set, and then designate which action you intend to use within the Set and Action menus. (Select the action in the Actions panel before you open the dialog box to preselect these menus.)
- Set processing, saving, and file naming options. For descriptions of the Batch dialog box settings see Batch and droplet processing options.
Tips for cross-platform droplets
When creating droplets for both Windows and Mac OS, keep the following compatibility issues in mind:
- After moving a droplet created in Windows to Mac OS, you must drag the droplet onto the Photoshop icon on your desktop. Photoshop updates the droplet for use in Mac OS.
- When creating a droplet in Mac OS, use the .exe extension to make droplets compatible with both Windows and Mac OS.
- References to file names are not supported between operating systems. If an action step references a file or folder name (such as an Open command, Save As command, or adjustment command that loads its settings from a file), execution pauses and the user is prompted for a file name.
Process a file with a droplet
- Drag a file or folder onto the droplet icon. Photoshop starts if it is not already running.
To the top
Batch and droplet processing options
Specify these options in the Batch and Droplet dialog boxes.
Override Action “Open” Commands Ensures that the files you selected in the Batch command are processed, without opening the file you may have specified in the action's Open command. If the action contains an Open command that opens a saved file and you don't select this option, the Batch command opens and processes only the file you used to record the Open command (This occurs because the Batch command opens the file specified by the action after each of the files in the Batch source folder is opened. Because the most recently opened file is the one named in the action, the Batch command performs the action on that file, and none of the files in the Batch source folder are processed.)
To use this option, the action must contain an Open command. Otherwise, the Batch command won't open the files you've selected for batch-processing. Selecting this option doesn't disregard everything in an Open command—only the choice of files to open.
Deselect this option if the action was recorded to operate on an open file, or if the action contains Open commands for specific files that are required by the action.
Include All Subfolders Processes files in subdirectories of the specified folder.
Suppress Color Profile Warnings Turns off display of color policy messages.
Suppress File Open Options Dialogs Hides File Open Options dialog boxes. This is useful when batching actions on camera raw image files. The default or previously specified settings will be used.
Destination menu Sets where to save the processed files
None Leaves the files open without saving changes (unless the action includes a Save command).
Save And Close Saves the files in their current location, overwriting the original files.
Folder Saves the processed files to another location. Click Choose to specify the destination folder.
Override Action "Save As" Commands Ensures that processed files are saved to the destination folder specified in the Batch command (or to their original folder if you chose Save and Close), with their original names or the names you specified in the File Naming section of the Batch dialog box.
If you don't select this option and your action includes a Save Ascommand, your files will be saved into the folder specified by theSave As command in the action, instead of the folder specified in the Batch command. In addition, if you don't select this option and the Save As command in the action specifies a filename, the Batch command overwrites the same file (the file specified in the action) each time it processes an image.
If you want the Batch command to process files using the original filenames in the folder you specified in the Batch command, save your image in the action. Then, when you create the batch, select Override Action "Save As" Command and specify a destination folder. If you rename the images in the Batch command and don't select Override Action "Save As" Command, Photoshop saves your processed images twice: once with the new name in the specified folder, and once with the original name in the folder specified by the Save As command in the action.
To use this option, the action must contain a Save As command. Otherwise, the Batch command won't save the processed files. Selecting this option doesn't skip everything in the Save As command—only the specified filename and folder.
Note: Some Save options aren't available in the Batch or Create Droplet commands (such as JPEG compression or TIFF options). To use these options, record a Save As step in the action that contains the desired options, and then use the Override Action "Save As" Commands option to make sure that your files are saved where you specify in the Batch or Create Droplet command. Photoshop disregards the specified filename and path in the Action's Save As command, and retains the Save options using the new path and filename you specify in the Batch dialog.
File Naming Specifies file naming conventions if writing files to a new folder. Select elements from the pop-up menus or enter text into the fields to be combined into the default names for all files. The fields let you change the order and formatting of the components of the filename. You must include at least one field that is unique for every file (for example, filename, serial number, or serial letter) to prevent files from overwriting each other. Starting Serial Number specifies the starting number for any serial number fields. Serial letter fields always start with the letter "A" for the first file.
Compatibility Makes filenames compatible with Windows, Mac OS, and UNIX operating systems.
Saving files using the Batch command options usually saves the files in the same format as the original files. To create a batch process that saves files in a new format, record the Save As command followed by the Close command as part of your original action. Then choose Override Action "Save As" Commands for the Destination when setting up the batch process.
Error menu Specifies how to handle processing errors:
Stop For Errors Suspends the process until you confirm the error message.
Log Errors to File Records each error in a file without stopping the process. If errors are logged to a file, a message appears after processing. To review the error file, open with a text editor after the Batch command has run.
Adobe also recommends
• Image processing video

Twitter™ and Facebook posts are not covered under the terms of Creative Commons.
Legal Notices | Online Privacy Policy
Play an action on a file
Specify playback speed
Manage actions
Manage action sets
For more information about actions
To the top
Play an action on a file
Playing an action executes the action's recorded commands in the active document. (Some actions require that you make a selection before playing; some can be executed on an entire file.) You can exclude specific commands from an action or play only a single command. If the action includes a modal control, you can specify values or use tools in a dialog box when the action pauses.
Note: In Button mode, clicking a button executes the entire action—although commands previously excluded are not executed.
- If necessary, select objects on which to play the action, or open a file.
-
Do one of the following:
-
(Illustrator) To play a set of actions, select the set name, and click the Play button ▶ in the Actions panel, or choose Play from the panel menu.
- To play an entire single action, select the action name, and click the Play button in the Actions panel, or choose Play from the panel menu.
- If you assigned a key combination to the action, press that combination to play the action automatically.
- To play only a part of an action, select the command from which you want to start playing, and click the Play button in the Actions panel, or choose Play from the panel menu.
- To play a single command, select the command, and then Ctrl-click (Windows) or Command-click (Mac OS) the Play button in the Actions panel. You can also press Ctrl (Windows) or Command (Mac OS), and double-click the command.
In Photoshop, to undo an action, take a snapshot in the History panel before you play an action, and then select the snapshot to undo the action.
To the top
Specify playback speed
You can adjust an action's playback speed or pause it to help you debug an action.
- Choose Playback Options from the Actions panel menu.
- Specify a speed, and click OK:
Accelerated Plays the action at normal speed (the default).
Note: When you play an action at accelerated speed, the screen may not update as the action executes—files may be opened, modified, saved, and closed without ever appearing on-screen, enabling the action to execute more quickly. If you want to see the files on-screen as the action executes, specify the Step By Step speed instead.
Step By Step Completes each command and redraws the image before going on to the next command in the action.
Pause For _Seconds Specifies the amount of time the application should pause between carrying out each command in the action.
To the top
Manage actions
Manage actions in the Actions panel to keep them organized and to make available only the actions you need for a project. You can rearrange, duplicate, delete, rename, and change options for actions in the Actions panel.
Rearrange actions in the Actions panel
- In the Actions panel, drag the action to its new location before or after another action. When the highlighted line appears in the desired position, release the mouse button.
Duplicate actions, commands, or sets
- Do one of the following:
- Alt-drag (Windows) or Option-drag (Mac OS) the action or command to a new location in the Actions panel. When the highlighted line appears in the desired location, release the mouse button.
- Select an action or command. Then choose Duplicate from the Actions panel menu.
- Drag an action or command to the Create New Action button at the bottom of the Actions panel.
You can duplicate sets with any of the same methods.
Delete actions, commands, or sets
- In the Actions panel, select the action, command, or set.
- Do any of the following:
- Click the Delete icon 📋 on the Actions panel. Click OK to complete the deletion.
- Alt-click (Windows) or Option-click (Mac OS) the Delete icon to delete the selection without displaying a confirmation dialog box.
- Drag the selection to the Delete icon on the Actions panel to delete without displaying a confirmation dialog box.
- Choose Delete from the Actions panel menu.
Delete all actions in the Actions panel
- Choose Clear All Actions (Photoshop) or Clear Actions (Illustrator) from the Actions panel menu.
Even after clearing all actions, the Actions panel can be restored to its default set of actions.
Rename an action or change options
- Select the action, and choose Action Options from the Actions panel menu.
- Type a new name for the action, or change the options for its set, function key combination, or button color.
- Click OK.
Double-clicking the action name in the Actions panel in Illustrator also opens the Action Options dialog box. In Photoshop, you can double-click an action in the Actions panel and enter a new name directly in the Actions panel.
To the top
Manage action sets
You can create and organize sets of task-related actions that can be saved to disk and transferred to other computers.
Note: Any actions that you create are automatically listed in the Actions panel, but to truly save an action and not risk losing it if you delete your preferences file (Illustrator) or Actions panel file (Photoshop), you have to save it as part of an action set.
Save a set of actions
- Select a set.
If you want to save a single action, first create an action set and move the action to the new set. - Choose Save Actions from the Actions panel menu.
- Type a name for the set, choose a location, and click Save.
You can save the file anywhere. You can save only the entire contents of a set in the Actions panel, not individual actions.
Note: (Photoshop only) If you place the saved action-set file in the Presets/Actions folder, the set will appear at the bottom of the Actions panel menu after you restart the application.
(Photoshop only) Press Ctrl+Alt (Windows) or Command+Option (Mac OS) when you choose the Save Actions command to save the actions in a text file. You can use this file to review or print the contents of an action. However, you can't reload the text file back into Photoshop.
Load a set of actions
By default, the Actions panel displays predefined actions (shipped with the application) and any actions you create. You can also load additional actions into the Actions panel.
- Do one of the following:
- Choose Load Actions from the Actions panel menu. Locate and select the action set file, and then click Load (Photoshop) or Open (Illustrator).
- (Photoshop only) Select an action set from the bottom of the Actions panel menu.
Photoshop action set files have the extension .atn; Illustrator action set files have the extension .aia.
Restore actions to the default set
- Choose Reset Actions from the Actions panel menu.
- Click OK to replace the current actions in the Actions panel with the default set, or click Append to add the set of default actions to the current actions in the Actions panel.
Organize action sets
To help you organize your actions, you can create sets of actions and save the sets to disk. You can organize sets of actions for different types of work—such as print publishing and online publishing—and transfer sets to other computers.
- To create a new set of actions, click the Create New Set button in the Actions panel or choose New Set from the panel menu. Then enter the name of the set, and click OK.
Note: If you plan to create a new action and group it in a new set, make sure you create the set first. Then, the new set will appear in the set popup menu when you create your new action.
- To move an action to a different set, drag the action to that set. When the highlighted line appears in the desired position, release the mouse button.
- To rename a set of actions, double-click the name of the set in the Actions panel or choose Set Options from the Actions panel menu. Then enter the new name of the set, and click OK.
- To replace all actions in the Actions panel with a new set, choose Replace Actions from the Actions panel menu. Select an actions file, and click Load (Photoshop) or Open (Illustrator).
Note: The Replace Actions command replaces all sets of actions in the current document. Before using the command, make sure that you have already saved a copy of your current set of actions using the Save Actions command.
To the top
For more information about actions
Adobe also recommends

Twitter™ and Facebook posts are not covered under the terms of Creative Commons.
Legal Notices | Online Privacy Policy
Define variables
Rename a variable
Define a data set
Preview or apply a data set
Generate graphics using data sets
Creating data sets in external files
Import a data set
Data-driven graphics make it possible to produce multiple versions of an image quickly and accurately for print or web projects. For example, you can produce 100 versions of a web banner with different text and images, all based on a template design.
Follow these general steps to create graphics from templates and data sets:
Create the base graphic to use as the template.
Use layers to separate the elements that you want to change in the graphic.
Define variables in the graphic.
Variables specify the parts of the image that change. (See Define variables.)
Create or import the data sets.
You can create the data sets in the template, or import them from a text file. (See Define a data set and Creating data sets in external files.)
Preview the document with each data set.
To see how your final graphics will look, you can preview before you export all the files. (See Preview or apply a data set.)
Generate your graphics by exporting them with the data.
You can export them as Photoshop (PSD) files. (See Generate graphics using data sets.)
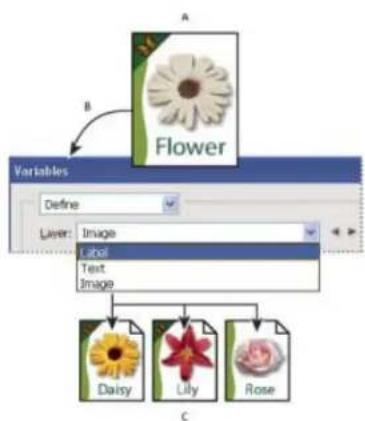
text_image
A B Flower Variables Define Layer: Image Label Text Image Daisy Lily Rose CCreating different versions of an image using variables
A. Source file template B. User defines layers as variables. C. Different versions of the image can be created, each with a different variable data set.
To the top
Define variables
You use variables to define which elements in a template change. You can define three types of variables. Visibility variables show or hide the content of a layer. Pixel Replacement variables replace the pixels in the layer with pixels from another image file. Text Replacement variables replace a string of text in a type layer.
Note: GoLive recognizes all text and visibility variables, but not Pixel Replacement variables.
text_image
Layers Normal Opacity 100% Lock: Fills 100% Label T Flower Image Share 1 fx Background Visibility Name: VisibilityVariable1 Text Replacement Name: TextVariable1 Pixel Replacement Name: PixelVariable1 SUNFLOWER TULIFTwo versions of an image based on the same template
A. Visibility variable B. Pixel Replacement variable C. Text Replacement variable
You cannot define variables for the Background layer.
-
Choose Image > Variables > Define.
-
Select a layer from the Layer pop-up menu that contains the content you want to define as a variable.
-
Select one or more types of variables:
Visibility Shows or hides the content of the layer.
Pixel Replacement Replaces the pixels in the layer with pixels from another image file.
Text Replacement Replaces a string of text in a type layer.
-
Do one of the following:
-
Choose Name and enter a name for the variable. Variable names must begin with a letter, underscore, or colon and cannot contain spaces or special characters (except for periods, hyphens, underscores, and colons).
-
Choose an existing variable from the Name pop-up menu to link this layer to. Layers linked to the same variable are shown next to the Name menu, along with the link icon.
-
For Pixel Replacement variables, set the following options.
-
Choose a method for scaling the replacement image: Fit scales the image so that it fits in the bounding box (which may leave parts of the bounding box empty), Fill scales the image so that it fills the bounding box entirely (which may cause the image to extend beyond the bounding box). As Is applies no scaling to the image, and Conform scales the image non-proportionally so that it fits in the bounding box.
- Click a handle on the alignment icon 📁 to choose an alignment for placing the image inside the bounding box. (This option is not available for Conform.)
-
Select Clip To Bounding Box to clip areas of the image that do not fit in the bounding box. This option is available only when the Fill or As Is replacement method is selected. (This option is not available for Conform.)
-
To define variables for another layer, choose a layer from the Layer pop-up menu. An asterisk appears next to the name of a layer that contains variables. You can use the navigation arrows to move between layers.
-
Click OK.
To the top
Rename a variable
-
Choose Image > Variables > Define.
-
Choose the layer that contains the variable from the Layer pop-up menu.
-
To rename the variable, enter a name in the Name text box. Variable names must begin with a letter, underscore, or colon and cannot contain spaces or special characters (except for periods, hyphens, underscores, and colons).
-
To remove the variable, deselect it.
To the top
Define a data set
A data set is a collection of variables and associated data. You define a data set for each version of the graphic that you want to generate.
-
Do one of the following:
-
Choose Image > Variables > Data Sets.
- If the Variables dialog box is open, choose Data Sets from the pop-up menu at the top of the dialog box, or click Next.
Note: You must define at least one variable before you can edit the default data set.
-
Click the New Data Set button
-
Select a variable from the Name pop-up menu or the list at the bottom of the dialog box.
-
Edit the variable data:
-
For Visibility variables, select Visible to show the layer's content or Invisible to hide the layer's content.
- For Pixel Replacement variables 📋, click Select File and select a replacement image file. Click Do Not Replace before the data set is
applied to leave the layer in its current state.
Note: Do Not Replace does not reset the file to its original state if another replacement has been applied previously.
- For Text Replacement variables Tenter a text string in the Value text box.
- Define additional data sets for each version of the graphic you want to generate.
You can edit, rename, or delete the data set later by first choosing it from the Data Set pop-up menu and editing its options. Use the arrow icons to move between data sets. Click the Delete icon to delete a data set.
To the top
Preview or apply a data set
You can apply a data set's contents to the base image while leaving all the variables and data sets intact. This changes the look of the PSD document to contain the values of the data set. You can also preview how each version of your graphic will look with each data set.
Note: Applying a data set overwrites your original document.
- Choose Image > Apply Data Set. Select the data set from the list and preview the image in the document window. To apply the data set, click Apply. Click cancel if you are previewing and don't want to change the base image.
You can also apply and preview a data set in the Data Set page of the Variables dialog box.
To the top
Generate graphics using data sets
After you define variables and one or more data sets, you can output, in batch mode, images using the data set values. You can output images as PSD files.
- Choose File > Export > Data Sets As Files.
- Enter a base name for all files generated. You may create your own file-naming scheme if you want.
- Click the Select Folder button to select a destination directory for your files.
- Choose data sets to export.
- Click OK.
To the top
Creating data sets in external files
You can quickly create a large number of data sets by creating an external text file that contains all the variable information and loading that file into a PSD document containing variables. One method is to enter your data into a text file or Microsoft Excel spreadsheet and then export it to a tab or comma-separated file.
The syntax of the external text file is as follows (where each line that starts with "Variable" or "Value" is an entire line by itself in your file):
VariableName1
Value1-1
Value1-2
Value1-M
All the variable names are listed on the first line, in the order that the values are given in subsequent lines. Each subsequent line represents one data set, with the values for each variable given.
To create multiple lines of text in a single line of text in a data set, enclose the text in double quotes and insert hard returns in the tab- or comma-separated file where you want the breaks to occur.
| External text file syntax elements | |
| Either a comma-separated (CSV) or a tab (tab-delimited) file that separates each variable name or value. | |
| A newline character that ends each data set and can be a line feed, carriage return, or both. | |
| “true” and “false” Allowed values for a visibility variable. | |
| Spaces Spaces around the delimiter are removed when parsing the file; between words in a value string (e.g., two of a kind) spaces are maintained and leading and trailing spaces are maintained if enclosed in double quotes (e.g., “one kind”). | |
| Double quotes Can be part of a value if preceded by another double quote (e.g., “B” would be “B” in the data set). | |
If
All variables defined in the PSD document must be defined in the text file. An error is displayed if the number of variables in the text file does not match the number in the document.
Example data set:
Using a template for flowers that holds variables for tulip and sunflower, you can set up a text file that looks like this:
{contents of FlowerShow.txt}
Variable 1, Variable 2, Variable 3
true, TULIP, c:\My Documents\tulip.jpg
false, SUNFLOWER, c:\My Documents\sunflower.jpg
false, CALLA LILY, c:\My Documents\calla.jpg
true, VIOLET, c:\My Documents\violet.jpg
Note: You can use a relative path for the image location if the text file is in the same folder as the image file. For example, the last item in the example can be: true, VIOLET, violet.jpg.
To the top
Import a data set
-
Do one of the following:
-
Choose File > Import > Variable Data Sets.
-
Choose Image > Variables > Data Sets and click the Import button.
-
Navigate to the text file to import.
-
Set up your import options.
Use First Column For Data Set Names Names each data set using the content of the first column of the text file (the values for the first
variable listed). Otherwise, the data sets are named "Data Set 1, Data Set 2, and so on."
Replace Existing Data Sets Deletes any existing data sets before importing.
-
Set the encoding of the text file or leave the setting Automatic.
-
Click OK.

Twitter™ and Facebook posts are not covered under the terms of Creative Commons.
Legal Notices | Online Privacy Policy
Guidelines for recording actions
Record an action
Record a path
Insert a stop
Change settings when playing an action
Exclude commands from an action
Insert a non-recordable menu command
Edit and rerecord actions
To the top
Guidelines for recording actions
Keep in mind the following guidelines when recording actions:
- You can record most—but not all—commands in an action.
- You can record operations that you perform with the Marquee, Move, Polygon, Lasso, Magic Wand, Crop, Slice, Magic Eraser, Gradient, Paint Bucket, Type, Shape, Notes, Eyedropper, and Color Sampler tools—as well as those that you perform in the History, Swatches, Color, Paths, Channels, Layers, Styles, and Actions panels.
- Results depend on file and program setting variables, such as the active layer and the foreground color. For example, a 3-pixel Gaussian blur won't create the same effect on a 72-ppi file as on a 144-ppi file. Nor will Color Balance work on a grayscale file.
- When you record actions that include specifying settings in dialog boxes and panels, the action will reflect the settings in effect at the time of the recording. If you change a setting in a dialog box or panel while recording an action, the changed value is recorded.
Note: Most dialog boxes retain the settings specified at the previous use. Check carefully that those are the values you want to record.
- Modal operations and tools—as well as tools that record position—use the units currently specified for the ruler. A modal operation or tool is one that requires you to press Enter or Return to apply its effect, such as transforming or cropping. Tools that record position include the Marquee, Slice, Gradient, Magic Wand, Lasso, Shape, Path, Eyedropper, and Notes tools.
If you record an action that will be played on files of different sizes, set the ruler units to percentages. As a result, the action will always play back in the same relative position in the image.
- You can record the Play command listed on the Actions panel menu to cause one action to play another.
To the top
Record an action
When you create a new action, the commands and tools you use are added to the action until you stop recording.
To guard against mistakes, work in a copy: at the beginning of the action before applying other commands, record the File > Save A Copy command (Illustrator) or record the File > Save As command and select As A Copy (Photoshop). Alternatively, in Photoshop you can click the New Snapshot button on the History panel to make a snapshot of the image before recording the action.
- Open a file.
- In the Actions panel, click the Create New Action button +, or choose New Action from the Actions panel menu.
- Enter an action name, select an action set, and set additional options:
Function Key Assigns a keyboard shortcut to the action. You can choose any combination of a function key, the Ctrl key (Windows) or Command key (Mac OS), and the Shift key (for example, Ctrl+Shift+F3), with these exceptions: In Windows, you cannot use the F1 key, nor can you use F4 or F6 with the Ctrl key.
Note: If you assign an action the same shortcut that is used for a command, the shortcut will apply the action rather than the command.
Color Assigns a color for display in Button mode.
- Click Begin Recording. The Begin Recording button in the Actions panel turns red ●.
Note: When recording the Save As command, do not change the filename. If you enter a new filename, that new name is recorded and used each time you run the action. Before saving, if you navigate to a different folder, you can specify a different location without having to specify a filename.
- Perform the operations and commands you want to record.
Not all tasks in actions can be recorded directly; however, you can insert most nonrecordable tasks using commands in the Actions panel menu.
- To stop recording, either click the Stop Playing/Recording button, or choose Stop Recording from the Actions panel menu. (In Photoshop, you can also press the Esc key.)
To resume recording in the same action, choose Start Recording from the Actions panel menu.
To the top
Record a path
The Insert Path command lets you include a complex path (a path created with a pen tool or pasted from Adobe Illustrator) as part of an action. When the action is played back, the work path is set to the recorded path. You can insert a path when recording an action or after it has been recorded.
-
Do one of the following:
-
Start recording an action.
- Select an action's name to record a path at the end of the action.
-
Select a command to record a path after the command.
-
Select an existing path from the Paths panel.
-
Choose Insert Path from the Actions panel menu.
If you record multiple Insert Path commands in a single action, each path replaces the previous one in the target file. To add multiple paths, record a Save Path command using the Paths panel after recording each Insert Path command.
Note: Playing actions that insert complex paths may require significant amounts of memory. If you encounter problems, increase the amount of memory available to Photoshop.
To the top
Insert a stop
You can include stops in an action that let you perform a task that cannot be recorded (for example, using a painting tool). After you complete the
task, click the Play button in the Actions panel to complete the action.
You can also display a short message when the action reaches the stop as a reminder of what needs to be done before continuing with the action.
You can include a Continue button in the message box in case no other task needs to be done.
-
Choose where to insert the stop by doing one of the following:
-
Select an action's name to insert a stop at the end of the action.
-
Select a command to insert a stop after the command.
-
Choose Insert Stop from the Actions panel menu.
- Type the message you want to appear.
- If you want the option to continue the action without stopping, select Allow Continue.
- Click OK.
You can insert a stop when recording an action or after it has been recorded.
To the top
Change settings when playing an action
By default, actions are completed using the values specified when they were originally recorded. If you want to change the settings for a command within an action, you can insert a modal control. A modal control pauses an action so that you can specify values in a dialog box or use a modal tool. (A modal tool requires pressing Enter or Return to apply its effect—once you press Enter or Return, the action resumes its tasks.)
A modal control is indicated by a dialog box icon to the left of a command, action, or set in the Actions panel. A red dialog box icon indicates an action or set in which some, but not all, commands are modal. You can't set a modal control in Button mode.
- Do one of the following:
- To enable a modal control for a command within an action, click the box to the left of the command name. Click again to disable the modal control.
- To enable or disable modal controls for all commands in an action, click the box to the left of the action name.
- To enable or disable modal controls for all actions in a set, click the box to the left of the set name.
To the top
Exclude commands from an action
You can exclude commands that you don't want to play as part of a recorded action. You can't exclude commands in Button mode.
- If necessary, expand the listing of commands in the action by clicking the triangle to the left of the action name in the Actions panel.
- Do one of the following:
- To exclude a single command, click to clear the check mark to the left of the command name. Click again to include the command.
• To exclude or include all commands or actions in an action or set, click the check mark to the left of the action or set name.
• To exclude or include all commands except the selected command, Alt-click (Windows) or Option-click (Mac OS) its check mark.
To indicate that some of the commands within the action are excluded, in Photoshop the check mark of the parent action turns red; in Illustrator the check mark of the parent action becomes dimmed.
Insert a non-recordable menu command
You cannot record the painting and toning tools, tool options, View commands, and Window commands. However, you can insert many non-recordable commands into an action using the Insert Menu Item command.
You can insert a command when recording an action, or after it has been recorded. An inserted command doesn't execute until the action is played, so the file remains unchanged when the command is inserted. No values for the command are recorded in the action. If the command opens a dialog box, the dialog box appears during playback, and the action pauses until you click OK or Cancel.
Note: When you use the Insert Menu Item command to insert a command that opens a dialog box, you cannot disable the modal control in the Actions panel.
-
Choose where to insert the menu item:
-
Select an action's name to insert the item at the end of the action.
-
Select a command to insert the item at the end of the command.
-
Choose Insert Menu Item from the Actions panel menu.
- With the Insert Menu Item dialog box open, choose a command from its menu.
- Click OK.
To the top
Edit and rerecord actions
It is easy to edit and customize actions. You can tweak the settings of any specific command within an action, add commands to an existing action, or step through an entire action and change any or all settings.
Overwrite a single command
- In the Actions panel, double-click the command.
- Enter the new values, and click OK.
Add commands to an action
-
Do one of the following:
-
Select the action name to insert a new command at the end of the action.
-
Select a command in the action to insert a command after it.
-
Click the Begin Recording button, or choose Start Recording from the Actions panel menu.
-
Record the additional commands.
-
When finished, click the Stop Playing/Recording button in the Actions panel or choose Stop Recording from the panel menu.
Rearrange commands within an action
- In the Actions panel, drag a command to its new location within the same or another action. When the highlighted line appears in the desired position, release the mouse button.
Record an action again
- Select an action, and choose Record Again from the Actions panel menu.
- If a modal tool appears, use the tool to create a different result, and press Enter or Return, or just press Enter or Return to retain the same settings.
- If a dialog box appears, change the settings, and click OK to record them, or click Cancel to retain the same values.
Adobe also recommends
- Adding conditional actions | Creative Cloud

Twitter™ and Facebook posts are not covered under the terms of Creative Commons.
Legal Notices | Online Privacy Policy
Add a conditional mode change to an action
To the top
Add a conditional mode change to an action
You can specify conditions for a mode change so that the conversion can occur during an action, which is a series of commands applied sequentially to a single file or a batch of files. When a mode change is part of an action, an error can occur if the file being opened is not in the source mode specified in the action. For example, suppose one step in an action is to convert an image with a source mode of RGB to a target mode of CMYK. Applying this action to an image in Grayscale mode, or any other source mode besides RGB, results in an error.
When you record an action, you can use the Conditional Mode Change command to specify one or more modes for the source mode and a mode for the target mode.
- Start recording an action.
- Choose File > Automate > Conditional Mode Change.
- In the Conditional Mode Change dialog box, select one or more modes for the source mode. Use the All or None buttons to select all possible modes or no mode.
- Choose a target mode from the Mode pop-up menu.
- Click OK. The conditional mode change appears as a new step in the Actions panel.
Adobe also recommends
- Adding conditional actions | Creative Cloud
Twitter™ and Facebook posts are not covered under the terms of Creative Commons.
Legal Notices | Online Privacy Policy
About actions
Actions panel overview
For more information about actions
To the top
About actions
An action is a series of tasks that you play back on a single file or a batch of files—menu commands, panel options, tool actions, and so on. For example, you can create an action that changes the size of an image, applies an effect to the image, and then saves the file in the desired format.
Actions can include steps that let you perform tasks that cannot be recorded (for example, using a painting tool). Actions can also include modal controls that let you enter values in a dialog box while playing an action.
In Photoshop, actions are the basis for droplets, which are small applications that automatically process all files that are dragged onto their icon.
Photoshop and Illustrator come with predefined actions installed that help you perform common tasks. You can use these actions as is, customize them to meet your needs, or create new actions. Actions are stored in sets to help you organize them.
You can record, edit, customize, and batch-process actions, and you can manage groups of actions by working with action sets.
To the top
Actions panel overview
You use the Actions panel (Window >Actions) to record, play, edit, and delete individual actions. This panel also lets you save and load action files.
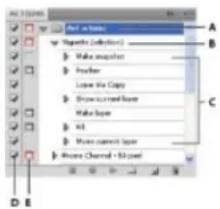
text_image
A B C D EPhotoshop Actions panel
A. Action set B. Action C. Recorded commands D. Included command E. Modal control (toggles on or off)
Expand and collapse sets, actions, and commands
- Click the triangle to the left of the set, action, or command in the Actions panel. Alt-click (Windows) or Option-click (Mac OS) the triangle to expand or collapse all actions in a set or all commands in an action.
View actions by name only
- Choose Button Mode from the Actions panel menu. Choose Button Mode again to return to list mode.
Note: You can't view individual commands or sets in Button mode.
Select actions in the Actions panel
- Click an action name. Shift-click action names to select multiple, contiguous actions, and Ctrl-click (Windows) or Command-click (Mac OS) action names to select multiple, discontinuous actions.
To the top
For more information about actions
Adobe also recommends
- Adding conditional actions | Creative Cloud
Twitter ^™ and Facebook posts are not covered under the terms of Creative Commons.
Legal Notices | Online Privacy Policy
Conditional actions let you build actions that choose what to do based on one of several different conditions. First, you choose a condition and then, optionally specify an action that plays if the document meets the condition. Then, you optionally specify an action that plays if the document does not meet the condition.
To insert a conditional action step into an action that you're recording or editing:
- Make sure that the actions you will be referencing are in the same actions set.
- Choose Insert Conditional from the Actions panel menu.
-
In the Conditional Action dialog box, choose a condition from the If Current menu.
-
Choose actions from the Then Play Action menu and the Else Play Action menu, and then, click OK.
You can also choose None in one of the menus, but not both. You can run an action only if a particular condition is false by choosing None as the Then Play Action and choosing the desired action as the Else Play Action.
For more information, see About actions and the Actions panel and Creating actions.
Note: There is a Conditional Mode Change command to specify conditions for a color mode change step in an action. Using this command can prevent an error where a file is not in the source mode specified by the action.
To the top
Testing the opposite of what's in the condition
There might be instances when you want to test the opposite of what's in a condition.
For example, suppose you want "Action 1" to play when when the frontmost document is non-square. You would specify the conditional: "If Current Document is Square, Then Play Action None, Else Play Action "Action 1."
To test for the opposite of a particular condition, swap the "Then" and "Else" actions.

Twitter™ and Facebook posts are not covered under the terms of Creative Commons.
Legal Notices | Online Privacy Policy
Photoshop lets you record tools such as the brush tool in your action. To enable this feature, choose Allow Tool Recording from the Actions panel menu.
A couple of items to keep in mind:
- When recording a tool, choose your brush as part of the action or Photoshop uses the currently selected brush.
- If you are recording the action to play back at a different size, set Photoshop's measurement units to percentage and don't define the brush size as part of a brush preset.
For more information, see About actions and the Actions panel and Creating actions.
Twitter™ and Facebook posts are not covered under the terms of Creative Commons.
Legal Notices | Online Privacy Policy
Web graphics
Copy CSS generates Cascading Style Sheet (CSS) properties from shape or text layers. The CSS is copied to the clipboard and can be pasted into a style sheet. For shapes it captures values for the following:
- size
- position
- stroke color
• fill color (including gradients) - drop shadow
For text layers, Copy CSS also captures the following values:
- font family
- font size
- font weight
- line height
- underline
- strikethrough
- superscript
- subscript
- text alignment
Copying CSS from a layer group containing shapes or text creates a class for each layer as well as a Group class. The Group class represents a parent div containing child divs that correspond to the layers in the group. The top/left values for the child divs are in relation to the parent div.
Note: The Copy CSS command does not work with Smart Objects or when selecting multiple shape/text layers that are not grouped.
-
In the Layers panel, do one of the following:
-
Right-click a shape/text layer or layer group and choose Copy CSS from the context menu.
-
Select a shape/text layer or layer group and choose Copy CSS from the Layers panel menu.
-
Paste the code into your style sheet document.
For more information on creating web pages with Photoshop, see Slicing web pages.

Twitter™ and Facebook posts are not covered under the terms of Creative Commons.
Legal Notices | Online Privacy Policy
Creating rollover images
Export to Zoomify
Working with hexadecimal color values
Note: For detailed instructions, click the links below. To ask questions, request features, or report problems, visit feedback.photoshop.com.
The Photoshop web tools make it easy to build component pieces for your web pages or to output complete web pages in preset or customized formats.
- Use layers and slices to design web pages and web page interface elements. (See Layers and Slicing web pages.)
- Use layer comps to experiment with different page compositions or to export variations of a page. (See Layer comps.)
- Create rollover text or button graphics to import into Dreamweaver or Flash.
- Create web animations with the Animation panel, then export them as animated GIF images or QuickTime files. See Creating frame animations.
- Use Adobe Bridge to create a web photo gallery to quickly turn a set of images into an interactive web site, using a variety of professional-looking templates.
For a video on designing web sites with Photoshop and Dreamweaver, see www.adobe.com/go/lrvid4043_dw.
To the top
Creating rollover images
A rollover is a button or image on a web page that changes when the mouse is over it. To create a rollover, you need at least two images: a primary image for the normal state and a secondary image for the changed state.
Photoshop provides a number of useful tools for creating rollover images:
- Use layers to create primary and secondary images. Create content on one layer, then duplicate the layer and edit it to create similar content while maintaining alignment between layers. When creating a rollover effect, you can change the layer's style, visibility or position, make color or tonal adjustments, or apply filter effects. See Duplicate layers.
- You can also use layer styles to apply effects, such as color overlays, drop shadows, glow, or emboss, to the primary layer. To create a rollover pair, turn the layer style on or off and save the image in each state. See Layer effects and styles.
- Use preset button styles from the Styles panel to quickly create rollover buttons with normal, mouseover, and mousedown states. Draw a basic shape with the rectangle tool and apply a style, such as Beveled Normal, to automatically turn the rectangle into a button. Then copy the layer and apply other preset styles, like Beveled Mouseover, to create additional button states. Save each layer as a separate image to create a finished rollover button set.
- Use the Save For Web & Devices dialog box to save rollover images in a web-compatible format and with an optimized file size. See Optimizing images.
When you save rollover images, use a naming convention to distinguish the primary (non-rollover state) image from the secondary (rollover state) image.
After creating a rollover image set in Photoshop, use Dreamweaver to place the images on a web page and automatically add the JavaScript code for the rollover action.
For a video on designing web sites with Photoshop and Dreamweaver, see www.adobe.com/go/lrvid4043_dw.
To the top
Export to Zoomify
You can post high-resolution images on the web that viewers can pan and zoom to see more detail. The basic-size image downloads in the same time as an equivalent size JPEG file. Photoshop exports the JPEG files and HTML file that you can upload to your web server.
- Choose File > Export > Zoomify and set export options.
Template Sets the background and navigation for the image viewed in the browser.
Output Location Specifies the location and name of the file.
Image Tile Options Specifies the quality of the image.
Browser Options Sets the pixel width and height for the base image in the viewer's browser.
- Upload the HTML and image files to your web server.
For a video on Zoomify, see www.adobe.com/go/vid0003.
To the top
Working with hexadecimal color values
Photoshop can display the hexadecimal values of image colors or copy a color's hexadecimal value for use in an HTML file.
View hexadecimal color values in the Info panel
- Choose Window > Info or click the Info panel tab to view the panel.
- Choose Panel Options from the panel menu. Under First Color Readout or Second Color Readout, choose Web Color from the Mode menu and click OK.
- Position the pointer over the color for which you want to view hexadecimal values.
Copy a color as a hexadecimal value
Photoshop copies colors either as an HTML COLOR attribute containing the hexadecimal value (color=#xxyyzz), or as the hexadecimal value alone.
-
Do one of the following:
-
With the Eyedropper tool, move the pointer over the color that you want to copy. Right-click (Windows) or Control-click (Mac OS), and choose Copy Color As HTML or Copy Color's Hex Code.
- Set the foreground color using the Color panel, the Swatches panel, or the Adobe Color Picker. From the Color panel menu, choose Copy Color As HTML or Copy Color's Hex Code.
-
In the Save For Web dialog box, click the color swatch or choose Matte > Other. In the Adobe Color Picker, right-click the hexadecimal value, and choose Copy.
-
Open the desired file in an HTML editing application, and choose Edit > Paste.
Adobe also recommends
- Save For Web & Devices overview
- Web graphic formats
• Create a web photo gallery
• Create a rollover image

Twitter™ and Facebook posts are not covered under the terms of Creative Commons.
Legal Notices | Online Privacy Policy
Slice types
Slice a web page
Convert auto and layer-based slices to user slices
View slices and slice options
Slices divide an image into smaller images that are reassembled on a web page using an HTML table or CSS layers. By dividing the image, you can assign different URL links to create page navigation, or optimize each part of an image using its own optimization settings.
You export and optimize a sliced image using the Save For Web& Devices command. Photoshop saves each slice as a separate file and generates the HTML or CSS code needed to display the sliced image.

text_image
Exhibits Visit Us Tours AquariumWeb page divided into slices.
When you work with slices, keep these basics in mind:
- You can create a slice by using the Slice tool or by creating layer-based slices.
- After you create a slice, you can select it using the Slice Select tool ✗ and then move, resize, or align it with other slices.
- You can set options for each slice—such as slice type, name, and URL—in the Slice Options dialog box.
- You can optimize each slice using different optimization settings in the Save For Web & Devices dialog box.
To the top
Slice types
Slices are categorized by their content type (Table, Image, No Image) and by the way they are created (user, layer-based, auto).
Slices created with the Slice tool are called user slices; slices created from a layer are called layer-based slices. When you create a new user slice or layer-based slice, additional auto slices are generated to account for the remaining areas of the image. In other words, auto slices fill the space in the image that is not defined by user slices or layer-based slices. Auto slices are regenerated every time you add or edit user slices or layer-based slices. You can convert auto slices to user slices.
User slices, layer-based slices, and auto slices look different—user slices and layer-based slices are defined by a solid line, whereas auto slices are defined by a dotted line. In addition, user slices and layer-based slices display a distinct icon. You can choose to show or hide auto slices, which can make your work with user-slices and layer-based slices easier to view.
A subslice is a type of auto slice that is generated when you create overlapping slices. Subslices indicate how the image is divided when you save the optimized file. Although subslices are numbered and display a slice symbol, you cannot select or edit them separately from the underlying slice. Subslices are regenerated every time you arrange the stacking order of slices.
Slices are created using different methods:
• Auto slices are automatically generated.
- User slices are created with the Slice tool.
• Layer-based slices are created with the Layers panel.
To the top
Slice a web page
You can use the slice tool to draw slice lines directly on an image, or design your graphic using layers, and then create slices based on the layers.
Create a slice with the Slice tool
- Select the Slice tool ⚫. (Press the C key to cycle through tools grouped with the Crop too.)
Any existing slices automatically appear in the document window.
- Choose a style setting in the options bar:
Normal Determines slice proportions as you drag.
Fixed Aspect Ratio Sets a height-to-width ratio. Enter whole numbers or decimals for the aspect ratio. For example, to create a slice twice as wide as it is high, enter 2 for the width and 1 for the height.
Fixed Size Specifies the slice's height and width. Enter pixel values in whole numbers.
- Drag over the area where you want to create a slice. Shift-drag to constrain the slice to a square. Alt-drag (Windows) or Option-drag (Mac OS) to draw from the center. Use View > Snap To to align a new slice to a guide or another slice in the image. See Move, resize, and snap user slices.
Create slices from guides
- Add guides to an image.
- Select the Slice tool, and click Slices From Guides in the options bar.
When you create slices from guides, any existing slices are deleted.
Create a slice from a layer
A layer-based slice encompasses all the pixel data in the layer. If you move the layer or edit the layer's content, the slice area automatically adjusts to include the new pixels.
flowchart
graph TD
    A["AQUARISM"] --> B["Exhibits"]
    B --> C["Water Intake"]
    C --> D["Fours"]
    E["AQUARISM"] --> F["Exhibits & Events"]
    F --> G["Water Intake"]
    G --> H["Fours"]
A layer-based slice is updated when the source layer is modified.
Layer-based slices are less flexible than user slices; however, you can convert ("promote") a layer-based slice to a user slice. See Convert auto and layer-based slices to user slices.
- Select a layer in the Layers panel.
- Choose Layer > New Layer-based Slice.
Don't use a layer-based slice when you plan to move the layer over a large area of the image during an animation, because the slice dimension may exceed a useful size.
To the top
Convert auto and layer-based slices to user slices
A layer-based slice is tied to the pixel content of a layer, so the only way to move, combine, divide, resize, and align it is to edit the layer—unless you convert it to a user slice.
All auto slices in an image are linked and share the same optimization settings. If you want to set different optimization settings for an auto slice, you need to promote it to a user slice.
- Using the Slice Select tool ↗, select one or more slices to convert.
- Click Promote in the options bar.
You can promote an auto slice in the Save For Web & Devices dialog box by unlinking it. See Work with slices in the Save For Web & Devices dialog box
To the top
View slices and slice options
You can view slices in Photoshop and the Save For Web & Devices dialog box. The following characteristics can help you identify and differentiate between slices:
Slice lines Define the boundary of the slice. Solid lines indicate that the slice is a user slice or layer-based slice; dotted lines indicate that the slice is an auto slice.
Slice colors Differentiate user slices and layer-based slices from auto slices. By default, user slices and layer-based slices have blue symbols, and auto slices have gray symbols.
In addition, the Save For Web & Devices dialog box uses color adjustments to dim unselected slices. These adjustments are for display purposes only and do not affect the color of the final image. By default, the color adjustment for auto slices is twice the amount of that for user slices.
Slice numbers Slices are numbered 01 from left to right and top to bottom, beginning in the upper-left corner of the image. If you change the arrangement or total number of slices, slice numbers are updated to reflect the new order.
Slice badges The following badges, or icons, indicate certain conditions.
图
User slice has Image content.
图
User slice has No Image content.
图
Slice is layer-based.
Show or hide slice boundaries
- Choose View > Show > Slices. To hide and show slices along with other items, use the Extras command. See Show or hide Extras.
Show or hide auto slices
- Do one of the following:
- Select the Slice Select tool, and click Show Auto Slices or Hide Auto Slices in the options bar.
- Choose View > Show > Slices. Auto slices appear with the rest of your slices.
Show or hide slice numbers
-
Do one of the following:
-
In Windows, choose Edit > Preferences > Guides, Grid & Slices.
-
In Mac OS, choose Photoshop > Preferences > Guides, Grid & Slices.
-
Under Slices, click Show Slice Numbers.
Change the color of slice lines
- In Windows, choose Edit > Preferences > Guides, Grid & Slices; in Mac OS, choose Photoshop > Preferences > Guides, Grid & Slices.
- Under Slice Lines, choose a color from the Line Color menu.
After the color change, selected slice lines are automatically displayed in a contrasting color.
Adobe also recommends
• Work with slices in the Save For Web & Devices dialog box
Twitter ^™ and Facebook posts are not covered under the terms of Creative Commons.
Legal Notices | Online Privacy Policy
Select one or more slices Move, resize, and snap user slices Divide user slices and auto slices Duplicate slices Copy and paste a slice Combine slices Change the stacking order of slices Align and distribute user slices Delete a slice Lock all slices
To the top
Select one or more slices
Do one of the following:
- Select the Slice Select tool 📋 and click the slice in the image. When working with overlapping slices, click the visible section of an underlying slice to select it.
- Select the Slice Select tool, and Shift-click to add slices to the selection.
- Select the Slice Select tool in the Save for Web & Devices dialog box, and click in an auto slice or outside the image area, and drag across the slices you want to select. (Clicking in a user slice and dragging moves the slice.)
- Choose File > Save For Web & Devices. In the dialog box, use the Slice tool to select a slice.
When using either the Slice tool or the Slice Select tool, you can switch from one tool to the other by holding down Ctrl (Windows) or Command (Mac OS).
To the top
Move, resize, and snap user slices
You can move and resize user slices in Photoshop, but not in the SaveFor Web & Devices dialog box.
Move or resize a user slice
- Select one or more user slices.
-
Do one of the following:
-
To move a slice, move the pointer inside the slice selection border, and drag the slice to a new position. Press Shift to restrict movement to a vertical, horizontal, or 45^ diagonal line.
- To resize a slice, grab a side or a corner handle of the slice, and drag. If you select and resize adjacent slices, common edges shared by the slices are resized together.
Resize or move a user slice using numeric coordinates
-
Select one or more user slices.
-
Click the Options button in the options bar. You can also double-click a slice to show the options.
-
In the Dimensions area of the Slice Options dialog box, change one or more of the following options:
X Specifies the distance in pixels between the left edge of the slice and the origin of the ruler in the document window.
Y Specifies the distance in pixels between the top edge of the slice and the origin of the ruler in the document window.
Note: The default origin of the ruler is the upper-left corner of the image.
W Specifies the width of the slice.
H Specifies the height of the slice.
Snap slices to a guide, user slice, or other object
-
Select the options you want from the View > Snap To submenu.
-
Choose View > Snap. A check mark indicates that the option is turned on.
-
Move your selected slices as desired. The slices snap to any of your chosen objects within 4 pixels.
To the top
Divide user slices and auto slices
Use the Divide Slice dialog box to divide slices horizontally, vertically, or both. Divided slices are always user slices, regardless of whether the original is a user slice or an auto slice.
Note: You cannot divide layer-based slices.
-
Select one or more slices.
-
With the Slice Select tool ✗, click Divide in the options bar.
-
Select Preview in the Divide Slice dialog box to preview the changes.
-
In the Divide Slice dialog box, select one or both of the following options:
Divide Horizontally Into Divides the slice lengthwise.
Divide Vertically Into Divides the slice widthwise.
-
Define how you want to divide each selected slice:
-
Select and enter a value for Slices Down or Slices Across to divide each slice evenly into the specified number of slices.
- Select and enter a value for Pixels Per Slice to create slices with the specified number of pixels. If the slice cannot be divided evenly by that number of pixels, the remainder is made into another slice. For example, if you divide a slice that is 100 pixels wide into three new
slices each 30 pixels wide, the remaining 10-pixel-wide area becomes a new slice.
- Click OK.
To the top
Duplicate slices
You can create a duplicate slice with the same dimensions and optimization settings as the original. If the original slice is a linked user slice, the duplicate is linked to the same collection of linked slices. Duplicate slices are always user slices, regardless of whether the original is a user slice, a layer-based slice, or an auto slice.
- Select a slice or multiple slices.
- Alt-drag (Windows) or Option-drag (Mac OS) from inside the selection.
To the top
Copy and paste a slice
You can copy and paste a selected slice within an image, into another image, or into another application such as Dreamweaver. Copying a slice copies all layers within the bounds of the slice (not just the active layer).
- Select one or more slices with the Slice Select tool ✗.
- Choose Edit > Copy.
Note: A slice can't be copied if there is an active selection in the document (a marquee pixel selection or a selected path).
-
Do one of the following:
-
If you want to paste the slice into another image, open and display that image.
-
If pasting into Dreamweaver, make your Dreamweaver document the active window.
-
Choose Edit > Paste. A new layer is created when a slice is pasted into a Photoshop image.
Note: A slice copied into Dreamweaver retains information about the filename and path of the original Photoshop source file. To view this information in Dreamweaver, right-click (Windows) or Ctrl+click (Mac OS) the image and choose Design Notes, then locate the FilePathSrc field on the All Info tab.
For a tutorial on copying and pasting between different applications, including Dreamweaver and Photoshop, see www.adobe.com/go/vid0193.
To the top
Combine slices
You can combine two or more slices into a single slice. Photoshop determines the dimensions and position of the resulting slice from the rectangle created by joining the outer edges of the combined slices. If the combined slices are not adjacent or have different proportions or alignments, the newly combined slice may overlap other slices.
The combined slice takes the optimization settings of the first slice in the series of slices you select. A combined slice is always a user slice, regardless of whether the original slices include auto slices.
Note: You cannot combine layer-based slices.
- Select two or more slices.
- Right -click (Windows) or Ctrl-click (Mac OS) and choose Combine Slices.
To the top
Change the stacking order of slices
When slices overlap, the last slice you create is the top slice in the stacking order. You can change the stacking order to gain access to underlying slices. You can specify which slice is on the top and bottom of the stack and move slices up or down in the stacking order.
Note: You cannot arrange the stacking order of auto slices.
- Select a slice or multiple slices.
- Choose the Slice Select tool ✗, and click a stacking order option in the options bar.

Stacking order options
A. Bring To Front B. Bring Forward C. Send Backward D. Send To Back
To the top
Align and distribute user slices
You can align user slices along an edge or their centers, and distribute user slices evenly along the vertical or horizontal axis. By aligning and distributing user slices, you can eliminate unneeded auto slices and generate a smaller, more efficient HTML file.
Note: To align or distribute layer-based slices, align or distribute the contents of the layers.
- Select the user slices you want to align.
- Choose the Slice Select tool ↗, and select an option in the options bar.
Alignment options
A. Top B. Vertical Centers C. Bottom D. Left E. Horizontal Centers F. Right

Distribute options
A. Top B. Vertical Centers C. Bottom D. Left E. Horizontal Centers F. Right
To the top
Delete a slice
When you delete a user slice or layer-based slice, auto slices are regenerated to fill the document area.
Deleting a layer-based slice does not delete the associated layer; however, deleting the layer associated with a layer-based slice does delete the layer-based slice.
Note: You cannot delete auto slices. If you delete all user slices and layer-based slices in an image, one auto slice covering the entire image remains.
- Select one or more slices.
- Choose the Slice or Slice Select tool and press the Backspace key or the Delete key.
- To delete all user slices and layer-based slices, choose View > Clear Slices.
To the top
Lock all slices
Locking slices prevents you from resizing, moving, or otherwise changing them accidentally.
- Choose View > Lock Slice.
Adobe also recommends
• Work with slices in the Save For Web & Devices dialog box

Twitter™ and Facebook posts are not covered under the terms of Creative Commons.
Legal Notices | Online Privacy Policy
Display the Slice Options dialog box Specify a slice content type Rename a slice Choose a background color for a slice Assign URL link information to an Image slice Specify browser messages and Alt text Add HTML text to a slice
To the top
Display the Slice Options dialog box
Do one of the following:
- Double-click a slice with the Slice Select tool. (If the tool isn't visible, hold down the Crop or Slice tool.)
- With the Slice Select tool active, click the Slice Options button in the options bar. This method is not in the Save For Web & Devices dialog box.
To the top
Specify a slice content type
You can specify how the slice data appears in a web browser when exported with an HTML file. The available options vary according to the slice type you select.
• Image slices contain image data. This is the default content type.
- No Image slices let you create empty table cells that can be populated with text or a solid color. You can enter HTML text in a No Image slice. If you set the "Text is HTML" option in the Save for Web & Devices dialog box, the text is interpreted as HTML when viewed in a browser. Slices of type No Image aren't exported as images and can be previewed in a browser.
Note: Setting options for an auto slice promotes the slice to a user slice.
- Select a slice. If you are working in Photoshop, double-click the slice with the Slice Select tool to display the Slice Options dialog box.
- In the Slice Options dialog box, select a slice type from the Type pop-up menu.
To the top
Rename a slice
As you add slices to an image, you may find it helpful to rename slices based on their content. By default, user slices are named according to the settings in the Output Settings dialog box. (See Output settings for web graphics.)
- Select a slice and double-click the slice with the Slice Select tool to display the Slice Options dialog box. In the Slice Options dialog box, type a new name in the Name text box.
Note: The Name text box is not available for No Image slice content.
Choose a background color for a slice
You can select a background color to fill the transparent area (for Image slices) or entire area (for No Image slices) of the slice.
Photoshop does not display the selected background color—you must preview the image in a browser to view the effect of selecting a background color.
- Select a slice. If you are working in the Photoshop Save For Web & Devices dialog box, double-click the slice with the Slice Select tool to display the Slice Options dialog box.
- In the Slice Options dialog box, select a background color from the Background Color pop-up menu. Select None, Matte, White, Black, or Other (using the Adobe Color Picker).
To the top
Assign URL link information to an Image slice
Assigning a URL to a slice makes the entire slice area a link in the resulting web page. When a user clicks the link, the web browser navigates to the specified URL and target frame. This option is available only for Image slices.
- Select a slice. If you are working in Photoshop, double-click the slice with the Slice Select tool to display the Slice Options dialog box.
-
In the Slice Options dialog box, enter a URL in the URL text box. You can enter a relative URL or absolute (full) URL. If you enter an absolute URL, be sure to include the proper protocol (for example, http://www.adobe.com, not www.adobe.com). For more information on using relative and full URLs, see an HTML reference.
-
If desired, enter the name of a target frame in the Target text box:
_blank Displays the linked file in a new window, leaving the original browser window open.
_self Displays the linked file in the same frame as the original file.
_parent Displays the linked file in its own original parent frameset. Use this option if the HTML document contains frames and the current frame is a child. The linked file appears in the current parent frame.
_top Replaces the entire browser window with the linked file, removing all current frames. The name must match a frame name previously defined in the HTML file for the document. When a user clicks the link, the specified file appears in the new frame.
Note: For more information on frames, see an HTML reference.
To the top
Specify browser messages and Alt text
You can specify what messages appear in the browser. These options are available only for Image slices and appear only in exported HTML files.
-
Select a slice. If you are working in Photoshop, double-click the slice with the Slice Select tool to display the Slice Options dialog box.
-
In the Slice Options dialog box, type the desired text.
Message Text Changes the default message in the browser's status area for a selected slice or slices. By default, the slice's URL, if any, is displayed.
Alt Tag/Alt Specifies an Alt tag for a selected slice or slices. The Alt text appears in place of the slice image in nongraphical browsers. It also appears in place of the image while the image is downloading and as a tool tip in some browsers.
To the top
Add HTML text to a slice
When you choose a slice of type No Image, you can enter text to be displayed in the slice area of the resulting web page. This can be plain text or text formatted with standard HTML tags. You can also select vertical and horizontal alignment options. For more information on specific HTML tags, see an HTML reference.
Photoshop does not display HTML text in the document window; you must use a web browser to preview the text. Be sure to preview HTML text in different browsers, with different browser settings, and on different operating systems to confirm that your text is displayed correctly on the web.
Note: The amount of text in a No Image slice can affect the layout of an exported page.
- Select a slice. Double-click the slice with the Slice Select tool to display the Slice Options dialog box. You can double-click the slice in the Save For Web & Devices dialog box to set additional formatting options.
- In the Slice Options dialog box, select No Image from the Slice Type menu.
- Type the desired text in the text box.
- (Save For Web & Devices dialog box only) If the text includes HTML formatting tags, select the Text Is HTML option. If you don't select this option, HTML tags are ignored and all text appears as unformatted plain text on the resulting web page.
- (SaveFor Web & Devices dialog box only) If desired, select options in the Cell Alignment section of the dialog box:
Default Uses the browser's default for horizontal alignment.
Left Aligns the text to the left side of the slice area.
Center Aligns the text to the center of the slice area.
Right Aligns the text to the right side of the slice area.
Default Uses the browser's default for vertical alignment.
Top Aligns the text to the top of the slice area.
Baseline Sets a common baseline for the first line of text in cells in the same row (of the resulting HTML table). Each cell in the row must use the Baseline option.
Middle Centers the text vertically in the slice area.
Bottom Aligns the text to the bottom of the slice area.
Adobe also recommends
- Preview optimized images in a web browser
• Output settings for web graphics
Legal Notices | Online Privacy Policy
About web photo galleries
Create a web photo gallery
Making sure that your colors match
Web photo gallery options
Web photo gallery styles
About customizing web photo gallery styles
Customize or create a web photo gallery style
Web photo gallery style tokens

To create web galleries with Photoshop CS5, see Create a web photo gallery in Adobe Bridge Help. To use the older, optional Web Photo Gallery plug-in described in the topics below, first download and install it for Windows or Mac OS.
To the top
About web photo galleries
A web photo gallery is a web site that features a home page with thumbnail images and gallery pages with full-size images. Each page contains links that allow visitors to navigate the site. For example, when a visitor clicks a thumbnail image on the home page, the associated full-size image is loaded into a gallery page. You use the Web Photo Gallery command to automatically generate a web photo gallery from a set of images.
text_image
Photo Gallery - Japanese File Edit View Help Movie: 100 Movie: 100 Movie: 100 Movie: 100 Movie: 100 Movie: 100 Movie: 100 Movie: 100 Movie: 100 Movie: 100 Movie: 100 Movie: 100 Movie: 100 Movie: 100 Movie: 100 Video Hand iconWeb photo gallery home page
Photoshop provides a variety of styles for your gallery, which you can select using the Web Photo Gallery command. If you are an advanced user who knows HTML, you can create a new style or customize a style by editing a set of HTML template files.
Each template for gallery styles comes with different options. If you're using a preset style, some options may be dimmed, or unavailable in that particular style.
To the top
Create a web photo gallery
Create web galleries using Adobe Bridge
Adobe Bridge provides updated web gallery features. For instructions, see Create a web photo gallery in Adobe Bridge Help, or view the tutorials below.
Video tutorial: Contact sheets and web galleries in CS5
Walk through the process in Adobe

text_image
123Bridge.... Read More http://goo.gl/xfvnL

by Richard Harrington http://www.RichardHarringt...
Contribute your expertise to Adobe Community Help
Book excerpt: Create galleries with Adobe Bridge

text_image
123Arrange and output web galleries using the latest CS5 features.... Read More http://goo.gl/cpKon

by Conrad Chavez http://www.conradchavez.co...
Contribute your expertise to Adobe Community Help
Use the older, optional Photoshop plug-in
- Download and install the older Web Photo Gallery plug-in for Windows or Mac OS.
- Run Photoshop in 32-bit mode (64-bit Mac OS only).
- (Optional) Select the files or folder you want to use in Adobe Bridge.
Your images will be presented in the order in which they're displayed in Bridge. If you'd rather use a different order, change the order in Bridge.
- Do one of the following:
• In Adobe Bridge, choose Tools > Photoshop > Web Photo Gallery.
- In Photoshop, choose File > Automate > Web Photo Gallery.
- Choose a style for the gallery from the Styles pop-up menu. A preview of the home page for the chosen style appears in the dialog box.
- (Optional) Enter an e-mail address as the contact information for the gallery.
- Choose the source files for your gallery from the Use menu.
Selected Images From Bridge Uses images you selected before opening the Web Photo Gallery dialog box.
Folder Uses images from folders you select using the Browse (Windows) or Choose (Mac OS) buttons. Select Include All Subfolders to include images inside any subfolders of the selected folder.
-
Click Destination, and then select a folder in which to store the images and HTML pages for the gallery. Then click OK (Windows) or Choose (Mac OS).
-
Select formatting options for the web gallery. Choose from the Options menu to display each set of options. See Web photo gallery options.
-
Click OK. Photoshop places the following HTML and JPEG files in your destination folder:
-
A home page for your gallery named index.htm or index.html, depending on the Extension options. Open this file in any web browser to preview your gallery.
- JPEG images inside an images subfolder.
• HTML pages inside a pages subfolder. - JPEG thumbnail images inside a thumbnails subfolder.
To the top
Making sure that your colors match
If you work with photos in a wide-gamut color working space such as ProPhoto RGB or Adobe RGB, image colors may change when viewed in a web gallery by a browser that doesn't read embedded color profiles. If this happens, try converting the image profiles to sRGB (which most browsers use as a default) before optimizing them or including them in a Web Photo Gallery. Convert them to sRGB in one of the following ways. It is a good idea to work with a copy of the images.
- To convert a single image, choose Edit >Convert To Profile and then choose sRGB. See Assign or remove a color profile (Illustrator, Photoshop).
- To convert a folder of images, use the Image Processor. Choose File > Scripts > Image Processor. See Convert files with the Image Processor.
If you use the Image Processor, you can save the files directly to JPEG format in the size that you want them. If you do so, make sure to turn Resize Images off in the Large Image options.
To the top
Web photo gallery options
General Options for file extensions, encoding, and metadata.
Extension Uses either .htm or .html as the filename extension.
Use UTF 8 Encoding For URL Uses UTF-8 encoding.
Add Width And Height Attributes For Images Specifies dimensions, shortening download time.
Preserve All Metadata Maintains metadata info.
Banner Text options for the banner that appears on each page in the gallery. Enter text for each of these:
Site Name The name of the gallery.
Photographer The name of the person or organization receiving credit for the photos in the gallery.
Contact Info The contact information for the gallery, such as a telephone number or a business address.
Date The date appearing on each page of the gallery. By default, Photoshop uses the current date.
Font and Font Size (Available for some site styles) Options for the banner text.
Large Images Options for the main images that appear on each gallery page.
Add numeric links (Available for some site styles) Places a numeric sequence (starting at 1, ending with the total number of pages in the gallery) running horizontally at the top of each gallery page. Each number is a link to the respective page.
Resize Images Resizes the source images for placement on the gallery pages. Choose a size from the pop-up menu or enter a size in pixels. For Constrain, choose which dimensions of the image you want to constrain during resizing. For JPEG Quality, choose an option from the pop-up menu, enter a value between 0 and 12, or drag the slider. The higher the value, the better the image quality and the larger the file.
Note: Photoshop uses the default image interpolation method set in preferences. Choose Bicubic Sharper as the default for best results when reducing image size.
Border Size Specifies the width, in pixels, of the border around the image.
Titles Use (Available for some site styles) Specifies options for displaying captions under each image. Select Filename to display the filename, or select Description, Credits, Title, and Copyright to display description text drawn from the File Info dialog box.
Font and Font Size (Available for some site styles) Specify the font and size of the caption.
Thumbnails Options for the gallery home page, including the size of the thumbnail images.
Size Specifies the thumbnail size. Choose from the pop-up menu or enter a value in pixels for the width of each thumbnail.
Columns and Rows Specify the number of columns and rows in which to display thumbnails on the home page. This option doesn't apply to galleries that use the Horizontal Frame Style or Vertical Frame Style.
Border Size Specifies the width, in pixels, of the border around each thumbnail.
Titles Use (Available for some site styles) Specifies options for displaying captions under each thumbnail. Select Filename to display the filename, or select Description, Credits, Title, and Copyright to display description text drawn from the File Info dialog box.
Font and Font Size (Available for some site styles) Specify the font and size of the caption.
Custom Colors Options for colors of elements in the gallery. To change the color of an element, click its color swatch and then select a new color from the Adobe Color Picker. You can change the background color of each page (Background option) and of the banner (Banner option).
Security Displays text over each image as a theft deterrent.
Content Specifies the text to be displayed. Select Custom Text to enter customized text. Select Filename, Description, Credits, Title, or Copyright to display text drawn from the File Info dialog box.
Font, Color, and Position Specify the font, color, and alignment of the caption.
Rotate Place the text on the image at an angle.
To the top
Web photo gallery styles
To create web galleries with Photoshop CS5, see Create a web photo gallery in Adobe Bridge Help. To use the older, optional Web Photo Gallery plug-in described below, first download and install it for Windows or Mac OS.
Photoshop provides a variety of styles for your web photo gallery. If you are an advanced user who knows HTML, you can create a new style or customize a style by editing a set of HTML template files.
The web photo gallery styles provided by Photoshop are stored in individual folders in the following locations:
Windows Program Files/Adobe/Adobe Photoshop CS5/Presets/Web Photo Gallery.
Mac OS Adobe Photoshop CS5/Presets/Web Photo Gallery.
The name of each folder in this location appears as an option in the Styles menu in the Web Photo Gallery dialog box. Each folder contains the following HTML template files, which Photoshop uses to generate the gallery:
Caption.htm Determines the layout of the caption that appears below each thumbnail on the home page.
FrameSet.htm Determines the layout of the frame set for displaying pages.
IndexPage.htm Determines the layout of the home page.
SubPage.htm Determines the layout of the gallery pages with full-size images.
Thumbnail.htm Determines the layout of the thumbnails that appear on the home page.
Each template file contains HTML code and tokens. A token is a text string that is replaced by Photoshop when you set its corresponding option in the Web Photo Gallery dialog box. For example, a template file may contain the following TITLE element that uses a token as its enclosed text:
When Photoshop generates the gallery using this template file, it replaces the token %TITLE% with the text that you entered for Site Name in the Web Photo Gallery dialog box.
To better understand an existing style, you can open and study its HTML template files using an HTML editor. Because only standard ASCII characters are required to create HTML documents, you can open, edit, and create these documents using a plain-text editor such as Notepad (Windows) or TextEdit (Mac OS).
To the top
About customizing web photo gallery styles
You can customize an existing web photo gallery style by editing one or more of its HTML template files. When customizing a style, you need to follow these guidelines so that Photoshop can generate the gallery correctly:
- The style folder must contain these files: Caption.htm, IndexPage.htm, SubPage.htm, Thumbnail.htm, and FrameSet.htm.
- You can rename the style folder but not the HTML template files in the folder.
- You can have an empty Caption.htm file, and place the HTML code and tokens determining the layout of the caption in the Thumbnail.htm file.
- You can replace a token in a template file with the appropriate text or HTML code, so that an option is set through the template file rather than through the Web Photo Gallery dialog box. For example, a template file may contain a BODY element with the following background color attribute that uses a token as its value:
bgcolor=%BGCOLOR%
To set the background color of the page to red, you can replace the token %BGCOLOR% with "FF0000."
- You can add HTML code and tokens to the template files. All tokens must be in uppercase characters, and begin and end with the percent (%) symbol.
To the top
Customize or create a web photo gallery style
- Locate the folder that stores the existing web photo gallery styles.
-
Do one of the following:
-
To customize a style, create a copy of the style folder, and store it in the same location as the existing style folders.
- To create a new style, create a new folder for the new style, and store it in the same location as the existing style folders.
The new or customized style (named for its folder) appears in the Styles menu in the Web Photo Gallery dialog box.
-
Using an HTML editor, do one of the following:
-
Customize the HTML template file.
- Create the necessary HTML template files and store them inside the style folder.
When creating the template files, make sure that you follow the guidelines for customization outlined in About customizing web photo gallery styles.
Note: When customizing or creating a template for a gallery style, you should place each of the following tokens on a separate line in the HTML file: %CURRENTINDEX%, %NEXTIMAGE%, %NEXTINDEX%, %PAGE%, %PREVIMAGE%, and %PREVINDEX%. When generating specific pages of a gallery, Photoshop skips lines in a template that contain tokens that don't apply to those pages. For example, when Photoshop generates the first gallery page, it skips any line in the template that contains the %PREVIMAGE% token, which determines the link to the previous gallery page. By keeping the %PREVIMAGE% token on a separate line, you ensure that Photoshop doesn't ignore other tokens in the template.
To the top
Web photo gallery style tokens
Photoshop uses tokens in the HTML template files to define a default web photo gallery style. Photoshop uses these tokens to generate a gallery based on user input in the Web Photo Gallery dialog box.
When customizing or creating a gallery style, you can add any token to any HTML template file, with the exception of %THUMBNAILS% and %THUMBNAILSROWS%, which can appear only in the IndexPage.htm file. When adding a token, keep in mind that you may also need to add HTML code to the file so that the token is used correctly.
You can use the following tokens in the HTML template files:
%ALINK% Determines the color of active links.
%ALT% Determines the name of an image file.
%ANCHOR% Provides the ability to return to the thumbnail of the image the user is viewing, rather than the beginning of the index. This takes effect when the user clicks the Home button.
%BANNERCOLOR% Determines the color of the banner.
%BANNERFONT% Determines the font of the banner text.
%BANNERFONTSIZE% Determines the font size of the banner text.
%BGCOLOR% Determines the background color.
%CAPTIONFONT% Determines the font of the caption below each thumbnail on the home page.
%CAPTIONFONTSIZE% Determines the font size of the caption.
%CAPTIONTITLE% Inserts the document title for a caption from the file information.
%CHARSET% Determines the character set used on each page.
%CONTACTINFO% Determines the contact information for the gallery, such as phone number and location.
%CONTENT_GENRATOR% Expands to "Adobe Photoshop CS5 Web Photo Gallery."
%COPYRIGHT% Inserts the copyright information for a caption from the file information.
%CREDITS% Inserts the credits for a caption from the file information.
%CURRENTINDEX% Determines the link for the current home page.
%CURRENTINDEXANCHOR% Resides in SubPage.htm and points to the first index page.
%DATE% Determines the date that appears on the banner.
%EMAIL% Determines the e-mail address contact information for the gallery.
%FILEINFO% Determines the image file information for a caption.
%FILENAME% Determines the filename of an image. Use this for metadata that appears as HTML text.
%FILENAME_URL% Determines the URL filename of an image. Use this for URL filenames only.
%FIRSTPAGE% Determines the link for the first gallery page that appears in the right frame of a frame set.
%FRAMEINDEX% Determines the link for the home page that appears in the left frame of a frame set.
%HEADER% Determines the title of the gallery.
%IMAGEBORDER% Determines the border size of the full-size image on a gallery page.
%IMAGE_HEIGHT% Enables the Add Width And Height Attributes For Images check box. This allows the user to download the attributes, reducing download time.
%IMAGE_HEIGHT_NUMBER% This token is replaced by a numeral (only) representing the width of the image.
%IMAGEPAGE% Determines the link to a gallery page.
%IMAGE_SIZE% If the Resize Images box is selected, this token contains the image pixel value used in the Large Images panel. If the box is not selected, this token contains an empty string. This is useful for JavaScript in the templates, because it can show the maximum height and width values for all images for the generated site.
%IMAGESRC% Determines the URL for a full-size image on a gallery page.
%IMAGE_WIDTH% Enables the Add Width And Height Attributes For Images check box. This allows the user to download the attributes, reducing download time.
%IMAGE_WIDTH_NUMBER% This token is replaced by a numeral (only) representing the width of the image.
%LINK% Determines the color of links.
%NEXTIMAGE% Determines the link for the next gallery page.
%NEXTIMAGE _CIRCULAR% Sets the link from large preview image to next large preview image.
%NEXTINDEX% Determines the link for the next home page.
%NUMERICLINKS% Inserts numbered links on subpages to all large preview images.
%PAGE% Determines the current page location (for example, page 1 of 3).
%PHOTOGRAPHER% Determines the name of the person or organization receiving credit for the photos in the gallery.
%PREVIMAGE% Determines the link for the previous gallery page.
%PREVINDEX% Determines the link for the previous home page.
%SUBPAGEHEADER% Determines the title of the gallery.
%SUBPAGETITLE% Determines the title of the gallery.
%TEXT% Determines the text color.
%THUMBBORDER% Determines the size of thumbnail borders.
%THUMBNAIL_HEIGHT% Enables the Add Width And Height Attributes For Images check box. This allows the user to download the attributes, reducing download time.
%THUMBNAIL_HEIGHT_NUMBER% This token is replaced with a numeral (only) representing the height of the thumbnail.
%THUMBNAILS% This token is replaced with thumbnails using the Thumbnail.htm file for the frame styles. You must place this token alone in a single, nonbreaking line in the HTML file.
%THUMBNAIL_SIZE% Contains the thumbnail pixel value in the Thumbnails panel. This is useful for JavaScript in the templates, as it can show the maximum height and width values for all thumbnails for the generated site.
%THUMBNAILSRC% Determines the link to a thumbnail.
%THUMBNAILSROWS% This token is replaced with rows of thumbnails using the Thumbnail.htm file for the nonframe styles. You must place this token alone in a single, nonbreaking line in the HTML file.
%THUMBNAIL_WIDTH% Enables the Add Width And Height Attributes For Images check box. This allows the user to download the attributes, reducing download time.
%THUMBNAIL_WIDTH_NUMBER% This token is replaced by a numeral (only) representing the width of the thumbnail.
%TITLE% Determines the title of the gallery.
%VLINK% Determines the color of visited links.

BY-NC-SA
Twitter™ and Facebook posts are not covered under the terms of Creative Commons.
Legal Notices | Online Privacy Policy
About optimization
Save For Web & Devices overview
Preview image gamma at different values
Optimize an image for the web
Save or delete optimization presets
Work with slices in the Save For Web & Devices dialog box
Compress a web graphic to a specific file size
Resize artwork while optimizing
Generate CSS layers for web graphics
Preview optimized images in a web browser
Save a file to e-mail
To the top
About optimization
When preparing images for the web and other online media, you often need to compromise between image display quality and the file size of the image.
Save for Web & Devices
You can use the optimization features in the Save For Web & Devices dialog box to preview optimized images in different file formats and with different file attributes. You can view multiple versions of an image simultaneously and modify optimization settings as you preview the image to select the best combination of settings for your needs. You can also specify transparency and matting, select options to control dithering, and resize the image to specified pixel dimensions or a specified percentage of the original size.
When you save an optimized file using the Save For Web & Devices command, you can choose to generate an HTML file for the image. This file contains all the necessary information to display your image in a web browser.
Photoshop Save As and Image Processor
In Photoshop, you can use the Save As command to save an image as a GIF, JPEG, or PNG file. Depending on the file format, you can specify image quality, background transparency or matting, color display, and downloading method. However, any web features—such as slices, links, and animations—that you've added to a file are not preserved.
You can also use the Photoshop Image Processor to save copies of a folder of images in JPEG format. You can use the Image Processor to resize and convert the images' color profile to web standard sRGB.
Save For Web & Devices overview
To the top
You use the Save For Web & Devices dialog box (File > Save For Web & Devices) to select optimization options and preview optimized artwork.
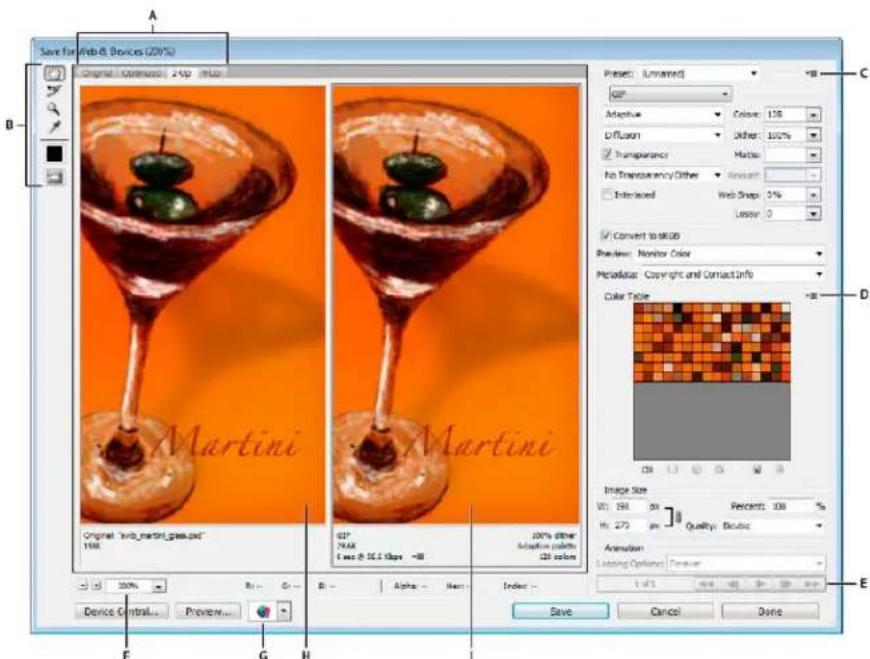
text_image
Save for Web.B Devices (20%) Original: Original 2-up info Martini Martini Original "web_martin_glass.pdf" 100% 0.7" 29.68 Last 35.2 fps -88 100% other Adoption colors 200% other Image Size W: 198 px H: 273 px Quality: Dicolor Animation Listing Options: Forever 1:47 Device Control... Preview... Save Cancel Done C D E F G HSave For Web & Devices dialog box (Photoshop version)
A. Display options B. Toolbox C. Optimize pop-up menu D. Color Table pop-up menu E. Animation controls (Photoshop only) F. Zoom text box G. Preview In Browser menu H. Original image I. Optimized image
Preview images in the dialog box
◆ Click a tab at the top of the image area to select a display option:
Original Displays the image with no optimization.
Optimized Displays image with the current optimization settings applied.
2-Up Displays two versions of the image side by side.
4-Up Displays four versions of the image side by side.
Navigate in the dialog box
If the entire artwork is not visible in the Save For Web & Devices dialog box, you can use the Hand tool to bring another area into view. Use the Zoom tool to magnify or reduce the view.
- Select the Hand tool (or hold down the spacebar), and drag in the view area to pan over the image.
- Select the Zoom tool 🔒, and click in a view to zoom in; hold down Alt (Windows) or Option (Mac OS), and click in a view to zoom out.
You can also type a magnification percentage or choose one at the bottom of the dialog box.
View optimized image information and download time
The annotation area below each image in the Save For Web & Devices dialog box provides optimization information. The annotation for the original image shows the file name and file size. The annotation for the optimized image shows the current optimization options, the size of the optimized file, and the estimated download time using the selected modem speed. You can choose a modem speed in the Preview pop-up menu.
Preview image gamma at different values
To the top
The gamma value of a computer monitor affects how light or dark an image looks in a web browser. In Photoshop, you can preview how your images will look on systems with different gamma values and make gamma adjustments to the image to compensate. Activating a preview option does not affect final image output.
Choose one of the following options by using the Save for Web/ & Devices dialog box Preview pop-up menu Monitor Color Makes no adjustments to image gamma. Monitor Color is the default setting.
Legacy Macintosh (No Color Management) Simulates the default gamma of 1.8 used by Mac OS 10.5 and earlier. Windows (No Color Management) Simulates the default gamma of 2.2 used by Windows and Mac OS 10.6 and later. Use Document Profile Adjusts the gamma to match any attached document color profile in a color-managed document.
Optimize an image for the web
To the top
-
Choose File > Save For Web & Devices.
-
Click a tab at the top of the dialog box to select a display option: Optimized, 2-Up, or 4-Up. If you select 4-Up, click the preview you want to optimize.
-
(Optional) If your image contains multiple slices, select one or more slices you want to optimize.
-
Select a preset optimization setting from the Preset menu, or set individual optimization options. The available options change depending on the file format you select.
If you're working in 4-Up mode, choose Repopulate Views from the Optimize menu to automatically generate lower-quality versions of the image after you change the optimization settings.
- Fine-tune the optimization settings until you are satisfied with the balance of image quality and file size. If your image contains multiple slices, be sure to optimize all the slices.
To restore an optimized preview to the original version, select it and then choose Original from the Preset menu.
-
If optimizing an image with an embedded color profile other than sRGB, you should convert the image's colors to sRGB before you save the image for use on the web. This insures that the colors you see in the optimized image will look the same in different web browsers. The Convert to sRGB option is selected by default.
-
(Photoshop only) From the Metadata menu, choose what metadata to save with the optimized file. (Choose File > File Info to view or enter document metadata.) Metadata is fully supported by JPEG file format, and partially supported by GIF and PNG file formats.
Note: The output metadata conforms to Metadata Working Group standards, so some JPEG metadata is stored in the EXIF and IIM formats, rather than XMP.
None No metadata saved (except for the EXIF copyright notice in JPEG files). Produces the smallest file size.
Copyright Saves copyright notice, rights usage terms, copyright status, and copyright info URL.
Copyright and Contact Info Saves all copyright information, plus the following information: creator, creator job title, e-mail(s), address, city, state/province, postal code, country, telephone(s), and website(s).
All Except Camera Info Saves all metadata, except EXIF data about camera settings such as shutter speed, date and time, focal length, exposure compensation, metering pattern, and flash use.
All Saves all metadata in the file.
-
Click Save.
-
In the Save Optimized As dialog box, do the following, and then click Save:
-
Enter a file name, and select a location for the resulting file or files.
- Select a Format option to specify what kind of files you want to save: an HTML file and image files, only image files, or only an HTML file.
- (Optional) Set output settings for HTML and image files.
- If your image contains multiple slices, select an option for saving slices from the Slices menu: All Slices or Selected Slices.
To reset optimization settings to the last saved version, press Alt (Windows) or Option (Mac OS), and click Reset. To keep the same settings the next time you open the Save For Web & Devices dialog box, press Alt/Option and click Remember.
For a video on saving files for the web in Illustrator, see www.adobe.com/go/vid0063.
Save or delete optimization presets
To the top
You can save optimization settings as a named set and apply the settings to other images. Settings that you save appear in the Preset pop-up menu, together with the predefined named settings. If you edit a named set or a predefined set, the Preset menu displays the term "Unnamed."
- Set optimization options as desired, and chooseSave Settings from the Optimize palette menu.
- Name the settings, and save them in the appropriate folder:
Photoshop (Windows XP) Document and Settings[\Username\Application Data\Adobe\AdobePhotoshop CS5\Optimized Settings
(Windows Vista) Users[\Username]\AppData\Roaming\Adobe\Adobe Photoshop CS5\Optimized Settings
(Mac OS) Users/[Username]/Library/Preferences/AdobePhotoshop CS5 Settings/Optimized Settings
Illustrator (Windows XP) Document and Settings[Username]\Application Data\Adobe\AdobeIllustrator CS5 Settings[Language]\Save for Web Settings\Optimize
(Windows Vista) Users[Username]\AppData\Roaming\Adobe\AdobeIllustrator CS5 Settings[Language]\Save for Web Settings\Optimize
(Mac OS) Users/[Username]/Library/ApplicationSupport/Adobe/Adobe Illustrator CS5/[Language]/Save for Web Settings/Optimize
Note: If you save the settings in a another location, they will not be available from the Preset pop-up menu.
- To delete a preset, select the preset from Preset menu, and select Delete Settings from the Optimize menu.
Work with slices in the Save For Web & Devices dialog box
To the top
If your image contains multiple slices, you must specify the slices to be optimized. You can apply optimization settings to additional slices by
linking the slices. Linked slices in GIF and PNG-8 format share a color palette and dither pattern to prevent the appearance of seams between the slices.
- To show or hide all slices, click the Toggle Slices Visibility button
- To select slices in the Save For Web & Devices dialog box, choose the Slice Select tool ↗, and then click a slice to select it. Shift-click or Shift-drag to select multiple slices.
Note: In the Save For Web & Devices dialog box, unselected slices are dimmed. This does not affect the color of the final image. - To view slice options in the Save For Web & Devices dialog box, select the Slice Select tool, and double-click a slice.
- To link slices, select two or more slices and choose Link Slices from the Optimize pop-up menu (to the right of the Preset menu). The link icon appears on the linked slices.
- To unlink a slice, select the slice, and then choose Unlink Slice from the Optimize pop-up menu.
- To unlink all slices in an image, choose Unlink All Slices from the Optimize pop-up menu.
Compress a web graphic to a specific file size
To the top
- Choose File > Save For Web & Devices.
- Click a tab at the top of the Save For Web & Devices dialog box to select a display option: Optimized, 2-Up, or 4-Up. If you select 4-Up, select the preview you want to optimize.
- (Optional) Select the slices you want to optimize and the file format you want to use.
- Select Optimize To File Size from the Optimize menu (to the right of the Preset menu).
- Enter the desired file size.
- Select a Start With option:
Current Settings Uses the current file format.
Auto Select GIF/JPEG Automatically selects the optimal format depending on image content. - Select a Use option to specify whether you want to apply the specified file size to current slice only, to each slice in the image, or to all slices. Click OK.
Resize artwork while optimizing
To the top
In the Save For Web& Devices dialog box, you can resize an image to specified pixel dimensions or to a percentage of the original size.
- Click the Image Size tab in the Save For Web & Devices dialog box.
- Set any of the additional options:
Constrain Proportions Maintains the current proportions of pixel width to pixel height.
Quality (Photoshop only) Specifies the interpolation method. Bicubic Sharper generally produces better results when you are reducing image size.
Anti-Alias (Illustrator only) Removes jagged edges in the artwork by applying anti-aliasing.
Clip To Artboard (Illustrator only) Clips the artwork size to match the document's Artboard boundary. Any artwork outside the Artboard boundary will be deleted.
Note: None of the features in the Image Size palette are available for the SWF and SVG file formats except Clip To Artboard.
- Enter new pixel dimensions or specify a percentage by which to resize the image, and click Apply.
Generate CSS layers for web graphics
To the top
You can use layers in your Illustrator artwork to generate CSS layers in the resulting HTML file. A CSS layer is an element that has an absolute position and can overlap with other elements in a web page. Exporting CSS layers is useful when you plan to create dynamic effects in your web page.
The Layers palette in the Save For Web & Devices dialog box gives you control over which top-level layers in your artwork are exported as CSS layers, and whether exported layers are visible or hidden.
- Click the Layers tab in the Save For Web & Devices dialog box.
- Select Export As CSS Layers.
- Select a layer from the Layer pop-up menu, and set the following options as desired:
Visible Creates a visible CSS layer in the resulting HTML file.
Hidden Creates a hidden CSS layer in the resulting HTML file.
CSS layers are the same as GoLive layers. Using Adobe GoLive, you can animate a CSS layer and use built-in JavaScript actions to create interactive effects.
Preview optimized images in a web browser
To the top
You can preview an optimized image in any web browser installed on your system from the Save For Web & Devices dialog box (File > Save For Web & Devices). The browser preview displays the image with a caption listing the image's file type, pixel dimensions, file size, compression specifications, and other HTML information.
• To preview an image in your default web browser, click the browser icon at the bottom of the Save For Web & Devices dialog box.
- To select a different browser, select Other from the browser pop-up menu (next to the browser icon).
- To add, edit, or remove a browser in the browser pop-up menu, select Edit List from the browser pop-up menu. In the Browsers dialog box, you can find all browsers on your computer and set the default browser to preview your image.
Save a file to e-mail
To the top
- Choose File > Save For Web & Devices.
- Click the Optimized tab at the top of the Save For Web& Devices dialog box.
- Choose JPEG Low from the Preset menu.
- In the Image Size area, click the chainlink icon to the right of the W and H boxes to retain image proportions. Then enter a width. For e-mail, 400 pixels is a good size. Use a smaller size if your recipient has a slow Internet connection.
- Click Save. Enter a file name and location in which to save the file. Under Format, make sure that Images Only is selected. Again click Save. Now you are ready to e-mail the file. In some e-mail programs, you can drag the file into the body of the message. In other programs, use the Attach or Insert command.
More Help topics
Save for web in Illustrator video

|
Set output options
HTML output options
Slice output options
Background output settings
Saving Files output settings
Include title and copyright information with an image
To the top
Set output options
Output settings control how HTML files are formatted, how files and slices are named, and how background images are handled when you save an optimized image. You set these options in the Output Settings dialog box.
You can save your output settings and apply them to other files.
-
To display the Output Settings dialog box, do one of the following:
-
When you save an optimized image, choose Other from the Settings pop-up menu in the Save Optimized or Save Optimized As dialog box.
-
Choose Edit Output Settings from the Optimize pop-up menu (to the right of the Preset menu) in the Save For Web & Devices dialog box.
-
(Optional) To display predefined output options, choose an option from the Settings pop-up menu.
-
Edit each set of options as needed. To switch to a different set of options, choose an options set from the pop-up menu below the Settings menu. Alternatively, click Next to display the next set in the menu list; click Prev to display the previous set.
-
(Optional) To save output settings, set the options as desired, and click Save. Type a file name, choose a location for the saved file, and click Save.
You can save the output settings anywhere. However, if you place the file in the Optimized Output Settings folder inside the Photoshop folder or in the Save For Web Settings/Output Settingsfolder inside the Illustrator folder, the file will appear in the Settings pop-up menu.
- (Optional) To load output settings, click Load, select a file, and click Open.
To the top
HTML output options
You can set the following options in the HTML set:
Output XHTML Creates web pages meeting the XHTML standard on export. Choosing Output XHTML disables other output options that might conflict with this standard. Selecting this option automatically sets the Tags Case and Attribute Case options.
Tags Case Specifies the capitalization for tags.
Attribute Case Specifies the capitalization for attributes.
Indent Specifies a method for indenting lines of code: using the authoring application's tab settings, using a specified number of spaces, or using no indentation.
Line Endings Specifies a platform for line ending compatibility.
Encoding Specifies a default character encoding for the web page. (This option is available only in Illustrator; Photoshop always uses UTF-8 encoding.)
Include Comments Adds explanatory comments to the HTML code.
Always Add Alt Attribute Adds the ALT attribute to IMG elements to comply with government web accessibility standards.
Always Quote Attributes Places quotation marks around all tag attributes. Placing quotation marks around attributes is required for compatibility with certain early browsers and for strict HTML compliance. However, always quoting attributes is not recommended. Quotation marks are used when necessary to comply with most browsers if this option is deselected.
Close All Tags Adds close tags for all HTML elements in the file for XHTML compliance.
Include Zero Margins On Body Tag Removes default internal margins in a browser window. Adds marginwidth, marginheight, leftmargin, and topmargin tags with values of zero to the body tag.
Slice output options
To the top
You can set the following options in the Slices set:
Generate Table Aligns slices using an HTML table rather than a cascading stylesheet.
Empty Cells Specifies how empty slices are converted to table cells. Select GIF, IMG W&H to use a 1-pixel GIF with width and height values specified on the IMG tag. Select GIF, TD W&H to use a 1-pixel GIF with width and height values specified on the TD tag. Select NoWrap, TD W&H to place a nonstandard NoWrap attribute on the table data and also place width and height values specified on the TD tags.
TD W&H Specifies when to include width and height attributes for table data: Always, Never, or Auto (the recommended setting).
Spacer Cells Specifies when to add one row and one column of empty spacer cells around the generated table: Auto (the recommended setting), Auto (Bottom), Always, Always (Bottom), or Never. For table layouts in which slice boundaries do not align, adding spacer cells can prevent the table from breaking apart in some browsers.
Generate CSS Generates a cascading stylesheet rather than an HTML table.
Referenced Specifies how slice positions are referenced in the HTML file when using CSS:
By ID Positions each slice using styles that are referenced by a unique ID.
Inline Includes style elements in the declaration of the block element
By Class Positions each slice using classes that are referenced by a unique ID.
Default Slice Naming Choose elements from the pop-up menus or enter text into the fields to create default names for slices. Elements include the document name, the word slice, numbers or letters designating slices or rollover states, the slice creation date, punctuation, or none.
Background output settings
To the top
You can set the following options in the Background set of the Output Settings dialog box:
View Document As Select Image if you want the web page to display an image or a solid color as a background behind the current image. Select Background if you want the web page to display the optimized image as a tiled background.
Background Image Enter the location of an image file, or click Choose and select an image. The file you specify will be tiled behind the optimized image on the web page.
Color Click the Color box, and select a background color using the color picker, or select an option from the pop-up menu.
Saving Files output settings
To the top
You set the following options in the Saving Files set of theOutput Settings dialog box:
File Naming Choose elements from the pop-up menus or enter text into the boxes to be combined into the default names for all files. Elements include document name, slice name, rollover state, trigger slice, file creation date, slice number, punctuation, and file extension. Some options are relevant only if the file contains slices or rollover states.
The text boxes let you change the order and formatting of the filename parts (for example, letting you indicate rollover state by an abbreviation instead of the full word).
Filename Compatibility Select one or multiple options to make the filename compatible with Windows (permits longer filenames), Mac OS, and UNIX.
Put Images In Folder Specifies a folder name where optimized images are saved (available only with documents containing multiple slices).
Copy Background Image When Saving Preserves a background image that has been specified in the Background preferences set.
Include title and copyright information with an image
To the top
You can add title and copyright information to a web page by entering information in the File Info dialog box. Title information appears in the web browser's title bar when the image is exported with an HTML file. Copyright information is not displayed in a browser; however, it is added to the HTML file as a comment and to the image file as metadata.
- Choose File > File Info.
- To enter a title that will appear in the web browser's title bar, in the Description section of the File Info dialog box, enter the desired text in the Document Title text box.
- To enter copyright information, in the Description section of the File Info dialog box, enter the desired text in the Copyright Notice text box.
- Click OK.

|
Web graphic formats
JPEG optimization options
GIF and PNG-8 optimization options
Optimize transparency in GIF and PNG images
View the color table for an optimized slice
Customize the color table for GIF and PNG-8 images
PNG-24 optimization options
WBMP optimization options
SWF optimization options (Illustrator)
SVG optimization options (Illustrator)
To the top
Web graphic formats
Web graphics formats can be either bitmap (raster) or vector. The bitmap formats—GIF, JPEG, PNG, and WBMP—are resolution-dependent, meaning that a bitmap image's dimensions, and possibly image quality, will change at different monitor resolutions. The vector formats—SVG and SWF—are resolution-independent and can be scaled up or down without losing any image quality. The vector formats can also include raster data. You can export from Save For Web & Devices to SVG and SWF in Adobe Illustrator only.
JPEG optimization options
To the top
JPEG is the standard format for compressing continuous-tone images such as photographs. Optimizing an image as a JPEG format relies on lossy compression, which selectively discards data.
Note: Since image data is lost when saving a file in JPEG format, it's a good idea to save the source file in its original format (for example, Photoshop .PSD) if you plan to edit the file further or create additional JPEG versions.

text_image
A JPEG B High Quality: 60 Progressive Blur: 0 Optimized Matter: Embed Color Profile Convert to sRGB Preview: Monitor Color Metadata: Copyright and Contact InfoOptimization settings for JPEG (Photoshop version)
A. File Format menu B. Compression Quality menu C. Optimize menu
Quality Determines the level of compression. The higher the Quality setting, the more detail the compression algorithm preserves. However, using a high Quality setting results in a larger file size than using a low Quality setting. View the optimized image at several quality settings to determine the best balance of quality and file size.
Optimized Creates an enhanced JPEG with a slightly smaller file size. The Optimized JPEG format is recommended for maximum file compression; however, some older browsers do not support this feature.
Progressive Displays the image progressively in a web browser. The image appears as a series of overlays, enabling viewers to see a low-resolution version of the image before it downloads completely. The Progressive option requires use of the Optimized JPEG format.
Note: Progressive JPEGs require more RAM for viewing and are not supported by some browsers.
Blur Specifies the amount of blur to apply to the image. This option applies an effect identical to that of the Gaussian Blurfilter and allows the file to be compressed more, resulting in a smaller file size. A setting of 0.1 to 0.5 is recommended.
Embed Color Profile (Photoshop) or ICC Profile (Illustrator) Preserves color profiles in the optimized file. Some browsers use color profiles for color correction.
Matte Specifies a fill color for pixels that were transparent in the original image. Click the Matte color swatch to select a color in the color picker, or select an option from the Matte menu: Eyedropper Color (to use the color in the eyedropper sample box), Foreground Color, Background Color, White, Black, or Other (to use the color picker).
Note: The Foreground Color and Background Color options are only available in Photoshop.
Pixels that were fully transparent in the original image are filled with the selected color; pixels that were partially transparent in the original image
are blended with the selected color.
GIF and PNG-8 optimization options
To the top
GIF is the standard format for compressing images with flat color and crisp detail, such as line art, logos, or illustrations with type. Like the GIF format, the PNG-8 format efficiently compresses solid areas of color while preserving sharp detail.
PNG-8 and GIF files support 8-bit color, so they can display up to 256 colors. The process of determining which colors to use is called indexing, so images in GIF and PNG-8 formats are sometimes called indexed color images. To convert an image to indexed color, a color lookup table is built to store and index the colors in the image. If a color in the original image does not appear in the color lookup table, the application either chooses the closest color in the table or simulates the color using a combination of available colors.
In addition to the following options, you can also adjust the number of colors in the image's color table. See Customize the color table for GIF and PNG-8 images.
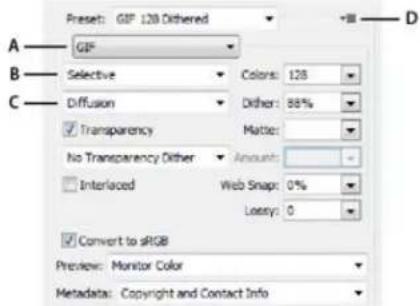
text_image
A GIF B Selective Colors: 128 Diffusion Dither: 88% Transparency Matrix: No Transparency Dither Amount: Interlaced Web Snap: 0% Lossy: 0 Convert to sRGB Preview: Monitor Color Metadata: Copyright and Contact InfoOptimization settings for GIF (Photoshop version)
A. File Format menu B. Color Reduction Algorithm menu C. Dithering Algorithm menu D. Optimize menu
Lossy (GIF only) Reduces file size by selectively discarding data. A higher Lossy setting results in more data being discarded. You can often apply a Lossy value of 5–10, and sometimes up to 50, without degrading the image. The Lossy option can reduce file size by 5% to 40%.
Note: You cannot use the Lossy option with the Interlaced option or with Noise or Pattern Dither algorithms.
Color Reduction Method and Colors Specifies a method for generating the color lookup table and the number of colors you want in the color lookup table. You can select one of the following color reduction methods:
Perceptual Creates a custom color table by giving priority to colors for which the human eye has greater sensitivity.
Selective Creates a color table similar to the Perceptual color table, but favoring broad areas of color and the preservation of web colors. This color table usually produces images with the greatest color integrity. Selective is the default option.
Adaptive Creates a custom color table by sampling colors from the predominant spectrum in the image. For example, an image with only the colors green and blue produces a color table made primarily of greens and blues. Most images concentrate colors in particular areas of the spectrum.
Restrictive (Web) Uses the standard 216-color color table common to the Windows and Mac OS 8-bit (256-color) palettes. This option ensures that no browser dither is applied to colors when the image is displayed using 8-bit color. (This palette is also called the web-safe palette.) Using the web palette can create larger files, and is recommended only when avoiding browser dither is a high priority.
Custom Uses a color palette that is created or modified by the user. If you open an existing GIF or PNG-8 file, it will have a custom color palette.
Use the Color Table palette in the Save For Web & Devices dialog box to customize the color lookup table.
Black and White, Grayscale, Mac OS, Windows Use a set palette of colors.
Dithering Method and Dither Determines the method and amount of application dithering. Dithering refers to the method of simulating colors not available in the color display system of your computer. A higher dithering percentage creates the appearance of more colors and more detail in an image, but can also increase the file size. For optimal compression, use the lowest percentage of dither that provides the color detail you require. Images with primarily solid colors may work well with no dither. Images with continuous-tone color (especially color gradients) may require dithering to prevent color banding.

natural_image
Close-up of green olives with red centers, possibly tomatoes or similar fruits, in a dark sauce (no text or symbols visible)
natural_image
Close-up of green olives with red dates, possibly tomatoes or similar fruits (no text or symbols visible)GIF image with 0% dither (left), and with 100% dither (right)
You can select one of the following dithering methods:
Diffusion Applies a random pattern that is usually less noticeable than Pattern dither. The dither effects are diffused across adjacent pixels.
Pattern Applies a halftone-like square pattern to simulate any colors not in the color table.
Noise Applies a random pattern similar to the Diffusion dither method, but without diffusing the pattern across adjacent pixels. No seams appear with the Noise dither method.
Transparency and Matte Determines how transparent pixels in the image are optimized.
• To make fully transparent pixels transparent and blend partially transparent pixels with a color, select Transparency and select a matte color.
- To fill fully transparent pixels with a color and blend partially transparent pixels with the same color, select a matte color and deselect Transparency.
- To select a matte color, click the Matte color swatch and select a color in the color picker. Alternatively, select an option from the Matte menu: Eyedropper Color (to use the color in the eyedropper sample box), Foreground Color, Background Color, White, Black, or Other (to use the color picker).
Note: The Foreground Color and Background Color options are only available in Photoshop.

natural_image
Illustration of a golden bottle with olive and red label 'Oil' (no text or symbols on the main subject)A
natural_image
Illustration of a bottle with olive and red 'Oil' text, no readable document or symbolsB
natural_image
Illustration of a golden bottle with olive and red 'Oil' lettering, no readable text or symbolsC

natural_image
Illustration of a glass bottle with olive and red chili peppers, no text or symbols presentD
Examples of transparency and matting
A. Original image B. Transparency selected with a matte color C. Transparency selected with no matting D. Transparency deselected with a matte color
Transparency Dithering When the Transparency option is selected, you can choose a method for dithering partially transparent pixels:
- No Transparency Dither applies no dither to partially transparent pixels in the image.
- DiffusionTransparency Dither applies a random pattern that is usually less noticeable than Pattern dither. The dither effects are diffused across adjacent pixels. If you select this algorithm, specify a Dither percentage to control the amount of dithering that is applied to the image.
- Pattern Transparency Dither applies a halftone-like square pattern to partially transparent pixels.
- Noise Transparency Dither applies a random pattern similar to the Diffusion algorithm, but without diffusing the pattern across adjacent pixels. No seams appear with the Noise algorithm.

natural_image
Illustration of a golden bottle with olive and red 'Oil' text, no readable document or symbols
natural_image
Illustration of a bottle with olive and red 'Oil' lettering, no readable text or symbols presentExample of Pattern Transparency dithering (left) and applied to a web page background (right)
Interlace Displays a low-resolution version of the image in a browser while the full image file is downloading. Interlacing can make downloading time seem shorter and can assure viewers that downloading is in progress. However, interlacing also increases file size.
Web Snap Specifies a tolerance level for shifting colors to the closest web palette equivalents (and prevent the colors from dithering in a browser). A higher value shifts more colors.
Optimize transparency in GIF and PNG images
To the top
Transparency makes it possible to create nonrectangular images for the web. Background transparency preserves transparent pixels in the image. This allows the background of the web page to show through the transparent areas of your image. Background matting simulates transparency by filling or blending transparent pixels with a matte color that can match the web page background. Background matting works best if the web page background is a solid color and if you know what that color is.
Use the Transparency and Matte options in the Save For Web & Devices dialog box to specify how transparent pixels in GIF and PNG images are optimized.
- (GIF and PNG-8) To make fully transparent pixels transparent and blend partially transparent pixels with a color, select Transparency and select a matte color.
- To fill fully transparent pixels with a color and blend partially transparent pixels with the same color, select a matte color and deselect Transparency.
- (GIF and PNG-8) To make all pixels with greater than 50% transparency fully transparent and all pixels with 50% or less transparency fully opaque, select Transparency and select None from the Matte menu.
- (PNG-24) To save an image with multilevel transparency (up to 256 levels), select Transparency. The Matte option is disabled since multilevel transparency allows an image to blend with any background color.
Note: In browsers that do not support PNG-24 transparency, transparent pixels may be displayed against a default background color, such as gray.
To select a matte color, click the Matte color swatch and select a color in the color picker. Alternatively, select an option from the Matte menu: Eyedropper Color (to use the color in the eyedropper sample box), Foreground Color, Background Color, White, Black, or Other (to use the color picker).
Note: The Foreground Color and Background Color options are only available in Photoshop.
View the color table for an optimized slice
To the top
The color table for a slice appears in the Color Table panel in the Save For Web & Devices dialog box.
Select a slice that is optimized in GIF or PNG-8 format. The color table for the selected slice appears in the SaveFor Web & Devices color table.
If an image has multiple slices, the colors in the color table may vary between slices (you can link the slices first to prevent this from happening). If you select multiple slices that use different color tables, the color table is empty and its status bar displays the message "Mixed."
Customize the color table for GIF and PNG-8 images
To the top
You use the color table in the Save For Web & Devices dialog box to customize the colors in optimized GIF and PNG-8 images. Reducing the number of colors often preserves image quality while reducing the file size of the image.
You can add and delete colors in the color table, shift selected colors to web-safe colors, and lock selected colors to prevent them from being dropped from the palette.
Sort a color table
Choose a sorting order from the Color Tablepalette menu:
- Unsorted restores the original sorting order.
- Sort By Hue sorts by the location of the color on the standard color wheel (expressed as a degree from 0 to 360). Neutral colors are assigned a hue of 0 and located with the reds.
- Sort By Luminance sorts by the lightness or brightness of a color.
- Sort By Popularity sorts by the colors' frequency of occurrence in the image.
Add a new color to the color table
You can add colors that were left out in building the color table. Adding a color to a dynamic table shifts the color in the palette closest to the new color. Adding a color to a fixed or Custom table adds an additional color to the palette.
- If any colors are currently selected in the color table, choose Deselect All Colors from the Color Table palette menu to deselect them.
- Choose a color by doing one of the following:
- Click the Eyedropper Color box in the SaveFor Web & Devices dialog box and choose a color from the color picker.
- Select the Eyedropper tool in the Save For Web & Devices dialog box and click in the image.
-
Do one of the following:
-
Click the New Color button in the color table.
- SelectNew Color from the Color Table palette menu.
• To switch the color table to a Custom palette, hold down Ctrl (Windows) or Command (Mac OS) when you add the new color.
The new color appears in the color table with a small white square in the lower right corner, indicating that the color is locked. If the color table is dynamic, the original color is displayed in the upper left and the new color is displayed in the lower right.
Select colors in the color table
A white border appears around selected colors in the Color Table.
• To select a color, click the color in the Color Table.
- To select multiple colors in the color table, press Shift and click another color. All colors in the rows between the first and second selected colors are selected. To select a nonadjacent group of colors, press Ctrl (Windows) or Command (Mac OS) and click each color that you want to select. The Color Table palette menu also provides commands for selecting colors.
- To select a color in the preview image, click in the preview with the Save For Web & Devices Eyedropper tool. Shift-click to select additional colors.
- To deselect all colors, choose Deselect All Colors from the Color Tablepalette menu.
Shift a color
You can change a selected color in the color table to any other RGB color value. When you regenerate the optimized image, the selected color changes to the new color wherever it appears in the image.
- Double-click the color in the color table to display the default color picker.
- Select a color.
The original color appears at the upper left of the color swatch and the new color at the lower right. The small square at the lower right of the color swatch indicates that the color is locked. If you shift to a web-safe color, a small white diamond appears at the center of the swatch.
-
To revert a shifted color to its original color, do one of the following:
-
Double-click the swatch for the shifted color. The original color is selected in the color picker. Click OK to restore the color.
• To revert all shifted colors in a color table (including web-shifted colors), choose Unshift All Colors from the Color Tablepalette menu.
Shift colors to the closest web palette equivalent
To protect colors from dithering in a browser, you can shift the colors to their closest equivalents in the web palette. This ensures that the colors won't dither when displayed in browsers on either Windows or Macintosh operating systems capable of displaying only 256 colors.
- Select one or more colors in the optimized image or color table.
- Do one of the following:
- Click the Web Shift button in the Color Table palette.
- Choose Shift/Unshift Selected Colors To/From Web Palette from the Color Table palette menu. The original color appears at the upper left of the color swatch and the new color at the lower right. The small white diamond in the center of the color swatch indicates that the color is web-safe; the small square at the lower right of the color swatch indicates that the color is locked.
-
To set a tolerance for shifting, enter a value for Web Snap. A higher value shifts more colors.
-
To revert web-shifted colors, do one of the following:
- Select a web-shifted color in the color table and click the Web Shift button in the Color Table palette.
- To revert all web-shifted colors in the color table, choose Unshift All Colors from the Color Table palette menu.
Map colors to transparency
You can add transparency to an optimized image by mapping existing colors to transparency.
- Select one or more colors in the optimized image or color table.
- Do one of the following:
- Click the Map Transparency button in the Color Table palette.
- Choose Map/Unmap Selected Colors To/From Transparent from the Color Table palette menu.
The transparency grid ☑ appears in half of each mapped color. The small square at the lower right of the color swatch indicates that the color is locked.
-
To revert transparency to original color, do one of the following:
-
Select the colors you want to revert and click the Map Transparency button or choose Map/Unmap Selected Colors To/From Transparent from the Color Table palette menu.
- To revert all transparency-mapped colors, chooseUnmap All Transparent Colors.
Lock or unlock a color
You can lock selected colors in the color table to prevent them from being dropped when the number of colors is reduced and to prevent them from dithering in the application.
Note: Locking colors does not prevent them from dithering in a browser.
- Select one or more colors in the color table.
-
Lock the color by doing one of the following:
-
Click the Lock button 🔒
- Choose Lock/Unlock Selected Colors from the Color Table palette menu.
A white square ☐ appears in the lower right corner of each locked color.
-
Unlock the color by doing one of the following:
-
Click the Lock button 🔒
- Choose Lock/Unlock Selected Colors from the Color Table palette menu.
The white square disappears from the color swatch.
Delete selected colors
You can delete selected colors from the color table to decrease the image file size. When you delete a color, areas of the optimized image that previously included that color are rendered using the closest color remaining in the palette.
When you delete a color, the color table automatically changes to a Custom palette. This is because the Adaptive, Perceptual, and Selective palettes automatically add the deleted color back into the palette when you reoptimize the image—the Custom palette does not change when you reoptimize the image.
- Select one or more colors in the color table.
-
Delete the color by doing one of the following:
-
Click the Delete icon
- Choose Delete Color from the Color Table palette menu.
Save a color table
You can save color tables from optimized images to use with other images and to load color tables created in other applications. Once you load a new color table into an image, the colors in the optimized image are changed to reflect the colors in the new color table.
- Select Save Color Table from the Color Table palette menu.
- Name the color table and choose a location where it will be saved. By default, the color table file is given the extension .act (for Adobe Color Table).
If you want to access the color table when selecting Optimization options for a GIF or PNG image, save the color table in the Optimized Colors folder inside the Photoshop application folder.
- Click Save.
Important: When you reload the table, all shifted colors will appear as full swatches and will be unlocked.
Load a color table
- Select Load Color Table from the Color Table palette menu.
- Navigate to a file containing the color table you want to load—either an Adobe Color Table (.act) file, an Adobe Color Swatch (.aco) file, or a GIF file (to load the file's embedded color table).
- Click Open.
PNG-24 optimization options
To the top
PNG-24 is suitable for compressing continuous-tone images; however, it produces much larger files than JPEG format. The advantage of using PNG-24 is that it can preserve up to 256 levels of transparency in an image.
Transparency and Matte Determine how transparent pixels in the image are optimized. See Optimize transparency in GIF and PNG images.
Interlace Displays a low-resolution version of the image in a browser while the full image file is downloading. Interlacing can make downloading time seem shorter and can assure viewers that downloading is in progress. However, interlacing also increases file size.
WBMP optimization options
To the top
WBMP format is the standard format for optimizing images for mobile devices, such as cell phones. WBMP supports 1-bit color, which means that WBMP images contain only black and white pixels.
The Dithering algorithm and percentage determine the method and amount of application dithering. For optimal appearance, use the lowest percentage of dither that provides the detail you require.
You can select one of the following dithering methods:
No Dither Applies no dithering at all, rendering the image in purely black and purely white pixels.
Diffusion Applies a random pattern that is usually less noticeable than Pattern dither. The dither effects are diffused across adjacent pixels. If you select this algorithm, specify a Dither percentage to control the amount of dithering applied to the image.
Note: Diffusion dither may cause detectable seams to appear across slice boundaries. Linking slices diffuses the dither pattern across all linked slices, and eliminates the seams.
Pattern Applies a halftone-like square pattern to determine the value of pixels.
Noise Applies a random pattern similar to the Diffusion dithering, but without diffusing the pattern across adjacent pixels. No seams appear with the Noise algorithm.
SWF optimization options (Illustrator)
To the top
The Adobe Flash (SWF) file format is a vector-based graphics file format for the creation of scalable, compact graphics for the web. Because the file format is vector-based, the artwork maintains its image quality at any resolution. The SWF format is ideal for the creation of animation frames, but you can also save raster images in SWF format or mix raster and vector graphics.
text_image
Preset: [Unnamed] A — SWF B — Flash Player 9 C — Layers to SWF Fra... Curve Quality: 7 Frame Rate: 12 Preserve: Appearance EditabilityOptimization settings for SWF
A. File format menu B. Flash Player menu C. Export menu
Preset Specifies the preconfigured set of options you want to use for export. You can create new presets by setting options as desired, and then choosing Save Settings from the panel menu. (To open the panel menu, click the triangle to the right of the Preset menu.)
Flash Player Version Specifies the earliest version of Flash Player that will support the exported file.
Type Of Export Determines how layers are exported. Select AI File To SWF File to export the artwork to a single frame. Select Layers To SWF Frames to export the artwork on each layer to a separate SWF frame, creating an animated SWF.
Note: Select AI File To SWF File to preserve layer clipping masks.
Curve Quality Specifies the accuracy of the bezier curves. A low number decreases the exported file size with a slight loss of curve quality. A higher number increases the accuracy of the bezier curve reproduction, but results in a larger file size.
Frame Rate Specifies the rate at which the animation will play in a Flash viewer. This option is available only for Layers To SWF Frames.
Loop Causes the animation to loop continuously, rather than play once and then stop, when played in a Flash viewer. This option is available only for Layers To SWF Frames.
Preserve Appearance Expands strokes into stroke-shaped fills and flattens any blending modes and transparency that SWF doesn't support.
Preserve Editability Converts strokes to SWF strokes, and approximates or ignores transparency that SWF doesn't support.
Note: SWF supports object-level opacity only.
Use the Export command instead of the Save For Web & Devices command to maintain artwork's stacking order by exporting each layer to a separate SWF file. You can then import the exported SWF files into Adobe Flash simultaneously.
Compressed Compresses the exported file.
Protect File Protects the file so that it cannot be imported by applications other than Flash.
Text As Outlines Converts all text to outlines to maintain appearance. If you plan to edit the text in Flash, don't select this option.
SVG optimization options (Illustrator)
To the top
SVG is a vector format that describes images as shapes, paths, text, and filter effects. The resulting files are compact and provide high-quality graphics on the web, in print, and even on resource-constrained handheld devices.
text_image
Preset: [Unnamed] A SVG B SVG 1.1 C None (Use System .. D Embed Images E Presentation Attrib... Optimize for Adobe SVG Viewer Compressed Decimals: 3 > Adobe CEF UTF-8 F GOptimization settings for SVG
A. File format menu B. SVG Profiles menu C. Font Subsetting menu D. Image Location menu E. CSS Properties menu F. Font Type menu G. Encoding menu
Compressed Creates a Compressed SVG (SVGZ) file.
SVG Profiles Specifies the SVG XML Document Type Definition for the exported file.
SVG 1.0 and SVG 1.1 Suitable for SVG files to be viewed on a desktop computer. SVG 1.1 is the full version of the SVG specification, of which SVG Tiny1.1, SVG Tiny 1.1 Plus, SVG Tiny 1.2, and SVG Basic 1.1 are subsets.
SVG Basic 1.1 Suitable for SVG files to be viewed on medium powered devices, such as handhelds. Keep in mind that not all handhelds support the SVG Basic profile. As a result, selecting this option doesn't guarantee that the SVG file will be viewable on all handhelds. SVG Basic doesn't support nonrectangular clipping and some SVG filter effects.
SVG Tiny 1.1 and SVG Tiny 1.1+ Suitable for SVG files to be viewed on small devices, such as mobile phones. Keep in mind that not all mobile phones support the SVG Tiny and SVG Tiny Plus profiles. As a result, selecting either of these options doesn't guarantee that the SVG file will be viewable on all small devices.
SVG Tiny 1.2 Suitable for SVG files to be viewed on a variety of devices ranging from PDAs and cellphones to laptops and desktop computers.
SVG Tiny doesn't support gradients, transparency, clipping, masks, symbols, or SVG filter effects. SVG Tiny Plus includes the ability to display gradients and transparency, but it doesn't support clipping, masks, symbols, or SVG filter effects.
For additional information on SVG profiles, see the SVG specification on the World Wide Web Consortium (W3C) website (www.w3.org).
Decimals Determines the precision of vector data in the SVG file. You can set a value of 1 to 7 decimal places. A high value results in a larger file size and increased image quality.
Font Subsetting Controls which glyphs are embedded from the SVG file. Select None from the Subsetting menu if you can rely on the necessary fonts being installed on end-user systems. Select Only Glyphs Used to only include glyphs for text that exists in the current artwork. The other values (Common English, Common English + Glyphs Used, Common Roman, Common Roman + Glyphs Used, All Glyphs) are useful when the textual content of the SVG file is dynamic (such as server-generated text or user-interactive text).
Font Type Specifies how fonts are exported.
Adobe CEF Uses font hinting for better rendering of small fonts. This font type is supported by the Adobe SVG Viewer but may not be supported by other SVG viewers.
SVG Doesn't use font hinting. This font type is supported by all SVG viewers.
Convert To Outlines Converts type to vector paths. Use this option to preserve the visual appearance of type in all SVG Viewers.
Image Location Specifies whether to embed or link to images. Embedding images increases file size but ensures that rasterized images are always available.
CSS Properties Determines how CSS style attributes are saved in the SVG code. The default method, Presentation Attributes, applies properties at the highest point in the hierarchy, allowing the most flexibility for specific edits and transformations. The Style Attributes method creates the most readable files but may increase file size. Choose this method if the SVG code will be used in transformations—for example, transformations using XSLT (Extensible Stylesheet Language Transformation). The Entity References method results in faster rendering times and reduced SVG file size. The Style Element method is used when sharing files with HTML documents. By selecting Style Element, you can then modify the SVG file to move a style element into an external stylesheet file that is also referenced by the HTML file—however, the Style Element option also results in slower rendering speeds.
Encoding Determines how characters are encoded in the SVG file. UTF (Unicode Transformation Format) encoding is supported by all XML
processors. (UTF-8 is an 8-bit format; UTF-16 is a 16-bit format.) ISO 8859-1 and UTF-16 encoding don't preserve file metadata. Optimize For Adobe SVG Viewer Optimizes images for Adobe SVG Viewer. More Help topics

|
3D and technical imaging
New 3D reflections and dragable shadows
Lynda.com (May. 7, 2012)
video-tutorial
Add realism with ease.
Streamlined 3d controls
Lynda.com (May. 7, 2012)
video-tutorial
Expand creative possibilities into another dimension.
Preparing to print 3D objects
Previewing and printing the 3D object
3D print utilities
FAQ
See also
With Photoshop, you can print any compatible 3D model without worrying about 3D printer limitations. In preparation for printing, Photoshop automatically makes 3D models watertight. Photoshop also generates the necessary support structures—scaffolding and rafts—to ensure that your 3D prints are successful.
To the top
Preparing to print 3D objects
- Select Window > Workspace > 3D to switch to the 3D workspace.
- Open the 3D model in Photoshop. If necessary, customize the size of the 3D model while opening it.
- Select 3D > 3D Print Settings.
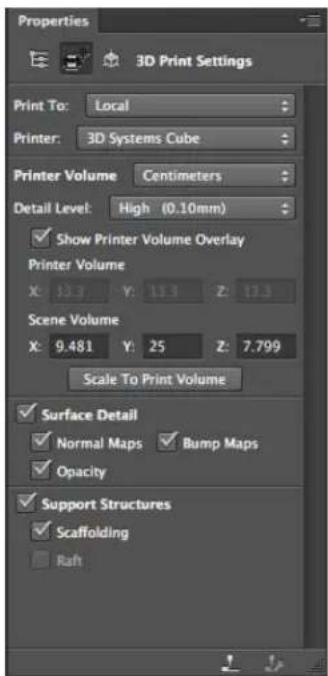
text_image
Properties 3D Print Settings Print To: Local Printer: 3D Systems Cube Printer Volume Centimeters Detail Level: High (0.10mm) Show Printer Volume Overlay Printer Volume X: 11.3 Y: 11.3 Z: 17.3 Scene Volume X: 9.481 Y: 25 Z: 7.799 Scale To Print Volume Surface Detail Normal Maps Bump Maps Opacity Support Structures Scaffolding Raft3D Print Settings
- In the 3D Print Settings panel, choose whether you want to print to a printer connected to your computer through a USB port (local printer) or use an online 3D printing service, such as Shapeways.com.
Note: Shapeways.com is a leading 3D printing marketplace and community. Shapeways.com provides you with various printer profiles that you can leverage while printing your 3D models. See this FAQ for more information.

To refresh the list of supported printers or Shapeways.com profiles, select Get Latest Printers from the Print To pop-up menu.
- Select a local printer or a Shapeways.com printer profile.
To view estimated prices for printing the 3D model using available Shapeways.com profiles, select Printer > Estimate Price.
- Select a unit for the printer volume—inch, centimeter, millimeter, or pixel. The unit is reflected in the Printer Volume dimensions as well as the print plate measurements.

natural_image
3D model of a rocket inside a wireframe cube with labeled axes (A, B, C) and no visible text or symbols on the model itself.A. 3D model B. Print plate C. Printer volume overlay
7. Select a Detail Level—Low, Medium, or High—for the 3D print. The time required to print the 3D object depends on the detail level that you choose.
8. If you don't want to see the 3D printer volume overlaid on the 3D model, deselect Show Printer Volume Overlay.
9. Adjust the Scene Volume dimensions to specify the desired size of the printed 3D object. When you change a value (X, Y, or Z), the other two values are scaled proportionately. As you modify the Scene Volume dimensions, notice that the print plate under the 3D model scales in proportion.
You can scrub the value of a Scene Volume dimension by clicking the dimension label (X, Y, or Z) and then dragging the mouse left or right. Hold down the Shift key to make the value scrub faster.
| Scene Volume | ||||
| X: | 9.481 | Y: | 25 | Z: 7.799 |
- Choose Scale To Print Volume if you want Photoshop to auto-scale your 3D model, such that it fills up the available print volume of the selected printer.
- If the 3D model has normal maps, bump maps, or opacity maps; you can choose to ignore one of more types of these maps while printing the model. You'll notice that the 3D model updates in real time when you change these Surface Detail settings.
- You may choose to not print the support structures (scaffolds or rafts) required for the 3D object. Use this option with caution, since the printing of the 3D model may fail if you don't print a necessary support structure.
- If your printer supports multiple materials, choose the material that you want to use for printing the 3D object.
Previewing and printing the 3D object
Once you're done specifying the 3D print settings, follow these steps:
- Click the Start Print icon (☐) or select 3D > 3D Print. Photoshop unifies the 3D scene and prepares it for the printing process.
- If you chose to print using a Shapeways.com profile, Photoshop prompts you that the actual cost of printing may differ from the displayed estimates. Click OK.
- In the preview window that appears, use the 3D camera tools to rotate, zoom, or move the 3D object.
Rotate the 3D camera
Roll the 3D camera
Pan the 3D camera
Slide the 3D camera
Reset the 3D camera to its original location
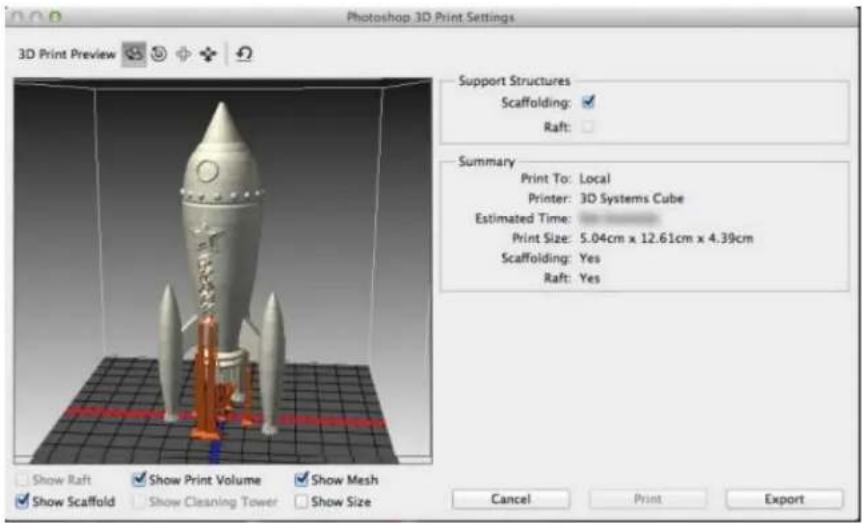
text_image
Photoshop 3D Print Settings 3D Print Preview Support Structures Scaffolding: ✓ Raft: Summary Print To: Local Printer: 3D Systems Cube Estimated Time: Print Size: 5.04cm x 12.61cm x 4.39cm Scaffolding: Yes Raft: Yes Show Raft ✓ Show Print Volume ✓ Show Mesh ✓ Show Scaffold ✓ Show Cleaning Tower ✓ Show Size Cancel Print Export3D print preview; notice the support structures
- If you want to export the 3D print settings to an STL file, click Export and save the file to an appropriate location on your computer. You can upload the STL file to an online service, such as Shapeways.com, or put it on an SD card for local printing.
- Review the 3D print summary and click Print.
You can cancel an in-progress 3D print by selecting 3D > Cancel 3D Print.
To the top
3D print utilities
Photoshop provides interactive wizard-based utilities that you can use for configuring, calibrating, and maintaining your 3D printer. You can use these utilities only when the 3D printer is powered on and connected to your computer.
- Select 3D > 3D Printer Utilities.
- Select the utility that you want to launch.
Calibrate Print Plate Helps level the print plate. This utility performs the following broad steps:
- Prompts you to remove any leftover printing material from the 3D printer
- Initializes the print head
- Lets you adjust/finetune the gap between the print plate and the print head for nine nozzle positions
You can use this utility in the wizard mode or in the manual mode.
Load Filament Helps load a filament into a fused deposition modeling (FDM) 3D printer. Photoshop initiates the head-heating process and the filament-loading mechanism for easy filament loading.
Remove Filament Helps remove a filament from an FDM 3D printer. Photoshop initiates the head-heating process and the filament-loading mechanism for easy filament removal.
Change Filament Helps replace the filament of an FDM 3D printer with a new filament. Photoshop initiates the head-heating process and the filament-loading mechanism for easy filament changing.
- Follow the onscreen instructions.
To the top
FAQ
What 3D printers are supported?
Can I apply a cross section to a 3D model before printing it?
Can I apply bump/opacity/normal maps to a 3D model before printing it?
Can I print 3D models in two colors?
How are 3D models having multiple layers printed?
To the top
See also
• 3D Painting | CC, CS6
• 3D panel enhancements | Photoshop CC
- Photoshop 3D documentation

Twitter ^™ and Facebook posts are not covered under the terms of Creative Commons.
Legal Notices | Online Privacy Policy
Video | 3D painting - The next level
Available 3D painting methods
Some tips to paint 3D models
Paint an object in the Live 3D Painting mode | Photoshop CC
Switch to the Projection Painting mode | Photoshop CC
Paint a 3D model texture | CS6
Target a texture type for painting | Photoshop CC
Paint in the unlit mode | Photoshop CC
Reveal surfaces to paint on
Set the paint falloff angle
Identify paintable areas
You can use any Photoshop painting tools to paint directly on a 3D model just as you would on a 2D layer. Use selection tools to target specific model areas or let Photoshop identify and highlight paintable areas. 3D menu commands let you clear away areas of a model to access interior or hidden portions for painting.
When painting directly on the model, you can choose which underlying texture map to apply paint to. Typically paint is applied to the diffuse texture map, which gives a model material its color properties. You can also paint on other texture maps, such as the bump map or opacity map. If you paint on an area of the model that lacks the type of texture map you're painting on, a texture map is automatically created.
To the top
Available 3D painting methods
Different painting methods are appropriate for different use cases. Photoshop provides the following 3D painting methods:
Live 3D Painting: (Default in Photoshop CC) Brush strokes made in the 3D model view or the texture view are reflected in real time in the other view. This 3D painting method offers high performance and minimum distortion.
Layer Projection Painting: The Gradient tool and filters use this painting method. The Layer Projection Painting method involves merging a painted layer with the underlying 3D layer. During the merge operation, Photoshop automatically projects the paint onto the appropriate target textures.
Projection Painting: (Default in Photoshop Extended CS6) Projection Painting is suitable for painting multiple textures simultaneously or for painting the seam between two textures. However, in general, it is a lower-performance painting method and may result in cracks when you're painting complex 3D objects.
Texture Painting: You can open the 2D texture and paint it directly.
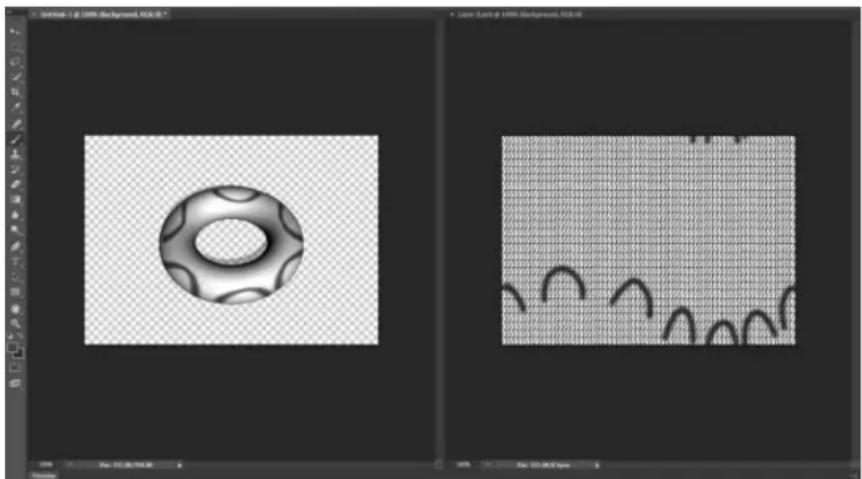
natural_image
Two grayscale images showing a donut-shaped object on the left and a textured grid on the right, both without any text or symbols.Some tips to paint 3D models
- If the model area is hidden, you can temporarily cut away surface areas that are blocking your view. See Reveal surfaces to paint on.
- If you are painting on curved or irregular surfaces, you can get visual feedback before you paint of which areas can best receive paint. See Identify paintable areas. You can also set the paint fall-off angle, which controls the amount of paint applied to angled surfaces. See Set the paint falloff angle.
- While painting texture seams, a single brush stamp applies only to one side of the seam. Move the center of the brush across the seam to paint its other side.
- If you try to paint on a texture map type that the material doesn't contain, Photoshop prompts you to create a map. For information on map types, see 3D Materials settings (Photoshop Extended).
Paint an object in the Live 3D Painting mode | Photoshop CC
- Open the 3D model in the 3D model view.
- Open the texture document that you want to paint. To do so, double-click the name of the texture in the Layers panel.
- Select Window > Arrange > Tile to view the 3D model view and the texture document side by side.
- Using the Brush tool, paint the 3D model or the texture document. Your brush stokes reflect automatically in the other view.
Switch to the Projection Painting mode | Photoshop CC
- Create or open a 3D model.
- Select 3D > Use Projection Painting.
- Paint your 3D model.
Note: In the Master 3D document, Photoshop uses the Projection Painting method by default for painting operations.
Paint a 3D model texture | CS6
- Use the 3D position tools to orient the model so that the area you want to paint on is facing forward.
-
Do one of the following to set the texture map to paint on:
-
Choose 3D > 3D Paint Mode, and select a map type.
-
In the 3D panel, select the Scene panel. Choose a map type from the Paint On menu.
-
(Optional) Using any selection tool, create a selection on the 3D model to restrict the area that you want to paint on.
-
Apply paint using the Paintbrush tool. You can also use any other tool in the second section of the Tools panel, such as the Paint Bucket, Smudge, Dodge, Burn, or Blur tools.
While painting (after completing a stroke), you can view the effect of the painting on the texture map itself. Do one of the following:
- Double-click the texture map in the Layers panel to open it.
- In the Materials section ☐ of the 3D panel, select the material for the area you are painting. In the lower section of the panel, click the menu icon ☑ for the texture map you're painting, and choose Open Texture.
To the top
Target a texture type for painting | Photoshop CC
You can target eight different texture types for painting:
- With your 3D model open, select 3D > Paint On Target Texture.
- Choose the texture type that you want to paint.
Note: In 3D models having multiple textures, only the texture that you open and start painting on is painted.
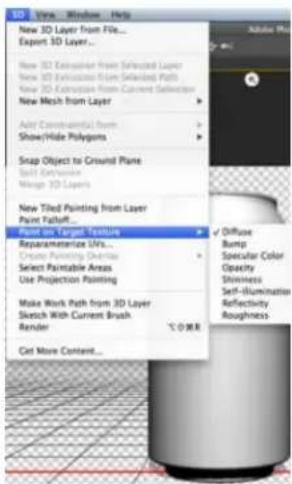
text_image
3D Vina - Window Help New 3D Layer from File... Export 1D Layer... New 3D Experience From Selected Layer New 3D Exclusion From Selected Paths New 3D Extrusion From Current Selection New Mesh from Layer Add Convexable Item Show/Hide Polygons Snap Object to Ground Plane Shift Geometry Move 3D Layers New Tiled Painting from Layer Paint Fault... Front Edge Layer Feature Repairerimize Vina... Create Drawing Charcoal Select Paintable Areas Use Projection Painting Make Work Path from 3D Layer Sketch With Current Brush Render Get More Content...Paint a target texture type
To the top
Paint in the unlit mode | Photoshop CC
You can choose to paint your 3D objects in the unlit mode. This mode ignores any lighting in your scene and wraps raw texture data of the appropriate type around your 3D objects. Painting in the unlit mode lets you paint without shading and with greater color accuracy.
Follow these steps:
- In the 3D panel, select Scene.
- In the Properties panel, select Surface.
- Select Unlit Texture from the Style pop-up menu.
To the top
Reveal surfaces to paint on
For more complex models with interior or hidden areas, you can hide sections of the model for easier access to surfaces you want to paint. For example, to apply paint to the dashboard of a car model, you can temporarily cut away the roof or windshield, then zoom inside the car to get an unobstructed view.
- Select an area of the model that you want to cut away, using a selection tool such as the Lasso or Marquee tool.
- Use any of the following 3D menu commands to reveal or hide areas of the model:
Hide Nearest Surface hides only the first layer of model polygons within the 2D selection. To quickly peel away surface of the model, you can use this command repeatedly while keeping the selection area active.

When hiding surfaces, rotate the model if necessary to position surfaces so that they are perpendicular to your currentview.
Only Hide Enclosed Polygons When selected, the Hide Nearest Surface command only affects polygons that are fully within the selection. When unchecked, ithides any polygons touched by the selection.
Invert Visible Surfaces Makes currently visible surfaces invisible, and invisible surfaces visible.
Reveal All Surfaces Makes all hidden surfaces visible again.
To the top
Set the paint falloff angle
When painting on a model, the paint falloff angle controls how much paint is applied to a surface as it curves away from the forward-facing view. The falloff angle is calculated based on a "normal", or straight line projecting out from the part of the model surface that faces you. For example, in a spherical model such as a soccer ball, the falloff angle to the exact center of the ball as it faces you is 0 degrees. As the surface of the ball curves away, the falloff angle increases, up to 90 degrees at the edges of the ball.
text_image
A B C E D FA. Eye/camera angle B. Minimum angle C. Maximum angle D. Paint fade start E. Paint fade end
- Choose 3D > 3D Paint Falloff
-
Set the minimum and maximum angle settings.
-
The maximum paint falloff range is 0 - 90 degrees. At 0 degrees, paint is only applied to the surface if it is facing directly forward, with no drop-off angle. At 90 degrees, paint can follow a curved surface such as a sphere to its visible edges. At a 45 degree setting, the painted area is limited to the areas of the sphere that don't curve away at more than 45 degrees.
- The Minimum falloff angle sets a range within which paint gradually fades as it approaches the maximum falloff angle. For example, if the maximum falloff angle is 45, and the minimum falloff is 30, paint opacity decreases from 100 to 0 percent between 30 and 45 degrees of falloff.
To the top
Identify paintable areas
It may not be clear just from looking at a 3D model whether you can successfully paint on certain areas. Because the model view may not provide
a 1 to 1 correspondence with the 2D texture itself, applying paint directly to the model is different from directly painting on a 2D texture map. What appears to be a small brush on the model may in fact be much larger in relation to the texture, depending on the resolution of the texture, or how close you are to the model when applying paint.
Good paintable areas are areas where you can apply paint or other adjustments to the model surface with the most consistent and predictable effect. In other areas, paint may be undersampled or oversampled due to your angle or distance from the model surface.
- Do one of the following:
- Choose 3D > Select Paintable Areas. A selection marquee highlights the best areas for painting on the model.
- In Scene section of the 3D panel, choose Paint Mask from the Preset menu.
In Paint Mask mode, white shows areas good for painting, blue shows areas where paint will be undersampled, and red shows areas where paint will be oversampled. (To paint on the model, you must change from the Paint Mask render mode to a render mode that supports painting, such as Solid.)
The areas selected by Select Paintable Areas, and the paintable areas shown in Paint Mask mode, are partially determined by the current Paint Falloff setting. A higher paint falloff setting increases the paintable area, a lower setting decreases the paintable area. See Set the paint falloff angle.
See also
• Daniel Presedo's YouTube channel

BY-NC-SR
Twitter™ and Facebook posts are not covered under the terms of Creative Commons.
Legal Notices | Online Privacy Policy
3D panel enhancements | Photoshop CC
The Photoshop 3D panel in Photoshop CC makes it easier for you to work with 3D objects. Modeled after the Layers panel, the 3D panel is structured as a scene graph/tree having root objects and child objects.
You can interact with 3D objects in the scene graph in several ways, such as:
- Delete objects
- Reorder objects
- Reverse object order
- Insert objects
- Duplicate objects
- Make instances of objects
- Group objects
You can access these interactions from the context menu associated with a 3D object. Right-click an object to access its context menu on Windows. To access the context menu on Mac OS, click the object with the Control key held down.
Some interactions are not available for certain types of 3D objects.
To the top
Display the 3D panel
- Select Window > 3D.
To the top
Basic interactions
| Interaction Description How to perform... Not available for... | |||
| Delete an object | Deletes the selected objects from the scene graph | Drag the object to the trash can, orUse the Delete Object command in the context menu | Objects under Scene, Environment, and View |
| Add an object | Adds a mesh or a preset 3D object | Right -click the 3D object.From the contextual menu, select the appropriate option to add an object. For example, select Add Pyramid. | Objects under Environment and Current View |
| Reorder an object | Changes the position of the selected object within the scene graph | Drag the object to its new position. | Objects under Scene, Environment, and Current View |
| Reverses the order of the | Select the objects.From the context | Objects under Scene, | |
| Reverse order of objects selected | objects within the scene graph | menu, select Reorder Objects. | Environment, and Current View |
| Duplicate an object | Duplicates the currently selected object | 1. Select an object.2. From the context menu, select Duplicate Objects. | Objects under Scene, Environment, and Current View |
| Group objects | Groups the selected objects | 1. Select the objects.2. From the context menu, select Group Items. | Materials, constraints, and objects under Scene and Environment |
| Ungroup objects | Ungroups a group of objects | 1. Select the group.2. From the context menu, select Ungroup Objects. | Materials, constraints, and objects under Scene and Environment |
To the top
Create an instance of a 3D object
An instance of a 3D object is a linked copy that reflects the changes made to the original object. If you want to modify the object and its instance independently, you can decouple the two.
Follow these steps to create an instance of a 3D object:
- In the 3D panel, right-click the mesh object. For example, right-click Hat.
- From the context menu for the object, select Instance Objects. This will create an instance of the object; for example, Hat1.
By default, the instance is linked with the original object.
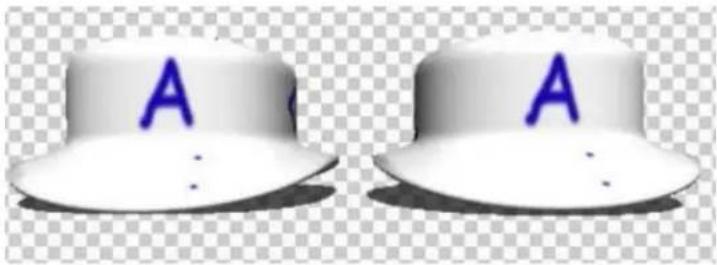
text_image
A ALinked instance: Changes made to the object reflect on the instance
Decouple an instance from the original object
When you decouple an instance from the original object, changes made to the original object are no longer reflected on the instance.
- Right-click the instance in the 3D panel (for example, Hat1).
- From the contextual menu, select Bake Instance.
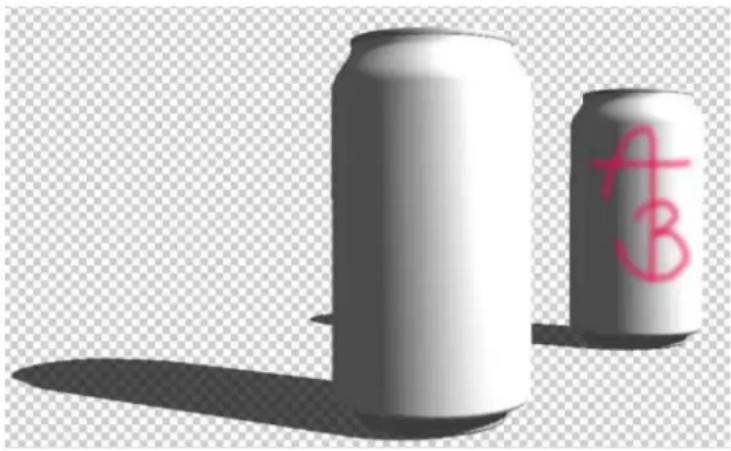
natural_image
Two white beverage cans with pink handwritten letters 'A' and 'B' on their side, casting shadows (no text or symbols on the cans themselves)Instance decoupled from the original object
See also
• Daniel Presedo's YouTube channel
- 3D Scene settings
- 3D Mesh settings
• 3D Materials settings
- 3D Lights settings
• "3D and technical imaging" in Photoshop Help

BY-NC-SA
Twitter™ and Facebook posts are not covered under the terms of Creative Commons.
Legal Notices | Online Privacy Policy
Understanding and displaying 3D files
3D object and camera tools
3D Axis
Note: In Photoshop CS5 and CS6, 3D functionality was part of Photoshop Extended. All features in Photoshop Extended are part of Photoshop CC. Photoshop CC does not have a separate Extended offering.
To the top
Understanding and displaying 3D files
Photoshop lets you position and animate 3D models, edit textures and lighting, and choose from several render modes.
3D fundamentals
3D files consist of the following components:
Meshes Provide the underlying structure of a 3D model. A mesh is often visualized as a wireframe, a skeletal structure built from thousands of individual polygons. A 3D model always has at least one mesh, and may combine multiple meshes. In Photoshop you can view meshes in a variety of render modes, and manipulate meshes independently of each other. While you can't alter the actual polygons in a mesh, you can change its orientation and transform it by scaling along different axes. You can also create your own 3D meshes, using pre-supplied shapes or by converting existing 2D layers. See 3D Mesh settings.
Note: To edit the polygon mesh of the 3D model itself, you must use a 3D authoring program.
Materials A mesh can have one or more materials associated with it, which control the appearance of all or part of the mesh. The material in turn relies on subcomponents called texture maps, whose cumulative effect creates the appearance of a material. The texture map itself is a 2D image file that creates various qualities such as color, pattern, shininess, or bumpiness. A Photoshop material can use up to nine different texture map types to define its overall appearance. See 3D Materials settings.
Lights Types include Infinite, Spot, Point lights, as well as Image-based lights that wrap around a scene. You can move and adjust color and intensity of existing lights, and add new lights to your 3D scene. See 3D Lights settings.
Open a 3D file
Photoshop can open the following 3D formats: DAE (Collada), OBJ, 3DS, U3D, and KMZ (Google Earth).
- Do one of the following:
- To open a 3D file on its own, choose File > Open, and select the file.
- To add a 3D file as a layer in an open file, choose 3D > New Layer From 3D File, and then select the 3D file. The new layer reflects the dimensions of the open file and presents the 3D model over a transparent background.
3D performance and display preferences
- Choose Edit > Preferences > 3D (Windows) or Photoshop > Preferences 3D (Mac OS).
- For information about options, hover the pointer over them, and read the Description section at the bottom of the dialog box.
To the top
3D object and camera tools
The 3D object and camera tools become active when a 3D layer is selected. Use the 3D object tools to change the position or scale of a 3D model; use the 3D camera tools to change the view of the scene. If your system supports OpenGL, you can also use the 3D Axis to manipulate 3D models and cameras. See Using the 3D Axis.
Move, rotate, or scale a model with 3D object tools
You can use the 3D object tools to rotate, reposition, or scale a model. While you manipulate the 3D model, the camera view remains fixed.
For tips about each 3D tool, choose Panel Options from the Info panel menu, and select Show Tool Hints. Click a tool, then move the cursor into the image window to view tool details in the Info Panel.

text_image
Position/ Default A B C D E F G H I Orientations X: 0 Y: 0 Z: 0 J3D object tools and options
A. Return to initial object position B. Rotate C. Roll D. Pan E. Slide F. Scale G. Position menu H. Save current position I. Delete current position J. Position coordinates
- In the Tools panel, click a 3D object tool, and hold down the mouse button to select from the following types:
Hold down Shift as you drag to constrain the Rotate, Pan, Slide, or Scale tool to a single direction of movement.
Rotate Drag up or down to rotate the model around its x-axis, or side to side to rotate it around its y axis. Hold down Alt (Windows) or Option (Mac OS) as you drag to roll the model.
Roll Drag side to side to rotate the model around its z axis.
Pan Drag side to side to move the model horizontally, or up or down to move it vertically. Hold down Alt (Windows) or Option (Mac OS) as you drag to move in the x/z direction.
Slide Drag side to side to move the model horizontally, or up or down to move it closer or farther away. Hold down Alt (Windows) or Option (Mac OS) as you drag to move in the x/y direction.
Scale Drag up or down to scale the model larger or smaller. Hold down Alt (Windows) or Option (Mac OS) as you drag to scale in the z direction.
Click the Return To Initial Position icon 📋 in the options bar to return the model to its initial view.
To numerically adjust position, rotation, or scaling, enter values on the right side of the options bar.
Move the 3D camera
Use the 3D camera tools to move the camera view while leaving the position of the 3D object fixed.

For tips about each 3D tool, choose Panel Options from the Info panel menu, and select Show Tool Hints. Click a tool, then move the cursor into the image window to view tool details in the Info Panel.

text_image
A B C D E F G H I J Strangton Ca... Orientations X: -90 Y: 0 Z: 1003D camera tools and options
A. Return to initial camera position B. Rotate C. Roll D. Pan E. Walk F. Zoom G. View menu H. Save current camera view I. Delete current camera view J. Camera position coordinates
- In the Tools panel, click a 3D camera tool, and hold down the mouse button to select from the following types:

Hold down Shift as you drag to constrain the Rotate, Pan, or Walk tools to a single direction of movement.
Rotate Drag to orbit the camera in the x or y direction. Hold down Alt (Windows) or Option (Mac OS) as you drag to roll the camera.
Roll Drag to roll the camera.
Pan Drag to pan the camera in the x or y direction. Hold down Alt (Windows) or Option (Mac OS) as you drag to pan in the x or z direction.
Walk Drag to walk the camera (z translation and y rotation). Hold down Alt (Windows) or Option (Mac OS) as you drag to walk in the z/x direction (z translation and x rotation).
Zoom Drag to change the field of view of the 3D camera. Maximum field of view is 180.
Perspective Camera (Zoom only) Displays parallel lines converging to vanishing points.
Orthographic Camera (Zoom only) Maintains parallel lines without convergence. Displays the model in accurate scale view without any perspective distortion.
DOF (Zoom only) Sets depth of field. Distance determines how far the in-focus field is from the camera. Blur obscures the remainder of the image.

Animate DOF to simulate camera focusing effects.
In the options bar, numeric values show the x, y, and z position of the 3D camera. You can also edit these values manually to adjust the camera view.
Change or create 3D camera views
- Do one of the following:
- Select a preset camera view of the model from the View menu.
Note: All preset camera views use orthographic projection.
• To add a custom view, place the 3D camera in the desired position using the 3D camera tools, then click Save in the options bar.

To return to the default camera view, select a 3D camera tool, and click the Return To Initial Camera Position icon in the options bar.
3D Axis
The 3D Axis shows the current X, Y, and Z-axis orientation of models, cameras, lights, and meshes in 3D space. It appears when you select any 3D tool, providing an alternative way to manipulate the selected item.

text_image
A B C D E F3D Axis with Mesh Rotate tool selected
A. Selected tool B. Minimize or maximize 3D Axis C. Move item along axis D. Rotate item E. Compress or elongate item F. Resize item
Note: OpenGL must be enabled to display the 3D Axis. See About GPU and OpenGL.
Show or hide the 3D Axis
- Choose View > Show > 3D Axis.
Minimize, restore, move, or resize the 3D Axis
- Move the pointer over the 3D Axis to display the control bar.
- Do one of the following:
• To move the 3D Axis, drag the control bar.
• To minimize, click the minimize icon.
• To restore to normal size, click the minimized 3D Axis.
- To resize, drag the zoom icon.
Move, rotate, or scale selected items with the 3D Axis
To use the 3D Axis, move the mouse pointer over an axis control to highlight it, and then drag as follows:
Note: Available axis controls vary depending upon the current editing mode (object, camera, mesh, or light).
• To move the selected item along the X, Y, or Z-axis, highlight the conical tip of any axis. Drag in either direction along the axis.
- To rotate the item, click the curved rotation segment just inside an axis tip. A yellow circle appears showing the rotation plane. Drag in a clockwise or counterclockwise circle around the 3D Axis center. To rotate more gradually, move the mouse further away from the center of
the 3D Axis.
- To resize the item, drag the center cube in the 3D Axis up or down.
• To compress or elongate the item along an axis, drag one of the colored transform cubes either toward or away from the center cube. - To constrain movement to an object plane, move the mouse pointer into the area where two axes intersect, near the center cube. A yellow plane icon appears between two axes. Drag in any direction. You can also move the pointer over the lower part of the center cube to activate the plane icon.
- 3D texture editing

Twitter™ and Facebook posts are not covered under the terms of Creative Commons.
Legal Notices | Online Privacy Policy
3D features | Creative Cloud-only
Video | 3D in CS6
3D panel targets scene elements
Properties panel provides contextual settings
Move tool consolidates object and camera adjustments
On-image controls directly edit elements
Create and adjust 3D extrusions
Define ground planes for imported objects
Make paths from 3D layers
Merge multiple 3D layers
Note: In Photoshop CS6, 3D functionality was part of Photoshop Extended. All features in Photoshop Extended are part of Photoshop CC. Photoshop CC does not have a separate Extended offering.
Beginning Photoshop CS6, Photoshop has a more intuitive 3D workflow, with consolidated tools and contextual on-image controls. For a quick description of these new features, see What's New in Photoshop CC | 3D imaging and What's New in CS6.
To the top
3D features | Creative Cloud-only
The Creative Cloud-only release of Photoshop CS6 included additional 3D features. These features are also available in Photoshop CC:
- 32-bit color pickers can now be used when specifying colors for materials, lines, surfaces, or lights in the Properties panel.
- Normal maps can be generated from Diffuse maps. In the 3D panel, select the 3D object you want to affect and then, click the Filter By Materials icon in the top area of the panel. Then, in the Properties panel, click the folder icon next to Normal: and choose Generate Normals From Diffuse from the menu.
- If you pause a rendering and make one or more selections, resuming the rendering will be applied to the selections. Resuming a rendering also works even after saving your document as a PSD.
• Cross Section now works with reflective surfaces and other surface styles such as Constant, Cartoon, and Sketch. - By default, an Image-Based Light (IBL) is added your 3D environment. Adobe offers other IBLs for download from Adobe® Photoshop® Extended 3D Content.
- You can change the Ray Trace rendering tile size from its default, which is set based on how many cores are in your computer. Choose Edit > Preferences > 3D (Windows) or Photoshop > Preferences > 3D (Mac OS) and then, choose a size from the Render Tile Size menu in the Ray Tracer section of the Preferences dialog box.
- During rendering, both the time remaining and percentage rendered are displayed in the Status Bar at the bottom of the document window.
- Photoshop now offers better OpenGL shadows. To specify the shadow quality that works best with your computer, choose Edit > Preferences > 3D (Windows) or Photoshop > Preferences > 3D (Mac OS). Then, choose an option from the Shadow Quality menu in the Interactive Rendering section of the Preferences dialog box.
Click the following link to view a video of Photoshop Senior Product Manager, Zorana Gee, presenting the new 3D features in the Creative Cloud version of Photoshop.
To the top
Video | 3D in CS6
Explore all the new 3D features with this series of quick videos.... Read More
http://www.youtube.com/user/dramenon/videos

by Daniel Presedo
Adobe's in-house Photoshop 3D expert
Contribute your expertise to Adobe Community Help

natural_image
Grid of nine yellow smiley face icons arranged in 3x3 pattern (no text or symbols)Note: A minimum of 512 MB of VRAM is required for the 3D features in the Creative Cloud version of Photoshop.
To the top
3D panel targets scene elements
In the streamlined 3D panel, select specific elements you want to edit:
- At the top of the 3D panel, select Scene 📄, Meshes 📅 Materials , Lights .
- Select an individual element (such as Current View in the Scene section). Or select multiple elements to apply uniform properties.
- Adjust settings in the Properties panel, or drag in the document window. (If you drag a specific object or light, the 3D panel then selects that element.)
Note: To add new lights, click the document icon at the bottom of the Scene and Lights sections. Or click the panel menu to save and load groups of lights as a preset.
To the top
Properties panel provides contextual settings
After you select individual elements in the 3D panel or document window, the Properties panel displays related settings. When you finish adjusting, click the Render icon 📄 at the bottom of the panel.
Note: Click the Coordinates icon 📄 at the top of the panel to enter precise numerical locations for objects, cameras, and lights. To quickly cycle between properties and coordinates, press the V key.
Environment settings include global ambient and image-based lights, and ground plane shadows and reflections.
Scene settings include render presets such as Bounding Box and Wireframe, and custom render options for cross-sections, surfaces, and points.
Camera settings include field of view (FOV), depth of field, and stereo options for anaglyph, lenticular, or side-by-side viewing.
Mesh settings let you catch and cast shadows, adjust 3D extrusions, and edit source text and paths.
Note: To hide an object, but retain its shadows for compositing with 2D images, select Invisible.
Materials settings include texture and bump map settings such as the new Roughness option.
Light settings let you choose from infinite, spot, and point types, and adjust color, intensity, and shadows.
To the top
Move tool consolidates object and camera adjustments
The Move tool ▶ is you adjust the placement of objects and camera:
- In the options bar, choose between Rotate 📄 pill , DX , Slide and So 🌐 modes.
• To quickly cycle through these modes, press Shift + V.
• To quickly switch between camera and Environment controls, click away from 3D objects.
Note: In the document window, a gold document border indicates camera control, a blue border Environment control, a green border Scene control, and no border Mesh control.
To the top
On-image controls directly edit elements
With on-image controls, you can often edit an entire 3D scene without accessing any workspace panels. To maximize your view, press the F key to cycle between full screen and standard screen modes.
In the document window, you can directly interact with the following elements:
Scene, Mesh, and Light settings To quickly access Scene properties in the document window, right-click the canvas away from 3D objects. Or right-click meshes and lights to access their properties.
Shadows Shift-click them, and then drag to reposition the related light.
Object bounding box controls Click an object once to activate, and then position mouse over various planes; when a plane is shaded yellow, drag to adjust the object along that axis. Or drag corners to rotate on the X or Y axis.
To the top
Create and adjust 3D extrusions
3D extrusion lets you extend type, selections, closed paths, shapes, and image layers into three dimensions.
- Select a path, shape layer, type layer, image layer, or specific pixel areas.
- Choose 3D > New 3D Extrusion From Selected Path, Layer, or Current Selection.
Note: To quickly extrude type while editing with the Type tool, click the 3D button in the options bar.
- With the mesh selected in the 3D panel, select the Deform 📄 or Cap 📋ons at the top of the Properties panel.
- Edit numerical settings in the Properties panel, or drag the interactive extrusion controls in the document window.
To edit the original path, type, or image layer, selected the related mesh in the 3D panel, and click Edit Source in the Properties panel.
To the top
Define ground planes for imported objects
Quickly create perspective planes with the Vanishing Point filter, and snap an imported object to them.
- Select an image layer, and choose Filter > Vanishing Point.
- Using the Create Plane and Edit Plane tools, create a grid to define a ground plane. Then click OK.
- Choose 3D > New 3D Layer from File.
The imported object is placed on the ground plane you defined.
To the top
Make paths from 3D layers
Choose 3D > Make Work Path from 3D Layer to convert the current rendering into a Work Path. This command traces a path over the alpha channel of the layer.
If you render in wireframe mode and adjust the crease threshold value to eliminate some unnecessary lines, you can create a rendering that looks hand drawn when stroked with a Photoshop brush.
To the top
Merge multiple 3D layers
To improve performance and interact shadows and reflections for multiple objects, merge as many 3D layers as you need. (Previous Photoshop versions required you to merge two 3D layers at a time.)
Before merging 3D layers, use the Orthographic camera view to position meshes with maximum precision:
- At the top of the 3D panel, click the Scene icon ☐, and select Current View.
- In the Properties panel, select Orthographic.
See also
• Daniel Presedo's YouTube channel
Twitter™ and Facebook posts are not covered under the terms of Creative Commons.
Legal Notices
Online Privacy Policy
Note: In Photoshop CS5 and Photoshop CS6, 3D functionality was part of Photoshop Extended. All features in Photoshop Extended are part of Photoshop CC. Photoshop CC does not have a separate Extended offering.
The Exposure and HDR Toning adjustments are primarily designed for 32-bit HDR images, but you can also apply them to 16- and 8-bit images to create HDR-like effects.
For a video about applying HDR effects to16- or 8-bit images, see www.adobe.com/go/lrvid5011_ps_en
Adjust HDR exposure
Exposure works by performing calculations in a linear color space (gamma 1.0) rather than the current color space.
-
Do one of the following:
-
Click the Exposure icon - an Exposure preset in the Adjustments panel.
- Choose Layer > New Adjustment Layer > Exposure.
Note: You can also choose Image > Adjustments > Exposure. But keep in mind that this method makes direct adjustments to the image layer and discards image information.
- In the Adjustments panel, set any of the following options:
Exposure Adjusts the highlight end of the tonal scale with minimal effect in the extreme shadows.
With 32-bit images, you can also access the Exposure slider at the bottom of the image window.
Offset Darkens the shadows and midtones with minimal effect on the highlights.
Gamma Adjusts the image gamma, using a simple power function. Negative values are mirrored around zero (that is, they remain negative but still get adjusted as if they are positive).
The eyedroppers adjust the luminance values of images (unlike the Levels eyedroppers that affect all color channels).
- The Set Black Point eyedropper sets the Offset, shifting the pixel you click to zero.
- The Set White Point eyedropper sets the Exposure, shifting the point you click to white (1.0 for HDR images).
- The Midtone eyedropper sets the Exposure, making the value you click middle gray.
Adjust HDR toning
The HDR Toning command lets you apply the full range of HDR contrast and exposure settings to individual images.
Note: HDR toning requires flattened layers.
- Open a 32-, 16-, or 8-bit image in RGB or Grayscale color mode.
- Choose Image > Adjustments > HDR Toning.
For detailed information about each setting, see Options for 16- or 8-bit images. (In the HDR Toning dialog box, these options apply to images of all bit depths.)
For more information about HDR
• High dynamic range images

BY-NC-SA
Twitter™ and Facebook posts are not covered under the terms of Creative Commons.
Legal Notices | Online Privacy Policy
About Photoshop and MATLAB
Set up MATLAB and Photoshop
Connect/disconnect to Photoshop from MATLAB
Using MATLAB Help
MATLAB commands
Create a document in MATLAB
To the top
About Photoshop and MATLAB
MATLAB is a high-level technical computing language and interactive environment for algorithm development, data visualization, data analysis, and numeric computation. With Photoshop Extended you can view MATLAB image-processing results in Photoshop, and combine MATLAB commands with Photoshop image-editing features.
Once you connect to Photoshop from MATLAB, typing commands into the MATLAB command prompt performs operations in Photoshop. You can run MATLAB algorithms and view the results in your image in Photoshop.
Note: Communication between Photoshop and MATLAB uses the Photoshop JavaScript interface and the MATLAB library interface.
To the top
Set up MATLAB and Photoshop
Install Photoshop and MATLAB on your computer. Once you have installed Photoshop Extended and MATLAB, you should verify the MATLAB integration.
For 64-bit systems, install the appropriate compiler
To use the Photoshop interface on a 64-bit system, a C compiler must be installed:
• In Windows, install Microsoft Developer Studio.
• In Mac OS, install XCode.
For more information, see the MATLAB Photoshop Read Me in the Photoshop application folder.
Note: In Windows, use 64-bit Photoshop with 64-bit MATLAB, and 32-bit Photoshop with 32-bit MATLAB.
Verify MATLAB integration
- Start Photoshop Extended and then MATLAB.
- From MATLAB, add the path Photoshop/MATLAB, including subfolders.
- At the MATLAB prompt, open the MATLAB folder, locate and open the Tests folder, and then type testall.
- Photoshop and MATLAB run a series of tests to ensure integration between the two programs and display a summary report.
(Optional) Set access to Photoshop from MATLAB
You can set up a path to Photoshop Extended to allow direct access to Photoshop commands from MATLAB.
- From MATLAB, choose File > Set Path.
- Click Add Folder and select the MATLAB folder where Photoshop Extended is installed.
- Click Save and then Close.
- From the MATLAB menu, choose File > Preferences.
- In the Preferences dialog box, click the General tree (upper-left).
- Click the Update Toolbox Path Cache button.
- Click Apply and then OK.
To the top
Connect/disconnect to Photoshop from MATLAB
• In MATLAB, do one of the following:
- To launch or connect to Photoshop, type pslaunch, and then press Enter (Windows) or Return (Mac OS).
- To disconnect from Photoshop and quit, type psquit and press Enter (Windows) or Return (Mac OS).
To the top
Using MATLAB Help
MATLAB's Help system includes examples of a MATLAB/Photoshop workflow.
- Choose Help > Full Product Family Help.
You see a Photoshop Toolbox with submenu items, including Examples for getting started. If you don't see the Photoshop Toolbox, try the following steps. - Click the Start Button.
- Choose Desktop Tools > View Source Files.
- Click the Refresh Start button, then Close, then retry the Help menu.
To the top
MATLAB commands
Typing commands in the MATLAB command line lets you connect and disconnect to Photoshop, and generate pixels viewable in a Photoshop document.
For a list of all MATLAB Photoshop commands, browse the file psfunctionscat.html, available in the MATLAB folder in the directory where you installed Photoshop. Enter help (command name) at the MATLAB command prompt for a fuller description of each command, including syntax, arguments, and examples.
Note: All MATLAB commands are supported for Japanese characters. MATLAB for Windows supports a Japanese language user interface on Japanese language Windows XP systems. MATLAB for Mac OS supports US English only on Japanese language Mac OS systems. For more information, contact The MathWorks, Inc.
To the top
Create a document in MATLAB
- In MATLAB, enter psnewdoc.
-
To specify the attributes of the new document, enter one of the following:
-
To create a document using the default values, enter psnewdoc(). For information on default values, see below.
- To create a document with a specific width and height, enter psnewdoc(W,H). The W and H values use the current units set in the Units & Rulers option in the Photoshop Preferences dialog box. Other document attributes are set to their default values.
Note: Enter "undefined" as a string to skip input arguments. The default size for a new document is 504 x 360 pixels.
- To create a document and specify attributes, enter psnewdoc(W,H,R,N,M,F,A,B,P). For information on new document attributes, see below.
Here is an example code for creating a document and specifying all the attributes in MATLAB:
psnewdoc(10, 10, 72, 'hi', 'cmyk', 'transparent', 2.5, 16, 'U.S. Web Coated (SWOP) v2')
New document attributes and defaults
Entering psnewdoc(W,H,R,N,M,F,A,B,P) creates a document with values for the following attributes:
W Specifies the width of the document using the current units from the Units & Rulers option in the Photoshop Preferences dialog box. The default width is 504 pixels.
H Specifies the height of the document using the current units in the Units & Rulers panel in the Photoshop Preference dialog box. The default height is 360.
R Specifies the resolution. The default is 72 ppi.
N Specifies the document name. The default is Untitled-X, where X is the index for new documents.
M Specifies the color mode: RGB, CMYK, Lab, Bitmap, or Grayscale. The default is RGB.
F Specifies the background contents of the new document: White, Background Color, or Transparent. The default is White.
A Specifies the pixel aspect ratio. The default is 1.0 (square).
B Specifies the bit depth: 1, 8, 16, or 32. The default is 8.
P Specifies the color profile. The default is the working color space for the specified color mode. The working spaces are specified in the Photoshop Color Settings dialog box.

Twitter™ and Facebook posts are not covered under the terms of Creative Commons.
Legal Notices | Online Privacy Policy
About measurement (Photoshop Extended)
Set the measurement scale (Photoshop Extended)
Use scale markers (Photoshop Extended)
Performing a measurement (Photoshop Extended)
Use the Measurement Log (Photoshop Extended)
To the top
About measurement (Photoshop Extended)
Using the Photoshop Extended Measurement feature you can measure any area defined with the Ruler tool or with a selection tool, including irregular areas selected with the Lasso, Quick Select, or Magic Wand tools. You can also compute the height, width, area, and perimeter, or track measurements of one image or multiple images. Measurement data is recorded in the Measurement Log panel. You can customize the Measurement Log columns, sort data within columns, and export data from the log to a tab-delimited, Unicode text file.
For a video on measurement features, see www.adobe.com/go/vid0029.
Measurement scale
Setting a measurement scale sets a specified number of pixels in the image equal to a number of scale units, such as inches, millimeters, or microns. Once you've created a scale, you can measure areas and receive calculations and log results in the selected scale units. You can create multiple measurement scale presets, although only one scale can be used in a document at a time.
Scale markers
You can place scale markers on an image to display the measurement scale. Scale markers can appear with or without a caption displaying measurement scale units.
To the top
Set the measurement scale (Photoshop Extended)
Use the Ruler tool to set the measurement scale for a document. You can create measurement scale presets for frequently used measurement scales. Presets are added to the Analysis > Set Measurement Scale submenu. The current measurement scale for a document is checked in the submenu, and appears in the Info panel.
Note: Measurement scale is set automatically for DICOM files. See About DICOM files (Photoshop Extended).
Choose Analysis > Set Measurement Scale > Default to return to the default measurement scale, 1 pixel = 1 pixel.
Set measurement scale
-
Open a document.
-
Choose Analysis > Set Measurement Scale > Custom. The Ruler tool is automatically selected. Drag the tool to measure a pixel distance in the image or enter a value in the Pixel Length text box. Your current tool setting is restored when you close the Measurement Scale dialog box.
-
Enter the Logical Length and Logical Units that you want to set equal to the Pixel Length.
For example, if the Pixel Length is 50, and you want to set a scale of 50 pixels per micron, enter 1 for Logical Length, and microns for the Logical Units.
-
Click OK in the Measurement Scale dialog box to set the measurement scale on the document.
-
Choose File > Save to save the current measurement scale setting with the document.
To display the scale in the Info panel, choose Panel Options from the panel menu ▼, and select Measurement Scale in the Status Information area.
To display the measurement scale at the bottom of the document window, choose Show > Measurement Scale from the document window menu.
Create a measurement scale preset
- Open a document.
- Choose Analysis > Set Measurement Scale > Custom.
- Create a measurement scale.
-
Click Save Preset and name the preset.
-
Click OK. The preset you created is added to the Analysis > Set Measurement Scale submenu.
Delete a measurement scale preset
- Choose Analysis > Set Measurement Scale > Custom.
- Select the preset you want to delete.
- Click Delete Preset and click OK.
To the top
Use scale markers (Photoshop Extended)
Measurement scale markers display the measurement scale used in your document. Set the measurement scale for a document before creating a scale marker. You can set the marker length in logical units, include a text caption indicating the length, and set the marker and caption color to black or white.
For a video on measurement features, see www.adobe.com/go/vid0029.
Create a scale marker
- Choose Analysis > Place Scale Marker.
- In the Measurement Scale Marker dialog box, set the following options:
Length Enter a value to set the length of the scale marker. The length of the marker in pixels depends on the measurement scale that is currently selected for the document.
Font Choose the font for the display text.
Font Size Choose the font size for the display text.
Display Text Select this option to show the logical length and units for the scale marker.
Text position Displays caption above or below the scale marker.
Color Sets the scale marker and caption color to black or white.
- Click OK.
The scale marker is placed in the lower left corner of the image. The marker adds a layer group to the document, containing a text layer (if the Display Text option is selected) and a graphic layer. You can use the Move tool to move the scale marker, or the Text tool to edit the caption or change text size, font, or color.
Add or replace scale markers
You can place multiple scale markers in a document, or replace existing markers.
Note: Additional scale markers are placed in the same position on the image and can obscure each other, depending on their length. To view an underlying marker, turn off the scale marker layer set.
- Choose Analysis > Place Scale Marker.
- Click Remove or Keep.
- Enter settings for the new marker and click OK.
Delete a scale marker
- In the Layers panel, select the Measurement Scale Marker layer group for the scale marker you want to delete.
- Right-click the layer group and select Delete Group from the context menu, or click the Delete Layer button.
- Click Group and Contents.
To the top
Performing a measurement (Photoshop Extended)
You can measure using the Photoshop selection tools, Ruler tool, or Count tool. Choose a measurement tool that matches the type of data you want to record in the Measurement Log.
- Create a selection area to measure values such as height, width, perimeter, area, and pixel gray values. You can measure one selection or several selections at once.
- Draw a line with the Ruler tool to measure linear distance and angle.
- Use the Count tool to count items on the image, then record the number of items. See Counting objects in an image (Photoshop Extended).
Each measurement measures one or more data points. The data points you select determine the information recorded in the Measurement log. Data points correspond to the type of tool you're measuring with. Area, perimeter, height, and width are available data points for measuring selections. Length and angle are available data points for Ruler tool measurements. You can create and save sets of data points for particular types of measurements to speed your workflow.
-
Open an existing document.
-
Choose Analysis > Set Measurement Scale and choose a measurement scale preset for the document (see Set the measurement scale (Photoshop Extended)), or choose Custom and set a custom measurement scale.
Measurements are computed and recorded in the Measurement Log using the scale units in effect when a measurement is recorded. If no measurement scale exists, the default scale is 1 pixel = 1 pixel.
-
(Optional) Choose Analysis > Select Data Points and do one of the following:
-
Choose Custom to select data points to measure.
- Select an existing data point preset from the submenu.
In the Select Data Points dialog box, data points are grouped according to the measurement tool that can measure them. The Common data points are available for all tools. They add useful information to the Measurement Log such as the name of the file being measured, the measurement scale, and the date/time of the measurement.
By default all data points are selected. You can select a subset of data points for a particular type of measurement, then save the combination as a data point preset.
Note: When you measure with a particular tool, only the data points associated with that tool are displayed in the log, even if other data points are selected. For example, if you make a measurement with the Ruler tool, only the Ruler tool data points appear in the Measurement Log, along with any Common data points that are selected.
-
Choose an image feature and measurement tool to match the selected data points. Do one of the following:
-
Create one or more selections on the image.
- Choose Analysis > Ruler Tool, or click the Ruler tool in the toolbox, then use the tool to measure the length of an image area.
-
Choose Analysis > Count Tool, or click the Count tool in the toolbox, then count items in the image.
-
Choose Window > Measurement Log to open the Measurement Log panel.
-
Choose Analysis > Record Measurements, or click Record Measurements in the Measurement Log panel.
Note: If your currently selected data points do not correspond to the current measurement tool, you are asked to select data points for that tool.
The Measurement log has columns for each data point you selected in the Measurement Data Points dialog box. Each measurement you make enters a new row of data in the Measurement Log.
If you measure multiple selected areas on the image, one row of data is created in the log containing summary or cumulative data for all selected areas, followed by a row of data for each selection area. Each selection area is listed as a separate Feature in the Label column of the log and assigned a unique number.
You can repeat steps 2 through 6 for a variety of different selections in the same or multiple documents. The Document column in the Measurement Log reflects the source of the measurement data.
Measurement Data Points
Angle Angle of orientation ( ±0-180 ) of the Ruler tool.
Area Area of selection in square pixels, or in calibrated units according to the current measurement scale (such as square millimeters).
Circularity 4pi(area/perimeter ^2 ). A value of 1.0 indicates a perfect circle. As the value approaches 0.0, it indicates an increasingly elongated polygon. Values may not be valid for very small selections.
Count Varies according to the measuring tool used. Selection tool: the number of discontinuous selection areas on the image. Count tool: the number of counted items on the image. Ruler tool: the number of Ruler lines visible (1 or 2).
Date and Time Applies a date/time stamp of when the measurement occurred.
Document Identifies the document (file) measured.
Gray Value This is a measurement of brightness, either from 0 to 255 (for 8-bit images), 0 to 32,768 (for 16-bit images), or 0.0 to 10 (for 32-bit images). For all gray value-related measurements, the image is internally converted to grayscale (equivalent to choosing Image > Mode > Grayscale) using the default grayscale profile. Then the requested calculations (mean, median, minimum, maximum) are calculated for each feature and for the summary.
Height Height of the selection (max y - min y), in units according to the current measurement scale.
Histogram Generates histogram data for each channel in the image (three for RGB images, four for CMYK, and so on), recording the number of pixels at each value from 0 to 255 (16-bit or 32-bit values are converted to 8-bit). When you export data from the Measurement Log, the numeric histogram data is exported to a CSV (comma-separated value) file. The file is placed in its own folder at the same location where the measurement log tab-delimited text file is exported. Histogram files are assigned a unique number, starting at 0, and progressing by 1. For multiple selections measured at once, one histogram file is generated for the total selected area, plus additional histogram files for each selection.
Integrated Density The sum of the values of the pixels in the selection. This is equivalent to the product of Area (in pixels) and Mean Gray Value.
Label Identifies and automatically numbers each measurement as Measurement 1, Measurement 2, and so on. For multiple selections measured simultaneously, each selection is assigned an additional Feature label and number.
Length Linear distance defined by the Ruler tool on the image, in units according to the current measurement scale.
Perimeter The perimeter of the selection. For multiple selections measured at once, one measurement is generated for the total perimeter of all selections, plus additional measurements for each selection.
Scale The measurement scale of the source document (for example, 100 px = 3 miles).
Scale Units Logical units of the measurement scale.
Scale Factor The number of pixels assigned to the scale unit.
Source Source of the measurement: Ruler tool, Count Tool, or Selection.
Width Width of the selection (max x - min x), in units according to the current measurement scale.
Create a data point preset
- Choose Analysis > Select Data Points > Custom.
- Select data points to include in the preset.
-
Click Save Preset and name the preset.
-
Click OK. The preset is saved and is now available from the Analysis > Select Data Points submenu.
Edit a data point preset
- Choose Analysis > Select Data Points > Custom.
- Choose the preset you want to edit from the Preset menu.
- Select or deselect data points. The Preset name changes to Custom.
- Click Save Preset. Enter the original preset name to replace the existing preset, or a new name to create a new preset.
Delete a data point preset
- Choose Analysis > Select Data Points > Custom.
- Choose the preset you want to delete from the Preset menu.
- Click Delete Preset, then Yes to confirm the deletion.
- Click OK.
To the top
Use the Measurement Log (Photoshop Extended)
When you measure an object, the Measurement Log panel records the measurement data. Each row in the log represents a measurement set; columns represent the data points in a measurement set.
When you measure an object, a new row appears in the Measurement Log. You can reorder columns in the log, sort data in columns, delete rows or columns, or export data from the log to a comma-delimited text file.
For a video on measurement features, see www.adobe.com/go/vid0029.
Display the Measurement Log
- Do one of the following:
- Choose Analysis > Record Measurements.
- Choose Window > Measurement Log.
Select rows in the log
- Do one of the following:
- Click a row in the log to select it.
- To select multiple contiguous rows, click the first row and drag through additional rows, or click the first row and then Shift-click the last row.
• To select noncontiguous rows, click the first row and then Ctrl-click (Windows) or Command-click (Mac) additional rows.
• To select all rows, click Select All.
• To deselect all rows, click Select None.
Select columns in the log
- Do one of the following:
- Click a column header.
- To select contiguous columns, click a column header and drag through additional columns, or click the first column header and then Shift-click the last column header.
- To select noncontiguous columns, click the first column header and then Ctrl-click (Windows) or Command-click (Mac) additional column headers.
Reorder, resize, or sort columns in the log
- Do one of the following:
- Drag selected columns to reorder them in the log. The column position is indicated by a double black line.
- To resize a column, click the column header and then drag the separator.
- To sort data in a column, click the column header to change the sort order, or right-click the header and choose Sort Ascending or Sort Descending. (Rows cannot be manually reordered.)
Delete rows or columns from the log
- Select one or more rows or columns in the log.
-
Do one of the following:
-
Choose Delete from the Measurement Log options menu.
- Click the Delete icon at the top of the panel.
- Right-click in a row or column header, then select Delete from the pop-up menu
Export Measurement Log data
You can export data from the Measurement Log into a comma-delimited text file. You can open the text file in a spreadsheet application and perform statistical or analytical calculations from the measurement data.
- Select one or more rows of data in the log.
-
Do one of the following:
-
Choose Export from the Measurement Log options menu.
- Click the Export icon at the top of the panel.
-
Right-click in a row, then select Export from the pop-up menu.
-
Enter a filename and location, and click Save.
The measurements are exported to a comma-delimited, UTF-8 text file.
Twitter ^™ and Facebook posts are not covered under the terms of Creative Commons.
Legal Notices | Online Privacy Policy
About image stacks
Creating an image stack
Use a script to create an image stack
To the top
About image stacks
An image stack combines a group of images with a similar frame of reference, but differences of quality or content across the set. Once combined in a stack, you can process the multiple images to produce a composite view that eliminates unwanted content or noise.
You can use image stacks to enhance images in number of ways:
• To reduce image noise and distortion in forensic, medical, or astrophotographic images.
- To remove unwanted or accidental objects from a series of stationary photos or a series of video frames. For example, you want to remove a figure walking through an image, or remove a car passing in front of the main subject matter.
Image stacks are stored as Smart Objects. The processing options you can apply to the stack are called stack modes. Applying a stack mode to an image stack is a non-destructive edit. You can change stack modes to produce different effects; the original image information in the stack remains unchanged. To preserve changes after you apply the stack mode, save the result as a new image, or rasterize the Smart Object. You can create an image stack manually or using a script.
To the top
Creating an image stack
For best results, images contained in an image stack should have the same dimensions and mostly similar content, such as a set of still images taken from a fixed viewpoint, or a series of frames from a stationary video camera. The content of your images should be similar enough to allow you to register or align them to other images in the set.
- Combine the separate images into one multi-layered image. See Duplicate layers.
Note: An image stack must contain at least two layers.
You can also combine images using a script (File > Scripts > Load Files into Stack).
- Choose Select > All Layers.
Note: To make the Background layer selectable with the All Layers command, you must first convert it to a regular layer.
-
Choose Edit > Auto-Align Layers and select Auto as the alignment option. If Auto does not create good registration of your layers, try the Reposition option.
-
Choose Layer > Smart Objects > Convert to Smart Object.
-
Choose Layer > Smart Objects > Stack Mode and select a stack mode from the submenu.
- For noise reduction, use the Mean or Median plug-ins.
- For removing objects from the image, use the Median plug-in.
The output is a composite image the same size as the original image stack. You may need to experiment with different plug-ins to get the best enhancement for a particular image.
To change the rendering effect, choose a different Stack Mode from the submenu. Stack rendering is not cumulative—each render effect operates on the original image data in the stack and replaces previous effects.
Stack modes
Stack modes operate on a per-channel basis only, and only on non-transparent pixels. For example, the Maximum mode returns the maximum red, green, and blue channel values for a pixel cross section and merges them into one composite pixel value in the rendered image.
| Rendering plug-in name Result Comments | ||
| Entropy entropy = - sum( (probability of value) | * log2( probability of value) )Probability of value = (number of occurrences of value) / (total number of non-transparent pixels) | The binary entropy (or zero order entropy) defines a lower bound on how many bits would be necessary to losslessly encode the information in a set. |
| Kurtosis kurtosis = ( sum( (value - mean) ) | 4over non-transparent pixels ) / ( ( number of non-transparent pixels - 1 )* (standard deviation)4). | A measure of peakedness or flatness compared to a normal distribution. The kurtosis for a standard normal distribution is 3.0. Kurtosis greater than 3 indicates a peaked distribution, and kurtosis less than 3 indicates a flat distribution (compared to a normal distribution). |
| Maximum The maximum channel values for all | non-transparent pixels | |
| Mean The mean channel values for all non- | transparent pixels | Effective for noise reduction |
| Median The median channel values for all | non-transparent pixels | Effective for noise reduction and removal of unwanted content from the image |
| Minimum The minimum channel values for all | non-transparent pixels | |
| Range Maximum minus the minimum of the | non-transparent pixel values | |
| Skewness skewness = (sum( (value - mean) ) | 3over non-transparent pixels ) / ( ( number of non-transparent pixels - 1 )* (standard deviation)3) | Skewness is a measure of symmetry or asymmetry around the statistical mean |
| Standard Deviation standard deviation = Square | Root(variance) | |
| Summation The sum channel values for all non- | ||
| transparent pixels | ||
| Variance | variance = (sum( (value-mean)2) over non-transparent pixels ) / ( number of non-transparent pixels - 1) |