VCI-400DJ - DJ Equipment VESTAX - Free user manual and instructions
Find the device manual for free VCI-400DJ VESTAX in PDF.

User questions about VCI-400DJ VESTAX
0 question about this device. Answer the ones you know or ask your own.
Ask a new question about this device
Download the instructions for your DJ Equipment in PDF format for free! Find your manual VCI-400DJ - VESTAX and take your electronic device back in hand. On this page are published all the documents necessary for the use of your device. VCI-400DJ by VESTAX.
USER MANUAL VCI-400DJ VESTAX
Installation and Setup
The Vestax VCI-400 is a class compliant USB plug and play device for Mac, however requires drivers for Windows. You will find these on the installation cd provided with your Vestax VCI-400.
NOTE: Please ensure you have the latest available drivers AND firmware updates, which may be required in order to be compatible with Serato DJ. Please go to http://serato.com/dj/support
- Download and install the latest version of Serato DJ from http://serato.com/dj/downloads
- Connect your Vestax VCI-400 to an available USB Port.
- Open Serato DJ.
text_image
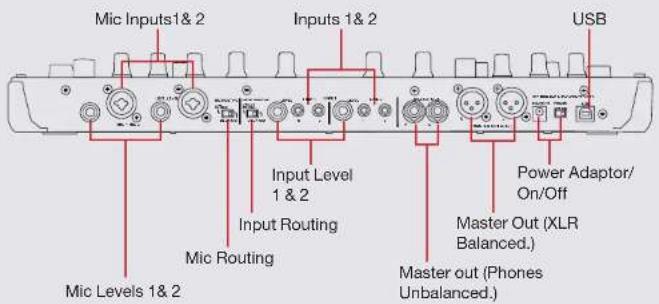
Mic Inputs1& 2 Inputs 1& 2 USB Input Level 1 & 2 Power Adaptor/ On/Off Input Routing Master Out (XLR Balanced.) Master out (Phones Unbalanced.) Mic Levels 1& 2Activation is only necessary for Serato DJ Intro controllers looking to upgrade to Serato DJ. Other supported Serato DJ controllers will not require activation.
To see a full list of supported Serato DJ Controllers click on the License panel.

Serato DJ Activation
To find out how to activate Serato DJ by either starting your free 14 day trial, or purchasing a license for Serato DJ, click here for the most up to date information.
serato

DJ
VERSION 1.1
Looping
You have up to 8 loops per track in Serato DJ, and the choice between either manual or auto loops. You can choose whether you have 4 loops (and 4 cuepoints) showing on screen, or 8 loops. To switch between Manual and Auto looping, click
(Manual) or (Auto) onscreen. When using your VCI-400, Manual and Auto Loop modes are available when using the performance pads by selecting the LOOP mode, or using the AUTO LOOP knob.
Manual Mode is one of the performance pad modes and controlled using the Performance Pads. SEE PERFORMANCE PADS FOR MORE INFORMATION.
VCI-400 Control Manual Loop Mode
Buttons 1-4 Select Select Saved Loops 1-4
Button 5 Set loop in point (Loop not active)/Edit start of loop point (Loop active)
Button 6 Set end of loop point (If Loop in point set)/Edit end of loop point (Loop active)
Button 7 Selected Loop ON/OFF
Button 8 Reloop
PARAM Halve or double Loop Length
NOTE The best way to edit the in and out points of a loop is with the jog wheel/platter on your Vestax VCI-400.
VCI-400 Control Auto Loop Mode Shift
AUTO LOOP (Knob Press) Auto Loop On/Off Reloop
AUTO LOOP (Knob Twist) Adjust Loop length Loop Shift Left/Right
PARAM Adjust Defined Loop
Length Range
NOTE: You can also save a loop to the next available free loop slot in the software. To do this, either click the Button in the manual/auto loop tab or click button in available loop slot. Your loops are saved to the file and recalled the next time it is loaded. They are not lost if the file is moved or renamed.
serato

DJ
VERSION 1.1
DJ-FX
The DJ-FX in Serato DJ are powered by iZotope™. Click the FX tab to open the FX panel. Select either 1, 2, 3, 4 or M to assign the selected effect bank to a deck or Master Output.
There are two available modes in the DJ-FX. Single FX Mode allows you to select one effect per FX bank, and has multiple parameters that can be adjusted. Multi FX Mode allows you to select up to three effects per FX bank, and adjust only one parameter, the FX Depth. The same effects available in Single FX mode are available in Multi FX mode, as well some additional presets.
You can select between the two FX modes by clicking either the Single FX mode button or Multi FX mode button


VCI-400 Control Single FX Mode Multi FX Mode Shift
| FX MODE (button) Toggle between FX Modes | Toggle between FX Modes |
| MASTER FX Assign FX to Master Output | Assign FX to Master Output |
| FX ON 1 (button) Effect On/Off Slot 1 Effect On/Off Slot 1 Select Effect | |
| FX ON 2 (button) Adjust Parameter 2 Slot 2 Effect On/Off Slot 2 Select Effect | |
| FX ON 3 (button) Adjust Parameter 4 Slot 3 Effect On/Off Slot 3 Select Effect | |
| FX 1 (knob) FX Dial 1 Adjust Parameter 1 Adjust Slot 1 FX | Parameter |
| FX 2 (knob) FX Dial 2 Adjust Parameter 3 Adjust Slot 2 FX | Parameter |
serato

DJ
FX 3 (knob) FX Dial 3 Adjust Parameter 5 Adjust Slot 3 FX
Parameter
| TAP Tap to the desiredFX tempo. To return to AUTOMode, press and hold | Tap to the desiredFX tempo. To return to AUTOMode, press and hold |
| BEATS Adjust BeatsMultiplier | Adjust BeatsMultiplier |
The effect time is set using the tracks BPM value, but by applying the Beats Multiplier you can increase or decrease the effect timing. Modify this by using the BEATS knob on the controller. Automatic tempo requires that the track on the deck assigned to the FX Unit has BPM information. Manual tempo mode allows you to tap in the tempo yourself.
VERSION 1.1
Performance Pads
text_image
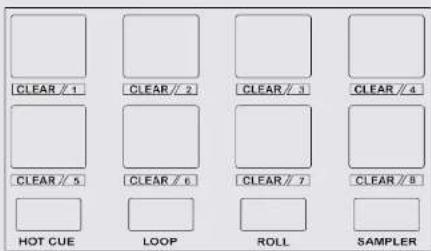
CLEAR / 1 CLEAR / 2 CLEAR / 3 CLEAR / 4 CLEAR / 5 CLEAR / 6 CLEAR / 7 CLEAR / 8 HOT CUE LOOP ROLL SAMPLERThe performance pads have four different modes you can select. The four modes are; HOT CUE, LOOP, ROLL and SAMPLER modes.
- HOT CUE Mode: When pressing buttons 1-8 you can add/trigger up to 8 Cue Points. Holding SHIFT and pressing buttons 1-8 will delete the Cue Points.
- LOOP Mode: Buttons 1-4 select the first 4 saved loop slots. Buttons 5 and 6 place in the IN and OUT points of loops. Button 7 turns the currently selected loop slot ON/OFF and Button 8 will Reloop the currently selected loop slot. SEE LOOPING FOR MORE INFORMATION.
- ROLL Mode: When pressing buttons 1-8 you can activate a loop roll. The Loop Roll Length is determined by the Auto Loop Range shown in the software, and can be adjusted by using the PARAM knob.
- SAMPLER Mode: Buttons 1-6 Trigger Samples loaded in your Sample Banks. Use the PARAM knob to toggle between Sample Banks.
Serato Video
Serato Video is a software plugin for Serato Software which adds the ability to playback and mix video files, use effects and fader transitions with your Serato DJ Controller, an additional MIDI controller or your mouse/keyboard.
For more information on Serato Video click here.
MIDI
The MIDI control feature in Serato DJ provides the ability to map Serato DJ software functions to MIDI controller functions such as keyboards, triggers, sliders, and knobs. Integrating MIDI controllers into your Serato DJ setup can improve live performance usability, such as hitting pads on a MIDI controller to trigger Loops and Cue Points.
For more information download the Serato DJ manual here.
NOTE You can not MIDI Map your Mixtrack Pro, you will need to connect an additional MIDI controller to use these MIDI functions.
serato

DJ
VERSION 1.1

text_image
1 2 3 4 5 6 7 8 9 10 11 12 13 14 15 16 17 18 19 20 21 47 46 TEMP 45 44 43 42 41 CHECK SELECT STOCK USB DAC CH-A BIASTER CH-B CH-D DATA GND VCI-30 CONTROLLER 22 23 24 25 26 27 28 40 39 38 37 36 35 34 33 32 31 30 29 SYNC LOAD SYNC LOAD RUBGER SYNC LOAD SYNC LOAD PUL A LPG PWR LPG PWR LPG PWR LPG PWR LPG PWR LPG PWR LPG PWR LPG PWR LPG PWR LPG PWR LPG PWR LPG PWR LPG PWR LPG PWR LPG PWR LPG PWR LPG PWR LPG PWR LPG PWR LPG PWR LPG PWP LPG PWP LPG PWP LPG PWP LPG PWP LPG PWP LPG PWP LPG PWP LPG PWP LPG PWP LPG PWP LPG PWP LPG PWP LPG PWP LPG PWP LPG PWP LPG PWP LPG PWP LPG PWP LPG PWP LPG PWT LPG PWT LPG PWT LPG PWT LPG PWT LPG PWT LPG PWT LPG PWT LPG PWT LPG PWT LPG PWT LPG PWT LPG PWT LPG PWT LPG PWT LPG PWT LPG PWT LPG PWT LPG PWT LPG PWTserato

DJ
VERSION 1.1
NOTE: SHIFT button is used with other buttons that have shift modifier functions.
VCI-400 Control Function Shift Function
| 1 FX ON 1 (button) Slot 1 Effect On/Off Slot 1 Select Effect | |||
| 2 FX ON 2 (button) Slot 2 Effect On/Off Slot 2 Select Effect | |||
| 3 USB LED The USB LED indicates USB connection with your computer. (The LED will not turn on if the power adapter is not connected.) | |||
| 4 ADAPTOR LED The Adaptor LED indicates the power status. The LED turns on when the power adaptor is connected the the power switch is set to ON. | |||
| 5 FX ON 3 (button) Slot 3 Effect On/Off Slot 3 Select Effect | |||
| 6 TAP (button) Tap to the desired FX tempo. To return to AUTO mode, press and hold | |||
| 7 TRIM (knob) Adjusts the gain for each channel | |||
| 8 EQ (knob) Adjusts the EQ for each channel | |||
| 9 BACK (button) Navigate back in currently focused area | |||
| 10 AREA (button) Cycle Files/Browser/Prepare/History Panels Cycle View Modes | |||
| 11 MASTER (knob) Adjusts the master output level | |||
| 12 MASTER PFL (button) Instant PFL selection to monitor the master output through your headphones | |||
| 13 PANEL (button) Cycle REC/FX/SP-6 panels Cycle REC/FX/SP-6 panels in reverse | |||
| 14 PREPARE (button) Loads track to prepare panel Open Prepare panel | |||
| 15 SYNC (button) Sync on Sync Off (Press twice to return to Absolute Pitch when in Relative Mode) | |||
| 16 LOAD (button) Load track to selected deck | |||
| 17 FX 1 (knob) Adjust Slot 1 FX Parameter | |||
| 18 FX 2 (knob) Adjust Slot 2 FX Parameter | |||
| 19 DATA SEND LED The Data Send LED indicates the MIDI data transmission from each VCI-400 control | |||
| 20 FX 3 (knob) Adjust Slot 3 FX Parameter | |||
| 21 BEATS Adjust Beats Multiplier |
serato

DJ
VERSION 1.1
| # | VCI-400 Control | Serato DJ Function | Shift Function |
| 22 | SHIFT The SHIFT button is used with other buttons that have shift modifier functions | ||
| 23 | AUTO LOOP Auto Loop On/Off (Click Knob) Auto Loop Length (Twist Knob) Loop Shift Left/Right | ||
| 24 | HOT CUE Activate Hot Cue performance mode | ||
| 25 | LOOP Activate Loop performance mode | ||
| 26 | ROLL Activate Loop Roll performance mode | ||
| 27 | SAMPLER Activate SP-6 Sampler performance mode | ||
| 28 | VINYL Toggle between Scratch or Slip mode Jog mode | ||
| 29 | HEADPHONE OUTPUT | Headphone connection. Connect your Headphones to this socket. | |
| 30 | CUE/MASTER HEADPHONE MIX | Control knob to adjust the headphone monitor mix balance between master output and monitor output. | |
| 31 | FILTER | LP/HP Combo Filter adjust | |
| 32 | FX ASSIGN 2 | Assign FX UNIT 2 to the selected channel | |
| 33 | FX ASSIGN 1 | Assign FX UNIT 1 to the selected channel | |
| 34 | CROSSFADER | Crossfades the output sound between the two selected decks | |
| 35 | BROWSER | Browses through currently focused area (library/crates/etc)/Click to navigate forward | Click to navigate Back |
| 36 | SAMPLER VOL | Adjusts the master volume of the sample player | |
| 37 | PFL | Cue selected channel in headphones | |
| 38 | PLAY/PAUSE | Play/Pause | Reverse |
| 39 | CUE | Temporary Cue | |
| 40 | CENSOR | Reverses the track while held down. When Censor is released, the track will continue as if censor had not been pressed. | |
| 41 | DECK SELECT | Select Deck C/A (Left Deck) or B/D (Right Deck) | |
| 42 | PERFORMANCE PADS | SEE PERFORMANCE PAD MODE SECTION | |
serato

DJ
VERSION 1.1
VCI-400 Control Serato DJ Function Shift Function
| 43 TEMPO FADER Adjust Tempo When in Sync mode, used to disable the | Pitch Fader temporarily and change the zero position | |
| 44 PARAM Function is determined by Performance Pad Mode selected | ||
| 45 PICK UP LED The Pick Up LED turns on when there is difference between the pitch fader position when switching decks. The LED will turn off when the pitch fader is moved and the difference in tempo is resolved. | ||
| 46 FX MODE Toggle between Single/Multi FX Modes | ||
| 47 MASTER FX Assign FX to Master Output | ||
| 48 JOG WHEEL Scratch, Jog and Slip which are determined by the VINYL button | Skip | |
Using the Tool Tips
Click on the 📄 icon to enable Tool Tips. This is located in between the MIDI and setup button in the top right hand corner of the screen. Tool Tips provide a handy way to learn the various features of Serato DJ.
Move the mouse over a section of the screen to bring up a context sensitive tool tip. Holding the mouse over the button with Tool Tips turned on will show you a list of all keyboard shortcuts.
For more information about how to use Serato DJ, please go to our website www.serato.com or refer to the Serato DJ Software Manual. For more information on your controller, please refer to the hardware manual.
For further help, please contact support@serato.com or go to www.serato.com/dj/support
serato

DJ