Atlanta - Tumble drier WHIRLPOOL - Free user manual and instructions
Find the device manual for free Atlanta WHIRLPOOL in PDF.

User questions about Atlanta WHIRLPOOL
0 question about this device. Answer the ones you know or ask your own.
Ask a new question about this device
Download the instructions for your Tumble drier in PDF format for free! Find your manual Atlanta - WHIRLPOOL and take your electronic device back in hand. On this page are published all the documents necessary for the use of your device. Atlanta by WHIRLPOOL.
USER MANUAL Atlanta WHIRLPOOL
Operating instructions
Surely connect the ground wire.
text_image
V+ MENU P+ V- P-text_image
V+ MENU P+ V- P-Thank you for choosing this product. This manual will guide you for proper operation. Before operating the TV, please read this manual properly. Please do keep this manual in a safe place for future references.
This portable TV has been designed for private use only.
1- Safety notice items
Preparation

text_image
100 mm 100 mm 100 mmFor ventilation, leave a space of at least 10cm free all around the set. To prevent any fault and unsafe situations, please do not place any objects on top of the set. Use this apparatus in moderate climates. Please read the following recommended safety precautions carefully for your safety.
1. Power Source
The TV set should be operated only from a 130-240 V AC, 50 /60Hz outlet. Ensure that you select the correct voltage setting for your convenience.
2. Power Cord

Do not place the set, apiece of furniture, etc. on the power cord (mains lead) or pinch the cord. Handle the power cord by the plug. Do not pull out the plug by tugging the cord and never touch the power cord when your hands are wet as this could cause a short circuit or electric shock. Never make a knot in the cord or tie it with other cords. The power cords should be placed in such a way that they are not likely to be stepped on. A damaged power cord can cause fire or give you an electric shock. When it is damaged and needs to be changed, it should be done by qualified personnel.
3. Moisture and Water

Do not use this equipment in a humid and damp place (avoid the bathroom, the sink in the kitchen, and near the washing machine). Do not expose this equipment to rain or water, as this may be dangerous and do not place objects filled with liquids, such as flower vases, on top. Avoid from dripping or splashing. If any solid object or liquid falls into the cabinet, unplug the TV and have it checked by qualified personnel before operating it any further.
4. Cleaning

Before cleaning, unplug the TV set from the wall outlet. Do not use liquid or aerosol cleaners. Use soft and dry cloth.
5. Ventilation
The slots and openings on the TV set are intended for ventilation and to ensure reliable operation. To prevent overheating, these openings must not be blocked or covered in anyway.
6. Heat and Flames

The set should not be placed near to naked flames and sources of intense heat, such as an electric heater. Ensure that no naked flame sources, such as lighted candles, are placed on top of the TV. Batteries shall not be exposed to excessive heat such as sunshine, fire or the like.
7. Lightning

In case of storm and lightning or when going on holiday, disconnect the power cord from the wall outlet.
8. Replacement Parts
When replacement parts are required, be sure the service technician has used replacement parts which are specified by the manufacturer or have the same specifications as the original one. Unauthorized substitutions may result in fire, electrical shock, or other hazards.
9. Servicing

Please refer all servicing to qualified personnel. Do not remove the cover yourself as this may result in an electric shock.
10. Waste Disposal
Instructions for waste disposal:
- Packaging and packaging aids are recyclable and should principally be recycled. Packaging materials, such as foil bag, must be kept away from children.
- Battery, including those which are heavy metal-free, should not be disposed of with household waste. Please dispose of used battery in an environmentally sound manner. Find out about the legal regulations which apply in your area.
- Cold cathode fluorescent lamp in LCD PANEL contains a small amount of mercury; please follow local ordinates or regulations for disposal.
Information for users applicable in European Union countries

This symbol on the product or on its packaging means that your electrical and electronic equipment should be disposed at the end of life separately from your household wastes. There are separate collection systems for recycling in EU.
For more information, please contact the local authority or the dealer where you purchased the product.
11. Disconnect Device
The mains plug is used to disconnect TV set from the mains and therefore it shall remain readily operable.
12. To prevent injury, this device must be securely attached to the wall in accordance with the installation instructions when mounted to the wall (if the option is available).
Operating Safety Instructions
When displaying the same still picture for more than 2 hours without any interruption, the picture contours of the continuously displayed contents may remain visible on screen, i.e. a persistent image remains. The same applies, when displaying for more than 2 hours:
• the same background/wallpaper
- logos, video games, computer images, Teletext
- contents with a non-filling aspect ratio (e.g. 4:3 format)
Note:
This device is not suitable for a long-time display of still pictures, including logos, video games, computer games, Teletext and screen non-filling contents.
Any persistent images caused by displaying still pictures, logos, video games, computer images, Teletext and screen non-filling contents cannot be erased. These do not represent any malfunction and will not be covered by the manufacturer's warranty."
PE Connection to mains
Be sure to ground the connection properly. Connect the ground terminal of TV with the ground terminal provided at the power outlet using the enclosed power cord. If the provided plug does not fit your outlet, consult an electrician for replacement of the obsolete outlet.

text_image
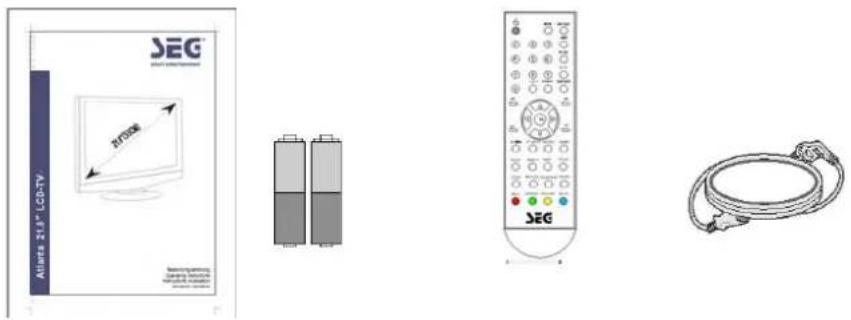
Surely connect the ground wire.2-Accessories
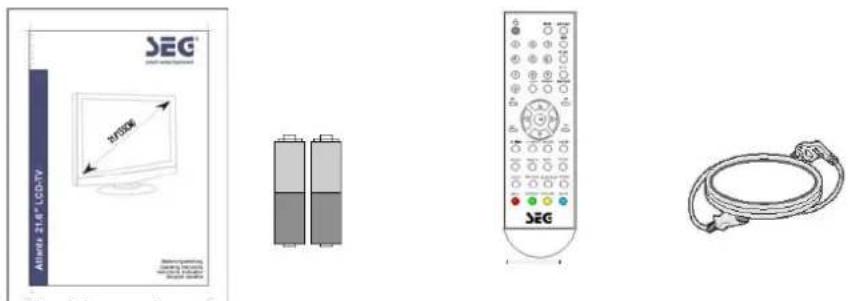
- User's Manual
- Batteries
- Remote control
- Power cord
Note:
Your product may also include various other accessories depending on region of purchase. The manual contains the technical, editorial errors or omissions, and by providing the material damage caused by accidents or causality, or the performance or use of this product. I will not take any responsibility. To constantly improve their products, without notice, I retained the right to change product specifications. The information in this manual will not hesitate to change the date to be announced. Prior written permission is strictly prohibited in any way, for any purpose, copying, duplication or dissemination of any content of this manual.
3- Product Overview
text_image
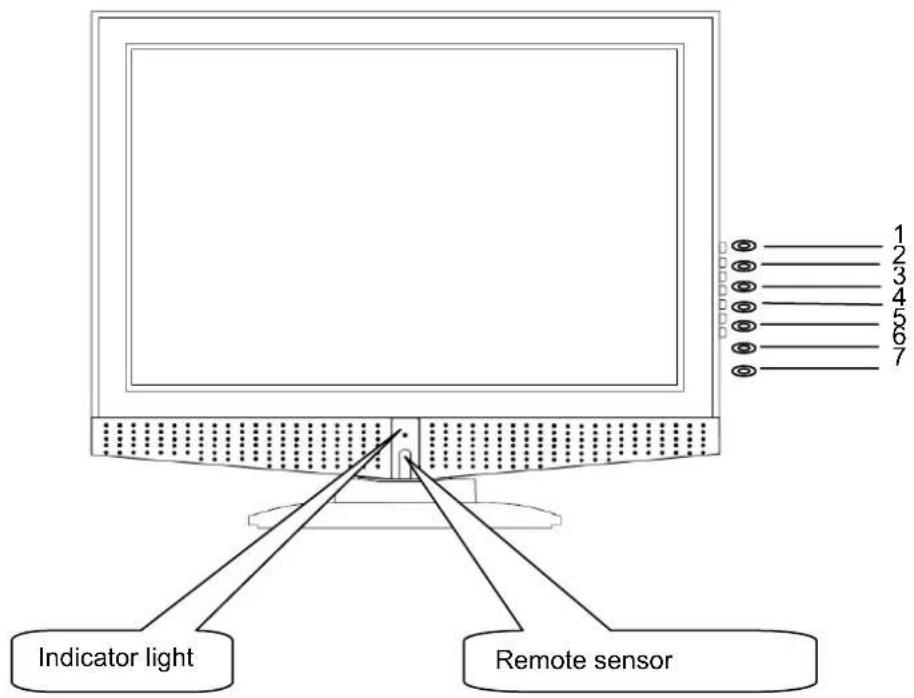
Indicator light Remote sensor 1 2 3 4 5 6 74- Control Panel Overview
(1) Control Panel Functions:
8- TV/AV - To select the input signals: TV / CVBS / SCART / S-VIDEO / VGA / HDMI
9- MENU - Enter into MENU
10- CH- - TV channel down
11- CH+ - TV channel up
12- VOL- - Volume down / Left orientation
13- VOL+ – Volume up / Right orientation
14- POWER - Power supply switch
Indicator Light Status
The indicator light is red when the TV is in standby mode. The indicator light is green when you press the ⬤ Key
(2) Illustration of Connectors
text_image
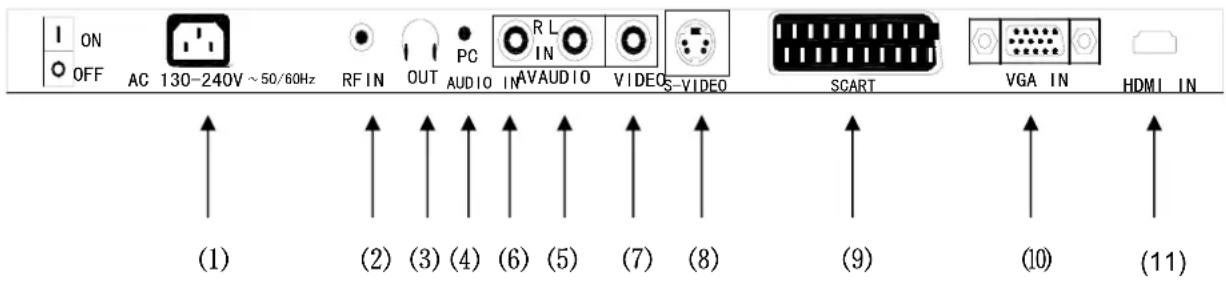
ON OFF AC 130-240V ~50/60Hz RFIN OUT PC AUDIO IN AVAUDIO VIDEOS SCART VGA IN HDMI IN (1) (2) (3) (4) (6) (5) (7) (8) (9) (10) (11)Connectors:
1: AC Power
[2] : Antenna input, connect antenna connector or aerial interface here to receive cable / aerial signal
3: earphone output
[4]: PC sound card audio inputs
[5]/[6] : L/R audio inputs (AV) from exterior AV devices such as DVD players, Video Camera's etc.
[7] : Composite video input, connect video input from external device here
[8] : S-VIDEO input, connect video input from external device here
9: SCART interface
10 : DB15 VGA interface
11: HDMI interface
NOTE: Provided by the machine part of the menu here are for your reference, and may actually improve because of the different products.
5- Remote Control Overview

text_image
DISPLAYMUTE EXIT 1 2 3 TV/AV 4 5 6 SYS 7 8 9 -/- RECALL. ETCOM 0 V+ P+ MENU V- P- S. MODE P. MODE NICAM SLEEP HOLD INDEX SIZE PGUP TEXT REVEAL SUBPAGE PGDN RED GREEN YELLOW BLUE SEGNOTE: Provided by the machine part of the menu here are for your reference, and may actually improve because of the different products.
1- Illustration of the keys on the remote control:
Table 1
| 1. POWER | Switches the set on from standby or off to standby. | |
| 2. TV/AV Select TV / SCART / PC | / AV / S-VIDEO / HDMI | |
| 3. EXIT Exit | ||
| 4. MENU | Selects a menu. | |
| 5. MUTE | Switches the sound on or off. | |
| 6. V - 7. V+ ▷ | adjusts the volume.adjusts menu settings. | |
| 8. P+ 9. P- ▽ | selects a programme or a menu item.switches the set on from standby. | |
| 10. 0~9 | TV channel number select or teletext page number select | |
| 11. -/-- | One bit or two bit TV channel select | |
| 12. DISPLAY Display current TV channel or cancel | ||
| 13. RECALL Previous program (Swap) | ||
| 14. NICAM Mono/Stereo – Dual I-II | ||
| 15. SYS TV System select | ||
| 16. P.MODE Picture mode select | ||
| 17. S.MODE | Sound mode select | |
| 18. SLEEP | Sets the sleep timer. | |
| 19. ENTER | Enter to select | |
| TELETEXT | 20. HOLD Hold on or off for current page display | |
| 21. INDEX Request index page. | ||
| 22. SIZE Change display size. | ||
| 23. PGUP Increase the page number by one | ||
| 24. TEXT Switch to the Teletext with text mode | ||
| 25. REVEAL | Reveal or hidden the hidden words | |
| 25. SUBPAGE | Sub coded page access | |
| 27. PGDN | Decrease the page number by one | |
| 28. RED | Correspond to the differently colored subjects | |
| 29. GREEN | ||
| 30. YELLOW | ||
| 31. BLUE | ||
6- BUTTON OPERATION
1 Power/Stand-By ON/OFF

With Mains status On, you can also turn off using Remote Control Hand Set. This status is called Stand-By mode. In this mode;
2 TV/AV Selection
You can select your video source by the TV/AV button.
Press the TV/AV button to following menu
press the ▲/▼ button to select following option
press the ▶ button to confirm
| TV |
| SCART |
| CVBS |
| S-VIDEO |
| VGA |
| HDMI |
3 [MENU] key
Press the MENU to a menu item.
press the ◀ / ▶ button to select following option
PICTURE-SOUND-SETUP-TIMER-FUNCTION

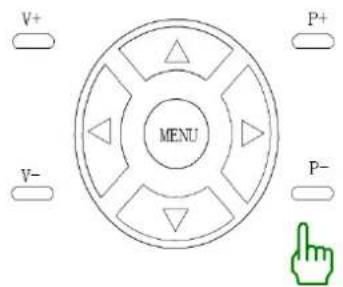
4 Program Up/Down
text_image
V+ MENU P+ V- P-Press the CH+ key, to change Program Up
Press the CH-key, to change Program Down
Press the CH+/CH- button to selects a programme or a menu item.
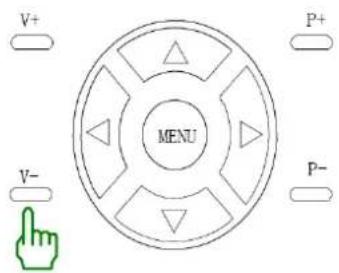
5 Volume Control
text_image
V+ MENU P+ V- P-Press the VOL+ key, for Volume Up
Press the VOL-key, for Volume Down
6 Direct Access Tuning

①
②
③
④
5
⑥
7
⑧
⑨
0
-/-
RECALL
O
O
Press the relevant key on the remote control if you want to choose any channel from 1 to 9. (for example: if you want to choose channel 8, just press the key number 8.)
7 MUTE
By pushing this key, sound output will be muted.
Press the MUTE again, or Volume Up/Down, and sound Volume will return.
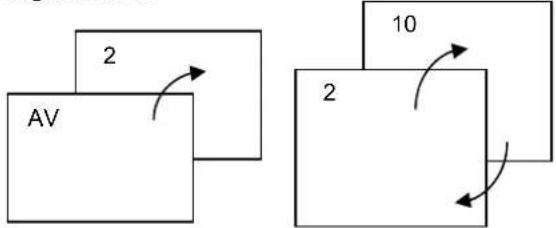
8 Quick View

TV Mode: Program will quick back to the previous Program being watched.
flowchart
graph TD
    A["AV"] -->|2| B["Block 1"]
    B --> C["Block 2"]
    C -->|10| D["Output"]
    style A fill:#f9f,stroke:#333
    style C fill:#bbf,stroke:#333
AV Mode: Back to TV channel
9 PICTURE MODE
P. MODE
By repeatedly pushing this key, picture effects will change as follows

STANDARD-PERSONAL-MOVIE-SPORT-MILD-GAME
10 OUND MODE
S. MODE
By repeatedly pushing this key, sound effects will change as follows:

PERSONAL-VOICE-MUSIC-THEATRE

11 SLEEP
SLEEP
repeatedly pushing this key, sleep timer will change as follows:

0-15-30-45-60-75-90-105-120-0Min
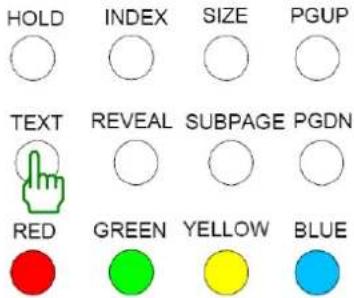
12 ELETEXT BUTTONS
text_image
HOLD INDEX SIZE PGUP TEXT REVEAL SUBPAGE PGDN RED GREEN YELLOW BLUETeletext features may vary depending on the Broadcasting Companies and is only available if the channel selected is transmitting Teletext. Pressing the Picture button whilst in Teletext operation will switch the current status to TV. When in Teletext mode, the volume may still be altered to the desired listening level.
TEXT Button
Press this button to enter Teletext mode and only the text page can be visible.
SIZE Button
Selects double height text. Press this button to enlarge the top half of the page. Press this button again to enlarge the bottom half of the page. Press this button again to return to the normal display.
Reveal Button
Press this button to display concealed information, such as solutions of riddles or puzzles. Press this button again to remove the information from the display.
TIME Button
When viewing a TV programme, press this button to display the time at the top right hand corner of the screen. Press this button again to remove the display. In the teletext mode, press this button to select a sub page number. The sub page number is displayed at the bottom of the screen. To hold or change the sub page, press the RED/GREEN, P+ / P- or NUMBER buttons.
Index Button
Press this button to return to the main index page.
Depending on the way information is transmitted, this may have to be pressed more than once to return to the main index page.
Red/Green/Yellow/Blue Buttons
These four buttons correspond to the differently coloured subjects.
7- TV Operation
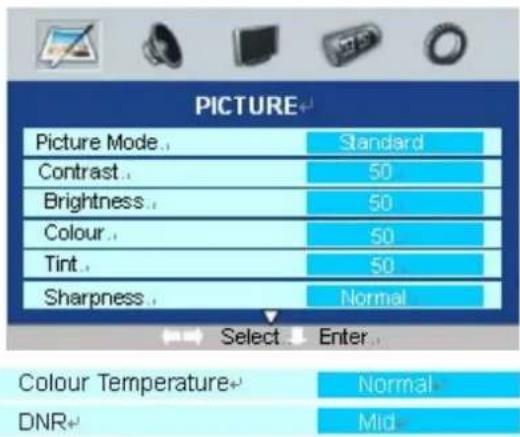
PICTURE menu options
text_image
PICTURE Picture Mode.. Standard Contrast . 50 Brightness . 50 Colour . 50 Tint . 50 Sharpness . Normal Select Enter Colour Temperature+ Normal DNR+ Mid- Press the MENU button to display the OSD main menu.
- Press the ◀ / ▶ button to select PICTURE

in the main menu.
- Press the ▼ / ▲ button to select your option what you want to adjust in the PICTURE menu.
- Press the ◀ / ▶ button to adjust.
- When you are satisfied with your adjustment, press the EXIT button to return to the previous menu or press the MENU button to exit the main menu.
Picture Mode
Select the type of picture which best corresponds to your viewing requirements by selecting Picture Mode in PICTURE menu. The following picture effects are available: Standard, Personal, Movie, Sport Mild and Game are the factory preset mode. If you want to change the value of Contrast, Brightness, Color, Tint (NTSC only), Sharpness or Color temperature on the picture menu, the Memory option is selected automatically.
You may select the picture mode directly by pressing the PMODE button on the remote control.
Contrast
Adjust the contrast of the picture.
Brightness
Adjust the brightness of the picture.
Color
Adjust the color saturation.
Tint
Adjust the tone of color when your system is in NTSC.
Sharpness
Adjust sharpness level of the picture.
Color temperature
Select an optimum color temperature mode to suit your eyes for viewing among Normal (balance), Warm (reddish) Cold (bluish).
DNR (Digital Noise Reduction)
If the broadcast signal received is weak, you can select the DNR option to reduce the video noise level between Low, Mid, High and off.
Note:
If cinema mode is set to Auto, cinema mode will be detected automatically when you are playing a movie with cinema mode.
SOUND menu options
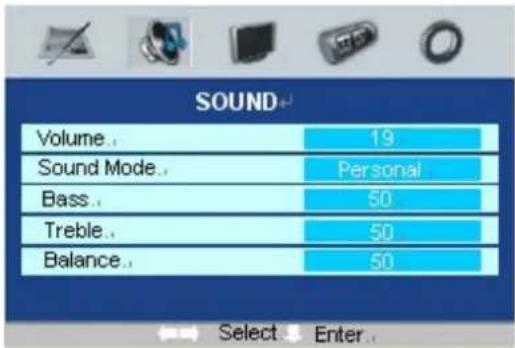
text_image
SOUND+ Volume. 19 Sound Mode. Personal Bass. 50 Treble. 50 Balance. 50 Select Enter.Volume
Adjust the sound level.
- Press the MENU button to display the OSD main menu.
- Press the ◀ / ▶ button to select SOUND

in the main menu.
-
Press the ▼ / ▲ button to select your option what you want to adjust in the SOUND menu.
-
Press the ◀ / ▶ button to adjust.
-
When you are satisfied with your adjustment, press the MENU button to return to the previous menu or press the EXIT button to exit the main menu.
Sound
You can select the type of sound which best corresponds to your listening requirements by selecting Sound in SOUND menu. The following sound effects are available: Music, Theater, Personal, Voice are the factory preset sound mode. If you want to change the value of Bass and Treble on the Sound menu, the Memory option is selected automatically.
You may select the picture mode directly by pressing the SMODE button on the remote control.
Bass
Increase or decrease the level of the lower-pitched sounds.
Treble
Increase or decrease the level of the higher-pitched sounds.
Balance
Adjust the audio output between left and right speakers.
TV SETUP menu options
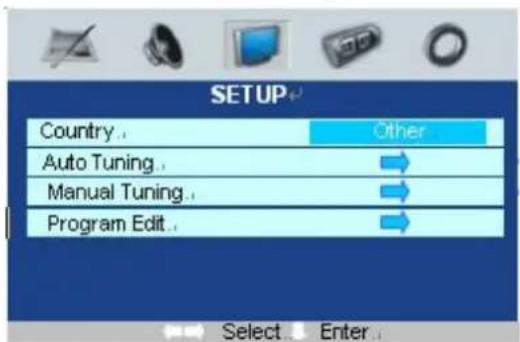
text_image
SETUP Country.. Other Auto Tuning.. → Manual Tuning.. → Program Edit.. → Select Enter.- Press the MENU button to display the OSD main menu.
- Press the ◀ / ▶ button to select SETUP

in the main menu.
- Press the ▼ / ▲ button to select your option what you want to adjust in the SETUP menu.
- Press the ◀ / ▶ button to adjust.
- When you are satisfied with your adjustment, press the MENU button to return to the previous menu or press the EXIT button to exit the main menu.
Auto tuning
This option allows you to Tuning the stations that can be received automatically. It's recommended that you use Auto tuning during installation of this unit.
Tips: Before perform Auto tuning, you must select a country where you are by selecting Country option.
-
Press the ▼ / ▲ button to select Auto tuning in SET UP menu.
-
Press the ◀ / ▶ button to perform your selection, sound system will be display on the screen.

text_image
Auto Tuning ! Press Enter Key to Start Enter Return- In Auto tuning menu, press the ◀ / ▶ button to select a corresponding TV system.
- Press the OK button to start auto tuning. A brand of tuning progress will display on the bottom side of the screen.
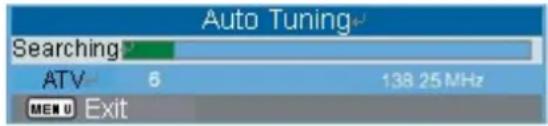
text_image
Auto Tuning Searching ATV 6 138.25MHz MEN U Exit- During searching, you can press the EXIT button to stop searching at any moment, and return to the previous menu.
Manual tuning
This option allows you manually tune for your broadcast stations or fine tune the channels received. Tips: Before perform Manual tuning, you must select a country where you are by selecting Country option
- Press the ▼ / ▲ button to select Manual tuning in SETUP menu.
- Press the ◀ / ▶ button to perform your selection, and the menu of Manual tuning will display on the screen.
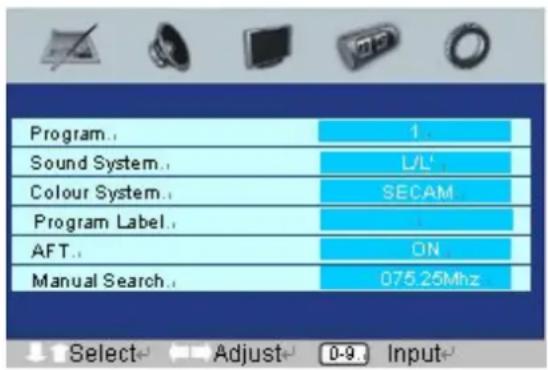
text_image
Program.: 1 Sound System.: L/L' Colour System.: SECAM Program Label.: AFT.: ON Manual Search.: 075.25MhzProgram
The current program number. Press the ◀ / ▶ button to select the upper or lower program.
Sound system
The sound system. Press the ◀ / ▶ button to select a corresponding sound system.
Color System
The color system. Press the ◀ / ▶ button to select a corresponding color system.
Program Label
This option allows you to name for a selected channel, you can also rename the program which you have named.
- Select a channel which you would like to operate for it.
-
Press the ▼ / ▲ button to select Program Label in SETUP menu.
-
Press the ◀ / ▶ button to perform your selection, and the menu of bar of program label will display on the bottom side of the screen.
Program Label

C01
- Press the numeric buttons to input the numbers directly or press the ▼ / ▲ button to select the letters.
- Press the ◀ / ▶ button move the cursor.
- After completed, press the ENTER button to return the previous menu or press the EXIT button to exit the main menu.
AFT (Auto fine tune)
Due to weak signals or a wrong antenna configuration, some of the channels may not be turned to the best reception condition. AFT function allows you to fine tune the selected channel.
Manual search
Manual search option allows you to preset channels one by one, in the program order of your choice.
Program Edit
This function allows you to recognize the order of the TV programs according to your preferences.
- Press the ▼ / ▲ button to select Program edit in SETUP menu.
- Press the ◀ / ▶ button to enter into the sub menu, and a channel list will be appeared on the screen.
- Press the ▼ / ▲ to select a channel in the list which you would like to sort.
- Press the ▶ button to perform your selection.
- Press the ▼ / ▲ button to select a channel in the list which location you would like to place at.
- Press the ▶ to perform your selection.
- After completed, press the MENU button to return to the previous menu or press the EXIT button to exit the main menu.
TIMER menu options
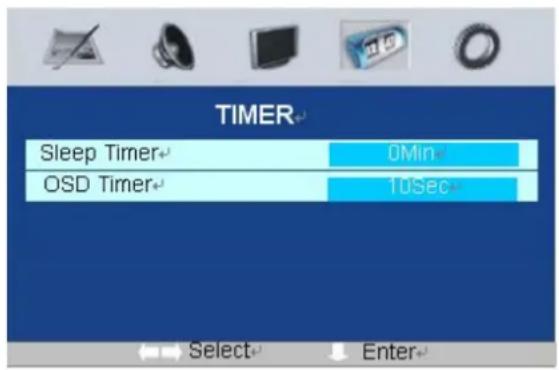
text_image
TIMER Sleep Timer← 0Min← OSD Timer← 10Sec← Select← Enter←- Press the MENU button to display the OSD main menu.
- Press the ◀ / ▶ button to select TIMER in the main menu.
- Press the ▼ / ▲ button to select your option what you want to adjust in the TIMER menu.
- Press the ◀ / ▶ button to adjust.
- When you are satisfied with your adjustment, press the EXIT button to return to the previous menu or press the MENU button to exit the main menu.
Sleep timer
Select the sleep time to automatically to standby. Time is set in increments of 10 minutes, from off to 120 minutes.
You may select the sleep time directly by pressing the SLEEP button repeatedly on the remote control.
OSD timer
Adjust the OSD settle time of the picture
FUNCTION menu options

text_image
FUNCTION Language← English→ Video Size← FullScreen→ Blue Screen← ON→ Child Lock← → First Time Installation← → Reset← ↕ Enter← Select → Enter←- Press the MENU button to display the OSD main menu.
- Press the ◀ / ▶ button to select

FUNCTION in the main menu.
-
Press the ▼ / ▲ button to select your option what you want to adjust in the FUNCTION menu.
-
Press the ◀ / ▶ button to adjust.
-
When you are satisfied with your adjustment, press the EXIT button to return to the previous menu or press the MENU button to exit the main menu.
Language
Press ▼ / ▲ button and then use ◀ / ▶ to select the language of OSD (On Screen Display).
ENGLISH-FRANCAISE-DEUTSCH-ITALIANO-ESPAÑOL-PORTUGESE
VIDEO SIZE
This option allows you to select the screen display mode which best corresponds to your viewing requirement, 5 kinds of aspect mode are available: AUTO, 4:3, zoom1, full screen,
Note:
The available aspect mode may be different in difference input signal.
Blue screen
This option allows you to select the blue background on or off. If on, the screen background will turn blue at very weak or no signal condition.
Child Lock
This option allows you to lock the buttons on the front panel, so that a child may not a accidentally change your viewing preferences.
Reset
Use ◀ / ▶ button to reset the device to the factory default settings.
PC menu operation
HDMI menu operation
Press TV/AV to select the input source to PC and HDMI mode
Press MENU button to display, then press ▶ button the PC Position and HDM Position
Press ▼ / ▲ button to select

text_image
PC Position Auto Sync← Begin← Phase← 93← Clock← 50← H Position← 50← V Position← 50← Position Reset← Select Enter←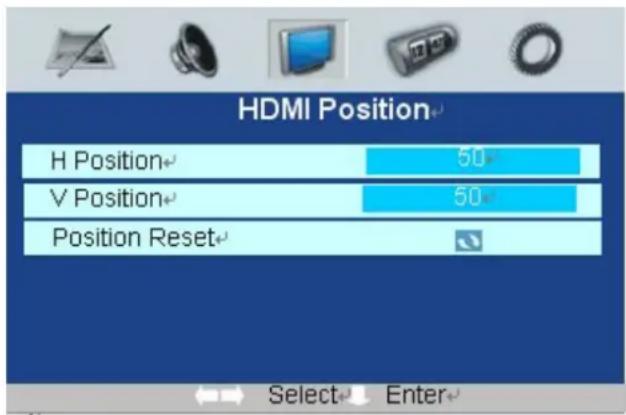
text_image
HDMI Position H Position 50 V Position 50 Position Reset Select EnterAuto sync
Press ENTER/V+ button to auto adjust the PC setting.
Phase
Press ENTER/V+ button to adjust the phase of the picture.
Clock
Press ENTER/V+ button to adjust the clock of the picture.
H-POSITION (PC mode and HDMI mode)
Press P+/P- button and then use V-/V+ to adjust the horizontal position of the picture.
V-POSITION (PC mode and HDMI mode)
Press P+/P- button and then use V-/V+ to adjust the vertical position of the picture
POSITION RESET (PC mode and HDMI mode)
Press ENTER/V+ button to reset the setting to factory default.
8- Product specifications
| TV-SYSTEM PAL/SECAM B/G D/K I L/L' | ||
| RECEIVING CHANNEL HYPER BAND | CABLE TUNER | |
| PROGRAM CHANNE S 0-99 Channels | ||
| CHANNEL DISPLAY | On-Screen Display (OSD) | |
| RF-ANTENNA INPUT | 75 ohms | |
| OPERATING VOLTAGE 130-240V AC, 50/60Hz | ||
| AUDIO German + Nicam Stereo | ||
| AUDIOOUTPUT POWER (%10 THD) | 2 x 2W | |
| POWER CONSUMPTION(W) | 70 W3W (Stand-by) | |
| PANEL | 16:9 Wide Display, 21.6" screen | |
| SIZE (mm) | WIDE | 230 |
| LENGTH | 460 | |
| HEIGHT | 383 | |
| WEIGHT (KG) | 4.7 | |
This product fulfills the following EN Norms:
■ EN 60065_2002 + A1_2006
■ EN 55013:2001/ + A1:2003+A2:2006
■ EN 55020:2002/+A1:2003+A2:2005
Design and specifications are subject to change without any notice
Table des matières
Introduction.... 1
Surely connect the ground wire.
2- Accessoires
text_image
V+ P+ MENU V- P-text_image
V+ MENU P+ V- P-text_image
Program Label C 01Surely connect the ground wire.