BB 1350 - Bread maker DELTA - Free user manual and instructions
Find the device manual for free BB 1350 DELTA in PDF.

User questions about BB 1350 DELTA
0 question about this device. Answer the ones you know or ask your own.
Ask a new question about this device
Download the instructions for your Bread maker in PDF format for free! Find your manual BB 1350 - DELTA and take your electronic device back in hand. On this page are published all the documents necessary for the use of your device. BB 1350 by DELTA.
USER MANUAL BB 1350 DELTA
natural_image
White Delta-branded milk maker with open lid and open lid, no visible text or symbols on device bodyPlease read the instructions carefully before using the machine. You will find a range of important and useful hints. Please keep the operating manual in a safe place and pass it on with the machine to other users.
For technical reasons this page is empty
TABLE OF CONTENTS Page
CE Declaration of Conformity....4
General notes on safety 5
Special notes on safety....6
Areas of use....7
Technical data ....7
Items supplied 8
List of possible program variations....9
Preparation times (including preheating times where available) 10
Description of equipment....11-12
Description of the display and operational controls 13-16
Heat retention function....16
Memory in event of power failure....16
Ambient conditions 17
Error messages on the LCD display ....17
Before using for the first time....18
Use of the breadmaker....18-20
Helpful hints 21-22
Tips regarding recipes....23
Recipes....24-29
Own recipes 30-31
Cleaning 32
Undesirable baking results – causes and solutions ....33
Troubleshooting....34-37
Warranty conditions ....38
Disposal....39
CE DECLARATION OF CONFORMITY
Hans-Ulrich Petermann GmbH & Co. KG hereby declares that this product complies with the following EU Directives: 73/23/EC, 89/336/EC and 89/109/EC and that this is confirmed by the CE marking.
The equipment meets the requirements of German Law on equipment safety. This is shown by the GS symbol from an independent testing institution:

GENERAL SAFETY ADVICE

This appliance may only be connected to a properly installed and protected power outlet with supply voltage in accordance with the identification label.
Always unplug the appliance in case of malfunction, before cleaning and when the appliance is not in use! Never pull by the power cable!
Never submerge the appliance in water and do not expose to rain or other-moisture!

If the appliance should fall into water, only remove it from the water when the plug is removed from the socket! Do not use again until it has been inspected by an authorised servicing centre. This also applies if the power cable or appliance is damaged or when the appliance has been dropped.
Ensure that the power cable and appliance is never placed on hot surfaces or near heat sources. Ensure that the power cable can not come into contact with hot or sharp-edged objects.

Never use the appliance when standing on a wet floor or when your hands or the appliance are wet.
Do not kink the power cable or wind it around the appliance.
Do not leave the appliance unsupervised during operation!
Repairs must only be performed by authorised customer service centres. Never attempt to open the appliance or insert metallic objects etc. inside.


If the appliance is not used as intended or operated incorrectly, we accept no liability for any resulting damage!
Never use the appliance outdoors, as it may be exposed to rain or other water!
Electrical appliances are not toys! Use and store the appliance out of reach of children. Do not leave the connection cable hanging down.
Do not allow children to operate this appliance.
If the power cable is damaged it must, for safety reasons, be replaced by an authorized servicing centre.
This appliance is not designed for commercial use, but exclusively for use in the domestic household!
SPECIAL NOTES ON SAFETY
WHEN USING BREADMAKERS

Do not stand the equipment on hot surfaces or near sources of heat. It should not be placed beneath wall cupboards or too near the wall, to avoid a build-up of heat.

Bread can burn! Never stand your breadmaker near highly flammable materials, such as near or beneath net curtains!
Only stand the breadmaker on a heat resistant, level, non-slip area of your kitchen worktop.

Never place anything on the machine or cover the vents. Heat and steam must be able to escape freely, otherwise heat will build up and may damage the equipment. Covering the vents also constitutes a fire hazard.
Use the equipment only for making bread or preparing doughs and jams, and not for any other purpose!

Do not insert bulky foodstuffs, metal foil or the like into the machine to avoid damaging it.
Use only the accessories provided. If you use parts made by other manufacturers you will forfeit your entitlement to cover under the warranty.
Never use more than the quantities given in the recipes provided in the operating manual.

Never try to remove ingredients or dough from the breadmaker when it is switched on!
Never remove the baking pan while the machine is in operation! Never touch a rotating kneading hook – risk of injury!
Do not touch the baking pan or kneading hook with pointed or sharp objects.
If the non-stick coating of the baking pan or of a kneading hook is damaged by improper use please refrain from using the part concerned. You can obtain kneading hooks and baking pans from the customer service address at reasonable cost.

Use the baking pan with the utmost care. Always remove the baking pan from the machine when adding ingredients, to avoid spillage on the baking chamber. Burning dough is a fire risk!

Pull out the plug immediately if you notice unusual smoke, steam or smells. The dough may have overflowed onto the heating element. Ensure that the outside of the baking pan and the baking chamber are always clean.

The surface of the equipment lid may become hot to the touch. Proceed with care. To remove the dough container always use an oven cloth or glove.

Do not relocate the equipment when the dough container is full of hot liquid (jam).
THE EQUIPMENT CAN BE USED FOR:
1) Kneading dough, e.g. for rolls or cakes and pastries.
2) Making bread according to the attached recipes or according to recipe books on the market.
3) Processing baking mixes.
4) Making jam.
TECHNICAL DATA
Rated voltage: 230 V
Rated frequency: 50 Hz
Rated burden: 850 W
Level of protection: I
Basic program: 11
Program variations: 134
Timer: up to 13 hours' baking delay
Heat retention function: 1 hour
Memory in the event of power failure: 15 minutes
Loaf sizes: 0.75 kg, 1.00 kg, 1.35 kg
Kneading hook and baking pan: non-stick coating
ITEMS SUPPLIED
1 Breadmaker
2 Kneading hooks and 1 baking pan
1 Measuring beaker
1 Measuring scoop (teaspoon/tablespoon)
1 Tool to remove baked-in kneading hooks
1 Operating manual without illustrations
natural_image
Line drawing of a kitchen appliance with control panel and buttons (no text or symbols)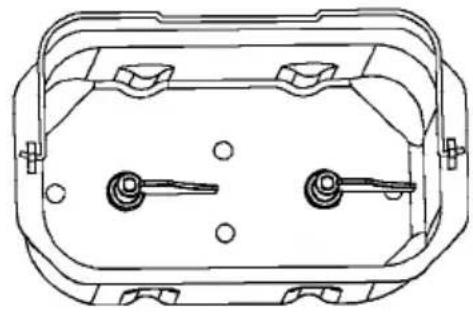
natural_image
Technical line drawing of a mechanical housing or enclosure with two central components and mounting holes (no text or symbols)

LISTING OF POSSIBLE PROGRAM VARIANTS FOR BREADMAKER BB 1350
| Prog. No. | Menu | Loaf size | Degree of browning (colour) | Time delay | Number of program variations per basic program | |||
| 1 | Basic | 0.75 kg/1.00 kg/1.35 kg [3] | X | Light/medium/dark [3] | X | Yes/No [2] | = | 18 |
| 2 | Quick | 0.75 kg/1.00 kg/1.35 kg [3] | X | Light/medium/dark [3] | - - - | = | 9 | |
| 3 | French | 0.75 kg/1.00 kg/1.35 kg [3] | X | Light/medium/dark [3] | X | Yes/No [2] | = | 18 |
| 4 | Rapid | 0.75 kg/1.00 kg/1.35 kg [3] | X | Light/medium/dark [3] | = | 9 | ||
| 5 | Whole wheat | 0.75 kg/1.00 kg/1.35 kg [3] | X | Light/medium/dark [3] | X | Yes/No [2] | = | 18 |
| 6 | Sweet | 0.75 kg/1.00 kg/1.35 kg [3] | X | Light/medium/dark [3] | X | Yes/No [2] | = | 18 |
| 7 | Dough | ---- | ---- | - - - | = | 1 | ||
| 8 | Bake | ---- | Light/medium/dark [3] | X | Yes/No [2] | = | 6 | |
| 9 | Jam | ---- | ---- | ---- | = | 1 | ||
| 10 | Sandwich | 0.75 kg/1.00 kg/1.35 kg [3] | X | Light/medium/dark [3] | X | Yes/No [2] | = | 18 |
| 11 | Gluten free | 0.75 kg/1.00 kg/1.35 kg [3] | X | Light/medium/dark [3] | X | Yes/No [2] | = | 18 |
Total number: 134
Preparation times
Program
Total time ** Program sequence
| No. | Loaf size | Program run time | Max. time delay | Preheating | Stirring | Kneading 1 | Kneading 2 | Rising 1 | Mixing 1 | Rising 2 | Mixing 2 | Rising 3 | Baking | Keeping warm |
| Unit | [g] | [h] | [h] | [min] | [min] | [min] | [min] | [min] | [min] | [min] | [min] | [min] | [min] | [min] |
| 1. Basic * | 750 | 3:20 | 13 | 17 | 3 | 3 | 13 | 45 | 0,5 | 18 | 0,5 | 45 | 55 | 60 |
| 1.000 | 3:30 | 13 | 20 | 3 | 3 | 13 | 45 | 0,5 | 18 | 0,5 | 45 | 62 | 60 | |
| 1.350 | 3:30 | 13 | 20 | 3 | 3 | 13 | 45 | 0,5 | 18 | 0,5 | 45 | 62 | 60 | |
| 2. Quick | 750 | 1:53 | 3 | 5 | 10 | 10 | 85 | 60 | ||||||
| 1.000 | 1:58 | 3 | 5 | 10 | 10 | 90 | 60 | |||||||
| 1.350 | 2:00 | 3 | 5 | 10 | 10 | 92 | 60 | |||||||
| 3. French * | 750 | 3:40 | 13 | 19 | 3 | 3 | 16 | 45 | 0,5 | 25 | 0,5 | 50 | 58 | 60 |
| 1.000 | 3:50 | 13 | 22 | 3 | 3 | 16 | 45 | 0,5 | 25 | 0,5 | 50 | 65 | 60 | |
| 1.350 | 3:50 | 13 | 22 | 3 | 3 | 16 | 45 | 0,5 | 25 | 0,5 | 50 | 65 | 60 | |
| 4. Rapid | 750 | 1:52 | 3 | 3 | 2 | 5 | 7 | 32 | 60 | 60 | ||||
| 1.000 | 1:58 | 4 | 3 | 2 | 5 | 7 | 32 | 65 | 60 | |||||
| 1.350 | 1:58 | 4 | 3 | 2 | 5 | 7 | 32 | 65 | 60 | |||||
| 5. Whole wheat * | 750 | 3:30 | 13 | 17 | 3 | 2 | 13 | 45 | 0,5 | 18 | 0,5 | 56 | 55 | 60 |
| 1.000 | 3:40 | 13 | 20 | 3 | 2 | 13 | 45 | 0,5 | 18 | 0,5 | 56 | 62 | 60 | |
| 1.350 | 3:40 | 13 | 20 | 3 | 2 | 13 | 45 | 0,5 | 18 | 0,5 | 56 | 62 | 60 | |
| 6. Sweet * | 750 | 3:00 | 13 | 6 | 3 | 2 | 10 | 40 | 0,5 | 20 | 0,5 | 45 | 53 | 60 |
| 1.000 | 3:10 | 13 | 11 | 3 | 2 | 10 | 40 | 0,5 | 20 | 0,5 | 45 | 58 | 60 | |
| 1.350 | 3:10 | 13 | 11 | 3 | 2 | 10 | 40 | 0,5 | 20 | 0,5 | 45 | 58 | 60 | |
| 7. Dough | 1:50 | 22 | 3 | 2 | 16 | 45 | 22 | |||||||
| 8. Bake | 1:00 | 13 | 60 | 60 | ||||||||||
| 9. Jam | 1:20 | heat for 15 mins. | 45 | min.standing phase | ||||||||||
| 10. Sandwich * | 750 | 3:00 | 13 | 7 | 3 | 2 | 13 | 45 | 0,5 | 18 | 0,5 | 39 | 52 | 60 |
| 1.000 | 3:05 | 13 | 8 | 3 | 2 | 13 | 45 | 0,5 | 18 | 0,5 | 39 | 56 | 60 | |
| 1.350 | 3:10 | 13 | 9 | 3 | 2 | 13 | 45 | 0,5 | 18 | 0,5 | 39 | 60 | 60 | |
| 11. Gluten free * | 750 | 2:40 | 13 | 3 | 2 | 3 | 12 | 10 | 0,5 | 19 | 0,5 | 45 | 65 | 60 |
| 1.000 | 2:50 | 13 | 4 | 2 | 3 | 12 | 10 | 0,5 | 19 | 0,5 | 45 | 74 | 60 | |
| 1.350 | 3:00 | 13 | 5 | 2 | 3 | 12 | 10 | 0,5 | 19 | 0,5 | 45 | 83 | 60 |
*Adding of ingredients at point ** possible only with these programs Program run time calculated without heat retention time
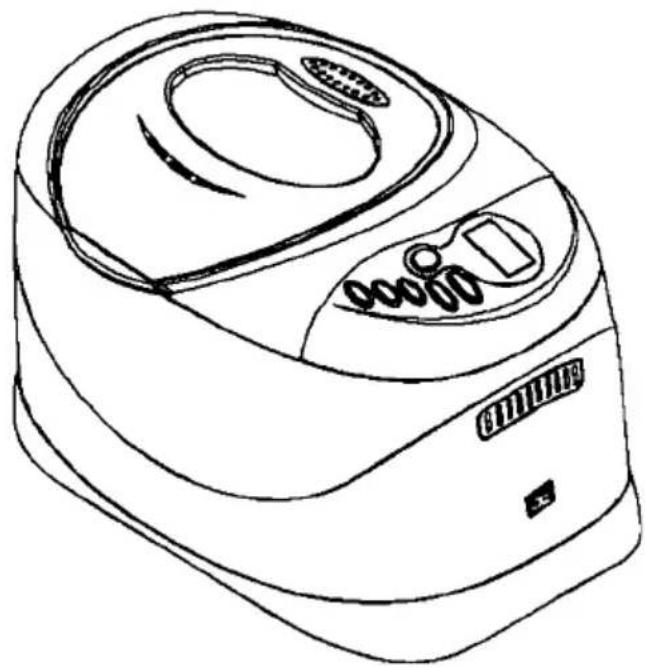
DESCRIPTION OF EQUIPMENT

text_image
H G I A F E B C DBreadmaker:
A) Casing lid
B) Control panel
C) ON/OFF switch
D) "COOL TOUCH" casing
E) Baking pan, non-stick coated
F) Baking chamber
G) Handle for removing baking pan
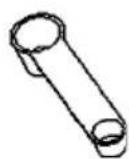
H) Kneading hook, non-stick coated
I) Viewing window
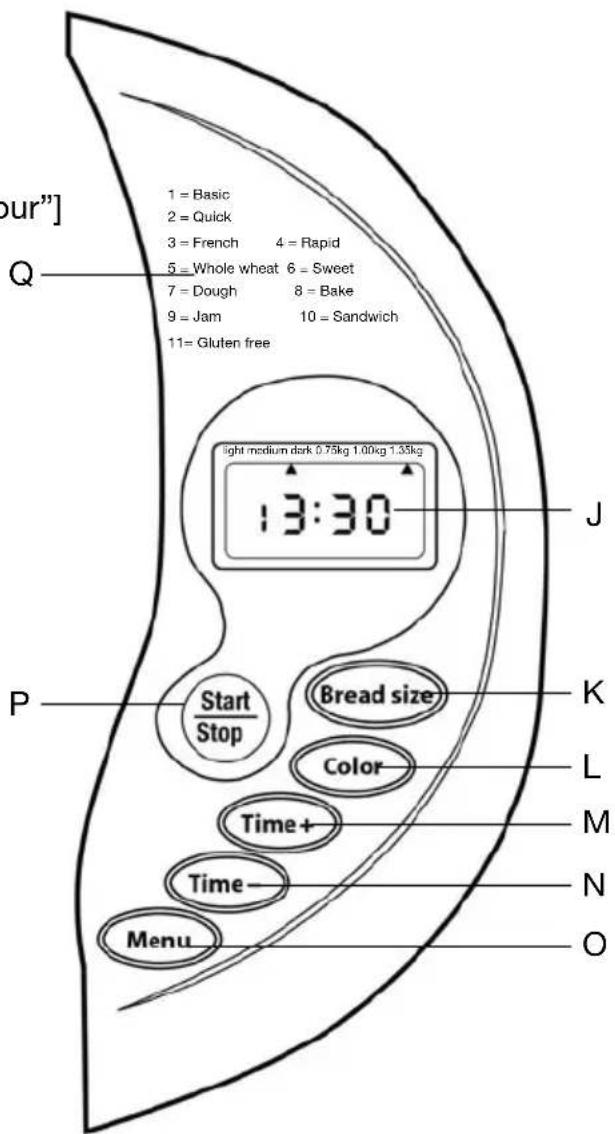
Operating buttons:
J) LCD display
K) Select button ["Bread size"]
L) Select button for degree of browning ["Colour"]
M) Select button ["Time +"]
N) Select button ["Time –"]
O) Select button ["Menu"]
1 = Basic
2 = Quick
3 = French
4 = Rapid
5 = Whole wheat
6 = Sweet
7 = Dough
8 = Bake
9 = Jam
10 = Sandwich
11= Gluten free
P) Select button ["Start/Stop"]
Q) List of basic programs 1 – 11
LCD-Display:
R) Display symbol for selected degree of browning
S) Display symbol for selected loaf size
T) Display of operating time, dependent on program selected
U) Display of basic program selected
text_image
our"] Q 1 = Basic 2 = Quick 3 = French 4 = Rapid 5 = Whole wheat 6 = Sweet 7 = Dough 8 = Bake 9 = Jam 10 = Sandwich 11= Gluten free light medium dark 0.75kg 1.00kg 1.35kg 1:3:30 J P Start Stop Bread size Color Time+ Time- Menu K L M N O
text_image
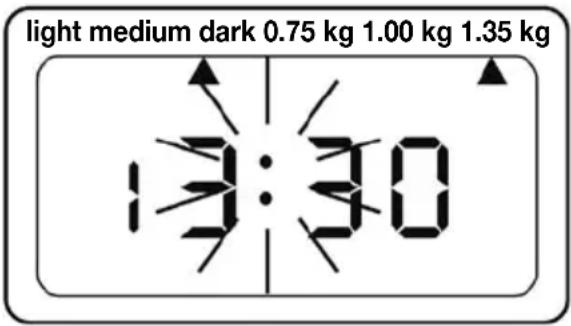
light medium dark 0.75 kg 1.00 kg 1.35 kg 13:30 R S U TDESCRIPTION OF THE DISPLAY AND OPERATIONAL CONTROLS
Select button

You may start or interrupt the selected program using this button. To start, press the button once. You will hear a short bleep, both dots on the digital display will start to flash and the program will begin.

All other buttons, with the exception of the "Start/Stop" button, are deactivated after the program has started, i.e. not functional for safety reasons.
To stop the program, hold the button down for about 2-3 seconds until a short whistling sound informs you that the program has ended.
text_image
light medium dark 0.75 kg 1.00 kg 1.35 kg 13:30
The relatively long time of 2-3 seconds prevents you from ending the program prematurely by touching the "Start/Stop" button inadvertently.

Select button

Please note that for programs marked with a star (*) the stirrer has a built-in delay (preheating function). You will find details of the appropriate preheating time in the table on Page 10 in the “preheating” column.
This button is used to select the desired programs (1-11). Each time a button is pressed you will hear a bleep, and the place in the program will be moved forward by one point. Note the explanation of the various basic programs below:
1 = Basic\*:
This program is used to process (knead, allow to stand, bake) mixed and white breads, consisting of wheat flour and/or rye flour.
2 = Quick:
“Quick” breads are baked with baking powder or bicarbonate of soda, which is activated by humidity and heat. We recommend that you firstly add all liquid ingredients and then the dry ingredients to the baking pan. Lumps could form in the corners of the baking pan because of the shorter program time. We therefore recommend that you break down the lumps of flour using a suitable baking spatula, if necessary. The bread is made in a decidedly shorter time; we therefore recommend that you only use recipes with basic bread ingredients (water, milk, eggs, possibly butter or margarine, flour, salt, sugar). The program is not suitable for breads with special ingredients.
Please consider that bread on this setting is generally somewhat smaller and not as light.
3 = French\*:
This program is used to process doughs with longer standing phases. For light, crustier breads made of white, heavily ground flour (mostly Type 405).
4 = Rapid\*:
This program is used for making breads quickly. This program has no facility for baking the bread later; see list of possible program variations on Page 9.
5 = Whole wheat\*:
This program is used to make breads with a high proportion of rye and wheat whole-grain flour, oats or bran. On this setting the longer preheating phase is used to allow the “grains” to absorb water more easily and to open up (sunflower seeds, sesame seeds, linseed, etc.).
The bread is therefore smaller, denser and heavier than comparable light breads. We do not recommend baking on a timer with this program as the quality of the bread could be adversely affected.
6 = Sweet\*:
This program is used to make sweet bread, e.g. with fruit juice, sugar, coconut flakes, raisins, dried fruits or chocolate.
7 = Dough\*:
This program is used to make dough (kneading and allowing to stand) but without the bake function. The dough can, for example, be used to make pizzas, plaits and rolls.
8 = Bake:
This program is only for baking doughs, without kneading or allowing them to rise (e.g. doughs which you have previously mixed or whose preparation has been interrupted by a lengthy power cut).
This program can also be used to rebake a bread which is too light or possibly not baked thoroughly enough.
Note: the preset time cannot be changed on this program. Press the "Start/Stop" button on the equipment if you wish to end the baking process prematurely.
9 = Jam\*:
This program is used to make home-made jam.
10 = Sandwich\*:
This program is used to make sandwich bread and to bake light bread with thinner crusts.
11 = Gluten free\*:
This baking program is particularly suited to the baking properties of gluten-free flour mixes or types.
Select button
for degree of browning

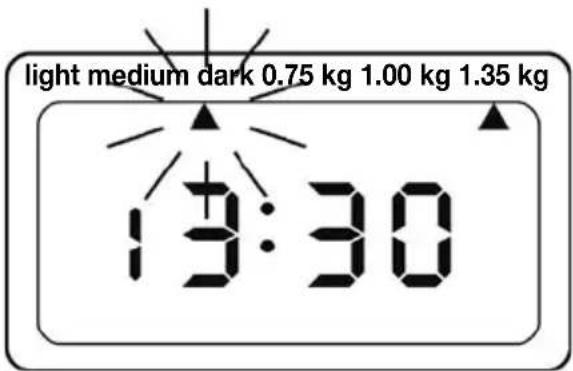
This button is used to select the desired crust colour: light, medium or dark. Every time the button is pressed the arrow in the LCD display moves up one browning level.
text_image
light medium dark 0.75 kg 1.00 kg 1.35 kg 13:30Select button

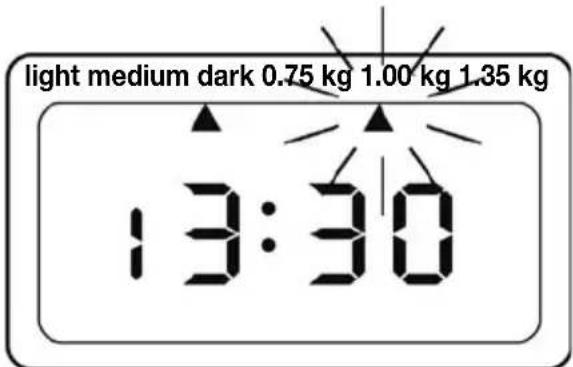
This button is used to select the desired bread weight. Press the button until the arrow in the digital display appears beneath the desired weight (0.75 kg, 1.00 kg, 1.35 kg).
text_image
light medium dark 0.75 kg 1.00 kg 1.35 kg 13:30
Please note that the breadmaker has been preset as standard to the 1 kg size. By pressing the “Loaf size” button you can change the current programming time in the LCD display, depending on the weight of bread selected. See the list of individual preparation times on Page 10.
Because of loss of liquid during baking, the weight of the ingredients is usually greater than that of the finished bread.
Select buttons

If you do not wish the breadmaker to begin immediately you may set the desired total delay time by pressing the above buttons. The maximum delay time which can be set is 13 hours. This function is used to ensure that freshly baked bread is ready at the desired time (e.g. for breakfast).
Note: The delay time includes the relevant baking time, irrespective of the program selected.

Before setting the time delay you must first of all choose the desired program and the degree of browning ("colour").
Every time the "Time +" button is pressed the delay time is increased by 10 minutes, and when the "Time -" button is pressed it is reduced by 10 minutes. The fixed baking times for the different programs are neither increased nor shortened by these settings.
Example:
It is now 20:30 and you would like the bread to be ready for the next morning at 7:00, i.e. in 10 hours and 30 minutes' time. First of all select the desired program, the degree of browning and the desired loaf size. Then press the "Time +" button or "Time -" button until "10:30" appears in the digital display. Now press the "Start/Stop" button to start the time delay program. The colon in "10:30" begins to flash and the remaining time is counted down in the LCD display.
If, for example, you have chosen the wholegrain bread program “5” and a loaf size of 0.75 kg (program run time: 3 hours 40 minutes) the breadmaker will be in ready mode for 7 hours and will begin the program during the night at 3:20.
Next morning at 7:00 you will have fresh bread. If you do not wish to remove the bread from the baking pan immediately at the end of the program, the bread will be kept warm for 1 hour using the built-in heat retention function.

Do not use any easily perishable ingredients for baking on time delay, e.g. eggs, fresh milk, fruit, onions, etc.
HEAT RETENTION FUNCTION
When the baking process has ended, the bread will be kept warm automatically for 1 hour. This prevents the inside of the bread becoming “soggy”. If you do not wish to use this additional function please press the “Start/Stop” button to end the program manually.
MEMORY IN THE EVENT OF POWER FAILURE
If there is a short power cut during the program the selected settings will automatically be stored for about 15 minutes. If the mains power returns within 15 minutes the program will continue automatically without the "Start/Stop" button having to be pressed again. If the power cut lasts longer than 15 minutes the contents of the memory will be lost and the breadmaker will have to be restarted (from the beginning).
If the longer power cut has occurred during the kneading/standing phase the program may be started again (from the beginning) by simply pressing the “Start/Stop” button.
If a longer power cut has occurred during baking the baking process may be completed by using Program 8 (bake only).
AMBIENT CONDITIONS
The breadmaker will function WITHOUT any problems within a wide range of temperatures but there may be differences in the size of the loaf if the room is very hot or very cold. The best results will be obtained at room temperatures between 15 and 34oC.
ERROR MESSAGES ON THE LCD DISPLAY
If the message shown appears after the machine has started, the temperature in the baking chamber of the equipment is too high. In this case stop the program, open the lid and allow the breadmaker to cool down for about 20-30 minutes. After that the equipment may be restarted.
light medium dark 0.75 kg 1.00 kg 1.35 kg
H OF
If the following message appears after the machine has started, the temperature sensor has malfunctioned. In this case do not continue to use the machine but send the machine to the authorised customer service address for servicing.
light medium dark 0.75 kg 1.00 kg 1.35 kg
Err
The display shown here will appear if the machine is operated in an environment that is too cold. After it has appeared you will hear 5 bleeps at intervals.
Then the machine will switch to the normal display for setting the desired program and loaf size. However, it will not be possible to start a program.
light medium dark 0.75 kg 1.00 kg 1.35 kg
LLL
This is a safety function because the yeast in the bread dough does not rise at an ambient temperature that is too low.
BEFORE USING FOR THE FIRST TIME
Carefully remove the breadmaker from its packaging and clean the baking pan, the kneading hooks, the measuring beaker, the measuring scoop and the removal tool in hot water using washing-up liquid or alternatively in a dishwasher (see also notes in the CLEANING section). Then rinse well and dry.
Place the machine near a power socket. Take care that you have a level, dry, non-slip and heat-resistant surface on which to stand it. Then plug the machine in and activate the ON/OFF switch on the side beneath the operating buttons, bringing it to position "I".
Before using for the first time please carry out a 10 minute test bake, using the baking pan and kneading hooks (without ingredients) with the lid down. To do this activate the “Menu” button until the program place “8” appears in the LCD display. Then press the “Start/Stop” button briefly. You will hear a short bleep, and the breadmaker will begin to heat up. To switch off the heating process press the “Start/Stop” button again for about 3 seconds. The switching off of the heating element will again be signalled by a short whistle. Then please switch the machine off by returning the ON/OFF switch to the “O” position.
It is quite normal for a slight smell and a little smoke to be produced at this point (sealing of heating element during manufacture) and is not a problem. Despite this ensure there is sufficient ventilation and clean the baking pan and the kneading hooks once again in hot water with a little washing-up liquid. Then rinse well and dry.
USE OF THE BREADMAKER
1) First insert the two kneading hooks into the driving axles in the dough container and turn the kneading hooks in a clockwise direction until they click into the axles.
We recommend smearing the bare ends of the driving axles with a small amount of margarine suitable for baking so that the dough does not stick to the axles and the kneading hooks can be released from the bread more easily later on.
2) A long bleep will sound during the program for the programs listed below:
Basic < after about 25 minutes (*)
French < after about 25 minutes (*)
Whole wheat < after about 25 minutes (*)
Sweet < after about 15 minutes (*)
Sandwich < after about 13 minutes (*)
A bleep while the program is running (see Point 2) means that more ingredients (e.g. nuts, raisins, linseeds, caraway seeds, dried fruit, etc.) may now be added.


3) Now place the chosen ingredients into the dough container.
Take the greatest possible care when using the baking pan. When adding the ingredients always take the baking pan out of the machine, to avoid spilling onto the baking chamber. Risk of fire from burning dough!
Keep to the order given in the relevant recipe:
a) First of all the liquid ingredients are placed in the baking pan, e.g. milk, water, oil, eggs, soft butter or margarine.
b) The dry ingredients are firstly mixed together, e.g. flour, salt, sugar. Then the mixture of dry ingredients should be added to the liquid in the baking pan.
c) Always make the yeast or baking powder the last ingredient to go into the container.

Use only dried yeast! Never add this to liquid but always to dry ingredients, in a small hollow made in the centre of the dry ingredients. (The yeast might otherwise be prevented from rising, particularly if the baking process is delayed using the timer).
4) Now place the baking pan in the breadmaker in the centre of the baking chamber and press downwards gently until you hear it click into place. Fold down the handle of the dough container.
5) Now carefully close the lid of the machine and connect the mains cable to an earthed socket installed in accordance with the regulations.
6) Now switch the machine on using the ON/OFF switch located on the side of the machine (under the operating buttons). Switch to "I".
7) Now press the "Menu" button to select the desired program.
8) To select the desired degree of browning press the "Colour" button.
9) To select the desired loaf size (0.75 kg, 1.00 kg, 1.35 kg) press the "Loaf size" button.
10) If necessary, now set the desired time delay by pressing the "Time +" or "Time -" buttons.
11) Finally press the "Start/Stop" button to start the program.
12) A bleep during the program – see Point 2 – means that more ingredients (e.g. nuts, raisins, linseed, caraway seed, dry fruit, etc.) may now be added.
Open the lid of the machine only to add ingredients. If you open the lid too often the bread may collapse.
During the baking process there may be steam coming from the ventilation openings on the machine lid. This process is normal and is not a cause for complaint.

13) At the end of the program you will hear about 8 – 10 bleeps. This signals the end of the program and the machine has now switched to heat retention mode. If you would like to take the bread out immediately press the “Start/Stop” button for about 2-3 seconds to end the program manually.
The equipment, the baking pan and the bread are – when removed immediately – very hot. Always use oven cloths or gloves. Do not grasp the machine, the baking pan (including handle) or the bread with bare hands!
14) Open the lid and pull up the baking pan from the baking chamber using the handle. Tilt the baking pan and shake it carefully so that the bread falls out. If possible allow the bread to cool on a cooling tray. Generally the bread can be removed easily because of the non-stick coating on the baking pan. If the bread is stuck fast loosen the bread from the edges of the dough container using a baking spatula made of plastic or wood.
15) Switch the machine off (ON/OFF switch in "O" position)
Never use a knife or other metal objects to loosen the bread. This may damage the non-stick coating.

After removing the bread check immediately whether the kneading hooks have remained in the bread. The kneading hooks are baked in and may remain in the loaf when it is removed.
16) Never forget to remove the kneading hooks before the bread is sliced. Otherwise the hooks could be damaged. Baked-in kneading hooks can be pulled from the bread using the removal tool provided.
If the bread is still hot the removal of the kneading hooks is simple. However, the hole which appears is somewhat bigger than with cool bread.
Leave the breadmaker to cool for about _ hour with the lid open and switched off (ON/OFF switch on side to "O" position) before you bake more bread.
If you do not wish to bake any more bread always return the ON/OFF switch on the side to the "OFF" position ("O" setting) and also pull the plug from the socket.
HELPFUL HINTS
▶ Ensure that all ingredients are at about the same temperature. Room temperature to lukewarm (18oC to 23oC) is best.
When using very soft water the fermenting process of the yeast is heightened, i.e. the dough rises further. To prevent the dough from rising too much we recommend reducing the yeast quantity given by about 25%.
The fermenting process of the yeast is also dependent on the prevailing air pressure, i.e. in high regions about 900 m/NN the fermenting process is stronger. Here too we would recommend reducing the quantity of yeast by 25%.
Baking mixes can be processed to make bread using the machine. However, it is important to check the total weight of all ingredients and ensure that 1,350 g is not exceeded. The dough may overflow and reach the heating element.
The viewing window may, in some circumstances, be misted up by the release of condensation at the beginning of the baking process; this process is normal and is not a cause for complaint.
When baking using your own recipes ensure that the total weight of the ingredients is monitored so that you can a) program the machine correctly and b) ensure that no dough overflows.
The more sugar you use, the darker the bread crust will be.
▶ Note that the baking result will change if you change the individual ingredients.
If you use, for example, dried fruit instead of nuts, the liquid content of the dough is increased. This may mean that less water is needed.
Do not restrict the circulation of air during use, i.e. do not cover up the ventilation slots of the drive motor and the exhaust apertures.
If you are not satisfied with the baking results, begin by changing the recipe slightly. Try it once more.
▶ Rye flour does not contain vegetable gluten, i.e. the bread does not rise very much. That is why the rye flour used should consist of 30% wheat flour.
▶ Under no circumstances use too much yeast or baking powder. The dough might overflow. Also the bread could push against the lid if it rises too much.
The use of fresh yeast may have a negative effect on the desired baking result. Therefore use only dried yeast to produce the dough.
▶ Different types of flour and other ingredients from various manufacturers might lead to different results.
▶ Always add the liquid ingredients to the baking pan first, then the dry ingredients mixed together.
▶ Under no circumstances increase the quantities for the 1,350 g recipes because the dough would overflow and could reach the heating element – fire risk!
If dough reaches the heating element, smoke will come from the baking chamber. In this case keep the lid of the breadmaker closed, switch the machine off using the ON/OFF switch and also pull out the plug from the socket. Leave the machine to cool sufficiently and then clean the baking chamber and the heating element as described in the section on “CLEANING”.
▶ To achieve a satisfactory result we recommend that you keep exact records of recipes and ingredients used.
If you require more kneading hooks or a new baking pan you can order them at reasonable cost from our service address (see page 38).
TIPS REGARDING RECIPES
Pleas use the measuring scoops included in the following way:
The small measuring scoop (teaspoon) is equivalent to a level teaspoon
The large measuring scoop (tablespoon) is equivalent to a level tablespoon

Even slight deviations when adding ingredients may have a considerable effect on baking results. Therefore be especially accurate when weighing out the liquid and dry ingredients.
1) Adding and weighing liquid ingredients:
With most of the recipes described below we recommend that you add only water or milk which is lukewarm. Butter or margarine should likewise always be soft or liquid when added. The required quantity of water, fresh milk, etc. must be determined using a measuring beaker.
2) Measuring powdered ingredients:
Always keep to the details in the relevant recipe. Use either the measuring scoop or kitchen scales to determine the quantity required.
3) Adding of ingredients:
Keep to the following order: liquid ingredients, eggs, salt, powdered ingredients. Add the yeast only to dry flour (into a hollow). Ensure that the yeast does not come into direct contact with salt.
When the dough has been kneaded for between about 13 – 25 minutes, depending on the program selected, you will hear a whistle which indicates that you may now add more ingredients (nuts, fruit, etc.). Do not add the other ingredients to the dough too soon, or some of the taste may be sacrificed during the ongoing kneading process. If you are baking using the timer do not add any easily perishable ingredients to the dough (e.g. eggs or fruit).
4) Types of flour:
Most of the types of flour obtainable in the market place are suitable for making bread such as: > wheat flour Type 405 for light wheat bread
rye flour Type 1800 for almost all wholegrain breads
rye flour Type 1370 for dark, mixed bread
rye flour Type 1150 for bread made with rye and wheat flour
rye flour Type 997 for light rye bread
rye flour Type 815 for light cakes and biscuits
Ready-mixed bread packs are also suitable.

The baking properties of a grain-based flour depend on the gluten part of the type of flour used. In this context bakers talk of “strong” or “soft” flours. Strong flours have a high proportion of gluten. Wheat flour has the best baking properties of all grain flour types.
Recipes:
Here are some recipe suggestions for your breadmaker.
Please always add the ingredients in the order given. Ensure that the dried yeast does not come into contact with liquid. The recipes in this instruction manual assume that the content of a sachet of dried yeast is 7 g.
Basic (Program 1 "Basic")
| Ingredients | 750 g | 1,000 g | 1,350 g |
| Water | 270 ml | 350 ml | 500 ml |
| Margarine or butter | 20 g | 25 g | 35 g |
| Salt | 1 teaspoon | 1 teaspoon | 1_ teaspoons |
| Sugar | 1 teaspoon | 1 teaspoon | 1_ teaspoons |
| Dark wheat flour (Type 1050) | 210 g | 270 g | 380 g |
| Rye flour (Type 997) | 210 g | 270 g | 380 g |
| Dried yeast | 3/4 sachet | 3/4 sachet | 1 sachet |
Banana nut bread
(Program 2 "Quick")
| Ingredients | |
| Milk | 250 ml |
| Oil | 4 tablespoons |
| Bananas, ripe and mashed | 2 |
| Eggs | 4 |
| Sugar | 120 g |
| Brown sugar | 90 g |
| Chopped walnuts | 100 g |
| Wheat flour (type 405) | 380 g |
| Backing powder | 2 teaspoons |
| Salt | 2 teaspoons |
White bread (Program 3: "French")
| Ingredients | 750 g | 1,000 g | 1,350 g |
| Water | 270 ml | 350 ml | 500 ml |
| Salt | 1 teaspoon | 1 teaspoon | 1_ teaspoons |
| Sugar | 1 teaspoon | 1 teaspoon | 1_ teaspoons |
| Semolina | 120 g | 150 g | 200 g |
| Wheat flour (Type 405) | 270 g | 350 g | 500 g |
| Dried yeast | 3/4 sachet | 3/4 sachet | 1 sachet |
Potato bread (Program 4 "Rapid")
| Ingredients | 750 g | 1,000 g | 1,350 g |
| Water or milk | 220 ml | 300 ml | 400 ml |
| Margarine or butter | 20 g | 25 g | 35 g |
| Eggs | 1 | 1 | 1 |
| Potatoes, mashed and cooked | 120 g | 150 g | 200 g |
| Salt | 1 teaspoon | 1 teaspoon | 1 1/2 teaspoons |
| Sugar | 1 teaspoon | 1 teaspoon | 1 1/2 teaspoons |
| Dark wheat flour (Type 1050) | 430 g | 630 g | 780 g |
| Dried yeast | 1 sachet | 1 sachet | 1 1/2 sachets |
French herb bread (Program 4: "Rapid")
| Ingredients | 750 g | 1,000 g | 1,350 g |
| Water | 270 ml | 350 ml | 480 ml |
| Wheat flour (Type 405) | 400 g | 525 g | 700 g |
| Dark wheat flour (Type 1050) | 50 g | 75 g | 100 g |
| Salt | 1 teaspoon | 1 teaspoon | 1 1/2 teaspoons |
| Sugar | 1 teaspoon | 1 teaspoon | 1 1/2 teaspoons |
| Parsley, dill and/or cress, chopped | 1 1/2 tablespoons | 1 1/2 tablespoons | 2 tablespoons |
| Crushed garlic cloves | 1 1/2 teaspoons | 2 teaspoons | 3 teaspoons |
| Butter or margarine | 12 g | 15 g | 20 g |
| Dried yeast | 3/4 sachet | 3/4 sachet | 1 sachet |
Pizza dough (Program 4: "Rapid")
| Ingredients | 750 g | 1,000 g | 1,350 g |
| Water | 280 ml | 375 ml | 570 ml |
| Olive oil | 1 tablespoon | 1 tablespoon | 1 tablespoon |
| Salt | 1 teaspoon | 1 teaspoon | 1 1/2 teaspoons |
| Sugar | 1 teaspoon | 1 teaspoon | 1 1/2 teaspoons |
| Oregano, dried and stripped | 1 1/2 teaspoons | 2 teaspoons | 2 1/2 teaspoons |
| Parmesan, grated | 2 tablespoons | 2 1/2 tablespoons | 3 1/2 tablespoons |
| Semolina | 75 g | 100 g | 150 g |
| Wheat flour (Type 405) | 360 g | 475 g | 650 g |
| Dried yeast | 3/4 sachet | 3/4 sachet | 1 sachet |
Wholegrain bread (Program 5: "Whole wheat")
| Ingredients | 750 g | 1,000 g | 1,350 g |
| Water | 270 ml | 350 ml | 500 ml |
| Salt | 1 teaspoon | 1 teaspoon | 1_ teaspoons |
| Honey | 1 teaspoon | 1 teaspoon | 2 teaspoons |
| Dark wheat flour (Type 1050) | 410 g | 540 g | 760 g |
| Dried yeast | 3/4 sachet | 3/4 sachet | 1 sachet |
Cinnamon raisin nut bread (Program 6: "Sweet")
| Ingredients | 750 g | 1,000 g | 1,350 g |
| Water | 250 ml | 330 ml | 450 ml |
| Oil | 2 tablespoons | 3 tablespoons | 4 tablespoons |
| Ground cinnamon | 3/4 teaspoon | 1 teaspoon | 1 1/2 teaspoons |
| Brown sugar | 1 tablespoon | 1 1/3 tablespoons | 1 1/2 tablespoons |
| Raisins | 60 g | 80 g | 110 g |
| Ground nuts (e.g. hazelnuts) | 60 g | 80 g | 110 g |
| Salt | 1 1/2 teaspoons | 2 teaspoons | 2 1/2 teaspoons |
| Dark rye flour (Type 1050) | 350 g | 460 g | 580 g |
| Dried yeast | 1/2 sachet | 3/4 sachet | 3/4 sachet |
Christmas bread (Program 6: "Sweet")
| Ingredients | 750 g | 1,000 g | 1,350 g |
| Water | 125 ml | 150 ml | 180 ml |
| Milk | 160 ml | 230 ml | 300 ml |
| Oil | 2 tablespoons | 3 tablespoons | 4 tablespoons |
| Salt | 2 teaspoons | 2 1/2 teaspoons | 3 teaspoons |
| Sugar | 4 tablespoons | 5 tablespoons | 6 tablespoons |
| Dark wheat flour (Type 1050) | 350 g | 460 g | 580 g |
| Chopped walnuts | 60 g | 80 g | 110 g |
| Dried fruit, cut in small pieces (e.g. dried plums) | 60 g | 80 g | 110 g |
| Dried yeast | 1/2 sachet | 3/4 sachet | 3/4 sachet |
Sandwich bread (Program 10: "Sandwich")
| Ingredients | 750 g | 1,000 g | 1,350 g |
| Water | 260 ml | 340 ml | 460 ml |
| Margarine or butter | 1 1/2 tablespoons | 2 tablespoons | 2 1/2 tablespoons |
| Salt | 1 1/2 teaspoons | 2 teaspoons | 2 1/2 teaspoons |
| Dried milk | 1 1/2 tablespoons | 2 tablespoons | 2 1/2 tablespoons |
| Sugar | 3 tablespoons | 4 tablespoons | 5 tablespoons |
| Dark wheat flour (Type 1050) | 380 g | 500 g | 620 g |
| Dried yeast | 1/2 sachet | 1/2 sachet | 3/4 sachet |
Jam (Program 9: "Jam")
| Ingredients | |
| Preserving sugar 2:1 | 500 g |
| Fruits(e.g. frozen raspberries, thawed or fresh strawberries) | 900-950 g |
| Lemon juice | 1 tablespoon |
Gluten free bread (Program 11: "Gluten free")
| Ingredients | 750 g | 1,000 g | 1,350 g |
| Milk | 225 ml | 300 ml | 400 ml |
| Margarine or butter | 1 tablespoon | 1 1/2 tablespoons | 2 tablespoons |
| Eggs | 1 | 1 | 1 |
| Salt | 1/4 teaspoon | 1/2 teaspoon | 3/4 teaspoon |
| Flour mix, gluten free (e.g. Hubmann or Hammermühle) | 560 g | 750 g | 1,000 g |
| Dried yeast | 1/2 sachet | 1/2 sachet | 1 sachet |
Good luck!
Own recipes
Own recipes
CLEANING

Before cleaning always pull out the plug and allow the machine to cool down!
Wipe the outside of the machine with a damp well-wrung cloth and then rub dry. Do not use sharp or chafing cleaning agents.
Never put water in the machine!

Do not use metallic objects or sharp or chafing cleaning agents to clean the baking chamber, the baking pan, the kneading hooks or the heating element. Use a soft damp sponge or a soft cloth. Wipe dry. Leave the lid of the machine open to allow the inside to dry thoroughly.

The non-stick coating of the baking pan and kneading hooks should under no circumstances be damaged using hard or chafing objects.
If the kneading hooks remain in the baking pan (and are not stuck in the bread), remove them from the axles first if you have already removed the baking pan from the machine.

The kneading hooks are still very hot shortly after baking! Do not touch with unprotected fingers!
If the kneading hooks are firmly seated on the axles, fill the baking pan with hot water and allow to stand for about 1/2 hour. You will then be able to remove the kneading hooks easily.
If there is baked-on dough residue, wash or soak the kneading hooks with soap suds and ensure that the hole on the underside is cleaned of all dough residue.
All accessories (baking pan, kneading hooks, measuring beaker, measuring scoop, removal tool) may alternatively be cleaned in the dishwasher.
Table of faults
TROUBLESHOOTING
| Cause:Fault: | Correction: | |
| - The equipment is not working. | > Equipment not connected to socket. | >> Insert plug into socket. |
| > The ON/OFF switch has not been activated. | >> Move ON/OFF switch to position “I”. | |
| > Fault in the socket. >> Check the plug with another suitable machine and have the electrical installation checked if necessary by an electrician. | ||
| - During baking there is smoke coming from the ventilation apertures. | > The heating element is still unused and is lightly greased for manufacturing reasons. | >> As described in the operating manual, allow the machine to heat up for about 10 minutes. The slight release of smoke will cease by itself after a short time. |
| > The dough has overflowed and has reached the heating element. | >> Switch the equipment off and pull out the plug. Remove thehotbaking pan and carefully clean thehotheating element. Use suitable aids (e.g. oven glove, to avoid burns). | |
| - The breadmaker is not heating up property. | > The lid is not closed correctly. | >> Close the lid correctly so that the heat cannot escape. |
| - It is very difficult to remove bread from the baking pan. | > The axles of the kneading hook drive were not greased before use with margarine suitable for baking. The bread has stuck to the driving axles. | >> Carefully loosen the bread from the baking pan using a suitable aid, e.g. plastic scraper). Pour hot water into the dough container and allow the driving axles to soak for about 10 minutes. Then clean thoroughly. |
| - The ingredients were not stirred evenly. | >The program was interrupted inadvertently. | >>Stir the ingredients and start the program once again. |
| >The lid was raised several times during the last rising phase. | >>Do not open the lid while the last rising phase is running. | |
| >Ingredients possibly not added in the correct order. | >>Add ingredients only according to the details in the operating manual. | |
| >Liquid used was too cold. | >>Keep to the details in the operating manual. | |
| >Margarine or butter used was too hard. | >>Ensure the ingredients are of the correct temperature. | |
| >Kneading hooks were not fitted correctly. | >>Ensure that the kneading hooks are correctly fitted. | |
| - The LCD display shows only “H OF” after pressing the “Start/Stop” button.“ | >The temperature in the baking chamber is still too high following a previous baking process. | >>Switch the equipment off and open the lid. Allow the breadmaker to cool down sufficiently before using again. |
| - The LCD display shows only “E” after the “Start/Stop” button is pressed.“ | >The temperature sensor has malfunctioned. | >>Have the equipment checked at the service address given. |
| - The LCD display shows “L” after switching on and the equipment gives 5 bleeps.“ | >The ambient temperature is too cold for the yeast in the bread dough. | >>Switch the equipment off. Set up again in a warmer place. After about 1 hour allow the equipment to operate again. |
| - The motor runs but the kneading hooks are not turning. | >The baking pan is not correctly inserted into the baking chamber. | >>Position the baking pan in the centre of the baking chamber and press it down lightly until you hear it click into place. |
| >The kneading hooks are not fitted correctly. | >>Ensure that the kneading hooks are fitted correctly. | |
| > The dough is so heavy that the drive mechanism cannot function. | >> Follow the recipe instructions closely and measure out the ingredients accurately. | |
| - The bread has risen so much that the dough is touching the lid. | > Fresh yeast used. >> Use only dried yeast. | |
| > Ambient temperature too high. | >> Use the equipment under the ambient conditions described in the operating manual. | |
| - The bread is too small or has not risen. | > The lid was opened during the baking phase. | >> Keep lid closed during baking phase. |
| > Proportion of wholegrain flour or grains too high. | >> Reduce the appropriate proportions. | |
| > The yeast was mixed with salt. | >> Do not mix the yeast with salt. | |
| - The dough has overflowed. | > Proportion of liquid too high. | >> Reduce the proportion of liquid and check consistency of dough. |
| - After baking, the bread is “soggy”. | > The bread was left in the dough container too long, the humidity it contained could not escape from the hot bread and has softened the bread inside. | >>Remove the bread from the dough container in good time. |
| - The kneading hooks have been baked in. | > This is normal procedure. >> | Remove the kneading hooks using the instructions in the operating manual. |
| - The bread is not fully baked. | > Possibly the incorrect program was chosen. | >> Place the bread back in the pan and rebake using Program “8”. |
| - After cutting, the bread is hollow inside. | > Too much water used. >> Put in less water. | |
| > No salt added. | >> Check the adding of salt. | |
| > Water temperature too high. | >> Ensure that the water is of the correct temperature. | |
| Cause:Fault: | Correcting: | |
| - The crust is too thick and the degree of browning is too dark when making cakes or foods with heavy sugar content. | > Different recipes or ingredients have a major effect on results.Too much sugar used. | >> If the degree of browning is too dark for the recipe used, press the “Start/Stop” button about 5 -10 minutes before the baking program ends,to interrupt the baking process early. Then allow the bread to stand in the baking pan for about 20 minutes before you open the lid. |
If you experience faults which are not listed here please ask our customer service. Our customer service personnel will be pleased to help you.
If we are unable to help you in this way please send the defective machine in its original packaging, with proof of purchase (date, stamp and signature of your dealer or purchase receipt), to our customer service office.

If you no longer have the original packaging, please pack the machine well with sufficient insulating material to avoid damage in transit. We will not be liable for transport damage caused by improper or insufficient packaging.
GUARANTEE CONDITIONS
Your appliance is covered by guarantee for a period of 3 years. This guarantee does not cover defects caused by incorrect connection, the use of attachments supplied by other manufactures, normal wear and tear, the use of force, your own attempts at repairs, or damage caused by improper use. This Guarantee does not affect your statutory rights.
Save your sales receipt. Return the faulty appliance to the ALDI shop where you bought it. Leave your name, address and telephone number there and let them know whether you either wish a new item (only if still available) or if you wish your money back.
Subject to technical alterations!
JTM CONTRACTS UK LIMITED
SUITE 3 HALLAM HOUSE
WATERSIDE BUSINESS PARK
DINNINGTON
S25 8QU
TELEPHONE 01909 517672
DISPOSAL

When the machine is no longer serviceable unplug it and take all parts and packaging materials to be disposed of in an environmentally friendly way – according to the currently valid regulations. The pertinent local administration authority will provide more information on this.
If you require more kneading hooks or a new baking pan you can order these at a reasonable cost from our service address (see page 38).