
PLM5114 - Lawn mower MAKITA - Free user manual and instructions
Find the device manual for free PLM5114 MAKITA in PDF.


| Product Type | Walk-Behind Lawn Mower |
| Brand | Makita |
| Model | PLM5114 |
| Power Source | Petrol |
| Engine Type | 4-Stroke Petrol Engine (not specified in manual) |
| Cutting Width | Not specified (cutting deck mentioned) |
| Cutting Height | Tool-free adjustable (multiple positions) |
| Grass Collector Capacity | Not specified (collector with plastic frame) |
| Weight | Not specified (machine to move with care) |
| Guaranteed Sound Power Level | 98 dB(A) |
| Sound Pressure Level at Ear | 82.9 dB(A) |
| Vibration Level (Hand-Arm) | 3.67 m/s² (uncertainty 0.3 m/s²) |
| Blade Type | Code 81004381/1 (marking facing ground) |
| Main Functions | Mowing, collection, side discharge, mulching (with optional kit) |
| Self-Propelled | Yes (drive clutch, speeds 1-3) |
| Safety | Blade brake, stone guard, deflector, engine stop when releasing lever |
| Maintenance and Cleaning | Clean with water after each use, do not use petrol on plastics |
| Spare Parts | Use exclusively original Makita parts |
| Repairability | Complex operations (blade) to be entrusted to a specialist centre |
| Warranty | According to seller's conditions and country, not covered if instructions not followed |
Frequently Asked Questions - PLM5114 MAKITA
User questions about PLM5114 MAKITA
0 question about this device. Answer the ones you know or ask your own.
Ask a new question about this device
Download the instructions for your Lawn mower in PDF format for free! Find your manual PLM5114 - MAKITA and take your electronic device back in hand. On this page are published all the documents necessary for the use of your device. PLM5114 by MAKITA.
USER MANUAL PLM5114 MAKITA
PLM5114
PLM5115
Pedestrian controlled lawnmower
1.2








D
-
Acoustic power level according to EEC directive 2000/14/CE
-
Conformity mark according to directive 2006/42/EC
- Year of manufacture
- Lawnmower type
- Serial number
- Name and address of Manufacturer
- Article Code
-
Engine power and speed
-
Chassis 12. Engine 13. Blade 14. Stone-guard 15. Grass-catcher 16. Handle 17. Throttle control 18. Engine brake lever 19. Drive engagement lever
DESCRIPTION OF THE SYMBOLS SHOWN ON THE CONTROLS (where present)
- Slow 22. Fast 23. Choke
- Engine stop 25. Transmission engaged
- Speed «1» 29. Speed «2» 30. Speed «3»
SAFETY REQUIREMENTS - Your lawnmower should be used with due care and attention. Symbols have therefore been placed on various parts of the machine to remind you of the main precautions to be taken. Their full meanings are explained later on. You are also asked to carefully read the safety regulations in the applicable chapter of this handbook.
- Important: Read the instruction handbook before using the machine.
- Danger of thrown objects. Keep other people at a safe distance whilst working.
- Danger of cutting. Blades in movement. Do not put hands or feet near the blades. Remove the spark plug lead and read instructions before carrying out any repair or maintenance.
Maximum noise and vibration levels
| For model ...... PLM | 5114 | 5115 |
| Operator ear noise pressure level (according to regulation 81/1051/EEC)...... db(A)- Measurement uncertainty (2006/42/EC - EN 27574) db(A) | 82,90,2 | 82,802 |
| Measured acoustic output level (according to directive 2000/14/EC, 2005/88/EC)....... db(A)- Measurement uncertainty (2006/42/EC - EN 27574) db(A) | 96,80,2 | 96,70,2 |
| Guaranteed acoustic output level (according to directive 2000/14/EC, 2005/88/EC)...... db(A) | 98 | 98 |
| Vibration level (according to the standard EN 1033) .. m/s2- Measurement uncertainty (2006/42/EC - EN 12096) m/s2 | 3,670,3 | 4,590,3 |
I
1) Read the instructions carefully. Get familiar with the controls and proper use of the equipment. Learn how to stop the engine quickly.
2) Only use the lawnmower for the purpose for which it was designed, i.e. for cutting and collecting grass. Any other use can be hazardous, causing damage to the machine. Examples of improper use may include, but are not limited to:
- transport of people, children or animals on the machine;
– being transported by the machine;
– using the machine to tow or push loads;
– using the machine for leaf or debris collection;
- using the machine to trim hedges, or for cutting vegetation other than grass;
– use of the machine by more than one person;
- using the blade on surfaces other than grass.
3) Never allow children or people unfamiliar with these instructions to use the lawnmower. Local regulations may restrict the age of the operator.
4) Never use the lawnmower:
- When people, especially children, or pets are nearby.
- If the operator has taken medicine or substances that can affect his ability to react and concentrate.
5) Remember that the operator or user is responsible for accidents or hazards occurring to other people or their property.
B) PREPARATION
1) While mowing, always wear sturdy footwear and long trousers. Do not operate the equipment when barefoot or wearing open sandals.
2) Thoroughly inspect the area where the equipment is to be used and remove all objects which may be thrown by the machine or damage the cutter assembly and the engine (stones, sticks, metal wire, bones, etc.)
3) WARNING: DANGER! Engine fuel is highly flammable:
- Store fuel in containers specifically designed for this purpose.
- Refuel using a funnel and outdoors only. Do not smoke while refuelling or whenever handling the fuel.
- Add fuel before starting the engine. Never remove the cap of the fuel tank or add fuel while the engine is running or when the engine is hot.
- If fuel is spilled, do not attempt to start the engine but move the machine away from the area of spillage and avoid creating any source of ignition until the fuel has evaporated and the vapour dispersed.
- Replace all fuel tanks and containers caps securely.
4) Substitute faulty silencers.
5) Before use, always inspect the machine, especially the condition of the blades, and check that the screws and cutting assembly are not worn or damaged. Replace worn or damaged blades and screws in sets to preserve balance.
6) Before mowing, attach the discharge opening guards (grass-catcher or stone-guard).
C) OPERATION
1) Do not operate the engine in a confined space where dangerous carbon monoxide fumes can collect.
2) Mow only in daylight or good artificial light.
3) If possible, avoid operating the equipment in wet grass.
4) Always be sure of your footing on slopes.
5) Walk, never run and do not allow yourself to be pulled along by the lawnmower.
6) Mow across the face of slopes, never up and down.
7) Exercise extreme caution when changing direction on slopes.
8) Do not mow on slopes of more than 20°.
9) Exercise extreme caution when pulling the lawnmower towards you.
10) Stop the blade if the lawnmower has to be tilted for transportation when crossing surfaces other than grass, and when transporting the lawnmower to and from the area to be mowed.
11) Never operate the lawnmower with defective guards, or without safety devices, such as the stone-guard and/or grass-catcher, in place.
12) Do not change the engine governor settings or overspeed the engine.
13) On power-driven models, disengage the drive clutch before starting the engine.
14) Start the engine carefully, following the instructions and keeping feet well away from the blade.
15) Do not tilt the lawnmower when starting the engine. Start the engine on a flat surface that is free of obstacles and tall grass.
16) Do not put hands or feet near or under rotating parts. Keep clear of the discharge opening at all times.
17) Never pick up or carry a lawnmower while the engine is running.
18) Stop the engine and disconnect the spark plug wire:
– Before carrying out any work underneath the cutting deck or before unclogging the chute;
– Before checking, cleaning or working on lawnmower;
- After striking a foreign object. Inspect the lawnmower for damage and make repairs before restarting and operating the lawnmower;
- If the lawnmower begins to abnormally vibrate (Immediate look for the cause of the vibrations and take for necessary controls at a Specialised Centre).
19) Stop the engine:
- Whenever you leave the lawnmower unattended. Remove the key from models with electric starters.
- Before refuelling.
- Every time you remove or replace the grass-catcher.
– Before adjusting the grass cutting height.
20) Reduce the throttle before turning off the engine and turn the fuel off when you have finished mowing, following the instructions in the engine handbook.
21) When mowing, always keep to a safe distance from the rotating blade. This distance is the length of the handle.
1) Keep all nuts, bolts and screws tight to be sure the equipment is in safe working condition. Regular maintenance is essential for safety and performance.
2) Never store the equipment with fuel in the tank inside a building where vapour may reach a flame or a spark or a source of extreme heat.
3) Allow the engine to cool before storing in an enclosed space.
4) To reduce the fire hazard, keep the engine, exhaust silencer, battery compartment and fuel storage area free of grass, leaves, or excessive grease. Do not leave containers with grass cuttings in rooms.
5) Check the stone-guard and grass-catcher frequently for wear and deterioration.
6) If the fuel tank has to be drained, this should be done outdoors and when the engine is cool.
7) Wear strong work gloves when removing and reassembling the blade.
8) Keep the blade balanced during sharpening. All operations on the blade (dismantling, sharpening, balancing, remounting and/or replacing) require a certain familiarity and special tools. For safety reasons, these jobs are best carried out at a specialized centre.
9) For safety reasons, never use the machine when it has worn or damaged parts. Parts are to be replaced and not repaired. Use genuine spare parts. Parts that are not of the same quality can damage the equipment and impair your safety.
E) TRANSPORTATION AND HANDLING
1) Whenever the machine is to be handled, raised, transported or tilted you must:
- wear strong working gloves;
- grasp the machine at the points that offer a safe grip, taking account of the weight and its distribution.
- use an appropriate number of people for the weight of the machine and the characteristics of the vehicle or the place where it has to be placed or collected.
2) During transport, fasten the machine securely with ropes or chains.
GB STANDARDS OF USE
For instructions regarding the engine and the battery (if supplied), read the relevant manuals.
NOTE - The number which precedes each paragraph links the references in the text to the respective figures (listed on the pages 2 - 3).
1. COMPLETE ASSEMBLY
NOTE - The machine can be supplied with some parts already assembled.
WARNING - Unpacking and completing the assembly should be done on a flat and stable surface, with enough space for machine handling and its packaging, always making use of suitable equipment.
Disposal of the packaging should be done in accordance with the local regulations in force.
1.1 Return the handle (1) to the work position and secure it to the side chassis supports using the supplied nuts and bolts (2) as illustrated.
The handle (1) can be height-adjusted in three different positions by inserting the pins (3) in one of the three pairs of holes on the brackets.
The washers (4) on the clamps (5) must be mounted so they keep the handle (1) firmly fixed without too much effort required to tighten or release them.
Tighten the clamps (5) after adjusting.
Insert the starter cable (6) in the guide spiral (7).
Tighten the nut (8) to secure the spiral (7).
1.2 Insert the frame (11) into the sack (12) and attach the plastic bars (13) using a screwdriver, as shown in the drawing.
2. DESCRIPTION OF CONTROLS
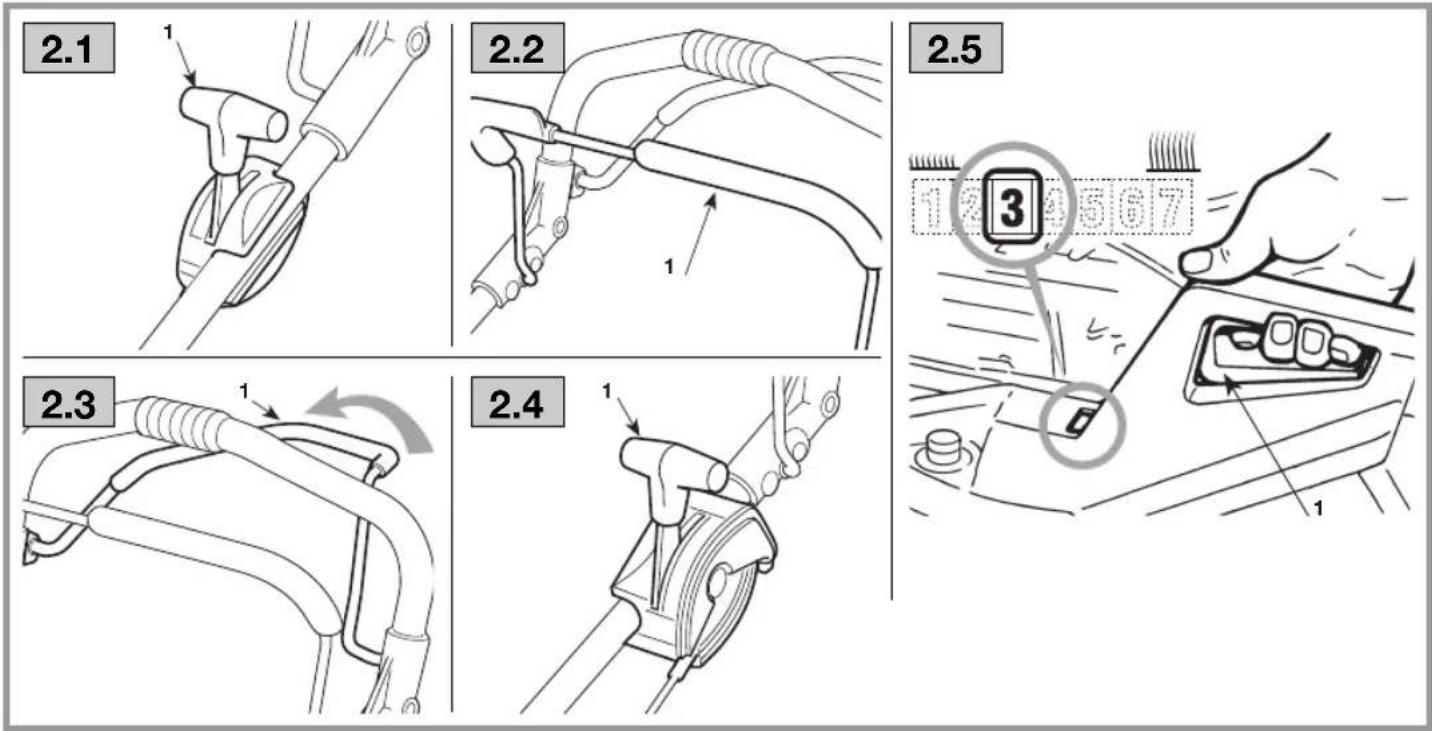
2.1 The throttle is controlled by the lever (1) and positioned as shown on the relative plate.
2.2 The blade brake is controlled by the lever (1), which should be held against the handle when starting and using the lawnmower.
The engine stops when the lever is released.
2.3 In power-driven models, draw the lever (1) towards the handle for forward movement. The lawnmower stops moving forward when the lever is released.
2.4 The speed change (if present) is controlled by the lever (1), whose positions are shown on the plate.
2.5 The cutting height is adjusted by releasing the lever (1) and lifting or lowering the chassis to the required position which can be seen through the special opening.
MAKE THIS ADJUSTMENT ONLY WHEN THE BLADE HAS STOPPED MOVING.
3. GRASS CUTTING
3.1 Lift the stone-guard and attach the grass-catcher (1) correctly as shown in the drawing.
3.2 To start, follow the instructions in the engine manual, pull the blade brake lever (1) against the handle and firmly pull the starter cable knob (2).
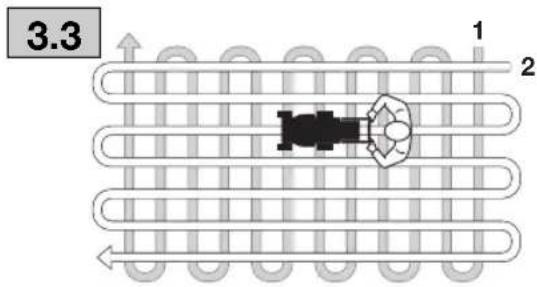
3.3 The lawn will look better if it is always cut to the same height and in alternate directions.
LAWN CARE RECOMENDATIONS
Each type of grass has different features and may thus require different ways to care for the lawn; always read the instructions on seed boxes for mowing height for the growth conditions in the work area.
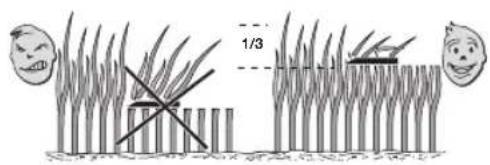
Keep in mind that most grass is made up of a stem and one or more leaves. If leaves are fully cut, the lawn is damaged and growth is more difficult.
The following indications generally apply:
- too low a cut causes grass tears and uprooting, with a "spotted" aspect;
- in the summer, cutting must be higher to avoid the ground from drying;
- do not cut wet grass; this could reduce blade efficiency due to sticky grass and tear the lawn;
- for particularly high grass, initially mow at maximum admitted machine height followed by a second mow after two or three days.
3.4 When you have finishing mowing, release the brake lever (1) and disconnect the spark plug cap (2).
WAIT FOR THE BLADE TO STOP before carrying out any type of work on the machine.
4. ROUTINE MAINTENANCE
IMPORTANT - Regular, careful maintenance is essential for keeping the safety level and original performance of the machine unchanged in time.
Store the lawnmower in a dry place.
1) Wear strong working gloves during any cleaning, maintenance or adjustment operation on the machine.
2) Carefully clean the machines with water after each cut; remove the grass debris and mud accumulated inside the chassis to avoid their drying and thus making the next start-up difficult.
3) Should it be necessary to access the lower part, only tilt the machine from the side shown in the engine handbook; following the relative instructions.
4) Do not drip petrol onto the plastic parts of the motor or the machine to prevent damaging them and remove all traces of spilt petrol immediately. The warranty does not cover damage to plastic parts caused by petrol.
4.1 Each intervention on the blade is best if conducted at a specialised Centre that has the most appropriate tools. Only blades with the following codes must be used on this machine:
81004381/1
Blades must always be marked ▲Given the product evolution, the above mentioned blade may be replaced in time by others, with similar interchangeable and operating safety characteristics.
Reassemble the blade (2) with the code and markings facing the ground, following the order indicated in the illustration.
Tighten the central screw (1) using a torque wrench set to 35-40 Nm.
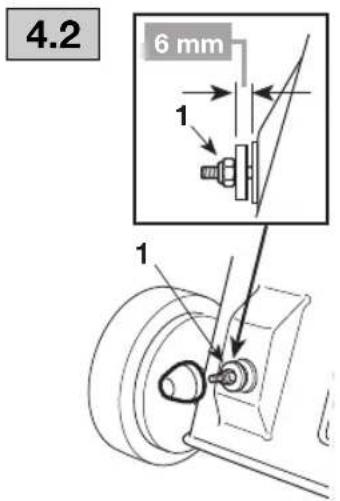
4.2 On models with drive units, adjust the tension of the belt with the nut (1) to get the right measurement (6 mm).
4.3 To clean inside the machine, use the hosepipe connector (1) provided.
Always stand behind the machine's handle when cleaning.
5. ENVIRONMENTAL PROTECTION
Environmental protection should be a priority of considerable importance when using the machine, for the benefit of both social coexistence and the environment in which we live.
– Try not to cause any disturbance to the surrounding area.
- Scrupulously comply with local regulations and provisions for the disposal of waste materials after cutting.
- Scrupulously comply with local regulations and provisions for the disposal of pakagings, oils, petrol, batteries, filters, damaged parts or any elements which have a strong impact on the environment; this waste must not be disposed of as normal waste, it must be separated and taken to specified waste disposal centres where the material will be recycled.
- At the time of decommissioning, do not pollute the environment with the machine, hand it over to a disposal centre, in accordance with the local laws in force.
Should you have any doubts or problems, do not hesitate to contact the nearest Service Centre or your Sales outlet.
I NORME DI SICUREZZA DA OSSERVARE SCRUPOLOSAMENTE
A) ADDESTRAMENTO
2. SÄÄDINTEN SELITYS
SK POKYNY NA POUŽITIE
Service, spare parts and guarantee
Maintenance and repair
The maintenance and repair of modern machines, as well as all safety devices, require qualified technical training and a special workshop equipped with special tools and testing devices.
All work not described in this Instruction Manual may be done only by a properly qualified workshop or authorised service centre.
The MAKITA service centres have all the necessary equipment and skilled and experienced personnel, who can work out cost-effective solutions and advise you in all matters.
Repair attempts by third parties or unauthorized persons will void all warranty claims.
Responsibility
On tools with engines by Briggs&Stratton, Honda, Tecumseh or Robin Subaru, the engine manufacturer or their authorised service centre is responsible for the engine only. MAKITA is responsible for the rest of the tool (excluding the engine).
This does not apply to electrical generators and all other tools or equipment not containing engines of the above brands.
Only MAKITA is responsible for these tools and equipment.
Spare parts
Reliable long-term operation, as well as the safety of your machine, depend among other things on the quality of the spare parts used.
Use only original MAKITA parts.
Only original spare parts and accessories guarantee the highest quality in material, dimensions, function and safety. Original spare parts and accessories can be obtained from your local dealer. He will also have the spare part lists to determine the required spare part numbers, and will be constantly informed about the latest improvements and spare part innovations.
Please note that the use of non-original parts renders the warranty void.
Guarantee
MAKITA guarantees the highest quality and will therefore reimburse all costs for repair by replacement of damaged parts resulting from material or production faults occurring within the guarantee period after purchase. Please note that in some countries particular guarantee conditions may exist. If you have any questions, please contact your sales-
man, who is responsible for the guarantee of the product. Please note that we cannot accept any responsibility for damage caused by:
- Disregard of the instruction manual.
• Non-performance of the required maintenance and cleaning. - Incorrect carburetor adjustment.
• Normal wear and tear. - Obvious overloading due to permanent exceeding of the upper performance limits.
- Use of force, improper use, misuse or accidents.
- Damage from overheating due to dirt on the fan housing.
- Work on the machine by unskilled persons or inappropriate repairs.
- Use of unsuitable spare parts or parts which are not original MAKITA parts, insofar as they have caused the damage.
- Use of unsuitable or old oil.
- Damage related to conditions arising from lease or rent contracts.
Cleaning, servicing and adjustment work is not covered by the guarantee. All repairs covered by the guarantee must be performed by a MAKITA service centre.
I
Briggs & Stratton 750 Series DOV
TÜV Rheinland LGA Products GmbH Am Grauen Stein - 51105 Köln Germany
2006/42/EC 2004/108/EC 2000/14/EC - 2005/88/EC
•ANHANG VI •ANNEXE VI •ANNEX VI •ALLEGATO VI •BIJLAGE IV •ANEXO VI •ANEXO VI •SYNHMMENO VI •EK VI •BILAGA VI •BILAG VI •LIITE VI •PRILOHY VI •ZAŁĄCZNIK VI •VI. MELLEKLET •PRILOJKENIE VI •ANEKS VI •PRILOGA VI •PRILOHY VI •ANEXA VI •PRIEDAS VI •VI PIELIKUMS •LISA VI •ANEKS VI
97 dB(A)
98 dB(A)
EN 836:1997+A1:1997+A2:2001 +A3:2004+A4:2006 EN ISO 12100-1-2:2005 EN ISO 3767-5:1998 EN ISO 14982:2009
83 dB(A)
4 m/s²
MAKITA INTERNATIONAL EUROPE Michigan Drive MK 15 8JD Tongwell Milton Keynes Bucks - U.K.
Tongwell Milton Keynes Bucks
09-12-2010
TOMOYASU KATO (Director - Makita Corporation - Japan)

•EG-KONFORMITÄTSERKLÄRUNG •DECLARATION DE CONFORMITE CEE •EC DECLARATION OF CONFORMITY •DICHIARAZIONE DI CONFORMITÄ CEE •EEG-VERKLARING VAN OVEREENSTEMMING •DECLARACIÓN “CE” DE CONFORMIDAD •DECLARAÇÃO CE DE CONFORMIDADE •ΔΗΛΩΣΗ ΣΥΜΜΟΡΦΩΣΗΣ ΕΕ •AET UYGUNLUK BEYANNAMESI •EG-FÖRKLARING FÖR ÖVERENSSSTÄMМELSE •EU-OVERENSSTEMMELSESERKLÆRING •CE-YHDENMUKAISUUSTODISTUS •ES PROHLÅSENÍ O SHODĚ •DEKLARACJA ZGODNOŚCI Z WYMOGAMI UE •EGK SZABVÁNYAZONOSSÄGI NYILATKOZAT •ДЕКЛАРАЦИЯ COOTBETCTВИЯ EC •EC IZJAVA O SUKLADNOSTI •IZJAVA O SKLADNOSTI CEE •ES VYHLÅSENIE O ZHODE •DECLARATIE DE CONFORMITATE CEE •CEE REIKALAVIMU ATITIKIMO DEKLARACIJA •EK ATBILSTĪBAS DEKLARĀCIJA •EMU VASTAVUSDEKLARATSIOON •DEKLARACIJA O SAGLASNOSTI EEZ
•Die Firma •La société •The company •La società •Het bedrijf •La sociedad •A sociedade •H εταιρεία •Sirket •Företaget •Firmaet •Yritys •Společnost •Spółka •Alulírott Vállalat •Предприятие •Tvrtka •Družba •Spoločnosť •Societatea •Bendrové •Uznémums •Firma •Preduzeće
MAKITA INTERNATIONAL EUROPE Michigan Drive MK 15 8JD Tongwell Milton Keynes Bucks - U.K.
• Bestätigt, dass der Rasenmäher mit Verbrennungsmotor • Atteste que la tondeuse à gazon avec moteur à combustion • Certifies that the lawnmower with combustion engine • Attesta che il rasaerba con motore a combustione • Verklaart dat de grasmaaier met verbrandingsmotor • Certifica que la cortadora de pasto con motor de combustion • Certifica que o corta-relva com motor de combustão • Beşauwini óti to xλοοκοπτικό με βενζίνοκυνητήρο • Yandaki yanmal motor ile donatılmış çim bicme makinesinin • Intygar att gräsklippningstraktom med förbränningsmotor • Erklærer herved, at gräsklipperen med forbrændingsmotor • Todistaa, että półttomoottorilla varustettu ruonheleikkuri • Prohlasuje, že travni sekačka se spalovacim motorem model • Zaświadcza, že kosiarka trawy z silnikiem na paliwo • Tanusitja, hogy a belsõgësü motorral rendelkežó fünyiró • Удостоверяет, что zraono-kocosilka с двигателем внутреннего сгорания • Izjavljuje da je kosilica s motorom s unutanjim izgaranjem • Potrjuje, dá je kosilnica z motorjem na izgorevanje • Vyñlasuje, že kosačka na trávu so spafovacim motorom, model • Atestă că mašina de tuns larba cu motor cu ardere internă • Liudija, kad žoliapjuve su vidaus decimo varikliu • Apliecina, ka zales plaujmašina ar iekšedzes dzinėju • Kinnitab, et sisepõlemismootoriga muruniduk • Potvrđuje da kosilica ima motor sa unutrašnjim sagorevanjem
PLM5115
•Schnittbreite •Largeur de coupe •Width of cut •Larghezza di taglio •Maaibreedte •Anchura de corte •Largura de corte •Plátoc kopínc •Kesim genisligi •Kilppbredd •Skærebredde •Leikkuualae •Šírkou •Szerokość koszenja •Nyírási szélesség •Shirina skaшивания •Širina rezanja •Širina reza •Širkou záberu •Látime de táiere •Pjovimo piotis •Plaušanas palums •Lõikelaius •Širina reza
51 cm
•Motor •Moteur •Engine •Motore •Motor •Motor •Motor •Kivnțărac •Motor •Motor •Motor •Moottori •Motorem •Silnik •Motor •Двигатель •Motor •Motor •Motorom •Motor •Variklis •Motors •Mootor •Motor
Honda GCV 190E
Geprüft durch •Examinée par •Tested by •Esaminato da •Getest door •Provado por •Testado por •Tou ελέγχείκε οπό •Yandaki kurum tarafından incelenmiş •Testad av •Kontrolleret af •Tarkastuksen suorittanut •Zkoušená •Sprawdzona przez •Bevizsgálta •Προνεριλ •Ispitana od strane •Pregledal •Skušaná •Examinat de •Patikrinimá atliko •Parbaudija •Kontrollitud •Ispitana od (2000/14/EC)
TÜV Rheinland LGA Products GmbH Am Grauen Stein - 51105 Köln Germany
- Entspricht den Anforderungen der Richtlinien - Est conforme aux spécifications des directives - Conforms to the specifications of directives - È conforme alle specifiche delle direttive - Võldoet aan de specificaties van de richtlijnen - Es conforme con las especificaciones de las directivas - Está conforme às especificações das directivas - Συμμοφρούται στις προδιαγραφές των οὐηνών - Yandaki direktiferin özelliklerine uygun olduğunu beyan eder - Uppfyller specifikationerna i direktiven - Er i overensstemmelse med specifikationerne ifolge direktiverne - On yhdenmukainen EU-direktliivien asettamien vaatlimüsten kanssa - Je ve shodė s požadavkyu směrnic - Jest zgodna ze specyifikacją zawarta w dyrektywach - Megfelel az alábbi irányelvek előírásainak - Coответствует требованиям следующих директив - Sukladna s temeljnim zahljevirma direktiva - Składno s specifikacijami direktiv - Ve zhode s požiadavkami smernic - Este in conformitate cu specifiætile direktivelor - Altitinka direktyvose pateiktas specifikacijas - Atblist šadu direktivu specifikacijäm - Vastab direktlivide nöutele - U skladu je s temeljnim zahtevima direktiva
2006/42/EC 2004/108/EC 2000/14/EC - 2005/88/EC
• Angewandtes Konformitätsbewertungsverfahren • Procedure appliquée pour l'évaluation de la conformité • Conformity assessment procedure • Procedura seguita per la valutazione della conformità • Gevolgde procedure voor de beoordeling van de overeenstemming • Procedimiento efectuado para la evaluación de la conformidad • Procedimento observado para a avaliação de conformidade • Διάδικασία που ακολουθηξηκε για την εκτίμηση της συμμορφωσης • Uygunluğun değerlendirilmesi izien misens prosedür • Procedur för utvärdering av konformitet • Folgende procedure er udfort til vurdering af overesstemmelsen • Suofitetut toimenpiteet yhdenmukaisüuden määrittelemiseksi • Posouzeni shody bylo provedeno podle • Sledzona procedura dla oceny zgodności • A szabványazonosság megállapitásához követett eljárás • Procedура, используемая для оценки соответствия • Provedeni postupak ocjene sukladnosti • Postopek za oceno skladnosti • Posúdenie zhody bolo vykonané podla • Procedură urmată pentru evaluarea conformității • Altifikimo ıvertinimo procedura pateikta • Atbilstibas novértësanai izmantotă procedura • Vastavuse hindamiseks läbivliud prodtseduur • Praćeni postupak za procenu saglasnosti
• ANHANG VI • ANNEXE VI • ANNEX VI • ALLEGATO VI • BIJLAGE IV • ANEXO VI • ANEXO VI • ZYNHMMENO VI • EK VI • BILAGA VI • BILAG VI • LIITE VI • PRILOHY VI • ZAŁĄCZNIK VI • VI. MELLEKLET • ПРИЛОЖЕНИЕ VI • ANEKS VI • PRILOGA VI • PRILOHY VI • ANEXA VI • PRIEDAS VI • VI PIELIKUMS • LISA VI • ANEKS VI
•Gemessener Schalleistungspegel •Niveau de puissance acoustique mesuré •Measured sound power level •Livello di potenza acustica rilevato •Gemeten geluidsniveau •Nivel de potencia acústica detectado •Nivel de potència sonora detectado •Μετρημένη στάθμη θορύβου •Οιζιλμύς ses gücü seviyesi •Uppmätt bullernivå •Målt stojniveau •Mittatu melutaso •Zištěná hladina akustického výkonu •Stwierdzony poziom mocy akustycznej •Mért zajtejlesitmény szint •Замеренный уровень акустической мощности •Izmjerena razina zvučne snage •Izmerjena raven akustične moći •Zistená hladina akustického výkonu •Nivel de putere acustică detectat •Nustatytas akustinės galios lygrmuo •Izmēritais akustiskās jaudas līmenis •Mõõdetud akustilise võimsuse tase •Izmereni nivo jačine zvuka
97 dB(A)
•Garantierter Schalleistungspegel •Niveau de puissance acoustique garanti •Guaranteed sound power level •Livello di potenza acustica garantito •Gewaarworgd geluidsniveau •Nivel de potencia acústica garantizado •Nivel de potência sonora garantido •Mėyiotn štăbųŋ Bopūbųu sųjųφωνα με την εγγυμοη •Garanti edilen ses gūcū seviyesi •Garanterad bullernivā •Garanteret stojniveau •Taattu melutaso •Zaručenā hladina akustického výkonu •Gwarantowany poziom mocy akustycznej •Garantált zajteljesítmény szint •Fαρατιρυγειβίουровень акустической мощности •Zajamčena razina zvučne snage •Zajamčena raven akustične moći •Zaručenā hladina akustického výkonu •Nivel de putere acusticā garantat •Garantuotas akustinės galios lygmuo •Garantētais akustiskās jaudas līmenis •Garanteeritud akustilise võmsuse tase •Garantovani nivo jačine zvuka
98 dB(A)
- Verweis auf harmonisierte Normen • Référence aux normes harmonisées • Reference to harmonised standards • Riferimento alle norme armonizzate - Verwijzing naar de geharmoniseerde normen • Referencia a las normas armonizadas • Referências às normas harmonizadas • Avóporó se svorúviovásva pórtu: • Harmonize standartlara atíf • Henvisning til harmoniserede standarder • Referens till harmoniserad standard • Viittaus yhdenmukaisuusstandarddeihin • Použité harmonizované normy • W odniesieniu dő norm harmonizujących • Hivatkozás a harmonizált szabványokra • Ссылки на согласованные нормы • Primijenjene su slijedeće harmonizirane norme • Sklic na usklajene predpise • Použité harmonizované normy • Referință la normele armonizate • Nuoroda j suderintus teisinius aktus • Atsauce uz saskaņotam normam • Vlide kooskõlastatud normidele • Pozivanje na uskladene norme
EN 836:1997+A1:1997+A2:2001 +A3:2004+A4:2006 EN ISO 12100-1-2:2005 EN ISO 3767-5:1998 EN ISO 14982:2009
• Schalldruckpegel am Ohr des Bedieners gemäß 81/1051/EWG • Niveau de pression sonore à l'oreille de l'utilisateur conforme à la directive 81/1051/CEE • Sound pressure level at the ear measured in compliance with 81/1051/CEE • Pressione acustica orecchio operatore in conformità alla 81/1051/CEE • Geluidsniveau aan het oor van de gebruiker overeenkomstig de richtlijn 81/1051/EEG • Presión acústica en el oido del operador conforme a la 81/1051/CEE • Pressão acústica nos ouvidos do operador em conformidade com a directiva 81/1051/CEE • Akoustikný nísební oto autí tou čísputný súquupuva je 81/1051/EOK • 81/1051/AET ye uygun olarak operatór kulačina gelen ses basinci • Ljudtryck vid operatórens óron i enlighet med 81/1051/EEC • Lydtryk ved operatorens órer i henhold til 81/1051/CEE • Ilmanpaine käyttáján korvien kohdalla on yhdenmukainen direktiviin 81/1051/ETY kanssa • Akusticky tlak působící na ucho obsluhy ve shodě s 81/1051/EHS • Ciśnienie akustyczne na ucho operatora zgodnie z 81/1051/UE • A kezelő fülénél mért zajnyomás a 81/1051/EGK-nak megfelelően • Akustическое давление na уши оператора, замерненное согласно 81/1051/CEE • Zvučni tlak na ušima rukovatelja je sukladan Direktivi 81/1051/EEC • Akustični pritisk na ušesa operatorja je skladen s predpisom 81/1051/CEE • Akusticky tlak na sluchovy orgán obsluhy je v zhode s nariadením 81/1051/EHS • Presiune acusticá în urechea operatorului în conformitate cu 81/1051/CEE • Akustinis slégis operatoriaus klausai atitinka 81/1051/CEE • Akustiskais spiediens uz operatora ausim, izmerítais saskaņa ar 81/1051/EEK • Akustiline surve töötaja kõrvale vastavalt 81/1051/ CEE • Nivo zvučnog pritiska na uhu radnika u skladu sa odredbom 81/1051/CEE
83 dB(A)
•Vibrationswert am oberen Führungsholm •Niveau de vibrations sur le guidon •Vibration level on the handle •Valore delle vibrazioni sul manico •Vibratiewaarde aan de handgreep •Nivel de las vibraciones en el mango •Valor das vibrações na pega •Tunið dovnösewn στη χευρολοβή •Tutak üzerinde vibrasyon değeri •Vibrationsvärde vid handtaget •Værdi for vibrationer på håndtaget •Kahvaan kohdistuva tärinäarvo •Hladina vibraci na rukojeti •Wartość vibracji na uchwycie •Rezgési erték a markolațon •Уровень вибрацій рукоятки •Vrijednost vibracija na ručki •Vrednost vibracij na ročaju •Uroveň vibracii na rukováti •Nivel de vribrati pe mâner •Rankenos vibraciju verté •Roktura vibrăcijas limenis •Kăepideme vibratsiooni măär •Vrednost vibracija na dršci (EN1033)
4,9 m/s²
- Autorisierte Person, eine technische Akte zu erstellen •Personne autorisée à constituer le Dossier Technique •Person authorised to create the Technical File - Persona autorizzata a costituire il Fascicolo Tecnico •Bevoegd persoon voor het opstellen van het Technisch Dossier •Persona autorizada para construir el Fascículo Técnico •Pessoa autorizada a elaborar o Caderno Técnico •Atojo εξουσιοδοτημένο για την συγκρότηση του Τεχνικού Φυλλαδιου •Teknik Fasiküllü oluşturmak için yetkili kisi •Person behörig att bilda det tekniska registret •Personen med befojelser til at danne det tekniske dossier •Teknisen kansion valmisteliuun valtuutettu henkilö •Osoba autorizovaná k sestavení technického spisu •Osoba uprawnlona do redagowania Dokumentacji technicznej •Műszaki Dosszie átvételére felhatalmazott személy •Лицо, уполномоченное на составление брошоры технической документации •Osoba ovlaštena za pravljenje Tehničke datoteke •Oseba, zadolžena za oblikovanje Tehničnega fascikla •Osoba autorizovaná na zostavenie technického spisu •Persoaná autorizatá så realizeze Dosarul Tehnic •Asmuo autorizuotas Techninio teksto kürimui •Pilnvarotais darbinieks, kas sagatavojá mapi ar tehnisko dokumentaciju •Technilise Lehe autoriseeritud koostaja •Osoba ovlašćena za sastavljanje Tehničke brošure
MAKITA INTERNATIONAL EUROPE Michigan Drive MK 15 8JD Tongwell Milton Keynes Bucks - U.K.
•Kennummer •Numéro de série •Serial number •Numero di matricola •Serienummer •Número de matricula •Número de matricula •Адябюс катаоксунс •Seri numarasi •Tillverkningsnummer •Serienummer •Sarjanumero •Výrobní číslo •Numer serjyny •Azonosító szám •Заводской номер •Matični broj •Serijska številka •Výrobné číslo •Numár de serie •Registravimo numeris •Registracijas numurs •Matriklinumber •Matični broj
Tongwell Milton Keynes Bucks
09-12-2010
TOMOYASU KATO (Director - Makita Corporation - Japan)
MULCHING

D ANWENDUNGSARTEN
① “Mulching” – Chopping and depositing grass on the lawn
② Cutting and collecting grass cuttings
③ Cutting and ejecting grass cuttings
SAFETY REGULATIONS
A) Introduction
1) This instruction sheet adds to the information contained in the machine instruction manual and becomes an integral part when the "mulching" accessory is used.
2) The application of the "mulching" accessory modifies the traditional system already fitted on the machine for mowing, collecting and ejecting grass cuttings.
3) The application of the accessory and the use of the machine equipped for “mulching” must fully comply with the safety regulations given in the machine instruction manual and with the instructions regarding different situations of use and maintenance.
B) Standards of use
1) Always fit and dismantle the accessory with the engine off, after removing the ignition key (if supplied), or after disconnecting the cap from the engine spark plug.
2) Apply the "mulching" accessory and check that the fitted parts have been fastened correctly and securely.
3) You always need to work with the grass-catcher or stone-guard fitted properly even when using the "mulching" accessory.
4) Always avoid removing a large quantity of grass, to avoid blocking the cutting deck or overloading the engine and the cutting parts. Regulate the forward speed depending on the lawn conditions and the quantity of grass removed.
INSTRUCTIONS FOR ASSEMBLY AND DISMANTLING
Assembly
Lift the stone-guard and fit the deflector cap (1) in the outlet, tilting it down slightly. Then push it right down until the bottom of the grip wedged against the bodywork (2).
Dismantling
Lift the stone-guard and remove the deflector cap (1)
MODALITÀ DI UTILIZZO
POKYNY PRE MONTÁŽ A DEMONTÁŽ
Montáž
To find your local distributor, please visit www.makita-outdoor.com
- Kann ohne Vorankündigung geändert werden • Sujet à des modifications sans aucun préavis • Sin objecto to modifications without notice • Soggetto a modifiche senza preavviso • Kan zonder kennisgeving wijzigingen ondergaan • Sujeto a modificaciones sin previo aviso • Sujeito a alterações sem aviso prévio • Упóкеɪται σε αλλαγές χωρις προειδοποίηση • Önceden haber verilmeksinzin δεμιθετιλεβίλε • Kan utsättas för modifieringar utan att detta meddelas • Ret til ændringer forbeholdes • Voidaan tehdä muutoksia ilman ennakkoilmoitusta • Možnost změn bez prédešlého upozornění • Poddawany modyfikacjom bez awizowania • Elözetes értesítés nélkül módosítható • Может быть изменено bez предварительного уведомления • Podložno promjenama bez prethodne obavijesti • Lahko pride do sprememb brez predhodnega obvestila • Možnosť zmien bez predošlého upozornenia • Poate fi modificat, fārā preaviz • Objekto pakeitimai be perspėjimo • Var tikt mainišs bez ieprieksēja bridinājuma • Võimalikud muudatused ilma ette teatamata • Podložno promenama bez prethodnog obaveštenja.

- D
- DESCRIPTION OF THE SYMBOLS SHOWN ON THE CONTROLS (WHERE PRESENT)
- I
- PREPARATION
- OPERATION
- TRANSPORTATION AND HANDLING
- GB STANDARDS OF USE
- COMPLETE ASSEMBLY
- DESCRIPTION OF CONTROLS
- GRASS CUTTING
- LAWN CARE RECOMENDATIONS
- ROUTINE MAINTENANCE
- ENVIRONMENTAL PROTECTION
- I NORME DI SICUREZZA DA OSSERVARE SCRUPOLOSAMENTE
- ADDESTRAMENTO
- SÄÄDINTEN SELITYS
- SK POKYNY NA POUŽITIE
- SERVICE, SPARE PARTS AND GUARANTEE
- MAINTENANCE AND REPAIR
- RESPONSIBILITY
- SPARE PARTS
- GUARANTEE
- EG-KONFORMITÄTSERKLÄRUNG •DECLARATION DE CONFORMITE CEE •EC DECLARATION OF CONFORMITY •DICHIARAZIONE DI CONFORMITÄ CEE •EEG-VERKLARING VAN OVEREENSTEMMING •DECLARACIÓN “CE” DE CONFORMIDAD •DECLARAÇÃO CE DE CONFORMIDADE •ΔΗΛΩΣΗ ΣΥΜΜΟΡΦΩΣΗΣ ΕΕ •AET UYGUNLUK BEYANNAMESI •EG-FÖRKLARING FÖR ÖVERENSSSTÄMМELSE •EU-OVERENSSTEMMELSESERKLÆRING •CE-YHDENMUKAISUUSTODISTUS •ES PROHLÅSENÍ O SHODĚ •DEKLARACJA ZGODNOŚCI Z WYMOGAMI UE •EGK SZABVÁNYAZONOSSÄGI NYILATKOZAT •ДЕКЛАРАЦИЯ COOTBETCTВИЯ EC •EC IZJAVA O SUKLADNOSTI •IZJAVA O SKLADNOSTI CEE •ES VYHLÅSENIE O ZHODE •DECLARATIE DE CONFORMITATE CEE •CEE REIKALAVIMU ATITIKIMO DEKLARACIJA •EK ATBILSTĪBAS DEKLARĀCIJA •EMU VASTAVUSDEKLARATSIOON •DEKLARACIJA O SAGLASNOSTI EEZ
- MULCHING
- D ANWENDUNGSARTEN
- SAFETY REGULATIONS
- INTRODUCTION
- STANDARDS OF USE
- INSTRUCTIONS FOR ASSEMBLY AND DISMANTLING
- ASSEMBLY
- DISMANTLING
- MODALITÀ DI UTILIZZO
- POKYNY PRE MONTÁŽ A DEMONTÁŽ
- MONTÁŽ
Brand : MAKITA
Model : PLM5114
Category : Lawn mower