ViviCam 5018 - Camera VIVITAR - Free user manual and instructions
Find the device manual for free ViviCam 5018 VIVITAR in PDF.

User questions about ViviCam 5018 VIVITAR
0 question about this device. Answer the ones you know or ask your own.
Ask a new question about this device
Download the instructions for your Camera in PDF format for free! Find your manual ViviCam 5018 - VIVITAR and take your electronic device back in hand. On this page are published all the documents necessary for the use of your device. ViviCam 5018 by VIVITAR.
USER MANUAL ViviCam 5018 VIVITAR
ViviCam 8018 Digital Camera
Owner Manual

text_image
Vivitar ViviCam 8018 DIGITAL LENS F=7.23mm F2.5Vivitar
© 2009 Sakar International, Inc. All rights reserved.
Windows and the Windows logo are registered trademarks of Microsoft Corporation.
All other trademarks are the property of their respective companies.
Table of Contents
Introduction 2
Key Features....2
What your camera includes ....2
Computer System Requirements for Windows XP....3
Computer System Requirements for Windows Vista....3
Computer System Requirements for Macintosh....4
A Quick Look at Your Camera....5
Preparing Your Camera for Use....6
Installing SD Memory Card....7
Main Icons on the LCD....8
Starting Your Camera....11
Camera Modes....11
Taking photos....11
Video Mode 23
Playback Mode....26
Installing PhoTags Express Software....33
Everything you need to get the most from your photos....37
Download photos and videos to your PC....40
Viewing Videos....44
Transferring photos and videos to your PC manually....44
Transferring photos and videos to your MAC manually....46
Maintenance of Your Digital Camera 46
Sakar Warranty Card....46
Appendix A: Technical Specifications....48
Appendix B: Troubleshooting....49
Introduction
Thank you for purchasing the ViviCam 8018 8.1 Mega-Pixel Digital Camera. Everything you need to take quality digital photos and videos is included with your camera.
Your digital camera can also be used as a removable disk. It enriches your life. Vivitar makes capturing those special moments so easy.
Please read this manual carefully first in order to get the most out of your digital camera.
Key Features
• Digital Video resolutions-640x480 Pixels (VGA), 320x240 Pixels (QVGA).
- 8.1 mega pixels camera with choice of 6 digital camera resolutions- 3264x2448pixels(8M), 3648x2048 Pixels(7M),2592x1944 pixels(5M), 2048x1536 pixels(3M) ,1920x1080 pixels (2M) and 640x480 pixels (VGA.).
• 1.8 inch TFT LCD
- 8x Digital Zoom function
• SD memory card slot compatible with memory card up to 8GB.
- Built in Flash
- PhoTags Express software for managing and enhancing your photos, printing, sending photos by e-mails and much more.
What your camera includes
- Digital Camera
• PhoTags Express software Installation CD - USB cable
• User's manual and Quick Start Guide
- Strap
Computer System Requirements for Windows XP
To be able to download photos to your PC, you will need the following minimum configuration:
• Pentium III process or above with Windows XP
• 128 MB RAM, with 150MB of free disk space
• Available USB interface
- CD-ROM Drive
• 1024 x 768 Recommended screen resolution
• 16-bit color or higher display adaptor
Computer System Requirements for Windows Vista
To be able to download photos to your PC your will need the following minimum configuration:
- Windows Vista
• 800MHz processor and 512 MB of system memory
• 20GB hard driver with at least 15GB of available space
• Support for Super VGA graphics
• Available USB Interface - CD-ROM drive
Computer System Requirements for Macintosh
• Power Macintosh G3 500 MHz or higher
• Mac OS X version 10.2.6 or later
- 128 MB or more available system RAM (256 MB recommended), 150 MB free disk space
- 800 x 600 or higher-resolution monitor displaying millions of colors
Note: This hardware is plug and play compatible when used on a Mac, however, the included software can be used on Windows operating systems only.
Check Look at Your Camera

Preparing Your Camera for Use
Battery Installation
Your camera requires 3 AAA batteries. To insert the batteries into the camera:
-
Slide and open the battery compartment on the side of the camera.
-
Please make sure that the batteries are inserted with the correct polarity facing up.

natural_image
Line drawing of a portable electronic device with control panel and cylindrical body (no text or symbols)3. Close the battery door.
When the “Low Battery” message is displayed on the LCD, this indicates that your camera has an insufficient battery power level and will be automatically powered off. You need to download the sample photo to your PC. If there is no SD card inserted before it powers off the photo will be lost.
Note:
-
If you don't intend to use your camera for an extended period of time, please remove the batteries to avoid battery leakage and corrosion.
-
Please don't remove the batteries or power off your camera before downloading the test photo when you have not inserted an SD card. The test images will be lost forever if they are not downloaded
before the camera is shut down or powered off.
-
Do not mix old and new batteries.
-
We recommend you use Alkaline batteries. Do not mix alkaline, standard (carbon-zinc), or rechargeable (nickel-cadmium metal hydride) batteries.
-
In order to conserve battery power if the camera is on but not in use for 60s it will automatically shut off. In this case only the sample images will be lost.
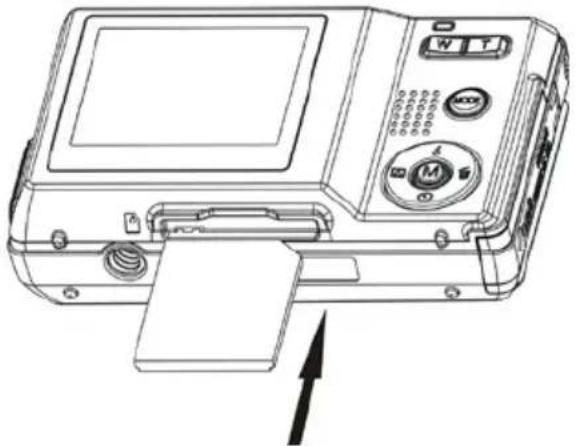
Installing SD Memory Card
Your camera has a memory card slot that enables you to insert any "SD" compatible memory card. Adding a memory card will allow you to increase the capacity of your camera before you have to transfer test photo to your PC. Install the SD memory card as below:
-
Locate the Memory Card slot.
-
Insert the Memory card into the slot in the correct direction. (see the sketch below)
natural_image
Line drawing of a digital camera module with control panel and buttons (no text or symbols)- Push the card in until you feel it "click" into position. The top of the card should be flushed with the surface
of the camera. An icon 📋 will appear on the LCD screen after you turn on your camera.
- Once the external memory card is inserted into the camera all the images taken with the camera will be stored on the card.
Note:
- Limited internal memory is provided for test images. The image will be deleted when camera power is turned off. Please download the images before power off .SD memory card is required for normal use.
- An external memory card is required for normal use. Your camera supports any compatible SD memory card (up to 8GB).
- If there is a photo in the internal memory when you insert the card into your camera, a “Move to card” message will appear on the LCD with Yes or No options. On selecting ‘Yes’ the photo will now be copied to your card.
- Formatting will delete all data on the SD memory card including protected data.
- Don't remove the SD card during formatting as this may damage the card and render it unusable.
- When your card is full, download the media on the SD card to your PC and delete the photos and videos from it in order to continue using your camera
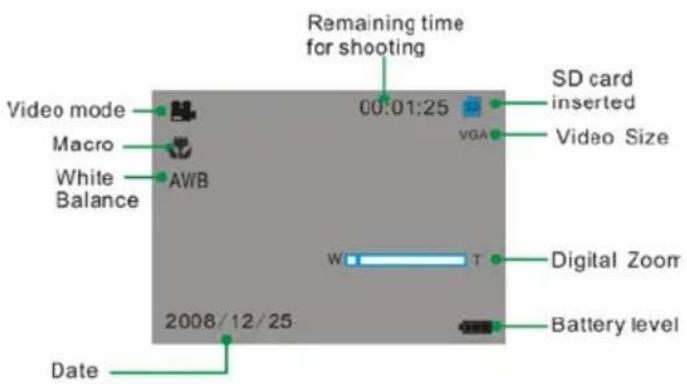
Main Icons on the LCD

text_image
White balance Flash off Camera mode Scene Macro Anti-shake ISO Exposure Date 2008/12/25 Self timer AWB Remaining photo numbers for taking 00025 SD card inserted Image size Image quality Digital Zoom Battery levelCamera mode
text_image
Remaining time for shooting Video mode Macro White Balance AWB 2008/12/25 SD card inserted VGA Video Size W T Digital Zoom Battery level DateVideo mode

text_image
JPG file 5M Photo sequence 100-0008 Battery levelPlayback mode for photos (full screen)

text_image
AVI file 00:00:06 VGA Video size 100-0008 Battery level Photo sequencePlayback mode for Videos (full screen)
Betypovabel

Full battery power

Medium battery power

Low battery power
Photoquality

Normal quality

Fine quality

Super quality
Flash

Force Flash

Auto

Red eye reduction

No Flash
Scenes

Auto

Portrait

Party

Night Portrait

Scenery

Beach

Night Scenery

Sport

High Sensitivity

Self-timer On(10 seconds)

Self-timer On(2 seconds)
Digital Zoom

Protect

Protect On
\White Balance

A u t o


Fluorescent

Cloudy

Daylight
Ant-Shake

Anti-Shake on

Anti-Shake off
Macro/Far function

Macro capture

Far capture
Starting Your Camera
Press and hold the Power button to turn on your camera. The LCD screen will light up indicating that your camera is on and ready for use.
To power off your camera, press the Power button once.
Camera Modes
There are 3 modes on your camera. To switch between modes press the MODE button.

- Camera Mode to take still photos

• Video Mode to capture video files

- Playback Mode:
Preview, print, edit photos and view videos
Taking photos
Power on your camera, the default mode is Camera mode. A camera icon appears in the top left corner of the
LCD screen.
- Hold the camera steady and compose your object as appears in the LCD screen.
- Press the Shutter button and wait a moment for the photo to be taken and saved to memory.
- After each photo is shot and the camera returns to icon mode, the numbers of photos left to shoot at this resolution is displayed on the top right of the LCD screen.
Note: When the memory is full, the LCD screen will display “Memory Full! Insert a SD Memory Card to Transfer and Take More Photos!” If you attempt to take a photo when the camera’s internal memory is full, the camera will beep continuously. Please download the test images to your computer as soon as possible or insert an SD memory card in order to take more images!
Digital Zoom function
You can magnify your subject using the digital zoom.
- Use the T and W buttons to adjust the zoom.
- The icon W T will appear on the LCD screen.
- Press the T button to zoom in on your subject.
- Push the W button to zoom back out.
Hyperfocal distance setting
This camera is equipped with a hyperfocal distance setting. The setting is found on the left hand side of the
camera.
- For far or mountain settings 🏠 push the Micro/Normal switch down.
- For up close settings 📋 push the Micro/Normal switch up.
The mountain setting gives you maximum depth-of-field you can possibly get with the lens you are using. You now can have the overhead branch in focus as well as the mountains in focus - and everything in between!
Flash
Your camera has a built in flash function which enables you to take photos when the light condition is not good.
- Press the Up button.
- Press the Up button once until you see the icon ↻ appear on the LCD screen. This indicates that the flash is forced on.
- Press the Up button again to change to the auto flash function.
- The icon ^A will appear at the top of the LCD indicating that the auto flash is turned on and ready to use.
- Press the Up button again to change from the auto flash to the red eye function.
- The icon will appear on the LCD indicating that the red eye reduction function has been activated.
- To turn off the flash function, press the Up button again until the icon 📋 is displayed on the LCD.
Note: A "Low Power" message will appear on the LCD screen, if you select the flash function when the battery
power is insufficient. To continue using the camera with the flash, please change new batteries.
Self-Timer
You can include yourself in a photo by using this feature to delay the time between your pressing the shutter and when the photo is actually taken. It is recommended that you use a tripod or place the camera on a steady and flat surface before you use the self-timer. The timer is either for 2 or 10 seconds.
- Press the Down or Timer button.
- The icon _2 appears on the top of the LCD screen. Press the Shutter button to activate the 2 second . reit
- The camera will countdown 2 seconds before the picture is taken.
- Press the down button again to select the 10 seconds self timer.
- Press the shutter button to start a 10 second count down after which the photo will automatically be taken.
Scene
Your camera has many built in scenes for you to take photos in almost any environment. The scenes included with your camera are Auto, Night Portrait, Night Scenery, Portrait, Scenery, Sport, Party, Beach or High Sensitivity. You can choose your best scenery according to your light and environmental conditions.
- Press the Menu button.
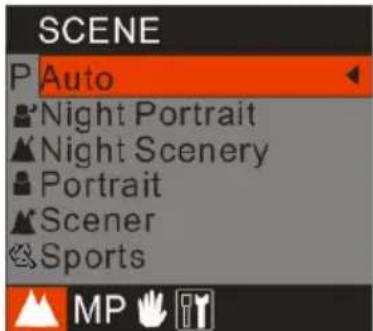
text_image
SCENE P Auto Night Portrait Night Scenery Portrait Scener Sports MP- Press the Up/Down button to select the scene that you desire.
- Press the Menu button to confirm the selection and exit to the standby mode.
Note: You can press Left button to select Scene quickly.
ImageSize
The image size and quality setting determines the number of photos that can be saved and the amount of memory required for each photo. The higher the photo quality the more memory it will use up. The image size and quality will also affect the maximum size you can print your photo effectively. To set the Image size:
- Press the Menu button.
- Press Right/Left button to select the Image Size mode.

text_image
IMAGE SIZE 8M 8M 7M 7M 5M 5M 3M 3M MP- Press the Up/Down button to select the desired image size.
- Press the Menu button to confirm, save and exit to standby mode.
AtShake
Your Digital Camera has a function that prevents photos coming out blurry as a result of trembling or shaking when taking the photo. This function allows you to take good quality photos without the use of a tripod.
To set as below:
- Press the Menu button.
- Press the Right/Left button to select the Anti-Shake menu.
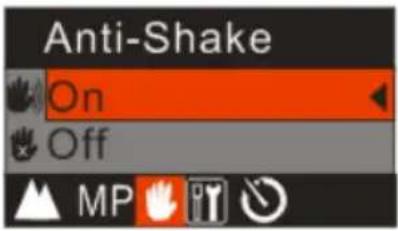
text_image
Anti-Shake On Off MP- Press the Up/Down button to select 'On'.
- To turn the Anti-Shake off follow steps 1 through 3 and then select the 'Off' option.
- Press the Menu button to confirm and save the choice.
- The 📄 icon will appear on the left hand side of the LCD screen.
Delete the last photo taken
The camera allows you to quickly delete the last photo taken
- After taking the photo press the Right or Delete button.
- A Delete message appears on the LCD with Yes/No options
- Press the Right/Left button to select the 'Yes' or 'No' option.
- Press the Menu button to confirm and save your choice.
- If you selected 'Yes' the photo is deleted from the memory card.
Setup Menu
Within the Setup menu you can set Exposure, White Balance, Sharpness, Quality, ISO, Date, Auto Power off, Language, Frequency, Format and Default Setting. Setup as below:
-
Press the Menu button.
-
Press the Right/Left button and select the Setup menu.

text_image
SETUP Exposure ISO ISO WB WhiteBalance Sharpness Quality 30 Date MPExposure
This setting allows you to control the brightness of your images.
- Press the Up/Down button to select the Exposure option.
- Press the Menu button.
- Press the Up/Down button to select an exposure value (from +3 to -3).
- Press the Menu button to confirm, save and exit to camera mode.
- The selected exposure number appears on the left hand side of the LCD.
ISO
This is a special function that allows you to compensate the light conditions when the light source is not good where you do not wish to use a flash or tripod. When you want to use ISO sensitization, choose the low value ISO to prevent spots or blotches appearing on your photo.
- Press the Up/Down button to select ISO.
- Press the Menu button.
- Press the Up/Down button to select one of the options Auto/100/200/400.
- Press the Menu button to confirm, save and exit to standby mode.
- The selected ISO icon appears on the left hand side of the LCD.
White Balance
This setting allows the camera to adjust the color of your photos according to the color of your light source.
- Press the Up/Down button to select the White Balance option.
- Press the Menu button.
- Press the Up/Down button to select one of the options Auto/Daylight/Cloudy/Incandescent/Fluorescent.
- Press the Menu button to confirm, save and exit to the camera standby mode.
- The selected White balance icon appears on the top of the LCD.
Sharpness
This setting allows you to adjust the sharpness of your images, making edges more or less distinct.
- Press the Up/Down button until you select Sharpness.
- Press the Menu button.
- Press the Up/Down button to select one of the options Normal/Sharp/Soft.
- Press the Menu button to confirm, save and exit to standby mode.
Quality
The quality of your photos also affects the number of shots that can be stored on your memory card before you need to download them to your computer. A high setting (Super or Fine) means you can take fewer photos, but they will be of better quality. The default value is Normal.
- Press the Up/Down button until you select Qual i t y.
- Press the Menu button.
- Press the Up/Down button to select one of the options Super/Fine/Normal.
- Press the Menu button to confirm, save and exit to standby mode.
Note: After you confirm, the icon associated with the quality selected will appear on the LCD.

normal quality

fine quality

super quality
Date
This feature allows you to set the system time which will be displayed on the photos.
- Press the Up/Down button until you select Date.
- Press the Menu button.
- Press the Up/Down button to select one of the options On/Off/Set Date.
- Press the Menu button to confirm.
If you wish to set the date:
-
Press the Menu button to enter Set Date option.
-
Press the Right/Left button to scroll from one option to the other of the date, time and format you wish to set.
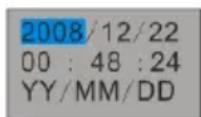
-
For each option use the Up/Down button to set the digits that are highlighted.
-
Press the Menu button to confirm and save the current setting.
Auto Power off
By default, if your camera is idle for 60 seconds it will automatically be powered off. Use the Auto Off option to change this setting:
-
Press the Up/Down button until you select the Auto Power Off option.
-
Press the Menu button.
-
Press the Up/Down button to select one of the options 1 Minute/2Minutes/3Minutes/Off.
-
Press the Menu button to confirm, save and exit to the camera mode.
Frequency
Fluorescent lighting oscillation can affect the quality of your videos. Set the camera for the correct frequency for the country that you are in. Your camera has 2 Frequency settings, 60HZ for the U.S. and 50HZ for Europe and Japan. The default setting is 60HZ:
- Press the Up/Down button until you select Frequency.
- Press the Menu button.
- Press the Up/Down button to select one of the options 50Hz/60Hz.
- Press Menu button to confirm, save and exit to standby mode.
Format
This function will format the memory card and will erase all files in memory including files that have been protected.
Important: Please use this option with Caution as all the images will be lost forever if they are not downloaded to the computer before you format.
- Press the Up/Down button until you select Format.
- Press the Menu button.
- Press the Up/Down button to select one for the options OK/Cancel.
- Press the Menu button to confirm. If you selected OK, then the following message will appear on the LCD:
FORMAT? YES NO
- Press Left/Right button to select and highlight either Yes or No.
- Press the Menu button to confirm.
- If you select 'Yes' the camera will begin to Format the SD Memory card. All images stored on the card will now be erased. This process in irreversible.
Default Setting
You can restore your camera to the original settings from factory.
- Press the Up/Down button until you select the Default Setting.
- Press the Menu button.
- Press the Up/Down button to select one of the options OK/Cancel.
- Press the Menu button to confirm, save and exit to the camera standby mode.
Video Mode
Press the MODE button to select the Video mode.
If no compatible SD Memory card is inserted in the SD card slot a "Insert an SD Memory Card" message will appear on the LCD screen as soon as you enter the Video mode.
Note: You will now need to insert an SD Memory Card inserted into the camera in order use and capture videos.
The video icon will appear on the top left corner of the LCD screen.
The total amount of time that you have to record as per the capacity of the memory card appears on the right top of the LCD screen.
- Press the Shutter button to start shooting videos.
- The elapsed time will appear on the LCD screen and icon REC● will flash on the LCD screen.
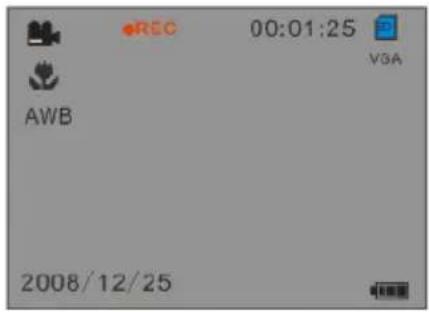
text_image
00:01:25 VGA AWB 2008/12/25shooting Videos
- Press the Shutter button again to stop and save this file to your memory card in AVI format.
Note: You can play this AVI file in playback mode on the camera or on your computer using Quick Time and Windows Media Player.
White Balance
You can select different White Balance options for shooting. This helps you to obtain the best quality video under the present lighting conditions that prevail for the time you are shooting the video.
- Press the Menu button.
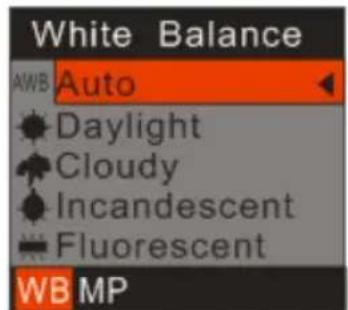
text_image
White Balance AWB Auto Daylight Cloudy Incandescent Fluorescent WB MP- Press the Up/Down button to select the menu option that best describes the present lighting conditions.
- Press the Menu button to confirm, save and exit to the video mode.
- The corresponding icon will appear on the LCD screen.
Image Size
Your camera supports 2 video resolutions- 640x480 (VGA) pixels, 320x240 (QVGA) pixels.
- Press the Menu button.
- Press the Right/Left button to select the MP or Image Size menu.

text_image
Image Size VGA VGA Q VGA QVGA WB MP- Press the Up/Down button to select and Image Size option VGA/QVGA.
- Press the Menu button to confirm, save and exit to the video standby mode.
Playback Mode
Set your camera to Playback mode by pressing the MODE button.
In this mode you can preview the photos and videos you have recorded.
In Playback mode you can rotate, protect, delete and crop your photos, protect and delete video clips. You can also print photos directly from your camera using PictBridge technology.
NOTE: The message, "NO FILE" will be displayed on the LCD screen if there are no images either on your camera or on the SD Memory card inserted in your camera.
Thumbnail display

natural_image
Grid of blank white squares with a yellow square in the top-left cell, no text or symbols present.3x3 Grid 9 thumbnails
- In Playback Mode press the W button to display all the images as thumbnails.
- Reversely, press the T button or the Menu button again to display the selected image in full screen.
- In full screen repeatedly pressing the T button to magnify the photos and press the Up/Down button to preview the photo in zoom in mode.
- Press W button to zoom back out.
Operation for still photos
Select the still photo you want to delete, rotate, protect, crop or print.
Rotate
- Press the Menu button. The first option is the Rotate option.
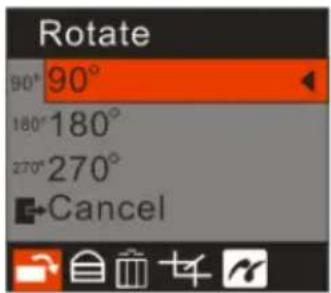
text_image
Rotate 90° 90° 180° 180° 270° 270° Cancel- Press the Up/Down button to select how many degrees you want to rotate the photo.
- Press the Menu button to confirm, save and return to the playback mode.
- The photo will now appear in the playback mode rotated as per your rotation choice.
Note: you cannot rotate a protected file when "File Protect" appears on the screen.
Protect
You can protect your photos/videos from accidental deletion by selecting the "lock" feature.
- Press the Menu button.
- Press Right/Left button to select the Protect menu.

text_image
Protect Lock Unlock- Press the Up/Down button to select "Lock".
- Press the Menu button to confirm and save your choice.
- A lock icon will appear on the bottom right corner on the LCD.
Note: At step 3 you can select "Unlock" and press the Menu button to unlock the current file.
Delete
Delete unwanted photos and videos at any time in order to free up memory. You can delete one image or video clip at a time or delete all except the unprotected photos and videos that are currently recorded on the memory card.
- Press the Menu button.
- Press the Right/Left button to select the Delete menu.
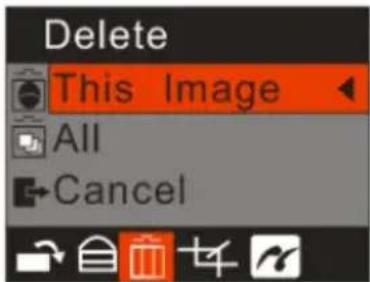
text_image
Delete This Image All Cancel-
Press the Up/Down button to select 'This Image' in order to delete the current photo/video that you selected only.
-
Press the Up/Down button to select 'All' in order to delete all the unprotected photos and videos on your memory card.
- Press the Menu button. A Delete message will appear with the options Yes/No.
- Press the Right/Left button to select "Yes" or "No" and press the Menu button to confirm.
- If you choose 'Yes' the image(s) will be deleted.
Crop Image
Crop your photos to show only a specific portion of an image or to highlight certain focal points. The Crop feature lets you zoom in on an image and then save that part of the image as a new photo.
- Press the Menu button.
- Press the Right/Left button to select the Crop Image menu.

text_image
Crop Image Crop Cancel-
Press the Up/Down button to select Crop or Cancel.
-
P r e s s the Menu button to confirm.
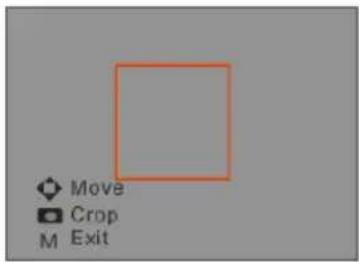
text_image
Move Crop M Exit- Press the T/W button to magnify the rectangle and select an area of the selected photo as a new file.
- Press the Up/Down/Right/Left button to move the rectangle and select an area.
- P r e s s the Shutter button.
- Press the Shutter button again to confirm and save the cropped section as a new photo or you can press Menu button to exit without saving.
Your camera allows you to print the photos with a compatible printer. The operation as explained below:
- Select the photo you want to print.
- Press the Menu button
- Press the Right/Left button to select the Print menu.
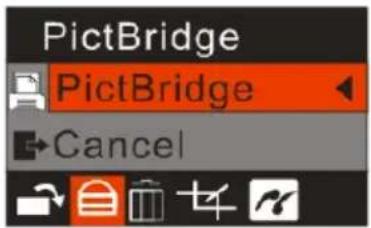
text_image
PictBridge PictBridge Cancel- Press the Up/Down to select the PictBridge option.
- Press the Menu button to confirm. A message will appear on the LCD screen "Please connect to device".
- Connect your camera and press OK button to the compatible printer with the USB cable to begin the printing process.
Playing the/Video file
- Select an AVI video file you wish to play.
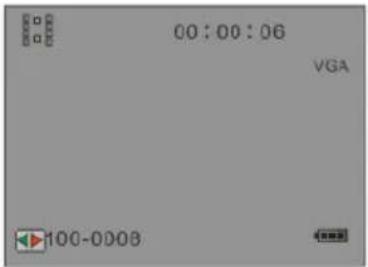
text_image
00:00:06 VGA 100-0008- Press the Shutter button to play the current AVI file.
- Press the Shutter button again to pause.
- Press Up button to stop.
Note: Instructions on how to protect or delete videos please refer to Operation for still photos.
Installing PhoTags Express Software
NOTE: Before attempting to install the software, make sure that you do not have the camera's USB cable attached to your computer. This will affect the install process and can cause a failed installation of the camera software and drivers.
In order to install the Software and drivers to download and edit the photos and videos captured using this camera, you need to install the CD installation disk.
Insert the installation CD into your CD-ROM drive. The installation screen should automatically open.
Warning: DO NOT PLUG YOUR CAMERA INTO THE USB PORT UNTIL THE SOFTWARE INSTALLATION HAS BEEN COMPLETELY INSTALLED.
- On the "Install your camera software" screen, select your camera model from the drop down list and click the "Install" button to install the PhoTags Express software. For more installation information click the "Read Me First!" button.

text_image
Install Your Camera Software PhoTags express SAKAR edition WhoCare USB Select the camera that you purchased from the drop down list, and then press the INSTALL button to install the Photo management software which may be followed by the installation of the camera's driver if this is required. Please exit all Windows programs before installing this program. If your camera is connected to your computer then please remove the USB cable from the computer before installing. DO NOT reconnect the Camera USB Cable to your computer until after the installation process has been completed and you have restarted your computer. Please me First Install Cut- On the "PhoTags Express" screen, click the "Next" button.
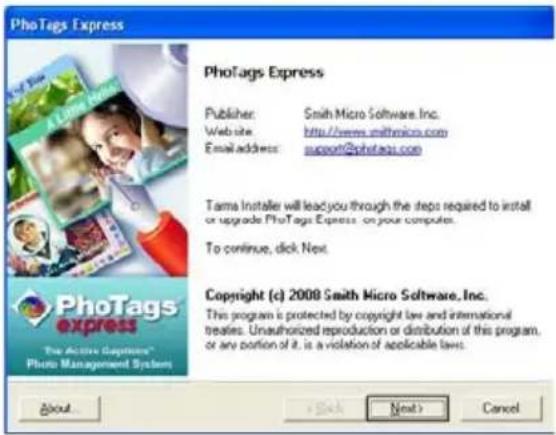
text_image
PhotoTags Express Publisher: Smith Micro Software, Inc. Website: http://www.smithmicro.com Email address: support@phototags.com Tama Installer will lead you through the steps required to install or upgrade PhotoTags Express on your computer. To continue, click Next. Copyright (c) 2008 Smith Micro Software, Inc. This program is protected by copyright law and international treaties. Unauthorized reproduction or distribution of this program, or any portion of it, is a violation of applicable laws. About... Next > Cancel- Please review the license terms and click the "I Agree" button to continue.
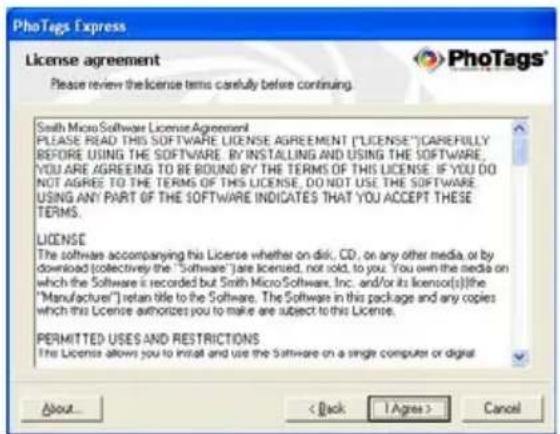
text_image
PhoTags Express License agreement Please review the license terms carefully before continuing. Smith Micro Software License Agreement PLEASE READ THIS SOFTWARE LICENSE AGREEMENT ("LICENSE") CAREFULLY BEFORE USING THE SOFTWARE. BY INSTALLING AND USING THE SOFTWARE. YOU ARE AGREED TO BE BOUND BY THE TERMS OF THIS LICENSE. IF YOU DO NOT AGREE TO THE TERMS OF THIS LICENSE, DO NOT USE THE SOFTWARE. USING ANY PART OF THE SOFTWARE INDICATES THAT YOU ACCEPT THESE TERMS. LICENSE The software accompanying this License whether on disk, CD, on any other media, or by download (collectively the "Software") are licensed, not sold, to you. You own the media on which the Software is recorded but Smith Micro Software, Inc. and/or its licencor(s) the "Manufacturer") retan title to the Software. The Software in this package and any copies which this License authorizes you to make are subject to this License. PERMITTED USES AND RESTRICTIONS The License allows you to install and use the Software on a single computer or digital About... < Back 1 Agree > Cancel- Let the "PhoTags Express" installer create the folder where the program will be installed to, and then click "Install".
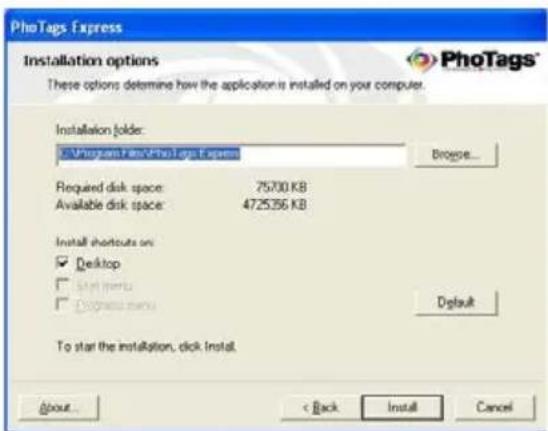
text_image
PhoTags Express Installation options These options determine how the application is installed on your computer. Installation folder: C:\Program Files\PhoTags Express Required disk space: 75700 KB Available disk space: 472536 KB Install shortcuts on: ✓ Desktop □ Install menu □ Install menu Default To start the installation, click install. About... < Back Install Cancel- Please wait while the application is being installed on your computer.

text_image
PhoTags Express Installation progress Please wait while the application is being installed on your computers. Installing files... Registering files... Creating application instructions... Loading system settings Clearing up... Overall installation progress 0011\F7\baby6.png About... Save Next Cancel- Once the application has been installed on your computer, click the "Finish" button to let the "PhoTags Express" installer finish the installation program.

text_image
PhoTags Express Installation completed PhoTags Express has been successfully installed on your computer. ✓ Start the application PhoTags express The Active Captions™ Photo Management System Please click: Finish to close Tama installer. About... Back FinishIf you selected the option for the application to start after pressing the Finish button, the application will automatically launch.
If not, then in order to open the application you need to double click on the Photags Express icon on the desktop.
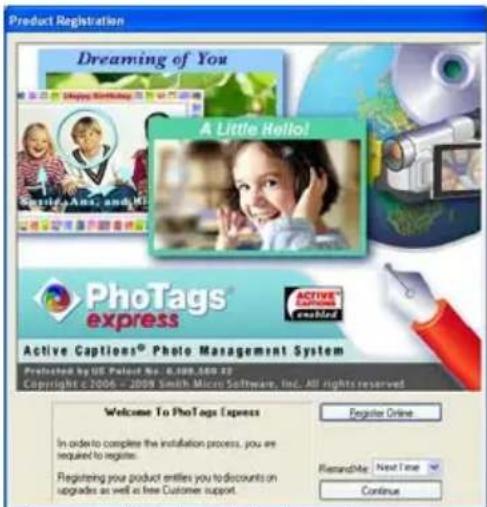
text_image
Product Registration Dreaming of You A Little Hello! PhoTags express Active Captions® Photo Management System Prestated by US Patent No. 6,000-500 X3 Copyright © 2006-2009 Smith Micro Software, Inc. All rights reserved. Welcome To PhoTags Express In order to complete the installation process, you are required to register. Register your product entifies you to discounts on upgrades as well as free Customer support. Register Online Remarable Next Time Continue- The Welcome to Photags Express Product Registration screen will open. This screen will appear each time you open the application until you register. To register your product please click the "Register Online" button and fill out the online registration form (This requires an internet connection).
Note: In order to complete the installation process you are required to register. Registering your product entitles you to discounts on upgrades as well as Free Customer Support.
If you choose to register at a later time click the "Continue" button to open the Photags Express application.
Everything you need to get the most from your photos
The "PhoTags Express" software that is installed on your computer allows you to edit existing photos that you have on your computer as well as the photos that you have captured with your camera.
- Power on your Digital Camera.
- Plug one end of the USB cable into the USB port of the camera.
- Plug the other end of the USB cable into a USB port on your computer.
- Wait for your computer to recognize that new hardware has been installed and the ready to use message pops up on the task bar.

text_image
Found New Hardware Your new hardware is installed and ready to use.If you have not already opened your application then click the "PhoTags Express" icon that appears on your desktop to open the "PhoTags Express" Software.

From the Main Menu screen that appears, select the "Select Photos", "Enhance Photos" or "Add Captions" buttons. You can use these features to edit your photos:
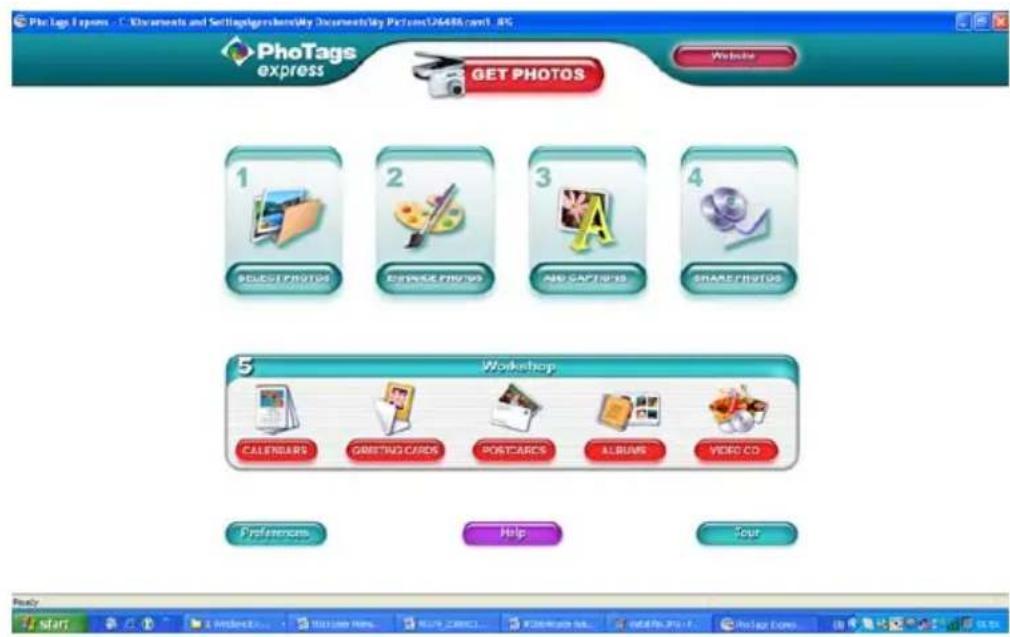
text_image
PhoTage Express Get PHOTOS Website 1 SELECT PHOTOS 2 CHANGE PHOTOS 3 AND CAPSORS 4 SHARE PHOTOS 5 Workshop CALENDARS GREETING CURES POSTCARCS ALBUMS VIDEO CO Preferences Help Pour Ready start Microsoft Office 100% Open Web... ADD CURRENT INFO. POSTCAPS.COM. ADD PHOTO - PPT.0000000000000000000000000000000000000000000000000000000000000000000000000Manage your photos by creating countless unique photo collections without duplicating any photos. Burn CD's of any folders for backup and storage.
Enhance your photos; Auto Enhance, Crop, Correct Red Eye, Manually Adjust and add Special Effects.
Add Active Captions- add Text Captions, Frames, Shapes, Keywords... and more that can be viewed or hidden any time.
Locate and Organize your photos and collections- Search by Captions, Category, Keyword or Date - directly from the operating system of your computer.
Share your photos via E-mail, Local Printing and Create HTML web pages for uploading online.
Workshops feature allows you to Create Calendars, two-sided Greeting Cards and Postcards on standard photo paper...
Create Photo Albums and Slide Shows on CDs that can be viewed on your PC and VCD's for viewing on your TV using your DVD player. Add background music to your slideshow.

text_image
PhotoTags Express - C:\Documents and Settings\Agoshons\My Documents\MyPictures\26486 cam1.JPG 1 Select Photos 2 Enhance Photos 3 Adi Captions 4 Share Photos 5 Workshop SHOW ME NOW WORKSHOP I have the story to use Allyn Creator Wizard to make Photo Accounts ALBUYS BARCLAYA GREETING CARDS POSTCARDS VIDEO CD Ready Collectors: UnNamed: 17 photos Dimensions: 60 X 250Download photos and videos to your PC
Transfer Photos and video images from your camera to your PC using PhoTags Express.
Select the "Get Photos" button from the top of the PhoTags Express Main Menu screen. The Get Photos Wizard opens.
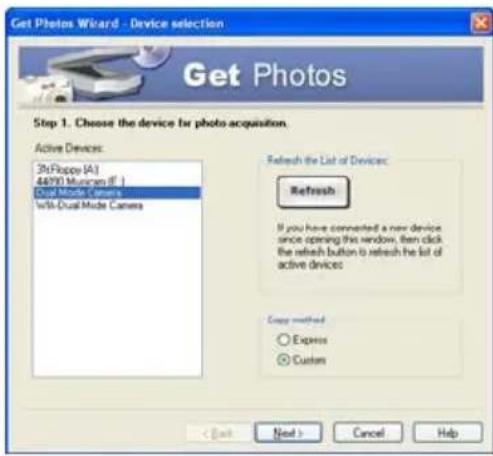
text_image
Get Photos Wizard - Device selection Get Photos Step 1. Choose the device for photo acquisition. Active Devices: 36Floppe [A] 44990 Muncen [F ] Dual Mode Camera With Dual Mode Camera Refresh the List of Devices: Refresh If you have commented a new device since opening this window, then click the refresh button to refresh the list of active devices Copy method: Express Custom < Back Next > Cancel HelpSelect the device (removable disk) option in the Active Devices window on the left and then select either the "Custom" or "Express" copy radial button in the Copy methods box.
CUSTOM COPY METHOD
Select the "Custom" copy radial button. Click the "Next" button.
Add Active Captions to your pictures. You can add a date, keywords, categories and more. Click "Next" to continue.

text_image
Get Photos Wizard - Batch options Step 2 - Set the batch operations for the photos you are getting. X 2007/F'18 Y 3 4 5 6 7 8 9 10 25 26 27 28 1 2 3 4 5 6 7 8 9 10 11 12 13 14 15 16 17 18 19 20 21 22 23 24 25 26 27 28 29 30 31 7 8 9 10 11 12 Keywords Categories Children Family Friends Hobby HomeChoose where to place your photos and videos. The default is to place all photos and videos into a folder under the C:\My Documents\ My Pictures folder with the date when the photos were taken as the folder name.

text_image
Get Photos Wizard : File Transfer Properties Step 3. Choose where to place your photos. Target directory: • automatically place photos in a corner folder under My Pictures with • The image when the picture must fall on using as the file name. ○ Place all photos in a folder under My Pictures will today's date as the folder name. ○ Select a folder name where the photos are to be placed. □ Consider and Select All Adapters in My Documents (My Picture) Browse Optionally enter a file name prefer to the group of photos: □ Include this photo from the corner after the setup exception < Back Finish Cancel HelpClick the "Finish" button to start the download process.

text_image
Please walk. 41/41A photos download progress bar appears showing the number of media (videos included) downloading to your computer.

text_image
PhotoTags Express - C:\Documents and Settings\chaff\My Documents\My Pictures\14044056.D9CF012L.jpg 1 Select Photos 2 Enhance Photos 3 Add Concepts 4 Share Photos 5 Workshop PhotoTags expressAll the media – Photos and Videos on your camera are now downloaded to your computer to the selected folder.
Open the "Select Photos" mode of Photags Express to view the thumbnails for all the media.
You may now use PhoTags Express to edit your photos, create collections and Burn CD's.
To learn more of how to get the most out of your PhoTags application select the "Show Me How" or the "?" Help Guide button found on the top right of the screen.
EXPRESS COPY METHOD
Select the "Express" copy radial button if you want to have all the images transferred to the PC without the option to select which photos you want to transfer.
In this mode you will not see a preview of the images transferred. For more information please refer to the Help Guide in PhoTags Express.
Viewing Videos
Make sure that your camera is connected to your computer with the USB cable. Open any application that will enable you to view video files (for example Windows Media Player).
Videos created and downloaded should be sitting in the C:\My Documents\My Pictures{date} folder. Videos are saved in AVI format. Double click on a video with the avi extension.
The video will begin to play automatically. To replay the video, use the media controls.
Once all the Photos and Videos have been downloaded to the computer it is recommended that you delete them from the camera thereby preparing your camera to take more photos and videos.
Transferring photos and videos to your PC manually
Turn on your camera, Change your camera mode to Playback and connect your camera to the computer correctly with USB cable, the screen will be shown a window (Removable Disk F:) as below:

text_image
Removable Disk (1:) Windows can perform the same action each time you insert a disk or convert a double with this next of fileNOTE: Now you can download the photos and videos to your computer with two methods as below:
1. Download photos directly from windows
Choose “copy pictures to a folder on my computer” on the Removable Disk (F:) window. After you click “OK”, there will be shown some windows on the screen step by step, you are only required to follow the description and click the buttons that are defaulted by the system to finish transferring.
Alternatively you can:
- Click on the START button in Windows.
-
Click on the MY COMPUTER Icon on the desktop.
-
Your memory card will appear as a REMOVABLE STORAGE DEVICE.
- Click on the REMOVABLE STORAGE DEVICE to view the images. The images are stored in the subfolder called DCM100.
- You can now copy and paste the images to any directory you choose.
Transferring photos and videos to your MAC manually
The Photags Express software is not compatible and will not install on a Mac.
In order to transfer photos and videos from your camera to your computer:
- Plug the camera into an available USB port
- A new drive should mount on the desktop which stores any photos or videos that have been taken.
Maintenance of Your Digital Camera
The digital camera is a delicate device. Please handle your camera with care to avoid damaging it.
Sakar Warranty Card
This warranty covers for the original consumer purchaser only and is not transferable. Products that fail to function properly UNDER NORMAL USAGE, due to defects in material or workmanship. Your product will be repaired at no charge for parts or labor for a period of one year.
What Is Not Covered By Warranty:
Damages or malfunctions not resulting from defects in material or workmanship and damages or malfunctions from other than normal use, including but limited to, repair by unauthorized parties, tampering, modification or accident.
What To Do When Service Is Required:
When returning your defective product (postage pre-paid) for service, your package should include:
- Copy of original bill of sale
- A detailed written description of the problem.
- Your return address and telephone number (Daytime)
MAIL TO ADDRESS BELOW:
Sakar International
Attention: Service Department
195 Carter Drive
Edison, NJ 08817
You may also visit www.vivitar.com for further assistance if necessary or call our tech support department toll free at 1-877-379-8200.
Appendix A: Technical Specifications
| Image Sensor | CMOS Sensor |
| Image Resolution | 3264x2448pixels(8M),3648x2048Pixels(7M),2592x1944 pixels(5M), 2048x1536 pixels(3M) ,1920x1080 pixels (2M) and 640x480 pixels (VGA.). |
| Video Resolution | 640X480,320X240pixels |
| File Format | JPEG/AVI |
| External Memory | SD / MMC Card (up to 8GB) |
| LCD Display | 1.8 Inch TFT LCD |
| Lens | f=7.23mm, F2.8 |
| Zoom | Y |
| Exposure | -3.0EV ~ +3.0EV |
| White Balance | Auto, Daylight, Cloudy, Incandescent, Fluorescent |
| ISO | Auto/100/200/400 |
| Scene | Auto/Night Portrait/Night Scenery/Portrait/Scenery/Sport/Party/Beach/High Sensitivity |
| Flash | Auto /Force/red eye reduction/Off |
| Self-timer | 2 or 10 sec delay |
| Anti-Shake | Y |
| PictBridge | Y |
| Interface | USB 1.1 |
| System Requirements | Window XP/ Vista/ Mac OS X (10.2.6 or higher) |
| Battery | 3*AAA |
| Working Temperature | 0~40 °C |
Appendix B: Troubleshooting
Q: I have taken photos but my computer says, "No photos in camera." What do I do?
A: First ensure that you have in fact taken photos. Press the Shutter/OK button a few times to take some sample photos and then try downloading them again.
If you still get a “no photos” error this may mean that your computer may not meet the minimum system requirements.
System Requirements:
At least a Pentium III 300Mhz, AMD Athlon 300Mhz or a Celeron 400MHz or higher as well as at least 128 MB ram. Please note that the older AMD K6 processors will not work. More information about determining your computer's specifications can be found in the General Computer Information section.
If you have determined that your computer meets the minimum system requirements and that you do have pictures in your camera, follow the steps below to reinstall the software.
Software Re-installation
- First install the software. Click on Start, Settings, Control Panel and Add/Remove programs. There are one programs you will need to remove –PhoTags Express. After removing, restart your computer. If your camera is connected, disconnect it.
- Now reinstall the software. Insert the CD that came with your camera. It should automatically run the installation.
- Restart the computer.
-
Once your computer is back up, plug the camera into your computer's USB port.
-
Right-click on the "My Computer" icon. Select properties.
If you are running Windows XP: click on hardware and then Device Manager.
If the camera is installed correctly, there will be a category listed for “Imaging Devices” and clicking on the “+” next to it should reveal your camera. If not, you will likely see “Digital Still Camera” under “Other Device” with a brightly colored marking next to it indicating it is not functioning correctly.
If you are running Windows XP: Right click on the non functioning device and select uninstall. If a warning pops up, press OK.
- Restart your computer again. Your camera is now successfully installed.
Q: How do I make sure I don't lose important pictures?
Your camera uses SDRAM memory, which requires a constant electric current to store your photos. Should your camera lose power (for instance if the battery dies or run out of power) all stored pictures will be lost. We recommend always downloading your photos to your computer as soon as possible to prevent unintentional data loss.
A02-090318