AP01 - Sports Watch ASICS - Free user manual and instructions
Find the device manual for free AP01 ASICS in PDF.

User questions about AP01 ASICS
0 question about this device. Answer the ones you know or ask your own.
Ask a new question about this device
Download the instructions for your Sports Watch in PDF format for free! Find your manual AP01 - ASICS and take your electronic device back in hand. On this page are published all the documents necessary for the use of your device. AP01 by ASICS.
USER MANUAL AP01 ASICS
Supervised by ASICS Institute of Sports Science
The contents of a quarantee
Instruction Manual
AP01:WKJS2
• World-Wide Limited Warranty
• Warranty term: Two years from the date of purchase
- Your watch will be repaired or replaced (with the same or similar model) free of charge at our option during the warranty term (see above) if it
should malfunction during normal use as described in the Instruction Manual.
- This warranty covers the watch itself (movement and case). Other parts than the above are not covered by the warranty.
• To have repairs and adjustments covered under this warranty performed, bring the watch, the warranty, and the original receipt identifying the
ASICS watch purchased and the date of purchase to an ASICS watch retailer or a nearby authorized ASICS service facility.
• Note that repairs will be charged in the following cases, even during the warranty term:
a. Failure or damage caused by improper use or carelessness;
b. Failure or damage caused by unjustifiable repair or modification;
c. Failure or damage caused by fire or water, or a natural disaster such as an earthquake;
d. Esthetic changes that occur during use (minor scratches, etc. on the case and glass);
a. In case the retail store and the purchase date are not indicated on the warranty, or if this information has been rewritten; and
f. If the warranty is not submitted along with the watch.
- Battery replacement will be charged even during the warranty term.
- Since the battery in your watch is a monitor battery inserted at the factory to check the functions and performance of the watch, it may run down
in less than the specified period after the date of purchase.
• The case, dial, glass, watchband or other parts of the watch may be replaced with substitutes if the originals are not available. - All postage, insurance and shipping costs incurred in presenting or sending the watch to the service facility are your responsibility.
• Some countries, states and regions do not allow the exclusion or limitation of consequential damages or limitations on how long an implied war-
ranty lasts so the above exclusion or limitation may not apply to you. This warranty gives you specific legal rights, and you may also have other
rights which vary from country to country, state to state, and region to region. - This warranty warrants that you can receive free repair in accordance with the terms set forth herein and within the specified term, and shall not restrict any lawful right of the Customer.
For the locations of the authorized ASICS service facilities, please visit our website at http://www.asics-watch.com.
Manufacturer: Seiko Instruments Inc.
- Nakase 1-chome, Mihama-ku, Chiba-shi, Chiba-ken, Japan

EU contact information:
Please visit the Website below, and contact
a nearby distributor.
http://asics-watch.com/eg/shoplist.html
TO PRESERVE THE QUALITY OF YOUR WATCH
Instruction Manual
AP01:WKJS2

WARNING

CAUTION
This symbol indicates any condition or practice which could result in serious personal injury or possible death if the instruction with this symbol is not strictly observed.
This symbol indicates any condition or practice which could result in minor personal injury or property loss if the instruction with this symbol is not strictly observed.
PRECAUTIONS ON WEARING YOUR WATCH

WARNING
When you are wearing the watch, take care not to tumble, fall or bump into others. This may injure yourself and others.
Take care not to hold a young child in your arms with the watch worn on your wrist. This may injure the child or cause him/her to develop a rash or allergy.
When you are wearing the watch, do not swing your arms forcefully to bump the watch against hard objects. This may cause property loss, or a malfunction of the watch.
Never attempt to operate any of the buttons in water. Water may get inside the watch to cause damage to it.
○Those who have not taken physical exercise for a long time and those who are ill should consult a doctor before starting running with the watch. If you feel sick while running, stop running immediately.
DAILY CARE

CAUTION
The case and band contact directly with the skin like an underwear. If they are left soiled, the rust that forms on them may stain the edge of the sleeve, or cause a rash or allergy on your wrist. Keep the case and bracelet clean to avoid this.
After the watch is removed from your wrist, wipe off perspiration or moisture from the watch using a soft dry cloth. Doing this will serve to prolong the service life the case, band, gasket and other parts.
Do not use chemicals such as benzine, thinner, alcohol and a solution of neutral detergent to clean the watch. This may cause a chemical change to deteriorate the watch.
If the watch is left under fluorosecond light or direct sunlight for a long time, or the band is left soiled until the soil adverse to it, the band may be discolored, hancered or broken. If your watch has a semitransparent urethane band, which is easily discolored, special care should be taken to keep it clean. It may be discolored in several months depending on the conditions of use.
Also, do not keep the watch in a place where it is exposed to high humidity, or do not leave the band wet with perspiration or water. Otherwise, the band may be discovered in a very short time.
When the band is soiled, rinse it in soapy water. Do no use solvents for cleaning as some solvents may deteriorate the band.
RASH AND ALLERGY

CAUTION
○Adjust the band so that there will be a little clearance between the band and your wrist to avoid accumulation of perspiration.
If you are susceptible to rash, the band may cause a rash or itching on your skin depending on your physical condition.
○The possible causes of the rash are as follows:
1. Allergy to metals; or
2. Rust, soil or perspiration on the watch or band.
○If any abnormal condition occurs on your skin, remove the watch from your wrist immediately, and consult a doctor.
REMARKS ON THE BATTERY
MONITOR BATTERY
The battery in your watch may run down in less than the specified period after the date of purchase, as it is a monitor battery inserted at the factory to check the functions and performance of the watch.
We cannot guarantee that the stored data will remain intact after the battery is replaced with a new one, or the watch is repaired at the service facility. To prevent the data from being lost, it is recommended that the important measurement and setting data be noted down on paper beforehand.
BATTERY REPLACEMENT
When the battery expires, be sure to replace it with a new one as soon as possible to prevent any malfunction. For battery replacement, contact the retailer from whom you watch was purchased.
☐If the exhausted battery is left in the watch for a long time, a malfunction may result due to battery leakage, etc. Have it replaced with a new one as soon as possible.
○Battery replacement is charged even if it runs down within the warranty period.

WARNING
The battery is not rechargeable. Never attempt to recharge it, as this may cause the battery to explode, leak fluid or be damaged.
○Do not open the case back forcibly to remove the battery from the watch.
○If it is necessary to take out the battery from the watch, keep it out of the reach of children.
○If a child swallows it, consult a doctor immediately as it will adversely affect the health of the child.

CAUTION
☐Do not expose the watch to temperatures outside the normal temperature range (50°C \~ 35°C) for a long time. This may shorten the battery life, or cause a malfunction due to battery leakage.
TO PRESERVE THE QUALITY OF YOUR WATCH
Instruction Manual
AP01:WKJS2
WATER RESISTANCE PLACES TO KEEP YOUR WATCH
Check the dial or case back of your watch for the water resistance indication, and use it properly according to the instructions in the table below:
| Indication on the case back | Condition of useDegree of water resistance | Accidental contact with water such as rain and splashes | Swimming, kitchen work and other water-related activities | Skin diving without breathing apparatus | Scuba diving using breathing apparatus and saturation diving using helium gas | |
| WATER RESIST | Water resistance for daily life use | ○ × | × × | |||
| WATER RESIST 5BAR or 10BAR | Enhanced water resistance | 5 bar | ○ ○ | × × | ||
| 10 bar | ○ ○ | ○ × | ||||

WARNING
- NEVER WEAR 10-bar water-resistant watch during saturation diving and air diving. - NEVER WEAR 5-bar water-resistant watch during any type of diving including skin diving.

CAUTION
☐ NEVER PUT 3-bar water-resistant watch into water. ☐ After the 5-bar or 10-bar water-resistant watch is used in the seawater, rinse the watch to remove salt as soon as possible. Otherwise, the watch may become rusty. To do so, do not rinse the watch under running water. Excessive water pressure may be applied to the watch; deteriorating its water resistant quality. Be sure to rinse the watch in a pot or bowl filled with water.
When not in use, the watch may be damaged, deteriorated or broken in the following cases:
○If the watch is exposed to temperatures outside the range between -5^ and +50^ , its performance may be deteriorated or it may stop operating.
○If the watch is left under direct sunlight or extremely high or low temperatures for a long time, this may cause it to gain or lose time.
○If the watch is left at a place where it is exposed to magnetideakage from a TV set, speaker, mobile phone, magnetic necklace, etc., it may gain or lose time.
○If the watch is left at a place where it is exposed to strong vibration, it may be damaged or gain or lose time.
☐If the watch is left at a place where it is exposed to chemical steam or chemicals, it may be deteriorated or damaged.
Examples of such chemicals: Benzine, thinner, manicure, cosmetic sprays, cleaners, toilet detergents, adhesives, mercury, iodized disinfectants, insecticides, etc.
○If the watch is left near a hot spring or kept together with insecticides, it may be deteriorated.
If you decide not to use the watch for a long time, it is recommended that the watch be stored in a box and placed at a well-ventilated place.
PERIODIC CHECK
To enjoy longer use of the watch, it is recommended that you have it overhauled and undergo thorough checking every 2 or 3 years. Depending on the conditions of use, the gasket and other parts may be deteriorated to affect the water resistant quality of the watch due to perspiration or water that may get inside it.
For overhaul and checking, contact the retailer from whom the watch was purchased.
When replacing the parts such as battery, please specify "GENUINE PARTS".
When the periodic check is performed, it is recommended that the gasket and the pushpin be also replaced with new ones.
Features of This Watch
Instruction Manual
AP01:WKJS2
SPM: It stands for “Steps Per Minute”, and represents the number of steps the runner takes in a minute. The SPM is a useful index that helps you maintain the running rhythm right for you.

SPM Function (P. 14)
By sensing with the built-in sensor the acceleration generated in the runner's body during running, this watch measures the number of steps taken, and converts it into the SPM data (the number of steps taken in 1 minute). It also enables you to control the exercise intensity during running. Using the SPM data and the data measured with the 1/100 sec. chronograph function in combination, you can run at different paces, either faster or slower than usual, as desired. During the chronograph measurement, the watch displays, besides the current time, the SPM, lap time, split time, and other running data, which is stored in memory as log data after the measurement is over. The number of steps data is accumulated on a monthly basis, and up to 12 months of such data is stored in memory.
\* Log data:
The data measured in each run is stored in a set in memory, and can be recalled run by run. For details, see P. 17.
To find the exercise intensity right for you
By focusing on the relationship among the "SPM", "speed", and "physical load perceived" during running, you can find the exercise intensity optimum for you, and it will make your running training far more effective.

natural_image
Silhouette of a running person next to a rising trend line graph (no text or symbols)
natural_image
Silhouette of a person running with a line graph overlay (no text or symbols)To control your running pace easily during a race
Knowing the SPM while you are running a race will prevent you from overpacing yourself in the first half and slowing down abruptly in the latter.

natural_image
Silhouette of a running person on a curved path (no text or symbols)To run the uphill road more skillfully
Run the uphill road rhythmically by adjusting your stride so that the SPM obtained on the level road can be maintained. You can run up the slope efficiently with less effort.
To check the change in your running pace in real time
To minimize the change in your running pace, it is necessary to know the change and adjust the pace immediately. By checking the SPM displayed in real time on your watch, you can know when to struggle, and when to slow down.

natural_image
Silhouettes of three runners in motion with a gray arrow pointing right (no text or symbols)
natural_image
Silhouettes of two runners in motion, one running with a sunburst effect (no text or symbols)To check the progress of your running with your own eyes
If the SPM decreases when you run the same distance at the same pace, this means you have acquired a dynamic running form with longer strides. You can check the progress of your running by checking the SPM displayed on the watch.
Features of This Watch
Instruction Manual
AP01:WKJS2

PACE Function (P. 22)
Using the algorithm developed by ASICS Institute of Sports Science, this watch can estimate the running pace and the distance run on the basis of the SPM measured during running.
The estimate of the distance varies depending on the course and weather conditions, and it should be noted that it serves as a general guideline only.
During the chronograph measurement, the watch dis-

plays, besides the current time, the distance run, pace, lap time, split time, and other running data, which is stored in memory as log data after the measurement is over. The distance data is accumulated on a monthly basis, and up to 12 months of such data is stored in memory.
* Customization of the algorithm (P. 6)
When the watch is purchased, the algorithm is intended for general runners.
The algorithm can be customized to provide more accurate estimates by inputting your own running data in the SET_UP mode.


Double Repeat Timer function (P. 11)
Two timers repeat counting down the set time alternately. From 10 seconds up to 99 hours, 59 minutes and 59 seconds can be set for each timer in one-second intervals.

Changeover between two time zones (T1 and T2) (P. 8)
The current time of two time zones can be set in the TIME mode.

3-Channel Daily Alarm function (P. 12)
The alarm can be set to ring at three different times of a day. The alarm of each channel can be engaged or disengaged independently of one another.

300 Lap Memory function (P. 16)
Up to 300 measurement data can be stored in memory.

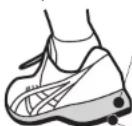
Shoes Impact Meter function (P. 28)
You can see how worn out your shoes are from the conditions of the outsole and the upper, but it is difficult to know to what extent the cushioning performance of your shoes have deteriorated.
The Shoes Impact Meter indicates the reduction in cushioning performance of your shoes using an index based on such data as total number of steps.
• The cushioning performance of the midsole of your shoes will reduce as they are used repeatedly.
• The Shoes Impact Meter indicates numerically the changes in the cushioning performance of the midsole as the Shoes Impact value.
- The watch assumes that the number of steps taken during running corresponds to the number of shocks given to the shoes, and calculates the Shoes Impact value by taking into account such user information as weight, gender and running speed.
Midsole
* Midsole: It serves as a cushion to absorb the shocks given to the shoes when they land on the ground. Outer sole

natural_image
Silhouette of a running person on a paved path (no text or symbols)To Use Your Watch to Suit Your Needs
Instruction Manual
AP01:WJS2

flowchart
graph TD
    A["1. Set the basic data (see P. 9)."] --> B["2. Run the usual distance in the usual pace (see P. 15 or 23)."]
    B --> C["3. Check your average SPM (see P. 17), and customize the algorithm by inputting AVG_PACE data (P. 19)."]
    C --> D["4. Run the usual distance in a pace slower or faster than usual (see P. 15 or 23)."]
    D --> E["5. Customize the algorithm by inputting SLOW_PACE FAST_PACE data (see P. 17 and 19)."]
    E --> F["6. For more recreational runners"]
    F --> G["For more advanced runners"]

    subgraph Data Input
        H["TIME mode: AM 12:31 10:08:59 FRI"] --> I["BASIC SETTING MODE: AM 12:31 10:08:59 WIDE"]
        I --> J["Setting completed"]
        J --> K["Your running distance and speed are calculated with the algorithm developed by ASICS."]
        L["ASICS"] --> M["Running speed"]
        M --> N["SPM"]
        O["AsICS"] --> P["ASICS' s algorithm calculates your running speed and distance based on the data measured while you are running."]
    end

    subgraph Running Data
        Q["SPM CHR mode or PACE CHR mode AVG_PACE"] --> R["Setting completed"]
        R --> S["Your running distance and speed are calculated accurately with the algorithm customized based on your running data."]
        T["SPM LOG mode SET UP mode"] --> U["Setting completed"]
        U --> V["Your running distance and speed are calculated more accurately with the algorithm customized based on your more detailed running data."]
    end

    style Data Input fill:#f9f,stroke:#333
    style Running Data fill:#ccf,stroke:#333
TABLE OF CONTENTS
Instruction Manual AP01:WKJ32
TO PRESERVE THE QUALITY OF YOUR WATCH P.2
Features of This Watch P.4
To Use Your Watch to Suit Your Needs.... P.6
Contents P.7
How to Use the Modes Available in Both SPM and PACE Functions … P.8
■TIME Mode P.8
■BASIC SETTING Mode P.9
■Setting of Other Features in BASIC SETTING Mode P.10
■TIMER Mode P.11
■ALARM Mode P.12
Modes of SPM and PACE Functions ......P.13
■Changeover between Two Functions/ Selection of Each Mode … P.13
How to Use SPM Function P.14
■SPM_CHR (Chronograph) Mode (Preparation Before starting Running) … P.14
■SPM_CHR Mode (Measurement with SPM Function) …… P.15
■SPM_LOG Mode P.17
■SET_UP Mode P.19
■STEPS Mode P.20
■MANUAL+ Mode P.21
How to Use PACE Function P.22
■ PACE_CHR (Chronograph) Mode (Preparation Before starting Running) … P.22
■PACE_CHR Mode (Measurement with PACE Function) …… P.23
■PACE_LOG Mode P.25
■DISTANCE mode P.27
How to use Shoes Impact Meter P.28
■Shoes Impact Meter Display P.28
■Selection of Shoes Impact Meter display P.28
■Initialization of Shoes Impact Meter P.29
■Input of Shoes Impact Value P.29
Product Specifications P.30
Troubleshooting Guide P.31
■Explanation of Marks / Definition of Terms P.32
How to Use the Modes Available in Both SPM and PACE Functions
TIME Mode
Instruction Manual
AP01:WKJS2
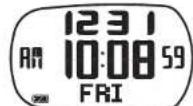
When the TIME mode appears, "TIME" is shown in the lower row of the display for 1 second before the day of the week is displayed instead.

text_image
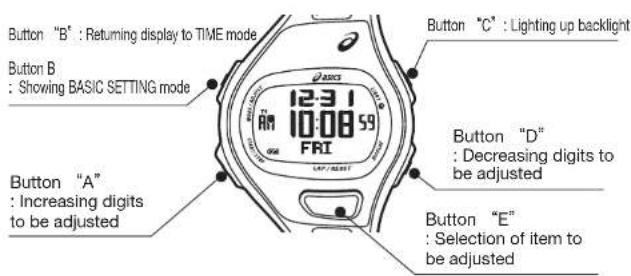
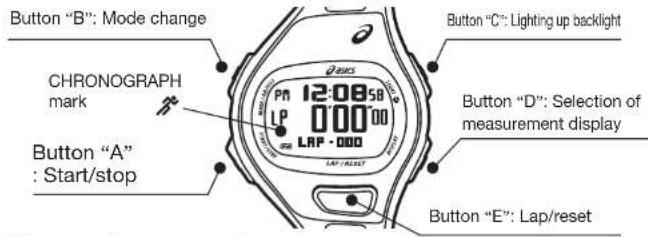
Button "B": Mode change Button "A": Turning on/off button operation confirmation sound 12:31 10:08 59 FRI Button "C": Lighting up backlight Button "D": Changeover between SPM and PACE functions Button "E" (pressed for more than 2 seconds): Changeover between 2 time zones (T1 and T2)Selection of TIME mode display format
Normal or large-digit display can be selected in the BASIC SETTING mode.
Month and date

text_image
Day of the week 12:31 10:08 59 FRI Current time Day of the week and date 10:08 FRI 31 58 Normal display Large-digit displayChangeover between SPM and PACE functions
Pressing button "D" changes over the functions between SPM and PACE. Name of the selected function is shown in the lower row of the display for 2 seconds.
SPM function PACE function

* Once either of the 2 functions is selected, the watch is set to show the modes of the selected function unless the function is changed over to the other by pressing button "D" in the TIME mode.
Turning on/off of the button operation confirmation sound
With each press of button "A", the button operation confirmation sound is turned on and off alternately. When it is turned on, the button operation confirmation sound mark is shown on the display.

Button operation confirmation sound mark
* When the watch is purchased, the button operation confirmation sound is turned off. * When the button is pressed to return to the TIME mode, and to show the newest total time display in the SPM LOG or PACE LOG mode, the button operation confirmation sound beeps in a tone different from usual.
Changeover between T1 and T2 time zones
Desired time zone (T1 or T2) can be selected by keeping button "E" pressed for more than 2 seconds. This dual time function is convenient during trip abroad. The time zone mark ("T1" or "T2") is shown to indicate which time zone is selected.
Time zone mark

Battery life indicator
- This function enables you to know when the battery needs to be replaced. - The power reserve is shown graphically in three levels.


* The battery mark “☐” indicates that the battery is nearing its end. When it is shown, replace the battery with a new one immediately.
How to Use the Modes Available in Both SPM and PACE Functions
In struc to n Man ual AP01: WJS2
BASIC SETTING Mode
text_image
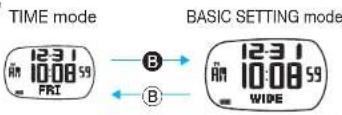
Button "B" : Returning display to TIME mode Button B : Showing BASIC SETTING mode 12:31 10:08 59 FRI UP / RIGHT Button "C" : Lighting up backlight Button "D" : Decreasing digits to be adjusted Button "A" : Increasing digits to be adjusted Button "E" : Selection of item to be adjustedSet the current time and calendar, and the personal data (weight and gender) in the BASIC SETTING mode. Be sure to set the data correctly, as the data set in this mode is used for various functions of this watch.
● To activate the BASIC SETTING mode
Keep button "B" pressed for more than 2 seconds to show the BASIC SETTING mode.
text_image
TIME mode 12:31 10:08 59 FRI B B B B 12:31 10:08 59 WIDE● Set the basic data in the following order:
TIME mode
If the watch is left untouched in the BASIC SETTING mode, it will automatically return to the TIME mode in 2 to 3 minutes.
BASIC SETTING mode

flowchart
graph LR
    A["CONT"] --> B["OFF"]
    B --> C["Eco"]
    C --> D["SH I 122 IMPACT"]
    D --> E["MALE"]
    E --> F["65 W (K9)"]
    F --> G["UNIT (K9)"]
    G --> H["12H 12/24H"]
    H --> I["A or D"]
    I --> J["Month"]
    J --> K["Year"]

    subgraph Display format
        L["12 19 10.08 59"] --> M["WIDE"]
        N["Auto-backlight See P. 10."] --> O["AUTO-05"]
        P["Seconds"] --> Q["SECOND"]
        R["Minute"] --> S["MINUTE"]
        T["Hour"] --> U["HOUR"]
        V["Date"] --> W["DAY"]
        X["Month"] --> Y["MONTH"]
    end

    style Display format fill:#f9f,stroke:#333
    style Auto-backlight fill:#ccf,stroke:#333
    style Seconds fill:#cfc,stroke:#333
    style Month fill:#fcc,stroke:#333
    style Date fill:#cff,stroke:#333
    style Year fill:#ffc,stroke:#333

    note right of L: Pressing button "A" or "D" while the seconds digits are flashing will reset the digits to "00". If the button is pressed while the seconds read any number from "30" to "59", 1 minute will be added.
    note right of T: Once the year, month and date digits are set, the day of the week is automatically set.
Contrast
See P. 10.
ECO function See P. 10.
Shoes Impact Meter
See P. 28.
Settable range: 0-9999
Gender
ALE or FEMALE
Weight
Settable range:
30 kg\~120 kg
66 lb\~264 lb
Measurement unit 12- or 24-hour time system kg and km, or lb and mile
If button "A" or "D" is kept pressed, the digits move quickly. "A" and "D" are attached to the displays above whose digits can be moved quickly by pressing the respective buttons.
How to Use the Modes Available in Both SPM and PACE Functions
Instruction Manual
AP01:WKJS2
Setting of Other Features in BASIC SETTING Mode
Changeover of display format
The display format changes over between the normal and large-digit display formats by pressing button "A" or "D".

Normal display

A or D

Large-digit display
Turning ON/OFF of auto-backlight
When the auto-backlight is turned on, the backlight lights up automatically for 2 seconds with each press of any button.
Default setting

When the auto-backlight is turned on, the auto-backlight mark is shown on the right side end of the display.
When the watch is purchased, the auto-backlight is turned off. Even while the function is turned on, the backlight will not light up automatically while in the BASIC SETTING mode, and while setting data in the ALARM, TIMER and MANUAL+ modes.

Setting of ECO function
The ECO function automatically turns off the display after the preset time (1, 3, 6 or 12 hours) has elapsed to save the battery power.
Default setting

Preset times available

- When the ECO function is activated, the ECO mark "ECO" is shown on the lower end of the display.
- If the display is turned off by the ECO function, it turns on again by pressing any of the buttons.
- Note that the ECO function will work only when the chronograph and timer are stopped and reset.
- When the watch is purchased, the ECO function is turned off.
Setting of contrast (CONT)
The contrast of the display can be adjusted in 7 levels for easy viewing.
Default setting


* When the watch is purchased, the contrast is set to "0".
Setting of Shoes Impact Meter
When the Shoes Impact Meter is set for the shoes already in use, input the Meter value corresponding to the accumulated running distance by referring to the guideline table (see P. 29).
* For more details of the use of the Shoes Impact Meter, see P. 28.
How to Use the Modes Available in Both SPM and PACE Functions
TIMER Mode
Instruction Manual AP01:WKJS2
When the TIMER mode appears, "TIMER" is shown in the lower row of the display for 1 second before the TIMER display is shown.
text_image
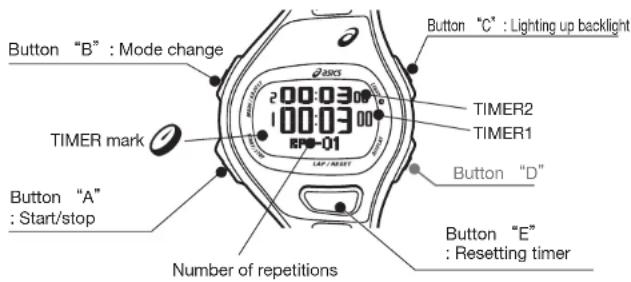
Button "B" : Mode change TIMER mark Button "A" : Start/stop Number of repetitions Timer mark 200:03 100:03 RPM-01 LAP/RESET Button "C" : Lighting up backlight TIMER2 TIMER1 Button "D" Button "E" : Resetting timerStart, Stop and Reset of the Timer
To start timer: Press button "A" to start the timer. The TIMER mark starts flashing.
While the timer is counting down:
• To stop the timer during countdown, press button "A" again.
- If "2" or more times is set for the number of repetitions, the timer repeats countdown the number of times you have set.
- The warning beep starts sounding 3 seconds before the set time is up, and the time-up beep sounds for 3 seconds after the set time is up.
• To stop the time-up beep, press any of the buttons.
When the timer is stopped:
• To reset the timer, press button "E".
• To restart the timer, press button "A".
After the timer finished counting down the set time: It will be reset to the set time automatically.s
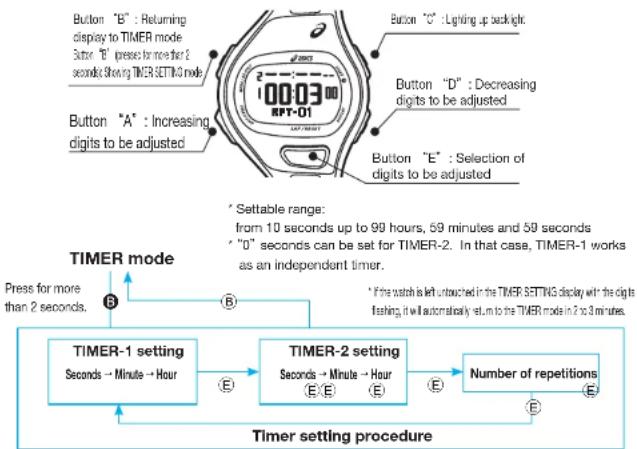
TIMER Setting
- Keep button "B" pressed for more than 2 seconds. The seconds digits of the timer start flashing. ^a Unless the timer is reset, the TIMER SETTING display will not appear. For the method of resetting the timer, see "Start, Stop and Reset of the Timer" above.
flowchart
graph TD
    A["TIMER-1 setting\nSeconds → Minute → Hour"] --> B["TIMER-2 setting\nSeconds → Minute → Hour"]
    B --> C["Number of repetitions"]
    C --> D["TIMER setting procedure"]
    style A fill:#f9f,stroke:#333
    style B fill:#ccf,stroke:#333
    style C fill:#cfc,stroke:#333
    style D fill:#fcc,stroke:#333
TIMER-2 Operation
- TIMER-2 starts countdown as soon as TIMER-1 has finished counting down the set time.
• The time-up beeps for TIMER-1 and TIMER-2 sound differently. - When "0" is set as the countdown time of TIMER-2, "-" is shown.
Start

flowchart
graph LR
    A["TIMER1"] --> B["TIMER2"]
    B --> C["TIMER1"]
    C --> D["TIMER2"]
    style A fill:#f9f,stroke:#333
    style B fill:#f9f,stroke:#333
    style C fill:#f9f,stroke:#333
    style D fill:#f9f,stroke:#333
How to Use the Modes Available in Both SPM and PACE Functions
ALARM Mode
Instruction Manual AP01: WJS2
When the ALARM mode appears, "ALARM" is shown in the lower row of the display for 1 second before the alarm channel number ("AL-1") is shown instead.

text_image
Button "B" : Mode change Current time 6:06:58 4:30 Designated alarm time Button "A" : Engagement/ disengagement of alarm ALARM mark IL-1 Button "C" : Lighting up backlight Button "D" : Alarm sound test Button "E" : Selection of alarm channelEngagement/disengagement of the alarm
- The alarm of each channel can be engaged or disengaged independently of one another.
- When the alarm of any one of the channels is engaged, t he ALARM mark (1)) is displayed.
• The alarm sounds at the designated time for 20 seconds.
• To stop the alarm, press any of the buttons.
Selection of the alarm channel
- When the ALARM display is first shown, "AL-1" (alarm channel No. 1) is displayed.
• The alarm sounds differently from channel to channel.
The alarm sound can be tested by pressing button "D".

flowchart
graph TD
    A["AL-1 AL-2 AL-3"] -->|E| B[" "]
    B -->|E| A
Alarm time setting
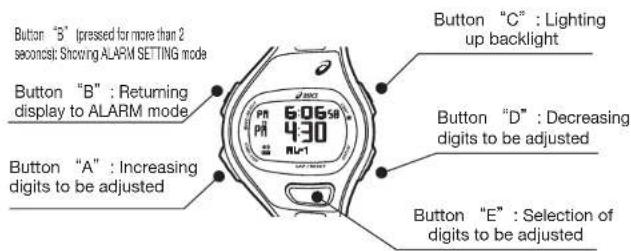
text_image
Button "5" I pressed for more than 2 seconds; Showing ALARM SETTING mode Button "B" : Returning display to ALARM mode Button "A" : Increasing digits to be adjusted Button "C" : Lighting up backlight Button "D" : Decreasing digits to be adjusted Button "E" : Selection of digits to be adjusted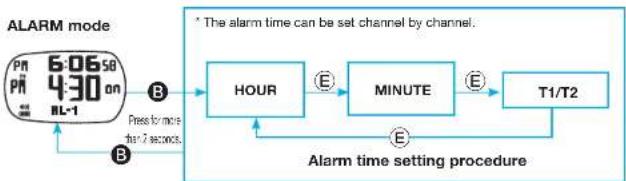
flowchart
graph LR
    A["6:06:50 Pn 4:30 on BL-1"] -->|B. Preform more for 7 seconds| B["HOUR"]
    B -->|E.| C["MINUTE"]
    C -->|E.| D["T1/T2"]
    D -->|E.| B
    style A fill:#f9f,stroke:#333
    style B fill:#ccf,stroke:#333
    style C fill:#cfc,stroke:#333
    style D fill:#fcc,stroke:#333
* The alarm rings according to the time of the selected time zone (T1 or T2). * When the display returns to the ALARM mode after the alarm setting procedure, the alarm is engaged automatically.
Modes of SPM and PACE Functions
Instruction Manual
AP01:WJ02
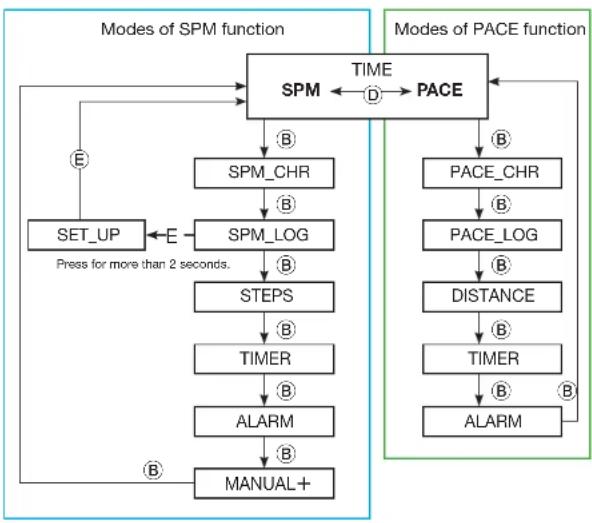
Changeover between Two Functions/ Selection of Each Mode
With each press of button "D" in the TIME mode, the SPM and PACE functions change over alternately.
With each press of button "B", each mode of the selected function appears in the order below.
* To change over the function from SPM to PACE or vice versa while in any of the modes of those functions, return the display to TIME mode, and then, press button "D" to change over the function.
To show the SET_UP mode, keep button "E" pressed for more than 2 seconds in the SET_LOG mode.
flowchart
graph TD
    A["SET_UP"] -->|E Press for more than 2 seconds.| B["SPM_LOG"]
    B -->|B| C["STEPS"]
    C -->|B| D["TIMER"]
    D -->|B| E["ALARM"]
    E -->|B| F["MANUAL+"]
    F --> G["SPM"]
    G -->|D TIME| H["PACE"]
    H -->|B| I["PACE_CHR"]
    I -->|B| J["PACE_LOG"]
    J -->|B| K["DISTANCE"]
    K -->|B| L["TIMER"]
    L -->|B| M["ALARM"]
    M -->|B| N["End"]
    style A fill:#f9f,stroke:#333
    style N fill:#f9f,stroke:#333
Modes shown when SPM function is selected
| Mode Description Reference | ||
| TIME | The current time and calendar are displayed, and the basic settings are made. Selection of the function is made between SPM and PACE. | P.8 |
| SPM_CHR | Chronograph measurement of SPM and other running data is made. | P.14 |
| SPM_LOG Log data including SPM can be checked lap by lap. | P.17 | |
| SET_UP | This mode can only be activated in the SPM_LOG mode. PACE data is input. | P.19 |
| STEPS | The total number of steps taken in each month can be checked for the previous 12 months. | P.20 |
| TIMER | The two timers can be set to count down two different times successively. | P.11 |
| ALARM | The alarm can be set to ring at three different times of a day. | P.12 |
| MANUAL+ The data input in the SET_UP mode can be adjusted. | P.21 | |
Modes shown when PACE function is selected
| Mode Description Reference | ||
| TIME | The current time and calendar are displayed, and the basic settings are made.Selection of the function is made between SPM and PACE. | P.8 |
| PACE_CHR | Chronograph measurement of PACE and other running data is made. | P.22 |
| PACE_LOG | Log data including distance run and average pace can be checked. | P.25 |
| DISTANCE | The total distance run in each month can be checked for the previous 12 months. | P.27 |
| TIMER | The two timers can be set to count down two different times successively. | P.11 |
| ALARM | The alarm can be set to ring at three different times of a day. | P.12 |
How to Use SPM Function
Instruction Manual AP01:WKJS2
SPM\_CHR (Chronograph) Mode (Preparation Before starting Running)
When the SPM_CHR mode appears, "SPM_CHR" is shown in the lower row of the display for 1 second before the chronograph display is shown.

text_image
Button "B" : Mode change Number of laps in memory Button "A" : Start/stop 12:08:58 LP 0'00'00' LAP · 000 LAP / RUST Button "C" : Lighting up backlight Button "D" : Selection of measurement display Button "E" : Lap/reset Shoes Impact Meter* For the distinction among the displays when the chronograph is reset, measuring and stopped, see P. 16.
Selection of measurement display
Note that the measurement display cannot be changed during measurement.

flowchart
graph LR
    A["SP 00000 -- LRP · 000"] --> B["Current time PM 120058"]
    B --> C["Split time SP LP 00000 00000 GPM"]
    C --> D["Lap time LP 00000 -- LRP · 000"]
    style A fill:#f9f,stroke:#333
    style B fill:#ccf,stroke:#333
    style C fill:#cfc,stroke:#333
    style D fill:#fcc,stroke:#333
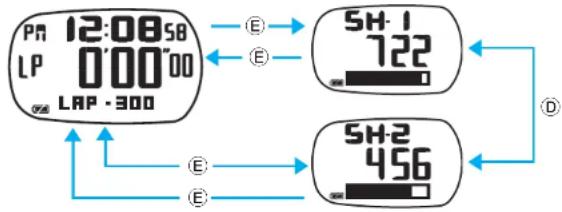
How to check the Shoes Impact Meter
SPM_CHR mode Shoes Impact Meter

flowchart
graph TD
    A["12:08:58 LP 0'00'00 LAP·000"] -->|E| B["5H-1 722"]
    A -->|E| C["5H-2 456"]
    A -->|D| C
* Press button "E" to return to the SPM_CHR mode.
^ Selection of the shoes (SH1 or SH2) can be made by pressing button "D". The Shoes Impact Meter for the selected shoes will be shown thereafter.
* For more detailed information on the Shoes Impact Meter, see P. 28.
Checking the memory capacity
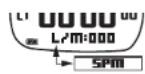
- When the chronograph is reset, "SPM" and "L/M" (Lap Memory: number of measurement data stored in memory) are shown alternately in the lower row o
- The number of measurement data in memory accumulates each time running data measurement is made.
- Up to 300 measurement data can be stored in memory.
How to Use SPM Function
Instruction Manual AP01: WJS2
SPM\_CHR Mode (Measurement with SPM Function)
text_image
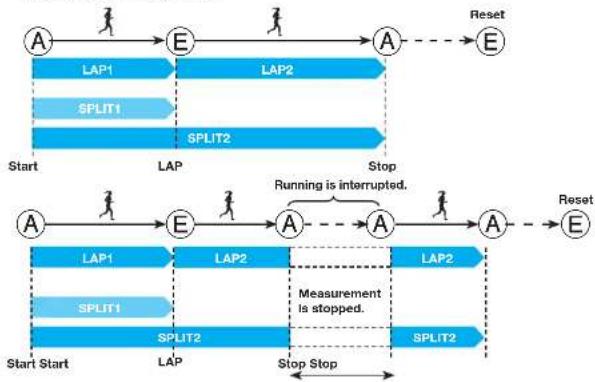
Button "B": Mode change CHRONOGRAPH mark Button "A" : Start/stop 12:08:58 000:00 LAP - DOO LAP / RESET Button "C": Lighting up backlight Button "D": Selection of measurement display Button "E": Lap/reset• Chronograph measurement
- Operate the button as shown in the illustrations below to measure lap and split times while you are running.
flowchart
graph TD
    A1["A"] --> E1["E"]
    E1 --> A2["A"]
    A2 --> Reset["E"]

    subgraph Start
        A1 --> S11["SPLIT1"]
        S11 --> S12["SPLIT2"]
        S12 --> A2

    end

    subgraph Stop
        A2 --> S13["SPLIT2"]
        S13 --> A2

    S11 --> L1["LAP1"]
    S12 --> L2["LAP2"]
    S13 --> L3["Measurement is stopped."]
    S13 --> L4["Stop Stop"]

    style Start fill:#f9f,stroke:#333
    style Stop fill:#bbf,stroke:#333
Lap time: Time required to run any given section of the entire distance.
(Ex.: Time required to run a circuit in a track race)
Split time: Time required to run from the start to any given point of the entire distance (10 or 20 km point).
- Changeover of displays during measurement
- When each of the displays in the upper box is selected before measurement, the display just below it in the lower box will appear, respectively, by pressing buttonD during measurement.
text_image
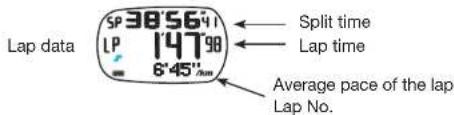
Display selected before measurement Split time SP 38'56'41 164 SPM SPM SPM Current time AM 12:08'58 164 SPM SPM SPM Lap time SP 38'56'41 LP 147'98 164 SPM Lap time SPM SPM Lap time After 5 seconds After 5 seconds After 5 seconds After 5 seconds D ↑ D ↑ D ↑ D ↑ Current time Lap time AM 12:08'58 LP 147'98 6.9 - Distance run Current time Lap time SP 38'56'41 LP 147'98 6.9 - Distance run Distance run Distance run Current time Lap time PP 12:08'58 SP 38'56'41 6.9 - Display shown by pressing the button- Display of lap data
- When the lap time is measured by pressing button"E" corresponding lap data is displayed for 6 seconds.
text_image
Lap data SP 385641 LP 14798 LBP-035 Split time Lap time Average SPM of the lap/ Lap No.* The lap data is displayed in the format above irrespective of the measurement display selected before starting the measurement.
"SF' and LP' shown on the left side of the display stand for 'spit time' and 'lap time', respectively.
SP: split time, LP: lap time
* When the lap time or split time measured exceeds 1 hour; LP or SP will disappear, respectively.
How to Use SPM Function
Instruction Manual
AP01:WJS2
SPM\_CHR Mode (Measurement with SPM Function)
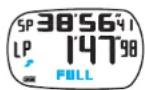
- Up to 300 measurement data can be stored in memory.
* "L/M" (Lap Memory) refers to the number of measurement data stored in memory. - By pressing button "E" to reset the chronograph after measurement, the running data measured is stored in memory.
- When the number of measurement data in memory reaches 300, the data measured thereafter cannot be stored in memory. The table below shows the number of data stored in memory after one measurement sequence for your reference.
| Chronograph measurement sequence | Number of lap times measured | Number of data stored in memory |
| Start Stop Reset Nil 3 | ||
| Start Lap-1 Stop Reset 1 4 | ||
| Start Lap-1 Lap-n Stop Reset | n | 3+n |
- When the number of data in memory nears the capacity limit (up to 300 data can be stored), the storable number of data can be increased by deleting the log data.
* For the method of deleting the log data, see P. 18.
* When flashing "FULL" is shown instead of lap No. after a lap time is measured:
- Data measured thereafter will not be stored in memory. - Average SPM for the lap will not be displayed, either.
●Distinction among the displays when the chronograph is reset, measuring and stopped

text_image
Display in the mid row CHRONOGRAPH markThe status of the chronograph can be distinguished by the display in the mid row or the status of the CHRONOGRAPH mark.
If you stand still while the
measurement is in progress,
"----" is sbwn in the mid row.
| Chronograph reset | Measurement in progress | Measurement stopped | |
| Display in mid row | |||
| CHRONOGRAPH mark | Not shown | Flashing | Remains shown |
How to Use SPM Function
SPM\_LOG Mode
Instruction Manual
AP01:WJS2
When the SPM_LOG mode appears, "SPM_LOG" is shown in the lower row of the display for 1 second before the Total Time display is shown.
Button "B" : Mode change
Button "B" (pressed for more
than 2 seconds): Deleting data
The newest log data set in memory
* When no log data is stored in memory:
Button "A"
: Selection of log data set

text_image
Button "C" : Lighting up backlight 120 455166 164 EPM Button "D" : Selection of log data set Button "E" : Selection of log Button "E" (pressed for m seconds); Activation of SETDetails of log data in SPM\_LOG mode
- Log data is stored and recalled in a set on a run-by-run basis.
| Log data element |
| Year, month and date of measurement, total time, and average SPM |
| Year, month and date of measurement, and total number of steps |
| Split time, lap time, average SPM of the lap, and lap No. |
| Best lap time, and lap No. |
| Average lap time |
* Note that different data elements are shown in the SPM_LOG and PACE_LOG modes.
Selection of log data set
•The newest log data set is displayed first. Press button "A" or "D" to select the desired log data set.

flowchart
graph LR
    A["The newest log data set in memory"] -->|A| B["The next previous log data set"]
    B -->|D| C["The oldest log data set in memory"]
    C -->|A| A
    B -.->|D| A
How to check the log data elements
- With each press of button "E", the log data elements can be checked in the following order. - By keeping button "E" pressed for more than 2 seconds while the total time or lap-by-lap data is displayed, the SET_UP mode is activated (for more details of the SET_UP mode, see P. 19).
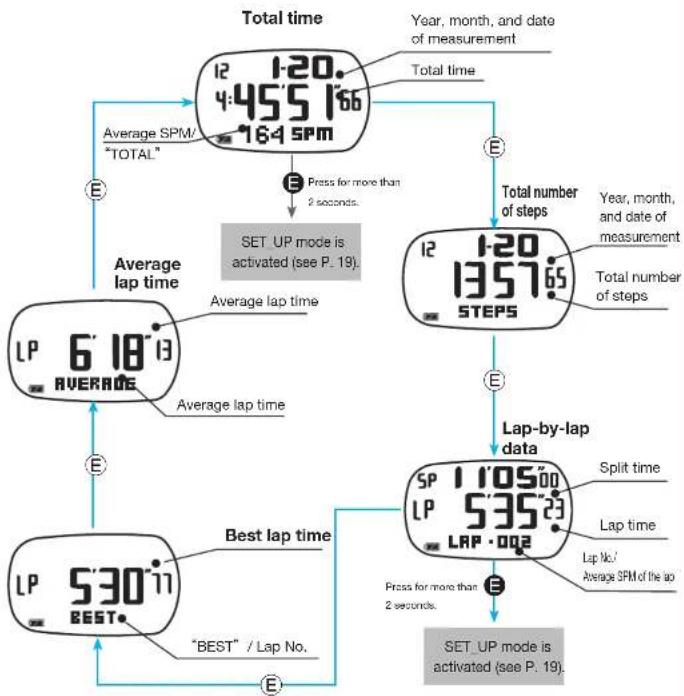
flowchart
graph TD
    A["12:00 4:45'5166 16:4 SPM"] --> B["Press for more than 2 seconds"]
    B --> C["SET UP mode is activated (see P. 19)"]
    C --> D["12:00 13:57'65 STEPS"]
    D --> E["Lap-by-lap data"]
    E --> F["SET_UP mode is activated (see P. 19)"]
    F --> G[""BEST" / Lap No."]
    G --> H["Best lap time"]
    H --> I["LP 5:30 '11 BEST"]
    I --> J["Average lap time"]
    J --> K["6:18 '13 AVERAGE"]
    K --> L["Average lap time"]
    L --> M["Total time"]
    M --> N["Year, month, and date of measurement"]
    N --> O["Total number of steps"]
    O --> P["Year, month, and date of measurement"]
    P --> Q["Total number of steps"]
    Q --> R["Total time"]
    R --> S["Year, month, and date of measurement"]
    S --> T["Total time"]
    T --> U["Total time"]
How to Use SPM Function
SPM_LOG Mode
Instruction Manual
AP01:WJS2
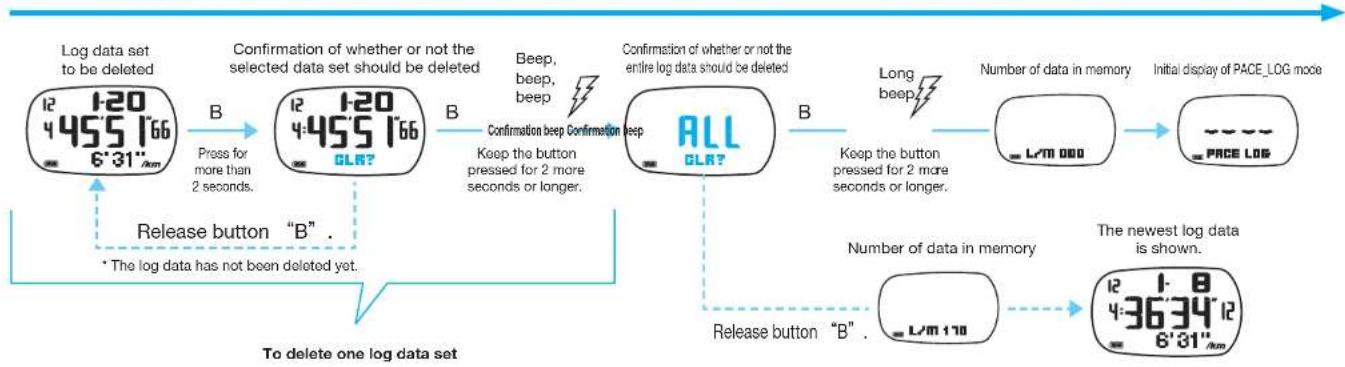
Deletion of log data stored in memory
- When the number of measurement data in memory nears the capacity limit (up to 300 data can be stored), the storable number of data can be increased by deleting the log data.
To delete the entire log data
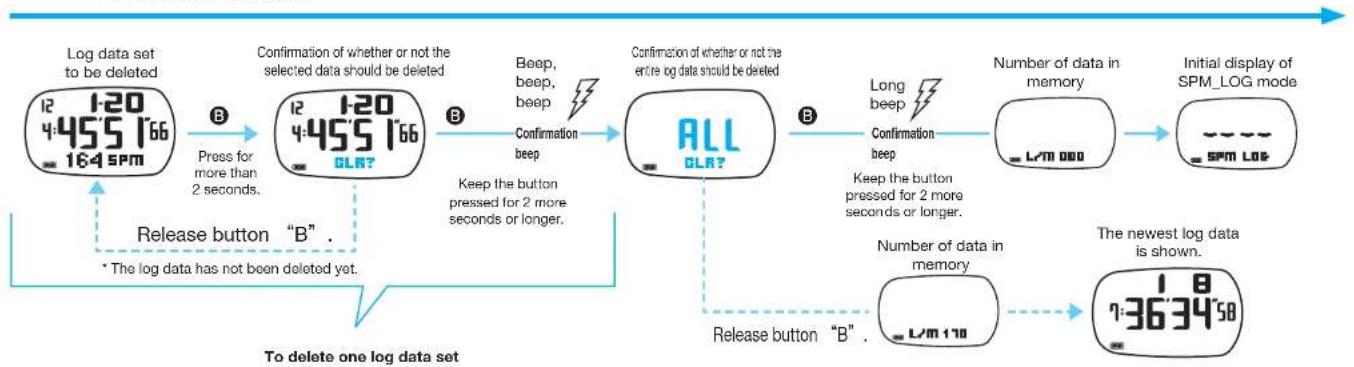
flowchart
graph TD
    A["Log data set to be deleted\n12 1:20\n4:455 166\n164 5PM"] --> B["Press for more than 2 seconds."]
    B --> C["Confirmation of whether or not the selected data should be deleted\n12 1:20\n4:455 166\nOLR?"]
    C --> D["Beep, beep, beep\nConfirmation beep"]
    D --> E["All\nOLR?"]
    E --> F["Long beep\nConfirmation beep\nKeep the button pressed for 2 more seconds or longer."]
    F --> G["Number of data in memory\nL/M 000"]
    G --> H["Initial display of SPM_LOG mode\nSPM LOG"]
    E --> I["Release button "B" .\n* The log data has not been deleted yet."]
    I --> J["The newest log data is shown.\n1:36'34'58"]
    J --> K["Release button "B" ."]
Notes on deletion of log data
* Be sure to keep button "B" pressed until the confirmation beep sounds. Otherwise, the log data will not be deleted.
^ The entire log data can be deleted only after one log data set is deleted.
* The log data in memory can be checked or deleted in both the SPM_LOG and PACE_LOG modes. If any log data set is deleted in one mode, it cannot be checked in the other, either.
* Before deleting the log data, check that the chronograph is reset.
How to Use SPM Function
SET\_UP Mode
Instruction Manual
AP01:WKJS2
To activate the SET_UP mode, press button "E" for more than 2 seconds while the total time or lap-by-lap data is shown in the SPM_LOG mode.
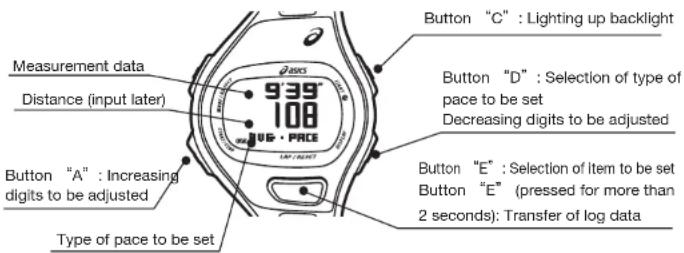
text_image
Measurement data Distance (input later) 9'39" 108 UG·PRICE Type of pace to be set Button "A" : Increasing digits to be adjusted Button "C" : Lighting up backlight Button "D" : Selection of type of pace to be set Decreasing digits to be adjusted Button "E" : Selection of item to be set Button "E" (pressed for more than 2 seconds): Transfer of log dataLog data to be set for each type of pace
For the SLOW PACE and FAST PACE settings, use the log data obtained when you run more slowly (with lower SPM) and faster (with higher SPM) than usual, respectively.
| Type of pace to be set | AVG · PACE SLOW · PACE FAST · PACE | ||
| Log data in SPM_LOG mode |  Usual pace Usual pace |  More slowly (with lower SPM) than usual More slowly (with lower SPM) than usual |  Faster (with higher SPM) than usual Faster (with higher SPM) than usual |
* The distances run to measure the log data to be set for the SLOW PACE and FAST PACE need not be the same.
- Only one type of pace can be set in one sequence of the SET_UP procedure. To set another type of pace, return to the SPV_LOG mode, and transfer the corresponding log data again. - Note that, if the data set for the AVG_PACE is renewed, the data set for the SLOW_PACE and FAST_PACE will be initialized and cleared.

flowchart
graph TD
    A["SPM_LOG mode"] --> B["Total time: 120/455/166/164 SPM"]
    A --> C["Lap-by-lap data: 1105/00/535/23/00/002"]
    B --> D["Press for more than 2 seconds."]
    C --> E["Mode name indication"]
    D --> F["SET_UP"]
    E --> G["SLOW-PACE"]
    E --> H["FAST-PACE"]
    G --> I["Selection of type of pace to be set"]
    H --> J["Input of distance run: 38'56'41 100 km DISTANCE"]
    I --> K["Time mode: 12:31 AM 10:08:59 FRI"]
    J --> L["Confirmation of PACE and SPM"]
    L --> M["Confirmation of transferred time: 38'56'41 722 CONFIRM"]
    M --> N["Confirmation of pace and SPM"]
    N --> O["Confirmation of completion of setting procedure"]
    O --> P["After 1 seconds"]
    P --> Q["Complete"]
    Q --> R["Long beep"]
    R --> S["PACE"]
    S --> T["SPM"]
    T --> U["Confirmation of transferred time"]
    U --> V["E"]
    V --> W["The measurement data transferred can be adjusted here."]
    style A fill:#f9f,stroke:#333
    style B fill:#ccf,stroke:#333
    style C fill:#cfc,stroke:#333
    style D fill:#fcc,stroke:#333
    style E fill:#cff,stroke:#333
    style F fill:#ffc,stroke:#333
    style G fill:#fcc,stroke:#333
    style H fill:#fcc,stroke:#333
    style I fill:#ffc,stroke:#333
    style J fill:#fcc,stroke:#333
    style K fill:#fcc,stroke:#333
    style L fill:#fcc,stroke:#333
    style M fill:#fcc,stroke:#333
    style N fill:#fcc,stroke:#333
    style O fill:#fcc,stroke:#333
    style P fill:#fcc,stroke:#333
    style Q fill:#fcc,stroke:#333
    style R fill:#fcc,stroke:#333
    style S fill:#fcc,stroke:#333
    style T fill:#fcc,stroke:#333
    style U fill:#fcc,stroke:#333
How to Use SPM Function
STEPS Mode
Instruction Manual
AP01:WJS2
When the STEPS mode appears, "STEPS" is shown in the lower row of the display for 1 second before the number of steps is shown.
text_image
Button "B" : Mode change Button "B" (pressed for more than 2 seconds): Deletion of data Month 20 13 26 36 JAN - STEPS Year Number of steps (The display indicates 263,658 steps.) Button "C" : Lighting up backlight Button "E" : Selection of monthly data * When no number of steps data is stored in memory: STEPSNumber of steps data
The total number of steps taken during a run are accumulated, and stored in memory on a monthly basis. Up to 12 months of such data is stored, and can be recalled month by month in order starting from the data of the current month.

flowchart
graph LR
    A["20 13°<br>26 36 58<br>JAN:STEPS"] --> B["20 12<br>45 92 16<br>DEC:STEPS"]
    B --> C["20 12<br>FEB:STEPS"]
    D["Measurement year"] --> B
    E["Measurement month"] --> A
    F["Number of steps data of the current month"] --> A
    G["Number of steps data of the previous month"] --> B
    H["Number of steps data of the 11 months ago"] --> C
Deletion of number of steps data

flowchart
graph LR
    A["20 12 105 SEP"] -->|Press for more than 2 seconds.| B["ALL BLR?"]
    B -->|Beep, beep, beep\nConfirmation beep| C["STEFE"]
    C -->|The entire number of steps data has been deleted.| D["Release the button."]
    D --> A
    note["The data has not been deleted yet."] -.-> A
* The number of steps data cannot be deleted month by month.
* Before deleting the number of steps data, check that the chronograph is reset.
* Deletion of the number of steps data will not affect the other data in memory such as the data recorded in the SPM_LOG, PACE_LOG and DISTANCE modes, which remains undeleted.
How to Use SPM Function
MANUAL+ Mode
Instruction Manual
AP01:WJS2
When the MANUAL+ mode appears, "MANUAL+" is shown in the lower row of the display for 1 second before the AVG_PACE display is shown.
Button "B": Mode change

text_image
Button "B" (pressed for more than 2 seconds); Deletion of data SPM PACE 184 449 AUG • PACE UP / RESET Button "C" : Lighting up backlight Button "D" : Selection of type of pace to be set Decreasing digits to be adjusted Button "E" : Selection of digits to be adjusted ' if the chronograph is not reset, 'CHR_in_Use' is shown. CHR in USEAdjustment of data set in the SET_UP mode
By following the procedure below, the data set in the SET_UP mode can be adjusted manually.
Deletion of data
Deletion of the pace data of one type affects the pace data of the other types differently depending on which type of pace data is deleted.
| Type of pace data to be deleted | Status of pace data |
| AVG · PACE | All types of pace data is deleted. |
| SLOW · PACE | Only the pace data of the AVG_PACE remains undeleted. |
| FAST · PACE |

flowchart
graph LR
    A["184 449 RUS·PACE"] -->|B Press for more than 2 seconds| B["184 449 OLR?"]
    B -->|B Keep the button pressed for 2 more seconds or longer.| C["--- RUS·PACE"]
flowchart
graph LR
    A["AVG_PACE SLOWPACE"] --> B["SLOW_PACE"]
    B --> C["FAST_PACE"]
    D["Adjustment of pace"] --> E["449_184_SPM"]
    E --> F["Adjustment of SPM"]
    F --> G["Error beep"]
    G --> H["IRVALID"]
    H --> I["Long beep"]
    I --> J["Confirmation beep"]
    J --> K["NOTE that, if the data set for the AVG_PACE is renewed, the data set for the SLOW PACE and FAST PACE will be initialized and cleared."]
    L["If the corresponding pace data has not been set, * is shown."] --> M["FAST_PACE"]
    N["If the data of the AVG_PACE has not been set, selection of SLOW PACE or FAST PACE display cannot be made."] --> O["FAST_PACE"]
    P["NOTE that, if the data set for the AVG_PACE is renewed, the data set for the SLOW PACE and FAST PACE will be initialized and cleared."] --> Q["FAST_PACE"]
How to Use PACE Function
Instruction Manual AP01:WKJS2
PACE\_CHR (Chronograph) Mode (Preparation Before starting Running)
When the PACE CHR mode appears, "PACE CHR" is shown in the lower row of the display for 1 second before the chronograph display is shown.
text_image
Button "B" : Mode change Number of laps in memory Button "A" : Start/stop 12:08:58 LP 000 000 LAP · 000 Button "C" : Lighting up backlight Button "D" : Selection of measurement display Button "E" : Lap/reset Shoes Impact Meter* For the distinction among the displays when the chronograph is reset, measuring and stopped, see P. 26.
- Selection of measurement display
Note that the measurement display cannot be changed during measurement.
flowchart
graph LR
    A["Split time SP 00000 00 PRDS"] --> B["Current time PA 12:08s8 00 PRDS"]
    B --> C["Split time SP LP 00000 000000 PRDS"]
    C --> D["Current time PA 12:08s8 00 PRDS"]
    D --> E["End"]
    style A fill:#f9f,stroke:#333
    style E fill:#f9f,stroke:#333
How to check the Shoes Impact Meter
Detailed information has indicated to P. 28

flowchart
graph TD
    A["PAC_CHR mode"] -->|E| B["Shoes Impact Meter"]
    C["LP 12:08 58"] -->|E| B
    D["0'00"00"] -->|E| B
    E["LAP·000"] -->|E| B
    F["SH-1 7:22"] --> G["Shoes Impact Meter"]
    H["SH-2 4:56"] --> G
    B --> I["Shoes Impact Meter"]
    G --> J["Shoes Impact Meter"]
* Press button "E" to return to the PACE CHR mode.
* Selection of the shoes (SH1 or SH2) can be made by pressing button "D".
The Shoes Impact Meter for the selected shoes will be shown thereafter.
* For more detailed information on the Shoes Impact Meter, see P. 28.
Checking the memory capacity
- When the chronograph is reset, "PACE" and "L/M" (Lap Memory: number of measurement data stored in memory) are shown alternately in the lower row of the display.
- The number of measurement data in memory accumulates each time running data measurement is made.
- Up to 300 measurement data can be stored in memory.
How to Use PACE Function
Instruction Manual
AP01:WJS2
PACE\_CHR Mode (Measurement with PACE Function)

text_image
Button "B" : Mode change CHRONOGRAPH mark Button "A" : Start/stop 12:08 58 1P 000 LAP · 000 Button "C" : Lighting up backlight Button "D" : Selection of measurement display Button "E" : Lap/resetChronograph measurement
Operate the button as shown in the illustrations below to measure lap and split times while you are running.
flowchart
graph LR
    A1["A"] --> E1["E"]
    E1 --> A2["A"]
    A2 --> Reset["E"]

    subgraph LAP1
        A1 --> SPLIT1["SPLIT1"]
        SPLIT1 --> A2
    end

    subgraph SPLIT2
        A2 --> SPLIT2["SPLIT2"]
        SPLIT2 --> A2

    subgraph_Measurement["Measurement is stopped."]
        A2 --> SPLIT2
        SPLIT2 --> A2

    StartStart["Start Start"] --> A1
    StartStart --> E1
    E1 --> SPLIT1
    SPLIT1 --> A2

    A2 --> Reset
    SPLIT2 --> A2

    subgraph_Running["Running is interrupted."]
        A2 --> Measurement
        Measurement --> SPLIT2
        SPLIT2 --> A2

    StartStop["Stop Stop"] --> SPLIT2
    SPLIT2 --> A2

    style A1 fill:#cce5ff,stroke:#333
    style E1 fill:#cce5ff,stroke:#333
    style SPLIT1 fill:#cce5ff,stroke:#333
    style SPLIT2 fill:#cce5ff,stroke:#333
    style Reset fill:#cce5ff,stroke:#333
Lap time: Time required to run any given section of the entire distance. (Ex.: Time required to run a circuit in a track race) Split time: Time required to run from the start to any given point of the entire distance (10 or 20 km point).
Changeover of displays during measurement
- When each of the displays in the upper box is selected before measurement, the display just below it in the lower box will appear, respectively, by pressing button "D" during measurement.

text_image
Display selected before measurement Split time Distance run SP 38'56"1 12" 6'45" PACE PACE Distance run Current time Distance run AM 12:08SB 12.0" 6'45" PACE Split time Lap time SP 38'56"1 LP 147"98" 6.9" PACE Current time SPLIT time AM 12:08SB SP 000"00" 8'45" After 5 seconds After 5 seconds After 5 seconds After 5 seconds D ↑ After 5 seconds D ↓ After 5 seconds D ↓ After 5 seconds D ↑ After 5 seconds Current time Lap time SP 12:08SB LP 147"98" 164 SPM SPM SPM Current time Lap time SP 38'56"1 LP 147"98" 164 SPM PACE Current time Lap time SP 12:08SB LP 530" 164 SPM SPM SPM Lap time Distance run SPM 550"11" 194" 164 SPM SPM Display shown by pressing the buttonDisplay of lap data
- When the lap time is measured by pressing button "E", corresponding lap data is displayed for 6 seconds.
text_image
Lap data 5P 38'56'4' LP 147'98' 6'45"Δm Split time Lap time Average pace of the lap Lap No.* The lap data is displayed in the format above irrespective of the measurement display selected before starting the measurement.
* "SP" and "LP" shown on the left side of the display stand for "split time" and "lap time", respectively. SP: split time, LP: lap time
* When the lap time or split time measured exceeds 1 hour, "LP" or "SP" will disappear, respectively.
How to Use PACE Function
Instruction Manual
AP01:WKJS2
PACE\_CHR Mode (Measurement with PACE Function)
Storage of measurement data in memory
- Up to 300 measurement data can be stored in memory.
^ "L/M" (Lap Memory) refers to the number of measurement data stored in memory. - By pressing button "E" to reset the chronograph after measurement, the running data measured is stored in memory, and the "L/M" (the number of data in memory) increases.
- When the number of measurement data in memory reaches 300, the data measured thereafter cannot be stored in memory. The table below shows the number of data stored in memory after one measurement sequence for your reference.
| Chronograph measurement sequence | Number of lap times measured | Number of data stored in memory |
| Start → Stop → Reset | Nil | 3 |
| Start → Lap-1 → Stop → Reset | 1 | 4 |
| Start → Lap-1 ⇒ → Lap-n → Stop → Reset | n | 3+n |
- When the number of data in memory nears the capacity limit (up to 300 data can be stored), the storable number of data can be increased by deleting the log data. Delete the unnecessary log data in a timely manner
* For the method of deleting the log data, see P. 26.
●Distinction among the displays when the chronograph is reset, measuring and stopped

text_image
Display in the mid row CHRONOGRAPH mark 12:08:58 LP 000 LAP 000 LAP / NEXTThe status of the chronograph can be distinguished by the display in the mid row or the status of the CHRONOGRAPH mark.
* If you stand still while the measurement is in progress, “- - -” is shown in the mid row.
* When flashing "FULL" is shown instead of lap No. after a lap time is measured:
- Data measured thereafter will not be stored in memory.
- Average SPM for the lap will not be displayed, either.
| Chronograph reset | Measurement in progress | Measurement stopped | |
| Display in mid row |  |  |  |
 |  |  | |
 |  |  | |
| CHRONOGRAPH mark | Not shown | " " Flashing | " Remains shown |
How to Use PACE Function
PACE\_LOG Mode
Instruction Manual AP01:WJS2
When the PACE_LOG mode appears, "PACE_LOG" is shown in the lower row of the display for 1 second before the total time display is shown.

text_image
Button "B" : Mode change Button "B" (pressed for more than 2 seconds) : Deleting data The newest log data set in memory * When no log data is stored in memory: FREE LOB Button "A" : Selection of log data set 12 1:20 455 166 8'45" UP/RESET Button "C" : Lighting up backlight Button "C" (pressed for more than 2 seconds) : Returning display to TIME mode Button "D" : Selection of log data set Button "E" : Selection of log data elementDetails of log data in PACE_LOG mode
- Log data is stored and recalled in a set on a run-by-run basis.
| Details of data element displayed |
| Year, month and date of measurement, total time, and average PACE |
| Year, month and date of measurement, and total number of steps |
| Split time, lap time, average PACE of the lap, and lap No. |
| Best lap time, and lap No. |
| Average lap time |
* Note that different data elements are shown in the SPM_LOG and PACE_LOG modes.
Selection of log data set
- The newest log data set is displayed first. Press button "A" or "D" to select the desired log data set.

flowchart
graph TD
    A["The newest log data set in memory"] -->|A| B["The next previous log data set"]
    B -->|D| C["The oldest log data set in memory"]
    C -->|A| A
    B -->|D| C
How to check the log data elements
- With each press of button "E", the log data elements can be checked in the following order.

flowchart
graph TD
    A["Total time"] --> B["12:45'5166 km"]
    B --> C["Year, month, and date of measurement"]
    C --> D["Total time"]
    D --> E["LP 6'18'13 AVERAGE"]
    E --> F["Average lap time"]
    F --> G["AVERAGE"]
    G --> H["Best lap time"]
    H --> I[""BEST" / Lap No."]
    I --> J["LP 5'30'11 BEST"]
    J --> K["Unit"]
    K --> L["12:45'5166 km"]
    L --> M["Total distance run"]
    M --> N["LP 11'0500 km"]
    N --> O["Lap-by-lap data"]
    O --> P["Split time"]
    P --> Q["Lap No./ Average pace of the lap"]
    Q --> R["E"]
    R --> S["Average pace/ "TOTAL""]
The SET_UP mode cannot be activated in the PACE_LOG mode.
How to Use PACE Function
PACE_LOG Mode
Instruction Manual
AP01:WJS2
- When the number of measurement data in memory nears the capacity limit (up to 300 data can be stored), the storable number of data can be increased by deleting the log data.
To delete the entire log data
flowchart
graph TD
    A["Log data set to be deleted\n12 1:20\n4:45'5 1'66\n6':31"km"] -->|B\nPress for more than 2 seconds.| B["Confirmation of whether or not the selected data set should be deleted\n12 1:20\n4:45'5 1'66\nOLR?"]
    B -->|B\nBeep, beep, beep| C["Confirmation beep Confirmation beep\nALL\nOLR?"]
    C -->|B\nKeep the button pressed for 2 more seconds or longer.| D["Number of data in memory\nLTM 000"]
    D --> E["Initial display of PACE_LOG mode\nPACE LOG"]
    E --> F["The newest log data is shown.\n12 1-8\n4:36'34'12\n6':81"km"]
    F --> G["Release button "B" .\n* The log data has not been deleted yet."]
    G --> H["To delete one log data set"]
Notes on deletion of log data
* Be sure to keep button "B" pressed until the confirmation beep sounds. Otherwise, the log data will not be deleted.
* The entire log data can be deleted only after one log data set is deleted.
* The log data in memory can be checked or deleted in both the SPM LOG and PACE LOG modes. If any log data set is deleted in one mode, it
cannot be checked in the other, either.
* Before deleting the log data, check that the chronograph is reset.
How to Use PACE Function
DISTANCE mode
Instruction Manual
AP01:WJS2
When the DISTANCE mode appears, "DISTANCE" is shown in the lower row of the display for 1 second before the newest monthly distance data is shown.
Button "B": Mode change
Button "B" (pressed for more than 2 seconds)
: Deletion of data
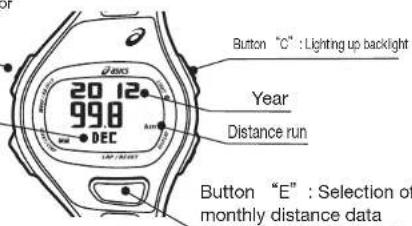
text_image
20 12 99.8 DEC Year Distance run Button "C" : Lighting up backlight Button "E" : Selection of monthly distance data* When no distance data is recorded in memory;

Distance data
The total distance of a run is accumulated, and stored in memory on a monthly basis. Up to 12 months of such data is stored, and can be recalled month by month in order starting from the data of the current month.

flowchart
graph LR
    A["20 12<br>998 km DEC"] --> B["20 12<br>119 km NOV"]
    B --> C["20 12<br>219 km OCT"]
    D["Measurement month"] --> A
    E["Measurement year"] --> A
    F["E"] --> B
    G["E"] --> C
    H["E"] --> C
Deletion of distance data
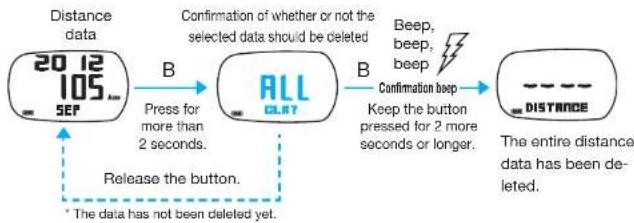
flowchart
graph LR
    A["2012 SEF"] -->|Press for more than 2 seconds.| B["ALL CLR7"]
    B -->|Beep, beep, beep\nConfirmation beep\nKeep the button pressed for 2 more seconds or longer.| C["-- Distance"]
    C -->|The entire distance data has been deleted.| D["Release the button."]
    D --> A
* Before deleting the distance data, check that the chronograph is reset.
* The distance data cannot be deleted month by month.
* Deletion of the number of steps data will not affect the other data in memory such as the data recorded in the SPM_LOG, PACE_LOG and DISTANCE modes, which remains undeleted.
Changeover of measurement units
The distance data is shown in the measurement unit you have set in the BASIC SETTING mode.

text_image
20 12 99.8 km DEC Unit: km Unit: mile 20 12 61.9 DEC mi.The distance is displayed to 2 decimal places up to 99.99 km, and with an integer thereafter.

text_image
20 12 99.8 km DEC 20 12 1 19 km NOV When the distance reaches 100 kmHow to use Shoes Impact Meter
Instruction Manual
AP01:WKJS2
Shoes Impact Meter Display Selection of Shoes Impact Meter display
The Shoes Impact Meter provides the guideline of the cushioning performance of the shoes on the basis of the ASICS running shoes.

text_image
SPM_LOG mode SP 0.0000 LAP·030 SPM E Button "B" : Initialization of Shoes Impact Meter SH-1 122 Shoes No. Button "D" : Change to SH-1 or SH-2 Shoes impact value PACE_LOG mode SP 0.0000 0.0 LAP·030 PAGE Shoes Impact Meter display* Unless the chronograph is reset, the Shoes Impact Meter display cannot be shown.
Guideline of shoes impact
| Shoes impact value Indication of Shoes Impact Meter Cushioning performance of mid-sole | |||
| 0 Brand new condition | |||
| ~ 100 |  | Condition fit for use in a race | |
| ~ 400 | Condition after long use | ||
| 400 ~ | Worn-out condition | ||
* Each horizontal dot of the Shoes Impact Meter represents different number of units of the shoes impact value depending on the range of the value.
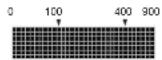
●0 \~ 100 : One dot represents 10 units of the shoes impact value.
● 100 – 400: One dot represents 20 units of the shoes impact value.
● 400 \~ : One dot represents 100 units of the shoes impact value.
- The Shoes Impact Meter is equipped with two displays (SH-1 and SH-2) that can show the shoes impact of two different pairs of shoes.
- When two pairs of shoes are used alternately for running, the shoes impact value of each pair can be indicated separately
SPM/PACE_CHR mode Shoes Impact Meter display
flowchart
graph TD
A["12:08'58'<br>LP 0'00"00<br>LAP·300"] -->|E| B["722"]
A -->|E| C["456"]
B -->|D| C
C -->|E| A
* When Shoes Impact Meter display has been changed over to the other: When button "E" is pressed to return to the SPM/PACE_CHR mode, flashing "SELECTED" is shown for 2 seconds to warn that the display has been changed over.

How to use Shoes Impact Meter
Instruction Manual
AP01:WKJS2
Initialization of Shoes Impact Meter Input of Shoes Impact Value
The two Shoes Impact Meter displays (SH-1 and SH-2) can be initialized separately.
flowchart
graph LR
    A["Shoes Impact Meter in use"] -->|B Press for more than 2 seconds| B["Shoes Impact Meter Should be deleted"]
    B -->|B Confirmation sound Keep the button pressed for 2 more seconds or longer.| C["Shoes Impact Meter has been initialized."]
    A --> D["Release button "B""]
    B --> D
* The Shoes Impact Meter display will not be initialized.
* If button "B" is released before the confirmation sound beeps, the Shoes Impact
Meter will not be initialized.
* The Shoes Impact Meter can be initialized in both the SPM_CHR and PACE_CHR modes.
* By initializing the Shoes Impact Meter when a new pair of shoes is purchased, the shoes impact value of the shoes can be estimated more accurately.
To use the Shoes Impact Meter with the shoes already in use, set the initial Shoes Impact value on "SH-1" Shoes Impact Meter display, referring to the table below.
Initial display
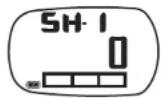
Settable range of shoes impact value:
0 - 9999
* When the watch is purchased, the shoes impact value is set to "0".
| Accumulated distance run Shoes impact value | ||
| 100km 62.5mile | 100 | |
| 200km 125.0mile | 200 | |
| 300km 187.5mile | 300 | |
How to set shoes impact value manually on "SH-1" display
① Keep button "B" pressed for more than 2 seconds in the TIME mode to activate the BASIC SETTING mode.
* For the method of activating the BASIC SETTING mode, see P. 9.
② Press button "E" repeatedly to show "IMPACT"
③ Press button "A" or "D" to input the shoes impact value by referring to the table above.
④ After the input of the shoes impact value is completed, press button "B" to return the display to the TIME mode.
Product Specifications
Instruction Manual
AP01:WKJS2
Specifications
| Frequency of crystal oscillator | 32,768 Hz |
| Loss/gain(monthly rate) | Less than 30 seconds(At temperature range between 5^ and 35^ ; when worn on the wrist) |
| Operational temperature range | -5^ +50^ 0^ +50^ for display function |
| Battery Lithium battery (CR2025) | |
| Battery life Approximately | 2 years(The above battery life varies depending on the use frequency of each function.) |
| Water resistance Check | the indication on the case back of your watch. |
| CHRONOGRAPH function | Measurement unit: 1/100 secondsMaximum measurable time: 99 hours, 59 minutes and 59 seconds 99Maximum storable number of data: 300[SPM function]Measurable range of pitch: 60 ~ 250 spmMaximum measurable number of accumulated steps: 999,999 steps[PACE function]Measurable range of pace: 1' 00'' 19' 59'' /km : 1' 37'' 32' 10'' /mile Measurable range of accumulated distance: 0.0 ~ 999.9 km: 0.0 ~ 621.1 miles |
| Data memory | [SPM function]Year, month and date of measurement, Total measurement time, average SPM, total number of steps, lap/split time, average SPM of a lap, best lap time, average lap time, and monthly total number of steps[PACE function]Year, month and date of measurement, Total measurement time, average pace, total distance run, lap/split time, average pace of a lap, best lap time, average lap time, and monthly total distance run |
| TIMER function | TIMER-1: 10 seconds ~ 99 hours, 59 minutes and 59 secondsTIMER-2: 10 seconds ~ 99 hours, 59 minutes and 59 secondsNumber repetitions: 1 ~ 99 timesWarning beep: sounds for 3 secondsTime-up beep: sounds for 3 secondsIt sounds in different tones between TIMER-1 and TIMER-2. |
| ALARM function | Daily alarm; can be set for either of the two time zones (T1 and T2)3-channel alarm (can be engaged/disengaged independently of one another)Alarm sounds at the designated time for 20 seconds.Alarm sounds differently from channel to channel. |
| DUAL TIME function Selection between two time zones (T1 and T2) can be made. | |
| BASIC SETTING Use of normal/large-digit display of time, turning on/off of auto-backlight, time/calendar setting, 0-resetting of seconds, changeover between12- and 24-hour time systems, contrast adjustment, ECO function setting, setting of measurement units, gender setting, weight setting (30 ~ 120 kg; 66 ~264 lb), and initial value setting of Shoes Impact Meter (0 ~9,999) | |
| SET_UP function SPM: 60 ~ 250 spmPace: 1' 00" ~ 19' 59"/km or 1' 37" ~ 32' 10"/mileInput of distance: 1.0 ~ 99.99 km or 0.5 ~ 62.1 miles | |
| Shoes Impact Meter function | Two Shoes Impact Meter displays for two pairs of shoesGraphic display functionMaximum settable shoes impact value: 9999 |
Materials
| Case | Plastic |
| Bezel | Aluminum |
| Band | Polyurethane |
Troubleshooting Guide
Instruction Manual
AP01:WKJS2
For watch functions in general For running measurement functions
| Problem Cause Remedy | Refer to | ||
| The display has become blank. | The battery has run down. | Request the retailer from whom the watch was purchased to replace the battery with a new one immediately. | — — |
| The watch gains or losses time temporarily. | The watch was left in a cold or hot place. | The accuracy will be recovered when the watch returns to the normal temperature. Set the correct time before use. | P.9 |
| The blur on the glass persists. | Water got inside the watch due to deterioration of the gasket or other reasons. | Consult the retailer from whom the watch was purchased. | — — |
| The timer does not repeat countdown. | The number of repetitions is set to “1” in the TIMER SETTING mode. | Set the number of repetitions as desired in the TIMER SETTING mode. | P.11 |
| The alarm will not ring at the designated time. | The time zone set for the TIME mode differs from that set in the ALARM SETTING mode. | Activate the ALARM SETTING mode to check if the time zone is set correctly. | P.12 |
| The alarm is not engaged for the alarm channel for which the alarm time is set. | Select that alarm channel in the ALARM mode, and activate the ALARM SETTING mode to engage the alarm. | P.12 | |
| The battery may near its end. | Check the battery life indicator. If it indicates that the battery near its end, request the retailer from whom the watch was purchased to replace the battery with a new one immediately. | P.8 | |
| The warning and time-up beeps will not sound. | The battery may near its end. | Check the battery life indicator. If it indicates that the battery near its end, request the retailer from whom the watch was purchased to replace the battery with a new one immediately. | P.8 |
| The backlight will not light up. |
| Problem Cause Remedy | Refer to | ||
| “---spm” is shown for the SPM value for a short time after the running is started. | It takes approximately 10 seconds after the running is started for the built-in sensor to recognize that the movement it senses is that of running. | The watch is intact, and can be used as usual. If the SPM value will not be shown after 10 seconds, the watch may be out of order. In that case, consult a nearby ASICS service facility. | — — |
| Though lap time measurement was made, neither SPM nor pace is displayed. | This watch is so designed that, if the lap time measured is less than 30 seconds, the average SPM or pace of the lap is not displayed, as a significant measurement error may be involved. | Measure a lap time when more than 30 seconds have elapsed from the start. | — — |
| The algorithm was customized, but the distance run indicated on the display differs from that actually run. | The data measured when you ran at a speed too faster or slower than usual was input in the SET UP mode. | Use the data measured when you run at a usual speed to customize the algorithm in the SET UP mode. | P.19 |
| The AVG PACE data cannot be set. | Data beyond the settable range of the running data was input. For example, invalid distance was set, or inappropriate adjustment of the transferred time was made. | Set the running data within the ranges below: SPM: 60 -250 SPM Pace: 1^ 00^ - 19^ 59^ /km or 1^ 37^ - 32^ 10^ /mile | P.21 |
| The SLOW PACE and FAST PACE data cannot be input. | An SPM value which is the same as the AVG_PACE data cannot be input as the SLOW PACE or FAST PACE data. | Input an SPM value different from the AVG_PACE data. | P.19 |
| The SLOW PACE and FAST PACE data was lost. | If the AVG_PACE data is updated, the SLOW PACE and FAST PACE data will be reset to “0”. | Input the SLOW PACE and FAST PACE data again. | P.19 |
| When used for walking, the SPM indicated on the display differs from that actually counted. | This watch is intended to measure the number of steps during running, and the accuracy of the SPM measurement during walking may vary significantly from user to user. | Swing the arms as sufficiently as possible while walking. | — — |
Explanation of Marks and Definition of Terms
Instruction Manual AP01:WKJS2
Explanation of Marks
text_image
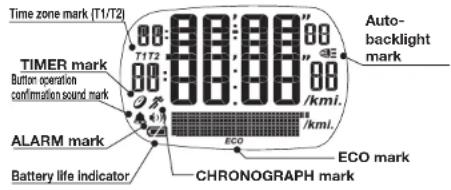
Time zone mark (T1/T2) TIMER mark Button operation confirmation sound mark ALARM mark Battery life indicator Auto- backlight mark "E0" "E1" /kmi. /ECO /ECO mark /EKO /EKO mark CHRONOGRAPH mark| Mark Indication of mark | ||
| CHRONOGRAPH mark | Flashes when the chronograph measurement is in progress, and remains lighted when the measurement is stopped. | |
| TIMER | Flashes when the timer is counting down, and remains lighted when it is stopped. | |
| Auto-backlight mark | Indicates that the backlight lights up automatically with each press of any of the buttons. | |
| T1T2 | Time zone mark (T1/T2) | Indicates which time zone is selected. |
| Button operation confirmation sound mark | Indicates that the button operation confirmation sound beeps with each press of any of the buttons. | |
| ALARM mark Indicates that alarm is engaged. | ||
| ECO | ECO mark | Indicates that the display will become blank if the watch is left untouched for the selected time period. |
| Battery life indicator Indicates the power reserve of the battery. | ||
Definition of Terms
SPM: It stands for "Steps Per Minute", and represents the total number of steps taken in 1 minute. Pace: The time required to run 1 km or 1 mile.
CHR: It stands for "chronograph". The chronograph can measure in 1/100 seconds.
Lap time: The time required to run any given section of the entire distance.
Split time: Time required to run from the start to any given point of the entire distance.
Algorithm: A formula used to calculate the running speed and distance on the basis of the SPM measured during running.
Type of pace to be set: The type of running data used for the algorithm.
AVG_PACE: Running data measured when the user runs at a usual speed.
SLOW PACE: Running data measured when the user runs at a speed slower than usual.
FAST PACE: Running data measured when the user runs at a speed faster than usual.
Log data set: The running data measured in a run, which is stored in a set in memory.
Lap No. (ex.: LAP-01): The order of a lap time measured during one chronograph measurement sequence.
Lap memory (ex.: L/m: 010): The accumulated number of measurement data stored in memory.
Monthly data: The data accumulated month by month (number of steps and distance data).
Number of steps data: The total number of steps taken during running accumulated month by month.
Distance data: The total distance run during running accumulated month by month.
TIMER function: A function to count down the set time and signals that that the set time is up with a beeping sound.
ALARM function: A function to ring a beeping sound at the time you have set.
Auto-backlight function: A function to light up the backlight automatically with each press of any of the buttons.
Contrast adjustment function: A function to adjust the contrast of the LCD display as desired.
ECO function: A function to turn off the display if the watch is left untouched for a selected time period.
Shoes Impact Meter: It indicates the reduction in cushioning performance of the shoes by calculating the shoes impact value on the basis of the number of steps measured during running, and the data input by the user.
T1/T2: A mark to indicate the time zone currently selected.
Button operation confirmation sound: A beep to confirm that the button operation was performed securely.
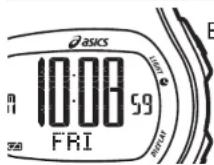
Button "C"
Keeping button "C" pressed for more than 2 seconds in any mode will return the display to the TIME mode.