TV Live - Media player WESTERN DIGITAL - Free user manual and instructions
Find the device manual for free TV Live WESTERN DIGITAL in PDF.

User questions about TV Live WESTERN DIGITAL
0 question about this device. Answer the ones you know or ask your own.
Ask a new question about this device
Download the instructions for your Media player in PDF format for free! Find your manual TV Live - WESTERN DIGITAL and take your electronic device back in hand. On this page are published all the documents necessary for the use of your device. TV Live by WESTERN DIGITAL.
USER MANUAL TV Live WESTERN DIGITAL
natural_image
Black HDMI Modbus 3.02 power driver device with control buttons and ventilation slots (no visible text or symbols on body)Table of Contents
1 Important User Information .... 1
Important Safety Instructions .... 1
WD Service and Support 2
Recording your WD Product Information .... 3
Registering your WD Product ....3
Accessories 5
2 Product Overview 6
3 Features and Functions ....8
Features....8
Connections 9
LED Indicators 10
Remote Control....11
4 Getting Started 12
Package Contents 12
Installation Requirements 12
Installation Procedure....12
5 Operating the WD TV Live HD Media Player.....25
Using the Remote Control 25
Using the WD TV HD Media Player Menu. 26
Media Library Compilation 27
Locating Your Contents on the Drive 30
6 Watching Video 34
Video Playback 34
Video Playback Controls 36
Video Playback Options 36
7 Playing Music 42
Music Playback 42
Music Playback Controls 44
Music Playback Options....44
8 Viewing Photos 46
Photo Display....46
Digital Camera Support 47
Photo Display Options 48
Photo Slideshow 50
9 Network Setup....54
Ethernet Network (Wired) Setup 54
Wireless Network Setup....57
Checking the Network Connection....60
10 Network Services 62
Accessing Media Content from the Network .....62
Transferring Files 65
11 Internet Services....70
Live365....70
Pandora....87
Flickr 100
YouTube....108
12 Settings and Advanced Features..... 127
Settings Navigation Buttons 127
File Management 128
Audio/Video 135
Music 140
Video 142
Photo 145
System 148
Network 154
Media Library 156
13 System Maintenance .... 159
System Firmware Upgrade ....159
Troubleshooting 162
Common Error Messages 165
FAQs 166
14 Appendix 167
Supported Formats 167
Regulatory Compliance 171
Warranty Information....173
GNU General Public License ("GPL")....174
1
Important User Information
Important Safety Instructions
This device is designed and manufactured to assure personal safety. Improper use can result in electric shock or fire hazard. The safeguards incorporated into this unit will protect you if you observe the following procedures for installation, use, and servicing.
- Read these instructions.
- Keep these instructions.
■ Heed all warnings.
■ Follow all instructions. - Do not use this apparatus near water.
■ Clean only with dry cloth. - Do not block any ventilation openings. Install in accordance with the manufacturer's instructions.
- Do not install near any heat sources such as radiators, heat registers, stoves, or other apparatus (including amplifiers) that produce heat.
- Do not defeat the safety purpose of the polarized or grounding-type plug. A polarized plug has two blades with one wider than the other. A grounding type plug has two blades and a third grounding prong. The wide blade or the third prong are provided for your safety. If the provided plug does not fit into your outlet, consult an electrician for replacement of the obsolete outlet.
- Protect the power cord from being walked on or pinched particularly at plugs, convenience receptacles, and the point where they exit from the apparatus.
- Only use attachments/accessories specified by the manufacturer.
- Unplug this apparatus during lightning storms or when unused for long periods of time.
- Refer all servicing to qualified service personnel. Servicing is required when the apparatus has been damaged in any way, such as power-supply cord or plug is damaged, liquid has been spilled or objects have fallen into the apparatus, the apparatus has been exposed to rain or moisture, does not operate normally, or has been dropped.
- Carefully read and follow the Quick Install Guide and User Manual.
- Do not operate this device outside the temperature range of 5°C–35°C (41°F–95°F).
- Do not drop or shake the device.
- Do not move the device when it is powered on.
- Power supply cords should be routed so that they are not likely to be walked on or pinched by items placed upon them or against them.
- Do not overload wall outlets.
For additional safety information, refer to www.wdc.com.
WD Service and Support
Should you encounter any problem, please give us an opportunity to address it before returning this product. Most technical support questions can be answered through our knowledge base or e-mail support service at support.wdc.com. If the answer is not available or, if you prefer, please contact WD at the best telephone number shown below.
Your product includes 30 days of free telephone support during the warranty period. This 30-day period starts on the date of your first telephone contact with WD technical support. E-mail support is free for the entire warranty period and our extensive knowledge base is available 24/7. To help us keep you informed of new features and services, remember to register your product online at register.wdc.com.
Accessing Online Support
Visit our product support website at support.wdc.com and choose from these topics:
- Downloads - Download drivers, software, and updates for your WD product.
- Registration - Register your WD product to get the latest updates and special offers.
- Warranty & RMA Services - Get Warranty, Product Replacement (RMA), RMA Status, and Data Recovery Information.
- Knowledge Base - Search by keyword, phrase, or answer ID.
- Installation - Get online installation help for your WD product or software.
Contacting WD Technical Support
When contacting WD for support, have your WD product serial number, system hardware, and system software versions available.
North America Asia Pacific
English 800.ASK.4WDC Australia 1 800 42 9861
(800.275.4932) China 800 820 6682/+65 62430496
Spanish 800.832.4778 Hong Kong +800 6008 6008
India 1 800 11 9393 (MNTL)/1 800 200 5789 (Reliance) 011 26384700 (Pilot Line)
| Europe (toll free)* | 00800 ASK4 WDEU Indonesia | +803 852 9439 | |
| (00800 27549338) | Japan | 00 531 650442 | |
| Korea | 02 719-3240 | ||
| Europe | +31 880062100 Malaysia | +800 6008 6008/1 800 88 1908/+65 62430496 | |
| Middle East | +31 880062100 Philippines | 1 800 1441 0159 | |
| Africa | +31 880062100 Singapore | +800 6008 6008/+800 608 6008/+65 62430496 | |
| Taiwan | +800 6008 6008/+65 62430496 | ||
* Toll free number available in the following countries: Austria, Belgium, Denmark, France, Germany, Ireland, Italy, Netherlands, Norway, Spain, Sweden, Switzerland, United Kingdom.
Recording your WD Product Information
In the following table, write the serial and model numbers of your new WD product. You can find this information on the label on the bottom of the device. You should also note the date of purchase. This information may be required when requesting technical support.
| Serial Number: |
| MAC Address: |
| Model Number: |
| Purchase Date: |
| System and Software Notes: |
Registering your WD Product
Your WD product includes 30 days of free technical support during the applicable warranty period for your product. The 30-day period commences on the date of your first telephone contact with WD technical support. Register your WD product online at register.wdc.com.
If your media player has an active network connection, you can register directly from the unit.
To register your WD product using the System Setting menu:
- Make sure your media player has an active network connection.
Go to "Network Setup" on page 54 for instructions on how to set up a network connection.
-
Navigate to the Home | Settings menu bar.
-
Press ▲/▼ to select System Setting 📄, then press ENTER.

text_image
System Setting Settings- Press ▲/▼ to select System registration, then press ENTER.

text_image
System Setting Display file size On Additional encoding support Western Europe Auto play Off System reset Update Device System information System registration- On the Register Product screen, press ▲/▼ to select First Name, then press ENTER.
text_image
Register Product First Name Last Name Email Serial Number Mac Address 00-16-e8-6d-73-e5-
Use the navigation buttons ▲▼◀▶ to type in your first name using the on-screen keyboard. Select Submit, then press ENTER.
-
Press ▲/▼ to select Last Name, then press ENTER.

text_image
Register Product First Name Last Name Email Serial Number Mac Address 00-16-e8-6d-73-e5-
Use the navigation buttons ▲▼◀▶ to type in your last name using the on-screen keyboard. Select Submit, then press ENTER.
-
Press ▲/▼ to select Email, then press ENTER.
text_image
Register Product First Name Last Name Email Serial Number Mail Address 00-18-e8-6a-73-e5 Monitor Cancel-
Use the navigation buttons ▲▼◀▶ to type in your email address using the on-screen keyboard. Select Submit, then press ENTER.
-
On the Register Product screen, press ◀▶ to select OK, and then press ENTER.
text_image
Register Product Would you like to register now?Accessories
For information on optional accessories for this product, visit:
| US | www.shopwd.com or www.wdstore.com |
| Canada | www.shopwd.ca or www.wdstore.ca |
| Europe | www.shopwd.eu or www.wdstore.eu |
| All others Contact | WD Technical Support in your region. For a list of Technical Support contacts, visit support.wdc.com and see Knowledge Base Answer ID 1048. |
2
Product Overview
Thank you for purchasing the WD TV Live HD Media Player. This user manual provides step-by-step instructions for installing and using your new media player. For the latest WD product information and news, visit our website at www.westerndigital.com.
The WD TV Live HD Media Player from Western Digital has everything you need to play your HD media collection and the fun stuff you find on the web in brilliant HD 1080p on your big screen TV. Because it supports a wide variety of file types, you can instantly enjoy all your home digital media, regardless of the file format. Plus you get direct access to a huge selection of video, photos, and music from popular internet sites like YouTube, Flickr, Live365, and Pandora (US only). The WD TV Live HD media player is exceptionally easy to use so anyone in the family can do it and, because it's networked, you can easily access media from any PC in the home.
Full-HD 1080p video playback and navigation - This is the real thing; Full-HD 1080p playback. Sit back and enjoy the spectacular picture quality of brilliant high definition video and the crystal clear sound of digital audio. Use the included remote control to make your entertainment choices using our crisp, animated navigation menus.
Play a wide variety of file formats – this media player supports a wide variety of the most popular file formats. No need to spend time transcoding.
Play videos, music and photos from the Internet on your big screen TV – Explore and watch YouTube videos and Flickr pictures on the big screen. Rock out to thousands of radio stations via Live 365 and discover new music with Pandora radio.
Access files anywhere on your home network – Play movies, music, and photos from any PC or drive on your home network. The Ethernet port connects this player to your home network through a wired connection or via popular, supported WiFi adapters (sold separately).
Turn your USB drive into an HD media player – Play content from most popular USB drives, and digital cameras, camcorders, and portable media players that can be recognized as mass storage devices. Optimized for My Passport portable hard drives.
Collect without limits – There's no limit to the size of your media collection; just add more USB drives for more space.
Play media seamlessly from multiple USB drives – Two USB ports on the player let you connect multiple USB storage devices and access them simultaneously. Our media library feature organizes the content on all the drives into one list sorted by media type.
Transfer files easily – Copy, move or delete files stored on a USB drive, a network drive, your camcorder, or a camera to the attached USB drive using the on-screen menus.
Show photos and movies directly from your digital camera or video camera – Works with digital cameras, digital video cameras, in fact, any digital imaging device that supports Picture Transfer Protocol.
Advanced navigation options
- Thumbnail, list, and preview modes – Browse your content by file name or by thumbnails of photos, album covers, video preview, and movie cover art.
- Media Library – This unique feature lets you view all your media by media type in one menu regardless of its location in folders or drives. You can view your content by categories such as genre, album, artist and date.
- Search – Search by genre, title, artist, filename and partial filename.
Photo viewing
■ Create custom slide shows with a variety of transitions and background music
- Zoom and pan
- Search by filename, partial filename, most recently viewed and date
Movie viewing
■ Fast forward, rewind, pause, zoom, and pan
■ View subtitles
■ Search by filename, partial filename, most recently viewed and date
Music playback
- Fast forward, rewind, pause, shuffle, repeat
- Search by filename, partial filename, most recently viewed and date.
File Management
- Copy files between USB drives and transfer files between a USB drive connected to the media player and your computer.
HDMI 1.3, composite video and component video output - The HDMI port lets you connect to the highest quality HDTV or home theater. Additional composite (RCA), and component outputs ensure compatibility with virtually all television sets.
SPDIF digital output – The optical audio output sends digital signals to your AV receiver for the best surroundsound experience.
Ultra-compact design - Fits easily into your entertainment center.
3
Features and Functions
Features
Audio/Video Interface
■ HDMI 1.3 interface for digital audio and high-definition video
■ Component video interface (YPbPr, green/blue/red) for analog video connection
■ Composite interface (RCA, yellow/white/red) for analog AV connection
■ Toslink (optical) audio for high-fidelity digital audio
- Auto source function enables the HD media player to detect and switch to a new interface connection. For example, the media player automatically switches to HD mode when it is connected through an HDMI cable.
■ Video output resolution includes 480i, 576i, 480p, 576p, 720i, 720p, 1080i, 1080p
■ Stereo or multi-channel digital surround audio output (digital surround sound is only available when using the Toslink S/PDIF interface).
- Wired or wireless Internet connection for access to online media content.
Multiformat Content Playback
Multiformat is a file type that groups other files of the same digital content but may be encoded in different digital formats. For example, a single video file may actually include a few components such as video, audio, and photo grouped together. The media player is capable of playing several different types of multiformat files. For a detailed list of supported formats, refer to “Supported Formats” on page 167.)
| Audio codec | Audio container | Video codec | Video container | Photo Subtitle* | Playlist | |
| MP3 AIFF MPEG 1 AVI | GIF SRT PLS | |||||
| MP2 | MPEG 2 | VOB/ISO | BMP | SUB | WPL | |
| WAV/PCM/LPCM | MKA | MPEG 4(ASP, AVC HD/H.264) | WMV9 | JPEG | SMI M3U | |
| Dolby Digital** | OGG | VC-1 | DVR-MS | TIF/TIFF*** | SSA | |
| FLAC | Xvid | MKV | PNG | ASS | ||
| WMA | MOV | |||||
| AAC | DAT (VCD/SVCD | |||||
| DTS**** | tp, ts, m2t/m2ts | |||||
| Vorbis | ||||||
*To convert subtitle files encoded in a different format, open the file with Notepad and do a Save As with the following parameters: File Type—All Files and Encoding—UTF-8.
**2-channel only. 2+channel signal is sent via digital pass through to a receiver. Manufactured under license from Dolby Laboratories. "Dolby" and the double-D symbol are trademarks of Dolby Laboratories.
***Single layer only.
***Manufactured under license under U.S. Patent #'s: 5,451,942; 5,956,674; 5,974,380; 5,978,762; 6,487,535 & other U.S. and worldwide patents issued & pending. DTS is a registered trademark & the DTS logos and Symbol are trademarks of DTS, Inc.
Plug-n-Play USB 2.0 Support\*
■ USB storage device with a USB connector
- Portable media players with USB connector
■ Digital cameras/camcorders with USB connector
*For a list of tested, compatible USB devices, see Article #2581 in our knowledge base at support.wdc.com.
USB Storage File System Support
NTFS
FAT/FAT32
■ HFS+
Connections
text_image
Diagram of a device rear panel with labeled ports and indicator lights
text_image
HOMI OPTICAL AV OUT Y Pb Pr ③ ④ ⑤ ⑥ ⑦ ⑧ ⑨Item Component Description
| 1 USB port 1 Supports connection of removable storage devices, portable media players, digital cameras with USB connectors, and USB wireless adapters. | ||
| 2 | Reset switch | Press for one second to reset to factory default. Press and hold 10 seconds to toggle between NTSC and PAL. (using a fine-tipped stylus or the unfolded end of a paperclip). |
| 3 Power jack Connects the power cable | ||
| 4 USB port 2 The same function as USB port 1 | ||
| 5 | HDMI port | Connects to your TV's HDMI port (HDMI cable sold separately) |
| 6 Toslink (optical) audio port | connects to your AV receiver (Toslink cable sold separately) | |
| 7 Ethernet port Supports LAN connection for wired Internet access. | ||
| 8 | Composite jack | Connect to your TV's analog video and audio jacks |
| 9 Component jack Connect to your TV's component (YPbPr) terminals. | ||
Note: The WD TV HD Media Player does not support USB hubs.
LED Indicators

text_image
HDMI 8450 1 2 3| Item Component Description | ||
| 1 Power | LED • On—The power cable is connected and the power is on.Off—The media player is in standby mode or the power cable is disconnected.Blinking—A system diagnostic failure has occurred.See “Troubleshooting” on page 162. | |
| 2 Infrared receiver | • Receives signals from the remote control. Point the tip of the remote control to the infrared receiver and ensure that the path between the two is unobstructed. | |
| 3 Status | LED • On—A USB device is being accessed and the media player is in idle mode.Off—No USB device is connected.Blinking—Scans for media from the USB storage.See “Media Library” on page 156 for more information. | |
Remote Control
- Infrared transmitter
- ⬆ HOME
- POWER
- Navigation buttons
- ENTER (turns Info bar ON or OFF)
- STOP
- BACK
- REV (rewind)
- PREV (previous track/page up)
- SEARCH
- OPTION
- PAUSE/PLAY
- FF (fast forward)
- NEXT (next track/page down)
- EJECT (safe removal of attached storage)
Note: For additional information, see "Using the Remote Control" on page 25.

text_image
1 2 3 POWER HOME 4 ENTER 5 6 7 BACK STOP OFFICE 8 REW PAUSE/PLAY FF 9 PREV NEXT 10 SEARCH ELECT WD4
Getting Started
Package Contents
natural_image
Black electronic device with ventilation slots and a control panel (no visible text or symbols)WD TV Live HD Media Player

Composite AV cables

Component (YPbPr) cables

Remote control and Two AAA batteries

AC power adapter

Quick Install Guide

Documentation and software CD
Installation Requirements
- Standard or HD TV with a composite (standard A/V), component (YPbPr), HDMI, or S/PDIF input
- USB storage device with a USB 2.0 connector
- Valid wired or wireless network connection
■ Media Library support requirement* —1% of total storage capacity
Optional: TV, stereo, or AV receiver with an optical digital (Toslink) or stereo audio input jack (audio playback only); Ethernet cable
*Can be turned off in Settings Menu if not needed.
Installation Procedure
The media player installation procedure is outlined below:
- Transfer content from your computer to the USB storage media.
- Connect the media player to your TV or entertainment unit through the desired interface option.
- Connect the power cable.
- Insert the batteries into the remote control.
- Connect the USB device containing your media content or establish a wired or wireless network connection.
Step 1 - Loading Content onto your USB Drive
Transfer your favorite content from your computer to your external USB drive, such as My Passport™ or My Book® (external USB drives and stand not included).
natural_image
Illustration of a laptop connected to a smartphone via wireless communication icons (music, video, camera) — no text or symbols present.Step 2 - Connecting the Power Cable
- Connect the power clip to the power cable plug.
The AC power adapter will vary, depending on your location. Some locations do not require a power plug clip. Units sold in those locations will have a fixed power plug. Refer to the illustration below.

text_image
US/JA/TW EU/KO UK CH AU/NZ
text_image
US/JA/TW EU/KO UK CH AU/NZInstalling InstallingRemoving Removing
- Connect the power cable to the media player's DC connector, and then plug the opposite end into an AC power outlet. The media player powers up automatically.

natural_image
Black-and-white photo of a connected network device with a power outlet and cable (no text or symbols visible)Wait a few seconds for your TV to detect the media player. If it is not detected, you may need to change the input source on your TV to HDMI or composite,
depending on your connection. Check the user documentation of your TV for more information.
Once the media player is detected, the splash screen displays to indicate system bootup, then the home screen of the user interface opens.
For more information, see "Using the WD TV HD Media Player Menu" on page 26.
Step 3 - Connecting the WD TV Live HD Media Player
The following figures illustrate the cable connections supported by the media player. The standard connection uses the included composite-to-mini AV cables.
Note: HDMI and Toslink (optical) cables are sold separately.
Important: Configure the media player's Audio/Video settings depending on the type of connection you choose. See "Audio/Video" on page 135 for more information on these settings.
Choosing the Best Connection
The quality of the picture produced by your TV depends on the quality of your TV and its connection to the media player.
| Connection Quality Connectors | ||
| HDMI Best | (up to 1080p) | Specialized, high-definition connector |
| Component Better (up to 1080i) | • Green = Y• Blue = Pb• Red = Pr | |
| Composite Good (480i/576i) | • Yellow = video• Red = right audio• White = left audio | |
Component (High Definition)HDMI (High Definition) Composite (Standard Definition)
natural_image
Three-panel diagram showing connected computer monitors and cables, with no visible text or symbols.HDMI Video and Audio (High Definition)
HDMI combines high-definition video, multi-channel audio, and inter-component control in a single digital cable. This interface provides video quality resolution of up to 1080p.
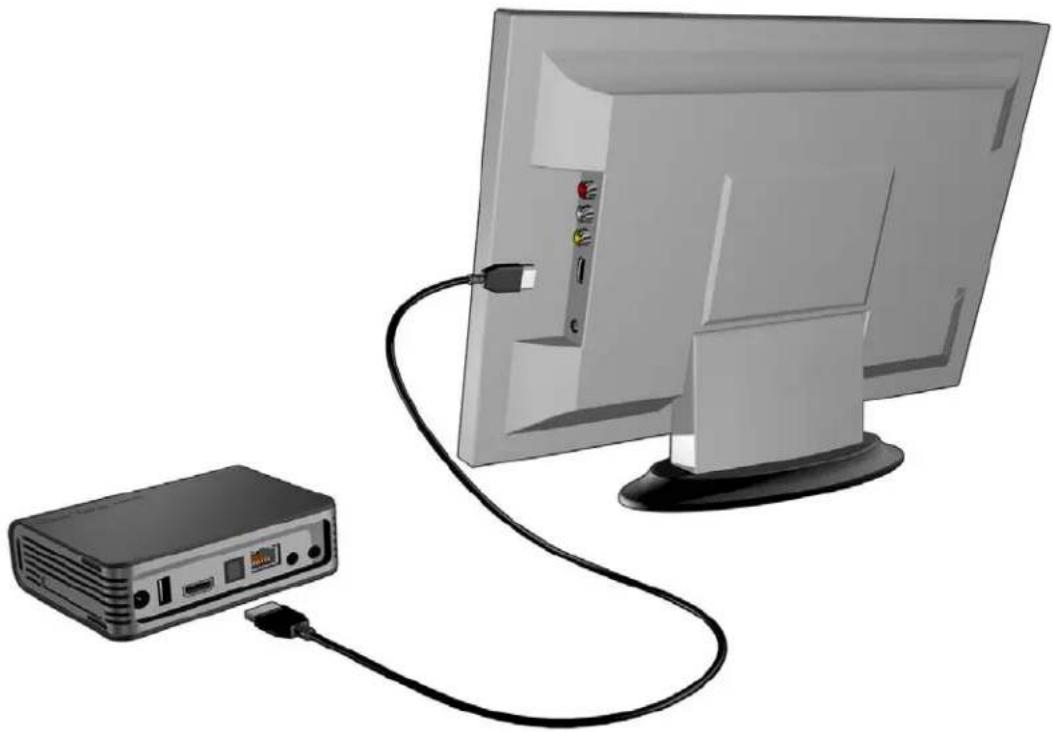
To connect your media player using an HDMI cable:
- Plug an HDMI cable into the HDMI connector on the media player.
- Plug the opposite end into the HDMI port on your TV or audio/video system (if available).
natural_image
Illustration of a projector connected to a computer monitor via cable (no text or symbols)As an option, for higher quality multi-channel audio:
- Plug a Toslink (optical) cable into the S/PDIF (optical digital) connector on the media player.
- Plug the opposite end into the optical digital port on your receiver or home theater system.
Note: HDMI and Toslink cables are sold separately.
- Select the appropriate TV input source.
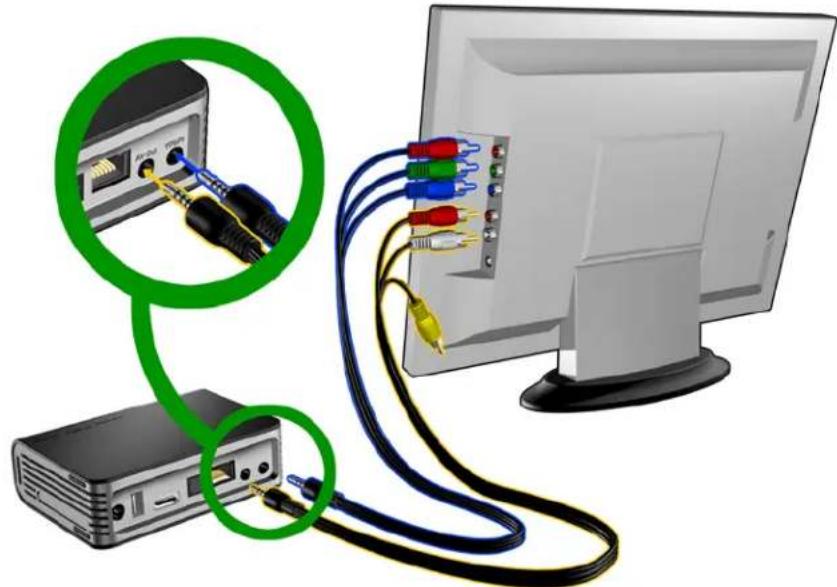
Component Video and Audio (High Definition)
The component connection only provides video signals. You will also need to connect the composite audio cables to provide sound. This interface provides video quality resolution of up to 1080i.
To connect your media player using a component-to-mini cable:
- Plug mini cable into the component connector on the media player.
- Plug the opposite ends into the component ports on your TV or audio/video system (if available), red to red, green to green, and blue to blue.
natural_image
Illustration of a computer monitor connected to a server via cable, showing cable routing and connection details (no text or symbols present)-
For audio, plug the composite-to-mini connector into the composite port on the media player.
-
Plug the audio connectors on the opposite end of the cable into the composite audio input ports on your TV, red to red and white to white.
Wait a few seconds for your TV to detect the media player. If the media player is not detected, you may need to change the input source on your TV to component or composite, depending on your connection. Check the user documentation of your TV for more information.
Once the media player is detected, the splash screen displays to indicate system bootup, then the home screen of the user interface opens.
Composite AV Connection (Standard Definition)
To use a composite connection:
- Plug the mini-connector into the composite port on the media player.
- Plug the opposite ends into the composite input ports on your TV, yellow to yellow, red to red, and white to white.
- Select the appropriate TV input source.

natural_image
Illustration of a computer monitor connected to a cable with three colored cables, showing a close-up of the device's cable connection (no text or symbols visible)Wait a few seconds for your TV to detect the media player. If the media player is not detected, you may need to change the input source on your TV to component or composite, depending on your connection. Check the user documentation of your TV for more information.
Once the media player is detected, the splash screen displays to indicate system bootup, then the home screen of the user interface opens.
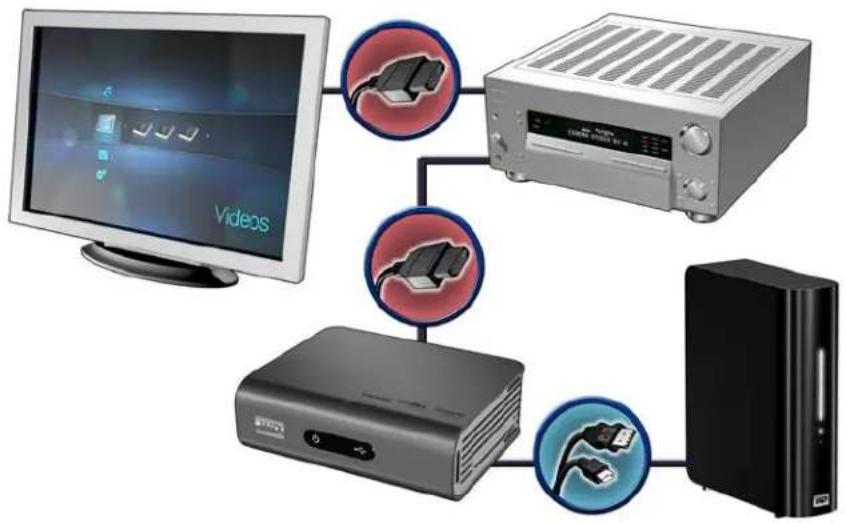
Home Theater (High Definition)
To connect a home theater system:
- Plug an HDMI cable into the HDMI connector on the media player.
- Plug the opposite end into the HDMI In port on your A/V receiver.
- Plug an HDMI cable into the HDMI Out port on your A/V receiver.
- Plug the opposite end into the HDMI port on your TV (if available).
- Select the appropriate TV input source.
flowchart
graph TD
    A["Computer"] --> B["Video"]
    B --> C["Server"]
    C --> D["Desktop"]
    subgraph Video Processing
        E["Switch"] --> F["Switch"]
        G["Switch"] --> H["Switch"]
    end
    subgraph Network Processing
        I["Switch"] --> J["Switch"]
        K["Switch"] --> L["Switch"]
    end
My Book external drive (sold separately)
Note: HDMI cable sold separately.
Step 4 - Connecting a USB Device
The media player has two USB ports that support playback from WD USB external drives.*
* For a list of supported WD external drives, see article #2581 in or knowledge base at support.wdc.com.
To connect the USB device:
- Connect the USB device to either of the media player's USB ports.

text_image
My Passport portable drive and stand (sold separately) My Book external drive (sold separately)- Wait for a few moments while the media player scans the USB device for media files. (Scanning is enabled by default. If you want to turn off automatic scanning, go to "Media Library Compilation" on page 27.)
This may take several minutes, depending on the storage capacity of the USB device and the number of available media files. When the USB device is detected, the status LED turns on and the Home screen displays the new USB directory icon
. If the media player does not detect any storage devices, "No storage present" appears on the screen. You can still navigate within the folders, but the folders will be empty.
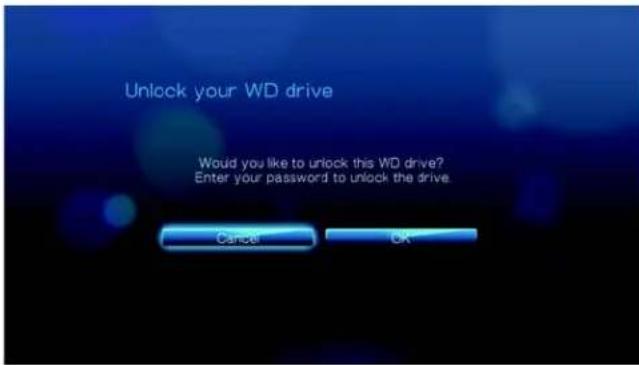
To unlock a locked WD USB device:
A USB device must be unlocked for the media player to access its contents.
-
Navigate to the Home screen, and select the icon for the media content you wish to access. It can be Music 🎨,Video , or Photo .
-
In the Unlock your WD Drive screen, press ◀/▶ to select OK, then press ENTER.
text_image
Unlock your WD drive Would you like to unlock this WD drive? Enter your password to unlock the drive. Cancel OK- Use the navigation buttons ▲▼◀▶ to type in the USB drive access password in the on-screen keyboard. Select Submit, then press ENTER.

text_image
USB 1 Password - b c d e f g h i j k l m n o p q r s t u v w x y z A B C 1 2 3 4 5 6 7 8 9 0 @#& Cancel Space Submit .comIf a wrong password is entered, the following screen displays.
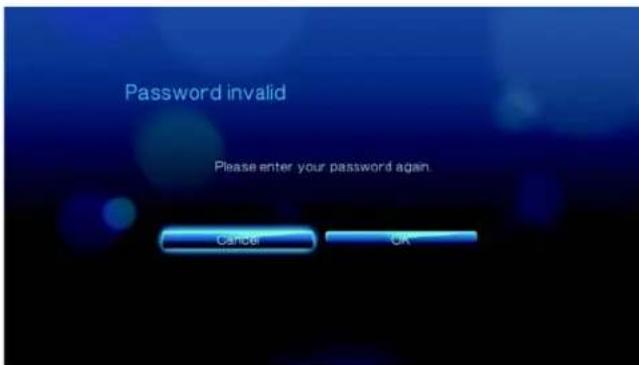
text_image
Password invalid Please enter your password again Cancel OKPress ◀/▶ to select OK, press ENTER, then type in the correct password.
If you enter the wrong password five consecutive times, the USB drive is placed in a hold state and the following message appears.

text_image
Too many password attempts There were too many password recovery attempts. Please safely remove your drive from WD TV, reconnect it and try again.Press ENTER to close the error message. Disconnect the USB drive. Power cycle and reconnect the USB drive and type in the correct access password. 4. Once the USB drive has been unlocked, the menu bar for the selected media type will appear. Press ▲ / ▼ to choose a filter option for displaying supported media contents, then press ENTER.
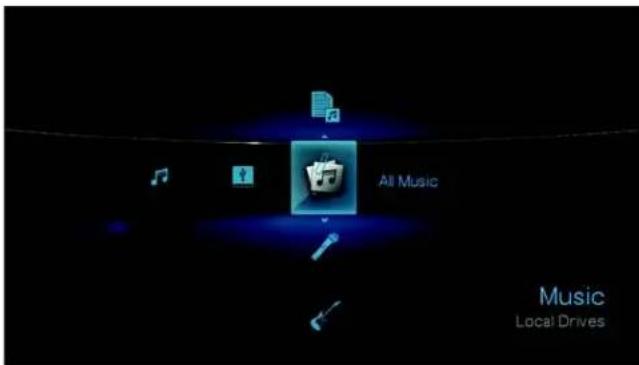
text_image
All Music Music Local DrivesSupported content for the selected media type will be displayed.
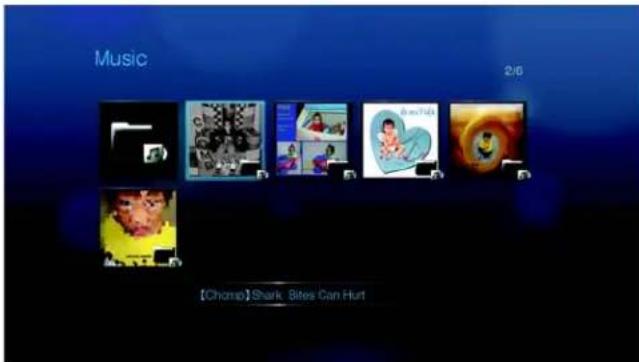
text_image
Music 2/6 【Chome】Shark Sites Can Hurt- Use the navigation buttons ▲▼◀▶ to select the content you wish to access, then press ENTER to start media playback.
Removing a USB Device
To prevent data loss, it is highly recommended that you first press the EJECT button on the remote control before removing a USB device.
To remove a USB device:
-
Press the HOME button .
-
Press the EJECT button
-
Select the USB device you want to remove.
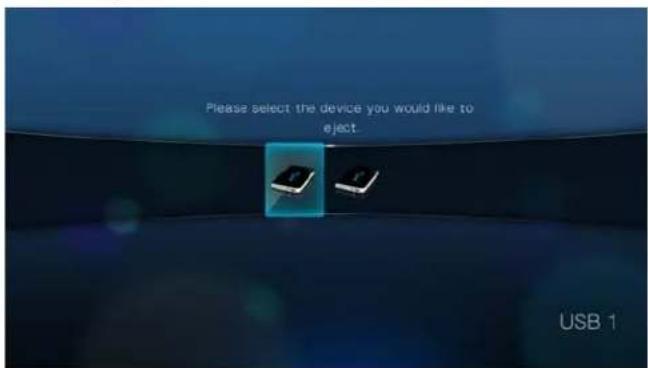
text_image
Please select the device you would like to eject. USB 1- Select OK, then press Enter.
text_image
Are you sure you want to remove this device? Cancel OK- Disconnect the USB device from the media player.
Step 5 - Connecting to the Internet
The media player can be connected to the Internet using a wired or wireless network connection for access to streaming video and online media content.
Wired Network Connection
To connect to a home network using an Ethernet cable:
-
Plug an Ethernet cable (sold separately) into the Ethernet connector on the media player.
-
Plug the opposite end of the Ethernet cable directly into a LAN port on a router or network switch.
natural_image
Illustration of a wireless router connected to a device via a blue cable, with a green arrow indicating the connection point (no text or symbols present)For detailed instructions on wireless and wired network connections and configuration, see "Network Setup" on page 54.
5
Operating the WD TV Live HD Media Player
Using the Remote Control
The media player remote control lets you navigate the Home screen, browse for media files, enable playback options, and customize the system settings. The infrared sensor detects infrared signals from the remote.
Important: Make sure there are no obstructions between the remote control and the infrared sensor on the media player.
| Button Function | |
| HOME Home screen which displays Music/Photo/Video/Setup. | |
| POWER Standby mode. | |
| Navigation buttons Navigate through Home options, menu screens, media libraries, on-screen keyboard, and toolbars. | |
| ENTER | Displays the media directories and Settings screens.Turns information bar ON or OFF.Begins playback of the selected media file.Enables the currently selected setting in a Settings option screen. |
| STOP Discontinues playback. | |
| BACK Goes back to the previous screen. | |
| REV (rewind) Scans backward during audio/video playback. Supports the following speeds: 2x, 4x, 8x, 16x. | |
| PREV (previous track) | Press once to jump to the start of the audio/video file.Press twice to jump to the previous audio/video/image file.Press to page upDuring Video REV mode, press to skip back 10 minutes. |
| SEARCH (current folder) | Locates a media file in the current folder. This function is only available when the Media Library setting is enabled. Does not search subfolder. |
| OPTION During playback, displays the toolbar for additional playback options. From an online media content screen, press to display more service options. | |
| PAUSE/PLAY Toggles between pause and playback. | |
| FF (fast forward) | Scans forward through the audio/video playback. Supports the following speeds: 2x, 4x, 8x, 16x. |
| NEXT (next track) | Skips to the next audio, video, or image file.Press to page down.During Video FF mode, press to skip forward 10 minutes. |
| EJECT Switches to safe mode so you can safely remove a USB device. | |
Using the WD TV HD Media Player Menu
The Home screen menu is displayed when you press HOME on the remote control. The icons on this screen let you browse your media library and configure the media player's settings.
text_image
Local Drives VideoHome Screen Options
The four main Home options (icons) are:
Video
Music
■ Photo
Settings
- The Music , Video , and Photo icons represent folders for the different media types. Media contents will be displayed either as file/file folders in a USB drive directory or as a media library compilation list based on metadata information. For example, music files can be categorized based on their genre or the artist's name.
- Settings lets you customize the way you use the media player and set preferences for media playback. For more information, see “Settings and Advanced Features” on page 127.
When there is a network connection, links to the following Internet services are also displayed.
Live365™ and ® PandoraMusic menu bar – See “Internet Services” on page 70 for more information on this Internet radio services.
- Flickr™ flickr in the Photo menu bar – See “Flickr” on page 100 for more information on this image hosting site.
- YouTube™ YouTube video the Video menu bar – See “YouTube” on page 108 for more information on this video hosting and sharing site.
Home Screen Navigation
Use the following keys to navigate through the menu screens.
| Button Function | |
| Up/Down arrow Select a | media type (photos, video, or music) or settingsSelect one of the option icons in an Internet service's submenu bar |
| Left/Right arrow Moves within a category | |
| ENTER Launches your selection | |
Media Library Compilation
Media Library Compilation refers to the process of scanning and consolidating the media contents of a USB drive into one comprehensive database so that you can easily browse and locate media files based on certain metadata information (e.g., video files are categorized based on title or release date).
Media Library Compilation Exemptions
The following conditions will prevent the media library compilation process.
■ The USB device has read-only protection.
- There is not enough hard disk space on the USB device.
To turn off Media Library Compilation (default is On):
- Navigate to Home | Settings

- Select Media Library Compilation, and then press ENTER.
text_image
System Language English Media library Off Screemsaver delay 5 Minutes Display fiässize Off Additional encoding support Western Europe Autoplay Off Systemreset3. Select OFF, then press ENTER.
text_image
Media library Off OnSupported Categories for Media Library Compilation Categories
Once the media library compilation process is completed, all available media files are organized under their respective media type directory. By default, media contents are displayed as thumbnails (music album/movie poster art, image thumbnail). The content categories are listed in the following table.
| Media Type Icon Category Description | ||
| Music |  | All Music Displays a list of all audio files arranged in alphabetical order. |
 | Artist Content is categorized based on the artist name. | |
 | Genre Content is categorized based on their genre. | |
 | Album Content is categorized based on their album names. | |
 | Date Content is organized by Date Modified. | |
 | Folders Contents are displayed in audio file folders. | |
| [C47K] | Recent Displays a list of audio folders/files that have been accessed recently. | |
 | Playlist Displays a list of music playlists. | |
| Video |  | All Video Displays a list of all video files arranged in alphabetical order. |
| [2YXD] | Date Content is organized by Date Modified. | |
 | Folders Contents are displayed in video file folders. | |
 | Recent Displays a list of video folders/files that have been played recently. | |
 | Playlist Displays a list of video playlists. | |
| Photo |  | All Pictures Displays a list of all images files arranged in alphabetical order. |
 | Date Content is organized by Date Modified. | |
| [72X2] | Folders Contents are displayed in image file folders. | |
| [90XT] | Recent Displays a list of image folders/files that have been accessed recently. | |
Locating Your Contents on the Drive
There are two ways of locating a particular media file depending on whether or not the media library compilation function is enabled.
Manual Search
You can manually search for a media file by navigating to the specific media section and browsing through the available file folders. This method is recommended if there are only a limited number of files to search through. Otherwise, it is better to enable the media library compilation and use the built-in Search function.
Use the navigation buttons to move around a particular folder; press ← to move between folders.

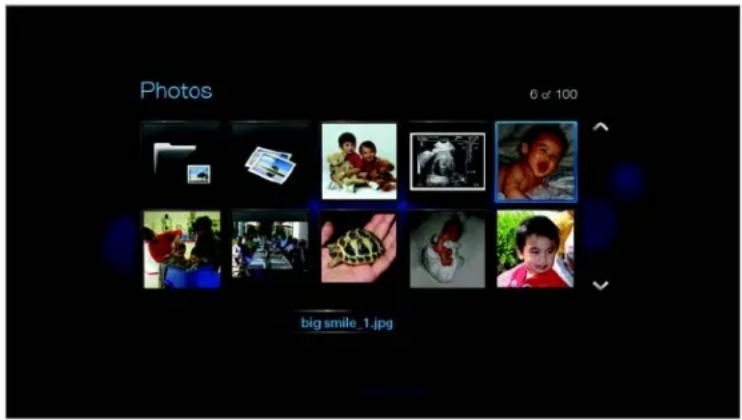
text_image
Photos 6 of 100 big amile_1.jpgThumbnail support for media files
Your media player supports thumbnails in two ways - embedded or user generated (some file formats do not support thumbnails).
Supported embedded formats with thumbnail:
Music - MP3 and WMA
Photo - JPEG (from EXIF or WDTV will auto generate thumbnails)
Video - MP4
To generate a thumbnail to a file:
-
Select a JPEG file that you want to display as a thumbnail of the music or video file.
-
Save the file in the same location as the file it will represent.
Folder Thumbnails view functions (defaults)
Music:
- Display folder.JPG (the image file must be named "folder.JPG" or thumbnail will not function)
- If no folder .JPG file is found, display the first album art image (.MP3 with embedded .JPG)
- If no album art is available, display the first .JPG in the folder
Photo:
■ Display folder.JPG
- If no folder.JPG file is found, display the first photo in the folder
Video:
■ Display folder.JPG
- If no folder.JPG file is found, display the first cover art (.MP4 with embedded .JPG)
- If no cover art is available, display the first photo in the same folder as the video to be played
File Thumbnail view functions (defaults)
Music:
■ Display album art (.MP3 file with embedded .JPG)
- If no album art is available, display the image file with the same name as the audio file to be played. (for example, song.wav will be associated with song.JPG)
Photo:
- Display thumbnail
Video:
■ Display .MP4 with embedded .JPG
- Display image file associated with the video file to be played (for example video.mkv will be associated with video.JPG)
Search Function
You must first enable the Media Library Compilation feature before using the Search function. Go to "Media Library Compilation" on page 27 for instructions.
To perform a media search:
- If you want to search for all types of media matching the search parameters, go to the Home screen.
If you want to search for particular type of media, for example video files only, go to the main browser screen of that media type.
-
Press on the remote control.
-
Define the search parameters. Select the Starts with or Contains field, then press ENTER.

text_image
Search Contains Starts with- Starts with – All files with filenames that begin with the characters entered in this field will be included in the search results. For example, inputting 'glo' will result to a search results like this:
Global party.mpeg
Glow of the Field.jpg
Gloss.mp3
- Contains – All files with filenames that includes the characters entered in this field will be listed in the search results. For example, inputting 'un' will result to a search results like this:
Land of the Rising Sun.mpeg
shunt_1a.jpg
Unite.mp3
- On the on-screen keyboard:
- Use the navigation buttons to select a character, then press ENTER to input it in the search bar.
- Select ABC or abc, then press ENTER to input characters in different case.
- Select 📄, then press ENTER to display the symbol keyboard for inputting special characters.
- If you want to erase the last character, select ← then press ENTER.

text_image
Search Search Space Cancel-
Once you defined the search parameters, select Search on the bottom of the on-screen keyboard, then press ENTER.
-
If there are no media files matching the search parameters, the following message appears.

text_image
Search completed. No results found. OKPress ENTER to display the on-screen keyboard again and redefine the search parameters.
If media files matching the search parameters you set are found, they will be listed as shown below.
text_image
Search 01leo_lei-lovz.mp3 02-leo_lei-whatever_it_takes.mp3 03-leo_lei-homeless.mp3 04-leo_lei-better_n_time.mp3 05-leo_lei-yester_day.mp3 06-leo_lei_take_a_bow.mp3 07-leo_lei_i_will_bemp3Use the navigation buttons to select the media file you are looking for, and then press ENTER or Ito initiate playback.
6
Watching Video
You can watch videos on your TV using the media player.
Supported Video Formats
The following video file formats are supported.
■ AVI (Xvid, AVC, MPEG1/2/4)
- MPG/MPEG
■ VOB/ISO
■ MKV (h.264, x.264, AVC, MPEG1/2/4)
■ TS/TP/M2T (MPEG1/2/4, AVC, VC-1)
■ MP4/MOV (MPEG4, h.264)
■ M2TS
■ WMV9 (VC-1)
Video Playback
To play back video:
- Browse to the Video category.

text_image
All Video Video Local Drives- Highlight All Video, then press ENTER.
-OR-
If Media Library is enabled, you can choose to navigate using a filter option (All Video, Date, Folders, Recent, or Playlist) by selecting the Video icon and then using the left and right arrow buttons on the remote control to scroll through the options listed.
The screen will display available video files and video folders. The display will either be in thumbnail (default), list mode, or video preview, depending on your Browser Display setting (see "Video" on page 142 for more information on Browser Display settings).
text_image
Videos 10 of 100 kayak.mp4-
Locate the video file you want to play.
-
To begin playback of a single video file, highlight the file, and then press ENTER.
- To begin playback of a video playlist, highlight the playlist name, then press PAUSE/PLAY.
- To begin playback of all video files in a folder, highlight a video in that folder, then press PAUSE/PLAY.
If you try to open a video file that has been partially played before, you are prompted to choose whether to play the file from the beginning or resume playback from the last playback position. Select OK to resume playback or Cancel to start playback from the beginning.
text_image
Please select [OK] to resume playback or [Cancel] to restart the video Cancel OKVideo Playback Controls
Use these buttons on the remote control to control video playback:
| Button Function | |
| STOP Discontinues video playback | |
| PAUSE/PLAY Pauses or resumes video playback | |
| 1. Press FF (fast forward) or REV (reverse) to scan video (press repeatedly to select the scan speed)2. Press PAUSE/PLAY to resume playback on the selected position | Scans the video playback forward or backwardThe media player supports the following scan speeds: 2x, 4x, 8x, 16x |
| NEXT | Plays the next video file in the video folder/playlistPress during Fast Forward to skip forward 10 minutes.Press NEXT to skip to the next chapter (if the video file supports chapters). |
| PREV • Plays the previous video file in the | video folder/playlistPress during Fast Reverse to skip back 10 minutes.Press PREV to skip to the previous chapter (if the video file supports chapters). |
Video Playback Options
The Video toolbar has several command icons to customize the way you watch your videos.
- To display the Video toolbar, press OPTION.
- To hide the toolbar, press BACK or OPTION again.
Displaying the Video Information Panel
Use this option to display the Video Information Panel on the bottom of the screen. This panel shows the following information about the current video:
The icon for the current repeat mode is displayed, if

text_image
Info bar 00.00.03 / 00.00.30 5.LHA_FORMOSA.Blu-ray.Re.1080p x264.DTS@mysiu.Sample.mVideo playback progress bar
Elapsed and total playback times
Video filename
To view the Video Information Panel:
- During video playback, press the OPTION key. The Options bar appears on the top of the screen.
- Highlight the information icon 🔒, then press ENTER. The Video Information Panel appears on the bottom of the screen.
text_image
info bar 00.00.03 / 00:00:30 5LHA_FORMOSA.Blu-ray.Re.1080p x264.DTS@mysilu.Sample.m-OR-
Press OPTION or BACK to hide the Video Information Panel.
Audio Channel Selection
Use this option to select the audio language used in the video playback. This option is only available if the current video has more than one audio track. Make sure the audio tracks are located in the same folder as the current video.
To select the audio channel:
-
Press OPTION. The Options bar opens.
-
Highlight 📄, then press ENTER repeatedly until the audio channel you want is displayed.
-OR-
Highlight Audio Off to turn off the sound.

text_image
Audio change 00:00.08 / 00:00.30 9:33:31:14 FOR KIOSA BURG NO 00000 X64D S@myaia3sChapter Selection
If you are viewing a multichapter video file, you can select which chapter to play.
To select the video chapter:
-
Press OPTION. The Options bar opens.
-
Highlight ☐, then press ENTER repeatedly until the preferred video chapter is displayed.

natural_image
View from inside a car showing a cracked asphalt road with surrounding landscape and navigation icons (no readable text or symbols)DTS Audio
This media player supports DTS audio. Simply select a video file with DTS audio encoding and select it for playback.

text_image
the digital experience 00:00.11 00:00:13 DTS video.mpegSelecting Subtitles
Use this option to view subtitles during video playback. Make sure the subtitle files are located in the same folder as the current video, and that it has the same filename as the video file.
Subtitle files (specific types that are supported) need to have the exact same file name as the media they are playing (the extensions will be different) and need to be located in the same folder as the video file.
To view subtitles:
- During video playback, press OPTION. The Options toolbar appears at the top of the screen.
text_image
Substrate 3 / 4 : French iWiD- Highlight ☐, then press ENTER repeatedly to cycle through the available subtitles.
-OR-
Select Subtitle Off to disable subtitles.
Selecting Video Zoom Options
Use these options to change the viewing scale of the video playback screen.
To change the viewing scale:
- During video playback, press OPTION. The Options bar appears on the top of the screen.
natural_image
Landscape photo of a green orchard with blooming trees and distant mountains, featuring a small farm in the foreground (no visible text or symbols)- Highlight 🔒 to zoom in or 🔒 to zoom out, then press ENTER repeatedly to cycle through the available zoom options.
-OR-
Press OPTION or BACK to revert to the default viewing scale.
Video Pan Mode
Use this option to pan the video display.
To pan the video display:
-
Press OPTION. The Options bar opens.
-
Select, then press ENTER.

natural_image
Landscape view of a green orchard with blooming trees and distant mountains, featuring a tractor in the foreground (no visible text or symbols)- Use the navigation buttons to pan the display.
Alternatively, press OPTION or ← to revert to the default display position.
Using Video Repeat
Use this option to repeat the video currently playing.
To set the video repeat mode:
- During video playback, press OPTION. The Options bar appears on the top of the screen.
- Highlight the repeat icon 🔒, then press ENTER repeatedly until the repeat mode icon you want is displayed. Options include:
- Normal 📄 – The video file will only be repeated once. When playback is completed, the previous browser screen is displayed.
- Repeat One ⚙ The current video is played repeatedly until you press STOP or BACK.
- Repeat All 📋 – All the files in the current video folder/playlist is played in sequence, and repeatedly, until you press STOP or BACK.
text_image
Play modeDid you know?
If you wish to play a list of VOB files continuously, simply select a file from the view screen and press Play. The VOB files will play in tandem seamlessly.
7
Playing Music
You can copy your music library to a USB device and listen to it from your entertainment unit using the media player. The following audio file and audio codec formats are supported.
MP3
■ WAV/PCM/LPCM
WMA
AAC
FLAC
■ MKA
AIF/AIFF
- OGG
- Dolby Digital
DTS
Music Playback
- Press HOME, then highlight the Music 🎯 bar. The music bar is displayed.

text_image
Scanning in progress All Music Music Local Drives- Highlight All Music, then press ENTER.
-OR-
If Media Library is enabled, you can navigate using a filter option (All Music, Artist, Genre, Album, Date, Folders, Recent, or Playlist) by selecting the Music icon and then using the left and right arrow buttons on the remote control to scroll through the options listed.
The screen will display available audio files and audio folders. The display will either be in thumbnail (showing the music album art, when available) or in list
mode depending on your Browser Display setting. Only audio files supported by the media player are displayed.
text_image
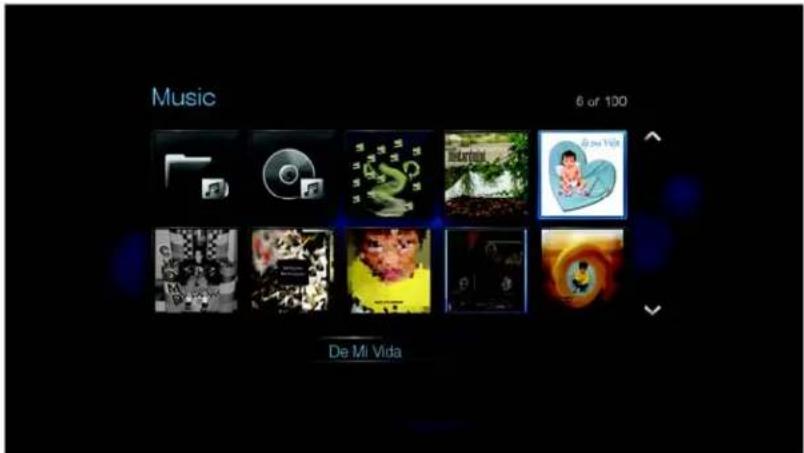
Music 6 of 100 De Mi Vida-
Locate the audio file you want to play.
-
To begin playback of a single audio file, highlight the file, and then press ENTER.
- To begin playback of a music playlist, highlight the playlist name, and then press PAUSE/PLAY.
- To begin playback of all audio files in a folder, highlight an audio file in that folder, and then press PAUSE/PLAY.
The music playback screen displays the following information about the currently played audio file:
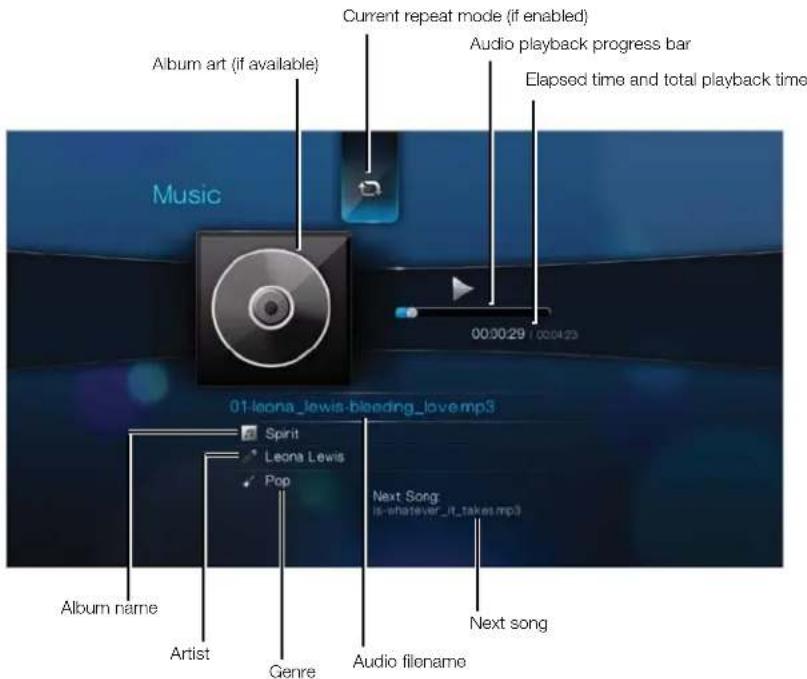
text_image
Current repeat mode (if enabled) Audio playback progress bar Elapsed time and total playback time Album art (if available) Music 00:00:29 / 00:04:23 01-leona_lewis-bleeding_love.mp3 Spirit Leona Lewis Pop Next Song: is-whatever_it_takes.mp3 Album name Artist Genre Audio filename Next songMusic Playback Controls
Use these buttons on the remote control to control music playback:
| Button Function | |
| STOP Stop audio playback | |
| PAUSE/PLAY Pause or resume audio playback | |
| 1. Press FF (fast forward) or REV (rewind) to scan the audio file (press repeatedly to select the scan speed).2. Press PLAY to resume playback on the selected position. | Scan the audio playback forward or backwardThe media player supports the following scan speeds: 2x, 4x, 8x, 16x |
| Press PREV (previous track) once. | Start playback from the beginning |
| Press NEXT | Play the next audio track in the music folder/ playlist |
| Press PREV (previous track) twice. | Play the previous audio track in the music folder/ playlist |
Music Playback Options
The two command icons on the Music toolbar let you set music repeat and shuffle modes.
- To display the music toolbar, press OPTION.
- To hide the toolbar, press BACK or OPTION again.
To set the music repeat mode:
- During music playback, press OPTION. The music toolbar opens at the top of the screen.
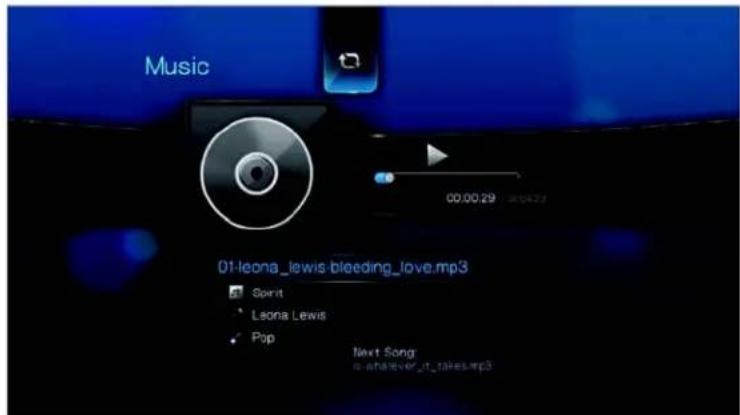
text_image
Music 00:00:29 (00:29) 01-leona_lewis-bleeding_love.mp3 ■ Spirit * Leona Lewis ✓ Pop Next Songwhatever_it_takes.mp3
-
Highlight 📊, then press ENTER repeatedly until the repeat icon you want is displayed. Options include:
-
Normal 📊 – The audio track will only be played once. When playback is completed, the previous browser screen is displayed.
- Repeat One 📄 – The current audio track is played repeatedly until you press STOP or BACK.
- Repeat All 📄 – All the audio files in the current music folder/playlist is played in sequence and repeatedly until you press STOP or BACK.
The icon for the enabled repeat mode will appear below the playback progress bar.
Music Shuffle Mode
Use this option to set the audio tracks in the current music folder/playlist to play in random order.
To enable music shuffle mode:
- During music playback, press OPTION. The music toolbar opens at the top of the screen.
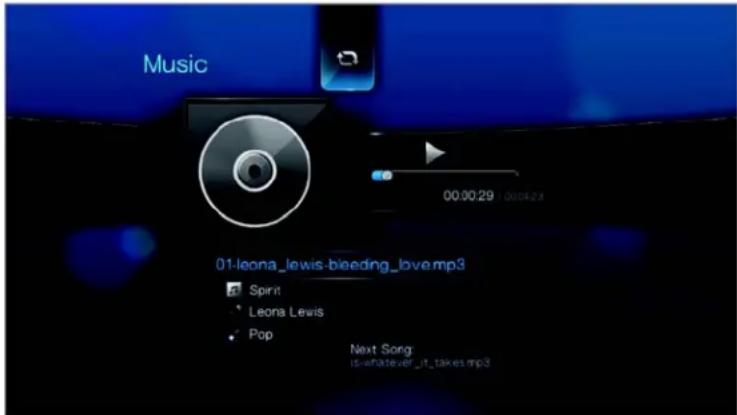
text_image
Music 00:00:29 00:42:28 01-leona_lewis-bleeding_love.mp3 • Spirit • Leona Lewis • Pop Next Song is whatever _it_takes.mp3- Press ENTER repeatedly until the shuffle icon ✗ is displayed.
Playing music from your iPod®
Apple ^® uses a proprietary naming scheme and because of this the media player is unable to display the original names for the folders and files as they are in your iPod. The media player instead reassigns new names for the folders and files, but only while in use with the media player. The original file information is preserved in your iPod. You can view the original file information when you play a file where the screen will display the metadata.
Note: The media player does not support playback of protected premium content such as movies or music from the iTunes ^® Store, Cinema Now, Movielink ^® , Amazon Unbox ^™ , and Vongo ^® .
To use your iPod with the media player, simply plug your iPod in to the USB port and navigate through the interface menu.
Note: The media player only supports USB mass storage mode. iPod Touch is not a USB mass storage device and is therefore not supported.
Viewing Photos
With the media player you can view your digital photo album in the comfort of your living room. It's perfect for sharing fun times with your friends and family. The following image file formats are supported:
- GIF (Animated GIFs are not supported)
- BMP (non-compressed)
- JPEG (grayscale, RGB, YCbCy) (does not support CMYK or YCCK)
- TIF/TIFF (RGB) (does not support CMYK, YMC, YMCK, or KCMY)
■ PNG (Non-alpha channel only)
Photo Display
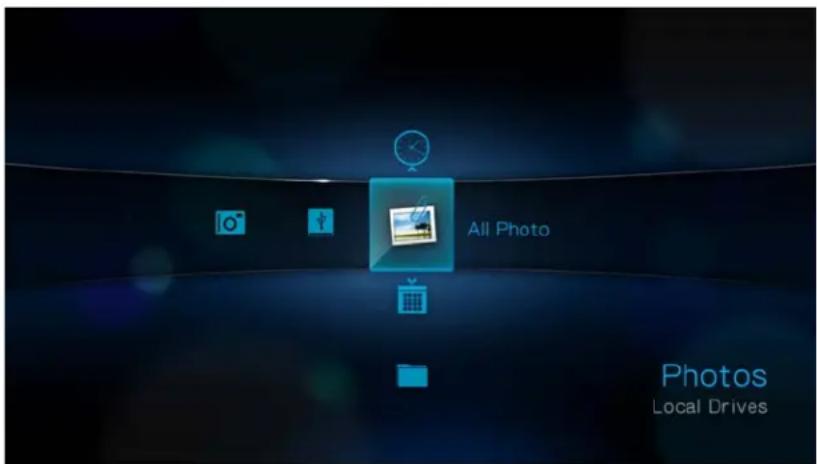
- Press HOME, then select the Photo ☐ bar. The photo bar is displayed.
text_image
All Photo Photos Local Drives- Select the All Photo icon 📋, then press ENTER.
-OR-
If Media Library is enabled, you can choose to navigate using a filter (All Pictures, Date, Folders, and Recent) by selecting the Photo icon and then using the left and right arrow buttons on the remote control to scroll through the options listed.
The screen will display thumbnails of available picture files and photo folders. Only image files supported by the media player are displayed.
text_image
Photos 6 of 100 big smile_1.jpg-
Locate the picture file you want to view.
-
To open a single picture file for viewing, select the file, and then press ENTER.
- To view the next picture file in the photo folder, press NEXT (track).
- To view the previous picture file in the photo folder, press PRE (previous).
You can also view a slideshow using all picture files in a photo folder. See "Photo Slideshow" on page 50 for instructions.
Digital Camera Support
You can attach your digital camera to the media player via a USB port and view the supported images files stored in the camera's memory card.
To view images from a digital camera:
- Attach your digital camera to the media player via the USB port.
The media player considers the camera's memory card as a read-only device and displays the following message.
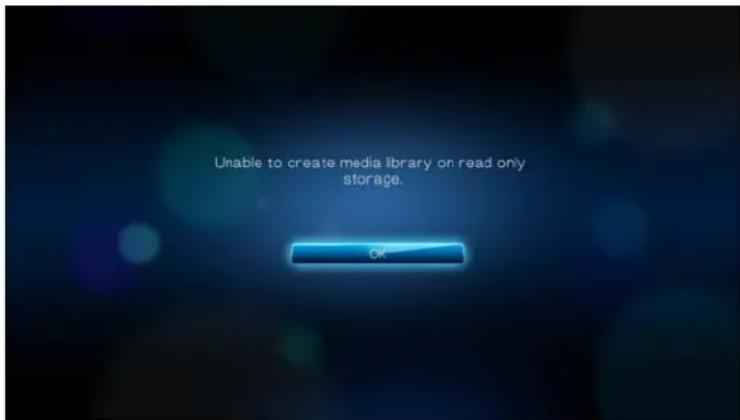
text_image
Unable to create media library on read only storage. OK- Press ENTER to close the message.
- Navigate to the Home | Photo bar.
- The digital camera is considered a USB device. Use the navigation buttons to select when press ENTER.

text_image
Camera 2 Photo Local drivesThe screen will display thumbnails of available picture files and photo folders. Only image files supported by the media player are displayed.
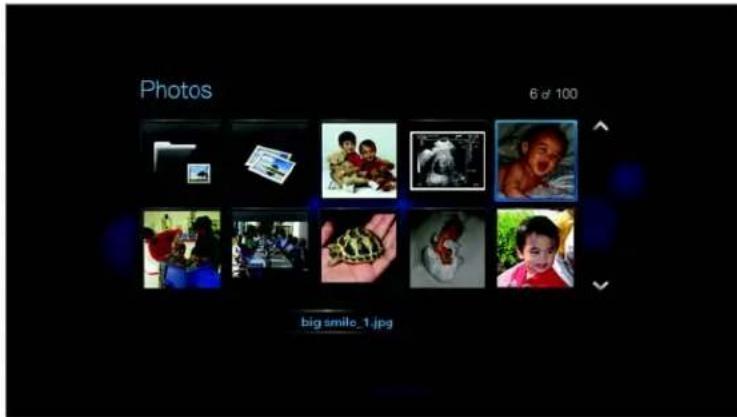
text_image
Photos 6 of 100 big smile_1.jpgProceed to step 3 of the next section for instructions on how to view image files.
Photo Display Options
The Picture toolbar has several command icons to customize the way you view your pictures.
- To display the Picture toolbar, press OPTION.
- To hide the toolbar, press BACK or OPTION again.
Panning Around the Picture
Use this to pan the picture display horizontally or vertically.
To pan the image display:
- During photo viewing, press OPTION. The Picture toolbar opens at the top of the screen.

natural_image
Computer monitor with abstract UI elements and a colorful background (no readable text or symbols)- Select the pan icon, then press ENTER.
- Use the remote control navigation buttons (Left, Right, Up, Down) to pan the display.
-OR-
Press OPTION or BACK to revert to the default display position.
Rotating the Picture
Use these options to rotate the image clockwise or counterclockwise. These settings do not affect the original file's orientation.
To rotate the picture:
- During photo viewing, press OPTION. The Picture toolbar opens at the top of the screen.

natural_image
Abstract colorful geometric shapes with icons, no text or symbols present- Highlight a picture rotate icon or to choose the direction of image rotation, then press ENTER repeatedly until the rotation you want is set.
-OR-
Press OPTION or BACK to revert to the default viewing orientation.
Using Photo Zoom
Use these options to change the viewing scale of the image display.
To change the viewing scale:
- During photo viewing, press OPTION. The Picture toolbar opens at the top of the screen.

natural_image
Computer monitor with five function buttons and icons on a colorful background (no readable text or symbols)- Select the zoom in icon 🔒 to zoom in or 🔒 to zoom out, then press ENTER repeatedly until the scale you want is shown.
-OR-
Press OPTION or BACK to revert to the default viewing scale.
Displaying the Picture Information Panel
Use this option to display the Picture Information Panel on the bottom of the screen.
This panel shows the following information about the current picture:
- Image filename
■ Image resolution and file size - Image's sequence number and the total number of image files in the current photo folder
To view the Picture Information Panel:
-
During photo viewing, press OPTION. The Picture toolbar opens at the top of the screen.
-
Select the Picture Info icon, then press ENTER.
-OR-
Press OPTION or BACK to hide the Picture Information Panel.
Photo Slideshow
The media player allows you to create a slideshow using the contents of a photo folder.
To start a slideshow:
-
Locate the photo folder containing the image files you want in the slideshow. (See "Photo Display" on page 46.)
-
Select the photo folder, then press PAUSE/PLAY to start the slideshow.
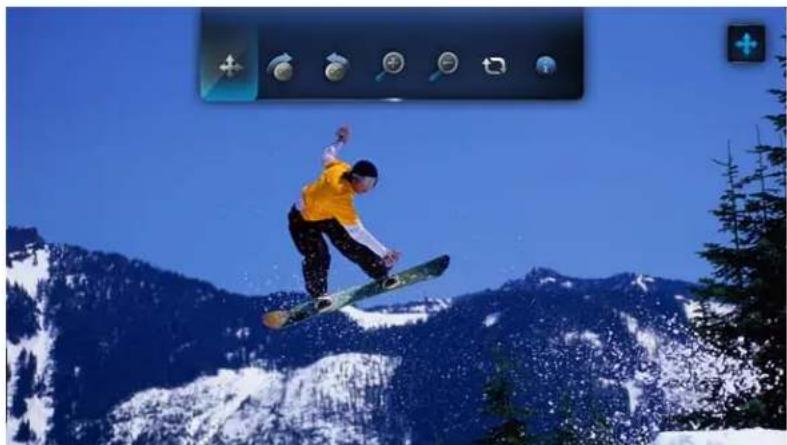
natural_image
Snowboarder mid-air performing a trick against a mountainous blue sky (no text or symbols visible)To listen to background music with a slideshow:
-
Navigate to the music folder containing the audio file/playlist you want to accompany the slideshow. (See "Music Playback" on page 42.)
-
Select the audio file/playlist, and then press PLAY.
- If you selected a single audio file, you may want to enable it to play repeatedly so it doesn't stop before the slideshow is done.
- If you selected a music playlist, you can choose to enable the repeat or shuffle mode.
- Press HOME, and then start the slideshow (as described above).
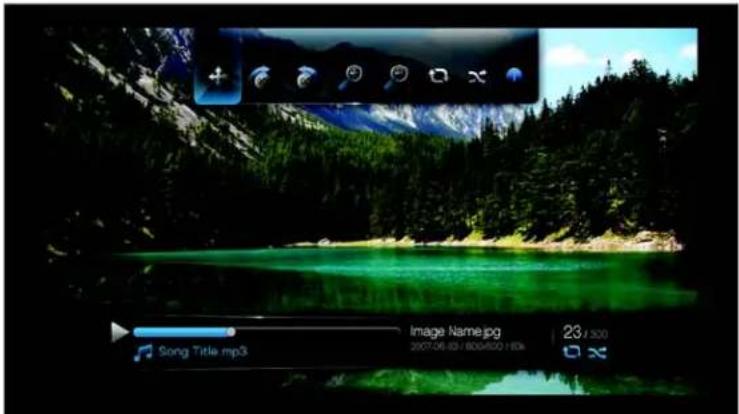
text_image
Song Title.mp3 Image Name.jpg 23/500 3007-06 03 / 8004520 / 180kDisplaying the Slideshow Information Panel
You can display the Slideshow Information Panel on the bottom of the screen. This panel shows the following information:

text_image
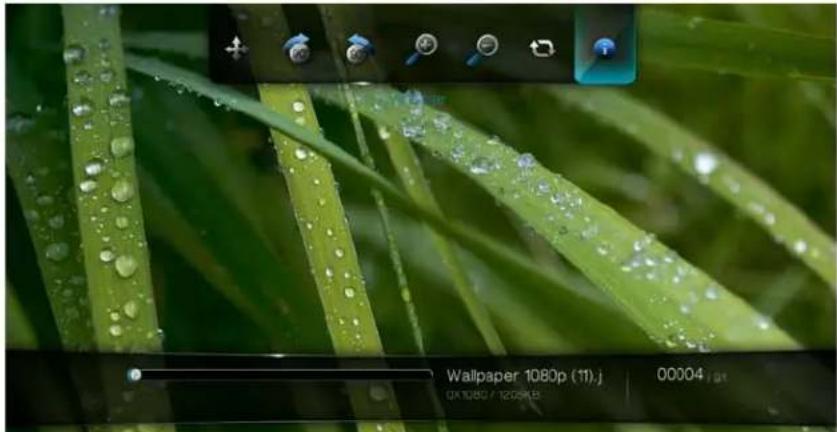
Slideshow progress bar Filename, image resolution, and file size of current image Repeat and/or shuffle icons (if enabled) Also shown (if used) is the filename of the music background Current image's sequence number and total number of image files in the folder Wallpaper 1080p (11).j 00004 0K1080 / 205KBTo view the Slideshow Information Panel:
- During a slideshow, press OPTION. The Slideshow toolbar opens at the top of the screen.
text_image
Wallpaper 1080p (11).j 00:00:04 / 12:05:08-
Select the Slideshow Info icon ⚙, then press ENTER. -OR-
-
Press OPTION or BACK to hide the Slideshow Information Panel.
Slideshow Playback Controls
Use these buttons on the remote control to control slideshow playback:
| Button Function | |
| STOP | Discontinue the slideshow |
| PAUSE/PLAY | Pause or resume the slideshow |
| STOP | Stop the music background |
| NEXT | Display the next picture file in the slideshow |
| PREV | Play the previous picture file in the slideshow |
Slideshow Options
The Slideshow toolbar has the same command icons as the Picture toolbar, with the addition of icons for slideshow repeat and shuffle modes.
Configuring the slideshow settings is discussed in the “Settings and Advanced Features” on page 127. These settings include the slideshow’s default repeat/shuffle modes, transition effect, and interval time.
Repeating and/or shuffling a Slideshow
Use this option to set the slideshow to play in a loop sequence.
To set the slideshow repeat mode:
- During a slideshow, press OPTION. The pictures toolbar opens at the top of the screen.

natural_image
Color palette grid displayed on a tablet device (no readable text or symbols)- Select 🔑, then press ENTER repeatedly until the repeat mode you want is displayed. Options include:
- Normal 📄 The slideshow is played once. When the last image is displayed, the previous browser screen is displayed.
- Repeat ☐ – The slideshow is played repeatedly until you press Stop or Back.
- Shuffle ✗ – The slideshow is played in random order until you press Stop.
- Repeat and Shuffle 📄 – The slideshow is played continuously in random order.

Network Setup
The WD TV Live HD Media Player can be connected to the local area network using a wired or wireless network connection for access to streaming video and online and offline media content.
Ethernet Network (Wired) Setup
- Plug an Ethernet cable into the Ethernet connector on the media player.
- Plug the opposite end of the Ethernet cable directly into a LAN port on a router or network switch.
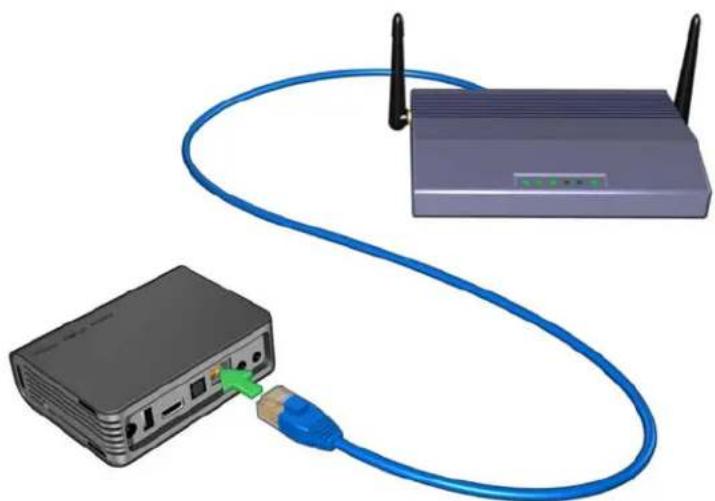
natural_image
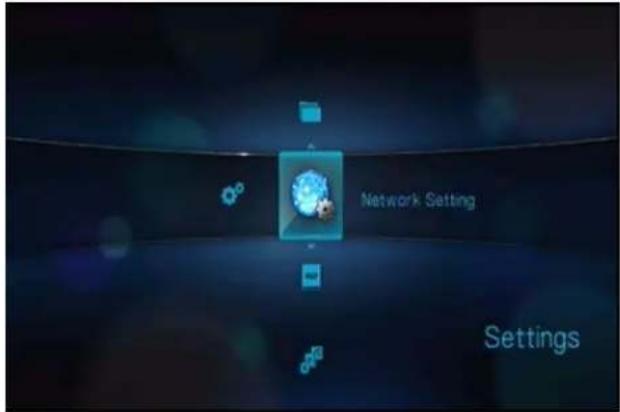
3D illustration of a wireless router connected to a device via a blue cable (no text or symbols visible)- Navigate to the Home | Settings menu bar.
- Press ▲/▼ to select Network Setting 🔓, then press ENTER.
text_image
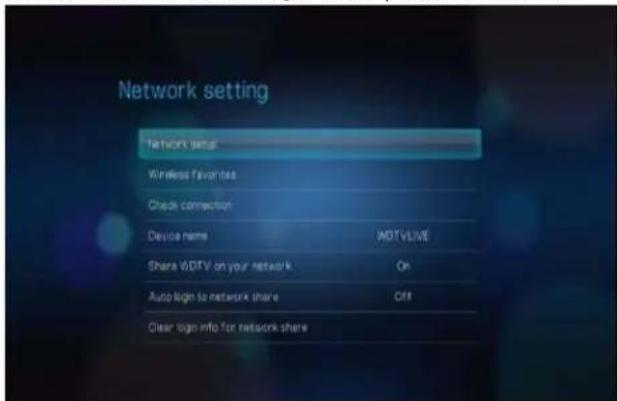
Network Setting Settings- Press ▲/▼ to select Network setup, then press ENTER.
text_image
Network setting Network setup Wireless favorites Check connection Device name MDTV olive Share MDTV on your network On Auto log to network share Off Clear log info for network share- Select a setup configuration option, then press ENTER.
Select Automatic to have the device attempt to detect your network connection automatically, then go to step 11.
Select Manual to manually set your network connection, then proceed to step 7.

text_image
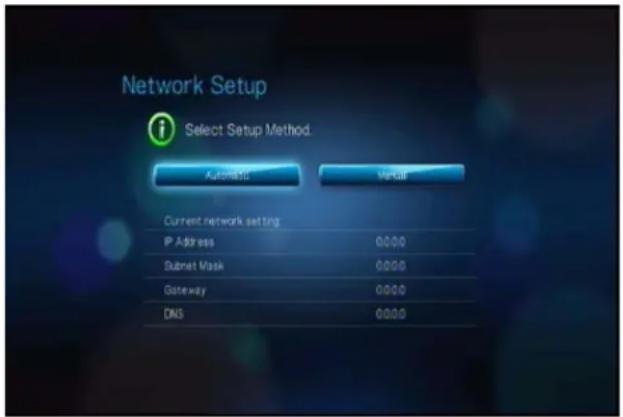
Network Setup i Select Setup Method Aumina C Up Up Current network setting IP Address 192.16825 Subnet mask 256.255.2550 Gateway 192.16821 DNS 192.16821- Once the network is detected, the following screen appears. Press ▲/▼ to select IP address, then press ENTER.

text_image
Network Setup IP Address 192.168.1.6 Subset Mask 255.255.255.0 Gateway 192.168.1.1 DNS 192.168.1.1 Finish- Press ◀▶ to key in your IP address using the on-screen keyboard. Select Submit, then press ENTER.

text_image
Network Setup IP Address 1921681.6 Submit- Repeat the step above to key in values for the subnet mask, gateway, and DNS settings.
- After entering all the configuration settings, select Finish, then press ENTER.
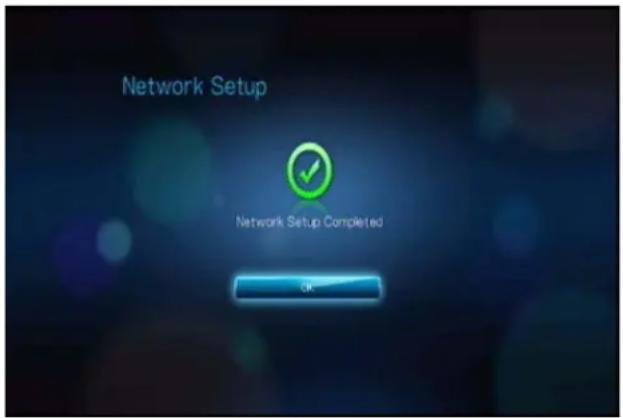
- Once the network is detected, the following screen appears. Press ENTER to display the Home screen.
text_image
Network Setup Network Setup Completed OKAfter establishing a network connection, you can:
- Use the different Internet services integrated into your media player to access streaming media. Go to the next chapter for more information on these services.
- Transfer files between the media player and your computer (PC or Mac). Procedures for copying and moving files between the media player and your computer are described in “File Management” on page 128.
Wireless Network Setup
Note: For a list of tested, compatible USB devices, see Article #3805 in our knowledge base at support.wdc.com.
- Connect a USB wireless adapter (sold separately) to the USB port on your media player.

natural_image
Black rectangular electronic device with a USB port and power button, showing internal ventilation and control buttons (no readable text or symbols)-
Navigate to the Home | Settings menu bar.
-
Press ▲/▼ to select Network Setting 🔍, then press ENTER.
text_image
Network Setting Settings- Press ▲/▼ to select Network setup, then press ENTER.
text_image
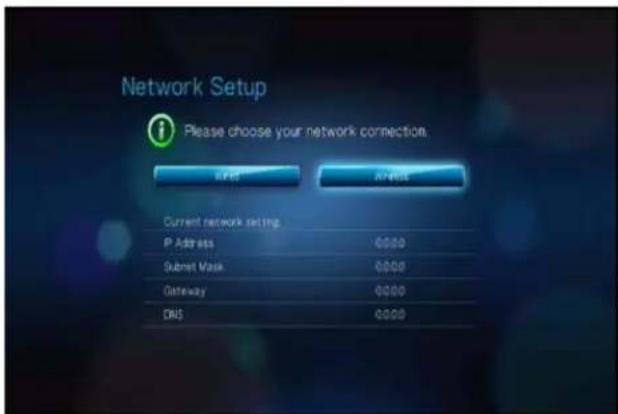
Network setting Network setup Wireless favorites Check Connection Device name NOTVLIVE Share WDTV on your network On Auto login to network share Off Clear login info for network share- Use the ◀▶ navigation buttons to select Wireless, then press ENTER.
text_image
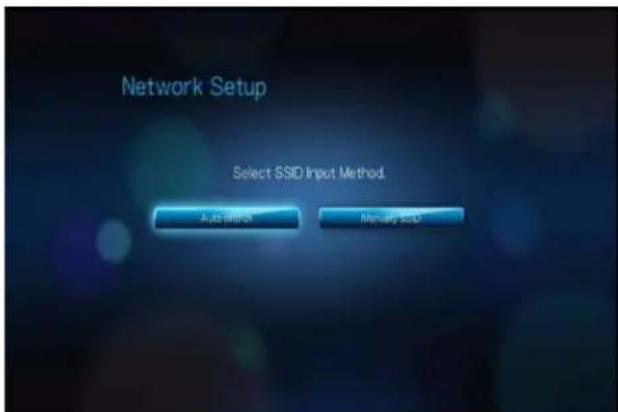
Network Setup Please choose your network connection. Current network setting P Address 0000 Subset Mask 0000 Gateway 0000 DNS 0000- Use the navigation buttons to select an SSID input option, then press ENTER.
text_image
Network Setup Select SSID Input Method. Auto Import Binary SSDIf you choose Auto search, the unit will search for available access points in your area. Proceed to step 7.
Choose Manually input SSID to input the SSID manually, then proceed to step 8.
- Press ▲/▼ to select the access point you want to connect to, then press ENTER. Proceed to step 10 to continue Auto search.

text_image
Network Setup Wireless Select an Available Network SSID Security Type Signal HWTEST-2.4G Ste-VIIIa-11G BUFFALO_SOU_1_ abc*%S#@-G- Use the navigation buttons ▲type in the SSID for the access point you want to connect to, select Submit, then press ENTER.

text_image
Network Setup Wireless Enter SSID Key: - a b c d e f g h i j k l m n o P q r s t u v w x y z A B C 1 2 3 4 5 6 7 8 9 0 @#& Cancel Space Submit www.- Press ▲/▼ to select a security protocol, then press, then press ENTER.

text_image
No Security WEP WPA-PSK TKIP WPA-PSK AES WPA2-PSK TKIP WPA2-PSK AES- Use the navigation buttons ▲ to key in the passcode for the access point, select Submit, then press ENTER.

text_image
Network Setup Wireless Please enter your Encryption Key ********e_ a b c d e f g h i j k l m n o p q r s t u v w x y z ABC 1 2 3 4 5 6 7 8 9 0 @#& Cancel Space Submit .com- Use the navigation buttons ◀▶ to select Automatic (obtains IP address automatically from the router) or Manual (input static IP address manually), then press ENTER. If you selected Manual, follow steps 7-10 under “Ethernet Network (Wired) Setup” on page 54. When finished, proceed to step 12 below.
text_image
Network Setup Select Setup Method. Automatic Vector Current network setting IP Address 0.000 Subnet Mask 0.000 Gateway 0.000 DNS 0.000- Once the network is successfully set up, the following screen appears. Press ENTER to display the Home screen.
text_image
Network Setup Network Setup Completed OKAfter establishing a network connection, you can:
- Use the Internet services integrated into your media player to access streaming media. Go to the next chapter for more information on these services.
- Transfer files between the media player and your computer (PC or Mac). Procedures for copying and moving files between the media player and your computer is described in “File Management” on page 128.
Checking the Network Connection
If you experience network problems, check the network connection to determine the cause of the problem.
To check the network connection:
- Navigate to the Home | Settings menu bar.
-
Press ▲/▼ to select Network Setting 🔒, then press ENTER.
-
Press ▲/▼ to select Check connection, then press ENTER.

text_image
Network Setting Network setup Wireless Favorites Check connection Device name WDTV-7200ps Santa Server Off Auto Sign Off Clear account informationThe unit will automatically check the network connection. Once the check is completed, the results display. A blue check mark on these items indicate that there is no problem with your network settings. If a problem is indicated, check your router settings and manual for a solution.
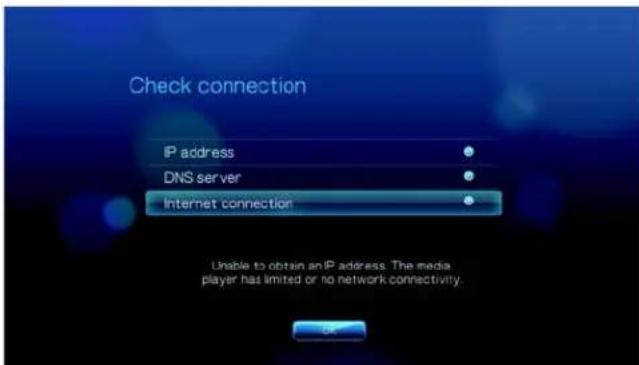
text_image
Check connection IP address DNS server Internet connection Unable to obtain an IP address. The media player has limited or no network connectivity.A red cross mark on the result items indicate a problem with the network settings. It can either be the IP address or the DNS server address. If the problem persists, you may want to check with your Internet service provider to make sure that the problem is not on their end.

text_image
Check connection IP address DNS server Internet connection Incorrect IP address. Please check your network setting and try again.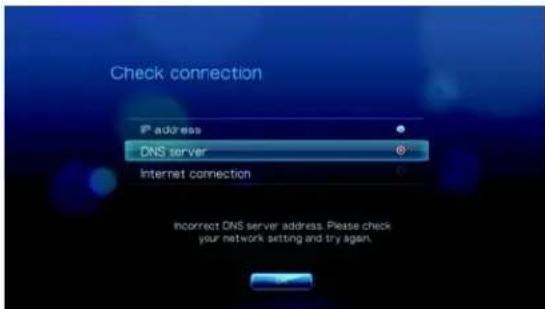
text_image
Check connection IP address DNS server Internet connection Incorrect DNS server address. Please check your network setting and try again.10
Network Services
Accessing Media Content from the Network
Once the media player has an active network connection, you can access media content from a NAS device or shared computer located on the same network as your media player.
To access media content from a network share:
-
Navigate to the Home screen, and select the icon for media content you wish to access. It can be Music ,Video , or Photo .
-
Press ▲/▼ to select Network Shares ■, then press ENTER.

text_image
Network Shares in 100 sec Music- Press ▲/▼ to select the network resource where the media content you wish to access is located, then press ENTER.
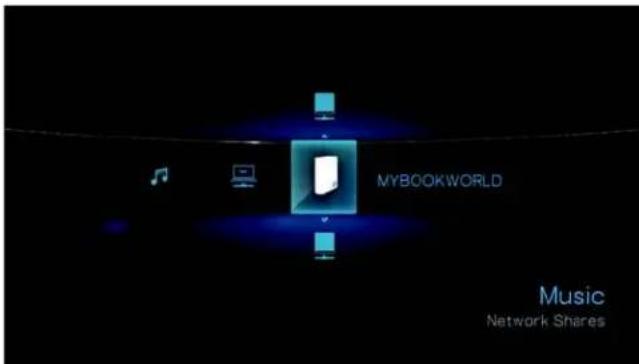
text_image
MYBOOKWORLD Music Network Shares- Type in your user name and password to access the network resource. For further information regarding password setup, refer to your NAS device documentation.
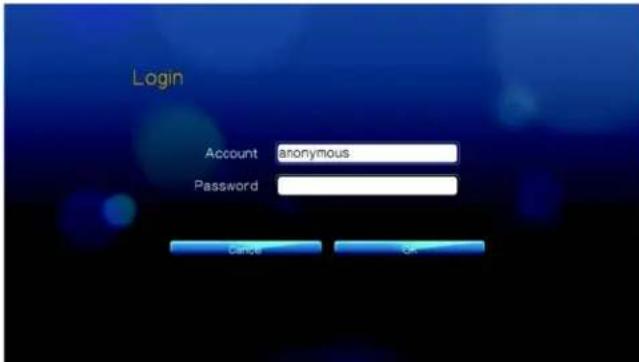
text_image
Login Account anonymous Password Cancel Cancel- Press ▶ to select OK, then press ENTER. Supported content for the selected media type displays.

text_image
Music 2/0 【Chronic】Shark Sites Can Hurt- Select the content you wish to access, then press ENTER to start media playback.
To access media content from a media server:
-
Navigate to the Home screen, and select the icon for media content you wish to access. It can be Music 🎨Video , or Photo .
-
Press ▲/▼ to select Media Servers □, then press ENTER.

text_image
Media Servers Music- Press ▲/▼ to select the network resource where the media content you wish to access is located, then press ENTER.

text_image
MyBookWorld Music Media Servers- Type in your user name and password to access the network resource. For further information regarding password setup, refer to your NAS device documentation.

text_image
Login Account anonymous Password Cancel OR- Press ▶ to select OK, then press ENTER. Supported content for the selected media type displays.

text_image
Music 2/6 【Chomp】Shark Sites Can Hurt- Select the content you wish to access, then press ENTER to start media playback.
Transferring Files
If the media player has an active network connection, any USB drive connected to it can serve as a network drive. This allows you to transfer files between your media player and your computer. This feature is applicable to a PC running the Windows® XP, Windows Vista®, or Windows 7 operating systems, as well to a Macintosh® computer running Mac® OS X® Leopard® or Snow Leopard®.
Enabling File Sharing on the Network Share (Samba Server)
- Navigate to the Home | Settings menu bar.
- Press ▲/▼ to select Network Setting 🔒, then press ENTER.
text_image
Network Setting Settings- Press ▲/▼ to select Share WD TV on your network and make sure the option is set to On.

text_image
Network setting Network setup Wireless favorites Check connection Device name NOTVIVE Share vDTV on your network Off Auto login to network share Off Clear login info for network share- Note the name indicated in the Device name field. This will help you identify your media player on the network.
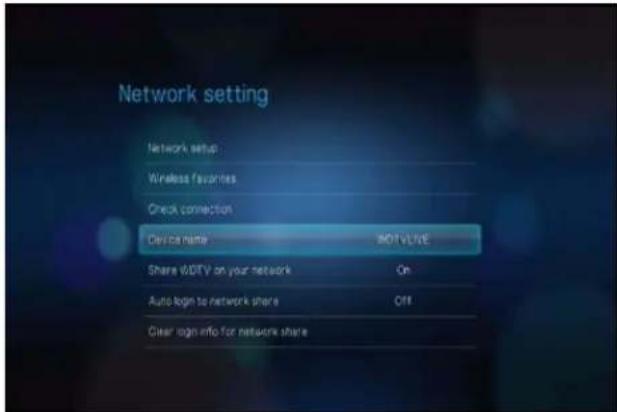
text_image
Network setting Network setup Wireless favorites Check connection Device name MOTVLIVE Share WDTV on your network On Auto login to network share Off Clear login info for network shareMoving Files Between the Media Player and a Windows XP Computer
- Connect the USB hard drive you need for the file transfer to your media player.
- Ensure that your computer is on the same network as your media player and that the file sharing option is enabled. Refer to Windows Help for instructions on how to enable file sharing on your computer.
- Check that the WD Discovery Tool that is bundled on the enclosed CD is installed on your computer. You need this tool to locate the media player over the network.
- Run WD Discovery on your computer. Your media player is automatically displayed on-screen.

text_image
WD Discovery™ Network Drives Found Things To Do WDTV LIVE Map Network Drive Browse Network Shares Create Desktop Shooting- Click Browse Network Share. The USB drive connected to your media player will be displayed.
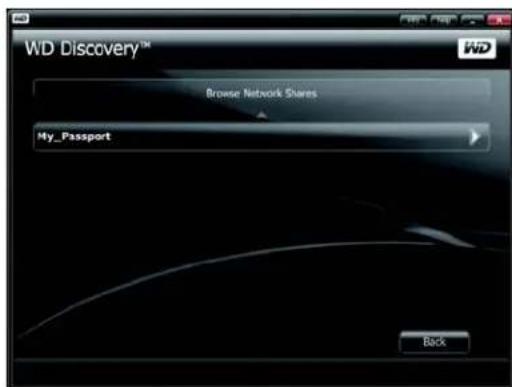
text_image
WD Discovery™ Browse Network Shares My_Passport Back- Click the USB drive you need for the file transfer. The USB drive contents display in a Windows Explorer window.
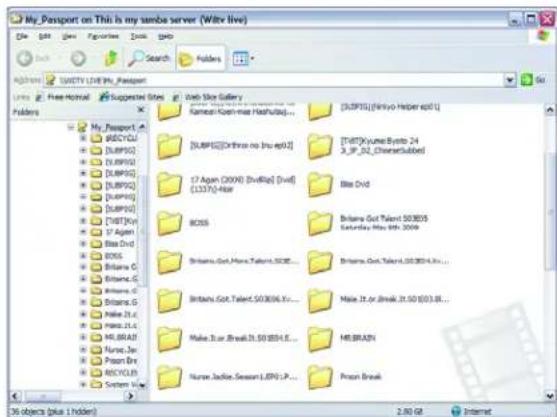
text_image
My Passport on This is my umbrella server (Witke Live) File Edit View Favorites Tools Help 1237451000000000000000000000000000000000000000000000000000000000000000000000000000000000000000 File Edit View Favorites Tools Help 12374510000000000000000000000000000000000000000000000000000 1237451289999999999999999999999999999999999999999999999999999999999999999999999999999999999999999999999999999 File Edit View Favorites Tools Help 123745128999999999999999999999999999999999999999999999999999999999999 12374512888888888888888888888888888888888888888888888888888888888888888 1237451286666666666666666666666666666666666666666666666666666666666666666666666666666666666 123745128444444444444444444444444444444444444444444444 12374512822222222222222222222222222222222222222 12374512811111111111111111111111111111111111111 12374512777777777777777777777777777777777777777777777 12374512755555555555555555555555555555555555 12374512733333333333333333333333333333333333333 12374512711111111111111111111111111111 123745126777777777777777777777777777777 123745126555555555555555555555555555 12374512633333333333333333333333333 12374512611111111111111111111 12374512577777777777777777777777 123745125555555555555555555555 12374512533333333333333333333 1237451251111111111111111 1237451247777 123745124555 123745124333 12374512422 1237451240 1237451238 1237451236 1237451234 1237451232 123745123 1237451228 1237451226- Locate the file(s) you intend to transfer and do a Copy/Paste, Cut/Paste, or Drag/Drop operation.
Moving Files Between the Media Player and a Windows Vista / Windows 7 Computer
- Connect the USB hard drive you need for the file transfer to your media player.
-
Ensure that your computer is on the same network as your media player and that the file sharing option is enabled. Refer to Windows Help for instructions on how to enable file sharing on your computer.
-
Open a Windows Explorer window, then click Network. Your media player is listed on the network resources list.

text_image
File Edit View Tools Help Organize Views Networks and sharing center Adda profile Adda a wireless options Favorite Links Documents Pictures Note >> Folders Desktop Acet Public Computer Network ACER-PC MYBOOKWORLD WDTV LIVE Control Panel Recycle Bin DUNACTT Release 1.5-R0-52 Installer- docs Name Category Workgroup Network location WDTV LIVE TPEG400288 : TVensly Media Server MyBookWorks MyBookWorks / PVConnect: Windows Media Connect EMACHINE-CIAO40: defineeee ACEA-PC MYBOOKWORLD WDTV LIVE acer-pc WDTV LIVE Categories: Computer Workgroup WORKGROUP Network location Network 1 item selected- Click the device corresponding to your media player.

text_image
File Edit View Tools Help Organize View Network and SharingCenter Favorites Documents Pictures Name >> Folders Desktop Acer Delete Computer Network ACER-PC MYBOOKWORLD WDTV LIVE Control Panel Reycle Bin DUNACTT Release 1.5-40-52-Installer- docs Name S0 WD_Essential Printers WD_Essential \\WDTV.LIVE) 1 item selected- Click the USB drive you need for the file transfer to display its contents.
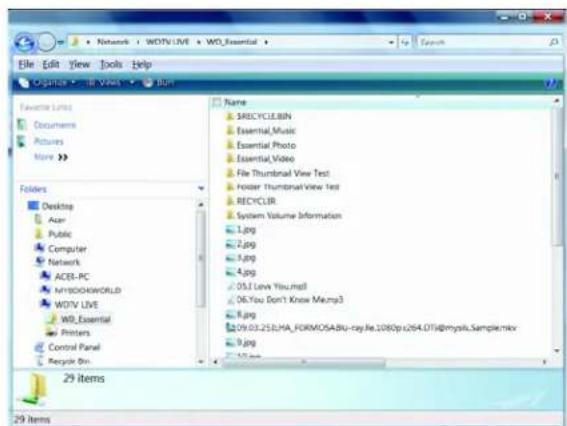
text_image
File Edit View Tools Help Organize TV Views Run Favorite Links Documents Pictures None >> Folders Desktop Acer Public Computer Network ACES-PC MYBOOKWORLD WDTV LIVE WB Essential Printers Control Panel Recycle Bin. Name 3M5CYCLE.BIN Essential,Music Essential Photo EssentialVideo File Thumbnail View Test Register ThumbnailView Test RECYCLIR System Volume Information 1.jpg 2.jpg 3.jpg 4.jpg .05.1 Love You.msd .06.You Don't Know Me.mp3 8.jpg 109.01.253LHA_FORMOSABu-ray.fle.1080p1264.DTI@mytek.Sample.mkx 9.jpg 29 items- Locate the file(s) you intend to transfer and do a Copy/Paste, Cut/Paste, or Drag/Drop operation.
Moving Files Between the Media Player and a Mac Computer
-
Connect the USB hard drive you need for the file transfer to your media player.
-
Ensure that your computer is on the same network as your media player and that the file sharing option is enabled. Refer to Apple Help for instructions on how to enable file sharing on your computer.
-
Open a Finder window.
-
On the Finder side bar, click Shared. Your media player is listed on the shared resources list.

text_image
WDTV LIVE DEVICES Mac Radintosh HD Disk HP Custom SHARED hydromvind WDTV User PLACES Desktop Visteon Applications Documents SEARCH FILE Today Wednesday Past Work All Images All Movies All Documents Add to: 100% Add to: 100% Add to: 100% Add to: 100% Add to: 100% Add to: 100% Add to: 100% Add to: 100% Add to: 100% Add to: 100% Add to: 100% Add to: 100% Add to: 100% Add to: -100% Add to: -100% Add to: -100% Add to: -100% Add to: -100% Add to: -100% Add to: -100% Add to: -100% Add to: -100% Add to: -100% Add to: -100% Add to: -100% Add to: -100%- Click the device corresponding to your media player. The USB drive connected to your media player displays.
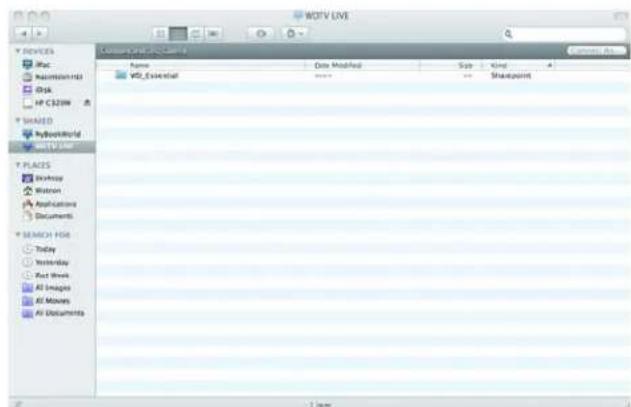
text_image
WDTV LIVE Name Data Modified Size Kind VDD_Essential 0000 -- Shappoint PLACES Workbox Watercolor Applications Documents SEARCH FOR Today Yesterday Fact Show All Images All Moves All Documents 1 lamp-
Click the USB drive you need for the file transfer to display its contents.
-
Locate the file(s) you intend to transfer and do a Copy/Paste, Cut/Paste, or Drag/Drop operation.
11
Internet Services
Important: A broadband Internet connection (e.g., DSL or cable) is required to use Internet services.
After connecting to a network, you can use the media player to access media content from the following Internet services:
- Internet radio – Live365 and Pandora
- Online image and video hosting – Flickr
- Online video sharing – YouTube
The above services are fully integrated with their web-based counterparts when accessed via the media player. If you are a registered user of any of these services, everything you create, rate, or bookmark when using the media player shows up on your account the next time you sign in to that service from your computer or mobile computing device.
Live365
Use Live365 to create your own online radio station or listen to other Live365 broadcasters' online stations. Music selections are compiled based on user ratings. Some small AM and FM stations also utilize Live365 to stream audio over the Internet.
To access Live365:
- Navigate to the Home | Music menu bar and select Live365, then press ENTER.
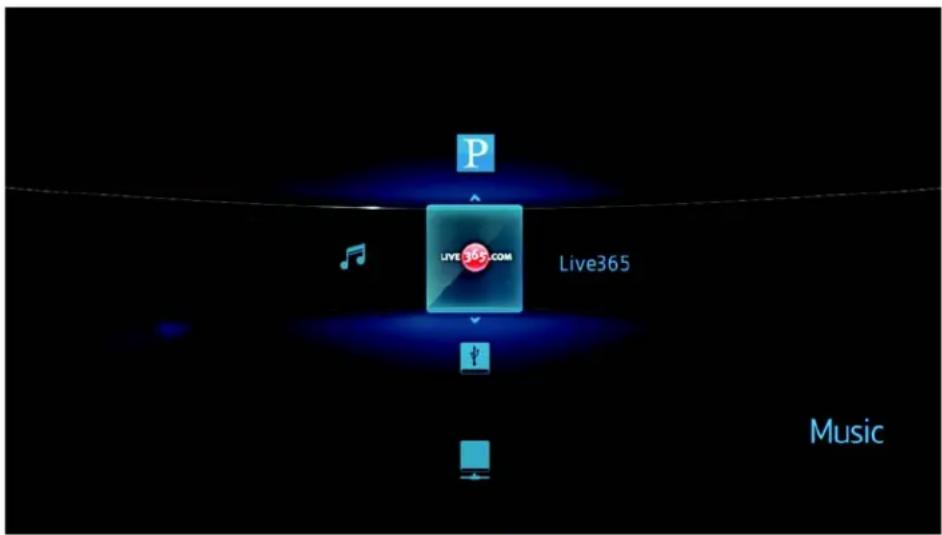
text_image
P LIVE365.COM Live365 MusicSigning in to Live365
You can start listening to free Live365 stations as an unregistered user, but to enjoy more features like access to recommended stations, saving stations to favorites,
securing track information, setting station preferences, and many others, you need to sign up for a Live365 account.
To sign in to Live365:
- Navigate to the Home | Music menu bar.
- Press ▲/▼ to select Live365, then press ENTER.

text_image
P Live365 Music- On the Live365 main screen, press ▲/▼ to select Sign In/Sign Out, then press ENTER.
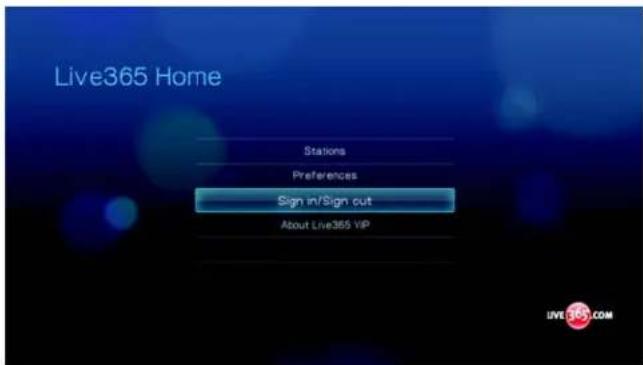
text_image
Live365 Home Stations Preferences Sign in/Sign out About Live365 VIP LIVE365.COM- Press ENTER to create your new Live365 account.

text_image
Live365 Login Create a new account UVI 365.COM- Use the navigation buttons ▲▼◀▶ to key in your Live365 user name on the on-screen keyboard. Select Submit, then press ENTER.
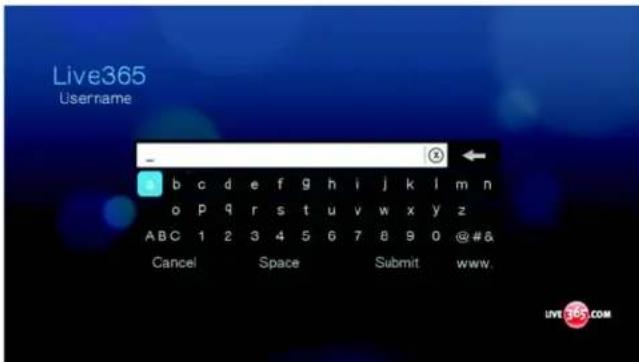
text_image
Live365 Username - # b c d e f g h i j k l m n o p q r s t u v w x y z A B C 1 2 3 4 5 6 7 8 9 0 @#& Cancel Space Submit www. LIVE365.COM-
Use the navigation buttons ▲▼◀▶ to key in your Live365 account password on the on-screen keyboard. Select Submit, then press ENTER.
-
Press ◀/▶ to select a save option.

text_image
Would you like to save this account? No Save user here only YesOptions include:
- No – Your account details are not saved. You need to repeat the initial sign-in process every time you use the media player to access the Live365 service.
- Save username only – Your user name is saved, but you will be prompted to type in your password every time you use the media player to access the Live365 service.
- Yes – Both your user name and password are saved. You are automatically logged in to your account every time you select Live365 from the Music menu bar.

- Press ENTER to complete the sign-in process. Once you have successfully signed in, the Live365 Home screen appears.
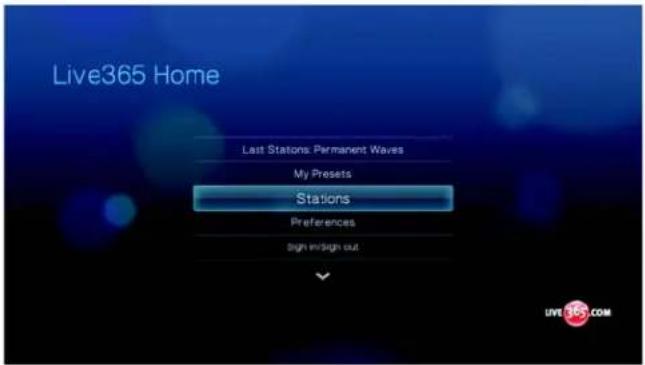
text_image
Live365 Home Last Stations: Permanent Waves My Presets Stations Preferences sign in sign out. LIVE 365.COMFrom this screen you can browse for new stations, access previous stations you've listened to, and define profile preferences for your Live365 account.
For more information on the features, options, and limitations of using Live365, go to http://www.live365.com/index.live.
Listening to a Live365 Station
■ New Live365 users can browse for a radio stations.
- You can access the last station you've listened to if you've already accessed Live365 from the media player.
- Registered Live365 users can access My Preset List and listen to favorite stations.
■ Live365 VIP members can listen to premium radio stations.
To browse for a radio station:
- On the Live365 main screen, press ▲/▼ to select Stations, then press ENTER.

text_image
Live365 Home Last Stations: Permanent Waves My Presets Stations Preferences Sign-in/Sign out LIVE 365.COM- Press ▲/▼ to select a station category, then press ENTER.

text_image
Stations Free Stations VIP Stations Recommendations Search LIVE 365.COMOptions include:
■ Free Stations – Free Internet radio.
- VIP Stations – Premium, uninterrupted Internet radio for registered and paying Live365 users. You must sign in to your Live365 account and be a valid VIP member before you can access this category. Go to page 76 for more information.
- Recommendations - Free Internet radio recommended by your other Live365 users. You must be signed in to access these stations.
- Search – Search for a Live365 station. Go to page 78 for more information.
- Press ◀/▶ to select the station you want to listen to.

text_image
Free Stations CD-ROM 99.99 FM WO RADIO 59.99 FM WD RADIO classical, opera, symphony LIVE 305.COM- Press ▪ or ENTER to start listening to the selected radio station.
To access the last station listened to:
- On the Live365 main screen, press ▲/▼ to select Last Stations.
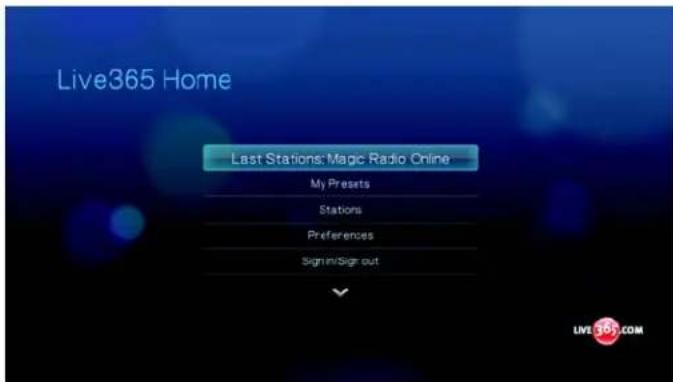
text_image
Live365 Home Last Stations: Magic Radio Online My Presets Stations Preferences Sign-in/Sign out LIVE 367.COM- Press ▪ or ENTER to start listening to the selected radio station.
To listen to a favorite station:
- On the Live365 main screen, press ▲/▼ to select My Presets, then press ENTER.
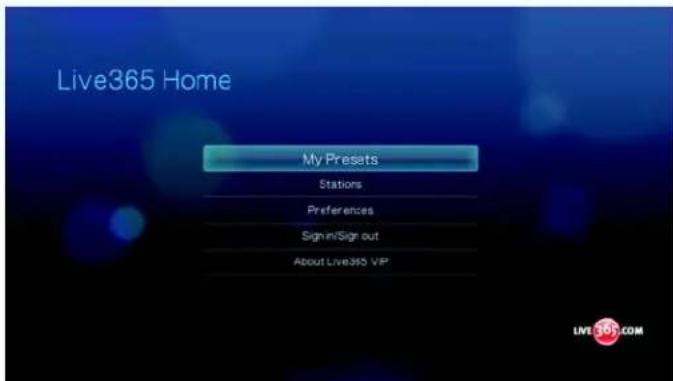
text_image
Live365 Home My Presets Stations Preferences Sign-in/Sign out About Live365 VIP LIVE 367.COM- Press ◀/▶ to select a station from your preset list.

text_image
Classical Music 99.99 FM WD RADIO 99.99 FM WD RADIO classical, open & symphony My Presets- Press ▪ or ENTER to start listening to the selected radio station.
To listen to a VIP station:
- On the Live365 main screen, press ▲/▼ to select Stations, then press ENTER.

text_image
Live365 Home Last Stations: Permanent Waves My Presets Stations Preferences Sign-in/Sign out LIVE 367.COM- Press ▲/▼ to select VIP Stations, then press ENTER.
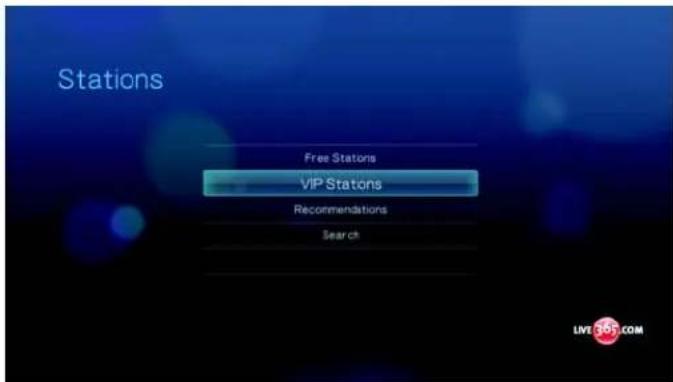
text_image
Stations Free Stations VIP Stations Recommendations Search LIVE 367.COM- Press ▲/▼ to select a music genre, then press ENTER.
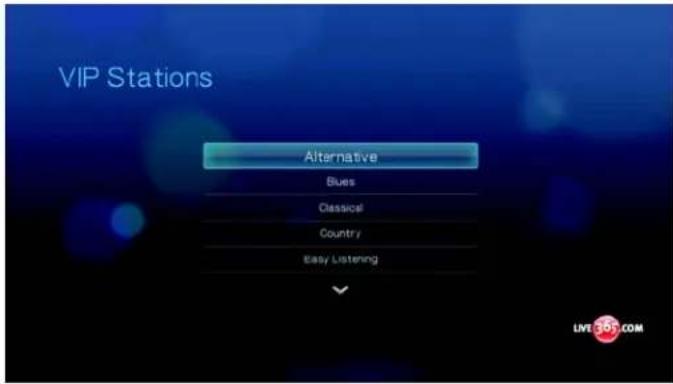
text_image
VIP Stations Alternative Blues Classical Country Easy Listening LIVE30P.COM- Press ▲/▼ to select a music sub-genre, then press ENTER.

text_image
VIP Stations • Britpop • Classic Alternative • College • Dancepark • Dream Pop- Press ◀/▶ to select the station you want to listen to.

text_image
VIP Stations Turtle & Rocco Easy Listening Mode Sunny Food Play Speech & Audio Video Turtle Video Menu Turtle Audio List Turtle Audio Guide Dunlee & Rocco easy listening, bripop slides LIVE 365.COM- Press ▪ or ENTER to start listening to the selected radio station.
Searching for a Live365 station
Perform a station search based on the following criteria:
- Artist name
- Track or CD title
■ Station information
■ Music genre - Station location
- Audio quality.
You can limit your search based on whether a station has been rated by Live365 editors or if it is a professional, independent, or official station.
To search for a Live 365 station:
- On the Live365 home screen, press OPTION to view the Live365 toolbar.
- Press ◀/▶ to select Search ⚙, then press ENTER.

text_image
Live365 Home Search Last Stations: Permanent Waves My Presets Stations Preferences Sign in/Sign out UVI 365.COM- On the on-screen keyboard, use the navigation buttons ▲▼◀▶ to key in a search keyword, then press ENTER.
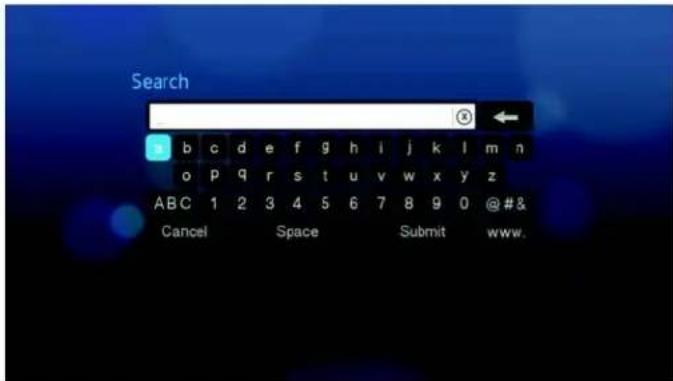
text_image
Search Cancel Space Submit www.- Press ◀/▶ to select a station from the search result.

text_image
Search Results Clavical Music 99.99 FM WD RADIO RLOGIC 501/4ND TBD 99.99 FM WD RADIO classical, open & symphony UVI-365.COM- Press ▪ or ENTER to start listening to the selected radio station.
Displaying the Currently Playing Station
- On the Live365 main screen, press OPTION to view the Live365 toolbar.
- Press ◀/▶ to select Now Playing ⚡, then press ENTER.

text_image
Live365 Home Now playing Now playing: Permanent Waves My Presets Stations Preferences Sign in/Sign out UVT 365.COMAdding a Station to Your Preset List
If you like a particular station, you can add it to your preset list for easier access in the future.
To add a station to your preset list from the station list:
-
Go to the station list showing the station logo for the station you want to add.
-
Press ◀/▶ to select the station you want to add.

text_image
Free Stations CD-ROM 99.99 FM WD RADIO 59.99 FM WD RADIO classical, opera, symphony LIVE 301.COM- Press ▲ enable the + Add to My Preset function, then press ENTER.
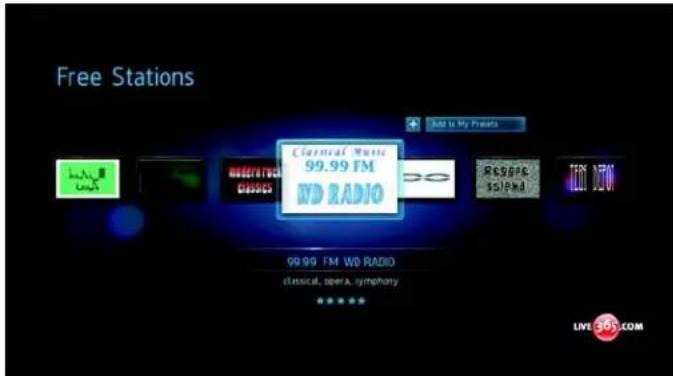
text_image
Free Stations Add to My Frames Classical Music 99.99 FM WD RADIO 99.99 FM WD RADIO classical opera, symphony ******** LIVE 305.COM- A confirmation screen appears. Press ENTER to confirm the new preset station and return to the Now Playing screen.
To add a station to your preset list from the Now Playing screen:
- Tune in to the station you want to add.
- Press ◀/▶ to select +, then press ENTER.

text_image
de me Vida 99:39 WD RADIO Donde poniste lo 00:01:19 Rocco Burwania LIVE 367.COM- A confirmation screen appears. Press ENTER to confirm the new preset station and return to the Now Playing screen.
Removing a Station from Your Preset List
You can remove stations you no longer want from your preset list.
To remove a station from your preset list:
-
Sign in to your Live365 account. Go to "To sign in to Live365:" on page 71 for instructions.
-
From the Live365 home screen, press ▲/▼ to select My Presets, then press ENTER.
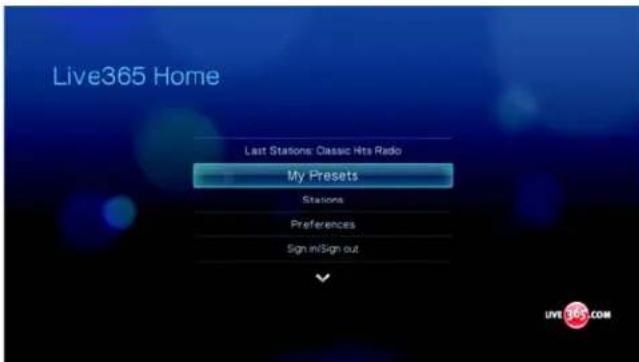
text_image
Live365 Home Last Stations: Classic Hits Radio My Presets Stations Preferences Sign in/Sign out UVI 365.COM-
Press ◀/▶ to select the station you want to remove.
-
Press ▲ to enable the Remove Station function, then press ENTER.
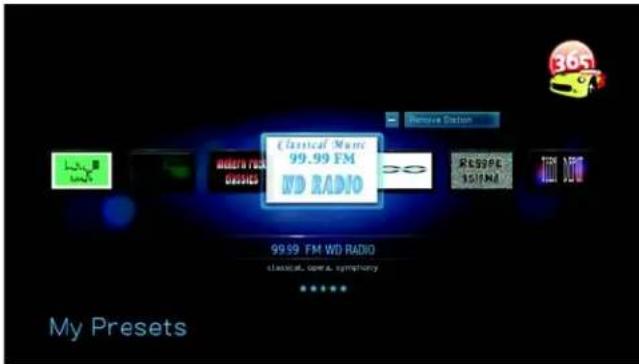
text_image
Clinical Mom 99.99 FM WD RADIO 99:99 FM WD RADIO classical, open & symphony My Presets- A confirmation prompt will appear. Press ENTER to go back the Now Playing screen.
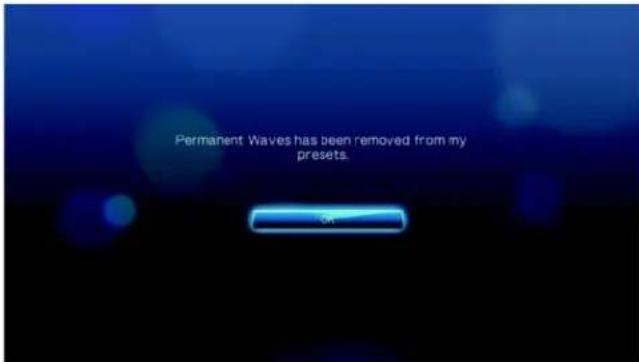
text_image
Permanent Waves has been removed from my presets. OKProviding Song Feedback
Music selections in Live365 are compiled based on their user ratings. You can participate in the selection process by giving a song the “thumbs up” 👍 or “thumbs down” ➤ vote.
To provide song feedback:
- While the song is playing, press ◀/▶ to select a feedback icon—▶ for a positive feedback, ▼ for a negative one. Press ENTER.
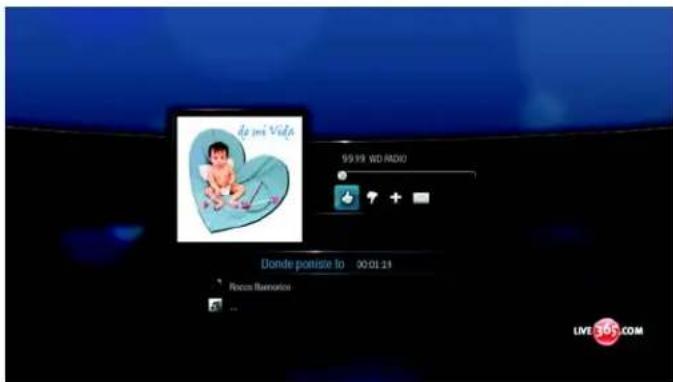
text_image
do me Viofa 99:39 WD RADIO Donde portase to 00:01:21 Room Remotion LIVE 301.COM- A feedback confirmation screen appears. Press ENTER to go back the the Now Playing screen.
Getting Track Information
You can send the track information of the currently playing song to your email account for later reference.
To secure track information:
- While the song is playing, press ◀/▶ to select 📄, then press ENTER.

- A confirmation screen appears. Press ENTER to return to the Now Playing screen.

text_image
Please check your email for the track info.The track information will be sent to the email address you used to sign up for your Live365 account.
Live365 Preferences
When browsing or searching for radio stations, you can:
- Specify that only radio stations of a specific audio quality display.
- Choose to sort radio stations alphabetically or by popularity (based on user recommendations).
To specify the audio quality of accessible stations:
- On the Live365 main screen, press ▲/▼ to select Preferences, then press ENTER.

text_image
Live365 Home Last Stations: Classic Hits Rado My Presets Stations Preferences Sign in/Sign out LIVE 367.COM- Press ▲/▼ to select Audio, then press ENTER.

text_image
Preferences Audio Sort Option LIVE 301.COM- Press ▲/▼ to select an audio quality option, then press ENTER.

text_image
Audio Options All Stations(8k-258k) Only High(98k-258k) Medium to High(58k-258k) Low to Medium(8k-58k) Only Low(8k-32k)To set how radio stations are sorted:
- On the Live365 main screen, press ▲/▼ to select Preferences, then press ENTER.
text_image
Live365 Home Last Stations: Classic Hits Radio My Presets Stations Preferences Sign in/Sign out LIVE 301.COM- Press ▲/▼ to select Sort Option, then press ENTER.

text_image
Preferences Audio Sort Option LIVE 365.COM- Press ▲/▼ to select a sort option, then press ENTER.
text_image
Sort Options Sort stations by alphabetically Sort stations by popularity LIVE 305.COMSigning out from Live365
Sign out of Live365 after a listening session to ensure that nobody can make changes to your Live365 settings and stations without your permission.
To sign out from Live365:
- On the Live365 main screen, press ▲/▼ to select Sign In/Sign Out, then press ENTER.

text_image
Last Stations: Classic Hits Radio Stations Preferences Sign In / Sign Out About Live36 VIP PANDORA internet radioTip: You can also press Option to show the toolbar, press ◀/▶ to select 🔊, then press Enter.
- Press ◀/▶ to select OK on the confirmation prompt, then press ENTER.

text_image
Are you sure you want to sign out? Cancel OKPandora
Pandora is an automated music recommendation and Internet radio service. With Pandora, you can input a song title or artist name and the service responds by playing selections that are musically similar. You can provide feedback (approved/not approved) on individual songs, which Pandora takes into account for future selections.
Conditions for Using Pandora
The following conditions must be satisfied before you can use the Pandora service.
- You must have a Pandora account. Go to www.pandora.com to create your account. Once you have registered, note your activation code. You will need this code to sign in to Pandora from your media player.
- At present, Pandora is only available for users located in the United States. You must have a US-based network connection.
To set the system language to English:
- Navigate to Home | Settings menu bar.
- Press ◀/▶ to select System 1, then press ENTER.
- Press ◀/▶ to select Language, then press ENTER.
- Press ▲/▼ to select English, then press ENTER.

text_image
Language English Franças Italiano Deutsch Español Portugues (Portugal) Portugues (Brasil)Signing in to Pandora for the first time
- Connect your media player to the network.
- Navigate to Home | Music 🎧 Pandora 📅 | Add account, then press ENTER.
text_image
Add account Music Pandora- If you already have a Pandora account, choose I have a Pandora account, then press ENTER to create your new Pandora account. Proceed to step 6.

text_image
Welcome to Pandora I am new to Pandora I have a Pandora account PANDORA internet radio- If you do not have a Pandora account, select I am new to Pandora, then press ENTER.

text_image
Welcome to Pandora I am new to Pandora I have a Pandora account PANDORA Internet radio- Write down the activation code and follow the onscreen instructions. When finished, choose Continue, then press ENTER.

text_image
Activation code Please go to http://www.pandora.com/ved and follow the instructions there to create a new account. Your Activation Code is: PANDORA When you are done with that, come back to this screen and press continue? Cancel Cancel PANDORA Internet radio- Use the navigation buttons ▲▼◀▶ to type in your Pandora user name using the on-screen keyboard, then press ENTER.

text_image
Pandora UserName - b c d e f g h i j k l m n o p q r s t u v w x y z A B C 1 2 3 4 5 6 7 8 9 0 @ # & Cancel Space Submit www. PANORA Internet radio- Use the navigation buttons ▲▼◀▶ to type in your Pandora account password using the on-screen keyboard, then press ENTER.
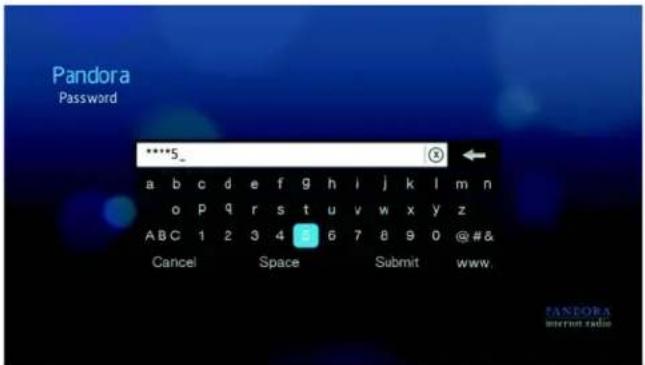
text_image
Pandora Password *****5_ a b c d e f g h i j k l m n o p q r s t u v w x y z A B C 1 2 3 4 6 7 8 9 0 @ # & Cancel Space Submit www. PANORA internet radio- Press ◀/▶ to select a save option.
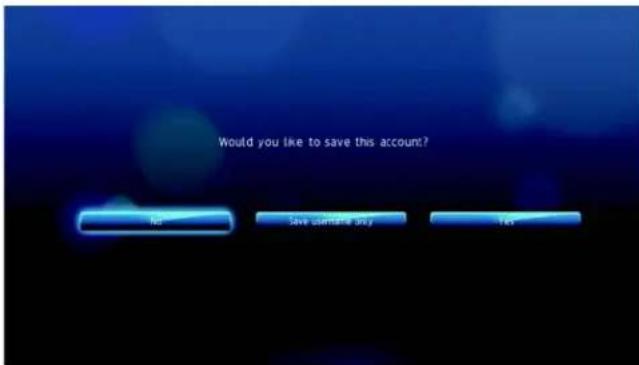
text_image
Would you like to save this account? No Save accounts only YesOptions include:
- No – Your account details will not be saved. You need to repeat the initial sign-in process every time you access the Pandora service using the media player.
- Save username only – Your user name is saved, but you will be prompted to type in your password every time you access the Pandora service using the media player.
- Yes – Both your user name and password are saved. You are automatically logged in to your account every time you select Pandora from the Music menu bar.
- Press ENTER to complete the sign-in process.
Once you have successfully signed in to Pandora, the Stations screen appears.
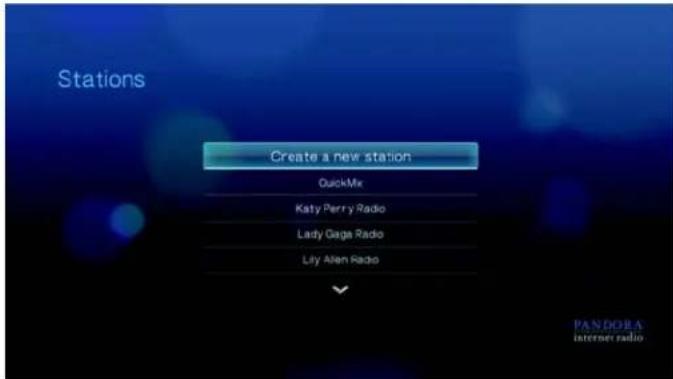
text_image
Stations Create a new station QuickMix Katy Perry Radio Lady Gaga Radio Lily Allen Radio PANDBRA internet radioFrom this screen you can create new stations, start listening to previously created stations and Quickmix playlist, and define profile preferences for your account.
For more information on the features, options, and limitations of using Pandora, go to http://blog.pandora.com/faq/#839.
Pandora Stations
A Pandora station is a personalized stream of music, based on one or more artist names or song titles of your choice. Once you've signed in to Pandora from your media player, you can easily access your stations from the Music ✪ menu bar.
Pandora stations reminders
- You can have up to 100 stations at any one time, plus one QuickMix. Once you reach this maximum number of stations you have to delete a station before you can add another one.
■ Pandora does not allow immediate or "on demand" playback of a specific song. - A Pandora station cannot play more than four songs by an artist in a three-hour period.
After eight hours of play, Pandora prompts you to see if you're still listening. Streaming stops until you respond. - The music selection streamed into your Pandora station contains a mix of songs or artists that were compiled based on:
- the initial station "seed" used in creating that station. Go to the next section for instructions on how to create a new Pandora station.
- the track feedback (thumbs up / thumbs down) you provide. Go to page 95 for more information.
■ the number of skips assigned to a track. Go to page 96 for more information. - You cannot rewind or immediately replay the songs played on your Pandora station.
To create a Pandora station:
- Press ▲/▼ to select Create a new station in the Stations screen.

text_image
Stations Create anew station Quickmix QuickMix Champ Radio Dantler & Room Radio TANDBRA Internet radio- Use the navigation buttons ▲▼◀▶ to type the name of an artist or song title using the on-screen keyboard. Select Submit, then press ENTER.

text_image
Search Cancel Space Submit www.- Press ▲/▼ to select a listing from the search results, then press ENTER.

text_image
Stations The David David D. PANTORA INTERNATIONALThe listing you selected will serve as the station 'seed' for Pandora to compile and stream music similar to your station.
To listen to a Pandora station:
- On the Stations screen, press ▲/▼ to select the name of the station you want to listen to.
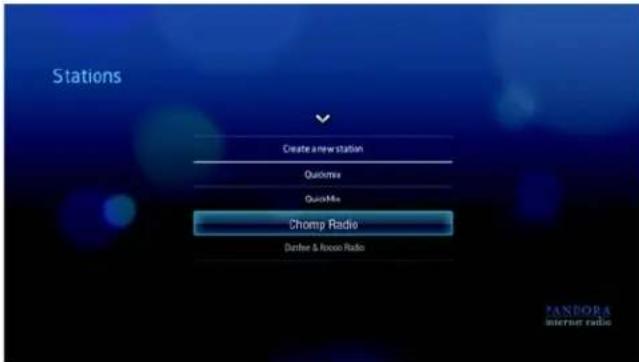
text_image
Stations Create a new station QuickMine QuickMine Chomp Radio Deliver & Repo Radio- Press ▪ or ENTER to start listening to the selected Pandora station.
To tune in to another station:
-
Press Option in the Now Playing screen.
-
Press ◀/▶ to select Stations ≡, then press ENTER.
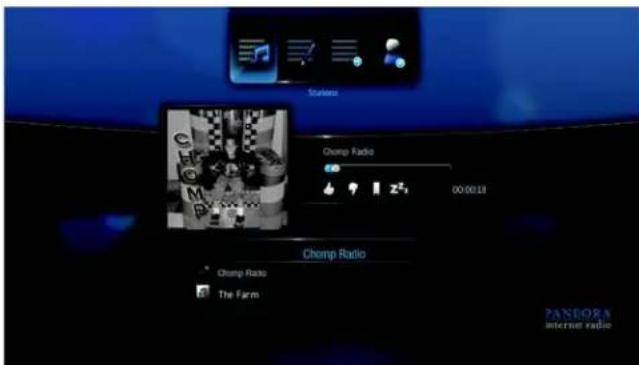
text_image
Stations Chomp Radio 00:00:11 Chomp Radio Chomp Radio The Farm PANORA internet radio-
Press ▲/▼ to select the name of the station you want to switch to.
-
Press to start listening to the selected station.
To rename a Pandora station:
-
Tune in to the station you want to rename, then press OPTION.
-
Press ◀/▶ to select Rename Station ≡, then press ENTER.

text_image
Panama Station Chomp Radio 00:00:21 Chomp Radio Chomp Radio The Farm TANORA Microsoft radio- Use the navigation buttons ▲▼◀▶ to key in a new station name using the on-screen keyboard. Select Submit, then press ENTER.

text_image
Jason Mr_ a b c d e f g h i j k l m n o p q r s t u v w x y z A B C 1 2 3 4 5 6 7 8 9 0 @#& Cancel Space Submit .comTo delete a Pandora station:
- Tune in to the station you want to delete, then press OPTION.
- Press ◀/▶ to select Delete Station ≡, then press ENTER.

text_image
Debeta Station Chomp Radio 00:00:30 Chomp Radio Chomp Radio The Farm TANORA Internet radio- Press ◀/▶ to select OK on the confirmation prompt, then press ENTER.
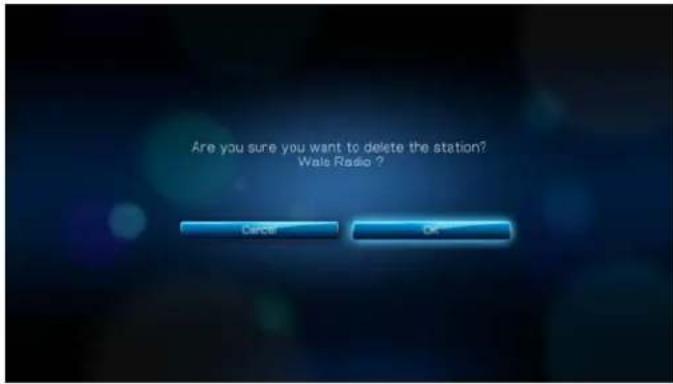
text_image
Are you sure you want to delete the station? Wals Radio?QuickMix
QuickMix is a feature that merges the playlist of multiple stations so you can listen to more than one of your stations at once.
To create a QuickMix:
- On the Stations screen, press ▲/▼ to select Quickmix.
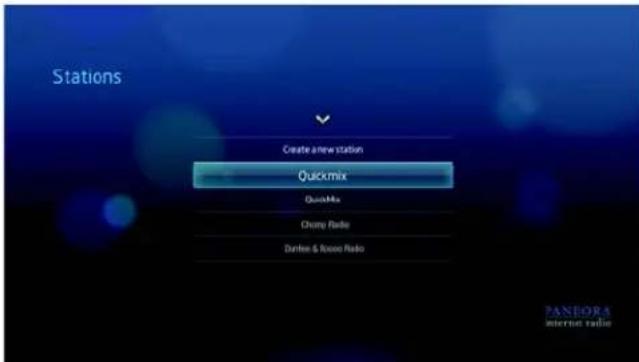
text_image
Stations Create a new station Quickmix QuickMix Cherry Radio Danfee & Romeo Radio PANEORA Internet radio- Press ▲/▼ to select the stations you want to include into the Quickmix playlist, then press ENTER.
Selected stations are marked with a ▶.
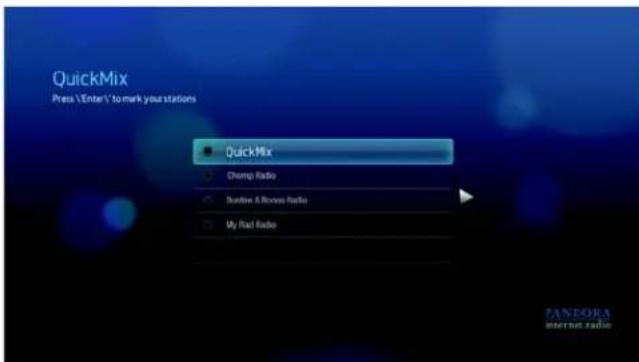
text_image
QuickMix Press \Enter \to mark your stations QuickMix Chomp Radio Burrow & Room Radio My Rail Radio PANEORA Internet radio- Press ▶ or ENTER to start listening to your new QuickMix playlist.
Providing Song Feedback
You can influence the music selection that is streamed into your Pandora station by providing track feedback for the song currently playing. You can give a song a “thumbs up” or a “thumbs down” vote.
Thumbs up
If you like the currently playing song, give it a thumbs up vote. This positive feedback means:
- The very next set of songs for this station will be generated using the song you've given a "thumbs up" vote to as a musical starting point.
- Future sets of songs are likely to have similar musical traits. Multiple "thumbs up" votes on this station for other similar songs will have a cumulative effect.
- This song will play somewhat more often than other songs on this station's potential playlist, and will play about as often as other songs that have received a "thumbs up" on this station.
Thumbs down
If you don't want to hear a song on a particular station, give it a thumbs down vote. This negative feedback means:
- The song will stop playing, if there are any of the remaining "six skips per hour" available on that particular station (this limit is per station, on a rolling per-hour basis).
- The song will be permanently removed from that particular station's playlist.
- A new set of songs with a different musical emphasis will begin to play.
- If you’ve given at least two “thumbs down” vote to a specific artist on that particular station, songs from that artist will no longer be included in that station’s playlist.
To provide song feedback:
- While a song is playing, press ◀/▶ to select 👍 or ▼, then press ENTER.
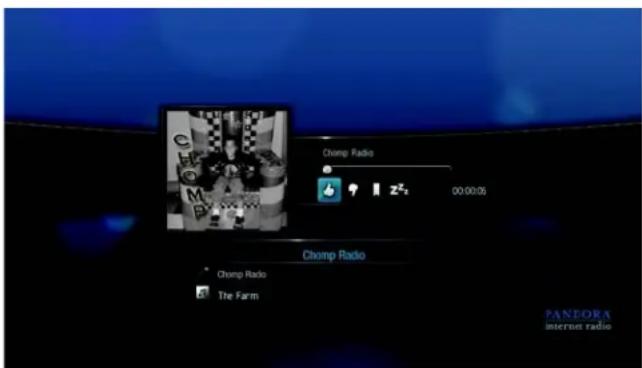
text_image
Chomp Radio 00:00:05 Chomp Radio * Chomp Radio □ The Farm PANEOA internet radioA prompt to confirm your vote appears.
Putting a Song to Sleep
When you want to stop listening to song, but not permanently remove it from a station's playlist, you put it to "sleep." This prevents the song from playing on any of your stations for 30 days.
To put a song to sleep:
- While a song is playing, press ◀/▶ to select ✗, then press ENTER.

text_image
Chomp Radio 00:00:32 Chomp Radio Chomp Radio The Farm PANDORA amernas radioA prompt to confirm the "sleep" action appears.
Bookmarking a Song or Artist
You have the option to bookmark a song or an artist for later reference. You can later refer to this bookmark if you want buy the track when you've sign in to Pandora from your computer or mobile computing device, or if you want to share your musical preferences with other Pandora users.
To bookmark a song or artist:
- While a song is playing, press ◀/▶ to select ▶, then press ENTER.
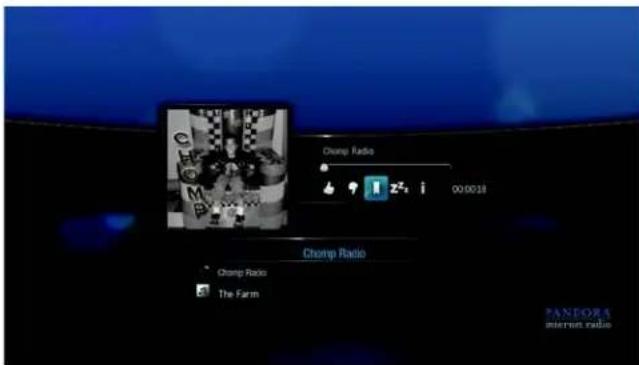
text_image
Champ Radio Champ Radio The Farm PANORA internet radio- Press ▲/▼ to select whether to bookmark the song title or the song artist, then press ENTER.
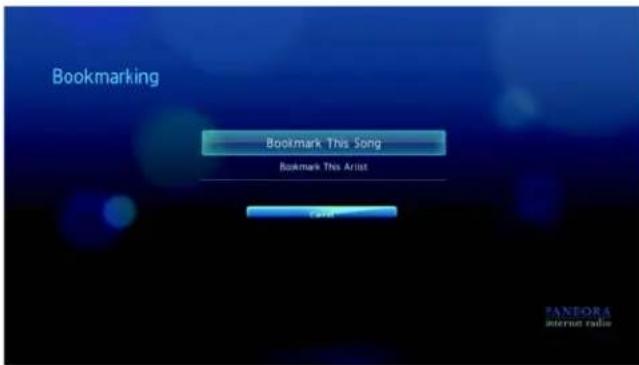
text_image
Bookmarking Bookmark This Song Bookmark This Artist TANORA stereo radioThe new bookmark is added to your listener profile page. Sign in to Pandora from your computer or mobile computing device to view this profile page.
Why a Song is in my Station's Playlist
You can see why Pandora included a particular song in your station's playlist. To view a song's analysis:
- While a song is playing, press ◀/▶ to select i, then press ENTER.
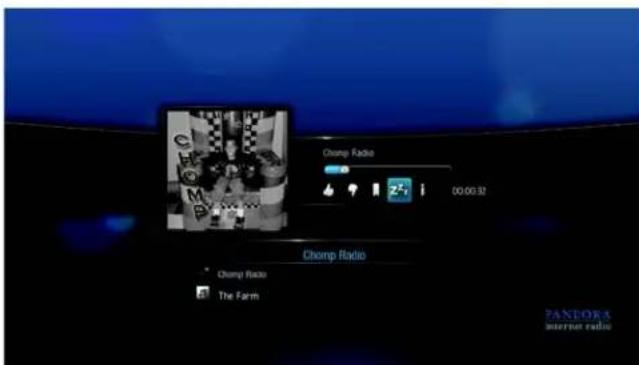
text_image
Chomp Radio 00:00:32 Chomp Radio Chomp Radio The Farm TANGORA interwar radioThe song analysis displays.
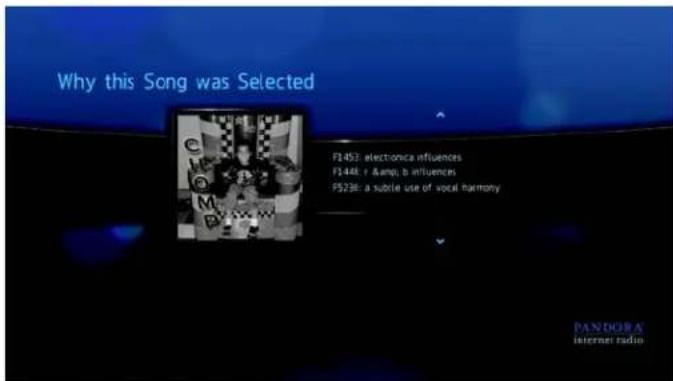
text_image
Why this Song was Selected F5453: electronic influences F5448: r & b influences F5298: a subtle use of vocal harmony PANDORA & internet radioSorting your Pandora Stations
You can choose how your stations are listed on the Stations screen.
To sort your Pandora stations:
- On the Stations screen, press OPTION.
- Press ▲/▼ to select a sorting option-by station name (in alphabetical order) or by last date of access, then press ENTER.
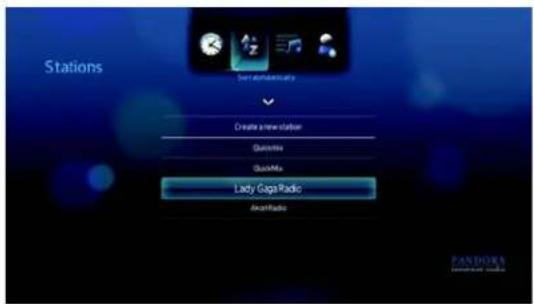
text_image
Stations Ever automatically Create new station Quintile Quick Mix Lady Gaga Radio AvonRadio
text_image
Stations Create new stations Quizins QuizMia Lady GagaRadio AnomRadioSigning out from Pandora
Sign out of Pandora after a listening session to ensure that nobody can make changes to your Pandora settings and stations without your permission.
To sign out of Pandora from the Stations or Now Playing screen:
- On the Stations or Now Playing screen, press OPTION.
- Press ◀/▶ to select Sign out 🔊, then press ENTER.

text_image
Stations Signout Create a new station Quickmix QuickMix Lady Gaga Radio AkanRadio PANOSIS internet radio- Press ◀/▶ to select Yes on the confirmation prompt, then press ENTER.
text_image
Are you sure you want to sign out? Cancel OKFlickr
Flickr is an online image and video management and sharing website. Flickr content is organized based on tags—a keyword or category label that describes content. Tags help users to search for contents that have something in common. Each content file can have as many as 75 tags associated with it.
To learn more about Flickr services, and the options and limitations related to them, go to http://www.flickr.com/tour/.
To access Flickr:
- Navigate to the Home | Photos 📄 menu bar and select Flickr flickr, then press ENTER.
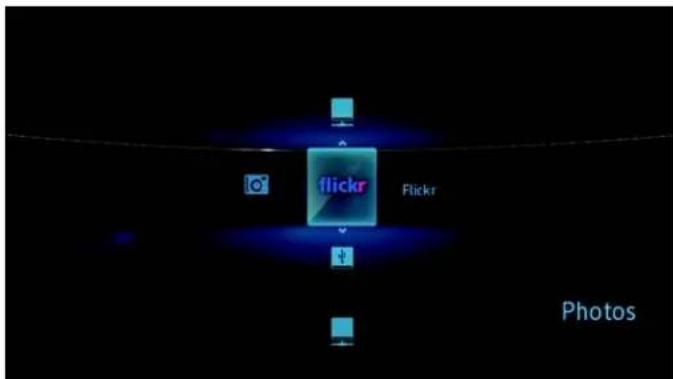
text_image
Flickr Flickr PhotosThe Explore screen appears.

text_image
Explore Last 7 days interesting Most recent uploads Hot tags My contacts My tags Search flickrExploring for Contents
You can explore photostreams (Flickr's term for content selection) available in Flickr's public domain.
To explore for random "interesting" media content:
- Press ▲/▼ to select Last 7 days interesting in the Explore screen, then press ENTER.

text_image
Explore Last 7 days interesting Most recent uploads Hot tags My contacts My tags Search flickrA photostream showing random contents rated as interesting by Flickr users displays. Go to page 106 for instructions on how to navigate a photostream.
To explore based on the upload date:
- Press ▲/▼ to select Most recent uploads in the Explore screen, then press ENTER.

text_image
Explore Last 7 days interesting Most recent uploads Hot tags My contacts My tags Search flickrA photostream showing the most recently uploaded content displays. Go to page 106 for instructions on how to navigate a photostream.
To explore based on popular tags:
- Press ▲/▼ to select Hot tags in the Explore screen, then press ENTER.

text_image
Explore Last 7 days interesting Most recent uploads Hot tags My contacts Mi tags Search 3/6 flickr- Press ▲/▼ to select a tag from the list, then press ENTER.
text_image
Explore app071409 bluemonday boketwednesday pretypontuesday höw höm hopt flickrA photostream showing contents associated with the selected tag is displayed. Go to page 106 for instructions on how to navigate a photostream.
To explore for content based on a specific keyword:
Keywords are words or phrases associated with the type of content you're looking for. Keyword searches are based on information indicated on a member's profile page.
- Press ▲/▼ to select Search in the Explore screen, then press ENTER.
text_image
Explore Last 7 days interesting Most recent uploads Hot tags My contacts My tags Search flickr- Press ▲/▼ to select Keywords, then press ENTER.
text_image
Explore Keywords Flickr members Tags 1/3 flickr- Use the navigation buttons ▲▼◀▶ to type a search word using the on-screen keyboard. Select Submit, then press ENTER.

text_image
Setting - b c d e f g h i j k l m n o p q r s t u v w x y z ABC 1 2 3 4 5 6 7 8 9 0 @#& Cancel Space Submit www. flickrA photostream showing contents associated with the specified keyword displays. Go to page 106 for instructions on how to navigate a photostream.
To explore for content based on tags:
Perform this type of search to find content based on information indicated in a member's tags list.
- Press ▲/▼ to select Search in the Explore screen, then press ENTER.

text_image
Explore Last 7 days interesting Most recent uploads Hot tags My contacts My tags Search flickr- Press ▲/▼ to select Tags, then press ENTER.
text_image
Explore Keywords Flickr members Tags 3/3 flickr- Use the navigation buttons ▲▼◀▶ to type a search word using the on-screen keyboard. Select Submit, then press ENTER.

text_image
Setting b c d e f g h i j k l m n o p q r s t u v w x y z A B C 1 2 3 4 5 6 7 8 9 0 @#& Cancel Space Submit www. flickrA photostream showing contents associated with the specified word is displayed. Go to page 106 for instructions on how to navigate a photostream.
Searching for a Flickr Member
To search for a Flickr member:
- Press ▲/▼ to select Search in the Explore screen, then press ENTER.
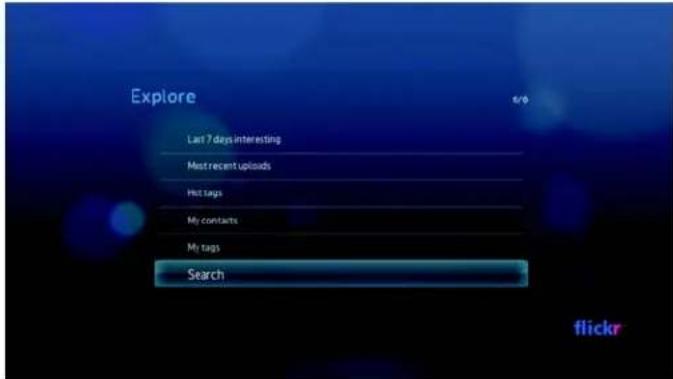
text_image
Explore Last 7 days interesting Most recent uploads Hot tags My contacts My tags Search flickr- Press ▲/▼ to select Flickr member, then press ENTER.

text_image
Explore Keywords Flickr members Tags 2/3 flickr- Use the navigation buttons ▲▼◀▶ to type a member's user name, email address, or interest using the on-screen keyboard. Select Submit, then press ENTER.

text_image
Setting b c d e f g h i j k l m n o p q r s t u v w x y z A B C 1 2 3 4 5 6 7 8 9 0 @ # & Cancel Space Submit www. flickrA browser screen listing Flickr member links matching your search criteria is displayed.
- Press ▲/▼ to select a link, then press ENTER to view that member's profile page.
If the selected member has public photostreams, you can explore them. Use the navigation buttons ▲▼◀▶ to select a content selection, then press ENTER to explore it. Go to the next section for instructions on how to navigate a photo-stream.
Flickr Photostream
The Flickr photostream layout is the same as that of a Photos directory in thumbnail mode.

text_image
Explore 1 of 500 red flickr- You can use the navigation buttons ▲ to select content.
- To view content in fullscreen mode, select the file and press ENTER.
- To view a slideshow using all the current photostream's content, press for ENTER. Contents display in the Flickr Player screen. Go to next section for information.
- To return to the photostream from fullscreen mode, press
■ To return to the photostream from Player mode, press
■ To view all photos in full screen, go to Photo Settings and select Fit to screen
Flickr Player
The Flickr Player layout is the same as that of a photo slideshow.
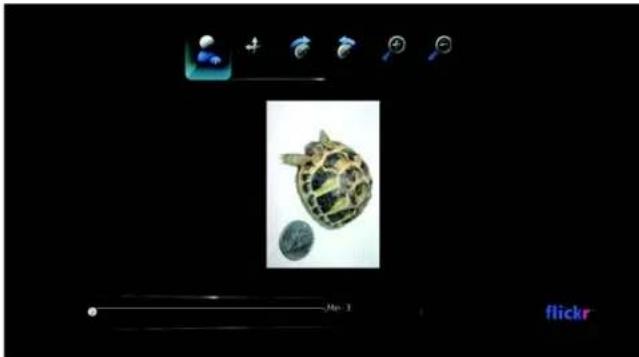
text_image
Screenshot of a mobile app interface with icons for navigation, search, and email, alongside a photo of a sea turtle.- Press ➕ to view the next content in the photostream.
- Press ◀ to view the previous content in the photostream.
■ To return to the photostream, press
Player Options
As with a regular photo slideshow, you can customize the way content is displayed in the Flickr Player. To do this, press OPTION to bring up the Player toolbar.
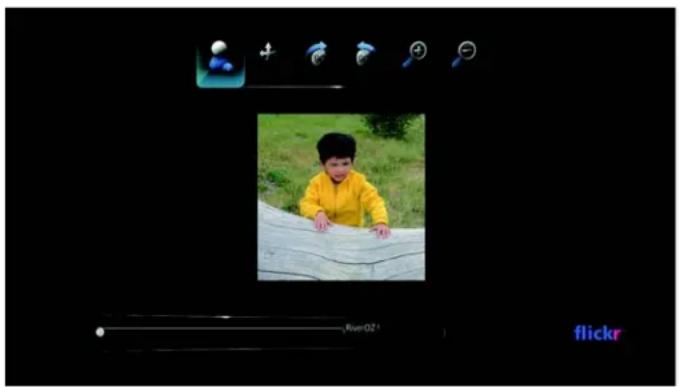
natural_image
Child in yellow jacket leaning on a stone wall outdoors, with camera icons and playback controls visible (no readable text or symbols)Note: To view photos enlarged in fit to screen or full screen mode, access the Settings menu and follow the instructions under "Photo Scaling" on page 146.
- To change the display's viewing scale, press ◀/▶ and select 🔒 to zoom in or 🔒 to zoom out, then press ENTER repeatedly until the preferred viewing scale is achieved.
Press OPTION or ← to revert to the default viewing scale.
- To rotate the image display, press ◀/▶ and select 🔍 or 🔽, then press ENTER repeatedly until the preferred display angle is achieved.
The display is rotated clockwise or counter-clockwise in 90° increments. Press OPTION or to revert to the default display angle.
- To view the profile page of the content's author, press ◀/▶ and select 🔒. If the user has other public photostreams, you can explore them as well. Use the navigation buttons ▲▼◀▶ to select a content selection, then press ENTER to explore it.
YouTube
YouTube is a video hosting website where you can upload and share videos.
To access YouTube:
- Navigate to the Home | Video menu bar and select YouTube .

text_image
YouTube YouTube VideoPress ENTER. The YouTube submenu bar displays.
- Press ▲/▼ to choose an option, then press ENTER.
Options include:
Account
Search
- Top favored
- Featured videos
- Recent videos
■ Most popular
■ Most viewed
- Top rated
- Preferences
Signing in to your YouTube account
Note: If you do not have a YouTube account and want to create one, go to www.youtube.com.
- Navigate to the Home | Video menu bar.
- Press ▲/▼ to select YouTube YouTube Videos, then press ENTER.
- On the YouTube submenu bar, press ▲/▼ to select Account ▲, then press ENTER.

text_image
Accounts Video YouTube- Select Sign in, then press ENTER.

text_image
YouTube Sign in Sign in Delete account- Use the navigation buttons ▲▼◀▶ to type your YouTube user name in the on-screen keyboard. Select Submit, then press ENTER.
text_image
YouTube Username - a b c d e f g h i j k l m n o p q r s t u v w x y z ABC 1 2 3 4 5 6 7 8 9 0 @#& Cancel Space Submit .com You Tube VIEWS- Use the navigation buttons ▲▼◀▶ to type your YouTube account password in the on-screen keyboard. Select Submit, then press ENTER.
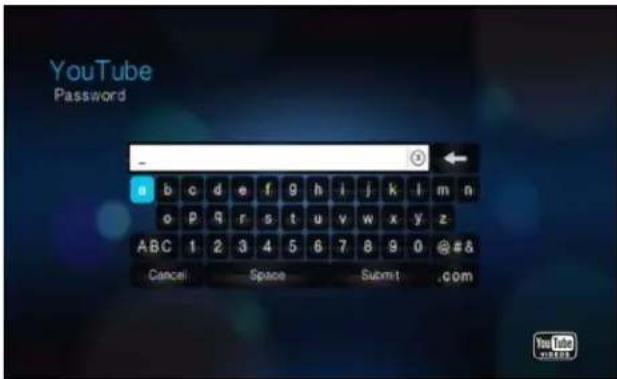
text_image
YouTube Password - a b c d e f g h i j k l m n o p q r s t u v w x y z ABC 1 2 3 4 5 6 7 8 9 0 @#& Cancel Space Submit .com- Press ◀/▶ to select a save option. Press ENTER when finished.
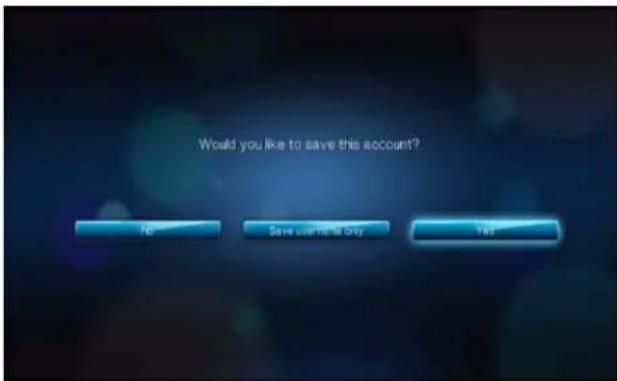
text_image
Would you like to save this account? No Save users to only YesOptions include:
- No – Your account details are not saved. You need to repeat the initial sign-in process every time you access YouTube using the media player.
- Save username only – Your username is saved, but you will be prompted to input your password every time you access YouTube using the media player.
-
Yes – Both your user name and password are saved. You can later sign in to your account from the YouTube Login screen.
-
The My favorites page appears. Go to the next section for more information on this page.
Account
By default, the My favorites page displays first when you sign in to your account. These are the videos you have saved as favorites in YouTube.
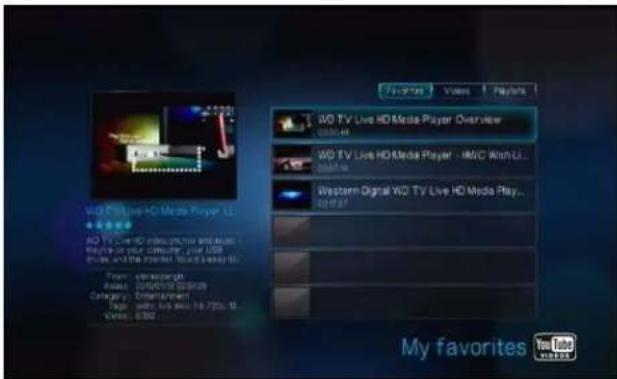
text_image
WQ TV Live HD Media Player Overview WQ TV Live HD Media Player - WMC Wish LL... Western Digital WD TV Live HD Media Play... My favorites You Tube VOCESNote: If you have not favored any videos, the screen displays "no content found."
This page also contains links to your uploaded videos (My videos) and video playlists (My playlists). Press ◀/▶ to select a link, then press ENTER to switch that video selection.
Pressing OPTION brings up the Account toolbar. Press ◀/▶ to select an option icon, then press ENTER to switch to that corresponding screen.
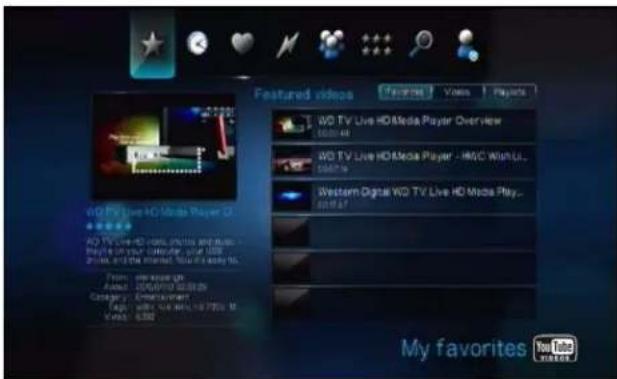
text_image
W2 TV Live HD Media Player Overview W2 TV Live HD Media Player - HMC Wish LL... Western Digital WD TV Live HD Media Play... My favorites YouTube VOLUMESearching for Videos
You can search YouTube for videos of particular interest to you. The search results are based on the tags associated with uploaded videos. The media player saves your searches so you can quickly recall them.
Note: Videos that are tagged "private" by users do not appear in search results.
To search for videos:
- On the YouTube submenu bar, press ▲ / ▼ to select Search ⚙, then press ENTER.

text_image
Search Video YouTubeTip: You can also click OPTION on any video selection page, press ◀/▶ to select from the toolbar, then press ENTER.
- Use the navigation buttons ▲▼◀▶ to type a keyword related to the subject matter of the video you're looking for using the on-screen keyboard. Select Submit, then press ENTER.

text_image
YouTube wd tv live_ Search History a b c d e f g h i j k l m n o p q r s t u v w x y z A B C 1 2 3 4 5 6 7 8 9 0 @# & Cancel Space Submit .com Press [SEARCH] key to use search history YouTube VICTOSThe video search begins (this may take a few seconds). Videos matching your search word appear in a video selection bar.
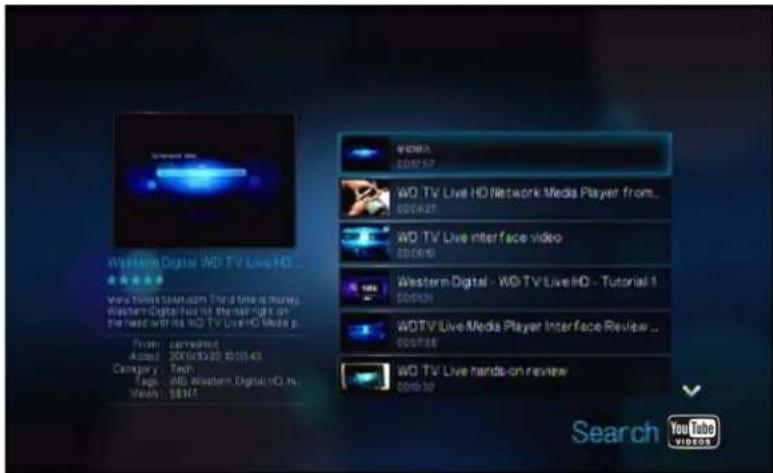
text_image
WORAI 000747 WO TV Live HD Network Media Player from... 000627 WO TV Live Interface Video 000019 Western Digital - WO TV Live HD - Tutorial 1 00039 WOTV Live Media Player Interface Review ... 000758 WO TV Live hands-on review 000130 Search YouTube VIDEOS- Press ▲/▼ to select a video from the display.
- Press ▪ or ENTER to start watching the selected video.
Go to page 121 for more information on using the YouTube Player.
To use search history:
- Enter the first letter of a previous search in the on-screen keyboard on the search screen. Previous searches beginning with this letter appear on the right side of the screen.
- Press the SEARCH 🔔 button on the remote control. This toggles you to the Search History list.
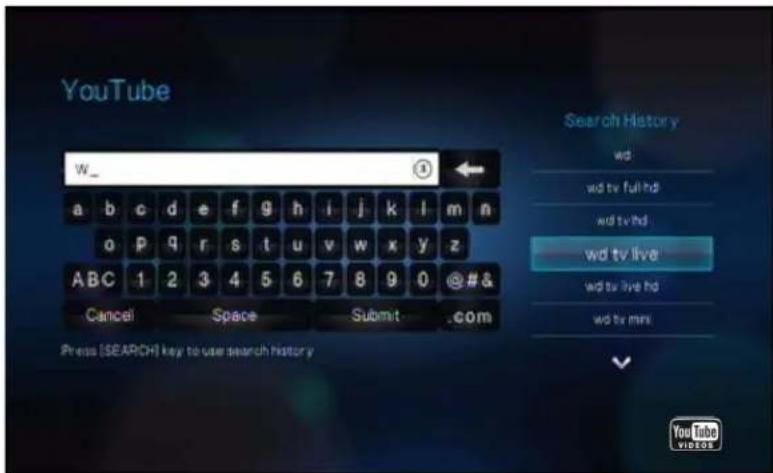
text_image
YouTube W_ Search History wd wd tv full hd wd tv hd wd tv live wd tv live hd wd tv min Press [SEARCH] key to use search history YouTube VIDEOS- Press ▲/▼ to select a search from the display.
- Press ENTER to perform the saved search.
Top Favorited
These are videos tagged as favorites by the majority of YouTube users.
To access Top Favorites:
- On the YouTube submenu bar, press ▲/▼ to select Top Favorited ♥, then press ENTER.

text_image
Top favored Video YouTubeTip: You can also click OPTION on any video selection page, press ◀/▶ to select ♥ from the toolbar, then press ENTER.
- Press ◀/▶ to choose from Today, This week, or This month, then press ▲/▼ to select a video from the displayed selection.
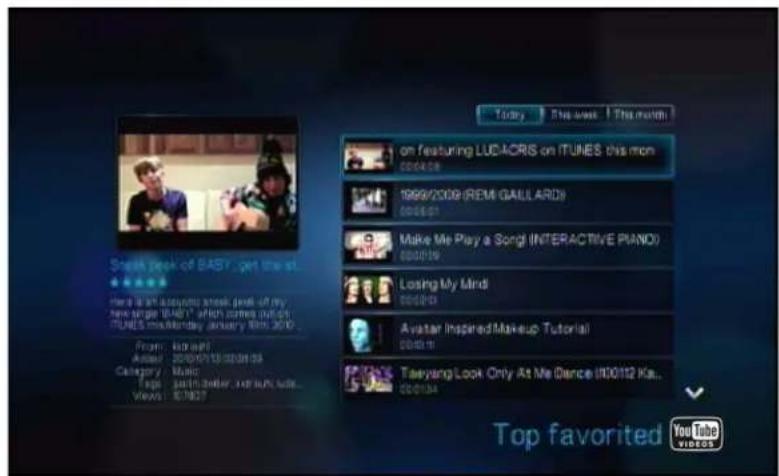
text_image
on featuring LUCKCRS on ITUNES this mom 1999/2009 (REMI GAILLARD) Make Me Play a Song! (INTERACTIVE PIANO) Losing My Mind Avatar Inspired Makeup Tutorial Tawyang Look Only At Me Dance (100/12 Ka... Top favored YouTube videos- Press III ▶ or ENTER to start watching the selected video. Go to page 121 for more information on using the YouTube Player.
Featured Videos
This video category is primarily populated with videos from YouTube's commercial partners, but might also include select user videos that are currently popular or have been previously showcased in YouTube's Spotlight Videos section.
To access Featured Videos:
- On the YouTube submenu bar, press ▲/▼ to select Featured Videos ★, then press ENTER.
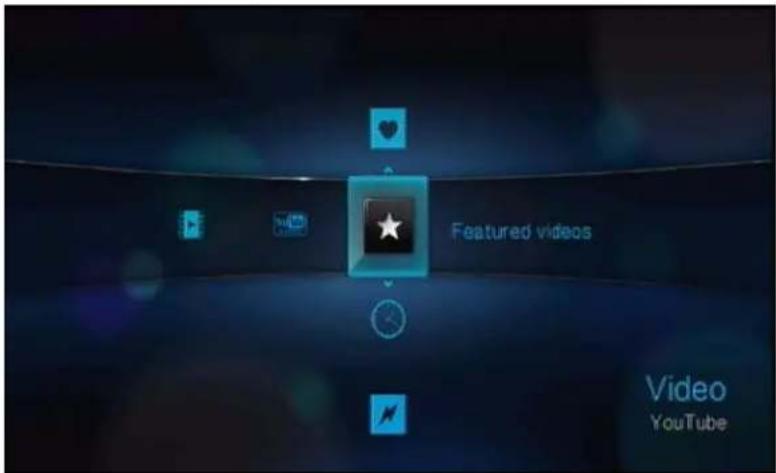
text_image
Featured videos Video YouTubeTip: You can also click OPTION on any video selection page, press ◀/▶ to select ★ from the toolbar, then press ENTER.
- Press ▲/▼ to select a video from the displayed selection.

text_image
Oxfam-Haïi emergency appeal http://www.oxfam.org/haifarmspal A major earthquake has struck Haji, had lan miles from the capital Portugal. France. From: Oxfam-Kreedith van Aloao: 30/05/19 08/07/6 Category: Monoprot Teja: Haïi, appeal emergency, no. Views: 302 Oxfam-Haïi emergency appeal September Earthquake in Haji (January 12, 2010) September Hali-Earth Quake Video - Les Cayes, Haiti 1, September Hali-Earthquake Aftermath September OK Go - This Too-Shal Pass September Stephen Kellogg & the Sheers - Shady Esper... September Featured videos YouTube videos- Press ▶ or ENTER to start watching the selected video. Go to page 121 for more information on using the YouTube Player.
Recent Videos
This video category contains the most recently uploaded videos on YouTube.
To access Recent Videos:
- On the YouTube submenu bar, press ▲/▼ to select Recent Videos Ⓗ, then press ENTER.
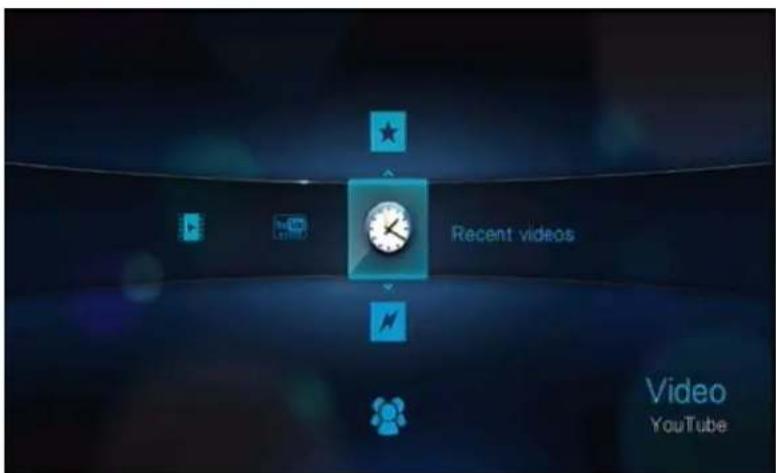
text_image
Recent videos Video YouTubeTip: You can also press OPTION on any video selection page, press ◀/▶ to select ✅ from the toolbar, then press ENTER.
- Press ▲/▼ to select a video from the displayed selection.

text_image
Recording Hardware And Software Copyright GAPGAPGAPGAPGAPGAPGAPGAPGAPGAL... $0.0000 Larko / Ne zelim da zham costs very funny,my more and frog D $0.0054 VID 00002-20091114-1713.36P $0.0008 mew/AVI $0.0040 Recent videos YouTube videos- Press III ▶ or ENTER to start watching the selected video. Go to page 121 for more information on using the YouTube Player.
Most Popular
These are videos deemed most popular by YouTube users.
To access Most Popular:
- On the YouTube submenu bar, press / to select Most popular , then press ENTER.
Tip: You can also click OPTION on any video selection page, press / to select from the toolbar, then press ENTER.
-
Press / to choose from Today, This week, or This month, then press / to select a video from the displayed selection.
-
Press or ENTER to start watching the selected video.
Go to page 121 for more information on using the YouTube Player.
Most Viewed
These are videos most viewed by YouTube users.
To access Most Viewed:
- On the YouTube submenu bar, press / to select Most viewed , then press ENTER.
Tip: You can also click OPTION on any video selection page, press / to select from the toolbar, then press ENTER.
-
Press / to choose from Today, This week, or This month, then press / to select a video from the displayed selection.
-
Press or ENTER to start watching the selected video.
Go to page 121 for more information on using the YouTube Player.
Top Rate d
These are videos with the highest ratings from YouTube users.
To access Top Rated:
- On the YouTube submenu bar, press ▲/▼ to select Top rated ..., then press ENTER.

text_image
Top rated Video YouTubeTip: You can also click OPTION on any video selection page, press ◀/▶ to select :from the toolbar, then press ENTER.
- Press ◀/▶ to choose from Today, This week, or This month, then press ▲/▼ to select a video from the displayed selection.

text_image
20 YOUTUBE PROJECT FOR AWESOME 09 Project for Awesome - My Puts Please Support all the Project for Awesome (also today's worldwide) comment: Thank you! Thank you to me. From: people? About: 30/08/2017/034 Category: Entertainment Help: Project for Awesome, 20... Views: 765.14 Today | This week | This month 20/08/2017 For Awesome: My Puts / Access/Special 00:00:59 Make a Difference Monday #5#MOTIVATIO.. 00:00:59 The Gift of Clean Water - Project for Ave.. 00:04:59 Project for Awesome FREE RACE? 00:02:19 Next's PROJECT FOR AWESOME video-ir o... 00:00:59 Full Video - Domination/Commentary : My ltr.. 00:10:19 Top rated YouTube VIEWS- Press ▪ or ENTER to start watching the selected video.
Go to page 121 for more information on using the YouTube Player.
Preferences
Preferences allows you to choose which country's content (videos and channels) you would like to view without changing the language of the site.
To access Preferences:
- On the YouTube submenu bar, press ▲/▼ to select Preferences 📄, then press ENTER.
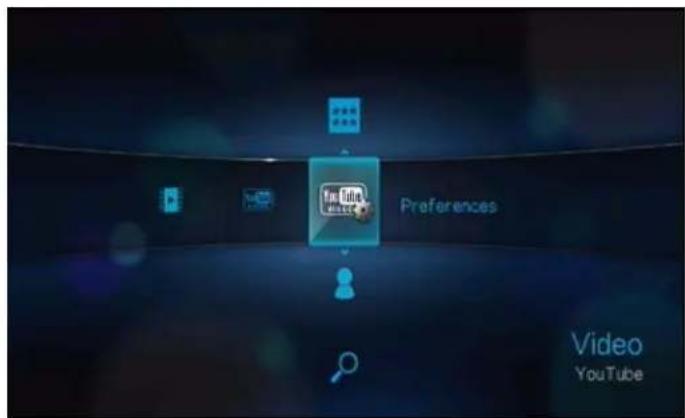
text_image
Video YouTube- Current location is highlighted. Press ENTER.
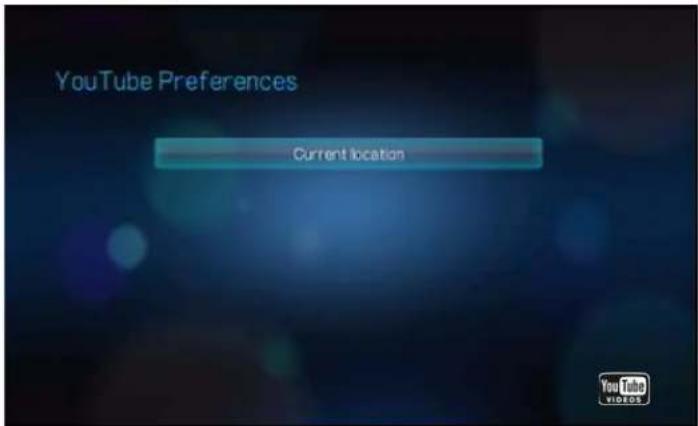
text_image
YouTube Preferences Current location- Press ▲/▼ to select a country from the list, then press ENTER.

text_image
Location Content Preference Worldwide Germany France Spain Italy Taiwan South Korea Japan RussiaYouTube Player
The YouTube Player layout is similar to the regular video playback screen. It displays the playback status bar and the elapsed and total playback times. Press ▪▶ to pause and resume playback. Press ▶▶ or ◀◀ to fast forward or rewind in 10 second increments.
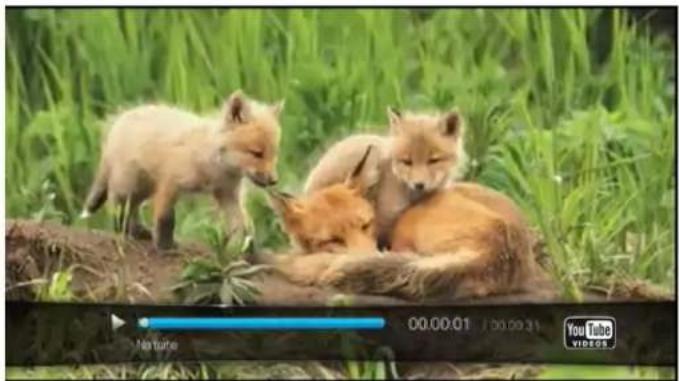
natural_image
Three young foxes resting in a grassy field with green foliage, captured by a video player interface (no text on animals or background)YouTube Player Options
As with a regular video playback screen, you can the customize the way content displays in the YouTube Player. To do this, press OPTION to bring up the Player toolbar.
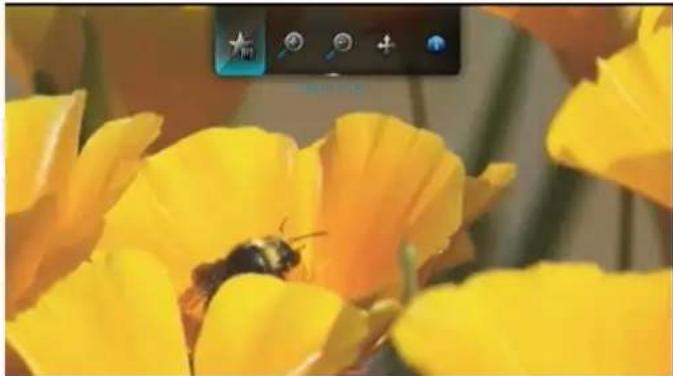
natural_image
Close-up of a bee on a yellow flower with camera control buttons in the corner (no text or symbols on the bee or flowers)- To change the display's viewing scale, press ◀/▶ and select 🔍 to zoom in or 🔍 to zoom out, then press ENTER repeatedly until the preferred viewing scale is achieved.
Press OPTION or ← to revert to the default viewing scale.
- To pan the video display, press ◀/▶ and select ◆, then press ENTER. Use the navigation buttons ▲ to pan the display.
Press OPTION or ← to revert to the default display position.
- To view the video's "watch page", press ◀/▶ and select 🔒. This is the page where you will find all information related to a video.
Press OPTION or ← to revert to the Player screen.
- To rate the video, press ◀/▶ and select ✗. Go to page 123 for more information.
Related Videos
After video playback, the Related Videos screen appears.
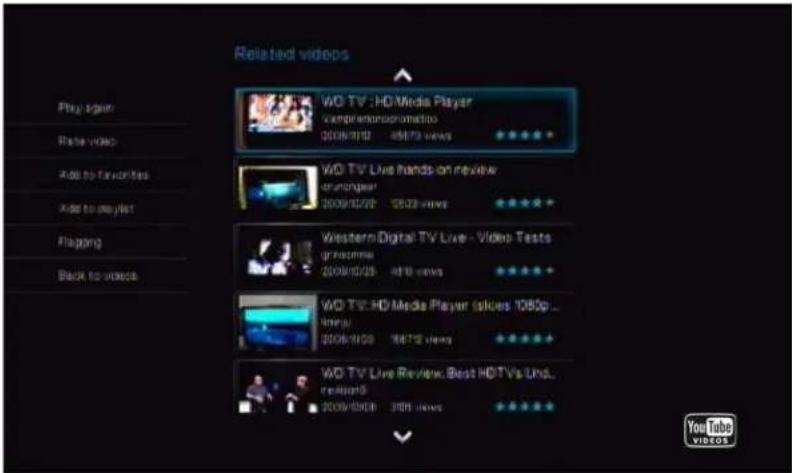
text_image
Related videos Play again Real video Add to favorites Add to playlist Flapping Back to videos WO TV : HD Media Player complementator 2008/12/12 4672 views WO TV Live hands on review stronger 2009/12/23 2523 views Western Digital TV Live - Video Tests prisms 2009/12/23 4678 views WO TV: HD Media Player slices 1050p ... free 2009/12/23 4672 views WO TV Live Review. Best HDTV is Und. relicipl 2009/12/23 300 views YouTube videosThis screen lists videos which might be related to recently played video by subject matter, making it easier to search for videos based on the same or similar subject. Each video in the list shows the video rating (number of highlighted “stars”) and the numbers of times it has been viewed. Press ▲/▼ to select a video from the list, then press ||► or ENTER to start watching the selected video.
Press ◀ to move the selection to the links on the left side of the screen. These links allow you to:
- replay the recently playbacked video – Play Again
- provide video feedback – Rate Video. Go to the next section for more information.
- add the video to your My Favorites list – Add to Favorites
- add the video to your My Playlists list – Add to Playlist
- flag the video as having inappropriate content - Flagging
- return to the last video selection page – Back to Videos
Press ▲/▼ to select a link, then press ENTER.
Rating Videos
You can rate videos on a basis of one to five stars during or after video playback.
Note: You must signed in to your YouTube account to rate videos. See "Signing in to your YouTube account" on page 109 for sign-in instructions.
To rate videos:
-
During playback, press OPTION.
-
Press ◀/▶ to select ★ from the toolbar, then press ENTER.
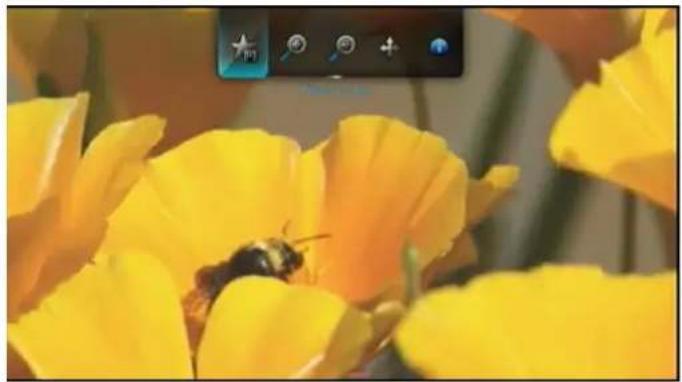
natural_image
Close-up of a bee pollinating yellow flowers with camera control buttons in the corner (no text or symbols on the bee or flowers)- Press ◀/▶ to highlight the number of stars corresponding to your preferred rating. Five is the highest rating, and one is the lowest.

text_image
Rate video WD TV Live HD Media Player Overview WD TV Live HD video, photos and music - play to on your computer, your USB drives, and the store. Awesome Add Add YouTube VIDEO-
Press ▼ to move the selection down to the prompt buttons.
-
Press ◀/▶ to select Yes, then press ENTER to confirm your rating.
-
Your video rating is confirmed. Press ENTER to go back to the Player screen. The average number of stars users give to the video are used to determined the overall video rating.
Tip: You can also rate videos after playback. On the Related Videos screen, press ▲/▼ to select Rate Video, then press ENTER.
Adding Videos to Favorites
If you enjoyed a particular video or simply want to refer to it later, you can tag it as a "favorite" to add it to your My Favorites list. Once added, you can keep track of this video.
To add a video to My Favorites from the Related Videos screen:
-
On the Related Videos screen of the video you want to add as a favorite, press to move the selection to the links on the left side of the screen.
-
Press ▲/▼ to select Add to Favorites, then press ENTER.
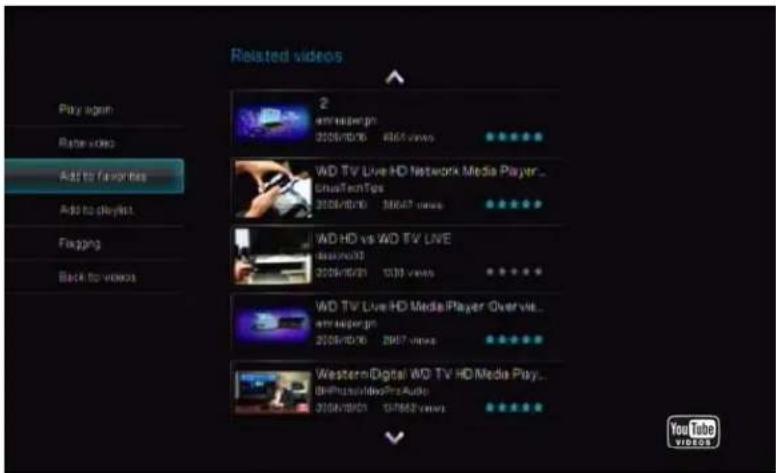
text_image
Related videos Play again Base video Add to favorites Add to playlist Flapping Back to videos 2 am@super.ph 2006/8/16 4365 views WD TV Live HD Network Media Player... UnusTechTips 2006/8/16 10647 views WD HD vs WD TV LIVE Session33 2006/8/16 1035 views WD TV Live HD Media Player Over vie... am@super.ph 2006/8/16 2007 views WesternDigital WD TV HD Media Play... (89Photo/videoProAudio) 2006/8/16 157882 views- Press ENTER at the confirmation prompt.
Signing out from YouTube
Sign out from YouTube after a viewing session to prevent other users from accessing your YouTube account without your permission.
To sign out from YouTube:
-
On your Account page, press OPTION.
-
Press ◀/▶ to select Logout 🔍, then press ENTER.
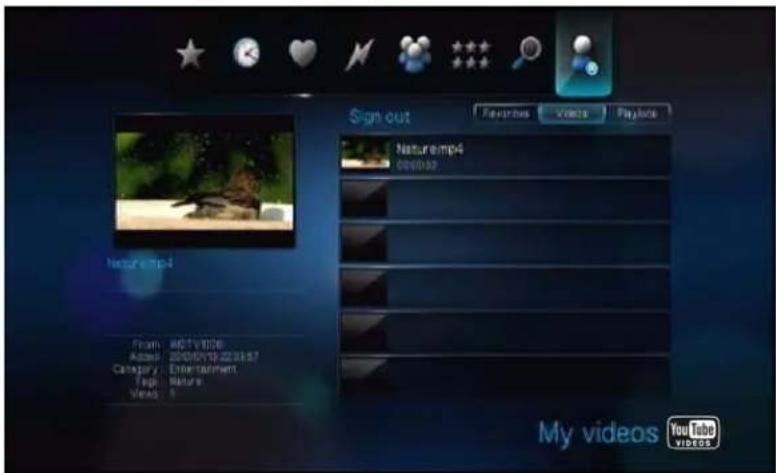
text_image
Sign out Favorites Views Playbox Nature.mp4 Cognizao Name: MCTV1026 Added: 20/07/15p.22.8.9.7 Category: Entertainment Tag: Nature Views: 5 My videos YouTube videos- Press ◀/▶ to select Yes on the confirmation prompt, then press ENTER.
Deleting a YouTube account from the media player
To delete a YouTube account from the media player:
- On the YouTube submenu bar, press ▲/▼ to select Account 🔒, then press ENTER.

text_image
Account Video YouTube- Press ▲/▼ to select Delete account, then press ENTER.

text_image
YouTube Sign in Sign in Delete account weaverer YouTube VIDEOS- Press ▲/▼ to select the account you want to delete, then press ENTER.
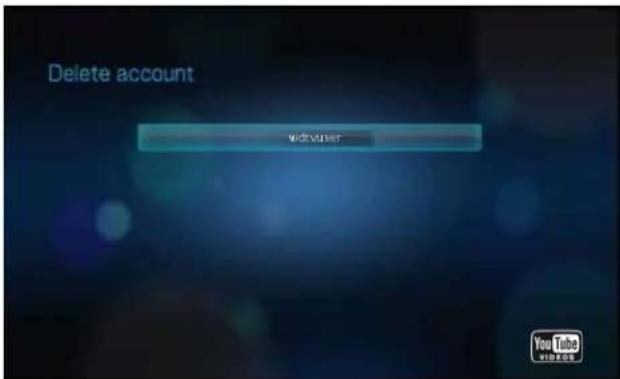
text_image
Delete account Widviseer YouTube VIDEO- Press ◀/▶ to select Yes on the confirmation prompt, then press ENTER.
Restricted Video Content
Some videos on YouTube are restricted by the content owner from playback via TV-connected devices. If you attempt to play one of these videos, the following screen displays:
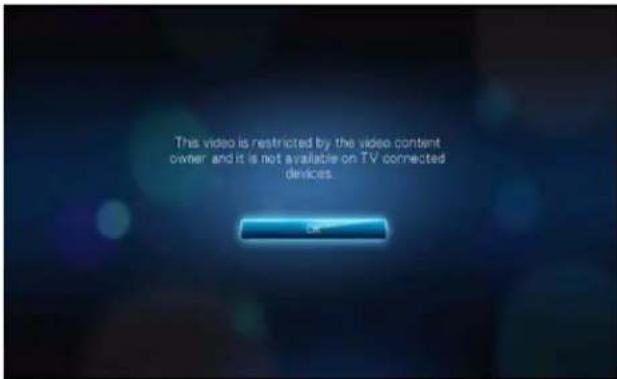
text_image
This video is restricted by the video content owner and it is not available on TV connected devices.Press ENTER to return to the previous screen.
Encoding Support for YouTube Worldwide
Many YouTube videos are encoded in a language other than the one you set as your media player's system language. In some cases, this results in garbled characters in the video ID or even playback failure. If this is the case, you need to enable the encoding support for the language that is causing the error.
To set the media player's additional encoding setting:
- Navigate to Home | Settings menu bar.
- Press ◀/▶ to select System ↓, then press ENTER.
- Press ◀/▶ to select Additional encoding support, then press ENTER.
- Press ▲/▼ to select the encoding support you require, then press ENTER.
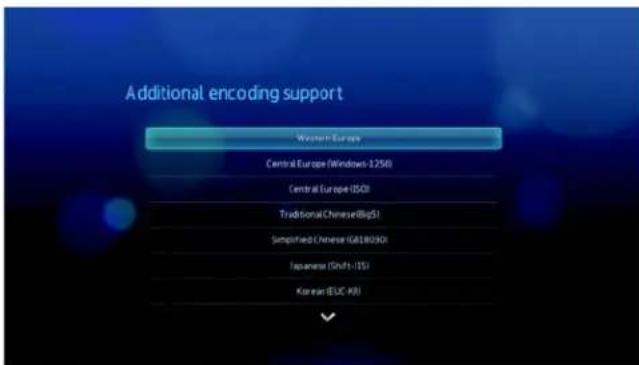
text_image
Additional encoding support Western Europe Central Europe (Windows-1250) Central Europe (ISO) Traditional Chinese@Bj51 Simplified Chinese (GB18030) Japanese (Shift -15) Korean (EUC-KI)12
Settings and Advanced Features
The Settings menu lets you customize the way you use the media player and set preferences for media playback.
To select a Settings category:
- Press HOME, then select the Settings icon 🎨.
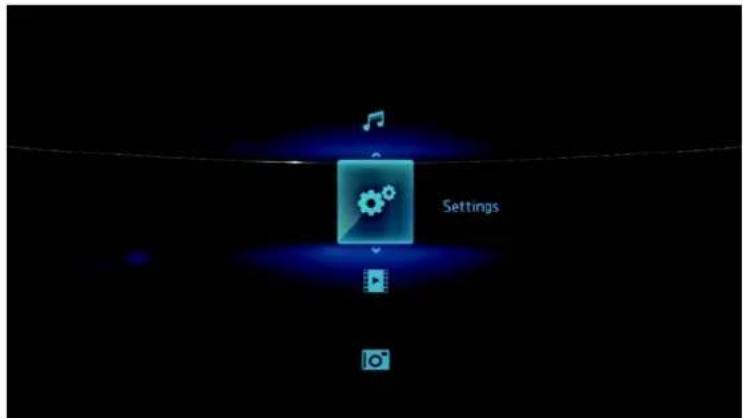
text_image
Settings- Use the Left/Right navigation buttons to select a Settings category, then press ENTER.
There are seven Settings categories, including File Management 📄, Audio/Video 📋, Music 🎵, Video , Photo , System 📋, and Network 🎲.
Settings Navigation Buttons
Use these buttons on the remote control to navigate within and between the Settings screens.
| Button Function | |
| Up/Down | Selects a menu setting in an option screen |
| ENTER Displays the option screen for the selected menu | |
| 1. Press ENTER. A confirmation prompt appears.2. Select OK, then press ENTER.If you fail to select OK within 15 seconds, the new setting will not be applied.If your entertainment unit cannot support the selected setting, no change is made and the original setting is retained. | Applies the selected menu setting |
| BACK | Displays the previous menu screen |
Selects
File Management
The file management feature allows you to copy or delete files from the attached USB devices.
Copying Files
- Navigate to Home | Settings

- Use the navigation buttons to select File Management ☐, then press ENTER.
text_image
File Management Settings- Press to select the file or folder you intend to copy.

text_image
File Management Select [RIGHT] key to select source Music Photo Video Demo Video DTS Video HD 1.mp3 / 7.20MB 2.mp3 / 4.8MB dsc1.pg / 64.04KB 4/11 Select AllTo select all files and folders for copying, press OPTION, then choose
Select All

text_image
File Management Select [RIGHT] key to select source Music Photo Video Demo Video DTS Video HD 1.mp3 / 7.20MB 2.mp3 / 4.81MB iso1.jpg / 64.04KB 4/11 Select All- After a file selection has been made, press OPTION, then select Copy 🔔.

text_image
File Management Select [RIGHT] key to select source Music Photo Video Demo Video DT3 Video HD tmp3 / 7.20MB 2.mp3 / 4.61MB doc1.jpg / 64.04KB 4/11 Copy- Navigate to the preferred destination folder, then press ▶ to select the folder.

text_image
File Management Press [RIGHT] key to select destination My Folder- Press ENTER to start copying the selected files into the destination folder.
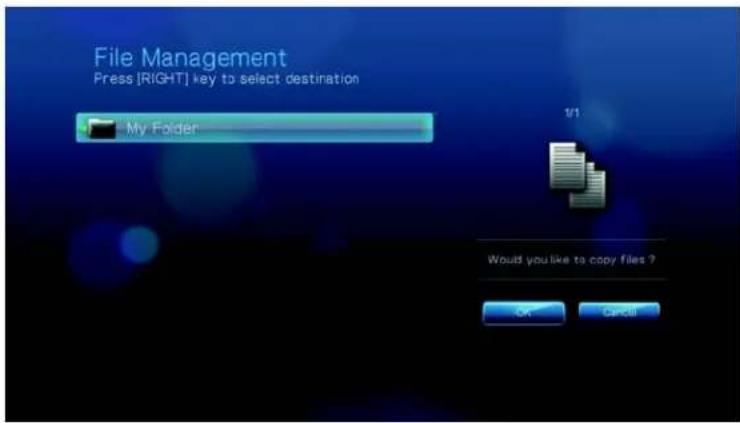
text_image
File Management Press [RIGHT] key to select destination My Folder 1/1 Would you like to copy files ? OK CancelA progress bar will indicate the copy status.

text_image
File Management Press [RIGHT] key to select destination My Folder 1/1 Copying 51 / 55After the file has been copied successfully, the completed message appears.
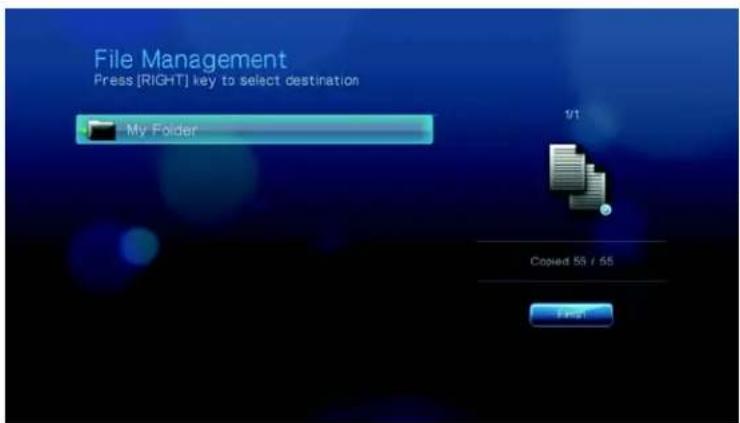
text_image
File Management Press [RIGHT] key to select destination My Folder 1/1 Copied 55 / 56 I PrintMoving Files
- Navigate to Home | Settings

-
Use the navigation buttons to select File Management ☐, then press ENTER.
-
Press ▶ to select the file or folder you intend to move.

text_image
File Management Select [RIGHT] key to select source Music Photo Video Demo Video DTS Video HD 1.mp3 / 7.20MB 2.mp3 / 4.61MB dsc1.jpg / 64.04KBTo select all files and folders for moving, press OPTION, then choose
Select All

text_image
File Management Select [RIGHT] key to select source Music Photo Video Demo Video DTS Video HD 1.mp3 / 7.20MB 2.mp3 / 4.81MB doc1.jpg / .64.04KB 4/11 Select All- After file selection has been made, press OPTION, then select Move


text_image
File Management Select [RIGHT] key to select source Music Photo Video Demo Video DTS Video HD 1mp3 / 7.20MB 2mp3 / 4.81MB dsct.jpg / 64.04KB 4/11 Move- Press ▶ repeatedly until the preferred destination folder is selected.
text_image
File Management Press [RIGHT] key to select destination My Folder 1/1- Press ENTER to start moving the selected files into the destination folder.
text_image
File Management Press [RIGHT] key to select destination My Folder 1/1 Would you like to move files ? OK CancelA progress bar will indicate the move status.
text_image
File Management Press [RIGHT] key to select destination My Folder 1/1 Moving 0 / 0After the selected files have been successfully moved to the destination folder the File Moved icon 📁 appears.

text_image
File Management Press [RIGHT] key to select destination My Folder 1/1 Moved 55 / 56 NextDeleting Files
- Navigate to Home | Settings

-
Use the navigation buttons to select File Management 📄, then press ENTER.
-
Press ▶ to select the file or folder you intend to delete.
text_image
File Management Select [RIGHT] key to select source Music Photo Video Demo Video DTS Video HD 1.mp3 / 7.20MB 2.mp3 / 4.51MB dsc1.jpg / 64.04KB 7/11To select all files and folders for deletion, press OPTION, then choose
Select All
text_image
File Management Select [RIGHT] key to select source Music Photo Video Demo Video DTS Video HD 1.mp3 / 7.20MB 2.mp3 / 4.81MB 0sc1.jpg / 64.04KB 4/11 Select All- After file selection has been made, press OPTION, then select Delete


text_image
File Management Select [RIGHT] key to select source Music Photo Video Demo Video DT3 Video HD 1.mp3 / 7.20MB 2.mp3 / 4.61MB csc1.jpg / 64.04KB 4/11 Delete- Press ENTER to confirm file deletion.

text_image
File Management Select [RIGHT] key to select source Music Photo Video Demo Video DTS Video HD tmp3 / 7.20MB 2.mp3 / 4.81MB csc1.jpg / 64.04KB 7/11 Would you like to delete files ? OK CancelA progress bar will indicate the file deletion status.

text_image
File Management Select [RIGHT] key to select source Music Photo Video Demo Video DTS Video HD 1mp3 / 7.20MB 2.mp3 / 4.51MB csc1.jpg / 64.04KB 7/11 Deleting 2 / 2After the selected files have been deleted, the File Deleted icon appears.
text_image
File Management Select [RIGHT] key to select source Music Photo Video Demo Video DTS Video HD 1mp3 / 7.20MB 2.mp3 / 4.51MB 0sc1.jpg / 64.04KB 7/11 Deleted 55 / 56 7/11
Audio/Video
Use the menus in this category to configure playback for audio and video files.
text_image
Audio/Video Video output Composite HDMI deep color 8 bit Aspect ratio Widescreen Audio output StereoVideo Output
Use this menu to select a video signal.
Composite
When using the standard RCA A/V cable (yellow, red, and white connectors) to connect the media player, select Composite in the Video output screen.
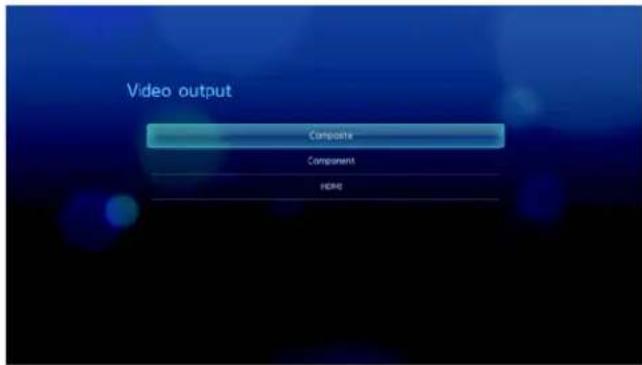
text_image
Video output Composite Component HESOYou will be prompted to select the TV standard applicable to your device. This setting depends on your regional location. Options include:
- NTSC–United States, Canada, Japan, Mexico, the Philippines, South Korea, and Taiwan.
- PAL–Europe, Greenland, parts of Africa and South America, the Mideast, China, India, Australia, and Indonesia
Select a regional TV standard then press ENTER.
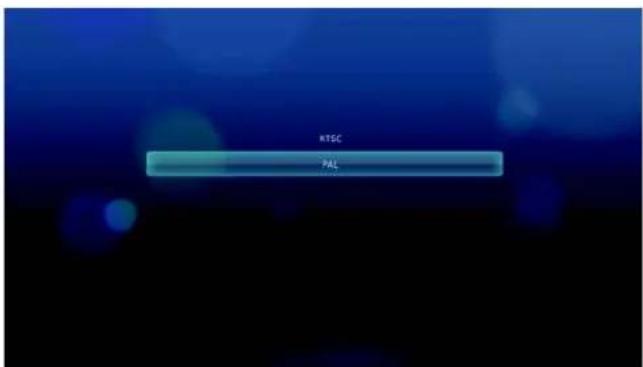
text_image
RTSC PALComponent
When using the YPbPr cable (green, blue, and yellow connectors) to connect the media player, select Component in the Video output screen.

text_image
Video output Composite Component HDMIYou will be prompted to select the video display resolution for your device. Select display resolution then press ENTER.

text_image
480Hz 60Hz 570Hz 50Hz 720Hz 50Hz 720Hz 60Hz 1080Hz 50Hz 1080Hz 60Hz 1080Hz 50HzHDMI
When using an HDMI cable (if your TV supports HDMI resolution), select HDMI in the Video output screen.

text_image
Video output Composite Component HDMIYou will be prompted to select the applicable HDMI video resolution for your device. Make your selection and press ENTER.
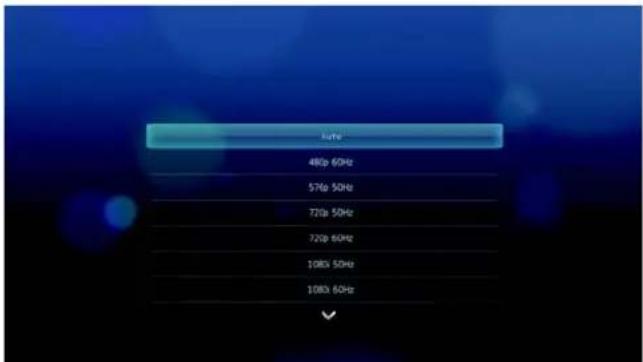
text_image
Rate 480p 60Hz 570p 50Hz 720p 50Hz 720p 60Hz 108h 50Hz 108h 60HzNote: The further down the list the setting, the higher the resolution and clearer the picture.
HDMI Deep Color Mode
Use this menu to increase the number of HDMI deep color bits available for transmission for each channel. A higher number of bits means there are more shades available for a television monitor to mix together. The default setting is 8 bit which is compatible with most televisions. However, you can select the higher color depth of 12 bit if your television supports HDMI 1.3 or higher. 12 bit provides a better color experience than 8 bit if your television is compatible.
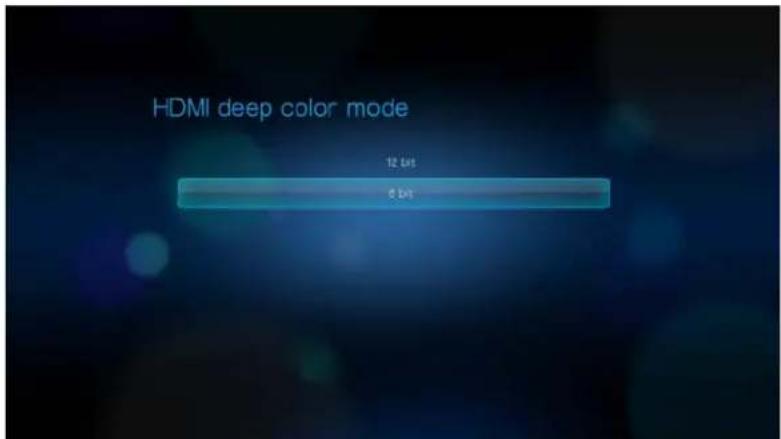
text_image
HDMI deep color mode 12 bits 0 bitsAspect Ratio
Use this menu to select the way videos are displayed. Options include:
- Normal (4:3)
- Widescreen (16:9)
The media player's default setting is Widescreen. Make sure your TV can support widescreen resolution, or this default setting can result in a distorted video display.
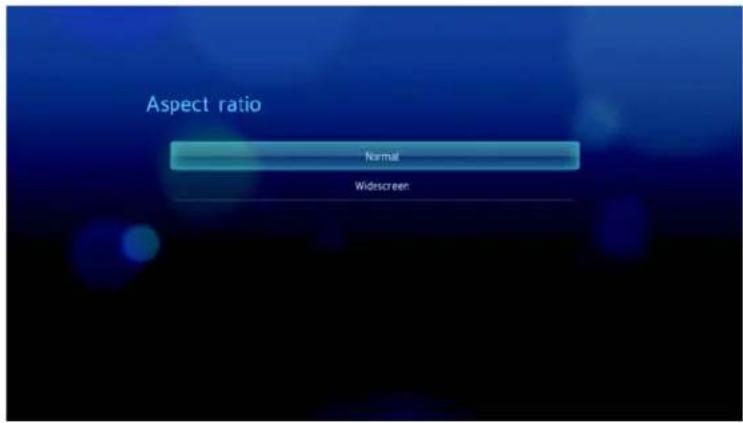
text_image
Aspect ratio Normal WidescreenAudio Output
Use this menu to select the audio output mode.
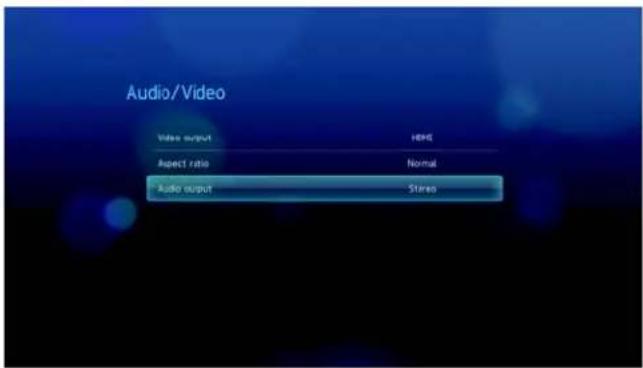
text_image
Audio/Video Video output Here Aspect ratio Normal Audio output StereoOptions include:
- Stereo - Recommended if you are using a 2- or 4-speaker entertainment unit.
- Digital - Select this option if you are using an Toslink (optical) connection to output surround sound.

text_image
Audio output Stereo DigitalMusic
Use the menus on the Music category to configure the display and sequence option for audio files.
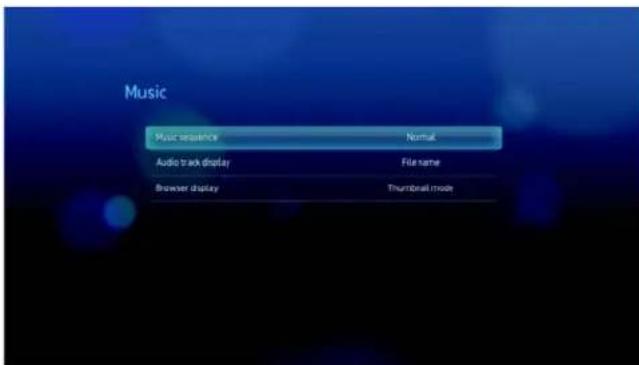
text_image
Music Music sequence Normal Audio track display File name Browser display Thumbnail modeMusic sequence
Use this menu to select the audio playback mode. The default setting is Normal. Go to "To set the music repeat mode:" on page 44 for a description of these audio playback modes.
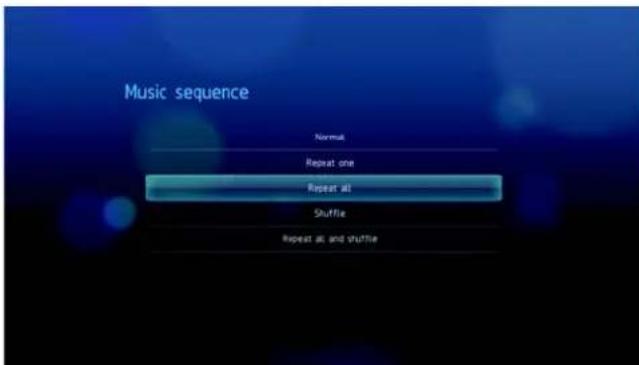
text_image
Music sequence Normak Repeat one Repeat at Shuffle Repeat at and shuffleAudio track display
Use this menu to select the default display mode for the audio browser screen. The default setting is Thumbnail mode. In the Music directory, this displays thumbnails of available album art.
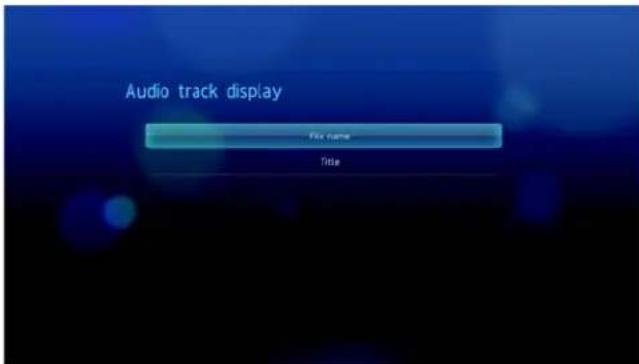
text_image
Audio track display File name TitleBrowser Display
Use this menu to select the default display mode for the audio browser screen. The default setting is Thumbnail mode. In the Music directory, this displays thumbnails of available album art.

text_image
Browser display List mode Thurinual mode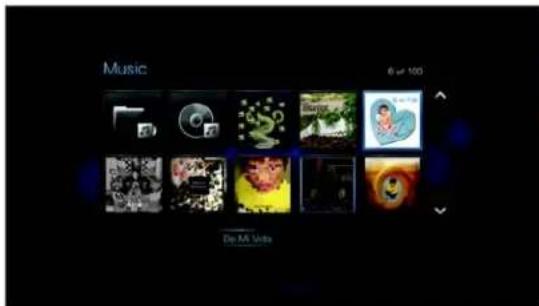
text_image
Music 6 or 100 Die AA VideoThumbnail mode

text_image
Music Track 22 way / 3.70MB Track 23 way / 3.70MB Track 24 way / 3.70MB Track 25 way / 3.70MB Track 26 way / 3.70MB Track 27 way / 3.70MB Track 28 way / 3.80MBList mode
Video
Use the menus on the Video category to configure the display and sequence option for video files.

text_image
Video Video sequence Normal Subtitle font size 40 Subtitle border Thin Subtitle default On Browser display Thunderal modeVideo sequence
Use this menu to select the video playback mode. The default setting is Normal. Go to "Using Video Repeat" on page 41 for a description of these video playback modes.
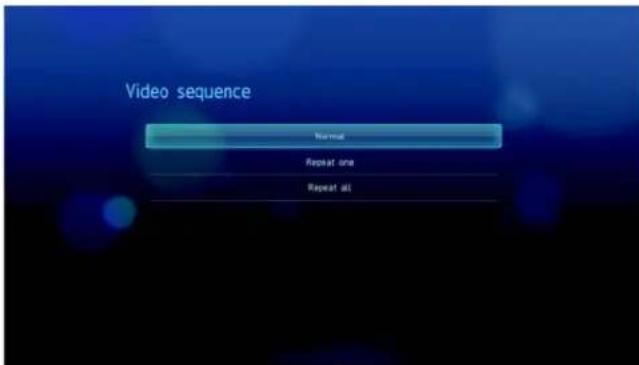
text_image
Video sequence Normal Repeat one Repeat allSubtitle font size
Use this menu to set the default font size for displaying video subtitles. The current font size value displays on the bottom of the screen. The second line in the display reflects the font size option currently selected.
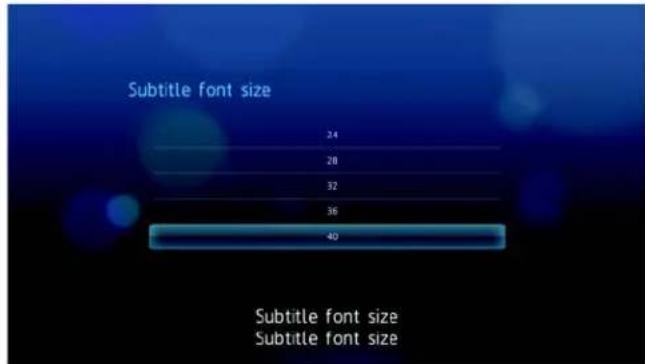
text_image
Subtitle font size 24 28 32 36 40 Subtitle font size Subtitle font sizeSubtitle border
Use this menu to set the default appearance of the subtitle frame.
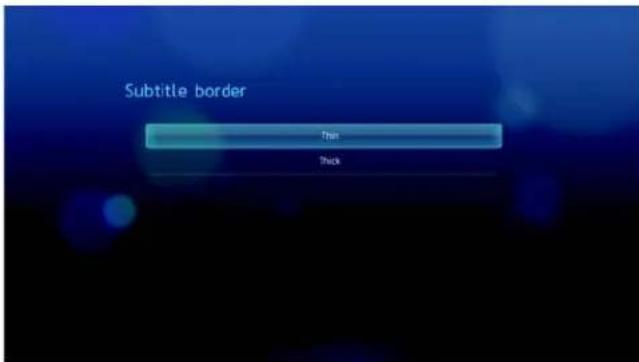
text_image
Subtitle border Thin ThickBrowser Display
Use this menu to select the default display mode for the video browser screen. The default setting is Thumbnail mode. In the Video directory, this displays thumbnails of available movie posters.

text_image
Browser display List male Thumbnail node Preview node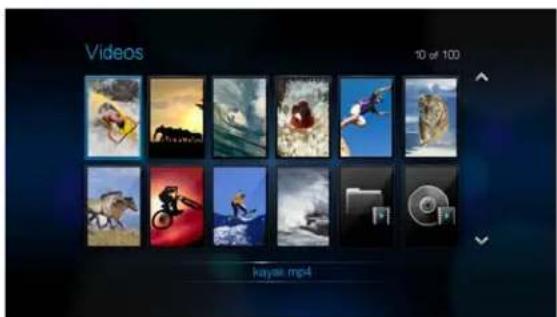
text_image
Videos 10 of 100 kayee.mp4Thumbnail mode

text_image
Photos 6 of 100 Movies TV Shows Load Season 4 Demo Real Superfield Cloverfield Power ShiftList mode

text_image
Video 3 of 27 T875261MOV / 48.63MB K061196MOV / 29.89MB K0361197.MOV / 8 K0612042MOV / 118.10MB K0612046MOV / 173.38MB K0661726.mov / 52.62MB Play Size: 807MB Play Type: MOV OK: OKPreview mode

Photo
Use the menus on this category to configure the display size and slideshow settings when viewing your image files.

text_image
Photos Browser display Thumbrait mode Slideshowsequence Normal Photo scaling Keep as original Transition effect Normal Interval time 3 SecondsBrowser Display
Use this menu to select how media files are displayed in their respective folders. The default setting is Thumbnail mode. In the Photo directory, this displays thumbnails of available image files.
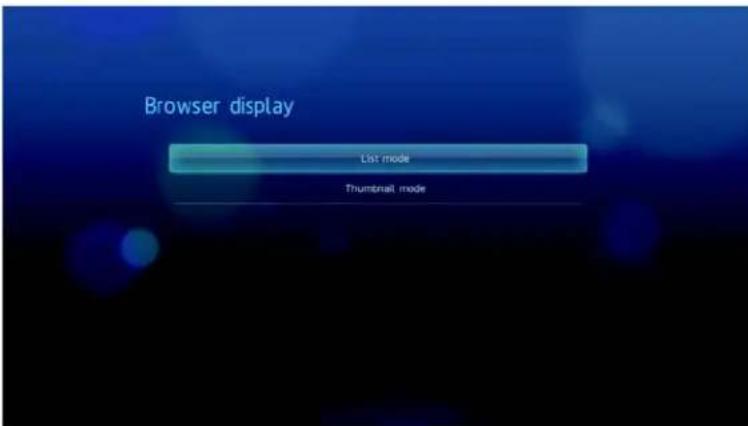
text_image
Browser display List mode Thumbnail mode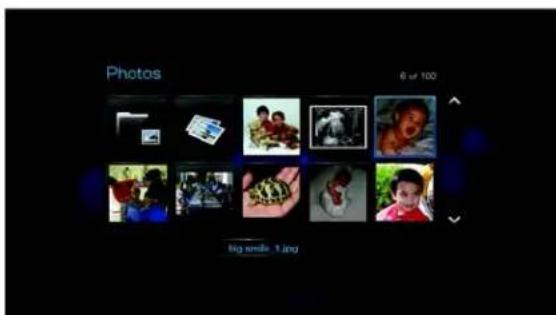
text_image
Photos 6 of 100 big sends: 1.jpgThumbnail mode
text_image
Photos 6 of 100 Movies TV Drive Lost Edition 4 Demo Real Superfed Cloverfield Fiatr ShortList mode
Slideshow Sequence
Use this menu to set the slideshow sequence mode. The default setting is Normal. See "Repeating and/or shuffling a Slideshow" on page 53 for a description of these slideshow sequence modes.

text_image
Slideshow sequence Normal Shuffle Repeat all Repeat all and shufflePhoto Scaling
Use this menu to define how pictures are scaled when you view them. This also applies when pictures are viewed in a slideshow. Options include:
- Keep as original – Maintains the original resolution of the image (default).
- Fit to screen – Fills as much of the display area as possible while maintaining correct image proportions.
- Display in full screen– Fills the display area with the image (this can lead to image distortion).
text_image
Photo scaling Keep as original Fit to screen Display in full screenTransition Effect
Use this menu to select the method used to display the next slide in a slideshow. The default setting is Fade.

text_image
Transition effect Normal Fade Wire Zoom Push RandomInterval Time
Use this menu to set the time interval between pictures in the slideshow. You can select from 3 seconds (default) to 5 minutes.
text_image
Interval time 3 Seconds 5 Seconds 10 Seconds 20 Seconds 30 Seconds 1 Minute 5 Minutes
System
Use the menus in this category to configure the media player's general functions.
- Navigate to the Home | Settings menu bar.
- Press ▲/▼ to select System Setting 📄, then press ENTER.
text_image
Systems Setting Settings- Press ▲/▼ to make a selection from the list of options, then press ENTER.
text_image
System Language English Media library On Screemaver: dazy 5 minutes Display file size On Additional encoding support Western Europe Auto play COff Reset to factory defaults
text_image
System Setting Username Device System information System registration AboutLanguage
Use this menu to select the display language.
Use this menu to enable Media Library, which refers to the process of consolidating the contents of a USB drive into one database so you can locate media files based on metadata information. See “Media Library” on page 156 for more information.

text_image
Media library Off OnScreensaver Delay
Use this menu to set the time of system inactivity before the screensaver display is enabled. The default setting is 5 minutes.

text_image
Screensaver delay Never 5 Minutes 10 Minutes 15 MinutesDisplay file size
Set this menu to On to display the file size information in the media browser screen.

text_image
Display file size Off OnAdditional encoding support
Select an encoding support for a secondary language. This prevents garbled characters in file names and subtitles defined in the selected language.
text_image
Additional encoding support Western Europe Central Europe (Windows-1258) Central Europe (ISO) Traditional Chinese BigS Simplified Chinese (G&E8030) Japanese (Shift-185) Korean (EUC-KB)Auto play
Select the type of media (music or video) that plays automatically when a USB device is connected to the media player. The media files should be located in the USB device's root directory for Auto Play to function.

text_image
Auto play Get Photoauto play Video auto playReset to Factory Defaults
Use this menu to restore all media player system preferences and playback settings to their default factory values. Reset to factory defaults corrects performance problems caused by a failed firmware upgrade or a faulty configuration settings.
To perform a system reset:
- Press ▲/▼ to select Reset to factory defaults, then press ENTER.
text_image
System setting Language English Media library On Screen saver delay 5 minutes Display file size On Additional encoding support Western Europe Auto play Off Reset to factory defaults- Press ◀▶ to select OK on the system reset prompt, then press ENTER.
text_image
Reset to factory defaults Are you sure you want to restore this device to factory settings? CURVE OKUpdate Device
Use this menu to check for the latest WD TV media player firmware version available online. If a new firmware version is available, you can download it automatically and upgrade the WD TV media player without using a USB device.
To perform a device update:
- Press ▲/▼ to select Update Device, then press ENTER. The screen displays the current firmware version.
text_image
Update Device Check for latest firmware and upgrade device. Current version: 0.0102 New version check- Press ◀▶ to select OK on the system reset prompt, and then press ENTER.
- Press ENTER to begin checking for a newer version of the software.
text_image
Update Device Searching for update Cancel- If the latest version of the firmware online is older than or similar to the current version of the firmware in the media player, the following screen appears. Select OK, then press ENTER to return to the Update Device screen. Press BACK to return to the System Settings screen.

text_image
Update Device Your media player is up to date. OKIf the latest version of the firmware online is newer than the current version of the firmware in the media player, the following screen appears. Select OK, then press ENTER to restart the system and perform a firmware upgrade. See "System Firmware Upgrade" on page 159 for further details on completing the firmware upgrade.
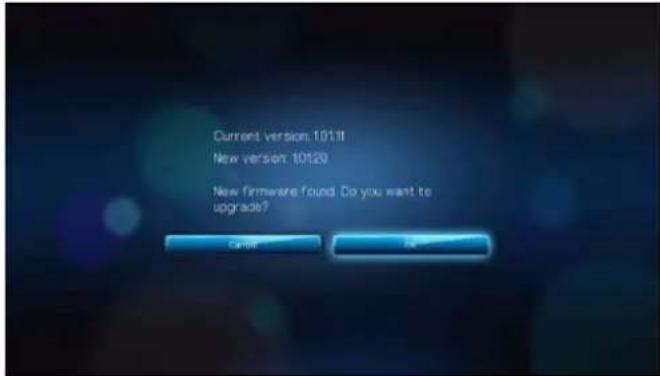
text_image
Current version: 10118 New version: 10120 New firmware found. Do you want to upgrade? Order UpgradeSystem Information
View the System Information screen to view network-related settings currently used by the media player.
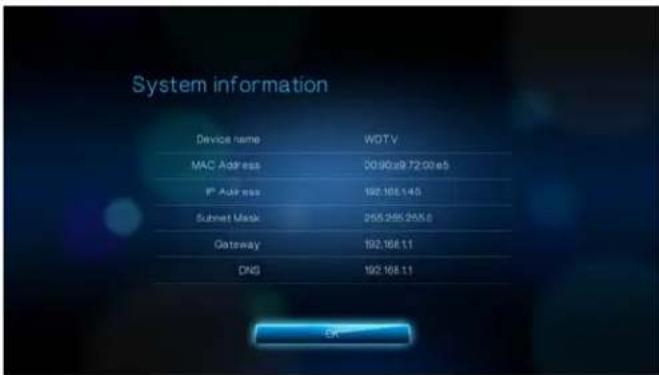
text_image
System information Device name WDTV MAC Address 20.90e9 72.00e5 IP Address 192.168.145 Submit Mask 255.955.255.6 Gateway 192.168.11 DNS 192.168.11 OKSystem Registration
You can register your media player if you have an active network connection. See "To register your WD product using the System Setting menu:" on page 3 for instructions.
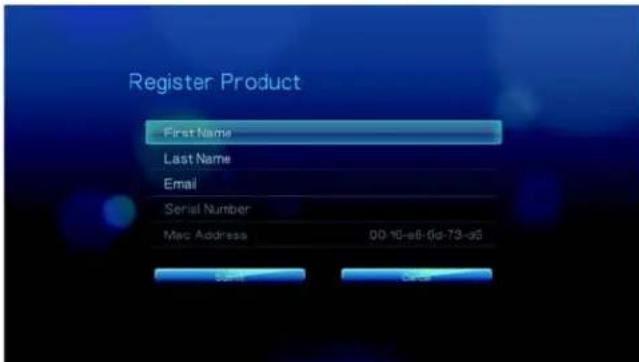
text_image
Register Product First Name Last Name Email Serial Number Mac Address 00-15-e6-0d-79-e5About
Select this option to display the current hardware and firmware configurations.

text_image
About WD WD TV HD Media Player Firmware version: 0.0101 For additional information regarding your HD Media Player, please refer to the user manual or visit http://support.wdc.com/ Fort powered by Arphice
Network
- Navigate to the Home | Settings menu bar.
- Press ▲/▼ to select Network Setting 🔒, then press ENTER.
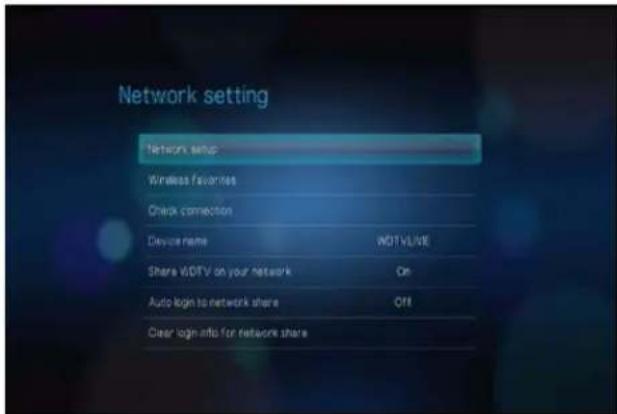
text_image
Network setting Network setup Wireless favorites Check connection Device name WDTV/WE Share WDTV on your network Off Auto login to network share Off Clear login info for network shareNetwork Setup
See "Network Setup" on page 54 for information and instructions.
Wireless Favorites
This menu displays a record of your wireless network settings. After performing a wireless network setup, the media player keeps a record of the LAN access point. Use this menu to reconnect to the local network without having to rekey the password.

text_image
Wireless Favorites 1. home_router 2. (Empty) 3. (Empty) 4. (Empty) 5. (Empty) Connect new Default DeleteCheck Connection
See "Checking the Network Connection" on page 60 for information and instructions.
Device Name
The name shown in the device name field helps you identify the media player on the network. Use this menu option to change the device name using the onscreen keyboard.
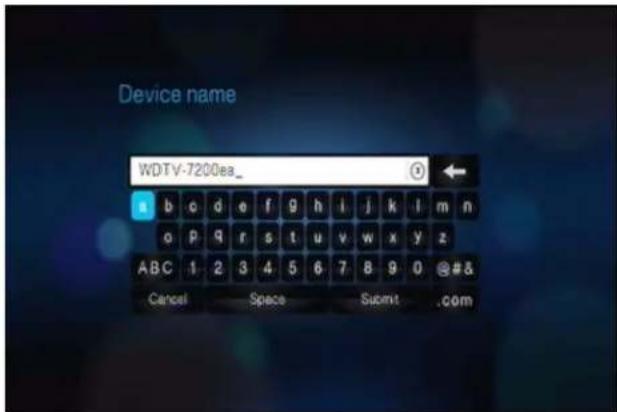
text_image
Device name WDTV-7200ea_ a b c d e f g h i j k l m n o p q r s t u v w x y z A B C 1 2 3 4 5 6 7 8 9 0 @#& Cancel Space Submit .comShare WD TV on Your Network
See "Transferring Files" on page 65 for information and instructions.
Auto Login
Use this menu to select a login procedure. When set to On, the media player logs into the network share anonymously. When set to Off, the media player prompts you to enter the account name and password to access the network share.
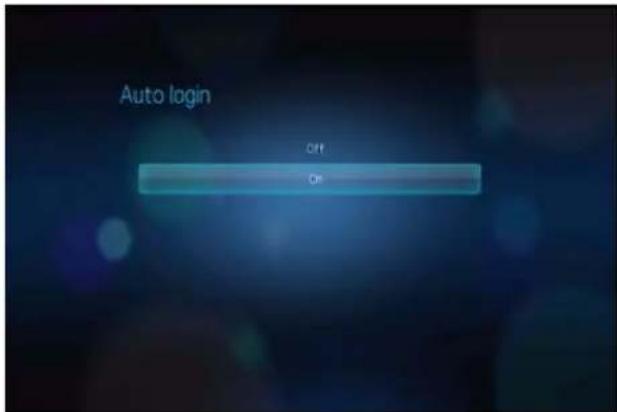
text_image
Auto login Off OffClear Account Information
Use this menu to clear login information (preset password) for the network share.

text_image
Clear account information Delete the preset's password?Media Library
Media Library scans and consolidates the media contents of a USB drive into a database through which you can easily locate media files. This feature is on by default.
The following conditions will prevent the Media Library from processing your media.
■ The USB device has read-only protection.
- There is not enough hard drive space on the USB device. Your media player needs some space to cache information, so that searches and scans are faster.
A note about metadata
Metadata is information about the data in a file that describes how, when, and by whom a particular set of data (video, music, photographic, or any other type of data) was collected, and how the data is formatted.
Not all files have metadata loaded. To add and edit metadata so that Media Library can aggregate the files properly, you can use one of several tools including:
- Adobe® Bridge (part of the Adobe Creative Suite)
■ abcAVI Tag Editor (freeware)
■ XnView 1.93.2 (freeware)
iTunes - Windows Media Player
Editing metadata
Editing metadata with iTunes:
- Open iTunes and click the song you want to edit.
- Open the File menu, then click Get Info.
A window opens, showing all of the information you can edit for the song that you selected. You can edit the song's:
Name
■ Artist
Year released
- Album name
- Composer
Track number
Genre
- When you are done, click OK. To edit the next song listed in your iTunes library, click Next.
Editing metadata with Windows Media Player:
- Open Windows Media Player.
- Click the Library tab.
- Right-click the title or other item to edit.
- When the menu opens, click Edit.
Converting the content into a usable format
There are several fast, easy-to-use applications available online that can convert photos, videos, and music files into formats optimized for use on your media player. The software also allows simultaneous conversion of multiple files in batches regardless of their original formats.
Examining your files
MedialInfo (free software) can provide technical and tag information about your video or audio files.
MedialInfo provides the following kinds of information:
- General—title, author, director, album, track number, date, and duration
■ Video—codec, aspect, fps, and bitrate - Audio—codec, sample rate, channels, language, and bitrate
■ Text—language of the subtitles
- Chapters—number and a list of chapters
Medialinfo supports the following formats:
■ Video—MKV, OGM, AVI, DivX, WMV, QuickTime, Real, MPEG-1, MPEG-2, MPEG-4, DVD (VOB) (Codecs: DivX, XviD, MSMPEG4, ASP, H.264, AVC)
■ Audio—OGG, MP3, WAV, RA, Dolby Digital, AAC, M4A, AU, AIFF
■ Subtitles—SRT, SSA, ASS, and SAMI
With MedialInfo, you can:
- Read many video and audio file formats
- Use several methods of viewing information, such as text, sheet, tree, and HTML
- Customise views
- Export information as text, such as CSV and HTML
To examine your files:
-
Use your browser and go to http://mediainfo.sourceforge.net/en.
-
Download the software and install it on your computer.
-
Follow the instructions as prompted.
13
System Maintenance
The system software of your media player can be upgraded to the latest release, which can improve support for media file playback and includes bug fixes and product enhancements. To ensure that you receive the latest update, we recommend registering your product at https://www.wdc.com/register.
This chapter describes how to upgrade the system firmware and perform simple troubleshooting. If you encounter an error message, refer to the “Common Error Messages” on page 165 for possible corrective action.
Solutions to more serious problems may require contacting your dealer or an authorized service center for assistance. For more information, refer to “WD Service and Support” on page 2.
System Firmware Upgrade
Firmware is an important set of instructions that tells your media player how to operate, what the interactive screens look like, and how to do what you tell it to do. Upgrading the firmware is important because WD is always developing newer, faster, and more efficient ways of doing things that your media player needs to know.
Important: Make sure the media player's AC power adapter remains connected during the firmware update. A power disruption during the update process can corrupt the system firmware. Also, make sure that you do not unplug the USB storage device.
To update the firmware:
- Go to support.wdc.com and download the latest firmware update file for your USB storage.
- Click "Downloads," then the product name (or photo).
- Copy the firmware update file to a USB drive's root folder.
- Connect the USB drive to the media player's USB port.
- Press HOME, then select the Settings 🎨 bar.
- Select the firmware upgrade icon 📁, and then press ENTER.

text_image
New firmware found SettingsYou are prompted to perform the firmware upgrade.

text_image
Current version: 10111 New version: 10120 New firmware found. Do you want to upgrade? Close OK- Select OK on the firmware update prompt, and then press ENTER. This restarts the system.

text_image
RebootingAfter restarting, the system automatically enters firmware upgrade mode.
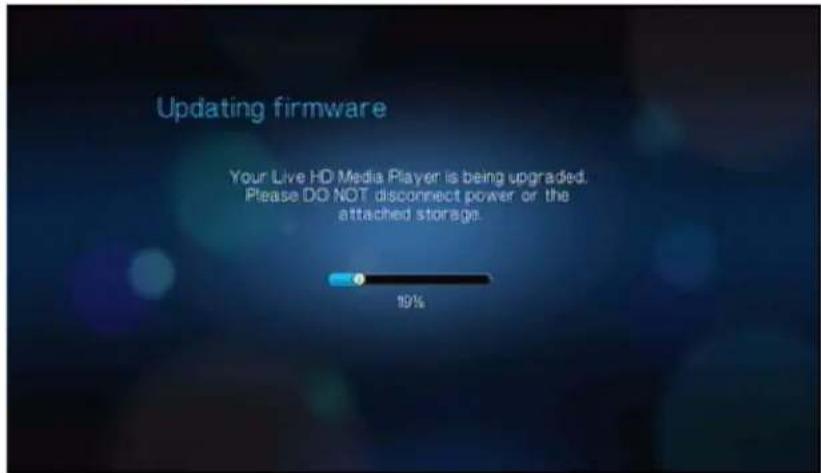
text_image
Updating firmware Your Live HD Media Player is being upgraded. Please DO NOT disconnect power or the attached storage. 19%Once the update process finishes, the following message appears and the media player restarts.

text_image
Updating firmware Upgrade complete. The media player will now restart. 100%When the media player restarts, the new firmware loads automatically.
Troubleshooting
| Problem Solution | |
| DISPLAY | |
| The TV screen is blank and the media player power LED remains off. | Make sure the TV is turned on.Make sure that the power adapter and power outlet are okay.Make sure that the interface cable is properly attached to the correct terminals on both the TV and the media player. |
| The TV screen is blank and the media player power LED is blinking. | A system diagnostic failure occurred. Turn off your media player, wait 10 minutes, then turn it on again. If the same thing happens, contact the WD Technical Support for assistance (see “WD Service and Support” on page 2). |
| The TV screen is blank and the media player power LED is on. | Make sure the TV is turned on.Make sure that the interface cable is properly attached to the correct terminals on both the TV and the media player.Press the reset button for 10 seconds. |
| The TV screen is blinking and fuzzy. Make sure that the interface cable is properly attached to the correct terminal(s) on both the TV and the media player.Make sure the media player power LED is on.If you are using a CRT TV, navigate to the Home | Settings | System screen and:- Make sure that theCompositeoption is selected as the video output.-Make sure the TV system setting matches the system used in your region.If you are using an LCD TV, navigate to the Home | Settings | System screen and:- Make sure that theHDMIoption is selected as the video output.-Make sure that the video resolution option is set asAuto. | |
| The video display is cut off or appears in a sidebar. | Navigate to the Home | Settings | Audio/Video screen and make sure that aspect ratio is set asNormal. |
| The slideshow pictures are distorted. Navigate to the Home | Settings | Photo screen and select Keep as original or Fit to screen in the Photo Scaling field. | |
| FILES | |
| File does not play. • Verify compatibility. | Refer to “Supported Formats” on page 167.• Use a media converter program to convert the file to a usable format. |
| AUDIO | |
| There is no sound. • Make sure the volume | on the entertainment unit is not muted.• Navigate to the Home | Settings | System screen and make sure the correct audio output setting is enabled.-If you are using the composite audio cable, the Stereo setting should be enabled.-If you are using an Toslink (optical) or HDMI connection, the Digital setting should be enabled.• If you are watching a video that supports multiple audio channels, make sure that the Audio Off option is disabled. Press Options |, and then press ENTER repeatedly until the intended audio channel is displayed. |
| USB DEVICE | |
| The Media Library process failed. Make | sure that:• the USB device has no read-only protection.• the USB device is not using the HFS+ Journaling file system.• there is enough storage space on the USB device. |
| The attached USB device is not visible on the Home screen. | • The media player only supports mass USB storage mode. Make sure that the USB device is configured as a "mass storage device."• Make sure the USB device's file system is supported (NTFS, FAT/FAT32, or HFS+). |
| REMOTE CONTROL | |
| The media player remote control does not work. | • Press only one button at a time.• Make sure the batteries are properly inserted.• The batteries may already be drained out. Replace batteries with new ones.• Make sure that the path between the remote control and the media player is not blocked. |
| The firmware upgrade recovery splash screen is shown after you turned on the media player. | The previous firmware upgrade process failed.Repeat the firmware upgrade process. Go to page 159 for instructions.If you are still unable to update the system firmware, perform a system reset. Go to page 151 for instructions. |
FIRMWARE UPGRADE
Common Error Messages
| If this message appears Perform this action | |
| HOME | |
| Hard drive cannot aggregate. There are different conditions under which this error message may appear. The message will specify the issue. For example, not enough space is used on the storage or a journaled file system. | |
| No storage present. Attach the USB device that contains your media files. | |
| Media Library requires more storage space: [XXXMB] | 1. Eject and disconnect the USB device from the media player.2. Connect the USB device to your computer and delete unnecessary files to meet the required storage space.3. Attach the USB device to the media player again. |
| Please turn off journaling on the attached storage's file system for the media player to compile the media library. | 1. Eject and disconnect the USB device from the media player.2. Connect the USB device to your Apple computer and disable the journaling function. Refer to the Apple Help for information.3. Attach the USB device to the media player again. |
| Unable to compile media library on read-only storage. | 1. Eject and disconnect the USB device from the media player.2. Connect the USB device to your computer and make sure the read-only protection is disabled.3. Attach the USB device to the media player again. |
| Unable to compile media library. Please check your storage setting. | 1. Eject and disconnect the USB device from the media player.2. Connect the USB device to your computer and <what action should be taken here?>3. Attach the USB device to the media player again. |
| Unrecognized storage. | The USB device model is not supported. Use another USB device. |
| Question XX: WD USB HDD Trouble Shooting | This indicates a system diagnostic failure. Contact WD Technical Support for assistance. |
| CONTENT PLAYBACK | |
| This folder is empty. There are no supported media files in the selected folder. Select another folder that contains media files of the correct format. | |
| Unable to play the selected file. Please recreate the file by using the included media editing software. | 1. Eject and disconnect the USB device from the media player.2. Connect the USB device to your computer and make sure the file format is correct.You can use the media editing software included in the WD Documentation CD. (See “How do I find media files and create playlists?” on page 166)3. Attach the USB device to the media player again. |
FAQs
How do I find media files and create playlists?
Several media player applications are currently available, such as Winamp and iTunes, that let you play, arrange, and edit media files. These media players also let you create playlists and edit the metadata information for media files. You can search the Internet with your browser to locate where these applications are available for download.
How do I copy the files from my music CD to my computer?
Digital audio extraction, or Ripping, is the process of copying audio (or video) content to a hard drive, typically from removable media, such as CDs or DVDs, or from media streams.
To rip music from CDs to a computer:
- Insert the CD into the optical drive of your computer.
-
Open the program that you use to rip the music to your computer, such as iTunes or Windows Media Player.
-
Press the Import button (using iTunes),
- OR -
Press the Rip button (using Windows Media Player).
-
Click the music you want to copy (Windows Media Player) and note where the music files are saved after they are copied. iTunes imports the entire CD into your iTunes music library.
-
Click the Start Rip button (Windows Media Player).
-
When ripping is complete, remove the CD. The music is now on your computer.
Some music may be covered by copyright laws which prevent its copying or distribution.
Can I use a universal remote control with the media player?
You can use most popular universal remote control devices such as the Logitech Harmony models.
Appendix
Supported Formats
| Filename extension Codec Format/container | ||
| VIDEO | ||
| .AVI Video: | XvidAVCMPEG1/2/4WMV9VC-1Audio:MPEG AudioPCMDolby DigitalDTS | AVI |
| .MPG Video: | MPEG1/2Audio:MPEG AudioDolby DigitalDTSPCM | mpeg ps |
| .MPEG | ||
| .MKV Video: | h.264x.264AVCMPEG1/2/4WMV9VC-1Audio:MPEG AudioPCMDolby Digital (passthrough for more than 2 channels)DTS (passthrough for more than 2 channels)AAC | MKV |
| .TS/.TP/.M2T Video: | MPEG1/2/4AVCVC-1Audio:MPEG AudioDolby DigitalDTS | TS |
| Filename extension | Codec | Format/container |
| .MP4/.MOV Video: | MPEG4AVCAudio:AACMPEG AudioDolby Digital | Quicktime |
| .ASF/.DVR-MS/.WMV Video: | MPEG2WMV9VC-1Audio:WMADolby Digital | ASF |
| .VOB/.ISO Video: | MPEG1/2Audio:MPEG AudioDolby DigitalDTSPCM | VOB/ISO |
| .M2TS Video: | MPEG1/2/4AVCVC-1Audio:MPEG AudioDolby DigitalDTS | M2TS |
| WMV9 VC-1 | ||
| Video notes:1. MPEG-2 MP@HL up to 1920x1080p24, 1920x1080i30, or 1280x720p60 resolution.2. MPEG4.2 ASP@L5 Rectangular shape video decoding up to 1280x720p30 resolution, support for B Pictures, data partitioning and error resiliency. No support for global motion compensation (GMC).3. WMV9/VC-1 MP@HL up to 1280x720p60 (<90% of the P-picture macroblocks have 4 motion vectors) or 1920x1080p24 resolution. Up to 1280x720p30 or 1920x1080i25 resolution if unconstrained 4MV bitstream.4. VC-1 AP@L3 up to 1920x1080i30 (<60% of the B-picture macroblocks have 4 motion vectors), 1920x1080p24, or 1280x720p60 resolution. Up to 1920x1080i25, 1920x1080p24, or 1280x720p60 resolution if unconstrained 4MV bitstream.5. MPEG-4.10 (H.264) BP@L3 up to 720x480p30 or 720x576p25 resolution, including FMO and ASO.6. MPEG-4.10 (H.264) MP@L4.1 and HP@L4.1 up to 1920x1080p24, 1920x1080i30, or 1280x720p60 resolution (constrained to match BD and HD-DVD specifications), 180 Mbin/s maximum for CABAC streams. | ||
AUDIO
| MP1/2/3/a MPEG audio None | ||
| AAC MPEG 2/4 AAC LC/HE | 1. ADTS | 2. ADIF |
| M4A/MP4A MPEG 2/4 AAC | LC/HE Quicktime | |
| FLAC FLAC FLAC | ||
| WAV | PCM (Microsoft) | WAVE |
LPCM PCM None
PCM
OGG OGG VORBIS OGG
WMA WMA ASF
AIF/AIFF PCM AIFF
MKA 1. MPEG audio
MATROSKA
-
MPEG 2/4 AAC LC/HE
-
PCM (Microsoft)
Dolby Digital Dolby Digital None
DTS DTS None
An audio receiver is required for multi-channel surround sound digital output.
| BMP | bmp | Uncompressed (most common) | 2048x2048 | |
| TIFF | tif/tiff | Uncompressed 24-bit RGB (most common) | 2048x2048 | Multi-page not supported, only shows 1st page |
| Compressed JPEG | ||||
| RLE (run-length encoding) | ||||
| LZW (loss less) | 2048x2048 | |||
| PNG | png | DEFLATE (loss less) | 2048x2048 | |
| GIF | gif | LZW (loss less) | 2048x2048 | For animation, only supports 1st page |
| JPEG | jpeg/jpg | JPEG (lossy) (most common) | 4096x4096 | CMYK not supported |
| Progressive | 1280x720 | |||
| Loss less | ||||
| JPEG2000 | .jp2 | JPEG2000 |
Compressed RGB JPEG formats only and progressive JPEG up to 2048. Single layer TIFF files only. Uncompressed BMP only. For specific details, please refer to the user manual.
Thumbnail Support Limitation
MUSIC
| Filename extension | Only supports ID3 and EXIF format have thumbnail | |
| mp3 Yes Thumbnail in the id3 tag | ("APIC" or "PIC" tag) | |
| wma Yes Thumbnail in the asf format ("WM/Picture" in the extended info) | ||
| m4a | Yes | Thumbnail in the quicktime format ("moov/udta/meta/ilst/covr") |
| mp4a Yes Thumbnail in the quicktime format ("moov/udta/meta/ilst/covr") | ||
| flac Yes | ||
| asf Yes Thumbnail in the asf format ("WM/Picture" in the extended info) | ||
| wmv | Yes | Thumbnail in the asf format ("WM/Picture" in the extended info) |
| mp4 Yes Thumbnail in the quicktime format ("moov/udta/meta/ilst/covr") | ||
| jpg Yes Thumbnail in the exif | ||
| jpe Yes Thumbnail in the exif | ||
| tiff Yes Thumbnail in the exif | ||
| tif | Yes Thumbnail in the exif | |
| jpeg | Yes Thumbnail in the exif | |
Regulatory Compliance
FCC Class B Information
This equipment has been tested and found to comply with the limits for a Class B digital device pursuant to Part 15 of the FCC Rules. These limits are designed to provide reasonable protection against harmful interference in a residential installation. This equipment generates, uses, and can radiate radio frequency energy and, if not installed and used in accordance with the manufacturer's instruction manual, may cause interference with radio communications. However, there is no guarantee that interference will not occur in a particular installation. If this equipment does cause harmful interference to radio or television reception, which can be determined by turning the equipment off and on, you are encouraged to try to correct the interference by one or more of the following measures:
■ Reorient or relocate the receiving antenna.
- Increase the separation between the equipment and the receiver.
- Connect the equipment into an outlet on a circuit different from that to which the receiver is connected.
- Consult the retailer or an experienced radio/television technician for help.
ICES-003/NMB-003 Statement
This device complies with Canadian ICES-003 Class B.
Safety Compliance
Approved for US and Canada. CAN/CSA-C22.2 No. 60065:03, UL-60065, 7th Ed: Audio, Video and Similar Electronic Apparatus - Safety Requirements.
This device is only for use with the compatible UL Listed AC adapter.
CE Compliance for Europe
Marking by the CE symbol indicates compliance of this system to the applicable Council Directives of the European Union, including the EMC Directive (2004/108/EC) and the Low Voltage Directive (2006/95/EC). A “Declaration of Conformity” in accordance with the applicable directives has been made and is on file at Western Digital Europe.
KCC Notice (Republic of Korea only)
Class B Device 1 — Please note that this device has been approved for non-business purposes and may be used in any environment, including residential areas.
Environmental Compliance (China)
| Part Name | Hazardous Substances | |||||
| Pb | Cd | Hg | Cr(VI) | PBBs. | PBDEs | |
| 机壳/机箱Chassis / Housing | X | O | O | O | O | O |
| 电路板组合/板卡PCBA/Card | X | O | O | O | O | O |
| 线材缆线/连接器Cable / Connector | X | O | O | O | O | O |
| 电源变压器/电源供应器Adapter / Power Supply | X | O | O | O | O | O |
| 机械-电机零件Mechanical-Electrical parts | X | O | O | O | O | O |
| 电池Battery | X | O | O | O | O | O |
| 遥控器Remote controller | X | O | O | O | O | O |
| O:表示有毒有害物质在该部件的所有均质材料中的含量均低于SJ/T11363-2006 标准规定的限量要求以下。X:表示该有毒有害物质至少在该部件的某一均质材料中的含量超出ST/T11363-2006 标准规定的限量要求。(在此表中,企业可能需要根据实际情况对标记“X”的项目进行进一步的技术性解释。) | ||||||
Warranty Information
Obtaining Service
WD values your business and always attempts to provide you the very best of service. If this Product requires maintenance, either contact the dealer from whom you originally purchased the Product or visit our product support Web site at support.wdc.com for information on how to obtain service or a Return Material Authorization (RMA). If it is determined that the Product may be defective, you will be given an RMA number and instructions for Product return. An unauthorized return (i.e., one for which an RMA number has not been issued) will be returned to you at your expense. Authorized returns must be shipped in an approved shipping container, prepaid and insured, to the address provided on your return paperwork. Your original box and packaging materials should be kept for storing or shipping your WD product. To conclusively establish the period of warranty, check the warranty expiration (serial number required) via support.wdc.com. WD shall have no liability for lost data regardless of the cause, recovery of lost data, or data contained in any Product placed in its possession.
Limited Warranty
WD warrants that the Product, in the course of its normal use, will for the term defined below, be free from defects in material and workmanship and will conform to WD's specification therefor. The term of your limited warranty depends on the country in which your Product was purchased. The term of your limited warranty is for 1 year in the North, South and Central America region, 2 years in the Europe, the Middle East and Africa region, and 1 year in the Asia Pacific region, unless otherwise required by law. The term of your limited warranty period shall commence on the purchase date appearing on your purchase receipt. WD shall have no liability for any Product returned if WD determines that the Product was stolen from WD or that the asserted defect a) is not present, b) cannot reasonably be rectified because of damage occurring before WD receives the Product, or c) is attributable to misuse, improper installation, alteration (including removing or obliterating labels and opening or removing external enclosures, unless the product is on the list of limited user-serviceable products and the specific alteration is within the scope of the applicable instructions, as found at support.wdc.com), accident or mishandling while in the possession of someone other than WD. Subject to the limitations specified above, your sole and exclusive warranty shall be, during the period of warranty specified above and at WD's option, the repair or replacement of the Product. The foregoing warranty of WD shall extend to repaired or replaced Products for the balance of the applicable period of the original warranty or ninety (90) days from the date of shipment of a repaired or replaced Product, whichever is longer.
The foregoing limited warranty is WD's sole warranty and is applicable only to products sold as new. The remedies provided herein are in lieu of a) any and all other remedies and warranties, whether expressed, implied or statutory, including but not limited to, any implied warranty of merchantability or fitness for a particular
purpose, and b) any and all obligations and liabilities of WD for damages including, but not limited to accidental, consequential, or special damages, or any financial loss, lost profits or expenses, or lost data arising out of or in connection with the purchase, use, or performance of the Product, even if WD has been advised of the possibility of such damages. In the United States, some states do not allow exclusion or limitations of incidental or consequential damages, so the limitations above may not apply to you. This warranty gives you specific legal rights, and you may also have other rights which vary from state to state.
GNU General Public License ("GPL")
Firmware incorporated into this product includes third party copyrighted software licensed under the GPL ("GPL Software"). In accordance with the GPL: 1) the source code for the GPL Software may be obtained at support.wdc.com/download/gpl; 2) you may re-use, re-distribute and modify the GPL Software; 3) with respect solely to the GPL Software, it is provided "as is" without warranty of any kind, either expressed or implied, including, but not limited to, the implied warranties of merchantability and fitness for a particular purpose, to the extent permitted by applicable law; and 4) a copy of the GPL is included on the enclosed CD, may be obtained at www.gnu.org, and may also be found at support.wdc.com/download/gpl.

dts ^TM
2.0+Digital Out
Manufactured under license under U.S. Patent #'s: 5,451,942; 5,956,674; 5,974,380; 5,978,762; 6,487,535 & other U.S. and worldwide patents issued & pending. DTS and the Symbol are registered trademarks, & DTS 2.0+ Digital Out and the DTS logos are trademarks of DTS, Inc. Product includes software. © DTS, Inc. All Rights Reserved.

DOLBY
DIGITAL
Manufactured under license from Dolby Laboratories. “Dolby” and the double-D symbol are trademarks of Dolby Laboratories.
Information furnished by WD is believed to be accurate and reliable; however, no responsibility is assumed by WD for its use nor for any infringement of patents or other rights of third parties which may result from its use. No license is granted by implication or otherwise under any patent or patent rights of WD. WD reserves the right to change specifications at any time without notice.
Western Digital, WD, the WD logo, WD TV, and My Book are registered trademarks in the U.S. and other countries; and My Passport is a trademark of Western Digital Technologies, Inc. Other marks may be mentioned herein that belong to other companies.
© 2010 Western Digital Technologies, Inc. All rights reserved.
Western Digital
20511 Lake Forest Drive
Lake Forest, California 92630 U.S.A.
4779-705035-A02 Feb 2010
Index
A
Accessories 5
aspect ratio
normal 139
troubleshooting 162
widescreen 139
audio channel 38
audio output 139
Settings menu 140
audio/video
autosource function 8
supported interfaces 8
Audio/Video menus
aspect ratio 139
audio output 139
HDMI deep color mode 138
video output 136
auto play function 150
autosource function 8
B
browser display
list mode 141, 144, 145
thumbnail mode 141, 144, 145
C
composite AV
connection 18
connectors 9
copying files 128
D
deleting files 133
digital camera support 47
display troubleshooting 162
DTS support 39
E
Eject function
button 25
procedure 23
encoding support 150
environmental compliance (China) 173
error messages 165
F
features
AV interfaces 8
supported file formats 8
supported file systems 9
USB support 9
file formats
image 46
playlist 8
subtitle 8
troubleshooting 166
file management
file copy 128
file delete 133
file move 130
file system
supported 9
troubleshooting 165
firmware upgrade
procedure 159
troubleshooting 163
Flickr 100
exploring for contents 101
photostream 106
player 106
searching for a member 105
G
GNU general public license 174
GPL software 174
H
HD media player
error messages 165
features 8
firmware information 154
firmware upgrade 159
hardware information 154
home screen 26
I/O connectors 9
installation procedures 12
installation requirements 12
language setting 149
LED indicators 10
operating 25
overview 6
package contents 12
preferences 127
regulatory compliance notices 171
remote control 11
screensaver delay 149
troubleshooting 162
warranty 173
HDMI
connection 16
connectors 9
Home
button 25
error messages 165
Music directory 42
overview 26
Photo directory 46
screen navigation 27
Settings screen 127
Video directory 34
Home Theater
connection 19
|
I/O connectors
composite AV 9
HDMI 9
Toslink 9
USB ports 9
information panel
music 43
photos 49
slideshow 51, 52
videos 37
installation
composite AV connection 18
HDMI connection 16, 19
power connection 14, 17, 18
requirements 12
USB connection 20
Internet services
Live365 62, 70
L
language setting 149
LED indicators
power 10
status 10
list mode 141, 144, 145
Live365 70
adding a station to your preset list 80
getting track information 83
listening 74
preferences 84
providing song feedback 82
removing a station from your preset list 81
searching 78
sign in 71
signing out 86
locating media content
manual search 30
Search function 31
M
maintenance
system 159
Media content
accessing from network share 62
accessing via media server 63
media library
exemptions 156
media library compilation
categories 29
enable 27
error messages 165
exemptions 27
LED indicator 10
overview 27, 156
moving files 130
music
album art 42
audio track display 140
auto play 150
MLB categories 29
playback controls 44
playback procedures 42
playback screen 43
sequence setting 140
shuffle mode 45
supported formats 8
use in slideshow 50
music playback options 44
N
navigation buttons 25
Network services
transferring files 65
network setting
auto login 156
check connection 155
clear account information 156
device name 155
network setup 154
samba server 155
wireless favorites 155
Network setup
Ethernet 54
wireless 57
network share 155
enable file sharing 65
NTSC 136
0
operating precautions 1
P
package contents 12
PAL 136
Pandora 87
bookmarking a song or artist 97
providing song feedback 95
QuickMix 95
signing in 88
signing out 99
sorting stations 99
stations 91
why a song is in my station's playlist 98
panning
photos 48
videos 40
photo display options 48
Photo menus
interval time 147
photo scaling 146
slideshow sequence 146
transition effect 147
photos
digital camera support 47
information panel 49
MLB categories 29
panning 48
rotating 49
scaling settings 146
supported formats 8
view 46
zoom options 49
playlist
supported formats 8
videos, playback 35, 43
power
AC connector 9
cable connection 14
global AC adapter configurations 14
LED indicator 10
power button 25
turn on 14, 17, 18
product
accessories 5
obtaining service 173
overview 6
recording information 3
registration 3
regulatory compliance 171
safety information 1
warranty 173
R
regulatory compliance
environmental compliance (China) 173
remote control 11
layout 11
transmission range 25
troubleshooting 163
repeat mode
music 44
slideshow 53
videos 41
reset to factory defaults 151
RoHS 173
s
screensaver delay 149
Search function
button 25
procedure 31
settings
apply new values 127
Audio/Video menu 135
Movie menu 142
network 154
Photo menu 145
Settings menu bar 127
Settings screen navigation 127
System menu 148, 154
share WD TV on your network 155
shuffle mode
music 45
slideshow 30
slideshow
interval time 147
music background 50
playback controls 52
repeat mode 53
sequence setting 146
shuffle mode 30
transition effect 147
troubleshooting 162
view 50
slideshow options 52
Software, GPL 174
subtitle
border setting 143
enable 39
font size setting 142
supported formats 8
System menus
browser display 141, 144, 145
system preferences
audio/video quality 135
general functions 148
music sequence 140
navigation buttons 127
photo function 145
Settings menu bar 127
video sequence 142
system reset 151
procedures 151
System Setting menus
About screen 154
additional encoding support 150
auto play 150
display file size 150
language 149
media library 149
reset to factory defaults 151
screensaver delay 149
system information screen 153
update device 152
System Settings menus
system information screen 153
T
thumbnail mode 141, 144, 145
Toslink
connectors 9
Transferring files 65
between the media player and a Mac computer 69
between the media player and a Windows Vista/Windows 7 computer 67
between the media player and a Windows XP computer 66
troubleshooting
audio 163
content playback 165
display 162
error messages 165
firmware upgrade 163
media library compilation 165
remote control 163
system reset 151
USB device 163
U
USB device
connection 20
disconnection 20
Eject button 25
error messages 165
LED indicator 10
media library 156
media library compilation 27
removal 23
supported devices 9
troubleshooting 163
USB ports 9
V
Video output
component 137
composite 136
video playback options 36
videos
aspect ratio 139
audio channel 38
auto play 150
chapter selection 38
DTS audio support 39
HDMI deep color mode setting 138
information panel 37
MLB categories 29
panning 40
playback controls 36
playback procedures 34
repeat mode 41
sequence setting 142
subtitles 39
supported formats 8
supported resolutions 8
video output setting 136
zoom options 40
W
warranty information 173
widescreen setting 139
Wireless network setup 57
Y
YouTube 108
adding videos to favorites 124
deleting an account from the media
player 125
encoding support 126
featured videos 115
most popular 117
most viewed 118
my account 111
player 121
preferences 120
rating videos 123
recent videos 116
restricted video content 126
search history 113
searching for videos 112
signing in 109
signing out 124
top favorited 114
top rated 119
Z
zoom options
photos 49
videos 40