Xsara Picasso (2005) - Car CITROEN - Free user manual and instructions
Find the device manual for free Xsara Picasso (2005) CITROEN in PDF.

User questions about Xsara Picasso (2005) CITROEN
0 question about this device. Answer the ones you know or ask your own.
Ask a new question about this device
Download the instructions for your Car in PDF format for free! Find your manual Xsara Picasso (2005) - CITROEN and take your electronic device back in hand. On this page are published all the documents necessary for the use of your device. Xsara Picasso (2005) by CITROEN.
USER MANUAL Xsara Picasso (2005) CITROEN
text_image
Diagram of a car interior with labeled dashboard and steering wheel, showing red annotations for key components.[Non-Text]

natural_image
Solid mustard-yellow background with no text, symbols, or discernible features
text_image
30 ESP ESP 200 100 200 500 100 150 200


text_image
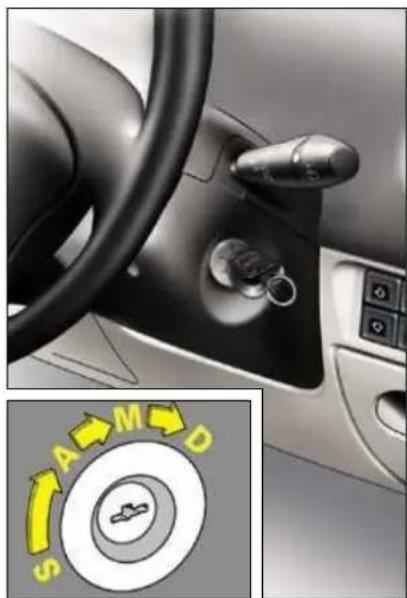
Diagram of a car control knob with directional arrows and labeled icons for motion or signal processing.


text_image
AUTO D 0.04
natural_image
Close-up of a car dashboard with control buttons and directional arrows (no text or symbols visible)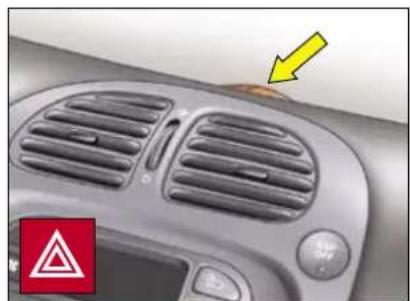
natural_image
Close-up of a car dashboard with ventilation grilles and a yellow arrow pointing to a component (no text or symbols visible)

natural_image
Solid yellow rectangle with black border (no text or symbols)
text_image
AUTO DID 0 0 0 0 0
text_image
Auto Auto 0 0 0 0 0 0 0 0 0 0 0 0 0 0 0 0 0 0 0 0 0 0 0 0 0 0 0 0 0 0 0 0 0 0 0 0 0 0 0 0 0 0 0 0 0 0 0 0 0 0 10 10


natural_image
Solid yellow rectangular shape with no text, symbols, or markings
text_image
2 AUTO 0

natural_image
Solid yellow rectangle with black border (no text or symbols)
text_image
2 1 AUTO 0 ↓ →
text_image
2 1 AUTO 0 AUTO
natural_image
Close-up of a vintage camera control panel with buttons and a yellow arrow pointing to the button (no readable text or symbols)
natural_image
Solid yellow rectangle with black border (no text or symbols)
text_image
Diagram of car seat assembly with labeled exercise positions and directional arrows for movement

natural_image
Close-up of a car dashboard with a black connector and yellow directional arrows indicating movement or change (no text or symbols visible)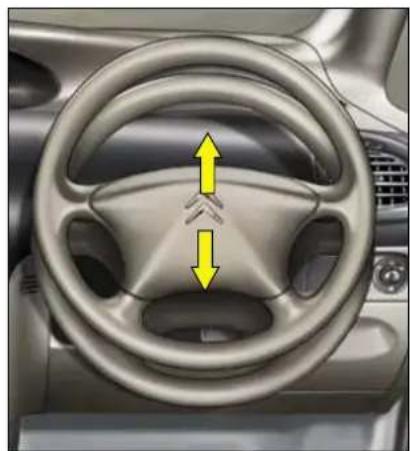
natural_image
Interior view of a car dashboard with steering wheel and directional arrows indicating movement (no text or symbols)
natural_image
Solid yellow rectangle with black border (no text or symbols)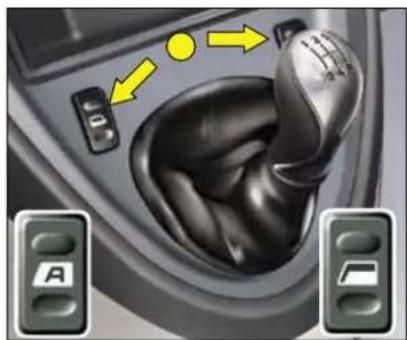
natural_image
Close-up of a car gear shift lever with control buttons and directional arrows (no text or symbols)
natural_image
Interior view of a car dashboard with control buttons and directional arrows (no text or symbols)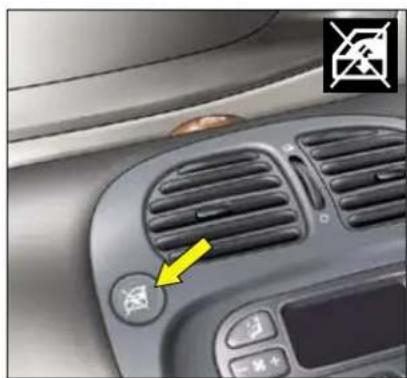
natural_image
Interior view of a car dashboard with a highlighted control knob and no visible text or symbols
text_image
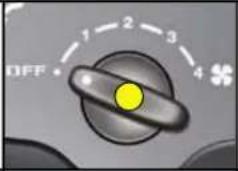
OFF 1 2 3 4


text_image
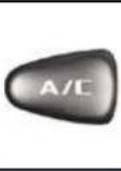
A/C OFF

 |  |  |  |  | |
 |  | ||||
 |  | ||||
 |  |
natural_image
Close-up of a car interior with a black car handle and yellow arrow pointing to the nose area (no text or symbols visible)
text_image
SET/+ OFF SET/← OFF
text_image
SET+ ON OFF SET-/→
natural_image
Solid yellow rectangle with no text, symbols, or patterns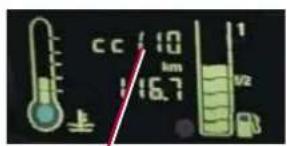
text_image
cc / 10 km 16.7 1 ½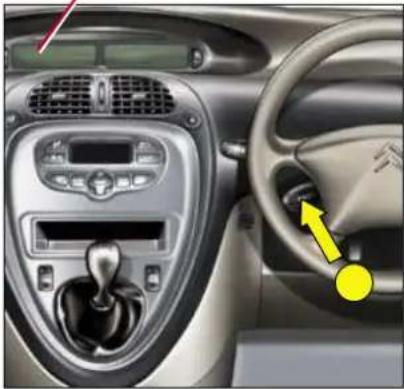
natural_image
Interior view of a car dashboard and steering wheel (no visible text or symbols)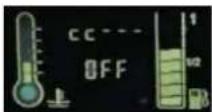
text_image
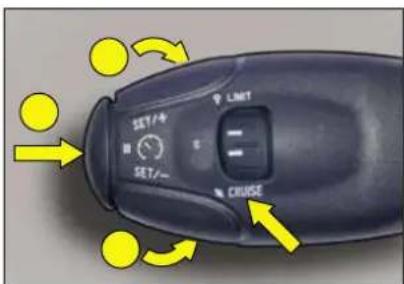
SET/+ SET/- LIMT CRIUSE


text_image
13.0 km 16.0 1/2
natural_image
Interior view of a car dashboard and steering wheel (no visible text or symbols)

text_image
SET/4 LIMIT SET/4 CHUISE

natural_image
Interior view of a car showing a backlight mirror and directional arrows (no text or symbols)
natural_image
Close-up of a car air conditioner control panel with buttons and a directional arrow (no text or symbols visible)
natural_image
Close-up of a car's side mirror with a small circular icon on the lens (no text or symbols visible)
natural_image
Close-up of a black key with two yellow pins on top (no text or symbols visible)
natural_image
Illustration of a key inserted into a car's head, showing internal components and wiring (no text or symbols)

natural_image
Solid yellow rectangle with black border (no text or symbols)
natural_image
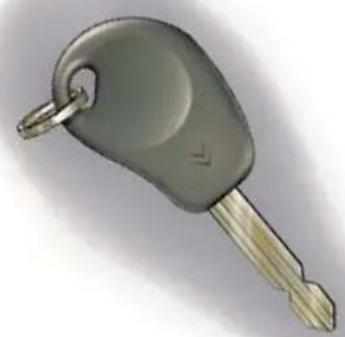
Illustration of a gray key with a gold handle and metallic tip, isolated on white background (no text or symbols)—

natural_image
Solid yellow rectangle with black border (no text or symbols)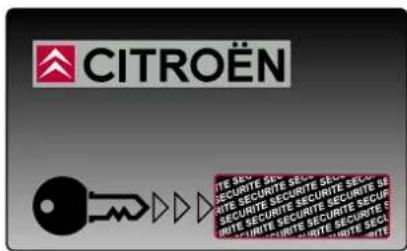
text_image
CITROËN ITE SECURITE SECURITE SECURITE SECURITE SECURITE SECURITE SECURITE SECURITE SECURITE SECURITE SECURITE SECURITE SECURITE SECURITE SECURITE SECURITE SECURITE SECURITE SECURITE SECURITE SECURITE SECURITE SECURITE SECURITE SECURITE SECURITE SECURITE SECURITE SECURITE SECURITE SECURITE SECURITE SECURITE SECURIT

natural_image
Interior view of a car dashboard with steering wheel and keyhole, showing directional control buttons (no text or symbols on main components)
text_image
Row of eight colored square icons with white symbols, including medical and emergency symbols, a ship, gear, ABS, ESP, cloud, person, and crossbones.


text_image
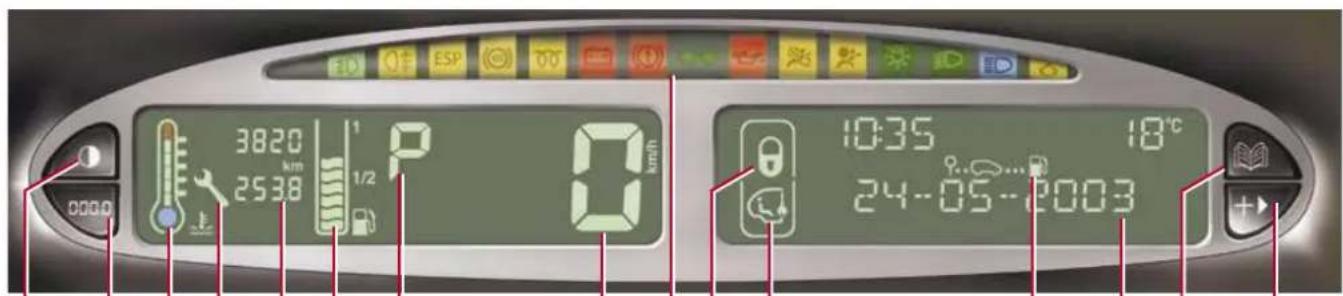
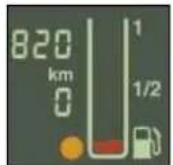
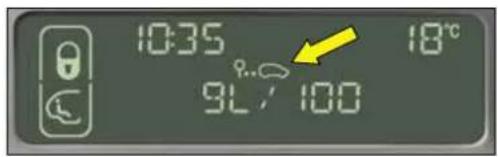
3820 km 2538 1/2 0 km/h 10:35 18°C 24-05-2003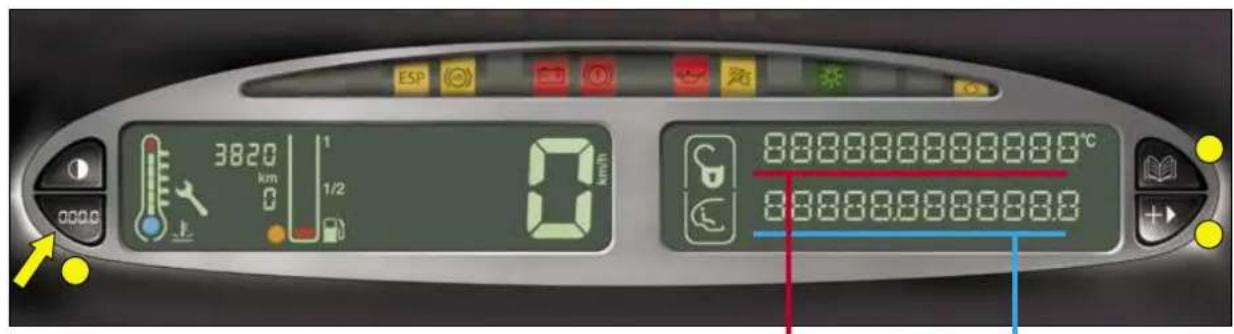
text_image
3820 km 1/2 0 km/h 888888888880°C 888888888880 | |||||
 | |||||
 | |||||
 | |||||
 | |||||
 | |||||
 | |||||
 | ||||
| [S1/D4] | ||||
 | ||||
 | ||||


 | |||||
 | |||||

—


text_image
10:35 18°C 24-05-2003

text_image
10:35 9L / 100 18°C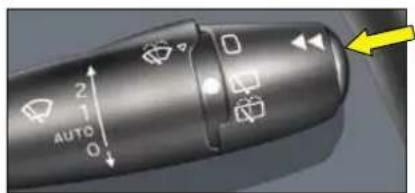
text_image
2 AUTO 0
text_image
356 KM
text_image
00 km 80-100 00-100 122 km/h
88888888888℃
88888.968888.9
text_image
2 1 AUTO 0

text_image
28230 km 0 000.0


natural_image
Close-up of a car gear shift lever with mesh head and control buttons (no text or symbols visible)
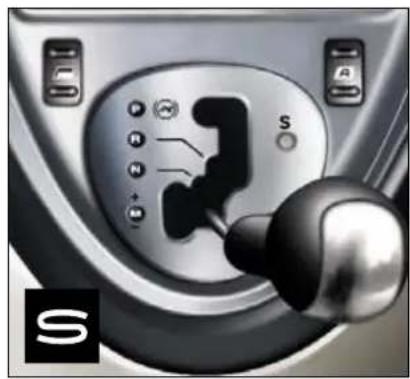
flowchart
graph TD
    A["1"] --> B["2"]
    C["3"] --> D["4"]
    E["5"] --> F["R"]
natural_image
Close-up of a car gear shift knob with a finger pointing to the mode (no text or symbols visible)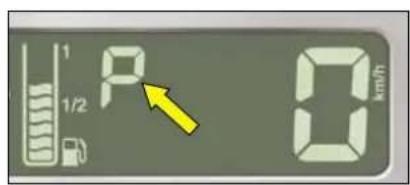
text_image
1 P 0 km/h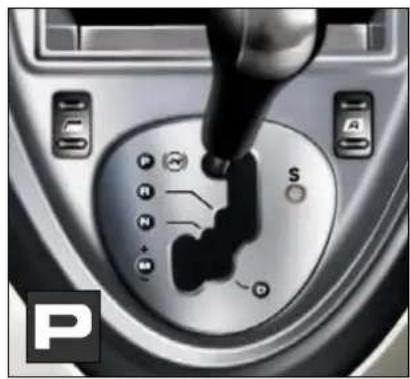
natural_image
Close-up of a car gear shift knob with a hand operating the wheel (no visible text or symbols)

一


text_image
Yellow rectangular sign with a red warning triangle containing an exclamation mark symbol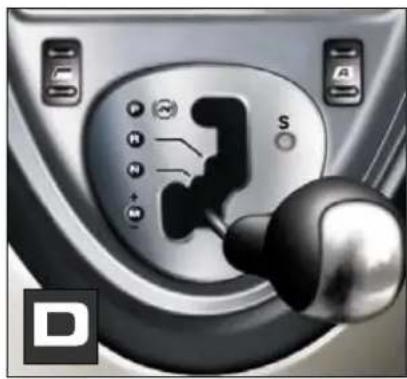
natural_image
Close-up of a car gear shift control panel with mode dial and switch (no visible text or symbols)
natural_image
Close-up of a car interior showing the steering wheel, mode dial, and control buttons (no readable text or symbols)


natural_image
Close-up of a car gear shift lever with labeled buttons and control panel (no readable text or symbols)
natural_image
Solid yellow rectangle with no text, symbols, or patterns
—

natural_image
Car interior view showing a car's seatbelt and steering wheel (no text or symbols visible)

natural_image
Solid yellow rectangular shape with no text, symbols, or markings

natural_image
Close-up of a car dashboard with ventilation grilles and a yellow directional arrow labeled 'ESP' (no readable text or symbols beyond label)

text_image
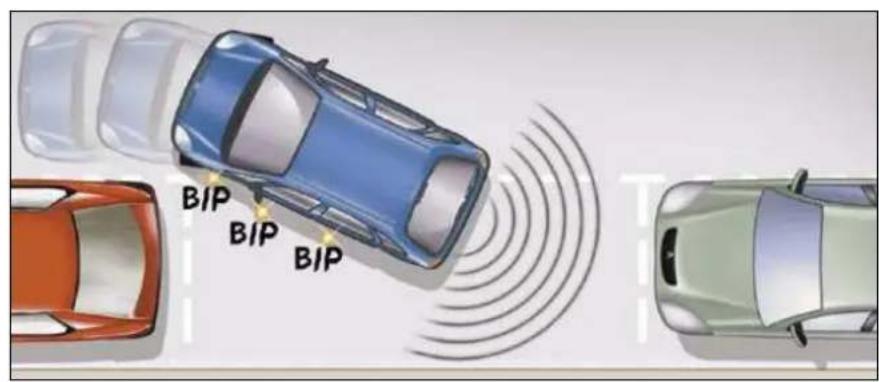
BIP BIP BIP
natural_image
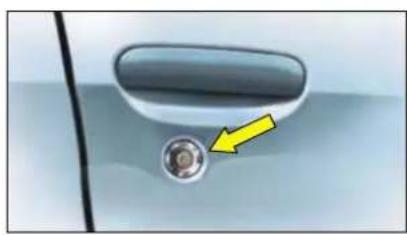
Close-up of a car door handle with a yellow arrow pointing to a circular component (no text or symbols visible)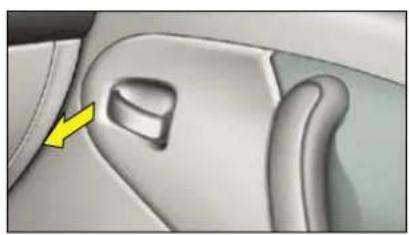
natural_image
Interior view of a car showing the side profile of a vehicle's seat and dashboard (no text or symbols visible)
text_image
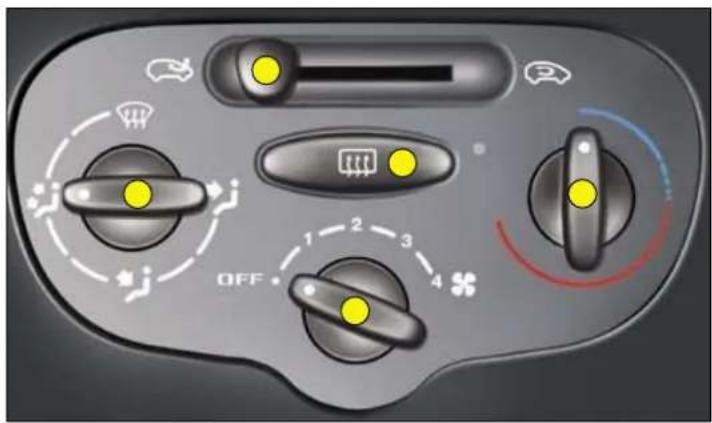
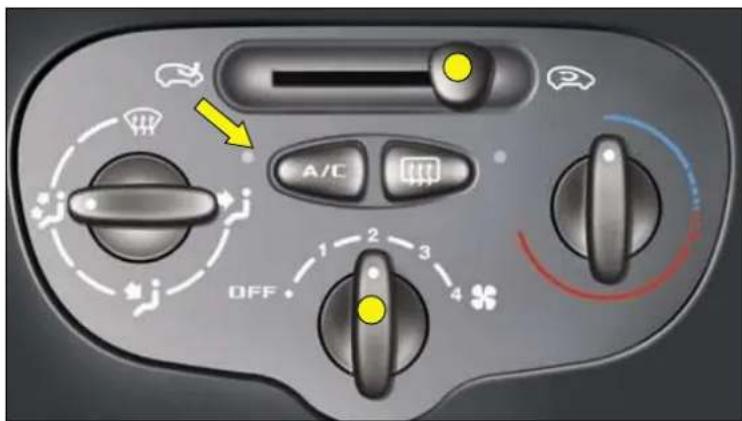
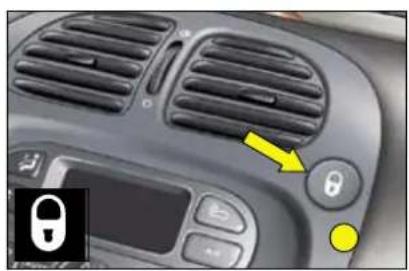
Close-up of a car interior panel with labeled buttons and a yellow arrow pointing to a button on the bottom.

natural_image
Close-up of a car air vent with a yellow arrow pointing to the control panel (no text or symbols visible)
natural_image
Close-up of a car air vent with a yellow arrow pointing to a small orange object on the grille (no text or symbols visible)
!

text_image
Diagram showing a car's side profile with a yellow arrow pointing to the front panel and an inset image of a vehicle with red arrows indicating motion or flow.
natural_image
Close-up of a white car's front panel with two yellow arrows pointing to the side (no text or symbols visible)
natural_image
Close-up of a car's front seat with a yellow arrow pointing to the seat area (no text or symbols visible)
natural_image
Close-up of a car door handle with a yellow arrow pointing to a circular component (no text or symbols visible)
natural_image
Interior view of a car showing the side profile of a vehicle's seat and dashboard (no text or symbols visible)
text_image
Close-up of a car interior panel with labeled buttons and a yellow arrow pointing to a button on the bottom.

natural_image
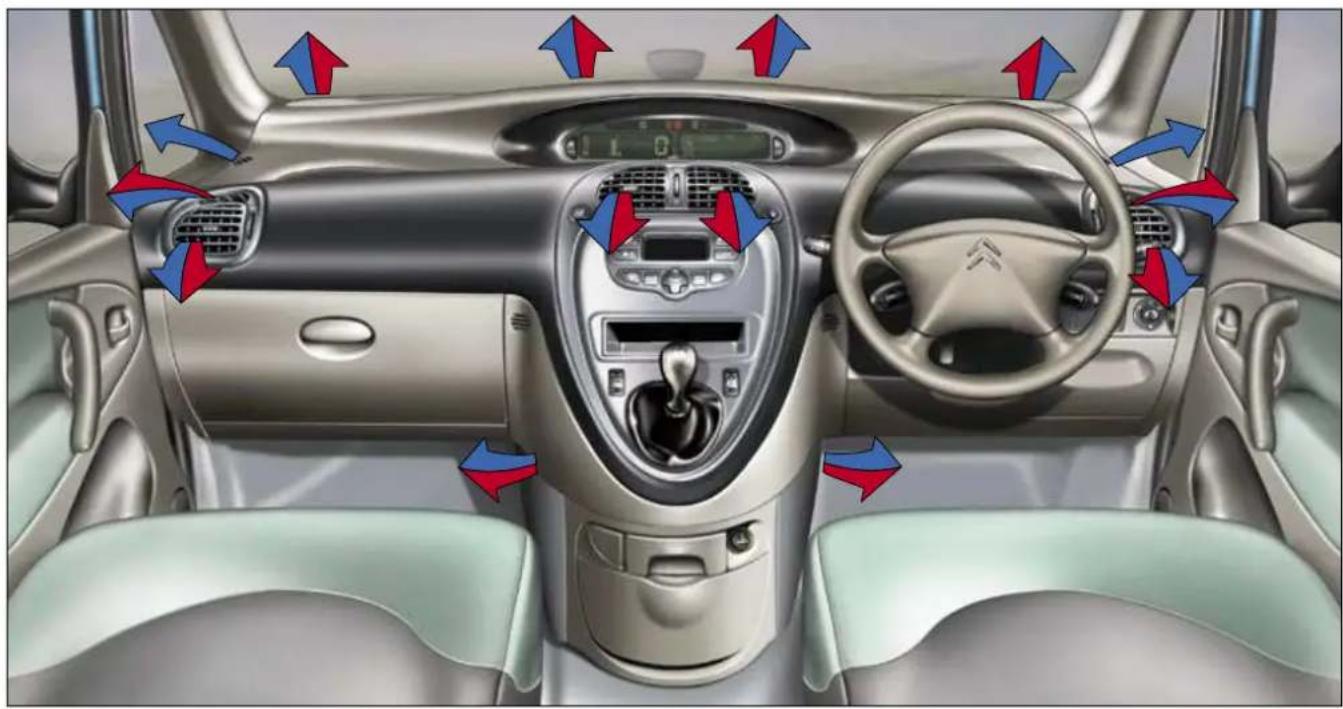
Interior view of a car dashboard with air condition indicators and directional arrows (no text or symbols)


text_image
AUTOFF 88.8 ECO A/C AUTO TEMP OFF


natural_image
Four identical green directional arrows on black background, no text or symbols present


natural_image
Illustration of a car seat with yellow directional arrows indicating movement or movement (no text or symbols present)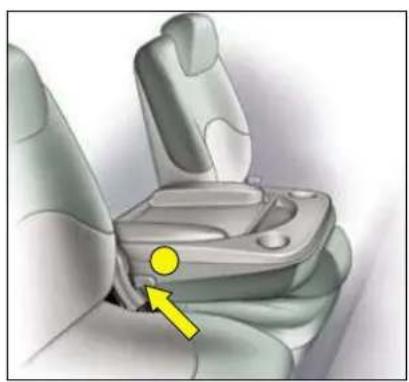
natural_image
Illustration of a hand holding a mechanical component with a yellow arrow pointing to a detail (no text or symbols present)
natural_image
Illustration of a hand holding a car with yellow directional arrows indicating movement or force (no text or symbols present)
flowchart
graph TD
    A["Step 1: Food preparation"] --> B["Step 2: Food preparation with red arrows indicating movement"]
    B --> C["Step 3: Food preparation with green arrows indicating movement"]
    C --> D["End"]

natural_image
Solid yellow rectangle with no text, symbols, or patterns
natural_image
Illustration of a car seatbelt with yellow directional arrows indicating movement or force (no text or symbols present)
natural_image
Illustration of a hand wearing a car seatbelt with yellow arrows indicating movement or force (no text or symbols present)
natural_image
Interior view of a car showing the rear seats and dashboard (no text or symbols visible)
natural_image
Solid yellow rectangle with black border (no text or symbols)
natural_image
Interior view of a car showing seatbelt and dashboard components with yellow directional arrows indicating movement (no text or symbols)
natural_image
Interior view of a car showing the rear seats and internal compartments with yellow arrows indicating directional flow or movement (no text or symbols present)
natural_image
Illustration of a car seatbelt mechanism with yellow directional arrows indicating movement (no text or symbols)
natural_image
Solid yellow rectangle with no text, symbols, or patterns
natural_image
Mechanical component with yellow arrows indicating motion or assembly (no text or symbols)
natural_image
Illustration of a hand holding a car seatbelt with yellow directional arrows indicating movement or force (no text or symbols present)
natural_image
Rear view of a silver sedan showing three rear seats with seat covers (no text or symbols visible)
natural_image
Rear view of a silver sedan showing three rear seats with seat covers and front-mounted gaskets (no text or symbols visible)
natural_image
Top-down view of a silver car showing the rear passenger seat, dashboard, and seat compartments (no text or symbols visible)
natural_image
Interior view of a silver car showing rear seats and driver seat arrangement (no text or symbols visible)
natural_image
Rear view of a silver sedan showing three internal compartments with wheels, no visible text or symbols
natural_image
Interior view of a silver car showing rear seats and dashboard (no text or symbols visible)
natural_image
Three pictograms showing a person sitting with a sword, one holding a blade and the other holding a tool, all without any text or symbols.
natural_image
Illustration of a car seatbelt with yellow directional arrows indicating movement or force (no text or symbols present)
natural_image
Interior view of a car showing seatbelt and dashboard components (no text or symbols visible)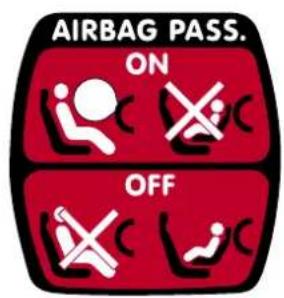
text_image
AIRBAG PASS. ON OFF
text_image
Car interior panel with visible brand logo and directional arrow, featuring Chinese text '飞腾' and a yellow square icon with a yellow arrow.
natural_image
Solid yellow rectangle with black border (no text or symbols)

natural_image
Close-up of a car seatbelt showing two yellow arrows pointing to the seat (no text or symbols visible)
natural_image
Close-up of a car interior showing a glossy surface with three yellow circular markers on the lid (no text or symbols visible)
natural_image
Close-up of a car door panel with a yellow arrow pointing to the left side (no text or symbols visible)
natural_image
Interior view of a car showing a yellow arrow pointing to a component on the side panel (no text or symbols visible)
natural_image
Interior view of a kitchen sink with a yellow directional arrow indicating rotation (no text or symbols)
natural_image
Close-up of a car's front wheel and dashboard with yellow arrows indicating directional changes (no text or symbols)
natural_image
Close-up of a mechanical component with a yellow arrow pointing to a small cylindrical feature (no text or symbols visible)
natural_image
Close-up of a car's dashboard and steering wheel (no text or symbols visible)
natural_image
Close-up of a modern office chair with curved armrests and front panel (no visible text or symbols)
natural_image
Close-up of metallic mechanical components with smooth surfaces and circular features (no text or symbols visible)
natural_image
Close-up of a white plastic toilet with a side panel, next to a light-colored ceramic bowl (no text or symbols visible)
natural_image
Interior view of a car showing a yellow arrow pointing to the side mirror (no text or symbols visible)
natural_image
Close-up of a car interior showing a metallic door clip with a small rectangular lens (no text or symbols visible)
natural_image
Close-up of a metallic ring with a yellow arrow pointing to a cable (no text or symbols visible)
natural_image
Interior view of a car backseat showing the rear seat tray and seatbelt (no text or symbols visible)
natural_image
Close-up of a metallic cutting tool with a pointed tip and curved handle, resting on a textured surface (no text or symbols visible)
natural_image
Close-up of a car interior showing the hood and seat area (no visible text or symbols)
natural_image
Solid yellow rectangle with black border (no text or symbols)
natural_image
Close-up of a car's side panel showing the interior and rear door, with no visible text or symbols on the main subject.
natural_image
Close-up of a car seatbelt and blue fabric with a yellow arrow pointing to a detail (no text or symbols)
natural_image
Close-up of a car interior showing dashboard and seat compartments with yellow directional arrows indicating movement or force (no text or symbols)
natural_image
Solid yellow rectangle with no text, symbols, or patterns
natural_image
Interior view of a car showing the rearview and side seats with two yellow arrows pointing to the backrest (no text or symbols present)
natural_image
3D illustration of a car seat mounted on a blue surface with two yellow arrows pointing to the side (no text or symbols)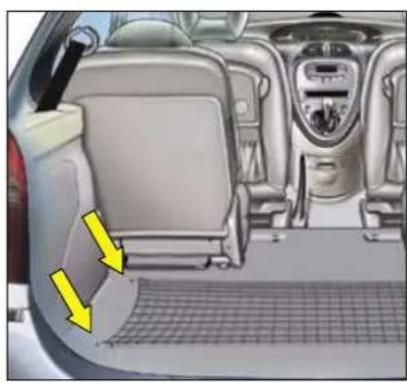
natural_image
Interior view of a car showing the rear seats and dashboard with yellow directional arrows indicating seat movement (no text or symbols present)
natural_image
Close-up of a gray plastic door with two circular holes and two yellow arrows pointing to the interior (no text or symbols)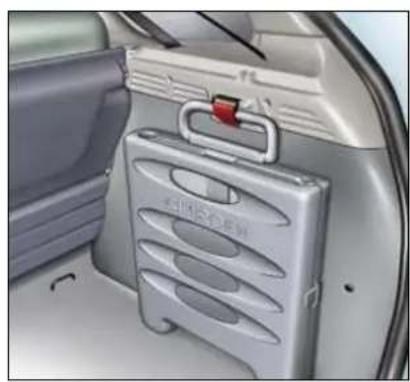
natural_image
Interior view of a car showing the rearrest door, front panel, and side door with a red scroll wheel (no visible text or symbols)
natural_image
Close-up of a car air intake switch with digital display and control buttons (no visible text or symbols)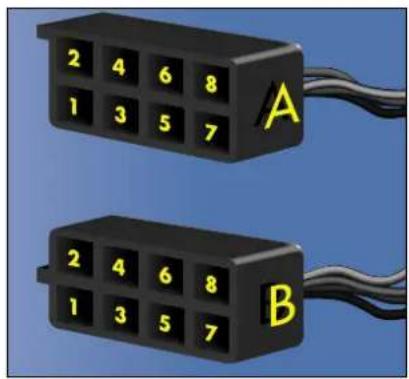
text_image
2 4 6 8 1 3 5 7 A 2 4 6 8 1 3 5 7 B
natural_image
Close-up of metallic mechanical components with smooth surfaces and circular features (no text or symbols visible)
natural_image
Interior view of a car showing a car's rear vent with a highlighted control panel and directional arrow (no text or symbols)

natural_image
Solid yellow rectangle with no text, symbols, or patterns
natural_image
Close-up of a car interior showing a red tool inserted into the seat area with yellow and black arrows indicating direction (no text or symbols)
natural_image
Close-up of a blue car's front grille and dashboard, showing the roof and grille details with a yellow arrow pointing to a specific area (no text or symbols visible)
natural_image
Close-up of a car's head panel with yellow arrows pointing to components, no visible text or symbols
natural_image
Solid yellow rectangle with black border (no text or symbols)
text_image
Top-down diagram of a car's front engine and dashboard with labeled components in Chinese, including fuel, battery, steering wheel, and gear.
text_image
Diagram of a car's front engine and dashboard with labeled components in Chinese, including sensors, battery, and steering wheel.
text_image
Top-down diagram of a car's engine bay with labeled components and icons for fuel, battery, and steering wheel.
natural_image
Solid yellow rectangular shape with no text, symbols, or markings
text_image
Top-down diagram of a car's engine bay with labeled components and icons for steering wheel, battery, and fuel.
natural_image
Solid yellow rectangular shape with no text, symbols, or markings
text_image
Safety warning sign with icons and a warning sign, including car, battery, and warning symbols
natural_image
Close-up of a car engine bay with visible hoses and components, no text or symbols present
natural_image
Close-up of a car engine bay with yellow arrows pointing to component parts (no visible text or symbols)
natural_image
Close-up of a car engine bay with visible components and a yellow arrow pointing to a component (no text or symbols)

natural_image
Close-up of a car engine bay with visible wiring and a yellow arrow pointing to a component (no text or symbols)
natural_image
Close-up of a car engine bay with visible components and a yellow arrow pointing to a component (no text or symbols)


natural_image
Solid yellow rectangle with no text, symbols, or patterns
natural_image
Close-up of a mechanical component with yellow circular annotations pointing to features (no visible text or symbols)

natural_image
Solid yellow rectangle with black border (no text or symbols)
natural_image
Diagram of automotive battery connected to car engine via cable, showing wiring and components (no text or labels)
text_image
Technical diagram showing mechanical assembly with labeled components and directional arrows, including a yellow circle and green checkmark.
natural_image
Interior view of a car air conditioner unit with control panel and door (no visible text or symbols)
natural_image
Floor plan layout with geometric shapes and color-coded blocks (no text or labels)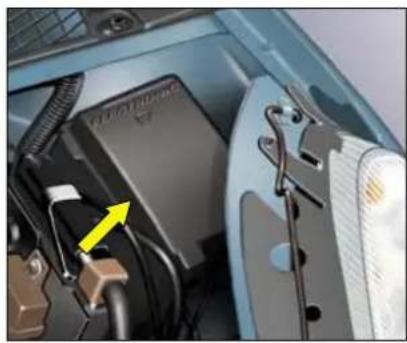
natural_image
Interior view of a car showing engine compartment with visible wiring and a yellow arrow pointing to a component (no text or symbols)
natural_image
Floor plan layout with colored blocks arranged in rows and columns (no text or labels)


natural_image
Close-up of a car fuel plug assembly with valve and connector (no visible text or symbols)
text_image
RON 95/98 ESSENCE SANS PLOMB UNLEADED FUEL ONLY NUR BLEIFREI BENZIN GASOLINA SIN PLOMODIESEL

natural_image
Close-up of a car's head with yellow measurement arrows pointing to the cornea (no text or symbols visible)
natural_image
Mechanical component diagram showing a housing assembly with yellow arrows indicating specific parts (no text or symbols present)
natural_image
Mechanical component diagram showing a motor or connector assembly with a yellow arrow indicating a specific part (no text or symbols present)
natural_image
Close-up of a circular metallic object on a light blue surface, possibly a lens or dial (no text or symbols visible)
natural_image
Close-up of a car's side profile with a yellow arrow pointing to the nose area (no text or symbols visible)
natural_image
Close-up of a car's front panel with three buttons and a mesh grille (no text or symbols visible)
natural_image
Close-up of a car door panel with a yellow arrow pointing to the left side (no text or symbols visible)
natural_image
Close-up of a car interior panel with a yellow arrow pointing to a component (no visible text or symbols)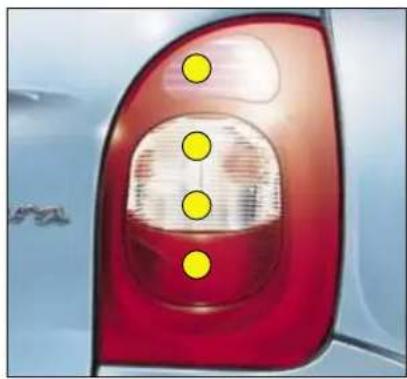
natural_image
Close-up of a car's rear light with red and white highlights, marked by yellow dots (no text or symbols visible)
natural_image
Close-up of a car interior showing internal wiring and a yellow arrow pointing to a component (no text or symbols visible)
natural_image
Close-up of a car head panel with internal compartments and directional arrows (no text or symbols)
natural_image
Close-up of a car rear panel with yellow directional arrows indicating movement or force (no text or symbols)
natural_image
Close-up of a car's front grille with a yellow arrow pointing to a specific area (no text or symbols visible)
natural_image
Solid yellow rectangle with no text, symbols, or patterns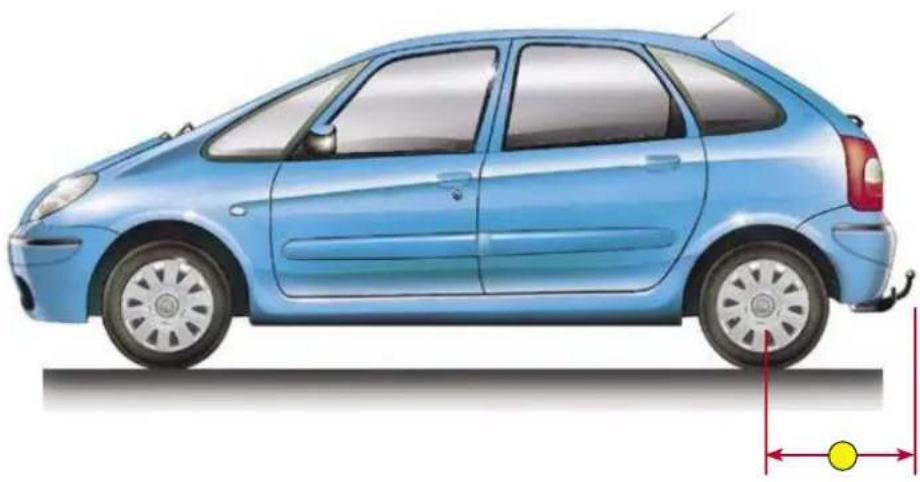
natural_image
Side view illustration of a light blue compact car with side mirror and front wheel (no text or symbols)


natural_image
Solid yellow rectangle with no text, symbols, or patterns
natural_image
Close-up of a car grille with a yellow circular marker and black connector (no text or symbols visible)
natural_image
Front view of a light blue car's side grille and headlights (no text or symbols visible)
text_image
Technical diagram showing a curved structure with highlighted circular features and yellow circular elements, likely illustrating a mechanical or structural assembly.
text_image
Yellow background with a red warning triangle containing an exclamation mark symbol
natural_image
Diagram of a mesh fence with yellow circular markers and two yellow dots, no text or symbols present
natural_image
Close-up of a mechanical component with a yellow arrow indicating direction (no visible text or symbols)
natural_image
Close-up of a car's side panel with a yellow arrow indicating clockwise motion (no text or symbols)
natural_image
Open cylindrical device with internal components, no visible text or symbols
text_image
Yellow background with a red triangular warning symbol containing an exclamation mark.
natural_image
Illustration of a blue car with attached sensors and mechanical components, showing exploded view and close-ups of parts (no text or symbols)
natural_image
Close-up of a mechanical component with a yellow arrow indicating a specific part (no text or symbols visible)
natural_image
Close-up of a car interior showing a handle and seat, with a yellow arrow pointing to a component (no text or symbols visible)
natural_image
Solid yellow rectangle with black border (no text or symbols)
natural_image
Close-up of a light blue car's side bumper with yellow arrows pointing to the nose area (no text or symbols visible)
natural_image
Close-up of a car's side profile with a yellow arrow pointing to the lower edge (no text or symbols visible)
!

—


natural_image
Side profile illustration of a light blue compact car with dimension lines (no text or symbols)
natural_image
Front view of a light blue Citroën car with visible front grille and height dimension lines (no text or symbols)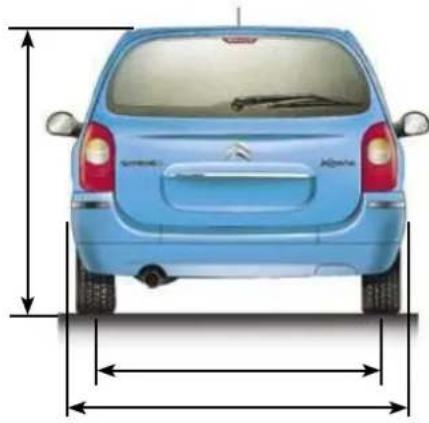
natural_image
Front view of a light blue car with side-mounted exhaust arrows indicating height and width (no text or symbols)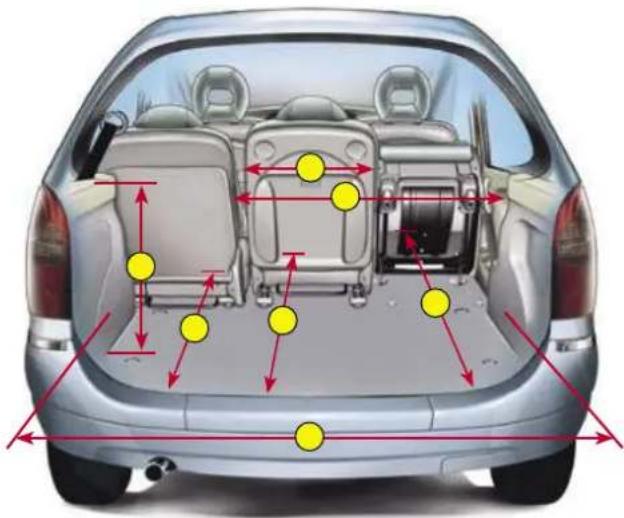
text_image
Diagram of a car's rear view with annotated vehicle positions and distance markers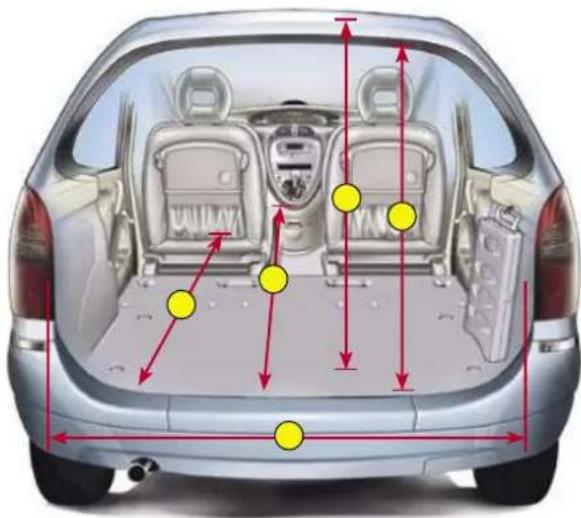
text_image
Diagram of a car back view with annotated yellow dots indicating specific positions or features, surrounded by red arrows and dimension lines.

text_image
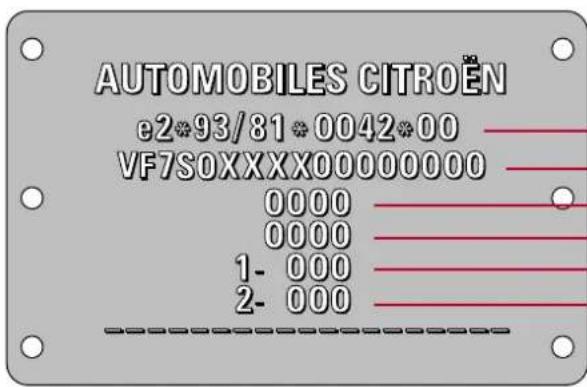
AUTOMOBILES CITROËN e2*93/81*0042*00 VF7S0XXXX00000000 0000 0000 1- 000 2- 000THE ON-BOARD NAVIGATION SYSTEM
Introduction
The On-board Navigation system guides you to the destination of your choice, by means of voice messages and visual instructions.
The system uses a cartographic database and GPS satellite guidance, the latter enabling your position to be plotted by means of several satellites.
On-board Navigation comprises the following components:
- the remote control
- the control panel display
- the electronic control unit
- the CD Rom
- the last voice message recall command,
- the satellite receiver aerial
Specific functions or services may vary depending on the C ROM version or on the count where the system is to be used.
For safety reasons, drivers are recommended not to use the remote control when the vehicle is moving, but to park safely and legally before modifying parameters or inputting data.
The system may be affected by disturbance or interruption in certain conditions (for example under bridges or in underground car parks, etc.).
natural_image
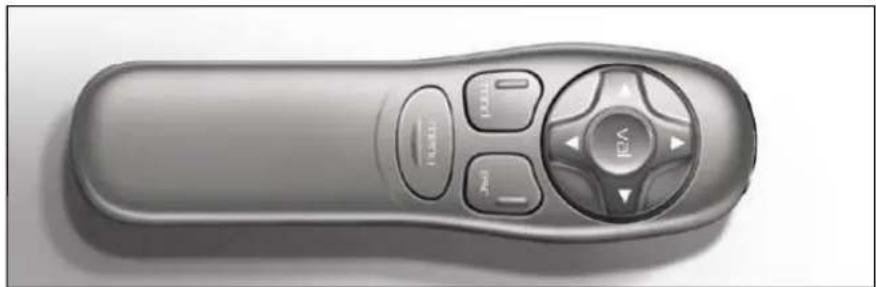
Top-down view of a gray remote control with buttons and a central knob (no text or symbols visible)The remote control
When pointed towards the right hand screen the remote control allows you to select the information contained in the different displays
Direction arrows :
These allow you to move around the screen and thus to choose functions.
Validate button: VAL
Validates the function or letter chosen.
Enables you, during navigation, to access the Rapid Tools menu
Mode button: MOD
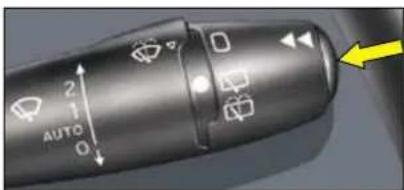
Short press each successive press allows you to select from the types of information permanently display on the right hand side of the screen date, navigation, trip computer and audio system (trip computer information can also be accessed by
successive presses on the end the wiper control at the steering wheel)
Press for at least two seconds : display disappears.
One press on any button brings the display back.
Escape button: Esc
Short press: cancels the current operation or warning message and returns you to the previous menu
Press for at least two seconds : return to the main menu
This button can be used to exi from any menu.
Menu button: menu
This button gives access to the main menu
It can be used at any time
THE ON-BOARD NAVIGATION SYSTEM
3
text_image
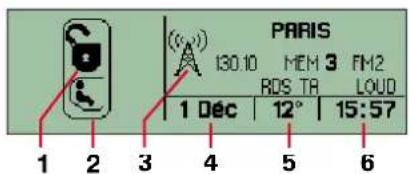
PARIS 130.10 MEM 3 FM2 RDS TR LOUD 1 Dec | 12° | 15:57 1 2 3 4 5 6The display
When driving, the display indicate
1 status of the central locking.
2 status of the child locks.
3 last mode used, radio, CD, CD changer, on-board computer, el
4 the date.
5 exterior temperature.
6 the time.
text_image
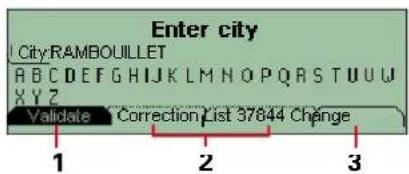
Enter city City:RAMBOUILLET ABCDEFGHIJKLMNOPQRSTUVWXYZ Validate Correction List 37844 Change 1 2 3When menus are in use, a variety of tabs will appear at the bottom of the screen, denoting access to the different functions
1 Function selected (highlighted).
2 Function inaccessible in this situation (dotted outline)
3 Function accessible (plain outlined) Use the direction arrows to move between tabs.

text_image
1 2 3 4 5 800 m FESSART IBOULOGNE BILLANC JEAN BAPTISTE CLEMENT 18 ×0 0 0 2 Km 12° 14:56 9 8 7 7While using On-board Navigation, the screen displays various types of information according to the manoeuvres to be carried out
1 Manoeuvre to be carried out.
2 Distance to the next manoeuvre.
3 Next manoeuvre to be carried on
4 Next road to take.
5 Road currently being taken.
6 The time.
7 Exterior temperature.
8 Distance to final destination
9 Visual warning indicating that the voice messaging is deactivated.
THE ON-BOARD NAVIGATION SYSTEM

text_image
1 2 3 4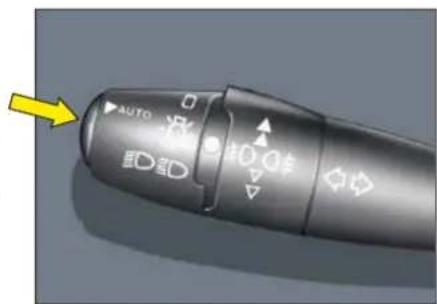
text_image
AUTO D2DThe electronic control unit
This is located inside the boot on the left hand side.
To gain access, turn the button one quarter turn.
1 CD Rom eject button.
2 CD Rom compartment.
3 The ON warning lamp indicates that the control unit is supply with power
4 The CD warning lamp indicates the presence of a CD ROM in the control unit.
The last voice message recall command
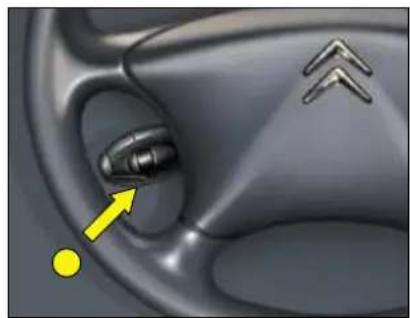
During navigation, a press on the end of the headlamp control repeats the last voice message.
During the course of a message the volume can be regulated using the radio volume adjustment button or its counterpart at the steering wheel.
Note: the message volume is not linked to the radio or traffic information volume.
The CD-ROM
It contains all the cartographic data on the country chosen.
It must be inserted with the printed face upwards.
THE ON-BOARD NAVIGATION SYSTEM
5
text_image
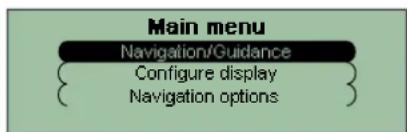
Main menu Navigation/Guidance Configure display Navigation optionsMain menu
Switch on the ignition.
Press the "MENU" button to access the main menu
Select a function using the direction arrows, then validate your choice ("VAL" button)
text_image
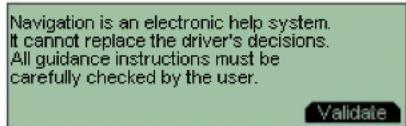
Navigation is an electronic help system. It cannot replace the driver's decisions. All guidance instructions must be carefully checked by the user. ValidateNavigation/guidance
Following the selection of "Navigation/guidance the screen will warn you about the use of navigation. Respect the regulations force and do not use the remote control when your vehicle is movir. Press the 'VAL' button to progress to the next menu
text_image
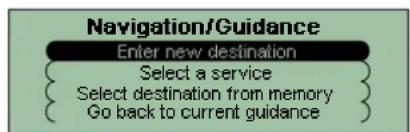
Navigation/Guidance Enter new destination Select a service Select destination from memory Go back to current guidanceThe "Navigation/guidance" menu offers you several options:
- entering the address of a new destination,
- selecting a service (hotel, railway station, airport, etc.) at a specific town,
- selecting a stored address from one of the two directories,
- resuming a guidance that was previously interrupted or ending a guidance in progress.
Two messages may be displayed depending on previous actions: "Resume guidance" or "Stop guidance".
A press on the "ESC" button allows you, after a validation, to suspend a guidance in progress and return to the main menu
THE ON-BOARD NAVIGATION SYSTEM
text_image
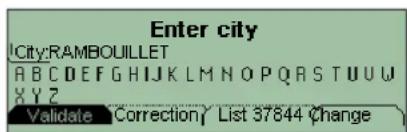
Enter city City:RAMBOUILLET ABCDEFGHIJKLMNOPQRSTUVWXYZ Validate Correction/ List 37844 ChangeEntering a new destination
The last town entered is displayed. To enter the name of a different town, select each letter with the direction arrows, validating each letter with the "VAL" button.
When the complete town name is displayed, select the "Validate" function then press the "VAL" button
In the case of an inputting error, the "Correction" function enables you to delete the last letter entered.
Note: As each letter is validated only those letters that can make u a name will appear
The "List" function indicates to you the number of towns beginning with these letters. This function is accessible when the tab has a plain outline
When the list contains less than 11 names, these are displayed automatically
Select a town, then validate "VAL" button)
The "Change" function allows you to delete completely the town you have entered and to enter a new one.
text_image
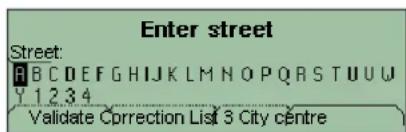
Enter street Street: A B C D E F G H I J K L M N O P Q R S T U U W Y 1 2 3 4 Validate Correction List 3 City centreEnter the name of the road.
Select the "Validate" function then press the "VAL" button.
Tip: satellite guidance can be activated after the town name and just the road name have been entered. For this, select the "Town centre" function.
text_image
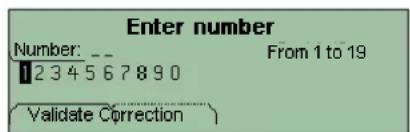
Enter number Number: -- 1234567890 From 1 to 19 Validate CorrectionIf you see numbers displayed, you can select the road number
Enter the road number. Select the "Validate" function then press the "VAL" key.
Tip: satellite guidance can be activated after the town name and jus the road name have been entered. For this, select the "Validate" function.
THE ON-BOARD NAVIGATION SYSTEM
text_image
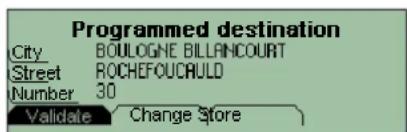
Programmed destination City BOULOGNE BILLINCOURT Street ROCHEFOUCAULD Number 30 Validate Change StoreThe complete destination is displayed.
Select the "Validate" function, then press the "VAL" button to start the route calculation
Note: by using the "Change" function you can delete or change the destination, or by using the "Store" function you can store it in one of the two directories (see section or storing an address in a directory
text_image
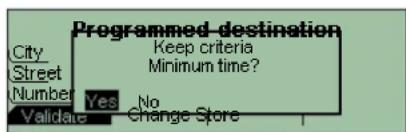
Programmed destination City Street Number Validare Yes No Keep criteria Minimum time? Change StoreThe last-used navigation parameter is displayed
Guidance commences automatically, provided this parameter is le on the screen and no further action is taken for 5 seconds, or when yo have validated the "YES" function.
Follow the instructions.
If you wish to modify the guidance parameter, select the "NO" function, then press the "VAL" button.

text_image
Minimum time Minimum distance Minimum time without freeway Priority to city roads ValidateChoose a parameter from the list then validate ("VAL" button).
When the cursor is on your chosen parameter, select the "Validate" function, then press the "VAL" button.
Guidance commences, follow the instructions.
Note: during guidance, you still have the option to modify your destination or guidance parameters by pressing the "VAL" button, which will return you to the guidance tools menu.
Depending on your preferences, the system will use different parameters to calculate the route.
THE ON-BOARD NAVIGATION SYSTEM
text_image
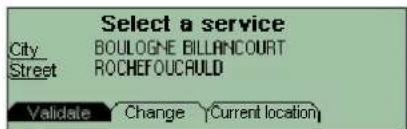
Select a service City BOULOGNE BILLANCOURT Street ROCHEFOUCRAULD Validate Change (Current location)Selecting a service
The last-entered address is displayed.
There are 3 ways you can define t area in which you wish to obtain a service
- retain the last-entered address using the "Validate" function.
- enter a new address using the "Change" function.
- automatically enter the area you are in, using the "Current location" function.

text_image
Conference centres Ferry terminals Golf courses Historical monuments HotelsWhen you have validated the address, choose a service from the list using the direction arrows.
Press the "VAL" button to select one of them.
The cursor on the left-hand side of the screen indicates your position in the total list of services

text_image
280 m CAMPANILE PARIS BOULOGNE BOULOGNE BILLANCOURT CARNOT Validate Previous Hotels 1/50 NextThe system provides a list of addresses in increasing order of distance.
The first address for the desire service is displayed.
An indication on the right of the screen (e.g. 1/50) tells you if there are several establishments (maximum of 50) offering the same service within roughly a thirty mile (50 km) radius.
A signal in the top left of the scree (e.g. 280 m) tells you how far you are from the chosen establishment (280 metres).
Use "Next" or "Previous" function to consult the list
When your chosen establishment is displayed, select the "Validate" function then press the "VAL" button. Select a navigation parameter
Guidance commences, follow the instructions
THE ON-BOARD NAVIGATION SYSTEM
C

text_image
Programmed destination City BOULOGNE BILLANCOURT Street ROCHEFOUCAULD Number 30 Change StoreStoring an address in a director When entering a new address, you can save it by selecting th "Store" function
text_image
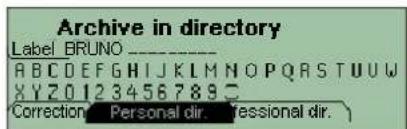
Archive in directory Label BRUNO ABCDEFGHIJKLMNOPQRSTUVWXYZ 123456789 Correction Personal dir. Personal dir.Enter the first line of the address (this will be classified automatic in alphabetical order)
If the name already exists with a different address, you can replace the old address with a new addre:
Choose either the Personal directory or the Professional directory, then press the "VAL" button. The address is then stored in the directory of your choice.

text_image
Directory Personal dir Professional dirSelecting a stored destination
Select the directory in which your desired address is stored, using the direction arrows, then press the "VAL" button.

text_image
CITROEN CTU LAURENCE STEPHANIE LIONELThe stored addresses are displayed in alphabetical order
The cursor on the left of the screer shows your position on the list.
Use the direction arrows to scroll up and down the list, then select a name by pressing the "VAL" button.
The complete address is displayed. Select the "Validate" function then press the "VAL" button
Select a guidance parameter Guidance commences, follow the instructions
THE ON-BOARD NAVIGATION SYSTEM
text_image
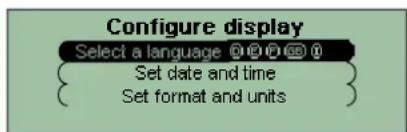
Configure display Select a language Ⓐ@○○○ { Set date and time { Set format and unitsConfi guring the display
Starting from the main menu, 'Confi gure display' gives access to the following function menus:
- selection of display and voice language (English, French, German, Italian, Spanish),
- adjustment of time and date,
- adjustment of formats and units (KM/H or MPH, °C or °F).
text_image
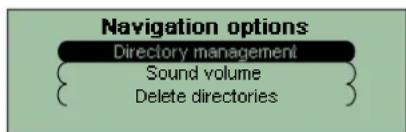
Navigation options Directory management { Sound volume } { Delete directories }Navigation options
From the main menu, select "Navigation options" to access the following function menus:
- directory manager. This allows you to alter or delete an address stored under a particular name, by selecting the directory and the name to be altered,
- adjustment of synthesised voice volume,
- deletion of all data stored in the two directories.
Note: the directory deletion menu enables you to delete all your private and business addresses when you come to resell your vehicle.

text_image
Guidance tools Guidance criteria Programmed destination Vocal synthetisGuidance tools rapid menu
This menu can be accessed only during guidance, using the "VAL" button.
It gives fast access to the most frequently-used functions:
- modification of parameters during guidance,
- display or modification of you entered destination,
- adjustment of synthesised voice volume.
THE ON-BOARD NAVIGATION SYSTEM

bar
| Stage | Value | | ----------- | ----- | | Validate | 10 |Adjustment of synthesised voice volume
You have two ways of adjusting the synthesised voice volume:
- via the "Navigation options" or "Guidance tools" menus, by selecting "Synthesised voice" and validating by pressing the "VAL" button,
- or, when a message is heard, by the use of the volume button either on the radio or at the steering wheel.
Note: in order not to interrupt a radio programme or playing of a C you can deactivate the synthesised voice by turning the volume to zero. A warning lamp will then light up of the display, indicating that the synthesised voice is deactivated. A press on the end of the headlamp control reactivates it with, as default a low volume.
RDS COMPACT DISC AUDIO SYSTEM
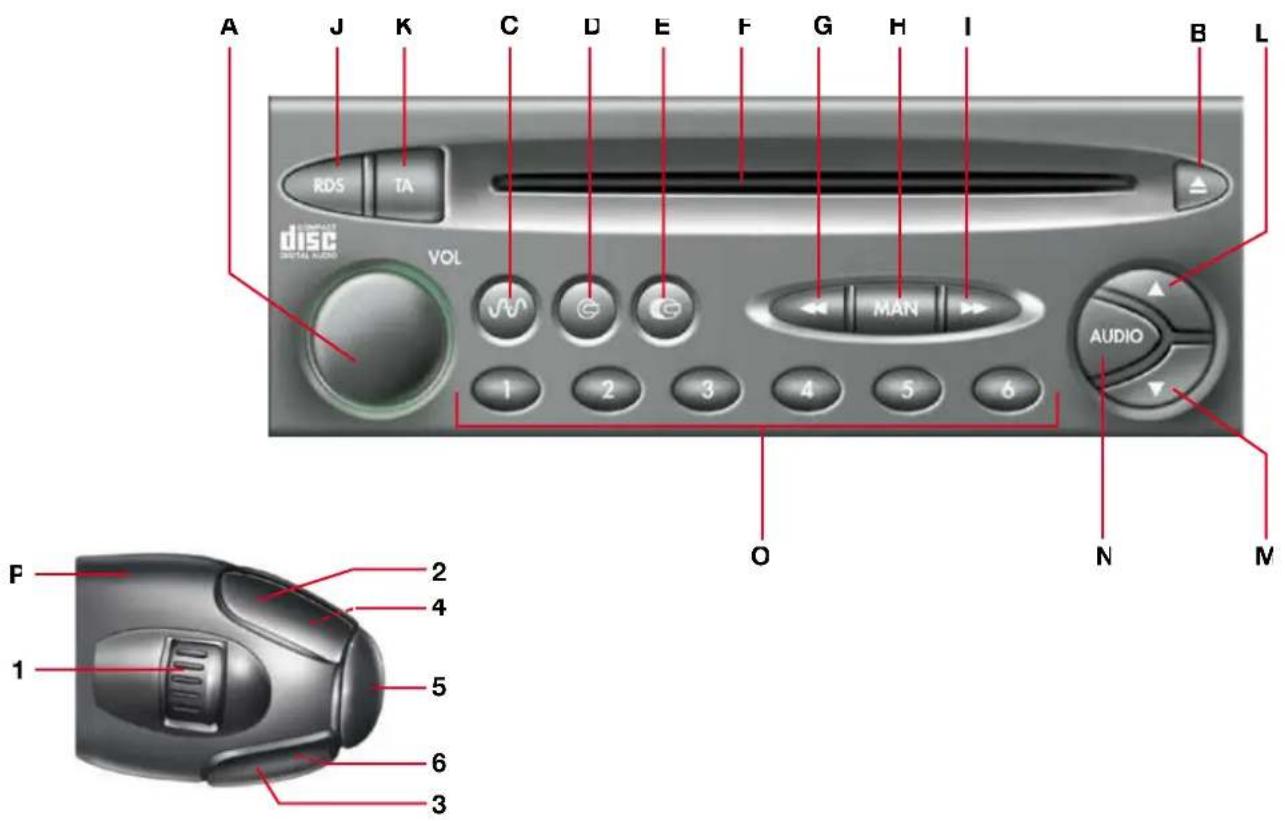
text_image
A J K C D E F G H I B L RDS TA disc VOL MAN AUDIO 1 2 3 4 5 6 O N M F 2 4 1 5 6 3USER'S GUIDE
RDS COMPACT DISC AUDIO SYSTEM
SAFETY PRECAUTIONS
Do not use the CD changer if the interior temperature is higher than +60°C or lower than -10°C.
If the temperature becomes too high, an automatic safety device will prevent the CD changer from working until an acceptable temperature is reached.
HANDLING COMPACT DISCS
Do not drop them.
Store the discs so that they are kept free of dust.
Avoid touching the disc surface as any scratches may lead to a deterioration of the sound quality.
Do not attach any stickers to the discs.
Do not write on them.
Do not use damaged or deformed discs.
Do not expose them to heat or direct sunlight.
If the surface of the compact disc is dirty, it can be wiped with a soft, clean cloth; always wipe from the centre of the disc out.
| A | ON/VOL | On/off.Volume control |
| B | [SWCD] | CD eject. |
| C | [SWCD] | Radio mode selectionWaveband and memory bank selector.Automatic pre-set function (Autostore). |
| D | [WATM] | CD mode selection. |
| E | [SwCD] | Selecting CD changer mode*. |
| F | CD aperture. | |
| G | [SWCD] | Radio mode:Tuning into lower frequenciesCD mode:Selecting the previous track.Fast reverse |
| H | [SWCD] | Radio mode:Activating the automatic or manual search mode.CD mode:Activating or deactivating the fast forward and reverse functions. |
| I | [SwCD] | Radio mode:Tuning into higher frequenciesCD mode:Selecting the next track.Fast forward. |
| J | [SwCD] | RDS functionsScanning for RDS transmissions.Regional search mode. |
| K | TA | Traffic information PTY function (selecting a programme type). |
| L | ▲ | Audio system sound adjustment (+). |
| C | ▼ | Audio system sound adjustment (-). |
| N | AUDIO | Audio system adjustment functions : bass. treble. loudness, fader, balance, automatic volume adjustment. |
| O | 1 to 6 | Radio mode: Pre-set radio stations. |
| P | Controls at the steering wheel :1 Radio mode:UP and DOWN search of pre-set stations.CD and CD changer mode * :CD selection.2 Radio mode:Frequency UP search.CD and CD changer mode * :Track Up search.Fast forward with accelerated sound3 Radio mode:Frequency DOWN search.CD and CD changer mode * :Track DOWN searchRapid reverse with accelerated sound.4 Increase in volume.5 Permits passage from one mode tc another : (RADIO, CD, CD CHANGER *).6 Decrease in volume.4+6 Long and simultaneous press or both buttons : MUTE (temporary sound pause). |
Consult the CITROËN dealer network.
GENERAL FUNCTIONS
ON/OFF
To turn the audio system on or off, press the button (A) once the key has been turned to the ACCESSORIES or IGNITION position.
Note:
- If the audio system had not been turned off when the ignition was last switched off, it will come on automatically when the ignition is switched on again, without button (A) needing to be pressed.
- The audio system can also be turned on, without using the ignition key, just by pressing button (A). In this case it will automatically turn itself off after 30 minutes.
ANTI-THEFT SYSTEM
The audio system is provided with a security code which ensures that it can only be used when fitted in your vehicle
Note:
- The anti-theft system operates automatically, and does not require any action on your behalf
MODE SELECTION :
RADIO
I o select radio mode, press buttor (C).
CD
The player starts automatically upon insertion of a CD.
To manually select CD mode (CD already inserted and radio mode active), press buttor (D).
CD CHANGER\*
To select CD changer mode, press buttor (E).
These operations can also be performed using button (5) on the control at the steering wheel (P).
Note :
- The last mode selected before the system was turned off will be the one that is automatically selected when the system is turned on again.
Consult the CITROËN dealer network.
Turn button (A) to increase or decrease the volume.
The display reads "VOLUME" followed by the volume level selected.
The volume can also be adjusted using buttons (4) and (6) on the control at the steering wheel (P).
Note :
- The volume level selected before the system was turned off will be the one that is automatically selected when the system is turned on again.
- The volume is automatically adjusted according to the vehicle speed.
SOUND PAUSE (MUTE)
Give a long and simultaneous press on both buttons (4) and (6) on the control at the steering wheel (P) to activate this function.
The audio output will be interrupted regardless of the mode selected.
The display indicates 'MUTE'.
To restore the audio output, press one of the buttons on the control at the steering wheel
SOUND ADJUSTMENT
Press successively on button (N) to view on the display the bass, treble, loudness, fader (front/rear sound distribution) and balance (left/right sound distribution) functions, followed by the current adjustment.
Press buttons (L) or (M) to modify the values of the function displayed.
Note :
- If the system is left for several seconds, it will return to the normal display mode.
- The bass and treble levels can be adjusted and memorised separately for the different modes.
AUTOMATIC VOLUME ADJUSTMENT FUNCTION
This function automatically adjusts the audio system volume according to the vehicle speed.
To have this function activated or disactivated, consult your CITROËN Dealer
RADIO MODE
RADIO RECEPTION
Your audio system will be subject to certain phenomena that are not encountered by domestic systems. The reception of AM and FM signals is subject to interference which is caused by the nature and propagation of the signals, and is not a fault of your audio system.
n AM mode, the reception may be affected when passing under power lines or bridges, or when travelling through turn n FM mode, the reception may be affected by the distance from the station transmitter, the reflecting of signals off obstacles (mountains, hills, tower blocks) and radio blackspots (no coverage from the station transmitter)
SELECTING RADIO MODE
f the system is not already in radio mode, press button (C).
SELECTING A WAVEBAND AND MEMORY BANK
Press button (C), to go through the memory banks FM1, FM2 and FM3, for the FM waveband, and the memory bank VW/LW, for the AM waveband.
AUTOMATIC SEARCH (Automatic search mode activated)
Press either button (I) or (G) briefly to tune into the following or preceding radio stations respectively, within the chosen wave band
3y keeping either button (I) or (G) pressed down, the search mode will proceed through the waveband and will stop at the first station it comes across once the button is released
The automatic search mode can also be operated using buttons (2) and (3) on the control at the steering wheel (P). It is possible to carry out a manual search to find a known station if the automatic search is unable to tune into it (for example, due to very weak reception).
MANUAL SEARCH (Manual search mode activated)
To select the manual search mode, briefly press the button "MAN" (H).
The display indicates "MN" followed by the frequency
By keeping either button (I) or (G) pressed down, the search mode will proceed through the waveband and will stop on the frequency shown on the display when the button is released. The system will remain on the frequency displayed
The system will automatically return to the automatic search mode after several seconds, or by pressing the button "MAN" (H).
TUNING SENSITIVITY
Automatic searches can be carried out according to two levels of sensitivity
- to pick up the strongest radio signals, select the local tuning function "LO".
- to pick up signals which are weaker or further away, select the distance tuning function "DX".
The searches are first carried out for the local sensitivity function "LO", then the distance sensitivity function "DX".
To immediately initiate a distance sensitivity search "DX", press either button (I) or (G) twice in a row.
RADIO MODE
MANUAL PRE-SETTING
Select the waveband and memory bank required using button (C).
Select a station using either the automatic or manual search modes.
Press and hold down one of buttons "1" to "6" (O) for more than two seconds.
The sound momentarily cuts off, then returns to its previous level to confirm that it has memorised the station
The audio system can memorise:
- 18 FM radio stations on 3 memory banks (FM1, FM2, FM3),
- 6 AM radio stations on 1 memory bank.
FM AUTOMATIC PRE-SETTING (AUTOSTORE FUNCTION)
It is possible to memorise the 6 strongest FM radio stations on the FM3 memory bank by holding down the button (C) for more than two seconds.
The display indicates "FM AST".
- The 6 strongest radio stations are memorised, wiping the previous 6 strongest
- Once the stations have been memorised, the first pre-set station on the FM3 memory bank is automatically select
Note :
- If the traffic information function has been activated (see RDS SYSTEM), the radio stations using RDS will be memorised first. If it is unable to memorise any new stations, the system will retain the previous memorised stations
- If the system is unable to find 6 stations, the unfilled memory slots will remain free
RECALLING PRE-SET STATIONS
Press the button (C) briefly to select the required waveband and memory bank
Select the desired pre-set radio station by pressing the relevant button '1" to "6" (O).
If a RDS station is selected, the station's frequency will appear on the display a few seconds before the station's name.
Recalling a RDS station may lead to the system automatically re-tuning to the frequency on which the best reception can be obtained according to the area in which you are travelling (see RDS SYSTEM).
This operation can also be performed using button (1) on the control at the steering wheel (P).
RDS SYSTEM
USING THE RDS (RADIO DATA SYSTEM) FUNCTION ON FM WHAT IS THE RDS SYSTEM?
The RDS system provides access to various functions described in this chapter, the main one of which allows you to keep listening to the same radio station by automatically selecting the frequency on which the best reception can be obtained according to the area in which you are travelling.
SCANNING FOR RDS TRANSMISSIONS
The system searches for and retains the best possible reception for a selected radio station
The system continually checks for any other frequencies on which the selected radio station is broadcast, and automatically chooses that offering the best reception.
Press the "RDS" button (J).
f the station you have selected does not broadcast on several frequencies in the area in which you are travelling, it is possible to deactivate the automatic RDS transmission scanning function.
Press the "RDS" button (J) again in order to deactivate the function.
Note :
- If the station received carries RDS with the RDS transmission scanning function, then the "RDS" indicator will come on with the "NAME" of the radio station shown on the display.
- If the station received carries RDS without the RDS transmission scanning function, then the "RDS" indicator will flash with the "NAME" of the radio station shown on the display.
- If the station received does not carry RDS, the "RDS" indicator will fall ash continually. The display will only show the station frequency.
- The "RDS" indicator will remain off if the RDS search function is deactivated. The display will either show the "NAME" of any stations carrying RDS, or the frequency of those without.
REGIONAL SEARCH MODE
Some national radio networks broadcast regional programmes at certain times of the day.
t is possible to either :
- search for the regional station only
- search across the whole network in order to find a different programme
Press the button 'RDS" (J) for more than two seconds in order to activate or deactivate the function.
Note :
- If the function has been activated, the system will remain tuned to one specific regional station
- If the function has been deactivated, the system will select the regional station with the strongest signal.
RDS SYSTEM
TRAFFIC INFORMATION
Your system allows you to receive traffic information broadcasts even while listening to another audio source
Press the "TA" button (K).
While a traffic information message is being broadcast
- The radio or CD makes a pause.
Once the message has been broadcast, the system will revert to its original mode.
Note :
- When searching for or automatically pre-setting stations, with the 'TA' function active, those stations which offer the traffic information service will be found or memorised fi rs
TRAFFIC INFORMATION VOLUME CONTROL
The traffic information volume operates separately from that of the rest of the system, and can be adjusted independently.
Adjust by turning button (A) while a traffic information message is being broadcast
This new volume level is now memorised.
RDS SYSTEM
SELECTING A PROGRAMME TYPE
With certain stations, it is possible to choose to listen to one type of programme above others, from a list of 15 programme types.
1 NEWS ..... Views fl ashes, 10 POP M ..... Pop music,
2 AFFAIRS .... Current affairs, 11 ROCK M .... Rock music,
3 INFO ..... General information, 12 M.O.R.M ..... Various
4 SPORT ..... Sports news, 13 LIGHT M .... light music,
5 EDUCATE ... Educational programmes, 14 CLASSICS ..... Classical music,
3 DRAMA ..... Series and drama, 15 OTHER M ..... Other music.
/ CULTURE Cultural programmes,
3 SCIENCE .... Science programmes,
9 VARIED ..... Other programmes,
Press the "TA" (K) button for more than two seconds.
Press buttons (I) or (G) to select the required programme type.
There are then two possible functions :
- Wait for a programme type to be broadcast
- Search for a station broadcasting the programme type.
f the system is left for several seconds, the audio system will revert to its initial mode.
WAITING FOR A PROGRAMME TYPE TO BE BROADCAST
After selecting a programme type, the audio system waits for the programme to be broadcast
When such a programme is broadcast, the audio system selects and plays the transmitting station, and the programme type name followed by the station name appear on the display
This selection occurs regardless of the audio mode currently activated.
Once the programme has finished, the audio system reverts to its initial mode
SEARCHING FOR A PROGRAMME TYPE
t is possible to carry out a search for a selected programme type: once the programme type has been selected, press one of the search buttons G or I , and the audio system will play the first station transmitting this programme type that it comes across. If none can be found, the system returns to the station it was originally tuned to, and deactivates the PTY function.
DEACTIVATING THE PTY FUNCTION
To deactivate this function, press the "TA" button (K) for more than two seconds - the audio system returns to normal node.
CD MODE\*
SELECTING CD MODE
After inserting a CD, with the printed side facing upwards, the player will start playing the CD automatically.
To manually select CD mode (CD already inserted), press button (D).
The CD Mode can also be selected by pressing button (5) on the control at the steering wheel (P).
EJECTING A CD
Press button (B) to eject the CD, the audio system will automatically switch to radio mode.
If the CD is not removed within 1 0 to 1 5 seconds of being ejected, it will automatically be taken back into the CD player, although it will not be played.
SELECTING A TRACK
Pressing button (I) once will play the next track on the disc.
Pressing button (G) once returns to the beginning of the track currently being played, pressing the button again plays the previous track.
By pressing the buttons several times, it is possible to skip several tracks at a time
These operations can also be performed using buttons (2) and (3) on the control at the steering wheel (P).
While listening to a CD, the display will show the track number and the length of time the track has been playing for.
For example: If you have been listening to the 3rd track on a CD for 2 minutes and 15 seconds, the display will read "T03 02:15".
FAST FORWARD AND REVERSE
To change swiftly to another track, press button (H), then press and hold down either button (I) or button (G) to fast forward or fast reverse respectively. Play restarts as normal when the button is released
The function is deactivated after several seconds if neither button (I) nor button (G) is pressed, or if button (H) is pressed again.
RANDOM PLAY (random order of play of the tracks, as selected by the CD player)
Press button (D) for more than two seconds.
The display indicates "RDM" and the track number.
To deactivate this function, press button (D) again for more than two seconds
*According to version or option.
RDS AUDIO SYSTEM WITH CASSETTE PLAYER
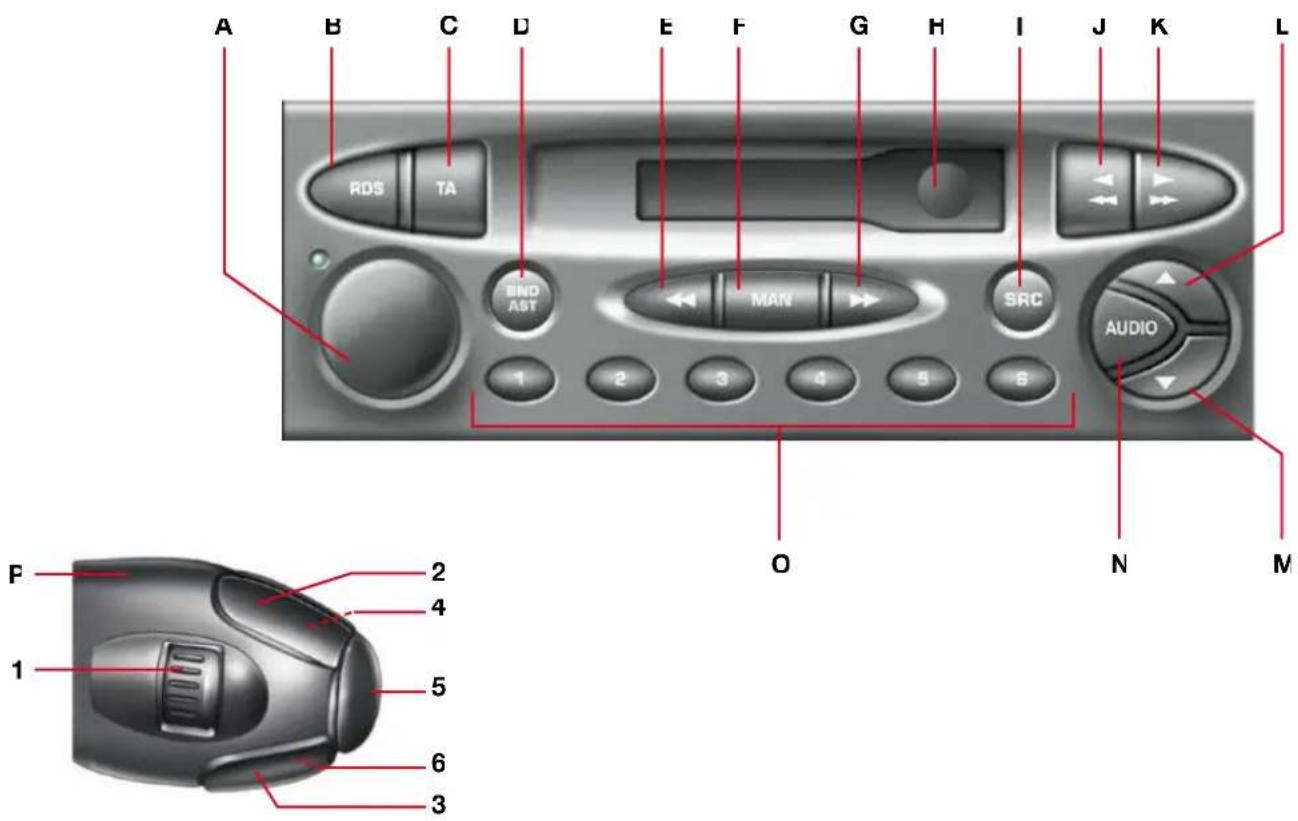
text_image
A B C D E F G H I J K L RDS TA END AST MAN SRC AUDIO 1 2 3 4 5 6 O N M F 2 4 1 5 6 3USER'S GUIDE
RDS AUDIO SYSTEM WITH CASSETTE PLAYER
PRECAUTIONS
The cassette player is a piece of high-precision equipment. To get the best out of it, follow the recommendations described below:
- Always use good quality cassettes. Poor quality cassettes may have a detrimental effect on the system operation and sound reproduction.
- Only use C60 or C90 cassettes.
- Do not expose cassettes directly to sunlight (for example, leaving them on the dashboard) as the temperatures reached in the vehicle may deform the cassette.
- Only insert a cassette into the player if the tape band is taught.
KEY
| A | ON/VOL | On/off.Volume control |
| B | RDS | RDS functionsScanning for RDS transmissions.Regional search mode. |
| C | TA | Traffic information |
| D | BNDAST | Waveband and memory bank selector.Automatic pre-set function (Autostore). |
| E | Radio mode :Tuning into lower frequencies. | |
| F | MAN | Radio mode :Activating the automatic or manual search modes |
| G | Radio mode :Tuning into higher frequencies | |
| H | Cassette aperture. | |
| I | SRC | Mode selection :('RADIO, CASSETTE, CD CHANGER'). |
| J | Cassette rewind. | |
| K | Cassette fast forward. | |
| J+K | Press the two buttons simultaneously :Half-way down to change the direction of playFully down to eject the cassette. |
| - | ▲ | Audio system sound adjustment (+). |
| M | ▼ | Audio system sound adjustment (-). |
| N | AUDIO | Audio system adjustment functions :pass, treble, loudness, fader, balance, automatic volume adjustment |
| O | 1 à 6 | Radio mode: Pre-set radio stations. |
| P | Controls at the steering wheel :1 Radio mode :UP or DOWN search of the pre-set stationCD changer mode *:Selection of a CD.2 Radio mode:Frequency UP search.Cassette mode:Cassette fast forward.CD changer mode *:Track UP searchFast forward with accelerated sound3 Radio mode:Frequency DOWN search.Cassette mode:Cassette rapid rewind.CD changer mode *:Track DOWN searchRapid rewind with accelerated sound.4 ncrease of volume.5 Permits change from one mode t:another :RADIO, CASSETTE, CD CHANGER*).6 Decrease of volume.4+6 Long and simultaneous press or both buttons : MUTE (temporary sound pause) |
* Consult the CITROËN dealer network.
GENERAL FUNCTIONS
ON/OFF
To turn the audio system on or off, press the button (A) once the key has been turned to the ACCESSORIES or IGNITION position.
Note :
- If the audio system had not been turned off when the ignition was last switched off, it will come on automatically when the ignition is switched on again, without button (A) needing to be pressed.
- The audio system can also be turned on, without using the ignition key, just by pressing button (A). In this case it will automatically turn itself off after 30 minutes.
ANTI-THEFT SYSTEM
The audio system is provided with a security code which ensures that it can only be used when fitted in your vehicle
Note :
- The anti-theft system operates automatically, and does not require any action on your behalf
MODE SELECTION :
RADIO
To select radio mode, press buttor (I).
CASSETTE
Playback starts automatically upon insertion of a cassette
To manually select cassette mode (cassette already inserted and radio mode active), press button (I).
CD CHANGER\*
To select CD changer mode, press buttor (I).
These operations can also be performed using button (5) on the control at the steering wheel (P).
Note :
- The last mode selected before the system was turned off will be the one that is automatically selected when the system is turned on again.
* Consult the CITROËN dealer network.
Turn button (A) to increase or decrease the volume.
The display reads "VOLUME" followed by the volume level selected.
The volume can also be adjusted using buttons (4) and (6) on the control at the steering wheel (P).
Note :
- The volume level selected before the system was turned off will be the one that is automatically selected when the system is turned on again.
- The volume is automatically adjusted according to the vehicle speed
SOUND PAUSE (MUTE)
Give a long and simultaneous press on both buttons (4) and (6) on the control at the steering wheel (P) to activate this function
The audio output will be interrupted regardless of the mode selected.
The display indicates "MUTE".
To restore the audio output, press one of the buttons on the control at the steering wheel
SOUND ADJUSTMENT
Press successively on button (N) to view on the display the bass, treble, loudness, fader (front/rear sound distribution) and balance (left/right sound distribution) functions, followed by the current adjustment
Press buttons (L) or (M) to modify the values of the function displayed.
Note :
- If the system is left for several seconds, it will return to the normal display mode
- The bass and treble levels can be adjusted and memorised separately for the different modes
AUTOMATIC VOLUME ADJUSTMENT FUNCTION
This function automatically adjusts the audio system volume according to the vehicle speed. To have this function activated or disactivated, consult your CITROËN Dealer
RADIO MODE
RADIO RECEPTION
Your audio system will be subject to certain phenomena that are not encountered by domestic systems. The reception of AM and FM signals is subject to interference which is caused by the nature and propagation of the signals, and is not a fault of your audio system.
n AM mode, the reception may be affected when passing under power lines or bridges, or when travelling through tunnels.
n FM mode, the reception may be affected by the distance from the station transmitter, the reflecting of signals off obstacles (mountains, hills, tower blocks) and radio blackspots (no coverage from the station transmitter).
SELECTING RADIO MODE
f the system is not already in radio mode, press button (1).
SELECTING A WAVEBAND AND MEMORY BANK
Press button (D) to go through the memory banks FM1, FM2 and FM3, for the FM waveband, and the memory bank VW/LW, for the AM waveband.
AUTOMATIC SEARCH (Automatic search mode activated)
Press either button (G) or (E) briefly to tune into the following or preceding radio stations respectively, within the chosen waveband
3y keeping either button (G) or (E) pressed down, the search mode will proceed through the waveband and will stop at the first station it comes across once the button is released
The automatic search mode can also be operated using buttons (2) and (3) on the control at the steering wheel (P).
t is possible to carry out a manual search to find a known station if the automatic search is unable to tune into it (for example, due to very weak reception)
MANUAL SEARCH (Manual search mode activated)
To select the manual search mode, briefly press the button "MAN" (F).
The display indicates "MN" followed by the frequency
3y keeping either button (G) or (E) pressed down, the search mode will proceed through the waveband and will stop of the frequency shown on the display when the button is released. The system will remain on the frequency displayed
The system will automatically return to the automatic search mode after several seconds, or by pressing the button "MAN" (F).
TUNING SENSITIVITY
Automatic searches can be carried out according to two levels of sensitivity
The searches are first carried out for the local sensitivity function "LO" then the distance sensitivity function 'DX'.
RADIO MODE
MANUAL PRE-SETTING
Select the waveband and memory bank required using button (D).
Select a station using either the automatic or manual search modes.
Press and hold down one of buttons "1" to "6" (O) for more than two seconds.
The sound momentarily cuts off, then returns to its previous level to confirm that it has memorised the station
The audio system can memorise:
- 18 FM radio stations on 3 memory banks (FM1, FM2, FM3),
- 6 AM radio stations on 1 memory bank.
FM AUTOMATIC PRE-SETTING (AUTOSTORE FUNCTION)
It is possible to memorise the 6 strongest FM radio stations on the FM3 memory bank by holding down the button (D) for more than two seconds.
The display indicates "FM AST".
- The 6 strongest radio stations are memorised, wiping the previous 6 strongest
- Once the stations have been memorised, the first pre-set station on the FM3 memory bank is automatically select
Note :
- If the traffic information function has been activated (see RDS SYSTEM), the radio stations using RDS will be memorised first. If it is unable to memorise any new stations, the system will retain the previous memorised stations
- If the system is unable to find 6 stations, the unfilled memory slots will remain free
RECALLING PRE-SET STATIONS
Press the button [D] briefly to select the required waveband and memory bank
Select the desired pre-set radio station by pressing the relevant button '1" to '6" (O).
If a RDS station is selected, the station's frequency will appear on the display a few seconds before the station's name. Recalling a RDS station may lead to the system automatically re-tuning to the frequency on which the best reception can be obtained according to the area in which you are travelling (see RDS SYSTEM).
This operation can also be performed using button (1) on the control at the steering wheel (P).
RDS SYSTEM
USING THE RDS (RADIO DATA SYSTEM) FUNCTION ON FM WHAT IS THE RDS SYSTEM?
The RDS system provides access to various functions described in this chapter, the main one of which allows you to keep listening to the same radio station by automatically selecting the frequency on which the best reception can be obtained according to the area in which you are travelling.
SCANNING FOR RDS TRANSMISSIONS
The system searches for and retains the best possible reception for a selected radio station.
The system continually checks for any other frequencies on which the selected radio station is broadcast, and automatically chooses that offering the best reception.
Press the 'RDS" button (B).
f the station you have selected does not broadcast on several frequencies in the area in which you are travelling, it is possible to deactivate the automatic RDS transmission scanning function.
Press the "RDS" button (B) again in order to deactivate the function.
Note :
- If the station received carries RDS with the RDS transmission scanning function, then the 'RDS" indicator will come on with the 'NAME" of the radio station shown on the display.
- If the station received carries RDS without the RDS transmission scanning function, then the 'RDS' indicator will flash with the 'NAME' of the radio station shown on the display.
- If the station received does not carry RDS, the "RDS" indicator will fl ash continually. The display will only show the station frequency.
- The “RDS” indicator will remain off if the RDS search function is deactivated. The display will either show the “NAME” of any stations carrying RDS, or the frequency of those without.
REGIONAL SEARCH MODE
Some national radio networks broadcast regional programmes at certain times of the day.
t is possible to either :
- search for the regional station only
- search across the whole network in order to find a different programme
Press the button ‘RDS” (B), for more than two seconds in order to activate or deactivate the function.
Note :
- When the function has been activated, the system will remain tuned to one specific regional station
- When the function has been deactivated, the system will select the regional station with the strongest signal.
RDS SYSTEM
TRAFFIC INFORMATION
Your system allows you to receive traffic information broadcasts even while listening to another audio source
Press the 'TA' button [C].
While a traffic information message is being broadcast
- The radio or cassette makes a pause.
Once the message has been broadcast, the system will revert to its original mode.
Note :
- When searching for or automatically pre-setting stations, with the 'TA' function active, those stations which offer the traffic information service will be found or memorised fi rs
TRAFFIC INFORMATION VOLUME CONTROL
The traffic information volume operates separately from that of the rest of the system, and can be adjusted independently.
Adjust by turning button 'A) while a traffic information message is being broadcast
This new volume level is now memorised.
CASSETTE MODE
SELECTING CASSETTE MODE
Playback starts automatically upon insertion of a cassette.
To manually select the cassette mode (if a cassette is already inserted in the player), press button (I).
These operations can also be performed using button (5) on the control at the steering wheel (P).
EJECTING THE CASSETTE
Press buttons (J) and (K) down fully and at the same time to eject the cassette. The audio system will automatically switch to radio mode.
DIRECTION OF PLAYBACK
At the end of a side, the player will automatically switch direction to play the other side of the cassette.
To reverse the direction of play before the end of the cassette, push buttor (J) and (K) down half-way at the same time
FAST FORWARD AND REWINC
Press either button (J) or button (K) so that it locks down, in order to rewind or fast forward the cassette respectively. To halt the fast forward or rewind, press the other button
These operations can also be performed using buttons (2) and (3) on the control at the steering wheel (P).
TECHNICAL SPECIFICATIONS\*
PRESENTATION
• 3 wavebands (MW/LW/FM).
- Remote control on steering wheel with 8 functions.
- Night lighting.
AUDIO SYSTEM
• Max. power 4x10 Watts.
- Notched volume control.
- Front/Rear & Right/Left balance control
- Loudness.
- Separate treble/bass adjustment.
• Automatic volume adjustment.
TUNER
• RDS Eon PTY (News).
- Independent RDS search and display of station name.
- Traffic information button (IA
• 24 pre-sets (18 FM - 6 MW/LW).
• Automatic memorisation of strongest stations (ASI)
CD PLAYER
- Random track play.
CASSETTE PLAYER
- Auto-reverse.
- Lockable fast forward and rewind.
PROTECTION
- Lockable fast forward and rewind.
RDS-EON (Enhanced Other Networks) System
- This is a service which links stations providing information in a common network. If you are tuned to a station in this network which does not itself transmit traffic information or such EON allows this type of information to be received via another station in the network (the radio will automatically select the first station of this network to transmit the information)
* According to version or option.