C4 (2005) - Car CITROEN - Free user manual and instructions
Find the device manual for free C4 (2005) CITROEN in PDF.

User questions about C4 (2005) CITROEN
0 question about this device. Answer the ones you know or ask your own.
Ask a new question about this device
Download the instructions for your Car in PDF format for free! Find your manual C4 (2005) - CITROEN and take your electronic device back in hand. On this page are published all the documents necessary for the use of your device. C4 (2005) by CITROEN.
USER MANUAL C4 (2005) CITROEN
natural_image
Red Citroën sports car with visible logo and 'TOTAL' branding, showing front wheel and windshield (no readable text beyond branding)
text_image
CITROËNCITROËN and TOTAL
A partnership of expertise
For 39 years, the research teams of CITROËN and TOTAL have combined their know-how to offer you the best engine/lubricant combination available. Cutting edge technology for your benefit. With TOTAL, you can be sure to have chosen the benchmark oil that best guarantees your CITROËN's performance and life-expectancy.
A partnership for the environment
TOTAL oils support CITROËN's advances in fuel economy, and CO_2 and harmful emission reductions.
The development of new generation oils specially adapted for Particle Filters, like TOTAL ACTIVA/QUARTZ INEO ECS can reduce CO_2 emissions by a tonne* and save a tank of fuel each year**.
* Official CO emissions reduction of 4 g per km (approx. 6 g per mile). Corresponds to a reduction in CO emissions of 1 tonne throughout the life of the vehicle, on a private diesel vehicle with an average life expectancy estimated at 250 000 km (approx. 160 000 miles). Source: TOTAL
** Or 30 L, average quantity of fuel required to fill a tank at a petrol station. Result obtained using TOTAL ACTIVA/QUARTZ INEO ECS oil instead of a traditional 15W-40 oil. on a CITROEN C4 1.6 HDi, whose average fuel consumption is 58.9 mpg (4.8 L/100 km), travelling 18 000 km (approx. 12 000 miles) per year. Source: TOTAL
A partnership of success
Competitive successes in the national rallies of the World Rally Championship bear testament to the performance and efficiency of the CITROËN – TOTAL partnership.

TOTAL
CITROËN prefers TOTAL
This handbook is compiled on the basis of all the equipment that is available (whether standard or optional) and of the technical specifications that were known at the time of going to print. The level of equipment on your vehicle depends on the model, the options chosen and the country where the vehicle is marketed.
Some of the equipment mentioned in this handbook may only be available at a later date.
Descriptions and illustrations are given without obligation. Automobiles CITROËN reserves the right to modify its models and their equipment without necessarily being bound to update the present handbook.
The trained professional staff of the CITROËN network are at your disposal to answer any questions you may have.
We wish you safe and enjoyable motoring in your new CITROËN.
This handbook is an integral part of your CITROËN. It should be kept in the vehicle where it can be consulted easily.
Do not forget to pass it on to the new owner if you should sell the vehicle.

Dconcept
Création 4Dconcept - Automobiles CITROËN - RCS PARIS 642 050 199 - Imp. en UE
6.2 07-08 Anglais


text_image
FIA MANUFACTURER'S WORLD RALLY CHAMPIONS CITROËN 2005 FIA MANUFACTURER'S WORLD RALLY CHAMPIONS CITROËN 2004 FIA MANUFACTURER'S WORLD RALLY CHAMPIONS CITROËN 2003 FIA DRIVERS' WORLD RALLY CHAMPIONS SÉBASTIEN LOEB 2006 FIA DRIVERS' WORLD RALLY CHAMPIONS SÉBASTIEN LOEB 2005 FIA DRIVERS' WORLD RALLY CHAMPIONS SÉBASTIEN LOEB 2004GB. 08C4. 0031
Anglais

natural_image
Two stylized cars, one red and one gray, displayed against a plain blue background (no text or symbols visible)We thank you for choosing to drive a new CITROËN and we congratulate you on your choice.
Please read this handbook carefully before taking to the road.
It contains essential information about driving your vehicle and operating its equipment, as well as other important advice to be rigorously followed.
The handbook also contains all you need to know about the servicing and routine maintenance of your vehicle, thus assuring both your safety and the reliability of your new CITROËN.
A thorough knowledge of your new CITROËN will enable you to enjoy driving to the full.
Depending on the version of your vehicle and its options, as well as on the date of manufacture and the country of marketing, some of the equipment or certain functions described in this handbook may not be present on your vehicle.

Please note the following point:
The fitting of electrical equipment or accessories that are not recommended by CITROEN may result in a failure of your vehicle's electronic system. Please note this specific warning. It is advisable to contact a CITROEN dealer to be shown the recommended equipment and accessories.
FAMILIARISATION
4 → 22
I - OPERATING CONTROLS
| ■ Instrument panel | 23 |
| ■ Warning lamps | 24 |
| ■ Particle filter (Diesel) | 26 |
| ■ Maintenance indicator | 27 |
| ■ Engine oil level indicator | 29 |
| ■ Display lighting rheostat | 29 |
III - COMFORT
41 → 56
■ Air distribution 41
■ Ventilation/Ventilation 43
■ Automatic air conditioning 45
■ Scented air freshener 48
■ Front seats 49
■ Rear seats 53
■ Rear view mirrors 55
■ Steering column adjustment 56
V - VISIBILITY
65 → 72
■ Lighting control 65
■ Headlamp adjustment 66
■ Direction indicators 67
■ Hazard warning lamps 67
■ Directional headlamps 68
■ Wiper controls 69
■ Interior lighting 71
II - MULTIFUNCTION DISPLAYS 31 → 40
■ Display A 31
■ Display C 34
■ NaviDrive Display 37
■ Trip computer 38
IV - ACCESS
57→64
■ Keys 57
■ Remote control 58
■ Alarm 60
■ Electric windows 62
■ Child safety 63
■ Doors 63
■ Tailgate 64
VI - INTERIOR COMFORT
73→77
■ Interior 73
■ Boot 77
VII - CHILD SAFETY
78 → 83
■ General 78
■ Child seats 79
■ Isofix mountings 81
VIII - SAFETY 84 → 96
■ Tyre pressure sensors 84
■ Braking assistance systems (ABS) 85
■ Trajectory control systems (ESP/ASR) 86
■ Seat belts 87
■ Airbags 90
■ Safety advice 94
■ Lane departure warning system 96
X - MAINTENANCE 116 → 123
■ Bonnet release 116
■ Petrol engines 117
■ Diesel engines 118
■ Levels 119
XII - TECHNICAL SPECIFICATIONS 151 → 162
■ Capacities 151
■ Weights 152
■ Fuel consumption 157
■ Dimensions 160
■ Vehicle identification 162
IX - DRIVING
97 → 115
■ Handbrake 97
■ Manual gearbox 99
■ Electronic gearbox system (EGS) - 6 speed 100
■ Hill start assist 105
■ Automatic gearbox 106
■ Cruise control 110
■ Speed limiter 112
XI - PRACTICAL ADVICE 124 → 150
■ Refuelling 124
■ Changing a wheel 125
■ Replacing bulbs 129
■ Replacing a fuse 136
■ Battery 142
■ Towing 145
■ Towing a trailer 147
■ Cold weather shield 148
■ Accessories 149
XIII - RADIO 163 → 179
■ Radio-RDS-CD 163
■ CD changer 173
■ Hands-free telephone 174
■ Frequently asked questions 178

INDEX
180 → 183

EXTERIOR
Directional headlamps
This lighting function automatically improves forward vision when cornering.
▶ 68
natural_image
3D rendering of a silver sedan car (no visible text or symbols)Visual and audible parking assistance, front/rear
This system warns you if an obstacle is detected when manoeuvring the vehicle.
114
Guide-me-home lighting
The headlamps stay on for a short period after switching off the ignition.
▶ 65
Lane departure warning system
Above 50 mph, this system is activated automatically if you inadvertently wander from your lane.
▶ 96
OPENING
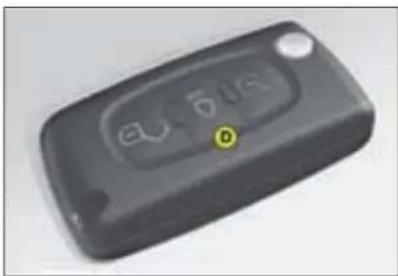
Remote control

text_image
A B CA. Unfolding/folding the key.
B. Unlocking the vehicle.
C. Locking the vehicle.
natural_image
Close-up of a black rectangular electronic device with control buttons and a yellow indicator labeled 'D' (no readable text or symbols beyond the label)D. Activating/deactivating guide-me-home lighting.
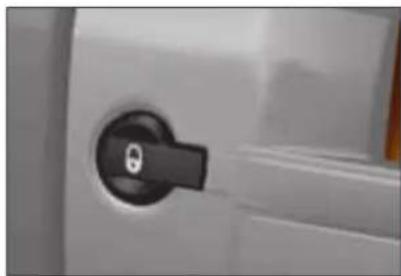
Manual central locking
natural_image
Close-up of a black keyhole on a white door panel (no text or symbols visible)Press once to lock the vehicle. Press again to unlock the vehicle.
In addition...
A long press on button C locks the vehicle and closes the windows.
Two successive presses on button C deadlocks the vehicle.
57
59
63

OPENING
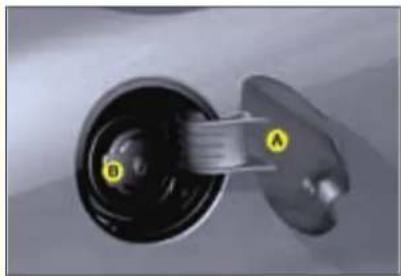
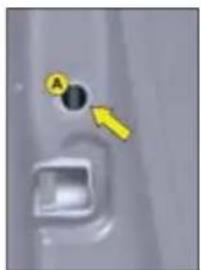
Fuel tank
natural_image
Close-up of a mechanical component with labeled parts A and D, showing internal structure (no text or symbols beyond labels)Tailgate Spare wheel and tools
natural_image
Close-up of a car's front panel with a yellow arrow pointing to the button (no text or symbols visible)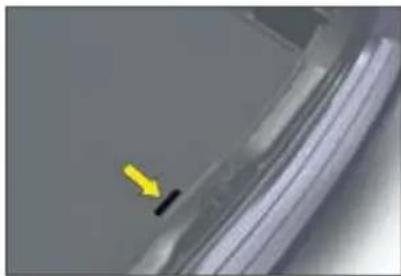
natural_image
Close-up of a car wheel rim with a yellow arrow pointing to the side edge (no text or symbols visible)A. Opening the fuel fi ller fl ap.
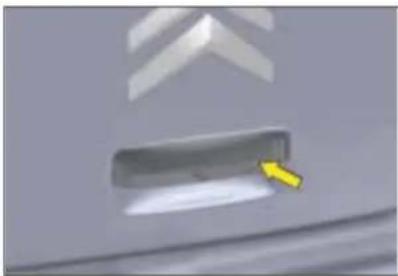
Unlock the vehicle with the remote control Access to the spare wheel
To open the fuel filler flap, pull at notched edge. There is a fuel label on the inside of the flap.
or the key. Lift the carpet, then remove the tool itsPress up on the lever and lift the tailgate. holder to gain access to the wheel.
Locking filler cap
Turn the key a quarter turn to lock and unlock the filler cap. When refuelling, place the cap on the carrier on the inside face of the filler flap.
B. Removing the filler cap.
Fuel tank capacity: 60 litres approximately.
Access to the tools
The tools are located in a protective holder in the spare wheel.
If your spare wheel is of different dimensions to the wheels on the vehicle, it is essential to use it only on a temporary basis, and to not drive above 80 km/h (50 mph).
6
124
64
125
INTERIOR
Translucent instrument panel
This system gives optimum contrast, whatever the external light level.
23
Scented air freshener
The air freshener distributes scented air throughout the cabin. It is located in the centre air vent
▶ 48
natural_image
Interior view of a car dashboard and steering wheel (no visible text or symbols)Audio and communication systems
These systems make use of the latest technologies: MP3-compatible audio, Bluetooth® hands-free kit, GPS mobile phone.
163
Cruise control/Speed limiter
These two systems allow the vehicle's speed to be maintained at a programmed level.
110,112
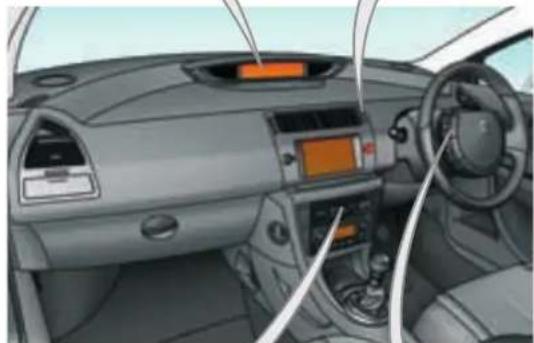
DASHBOARD

text_image
Interior view of a car with numbered annotations pointing to key components such as steering wheel, dashboard, and steering wheel.- Controls:
- Mirrors.
- Windows.
- Child safety
-
Headlamp adjustment.
-
Controls:
• ESP.
- Parking assistance.
• Lane departure warning system.
• Anti-intrusion alarm.
-
Steering lock and ignition switch.
-
Controls:
• Windscreen wiper.
- Screen wash.
- Rear screen wiper.
- Trip computer.
-
Fixed centred controls.
-
Direction indicator warning lamps.
-
Speed indicator.
-
Controls:
- Trip mileage recorder reset button.
• Display lighting rheostat.
- Display of alerts and status of functions.
-
Centre air vents.
-
Driver's airbag.
-
Horn.
-
Gear lever.
-
Handbrake.
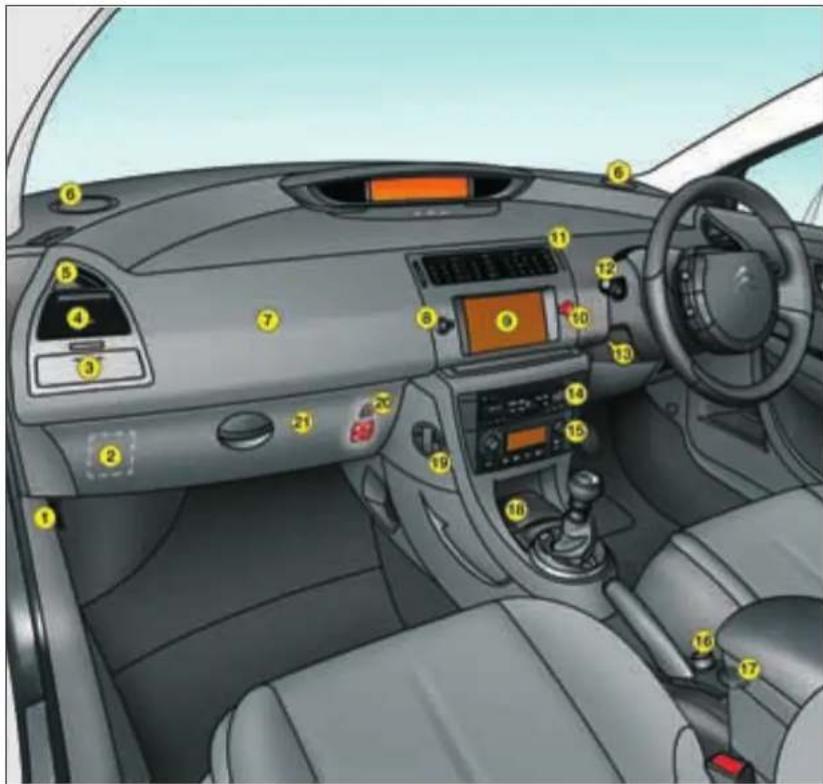
DASHBOARD
text_image
Interior view of a car dashboard with numbered labels pointing to various controls and infotainment areas.-
Bonnet release.
-
Fusebox cover.
-
Storage drawer (left and right).
-
Lateral air vent (left and right).
-
Side window demister vent (left and right).
-
Loudspeaker (Tweeter) (left and right)
7.Passenger's airbag.
-
Control for central locking of doors and boot.
-
Multifunction display.
-
Hazard lamps control.
-
Scented air freshener.
-
Controls:
- Lighting.
• Direction indicators.
- Front fog lamps
- Rear fog lamps.
-
Steering column adjustment lever.
-
Radio-CD or NaviDrive radio navigation
-
Air conditioning or heating/ventilation
-
Cigar lighter.
-
12-volt accessory socket (150 W max). or
USB socket.
-
Ashtray.
-
Carrier bag hook.
-
Key-operated switch:
Passenger's airbag activation/deactivation.
- Lower glovebox.
- Handbook pack storage.
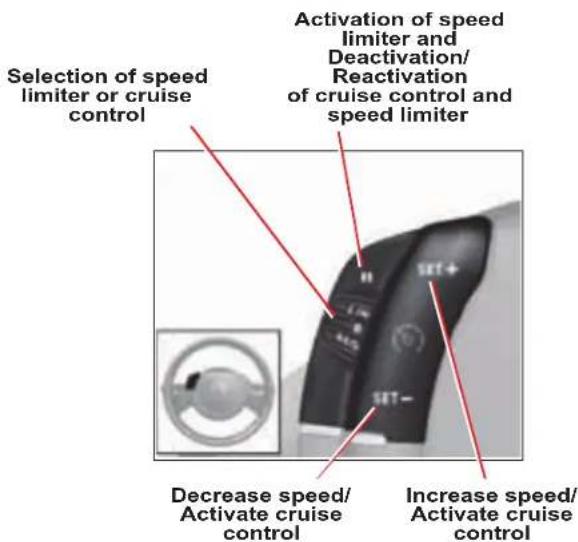
FIXED CENTRED CONTROLS STEERING WHEEL
Controls for speed limiter and cruise control
Function controls:
- Display lighting rheostat
- Voice recognition
- Air recirculation
- Telephone
- Personal button

text_image
Audio system controls Warning lamps: lighting and direction indicators Horn Multifunction display controlsFIXED CENTRED CONTROLS STEERING WHEEL
Controls for speed limiter and cruise control
Audio system controls
See "Audio" or your Navidrive instructions
text_image
Selection of speed limiter or cruise control Activation of speed limiter and Deactivation/Reactivation of cruise control and speed limiter Decrease speed/Activate cruise control Increase speed/Activate cruise control
text_image
Search for higher radio frequencies Scrolling of memorised stations Increase sound volume Reduce sound volume MuteFIXED CENTRED CONTROLS STEERING WHEEL
Starting voice recognition
(See "Audio" or your Navidrive instructions)
Display lighting rheostat

text_image
Diagram showing a device with labeled buttons and a circular dial, including red arrows pointing to features.Telephone pick up/hang-up
(See "Audio" or your Navidrive instructions)
Display the "Directory" menu
(See "Audio" or your Navidrive instructions)
Personal button:
- Black panel (default function), or
- Interior lamp on/off, or
- Log of alerts, or
- Status of functions
Give a long press on this button to display the personalisation menu.
Validation of the function selected or the value modified Pick up/hang up
(See "Audio" or your Navigation instructions)
Access to "Main menu"*
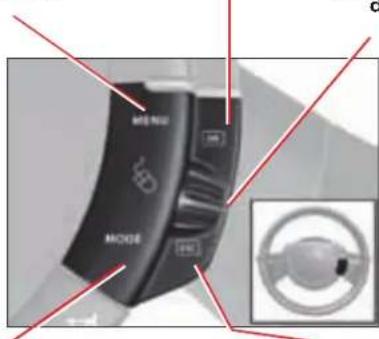
text_image
MENU MODESelection of the type of information displayed on the right of the screen (radio, trip computer, navigation/guidance...) and for screen A, choice of activation/deactivation of your functions and choice of your adjustments
Scrolling in the multifunction display
Cancel the current operation or return to the previous screen
* In compliance with national legislation, in some countries the "menu" control is deactivated when driving.
SITTING COMFORTABLY
Front seats
Manual adjustments

natural_image
Diagram of a car interior with a yellow arrow pointing to the side panel (no text or symbols present)Forwards-backwards Driver's seat cushion height and angle adjustment

natural_image
Diagram of a car's side profile with a highlighted black object and an arrow pointing to it (no text or symbols present)
natural_image
Side view of a car's front wheel assembly with yellow arrows indicating components (no text or symbols)Seat back angle and lumbar adjustment
Electrically operated adjustments (driver's seat only)
natural_image
Two small mechanical components with a yellow arrow pointing to one (no text or symbols visible)Forwards-backwards

natural_image
Two mechanical components with a yellow arrow pointing to one (no text or symbols visible)Seat cushion height and angle adjustment

natural_image
Close-up of a black mechanical component with a yellow arrow pointing to it, next to a gray rectangular block (no visible text or symbols)Seat back angle and lumbar adjustment
51
SITTING COMFORTABLY
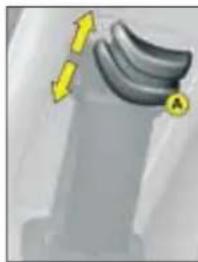
Adjustment of front head restraints

natural_image
Illustration of a person's head with yellow directional arrows indicating motion or movement (no text or symbols)Height and angle.
Manual adjustment of steering wheel height and reach

natural_image
Interior view of a car showing steering wheel and dashboard with yellow directional arrows (no text or symbols)- Unlock the steering column using the lever.
- Adjust the position of the steering wheel for height and reach.
- Lock the steering column with the lever.
Adjustment of rear head restraints
A. Low position.
B. High position.

53

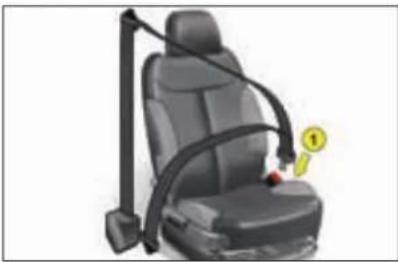
Front seat belt
natural_image
Car seat with black car seatbelt and orange belt, no visible text or symbols- Locking.
natural_image
Illustration of a banana on a surface with directional arrows indicating movement (no text or symbols)
natural_image
Close-up of a mechanical component with a yellow arrow and label B pointing to a specific part (no readable text or symbols)A. Height adjustment (5-door)
B. Holding the seat belt (3-door)
▶ 87

SITTING COMFORTABLY
Adjustment of exterior rear view mirrors
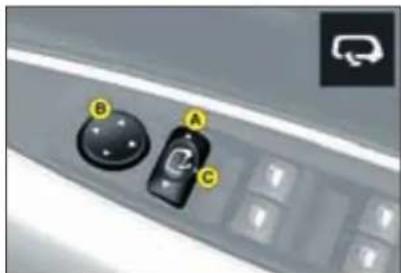
text_image
Close-up of a car control panel with labeled buttons A, B, and C pointing to specific controls.A. Select the mirror.
B. Adjust the mirror.
C. Fold-back/Unfolding.
55
Adjustment of interior rear view mirror Electric windows

natural_image
Close-up of a car frontview mirror with numbered labels (1, 2, 3) pointing to the lens area (no text or symbols on the mirror itself)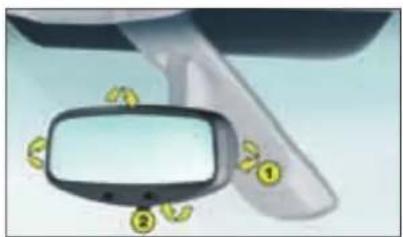
natural_image
Illustration of a car front mirror with yellow icons and numbers, no text or symbols present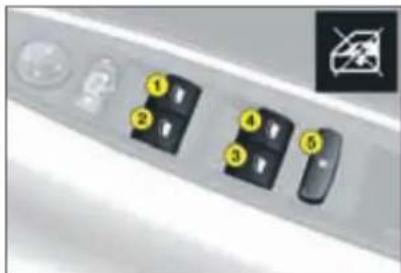
text_image
Diagram showing labeled buttons or ports with numbered indicators, including a warning symbol and a cross symbol.- Driver's window control.
- Passenger's window control.
- Left hand rear window control.
- Right hand rear window control.
Child safety
- Inhibition of the opening of the passenger and rear doors and electric windows.
56
62
VISIBILITY
Lighting

text_image
A B C DRing A


Ring B

Lighting off.
Automatic lighting.
Sidelamps.
Dipped or main beam.
Front foglamps and rear foglamps.
65
Screen wipe
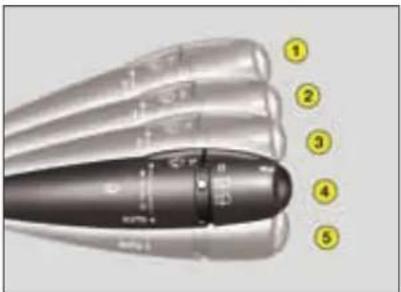
text_image
Diagram of a pen-like object with numbered callouts pointing to specific parts, likely for technical or engineering reference.Windscreen wipe
2 Fast speed.
1 Normal speed.
I Intermittent.
0 Off.
AUTO Automatic wipe or single wipe.
Deactivation of automatic wipe
Go to position 1 then return to position 0.

natural_image
Close-up of a metallic cylindrical object with a curved handle and a labeled section (no readable text or symbols)Rear screen wipe

Off.

Intermittent.

Timed wipe and wash.
69
70

GOOD VENTILATION
To obtain the best from the system, we advise:
| I would like ... | Heating or manual Air Conditioning | ||||
| Air distribution Air flow | Air recirculation/ Fresh air intake | Temperature A/C | |||
| HEATING |  |  |  |  |  |
| COOLING |  |  |  |  |  |
 |  |  |  |  |  |
MONITORING
text_image
E B C D 70 A B D
text_image
D C D A OFF OFF ESP OFFInstrument panel Controls
A. Speedometer.
B. Rev counter.
C. Fuel gauge.
D. Lighting rheostat.
E. Warning lamp.
Warning lamps
Ignition on, the orange and red alert warning lamps come on.
With the engine running, these same warning lamps should go out.
If a warning lamp stays on, refer to the relevant page.
A. Deactivation of the ESP/ASR system.
▶ 86
B. Deactivation of the visual and audible parking assistance.
114
C. Deactivation of the lane departure warning system.
▶ 96
D. Deactivation of the alarm volumetric sensors.
61
23
▶ 24
PASSENGER SAFETY
Activation/Deactivation of the front passenger's airbag
text_image
OFF ON ON/OFF LOAD B C AA. Insert the ignition key.
B. Select the "ON" or "OFF" position.
C. Remove the key.
Warnings for seat belts unfastened/not fastened
text_image
Cropped image showing a blackboard with red Chinese characters and orange control panel on the left, likely part of a train or vehicle control panel.
Driver

Front passenger.

Left rear passenger.

Centre rear passenger.

Right rear passenger.
Child safety
natural_image
Close-up of a car door panel with a highlighted circular hole and an arrow pointing to it (no text or symbols visible)
natural_image
Close-up of a car interior with a black 'No' symbol and a small circular badge labeled 'B' (no readable text or symbols beyond the label)A. Manual control.
B. Electric control.
▶ 83
92
▶ 25

DRIVING
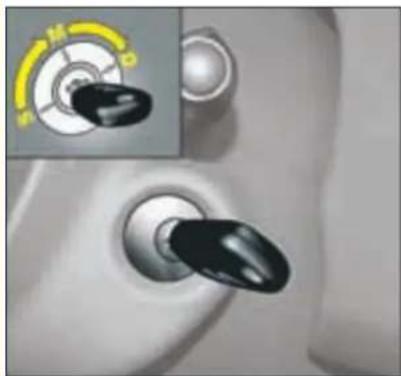
Ignition switch
natural_image
Close-up of a car's air vent with a black knob and a yellow dial, showing no text or symbols.• S: Steering lock
To free the steering, turn the steering wheel slightly at the same time as turning the key, avoiding any undue force.
• M: Ignition
D: Starter
Release the key as soon as the engine has started. Never turn to this position when the engine is running.
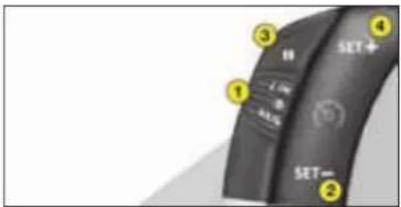
Cruise control
text_image
SET+ 1 2 3 4 SET- 5 6 7 8 9 10- Selecting/stopping the cruise control mode.
- Setting a cruising speed/Reducing the value memorised.
- Stopping/Resuming cruise control.
- Setting a cruising speed/Increasing the value memorised.
To be memorised or activated, the speed of the vehicle must be above 40 km/h (25 mph), with fourth or higher gear selected on a manual gearbox (second in the case of 6-speed EGS or automatic gearbox).
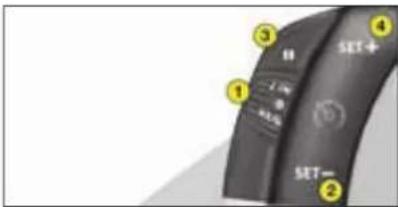
Speed limiter
text_image
SET+ 1 2 3 4 5 6 7 SET- 2- Selecting/Stopping the speed limiter mode.
- Reducing the value memorised.
- Starting/Stopping speed limitation.
- Increasing the value memorised.
110
112
DRIVING
6-speed Electronic Gearbox System

Automatic mode

natural_image
Close-up of a mechanical component pressing into a car gear (no visible text or symbols)The gearbox operates in auto-active mode without input on your part.

Manual mode

natural_image
Close-up of a mechanical lever mechanism with labeled parts (A, M, S) and no visible text or symbols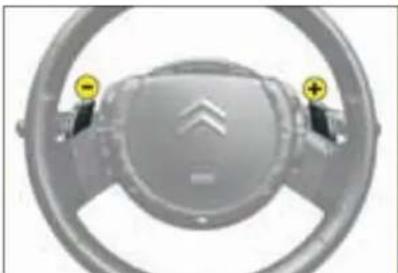
natural_image
Close-up of a car steering wheel with two yellow warning signs on the steering wheel (no text or symbols visible)Or
Using the lever
Push the lever forwards to change up. Pull the lever backwards to change down.
Using the control paddles behind the steering wheel
Press the "+" or "-" control paddle behind the steering wheel for an immediate gear change up or down respectively.

Reverse

Neutral
Do not select this position, even momentarily, when the vehicle is moving.
Under heavy acceleration, a higher gear will only be engaged if the driver operates the gear lever or the controls on the steering wheel.

Sport setting
100
DRIVING
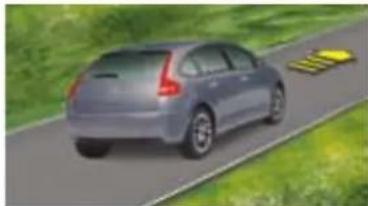
Hill start assist (6-speed Electronic Gearbox System)
To aid starting on a gradient, your vehicle is equipped with a system that keeps it temporarily immobilised.
natural_image
Rear view of a silver car driving on a road with yellow traffic signs, surrounded by greenery (no text or symbols visible)On a rising gradient, with the vehicle, stationary, the vehicle is held for a brief moment after releasing the brake pedal, if you are in A or M.

natural_image
Illustration of a silver sedan driving on a road with yellow directional arrows indicating speed (no text or symbols)On a falling gradient, with the vehicle stationary and reverse gear engaged, the vehicle is held for a brief moment after releasing the brake pedal.
DASHBOARD
INSTRUMENT PANEL
On opening the driver's door or unlocking with the remote control, for approximately 30 seconds the instrument panel is activated, displaying the mileage recorders and if applicable, the maintenance indicator spanner.
Central display
1 Rev counter
2 Cruise control or speed limiter settings
3 Speedometer
4 Maintenance indicator on switching on, then mileage recorder
5 Trip mileage recorder
6 Fuel gauge
7 Engine oil level check
8 Coolant temperature
1

text_image
Display of warning lamps Trip mileage recorder reset button 70 Display lighting rheostat Display of alerts and Status of functions Display of warning lampsDASHBOARD
1
WARNING LAMPS

text_image
扣 来 ID ID OKLighting and signalling lamps See "Visibility".

LH direction indicator

RH direction indicator
The direction indicator lamps all operate simultaneously when the hazard warning is on.

Foglamps (rear)

Foglamps (front)

Sidelamps

Dipped beam
If this warning lamp flashes, it is indicating a malfunctioning of the directional headlamps.
Contact a CITROËN dealer.

Main beam
Alert warning lamps

Imperative stop warning lamp
When the warning lamp comes on, it is
imperative to stop the vehicle and switch off the engine.
Contact a CITROËN dealer.

Warning lamp for handbrake, brake fluid level and braking distribution fault
When the engine is running, this warning lamp indicates that the handbrake is applied or incompletely released, that the brake fluid level is insufficient, or that the braking system is malfunctioning.
If the warning lamp remains lit when the handbrake is released, stop immediately and contact a CITROËN Dealer (See "Safety").

DASHBOARD

Driver's seat belt not fastened
This lamp comes on if the driver's seat belt is not fas-
tened when the ignition is switched on and while the vehicle is moving at up to 20 km/h (approx. 12 mph)
Above 20 km/h (12 mph), the war ning lamp flashes for about 120 seconds, accompanied by an audible signal.


Passenger seat belt not fastened/unfastened
On switching on the ignition, the warning lamp comes on when the passenger's seat belt is not fastened.
It goes out when the engine is running, doors closed, after 30 seconds.
Then it comes on, if the belt is not fastened, while the vehicle is moving at up to 20 km/h (approx. 12 mph).
Above 20 km/h (12 mph), the warning lamp flashes for about 120 seconds, accompanied by an audible signal.

Doors open detection
This warning lamp, when the engine is running, comes on if a door, the bonnet and/or the boot is open.

Front passenger's airbag deactivation warning lamp
(See "Safety").

Front/side airbag fault warning lamp
(See "Safety").

Anti-lock Braking System
The ABS warning lamp lights when the ignition is switched on and should go out after a few seconds.
If the warning lamp does not go out, there may be a system malfunction.

Diesel Preheater
Wait for it to go out before operating the starter.

SERVICE warning lamp
If it comes on, this indicates a fault with one of the systems that do not have a specific warning lamp.
See the radio "Log of alerts" to dis-cover the origin of the corresponding alert message.

Depollution system warning lamp
If it flashes or lights up while you are driving, this indica-
tes a depollution system operating fault.
Urgently consult a CITROËN Dealer.

Child safety warning lamp
If child safety is activated, this warning lamp comes on then goes out approximately 10 seconds after starting the engine.

DASHBOARD
1

ESP/ASR warning lamp In operation
When either the ESP or ASR system is brought into
operation, the ESP/ASR warning lamp flashes.
In the event of a problem
When the vehicle is moving, the lighting of the ESP/ASR warning lamp indicates that the system is malfunctioning.
Contact a CITROËN dealer.
Deactivation
Illumination of the ESP/ASR warning lamp and of the ESP control, means that the system is deactivated.

Fuel gauge and low fuel warning
When the tank is full, all the indicator bars are illuminated.
When the low fuel level war-
ning comes on, there remain around 7 litres of fuel in the tank and 2 or 3 bars of the gauge will flash.
If the last bar disappears, there are only around 2 litres of fuel in the tank.

"Foot-on-brake" starting warning lamp for (6 speed) Electronic Gearbox System
During the engine starting phase, this flashes if you are not pressing the brake pedal.
See "(6 speed) Electronic Gearbox System".
This warning lamp may flash in the instrument panel to remind you to apply the brake when engaging reverse gear.
To regenerate the filter, you are advised to drive, as soon as traffic conditions permit, at a speed of 60 km/h (40 mph) or more for at least 5 minutes (until the warning message disappears).
If this alert persists, consult a CITROËN dealer.
Observation: After prolonged idling or driving at very low speeds, you may occasionally notice water vapour being emitted from the exhaust when accelerating. This is of no consequence to the running of the vehicle or to the environment.
DIESEL PARTICULATE FILTER SYSTEM
Complementary to the catalytic converter, this filter makes an active contribution to the preservation of air quality by the retaining of the unburnt pollutant particles. Black exhaust fumes are thus no longer emitted.
Clogging of the particle filter

The SERVICE warning lamp and a message in the instrument panel are displayed indicating that
the particulate filter is starting to become clogged (exceptionally prolonged urban driving conditions: reduced speed, traffic congestion...).
Diesel fuel additive level

If the additive level is low, a message appears in the multifunction screen, accompanied by
an audible signal and illumination of the SERVICE warning lamp: it is necessary to have the additive level topped up. Contact a CITROËN dealer as soon as possible.
DASHBOARD
MAINTENANCE INDICATOR
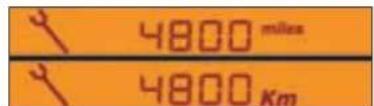
The maintenance indicator informs you when the next service is due, in conformity with the servicing programme detailed in the vehicle's Maintenance Guide. This information is determined depending on two parameters: the mileage travelled and the time elapsed since the previous service.
Operation
When the ignition is switched on and for several seconds afterwards, the maintenance spanner symbol appears; the total mileage recorder shows how many miles remain to be travelled before the next service is due (in thousands and hundreds of miles).
For example: you have the following distance left to travel before the next service:
text_image
4800 miles 4800 KmA few seconds afterwards, the total mileage display appears.

text_image
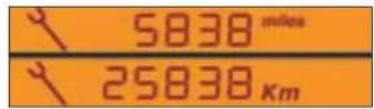
5838 miles 25838 KmFunctioning if the distance to the next service is less than 600 miles
Each time the ignition is switched on, and for five seconds, the maintenance symbol and the mileage will flash.
For example: you have the following distance left to travel before the next service: 900 km.
For five seconds on switching on the ignition, the display shows
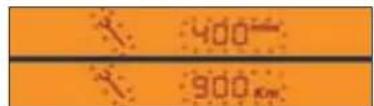
text_image
400 900 kmA few seconds afterwards, the total-mile lease display appears and the maintenance symbol remains illuminated. This signifies that the vehicle will be due for a service shortly.
text_image
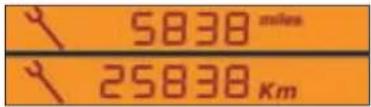
5838 miles 25838 kmDASHBOARD
Functioning if the service interval is exceeded
Each time the ignition is switched on, the maintenance symbol and the extra mileage travelled (with a minus in front) will flash.
For example: the preset service distance has been exceeded by 300 km. Your vehicle must be serviced as soon as possible.

text_image
-300 -300 RMWA few seconds after you have swit - ched on the ignition, the total mileage recorder returns to its normal operation and the maintenance symbol remains illuminated.
text_image
5830 miles 25830 KmMaintenance intervals
If your vehicle is used in particularly harsh conditions, it is necessary to select the maintenance schedules for "special operating conditions" (see the Maintenance Guide) which consist of more frequent services.

natural_image
Close-up of a transparent cylindrical object with a yellow arrow and number 1 pointing to it (no visible text or symbols)
Resetting the mileage indicator to zero
Your CITROËN dealer performs this operation after each service. However, if you carry out the servicing yourself, the procedure for resetting to zero is as follows:
- Switch off the ignition, then place the key on position S, steering lock.
- Press control 1 and keep it pressed.
- Switch on the ignition.
- Keep control 1 pressed until the zero appears and the maintenance symbol disappears.
- Switch off the ignition.
DASHBOARD
ENGINE OIL LEVEL INDICATOR
When the ignition is switched on, the oil level indicator is displayed for several seconds.

This display indicates normal operating.

A flashing of "OIL" indicates an oil level that is below the minimum. Check using the manual dipstick. Check the oil level with the vehicle on horizontal ground, the engine having been switched off for at least 15 minutes.

A flashing of "OIL --"Indicates a malfunction of the indicator. Consult your CITROËN dealer.
DASHBOARD LIGHTING
RHEOSTAT

text_image
Diagram showing two labeled parts (A and B) with decorative patterns and arrows, likely illustrating a process or design concept.The rheostat is active if the sidelamps are on and applies to:
- the instrument panel - the displays
The desired brightness is selected via control A or by pressing control B.
With control B, press until the brightness is at maximum. Release, press until you reach minimum.
DASHBOARD
1
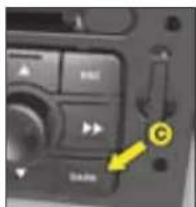
DARK BUTTON BLACK PANEL

natural_image
Close-up of a car dashboard with control buttons and a yellow arrow pointing to the right side (no visible text or symbols)After the first press on control only the top part of the display remains illuminated.
A second press on controlC triggers black panel mode.
(with headlamps on)
text_image
Close-up of a control panel interface with labeled buttons and a yellow arrow pointing to a button labeled 'C'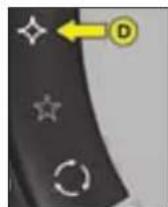
C, This function switches off certain of the displays, for night driving. It can be activated:
- either by 2 presses on control C
- or by 1 press on control D if this control has been programmed with the black panel function.
The instrument panel continues to show vehicle speed as well as the cruise control and speed limiter functions if these are activated.
If there is an alert or a modification of functions or adjustments, black panel is interrupted.
To programme control D:
- give a long press on control D,
- then select the black panel function on the multifunction screen using the arrowed buttons on your radio/CD or Navidrive system. Validate with a press on "OK".
Note: the dashboard lighting rheostat still operates in black panel mode.
MULTIFUNCTION DISPLAY
DISPLAY A

text_image
① 1900 ② 23 AUG 2008 ③ 25thPresentation:
1 - Time
2 - Date and Display zone
3 - Ambient temperature
If the outside temperature is between +3 °C and -3 °C, the temperature display flashes (risk of ice).
Note: The outside temperature displayed may be higher than the actual temperature if the vehicle is standing in bright sunshine.

text_image
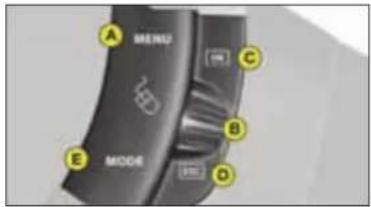
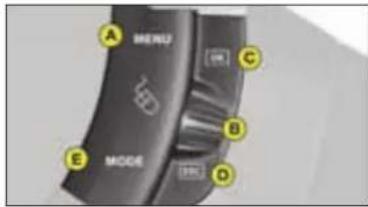
A MENU B MODE C D E
text_image
Control panel interface with labeled buttons and indicators, showing drive dials A through FControls:
A - Access to the "Main menu"
B - Scrolling in the display menus.
C - Validation and selection in the menus of the function chosen or the value modified
D - Cancellation of the operation or return to the previous display.
E - Selection of the type of information displayed in zone 2 (date, radio/CD and trip computer)
E or F - In the menus, choice of activation/deactivation of your functions and choice of your settings.
The driver is advised not to operate the controls when driving.
MULTIFUNCTION DISPLAY
||


text_image
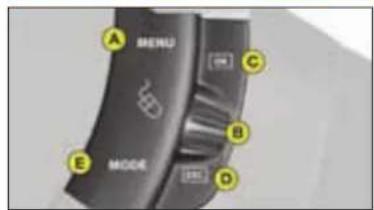
A MENU B C D E MODE
text_image
Control panel interface with labeled buttons and display screen, showing directional arrows for function keys A through F.Main menu
By pressing control A then B, you have access to the following functions:
• Radio-CD (See "Radio")
- Vehicle configuration, to activate/deactivate:
- Triggering of rear screen wipe
- Automatic guide-me-home lighting, with choice of duration
- Options, to display the alerts
- Display adjustments, to adjust the date and time on the display
• Languages, to select the display language
- Units, to access the choices of units of Temperature and Fuel Consumption
To activate/deactivate rear screen wipe on engaging reverse gear
- Press on A.
- Select, using B, the sub-menu to personalise-configure your vehicle, then confirm your choice by a press on C.
- Select rear screen wipe, using B.
- The system tells you whether the function is active/inactive. Modify this status by a press on E or F.
- Validate with a press on C.
To activate/deactivate automatic guide-me-home lighting
- Press on A.
- Select, using B, the sub-menu to personalise-configure your vehicle, then confirm your choice by a press on C.
- Select guide-me-home lighting, using B.
- The system tells you whether the function is active/inactive. Modify this status by a press on E or F.
- Validate with a press on C.
MULTIFUNCTION DISPLAY

text_image
A MENU B C D E MODE
text_image
Control panel interface with labeled buttons and display screen, showing directional arrows for functions A through F.To display the log of alerts
- Press on A.
- Using B, select the sub-menu for options. Confirm with two presses on C.
Note: You can cancel the start of the display by selecting E to abandon, validate with a press on C.
The alerts that have previously been signalled to you but not resolved, are recalled to you in a scroll. To delete the display of an alert, press D.
To adjust the date and time
- Press on A.
- Using B, select the sub-menu for Display Adjustments then validate with a press on C.
- Using B, select what you wish to modify: year, month, day, hour, minutes, or display mode.
- Make your adjustment by presses on E or F. You can continue your adjustments, selecting further parameters by pressing B. When you have finished your adjustments, press C.
To choose the language
- Press on A.
- Using B, select the sub-menu for Languages. Confirm your choice with a press on C.
- By presses on E or F, select the language of your choice then validate with a press on C.
To choose the units
- Press on A.
- Using B, select the sub-menu for Units. Confirm your choice with a press on C.
- Using B, select the unit you wish to modify (Temperature or Consumption).
- Via presses on E or F, select the unit of your choice, then validate with a press on C.
Note: This choice concerns all the types of information (fuel consumption, speed, etc.) that appear on the displays.
MULTIFUNCTION DISPLAY
DISPLAY C
text_image
1 2 3 30 EUROF 2 12:33 Tuesday 22 July 2009Presentation:
1 - Time.
2 - Ambient temperature
3 - Date and Display zone
If the outside temperature is between +3 °C and -3 °C, the temperature display flashes (risk of ice).
Note: the outside temperature displayed may be higher than the actual temperature if the vehicle is standing in bright sunlight.
The driver is advised not to operate the controls when driving.
text_image
A MENU B C D E MODE
text_image
Control panel interface with labeled buttons and display screen, showing directional arrows for functions A through FControls
A - Access to the "Main menu".
B - Scrolling in the display menus.
C - Validation and selection in the menus of the function chosen or the value modified.
D - Cancellation of the operation or return to the previous display.
E - Selection of the type of information you wish to see permanently displayed (date, radio-CD, trip computer) on the right of the screen.
Main menu
Press control A to display the "Main menu" for the multifunction screen. Using this menu, you have access to the following functions:

Radio-CD
(See "Radio")

Bluetooth hands-free kit
(See "Radio")

Trip computer
It allows:
- Distance to your destination.
- Access to log of alerts (list of the alerts that have been previously signalled).
- Access to status of functions, for example activation/deactivation of automatic lighting of head-lamps, ESP, windscreen wipers.
MULTIFUNCTION DISPLAY

Personalisation Configuration
It allows you to activate/deactivate:
- Triggering of rear screen wipe.
- Automatic guide-me-home lighting, with choice of duration.
- Driving headlamps.
Also to choose: - Brightness, the time, the date, units.
- The display language.
To activate/deactivate rear wipe on engaging reverse gear
- Press on A.
- Use B to select the trip computer icon, then confirm with a press on C.
- Select your entry of distance, using B. Confirm your choice with a press on C.
- To choose the distance, select the figure to be modified, using B, then confirm with a press on C.
- Use B to adjust the value then validate with a press on C.
- Validate on "OK" on the display.
To activate/deactivate automatic guide-me-home lighting
- Press on A.
- Use B to select the icon "Personalisation-Configuration" then confirm your choice with a press on C.
- Then select the sub-menu for vehicle parameters. Confirm your choice with a press on C.
- Using B, select lighting and signalling. Confirm your choice with a press on C.
- Then with a press on C, select/deselect guide-me-home lighting to activate or deactivate it. After activation, choose the duration: press on C then use B to select the duration and press on C.
- Validate on "OK" on the display.
To activate/deactivate the directional headlamps
- Press on A.
- Use B to select the icon "Personalisation-Configuration" then confirm your choice with a press on C.
-
Then select the sub-menu for vehicle parameters. Confirm with a press on C.
-
Using B, select the driving assistance. Confirm your choice with a press on C.
- Then with a press on C, select/deselect driving headlamps to activate or deactivate them.
- Validate on "OK" on the display.
To adjust the display brightness
- Press on A.
- Use B to select the icon "Personalisation-Configuration" then confirm your choice with a press on C.
- Select the display configuration using B. Confirm with a press on C.
- Select the adjustment of brightness. Confirm with a press on C.
- Use B to select normal or other display mode, then validate with a press on C. To adjust the brightness, select the symbols "+" or "-" and confirm your adjustment with a press on C.
- Validate on "OK" on the display.

MULTIFUNCTION DISPLAY
||

text_image
A MENU B MODE C D E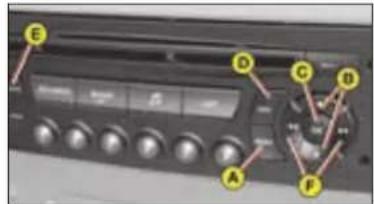
text_image
Control panel interface with labeled buttons and display screen, showing directional arrows and labels A through FTo adjust the date and time
- Press on A.
- Use B to select the icon "Personalisation-Configuration" then confirm your choice with a press on C.
- Select the display configuration using B. Confirm with a press on C.
- Select the date and time adjustment, using B, then confirm with a press on C.
- Use B to select the values to be modified. Confirm with a press on C.
- Make your adjustments using B, validating each adjustment with a press on C.
- Validate on "OK" on the display.
To choose units
- Press on A.
- Use B to select the icon "Personalisation-Configuration" then confirm your choice with a press on C.
- Select the display configuration using B. Confirm with a press on C.
- Then select the sub-menu for Units. Confirm with a press on C.
- Using B, select the unit to be modified (Temperature or Consumption) then validate with a press on C.
- Validate on "OK" on the display.
Note: This choice concerns all the types of information (fuel consumption, speed, etc.) that appear on the displays.
To choose the language
- Press on A.
- Use B to select the icon "Personalisation-Configuration" then confirm your choice with a press on C.
- Select the choice of language, using B.
- Using B, select the desired language and validate your choice with a press on C.
- Validate on "OK" on the display.
MULTIFUNCTION DISPLAY
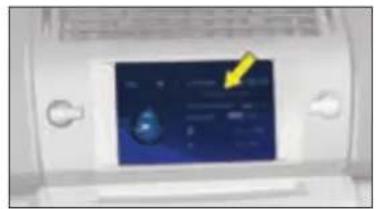
NAVIDRIVE DISPLAY
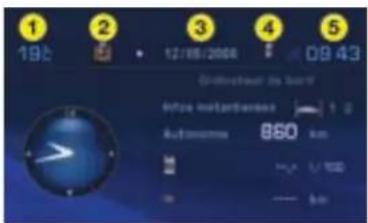
text_image
1 19:0 2 12/06/2006 3 4 09:43 Schweizahl am band Intrate Netherlands Automotive 850 km 850 U 1000 50 500Presentation:
1 - Ambient temperature
2 - Directory
3 - Date
4 - Telephone
5 - Time
If the outside temperature is between +3 °C and -3 °C, the temperature display flashes (risk of ice).
Note: The outside temperature displayed may be higher than the actual temperature if the vehicle is standing in bright sunshine.
The driver is advised not to operate the controls when driving.

text_image
A MENU B C D E MODE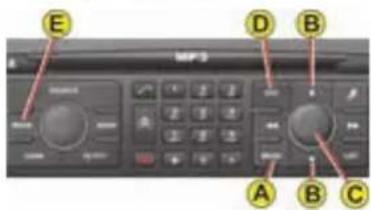
text_image
E D B A B CControls
A - Access to the "Main menu".
B - Scrolling in the display menus.
C - Validation and Selection in the menus, of the function chosen or value modified.
D - Cancellation of the operation or return to the previous display.
E - Selection of the type of information you wish to see permanently displayed (date, radio-CD, trip computer) on the right of the screen.
Main menu
Press control A to display the "Main menu" for the multifunction screen.
This menu gives access to the following functions (See "Navidrive" instructions):

Navigation/guidance

Map

Traffic information

Audio

Audio

Configuration, for adjusting various parameters (date, time, units)

Video

Vehicle diagnosis

MULTIFUNCTION DISPLAY
TRIP COMPUTER
||

natural_image
Close-up of a black handheld device with control buttons and a yellow arrow pointing to the right (no readable text or symbols)To obtain display and selection of the different types of information, give short presses on the end of the windscreen wiper stalk.
To reset trip computer information to zero, press continuously for a few seconds on the end of the stalk when one of the information types is displayed.

text_image
1900 25 300 mDisplay A
The trip computer provides 5 types of information, which can be accessed by pressing successively on the end of the control stalk.
- Range
• Instantaneous fuel consumption
• Distance travelled
• Average fuel consumption
• Average speed
To cancel the display of the trip computer information press a sixth time
text_image
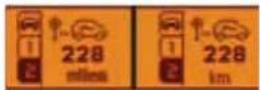
Digital display screen showing a blue interface with a yellow arrow pointing to it, likely indicating a measurement or status.Display C or NaviDrive
3 types of instantaneous information:
- Range
- Instantaneous consumption
- Distance remaining to be travelled
It also gives you access to 3 types of information for two Journeys 1 and 2:
- Distance travelled
- Average consumption
- Average speed
MULTIFUNCTION DISPLAY
Display C or NaviDrive (continued)
The journeys
Journeys 1 and 2 are identical but independent of each other. For example, you can use Journey 1 for daily calculations and Journey 2 for monthly calculations.
To reset a journey to zero
When the desired journey is displayed, give a long press on the end of the wiper stalk.
Permanent display
Pressing the "Mode" button causes the trip computer information to be displayed permanently.
Enter the distance to be travelled
- Press A.
- Using B select the trip computer icon, then validate by pressing C.
- Select distance entry, using B. Validate your choice by pressing C.
- To choose the distance, select the figure to be modified using B then validate using C.
- Using B, adjust the value then validate using C.
- Validate with "OK" in the display.
To display the log of alerts or status of functions
- Press A.
- Using B select the trip computer icon, then validate by pressing C.
- Select the log of alerts or status of functions.
- Once the list is displayed, scroll through the list using B.
- Press D to return to the permanent display.
text_image
A MERU B MODE C D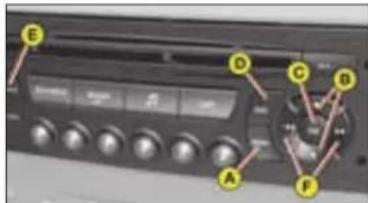
text_image
Control panel interface with labeled buttons and indicators, showing a display and rotary dial with yellow connectorsMULTIFUNCTION DISPLAY
Display A Display C or NaviDrive
Range


This indicates the mileage that can still be travelled using the fuel remaining in the tank.
When the distance remaining to be travelled is less than about 25 km (approx. 15 miles), only three dashes are displayed.
After resetting the computer, the indication of remaining range is only reliable after the vehicle has been used for a certain time.

Average fuel consumption
The average fuel consumption is calculated from the last reset of the computer.

Instantaneous fuel consumption
This is calculated from consumption over the previous 2 seconds. This function is only available when travelling at over 30 km/h (approx. 20 mph).
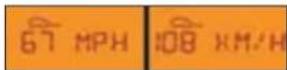
Average speed
The average speed is obtained, from the last reset of the computer, by dividing the distance covered by the time taken (ignition on).

Distance travelled
It indicates the distance travelled since the trip computer was last reset to zero.
Distance remaining
See previous page.
(continued)


40

COMFORT
VENTILATION
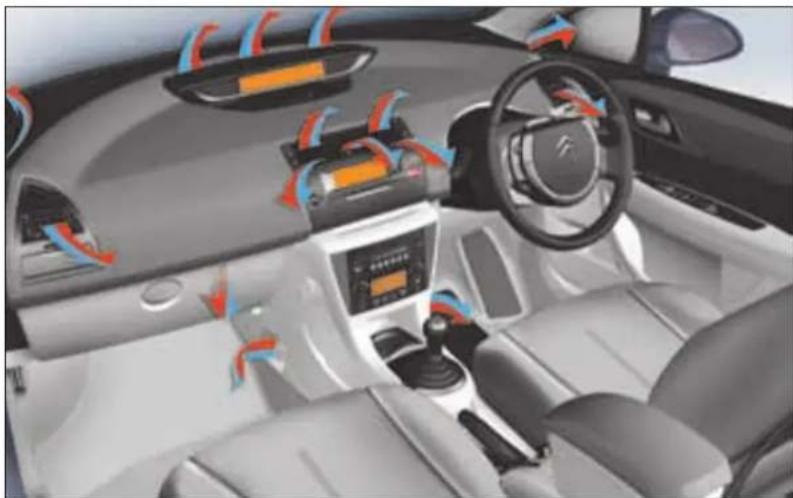
natural_image
Interior view of a modern car with visible fuel efficiency indicators and dashboard (no text or symbols)Air intake
Make sure that the exterior air inlet grille at the base of the windscreen is clean (free of dead leaves, snow etc.).
If washing the vehicle with a high pressure jet, take care to avoid targeting close to the air inlet.
Air vents
The air vents have grilles for directing the flow of air (up/down, right/left) with controls for adjusting the volume of air.
Air circulation
Optimal comfort is obtained by a good distribution of air in the front and the rear of the passenger compartment.
To ensure efficient operation, take care not to obstruct the air outlets located under the front seats.
Pollen filter/odour filter (active carbon)
Your installation has a filter for excluding dust and restricting disagreeable odours.
This filter needs to be changed according to the maintenance requirements. (See: Maintenance Guide).
COMFORT
III
Air conditioning
At any time of year, the air conditioning is useful for removing air humidity and misting.
To keep the air conditioning compressor well sealed, it is essential to operate the air conditioning at least once in every month.
To be effective, the air conditioning should only be used with the windows closed.
If you are towing a heavy trailer or if outside temperatures are very high, the air conditioning may be temporarily interrupted in favour of engine cooling.
Water arising from condensation in the air conditioning is allowed to drain out through an aperture provided for this purpose; a pool of water may thus form beneath the vehicle when stationary.
You are recommended to have the air conditioning system checked on a regular basis (see Maintenance Guide).
The air conditioning uses energy from the engine to operate. This results in extra fuel consumption
natural_image
Close-up of a metallic mechanical component with a yellow arrow pointing to a small feature (no text or symbols visible)Sensor
The automatic air conditioning inside the passenger compartment makes use of the sunlight sensor, which is located on the dashboard behind the instrument panel.
Take care not to obstruct it.
COMFORT
HEATING/VENTILATION
text_image
Control panel interface with numbered buttons and dials, likely for vehicle or system controlMANUAL AIR CONDITIONING

natural_image
Close-up of a car air conditioning control panel with dials and buttons (no readable text or symbols)The heating/ventilation and manual air conditioning systems can only function with the engine running.
1 - Adjustment of the air distribution

Demisting - Defrosting.
Flow to the windscreen and front side windows.

Distribution to the wind-screen, side windows and footwells.

Flow to front and rear passenger footwells.

Air flow to the face level vents.
Distribution from the air blower can be altered at will by placing the distributor 1 in an intermediate position.
2 - Air recirculation

This position is for excluding disagreeable odours or emissions coming from outside the cabin. With a
press on control 2, the entry of air from outside is closed off, the lamp comes on.
This should be cancelled as soon as possible to prevent misting and to allow fresh air into the cabin.
To deactivate air recirculation, press again on control 2, the warning lamp goes out.
3 - Heater blower control
The air blower operates only when the engine is running. For optimum comfort in the passenger compartment, the control should not remain in position 0 (position 1 minimum).
4 - Temperature control
COMFORT
5 - Rear screen demisting
Can only be operated with the engine running.
6 - Air conditioning
The air conditioning will only operate when the engine is running.

Demisting-deicing of the windscreen and front side windows
III

One press on control 5 activates the electric demisting of the rear screen and, according to version, the exte-
rior rear view mirrors. The warning lamp comes on.
It switches off automatically to avoid excessive consumption of power.
One press stops the demisting.
A further press starts it again.
Note: If the engine is stopped before the end of demisting, the latter will resume the next time the engine is started.

Press on control 6. The warning lamp comes on.
For air conditioning, the air
blower control 3 must not be on position "0".
Air conditioning is obtained by mixing the warm air with refrigerated air. The control for the blown air temperature 4 adjusts the air conditioning provided the control 6 is operational.
- Place the controls for temperature and air flow on maximum.
- Close the central air vents.
- Operate the air conditioning by pressing the control 6, the warning lamp comes on.
Note: you should not be in air recirculation.
COMFORT
AUTOMATIC AIR CONDITIONING

text_image
19.4°C 20.1°CThis system automatically regulates temperature, air flow and air distribution in the passenger compartment according to the temperature selected (for each side, right and left). It provides an optimum level of comfort regardless of the climatic conditions, by permanent use of the automatic air conditioning mode (press the AUTO button) and with all the vents open. Having no airflow prevents the air conditioning and the system in general from working.
1 - Automatic operation

This is the normal operating mode.

A press on this control, confirmed by the display of "A/C" and "AUTO", automatically manages all the 5 following
functions according to the temperature chosen:
- Flow of air.
- Cabin temperature.
- Distribution of air.
- Air conditioning.
- Recycling of air.
To enable the system to operate, all the air vents should be kept open.

2 - Adjustment of temperature on left hand side

3 - Adjustment of temperature on right hand side

To display the desired temperature, rotate control 2 or 3:
- To the left to lower the temperature - To the right to raise the temperature The difference between the temperatures on the right and on the left cannot be greater than 3.
An adjustment around 21 will provide a temperature that is comfortable. Depending on your requirements, an adjustment between 18 and 24 is normal.

The display HI (high) corresponds to a demand for maximum heating (above 27).
To prevent misting of the interior of the vehicle in cold and damp conditions, the use of AUTO mode is recommended.

The display LO (low) corresponds to a demand for maximum air conditioning (below 15).
III
COMFORT
Notes:
- When you enter the vehicle, the temperature inside the vehicle may be much colder (or warmer) than a comfortable temperature. It is no use modifying the displayed temperature to try to attain the desired level of comfort. The system automatically strives to compensate this temperature discrepancy as rapidly as possible.
- When starting the engine from cold, in order to avoid distributing too much cold air, the blower will attain its optimum level gradually.
Manual recalling of one or more functions
All the functions 4, 6 and 7 can be adjusted manually.
Display of the function "AUTO" then disappears.
4 - Air conditioning 6 - Adjustment of the air

To stop the air conditioning, press on the control 4. The symbol "A/C" disappears.
To restart it, press again on
the control 4. The symbol "A/C" displays.
5 - Air recirculation

When you press on control 5, the entry of air from outside is blocked off and the associated symbol is displayed.
This function can also be accessed by pressing the appropriate button on the steering wheel.
While retaining the other settings, this position excludes disagreeable odours or emissions coming from outside. It should be cancelled as soon as possible to prevent misting and to allow fresh air into the cabin.
To deactivate the air recirculation, press again on control 5.
distribution

Press the button successively so that the display shows, in turn, the air flow to:

The windscreen and front side windows.

The windscreen, front side windows and passenger footwells.

Passenger footwells.

Central and lateral air vents and passenger footwells.

Central and lateral air vents.
COMFORT
7 - Air flow
Heater blower speed: press button:

To increase it

To decrease it.
The level of air flow is represented on the display by the progressive filling of the fan blades.
A press on the control 7 deactivates the function "AUTO". To restart it, press again on the control AUTO.
Note: to avoid condensation and poor air quality in the passenger compartment, it is recommended always to maintain a sufficient flow of air.
8 - Demisting - deicing of the windscreen and front side windows
While it is operating, the warning lamp lights and the symbol appears on the display.
This control is for rapid deicing or demisting of the windscreen, acting automatically on the air blower flow, air distribution, air conditioning and air entry.
To stop it, press again on control 8 or on the control AUTO.
Note: you should not have air recirculation selected.
9 - Demisting - deicing of the rear screen

When this function is working, the warning lamp comes on and the symbol appears on the display.
This control is for rapid deicing or demisting of the rear screen.
It switches off automatically to avoid excessive consumption of power.
To stop it, press again on the control 9.
Press AUTO to return the system to its automatic function.
COMFORT
SCENTED AIR FRESHENER
III
natural_image
Close-up of a car air conditioner unit with a yellow arrow pointing to the button (no visible text or symbols)The scented air freshener is located to the right of the central air vent. You can stop or adjust the flow of scented air, via control 1.
natural_image
Black plastic mechanical component with a yellow circular marker labeled 'A' (no text or symbols on the object itself)To remove the cartridge, take the cap A off the new cartridge that you will fit and put it on the cartridge you are removing.
natural_image
Close-up of a black plastic device with a yellow circular marker labeled 'A' pointing to it, no visible text or symbols on the device itself.To remove the cartridge, take the cap A from your new cartridge and place it in the small orifice of the cartridge you are removing. Pull.
The central air vents should be open.
The cartridges need replacing from time to time.
As a matter of safety, use the scented air freshener and cartridges only for the purpose intended, in conformity with the user instructions.
Keep the cartridge packaging together with the user instructions and precautions.
Do not dismantle the cartridges.
Do not touch the scent mesh.
Never try to refill the scented air freshener or the cartridges with a freshener other than those approved by CITROËN.
Keep these items away from children and animals.
Avoid them coming into contact with the skin or eyes.
In the event of ingestion, consult a doctor and show him the packaging or the label.
Do not install, remove or adjust a cartridge while driving.
COMFORT
FRONT SEATS
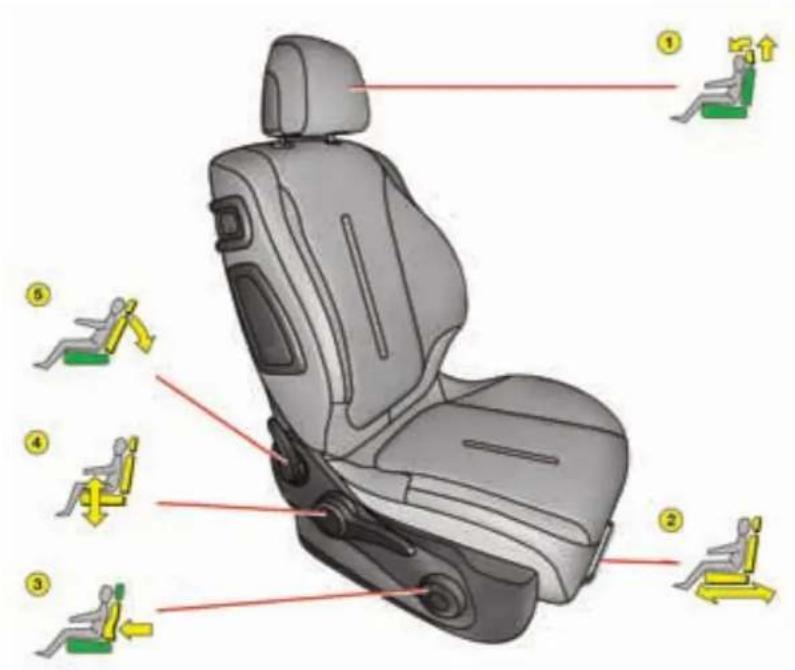
text_image
Diagram of a car seat with numbered instructions for lifting exercise, including seat numbers and movement icons.
natural_image
Car seat with a black belt buckle and a small inset showing a robotic arm (no text or symbols)COMFORT
Manual adjustments
III

Head restraint
To raise, pull upwards. To lower, press on the unlocking button and on the head restraint. The adjustment is correct when the upper edge of the restraint is level with the top of your head. The head restraint is also angle-adjustable.
To remove, press on the unlocking button and pull upwards.
Note: Never drive the vehicle without the head restraints fitted.

Lumbar support
Turn the control to adjust the seat to the desired position.
Driver's seat height
Raise or lower the control the number of times required to obtain the desired position.

Backrest angle
Use the control A to adjust the back-rest angle.
It is possible to recline the backrest to an angle of 45^ by tilting it until it locks; press the control to unlock.
Reach
Lift the control bar and adjust the seat to the desired position.

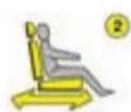
Access to the rear seats
To access or exit the rear seat positions, tilt the control 6 towards the front to fold the front seat back-rest and slide the front seat forwards.
Afterwards the front seat will revert to its initial position.
Make sure that the seat is securely locked in place.
COMFORT

natural_image
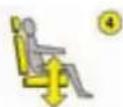
Two electronic components with numbered labels (1 and 2) on their surfaces, no visible text or symbols.Electrically operated adjustments
① Adjustment of seat height, angle and reach
② Adjustment of backrest angle and lumbar support

Raise or lower the front of control 1 to make the front of the seat cushion higher or lower.

Raise or lower the rear of control 1 to make the seat higher or lower.

Action control 1 to the front or to the rear to move the seat forward or back.

Push the top of control 2 forward or back to adjust the backrest angle.

Raise or lower control 2 to increase or decrease the lumbar support.

natural_image
Close-up of a car interior panel with a small logo (no readable text or symbols)Heated seats
The front seats can be heated independently. Use the controls placed on the sides of the seats, turning them to select one of three heating levels:
0: Off.
1: Gentle heat.
2: Medium heat.
3: Strong heat.
The seat temperature will adjust accordingly.
Note: The heated seats will only operate when the engine is running.
Note: The seats can still be moved on a temporary basis:
- when opening one of the front doors.
- after switching off the ignition.
III

text_image
M 2 1Memorisation of driving positions
You have the possibility to memorise two driving positions, via the buttons M/1 and M/2.
COMFORT
Memorisation using the buttons
To memorise, using the buttons located on the side of the seat:
- turn the ignition key to the drive position,
- adjust your seat and your exterior rear view mirrors,
- press on button M then immediately on button 1 "first driving position" or on button 2 "second driving position".
The memorisation is recognised by an audible signal. Memorising of a new position cancels the previous one.
Recall of a memorised driving position
Vehicle stopped (ignition on or engine running)
- Press briefly on button 1 or 2 to recall the corresponding memorised position.
Note: after five consecutive recalls of a memorised position, this function will be deactivated until the engine is started.
Vehicle moving
- Keep button 1 or 2 pressed to recall the corresponding memorised position.
COMFORT
REAR SEATS

natural_image
Interior view of a modern office or retail space with a rectangular box and chair (no visible text or symbols)Rear armrest
- Lower the rear armrest to improve your comfort.
- Lift the cover for access to its storage box.
This can contain a storage box, two cup holders and two pen holders.


Rear head restraints
The rear head restraints have two positions:
- A low stowed position when the seat is not occupied.
- A raised position to optimise the safety of the passenger, by raising it to its stop, including when used with a forward facing child seat.
To lower the head restraints, press on the unlocking controls.
To remove them, pull upwards as far as permitted, then press on the un-locking controls.
Note: Never drive the vehicle without the head restraints fitted.

natural_image
Close-up of a car head panel with numbered annotations (1 and 2) pointing to specific parts, no visible text or symbols beyond labels.Folding the seat cushion
- raise the front of the seat cushion,
- tilt it towards the front seats.
When repositioning the seat base, make sure that the seat belt buckles are back in place.
Note: When you fold a rear seat cushion, you should also fold the corresponding backrest.
Before folding the seat
Before tipping the rear seat, make sure that the seat belts will not be snagged or trapped by the seat and its catches.
Position them carefully to the sides of the backrests.
III

natural_image
Close-up of a black rectangular object with a yellow arrow pointing to it, labeled 'A' (no text or symbols on the object itself)Folding the backrest
Stow the head restraints.
Press on control A located on the extremity of the backrest and tilt fully forwards.
When returning the seat backrest to the normal position, ensure that it locks into place: the red warning indicator, located on the control, must not be visible.
COMFORT
natural_image
Interior view of a modern office or cinema space with white furniture and a person standing in the background (no visible text or symbols)When you are handling the rear seats, avoid trapping the seat belts and make sure that the belt buckles are positioned correctly.
natural_image
Close-up of a metallic surface with two yellow directional arrows indicating movement or force (no text or symbols)Removing the seat base
To improve seating versatility, the rear seats are removable.
Detach one of the linkages from its securing point, then disengage the other linkage to remove the seat assembly.
COMFORT
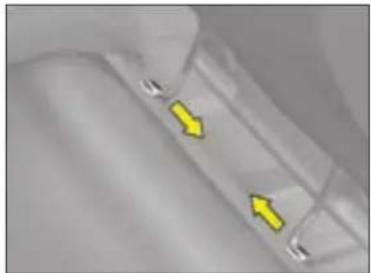
DOOR MIRRORS
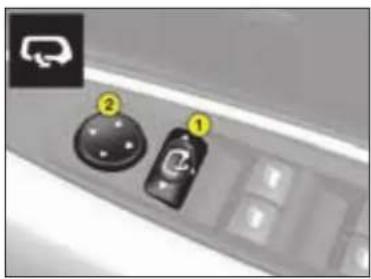
text_image
Control panel interface with labeled buttons and icons, showing a dial indicator and connector iconAdjustment of rear view mirrors
Functions with ignition switched on. From the driver's position, select the rear view mirror via the control 1, then adjust in the four directions by moving the control 2.
Deicing of rear view mirrors is coupled with electric demisting of the rear screen.
Fold-back of door mirrors
When the vehicle is parked, the door mirrors can be folded back either manually or electrically.
Electric fold-back
From the central position, one press towards the rear on control 1 folds the rear view mirrors back.
To return them to the initial position, press again on the control towards the rear.
Automatic electric fold back
Automatic fold-back operates when you lock the doors with the remote control.
The opposite movement applies when you unlock the doors, except if you operated fold-back before switching off the ignition.
Note: Automatic fold-back of the rear view mirrors can be deactivated. Consult your CITROËN dealer.
Automatic tilting of mirrors when reversing
This function automatically gives you a view of the ground while reversing the vehicle.
Activation
With the engine running:
- Select the rear view mirror using control 1.
- Engage reverse gear, the mirror glass automatically positions itself to improve your vision of the pavement.
- If necessary, adjust the mirror to your preference using the electric control 2.
Deactivation
To deactivate the function, move control 1 to the central position.
III
INTERIOR REAR VIEW MIRROR
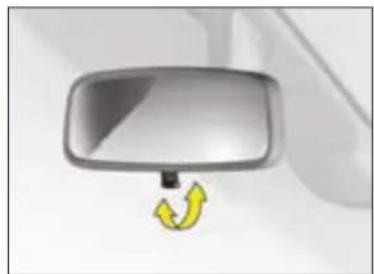
natural_image
Close-up of a car front mirror with a yellow curved arrow pointing to the side (no text or symbols)Manual interior mirror
The lever on the lower edge enables you to place the rear view mirror in either of two positions:
Day position: the lever is not visible.
Night position (antidazzle): the lever is visible.

natural_image
Close-up of a metallic rectangular device with a small inset showing a light beam or beam path (no text or symbols visible)Automatic photochromic interior rear view mirror
This provides an automatic and progressive changing between day use and night use.
To avoid causing dazzle, the mirror automatically becomes darker depending on the intensity of light coming from the rear. It becomes lighter as soon as brightness diminishes, thus ensuring optimal vision.
To operate
Switch on the ignition and press control 1.
- Warning lamp 2 on: automatic mode.
- Warning lamp 2 off: automatic mode stopped. The mirror remains in its lightest definition.
Note: for optimal vision, the mirror lightens automatically when reverse gear is engaged.
STEERING COLUMN ADJUSTMENT

natural_image
Interior view of a car dashboard with steering wheel and steering wheel (no visible text or symbols)Both the height and reach of the steering wheel can be adjusted.
With the vehicle at rest, first adjust the seat to the most suitable position, then adjust the position of the steering wheel.
Adjustment
Unlock the steering by pulling the control towards you.
Adjust the steering wheel position then lock by pushing the control fully downwards.
If you press firmly downwards on your steering wheel after locking, you may hear a slight click. The steering is then in its definitive position.
As a safety measure, do not adjust your driving position while driving.
ACCESS
KEYS

natural_image
Close-up of a black key with a metallic handle and engraved logo (no text or symbols visible)The key operates all the vehicle's locks as well as the ignition.
Note: For safety reasons, a buzzer will sound if you have switched off the ignition and opened the driver's door without previously removing the ignition key.
The key is used to deactivate the passenger's front airbag (see "Safety").

Advice
For any modification concerning the keys it is essential to contact a CITROËN dealer taking all of the keys in your possession with you.
Central locking using the key
A brief action with the key locks the vehicle.
Central deadlocking using the key
A second action straight away with the key deadlocks the vehicle. It is then impossible to open the doors from either inside or outside the vehicle.
A long action with the key closes the windows.
Note: With the vehicle stationary and the engine switched off, locking is signalled by the flashing of the interior locking control warning lamp.
If any of the doors, or the boot, is open or not properly closed, central locking does not operate.
Electronic immobiliser
The key contains a coded electronic chip. When switching on, the code must be recognised to allow the engine to be started.
This electronic immobiliser locks the engine management system a few seconds after switching off the ignition, and prevents unauthorised starting of the engine.
If the key is not recognised, starting is not possible.
If this occurs, leave your vehicle immobilised and contact a CITROËN dealer.

It is dangerous to deadlock the vehicle when someone is inside as unlocking from the interior is impossible (without the remote control).
In the event of loss of the keys go to a CITROËN dealer with proof of ownership of the vehicle.
The CITROËN dealer network will be able to recover the key code and the transponder code to order replacement keys.
IV

text_image
B C A D EC B/SCentral unlocking
A short press on button B unlocks your vehicle.
This operation is confirmed by the rapid flashing of the direction indicators and the lighting of the interior lamp (if the function is activated). It can also deploy the exterior rear view mirrors.
ACCESS
Central locking, closing windows, deadlocking
- A short press on button A locks your vehicle.
- A long press on buttonA locks your vehicle and closes the windows.
This operation is confirmed by the direction indicators illuminating for approx. two seconds and by the interior lamp switching off. This also folds the exterior rear view mirrors.
If any of the doors, or the boot, is open or not properly closed, central locking does not operate.
For vehicles equipped with dead-locking, two successive presses on button A deadlocks the vehicle.
It is then impossible to open the doors from either inside or outside the vehicle.
Note: The simultaneous use of other high frequency equipment (mobile telephones, domestic alarms...) may momentarily hinder the operation of the remote control.
In the event of a permanent fault, the remote control should be reinitialised. (See next page).

It is dangerous to deadlock the vehicle when someone is inside as unlocking from the interior is impossible (without the remote control). When closing the windows using the remote control, the user should make sure that nobody is obstructing the windows from shutting properly.
ACCESS
Guide-me-home lighting
A press on button C operates the guide-me-home lighting (illumination of the sidelamps and dipped beams for approx. one minute).
A second press prior to the end of this timing cancels the guide-me-home lighting.
Locating of the vehicle
To locate the vehicle in a carpark, press button A, the interior lamps come on and the direction indicators flash for a few seconds. The vehicle remains locked.
Folding and ejection of the key
Button D is for folding and ejecting the key from its housing in the remote control.
If you do not press on button D, you could damage the mechanism.
Take care not to place the remote control in contact with grease or dust, or leave it in the rain or in a damp environment.
A hard object also on the key ring, pressing on the key while it is in the ignition, can cause a malfunction.
Changing the remote control battery
Unclip the cover to gain access to the battery.
Battery: CR 0523: 3 V.
Re-initialisation of the remote control
After a change of battery, it is necessary to re-initialise the remote control. To do that, switch on the ignition and immediately action button A on your remote control to trigger the action desired. This may take some ten seconds.
Do not throw away the old batteries. They should be returned to the CITROËN dealer or deposited in a recognised recycling facility.
Except when reinitialising, the remote control cannot function while the key is in the ignition, even when switched off.
Warning: By inadvertently actioning the remote control, when for example it is in your pocket, you can unlock the vehicle without your realising it.
However, if no door is opened with 30 seconds of unlocking, the vehicle locks itself again automatically, without arming the alarm.
Warning: There is a risk of damage if the replacement battery is not the correct one.
Only use batteries that are identical or equivalent to those approved by CITROËN.
ACCESS
ANTI-INTRUSION ALARM

text_image
OFF Print OFF ESP OFFYour vehicle may be equipped with an anti-intrusion alarm.
This ensures:
• Exterior perimeter protection by means of detectors on the access points (doors, tailgate, bonnet) as well as on the electrical supply.
- Interior volumetric protection by means of ultrasonic sensors (detecting movement inside the passenger compartment).
This can be deactivated using control 1.
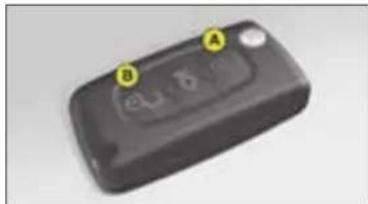
text_image
A B eL1.6The installation also includes a siren and a warning lamp 2 visible from the outside, indicating the three possible alarm statuses:
- Alarm not armed (not on standby), warning lamp off.
- Alarm armed (on standby), the warning lamp flashes slowly.
- Alarm triggered (signalling an intrusion), the warning lamp flashes rapidly if the alarm is disarmed with a press on button B. It stops flashing as soon as you switch on the ignition.
Note: in the event of a malfunction, the warning lamp 2 comes on continuously.
Arming the alarm using the remote control
Switch off the ignition and leave the vehicle.
Ensure that all doors and the boot are closed.
Lock the vehicle using button A on the remote control.
When the alarm is armed, the protections become active within 5 seconds (perimeter) and 45 seconds (volumetric).
Triggering
Provided the alarm is armed, any intrusion triggers the siren for 30 seconds, accompanied by the illumination of the direction indicators.
The alarm then reverts to armed status, but the deployment remains memorised and is signalled by the rapid flashing of the alarm warning lamp 2 when you press the unlocking button B. The flashing stops when you switch on the ignition.
The siren is also triggered if there is a cutting of the electrical supply. To stop it, restore the electrical supply then give a press on the unlocking button B.
ACCESS
Disarming the alarm using the remote control
The alarm is disarmed when you unlock the vehicle (by pressing button B on the remote control).
Disarming the alarm using the key
Unlock the doors with the key. The siren is triggered. Enter the vehicle and switch on the ignition to stop the siren. Otherwise the siren will continue for about 30 seconds.
Deactivation of volumetric detection
The alarm is able to operate with only perimeter protection if you deactivate the volumetric protection (if for example you wish to leave an animal in the vehicle).
To do this, switch off the ignition, then press immediately on control 1 for at least one second.
The warning lamp 2 should be on permanently. It will start to flash when the alarm activates.
Arm the alarm by locking your vehicle using the remote control.
Automatic activation (depending on country)
The alarm arms automatically 2 minutes after the boot or the last door is closed.
In order to prevent the alarm then being triggered by a door or the boot being opened, it is essential to press again on the unlocking button B on the remote control.
Note:
- If you wish to lock your vehicle without arming the alarm, just lock the vehicle with the key.
• If you try to lock your vehicle when a door or the boot is still open, the central locking will not operate, but your alarm becomes armed after approx. 45 seconds.
Note: the siren is automatically disarmed (for example if you need to disconnect the battery) immediately after you unlock the vehicle using the remote control.
ACCESS
WINDOWS

natural_image
Close-up of a computer mouse control panel with three black buttons and a yellow indicator arrow pointing to the button (no text or symbols visible)Electric windows
The driver uses the controls located on the door to operate the vehicle's electric windows.
Note: the electric windows can also be operated for a limited time after the ignition has been switched off (including after the front doors have been opened).
Sequential electric window controls
There are two operating modes:
manual mode
Press or pull the control switch, without going beyond the point of resistance. The window stops on release of the control switch.
automatic mode
Press or pull the control switch beyond the point of resistance. The window opens or closes completely on release of the control switch.
Pressing or pulling the switch again stops the movement of the window.
Anti-pinch device
An anti-pinch device stops the window from rising. If it meets an obstacle, it goes back down.
After a battery disconnection or in the event of a malfunction, you have to re-initialise the anti-pinch function:
- Lower the window fully using the control, then close. It will rise only a few centimetres.
- Press repeatedly on the control until the window is fully closed.
Warning: During this operation, the anti-pinch protection does not work.
ALWAYS PAY ATTENTION TO WHERE CHILDREN ARE WHEN OPENING OR CLOSING WINDOWS.
- Always remove the ignition key when leaving the vehicle, even for short periods.
- If the driver is operating the passenger's electric window control, the driver should ensure that no passenger is obstructing the window from closing.
- The driver should check that the electric windows are used properly by the passengers.
- Should there be any risk of a person becoming trapped by a window closing, you should immediately reverse the window movement. To do this, reverse the position of the control concerned.
ACCESS
Electric child safety

This allows from the front, deactivation of the opening of the rear doors and the use of the rear windows.
It is activated by means of a press on control A located on the electric windows control panel. The warning lamp in the instrument panel lights up for approx. 10 seconds.
Each time the ignition is switched on, the warning lamp comes on for approx. 10 seconds.
Opening of the doors from the outside and operation of the rear electric windows remain possible from the front of the vehicle.
DOORS
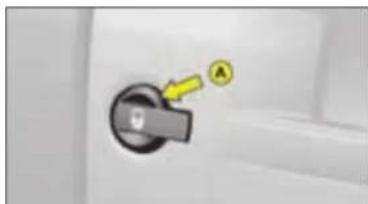
natural_image
Close-up of a door handle with a yellow arrow pointing to the handle area (no text or symbols visible)Locking the doors from the inside
With the doors closed, press button B once to operate the electric central locking and unlocking.
The doors can still be opened from inside.
The central locking will not operate if a door is open, or not properly closed.
The lamp on the control B can signal any of 3 statuses:
- It flashes if the doors are open when the vehicle is stationary, engine stopped.
- It lights up if the doors are locked and the ignition is switched on.
- It goes out if the doors are not locked.
Note: Control B is inactive if the vehicle has been locked with the remote control or with the key.
Personal security
When the vehicle is started, the system automatically locks the doors and tailgate as soon as you reach a speed of approx. 10 km/h (6 mph).
Note: If a door is opened, this door will automatically relock as soon as the vehicle reaches approx. 6 mph.
Activation/Deactivation of the function
After switching on the ignition, give a long press on the central unlocking button until a message is displayed.

If you decide to drive with the doors locked, remember that in the event of an accident this renders is more difficult for the agency services.
IV

natural_image
Close-up of a mechanical component with a highlighted section labeled B (no readable text or symbols)Manual operation
(emergency mode)
In the event of an electrical fault, it is possible to lock the vehicle's doors by actioning control C on each door.
With the door open, insert the end of a key or similar item into the aperture and turn.
Close the door.
After a repair, normal functioning resumes using either the unlocking control B, the remote control, or the key used in the driver's door.
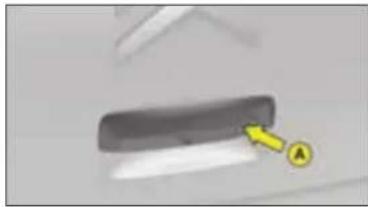
natural_image
Close-up of a dark rectangular object with a yellow arrow pointing to it, labeled 'A' (no text or symbols on the object itself)TAILGATE
Opening from the outside
Press upwards on lever 1 which is located between the number plate lamps.
Anti-theft security
In all cases, as soon as the vehicle is moving (at above approx. 10 km/h or 6 mph) the tailgate locks automatically. The tailgate unlocks when a door is opened or if the interior locking/unlocking button is pressed.
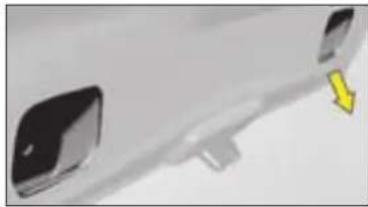
natural_image
Close-up of a white car front bumper with a yellow arrow pointing to the side (no text or symbols visible)Closing the tailgate
Lower the tailgate, using the 2 hand-hold zones located on the tailgate interior trim.
Removing your fingers, press down to close.
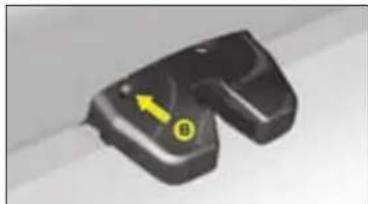
natural_image
Close-up of a black mechanical component with a yellow arrow and circular symbol (no text or labels visible)Emergency unlocking
If there is a problem with unlocking the tailgate, it can be unlocked from inside the boot:
- insert a screwdriver or similar tool into hole 2 of the lock,
- turn it in order to unlock the tailgate.
VISIBILITY
LIGHTING CONTROLS
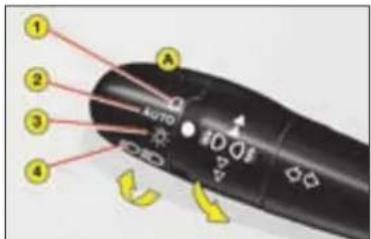
text_image
1 2 3 4 AUTO A 100 1001 Off
2 Automatic lighting
3 Sidelamps
4 Dipped beam/Main beam

All lighting off
Turn the barrel A forward.

Automatic lighting of headlamps
Sidelamps and dipped beams come on automatically in conditions of poor ambient light or when the wipers are in continuous operation.
They go out as soon as the light is once again sufficient or approx. 5 minutes after the wipers have stopped.
To activate this function, place control A on position 2.
Do not cover the brightness sensor, which is visible from the outside of the windscreen, behind the interior rear view mirror.
Turn the barrel A forward.

Sidelamps on
Turn the barrel A forward.

Dipped beams/ main beams on
Pull the stalk towards you to change from dipped beam to main beam and vice versa.
Lights left on
An audible warning signal is triggered on opening the driver's door, ignition off, to indicate that the vehicle's lights are still on.
It stops on closing the door, switching off the lights or switching on the ignition.
There is no signal if automatic lighting or guide-me home lighting is activated.
Guide-me-home lighting
This function leaves the headlamps on temporarily to assist your exit in low light conditions.
This function is activated:
- Manually by pulling the lighting stalk towards you, ignition switched off.
• Automatically, provided that:
- the automatic headlamp lighting has been activated,
- the guide-me-home lighting has been activated. For this, select in the "Main menu", then in "Personalisation-Configuration", the lighting and signalling sub-menu and then activate the function.
See "Multifunction displays".
Note: It is possible to modify the duration of the guide-me-home lighting (approx. 60, 30 or 15 seconds) in the menu "Personalisation-Configuration".
For display A the period is fixed (approximately 30 seconds)
V

text_image
0 10 01 BVehicles with front and rear foglamps (Ring B)
#00\$
They operate when sidelamps, dipped beams or main beams are switched on.
For a vehicle equipped with rear foglamps:
- 1st notch forwards: switches on rear foglamps.
- 1st notch rearwards: switches off rear foglamps.
For a vehicle equipped with front and rear foglamps:
- 1st notch forwards: switches on front foglamps.
- 2nd notch forwards: switches on rear foglamps.
- 1st notch rearwards: switches off rear foglamps.
- 2nd notch rearwards: switches off front foglamps.
Note:
The rear foglamps must only be used when visibility is severely reduced (fog, snow).
In conditions of poor visibility, if the ambient brightness does not trigger the automatic lighting, it is up to you to switch on your dipped beams manually, as well as your foglamps.

text_image
ESP OFF 1/0 DHEADLAMP ADJUSTMENT
You are advised to adjust the aim of the headlamps in accordance with vehicle load.
In the dashboard on the right hand side of the steering column.
- 1 or 2 occupants in the front seats.
-. 3 occupants.
1. 5 occupants.
- Intermediate position.
2. 5 occupants + maximum authorised load.
- Intermediate position.
3. Driver + maximum authorised load.
Note: vehicles equipped with Xenon headlamps have automatic headlamp adjustment.

VISIBILITY
SIGNALLING
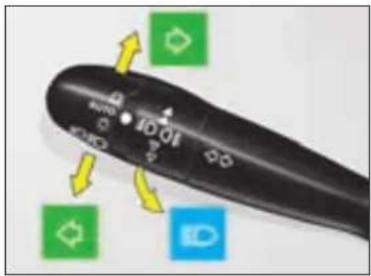
text_image
Close-up of a black remote control with labeled buttons and directional arrows indicating action or movement.Direction indicators
Left: move the stalk downwards.
Right: move the stalk upwards.
Movement of the steering wheel returns the stalk to the off position automatically.
Headlamp flash
Pull the stalk towards you to flash headlamps.
The headlamp flash operates even with the ignition off.
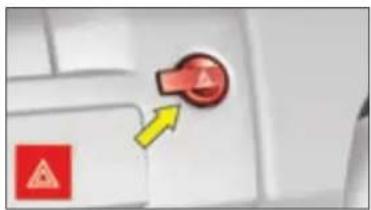
natural_image
Close-up of a computer keyboard with a red button and yellow directional arrow (no text or symbols visible)Hazard warning lamps
Simultaneous operation of the direction indicators.
Only use these if there is danger, for example when you have to stop suddenly or in unusual driving conditions.
They also operate without the ignition being on.
Driving with the hazard warning lamps on renders the direction indicators inoperable.
Emergency lighting of hazard warning lamps
Sudden vehicle deceleration automatically causes the hazard warning lamps to activate.
These cease automatically when you reaccelerate or manually if you press the hazard warning lamps control on the dashboard.


VISIBILITY
This function is associated with headlamps that have Xenon bulbs. Whether on dipped beam or main beam, your headlamps follow the direction of the road ahead.
Lighting quality when driving round bends is considerably improved.

natural_image
Nighttime photo of a car driving on a curved road with illuminated headlights and distant cyclists (no text or symbols visible)Function activated
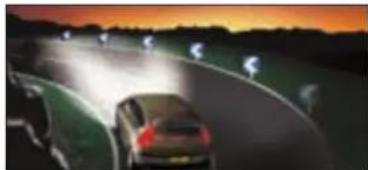
natural_image
Nighttime photo of a car driving on a curved road with illuminated headlights, no visible text or symbolsFunction deactivated
V
Activation/Deactivation
This can be activated/deactivated in the "Main menu". See "Multifunction displays".
See "Multifunction displays".
The status of the function is memorised on switching off the ignition.
By default, this function is in activated mode.
Note: At zero or very low speed, or in reverse gear, this function is inactive.
68
If there is a malfunction, the "Dipped beams" warning lamp flashes.
Have the system checked by a CITROËN dealer.
You are recommended to have both Xenon bulbs changed if there has been a malfunction in either of them.

VISIBILITY
SCREEN WIPE

text_image
Diagram showing a device with labeled parts and a switch icon, likely illustrating a mechanical or electrical component.Windscreen wiper stalk
2 Fast speed
1 Normal speed
I Intermittent
0 Off
AUTO Automatic wiping.
Position 1: The timing of the intermittent wipe adjusts automatically to the speed of the vehicle.
Position 1 or 2: when stationary, the windscreen wiper speed automatically reduces.
As a safety precaution, the wiper system is deactivated approx. 1 minute after the ignition has been switched off.
On switching the ignition back on, to reactivate the function:
- return to the Off position,
- change to the position desired.
Automatic wiping
AUTO position: press downwards to activate automatic wiping.
Press downwards: Automatic wipe activated.
Note: A press downwards triggers a single wipe, but without deactivating automatic wipe.
Deactivating automatic wiping
Go to position 1 then return to position 0.
WARNING:
Do not cover the rain sensor, which is visible from the outside of the wind-screen, behind the interior rear view mirror.
When washing the vehicle, switch off the ignition or deactivate automatic wiping.
V

text_image
AUTO+ A BA - Windscreen washer
To operate the windscreen wash, pull the wiper stalk towards you.
Screen wash is accompanied by a timed screen wipe, the headlamp wash also operates if dipped beams are switched on.
VISIBILITY
B - Rear screen wiper

To deactivate.

Intermittent rear wipe.

Timed rear screen wash/wipe.
Reversing
On engaging reverse gear, if the front wiper is on, the rear wiper starts.
Activation/deactivation of this function is possible in the menu "Personalisation-Configuration" of the "Main menu".
Deactivation of this function is necessary when a bicycle carrier is installed on the tailgate.
Changing the wiper blades
The wipers should be stopped in the maintenance position (during replacement).
Switch off the ignition and action the wipe stalk within one minute. The wipers will position themselves in the middle of the windscreen.
For this, switch off the ignition then, within one minute, action the wiper stalk. The wipers will position themselves to the centre of the windscreen.
For optimum wiping performance, replace the wiper blades as soon as they leave traces on the screen; otherwise change them once or twice per year (in spring and autumn, for example).
Always check that the windscreen and rear screen wipers can operate
freely, for example if fitting a bicycle carrier, or in freezing temperatures.
Remove any accumulation of snow from
the base of the windscreen.

VISIBILITY
INTERIOR LIGHTING
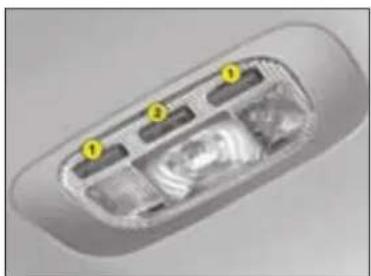
natural_image
Interior view of a car showing the dashboard and seat compartments (no text or symbols visible)1 - Spotlamps
A press on one of the buttons will switch the corresponding spotlamp on or off.
They will not come on if the ignition is switched off or the vehicle is in economy mode.
2 - Front and rear interior lamps

In this position, the interior lamp comes on when you open a door or the boot.

In this position, it is deactivated and switched off permanently.
In the front, the spotlamps are deactivated.

In this position, lighting is permanent.
Welcome lighting
Automatic lighting of interior lamps
- When you enter the vehicle: They come on immediately you unlock the vehicle or open a door. They go out 30 seconds after doors have been closed, or after the ignition has been switched on.
- When you leave the vehicle: They come on when you remove the ignition key (for about 30 seconds), or when a door is opened. They go out after 30 seconds with the doors closed, or immediately the vehicle is locked.


V

natural_image
Close-up of a car's front window with a yellow arrow pointing to the side panel (no visible text or symbols)Glovebox lighting
Comes on automatically when the cover is opened.
Do not forget to close it again. Does not work with the ignition off.
VISIBILITY
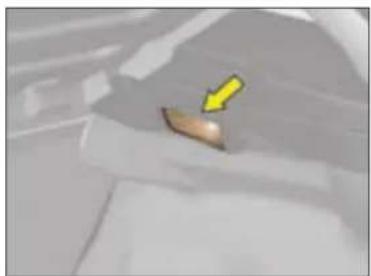
natural_image
Close-up of a car interior with a yellow arrow pointing to a small object on the surface (no visible text or symbols)Boot lighting
Operates automatically on opening the tailgate.

natural_image
Close-up of a white plastic container with a small yellow mark on top (no text or symbols visible)Sill lighting
These light up automatically with the interior lamps.
INTERIOR COMFORT
INTERIOR COMFORT

natural_image
Close-up of a kitchen handle with a circular knob and a highlighted button labeled 'A' (no text or symbols on the knob itself)Glovebox
To open, pull the handle and lower the lid.
The glovebox has:
- Storage locations for pens, spectacles, telephone cards, etc.
- Three sockets for connecting audio/video equipment.
- A ventilation nozzle A, which can be closed manually. It delivers the same air-conditioned air as the front and lateral air vents.

WARNING: As a safety measure, the glovebox must remain shut when the vehicle is in motion.
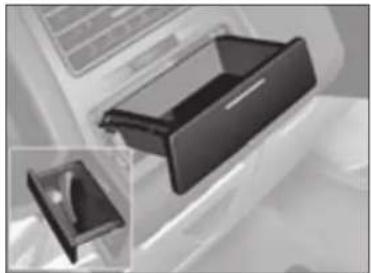
natural_image
Close-up of a black plastic door clip with an inset close-up view (no text or symbols visible)Storage drawers Floor mats
To open: press at the centre of the drawer.
To retrieve an object, lift the drawer up using the aperture provided.

natural_image
Close-up of a white plastic door with a dark rectangular opening (no visible text or symbols)Storage flap
To open: press at the centre.

natural_image
Close-up of a car's seat with arrows indicating motion direction (no text or symbols)If removing the mat on the driver's side:
- slide the seat as far as possible rearwards,
- completely undo the fixings,
- remove the fixings, then the floor mat.
When refitting, position the floor mat correctly and press the fixings firmly home.
Check that the floor mat is securely in position.
To prevent any hindrance under the pedals:
- use only the floor mats that are compatible with the fixings already present in the vehicle. It is essential to use these fixings.
- never fit any further floor mats on top.
INTERIOR COMFORT

natural_image
Close-up of a white plastic appliance with a curved handle and control panel (no visible text or symbols)Storage pockets in the front doors and rear panels
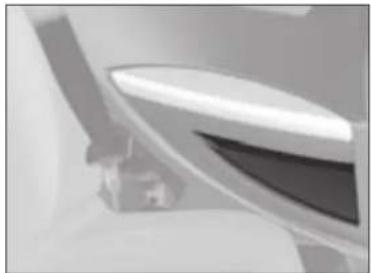
natural_image
Close-up of a mechanical component or tool with no visible text or symbols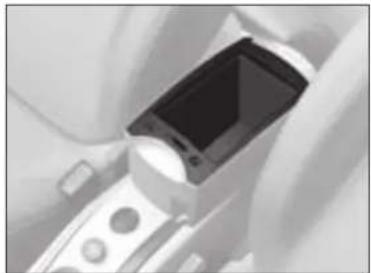
natural_image
Close-up of a medical or electronic device with a screen and buttons (no visible text or symbols)Oddments tray on front central console
VI
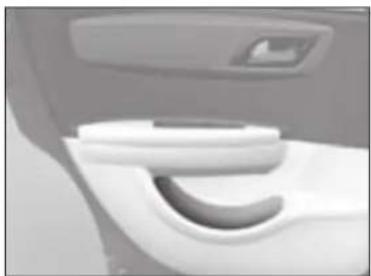
natural_image
Close-up of a white car interior showing the door, toilet handle, and seat (no text or symbols visible)Storage pockets

natural_image
Black diamond-shaped mesh pattern on a textured background (no text or symbols)74
c4_dd_chap-06_ed05-2008.indd 74 10/07/2008 13:42:30

INTERIOR COMFORT
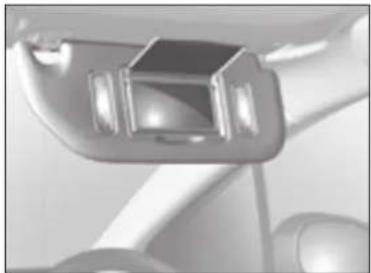
natural_image
Close-up of a car's rearview mirror and dashboard (no text or symbols visible)Sun visors
Fold visors down to avoid dazzle from ahead.
They can be disengaged from their central fixing and pivoted over to the side windows if required.
The passenger's and driver's sun visors each have a mirror that can be covered.
Sun visor with illuminated mirror
Illuminates automatically on opening the mirror cover flap (ignition on).

natural_image
Close-up of a white car interior with a rectangular button (no text or symbols visible)Glasses-holder Carrier bag hook
Toll payment/Parking windows
The heat-reflective windscreen includes a zone either side of the interior mirror base that allows optical reading of access badges (for a toll payment card, for example).
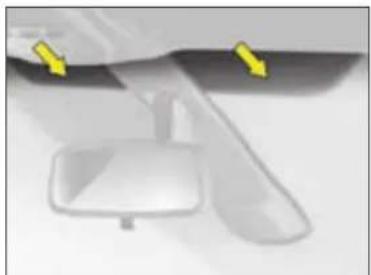
natural_image
Close-up of a mechanical component with two yellow arrows pointing to features (no text or symbols visible)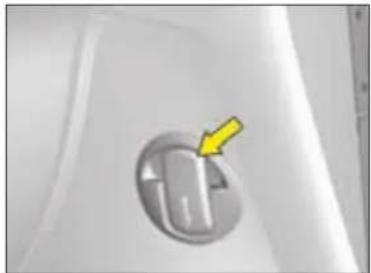
natural_image
Close-up of a metallic circular component with a yellow arrow pointing to it, no visible text or symbols.- Press at the bottom to deploy the hook.
- Press at the top to stow the hook.
Grab handles/
Coat hooks

natural_image
Close-up of a curved mechanical component or handle (no visible text or symbols)
INTERIOR COMFORT
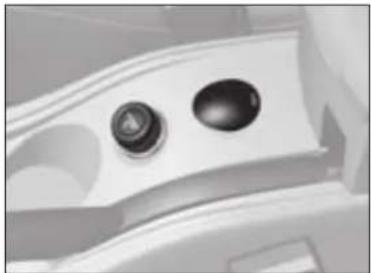
natural_image
Close-up of a car's dashboard and steering wheel (no text or symbols visible)Cigar lighter
Operates when the ignition is on. Push in and wait a few moments. The cigar lighter will release automatically. The cigar lighter will gradually emerge for easy removal.
12 V accessories socket
(Maximum power: 120 Watts) Operates when the ignition is on. It is located on the central console.

natural_image
Close-up of a mechanical lever mechanism with a yellow arrow pointing to the pivot point (no text or symbols visible)Ashtray
To open it, lift the flap. To empty the ashtray, lift at the rear and pull towards you.
To refit
Reposition the front part of the ashtray, then press on the rear part.
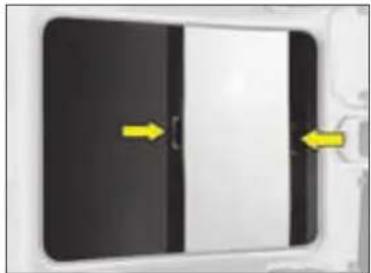
natural_image
Close-up of a black rectangular object with a white horizontal bar and two yellow arrows pointing to it, no visible text or symbols.Panoramic roof
The roof has two opaque blinds positioned at the front and rear.
To close the front blind, pull the handle rearwards.
To close the rear blind, pull the handle forwards.
The blinds have a delay mechanism which stows them automatically when you release them.
VI
INTERIOR COMFORT
BOOT

natural_image
Close-up of a mesh mesh structure with no visible text or symbolsLuggage securing rings
Use the 2 side fixings at the rear, as well as the 6 anchoring rings on the boot floor and the rear seat backrest, to secure your loads.
For safety reasons, in case of hard braking, heavy objects should be placed as far forward as possible.
Protective net
This helps to secure objects stowed in the boot.
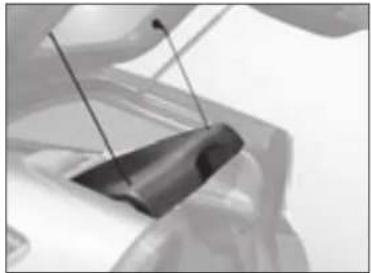
natural_image
Close-up of a black plastic clip holding a white rod, with no visible text or symbols.Removing the rear shelf (3- door model)
- Detach the cords.
- Carefully lift then pull, tilting it slightly on one side.
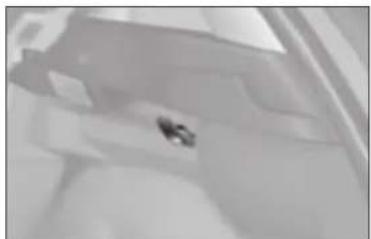
natural_image
Interior view of a modern building with visible windows and a small emblem on the floor (no text or symbols)Boot hook
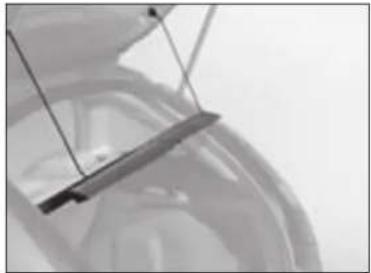
natural_image
Close-up of a mechanical component with wires and a bracket (no visible text or symbols)Removing the rear shelf (5- door model)
- Detach the cords.
- Carefully lift then pull.
Avoid using the rear shelf for heavy or hard items.
These could be dangerous if thrown around during harsh braking or, if they touch the rear screen, could damage the heating elements.
CHILD SAFETY
When children are in the car
For maximum safety, consult the relevant authority in your country to be sure that you know the rules for the carrying of children. Observe the following recommendations:
• In accordance with European Regulations, all children of under 12 years of age or of height less than 1m 50 must be carried in approved child seats suitable for their age and weight, on seats equipped with a seat belt or ISOFIX anchorage. Check that the child seat is in compliance with current legislation, ensuring that it bears an orange label featuring the range of weights for which it is suitable as well as its approval no.
- children under 9 kg must be carried in a rear-facing child seat, whether installed in the front or at the back.
- It is recommended to use this position for as long as possible (up to 2 or 3 years old).
• Statistically, the safest seats for the carrying of children are the vehicle's rear seat positions.
• CITROËN recommends you to install your child in one of the rear seat positions, even when using a rear-facing child seat.
• Children must not under any pretext be carried on the knees of a passenger (risk of being thrown against the dashboard or windscreen should there be a collision).
• Children must not be allowed to stand between the backrests of the front seats, as they could be thrown forwards under sudden braking or in the event of a collision.
- The rear doors are equipped with a "Child Safety" locking device. This allows the doors to be opened from the outside unless they are under central locking.
• Each time you switch on the ignition, check that this device is activated.
- Never leave a child in a vehicle that is exposed to sunshine.
- Before opening a door, make sure that it is safe to do so.
- When leaving your vehicle, remove the ignition key and properly apply the parking brake.
- Do not leave the key in the vehicle, as children could lock themselves in, either using the remote control or by pressing the central locking button.
- Children should not be left alone in the vehicle.
Regulations for the carriage of children in the front passenger seat position
If the child is travelling in a rear-facing child seat, it is essential to deactivate the passenger's front airbag. Otherwise the child risks being killed or seriously injured should the airbag deploy.
In the front passenger's seat, children less than 10 years of age must not be carried "forward-facing", except if:
• The rear seats are occupied by other children.
• The rear seats cannot be used (if they are folded or not present).
If your child is travelling forward-facing in the front passenger seat position, slide the front passenger seat to an intermediate position and leave the airbag activated.
CHILD SAFETY
CITROËN offers you a complete range of child seats that can be secured by means of the vehicle seat belt. These child seats have been tested on vehicles in collision conditions and they guarantee maximum safety for your children. They have also been selected for their ease of installation as well as for the comfort of the child.
In all cases, be sure to follow the child seat fitting instructions as detailed in the installation manual provided by the seat manufacturer.


"Passenger airbag OFF"
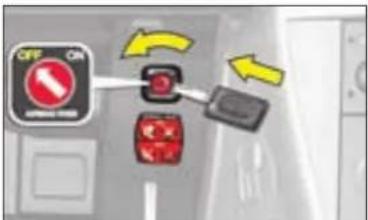
text_image
OFF ON ON/OFF
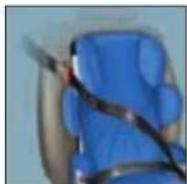
GROUP 0+ from birth to 13 kg (around 1 year old)
Römer Baby-Safe Plus (L1): rear-facing, for use with a three-point seat belt. The deep, reinforced shell is designed to provide the maximum protection to the child in the event of a lateral impact.
GROUPS 2/3 (from 15 to 36 kg)
Recaro Start (L2): for use with a three-point seat belt. The height and width of the backrest as well as the length of the seat cushion should be adjusted depending on the age and girth of your child.
Klippan Optima (L3): for use with a three-point seat belt. From 6 years old (approx. 22 kg), only height adjustment is required.


GROUPS 1/2/3 (from 9 to 36 kg)
Kiddy Life (L4): for use with a three-point seat belt. The height and width of the backrest as well as the length of the seat cushion should be adjusted depending on the age and girth of your child. For the safety of young children (from 9 to 18 kg), CITROËN recommends you to use the protection apron.
Other child seats are recommended: see ISOFIX child seats in the handbook. See "Child restraints".

The majority of serious injuries resulting from accidents occur when a child either is not secured or is secured incorrectly. It is essential to adhere to the child seat fitting instructions as detailed in the installation manual provided by the seat manufacturer. ISOFIX child seats are particularly recommended for their ease and safety of use.
When a rear-facing child seat is installed on the front passenger's seat, the front passenger's airbag must be deactivated. Otherwise there is a risk of death or serious injury to the child on deployment of the airbag.
CHILD SAFETY
CHILD SEATS secured by means of the vehicle seat belt
In accordance with European Regulations, the table tells you to what extent each of the seat positions in your vehicle may take a child seat that is secured by means of the vehicle seat belt and approved as "Universal" depending on the weight of the child.
| Seat(s) | Weight of child | ||||
| Up to 10 kgUp to 13 kg(groups 0 and 0+) | 9 - 18 kg(group 1) | 15 - 25 kg(group 2) | 22 - 36 kg(group 3) | ||
| Frontpassenger (a) | Fixed seat U | U | U | U | |
| Height-adjustable seat | U(R) | U(R) | U(R) | U(R) | |
| Lateral rear | U | U | U | U | |
| Central rear | L1 | X | L3 | L3 | |
VII
U: Seat suitable for the installation of a universal rear-facing child seat and a universal forward-facing child seat
U(R): Seat position suitable for installation of a universal rear-facing child seat and of a forward-facing seat. The vehicle seat should be adjusted to the highest position.
(a) It is essential to deactivate the front passenger's airbag when a "rear facing" child seat is installed in the front passenger's seat position. Before placing your child in the front passenger's seat position, consult the legislation currently in force in your country on the carrying of children in this position.
L-: Only the child seats indicated may be installed in the seat position concerned (depending on country).
X: Position not suitable for installation of a child seat of the weight group indicated.
Take care to comply with the fitting instructions given in the child seat manufacturer's user guide.
80
CHILD SAFETY

natural_image
Top-down view of a car with four seats and three yellow-labeled windows (no text or symbols)ISOFIX anchoring points and the ISOFIX fastening system
The lateral rear seat positions are equipped with the ISOFIX regulation anchorages.
text_image
Léo FITZ a bThere are 3 rings for each seat position:
- Two "bottom" rings a and b located between the backrest and the vehicle seat. These are about 28 cm apart.

natural_image
Top-down view of a car backrest with two yellow arrows pointing to the rear panel (no text or symbols visible)
natural_image
Simple 3D-rendered diagram of a mechanical part with a yellow arrow and a circular symbol (no text or labels)- One "top" ring c located in the boot between the wheelarch and the seat backrest.
ISOFIX child seats have two latches which are easy to secure on the two "bottom" rings a and b.
Some ISOFIX child seats also have a top belt, which is for attaching on the ISOFIX "top" ring c.
To attach the top belt, raise the head restraint of the vehicle seat, then pass the buckle between the two supports. Next fix the buckle on the "top" ring c and tension the top belt.
In all cases, the head restraint has to be raised to the maximum.
This fixing system is intended for children weighing up to 18 kg.

CHILD SAFETY
text_image
LED FIT a bIncorrect installation of a child seat in a vehicle compromises protection of the child in the event of a collision. The ISOFIX fastening system enables you to reduce those risks posed by incorrect fitting, offering you a convenient, strong and reliable fitting for a child seat in your vehicle.
The ISOFIX child seat recommended for your vehicle is: ISOFIX RÖMER Duo:
It is sold by the CITROËN network. This seat has an upper strap, which must be attached to the ISOFIX "upper tether".
The RÖMER Duo Plus ISOFIX is approved specifically for your vehicle. If it is installed in a rear seat position, the vehicle's corresponding front seat should be adjusted so that the child's feet do not touch the backrest of this front seat.
This ISOFIX child seat can also be installed in seat positions that are not equipped with ISOFIX anchoring points. In this case, it is compulsory to secure it to the vehicle seat by means of the vehicle seat belt.
CHILD SAFETY
LOCKING REAR DOORS

natural_image
Close-up of a car door handle with a yellow arrow pointing to the center (no text or symbols visible)Manual operation
Rear doors are locked by operating the lever on the rear face of the door in question. When the manual safety is in use, the aperture is horizontal.

natural_image
Close-up of a black USB flash drive with a yellow arrow pointing to it, no visible text or symbolsElectric operation
The electrical safety is activated by pressing the control located to the rear of the electric windows panel. This prohibits movement of the rear electric windows and rear passenger doors.
It is still possible to open the doors from the outside, provided the vehicle is not locked.

If the child safety lock is activated, the warning lamp comes on for approximately 10 seconds when switching on the ignition.
This system is independent of and in no way replaces the central locking.
Check the status of the child safety locks every time the ignition is switched on.
Always remove the ignition key when leaving the vehicle even if only for a short time.
In the event of a violent impact, the electric child safety locks are deactivated automatically to allow rear passenger to get out of the vehicle.
SAFETY
TYRE PRESSURE SENSORS
This function alerts you in the event of a tyre being deflated or punctured. For this purpose, sensors continuously monitor the condition of the vehicle's wheels.
This system does not absolve the driver of the need to check the tyre pressures regularly.
Change the damaged wheel (whether punctured or substantially deflated), have the tyre repaired as soon as possible, then check the tyre pressure as soon as you can after that.
The wheel affected will no longer be detectable by the alert system if it is in the boot or undergoing repair (information given by the vehicle outline). The spare wheel will not be monitored by the alert system.
This system does not absolve the driver of the need to check the tyre pressures on a regular basis (see "Identification"), to ensure that the vehicle behaves as it should and to avoid premature wear on the tyres, especially when the vehicle is being subjected to heavy loads or driven at high speeds.
Do not forget to check the tyre pressure on the spare wheel.
Under-inflation warning

The SERVICE warning lamp lights up and a vehicle outline is displayed. The wheel(s) concerned will be shown flashing on the vehicle
outline. Check the tyre pressures as soon as possible.
Wheel without senso
The SERVICE warning lamp lights up and a vehicle outline is displayed. The wheel(s) concerned will be shown as absent on the vehicle
outline. If you have not changed a wheel, this information indicates a malfunctionong of the system.

Any repair or any change of tyre, on a wheel fitted with a sensor, should be carried out by a CITROËN Dealer.
The system may be affected from time to time by interference from radio transmissions on similar frequencies.
Puncture

The STOP warning lamp lights up and a vehicle outline is displayed.
The wheel(s) concerned will be shown flashing on the vehicle outline. Stop
the vehicle immediately, avoiding any violent actions on the steering wheel or brakes.
SAFETY
BRAKES
Braking system
Your vehicle's most important safety feature, the braking system, is provided by brake discs (or discs and drums) and a dual hydraulic circuit.
When the engine is running, power assistance is provided so that pedal effort is reduced.
- On wet roads, or after washing the vehicle, there can be a slight delay in brake response. From time to time, apply the brakes briefly so that the heat generated can dispel any moisture.

ABS - Anti-lock Braking System
This system improves vehicle safety by preventing the
wheels from locking under emergency braking or when braking on surfaces offering poor adhesion.
It thus allows control of the steering to be retained.
The operational capacity of the various electrical components of the ABS is continuously monitored, both before and during your journey. On switching on the ignition, the ABS warning lamp will light up and then should go out after a few seconds.
If the warning lamp stays on, this means that the ABS has been disconnected because a fault was detected. If the warning lamp lights up when you are driving, this means that the ABS system is not active.
In either case, the normal braking system remains effective, as on a vehicle without ABS. Nevertheless, to restore the additional safety afforded by correct functioning of ABS, it is recommended that the vehicle be taken to a CITROÉN dealer as soon as possible.
On slippery roads (loose stones, snow, ice, etc.), it remains essential to drive with caution.


If the parking brake is off, the lighting of this warning lamp, in conjunction with the STOP warning lamp, indicates that the brake fluid level is low or that the braking distributor is malfunctioning.
It is essential to stop the vehicle.
Contact a CITROËN dealer as soon as possible.
Emergency braking assistance
This system enables you in an emergency to achieve the optimum braking pressure, thus to reduce the stopping distance. It is triggered by your speed of action on the brake pedal, which reduces its resistance to that action. Keep the brake pedal pressed until the vehicle comes to a stop.
In the event of emergency braking, press and keep the pedal down very firmly without reducing the level of effort.
VIII

When the engine is not running, the braking system will not have power-assistance.
The effort required on the brake pedal will be considerably increased.
Take all reasonable safety precautions if you have to move the vehicle.
Never drive the vehicle without the engine running.
SAFETY
ELECTRONIC STABILITY PROGRAMMES
Electronic Stability Programme (ESP) and Traction Control (ASR)
These systems are closely connected to the ABS and additional to it. Where a difference is detected between the trajectory followed by the vehicle and that wanted by the driver, the ESP system acts automatically on the brake of one or more wheels to return the vehicle to the trajectory wanted, within the limits of the laws of physics. The ASR system optimises traction and prevents wheel spin by acting on the brakes of the driving wheels. It also improves steering stability during acceleration.
VIII
Operation
When either the ESP or ASR system is brought into operation, the ESP/ASR warning lamp flashes.
Deactivation
In exceptional conditions (vehicle stuck in snow, soft ground, etc.) it may prove useful to deactivate the ESP/ASR system to allow the wheels to spin and thus regain traction. Press on control A, the ESP/ASR warning lamp and the control light up. The ESP/ASR systems are no longer active.
The ESP/ASR systems will activate again:
- Automatically after the ignition has been switched off.
- Automatically when you drive at above approx. 30 mph.
- Manually with another press on control A.
Operational anomaly
If there is a system malfunction, the ESP/ASR warning lamp comes on. Contact CITROËN to have the system checked.

text_image
ESP OFF A ESPSAFETY RECOMMENDATIONS
The ESP system offers increased driving safety but is not in place to encourage the driver to take additional risks or to drive at excessive speeds.
The functioning of this system is subject to compliance with the manufacturer's recommendations on wheels (tyres and rims), brake parts and electronic components, as well as with CITROEN's assembly and repair procedures.
After any collision, have this system checked by a CITROËN dealer.
SAFETY
SEAT BELTS

natural_image
Close-up of a metallic mechanical component with curved grooves (no visible text or symbols)Seat belt height adjustment (5-door model)
The correct positioning for the seat belt anchorage is mid-shoulder height.
To adjust it, pinch the control and slide it in the desired direction.
natural_image
Close-up of a black mechanical component with yellow arrows pointing to features, no visible text or symbolsHolding the seat belt (3-door model)
Raise then lock part A, to retain the seat belt buckle when it is unfastened.
It is necessary to remove the seat belt from the buckle retainer before moving the seat to access the rear seat positions.

As a safety measure, these operations should only be done at standstill.
VIII
SAFETY
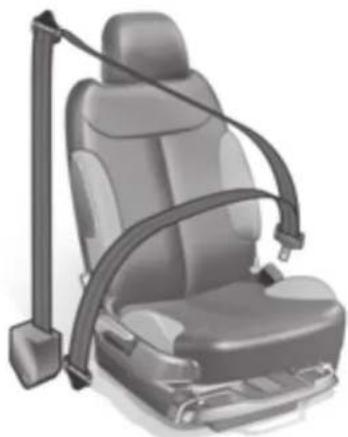
natural_image
Illustration of a car seat with a horizontal arm strap, no text or symbols presentWarning
When the pretensioners are deployed, there is a light discharge of harmless smoke and a loud noise, both due to the detonation of the integral explosive cartridges that activate them.
Depending on the nature and the force of the impact, this triggering may happen prior to, and independently of, the deployment of the airbags.
In all cases, the airbag warning lamp comes on.
Legislation makes it compulsory for all the vehicle's occupants to wear seat belts, including pregnant women and however short the journey.
Inside the cabin, the seat belt is the most important protection for passengers.
A warning lamp informs you if the driver's and/or front/rear passengers' seat belts are not fastened, when the ignition is switched on.
In the event of a collision or on emergency braking, the seat belt will hold you in your seat, preventing you from being thrown from the vehicle.
Pyrotechnically pretensioned seat belts with force-limiters
In the event of a collision:
• The pretensioners pull back the front seat belts. The occupants are thus held more firmly against their seats.
• The force limiters reduce the pressure of the seat belt against the occupant's chest, thus enhancing the protection that the seat belt provides.

Seat belts and pyrotechnic pretensioner systems
They must be replaced following a deployment, preferably by a CITROËN dealer or by an authorised repairer.
Due to the safety regulations in force, any check or any replacement should preferably be carried out by the CITROËN network which guarantees the work and ensures that it is done correctly.
Any repair that is not done in strict compliance with requirements could result in the systems operating incorrectly or randomly, with the risk of bodily injuries being caused.
SAFETY
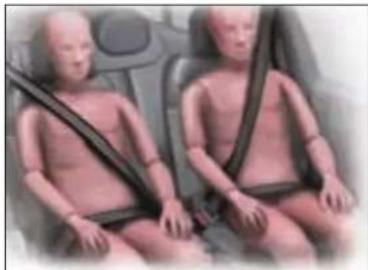
natural_image
Two baby car seats with seatbelt, shown in side profile (no text or symbols visible)Fastening
Pull the belt down in front of you in a steady movement, making sure that it does not become twisted.
Press the fastening into its buckle.
Check that the seat belt has fastened correctly and that the automatic reel lock is working correctly by pulling the strap.
The abdominal part of the strap should be positioned as low down as possible in the lap and as tight as possible.
The chest part should be positioned if possible in the channel of the shoulder.
Each belt has a reel that adjusts its length automatically to the girth of the seat occupant.
Unfastening
Press the red button on the buckle to unfasten the belt.
The belt retracts automatically when not in use.
Recommendations
To be effective, a seat belt:
- Must be able to restrain a single person of adult size.
- Must not bear any signs of being cut or frayed.
Do not swap buckles, as then they would not fulfil their proper roles.
Before and after use, make sure that the belt is correctly retracted.
If the seats have armrests, the central part of the belt should pass underneath.

natural_image
Illustration of a baby wearing a seatbelt, seated in a car seat (no text or symbols visible)Positioning of the belt recommended for pregnant women
Position the lower part of the belt as low down as possible on the lap, so that it exerts no pressure on the abdomen.
VIII

• Always adjust your seat belt while the vehicle is stationary.
• The driver must ensure that all the passengers have correctly fastened their seat belts.
- Do not pass the belt over hard or breakable objects that you may have in your pockets.
- Never use clamps or clips to loosen your seat belt.
• Never carry a child on your knee. - Regularly check the condition and cleanliness of the seat belts. See "Maintenance".
- Have the seat belts checked periodically by a CITROËN dealer as well as after any accident, even a minor one.
SAFETY
AIRBAGS
Your vehicle may have:
- A driver's airbag located in the steering wheel, under the central cover.
- A passenger's airbag in the dashboard.
- Two side airbags located in the backrests of the driver's seat and front passenger's seat (door side).
- Two curtain airbags located on the interior edges of the roof.
The control unit for the airbags and sensors analyses any frontal and lateral impacts suffered in the collision detection zones (see illustration p 91).
According to the degree of seriousness of impacts, it determines:
- Whether the seat belt is sufficient to protect you (Slight impact).
- Whether the seat belt pretensioner needs to be additionally actioned in order to hold you in your seat (Medium impact).
- Whether the airbag should be deployed in addition to the two initial systems (Violent impact).
Never deactivate the passenger's airbag when a passenger is present (unless a child in a rear-facing child seat). See "Passenger's airbag deactivation".
Each time you switch on the ignition, a warning lamp in the dashboard lights up for a few seconds and then goes out.

Replacement of the pyrotechnic systems associated with the airbags
After the airbags have been deployed, the pyrotechnic systems have to be changed in strict compliance with the manufacturer's specifications.
VIII
Consult a CITROËN dealer in the following situations:
• The warning lamp flashes for a few minutes then remains on.
• The warning lamp does not light up.
• A message appears on the display.
90

SAFETY
Examples of impact detection zones
Area of frontal impact
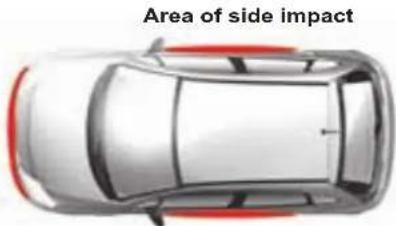
text_image
Area of side impactArea of side impact
Front airbags and knees airbags
For these airbags to deploy, it requires a violent frontal impact applied on all or part of the frontal impact zone (see illustration) from forward of the vehicle in a horizontal plane.
The airbag interposes itself between the vehicle's front occupant and the dashboard to cushion the person from being thrown forward. The airbag thus limits the risk of trauma to the head and chest. For the driver, the knees airbag protects the knees. The front passenger's airbag can be deactivated. see "Passenger's airbag deactivation".
Side airbags and curtain airbags
Deployment of these airbags requires a violent lateral impact applied on all or part of one of the lateral collision zones, coming in a horizontal plane from the side.
The role of the side airbag is to place itself between the occupant (driver or front passenger) and the door panel, thus limiting the risk of injuries to the chest.
The role of the curtain airbag is to place itself between the front or rear occupant and the windows, thus limiting the risk of injuries to the head.
These airbags may not deploy if there is only a slight collision on the side of the vehicle, or if the vehicle rolls over. They will not deploy for a front or rear collision.
VIII
SAFETY
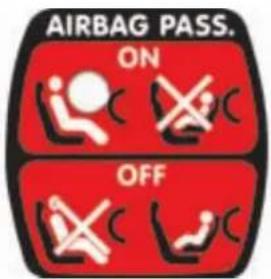
text_image
AIRBAG PASS. ON OFFThe front passenger's airbag can be deactivated.

text_image
OFF ON ORANGE CLOSEPassenger's airbag deactivation
In order to be able to use a "rear-facing" child seat in the front passenger position, it is essential to deactivate the passenger airbag.
To do that :
- With the ignition off, insert the key into the switch A, located in the glovebox.
- Turn the key to position "OFF". The passenger's airbag is deactivated.
The front passenger airbag deactivation warning lamp in the instrument panel lights up (ignition on).
To reactivate the front passenger's airbag
Don't forget to reactivate the airbag function for a passenger or a forward facing child seat.
To do that, with ignition switched off:
- Insert and turn the key to the "ON" position, the airbag is activated.
The warning lamp in the instrument panel comes on for a few seconds when you switch the ignition on.
VIII

If there is a malfunction, the "airbag fault" warning lamp comes on.
In the front passenger's seat position, it is essential to deactivate the front passenger's airbag whenever a "rear-facing" child seat is installed there.
Otherwise the child risks being killed or seriously injured should the airbag deploy.
92

SAFETY

The wearing of seat belts is compulsory for all vehicle occupants. Inside the cabin, the seat belt is the
most important protection for passengers.
The airbag is a protection in addition to the seat belt. Its effectiveness requires the seat belt to be worn correctly.
Children under ten years of age should always be carried in the rear seats. See "Child safety".
The driver and passengers must adopt a normal, vertical sitting position that is compatible with deployment of the airbags. See "Driving position".
Never attach anything to the steering wheel central cover, to the sides of the front seats or to the vehicle pillars or roof (risk of injuries should the airbags deploy).
Hold the steering wheel in the "quarter-past-nine" position: do not hold it by the branches or rest your hands on its central cover.
Smoke as little as possible in the vehicle (risk of burns or injury should the airbag be deployed).
Do not leave any accessory or object on the dashboard or between your body and the airbag (risk of malfunction or personal injury).
Fit only seat covers that are approved by CITROËN.
Do not put your feet on the dashboard (risk of injury should the front passenger airbag deploy).
The airbags do not deploy in the case of a slight collision or an impact at the rear of the vehicle or in certain manoeuvring conditions.
The deployment of one or more airbags is accompanied by a small release of unharmful smoke, as well as by a detonation that is caused by the activation of the pyrotechnic cartridge integral to the system. This smoke is not toxic but may be an irritant to persons who are sensitive.
The noise of the detonation may affect hearing for a brief time.
Vacate the vehicle as soon as possible after the accident (provided it is safe to do so). If this is not possible, open the windows or doors.
Even observing all the advised precautions, the risk of injury or slight burning to the head, chest or arms during deployment of an airbag cannot be ruled out. In fact, inflation of the airbag is virtually instantaneous (approx. 30 milliseconds); then it deflates in the same time, emitting hot gases through holes provided for this purpose. This equipment works only once. It cannot operate to provide further protection in the event of a second impact.
It is imperative to have the system overhauled in strict compliance with the manufacturer's specifications.
SAFETY
SAFETY ADVICE
Any operation under the bonnet necessitates a number of safety precautions.
Be particularly careful both before and during all checks under the bonnet:
- Allow the engine to cool down.
- Keep children away from the vehicle.
• Make sure that you possess the necessary tools and expertise.
Bonnet
Before opening the bonnet, make sure that your hands and clothing are protected. Allow the engine to cool down.
Make sure that the bonnet is stable in the open position. Beware of gusts of wind that could cause the bonnet to fall and cause serious injuries.
Moving parts
There will be a certain number of moving parts when the engine is running.
Even when the engine is switched off, the cooling fan could still operate without warning. Do not wear loose clothing (ties, scarfs, etc.), tie back long hair, all of which could become entangled in a pulley or be dragged into a drive belt.
Work in safety
The first rule of safety is to choose a suitable environment.
Do not use open roads or public rights of way. Other traffic represents a hazard.
If you need the engine running, work outdoors and not in a confined space as there is a health risk from exhaust gases.
Make sure that your vehicle is not parked over inflammable materials (dry grass, fuels, etc.) as the very high temperatures associated with the catalytic converter could ignite them.
Choose firm, level ground sheltered from the wind. Keep children away from the vehicle.
On the road
If a warning lamp comes on while you are driving, stop the vehicle with due regard to the safety of other road users and switch off the ignition.
Puncture
Switch on your hazard warning lamps and get all passengers away to a place of safety, well away from the traffic (for example behind crash barriers or on the grass verge).
Position the jack correctly to ensure that the vehicle is stable. See "Changing a wheel".
Never attempt any repairs under a vehicle that has been jacked up, without first supporting it on axle stands or some other reliable support.
VIII
SAFETY
Radiator
In normal usage, the coolant temperature reaches or exceeds 100 °C. Never remove the cap of a radiator that is hot: there is danger from projection of scalding liquid and steam. See "Levels".
The antifreeze contained in the coolant lends it the following properties:
- Protection against low temperatures (initial protection: -35 °C).
- Anti-corrosion protection.
- Resistance to high operating temperatures.
See the Maintenance Guide.
Oil
In normal use, the engine oil can exceed temperatures of 130 °C and thus can cause serious burns.
Exhaust system
Beware of the very high temperatures attained by the various components of the exhaust system (risk of burns).
Fuel cut-off switch
Your vehicle is equipped with a safety device which cuts off the fuel supply in the event of a collision.
Petrol
Be extremely careful when decanting or draining petrol or when repairing petrol leaks because of the high risk of fire.
Diesel fuel
The diesel fuel system of an HDi vehicle is a high pressure system. Any repair work must be carried out by suitably qualified personnel, such as can be guaranteed by the CITROËN network.

At all times:
- Avoid attempting repairs while close to moving traffic. If this is absolutely necessary, take all possible precautions.
- Ensure that your passengers seek safety away from the vehicle and off the roadway (road verges and motorway hard shoulders are not safe places).
- Keep children away from the vehicle and in safety.
- Operate the hazard lamps and erect warning signs.
- Preferably summon assistance from a CITROËN-approved breakdown service.
- For guaranteed quality and safety, use CITROËN products.
VIII
SAFETY
LANE DEPARTURE WARNING SYSTEM

text_image
OFF P0 OFF ESP OFF AThis driving assistance device alerts you if you are wandering from your lane (continuous or dotted line marking on the road surface).
It is designed especially for use on motorways and dual carriageways, operating only at speeds above 80 km/h (approx. 50 mph).
Activation/Deactivation
A press on control A activates the function, the warning lamp on the control lights up.
A second press on control A deactivates the function, the warning lamp on the control goes out.
Whenever you start the engine, the mode (activated/deactivated), selected when you last switched off the engine, is retained.
Operation
Provided you are travelling at over 80 km/h (approx. 50 mph), if you cross a lane marking, you are alerted by a vibration within the cushion of your seat:
- oriented to the right for crossing a lane marking to the right, - oriented to the left for crossing a lane marking to the left.
The system does not alert you while your direction indicator is operating, nor for about 20 seconds after your direction indicator has stopped.
Note: This device is designed to identify traffic lane markings.
In certain specific instances, it may trigger an unwanted alert, for example when you cross a direction arrow or some other random marking.
The effectiveness of the system may be temporarily affected by conditions external to the vehicle:
• Detection of lanes made difficult by:
- Markings that are worn or erased.
- Insufficient contrast with the surface of the road.
- Masking of the sensors due to:
- Driving in snow or heavy rain.
- Driving on roads covered with mud or surface water.
If the system is ineffective for a prolonged period, contact a CITROËN dealer.

The driver must still remain attentive and in complete control of the vehicle.
DRIVING
HANDBRAKE

natural_image
Close-up of a car seatbelt buckle with a yellow warning symbol (no text or labels)The parking brake is applied, with the vehicle stationary, by pulling on the lever with a force that is proportionate to the steepness of the slope.
To facilitate the action on the lever, you are recommended to press the brake pedal at the same time.
In all circumstances, as a precautionary measure, engage first gear. For vehicles equipped with an automatic gearbox, ensure that the parking position (P) is selected.
On steep slopes, turn the steering wheel towards the kerb.
To release the handbrake, press on the end of the lever, pull the lever up then lower it fully.
The warning lamp will come on if the handbrake is on or not fully released.
Before leaving the vehicle, make sure that the parking brake is sufficiently applied to prevent the vehicle from moving if on a slope, or if accidentally or deliberately pushed.
As an additional precaution on steep slopes:
- Apply the parking brake.
- Engage a gear.
- Turn the steering wheel towards the kerb (if there is one).
DRIVING
STARTING
Manual gearbox
- Ensure that the gear lever is in the neutral position.
- Do not touch the accelerator.
- In the case of diesel engine vehicles: turn the key to the drive position. Wait for the pre-heater warning lamp to go off, if it is on.
- Action the starter by turning the key until the engine starts (but not for more than ten seconds).
- In temperatures lower than 0 °C, apply the clutch during the action on the starter in order to aid starting. Then release the clutch slowly.
(6 speed) Electronic Gearbox System
- Check that you are in position N.
- Fully depress the brake pedal.
- Do not touch the accelerator.
- For Diesel engines: turn the key to position M. Wait for the pre-heater warning lamp to go off if it is on.
- Action the starter by turning the key until the engine turns over (not for longer than ten seconds).
Note: If the vehicle has been stationary for a long time, or if you have pressed the brake pedal a number of times while stationary, it will be necessary to press the brake pedal hard down in order to authorise the engine to start.
Automatic gearbox
- Check that you are in position P or N.
- Do not touch the accelerator.
- For Diesel engines: turn the key to position M. Wait for the pre-heater warning lamp to go off if it is on.
- Action the starter by turning the key until the engine turns over (not for longer than ten seconds).

Advice
Vehicles equipped with a Turbo:
Turbo equipped engines MUST be allowed to return to idle for several seconds before switching off the ignition. Failure to do so could cause serious damage to the turbo unit.
Flicking the throttle pedal as the ignition is turned off can lead to severe damage to the turbo unit.
98

DO NOT RUN THE ENGINE IN A SPACE THAT IS ENCLOSED OR INSUFFICIENTLY VENTILATED.

DRIVING
MANUAL GEARBOX
natural_image
Mechanical gear shift lever with green and yellow directional arrows indicating rotation (no text or symbols)5 speed gearbox
Reverse gear
Do not select reverse gear until the vehicle is completely stationary.
Depress the clutch pedal and wait a few moments before gently engaging reverse gear.

text_image
A R 1 3 5 2 4 66 speed gearbox
Reverse gear
Lift the collar A to engage reverse gear.
Do not select reverse gear until the vehicle is completely stationary.
Depress the clutch pedal and wait a few moments before gently engaging reverse gear.
DRIVING
The 6-speed electronic gearbox offers a choice of two driving modes:

natural_image
Close-up of a mechanical component inserted into a car gear (no visible text or symbols)An automated mode with the gear lever in position A.
A manual mode with two methods of operation:

natural_image
Close-up of a mechanical lever mechanism with no visible text or symbols- the gear lever in position M,

text_image
5 6 7 4 3 ALUTO 5 2 1 0 x1000Display in the instrument panel
N. Neutral
R. Reverse
1, 2, 3, 4, 5, 6. Gears in manual mode
A1, A2, A3,
A4, A5, A6. Gears in automatic mode.
S. Sport (Sport driving style)
IX
Note: if you are in automatic mode, an instant manual mode activates whenever you action one of the controls at the steering wheel.

natural_image
Close-up of a car steering wheel with two yellow sensors labeled '1' on the steering wheel (no text or symbols beyond labels)- the paddle controls behind the steering wheel.
For each of these two modes, a Sport option (corresponding to a more dynamic style of driving) is also available.

DRIVING

Neutral
If the vehicle is moving, do not select this position, even momentarily.

Reverse gear
Only engage reverse gear when the vehicle is stationary.
If the vehicle is moving at a very low speed, if reverse gear is requested (position R) this will be taken into account only when the vehicle comes to a halt.
The "foot on brake" warning lamp may flash in the instrument panel to remind you to brake.
If the vehicle is moving at a high speed, if reverse gear is requested the warning lamp "N" will flash and your vehicle will go automatically into neutral. To re-engage a gear, you have only to return the gear lever to position A or M.
A sound signal indicates when reverse gear is engaged.
If parking assistance is deactivated, the sound signal for reverse gear engaged is absent.

Automatic mode

Manual mode
- Push the lever to change to a higher gear.
- Pull the lever to change to a lower gear.

The engine can only be started if the brake pedal is pressed and the gear lever is in position N.
The warning lamp "foot on brake" flashes on the display. With the engine running, before accelerating away check the position engaged by looking at the lever grille or the rev counter R, A or M.
If you are stationary with the engine running, take care to leave your gear selector in position N.
natural_image
Close-up of a mechanical component with a yellow arrow pointing to a small circular feature, no visible text or symbols.Sport option
Activation
Press on button S, situated on the lever grille.
The warning lamp "S" displays on the rev counter.
This option can be activated either in automatic mode or in manual mode.
Deactivation
Press again again on button S on the lever grille.
The warning lamp "S" disappears on the rev counter.
Note: the Sport option is deactivated whenever you switch off the ignition.
DRIVING

natural_image
Close-up of a mechanical lever mechanism with labeled buttons (M, A, S) on a gray gear-like surface (no text or symbols beyond icons)Starting the vehicle
- To start the engine, the gear lever has to be in position N.
- Fully depress the brake pedal.
- Action the starter.
- With the engine running, depending on your preference place the lever on R, A or M.
- Check the position engaged on the rev counter.
- Release the handbrake.
- Release the brake pedal and accelerate.
If the lever is not in position N, the warning lamp "N" flashes on the rev counter.
If the brake pedal is not pressed down, the warning lamp "Foot on brake" flashes in the instrument panel.
In both cases, the engine does not start; recommence the above procedure.
Note: If the vehicle has been stationary for a long time, or if you have pressed the brake pedal a number of times while stationary, it will be necessary to press the brake pedal hard down in order to authorise the engine to start.
Stopping the engine
Before switching the engine off, you can choose:
- to leave the vehicle in neutral; for that, place the lever in position N,
- to leave the vehicle with a gear engaged (R, A or M); for that, place the lever in the position chosen. In this case, the vehicle cannot be moved.
In all cases, it is essential to apply the handbrake.
Before undertaking any operation in the engine compartment, make absolutely sure that the gearbox is in neutral and that the handbrake is on.
IX

Do not hold the vehicle stationary using only the accelerator.
If you are stopped on an incline, use the handbrake to hold the vehicle.
Acceleration
To obtain optimum acceleration (for example to overtake another vehicle), you have only to press the pedal hard down to go beyond the end-of-travel switch.
DRIVING
natural_image
Close-up of a mechanical component with a hand pressing into a socket, next to an orange circular icon labeled 'A5' (no readable text or symbols on the object itself)Automated mode
Place the selection lever in position A.
"A" appears in the speedometer to confirm the selection made.
The gearbox then operates in autoactive mode, without intervention on your part.
It constantly selects the gear best adapted to the following parameters:
- Style of driving.
- Road profile.

natural_image
Close-up of a car steering wheel with a highlighted orange 'Rs' component (no readable text or symbols)Instant manual mode
Even in automatic mode, if you touch the controls under the steering wheel "+" or "-" you immediately change gear.
The "A" warning lamp remains displayed on the rev counter.
In the absence of any further action, automatic mode reactivates to cope with the prevailing driving conditions.

natural_image
Close-up of a mechanical lever with a screw and base, showing no text or symbols on the lever itself.Cancellation of automatic mode
Move the gear lever from position A to select a different position.
The "A" warning lamp disappears on the rev counter.
DRIVING
natural_image
Close-up of a mechanical lever mechanism with labeled buttons (no text or symbols beyond basic markings)Manual mode
Position the gear lever in position M, then:
- push the lever to engage a higher gear,
- pull the lever to change down.

natural_image
Top-down view of a car steering wheel with yellow and green circular indicators (no text or symbols)Manual mode with controls behind the steering wheel
Place the gear lever in positionM, and then the controls at the steering wheel will give you access to the six gears in forward drive.
To change gear:
- Press behind the control "+" at the steering wheel to engage a higher gear.
- Press behind the control "-" at the steering wheel to change down.
Observations:
When the vehicle is braking or reducing speed, the gearbox changes down automatically to a suitable gear.
In manual mode, it is not necessary to release the accelerator during changes of gear.
Changes of gear are accepted only if consistent with engine speed.
IX
Note: These controls at the steering do not permit you to select neutral or reverse gear.

Under heavy acceleration, a higher gear will only be engaged when the driver actions the
gear lever or the controls at the steering wheel.

DRIVING
HILL START ASSIST (with 6-speed electronic gearbox system)
To aid starting on a gradient, your vehicle is equipped with a system that keeps it temporarily immobilised.
It keeps the brakes applied for a brief moment, precisely the time taken for moving your foot from the brake pedal to the accelerator pedal.
This function is only active when the vehicle is completely stationary, with your foot on the brake pedal, in particular conditions on a slope.

natural_image
Rear view of a silver car on a road with a yellow traffic sign nearby (no visible text or symbols)On an ascending slope, with the vehicle stationary, the vehicle is held for a brief moment when you release the brake pedal, provided you are in A or M.

natural_image
Illustration of a silver car on a road with a yellow traffic sign indicating lane markings (no text or symbols present)On a descending slope, provided the vehicle is stationary and reverse gear is engaged, the vehicle is held for a brief moment when you release the brake pedal.


Display of these warning lamps indicates a malfunctioning of the hill start assist function.


Do not leave the vehicle during the hill start phase. The hill start function cannot be deactivated.
105

DRIVING
AUTOMATIC GEARBOX

natural_image
Close-up of a metallic lever switch on a car gear (no visible text or symbols)The automatic gearbox offers:
D: operation in auto-active automatic mode, adapting automatically to your style of driving.
M: operation in sequential mode, with manual gear changing.
D and a press on button S or *: operation in automatic Sport or Snow mode.
P: Park
R: Reverse
N: Neutral
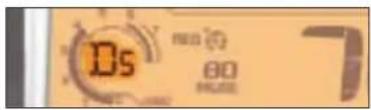
text_image
DS 80 MODEGear lever position
The position of the gear selector is displayed in the instrument panel.
For safety:
• The gear lever can only be disengaged from position P if you are pressing the brake pedal.
- When a door is opened, an audible signal sounds if the lever is not in position P.
- Before leaving the vehicle, make absolutely certain that the PARK or P position is selected.

natural_image
Close-up of a metallic gear shift lever on a car wheel (no text or symbols visible)Starting the engine
The engine can be started only in position P or N.
A safety device ensures that starting is impossible in the other positions.
After starting the engine, with selector on P, depress the brake pedal then shift the selector to D, R or M,
- D for automatic,
- R for reverse,
- M for manual operation.
A shift from D (automatic) to M (manual) is possible at any time.
IX

DRIVING

natural_image
Close-up of a metallic lever shift mechanism (no text or symbols visible)
Drive
The gearbox always selects the gear best adapted to the following parameters:
- style of driving,
- route profile,
- vehicle load.
In this way the gearbox operates in autoadaptive mode, without the need for your intervention.
For certain manoeuvres (for example overtaking), it is possible to obtain maximum acceleration by pressing hard down on the accelerator pedal, which may trigger automatic changedown to a lower gear.
Note
During braking, the gearbox may kick down automatically in order to offer an effective engine brake.
If you rapidly lift your foot off the accelerator, the gearbox will guard your safety by not changing up again.

natural_image
Close-up of a metallic lever switch mechanism (no text or symbols visible)
Sequential forward drive
Selector position for manual gear changing.
- Selector at M.
- Push the selector towards the sign "+" to change up a gear.
- Pull the selector towards the sign "-" to change down a gear.
Note: Passage from one gear to another is only possible when vehicle speed and engine speed permit.
The Sport and Snow programmes are not operative in sequential mode.
The change from position D (drive in automatic mode) to position M (drive in sequential mode) or vice versa may be effected at any time.
DRIVING
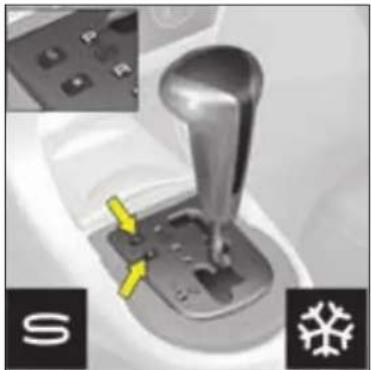
natural_image
Mechanical gear shift lever with control panel and yellow arrow indicator (no text or symbols)Operation in Sport or Snow automatic mode
Select the driving mode:
- Normal, for regular use, the warning lamps S and * are not illuminated.
- Sport, for more responsive driving, to provide maximum performance and acceleration.
- Snow, for smooth driving in wintry conditions.
- With selector on D, press button S the warning lamp S in the rev counter will light up, you are in "SPORT" mode.
- With selector on D, press button: * the warning lamp * in the rev counter will light up, you are in "SNOW" mode.
- Press button again, warning lamps S and ✝ go out, the "NORMAL" mode is active.
IX

- Flashing of the warning lamp for the position requested signals that this position has not yet been permitted.
- When the warning lamp is fixed, the position is confirmed.
- The display of a dash in the rev counter indicates a fault. Urgently consult a CITROËN Dealer
If there is a fault:
- A sharp hesitation may be felt when you select R for reverse gear.
- The gearbox is stuck in a gear.
- Do not exceed 100 km/h (approx. 60 mph).
Urgently consult a CITROËN Dealer

DRIVING

Park
Do not engage until the vehicle is completely stationary.
To avoid any movement of the vehicle when parked, select position P and apply the handbrake firmly. Check that the selector is in the P position to ensure that the driving wheels are locked.

- Never select position N if the vehicle is moving.
- Never select positions P or R if the vehicle is not completely stationary.
If, while the vehicle is moving, position N is engaged inadvertently, let the engine idle before engaging position D or M.

Reverse gear
Do not engage until the vehicle is stationary, foot on brake. To avoid engine hesitation, do not accelerate immediately after the selection.

Neutral
Do not select this position, even momentarily, when the vehicle is in motion.
DRIVING
CRUISE CONTROL

text_image
SET+ SET- 1 2 3 4This driving assistance function allows you to drive at the speed of your choice without the need to action the accelerator.
This system is available above 40 km/h (25 mph), with 4th gear or higher on a manual gearbox or 2nd gear or higher on an automatic gearbox.
Note: Information relating to the cruise control is displayed in zone A of the instrument panel.
To select the function
Turn control 1 to position "REG".
To select a cruising speed
At the time you select the function via the control 1, there is no cruise speed previously memorised:


text_image
05 70 8200 MPW 120 A REO 69 outAccelerate to the desired speed, then press button 2 or button 4. The cruise speed will then be memorised and displayed in zone A on the instrument panel.

You can then release the accelerator pedal. The vehicle will automatically keep to that chosen speed.
Note: The vehicle speed may vary slightly from that memorised.
Adjustment of the memorised speed while cruise control is in operation
To adjust the memorised speed, displayed in zone A, press on:
- button 4 to increase the speed,
- button 2 to decrease the speed.
Note: you can use successive presses to modify the cruise speed in steps of 1 mph and a continuous press to jump in steps of 5 mph.
To exceed the cruise speed temporarily
While cruise control is in use, it is always possible to go above the cruise speed simply by pressing the accelerator pedal (for example to overtake another vehicle). The speed displayed in zone A flashes.
You have only to release the accelerator pedal to return to your cruise speed.
Note: if during cruise control the system cannot keep to the cruise speed (e.g. on a steep descent), then the speed flashes. If necessary, brake to curb your speed.
DRIVING

text_image
SET+ SET- 1 2 3 4Deactivation of cruise control with memorised speed
- Either by pressing the brake pedal or the clutch pedal.
- Or with a press on button 3.
- Or when ESP or ASR is active.
Note: cruise control is disengaged when the gear lever is in neutral position.
These actions bring up the display "OFF" in zone A in the instrument panel.
These actions do not cancel your cruise speed which remains displayed on the instrument panel.

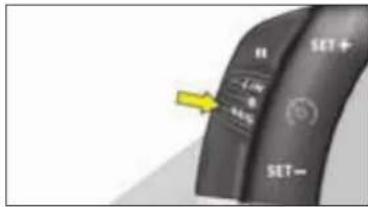
text_image
SET+ SET- OK OKReactivation of cruise control
- by recalling the memorised speed:
Following a deactivation, press on button 3. Your vehicle automatically resumes the memorised cruise speed displayed in zone A. - by selecting the current speed: Press on button 2 or 4 as soon as the desired speed is reached. The information "OFF" will then disappear from zone A.
To cancel the function
- by moving the control from position "REG" to position 0.
- by stopping the engine. The cruise speed chosen previously is no longer memorised.
In the event of a malfunction, a message is displayed, accompanied by a sound signal and lighting of the SERVICE warning lamp.
Consult your CITROËN dealer.

Cruise control must only be used where road conditions permit driving at a constant speed.
Do not use it on congested roads or when weather and road conditions are poor.
The driver must still remain attentive and in complete control of the vehicle.
You are recommended to keep your feet within range of the pedals.
To avoid any interference with the pedals:
- ensure that any over-mats are correctly fitted,
- never superimpose one over-mat on another.
DRIVING
SPEED LIMITER

text_image
1 2 3 4 SET+ SET- 1 L/R R -0.5%This driving assistance device allows you to select a maximum speed that you wish not to exceed. This has to be a speed greater than 30 km/h (approx. 20 mph).
The speed limiter controls are located on the steering wheel.
Note: The information relating to the limiter is displayed in zone A of the instrument panel.
IX
To select the function
Turn control 1 to position "LIM". On selection of the function, the last speed memorised and the information "OFF" will appear:


text_image
OS LIM off SS 70 MPH 8200To adjust the maximum speed
Provided the engine is running, you can adjust the memorised maximum speed, with short or long presses on:
- button 4 to increase the memorised maximum speed,
- button 2 to decrease the memorised maximum speed.
Note: successive presses modify the memorised speed in steps of 1 km/h (1 mph), a continuous press in steps of 5 km/h (3 mph).
Activation of the maximum speed
When the desired maximum speed is displayed, press button 3 to activate the limitation.
The information "OFF" then disappears from zone A.
While the function is active, pressing the accelerator pedal will not enable you to go beyond the programmed speed unless you press the pedal hard down past the tight spot (see "Temporary exceeding of the maximum speed").

Note: The vehicle speed may vary slightly from that memorised.
DRIVING

Deactivation of the maximum speed
Press button 3.
The information "OFF" will appear on the instrument panel screen.
This action does not cancel the memorised maximum speed, which remains displayed in zone A of the instrument panel.
Temporary override of the maximum speed
You can exceed the memorised maximum speed at any time by pressing the accelerator pedal hard down past the tight spot.
During the time the limit speed is being exceeded, the displayed speed flashes.
You have only to release the accelerator pedal to return below the maximum speed, thus keeping the function active.
Note: if during speed limitation, the system cannot keep to the maximum speed (especially on a steep descent or if you accelerate too hard) the speed flashes. Adapt your speed as necessary.
The function will re-engage when your speed has returned below the desired maximum.
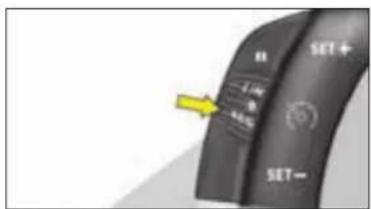
text_image
SET+ SET- 1.4% 0.5%To stop the function
- move the control from position "LIM" to position 0.
- or stop the engine.
The speed that you chose is memorised.
In the event of a malfunction, a message is displayed, accompanied by a sound signal and lighting of the SERVICE warning lamp.
Consult your CITROËN dealer.

A floor mat not recommended by CITROËN risks sliding under the accelerator pedal, thus
preventing you from pressing past the tight spot.
It will then be impossible to exit from the desired limitation, unless by acting on the steering wheel control.
The driver must still remain attentive and in complete control of the vehicle.
We advise the driver to keep their feet close to the pedals.
DRIVING
VISUAL AND AUDIBLE
FRONT AND REAR PARKING
ASSISTANCE

text_image
OFF Pill OFF ESP OFFProximity sensors are located in the front and rear bumpers of your vehicle.
When manoeuvring, whether forwards or in reverse, at a speed below approx. 6 mph, they warn you of the presence of any obstacle situated within their detection zone, by means of:
- a sound signal emitted by the front or rear loudspeakers,
- the display of the outline of your vehicle with shading at the zones where obstacles are detected.
As the vehicle approaches an obstacle, the sound signal tells you its position according to whether the sound issues from the front LH or RH speaker or from the rear LH or RH speaker.
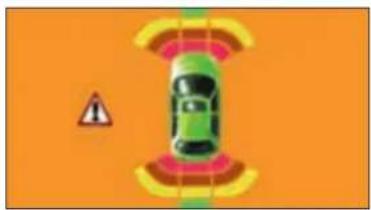
natural_image
Top-down illustration of a car with sensor waves and warning sign, set against an orange background (no text or symbols)NaviDrive version

text_image
Traffic warning sign with warning triangle, car silhouette, and road markingsScreen C version
- As the vehicle gets close to the obstacle, the sound signal becomes ever more rapid and the shading appears ever closer to your vehicle's outline.
- When the obstacle is less than around 25 centimetres from the vehicle, the signal becomes continuous and a WARNING panel appears on the display.
Activation/Deactivation
You can activate/deactivate the parking assistance with a press on control 1. If the parking assistance is inactive, the warning lamp is on.
Activation or deactivation of the parking assistance is memorised when you stop the vehicle.
Note: The system is deactivated automatically if a trailer is attached to the vehicle.
The fitting of the towbar should be carried out by the CITROËN network.
This system does not replace the vigilance and responsibility of the driver.
IX
DRIVING
Operation:
- When you engage reverse gear, a sound signal informs you that the system is active. The outline of your vehicle is displayed on the screen. Any obstacles situated at the rear or at the front of the vehicle can be detected.
- Moving forward at a speed lower than approx. 10 km/h (6 mph), either in neutral or in a gear, the outline of your vehicle is displayed on the screen immediately an obstacle is detected in front of the vehicle. Obstacles situated at the front of the vehicle can be detected.
Note
- The proximity sensors cannot detect obstacles situated immediately below or above the bumpers.
- A thin object such as a spike or stake, or other similar object, may be detected only at the start of your manoeuvre but not when the vehicle has approached close to it.
- During the winter months or in bad weather, make sure that the sensors are not covered by dirt or by ice or snow.

When selecting reverse gear, a short audible signal followed by another audible signal, accom-
panied by the illumination of the SERVICE warning lamp indicates a malfunction of the system.
Consult a CITROËN dealer.
MAINTENANCE
BONNET RELEASE
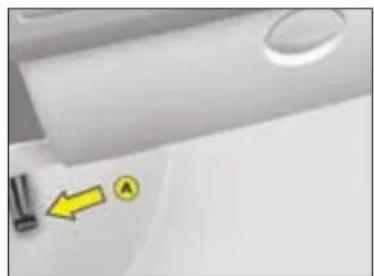
natural_image
Close-up of a white surface with small mechanical components and a yellow arrow pointing to a labeled point A (no text or symbols beyond basic markings)This should only be operated if the vehicle is stationary.
To release the bonnet, pull control A located under the dashboard to the right.

text_image
Diagram showing a device with a yellow arrow and label 'A' pointing to it, possibly indicating a directional or action point.Move the lever A, located above the grille, to the right of the chevrons, then lift.

text_image
Diagram showing a vehicle's side profile with numbered annotations pointing to specific areasBonnet stay: detach the stay and pivot to introduce it into the notch 1, then into the notch 2 (see the arrow reference).
Closing
Return the stay to its initial position, lower the bonnet and let it slam shut.
x
Make sure that the bonnet is securely locked.
Avoid operating the bonnet when there are high winds.
MAINTENANCE

text_image
Diagram of a car engine bay with numbered components for identificationPETROL ENGINES
They give access for checking the levels of the various fluids and the replacement of certain items.
-
Power steering reservoir.
-
Brake fluid reservoir.
-
Engine oil dipstick.
-
Screen and headlamp wash reservoir.
-
Battery.
-
Topping up engine oil.
-
Engine coolant.
-
Fusebox.
-
Air filter*.
* Depending on engine.
MAINTENANCE

text_image
Technical diagram of a car body panel with numbered components for identificationDIESEL ENGINES
They give access for checking the levels of the various fluids, the replacement of certain items and priming the fuel system.
x
- Power steering reservoir.
- Screen and headlamp wash reservoir.
-
Engine coolant.
-
Brake fluid reservoir.
- Battery.
- Fusebox.
- Air filter*.
-
Engine oil dipstick.
-
Topping up engine oil.
- Priming pump*.
- Bleed screw*.
* Depending on engine.
118

MAINTENANCE
LEVELS
Air filter
Follow the recommendations in the Maintenance Guide.

Windscreen, rear screen and headlamp washer fluid
It is recommended that you use products approved by CITROËN.
Screenwash fluid reservoir: 3.5 litres.
Screen and headlamp wash reservoir: 6.5 litres.
Specification for the fluid
To ensure optimum cleaning and to avoid freezing, topping up or filling of the reservoir must not be done with just water.

Engine coolant
The coolant level should be between the MAX and MIN marks on the header tank.
If the engine is hot, wait 15 minutes.
Quality: See "Maintenance Guide"
Never work on the cooling system if the engine is hot.
Engine oil

Check the oil level with the vehicle parked on level ground, after the engine
has been switched off for at least fifteen minutes.
Quality: See "Maintenance Guide"

Take out the oil dipstick. The level must be between the MAX and MIN marks on the dipstick
It should never exceed the maximum mark.
MAX MIN

Brake fluid
The fluid level must be situated within the MAX and MIN marks visible on the reservoir.
The screenwash fluid should be replaced periodically as it loses its effectiveness over time.
Quality: See "Maintenance Guide" If the warning lamp comes on while you are driving, stop immediately and contact the CITROËN network.
Dust filter/odour filter (active carbon)
See "Maintenance Guide"

12 volt battery
See "Practical advice".

When working under the bonnet, when the engine is hot (even stopped and the ignition switched off), the cooling fan could operate at any time.
Check the engine oil level frequently between routine service visits, as well as prior to long journeys.
MAINTENANCE
LEVELS
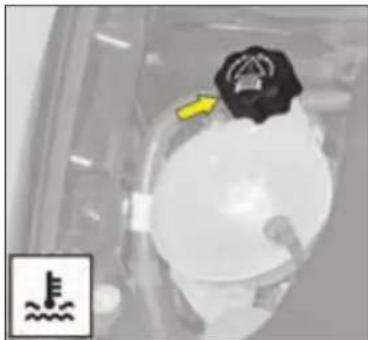
natural_image
Close-up of a mechanical component with a yellow arrow pointing to a circular feature, no visible text or symbols.Radiator - coolant
The coolant must only be checked or topped up if the power unit is cold.
Engine hot
As the cooling system is pressurised, wait for at least one hour after switching off the engine before intervening.
To avoid the risk of scalding, slacken the cap two turns to allow the pressure to escape. Once the pressure has fallen, remove the cap and top up the level.

Topping up the cooling system
The coolant level should be between the MAX and MIN marks on the header tank.
Top up the level. If you have to add more than 1 litre, you should have the cooling system checked by CITROËN.
Make sure that the cap is on correctly
Note: The necessity to top up frequently would indicate a malfunction that should be checked at the earliest opportunity.
Note: On vehicles equipped with a particle filter, the cooling fan may operate for some ten minutes after the engine has stopped.
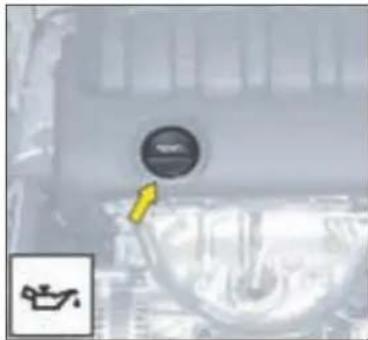
natural_image
Close-up of a mechanical component with a circular dial and a yellow arrow pointing to it (no visible text or symbols)Adding engine oil
Remove the dipstick before topping up. Check the level after filling.
It should never exceed the maximum mark.
Screw on the cap before closing the bonnet.
Quality: See "Maintenance Guide".
MAINTENANCE

natural_image
Close-up of mechanical components with highlighted section A, no visible text or symbolsWindscreen and rear screen washer fluid
For best results as well as for your safety, use only CITROËN approved products which protect at temperatures as low as -25 °C to -30 °C.
It is essential to have sufficient screen wash fluid if your vehicle is equipped with Xenon headlamps.
To check the level, place a finger on aperture A before removing the cap.
Capacity: 3.5 litres.
Capacity with headlamp washers: 6.5 litres.
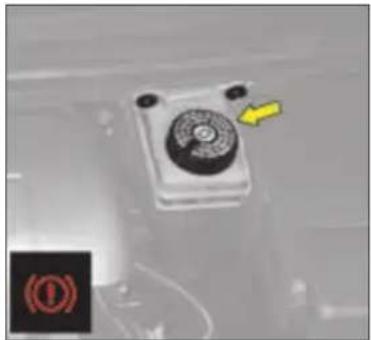
natural_image
Close-up of a mechanical control panel with a yellow arrow pointing to it, no visible text or symbols.Brake fluid reservoir
Check and top up at regular intervals.
The fluid level must be situated within the max and min marks visible on the reservoir.
If the warning lamp comes on when driving, stop as quickly as possible and contact a CITROEN dealer.
Brake fluid
The synthetic fluid not only gives protection against corrosion but also ensures correct functioning of the braking system in all environmental conditions, therefore you should only use the synthetic product recommended by the CITROËN network. (this fluid must be replaced every two years).
These important requirements are detailed in your vehicle's Maintenance Guide.
Quality: See "Maintenance Guide".
When working under the bonnet, when the engine is hot (even stopped and the ignition switched off), the cooling fan could operate at any time.
MAINTENANCE
Wear of brake discs, brake pads and brake drums
The rate of wear of the brake pads depends on the use of your vehicle (urban use, frequent stops), and on your style of driving or the type of journey.
For information on checking the discs and drums for wear, contact a CITROËN dealer.
After washing the vehicle, brake progressively to dry out the brake linings.
DIESEL INJECTION EQUIPMENT
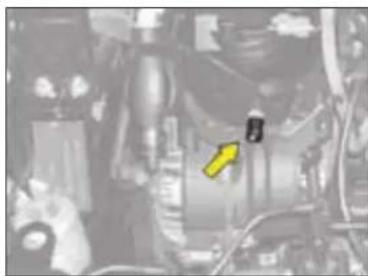
natural_image
Close-up of a mechanical assembly with visible components and a yellow arrow pointing to a specific part (no text or symbols present)Bleeding of water from the diesel fuel filter
To be bled on a regular basis (at every oil change).
To evacuate the water, slacken the bleed screw or the water in diesel fuel sensor, which is located at the base of the filter, until water ceases to flow out.
Then retighten the bleed screw or the water in diesel fuel sensor.

natural_image
Top-down view of a black plastic mechanical component with numbered callouts (no readable text or symbols)Protection cover
HDi 135 and 140 engines
Remove the protection cover by first unclipping point 1, then 3 and 4. Detach point 2 by pulling towards you, then lift.
To reposition the protection cover, attach point 2 first. Lower the cover, keeping it centred. Clip points 1 and 4, pushing vertically and slightly rearwards. Clip point 3 pushing down vertically.
x
122
HDi engines are of a highly technical nature. All maintenance and repairs require specific qualifications which only your CITROËN Dealer can guarantee.

MAINTENANCE
PRIMING THE DIESEL FUEL SYSTEM

natural_image
Close-up of a mechanical component with a yellow arrow pointing to a specific part (no visible text or symbols)HDI 135 and 140 engines
Detach the protection cover to access the priming pump.
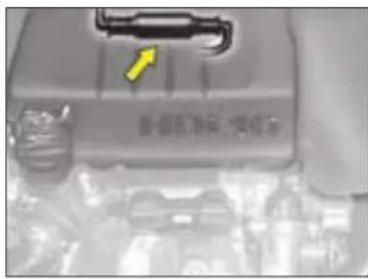
HDi 90 and 110 engines
Detach the protection cover to access the priming pump.
In the event of running out of fuel:
- After filling (5 litres minimum), operate the manual priming pump until some resistance is felt.
- Operate the starter motor while depressing the accelerator pedal slightly until the engine starts.
If the engine fails to start at the first attempt, wait 15 seconds before trying again.
If the engine fails to start after several attempts, repeat the procedure from the beginning.
When the engine is idling, accelerate slightly to complete the bleeding of the circuit.
HDi engines are of a highly technical nature.
All maintenance and repairs require specific qualifications which only your CITROËN Dealer can guarantee.
PRACTICAL ADVICE
FUEL
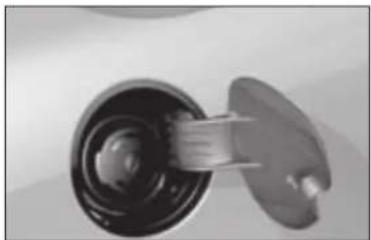
natural_image
Close-up of a mechanical component with a cylindrical shaft and flange (no visible text or symbols)A label on the inside of the fuel fill-er flap indicates the approved fuel quality type.
For petrol engines with catalytic converter, use of unleaded fuel is obligatory
The filler neck has a narrower orifice to admit only petrol filler nozzles.
When you are filling your fuel tank, do not persist after the third cutoff; this could cause your vehicle to malfunction.
BioFlex
Your vehicle has been designed to operate equally on unleaded petrol (95 or 98) or on bioethanol (in Europe this is a mixture of 85 % ethanol and 15 % unleaded petrol, known as E85).
A label inside the fuel filler flap indicates the fuels authorised:
DIESEL FUEL

UNLEADED PETROL
Petrol engines are designed to run on RON 95 fuel.
However, for better vehicle performance (petrol engines), we recommend RON 98.


Other than the question of the two authorised fuels, your vehicle is used in the same way as a traditional petrol vehicle.

If you have put in fuel that is wrong for your vehicle, it is essential to have the tank drained before you start the engine.
In winter conditions, starting from cold may seem difficult. During periods of very cold weather we recommend the use of 95 or 98 unleaded petrol in preference to B85 so as to ensure optimum starting performance.
XI
PRACTICAL ADVICE
CHANGING A WHEEL
natural_image
Close-up of a metallic mechanical component with a yellow arrow pointing to a small black feature (no text or symbols visible)Access to the spare wheel Lift the boot floor.
Dimension of the spare wheel
If your spare wheel is of a different dimension to those on the vehicle (identified by a label), it is essential to use it only on a temporary basis, to drive not above 80 km/h (50 mph) and to have the original wheel refitted as soon as possible.
Tyre pressures
This is indicated on a label in the front door aperture.
Light alloy wheels
If your vehicle is equipped with light alloy wheels and a steel spare wheel, then if fitting the latter it is normal to note that the heads of the wheel bolts do not come to bear on the wheel rim.
The steel spare wheel is secured by the conical tapering of the wheel bolts' shafts, see diagram.
When refitting the light alloy wheel, ensure that the wheel bolt heads are in undamaged condition.
Switch on your hazard warning lamps.
Never get underneath the vehicle if it is supported only by the jack; use an axle stand.
The jack is designed specifically for your vehicle, do not use it for other applications.
Refit the repaired original wheel as soon as possible. With a spare wheel fitted, drive with caution.
PRACTICAL ADVICE

text_image
Labeled diagram of a mechanical device with numbered parts for identificationTools
The tools are located in a protective holder in the spare wheel, remove the strap to gain access.
1 - Wheelbrace
2 - Centring guide
3 - Tool for removing/refitting wheel bolts
4 - Jack with handle
5 - Removable towing ring
6 - Tool for bolt protectors on aluminium wheels
natural_image
Close-up of a mechanical component with a yellow arrow and dotted line indicating direction (no text or symbols)Removing the wheel
- Undo the yellow central screw by a quarter turn.
- Raise the spare wheel towards you rearwards.
- Remove the wheel from the bootspace.
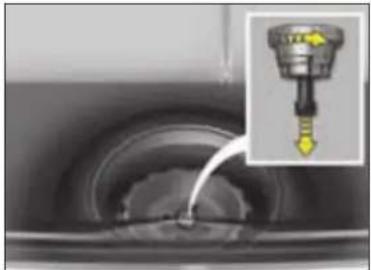
natural_image
Close-up of a mechanical component with a water droplet inserted, showing internal structure (no text or symbols visible)Repositioning the wheel
- Refit the wheel in place.
- Undo the yellow central screw by a few turns, then position it at the centre of the wheel.
- Do up the central screw until tight so that the wheel is securely retained in place.
XI
The wheel should be correctly positioned flat in the centre of its well.
126

PRACTICAL ADVICE

natural_image
Close-up of a car wheel rim with a yellow arrow pointing to the center (no text or symbols visible)Removal
1 - Park the vehicle on stable, firm ground. Apply the handbrake.
Switch off the ignition and engage first gear or reverse gear, depending on any slope (for vehicles with automatic gearbox, select position P).
2 - Detach the embellisher using the wheelbrace 1 by pulling close to the valve.
For vehicles with aluminium wheel rims, slide the removal tool 6 into the slot in the central embellisher and apply firm leverage to detach.
3 - Slacken the wheel bolts.
For vehicles with aluminium wheels, slacken the anti-theft nut using the tool provided.
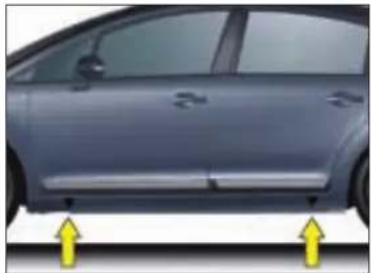
natural_image
Side view of a silver car with two yellow arrows pointing to the side (no text or symbols visible)4 - Position the jack under the bodyshell, exactly as in the illustration, at the mark A (in the recess in the sill member) closest to the wheel that is to be replaced.
5 - Deploy the jack 4 until its base is in contact with the ground. Make sure that the base of the jack is vertically below the jacking point used.
6 - Raise the vehicle.
7 - Remove the bolts and disengage the wheel.
Make absolutely sure that the occupants have left the vehicle and are in an area that ensures their safety.
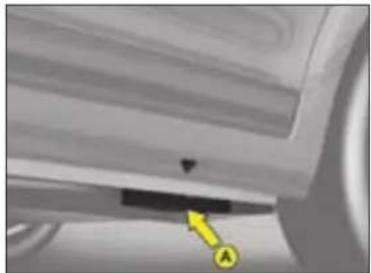
natural_image
Close-up of a mechanical component with a yellow arrow and label 'A' pointing to a specific area (no readable text or symbols)Refitting
1 - Position the wheel with the aid of the centring guide.
2 - Do up the 3 bolts by hand and remove the centring guide. Position the 4th bolt.
3 - Do pre-tightening with the wheel-brace 1.
4 - Retract the jack 4 and disengage it.
5 - Tighten the wheel bolts using the wheelbrace 1.
6 - Reposition the embellisher, commencing by placing the slot at the valve, pressing it home with the palm of your hand. For vehicles with aluminium wheels, refit the bolt protector.
7 - Stow the tools and the wheel in the boot.
8 - Check the tyre pressure and also have its balancing checked.
PRACTICAL ADVICE

natural_image
Close-up of a car tire with visible tread pattern and a small yellow logo on the side (no text or symbols)
natural_image
Abstract pattern of wavy black lines and yellow dots on a dark background (no text or symbols)Wear indicators
Check the tread depth frequently. Minimum legal depth: 1.6 mm.
Check the wear indicators and the tread depth regularly as worn tyres have reduced grip. The wear indicators show when a tyre is at its safe wear limit.
Under-inflated tyres can overheat, leading to structural damage and the risk of a blow-out.
Impacts with kerbs, potholes or hidden obstructions in the road can cause internal damage and premature failure of the tyre. Such impacts can also cause misalignment of the steering geometry and subsequent rapid tyre wear.
Advice
We therefore recommend that you have the tyres and suspension geometries checked after any such incidents.
Prolonged driving on poor surfaces may be the cause of damage which may only become evident at a later date.
If replacing your tyres, it is essential to use the tyre sizes that are recommended for your vehicle.
Contact a CITROËN dealer.
Inspect the tyres regularly for wear and damage such as cuts, cracks or bulges, etc.
Remove any foreign bodies (stones, pieces of metal) that may have pierced the tyre. They could cause further damage to the tyre carcass.
Correctly inflated tyres provide:
• Optimum roadholding.
- Precise, light steering.
- Improved fuel economy.
- Increased tyre life.
Use the tyre pressures recommended by CITROËN.
Check the tyre pressures when the tyres are cold, on a frequent basis.
Never reduce the pressure of a hot tyre
Puncture
A punctured tyre should always be removed from the rim and thoroughly examined for any secondary damage before attempting any repair. When a repair is possible, it should be carried out as soon as possible to prevent further damage to the tyre.
Tyre repair should be carried out by a tyre specialist who will assume responsibility for the repair.
XI
On slippery surfaces, drive prudently. Make sure that all 4 tyres are always in good condition and that the tyre pressures (including for the spare wheel) are always set correctly.
128

PRACTICAL ADVICE
REPLACING BULBS
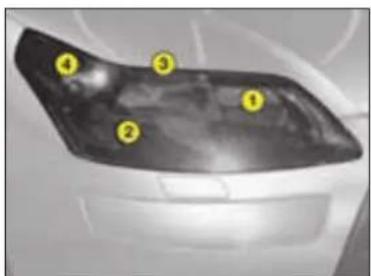
text_image
Diagram of a car's front panel with numbered labels pointing to different sectionsFRONT LAMPS
① Headlamp dipped beam
② Main beam
③ Sidelamp
④ Direction indicator
Note: A light mist film can appear on the internal surface of the headlamp lens in certain climatic conditions (low temperature, humidity). This disappears within a few minutes of switching on the headlamps.
Note: If it should be necessary to access the front RH headlamp, remove the cover by pressing the 2 clips.
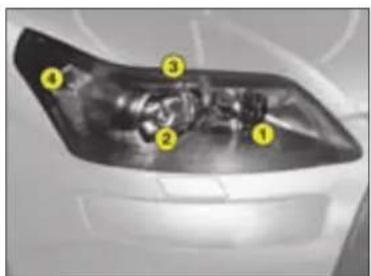
text_image
Diagram of a car's front wheel with numbered labels pointing to key componentsFRONT LAMPS, DIRECTIONAL HEADLAMPS
① Additional headlamp (main beam)
② Headlamp dipped beam/ Main beam
③ Sidelamp
④ Direction indicator

The halogen bulbs should not be changed until they have been off for a few minutes (risk of serious burns).
Do not touch the new bulb directly with your fingers; use a lint-free cloth.
It is essential that only anti U.V. type bulbs are used in order not to damage the headlamp.
When using a high-pressure jet wash for cleaning the vehicle, don't persist on the headlamps and other lamps, particularly around their edges, so as to avoid damaging their lacquer finish or seals.

If the headlamp has this symbol, any operation involving changing a Xenon D1S bulb must be
carried out by the CITROEN network (risk of electrocution). It is recommended to change both bulbs at the same time if one is faulty.
PRACTICAL ADVICE

natural_image
Mechanical component with a highlighted circular component and yellow arrow indicator (no text or symbols)Main beam
Pull the rubber stops.
Disconnect the bulb.
Disengage the ends of the retaining spring to release it.
Remove the bulb.
Bulb: H1 For vehicles not equipped with Xenon headlamp bulbs.
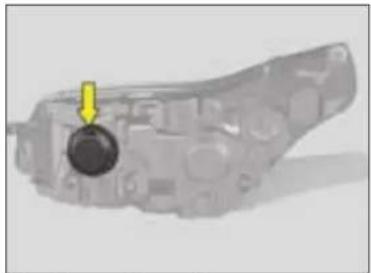
natural_image
Mechanical component with a yellow arrow pointing to a circular feature (no visible text or symbols)Headlamp dipped beam
Pull the rubber stops.
Disconnect the bulb.
Disengage the ends of the retaining spring to release it.
Remove the bulb.
Bulb: H7
Note: On HDi 90 and 110 engines, unclip the cover for access to the left hand headlamp.
XI
130

PRACTICAL ADVICE
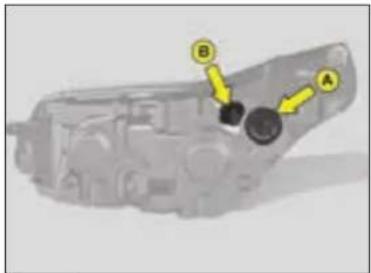
text_image
Diagram of a mechanical component with labeled parts A and B, showing directional arrows indicating movement or flow.Front lamps
Front direction indicator
Rotate the bulb-holder A by a quarter turn and pull.
Press to disengage the bulb.
Bulb: PY 21 W yellow.
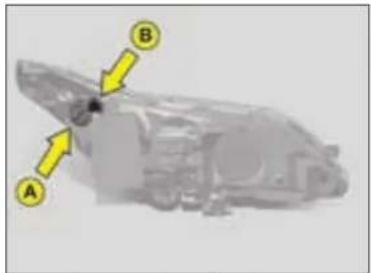
text_image
Diagram of a vehicle's rear window with labeled components A, B, and directional arrows indicating parts of the window.Front lamps, directional headlamps
Sidelamp
Disconnect the connector by pressing on the metallic part.
Rotate the bulb-holder B by a quarter turn and pull on the bulb.
Bulb: W 5.
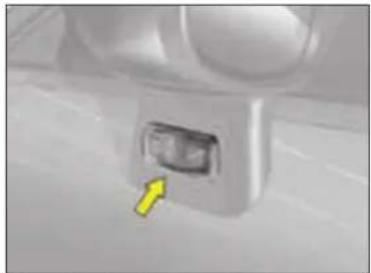
natural_image
Close-up of a white mechanical component with a yellow arrow pointing to a small internal component (no visible text or symbols)Direction indicator side repeaters in the rear view mirrors
To change the side repeater bulb, press firmly in the area indicated by the arrow, then pull on the side repeater.
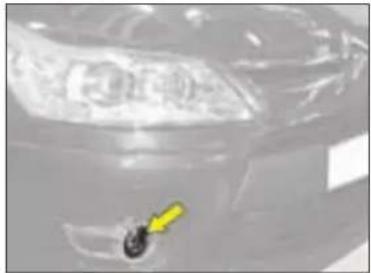
natural_image
Close-up of a car headlight with a yellow arrow pointing to the nose area (no visible text or symbols)Front foglamps
Consult your CITROËN dealer.
PRACTICAL ADVICE

natural_image
Interior view of a modern office or restaurant with multiple windows and seating (no visible text or symbols)Interior lamp
Unclip the transparent cover of the interior lamp to reach the bulb.
Bulb: W 5 W
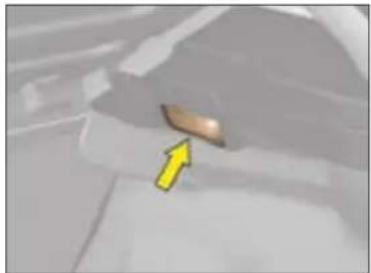
natural_image
Close-up of a car's side panel with a yellow arrow pointing to the nose area (no text or symbols visible)Boot lighting
Unclip the lens unit to access the bulb.
Bulb: W 5 W

natural_image
Interior view of a vehicle showing a yellow arrow pointing to a yellow rectangular object on the side (no visible text or symbols)Glovebox lighting
Unclip the lens unit to access the bulb.
Bulb: W 5 W
Spotlamps
Unclip the cover of the interior lamp, then if necessary the partition for the spotlamp concerned, to access the bulb.
Bulb: W 5 W

natural_image
Close-up of a white object with a small yellow mark on its surface (no text or symbols visible)Sill lighting
Unclip the headlamp to access the bulb.
Bulb: W 5 W
XI

PRACTICAL ADVICE

text_image
Close-up of a car rear taill with numbered labels pointing to the front and side panelsREAR LAMPS (5-door model)
Identify the failed bulb.
Bulbs:
① Sidelamp: W 5.
② Stop lamps and sidelamps: P21/5.
③ Direction indicator: PY 21 W.

natural_image
Close-up of a red pen tip with a yellow arrow pointing to it, labeled 'A' (no text or symbols on the pen itself)
text_image
Diagram of a red mechanical component with numbered parts and an arrow indicating directionRemoval
Open the boot:
- First remove the top part of the rear lamp unit by undoing the screw A.
- To have access to the nuB, detach the boot rear trim by removing the pins. Undo B.
- Remove the bottom part of the lamp unit.
- To change a bulb, simply rotate it a quarter turn.
natural_image
Close-up of a car's front bumper with a red arrow pointing to the rim (no visible text or symbols)Third stop lamp
Consult your CITROËN dealer.
PRACTICAL ADVICE
text_image
Close-up of a car rear bumper with numbered labels pointing to red and white areasREAR LAMPS (3-door model)
Identify the failed bulb.
Bulbs:
① Direction indicator: P21 W.
② Reversing lamp: P21 W.
③ Stop lamps and sidelamps: P21/5.
text_image
A 1 A 2 B 3Removal
To have access to the nut B, detach the boot rear trim by removing the pins. Undo B.
Remove the bulb-holder by detaching the points A.
Disengage the lamp unit.
To change a bulb, rotate it a quarter turn.

natural_image
Top-down view of a car rear bumper with a red arrow pointing to the front panel (no text or symbols visible)Third stop lamp
Consult your CITROËN dealer.
XI
134

PRACTICAL ADVICE

natural_image
Close-up of a white rectangular object with two yellow arrows pointing upward, no visible text or symbols.Rear number plate lamp
- Insert a thin screwdriver into one of the holes on the outside of the plastic cover.
- Push outwards.
- Remove the plastic cover.
- Replace the faulty bulb by simply pulling it out.
Bulb: W 5 W.
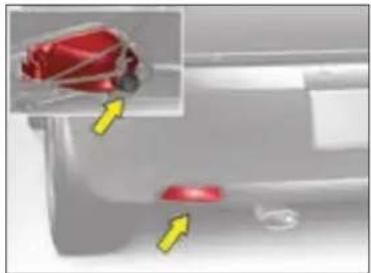
natural_image
Close-up of a car's side panel with red buttons and a magnified inset showing a red object (no text or symbols visible)Foglamp
Rotate the bulb-holder a quarter turn.
Bulb: P21
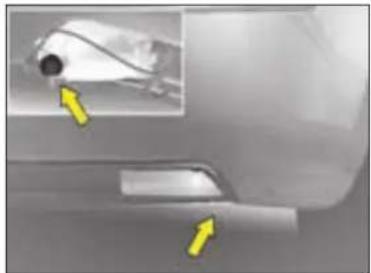
natural_image
Close-up of a car's side profile with yellow arrows pointing to a small object (no visible text or symbols)Reversing lamp (5-door model)
Rotate the bulb-holder a quarter turn.
Bulb: P21

After replacing a bulb, check the correct operation of the lighting and signalling.
135

PRACTICAL ADVICE
REPLACING A FUSE
Fuse box
There are two fuse boxes, one below the dashboard and one under the bonnet.
Fuses under the dashboard
To access the fuses below the dashboard, pull back the access cover, undo the screws a quarter turn and tilt the whole unit.
Replacing a fuse
Before replacing a fuse, it is essential to find the cause of the incident and to rectify it. The fuse identification numbers are indicated inside the fuse box.
Replace a blown fuse with one of the same rating (the same colour)
Use the special pliers A stowed on the cover close to the fuseboxes, this includes a compartment for replacement fuses.
Good Faulty
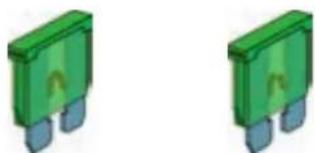
Tool A


natural_image
Close-up of a mechanical component with internal structure and a yellow arrow indicating a specific part (no visible text or symbols)Access to the first fusebox under the dashboard

text_image
P11 P2 P3 P4 P5 P6 P7 P8 P9 P10 P11 P12 P13 P14Fuses under the dashboard
Your vehicle's electrical system is designed to operate with standard or optional equipment.
Before installing other electrical equipment or accessories in your vehicle, contact a CITROËN dealer.
CITROËN will not accept responsibility for the cost incurred in repairing your vehicle or for rectifying the malfunctions resulting from the installation of accessories not supplied and not recommended by CITROËN and not installed in accordance with its instructions, in particular when the consumption of all of the additional equipment connected exceeds 10 milliamperes.
XI

PRACTICAL ADVICE
FUSES UNDER THE DASHBOARD
| Fuse N° Rating Functions | |
| F1 15 A | Central locking |
| F2 30 A | Central locking - Deadlocking |
| F3 5 A | Airbags and pretensioners |
| F4 10 A | |
| F5 30 A | Electric front windows - Heated exterior rear view mirrors |
| F6 30 A | Electric rear windows |
| F7 5 A | Interior lighting |
| F8 20 A | |
| F9 30 A | Cigar lighter - Rear 12 V socket |
| F10 15 A | Tyre pressure sensor - Auto. gearbox - STOPLAMP switch |
| F11 15 A | Ignition - Diagnostic socket - Particle filter |
| F12 15 A | Electric seat - Lane wandering alert - Parking assistance |
| F13 5 A | Rain sensor - Sunlight sensor - (6 speed) Electronic Gearbox System - Engine relay unit |
| F14 15 A | |
| F15 30 A | Central locking - Deadlocking |
| F16 | SHUNT |
| F17 40 A | Heated rear screen |
PRACTICAL ADVICE

natural_image
Interior view of a device showing internal components and a yellow arrow pointing to a specific area (no visible text or symbols)Fuse box
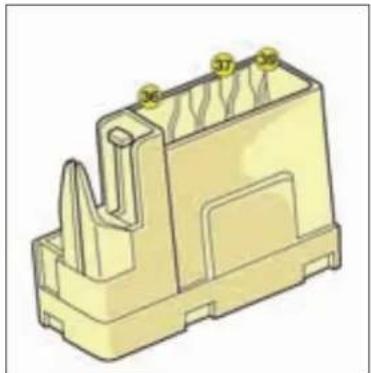
natural_image
3D rendering of a yellow plastic electrical connector housing with mounting holes and internal slots (no text or symbols)XI
| Fuse N° | Rating Functions |
| F36 30 A | Hi Fi amplifier |
| F37 30 A | Driver's electric seat |
| F39 20 A | Heated seats |
138

PRACTICAL ADVICE

natural_image
Interior view of a vehicle showing a car with a large display screen (no visible text or symbols)Fuse box
To access the engine compartment fusebox, detach and remove the cover.

text_image
10 11 1 2 3 4FUSES UNDER THE BONNET
| Fuse N° | Rating Functions |
| F1 20 A | ECU engine management - Cooling fan |
| F2 15 A | Horn |
| F3 10 A | Windscreen and rear screen wash |
| F4 20 A | Headlamp washer |
| F5 15 A | Fuel pump |
| F6 10 A | |
| F7 10 A | ABS ECU/ESP ECU - Power steering |
| F8 25 A | Starter |
| F9 10 A |
After any repair, reclose the cover very carefully. If the cover is not correctly positioned or not properly closed, your vehicle could be subject to serious malfunctions. For the same reason, take the utmost care not to spill any liquids.
Only authorised personnel from the CITROËN network are allowed to carry out any work on the additional protection MAXI fuses located in the fuse boxes.
PRACTICAL ADVICE
FUSES UNDER THE BONNET
| Fuse N° Rating Functions | ||
| F10 30 A | Engine electrovalve - Water-in-diesel-fuel sensor - ECU engine management - Injectors - Ignition coil - Oxygen sensor - Canister purge electrovalve (1.4 16V and 1.6 16V engines) | |
| F11 40 A | Air blower - Air conditioning | |
| F12 30 A | Windscreen wiper | |
| F13 40 A | Built-in Systems Interface | |
| F14 - Not used | ||
| F15 10 A | Right hand main beam | |
| F16 10 A | Left hand main beam | |
| F17 15 A | Left hand dipped beam | |
| F18 15 A | Right and dipped beam | |
| F19 15 A | Engine management ECU (1.4i 16V and 1.6i 16V engines) | |
| F20 20 A | Engine electrovalves | |
| F21 5 A | Cooling fans relay - Valvetronic | |
XI
PRACTICAL ADVICE
natural_image
Pure electrical circuit lines without any symbolsFUSES UNDER THE BATTERY
| Fusible N° Intensité Fonctions | |
| F1 - Not used | |
| F2* 30 A Gearbox (electronic or automatic) | |
| F3 - Not used | |
| F4 - Not used | |
| F5* 80 A Power steering electro-pump unit | |
| F6* 70 A Heater unit (Diesel) | |
| F7* 100 A Switching and protection unit | |
| F8 - Not used | |
| F9* 30 A Electronic gearbox electro-pump unit | |
| F10* 30 A Valvetronic electronic motor | |
MAXI-FUSES
* The maxi-fuses are an additional protection for the electrical systems. All work on the maxi-fuses must be done by a CITROËN dealer.
| Fuse N° Rating Functions | |
| MF1* 30 A/50 A | |
| MF2* | 30 A ABS/ESP pump supply |
| MF3* | 50 A ABS/ESP ECU |
| MF4* | 80 A Built-in Systems Interface |
| MF5* | 80 A Built-in Systems Interface |
| MF6* | 80 A Cabin fusebox |
| MF7* | 20 A Diagnostic socket/FAP additive pump |
| MF8* | - Not used |
141
PRACTICAL ADVICE
BATTERY
Removal
If the vehicle is fitted with an alarm, this should be deactivated before disconnecting the battery.
Disconnect the battery leads, negative lead first.
Refitting
Ensure that the battery is correctly positioned.
On certain models, the flange should be midway between the two battery terminals.
Reconnect the battery starting with the positive lead first.
Precautions
- Ensure that the posts and terminals are clean.
- If they become sulphated (white deposit), disconnect and clean them.
- Never disconnect the leads while the engine is running.
- Never recharge the battery without first disconnecting the battery leads.
Recharging using a battery charger
The voltage must never exceed 15.5 volts and the charging current must never exceed 20 % of the rating marked on the battery casing (for example: 250 A, setting: 50 A maximum).
Length of charge: 24 hours maximum. Only battery chargers with a constant, regulated voltage output should be used.
If the vehicle is not in use for a prolonged period
If the vehicle is to be taken out of use for periods of more than one month, the battery should be disconnected.

If a metal object makes a contact between the two battery terminals or between the battery + and the bodywork, this
causes a short-circuit (risk of fire and serious burns).
The battery releases minute quantities of hydrogen, a gas which is explosive under certain conditions. Never use a flame or create sparks close to the battery.
The battery contains dilute sulphuric acid which is highly corrosive:
- When handling batteries, always protect your face and especially your eyes.
• In the event of any contact with the skin, rinse immediately with copious amounts of fresh water.
Refer to a CITROËN dealer for battery replacements.
PRACTICAL ADVICE
Access to the battery
The battery is located in the engine compartment.
For access to it:
- open the bonnet using the interior release lever, then the exterior safety catch,
- fix the bonnet stay in place,
- remove the plastic cover for access to the two terminals,
- if necessary, unclip the fusebox to remove the battery.
Emergency starting with a slave battery
A vehicle with a discharged battery can be started with either a slave battery or the battery of another vehicle.
A Discharged battery
B Slave battery
It is essential to proceed strictly following the sequence indicated.
Check that the emergency battery is correctly charged up (12 volts).
If you are using the battery on another vehicle, stop the engine of the assisting vehicle. The two vehicles must not come into direct contact with each other.

natural_image
Two electrocandescent batteries (A and B) connected by a black wire with red and black terminals, showing positive and negative charges.Connect the cables in the order indicated in the diagram. Make sure that the clamps are properly secured (risk of sparks).
Start the engine of the assisting vehicle. Let the engine run for about a minute at a slightly accelerated speed.
Start the engine of the assisted vehicle.
Note: For any repair necessitating a disconnection of the battery, it is essential to wait three minutes after switching off the ignition and to avoid any action that could prevent the vehicle's electrical circuit from changing to standby mode (such as opening and closing doors, using the remote control etc.).

Advice
Replace it with a battery of the same type (voltage, amp rating).
Do not touch the cable clamps during the procedure.
Do not lean over the batteries.
Disconnect the cables in the reverse order to connection, ensuring that they do not touch each other.

Never apply a flame or create sparks close to the battery (explosive gas).
The battery contains diluted sulphuric acid which is highly corrosive.
If ever you are handling the battery, protect your eyes and face.
In the event of any contact with the skin, rinse immediately with copious amounts of fresh water.
If the vehicle is not used for more than one month, it is recommended that the battery be disconnected.
PRACTICAL ADVICE

natural_image
Illustration of a blue battery with two top tabs and a battery symbol below (no text or labels)Before disconnection
Before disconnecting the battery, wait 3 minutes after switching off the ignition, and close the windows and doors.
After disconnection
After the battery has been disconnected for a long period, it may be necessary to re-initialise the following functions:
- Anti-pinch and sequential operation on the electric windows.
- Parameters of the multifunction display (date, time, language, units of distance and temperature).
- Radio stations.
- Navigation reception.
- Synchronisation of remote control.
- Central locking.
Certain adjustments will be cancelled: it is necessary to make them again.
Starting the engine for the first time after disconnecting and connecting the battery:
- Turn the ignition key.
- Wait approx. one minute before actioning the starter, so as to allow the electronic systems to reinitialise.
Economy mode
In order not to discharge the battery when the engine is stopped, your vehicle goes automatically into economy mode.
The electrical components relating to comfort and headlamps (not side-lamps or hazard warning lamps) are automatically cut.
To reactivate them, the engine must be run for:
- less than 10 minutes to have the systems available for an equivalent period.
- more than 10 minutes to keep them available for approximately 30 minutes.
Note: a starting economy mode message appears on the multifunction screen.
PRACTICAL ADVICE
TOWING
Towing (boat, caravan, etc.)
Before departure:
Check the tyre pressures of both car and trailer.
Check all the exterior and signalling lamps of the car and trailer.
Practice manoeuvring, especially reversing.
Grease the towing ball hitch regularly, and remove it when not towing for a long period.
Spread the load inside the caravan and keep within the towing weight limits.
Always drive at moderate speeds, changing down a gear in good time before hill climbs or descents. Be aware of the effect of side winds.
Braking distances are increased. Use the brakes gently and progressively. Avoid sudden braking.
If you have to park on an incline, make sure that the parking brake is firmly applied. Check that the tow hitch is firmly attached and, if necessary, chock the wheels of the trailer.
When towing, the fuel consumption will increase.
Towing a vehicle
If you are towing another vehicle, the latter should be out of gear (gearbox in neutral). Move the gear lever to neutral (position N for SensoDrive and automatic gearboxes).
Observe your vehicle's towing limits
It is essential to comply with the max. Gross Trailer Weights and speed limits as specified by legislation in each country. For further information about the towing capacity of your vehicle and its max. authorised Gross Train Weight, contact a CITROEN dealer
Removable towing ring
The towing ring is detachable and can be fitted either at the front or at the rear of the vehicle. It is stowed in the jack's protective holder in the spare wheel.

Advice
In exceptional circumstances, it is permitted to tow the vehicle at low speed over a short distance (in accordance with the local legislation in force).
In all other cases, the vehicle must be transported by a transporter.
CAUTION - TOWING A
VEHICLE WITH AUTOMATIC TRANSMISSION
Put the selector lever in position N (neutral).
PRACTICAL ADVICE
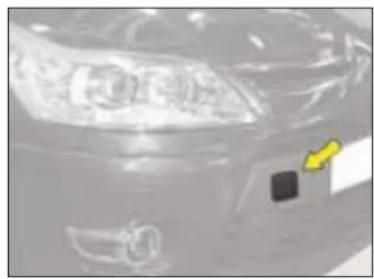
natural_image
Close-up of a car's head and front headlights, showing no visible text or symbols
natural_image
Close-up of a vehicle's rear window with two arrows pointing to the side of the black dot (no text or symbols visible)Towing with all wheels on the ground
Towing ring fixings are placed at the front and at the rear of the vehicle.
To access them:
- at the front: push on the left to tilt the cover, then remove it.
- at the rear: push at bottom, then pull on top.
The cover remains attached to the bumper by means of a tab, so that it cannot become lost.
The ignition key should be in position "M" so as to retain steering.
Use a bar with hooks to attach on the towing rings.
Vehicles with manual transmission
For vehicles with manual transmission, the gear lever must be in neutral. Failure to observe this requirement can lead to the failure of certain braking components and a lack of braking assistance on restarting the engine.

If the engine is not running, the steering and braking systems will not be power-assisted.
If towing another vehicle, the latter should be free-wheeling (that is, gearbox in neutral).
XI
PRACTICAL ADVICE
TOWBAR
We recommend you to have this device fitted by a CITROËN Dealer, who will be acquainted with your vehicle's towing capability and with the procedures necessary for installing a safety item of this kind.
It is essential to install a CITROËN approved electronic unit when having a towbar fitted, in order to prevent any risk of malfunction or damage (risk of fire).
The fitting of a caravan mirror on the wing is prohibited.
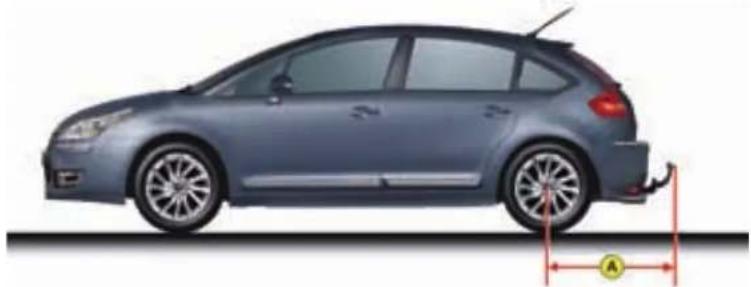
natural_image
Side profile illustration of a car with a visible side-mounted sensor or sensor, shown from front to side (no text or symbols)dimensions in metres: A = 0.841
Respect the towing limits of your vehicle.
PRACTICAL ADVICE
COLD WEATHER SCREEN "SNOW GUARD"
The screen supplied with the vehicle (depending on country) should be fitted during the winter period. It is essential to remove it when temperatures are above 10 degrees Celsius.
Don't forget to remove the cold weather screen:
- when the ambient temperature is above 10 °C,
- when towing,
- for speeds above 120 km/h (75 mph).
RADIO PRE-EQUIPMENT

natural_image
Interior view of a kitchen appliance control panel with no visible text or symbolsCITROËN radio option
See the separate instruction booklet in the vehicle document pack.
Radio connections
Consult your CITROËN dealer

natural_image
Interior view of a car dashboard with steering wheel and seatbelt (no visible text or symbols)Fitting of front and rear
loudspeakers
Consult your CITROËN dealer
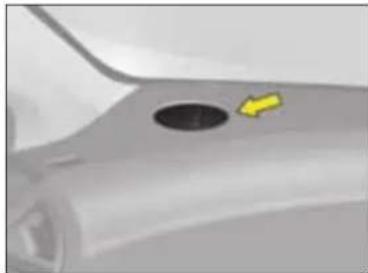
natural_image
Close-up of a car's side profile with a circular hole and a yellow arrow pointing to it (no text or symbols visible)On the dashboard
Two tweeters located at each end of the dashboard. Detach and pull the grille, connect the tweeters, fit them on the grille, rotating them a quarter turn, reposition the grilles.
XI
PRACTICAL ADVICE
ACCESSORIES

natural_image
Abstract graphic with blue background, white boxes, and colorful icons (no text or symbols)A wide range of CITROËN replacement parts and accessories is available from the dealer network.
They are all from the CITROËN catalogue.
After being tested for reliability and safety, these parts and accessories are all adapted for your CITROËN vehicle.
The range is structured around 5 groups:
"Comfort and leisure": floor mats, boot protector, storage box under rear shelf, sun blinds, roof bars, arm rest, telephone carrier, child seats and booster cushions, air freshener cartridges...
To avoid any interference with the pedals:
- ensure that any over-mats are correctly fitted,
- never superimpose one over-mat on another.
"Personalisation": seat covers, 15 and 17 inch light alloy wheel rims, wheel embellishers, standard mudflaps, style mudflaps, door deflectors, door aperture protectors, aluminium interior trim kit, door handle protectors...
"Boutique": screenwash fluid, cleaning and maintenance products for interior and exterior...
The fitting of electrical equipment or accessories that are not recommended by CITROEN may result in a failure of your vehicle's electronic system or excessive current consumption. Please note this specific warning. It is advisable to contact a CITROEN dealer to be shown the recommended equipment and accessories.
"Security and safety": anti-intrusion alarm, first aid kit, warning triangle, high visibility vest, snow chains and anti-slip covers, front foglamp kit, rear parking assistance...
"Navigation and communication": Bluetooth® hands-free kit, radios, portable navigation systems, CD changer, auxiliary cable for radio (e.g. connection between MP3 player and radio), speakers...
PRACTICAL ADVICE
Roof bars and roof boxes
The design of your vehicle is such that for your safety and to avoid damaging the roof and tailgate you should use roof bars and roof boxes that have been tested and approved by AUTOMOBILES CITROËN.
Recommendations
- Spread the load uniformly, taking care not to overload one side.
- Place the heaviest load as close as possible to the roof.
- Fix the load securely and attach warnings if the load is large.
- Drive gently, sensitivity to side winds is increased (the stability of your vehicle may be affected).
- Remove the roof bars when no longer needed.
C4 ENTERPRISE

text_image
Diagram showing a mechanical assembly with labeled parts A and B, and a yellow curved arrow indicating motion or force.Luggage cover
This conceals the interior of the vehicle in combination with your rear shelf.
Installation
Take care to insert the fixings A on the frame B.
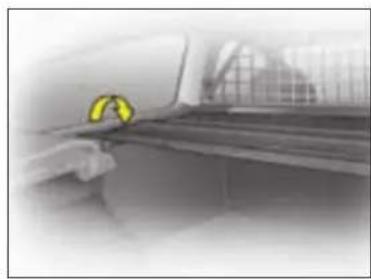
natural_image
Close-up of a car's side panel with a yellow circular emblem on the left side (no visible text or symbols)Stowage
To access the load area roll up the luggage cover.
Removal
It is possible to remove the luggage cover entirely.
XI
Bicycle carrier
The installation of a bicycle carrier on the tailgate of 3 door models is prohibited.
Respect the authorised load capacity.
Do not place hard or heavy objects on the luggage cover. They could become dangerous projectiles in the event of sudden braking or a collision.
150
TECHNICAL SPECIFICATIONS
CAPACITIES
| Engine type | Engine oil capacity in litres (1) |
| 1.4i 16V - 65 kW 3.15 | |
| 1.6i 16V - 80 kW | 3.35 |
| 1.6i 16V - 88 kW | - |
| 1.6i 16V - 110 kW | - |
| 1.6i 16V - 103 kW | - |
| HDi 66 kW (90 hp) | 3.85 |
| HDi 80 kW (110 hp) | 3.85 |
| HDI 100 kW (135 hp) | 5.3 |
| HDI 103 kW (140 hp) | 5.3 |
ENGINE TABLES LEGEND
BVM: Manual gearbox.
BVMP: (6 speed) Electronic Gearbox System.
BVA: Automatic gearbox.
FAP: Diesel particulate filter system (DPFS).
"Michelin Energy Saver": tyres with very low rolling resistance. This tyre equipment contributes to the protection of the environment and the reduction of your vehicle's fuel consumption.
BioFlex: A vehicle fitted with a BioFlex engine can operate equally on unleaded petrol (95/98) or on bioethanol (See "Fuel").
Observe your vehicle's towing limits.
It is essential to comply with the max. Gross Trailer Weights and speed limits as specified by legislation in each country. For further information about the towing capacity of your vehicle and its max. authorised Gross Train Weight, contact your CITROËN dealer.
(1) After an oil change with filter change
TECHNICAL SPECIFICATIONS
WEIGHTS - PETROL
| Engine type | 3-door model | |||||||||
| 1.4i 16V BVM | 1.6i 16V BVM | 1.6i 16V BVA | 1.6i 16V 120 ch BVM | 1.6i 16V 120 ch BVA | 1.6i 16V 150 ch BVM | 1.6i 16V 140 ch BVA | 1.6i 16V manual BioFlex | |||
| Fuel tank capacity | Approximately 60 litres | |||||||||
| Recommended fuel | Unleaded petrol RON 95 - RON 98 | E85 | ||||||||
| Turning circle between walls (in metres) | 11.3 11.3 11.3 11.3 11.3 11.3 11.3 - | |||||||||
| French fiscal rating | 6 7 7 7 7 9 9 7 | |||||||||
| Power (kW) | 65 | 80 | 80 | 88 | 88 | 110 | 103 | 80 | - | |
| Calculated maximum speed in km/h (mph) (in the highest gear) | 182 | 194 | 188 | - | - | - | - | 194 | - | |
| Weights (kg) | ||||||||||
| Unladen weight | 1 182 | 1 200 | 1 274 | 1 220 | 1 273 | 1 276 | 1 290 | 1 200 | - | |
| Gross vehicle weight (GVW) | 1 702 | 1 732 | 1 794 | 1 731 | 1 761 | 1 763 | 1 776 | 1 732 | - | |
| Maximum rear axle weight | 850 | 850 | 850 | 910 | 910 | 920 | 910 | 850 | - | |
| Gross train weight (GTW) | 2 902 | 2 932 | 2 994 | 3 031 | 3 031 | 3 163 | 3 076 | 2 932 | - | |
| Gross trailer weight (with brakes) (within the Gross Train Weight limit) | ||||||||||
| 10 to 12 % incline | 1 200 | 1 200 | 1 200 | 1 300 | 1 270 | 1 400 | 1 300 | 1 200 | - | |
| 8 to 10 % incline | 1 200 | 1 200 | 1 200 | 1 300 | 1 270 | 1 400 | 1 300 | 1 200 | - | |
| Incline of up to 8 % | 1 500 | 1 400 | 1 400 | 1 400 | 1 300 | 1 500 | 1 350 | 1 400 | - | |
| Gross trailer weight (without brakes) | 628 | 637 | 674 | 645 | 670 | 645 | 680 | 637 | - | |
| Trailer nose weight | 63 | 61 | 62 | 65 | 65 | 70 | 70 | 61 | - | |
| Maximum roof bar load | 75 | |||||||||
XII
152
TECHNICAL SPECIFICATIONS
WEIGHTS - PETROL
| WEIGHTS - PETROL | 3-door model | |||||||
| Engine type | 1.4i 16V BVM | 1.6i 16V BVM | 1.6i 16V BVA | 1.6i 16V 120 ch BVM | 1.6i 16V 120 ch BVA | 1.6i 16V 150 ch BVM | 1.6i 16V manua BioFlex | |
| Fuel tank capacity | Approximately 60 litres | |||||||
| Recommended fuel | Unleaded petrol RON 95 - RON 98 | E85 | ||||||
| Turning circle between walls (in metres) | 11.3 11.3 11.3 11.3 11.3 11.3 - | |||||||
| French fiscal rating | 6 7 7 7 7 9 7 | |||||||
| Power (kW) | 65 | 80 | 80 | 88 | 88 | 110 | 80 | - |
| Calculated maximum speed in km/h (mph) (in the highest gear) | 182 | 194 | 188 | - | - | - | 194 | - |
| Weights (kg) | ||||||||
| Unladen weight | 1 181 | 1 200 | 1 278 | 1 217 | 1 273 | 1 271 | 1 200 | - |
| Gross vehicle weight (GVW) | 1 701 | 1 720 | 1 798 | 1 727 | 1 757 | 1 754 | 1 720 | - |
| Maximum rear axle weight | 850 | 850 | 850 | 910 | 900 | 910 | 850 | - |
| Gross train weight (GTW) | 2 901 | 2 920 | 2 998 | 3 027 | 3 027 | 3 154 | 2 920 | - |
| Gross trailer weight (with brakes) (within the Gross Train Weight limit) | ||||||||
| 10 to 12 % incline | 1 200 | 1 200 | 1 200 | 1 300 | 1 270 | 1 400 | 1 200 | - |
| 8 to 10 % incline | 1 200 | 1 200 | 1 200 | 1 300 | 1 270 | 1 400 | 1 200 | - |
| Incline of up to 8 % | 1 500 | 1 400 | 1 400 | 1 400 | 1 300 | 1 500 | 1 400 | - |
| Gross trailer weight (without brakes) | 628 | 637 | 676 | 645 | 670 | 645 | 637 | - |
| Trailer nose weight | 63 | 61 | 63 | 65 | 65 | 70 | 61 | - |
| Maximum roof bar load | 75 | |||||||
TECHNICAL SPECIFICATIONS
WEIGHTS - DIESEL
| WEIGHTS - DIESEL | 5-door model | ||||||
| Engine type | HDi 90 BVM | HDi 90 FAP BVM | HDi 110 BVM | HDi 110 FAP BVM | HDi 110 FAP BVMP | HDi 135 FAP BVA | HDi 140 FAP BVM |
| Fuel tank capacity | Approximately 60 litres | ||||||
| Recommended fuel | Diesel fuel | ||||||
| Turning circle between walls (in metres) | 11.3 11.3 11.3 11.3 12 | ||||||
| French fiscal rating | 5 5 6 6 6 | 7 7 | |||||
| Power (kW) | 66 | 66.2 | 80 | 80 | 80 | 100 | 103 |
| Calculated maximum speed in km/h (mph) (in the highest gear) | 180 | 180 | 192 | 192 | 192 | 206 | 207 |
| Weights (kg) | |||||||
| Unladen weight | 1 257 | 1 280 | 1 270 | 1 280 | 1 293 | 1 416 | 1 381 |
| Gross vehicle weight (GVW) | 1 777 | 1 800 | 1 800 | 1 800 | 1 800 | 1 880 | 1 849 |
| Maximum rear axle weight | 850 | 850 | 850 | 850 | 850 | 850 | 850 |
| Gross train weight (GTW) | 3 077 | 3 100 | 3 100 | 3 100 | 3 100 | 3 350 | 3 449 |
| Gross trailer weight (with brakes) (within the Gross Train Weight limit) | |||||||
| 10 to 12 % incline | 1 300 | 1 300 | 1 300 | 1 300 | 1 300 | 1 570 | 1 500 |
| 8 to 10 % incline | 1 300 | 1 300 | 1 300 | 1 300 | 1 300 | 1 570 | 1 500 |
| Incline of up to 8 % | 1 300 | 1 300 | 1 300 | 1 300 | 1 300 | 1 570 | 1 800 |
| Gross trailer weight (without brakes) | 666 | 677 | 672 | 677 | 675 | 740 | 728 |
| Trailer nose weight | 66 | 66 | 66 | 66 | 65 | 70 | 73 |
| Maximum roof bar load | 75 | ||||||
XII
154
TECHNICAL SPECIFICATIONS
WEIGHTS - DIESEL
| Engine type | HDi 90 BVM | HDi 90 FAP BVM | HDi 110 BVM | HDi 110 FAP BVM | HDi 110 FAP BVMP | HDi 135 FAP BVA | HDi 140 FAP BVM | |
| Fuel tank capacity | Approximately 60 litres | |||||||
| Recommended fuel | Diesel fuel | |||||||
| Turning circle between walls (in metres) | 11.3 | 11.3 | 11.3 | 11.3 | 12 | |||
| French fiscal rating | 5 | 5 | 6 | 6 | 7 | 7 | ||
| Power (kW) | 66 | 66.2 | 80 | 80 | 80 | 100 | 103 | |
| Calculated maximum speed in km/h (mph) (in the highest gear) | 180 | 180 | 192 | 192 | 192 | 206 | 207 | |
| Weights (kg) | ||||||||
| Unladen weight | 1 255 | 1 279 | 1 269 | 1 279 | 1 293 | 1 410 | 1 379 | |
| Gross vehicle weight (GVW) | 1 775 | 1 799 | 1 790 | 1 799 | 1 790 | 1 880 | 1 835 | |
| Maximum rear axle weight | 850 | 850 | 850 | 850 | 850 | 850 | 850 | |
| Gross train weight (GTW) | 3 075 | 3 099 | 3 090 | 3 099 | 3 090 | 3 450 | 3 335 | |
| Gross trailer weight (with brakes) (within the Gross Train Weight limit) | ||||||||
| 10 to 12 % incline | 1 300 | 1 300 | 1 300 | 1 300 | 1 300 | 1 570 | 1 500 | |
| 8 to 10 % incline | 1 300 | 1 300 | 1 300 | 1 300 | 1 300 | 1 570 | 1 500 | |
| Incline of up to 8 % | 1 300 | 1 300 | 1 300 | 1 300 | 1 300 | 1 570 | 1 800 | |
| Gross trailer weight (without brakes) | 665 | 677 | 672 | 677 | 675 | 740 | 727 | |
| Trailer nose weight | 66 | 66 | 66 | 66 | 65 | 70 | 73 | |
| Maximum roof bar load | 75 | |||||||
TECHNICAL SPECIFICATIONS
GENERAL: C4 ENTERPRISE*
| Engine type | HDi 90 BVM | HDi 110 BVM | HDi 90 BVM | HDi 90 FAP BVM | HDi 110 BVM |
| French fiscal rating | 6 6 6 - 6 | ||||
| Weights (kg) | |||||
| Unladen 1 244 1 276 1 247 - 1 265 | |||||
| Gross Vehicle Weight 1 770 1 800 1 780 - 1 790 | |||||
| Payload (including driver) | 526 | 524 | 533 | - | 525 |
| Gross Train Weight | 3 070 3 100 | 3 080 - 3 090 | |||
| Trailer weight with brakes (within Gross Train Weight) | 1 300 1 300 | 1 300 - 1 300 | |||
| Trailer weight without brakes | 655 | 675 | 660 | - | 670 |
| Trailer nose weight | 52 | 52 | 52 | - | 52 |
| Maximum roof bar load | 75 | ||||
XII
* Applicable to all countries, except France and Overseas France.
For France and DOM-TOM countries, refer to the table on the "Technical Specifications - Weights" page.
TECHNICAL SPECIFICATIONS
FUEL CONSUMPTION
| Engine type 1.4i 16V 1.6i 16V | 1.6i 16V 120 ch | 1.6i 16V 150 ch | 1.6i 16V 140 ch | 1.6i 16V manual BioFlex | |||||
| Saloon BVM BVM BVA BVM | BVA BVM | BVA BVM | |||||||
| Recommended fuel | Unleaded petrol RON 95 - RON 98 | E85 | |||||||
| Urban | 8.7 | 9.5 | 10.6 | 9.3 | 10.1 | 9.8 | - | 9.5 | - |
| CO2 emissions | 209 | 224 | 252 | 220 | 240 | 234 | - | 224 | - |
| Extra urban | 5.2 | 5.7 | 5.8 | 5.2 | 5.5 | 5.3 | - | 5.7 | - |
| CO2 emissions | 124 | 135 | 138 | 124 | 131 | 127 | - | 135 | - |
| Combined | 6.4 | 7.1 | 7.6 | 6.7 | 7.2 | 6.9 | - | 7.1 | - |
| CO2 emissions | 153 | 169 | 180 | 159 | 171 | 164 | - | 169 | - |
These consumption values are established in compliance with European directive 80/1268/CEE. They can vary depending on how the vehicle is driven, on the prevailing traffic conditions, on weather conditions, on vehicle load, on how the vehicle has been maintained and also on how many accessories are in use.
The fuel consumption figures quoted are correct at time of going to press.
TECHNICAL SPECIFICATIONS
FUEL CONSUMPTION
| Engine type HDi 90 HDi 90 FAP HDi 110 HDi 110 FAP | HDi 135 FAP | HDi 140 FAP | |||||
| Saloon BVM BVM BVM BVM BVMP BVA BVM | |||||||
| Recommended fuel | 5.8 | 6.0 | 6.1 | 6.0 | 5.8 | 9.1 | - |
| CO_2 emissions | 154 | 161 | 164 | 161 | 154 | 242 | - |
| Extra urban | 3.8 | 4.0 | 4.0 | 4.0 | 3.8 | 5.1 | - |
| CO_2 emissions | 101 | 108 | 108 | 108 | 101 | 136 | - |
| Combined | 4.5 | 4.7 | 4.8 | 4.7 | 4.5 | 6.6 | - |
| CO_2 emissions | 120 | 125 | 128 | 125 | 120 | 175 | - |
These consumption values are established in compliance with European directive 80/1268/CEE. They can vary depending on how the vehicle is driven, on the prevailing traffic conditions, on weather conditions, on vehicle load, on how the vehicle has been maintained and also on how many accessories are in use.
XII
158
The fuel consumption figures quoted are correct at time of going to press.
TECHNICAL SPECIFICATIONS
DIESEL FUEL CONSUMPTION with "Michelin Energy Saver" tyres (15 and 16 inch wheels)
| Engine type HDi 90 HDi 110 | ||
| Saloon BVM BVMP | ||
| Recommended fuel -- | ||
| CO_2 emissions -- | ||
| Extra urban -- | ||
| CO_2 emissions -- | ||
| Combined -- | ||
| CO_2 emissions -- |
These consumption values are established in compliance with European directive 80/1268/CEE. They can vary depending on how the vehicle is driven, the prevailing traffic conditions, weather conditions, vehicle load, how the vehicle has been maintained and also on how many vehicle systems and accessories are in use.
The fuel consumption figures quoted are correct at time of going to press.
159
TECHNICAL SPECIFICATIONS
DIMENSIONS (in metres)
| 3-doormodel | 5-doormodel | |
| A | 2.608 | |
| B | 4.288 4.275 | |
| C | 0.950 | |
| D | 0.730 0.717 | |
| E | 1.502/1.510 | |
| F | 1.497/1.505 | |
| G | 1.769 1.773 | |
| H | 1.456/1.496 | |
| I | 1.964 |
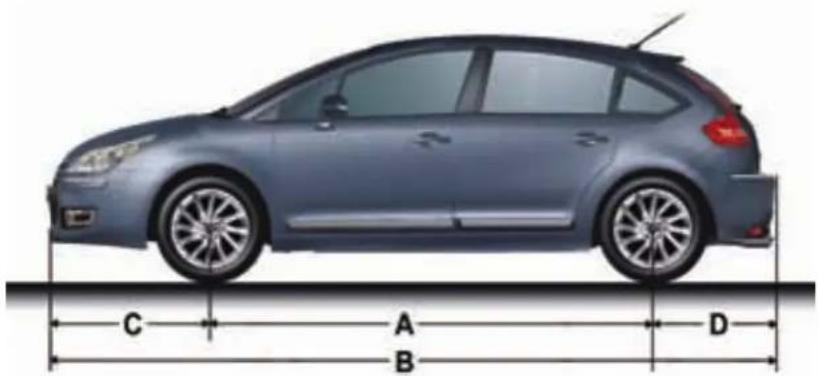
natural_image
Side profile of a car with labeled dimensions A, B, C, D (no text or symbols on the car itself)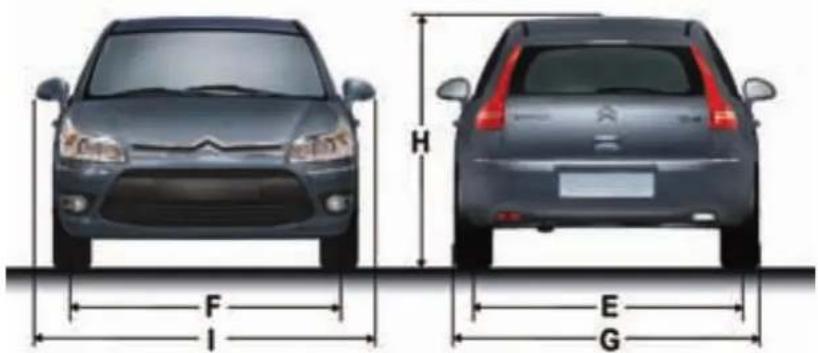
text_image
H F I E GXII
TECHNICAL SPECIFICATIONS
DIMENSIONS (in metres)

text_image
A E Q H F B C D3-door model
| A 0.903/1.067 |
| B 0.513/0.518 |
| C 0.794 |
| D 1.034 |
| E 0.791 |
| F 1.385 |
| G 0.725 |
| H 0.791 |

text_image
A E G H F B C D5-door model
| A 0.862/1.044 |
| B 0.492/0.515 |
| C 0.794 |
| D 1.034 |
| E 0.791 |
| F 1.385 |
| G 0.725 |
| H 0.791 |
TECHNICAL SPECIFICATIONS
VEHICLE IDENTIFICATION
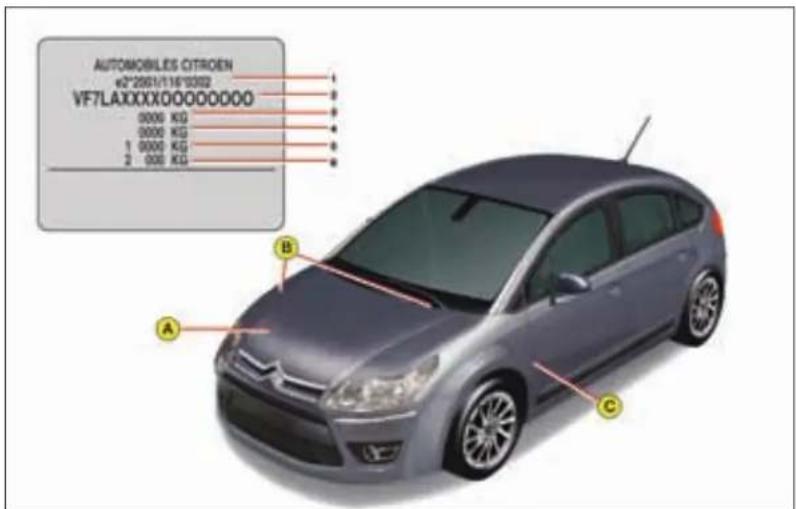
text_image
AUTOMOBILES CITROEN +2°2051/116°03'02 VF7LAXXXXXOOOOOOOOO 0000 KG 0000 KG 1 0000 KG 2 000 KG A B CAll original CITROËN replacement parts are available from CITROËN. It is in the user's interest, for his safety and for the sake of the warranty, to reject all other parts. Fitting parts or units not supplied by CITROËN may even result in violation of the law, if it involves non-compliance with regulations concerning safety, pollution control, interference suppression and the noise level of the vehicle. Fitting such parts or units could also deprive the user of any recourse against the maker.
A Chassis number label
1: EU type approval number.
2: Vehicle Identification N°. (VIN).
3: Gross vehicle weight.
4: Gross train weight.
5: Maximum weight on front axle.
6: Maximum weight on rear axle.
B Vehicle identification number On the bodywork and behind the windscreen.
C Colour code. Tyre reference Tyre pressures
XII
AUDIO
RADIO - RDS - CD

text_image
ABCDEFGHIJK SOURCE NAME LAST ON OKNPMROQL
text_image
Diagram of a smartphone with labeled parts showing front, side, and interior views with numbered labels
natural_image
Close-up of a car seatbelt switch mechanism (no visible text or symbols)XIII
163
AUDIO
BUTTON CONTROLS
| A | On/Off.Volume adjust. | |
| B CD effect. | ||
| C CD aperture. | ||
| D | SOURCE | One press:Selection of sound source (Radio, CD, CD changer). |
| E | BAND/AST | Short press:Selection of frequency bands and memory banks.Long press:Automatic pre-set function (Autostore). |
| F | Call-up of audio adjustments:Sound ambiences, bass, treble, loudness, fade, balancespeed-sensitive volume. | |
| G | LIST | Radio source:- Short press:Display of the list of radio stations available (30 maximum).- Long press:Update of list of stations.CD source:Display of list of tracks of the CD. |
| H | ESC | Short press:Cancel the current operation or delete a superimposed display.Long press:Return to the permanent display. |
| I | TA/PTY | Short press:TA function (road information).Long press:PTY function (selection of programme type |
| J | Radio source:Manual search of higher frequencies.CD/MP3 changer source:Selection of the previous CD/CD-coveOther sources:Scrolling in the Main Menu. | |
| K | Radio source:Automatic search of higher frequencies.CD source, CD changer source and MP3 source:Forward search for tracks.- Long press:Fast forward with accelerated sound.Other sources:In the menus, choice of your adjustmentIf your vehicle has the Bluetooth® system:Selection of characters. | |
| L | OK | Button for validation and activation/deactivation of certain functions.If your vehicle has the Bluetooth® system: Answer call, end call. |
| M | Radio source: Manual search of lower frequencies.CD/MP3 changer source: Selection of the next CD/CD-cover.Other sources: Scrolling in the Main Menu. | |
| N | Radio source: Automatic search of lower frequencies.CD source, CD changer source and MP3 source: Reverse search for tracks.- Long press: Rewind with accelerated sound.Other sources: In the menus, choice of your adjustments.If your vehicle has the Bluetooth® system: Selection of characters. | |
| O | MENU | Display of the Main Menu.In certain countries, this control is deactivated while the vehicle is moving. |
| P | 1-6 | Radio source:- Short press: Recall of pre-set stations.- Long press: Memorisation.CD changer source: Selecting a CD. |
| 1-5 | ||
| Q | DARK | Short successive presses:- One press: Display of radio, time and temperature only.- Two presses: Display off (blank display).- Three presses: Return to the standard display. |
| R | MODE | Selection of the type of information displayed. |
| S | CD changer. |
XIII
164
AUDIO
CONTROLS AT THE STEERING WHEEL
The controls at the steering wheel give you access to certain functions, without you needing to use the radio-CD control panel.
| 1 | VOL + | Volume increase |
| 2 | Radio source:Short press: Automatic search of higher frequencies.CD and CD changer source:Short press: Forward search for tracks.Long press: Fast forward with accelerated sound. | |
| 3 | Radio source:Scrolling of pre-set stations.CD and MP3 source:Search of the track.CD changer source:Selection of next or previous CD. | |
| 4 | VOL - | Volume decrease. |
| 5 | MuteFirst press: Temporary sound pause.Second press: Restoration of sound. | |
| 6 | MENU | Access to the main menu to activate/deactivate or choose the adjustments for your vehicle.In certain countries, this control is deactivated while the vehicle is moving. |
| 7 | OK | In a menu, a list, an alphabet:Validation of the function, the element or the value chosen.If your vehicle has the Bluetooth® system: Answer call, end call |
| 8 | Selection of the next or previous elements of a menu in a screen, a list, an alphabet. | |
| 9 | ESC | Short press: Cancellation of the current operation.Long press: Return to the permanent display. |
| 10 | MODE | Selection of type of information displayed on the right of the screen and, for screen A, choice of activation/deactivation of functions and adjustments. |
| 11 | If your vehicle has the Bluetooth® system:Press: Display of the "Directory" menu. | |
| 12 | If your vehicle has the Bluetooth® system:Press: Activation of voice recognition. |
Display A
Display C
Technical specifications
Your Bluetooth® compatible radio possesses:
- 3 wavebands (MW/LW/FM).
- Dual tuner with RDS EON PTY, display of the PS name, RDS programme search, TA traffic information, 24 preselections (18 FM - 6 MW/LW), automatic memorisation of the AST strongest stations.
- An MP3-compatible CD reader.
- Audio power of 4x35 W.
AUDIO
AUDIO SETTINGS
On/Off
With the key in Drive position M, press on control A to switch the radio on or off.
Note:
- If the radio was on the last time you switched off the ignition, it will resume automatically when you switch on the ignition again. You will not have to press on control A.
- After switching off the ignition, you can still operate the audio system even without the ignition key being present. Simply press on button A. The system will turn itself off after approx. 30 minutes.
Anti-theft system
This radio is coded in such a way as to function only on your particular vehicle. It would be unusable if installed on any other vehicle.
Note:
The anti-theft system is automatic and requires no action on your part.
Selection of source
To select either Radio, CD (CD already inserted and Radio source activated), or CD changer source, press on control D.
When you insert a CD it automatically starts being read.
Note:
When the radio is switched off, the source selected is memorised.
Volume adjustment
Rotate control A to increase or decrease the sound volume.
You can also increase or decrease the volume using buttons 1 and 4 at the steering wheel.
Note:
- The sound volume when you switch off the radio will be the same when you switch it on again.
- The radio sound volume automatically adjusts to the vehicle speed, provided the "volume adjustment" function is activated.
Temporary sound pause
Press on control 5 at the steering wheel to activate this function.
The sound will be paused, regardless of the source selected.
To restore the audio output, press one of the controls at the steering wheel.
Sound adjustments
Each press on buttonF brings up the parameter to be adjusted: choice of predefined sound ambiances, bass, treble, loudness, fade (front/rear sound distribution), balance (left/right sound distribution) and volume adjusted to vehicle speed.
Press buttons K or N to modify the values for the function displayed.
Note:
- The selection of a sound ambiance automatically adjusts bass and treble. These can be modified.
To restore the original adjustments for the musical ambiances, reset bass and treble to zero. - Adjustment of loudness, as well as bass and treble when they are available, are specific to each sound source and to each musical ambiance.
- If you leave the audio system un-actioned for a few seconds, it will revert to the normal display.
XIII
166
AUDIO
RADIO SOURCE
Notes on radio reception
Your radio will be subject to certain phenomena that are not encountered by domestic systems.
The reception of AM and FM signals may suffer from interference, which is caused by the nature and propagation of the signals and does not reflect on the quality of your radio installation.
In AM, the reception may be affected when passing under power lines or bridges, or when travelling through tunnels.
In FM mode, the reception may be affected by the distance from the station transmitter, the reflecting of signals off obstacles (mountains, hills, tower blocks) and radio blackspots (no coverage from the station transmitter).
Selection of radio source
Press button D to select the source.
Selection of frequencies and memory banks
Press button E successively to go through the memory banks FM1, FM2 and FM3, for the FM waveband, and the memory banks MW/LW, for the AM waveband.
Manual search
Manual search is via buttons J or M.
By keeping button J or M pressed, you will be able to scroll through the waveband. Scrolling will stop as soon as you release the button. The radio will remain tuned to the frequency that is displayed.
Tuning sensitivity
Automatic searches can be carried out according to two levels of sensitivity:
- To capture the most powerful transmitters, choose the local search mode "LO" (default option).
- To capture the weakest or most distant transmitters, choose the sensitive search mode "DX".
Search for a station is done first in "LO" (local) sensitivity, then in "DX" (distant) sensitivity.
To commence a search in sensitivity "DX" (distant) immediately, press twice in succession on one of the buttons K or N.
Automatic search
A short press on one of the buttons K or N will tune into higher or lower radio stations respectively, within the chosen waveband.
By keeping button K or N pressed, you will be able to scroll through the waveband. The scrolling will stop at the first station it finds once the button is released.
You can also do this by means of control 2 at the steering wheel. If the automatic search is unable to tune into a known frequency (perhaps owing to very weak reception), it is possible to search manually to find this station.
Display and selection of a station available in the area in which you are travelling
Briefly press on button G to bring up a list of stations, this is updated every 10 minutes.
You can also update this list at any time by giving a long press on button G.
To listen to one of these stations, select by pressing buttons J or M and validate using button L.
AUDIO
Manual pre-setting
Select the waveband and memory bank required using button E. Select a station using either automatic or manual search.
Keep pressing for more than two seconds on one of the pre-selection buttons 1 to 6 on the keypad P.
The sound momentarily cuts off, then returns to its previous level to confirm that it has memorised the station.
Automatic memorisation of transmitters (Autostore function)
In FM, if you hold down button E for more than two seconds, your radio will automatically memorise the 6 strongest stations on the FM3 memory bank.
The display shows "FM AST".
The radio memorises the 6 strongest transmitters, deleting the 6 previously memorised.
After the memorisation, the radio goes directly to memory 1 of memory bank FM3.
Note:
- If the traffic information function has been activated (see RDS SYSTEM), the stations offering this facility will be memorised as priority.
If it is unable to memorise any new stations, the system will retain the previously memorised stations.
- If the system is unable to find 6 stations, the unfilled memory slots will remain free.
Recall of pre-set stations
Press button E briefly to select the required waveband and memory bank.
A short press on one the pre-selection buttons 1 to 6 on the keypad P recalls the corresponding memorised station. You can also do this using the control 3 at the steering wheel.
If it is a RDS station, the frequency appears some seconds before the name appears.
For RDS stations, recall of a station may prompt a search for a frequency corresponding to the region where you happen to be (see RDS system).
XIII
168
AUDIO
RDS SYTEM
Using the RDS (radio data system) function on FM
The majority of FM radio stations use the RDS system. The radio in your vehicle has this system.
The RDS system enables these stations to transmit non-audible data in addition to the broadcasting of their programmes. The data provides access to various functions described in this chapter, such as: display of the station name, intermittent traffic information flashes or automatic scanning of stations. This enables you to continue listening to your chosen radio station, regardless of the different frequencies it uses in the regions through which you are travelling.
Scanning of RDS stations
Your radio keeps the best possible reception by continuously looking for any other frequencies on which the selected radio station is broadcast, automatically choosing the frequency offering the best reception (if the station broadcasts on more than one transmitter or frequency).
Activation/deactivation of the RDS functions
The RDS functions can be accessed via the following two menus:
- Main menu (press button O).
- AUDIO menu (press button L).
To activate/deactivate the RDS functions on the display C:
- Press button O
- Select the AUDIO icon using buttons J or M.
- Confirm your choice with a press on button L.
- Select the sub-menu for the FM waveband, via buttons J or M. Confirm your choice with a press on button L.
- Select scanning for RDS stations, via buttons J or M.
- Validate your choice with a press on button L.
- Using control L, select/deselect to activate/deactivate the function.
- Validate your choice by selecting "OK" on the display.
To activate/deactivate the RDS functions on the display A:
- Press button O.
- Select the AUDIO-CD icon via buttons J or M.
- Select scanning for RDS stations, via buttons J or M. The system tells you the status (active or inactive) of the function.
- Modify this status via buttons K or N.
- Then please wait for the display to disappear.
Note:
If the RDS function is active:
- The "RDS" on the display will light up provided the station being received uses the RDS system with scanning of frequencies.
- The "RDS" on the display is barred if the station received uses the RDS system without frequency search.
If your RDS function is deactivated, the "RDS" on the display will be absent in all cases.
The display will indicate the "NAME" for the stations that use the RDS system and the frequency for stations that do not use it.
AUDIO
Regional search mode
Some stations, when they are organised in networks, broadcast regional programmes at certain times of day, and national programmes at other times.
It is possible to search:
- Either for a regional station only.
- Or across the whole network in order to find a different programme.
To activate/deactivate this function, proceed as for Scanning of RDS stations.
Note:
When this mode is activated, the system will remain tuned to one specific regional station.
TA traffic information (traffic announcements)
Some stations allow broadcasting, only in FM, of these messages thanks to the "TA" function. You can activate the "TA" function by pressing on button I. This allows you, even though you are listening to another audio source or to a radio programme not itself providing traffic messages, to receive traffic information flashes from an FM station which broadcasts them.
While the messages are being broadcast the original source is paused and when the messages have ended your radio will automatically revert to the music programme you were listening to.
Note:
- You have to be in FM wave band.
- The station being listened to should indicate via the RDS system that it broadcasts traffic information.
- Stations organised in a network (EON) have regional transmitters that send their own programmes: while you are listening to one of these stations the system will switch automatically to a station on the network that is broadcasting traffic information.
- You can stop listening to a message by pressing button I.
Sound volume adjustment for traffic information
The sound volume for traffic information operates separately from that for the rest of the system, and can be adjusted independently. Rotate button A while a traffic information message is being broadcast. This volume adjustment is memorised.
Selecting a programme type
Certain stations offer the possibility of listening to a particular programme type, selected from a list (PTY). press for more than two seconds on button I.
Press on buttons J or M to scroll through and select the programme type you prefer, then press on button L to validate your choice.
Searching for a station
broadcasting this programme type
When you have chosen a programme type, the list of corresponding stations appears on the display, press on buttons J or M to scroll down and select the station you want, then press on button L to validate your choice.
Quitting pty mode
To quit "PTY" mode, select the function to deactivate "PTY" in the list of the different programme types.
Radio text via contextual menu
This function allows you to view the information broadcast by the station, concerning the programme you are currently listening to.
To activate/deactivate this function, proceed as for Scanning of RDS stations.
XIII
170
AUDIO
CD SOURCE
Selecting CD source
After inserting a CD, with the printed side facing upwards, the player will start playing the CD automatically. To change manually to CD source (CD already inserted), press button D until you obtain the source you require.
Ejecting a CD
Press button B to eject the CD, the audio system will automatically switch to radio source.
If the CD is not removed within 10 to 15 seconds of being ejected, it will automatically be taken back into the CD player, although it will not be played.
Selecting a track
Press button K once to play the next track.
Press button N once to return to the beginning of the track currently being played, press a second time to go back to the start of the previous track.
Press the buttons successively to skip several tracks at a time.
This can also be done via the control G. As the list of tracks is displayed on the screen, select the desired track using buttons J or M, then validate using button L.
You can also do this by means of control 2 at the steering wheel.
Fast forward and rewind with accelerated sound
To move swiftly through the CD, press and keep pressed button K or N, respectively for fast forward or rewind with accelerated sound. Play resumes as normal when the button is released.
Menu
This menu allows activation/deactivation of two options:
- Playback of the first 7 seconds (approx.) of each track of the CD.
- Random playback of the CD tracks.
This can be accessed in two ways: - Either by pressing button O and proceeding as for Search of Stations RDS – for screen C, the sub-menu corresponds to the Audio Preferences.
- Or, provided you are in CD source, by pressing on button L. You can then access the Audio menu (for screen C only).
Note:
If one of these options is active, it remains active for CD changer source.
Safety precautions
For safety, do not use a CD player if the cabin temperature is higher than +60 °C or lower than -10°C.
If the temperature becomes too high, an automatic safety device will prevent the CD player from working until an acceptable temperature is restored.
Handling compact discs
Do not drop them. Store the CDs so that they are kept of dust. Avoid touching the disc surface as any scratches may adversely affect the sound quality. Do not attach any stickers to the discs. Do not use damaged or deformed discs. Do not expose them to heat or direct sunlight.
If the surface of the compact disc is dirty, it can be wiped with a soft, clean cloth. Always wipe from the centre of the disc outwards.
AUDIO
MP3 CD player
Your Audio CD system may be MP3 compatible.
As you insert a CD recorded in MP3 format, playback starts of the first song of the first CD-cover.
You can select a particular track by using buttons N or K and CD-covers using buttons J or M.
To select a track
To display the list of CD-covers, press on button G.
Use buttons J or M to select the CD-cover you wish to listen to.
To open a CD-cover, press L.
Use buttons N or K to select the track you wish to listen to.
Validate by pressing button L or control 7 at the steering wheel.
Menu
This menu is for activation/deactivation of three options:
- Playback of the first 7 seconds (approx.) of each track of the CD.
- Repetition of the current CD-cover.
- Random playback of CD-cover tracks by CD-cover.
This can be accessed in two ways:
- Either by pressing button O and proceeding as for Search of Stations RDS – for screen C, the sub-menu corresponds to the Audio Preferences.
- Or, provided you are in CD source, by pressing on button L. You can then access the Audio menu (for screen C only).
XIII
172

AUDIO
CD CHANGER SOURCE
CD Changer
This unit (if fitted) is located under the front centre armrest and can receive 6 CDs.
Inserting CDs into the magazine
- To insert a CD, press the LOAD button, then the one for the slot in question. When the indicator lamp for the slot flashes, insert the CD.
- To insert CDs in all of the slots, press the LOAD button for 2 seconds. Insert each CD in turn after its slot indicator lamp flashes.
Note:
- Each compartment takes one disc only.
- The CD changer will not operate if discs are inserted the wrong way up.
Removing discs
- To eject a CD, press the EJECT button then the button for the corresponding slot.
- To eject all the CDs, press the EJECT button for 2 seconds.
Removing discs
To remove a CD, give a long press on the corresponding button.
Play starts with the first track on the first CD.
Selecting a CD
To select a CD, press one of the pre-select buttons 1 to 6 on the keypad P, or scroll through them using J or M
The CD will start to play automatically.
You can also do this by means of control 3 at the steering wheel.
After each change of source, on return to CD changer source, playback will resume at the same point where it had been interrupted.
Selecting a track
Press button K once to play the next track.
Press button N once to return to the beginning of the track currently being played, press a second time to go back to the start of the previous track.
Press the buttons successively to skip several tracks at a time.
You can also do this by means of the controls 2 and 3 at the steering wheel.
Fast forward and rewind with accelerated sound
Press and keep pressed one of the buttons K or N respectively for fast forward or rewind with accelerated sound. Play resumes as normal when the button is released.
Menu
This menu is for activation/deactivation of three options:
- Playback of the first 7 seconds (approx.) of each track of the CD.
- Repetition of the current CD.
- Random playback of tracks, CD by CD.
This can be accessed in two ways: - Either by pressing button O and proceeding as for Search of Stations RDS – for screen C, the sub-menu corresponds to the Audio Preferences.
- Or if you are in CD changer source by pressing button L. You then have access to the AUDIO menu (for screen C only).
Note:
If one of these options is active, it remains active for CD source.
AUDIO
HANDS-FREE TELEPHONE
Your audio system may be Bluetooth compatible. It allows you to connect a mobile telephone for "hands free" use and even to use its directory.
It permits you to twin up to four telephones, to be able then to connect whichever one you choose. The Bluetooth® functions available and the content of the display are dependent on the type of mobile telephone, its settings and the type of contract you have. For this reason it is advisable to make enquiries with your telephone provider.
Prior to any operation:
- Your display should be lit up (key in position M).
- Your telephone's Bluetooth system must be activated.
Twinning a telephone
Twinning a telephone consists of having it recognised by the Bluetooth® system on your vehicle. This then permits an instantaneous connection.
Twinning can only be performed with ignition switched on, display illuminated, engine stopped. No other telephone should be connected.
The twinning must be performed with the telephone and its Bluetooth® system activated.
Note:
Refer to the user instructions to familiarise yourself with the features of twinning.
- The telephone detects the Bluetooth® system on your vehicle. "C4" displays on your telephone.
You should then select "C4" on your telephone controls. Next you must choose whether or not to accept this twinning then select, on screen C using J, M or 8, one of the 4 memories. Validate with a press on button L or 7.
Note:
You can select a memory already attributed, although the telephone twinned to this location will no longer be.
- Next the telephone asks you to enter an identification code: 1234.
- Validate.
Note:
This entry may be demanded earlier in the twinning sequence.
The telephone is now twinned to your Bluetooth® system. For immediate access to the Bluetooth® functions, it may be necessary to make a connection (see following page "Configuration: Connecting a twinned mobile telephone").
Once the twinning is finished, you will be able to connect your telephone via the "Main menu".
Connecting a twinned telephone
Each time you enter the vehicle, after switching on the audio system, your telephone is detected automatically. If more than one telephone is present, the last telephone to have been connected is the first to be recognised.
Note:
Disconnections may occur. You may have to make a new connection (see following page, "Configuration: Connecting a twinned mobile telephone").
Remarks:
- In the event of a problem, it is recommended to switch your telephone off and then on again.
- If you switch off your telephone within the field of reception of the Bluetooth® system on your vehicle, the next connection will not be automatic. To restore automatic connection, you will have to connect your telephone manually (see following page, "Configuration: Connecting a twinned mobile telephone").
- If you are already in telephone communication when the audio system is turned on, the latter detects the telephone.
- To avoid interference, you are advised not to place your mobile telephone close to your radio.
To accept an incoming call
Using button L or control 7 at the steering wheel.
XIII
174

AUDIO
Main Menu
Press on the Menu control O to access the Main Menu, then select the "Telephone" icon via buttons J, M or 8 and then validate the selection via button L or 7. You have access:
- To the Directory.
- To Configuration.
- To Communication Management.
You access your choices using J, M or 8 then you validate them with a press on L or 7.
This main menu can also be accessed by pressing button E then button L.
Directory
This menu lets you open:
- The telephone Directory of the telephone that is connected.
- The Calls List.
This menu can also be accessed with a press on control 11.
Telephone directory
The starting of a telephone call can be done independently of the telephone or of the audio system, thanks to the directory.
The directory is displayed. Select the number via J, M or 8, then validate with a press on L or 7.
Remarks:
- The directory displayed updates itself automatically.
- If the person to be called does not figure in the directory, the call can only be made starting from the telephone.
- If you have information recorded in the Vcard format, you must select the person you wish to call, then validate. A list of 4 numbers maximum can be displayed with the following labels: "Home", "Office", "Mobile" and "Car".
Calls list
After selecting this component and then validating, the calls list is displayed with a maximum of: 10 calls made (arrow pointing upward), 10 calls received (arrow pointing downward) and 10 calls not connected.
It is possible to make a call starting from this list: Select the number via J, M or 8, then validate with a press on L or 7.
Configuration
This menu allows you to:
- Deleting a twinning.
Using J, M or 8, select this choice then validate via L or 7. Select in the list the telephone that you no longer wish to have twinned. Validate.
- Consulting the list of twinnings.
The list of telephones twinned is displayed.
- Connecting a mobile telephone that is twinned.
Select the telephone that you wish to connect. This access allows you to make a connection manually.
Call management
This menu is accessible during your calls, permitting you to:
- Swap a call if there is another call incoming.
- End a call.
- Be in Secret mode.
Remark:
If you are in telephone conversation, you have access to this "Configuration" menu by means of a press on L or 7.
AUDIO
Swapping a call
During a telephone conversation, the system is able to tell you of a second call incoming. To accept it, validate. To change from one call to the other, select this choice.
End a call
This choice enables you to end a telephone conversation, for example if there is another call incoming.
Secret mode
Selecting this choice allows you not to be heard by the other person. To restore sound to the other person, select deactivation of Secret mode in the menu "Call Management".
Note:
If you wish to transfer a call from the audio system to the mobile telephone (for example when leaving your vehicle), refer to the user instructions for the latter.
Voice recognition
A short press on button 12 starts voice recognition for the telephone. Voice recognition allows you to make a call to a number for which you have recorded a label on the mobile telephone that is twinned and connected.
Remark:
It is possible to stop the call as long as the dialling has not commenced, by means of a short press on button 12.
Remarks:
- While you are on a call, the audio source currently being listened to is paused.
- Some ring tones on your mobile telephone may not be recognised by the Bluetooth ^® system on your vehicle. A different ring tone will be chosen by the system.
Displays
Press the "MODE" button to display telephone information in the right hand part of the display.
A "Telephone" symbol appears on your display when you connect a mobile telephone.
A "Battery" symbol appears at the bottom of the display to indicate the range of the mobile telephone connected.
An "Envelope" symbol appears at the bottom of the display to indicate the presence of an unread SMS on the mobile telephone connected.
A "Sound track" symbol appears at the bottom of the display to indicate the presence of a message on the mobile telephone connected.
XIII
176
AUDIO
JBL HI-FI SYSTEM
Your vehicle may be equipped with a JBL Hi-Fi system, specially designed to fit in with your cabin interior.
Adjustment in CD or radio mode
The basic functions remain the same as those for the radio.
No extra adjustment is necessary.
However, to profit fully from your JBL audio system, you are recommended to adjust the audio functions: bass (Bass), treble (Treb), front/rear balance (Fad), left/right balance (Bal) to position O, Loudness (Loud) to position ON for listening to a CD and position OFF for listening to the radio.
AUDIO
FREQUENTLY-ASKED QUESTIONS
The table below provides answers to the questions that are asked the most frequently.
| QUESTION | ANSWER | SOLUTION |
| There is a discrepancy in sound quality between the different audio sources (radio, CD, CD changer etc.). | To achieve an optimum listening quality, the audio adjustments (Volume, Bass, Treble, Ambiance, Loudness) can be adapted to each of the different sound sources, which can produce audible shifts when you change the source (radio, CD, CD changer etc.). | Check that the audio adjustments (Volume, Bass, Treble, Ambiance, Loudness) are adapted to the sources being listened to. It is recommended that you should adjust the AUDIO functions (Bass, Treble, Front-Rear balance, Left-Right balance) to the mid position, select the musical ambiance "None", adjust the loudness correction to the position "Active" in CD mode and to the position "Inactive" in radio mode. |
| The CD immediately ejects or does not play back. | The CD is the wrong way up, is unplayable, does not contain audio data or contains an audio format that the radio cannot play back. The CD is protected by an anti-pirating protection system unrecognised by the radio. | - Check that you have inserted the CD the right way up in the CD player.- Check the condition of the CD: the CD cannot be played back if it is too damaged.- Check the contents if it is a burnt CD: refer to the advice given in the chapter on Audio System.- The radio's CD player cannot play back DVDs.- For reasons of poor quality, some burnt CDs will not be played back by the audio system.- The CD changer does not play back MP3 CDs. |
| The CD player sound is downgraded. | The CD being used is scratched or of poor quality | Insert only CDs of good quality and keep them in good condition. |
| The radio adjustments (bass, treble, ambiances) are unsuitable. | Return the treble and bass levels to 0, without selecting any ambiance. |
XIII
178

AUDIO
| QUESTION | ANSWER | SOLUTION |
| The pre-set stations do not work (no sound, 87.5 Mhz is displayed, etc.). | The waveband selected is not the correct one. Press on the button BAND AST to retrieve the wave band (AM, FM1, FM2, FMAST) where the stations have been memorised. | |
| Traffic Announcements (TA) is displayed, but I do not receive any road information. | The particular radio station is not in the regional traffic information network. | Change to a radio station which does broadcast traffic information. |
| The reception quality of the radio station being listened to gradually deteriorates or the pre-set stations do not work (no sound, 87.5 Mhz displayed, etc.). | The vehicle is too distant from the transmitter of the station being listened to, or no transmitter is present in the geographical area you are passing through. | Activate the RDS function to allow the system to check whether a more powerful transmitter is to be found in the geographical area. |
| The environment (hills, high buildings, tunnels, underground car parks, etc.) is blocking reception, even in RDS mode. | This phenomenon is normal and does not imply anything wrong with the radio. | |
| The aerial is absent or has been damaged (for example after going through a car wash or in an underground car park). | Have the aerial checked by a CITROËN dealer. | |
| Cutting of sound for 1 or 2 seconds in radio mode. | The RDS system during this brief sound cut-off is searching for a better frequency that might offer improved reception of the station. | Deactivate the RDS function if the phenomenon occurs too frequently and always on the same journey. |
| When the engine is not running, the radio stops after a few minutes. | When the engine is switched off, the working time for the radio depends on the vehicle battery charge.The interruption is normal: the radio goes into economy mode, cutting off in order to save the vehicle's battery. | You have to start the engine so as to increase the battery charge. |
| The message "the audio system is overheating" appears on the screen. | In order to protect the audio equipment in excessive ambient temperatures, the radio goes into an automatic thermic protection mode which results in a reduction in sound volume or stopping of the CD player. | Switch off the audio system for a few minutes in order to allow the system to cool down. |

INDEX

A A.B.S. 25-85
Access 57-64
Accessories socket 12 V....76
Adjusting the headlamps ..... 66
Adjusting the seat belts 87 → 89
Adjusting the seats .....13-49 → 54-80-82
Adjusting the steering column 56
Adjusting the time ....31 → 33-35-37
Airbags 90→93
Air distribution 17-43-46
Air filter 117→119
Air recirculation ..... 10-12-17 -43-46
Air vents 8-9-41
Anti-intrusion alarm ..... 60-61
Ashtray 76
Audio adjustments 166
Automatic dual zone air conditioning .... 17-45 → 47
Automatic gear lever 100 → 108
Automatic gearbox.... 106 → 109
Automatic headlamp lighting 65
B Battery 142→144
Battery replacement ...... 142 → 144
Bluetooth 174→176
Bonnet 116
Boot 64-77
Brake fluid 24-119-121
Brake pads control 122
Braking system 85-121
Bulbs (replacement) ..... 129 → 135
C Capacities 151
Cargo net 77
Cargo rings 77
Carrier bag hook 75
CD 171-173
CD changer 173
Central locking 57-58
Changing a wheel ..... 125 → 128
Changing bulbs ..... 129 → 135
Changing fuses ..... 136 → 141
Changing remote control battery ....59
Chassis no.plate 162
Child restraints ..... 79 → 82
Child safety 63-78 → 83
Child seats 78→82
Cigar lighter 9-76
Cold weather screen: "snow-guard" 148
Colour code 162
Coolant fluid 117→120
C Coolant temperature indicator ..... 23-117 → 120
Cooling system 119-120
Cruise control .....7-10-11-20-110-111
D Dashboard 8-9
Dashboard lighting 29
Date 31→37
Deadlocking 57-58
Defrosting - demisting .....17-43-44-47
Diesel engine 118
Diesel injection equipment 122-123
Diesel preheater 25
Dimensions 160-161
Direction indicators ....8-10-24-67
Directional headlamps ..... 68
Distance recorder 23
Driving position 52
E Economy mode .....144
Electric windows 15-62
Electronic gearbox (6-speed) 100 → 104
Electronic immobiliser key .....57
Embellishers 127-149
Emergency braking assistance....85
Engine oil 23-29-95-119 -120-151


INDEX
E Engine oil level indicator .....29
Engines 117-118
Engine levels 117-118
ESP (Electronic stability
programme)......8-18-26-86
ESP deactivation 86
F Filling the tank 124
Fitting loudspeakers ..... 148
Fixed centred controls steering wheel .... 10 → 12
Floor mat 73
Folding seat back 53-54
Folding the rear seats ..... 53
Front seats 49 → 52
Fuel 124
Fuel consumption ..... 157 → 159
Fuel cut-off switch 95
Fuel flap 6-124
Fuel quality 124
Fuses 136→141
G Glovebox 73
Grab handles 75
Guide-me-home lighting ..... 65
H Handbrake 9-24
Hazard lamps 9-67-94
Head restraints ..... 14-50-53
Headlamp wash 70-119
Headlamps 16-24
Heated seats 51
Hill start assist 105
Horn 8-10
I Ignition 20
Instrument panels 8-23
Interior lamp 71-132
Interior lighting 71-72
Isofix (fixings) 81-82
J Jack 94-126-127
K Keys.... 57-58
L Lamps left on 65
Lane departure
warning system ...... 8-18-96
Levels and checks .....119 → 121
Lifting, towing 145
Lighting 65→67
Lighting controls ..... 65 → 67
Loads and towing ... 145 → 147
Locating of the vehicle ..... 59
Log of alerts 12-23
Loudspeakers 114-148
M Main beams 24-65-66
Main menu ..... 12-31-32-34-164
Maintenance 116→123
Maintenance indicator .... 27-28
Manual air
conditioning 17-43-44
Manual gearbox 99
Mileage counters 23
MP3 172-173
Multifunction
display 9-31→40
N Navidrive colour screen .....37
Night driving 29-30
P Parking assistance .... 8-101 -114-115
Particle filter (Diesel) 26
Passenger airbag
deactivation 25-92
Personal security 63-64
Petrol engine 117
Pretensioners 88
Priming the fuel system ..... 123
R Radiator coolant
level 120-121
Radio ... 9-32-34-148-163 → 170
Radio pre-equipment ..... 148
Rear demisting 44-47
Rear seats 53-54
Rear shelf 77
Rear view mirror 55-56
Rear view mirror
(demisting) 55
Remote control 58-61
Rev counter 18-23
Reverse
gear ......21-70-99-101-109
Roof bars 149-150
s Safety
recommendations ..... 86-87
-94-95
Scented air freshener 48
Screen wash 9-119 181


INDEX
S Seat belt not-fastened detection 25
Seat belts 19-87 → 89
Sidelamps 16-24-65-66
Sill lighting 72
Spare wheel ..... 125 → 128
Speed
limiter .... 10-11-20-23-112-113
Spotlamps 71
Starter 20-98-102
Steering lock 9-20
Steering wheel
adjustment 8-56
Stoplamps 133-134
Storage 53-74
Storage drawer 9-73
Sunvisors 75
W Warning lamps ...... 24 → 26
Wash/wipe 16-69-70
Wear of brake pads .....122
Weights 152→156
Windows 8-15-62-63
T Third stop lamp....134
Tools 126
Towbar 147
Towing 145-146
Towing ring 126-145
Trailer weights ..... 151 → 156
Trip computer 38-40
Tyre deflation detection ..... 84
Tyre maintenance 128
Tyre pressures ..... 84-125-162
Tyre wear 84-128
V Vehicle identification .....162
Ventilation 41→47
182 Visibility 65→72


INDEX


