Silverado 1500 (2012) - Car CHEVROLET - Free user manual and instructions
Find the device manual for free Silverado 1500 (2012) CHEVROLET in PDF.

User questions about Silverado 1500 (2012) CHEVROLET
0 question about this device. Answer the ones you know or ask your own.
Ask a new question about this device
Download the instructions for your Car in PDF format for free! Find your manual Silverado 1500 (2012) - CHEVROLET and take your electronic device back in hand. On this page are published all the documents necessary for the use of your device. Silverado 1500 (2012) by CHEVROLET.
USER MANUAL Silverado 1500 (2012) CHEVROLET
2012ChevroletSilveradoOwnerManual
InBrief....1-1
InstrumentPanel......1-2
InitialDriveInformation......1-8
VehicleFeatures......1-29
Performanceand
Maintenance....1-37
Keys, Doors, and
Windows......2-1
KeysandLocks......2-2
Doors....2-11
VehicleSecurity......2-13
ExteriorMirrors......2-16
InteriorMirrors......2-19
Windows....2-20
Roof....2-23
SeatsandRestraints......3-1
HeadRestraints......3-2
FrontSeats......3-3
RearSeats......3-12
SafetyBelts....3-14
AirbagSystem......3-25
ChildRestraints......3-45
Storage....4-1
StorageCompartments......4-1
InstrumentsandControls....5-1
Controls....5-2
WarningLights,Gauges,and
Indicators......5-12
InformationDisplays......5-33
VehicleMessages......5-43
VehiclePersonalization......5-52
UniversalRemoteSystem....5-61
Lighting....6-1
ExteriorLighting......6-1
InteriorLighting......6-8
LightingFeatures......6-10
InfotainmentSystem......7-1
Introduction......7-1
Radio....7-9
AudioPlayers......7-16
RearSeatInfotainment......7-40
Phone....7-52
TrademarksandLicense
Agreements....7-60

Information Provided by
DEALER
ClimateControls......8-1
ClimateControlSystems.....8-1
AirVents....8-11
DrivingandOperating......9-1
DrivingInformation......9-2
StartingandOperating......9-27
EngineExhaust......9-37
AutomaticTransmission.....9-39
ManualTransmission......9-46
DriveSystems....9-47
Brakes....9-61
RideControlSystems......9-65
CruiseControl....9-69
ObjectDetectionSystems....9-72
Fuel....9-79
Towing....9-86
Conversionsand
Add-Ons....9-119
2012ChevroletSilveradoOwnerManual
VehicleCare....10-1
GeneralInformation......10-3
VehicleChecks......10-4
HeadlampAiming......10-41
BulbReplacement......10-43
ElectricalSystem......10-48
WheelsandTires......10-57
JumpStarting......10-96
Towing....10-101
AppearanceCare......10-106
ServiceandMaintenance...11-1
GeneralInformation......11-1
MaintenanceSchedule......11-3
SpecialApplication
Services......11-9
AdditionalMaintenance
andCare....11-10
RecommendedFluids,
Lubricants, and Parts.....11-13
MaintenanceRecords.....11-17
TechnicalData......12-1
VehicleIdentification......12-1
VehicleData....12-2
CustomerInformation.....13-1
CustomerInformation......13-2
ReportingSafetyDefects....13-20
VehicleDataRecordingand
Privacy....13-21
OnStar....14-1
OnStarOverview......14-1
OnStarServices......14-2
OnStarAdditional
Information......14-5
Index......i-1


Thenames, logos, emblems, slogans, vehiclemodelnames, and vehiclebodydesignsappearingin thismanualincluding, but not limitedto, GM, theGMlogo, CHEVROLET, theCHEVROLET Emblem, SILVERADO, and Z71 aretrademarksand/orservice marksofGeneralMotorsLLC, its subsidiaries, affiliates, or licensors.
Thismanualdescribesfeaturesthat mayormaynotbeonyourspecific vehicleeitherbecausetheyare optionsthatyoudidnotpurchaseor duetochangessubsequenttothe printingofthisownermanual.
Pleaserefertothepurchase documentationrelatingtoyour specificvehicletoconfirmeachof thefeaturesfoundonyourvehicle. ForvehiclesfirstsoldinCanada, substitutethename"General MotorsofCanadaLimited"for ChevroletMotorDivisionwhereverit appearsinthismanual.
IfthevehiclehastheDuramax ^® dieselengine,seetheDuramax dieselsupplementforadditionaland specificinformationonthisengine.
If the vehicle is a hybrid, se the hybrids supplement form more information.
Keepthismanualinthevehiclefor quickreference.
CanadianVehicleOwners
AFrenchlanguagecopyofthis manualcanbeobtainedfromyour dealerorfrom:
Helm, Incorporated Attention: CustomerService 47911 HalyardDrive Plymouth, MI48170
LithoinU.S.A.
PartNo.20902913BSecondPrinting
©2011GeneralMotorsLLC.AllRightsReserved.
UsingthisManual
Toquicklylocateinformationabout thevehicle,usethelIndexinthe backofthemanual.Itisan alphabeticallistofwhatisinthe manualandthepagenumber whereitcanbefound.
Danger,Warnings, and Cautions
Warning messages found on vehicle labels and this manual describe hazards and what to avoid or reduce them.
Dangerindicatesahazardwitha highlevelofriskwhichwillresultin seriousinjuryordeath.
Warningor Caution indicates a hazard that could result in injury or death.
WARNING
These mean there is something that could hurt you or other people.
Notice: This mean there is something that could result in property or vehicle damage. This would not be recovered by the vehicle's warranty.

Acirclewithaslashthroughitisa safetysymbolwhichmeans“Do Not,”“Donotdothis,”or“Donotlet thishappen.”
Symbols
Thevehiclehascomponentsand labelsthatusesymbolsinsteadof text.Symbolsareshownalongwith thetextdescribingtheoperationor informationrelatingtoaspecific component,control,message, gauge,orindicator.
(i): This symbol is shown when you need to see your own manual for additional instructions or information.
☐: This symbol is shown when you need to see a service manual for additional instructions or information.
VehicleSymbolChart
Herearesomeadditionalsymbols that may be found on the vehicle and what they mean. Form more information on the symbol, refer to the Index.
:AdjustablePedals
AirbagReadinessLight
AirConditioning
(ABS):AntilockBrakeSystem(ABS)
^1 :AudioSteeringWheelControls orOnStar®
(1):BrakeSystemWarningLight
- + : ChargingSystem
:CruiseControl
EngineCoolantTemperature
-ExteriorLamps
D:FogLamps
:FuelGauge
Fuses
ED:HeadlampHigh/Low-Beam Changer
LATCHSystemChild Restraints
:MalfunctionIndicatorLamp
OilPressure
OutsidePowerFoldaway Mirrors
Power
Ω:RemoteVehicleStart
SafetyBeltReminders
(1):TirePressureMonitor
-∞:Tow/HaulMode
: TractionControl/StabiliTrak®
:WindshieldWasherFluid
vilntroduction
NOTES
InBrief
InstrumentPanel
InstrumentPanel(Base/Uplevel
Version)....1-2
InstrumentPanel(Premium
Version)....1-6
InitialDriveInformation
InitialDriveInformation......1-8
RemoteKeylessEntry(RKE)
System......1-8
RemoteVehicleStart......1-9
DoorLocks......1-9
Windows....1-10
SeatAdjustment......1-12
MemoryFeatures......1-14
HeatedandVentilated
Seats......1-16
HeadRestraint
Adjustment......1-16
SafetyBelts....1-17
PassengerSensing
System......1-17
MirrorAdjustment......1-18
SteeringWheel
Adjustment......1-21
ThrottleandBrakePedal
Adjustment......1-21
InteriorLighting......1-21
ExteriorLighting......1-22
WindshieldWiper/Washer....1-23
ClimateControls......1-24
Transmission....1-26
Four-WheelDrive......1-27
VehicleFeatures
Radio(s)....1-29
SatelliteRadio....1-30
PortableAudioDevices.....1-31
Bluetooth ^® 1-31
SteeringWheelControls.....1-31
CruiseControl....1-32
NavigationSystem......1-32
DriverInformation
Center(DIC)....1-33
RearVision
Camera(RVC)....1-34
UltrasonicParkingAssist....1-34
PowerOutlets......1-34
UniversalRemoteSystem...1-35
Sunroof....1-35
PerformanceandMaintenance
StabiliTrak® System......1-37
TirePressureMonitor......1-38
EngineOilLifeSystem.....1-38
FuelE85(85%Ethanol).....1-39
DrivingforBetterFuel
Economy......1-39
RoadsideAssistance
Program......1-40
OnStar ^® 1-40

Information Provided by
DEALER
纸 - 尸尺 □ 二 红 垣 面
InstrumentPanel
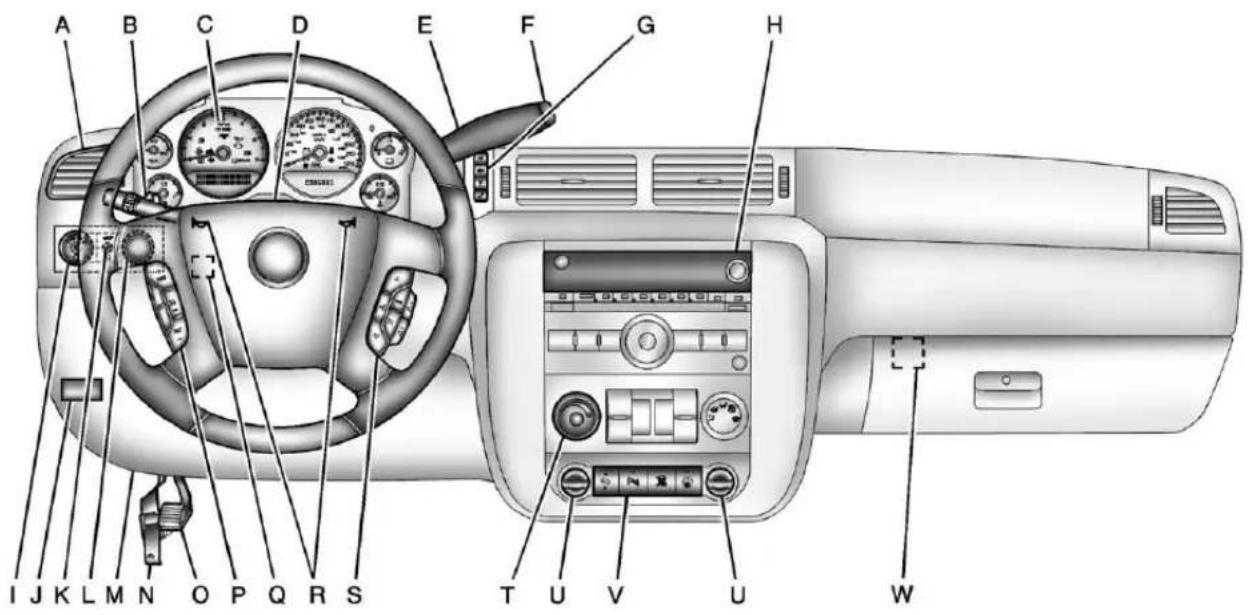
InstrumentPanel(Base/UplevelVersion)

text_image
A B C D E F G H 309 I J K L M N O P Q R S T U V W X Y
Information Provided by. DEALER
A. AirVentsonpage8-11.
B. TurnandLane-ChangeLever.
See TurnandLane-Change
Signalsonpage6-6.
WindshieldWiper/Washeron
page5-5.
C.DriverInformationCenter(DIC)
Buttons.SeeDriverInformation
Center(DIC)onpage5-33.
D. HazardWarningFlasherson page6-5(OutofView).
E. InstrumentClusteron page5-13.
F.ShiftLever.SeeAutomatic Transmissiononpage9-39.
Tow/HaulSelectorButton (IfEquipped). See Tow/Haul Modeonpage9-44.
RangeSelectionMode(Allison TransmissionandHydra-Matic 6-SpeedButton)(IfEquipped). SeeManualModeon page9-43.
G. Infotainmentpage 7-1.
H. InstrumentPanelStorageon page4-1.
I. Integrated Trailer Brake Controller(IfEquipped). See Trailer Towing on page 9-90.
J. Exterior Lamp Controlson page6-1.
K.DataLinkConnector(DLC) (OutofView).SeeMalfunction IndicatorLamponpage5-25.
L.HoodRelease.SeeHoodon page10-5.
M. Parking Brakeonpage9-63.
1-4InBrief
N.DomeLampsonpage6-9.
FogLampsonpage6-7
(IfEquipped).
O. CruiseControlonpage9-69.
P. Steering Wheel Adjustment page 5-2.
Q.Hornonpage5-5.
R. Steering Wheel Controlson page 5-3 (If Equipped).
S.AutomaticTransferCase Control(IfEquipped).See Four-WheelDriveon page 10-33.
T. Ashtray(IfEquipped). See Ashtraysonpage5-12 and CigaretteLighteronpage5-11.
U.StabiliTrak ^® Systemon page9-65(IfEquipped). UltrasonicParkingAssiston page9-72(IfEquipped).
PedalAdjustButton (IfEquipped). See Adjustable Throttle and Brake Pedalon page 9-27.
ExhaustBrake(IfEquipped). See "Brakes" in the Duramax dieselsupplement.
V.PowerOutletsonpage5-10.
W. ClimateControlSystems (withAirConditioning) on page8-1 or ClimateControl Systems (withHeaterOnly) on page8-4 (IfEquipped).
DualAutomaticClimateControl Systemonpage8-5 (IfEquipped).
X.PowerTakeOff(PTO)Control (IfEquipped).SeePowerTake Off(PTO)intheDuramaxdiesel supplement.
Y.PassengerAirbagOffControl (IfEquipped).SeeAirbag On-OffSwitchonpage3-33.
InBrief1-5
NOTES
InstrumentPanel(PremiumVersion)
text_image
A B C D E F G H IJKLMN OP QRS T U V U WA. AirVentsonpage8-11.
B. TurnandLane-ChangeLever.
See TurnandLane-Change
Signalsonpage6-6.
WindshieldWiper/Washeron
page5-5.
C. InstrumentClusteron page5-13.
D. HazardWarningFlasherson page6-5(OutofView).
E.ShiftLever.SeeAutomatic Transmissiononpage9-39.
RangeSelectionMode (IfEquipped).SeeManual Modeonpage9-43.
F. Tow/HaulModeonpage9-44 (IfEquipped).
G.DriverInformationCenter(DIC)
Buttons.SeeDriverInformation
Center(DIC)onpage5-33.
H. Infotainmentpage7-1.
I. Exterior Lamp Controlson page6-1.
J. Integrated Trailer Brake Controller (If Equipped). See Trailer Towing on page 9-90.
K.DomeLampsonpage6-9.
L.AutomaticTransferCase Control(IfEquipped).See Four-WheelDriveon page 10-33.
M. DataLinkConnector(DLC) (OutofView). See Malfunction IndicatorLamponpage5-25.
N.HoodRelease.SeeHoodon page10-5.
O. Parking Brakeonpage9-63.
P. CruiseControlonpage9-69.
Q. Steering Wheel Adjustment page5-2.
R.Hornonpage5-5.
S. Steering Wheel Controlson page5-3.
T. ClimateControlSystems
(withAirConditioning) on page8-1 or ClimateControl Systems
(withHeaterOnly) on page8-4 (IfEquipped).
DualAutomaticClimateControl Systemonpage8-5 (IfEquipped).
U.PowerOutletsonpage5-10.
CigaretteLighter(IfEquipped).
SeeAshtraysonpage5-12and
CigaretteLighteronpage5-11.
1-8InBrief
V. StabiliTrak ^® Systemon page9-65(IfEquipped).
PedalAdjustButton (IfEquipped). See Adjustable Throttle and Brake Pedalon page 9-27.
UltrasonicParkingAssiston page9-72(IfEquipped).
ExhaustBrake(IfEquipped). See "Brakes" in the Duramax dieselsupplement.
W.PassengerAirbagOffControl (IfEquipped).SeeAirbag On-OffSwitchonpage3-33.
InitialDrive Information
Thissectionprovidesabrief overviewaboutsomeofthe importantfeaturesthatmayormay notbeonyourspecificvehicle.
Formoredetailedinformation, refer toeachofthefeatureswhichcanbe foundlaterinthisownermanual.
RemoteKeylessEntry (RKE)System
TheRKEtransmitterisused to remotelylockandunlockthedoors fromupto60m(195ft)awayfrom thevehicle.

natural_image
Close-up of a metallic door with four key buttons and a stylized face (no text or symbols):Presstounlockthedriverdoor. Press againwithinthreeseconds tounlockallremainingdoors.

:Presstolockalldoors.Lock andunlockfeedbackcanbe personalized.See Vehicle Personalization(WithDICButtons) onpage5-52.
:Pressandreleasetolocate thevehicle.Press andholdfor morethantwosecondstosoundthe panicalarm.Press againto cancelthepanicalarm.
SeeKeysonpage2-2andRemote KeylessEntry(RKE)System Operationonpage2-3.
RemoteVehicleStart
With this feature the engine can be started from outside of the vehicle.
StartingtheVehicle
-
AimtheRKEtransmitteratthe vehicle.
-
Pressandrelease

- Immediately after completing Step2, press and hold until the turnsign allamps flash.
Whenthevehiclestarts, the parking lampswillturnonandremainonas longastheengineisrunning. The doorswillbelockedandtheclimate controlsystemmaycomeon.
Theenginewillcontinuetorunfor 10minutes.Repeatthestepsfora 10-minutetimeextension.Remote startcanbeextendedonlyonce.
CancelingaRemoteStart
Tocancelaremotestart:
- AimtheRKEtransmitteratthe vehicleandpressandhold untiltheparkinglampsturnoff.

• Turnonthehazardwarning flashers.
• Turntheignitiononandthen backoff.
See Remote Vehicle Starton page2-5.
DoorLocks
Thereareseveralwaystolockand unlockthevehicle.
Fromoutside, usetheRemote KeylessEntry(RKE)transmitteror thekeyinthedriverdoor.
Frominside, usethepowerdoor locksorthemanualdoorlocks. To lockorunlockthedoorwiththe manuallocks, pushdownorpullup onthemanuallockknob.
1-10InBrief
PowerDoorLocks

text_image
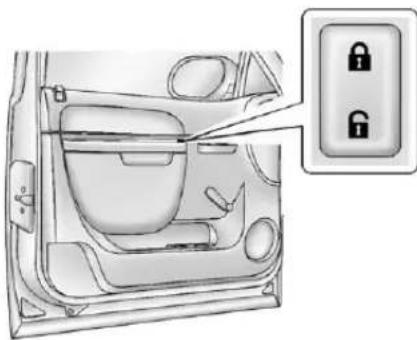
Diagram showing car interior with lock icons and a labeled control panelCrewCabPremiumTrimShown, Up-LevelSimilar
natural_image
Interior view of a car showing the dashboard and seat area with two lock icons (no text or symbols present)BaseTrim
Forvehicleswithpowerdoorlocks:
:Presstolockthedoors.
:Presstounlockthedoors.
SeeDoorLocksonpage2-8and PowerDoorLocksonpage2-9for moreinformation.

Information Provided by
DEALER
兹,开户证件复印件
Windows
ManualWindows
Turnthehandcrankoneachdoor tomanuallyraiseorlowerthe manualwindows.
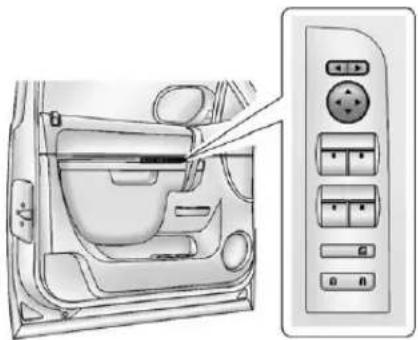
PowerWindows
natural_image
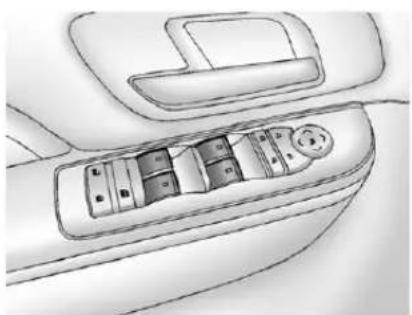
Line drawing of a car interior showing dashboard and seat compartments (no text or symbols)CrewCabPremiumTrimShown, OthersModelsSimilar
The driver door has as switch to control all windows. Each passenger door has as switch to control that window. The power windows work when the ignition is in ON/RUN or ACC/ACCESSORY, or Retained Accessory Power (RAP). See Retained Accessory Power (RAP) on page 9-32.
Presstheswitchtolowerthe window.Pulltheswitchupto raiseit.
Formoreinformation,see:
- Windowsonpage2-20.
• PowerWindowsonpage2-21.
PowerSlidingRearWindow

natural_image
Top-down view of a car air conditioner panel showing vent, door, and side compartments (no text or symbols)Ifequipped, thepowerslidingrear windowworkswhentheignitionhas beenturnedtoACC/ACCESSORY orON/RUN,orwhenRetained AccessoryPower(RAP)isactive.
SeeRetainedAccessoryPower (RAP)onpage9-32
- Pushtheswitchtoopenthe window.
• Pulltheswitchtoclosethe window.
Thepowerslidingrearwindow cannotbeoperatedmanually.
1-12InBrief
SeatAdjustment ManualSeats

natural_image
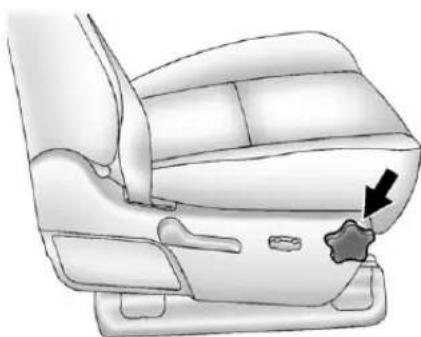
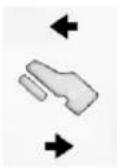
Close-up of a toilet handle with an arrow indicating direction (no text or symbols)Toadjusttheseat:
- Liftthebartounlocktheseat.
2.Slidetheseattothedesired positionandreleasethebar.
- Trytomovetheseatback and forthobesuretheseatis lockedinplace.
SeeSeatAdjustmentonpage3-3.
PowerSeats
natural_image
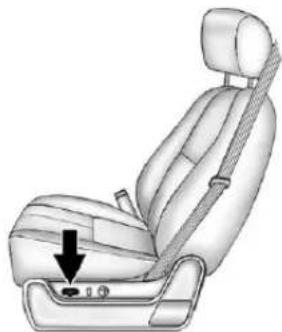
Illustration of a car seatbelt with a black arrow pointing to the seat area (no text or symbols present)Toadjustapowerseat, ifequipped:
- Movetheseatforwardor rearwardbyslidingthecontrol forwardorrearward.
- Ifavailable, raise or lower the frontor rear part of these seat cushion by moving the frontor rear of the controlupordown.
- Ifavailable, raise or lower the entire seat by moving the entire controlupordown.

SeePowerSeatAdjustmenton page3-5.
LumbarAdjustment ManualLumbar
natural_image
Diagram of a car seat with a star-shaped button and arrow indicating direction (no text or symbols)Ifequipped, increase or decrease manuallumbarsupport by turning the knob forward or rearward.
SeeLumbarAdjustmenton page3-6.
PowerLumbar

natural_image
Illustration of a car seat with a black arrow pointing to the seat area (no text or symbols present)Toadjustthepowerlumbarsupport, ifequipped:
- Onvehicleswithtwo-way lumbar,pressandholdthetop orbottomofthecontrolto increaseordecreaselumbar support.
- Onvehicleswithfour-way lumbar,pressandholdthefront orrearofthecontroltoincrease ordecreaselumbarsupport. To raiseorlowertheheightofthe support,pressandholdthetop orbottomofthecontrol.
SeeLumbarAdjustmenton page3-6.
RecliningSeatbacks
ManualRecliningSeatbacks

natural_image
Illustration of a car seatbelt with a black arrow indicating the seatbelt buckle (no text or symbols present)Toreclineamanualseatback:
-
Liftthelever.
-
Movetheseatbacktothe desiredposition, and then releasethelevertolockthe seatbackinplace.
-
Pushandpullontheseatbackto makesureitislocked.
1-14InBrief
Toreturntheseatbacktotheupright position:
-
Lift the lever fully without applying pressure to the seatback, and these seatback will return to the upright position.
-
Pushandpullontheseatback to make sureitislocked.
SeeRecliningSeatbackson page3-7.
PowerRecliningSeatbacks

natural_image
Illustration of a car seat with a black arrow pointing to the seat area (no text or symbols present)Toadjustapowerseatback, ifequipped:
• Tiltthetopofthecontrol rearwardtorecline.
- Tiltthetopofthecontrolforward toraise.
SeeRecliningSeatbackson page3-7.
MemoryFeatures
natural_image
Interior view of a car dashboard with control panel and directional arrow (no text or symbols)Onvehicleswiththememory feature,thecontrolsonthedriver doorareusedtoprogramandrecall memorysettingsforthedriverseat, outsidemirrors,andtheadjustable throttleandbrakepedals, ifequipped.

StoringMemoryPositions
Tosaveintomemory:
-
Adjustthedriverseat and seatbackrecliner, both outside mirrors, and the throttle and brakepedals, if equipped.
See Power Mirror on page 2-17 and Adjustable Throttle and Brake Pedal on page 9-27.
Notallmirrorsandadjustable throttleandbrakepedalswill havetheabilitytosaveand recalltheirpositions. -
Pressandhold "1" until twobeepssound.
-
Repeatforaseconddriver positionusing "2."
Torecall, press and release "1" or "2." The vehicle must be in P (Park). As single beep will sound. These at, outside mirrors, and adjustable throttle and brake pedals, if equipped, will moveto the position previously stored for the identified driver.
See Memory Seat on page 3-8 and Vehicle Personalization (With DIC Buttons) on page 5-52.
EasyExitDriverSeat
Thisfeaturecanmovetheseat rearwardtoallowextraroomtoexit thevehicle.
:Presstorecalltheeasyexit seatposition.Thevehiclemustbe inP(Park).
See Memory Seat on page 3-8 and Vehicle Personalization (With DIC Buttons) on page 5-52.
1-16InBrief
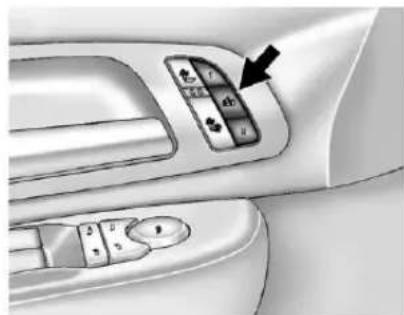
HeatedandVentilated Seats

natural_image
Interior view of a car dashboard with control panel and directional arrow (no text or symbols)HeatedandCooledSeatButtons Shown, HeatedSeatButtons Similar
Ifavailable,thebuttonsareonthe frontdoors.Tooperate,theignition mustbeinON/RUN.
:lfavailable,presstocool theseat.
:Presstoheatthe seatbackonly.
:Presstoheattheseatand seatback.
Pressthebuttononceforthe highestsetting.Witheachpressof thebutton,theseatwillchangeto thenextlowersetting,andthen to theoffsetting.Thelightsindicate threeforthehighestsettingandone forthelowest.
See Heated and Ventilated Front Seatsonpage 3-10.
HeadRestraint Adjustment
Donotdriveuntiltheheadrestraints foralloccupantsareinstalled and adjusted properly.
Toachieveacomfortableseating position,changetheseatback reclineangleaslittleasnecessary whilekeepingtheseatandthehead restraintheightintheproper position.
SeeHeadRestraintsonpage3-2 and SeatAdjustmentonpage3-3.
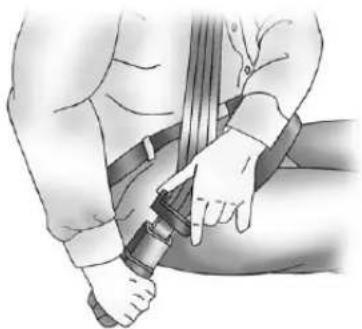
SafetyBelts
natural_image
Illustration of a person adjusting a belt buckle (no text or symbols)Refertothefollowingsectionsfor importantinformationonhowtouse safetybeltsproperly.
• SafetyBeltsonpage3-14.
• HowtoWearSafetyBelts Properlyonpage3-15.
• Lap-ShoulderBeltonpage3-17.
• LowerAnchorsandTethersfor Children(LATCHSystem)on page3-54.
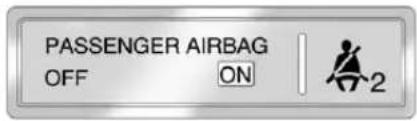
PassengerSensing System
Thepassengersensingsystem, ifequipped, turnsoffthefront outboardpassengerfrontalairbag undercertainconditions. Noother airbagisaffectedbythepassenger sensingsystem.
Ifthevehiclehasoneofthe indicatorspicturedinthefollowing illustrations,thenthevehiclehasa passengersensingsystemforthe rightfrontpassengerpositionunless thereisanairbagoffswitchlocated intheglovebox.
Ifthereisanairbagoffswitch,the vehicledoesnothaveapassenger sensingsystem.SeeAirbagOn-Off Switchonpage3-33formore information.
Thepassengerairbagstatus indicatorwillbevisibleonthe overheadconsolewhenthevehicle isstarted.
text_image
PASSENGER AIRBAG OFF ON 2UnitedStates
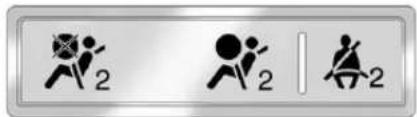
text_image
Three symbolic icons representing running, running figures, and sitting figures with the number 2 in each.CanadaandMexico
See Passenger Sensing System on page 3-37 for important information.
1-18InBrief
MirrorAdjustment
Usinghood-mountedairdeflectors andadd-onconvexmirror attachmentscoulddecrease mirror performance.
ExteriorMirrors
PowerMirrors
text_image
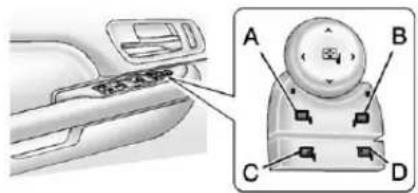
Technical diagram showing a car interior with labeled parts A, B, C, and D, including a control panel and directional arrows.CrewCabPremiumTrimwith PowerFoldingMirrorsShown, Up-LevelSimilar
- Press(A) or (B) to select the driver or passengers idemirror.
-
Pressthearrowsonthecontrol padtomovethemirrorup, down,right, or left.
-
Adjusteachoutsidemirrorso thatalittleofthevehicleandthe areabehinditcanbeseen.
- Presseither(A)or(B)again to deselectthemirror.
SeePowerMirrorsonpage2-17.
If the vehicle has power folding mirrors:
- Press(C) tofold themirrors out tothedriving position.
- Press(D) to fold them mirrors into the folded position.
See Folding Mirror on page 2-18.
Themirrorsmayalsoincludea memoryfunctionthatworkswiththe memoryseats.SeeMemorySeats onpage3-8formoreinformation.

natural_image
Interior view of a car showing the dashboard and control panel (no text or symbols visible)CrewCabUp-LevelTrimwithout PowerFoldingMirrors
- Movetheselectorswitchlocated abovethefour-waycontrolpad totheleftorrighttochoose eitherthedriversideor passengersidemirror.
- Pressoneofthefourarrows locatedonthecontrolpadto movethemirrorinthedesired direction.
- Adjusteachoutsidemirrorso thatalittleofthevehicleandthe areabehinditcanbeseen.
SeePowerMirrorsonpage2-17.
Keeptheselectorswitchinthe centerpositionwhennotadjusting eitheroutsidemirror.
ManualMirrors
Ifthevehiclehasmanualmirrors, theycanbeadjustedbymovingthe mirrorupanddownorlefttorightto seealittleofthesideofthevehicle, andhaveaclearviewbehindthe vehicle.
ManualFoldingMirrors
If the vehicle has manual folding mirrors, push them mirror toward the vehicle. Push them mirror outward, to return to its original position.
Manuallyfoldthemirrorsinwardto preventdamagewhengoing throughanautomaticcarwash.
See Folding Mirror on page 2-18.
Trailer-TowMirrors
Ifthevehiclehastowingmirrors, theycanbeadjustedforaclearer viewoftheobjectsbehindyou. Manuallypulloutthemirrorheadto extenditforbettervisibilitywhen towingatrailer.See Trailer-Tow Mirrorsonpage2-16.
HeatedMirrors
Forvehiclewithheatedmirrors:
Press ☐ toheatthemirrors. If the vehicle hasatowing mirror, only the upperglass of them mirror is heated. Thelowerconvex part of the towing mirrors is no heated.
See "RearWindowDefogger" under ClimateControlSystems(withAir Conditioning) on page 8-1 or ClimateControlSystems(with Heater Only) on page 8-4 or Dual Automatic Climate Control System on page 8-5 form more information.
1-20InBrief
ParkTiltMirrors
If the vehicle has the memory package, the exterior mirror stilt to a preselected position when the vehicle is in R (Reverse). This feature let the driver view the curb when parallel parking. The mirrors return to the original position when the vehicle is shifted out of R (Reverse), or the ignition is turned off to OFF/LOCK.
Thisfeaturecanbeprogramed throughtheDriverInformation Center(DIC).See Vehicle Personalization(WithDICButtons) onpage5-52formoreinformation.
InteriorMirror
Adjustment
Holdtherearviewmirrorinthe centerandmoveittoviewthearea behindthevehicle.
ManualRearviewMirror
Forvehicleswithamanualrearview mirror, pushthetabforwardfor daytimeuseandpullitfornighttime usetoavoidglarefromthe headlampsfrombehind.See ManualRearviewMirroron page2-19.
AutomaticDimmingRearview Mirror
Forvehicleswithanautomatic dimmingrearviewmirror. Themirror willautomaticallyreducetheglare fromtheheadlampsfrombehind. Thedimmingfeaturecomeson whenthevehicleisstarted.
SeeAutomaticDimmingRearview Mirroronpage2-20.
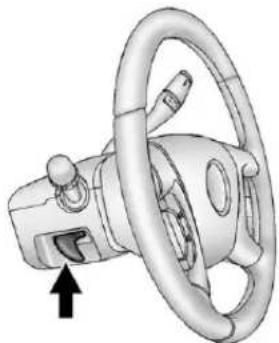
SteeringWheel Adjustment
natural_image
3D rendering of a steering wheel and steering wheel with a black arrow pointing to the steering wheel (no text or symbols)Thetiltleverislocatedonthelower leftsideofthesteeringcolumn.
Toadjustthesteeringwheel:
- Holdthesteeringwheelandpull thelever.
- Movethesteeringwheelup ordown.
- Releasethevertolockthe wheelinplace.
Donotadjustthesteeringwheel whiledriving.
ThrottleandBrakePedal Adjustment
Onvehicleswiththisfeature,you canchangethepositionofthe throttleandbrakepedals.
The control used to adjust the pedals is located on the instrument panel below the climate control system.
Pressthebottomofthecontrolto movethepedalsclosertoyour body.Pressthetopofthecontrolto movethepedalsaway.
SeeAdjustable ThrottleandBrake Pedalonpage9-27.

InteriorLighting
DomeLamps
Thedomelampsarelocatedinthe overheadconsole.
Theycomeonwhenanydooris openedandturnoffafterallthe doorsareclosed.
Turntheinstrumentpanel brightnessknoblocatedbelowthe domelampoverridebutton, clockwisetothefarthestpositionto manuallyturnonthedomelamps. Thedomelampsremainonuntilthe knobisturnedcounterclockwise.
1-22InBrief
DomeLampOverride
Thedomelampoverridebuttonis locatednexttotheexteriorlamps control.

text_image
AUTO DOME OFF OKDomelOff: Pressthebuttoninandthe domelampsremainoffwhenadoor isopened. Pressthebuttonagain to returnittotheextendedpositionso thatthedomelampscomeonwhen adoorisopened.
ReadingLamps
Forvehicleswithreadinglampsin theoverheadconsole, press the buttonlocatednexttothelampto turnitonoroff.
The vehicle may also have an reading lamps in other locations. The lamps cannot be adjusted.
Formoreinformationaboutinterior lamps,see:
• DomeLampsonpage6-9.
- ReadingLampsonpage6-9.
• InstrumentPanelIllumination Controlonpage6-8.
ExteriorLighting

text_image
AUTO DOME OFF #0The exterior lamps control is located on the instrument panel to the left of the steering wheel.
Turnsofftheautomatic headlampsandDaytimeRunning Lamps(DRL).Turntheheadlamp controltotheoffpositionagainto turntheautomaticheadlampsor DRLbackon.
ForvehiclesfirstsoldinCanada, theoffpositionwillonlyworkwhen thevehicleisshiftedintoP(Park).
AUTO: Automatically turn on the headlamps, parking lamps, taillamps, instrument panellights, and license plate lamps.
200: Turnsontheparkinglamps, taillamps, instrumentpanellights, and licenseplatelamps.
:Turnsontheheadlamps, parkinglamps, taillamps, instrument panellights, and licenseplate lamps.
Formoreinformation,see:
- ExteriorLampControlson page6-1.
• DaytimeRunningLamps(DRL) onpage6-3. - FogLampsonpage6-7.
WindshieldWiper/Washer

text_image
Diagram of a mechanical or electrical component with directional arrows and symbols, likely indicating motion or flow paths.Thefrontwipercontrolislocatedon theturnandlane-changelever.
Thewindshieldwipersarecontrolled byturningthebandwith 📋onit.
: For a single wipe, turn to , thenrelease.Forseveralwipes, holdthebandon longer.
○:Turnsthewindshield wipersoff.
!:Turnthebandupformore frequentwipesordownforless frequentwipes.
:Slowwipes.
:Fastwipes.
:Pushthepaddleatthetopof thelevertospraywasherfluidon thewindshield.
See Windshield Wiper/Washeron page5-5.

Information Provided by: DEALER
1-24InBrief
ClimateControls
Thesesystemscontroltheheating, cooling, and ventilation.
ClimateControlSystem(WithAirConditioning)

text_image
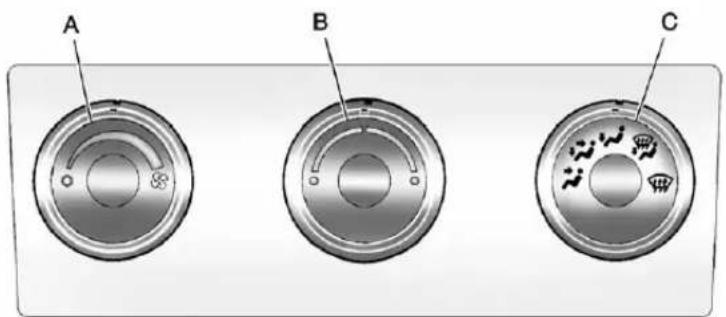
A B C D E F GA.FanControl
B.TemperatureControl
C.AirDeliveryModeControl
D.AirConditioning
E. OutsideAir
F.AirRecirculation
G.RearWindowDefogger

lofamination Provided by
DEALER
统一开户号:210000000
(二) 本次股东大会的召集和召开程序
ClimateControlSystem(WithHeaterOnly)
text_image
A B CA. FanControl
B. TemperatureControl
C.AirDeliveryModeControl
See Climate Control Systems (with Air Conditioning) on page 8-1 or Climate Control Systems (with Heater Only) on page 8-4.

Information Provided by: DEALER
DualAutomaticClimateControlSystem

text_image
A B C D E F G A AUTO PASS H I J K LA.DriverandPassenger TemperatureControls
B.FanControl
C.AUTO
D.Defrost
E.AirRecirculation
F.OutsideAir
G.AirDeliveryModeControl
H.Display
1.PowerButton
J.RearWindowDefogger
K.AirConditioning
L.PASS(Passenger)
See DualAutomaticClimateControl
Systemonpage8-5.

Information Provided by: DEALER
Transmission
RangeSelectionMode

natural_image
Close-up of a metallic electronic device with a control panel and indicator light (no text or symbols visible)TheRangeSelectionModeswitch, ifequipped, islocatedontheshift lever.
ToenabletheRangeSelection feature:
-
Movethecolumnshiftleverto theM(Manual)position. The currentrangewillappearnextto theM. Thisisthehighest attainablerangewithalllower gearsaccessible. Asan example, when5(Fifth)gearis selected, 1(First)through 5(Fifth)gearsareavailable.
-
Presstheplus/minusbuttons, locatedonthesteeringcolumn shiftlever,toselectthedesired rangeofgearsforcurrentdriving conditions.SeeManualModeon page9-43.
WhileusingRangeSelectionMode, cruisecontrolandtheTow/Haul modecanbeused.
GradeBrakingisnotavailablewhen RangeSelectionModeisactive. See Tow/HaulModeonpage9-44.
Four-WheelDrive
IfthevehiclehasFour-WheelDrive, youcansendtheengine'sdriving powertoallfourwheelsforextra traction.
TransferCaseButtons
The vehicle will have one of these threestyles of transfercase controls. Use these control to shift into and out of the different Four-Wheel Drivemodes.
ManualTransferCase

natural_image
3D rendering of a mechanical lever mechanism with no visible text or symbolsThistransfercaseshiftleverison thefloortotherightofthedriver.
ElectronicTransferCase
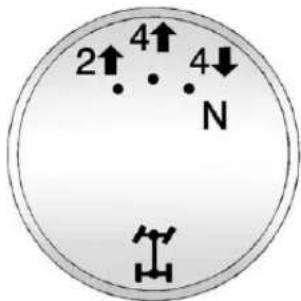
text_image
2↑ 4↑ N 4↓Thistransfercaseknobislocated nexttothesteeringcolumn.
AutomaticTransferCase

text_image
AUTO 2↑ 4↑ 4↓ NThistransfercaseknobislocated nexttothesteeringcolumn.
Eachtransfercasedesignoffers differentdriveoptions. Thelist belowdescribestedifferentdrive optionsthatmaybeavailable.
2 ↑(Two-Wheel-DriveHigh): This setting is used for driving in most street and highways situations.
AUTO(AutomaticFour-Wheel Drive): This setting is ideal for use when roads surfacetraction conditions are variable.
4 ↑(Four-WheelHigh):Usethe Four-Wheel-DriveHighposition whenextratractionisneeded,such asonsnowyoricyroadsorinmost off-roadsituations.
N(Neutral): Shiftthetransfercase to Neutralonlywhentowingthe vehicle. See Recreational Vehicle Towingonpage 10-101 or Trailer Towingonpage 9-90.
4 ↓(Four-Wheel-DriveLow): This settingsendsmaximumpowertoall fourwheels. You might choose Four-Wheel-DriveLowify you are driving off-road indeeps and deep mud, deep snow, and while climbing or descending steephills.
SeeFour-WheelDriveon page9-47.
VehicleFeatures Radio(s)

text_image
DVD i SOLI DIGITAL FAV MENU EQ CAT CD BAND SEEK SEEK REV FWD DVD/CD AUXRadiowithUSB,CD,andDVD(MP3)
:Presstoturnthesystemon andoff.Turntoincreaseor decreasethevolume.
BAND: Presstochoosebetween FM, AM, or XM™, ifequipped. ♪: Select radio stations.

SEEK or SEEK: Seek or scan stations.
i: Presstoswitchthedisplay betweentheradiostationfrequency andthetime. Whiletheignitionis off, pressthisbuttontodisplaythe time. Presstodisplayadditionaltext informationrelatedtothecurrent FM-RDSorXMstation; orCD, MP3, orWMAsong. Ifinformationis available during XM, CD, MP3, orWMA playback, the song title informationdisplaysonthetopline ofthedisplayandartistinformation displaysonthebottomline. When informationisnotavailable, "NO INFO" displays.
Formoreinformationaboutthese andotherradiofeatures,see Operationonpage7-3.
ForvehicleswithaRearSeat EntertainmentSystem(RSE)and RearSeatAudioSystem(RSA),see RearSeatEntertainment(RSE) Systemonpage7-40andRear SeatAudio(RSA)Systemon page7-50formoreinformation.
StoringRadioStations
A maximum of 36 stations can be stored as favorites using the six soft keys located below the radio station frequency tags and by using the radio FAV button. Press FAV to go through uptosix pages of favorites, each having six favorite stations available per page. Each page of favorites can contain any combination of AM, FM, or XM stations.
Formoreinformation,see"Storing RadioStations"inAM-FMRadioon page7-9.
SettingtheClock
Tosetthetimeanddate:
- TurntheignitionkeytoACC/ ACCESSORYorON/RUN, then press ⏻, toturntheradioon.
- Press ⏻todisplayHR,MIN, MM,DD,andYYYY(hour, minute,month,day,andyear).
- Pressthesoftkeylocatedunder anyoneofthelabelstobe changed.
- Toincreaseordecreasethetime ordate, turn ♪clockwiseor counter-clockwise.
Fordetailedinstructionsonsetting theclockforthevehicle'sspecific audiosystem,seeClockon page5-8.
SatelliteRadio
XMisasatelliteradioservicebased inthe48contiguousUnitedStates and10Canadianprovinces.
XMsatelliteradiohasa widevarietyofprogramming and commercial-freemusic, coast to coast, and indigital-quality sound.
Afeeisrequiredtoreceivethe XMservice.
Formoreinformation, referto:
• www.xmradio.comorcall 1-800-929-2100(U.S.)
• www.xmradio.caorcall 1-877-438-9677(Canada)
See Satellite Radioonpage 7-11.
PortableAudioDevices
This vehicle may have an auxiliary input located on the radioface plate and a USB port located in the center console on the instrument panel. External device such as an iPod laptop computer, MP3 player, CD changer, or USB storage device can be connected to the auxiliary port using a 3.5mm(1/8in) input cable or the USB port depending on the audiosystem.
See "UsingtheAuxiliaryInputJack" and "UsingtheUSBPort" in AuxiliaryDevicesonpage7-35.
Bluetooth®
ForvehicleswithaBluetooth system, itallowsuserswitha Bluetooth-enabledcellphoneto make and receive hands-free calls using the vehicle's audiosystem and controls.
TheBluetooth-enabledcellphone mustbepairedwiththeBluetooth systembeforeitcanbeusedinthe vehicle.Notallphoneswillsupport allfunctions.Formoreinformation, visitwww.gm.com/bluetooth.
Formoreinformation,seeBluetooth onpage7-52.
SteeringWheelControls

natural_image
Diagram of a car steering wheel and its control panel (no text or symbols)Ifavailable, someaudiocontrols can be adjusted at the steering wheel.
△:Presstogotothenextfavorite radiostation,trackonaCD, orfolderonaniPod ^® orUSB device.
/ ▽ : Press to go to the previousfavoriteradiostation,track onaCD,orfolderonaniPod ^® or USBdevice.Presstorejectan incomingcall,ortoendacall.

1-32InBrief
I / w: : Press to silence the vehicle speakeronly.Pressagaintoturn thesoundon.Pressandholdlonger thantwosecondstointeractwith OnStar® orBluetoothsystems, ifequipped.
+ :Presstoincreasevolume.
- Presstodecreasevolume.
SRCE: Presstoswitch between theradio and CD, and forequipped vehicles, the DVD, frontauxiliary, andre a auxiliary.
D: Presstoseekthenextradio station, thenextrackorchapter whilesourcedtotheCDorDVD slot, ortoselecttracksandfolders onaniPodorUSBdevice.
Formoreinformation,see Steering WheelControlsonpage5-3.
CruiseControl

text_image
RES SET:Presstoturnthesystemon oroff. The indicator light is on when cruise control is on and turn soff when cruise control is off.
+RES:Pressbrieflytomakethe vehicleresumetoapreviouslyset speed,orpressandholdto accelerate.
SET-:Presstosetthespeed and activate cruise controlormakethe vehicle decelerate.

☒: Presstodisengagecruise controlwithoutouterasingtheset speedfrommemory.
See Cruise Control on page 9-69.
NavigationSystem
If the vehicle has an navigation system, there is a separate navigation system manual that includes information on the radio, audioplayers, and navigation system.
Thenavigationsystemprovides detailedmapsofmostmajor freewaysandroads. Aftera destinationhasbeenset, the systemprovidesturn-by-turn instructionsforreachingthe destination. In addition, the system can help locate a variety of point sof interest (POIs), such as banks, airports, restaurants, and more.
Seethenavigationsystemmanual formoreinformation.
DriverInformation Center(DIC)
The DIC display is located at the bottom of the instrument panel cluster. It shows the status of many vehicle systems and enables access to the personalization menu.
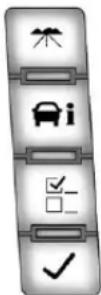
The DIC buttons are located on the instrument panel, next to the steering wheel.
Some vehicles donothavethe button shown, however some of themuscan be viewed by using the tripodometer reset stem.
:Presstodisplaythe odometer, tripodometer, fuelrange, averageeconomy, fuelused, timer, instantaneous economy and Active Fuel Management™ indicator, and transmission temperature. The compassandoutsideair temperature will also be shown in the display. The temperature will be shown in °Cor°F depending on the units selected.
i: Presstodisplaytheoillife, units, tirepressurereadingsfor vehicleswiththeTirePressure MonitorSystem(TPMS), trailer brakegainandoutputinformation forvehicleswiththeIntegrated TrailerBrakeControl(ITBC)system, enginehours,compasszone setting,andcompassrecalibration.
F::Presstocustomizethefeature settingsonyourvehicle.See VehiclePersonalization(WithDIC Buttons)onpage5-52formore information.
√:Presstosetorresetcertain functionsandtoturnoffor acknowledgedemessagesontheDIC.
Formoreinformation, seeDriver InformationCenter(DIC) on page5-33.
VehicleCustomization
Somevehiclefeaturescanbe programmedbyusingtheDIC buttonsnexttothesteeringwheel. Thesefeaturesinclude:
- Language
• DoorLockandUnlockSettings
• RKELockandUnlockFeedback - Lighting
- ChimeVolume
- MemoryFeatures
See Vehicle Personalization(With DICButtons) on page 5-52.
RearVision Camera(RVC)
Ifavailable,theRVCdisplaysa viewoftheareabehindthevehicle whenthevehicleisshiftedinto R(Reverse).Thisisdisplayedon theinsiderearviewmirrororthe navigationscreen,ifequipped.
Tocleanthecameralens, located in the bezelofthetailgatehandle, rinseitwithwaterandwipeitwitha softcloth.
Formoreinformation,seeRear VisionCamera(RVC)onpage9-74.
UltrasonicParkingAssist
Ifavailable, UltrasonicRearParking Assist(URPA)systemusessensors ontherearbumpertoassistwith parking and avoiding objects while inR(Reverse). It operates at speeds less than 8km/h (5mph). URPA uses audible beepsto provided distance and system information.
Keepthesensorsonthevehicle's rearbumpercleantoensureproper operation.
See Ultrasonic Parking Assiston page9-72.
PowerOutlets
Accessorypoweroutletscanbe usedtopluginelectricalequipment, suchasacellphone, MP3 player, etc.
The vehicle may have two accessory power outlets located below the climate control system, or may have one accessory power outlet and one cigarette lighter. The cigarette lighter is designed to fit only in there except a closest to the driver.
Theremaybeanotheraccessory poweroutletintherearcargoarea. Ifthevehiclehasafloorconsole, thereisanaccessorypoweroutlet insidethestoragebinandoneon therearofthefloorconsole.
Theaccessorypoweroutletsare powered, evenwhentheignitionis inLOCK/OFF. Continuingtouse poweroutletswhiletheignitionisin LOCK/OFFmaycausethevehicle's batterytorundown.
SeePowerOutletsonpage5-10.

UniversalRemoteSystem
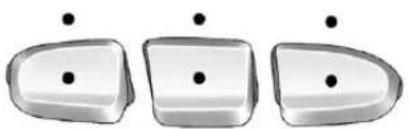
natural_image
Three identical 3D-rendered objects with black dots, arranged horizontally (no text or symbols)VehicleswiththeUniversalRemote Systemwillhavethesebuttons locatedintheheadliner.
This system provides a way to replace up three re-remote control transmitters used to activate devices such as a aged door openers, security systems, and home automation devices.
Readtheinstructionscompletely beforeattemptingtoprogramthe transmitter.Becauseofthesteps involved,itmaybehelpfultohave anotherpersonassistwith programmingthetransmitter.
See Universal Remote System on page 5-61.
Sunroof ExtendedCab

natural_image
Interior view of a car dashboard with a digital display and control buttons (no visible text or symbols)Onvehicleswithasunroof,the sunroofonlyoperateswhenthe ignitionisintheACC/ACCESSORY orON/RUNortheRetained AccessoryPower(RAP)isactive. SeeRetainedAccessoryPower (RAP)onpage9-32formore information.
Vent: From the closed position, press and hold therear of the switch to vent the sunroof. Toclosethe sunroof, press and hold the front of the switch.
Open: From the event position, the sunroof can be fully opened either manually or by using the express-open feature. To open manually, presstherearof the switch to the first detent and hold until the sunroof has reached the desired position. To open using express-open, presstherearof the switch to these second detent and release. The sunroof will move to the full open position. Tostopthe sunroof part way, presstheswitcha second time.
1-36InBrief
Close: Fromthevent, oropen position, pressandholdthefrontof theswitchtoclosethesunroof.
Thesunroofalsohasaroller sunshadethatcanbeusedtoblock theraysofthesun.Toopenthe sunshade,pressandunlatchit,and rollitback.Toclose,pullitforward andlatchitintotheclosedposition.
See Sunroof(CrewCab) on page 2-24 or Sunroof(Extended Cab) on page 2-23.
CrewCab

text_image
A BA. OpenorClose
B.Vent
Onvehicleswithasunroof,the sunroofonlyoperateswhenthe ignitionisintheACC/ACCESSORY orON/RUNortheRetained AccessoryPower(RAP)isactive. SeeRetainedAccessoryPower (RAP)onpage9-32formore information.
Vent: From the closed position, presstherearofthepassengerside switch(B) toventthesunroof.
Manual-Open/Manual-Close: To openthesunroof, pressandhold therearofthedriversideswitch(A) untilthesunroofreachesthe desiredposition. Pressandholdthe frontofthedriversideswitchto closeit.
Express-Open/Express-Close:To express-openthesunroof,fully pressandreleasetherearofthe driversideswitch(A)untilthe sunroofreachesthedesired position.Toexpress-closethe sunroof,fullypressandreleasethe frontofthedriversideswitch.Press theswitchagaintostopit.

Whenthesunroofisopened,anair deflectorwillautomaticallyraise. Theairdeflectorwillretractwhen thesunroofisclosed.
Thesunroofalsohasasunshade thatyoucanpullforwardtoblock theraysofthesun. Thesunshade mustbeopenedandclosed manually.
Ifanobjectisinthepathofthe sunroofwhileitisclosing,the anti-pinchfeaturewilldetectthe objectandstopthesunroof.
See Sunroof(CrewCab) on page 2-24 or Sunroof(Extended Cab) on page 2-23.
Performance and Maintenance
StabiliTrak® System
Ifequipped, the vehicle has a traction control system that limits wheel spin and the Stabili Trak system that assists with directional control of the vehicle difficult driving conditions. Both systems turn on automatically every time the vehicle is started.
- Toturnofftractioncontrol, press andrelease on the instrument panel. The appropriate DIC messagedisplays. See Ride ControlSystemMessageson page 5-48.
- Toturnoffbothtractioncontrol andStabiliTrak,pressandhold CF until CF illuminatesandthe appropriateDICmessage displays.SeeRideControl SystemMessagesonpage5-48.
- Pressandrelease ^### again to turnonbothsystems.
Formoreinformation,see StabiliTrak® Systemonpage9-65.
TirePressureMonitor
This vehicle may have a Tire Pressure Monitor System (TPMS).

The TPMS warninglightalertsyou toasignificantlossinpressureof oneofthevehicle'stires.Ifthe warninglightcomeson,stopas soonaspossibleandinflatethe tirestotherecommendedpressure shownontheTireandLoading Informationlabel.SeeVehicleLoad Limitsonpage9-17.Thewarning lightwillremainonuntilthetire pressureiscorrected.
During cooler conditions, the low tire pressure warning light may appear when the vehicle is first started and then turn off. This maybe an early indicator that the tire pressures are getting low and the tires need to be inflated to the proper pressure.
The TPMS does not replacenormal monthly tire maintenance. It is the driver's responsibility to maintain correct tire pressures.
See TirePressureMonitorSystem onpage 10-67.
EngineOilLifeSystem
Theengineoillifesystemcalculates engineoillifebasedonvehicleuse and, onmostvehicles, displaysa DICmessagewhenitisnecessary tochangetheengineoilandfilter. Theoillifesystemshouldbereset to 100% only following an oil change.
ResettingtheOilLifeSystem
ToresettheEngineOilLifeSystem onmostvehicles:
-
DisplayOILLIFEREMAINING ontheDIC.Ifthevehicledoes nothaveDICbuttons,the vehiclemustbeinP(Park)to accessthisdisplay.
-
PressandholdtheSET/RESET buttonontheDIC, orthetrip odometerresetstemifthe vehicledoesnothaveDIC buttons, formorethan fiveseconds. Theoillifewill changeto 100%.
Onallvehicles, theEngineOilLife Systemcanberesetasfollows:
- TurntheignitiontoON/RUNwith theengineoff.
- Fullypress the accelerator pedal slowly three times within five seconds.
- DisplayOILLIFEREMAINING ontheDIC. If the display shows 100%, the system is reset.
SeeEngineOilLifeSystemon page10-10.
FuelE85(85%Ethanol)
VehiclesthathaveaFlexFuelbadge andayellowfuelcapcanuseeither unleadedgasolineorethanolfuel containingupto85%ethanol(E85). SeeFuelE85(85%Ethanol)on page9-83. Forallothervehicles, useonlytheunleadedgasoline describedunderRecommended Fuelonpage9-80.
DrivingforBetterFuel Economy
Drivinghabitscanaffectfuel mileage. Herearesomedrivingtips togetthebestfueleconomy possible.
- Avoidfaststartsandaccelerate smoothly.
- Brakegraduallyandavoid abruptstops.
- Avoididlingtheengineforlong periodsoftime.
- When road and weather conditions are appropriate, use cruise control.
• Alwaysfollowpostedspeed limitsordrivemoreslowlywhen conditionsrequire.
- Keepvehicletiresproperly inflated.
• Combineseveraltripsintoa singletrip.
- Replacethevehicle'stireswith thesameTPCSpecnumber moldedintothetire'ssidewall nearthesize.
- Followrecommended scheduled maintenance.
Roadside Assistance Program
U.S.:1-800-243-8872
TTYUsers(U.S.):1-888-889-2438
Canada:1-800-268-6800
Mexico:01-800-466-0800
AstheownerofanewChevrolet, you are automaticallyenrolledinthe RoadsideAssistanceprogram.
SeeRoadsideAssistanceProgram (U.S. and Canada) on page 13-8 or RoadsideAssistanceProgram (Mexico) on page 13-11.
Roadside Assistance and On Star (U.S. and Canada)
If you have an active On Star subscription, press the button and the current GPS location will be sent to an Star advisor who will assess your problem, contact Roadside Assistance, and relay you exact location to get the help you need.
OnlineOwnerCenter(U.S.and Canada)
TheOnlineOwnerCenterisa complimentaryservicethatincludes onlineservicereminders,vehicle maintenancetips,onlineowner manual,specialprivileges, andmore.
Signuptodayat:
U.S.: chevrolet.com (clickon "Owners," then "ManageMy Chevrolet/OwnersLogin")
Canada:chevroletowner.ca
OnStar®
Ifequipped, this vehicle has a comprehensive, in-vehiclesystem that can connect to alive Advisor for Emergency, Security, Navigation, Connection, and Diagnostic Services. See On Star Overview page 14-1.
Keys, Doors, and Windows
KeysandLocks
Keys......2-2
RemoteKeylessEntry(RKE)
System......2-2
RemoteKeylessEntry(RKE)
SystemOperation......2-3
RemoteVehicleStart......2-5
DoorLocks......2-8
PowerDoorLocks......2-9
DelayedLocking......2-9
AutomaticDoorLocks......2-10
LockoutProtection......2-10
SafetyLocks......2-10
Doors
RearDoors
(ExtendedCab)......2-11
Tailgate....2-11
VehicleSecurity
VehicleSecurity......2-13
Anti-theftAlarmSystem.....2-13
Immobilizer......2-14
ImmobilizerOperation......2-14
ExteriorMirrors
ConvexMirrors......2-16
ManualMirrors......2-16
Trailer-TowMirrors......2-16
PowerMirrors......2-17
FoldingMirrors......2-18
HeatedMirrors......2-19
ParkTiltMirrors......2-19
InteriorMirrors
ManualRearviewMirror.....2-19
AutomaticDimmingRearview
Mirror....2-20
Windows
Windows....2-20
ManualWindows......2-21
PowerWindows......2-21
RearWindows......2-22
SunVisors....2-23
Roof
Sunroof(ExtendedCab).....2-23
Sunroof(CrewCab).....2-24

Information Provided by:
DEALER
纸 - 尸尺 □ 二 纽 导 明
KeysandLocks
Keys

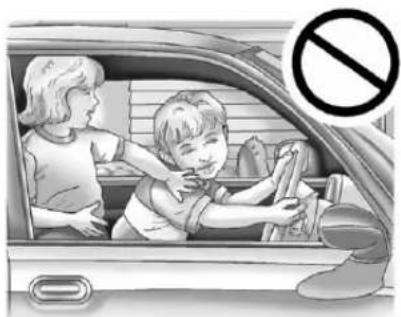
WARNING
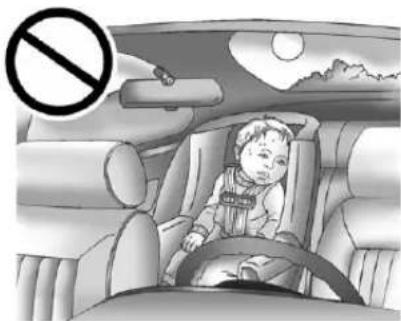
Leavingchildreninavehiclewith theignitionkeyisdangerousfor manyreasons. Childrenorothers couldbebadlyinjuredoreven killed. Theycouldoperatethe powerwindowsorothercontrols orevenmakethevehiclemove. Thewindowswillfunctionwiththe keysintheignitionandchildren couldbeseriouslyinjuredorkilled ifcaughtinthepathofaclosing window. Donotleavethekeysin avehiclewithchildren.
natural_image
Illustration of a child and an adult inside a car, with a no-smoking symbol overlay (no text or symbols on the figures)Thekeyisusedfortheignitionand alldoorlocks.
Thekeyhasabar-codedkeytag thatthedealerorqualifiedlocksmith canusetomakenewkeys.Store thisinformationinasafeplace,not inthevehicle.
Seeyourdealerifareplacement keyoradditionalkeyisneeded.
Notice: If the keys get locked in the vehicle, it may have to be damaged to get them out. Always carry as spare key.
If you are locked out of the vehicle, call the Roadside Assistance Center. See Roadside Assistance Program (U.S. and Canada) on page 13-8 or Roadside Assistance Program (Mexico) on page 13-11.
With an active On Stars subscription, an On Star Advisorm may remotely unlock the vehicle. See On Star Overview on page 14-1.
RemoteKeylessEntry (RKE)System
SeeRadioFrequencyStatementon page 13-23forinformation regardingPart15oftheFederal CommunicationsCommission(FCC) rulesandIndustryCanada StandardsRSS-GEN/210/220/310.

Information Provided by: DEALER
If thereisadecreaseintheRKE operatingrange:
- Checkthedistance. The transmitter may be too far from the vehicle.
- Checkthelocation. Other vehiclesorobjectsmaybe blockingthesignal.
- Checkthetransmitter's battery. See "BatteryReplacement" later in this section.
- Ifthetransmitterisstillnot workingcorrectly,seeyour dealeroraqualifiedtechnician forservice.
RemoteKeylessEntry (RKE)SystemOperation
The Remote Keyless Entry (RKE) transmitter functions workup to 60m (195ft) away from the vehicle.
There are other conditions which can affect the performance of the transmitter. See Remote Keyless Entry(RKE) Systempage 2-2.

natural_image
Close-up of a metallic door with four key buttons and a stylized face (no text or symbols)WithRemoteStart(without RemoteStartSimilar)
Ω(RemoteVehicleStart): For vehicles with this feature, press to start the engine from outside the vehicle using the RKE transmitter. See Remote Vehicle Start on page 2-5 for additional information.
(Lock): Presstolockallthe doors.
If enabled through the Driver Information Center (DIC), the turn sign allamps flash on ceto indicate locking has occurred. If enabled through the DIC, the horn chirps when is pressed again within three seconds. See Vehicle Personalization (With DIC Buttons) on page 5-52 for additional information.
Pressing 🔒armsthecontent theft-deterrentsystem.See Anti-theftAlarmSystemon page2-13.
(Unlock):Pressoncetounlock onlythedriverdoor.If ispressed againwithinthreeseconds,all remainingdoorsunlock.Theinterior lampsmaycomeonandstayonfor 20secondsoruntiltheignitionis turnedon.
If enabled through the DIC, the turn sign allamps flashtwiceto indicate unlocking has occurred. See Vehicle
Personalization(WithDICButtons) onpage5-52. If enabled through the DIC, the exterior lights may turn on. See "Approach Lighting" under Vehicle Personalization(WithDIC Buttons) on page 5-52.
Pressing ☎ontheRKEtransmitter disarmsthecontenttheft-deterrent system.SeeAnti-theftAlarm Systemonpage2-13.
(VehicleLocator/Panic Alarm):Pressandreleaseto locatethevehicle. Theturnsignal lampsflashandthehornsounds threetimes.
Pressandhold ⚙ formorethan twosecondstoactivatethepanic alarm. Theturnsignallampsflash andthehornsoundsrepeatedlyfor 30seconds. Thealarmturnsoff whentheignitionismovedtoON/RUNor ⚙ ispressedagain. The ignitionmustbeinLOCK/OFF for thepanicalarmtowork.

Information Provided by: DEALER
ProgrammingTransmittersto theVehicle
OnlyRKEtransmittersprogrammed tothisvehiclewillwork. Ifa transmitterislostorstolen, a replacementcanbepurchased and programmedthroughyourdealer. Whenthereplacementtransmitteris programmedtothisvehicle, all remainingtransmittersmustalsobe reprogrammed.Anylostorstolen transmitterswillnolongerwork oncethenewtransmitteris programmed. Eachvehiclecan haveuptoeighttransmitters programmedtoit.Seeyourdealer fortransmitterprogramming.
BatteryReplacement
Replace the battery if the REPLACE BATTERY IN REMOTE KEY messaged displays in the DIC.
Notice: When replacing the battery, donottouchany of the circuitry on the transmitter. Static from your body could damage the transmitter.
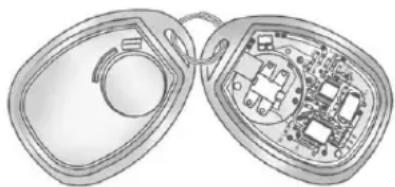
natural_image
Diagram of a device showing two open compartments with internal circuitry and components (no text or symbols)Toreplacethebattery:
-
Separatethetransmitterwitha flat, thinobject, suchasaflat headscrewdriver.
-
Carefullyinsertthetoolinto thenotchlocatedalongthe partinglineofthe transmitter.Donotinsert thetooltoofar.Stopas soonasresistanceisfelt.
• Twistthetooluntilthe transmitterisseparated. -
Removetheoldbattery. Donot useametalobject.
- Insertthenewbattery, positive sidefacingdown. Replace with a CR2032orequivalent battery.
- Snapthetransmitterback together.
RemoteVehicleStart
Ifavailable, thisfeatureallowsyou tostarttheenginefromoutsideof thevehicle. Itmayalsostartupthe vehicle'sheatingorairconditioning systemsandrearwindowdefogger. Normaloperationofthesystemwill returnafterthekeyisturnedtothe ON/RUNposition.
If the vehicle has an automatic climate control system, the climate control system will default to a heating or cooling mode depending on the outside temperature. If the vehicle does not have an automatic climate control system, the system will turn on at the setting the vehicle was set to when the vehicle was last turned off.
During aremotestart, if the vehicle has an automatic climate control system and heated seats, the heated seats will turn on during colder outside temperatures and will shutoff when the key is turned to ON/RUN. If the vehicle does not have an automatic climate control system, during remotestart, manually turn the heated seat on and off. See Heated and Ventilated Front Seat on page 3-10 for additional information.
Lawsinsomecommunitiesmay restricttheuseofremotestarters. Forexample,somelawsmay requireapersonusingtheremote starttohavethevehicleinview whendoingso.Checklocal regulationsforanyrequirementson remotestartingofvehicles.
Donotusetheremotestartfeature ifthevehicleislowonfuel. The vehiclemayrunoutoffuel.
If the vehicle has theremotestart feature, the RKE transmitter functions will have an increased range of operation. However, the rangemaybeless while the vehicle is running.
There are other conditions which can affect the performance of the transmitter. See Remote Keyless Entry (RKE) System on page 2-2 for additional information.
Ω(RemoteStart): Thisbuttonwill beontheRKEtransmitterifthe vehiclehasremotestart.
Tostartthevehicleusingtheremote startfeature:
1.AimtheRKEtransmitteratthe vehicle.
- Pressandrelease

- Immediately press and hold until the turn sign all lamps flash. If you cannot seethe vehicle's lamps, press and hold for twotofoursecond.
Whenthevehiclestarts, the parkinglampswillturnonand remainonwhilethevehicleis running. Thedoorswillbe lockedandtheclimatecontrol systemmaycomeon.
Theenginewillcontinuetorun for10minutes.Repeatthesteps fora10-minutetimeextension. Remotestartcanbeextended onlyonce.
Afterenteringthevehicleduringa remotestart,insertandturnthekey toON/RUNtodrivethevehicle.
Tocancelaremotestart:
- AimtheRKEtransmitteratthe vehicleandpressandhold untiltheparkinglampsturnoff.
• Turnonthehazardwarning flashers.
• Turntheignitiononandthen backoff.
The vehicle can beremot started two separate times between driving sequences. The engine will run for 10 minutes after each remot start.
Or, you can extend the engineer run time by another 10 minutes within the first 10 minutes to start time frame, and before the engine stops.
Forexample,if and then are pressed again after the vehicle has been running for five minutes, 10 minutes are added, allowing the engine or unfor 15 minutes.
The additional 10 minutes are considered a second remote vehicle start.
Oncetworemotestarts, orasingle remotestartwithonetimeextension hasbeendone, the vehicle must be started with the key. After the key is removed from the ignition, the vehicle can beremotestarted again.
The vehicle cannot be remote started if the key is in the ignition, the hood is not closed, or if there is an emission control system malfunction and the check engine light is on.
Also, the engine will turn off during a remote vehicle start if the coolant temperature get too high or if the oil pressure gets slow.
RemoteStartReady
If the vehicle does nothavethe remote vehicle start feature, it may havether remotestart ready feature. This feature allows your deal to add the manufacturer's remote vehicle start feature.
Seeyourdealertoaddthe manufacturer'sremotevehiclestart featuretothevehicle.
DoorLocks

WARNING
Unlockeddoorscanbe dangerous.
- Passengers, especially children, caneasily open the doors and fallout of famoving vehicle. When a doctor is locked, the handle will not open it. The chance of being thrown out of the vehicle in a crash is increased if the doors are not locked. So, all passengers should wear safety belts properly and the door should be locked whenever the vehicle is driven.
(Continued)
WARNING(Continued)
- Youngchildrenwhogetinto unlockedvehiclesmaybe unabletogetout.Achildcan beovercomebyextremeheat andcansufferpermanent injuriesorevendeathfrom heatstroke.Alwayslockthe vehiclewheneverleavingit.
- Outsiderscaneasilyenter throughanunlockeddoor whenyouslowdownorstop thevehicle. Lockingthedoors canhelppreventthisfrom happening.
Thereareseveralwaystolockand unlockthevehicle.
Fromoutside, usetheRemote KeylessEntry(RKE)transmitteror thekeyinthedriverdoor.
Frominside, usethepowerdoor locksormanualdoorlocks. Tolock orunlockthedoorwiththemanual locks, pushdownorpulluponthe manuallockknob.
PowerDoorLocks

text_image
Diagram showing car interior with lock icons and a labeled control panelCrewCabPremiumTrimShown, Up-LevelSimilar
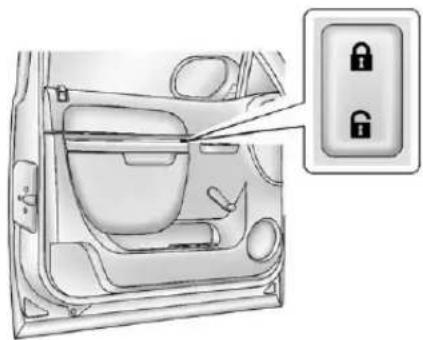
natural_image
Interior view of a car showing the dashboard and seat area with a lock icon (no text or symbols)BaseTrim
Forvehicleswithpowerdoorlocks:
:Presstolockthedoors.
:Presstounlockthedoors.
DelayedLocking
The vehicle may have the delayed locking feature. When locking the doors with the power lock switch and door is open, the doors will lock five seconds after the last door is closed. You will hear three echimes to signal that the delayed locking feature is in use.
Pressing the power lock switch twicewilloverridethedelayed locking feature and immediately lock allthedoors.
Thisfeaturewillnotoperateifthe keyisintheignition.
Thisfeaturecanbeprogrammed usingtheDriverInformation Center(DIC).See"DelayDoorLock" underVehiclePersonalization(With DICButtons)onpage5-52.
AutomaticDoorLocks
The vehicle may have an automatic lock/unlock feature. This feature can be programmed using the Driver Information Center (DIC). See Vehicle Personalization (With DIC Buttons) on page 5-52 form more information on DIC programming.
LockoutProtection
Ifthedriversidepowerdoorlock switchispressedwhenthedriver doorisopenandthekeyisinthe ignition,allofthedoorswilllockand thenthedriverdoorwillunlock.
Ifthepassengersidepowerdoor lockswitchispressedwhenthe frontpassengerdoorisopenand thekeyisintheignition,allofthe doorswilllockandthenthefront passengerdoorwillunlock.
SafetyLocks
The vehicle has reardoor security lock stop prevent passengers from opening there ardoors from the inside.
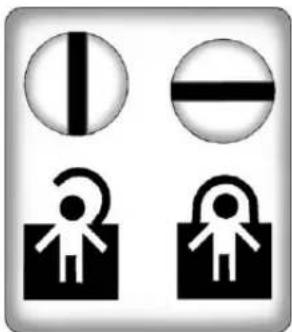
natural_image
Four black-and-white icons: vertical line, horizontal bar, person with curved arrow, and lock (no text or symbols)Openthereardoorstoaccessthe securitylocksontheinsideedgeof eachdoor.
Tosetthelocks, insertakey into the slot and turnitto the horizontal position. Thedoor can only be opened from the outside with the door unlocked. Toreturn the doorto normal operation, turn the slot to the vertical position.
Doors
RearDoors (ExtendedCab)

natural_image
Close-up of a car door handle with a black arrow pointing to the internal panel (no text or symbols visible)Toopenarearaccessdoorfromthe outside,firstopenthefrontdoor. Then,usethehandlelocatedonthe frontedgeoftherearaccessdoorto openit.
Therearaccessdoormustbe closedbeforethefrontdoorcan close.

natural_image
3D mechanical component diagram showing a piston-like structure with an arrow indicating direction (no text or symbols)Toopenarearaccessdoorfromthe inside,firstopenthefrontdoor. Then,usethehandlelocatedonthe insideoftherearaccessdoor toopen.

Tailgate

WARNING
Itisextremelydangeroustoride onthetailgate,evenwhenthe vehicleisoperatedatlowspeeds. Peopleridingonthetailgate caneasilylosetheirbalanceand fallinresponsetovehicle maneuvers.Fallingfromamoving vehiclemayresultinserious injuriesordeath.Donotallow peopletorideonthetailgate.Be sureeveryoneinyourvehicleisin aseatandusingasafetybelt properly.
Onvehicleswithalockonthe tailgate, usethekeytolockor unlockthetailgate.
Openthetailgatebyliftinguponits handlewhilepullingthe tailgatedown.
2-12Keys, Doors, and Windows
Toshutthetailgate, firmlypushit upward until latches.
Afterclosingthetailgate, pullitback to besureitlatchessecurely.
TailgateRemoval
Thetailgatecanberemovedto allowfordifferentloadingsituations. Assistancemaybeneededwiththe removaltoavoiddamagetothe vehicle.
OnvehicleswithaRearVision Camera, it must be disconnected before removing the detail gate. See RearVisionCamera(RVC) on page 9-74 form more information.
Toremovethetailgate:

text_image
A B C-
Raisethetailgateslightly, pull outandholdthecableretaining clip(A).Pushthecable(C)up andoffofthebolt(B).Repeaton theotherside.
-
With the tailgate about halfway open, lift the rightedge of the tailgate from the lower pivot.
Onvehicleswiththetailgate assistfeature,raisethetailgate nearlyallthewaytotheclosed positionpriortoremovingthe leftedge.
3.Movethetailgatetotherightto releasetheleftedge.
Reversethisprocedureoreinstall thetailgate.Makesurethetailgate issecure.
VehicleSecurity
This vehicle has the heft-deterrent features; however, they donot make it impossible to steal.
Anti-theftAlarmSystem
This vehicle may have a content theft-deterrentalarmsystem.

Thisisthesecuritylight.
Toarmthetheft-deterrentsystem:
- Openthedoor.
- LockthedoorwiththeRemote KeylessEntry(RKE)transmitter. Thesecuritylightshouldflash.
If the delayed locking feature is active, the alarm will not be activated until all doors are closed and these security light goes off.
- Closealldoors. Thesecurity lightwillstopflashingandgooff afterapproximately 30 seconds. Thesystemisarmedwhenthe securitylightgoesoff.
Ifalockeddriverdoorisopened withoutusingtheRKEtransmitter,a 10secondpre-alarmwilloccur.The hornwillchirpandthelightswill flash.Ifthekeyisnotplacedinthe ignitionandturnedtoSTARTorthe doorisnotunlockedbypassing theunlockbuttonontheRKE transmitterduringthe10second pre-alarm,thealarmwillgooff.The vehicle'sheadlampswillflashand thehornwillsoundforabout 30seconds,thenwillturnofftosave thebatterypower.
Thetheft-deterrentsystemwillnot activateifthedoorsarelockedwith thekeyorthemanualdoorlock. Itactivatesonlyifyyouusethe powerdoorlockswitchortheRKE transmitter. Thevehiclecanbe startedwiththecorrectkeyifthe alarmissetoff.
To avoid setting off the alarm by accident:
- If you donot want to activate the theft-deterrent system, the vehicles should be locked with the door key after the doors are closed.
• Alwaysunlockadoorwiththe RKEtransmitter.
If the alarmissetoff, press unlock on the RKE transmitter or placethe key in the ignition and turnitto START.
TestingtheAlarm
Totestthealarm:
- Lowerthedriverwindow and openthedriverdoor.
- PresslockontheRKE transmitter.
- Closethedoorandwaitforthe securitylighttogoout.
- Reachinthroughthewindow, unlockthedoorwiththemanual doorlock, andopenthedoor. This should setoffthealarm.
Ifthealarmdoesnotsoundwhenit shouldbuttheheadlampsflash, checktoseeifthehornworks.The hornfusemaybeblown.Toreplace thefuse,seeFusesandCircuit Breakersonpage10-49.
If the alarm does not sound or the headlamps donot flash, see your dealer for service.
Immobilizer
SeeRadioFrequencyStatementon page 13-23forinformation regardingPart15oftheFederal CommunicationsCommission(FCC) rulesandIndustryCanada StandardsRSS-GEN/210/220/310.
ImmobilizerOperation
ThisvehiclehasPASS-Key ^® III+ (PersonalizedAutomotiveSecurity System)theft-deterrentsystem. PASS-KeyIII+isapassive theft-deterrentsystem.
Thesystemisautomaticallyarmed whenthekeyisremovedfromthe ignition.
Thesystemisautomatically disarmedwhenthekeyisturnedto ON/RUN,ACC/ACCESSORY, orSTARTfromtheLOCK/OFF position.
Youdonothavetomanuallyarmor disarmthesystem.
Thesecuritylightwillcomeonif thereisaproblemwitharmingor disarmingthetheft-deterrent system.
WhenthePASS-KeyIII+system sensesthatsomeoneisusingthe wrongkey,itpreventsthevehicle fromstarting.Anyoneusinga trial-and-errormethodtostartthe vehiclewillbediscouragedbecause ofthehighnumberofelectricalkey codes.
If the engine does not start and the security light on the instrument panel cluster comes on when trying to start the vehicle, ther maybe a problem with the theft-deterrent system. Turn the ignition off and try again.
Iftheenginestilldoesnotstart,and thekeyappearstobeundamaged, tryanotherignitionkey.Atthistime, youmayalsowanttocheckthe fuse.SeeFusesandCircuit Breakersonpage10-49.Ifthe enginestilldoesnotstartwiththe otherkey,thevehicleneedsservice.

Ifthevehicledoesstart,thefirstkey maybefaulty.Seeyourdealerwho canservicethePASS-KeyIII+to haveanewkeymade.
ItispossibleforthePASS-KeyIII+decodertolearnthetranspondervalueofaneworreplacementkey.Upto10keysmaybeprogrammedforthevehicle.Thefollowingprocedureisforprogrammingadditionalkeysonly.Ifallthecurrentlyprogrammedkeysarelostordonotoperate,youmustseeyourdealeroralocksmithwhocanservicePASS-KeyIII+tohavekeysmadeandprogrammedtothesystem.
Seeyourdealeroralocksmithwho canservicePASS-KeyIII+togeta newkeyblankcutexactlyasthe ignitionkeythatoperatesthe system.
Toprogramthenewadditionalkey:
- Verify that thenewkey has a stampedonit.
- Inserttheoriginal, already programmedkeyintheignition andstarttheengine. If the enginewillnotstart, see your dealerforservice.
-
After the engine has started, turn the key to LOCK/OFF, and removethe key.
-
Insertthenewkeytobe programmedandturnittothe ON/RUNpositionwithin fivesecondsofturningthe ignitiontotheLOCK/OFF positioninStep3.
Thesecuritylightwillturnoff oncethekeyhasbeen programmed.
- RepeatSteps1 through4 if additionalkeysaretobe programmed.
Ifyouloseordamageyour PASS-Keyll+key,seeyourdealer oralocksmithwhocanservice PASS-Keyll+tohaveanew keymade.
Donotleavethekeyordevice thatdisarmsordeactivatesthe theft-deterrentsysteminthevehicle.
ExteriorMirrors
ConvexMirrors

WARNING
Aconvexmirrorcanmakethings, likeothervehicles, lookfarther awaythantheyreallyare. If you cuttoosharplyintotherightlane, youcouldhitavehicleonthe right. Checktheinsidemirroror glanceoveryourshoulderbefore changinglanes.
Thepassengersidemirrorisconvex shaped. Aconvexmirror's surface is curvesomorecanbeseen from thedriverseat.
ManualMirrors
Ifthevehiclehasmanualmirrors, theycanbeadjustedbymovingthe mirrorupanddownorlefttorightto seealittleofthesideofthevehicle, andhaveaclearviewbehindthe vehicle.
Usinghood-mountedairdeflectors andadd-onconvexmirror attachmentscoulddecrease mirror performance.
Trailer-TowMirrors
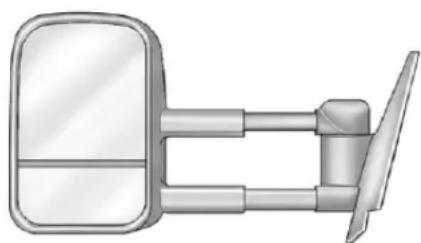
natural_image
Illustration of a car front-mounted mirror and lever (no text or symbols)Ifthevehiclehastowingmirrors, theycanbeadjustedforaclearer viewoftheobjectsbehindyou. Manuallypulloutthemirrorheadto extenditforbettervisibilitywhen towingatrailer.
Thelowerportionofthemirroris convex. Aconvexmirror's surface is curved to seem more from the driver seat. The convex mirror can be adjusted manually to the driver preferred position for better vision.
Themirrormayhaveaturnsignal arrowthatflashesinthedirectionof theturnorlanechange.
PowerMirrors
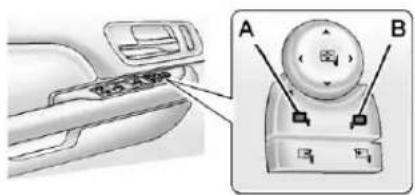
text_image
Diagram showing car interior control panel with labeled buttons A and B, including a directional arrow indicating left-hand rule.CrewCabPremiumTrimwith PowerFoldingMirrorsShown, OtherModelsSimilar
- Press(A) or (B) to select the driver or passengers idemirror.
- Pressthearrowsonthecontrol padtomovethemirrorup, down,right, or left.
- Adjusteachoutsidemirrorso thatalittleofthevehicleandthe areabehinditcanbeseen.
4.Presseither(A)or(B)again to deselectthemirror.
Themirrorsmayalsoincludea memoryfunctionthatworkswiththe memoryseats.SeeMemorySeats onpage3-8formoreinformation.

natural_image
Interior view of a car showing the dashboard and control panel (no text or symbols visible)CrewCabUp-LevelTrimwithout PowerFoldingMirrors
-
Movetheselectorswitchlocated abovethefour-waycontrolpad totheleftorrighttochoose eitherthedriversideor passengersidemirror.
-
Pressoneofthefourarrows locatedonthecontrolpadto movethemirrorinthedesired direction.
- Adjusteachoutsidemirrorso thatalittleofthevehicleandthe areabehinditcanbeseen.
Keeptheselectorswitchinthe centerpositionwhennotadjusting eitheroutsidemirror.
FoldingMirrors
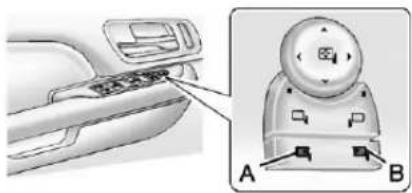
natural_image
Technical illustration of a device with labeled parts A and B, showing internal components without any readable text or symbols.CrewCabPremiumTrimwith PowerFoldingMirrorsShown, OtherModelsSimilar
PowerFolding
Ifequippedwithpowerfolding mirrors:
- Press(A)tofoldthemirrorsout tothedrivingposition.
- Press(B) to fold them mirrors into the folded position.
Themirrorsmayalsoincludea memoryfunctionthatworkswiththe memoryseats.SeeMemorySeats onpage3-8formoreinformation.
ResettingthePowerFolding Mirrors
Resetthepowerfoldingmirrorsif:
- Themirrorsareaccidentally obstructedwhilefolding.
• They are accidentally manually folded/unfolded.
• Themirrorswillnotstayinthe unfoldedposition.
• Themirrorsvibrateatnormal drivingspeeds.
Foldandunfoldthemirrorsonetime usingthemirrorcontrolstoreset themtotheirnormalposition. Apoppingnoisemaybeheard duringtheresettingofthepower foldingmirrors. Thissoundisnormal afteramanualfoldingoperation.
ManualFolding
Ifequippedwithmanualfolding mirrors, pushthemirrortowardthe vehicle. Pushthemirroroutward, to returntoitsoriginalposition.
Manuallyfoldthemirrorsinwardto preventdamagewhengoing throughanautomaticcarwash.
AutomaticDimming
Ifequippedwithanautomatic dimmingmirror,thedriveroutside mirrorautomaticallydimesforthe glareoftheheadlampsfrombehind. Thisfeatureiscontrolledbytheon andoffsettingontheinside rearviewmirror.
SeeAutomaticDimmingRearview Mirroronpage2-20.
TurnSignalIndicator
The vehicle may also have a turn signal indicator on the mirror. An arrow on the mirror flashes in the direction of the turn or lane change.
HeatedMirrors
Forvehicleswithheatedmirrors:
(RearWindowDefogger):
Presstoheatthemirrors.Ifthe vehiclehastowingmirrors,onlythe upperglassofthemirrorisheated. Thelowerconvexpartofthetowing mirrorsisnotheated.
See "RearWindowDefogger" under ClimateControlSystems(withAir Conditioning) on page 8-1 or ClimateControlSystems(with Heater Only) on page 8-4 or Dual Automatic Climate Control System on page 8-5 form more information.
ParkTiltMirrors
If the vehicle has the memory package, the passenger and/or driver mirror tilt to apre selected position when the vehicle is in R (Reverse). This feature lets the driverview the curb when parallel parking. Themirror(s) return to the original position when the vehicle is shifted out of R (Reverse), or the ignitionisturned off to OFF/LOCK.
Turnthisfeatureonoroffthrough theDriverInformationCenter(DIC). See VehiclePersonalization(With DICButtons)onpage5-52formore information.
InteriorMirrors
ManualRearviewMirror
Toadjusttheinsiderearviewmirror, holdtherearviewmirrorinthe centerandmoveittoviewthearea behindthevehicle.
Forvehicleswithamanualrearview mirror, pushthetabforwardfor daytimeuseandpullitfornighttime usetoavoidglarefromthe headlampsfrombehind.
VehicleswithOnStar ^® havethree controlbuttonsatthebottomofthe mirror.Seeadealerformore informationaboutOnStarandhow tosubscribetoit.SeeOnStar Overviewonpage14-1.
AutomaticDimming RearviewMirror
The vehicle may have an automatic dimming inside rear view mirror.
Toadjusttheinsiderearviewmirror, holdtherearviewmirrorinthe centerandmoveittoviewthearea behindthevehicle.
The automatic dimming rear view mirror will automatically reduce the glare from the headlamps from behind. Thedimming feature comes on when the vehicle is started.
On/Off): Presstoturnthe dimmingfeatureonoroff.
The vehicle may also have a Rear Vision Camera (RVC). See Rear Vision Camera (RVC) on page 9-74 form more information.
IfthevehiclehasaRVC,the buttonforturningthedimming featureonoroffwillnotbe available.
VehicleswithOnStarhavethree additionalcontrolbuttonsforthe OnStarsystem.Seeadealerfor moreinformationaboutOnStarand howtosubscribetoit.SeeOnStar Overviewonpage14-1.
CleaningtheMirror
Donotsprayglasscleanerdirectly onthemirror. Useasofttowel dampenedwithwater.
Windows

WARNING
Leavingchildren, helpless adults, orpetsin vehicle with the windows closed is dangerous. They can be overcome by the extreme heat and suffer permanent injuries overvendath from heat stroke. Never leave a child, helpless adult, orpet alone in vehicle, especially with the windows closed in warmor hot weather.
natural_image
Interior view of a car with a child sitting in the seat, no visible text or symbolsThe vehicle aerodynamics are designed to improve fueleconomy performance. This may result in a pulsingsound when awindow is partially open. Toreducethesound, open another window worths sunroof (ifequipped).
ManualWindows
Turnthehandcrankoneachdoor tomanuallyraiseorlowerthe manualwindows.
PowerWindows
WARNING
Leavingchildreninavehiclewith thekeysisdangerousformany reasons. Childrenorotherscould bebadlyinjuredorevenkilled. Theycouldoperatethepower windowsorothercontrolsoreven makethevehiclemove. The windowswillfunctionandthey couldbeseriouslyinjuredorkilled ifcaughtinthepathofaclosing window.Donotleavekeysina vehiclewithchildren.
When there are children in the rearseatusethewindowlockout button to prevent unintentional operation of the windows.
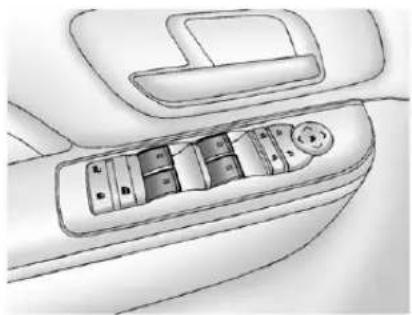
natural_image
Top-down line drawing of a car interior showing dashboard, seats, and seatbelt (no text or symbols)CrewCabPremiumTrimShown, OthersModelsSimilar
The driverdoorhasaswitch to control all windows. Each passenger door has as switch to control that window. The power window only work when the ignition is in ON/RUN or ACC/ACCESSORY, or when Retained Accessory Power (RAP) is active. See Retained Accessory Power (RAP) on page 9-32.
Pushtheswitchdowntolowerthe window, and pullupthefrontofthe switchtoraisethewindow.
2-22Keys, Doors, and Windows
Express-downWindows
Theexpress-downfeatureallowthe driverandfrontpassengerwindows tobeloweredwithoutholdingthe switch.Pushtheswitchdowntothe seconddetent,thenrelease,to activatetheexpress-downmode. Theexpress-downmodecanbe canceledatanytimebypullingup onthefrontoftheswitch.Toopen thewindowpartway.pushtheswitch downtothefirstdetentuntilthe windowisatthedesiredposition.
WindowLockout
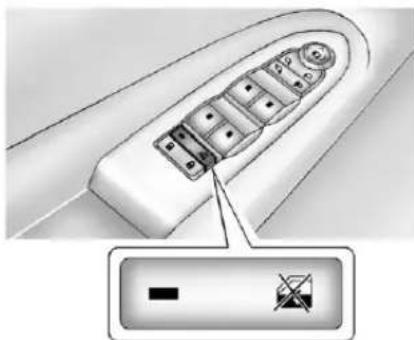
natural_image
Diagram of a control panel with buttons and a cursor icon, no readable text or symbols presentCrewCabPremiumTrimShown, OthersModelsSimilar
(WindowLockout): Thedriver doorpowerwindowswitchhasa lockoutfeature. This feature prevents therearwindows from operating, except from the driver position. Presstheswitchtoengage or disengagethelockoutfeature. An indicator lightontheswitchwill come on whentelockoutfeature is engaged, and will go off when disengaged.
RearWindows
PowerSlidingRearWindow
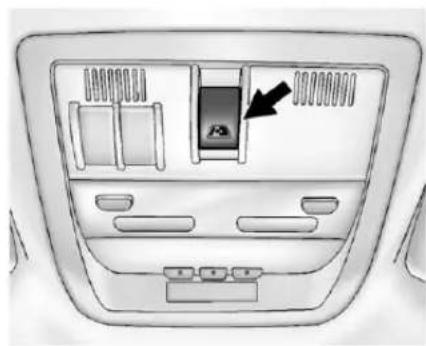
natural_image
Interior view of a car dashboard with seats and air conditioner unit (no text or symbols)Ifequipped, thepowerslidingrear windowworkswhentheignitionhas beenturnedtoACC/ACCESSORY orON/RUN,orwhenRetained AccessoryPower(RAP)isactive.

SeeRetainedAccessoryPower (RAP)onpage9-32formore information.
- Pushtheswitchtoopenthe window.
• Pulltheswitchtoclosethe window.
Thepowerslidingrearwindow cannotbeoperatedmanually.
SunVisors

natural_image
Diagram showing two car door lockers with directional arrows indicating movement (no text or symbols)Pullthesunvisordowntoblock glare.Detachthesunvisorfromthe centermounttopivottotheside window,ortoextendalongtherod, ifavailable.
Roof
Sunroof(ExtendedCab)
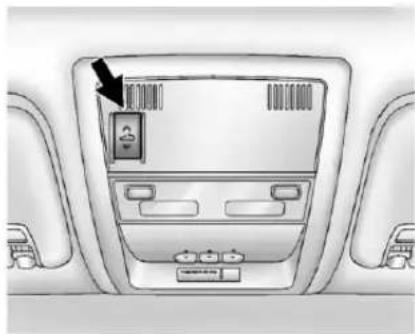
natural_image
Interior view of a car dashboard with a digital display and control panel (no visible text or symbols)Onvehicleswithasunroof,the sunroofonlyoperateswhenthe ignitionisintheACC/ACCESSORY orON/RUNortheRetained AccessoryPower(RAP)isactive. SeeRetainedAccessoryPower (RAP)onpage9-32formore information.
Vent: From the closed position, press and hold therear of the switch to vent the sunroof. Toclosethe sunroof, press and hold the front of the switch.
Open: From the event position, the sunroof can be fully opened either manually or by using the express-open feature. To open manually, presstherearof the switch to the first detent and hold until the sunroof has reached the desired position. To open using express-open, presstherearof the switch to these second detent and release. The sunroof will move to the full open position. Tostop the sunroof part way, presstheswitcha second time.
2-24Keys, Doors, and Windows
Close: Fromthevent, oropen position, pressandholdthefrontof theswitchtoclosethesunroof.
Thesunroofalsohasaroller sunshadethatcanbeusedtoblock theraysofthesun. Theroller sunshadecanbemanuallyoperated withthesunroofinanopenor closedposition. Toopenthe sunshade, pressandunlatchit, and rollitback. Toclose, pullitforward andlatchitintotheclosedposition.
Whenthesunroofisopened,anair deflectorwillautomaticallyraise. Theairdeflectorwillretractwhen thesunroofisclosed.
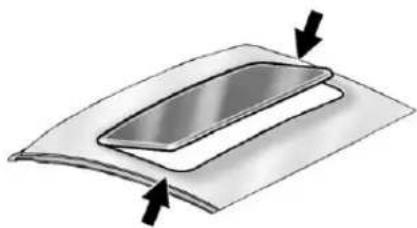
natural_image
Diagram of a layered object with two arrows indicating direction (no text or symbols)Dirtanddebrismaycollectonthe sunroofsealorinthetrack. This could cause an issue with sunroof operation or noise. It could also plug the water drainagesystem. Periodically open the sunroof and remove any obstacles or loose debris. Wipethesunroofsealand roof sealing area using a clean cloth, mild soap, and water. Donot remove grease from the sunroof.

Sunroof(CrewCab)
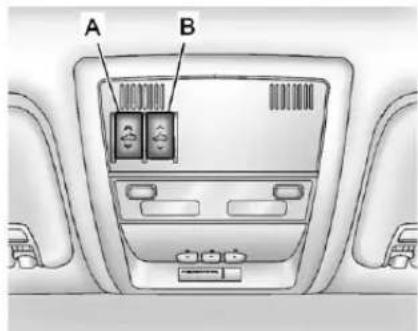
text_image
A BA.OpenorClose
B.Vent
Onvehicleswithasunroof,the sunroofonlyoperateswhenthe ignitionisintheACC/ACCESSORY orON/RUNortheRetained AccessoryPower(RAP)isactive. SeeRetainedAccessoryPower (RAP)onpage9-32formore information.
Vent: From the closed position, presstherearofthepassengerside switch(B) toventthesunroof.
Manual-Open/Manual-Close: To openthesunroof, pressandhold therearofthedriversideswitch(A) untilthesunroofreachesthe desiredposition. Pressandholdthe frontofthedriversideswitchto closeit.
Express-Open/Express-Close: To express-openthesunroof, fully pressandreleasetherearofthe driversideswitch(A) until the sunroofreachesthedesired position. To express-closethe sunroof, fullypressandreleasethe frontofthedriversideswitch. Press the switchagaintostopit.
Whenthesunroofisopened,anair deflectorwillautomaticallyraise. Theairdeflectorwillretractwhen thesunroofisclosed.
Thesunroofalsohasasunshade whichcanbepulledforwardtoblock sunrays. Thesunshademustbe openedandclosedmanually.
Ifanobjectisinthepathofthe sunroofwhileitisclosing,the anti-pinchfeaturewilldetectthe objectandstopthesunroof.
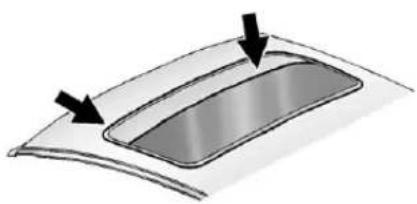
natural_image
Diagram of a curved panel with two arrows pointing to its top surface (no text or symbols)Dirtanddebrismaycollectonthe sunroofsealorinthetrack. This could cause an issue with sunroof operation noise. It could also plug the water drainagesystem. Periodically open the sunroof and remove any obstacles or loose debris. Wipethesunroofsealand roof sealing area using a clean cloth, mild soap, and water. Donot remove grease from the sunroof.
2-26Keys, Doors, and Windows
NOTES
Seatsand Restraints
HeadRestraints
HeadRestraints....3-2
FrontSeats
SeatAdjustment......3-3
CenterSeat....3-5
PowerSeatAdjustment......3-5
LumbarAdjustment......3-6
RecliningSeatbacks......3-7
MemorySeats......3-8
HeatedandVentilatedFront Seats....3-10
RearSeats
RearSeats(ExtendedCab FullBench)....3-12
RearSeats(AllSplitBench and HybridFullBench).....3-13
SafetyBelts
SafetyBelts....3-14
HowtoWearSafetyBelts Properly....3-15
Lap-ShoulderBelt......3-17
SafetyBeltUseDuring Pregnancy....3-22
LapBelt....3-22
SafetyBeltExtender......3-23
SafetySystemCheck......3-23
SafetyBeltCare....3-24
ReplacingSafetyBeltSystem PartsafteraCrash......3-24
AirbagSystem
AirbagSystem......3-25
WhereAretheAirbags?.....3-27
WhenShouldanAirbag Inflate?......3-29
WhatMakesanAirbag Inflate?......3-31
HowDoesanAirbag Restrain?......3-31
WhatWillYouSeeafteran AirbagInflates?......3-32
AirbagOn-OffSwitch.....3-33
PassengerSensing System....3-37
ServicingtheAirbag-Equipped Vehicle....3-42
AddingEquipmenttothe Airbag-EquippedVehicle...3-43
AirbagSystemCheck......3-44
ReplacingAirbagSystem PartsafteraCrash......3-45
ChildRestraints
OlderChildren....3-45
InfantsandYoung Children....3-48
ChildRestraintSystems.....3-50
WheretoPuttheRestraint...3-52
LowerAnchorsandTethers forChildren(LATCH System)....3-54
ReplacingLATCHSystem PartsAfteraCrash......3-62
SecuringChildRestraints (RearSeatPosition)......3-63
SecuringChildRestraints (CenterFrontSeat Position)....3-65
SecuringChildRestraints (RightFrontSeat Position)....3-65
3-2 Seats and Restraints
HeadRestraints
FrontSeats
Thefrontseatshaveadjustable headrestraintsintheoutboard seatingpositions.

WARNING
Withheadrestraintsthatarenot installedandadjustedproperly, thereisagreaterchancethat occupantswillsufferaneck/spinalinjuryinacrash.Donot driveuntiltheheadrestraintsfor allooccupantsareinstalledand adjustedproperly.
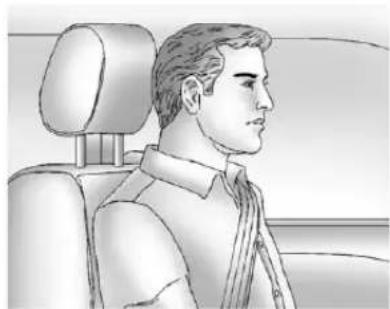
natural_image
Side profile illustration of a man in a car seat, showing head and torso (no text or symbols)Adjusttheheadrestraintsothatthe topoftherestraintisatthesame heightasthetopoftheoccupant's head. Thispositionreducesthe chanceofaneckinjuryinacrash.
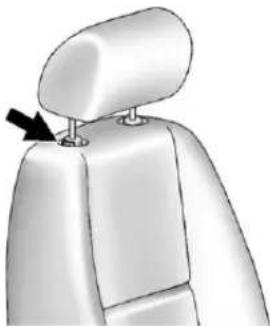
natural_image
3D model of a human torso with a black arrow pointing to a small object on the chest (no text or symbols)Theheightoftheheadrestraintcan beadjusted.Pulltheheadrestraint uptoraiseit.Trytomovethehead restrainttomakesurethatitis lockedinplace.
Tolowertheheadrestraint,press thebutton,locatedonthetopofthe seatback,andpushtherestraint down.Trytomovethehead restraintafterthebuttonisreleased tomakesurethatitislockedin place.
Thefrontseatoutboardhead restraintsarenotdesignedtobe removed.
RearSeats
Therearseathasadjustable headrestsintheoutboardseating positions.
Theheightoftheheadrestcanbe adjusted. Pulltheheadrestupto raiseit. Tolowertheheadrest, push downontheheadrest.
Rearoutboardheadrestsarenot designedtoberemoved.
FrontSeats
SeatAdjustment

WARNING
Youcanlosecontrolofthe vehicleifyoutrytoadjustadriver seatwhilethevehicleismoving. Thesuddenmovementcould startleandconfuseyou,ormake youpushapedalwhenyoudo notwantto.Adjustthedriverseat onlywhenthevehicleisnot moving.
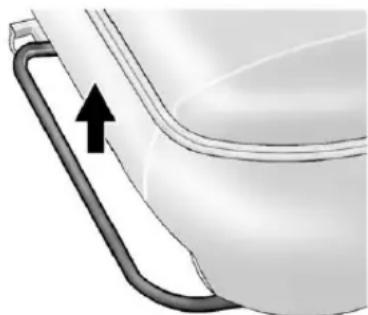
natural_image
Close-up of a toilet handle with a black arrow pointing to the outlet (no text or symbols visible)SplitBenchorBucketSeat
Toadjusttheseat:
- Liftthebartounlocktheseat.
2.Slidetheseattothedesired positionandreleasethebar. - Trytomovetheseatback and forhtobesuretheseatis lockedinplace.
Some vehicles have a folding front benchseat.

Information Provided by: DEALER
3-4 Seats and Restraints
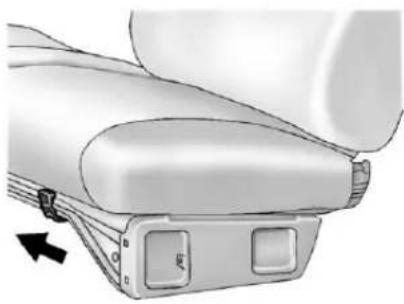
natural_image
Mechanical component diagram showing a seatbelt with a directional arrow indicating movement (no text or symbols present)BenchSeat
Toadjusttheseat:
- Movethelevertotherightto unlocktheseat.
2.Slidetheseattothedesired positionandreleasethelever. - Trytomovetheseatback and forthtomakesureitislocked intoplace.
FoldingtheBenchSeat
Tofoldthebenchseat:
- Pushbackonthefrontofthe seatback.

natural_image
3D rendering of a car seat or seat frame with a black arrow pointing to the side panel (no text or symbols visible)-
Pulloneofthereleaselevers, at eachendoftheseatonthe lowerrearoftheseatback, completelyout.
-
While holding the leverout, fold these at back forward until rest on these seat.
- Releasethelever.
Donottrytoreleasethe seatbackbeforepullingthe releaseleversortherelease systemcanbedamaged.

WARNING
Ifeitherseatbackisnotlocked, it couldmoveforwardinasudden stoporcrash. That could cause injury to the person sitting there. Always push and pull on the seatbackstobesure they are locked.

Information Provided by: DEALER
WARNING
Asafetybeltthatisimproperly routed, not properly attached, ortwisted will not provide the protection needed in acrash. The person wearing the belt could be seriously injured. After raising the reseatback, always check to be sure that the safety belts are properly routed and attached, and are not twisted.
Reversethestepstoraisethe seatback.Pushandpullonthe seatbacktomakesuretheseatback islockedintheuprightposition beforedriving.Makesurethesafety beltsarenottwistedorcaughtinthe seatback.
CenterSeat
Ifequipped, thecenterfront seatbackdoublesasanarmrestand cupholder/storageareaforthedriver andpassengerwhenthecenter frontseatisnotused. Donotuseit asaseatingpositionwhenthe seatbackisfoldeddown.
PowerSeatAdjustment

natural_image
Illustration of a car seat with a black arrow pointing to the lower side of the seat (no text or symbols present)Toadjustapowerseat,ifequipped:
- Movetheseatforwardor rearward by sliding the control forward or rearward.
- Ifavailable, raise or lower the frontor rear part of these seat cushion by moving the frontor rear of the controlupordown.
- Ifavailable, raise or lower the entire seat by moving the entire controlupordown.
Toadjusttheseatback,see"Power RecliningSeatbacks"under RecliningSeatbacksonpage3-7.
3-6SeatsandRestraints
LumbarAdjustment
ManualLumbar
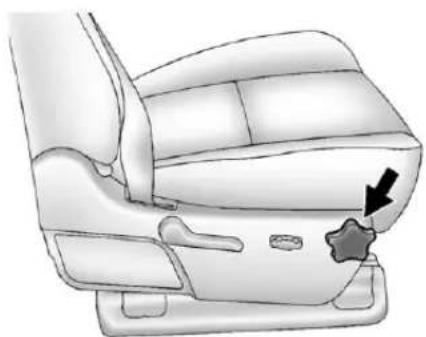
natural_image
Illustration of a car seat with a star-shaped button and arrow pointing to the seat area (no text or symbols present)Ifequipped, increase or decrease manuallumbarsupport by turning the knob forward or rearward.
PowerLumbar
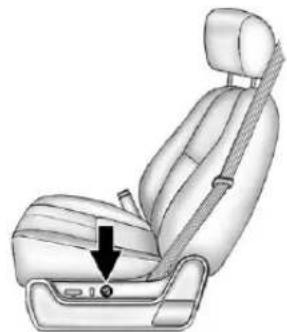
natural_image
Illustration of a car seatbelt seat with a black arrow pointing to the seat (no text or symbols present)Toadjustthepowerlumbarsupport, ifequipped:
- Onvehicleswithtwo-way lumbar,pressandholdthetop orbottomofthecontrolto increaseordecreaselumbar support.
- Onvehicleswithfour-way lumbar,pressandholdthefront orrearofthecontroltoincrease ordecreaselumbarsupport. To raiseorlowertheheightofthe support,pressandholdthetop orbottomofthecontrol.

RecliningSeatbacks
WARNING
Sittinginareclinedpositionwhen thevehicleisinmotioncanbe dangerous.Evenwhenbuckled up,thesafetybeltscannotdo theirjob.
Theshoulderbeltwillnotbe againstyourbody.Instead,itwill beinfrontofyou.Inacrash,you couldgointoit,receivingneckor otherinjuries.
Thelapbeltcouldgoupover yourabdomen. Thebeltforces wouldbethere, notatyourpelvic bones. This could cause serious internal injuries.
Forproperprotectionwhenthe vehicleisinmotion,havethe seatbackupright.Thensitwell backintheseatandwearthe safetybeltproperly.
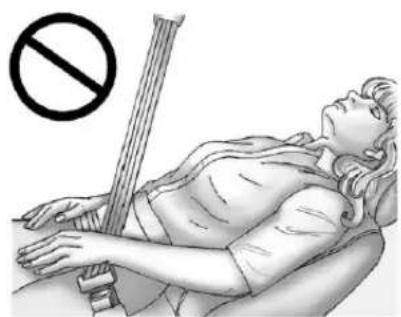
natural_image
Illustration of a person lying on their back holding a stringed instrument, with a no-smoking symbol above (no text or labels)Donothaveaseatbackreclinedif thevehicleismoving.
ManualRecliningSeatbacks
WARNING
Ifeitherseatbackisnotlocked, it couldmoveforwardinasudden stoporcrash. Thatcouldcause injurytothepersonsittingthere. Alwayspushandpullontheseatbackstobesuretheyare locked.

natural_image
Illustration of a car seatbelt with a black arrow indicating the seatbelt point (no text or symbols present)Toadjustamanualseatback:
- Liftthelever.
Theseatbackwillautomatically foldforward.
-
Torecline, movetheseatback rearwardtothedesiredposition, thenreleasethelevertolockthe seatbackinplace.
-
Pushandpullontheseatbackto makesureitislocked.
3-8 Seats and Restraints
Toreturntheseatbacktotheupright position:
-
Lift the lever fully without applying pressure to the seatback, and these seatback will return to the upright position.
-
Pushandpullontheseatbackto makesureitislocked.
PowerRecliningSeatbacks
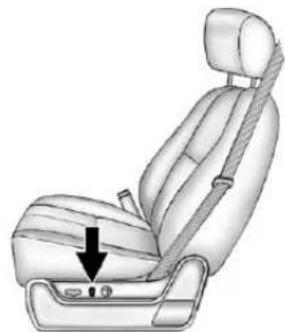
natural_image
Illustration of a car seatbelt with a black arrow pointing to the seat area (no text or symbols present)Toreclineapowerseatback, ifequipped:
- Tiltthetopofthecontrol rearwardtorecline.
• Tiltthetopofthecontrolforward toraise.
MemorySeats

natural_image
Interior view of a car dashboard with control panel and directional arrow (no text or symbols)Onvehicleswiththememory feature,thecontrolsonthedriver doorareusedtoprogramandrecall memorysettingsforthedriverseat, outsidemirrors,andtheadjustable throttleandbrakepedals, ifequipped.

StoringMemoryPositions
Tosaveintomemory:
- Adjustthedriverseat, seatback recliner, bothoutsidemirrors, andthethrottleandbrake pedals, ifequipped.
See Power Mirror on page 2-17 and Adjustable Throttle and Brake Pedal on page 9-27.
Notallmirrorsandadjustable throttleandbrakepedalswill havetheabilitytosaveand recalltheirpositions.
-
Pressandhold "1" until twobeepssound.
-
Repeatforaseconddriver positionusing "2."
Torecall, press and release "1" or "2." The vehicle must be in P (Park). As single beep will sound. These at, outside mirrors, and adjustable throttle and brake pedal will move to the position previously stored for the identified driver.
MemoryRemoteRecall
Thememoryfeaturecanrecallthe driverseat,outsidemirrors,and pedals,ifequipped,tostored positionswhenenteringthevehicle.
Toactivate, unlockthedriver doorwiththeRemoteKeyless Entry(RKE)transmitter. Thedriver seat, outsidemirrors, and adjustable pedals, ifequipped, willmoveto the memorypositionassociatedwith the transmitterusedtounlockthe vehicle.
Thisfeaturecanbeturnedonoroff usingthevehiclepersonalization menu.See Vehicle Personalization (With DICButtons)onpage 5-52.
Tostoprecallmovement, pressone of the powerseat controls, memory buttons, or power mirror buttons, or head adjustable pedal switch.
If something has blocked the driver seat and/or head adjustable pedals while recalling a memory position, there call may stop. Remove the obstruction; then press and hold the appropriatemanual control for the memory item that is not recalling for two seconds. Try recalling the memory position again by pressing the appropriate memory button. If the memory position is still not recalling, see your dealer for service.
3-10 Seats and Restraints
EasyExitDriverSeat
Thisfeaturecanmovetheseat rearwardtoallowextraroomtoexit thevehicle.
(EasyExitDriverSeat):Press torecalltheeasyexitseatposition. ThevehiclemustbeinP(Park).
Iftheeasyexitseatfeatureis programmedoninthevehicle personalizationmenu,automatic seatmovementoccurswhenthe ignitionkeyisremoved.
Asinglebeepsounds. Thedriver seatmovesback approximately 8cm(3in). Tomovetheseatback farther, press again until the seatisallthewayback.
If something has blocked the driver seat while recalling the exit position, there call may stop. Remove the obstruction; then press and hold the power seat control rearward for twoseconds. Try recalling the exit position again. If the exit position is still not recalling, see your dealer for service.
See Vehicle Personalization (With DIC Buttons) on page 5-52.
HeatedandVentilated FrontSeats

WARNING
If you cannot feel temperature change or paint to the seat theater may cause burns even at low temperatures. To reduce risk of burns, people with such a conditions should use care when using these seat theater, especially for long periods of time. Don't place anything on these that insulates against heat, such as a blanket, cushion, cover, or similar item. This may cause these seat theater to overheat. An overheated seat theater may cause a burn or may damage these seat.
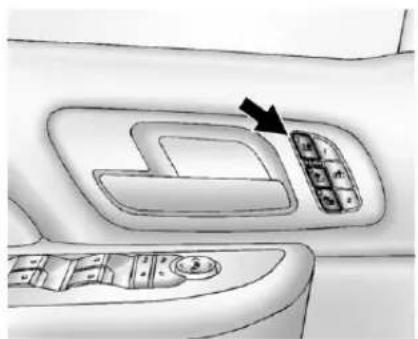
natural_image
Interior view of a car dashboard with control panel and directional arrow (no text or symbols)HeatedandCooledSeatButtons Shown, HeatedSeatButtons Similar
Ifavailable, thebuttonsareonthe frontdoors. Tooperate, theignition mustbeinON/RUN.
(CooledSeat): If available, presstocooltheseat.
(HeatedSeatback): Pressto heattheseatback only.
(HeatedSeatandSeatback): Presstoheattheseatand seatback.
Pressthebuttononceforthe highestsetting.Witheachpressof thebutton,theseatwillchangeto thenextlowersetting,andthento theoffsetting.Thelightsindicate threeforthehighestsettingandone forthelowest.
Thepassengerseatmaytake longertoheatup.
Onvehicleswithheatedseats,the heatedseatsarecanceled 10secondsaftertheignitionis turnedoff.
Onvehicleswithheatedandcooled seats,theheatedandcooledseats arecanceledwhentheignitionis turnedoff.
Tousethisfeatureafterrestarting thevehicle,pressthedesiredbutton again.
RemoteStartHeatedSeats
When it is cold outside, the heated seats may turn on automatically during a remote vehicle start. The heated seat will be canceled when the ignition is turned on. Press the desired button to set the heated seats after the vehicle is started.
Thelightsontheheatedseat buttonsdonotturnonduringa remotestart.
Thetemperatureperformanceofan unoccupiedseatmaybereduced. Thisisnormal.
See Remote Vehicle Starton page2-5.
RearSeats
RearSeats(Extended CabFullBench)
FoldingtheRearSeat
Notice: Folding arearseat with the safety belts still fastened may caused damage to these at the safety belts. Always unbockle the safety belts and return them to their normal stowed position before folding arearseat.

natural_image
Close-up of a metallic curved object with a looped handle, resembling a stylized container or connector (no text or symbols visible)Tofoldtheseat:
- Pulluponthefrontoftheseat cushionwhilepullingdownon thereleasestrapundertheseat cushion.
- Pulltheseatcushionupuntil latcheswiththeseatback.
- Pullforwardontheseatcushion tomakesureitislockedin place.
Tounfoldtheseat:
- Pushtheseatcushionrearward whilepullingthereleasestrap undertheseatcushion.Pullthe seatcushiondownuntil latches.
- Pullupontheseatcushionto makesureitislockedinplace. Makesurethesafetybeltsare nottwistedorcaughtintheseat cushion.

WARNING
Asafetybeltthatisimproperly routed, not properly attached, ortwisted will not provide the protection needed in acrash. The person wearing the belt could be seriously injured. After raising the reseatback, always check to be sure that the safety belts are properly routed and attached, and arenottwisted.
RearSeats(AllSplit BenchandHybridFull Bench)
FoldingRearSeat
Eithersideoftherearseatcanbe foldedforaddedcargospace.
Notice: Folding arearseat with the safety belts still fastened may caused damage to theseator the safety belts. Always unbuckle the safety belts and return them to their normal stowed position before folding arearseat.
Makesurethatnothingison theseat.
Tofoldtheseat,slowlypulltheseat cushionup.
Toreturntheseattothenormal seatingposition,slowlypulltheseat cushiondown.
Makesurethesafetybeltsarenot twistedorcaughtintheseat cushion.
WARNING
Asafetybeltthatisimproperly routed, not properly attached, ortwisted will not provide the protection needed in acrash. The person wearing the belt could be seriously injured. After raising the reseatback, always check to be sure that the safety belts are properly routed and attached, and are not twisted.
3-14 Seats and Restraints
SafetyBelts
Thissectionofthemanual describeshowtousesafetybelts properly.Italsodescribessome thingsnottodowithsafetybelts.

WARNING
Donotletanyoneridewherea safetybeltcannotbeworn properly.Inacrash,ifyouoryour passenger(s)arenotwearing safetybelts,injuriescanbemuch worsethanifyouarewearing safetybelts.Youcanbeseriously injuredorkilledbyhittingthings insidethevehicleharderorby beingejectedfromthevehicle.In addition,anyonewhoisnot buckledupcanstrikeother passengersinthevehicle.
(Continued)
WARNING(Continued)
Itisextremelydangeroustoride inacargoarea,insideoroutside ofavehicle.Inacollision, passengersridingintheseareas aremorelikelytobeseriously injuredorkilled.Donotallow passengerstorideinanyareaof thevehiclethatisnotequipped withseatsandsafetybelts.
Alwayswearasafetybelt, and checkthatallpassenger(s) are restrainedproperlytoo.
Thisvehiclehasindicatorsasa remindertobucklethesafetybelts. See SafetyBeltReminderson page5-19.
WhySafetyBeltsWork

natural_image
Illustration of a person seated in a car seat, wearing a vest and holding a device (no text or symbols visible)Whenridinginavehicle,youtravel asfastasthevehicledoes.Ifthe vehiclestopssuddenly,youkeep goinguntilsomethingstopsyou. Itcouldbethewindshield,the instrumentpanel,orthesafetybelts!

Information Provided by: DEALER
Whenyouwearasafetybelt,you andthevehicleslowdowntogether. Thereismoretimetostopbecause youstopoveralongerdistanceand, whenwornproperly,yourstrongest bonestaketheforcesfromthe safetybelts.Thatiswhywearing safetybeltsmakessuchgood sense.
QuestionsandAnswersAbout SafetyBelts
Q: Willlbetrappedinthevehicle afteracrashiflamwearinga safetybelt?
A: You could be—whether you are wearing as safety belt or not. Your chance of being conscious during and after a crash, so you can unbuckle and get out, is much greater if you are belted.
Q: If my vehicle has air bags, why should have to wear safety belts?
A: Airbagsaresupplemental systemsonly; sotheyworkwith safetybelts—notinsteadof them. Whetherornotanairbag isprovided, allooccupantsstill havetobuckleuptogetthe mostprotection.
Also, innearly all states and in all Canadian provinces, the law requires wearingsafety belts.
HowtoWearSafetyBelts Properly
Thissectionisonlyforpeopleof adultsize.
Therearespecialthingstoknow aboutsafetybeltsandchildren.And therearedifferentrulesforsmaller childrenandinfants.Ifachildwillbe ridinginthevehicle,seeOlder Childrenonpage3-45orInfants andYoungChildrenonpage3-48. Followthoserulesforeveryone's protection.
It is very important for all occupants to buckle up. Statistic show that unbelted people are hurt more often incrashesthan those who are wearing safety belts.
3-16SeatsandRestraints
Thereareimportantthingstoknow aboutwearingasafetybeltproperly.

natural_image
Side-by-side anatomical illustrations of human torso and pelvis with black surgical bandages, no text or labels present-
Situpstraightandalwayskeep yourfeetonthefloorinfront ofyou.
• Alwaysusethecorrectbuckle foryourseatingposition. -
Wearthelappartofthebeltlow andsnugonthehips,just touchingthethighs.Inacrash, thisappliesforcetothestrong pelvicbonesandyouwouldbe lesslikelytoslideunderthelap belt.Ifyouslidunderit,thebelt wouldapplyforceonyour abdomen.Thiscouldcause seriousorevenfatalinjuries.
- Weartheshoulderbeltoverthe shoulderandacrossthechest. Thesepartsofthebodyarebest abletotakebeltrestraining forces. Theshoulderbeltlocksif thereisasuddenstoporcrash.
- Wearthelappartofthebeltlow andsnugonthehips,just touchingthethighs.Inacrash, thisappliesforcetothestrong pelvicbonesandyouwouldbe lesslikelytoslideunderthelap belt.Ifyouslidunderit,thebelt wouldapplyforceonyour abdomen.Thiscouldcause seriousorevenfatalinjuries.
- Weartheshoulderbeltoverthe shoulderandacrossthechest. Thesepartsofthebodyarebest abletotakebeltrestraining forces. Theshoulderbeltlocksif thereisasuddenstoporcrash.

WARNING
Youcanbeseriouslyinjured, orevenkilled,bynotwearing yoursafetybeltproperly.
• Neverallowthelapor shoulderbelttobecome looseortwisted.
- Neverweartheshoulderbelt underbotharmsorbehind yourback.
- Neverroutethelapor shoulderbeltoveran armrest.
Lap-ShoulderBelt
Allseatingpositionsinthevehicle havealap-shoulderbelt.
The following instructionsexplain howtowearalap-shoulderbelt properly.
- Adjusttheseat, if theseatis adjustable, so you cansit up straight. Toseehow, see "Seats" in the Index.
- Pickupthelatchplateandpull thebeltacrossyou.Donotletit gettwisted.
Thelap-shoulderbeltmaylockif youpullthebeltacrossyouvery quickly. If this happens, let the beltgobackslightlytounlockit. Then pullthebeltacrossyou moreslowly.
Iftheshoulderportionofa passengerbeltispulledoutall theway,thechildrestraint lockingfeaturemaybeengaged. Ifthishappens,letthebeltgo backallthewayandstartagain.
Engagingthechildrestraint lockingfeaturemayaffectthe passengersensingsystem, ifequipped.SeePassenger SensingSystemonpage3-37 formoreinformation.

natural_image
Medical illustration showing hands performing a procedure on a patient's abdomen with a catheter (no text or symbols present)If the belt stops before it reaches the buckle, when using the lap-shoulder belt in a rear center seating position of a crew-cab, tilt the latch plate and keep pulling the safety belt until it can be buckled.
3-18 Seats and Restraints

natural_image
Illustration of a person adjusting a belt buckle (no text or symbols present)- Pushthelatchplate into the buckle until it clicks.
Pulluponthelatchplateto makesureitissecure.Ifthebelt isnotlongenough,see Safety BeltExtenderonpage3-23.
Ifthelatchplatewillnotgofully intothebuckle,checkifthe correctbuckleisbeingused.
Positionthereleasebuttonon thebucklesothatthesafetybelt couldbequicklyunbuckledif necessary.
- If equipped with a shoulder belt height adjuster, move it to the height that is right for you. See "Shoulder Belt Height Adjuster" later in this section.

natural_image
Illustration of a person's arm being lifted by a sword, showing the blade and band (no text or symbols)- Tomakethelapparttight, pull upontheshoulderbelt.
It may be necessary to pull stitching on the safety belt through the latch plate to fully tight enthelap beltons smaller occupants.
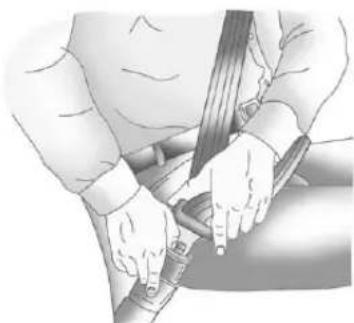
natural_image
Illustration of a person's seatbelt being adjusted, showing hands and a belt (no text or symbols)Tounlatchthebelt, pushthebutton onthebuckle. Thebelt should return to its stowed position.
Beforeadoorisclosed,besurethe safetybeltisoutoftheway.Ifa doorisslammedagainstasafety belt,damagecanoccurtoboththe safetybeltandthevehicle.

ShoulderBeltHeightAdjuster
The vehicle has a shoulder belt height adjuster for the driver and right front passenger.
Adjusttheheightsotheshoulder portionofthebeltisontheshoulder andnotfallingoffofit.Thebelt shouldbecloseto,butnot contacting,theneck.Improper shoulderbeltheightadjustment couldreducetheeffectiveness of thesafetybeltinacrash.SeeHow toWearSafetyBeltsProperlyon page3-15.

text_image
A ARegularandCrewCab
Tomovetheadjusterdownforthe regularandcrewcabs,squeezethe buttons(A)onthesidesofthe heightadjusterandmovetheheight adjustertothedesiredposition.

text_image
AExtendedCab
Ontheextendedcab, pushdownon thereleasebutton(A)andmovethe heightadjustertothedesired position.
Youcanmovtheadjusterupjust bypushingupontheshoulderbelt guide.
Afteryoumovetheadjusterto whereyouwantit,trytomoveit down,withoutsqueezingthebuttons fortheregularandcrewcabs, orwithoutpushingtherelease buttonforextendedcabs,tomake sureithaslockedintoposition.
3-20SeatsandRestraints
SafetyBeltPretensioners
Thisvehiclehassafetybelt pretensionersforfrontoutboard occupants. Although the safety belt pretensioners cannot be seen, they are part of the safety belt assembly. They can help tightenthesafety belts during the early stages of a moderate to severe frontal, near frontal, or rear crash if the threshold conditions for pretensioner activation are met. And, if your vehicle hasside impact air bags, safety belt pretensioners can help tightenthesafety belts in aside crashorarollover event.
Pretensionersworkonlyonce.Ifthe pretensionersactivateinacrash, theywillneedtobereplaced,and probablyothernewpartsforthe vehicle'ssafetybeltsystem.See ReplacingSafetyBeltSystemParts afteraCrashonpage3-24.
RearSafetyBeltComfort Guides
This vehicle may haverear shoulder belt comfort guides. If not, they are available through your dealer. The guides may provide added safety belt comfort for older children who have out grown booster seats and for some adults. When installed and properly adjusted, the comfort guide position the belt away from the neck and head.
Hereishowtoinstallacomfort guidetotheshoulderbelt:
- Removetheguidefromits storageclipontheinteriorbody.
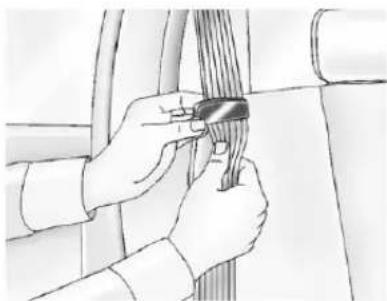
natural_image
Illustration of hands tying a knot around a rope (no text or symbols)- Placetheguide over the belt and insert the two edges of the belt into the slot of the guide.

natural_image
Close-up of a metallic clamp securing a flexible cable or wire (no text or symbols visible)- Besurethatthebeltisnot twistedanditiesflat. The elasticcordmustbeunderthe beltandtheguideontop.
WARNING
Asafetybeltthatisnotproperly wornmaynotprovidethe protectionneededinacrash. The personwearingthebeltcouldbe seriouslyinjured. Theshoulder beltshouldgoovertheshoulder andacrossthechest. Theseparts ofthebodyarebestabletotake beltrestrainingforces.

natural_image
Illustration of a person wearing a seatbelt and holding a string (no text or symbols present)- Buckle, position, and release the safety belt as described previously in this section. Make sure the shoulder portion of the belt is on the shoulder and not falling off of it. The belt should be closeto, but not contacting, theneck.
Toremoveandstorethecomfort guide,squeezethebeltedges togethersothatthesafetybeltcan beremovedfromtheguide.Slide theguideontothestorageclip.

3-22SeatsandRestraints
SafetyBeltUseDuring Pregnancy
Safetybeltsworkforeveryone, includingpregnantwomen.Likeall occupants,theyaremorelikelyto beseriouslyinjurediftheydonot wearsafetybelts.
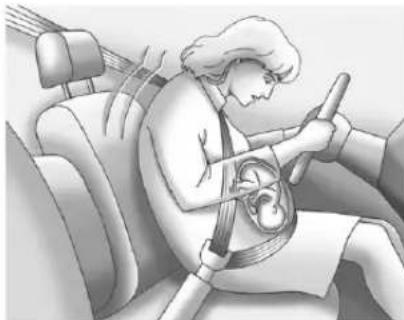
natural_image
Illustration of a person wearing a car seatbelt and using a steering wheel (no text or symbols)Apregnantwomanshouldweara lap-shoulderbelt, and the lap portions should bewornaslowas possible, belowtherounding, throughout the pregnancy.
The best way to protect the fetus is to protect them other. When as safety belt is worn properly, it is more likely that the fetus will not be hurt in a crash. For pregnant women, as for anyone, the key to makings safety belt is effective is wearing them properly.
LapBelt
Thissectionisonlyforthelapbelt. Tolearnhowtowearalap-shoulder belt, seeLap-ShoulderBelton page3-17.
The vehicle may have a center seating position with alapsafety belt. The lapsafety belt does not have a retractor.
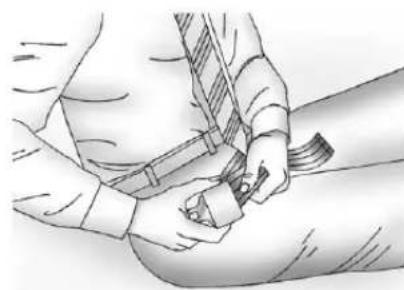
natural_image
Illustration of a person adjusting a belt or belt device (no text or symbols visible)Tomakethebeltlonger, tiltthelatch plateandpullitalongthebelt.
Buckle, position, andreleaseitthe samewayasthelappartofa lap-shoulderbelt.

natural_image
Illustration of a person adjusting a rope or cable (no text or symbols present)Tomakethebeltshorter, pullitsfree endasshownuntilthebeltissnug.
Ifthebeltisnotlongenough,see SafetyBeltExtenderonpage3-23.
Makesurethereleasebuttononthe buckleispositionedsoyouwould beabletounbucklethesafetybelt quicklyifnecessary.
SafetyBeltExtender
Ifthevehicle'ssafetybeltwillfasten aroundyou,youshoulduseit.
Butifasafetybeltisnotlong enough,yourdealerwillorderyou anextender.Whenyougointo orderit,taketheheaviestcoatyou willwear,sotheextenderwillbe longenoughforyou.Tohelpavoid personalinjury,donotletsomeone elseuseit,anduseitonlyforthe seatismadetofit.Theextender hasbeendesignedforadults.Never useitforsecuringchildseats.To wearit,attachittotheregularsafety belt.Formoreinformation,seethe instructionsheetthatcomeswith theextender.
SafetySystemCheck
Nowandthen, check that the safety belt reminder light, safety belts, buckles, latch plates, retractors, and anchorages are all working properly. Look for any other loose or damaged safety belts system parts that might keep safety belts system from doing its job. See your dealer to have it repaired. Tornor frayed safety belts may not protect you in a crash. They can ripart under impact forces. Ifabeltistornor frayed, get anewoneright away.
Makesurethesafetybeltreminder lightisworking.SeeSafetyBelt Remindersonpage5-19.
Keepsafetybeltscleananddry. See SafetyBeltCareonpage3-24.
SafetyBeltCare
Keepbeltscleananddry.

WARNING
Donotbleachordyesafetybelts. Itmayseverelyweakenthem. In acrash, they might not be able to provide adequate protection. Cleansafetybeltsonly with mild soap and lukewarmwater.
ReplacingSafetyBelt SystemPartsaftera Crash

WARNING
Acrashcandamagethesafety beltsysteminthevehicle. Adamagedsafetybeltsystem maynotproperlyprotectthe personusingit,resultingin seriousinjuryorevendeathina crash.Tohelpmakesurethe safetybeltsystemsareworking properlyafteracrash,havethem inspectedandanynecessary replacementsmadeassoonas possible.
Afteraminorcrash, replacement of safetybeltsmaynotbenecessary. Butthesafetybeltasembliesthat were used during any crash may have been stressed or damaged. Seeyourdealertohavethesafety beltassemblies inspected or replaced.
Newpartsandrepairsmaybe necessaryevenifthesafetybelt systemwasnotbeingusedatthe timeofthecrash.
Havethesafetybeltpretensioners checkedifthevehiclehasbeenina crash,oriftheairbagreadinesslight staysonafteryoustartthevehicle orwhileyouaredriving.SeeAirbag ReadinessLightonpage5-20.

Information Provided by: DEALER
AirbagSystem
The vehicle hasthe following airbags:
• Afrontalairbagforthedriver.
- Afrontalairbagfortherightfront passenger.
The vehicle may have the following airbags:
• Aseat-mountedsideimpact airbagforthedriver.
- Aseat-mountedsideimpact airbagfortherightfront passenger.
- Aroof-railairbagforthedriver andthepassengerseated directlybehindthedriver.
- Aroof-railairbagfortheright frontpassengerandtheperson seateddirectlybehindtheright frontpassenger.
Alloftheairbagsinthevehiclewill havethewordAIRBAGembossed inthetrimoronanattachedlabel nearthedeploymentopening.
Forfrontalairbags, theword AIRBAG will appear on the middle part of the steering wheel for the driver and the instrument panel for the right front passenger.
Withseat-mountedsideimpact airbags, thewordAIRBAGwill appearonthesideoftheseatback closesttothedoor.
Withroof-railairbags, theword AIRBAG will appear along the headlinerortrim.
Airbagsaredesignedtosupplement theprotectionprovidedbysafety belts. Eventhoughtoday'sairbags arealsodesignedtohelpreduce theriskofinjuryfromtheforceofan inflatingbag,allairbagsmustinflate veryquicklytodotheirjob.
Herearethemostimportantthings toknowabouttheairbagsystem:

WARNING
Youcanbeseverelyinjuredor killedinacrashifyouarenot wearingyoursafetybelt—evenif youhaveairbags.Airbagsare designedtoworkwithsafety belts,butdonotreplacethem. Also,airbagsarenotdesignedto deployineverycrash.Insome crashessafetybeltsareyouronly restraint.SeeWhenShouldan AirbagInflate?onpage3-29.
Wearingyoursafetybeltduringa crashhelpsreduceyourchance ofhittingthingsinsidethevehicle orbeingejectedfromit.Airbags are“supplementalrestraints”to thesafetybelts.Everyoneinyour vehicleshouldwearasafetybelt properly—whetherornotthereis anairbagforthatperson.

WARNING
Because airbagsinflatewithgreat forceandfasterthantheblinkof aneye,anyonewhoisup against,orveryclosetoany airbagwhenitinflatescanbe seriouslyinjuredorkilled.Donot situnnecessarilyclosetoany airbag,asyouwouldbeifsitting ontheedgeoftheseatorleaning forward.Safetybeltshelpkeep youinpositionbeforeandduring acrash.Alwayswearasafety belt,evenwithairbags.Thedriver shouldsitasfarbackaspossible whilestillmaintainingcontrol of thevehicle.
Occupantsshouldnotleanonor sleepagainstthedoororside windowsinseatingpositionswith seat-mountedsideimpactairbags and/orroof-railairbags.

WARNING
Childrenwhoareupagainst, orverycloseto,anyairbagwhen itinflatescanbeseriously injuredorkilled.Airbagsplus lap-shoulderbeltsofferprotection foradultsandolderchildren,but notforyoungchildrenandinfants. Neitherthevehiclesafetybelt systemnoritsairbagsystemis designedforthem.Young childrenandinfantsneedthe protectionthatachildrestraint systemcanprovide.Always securechildrenproperlyinthe vehicle.Toreadhow,seeOlder Childrenonpage3-45orInfants andYoungChildrenon page3-48.

Thereisanairbagreadinesslight ontheinstrumentpanelcluster, whichshowstheairbagsymbol.
Thesystemcheckstheairbag electricalsystemformalfunctions. Thelighttellsyouifthereisan electricalproblem.SeeAirbag ReadinessLightonpage5-20for moreinformation.
WhereAretheAirbags?
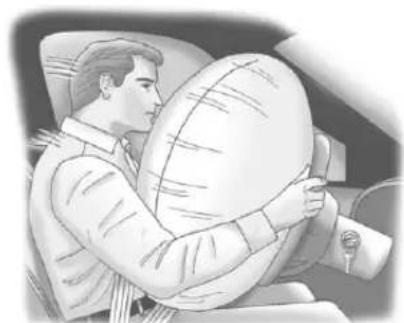
natural_image
Illustration of a person seated in a car, holding a large circular object (no text or symbols visible)Thedriverairbagisinthemiddleof thesteeringwheel.
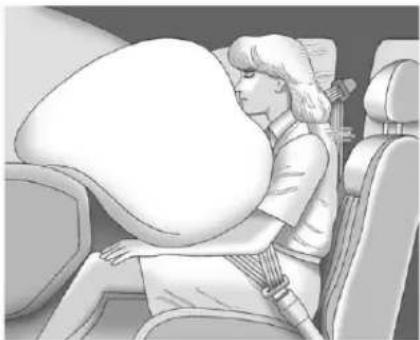
natural_image
Illustration of a person sitting in a car seat, viewed from behind (no text or symbols visible)Therightfrontpassengerairbagis intheinstrumentpanelonthe passengerside.

Information Provided by: DEALER
3-28SeatsandRestraints
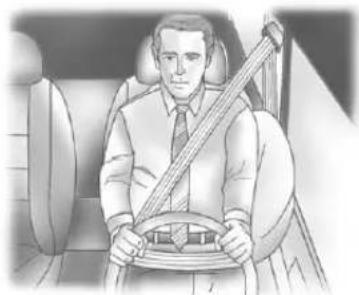
natural_image
Illustration of a man sitting in a car, holding a steering wheel (no text or symbols visible)DriverSideShown, Passenger SideSimilar
Ifthevehiclehasseat-mountedside impactairbagsforthedriverand rightfrontpassenger,theyareinthe sideoftheseatbacksclosesto thedoor.

natural_image
Illustration of a car interior with two people, one seated and one standing, showing no text or symbols.DriverSideShown, Passenger SideSimilar
If the vehicle has roof-rail air bags forth driver, right front passenger, and second row out board passengers, they are in the ceiling abovethesidewindows.

WARNING
If something is between an occupant and an airbag, the airbag might not inflate properly or it might force the object into
(Continued)
WARNING(Continued)
thatpersoncausingsevereinjury orevendeath.Thepathofan inflatingairbagmustbekept clear.Donotputanything betweenanoccupantandan airbag,andonotattachorput anythingonthesteeringwheel huboronornearanyother airbagcovering.
Donotuseseataccessoriesthat blocktheinflationpathofa seat-mountedsideimpactairbag.
Neversecureanythingtotheroof ofvehiclewithroof-railairbags byroutingaropeortie-down throughanydoororwindow opening. If youdo, the pathofan inflatingroof-railairbagwillbe blocked.
WhenShouldanAirbag Inflate?
Frontalairbagsaredesignedto inflateinmoderatetoseverefrontal ornear-frontalcrashestohelp reducethepotentialforsevere injuriesmainlytothedriver'sorright frontpassenger'sheadandchest. However,theyareonlydesignedto inflateiftheimpactexceedsa predetermineddeployment threshold.Deploymentthresholds areusedtopredicthowseverea crashislikelytobeintimeforthe airbagstoinflateandhelprestrain theoccupants.
Whether the frontal air bags willor should deploy is not based on how fast your vehicle is traveling. It depends largely on what you hit, the direction of the impact, and how quickly your vehicles slows down.
Frontalairbagsmayinflateat differentcrashspeeds. For example:
- Ifthevehiclehitsastationary object, theairbagscouldinflate atadifferentcrashspeedthanif thevehiclehitsamovingobject.
- Ifthevehiclehitsanobjectthat deforms,theairbagscould inflateatadifferentcrashspeed thanifthevehiclehitsanobject thatdoesnotdeform.
- Ifthevehiclehitsanarrowobject (likeapole), theairbags could inflate at different crash speed than if the vehicle hits a wide object (likeawall).
- Ifthevehiclegoesintoanobject atanangle, theairbags could inflate at different crash speed than if the vehiclegoes straight into the object.
Thresholdscanalsovarywith specificvehicledesign.
Frontalairbagsarenotintendedto inflateduringvehiclerollovers, rear impacts, orinmanysideimpacts.
IftheGVWR(GrossVehicleWeight Rating)ofyourvehicleis3855kg (8,500lb)orabove,thevehiclehas singlestageairbags.IftheGVWRis below3855kg(8,500lb)thenthe vehiclehasdualstageairbags. Vehicleswithafullbenchseatare equippedwithsinglestateairbags. YoucanfindtheGVWRonthe certificationlabelontherearedge ofthedriverdoor.See VehicleLoad Limitsonpage9-17formore information.
3-30 Seats and Restraints
The vehicle may have dual-stage frontal airbags. Dual-stage airbags adjust therestraint according to crash severity. The vehicle has electronic frontalsensors, which help the sensingsystemdistinguish between amoderate frontal impact and amoresevere frontal impact. Formoderate frontal impacts, dual-stage airbags inflate at a level less than full deployment. Formore severe frontal impacts, full deployment occurs.
Vehicleswithdualstageairbags alsohaveseatpositionsensors whichenablethesensingsystemto monitorthepositionofthedriver seat(allmodels),andoncrewcab andextendedcabmodelstheright frontpassengerseatonlightduty modelsonly. Theseatposition sensorprovidesinformationthatis usedtodetermineiftheairbags shoulddeployatareducedlevelor atfulldeployment.
The vehicle may inform any have seat-mounted side impact and roof-rail airbags. See Airbag System on page 3-25. Seat-mounted side impact and roof-rail air bags are intended to inflate in moderate to severe side crashes. In addition, the seroof-rail air bags are intended to inflate during a rollover or in a severe frontal impact. Seat-mounted side impact and roof-rail air bags will inflate if the crash severity is above the system's designed threshold level. The threshold level can vary with specific vehicle design.
Roof-railairbagsarenotintended toinflateinrearimpacts.A seat-mountedsideimpactairbagis intendedtodeployonthesideofthe vehiclethatisstruck.Bothroof-rail airbagswilldeploywheneitherside ofthevehicleisstruck,orifthe sensingsystempredictsthatthe vehicleisabouttorollover,orina severefrontalimpact.
Inanyparticularcrash, noonecan say whether an airbag should have inflated simply because of the damage to a vehicle or because of what therepair costs were. For frontal airbags, inflation is determined by what the vehicle hits, the angle of the impact, and how quickly the vehicles slows down. For seat-mounted side impact and roof-rail air bags, deployment is determined by the location and severity of the side impact. In a rollover event, roof-rail air bag deployment is determined by the direction of the roll.
WhatMakesanAirbag Inflate?
Inadeploymentevent,thesensing systemsendsanelectricalsignal triggeringareleaseofgasfromthe inflator.Gasfromtheinflatorfillsthe airbagcausingthebagtobreakout ofthecoveranddeploy.Theinflator, theairbag,andrelatedhardwareare allpartoftheairbagmodule.
Frontalairbagmodulesarelocated insidethesteeringwheel and instrumentpanel. For vehicles with seat-mounted side impact air bags, there are air bags modules in the side of the front seat back closest to the door. For vehicles with roof-rail air bags, there are air bag modules in the ceiling of the vehicle, near the sidewindow sthath have occupant seating positions.
HowDoesanAirbag Restrain?
Inmoderatetoseverefrontalor nearfrontalcollisions, evenbelted occupantscancontactthesteering wheelortheinstrumentpanel. In moderatetoseveresidecollisions, evenbeltedoccupantscancontact theinsideofthevehicle.
Airbagssupplementtheprotection providedbysafetybelts.Frontal airbagsdistributetheforceofthe impactmoreevenlyoverthe occupant'supperbody,stopping theoccupantmoregradually. Seat-mountedsideimpactand roof-railairbagsdistributetheforce oftheimpactmoreevenlyoverthe occupant'supperbody.
Rollovercapableroof-railairbags aredesignedtohelpcontainthe headandchestofoccupantsinthe outboardseatingpositionsinthe firstandsecondrows. Therollover capableroof-railairbagsare designedtohelpreducetheriskof fullorpartialejectioninrollover events,althoughnosystemcan preventallsuchejections.
Butairbagswouldnothelpinmany typesofcollisions,primarily becausetheoccupant'smotionis nottowardthoseairbags.SeeWhen ShouldanAirbagInflate?on page3-29formoreinformation.
Airbagsshouldneverberegarded asanythingmorethanasupplement tosafetybelts.
WhatWillYouSeeafter anAirbagInflates?
Afterthefrontalairbagsand seat-mountedsideimpactairbags inflate,theyquicklydeflate,so quicklythatsomepeoplemaynot evenrealizeanairbaginflated. Roof-railairbagsmaystillbeatleast partiallyinflatedforsometimeafter theydeploy.Somecomponentsof theairbagmodulemaybehotfor severalminutes.Forlocationofthe airbagmodules,seeWhatMakes anAirbagInflate?onpage3-31.
Thepartsoftheairbagthatcome intocontactwithyoumaybewarm, butnottoohottotouch. Theremay besomesmokeanddustcoming fromtheventsinthedeflated airbags. Airbaginflationdoesnot preventthedriverfromseeingoutof thewindshieldorbeingabletosteer thevehicle, nordoesitprevent peoplefromleavingthevehicle.
WARNING
Whenanairbaginflates, there maybedustintheair. This dust could cause breathing problems for people with a history of asthma or other breathing trouble. To avoid this, everyone in the vehicles should get out as soon as it is safetodoso. If you have breathing problems but cannot get out of the vehicle after an air bag inflates, then get fresh hair by opening a window or a door. If you experience breathing problems following an air bag deployment, you should seek medical attention.
The vehicle may have a feature that may automatically unlock the doors, turn on the interior lamps and hazard warning flashers, and shut off the fuel system after the air bags inflate. You can lock the doors, turn
offtheinteriorlampsandhazard warningflashersbyusingthe controlsforthosefeatures.
WARNING
Acrashsevereenoughtoinflate theairbagsmayhavealso damagedimportantfunctionsin thevehicle,suchasthefuel system,brakeandsteering systems,etc.Evenifthevehicle appearstobedrivableaftera moderatecrash,theremaybe concealeddamagethatcould makeitdifficulttosafelyoperate thevehicle.
Usecautionifyoushouldattempt torestarttheengineafteracrash hasoccurred.
Inmanycrashessevereenoughto inflatetheairbag, windshieldsare brokenbyvehicledeformation. Additionalwindshieldbreakagemay alsooccurfromtherightfront passengerairbag.
- Airbagsaredesignedtoinflate onlyonce.Afteranairbag inflates,youwillneedsomenew partsfortheairbagsystem. Ifyoudonotgetthem,the airbagsystemwillnotbethere tohelpprotectyouinanother crash.Anewsystemwillinclude airbagmodulesandpossibly otherparts.Theservicemanual foryourvehiclecoverstheneed toreplaceotherparts.
- The vehicle has acrash sensing and diagnostic module which records information after a crash. See Vehicle Data Recording and Privacy on page 13-21 and Event Data Recorderson page 13-22.
- Letonlyqualifiedtechnicians workontheairbagsystems. Improperservicecanmeanthat anairbagsystemwillnotwork properly.Seeyourdealerfor service.
AirbagOn-OffSwitch
Ifoneoftheswitchespicturedinthe followingillustrationsislocatedin theglovebox,thevehiclehasan airbagon-offswitchthatyoucan usetomanuallyturnonoroffthe rightfrontpassengerairbag.
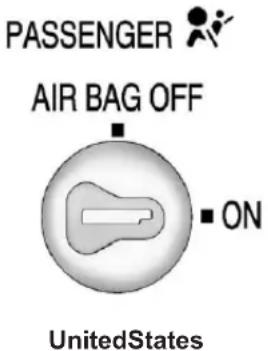
text_image
PASSENGER AIR BAG OFF ■ ON UnitedStates

natural_image
Abstract diagram with three symbolic figures and a central abstract shape, no text or labels present.CanadaandMexico
Ifthevehicledoesnothavean airbagoffswitch,itmayhavea passengersensingsystem.See PassengerSensingSystemon page3-37.
This switch should only be turned to the off position if the person in the right front passenger position is a member of a passenger risk group identified by thenational government as follows:
Infant.Aninfant(lessthan1year old)mustrideinthefrontseat because:
• Myvehiclehasnorearseat;
• Myvehiclehasarearseattoo smalltoaccommodatea rear-facinginfantseat;or
- Theinfanthasamedical conditionwhich,accordingtothe infant'sphysician,makesit necessaryfortheinfanttoridein thefrontseatsothatthedriver canconstantlymonitorthe child'scondition.
Childage1to12.Achild age1to12mustrideinthefront seatbecause:
• Myvehiclehasnorearseat;
- Althoughchildrenages1to12 rideintherearseat(s)whenever possible,childrenages1to12 sometimesmustrideinthefront becausenospaceisavailablein therearseat(s)ofmyvehicle;or
- Thechildhasamedical conditionwhich,accordingtothe child'sphysician,makesit necessaryforthechildtoridein thefrontseatsothatthedriver canconstantlymonitorthe child'scondition.
MedicalCondition.Apassenger hasamedicalconditionwhich, accordingtohisorherphysician:
- Causesthepassengerairbagto poseaspecialriskforthe passenger; and
- Makesthepotentialharmfrom thepassengerairbaginacrash greaterthanthepotentialharm fromturningofftheairbagand allowingthepassenger,evenif belted,tohittheinstrument panelorwindshieldinacrash.
WARNING
Iftherightfrontpassengerairbag isturnedoffforapersonwhois notinariskgroupidentifiedby thenationalgovernment,that personwillnothavetheextra protectionofanairbag.Ina crash,theairbagwillnotbeable toinflateandhelpprotectthe personsittingthere.Donotturn offthepassengerairbagunless thepersonsittingthereisinarisk group.
PASSENGER

AIR BAG OFF

natural_image
Close-up of a mechanical knob with a circular head and a curved arrow indicating rotation (no text or symbols)UnitedStates

Information Provided by
DEALER
图 1-10 号 2-3 审理
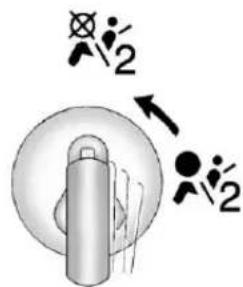
text_image
Diagram showing mechanical components with symbols and arrows indicating motion or force directionsCanadaandMexico
Toturnofftherightfrontpassenger airbag, inserttheignitionkeyinto theswitch, pushin, andmovethe switchtotheoffposition.
ThewordOFFortheoffsymbolwill comeoninthepassengerairbag statusindicatorlocatedinthe overheadconsoletoletyouknow thattherightfrontpassengerairbag isoff,afterthesystemcheckis completed. Theairbagofflightwill comeonandstayontoletyou
knowthattherightfrontpassenger's airbagisoff.SeeAirbagOn-Off Lightonpage5-21.
WARNING
If the airbagreadiness light ever comes on and stay son, it means that something may bewrong with the air bagsystem. For example, theright front passenger air bag could inflate even though the air bagon-off switchisturned off.
Tohelpavoidinjurytoyourselfor others,havethevehicleserviced rightaway.SeeAirbagReadiness Lightonpage5-20formore information,includingimportant safetyinformation.
PASSENGER

AIR BAG OFF
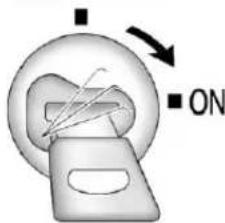
text_image
Diagram showing a device with ON/OFF indicators and directional arrows, likely illustrating a process or state change.UnitedStates

text_image
Diagram showing a device with two symbols (× and -) and arrows indicating process flow or action, possibly representing a system or process.CanadaandMexico
Toturntherightfrontpassenger airbagonagain, inserttheignition keyintotheswitch, pushin, and movetheswitchtotheonposition.
Therightfrontpassengerfrontal airbagisnowenabled(mayinflate). SeeAirbagOn-OffLighton page5-21formoreinformation.
PassengerSensing System
Ifthevehiclehasoneofthe indicatorspicturedinthefollowing illustrations,thenthevehiclehasa passengersensingsystemforthe rightfrontpassengerposition, unlessthereisanairbagoffswitch locatedintheglovebox.Ifthereis anairbagoffswitch,thevehicle doesnothaveapassengersensing system.SeeAirbagOn-OffSwitch onpage3-33formoreinformation.
Thepassengerairbagstatus indicatorwillbevisibleonthe overheadconsolewhenthevehicle isstarted.
Inaddition,ifthevehiclehasa passengersensingsystemforthe rightfrontpassengerposition,the labelonthevehicle'ssunvisors refersto"ADVANCEDAIRBAGS".
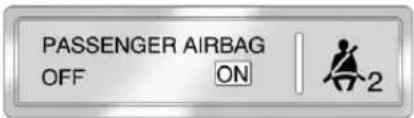
text_image
PASSENGER AIRBAG OFF ON 2UnitedStates
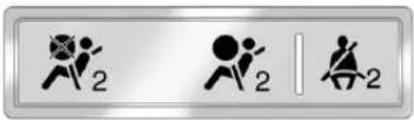
text_image
Three identical icons with the number '2' and a vertical line, likely indicating a sequence or step indicator.CanadaandMexico
ThewordsONandOFF,orthe symbolforonandoff,willbevisible duringthesystemcheck.Ifyouare usingremotestarttostartthe vehiclefromadistance,ifequipped, youmaynotseethesystemcheck. Whenthesystemcheckis complete,eitherthewordONor OFF,orthesymbolforonoroff,will bevisible.SeePassengerAirbag StatusIndicatoronpage5-23.
3-38SeatsandRestraints
Thepassengersensingsystemwill turnofftherightfrontpassenger frontalairbagundercertain conditions. Thedriverairbag, seat-mountedsideimpactairbags (ifequipped), andtheroof-rail airbags (ifequipped) are not affected by the passengersensing system.
Thepassengersensingsystem workswithsensorsthatarepartof therightfrontpassengerseatand safetybelt. Thesensorsare designedtodetectthepresenceof aproperly-seatedoccupantand determineiftherightfront passengerfrontalairbagshouldbe enabled(mayinflate)ornot.
According to accident statistics, children are safer when properly secured in a rearseatin the correct child restraint for their weight and size.
Werecommendthatchildrenbe securedinarearseat,including:an infantorachildridingina rear-facingchildrestraint;achild ridinginaforward-facingchildseat; anolderchildridinginabooster seat;andchildren,whoarelarge enough,usingsafetybelts.
Alabelonthesunvisorsays, "Neverputarear-facingchildseatin thefront." Thisisbecausetheriskto therear-facingchilddissogreat, iftheairbagdeploys.

WARNING
Achildinarear-facingchild restraintcanbeseriouslyinjured orkillediftherightfront passengerairbaginflates. This is because the back of the rear-facing child restraint would be very closetotheinflating airbag. Achildinaforward-facing child restraint can beseriously injured or killed iftherightfront
(Continued)
WARNING(Continued)
passengerairbaginflatesandthe passengerseatisinaforward position.
Evenifthepassengersensing systemhasturnedofftheright frontpassengerfrontalairbag,no systemisfail-safe.Noonecan guaranteeethatanairbagwillnot deployundersomeunusual circumstance,eventhoughthe airbagisturnedoff.
Securerear-facingchild restraintsinarearseat,evenif theairbagisoff.Ifyousecurea forward-facingchildrestraintin therightfrontseat,alwaysmove thefrontpassengerseatasfar backasitwillgo.Itisbetterto securethechildrestraintina rearseat.
Ifthevehicledoesnothavearear seatthatwillaccommodatea rear-facingchildrestraint,a rear-facingchildrestraintshouldnot beinstalledinthevehicle,evenif theairbagisoff.
Thepassengersensingsystemis designedtoturnofftherightfront passengerfrontalairbagif:
• Therightfrontpassengerseatis unoccupied.
- Thesystemdeterminesaninfant ispresentinachildrestraint.
- Arightfrontpassengertakes his/herweightoffoftheseatfor aperiodoftime.
- Or, if there is a critical problem with the air bagsystem or the passengersensingsystem.
Whenthepassengersensing systemhasturnedofftherightfront passengerfrontalairbag,theoff indicatorwilllightandstaylitto remindyouthattheairbagisoff. SeePassengerAirbagStatus Indicatoronpage5-23.
Thepassengersensingsystemis designedtoturnon(mayinflate)the rightfrontpassengerfrontalairbag anytimethesystemsensesthata personofadultsizeissitting properlyintherightfront passengerseat.
Whenthepassengersensing systemhasallowedtheairbagtobe enabled, theonindicatorwilllight andstaylittoremindyouthatthe airbagisactive.
Forsomechildren, including childreninchildrestraints, and for very small adults, the passenger sensingsystemmayormaynotturn offtherightfrontpassengerfrontal airbag, depending upon the person's seatingpostureandbody build. Everyone in your vehicle who has outgrown childrestraints should wear as safety belt properly—whether or not there is an airbag forth at person.

WARNING
If the airbagreadiness light ever comes on and stay on, it means that something may be wrong with the air bags system. To help avoid injury to yourself for others, have the vehicles serviced right away. See Airbag Readiness Lighton page 5-20 form more information, including important safety information.
IftheOnIndicatorisLitfora ChildRestraint
Ifachildrestrainhasbeeninstalled andtheonindicatorislit:
- Turnthevehicleoff.
- Removethechildrestraint from the vehicle.
- Remove any additional items from these seats such as blankets, cushions, seat covers, seat heaters, or seat massagers.
-
Reinstall the child restraint following the directions provided by the child restraint manufacturer and referto Securing Child Restraints (Center Front Seat Position) on page 3-65 or Securing Child Restraints (Right Front Seat Position) on page 3-65 or Securing Child Restraints (Rear Seat Position) on page 3-63.
-
If, afterreinstalling the child restraint and restarting the vehicle, the on indicator is still lit, turn the vehicle off. Then slightly reclin the vehicle seat back and adjust these at cushion, if adjustable, to make sure that the vehicle seat back is not pushing the child restraint into these at cushion.
Alsomakesurethechild restraintisnottrappedunderthe vehicleheadrestraint.Ifthis happens,adjustthehead restraint.SeeHeadRestraints onpage3-2.
6.Restartthevehicle.
Thepassengersensingsystem mayormaynotturnoffthe airbagforachildinachild restraintdependinguponthe child'sseatingpostureandbody build.Itisbettertosecurethe childrestraintinarearseat.
IftheOffIndicatorisLitforan Adult-SizeOccupant

natural_image
Illustration of a woman seated in a car, viewed from the side (no text or symbols present)Ifapersonofadult-sizeissittingin therightfrontpassengerseat,but theoffindicatorislit,itcouldbe becausethatpersonisnotsitting properlyintheseat.Ifthishappens,
usethefollowingstepstoallowthe systemtodetectthatpersonand enabletherightfrontpassenger frontalairbag:
- Turnthevehicleoff.
- Remove any additional material from these seat, such as blankets, cushions, seat covers, seat heaters, or seat massagers.
- Placetheseatbackinthefully uprightposition.
- Havethepersonsituprightin theseat, centeredontheseat cushion, with legscomfortably extended.
- Restartthevehicleandhavethe personremaininthispositionfor twotothreeminutesaftertheon indicatorislit.
AdditionalFactorsAffecting SystemOperation
Safetybeltshelpkeepthe passengerinpositionontheseat duringvehiclemaneuversand braking,whichhelpsthepassenger sensingsystemmaintainthe passengerairbagstatus.See "SafetyBelts" and "ChildRestraints" intheIndexforadditional informationabouttheimportanceof properrestraintuse.
If the shoulder portion of the belt is pulled out all the way, the child restraint locking feature will be engaged. This may unintentionally causethe passengers sensing system to turn the air bag off for some adult size occupants. If this happens, let the belt go back all the way and start again.
Athicklayerofadditionalmaterial, suchasablanketorcushion, oraftermarketequipmentsuchas seatcovers,seatheaters,andseat massagerscanaffecthowwellthe passengersensingsystem operates.Werecommendthatyou notuseseatcoversorother aftermarketequipmentexceptwhen approvedbyGMforyourspecific vehicle.SeeAddingEquipmentto theAirbag-EquippedVehicleon page3-43formoreinformation aboutmodificationsthatcanaffect howthesystemoperates.
Theonindicatormaybelitifan object,suchasabriefcase, handbag,grocerybag,laptopor otherelectronicdevice,isputonan unoccupiedseat.Ifthisisnot desired,removetheobjectfrom theseat.
WARNING
Stowingofarticlesunderthe passengerseatorbetweenthe passengerseatcushionand seatbackmayinterferewiththe properoperationofthepassenger sensingsystem.
Servicingthe Airbag-EquippedVehicle
Airbagsaffecthowthevehicle shouldbeserviced.Thereareparts oftheairbagsysteminseveral placesaroundthevehicle.Your dealerandtheservicemanualhave informationaboutservicingthe vehicleandtheairbagsystem.To purchaseaservicemanual,see ServicePublicationsOrdering Informationonpage13-19.
WARNING
Forupto10secondsafterthe vehicleisturnedoffandthe batteryisdisconnected,anairbag canstillinflateduringimproper service.Youcanbeinjuredifyou areclosetoanairbagwhenit inflates.Avoidyellowconnectors. Theyareprobablypartofthe airbagsystem.Besuretofollow properserviceprocedures,and makesurethepersonperforming workforyouisqualifiedtodoso.
AddingEquipmenttothe Airbag-EquippedVehicle
Q: Isthereanythinglmightadd toorchangeaboutthevehicle thatcouldkeeptheairbags fromworkingproperly?
A: Yes. If you add things that change your vehicle's frame, bumpersystem, height, frontend or sidesheet metal, they may keep the air bags system from working properly. Changing or moving any part of the front seats, safety belts, the airbag sensing and diagnostic module, steering wheel, instrument panel, roof-rail air bag modules, ceiling headliner or pillargarnish trim, overhead console, front sensors, side impacts sensors, or air bag wiring can affect the operation of the air bags system.
Inaddition, the vehicle may have passengersensingsystem for the right front passenger's position, which includes sensors that are part of the passenger's seat. The passengersensing system may not operate properly if the original seat trim is replaced with non-GM covers, upholstery or trim, or with GM covers, upholstery or trim designed for different vehicle. Any object, such as an aftermarket seat theaterora comfort-enhancing pads device, installed underorontop of these at fabric, could also interfere with the operation of the passengersensingsystem. This could either prevent proper deployment of the passenger airbag(s) or prevent the passengersensingsystem from properly turning off the passenger airbag(s). See Passenger Sensing System on page 3-37.
If you have any questions about this, you should contact Customer Assistance before you modify your vehicle. The phone numbers and addresses for Customer Assistance are in Step Two of the Customer Satisfaction Procedure in this manual. See Customer Satisfaction Procedure (U.S. and Canada) on page 13-2 or Customer Satisfaction Procedure (Mexico) on page 13-4.
If the vehicle has rollover roof-railairbags, see Different Size Tires and Wheelson page 10-77 for additional important information.

Q: Whatifladdedasnowplow? Willitkeeptheairbagsfrom workingproperly?
A: We have designed our airbag system to work properly under awider range of conditions, including snow plowing with vehicle that has the optional Snow Plow Prep Package (RPOVYU). But on change or defeat the snow plow's "tripping mechanism." If you do, it can damage your snow plow and your vehicle, and it may cause an air bag inflation.
Q: Because I have adisability, Ihavetogetmy vehicle modified. How can find out whether this will affect my air bagsystem?
A: If you have questions, call Customer Assistance. The phonenumbers and addresses for Customer Assistance are in Step Two of the Customer Satisfaction Procedure in this manual. See Customer Satisfaction Procedure (U.S. and Canada) on page 13-2 or Customer Satisfaction Procedure (Mexico) on page 13-4.
Inaddition, your dealer and the servicemanual have information about the location of the airbag sensors, sensing and diagnostic module and airbag wiring.
AirbagSystemCheck
Theairbagsystemdoesnotneed regularly scheduled maintenance or replacement. Makesuretheairbag readinesslightisworking. See AirbagReadinessLighton page 5-20.
Notice:Ifanairbagcoveringis damaged,opened,orbroken,the airbagmaynotworkproperly.Do notopenorbreaktheairbag coverings.Ifthereareany openedorbrokenairbagcovers, havetheairbagcoveringand/or airbagmodulereplaced.Forthe locationoftheairbags,see WhereAretheAirbags?on page3-27.Seeyourdealerfor service.
ReplacingAirbagSystem PartsafteraCrash

WARNING
Acrashcandamagethe airbagsystemsinthevehicle. Adamagedairbagsystem maynotworkproperlyandmay notprotectyouandyour passenger(s)inacrash,resulting inseriousinjuryorevendeath.To helpmakesuretheairbag systemsareworkingproperly afteracrash,havethem inspectedandanynecessary replacementsmadeassoonas possible.
Ifanairbaginflates, you will need to replace airbagsystemparts. See your dealerforservice.
If the airbag readiness light stay on after the vehicle is started or comes on when you are driving, the airbag system may not work properly. Have the vehicles serviced right away. See Airbag Readiness Lighton page 5-20.
ChildRestraints OlderChildren

natural_image
Illustration of two people sitting side by side, wearing traditional-style clothing (no text or symbols visible)Olderchildrenwhohaveoutgrown boosterseatsshouldwearthe vehiclesafetybelts.

Information Provided by: DEALER
Themanufacturer'sinstructionsthat comewiththeboosterseatstatethe weightandheightlimitationsforthat booster.Useaboosterseatwitha lap-shoulderbeltuntilthechild passesthefittestbelow:
- Sitallthewaybackontheseat. Dothekneesbendattheseat edge?Ifyes,continue.Ifno, returntotheboosterseat.
-
Bucklethelap-shoulderbelt. Doestheshoulderbeltreston theshoulder?Ifyes,continue. Ifno,tryusingtherearsafety beltcomfortguide.See“Rear SafetyBeltComfortGuides” underLap-ShoulderBelton page3-17formoreinformation. Iftheshoulderbeltstilldoesnot restontheshoulder,thenreturn totheboosterseat.
-
Doesthelapbeltfitlowand snugonthehips,touchingthe thighs?Ifyes,continue.Ifno, returntotheboosterseat.
- Canpropersafetybeltfitbe maintainedforthelengthofthe trip?Ifyes,continue.Ifno, returntotheboosterseat.
Q: Whatistheproperway to wearsafetybelts?
A: Anolderchildshouldwearalap-shoulderbeltandgettheadditionalrestraintashoulderbeltcanprovide. Theshoulderbeltshouldnotcrossthefaceorneck. Thelapbeltshouldfitsnuglybelowthehips, justtouchingthetopofthethighs.Thisappliesbeltforcetothechild'spelvicbonesinacrash.Itshouldneverbewornovertheabdomen,whichcouldcausesevereorevenfatalinternalinjuriesinacrash.
Alsosee"RearSafetyBeltComfort Guides"underLap-ShoulderBelton page3-17.
According to accident statistics, children and infants are safer when properly restrained in a child restraintsystemor infant restraint system secured in a rearseating position.
Inacrash, children who are not buckled up can strike other people who are buckled up, or can be thrown out of the vehicle. Older children need to use safety belts properly.
WARNING
Neverallowmorethanonechild towearthesamesafetybelt. The safetybelt cannot properly spread the impact forces. Inacrash, they can be crushed together and seriously injured. As safety belt must be used by only one person at time.

natural_image
Illustration of three people seated in a car, one wearing a seatbelt, with a no-smoking symbol overlay (no text or symbols present)WARNING
Neverallowachildtowearthe safetybeltwiththeshoulderbelt behindtheirback.Achildcanbe seriouslyinjuredbynotwearing thelap-shoulderbeltproperly.Ina crash,thechildwouldnotbe restrainedbytheshoulderbelt. Thechildcouldmovetoofar forwardincreasingthechance of headandneckinjury.Thechild mightalsoslideunderthelap belt.Thebeltforcewouldthenbe appliedrightontheabdomen. Thatcouldcauseseriosorfatal injuries.Theshoulderbeltshould goovertheshoulderandacross thechest.
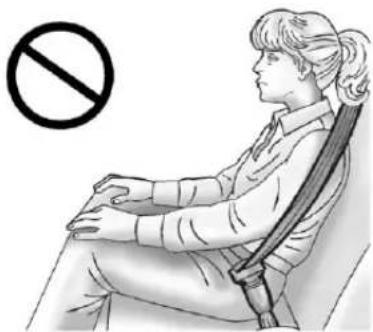
natural_image
Illustration of a person sitting in a chair with a diagonal band, no text or symbols present
InfantsandYoung Children
Everyoneinavehicleneeds protection! Thisincludesinfantsand allotherchildren. Neither the distancetravelednortheage and sizeofthetravelerchangesthe need,foreveryone,tousesafety restraints. Infact,thelawinevery stateintheUnitedStatesandin everyCanadianprovincesays childrenuptosomeagemustbe restrainedwhileinavehicle.

WARNING
Childrencanbeseriouslyinjured orstrangledifashoulderbeltis wrappedaroundtheirneckand thesafetybeltcontinuesto tighten.Neverleavechildren unattendedinvehicleandnever allowchildrentoplaywiththe safetybelts.
Airbagspluslap-shoulderbeltsoffer protectionforadultsandolder children,butnotforyoungchildren andinfants.Neitherthevehicle's safetybeltsystemnoritsairbag systemisdesignedforthem.Every timeinfantsandyoungchildrenride invehicles,theyshouldhavethe protectionprovidedbyappropriate childrestraints.
Childrenwhoarenotrestrained properlycanstrikeotherpeople, orcanbethrownoutofthevehicle.

WARNING
Neverholdaninfantorachild whileridinginavehicle.Dueto crashforces,aninfantorachild willbecomesoheavyitisnot possibletoholditduringacrash. Forexample,inacrashatonly 40km/h(25mph),a5.5kg(12lb) infantwillsuddenlybecomea 110kg(240lb)forceonaperson's (Continued)
WARNING(Continued)
arms.Aninfantshouldbe securedinanappropriate restraint.

natural_image
Illustration of a woman breastfeeding a baby in a car seat, with a no-smoking symbol above (no text or labels)
Information Provided by: DEALER
WARNING
Childrenwhoareupagainst, orverycloseto,anyairbagwhen itinflatescanbeseriouslyinjured orkilled.Neverputarear-facing childrestraintintherightfront seat.Securearear-facingchild restraintinarearseat.Itisalso bettertosecureaforward-facing childrestraintinarearseat.Ifyou mustsecureaforward-facing childrestraintintherightfront seat,alwaysmovethefront passengerseatasfarbackasit willgo.
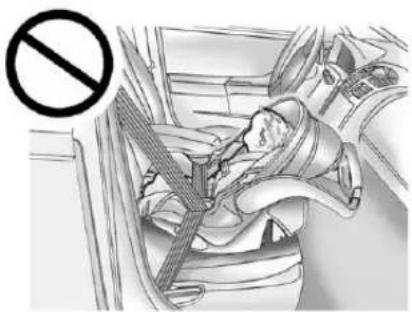
natural_image
Interior view of a car showing a person seated in the seat with a carbelt, no visible text or symbols.Q: Whatarethedifferenttypes of add-onchildrestraints?
A: Add-onchildrestraints, which are purchased by the vehicle owner, are available in four basic types. Selection of particular restraint should take into consideration not only the child's weight, height, and age but also whether or not the restraint will be compatible with the motor vehicle in which it will be used. Formost basic types of child restraints, there are many different models available. When purchasing a child restraint, be sure its designed to be used in amotor vehicle. Ifitis, the restraint will have alabels saying that it meets federal motor vehicles safety standards.
3-50SeatsandRestraints
Therestraintmanufacturer's instructionsthatcomewiththe restraintstatetheweightand heightlimitationsforaparticular childrestraint.Inaddition,there aremanykindsofrestraints availableforchildrenwith specialneeds.

WARNING
Toreducetheriskofneck and headinjury during acrash, infants need completes support. In a crash, if an infant's in a rear-facing child restraint, the crash forces can be distributed across the strongest part of an infant's body, the back and shoulders. Infant should always besecured in rear-facing child restraints.

WARNING
Ayoungchild'shipbonesarestill sosmallthatthevehicle'sregular safetybeltmaynotremainlowon thehipbones,asitshould. Instead,itmaysettleuparound thechild'sabdomen.Inacrash, thebeltwouldapplyforceona bodyareathatisunprotectedby anybonystructure.Thisalone couldcauseseriousorfatal injuries.Toreducetheriskof seriousorfatalinjuriesduringa crash,youngchildrenshould alwaysbesecuredinappropriate childrestraints.
ChildRestraintSystems

natural_image
3D illustration of a mechanical component with handle and internal structure (no text or symbols)(A)Rear-FacingInfantSeat
Arear-facinginfantseat(A) providesrestraintwiththeseating surfaceagainstthebackofthe infant.
The harnesssystemholdstheinfant inplaceand,inacrash,actsto keeptheinfantpositionedinthe restraint.
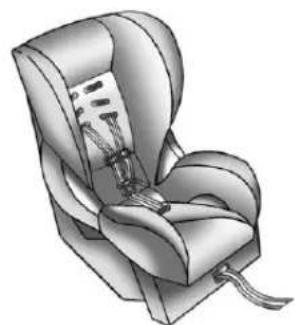
natural_image
Illustration of a car seat with straps and straps (no text or symbols)(B)Forward-FacingChildSeat
Aforward-facingchildseat(B) provides restraint for the child's body with the harness.
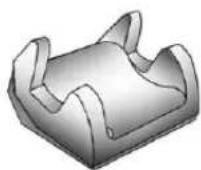

natural_image
3D rendered illustration of a car seat with front and backrest compartments (no text or symbols)(C)BoosterSeats
Aboosterseat(C)isachildrestraint designedtoimprovethefitofthe vehicle'ssafetybeltsystem. Aboosterseatcanalsohelpachild toseeoutthewindow.
SecuringanAdd-OnChild RestraintintheVehicle

WARNING
Achildcanbeseriouslyinjuredor killedinacrashifthechild restraintisnotproperlysecuredin thevehicle.Securethechild restraintproperlyinthevehicle usingthevehiclesafetybeltor LATCHsystem,followingthe instructionsthatcamewiththat childrestraintandtheinstructions inthismanual.
Tohelpreducethechanceofinjury, thechildrestraintmustbesecured inthevehicle.Childrestraint systemsmustbesecuredinvehicle seatsbylapbeltsorthelapbelt portionofalap-shoulderbelt,orby theLATCHsystem.SeeLower AnchorsandTethersforChildren (LATCHSystem)onpage3-54.
Childrencanbeendangeredina crashifthechildrestraintisnot properlysecuredinthevehicle.
Whensecuringanadd-onchild restraint, refertotheinstructions that comewiththerestraint which maybeontherestraintitselforina booklet, or both, and to this manual. The childrestraint instructions are important, so if they are not available, obtain are replacement copy from the manufacturer.
Keepinmindthatanunsecured childrestraintcanmovearoundina collisionorsuddenstopandinjure peopleinthevehicle.Besureto properlysecureanychildrestraintin thevehicle—evenwhennochildis init.
In some areas of the United States and Canada, Certified Child Passenger Safety Technicians (CPSTs) are available to inspect and demonstrate how to correctly use and install child restraints. In the U.S., referto the National Highway Traffic Safety Administration (NHTSA) website to locate the nearest child's safety seat inspection station. For CPST availability in Canada, check with Transport Canada or the Provincial Ministry of Transportation office.
SecuringtheChildWithinthe ChildRestraint

WARNING
Achildcanbeseriouslyinjuredor killedinacrashifthechildisnot properlysecuredinthechild restraint.Securethechild properlyfollowingtheinstructions thatcamewiththatchildrestraint.
WheretoPutthe Restraint
According to accident statistics, children and infants are safer when properly restrained in a child restraintsystemor infant restraint system secured in a rearseating position.
Werecommendthatchildrenand childrestraintsbesecuredinarear seat,including:aninfantorachild ridinginarear-facingchildrestraint; achildridinginaforward-facing childseat;anolderchildridingina boosterseat;andchildren,whoare largeenough,usingsafetybelts.
Ifachildrestraintissecuredinthe rightfrontpassengerseat, and the vehiclehasaswitchintheglove boxtomanuallyturnofftheright frontpassengerairbag, seeAirbag On-OffSwitchonpage3-33and SecuringChildRestraints(Center FrontSeatPosition) on page 3-65 or SecuringChildRestraints(Right FrontSeatPosition) on page 3-65 or SecuringChildRestraints(Rear

Information Provided by: DEALER
SeatPosition)onpage3-63for moreinformation,including importantsafetyinformation.
Alabelonthesunvisorsays, "Neverputarear-facingchildseatin thefront." Thisisbecausetheriskto therear-facingchildissogreat, iftheairbagdeploys.

WARNING
Achildinarear-facing childrestraintcanbeseriously injuredorkillediftherightfront passengerairbaginflates. Thisisbecausethebackofthe rear-facingchildrestraintwould beveryclosetotheinflating airbag.Achildinaforward-facing childrestraintcanbeseriously injuredorkillediftherightfront passengerairbaginflatesandthe passengerseatisinaforward position.
(Continued)
WARNING(Continued)
Evenifthepassengersensing systemorairbagswitchhas turnedofftherightfront passengerfrontalairbag,no systemisfail-safe.Noonecan guaranteeethatanairbagwillnot deployundersomeunusual circumstance,eventhoughitis turnedoff.
Securerear-facingchild restraintsinarearseat,evenif theairbagisoff.Ifyousecurea forward-facingchildrestraintin therightfrontseat,alwaysmove thefrontpassengerseatasfar backasitwillgo.Itisbetterto securethechildrestraintina rearseat.

WARNING
Achildinachildrestraintinthe centerfrontseatcanbebadly injuredorkilledbythefrontal airbagsiftheyinflate.Never secureachildrestraintinthe centerfrontseat.Itisalways bettertosecureachildrestraintin arearseat.
Donotusechildrestraintsinthe centerfrontseatposition.
Whensecuringachildrestraintina rearseatingposition,studythe instructionsthatcamewithyour childrestrainttomakesureitis compatiblewiththisvehicle.
Childrestraintsandboosterseats varyconsiderablyinsize, and some may fit uncertain seating positions better than others. Always make sure the child restraint is properly secured.
Dependingonwhereyouplacethe childrestraintandthesizeofthe childrestraint,youmaynotbeable toaccessadjacentsafetybelt assembliesorLATCHanchorsfor additionalpassengersorchild restraints.Adjacentseating positionsshouldnotbeusedifthe childrestraintpreventsaccesstoor interfereswiththeroutingofthe safetybelt.
Ifthevehicledoesnothavearear seatthatwillaccommodatea rear-facingchildrestraint,a rear-facingchildrestraintshouldnot beinstalledinthevehicle,evenif theairbagisoff.
Whereverachildrestraintis installed, besuretosecurethe childrestraintproperly.
Keepinmindthatanunsecured childrestraintcanmovearoundina collisionorsuddenstopandinjure peopleinthevehicle.Besureto properlysecureanychildrestraintin yourvehicle—evenwhennochild isinit.
LowerAnchorsand TethersforChildren (LATCHSystem)
TheLATCHsystemholdsachild restraintduringdrivingorinacrash. Thissystemisdesignedtomake installationofachildrestrainteasier. TheLATCHsystemusesanchorsin thevehicleandattachmentsonthe childrestraintthataremadeforuse withtheLATCHsystem.
MakesurethataLATCH-compatible childrestraintisproperlyinstalled usingtheanchors,orusethe vehicle'ssafetybeltstosecurethe restraint,followingtheinstructions thatcamewiththatrestraint,and alsotheinstructionsinthismanual.
Wheninstallingachildrestraintwith atoptether,youmustalsouse eithertheloweranchorsorthe safetybeltstoproperlysecurethe childrestraint.Achildrestraintmust neverbeinstalledusingonlythetop tetherandanchor.
InordertousetheLATCHsystemin yourvehicle,youneedachild restraintthathasLATCH attachments.Thechildrestraint manufacturerwillprovideyouwith instructionsonhowtousethechild restraintanditsattachments.The followingexplainshowtoattacha childrestraintwiththese attachmentsinyourvehicle.
Notallvehicleseatingpositionsor childrestraintshaveloweranchors andattachmentsortoptether anchorsandattachments.
LowerAnchors

text_image
Technical diagram showing mechanical assembly with labeled parts A and B, including a magnified inset view.Loweranchors(A)aremetalbars built into the vehicle. There are two lower anchors foreach LATCH seating position that will accommodate child restraint with lower attachments(B).
TopTetherAnchor
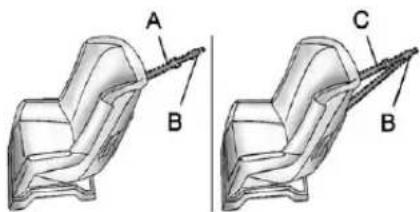
text_image
A B C BAtoptether(A,C)anchorsthetop ofthechildrestrainttothevehicle. Atoptetheranchorisbuilt intothevehicle. Thetoptether attachment(B)onthechildrestraint connectstothetoptetheranchorin thevehicleinordertoreducethe forwardmovementandrotationof thechildrestraintduringdrivingorin acrash.
Yourchildrestraintmayhavea singletether(A)oradualtether(C). Eitherwillhaveasingle attachment(B)tosecurethetop tethertotheanchor.
Somechildrestraintsthathavea toptetheraredesignedforusewith orwithoutthetoptetherbeing attached.Othersrequirethetop tetheralwaystobeattached.In Canada,thelawrequiresthat forward-facingchildrestraintshave atoptether,andthatthetetherbe attached.Besuretoreadandfollow theinstructionsforyourchild restraint.
LowerAnchorandTopTether AnchorLocations

natural_image
Two identical white cylindrical objects with rounded tops, one with a small leaf-like top (no text or symbols)RegularCab—Two-Passenger FrontSeat
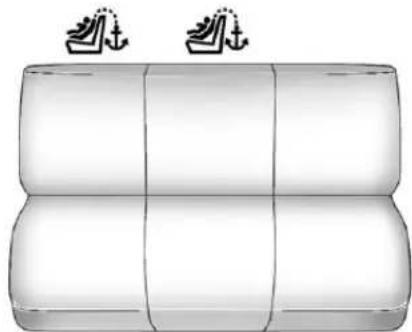
natural_image
Illustration of a cylindrical object with two small boat symbols above it, no text or labels present.RegularCab—Three-Passenger FrontSeat
(TopTetherAnchor): Seating positions with toptetheranchors.
Donotinstallachildrestraintinthe centerfrontseatposition.See SecuringChildRestraints(Center FrontSeatPosition)onpage3-65 orSecuringChildRestraints(Right FrontSeatPosition)onpage3-65 orSecuringChildRestraints(Rear SeatPosition)onpage3-63for moreinformation.

natural_image
Illustration of a three-panel car seat with two seats and two chairs, each featuring a small sleeping figure (no text or symbols)CrewandExtendedCabRearSeat
(TopTetherAnchor): Seating positions with toptetheranchors.
②(LowerAnchor): Seating positions with twoloweranchors.
Forcrewandextendedcabmodels, therearoutboardseatingpositions haveexposedmetalloweranchors locatedinthecreasebetweenthe seatbackandtheseatcushion.

Forregularcabmodels, thereisan anchorsymbolonthecoversto assistyouinlocatingthetoptether anchors.

natural_image
Diagram of a vehicle charging station with two cars on a platform (no text or symbols)RegularCab
Donotinstallachildrestraintinthe centerseatposition.SeeSecuring ChildRestraints(CenterFrontSeat Position)onpage3-65orSecuring ChildRestraints(RightFrontSeat Position)onpage3-65orSecuring ChildRestraints(RearSeat Position)onpage3-63formore information.
Forregularcabmodels, the top tether anchors are located under covers on the back panel behind the passenger seat. Removethetrim plug to access the anchor. Besure touse an anchor located on the sameside of the vehicle as the seating position where the child restraint will be placed.
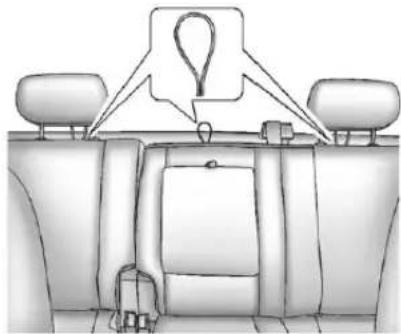
natural_image
Interior view of a car dashboard with seats and overhead menu items (no text or symbols)CrewCabShown, ExtendedCab Similar
Forcrewandextendedcabmodels, thetoptetheranchorsaretheloops locatednearthetopoftheseatback foreachrearseatingposition.

Theseloopswillbeusedtoroute thetoptetherthrough,aswellas,to securethetoptetherinthevehicle. Besuretouseananchor(loop) locatedonthesamesideofthe vehicleastheseatingposition wherethechildrestraintwillbe placed.
Besuretoreadtheinstructions followingtoproperlyinstallachild restraintusingtheseloops.
Donotsecureachildrestraintina positionwithoutatoptetheranchor ifanationalorlocallawrequires thatthetoptetherbeattached,orif theinstructionsthatcomewiththe childrestraintsaythatthetoptether mustbeattached.
According to accident statistics, children and infants are safer when properly restrained in a child restraintsystemor infant restraint system secured in a rearseating position. See Where to Put the Restrainton page 3-52 for additional information.
SecuringaChildRestraint DesignedfortheLATCH System

WARNING
IfaLATCH-typechildrestraintis notattachedtoanchors, thechild restraintwillnotbeabletoprotect thechildcorrectly. Inacrash, the childcouldbeseriouslyinjuredor killed. InstallaLATCH-typechild restraintproperlyusingthe anchors, orusethevehiclesafety beltstosecuretherestraint, followingtheinstructionsthat camewiththechildrestraintand theinstructionsinthismanual.

WARNING
Donotattachmorethanonechild restrainttoasinglanchor, exceptforthecentertoptether anchorsinthecrewandextended cabs. Attachingmorethanone childrestrainttoasinglanchor couldcausetheanchor attachmenttocomelooseoreven breakduringacrash. Achildor otherscouldbeinjured. Toreduce theriskofseriousorfatalinjuries duringacrash, attachonlyone childrestraintperanchor.

Information Provided by: DEALER
WARNING
Childrencanbeseriouslyinjured orstrangledifashoulderbeltis wrappedaroundtheirneckand thesafetybeltcontinuesto tighten.Buckleanyunusedsafety beltsbehindthechildrestraintso childrencannotreachthem.Pull theshoulderbeltallthewayout oftheretractortosetthelock, ifthevehiclehasone,afterthe childrestrainthasbeeninstalled.
Notice: DonotlettheLATCH attachmentsrubagainstthe vehicle'ssafetybelts. This may damage these parts. If necessary, move buckledsafetybeltsto avoid rubbing the LATCH attachments.
Donotfoldtheemptyrearseat withasafetybeltbuckled. This coulddamagethesafetybeltor theseat. Unbuckleandreturnthe safetybelttoitsstowedposition, beforefoldingtheseat.
RegularCabModels
- If the child restraint manufacturer recommend that the toptether be attached, attach and tighten the toptetherto the toptether anchor, if your vehicle has one. Referto the child restraint instructions and the following steps:
1.1. Pull the passenger seatback forward by pulling therecliner handle upward to access sthetoptether anchor. See Reclining Seatbackson page 3-7 for additional information.
1.2. Findthetoptetheranchor.
1.3. Removethecoverto exposetheanchor.
1.4. Route, attach, and tighten the toptether according to your child restraint instructions and the following instructions:
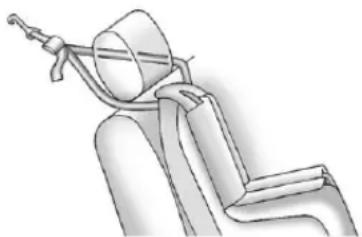
natural_image
Line drawing of a seated car seat with a handle and seatbelt (no text or symbols)If the position you are using has an adjustable headrest or head restraint and you are using adualtether, routethetether around the headrestorhead restraint.

Information Provided by: DEALER
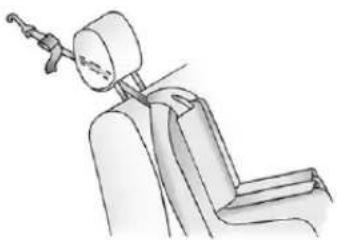
natural_image
Line drawing of a seated car seat with a mechanical arm inserted (no text or symbols)If the position you are using has an adjustable headrest or head restraint and you are using a single tether, raise the head restor head restraint and routethe tether under the head restor head restraint and between the head restor head restraint posts.
-
See SecuringChildRestraints (CenterFrontSeatPosition) on page 3-65 or SecuringChild Restraints (RightFrontSeat Position) on page 3-65 or SecuringChildRestraints (Rear SeatPosition) on page 3-63 for instruction on installing the childrestraint using the safety belts.
-
Beforeplacingachildinthe childrestraint, makesureitis securelyheldinplace. To check, graspthechildrestraintatthe LATCHpathandattemptto moveitside-to-side and back-and-forth. Thereshouldbe nomorethan2.5cm(1in)of movementforproperinstallation.

Information Provided by: DEALER
CrewandExtendedCabModels
- Attachandtightenthelower attachmentstothelower anchors. If the child restraint does nothavelower attachmentsorthedesired seating positiondoes nothave lower anchors, secure the child restraint with the toptether and the safety belts. Refertoyour child restraint manufacturer instructions and the instructions in this manual.
1.1. Find the lower anchors for the desired seating position.
1.2. Put the child restraint on theseat.
1.3. Attachandtightenthelower attachmentsonthechild restrainttothelower anchors.
- If the child restraint manufacturer recommend that the toptether be attached, attach and tighten the toptethertothetoptether anchor (loop), if your vehicle has one. Referto the child restraint instructions and the following steps:

text_image
Diagram of a mechanical device with labeled parts A, B, C, D and directional arrows indicating movement or force.Example—RearDriverSide Position
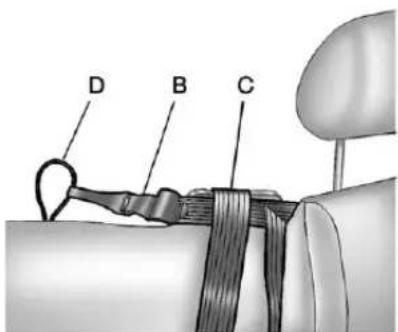
text_image
D B CExample—RearDriverSide Position
2.1. When using a child restraint with atoptether in therear driverside position:
A. Raisetheheadrest orheadrestraint.
B. Routethetop tether(B) between theheadrestorhead restraintposts, throughtheloop(A), behindtheinboard headrest or had

(inflammation Provided by: DEALER
restraintpost, and underthecenter shoulderbelt(C).
C. Attachthetop tether(B) to the toptether anchor(loop)(D) at thecenterrear seatingposition.
2.2. When using a child restraint with atoptether in therear center position:
A. Routethetop tether(B) through thecenterloop(D), andbehindthe inboardpassenger sideheadrestor headrestraintpost.
B. Attachthetop tether(B) tothetop tetheranchor(loop) attherear passengerside seatingposition.
2.3. When using a child restraint with atoptether in therear passenger position:
A. Raisetheheadrest orheadrestraint.
B.Routethetop tether(B)between theheadrestorhead restraintposts, throughtheloopon thepassengerside andbehindthe inboardheadrestor headrestraintpost.
C.Attachthetop tether(B)tothe toptether anchor(loop)(D)at thecenterrear seatingposition.
2.4. Tightenthetoptetherwhen andasthechildrestraint manufacturer's instructionssay.
Whenthetoptetheris tightened, the anchor (loop) may bend. This is normal and will not damage the vehicle.
- Beforeplacingachildinthe childrestraint, makesureitis securelyheldinplace. To check, graspthechildrestraintatthe LATCHpathandattemptto moveitside-to-side and back-and-forth. Thereshouldbe nomorethan2.5cm(1in)of movementforproperinstallation.
ReplacingLATCHSystem PartsAfteraCrash

WARNING
AcrashcandamagetheLATCH systeminthevehicle.Adamaged LATCHsystemmaynotproperly securethechildrestraint, resultinginseriousinjuryoreven deathinacrash.Tohelpmake suretheLATCHsystemis workingproperlyafteracrash, seeyourdealertohavethe systeminspectedandany necessaryreplacementsmadeas soonaspossible.
If the vehicle has the LATCH system and it was being used during a crash, new LATCH system parts may be needed.
Newpartsandrepairsmaybe necessaryeveniftheLATCH systemwasnotbeingusedatthe timeofthecrash.
SecuringChildRestraints (RearSeatPosition)
Whensecuringachildrestraintina rearseatingposition,studythe instructionsthatcamewiththe childrestrainttomakesureitis compatiblewiththisvehicle.
If the child restraint that the LATCH system, see Lower Anchors and Tethers for Children (LATCH System) on page 3-54 for how and where to install the child restraint using LATCH. If a child restraint is secured in the vehicle using a safety belt and it uses to optether, see Lower Anchors and Tethers for Children (LATCH System) on page 3-54 for optether anchor locations.
Donotsecureachildseatina positionwithoutatoptetheranchor ifanationalorlocallawrequires thatthetoptetherbeanchored,orif theinstructionsthatcomewiththe childrestraintsaythatthetopstrap mustbeanchored.
In Canada, the law requires that forward-facing child restraint have adopted, and that the tether be attached.
If the child restraint does not have the LATCH system, you will be using the safety belt to secure the child restraint in this position. Be sure to follow the instruction that camewith the child restraint. Secure the child in the child restraint when and asthe instruction say.
If more than one child restraint need to be installed in therear seat, besuretoread Where to Put the Restrainton page 3-52.
- Putthechildrestraint on theseat.
- Pickup the latch plate, and run the lap and shoulder portions of the vehicle's safety belt through or around therestraint. The child restraint instructions will show you how.

Information Provided by: DEALER
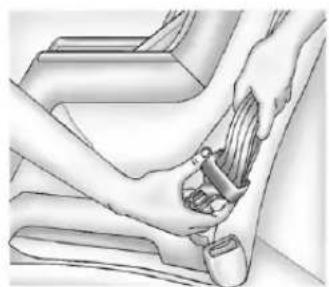
natural_image
Illustration of a hand securing a seatbelt on a vehicle (no text or symbols)Forcrewcabsecondrow seatingspositions,tiltthelatch platetoadjustthebeltifneeded.
3-64SeatsandRestraints

natural_image
Illustration of a person adjusting a car seatbelt (no text or symbols visible)- Pushthelatchplate into the buckle until it clicks.
Positionthereleasebuttonon thebucklesothatthesafetybelt couldbequicklyunbuckledif necessary.
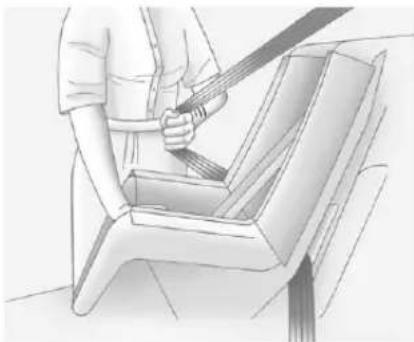
natural_image
Illustration of a person using a seatbelt to lift a car seat (no text or symbols)- Pulltheshoulderbeltalltheway outoftheretractortosetthe lock. Whentheretractorlockis set, thebeltcanbetightenedbut notpulledoutoftheretractor.

natural_image
Illustration of a hand using a tool to lift a mechanical component (no text or symbols visible)- Totightenthebelt, pushdown onthechildrestraint, pullthe shoulderportionofthebelt to tightenthelapportionofthebelt, andfeedtheshoulderbeltback intotheretractor. Wheninstalling aforward-facingchildrestraint, it maybehelpfultouseyourknee topushdownonthechild restraintasyoutightenthebelt.
Trytopullthebeltoutofthe retractortomakesurethe retractorislocked.Ifthe retractorisnotlocked,repeat Steps4and5.

- If the child restraint has a top tether, follow the child restraint manufacturer's instructions regarding the use of the top tether. See Lower Anchors and Tethers for Children (LATCH System) on page 3-54 form more information.
- Beforeplacingachildinthe childrestraint, makesureitis securelyheldinplace.Tocheck, graspthechildrestraintatthe safetybeltpathandattemptto moveitside-to-sideand back-and-forth.Whenthechild restraintisproperlyinstalled, thereshouldbenomorethan 2.5cm(1in)ofmovement.
Toremovethechildrestraint, unbucklethevehiclesafetybeltand letitreturntothestowedposition. Ifthetoptetherisattachedtoatop tetheranchor, disconnectit.
SecuringChildRestraints (CenterFrontSeat Position)
WARNING
Achildinachildrestraintinthe centerfrontseatcanbebadly injuredorkilledbythefrontal airbagsiftheyinflate.Never secureachildrestraintinthe centerfrontseat.Itisalways bettertosecureachildrestraintin arearseat.
Donotusechildrestraintsinthe centerfrontseatposition.
SecuringChildRestraints (RightFrontSeat Position)
WithPassengerSensing System
Thisvehiclehasairbags.Arear seatisasaferplacetosecurea forward-facingchildrestraint.See WheretoPuttheRestrainton page3-52.
Inaddition, the vehicle may have a passengersensingsystem which is designed to turn off the right front passenger frontal air bag under certain conditions. See Passenger Sensing System on page 3-37 and Passenger Airbag Status Indicator on page 5-23 form more information on this, including important safety information.
Alabelonthesunvisorsays, "Neverputarear-facingchildseatin thefront." Thisisbecausetheriskto therear-facingchildissogreat, iftheairbagdeploys.

WARNING
Achildinarear-facingchild restraintcanbeseriouslyinjured orkillediftherightfront passengerairbaginflates. This is because the back of the rear-facing child restraint would be very closetotheinflating airbag. Achildinaforward-facing child restraint can beseriously injured or killed iftherightfront passengerairbaginflates and the passenger seat in a forward position.
The vehicle may have a passengersensingsystem which is designed to turn off the right front passenger frontal airbag under certain conditions.
(Continued)
WARNING(Continued)
Evenifthepassengersensing system,ifequipped,hasturned offtherightfrontpassenger frontalairbag,nosystemis fail-safe.Noonecanguarantee thatanairbagwillnotdeploy undersomeunusual circumstance,eventhough itisturnedoff.
Securerear-facingchild restraintsinarearseat,evenif theairbagisoff.Ifyousecurea forward-facingchildrestraintin therightfrontseat,alwaysmove thefrontpassengerseatasfar backasitwillgo.Itisbetterto securethechildrestraintina rearseat.
See Passenger Sensing System on page 3-37 for additional information.
Ifthevehicledoesnothavearear seatthatwillaccommodatea rear-facingchildrestraint,a rear-facingchildrestraintshouldnot beinstalledinthevehicle,evenif theairbagisoff.
If the child restraint has the LATCH system, see Lower Anchors and Tethers for Children (LATCH System) on page 3-54 for how and where to install the child restraint using LATCH. If you secure each child restraint using safety belt and it uses to opt tether, see Lower Anchors and Tethers for Children (LATCH System) on page 3-54 for to optether anchor locations.
Donotsecureachildseatina positionwithoutatoptetheranchor ifanationalorlocallawrequires thatthetoptetherbeanchored,orif theinstructionsthatcomewiththe childrestraintsaythatthetopstrap mustbeanchored.
InCanada, the law requires that forward-facing child restraints have adopted, and that the tether be attached.
Youwillbeusingthelap-shoulder belttosecurethechildrestraintin thisposition.Followtheinstructions thatcamewiththechildrestraint.
- Movetheseatasfarbackasit willgobeforesecuringthe forward-facingchildrestraint.
Whenthepassengersensing system, ifequipped, hasturned offtherightfrontpassenger frontalairbag, theoffindicatorin thepassengerairbagstatus indicatorshouldlightandstaylit whenyoustartthevehicle. See PassengerAirbagStatus Indicatoronpage5-23.
-
Putthechildrestraint on theseat.
-
Pickup the latch plate, and run the lap and shoulder portions of the vehicle's safety belt through or around therestraint. The child restraint instructions will show you how.
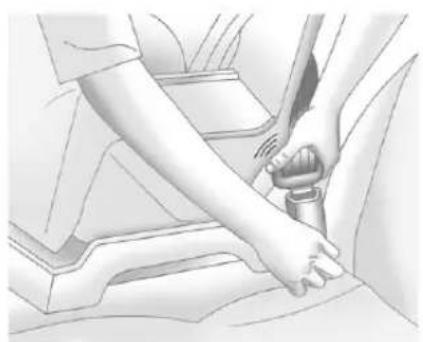
natural_image
Illustration of a hand adjusting a car seatbelt (no text or symbols visible)- Pushthelatchplate into the buckle until it clicks.
Positionthereleasebuttonso thatthesafetybeltcouldbe quicklyunbuckledifnecessary.
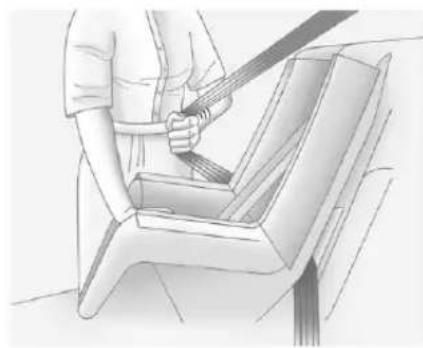
natural_image
Illustration of a person using a seatbelt to lift a vehicle (no text or symbols present)- Pulltheshoulderbeltalltheway outoftheretractortosetthe lock. Whentheretractorlockis set, thebeltcanbetightenedbut notpulledoutoftheretractor.


natural_image
Mechanical assembly diagram showing a hand operating a tool on a component with multiple pins (no text or labels visible)- Totightenthebelt, pushdown onthechildrestraint, pullthe shoulderportionofthebelt to tightenthalapportionofthebelt, andfeedtheshoulderbeltback intotheretractor. Wheninstalling aforward-facingchildrestraint, it maybehelpfultouseyourknee topushdownonthechild restraintasyoutightenthebelt.
Trytopullthebeltoutofthe retractortomakesurethe retractorislocked.Ifthe retractorisnotlocked,repeat Steps5and6.
-
If the vehicle does not have a reseat and the child restraint has to optether, follow the child restraint manufacturer's instructions regarding the use of the optether. See Lower Anchors and Tethers for Children (LATCHSystem) on page 3-54 form more information.
-
Beforeplacingachildinthe childrestraint, makesureitis securelyheldinplace. To check, graspthechildrestraintatthe safetybeltpathandattemptto moveitsidetosideandback andforth. Whenthechild restraintisproperlyinstalled, thereshouldbenomorethan 2.5cm(1in)ofmovement.
Ifthevehicleisequippedwitha passengersensingsystem,and whenthepassengersensingsystem hasturnedofftherightfront passengerfrontalairbag,theoff indicatorinthepassengerairbag statusindicatorshouldlightandstay lit when you start the vehicle.
Ifachildrestrainhasbeeninstalled andtheonindicatorislit,see"Ifthe OnIndicatorisLitforaChild Restraint"underPassengerSensing Systemonpage3-37formore information.
Toremovethechildrestraint, unbucklethevehiclesafetybeltand letitreturntothestowedposition. Ifthetoptetherisattachedtoatop tetheranchor, disconnectit.
WithAirbagOffSwitch
Thisvehiclehasairbags. Arear seatisasaferplacetosecurea forward-facingchildrestraint. See Where to Put the Restrainton page 3-52.
Theremaybeaswitchintheglove boxthatyoucanusetoturnoffthe rightfrontpassengerfrontalairbag. SeeAirbagOn-OffSwitchon page3-33formoreinformation, includingimportantsafety information.
Alabelonthesunvisorsays, "Neverputarear-facingchildseatin thefrontunlessairbagisoff." This is because there is to there are facing childissogreat, if the airbag deploys.

WARNING
Achildinarear-facingchild restraintcanbeseriouslyinjured orkillediftherightfront passengerairbaginflates. This is because the back of the rear-facing child restraint would be very closetotheinflating airbag. Achildinaforward-facing child restraint can beseriously injured or killed iftherightfront passengerairbaginflates and the passenger seat in a forward position.
(Continued)
WARNING(Continued)
Eveniftheairbagswitchhas turnedofftherightfront passengerfrontalairbag,no systemisfail-safe.Noonecan guaranteethatanairbagwillnot deployundersomeunusual circumstance,eventhoughitis turnedoff.
Securerear-facingchild restraintsinarearseat, even if theairbagisoff. If you secure a forward-facing child restraint in therightfrontseat, always move the front passenger seat as far back as it will go. It is better to secure the child restraint in rearseat.

WARNING
If the airbagreadinesslightever comesonandstayson, it means that something may bewrong with the airbagsystem. For example, therightfront passengerairbagcouldinflate even though the airbagon-off switchisturnedoff.
To help avoid injury to yourself for others, have the vehicles serviced right away. See Airbag Readiness Lighton page 5-20 form more information, including important safety information.
Ifthevehicledoesnothavearear seatthatwillaccommodatea rear-facingchildrestraint,a rear-facingchildrestraintshouldnot beinstalledinthevehicle,evenif theairbagisoff.
3-70 Seats and Restraints
If the child restraint has the LATCH system, see Lower Anchors and Tethers for Children (LATCH System) on page 3-54 for how and where to install the child restraint using LATCH. If a child restraint is secured using safety belt and it uses to optether, see Lower Anchors and Tethers for Children (LATCH System) on page 3-54 for to optether anchor locations.
Donotsecureachildrestraintina positionwithoutatoptetheranchor ifanationalorlocallawrequires thatthetoptetherbeanchored,orif theinstructionsthatcomewiththe childrestraintsaythatthetopstrap mustbeanchored.
InCanada, the law requires that forward-facing child restraints have to optether, and that the tether be attached.
Youwillbeusingthelap-shoulder belttosecurethechildrestraintin thisposition.Followtheinstructions thatcamewiththechildrestraint.
-
Movetheseatasfarbackasit willgobeforesecuringthe forward-facingchildrestraint. Ifyouhavenootherchoicebut toinstallarear-facingchild restraintinthisseat,makesure theairbagisoffoncethechild restrainthasbeeninstalled. Whentheairbagoffswitchhas turnedofftherightfront passengerfrontalairbag,theoff indicatorintheairbagofflight shouldlightandstaylitwhen youstartthevehicle.SeeAirbag On-OffLightonpage5-21.
-
Putthechildrestraint on theseat.
-
Pickup the latch plate, and run the lap and shoulder portions of the vehicle's safety belt through or around therestraint. The child restraint instructions will show you how.
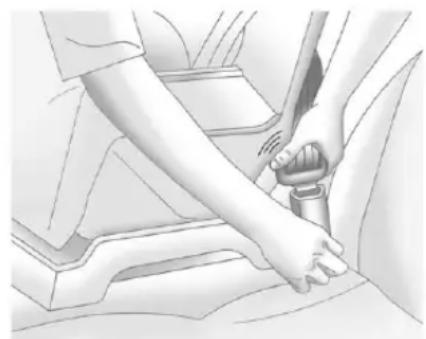
natural_image
Illustration of a hand adjusting a car seatbelt, showing the grip and seat area (no text or symbols)- Pushthelatchplate into the buckle until it clicks.
Positionthereleasebuttonso thatthesafetybeltcouldbe quicklyunbuckledifnecessary.

natural_image
Illustration of a person using a broom to clean or wash a seatbelt (no text or symbols visible)- Pulltheshoulderbeltalltheway outoftheretractortosetthe lock. Whentheretractorlockis set, thebeltcanbetightenedbut notpulledoutoftheretractor.
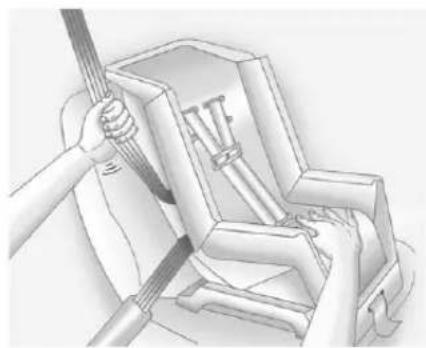
natural_image
Illustration of hands using a tool to lift a mechanical component (no text or symbols visible)-
Totightenthebelt, pushdown onthechildrestraint, pullthe shoulderportionofthebelt to tightenthelapportionofthebelt, andfeedtheshoulderbeltback intotheretractor. Wheninstalling aforward-facingchildrestraint, it maybehelpfultouseyourknee topushdownonthechild restraintasyoutightenthebelt.
Trytopullthebeltoutofthe retractortomakesurethe retractorislocked. If the retractorisnotlocked, repeat Steps 5 and 6. -
If your vehicle does not have a reseat and your child restraint has to optether, follow the child restraint manufacturer's instructions regarding the use of the optether. See Lower Anchors and Tethers for Children (LATCHSystem) on page 3-54.
-
Beforeplacingachildinthe childrestraint, makesureitis securelyheldinplace. To check, graspthechildrestraintatthe safetybeltpathandattemptto moveitsidetosideandback andforth. Whenthechild restraintisproperlyinstalled, thereshouldbenomorethan 2.5cm(1in)ofmovement.
Toremovethechildrestraint, unbucklethevehiclesafetybeltand letitreturntothestowedposition. Ifthetoptetherisattachedtoatop tetheranchor, disconnectit.

Ifyouturnedtheairbagoffwiththe switch,turnontherightfront passengerairbagwhenyouremove thechildrestraintfromthevehicle unlesssthepersonwhowillbesitting thereisamemberofapassenger airbagriskgroup.SeeAirbag On-OffSwitchonpage3-33for moreinformation,including importantsafetyinformation.
HeavyDutyCrewCabOnly
Thisvehiclehasairbags. Arear seatisasaferplacetosecurea forward-facingchildrestraint. See Where to Put the Restrainton page 3-52.
Alabelonthesunvisorsays, "Neverputarear-facingchildseatin thefront." Thisisbecausetheriskto therear-facingchildissogreat, iftheairbagdeploys.
Neverputarear-facingchild restraintintherightfrontpassenger seat. Hereiswhy:

WARNING
Achildinarear-facingchild restraintcanbeseriouslyinjured orkillediftherightfront passenger'sairbaginflates. This isbecausethebackofthe rear-facingchildrestraintwould beveryclosetotheinflating airbag.Alwayssecurea rear-facingchildrestraintina rearseat.
If the vehicle does not have a rear seat that will accommodate a rear-facing child restraint, a rear-facing child restraint should not be installed in the vehicle, even if the air bag is off.
If the child restraint that the LATCH system, see Lower Anchors and Tethers for Children (LATCH System) on page 3-54 for how and where to install the child restraint using LATCH. If you secure a child restraint using safety belt and it uses to opt tether, see Lower Anchors and Tethers for Children (LATCH System) on page 3-54 for to optether anchor locations.
Donotsecureachildseatina positionwithoutatoptetheranchor ifanationalorlocallawrequires thatthetoptetherbeanchored,orif theinstructionsthatcomewiththe childrestraintsaythatthetopstrap mustbeanchored.
InCanada, the law requires that forward-facing child restraints have to optether, and that the tether be attached.

Information Provided by: DEALER
Youwillbeusingthelap-shoulder belttosecurethechildrestraintin thisposition.Followtheinstructions thatcamewiththechildrestraint.
- Movetheseatasfarbackasit willgobeforesecuringthe forward-facingchildrestraint.
- Putthechildrestraint on theseat.
- Pickup the latch plate, and run the lap and shoulder portions of the vehicle's safety belt through or around therestraint. The child restraint instructions will show you how.

natural_image
Illustration of a person's hand using a belt buckle to adjust the seat (no text or symbols visible)- Pushthelatchplate into the buckle until it clicks.
Makesurethereleasebuttonis positionedsoyouwouldbeable tounbucklethesafetybelt quicklyifnecessary.
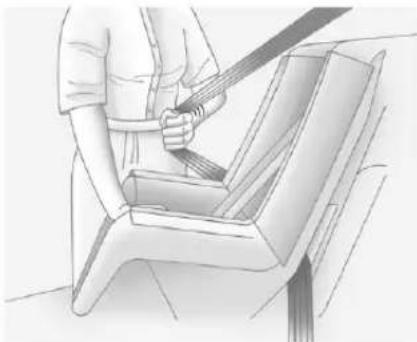
natural_image
Line drawing of a person using a belt to lift a seatbelt (no text or symbols)- Pulltheshoulderbeltalltheway outoftheretractortosetthe lock. Whentheretractorlockis set, thebeltcanbetightenedbut notpulledoutoftheretractor.

3-74SeatsandRestraints
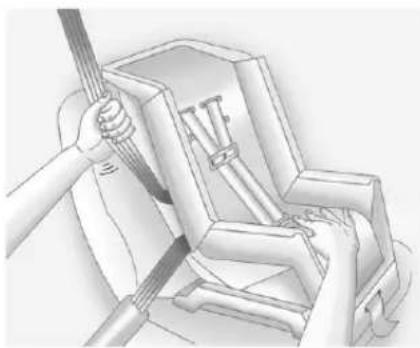
natural_image
Technical illustration of a mechanical assembly with a tool interacting with a component (no text or symbols visible)- Totightenthebelt, pushdown onthechildrestraint, pullthe shoulderportionofthebelt to tightenthelapportionofthebelt, andfeedtheshoulderbeltback intotheretractor. Wheninstalling aforward-facingchildrestraint, it maybehelpfultouseyourknee topushdownonthechild restraintasyoutightenthebelt.
Trytopullthebeltoutofthe retractortomakesurethe retractorislocked.Ifthe retractorisnotlocked,repeat Steps5and6.
-
If your child restraint has a top tether, follow the child restraint manufacturer's instructions regarding the use of the top tether. See Lower Anchors and Tethers for Children (LATCH System) on page 3-54 form more information.
-
Beforeplacingachildinthe childrestraint, makesureitis securelyheldinplace. To check, graspthechildrestraintatthe safetybeltpathandattemptto moveitsidetosideandback andforth. Whenthechild restraintisproperlyinstalled, thereshouldbenomorethan 2.5cm(1in)ofmovement.
Toremovethechildrestraint, unbucklethevehiclesafetybeltand letitreturntothestowedposition. Ifthetoptetherisattachedtoatop tetheranchor, disconnectit.
Storage
StorageCompartments
InstrumentPanelStorage.....4-1
GloveBox......4-1
Cupholders......4-1
CenterConsoleStorage.....4-2
Storage Compartments
InstrumentPanelStorage
Forvehiclesequippedwithan instrumentpanelstoragearea,itis locatedabovetheglovebox.
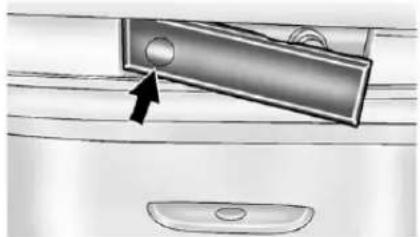
natural_image
Diagram of a kitchen handle with an arrow pointing to a button (no text or symbols present)Accessthestorageareaby pressingandholdinginthedriver sideofthehandleandpullouton theexposedportionofthehandle.
GloveBox
Liftuponthegloveboxleverto openit.
Cupholders
Ifequipped, therearecupholderson thecenterconsoleandtherearof thecenterconsole,alsointherear seatarmrest.
Pullthecoverdownontherearof thecenterconsoletoaccessthe cupholdersintherearofthecenter console.
Pulltherearseatarmrestdownto accessthecupholders.
4-2Storage
CenterConsoleStorage
Vehicleswithanupperandlower centerconsolestorageareahave cupholdersincluded.
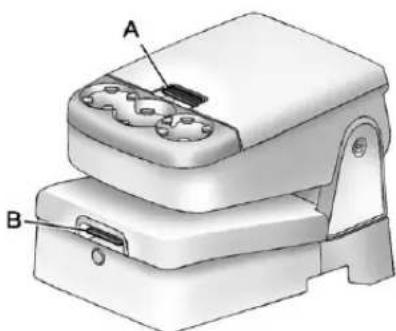
natural_image
3D diagram of a mechanical device with labeled parts A and B, showing internal components (no text or symbols beyond labels)Pullthelever(A)uptoaccessthe upperstoragearea.Raisetheupper storagebin,thenpullthelever(B) uptoaccessthelowerstoragearea. Usethekeytolockandunlockthe lowerstoragearea.

Information Provided by: DEALER
Instruments and Controls
Controls
SteeringWheelAdjustment...5-2
SteeringWheelControls.....5-3
Horn....5-5
WindshieldWiper/Washer.....5-5
Compass....5-6
Clock....5-8
PowerOutlets......5-10
CigaretteLighter....5-11
Ashtrays....5-12
WarningLights, Gauges, and Indicators
WarningLights, Gauges, and
Indicators......5-12
InstrumentCluster......5-13
Speedometer....5-14
Odometer....5-14
TripOdometer......5-14
Tachometer....5-14
FuelGauge....5-15
EngineOilPressure
Gauge....5-16
EngineCoolantTemperature Gauge....5-17
VoltmeterGauge......5-18
SafetyBeltReminders......5-19
AirbagReadinessLight.....5-20
AirbagOn-OffLight......5-21
PassengerAirbagStatus Indicator....5-23
ChargingSystemLight.....5-24
Malfunction IndicatorLamp....5-25
BrakeSystemWarning Light....5-27
AntilockBrakeSystem(ABS) WarningLight....5-28
Four-Wheel-DriveLight.....5-29
Tow/HaulModeLight......5-29
StabiliTrak® OFFLight......5-30
TractionControlSystem (TCS)/StabiliTrak® Light....5-30
TirePressureLight......5-30
EngineOilPressureLight....5-31
LowFuelWarningLight.....5-32
SecurityLight......5-32
High-BeamOnLight......5-32
FrontFogLampLight......5-33
CruiseControlLight......5-33
InformationDisplays
DriverInformation
Center(DIC)......5-33
VehicleMessages
VehicleMessages......5-43
BatteryVoltageandCharging Messages....5-43
BrakeSystemMessages....5-43
DoorAjarMessages......5-44
EngineCoolingSystem Messages....5-45
EngineOilMessages......5-46
EnginePowerMessages....5-47
FuelSystemMessages.....5-47 KeyandLockMessages.....5-47
LampMessages......5-47
ObjectDetectionSystem Messages......5-48
RideControlSystem Messages......5-48
AirbagSystemMessages....5-49
Anti-theftAlarmSystem Messages......5-50
StartingtheVehicle
Messages......5-50
TireMessages......5-50
5-2 InstrumentsandControls
TransmissionMessages.....5-51
VehicleReminder
Messages......5-51
WasherFluidMessages.....5-52
VehiclePersonalization
VehiclePersonalization(With
DICButtons)....5-52
UniversalRemoteSystem
UniversalRemoteSystem...5-61
UniversalRemoteSystem
Programming......5-62
UniversalRemoteSystem
Operation....5-67
Controls
SteeringWheel Adjustment

natural_image
3D illustration of a car steering wheel with a directional arrow indicating clockwise motion (no text or symbols)Thetiltleverislocatedonthelower leftsideofthesteeringcolumn.

information Provided by
DEALER
第一开开后二起复
Toadjustthesteeringwheel:
-
Hold the steering wheel and pull the lever.
-
Movethesteeringwheelup ordown.
-
Releasethevertolockthe wheelinplace.
Donotadjustthesteeringwheel whiledriving.
SteeringWheelControls

natural_image
Diagram of a car steering wheel and its dashboard (no text or symbols present)Ifequipped, someaudiocontrols canbeadjustedatthesteering wheel.
△(Next):Presstogotothenext favoriteradiostation,trackonaCD, orfolderonaniPod ^® orUSB device.
/ ▽ (Previous/End): Press to gotothepreviousfavoriteradio station,trackonaCD,orfolderon aniPod ^® orUSBdevice.Pressto rejectanincomingcall,orenda currentcall.
Radio
Toselectpresetorfavoriteradio stations:
Pressandrelease △ or 📞 / ▽ to gotothenextorpreviousradio stationstoredasapresetor favorite.
CD/DVD
ToselecttracksonaCD/DVD:
Pressandrelease △ or 📞 / ▽ to gotothenextorprevioustrack.
SelectingTracksonaniPodor USBDevice(Vehicleswithouta NavigationSystem)
-
Pressandhold △or▽/▽ whilelisteningtoasonguntilthe contentsofthecurrentfolder displayontheradiodisplay.
-
Pressandrelease △or▽/▽ toscrollupordownthelist, then pressandhold △, orpress ▷ to play the highlighted track.
NavigatingFoldersonaniPodor USBDevice(Vehicleswithouta NavigationSystem):
-
Pressandhold △or▽/▽ whilelisteningtoasonguntilthe contentsofthecurrentfolder displayontheradiodisplay.
-
Pressandhold 📞/▽togo backtothepreviousfolderlist.
-
Pressandrelease △or▽/▽ toscrollupordownthelist.
- Toselectafolder, press andhold △, orpress whenthefolder is highlighted.
• Togobackfurtherinthe folderlist,pressandhold

NavigatinganiPodorUSBDevice ontheMainAudioScreen (VehicleswithaNavigation System)
- Pressandrelease
toselectthenextorprevious trackwithintheselected category. - Pressandhold △ or ⚡ / ∇ to movequicklythroughthetracks.
- Pressandrelease ▷tomoveup onetrackwithintheselected category.

NavigatinganiPodorUSBDevice ontheMusicNavigatorScreen (VehicleswithaNavigation System)
- Pressandrelease
toselectthenextorprevious trackwithintheselected category. - Pressandhold △ or ⚡ / ∇ to movequicklythroughthetracks withintheselectedcategory.

- Pressandrelease ▷tomoveup onetrackwithintheselected category.
/ _^2 (Mute/Push to Talk): Press tosilencethevehiclespeakersonly. Pressagaintoturnthesoundon.
ForvehicleswithBluetoothor OnStarsystems,pressandholdfor longerthantwosecondstointeract withthosesystems.SeeBluetooth onpage 7-52 and OnStarOverview onpage 14-1formoreinformation.
SRCE(Source/Voice
Recognition): Presstoswitch betweentheradioandCD, and for equipped vehicles, the DVD, front auxiliary, andrearauxiliary.
Forvehicleswiththenavigation system, pressandholdthisbutton forlongerthanonesecondto initiatevoicerecognition. See "Voice Recognition" in the Navigation Systemmanualformore information.
(Seek): Presstogotothenext radiostationwhileinAM, FM, orXM^TM.
Forvehicleswithorwithouta navigationsystem:
Press ⚠togotothenexttrackor chapterwhilesourcedtotheCDor DVDslot.
Press ⚠toselectatrackorafolder when navigatingfoldersonaniPod orUSBdevice.
Forvehicleswithanavigation system:
-
Pressandhold Untilabeeepis heard, toplacetheradiointo SCANmode. Astationwillplay forfivesecondsbeforemoving tothenextstation.
-
TostoptheSCANfunction, press ▷again.
WhilelisteningtoaCD/DVD, press andhold Dtoquicklymoveforward throughthetracks. Releasetostop onthedesiredtrack.
- 📄:Presstoincreasevolume.
- Presstodecreasevolume.
Horn
Tosoundthehorn, pressthecenter padonthesteeringwheel.
WindshieldWiper/Washer
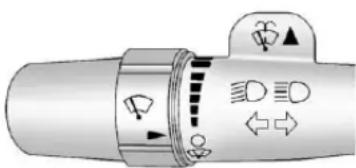
text_image
Diagram of a mechanical or electrical component with directional arrows and symbols, likely indicating movement or flow.Thefrontwipercontrolislocatedon theturnandlane-changelever.
Thewindshieldwipersarecontrolled byturningthebandwith 📋onit.
(Mist): Forasinglewipe, turn to , thenrelease. For several wipes, holdthebandon longer.
○(Off):Turnsthewindshield wipersoff.
!(AdjustableIntervalWipes): Turnthebandupformorefrequent wipesordownforlessfrequent wipes.
(LowSpeed):Slowwipes.
(HighSpeed):Fastwipes.
Cleariceandsnowfromthewiper bladesbeforeusingthem.Iffrozen tothewindshield,carefullyloosenor thawthem.Damagedwiperblades shouldbereplaced.SeeWiper BladeReplacementonpage 10-40.
Heavysnoworicecanoverloadthe wipermotor.Acircuitbreakerwill stopthemotoruntilcoolsdown.

Information Provided by: DEALER
WindshieldWasher

WARNING
Infreezingweather, donotuse the washer until the windshield is warmed. Otherwise the washer fluid can form mice on the windshield, blocking your vision.

(WasherFluid):Pushthe ddlemarkedwiththewindshield shersymbolatthetopofthe ltifunctionlever,tospraywasher donthewindshield. Thewipers arthewindowandtheneither porreturntothepresetspeed.
Compass
The vehicle may have a compass in the Driver Information Center(DIC).
CompassZone
Thezoneissettozoneeightupon leavingthefactory. Yourdealerwill setthecorrectzoneforyour location.
Undercertaincircumstances, such as during along-distance, cross-country tripormoving to a new state or province, it will be necessary to compensate for compass variance by resetting the zonethrough the DIC if the zone is not set correctly.
Compassvarianceisthedifference betweentheearth'smagneticnorth andtruegeographicnorth.Ifthe compassisnotsettothezone whereyoulive,thecompassmay givefalsereadings.Thecompass mustbesettothevariancezonein whichthevehicleistraveling.
Toadjustforcompassvariance, use the following procedure:
CompassVariance(Zone) Procedure
- Donotsetthecompasszone whenthevehicleismoving. Only setitwhenthevehicleisin P(Park).
Pressthevehicleinformation buttonuntilPRESS √TO CHANGECOMPASSZONE displays.Or,ifthevehicledoes nothaveDICbuttons,pressthe tripodometerresetstemuntil CHANGECOMPASSZONE displays.

Information Provided by: DEALER
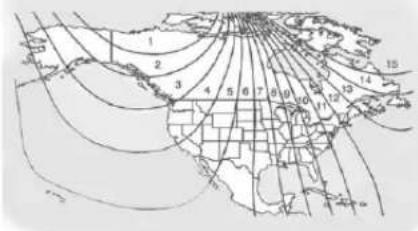
text_image
Topographic map with numbered contour lines and labeled regions, likely for survey or land use analysis- Find the vehicle's current location and variance zone numberonthemap.
Zones1 through 15 are available.
- Presstheset/resetbutton to scrollthroughandselectthe appropriatevariancezone.
4.Pressthetrip/fuelbuttonuntil thevehicleheading,for example,NforNorth,is displayedintheDIC.Or,ifthe vehicledoesnothaveDIC buttons,pressandholdthetrip odometerresetstemfor twosecondstoselectthenext availablevariancezone.Repeat thisstepuntiltheappropriate variancezoneisdisplayed.
- If calibration is necessary, calibratethecompass. See "Compass Calibration Procedure" following.
CompassCalibration
The compasscanbemanually calibrated. Only calibratethe compassinamagnetically clean and safelocation, such as an open parking lot, wheredriving the vehicle in circles is not danger. It is suggested to calibrate away from all buildings, utility wires, manhole covers, or other industrial structures, if possible.
IfCALshouldeverappearinthe DICdisplay, thecompassshouldbe calibrated.
IftheDICdisplaydoesnotshowa heading,forexample,NforNorth, ortheheadingdoesnotchange aftermakingturns,theremaybea strongmagneticfieldinterferingwith thecompass.Suchinterference maybecausedbyamagnetic CBorcellphoneantennamount,a magneticemergencylight,magnetic notepadholder,oranyother magneticitem.Turnoffthevehicle, movethemagneticitem,thenturn onthevehicleandcalibratethe compass.
Tocalibratethecompass, usethe following procedure:
CompassCalibrationProcedure
- Before calibrating the compass, makes sure the compass zone is set to the variance zone in which the vehicle is located. See "Compass Variance (Zone) Procedure" earlier in this section.
Donotoperateanyswitches suchaswindow, sunroof, climatecontrols, orseats during thecalibrationprocedure.
-
Pressthevehicleinformation buttonuntilIPRESS √TO CALIBRATECOMPASS displays.Or,ifthevehicledoes nothaveDICbuttons,pressthe tripodometerresetstemuntil CALIBRATECOMPASS displays.
-
Presstheset/resetbutton to start the compass calibration. Or, if the vehicle does not have DIC buttons, press and hold the trip odometer reset stem for two second st o start the compass calibration.
-
The DIC will display CALIBRATING: DRIVEIN CIRCLES. Drivethe vehicle in tight circles at less than 8 km/h (5 mph) to complete the calibration. The DIC will display CALIBRATION COMPLETE for a few seconds when the calibration is complete. The DIC display will then return to the previous menu.
Clock
AM-FMRadioandAM-FM RadiowithCDPlayer
Tosettheclock:
-
TurntheignitionkeytoACC/ ACCESSORYorON/RUN, then pressthe ⏻buttontoturnthe radioon.
-
Pressthe ⏻ buttonuntilthehour numbersbegintoflash, then turnthe ♪ knobtoincreaseor decreasethehour.
-
Pressthe ⏻ buttonuntilthe minutenumbersbegintoflash, thenturnthe ♪ knobtoincrease ordecrease theminutes.
4.Pressthe ⏻buttonuntilthe 12HRor24HRtimeformat beginstoflash, thenturnthe ♪knobtochangethetime format.
5.Pressthe buttonagainuntil theclockdisplaystopsflashing tosetthecurrentlydisplayed time,orwaituntiltheflashing stopsafterfivesegendsandthe currenttimedisplayed automaticallysets.
MP3RadioswithaSingleCDoraSingleCDandDVDPlayer
Toadjustthetimeanddate:
- TurntheignitionkeytoACC/ACCESSORYorON/RUN, then pressthe ⏻buttontoturnthe radioon.
- Pressthe ⏻ buttonodisplay HR, MIN, MM, DD, YYYY(hour, minute, month, day, and year).
-
Pressthesoftkeylocatedunder anyoneofthetabstochange thatsetting.
-
Toincreasethetimeordate, do oneofthefollowing:
-
Pressthesoftkeybelowthe selectedtab.
- Pressthe☒SEEKbutton.
-
PresstheFWDbutton.
• Turnthe knobclockwise. -
Todecreasethetimeordate, do oneofthefollowing:
• PresstheKSEEKbutton.
- Pressthe◀◀REVbutton.
• Turnthe♪knob counterclockwise.
Tochangethetimedefaultsetting from12hourto24hourortochange thedatedefaultsettingfrommonth/day/yeartoday/month/year:
- Pressthe ⏻buttonandthenthe softkeylocatedbelowthe forwardarrowtab.12H,24H,the dateMM/DD(monthandday), andDD/MM(dayandmonth) displays.
- Pressthesoftkeylocatedbelow thedesiredoption.
- Pressthe ⏻ buttonagainto applythedesiredoption, or let thescreentimeout.
MP3RadiowithaSix-DiscCD Player
Tosetthetimeanddate:
- TurntheignitionkeytoACC/ACCESSORYorON/RUN, then pressthe ⬇buttontoturnthe radioon.
- PresstheMENUbuttonand thenthesoftkeyunderthe ☐tab todisplayHR, MIN, MM, DD, YYYY(hour, minute, month, day, andyear).
- Pressthesoftkeylocatedunder anyoneofthetabstochange thatsetting.
-
Toincreasethetimeordate, do oneofthefollowing:
-
Pressthesoftkeybelowthe selectedtab.
- PresstheSEEKbutton.
-
Pressthe▶▶FWDbutton.
• Turnthe♪knobclockwise. -
Todecreasethetimeordate, do oneofthefollowing:
• PresstheKSEEKbutton.
- Pressthe◀◀REVbutton.
• Turnthe♪knob counterclockwise.
Tochangethetimedefaultsetting from 12hourto24hourortochange thedatedefaultsettingfrommonth/daytoday/month:
- PresstheMENUbutton and thenthesoftkeyunderthe ☐tab.
- Pressthesoftkeylocatedbelow theforwardarrowtab.12H,24H, thedateMM/DD(monthand day), and DD/MM(dayand month) displays.
- Pressthesoftkeylocatedbelow thedesiredoption.
- PresstheMENUbuttonagainto applythedesiredoption, or let the screen time out.
PowerOutlets
Accessorypoweroutletscanbe usedtopluginelectricalequipment, suchasacellphone, MP3 player, etc.
The vehicle may have two accessory power outlets located below the climate control system, or may have one accessory power outlet and one cigarette lighter. The cigarette lighter is designed to fit only in there except a closest to the driver.
Theremaybeanotheraccessory poweroutletintherearcargoarea. Ifthevehiclehasafloorconsole, thereisanaccessorypoweroutlet insidethestoragebinandoneon therearofthefloorconsole.
Removethecovertoaccessand replacewhennotinuse.
Theaccessorypoweroutletsare powered, evenwhentheignitionis inLOCK/OFF. Continuingtouse poweroutletswhiletheignitionisin LOCK/OFFmaycausethevehicle's batterytorundown.
WARNING
Powerisalwayssuppliedtothe outlets.Donotleaveelectrical equipmentpluggedinwhenthe vehicleisnotinusebecausethe vehiclecouldcatchfireandcause injuryordeath.
Notice:Leavingelectrical equipmentpluggedinforan extendedperiodoftimewhilethe vehicleisoffwilldrainthe battery.Alwaysunplugelectrical equipmentwhennotinuseand donotpluginequipmentthat exceedsthemaximum20ampere rating.
Certainpoweraccessoryplugsmay notbecompatibletotheaccessory poweroutletandcouldoverload vehicleoradapterfuses.lfa problemisexperienced,seeyour dealer.
When adding electrical equipment, besuretofollow the proper installation instructions included with the equipment. See Add-On Electrical Equipment on page 9-119.
Notice: Hangingheavy equipment from the power outlet can caused damage not covered by the vehicle warranty. The power outlets are designed for accessory power plug only, such as cell phone charge cords.
CigaretteLighter
Tousethecigarettelighter, pushit inalltheway, andletgo. Whenitis readyforuse, the lighterpops backout.
Notice: Holding acigarettelighter inwhileitisheating does not let the lighter back away from the heating element when it is hot. Damage from overheating can occur to the lighter or heating element, or a fuse could be blown. Donotholdacigarette lighter in whileitisheating.
Ashtrays
The vehicle may have a front ash tray located near the center of the instrument panel. Pull on the doorto open it. The ash tray may have a cigarette lighter.
Notice: If papers, pins, or other flammable items are put in the ashtray, hot cigarettes or other smoking materials could ignite them and possibly damage the vehicle. Never put flammable items in the ashtray.
Toremovetheashtray, open the door and pull the ashtray bintoward you. Tore placetheashtray, insert the ashtray bin insidetheashtray door and press down until engages.
WarningLights, Gauges,and Indicators
Warninglightsandgaugescan signalthatsomethingiswrong beforeitbecomesseriousenough tocauseanexpensiverepairor replacement.Payingattentiontothe warninglightsandgaugescould preventinjury.
Warninglightscomeonwhenthere couldbeaproblemwithvehicle function. Somewarninglightscome onbrieflywhentheengineisstarted toindicatetheyareworking.
Gaugescanindicatewhenthere couldbeaproblemwithvehicle function.Oftengaugesandwarning lightsworktogethertoindicatea problemwiththevehicle.
Whenoneofthewarninglights comesonandstaysonwhile driving,orwhenoneofthegauges showstheremaybeaproblem, checkthesectionthatexplainswhat todo.Followthismanual'sadvice. Waitingtodorepairscanbecostly andevendangerous.
InstrumentCluster

text_image
RPM x1000 3 2 4 1 5 0 6 BRAKE 1/2 E F 40 80 0 100 20 40 -10 -20 0 ABS MPH km/h 120 140 90 160 180 120 200 14 9 19 210 160 260EnglishLightDutyPremiumShown.Metric, Uplevel, BaseandHeavyDutySimilar.

Information Provided by: DEALER
5-14 InstrumentsandControls
ForvehicleswithaDURAMAX ^® Dieselengine,seetheDURAMAX ^® DieselSupplementformore information.
ForvehicleswithaHybrid,seethe Hybrid Supplementformore information.
Speedometer
Thespeedometershowsthe vehicle'sspeedineitherkilometers perhour(km/h)ormilesper hour(mph).
Odometer
Theodometershowshowfarthe vehiclehasbeendriven,ineither kilometersormiles.
EngineHourMeterDisplay
TheDriverInformationCenter(DIC) canalsodisplaythenumberof hourstheenginehasrun. Todisplay theenginehours,turntheignition off,thenpressandholdthereset buttonforatleastfourseconds.The hourmeterdisplaysforupto 30seconds,oruntiltheignitionis turnedon.SeeDriverInformation Center(DIC)onpage5-33formore information.
TripOdometer
Thetripodometersshowshowfar thevehiclehasbeendrivensince thetripodometerwaslastset tozero.
Presstheresetbutton, located on the instrument panel clusternext to the voltmeter, to toggle between the tripodometer and theregular odometer. Holdingtheresetbutton for approximately one second while the tripodometer is displayed will reset it.
Todisplaytheodometerreading withtheignitionoff,pressthereset button.
SeeDriverInformationCenter(DIC) onpage5-33formoreinformation.
Tachometer
Thetachometerdisplaystheengine speedinrevolutionsperminute (rpm). For a description of how Grade Braking affects vehiclespeed while the Tow/Haul Mode is activated, see Tow/Haul Mode on page 9-44 form more information.
If the vehicle is a hybrid, se the hybrids supplement form more information.

FuelGauge

natural_image
Circular diagram with directional arrows and a fuel pump icon, no text or symbols presentMetric

text_image
1/2 € FEnglish
Whentheignitionison, thefuel gaugeshowsabouthowmuchfuel isleftinthefueltank.
Anarrowonthefuelgauge indicatesthesideofthevehiclethe fueldoorison.
Thegaugewillfirstindicateempty beforethevehicleisoutoffuel,but thevehicle'sfueltankshouldbe filledsoon.
WhenthefueltankislowtheFUEL LEVELLOWmessageappears. SeeFuelSystemMessageson page5-47formoreinformation.
Herearesomesituationsowners canexperiencewiththefuelgauge. Noneoftheseindicateaproblem withthefuelgauge.
- Atthegasstation, thefuelpump shutsoffbeforethegauge readsfull.
- Ittakesalittlemoreorlessfuel tofillupthanthefuelgauge indicated. Forexample, the gaugemayhaveindicatedthe tankwashalffull,butitactually tookalittlemoreorlessthan halfthefueltank'scapacityto fillit.
- Thegaugegoesbacktoempty whentheignitionisturnedoff.
If the vehicle has a diesel engine, seethe Duramax diesels supplement formore information.
If the vehicle is a hybrid, se the hybrids supplement form more information.
EngineOilPressure Gauge

radar
| Current (kPa) | |---| | 275 | | 0 | | 550 |Metric
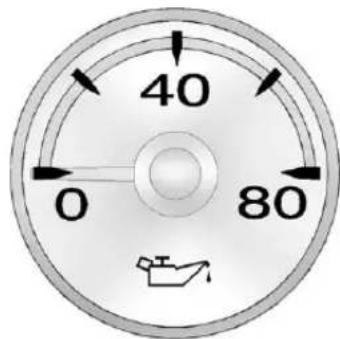
text_image
40 0 80English
The engine oil pressure gauge shows the engine oil pressure in kPa (kilopascals) or psi (pounds per square inch) when the engine is running.
Oil pressure can vary with engine speed, outside temperature and oil viscosity, but if readings are outside the normal operating range, the oil pressure light comes on. See Engine Oil Pressure Light on page 5-31 for more information.
A reading outside the normal operating range can be caused by a dangerously low oil level or some other problem causing low oil pressure. Check the vehicle's oil as soon as possible. See "OIL PRESSURE LOW STOP ENGINE" under Engine Oil Messages on page 5-46 and Engine Oil on page 10-7.

WARNING
Do not keep driving if the oil pressure is low. The engine can become so hot that it catches fire. Someone could be burned. Check the oil as soon as possible and have the vehicle serviced.

Notice:Lackofproperengineoil maintenancecandamagethe engine.Drivingwiththeengine oilowcanalsodamagethe engine.Therepairswouldnotbe coveredbythevehiclewarranty. Checktheoillevelassoonas possible.Addoilifrequired,but iftheoilleveliswithinthe operatingrangeandtheoil pressureisstilllow,havethe vehicleserviced.Alwaysfollow themaintenanceschedulefor changingengineoil.
Ifthevehiclehasadieselengine, seetheDuramaxdieselsupplement formoreinformation.
If the vehicle is a hybrid, se the hybrids supplement form more information.
EngineCoolant TemperatureGauge
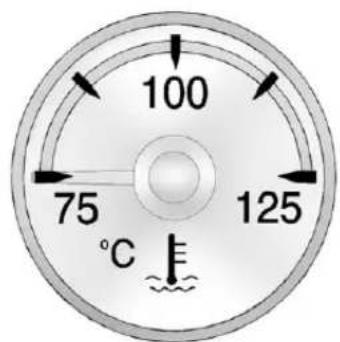
text_image
100 75 125 °CMetric

radar
| Temperature (°C) | | ---------------- | | 210 | | 160 | | 260 |English
Thisgaugeshowstheengine coolanttemperature.
Italsoprovidesanindicatorofhow hardthevehicleisworking. During a majority of the operation, the gauge reads 100°C (210°F) or less. If pulling a load ongoing uphills, it is normal for the temperature to fluctuate and go over the 113°C (235°F) mark. If the gaugereaches the 125°C (260°F) mark, it indicates that the cooling system is working beyond its capacity.

5-18 InstrumentsandControls
SeeEngineOverheatingon page10-24.
If the vehicle is a hybrid, se the hybrids supplement form more information.
VoltmeterGauge
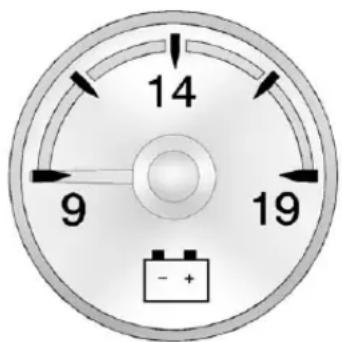
text_image
14 9 19 - +This gauge indicates the battery voltage when the ignition is turned on.
Whentheignitionison, this gauge indicate the battery voltage.
Whentheengineisrunning, this gaugeshowstheconditionofthe chargingsystem. Thegaugecan transitionfromahighertolowerora lowertohigherreading. This is normal. If the vehicle is operating outside thenormaloperating range, the charging system light comes on. See Charging System Lighton page 5-24 form more information. The voltmetergaugemayalsoread lower when infueleconomymode. This is normal.
Readingsoutsidethenormal operatingrangecanalsooccur whenalargenumberofelectrical accessoriesareoperatinginthe vehicleandtheengineisleftidling foranextendedperiod. This conditionisnormalsincethe chargingsystemisnotableto providefullpoweratengineidle. As enginespeedsareincreased, this conditionshouldcorrectitselfas higherenginespeedsallowthe chargingsystemtocreatemaximum power.
The vehicle can only be driven fora short timewith thereadings outside then normal operating range. If the vehicle must be driven, turn off all accessories, such as her radio and air conditioner.
Readingsoutsidethenormal operatingrangeindicateapossible problemintheelectricalsystem. Havethevehicleservicedassoon aspossible.
SafetyBeltReminders DriverSafetyBeltReminder Light
Thereisadriversafetybelt reminderlightontheinstrument panelcluster.
Whenthevehicleisstarted,this lightflashesandachimemaycome ontoremindthedrivertofasten theirsafetybelt.Thenthelight staysonsoliduntilthebeltis buckled.Thiscyclemycontinue severaltimesifthedriverremainsor becomesunbuckledwhilethe vehicleismoving.
Ifthedriversafetybeltisbuckled, neitherthelightnorthechime comeson.
PassengerSafetyBelt ReminderLight
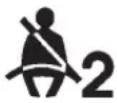
Forvehiclesequippedwiththe passengersafetybeltreminder light,severalsecondsafterthe engineisstarted,achimesounds forseveralsecondstoremindthe frontpassengertobuckletheir safetybelt. Thepassengersafety beltlightflashesandthenstayson soliduntilthebeltisbuckled. This cyclecontinuesseveraltimesifthe passengerremainsorbecomes unbuckledwhilethevehicleis moving.
If the passengers safety belt is buckled, neither the chimen or the light comes on.
Thefrontpassengersafetybelt warninglightandchimemayturnon ifanobjectisputontheseatsuch asabriefcase,handbag,grocery bag,laptop,orotherelectronic device.Toturnoffthewarninglight and/orchime,removetheobject fromtheseatorbucklethe safetybelt.
AirbagReadinessLight
Thesystemcheckstheairbag's electricalsystemforpossible malfunctions. If the light stay on it indicates there is an electrical problem. Thesystemcheck include the airbagsensor(s), the pretensioners, the airbag modules, the wiring and the crash sensing and diagnostic module. Form more information on the airbag system, see Airbag System on page 3-25.

Theairbagreadinesslightcomeson solidforafewsecondswhenthe engineisstarted.Ifthelightdoes notcomeonthen,haveitfixed immediately.
WARNING
If the airbagreadinesslightstays on after the vehicle is started or comes on while driving, it means the air bagsystem might not be working properly. The airbags in the vehicle might not inflate a crash, or they could even inflate without a crash. To help avoid injury, have the vehicles serviced right away.
If thereisaproblemwiththeairbag system,aDriverInformationCenter (DIC)messagecanalsocomeon. SeeAirbagSystemMessageson page5-49formoreinformation.
AirbagOn-OffLight
If the vehicle has an air bag on-off switch, it also has a passenger air bag status indicator located in the overhead console.

text_image
PASSENGER AIRBAG OFF ON 2UnitedStates
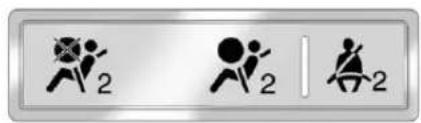
text_image
Three identical icons showing a running figure with a cross symbol, followed by a stick figure and a person holding a '2' sign.CanadaandMexico
Whenthevehicleisstarted,the passengerairbagstatusindicator willlightONandOFF,orthe symbolforonandoff,willlightfor severalsecondsasasystemcheck. Then,afterseveralmoreseconds, thestatusindicatorONorOFF, oreithertheonoroffsymbol,will lighttoletyouknowthestatusof therightfrontpassengerfrontal airbag.
Whentherightfrontpassenger airbagismanuallyturnedoffusing theairbagon-offswitchintheglove box,theindicatorlightOFFforthe offsymbolwillcomeonandstayon asareminderthattheairbaghas beenturnedoff.Thislightwillgooff whentheairbaghasbeenturned on.SeeAirbagOn-OffSwitchon page3-33formoreinformation, includingimportantsafety information.
5-22InstrumentsandControls
PASSENGER

AIR BAG OFF
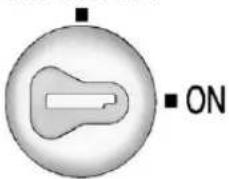
text_image
■ ONUnitedStates


natural_image
Simple icon showing a stylized dog inside a circle next to two stick figures (no text or symbols)CanadaandMexico

WARNING
Iftherightfrontpassengerairbag isturnedoffforapersonwhois notinariskgroupidentifiedby thenationalgovernment,that personwillnothavetheextra protectionofanairbag.Ina crash,theairbagwillnotbeable toinflateandhelpprotectthe personsittingthere.
Donotturnoffthepassenger airbagunlessthepersonsitting thereisinariskgroupidentified bythenationalgovernment.See AirbagOn-OffSwitchon page3-33formoreonthis, includingimportantsafety information.

WARNING
If the airbagreadinesslightever comeson and stayson, it means that something may be wrong with the air bagsystem. For example, therightfront passenger air bag could inflate even though the air bag on-off switchisturned off.
Tohelpavoidinjurytoyourselfor others,havethevehicleserviced rightaway.SeeAirbagReadiness Lightonpage5-20formore information,includingimportant safetyinformation.
IfthewordONortheonsymbolis lit, itmeansthattherightfront passengerfrontalairbagisenabled (mayinflate). SeeAirbagOn-Off Switchonpage3-33formore information, including important safetyinformation.

Information Provided by: DEALER
If,afterseveralseconds,bothstatus indicatorlightsremainon,orifthere arenolightsatall,theremaybea problemwiththelightsortheairbag on-offswitch.Seeyourdealerfor service.
PassengerAirbagStatus Indicator
Ifthevehiclehasoneofthe indicatorspicturedinthefollowing illustrations,thenthevehiclehasa passengersensingsystemforthe rightfrontpassengerpositionunless thereisanairbagoffswitchlocated intheglovebox.Ifthereisan airbagoffswitch,thevehicledoes nothaveapassengersystem system.SeeAirbagOn-OffSwitch onpage3-33.
The passenger airbag status indicator is on the overhead console. See Passenger Sensing System on page 3-37 for important safety information.
Inaddition,ifthevehiclehasa passengersensingsystemforthe rightfrontpassengerposition,the labelonthevehicle'ssunvisor refersto"ADVANCEDAIRBAGS".

text_image
PASSENGER AIRBAG OFF ON 2UnitedStates

text_image
Three identical icons with the number '2' and a vertical line, likely representing motion or exercise symbols.CanadaandMexico
Whenthevehicleisstarted, the passengerairbagstatusindicator willlightONandOFF, orthesymbol foronandoff, forseveralseconds asasystemcheck. Then, after severalmoreseconds, thestatus indicatorwilllighteitherONorOFF, oreithertheonoroffsymboltolet youknowthestatusoftherightfront passengerfrontalairbag.
5-24InstrumentsandControls
IfthewordONortheonsymbolis litonthepassengerairbagstatus indicator, itmeansthattheright frontpassengerfrontalairbagis enabled (mayinflate).
IfthewordOFFortheoffsymbolis litontheairbagstatusindicator, it meansthatthepassengersensing systemhasturnedofftherightfront passengerfrontalairbag.
If,afterseveralseconds,bothstatus indicatorlightsremainon,orifthere arenolightsatall,theremaybea problemwiththelightsorthe passengersensingsystem.See yourdealerforservice.
WARNING
If the airbagreadiness light ever comes on and stay on, it means that something may be wrong with the air bags system. To help avoid injury to yourself for others, have the vehicles serviced right away. See Airbag Readiness Lighton page 5-20 form more information, including important safety information.
ChargingSystemLight

Thislightcomesonbrieflywhenthe ignitionkeyisturnedtoSTART,but theengineisnotrunning,asa check to show it is working.

Information Provided by: DEALER
Ifitdoesnot,havethevehicle servicedbyyourdealer.
Thelightshouldgooutoncethe enginestarts.lfitstayson, orcomesonwhiledriving,there couldbeaproblemwiththe chargingsystem.Achargingsystem messageintheDriverInformation Center(DIC)canalsoappear.See BatteryVoltageandCharging Messagesonpage5-43formore information.Thislightcouldindicate thatthereareproblemswitha generatordrivebelt,orthatthereis anelectricalproblem.Haveit checkedrightaway.Ifthevehicle mustbedrivenashortdistancewith thelighton,turnoffaccessories, suchastheradioandair conditioner.
If the vehicle is a hybrid, se the hybrids supplement form more information.
Malfunction IndicatorLamp
AcomputersystemcalledOBDII (On-BoardDiagnostics-Second Generation)monitorstheoperation ofthevehicletoensureemissions areatacceptablelevels,toproduce acleanerenvironment.Thislight comesonwhenthevehicleis placedinON/RUN,asacheckto showitisworking.Ifitdoesnot, havethevehicleservicedbyyour dealer.SeeIgnitionPositionson page9-28.

Ifthemalfunctionindicatorlamp comesonandstaysonwhilethe engineisrunning,thisindicatesthat thereisanOBDIIproblemand serviceisrequired.
Malfunctionsoftenareindicated by thesystembeforeanyproblemis apparent. Beingawareofthelight canpreventmoreseriousdamage tothevehicle. Thissystemassists theservicetechnicianincorrectly diagnosinganymalfunction.
Notice: If the vehicle is continually driven with this light on, the emission control might not work as well, the vehicle fuel economy might not be as good, and the engine might not run as smoothly. This could lead to costly repairs that might not be covered by the vehicle warranty.
Notice: Modificationsmadetothe engine, transmission, exhaust, intake, orfuelsystemofthe vehicleorthereplacementofthe originaltireswithotherthan thoseofthesameTire PerformanceCriteria(TPC)can affectthevehicle'semission controlsandcancausethislight tocomeon.Modificationsto thesesystemscouldleadto costlyrepairsnotcoveredbythe vehiclewarranty.Thiscouldalso resultinafailuretopassa requiredEmissionInspection/ Maintenancetest.See AccessoriesandModificationson page10-4.
Thislightcomesonduringa malfunctioninoneoftwoways:
LightFlashing: Amisfirecondition has been detected. Amisfire increases vehicle emissions and could damage the emission control system on the vehicle. Diagnosis and servicemight berequired.
Topreventmoreseriousdamageto thevehicle:
- Reducevehiclespeed.
- Avoidhardaccelerations.
- Avoidsteepuphillgrades.
- Iftowingatrailer, reducethe amountofcargobeinghauledas soonasitispossible.
Ifthelightcontinuestoflash,stop andparkthevehicle.Turnthe vehicleoff,waitatleast10seconds, andrestarttheengine.Ifthelightis stillflashing,followtheprevious stepsandseeyourdealerfor serviceassoonaspossible.
LightOnSteady: Anemission controlsystemmalfunctionhas beendetectedonthevehicle. Diagnosisandservicemightbe required.
The following maycorrectan emissionsystemmalfunction:
- Check that the fuel cap is fully installed. See Filling the Tankon page 9-84. The diagnostic system can determine if the fuel cap has been left for improperly installed. A loose or missing fuel cap allows fuel to evaporate into the atmosphere. Afew driving trip with the cap properly installed should turn the light off.
- Checkthatgoodqualityfuelis used.Poorfuelqualitycauses theenginenottorunas efficientlyasdesignedandmay causestallingafterstart-up, stallingwhenthevehicleis changedintogear,misfiring, hesitationonacceleration, orstumblingonacceleration. Theseconditionsmightgoaway oncetheengineiswarmedup.
Ifoneormoreoftheseconditions occurs, changethefuelbrandused. Itwillrequireatleastonefulltankof theproperfueltoturnthelightoff.
SeeRecommendedFuelon page9-80.
If none of the above havemad the light turn off, your dealer can check the vehicle. The dealer has the propertestequipment and diagnostictoolstofix any mechanicalorelectrical problems that might have developed.
EmissionsInspection and MaintenancePrograms
Somelocalgovernmentsmayhave programstoinspecttheon-vehicle emissioncontrolequipment. For the inspection, the emissionsystemtest equipment is connected to the vehicle's DataLink Connector(DLC).

natural_image
Diagram of a 24-pin connector with slots and connectors (no text or labels)The DLC is under the instrument panel to the left of the steering wheel. See your dealer if assistance is needed.
The vehicle may not pass inspection if:
- Themalfunctionindicatorlampis onwiththeengine running, orif thelightdoesnotcomeonwhen theignitionisturnedtoON/RUN whiletheengineisoff. Seeyour dealerforassistanceinverifying properoperationofthe malfunctionindicatorlamp.
- TheOBDII(On-Board Diagnostics)systemdetermines that critical emission control systemshavenotbeen completely diagnosed. The vehicle would be considered not ready for inspection. This can happen if the 12-volt battery has recently been replaced or run down. The diagnostics system is designed to evaluate critical emission control systems during normal driving. This can take several day so froutined driving.
If this has been done and the vehicle still does not pass the inspection for lack of OBDII system readiness, your dealer can prepare the vehicle for inspection.
BrakeSystemWarning Light
Withtheignitionon,thebrake systemwarninglightcomeson whentheparkingbrakeisset.Ifthe vehicleisdrivenwiththeparking brakeengaged,achimesounds whenthevehiclespeedisgreater than8km/h(5mph).
The vehicle brakes system consists of two hydraulics circuits. If one circuit is not working, there are remaining circuit can still work to stop the vehicle. Fornormal braking performance, both circuits need to be working.
If the warning light comes on and a chimesounds there could be a brake problem. Have the brake system inspected right away.
Thislightcanalsocomeondueto lowbrakefluid.SeeBrakeFluidon page10-31formoreinformation.


BRAKE
MetricEnglish
Thislightcomesonbrieflywhenthe ignitionkeyisturnedtoON/RUN. Ifitdoesnotcomeonthen,haveit fixedsoitisreadytowarnifthereis aproblem.
WARNING
Thebrakesystemmightnotbe workingproperlyifthebrake systemwarninglightison. Drivingwiththebrakesystem warninglightoncanleadtoa crash.Ifthelightisstillonafter thevehiclehasbeenpulledoff theroadandcarefullystopped, havethevehicletowedfor service.
Ifthelightcomesonwhiledriving, pullofftheroadandstopcarefully. Thepedalmightbehardtropush ormightgoclosertothefloor.Itcan takelongertostop.Ifthelightisstill on,havethevehicletowedfor service.See Towingthe Vehicleon page10-101.
If the vehicle is a hybrid, se the hybrids supplement form more information.
AntilockBrakeSystem (ABS)WarningLight

ForvehicleswiththeAntilockBrake System(ABS), thislightcomeson brieflywhentheengineisstarted.
If it does not, hav the vehicle serviced by your dealer. If the system is working normally the indicator light thengoes off.
IftheABSlightstayson,turnthe ignitionoff.Ifthelightcomeson whiledriving,stopassoonasitis safelypossibleandturntheignition off.Thenstarttheengineagainto resetthesystem.IftheABSlight stayson,orcomesonagainwhile driving,thevehicleneedsservice. Iftheregularbrakesystemwarning lightisnoton,thevehiclestillhas brakes,butnotantilockbrakes.

Information Provided by: DEALER
If theregularbrakesystemwarning lightisalsoon,thevehicledoesnot haveantilockbrakesandthereisa problemwiththeregularbrakes. SeeBrakeSystemWarningLighton page5-27.
ForvehicleswithaDriver InformationCenter(DIC), see Brake SystemMessagesonpage5-43 for allbrake-related DIC messages.
If the vehicle is a hybrid, se the hybrids supplement form more information.
Four-Wheel-DriveLight

Forvehiclesequippedwiththe four-wheel-drivelight,itcomeson whenavehiclewithamanual transfercaseisshiftedinto four-wheeldriveandthefrontaxle engages.
Somedelaybetweenheshifting andthelightcomingonisnormal.
See Four-WheelDriveonpage9-47 formoreinformation.
Tow/HaulModeLight

ForvehicleswiththeTow/Haul Modefeature,thislightcomeson whentheTow/HaulModehasbeen activated.
Formoreinformation, see Tow/Haul Modeonpage9-44.
StabiliTrak® OFFLight
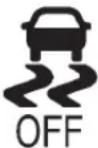
Thislightcomesonbrieflywhile startingtheengine.
If it does not, have the vehicle serviced by your dealer. If the system is working normally, the indicator light thengoes off.
PressandreleasetheTraction ControlSystem(TCS)/StabiliTrak buttontoturnoffTCS,anda messagedisplaysintheDIC.
PressandbrieflyholdtheTCS/StabiliTrakbuttontoturnofftheStabiliTraksystem;theStabiliTrakOfflightcomesonandamessageappearsintheDriverInformationCenter(DIC).
IftheStabiliTrak/TCSsystemisoff, thesystemdoesnotassistin controllingthevehicle. Turnonthe StabiliTrak/TCSsystemandthe indicatorlightturnsoff.
SeeStabiliTrak ^® Systemon page9-65,andRideControlSystem Messagesonpage5-48formore information.
TractionControlSystem (TCS)/StabiliTrak® Light
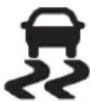
The TCS/StabiliTraklightcomeson brieflywhentheengineisstarted.
Ifthelightdoesnotcomeonor stayson,havethevehicleserviced bythedealer.Ifthesystemis workingnormally,theindicatorlight turnso ff.
Ifthelightcomesonandstayson whiledriving, andamessage displaysintheDriverInformation Center(DIC), havethevehicle servicedbythedealer. See Ride ControlSystemMessageson page5-48formoreinformation.
Ifthelightflasheswhiledriving, this meansthatStabiliTrakorTCSis assistingincontrollingthevehicle. SeeStabiliTrak® Systemon page9-65formoreinformation.
TirePressureLight

ForvehicleswiththeTirePressure MonitorSystem(TPMS), thislight comesonbrieflywhentheengineis started. Itprovidesinformation abouttirepressuresandtheTPMS.

WhentheLightIsOnSteady
This indicates that one or more of the tires are significantly underinflated.
ADriverInformationCenter(DIC) tirepressuremessagemayalso display.See TireMessageson page5-50.Stopassoonas possible, andinflatethetirestothe pressurevalueshownontheTire andLoadingInformationlabel.See TirePressureonpage10-65.
WhentheLightFlashesFirstand ThenIsOnSteady
If the light flashes for about a minute and then stay on, ther may be a problem with the TPMS. If the problem is not corrected, the light will come on at every ignition cycle. See Tire Pressure Monitor Operation on page 10-68.
EngineOilPressureLight

WARNING
Donotkeepdrivingiftheoil pressureislow.Theenginecan becomesohotthatitcatchesfire. Someonecouldbeburned.Check theoilassoonaspossibleand havethevehicleserviced.
Notice:Lackofproperengineoil maintenanceandamagethe engine.Drivingwiththeengine oilowcanalsodamagethe engine.Therepairswouldnotbe coveredbythevehiclewarranty.
Checktheoillevelassoonas possible.Addoilifrequired,but iftheoilleveliswithinthe operatingrangeandtheoil pressureisstilllow,havethe vehicleserviced.Alwaysfollow themaintenanceschedulefor changingengineoil.
Thislightcomesonbrieflywhile startingtheengine.Ifitdoesnot, havethevehicleservicedbyyour dealer.Ifthesystemisworking normallytheindicatorlightthen goesoff.
Ifthelightcomesonandstayson, it meansthatoilisnotflowingthrough theengineproperly. Thevehicle couldbelowonoilanditmight havesomeothersystemproblem.
If the vehicle is a hybrid, se the hybrids supplement form more information.
LowFuelWarningLight

Thislight, underthefuelgauge, comesonbrieflywhiletheengineis beingstarted.
Thislightandachime,ifthevehicle isequippedwitharadio,comeson whenthefueltankislowonfuel. TheDriverInformationCenteralso displaysaFUELLEVELLOW message.SeeFuelSystem Messagesonpage5-47formore information.Whenfuelisaddedthis lightandmessageshouldgooff.Ifit doesnot,havethevehicleserviced byyourdealer.
SecurityLight

Thesecuritylightshouldcomeon brieflyastheengineisstarted.Ifthe systemisworkingnormally,the indicatorlightturnsoff.Ifitdoesnot comeon,havethevehicleserviced byyourdealer.
Ifthelightstaysonandtheengine doesnotstart,therecouldbea problemwiththetheft-deterrent system.
Thislightisalsousedtoindicatethe statusoftheanti-theftalarmsystem whentheignitionisturnedoff.The lightwillflashrapidlyifthealarm systemisarmingandoneormore ofthemonitoredentrypointsisnot closed.Thelightwillstayonifthe alarm is arming and all entry points areclo sed.
Forinformationregardingthislight andthevehicle'ssecuritysystem, seeAnti-theftAlarmSystemon page2-13.
High-BeamOnLight

Thislightcomesonwhenthe high-beamheadlampsareinuse. SeeHeadlampHigh/Low-Beam Changeronpage6-3.

FrontFogLampLight

Forvehicleswithfoglamps,this lightcomesonwhenthefoglamps areon.
Thelightgoesoutwhenthefog lampsareturnedoff.SeeFog Lampsonpage6-7formore information.
CruiseControlLight
Forvehiclesequippedwithcruise control, this light comes on whenever the cruise control is set.
Thelightgoesoutwhenthecruise controlisturnedoff.SeeCruise Controlonpage9-69formore information.
InformationDisplays
DriverInformation Center(DIC)
The vehicle has a Driver Information Center(DIC).
The DIC displays information about this vehicle. It also displays warning messages if a system problem is detected.
Allmessageswillappearin theDICdisplaylocatedbelowthe tachometerintheinstrumentpanel cluster.
The DIC comes on when the ignition is on. After a short delay, the DIC will display the information that was last displayed before the engine wasturned off.
The DIChasdifferentdisplays whichcanbeaccessedbypassing the DICbuttonslocatedonthe instrumentpanel,nexttothe steeringwheel.Ifthevehicledoes nothaveDICbuttons,thetrip odometerresetstemcanbeusedto accesssomeofthemenuitems.
The DIC displaystrip, fuel, and vehicle system information, and warning messages if a system problem is detected.
The DIC also allow some features to be customized. See Vehicle Personalization (With DIC Buttons) on page 5-52 form more information.
Ifthevehiclehasadieselengine, seetheDuramax ^® diesel supplementformoreinformation.
DICButtons

Thebuttonsarethetrip/fuel, vehicle information, customization, andset/resetbuttons. Thebuttonfunctions are detailed in the following pages.
( Trip/Fuel):Pressthisbutton todisplaytheodometer,trip odometer,fuelrange,average economy,fuelused,timer, transmissiontemperature,and instantaneouseconomyandActive FuelManagement™ indicator.The compass and outside temperature will also be shown in the display.

Information Provided by: DEALER
Thetemperaturewillbeshownin°C or°Fdependingontheunits selected.
i(VehicleInformation):Press thisbuttontodisplaytheoillife, units,tirepressurereadingsfor vehicleswiththeTirePressure MonitorSystem(TPMS),trailer brakegainandoutputinformation forvehicleswiththeIntegrated TrailerBrakeControl(ITBC)system, enginehours,compasszone setting,andcompassrecalibration.
☑-(Customization):Pressthis buttontocustomizethefeature settingsonthevehicle.See Vehicle Personalization(WithDICButtons) onpage5-52formoreinformation.
√(Set/Reset):Pressthisbutton to setorreset certain functions and to turnofforacknowledgemessages on the DIC.
Trip/FuelMenultems(withDIC Buttons)
( Trip/Fuel ): Pressthisbutton toscrollthroughthefollowingmenu items:
Odometer
Pressthetrip/fuelbuttonuntil ODOMETERdisplays. Thisdisplay showsthedistancethevehiclehas beendrivenineitherkilometers(km) ormiles.Pressingthetripodometer resetstemwillalsodisplaythe odometer.
Toswitchbetweenmetricand Englishmeasurements,see "Units" laterinthissection.
TripOdometer
Pressthetrip/fuelbuttonuntilTRIP displays. This display shows the current distance traveled neither kilometers (km) or miles in the last reset for the tripod odometer. Pressing the tripod odometer reset stem will also display the tripod odometer.
Thetripodometercanberesetto zerobypressingtheset/reset buttonwhilethetripodometeris displayed.Youcanalsoresetthe tripodometerwhileitisdisplayedby pressingandholdingthetrip odometerresetstem.
Thetripodometerhasafeature calledtheretro-activereset. This canbeusedtosethetripodometer tothenumberofmiles(kilometers) drivensincetheignitionwaslast turnedon. Thiscanbeusedifthe tripodometerisnotresetatthe beginningofthetrip.
Tousetheretro-activeresetfeature, pressandholdtheset/resetbutton foratleastfourseconds. Thetrip odometerwilldisplaythenumberof kilometers(km)ormilesdrivensince theignitionwaslastturnedon and thevehiclewasmoving. Oncethe vehiclebeginsmoving, thetrip odometerwillaccumulatemileage.
Forexample, if the vehicle was driven 8km (5 miles) before it is started again, and then the retro-activereset feature is activated, the display will show 8km (5 miles). Asthe vehicle begins moving, the display will then increaseto 8.2km (5.1 miles), 8.4km (5.2 miles), etc.
FuelRange
Pressthetrip/fuelbuttonuntilFUEL RANGEdisplays. Thisdisplay showstheapproximatenumberof remainingkilometers(km)ormiles thevehiclecanbedrivenwithout refueling. Thedisplaywillshow LOWifthefuellevelislow.
Thefuelrangeestimateisbasedon anaverageofthevehicle'sfuel economyoverrecentdrivinghistory andtheamountoffuelremainingin thefueltank. Thisestimatewill changeifdrivingconditionschange. Forexample,ifdrivingintrafficand makingfrequentstops,thisdisplay mayreadonenumber,butifthe vehicleisdrivenonafreeway,the numbermaychangeeeventthough thesameamountoffuelisinthe fueltank. Thisisbecausedifferent drivingconditionsproducedifferent fueleconomies.Generally,freeway drivingproducesbetterfuel economythancitydriving.Fuel rangecannotbereset.
AverageEconomy
Pressthetrip/fuelbuttonuntilAVG ECONOMYdisplays.Thisdisplay showstheapproximateaverage litersper100kilometers(L/100km) ormilespergallon(mpg).This numberiscalculatedbasedonthe numberofL/100km(mpg)recorded sincethelasttimethismenu itemwasreset.ToresetAVG ECONOMY,pressandholdthe set/resetbutton.
FuelUsed
Pressthetrip/fuelbuttonuntil FUELUSEDdisplays. Thisdisplay showsthenumberofliters(L)or gallons(gal)offuelusedsincethe lastresetofthismenuitem. Toreset thefuelusedinformation,pressand holdtheset/resetbuttonwhileFUEL USEDisdisplayed.
Speedometer
Thespeedometershowshowfast thevehicleismovingineither kilometersperhour(km/h)ormiles perhour(mph). Thespeedometer cannotbereset.
Timer
Pressthetrip/fuelbuttonuntil TIMERdisplays.Thisdisplaycanbe usedasatimer.
Tostartthetimer, presstheset/ resetbuttonwhileTIMERis displayed. Thedisplaywillshowthe amountoftimethathaspassed sincethetimerwaslastreset, not includingtimetheignitionisoff. Timewillcontinuetobecountedas longastheignitionison, even if anotherdisplayisbeingshownon theDIC. Thetimerwillrecord upto99hours, 59minutes, and 59seconds(99:59:59)afterwhich thedisplaywillreturntozero.
Tostopthetimer, presstheset/reset buttonbrieflywhile TIMERis displayed.

Toresetthetimertozero, pressand holdtheset/resetbuttonwhile TIMERisdisplayed.
TransmissionTemperature
Pressthetrip/fuelbuttonuntil TRANSTEMPdisplays.This displayshowsthetemperatureof theautomatictransmissionfluidin eitherdegreesCelsius(°C)or degreesFahrenheit(°F).
InstantaneousEconomyand ActiveFuelManagement™ Indicator
If the vehicle has this display, press the trip/fuel button until INSTECON V8 displays. This display shows the current fueleconomy at particular moment and will change frequently as driving conditions change. This display shows the instantaneous fueleconomy in liters per 100 kilometers (L/100km) or miles per gallon (mpg). Unlike average economy, this screen cannot be reset.
AnActiveFuelManagement indicatordisplaysontherightside oftheDIC,whileINSTECON displaysontheleftside.ActiveFuel Managementallowstheengineto operateoneitherfouroreight cylinders,dependingondriving demands.WhenActiveFuel Managementisactive,V4will displayontheDIC.WhenActive FuelManagementisinactive,V8 willdisplay.SeeActiveFuel Management® onpage9-37for moreinformation.
BlankDisplay
Thisdisplayshowsnoinformation.
Vehicle Information Menu Items(with DIC Buttons)
i(VehicleInformation):Press thisbuttontoscrollthroughthe followingmenuitems:
OilLife
Pressthevehicleinformationbutton untilOILLIFEREMAINING displays. Thisdisplayshowsan estimateoftheoil'sremaininguseful life. Ifyousee99%OILLIFE REMAININGonthedisplay, that means99%ofthecurrentoillife remains. Theengineoillifesystem willalertyoutochangetheoilona scheduleconsistentwithyour drivingconditions.
Whentheremainingoillifeislow, theCHANGEENGINEOILSOON messagewillappearonthedisplay. See "CHANGEENGINEOILSOON" underEngineOilMessageson page5-46. You should change the oil as soon as you can. See Engine Oil on page 10-7. In addition to the engine oil ifesystem monitoring the oil life, additional maintenance is recommended in the Maintenance Schedule in this manual. See Maintenance Schedule on page 11-3 form more information.
Remember,youmustresettheOIL LIFEdisplayaftereachoilchange. Itwillnotresetitself.Also,be carefulnottoresettheOILLIFE displayaccidentallyatanytime otherthanwhentheoilhasjust beenchanged.Itcannotbereset accuratelyuntilthenextoilchange. Toresettheengineoillifesystem, seeEngineOilLifeSystemon page 10-10.
Units
Pressthevehicleinformationbutton untilUNITSdisplays.Thisdisplay allowsyoutoselectbetweenmetric orEnglishunitsofmeasurement.Onceinthisdisplay,presstheset/resetbuttontoselectbetween METRICorENGLISHunits.Allofthevehicleinformationwill thenbedisplayedintheunitof measurementselected.
TirePressure
If the vehicle has the Tire Pressure Monitor System (TPMS), the pressure foreachtire can be viewed in the DIC. The tire pressure will be shown nine other kilopascals (kPa) or pound spersquare inch (psi). Press the vehicle information button until the DIC displays FRONT TIRESkPa (PSI) LEFT ## RIGHT ##. Pressthe vehicle information button again until the DIC displays REARTIRESkPa (PSI) LEFT ## RIGHT ##.
Ifalowtirepressureconditionis detectedbythesystemwhile driving, amessageadvisingyouto addpressureinaspecifictirewill appearinthedisplay. See Tire Pressureonpage10-65and Tire Messagesonpage5-50formore information.
If the tire pressured display shows dashes instead of a value, there may be a problem with the vehicle. If this consistently occurs, see your dealer for service.
TrailerGainandOutput
OnvehicleswiththeIntegrated TrailerBrakeControl(ITBC)system, thetrailerbrakedisplayappearsin theDIC.Pressthevehicle informationbuttonuntilTRAILER GAINandOUTPUTdisplay.
TRAILERGAINshowsthetrailer gainsetting. This setting can be adjusted from 0.0 to 10.0 with either a trailer connected or disconnected.
OUTPUTshowsthepoweroutputto thetraileranytimeatrailerwith electricbrakesisconnected.Output isdisplayedin0to10bars.Dashes mayappearintheOUTPUTdisplay.
Toadjusttrailergainsee "Integrated TrailerBrakeControlSystem" under TowingEquipmentonpage9-106 formoreinformation.
Battery
Thisdisplayshowsthecurrent batteryvoltage.Ifthevoltageisin thenormalrange,thevaluewill display.Forexample,thedisplay mayreadBATTERY13VOLTS. Yourvehicle'schargingsystem regulatesvoltagebasedonthestate ofthebattery.Thebatteryvoltage mayfluctuatewhenviewingthis informationontheDIC.This is normal.
OilPressure
This displayshowstheoilpressure ineitherkilopascals(kPa)orpounds persquareinch(psi).
EngineHours
Pressthevehicleinformationbutton until ENGINEHOURSdisplays. This displayshowsthetotalnumberof hourstheenginehasrun.
CompassZoneSetting
Thisdisplayallowsforsettingthe compasszone.SeeCompasson page5-6formoreinformation.
CompassRecalibration
This display allows for calibrating the compass. See Compassion page 5-6 form more information.
BlankDisplay
Thisdisplayshowsnoinformation.
TripOdometerResetStem Menultems(withDICButtons)
Usethetripodometerresetstemto viewtheodometerandtrip odometer.TheLanguageselection andEngineHoursdisplaycanalso beaccessedwiththetripodometer resetstem.
Odometer
Pressthetripodometerresetstem untilODOMETERdisplays. This displayshowsthedistancethe vehiclehasbeendrivenineither kilometers(km)ormiles(mi).
TripOdometer
Pressthetripodometerresetstem untilTRIPdisplays.Thisdisplay showsthecurrentdistance traveledineitherkilometers(km) ormiles(mi)sincethelastresetfor thetripodometer.
Thetripodometercanberesetto zerobypressingandholdingthetrip odometerresetstemwhilethetrip odometerisdisplayed.
Thetripodometerhasafeature calledtheretro-activereset. This canbeusedtosethetripodometer tothenumberofmiles(kilometers) drivensincetheignitionwaslast turnedon. Thiscanbeusedifthe tripodometerisnotresetatthe beginningofthetrip.
Tousetheretro-activeresetfeature, pressandholdthetripodometer resetstemforatleastfourseconds. Thetripodometerwilldisplaythe numberofkilometers(km)or miles(mi)drivensincetheignition waslastturnedonandthevehicle wasmoving.Oncethevehicle beginsmoving,thetripodometer willaccumulatemileage. For example,ifthevehiclewasdriven 8km(5miles)beforeitisstarted again,andthentheretro-active resetfeatureisactivated,the displaywillshow8km(5miles).As thevehiclebeginsmoving,the displaywillthenincreaseto8.2km (5.1miles),8.4km(5.2miles),etc.
Language
Thisdisplayallowsyoutoselect thelanguageinwhichtheDIC messageswillappear.Toselecta language:
-
Pressthetripodometerreset stemuntilODOMETERdisplays.
-
While in the ODOMETER display, press and hold the trip odometer reset stem for three seconds until the currently set languaged displays.
-
Continuetopressandholdthe tripodometerresetstemtoscroll throughalloftheavailable languages.
The available selections are ENGLISH(default), FRANCAIS(French), ESPANOL(Spanish), and NO CHANGE.
- Oncethedesiredlanguageis displayed, releasethetrip odometerresetstemtosetthe choice.
EngineHours
TodisplaytheENGINEHOURS, placetheignitioninLOCK/OFFor ACC/ACCESSORY, thenpressand holdthetripodometerresetstemfor foursecondswhileviewingthe ODOMETER. Thisdisplayshows the total number of hours the engine has run.
TripOdometerResetStem Menultems(withoutDIC Buttons)
Language
Thisdisplayallowsyoutoselectthe languageinwhichtheDIC messageswillappear.Toselecta language:
-
Pressthetripodometerreset stemuntilODOMETERdisplays.
-
While in the ODOMETER display, press and hold the trip odometer reset stem for three seconds until the currently set languaged displays.
-
Continuetopressandholdthe tripodometerresetstemtoscroll throughalloftheavailable languages.
The available languages are ENGLISH(default), FRANCAIS(French), ESPANOL(Spanish), and NOCHANGE.
- Oncethedesiredlanguageis displayed, releasethetrip odometerresetstemtosetthe choice.
TripOdometer
Pressthetripodometerresetstem untilTRIPdisplays. Thisdisplay shows the current distance traveled in either kilometers (km) or miles (mi) sincethelastreset for the tripodometer.
Thetripodometercanberesetto zerobypressingandholdingthetrip odometerresetstemwhilethetrip odometerisdisplayed.
Thetripodometerhasafeature calledtheretro-activereset. This canbeusedtosethetripodometer tothenumberofmiles(kilometers) drivensincetheignitionwaslast turnedon. Thiscanbeusedifthe tripodometerisnotresetatthe beginningofthetrip.
Tousetheretro-activeresetfeature, pressandholdthetripodometer resetstemforatleastfourseconds. Thetripodometerwilldisplaythe numberofkilometers(km)or miles(mi)drivensincetheignition waslastturnedonandthevehicle wasmoving.Oncethevehicle beginsmoving,thetripodometer willaccumulatemileage. For example,ifthevehiclewasdriven 8km(5miles)beforeitisstarted again,andthentheretro-active resetfeatureisactivated,the displaywillshow8km(5miles).As thevehiclebeginsmoving,the displaywillthenincreaseto8.2km (5.1miles),8.4km(5.2miles),etc.
Transmission Temperature
Pressthetripodometerresetstem untilTRANSTEMPdisplays. This displayshowsthetemperatureof theautomatictransmissionfluidin eitherdegreesCelsius(°C)or degreesFahrenheit(°F).
TrailerGainandOutput
OnvehicleswiththeIntegrated TrailerBrakeControl(ITBC)system, thetrailerbrakedisplayappearsin theDIC.Pressthetripodometer resetstemuntilTRAILERGAINand OUTPUTdisplay.
TRAILERGAINshowsthetrailer gainsetting. This setting can be adjusted from 0.0 to 10.0 with either a trailer connected or disconnected.
OUTPUTshowsthepoweroutputto thetraileranytimeatrailerwith electricbrakesisconnected.Output isdisplayedin0to10bars.Dashes mayappearintheOUTPUTdisplay.
Toadjusttrailergainsee "Integrated TrailerBrakeControlSystem" under TowingEquipmentonpage9-106 formoreinformation.
Speedometer
Thespeedometershowshowfast thevehicleismovingineither kilometersperhour(km/h)ormiles perhour(mph). Thespeedometer cannotbereset.
Battery
Thisdisplayshowsthecurrent batteryvoltage.Ifthevoltageisin thenormalrange,thevaluewill display.Forexample,thedisplay mayreadBATTERY13VOLTS. Yourvehicle'schargingsystem regulatesvoltagebasedonthestate ofthebattery.Thebatteryvoltage mayfluctuatewhenviewingthis informationontheDIC.This is normal.
OilPressure
Thisdisplayshowstheoilpressure ineitherkilopascals(kPa)orpounds persquareinch(psi).
CompassZoneSetting
This display allows for setting the compasszone. See Compasson page 5-6 form more information.
CompassRecalibration
This display allows for calibrating the compass. See Compassion page 5-6 form more information.
OilLife
Toaccessthisdisplay,thevehicle mustbeinP(Park).Pressthetrip odometerresetstemuntilOILLIFE REMAININGdisplays.Thisdisplay showsanestimateoftheoil's remainingusefullife.Ifyousee 99%OILLIFEREMAININGonthe display,thatmeans99%ofthe currentoilliferemains.Theengine oillifesystemwillalertyouto
changetheoilonaschedule consistentwithyourdriving conditions.
Whentheremainingoillifeislow, theCHANGEENGINEOILSOON messagewillappearonthedisplay. See“CHANGEENGINEOILSOON” underEngineOilMessageson page 5-46. You should change the oilassoonasyoucan. SeeEngine Oilonpage 10-7. In addition to the engineoillifesystemmonitoring the oillife, additional maintenance is recommended in the Maintenance Schedule in this manual. See Maintenance Schedule on page 11-3 form more information.
Remember, you must reset the OIL LIFE display after each oil change. It will not reset itself. Also, be careful not to reset the OILLIFE display accidentally at any time other than when the oil has just been changed. It cannot be reset accurately until then ex toil change. To reset the engine oil system, see Engine Oil Life System on page 10-10.

VehicleMessages
MessagesdisplayedontheDIC indicatethestatusofthevehicleor someactionmaybeneededto correctacondition.Multiple messagesmayappearoneafter another.
Themessagesthatdonot requireimmediateactioncanbe acknowledgedandclearedby pressing √(Set/Reset)orthetrip odometerresetstem.
Themessagesthatrequire immediateactioncannotbecleared untilthatactionisperformed.
Allmessagesshouldbetaken seriouslyandclearingthemessage doesnotcorrecttheproblem.
The following are the possible messages and some information about them.
If the vehicle has a diesel engine, seethe Duramax ^® diesel supplement from more information.
BatteryVoltage and ChargingMessages
BATTERYLOWSTART VEHICLE
Whenthevehicle's battery is severely discharged, this message will display and four chimes will sound. Start the vehicle immediately. If the vehicle is not started and the battery continues to discharge, the climate controls, heated seats, and audiosystems will shutoff and the vehicle may require a jump start. Theses systems will function again after the vehicle is started.
SERVICEBATTERY CHARGINGSYSTEM
Onsomevehicles, this message displays if there is a problem with the battery charging system. Under certain conditions, the charging system light may also turn on the instrument panel cluster. See Charging System Light on page 5-24. Driving with this problem
coulddrainthebattery.Turnoffall unnecessaryaccessories.Havethe electricalsystemcheckedassoon aspossible.Seeyourdealer.
BrakeSystemMessages
SERVICEBRAKESYSTEM
Thismessagedisplaysalongwith thebrakesystemwarninglightif thereisaproblemwiththebrake system.SeeBrakeSystemWarning Lightonpage5-27.Ifthismessage appears,stopassoonaspossible andturnoffthevehicle.Restartthe vehicleandcheckforthemessage ontheDICdisplay.Ifthemessage isstilldisplayedorappearsagain whenyoubegindriving,thebrake systemneedsserviceassoonas possible.Seeyourdealer.
SERVICEBRAKESSOON
Onsomevehicles, thismessage displaysifthereisaproblemwith thebrakesystem.Ifthismessage appears, stopassoonaspossible andturnoffthevehicle.Restartthe vehicleandcheckforthemessage ontheDICdisplay.Ifthemessage isstilldisplayedorappearsagain whenyoubegindriving,thebrake systemneedsservice.Seeyour dealer.
SERVICETRAILERBRAKE SYSTEM
OnvehicleswiththeIntegrated TrailerBrakeControl(ITBC)system, thismessagedisplaysandachime maysoundwhenthereisaproblem withtheITBCsystem.
Whenthismessagedisplays, power isnolongeravailabletothetrailer brakes.
Assoonasitissafetodoso, carefullypullyourvehicleoverto thesideoftheroadandturnthe ignitionoff.Checkthewiring connectiontothetrailerandturnthe ignitionbackon.Ifthismessagestill displays,eitheryourvehicleorthe trailerneedsservice.Seeyour dealer.
See "Integrated Trailer Brake Control System" under Towing Equipment on page 9-106 form more information.
DoorAjarMessages DRIVERDOOROPEN
Thismessagedisplaysandachime maysoundifthedriverdoorisnot fullyclosedandthevehicleis shiftedoutofP(Park).Stopandturn offthevehicle,checkthedorfor obstructions,andclosethedoor again.Checktoseeifthemessage stillappearsontheDIC.
HOODOPEN
Thismessagedisplaysandachime maysoundifthehoodisnotfully closed.Stopandturnoffthe vehicle,checkthehoodfor obstructions,andclosethehood again.Checktoseeifthemessage stillappearsontheDIC.
LEFTREARDOOROPEN (CrewCab)
Thismessagedisplaysandachime maysoundifthedriversiderear doorisnotfullyclosedandthe vehicleisshiftedoutofP(Park). Stopandturnoffthevehicle,check thedoorforobstructions,andclose thedooragain.Checktoseeifthe messagestillappearsontheDIC.
PASSENGERDOOROPEN
Thismessagedisplaysandachime maysoundifthefrontpassenger doorisnotfullyclosedandthe vehicleisshiftedoutofP(Park). Stopandturnoffthevehicle,check thedoorforobstructions,andclose thedooragain.Checktoseeifthe messagestillappearsontheDIC.
RIGHTREARDOOROPEN (CrewCab)
Thismessagedisplaysandachime maysoundifthepassengerside reardoorisnotfullyclosedandthe vehicleisshiftedoutofP(Park). Stopandturnoffthevehicle,check thedoorforobstructions,andclose thedooragain.Checktoseeifthe messagestillappearsontheDIC.
EngineCoolingSystem Messages
ENGINEHOTA/C (AirConditioning) TURNEDOFF
Thismessagedisplayswhenthe enginecoolantbecomeshotterthan thenormaloperatingtemperature. SeeEngineCoolantTemperature Gaugeonpage5-17.Toavoid addedstrainonahotengine, theairconditioningcompressor automaticallyturnsoff.Whenthe coolanttemperaturereturnsto normal,theairconditioning compressorturnsbackon.Youcan continuetodriveyourvehicle.
If this message continues to appear, havethesystem repaired by your dealer as soon as possible to avoid damage to the engine.
ENGINEOVERHEATEDIDLE ENGINE
Notice: If you drivethe vehicle while the engine is overheating, severe engined damagemay occur. If an overheat warning appears on the instrument panel cluster and/or DIC, stop the vehicle as soon as possible. See Engine Overheating on page 10-24 form more information.
Thismessagedisplayswhenthe enginecoolanttemperatureistoo hot.Stopandallowthevehicleto idleuntilcoolsdown.SeeEngine Coolant Temperature Gaugeon page5-17.
See Overheated Engine Protection Operating Mode on page 10-27 for information on driving to asafe place in an emergency.
ENGINEOVERHEATEDSTOP ENGINE
Notice: If you drivethe vehicle while the engine is overheating, severe engined damagemay occur. If an overheat warning appears on the instrument panel cluster and/or DIC, stop the vehicle as soon as possible. See Engine Overheating on page 10-24 form more information.
Thismessagedisplaysandachime maysoundiftheenginecooling systemreachesunsafe temperaturesforoperation.Stop andturnoffthevehicleassoonasit issafetodosotoavoidsevere damage. Thismessageclearswhen theenginehascooledtoasafe operatingtemperature.
EngineOilMessages CHANGEENGINEOILSOON
Thismessagedisplayswhenthe engineoilneedstobechanged. Whenyouchangetheengineoil,be suretoresettheCHANGEENGINE OILSOONmessage.SeeEngine OilLifeSystemonpage10-10for informationonhowtoresetthe message.SeeEngineOilon page10-7andMaintenance Scheduleonpage11-3formore information.
ENGINEOILHOTIDLE ENGINE
Thismessagedisplayswhenthe engineoilbecomeshotterthanthe normaloperatingtemperature.Stop andallowthevehicletoidleuntil coolsdown.SeeEngineCoolant TemperatureGaugeonpage5-17.
OILPRESSURELOWSTOP ENGINE
Notice: If you drivethe vehicle while the engine oil pressure is low, severe engaged damagemay occur. If a low oil pressure warning appears on the Driver Information Center (DIC), stop the vehicle as soon as possible. Do not drivethe vehicle until the cause of the low oil pressure is corrected. See Engine Oilon page 10-7 form more information.
Thismessagedisplaysiflowoil pressurelevelsoccur.Stopthe vehicleassoonassafelypossible anddonotoperateituntilthecause ofthelowoilpressurehasbeen corrected.Checktheoilassoonas possibleandhavethevehicle servicedbyyourdealer.SeeEngine Oilonpage 10-7.
EnginePowerMessages ENGINEPOWERISREDUCED
Thismessagedisplaysandachime maysoundwhenthecoolingsystem temperaturegetstoohotandthe enginefurtherenterstheengine coolantprotectionmode.See EngineOverheatingonpage10-24 formoreinformation.
Thismessagealsodisplayswhen thevehicle'senginepoweris reduced.Reducedenginepower canaffectthevehicle'sabilityto accelerate.Ifthismessageison, butthereisnoreductionin performance,proceedtoyour destination.Theperformancemay bereducedthenexttimethevehicle isdriven.Thevehiclemaybedriven atareducedspeedwhilethis messageison,butaccelerationand speedmaybereduced.Anytime thismessagestayson,thevehicle shouldbetakentoyourdealerfor serviceassoonaspossible.
FuelSystemMessages FUELLEVELLOW
Thismessagedisplaysandachime maysoundifthefuellevelislow. Refuelassoonaspossible.See FuelGaugeonpage5-15andFuel onpage9-79formoreinformation.
TIGHTENGASCAP
Thismessagemaydisplayalong withthecheckenginelightonthe instrumentpanelclusterifthe vehicle'sfuelcapisnottightened properly.SeeMalfunctionIndicator Lamponpage5-25.Reinstallthe fuelcapfully.SeeFillingtheTank onpage9-84.Thediagnostic systemcandetermineifthefuelcap hasbeenleftofforimproperly installed.Alooseormissingfuel capallowsfueltoevaporateintothe atmosphere.Afewdrivingtripswith thecapproperlyinstalledshould turnthislightandmessageoff.
KeyandLockMessages REPLACEBATTERYIN REMOTEKEY
ThismessagedisplaysifaRemote KeylessEntry(RKE)transmitter batteryislow.Thebatteryneedsto bereplacedinthetransmitter. See "BatteryReplacement" under RemoteKeylessEntry(RKE) SystemOperationonpage2-3.
LampMessages
TURNSIGNALON
Thismessagedisplaysandachime soundsifaturnsignalisleftonfor 1.2km(0.75mi).Movetheturn signal/multifunctionlevertotheoff position.
ObjectDetectionSystem Messages
PARKASSTBLOCKEDSEE OWNERSMANUAL
Thismessagedisplaysifthereis somethinginterferingwiththepark assistsystem.SeeUltrasonic ParkingAssistonpage9-72for moreinformation.
PARKASSISTOFF
Afterthevehiclehasbeenstarted, thismessagedisplaystoremindthe driverthattheURPAsystemhas beenturnedoff.Presstheset/reset buttonorthetripodometerreset stemtoacknowledgethismessage andclearitfromtheDICdisplay.To turntheURPAsystembackon,see UltrasonicParkingAssiston page9-72.
SERVICEPARKASSIST
Thismessagedisplaysifthereisa problemwiththeUltrasonicRear ParkingAssist(URPA)system.Do notusethissystemtohelpyou park.SeeUltrasonicParkingAssist onpage9-72formoreinformation. Seeyourdealerforservice.
RideControlSystem Messages
SERVICESTABILITRAK
IfthevehiclehasStabiliTrakand thismessagedisplays,itmeans theremaybeaproblemwiththe StabiliTraksystem.Ifyouseethis message,trytoresetthesystem. Stop;turnofftheengineforatleast 15seconds;thenstarttheengine again.Ifthismessagestillcomes on,itmeansthereisaproblem.You shouldseeyourdealerforservice. Thevehicleissafetodrive; however,youdonothavethe benefit of StabiliTrak, so reduce your speed and drive accordingly.
SERVICETRACTION CONTROL
If the vehicle has Stabili Trak, this messaged displays when there is a problem with the Traction Control System (TCS). Whenthism message displays, the system will not limit wheelspin. Adjust your driving accordingly. See your dealer for service. See Stabili Trak ^® System on page 9-65 form more information.
STABILITRAKINITIALIZING
IfthevehiclehasStabiliTrak, this messagemaycomeonifthe StabiliTraksystemhasnotfully initializedbecauseofroad conditionsortheincorrecttiresize. WhentheStabiliTraksystemisfully initialized,themessagewillturnoff. SeeStabiliTrak® Systemon page9-65formoreinformation. Ifthismessagecontinuestobe displayedformultipleignitioncycles andondifferentroadsurfaces,see yourdealerforservice.

TRACTIONXX STABILITRAKXX
Thismessagedisplayswhenthe tractioncontroland/orStabiliTrak systemshavebeenturnedonoroff. Adjustyourdrivingaccordingly.To limitwheelspinandrealize thefullbenefitsofthestability enhancementsystem,youshould normallyleaveStabiliTrakon. However,youshouldturn StabiliTrakoffifthevehiclegets stuckinsand,mud,ice,orsnow andyouwanttorockthevehicleto attempttofreeit,orifyouare drivinginextremeoff-road conditionsandrequiremorewheel spin.SeelftheVehicleIsStuckon page9-16.ToturntheStabiliTrak systemonoroff,seeStabiliTrak Systemonpage9-65.
STABILITRAKOFFmay also display when the stability control has been automatically disabled. There are several conditions that can cause this message to appear.
• Oneconditionisoverheating, whichcouldoccurifStabiliTrak activatescontinuouslyforan extendedperiodoftime.
- Themessagealsodisplaysifthe brakesystemwarninglightison. SeeBrakeSystemWarning Lightonpage5-27.
- Themessagecoulddisplayifthe stabilitysystemtakeslonger thanusualtocompleteits diagnosticchecksduetodriving conditions.
- Themessagedisplaysifan engineorvehiclerelated problemhasbeendetectedand thevehicleneedsservice.See yourdealer.
Themessageturnsoffassoonas theconditionsthatcausedthe messagetobedisplayedareno longerpresent.
AirbagSystemMessages
SERVICEAIRBAG
Thismessagedisplaysifthereisa problemwiththeairbagsystem. Haveyourdealerinspectthe systemforproblems.SeeAirbag ReadinessLightonpage5-20and AirbagSystemonpage3-25for moreinformation.
Anti-theftAlarmSystem Messages
SERVICETHEFTDETERRENT SYSTEM
Thismessagedisplayswhenthere isaproblemwiththetheft-deterrent system. The vehicle mayormay not restart so you may want totak the vehicle to your dealer before returning off the engine. See Immobilizer Operation on page 2-14 form more information.
StartingtheVehicle Messages
FASTIDLEON
If your vehicle has this feature, this messaged displays when the fast idle feature is on. See Fast Idle System on page 9-31 form more information.
TireMessages
SERVICETIREMONITOR SYSTEM
IfthevehiclehastheTirePressure MonitorSystem(TPMS), this messagedisplaysifapartonthe systemisnotworkingproperly. The tirepressurelightalsoflashesand thenremainsonduringthesame ignitioncycle.See TirePressure Lightonpage5-30.Several conditionsmaycausethismessage toappear.See TirePressure MonitorOperationonpage10-68for moreinformation.Ifthewarning comesonandstayson,theremay beaproblemwiththeTPMS.See yourdealer.
TIRELEARNINGACTIVE
If the vehicle has the Tire Pressure Monitor System (TPMS), this messaged displays when the system is re-learning the tire positions on your vehicle. The tire positions must be re-learned after rotating the tires or after replacing a tire or sensor.
See TireInspectiononpage10-71, TireRotationonpage10-72, Tire PressureMonitorSystemon page 10-67, and TirePressureon page 10-65 formoreinformation.
TIRELOWADDAIRTOTIRE
IfthevehiclehastheTirePressure MonitorSystem(TPMS), this messagedisplayswhenthe pressureinoneormoreofthe vehicle'stiresislow. Thismessage alsodisplaysLEFTFRT(leftfront), RIGHTFRT(rightfront), LEFTRR (leftrear), orRIGHTRR(rightrear) to indicate the location of the low tire. Thelow tire pressure warning lightwill alsocomeon. See Tire Pressure Lightonpage 5-30. You can receive more than on one tire pressure message at a time. To read the other message that may have been sent at the same time, presstheset/reset button orthethe trip odometer reset stem. If atire pressure message appears the DIC, stop as soon as you can. Have the tire pressures checked and set
tothoseshownontheTireLoading Informationlabel.See Tireson page 10-57,VehicleLoadLimitson page 9-17,and TirePressureon page 10-65.TheDICalsoshows the tirepressure values.SeeDriver InformationCenter(DIC) on page 5-33.
TransmissionMessages SERVICE4WHEELDRIVE
Ifthevehiclehasfour-wheeldrive, thismessagemaydisplayifa problemoccurswiththe four-wheel-drivesystem.Ifthis messageappears,stopassoonas possibleandturnoffthevehicle. MakesurethekeyisintheLOCK/OFFpositionforatleastoneminute andthenrestartthevehicleand checkforthemessageontheDIC display.Ifthemessageisstill displayedorappearsagainwhen youbegindriving,the four-wheel-drivesystemneeds service.Seeyourdealer.
TRANSMISSIONHOTIDLE ENGINE
Notice: If you drivethe vehicle while the transmission fluid is overheating and the transmission temperature warning is displayed on the instrument panel cluster and/or DIC, you can damage the transmission. This could lead to costly repair that would not be covered by the warranty. Donot drivethe vehicle with overheated transmission fluid or while the transmission temperature warning is displayed.
Thismessagedisplaysandachime maysoundifthetransmissionfluid inthevehiclegetshot.Drivingwith thetransmissionfluidtemperature highcancausedamagetothe vehicle.Stopthevehicleandletit idletoallowthetransmissionto cool.Thismessageclearsandthe chimestopswhenthefluid temperaturereachesasafelevel.
VehicleReminder Messages
CHECKTRAILERWIRING
OnvehicleswiththeIntegrated TrailerBrakeControl(ITBC)system, thismessagemaydisplayanda chimemaysoundwhenoneofthe followingconditionsexists:
- Atrailerwithelectricbrakes becomes disconnected from the vehicle.
- If the disconnect occurs while the vehicle is stopped, this message clears itself after a short time.
-Ifthedisconnectoccurswhile thevehicleismoving, this messagestaysonuntilthe ignitionisturnedoff.
• Thereisashortinthewiringto theelectrictrailerbrakes.
Whenthismessagedisplays, power isnolongeravailabletothetrailer brakes.
Assoonasitissafetodoso, carefullypullthevehicleovertothe sideoftheroadandturntheignition off.Checkthewiringconnection to the trailerandturntheignitionback on.Thismessageclearsifthetrailer isreconnected.Thismessagealso clearsifyouacknowledgeit.Ifthis messagestilldisplays,eitherthe vehicleorthetrailerneedsservice. Seeyourdealer.
See "Integrated Trailer Brake Control System" under Towing Equipment on page 9-106 form more information.
ICEPOSSIBLEDRIVE WITHCARE
Thismessagedisplayswhenice conditionsarepossible.
TRAILERCONNECTED
OnvehicleswiththeIntegrated TrailerBrakeControl(ITBC)system, thismessagedisplaysbrieflywhen atrailerwithelectricbrakesisfirst connectedtothevehicle.
Thismessageclearsitselfafter severalseconds. Thismessagealso clearsifyouacknowledgeit. After thismessageclears, theTRAILER GAIN/OUTPUTdisplayappearsin theDIC.
See "TRAILERGAIN/OUTPUT" underDriverInformationCenter (DIC)onpage5-33and "Integrated TrailerBrakeControlSystem" under TowingEquipmentonpage9-106 formoreinformation.
WasherFluidMessages WASHERFLUIDLOWADD FLUID
Thismessagedisplayswhenthe windshieldwasherfluidislow.Fill the windshieldwasherfluidreservoir as soon as possible.SeeEngine CompartmentOverview page 10-6 forthelocationofthe windshieldwasherfluidreservoir. Also,see WasherFluidon page 10-29 formoreinformation.
Vehicle Personalization
VehiclePersonalization (WithDICButtons)
The vehicle may have customization capabilities that allow you to program certain feature to be preferred setting. Customization features can only be programmed to one setting on the vehicle and cannot be programmed to a preferred setting for different drivers.
Allofthecustomizationoptionsmay notbeavailableonthevehicle.Only theoptionsavailablewillbe displayedontheDIC.
The defaultsettings for the customization features were reset when the vehicle left the factory, but may have been changed from their default states in cethen.
Thecustomizationpreferencesare automaticallyrecalled.
Tochangecustomization preferences, usethefollowing procedure.
EnteringtheFeature SettingsMenu
- Turntheignitiononandplace thevehicleinP(Park).
Toavoidexcessivedrainonthe battery,turntheheadlampsoff. - Pressthecustomizationbutton toscrollthroughtheavailable customizableoptions.
FeatureSettingsMenultems
The following customization features allowyoutoprogramsettingstothe vehicle:
DISPLAYINENGLISH
Thisfeaturewillonlydisplayifa languageotherthanEnglishhas beenset. Thisfeatureallowsyouto changethelanguageinwhichthe DICmessagesappeartoEnglish.
Pressthecustomizationbuttonuntil thePRESS √TODISPLAYIN ENGLISHscreenappearsonthe DICdisplay.Presstheset/reset buttononcetodisplayallDIC messagesinEnglish.
DISPLAYLANGUAGE
Thisfeatureallowsyoutoselectthe languageinwhichtheDIC messageswillappear.
Pressthecustomizationbuttonuntil theDISPLAYLANGUAGEscreen appearontheDICdisplay.Press theset/resetbuttononcetoaccess thesettingsforthisfeature.Then pressthecustomizationbuttonto scrollthroughthefollowingsettings:
ENGLISH(default):Allmessages willappearinEnglish.
FRANCAIS: All messages will appear in French.
ESPANOL: Allmessages will appear in Spanish.
NOCHANGE: Nochangewillbe madetothisfeature. Thecurrent settingwillremain.
Toselectasetting, presstheset/resetbuttonwhilethedesired settingisdisplayedontheDIC.
Youcanalsochangethelanguage bypassingthetripodometerreset stem. See "Language" underDriver InformationCenter(DIC) on page5-33formoreinformation.
AUTODOORLOCK
Thisfeatureallowsyoutoselect whenthevehicle'sdoorswill automaticallylock.SeeAutomatic DoorLocksonpage2-10formore information.
Pressthecustomizationbuttonuntil AUTODOORLOCKappearsonthe DICdisplay.Presstheset/reset buttononcetoaccessthesettings forthisfeature.Thenpressthe customizationbuttontoscroll throughthefollowingsettings:
SHIFTOUTOFPARK(default): Thedoorswillautomaticallylock whenthevehicleisshiftedoutof P(Park).
ATVEHICLESPEED: Thedoors will automatically lock when the vehiclespeed is above 13 km/h (8 mph) forth reese seconds.
NOCHANGE: Nochangewillbe madetothisfeature. Thecurrent settingwillremain.
Toselectasetting, presstheset/resetbuttonwhilethedesired settingisdisplayedontheDIC.
AUTODOORUNLOCK
Thisfeatureallowsyoutoturnoff theautomaticdoorunlocking feature.Italsoallowsyoutoselect whichdoorsandwhentedoorswill automaticallyunlock.SeeAutomatic DoorLocksonpage2-10formore information.
Pressthecustomizationbuttonuntil AUTODOORUNLOCKappearson theDICdisplay.Presstheset/reset buttononcetoaccessthesettings forthisfeature.Thenpressthe customizationbuttontoscroll throughthefollowingsettings:
OFF: Noneofthedoorswill automaticallyunlock.
DRIVERATKEYOUT: Only the driverdoorwillunlockwhenthekey istakenoutoftheignition.
DRIVERINPARK: Only the driver door will unlock when the vehicle is shifted into P(Park).
ALLATKEYOUT: Allofthedoors will unlockwhenthekeyistaken outoftheignition.
ALLINPARK(default):Allofthe doorswillunlockwhenthevehicleis shiftedintoP(Park).
NOCHANGE: Nochangewillbe madetothisfeature. Thecurrent settingwillremain.
Toselectasetting, presstheset/resetbuttonwhilethedesired settingisdisplayedontheDIC.
REMOTEDOORLOCK
Thisfeatureallowsyoutoselectthe typeoffeedbackreceivedwhen lockingthevehiclewiththeRemote KeylessEntry(RKE)transmitter. Youwillnotreceivefeedbackwhen lockingthevehiclewiththeRKE transmitterifthedoorsareopen. SeeRemoteKeylessEntry(RKE) SystemOperationonpage2-3for moreinformation.
Pressthecustomizationbuttonuntil REMOTEDOORLOCKappearson theDICdisplay.Presstheset/reset buttononcetoaccessthesettings forthisfeature.Thenpressthe customizationbuttontoscroll throughthefollowingsettings:
OFF: Therewillbenofeedback whenyoupressthelockbuttonon theRKEtransmitter.
LIGHTSONLY:Theexteriorlamps willflashwhenyoupressthelock buttonontheRKEtransmitter.
HORNONLY: The horn will sound on these second press of the lock button on the RKE transmitter.
HORN&LIGHTS(default): The exteriorlampswillflashwhenyou pressthelockbuttonontheRKE transmitter, and the hornwill sound whenthelockbutton ispressed again within five seconds of the previous command.
NOCHANGE: Nochangewillbe madetothisfeature. Thecurrent settingwillremain.
Toselectasetting, presstheset/resetbuttonwhilethedesired settingisdisplayedontheDIC.
REMOTEDOORUNLOCK
Thisfeatureallowsyoutoselectthe typeoffeedbackreceivedwhen unlockingthevehiclewiththe RemoteKeylessEntry(RKE) transmitter.Youwillnotreceive feedbackwhenunlockingthe vehiclewiththeRKEtransmitterif thedoorsareopen.SeeRemote KeylessEntry(RKE)System Operationonpage2-3formore information.
Pressthecustomizationbuttonuntil REMOTEDOORUNLOCKappears ontheDICdisplay.Presstheset/resetbuttononcetoaccessthe settingsforthisfeature.Thenpress thecustomizationbuttontoscroll throughthefollowingsettings:
LIGHTSOFF: The exterior lamps will not flash when you press the unlock button on the RKE transmitter.
LIGHTSON(default): The exterior lampswillflashwhenyoupressthe unlockbuttonontheRKE transmitter.
NOCHANGE: Nochangewillbe madetothisfeature. Thecurrent settingwillremain.
Toselectasetting, presstheset/resetbuttonwhilethedesired settingisdisplayedontheDIC.
DELAYDOORLOCK
Onvehicleswithacrewcab, this featureturnsthedelayeddoorlocks onoroff. Whenlockingthedoors withthepowerdoorlockswitchand adoorisopen, thisfeaturewill delaylockingthedoorsuntil fivesecondsafterthelastdooris closed. Youwillhearthreechimes tosignalthatthedelayedlocking featureisinuse. Thekeymustbe outoftheignitionforthisfeatureto work. Youcantemporarilyoverride delayedlockingbypassingthe powerdoorlockswitchtwice. See DelayedLockingonpage2-9for moreinformation.
Pressthecustomizationbuttonuntil DELAYDOORLOCKappearson theDICdisplay.Presstheset/reset buttononcetoaccessthesettings forthisfeature.Thenpressthe customizationbuttontoscroll throughthefollowingsettings:
OFF: Therewillbenodelayed lockingofthevehicle'sdoors.
ON(default): Thedoorswillnot lockuntilfivesecondsafterthelast doorisclosed.
NOCHANGE: Nochangewillbe madetothisfeature. Thecurrent settingwillremain.
Toselectasetting, presstheset/resetbuttonwhilethedesired settingisdisplayedontheDIC.
EXITLIGHTING
Thisfeatureallowsyoutoselectthe amountoftimeyouwantthe exteriorlampstoremainonwhenit isdarkenoughoutside.This happensafterthekeyisturnedfrom ON/RUNtoLOCK/OFF.
Pressthecustomizationbuttonuntil EXITLIGHTINGappearsontheDIC display.Presstheset/resetbutton oncetoaccessthesettingsforthis feature.Thenpressthe customizationbuttontoscroll throughthefollowingsettings:
OFF: The exterior lampswill not turnon.
30SECONDS(default): The exteriorlampswillstayonfor 30seconds.
1MINUTE: The exterior lampswill stay on for one minute.
2MINUTES:Theexteriorlampswill stayonfortwominutes.
NOCHANGE: Nochangewillbe madeto this feature. The current setting will remain.
Toselectasetting, presstheset/resetbuttonwhilethedesired settingisdisplayedontheDIC.
APPROACHLIGHTING
Thisfeatureallowsyoutoselectif theexteriorlightsturnonbriefly duringlowlightperiodsafter unlockingthevehicleusingthe RemoteKeylessEntry(RKE) transmitter.
Pressthecustomizationbuttonuntil APPROACHLIGHTINGappearson theDICdisplay.Presstheset/reset buttononcetoaccessthesettings forthisfeature.Thenpressthe customizationbuttontoscroll throughthefollowingsettings:
OFF: The exterior light will not turn on when you unlock the vehicle with the RKE transmitter.
ON(default): Ifitisdarkenough outside, the exterior light will turn on briefly when you unlock the vehicle with the RKE transmitter.
Thelightswillremainonfor 20seconds,untilthelocbuttonon theRKEtransmitterispressed, oruntilthevehicleisnolongeroff. SeeRemoteKeylessEntry(RKE) SystemOperationonpage2-3for moreinformation.
NOCHANGE: Nochangewillbe madetothisfeature. Thecurrent settingwillremain.
Toselectasetting, presstheset/resetbuttonwhilethedesired settingisdisplayedontheDIC.
CHIMEVOLUME
Ifavailable, thisfeatureallowsyou toselectthevolumelevelofthe chime.
Pressthecustomizationbuttonuntil CHIMEVOLUMEappearsonthe DICdisplay.Presstheset/reset buttononcetoaccessthesettings forthisfeature.Thenpressthe customizationbuttontoscroll throughthefollowingsettings:
NORMAL: Thechimevolumewill besettoanormallevel.
LOUD: The chimevolumewillbe settoaloudlevel.
5-58 InstrumentsandControls
NOCHANGE: Nochangewillbe madetothisfeature. Thecurrent settingwillremain.
Thereisnodefaultforchime volume. The volumewillstayatthe lastknownsetting.
Toselectasetting, presstheset/resetbuttonwhilethedesired settingisdisplayedontheDIC.
PARKTILTMIRRORS
Ifthevehiclehasthisfeature, it allowsyoutoselectiftheoutside mirror(s)willautomaticallytiltdown whenthevehicleisshiftedinto R(Reverse).SeeParkTiltMirrors onpage2-19formoreinformation.
Pressthecustomizationbuttonuntil PARKTILTMIRRORSappearson theDICdisplay.Presstheset/reset buttononcetoaccessthesettings forthisfeature.Thenpressthe customizationbuttontoscroll throughthefollowingsettings:
OFF(default):Neitheroutside mirrorwillbetilteddownwhenthe vehicleisshiftedintoR(Reverse).
DRIVERMIRROR: Thedriver outsidemirrorwillbetilteddown whenthevehicleisshiftedinto R(Reverse).
PASSENGERMIRROR: The passengeroutsidemirrorwillbe tiltedownwhenthevehicleis shiftedintoR(Reverse).
BOTHMIRRORS: Thedriverand passengeroutsidemirrorswillbe tiltedownwhenthevehicleis shiftedintoR(Reverse).
NOCHANGE: Nochangewillbe madetothisfeature. Thecurrent settingwillremain.
Toselectasetting, presstheset/resetbuttonwhilethedesired settingisdisplayedontheDIC.
EASYEXITRECALL
Ifthevehiclehasthisfeature, it allowsyoutoselectyourpreference fortheautomaticeasyexitseat feature. SeeMemorySeatson page3-8formoreinformation.
PressthecustomizationbuttonuntilEASYEXITRECALLappearsontheDICdisplay.Presstheset/resetbuttononcetoaccessthesettingsforthisfeature.Thenpressthecustomizationbuttontoscrollthroughthefollowingsettings:
DOORBUTTONONLY: No automaticseatexitrecallwillloccur. Therecallwillonlyoccurafter pressingtheeasyexitseatbutton.
BUTTON&KEYOUT(default):If thefeaturesareenabledthroughthe EASYEXITSETUPmenu,the driverseatwillmovebackwhenthe keyisremovedfromtheignitionor theeasyexitseatbuttonispressed.
The automatic ease exit seat movement will only occur on time after the key is removed from the ignition. If the automatic movement has already occurred, and you put the key back in the ignition and remove it again, these will stay in the original exit position, unless a memory recall took place prior to removing the key again.
NOCHANGE: Nochangewillbe madetothisfeature. Thecurrent settingwillremain.
Toselectasetting, presstheset/resetbuttonwhilethedesired settingisdisplayedontheDIC.
EASYEXITSETUP
Ifthevehiclehasthisfeature, it allowsyoutoselectwhichareaswill recallwiththeautomaticeasyexit seatfeature. Italsoallowsyouto turnofftheautomaticeasyexit feature. SeeMemorySeatson page3-8 and EASYEXITRECALL earlierformoreinformation.
PressthecustomizationbuttonuntilEASYEXITSETUPappearsontheDICdisplay.Presstheset/resetbuttononcetoaccessthesettingsforthisfeature.Thenpressthemenuup/downbuttontoscrollthroughthefollowingsettings:
OFF: No automaticseatexitwill recall.
SEATONLY(default): Thedriver seatwillrecall.
NOCHANGE: Nochangewillbe madetothisfeature. Thecurrent settingwillremain.
Toselectasetting, presstheset/ reset button while the desired setting is displayed on the DIC.
MEMORYSEATRECALL
If the vehicle has this feature, it allows you to select your preference for her remememory seat recall feature. See Memory Seat on page 3-8 form more information.
Pressthecustomizationbuttonuntil MEMORYSEATRECALLappears ontheDICdisplay.Presstheset/resetbuttononcetoaccessthe settingsforthisfeature.Thenpress thecustomizationbuttontoscroll throughthefollowingsettings:
OFF(default): Noremotememory seatrecallwilloccur.
ON: Thedriverseatand, onsome vehicles, theoutsidemirrorswill automaticallymovetothestored drivingpositionwhentheunlock buttonontheRemoteKeyless Entry(RKE)transmitterispressed. Onsomevehicleswiththe adjustablethrottleandbrakepedal feature, thepedalswillalso automaticallymove.
NOCHANGE: Nochangewillbe madetothisfeature. Thecurrent settingwillremain.
Toselectasetting, presstheset/resetbuttonwhilethedesired settingisdisplayedontheDIC.
REMOTESTART
If your vehicle has this feature, it allows out to turn theremot start for on. Theremot start feature allows out start the engine from outside of the vehicle using the Remote Keyless Entry (RKE) transmitter. See Remote Vehicle Start on page 2-5 form more information.
Pressthecustomizationbuttonuntil REMOTESTARTappearsonthe DICdisplay.Presstheset/reset buttononcetoaccessthesettings forthisfeature.Thenpressthe customizationbuttontoscroll throughthefollowingsettings:
OFF: Theremotestartfeaturewill bedisabled.
ON(default): Theremotestart featurewillbeenabled.
NOCHANGE: Nochangewillbe madetothisfeature. Thecurrent settingwillremain.
Toselectasetting, presstheset/resetbuttonwhilethedesired settingisdisplayedontheDIC.
FACTORYSETTINGS
Thisfeatureallowsyoutosetallof thecustomizationfeaturesbackto theirfactorydefaultsettings.
Pressthecustomizationbuttonuntil FACTORYSETTINGSappearson theDICdisplay.Presstheset/reset buttononcetoaccessthesettings forthisfeature.Thenpressthe customizationbuttontoscroll throughthefollowingsettings:
RESTOREALL(default): The customizationfeatureswillbesetto theirfactorydefaultsettings.
DONOTRESTORE:The customizationfeatureswillnotbe settotheirfactorydefaultsettings.
Toselectasetting, presstheset/resetbuttonwhilethedesired settingisdisplayedontheDIC.
EXITFEATURESETTINGS
Thisfeatureallowsyoutoexitthe featuresettingsmenu.
Pressthecustomizationbuttonuntil PRESS √TOEXITFEATURE SETTINGSappearsintheDIC display.Presstheset/resetbutton oncetoexitthemenu.
If you donotexit, pressing the customization button again will return out the beginning of the feature settings menu.
ExitingtheFeature SettingsMenu
Thefeaturesettingsmenuwillbe exitedwhenanyofthefollowing occurs:
• Thevehicleisnolongerin ON/RUN.
- Thetrip/fuelorvehicle information DIC buttons are pressed.
• Theendofthefeaturesettings menuisreachedandexited.
• A40-secondtimeperiodhas elapsedwithnoselectionmade.
UniversalRemote System
SeeRadioFrequencyStatementon page 13-23forinformation regardingPart15oftheFederal CommunicationsCommission(FCC) rulesandIndustryCanada StandardsRSS-GEN/210/220/310.
UniversalRemoteSystem Programming

natural_image
Three identical white rectangular objects with black dots above them, arranged horizontally (no text or symbols)VehicleswiththeUniversalRemote Systemwillhavethesebuttons locatedintheheadliner.
This system provides a way to replace up three re-remote control transmitters used to activate devices such as a aged door openers, security systems, and home automation devices.
Donotusethissystemwithany garagedooropenerthatdoesnot havethestopandreversefeature. Thisincludesanygaragedoor openermodelmanufacturedbefore April1,1982.
Readtheinstructionscompletely beforeattemptingtoprogramthe transmitter.Becauseofthesteps involved,itmaybehelpfultohave anotherpersonassistwith programmingthetransmitter.
Besuretokeeptheoriginalremote controltransmitterforuseinother vehicles,aswellasforfuture programming.Onlytheoriginal remotecontroltransmitterisneeded forFixedCodeprogramming.The programmedbuttonsshouldbe erasedwhenthevehicleissoldor theleaseends.See“Erasing UniversalHomeRemoteButtons”in thissection.
Parkthevehicleoutsideofthegaragewhenprogrammingagaragedoor.Besurethatpeopleandobjectsareclearofthegaragedoororgatethatisbeingprogrammed.
ProgrammingUniversalHome Remote—RollingCode
Forquestionsorhelpprogramming theUniversalHomeRemote System, call 1-866-572-2728orgo towww.learcar2u.com.
Mostgaragedooropenerssold after1996areRollingCodeunits.
Programmingagaragedooropener involvestime-sensitive actions, so readtheentireprocedurebefore starting. Otherwise, the device will timeout and the procedure will have to be repeated.
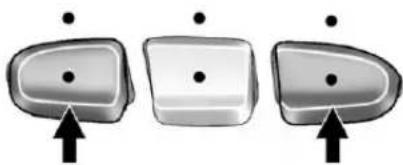
natural_image
Three identical metallic objects with black dots and upward arrows indicating movement or force (no text or symbols)Toprogramuptothreedevices:
- Frominsidethevehicle, press thetwooutsidebuttonsatthe sametimeforoneto twoseconds, andimmediately releasethem.

text_image
Control panel interface with warning icons and a downward arrow indicating action-
Inthegarage, locatethe garagedooropenerreceiver (motor-headunit). Findthe "Learn" or "Smart" button. It can usually be found where the hangingantennawire is attached to the motor-head unit and maybe acolored button. Pressthisbutton. Afterpressing this button, complet the following steps in less than 30 seconds.
-
Immediately return to the vehicle. Press and hold the Universal Home Remote button that will be used to control the garagedoor until the garage doormoves. The indicator light, abovethes elected button, should slowly blink. This button may need to beheld for up to 20 seconds.
-
Immediately, withinonesecond, releasethebuttonwhenthe garagedoormoves. The indicatorlightwillblinkrapidly untilprogrammingiscomplete.
-
Pressandreleasethesame buttonagain. Thegaragedoor shouldmove, confirming that programming is successful and complete.
ToprogramanotherRollingCode devicesuchasanadditionalgarage dooropener,asecuritydevice, orhomeautomationdevice,repeat Steps1through5,choosinga differentfunctionbuttoninStep3 thanwhatwasusedforthegarage dooropener.
Iftheseinstructionsdonotwork,the garagedooropenerisprobablya FixedCodeunit.Followthe programminginstructionsthatfollow foraFixedCodecgaragedoor opener.
ProgrammingUniversalHome Remote—FixedCode
Forquestionsorhelpprogramming theUniversalHomeRemote System, call 1-866-572-2728orgo towww.learcar2u.com.
Mostgaragedooropenerssold before1996areFixedCodeunits.
Programmingagaragedooropener involvestime-sensitive actions, so readtheentireprocedurebefore starting. Otherwise, the device will timeout and the procedure will have to be repeated.

text_image
CT5 206-12 TI24Toprogramuptothreedevices:
- Toverify that the garagedoor openerisaFixedCodeunit, removethe battery cover on the hand-held transmitters supplied by the manufacturer of the garagedooropener motor. If there is a row of dip switches similar to the graphic above, the garagedoor openerisaFixed Codeunit. If you donot see a row of dip switches, return to the previous section for Programming Universal Home Remote—Rolling Code.
Yourhand-heldtransmittercan havebetween8to12dip switchesdependingonthe brandoftransmitter.
Thegaragedooropenerreceiver (motorheadunit) could also havearowofdipswitchesthat canbeusedwhenprogramming theUniversalHomeRemote. Ifthetotalnumberofswitches onthemotorheadand hand-heldtransmitterare different,orifthedipswitch settingsaredifferent,usethedip switchsettingsonthemotor headunittoprogramthe UniversalHomeRemote. The motorheaddipswitchsettings canalsobeusedwhenthe originalhand-heldtransmitteris notavailable.
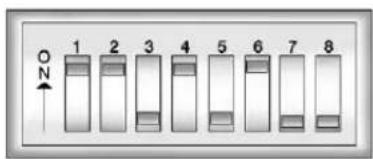
text_image
1 2 3 4 5 6 7 8ExampleofEightDipSwitches with TwoPositions
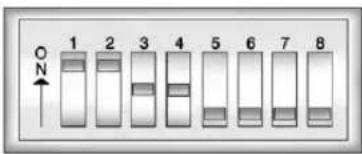
text_image
1 2 3 4 5 6 7 8ExampleofEightDipSwitches withThreePositions
Thepanelofswitchesmightnot appearexactlyastheydointhe examplesabove,butthey shouldbesimilar.
Theswitchpositionsonthe hand-heldtransmittercouldbe labeledasfollows:
- Aswitchintheupposition couldbelabeledasUp, +,orOn.
- Aswitchinthedown positioncouldbelabeledas Down, -, orOff.
-
Aswitchinthemiddle positioncouldbelabeledas Middle,0,orNeutral.
-
Writedownthe8to12switch settingsfromlefttorightas follows:
-
Whenaswitchisintheup position, write "Left."
- Whenaswitchisinthe downposition,write"Right."

5-66InstrumentsandControls
- Ifaswitchissetbetween theupanddownposition, write "Middle."
Theswitchsettingswritten downinStep2now becomethebuttonstrokes tobeenteredintothe UniversalHomeRemotein Step4.Besuretoenterthe switchsettingswrittendown inStep2,inorderfromleft toright,intotheUniversal HomeRemote,when completingStep4.
- From inside your vehicle, first firmly press all three buttons at the same time for about three seconds. Releasethe button stop the Universal Home Remote into programming mode.

natural_image
Three identical abstract shapes with labeled points A, B, and C, no text or symbols present.A.LeftButton(Up, +, orOn)
B.MiddleButton(Middle,0, orNeutral)
C.RightButton (Down, -, or Off)
- The indicator lightswillblink slowly. Entereachswitchsetting from Step2 into your vehicle's UniversalHomeRemote. You will have two and one-half minute to complete Step4. Now press one button on the UniversalHomeRemote for each switch settings as follows:
- If you wrote "Left," press the left button (A) in the vehicle.
- Ifyouwrote"Right,"press therightbutton(C)inthe vehicle.
- Ifyouwrote"Middle,"press themiddlebutton(B)inthe vehicle.

- Afterenteringalloftheswitch positions, once again firmly press and release all three buttons at the same time. The indicator lights will turn on.
- Pressandholdthebuttonthat willbeusedtocontrolthe garagedooruntilthegarage doormoves. Theindicatorlight abovetheselectedbutton shouldslowlyblink. Thisbutton mayneedtobeheldforupto 55seconds.
- Immediately releasethebutton whenthegaragedoormoves. The indicatorlightwillblink rapidlyuntilprogrammingis complete.
- Pressandreleasethesame buttonagain. Thegaragedoor shouldmove, confirming that programming is successful and complete.
ToprogramanotherFixedCode devicesuchasanadditionalgarage dooropener,asecuritydevice, orhomeautomationdevice,repeat Steps1-8,choosingadifferent buttoninStep6thanwhatwasused forthegaragedooropener.
UniversalRemoteSystem Operation
Pressandholdtheappropriate buttonforatleasthalfofasecond. Theindicatorlightwillcomeon whilethesignalisbeingtransmitted.
ReprogrammingUniversal HomeRemoteButtons
Anyofthethreebuttonscanbe reprogrammedbyrepeatingthe instructions.
ErasingUniversalHome RemoteButtons
Theprogrammedbuttonsshouldbe erasedwhenthevehicleissoldor theleaseends.
ToeraseeitherRollingCodeor FixedCodesettingsonthe UniversalHomeRemotedevice:
- Pressandholdthetwooutside buttonsatthesametimefor approximately20seconds, until theindicatorlights, located directlyabovethebuttons, begin toblinkrapidly.
- Oncetheindicatorlightsbeginto blink, releasebothbuttons. The codesfromallbuttonswillbe erased.
Forhelporinformationonthe UniversalHomeRemoteSystem, callthecustomerassistancephone numberunderCustomerAssistance Offices(U.S.andCanada)on page 13-5orCustomerAssistance Offices(Mexico)onpage 13-6.
5-68 InstrumentsandControls
NOTES

DEALER
法定代表人:王志忠
Lighting
ExteriorLighting
ExteriorLampControls......6-1
ExteriorLampsOff
Reminder......6-3
HeadlampHigh/Low-Beam
Changer......6-3
Flash-to-Pass......6-3
DaytimeRunning
Lamps(DRL)....6-3
AutomaticHeadlamp
System......6-4
HazardWarningFlashers.....6-5
TurnandLane-Change
Signals......6-6
FogLamps....6-7
Auxiliary
Roof-MountedLamp......6-7
InteriorLighting
InstrumentPanelIllumination
Control....6-8
CargoLamp......6-8
DomeLamps......6-9
ReadingLamps......6-9
LightingFeatures
EntryLighting......6-10
ExitLighting......6-10
BatteryLoadManagement...6-10
BatteryPowerProtection....6-11
ExteriorLighting
ExteriorLampControls

text_image
AUTO DOME OFF ±0The exterior lamps control is located on the instrument panel to the left of the steering wheel.
Itcontrolsthefollowingsystems:
- Headlamps
- Taillamps
- ParkingLamps
- LicensePlateLamps
- InstrumentPanelLights
- RoofMarkerLamps (IfEquipped)
6-2Lighting
The exterior lamps control has four positions:
(Off):Turnsofftheautomatic headlampsandDaytimeRunning Lamps(DRL).Turntheheadlamp controltotheoffpositionagainto turntheautomaticheadlampsor DRLbackon.
ForvehiclesfirstsoldinCanada, theoffpositionwillonlyworkwhen thevehicleisshiftedintoP(Park).
AUTO(Automatic): Automatically turnsontheheadlampsatnormal brightness, togetherwiththe following:
- ParkingLamps
- InstrumentPanelLights
- Taillamps
- LicensePlateLamps
• RoofMarkerLamps (IfEquipped)
Whenthevehicleisturnedoff and theheadlampsareinAUTO, the headlampsmayautomatically remainonforasettime. Thetime of the delay can be changed using the DIC. See Driver Information Center (DIC) on page 5-33
00=(ParkingLamps):Turnsonthe parkinglampstogetherwiththe following:
• InstrumentPanelLights
- Taillamps
- LicensePlateLamps
• RoofMarkerLamps (IfEquipped)
ID(Headlamps): Turnsonthe headlampstogetherwiththe following:
- ParkingLamps
• InstrumentPanelLights -
Taillamps
-
LicensePlateLamps
• RoofMarkerLamps (IfEquipped)
Whentheheadlampsareturnedon whilethevehicleison,the headlampsturnoffautomatically 10minutesaftertheignitionis turnedoff.Whentheheadlampsare turnedonwhilethevehicleisoff, theheadlampswillstayonfor 10minutesbeforeautomatically turningofftopreventthebattery frombeingdrained.Turnthe headlampcontroltooffandthen backtotheheadlamponpositionto maketheheadlampsstayonforan additional10minutes.
Pushtheturnsignal/multifunction levertowardtheinstrumentpanelto changetheheadlampsfromlow beamtohighbeam.
ExteriorLampsOff Reminder
Forvehicleswitharadio,areminder chimesoundswhentheheadlamps orparkinglampsaremanually turnedon,theignitionisoff,anda doorisopen.Todisablethechime, turnthelampoff.
HeadlampHigh/Low-BeamChanger
ID ID (HeadlampHigh/Low-Beam
Changer): Push the levertoward the instrument panel, to changethe headlamps from low to high beam.
Pullthemultifunctionlevertoward youandreleaseit,toreturnto low-beamheadlamps.

Whenthehighbeamsareon, this indicatorlightontheinstrument panelclusterwillalsobeon.
Flash-to-Pass
Thisfeatureletsyouusethe high-beamheadlampstosignala driverinfrontofyouthatyouwant topass.Itworksevenifthe headlampsareintheautomatic position.
DaytimeRunningLamps(DRL)can makeiteasierforotherstoseethe frontofyourvehicleduringtheday. Fullyfunctionaldaytimerunning lampsarerequiredonallvehicles firstsoldinCanada.
The DRL system comes on when the following conditions are met:
- Theignitionison.
• Theexteriorlampscontrolis inAUTO.
6-4Lighting
• ThetransmissionisnotinPark.
• Thelightsensordeterminesitis daytime.
WhentheDRLsystemison,only theDRLlampsareon.The taillamps,sidemarker,instrument panellights,andotherlampswillnot beon.
Whenitbeginstogetdark,the automaticheadlampsystem switchesfromDRLtothe headlamps.
ToturnofftheDRLamps,turnthe exteriorlampscontroltotheOFF positionandthenrelease.For vehiclesfirstsoldinCanada,the transmissionmustbeintheP(Park) positionbeforetheDRLampscan beturnedoff.
AutomaticHeadlamp System
Whenitisdarkenoughoutside,the automaticheadlampsystemturns ontheheadlampsatthenormal brightness,alongwiththetaillamps, sidemarker,parkinglamps,andthe instrumentpanellights.Theradio lightswillalsobedim.
Toturnofftheautomaticheadlamp system,turntheexteriorlamps switchtotheoffpositionandthen releaseit.Forvehiclesfirstsoldin Canada,thetransmissionmustbe intheP(Park)positionbeforethe automaticheadlampsystemcanbe turnedoff.
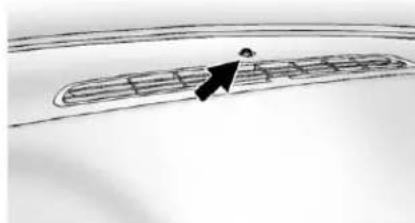
natural_image
Simple line drawing of a person walking along a curved path with horizontal bars (no text or symbols)Thevehiclehasalightsensor locatedonthetopoftheinstrument panelwhichregulateswhenthe automaticheadlampsturnon.Do notcoverthesensor,otherwisethe headlampswillcomeonwhenever theignitionison.
Thesystemmayalsoturnonthe headlampswhendrivingthrougha parkinggarageorheavyovercast weather. Thisisnormal.
Thereisadelayinthetransition between the daytime and nighttime operation of the Daytime Running Lamps (DRL) and the automatic headlampsystem so that driving under bridges or bright overhead streetlights does not affect the system. The DRL and automatic headlampsystem are only affected when the lightsensor detects a change in lighting lasting longer than the delay.
Ifthevehicleisstartedinadark garage,theautomaticheadlamp systemcomesonimmediately. Oncethevehicleleavesthegarage, ittakesapproximatelyyoneminute fortheautomaticheadlampsystem tochangetoDRLifitisbright enoughoutside.Duringthatdelay, theinstrumentpanelclustermaynot beasbrightasusual.Makesurethe instrumentpanelbrightnesscontrol isinthefullbrightposition.See InstrumentPanelIllumination Controlonpage6-8.
Toidlethevehiclewiththe automaticheadlampsystemoff,turn thecontroltotheoffposition.
Theheadlampswillalsostayon afteryouexitthevehicle. This featurecanbeprogrammedusing theDriverInformationCenter(DIC). SeeVehiclePersonalization(With DICButtons)onpage5-52.
If the vehicle is not equipped with DIC buttons, exit lighting is automatic. When it is dark enough outside, the exterior lamps remain on for 30 seconds after the ignition is moved from ON/RUN to LOCK/OFF.
Forvehicleswithoutaradio, the instrumentpanellightremainsonfor 30secondswiththedriverdoor closed. Forvehicleswitharadio, the instrumentpanellightremains onfor10minuteswiththedriver doorclosed. SeeRetained AccessoryPower(RAP)on page9-32.
The regular headlamp system can be turned on when needed.
HazardWarningFlashers
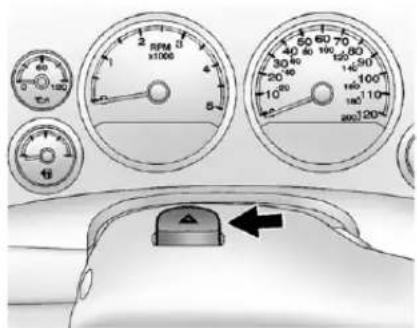
text_image
Diagram of car dashboard with analog gauges and a rotary knob, showing speed, temperature, and distance measurements.△(HazardWarningFlashers): Pressthisbuttonlocatedontopof thesteeringcolumn,tomakethe frontandreturnsignallamps flashonandoff.Thiswarnsothers thatyouarehavingtrouble.Press againtoturntheflashersoff.
Whenthehazardwarningflashers areon,thevehicle'sturnsignalswill notwork.
TurnandLane-Change Signals

natural_image
Close-up of a car headlight switch with directional arrows indicating rotation (no text or symbols)Anarrowontheinstrumentpanel clusterflashesinthedirectionofthe turnorlanechange.
Movetheleverallthewayupor downtosignalaturn.
Raiseorlowertheleverforless thanoneseconduntilthearrow startstoflashtosignalalane change. This causestheturn signalstoautomaticallyflash threetimes.Itwillflashsixtimesif Tow/HaulModeisactive.Holding theturnsignalleverformorethan onesecondwillcausetheturn signalstoflashuntilyoureleasethe lever.
Theleverreturnstoitsstarting positionwheneveritisreleased.
Ifaftersignalingaturnoralane changethearrowsflashrapidlyor donotcomeon,asignalbulbcould beburnedout.
Havethebulbsreplaced. If the bulb is not burned out, check the fuse. See Fuses and Circuit Breakerson page 10-49.
TurnSignalOnChime
If the turn signal is left on form more than 1.2 km (0.75 mi), achime sounds at each flash of the turn signal, if the vehicle has a radio. Them message TURNSIGNALON will also appear in the Driver Information Center (DIC). To turn the chime and message off, move the turn signal alleverto the off position.
FogLamps

text_image
AUTO DOME OFF #0Forvehicleswithfoglamps,the controlislocatednexttotheexterior lampscontrolontheinstrument panel,totheleftofthesteering column.
TheignitionmustbeintheON/RUN positionforthefoglampsto comeon.
D(FogLamps):Presstoturnthe foglampsonoroff.Alightwillcome onintheinstrumentpanelcluster.
Whenthefoglampsareturnedon, theparkinglampsautomatically turnon.
Whentheheadlampsarechanged tohighbeam, thefoglampsalsogo off. Whenthehigh-beamheadlamps areturnedoff, thefoglampswill comeonagain.
Somelocalitieshavelawsthat requiretheheadlampstobeonwith thefoglamps.
Auxiliary Roof-MountedLamp
If the vehicle has this feature, this button includes wiring provisions for adealerora qualified service center to install an auxiliary roof lamp.

natural_image
Diagram of a vehicle interior layout with no visible text or symbolsThisbuttonislocatedonthe overheadconsole.
Whenthewiringisconnectedtoan auxiliaryroof-mountedlamp, pressingthebottomofthebutton willactivatethelampandilluminate anindicatorlightatthebottomof thisbutton.Pressingthetopofthe buttonwillturnofftheroof-mounted lampandindicator.
The emergencyrooflampcircuitis fusedat30amps, sothetotal currentdrawoftheattachedlamps shouldbelessthanthisvalue. The attachmentpointsfortherooflamp circuitsaretwobluntcutwires locatedabovetheoverhead console, adarkgreenswitched powerwireandablackgroundwire.
Formoreinformationonroofmount emergencylampinstallation,please visittheGMUpfitterwebsiteat www.gmupfitter.comorcontactyour dealer.
Ifthevehiclehasthisbutton,the vehiclemayhavethesnowplow preppackage.Forfurther information,seeAddingaSnow PloworSimilarEquipmenton page9-119.
InteriorLighting
InstrumentPanel IlluminationControl
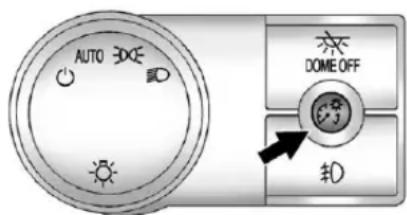
text_image
AUTO EXE DOME OFF $0(InstrumentPanel Brightness): Thisfeaturecontrols thebrightnessoftheinstrument panellightsandislocatednextto theexteriorlampscontrol.
Pushtheknobtoextendoutand thenitcanbeturned.
Turntheknobclockwiseor counterclockwisetobrightenordim theinstrumentpanellights. Turning theknobtothefarthestclockwise positionturnsonthedomelamps.
CargoLamp
Thecargolampscomeonby turningtheinstrumentpanel brightnesscontrolknobtothe farthestclockwiseposition. This knobislocatedontheinstrument panelandalsoturnsonthedome lamps.
Thecargolampscanbeusedif morelightisneededinthecargo areaofthevehicleorinthetop-box storageunits.
DomeLamps
Thedomelampsarelocatedinthe overheadconsole.
Theycomeonwhenanydooris openedandturnoffafterallthe doorsareclosed.
Turntheinstrumentpanel brightnessknoblocatedbelowthe domelampoverridebutton, clockwisetothefarthestpositionto manuallyturnonthedomelamps. Thedomelampsremainonuntilthe knobisturnedcounterclockwise.
DomeLampOverride
Thedomelampoverridebuttonis locatednexttotheexteriorlamps control.

text_image
AUTO DOME OFF #0(DomeOff):Pressthebutton inandthedomelampsremainoff whenadoorisopened.Pressthe buttonagaintoreturnittothe extendedpositionsothatthedome lampscomeonwhenadooris opened.
ReadingLamps
Forvehicleswithreadinglamps, theyarelocatedontheoverhead console.
Toturnonthereadinglamps, press thebuttonlocatednexttoeach lamp. Toturnthemoff, pressthe buttonagain.
The vehicle may also havereading lamps in other locations. Toturn the lampson or off, pressthe button located next to the lamp.
IfthevehiclehasaDVDRearSeat Entertainment(RSE)system,press thelamplensestoturnthelampson oroff.
Thelampsarefixedandcannotbe adjusted.
LightingFeatures
EntryLighting
The vehicle has an illuminated entry feature.
Whenthedoorsareopened, the domelampswillcomeonifthe domeoverridebuttonisinthe extendedposition. Ifthedome overridebuttonispressedin, the lampswillnotcomeon.
ExitLighting
Theinteriorlampscomeonwhen thekeyisremovedfromtheignition. Theyturnoffautomaticallyin 20seconds. Thelightsdonotcome onifthedomeoverridebuttonis pressedin.
BatteryLoad Management
The vehicle has Electric Power Management (EPM) that estimates the battery's temperature and state of charge. It then adjusts the voltage for best performance and extended life of the battery.
Whenthebattery'sstateofcharge islow,thevoltageisraisedslightly toquicklybringthechargebackup. Whenthestateofchargeishigh, thevoltageisloweredslightlyto preventovercharging.Ifthevehicle hasavoltmetergaugeoravoltage displayontheDriverInformation Center(DIC),youmayseethe voltagemoveupordown.This is normal.Ifthereisaproblem,an alertwillbedisplayed.
The battery can be discharged at idle if the electrical loads are very high. This is true for all vehicles. This because the generator (alternator) may not be spinning fast enough that let to produce all of the power needed for very high electrical loads.
Ahighelectricalloadoccurswhen severalofthefollowingareon,such as:headlamps,highbeams,fog lamps,rearwindowdefogger, climatecontrolfanathighspeed, heatedseats,enginecoolingfans, trailerloads,andloadspluggedinto accessorypoweroutlets.
EPMworkstoppreventexcessive dischargeofthebattery.ltdoesthis bybalancingthegenerator'soutput andthevehicle'selectricalneeds. Itcanincreaseengineidlespeedto generatemorepowerwhenever needed.Itcantemporarilyreduce thepowerdemandsofsome accessories.
Normally, these actions occur in steps or levels, without being noticeable. In rare cases at the highest level of corrective action, this action may be notice able to the driver. If so, a DIC messagemight be displayed, such as BATTERY SAVERACTIVE, BATTERY VOLTAGELOW, or LOWBATTERY. If one of these messages displays, it is recommended that the driver reduces electrical loads as much as possible. See Driver Information Center (DIC) on page 5-33.
BatteryPowerProtection
Thisfeatureshutsoffthedomeand readinglamps,iftheyareleftonfor morethan10minutesafterthe ignitionisturnedoff.Thecargo lampshutsoffafter20minutes.This preventsthebatteryfrom runningdown.
6-12Lighting
NOTES

DEALER
法定代表人:王志忠
Infotainment System
Introduction
Infotainment......7-1
Theft-DeterrentFeature.....7-2
Operation....7-3
Radio
AM-FMRadio....7-9
SatelliteRadio....7-11
RadioReception......7-14
FixedMastAntenna......7-15
SatelliteRadioAntenna.....7-15
AudioPlayers
CDPlayer....7-16
CD/DVDPlayer......7-23
Auxiliary Devices.....7-35
RearSeatInfotainment
RearSeatEntertainment (RSE)System....7-40
RearSeatAudio(RSA) System......7-50
Phone
Bluetooth....7-52
TrademarksandLicense Agreements
TrademarksandLicense Agreements....7-60
Introduction
Infotainment
Determinewhichradiothevehicle hasandreadthefollowingpagesto becomefamiliarwithitsfeatures.

WARNING
Takingyoureyesofftheroadfor extendedperiodscouldcausea crashresultingininjuryordeath toyouorothers.Donotgive extendedattentiontoinfotainment taskswhiledriving.
This system provides access to many audio and non-audiolistings.
7-2InfotainmentSystem
Tominimizetakingyoureyesoffthe roadwhiledriving,dothefollowing whilethevehicleisparked:
- Becomefamiliarwiththe operationandcontrolsofthe audiosystem.
- Setupthetone, speaker adjustments, and presetradio stations.
Formoreinformation,seeDefensive Drivingonpage9-3.
Notice: Contact your dealer before adding any equipment.
Addingaudioorcommunication equipmentcouldinterferewith theoperationoftheengine,radio, orothersystems,andcould damagethem.Followfederal rulescoveringmobileradioand telephoneequipment.
The vehicle has retained Accessory Power (RAP). With RAP, the audiosystem can be played even after the ignitionisturned off. See Retained Accessory Power (RAP) on page 9-32 form more information.
Navigation/RadioSystem
Forvehicleswithanavigationradio system,seetheseparateNavigation SystemManual.
Theft-DeterrentFeature
TheftLock ^® is designed to discourage the theft of the vehicle's radiobylearning portion of the Vehicle Identification Number (VIN). Theradiodes not operate if itis stolenormoved to different vehicle.
Operation

text_image
AM FM 12 AUX 1 2 3 4 5 6 BAND SEEK SEEK EQAM-FMRadio

information Provided by:
DEALER
致:产品收益计算方法
7-4InfotainmentSystem
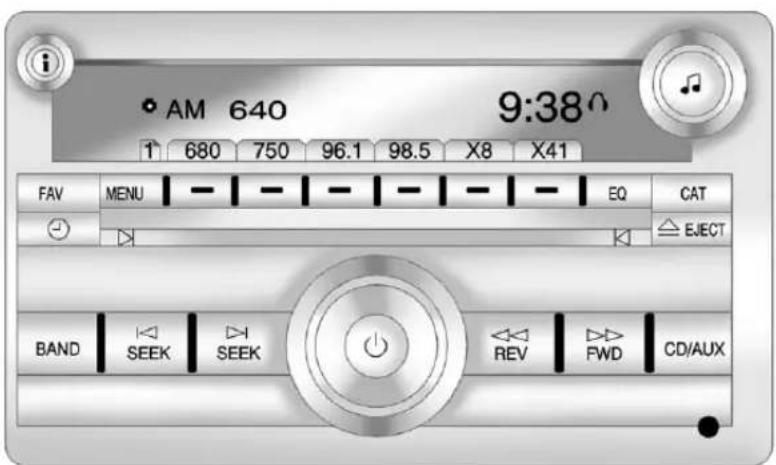
text_image
AM 640 9:38 1 680 750 96.1 98.5 X8 X41 FAV MENU - - - - - - - - EQ CAT EJECT BAND SEEK SEEK REV FWD CD/AUXRadiowithCD(MP3)Shown; RadiowithUSBandCD(MP3), Radiowith USBandSix-DiscCD(MP3), and RadiowithCDSimilar

Information Provided by: DEALER

text_image
DVD i DND DIGITAL FAV MENU EQ CAT CD BAND SEEK SEEK REV FWD DVD/CD AUXRadiowithUSB,CD,andDVD(MP3)
The vehicle has one of the seradios as its audiosystem.
RadioswithCDandDVD
VehicleswithaUSB,CD,andDVD radiohaveaBose ^® Surround SoundSystem.Someofitsfeatures
areexplainedlaterinthissection, "AdjustingtheSpeakers (Balance/Fade)."
VehicleswithaUSB,CD,andDVD radiomayhaveaRearSeat Entertainment(RSE)system.See Rear Seat Entertainment (RSE)

information Provided by: DEALER
Systemonpage7-40formore informationonthevehicle'sRSE system.
TheDVDplayeristhetopslot ontheradiofaceplate. The playeriscapableofreadingthe DTS-programmedDVDAudioor DVDVideomedia.(DTSandDTS DigitalSurroundareregistered trademarksofDigitalTheater Systems,Inc.)
Dolbyandthedouble-Dsymbolare trademarksofDolbyLaboratories. Manufacturedunderlicensefrom DolbyLaboratories.
UsingtheRadio
(Power/Volume):Presstoturn thesystemonandoff.
Turnclockwiseorcounterclockwise toincreaseordecreasethevolume.
i(Information)(AM-FMRadioand AM-FMRadiowithCD):Pressto switchthedisplaybetweentheradio stationfrequencyandthetime. Whiletheignitionisoff,pressthis buttontodisplaythetime.Pressto displayadditionaltextinformation relatedtothecurrentFM-RDSor XMstation;orCD,MP3,orWMA song.lfinformationisavailable duringXM,CD,MP3,orWMA playback,thesongtitleinformation displaysonthetoplineofthe displayandartistinformation displaysonthebottomline.When informationisnotavailable,"NO INFO"displays.
SpeedCompensatedVolume (SCV):RadioswithSpeed CompensatedVolume(SCV) automaticallyadjusttheradio volumetocompensateforroad and windnoiseasthevehicle'sspeed changeswhiledriving,sothatthe volumelevelstaysconsistent.
ToactivateSCV:
-
Settheradiovolumetothe desiredlevel.
-
PresstheMENUbutton to displaytheradiosetupmenu.
-
Pressthesoftkeyunderthe AUTOVOLUM(automatic volume)tabontheradiodisplay.
-
Pressthesoftkeyunderthe desiredSpeedCompensated Volumesetting(OFF, Low, Med, or High)toselectthelevelof radiovolumecompensation. Thedisplaytimesoutafter approximately 10 seconds. Each highersettingallowsformore radio volume compensation at faster vehicle speeds.

Information Provided by: DEALER
SettingtheTone(Bass/Treble) (AM-FMRadioandAM-FM RadiowithCD)
Toadjustthebassortreble:
-
Pressthe ♪knobuntilBassor Trebledisplays.
-
Toadjustthesetting,dooneof thefollowing:
- Turnthe♪knob.
- Presseither✉SEEK, or ⌘SEEK.
SettingtheTone(Bass/Midrange/Treble)(AllExcept AM-FMRadioandRadio withCD)
BASS/MID/TREB(Bass, Midrange, orTreble): Toadjustthebass, midrange, ortreble:
-
Pressthe ♪knobuntilthetone controltabsdisplay.
-
Highlightthedesiredtone controltabbydoingoneofthe following:
-
Pressthe knob.
• Pressthesoftkeyunderthe desiredtab. -
Adjust the setting by doing one of the following:
• Turnthe♪knobclockwise orcounterclockwise.
- Pressthe SEEK, or SEEK.
- Pressthe▷▷FWD, or ◀REV.
lfastation'sfrequencyisweakorif thereisstatic,decreasethetreble.
Toquicklyadjustbass, midrange, ortrebletothemiddleposition, pressthesoftkeypositionedunder theBASS,MID,orTREBtabfor morethantwoseconds.Abeep soundsandtheleveladjuststothe middleposition.
Toquicklyadjustalltoneand speakercontrolstothemiddle position, press the ♪ knobformore thantwosecondsuntilabeep sounds.
EQ(Equalization):Pressthis buttontochoosebassandtreble equalizationsettingsdesignedfor differenttypesofmusic.Selecting MANUAL,orchangingbassor treble,returnstheEQtothe manualbassandtreblesettings.
UniqueEQsettingscanbesaved foreachsource.
IftheradiohasaBose ^® audio system,theEQsettingsareeither MANUALorTALK.
AdjustingtheSpeakers (Balance/Fade)(AM-FMRadio and AM-FMRadiowithCD)
Toadjustthebalanceorfade:
-
Press 📋orpressthe knob untilthespeakercontrollabel displays.
-
To adjust the setting, do one of the following:
- Turnthe♪knob.
- Presseither✉SEEK, or KSEEK.
- Presseither▶▶FWD, or ◀REV.
AdjustingtheSpeakers (Balance/Fade)(AllExcept AM-FMRadioandRadio withCD)
BAL/FADE(Balance/Fade): Toadjustthebalanceorfade:
-
Pressthe ♪knobuntilthe speakercontroltabsdisplay.
-
Highlightthedesiredspeaker controltabbydoingoneofthe following:
- Pressthe♪knob.
• Pressthesoftkeyunderthe desiredtab.
- Adjustthesettingbydoingone ofthefollowing:
• Turnthe♪knobclockwise orcounterclockwise.
- PresstheDEEek, or KSEEK.
- PresstheFWD, or REV.

information Provided by: DEALER
Toquicklyadjustallspeakerand tonecontrolstothemiddleposition, pressthe ♪knobformorethan twoseconds.
If the Rear Seat Audio (RSA) is turned on, theradiodisables FADE and mutestherearspeakers.
RadioMessages
CalibrationError:Theaudio systemhasbeencalibrated forthevehiclefromthefactory. IfCalibrationErrordisplays,it meansthattheradiohasnotbeen configuredproperlyforthevehicle anditmustbereturnedtoyour dealerforservice.
LockedorLoc:Oneofthese messageswilldisplaywhenthe THEFTLOCK® systemhaslocked uptheradio.Takethevehicleto yourdealerforservice.
Ifanyerroroccursrepeatedlyorif anerrorcannotbecorrected, contactyourdealer.
Radio
AM-FMRadio
RadioDataSystem(RDS)
ForradioswiththeRadioData System(RDS)feature,itonlyworks withFMstationsthatbroadcast RDSinformation. Thissystemrelies uponreceivingspecificinformation fromthesestationsandonlyworks whentheinformationisavailable. Whiletheradioistunedtoan FM-RDSstation,thestationname orcallletterswilldisplay.Inrare cases,aradiostationcould broadcastincorrectinformationthat causestheradiofeaturestowork improperly.Ifthishappens,contact theradiostation.
i(Information)(RDSFeatures): ForvehicleswithRDSfeatures, press itodisplayadditionaltext informationrelatedtothecurrent FM-RDSstation.Ifinformationis available,thesongtitleinformation displaysonthetoplineofthe
displayandartistinformation displaysonthebottomline.When informationisnotavailable,"NO INFO"displays.
FindingaStation
BAND: Presstoswitchbetween AM, FM, or XM™, ifequipped.
♪(Tune):Turntomanuallyselect radiostations.
KSEEK:Presstoseekthe previousradiostation.Pressand holdforafewsecondsuntilabeep soundstoscanforradiostationsin descendingorder;pressthe KSEEKbuttonagaintostop scanningradiostations.Theradio onlyseeksandscansstationswith astrongsignalthatareinthe selectedband.
FortheAM-FMRadio, press and hold the KSEEK for four seconds until double beepsound stoscan the preset stations. The station frequency flashes while ether radiois in the scan mode.
SEEK: Presstoseekthenext radiostation. Pressandholdfora fewsecondsuntilabeepsoundsto scanforradiostationsinascending order; pressthe SEEKbutton againtostopscanningradio stations. Theradioonlyseeksand scansstationswithastrongsignal thatareintheselectedband.
FortheAM-FMRadio, press and hold the SEEK for four seconds until double beepsound stoscan the preset stations. The station frequency flashes while ether radiois in the scan mode.
◀REV:Presstomanuallytuneto aradiostationindescendingorder. ▶FWD:Presstomanuallytuneto aradiostationinascendingorder.
FAV(Favorites): Presstoselect differentfavoritespagesforstored radiostations.
StoringRadioStations
Drivers are encouraged to store the radiostation while the vehicle is parked; see Defensive Driving on page 9-3. Tunetostored radio stations using the presets, favorites button, and steering wheel controls, if the vehicle has this feature.
RadiosthathaveaFAVbuttonstore radiostationsasfavorites.Upto 36stationscanbeprogrammedas favoritesusingthesixsoftkeys belowtheradiostationfrequency tabsandbyusingtheFAVbutton. PresstheFAVbuttontogothrough uptosixpagesoffavorites,each havingsixfavoritestationsavailable perpage.Eachpageoffavorites cancontainanycombinationofAM, FM,orXM,ifequipped,stations.
Radiosthatdonothavea FAVbuttonstoreradiostations aspresets.Upto18stations (6FM1,6FM2,and6AM),canbe programmedonthesixnumbered pushbuttons.
SettingPresetStations
Tostorepresets:
- Tunetoaradiostation.
- Pressandholdoneofthe sixnumberedpushbuttonsfor threesecondsuntilabeep sounds.
- RepeatSteps1 and 2 to store additional radiostations.
StoringaRadioStationasa Favorite
Tostoreastationasafavorite:
- Tunetoaradiostation.
- PresstheFAVbuttontodisplay thepagewherthestationwill bestored.
- Pressandholdoneofthesix softkeysuntilabeepsounds.
- RepeatSteps1 through 3 to store additional radiostations.
Thenumberoffavoritespagescan besetupusingtheMENUbutton. Tosetupthenumberoffavorites pages:
- PresstheMENUbutton.
- Pressthesoftkeylocatedbelow theFAV1-6tab.
- Selectthenumberoffavorites pagesbypassingthesoftkey locatedbelowthedisplayed pagenumbers.
- PresstheFAVbutton, orletthe menutimeout, toreturntothe originalmainradioscreen showingtheradiostation frequencytabsandtobeginthe processofprogramming favorites.
SatelliteRadio
XM™SatelliteRadioService
XMisasatelliteradioservicebased inthe48contiguousUnitedStates and10Canadianprovinces.XM SatelliteRadiohasawidevarietyof programmingandcommercial-free music,coasttocoast,andin digital-qualitysound.Aservicefee isrequiredtoreceivetheXM service.Iftheserviceneedstobe reactivated,theradiowilldisplay "NoSubscriptionPleaseRenewon channelXM1."Formore information,contactXMat www.xmradio.comor 1-800-929-2100intheU.S.,and www.xmradio.caor 1-877-438-9677inCanada.
i(Information)(XMSatelliteRadio
Service): For vehicles with XM, press itodisplayadditionaltext information related to the current XMchannel. If information is available, the song title information displays on the top line of the display and artist information displays on the bottom line. When information is not available, "NO INFO" displays.
FindingaChannel
BAND: Presstoswitchbetween AM, FM, or XM™, ifequipped.
♪(Tune):Turntomanuallyselect anXMchannel.
KSEEK:Presstogotothe previousXMchannel.
SEEK:Presstogotothenext XMchannel.
REV: Presstogotothe previous XMcategory.
FWD: Presstogotothenext XMcategory.
FAV(Favorites): Presstoselect differentfavoritespagesforstored radiostations.
CAT(Category): The CAT button is used to find XM channels when the radiois in the XM mode.
FindingaCategory(CAT) Station
TofindXMchannelsinacategory:
- PresstheCATbuttontodisplay thecategorytabs. Continue pressingtheCATbuttonuntilthe desiredcategorynamedisplays.
- RadioswithCDandDVD canalsonavigatethe categorylistbypassingthe ▶FWDorthe ◀REV buttons.
7-12InfotainmentSystem
- Presseitherofthetwosoftkeys belowthedesiredcategorytab toimmediatelytunetothefirst XMstationinthatcategory.
TogotothepreviousornextXM stationintheselectedcategory, dooneofthefollowing:
- Turnthe♪knob.
• Pressthesoftkeybelowthe rightorleftarrowsinthe categorytab. -
PressKSEEKorXSEEK.
-
Toexitthecategorysearch mode, press the FAV button or BAND button to display the favorites again.
AddingandRemovingCategories
Categories cannot be added or removed while the vehicle is moving faster than 8 km/h (5 mph).
Toaddorremoveacategory:
- PresstheMENUbutton.
- Pressthesoftkeylocatedbelow theXMCATtab.
- Turnthe ♪knobtodisplaythe categorytoaddorremove.
- Pressthesoftkeylocatedunder theAddorRemovetab.
Torestoreallremoved categories, pressthesoftkey undertheRestoreAlltab. - Repeatthestepstoremove morecategories.
StoringXMChannels
DriversareencouragedtostoreXM channelswhilethevehicleis parked;seeDefensiveDrivingon page9-3.Tunetostoredradio stationsusingthepresets,favorites button,andsteeringwheelcontrols, ifthevehiclehasthisfeature.
Upto36stationscanbe programmedasfavoritesusingthe sixsoftkeysbelowtheradiostation frequencytabsandbyusingthe FAVbutton.PresstheFAVbuttonto gothroughuptosixpagesof favorites,eachhavingsixfavorite stationsavailableperpage.Each pageoffavoritescancontainany combinationofAM,FM,orXM, ifequipped,stations.
StoringanXMChannelasa Favorite
Tostoreastationasafavorite:
- TunetoanXMchannel.
- PresstheFAVbuttontodisplay thepagewherthestationwill bestored.
- Pressandholdoneofthesix softkeysuntilabeepsounds.
- RepeatSteps1 through 3 to store additional radiostations.
Thenumberoffavoritespagescan besetupusingtheMENUbutton. Tosetupthenumberoffavorites pages:
- PresstheMENUbutton.
- Pressthesoftkeylocatedbelow theFAV1-6tab.
- Selectthenumberoffavorites pagesbypassingthesoftkey locatedbelowthedisplayed pagenumbers.
- PresstheFAVbutton, orletthe menutimeout, toreturntothe originalmainradioscreen showingtheradiostation frequencytabsandtobeginthe processofprogramming favorites.
XMRadioMessages
XL(ExplicitLanguage
Channels): These channels, or any others, can be blocked data customer's request, by calling 1-800-929-2100 in the U.S. and 1-877-438-9677 in Canada.
XMUdating: The encryptioncode in thereceiver is being updated, and no action is required. This process should taken longer than 30 seconds.
NoXMSignal: Thesystemis functioning correctly, but the vehicle is in alocation that is blocking the XM signal. Whenthe vehicle is moved into an open area, the signal should return.
LoadingXM: The audiosystem is acquiring and processing audio and text data. No action is needed. This messages should disappear shortly.
ChannelOffAir: Thischannelis notcurrentlyinservice. Tuneinto anotherchannel.
ChannelUnauth: Thischannelis blockedorcannotbereceivedwith yourXMsubscriptionpackage.
ChannelUnavail: Thispreviously assignedchannelisnolonger assigned.Tunetoanotherstation. If this station was one of the presets, choose another station for that preset button.
NoArtistInfo: Noartist information is available at thistime on this channel. Thesystemis working properly.
NoTitleInfo:Nosongtitle informationisavailableatthistime onthischannel.Thesystemis workingproperly.
NoCATInfo:Nocategory informationisavailableatthistime onthischannel.Thesystemis workingproperly.
7-14InfotainmentSystem
Nolnformation: Notextor informationalmessagesare availableatthistimeonthis channel. Thesystemisworking properly.
NoSubscriptionPleaseRenew: TheXMsubscriptionneedstobe reactivated.ContactXMat www.xmradio.comorcall 1-800-929-2100intheU.S.and www.xmradio.caorcall 1-877-438-9677inCanada.
CATNotFound: There are no channels available for these selected category. Thesystemisworking properly.
XMTheftlocked:TheXMreceiver inthevehiclecouldhavepreviously beeninanothervehicle.Forsecurity purposes,XMreceiverscannotbe swappedbetweenvehicles.Ifthis messageisreceivedafterhaving thevehicleserviced,checkwith yourdealer.
XMRadioID: Iftunedtochannel0, thismessagealternateswiththeXM Radioeight-digitradioIDlabel. This labelisneededtoactivatethe service.
Unknown: If this message is received when tuned to channel 0, there could be a receiver fault. Consult with your dealer.
CheckAntenna: If this message does not clear within a short period of time, there are a receptor antenna could have a fault. Consult with your dealer.
CheckXMReceivr:Ifthis messagedoesnotclearwithina shortperiodoftime,thereceiver couldhaveafault.Consultwithyour dealer.
XMNotAvailable: If this message does not clear within a short period of time, there are ever could have a fault. Consult with your dealer.
RadioReception
Frequencyinterferenceandstatic canoccurduringnormalradio receptionifitemssuchascellphone chargers,vehicleconvenience accessories,andexternalelectronic devicesarepluggedintothe accessorypoweroutlet.Ifthereis interferenceorstatic,unplugthe itemfromtheaccessorypower outlet.
AM
TherangeformostAMstationsis greaterthanforFM,especiallyat night. Thelongerrangecancause stationfrequenciestointerferewith eachother. Forbetterradio reception, mostAMradiostations boost the power levels during the day, and then reduce these levels during thenight. Staticcan also occur when things like storms and power lines interferewith radio reception. Whenthishappens, try reducing the trebleontheradio.

FMStereo
FMsignalsonlyreachabout 16to65km(10to40mi).Although theradiohasabuilt-inelectronic circuitthatautomaticallyworksto reduceinterference,somestaticcan occur,especiallyaroundtall buildingsorhills,causingthesound tofadeinandout.
XM™SatelliteRadioService
XMSatelliteRadioServicegives digitalradioreceptionfromcoastto coastinthe48contiguousUnited States,andinCanada.Justaswith FM,tallbuildingsorhillscan interferewithsatelliteradiosignals, causingthesoundtofadeinand out.Inaddition,travelingorstanding underheavyfoliage,bridges, garages,ortunnelsmaycauseloss oftheXMsignalforaperiodoftime.
CellularPhoneUsage
Cellularphoneusagemaycause interferencewiththevehicle'sradio. Thisinterferencemayoccurwhen makingorreceivingphonecalls, chargingthephone'sbattery, orsimplyhavingthephoneon.This interferencecausesanincreased levelofstaticwhilelisteningtothe radio.Ifstaticisreceivedwhile listeningtotheradio,unplugthe cellularphoneandturnitoff.
FixedMastAntenna
The fixed mastantennacan withstand most car washes without being damaged as long as it is securely attached to the base. If the mast becomes slightly bent, straighten it out by hand. If themast is badly bent, replace it.
Occasionallychecktomakesure theantennaistightenedtoitsbase. Iftighteningisrequired,tightenby handuntilfullyseatedplus one quarter turn.
SatelliteRadioAntenna
The XMSatelliteRadioantennais locatedontheroofthevehicle. Keeptheantennaclearof obstructionsforclearradio reception.
If the vehicle has as unroof, the performance of the XMsystem (ifequipped) may be affected if the sunroof is open.
AudioPlayers
CDPlayer
CareoftheCDPlayer
DonotaddanylabeltoaCD. ItcouldgetcaughtintheCD.Ifa CDisrecordedonapersonal computerandadescriptionlabelis needed,trylabelingthetopofthe recordedCDwithamarkingpen.
TheuseofCDlenscleaners isnotadvised,duetotheriskof contaminatingthelensoftheCD opticswithlubricantsinternaltothe CDplayermechanism.
Notice:Ifalabelisaddedtoa CD, morethanoneCDisinserted intotheslotatatime, oran attemptismadetoplayscratched ordamaged CDs, the CDplayer could bedamaged. While using the CDplayer, use only CDs in good condition without anylabel, load one CDatatime, and keep the CDplayer and the loadingslot free offoreignmaterials, liquids, and debris.
Ifanerrordisplays,see"CDPlayer Messages"laterinthissection.
CareofCDs
IfplayingaCD-R,thesoundquality canbereducedduetoCD-Ror CD-RWquality,themethodof recording,thequalityofthemusic thathasbeenrecorded,andthe waytheCD-RorCD-RWhasbeen handled.Handlethemcarefully.
StoreCD-RsorCD-RWsintheir originalcasesorotherprotective casesandawayfromdirectsunlight anddust.TheCDplayerscansthe bottomsurfaceofthedisc.Ifthe surfaceofaCDisdamaged,such ascracked,broken,orscratched, theCDdoesnotplayproperlyornot atall.Donottouchthebottomside ofaCDwhilehandlingit;thiscould damagethesurface.PickupCDs bygraspingtheouteredgesorthe edgeoftheholeandtheouteredge.
If the surface of a CD is soiled, clean with as soft, lint-free cloth or dampen a clean, soft cloth in amild, neutral detergent solution mixed with water. Makes sure the wiping process starts from the center to the edge.
InsertingaCD(SingleCD Player)
InsertaCDpartwayintotheslot, labelsideup. The player pulls it in and the CD should begin playing.
InsertingaCD(s)(Six-DiscCD Player)
LOAD:PresstoloadCDsinto theCDplayer.ThisCDplayerholds uptosixCDs.
ToinsertoneCD:
- PressandreleasetheLOAD button.
- Waitforthemessagetoinser thedisc.
- LoadaCD.InserttheCD partwayintotheslot, labelside up. TheplayerpullstheCDin.
ToinsertmultipleCDs:
- PressandholdtheLOADbutton fortwoseconds.Abeepsounds andLoadAllDiscsdisplays.
- Waitforthemessageonwhento insertthediscs. The CDplayer takesuptosixCDs.
- PresstheLOADbuttonagain to cancelloadingmoreCDs.
EjectingaCD(SingleCD Player)
△EJECT:Pressandreleaseto ejectthedisc.RemovetheCD whenRemoveDiscdisplays. Ifthediscisnotremoved,after severalsecondsthediscis automaticallypulledbackintothe player.
EjectingaCD(Six-DiscCD Player)
△EJECT:Pressandreleaseto ejectthediscthatiscurrently playing.RemovetheCDwhen RemoveDiscdisplays.Ifthediscis notremoved,afterseveralseconds thediscisautomaticallypulledback intotheplayer.
ToejectallCDs, pressandholdthe △EJECTbuttonfortwoseconds.
PlayingaCD
Iftheignitionorradioisturnedoff withaCDintheplayer,itstaysin theplayer.Whentheignitionor radioisturnedon,theCDstarts playingwhereitstopped,ifitwas thelastselectedaudiosource.The CDiscontrolledbythebuttonson theradiofaceplateorbytheRSA unit.SeeRearSeatAudio(RSA) Systemonpage7-50formore information.
7-18InfotainmentSystem
WhenaCDisinserted,theCD symboldisplaysontheleftsideof theradiodisplay.Aseachnewtrack startstoplay,thetracknumber displays.
TheCDplayercanplaythesmaller 8cm(3in)singleCDswithan adapterring.Full-sizeCDsandthe smallerCDsareloadedinthesame manner.
CD/AUX(CD/Auxiliary):Pressto cyclebetweenCDorAuxiliarywhen listeningtotheradio.TheCDicon andamessageshowingthedisc and/ortracknumberwilldisplay whenaCDisintheplayer.Press againandthesystemautomatically searchesforanauxiliaryinput device;seeAuxiliaryDeviceson page7-35formoreinformation.Ifa portableaudioplayerisnot connected,"NoInputDeviceFound" displays.
i(Information): Presstodisplay additionaltextinformationrelatedto thecurrentsong.lfinformationis available,thesongtitleinformation displaysonthetoplineofthe displayandartistinformation displaysonthebottomline.When informationisnotavailable,"NO INFO"displays.
♪(Tune):Turntoselecttrackson theCDthatiscurrentlyplaying.
KSEEK: Presstogotothestartof thecurrenttrackifmorethan 10secondsontheCDhaveplayed.
Presstogototheprevioustrackif lessthan10secondsontheCD haveplayed.
Pressandhold, or press multiple times, to continue moving backward through the trackson the CD.
SEEK: Presstogotothenext track.
Pressandhold, or press multiple times, to continue moving forward through the tracks on the CD.
◀REV(FastReverse):Press andholdtoreverseplaybackquickly withinatrack.
FWD(FastForward): Press and hold to advance playback quickly within at track.
RPT(Repeat): FortheAM-FM RadiowithCD, pressandrelease the RPTbuttontorepeatthecurrent track. Press RPTagaintoturnoff repeatplay.
RDM(Random): Presstolistento tracksinrandom, rather than sequential order. Touserandom, do one of the following:
FortheAM-FMRadiowithCD:
-
PresstheRDMbuttonuntilthe randomicondisplays.
-
PresstheRDMbuttonagain untiltherandomicondisappears fromthedisplay.
FortheRadiowithCD(MP3)and RadiowithUSBandCD(MP3):
- Pressthesoftkeypositioned undertheRDMtabuntilRandom CurrentDiscdisplays.
- Pressthesoftkeyagaintoturn offrandomplay.
FortheRadiowithUSBand Six-DiscCD(MP3):
- Pressthesoftkeypositioned undertheRDMtabuntil RandomizeAllDiscsdisplay to playtracksfromallCDsloaded inrandomorder.
- Pressthesoftkeypositioned undertheRDMtabuntilRandom CurrentDiscdisplaystoplay tracksfromasingleCDin randomorder.
- Pressthesamesoftkeyagain to turnoffrandomplay.
MP3-SupportedFiles
The RadiowithCD(MP3), Radio with USBandCD(MP3), and Radio with USBandSix-DiscCD(MP3) havethecapabilityofplayingan MP3CD-RorCD-RWdisc.
Format
Radiosthathavethecapability of playingMP3scanplay.mp3or.wma filesthatwererecordedontoa CD-RorCD-RWdisc. Thefilescan berecordedwiththefollowingfixed bitrates: 32kbps, 40kbps, 56kbps, 64kbps, 80kbps, 96kbps, 112kbps, 128kbps, 160kbps, 192kbps, 224kbps, 256kbps, and 320kbps or avariablebitrate.
CompressedAudioorMixedMode Discs
Theradiocanplaydiscsthat containbothuncompressedCD audioandMP3files. If both formats are onthedisc, theradioreadsall MP3filesfirst, then the uncompressed CDaudiofiles.
CD-R- or CD-RW-Supported File and Folder Structure
Theradiosupports:
- Upto50folders.
- Upto8foldersindepth.
- Upto50playlists.
- Upto255files.
- Playlistswithan.m3uor.wpl extension.
- Fileswithan.mp3,.wma,or.cda fileextension.
RootDirectory
Therootdirectoryistreatedasa folder.Filesarestoredintheroot directorywhenthediscorstorage devicedoesnotcontainfolders. Filesaccessedfromtheroot directoryofaCDdisplayas F1ROOT.
EmptyFolder
Foldersthatdonotcontainfilesare skipped, and the player advance to then next folder that contains files.
OrderofPlay
Compressedaudiofilesare accessedinthefollowingorder:
- Playlists(Px).
- Filesstoredintherootdirectory.
- Filesstoredinfoldersintheroot directory.
Tracksareplayedinthefollowing order:
- Playbeginsfromthefirsttrackin thefirstplaylistandcontinues sequentiallythroughalltracksin eachplaylist.Whenthelast trackofthelastplaylisthas played,playcontinuesfromthe firsttrackofthefirstplaylist.
- Playbeginsfromthefirsttrackin thefirstfolderandcontinues sequentiallythroughalltracksin eachfolder.Whenthelasttrack ofthelastfolderhasplayed, playcontinuesfromthefirst trackofthefirstfolder.
FileSystemandNaming
Thesongnamethatdisplaysisthe songnamethatiscontainedinthe ID3tag.Ifthesongnameisnot presentinthelID3tag,thenthe radiodisplaysthefilenamewithout theextension(suchas.mp3)asthe trackname.
Tracknameslongerthan 32charactersor4pagesare shortened. Thedisplaydoesnot showpartsofwordsonthelast pageoftextandtheextensionof thefilenameisnotdisplayed.
PreprogrammedPlaylists
CDsthathavepreprogrammed playlistsreatedusingWinAmp™, MusicMatch™, or RealJukebox™ softwarecanbeaccessed; however, thereisnopaylist-editingcapability usingtheradio. Theseplaylistsare treatedasspecialfolderscontaining compressed audiosongfiles.
Playliststhathavean.m3uor.pls fileextensionandarestoredona USBdevicemaybesupportedby theradiowithaUSBport.
Playlistscanbechangedbyusing thesoftkeysbelowthe
PlayinganMP3
i(Information): Presstodisplay additionaltextinformationrelated to thecurrentsong.lfinformationis available,thesongtitleinformation displaysonthetoplineofthe displayandartistinformation displaysonthebottomline.When informationisnotavailable,"NO INFO"displays.
Tune: TurntoselectMP3son theCDcurrentlyplaying.
KSEEK:Presstogotothestartof thetrack,ifmorethan10seconds haveplayed.Pressandholdor pressmultipletimestocontinue movingbackwardthroughtracks.
SEEK:Presstogotothenext track.Pressandholdorpress multipletimestocontinuemoving forwardthroughtracks.
◀REV(Reverse):Pressandhold
toreverseplaybackquickly.Sound
isheardatareducedvolumeand
theelapsedtimeofthefiledisplays.
Release ◀REVtoresumeplaying.
FWD(FastForward):Press andholdtoadvance playback quickly.Soundisheardatareduced volumeandtheelapsedtimeofthe filedisplays.Release FWDto resumeplaying.Theelapsedtimeof thefiledisplays.
(NextFolder):Pressthe softkeybelowthe tabtogoto thefirsttrackinthenextfolder.
RDM(Random):Presstolistento tracksinrandom, rather than sequential order. Touserandom, do one of the following:
FortheRadiowithCD(MP3)and RadiowithUSBandCD(MP3):
-
Pressthesoftkeypositioned undertheRDMtabuntilRandom CurrentDiscdisplays.
-
Pressthesoftkeyagaintoturn offrandomplay.
7-22InfotainmentSystem
FortheRadiowithUSBand Six-DiscCD(MP3):
- Pressthesoftkeypositioned undertheRDMtabuntil RandomizeAllDiscsdisplaysto playtracksfromallICDsloaded inrandomorder.
- Pressthesoftkeypositioned undertheRDMtabuntilRandom CurrentDiscdisplaystoplay tracksfromasingleCDin randomorder.
- Pressthesamesoftkeyagain to turnoffrandomplay.
(MusicNavigator):Pressthe softkeybelowthe tabtoplay thefilesinorderbyartistoralbum.
Theplayerscansthediscto sortthefilesbyartistandalbum ID3taginformation.Itcantake severalminutestoscanthedisc dependingonthenumberoffileson thedisc.Theradiomaybegin playingwhileitisscanninginthe background.
Whenthescanisfinished,thedisc beginsplayingfilesinorderby artist.Thecurrentartistplayingis shownonthesecondlineofthe display.Onceallsongsbythatartist areplayed,theplayermovestothe nextartistinalphabeticalorderand beginsplayingfilesbythatartist.
Tolistentofilesbyanotherartist, pressthesoftkeylocatedbelow eitherarrowtab. Thediscgoesto thenextorpreviousartistin alphabeticalorder. Continue pressingeithersoftkeybelowthe arrowtabuntilthedesiredartist displays.
Tochangefrom playbackbyartistto playbackbyalbum:
- Pressthesoftkeylocatedbelow theSortBytab.
- Pressoneofthesoftkeysbelow theAlbumtabfromthesort screen.
- Pressthesoftkeybelowthe Backtabtoreturntothemain music[navigatorscreen].
Thealbumnamedisplaysonthe secondlinebetweenhearrows, and songsfromthecurrentalbum begintoplay.Onceallsongsfrom thatalbumhaveplayed,theplayer movestothenextalbumin alphabeticalorderontheCDand beginsplayingMP3sfromthat album.
Toexitmusicnavigatormode, press thesoftkeybelowtheBacktabto returntonormalMP3 playback.
CDPlayerMessages
CHECKDISC: If this message displays and/or the CDejects, it could be before one of the following reasons:
- Itisveryhot. When the temperaturereturnstonormal, theCDshouldplay.
• Theroadisveryrough. When theroadbecomessmoother, the CDshouldplay.
• TheCDisdirty, scratched, wet, or upsidedown.
• Theairisveryhumid.Ifso,wait aboutanhourandtryagain.
• Therewasaproblemwhile burningtheCD. - ThelabeliscaughtintheCD player.
If the CD is not playing correctly, for any other reason, try known good CD.
Ifanyerroroccursrepeatedlyorif anerrorcannotbecorrected, contactyourdealer.Iftheradio displaysanerrormessage,writeit downandprovideittoyourdealer whenreportingtheproblem.
CD/DVDPlayer
CareoftheCDandDVDPlayer
Donotaddanylabeltoadisc. ItcouldgetcaughtintheCDor DVDplayer.Ifadiscisrecordedon apersonalcomputeranda descriptionlabelisneeded,try labelingthetopoftherecordeddisc withamarkingpen.
TheuseofCD/DVDlenscleanersis notadvised, duetotherisk of contaminatingthelensoftheoptics with lubricantsinternaltotheCD and DVDplayermechanism.
Notice:Ifalabelisaddedtoa CD, morethanoneCDisinserted intotheslotatatime, oran attemptismadetoplayscratched ordamaged CDs, the CD player could bedamaged. While using the CD player, use only CDs in good condition without anylabel, load one CD at time, and keep the CD player and the loadingslot free off foreign materials, liquids, and debris.
Ifanerrordisplays,see"CD Messages"laterinthissection.
CareofCDsandDVDs
IfplayingaCD-RorCD-RW,the soundqualitycanbereduceddueto CD-RorCD-RWquality,themethod ofrecording,thequalityofthemusic thathasbeenrecorded,andthe waytheCD-RorCD-RWhasbeen handled.Handlethemcarefully. StoreCD-RsorCD-RWsintheir originalcasesorotherprotective casesandawayfromdirectsunlight anddust.TheCDorDVDplayer scansthebottomsurfaceofthe disc.Ifthesurfaceofadiscis damaged,suchascracked,broken, orscratched,thediscdoesnotplay properlyornotatall.Donottouch thebottomsideofadiscwhile handlingit;thiscoulddamagethe surface.Pickupdiscsbygrasping theouteredgesortheedgeofthe holeandtheouteredge.
If the surface of adiscissoiled, cleanit with asoft, lint-free clothor dampenaclean, softclothinamild, neutral detergents solution mixed with water. Makesurethewiping process starts from the centerto the edge.
AudioOutput
Onlyoneaudiosourcecanbeheard throughthespeakersatonetime. AnaudiosourceisdefinedasDVD slot,CDslot,XM,FM-AM,front auxiliaryjack,USBport,orrear auxiliaryjack.
Pressthe ⬇buttontoturntheradio on. Theradiocanbeheardthrough allofthevehiclespeakers.
Frontseatpassengerscanlistento theradio(AM,FM,orXMif equipped)bypassingtheBAND buttonortheDVD/CDAUXbuttonto selectCDslot,DVDslot,front auxiliaryinput,USBport,orrear auxiliaryinput(ifavailable).
Ifaplaybackdeviceispluggedinto theradio'sfrontauxiliaryinputjack, USBport,ortherearauxiliaryjack, thefrontseatpassengersareable tolistentoplaybackfromthis sourcethroughthevehicle speakers.See"UsingtheAuxiliary InputJack"inAuxiliaryDeviceson page 7-35,or"Audio/Video(A/V) Jacks"underRearSeat Entertainment(RSE) Systemon page 7-40formoreinformation.
Insomevehicles, depending on audiooptions, therearspeakers can bemuted when the RSA power is turned on. See Rear Seat Audio (RSA) Systempage 7-50 for more information.
InsertingaDisc
Insertadiscpartwayintoeitherslot, labelsideup. Theplayerpullsitin andthediscshouldbeginplaying. (Loadingadiscintothesystem, dependingonmediatype and format, rangesfrom5to20seconds foraCD, andupto30secondsforaDVDtobeginplaying.)

EjectingaDisc
△CD(Eject):Pressandrelease toejectthediscthatiscurrently playing.TheCDejectsfromthe bottomslot.Abeepsoundsand EjectingDiscdisplays.Oncethe discisejected,RemoveDisc displays.Thedisccanberemoved. Ifthediscisnotremoved,after severalsecondsthedisc automaticallypullsbackintothe player.
△DVD(Eject):Pressand releasetoejectthediscthatis currentlyplayinginthetopslot. AbeepsoundsandEjectingDisc displays.
Ifloadingandreadingofadisc cannotbecompleted,dueto unknownformat,etc.,andthedisc failstoeject,pressandholdfor morethanfivesecondstoforcethe disctoeject.
PlayingaCD(inEitherthe DVDorCDSlot)
If the ignition or radioisturned off with a CD in the player, it stays in the player. When the ignition or radioisturned on, the CD starts playing where it stopped, if it was the last selected audio source. The CD is controlled by the button on the radio face plate or by the RSA unit. See Rear Seat Audio (RSA) System on page 7-50 form more information. The DVD/CD decks (the upperslotisthe DVD deck and the lowerslotisthe CD deck) of the radio are compatible with most audio CDs, CD-Rs, CD-RWs, and MP3s.
WhenaCDisinserted,thetexttab DVDorCDsymboldisplayonthe leftsideoftheradiodisplay.As eachnewtrackstartstoplay,the tracknumberdisplays.
TheCDplayercanplaythesmaller 8cm(3in)singleCDswithan adapting. Full-size CDsandthe smaller CDsareloadedinthesame manner.
DVD/CDAUX(Auxiliary):Pressto cyclethroughDVD,CD,orAuxiliary whenlisteningtotheradio.The DVD/CDtexttabandamessage showingthetrackorchapter numberwilldisplaywhenadiscisin eitherslot.PresstheDVD/CDAUX buttonagainandthesystem automaticallysearchesforan auxiliaryinputdevice;seeAuxiliary Devicesonpage7-35formore information.Ifaportableaudio playerisnotconnected,"NoAux InputDevice"displays.Ifadiscisin boththeDVDslotandtheCDslot, theDVD/CDAUXbuttoncycles betweenthetwosourcesanddoes notindicate"NoAuxInputDevice."
Ifafrontauxiliarydeviceis connected, the DVD/CDAUXbutton cyclethroughallavailableoptions, suchas: DVDslot, CDslot, Front Auxiliary, and RearAuxiliary (ifavailable). See "Usingthe AuxiliaryInputJack" in Auxiliary Devicesonpage7-35or "Audio/Video(A/V)Jacks" under RearSeat Entertainment(RSE) System on page 7-40 form more information.
IfadiscisinsertedintothetopDVD slot,therearseatoperatorcanturn onthevideoscreenandusethe remotecontroltonavigatetheCD (tracksonly)throughtheremote control.
i(Information): Presstodisplay additionaltextinformationrelatedto thecurrentsong.lfinformationis available,thesongtitleinformation displaysonthetoplineofthe displayandartistinformation displaysonthebottomline.When informationisnotavailable,"NO INFO"displays.
♪(Tune):Turntoselecttrackson thediscthatiscurrentlyplaying.
KSEEK:Presstogotothestartof thecurrenttrack,ifmorethan fivesecondsontheCDhave played.
Presstogototheprevioustrackif lessthanfivesecondsontheCD haveplayed.
Pressandhold, or press multiple times, to continue moving backward through the trackson the CD.
DEEKE:Presstogotothenext track.
Pressandhold, or press multiple times, to continue moving forward through the trackson the CD.
◀REV(FastReverse):Press andholdtoreverseplaybackquickly withinatrack.
FWD(FastForward):Press andholdtoadvance playback quickly within at track.
RDM(Random): Presstolistento tracksinrandom, rather than sequentialorder. Touserandom:
-
Pressthesoftkeyunderthe RDMtabuntilRandomCurrent Discdisplays.
-
Pressthesoftkeyagaintoturn offrandomplay.
MP3andWMASupportedFiles
Format
Theradiocanplay.mp3or.wma filesthatwererecordedontoa CD-RorCD-RWdisc.
CompressedAudioorMixedMode Discs
Theradioplaysdiscsthatcontain bothuncompressedCDaudioand MP3/WMAfilesdependingonwhich slotthediscisloadedinto.
TheDVDplayeronlyreads uncompressedaudioandignores MP3/WMAfilesonamixed modedisc.
TheCDplayerreadsboth uncompressedaudioandMP3/WMAfilesonamixedmodedisc. Uncompressdaudioisplayed beforeMP3/WMAfiles.Pressthe CAT(category)buttontotoggle betweenuncompressedaudioand MP3/WMAfiles.
CD-RorCD-RWSupportedFile andFolderStructure
TheDVDplayersupports:
- Upto255folders.
• Uptoeightfoldersindepth. - Upto15playlists.
- Upto40sessions.
- Playlistswithan.m3uor.wpl extension.
- Fileswithan.mp3,.wma,or.cda fileextension.
TheCDplayersupports:
• Upto512filesandfolders.
• Upto8foldersindepth.
- Playlistswithan.m3uor.wpl extension.
- Fileswithan.mp3,.wma,or.cda fileextension.
RootDirectory
Therootdirectoryofthediscis treatedasafolder.Iftheroot directoryhascompressedaudio files,thedirectorydisplaysas F1ROOTontheradio.
Ifadisccontainsboth uncompressedCDaudioand MP3/WMAfiles,afolderunderthe rootdirectorycalledCDaccesses alloftheCDaudiotrackson thedisc.
EmptyFolder
Foldersthatdonotcontainfilesare skipped, and the player advance to thenext folder that contains files.
NoFolder
Whenthedisccontainsonly compressedfiles, thefilesare locatedundertherootfolder. The nextandpreviousfolderfunction doesnotfunctiononadiscthatwas recordedwithoutfoldersorplaylists. Whendisplayingthenameofthe folder, theradiodisplaysROOT.
Whenthediscontainsonly playlistsandcompressedaudio files,butnofolders,allfilesare locatedundertherootfolder.The folderdownandthefolderup buttonssearchplaylistsfirstand thengototherootfolder.Whenthe radiodisplaysthenameofthe folder,theradiodisplaysROOT.
OrderofPlay
Compressedaudiofilesare accessedinthefollowingorder:
- Playlists(Px).
- Filesstoredintherootdirectory.
- Filesstoredinfoldersintheroot directory.
Tracksareplayedinthefollowing order:
- Playbeginsfromthefirsttrackin thefirstplaylistandcontinues sequentiallythroughalltracksin eachplaylist.Whenthelast trackofthelastplaylisthas played,playcontinuesfromthe firsttrackofthefirstplaylist.
- Playbeginsfromthefirsttrackin thefirstfolderandcontinues sequentiallythroughalltracksin eachfolder.Whenthelasttrack ofthelastfolderhasplayed, playcontinuesfromthefirst trackofthefirstfolder.
Whenplayentersanewfolder, the displaydoesnotautomaticallyshow thenewfoldernameunlesssthe foldermodehasbeenchosenas thedefaultdisplay. Thenewtrack namedisplays.
FileSystemandNaming
Thesongnamethatdisplaysisthe songnamethatiscontainedinthe ID3tag.Ifthesongnameisnot presentinthelID3tag,thenthe radiodisplaysthefilenamewhout theextension(suchas.mp3)asthe trackname.
Tracknameslongerthan 32charactersor4pagesare shortened.Partsofwordsonthe lastpageoftextandtheextension ofthefilenamedonotdisplay.
PreprogrammedPlaylists
Preprogrammedplayliststhatwere createdusingWinAmp™, MusicMatch™, or RealJukebox™ software can be accessed; however, they cannot be edited using the
radio. These playlists are treated as special folders containing compressed audiosongfiles.
Playliststhathavean.m3uor.pls fileextensionandarestoredona USBdevicemaybesupportedby theradiowithaUSBport.
PlayinganMP3orWMA (inEithertheDVDorCDSlot)
IfadiscisinsertedintothetopDVD slot,therearseatoperatorcanturn onthevideoscreenandusethe remotecontroltonavigatetheCD (tracksonly).
Tune:TurntoselectMP3/WMA files.
KSEEK:Presstogotothestartof thetrack,ifmorethanfiveseconds haveplayed.Pressandholdor pressmultipletimes,iflessthan fivesecondshaveplayed,to continuemovingbackwardthrough tracks.
SEEK: Presstogotothenext track.
Pressandhold, or press multiple times, to continue moving forward through tracks.
◀◀REV(Reverse):Pressandhold toreverseplaybackquickly.
FWD(FastForward): Press and hold to advance playback quickly.
<(PreviousFolder):Press thesoftkeybelowthe <tabto gotothefirsttrackintheprevious folder.
(NextFolder):Pressthe softkeybelowthe tabtogoto thefirsttrackinthenextfolder.
RDM(Random): Presstolistento tracksinrandom, rather than sequential order.
Touserandom:
-
Pressthesoftkeyunderthe RDMtabuntilRandomCurrent Discdisplays
-
Pressthesamesoftkeyagain to turnoffrandomplay.
(MusicNavigator):Pressthe softkeybelowthe tabtoplay filesinorderbyartistoralbum.
Theplayerscansthediscto sortthefilesbyartistandalbum ID3taginformation.Itcantake severalminutestoscanthedisc dependingonthenumberoffileson thedisc.Theradiomaybegin playingwhileitisscanninginthe background.
Whenthescanisfinished,thedisc beginsplayingfilesinorderby artist.Thecurrentartistplayingis shownonthesecondlineofthe display.Onceallsongsbythatartist areplayed,theplayermovestothe nextartistinalphabeticalorderand begins playing files by that artist.
Tolistentofilesbyanotherartist, pressthesoftkeylocatedbelow eitherarrowtab. Thediscgoesto thenextorpreviousartistin alphabeticalorder. Continue pressingeithersoftkeybelowthe arrowtabuntiltheartistdisplays.
Tochangefrom playbackbyartistto playbackbyalbum:
-
PressthesoftkeybelowtheSort Bytab.
-
Pressoneofthesoftkeysbelow theAlbumtabfromthesort screen.
-
Pressthesoftkeybelowthe Backtabtoreturntothemain musicnavigatorscreen.
Thealbumnamedisplaysonthe secondlinebetweenhearrows, and songsfromthecurrentalbum begintoplay.Onceallsongsfrom thatalbumhaveplayed,theplayer movestothenextalbumin alphabeticalorderontheCDand beginsplayingMP3filesfromthat album.
7-30InfotainmentSystem
Toexitmusicnavigatormode, press thesoftkeybelowtheBacktabto returntonormalMP3 playback.
UsingtheDVDPlayer
TheDVDplayercanbecontrolled bythebuttonsontheremote control,theRSAsystem,orbythe buttonsontheradiofaceplate.See "RemoteControl"underRearSeat Entertainment(RSE)Systemon page7-40andRearSeatAudio (RSA)Systemonpage7-50for moreinformation.
TheDVDplayerisonlycompatible withDVDsoftheappropriateregion codeprintedonthejacketof mostDVDs.
TheDVDslotoftheradiois compatiblewithmostaudioCDs andCD-R/RW,DVD-Video, DVD-Audio,DVD-R/RW,andDVD +R/RWmedia,alongwithMP3and WMAformats.
Ifanerrormessagedisplaysonthe videoscreenotheradio,see "DVD DisplayErrorMessage" under RearSeatEntertainment(RSE) Systemonpage7-40,and "CD/DVD PlayerMessages" laterinthis sectionformoreinformation.
InsertingaDisc
Insertadiscpartwayintothetop slot, labelsideup. The player pulls itinandthediscshouldbegin playing. "LoadingDisc" shows on theradiodisplay. Atthesametime, theradiodisplaysasoftkeymenu of option(s). Somediscsautomatically play themoviewhile others defaulttothesoftkeymenudisplay, which requires the Play, Enter, or Navigationsoftkeystobe pressed, either by soft keyor by the rearseatpassenger using the remote control.
Loadingadiscintothesystem, dependingonmediatype and format, ranges from 5 to 20 seconds for a CD, and up to 30 seconds for a DVD.
EjectingaDisc
△DVD(Eject):Pressand releasetoejectthediscurrently playinginthetopslot.Abeep soundsandEjectingDiscdisplays.
Ifloadingandreadingofadisc cannotbecompleted,dueto unknownformat,etc.,andthedisc failstoeject,pressandholdfor morethanfivesecondstoforcethe disctoeject.
PlayingaDVD
DVD/CDAUX(Auxiliary):Pressto cyclethroughDVD,CD,orAuxiliary whenlisteningtotheradio.The DVD/CDtexttabandamessage showingthetrackorchapter numberwilldisplaywhenadiscisin eitherslot.PresstheDVD/CDAUX buttonagainandthesystem automaticallysearchesforan auxiliaryinputdevice;seeAuxiliary Devicesonpage7-35formore information.Ifaportableaudio playerisnotconnected,"NoAux InputDevice"displays.Ifadiscisin boththeDVDslotandtheCDslot, theDVD/CDAUXbuttoncycles betweenethtwosourcesanddoes notindicate"NoAuxInputDevice." Ifafrontauxiliarydeviceis connected,theDVD/CDAUXbutton cyclesthroughallavailableoptions, suchas:DVDslot,CDslot,front
auxiliary, andrearauxiliary (ifavailable). See "Using the Auxiliary Input Jack" in Auxiliary Devices on page 7-35 or "Audio/Video(A/V)Jacks" under Rear Seat Entertainment (RSE) System on page 7-40 form more information.
IfadiscisinsertedintothetopDVD slot, therearseatoperatorcanturn onthevideoscreenandusethe remotecontroltonavigatetheCD (tracksonly)throughtheremote control.
(Power): Presstoturntheradio onoroff. Turnclockwiseor counterclockwisetoincreaseor decreasethevolume. Press and holdformorethantwosecondsto turnofftheentireradioandRear SeatEntertainment(RSE)system andtostarttheParentalControl feature. ParentalControlprevents therearseatoccupantfrom operatingtheRearSeatAudio (RSA)systemorremotecontrol.
Alocksymboldisplaysnexttothe clockdisplay.TheParentalControl featureremainsonuntiltheknobis pressedandheldformorethan twosecondsagain,oruntilthe driveturnstheignitionoffandexits thevehicle.
♪(Tune):Turntoselecttrackson aCDorDVD.
KSEEK: Presstoreturntothestart of the current trackorchapter. Pressagaintogototheprevious trackorchapter. This button might not work when the DVD displaying the copyright information or the previews.
DEEKE:Presstogotothenext trackorchapter.Thisbuttonmight notworkwhentheDVDDisplaying thecopyrightinformationorthe previews.
7-32InfotainmentSystem
◀REV(FastReverse):Pressto quicklyreversetheCDorDVDat fivetimesthenormalspeed.Tostop fastreversing,pressagain.This buttonmightnotworkwhenthe DVDdisplayingthecopyright informationorthepreviews.
FWD(FastForward):Pressto fastforwardtheCDorDVDat fivetimesthenormalspeed.Tostop fastforwarding,pressagain.This buttonmightnotworkwhenthe DVDdisplayingthecopyright informationorthepreviews.
UsingSoftkeystoPlayaDVD-V (Video)
OnceaDVD-Visinserted,theradio displaymenushowsseveraltab optionsfor playback.Pressthe softkeylocatedunderanytaboption duringDVD-V playback.
▶ / II (Play/Pause): Press either the Player Pausetab displayed on theradio, to toggle between pausing or restarting playback of a DVD. If the forward arrow is showing on the display, the system is in pause mode. If the Pausetab is showing on the display, the system is in playback mode. If the DVD screen is off, press the play button to turn the screen on.
SomeDVDsbeginplayingafterthe previewshavefinished,although therecouldbeadelayofupto 30seconds.IftheDVDdoesnot beginplayingthemovie automatically,pressthesoftkey locatedundertheplay/pause symboltagdisplayedontheradio. IftheDVDstilldoesnotplay,refer totheon-screeninstructions, ifavailable.
■(Stop):Presstostopplaying, rewinding,orfastforwardingaDVD.
◀(Enter):Presstoselectthe choicesthatarehighlightedin anymenu.
Menu):Presstoaccessthe DVDmenu.TheDVDmenuis differentoneveryDVD.Usethe softkeyslocatedunderthe navigationarrowstonavigatethe cursorthroughtheDVDmenu.After makingaselectionpressthis button.Thisbuttononlyoperates whenusingaDVD.
Nav(Navigate):Presstodisplay directionalarrowsfornavigating throughthemenus.
(Return): Presstoexitthe currentactivemenuandreturnto thepreviousmenu. Thisbutton operatesonlywhenaDVDis playingandamenuisactive.
Therearseatpassengercan navigatetheDVD-VandDVD-A menusandcontrolsthrough the remotecontrol.See"Remote Control"underRearSeat Entertainment(RSE)Systemon page7-40formoreinformation.The videoscreenautomaticallyturnson whentheDVD-Visinserted intotheDVDslot,anddoesnot automaticallypoweronwhenthe DVD-AisinsertedintotheDVDslot. Itmustbemanuallyturnedonby therearseatoccupantthrough the remotecontrolpowerbutton.
UsingSoftkeystoPlayaDVD-A (Audio)
OnceaDVD-Aisinserted,theradio displaymenushowsseveraltab optionsfor playback.Pressthe softkeylocatedunderanytaboption duringDVD-A playback.
▶ / II (Play/Pause): Press either theplayorpauseicondisplayedon theradio, to toggle between pausing or restarting playback of a DVD. If the forward arrow is showing on the display, the system is in pause mode. If the pauset abis showing on the display, the system is in playback mode.
◀Group▶:Presstocycle throughmusicalgroupingsonthe DVD-Adisc.
Nav(Navigate):Presstodisplay directionalarrowsfornavigating throughthemenus.
●(AudioStream):Presstocycle throughaudiostreamformats locatedontheDVD-Adisc. The videoscreenshowstheaudio streamchanging.
Therearseatpassengercan navigatetheDVD-VandDVD-A menusandcontrolsthrough the remotecontrol.See"Remote Control"underRearSeat Entertainment(RSE)Systemon page7-40formoreinformation.The videoscreenautomaticallyturnson whentheDVD-Visinsertedintothe DVDslot,anddoesnot automaticallypoweronwhenthe DVD-AisinsertedintotheDVDslot. Itmustbemanuallyturnedonby therearseatoccupantthrough the remotecontrolpowerbutton.
StoppingandResuming Playback
TostopplayingaDVDwithout turningoffthesystem, press the ■buttonontheremotecontrol, orpressthesoftkeylocatedunder the ■ or the ▶ / || tabs displayed ontheradio.Iftheradioissourced tosomethingotherthanDVD-V, presstheDVD/CDAUXbuttonto makeDVD-Vtheactivesource.
7-34InfotainmentSystem
ToresumeDVD playback, pressthe ▶ / II button on the remote control, orpressthesoftkeylocated under the ▶ / II tab on the radio. The DVD should resume play from where it last stopped if the dischas not been ejected and the stop button has not been pressed twice on theremote control. If the dischas beenejected or the stop button has been pressed twice on theremote control, the disc resumes playing at the beginning of the disc.
CD/DVDPlayerMessages
DiscFormatError: Thismessage displaysifthediscisinsertedwith thedisclabelwrongsideup,orif thediscisdamaged.
DiscRegionError: Thismessage displaysifthediscisnotfroma correctregion.
NoDisclnInserted: Thismessage displaysifnodiscispresentwhen the △orDVD/CDAUXbuttonis pressedontheradio.
OpticalError: Thismessage displaysifthediscwasinserted upsidedown.
DiskReadError: Thismessage displaysifadiscwasinserted with aninvalidorunknownformat.
PlayerError: Thismessage displaysiftherearediscloador discejectproblems.
- Itisveryhot. Whenthe temperaturereturnstonormal, thediscshouldplay.
-
Theroadisveryrough.When theroadbecomessmoother,the discshouldplay.
-
Thediscisdirty, scratched, wet, or upsidedown.
• Theairisveryhumid.Ifso,wait aboutanhourandtryagain.
• Therewasaproblemwhile burningthedisc.
• Thelabeliscaughtinthe CD/DVDplayer.
Ifthediscisnotplayingcorrectly,for anyotherreason,tryaknown gooddisc.
Ifanyerroroccursrepeatedlyorif anerrorcannotbecorrected, contactyourdealer.Iftheradio displaysanerrormessage, writeit downandprovideittoyourdealer whenreportingtheproblem.
AuxiliaryDevices
UsingtheAuxiliaryInputJack
Radioswithanauxiliaryinputjack locatedonthelowerrightsideofthe faceplatecanconnecttoanexternal audiodevicesuchasaniPod ^® , MP3player,orCDplayer,foruseas anothersourceforaudiolistening. Thisinputjackisnotanaudio output;donotplugheadphonesinto thefrontauxiliaryinputjack.
Driversareencouragedtosetup anyauxiliarydevicewhilethe vehicleisinP(Park).See DefensiveDrivingonpage9-3for moreinformationondriver distraction.
Touseaportableaudioplayer, connecta3.5mm(1/8in)cableto theradio'sfrontauxiliaryinputjack. Whenadeviceisconnected, press theradioCD/AUXbuttontobegin playingaudiofromthedeviceover thevehiclespeakers.
Foroptimalsoundquality, increase theportableaudiodevice'svolume totheloudestlevel.
Itisalwaysbesttopowerthe portableaudiodevicethroughits ownbatterywhileplaying.
(Power/Volume):Turnclockwise orcounterclockwisetoincreaseor decrease the volume of the portable player. Additional volume adjustments might have to be made from the portable device if the volume is not loud or soften enough.
BAND: Presstolistentotheradio whenaportableaudiodeviceis playing. Theportableaudiodevice continuesplaying.
CD/AUX(CD/Auxiliary):Pressto playaCDwhenaportableaudio deviceisplaying.Pressagainand thesystembeginsplayingaudio fromtheconnectedportableaudio player.Ifaportableaudioplayeris notconnected,"NoInputDevice Found"displays.
DVD/CDAUX(DVD/CD/
Auxiliary): Presstocyclethrough DVD, CD, or Auxiliary when listening to other radio. The DVD/CD text tabandam messages showing trackor chapter number will display when adiscisineitherslot. Press again and the system automatically searches for an auxiliary input device, such as a portable audio player. If a portable audiop layer is not connected, "No Aux Input Device" displays. If a discisin both the DVD slot and the CD slot, the DVD/CDAUX button cycles between the two sources and does not indicate "No Aux Input Device." If a front auxiliary device is connected, the DVD/CDAUX button cycle through all available options, such as: DVD slot, CD slot, front auxiliary, and re a auxiliary (if available). See "Using the Auxiliary Input Jack" in this section, or "Audio/Video(A/V)Jacks" under Rear Seat Entertainment (RSE) System on page 7-40 form more information.
UsingtheUSBPort
RadioswithaUSBportcancontrol aUSBstoragedeviceoraniPod usingtheradiobuttonsandknobs. See "PlayinganMP3" in CDPlayer onpage 7-16 or CD/DVDPlayer on page 7-23 for information about how to connect and control a USB storagedeviceoraniPod.
USBSupport
TheUSBconnectorislocatedon theinstrumentpanelorinthecenter console, and uses the USB2.0 standard.
USB-SupportedDevices
- USBflashdrive
- PortableUSBharddrive
• FifthgenerationorlateriPod -
iPodnano
-
iPodtouch
- iPodclassic
NotalliPodsandUSBdrivesare compatiblewiththeUSBport.
MakesuretheiPodhasthe latestfirmwarefromApple ^® for properoperation.iPodfirmware canbeupdatedusingthelatest iTunes ^® application.See www.apple.com/itunes.
ForhelpwithidentifyingtheiPod, go towww.apple.com/support.
RadiosthathaveaUSBportcan play.mp3and.wmafilesthatare storedonaUSBstoragedeviceas wellasAACfilesthatarestoredon aniPod.
USB-SupportedFileandFolder Structure
Theradiosupports:
-
Upto700folders
• Uptoeightfoldersindepth -
Upto65,535files.
- Folderandfilenamesupto 64bytes
- Fileswithan.mp3or.wmafile extension
• AACfilesstoredonaniPod - FAT16
- FAT32
ConnectingaUSBStorage DeviceoriPod®
TheUSBportcanbeusedto controlaniPodoraUSBstorage device.
ToconnectaUSBstoragedevice, connectthedevicetotheUSBport locatedinthecenterconsoleoron theinstrumentpanel.

ToconnectaniPod, connectone endoftheUSBcablethatcame withtheiPodtotheiPod'sdock connectorandconnecttheother endtotheUSBportlocatedinthe centerconsoleorontheinstrument panel. If thevehicleisonandthe USBconnectionworks, "OKto disconnect" andaGMlogomay appearontheiPod, andiPod appearsontheradiodisplay. The iPodmusicappearsontheradio's displayandbeginsplaying.
TheiPodchargeswhileitis connectedtothevehicleifthe vehicleisintheACC/ACCESSORY orON/RUNposition.Whenthe vehicleisturnedoff,theiPod automaticallypowersoffandwillnot chargeordrawpowerfromthe vehicle'sbattery.
If you have an olderi Pod model that is not supported, it can still be used by connecting it to the auxiliary input jack using a standard 3.5mm (1/8in) stereocable. See "Using the Auxiliary Input Jack" earlier form more information.
UsingtheRadiotoControla USBStorageDeviceoriPod
TheradiocancontrolaUSB storagedeviceoraniPodusingthe radiobuttonsandknobs,and displaysonginformationonthe radio'sdisplay.
Tune: Turntoselectfiles.
KSEEK: Presstogotothestartof thetrack, if more than 10 seconds have played. Pressandholder pressmultipletimesto continue moving backward through tracks.
SEEK: Presstogotothenext track. Pressandholdorpress multipletimestocontinuemoving forwardthroughtracks.
◀REV(Reverse):Pressandhold toreverseplaybackquickly.Sound isheardatareducedvolume. Release ◀REVtoresumeplaying. Theelapsedtimeofthefile displays.
FWD(FastForward):Press andholdtoadvance playback quickly. Soundisheardatareduced volume. Release FWDto resume playing. Theelapsed time of thefiledisplays.
i(Information): Presstodisplay additionalinformationaboutthe selectedtrack.
UsingSoftkeystoControla USBStorageDeviceoriPod
Thefivesoftkeysbelowtheradio displayareusedtocontrolthe functionslistedbelow.
Tousethesoftkeys:
-
Pressthefirstorfifthsoftkey belowtheradiodisplayto displaythefunctionslisted below, orpressthesoftkey belowthefunctionifitis currentlydisplayed.
-
Pressthesoftkeybelowthetab with the function on it to set that function.
II(Pause):Pressthesoftkey below Itopausethetrack. Thetab appearsraisedwhenpauseisbeing used. Pressthesoftkeybelow II againtoresume playback.
Back: Pressthesoftkeybelowthe backtabtogobacktothemain displayscreenonaniPod, orthe rootdirectoryonaUSBstorage device.
(FolderView):Pressthe softkeybelow toviewthe contentsofthecurrentfolderonthe USBdrive.Tobrowseandselect files:
- Pressthesoftkeybelow

-
Turn ♪toscrollthroughthelist offolders.
-
Press ⬆toselectthedesired folder. If there is more then one folder, repeatSteps1 and 2 until the desired folder is reached.
-
Turn 🔍 to scroll through the files in these selected folder.
-
Press ♪toselectthedesiredfile tobeplayed.
Toskipthroughlargelists, thefive softkeyscanbeusedtonavigate in thefollowingorder:
- Firstsoftkey,firstiteminthelist.
• Secondsoftkey, 1% through the listeachtimethesoftkey is pressed.
• Thirdsoftkey,5%throughthelist eachtimethesoftkeyispressed.
• Fourthsoftkey, 10% through the listeachtimethesoftkey is pressed.
• Fifthsoftkey, endofthelist.
(MusicNavigator):Pressthe softkeybelow toviewand selectafileonaniPod,usingthe iPod'smenusystem.Filesare sortedby:
- Playlists
- Artists
- Albums
-
Genres
-
Songs
- Composers
Toselectfiles:
- Pressthesoftkeybelow

- Turn ♪toscrollthroughthelist ofmenus.
- Press ♪ to select the desired menu.
- Turn 🔊 to scroll through the folders or files in the selected menu.
- Press ♪toselectthedesiredfile tobeplayed.
Toskipthroughlargelists, thefive softkeyscanbeusedtonavigate in the following order:
- Firstsoftkey,firstiteminthelist.
• Secondsoftkey, 1% through the listeachtimethesoftkey is pressed.
• Thirdsoftkey,5%throughthelist eachtimethesoftkeyispressed.
• Fourthsoftkey, 10% through the listeachtimethesoftkey is pressed.
• Fifthsoftkey, endofthelist.
RepeatFunctionality
TouseRepeat:
Pressthesoftkeybelow 📄or→1 toselectbetweenRepeatAlland RepeatTrack.
(RepeatAll):Pressthesoftkey below torepeatalltracks. The tabappearsloweredwhenRepeatAllisbeingused. Thisisthedefault modewhenaUSBstoragedevice oriPodisfirstconnected.
1(RepeatTrack):Pressthe softkeybelow 1torepeatone track. Thetabappearsraisedwhen RepeatTrackisbeingused.
ShuffleFunctionality
TouseShuffle:
Pressthesoftkeybelow
→, ✕S, ✕A, or ✕F to select betweenShuffleOff, ShuffleAll Songs/ShuffleSongs, Shuffle Album, or ShuffleFolder.
→(ShuffleOff):Pressthe softkeybelow ✗Stoturnshuffle off. Thisisthedefaultmodewhena USBstoragedeviceoriPodisfirst connected.
S(ShuffleAllSongs/Shuffle Songs):Pressthesoftkeybelow
F or A to shuffle all song theUSBstoragedeviceoriPod.
XA(ShuffleAlbum):Pressthe softkeybelow →toshuffleall songsinthecurrentalbumon aniPod.
XF(ShuffleFolder):Pressthe softkeybelow toshuffleall songsinthecurrentfolderonaUSB storagedevice.

Information Provided by: DEALER
RearSeat Infotainment
RearSeatEntertainment (RSE)System
The vehicle may have a DVD Rear Seat Entertainment (RSE) system. The RSE system works with the vehicle's audiosystem. The DVD player is part of the frontradio. The RSE system includes a radiowitha DVD player, avideodisplayscreen, audio/videojacks, twowireless headphones, and a remote control. See CD/DVD Player on page 7-23 form more information on the vehicle's CD/DVD player.
BeforeDriving
TheRSEisdesignedforrearseat passengersonly. Thedrivercannot safelyviewthevideoscreenwhile drivingandshouldnottrytodoso.
Insevereorextremeweather conditions, the RSEsystem might not work until the temperature is within the operating range. The operating range for the RSE system is above -20^(-4^) or below 60^(140^) . If the temperature of the vehicle is outside this range, heater cool the vehicle until the temperature is within the operating range of the RSE system.
ParentalControl
TheRSEsystemmayhavea ParentalControlfeature,depending onwhichradiothevehiclehas.To startParentalControl,pressand holdtheradiopowerbuttonformore thantwosecondstostopallsystem featuressuchas:radio,video screen,RearSeatAudio(RSA), DVD,and/orCD.WhileParental Controlison,apadlockicon displays.
Theradiocanbeturnedbackon withasinglepressofthepower button, buttheRSEsystemwill remainunderParentalControl.
ToturnParentalControloff, press and holdtheradiopowerbutton for morethantwoseconds. The RSE returns from where it was previously left and the padlockicon disappears from theradiodisplay.
ParentalControlcanalsobeturned offbyinsertingorejectinganydisc, pressingtheplayiconontheradio DVDdisplaymenu,orchangingan ignitionposition.
Headphones
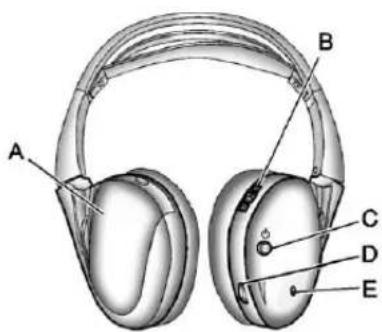
text_image
A B C D EA. Batterycover
B.Channel1or2switch
C.Powerbutton
D. Volumecontrol
E. Powerindicatorlight
The RSE includestwo2-channel wirelessheadphonesthatare dedicatedtothissystem.Channel1 isdedicatedtothevideoscreen, whileChannel2 isdedicatedtoRearSeatAudio(RSA)selections. Theseheadphonescanbeusedto listentotheradio, CDs, DVDs, MP3s, DVD-As, oranyauxiliary sourceconnectedtoA/Vjacksor theauxiliaryinputjack, ifthevehicle hasthisfeature. Thewireless headphoneshaveapowerbutton, channel1 or2 switch, andavolume control.
Pushthepowerbuttontoturnon theheadphones.Anindicatorlight locatedontheheadphonescomes on.Ifthelightcomeson,butthere isintermittentsoundand/orstaticon theheadphones,oriftheindicator lightdoesnotcomeon,thebatteries mightneedtobereplaced.See "BatteryReplacement"laterinthis sectionformoreinformation.Switch theheadphonestoOffwhennot inu se.
Infraredtransmittersarelocatedat therearoftheoverheadconsole. Theheadphonesshutoff automaticallytosavethebattery poweriftheRSEsystemandRSA areshutoff,oriftheheadphones areoutofrangeofthetransmitters formorethanthreeminutes.Ifyou movetoofarforwardorstepoutof thevehicle,theheadphoneslose theaudiosignal.
Toadjustthevolumeonthe headphones,usethevolumecontrol locatedontherightside.
Foroptimalaudioperformance, the headphonesmustbeworncorrectly. Headphonesshouldbewornwith theheadbandoverthetopofthe headforbestaudioreception. The symbolL(Left)appearsonthe outsidebottomedgeoftheearcup andshouldbepositionedontheleft ear. ThesymbolR(Right)appears ontheoutsidebottomedgeofthe earcupandshouldbepositionedon therightear.
Notice: Donotstorethe headphonesinheatordirect sunlight. This could damage the headphones and repairs will not be covered by the warranty. Storage in extreme cold can weaken the batteries. Keep the headphones stored in a cool, dry place.
If the foam ear pads attached to the headphones become worn nor damaged, the pad scan bereplaced separately from the headphones set. Top purchases are placement ear pads, call 1-888-293-3332, then prompt zero (0), or contact your dealer.
BatteryReplacement
Tochangethebatteriesonthe headphones:
- Turnthescrewtoloosenthe batterydoorlocatedontheleft sideoftheheadphones.Slide thebatterydooropen.
- Replacethetwobatteries in the compartment. Makesure that they are installed correctly, using the diagram on the inside of the battery compartment.
- Replacethebatterydoor and tightenthedoorscrew.
If the headphones are to be stored for a long period of time, remove the batteries and keep them in a cool, dry place.
Audio/Video(A/V)Jacks

natural_image
Three circular mechanical components arranged horizontally within a rectangular frame (no text or symbols)Yellow: VideoInput
White:LeftAudioInput
Red:RightAudioInput
TheA/Vjacksarecolorcodedto matchtypicalhomeentertainment systemequipment.
TheA/Vjacks, located on therear of the floor console, allow a doctor videosignalstobe connected from an auxiliary devices such as camcorderoravideogame unit to the RSE system. Adapter connectors or cables (not included) may be required to connect the auxiliary device to the A/Vjacks. Refertothemanufacturer's instructions for proper usage.
Powerforauxiliarydevicesisnot suppliedbytheradiosystem.
Tousetheauxiliaryinputsofthe RSEsystem,connectanexternal auxiliarydevicetothecolor-coded A/Vjacksandturnboththeauxiliary deviceandthevideoscreenpower on.IfthevideoscreenisintheDVD playermode,pressingtheAUX (auxiliary)buttonontheremote controlswitchesthevideoscreen fromtheDVDplayermodetothe auxiliarydevice.Theaudioofthe connectedsourcecanbelistenedto
overthespeakersbysourcingthe radiototheauxiliarydeviceorby sourcingtheRSAtotheRearAux andlisteningwiththewireless headphonesonChannel2orwith thewiredheadphones.See"Using theAuxiliaryInputJack" under AuxiliaryDevicesonpage7-35for moreinformationaboutchanging thesource.
ChangingtheRSEVideoScreen Settings
Thescreendisplaymode(normal, full, and zoom), screenbrightness, and setup menu language can be changed from the onscreen setup menu. To change any feature:
- Pressthe
□(displaymenu)
buttonontheremotecontrol.
- Usetheremotecontrol
▲, ▼, ◀, ▶ (navigation)
arrowsandthe ←(enter)
buttontousethesetupmenu.
- Pressthe □ buttonagain to removethesetupmenufromthe screen.
AudioOutput
AudiofromtheDVDplayeror auxiliaryinputscanbeheard throughthefollowingpossible sources:
- Wirelessheadphones
- Vehiclespeakers
- Vehicle-wiredheadphonejacks ontheRSAsystem,ifthe vehiclehasthisfeature.
The RSEsystemalwaystransmits the audiosignaltothewireless headphones, if there is audio available. See "Headphones" earlier in this section form more information.

Information Provided by
DEALER
7-44InfotainmentSystem
TheDVDplayeriscapableof outputtingaudiotothewired headphonejacksontheRSA system,ifthevehiclehasthis feature.TheDVDplayercanbe selectedasanaudiosourceonthe RSAsystem.SeeRearSeatAudio (RSA)Systemonpage7-50for moreinformation.
Whenadeviceisconnectedtothe A/Vjacks,ortheradio'sauxiliary inputjackifthevehiclehasthis feature,therearseatpassengers areabletohearaudiofromthe auxiliarydevicethroughthewireless orwiredheadphones.Thefrontseat passengersareabletolistento playbackfromthisdevicethrough thevehiclespeakersbyselecting AUXasthesourceontheradio.
VideoScreen
The videoscreenislocated in the overhead console.
Tousethevideoscreen:
-
Pushthereleasebuttonlocated ontheoverheadconsole.
-
Movethescreentothedesired position.
Whenthevideoscreenisnotin use, pushitupintoitslocked position.
IfaDVDDisplayingandthescreen israisedtoitslockedposition,the screenremainson.Thisisnormal, andtheDVDcontinuestoplay throughthepreviousaudiosource. Usetheremotecontrolpowerbutton orejectthedisctoturnoffthe screen.
The overhead console contains the infrared transmitters forthewireless headphones and the infrared receivers for theremote control. They are located at therearof the console.
Notice: Avoid directly touching the videoscreen, as damagemay occur. See "CleaningtheVideo Screens" later in this section for more information.
RemoteControl

Tousetheremotecontrol,aimitat thetransmitterwindowattherearof theRSEoverheadconsole and pressthedesiredbutton.Direct sunlightorverybrightlightcould affecttheabilityoftheRSE transmittertoreceivesignalsfrom theremotecontrol.Iftheremote controldoesnotseemtobe working,thebatteriesmightneedto bereplaced.See"Battery Replacement"laterinthissection.
Objectsblockingthelineofsight couldalsoaffectthefunctionofthe remotecontrol.
IfaCDorDVDisintheRadioDVD slot,theremotecontrol ⬇(power) buttoncanbeusedtoturnonthe videoscreendisplayandstartthe disc.Theradiocanalssoturnonthe videoscreendisplay.SeeOperation onpage7-3formoreinformation.
Notice: Storingtheremote controlinahotareaorindirect sunlightcandamageit, and the repairs will not be recovered by the warranty. Storage in extreme cold can weaken the batteries. Keep theremote control stored in cool, dry place.
Iftheremotecontrolbecomeslost ordamaged, anewuniversal remotecontrolcanbepurchased. Ifthishappens, makesurethe universalremotecontrolusesa codesetofToshiba®.
RemoteControlButtons
(Power):Pressthisbutton to turnthevideoscreenonandoff.
(Illumination): Pressthisbutton toturntheremotecontrolbacklight on. The backlight automatically timesoutafter7to10secondsifno otherbuttonispressedwhilethe backlightison.
(Title): Pressthisbutton to return the DVD to the main menu of the DVD. This function could vary foreach disc.
(MainMenu):Pressthisbutton toaccesstheDVDmenu.TheDVD menuisdifferentoneveryDVD. Usethenavigationarrowstomove thecursoraroundtheDVDmenu. Aftermakingaselectionpressthe enterbutton.Thisbuttononly operateswhenusingaDVD.
▲, ▼, ◀, ▶ (Menu Navigation
Arrows):Usethearowbuttonsto navigatethroughamenu.
◀(Enter):Pressthisbuttonto selectthechoicethatishhighlighted inanymenu.
□(DisplayMenu):Pressthis buttontoadjustthebrightness, screendisplaymode(normal,full, orzoom),anddisplaythe languagemenu.
(Return):Pressthisbuttonto exitthecurrentactivemenuand returntothepreviousmenu.This buttonoperatesonlywhenthe displaymenuoraDVDmenuis active.
■(Stop):Pressthisbuttontostop playing,fastreversing,orfast forwardingaDVD.Pressthisbutton twicetoreturntothebeginningof theDVD.
▶ ||(Play/Pause):Pressthis buttontostartplayingaDVD.Press thisbuttonwhileaDVDisplayingto pauseit.Pressitagaintocontinue playingtheDVD.
While the DVD displaying, the DVD can be played slowly by bypassing the play/pause button then pressing the fast forward button. The DVD continues playing in as low play mode. Also, reverse can be played slowly by bypassing the play/pause button and then pressing the fast reverse button. Tocancelslow play mode, presstheplay/pause button.
◀(PreviousTrack/Chapter):
Pressthisbuttontoreturntothe startofthecurrenttrackorchapter. Pressthisbuttonagaintogotothe previoustrackorchapter. This buttonmightnotworkwhenthe DVDisplayingthecopyright informationorthepreviews.
▶(NextTrack/Chapter):Press thisbuttontogotothebeginningof thenextchapterortrack.This buttonmightnotworkwhilethe DVDdisplayingthecopyright informationorthepreviews.
(FastReverse):Pressthis buttontoquicklyreversetheDVDor CD.TostopfastreversingaDVD video,presstheplay/pausebutton. TostopfastreversingaDVDaudio orCD,releasethefastreverse button.Thisbuttonmightnotwork whentheDVDdisplayingthe copyrightinformationorthe previews.
(FastForward):Pressthis buttontofastforwardtheDVDor CD.TostopfastforwardingaDVD video,presstheplay/pausebutton. TostopfastforwardingaDVDaudio orCD,releasethefastforward button.Thisbuttonmightnotwork whiletheDVDdisplayingthe copyrightinformationorthe previews.
●(Audio):Pressthisbuttonto changeaudiotracksonDVDsthat havethisfeaturewhentheDVDis playing. Theformatandcontentof thisfunctionvaryforeachdisc.
☐(Subtitles):Pressthisbuttonto turnonoroffsubtitlesandtomove throughsubtitleoptionswhena DVDisplaying. Theformatand contentofthisfunctionvaryfor eachdisc.
AUX(Auxiliary):Pressthisbutton toswitchthesystembetweenthe DVDplayerandanauxiliarysource.
(Camera): Pressthisbutton to changecameraanglesonDVDs that havethisfeaturewhileaDVD is playing. The format and content of this function vary foreachdisc.
1through0(NumericKeypad): Thenumerickeypadprovidesthe capabilityofdirectchapterortrack numberselection.
☒(Clear): Pressthisbuttonwithin threesecondsafterenteringa numericselection, toclearall numericalinputs.
≥10(DoubleDigitEntries):Press thisbuttontoselectchapterortrack numbersgreaterthannine.Press thisbuttonbeforeenteringthe number.
BatteryReplacement
Tochangetheremotecontrol batteries, dothefollowing:
-
Slidetherearcoverbackonthe remotecontrol.
-
Replace the two batteries in the compartment. Makes sure they are installed correctly using the diagram on the inside of the remote control.
-
Replace the battery cover. If theremote controlist of bestored for along period of time, remove the batteries and keep them in a cool, dry place.
7-48InfotainmentSystem
TipsandTroubleshootingChart
| ProblemRecommendedAction | |
| Thereisnopower.TheignitionmightnotbeturnedtoON/RUNor | ACC/ACCESSORY. |
| Thepicturedoesnotfillthescreen.Thereareblackbordersonthetopandbottomoronbothsides,orthepicturelooksstretchedout. | Checkthedisplaymodesettingsinthesetupmenubypressingthedisplaymenubuttonontheremotecontrol. |
| Inauxiliarymode,thepicturemovesorscrolls.Checktheauxiliaryinputconnectionsatbothdevices. | |
| Theremotecontroldoesnotwork.Checktomakesurethereisnpobstructionbetweenheremotecontrolandthetransmitterwindow.Checkthebatteriestomakesuretheyarenotdeadorinstalledincorrectly. | |
| Afterstoppingtheplayer,andpushingPlay,sometimestheDVDstartswhereitletoffandsometimesatthebeginning. | Ifthestopbuttonwaspressedonetime,theDVDplayerresumesplayingwheretheDVDwasstopped.Ifthestopbuttonwaspressedtwotimes,theDVDplayerbeginstoplayfromthebeginningoftheDVD. |
| Theauxiliarysourceisrunning,butthereisnopictureorsound. | CheckthattheRSEvideoscreenisintheauxiliarysourcemode.Checktheauxiliaryinputconnectionsatbothdevices. |
TipsandTroubleshootingChart(cont'd)
| ProblemRecommendedAction | |
| Sometimesthewirelessheadphoneaudiocutsoutor buzzes. | Checkforobstructions,lowbatteries,receptionrange,andinterferencefromcellulartelephonetowers,oruseacellulartelephoneinthevehicle.CheckthattheheadphonesareoncorrectlyusingtheL(left)andR(right)ontheheadphones. |
| Theremoteand/ortheheadphonesarelost.Seeyourdealerforassistance. | |
| TheDVDdisplaying,butthereisnopictureorsound.CheckthattheRSEvideoscreenissourcedtotheDVD player. | |
DVDDisplayErrorMessages
TheDVDdisplayerrormessage dependsontheradiothatisinthe vehicle. Thevideoscreencan displayoneofthefollowing:
DiscLoad/EjectError: This messagedisplayswhenthereare discloadorejectproblems.
DiscFormatError: Thismessage displaysifthediscisinsertedwith thedisclabelwrongsideup,orif thediscisdamaged.
DiscRegionError: Thismessage displaysifthediscisnotfroma correctregion.
NoDisclnseted: Thismessage displaysifnodiscispresentwhen EJECTorDVDAUXispressedon theradio.
DVDDistortion
Videodistortioncanoccurwhen operatingcellularphones, scanners, CBradios, GlobalPositionSystems (GPS)*, two-wayradios, mobilefax machines, orwalkietalkies.
Itmightbenecessarytoturnoffthe DVDplayerwhenoperatingoneof thesedevicesinornearthevehicle.
*ExcludestheOnStar®System.
CleaningtheRSEOverhead Console
WhencleaningtheRSEoverhead consolesurface,useonlyaclean clothdampenedwithcleanwater.
CleaningtheVideoScreen
Whencleaningthevideoscreen, useonlyacleanclothdampened withcleanwater. Usecarewhen directlytouchingorcleaningthe screen, asdamagecouldresult.
RearSeatAudio(RSA) System
Vehicleswiththisfeatureallowthe rearseatpassengerstolistento andcontrolanyofthemusic sources:radio,CDs,DVDs,orother auxiliarysources.However,therear seatpassengerscanonlycontrol themusicsourcesthefrontseat passengersarenotlisteningto (exceptonsomeradioswheredual controlisallowed).Forexample, rearseatpassengerscancontrol andlistentoaCDthroughthe headphones,whilethedriverlistens totheradiothroughthefront speakers.Therearseatpassengers havecontrolofthevolumeforeach setofheadphones.
Theradiofunctionalityiscontrolled byboththeRSAandthefrontradio. Onlyonebandcanbetunedtoat onetime.Changingthebandonthe RSAorthefrontradiowillchange thebandontheothersystem, iftheyarebothsourcedtotheradio.
The RSA functions can be used even while the main radio is off. The front audiosystem will display the headphone icon when the RSA is on, and it will disappear from the display when the RSA is off.
Audiocanbeheardthroughwired headphones(notincluded)plugged intothejacksontheRSA.Ifthe vehiclehasthisfeature,audiocan alsobeheardonChannel2ofthe wirelessheadphones.
Dependingontheaudiosystem,the rearspeakersmaycontinuetoplay whentheRSAaudioisactive throughtheheadphones.
TolistentoaniPodorportable audiodevicethroughtheRSA, attachtheiPodorportableaudio devicetothefrontauxiliaryinput (ifavailable),locatedonthefront audiosystem.TurntheiPodon, thenchoosethefrontauxiliaryinput withtheRSASRCEbutton.

text_image
SRCS PROG(Power):Pressthisbuttonto turntheRSAonoroff.
Volume: Toincrease or decrease headphone volume, turn the knobs located next to the SRCE or PROG buttons. The left knob control the left headphones and the right knob control the right headphones.
SRCE(Source): Pressthis buttonoswitchbetweentheradio (AM-FM), XM™ (ifequipped), CD, andifthevehiclehasthese features, DVD, frontauxiliary, and rearauxiliary.
KID(Seek):WhenlisteningtoFM, AM, or XM™ (ifequipped), press theseekarrowstogotothe previousortothenextstationor channelsandstaythere. This functionisinactive, withsome radios, ifthefrontseatpassengers arelisteningtotheradio.
Pressandholdeitherseekarrow untilthedisplayflashes,totuneto anindividualstation.Thedisplay stopsflashingafterthebuttonshave notbeenpushedformorethan twoseconds.Thisfunctionis inactive,withsomeradios,ifthe frontseatpassengersarelistening totheradio.
Whilelisteningtoadisc, press the leftseekarrowtogobacktothe startofthecurrenttrackorchapter (ifmorethan10secondshave played). Presstherightseekarrow togothenexttrackorchapter on thedisc. Thisfunctionisinactive, withsomeradios, ifthefrontseat passengersarelisteningtothedisc.
WhileaDVDvideomenuisbeing displayed, presseitherseekarrow toperformacursorupordownon themenu.Holdeitherseekarrowto performacursorleftorrighton themenu.
PROG(Program):Pressthis buttonogotothenextpresetradio stationorchannelsetonthemain radio. Thisfunctionisinactive,with someradios,ifthefrontseat passengersarelisteningtothe radio.
WhileaCDorDVD-Adiscis playing, pressthisbuttontogoto thebeginningoftheCDorDVD-A. Thisfunctionisinactive, withsome radios, ifthefrontseatpassengers arelisteningtotheCDorDVD-A.
WhileadiscisplayingintheCDor DVDchanger,pressthisbuttonto selectthenextdisc,ifmultiplediscs areloaded. Thisfunctionisinactive, withsomeradios,ifthefrontseat passengersarelisteningtothedisc.
WhileaDVDvideomenuisbeing displayed, pressthePROGbutton toperformthemenufunction, Enter.
Phone
Bluetooth
Forvehiclesequipped with Bluetoothcapability, the system can interact with many cell phones, allowing:
- Placementandreceiptofcallsin ahands-freemode.
- Sharingofthecellphone's addressbookorcontactlistwith thevehicle.
Tominimizedriverdistraction, beforedriving, and with the vehicle parked:
- Becomefamiliarwiththe featuresofthecellphone. Organizethephonebookand contactlistsclearlyanddelete duplicateorrarelyusedentries. Ifpossible,programspeeddial orothershortcuts.
- Reviewthecontrolsand operation of the infotainment system.

Information Provided by: DEALER
- Paircellphone(s)tothevehicle. Thesystemmaynotworkwith allcellphones.See"Pairing"in thissectionformoreinformation.
- If the cell phone has voice dialing capability, learntouse that feature to access the address book or contact list. See "Voice Pass-Thru" in this section form more information.
- See "StoringandDeletingPhone Numbers" in this section for more information.

WARNING
When using acellphone, it can be distracting to look to long or too often at the screen of the phone or the infotainment (navigation) system. Taking your eyes off the road to long or too oft could cause a crash resulting in injury or death. Focus your attention on driving.
ABluetoothsystemcanusea Bluetooth-capablecellphonewitha Hands-FreeProfiletomake and receivephonecalls. Thesystem canbeusedwhilethekeyisinthe ON/RUNorACC/ACCESSORY position. TherangeoftheBluetooth systemcanbeupto9.1m(30ft). Notallphonessupportallfunctions, andnotallphonesworkwiththe in-vehicleBluetoothsystem.See www.gm.com/bluetoothformore informationoncompatiblephones.
VoiceRecognition
The Bluetooth system uses voice recognition to interpret voice command stodial phonenumbers and nametags.
For additional information, say "Help" while you are in a voice recognition menu.
Noise: Keepinteriornoiselevelsto a minimum. Thesystemmaynot recognizevoicecommandsifthere istoomuchbackgroundnoise.
WhentoSpeak: Ashorttone soundsafterthesystemresponds indicatingwhenitiswaitingfora voicecommand.Waituntilthetone andthenspeak.
HowtoSpeak: Speak clearly in a calmandnatural voice.
AudioSystem
When using the in-vehicle Bluetooth system, sound comesthrough the vehicle's front audiosystem speakers and overridest the audio system. Usethea audiosystem volumeknob, during acall, to changethe volume level. The adjusted volume level remains in memory for later calls. Toprevent missed calls, a minimum volume level is used if the volume is turned downtoolow.
BluetoothControls
Usethebuttonslocatedonthe steeringwheeltooperatethe in-vehicleBluetoothsystem.See SteeringWheelControlson page5-3formoreinformation.
P / (Push To Talk): Press to answerincomingcalls, confirm systeminformation, and start speechrecognition.
/ ▽ (End): Press to end a call, rejectacall, orcancelanoperation.
Pairing
ABluetoothenabledcellphone mustbepairedtotheBluetooth systemandthenconnectedtothe vehiclebeforeitcanbeused.See thecellphonemanufacturer'suser guideforBluetoothfunctionsbefore pairingthecellphone.IfaBluetooth phoneisnotconnected,callswillbe madeusingOnStarHands-Free Calling,ifequipped.SeeOnStar Overviewonpage14-1formore information.

7-54InfotainmentSystem
PairingInformation
- ABluetoothphonewithMP3 capabilitycannotbepaired to the vehicleasaphoneandan MP3playeratthesametime.
- Uptofivecellphonescanbe pairedtotheBluetoothsystem.
• Thepairingprocessisdisabled whenthevehicleismoving. - Pairingonlyneedstobe completedonce, unless the pairinginformationonthecell phonechangesorthecellphone isdeletedfromthesystem.
- Onlyonepairedcellphonecan beconnectedtotheBluetooth systematatime.
- If multiplepairedcellphones are within range of the system, the system connects to the first available paired cell phone in the order that they were first paired to the system. To connect to a different paired phone, see "Connecting to a Different Phone" later in this section.
PairingaPhone
- Pressandhold twoseconds.
/for
-
Say "Bluetooth." This command can be skipped.
-
Say "Pair." Thesystemresponds withinstructionsandafour-digit PersonalIdentificationNumber (PIN). The PINisusedinStep5.
-
Start the pairing process on the cellphonethatyouwanttopair. For help with this process, see the cellphonemanufacturer's userguide.
-
Locatethedevicenamed "Your Vehicle" inthelistonthecell phone. Followtheinstructions onthecellphonetoenterthe PINprovidedinStep3. Afterthe PINissuccessfullyentered, the systempromptsyoutoprovidea nameforthepairedcellphone. Thisnamewillbeusedto indicatewhichphonesare pairedandconnectedtothe vehicle. Thesystemresponds with "
hasbeen successfullypaired" afterthe pairingprocessiscomplete. - RepeatSteps1 through 5 topair additional phones.
ListingAllPairedandConnected Phones
Thesystemcanlistallcellphones pairedtoit.lfapairedcellphoneis alsoconnectedtothevehicle,the systemrespondswith"isconnected" afterthatphonename.
- Pressandhold for twoseconds.
- Say "Bluetooth."
- Say "List."
DeletingaPairedPhone
If the phonename you want to delete is unknown, see "Listing All Paired and Connected Phones."
- Pressandhold for
twoseconds.
2.Say"Bluetooth." - Say "Delete." Thesystemasks whichphonetodelete.
- Saythenameofthephoneyou wanttodelete.
ConnectingtoaDifferentPhone
Toconnecttoadifferentcellphone, theBluetoothsystemlooksforthe nextavailablecellphoneinthe orderinwhichalltheavailablecell phoneswerepaired.Dependingon whichcellphoneyouwantto connectto,youmayhavetouse thiscommandseveraltimes.
-
Pressandhold for twoseconds.
2.Say"Bluetooth."
3.Say"Changephone." -
Ifanothercellphoneis found,theresponsewillbe "
isnow connected."
• Ifanothercellphoneisnot found, theoriginalphone remainsconnected.

Information Provided by: DEALER
StoringandDeletingPhone Numbers
Thesystemcanstoreupto 30phonenumbersasnametagsin theHands-FreeDirectorythatis sharedbetweentheBluetoothand OnStarsystems,ifequipped.
The following commands are used to delete and store phonenumbers.
Store: This command will store a phonenumber, oragroup of numbers as anametag.
DigitStore: This command allows a phonenumbertobestoredasa nametagbyenteringthedigitsone atatime.
Delete: This command is used to delete individual nametags.
DeleteAllNameTags: This commanddeletesallstoredname tagsintheHands-FreeCalling DirectoryandtheOnStar Turn-by-TurnDestinationsDirectory, ifequipped.
Usingthe"Store"Command
- Pressandhold twoseconds.
/for
2.Say"Store."
- Say the phonenumber group of numbers you want to store all at once with no pauses, then follow the directions given by the system to save an ametag for this number.
Usingthe"DigitStore"Command
Ifanunwantednumberis recognizedbythesystem, say "Clear"atanytimetoclearthelast number.
Tohearallofthenumbers recognizedbythesystem, say "Verify"atanytime.
- Pressandhold twoseconds.
/lefor
2.Say"DigitStore."
- Sayeachdigit, oneatatime, thatyouwanttostore. After eachdigitisentered, thesystem repeatsbackthedigititheard followedbyatone. Afterthelast digithasbeenentered, say "Store," and then followthe directionsgivenbythesystemto saveanametagforthisnumber.
Usingthe"Delete"Command
- Pressandhold twoseconds.
/for
-
Say "Delete."
-
Saythenametagyouwantto delete.
Usingthe"DeleteAllNameTags" Command
Thiscommanddeletesallstored nametagsintheHands-Free CallingDirectoryandtheOnStar Turn-by-TurnDestinationsDirectory, ifequipped.
Todeleteallnametags:
- Pressandhold twoseconds.
/for
- Say "Deleteallnametags."
ListingStoredNumbers
Thelistcommandwilllistallstored numbersandnametags.
Usingthe"List"Command
- Pressandhold twoseconds.
C/102for
2.Say"Directory."
- Say "Hands-FreeCalling."
4.Say"List."
MakingaCall
Callscanbemadeusingthe followingcommands.
DialorCall: Thedialorcall commandcanbeused interchangeablytodialaphone numberorastorednametag.
DigitDial: This command allows a phonenumbertobedialed by entering the digits one at time.
Re-dial: This command is used to dial the last number used on the cell phone.
Using the "Dial" or "Call" Command
- Pressandhold for twoseconds.
- Say "Dial" or "Call."
- Saytheentirenumberwithout pausing, or say thenametag.
Onceconnected, thepersoncalled willbeheardthroughtheaudio speakers.
Usingthe“DigitDial”Command
Thedigitdialcommandallowsa phonenumbertobedialedby enteringthedigitsoneatatime. Aftereachdigitisentered, the systemrepeatsbackthedigitit heardfollowedbyatone.
Ifanunwantednumberis recognizedbythesystem, say "Clear"atanytimetoclearthelast number.
Tohearallofthenumbers recognizedbythesystem, say "Verify"atanytime.
- Pressandhold for twoseconds.
- Say "DigitDial."
- Sayeachdigit, oneatatime, thatyouwanttodial. After each digitisentered, the system repeats backthedigititheard followed by atone. After the last digithasbeenentered, say "Dial."
Onceconnected, the person called will be heard through the audio speakers.
Usingthe"Re-dial"Command
- Pressandhold for twoseconds.
- Afterthetone, say "Re-dial."
Onceconnected, thepersoncalled willbeheardthroughtheaudio speakers.
ReceivingaCall
When an incoming call is received, the audiosystemmutes and aring tone is heardin the vehicle.
- Press/1/2toanswerthecall.
- Press/▽toignoreacall.
CallWaiting
Callwaitingmustbesupported on thecellphoneandenabledbythe wirelessservicecarrier.
- Press/1toansweran incomingcallwhenanothercall isactive.Theoriginalcallis placedonhold.
- Press/againtoreturn to theoriginalcall.
• Toignoretheincomingcall, no actionisrequired. - Press/▽todisconnectthe currentcallandswitchtothecall onhold.
Three-WayCalling
Three-way calling must be supported on the cell phone and enabled by the wireless service carrier.
-
Whileonacall, press
2.Say"Three-waycall." -
Usethedialorcallcommandto dialthenumberofthethirdparty tobecalled.
- Oncethecallisconnected, press Ⓜ/¶ tolinkallcallers together.
EndingaCall
Press/▽toendacall.
MutingaCall
During acall, all sounds from inside the vehicle can be muted so that the person on the other end of the call can not hear them.
- Tomuteacall, press/10, and then say "Mutecall."
- Tocancelmute, press/1/16, andthensay "Un-mutecall."
TransferringaCall
Audiocanbetransferredbetween theBluetoothsystemandthecell phone.
Thecellphonemustbepaired and connected with the Bluetooth system before acall can be transferred. The connection process cantakeuptotwominutes after the ignitionisturned to ON/RUN.
TransferringAudiofromthe BluetoothSystemtoaCellPhone
During acallwiththeaudiointhe vehicle:
- Press
- Say "TransferCall."
TransferringAudiotothe BluetoothSystemfromaCell Phone
During acallwiththeaudioonthe cellphone, press Ⓞ/w#.Theaudio transferstothevehicle. If theaudio does not transfertothevehicle, use the audiotransferfeature on thecell phone. Seeyourcellphone manufacturer'suserguideformore information.
VoicePass-Thru
Voicepass-thruallowsaccesstothe voicerecognitioncommandsonthe cellphone.Seeyourcellphone manufacturer'suserguidetoseeif thecellphonesupportsthisfeature.
Toaccesscontactsstoredinthecell phone:
- Pressandhold for twoseconds.
- Say "Bluetooth." This command can be skipped.
- Say "Voice." Thesystem responds "OK, accessing
"
Thecellphone'snormalprompt messageswillgothroughtheircycle accordingtothephone'soperating instructions.
DualToneMulti-Frequency (DTMF)Tones
TheBluetoothsystemcansend numbersandthenumbersstoredas nametagsduringacall.Youcan usethisfeaturewhencallinga menu-drivenphonesystem.Accountnumberscanalsobe storedforuse.
SendingaNumberorNameTag DuringaCall
- Press /_^ . Thesystem responds "Ready," followed by atone.
2.Say"Dial." - Saythenumberornametag tosend.
ClearingtheSystem
Unlessinformationisdeletedoutof their-vehicleBluetoothsystem,it willberetainedindefinitely.This includesallsavednametagsinthe phonebookandphonepairing information.Forinformationonhow todeletethisinformation,seethe previoussection"DeletingaPaired Phone"andtheprevioussections ondeletingnametags.
OtherInformation
TheBluetooth ^® wordmark and logosareowned by the Bluetooth SIG, Inc. and any use of such marks by General Motors is under license. Other trademarks and tradenames are those of their respective owners.
SeeRadioFrequencyStatementon page 13-23forinformation regardingPart15oftheFederal CommunicationsCommission(FCC) rulesandIndustryCanada StandardsRSS-GEN/210/220/310.
Trademarksand LicenseAgreements

dts
Digital Surround
Manufacturedunderlicenseunder U.S.Patent#'s:5,451,942; 5,956,674;5,974,380;5,978,762; 6,487,535&otherU.S.and worldwidepatentsissued& pending.DTSandtheSymbolare registeredtrademarksandDTS DigitalSurroundandtheDTSlogos aretrademarksofDTSInc.All RightsReserved.
DOLBY®
DIGITAL
Manufacturedunderlicensefrom DolbyLaboratories.Dolbyandthe double-Dsymbolaretrademarksof DolbyLaboratories.

Information Provided by:
DEALER
图一 严风口口证信图
ClimateControls
ClimateControlSystems
ClimateControlSystems (withAirConditioning).....8-1
ClimateControlSystems (withHeaterOnly)....8-4
DualAutomaticClimateControl System....8-5
AirVents
AirVents....8-11
ClimateControlSystems
ClimateControlSystems(withAirConditioning)
With this system the heating, cooling, and ventilation can be controlled.

text_image
A B C D E F GA. FanControl
B. TemperatureControl
C.AirDeliveryModeControl
D. AirConditioning
E.OutsideAir
F. Recirculation
G.RearWindowDefogger
8-2ClimateControls
TemperatureControl: Turn clockwise or counterclockwiseto increase or decrease the temperature inside the vehicle.
(FanControl): Turnclockwise orcounterclockwisetoincreaseor decreasethefanspeed. Turnthe knoballthewaycounterclockwise toturnthefrontsystemoff.
AirDeliveryModeControl: Turn clockwiseorcounterclockwiseto changethedirectionoftheairflow insidethevehicle. Theknobcanbe positionedbetweenwomodesto selectacombinationofthose modes.
Selectfromthefollowing:
(Vent):Airisdirectedtothe instrumentpaneloutlets.
(Bi-Level):Airisdivided betweentheinstrumentpanel and flooroutlets.
(Floor):Airisdirectedtothe flooroutlets,withsomeairdirected tothewindshieldandsidewindow outlets.Inthismode,thesystem automaticallyselectsoutsideair. Recirculationcannotbeselectedin floormode.
(Defog): This mode clear the window soffogormoisture. Air is directed to the windshield, floor outlets, and sidewindowvents.
(Defrost): Thismoderemoves fogorfrostfromthewindshield morequickly. Airisdirectedtothe windshieldandthesidewindow vents, with someairdirectedtothe floorvents. Thesystem automaticallyforcesoutsideairinto the vehicle.
There circulationmode cannot be selected in the defogordefrost mode. Wheneithermode is selected, the system runsthe air conditioning compressor, unless the outside temperature is closeto freezing.
Donotdrivethevehicleuntilallthe windowsareclear.
(OutsideAir): Presstoturn theoutsideairmodeon. An indicatorlightcomesontoshow thatoutsideairison. Inthismode outsideaircirculatesthroughoutthe vehicle. Theoutsideairmodecan beusedwithallmodes, but it cannotbeusedwiththe recirculationmode.
(Recirculation): Presstoturn therecirculationmodeon. An indicatorlightcomesontoshow thatrecirculationison.
Thismoderecirculatesandhelpsto quicklycooltheairinsidethe vehicle.Itcanbeusedtohelp preventoutsideairandodorsfrom enteringthevehicle.

There circulationmode cannot be used with floor, defogordefrost modes. If recirculation is selected with one of these modes, the indicator light flashest hreetimes and then turn soff. While in recirculation modethewindows may fog whenthe weather is cold and damp. Toclearthefog, select either the defogordefrost mode and increasethe fanspeed.
There circulation mode can be turned off by pressing the outside air button, or by turning off the ignition.
(AirConditioning): Pressto turntheairconditioningsystemon oroff. Anindicatorlightcomesonto showthattheairconditioningison. Theairconditioningcanbeselected inanymodeaslongasthefan switchison.
Theairconditioningsystem removesmoisturefromtheair,soa smallamountofwatermightdrip underthevehiclewhileidlingor afterturningofftheengine.This is normal.
RearWindowDefogger
Forvehicleswitharearwindow defogger,awarminggridisusedto removefogfromtherearwindow.
(Rear):Presstoturntherear windowdefoggeronoroff.An indicatorlightonthebuttoncomes ontoshowthattherearwindow defoggerison.
Therearwindowdefoggeronly workwhentheignitionisinON/RUN.Therearwindowdefogger staysonforapproximately 10minutesafterthebuttonis pressed,unlesstheignitionis turnedtoACC/ACCESSORYor LOCK/OFF.Thedefoggercanalso beturnedoffbyturningoffthe engine.
Notice: Donotuseanything sharpontheinsideoftherear window. If you do, you could cut ordamagethewarminggrid, and therepairswould not recovered by the vehicle warranty. Donot attachatemporary vehicle license, tape, adecal, or anything similar to the defogger grid.
ClimateControlSystems(withHeaterOnly)
With this system the heating and ventilation can be controlled.
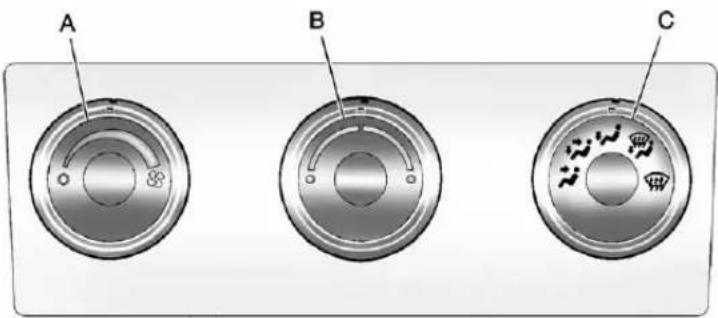
text_image
A B CA.FanControl
B. TemperatureControl
C.AirDeliveryModeControl
TemperatureControl: Turn clockwise or counterclockwiseto increase or decrease the temperature inside the vehicle.
(FanControl): Turnclockwise or counterclockwisetoincreaseor decreasethefanspeed. Turnthe knoballthewaycounterclockwise toturnthefrontsystemoff.
AirDeliveryModeControl:
Turnclockwiseorcounterclockwise toincreaseordecreasethe temperatureinsidethevehicle.

Information Provided by
DEALER
Theknobcanbepositioned betweenwomodestoselecta combinationofthosemodes.
Selectfromthefollowing:
(Vent):Airisdirectedtothe instrumentpaneloutlets.
(Bi-Level):Airisdivided betweentheinstrumentpanel and flooroutlets.
(Floor):Airisdirectedtothe flooroutlets,withsomeairdirected tothewindshield,sidewindow,and secondrowflooroutlets.Inthis mode,thesystemautomatically selectsoutsideair.
(Defog): This mode clear the window soffogormoisture. Air is directed to the windshield, floor outlets, and sidewindowvents.
(Defrost): Thismoderemoves fogorfrostfromthewindshield morequickly. Airisdirectedtothe windshieldandthesidewindow vents,withsomeairdirected tothefloorvents. Thesystem automaticallyforcesoutsideairinto thevehicle.
Donotdrivethevehicleuntilallthe windowsareclear.
DualAutomaticClimateControlSystem
Theheating, cooling, and ventilation in the vehicle can be controlled with this system. The vehicle also has a flow-through ventilation system described later in this section.
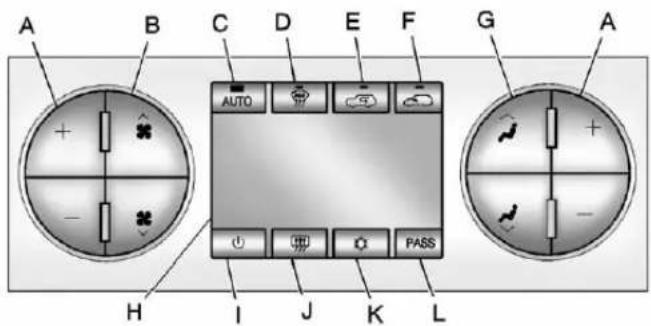
text_image
A B C D E F G A AUTO PASS H I J K LA.DriverandPassenger TemperatureControls
B.FanControl
C.AUTO
D. Defrost
E. Recirculation
F. Outside Air
G.AirDeliveryModeControl H.Display
- On/Off
J.RearWindowDefogger
K.AirConditioning
L.PASS(Passenger)
(On/Off):Presstoturnthe climatecontrolsystemonoroff. Outsideairstillentersthevehicle, andisdirectedtothefloor. This directioncanbechangedby pressingthemodebutton. Recirculationcanbeselectedonce youhaveselectedventorbi-level mode. Thetemperaturecanalsobe adjustedusingeithertemperature button. If theairdeliverymodeor temperaturesettingsareadjusted withthesystemoff, the display illuminatesbriefytoshowthe settingsandthenreturnstooff. The systemcanbeturnedbackonby pressingeither ⏻, ⚙, ⚣, ⚣, the defrostortheAUTObutton.
DriverandPassengerSide TemperatureControls
The driver and passengers side temperature buttons are used to adjust the temperature of their coming through the system on the driver or passengers side of the vehicle. The temperature can be adjusted even if the system is turned off. This is possible since outside air always flow through the system, the vehicle is moving forward unless it is set to recirculation mode. See "Recirculation" later in this section.
Pressthe+or-buttonstoincrease ordecreasethecabintemperature. Thedriversideorpassengerside temperaturedisplayshowsthe temperaturesettingincreasingor decreasing.
Thepassengertemperaturesetting canbesettomatchthedriver temperaturesettingbypassingthe PASSbuttonandturningoffthe PASSindicator.Whenthe passengertemperaturesettingisset differentthanthedriversetting,the indicatoronthePASSbutton illuminatesandboththedriverside andpassengersidetemperature displaysareshown.
Whenindefrostmodethe passengertemperaturesetting cannotbechanged.
AutomaticOperation
AUTO(Automatic): When automatic operation is active, the system control she inside temperature, the air delivery, and the fanspeed.
Usethestepsbelowtoplacethe entiresysteminautomaticmode:
- PresstheAUTObutton.
When AUTOisselected, the displaychangestoshowthe currenttemperature(s)and AUTOislitonthedisplay. The currentairdeliverymode and fanspeedarealsodisplayedfor aboutfiveseconds.
When AUTOisselected, theair conditioningoperationandair inletareautomaticallycontrolled. Theairconditioningcompressor mayrunwhentheoutside temperatureisabovefreezing. Theairinletwillnormallybeset tooutsideair.lfitishotoutside, theairinletmayautomatically switchtotherecirculatemodeto helpquicklycooldowntheair insidethevehicle. Thelighton thebuttoncomesonin recirculation.
- Setthedriverandpassenger temperature.
To find your comfort setting, start with a 23°C (74°F) temperature setting and allow about 20 minutes for the system to regulate. Use the driver or passenger temperature buttons to adjust the temperatures setting as necessary. If at temperature setting of 15°C (60°F) is chosen, the system remains at the maximum cooling setting. If at temperatures setting of 32°C (90°F) is chosen, the system remains at the maximum heat setting. Choosing either maximum setting will not cause the vehicle to be a cooler than faster.
Donotcoverthesolarsensor locatedonthetopoftheinstrument panelnearthewindshield. This sensorregulatesairtemperature basedonsunload. Formore informationonthesolarsensor, see "Sensors" later in this section.
Toavoidblowingcoldairincold weather,thesystemdelaysturning thefanonuntilwarmairis available. Thelengthofdelay dependsontheenginecoolant temperature.Pressingthefan switchoverridesthisdelayand changesthefantoaselected speed.
ManualOperation
(FanControl):Pressthesestbuttonstoincreaseordecreasethefanspeed.
Pressingeitherfanbuttonwhilein automaticcontrolplacesthefan undermanualcontrol. Thefan settingremainsdisplayedandthe AUTOlightturnsoff. Theair deliverymoderemainsunder automaticcontrol.
(AirDeliveryModeControl): Pressthesebuttonstochangethe directionoftheairflowinthevehicle. Repeatedlypresseitherbuttonuntil thedesiredmodeappearsonthe display.
Pressingeithermodebuttonwhile thesystemisoffchangestheair deliverymodewithoutturningthe systemon.
Pressingeithermodebuttonwhilein automaticcontrolplacesthemode undermanualcontrol. Theair deliverymodesettingdisplaysand theAUTOlightturnsoff. Thefan remainsunderautomaticcontrol.
(Vent):Airisdirectedtothe instrumentpaneloutlets.
(i)(Bi-Level):Airisdivided between the instrument panel and floor outlets. Some air is directed toward the windshield and side window outlets.
(Floor):Airisdirectedtothe flooroutlets,withsometothe windshield,sidewindowoutlets,and secondrowflooroutlets.Inthis mode,thesystemautomatically selectsoutsideair.
(Defog): This mode clear the window soffogormoisture. Air is directed to the windshield, floor outlets, and sidewindowvents. In this mode, the system turn soff recirculation and runst heair conditioning compressor unless the outside temperature is closet to freezing. There circulation mode cannot be selected while in the defrost mode.
(Defrost): Thismoderemoves fogorfrostfromthewindshield morequickly. Airisdirectedtothe windshieldandsidewindowvents, withsomedirectedtothefloor vents. Inthismode, thesystem automaticallyforcesoutsideairinto thevehicleandrunstheair
conditioningcompressorunlessthe outsidetemperatureiscloseto freezing.Therecirculationmode cannotbeselectedwhileinthe defrostmode.
Thepassengertemperaturecontrol cannotbeactivatedwhileindefrost mode.IfthePASSbuttonis pressed,thebuttonindicatorflashes threetimesandwillnotwork.Ifthe passengertemperaturebuttonsare adjusted,thedrivertemperature indicatorchanges.Thepassenger temperaturewillnotbedisplayed.
Ifvent, bi-level, orfloormodeis selected again, the climate control system display the previous temperatures settings.
Donotdrivethevehicleuntilall windowsareclear.
(AirConditioning): Pressto turntheairconditioning(A/C) compressoronandoff. An indicator light comes on to show that the air conditioning is on.
If this button is pressed when the air conditioning compressor is unavailable, but outside conditions, the indicator flashes threetimes and then turn soff. If the air conditioning is on and the outsidetemperature drops below a temperature which is too cool for air conditioning to be effective, the air conditioning light turn soft to show that the air conditioning mode has been canceled.
Onhotdays, openthewindowslong enoughtolethotinsideairescape. This help storeducethetimeit takes for the vehicle to cooldown. It also helps the system to operate more efficiently.
Theairconditioningsystem removesmoisturefromtheair,soa smallamountofwatermightdrip underthevehiclewhileidlingor afterturningofftheengine. This is normal.
(Recirculation): Presstoturn therecirculationmodeon. An indicatorlightcomesontoshow thatrecirculationison.
Thismoderecirculatesandhelpsto quicklycooltheairinsidethe vehicle.Itcanbeusedtohelp preventoutsideairandodorsfrom enteringthevehicle.
There circulationmode cannot be used with floor, defog, or defrost modes. If recirculation is selected with one of those modes, the indicator light flashest hreetimes and then turn soff. The air conditioning compressor alsocomes on whenthismode is activated.
While in recirculation mode, the windows may fog when the weather is cold and damp. Toclear the fog, select either the defog or defrost mode and increase the fanspeed.
There circulation mode can be turned off by pressing the outside air button, or by turning off the ignition.
(OutsideAir): Presstoturnthe outsideairmodeon. An indicator lighton the button comes onto show that outside is on. When selected, air from outside the vehicle circulate throughout the vehicle. There circulation mode cannot be used with the outside airmode.
RearWindowDefogger
Therearwindowdefoggerusesa warminggridtoremovefogfromthe rearwindow.
(RearWindowDefogger):
Forvehicleswiththisfeature, presstoturnthedefoggeron oroff.Itautomaticallyturnsoff severalminutesafterithasbeen activated.Thedefoggercanalsobe turnedoffbyturningtheengineoff. Donotdrivethevehicleuntilall windowsareclear.
Notice: Donotusearazorblade orsharpobjecttocleartheinside rearwindow.Donotadhere anythingtothedefoggergrid linesintherearglass. These actionsmaydamagetherear defogger.Repairswouldnotbe coveredbyyourwarranty.
HeatedMirror:Forvehicleswith heatedoutsiderearviewmirrors,the mirrorsheattohelpclearfogorfrost fromthesurfaceofthemirrorwhen therearwindowdefogbuttonis pressed.SeePowerMirrorson page2-17.
Sensors

natural_image
Diagram showing a dome-shaped object with an arrow pointing downward, resting on parallel lines above a textured surface (no text or symbols)Thesolarsensor, located in the defrost grille in them middle of the instrument panel, monitor the solar heat. Donot cover the solar sensor or the system will not work properly.
natural_image
Circular diagram with evenly spaced dots arranged in a grid pattern (no text or symbols)Theinteriortemperaturesensor, locatedintheheadliner, measures the temperatureoftheairinsidethe vehicle.
Thereisalsoanexterior temperaturesensorlocatedbehind thefrontgrille. This sensorreads the outside air temperature and helps maintain the temperature inside the vehicle. Any cover on the front of the vehicle could cause a falsereading in the displayed temperature.
Theclimatecontrolsystemusesthe informationfromthesesensorsto maintaincomfortsettingsby adjustingtheoutlettemperature,fan speed,andtheairdeliverymode. Thesystemmayalsosupplycooler airtothesideofthevehiclefacing thesun.Therecirculationmodewill alsobeusedasneededtomaintain cooloutlettemperatures.
AirVents
Usetheairoutletslocatedinthe centerandonthesideofthe instrumentpaneltodirectthe airflow. Usethethumbwheelsnear theairoutletstoopenorcloseoff theairflow.
OperationTips
- Clearawayanyice, snow, orleavesfromairinletsatthe baseofthewindshieldthatcould blocktheflowofairintothe vehicle.
- Keepthepathunderthefront seatsclearofobjectstohelp circulatetheairinsideofthe vehiclemoreeffectively.
- Useofnon-GMapprovedhood deflectorscanadverselyaffect theperformanceofthesystem. Checkwithyourdealerbefore addingequipmenttotheoutside ofthevehicle.
8-12 Climate Controls
2 NOTES
Driving and Operating
DrivingInformation
DistractedDriving......9-2
DefensiveDriving......9-3
DrunkDriving....9-3
ControlofaVehicle......9-3
Braking....9-4
Steering....9-4
Off-RoadRecovery......9-5
LossofControl......9-5
Off-RoadDriving....9-6
DrivingonWetRoads......9-12
HighwayHypnosis......9-12
HillandMountainRoads.....9-13
WinterDriving......9-14
IftheVehicleIsStuck......9-16
VehicleLoadLimits......9-17
Truck-CamperLoading
Information......9-25
StartingandOperating
NewVehicleBreak-In.....9-27
Adjustable Throttle and Brake
Pedal....9-27
IgnitionPositions......9-28
StartingtheEngine......9-30
FastIdleSystem......9-31
RetainedAccessory Power(RAP)....9-32
EngineCoolantHeater......9-32
ShiftingIntoPark......9-34
ShiftingoutofPark......9-35
Parking(Manual Transmission)....9-36
ParkingoverThings ThatBurn....9-36
ActiveFuelManagement ^® ...9-37
EngineExhaust
EngineExhaust......9-37
RunningtheVehicleWhile Parked....9-38
AutomaticTransmission
AutomaticTransmission.....9-39
ManualMode....9-43
Tow/HaulMode......9-44
ManualTransmission
ManualTransmission......9-46
DriveSystems
Four-WheelDrive......9-47

Information Provided by: DEALER
Brakes
AntilockBrake
System(ABS)....9-61
ParkingBrake......9-63
BrakeAssist....9-64
HillStartAssist(HSA)......9-65
RideControlSystems
StabiliTrak® System......9-65
LockingRearAxle......9-69
CruiseControl
CruiseControl......9-69
ObjectDetectionSystems
UltrasonicParkingAssist....9-72
RearVision
Camera(RVC)......9-74
Fuel
Fuel....9-79
RecommendedFuel......9-80
GasolineSpecifications(U.S. andCanadaOnly)....9-81
CaliforniaFuel
Requirements......9-81
FuelsinForeignCountries...9-81
FuelAdditives......9-82
9-2DrivingandOperating
FuelE85(85%Ethanol).....9-83
FillingtheTank....9-84
FillingaPortableFuel
Container....9-85
Towing
GeneralTowing
Information......9-86
DrivingCharacteristicsand
TowingTips....9-86
TrailerTowing......9-90
TowingEquipment......9-106
TrailerSway
Control(TSC)......9-118
ConversionsandAdd-Ons
Add-On Electrical
Equipment......9-119
AddingaSnowPlowor
SimilarEquipment......9-119
PickupConversionto
ChassisCab......9-123
DrivingInformation
DistractedDriving
Distractioncomesinmanyforms andcantakeyourfocusfromthe taskofdriving.Exercisegood judgmentandonotletother activitiesdivertyourattentionaway fromtheroad.Manylocal governmentshaveenactedlaws regardingdriverdistraction.Become familiarwiththelocallawsin yourarea.
Toavoiddistracteddriving,always keepyoureyesontheroad,hands onthewheel,andmindonthedrive.
- Donotuseaphonein demandingdrivingsituations. Useahands-freemethodto placeorreceivenecessary phonecalls.
- Watchtheroad.Donotread, takenotes,orlookup informationonphonesorother electronic devices.

Information Provided by: DEALER
- Designateafrontseat passengertohandlepotential distractions.
- Becomefamiliarwithvehicle featuresbeforedriving,suchas programmingfavoriteradio stationsandadjustingclimate controlandseatsettings. Programalltripinformationinto anynavigationdevicepriorto driving.
- Waituntilthevehicleisparked toretrieveitemsthathavefallen tothefloor.
- Stoporparkthevehicletotend tochildren.
- Keeppetsinanappropriate carrierorrestraint.
- Avoidstressfulconversations whiledriving,whetherwitha passengeroronacellphone.
WARNING
Takingyoureyesofftheroadtoo longortoooftencouldcausea crashresultingininjuryordeath. Focusyourattentionondriving.
Refertotheinfotainmentsectionfor moreinformationonusingthat system,includingpairingandusing acellphone.
Ifequipped, refertothenavigation manualforinformationonthat system, includingpairingandusing acellphone.
DefensiveDriving
Defensivedrivingmeans"always expecttheunexpected."Thefirst stepindrivingdefensivelyistowear thesafetybelt.See SafetyBeltson page3-14.
- Assumethatotherroadusers (pedestrians, bicyclists, and otherdrivers) are going to be careless and make mistakes. Anticipate what they might do and beready.
- Allowenoughfollowingdistance betweenyouandthedriverin frontofyou.
• Focusonthetaskofdriving.
DrunkDriving
Deathandinjuryassociatedwith drinkinganddrivingisaglobal tragedy.
WARNING
Drinkingandthendrivingisvery dangerous.Yourreflexes, perceptions, attentiveness,and judgmentcanbeaffectedbyevenasmallamountofalcohol.You canhaveaserious—oreven fatal—collisionifyoudriveafter drinking.
Donotdrinkanddriveorridewith adriverwhohasbeendrinking. Ridehomeinacab;orifyouare withagroup,designateadriver whowillnotdrink.
ControlofaVehicle
Braking, steering, and accelerating are important factors in helping to control vehicle while driving.
Braking
Brakingactioninvolvesperception timeandreactiontime.Decidingto pushthebrakepedalisperception time.Actuallydoingitis reactiontime.
Averagedriverreactiontimeis about three-quarters of a second. In that time, a vehicle moving at 100 km/h (60 mph) travels 20 m (66 ft), which could be a lot of distance in an emergency.
Helpfulbrakingtipstokeepinmind include:
- Keepenoughdistancebetween youandthevehicleinfront ofyou.
- Avoidneedlessheavybraking.
- Keeppacewithtraffic.
If the engine ever stops while the vehicle is being driven, brake normally but donot pump the brakes. Doings could make the pedal hardertop ushdown. If the engine stops, there will become
powerbrakeassistbutitwillbe usedwhenthebrakeisapplied. Oncethepowerassistisusedup, it cantakelongertostopandthe brakepedalwillbehardertopush.
Steering
HydraulicPowerSteering
Yourvehiclehashydraulic powersteering.Itmayrequire maintenance.SeePowerSteering Fluid Power Steering Fluid on page 10-28.
Ifpowersteeringassistislost because the engine stops the powersteeringsystem is not functioning, the vehicle can be steered but may require increased effort. See your dealer if there is a problem.
If the vehicle is a hybrid, se the hybrids supplement form more information.
CurveTips
• Takecurvesatareasonable speed.
- Reducespeedbeforeenteringa curve.
- Maintainareasonablesteady speedthroughthecurve
- Waituntilthevehicleisoutof thecurvebeforeaccelerating gentlyintothestraightaway.
SteeringinEmergencies
- Therearesomesituationswhen steeringaroundaproblemmay bemoreeffectivethanbraking.
- Holdingbothsidesofthe steeringwheelallowsyoutoturn 180degreeswithoutremoving ahand.
- AntilockBrakeSystem(ABS) allowssteeringwhilebraking.
Off-RoadRecovery
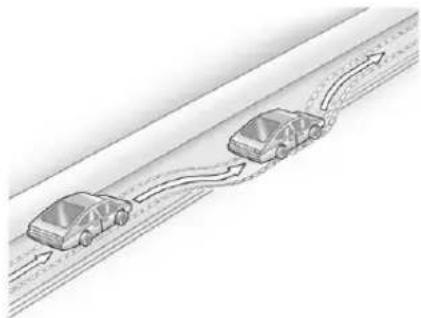
natural_image
Diagram of two cars driving on a road with directional arrows indicating flow (no text or symbols)Thevehicle'srightwheelscandrop offtheedgeofaroadontothe shoulderwhiledriving.Follow thesetips:
-
Easeofftheacceleratorand then, if there is nothing in the way, steer the vehicles that it straddlesthe edge of the pavement.
-
Turnthesteeringwheelabout one-eighthofaturn, until the rightfronttirecontactsthe pavementedge.
- Thenturnthesteeringwheelto gostraightdowntheroadway.
LossofControl
Skidding
Therearethreetypesofskidsthat correspondtothevehicle'sthree controlsystems:
- BrakingSkid—wheelsarenot rolling.
• SteeringorCornering Skid—toomuchspeedor steeringinacurvecausestires toslipandlosecorneringforce. - AccelerationSkid—toomuch throttlecausesthedriving wheelstospin.
Defensivedriversavoidmostskids bytakingreasonablecaresuitedto existingconditions,andbynot overdrivingthoseconditions.But skidsarealwayspossible.
If the vehicle start to slide, follow these suggestions:
- Easeyourfootoffthe acceleratorpedalandquickly steerthewayyouwantthe vehicletogo.Thevehiclemay straightenout.Bereadyfora secondskidifitoccurs.
- Slowdownandadjustyour drivingaccordingtoweather conditions. Stoppingdistance canbelongerandvehicle controlcanbeaffectedwhen tractionisreducedbywater, snow,ice,gravel,orother materialontheroad. Learnto recognizewarningclues—such asenoughwater,ice,orpacked snowontheroadtomakea mirroredsurface—andslow downwhenyouhaveanydoubt.
9-6DrivingandOperating
- Trytoavoidsuddensteering, acceleration, or braking, including reducing vehiclespeed by shifting to lower gear. Any sudden changes could cause the rest of the vehicle.
Remember: Antilockbrakeshelp avoidonlythebrakingskid.
Off-RoadDriving
Four-wheel-drive vehicles can be used for off-road driving. Vehicles without four-wheeldrive and vehicles note equipped with All Terrain(AT) or On-Off Road (OOR) tires must not be driven off-road exception level, solids surface. To contact the tire manufacturer for more information about the original equipment tires, see the Limited Warranty and Owner Assistance Information manual.
Controllingthevehicleisthekeyto successfuloff-roaddriving. One of the bestwaystocontrolthevehicle istocontrolthespeed.

WARNING
Whendrivingoff-road, bouncing and quickchangesindirection caneasilythrowyououtof position. Thiscouldcauseyouto losecontrolandcrash. Youand yourpassengersshouldalways wearsafetybelts.
BeforeDrivingOff-Road
• Have all necessary maintenance and servicework completed.
- Fuelthevehicle,fillfluidlevels, andcheckinflationpressurein alltires,includingthespare, ifequipped.
- Readalltheinformationabout four-wheel-drivevehiclesinthis manual.
- Makesureallunderbody shields, ifequipped, areproperly attached.
- Knowthelocallawsthatapplyto off-roaddriving.
Togainmoregroundclearanceif needed, it may be necessary to remove the front fascialower airdam.
Notice: Operating the vehicle for extended period without the front fascialowerairdam installed can cause improper air flow to the engine. Re-attach the front fasciaairdama after off-road driving.
LoadingtheVehiclefor Off-RoadDriving
WARNING
- Unsecured cargoontheload floorcanbetossed about whendrivingoverrough terrain. Youoryour passengerscanbestruckby flyingobjects.Securethe cargoproperly.
- Keepcargointhecargoarea asfarforwardandaslowas possible. Theheaviestthings shouldbeonthefloor, forwardoftherearaxle.
- Heavyloadsontheroofraise thevehicle'scenterofgravity, makingitmorelikelytoroll over. Youcanbeseriouslyor fatallyinjuredifthevehicle rollsover. Putheavyloads insidethecargoarea, noton theroof.
Formoreinformationaboutloading thevehicle,seeVehicleLoadLimits andTires.
EnvironmentalConcerns
- Alwaysuseestablishedtrails, roads,andareasthathavebeen setasideforpublicoff-road recreationaldrivingandobeyall postedregulations.
- Donotdamageshrubs, flowers, trees, or grassesordisturb wildlife.
- Donotparkoverthingsthat burn.SeeParkingOverThings thatBurn.
DrivingonHills
Drivingsafelyonhillsrequiresgood judgmentandanunderstandingof whatthevehiclecanandcannotdo.

WARNING
Ifthevehiclehasthettwo-speed automatictransfercase, shifting thetransfercasetoN(Neutral) cancauseyourvehicletoroll evenifthetransmissionisin P(Park)foranautomatic transmissionoranygearposition foramanualtransmission. This is because the N(Neutral) position on the transfercase overridesthe transmission. You or someone else could be injured. If leaving the vehicle, set the parking brake and shift the transmission to P(Park) for an automatic transmission or any gear position for amanaltransmission. Shift the transfercasetoany position but N(Neutral).
Beforedrivingonahill,assess thesteepness,traction,and obstructions.Iftheterrainahead cannotbeseen,getoutofthe vehicleandwalkthehillbefore drivingfurther.
Whendrivingonhills:
• Usealowgearandkeepafirm griponthesteeringwheel.
- Maintainaslowspeed.
- Whenpossible,drivestraightup ordownthehill.
- Slowdownwhenapproaching thetopofthehill.
- Useheadlampsevenduringthe daytomakethevehiclemore visible.

WARNING
Drivingtothetopofahillathigh speedcancauseanaccident. Therecouldbeadrop-off, embankment, cliff, oreven another vehicle. You could be seriously injuredorkilled. As you nearthetopofahill, slowdown and stayalert.
- Nevergodownhillforwardor backwardwitheitherthe transmissionortransfercasein N(Neutral).Thebrakescould overheatandyoucouldlose control.
WARNING
If the vehicle has the two-speed automatic transference, shifting the transfer case to N(Neutral) can cause your vehicle to roll even if the transmission is in P(Park). This because the N(Neutral) position on the transfer case over ridest the transmission. You someone else could be injured. If leaving the vehicle, set the parking brake and shift the transmission to P(Park). Shift the transfer case to any position but N(Neutral).
- Whendrivingdownahill, keep thevehicleheadedstraight down. Usealowgearbecause theenginewillworkwiththe brakestoslowthevehicleand helpkeepthevehicleunder control.
WARNING
Heavybrakingwhengoingdown ahillcancauseyourbrakesto overheatandfade. This could cause lossof control and you or others could be injuredorkilled. Apply the brakes slightly when descending ahilland use alow gearto keep vehicles speed under control.
Ifthevehiclestallsonahill:
- Apply the brake stop the vehicle, and then apply the parking brake.
- ShiftintoP(Park)foran automatictransmissionor 1(First)foramanual transmissionandthenrestartthe engine.
-
Ifdrivinguphillwhenthe vehiclestalls, shiftto R(Reverse), releasethe parking brake, and back straight down.
-
Nevertrytoturnthevehicle around. If the hill is steep enough to stall the vehicle, it is steep enough to cause it to rollover.
• If you cannot make it up the hill, back straight down the hill.
• Neverbackdownahillin N(Neutral)usingonlythe brake.
• Thevehiclecanroll backwardquicklyandyou couldlosecontrol. - Ifdrivingdownhillwhenthe vehiclestalls, shifttoa lowergear, releasethe parkingbrake, anddrive straightdownthehill.
9-10DrivingandOperating
- If the vehicle cannot be restarted after stalling, set the parking brake, shift an automatic transmission into P (Park) or a manual transmission into 1 (First), and turn the vehicle off.
3.1.Leavethevehicle and seekhelp.
3.2. Stayclearofthepaththe vehiclewouldtakeifit rolleddownhill.
- Avoidturnsthattakethevehicle acrosstheinclineofthehill. Ahillthatcanbedrivenstraight upordownmightbetoosteepto driveacross.Drivingacrossan inclineputsmoreweightonthe downhillwheelswhichcould causeadownhillslideora rollover.
- Surfaceconditionscanbea problem. Loosegravel, muddy spots, orevenwetgrasscan causethetirestoslipsideways, downhill. If the vehicles lips sideways, it can hits something that will tripit-arock, arut, etc.-and rollover.
- Hiddenobstaclescanmakethe steepnessoftheinclinemore severe. Ifarockisdrivenacross withtheuphillwheels, orifthe downhillwheelsdropintoarut ordepression, thevehiclecantilt evenmore.
- Ifaninclinemustbedriven across, and the vehicle start to slide, turdownhill. This should help straighten out the vehicle and prevent the sideslipping.

WARNING
Gettingoutofthevehicleonthe downhillsidewhenstopped acrossaninclineisdangerous. Ifthevehiclerollsover,youcould becrushedorkilled.Alwaysget outontheuphillsideofthe vehicleandstaywellclearofthe rolloverpath.
DrivinginMud, Sand, Snow, orlce
Usealowgearwhendrivingin mud-thedeeperthemud,the lowerthegear.Keepthevehicle movingtoavoidgettingstuck.
Tractionchangeswhendrivingon sand. Onloosesand, suchason beachesorsanddunes, thetires tendtosinkintothesand. This affectssteering, accelerating, and braking. Driveatareducedspeed and avoidsharpturnsorabrupt maneuvers.
Tractionisreducedonhardpacked snowandiceanditiseasytolose control.Reducevehiclespeedwhen drivingonhardpackedsnow andice.

WARNING
Drivingonfrozenlakes, ponds, orriverscanbedangerous. Ice conditions vary greatly and the vehicle could fall through the ice; you and your passengers could drown. Drive your vehicle on safe surfaces only.
DrivinginWater

WARNING
Drivingthroughrushingwatercan bedangerous.Deepwatercan sweepyourvehicledownstream andyouandyourpassengers coulddrown.Ifitisonlyshallow water,itcanstillwashawaythe groundfromunderyourtires. Tractioncouldbelost,andthe vehiclecouldrollover.Donot drivethroughrushingwater.
Notice: Donotdrivethrough standingwaterifitisdeep enoughtocoverthewheelhubs, axlesorexhaustpipe. Deepwater candamagetheaxleandother vehicleparts.
Ifthestandingwaterisnottoodeep, driveslowlythroughit. Atfaster speeds, watersplashesonthe ignitionsystemandthevehiclecan stall. Stalling can also occur if you get the exhaust pipe under water.
While the exhaust pipe is under water, you will not be able to start the engine. Whenging through water, the brakes get wet, and it might take long to stop. See Driving on Wet Roads.
AfterOff-RoadDriving
Removeanybrushordebristhat hascollectedontheunderbodyor chassis, orunderthehood. These accumulationscanbeafirehazard.
Afteroperationinmudorsand, havethebrakeliningscleaned and checked. Thesesubstancescan causeglazingandunevenbraking. Checkthebodystructure,steering, suspension,wheels,tires,and exhaustsystemfordamageand checkthefuellinesandcooling systemforanyleakage.
Morefrequentmaintenance serviceisrequired. Refertothe MaintenanceScheduleformore information.
DrivingonWetRoads
Rainandwetroadscanreduce vehicletraction and affect your ability to stop and accelerate. Always drives slower in the set types of driving conditions and avoid driving through large puddles and deep-standing or flowing water.

WARNING
Wetbrakescancausecrashes. Theymightnotworkaswellina quickstopandcouldcause pullingtooneside.Youcould losecontrolofthevehicle.
Afterdrivingthroughalarge puddleofwateroracar/vehicle wash, lightlyapplythebrake pedaluntilthebrakeswork normally.
(Continued)
WARNING(Continued)
Flowingorrushingwatercreates strongforces.Drivingthrough flowingwatercouldcausethe vehicletobecarriedaway.Ifthis happens,youandothervehicle occupantscoulddrown.Donot ignorepolicewarningsandbe verycautiousabouttryingtodrive throughflowingwater.
Hydroplaning
Hydroplaningisdangerous.Water canbuildupunderthevehicle's tiressotheyactuallyrideonthe water.Thiscanhappeniftheroadis wetenoughandyouaregoingfast enough.Whenthevehicleis hydroplaning,ithaslittleorno contactwiththeroad.
Thereisnohardandfastruleabout hydroplaning. Thebestadviceisto slowdownwhentheroadiswet.

information Provided by: DEALER
OtherRainyWeatherTips
Besidesslowingdown,otherwet weatherdrivingtipsinclude:
- Allowextrafollowingdistance.
- Passwithcaution.
- Keepwindshieldwiping equipmentingoodshape.
- Keepthewindshieldwasherfluid reservoirfilled.
- Havegoodtireswithproper treaddepth.See Tireson page10-57.
• Turnoffcruisecontrol.
HighwayHypnosis
Alwaysbealertandpayattentionto yoursurroundingswhiledriving. Ifyoubecometiredorsleepy,finda safeplacetoparkthevehicle andrest.
Otherdrivingtipsinclude:
- Keepthevehiclewellventilated.
- Keeptheinterior temperaturecool.
- Keepyoureyesmoving—scan theroadaheadandtothesides.
- Checktherearviewmirrorand vehicleinstrumentsoften.
HillandMountainRoads
Drivingonsteephillsorthrough mountainsisdifferentthandriving onflatorrollingterrain. Tipsfor drivingintheseconditionsinclude:
- Keepthevehicleservicedandin goodshape.
- Checkallfluidlevelsandbrakes, tires,coolingsystem,and transmission.
- Shifttoalowergearwhengoing downsteeporlonghills.
WARNING
If you donot shiftdown, the brakes could get so hot that they would not work well. You would then have poor braking over no going down a hill. You could crash. Shift downtolet the engine assist the brakes on a steep downhill slope.
WARNING
CoastingdownhillinN(Neutral) orwiththeignitionoffis dangerous. Thebrakeswillhave todoalltheworkofslowingdown andtheycouldgetsohotthat theywouldnotworkwell. You wouldthenhavepoorbrakingor evennonegoingdownahill. You couldcrash.Alwayshavethe engineerunningandthevehiclein gearwhengoingdownhill.
- Stayinyourownlane.Donot swingwideorcutacrossthe centeroftheroad.Driveat speedsthatletyoustayinyourownlane.
- Bealertontopofhills; somethingcouldbeinyourlane (stalledcar,accident).
- Payattentiontospecialroad signs(fallingrocksarea,winding roads,longgrades,passingor no-passingzones)andtake appropriateaction.
WinterDriving
DrivingonSnoworIce
Drivecarefullywhenthereissnow oricebetweenthetiresandthe road,creatinglesstractionorgrip. Weticecanoccuratabout0°C (32°F)whenfreezingrainbeginsto fall,resultinginevenlesstraction. Avoiddrivingonweticeorin freezingrainuntilroadscanbe treatedwithsaltorsand.
Drivewithcaution,whatever the condition.Accelerategently so tractionisnotlost.Acceleratingtoo quicklycausesthewheelstospin andmakesthesurfaceunderthe tiresslick,sothereisevenless traction.
Trynottobreakthefragiletraction. If you accelerate at toofast, the drive wheels will spin and polish the surface under the tire seven more.
TheAntilockBrakeSystem(ABS) onpage9-61improvesvehicle stabilityduringhardstopson slipperyroads,butapplythebrakes soonerthanwhenondrypavement.
Allowgreaterfollowingdistanceon anyslipperyroadandwatchfor slipperyspots.lcypatchescan occuronotherwiseclearroadsin shadedareas.Thesurfaceofa curveoranoverpasscanremainicy whenthesurroundingroadsare clear.Avoidsuddensteering maneuversandbrakingwhile onice.
Turnoffcruise control on slippery surfaces.
BlizzardConditions
Beingstuckinsnowcanbea serioussituation.Staywiththe vehicleunlesssthereishelpnearby. Ifpossible,usetheRoadside AssistanceProgram(U.S.and Canada)onpage13-8orRoadside AssistanceProgram(Mexico)on page 13-11.Togethelpandkeep everyoneinthevehiclesafe:
• Turnonthehazardwarning flashers.
- Tiearedclothtoanoutside mirror.
WARNING
Snowcantrapengineexhaust underthevehicle. This may cause exhaust gas to get inside. Engine exhaust contains carbon monoxide (CO) which cannot be seen or smelled. It can cause unconsciousness and even death.
Ifthevehicleisstuckinthesnow:
- Clearawaysnowfromaround thebaseofyourvehicle, especiallyanythatisblocking theexhaustpipe.
- Checkagainfromtimeto timetobesuresnowdoes notcollectthere.
- Openawindowabout5cm (2in)onthesideofthe vehiclethatisawayfromthe windtobringinfreshair.
(Continued)
WARNING(Continued)
- Fullyopentheairoutletson orundertheinstrument panel.
- Adjusttheclimatecontrol systemtoasettingthat circulatestheairinsidethe vehicleandsetthefanspeed tothehighestsetting.See "ClimateControlSystems"in theIndex.
Formoreinformationabout carbonmonoxide,seeEngine Exhaustonpage9-37.
Runtheengineforshortperiods onlyasneededtokeepwarm,but becareful.
Tosavefuel, runtheengine for only short periods as needed to warm the vehicle and thenshutthe engine off and closet hewindowmost of the way to save heat. Repeat this until help arrives but only when you feel really uncomfortable from the cold. Moving about to keep warm also helps.
Ifittakessometimeforhelpto arrive,nowandthenwhenyourun theengine,pushtheaccelerator pedalslightlysotheengineurus fasterthantheidlespeed.This keepsthebatterychargedtorestart thevehicleandtosignalforhelp withtheheadlamps.Dothisaslittle aspossibletosavefuel.
IftheVehiclesStuck
Slowlyandcautiously spin the wheelstofreethe vehicle when stuckins and mud, ice, or snow. See "Rocking Your Vehicle to Get It Out" later in this section.
Ifthevehiclehasatractionsystem, itcanoftenhelptofreeastuck vehicle. Refertothevehicle's tractionsysteminthelndex. Ifstuck tooseverelyforthetractionsystem tofreethevehicle, turnthetraction systemoffandusetherocking method.

WARNING
If the vehicle's tiresspinathigh speed, they can explode, and you or others could be injured. The vehicle can overheat, causing an engine compartment fire or other damage. Spin the wheels as little as possible and avoid going above 56 km/h (35 mph).
Forinformationaboutusingtire chainsonthevehicle,see Tire Chainsonpage10-81.
RockingYourVehicleToGet ItOut
Turnthesteeringwheelleftand righttocleartheareaaroundthe frontwheels. Forfour-wheel-drive vehicles, shift into Four-Wheel High. For vehicles with Stabili Trak ^® , turn the traction control part of the system off. Shift back and forth between R (Reverse) and forward gear, spinning the wheels as little as possible. Toprevent transmission wear, wait until the wheels stop spinning before shifting gears.
Releasetheacceleratorpedalwhile shifting,andpresslightlyonthe acceleratorpedalwhenthe transmissionisingear.Slowly spinningthewheelsintheforward andreversedirectionscausesa rockingmotionthatcouldfreethe vehicle.Ifthatdoesnotgetthe vehicleoutafterafewtries,itmight needtobetowedout.Recovery hookscanbeused,ifthevehicle hasthem.Ifthevehicledoesneed tobetowedout,see Towingthe Vehicleonpage 10-101.
RecoveryHooks

WARNING
Neverpullonrecoveryhooks fromtheside.Thehookscould breakandyouandotherscould beinjured.Whenusingrecovery hooks,alwayspullthevehicle straightout.
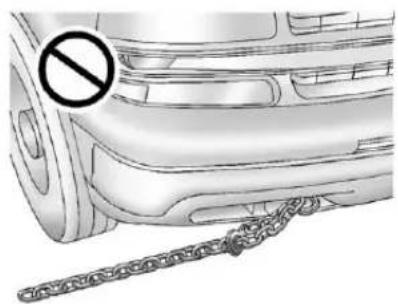
natural_image
Side view of a car's front bumper with a circular no-smoking symbol (no text or labels)Notice: Never user recovery hookstotowthe vehicle. Your vehicle could bed damaged and it would not be recovered by warranty.
Forvehicleswithrecoveryhooksat thefrontofthevehicle,youcanuse themifyouarestuckoff-roadand needtobepulledtosomeplace whereyoucancontinuedriving.
VehicleLoadLimits
Itisveryimportanttoknowhow muchweightyourvehiclecan carry. Thisweightiscalledthe vehiclecapacityweightand includestheweightofall occupants, cargo, and all nonfactory-installedoptions. Twolabelsonyourvehicleshow howmuchweightitwas designedtocarry, the Tireand LoadingInformationlabeland theCertification/Tirelabel.
WARNING
Donotloadthevehicleany heavierthantheGross VehicleWeightRating (GVWR), oreitherthe maximumfrontorrearGross AxleWeightRating(GAWR). Thiscancausesystemsto breakandchangethewaythe vehiclehandles. Thiscould causelossofcontrolanda crash. Overloadingcanalso shortenthelifeofthevehicle.
9-18DrivingandOperating
TireandLoadingInformation Label
LabelExample
AvehiclespecificTireand LoadingInformationlabelis attachedtothecenterpillar (B-pillar).Withthedriverdoor open,youwillfindthelabel attachedbelowthedoorlock
post(striker). Thetire and loading information label shows thenumberofoccupantseating positions(A), and themaximum vehiclecapacityweight(B) in kilograms and pounds.
The Tire and Loading Information label also shows the sizeofthe originalequipment tires (C) and there recommended coldtireinflation pressures (D). Formoreinformationontires and inflation see Tires on page 10-57 and Tire Pressure on page 10-65.
Thereisalsoimportantloading informationonthevehicle Certification/Tirelabel.Ittells youtheGrossVehicleWeight Rating(GVWR)andtheGross AxleWeightRating(GAWR)for thefrontandrearaxles.See "Certification/TireLabel"laterin thissection.
StepsforDeterminingCorrect LoadLimit
- Locate the statement "The combined weight of occupants and cargo should never exceed XXX kg or XXX lbs" on your vehicle's placard.
- Determine the combined weight of the driver and passengers that will be riding in your vehicle.
-
Subtract the combined weight of the driver and passengers from XXX kg or XXX lbs.
-
The resulting figure equals the available amount of cargo and luggage load capacity. For example, if the "XXX" amount equals 1400 lbs and there will be five 150 lb passengers in your vehicle, the amount of available cargo and luggage load capacity is 650 lbs (1400–750 (5x150) = 650 lbs).
-
Determine the combined weight of luggage and cargo being loaded on the vehicle. That weight may not safely exceed the available cargo and luggage load capacity calculated in Step 4.
-
If your vehicle will be towing a trailer, the load from your trailer will be transferred to your vehicle. Consult this manual to determine how this reduces the available cargo and luggage load capacity of your vehicle. See Trailer Towingonpage9-90for important information on towing a trailer, towing safety rules and trailering tips.

9-20DrivingandOperating

text_image
A - B = CExample1
A. Vehicle Capacity Weight for Example 1=(453kg)(1,000lbs)
B. SubtractOccupantWeight@
68kg(150lbs)×2=136kg
(300lbs)
C. Available Occupant and Cargo Weight=317kg(700lbs)
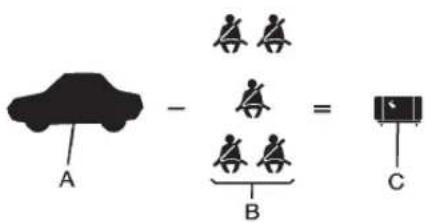
text_image
A - B = CExample2
A. Vehicle Capacity Weight for Example2=453kg(1,000lbs)
B. SubtractOccupantWeight@68kg(150lbs)×5=340kg (750lbs)
C. Available Cargo Weight=113kg(250lbs)
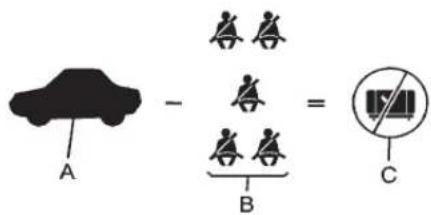
text_image
A - B = CExample3
A. Vehicle Capacity Weight for Example3=453kg(1,000lbs)
B. SubtractOccupantWeight@91kg(200lbs)×5=453kg (1,000lbs)
C. Available Cargo Weight=0kg(0lbs)

Information Provided by: DEALER
Refertoyourvehicle'stireand loadinginformationlabelfor specificinformationaboutyour vehicle'scapacityweight and seatingpositions. Thecombined weightofthedriver,passengers, andcargoshouldneverexceed yourvehicle'scapacityweight.
Certification/TireLabel
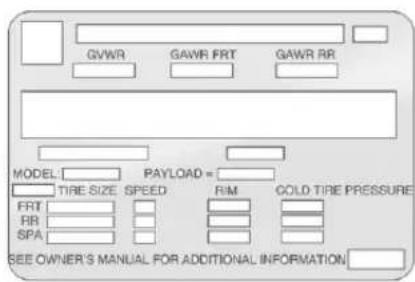
text_image
GVWR GAWR FRT GAWR RR MODEL PAYLOAD = TIRE SIZE SPEED RIM GOLD TIRE PRESSURE FRT RR SPA SEE OWNER'S MANUAL FOR ADDITIONAL INFORMATIONAvehiclespecificCertification/Tirelabelisfoundontherear edgeofthedriverdoor. The labelshowsthesizeofyour vehicle'soriginaltiresandthe inflationpressuresneededto obtainthegrossweightcapacity
of your vehicle. This is called Gross Vehicle Weight Rating (GVWR). The GVWR include the weight of the vehicle, allooccupants, fuel, and cargo.
The Certification/Tirelabel also tells you the maximum weights for the front and rear axles, called Gross Axle Weight Rating (GAWR). To find out the actual load on your front and rear axles, you need to go to a weigh station and weigh your vehicle. Your dealer can help you with this. Besuretospread out your loadequally on both sides of the centerline.
9-22DrivingandOperating
NeverexceedtheGVWRfor yourvehicle,ortheGAWRfor eitherthefrontorrearaxle.
The Certification/Tirelabel also contains important information about your Front Axle Reserve Capacity. See "What is front axle reserve capacity, and how doI calculate it?" under Addinga SnowPlowor Similar Equipment on page 9-119.

WARNING
In the case of a sudden stop or collision, things carried in the bed of your truck could shift forward and come into the passenger area, injuring you and others. If you put things in the bed of your truck, you should make sure they are properly secured.

WARNING
Donotloadthevehicleany heavierthantheGross VehicleWeightRating (GVWR), oreitherthe maximumfrontorrearGross AxleWeightRating(GAWR). Thiscancausesystemsto breakandchangethewaythe vehiclehandles. Thiscould causelossofcontrolanda crash. Overloadingcanalso shortenthelifeofthevehicle.
Notice: Overloading the vehicle may caused damage. Repairs would not be recovered by the vehicle warranty. Do not overload the vehicle.
Usingheaviersuspension componentstogetadded durabilitymightnotchangeyour weightratings.Askyourdealer tohelpyouloadyourvehiclethe rightway.
If you put things inside your vehicle—likesuit cases, tools, packages, or anything else—they go as fast as the vehicle goes. If you havet to stop or turn quickly, or if there is a crash, they will keep going.

Information Provided by: DEALER
WARNING
Thingsyouputinsidethe vehiclecanstrikeandinjure peopleinasuddenstopor turn, orinacrash.
- Putthingsinthecargo areaofthevehicle.Try to spreadtheweightevenly.
- Neverstackheavier things,likesuitcases, insidethevehiclesothat someofthemareabove thetopsoftheseats.
- Donotleavean unsecuredchildrestraint inthevehicle.
- Whenyoucarrysomething insidethevehicle,secure itwheneveryoucan.
- Donotleaveaseatfolded downunlessyouneedto.
Thereisalsoimportantloading informationforoff-roaddrivingin thismanual.See"Loading YourVehicleforOff-Road Driving"underOff-RoadDriving onpage9-6.
Two-TieredLoading
Dependingonthemodelofyour pick-up,anupperloadplatform canbecreatedbypositioning threeorfour5cm(2inches)by 15cm(6inches)woodenplanks acrossthewidthofthepickup box.Theplanksmustbe insertedinthepickupbox depressions.
When using this upper load platform, besuretheload is securely tied downtopreventit from shifting. Theload's center of gravity should be positioned in a zone over therearaxle. The zone is located in the area between the front of each wheel well and therear of each wheel well. The center of gravity height must not extend abovethetop of the pickup box flare board.
Anyloadthatextendsbeyond thevehicle'staillampareamust beproperlymarkedaccordingto locallawsandregulations.
Remembernottoexceed theGrossAxleWeight Rating(GAWR)ofthefrontor rearaxle.
9-24DrivingandOperating
Add-OnEquipment
Whenyoucarryremovable items,youmayneedtoputa limitonhowmanypeopleyou carryinsideyourvehicle.Be suretoweighyourvehicle beforeyoubuyandinstallthe newequipment.
Notice: Overloading the vehicle may caused damage. Repairs would not be recovered by the vehicle warranty. Do not overload the vehicle.
Remembernottoexceed theGrossAxleWeight Rating(GAWR)ofthefrontor rearaxle.
| *Equipment | Maximum Weight |
| LadderRack andCargo | 340kg (750lbs) |
| CrossToolbox andCargo | 181kg (400lbs) |
| SideBoxes andCargo | 113kg per side(250lbs perside) |
| *Thecombinedweightforall rail-mountedequipmentshould notexceed454kg(1,000lbs). | |
LoadingPoints
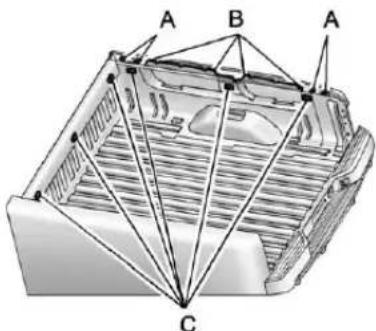
text_image
A B A CA. PrimaryLoadPoints
B.SecondaryLoadAreas
C. CargoManagementOption Holes
Structuralmembers(A)and(B)are includedinthepick-upboxdesign. Additionalaccessoriesshoulduse theseloadpoints.Dependingonthe accessorydesign,useaspacer undertheaccessoryattheload
pointstoremovegap.Theholesfor theCargoManagementSystem(C) arenotintendedforattachmentof aftermarketequipment.See www.gmupfitter.comforadditional pick-upboxloadbearingstructural information.
Truck-CamperLoading Information
Avehicle-specific Truck-Camper Loading Information label is attached to the inside of the vehicle's glovebox. This label indicates if as slide - incamper can be carried, how much of a load the vehicle can carry, and how to correctly spread out the load. It will help to match the right slide in camperto the vehicle.
Yourdealercanhelpmakea goodvehicle-campermatchand helpdeterminetheCargo WeightRating(CWR).
When installing and loading a slide-incamper, check the manufacturer's instructions.
Whencarryingaslide-in camper, the total cargoload of the vehicle is the weight of the camper, plusthe following:
• Everythingaddedtothe camperafteritleftthefactory
• Everythinginthecamper
• Allthepeopleinside
TheCWRisthemaximum weightoftheloadthevehicle cancarry.Itdoesnotincludethe weightofthepeopleinside.But, useabout68kg(150lbs)for eachseat.
Thetotalcargoloadmustnotbe morethanthevehicle'sCWR.
Refertothe Truck-Camper Loading Information label in the gloveboxfordimensions A and Basshowninthefollowing illustration.
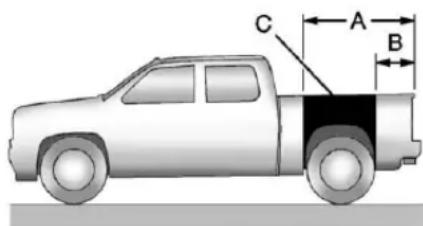
text_image
A B CUsetherearedgeoftheload floorformeasurementpurposes. Therecommendedlocationfor thecargocenterofgravityisat pointCfortheCWR.Itisthe pointwherethemassof abodyisconcentratedand, ifsuspendedatthatpoint,would balancethefrontandrear.
Hereisanexampleofproper truckandcampermatch:
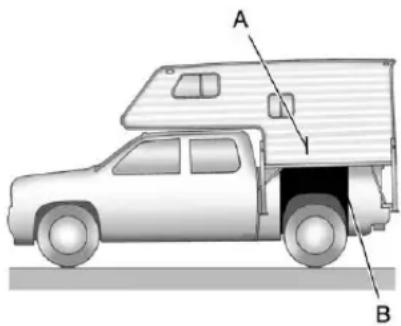
text_image
A BA. CamperCenterofGravity
B. Recommended Center of Gravity Location Zone
Whenthetruckisusedtocarry aslide-incamper, the total cargo loadofthetruckconsistsofthe manufacturer'scamperweight figure, the weightofinstalled additionalcamperequipmentnot includedinthemanufacturer's camperweightfigure, the weight ofcampercargo, and the weight of passengers in the camper. Thetotal cargoload should not exceed the truck's cargoweight rating, and the camper's center of gravity (A) should fall within the truck's recommended center of gravity zone (B) when installed.
Anyaccessoriesorother equipmentthatareaddedtothe vehiclemustbeweighed. Then, subtractthisextraweightfrom theCWR.Thisextraweightmay shortenthecenterofgravity zoneofthevehicle.
If the slide-incamperandits load weighs less than the CWR, the center of gravity zone for your vehicle may belarger.
Securelooseitemstopprevent weightshiftsthatcouldaffectthe balanceofthevehicle.Whenthe truck-camper is loaded, drive to a scale and weigh on the front
andontherearwheels separatelytodetermineaxle loads.Individualaxleloads shouldnotexceedeitherofthe grossaxleweightratings (GAWR).Thetotalaxleloads shouldnotexceedyourvehicle's grossvehicleweightrating (GVWR).Theseratingsare givenonthevehiclecertification labelattachedtotherear edgeofthedriverdoor.See "Certification/TireLabel" under VehicleLoadLimitson page9-17.Ifweightratingsare exceeded,moveorremove itemstobringallweightsbelow theratings.
Seeyourdealerformore informationoncurbweights, cargoweights, CargoWeight Ratingandthecorrectcenterof gravityzone.
Starting and Operating
NewVehicleBreak-In
Notice: The vehicle does not need an elaborate break-in. But it will perform better in the long run if you follow these guidelines:
- Keepthevehiclespeedat 88km/h(55mph)orlessfor thefirst805km(500miles).
-
Donotdriveatanyone constantspeed, fastor slow, for the first 805km (500 miles). Donotmake full-throttle starts. Avoid downshifting to brake or slow the vehicle.
-
Avoidmakinghardstopsfor thefirst322km(200miles)or so.Duringthistimethenew brakeliningsarenotyet brokenin.Hardstopswith newliningscanmean prematurewearandearlier replacement.Followthis breaking-inguidelineevery timeyougetnewbrake linings.
- Donottowatrailerduring break-in. See Trailer Towing on page 9-90 forthetrailer towing capabilities of the vehicle and more information.
Followingbreak-in, enginespeed and load can be gradually increased.
Adjustable Throttle and Brake Pedal
Onvehicleswiththisfeature,you canchangethepositionofthe throttle and brake pedals.
Noadjustmenttothepedalscanbe madewhenthevehicleisin R(Reverse)orwhileusingcruise control.
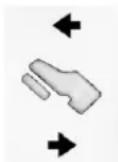
The control used to adjust the pedals is located on the instrument panel below the climate control system.
Pressthebottomofthecontrolto movethepedalscloser.Pressthe topofthecontroltomovethe pedalsaway.
Before you start driving, fully press the brake pedal to confirm the adjustment is right for you. While driving, make only small adjustments.
The vehicle may have an memory function which let speedal settings be saved and recalled. See Memory Seatson page 3-8.
IgnitionPositions

text_image
A B C DTheignitionswitchhasfourdifferent positions.
ToshiftoutofP(Park), theignition mustbeinON/RUNorACC/ACCESSORYandtheregularbrake pedalmustbeapplied.
A(STOPPINGTHEENGINE/LOCK/OFF): Whenthevehicleis stopped, turntheignitionswitch to LOCK/OFF toturntheengineoff. RetainedAccessoryPower(RAP) will remain active. See Retained AccessoryPower(RAP) on page 9-32 form more information.
Thispositionlockstheignition. Italsolocksthetransmissionon automatictransmissionvehicles. Thekeycanberemovedin LOCK/OFF.
Donotturntheengineoffwhenthe vehicleismoving. This will cause a lossof power assistinthe brake and steeringsystemsanddisable theairbags.
If the vehicle must be shutoff in an emergency:
- Brakeusing a firmand steady pressure. Donotpump the brakes repeatedly. This may deplete power assist, requiring increased brake pedal force.
2.Shiftthevehicletoneutral.This canbedonewhilethevehicleis moving.Aftershiftingtoneutral, continuetofirmlyapplythe brakesandsteerthevehicletoa safelocation. - Cometoacompletestop.Shift toP(Park)withanautomatic transmission,orNeutralwitha manualtransmission.Turnthe ignitiontoLOCK/OFF.
- Settheparkingbrake. See ParkingBrakeonpage9-63.
WARNING
Turningoffthevehiclewhile movingmaycauselossofpower assistinthebrakeandsteering systemsanddisabletheairbags. Whiledriving,onlyshutthe vehicleoffinanemergency.
If the vehicle cannot be pulled over, and must be hutoff while driving, turn the ignition to ACC/ACCESSORY.
Onvehicleswithanautomatic transmission, the shift lever must be in P(Park) to turn the ignitions switch to LOCK/OFF.
Thesteeringcanbindwiththe wheelsturnedoffcenter.Ifthis happens,movethesteeringwheel fromrighttoleftwhileturningthe keytoACC/ACCESSORY.Ifthis doesn'twork,thenthevehicleneeds service.
Notice: Using a tool to forc the key to turn in the ignition could caused damage to the switchor break the key. Usethe correct key, makes sure it is all the way in, and turn it only with your hand. If the key cannot be turned by hand, see your dealer.
B(ACC/ACCESSORY): This positionletstthingsliketheradio andthewindshieldwipersoperate whiletheengineisoff. Usethis positionifthevehiclemustbe pushedortowed.
C(ON/RUN): This position can be used to operate the electrical accessories and to display some instrument panel cluster warning and indicator lights. This position can also be used for service and diagnostics, and to verify the proper operation of them malfunction indicator lampasm may be required for remission inspection purposes.
Theswitchstaysinthisposition whentheengineisrunning. The transmissionisalsounlockedinthis positiononautomatictransmission vehicles.
IfyouleavethekeyintheACC/ ACCESSORYorON/RUNposition withtheengineoff,thebatterycould bedrained.Youmaynotbeableto startthevehicleifthebatteryis allowedtodrainforanextended periodoftime.
D(START): This is the position that starts the engine. Whenthe engine starts, releasethe key. The ignition switch return to ON/RUN for driving.
If the vehicle is equipped with a radio, awarning on new will sound whentled river door is opened, the ignition is in ACC/ACCESSORY or LOCK/OFF and the key is in the ignition.
StartingtheEngine
If the vehicle has diesel engine, seethe Duramax diesels supplement form more information.
If the vehicle is a hybrid, se the hybrids supplement form more information.
Notice:Theengineisdesignedto workwiththeelectronicsinthe vehicle.Ifyouaddelectricalparts oraccessories,youcouldchange thewaytheengineoperates. Beforeaddingelectrical equipment,checkwithyour dealer.Ifyoudonot,theengine mightnotperformproperly.Any resultingdamagewouldnotbe coveredbythevehiclewarranty.
Placethetransmissioninthe propergear.
AutomaticTransmission
MovetheshiftlevertoP(Park)or N(Neutral). Theenginewillnotstart inanyotherposition. Torestartthe enginewhenthevehicleisalready moving, useN(Neutral)only.
Notice: Donottrytoshiftto P(Park)ifthevehicleismoving. If youdo, you could damage the transmission. ShifttoP(Park) only when the vehicle is stopped.
ManualTransmission
Theshiftlevershouldbein N(Neutral)andtheparkingbrake engaged. Holdtheclutchpedal downtothefloorandstartthe engine. Thevehiclewillnotstartif theclutchpedalisnotallthe waydown.
StartingProcedure
- With your footoff the accelerator pedal, turn the ignition key to START. Whenthe engine starts, let goofthe key. The idlespeed will godown a s you re engine gets warm. Donot racethe engine immediately after starting it. Operatethe engine and transmissionently to allow the oiltowarmup and lubricate all moving parts.
Thevehiclehasa Computer-ControlledCranking System. Thisfeatureassistsin startingtheengineandprotects components. Iftheignitionkeyis turnedtotheSTARTposition, andthenreleasedwhenthe enginebeginscranking, the enginewillcontinuecrankingfor afewsecondsoruntilthe vehiclestarts. Iftheenginedoes notstartandthekeyisheldin STARTformanyseconds, crankingwillbestoppedafter 15secondstopreventcranking motordamage. Topreventgear

damage, this system also prevents cranking if the engine is already running. Engine cranking can be stopped by turning the ignitions switch to the ACC/ACCESSORY or LOCK/OFF position.
When the Low Fuel warning lampison and the FUEL LEVEL LOW message is displayed in the Driver Information Center (DIC), the Computer-Controlled Cranking System is disabled to prevent possible vehicle component damage. When this happens, hold the ignitions switch in the START position to continue engine cranking.
Notice:Crankingtheenginefor longperiodsoftime,byreturning thekeytotheSTARTposition immediatelyaftercrankinghas ended,canoverheatanddamage thecrankingmotor,anddrainthe battery.Waitatleast15seconds betweeneachtry,toletthe crankingmotorcooldown.
- If theenginedoesnotstart after 5-10 seconds, especially invery cold weather (below - 18°C or 0°F), it could beflooded with to much gasoline. Try pushing the accelerator pedal all the way to the floor and holding it there as you hold the key in START for up to 15 seconds. Wait at least 15 seconds between each try, to allow the cranking motort o cool down. Whentheenginestarts, let go of the key and accelerator. If the vehicle starts briefly but then stops again, do these same thing. This clear the extra gasoline from the engine. Donot racethe engine immediately after starting it. Operat the engine and transmission gently until the oil warmsup and lubricates all moving parts.

FastIdleSystem
If the vehicle has this feature it is available only with cruise control. The manual fastidles switch is operated using the cruise control buttons located on the left hand side of the steering wheel.
This system can be used to increase engine idlespeed whenever the following conditions are met:
- Theparkbrakeisset.
• Thebrakepedalisnotpressed. - The vehicle must not be moving and the accelerator must not be pressed.
Tocontrolthefastidle:
- ToenabletheFastIdleSystem, pressandreleasetheCruise ControlOn/Offbuttonand ensurethattheswitchLEDislit.
- PressandreleasetheCruise ControlSetswitch.Engine speedwillbeheldat approximately1200RPM.
Whenthefastidleisactivethe DriverInformationCenter(DIC)will display"FASTIDLEON."
Oneofthefollowingactionswillturn offthefastidle:
- Pressingthebrake.
- SelectingtheCruiseControl Cancelbutton.
• ReleasingtheParkingBrake. - Thetransmissionshiftleveris movedoutofP(Park)or N(Neutral).
- SelectingtheCruiseControlOn/Offbuttonwhenitwas previouslyon.
- PressingtheCruiseControlSet switchasecondtime.
- Pressingtheacceleratorgreater thanaquarterofthewaydown.
- Turningtheignitionswitchtothe LOCK/OFFposition.
RetainedAccessory Power(RAP)
The following vehicle accessories can be used for up to 10 minutes after the engine is turned off:
- AudioSystem
- PowerWindows
- OnStarSystem(ifequipped)
- Sunroof(ifequipped)
Thesefeaturesworkwhen thekeyisinON/RUNorACC/ ACCESSORY.Oncethekeyis turnedfromON/RUNtoLOCK/OFF, thewindowsandsunroofcontinue toworkupto10minutesuntilany doorisopened.Theradiocontinues toworkforupto10minutesoruntil thedriverdoorisopened.
EngineCoolantHeater
Theengineheatercanprovide easierstartingandbetterfuel economyduringenginewarm-upin coldweatherconditionsator below-18°C(0°F).Vehicleswithan engineheatershouldbepluggedin atleastfourhoursbeforestarting. Aninternalthermostatinthe plug-endofthecordmayexist whichwillpreventenginecoolant heateroperationattemperatures above-18°C(0°F).
If the vehicle has a diesel engine, seethe Duramax Diesels supplement form more information.
ToUsetheEngineCoolant Heater
- Turnofftheengine.
- Openthehood and unwrap the electrical cord. The cord is secured to the Engine Compartment Fuse Block with a clip. Carefully removethewire tiewhich bundle the electrical plug. Donotcut the electrical cord.
- Plugthecordintoanormal, grounded110-voltACoutlet.
WARNING
Pluggingthecordintoan ungroundedoutletcouldcausean electricalshock.Also,thewrong kindofextensioncordcould overheatandcauseafire.You couldbeseriouslyinjured.Plug thecordintoaproperlygrounded three-prong110-voltACoutlet. Ifthecordwillnotreach,usea heavy-dutythree-prongextension cordratedforatleast15amps.
- Before starting the engine, be suretounplugandstorethe cordasitwasbeforetokeepit awayfrommovingengineparts. If you donot, it could be damaged.
Thelengthoftimetheheatershould remainpluggedindependson severalfactors.Askadealerinthe areawhereyouwillbeparkingthe vehicleforthebestadviceonthis.
ShiftingIntoPark

WARNING
Itcanbedangeroustogetoutof thevehicleiftheshiftleverisnot fullyinP(Park)withtheparking brakefirmlyset. Thevehiclecan roll. If you have left the engine running, the vehicle can move suddenly. You or others could be injured. Tobesure the vehicle will not move, even when you are on fairly level ground, us the steps that follow. With four-whe eldrive, if the transfercase is in N(Neutral), the vehicle will be freetoroll, even if theshift lever is in P(Park). So, besure the transfercase is in a drive gear—not in N(Neutral). If you are pulling at trailer, see Driving Characteristics and Towing Tips on page 9-86.
- Holdthebrakepedaldown, then settheparkingbrake. See ParkingBrakeonpage9-6 formoreinformation.
- Movetheshiftleverintothe P(Park)positionbypullingthe shiftlevertowardyouand movingitupasfarasitwillgo.
- Besurethetransfercaseisina drivegear—notinN(Neutral).
- Turntheignitionkeyto LOCK/OFF.
- Removethekeyandtakeitwith you. If you can leavethe vehicle with the ignition key in your hand, the vehicle is in P (Park).
LeavingtheVehicleWiththe EngineRunning

WARNING
Itcanbedangeroustoleavethe vehiclewiththeengine running. Thevehiclecouldmovesuddenly iftheshiftleverisnotfully in P(Park)withtheparkingbrake firmlyset.
If you have four-wheeldrive and the transfer case is in N(Neutral), the vehicle will be frontoroll, even if the shift leverisin P(Park). Sobesure the transfer case is in a drive gear—not in N(Neutral).
And, if you leav the vehicle with the engineer running, it could overheat and be v encatch fire. You or others could be injured. Donot leav the vehicle with the engine running unless you haveto.
If you havetoleavethe vehicle with the engineer running, besure your vehicle is in P (Park) and the parking brake is firmly set before you leave it. After you movetheshift lever into P (Park), hold theregular brake pedaldown. Then, see if you can movetheshift lever away from P (Park) without first pulling it toward you. If you can, it mean that the shift lever was not fully locked into P (Park).
TorqueLock
If you are parking on a hill and you donot shift your transmission into P (Park) properly, the weight of the vehicle may put to much force on the parking paw in the transmission. You may find it difficult to pull the shift lever out of P (Park). This is called torque lock. To prevent torque lock, set the parking brake and thenshift into P (Park) properly before you leave the driver seat. To find out how, Shifting Into Park on page 9-34.
Whenyouarereadytodrive,move theshiftleveroutofP(Park)before youreleasetheparkingbrake.
Iftorquelockdoesoccur,youmay needtohaveanothervehiclepush yoursalittleuphilltotakesomeof thepressurefromtheparkingpawl inthetransmission,thenyouwillbe abletopulltheshiftleveroutof P(Park).
ShiftingoutofPark
This vehicle is equipped with an electronic shift lock releases system. Theshift lock release is designed to:
- Preventignitionkeyremoval unlesstheshiftleverisin P(Park)withtheshiftlever buttonfullyreleased.
- Preventmovementoftheshift leveroutofP(Park), unless the ignitionisinON/RUNorACC/ACCESSORYandtheregular brakepedalisapplied.
Theshiftlockreleaseisalways functionalexceptinthecaseofan unchargedorlowvoltage(lessthan 9volt)battery.
If the vehicle has an uncharged battery or a battery with low voltage, trcharging or jump starting the battery. See Jump Starting on page 10-96 form more information.
ToshiftoutofP(Park)usethe following:
- Applythebrakepedal.
- Movetheshiftlevertothe desiredposition.
If you still are unable to shift out of P(Park):
- Easethepressureontheshift lever.
- While holding down the brake pedal, presstheshift leverall the way into P(Park).
- Movetheshiftlevertothe desiredposition.
If you are still having a problem shifting, then have the vehicle serviced soon.
Parking(Manual Transmission)
If the vehicle has a manual transmission, before you get out of the vehicle, movetheshift lever into R(Reverse), and firmly apply the parking brake. Oncetheshift lever has been placed into R(Reverse) with the clutch pedalpressed in, turn the ignition key to LOCK/OFF, removethe key and releasethe clutch.
If you are parking on a hill, or if the vehicle is pulling at a trailer, see Driving Characteristics and Towing Tipson page 9-86.
ParkingoverThings ThatBurn

WARNING
Thingsthatcanburncouldtouch hotexhaustpartsunderthe vehicleandignite.Donotpark overpapers,leaves,drygrass, orotherthingsthatcanburn.
ActiveFuelManagement®
VehicleswithV8enginesmayhave ActiveFuelManagement™. This systemallowstheenginetooperate oneitherallorhalfofitscylinders, dependingonthedrivingconditions.
Whenlesspowerisrequired, such ascruisingataconstantvehicle speed, thesystemwilloperate in thehalfcylindermode, allowingthe vehicletoachievebetterfuel economy. Whengreaterpower demandsarerequired, such as acceleratingfromastop, passing, ormergingontoafreeway, the systemwillmaintainfull-cylinder operation.
If the vehicle has an Active Fuel Management™ indicator, see Driver Information Center (DIC) on page 5-33 form more information on using this display.
EngineExhaust
WARNING
Engineexhaustcontainscarbon monoxide(CO)whichcannot be seenorsmelled.ExposuretoCO cancauseunconsciousness and evendeath.
Exhaustmayenterthevehicleif:
- The vehicleidlesinareas with poor ventilation (parking garages, tunnels, deep snow that may block under body airflowortail pipes).
• Theexhaustsmellsor soundsstrangeordifferent.
• Theexhaustsystemleaks duetocorrosionordamage. - Thevehicleexhaustsystem has been modified, damaged or improperly repaired.
(Continued)
WARNING(Continued)
- Thereareholesoropenings inthevehiclebodyfrom damageoraftermarket modificationsthatarenot completelysealed.
Ifunusualfumesaredetectedor ifitissuspectedthatexhaustis comingintothevehicle:
- Driveitonlywiththewindows completelydown.
- Havethevehiclerepaired immediately.
Neverparkthevehiclewiththe engineerunninginanenclosed areasuchasagarageora buildingthathasnofreshair ventilation.
RunningtheVehicle WhileParked
Itisbetternottoparkwiththe engine running. Butifyoueverhave to,herearesomethingstoknow.

WARNING
Idlingvehicleinanenclosed areawithpoorventilationis dangerous.Engineexhaustmay enterthevehicle.Engineexhaust containscarbonmonoxide(CO) whichcannotbeseenorsmelled. Itcancauseunconsciousness andevendeath.Neverrunthe engineinanenclosedareathat hasnofreshairventilation.For moreinformation,seeEngine Exhaustonpage9-37.

WARNING
Itcanbedangeroustogetoutof thevehicleiftheautomatic transmissionshiftleverisnotfully inP(Park)withtheparkingbrake firmlyset.Thevehiclecanroll.Do notleavethevehiclewhenthe engineisrunningunlessyou haveto.Ifyouhaveleftthe engineerunning,thevehiclecan movesuddenly.Youorothers couldbeinjured.Tobesurethe vehiclewillnotmove,evenwhen youareonfairlylevelground, alwayssettheparkingbrakeand movetheshiftlevertoP(Park).

WARNING
Four-wheeldrivevehicleswiththe transfercaseinN(Neutral)will allowthevehicletoroll,evenif theautomatictransmissionshift leverisinP(Park).So,besure thetransfercaseisinadrive gear—notinN(Neutral).Always settheparkingbrake.
Followtheproperstepstobesure thevehiclewillnotmove.See ShiftingIntoParkonpage9-34. Ifpullingatrailer,seeDriving CharacteristicsandTowingTipson page9-86.

Information Provided by. DEALER
Automatic Transmission
If the vehicle is a hybrid, se the hybrids supplement form more information.
Vehicleswithanautomatic transmissionhaveanelectronic shiftpositionindicatorwithinthe instrumentpanelcluster. This displaycomesonwhentheignition keyisturnedtotheON/RUN position.
Thereareseveraldifferentpositions fortheshiftlever.
PRND321
Hydra-Matic® 4-SpeedAutomatic Transmission
PRNDM 1
HeavyDuty6-SpeedAutomatic TransmissionShown(LightDuty 6-SpeedSimilar)
See "RangeSelectionMode" under ManualModeonpage9-43.

Information Provided by: DEALER
P(Park): Thispositionlocksthe rearwheels.Itisthebestpositionto usewhenstartingtheengine because the vehicle cannot move easily.Whenparkedonahill, especially when the vehicle has a heavy load, you might notice an increase in the effort to shift out of P(Park). See "TorqueLock" under Shifting Into Park on page 9-34 for more information.
WARNING
It is dangerous to get out of the vehicle if the shift lever is not fully in P (Park) with the parking brake firmly set. The vehicle can roll.
Donotleavethevehiclewhenthe engineisrunningunlessyou haveto.Ifyouhaveleftthe engineerunning,thevehiclecan movesuddenly.Youorothers couldbeinjured.Tobesurethe vehiclewillnotmove,evenwhen youareonfairlylevelground, alwayssettheparkingbrakeand movetheshiftlevertoP(Park). SeeShiftingIntoParkon page9-34.Ifyouarepullinga trailer,seeDrivingCharacteristics and TowingTipsonpage9-86.
WARNING
If you have Four-WheelDrive, the vehicle will be frontoroll—even if the shift leverisin P(Park)—if the transfer case is in Neutral. So, be sure that transfer case is in drive gear, Two-Wheel Drive High or Four-Wheel Drive High or Four-Wheel Drive Low—not in Neutral. See Shifting Into Park on page 9-34.
R(Reverse): Usethisgearto backup.
Notice: ShiftingtoR(Reverse) while the vehicle is moving forward could damage the transmission. There pairs would not be recovered by the vehicle warranty. Shift to R(Reverse) only after the vehicle is stopped.
Torockthevehiclebackandfortho getoutofsnow,ice,orsandwithout damagingthetransmission,seelf the VehicleIsStuckonpage9-16.
N(Neutral):Inthisposition,the enginedoesnotconnectwiththe wheels.Torestartwhenyouare alreadymoving,useN(Neutral) only.Also,useN(Neutral)whenthe vehicleisbeingtowed.

WARNING
Shiftingintoadrivegearwhilethe engineisrunningathighspeedis dangerous.Unlessyourfootis firmlyonthebrakepedal,the vehiclecouldmoveveryrapidly.Youcouldlosecontrolandhit peopleorobjects.Donotshift intoadrivegearwhiletheengine isrunningathighspeed.
Notice: ShiftingoutofP(Park) or N(Neutral) with the engine running at high speed may damage the transmission. The repairs would not be covered by the vehicle warranty. Besure the engine is not running at high speed when shifting the vehicle.
D(Drive): This position is for normal driving. It provides the best fueleconomy. If you need more power for passing, and you are:
- Goinglessthanabout55km/h (35mph), pushtheaccelerator pedalabouthalfwaydown.
- Goingabout55km/h(35mph)or more,pushtheacceleratorall thewaydown.
Bydoingthis,thevehicleshifts downtothenextgearandhas morepower.
D(Drive)canbeusedwhentowing atrailer,carryingaheavyload, drivingonsteephills,orforoff-road driving.Youmightwanttoshiftthe transmissiontoalowergear selectionifthetransmissionshifts toooften.
Downshiftingthetransmissionin slipperyroadconditionscouldresult inskidding. See "Skidding" under LossofControlonpage9-5.
The vehicle has a shift stabilization feature that adjusts the transmission shifting to the current driving conditions in order to reduce rapid upshifts and downshifts. This shift stabilization feature is designed to determine, before making an upshift, if the engine is able to maintain vehicles speed by analyzing things such as vehicles speed, throttle position, and vehicle load. If the shift stabilization feature determines that a current vehicle speed cannot be maintained, the transmission does not upshift and instead hold the current gear. In some cases, this could appear to be delayed shift, however the transmission is operating normally.
The transmissionusesadaptive shiftcontrols.Adaptiveshiftcontrols continually compares keyshift parameter stoppre-programmed ideal shifts stored in the transmissions computer. The transmission constantly makes adjustment to improve vehicle performance according to how the vehicle is being used, such as with a heavy load or when temperature changes. During this adaptiveshift control process, shifting might feel different asthetransmission determines the best settings.
Whentemperaturesareverycold, theAllisonTransmissionand Hydra-Matic6-Speedtransmission's gearshiftingcouldbedelayed providingmorestableshiftsuntilthe enginewarmsup.Shiftscouldbe morenoticeablewithacold transmission.Thisdifferencein shiftingisnormal.
M(ManualMode): Thispositionis available on vehicles with the Allison Transmission or Hydra-Matic 6-Speed transmission. It lets drivers select the range of gears appropriate for current driving conditions. If the vehicle has this feature, see "Range Selection Mode" under Manual Mode on page 9-43.
3(Third): This position is alsoused for normal driving. It reduces vehicle speed more than D(Drive) without using the brakes. You might choose 3(Third) instead of D(Drive) when driving on hilly, winding roads, when towing a trailer, so there is less shifting between gears and when going down a steephill.
2(Second): Thispositionreduces vehiclespeedevenmorethan 3(Third)withoutusingthebrakes. Youcanuse2(Second)onhills. Itcanhelpcontrolvehiclespeedas yougodownsteepmountainroads, butthenyouwouldalsowanttouse the brakes off and on.
If you manually select 2 (Second) in an automatic transmission, the transmission will start in second gear. You can us this feature for reducing the speed of therear wheels when you are trying to start the vehicle from mastoponslippery roadsurfaces.
1(First): FortheHydra-Matic 4-Speedtransmissionthisposition reduces vehiclespeedevenmore than2(Second)withoutusingthe brakes. Youcanuseitonverysteep hills, orindeepsnowormud. If the shiftleverisputin1(First)while the vehicleismovingforward, the transmissiondoesnotshiftintofirst gearuntilthevehicleisgoingslowly enough.
ForanAllison Transmissionor Hydra-Matic6-Speedtransmission, thispositionreducesvehiclespeed withoutusingthebrakes.Youcan useitformajor/severedowngrades andoff-roaddrivingwherethe vehiclewouldotherwiseaccelerate duetosteepnessofgrade.When youshiftto1(First)itprovidesthe lowestgearappropriatetocurrent roadspeedandcontinuesto downshiftasthevehicleslows, eventuallydownshiftingto 1(First)gear.
Notice: Spinningthetiresor holdingthevehicleinone placeonahillusingonlythe acceleratorpedalmaydamage thetransmission. Therepairwill notbecoveredbythevehicle warranty. If you are stuck, donot spinthetires. When stopping on ahill, usethebrakestohold the vehicleinplace.
ManualMode
RangeSelectionMode (Allison® Transmissionor Hydra-Matic® 6-Speed Transmission)
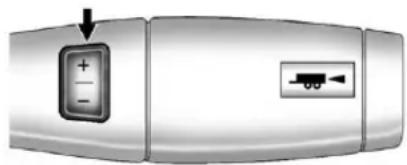
natural_image
Close-up of a device's front panel showing a button labeled '+' and a connector symbol (no readable text or labels)The vehicle may have a Range Selection Mode. The Range Selection Mode helps control the vehicle's transmission and vehicle speed while driving downhill or towing a trailer by letting you select adesired range of gears.
Tousethisfeature,dothefollowing:
- Movetheshiftleverto M(ManualMode).
- Presstheplus/minusbuttons, locatedonthesteeringcolumn shiftlever, toselectthedesired rangeofgearsforcurrentdriving conditions.
WhenM(ManualMode)isselected anumberdisplaysnexttotheM, indicatingthecurrentgear.
Thisnumberisthehighestgearthat canbeused. However, the vehicle can automatically shift to lower gears as it adjust to driving conditions. This mean that all gears below that number are available. When 5 (Fifth) is selected, 1 (First) through 5 (Fifth) gears are automatically shifted by the vehicle, but 6 (Sixth) cannot be used until the plus/minus button located on the steering column lever is used to changeto the gear.

Information Provided by: DEALER
9-44DrivingandOperating
GradeBrakingisnotavailablewhen RangeSelectionModeisactive. See Tow/HaulModeonpage9-44.
WhileusingRangeSelectionMode, CruiseControlandtheTow/Haul Modecanbeused.
Ifthevehiclehasanexhaustbrake, itcanalsobeused,butwillnot automaticallydownshift the transmission.SeeExhaustBrakein theDuramaxDieselsupplement.
Notice: Spinningthetiresor holdingthevehicleinone placeonahillusingonlythe acceleratorpedalmaydamage thetransmission. Therepairwill notbecoveredbythevehicle warranty. If you are stuck, donot spinthetires. When stopping on ahill, usethebrakestohold the vehicle in place.
LowTractionMode
If your vehicle has the Allison Transmission, or the Hydra-Matic 6-Speed Automatic Transmission, it has a Low Traction Modethat can assist in vehicle acceleration when road conditions are slippery, such as with ice or snow. While the vehicle is a catastop, select the second gear range using Range Selection Mode. This will limit torque to the wheels after it detects wheels slip, preventing the tires from spinning.
Tow/HaulMode
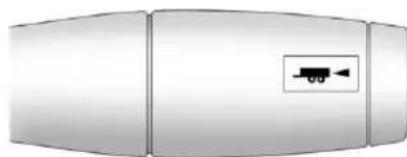
natural_image
Simple illustration of a rectangular device with a small arrow icon on the side (no text or symbols)4-SpeedAutomaticTransmission

natural_image
Close-up of a metallic electronic device with a control panel and indicator light (no text or symbols visible)6-SpeedAutomaticTransmission
Vehicleswithanautomatic transmissionhaveaTow/Haul Mode.The Tow/HaulModeadjusts thetransmissionshiftpatternto reduceshiftcycling,providing increasedperformance,vehicle control,andtransmissioncooling whendrivingdownsteephillsor Mountaingrades,towing,orhauling heavyloads.

Theselectorbuttonislocatedonthe endoftheshiftlever.TurntheTow/HaulModeonandoffbypassing thebutton.WhentheTow/Haul Modeisenabled,alightonthe instrumentpanelclusterwill comeon.
See Tow/HaulModeLighton page5-29andHillandMountain Roadsonpage9-13formore information.
Alsosee "Tow/HaulMode" under TowingEquipmentonpage9-106 formoreinformation.
GradeBraking(6-Speed AutomaticTransmission)
TheGradeBrakingshiftmodescan beactivatedbypressingthebutton ontheendoftheshiftcontroller. WhileinRangeSelectionMode, GradeBrakingisdeactivated allowingthedrivertoselecta desiredrangeofgears.
GradeBrakingisonlyactivwhile theTow/HaulModeisselectedand youarenotintheRangeSelection Mode.See“Tow/HaulMode”listed previouslyandManualModeon page9-43formoreinformationon theRangeSelectionMode.Grade Brakingassistsinmaintaining desiredvehiclespeedswhendriving ondownhillgradesbyautomatically implementingashiftschedulethat utilizestheengineandtransmission toslowthevehicle. Thisreduces wearonthebrakingsystemand increasescontrolofthevehicle.
GradeBrakingmonitorsvehicle speed, acceleration, enginetorque and brake pedal usage. Using this information, it detects when the truckisonadownhillgrade and the driver desire to slow the vehicle by pressing the brake.
Thisfeatureisactivewhenthe exhaustbrakeisenabled (ifequipped).
Alsosee TowingEquipmenton page9-106formoreinformation.
ManualTransmission

text_image
1 3 5 2 4 RIf the vehicle is equipped with a manual transmission, this is the shift pattern.
Hereishowtooperatethemanual transmission:
1(First): Presstheclutchpedal and shift into 1(First). Then, slowly let upon the clutch pedal as you slowly press down on the accelerator pedal.
Youcanshiftinto1(First)whenyou aregoinglessthan30km/h (20mph).Ifyouhavecometoa completestopanditishardtoshift into1(First),puttheshiftleverin Neutralandletupontheclutch. Thenpresstheclutchpedalback downandshiftinto1(First).
2(Second): Presstheclutchpedal asyouletupontheaccelerator pedalandshiftinto2(Second). Then, slowlyletupontheclutch pedalasyoupresstheaccelerator pedal.
3(Third),4(Fourth)and5(Fifth): Shiftinto3(Third),4(Fourth)and 5(Fifth)thesamewayyoudofor 2(Second).Slowlyletuponthe clutchpedalasyoupressthe acceleratorpedal.
Tostop, letupon the accelerator pedaland pressthebrakepedal. Just before the vehicle stops, press the clutch pedaland the brake pedal, and shift to Neutral.
Neutral: Usethispositionwhen youstartoridletheengine.
R(Reverse):Tobackup,pressthe clutchpedal.Afterthevehiclestops, shiftintoR(Reverse).Slowlyletup ontheclutchpedalasyoupressthe acceleratorpedal.Ifitishardto shift,lettheshiftleverreturnto Neutralandreleasetheclutch pedal.Thenpresstheclutchagain andshiftintoR(Reverse).Donot attempttoshiftinto5(Fifth)priorto shiftingintoR(Reverse).The transmissionhasalockoutfeature whichpreventsa5(Fifth)gearto R(Reverse)gearshift.
Notice: ShiftingtoR(Reverse) while the vehicle is moving forward could damage the transmission. There pairs would not be recovered by the vehicle warranty. Shift to R(Reverse) only after the vehicle is stopped.
UseR(Reverse), alongwiththe parkingbrake, forparkingthe vehicle.
ShiftSpeeds
WARNING
Ifyouskipagearwhenyou downshift,youcouldlosecontrol ofthevehicle.Youcouldnjure yourselforothers.Donotshift downmorethanonegearata timewhenyoudownshift.
DriveSystems
Four-WheelDrive
IfthevehiclehasFour-WheelDrive, youcansendtheengine'sdriving powertoallfourwheelsforextra traction.Togetthemostsatisfaction outofFour-WheelDrive,youmust befamiliarwithitsoperation.Read thefollowingbeforeusing Four-WheelDrive.Seethe appropriatetextforthetransfer caseinthevehicle.
Notice:Driving onclean,dry pavementinFour-WheelDrive HighorFour-WheelDriveLowfor anextendedperiodoftimemay cause premature wear onthe vehicle's powertrain.Donotdrive onclean,dry pavementin Four-WheelDrive Highor Four-WheelDrive Lowfor extended period softime.
Whiledrivingoncleandrypavement andduringtightturns,youmay experiencevibrationinthesteering system.
IfthevehiclehasStabiliTrak ^® , shiftingintoFour-WheelDriveLow willturnTractionControland StabiliTrakoff.SeeStabiliTrak ^® Systemonpage9-65.
FrontAxle
Thefrontaxleengagesand disengagesautomaticallywhenyou shiftthetransfercase.Somedelay fortheaxletoengageordisengage isnormal.
ManualTransferCase
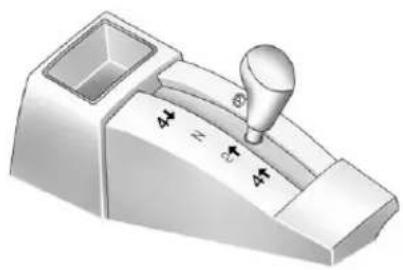
natural_image
3D rendering of a mechanical lever handle with no visible text or symbolsThetransfercaseshiftleverison thefloortotherightofthedriver. Usethislevertoshiftintoandoutof Four-WheelDrive.
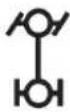
AFour-WheelDriveindicatorlight comesonwhenyoushiftinto four-wheeldriveandthefrontaxle engages.SeeFour-Wheel-Drive Lightonpage5-29.
Somedelaybetweenshiftingand whentheindicatorlightcomesonis normal.

(information Provided by: DEALER
RecommendedTransferCaseSettings
| DrivingConditions | TransferCaseSettings | |||
| 2↑4↑4↓N | ||||
| NormalYES | ||||
| SevereYES | ||||
| ExtremeYES | ||||
| VehicleinTow*YES | ||||
| *See Recreational Vehicle Towing on page 10-101 or Towing the Vehicle onpage10-101. | ||||
If the vehicle has Stabili Trak ^® , shifting into Four-Wheel Drive Low will turn Traction Control and Stabili Trak off. See Stabili Trak ^® System on page 9-65.
Notice: Driving on clean, dry pavement in four-wheeldrive for an extended period of time can cause premature wear on the vehicle's power train. Donot drive on clean, dry pavement in Four-Wheel Drive forextended period so fast time.
4 ↓(Four-WheelDriveLow): This setting also engages the frontaxle and deliver sextratorque. You may never need Four-WheelDriveLow. It sends maximum power to all four wheels. You might choose Four-WheelDriveLow if you are driving off-road in deep and deep mud, deep snow, and while climbing or descending steephills.

Information Provided by: DEALER

Aparkingbrakesymbolislocated nexttotheN(Neutral)symbolasa remindertosettheparkingbrake beforeshiftingthetransfercaseinto N(Neutral).
WARNING
Shiftingthetransfercaseto N(Neutral)cancausethevehicle torollevenifthetransmissionis inP(Park).Youorsomeoneelse couldbeseriouslyinjured. Be suretosettheparkingbrake beforeplacingthetransfercasein N(Neutral).SeeParkingBrakeon page9-63.
N(Neutral): Shifttothissetting onlywhenthevehicleneedstobe towed.SeeRecreationalVehicle Towingonpage 10-101or Towing the Vehicleonpage 10-101.
2 ↑(Two-WheelDriveHigh): This setting is used for driving in most street and highways situations. The front axle is not engaged in two-wheeldrive. This setting also provides the best fuel economy.
4 ↑(Four-WheelDriveHigh): Use this setting when you need extra traction, such as on snowy oricy roads or in most off-roads situations. This setting also engages the front axle to help drive your vehicle. This is the best setting to use when plowingsnow.
YoucanshiftfromTwo-WheelDrive HightoFour-WheelDriveHighor Four-WheelDriveHighto Two-WheelDriveHighwhilethe vehicleismoving.Inextremelycold weather,itmaybenecessaryto stoporslowthevehicletoshiftinto Four-WheelDriveHigh.
WhenUsingtheManual TransferCase
- ShiftsintooroutofFour-Wheel DriveLoworN(Neutral)should bemadeusingquickmotionsto avoidexcessivegeargrinding. Shiftingslowlymaymakeitmore difficulttoshift.
- Youmaynoticethatitisharder toshiftwhenthevehicleiscold. Afterthevehiclewarmsupthe shiftingwillreturntonormal.
- WhileinFour-WheelHighor Four-WheelDriveLowyou mayexperiencereducedfuel economy.
- AvoiddrivinginFour-Wheel Driveonclean,drypavement. Itmaycauseyourtirestowear faster,makethetransfercase hardertoshift,andrunnoisier.
- Ifthetransfercaseshifterisin theN(Neutral)positionandyou havedifficultyreachingthe selectedtransfcasemode, withtheengine running, shiftthe transmissionmomentarilyto D(Drive)andthenbackto N(Neutral). Thiswillrealignthe geartethinthetransfercase andallowyoutocompletethe shift.
Shifting from Two-Wheel Drive Highto Four-Wheel Drive High
- ShiftsbetweenTwo-WheelDrive HighandFour-WheelDriveHigh canbemadeatanyvehicle speed.
-
Shiftthetransfercaseleverin onecontinuousmotioninto eithertheFour-WheelDriveHigh orTwo-WheelDriveHigh position.
-
Shifting from Two-Wheel Drive Hight to Four-Wheel Drive High while the vehicle is in motion may require that moderate force be applied to the shift lever for a few seconds before Four-Wheel Drive High can be engaged, especially in cold weather.
- Inextremelycoldweather, it may be necessary to slow or stop the vehicle to shift into Four-Wheel Drive High.
- WhileinFour-WheelDriveHigh, thevehiclecanbedrivenatany postedlegalspeedlimit.
ShiftingInorOutofFour-Wheel DriveLow
Notice: Shifting the transfer case into Four-Wheel-Drive Low while moving at speeds faster than 5 km/h (3 mph) may cause premature wear to the transfer case, and may cause the gears to grind. To avoid causing premature wear, and grinding the gears, donot shift the transfer case into Four-Wheel-Drive Low while the vehicle is moving faster than 5 km/h (3 mph).
- Shifting into Four-Wheel Drive Low should bedone, if possible, with the vehicle at as light roll, 5km/h (3mph) or less.
- Shiftthetransmissioninto N(Neutral).
WARNING
Shiftingthetransfercaseto N(Neutral)cancausethevehicle torollevenifthetransmissionis inP(Park).Youorsomeoneelse couldbeseriouslyinjured. Be suretosettheparkingbrake beforeplacingthetransfercasein N(Neutral).SeeParkingBrakeon page9-63.
- ShiftingintoFour-WheelDrive Lowwiththevehicleatastop maybemoredifficult. You may beunabletocompletetheshift toFour-WheelDriveLow, and thetransfercasewillendupin N(Neutral). Thisisnormal, and isafunctionofthegearteeth aligninginthetransfercase. Whenthishappens, makesure theengineison, shiftthe transmissionmomentarilyto D(Drive)andbackto N (Neutral), and then complete the transfer case shift.

- Shiftthetransfercaseshiftlever inonecontinuousmotioninto theFour-WheelDriveLow position.
- WheninFour-WheelDriveLow donotdrivefasterthan 72km/h(45mph). This will reduce wear and extend the life of your transfercase.
ShiftingInorOutofNeutral
- With the vehiclerunning and the engineatanidle, set the parking brake.
- Placethetransmission into N(Neutral).
Shiftthetransfercaseinone continuousmotionintooroutofthe N(Neutral)position.
ElectronicTransferCase
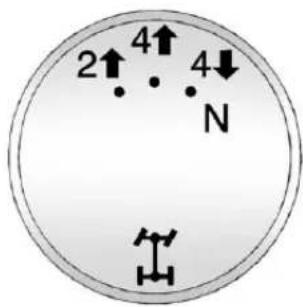
text_image
2↑ 4↑ N 4↓Thetransfercaseknobislocated nexttothesteeringcolumn.
Usethedraltoshiftintoandoutof four-wheeldrive.
RecommendedTransferCaseSettings
| DrivingConditions | TransferCaseSettings | |||
| 2↑4↑4. | N | |||
| NormalYES | ||||
| SevereYES | ||||
| ExtremeYES | ||||
| VehicleinTow*YES | ||||
| *See Recreational Vehicle Towing on page 10-101 or Towing the Vehicle onpage10-101. | ||||
Youcanchooseamongfourdriving settings:
Indicatorlightsinthedialshow whichsettingyouarein.The indicatorlightswillcomeonbriefly whenyouturnontheignitionand onewillstayon.Ifthelightsdonot comeon,youshouldtakethe vehicletoyourdealerforservice. Anindicatorlightflasheswhile shiftingthetransfercaseand remains illuminated when the shift is complete. If for some reason the
transfercasecannotmakea requestedshift, it will return to the lastchosensetting.
2 ↑(Two-WheelDriveHigh): This setting is used for driving in most street and highways situations. The frontaxle is not engaged in Two-WheelDrive. This setting also provides the best fuel economy.
4↑(Four-WheelDriveHigh): Use the Four-WheelDrive High position when extratraction is needed, such as on snowy or icy roads or in most off-roads situations. This setting also engages the frontaxle to help drive the vehicle. This best setting to use when plowingsnow.
4 ↓(Four-WheelDriveLow): This setting also engages the frontaxle and deliver sex tratorque. You may never need this setting. It sends maximum power to all four wheels. You might choose Four-WheelDrive Low while driving off-road indeep sand, deep mud, deep snow, and while climbing or descending steep hills.
IfthevehiclehasStabiliTrak ^® , shiftingintoFour-WheelDriveLow willturnTractionControland StabiliTrakoff.SeeStabiliTrak ^® Systemonpage9-65.
WARNING
Shiftingthetransfercaseto N(Neutral)cancausethevehicle torollevenifthetransmissionis inP(Park).Youorsomeoneelse couldbeseriouslyinjured. Be suretosettheparkingbrake beforeplacingthetransfercasein N(Neutral).SeeParkingBrakeon page9-63.
N(Neutral): Shiftthevehicle's transfercasetoN(Neutral)only whentowingthevehicle. See RecreationalVehicleTowingon page 10-101 or Towingthe Vehicle onpage 10-101 formore information.
If the SERVICE4WHEELDRIVE messagestayson, you should take the vehicle to your dealer for service. See "SERVICE4WHEEL DRIVE" under Transmission Messages on page 5-51.
ShiftingIntoTwo-Wheel DriveHigh
TurntheknobtotheTwo-Wheel DriveHighposition. This can be done at anyspeed, except when shifting from Four-WheelDriveLow. See "Shifting Out of Four-Wheel DriveLow" form more information.
ShiftingIntoFour-Wheel DriveLow
When Four-WheelDriveLowis engaged, vehiclespeedshould be kept below 72km/h (45mph). Extended high-speed operation in Four-WheelDriveLowmay damage or short enthe life of the drivetrain.
ToshifttotheFour-WheelDrive Lowposition, theignitionmustbein ON/RUNandthevehiclemustbe stoppedormovinglessthan5km/h (3mph)withthetransmissionin N(Neutral). Thepreferredmethod forshiftingintoFour-WheelDrive Lowistohavethevehiclemoving 1.6to3.2km/h(1to2mph). Turnthe knobtotheFour-WheelDriveLow position. Youmustwaitforthe

Four-WheelDriveLowindicatorlight tostopflashingandremainon beforeshiftingthetransmission ingear.
Notice: Shifting the transmission into gear before there requested mode indicator lighthas stopped flashing could damage the transfercase. To help avoid damaging the vehicle, always wait forthemode indicator light to stop flashing before shifting the transmission into gear.
Itistypicalforthevehicletoexhibit significantengagementnoiseand bumpwhenshiftingbetween Four-WheelDriveLowand Four-WheelDriveHighranges orfromtransfercaseN(Neutral) withtheengine running.
Iftheknobisturnedtothe Four-WheelDriveLowposition whenthevehicleisingearand/or movingmorethan5km/h(3mph), theFour-WheelDriveLowindicator lightwillflashfor30secondsand notcompletetheshift. After
30secondsthetransfercasewill shifttoFour-WheelDrive Highmode.
ShiftingOutofFour-Wheel DriveLow
ToshiftfromFour-WheelDrive LowtoFour-WheelDriveHigh, orTwo-WheelDriveHigh,the vehiclemustbestoppedormoving lessthan5km/h(3mph)withthe transmissioninN(Neutral)andthe ignitioninON/RUN.Thepreferred methodforshiftingoutof Four-WheelDriveLowistohave thevehiclemoving1.6to3.2km/h (1to2mph).Turntheknobtothe Four-WheelDriveHighor Two-WheelDriveHighposition.You mustwaitfortheFour-WheelDrive HighorTwo-WheelDriveHigh indicatorlighttostopflashingand remainonbeforeshiftingthe transmissionintogear.
Notice: Shifting the transmission into gear before there requested mode indicator lighthas stopped flashing could damage the transfercase. To help avoid damaging the vehicle, always wait forthemode indicator light to stop flashing before shifting the transmission into gear.
Itistypicalforthevehicletoexhibit significantengagementnoiseand bumpwhenshiftingbetween Four-WheelDriveLowand Four-WheelDriveHighrangesor fromtransfercaseN(Neutral)with theengine running.
Iftheknobisturnedtothe Four-WheelDriveHigh, orTwo-WheelDriveHighswitch positionwhenthevehicleising gearand/ormovingmorethan 5km/h(3mph),theFour-Wheel DriveHigh,AUTO,orTwo-Wheel DriveHighindicatorlightwillflash for30secondsbutwillnotcomplete theshift.
ShiftingintoNeutral
Toshiftthetransfercaseto
N(Neutral)dothefollowing:
- Makesurethevehicleisparked sothatitwillnotroll.
-
Settheparkingbrakeandpress andholdtheregularbrake pedal.SeeParkingBrakeon page9-63formoreinformation.
-
Startthevehicleorturnthe ignitiontoON/RUN.
-
Shiftthetransmission to N(Neutral).
-
Shiftthetransfercaseto Two-WheelDriveHigh.
-
Turnthetransfercasedial clockwisetoN(Neutral)until stopsandholditthereuntilthe Neutrallightstartsblinking. This willtakeleast10seconds. Thenslowlyreleasethedialto thefourlowposition.The N(Neutral)lightwillcomeon whenthetransfercaseshiftto N(Neutral)iscomplete.
-
If the engine is running, verify that the transfer case is in N(Neutral) by shifting the transmission to R(Reverse) for one second, then shift the transmission to D(Drive) for one second.
- TurntheignitiontoACC/ ACCESSORY, which will turn the engineoff.
- Placethetransmissionshift leverinP(Park).
- Releasetheparkingbrakeprior tomovingthevehicle.
- TurntheignitiontoLOCK/OFF.
ShiftingOutofNeutral
Toshiftthetransfercaseoutof N(Neutral)dothefollowing:
-
Settheparkingbrakeandapply theregularbrakepedal.
-
TurntheignitiontoON/RUNwith theengineoff, and shift the transmissiontoN(Neutral).
-
Turnthetransfercasedialto Two-WheelDriveHigh.
Afterthetransfercasehas shiftedoutofN(Neutral),the N(Neutral)lightwillgoout. -
Releasetheparkingbrakeprior tomovingthevehicle.
Notice: Shifting the transmission into gear before there requested mode indicator lighthas stopped flashing could damage the transfercase. To help avoid damaging the vehicle, always wait forthemode indicator light to stop flashing before shifting the transmission into gear.
- Start the engine and shift the transmission to the desired position.
Excessivelyshiftingthetransfer caseintooroutofthedifferent modesmaycausethetransfercase toentertheshiftprotectionmode. Thiswillprotectthetransfercase frompossibledamageandwillonly allowthetransfercasetorespondto oneshiftper10seconds. The transfercasemaystayinthismode foruptothreeminutes.
AutomaticTransferCase

text_image
AUTO 2↑ 4↑ N 4↓The transfer case knob is located next to the steering column.
Usethedialtoshiftintoandoutof Four-WheelDrive.
Youcanchooseamongfivedriving settings:
Indicatorlightsinthedialshow whichsettingyouarein.The indicatorlightswillcomeonbriefly whenyouturnontheignitionand onewillstayon.Ifthelightsdonot comeon,youshouldtakethe vehicletoyourdealerforservice. Anindicatorlightwillflashwhile shiftingthetransfercase.Itwill remainilluminatedwhentheshiftis complete.Ifforsomereasonthe transfercasecannotmakea requestedshift,itwillreturntothe lastchosensetting.
2 ↑(Two-WheelDriveHigh): This setting is used for driving in most street and highways situations. The frontaxle is not engaged in Two-WheelDrive. This setting also provides the best fuel economy.
AUTO(AutomaticFour-Wheel Drive): Thissettingisidealforuse whenroadsurfacetraction conditionsarevariable.When drivingthevehicleinAUTO,the frontaxleisengaged,butthe vehicle'spowerissentonlytothe frontandrearwheelsautomatically basedondrivingconditions.Driving inthismoderesultsinslightlylower fueleconomythanTwo-Wheel DriveHigh.
4 ↑(Four-WheelDriveHigh): Use the Four-WheelDrive High position when extratraction is needed, such as on snowy or icy roads or in most off-roads situations. This setting also engages the frontaxle to help drive the vehicle. This is the best setting to use when plowingsnow.
4↓(Four-WheelDriveLow):This setting also engage the frontaxle and deliver sex tratorque. You may never need this setting. It sends maximum power to all four wheels. You might choose Four-WheelDrive Low if you are driving off-road in deep sand, deep mud, deep snow, and while climbing or descending steep hills.
If the vehicle has Stabili Trak ^® , shifting into Four-Wheel Drive Low will turn Traction Control and Stabili Trak off. See Stabili Trak ^® System on page 9-65.
WARNING
Shiftingthetransfercaseto N(Neutral)cancausethevehicle torollevenifthetransmissionis inP(Park).Youorsomeoneelse couldbeseriouslyinjured. Be suretosettheparkingbrake beforeplacingthetransfercasein N(Neutral).SeeParkingBrakeon page9-63.
N(Neutral): Shiftthevehicle's transfercasetoN(Neutral)only whentowingthevehicle. See RecreationalVehicleTowingon page10-101or Towingthe Vehicle onpage10-101formore information.
If the SERVICE4WHEELDRIVE messagestayson, you should take the vehicle to your dealer for service. See "SERVICE4WHEEL DRIVE" under Transmission Messages on page 5-51.
ShiftingIntoFour-WheelDrive HighorAUTO(Automatic Four-WheelDrive)
TurntheknobtotheFour-Wheel DriveHighorAUTOposition. This can bedoneatanyspeed, except whenshifting from Four-Wheel DriveLow. The indicator light will flash while shifting. It will remain on when the shift is completed.
ShiftingIntoTwo-Wheel DriveHigh
TurntheknobtotheTwo-Wheel DriveHighposition. This can be done at anyspeed, except when shifting from Four-WheelDriveLow. The indicator light will flash while shifting. It will remain on when the shift is completed.
ShiftingIntoFour-Wheel DriveLow
When Four-WheelDriveLowis engaged, vehiclespeedshouldbe kept below 72km/h (45mph).
Extendedhigh-speedoperationin Four-WheelDriveLowmaydamage orshortenthelifeofthedrivetrain.
ToshifttotheFour-WheelDrive Lowposition, theignitionmustbein ON/RUNandthevehiclemustbe stoppedormovinglessthan5km/h (3mph)withthetransmissionin N(Neutral). Thepreferredmethod forshiftingintoFour-WheelDrive Lowistohavethevehiclemoving 1.6to3.2km/h(1to2mph). Turnthe knobtotheFour-WheelDriveLow position. Youmustwaitforthe Four-WheelDriveLowindicatorlight tostopflashingandremainon beforeshiftingthetransmission intogear.
Notice: Shifting the transmission into gear before there requested mode indicator lighthas stopped flashing could damage the transfercase. To help avoid damaging the vehicle, always wait forthemode indicator light to stop flashing before shifting the transmission into gear.
Itistypicalforthevehicletoexhibit significantengagementnoiseand bumpwhenshiftingbetween Four-WheelDriveLowand Four-WheelDriveHighrangesor fromN(Neutral)withtheengine running.
Iftheknobisturnedtothe Four-WheelDriveLowposition whenthevehicleisingearand/or movingmorethan5km/h(3mph), theFour-WheelDriveLowindicator lightwillflashfor30secondsand notcompletetheshift. After 30secondsthetransfercasewill shifttoFour-WheelDrive Highmode.
ShiftingOutofFour-Wheel DriveLow
ToshiftfromFour-WheelDriveLow toFour-WheelDriveHigh,AUTOor Two-WheelDriveHigh,thevehicle mustbestoppedormovingless than5km/h(3mph)withthe transmissioninN(Neutral)and the ignition in ON/RUN. The preferred method for shifting
outofFour-WheelDriveLow istohavethevehiclemoving 1.6to3.2km/h(1to2mph).Turnthe knobtotheFour-WheelDriveHigh, AUTOorTwo-WheelDriveHigh position. Youmustwaitforthe Four-WheelDriveHigh, AUTOor Two-WheelDriveHighindicatorlight tostopflashingandremainon beforeshiftingthetransmission intogear.
Notice: Shifting the transmission into gear before there requested mode indicator lighthas stopped flashing could damage the transfercase. To help avoid damaging the vehicle, always wait forthemode indicator light to stop flashing before shifting the transmission into gear.
Itistypicalforthevehicletoexhibit significantengagementnoiseand bumpwhenshiftingbetween Four-WheelDriveLowand Four-WheelDriveHighrangesor fromN(Neutral)withtheengine running.

Iftheknobisturnedtothe Four-WheelDriveHigh,AUTO, orTwo-WheelDriveHighswitch positionwhenthevehicleisin gearand/ormovingmorethan 5km/h(3mph),theFour-Wheel DriveHigh,AUTOorTwo-Wheel DriveHighindicatorlightwillflash for30secondsbutwillnotcomplete theshift.
ShiftingintoNeutral
Toshiftthetransfercaseto N(Neutral)dothefollowing:
- Makesurethevehicleisparked sothatitwillnotroll.
- Settheparkingbrakeandapply theregularbrakepedal. See ParkingBrakeonpage9-63for moreinformation.
-
Startthevehicleorturnthe ignitioninON/RUN.
-
Putthetransmission in N(Neutral).
- Shiftthetransfercaseto Two-WheelDriveHigh.
- Turnthetransfercasedial clockwisetoN(Neutral)until stopsandholditthereuntilthe N(Neutral)lightstartsblinking. Thiswilltakeatleast 10seconds. Thenslowly releasethedialtothefourlow position. TheN(Neutral)lightwill comeonwhentetransfercase shifttoN(Neutral)iscomplete.
-
If the engine is running, make sure that the transfer case is in N(Neutral) by shifting the transmission to R(Reverse) for one second, then shift the transmission to D(Drive) for one second.
-
TurntheignitiontoACC/ ACCESSORY, which will turn the engineoff.
- Placethetransmissionshift leverinP(Park).
- Releasetheparkingbrakeprior tomovingthevehicle.
11.TurntheignitiontoLOCK/OFF.
ShiftingOutofNeutral
ToshiftoutofN(Neutral)dothe following:
-
Settheparkingbrakeandapply theregularbrakepedal.
-
TurntheignitiontoON/RUNwith theengineoff, and shift the transmissiontoN(Neutral).
-
Turnthetransfercasedialto Two-WheelDriveHigh, Four-WheelDriveHigh, or AUTO.
Afterthetransfercasehas shiftedoutofN(Neutral),the N(Neutral)lightwillgoout.
- Releasetheparkingbrakeprior to movingthevehicle.
Notice: Shifting the transmission into gear before there requested mode indicator lighthas stopped flashing could damage the transfercase. To help avoid damaging the vehicle, always wait forthemode indicator light to stop flashing before shifting the transmission into gear.
- Starttheengineandshiftthe transmissiontothedesired position.
Brakes
AntilockBrake System(ABS)
This vehicle might have the Antilock Brake System (ABS), an advanced electronic braking system that helps prevent abrakingskid.
Whentheengineisstartedandthe vehiclebeginstodriveaway,ABS checksitself.Amomentarymotoror clickingnoisemightbeheardwhile thistestisgoingon.Thisisnormal.

If there is a problem with ABS, this warning light stays on. See Antilock Brake System (ABS) Warning Light on page 5-28.
AlongwithABS, thevehiclehasa DynamicRearProportioning(DRP) system. If thereisaDRP problem, both the brake and ABS warning lights come on accompanied by a 10-second chime. The lights and chimewill come oneachtimeth ignitionisturned on until the problem is repaired. Se your dealer for service.
Letussaytheroadiswetandyou aredrivingsafely.Suddenly,an animaljumpsoutinfrontofyou. Youslamonthebrakesand continuebraking.Hereiswhat happenswithABS:
Acomputersensesthatthewheels areslowingdown. Ifoneofthe wheelsisabouttostoprolling, the computerwillseparatelyworkthe brakesateachfrontwheelandat bothrearwheels.
ABScanchangethebrakepressure toeachwheel, asrequired, faster thananydrivercould. Thiscanhelp thedriversteeraroundtheobstacle while brakinghard.
Asthebrakesareapplied, the computerkeepsreceivingupdates onwheelspeedandcontrols brakingpressureaccordingly.
Remember:ABSdoesnotchange thetimeneededtogetafootupto thebrakepedaloralwaysdecrease stoppingdistance.Ifyougettoo closetothevehicleinfrontofyou, therewillnotbeenoughtimeto applythebrakesifthatvehicle suddenlyslowsorstops.Always leaveenoughroomupaheadto stop,evenwithABS.
UsingABS
Donotpumpthebrakes.Justhold thebrakepedaldownfirmlyandlet antilockwork.Youmightfeelthe brakesvibrateorhearsomenoise, butthisisnormal.
BrakinginEmergencies
IfthevehiclehasABS, itallowsthe drivertosteerandbrakeatthe sametime. However, ifthevehicle does not have ABS, the first reaction, tohitthebrakepedal hard and holditdown, might bethe wrongthingtodo. The wheels can stop rolling. Oncetheydo, the vehicle cannot respond to the driver's steering. Momentum will carry it in whatever direction it was headed when the wheels stopped rolling. That could be offtheroad, into the everything the driver was trying to avoid, or in to traffic.
If the vehicle does not have ABS, use as quickze braking technique. This gives maximum braking while maintaining steering control. Do this bypassing the brake pedal with steadily increasing pressure.
Inanemergency,youwillprobably wanttosqueezethebrakeshard withoutlockingthewheels.Ifyou hearorfeelthewheelssliding,ease offthebrakepedal. Thishelps retainsteeringcontrol.WithABS,it isdifferent.
Inmanyemergencies,steeringcan helpmorethaneventheverybest braking.
ParkingBrake

natural_image
Diagram of a car's dashboard and steering wheel (no text or symbols)Forvehicleswithareleasehandle, settheparkingbrakebyholdingthe regularbrakepedaldown,then pushingdowntheparkingbrake pedal.
Iftheignitionison,thebrake systemwarninglightwillcomeon. SeeBrakeSystemWarningLighton page5-27.
Achimesoundsandthewarning lightflasheswhentheparkingbrake isappliedandthevehicleismoving atleast8km/h(5mph).
Toreleasetheparkingbrake, hold theregularbrakepedaldown. Then pullthebottomedgeofthelever withtheparkingbrakesymbol, locatedabovetheparkingbrake pedal.
If the ignition is on when the parking brake is released, the brakes system warning light goes off.
Notice: Driving with the parking brake on can over heat the brake system and cause premature wear ordamagetobrakesystem parts. Makes sure that the parking brake is fully released and the brakewarning light is off before driving.
If you are towing a trailer and are parking on any hill, see Driving Characteristics and Towing Tips on page 9-86.

natural_image
Illustration of a car pedal mechanism with two curved guide rails (no text or symbols)For vehicles without are lease handle, set the parking brake by holding there regular brake pedal down, then pushing down the parking brake pedal.

If the ignition is on, the brake system warning light will come on. See Brake System Warning Light on page 5-27.
Notice: Driving with the parking brake on can overheat the brake system and cause premature wear ordamagetobrakesystem parts. Makes sure that the parking brake is fully released and the brakewarning light is off before driving.
Toreleasetheparkingbrake, hold theregularbrakepedaldown, then pushdownmomentarily on the parkingbrakepedal until you feel the pedal release. Slowly pully our footupoff the parkbrakepedal.
If the parking brake is not released when you begint drive, the brake system warning light will flash a chimewill sound warning you that the parking brake is still on.
If you are towing a trailer and are parking on a hill, see Driving Characteristics and Towing Tips on page 9-86.
BrakeAssist
If this vehicle has Stabili Trak ^® , it also has a Brake Assist feature designed to assist the driver in stopping or decreasing vehicle speed in emergency driving conditions. This feature uses the stability system hydraulic brake control module to supplement the power brakesystem under conditions where the driver has
quicklyandforcefullyappliedthe brakepedalinanattempttoquickly stoporslowdownthevehicle.The stabilitysystemhydraulicbrake controlmoduleincreasesbrake pressureateachcornerofthe vehicleuntiltheABSactivates. Minorbrakepedalpulsationor pedalmovementduringthistimeis normalandthedrivershould continuetoapplythebrakepedalas thedrivingsituationdictatesThe BrakeAssistfeaturewill automaticallydisengagewhenthe brakepedalisreleasedorbrake pedalpressureisquickly decreased.
HillStartAssist(HSA)
Non-hybridvehicleswithStabiliTrak haveaHillStartAssist(HSA) feature,whichmaybeusefulwhen thevehicleisstoppedonagrade. Thisfeatureisdesignedtoprevent thevehiclefromrolling,either forwardorrearward,duringvehicle driveoff.Afterthedrivercompletely stopsandholdsthevehicleina completestandstillonagrade,HSA willbeautomaticallyactivated. Duringthetransitionperiodbetween whenthedriverreleasesthebrake pedalandstartstoaccelerateto driveoffonagrade,HSAholdsthe brakingpressureforamaximumof twosecondstoensurethatthereis
norolling. Thebrakeswill automaticallyreleasewhenthe acceleratorpedalisappliedwithin thetwo-secondwindow.Ifthe vehicleisequippedwiththe IntegratedTrailerBrakeControl (ITBC)system,HSAmayalsoapply thetrailerbrakes.Itwillnotactivate ifthevehicleisinadrivegearand facingdownhillorifthevehicleis facinguphillandinR(Reverse). Theremaybesituationsonminor hills(lessthan5%grade)witha loadedvehicleorwhilepullinga trailerwhereHSAwillnotactivate.
RideControlSystems
StabiliTrak® System
The vehicle has a vehicle stability enhancements system called Stabili Trak. It is an advanced computer-controlled system that assists the driver with directional control of the vehicle difficult driving conditions.
StabiliTrakactivateswhenthe computersensesadiscrepancy betweentheintendedpathandthe directionthevehicleisactually traveling.StabiliTrakselectively appliesbrakingpressureatanyone ofthevehicle'sbrakestoassistthe driverwithkeepingthevehicleon theintendedpath.
StabiliTrakisonautomatically wheneverthevehicleisstarted.To assistwithdirectionalcontrolofthe vehicle,thesystemshouldalways belefton.TrailerSwayControl (TSC)isalsoonautomaticallywhen thevehicleisstarted.See Trailer SwayControl(TSC)onpage9-118 formoreinformation.
Whenthevehicleisstartedand beginstomove,thesystem performsseveraldiagnosticchecks toinsuretherearenoproblems. Thesystemmaybeheardorfelt whileitisworking.Thisisnormal anddoesnotmeanthereisa problemwiththevehicle.The systemshouldinitializebeforethe vehiclereaches32km/h(20mph). Insomecases,itmaytake approximately3.2km(2mi)of drivingbeforethesysteminitializes.
Ifcruisecontrolisbeingusedwhen StabiliTrakactivates, thecruise controlautomaticallydisengages. Thecruisecontrolcan be re-engagedwhenroadconditions allow.SeeCruiseControlon page9-69.
If the system fail to turnover nor activate, the Stabili Trak light along with a message will be displayed on the Driver Information Center (DIC). If a DIC message appears, make sure the Stabili Trak system has not been turned off using the Traction Control System (TCS) / Stabili Trak button. Thenturn the vehicle off, wait 15 seconds, and then turn it back on a gain to reset the system. If any of them messages still appear on the DIC, the vehicles should be taken in for service. For more information on the DIC messages, see Ride Control System Messages on page 5-48.

TheStabiliTraklightwillflashonthe instrumentpanelclusterwhenthe systemortheTSCfeatureisboth onandactivated.
Thesystemmaybeheardorfelt whileitisworking;thisisnormal.
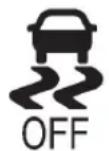
The TCS/StabiliTrakbuttonis located on the instrument panel.
Thetractioncontrolpartof StabiliTrakcanbeturnedoffby pressingandreleasingtheTCS/StabiliTrakbuttonifbothsystems (tractioncontrolandStabiliTrak) werepreviouslyon.
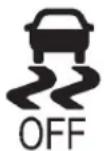
TodisablebothTCSand StabiliTrak,pressandholdthe TCS/StabiliTrakbuttonuntilthe StabiliTrakOFFlightilluminatesand theappropriateDICmessage displays.Thiswillalsodisablethe TSCfeature.
Tractioncontrol and Stabili Trak can be turned on by pressing and releasing the TCS/Stabili Trak button if they are not automatically shutoff for any other reason. This will also enable the TSC feature.
WhentheTCSorStabiliTraksystem isturnedoff,theStabiliTraklight andtheappropriatemessagewillbe displayedontheDICtowarnthe driver.Thevehiclewillstillhave brake-tractioncontrolwhentraction controlisoff,butwillnotbeableto usetheenginespeedmanagement system.See“TractionControl Operation”nextformore information.
When the TC Shasbeen turned off, system noises may still be heard as a result of the brake-traction control coming on.
Itisrecommendedtoleavethe systemonfornormaldriving conditions,butitmaybenecessary toturnthesystemoffifthevehicle isstuckinsand,mud,iceorsnow, andyouwantto"rock"thevehicleto attempttofreeit.Itmayalsobe necessarytoturnoffthesystem whendrivinginextremeoff-road conditionswherehighwheelspinis required.Seelfthe VehicleIs Stuck onpage9-16.
Whenthetransfercaseisin4LO, thestabilitysystemisautomatically disabled,theStabiliTraklightcomes on,andtheappropriatemessage willappearontheDIC.Bothtraction controlandStabiliTrakare automaticallydisabledinthis condition.
TractionControlOperation
The TCSispartoftheStabiliTrak system. Tractioncontrolllimitswheel spinbyreducingenginepowerto thewheels(enginespeed management)andbyapplying brakestoeachindividualwheel (brake-tractioncontrol)as necessary.
The TCSisenabledautomatically whenthevehicleisstarted.Itwill activateandtheStabiliTraklightwill flashifitsensesthatanyofthe wheelsarespinningorbeginningto losetractionwhiledriving.Iftraction controlisturnedoff,onlythe brake-tractioncontrolportionof tractioncontrolwillwork.The enginespeedmanagementwillbe disabled.Inthismode,engine powerisnotreducedautomatically andthedrivenwheelscanspin morefreely.Thiscancausethe brake-tractioncontroltoactivate constantly.
Notice: If the wheel(s) of one axle is allowed to spin excessively while the Stabili Trak ^ , ABS, brake warning lights, and any relevant DIC messages are displayed, the transfer case could be damaged. There pairs would not be recovered by the vehicle warranty. Reduce engine power and donot spin the wheel(s) excessively while these lights and messages are displayed.
The TCS may activate on dry or rough roads or under conditions such as heavy acceleration while turning or abrupt up shifts/down shifts of the transmission. When this happens, areduction in acceleration may be noticed, oranoise or vibration maybe heard. This is normal.
Ifcruisecontrolisbeingusedwhen thesystemactivates,theStabiliTrak lightwillflashandcruisecontrolwill automaticallydisengage.Cruise controlmaybereengagedwhen road conditions allow. See Cruise Control on page 9-69.
StabiliTrakmayalsoturnoff automaticallyifitdeterminesthata problemexistswiththesystem. Iftheproblemdoesnotclearitself afterrestartingthevehicle,seeyour dealerforservice.
Non-hybridvehicleswithStabiliTrak haveaTrailerSwayControl(TSC) feature.See TrailerSwayControl (TSC)onpage9-118.
Non-hybridvehicleswithStabiliTrak haveaHillStartAssist(HSA) feature.SeeHillStartAssist(HSA) onpage9-65.
Adding non-dealer accessories can affect the vehicle's performance. See Accessories and Modifications on page 10-4.
LockingRearAxle
Vehicleswithalockingrearaxlecan givemoretractiononsnow,mud, ice,sand,orgravel.Itworkslikea standardaxlemostofthetime,but whentractionislow,thisfeaturewill allowtherearwheelwiththemost tractiontomovethevehicle.
CruiseControl
WARNING
Cruisecontrolcanbedangerous whereyoucannotdrivesafelyat asteadyspeed.So,donotuse thecruisecontrolonwinding roadsorinheavytraffic.
Cruisecontrolcanbedangerous onslipperyroads. Onsuchroads, fastchangesintiretraction can cause excessive wheelslip, and you could lose control. Donotuse cruise control on slippery roads.
Forvehicleswithcruisecontrol,a speedofabout40km/h(25mph)or morecanbemaintainedwithout keepingyourfootonthe accelerator.Cruisecontroldoes notworkatspeedsbelowabout 40km/h(25mph).
Whenthebrakesareapplied, cruise controlisturnedoff.
ForvehicleswithanAllisonor Hydra-Matic6-speedautomatic transmission,see"GradeBraking" under Tow/HaulModeonpage9-44 foranexplanationofhowcruise controlinteractswiththeRange SelectionMode,tow/haulandgrade brakingsystems.
ForvehicleswiththeStabiliTrak systemthatbeginstolimitwheel spinwhileyouareusingcruise control, thecruisecontrolwill automaticallydisengage. See StabiliTrak® Systemonpage9-65.
9-70DrivingandOperating
When road conditions allow the cruise control to be safely used again, it can be turned back on.

text_image
+ RES - SET -(On/Off): Presstoturnthe systemonoroff. The indicator light is onwhencruisecontrolison and turnsoffwhencruisecontrolisoff.
+RES(Resume/Accelerate): Pressbrieflytoresumetoa previouslysetspeed,orpressand holdtoaccelerate.
SET-(Set/Coast):Presstoset thespeedandactivatecruise controlormakethevehicle decelerate.
☒(Cancel):Presstodisengage cruisecontrolwithouterasingthe setspeedfrommemory.
SettingCruiseControl
If the cruise button is on when not in use, it could get bumped and go into cruise when not desired. Keep the cruise control switch off when cruise is not being used.
Thecruisecontrollightonthe instrumentpanelclusterwillcome onafterthecruisecontrolhasbeen settothedesiredspeed.
- Press

-
Getuptothedesiredspeed.
-
PresstheSET-buttonlocated onthesteeringwheeland releaseit.
- Takeyourfootoffthe accelerator.
ResumingaSetSpeed
If the cruise control lissetata desired speed and then the brakes are applied, the cruise control is disengaged without erasing the set speed from memory.
Oncethevehiclespeedreaches about40km/h(25mph)ormore, pressthe+RESbuttononthe steeringwheel. Thevehiclereturns totheprevioussetspeedandstays there.

IncreasingSpeedWhileUsing CruiseControl
If the cruise control system is already activated,
- Pressandholdthe+RESbutton onthesteeringwheeluntilthe desiredspeedisreached,then releaseit.
- Toincreasevehiclespeedin smallamounts, pressthe+RES button. Each timethisis done, the vehiclegoes about 1.6km/h (1mph) faster.
ReducingSpeedWhileUsing CruiseControl
If the cruise control system is already activated,
- PressandholdtheSET-button onthesteeringwheeluntilthe desiredlowerspeedisreached, thenreleaseit.
- Toslowdowninsmallamounts, presstheSET-buttononthe steeringwheelbriefly.Eachtime thisisdone,thevehiclegoes about1.6km/h(1mph)slower.
PassingAnotherVehicleWhile UsingCruiseControl
Use the accelerator pedal to increase the vehicles speed. When you take your foot off the pedal, the vehicle will slow down to the previous set cruises speed.
UsingCruiseControlonHills
Howwellthecruise control works on hills depend on the vehicle speed, the load, and the steepness of the hills. Whenging up steep hills, pressing the accelerator pedal may be necessary to maintain vehicles speed.
Whilegoingdownhill:
- Vehicleswithafourspeed automatictransmissionmay needtohavethebrakesapplied orthetransmissionshiftedtoa lowergeartokeepthe speeddown.
- Vehicleswithasixspeed automatictransmissionhavea CruiseGradeBrakingfeature thatmayautomaticallyshifttoa lowergeartokeepthespeed down.Itmaybenecessaryto applythebrakeormanuallyshift thetransmissiontoalowergear. Thevehiclemayshifttoahigher gearwhengradebraking assistanceisnolongerrequired. CruiseGradeBrakingisnot availablewhileinRange SelectionMode. Thisfeatureis activewhentheexhaustbrakeis enabled(ifequipped). See "RangeSelectionMode" under ManualModeonpage9-43.
Whenthebrakesaremanually appliedthecruisecontrolis disengaged.
EndingCruiseControl
Therearethreewaystoendcruise control:
• Todisengagecruisecontrol; steplightlyonthebrakepedal.
- Press⊗onthesteeringwheel.
- Toturnoffthecruisecontrol, press 📋 onthesteeringwheel.
ErasingSpeedMemory
Thecruisecontrolsetspeedis erasedfrommemorybypassing 📋oriftheignitionisturnedoff.
ObjectDetection Systems
UltrasonicParkingAssist
Ifavailable, the Ultrasonic Rear Parking Assist (URPA) system assiststhedriverwithparking and avoiding objects while in R (Reverse). URPA operates at speeds less than 8 km/h (5 mph). Thesensorsontherear bumper detect objects upto 2.5 m (8 ft) behind the vehicle, and at least 25 cm (10 in) off the ground.

WARNING
TheURPAsystemdoesnot detectpedestrians, bicyclists, animals, oranyotherobjects located below the bumper or that are too close to or far from the vehicle. Toprevent injury, death, or vehicled damage, even with URPA, always check the area around the vehicle and check all mirrors before backing.
HowtheSystemWorks
URPA comeson automatically when the shift lever is moved into R(Reverse). As single tones sounds to indicate the system is working.
URPAoperatesonlyatspeedsless than8km/h(5mph).
Anobstacleisindicatedbyaudible beeps. The interval between the beepsbecomesshorterasthe vehiclegetsclosertotheobstacle.
Whenthedistanceislessthan 30cm(12in)thebeepingisa continuoustoneforfiveseconds.
Tobedetected, objectsmustbeat least25cm(10in)offtheground andbelowtailgatelevel. Objects mustalsobewithin2.5m(8ft)from therearbumper. Thisdistancemay belessduringwarmerorhumid weather.
TurningtheSystemOnandOff
TheURPAsystemcanbeturnedon andoffusingtherearparkaid disablebuttonlocatednexttothe radio.

The indicator light comes on when the system is disabled and turn soff when the system is on.
Whenthesystemisoff, PARK ASSISTOFFdisplaysontheDriver InformationCenter(DIC). The messagedisappearsafterashort periodoftime.
URPAdefaultstotheonsetting eachtimethevehicleisstarted.
Notice: If you use URPA while the tailgate is lowered, it may not detect an object behind your vehicle, and you might back into the object and damage your vehicle. Always verify the tailgate is closed when using URPA or turnoff URPA which driving with the tailgate lowered.
WhentheSystemDoesNot SeemtoWorkProperly
The following messages maybe displayed on the DIC:
SERVICEPARKASSIST: If this message occurs, takethe vehicle to your dealer to repair the system.
PARKASSTBLOCKEDSEE OWNERSMANUAL:This
messagecanoccurunderthe followingconditions:
- Theultrasonicsensorsarenot clean.Keepthevehicle'srear bumperfreeofmud,dirt,snow, ice,andslush.Forcleaning instructions,seeExteriorCare onpage 10-106.
- Theparkassistsensors are covered by frostorice. Frostor ice can form around and behind the sensors and may not always be seen; this can occur after washing the vehicle in cold weather. Themessagemay not clear until the frostorice has melted.
9-74DrivingandOperating
- Atrailerwasattachedtothe vehicle,oranobjectwas hangingoutofthetailgateduring thelastdrivecycle.Oncethe objectisremovedandthe tailgateisraised,URPAwill returntonormaloperation.
- Atowbarisattachedtothe vehicle.
- Thebumperisdamaged. Take the vehicle to your dealer to repair the system.
- Otherconditions,suchas vibrationsfromajackhammeror thecompressionofairbrakeson averylargetruck,areaffecting systemperformance.
RearVision Camera(RVC)
Ifavailable, theRearVisionCamera (RVC)systemdisplayspartofthe scenebehindthevehicle.

WARNING
TheRVCsystemdoesnotdisplay pedestrians, bicyclists, animals, oranyotherobjectlocated outsidethecamera'sfieldofview, belowthebumper, orunderthe vehicle.
Donotbackthevehicleusing onlytheRVCscreen,suchas duringlonger,higherspeed backingmaneuvers,orwhere therecouldbecross-traffic. Perceiveddistancesmaybe differentfromactualdistances.
(Continued)
WARNING(Continued)
Failuretousepropercarebefore backingmayresultinjury, death,orvehicledamage.Always checkbeforebackingbychecking behindandaroundthevehicle.
VehicleswithoutNavigation System
TheRVCsystemdisplaysaviewof theareabehindthevehicle.When thevehicleisonandshiftedinto R(Reverse)thevideoimage appearsontheinsiderearview mirror.Thevideoimagedisappears afterthevehicleisshiftedoutof R(Reverse).

Information Provided by: DEALER
TurningtheRVCSystemOnorOff
ToturnofftheRVCsystem,press andhold ⏻,locatedontheinside rearviewmirror,untiltheleft indicatorlightturnsoff.TheRVC displayisnowdisabled.
ToturntheRVCsystemon, press andhold ⏻ until the left indicator light comes on. The RVC system display will appear in the mirror.
VehicleswithNavigation System
TheRVCsystemisdesignedto helpthedriverwhenbackingupby displayingaviewoftheareabehind thevehicle.Whenthevehicleis shiftedintoR(Reverse),thevideo imageappearsonthenavigation screen.Afterdelay,thenavigation screendisplaysthelastscreenafter thevehicleisshiftedoutof R(Reverse).
TurningtheRVCSystemOnorOff
ToturntheRVCsystemonoroff:
- ShiftintoP(Park).
- PressMENU to enter the configure menu options. Turn the Multifunction knob until the Display feature is highlighted and press the Multifunction knob. Or press the Display screen button
- Select the Rear Camera Options screen button. The Rear Camera Option screen displays.

text_image
Rear Camera Options Back Video Symbols Guiding Lines- SelecttheVideoscreenbutton. WhentheVideoscreenbuttonis highlightedtheRVC systemison.
Thedelayaftershiftingoutof R(Reverse)isapproximately 10seconds. Thedelaycanbe canceledbyperformingoneofthe following:
- Pressingahardkeyonthe navigationsystem.
- ShiftingintoP(Park).
- Reaching vehiclespeed of 8km/h(5mph).
AdjustingtheBrightnessand ContrastoftheScreen
Toadjustthebrightness and contrastofthescreen, pressthe MENUbuttonwhiletheRVCimage isonthedisplay. Any adjustments madewillonlyaffecttheRVC screen.
(Brightness): Touchthe+(plus) or-(minus)screenbuttonsto increaseordecreasethebrightness of the screen.
●(Contrast): Touchthe+(plus) or-(minus)screenbuttonsto increaseordecreasethecontrastof thescreen.
Symbols
Thenavigationsystemmayhavea featurethatallowsforviewing parkingassistsymbolsonthe navigationscreenwhileusingthe RVC.TheUltrasonicRearPark Assist(URPA)systemmustnotbe disabledtousethecautionsymbols.
IfURPAhasbeendisabledandthe symbolshavebeenturnedon,the RearParkingAssistSymbols Unavailableerrormessagemay display.SeeUltrasonicParking Assistonpage9-72.
Thesymbolsappearnearobjects detectedbytheURPAsystem.The symbolmaycovertheobjectwhen viewingthenavigationscreen.
Toturnthesymbolsonoroff:
- MakesurethatURPAhasnot beendisabled.
2.ShiftintoP(Park).
-
PressMENU to enter the configure menu options. Turn the Multifunction knob until the Display feature is highlighted and press the Multifunction knob. Or press the Display screen button.
-
Select the Rear Camera Options screen button. The Rear Camera Option screen displays.
-
Touch the Symbol screen button. Thescreen button will be highlighted when on.
Guidelines
TheRVCsystemhasaguideline overlaythatcanhelpthedriveralign thevehiclewhenbackingintoa parkingspot.
If the vehicle has dual rear wheels, this feature will not be available.
Toturntheguidelinesonoroff:
-
MakesurethatURPAhasnot beendisabled.
-
ShiftintoP(Park).
-
PressMENU to enter the configure menu options. Turn the Multifunction knob until the Display feature is highlighted and press the Multifunction knob. Or press the Display screen button
-
Select the Rear Camera Options screen button. The Rear Camera Option screen displays.
- Touch the Guideliness screen button. Thescreenbutton will be highlighted when on.
RVCLocation
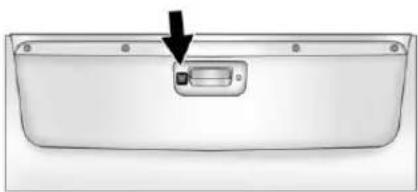
natural_image
Front view of a rectangular electronic device with a black arrow pointing to a small component (no text or symbols visible)Thecameraislocatedinthebezel forthetailgatehandle.
Thisshowsthefieldofviewthatthe cameraprovides.

natural_image
Diagram of a vehicle wheel and dashboard with a dashed line and labeled point A (no text or symbols beyond labels)A.Viewdisplayedbythecamera
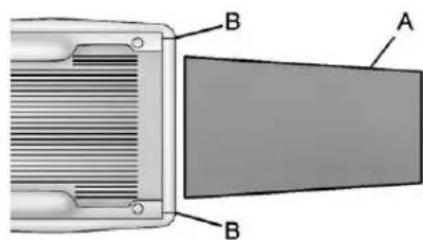
text_image
B A BA.Viewdisplayedbythecamera B.Cornersoftherearbumper
Displayedimagesmaybefurtheror closerthantheyappear. The area displayedislimitedandobjects whichareclosetoeithercornerof thebumperorunderthebumperdo notdisplay.
DisconnectingtheRVC
Therearvisioncameramustbe disconnectedifthetailgateneedsto beremoved.
Todisconnectthecamera:
- Removethelicenseplate.
2.Disconnectthecamera connectorsfromthechassis harness,locatedbehindthe licenseplate,bypressingonthe releasetaboneachconnector.

9-78DrivingandOperating

text_image
A B C A B CA. Chassisharnessconnector
B.Releasetab
C.Cameraconnector
- Plugthetwoexposedchassis harnessconnectorstogetherto preventcontamination.

text_image
A BA. Chassisharnessconnector
B. Releasetab
- Feedthewiringharnessthrough thepickupbox, thenplugthe cameraconnectorstogetherto preventcontamination.
- Removethetailgate. See Tailgateonpage2-11 formore information.
- Reinstallthelicenseplate.
Reversethisproceduretoreinstall theRVCandmakesurethe grommet and connection are secure.

WhentheSystemDoesNot SeemToWorkProperly
TheRVCsystemmightnotwork properlyordisplayaclearimageif:
- TheRVCisturnedoff.See "TurningtheRVCSystemOnor Off"earlierinthissection.
- Itisdark.
• Thesunorthebeamof headlampsisshiningdirectly intothecameralens. - Ice, snow, mud, or anything else builds upon the cameralens. Cleanthelens, rinse it with water, and wipe it with as soft cloth.
- Thebackofthevehicleisinan accident, theposition and mountingangleofthecamera canchangeorthecameracan beaffected. Besuretohavethe cameraanditspositionand mountinganglecheckedatyour dealer.
TheRVCsystemdisplayinthe rearviewmirrormayturnoffornot appearasexpectedduetoone of the following conditions. If this occurs the left indicator light on the mirror will flash.
- Aslowflashmayindicatealoss ofvideosignal,ornovideo signalpresentduringthereverse cycle.
- Afastflashmayindicatethatthe displayhasbeenonforthe maximumallowabletimeduring areversecycle,orthedisplay hasreachedanOver Temperaturelimit.
Thefastflashconditionsare usedtoprotectthevideodevice fromhightemperature conditions.Onceconditions returntonormalthedevicewill resetandthegreenindicatorwill stopflashing.
During any of these fault conditions, the display will be blank and the indicator will flash while the vehicle is in R (Reverse) or until the conditions return on normal.
Pressandhold ⏻whentheleft indicatorlightisflashingtoturnoff thevideodisplayalongwiththeleft indicatorlight.
Fuel
Fordieselenginevehicles, see "FuelforDieselEngines" in the DuramaxDiesel Supplement.
ForVehicleswithgasolineengines, pleasereadthis.
Gasoline
Useoftherecommendedfuelisan importantpartoftheproper maintenanceofthisvehicle.Tohelp keeptheenginecleanandmaintain optimumvehicleperformance,we recommendtheuseofgasoline advertisedasTOPTIERDetergent Gasoline.
LookfortheTOPTIERlabelonthe fuelpumptoensuregasolinemeets enhanceddetergencystandards developedbyautocompanies.Alist ofmarketersprovidingTOPTIER DetergentGasolinecanbefoundat www.toptiergas.com.

Detergent Gasoline

VehiclesthathaveaFlexFuelbadge and yellowfuelcapcanuse either unleaded gasolineorethanol fuel containing upto 85% ethanol (E85). See Fuel E85 (85% Ethanol) on page 9-83. For all other vehicles, use only the unleaded gasoline described under Recommended Fuel on page 9-80.
RecommendedFuel
For all vehiclesexcept those with the 6.2 LV8 engine (VINCode2), useregular unleaded gasolinewith apostedoctanerating of 87 or higher. If the octanerating is less than 87, anaudible knocking noise, commonly referred to as spark knock, might be heard when driving. If this occurs, use as solinerated at 87 octane or higher as soon as possible. If heavy knocking is heard when using gasolinerated at 87 octane or higher, the engine need service.
Ifthevehiclehasthe6.2LV8engine (VINCode2),usepremium unleadedgasolinewithaposted octaneratingof91orhigher.You canalsouseregularunleaded gasolineratedat87octaneor higher,butthevehicle'sacceleration couldbeslightlyreduced,anda slightaudibleknockingnoise, commonlyreferredtoasspark knock,mightbeheard.Iftheoctane islessthan87,youmightnoticea heavyknockingnoisewhenyou drive.Ifthisoccurs,useagasoline ratedat87octaneorhigherassoon aspossible.Otherwise,youcould damagetheengine.Ifheavy knockingisheardwhenusing gasolineratedat87octaneor higher,theengineneedsservice.

GasolineSpecifications (U.S.andCanadaOnly)
Ataminimum, gasolines should meet ASTM specification D4814 in the United States or CAN/CGSB-3.5 or 3.511 in Canada. Some gasolines contain an octane-enhancing additive called methylcyclopentadienylmanganese tricarbonyl (MMT). Were recommend against the use of gasolines containing MMT. See Fuel Additives on page 9-82 for additional information.
CaliforniaFuel Requirements
Ifthevehicleiscertifiedtomeet CaliforniaEmissionsStandards,itis designedtooperateonfuelsthat meetCaliforniaspecifications.See theunderhoodemissioncontrol label.Ifthisfuelisnotavailablein statesadoptingCaliforniaEmissions Standards,thevehiclewilloperate satisfactorilyonfuelsmeeting federalspecifications,butemission controlsystemperformancemight beaffected.Themalfunction indicatorlampcouldturnonandthe vehiclemightfailasmog-checktest. SeeMalfunctionIndicatorLampon page5-25.Ifthisoccurs,returnto yourauthorizeddealerfordiagnosis. Ifitisdeterminedthatthecondition iscausedbythetypeoffuelused, repairsmightnotbecoveredbythe vehiclewarranty.
FuelsinForeign Countries
Neveruseleadedgasolineorany otherfuelnotrecommendedinthe previousstextonfuel.Costlyrepairs causedbyuseofimproperfuel wouldnotbecoveredbythevehicle warranty.
Tocheckthefuelavailability, askan autoclub, or contact a major oil company that does business in the country where you will be driving.
FuelAdditives
Toprovidecleanerair,allgasolines intheUnitedStatesarenow requiredtocontainadditivesthat helppreventengineandfuelsystem depositsfromforming,allowingthe emissioncontrolsystemtowork properly.Inmostcases,nothing shouldhavetobeaddedtothefuel. However,somegasolinescontain onlytheminimumamountof additiverequiredtomeetU.S.EnvironmentalProtectionAgency regulations.Tohelpkeepfuel injectorsandintakevalvesclean andavoidproblemsduetodirty injectorsorvalves,lookforgasoline thatisadvertisedasTOPTIER DetergentGasoline.Lookforthe TOPTIERlabelonthefuelpumpto ensuregasolinemeetsenhanced detergencystandardsdevelopedby theautocompanies.Alistof marketersprovidingTOPTIER DetergentGasolinecanbefoundat www.toptiergas.com.
ForcustomerswhodonotuseTOP TIERDetergentGasolineregularly, onebottleofGMFuelSystem TreatmentPLUS,addedtothefuel tankateveryengineoilchange,can helpcleandepositsfromfuel injectorsandintakevalves.GMFuel SystemTreatmentPLUSistheonly gasolineadditiverecommendedby GeneralMotors.Itisavailableat yourdealer.
Gasolinescontainingoxygenates, suchasethersandethanol, and reformulatedgasolinesmightbe availableinyourarea. We recommendthatyouusethese gasolines,iftheycomplywiththe specificationsdescribedearlier. However,E85(85%ethanol)and otherfuelscontainingmorethan 15%ethanolmustnotbeusedin vehiclesthatwerenotdesignedfor thosefuels.
Notice: This vehicle was not designed for fuel that contains methanol. Donotuse fuel containing methanol. It can corrode metal parts in the fuel system and is also damage plastic and rubber parts. That damage would not be recovered under the vehicle warranty.
Somegasolinesthatare notreformulatedforlow emissionscancontainan octane-enhancingadditivecalled methylcyclopentadienylmanganese tricarbonyl(MMT);asktheattendant whereyoubuygasolinewhetherthe fuelcontainsMMT.Werecommend againsttheuseofsuchgasolines. FuelscontainingMMTcanreduce sparkpluglifeandaffectemission controlsystemperformance.The malfunctionindicatorlampmight turnon.Ifthisoccurs,returntoyour dealerforservice.
FuelE85(85%Ethanol)
VehiclesthathaveaFlexFuelbadge andayellowfuelcapcanuseeither unleadedgasolineorethanolfuel containingupto85%ethanol(E85). Forallothervehicles, useonlythe unleadedgasolinedescribedunder RecommendedFuelonpage9-80.
WeencouragetheuseofE85in vehiclesthataredesignedtouseit. TheethanolinE85isa“renewable” fuel, meaningitismadefrom renewablesourcessuchascorn andothercrops.
Manyservicestationswillnohave an85%ethanolfuel(E85)pump available.TheU.S.Departmentof Energyhasanalternativefuels website(www.afdc.energy.gov/afdc/locator/stations/)thatcanhelpyou findE85fuel.Thosestationsthatdo haveE85shouldhavealabel indicatingethanolcontent.Donot usethefueliftheethanolcontentis greaterthan85%.
Ataminimum, E85 should meet ASTMSpecificationD5798 or CGSBSpecification3.512. Filling the tank with fuel mixture that do not meet ASTMorCGSB specifications can affect driveability and could cause them malfunction indicator lamptocomeon. Asthe outside temperature approaches freezing, ethanol fuel distributors should supply winter grade ethanol, the same as with unleaded gasoline.
Itisbestnottoalternaterepeatedly between gasoline and E85. If you doswitchfuels, it is recommended that you addasmuch fuelas possible—donotaddlessthan 11L(3gal) when refueling. You should drivethe vehicle immediately after refueling for at least 11km (7mi) to allow the vehicle to adapt to the change in ethanol concentration.
E85haslessenergyperliter (gallon)thangasoline,soyouwill needtorefillthefueltankmore oftenwhenusingE85thanwhen youareusinggasoline.SeeFilling theTankonpage9-84.
Notice: Someadditives are not compatible with E85 fuel and can harm the vehicle's fuel system. Donot add anything to E85. Damage caused by additives would not be covered by the vehicle warranty.
Notice: This vehicle was not designed for fuel that contains methanol. Donotuse fuel containing methanol. It can corrodemetal parts in the fuel system and also damage plastic and rubber parts. That damage would not be covered under the vehicle warranty.
FillingtheTank
If the vehicle has a diesel engine, seethe Duramax diesels supplement form more information.

WARNING
Fuelvaporburnsviolentlyanda fuelfirecancausebadinjuries. Tohelpavoidinjuriestoyouand others,readandfollowallthe instructionsonthefuelpump island.Turnofftheenginewhen refueling.Donotsmokenearfuel orwhenrefuelingthevehicle.Do notusecellularphones.Keep sparks,flames,andsmoking materialsawayfromfuel.Donot leavethefuelpumpunattended whenrefuelingthevehicle.Thisis againstthelawinsomeplaces. Donotre-enterthevehiclewhile pumpingfuel.Keepchildrenaway fromthefuelpump;neverlet childrenpumpfuel.
Thetetheredfuelcapislocated behindahingedfueldooronthe driversideofthevehicle. Vehicles thathaveaFlexFuelbadgeanda yellowfuelcapcanuseeither unleadedgasolineorethanolfuel containingupto85%ethanol(E85). SeeFuelE85(85%Ethanol)on page9-83.
Toremovethefuelcap, turnit slowlycounterclockwise.

WARNING
Fuelcansprayoutonyouifyou openthefuelcaptooquickly. Ifyouspillfuelandthen somethingignitesit,youcouldbe badlyburned.Thisspraycan happenifthetankisnearlyfull, andismorelikelyinhotweather. Openthefuelcapslowlyandwait foranyhissnoisetostop.Then unscrewthecapalltheway.
Ifthevehicleisadualfueltank chassiscabmodel, anditrunsout offuel, refuelthefrontfueltankfirst toensureaquickrestart.
Becarefulnottospillfuel.Donot topofforoverfillthetankandwaita fewsecondsafteryouhavefinished pumpingbeforeremovingthe nozzle.Cleanfuelfrompainted surfacesassoonaspossible.See ExteriorCareonpage 10-106.
When replacing the fuel cap, turn it clockwise until it clicks. It will require more effort to turn the fuel cap on the last turn any outightenit. Make sure the cap is fully installed. The diagnostics system can determine if the fuel cap has been left for improperly installed. This would allow fuel to evaporate into the atmosphere. See Malfunction Indicator Lampon page 5-25.
The TIGHTENGASCAP message displays on the Driver Information Center (DIC) if the fuel cap is not properly installed. See Fuel System Messages on page 5-47 form more information.

WARNING
Ifafirestartswhileyouare refueling, donotremovethe nozzle. Shutofftheflowoffuelby shuttingoffthepumporby notifyingthestationattendant. Leavetheareaimmediately.
Notice: Ifanewfuelcapis needed, besuretogetheright typeofcapfromyourdealer. The wrongtypeoffuelcapmightnot fitproperly, mightcausethe malfunctionindicatorlampto light, and coulddamagethefuel tankandemissionssystem. See MalfunctionIndicatorLampon page5-25.
FillingaPortableFuel Container

WARNING
Neverfillaportablefuelcontainer whileitisinthevehicle.Static electricitydischargefromthe containercanignitethefuel vapor.Youcanbebadlyburned andthevehicledamagedifthis occurs.Tohelpavoidinjurytoyou andothers:
- Dispensefuelonlyinto approvedcontainers.
- Donotfillacontainerwhileit isinsideavehicle,ina vehicle'strunk,pickupbed, oronanysurfaceotherthan theground.
(Continued)
WARNING(Continued)
- Bringthefillnozzleincontact withtheinsideofthefill openingbeforeoperatingthe nozzle.Contactshouldbe maintaineduntilthefillingis complete.
- Donotsmokewhile pumpingfuel.
- Donotuseacellularphone whilepumpingfuel.
Towing
GeneralTowing Information
Onlyusetowingequipmentthathas beendesignedforthevehicle.
Contact your dealer or trailering dealer for assistance with preparing the vehicle for towing a trailer.
Seethefollowingtrailertowing informationinthissection:
- Forinformationondrivingwhile towingatrailer,see "Driving Characteristicsand TowingTips."
- Formaximumvehicleandtrailer weights,see"TrailerTowing."
- Forinformationonequipmentto towatraler,see "Towing Equipment."
Forinformationontowingadisabled vehicle, see TowingtheVehicleon page 10-101. Forinformationon towingthevehiclebehindanother vehiclesuchasamotorhome, see RecreationalVehicleTowingon page 10-101.
DrivingCharacteristics and TowingTips
PullingaTrailer
Importantpointsforpullingatrailer:
- Therearemanydifferentlaws, includingspeedlimitrestrictions, havingtodowithtrailering. Makesuretherigwillbelegal, notonlywhereyoulivebutalso whereyouwillbedriving. Agoodsourceforthis informationcanbestateor provincialpolice.
-
Considerusingaswaycontrol. See "Hitches" under Towing Equipmentonpage9-106.
-
Donottowatraileratallduring thefirst800km(500miles)the newvehicleisdriven.The engine,axle,orotherpartscould bedamaged.
- Duringthefirst800km (500miles)thatatraileris towed,donotdriveover80km/h (50mph)andonotmakestarts atfullthrottle. Thishelpsthe engineandotherpartsofthe vehiclewearinattheheavier loads.
- VehiclescantowinD(Drive). Shiftthetransmissiontoalower gearifthetransmissionshifts toooftenunderheavyloadsand/orhillyconditions.
Importantconsiderationsthathave todowithweight:
• Weightofthetrailer
• Weightofthetrailertongue
• Weightonthevehicle'stires
• Weightofthetrailing combination
DrivingwithaTrailer

WARNING
Whentowingatrailer, exhaust gasesmaycollectattherearof thevehicleandenterifthe liftgate,trunk/hatch,orrear-most windowisopen.
EngineexhaustcontainsCarbon Monoxide(CO)whichcannotbe seenorsmelled.Itcancause unconsciousnessandevendeath.
T maximizes safety whentowing atrailer:
- Havetheexhaustsystem inspectedforleaksandmake necessaryrepairsbefore startingatrip.
- Neverdrivewiththeliftgate, trunk/hatch,orrear-most windowopen.
(Continued)
WARNING(Continued)
- Fullyopentheairoutletson orundertheinstrument panel.
- AdjusttheClimateControl systemtoasettingthat bringsinonlyoutsideairand setthefanspeedtothe highestsetting.SeeClimate ControlSysteminthelndex.
Formoreinformationabout CarbonMonoxide,seeEngine Exhaustonpage9-37.
Towingatralerrequiresacertain amountofexperience. The combinationyouaredrivingis longerandnotasresponsiveasthe vehicleitself.Getacquaintedwith thehandlingandbrakingoftherig beforesettingoutfortheopenroad.
Beforestarting, checkalltrailerhitch partsandattachments, safety chains, electricalconnectors, lamps, tires, and mirrors. If the trailer haselectric brakes, start the combinationmoving and then apply the trailerbrakecontrollerbyhand to besurethebrakeswork.
Duringthetrip, checkoccasionally tobesurethattheloadissecure andthelampsandanytrailer brakesstillwork.
FollowingDistance
Stayatleasttwiceasfarbehindthe vehicleaheadasyouwouldwhen drivingthevehiclewithoutatrailer. Thiscanhelptoavoidheavy brakingandsuddenturns.
Passing
Morepassingdistanceisneeded whentowingatrailer.The combinationwillnotaccelerateas quicklyandislongersoitis necessarytogomuchfarther beyondthepassedvehiclebefore returningtothelane.
BackingUp
Holdthebottomofthesteering wheelwithonehand.Tomovethe trailertotheleft,movethathandto theleft.Tomovethetrailertother right,moveyourhandtotheright. Alwaysbackupslowlyand, ifpossible,havesomeone guideyou.
MakingTurns
Notice: Making very sharp turns while trailering could cause the trailertocome in contact with the vehicle. The vehicle could be damaged. Avoid making very sharp turns while trailering.
Whenturningwithatrailer,make widerturnsthannormal.Dothisso thetrailerwillnotstrikesoft shoulders,curbs,roadsigns,trees, orotherobjects.Avoidjerkyor suddenmaneuvers.Signalwellin advance.
If the trailer turns signal bulbs burn out, the arrows on the instrument panel will still flash for turns. It is important to check occasionally to be sure the trailer bulbs are still working.
DrivingonGrades
Reducespeedandshifttoalower gearbeforestartingdownalongor steepdowngrade.Ifthe transmissionisnotshifteddown,the brakesmightgethotandnolonger workwell.
VehiclescantowinD(Drive).Shift thetransmissiontoalowergearif thetransmissionshiftstoooften underheavyloadsand/orhilly conditions.
The Tow/HaulModemaybeusedif thetransmissionshiftstoooften. See Tow/HaulModeonpage9-44.
Whentowingathighaltitudeon steepuphillgrades,considerthe following:Enginecoolantwillboilat alowertemperaturethanatnormal altitudes.Iftheengineisturnedoff immediatelyaftertowingathigh altitudeonsteepuphillgrades,the vehiclemayshowsignssimilarto engineoverheating.Toavoidthis, lettheengineerunwhileparked, preferablyonlevelground,withthe automatictransmissioninP(Park) forafewminutesbeforeturningthe engineoff.Iftheoverheatwarning comeson,seeEngineOverheating onpage 10-24.
ParkingonHills

WARNING
Parkingthevehicleonahillwith thetrailerattachedcanbe dangerous. If something goes wrong, therigcouldstarttomove. People can be injured, and both the vehicle and the trailer can be damaged. When possible, always parktherigonaflatsurface.
Ifparkingtherigonahill:
-
Pressthebrakepedal, butdo notshiftintoP(Park)yet. Turn thewheelsintothecurbiffacing downhillorintotrafficiffacing uphill.
-
Havesomeoneplacechocks underthetrailerwheels.
-
Whenthewheelchocksarein place, releasetheregularbrakes untilthechocksabsorbtheload.
- Reapplythebrakepedal. Then apply the parking brake and shift into P(Park).
- If the vehicle is four-wheel-drive, besurethetransfercase is a drive gear and not in N (Neutral).
- Releasethebrakepedal.

WARNING
Itcanbedangeroustogetoutof thevehicleiftheshiftleverisnot fullyinP(Park)withtheparking brakefirmlyset. Thevehicle canroll.
If the engine has been left running, the vehicle can move suddenly. You or others could be injured. Tobesure the vehicle will not move, even when on fairly level ground, use the step that follow.
(Continued)
WARNING(Continued)
Alwaysputtheshiftleverfullyin P(Park)withtheparkingbrake firmlyset.
Ifthetransfercaseona four-wheel-drivevehicleisin N(Neutral),thevehiclewillbe freetoroll,eveniftheshiftlever isinP(Park).Besurethetransfer caseisinadrivegear—notin N(Neutral).
LeavingAfterParkingonaHill
- Apply and hold the brake pedal.
2.Starttheengine.
3.Shiftintoagear. - Releasetheparkingbrake.
- Letuponthebrakepedal.
- Driveslowlyuntilthetraileris clearofthechocks.
- Stopandhavesomeonepickup andstorethechocks.
MaintenancewhenTrailer Towing
Thevehicleneedsservicemore oftenwhenpullingatrailer.See MaintenanceScheduleon page11-3. Thingsthatare especiallyimportantintrailer operationareautomatic transmissionfluid,engineoil,axle lubricant,belts,coolingsystem,and brakesystem.Itisagoodideato inspectthesebeforeandduring thetrip.
Checkperiodicallytoseethatall hitchnutsandboltsaretight.
TrailerTowing
Ifthevehiclehasadieselengine, seetheDuramaxdieselsupplement formoreinformation.
If the vehicle is a hybrid, se the hybrids supplement form more information.
Donottowatrailerduringbreak-in. SeeNewVehicleBreak-Inon page9-27formoreinformation.
WARNING
Thedrivercanlosecontrolwhen pullingatrailerifthecorrect equipmentisnotusedorthe vehicleisnotdrivenproperly. For example, ifthetraileristoo heavy, thebrakesmaynotwork wellorevenatall. Thedriverand passengerscouldbeseriously injured. Thevehiclemayalsobe damaged; theresultingrepairs wouldnotbecoveredbythe vehiclewarranty. Pullatrailer onlyifallthestepsinthissection havebeenfollowed. Ask your dealerforadviceandinformation abouttowingatrailerwiththe vehicle.
Notice: Pullingatailer improperlycandamagethe vehicleandresultincostly repairsnotcoveredbythevehicle warranty. Topullatrailer correctly, followtheadvice in this section and seeyourdealer for important information about towingatralerwiththevehicle.
To identify the trailering capacity of the vehicle, read the information in "Weight of the Trailer" later in this section.
Traileringisdifferentthanjust drivingthevehiclebyitself. Traileringmeanschangesin handling,acceleration,braking, durability,andfueleconomy. Successful,safetraileringtakes correctequipment,andithastobe usedproperly.
The following information has many time-tested, important trailering tips and safety rules. Many of these are important for yoursafety and that of your passengers. Sopleaseread this section carefully before pulling a trailer.
WeightoftheTrailer
Howheavycanatrailersafelybe? Itdependsonhowtherigisused. Speed,altitude,roadgrades, outsidetemperature,andhowmuch thevehicleisusedtopullatrailer areallimportant.Itcandependon anyspecialequipmentonthe vehicle,andtheamountoftongue weightthevehiclecancarry.See "WeightoftheTrailerTongue"later inthissectionformoreinformation.
Trailerweightrating(TWR)is calculatedassumingthetowvehicle hasonlythedriverbutallrequired traileringequipment.Weightof additionaloptionalequipment, passengers,andcargointhetow vehiclemustbesubtractedfromthe trailerweightrating.
Forkingpinweightandtrailer tongueweightinformation,see "WeightoftheTrailerTongue"later inthissection.
Usethefollowingcharttodetermine howmuchthevehiclecanweigh, baseduponthevehiclemodeland options.
Weightslistedapplyfor conventionaltrailersandfifth-wheel trailersunlessotherwisenoted.
9-92DrivingandOperating
| VehicleAxleRatioMaxi | mumTrailerWeightG | CWR(a) | |
| 1500Series2WDRegularCabStandardBox | |||
| 4.3LV6(b)3.232177kg(4,800lbs)430 | 9kg(9,500lbs) | ||
| 4.3LV6—WithAutomatic Transmission(b) | 3.732449kg(5,400lbs)4536kg(10,000lbs) | ||
| 4.3LV6—WithManual Transmission(b) | 3.731860kg(4,100lbs)3938kg(8,683lbs) | ||
| 4.8LV8(b)3.232132kg(4,700lbs)430 | 9kg(9,500lbs) | ||
| 4.8LV8(b)3.733266kg(7,200lbs)544 | 3kg(12,000lbs) | ||
| 5.3LLMGV8(b)3.082994kg(6,600lbs) | 5216kg(11,500lbs) | ||
| 5.3LLMGV8,K5LHD CoolingPkg | 3.083357kg(7,400lbs)5534kg(12,200lbs) | ||
| 5.3LLMGV8K5LHDCoolingPkg | 3.424128kg(9,100lbs)6350kg(14,000lbs) | ||
| 1500Series2WDExtendedCabStandardBox | |||
| 4.3LV6(b)3.231996kg(4,400lbs)430 | 9kg(9,500lbs) | ||
| 4.8LV8(b)3.232132kg(4,700lbs)453 | 6kg(10,000lbs) | ||
| 4.8LV8(b)3.733039kg(6,700lbs)544 | 3kg(12,000lbs) | ||
| 5.3LV8(b)3.082812kg(6,200lbs)521 | 6kg(11,500lbs) | ||
| 5.3LV8K5LHDCoolingPkg(b) | 3.083130kg(6,900lbs)5534kg(12,200lbs) | ||
| 5.3LV8K5LHDCoolingPkg—ConventionalTrailer | 3.424400kg(9,700lbs)6804kg(15,000lbs) | ||
| 5.3LV8K5LHDCoolingPkg—Fifth-WheelTrailer | 3.424264kg(9,400lbs)6804kg(15,000lbs) | ||
| 6.2LV8K5LHDCoolingPkg—ConventionalTrailer | 3.424400kg(9,700lbs)6804kg(15,000lbs) | ||
| 6.2LV8K5LHDCoolingPkg—Fifth-WheelTrailer | 3.424264kg(9,400lbs)6804kg(15,000lbs) | ||
| 6.2LV8NHTMaxTraileringPkg—ConventionalTrailer | 3.734853kg(10,700lbs)7257kg(16,000lbs) | ||
| 6.2LV8NHTMaxTraileringPkg—Fifth-WheelTrailer | 3.734808kg(10,600lbs)7257kg(16,000lbs) | ||
| 1500Series2WDCrewCabShortBox(b) | |||
| 4.8LV83.232132kg(4,700lbs)4536kg(10,000lbs) | |||
| 4.8LV83.733039kg(6,700lbs)5443kg(12,000lbs) | |||
| 5.3LV8(LMG)3.082812kg(6,200lbs) | 5216kg(11,500lbs) | ||
| 5.3LV8(LMG)K5LHDCoolingPkg | 3.083130kg(6,900lbs)5534kg(12,200lbs) | ||
| 5.3LV8(LC9)XFE | 3.083175kg(7,000lbs)5534kg(12,200lbs) | ||
9-94DrivingandOperating
| VehicleAxleRatioMaxi | numTrailerWeightG | CWR(a) | |
| 5.3LV8(LMG)K5LHDCoolingPkg | 3.424355kg(9,600lbs)6804kg(15,000lbs) | ||
| 6.2LV8K5LHDCoolingPkg3.424400 | kg(9,700lbs)6804kg(15,000lbs) | ||
| 6.2LV8NHTMaxTraileringPkg3.734 | 308kg(10,600lbs)725 | 7kg(16,000lbs) | |
| 1500Series2WDRegularCabLongBox | |||
| 4.3LV6(b) | 3.232132kg(4,700lbs) | 4309kg(9,500lbs) | |
| 4.3LV6(b) | 3.732359kg(5,200lbs)4536kg(10,000lbs) | ||
| 4.8LV8(b) | 3.232313kg(5,100lbs)4536kg(10,000lbs) | ||
| 4.8LV8(b) | 3.733221kg(7,100lbs)5443kg(12,000lbs) | ||
| 5.3LV8 | 3.082948kg(6,500lbs) | 5216kg(11 | 500lbs) |
| 5.3LV8K5LHDCoolingPkg3.083266 | kg(7,200lbs)5534kg(12,200lbs) | ||
| 5.3LV8K5LHDCoolingPkg-ConventionalTrailer | 3.424536kg(10,000lbs)6804kg(15,000lbs) | ||
| 5.3LV8K5LHDCoolingPkg-Fifth-WheelTrailer | 3.424037kg(8,900lbs)6804kg(15,000lbs) | ||
| 1500Series2WDExtendedCabLongBox | |||
| 5.3LV8(b) | 3.08 | 2722kg(6,000lbs)5216kg(11,500lbs) | |
| 5.3LV8K5LHDCoolingPkg(b) | 3.083039kg(6,700lbs)5534kg(12,200lbs) | ||
| VehicleAxleRatioMaxi | mumTrailerWeightG | CWR(a) | |
| 5.3LV8K5LHDCoolingPkg—ConventionalTrailer | 3.424309kg(9,500lbs)6804kg(15,000lbs) | ||
| 5.3LV8K5LHDCoolingPkg—Fifth-WheelTrailer | 3.424082kg(9,000lbs)6804kg(15,000lbs) | ||
| 1500Series4WDRegularCabStandardBox | |||
| 4.3LV6(b)3.732313kg(5,100lbs)453 | 6kg(10,000lbs) | ||
| 4.8LV8(b)3.422722kg(6,000lbs)499 | 0kg(11,000lbs) | ||
| 5.3LV8(b)3.082903kg(6,400lbs)521 | 6kg(11,500lbs) | ||
| 5.3LV8K5LHDCoolingPkg3.083221 | kg(7,100lbs)5534kg(12,200lbs) | ||
| 5.3LV8K5LHDCoolingPkg—ConventionalTrailer | 3.424037kg(8,900lbs)6350kg(14,000lbs) | ||
| 5.3LV8K5LHDCoolingPkg—Fifth-WheelTrailer | 3.423719kg(8,200lbs)6350kg(14,000lbs) | ||
| 1500Series4WDExtendedCabStandardBox | |||
| 4.8LV8(b)3.422495kg(5,500lbs)499 | 0kg(11,000lbs) | ||
| 5.3LV8(b)3.082767kg(6,100lbs)521 | 6kg(11,500lbs) | ||
| 5.3LV8K5LHDCoolingPkg(b)3.0830 | 84kg(6,800lbs)5534kg(12,200lbs) | ||
9-96DrivingandOperating
| VehicleAxleRatioMaxi | numTrailerWeightG | CWR(a) | |
| 5.3LV8K5LHDCoolingPkg-ConventionalTrailer | 3.424354kg(9,600lbs)6804kg(15,000lbs) | ||
| 5.3LV8K5LHDCoolingPkg-Fifth-WheelTrailer | 3.424354kg(9,600lbs)6804kg(15,000lbs) | ||
| 6.2LV8K5LHDCoolingPkg-ConventionalTrailer | 3.424264kg(9,400lbs)6804kg(15,000lbs) | ||
| 6.2LV8K5LHDCoolingPkg-Fifth-WheelTrailer | 3.424128kg(9,100lbs)6804kg(15,000lbs) | ||
| 6.2LV8NHTMaxTraileringPkg-ConventionalTrailer | 3.734717kg(10,400lbs)7257kg(16,000lbs) | ||
| 6.2LV8NHTMaxTraileringPkg-Fifth-WheelTrailer | 3.734672kg(10,300lbs)7257kg(16,000lbs) | ||
| 1500Series4WDCrewCabShortBox(b) | |||
| 4.8LV83.422495kg(5,500lbs)4990kg(11,000lbs) | |||
| 5.3LV83.082722kg(6,000lbs)5216kg(11,500lbs) | |||
| 5.3LV8K5LHDCoolingPkg | 3.083039kg(6,700lbs)5534kg(12,200lbs) | ||
| 5.3LV8K5LHDCoolingPkg | 3.424309kg(9,500lbs)6804kg(15,000lbs) | ||
| 6.2LV8K5LHDCoolingPkg | 3.424264kg(9,400lbs)6804kg(15,000lbs) | ||
| 6.2LV8NHTMaxTraileringPkg | 3.734717kg(10,400lbs)7257kg(16,000lbs) | ||
| VehicleAxleRatioMaxi | mumTrailerWeightG | CWR(a) | |
| 1500Series4WDRegularCabLongBox | |||
| 4.3LV6(b)3.732223kg(4,900lbs)453 | 6kg(10,000lbs) | ||
| 4.8LV8(b)3.422631kg(5,800lbs)499 | 0kg(11,000lbs) | ||
| 5.3LV8(b)3.082858kg(6,300lbs)521 | 6kg(11,500lbs) | ||
| 5.3LV8K5LHDCoolingPkg3.083175 | kg(7,000lbs)5534kg(12,200lbs) | ||
| 5.3LV8K5LHDCooling Pkg-ConventionalTrailer | 3.424445kg(9,800lbs)6804kg(15,000lbs) | ||
| 5.3LV8K5LHDCooling Pkg-Fifth-WheelTrailer | 3.424400kg(9,700lbs)6804kg(15,000lbs) | ||
| 1500Series4WDExtendedCabLongBox | |||
| 5.3LV8(b)3.082631kg(5,800lbs)521 | 6kg(11,500lbs) | ||
| 5.3LV8K5LHDCoolingPkg(b)3.0829 | 48kg(6,500lbs)5534kg(12,200lbs) | ||
| 5.3LV8K5LHDCooling Pkg-ConventionalTrailer | 3.424218kg(9,300lbs)6804kg(15,000lbs) | ||
| 5.3LV8K5LHDCooling Pkg-Fifth-WheelTrailer | 3.423674kg(8,100lbs)6804kg(15,000lbs) | ||
9-98DrivingandOperating
| VehicleAxleRatioMaxi | numTrailerWeightG | CWR(a) | |
| 2500Series2WDExtendedCabStandardBoxHD | |||
| 6.0LV83.734445kg(9,800lbs)7257kg(16,000lbs) | |||
| 6.0LV8—ConventionalTrailer4.105897kg(13,000lbs)9299kg(20,500lbs) | |||
| 6.0LV8 — Fifth-Wheel Trailer | 4.10 | 6 486 kg (14,300 lbs) | 9 299 kg (20,500 lbs) |
| 2500Series2WDCrewCabStandardBoxHD | |||
| 6.0LV83.734400kg(9,700lbs)7257kg(16,000lbs) | |||
| 6.0LV8—ConventionalTrailer4.105897kg(13,000lbs)9299kg(20,500lbs) | |||
| 6.0LV8 — Fifth-Wheel Trailer | 4.10 | 6 441 kg (14,200 lbs) | 9 299 kg (20,500 lbs) |
| 2500Series2WDRegularCabLongBoxHD | |||
| 6.0LV83.734627kg(10,200lbs)7257kg(16,000lbs) | |||
| 6.0LV8—PayloadPerformance Pkg(UB7) | 3.734536kg(10,000lbs)7257kg(16,000lbs) | ||
| 6.0LV8—ConventionalTrailer4.105897kg(13,000lbs)9299kg(20,500lbs) | |||
| 6.0LV8 — Fifth-Wheel Trailer | 4.10 | 6 668 kg (14,700 lbs) | 9 299 kg (20,500 lbs) |
| VehicleAxleRatioMaxi | mumTrailerWeightG | CWR(a) | |
| 2500Series2WDExtendedCabLongBoxHD | |||
| 6.0LV83.734400kg(9,700lbs)7257kg(16,000lbs) | |||
| 6.0LV8—ConventionalTrailer4.1058kg(13,000lbs)9299kg(20,500lbs) | |||
| 6.0LV8 — Fifth-Wheel Trailer | 4.10 | 6 441 kg (14,200 lbs) | 9 299 kg (20,500 lbs) |
| 2500Series2WDCrewCabLongBoxHD | |||
| 6.0LV83.734354kg(9,600lbs)7257kg(16,000lbs) | |||
| 6.0LV8—ConventionalTrailer4.1058kg(13,000lbs)9299kg(20,500lbs) | |||
| 6.0LV8 — Fifth-Wheel Trailer | 4.10 | 6 396 kg (14,100 lbs) | 9 299 kg (20,500 lbs) |
| 2500Series4WDExtendedCabStandardBoxHD | |||
| 6.0LV83.734309kg(9,500lbs)7257kg(16,000lbs) | |||
| 6.0LV8—ConventionalTrailer4.1058kg(13,000lbs)9299kg(20,500lbs) | |||
| 6.0LV8 — Fifth-Wheel Trailer | 4.10 | 6 350 kg (14,000 lbs) | 9 299 kg (20,500 lbs) |
| 2500Series4WDCrewCabStandardBoxHD | |||
| 6.0LV83.734264kg(9,400lbs)7257kg(16,000lbs) | |||
| 6.0LV8—ConventionalTrailer4.1058kg(13,000lbs)9299kg(20,500lbs) | |||
| 6.0LV8 — Fifth-Wheel Trailer | 4.10 | 6 305 kg (13,900 lbs) | 9 299 kg (20,500 lbs) |
9-100DrivingandOperating
| VehicleAxleRatioMaxi | numTrailerWeightG | CWR(a) | |
| 2500Series4WDRegularCabLongBoxHD | |||
| 6.0LV83.734491kg(9,900lbs)7257kg(16,000lbs) | |||
| 6.0LV8—ConventionalTrailer4.105897kg(13,000lbs)9299kg(20,500lbs) | |||
| 6.0LV8 — Fifth-Wheel Trailer | 4.10 | 6 532 kg (14,400 lbs) | 9 299 kg (20,500 lbs) |
| 2500Series4WDExtendedCabLongBoxHD | |||
| 6.0LV83.734264kg(9,400lbs)7257kg(16,000lbs) | |||
| 6.0LV8—ConventionalTrailer4.105897kg(13,000lbs)9299kg(20,500lbs) | |||
| 6.0LV8 — Fifth-Wheel Trailer | 4.10 | 6 305 kg (13,900 lbs) | 9 299 kg (20,500 lbs) |
| 2500Series4WDCrewCabLongBoxHD | |||
| 6.0LV83.734218kg(9,300lbs)7257kg(16,000lbs) | |||
| 6.0LV8—ConventionalTrailer4.105897kg(13,000lbs)9299kg(20,500lbs) | |||
| 6.0LV8 — Fifth-Wheel Trailer | 4.10 | 6 260 kg (13,800 lbs) | 9 299 kg (20,500 lbs) |
| 3500Series2WDRegularCabLongBox | |||
| 6.0LV8(SingleRearWheels) ConventionalTrailer | 4.105897kg(13,000lbs)9299kg(20,500lbs) | ||
| 6.0LV8(SingleRearWheels) Fifth-WheelTrailer | 4.106577kg(14,500lbs)9299kg(20,500lbs) | ||
| 6.0LV8(DualRearWheels)3.734354 | kg(9,600lbs)7257kg(1 | 6,000lbs) | |
| 6.0LV8(DualRearWheels)4.106396 | kg(14,100lbs)9299kg | (20,500lbs) | |
| 3500Series2WDExtendedCabLongBox | |||
| 6.0LV8(SingleRearWheels)3.73430 | 9kg(9,500lbs)7257kg | (16,000lbs) | |
| 6.0LV8(SingleRearWheels)ConventionalTrailer | 4.105897kg( | (13,000lbs)9299kg(20,500lbs) | |
| 6.0LV8(SingleRearWheels)Fifth-WheelTrailer | 4.106350kg( | (14,000lbs)9299kg(20,500lbs) | |
| 6.0LV8 (Dual Rear Wheels) | 3.73 | 4 128kg (9,100 lbs) | 7 257 kg (16,000 lbs) |
| 6.0LV8(DualRearWheels)4.106169 | kg(13,600lbs)9299kg | (20,500lbs) | |
| 3500Series2WDCrewCabStandardBox | |||
| 6.0LV8 | 3.73 | 4 309kg (9,500 lbs) | 7 257 kg (16,000 lbs) |
| 6.0LV8 — Conventional Trailer | 4.10 | 5 897 kg (13,000 lbs) | 9 299 kg (20,500 lbs) |
| 6.0LV8Fifth-WheelTrailer | 4.106350kg(14,000lbs)9299kg(20,500lbs) | ||
9-102DrivingandOperating
| VehicleAxleRatioMaxi | numTrailerWeightG | CWR(a) | |
| 3500Series2WDCrewCabLongBox | |||
| 6.0LV8(SingleRearWheels)3.73426 | 4kg(9,400lbs)7257kg | (16,000lbs) | |
| 6.0LV8(SingleRearWheels)ConventionalTrailer | 4.105897kg | (13,000lbs)9299kg(20,500lbs) | |
| 6.0LV8(SingleRearWheels)Fifth-WheelTrailer | 4.106305kg | (13,900lbs)9299kg(20,500lbs) | |
| 6.0LV8(DualRearWheels)3.734082 | kg(9,000lbs)7257kg | (16,000lbs) | |
| 6.0LV8(DualRearWheels)4.106123 | kg(13,500lbs)9299kg | (20,500lbs) | |
| 3500Series4WDRegularCabLongBox | |||
| 6.0LV8(SingleRearWheels)3.73440 | 0kg(9,700lbs)7257kg | (16,000lbs) | |
| 6.0LV8(SingleRearWheels)ConventionalTrailer | 4.105897kg | (13,000lbs)9299kg(20,500lbs) | |
| 6.0LV8(SingleRearWheels)Fifth-WheelTrailer | 4.16441kg | (14,200lbs)9299kg(20,500lbs) | |
| 6.0LV8(DualRearWheels)3.734218 | kg(9,300lbs)7257kg | (16,000lbs) | |
| 6.0LV8(DualRearWheels)4.106260 | kg(13,800lbs)9299kg | (20,500lbs) | |
| VehicleAxleRatioMaxi | mumTrailerWeightG | CWR(a) | |
| 3500Series4WDExtendedCabLongBox | |||
| 6.0LV8(SingleRearWheels)3.73417 | 3kg(9,200lbs)7257kg | (16,000lbs) | |
| 6.0LV8(SingleRearWheels)ConventionalTrailer | 4.105897kg | (13,000lbs)9299kg(20,500lbs) | |
| 6.0LV8(SingleRearWheels)Fifth-WheelTrailer | 4.106214kg | (13,700lbs)9299kg(20,500lbs) | |
| 6.0LV8(DualRearWheels)3.734037 | kg(8,900lbs)7257kg | (6,000lbs) | |
| 6.0LV8(DualRearWheels)4.106078 | kg(13,400lbs)9299kg | (20,500lbs) | |
| 3500Series4WDCrewCabStandardBox | |||
| 6.0LV8 | 3.734173kg | (9,200lbs)7257kg(16,000lbs) | |
| 6.0LV8 — Conventional Trailer | 4.10 | 5 897 kg (13,000 lbs) | 9 299 kg (20,500 lbs) |
| 6.0LV8 — Fifth-Wheel Trailer | 4.10 | 6 214 kg (13,700 lbs) | 9 299 kg (20,500 lbs) |
| 3500Series4WDCrewCabLongBox | |||
| 6.0LV8(SingleRearWheels)3.73412 | 8kg(9,100lbs)7257kg | (16,000lbs) | |
| 6.0LV8(SingleRearWheels)ConventionalTrailer | 4.105897kg | (13,000lbs)9299kg(20,500lbs) | |
| 6.0LV8(SingleRearWheels)Fifth-WheelTrailer | 4.1.06169kg | (13,600lbs)9299kg(20,500lbs) | |
9-104DrivingandOperating
| VehicleAxleRatioMaxi | numTrailerWeightGCWR(a) | |
| 6.0LV8(DualRearWheels)3.733946 | kg(8,700lbs)7257kg(16,000lbs) | |
| 6.0LV8(DualRearWheels)4.105987 | kg(13,200lbs)9299kg(20,500lbs) | |
| (a)TheGrossCombinationWeightRating(GCWR)isthetotalallowableweightofthecompletelyloadedvehicle andtrailerincludinganypassengers,cargo,equipment,andconversions.TheGCWRforthevehicleshouldnotbe exceeded.(b)Thismodelisneitherdesignednorintendedtotowfifth-wheelorgoosenecktrailers. | ||
Askyourdealerfortrailering informationoradvice,orwriteusat ourCustomerAssistanceOffices. SeeCustomerAssistanceOffices (U.S.andCanada)onpage 13-5or CustomerAssistanceOffices (Mexico)onpage 13-6formore information.
WeightoftheTrailerTongue
Thetongueload(A)ofanytraileris veryimportantbecauseitisalso partofthevehicleweight.The GrossVehicleWeight(GVW) includesthecurbweightofthe vehicle,anycargocarriedinit,and thepeoplewhowillberidinginthe vehicleaswellastrailertongue weight.Vehicleoptions,equipment,
passengersandcargointhevehicle reducetheamountoftongueweight thevehiclecancarry,whichwillalso reducethetrailerweightthevehicle cantow.See"VehicleLoadLimits" formoreinformationaboutthe vehicle'smaximumloadcapacity.

A
B
Trailertongueweight(A)shouldbe 10to15percentandfifth-wheel gooseneckkingpinweightshouldbe 15to25percentoftheloadedtrailer weightuptothemaximumsfor vehicleseriesandhitchtype.:
| VehicleSeriesHitchType | MaximumTongue Weight | |
| 1500WeightCarrying | 272kg(600lbs) | |
| 1500WeightDistributing | 499kg(1,100lbs) | |
| 1500Fifth-WheelGooseneck | 680kg(1,500lbs) | |
| 2500/3500 StandardBox | WeightCarryingor WeightDistributing | 680kg(1,500lbs) |
| 2500/ 3500LongBox | WeightCarryingor WeightDistributing | 907(2,000lbs) |
| 2500Fifth-WheelGooseneck | 1361kg(3,000lbs) | |
| 3500SingleRear Wheels | Fifth-WheelGooseneck18 | 14kg(4,000lbs) |
| 3500DualRear Wheels | Fifth-WheelGooseneck24 | 95kg(5,500lbs) |
| *816kg(41,800lbs)forvehiclesbuiltbeforeOctober,2011.Checkthe hitchratinglabelforcorrectmaximumforthevehicle. | ||
Donotexceedthemaximum allowabletongueweightforthe vehicle.Choosetheshortesthitch extensionthatwillpositionthehitch
ballclosesttothevehicle. This will help reduce the effect of trailer tongue weight on therearaxle.

Information Provided by: DEALER
Traileringmaybelimitedbythe vehicle'sabilitytocarrytongue weight.Tongueorkingpinweight cannotcausethevehicletoexceed theGVWR(GrossVehicleWeight Rating)ortheRGAWR(RearGross AxleWeightRating).See“Total WeightontheVehicle'sTires”later inthissectionformoreinformation.
Afterloadingthetrailer, weighthe trailerandthenthetongue, separately, toseeiftheweightsare proper. If they are not, adjustments might be made by moving some items around in the trailer.
TotalWeightontheVehicle's Tires
Besurethevehicle'stiresare inflatedtotheinflationpressures foundontheCertificationTirelabel onthedriversdoororsee Vehicle LoadLimitsonpage9-17formore information.Makesurenotto exceedtheGVWRlimitforthe vehicle,ortheRGAWR,withthetow vehicleandtrailerfullyloadedfor thetripincludingtheweightofthe
trailertongue.Ifusinga weight-distributinghitch,makesure nottoexceedtheRGAWRbefore applyingtheweightdistribution springbars.
WeightoftheTrailering Combination
It is important that the combination of the tow vehicle and trailer does not exceed any of its weight ratings—GCWR, GVWR, RGWR, Trailer Weight Rating, or Tongue Weight. The only way to be sure it is not exceeding any of these ratings of the weight the tow vehicle and trailer combination, fully loaded for the trip, getting individual weights for each of these items.
TowingEquipment
Hitches
The correcthitchequipment helps maintain combination control. Many trailers can be towed with a weight-carrying hitch which simply features a coupler latched to the
hitchball, oratoweyelatchedtoa pintlehook. Othertrailersmay require a weight-distributing hitch that uses spring bar st distribute the trailertongue weight among the two vehicle and trailer axles. Fifth-wheel and gooseneck hitches may also be used. See "Weight of the Trailer Tongue" under Trailer Towing on page 9-90 for rating limits with various hitch types.
Ifastep-bumperhitchwillbeused, thebumpercouldbedamaged in sharpturns. Makesurethere isampleroomwhenturningtoavoid contactbetweenthetrailerandthe bumper.
Considerusingswaycontrolswith anytrailer.Askatrailering professionalaboutswaycontrolsor refertothetrailermanufacturer's recommendationsandinstructions.
Weight-DistributingHitch Adjustment

text_image
A BA. BodytoGroundDistance
B.FrontofVehicle
When using a weight-distributing hitch, the spring bar should be adjusted so the distance (A) is the same after coupling the trail to the tow vehicle and adjusting the hitch.
Fifth-WheelandGooseneck Trailering
Fifth-wheelandoosenecktrailers canbeusedwithmanypickup models. Thesetrailersplacea largerpercentageoftheweight (kingpinweight)onthetowvehicle thanconventionaltrailers. Make surethisweightdoesnotcausethe vehicletoexceedGAWRorGVWR.
Fifth-wheelgooseneckkingpin weightshouldbe15to25percentof the trailerweightuptothemaximum amountspecifiedinthetrailering chartforthevehicle.See"Weightof the Trailer"under Trailer Towingon page9-90formoreinformation.
Thehitchshouldbelocatedinthe pickupbedsothatitscenterlineis overorslightlyinfrontoftherear axle.Takecarethatitisnotsofar forwardthatitwillcontacttheback ofthecabinsharpturns.This is especiallyimportantforshortbox pickups.Trailerpinboxextensions andslidingfifth-wheelhitch assembliescanhelpthiscondition. Thereshouldbeatleastsixinches ofclearancebetweenthetopofthe pickupboxandthebottomofthe trailersshelfthatextendsover thebox.
Makesurethehitchisattachedto thetowvehicleframerails.Donot usethepickupboxforsupport.
SafetyChains
Alwaysattachchainsbetweenthe vehicleandthetrailer.Crossthe safetychainsunderthetongueof thetrailertohelppreventthetongue fromcontactingtheroadifit becomesseparatedfromthehitch. Instructionsaboutsafetychains maybeprovidedbythehitch manufacturerorbythetrailer manufacturer.Ifthetrailerbeing towedweighsupto2271kg (5,000lbs)withafactory-installed stepbumper,safetychainsmaybe attachedtotheattachingpointson thebumper;otherwise,safety chainsshouldbeattachedtoholes onthetrailerhitchplatform.Always leavejustenoughslacksothe combinationcanturn.Neverallow safetychainstodragontheground.
TrailerBrakes
Aloaded trailer that weighs more than 900 kg (2,000 lbs) need to have its own brakes system that is adequate forth the weight of the trailer. Besuretoread and follow the instructions forth the trailer brakes so they are installed, adjusted, and maintained properly.
Donottapintothevehicle's hydraulicbrakesystem.
AuxiliaryBattery
Theauxiliarybatteryprovisioncan beusedtosupplyelectricalpower toadditionalequipmentthatmaybe added,suchasaslide-incamper. Ifthevehiclehasthisprovision,this relaywillbelocatedonthedriver sideofthevehicle,nexttothe underhoodelectricalcenter.
Besuretofollowtheproper installationinstructionsincludedwith anyelectricalequipmentthatis installed.
Notice:Leavingelectrical equipmentonforextended periodswilldrainthebattery. Alwaysturnoffelectrical equipmentwhennotinuseand donotuseequipmentthat exceedsthemaximumamperage ratingof40amperesforthe auxiliarybatteryprovision.
TrailerWiringHarness
The vehicle is equipped with one of the following wiring harnesses for towing a trailer or hauling as slide-in camper.
BasicTrailerWiring
Allregular, extended cabandcrew cabpickupshaveaseven-wire trailertowingharness.
Forvehiclesnotequipped with heavydutytrailering, the harness is secured to the vehicle's frame behind the spare tire mount. The harness requires the installation of a trailer connector, which is available through your dealer.
Iftowingalight-duty trailer with a standard four-way round pin connector, an adapter is available from your dealer.
Heavy-DutyTrailerWiringHarness Package
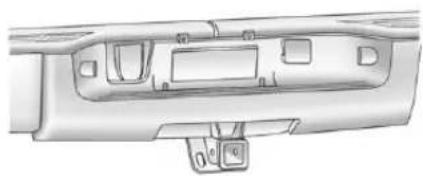
natural_image
Technical line drawing of a vehicle rear panel showing internal compartments and mounting points (no text or symbols)Forvehiclesequippedwithheavy dutytrailering,theharness connectorismountedinthebumper. Theseven-wireharnesscontains thefollowingtrailercircuits:
• Yellow:LeftStop/TurnSignal
- DarkGreen:RightStop/Turn Signal
- Brown: Taillamps
- White:Ground
• LightGreen:Back-upLamps - Red:BatteryFeed*
• DarkBlue:TrailerBrake*
*Thefusesforthesetwocircuitsare installedintheunderhoodelectrical center,butthewiresarenot connected. Theyshouldbe connectedbyyourdealerora qualifiedservicecenter. Thefuse andwirefortheITBCisfactory installedandconnectedifthe vehicleisequippedwithanITBC. Thefuseforthebatteryfeedisnot requiredifthevehiclehasan auxiliarybattery.Ifthevehicledoes nothaveanauxiliarybattery,have yourdealerorauthorizedservice centerinstalltherequiredfuse.

9-110DrivingandOperating
Ifchargingaremote(non-vehicle) battery, press the Tow/Haul Mode button, if equipped, located at the end of the shift lever. This will boost the vehiclesystem voltage and properly charge the battery. If the traileristoolight for Tow/Haul Mode, or the vehicle is not equipped with Tow/Haul, turn on the headlamps as a second way to boost the vehicles system and charge the battery.
Camper/Fifth-WheelTrailerWiring Package
Theseven-wirecamperharnessis locatedunderthefrontedgeofthe pickupboxonthedriversideofthe vehicle,attachedtotheframe bracket.Aconnectormustbeadded tothewiringharnesswhich connectstothecamper.
The harness contains the following camper/trailercircuits:
• Yellow:LeftStop/TurnSignal
• DarkGreen:RightStop/Turn Signal
- Brown:Taillamps
- White:Ground
• LightGreen:Back-upLamps
- Red:BatteryFeed
• DarkBlue:TrailerBrake
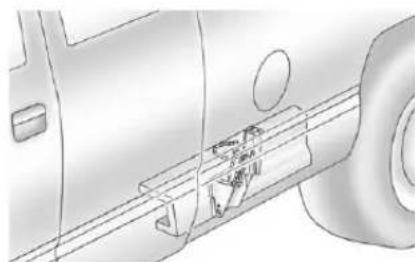
natural_image
Technical line drawing of a vehicle showing internal components and structural lines (no text or symbols)Ifthevehicleisequippedwiththe "Heavy-DutyTrailering"option, pleasereferto"Heavy-DutyTrailer WiringPackage"earlierinthis section.
Whenthecamper-wiringharnessis orderedwithouttheheavy-duty traileringpackage,aseven-wire harnesswithaseven-pinconnector islocatedattherearofthevehicle andistiedtothevehicle'sframe.
ElectricBrakeControlWiring Provisions
These wiring provisions are included with the vehicle as part of the trailer wiring package. These provisions are for an electric brake controller. The instrument panel contains blunt cut wires behind the steering column forth a trailer brake controller. The harness contains the following wires:
• DarkBlue:BrakeSignalto TrailerConnector
• Red/Black:Battery
• LightBlue/White:BrakeSwitch
- White:Ground
The harness should be installed by your dealer or a qualified service center.
Ifthevehicleisequippedwithan IntegratedTrailerBrakeControl (ITBC)System,thebluntcutsexist, butarenotconnectedfurtherinthe harness.Ifanaftermarkettrailer brakecontrollerisinstalled,the
ITBCmustbedisconnected.Donot powerbothITBCandaftermarket controllerstocontrolthetrailer brakesatthesametime.
Tow/HaulMode
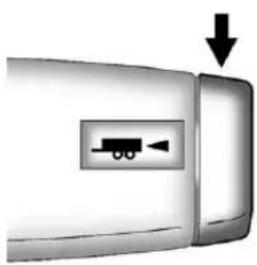
natural_image
Close-up of a vehicle door handle with a small truck icon and directional arrow (no text or symbols)Pressingthisbuttonattheendof theshiftleverturnsonandoffthe Tow/HaulMode.

This indicator light on the instrument panel cluster comes on when the Tow/Haul Mode is on.
Tow/Haulisafeaturethatassists whenpullingaheavytrailerora largeorheavyload.See Tow/Haul Modeonpage9-44formore information.
Tow/Haulisdesignedtobemost effectivewhenthevehicleand trailercombinedweightisatleast 75percentofthevehicle'sGross CombinedWeightRating(GCWR). See"WeightoftheTrailer"under TrailerTowingonpage9-90. Tow/Haulismostusefulunderthe followingdrivingconditions:
- Whenpullingaheavytrailerorla largeorheavyloadthrough rollingterrain.
- Whenpullingaheavytraileroralargeorheavyloadinstop-and-gotraffic.
- Whenpullingaheavytrailerora largeorheavyloadinbusy parkinglotswhereimprovedlow speedcontrolofthevehicleis desired.
OperatingthevehicleinTow/Haul whenlightlyloadedorwithnotrailer atallwillnotcausedamage. However, thereisnobenefitto the selectionofTow/Haulwhenthe vehicleisunloaded. Sucha selectionwhenunloadedmay resultinunpleasantengine and transmissiondrivingcharacteristics andreducedfueleconomy. Tow/Haulisrecommendedonly whenpullingaheavytrailerora largeorheavyload.
IntegratedTrailerBrake ControlSystem

The vehicle may have an Integrated Trailer Brake Control (ITBC) system for electric trailer brakes.
This symbol is located on the Trailer Brake Control Panel vehicles with an Integrated Trailer Brake Control system. The power output to the trailer brakes is based on the amount of brake pressure being applied by the vehicle's brake system. This available power output to the trailer brakes can be adjusted to a wider range of trailering situations.
TheITBCsystemisintegratedwith thevehicle'sbrake,antilockbrake, andStabiliTrak(ifequipped) systems.Intraileringconditionsthat causethevehicle'santilockbrakeor StabiliTraksystemstoactivate, powersenttothetrailer'sbrakeswill beautomaticallyadjusted to minimizetrailerwheellock-up.This doesnotimplythatthetrailerhas StabiliTrak.
Non-hybridvehicleswithStabiliTrak haveaTrailerSwayControl(TSC) feature.See TrailerSwayControl (TSC)onpage9-118.
Non-hybridvehicleswithStabiliTrak haveaHillStartAssist(HSA) feature.SeeHillStartAssist(HSA) onpage9-65.
Ifthevehicle'sbrake,antilockbrake, orStabiliTraksystemsarenot functioningproperly,theITBC systemmaynotbefullyfunctional ormaynotfunctionatall.Makesure allofthesesystemsarefully operationaltoensurefull functionalityoftheITBCsystem.
TheITBCsystemispowered throughthevehicle'selectrical system.Turningtheignitionoffwill alsoturnofftheITBCsystem.The ITBCsystemisfullyfunctionalonly whentheignitionisinONor inRUN.
TheITBCsystemcanonlybeused withtrailerswithelectricbrakes.
WARNING
Connectingatrailerthatisnot compatiblewiththeITBCsystem mayresultinreducedorcomplete lossoftrailerbraking.Theremay beanincreaseinstopping distanceotrailerinstabilitywhich couldresultinpersonalinjuryor damagetothevehicle,trailer, orotherproperty.Anaftermarket controllermaybeavailablefor usewithtrailerswithsurge,air, orelectric-over-hydraulictrailer brakesystems.Todeterminethe typeofbrakesonthetrailerand theavailabilityofcontrollers, checkwithyourtrailer manufacturerordealer.
Whentrailering, makesureofthe following:
- TheITBCsystemisusedonly withtrailersthatareequipped withelectricbrakes.
- Allapplicablelocalandfederal lawsandregulationsare followed.
- Allelectrical and mechanical connection to the trailer are madecorrectly.
- Thetrailer's brakes are in proper working condition.
- Thetrailerandvehicleare properlyloadedforthetowing condition.
TheITBCsystemisa factory-installeditem. Out-of-factory installationofthissystemshouldnot beattempted.GMisnotresponsible forwarrantyorperformanceofthe systemresultingfromout-of-factory installation.
TrailerBrakeControlPanel
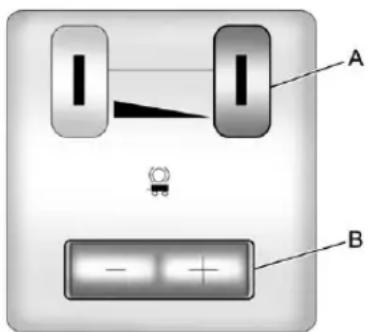
text_image
A BA.ManualTrailerBrakeApply Lever
B. TrailerGainAdjustmentButtons
TheITBCsystemhasacontrol panellocatedontheinstrument paneltotheleftofthesteering column.SeeInstrumentPanel (PremiumVersion)onpage 1-6or InstrumentPanel(Base/Uplevel Version)onpage 1-2formore information.Thecontrolpanel allowsadjustmenttotheamountof output,referredtoastrailerergain,
availabletotheelectrictrailer brakesandallowsmanual applicationofthetrailerbrakes. The TrailerBrakeControlPanelisused alongwiththeTrailerBrakeDisplay PageontheDICtoadjustand displaypoweroutputtothetrailer brakes.
TrailerBrakeDICDisplayPage
TheITBCsystemdisplays messagesonthevehicle'sDriver InformationCenter(DIC).See DriverInformationCenter(DIC)on page5-33formoreinformation.
Thedisplaypageindicates Trailer Gainsetting, poweroutputtothe electrictrailerbrakes, trailer connection, and systemoperational status.
The TrailerBrakeDisplayPagecan bedisplayedbyperforminganyof thefollowingactions:
- ScrollingthroughtheDICmenu pagesusingtheodometertrip stem or the DIC Vehicle Information button (if equipped).
- PressingaTrailerGain button—IftheTrailerBrake DisplayPageisnotcurrently displayed,pressingaTrailer Gainbuttonwillfirstrecallthe currentTrailerGainsetting.After theTrailerBrakeDisplayPageis displayed,eachpressand releaseofthegainbuttonswill thencausetheTrailerGain settingtochange.
- ActivatingtheManualTrailer BrakeApplylever.
- Connectingatrailerequipped withelectrictrailerbrakes.
AIIIDICwarningandservice messagesmustfirstbe acknowledgedbythedriverby pressingtheodometertripstemor theDICVehicleInformationbutton (ifequipped)beforetheTrailer BrakeDisplayPagecanbe displayedandTrailerGaincanbe adjusted.
TRAILERGAIN: Thissettingis displayedanytimetheTrailerBrake DisplayPageisactive. Thissetting canbeadjustedfrom0.0to10.0 witheitheratrailerconnectedor disconnected. ToadjusttheTrailer Gain, pressoneoftheTrailerGain adjustmentbuttonslocatedonthe TrailerBrakeControlPanel. Press andholdagainbuttontocausethe TrailerGaintocontinuouslyadjust. Toturntheoutputtothetraileroff, adjusttheTrailerGainsettingto 0.0(zero).
0.0(zero)gainisthefactorydefault setting.Toproperlyadjusttrailer gain,see"TrailerGainAdjustment Procedure"laterinthissection.
TRAILER OUTPUT: This is displayed any time at a trailer with electric brakes connected. Output to the electric brakes is based on the amount of vehicle braking present and relativeto the Trailer Gain setting. Output is displayed from 0 to 10 bars foreach gain setting.
Non-hybridvehicleswithTrailer SwayControl(TSC)orHillStart Assist(HSA),outputtothelectric trailerbrakesmaybedisplayed whenthesystemsareactive.See TrailerSwayControl(TSC)on page9-118andHillStartAssist (HSA)onpage9-65.
TheTrailerOutputwill indicate“----”ontheTrailer BrakeDisplayPagewheneverthe followingoccur:
- Notrailerisconnected
- Atrailerwithoutelectricbrakes isconnected(noDICmessage isdisplayed)
- Atrailerwithelectricbrakeshas becomedisconnected(a CHECKTRAILERWIRING messagewillalsobedisplayed ontheDIC)
- Thereisafaultpresentinthe wiringtotheelectrictrailer brakes(aCHECKTRAILER WIRING message will also be displayed on the DIC)
- ThereisafaultintheITBC system(aSERVICETRAILER BRAKESYSTEMmessage will also be displayed in the DIC)
ManualTrailerBrakeApply
TheManualTrailerBrakeApply LeverislocatedontheTrailerBrake ControlPanelandisusedtoapply thetrailer'selectricbrakes independentofthevehicle'sbrakes. ThisleverisusedintheTrailerGain AdjustmentProceduretoproperly adjustthepoweroutputtothetrailer brakes.Slidingthelevertotheleft willapplyonlythetrailerbrakes. Thepoweroutputtothetraileris indicatedintheTrailerBrake DisplayPageontheDIC.Ifthe vehicle'sservicebrakesareapplied whileusingtheManualTrailerBrake ApplyLever,thetraileroutputpower willbethegreaterofthetwo.
Thetrailer'sandthevehicle'sbrake lampswillcomeonwheneither vehiclebrakingormanualtrailer brakesareapplied.

TrailerGainAdjustmentProcedure
TrailerGainshouldbesetfora specifictraileringconditionandmust beadjustedanytimevehicle loading, trailerloading, orroad surfaceconditionschange.
Settingthe TrailerGainproperlyis neededforthebesttrailerstopping performance.Atrailerthatis over-gainedmayresultinlocked trailerbrakes.Atrailerthatis under-gainedmayresultinnot enoughtrailerbraking.Bothofthese conditionsmayresultinpoorer stoppingandstabilityofthevehicle andtrailer.
Usethefollowingprocedure to correctlyadjustTrailerGainforeach towingcondition:
- Makesurethetrailerbrakesare improperworkingcondition.
-
Connectaproperlyloaded trailer tothevehicleandmakeall necessarymechanicaland electricalconnections.See VehicleLoadLimitson page9-17formoreinformation.
-
After the electrical connection is madetoatrailerequipped with electric brakes:
• ATRAILERCONNECTED messagewillbebriefly displayedontheDIC.
• TheTrailerBrakeDisplay Pagewillappearonthe DICshowingTRAILER GAINandTRAILER OUTPUT.
- IntheTrailerOutputdisplay ontheDIC, "----" will disappearifthereisno errorpresent. Connectinga trailerwithoutelectric brakeswillnotclearthesix dashedlines.
- Adjust the Trailer Gain by using the gain adjustment (+/-) button on the Trailer Brake Control Panel.
- Drivethevehiclewiththetrailer attachedonalevelroadsurface representativeofthetowing conditionandfreeoftrafficat about32to40km/h(20to 25mph)andfullyapplythe ManualTrailerBrakeApply Lever.
Adjustingtrailergainatspeeds lowerthan32to40km/h(20to 25mph)mayresultinan incorrectgainsetting.
- Adjust the Trailer Gainto just below the point of trailer wheel lock-up, indicated by trailer wheels equal to tire smoke when a trailer wheel locks.
Trailerwheellock-upmaynot occuriftowingaheavilyloaded trailer. In this case, adjust the TrailerGaintothehighest allowablesettingforthetowing condition.
- Re-adjust Trailer Gain any time vehicle loading, trailer loading or roads surface conditions change or if trailer wheellock-up is noticed at any time while towing.
OtherITBC-RelatedDICMessages
InadditiontodisplayingTRAILER GAINandTRAILEROUTPUT throughtheDIC, trailerconnection andITBCsystemstatusare displayedontheDIC.
TRAILERCONNECTED: This message will be briefly displayed when at a trailer with the electric brakes is first connected to the vehicle. This message will automatically turn off in about 10 seconds. The driver can also acknowledge this message before it automatically turn off.
CHECKTRAILERWIRING: This message will be displayed if:
- The TBC system first determines connection to a trailer with the electric brakes and thenthe trailer harness becomes disconnected from the vehicle.
Ifthedisconnectoccurswhile thevehicleisstationary,this messagewillautomaticallyturn offinabout30seconds.This messagewillalsoturnoffifthe driveracknowledgesthis messageorifthetrailerharness isre-connected.
Ifthedisconnectoccurswhile thevehicleismoving,this messagewillcontinueuntilthe ignitionisturnedoff.This messagewillalsoturnoffifthe driveracknowledgesthis messageorifthetrailerharness isre-connected.
- Thereisanelectricalfaultinthe wiringtotheelectrictrailer brakes. Thismessagewill continueaslongasthereisan electricalfaultinthetrailer wiring. Thismessagewill alsoturnoffifthedriver acknowledgedthismessage.
Todetermineiftheelectricalfaultis onthevehiclesideortrailersideof thetrailerwiringharness connection,dothefollowing:
-
Disconnect the trailer wiring harness from the vehicle.
-
Turntheignitionoff.
-
Wait10 seconds, thenturn the ignitionback to RUN.
9-118DrivingandOperating
- If the CHECKTRAILERWIRING messagere-appears, the electrical fault is on the vehicle side.
If the CHECKTRAILERWIRING message only re-appears when connecting the trailer wiring harness to the vehicle, the electrical fault is on the trailers side.
SERVICETRAILERBRAKE SYSTEM: This message will be displayed when there is a problem with the IBC system. If this message persists over multiple ignition cycles, there is a problem with the IBC system. Takethe vehicle to an authorized GM dealer to have the IBC system diagnosed and repaired.
IfeithertheCHECKTRAILER WIRINGorSERVICETRAILER BRAKESYSTEMmessageis displayedwhiledrivingthevehicle, powerisnolongeravailabletothe trailerbrakes.Whentraffic conditionsallow,carefullypullthe vehicleovertothesideoftheroad andturntheignitionoff.Checkthe wiringconnectiontothetrailerand turntheignitionbackon.Ifeitherof thesemessagescontinues,either thevehicleortrailerneedsservice.
AnauthorizedGMdealermaybe abletodiagnoseandrepair problemswiththetrailer.However, anydiagnosisandrepairofthe trailerisnotcoveredunderthe vehiclewarranty.Pleasecontact yourtrailerdealerforassistance withtrailerrepairsandtrailer warrantyinformation.
TrailerSway Control(TSC)
Non-hybridvehicleswithStabiliTrak haveaTrailerSwayControl(TSC) feature. If the vehicle is istowing a trailer and the system detect that the trailer is swaying, the vehicle brakes are applied without the driver pressing the brake pedal. If the vehicle is equipped with the Integrated Trailer Brake Control (ITBC) system, Stabili Trak may also apply the trailer brakes. The TCS/ Stabili Trak warning light will flash on the instrument panel clusterton to notify the drivertoreducespeed. If the trailer continues on way, Stabili Trak will reduce engine torquet help slow the vehicle. See Stabili Trak ^ System page 9-65 form more information.
Adding non-dealer accessories can affect the vehicle performance. See Accessories and Modifications on page 10-4 form more information.
Conversionsand Add-Ons
Add-On Electrical Equipment
Notice: Donotaddanything electrical to the vehicle unless you check with your dealer first. Some electric alequipment can damage the vehicle and the damage would not be recovered by the vehicle's warranty. Some add-onelectric alequipment can keep other components from working asthey should.
Add-onequipmentcandrainthe vehicle's 12-voltbattery, even if the vehicle is not operating.
The vehicle has an air bags system. Before attempting to add anything electrical to the vehicle, see Servicing the Airbag-Equipped Vehicle on page 3-42 and Adding Equipment to the Airbag-Equipped Vehicle on page 3-43.
AddingaSnowPlowor SimilarEquipment
Beforeinstallingasnowplowonthe vehicle,herearesomethingsyou needtoknow:
Notice: If the vehicle does not havethesnowplowprep package, adding aplowcan damagethe vehicle, and the repairs would not be covered by warranty. Unless the vehicle was built to carry as now plow, donot add oneto the vehicle. If the vehicle has the snow plow prep package, called RPOVYU, then the payload the vehicle can carry will be reduced when as now plow is installed. The vehicle can be damaged if either the frontor rear axleratings or the Gross Vehicle Weight (GVW) are exceeded.
Some vehicles are built with a special snow plow prepackage, called RPOVYU. If the vehicle has this option, you can add ap low to it, provided certain weights, such as the weight on the vehicle's axles and the Gross Vehicle Weight (GVW), are not exceeded.
Theplowthevehiclecancarry dependsonmanythings,suchas:
- Theoptionsthevehiclecame with,andtheweightofthose options.
- Theweightandnumberof passengersintendedtobe carried.
- Theweightofitemsaddedtothe vehicle,likeatoolboxor truckcap.
- Thetotalweightofany additionalcargointendedtobe carried.
9-120DrivingandOperating
Say,forexample,youhavea318kg (700lb)snowplow. Thetotalweight ofallooccupantsandcargoinside thecabshouldnotexceed135kg (300lb). Thismeansthatyoumay onlybeabletocarryonepassenger. But,eventhismaybetoomuchif thereisotherequipmentalready addingtotheweightofthevehicle.
Herearesomeguidelinesforsafely carryingasnowplowonthevehicle:
- Makesuretheweightonthe frontandrearaxlesdoesnot exceedtheaxleratingforeach.
-
Forthefrontaxle, if more cargo or passengers must be carried, appropriate counterballast must be installed rear of therearaxle. Counterballast must be properly secured so it will not move during driving.
-
Followthesnowplow manufacturer's recommendationsregarding rearballast.Rearballast mayberequiredtoensurea properfrontandrearweight distributionratio,eventhough theactualweightatthefront axlemaybelessthanthefront axlerating.
- Thesnowplowmanufactureror installercanassistyouin determiningtheamountofrear ballastrequired,tohelpmake surethesnowplow/vehicle combinationdoesnotexceed theGVWrating,thefrontand rearaxleratings,andthefront andrearweightdistributionratio.
- Thetotalvehiclemustnot exceedtheGVWrating.
Frontaxlereservecapacityisthe differencebetweentheGrossAxle WeightRating(GAWR)andthefront axleweightofthevehiclewithfull fuelandpassengers.Basically,itis theamountofweightthatcanbe addedtothefrontaxlebefore reachingthefrontGAWR.
Thefrontaxlereservecapacityfor thevehiclecanbefoundinthe lowerrightcornerofthe Certification/Tirelabel,as shown.
: TRUCK
COLD TIRE PRESSURE
XXXKPA(XXPSI)
XXXKPA(XXPSI)
E INFORMATION
F XXX LB
TXXXXLB
UnitedStates

COLD TIRE PRESSURE
PRESSION A FROID
XXXXXXXXX(XXPSI)
XXXXXXXXX(XXPSI)

(Wx(A+W.B.))/W.B.=Weightthe accessoryisaddingtothe frontaxle.
Where:
W=Weightofaddedaccessory
A=Distancethattheaccessory
isinfrontofthefrontaxle
W.B.=VehicleWheelbase
Forexample, addinga318kg (700lb) snowplowactuallyadds morethan318kg(700lb) to the frontaxle. Using the formula, if the snowplowis 122cm(4ft) in front of the frontaxle and the wheel base is 305cm(10ft), then:
W=318kg(700lb)
A=122cm(4ft)
W.B.=305cm(10ft)
(W × (A + W.B.)) / W.B. =
(318x(122+305))/305=445kg
(980lbs)
So, if the frontaxlereserve capacity is more than 445 kg (980 lbs), the snowplow could be added without exceeding the front GAWR.

Information Provided by
DEALER
前一开月日二收每面
Heavierequipmentcanbeaddedon thefrontofthevehicleifitis compensatedforbycarryingfewer passengers,lesscargo,orby positioningcargotowardtherear. Thishastheeffectofreducingthe loadonthefront.However,thefront GAWR,rearGAWR,andtheGross VehicleWeightRating(GVWR)must neverbeexceeded.

WARNING
Onsomevehiclesthathave certainfrontmountedequipment, suchasasnowplow, itmaybe possibletoloadthefrontaxleto thefrontgrossaxleweightrating (GAWR) but nothaveenough weightontherearaxleto have properbraking performance. If the brakes cannotworkproperly, you could have acrash. To help the brakesworkproperly when a snowplowisinstalled, always follow the snowplow
(Continued)
WARNING(Continued)
manufacturerorinstaller's recommendationforrearballast toensureaproperfrontandrear weightdistributionratio,even thoughtheactualfrontweight maybelessthanthefront GAWR,andthetotalvehicle weightislessthanthegross vehicleweightrating(GVWR). Maintainingaproperfrontand rearweightdistributionratiois necessarytoprovideproper brakingperformance.
Totalvehiclereservecapacityisthe differencebetweentheGVWRand theweightofthetruckwithfullfuel andpassengers.Itistheamountof weightthatcanbeaddedtothe vehiclebeforereachingtheGVWR. Keepinmindthatreservecapacity numbersareintendedasaguide whenselectingtheamountof equipmentorcargothetruckcan carry.Ifunsureofthevehicle'sfront, rear,ortotalweight,gotoaweigh stationandweighthevehicle.Your dealercanalsohelpwiththis.
Thetotalvehiclereservecapacity forthevehiclecanbefoundinthe lowerrightcornerofthe Certification/Tirelabelasshown previously.
Seeyourdealerforadditional adviceandinformationaboutusing asnowplowonthevehicle.Also, seeVehicleLoadLimitson page9-17.
EmergencyRoofLamp Provisions
VehicleswiththeRPOVYUsnow plowpreppackagealsohavean emergencyrooflamprovision package,RPOTRW.Wiringforthe emergencyrooflampisprovided abovetheoverheadconsole.See AuxiliaryRoof-MountedLampon page6-7forswitchlocation.
PickupConversionto ChassisCab
Weareawarethatsomevehicle ownersmightconsiderhavingthe pickupboxremovedanda commercialorrecreationalbody installed.Ownersshouldbeaware that,asmanufactured,thereare differencesbetweenachassiscab andapickupwiththeboxremoved whichcouldaffectvehiclesafety. Thecomponentsnecessarytoadapt apickuptopermititssafeusewith aspecializedbodyshouldbe installedbythebodybuilder.
9-124DrivingandOperating
NOTES

DEALER
法定代表人:王志忠
VehicleCare
GeneralInformation
GeneralInformation......10-3
CaliforniaProposition 65Warning......10-3
CaliforniaPerchlorate MaterialsRequirements....10-3
Accessories and Modifications....10-4
VehicleChecks
DoingYourOwn ServiceWork......10-4
Hood....10-5
EngineCompartment Overview....10-6 EngineOil....10-7
EngineOilLifeSystem.....10-10
AutomaticTransmissionFluid (4-SpeedTransmission)...10-11
AutomaticTransmission Fluid(6-Speed Transmission)....10-14
ManualTransmission Fluid....10-18
HydraulicClutch......10-18
EngineAirCleaner/Filter....10-18
CoolingSystem......10-20
EngineCoolant......10-21
EngineOverheating.....10-24
OverheatedEngine
Protection
OperatingMode......10-27
EngineFan......10-27
PowerSteeringFluid.....10-28
WasherFluid......10-29
Brakes....10-30
BrakeFluid....10-31
Battery....10-33
Four-WheelDrive......10-33
FrontAxle.....10-35
RearAxle....10-36
NoiseControlSystem.....10-37
StarterSwitchCheck......10-38
AutomaticTransmissionShift
LockControlFunction
Check......10-39
IgnitionTransmissionLock
Check....10-39
ParkBrakeandP(Park)
MechanismCheck......10-40
WiperBlade
Replacement.....10-40
GlassReplacement......10-41

Information Provided by: DEALER
HeadlampAiming
HeadlampAiming......10-41
BulbReplacement
BulbReplacement......10-43
HalogenBulbs......10-44
Headlamps, FrontTurn Signal, Sidemarker, and ParkingLamps.....10-44
Pick-UpBoxIdentification andFenderMarker Lamps....10-45
Taillamps(ChassisCab Models)....10-45
Taillamps, TurnSignal, Stoplamps, and Back-Up Lamps.....10-46
CenterHigh-Mounted Stoplamp(CHMSL)and CargoLamp......10-46
LicensePlateLamp......10-47
ReplacementBulbs.....10-48
ElectricalSystem
ElectricalSystem
Overload......10-48
FusesandCircuit
Breakers......10-49
EngineCompartmentFuse
Block....10-49
InstrumentPanelFuse
Block....10-54
WheelsandTires
Tires....10-57
TireSidewallLabeling.....10-58
TireDesignations......10-61
TireTerminologyand
Definitions......10-62
TirePressure......10-65
TirePressureforHigh-Speed
Operation......10-66
TirePressureMonitor
System......10-67
TirePressureMonitor
Operation......10-68
TireInspection......10-71
TireRotation....10-72
DualTireRotation......10-74
WhenItIsTimeforNew
Tires....10-75
BuyingNewTires......10-75
DifferentSizeTiresand
Wheels......10-77
UniformTireQuality
Grading....10-78
WheelAlignmentandTire
Balance....10-79
WheelReplacement......10-80
TireChains....10-81
IfaTireGoesFlat......10-82
TireChanging......10-84
Full-SizeSpareTire.....10-95
JumpStarting
JumpStarting......10-96
Towing
TowingtheVehicle......10-101
Recreational Vehicle
Towing....10-101
AppearanceCare
ExteriorCare......10-106
InteriorCare......10-109
FloorMats....10-112

Information Provided by
DEALER
兹,严凡□□□□如
GeneralInformation
Forserviceandpartsneeds,visit yourdealer.Youwillreceive genuineGMpartsandGM-trained andsupportedservicepeople.
GenuineGMpartshaveoneof thesemarks:

Genuine GM | Parts

Accessories
CaliforniaProposition 65Warning
Mostmotorvehicles, including this one, contain and oremit chemicals known to the State of California to cause cancer and birth defect or other reproductive harm. Engine exhaust, many parts and systems, many fluids, and some component wear by products contain and/or emitthes Chemicals.
CaliforniaPerchlorate MaterialsRequirements
Certaintypesofautomotive applications,suchasairbag initiators,safetybeltpretensioners, andlithiumbatteriescontainedin RemoteKeylessEntrytransmitters, maycontainperchloratematerials. Specialhandlingmaybenecessary. Foradditionalinformation,see www.dtsc.ca.gov/hazardouswaste/perchlorate.

Information Provided by: DEALER
Accessories and Modifications
Adding non-dealer accessories or making modification to the vehicle can affect vehicle performance and safety, including such things as airbags, braking, stability, ride and handling, emission systems, aerodynamics, durability, and electronics systems like antilock brakes, traction control, and stability control. These accessories or modifications could deven cause malfunctionordamagenotcovered by the vehicle warranty.
Damageetovehiclecomponents resultingfrommodificationsorthe installationoruseofnon-GM certifiedparts,includingcontrol moduleorsoftwaremodifications,is notcoveredunderthetermsofthe vehiclewarrantyandmayaffect remainingwarrantycoveragefor affectedparts.
GMAccessoriesaredesignedto complementandfunctionwithother systemsonthevehicle.Seeyour dealertoaccessorizethevehicle usinggenuineGMAccessories installedbyadealertechnician.
Also, see Adding Equipment to the Airbag-Equipped Vehicle on page 3-43.
VehicleChecks
DoingYourOwn ServiceWork
If the vehicle is a hybrid, se the hybrids supplement form more information.

WARNING
It can be dangerous to work on your vehicle if you don't have the proper knowledge, service manual, tools, or parts. Always follow owner manual procedures and consult the servicemanual for your vehicle before doing any servicework.
If doingsome of your own service work, us the properservice manual. It tells you much more about how to servicethe vehicle than this manual can. To order the properservicemanual, see Service Publications Ordering Information on page 13-19.
Thisvehiclehasanairbagsystem. Beforeattemptingtodayyourown servicework,seeAirbagSystem Checkonpage3-44.
Keeparecordwithallpartsreceipts andlistthemileageandthedateof anyserviceworkperformed.See MaintenanceRecordson page11-17.
Hood
Toopenthehood:
- Pull the handle with this symbol on it. It is located inside the vehicle to the lower left of the steering wheel.

natural_image
Interior view of a vehicle showing the dashboard and engine compartment with an arrow indicating direction (no text or symbols present)-
Thengotothefrontofthe vehicleandlocatethesecondary hoodrelease,nearthecenterof thegrille.
-
Push these secondaryhood releasetotheright.
-
Liftthehood. Beforeclosingthehood, besure allthefillercapsareonproperly. Thenbringthehoodfromfull opentowithin152mm(6in) fromtheclosedposition, pause, thenpushthefrontcenterofthe hoodwithaswift, firmmotionto fullyclosethehood.

EngineCompartmentOverview

text_image
A B C D E F G H I J K L M5.3LV8EngineShown(4.3LV6Engine,4.8LV8Engine,6.0LV8Engine,and6.2LV8EngineSimilar)

Information Provided by: DEALER
A. EngineAirCleaner/Filteron page 10-18.
B. Coolant Surge Tank and Pressure Cap. See Cooling System on page 10-20.
C. Positive(+)Terminal.See Jump Startingonpage 10-96.
D. Batteryonpage 10-33.
E.RemoteNegative(−)Terminal (OutofView).See Jump Startingonpage 10-96.
F. Automatic Transmission
Dipstick(OutofView). See "CheckingtheFluidLevel" underAutomaticTransmission Fluid(4-SpeedTransmission) onpage10-11orAutomatic TransmissionFluid(6-Speed Transmission) onpage10-14.
G. EngineOilFillCap. See "When toAddEngineOil" under EngineOilonpage 10-7.
H. EngineOilDipstick(Outof View). See "CheckingEngine Oil" under EngineOilon page 10-7.
I. EngineCoolingFan(Outof View). See CoolingSystem on page 10-20.
J. Power Steering Fluid Reservoir. See Power Steering Fluid on page 10-28.
K.BrakeMasterCylinder Reservoir.SeeBrakeFluidon page10-31.
L.EngineCompartmentFuse Blockonpage10-49.
M. Windshield Washer Fluid Reservoir. See "Adding Washer Fluid" under Washer Fluid on page 10-29.
If the vehicle has a diesel engine and/or an Allison Transmission, see the Duramax Diesel Supplement.
EngineOil
Fordieselenginevehicles, see "EngineOil" in the Duramax Diesel Supplement.
Toensureproperengine performanceandlonglife,careful attentionmustbepaidtoengineoil. Followingthesesimple,but importantstepswillhelpprotect yourinvestment:
- Alwaysuseengineoilapproved totheproperspecificationandof theproperviscositygrade.See "SelectingtheRightEngineOil" inthissection.
- Checktheengineoillevel regularlyandmaintainthe properoillevel.See"Checking EngineOil"and"WhentoAdd EngineOil"inthissection.
- Changetheengineoilatthe appropriatetime.SeeEngineOil LifeSystemonpage10-10.
- Always dispose of engine oil properly. See "What to Dow with Used Oil" in this section.
CheckingEngineOil
Itisagoodideatochecktheengine oillevelateachfuelfill. Inorderto getanaccuratereading, the vehicle must be on level ground. The engine oildipstick handle is yellow loop. See Engine Compartment Overview page 10-6 for the location of the engine oildipstick.
Obtaininganaccurateoillevel readingisessential:
- If the engine has been running recently, turn off the engine and allow several minutes for the oil to drain back into the oil pan. Checking the oil level too soon after engines hutoff will not provide an accurate oil level reading.
- Pulloutthedipstickandcleanit withapapertowelorcloth, then pushitbackinalltheway. Removeitagain, keepingthetip down, and checkthelevel.
WhentoAddEngineOil
◇◇◇◇◇◇◇◇
If the oil is below the cross-hatched area at the tip of the dipstick, add 1L(1qt) of there recommended oil and then recheck the level. See "Selecting the Right Engine Oil" in this section for an explanation of what kind of oil to use Forengine oil crank case capacity, see Capacities and Specifications on page 12-2.

Information Provided by: DEALER
Notice: Donotaddtoomuchoil. Oil levels above or below the acceptable operating range shown on the dipstick are harmful to the engine. If you find that you have an oil level above the operating range, i.e., the engine has some oil that the oil level gets above the cross-hatched area that shows the proper operating range, the engine could be damaged. You should drain out the excess oil limit driving of the vehicle and seek as service professional to remove the excess amount of oil.
SeeEngineCompartmentOverview onpage 10-6forthelocationofthe engineoilfillcap.
Addenoughoiltoputthelevel somewhereintheproperoperating range.Pushthedipstickalltheway backinwhenthrough.
SelectingtheRightEngineOil
Selectingtherightengineoil dependsonboththeperoil specificationandviscositygrade. SeeRecommendedFluidsand Lubricantsonpage11-13.
Specification
Use and ask for licensed engine oils with the dexos 1^TM approved certification mark. Engine oils meeting therequirements for the vehicles should have the dexos ^TM 1 approved certification mark. This certification mark indicates that the oil has been approved to the dexos 1 specification.

text_image
dexos™Notice: Failuretousethe recommendedengineoilor equivalentcanresultinengine damagenotcoveredbythe vehiclewarranty.Checkwithyour dealerorserviceprovideron whethertheoilisapprovedtothe dexos1specification.
ViscosityGrade
SAE5W-30 isthebestviscosity grade for the vehicle. Donot use otherviscosity grade oil such as SAE10W-30, 10W-40, or 20W-50.
Ifinanareaofextremecold, where the temperaturefallsbelow-20°F (-29°C), anSAE0W-30oilshould beused. Anoilofthisviscosity gradewillprovideeasiercold startingfortheengineatextremely lowtemperatures. Whenselecting anoiloftheappropriateviscosity grade, alwaysselectanoilthat meetsthedexos1specificationor equivalent. See "Specification" for moreinformation.
EngineOilAdditives/Engine OilFlushes
Donotaddanythingtotheoil. The recommended oil with the dexos specification and displaying the dexos certification mark are all that is needed for good performance and engine protection.
Engineoilsystemflushesarenot recommendedandcouldcause enginedamagenotcoveredbythe vehiclewarranty.

WhattoDowithUsedOil
Usedengineoilcontainscertain elementsthatcanbeunhealthyfor yourskinandcouldevencause cancer.Donotletusedoilstayon yourskinforverylong.Cleanyour skinandnailswithsoapandwater, oragoodhandcleaner.Washor properlydisposeofclothingorrags containingusedengineoil.Seethe manufacturer'swarningsaboutthe useanddisposalofoilproducts.
Usedoilcanbeathreattothe environment.Ifyouchangeyour ownoil,besuretodrainalltheoil fromthefilterbeforedisposal.Never disposeofoilbyputtingitinthe trashorpouringitontheground, intosewers,orintostreamsor bodiesofwater.Recycleitbytaking ittoaplacethatcollectsusedoil.
EngineOilLifeSystem
WhentoChangeEngineOil
This vehicle has a computer system that indicates when to change the engine oil and filter. This is based on a combination of factors which include engine revolutions, engine temperature, and miles driven. Based on driving conditions, the mileage at which an oil change is indicated can vary considerably. For the oil if system to work properly, the system must be set every time the oil is changed.
Onsomevehicles,whenthesystem hascalculatedthatollifehasbeen diminished,aCHANGEENGINE OILSOONmessagecomesonto indicate thatanoilchangeis necessary.SeeEngineOil Messagesonpage5-46.Change theoilassoonaspossiblewithin thenext1000km(600mi).Itis possible that,ifdrivingunderthe
bestconditions,theoillifesystem mightindicatethatanoilchangeis notnecessaryforuptoayear.The engineoilandfiltermustbe changedatleastonceayearand, atthistime,thesystemmustbe reset.Forvehicleswithoutthe CHANGEENGINEOILSOON message,anoilchange isneededwhentheOILLIFE REMAININGpercentageisnear 0%.Yourdealerhastrainedservice peoplewhowillperformthiswork andresetthesystem.Itisalso importanttochecktheoilregularly overthecourseofanoildrain intervalandkeepitattheproper level.
Ifthesystemiseverreset accidentally,theoilmustbe changedat5000km(3,000mi) sincethelastoilchange. Remembertoresettheoillife systemwhenevertheoilischanged.
HowtoResettheEngineOil LifeSystem
Resetthesystemwheneverthe engineoilischangedsothatthe systemcancalculatethenext engineoilchange.Alwaysresetthe engineoillifeto100%aftereveryoil change.Itwillnotresetitself.To resetthesystemonmostvehicles:
-
Display the OILLIFE REMAINING on the DIC. If the vehicle does not have DIC buttons, the vehicle must be in P (Park) to access this display. See Driver Information Center (DIC) on page 5-33.
-
PressandholdtheSET/RESET buttonontheDIC, orthetrip odometerresetstemifthe vehicledoesnothaveDIC buttons, formorethan fiveseconds. Theoillifewill changeto 100%.
Onallvehicles,theEngineOilLife Systemcanberesetasfollows:
- TurntheignitiontoON/RUNwith theengineoff.
- Fullypress the accelerator pedal slowly three times within five seconds.
- DisplaytheOILLIFE REMAININGontheDIC.Ifthe displayshows 100%, thesystem isreset.SeeDriverInformation Center(DIC)onpage 5-33.
IfthevehiclehasaCHANGE ENGINEOILSOONmessageandit comesbackonwhenthevehicleis startedand/ortheOILLIFE REMAININGisnear0%,theengine oillifesystemhasnotbeenreset. Repeattheprocedure.
AutomaticTransmission Fluid(4-Speed Transmission)
WhentoCheckandChange AutomaticTransmissionFluid
Agoodtimetochecktheautomatic transmissionfluidleveliswhenthe engineoilischanged.
Changethefluidandfilteratthe intervalslistedinMaintenance Scheduleonpage11-3andbesure tousethetransmissionfluidlistedin RecommendedFluidsand Lubricantsonpage11-13.
HowtoCheckAutomatic TransmissionFluid
Because this operation can be a little difficult, it maybe best to have this done at the dealer service department.
Ifnottakentothedealer, besureto followalltheinstructionshereora falsereadingonthedipstickcould result.
Notice: Toomuchortoo littlefluidcandamagethe transmission. Toomuchcan meanthatsomeofthefluidcould comeoutandfallonhotengine partsorexhaustsystemparts, startingafire. Toolittlefluid couldcausethetransmissionto overheat. Besuretogetan accuratereadingifchecking the transmissionfluid.
Waitatleast30minutesbefore checkingthetransmissionfluidlevel ifyouhavebeendriving:
- Whenoutsidetemperaturesare above 32^ C(90^ F) .
• Athighspeedforquiteawhile.
• Inheavytraffic—especially in hotweather.
• Whilepullingatrailer.
Together right reading, the fluid should beat normal operating temperature, which is 82^ C to 93^ C ( 180^ F to 200^ F).
Getthevehiclewarmedupby drivingabout24km(15miles)when outsidetemperaturesareabove 10^ C( 50^ F).Ifitiscolderthan 10^ C ( 50^ F),drivethevehiclein3(Third) untiltheenginetemperaturegauge movesandthenremainssteadyfor 10minutes.
Acoldfluidcheckcanbemade afterthevehiclehasbeensittingfor eighthoursormorewiththeengine off,butthisisusedonlyasa reference.Lettheengine run atidleforfiveminutesifoutside temperaturesare 10°C(50°F)or more.Ifitiscolderthan10°C (50°F),theenginemayhavetoidle longer.Shouldthefluidlevelbelow duringthiscoldcheck,thefluidmust becheckedwhenhotbeforeadding fluid.Checkingthefluidhotwillgive youamoreaccuratereadingofthe fluidlevel.
CheckingtheFluidLevel
Preparethevehicleasfollows:
- Parkthevehicleonalevel place. Keep the engineer running.
- With the parking brake applied, placetheshift leverin P(Park).
- With your foot on the brake pedal, movetheshift lever through each gear range, pausing for about three seconds in each range. Then, position the shiftleverin P (Park).
- Let the engineer unatidle for three minutes or more.
Then, without shutting off the engine, follow these steps:

- Locatethetransmissiondipstick handlewiththisgraphicwhichis locatedattherearoftheengine compartment,onthepassenger sideofthevehicle.
SeeEngineCompartment Overviewonpage10-6formore informationonlocation.
2.Flipthehandleup,thenpullout thedipstickandwipeitwitha cleanragorpapertowel. - Pushitbackinalltheway, wait threesecondsandthenpullit backoutagain.

- Check both sides of the dipstick, and read the lower level. The fluid level must be in the cold area, below the cross-hatched area, for a cold check or in the Hot cross-hatched area for a hot check. Besure to keep the dipstick pointed down to get an accuratereading.
- If the fluid level is in the acceptablerange, push the dipstick back in all the way; then flip the handled downtolock the dipstick in place.

Information Provided by: DEALER
ConsistencyofReadings
Alwayscheckthefluidlevelatleast twiceusingtheproceduredescribed previously.Consistency(repeatable readings)isimportanttomaintaining properfluidlevel.Ifreadingsarestill inconsistent,contactthedealer.
HowtoAddAutomatic TransmissionFluid
RefertoRecommendedFluidsand Lubricantsonpage11-13to determinewhatkindoftransmission fluidtouse.
Usingafunnel,addfluiddownthe transmissiondipsticktubeonlyafter checkingthetransmissionfluid whileitishot.Acoldcheckisused onlyasareference.Ifthefluidlevel islow,addonlyenoughofthe properfluidtobringthelevelupto theHOTareaforahotcheck. Itdoesnottakemuchfluid, generallylessthan0.5Liter(1Pint). Donotoverfill.
Notice: Use of the incorrect automatic transmission fluid may damage the vehicle, and the damages may not be recovered by the vehicle warranty. Always use the automatic transmission fluid listed in Recommended Fluids and Lubricantson page 11-13.
- Afteraddingfluid,recheckthe fluidlevelasdescribedunder "HowtoCheckAutomatic TransmissionFluid,"earlierin thissection.
- Whenthecorrectfluidlevelis obtained, pushthedipstickback inalltheway; then flip the handledowntolockthedipstick inplace.
AutomaticTransmission Fluid(6-Speed Transmission)
WhentoCheckandChange AutomaticTransmissionFluid
Itisusuallynotnecessarytocheck thetransmissionfluidlevel. Theonlyreasonforfluidlossisa transmissionleakoroverheated transmission.Ifasmallleakis suspected,thenusethefollowing checkingprocedurestocheckthe fluidlevel.However,ifthereisa largeleak,thenitmaybenecessary tohavethevehicletowedtoa dealerservicedepartmentandhave itrepairedbeforedrivingthevehicle further.
Notice:Useoftheincorrect automatictransmissionfluidmay damagethevehicle,andthe damagesmaynotbecoveredby thevehiclewarranty.Alwaysuse theautomatictransmissionfluid listedinRecommendedFluids andLubricantsonpage11-13.

Changethefluidandfilteratthe scheduledmaintenanceintervals listedinMaintenanceScheduleon page11-3.Besuretousethe transmissionfluidlistedin RecommendedFluidsand Lubricantsonpage11-13.
HowtoCheckAutomatic TransmissionFluid
Notice: Toomuchortoo littlefluidcandamagethe transmission. Toomuchcan meanthatsomeofthefluidcould comeoutandfallonhotengine partsorexhaustsystemparts, startingafire. Toolittlefluid couldcausethetransmissionto overheat. Besuretogetan accuratereadingifchecking the transmissionfluid.
Beforecheckingthefluidlevel, preparethevehicleasfollows:
-
Start the engine and park the vehicle on levels surface. Keep the engineer running.
-
Apply the parking brake and placetheshift lever in P(Park).
-
With your foot on the brake pedal, movetheshift lever through each gear range, pausing for about three seconds in each range. Then, movetheshift lever back to P (Park).
-
Allow the engineetoidle (500–800rpm) for at least 1 minute. Slowly releasethe brakepedal.
-
Keep the engineer running and press the Trip/Fuel button or trip odometer reset stem until TRANSTEMP (Transmission Temperature) display on the Driver Information Center (DIC).
-
Using the TRANSTEMP reading, determine and perform the appropriate check procedure. If the TRANSTEMP reading is not within there required temperature ranges, allow the vehicle to cool, or operate the vehicle until the appropriate transmission fluid temperature is reached.
ColdCheckProcedure
Use this procedure only as a reference to determine if the transmission has enough fluid to be operated safely until a hot check procedure can be made. The hot check procedure is most accurate to check the fluid level. Perform the hot check procedure at the first opportunity.
Usethiscoldcheckprocedure to checkfluidlevelwhen the transmissiontemperatureis between27°Cand32°C (80°Fand90°F).

- Locatethetransmissiondipstick attherearoftheengine compartment, onthepassenger sideofthevehicle.
SeeEngineCompartment Overviewonpage10-6formore information.
-
Flip the handleup, then pull out the dipstick and wipe it with a clean ragor papertowel.
-
Installthedipstickbypushingit backinalltheway;wait threeseconds,andthenpullit backoutagain.
- Check both sides of the dipstick and read the lower level. Repeat the procedure to verify the reading.

-
If the fluid level is below the COLD check band, add only enough fluid as necessary to bring the level into the COLD band. It does not take much fluid, generally less than 0.5 Liter (1Pint). Donotoverfill.
-
Performahotcheckat thefirstopportunityafterthe transmissionreachesanormal operatingtemperaturebetween 71°C to 93°C (160°F to 200°F).
- If the fluid level is in the acceptablerange, push the dipstick back in all the way, then flip the handled downtolock the dipstick in place.
HotCheckProcedure
Use this procedure to check the transmission fluid level when the transmission fluid temperature is between 71°C and 93°C (160°F and 200°F).

Information Provided by: DEALER
The hotcheck is themost accurate method to check the fluid level. The hotcheck should be performed at the first opportunity in order to verify the cold check. The fluid level rises as fluid temperature increases, so it is important to ensure the transmission temperature is within range.

- Locatethetransmissiondipstick attherearoftheengine compartment, onthepassenger sideofthevehicle.
SeeEngineCompartment Overviewonpage10-6formore information.
-
Flip the handleup, then pull out the dipstick and wipe it with a clean ragor papertowel.
-
Installthedipstickbypushingit backinalltheway;wait threeseconds,andthenpullit backoutagain.
- Check both sides of the dipstick and read the lower level. Repeat the procedure to verify the reading.

- Safeoperatingleveliswithinthe HOTcrosshatchbandonthe dipstick. If the fluid level is not within the HOT band, and the transmission temperature is between 71°C and 93°C (160°F and 200°F), add or drain fluid as necessary to bring the level into
theHOTband.Ifthefluidlevelis low,addonlyenoughfluidto bringthelevelintotheHOT band.Itdoesnottakemuch fluid,generallylessthan0.5L (1pint).Donotoverfill.
- If the fluid level is in the acceptablerange, push the dipstick back in all the way, then flip the handled downtolock the dipstick in place.
ConsistencyofReadings
Alwayscheckthefluidlevelatleast twiceusingtheproceduredescribed previously.Consistency(repeatable readings)isimportanttomaintaining properfluidlevel.Ifreadingsarestill inconsistent,contactthedealer.

ManualTransmission Fluid
Itisnotnecessarytocheckthe manualtransmissionfluidlevel. Atransmissionfluidleakistheonly reasonforfluidloss.Ifaleak occurs,takethevehicletoyour dealerservicedepartmentandhave itrepairedassoonaspossible.See RecommendedFluidsand Lubricantsonpage11-13forthe properfluidtouse.
HydraulicClutch
Itisnotnecessarytoregularly checkbrake/clutchfluidunlessyou suspectthereisaleakinthe system.Addingfluidwillnotcorrect aleak.Afluidlossinthissystem couldindicateaproblem.Havethe systeminspectedandrepaired.
WhentoCheckandWhat toUse

Thebrake/hydraulicclutchfluid reservoircaphasthissymbolonit. Thecommonhydraulicclutchand brakemastercylinderfluidreservoir isfilledwithDOT3brakefluidas indicatedonthereservoircap.See EngineCompartmentOverviewon page 10-6forreservoirlocation.

HowtoCheckandAddFluid
Visuallycheckthebrake/clutchfluid reservoirtomakesurethefluidlevel isattheMIN(minimum)lineonthe sideofthereservoir.Thebrake/hydraulicclutchfluidsystemshould beclosedandsealed.
Donotremovethecaptocheckthe fluidlevelortotop-offthefluidlevel. Removethecaponlywhen necessarytoaddtheproperfluid untilthelevelreachestheMINline.
EngineAirCleaner/Filter
If the vehicle has a diesel engine, see "Pickup Models" under "Engine Air Cleaner/Filter" in the Duramax ^® Diesel Supplement for the correct inspection and replacement procedures.
SeeEngineCompartmentOverview onpage10-6forthelocationofthe engineaircleaner/filter.
WhentoInspecttheEngineAir Cleaner/Filter
Inspecttheaircleaner/filteratthe scheduledmaintenanceintervals andreplaceitatthefirstoilchange aftereach80000km(50,000mi) interval.SeeMaintenanceSchedule onpage11-3formoreinformation. Ifdrivingondusty/dirtyconditions, inspectthefilterateachengineoil change.
HowtoInspecttheEngineAir Cleaner/Filter
Toinspecttheaircleaner/filter, removetheengineaircleaner/filter fromthevehiclebyfollowing Steps1 through6. Whentheengine aircleaner/filterisremoved, lightly shakeittoreleaseloosedustand dirt. Iftheengineaircleaner/filter remainscoveredwithdirt, anew filterisrequired. Neveruse compressedairtocleanthefilter.
ReplacingtheEngineAirCleaner/Filter

natural_image
Technical illustration of a mechanical or electrical component with no visible text or symbols-
Locatetheaircleaner/filter assembly.SeeEngine CompartmentOverview page 10-6.
-
Loosenthefourscrewsonthe coverofthehousingandliftup thecover.
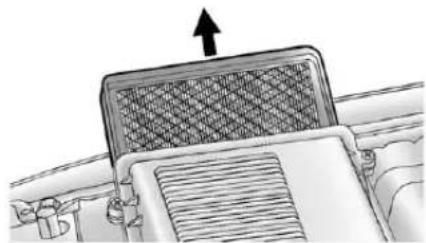
natural_image
Diagram of a car air vent with airflow direction arrow (no text or symbols)-
Removetheengineaircleaner/ filterfromthehousing. Takecare todislodgeaslittledirtas possible.
-
Cleantheengineaircleaner/filtersealingsurfacesandthe housing.
10-20VehicleCare
- Inspectorreplacetheengineair cleaner/filter.
- Reinstall the cover and tighten the screws.

WARNING
Operatingtheenginewiththeair cleaner/filteroffcancauseyouor otherstobeburned.Theair cleanernotonlycleanstheair;it helpstostopflamesiftheengine backfires.Usecautionwhen workingontheengineanddonot drivewiththeaircleaner/filteroff.
CoolingSystem
IfthevehiclehastheDuramax® dieselengine,seetheDuramax dieselsupplementformore information.
Thecoolingsystemallows the enginetomaintainthecorrect workingtemperature.
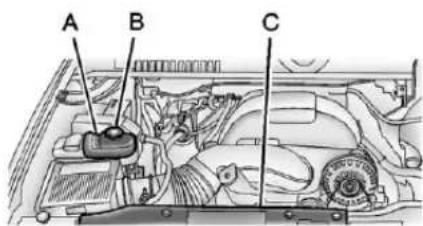
text_image
A B C5.3LV8EngineShown
(4.3LV6Engine, 4.8LV8Engine, 6.0LV8Engine, and 6.2LV8EngineSimilar)
A.CoolantSurgeTank
B. CoolantSurgeTank PressureCap
C. EngineCoolingFan

WARNING
Anelectricenginecoolingfancan startevenwhentheengineisnot running.Toavoidinjury,always keephands,clothing,andtools awayfromanyengine coolingfan.

Information Provided by: DEALER

WARNING
Heaterandradiatorhoses, and otherengineparts, can be very hot. Donottouchthem. If you do, you can be burned.
Donotruntheengineifthereisa leak. If youruntheengine, it could lose all coolant. That could cause an engine fire, and you could be burned. Get anyleak fixed before you drivethe vehicle.
Notice: Using coolantother than DEX-COOL ^® can cause premature engine, heater core, or radiator corrosion. In addition, the engine coolant could require changing sooner, at 50000 km (30,000 mi) or 24 months, whichever occurs first. Any repairs would not be covered by the vehicle warranty. Always use DEX-COOL (silicate-free) coolant in the vehicle.
EngineCoolant
Thecoolingsysteminthevehicleis filledwithDEX-COOL ^® engine coolant. Thiscoolantisdesignedto remaininthevehiclefor5yearsor 240000km(150,000mi),whichever occursfirst.
The following explainsthecooling systemandhowtocheckandadd coolantwhenitislow. If thereisa problemwithengineoverheating, seeEngineOverheatingon page 10-24.
WhattoUse

WARNING
Addingonlyplainwaterorsome otherliquidtothecoolingsystem canbedangerous. Plainwater andotherliquids, canboilbefore thepropercoolantmixturewill. Thecoolantwarningsystemisset forthepropercoolantmixture. With plain water or the wrong
(Continued)
WARNING(Continued)
mixture, theenginecouldgettoo hotbutyouwouldnotgetthe overheatwarning. Theengine couldcatchfireandyouorothers couldbeburned. Usea 50/50mixtureofclean,drinkable waterandDEX-COOLcoolant.
Usea50/50mixtureofclean, drinkablewaterandDEX-COOL coolant. If using this mixture, nothingelseneedstobeaded. This mixture:
• Givesfreezingprotectiondown to -37^(-34^) , outside temperature
• Givesboilingprotectionupto 129°C(265°F), engine temperature
• Protectsagainstrustand corrosion
10-22VehicleCare
• Willnotdamagealuminumparts
• Helpskeeptheproperengine temperature
Notice: If an improper coolant mixture is used, the engine could overheat and be badly damaged. Therepair cost would not be covered by the vehicle warranty. To much water in them mixture can freeze and crack the engine, radiator, heater core, and other parts.
Notice:Ifextrainhibitorsand/or additivesareusedinthevehicle coolingsystem,thevehiclecould bedamaged.Useonlytheproper mixtureoftheenginecoolant listedinthismanualforthe coolingsystem.See RecommendedFluidsand Lubricantonpage11-13for moreinformation.
Neverdisposeofenginecoolantby puttingitinthetrash,pourington theground,orintosewers,streams, orbodiesofwater.Havethecoolant changedbyanauthorizedservice center,familiarwithlegal requirementsregardingused coolantdisposal.Thiswillhelp protecttheenvironmentandyour health.
CheckingCoolant
Thecoolantsurgetankislocatedin theenginecompartmentonthe passengersideofthevehicle.See EngineCompartmentOverviewon page 10-6formoreinformationon location.
The vehicle must be on a level surface when checking the coolant level.
Checktoseeifcoolantisvisiblein thecoolantsurgetank.Ifthecoolant insidethecoolantsurgetankis boiling,donotdoanythingelseuntil itcoolsdown.Ifcoolantisvisible but the coolant level is not at or above the FULL COLD mark, add a
50/50mixtureofclean,drinkable waterandDEX-COOLcoolantatthe coolantsurgetank,butbesurethe coolingsystemiscoolbeforethis isdone.
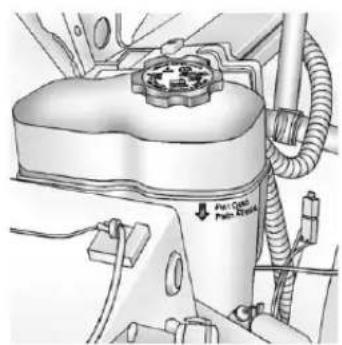
natural_image
Technical diagram of a vehicle engine compartment with hoses and a central fan (no text or symbols)Thecoolantlevelshouldbeator abovetheFULLCOLDmark.Ifitis not,theremaybealeakinthe coolingsystem.
HowtoAddCoolanttothe CoolantSurgeTankfor GasolineEngines
If the vehicle has a diesel engine, see "Cooling System" in the Duramax Diesel Supplement for the proper coolant fill procedure.

WARNING
Youcanbeburnedifyouspill coolantonhotengineparts. Coolantcontainsethyleneglycol anditwillburniftheengineparts arehotenough.Donotspill coolantonahotengine.
Notice: This vehicle has a specific coolantfill procedure. Failure to follow this procedure could cause the engine to overheat and be severely damaged.

WARNING
Anelectricenginecoolingfan underthehoodcanstartupeven whentheengineisnotrunning andcancauseinjury.Keep hands,clothing,andtoolsaway fromanyunderhoodelectricfan.

WARNING
Steamandscaldingliquidsfroma hotcoolingsystemcanblowout andburnyoubadly. They are underpressure, andify outurn thecoolantsurgetankpressure cap—evenalittle—they can come outathighspeed. Never turnthecapwhenthecooling system, including thecoolant surgetankpressurecap, ishot. Waitforthecoolingsystem and coolantsurgetankpressurecap to coolify you ever havetoturn the pressure cap.
Ifnocoolantisvisibleinthesurge tank, addcoolantasfollows:

- Removethecoolantsurgetank pressurecapwhenthecooling system, including the coolant surgetank pressurecap and upperradiator hose, is no longerhot.
Turnthepressurecapslowly counterclockwiseaboutonefull turn.Ifahissisheard,waitfor thatstop.Ahissmeansthere isstillsomepressureleft.
- Keep turning the pressure cap slowly, and remove it.

text_image
Anti-Golf Parts Engine- Fill the coolantsurgetank with the proper mixture to the FULL COLDmark.
- With the coolantsurgetank pressure capoff, start the engine and let it run until the engine coolant temperature gauge indicates approximately 90°C (195°F).
Bythistime, thecoolantlevel insidethecoolantsurgetank maybelower. Ifthelevelis lower, addmoreoftheproper mixturetothecoolantsurgetank untilthelevelreachestheFULL COLDmark.
- Replacethepressurecap. Be surethepressurecapis hand-tightandfullyseated.
- Verify coolant level after the engine isshutoff and the coolant iscold. If necessary, repeat coolant fill procedure Steps 1 through 6.
Notice: If the pressure cap is not tightly installed, coolant loss and possible engine damage may occur. Besure the cap is properly and tightly secured.
EngineOverheating
IfthevehiclehastheDuramax® Dieselengine,seetheDuramax DieselSupplementformore information.
The vehicle has several indicators to warn of engine overheating.
Thereisacoolanttemperature gaugeonthevehicle'sinstrument panel.SeeEngineCoolant TemperatureGaugeonpage5-17.
Inaddition, there are ENGINE OVERHEATED STOPENGINE, ENGINEOVERHEATEDIDLE ENGINE, and ENGINEPOWERIS REDUCED messages in the Driver Information Center (DIC) on the instrument panel. See Engine Cooling System Messages on page 5-45 and Engine Power Messages on page 5-47.
If the decision is madenottolift the hood when this warning appears, gets service help right away. See Roadside Assistance Program (U.S. and Canada) on page 13-8 or Roadside Assistance Program (Mexico) on page 13-11.
If the decisionismadetolift the hood, makesurethevehicleis parkedonalevelsurface.
Thenchecktoseeiftheengine coolingfansarerunning. If the engineisoverheating, bothfans shouldberunning. If they are not, donotcontinuetoruntheengine and havethevehicleserviced.
Notice: Enginedamage from running you're in without coolant is not covered by the vehicle warranty. See Overheated Engine Protection Operating Mode for information on driving to as safe place in an emergency.
Notice: If the engine catches fire while driving with no coolant, the vehicle can be badly damaged. The costly repairs would not be covered by the vehicle warranty. See Overheated Engine Protection Operating Mode on page 10-27 for information on driving to asafeplace in an emergency.
IfSteamisComingfromthe EngineCompartment
WARNING
Steamfromanoverheatedengine canburnyoubadly,evenifyou justopenthehood.Stayaway fromtheengineifyouseeorhear steamcomingfromit.Turnitoff andgeteveryoneawayfromthe vehicleuntiltcoolsdown.Wait untilthereisnosignofsteamor coolantbeforeyouopen thehood.
(Continued)
WARNING(Continued)
If you keep driving when the vehicles engine is over heated, the liquids in it can catch fire. You or others could be badly burned. Stop the engine if to overheats, and get out of the vehicle until the engine is cool.
See Overheated Engine Protection Operating Mode on page 10-27 for information on driving to as safe place in an emergency.
IfNoSteamisComingfrom theEngineCompartment
The ENGINEOVERHEATED STOPENGINEortheENGINE OVERHEATEDIDLEENGINE message, alongwithalowcoolant condition, canindicateaserious problem.
Ifthereisanengineoverheat warning,butnosteamisseenor heard,theproblemmaynotbetoo serious.Sometimestheenginecan getalittletoohotwhenthevehicle:
• Climbsalonghillonahotday
• Stopsafterhigh-speeddriving
• Idlesforlongperiodsintraffic
- Towsatraler;see TrailerTowing onpage9-90.
IftheENGINEOVERHEATED STOPENGINEortheENGINE OVERHEATEDIDLEENGINE messageappearswithnosignof steam,trythisforaminateorso:
- Turntheairconditioningoff.
- Turntheheaterontothehighest temperatureandtothehighest fanspeed.Openthewindowsas necessary.
- If stopped in traffic jam, apply the brake, shift to N (Neutral); otherwise, shift to the highest gear while driving—D (Drive) or 3 (Third).
If the temperature overheat gauge isnolonger in the overheat zone or an overheat warning nolonger displays, the vehicle can be driven. Continuetodrivethe vehicles slowly for about 10 minutes. Keep as safe vehicle distance from the vehicle in front. If the warning does not come back on, continued or driven normally.
Ifthewarningcontinues,pullover, stop,andparkthevehicle rightaway.
Ifthereisnosignofsteam,idlethe engineforfiveminuteswhile parked.Ifthewarningisstill displayed,turnofftheengineuntil coolsdown.Also,see"Overheated EngineProtectionOperatingMode" laterinthissection.
OverheatedEngine Protection OperatingMode
Ifanoverheatedenginecondition existsandtheENGINEPOWERIS REDUCEDmessagedisplays,an overheatprotectionmodewhich alternatesfiringgroupsofcylinders helpstopreventenginedamage.In thismode,alossinpowerand engineperformancewillbenoticed. Thisoperatingmodeallowsthe vehicletobedriventoasafeplace inanemergency.Driving extendedkm(mi)and/ortowinga trailerintheoverheatprotection modeshouldbeavoided.
Notice: Afterdriving in the overheated engine protection operating mode, to avoid engine damage, allow the engine to cool before attempting any repair. The engine oil will be severely degraded. Repair the cause of coolant loss, changethe oil and reset the oil lifesystem. See Engine Oilon page 10-7.
EngineFan
Ifthevehiclehasaclutchedengine coolingfan,whentheclutchis engaged,thefanspinsfasterto providemoreairtocooltheengine. Inmosteverydaydrivingconditions, thefanisspinningslowerandthe clutchisnotfullyengaged.This improvesfueleconomyandreduces fannoise.Underheavyvehicle loading,trailertowing,and/orhigh outsidetemperatures,thefanspeed increasesastheclutchmorefully engages,soanincreaseinfan noisemaybeheard.Thisisnormal andshouldnotbemistakenasthe transmissionslippingormaking extrashifts.Itismerelythecooling systemfunctioningproperly.Thefan willslowdownwhenadditional coolingisnotrequiredandthe clutchdisengages.
Thisfannoisemayalsobeheard whenstartingtheengine.Itwillgo awayasthefanclutchpartially disengages.
If the vehicle has electric cooling fans, the fans maybe heard spinning at lowspeed during most everyday driving. The fans may turn off in no cooling is required. Under heavy vehicle loading, trailertowing, highoutsidetemperatures, or operation of the air conditioning system, the fans may change to high speed and an increase in fan noise may be heard. This is normal and indicate that the cooling system is functioning properly. The fans will change to low speed when additional cooling is no longer required.
PowerSteeringFluid
SeeEngineCompartmentOverview onpage10-6forreservoirlocation.
WhentoCheckPowerSteering Fluid
Itisnotnecessarytoregularly checkpowersteeringfluidunless thereisaleaksuspectedinthe systemoranunusualnoiseis heard.Afluidlossinthissystem couldindicateaproblem.Havethe systeminspectedandrepaired.
HowtoCheckPowerSteering Fluid
Notice:Extremely small amounts of contamination can cause steering system damage and cause it tonotwork properly. Do not allow contaminant to contact the fluid side of the reservoir cap/ dipstickortoenterthereservoir.
Tocheckthepowersteeringfluid:
- Turnthekeyoffandletthe enginecompartmentcooldown.
- Wipethecapandthetopofthe reservoirclean.
- Unscrewthecapandwipethe dipstickwithacleanrag.
- Replacethecapandcompletely tightenit.
- Removethecapagainandlook atthefluidlevelonthedipstick.
ThelevelshouldbeattheFULL COLDmark.Ifnecessary,addonly enoughfluidtobringthelevelupto thema rk.

Information Provided by: DEALER
WhattoUse
Todeterminewhatkindoffluidto use,seeRecommendedFluidsand Lubricantsonpage11-13.Always usetheproperfluid.
Notice: Use of the incorrect fluid may damage the vehicle and the damages may not be recovered by the vehicle's warranty. Always use the correct fluid listed in Recommended Fluids and Lubricantson page 11-13.
WasherFluid
WhattoUse
When windshieldwasherfluidneeds tobeadded, besuretoreadthe manufacturer's instructions before use. Use fluid that hassufficient protection against freezing in an areawher the temperature may fall below freezing.
AddingWasherFluid
The vehicle has a low washer fluid message on the DIC that comes on when the washer fluid is slow. The message is displayed for 15 seconds at the start of each ignition cycle. When the WASHER FLUIDLOWADDFLUID message displays, washer fluid will need to be added to the windshield washer fluid reservoir.

Openthecapwiththewasher symbolonit.Addwasherfluiduntil thetankisfull.SeeEngine CompartmentOverviewon page10-6forreservoirlocation.
Notice
- When using concentrated washer fluid, follow the manufacturer's instructions for adding water.
-
Donotmixwaterwith ready-to-usewasherfluid. Watercancausethesolution tofreezeanddamagethe washerfluidtankandother partsofthewashersystem.
-
Fillthewasherfluidtankonly three-quartersfullwhenitis verycold. This allows for fluidexpansioniffreezing occurs, which could damagethetankifitis completelyfull.
- Donotuseenginecoolant (antifreeze)inthewindshield washer.ltcandamagethe windshieldwashersystem andpaint.
Brakes
This vehicle has front disc brakes and could havereardrum brakes or reardisc brakes.
Discbrakepadshavebuilt-inwear indicatorsthatmakeahigh-pitched warningsoundwhenthebrakepads arewornandnewpadsareneeded. Thesoundcancomeandgoorbe heardallthetimethevehicleis moving,exceptwhenapplyingthe brakepedalfirmly.

WARNING
Thebrakewearwarningsound meansthatsoonthebrakeswill notworkwell.Thatcouldleadto acrash.Whenthebrakewear warningsoundisheard,havethe vehicleserviced.
Notice: Continuing to drivewith worn-out brake pad could result incostly brakerepair.
Somedrivingconditionsorclimates cancauseabrakesquealwhenthe brakesarefirstappliedorlightly applied. Thisdoesnotmean somethingiswrongwiththebrakes.
Properlytorquedwheelnutsare necessarytohelppreventbrake pulsation.Whentiresarerotated, inspectbrakepadsforwear and evenlytightenwheelnutsinthe propersequencetotorque specificationsinCapacitiesandSpecificationsonpage12-2.
If the vehicle has reardrum brakes, they donothavewear indicators, but if a rear braker rubbing noise is heard, hav there rear brakel inings inspected immediately. Rear brake drum should be removed and inspected each timethetires are removed for rotation or changing.
Drumbrakeshaveaninspection holetoinspectliningwearduring scheduledmaintenance. When the frontbrakepadsarereplaced, have therearbrakesinspected, too.
Brakeliningsshouldalwaysbe replacedascompleteaxlesets.
BrakePedalTravel
Seeyourdealerifthebrakepedal doesnotreturntonormalheight, orifthereisarapidincreasein pedaltravel. Thiscouldbeasign thatbrakeservicemightbe required.
BrakeAdjustment
Everytimethebrakesareapplied, withorwithoutthevehiclemoving, thebrakesadjustforwear.
ReplacingBrakeSystemParts
Thebrakingsystemonavehicleis complex. Itsmanypartshavetobe oftopqualityandworkwelltogether ifthevehicleistohavereallygood braking. Thevehiclewasdesigned andtestedwithtop-qualitybrake parts. Whenpartsofthebraking systemarereplaced, besuretoget new, approvedreplacementparts. Ifthisisnotdone, thebrakesmight notworkproperly. Forexample, installingdiscbrakepadsthatare wrongforthevehicle, canchange thebalancebetweenthefrontand rearbrakes—fortheworse. The brakingperformanceexpectedcan changeinmanyotherwaysifthe wrongreplacementbrakepartsare installed.
BrakeFluid

Thebrakemastercylinderreservoir isfilledwithDOT3brakefluid.See EngineCompartmentOverviewon page 10-6forthelocationofthe reservoir.
Thereareonlytworeasonswhythe brakefluidlevelinthereservoir mightgodown:
- Thebrakefluidlevelgoesdown becauseofnormalbrakelining wear.Whennewliningsare installed,thefluidlevelgoes backup.
- Afluidleakinthebrake hydraulicsystemcanalsocause alowfluidlevel.Havethebrake hydraulicsystemfixed,sincea leak means that sooner or later the brakes will not work well.
Donottopoffthebrakefluid. Addingfluiddoesnotcorrectaleak. Iffluidisaddedwhenthelingsare worn,therewillbetoomuchfluid whennewbrakeliningsare installed.Addorremovebrakefluid, asnecessary,onlywhenworkis doneonthebrakehydraulicsystem.
WARNING
Iftoomuchbrakefluidisadded, it canspillontheengineandburn, iftheengineishotenough. You orotherscouldbeburned, and thevehiclecouldbedamaged. Addbrakefluidonlywhenworkis doneonthebrakehydraulic system. See "CheckingBrake Fluid" in this section.
Whenthebrakefluidfallstoalow level,thebrakewarninglightcomes on.SeeBrakeSystemWarning Lightonpage5-27.
RefertotheMaintenanceSchedule todeterminewhentocheckthe brakefluid.SeeMaintenance Scheduleonpage11-3.
CheckingBrakeFluid
Checkbrakefluidbylookingatthe brakefluidreservoir.SeeEngine CompartmentOverview page 10-6.
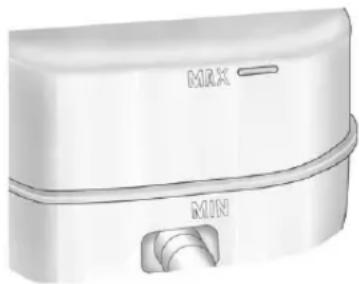
natural_image
Illustration of a white cylindrical device with 'MAX' and 'R019' labels, no additional text or symbols present.Thefluidlevelshouldbeabove MIN. Ifitisnot, havethebrake hydraulicsystemcheckedtoseeif thereisaleak.
Afterworkisdoneonthebrake hydraulicsystem, makesurethe levelisabovetheMINbutnotover theMAXmark.
WhattoAdd
UseonlynewDOT3brakefluid fromasealedcontainer.See RecommendedFluidsand Lubricantsonpage11-13.
Alwayscleanthebrakefluid reservoircapandtheareaaround thecapbeforeremovingit. This helpskeepdirtfromenteringthe reservoir.

WARNING
Withthewrongkindoffluidinthe brakehydraulicsystem,the brakesmightnotworkwell.This couldcauseacrash.Alwaysuse theproperbrakefluid.
Notice
- Usingthewrongfluidcan badlydamagebrake hydraulicsystemparts. For example, justafewdropsof mineral-basedoil, such as engineoil, inthebrake hydraulicsystemcan damagebrakehydraulic systempartssobadlythat theywillhavetobereplaced. Donotletsomeoneputin thewrongkindoffluid.
- Ifbrakefluidisspilledonthe vehicle'spaintedsurfaces, thepaintfinishcanbe damaged.Becarefulnotto spillbrakefluidonthe vehicle.Ifyoudo,washitoff immediately.

Information Provided by: DEALER
Battery
If the vehicle is a Hybrid, se the Hybrid Supplement form more information.
Thisvehiclehasamaintenancefree battery(orbatteries).Refertothe replacementnumberontheoriginal batterylabelwhenanewbatteryis needed.SeeEngineCompartment Overviewonpage10-6forbattery location.
WARNING
Batteryposts,terminals,and relatedaccessoriescontainlead andleadcompounds,chemicals knowntotheStateofCaliforniato causecancerandreproductive harm.Washhandsafterhandling.
VehicleStorage
WARNING
Batterieshaveacidthatcanburn youandgasthatcanexplode. Youcanbebadlyhurtifyouare notcareful.See Jump Startingon page 10-96fortipsonworking aroundabatterywithout gettinghurt.
InfrequentUsage:Removethe black,negative(-)cablefromthe batterytokeepthebatteryfrom runningdown.
ExtendedStorage:Removethe black,negative(−)cablefromthe batteryoruseabatterytrickle charger.
Four-WheelDrive
TransferCase
WhentoCheckLubricant
RefertoMaintenanceScheduleon page11-3todeterminewhento checkthelubricant.
HowtoCheckLubricant

natural_image
Technical diagram of a mechanical assembly with labeled parts A and B (no text or symbols beyond labels)ElectricShiftTransferCase
A.FillPlug
B.DrainPlug

natural_image
Technical diagram of a mechanical assembly with labeled parts A and B (no text or symbols beyond labels)ManualShiftTransferCase
A.FillPlug
B.DrainPlug

natural_image
Technical diagram of a mechanical assembly with labeled components A and B (no text or symbols beyond labels)ActiveTransferCase
A. FillPlug
B.DrainPlug
Togetanaccuratereading, the vehicleshouldbeonalevel surface.
Ifthelevelisbelowthebottomof thefillplughole, located on the transfercase, some lubricantwill needtobeadded. Addenough lubricanttoraisetheleveltothe bottomofthefillplughole. Usecare notto overtighten the plug.

information Provided by
DEALER
WhentoChangeLubricant
RefertoMaintenanceScheduleon page 11-3 todetermine how oftento changethelubricant.
WhattoUse
RefertoRecommendedFluidsand Lubricantsonpage11-13to determinewhatkindoflubricant touse.
FrontAxle
WhentoCheckandChange Lubricant
Itisnotnecessarytoregularly checkfrontaxlefluidunlessaleak issuspected,oranunusualnoiseis heard.Afluidlosscouldindicatea problem.Haveitinspectedand repaired.
HowtoCheckLubricant
Togetanaccuratereading, the vehicleshouldbeonalevel surface.
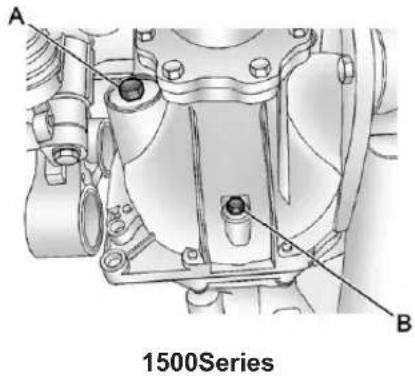
text_image
A B 1500SeriesA. FillPlug
B.DrainPlug
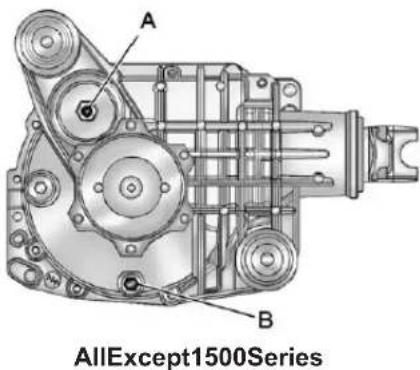
text_image
A B AllExcept1500SeriesA.FillPlug
B.DrainPlug
- Whenthedifferentialiscold, add enoughlubricanttoraisethe levelfrom0mm(0in)to3.2mm (1/8in)belowthefillplughole.
- Whenthedifferentialisat operatingtemperature(warm), addenoughlubricanttoraisethe leveltothebottomofthefill plughole.

10-36VehicleCare
WhattoUse
RefertoRecommendedFluidsand Lubricantsonpage11-13to determinewhatkindoflubricant touse.
RearAxle
WhentoCheckLubricant
Itisnotnecessarytoregularly checkrearaxlefluidunlessaleakis suspectedoranunusualnoiseis heard.Afluidlosscouldindicatea problem.Haveitinspectedand repaired.
Allaxleassembliesarefilledby volumeoffluidduringproduction. Theyarenotfilledtoreachacertain level.Whencheckingthefluidlevel onanyaxle,variationsinthe readingscanbecausedbyfactory filldifferencesbetweenthemminimum andthemaximumfluidvolume. Also,ifvehiclehasjustbeen drivenbeforecheckingthefluid level,itmayappearlowerthan normalbecausefluidhastraveled outalongtheaxletubesandhas notdrainedbacktothesumparea. Therefore,areadingtaken fiveminutesafterthevehiclehas beendrivenwillappeartohavea lowerfluidlevelthanvehiclethat hasbeenstationaryforanhouror two.Rememberthattherearaxle assemblymustbesupportedtoget atruereading.

HowtoCheckLubricant

natural_image
Technical illustration of a mechanical assembly with a central component and an arrow indicating a specific part (no text or symbols present)2500HDwith6.0L

natural_image
Technical diagram of a mechanical component with a circular feature and an arrow indicating direction (no text or symbols present)AllOtherSeriesandEngines
Togetanaccuratereading, the vehicle should be on a level surface.
- Forall4.3L,4.8Land5.3L 1500Seriesapplications,the properlevelis1.0mmto 19.0mm(0.04into0.7in) belowthebottomofthefillhole, locatedontherearaxle.Add onlyenoughfluidtoreachthe properlevel.
- Forall6.0Land6.2L 1500Seriesapplications, the properlevelisfrom15mmto 40mm(0.6into1.6in)below thebottomofthefillplughole, locatedontherearaxle.Add onlyenoughfluidtoreachthe properlevel.
- Forall6.0L2500HDSeries applications, the proper level is from 0mm to 13mm (0to0.5in) below the bottom of the fill plug hole, located on therear axle. Add only enough fluid to reach the proper level.
- Forall6.6LDuramaxDiesel 2500HDSeriesapplicationsand all3500Seriesapplications,the properlevelisfrom17mmto 21mm(0.6into0.8in)belowthe bottomofthefillplughole, locatedontherearaxle.Add onlyenoughfluidtoreachthe properlevel.
WhattoUse
RefertoRecommendedFluidsand Lubricantsonpage11-13to determinewhatkindoflubricant touse.
NoiseControlSystem
The following information relates to compliance with federal noise emission standards for vehicles with a Gross Vehicle Weight Rating (GVWR) of more than 4536 kg (10,000 lbs). Thenoise control system warranty is given in your warranty booklet.
Thesestandardsapplyonlyto vehiclessoldintheUnitedStates.
Federallawprohibitsthefollowing actsorthecausingthereof:
-
Theremovalorrendering inoperativebyanyperson, other thanforpurposesof maintenance, repairor replacement, ofanydeviceor elementofdesignincorporated intoanynewvehicleforthe purposeofnoisecontrol, prior to itssaleordeliverytotheultimate purchaserorwhileitisinuse; or
-
The use of the vehicle aftersuch deviceorelement of design has been removed or rendered in operative by any person.
Amongthoseactspresumedto constitutetamperingaretheacts listedbelow.
Insulation:
Removalofthenoiseshieldsorany underhoodinsulation.
Engine:
Removalorrenderingenginespeed governor,ifthevehiclehasone, inoperativesoastoallowengine speedtoexceedmanufacturer specifications.
FanandDrive:
- Removaloffanclutch, if the vehiclehasone, orrendering clutchinoperative.
- Removalofthefanshroud,ifthe vehiclehasone.
AirlIntake:
- Removaloftheaircleaner silencer.
• Modificationoftheaircleaner.
Exhaust:
- Removalofthemufflerand/or resonator.
- Removaloftheexhaustpipes andexhaustpipeclamps.
StarterSwitchCheck
WARNING
When you are doing this inspection, the vehicle could moves suddenly. If the vehicle moves, you or others could be injured.
- Before starting this check, be sure there is enoughroom around the vehicle.
- Firmlyapplyboththeparking brakeandtheregularbrake. SeeParkingBrakeon page9-63.
Donotusetheaccelerator pedal, and bereadytoturnoff theengineimmediatelyifit starts.
- For automatic transmission vehicles, try to start the engine in each gear. The vehicle should start only in P (Park) or N (Neutral). If the vehicle starts in any other position, contact your dealer for service.
Formanualtransmission vehicles,puttheshiftleverin Neutral,pushtheclutchpedal downhalfway,andtrytostart theengine.Thevehicleshould startonlywhentheclutchpedal ispusheddownallthewayto thefloor.Ifthevehiclestarts whentheclutchpedalisnot pushedallthewaydown, contactyourdealerforservice.
AutomaticTransmission ShiftLockControl FunctionCheck

WARNING
When you are doing this inspection, the vehicle could moves suddenly. If the vehicle moves, you or others could be injured.
-
Before starting this check, be sure there is a rough room around the vehicle. It should be parked on levels surface.
-
Firmly apply the parking brake. See Parking Brake on page 9-63.
Bereadytoapplytheregular brakeimmediatelyifthevehicle beginstomove.
- With the engine off, turn the ignition on, but donot start the engine. Without applying the regular brake, try to mov the shiftlever out of Park with normaleffort. If the shift lever moves out of Park, contact your dealer for service.
IgnitionTransmission LockCheck
Whileparked, and with the parking brakeset, try to turn the ignition to LOCK/OFFineachshift lever position.
- Forautomatictransmission vehicles, theignitions should turn to LOCK/OFFonlywhen the shiftleverisinP(Park).
- Formanualtransmission vehicles, theignitions should turn to LOCK/OFFonlywhenyou pressthekeyreleasebutton.
Onallvehicles, the ignition key should come out only in LOCK/OFF.
Contactyourdealerifserviceis required.
ParkBrakeandP(Park) MechanismCheck

WARNING
Whenyouaredoingthischeck, thevehiclecouldbegintomove. Youorotherscouldbeinjured andpropertycouldbedamaged. Makesurethereisroominfront ofthevehicleincaseitbeginsto roll. Bereadytoapplytheregular brakeatonceshouldthevehicle begintomove.
Parkonafairlysteephill, with the vehiclefacingdownhill. Keeping yourfootontheregularbrake, set theparkingbrake.
- Tochecktheparkingbrake's holdingability:Withtheengine runningandthetransmissionin N(Neutral),slowlyremovefoot pressurefromtheregularbrake pedal.Dothisuntilthevehicleis heldbytheparkingbrakeonly.
- TochecktheP(Park) mechanism'sholdingability: Withtheengine running, shiftto P(Park). Then releasethe parkingbrake followed by the regularbrake.
Contactyourdealerifserviceis required.
WiperBladeReplacement
Windshieldwiperbladesshouldbe inspectedforwearorcracking.See Maintenance Scheduleon page 11-3formoreinformationon wiperbladeinspection.
Replacementbladescomein differenttypesandareremovedin differentways.Toremovethewiper blade:
- Pullthewindshieldwiperarm connectorawayfromthe windshield.
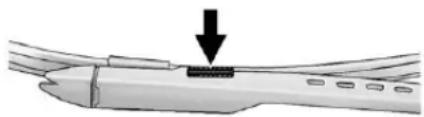
natural_image
Diagram of a mechanical component with a downward arrow indicating force or movement (no text or symbols present)- Squeezethegroovedareason eachsideoftheblade, and turn thebladeassemblyawayfrom thearmconnector.
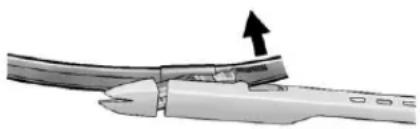
natural_image
Close-up of a pliers with an arrow indicating force direction (no text or symbols)- Installthenewbladeontothe armconnectorandmakesure thegroovedareasarefullysetin thelockedposition.
Forthepropertyandsize,see MaintenanceReplacementPartson page 11-16.
GlassReplacement
Ifthewindshieldorfrontsideglass mustbereplaced, seeyourdealer todeterminethecorrect replacementglass.
HeadlampAiming
The vehicle has a visual optical headlampaimingsystem. The aim of the headlampshas been preset at the factory and should need no further adjustment.
However, if the vehicle is damaged in acrash, the aim of the headlamps may be affected and adjustment may be necessary.
Ifoncomingvehiclesflashtheirhigh beamsatyou, this may mean the vertical aim of the headlamps needs to be adjusted.
It is recommended that the vehicle betakentoyourdealerforservice if the headlampsneedtobeadjusted. It is possible, however, tore-aim the headlampsas described.
The vehicles should:
- Beplacedsotheheadlamps are7.6m(25ft)from a light-coloredwall.
- Haveallfourtiresonalevel surfacewhichislevelalltheway tothewall.
- Beplacedsoitisperpendicular tothewall.
- Nothaveanysnow,ice,ormud onit.
- Befullyassembledandallother workstoppedwhileheadlamp aimingisbeingperformed.
- Beloadedwithafulltankoffuel andonepersonor75kg (160lbs)sittingonthe driverseat.
• Havethetiresproperlyinflated. - Havethesparetireinitsproper locationinthevehicle.
Headlampaimingisdonewiththe vehicle'slow-beamheadlamps. The high-beamheadlampswillbe correctlyaimedifthelow-beam headlampsareaimedproperly.

10-42VehicleCare
Toadjusttheverticalaim:
- Openthehood. See Hoodon page 10-5
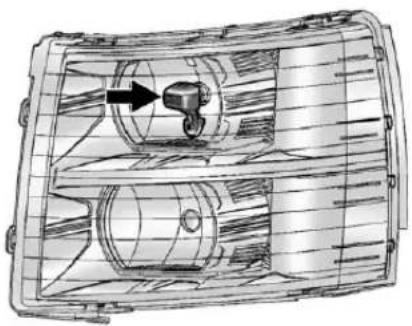
natural_image
Technical line drawing of a vehicle headgear housing with internal components and a directional arrow (no text or symbols)-
Locatetheaimdotonthelensof thelow-beamheadlamp.
-
Recordthedistancefromthe groundtotheaimdotonthe low-beamheadlamp.
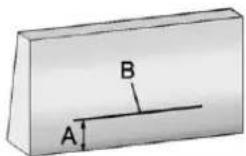
-
Atawall, measure from the ground upward (A) to the recorded distance from Step3 and mark it.
-
Drawortapeahorizontalline(B) onthewallthewidthofthe vehicleattheheightofthemark inStep4.
Notice: Donotcoveraheadlamp toimprovebeamcut-offwhen aiming. Coveringaheadlampmay cause excessiveheatbuild-up whichmaycausedamagetothe headlamp.
- Turnonthelow-beam headlampsandplaceapieceof cardboardorequivalentinfront oftheheadlampnotbeing adjusted. Thisallowsonlythe beamoflightfromtheheadlamp beingadjustedtobeseenonthe flatsurface.

natural_image
Mechanical assembly diagram showing a bracket with mounting holes and a black arrow indicating a specific component (no text or symbols present)- Locatetheverticalheadlamp aimingscrews, which are under the hoodneareachheadlamp assembly.
Theadjustmentscrewcanbe turnedwithanE8Torx ^® socket.
- Turntheverticalaimingscrew untiltheheadlampbeamis aimedtothehorizontal tapeline. Turnitclockwiseor counterclockwisetoraiseor lowertheangleofthebeam.
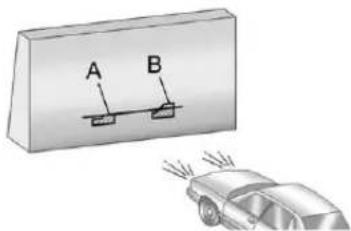
text_image
A B- Makesurethatthelightfromthe headlampispositionedatthe bottomedgeofthehorizontal tapeline. Thelamponthe left(A)showsthecorrect headlampaim. Thelamponthe right(B)showstheincorrect headlampaim.
10.RepeatSteps7through9for theoppositeheadlamp.

Information Provided by: DEALER
BulbReplacement
Forthepropertyofreplacement bulbs,seeReplacementBulbson page 10-48.
Foranybulb-changingprocedure notlisted in this section, contact your dealer.
HalogenBulbs

WARNING
Halogenbulbshavepressurized gasinsideandcanburstifyou droporscratchthebulb. Youor otherscouldbeinjured. Besure toreadandfollowtheinstructions onthebulbpackage.
Headlamps, FrontTurn Signal, Sidemarker, and ParkingLamps
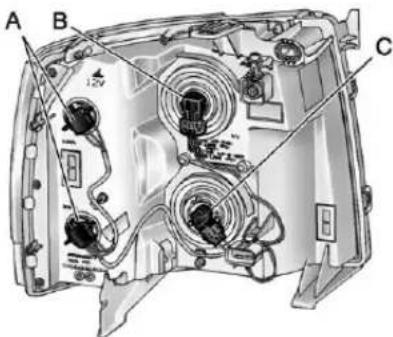
text_image
A B CA. Park/TurnSignal/ SidemarkerLamp
B.Low-BeamHeadlamp
C. High-BeamHeadlamp
1. Openthehood. See Hoodon page 10-5
- If you are replacing the bulbon the passengers side, remove the EngineAirCleaner cover. See EngineAirCleaner/Filter on page 10-18 form more information.
- Reachinandaccessthebulb socketsfrominsidetheengine compartment.
- Turnthebulbsocket counterclockwisetoremoveit fromtheheadlampassembly andpullitstraightout.
- Unplugtheelectricalconnector from the old bulb by releasing the clips on the bulb socket.
- Replaceitwithanewbulb.
- Plugintheelectricalconnector.
- Reinstallthenewbulbsocket intotheheadlampassembly and turnitclockwisetosecure.
Pick-UpBoxIdentification andFenderMarker Lamps
Thepick-upboxidentificationlamps areLEDs. For replacement of the LEDlighting assembly contact your dealer.
Toreplaceapickupboxfender markerlampbulb:
- Pressthetabfromthebackto removethelamp.
- Turnthebulbsocket counterclockwisetoremovefrom thelampassembly.
- Gentlyprythebulbfromthe socket.
- Installthenewbulbinsocket.
- Reinstallsocketintolamp assembly.
- Reinstallthelampassembly.
Taillamps(ChassisCab Models)

text_image
A BA.BackupLamp
B. Stoplamp/Taillamp/Turn SignalLamp
Toreplaceoneofthesebulbs:
- Removethefourscrews.
- Liftthelensoffthelamp assembly.
- Turntheoldbulb counterclockwiseandpulltheit straightoutfromthesocket.
- Installanewbulbintothe socket, turnitclockwise, and pressitinuntilistight.
- Reinstallthelensandthe fourscrews.

Taillamps, TurnSignal, Stoplamps, and Back-Up Lamps

text_image
A B AA. Stoplamp/Taillamp/Turn SignalLamp
B.Back-upLamp
Toreplaceoneofthesebulbs:
- Openthetailgate. See Tailgate onpage2-11 formore information.
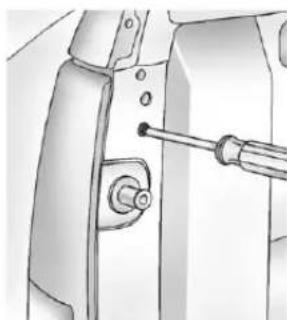
natural_image
Mechanical component diagram showing a screwdriver inserted into a bracket (no text or symbols visible)-
Removethetworearlamp assemblyscrewsnearthe tailgatelatchstrikerpostandpull rearwarduntildisengagingthe twoouterpinsonthetaillamp assemblyfromthevehicle.
-
Turnthebulbsocket counterclockwisetoremoveit fromthetaillampassembly.
-
Pulltheoldbulbstraightout fromthesocket.
- Pressanewbulbintothesocket andturnthesocketclockwise intothetaillampassembly.
6.Reinstallthetaillampassembly.
CenterHigh-Mounted Stoplamp(CHMSL)and CargoLamp
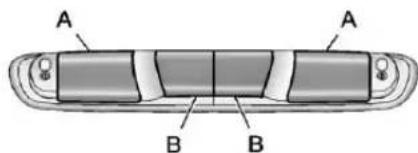
text_image
A A B BA.CargoLamp
B. CenterHigh-MountedStoplamp (CHMSL) Bulb

Toreplaceoneofthesebulbs:

natural_image
Top-down schematic of a vehicle showing front and side panels with a black arrow pointing to the side panel (no text or symbols)- Removethetwoscrewsandlift offthelampassembly.
- On thereversesideofthelamp assembly, removethebulb socketbyturningitonequarter turncounterclockwiseandpullit straightout.
- Removethebulbbypullingit straightoutofthesocket.
- Install the bulb by pushing the bulb straight into the socket.
- Install the bulb socket into the lamp assembly by turning it one quarter turn clockwise.
- Reinstall the lamp as assembly and tightenthescrews.
LicensePlateLamp
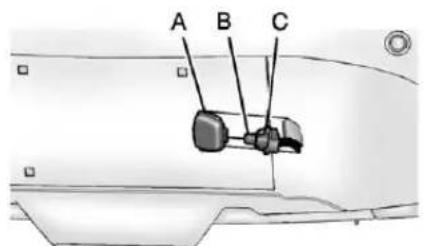
text_image
A B CA. LicensePlateLampHousing
B.Bulb
C.BulbSocket
Toreplaceoneofthesebulbs:
-
Usingasmallflat-bladedtool, insertthebladeendattheback edgeoftherearlicenseplate lamphousing(A).
-
Gently push forward while lifting the backed geofthelamp housing from the bumper opening.
- Turnthebulbsocket(C) one-quarterturntoreleasethe bulbsocketfromthelamp housing(A).
- Pullthebulb(B) from the bulb socket(C).
- Reversethestepstoinstall.

ReplacementBulbs
| ExteriorLampBulb | Number |
| Back-upLamp921LL | |
| Back-upLamp*1156 | |
| CargoLampand CenterHigh-Mounted Stoplamp (CHMSL) | 912LL |
| FenderMarker Lamp(IfEquipped) | W5WLL |
| FrontTurnSignal Lampand ParkingLamp | 3157A |
| High-Beam Headlamp | 9005 |
| Low-Beam Headlamp | H11 |
| License PlateLamp | 168 |
| ExteriorLampBulb | Number |
| SidemarkerLamp/Stoplamp/Taillamp/TurnSignalLamp | 3047K |
| Stoplamp/TurnSignalLamp/Taillamp* | 1157 |
| *ChassisCabModels | |
Forreplacementbulbsnotlisted here,contactyourdealer.
ElectricalSystem
ElectricalSystem Overload
The vehicle has fuses and circuit breaker stop protect against electrical system overload.
Whenthecurrentelectricalloadis tooheavy, the circuitbreakeropens and closes, protecting the circuit until the current load return to normal or the problem is fixed. This greatly reduces the chance of circuit overload and fire caused by electrical problems.
Fusesandcircuitbreakersprotect powerdevicesinthevehicle.
Replaceabadfusewithanewone oftheidenticalsizeandrating.
If thereisaproblemontheroad and afuseneedstobereplaced, the sameamperagefusecan be borrowed. Choose some feature of the vehicle that is not needed to use and replace it as soon as possible.
HeadlampWiring
Anelectricaloverloadmaycause thelampstogoonandoff, orin somecasestoremainoff. Havethe headlampwiringcheckedrightaway ifthelampsgoonandoffor remainoff.
WindshieldWipers
Ifthewipermotoroverheatsdueto heavysnoworice, the windshield wiperswillstopuntilthemotorcools and will then restart.
Although the circuit is protected from electrical overload, overload dueto heavysnow oricemay cause wiper linkaged damage. Always clear rice and heavysnow from the windshield before using the windshield wipers.
If the overload is caused by an electrical problem and not snow or ice, besuretogetit fixed.
FusesandCircuit Breakers
If the vehicle is a hybrid, se the hybrids supplement form more information.
Thewiringcircuitsinthevehicleare protectedfromshortcircuitsbya combinationoffuses,circuit breakersandfusiblethermallinks. Thisgreatlyreducesthechanceof firescausedbyelectricalproblems.
Lookatthesilver-coloredband insidethefuse. Ifthebandisbroken ormelted, replacethefuse. Besure youreplaceabadfusewithanew oneoftheidenticalsizeandrating.
If you ever have a problemon the road and don't have as spare fuse, you can borrow onethathasthe same amperage. Just picks some feature of your vehicle that you can get along without - likether radioor accessory power outlet - and use its fuse, if it is the correct amperage. Replace it as soon as you can.
EngineCompartment FuseBlock
If the vehicle has a diesel engine, seethe Duramax Diesels supplement form more information.
If the vehicle is a hybrid, se the hybrids supplement form more information.
TheEngineCompartmentFuse Blockislocatedintheengine compartment,onthedriversideof thevehicle.

natural_image
Simple icon of a battery with a lightning bolt symbol (no text or labels)Liftthecovertoaccessthefuse block.
Notice: Spilling liquidon any electrical component on the vehicle may damage it. Always keep the cover on any electrical component.
Toremovefuses, holdtheendof thefusebetweenyourthumbband indexfingerandpullstraightout.
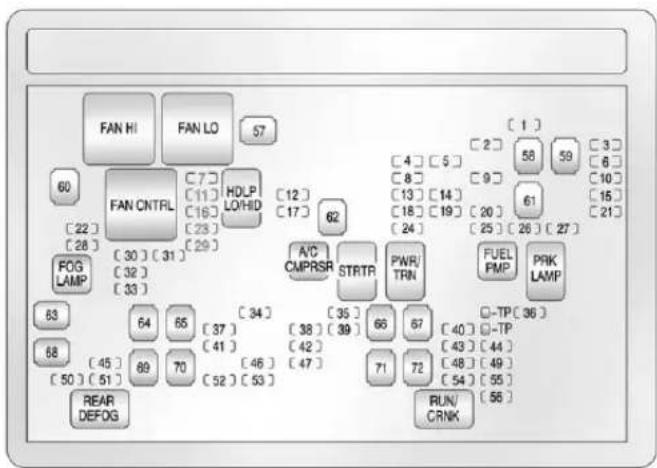
text_image
FAN HI FAN LO 57 60 [22] [28] FAN CNTRL [7] [11] [16] [23] [29] HOLP LO/HID [12] [17] [62] A/D CMPRSR STRTR PWR/ TRN [4] [5] [8] [13] [14] [18] [19] [20] [24] [25] [26] [27] [1] [2] 58 59 [3] [6] [10] [15] [21] 61 FUEL PMP PRK LAMP -TP [36] [40] [43] [44] [48] [49] [54] [55] 71 RUN/ CRNK [56] 63 64 65 [37] [41] [34] [38] [39] [35] [42] [47] [46] [52] [53] 68 69 70 [45] [50] [51] REAR DEFOG| FusesUsage | |
| 1 | RightTrailerStop/TurnLamp |
| FusesUsage | |
| 2 | Electronic Suspension Control,Automatic LevelControl Exhaust |
| 3 | LeftTrailerStop/ TurnLamp |

Information Provided by: DEALER
| FusesUsage | |
| 4Engine | Controls |
| 5 | EngineControl Module,Throttle Control |
| 6 | TrailerBrake Controller |
| 7FrontW | washer |
| 8Oxygen | Sensor |
| 9 | AntilockBrakes System2 |
| 10 | TrailerBack-up Lamps |
| 11 | DriverSide Low-Beam Headlamp |
| 12 | EngineControl Module(Battery) |
| FusesUsage | |
| 13 | FuellInjectors, IgnitionCoils (RightSide) |
| 14 | Transmission ControlModule (Battery) |
| 15 | VehicleBack-up Lamps |
| 16 | PassengerSide Low-Beam Headlamp |
| 17 | AirConditioning Compressor |
| 18Oxygen | nSensors |
| 19 | Transmission Controls(Ignition) |
| 20FuelPump | |
| FusesUsage | |
| 21 | FuelSystemControlModule |
| 22NotUsed | |
| 23NotUsed | |
| 24 | FuelInjectors,IgnitionCoils(LeftSide) |
| 25Trailer | ParkLamps |
| 26 | DriverSideParkLamps |
| 27 | PassengerSideParkLamps |
| 28FogLamps | |
| 29Horn | |
| 30 | PassengerSideHigh-BeamHeadlamp |
| 31 | DaytimeRunningLamps(DRL) |
10-52VehicleCare
| FusesUsage | |
| 32 | DriverSideHigh-BeamHeadlamp |
| 33 | DaytimeRunningLamps2 |
| 34Sunroof | |
| 35 | KeyIgnitionSystem,TheftDeterrentSystem |
| 36WindshieldWiper | |
| 37 | SEOB2UpfitterUsage(Battery) |
| 38 | ElectricAdjustablePedals |
| 39 | ClimateControls(Battery) |
| 40 | AirbagSystem(Ignition) |
| FusesUsage | |
| 41Amplifier | |
| 42AudioSystem | |
| 43 | Miscellaneous (Ignition), Cruise Control |
| 44NotUsed | |
| 45 | AirbagSystem (Battery) |
| 46 | InstrumentPanel Cluster |
| 47Power | Take-Off |
| 48 | AuxiliaryClimate Control(Ignition) |
| 49 | Center High-Mounted Stoplamp(CHMSL) |
| 50RearDefogger | |
| FusesUsage | |
| 51Heated | Mirrors |
| 52 | SEOB1UpfitterUsage(Battery) |
| 53 | AccessoryPowerOutlet |
| 54 | SEOUpfitterUsage |
| 55 | ClimateControls(Ignition) |
| 56 | EngineControlModule,SecondaryFuelPump(Ignition) |
| J-Case Fuses | Usage |
| 57Cooling | Fan1 |
| 58NotUsed | |
| 59 | HeavyDutyAntilockBrakeSystem |
| 60Cooling | Fan2 |
| 61 | AntilockBrakeSystem1 |
| 62Starter | |
| 63 | Stud2(Trailer Brakes) |
| 64 | LeftBussedElectricalCenter1 |
| 65NotUsed | |
| 66NotUsed | |
| 67Transfer | Case |
| J-Case Fuses | Usage |
| 68 | Stud1(Trailer Connector BatteryPower)(Optional-40A FuseRequired) |
| 69 | Mid-Bussed ElectricalCenter1 |
| 70 | ClimateControl Blower |
| 71NotUsed | |
| 72 | LeftBussed ElectricalCenter2 |
| RelaysUsage | |
| FANHI | CoolingFanHigh Speed |
| FANLO | CoolingFanLow Speed |
| FANCNTRL | CoolingFan Control |
| RelaysUsage | |
| HDLPLO/HID | Low-BeamHeadlamp |
| FOGLAMPFrontFogLamps | |
| A/CCMPRSR | AirConditioningCompressor |
| STRTRStarter | |
| PWR/TRNPowertrain | |
| FUELPMPFuelPump | |
| PRKLAMPParkingLamps | |
| REARDEFOG | RearDefogger |
| RUN/CRNKSwitchedPower | |
InstrumentPanelFuse Block
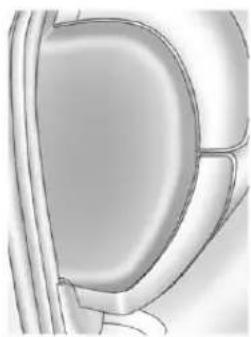
natural_image
Close-up of a mechanical component with curved surfaces and layered edges (no visible text or symbols)Theinstrumentpanelfuseblock accessdoorislocatedonthedriver sideedgeoftheinstrumentpanel.
Pulloffthecovertoaccessthefuse block.
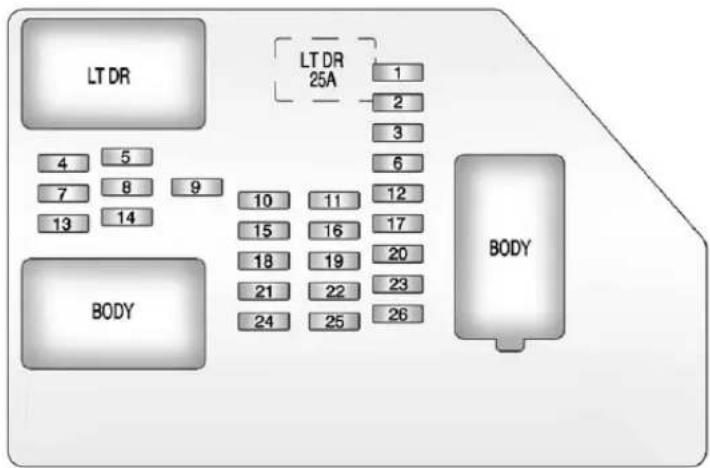
flowchart
graph TD
    A["LT DR"] --> B["1"]
    A --> C["2"]
    A --> D["3"]
    A --> E["6"]
    A --> F["10"]
    A --> G["11"]
    A --> H["12"]
    A --> I["15"]
    A --> J["16"]
    A --> K["17"]
    A --> L["18"]
    A --> M["19"]
    A --> N["20"]
    A --> O["21"]
    A --> P["22"]
    A --> Q["23"]
    A --> R["24"]
    A --> S["25"]
    A --> T["26"]
    U["BODY"] --> V["13"]
    U --> W["14"]
    U --> X["7"]
    U --> Y["8"]
    U --> Z["9"]
    U --> AA["10"]
    U --> AB["11"]
    U --> AC["12"]
The vehicle may not be equipped with allothefuses, relays, and feature shown.
| FusesUsage | |
| 1RearSeats | |
| 2 | RearAccessoryPowerOutlet |
| FusesUsage | |
| 3 | SteeringWheelControlsBacklight |
| 4Driver | DoorModule |
| 5 | DomeLamps,DriverSideTurnSignal |

Information Provided by DEALER
| FusesUsage | |
| 6 | DriverSideTurn Signal,Stoplamp |
| 7 | InstrumentPanel BackLighting |
| 8 | PassengerSideTurn Signal,Stoplamp |
| 9 | PassengerDoor Module,DriverUnlock |
| 10 | PowerDoorLock2 (UnlockFeature) |
| 11 | PowerDoorLock2 (LockFeature) |
| 12 | Stoplamps,Center High-Mounted Stoplamp |
| 13Rear | ClimateControls |
| 14PowerMirror | |
| 15 | BodyControl Module(BCM) |
| 16 | AccessoryPower Outlets |
| FusesUsage | |
| 17 | InteriorLamps |
| 18 | PowerDoorLock1(UnlockFeature) |
| 19 | RearSeatEntertainment |
| 20 | UltrasonicRearParkingAssist,PowerLiftgate |
| 21 | PowerDoorLock1(LockFeature) |
| 22 | DriverInformationCenter(DIC) |
| 23 | Wiper |
| 24 | CooledSeats |
| 25 | DriverSeatModule,RemoteKeylessEntrySystem |
| 26 | DriverPowerDoorLock(UnlockFeature) |
| Circuit Breaker | Usage |
| LTDR | DriverSidePowerWindowCircuitBreaker |
| Harness ConnectorUsage | |
| LTDR | DriverDoor Harness Connection |
| BODYHarnessConnector | |
| BODYHarnessConnector | |
CenterInstrumentPanelFuse Block
Thecenterinstrumentpanelfuse blockislocatedunderneaththe instrumentpanel, totheleftofthe steeringcolumn.
TopView

flowchart
graph TD
    A["BODY 2"] --> B["CB1"]
    A --> C["CB2"]
    A --> D["CB3"]
    A --> E["CB4"]
    F["BODY 1"] --> G["HEADLINER 3"]
    H["BODY 3"] --> I["HEADLINER 2"]
    J["HEADLINER 1"] --> K["HEADLINER 1"]
    L["SEO/UPFITTER"] --> M["HEADLINER 1"]
| Harness ConnectorUsage | |
| BODY2 | BodyHarness Connector2 |
| BODY1 | BodyHarness Connector1 |
| BODY3 | BodyHarness Connector3 |
| HEADLINER 3 | HeadlinerHarness Connector3 |
| HEADLINER 2 | HeadlinerHarness Connector2 |
| HEADLINER 1 | HeadlinerHarness Connector1 |
| SEO/UPFITTER | SpecialEquipment OptionUpfitter HarnessConnector |
| Circuit BreakerUsage | |
| CB1 | PassengerSide PowerWindowCircuit Breaker |
| CB2 | PassengerSeat CircuitBreaker |
| CB3 | DriverSeatCircuit Breaker |
| CB4Rear | SlidingWindow |
WheelsandTires
Tires
EverynewGMvehiclehas high-qualitytiresmadebya leadingtiremanufacturer.See thewarrantymanualfor informationregardingthetire warrantyandwheretoget service.Foradditional informationrefertothetire manufacturer.

WARNING
- Poorlymaintained and improperly used tires are dangerous.
• Overloadingthetirescan causeoverheatingasaresult oftoomuchflexing.There couldbeablowoutanda seriouscrash.See Vehicle LoadLimitsonpage9-17.
(Continued)
WARNING(Continued)
- Underinflatedtiresposethe samedangerasoverloaded tires. Theresultingcrash couldcauseseriousinjury. Checkalltiresfrequently to maintaintherecommended pressure. Tirepressure shouldbecheckedwhenthe tiresarecold.
• Overinflatedtiresaremore likelytobecut, punctured, orbrokenbyasudden impact—suchaswhen hittingapothole. Keeptiresat therecommended pressure. - Wornoroldtirescancausea crash. If the treadis badly worn, replacethem.
- Replaceanytiresthathave beendamagedbyimpacts withpotholes,curbs,etc.
(Continued)
WARNING(Continued)
- Improperlyrepairedtirescan causeacrash. Only the dealeroranauthorized tire servicecenters should repair, replace, dismount, and mount the tires.
- Donotspinthetiresin excessof56km/h(35mph) onslipperysurfacesuchas snow,mud,ice,etc. Excessivespinningmay causethetirestoexplode.
See TirePressurefor High-SpeedOperationon page 10-66 for inflation pressure adjustment for high speed driving.
20-InchTires
Ifthevehiclehas20-inchP275/55R20sizetires,theyare classifiedastouringtiresand aredesignedforonroaduse. Thelow-profile,widetread designisnotrecommendedfor "off-road"drivingorcommercial usesuchassnowplowing.See Off-RoadDrivingonpage9-6 andAddingaSnowPlowor SimilarEquipmenton page9-119foradditional information.
Notice: Low-profiletiresare moresusceptibletodamage fromroadhazardsorcurb impactthanstandardprofile tires. Tireand/orwheel assemblydamagecanoccur whencomingintocontact withroadhazardslike, potholes, orsharpedged objects, orwhenslidingintoa curb. Thewarrantydoesnot coverhistypeofdamage. Keeptiressettothecorrect inflationpressure and, when possible, avoidcontactwith curbs, potholes, and other roadhazards.
TireSidewallLabeling
Usefulinformationaboutatireis moldedintothesidewall. The exampleshowatypical passengerandlighttrucktire sidewall.
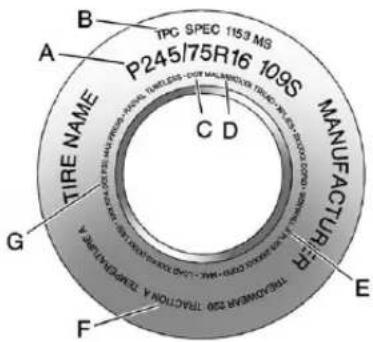
text_image
TIRE NAME A B P245/75R16 109S MANUFACTURER E F G C D TPC SPEC 1153 MS TRIOWAR 250 TRACTORA TANGUARDPassenger(P-Metric)Tire
(A)TireSize: Thetiresize codeisacombinationofletters andnumbersusedtodefinea particulartire'swidth,height,aspectratio,constructiontype,andservicedescription.Seethe "TireSize"illustrationalterinthis sectionformoredetail.

(B)TPCSpec(Tire PerformanceCriteria Specification):Original equipmenttiresdesignedto GM'sspecificireperformance criteriahaveaTPCspecification codemoldedontothesidewall. GM'sTPCspecificationsmeetor exceedallfederalsafety guidelines.
(C)DOT(Departmentof Transportation): The DepartmentofTransportation (DOT)codeindicatesthatthe tireisincompliancewith theU.S.Departmentof TransportationMotorVehicle SafetyStandards.
(D) TireIdentificationNumber (TIN): The letters and numbers following the DOTcode are the TireIdentificationNumber (TIN). The TIN shows the manufacturer and plant code, tiresize, and datethetirewas
manufactured. The TINis moldedontobothsidesofthe tire, althoughonlyonesidemay havethedateofmanufacture.
(E)TirePlyMaterial :Thetype ofcordandnumberofpliesin thesidewallandunderthetread.
(F)UniformTireQuality Grading(UTQG):Tire manufacturersarerequired to gradetiresbasedonthree performancefactors:treadwear, traction,andtemperature resistance.Formore information,seeUniformTire QualityGradingonpage 10-78.
(G)MaximumColdInflation LoadLimit :Maximumload thatcanbecarriedandthe maximumpressureneeded tosupportthatload. For informationonrecommended tirepressureseeTirePressure on page 10-65 and Vehicle Load Limits on page 9-17.

text_image
B TPC SPEC 2012 MS LT245/75R16/E 120/116S A C MANUFACTURER G F THE NAME 17 X.X LOAD SINGLEX XXX-LSBS • AT XX PSI COLO • MAX. LOAD QUNK - XXX - X.X • 11002 ES6 • DOT MAL9 ANCOX TREAD • PULI • 11002 ES6 • DOT MAL9 ANCOX TREAD • PULI • 11002 ES6 • DOT MAL9 ANCOX TREAD • PULI • 11002 ES6 • DOT MAL9 ANCOX TREAD • PULI • 11002 ES6 • DOT MAL9 ANCOX TREAD • PULI • 11003 PSB COLD • SIDEWALL 2 PAKE • • 11003 PSB COLD • SIDEWALL 2 PAKE • • 11003 PSB COLD • SIDEWALL 2 PAKE •LightTruck(LT-Metric)Tire
(A)TireSize: Thetiresize codeisacombinationofletters andnumbersusedtodefinea particulartire'swidth,height,aspectratio,constructiontype,andservicedescription.Seethe "TireSize"illustrationalterinthis sectionformoredetail.
(B)TPCSpec(Tire PerformanceCriteria Specification):Original equipmenttiresdesignedto GM'sspecificireperformance criteriahaveaTPCspecification codemoldedontothesidewall. GM'sTPCspecificationsmeetor exceedallfederalsafety guidelines.
(C)DualTireMaximumLoad : Maximumloadthatcanbe carriedandthemaximum pressureneededtosupportthat loadwhenusedinadual configuration.Forinformationon recommendedtirepressuresee TirePressureonpage10-65 and VehicleLoadLimitson page9-17.
(D)DOT(Departmentof Transportation): The DepartmentofTransportation (DOT)codeindicatesthatthe tireisincompliancewiththe U.S.Departmentof TransportationMotorVehicle SafetyStandards.
(E) TireIdentificationNumber (TIN): The letters and numbers following the DOT code are the TireIdentificationNumber(TIN). The TIN show the manufacturer and plant code, tiresize, and datethetire was manufactured. The TIN is molded on both sides of the tire, although only ones idemay havethedate of manufacture.
(F)TirePlyMaterial :Thetype ofcordandnumberofpliesin thesidewallandunderthetread.
(G) Single Tire Maximum Load: Maximum load that can be carried and the maximum pressure needed to support that load when used as a single. For information on recommended tire pressure see Tire Pressure on page 10-65 and Vehicle Load Limit on page 9-17.
TireDesignations
TireSize
The example show atypical passenger vehicle and light truck tiresize.
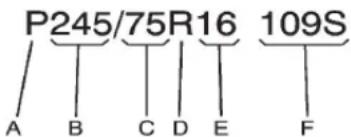
text_image
P245/75R16 109S A B C D E FPassenger(P-Metric)Tire
(A) Passenger(P-Metric) Tire: The United States version of a metric timesizing system. The letter Pasthe first character in the timesizes an passenger vehicle tire engineed to standards set by the U.S. Tire and Rim Association.
(B)TireWidth : Thethree-digit numberindicatesthetiresection widthinmillimetersfrom sidewalltosidewall.
(C)AspectRatio :Atwo-digit numberthatindicatesthetire height-to-widthmeasurements. Forexample,ifthetiresize aspectratiois75,asshownin itemCofthetireillustration,it wouldmeanthatthetire's sidewallis75percentashighas itiswide.
(D)ConstructionCode :A lettercodeisusedtoindicate thetypeofplyconstructionin thetire.TheletterRmeans radialplyconstruction;the letterDmeansdiagonalorbias plyconstruction;andtheletterB meansbelted-biasply construction.
(E)RimDiameter :Diameterof thewheelininches.
(F)ServiceDescription :These charactersrepresenttheload indexandspeedratingofthe tire. Theloadindexrepresents theloadcarryingcapacityatire iscertifiedtocarry. Thespeed ratingisthemaximumspeeda tireiscertifiedtocarryaload.
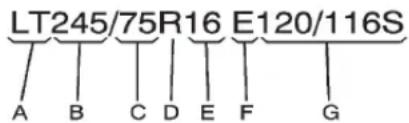
text_image
LT245/75R16 E120/116S A B C D E F GLightTruck(LT-Metric)Tire
(A)LightTruck(LT-Metric)
Tire: TheUnitedStatesversion ofametrictiresizingsystem. ThelettersLTasthefirsttwo charactersinthetiresizemean alighttrucktireengineeredto standardssetbytheU.S.Tire andRimAssociation.
(B)TireWidth: Thethree-digit numberindicatesthetiresection widthinmillimetersfrom sidewalltosidewall.
(C)AspectRatio :Atwo-digit numberthatindicatesthetire height-to-widthmeasurements. Forexample,ifthetiresize aspectratiois75,asshown initemCofthelighttruck (LT-Metric)tireillustration,it wouldmeanthatthetire's sidewallis75percentashighas itiswide.
(D)ConstructionCode :A lettercodeisusedtoindicate thetypeofplyconstructionin thetire.TheletterRmeans radialplyconstruction;the letterDmeansdiagonalorbias plyconstruction;andtheletterB meansbelted-biasply construction.
(E)RimDiameter :Diameter of thewheelin inches.
(F)LoadRange :LoadRange.
(G)ServiceDescription :The servicedescriptionindicate the loadindexandspeedratingofa tire.lftwonumbersaregivenas intheexample,120/116,then thisrepresentstheloadindexfor singleversusdualwheelusage (single/dual).Thespeedratingis themaximumspeedatireis certifiedtocarryaload.
TireTerminology and Definitions
AirPressure: The amount of airinsidethetirepressing outwardoneachsquareinch of the tire. Airpressure is expressed ink Pa (kilopascal) or psi (poundspersquareinch).
AccessoryWeight : The combinedweightofoptional accessories. Some examples of optional accessories are automatic transmission, power steering, power brakes, power windows, power seats, and air conditioning.
AspectRatio : Therelationship of atire'sheighttoitswidth.
Belt: Arubbercoatedlayerof cordsthatislocatedbetween thepliesandthetread. Cords maybemadefromsteelorother reinforcingmaterials.
Bead: Thetirebead contains steelwireswrapped by steel cordsthathold the tire onto therim.
BiasPlyTire :Apneumatictire inwhichthepliesarelaidat alternateangleslessthan 90degreestothecenterlineof thetread.
ColdTirePressure: The amountofairpressureinatire, measuredinkPa(kilopascal) orpsi(poundspersquareinch) beforeatirehasbuiltupheat fromdriving. See TirePressure onpage 10-65.
CurbWeight : The weight of a motor vehicle with standard and optionalequipment including the maximum capacity off fuel, oil, and coolant, but without passengers and cargo.
DOTMarkings :Acodemolded intothesidewallofative signifyingthatthetireisin compliancewiththeU.S. DepartmentofTransportation (DOT)MotorVehicleSafety Standards.TheDOTcode includestheTireIdentification Number(TIN),analphanumeric designatorwhichcanalso
identify the tire manufacturer, production plant, brand, and date of production.
GVWR: Gross Vehicle Weight Rating. See Vehicle Load Limits on page 9-17.
GAWRFRT: Gross Axle Weight Rating for the front axle. See Vehicle Load Limit on page 9-17.
GAWRRR : Gross Axle Weight Rating for therearaxle. See Vehicle Load Limit on page 9-17.
IntendedOutboardSidewall : Thesideofanasymmetricaltire, thatmustalwaysfaceoutward whenmountedonavehicle.
Kilopascal(kPa) : Thematic unitforairpressure.
LightTruck(LT-Metric)Tire :A tireusedonlightdutytrucksand somemultipurposepassenger vehicles.
LoadIndex : Anassigned numberranging from 1 to 279 that correspond to the load carrying capacity of fatire.
Maximum Inflation Pressure : Themaximum air pressure to which acoldt tire can be inflated. Themaximum air pressure is molded onto the sidewall.
MaximumLoadRating :The loadratingforatireatthe maximumpermissibleinflation pressureforthattire.
MaximumLoadedVehicle Weight: Thesumofcurb weight, accessoryweight, vehiclecapacityweight, and productionoptionsweight.
NormalOccupantWeight:The numberofoccupantsavehicle isdesignedtoseatmultipliedby 68kg(150lbs).See Vehicle LoadLimitsonpage9-17.
OccupantDistribution : Designatedseatingpositions.
OutwardFacingSidewall :The sideofanasymmetricaltirethat hasaparticularsidethatfaces outwardwhenmountedona vehicle. Thesideofthetirethat containsawhitewall,bears whitelettering,orbears manufacturer,brand,and/or modelnamemoldingthatis higherordeeperthanthesame moldingsontheothersidewall ofthetire.
Passenger(P-Metric)Tire :A tireusedonpassengercarsand somelightdutytrucksand multipurposevehicles.
Recommended Inflation Pressure: Vehicle manufacturer's recommended tireinflation pressure as shown on the tire placard. See Tire Pressure on page 10-65 and Vehicle Load Limit on page 9-17.
RadialPlyTire :Apneumatic tireinwhichtheplycordsthat extendtothebeadsarelaidat 90degreestothecenterlineof thetread.
Rim: Ametalsupportforatire anduponwhichthetirebeads areseated.
Sidewall: The portion of atire between the bread and the bead.
SpeedRating :An alphanumericcodeassignedto atireindicatingthemaximum speedatwhichatirecan operate.
Traction: Thefrictionbetween the tire and theroad surface. The amount of grip provided.
Tread: The portion of atire that comes into contact with theroad.
TreadwearIndicators :Narrow bands,sometimescalledwear bars,thatshowacrossthetread ofatirewhenonly1.6mm (1/16in)oftreadremains.See WhenItIs TimeforNew Tires onpage 10-75.
UTQGS(UniformTireQuality GradingStandards) :
Atireinformationsystem thatprovidesconsumerswith ratingsforatire'straction, temperature,andtreadwear. Ratingsaredetermined bytiremanufacturersusing governmenttestingprocedures. Theratingsaremoldedintothe sidewallofthetire.SeeUniform TireQualityGradingon page10-78.
VehicleCapacityWeight : The number of designated seating positions multiplied by 68kg(150lbs) plustherated cargoload. See VehicleLoad Limitsonpage9-17.
VehicleMaximumLoadonthe
Tire:Loadonanindividualtire duetocurbweight,accessory weight,occupantweight,and cargoweight.
VehiclePlacard :Alabel permanentlyattachedtoa vehicleshowingthevehicle capacityweightandtheoriginal equipmenttiresizeand recommendedinflationpressure. See "TireandLoading InformationLabel" under Vehicle LoadLimitsonpage9-17.
TirePressure
Tiresneedthecorrectamountof airpressuretooperate effectively.
Notice: Neithertire underinflation nor overinflationis good. Underinflatedtires, ortires that donothaveenoughair, can result in:
- Tireoverloading and overheating which could lead to ablowout.
• Prematureor irregularwear.
- Poorhandling.
- Reducedfueleconomy.
Overinflatedtires, ortiresthat havetoomuchair, can resultin:
- Unusualwear.
- Poorhandling.
- Roughride.
- Needlessdamagefrom roadhazards.
The Tire and Loading Information label on the vehicle indicates the originalequipment tires and the correct cold tire inflation pressures. The recommended pressure is the minimum air pressure needed to support the vehicle's maximum loadcarrying capacity.

For additional information regarding how much weight the vehicle can carry, and an example of the Tire and Loading Information label, see Vehicle Load Limit on page 9-17. How the vehicle is loaded affects vehicle handling and ride comfort. Never load the vehicle with more weight than it was designed to carry.
WhentoCheck
Checkthetiresonceamonth ormore.
Donotforgetthesparetire, ifthevehiclehasone.See Full-Size Spare Tireon page 10-95foradditional information.
HowtoCheck
Useagoodqualitypocket-type gaugetochecktirepressure. Propertireinflationcannotbe determinedbylookingatthetire. Check the tire inflation pressure whentetires are cold, meaning the vehicle has not been driven for at least three hours or more than 1.6 km (1 mi).
Removethevalvecapfromthe tirevalvestem.Pressthetire gaugefirmlyontothevalveto getapressuremeasurement. Ifthecoldtireinflationpressure matchestherecommended pressureontheTireand LoadingInformationlabel,no furtheradjustmentisnecessary. Iftheinflationpressureislow, addairuntiltherecommended pressureisreached.Ifthe inflationpressureishigh,press onthemetalsteminthecenter ofthetirevalvetoreleaseair.
Re-checkthetirepressurewith thetiregauge.
Return the valve capson the valve stems to prevent leaks and keep out dirt and moisture.
TirePressurefor High-SpeedOperation

WARNING
Drivingathighspeeds, 160km/h (100mph) or higher, puts an additional strainontires. Sustained high-speed driving causes excessive heat buildup and can cause sudden tire failure. You could have acrash and you others could be killed. Some high-speedrated tires require inflation pressure adjustment for high-speed operation. When speed limits and road conditions are such that vehicle can be driven at high speeds, makes sure the tires aerated for high-speed operation, in excellent condition, and set to the correct cold tire inflation pressure for the vehicle load.
VehicleswithP265/70R17orP275/55R20sizetiresrequireinflation pressureadjustmentwhendriving thevehicleatspeedsof160km/h (100mph)orhigher.Setthecoldtire inflationpressureto20kPa(3psi) abovetherecommendedcoldtire pressureshownontheTireand LoadingInformationlabel.
Returnthetirestothe recommendedcoldtireinflation pressurewhenhigh-speeddriving hasended.SeeVehicleLoadLimits onpage9-17andTirePressureon page10-65.
TirePressureMonitor System
The TirePressureMonitorSystem (TPMS) uses radio and sensor technology to check tire pressure levels. The TPMS sensors monitor the air pressure in your tires and transmit tire pressurereading stoa receiver located in the vehicle.
Eachtire, including the spare (if provided), should be checked monthly when cold and inflated to the inflation pressurerecommended by the vehicle manufacturer on the vehicle placardortire inflation pressure label. (If your vehicle has tires of different sizing thanthesize indicated on the vehicle placardor tire inflation pressure label, you should determinethe propertire inflation pressure forthosetires.)
Asanadded safety feature, your vehicle has been equipped with a tire pressure monitoringsystem (TPMS) that illuminates alowtire pressure telltale when none or more of your tires is significantly under-inflated.
Accordingly, whenthelowtire pressuretelltaleilluminates, you shouldstopandcheckyourtiresas soonaspossible, andinflatethem totheproperpressure. Drivingona significantlyunder-inflatedtire causesthetiretooverheatandcan
leadtotirefailure.Under-inflation alsoreducesfuelefficiencyandtire treadlife,andmayaffectthe vehicle'shandlingandstopping ability.
PleasenotethattheTPMSis notasubstituteforpropertire maintenance,anditisthedriver's responsibilitytomaintaincorrecttire pressure,evenifunder-inflationhas notreachedtheleveltotrigger illuminationoftheTPMSlowtire pressuretelltale.
Yourvehiclehasalsobeen equippedwithaTPMSmalfunction indicatortoindicatewhenthe systemisnotoperatingproperly. TheTPMSmalfunctionindicatoris combinedwiththelowtirepressure telltale.Whenthesystemdetectsa malfunction,thetelltalewillflashfor approximatelyoneminuteandthen remaincontinuouslyilluminated. Thissequencewillcontinueupon subsequentvehiclestart-upsas longasthemalfunctionexists.
Whenthemalfunctionindicatoris illuminated,thesystemmaynotbe abletodetectorsignallowtire pressureasintended.TPMS malfunctionsmayoccurforvariety ofreasons,includingtheinstallation ofreplacementoralternatetiresor wheelsonthevehiclethatprevent theTPMSfromfunctioningproperly. AlwayschecktheTPMSmalfunction telltaleafterreplacingoneormore tiresorwheelsonyourvehicleto ensurethatthereplacementor alternatetiresandwheelsallowthe TPMStocontinuetofunction properly.
See TirePressureMonitor Operationonpage 10-68 for additional information.
FederalCommunications Commission(FCC)Rulesand withIndustryCanada Standards
SeeRadioFrequencyStatementon page13-23forinformation regardingPart15oftheFederal CommunicationsCommission(FCC) RulesandwithIndustryCanada StandardsRSS-GEN/210/220/310.
TirePressureMonitor Operation
This vehicle may have a Tire Pressure Monitor System (TPMS). The TPMS is designed to warn the driver when alow tire pressure condition exists. TPMS sensors are mounted on to each tire and wheel assembly, excluding the spare tire and wheel assembly. The TPMS sensors monitor the air pressure in the tires and transmit the tire pressurereading to are receiver located in the vehicle.

Whenalowtirepressurecondition isdetected,theTPMSilluminates thelowtirepressurewarninglight locatedontheinstrumentcluster. Ifthewarninglightcomeson,stop as soonaspossibleandinflatethe tirestotherecommendedpressure shownontheTireandLoading Informationlabel.SeeVehicleLoad Limitsonpage9-17.
Amessagetocheckthepressurein aspecifictiredisplaysintheDriver InformationCenter(DIC).Thelow tirepressurewarninglightandthe DICwarningmessagecomeonat eachignitioncycleuntilthetiresare inflatedtothecorrectinflation pressure.IfthevehiclehasDIC buttons,tirepressurelevelscanbe viewed.Foradditionalinformation anddetailsabouttheDICoperation

anddisplays,seeDriverInformation Center(DIC)onpage5-33andTire Messagesonpage5-50.
Thelowtirepressurewarninglight maycomeonincoolweatherwhen thevehicleisfirststarted,andthen turnoffasthevehicleisdriven.This couldbeanearlyindicatorthatthe airpressureisgettinglowand needstobeinflatedtotheproper pressure.
ATireandLoadingInformationlabel showsthesizeoftheoriginal equipmenttiresandthecorrect inflationpressureforthetireswhen theyarecold.SeeVehicleLoad Limitsonpage9-17,foranexample oftheTireandLoadingInformation labelanditslocation.Alsosee Tire Pressureonpage10-65.
The TPMScanwarnaboutalow tirepressureconditionbutil doesnotreplacenormaltire maintenance.See TireInspection onpage 10-71,TireRotationon page 10-72and Tireson page 10-57.
Notice:Tiresealantmaterialsare notallthesame.Anon-approved tiresealantcoulddamagethe TPMSsensors.TPMSsensor damagecausedbyusingan incorrecttiresealantisnot coveredbythevehicle warranty.Alwaysuseonlythe GM-approvedtiresealant availablethroughyourdealeror includedinthevehicle.
TPMSMalfunctionLightand Message
TheTPMSwillnotfunctionproperly ifoneormoreoftheTPMSsensors aremissingorinoperable.Whenthe systemdetectsamalfunction,the lowtirepressurewarninglight flashesforaboutoneminuteand thenstaysonfortheremainderof theignitioncycle.ADICwarning messagealsodisplays.The malfunctionlightandDICwarning messagecomeonateachignition
cycleuntiltheproblemiscorrected. Someoftheconditionsthatcan causethesetocomeonare:
- Oneoftheroadtireshasbeen replacedwiththesparetire. The spare tiredoesnothavea TPMSsensor. Themalfunction lightandtheDICmessage shouldgooffaftertheroadtire isreplacedandthesensor matchingprocessisperformed successfully. See"TPMSSensor MatchingProcess"laterinthis section.
- TheTPMSsensormatching processwasnotdoneornot completedsuccessfullyafter rotatingthetires. The malfunctionlightandtheDIC messageshouldgooffafter successfullycompleting the sensormatchingprocess.See "TPMSSensorMatching Process"laterinthissection.
- OneormoreTPMSsensorsare missingordamaged. The malfunctionlightandtheDIC messageshouldgooffwhenthe TPMSsensorsareinstalledand thesensormatchingprocessis performedsuccessfully.See yourdealerforservice.
- Replacementtiresorwheelsdo notmatchtheoriginalequipment tiresorwheels.Tiresandwheels otherthanthoserecommended couldpreventtheTPMSfrom functioningproperly.SeeBuying NewTiresonpage10-75.
- Operatingelectronicdevicesor beingnearfacilitiesusingradio wavefrequenciessimilartothe TPMScouldcausetheTPMS sensorstomalfunction.
If the TPMS is not functioning properly, it cannot detectorsignala lowtirecondition. Seeyourdealer for service if the TPMS malfunction light and DIC message come on and stay on.
TPMSSensorMatching Process
EachTPMSsensorhasaunique identificationcode. Theidentification codeneedstobematchedtoanew tire/wheelpositionafterrotatingthe vehicle'stiresorreplacingoneor moreoftheTPMSsensors. Also, theTPMSsensormatchingprocess shouldbeperformedafterreplacing asparetirewitharoadtire containingtheTPMSsensor. The malfunctionlightandtheDIC messageshouldgooffatthenext ignitioncycle. Thesensorsare matchedtothetire/wheelpositions, usingaTPMSrelearntool, inthe followingorder:driversidefronttire, passengersidefronttire, passenger sidereartire, anddriversiderear. Seeyourdealerforserviceorto purchasearelearntool.
There are two minutes to match the first tire/wheel position, and five minutes overall to match all four tire/wheel positions. If it takes longer, the matching process stops and must be restarted.
TheTPMSsensormatching processis:
- Settheparkingbrake.
- TurntheignitiontoON/RUNwith theengineoff.
- PresstheRemoteKeylessEntry (RKE) transmitter's LOCK and UNLOCK buttonsatthesame timefor approximately five seconds. The hornsounds twicetosignalthereceiverisin relearnmode and TIRE LEARNINGACTIVEmessage display on the DIC screen.
If the vehicle does not have RKE, press the Driver Information Center (DIC) vehicle information button until the PRESS √ TO RELEARNTIRE POSITIONS messagedisplays. The hornsoundstwicetosignal thereceiver is in relearn mode and TIRELEARNINGACTIVE messagedisplays on the DIC screen.
IfthevehicledoesnothaveRKE orDICbuttons,pressthetrip odometerresetstemlocatedon theinstrumentpanelclusteruntil thePRESS √TORELEARN TIREPOSITIONSmessage displays.Thehornsoundstwice tosignalthereceiverisin relearnmodeandTIRE LEARNINGACTIVEmessage displaysontheDICscreen.
- Startwiththedriverside fronttire.
- Placetherelearntoolagainst thetiresidewall, nearthevalve stem. Thenpressthebuttonto activatetheTPMSsensor. Ahornchirpconfirmsthatthe sensoridentificationcodehas beenmatchedtothistireand wheelposition.
- Proceed to the passengerside front tire, and repeat the procedure in Step 5.
-
Proceed to the passengerside reartire, and repeat the procedure in Step 5.
-
Proceed to the driversiderear tire, and repeat the procedure in Step5. The hornsound two timesto indicate the sensor identification code has been matched to the driversiderear tire, and the TPMS sensor matching process is no longer active. The TIRELEARNING ACTIVE message on the DIC displayscreen goes off.
- Turntheignitionswitchto LOCK/OFF.
- Set all four trestothe recommended air pressure level as indicated on the Tire and Loading Information label.
TireInspection
Werecommendthatthetires, includingthesparetire,ifthe vehiclehasone,beinspected forsignsofwearordamageat leastonceamonth.
Replacethetireif:
• Theindicatorsatthreeor moreplacesaroundthetire canbeseen.
- Thereiscordorfabric showingthroughthetire's rubber.
- Thetreadorsidewallis cracked, cut, orsnagged deepenoughtoshowcordor fabric.
- Thetirehasabump,bulge,orsplit.
- Thetirehasapuncture, cut, orotherdamagethatcannot berepairedwellbecauseof thesizeorlocationofthe damage.
TireRotation
Tiresshouldberotatedevery 12000km(7,500mi).See Maintenance Scheduleon page 11-3.
Tiresarerotatedtoachievea uniformwearforalltires. The firstrotationisthemost important.
Anytimeunusualwearis noticed,rotatethetiresassoon aspossibleandcheckthewheel alignment.Alsocheckfor damagedtiresorwheels.See WhenItIsTimeforNewTires onpage10-75andWheel Replacementonpage10-80.
If your vehicle has dual rear wheels, also see Dual Tire Rotation on page 10-74.

flowchart
graph TD
    A["Left Wheel"] --> B["Right Wheel"]
    B --> C["Left Wheel"]
    C --> D["Right Wheel"]
    D --> A
    style A fill:#f9f,stroke:#333
    style B fill:#f9f,stroke:#333
    style C fill:#f9f,stroke:#333
    style D fill:#f9f,stroke:#333
Usethisrotationpatternwhen rotatingthetiresifthevehicle hassinglerearwheels.

flowchart
graph TD
    A[" "] --> C[" "]
    B[" "] --> C[" "]
    C[" "] --> D[" "]
    D[" "] --> E[" "]
    E[" "] --> F[" "]
    F[" "] --> G[" "]
    G[" "] --> H[" "]
    H[" "] --> I[" "]
    I[" "] --> J[" "]
    J[" "] --> K[" "]
    K[" "] --> L[" "]
    L[" "] --> M[" "]
    M[" "] --> N[" "]
    N[" "] --> O[" "]
    O[" "] --> P[" "]
    P[" "] --> Q[" "]
    Q[" "] --> R[" "]
    R[" "] --> S[" "]
    S[" "] --> T[" "]
    T[" "] --> U[" "]
    U[" "] --> V[" "]
    V[" "] --> W[" "]
    W[" "] --> X[" "]
    X[" "] --> Y[" "]
    Y[" "] --> Z[" "]
    Z[" "] --> A[" "]
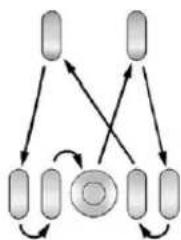
flowchart
graph TD
    A[" "] --> C(( ))
    B[" "] --> C
    C --> D(( ))
    D --> E[" "]
    E --> F[" "]
    F --> G[" "]
    G --> H[" "]
    H --> I[" "]
    I --> J[" "]
    J --> K[" "]
    K --> L[" "]
    L --> M[" "]
    M --> N[" "]
    N --> O[" "]
    O --> P[" "]
    P --> Q[" "]
    Q --> R[" "]
    R --> S[" "]
    S --> T[" "]
    T --> U[" "]
    U --> V[" "]
    V --> W[" "]
    W --> X[" "]
    X --> Y[" "]
    Y --> Z[" "]
Use this rotation pattern when rotating the tires if the vehicle has dual rear wheels (except polished forged aluminum wheels).

Information Provided by: DEALER
Vehicleswithpolishedforged aluminumdualwheelshave threeuniquewheels;afront,a rearouterandarearinner. Thesewheelscannoterotated toanotherposition,however, theycanberotatedfromleftto righttothesameposition.
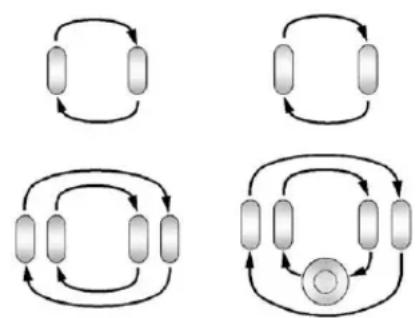
Usethisrotationpatternwhen rotatingthetiresifthevehicle haspolishedforgedaluminum dualrearwheels.
Thesparewheelcanbeusedin anypositionandcanberotated withtherearinnerwheels.
Wheninstallingdualwheels, checkthattheventholesinthe innerandouterwheelsoneach sidearelinedup.
Adjustthefrontandreartiresto therecommendedinflation pressureontheTireand LoadingInformationlabelafter thetireshavebeenrotated.See TirePressureonpage10-65 and VehicleLoadLimitson page9-17.
Check that all wheel nuts are properly tightened. See "Wheel Nut Torque" under Capacities and Specifications on page 12-2.
WARNING
Rustordirtonawheel,oronthe partstowhichitisfastened,can makewheelnutsbecomeloose aftertime. Thewheelcouldcome offandcauseanaccident.When changingawheel,removeany rustordirtfromplaceswherethe wheelattachestothevehicle.In anemergency,aclothorapaper towelcanbeused;however,use ascaperorwirebrushlaterto removeallrustordirt.
Lightlycoatthecenterofthe wheelhubwithwheelbearing greaseafterawheelchangeor tirerotationtopreventcorrosion orrustbuild-up.Donotget greaseontheflatwheel mountingsurfaceoronthe wheelnutsorbolts.
Resetthe TirePressureMonitor System(TPMS),ifthevehicle hasone.See TirePressure MonitorOperation on page 10-68.
Checkthatthesparetire,ifthe vehiclehasone,isstored properly.Push,pull,andthentry torotateorturnthetire.Ifit moves,tightenthecable. See"StoringaFlatorSpareTire andTools"underTireChanging onpage10-84.
DualTireRotation
Whenthevehicleisnew, orwheneverawheel, wheel bolt, orwheelnutisreplaced, checkthewheelnuttorqueafter 160, 1600, and 10000km (100, 1,000, and 6,000mi) of driving. Forpropertorqueandwheelnut tightening information, see "RemovingtheSpareTireand Tools" under TireChangingon page 10-84.
Theoutertireonadualwheelsetup generallywearsfasterthanthe innertire.Tireslastlongerandwear moreevenlyiftheyarerotated.See TireInspectiononpage10-71and TireRotationonpage10-72.Also seeMaintenanceScheduleon page 11-3.

WARNING
If the vehicle is operated with a tire that is under inflated, the tire can overheat. An overheated tire can lose air suddenly or catch fire. You or others could be injured. Properly inflate all tires, including the spare.
See TirePressureonpage 10-65, forinformationonpropertire inflation.
WhenItIsTimeforNew Tires
Factors, such as maintenance, temperatures, drivingspeeds, vehicleloading, and road conditions affect the wear rate of the tires.
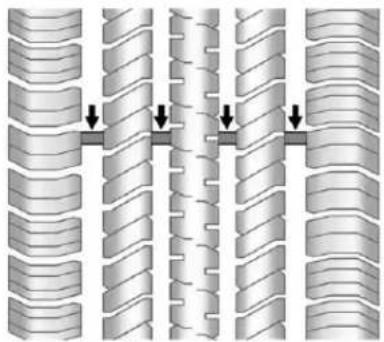
natural_image
Diagram of interlocking cylindrical structures with directional arrows indicating movement or force (no text or symbols)Treadwearindicatorsareonewayto tellwhenitistimefornewtires. Treadwearindicatorsappearwhen thetireshaveonly1.6mm(1/16in) orlessoftreadremaining.Some commercialtrucktiresmaynothave treadwearindicators.See Tire
Inspectiononpage10-72and Tire Rotationonpage10-72for additionalinformation.
Therubberintiresagesovertime. Thisalsoappliestothesparetire, ifthevehiclehasone, evenifitis neverused. Multipleconditions includingtemperatures, loading conditions, andinflationpressure maintenanceaffecthowfastaging takesplace. Tireswilltypicallyneed tobereplacedduetowearbefore theymayneedtobereplaceddue toage. Consultthetire manufacturerformoreinformation onwhentiresshouldbereplaced.
VehicleStorage
Tiresagewhenstorednormally mountedonaparkedvehicle.Park avehiclethatwillbestoredforat leastamonthinacool,dry,clean areaawayfromdirectsunlightto slowaging.Thisareashouldbefree ofgrease,gasolineorother substanceesthatcandeteriorate rubber.
Parkingforanextendedperiodcan causeflatspotsonthetiresthat mayresultinvibrationswhile driving. Whenstoringavehiclefor atleastamonth,removethetiresor raisethevehicletoreducethe weightfromthetires.
BuyingNewTires
GMhasdevelopedandmatched specifictiesforthevehicle. The originalequipmenttiresinstalled werdesignedtomeetGeneral MotorsTirePerformanceCriteria Specification(TPCSpec)system rating.Whenreplacementtiresare needed,GMstronglyrecommends buyingtireswiththesameTPC Specrating.
GM's exclusive TPCSpecsystem considers over a dozencritical specification that impact the overall performance of the vehicle, including brakesystem performance, ride and handling, traction control, and tire pressure monitoring performance. GM's TPC Specnumber is molded onto the tire's sidewall near the tiresize. If the tires have an all-season bread design, the TPC Specnumber will be followed by MS form and snow. See Tire Sidewall Labeling on page 10-58 for additional information.
GMrecommendsreplacingallthe tiresatthesametime.Uniformtread depthonalltireswillhelpto maintaintheperformanceofthe vehicle.Brakingandhandling performancemaybeadversely affectedifallthetiresarenot replacedatthesametime.See Tire Inspectiononpage 10-71and Tire Rotationonpage 10-72for informationonpropertirerotation.
WARNING
Tirescouldexplodeduring improperservice.Attempting tomountordismountatire couldcauseinjuryordeath. Onlyyourdealerorauthorized tireservicecentershould mountordismountthetires.
WARNING
Mixingtiresofdifferentsizes, brands,ortypesmaycauseloss ofcontrolofthevehicle,resulting inacrashorothervehicle damage. Usethecorrectsize, brand,andtypeoftiresonall wheels.
This vehicle may have adifferent sizesparethantheroadtires originally installed on the vehicle. When new, the vehicle included a
(Continued)
WARNING(Continued)
sparetireandwheelassembly withasimilaroveralldiameteras theroadtiresandwheels,soitis allrighttodriveonit. Thespare tirewasdevelopedforuseonthis vehicleandwillnotaffectvehicle handling.
WARNING
Usingbias-plytiresonthe vehiclemaycausethewheel rimflangestodevelopcracks aftermanymilesofdriving. Atireand/orwheelcouldfail suddenlyandcauseacrash. Useonlyradial-plytireswith thewheelsonthevehicle.
If the vehicle tires must bere placed with atire that does not have a TPC Spec number, makes sure they are the namesize, load range, speed rating, and construction (radial) as the original tires.
Vehiclesthathaveatirepressure monitoringsystemcouldgivean inaccuratelow-pressurewarningif non-TPCSpecratedtiresare installed.See TirePressureMonitor Systempage 10-67.
The Tire and Loading Information label indicates the original equipment tires on the vehicle. See Vehicle Load Limit on page 9-17 forthelabellocation and more information about the Tire and Loading Information label.
DifferentSizeTiresand Wheels
If wheels sortires are installed that are different sizethan the original equipment wheels and tires, vehicle performance, including its braking, ride and handling characteristics, stability, and resistancetorollover maybe affected. If the vehicle has electronics system such as antilock brakes, rolloverairbags, traction control, and electronic stability control, the performance of these systems can also be affected.
WARNING
If different-sized wheels are used, theremay not bean acceptable level of performance and safety if tires not recommended forth those wheels are selected. This increases the chance of a crash and serious injury. Only use GM specific wheel and tires systems developed for the vehicle, and havethem properly installed by a GM certified technician.
SeeBuyingNewTireson page10-75andAccessoriesandModificationsonpage10-4.
UniformTireQuality Grading
Qualitygradescanbefound whereapplicableonthetire sidewallbetweentreadshoulder andmaximumsectionwidth. For example:
Treadwear200TractionAA TemperatureA
The following information relates to the system developed by the United States National Highway Traffic Safety Administration (NHTSA), which gradestires by treadwear, traction, and temperature performance. This applies only to vehicle less sold in the United States. The grades are molded on the sidewall of most passenger cartires. The Uniform Tire Quality Grading
(UTQG)systemdoesnotapply todeeptread,wintertires, compactsparetires,tireswith nominalrimdiametersof 10to12inches(25to30cm), ortosomelimited-production tires.
While the tires available on General Motors passengers cars and light trucks may vary with respect to these grades, they must also conform to federal safety requirements and additional General Motors Tire Performance Criteria (TPC) standards.
All Passenger Car Tires Must Conform to Federal Safety Requirements In Addition To These Grades.
Treadwear
Thetreadweargradeisa comparativeratingbasedonthe wearrateofthetirewhentested undercontrolledconditionsona specifiedgovernmenttest course. Forexample, atire graded150wouldwearoneand ahalf(1½)timesaswellonthe governmentcourseasatire graded100. Therelative performanceoftiresdepends upontheactualconditionsof theiruse, however, and may departsignificantlyfromthe normduetovariationsindriving habits, servicepractices anddifferencesinroad characteristicsandclimate.
Traction-AA,A,B,C
Thetractiongrades, from highest to lowest, are AA, A, B, and C. Those grades represent the tire's ability to stop on wet pavement as measured under controlled condition on specified government test surfaces of asphalt and concrete. At remarked C may have poor traction performance. Warning: Thetraction grade assigned to histire is based on straight-ahead braking traction tests, and does not include acceleration, cornering, hydroplaning, or peak traction characteristics.
Temperature—A,B,C
ThetemperaturegradesareA (thehighest), B, and C, representing the tire's resistance to the generation of heat and its ability to dissipate heat when tested under controlled
conditionsonaspecifiedindoor laboratorytestwheel.Sustained hightemperaturecancausethe materialofthetiretodegenerate andreducetirelife,and excessivetemperaturecanlead tosuddentirefailure.Thegrade Ccorrespondstoalevelof performancewhichall passengercartiresmustmeet undertheFederalMotorSafety StandardNo.109.GradesBand Arepresenthigherlevelsof performanceonthelaboratory testwheelthanthemminimum requiredbylaw.Warning:The temperaturegradeforthistireis establishedforatirethatis properlyinflatedandnot overloaded.Excessivespeed, underinflation,orexcessive loading,eitherseparatelyorin combination,cancauseheat buildupandpossibletirefailure.
WheelAlignmentandTire Balance
Thetiresandwheelswerealigned andbalancedatthefactoryto providethelongesttirelifeandbest overallperformance.Adjustmentsto wheelalignmentandtirebalancing willnotbenecessaryonaregular basis.However,checkthe alignmentifthereisunusualtire wearorifthevehicleispullingto onesideortheother.Ifthevehicle vibrateswhendrivingonasmooth road,thetiresandwheelsmight needtoberebalanced.Seeyour dealerforproperdiagnosis.
WheelReplacement
Replaceanywheelthatisbent, cracked,orbadlyrustedor corroded.Ifwheelnutskeepcoming loose,thewheel,wheelboltsand wheelnutsshouldbereplaced. Ifthewwheelleaksair,replaceit. Somealuminumwheelscanbe repaired.Seeyourdealerifanyof theseconditionsexist.
Yourdealerwillknowthekindof wheelthatisneeded.
Eachnewwheelshouldhavethe sameload-carryingcapacity, diameter,width,offsetandbe mountedthesamewayastheoneit replaces.
Replacewheels, wheelbolts, wheel nuts, or Tire Pressure Monitor System (TPMS) sensors with new GM originale equipment parts.
WARNING
Using the wrong replacement wheels, wheel bolts, or wheel nutscan be dangerous. It could affect the braking and handling of the vehicle. Tirescan lose air, and cause loss of control, causing a crash. Always set the correct wheel, wheel bolts, and wheel nuts for replacement.
Notice: The wrong wheel can also cause problems with bearing life, brake cooling, speedometer orodometeralibration, headlampaim, bumper height, vehicleground clearance, and tire ortirechain clear anctothe body and chassis.
Wheneverawheel, wheelbolt, orwheelnutisreplacedonadual wheelsetup, checkthewheelnut torqueafter160, 1600 and 10000km(100, 1,000 and 6,000mi) of driving. For propertorque, see "WheelNutTorque" under Capacities and Specifications on page 12-2.
SeelfaTireGoesFlaton page 10-82 form more information.
UsedReplacementWheels
WARNING
Replacingawheelwithaused oneisdangerous.Howithas beenusedorhowfarithasbeen drivenmaybeunknown.Itcould failsuddenlyandcauseacrash. Whenreplacingwheels,usea newGMoriginalequipment wheel.
TireChains

WARNING
If the vehicle has dual wheels or P265/65R18, P275/55R20, LT265/70R17, LT265/70R18, LT265/60R20, P285/50R20, P285/45R22 or 285/45R22 size tires, donot usetire chains. They candamagethe vehicle because there is not enough clearance. Tire chains used on a vehicle without the proper amount of clearance can caused damage to the brakes, suspension, or other vehicle parts. The areadamaged by the tire chains could cause you to lose control of the vehicle and you or others maybe injured in crash.
(Continued)
WARNING(Continued)
Useanother type of traction device only if its manufacturer recommends it for use on the vehicle and tiresize combination and road conditions. Follow that manufacturer's instructions. To help avoid damage to the vehicle, drives lowly, read just, or remove the device if it is contacting the vehicle, and donot spin the vehicle's wheels.
If youdofindtractiondevicesthat will fit, install themontherear tires.
Notice: If the vehicle does not have dual wheels and has atire size other than P265/65R18, P275/55R20, LT265/70R17, LT265/70R18, LT265/60R20, P285/50R20, P285/45R22, or 285/45R22, use tire chains only where legal and only when you must. Use chains that are the propersize for the tires. Install them on the tires of therear axle. Donot use chains on the tires of the front axle. Tightenthemastightly as possible with the ends securely fastened. Drives lowly and follow the chain manufacturer's instructions. If you can hear the chains contacting the vehicle, stop and retightenthem. If the contact continues, slowdown until stops. Driving to of a star spinning the wheel with chains on will damage the vehicle.

Information Provided by: DEALER
IfaTireGoesFlat
Itisunusualforatiretoblowout whiledriving,especiallyifthetires aremaintainedproperly.Ifairgoes outofatire,itismuchmorelikelyto leakoutslowly.Butifthereeverisa blowout,hereareafewtipsabout whattoexpectandwhattodo:
Ifafronttirefails,theflattire createsadragthatpullsthevehicle towardthatside.Takeyourfootoff theacceleratorpedalandgripthe steeringwheelfirmly.Steerto maintainlaneposition,andthen gentlybraketoastop,welloffthe road,ifpossible.
Arearblowout,particularlyyona curve,actsmuchlikeaskidand mayrequirethesamecorrectionas usedinaskid. Stoppressingthe acceleratorpedalandsteerto straightenthevehicle. Itmaybe verybumpyandnoisy. Gentlybrake toastop, wellofftheroad, ifpossible.
WARNING
Drivingonaflattirewillcause permanentdamagetothetire. Re-inflatingatireafterithas beendrivenonwhileseverely underinflatedorflatmaycausea blowoutandaseriouscrash. Neverattempttore-inflateatire thathasbeendrivenonwhile severelyunderinflatedorflat. Haveyourdealeroranaauthorized tireservicecenterrepairor replacetheflattireassoonas possible.
WARNING
Liftingvehicleandgetting underittodomainaintenanceor repairsidangerouswithoutthe appropriatesafetyequipmentand training.Ifajackisprovidedwith thevehicle,itisdesignedonlyfor changingaflattire.Ifitisusedfor anythingelse,youorotherscould bebadlyinjuredorkilledifthe vehicleslipsoffthejack.Ifajack isprovidedwiththevehicle,only useitforchangingaflattire.
Ifatiregoesflat, avoidfurthertire andwheeldamagebydrivingslowly toalevelplace, wellofftheroad, ifpossible. Turnonthehazard warningflashers.SeeHazard WarningFlashersonpage6-5.
WARNING
Changingatirecanbe dangerous. The vehiclecanslip off the jack and rollover or fall causing injury or death. Find a level placeto changethe tire. To help prevent the vehicle from moving:
- Settheparkingbrakefirmly.
- Putanautomatic transmission in P(Park)ora manual transmission in 1(First)orR(Reverse).
- For four-wheel-drive vehicles, besure the transfercaseisinadrive gear—notinN(Neutral).
(Continued)
WARNING(Continued)
- Turnofftheengineanddo notrestartwhilethevehicle israised.
- Donotallowpassengersto remaininthevehicle.
- Placewheelblocksonboth sidesofthetireatthe oppositecornerofthetire beingchanged.
Whenthevehiclehasaflattire(B), usethefollowingexampleasa guidetoassistintheplacementof thewheelblocks(A).
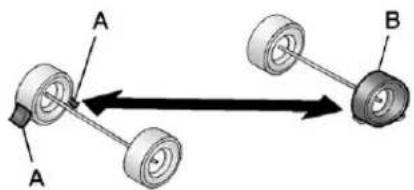
text_image
A A BA.WheelBlock
B.FlatTire
The following information explains howtousethejackandchange atire.
TireChanging
RemovingtheSpareTireand Tools

text_image
C F B A E DCrewCab
A. WingNutRetainingToolKit
B. ToolKit
C.WheelBlocks
D.Jack
E.JackKnob
F.WingNutRetainingWheel Blocks
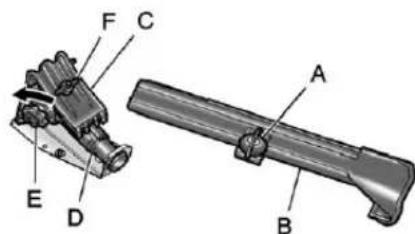
text_image
Technical diagram of a mechanical assembly with labeled parts A through FRegularCab
A. WingNutRetainingToolKit
B. ToolKit
C.WheelBlocks
D.Jack
E.JackKnob
F.WingNutRetainingWheel Blocks

text_image
Technical diagram of an engine gun with labeled parts A, B, C, D, EExtendedCab
A. WingNutRetainingToolKit
B. ToolKit
C.WheelBlocks
D.Jack
E.JackKnob

lofannation Provided by
DEALER
如:一、召开日期:二01年5月
Forregularcabmodels,the equipmentyouwillneedisbehind thepassengerseat.Forextended andcrewcabmodels,the equipmentisontheshelfbehindthe passengersidesecondrowseat.
- Turntheknobonthejack counterclockwisetolowerthe jackheadtoreleasethejack fromitsholder.
- Turnthewingnut counterclockwisetoremove thewheelblocksandthe wheelblockretainer.
- Turnthewingnutusedtoretain thestoragebagandtools counterclockwisetoremoveit.
Usethejackhandleextensionsand thewheelwrenchtoremovethe underbody-mountedsparetire.

text_image
Diagram of car wheel assembly with labeled parts including tire, switch, and connector componentsA. Spare Tire (Valve Stem Pointed Down)
B. HoistAssembly
C. HoistCable
D. Tire/WheelRetainer
E.HoistShaft
F.HoistEndofExtensionTool
G.HoistShaftAccessHole
H.WheelWrench
I. JackHandleExtensions
J.SpareTireLock(Ifequipped)
1. Openthespare tirelockcover onthebumperandusethe ignitionkeytoremovethespare tirelock(J). Toremovethespare tirelock, inserttheignitionkey turnandpullstraightout.
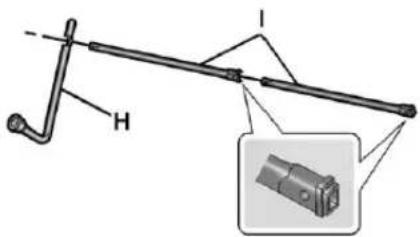
text_image
Technical diagram of a mechanical lever with labeled component H and an inset showing a cylindrical component.- Assemble the wheel wrench (H) and the two jack handle extensions (I), as shown.


text_image
G F- Insert the hoistend (open end) (F) of the extension through the hole (G) in therear bumper.
Donotusethechiseledendof thewheelwrench.
Besurethehoistendofthe extension(F)connectstothe hoistshaft. Theribbedsquare endoftheextensionisusedto lowerthesparetire.
-
Turnthewheelwrench counterclockwisetolowerthe sparetiretotheground. Continuetoturnthewheel wrenchuntilthesparetirecan bepulledoutfromunderthe vehicle.
-
Pullthesparetireoutfromunder thevehicle.
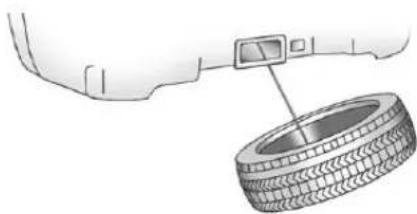
natural_image
Diagram of a car tire mounted on a vehicle's side panel, with a sensor attached to the wheel (no text or symbols present)-
Tiltthetiretowardthevehicle withsomeslackinthecableto accesssthetire/wheelretainer. Tilttheretainerandpullit throughthecenterofthewheel alongwiththecableandspring.
-
Putthesparetirenearthe flattire.
RemovingtheFlatTireand InstallingtheSpareTire
Usethefollowingpicturesand instructionstoremovetheflattire andraisethevehicle.
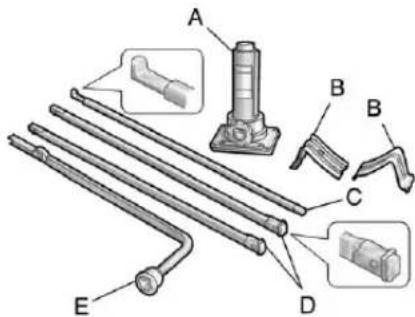
text_image
Technical diagram of mechanical components with labeled parts A, B, C, D, and EA.Jack
B.WheelBlocks
C.JackHandle
D. JackHandleExtension
E.WheelWrench
Thetoolsyouwillbeusinginclude thejack(A),thewheelblocks(B), thejackhandle(C),thejackhandle extensions(D),andthewheel wrench(E).
- Doasafetycheckbefore proceeding. Seelfa Tire Goes Flatonpage 10-82 formore information.
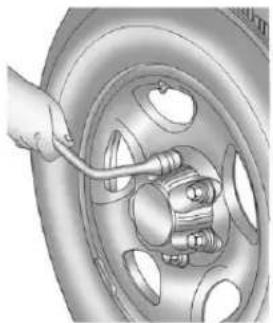
natural_image
Illustration of a hand using a tool to adjust or install a car wheel rim (no text or symbols visible)- If the vehicle has wheel nut caps, loosent hem by turning the wheel wrench counterclockwise.
Ifthevehiclehasacentercap withwheelnutcaps,thewheel nutcapsaredesignedtostay withthecentercapaftertheyare loosened.Removetheentire centercap.
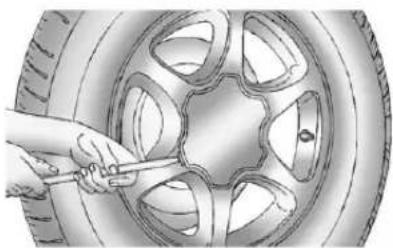
natural_image
Illustration of a hand using a tool to trim a car wheel rim (no text or symbols visible)Ifthewheelhasasmoothcenter cap, placethechiselendofthe wheelwrenchintheslotonthe wheel, and gentlypryitout.
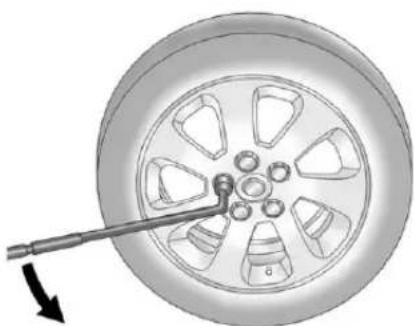
natural_image
Mechanical component diagram showing a wheel with a tool inserted, no text or symbols present- Usethewheelwrenchandturnit counterclockwisetoloosenthe wheelnuts. Donotremovethe wheelnutsyet.

Information Provided by: DEALER

natural_image
Diagram showing a car's side profile and a close-up of the steering wheel (no text or symbols present)FrontPosition-1500Models
- Position the jack under the vehicle, as shown. If the flatt tire is on the front of the vehicle (1500 Model vehicles), position the jack under the bracket attached to the vehicle's frame, behind the flatt tire.
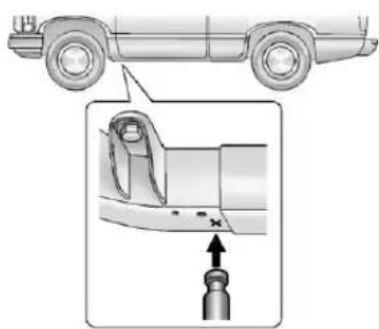
natural_image
Diagram of a car's side profile and internal component detail (no text or symbols)FrontPosition-AllOtherModels
Positionthejackunderthe vehicle,asshown.Iftheflattire isonthefrontofthevehicle(all othermodels),positionthejack ontheframebehindtheflattire.

text_image
Technical diagram showing vehicle rear suspension system with load arrows and mechanical assembly diagram belowRearPosition-1500Models
- If the flattire is on therear, for 1500 models position the jack under therear axle about 5cm (2in) in board of the shock absorber bracket.

Information Provided by: DEALER

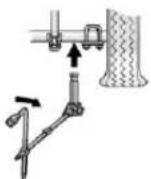
RearPosition- AllOtherModels
Forallothermodels, position the jackundertherearaxlebetween thespringanchorandtheshock absorberbracket.
Ifasnowplowhasbeenadded tothefrontofthevehicle,lower thesnowplowfullybefore raisingthevehicle.
Makesurethatthejackheadis positionedsothattherearaxle isrestingsecurelybetweenthe groovesthatareonthe jackhead.
WARNING
Gettingunderavehiclewhenitis liftedonajackisdangerous. Ifthevehicleslipsoffthejack, youcouldbebadlyinjuredor killed.Nevergetunderavehicle whenitissupportedonlyby ajack.
WARNING
Raisingthevehiclewiththejack improperlypositionedcan damagethevehicleandeven makethevehiclefall. To help avoidpersonalinjuryandvehicle damage, besuretofitthejacklift headintotheproperlocation beforeraisingthevehicle.
- Turnthewheelwrench clockwisetoraisethevehicle. Raisethevehiclefarenoughoff thegroundsothereisenough roomforthesparetiretofit underthewheelwell.

natural_image
Illustration of a hand adjusting a car wheel component with threaded bolts (no text or symbols)- Remove all the wheel nuts and take off the flattire.

WARNING
Rustordirtonawheel,oronthe partstowhichitisfastened,can makewheelnutsbecomeloose aftertime.Thewheelcouldcome offandcauseanaccident.When changingawheel,removeany rustordirtfromplaceswherethe wheelattachestothevehicle.In anemergency,aclothorapaper towelcanbeused;however,use ascaperorwirebrushlaterto removeallrustordirt.

natural_image
Illustration of a hand cleaning a car brake disc with a cloth (no text or symbols)-
Remove any rustordirt from the wheel bolts, mountingsurfaces, and spare wheel.
-
Installthesparetire.

WARNING
Neveruseoilorgreaseonbolts ornutsbecausethenutsmight comeloose. Thevehicle'swheel couldfalloff, causingacrash.
-
Putthewheelnutsbackon withtheroundedendofthe nutstowardthewheel.
-
Tighteneachwheelnutby hand. Thenusethewheel wrenchtotightenthenutsuntil thewheelisheldagainst thehub.
-
Turnthewheelwrench counterclockwisetolowerthe vehicle. Lowerthejack completely.

Information Provided by: DEALER
WARNING
Ifwheelstudsaredamaged,they canbreak.Ifallthestudsona wheelbroke,thewheelcould comeoffandcauseacrash. Ifanystudisdamagedbecause ofaloose-runningwheel,itcould bethatallofthestudsare damaged.Tobesure,replaceall studsonthewheel.Ifthestud holesinawheelhavebecome larger,thewheelcouldcollapsein operation.Replaceanywheelif itsstudholeshavebecomelarger ordistortedinanyway.Inspect hubsandhub-pilotedwheelsfor damage.Becauseofloose runningwheels,pilotingpad damagemayoccurandrequire replacementoftheentirehub,for propercenteringofthewheels. Whenreplacingstuds,hubs, wheelnutsorwheels,besureto useGMoriginalequipmentparts.
WARNING
Wheelnutsthatareimproperlyor incorrectlytightenedcancause thewheelstobecomelooseor comeoff. Thewheelnutsshould beightenedwithatorquewrench tothepropertorquespecification afterreplacing. Followthetorque specificationsuppliedbythe aftermarketmanufacturerwhen usingaccessorylockingwheel nuts.SeeCapacitiesand Specificationsonpage12-2for originalequipmentwheelnut torquespecifications.
Notice:Improperlytightened wheelnutscanleadtobrake pulsationandrotordamage.To avoidexpensivebrakerepairs, evenlytightenthewheelnutsin thepropersequenceandtothe propertorquespecification.See CapacitiesandSpecificationson page 12-2 for the wheel nut torque specification.
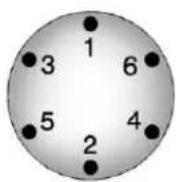

- Tightenthenutsfirmlyina crisscrosssequence, as shown, by turning the wheel wrench clockwise.
Forvehicleswithdualwheels,have atechniciancheckthewheelnut tightnessofallwheelswithatorque wrenchafterthefirst160km (100mi)andthen1600km (1,000mi)afterthat.Repeatthis servicewheneveryouhaveatire removedorserviced.See CapacitiesandSpecificationson page12-2formoreinformation.
Whenreinstallingtheregularwheel andtire,alsoreinstalleitherthe centercap,orbolt-onhubcap, dependingonwhatthevehicleis equippedwith.Forcentercaps, placethecaponthewheelandtap itintoplaceuntilitseatsflushwith thewheel.Thecaponlygoeson oneway.Besuretolineupthetab onthecentercapwiththe indentationonthewheel.For bolt-onhubcaps,aligntheplastic nutcapswiththewheelnutsand thentightenbyhand.Thenusethe wheelwrenchtotighten.
StoringaFlatorSpareTire andTools
WARNING
Storingajack, atire, orother equipment in the passenger compartment of the vehicle could cause injury. In sudden stop or collision, loose equipment could strike someone. Store all these in the proper place.
Notice: Storinganaluminum wheelwithaflattireunderyour vehicleforanextendedperiodof timeorwiththevalvestempointingupcandamagethe wheel.Alwaysstowthewheel withthevalvestempointing downandhavethewheel/tire repairedassoonaspossible.
Storethetireundertherearofthe vehicleinthesparetirecarrier.
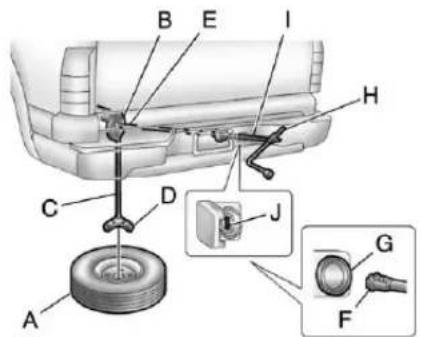
text_image
Technical diagram of a car's internal components with labeled parts A through H, including a tire and electrical switch.A. FlatorSpareTire(ValveStem PointedDown)
B. HoistAssembly
C.HoistCable
D. Tire/WheelRetainer
E.HoistShaft
F. HoistEndofExtensionTool
G.HoistShaftAccessHole
H.WheelWrench
I. JackHandleExtensions
J.SpareTireLock(IfEquipped)
-
Put the tire on the ground at the rear of the vehicle with the valve stemp pointed down, and to therear.
-
Pull the cable and spring through the center of the wheel. Tilt the wheel retainer plate down and through the center wheel.
Makesuretheretainerisfully seatedacrosstheundersideof thewheel.

text_image
Technical diagram of a mechanical lever with labeled component H and an inset showing a component detail- Attachthewheelwrench(H) and extensions(I) together, as shown.
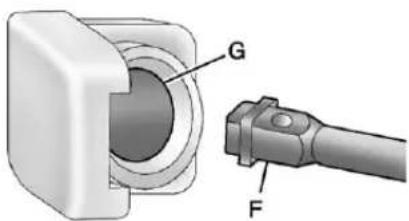
text_image
G F- Insert the hoistend (F) through the hole (G) in therear bumper and onto the hoist shaft.
Donotusethechiseledendof thewheelwrench.
10-94VehicleCare
- Raisethetirepartwayupward. Makesuretheretainerisseated inthewheelopening.
- Raisethetirefullyagainstthe undersideofthevehicleby turningthewheelwrench clockwiseuntilyouheartwo click sorfeelitskiptwice.You cannotovertightenthecable.

text_image
A B- Makesurethetireisstored securely.Push, pull(A), and then trytoturn(B) the tire. If the tire moves, usethewheelwrench to tightenthecable.
- Reinstallthesparetirelock, ifthevehiclehasone.
text_image
Technical diagram of a sewing machine with labeled parts A through H, showing mechanical components and assembly.A. WingNutRetainingWheel Blocks
B.WheelBlocks
C.WingNutRetainingToolKit
D.WheelWrenchandExtensions
E.ToolBag
F.JackMountingBracket

G.Jack
H.BoltRetainingWheelBlocks
1. Putthetools(D)inthetool bag(E)andplacetheminthe retainingbracket(C).
2. Tightendownthewingnut(C).
3. Assemble the wheel blocks (B) and jack (G) together with the wing nut (A) and retaining bolt (H).
4. Position the jack (G) in the mounting bracket (F). Position the holes in the base of the jack (G) onto the pin in the mounting bracket (F).
5. Returnthemtotheiroriginal locationinthevehicle. Formore information, referto "Removing the Spare Tire and Tools" for more information.
Full-SizeSpareTire
Yourvehicle,whennew,hada fully-inflatedsparetire.Asparetire mayloseairovertime,socheckits inflationpressureregularly.See Tire Pressureonpage 10-65 and VehicleLoadLimitsonpage 9-17 forinformationregardingpropertire inflationandloadingyourvehicle. Forinstructiononhowtoremove, installorstoreasparetire,see "RemovingtheFlatTireand InstallingtheSpare" and "Storinga FlatorSpareTireandTools" under TireChangingonpage 10-84.
Notice: If the vehicle has four-wheeldrive and adifferent sizesparetire is installed, donot drive infour-wheeldrive until the flattire is repaired and/or replaced. The vehicle could be damaged and therepair would not be recovered by the warranty. Never use four-wheeldrive when adifferentsizesparetire is installed on the vehicle.
Yourvehiclemayhaveadifferent sizesparetirethantheroadtires originallyinstalledonyourvehicle. Thissparetirewasdevelopedfor useonyourvehicle,soitisallright todriveonit.Ifyourvehiclehas four-wheeldriveandthedifferent sizesparetireisinstalled,keepthe vehicleintwo-wheeldrive.
Afterinstallingthesparetireonyour vehicle,youshouldstopassoonas possibleandmakesurethespare tireiscorrectlyinflated.Havethe damagedorflatroadtirerepairedor replacedassoonasyoucanand installedbackontoyourvehicle. Thisway,thesparetirewillbe availableincaseyouneeditagain.
Donotmixtiresandwheelsof differentsizes, because they will not fit. Keep your spare tire and its wheel together. If your vehicle has a spare tire that does not match your vehicle's original road tires and wheels in size and type, donot includethes spare in the tirerotation.
JumpStarting
Formoreinformationaboutthe vehiclebattery,seeBatteryon page10-33.
If the vehicle is a hybrid, se the hybrids supplement form more information.
Ifthevehicle'sbattery(orbatteries) hasrundown,youmaywanttouse anothervehicleandsomejumper cablestostartyourvehicle.Besure tousethefollowingstepstodoit safely.
WARNING
Batteriescanhurtyou. They can be dangerous because:
• They contain acid that can burn you.
• Theycontaingasthatcan explodeorignite.
• They contain enough electricity to burn you.
If you donot follow these steps exactly, some or all of these things can hurt you.
Notice: Ignoring the seven steps could result in costly damage to the vehicle that would not be covered by the warranty.
Trying to start the vehicle by pushing or pulling it will not work, and it could damage the vehicle.
- Check the other vehicle. It must have a 12-volt battery with a negative ground system.
Notice: Only use vehicle that has a 12-voltsystem with a negative ground for jump starting. If the other vehicle does not have a 12-voltsystem with a negative ground, both vehicles can be damaged.
- If you have a vehicle with a diesel engine with twobatteries, you should know before you begin that, especially in cold weather, you may not be able to get enough power from a single battery in another vehicle to start your diesel engine. If your vehicle has more than one battery, using the battery that is closest to the starter will reduce electrical resistance. This is located on the passengers side, in therear of the engine compartment.
3.Getthevehiclescloseenough sothejumpercablescanreach, butbesurethevehiclesarenot touchingeachother.Iftheyare, itcouldcauseanunwanted groundconnection.Youwould notbeabletostartyourvehicle, andthebadgroundingcould damagetheelectricalsystems.
To avoid the possibility of the vehicles rolling, set the parking brake firmly on both vehicles involved in the jump start procedure. Put the automatic transmission in P (Park) or a manual transmission in Neutral before setting the parking brake. If you have a four-wheel-drive vehicle, besure the transfer case is in a drive gear, not in Neutral.
Notice:Ifanyaccessoriesareleft onorpluggedinduringthejump startingprocedure,theycouldbe damaged.Therepairswouldnot recoveredbythevehicle warranty.Wheneverpossible, turnofforunplugallaccessories oneithervehiclewhenjump startingthevehicle.
-
Turnofftheignitiononboth vehicles. Unplugunnecessary accessoriespluggedintothe accessorypoweroutlets. Turn offtheradioandallthelamps thatarenotneeded. Thiswill avoidsparksandhelpsaveboth batteries. Anditcouldsavethe radio!
-
Openthehoodontheother vehicleandlocatethe positive(+)andnegative(-) terminallocationsonthat vehicle.
Thepositive(+)terminal,is locatedunderaredplasticcover atthepositivebatterypost.To uncoverthepositive(+)terminal, opentheredplasticcover.

natural_image
Mechanical assembly diagram showing hoses and components with an arrow indicating a specific connection point (no text or labels present)If your vehicle has a gasoline engine, theremotenegative (-) terminalisastudlocated on the right front of the engine, where thenegative batterycable attaches.

If your vehicle has a diesel engine, theremotenegative (-) terminalisthenegative (-) post on the auxiliary battery on the driver side of the engine compartment.
Formoreinformationonthe locationoftheremote positive(+)andremote negative(-)terminals,see EngineCompartmentOverview onpage10-6

WARNING
Anelectricfancanstartupeven whentheengineisnotrunning andcaninjureyou.Keephands, clothingandtoolsawayfromany underhoodelectricfan.

WARNING
Usinganopenflameneara batterycancausebatterygasto explode.Peoplehavebeenhurt doingthis,andsomehavebeen blinded.Useaflashlightifyou needmorelight.
Besurethebatteryhasenough water. Youdonotneedtoadd watertothebatteryinstalledin yournewvehicle. Butifabattery hasfillercaps, besuretheright amountofffluidisthere. Ifitislow, addwatertotakecareofthat first. If youdonot, explosiveegas could be present.
Batteryfluidcontainsacidthat canburnyou.Donotgetiton you.Ifyouaccidentallygetitin youreyesoronyourskin,flush theplacewithwaterandget medicalhelpimmediately.

WARNING
Fansorothermovingengine partscaninjureyoubadly.Keep yourhandsawayfrommoving partsoncetheengineisrunning.
- Check that the jumpercables do nothavelooseormissing insulation. If they do, you could get shock. The vehicles could be damaged too.
Beforeyouconnectthecables, herearesomebasicthingsyou shouldknow.Positive(+)willgo topositive(+)ortoaremote positive(+)terminalifthevehicle hasone.Negative(-)willgotoa heavy, unpaintedmetalengine partortoaremotenegative(-) terminalifthevehiclehasone.
Donotconnectpositive(+)to negative(-)oryouwillgeta shortthatwoulddamagethe batteryandmaybeotherparts too.Anddonotconnectthe negative(-)cabletothe negative(-)terminalonthedead batterybecausethiscancause sparks.
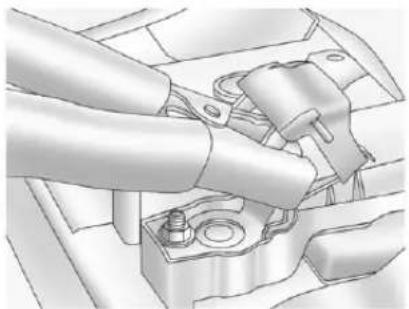
natural_image
Mechanical assembly diagram showing a hand operating a component with no visible text or symbols5.3LEngine(4.3L,4.8L,6.0L,6.2L and 6.6LSimilar)
-
Connecttheredpositive(+) cabletothepositive(+)terminal ofthevehiclewiththedead battery.
-
Donotlettheotherendtouch metal. Connectittothe positive(+)terminalofthegood battery. Usearemote positive(+)terminalifthevehicle hasone.
9.Nowconnecttheblack negative(-)cabletothe negative(-)terminalofthegood battery.Usearemote negative(-)terminalifthe vehiclehasone.
Donotlettheotherendtouch anythinguntilthenextstep.
- Connecttheotherendofthe negative(-)cabletoaheavy, unpaintedmetalenginepartor totheremotenegative(-) terminal,onthevehiclewith thedeadbattery.
11.Startthevehiclewiththegood batteryandruntheenginefora while.
- Trytostartthevehiclethathad thedeadbattery.Ifitwillnot startafterafewtries,it probablyneedsservice.
Notice: If the jumpercables are connected or removed in the wrong order, electrical shorting may occur and damage the vehicle. There pairs would not be covered by the vehicle warranty. Always connect and remove the jumpercables in the correct order, makingsure that the cables donottouche achother or other metal.
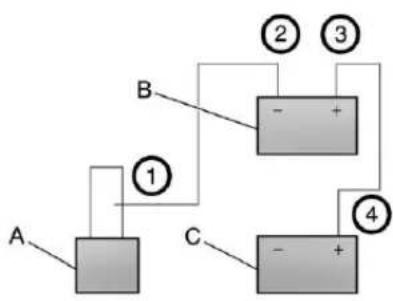
flowchart
graph TD
    A["Component A"] -->|①| B["Component B"]
    B -->|②| C["Component C"]
    B -->|③| D["Component D"]
    C -->|④| E["Component E"]
    D -->|④| E
JumperCableRemoval
A. Heavy, Unpainted Metal Engine Partor Remote Negative (-) Terminal
B. GoodBatteryorRemote Positive(+)andRemote Negative(-)Terminals
C. DeadBatteryorRemote Positive(+)Terminal
Todisconnectthejumpercables frombothvehiclesdothefollowing:
- Disconnecttheblack negative(-)cablefromthe vehiclethathadthebadbattery.
2.Disconnecttheblack negative(-)cablefromthe vehiclewiththegoodbattery.
-
Disconnecttheredpositive(+) cablefromthevehiclewiththe goodbattery.
-
Disconnecttheredpositive(+) cablefromtheothervehicle.
-
Return the positive (+) terminal cover, to its original position.
Towing
TowingtheVehicle
Notice: To avoid damage, the disabled vehicle should be towed with all four wheel soff the ground. Care must be taken with vehicle sthathavelow ground clearance and/or special equipment. Always flat bedona car carrier.
Consultyourdealerora professionaltowingserviceifthe disabledvehiclemustbetowed. SeeRoadsideAssistanceProgram (U.S.andCanada)onpage13-8or RoadsideAssistanceProgram (Mexico)onpage13-11.
Totowthevehiclebehindanother vehicleforrecreationalpurposes, suchasbehindamotorhome,see "RecreationalVehicleTowing"inthis section.
Recreational Vehicle Towing
Recreationalvehicletowingmeans towingthevehiclebehindanother vehicle,suchasamotorhome.The twomostcommontypesof recreationalvehicletowingare knownasdinghytowinganddolly towing.Dinghytowingistowingthe vehiclewithallfourwheelsonthe ground.Dollytowingistowingthe vehiclewithtwowwheelsonthe groundandtwowheelsupona deviceknownasadolly.
Herearesomeimportantthingsto considerbeforerecreationalvehicle towing:
- Whatisthetowingcapacity ofthetowingvehicle? Besuretoreadthetow vehiclemanufacturer's recommendations.
- Whatisthedistancethatwillbe travelled?Somevehicleshave restrictionsonhowfarandhow longtheycantow.
- Isthepropertowingequipment goingtobeused? Seeyour dealerortraileringprofessional foradditionaladviceand equipmentrecommendations.
- Isthevehiclereadytobe towed?Justaspreparingthe vehicleforalongtrip,makesure thevehicleispreparedtobe towed.
DinghyTowing
Two-Wheel-DriveVehicles
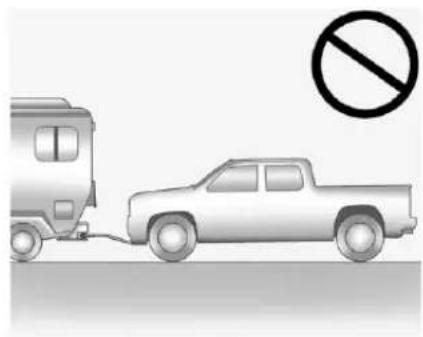
natural_image
Illustration of a pickup truck and a pickup truck with a no-smoking symbol (no text or labels)Notice: If the vehicle is bestowed with all four wheels on the ground, the drivetrain components could be damaged. There pairs would not be recovered by the vehicle warranty. Donot tow the vehicle with all four wheels on the ground.
Two-wheel-drive vehicle should not be towed with all four wheels on the ground. Two-wheel-drive
transmissionshavenoprovisions for internal lubrication while being towed.
Four-Wheel-DriveVehicles
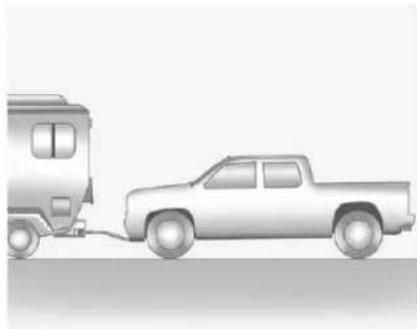
natural_image
Side view illustration of a pickup truck and a pickup truck connected by a cable, no text or symbols presentUsethefollowingprocedure to dinghytowafour-wheel-drive vehicle:
-
Position the vehicle being towed behind the tow vehicle and shift the transmission to P (Park).
-
Turntheengineoffandfirmlyset theparkingbrake.

Information Provided by DEALER
- Securelyattachthevehicle beingtowedtothetowvehicle.

WARNING
Shiftingafour-wheel-drive vehicle'stransfercaseinto N(Neutral)cancausethevehicle torollevenifthetransmissionis inP(Park). Thedriverorothers couldbeinjured. Makesurethe parkingbrakeisfirmlysetbefore thetransfercaseisshiftedto N(Neutral).
4.Shiftthetransfercaseto N(Neutral).See"Shiftinginto Neutral"underFour-WheelDrive onpage9-47fortheproper proceduretoselecttheNeutral positionforthevehicle.
- Releasetheparkingbrakeonly afterthevehiclebeingtowedis firmlyattachedtothetowing vehicle.
- TurntheignitiontoLOCK/OFF andremovethekey—the steeringwheelwillstillturn.
Aftertowing, see "ShiftingOutof Neutral" under Four-WheelDriveon page 9-47 for the proper procedure to take the vehicle out of the Neutral position.
DollyTowing
FrontTowing(FrontWheelsOff theGround)—Two-Wheel-Drive Vehicles

natural_image
Illustration of a pickup truck and a pickup truck with a no-smoking symbol (no text or labels)Notice: If atwo-wheeldrive vehicleistowedwiththerear wheelsontheground, the transmissioncouldbedamaged. Therepairswouldnotbecovered bythevehiclewarranty.Never towthevehiclewiththerear wheelsontheground.
Two-wheel-drive vehicles should not be towed with therear wheels on the ground. Two-wheel-drive transmissions havenoprovisions for internal lubrication while being towed.
Todollytowatwo-wheel-drive vehicle, the vehicle must be towed with therear wheels on the dolly. See "Rear Towing (Rear Wheels Off the Ground)" later in this section for more information.
FrontTowing(FrontWheelsOff theGround)-Four-Wheel-Drive Vehicles
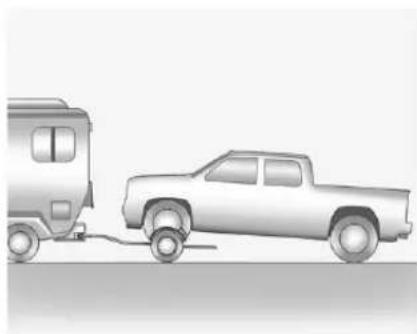
natural_image
Side view illustration of a pickup truck and a pickup truck on a road (no text or symbols)Usethefollowingproceduredodolly towafour-wheel-drivevehiclefrom thefront:
- Attachthedollytothetow vehiclefollowingthedolly manufacturer'sinstructions.
-
Drivethefrontwheelsontothe dolly.
-
Shiftthetransmission to P(Park).
- Firmlysettheparkingbrake.

WARNING
Shiftingafour-wheel-drive vehicle'stransfercaseinto N(Neutral)cancausethevehicle torollevenifthetransmissionis inP(Park). Thedriverorothers couldbeinjured. Makesurethe parkingbrakeisfirmlysetbefore thetransfercaseisshiftedto N(Neutral).
-
Use an adequate clamping device designed for towing to ensure that the front wheels are locked into the straight position.
-
Securethevehicletothedolly followingthemanufacturer's instructions.
7.Shiftthetransfercaseto N(Neutral).See"Shiftinginto Neutral"underFour-WheelDrive onpage9-47fortheproper proceduretoselecttheneutral positionforthevehicle. - Releasetheparkingbrakeonly afterthevehiclebeingtowedis firmlyattachedtothetowing vehicle.
- TurntheignitiontoLOCK/OFF.
Aftertowing, see "ShiftingOutof Neutral" under Four-WheelDriveon page9-47.

Information Provided by: DEALER
RearTowing(RearWheelsOff theGround)
Two-Wheel-DriveVehicles

natural_image
Side view illustration of a pickup truck and a pickup truck on a road (no text or symbols)Use the following procedure today to watwo-wheel-drive vehicle from therear:
-
Attachthedollytothetow vehiclefollowingthedolly manufacturer'sinstructions.
-
Drivetherearwheelsontothe dolly.
- Firmlysettheparkingbrake. SeeParkingBrakeon page9-63.
- PutthetransmissioninP(Park).
- Secure the vehicle to the dolly following the manufacturer's instructions.
- Use an adequate clamping device designed for towing to ensure that the front wheels are locked into the straight position.
- TurntheignitiontoLOCK/OFF.
Four-Wheel-DriveVehicles
Usethefollowingproceduredodolly towafour-wheel-drivevehiclefrom therear:
-
Attachthedollytothetow vehiclefollowingthedolly manufacturer'sinstructions.
-
Drivetherearwheelsontothe dolly.
-
Firmlysettheparkingbrake. SeeParkingBrakeon page9-63.
-
PutthetransmissioninP(Park).
-
Secure the vehicle to the Holly following the manufacturer's instructions.
-
Use an adequate clamping device designed for towing to ensure that the front wheels are locked into the straight position.

WARNING
Shiftingafour-wheel-drive vehicle'stransfercaseinto N(Neutral)cancausethevehicle torollevenifthetransmissionis inP(Park). Thedriverorothers couldbeinjured. Makesurethe parkingbrakeisfirmlysetbefore thetransfercaseisshiftedto N(Neutral).
7.Shiftthetransfercaseto N(Neutral).See"Shiftinginto Neutral"underFour-WheelDrive onpage9-47fortheproper proceduretoselecttheneutral positionforthevehicle.
- TurntheignitiontoLOCK/OFF. Aftertowing, see "ShiftingOutof Neutral" under Four-WheelDrive on page 9-47.
AppearanceCare
ExteriorCare
WashingtheVehicle
Topreservethevehicle'sfinish, washitoftenandoutofdirect sunlight.
Notice: Donotusepetroleum based, acidic, or abrasive cleaning agents asthey can damage the vehicle's paint, metal, or plastic parts. If damage occurs, it would not be recovered by the vehicle's warranty. Approved cleaning product scan be obtained from your dealer. Followall manufacturer directions regarding correct product usage, necessary safety precautions, and appropriate disposal of any vehicle care product.
Notice: Avoid using high pressure washes closer than 30cm(12in) to the surface of the vehicle. Use of power washers exceeding 8,274kPa (1,200 psi) can result in damage or removal of paint and decals.
Rinsethevehiclewell, before washing and after, to remove all cleaning agents completely. If they are allowed today on the surface, they could stain.
Drythefinishwithasoft, clean chamoisoranall-cottontowel to avoidsurfacescratchesandwater spotting.
FinishCare
Applicationofaftermarketclearcoat sealant/waxmaterialsisnot recommended. Ifpaintedsurfaces aredamaged, seeyourdealerto havethedamageassessed and repaired. Foreignmaterialssuchas calciumchlorideandothersalts, ice meltingagents, roadoilandtar, tree sap, birddroppings, chemicalsfrom industrialchimneys, etc., can damagethevehicle'sfinishifthey remainonpaintedsurfaces. Wash thevehicleassoonaspossible. Ifnecessary, usenon-abrasive cleanersthataremarkedsafefor paintedsurfacestoremoveforeign matter.
Occasionalhandwaxingormild polishingsshouldbedonetoremove residuefromthepaintfinish.See yourdealerforapprovedcleaning products.
Notice: Machine compounding or aggressive polishing on a basecoat/clearcoat paint finish may damage it. Use only non-abrasivewaxes and polishes that are made for a basecoat/ clearcoat paint finish on the vehicle.
Tokeep the paint finish looking new, keep the vehiclegaragedor covered whenever possible.
ProtectingExteriorBrightMetal Parts
Regularlycleanbrightmetalparts withwaterorchromepolishon chromeorstainlesssteeltrim, ifnecessary.
Foraluminum, never use autoor chromepolish, steam, or caustic soaptoclean. A coating of wax, rubbed to high polish, is recommended for all bright metal parts.
CleaningExteriorLamps/Lenses
Useonlylukewarmorcoldwater,a softcloth,andacarwashingsoap tocleanexteriorlampsandlenses. Followinstructionsunder"Washing theVehicle"laterinthissection.
WindshieldandWiperBlades
Cleantheoutsideofthewindshield withglasscleaner.
Cleanrubberbladesusinglint-free clothorpapertowelsoakedwith windshieldwasherfluidoramild detergent.Washthewindshield thoroughlywhencleaningthe blades.Bugs,roadgrime,sap,and abuildupofvehiclewash/wax treatmentsmaycausewiper streaking.
Replacethewiperbladesiftheyare wornordamaged. Damagecanbe causedbyextremedusty conditions, sand, salt, heat, sun, snowandice.
Weatherstrips
Applysiliconegreaseon weatherstripstomakethemlast longer,sealbetter,andnotstickor squeak.SeeRecommendedFluids andLubricantsonpage 11-13.
Tires
Useastiffbrushwithtirecleanerto cleanthetires.
Notice: Using petroleum-based tiredressing product on the vehicle may damage the paint finish and/or tires. When applying atiredressing, always swipe off any overspray from all painted surfaces on the vehicle.
WheelsandTrim—Aluminum orChrome
Useasoft, cleanclothwithmild soapandwatertocleanthewheels. Afterrinsingthoroughlywithclean water, drywithasoft, cleantowel. Awaxmaythenbeapplied.
Keepthewheelscleanusingasoft, cleanclothwithmildsoapand water.Rinsewithcleanwater.After rinsingthoroughly,drywithasoft, cleantowel.Awaxmaythenbe applied.
Notice: Chromewheels and other chrometrimmay bedamaged if the vehicle is not washed after driving on roadsthath have been sprayed with magnesium, calcium, or sodium chloride. These chlorides are used on roads for condition such as ice and dust. Always wash the chromewith soap and water after exposure.
Notice: To avoid surface damage, donotuse strong soaps, chemicals, abrasive polishes, cleaners, brushes, or cleaners that contain acidonal aluminum or chrome-plated wheels. Use only approved cleaners. Also, never drive a vehicle with aluminum or chrome-plated wheel through an automatic car wash that uses silicone car bidetire cleaning brushes. Damage could occur and there pairs would not be covered by the vehicle warranty.
Steering, Suspension, and ChassisComponents
Visuallyinspectfrontandrear suspensionandsteeringsystemfor damaged,loose,ormissingpartsor signsofwear.Inspectthepower steeringforproperhook-up,binding, leaks,cracks,chafing,etc.Visually checkconstantvelocityjoints, rubberboots,andaxlesealsfor leaks.
BodyComponentLubrication
Lubricateallkeylockcylinders, hoodhinges,liftgatehinges,and steelfueldoorhingeunlessthe componentsareplastic.Applying siliconegreaseonweatherstrips withacleanclothwillmakethem lastlonger,sealbetter,andnotstick orsqueak.
UnderbodyMaintenance
Useplainwatertoflushdirtand debrisfromthevehicle'sunderbody. Yourdealeroranunderbodycar washingsystemcandothis.Ifnot removed,rustandcorrosioncan develop.
SheetMetalDamage
If the vehicle is damaged and requires sheet metal repair or replacement, makes sure the body repair shop applies anti-corrosion material to parts repaired or replaced to restore corrosion protection.
Original manufacturer replacement partswillprovidethe corrosion protectionwhilemaintainingthe vehiclewarranty.
FinishDamage
Quicklyrepairminorchipsand scratcheswithtouch-upmaterials availablefromyourdealertoavoid corrosion.Largerareasoffinish damagecanbecorrectedinyour dealer'sbodyandpaintshop.
ChemicalPaintSpotting
Airbornepollutantscanfallupon andattackpaintedvehiclesurfaces causingblotchy,ring-shaped discolorations,andsmall,irregular darkspotsetchedintothepaint surface.
InteriorCare
Topreventdirtparticleabrasions, regularlycleanthevehicle'sinterior. Immediatelyremoveanysoils. Note thatnewspapersordarkgarments thatcantransfercolortohome furnishingscanalsopermanently transfercolortothevehicle's interior.
Useasoftbristlebrushtoremove dustfromknobsandcrevicesonthe instrumentcluster. Usingamild soapsolution,immediatelyremove handlotions,sunscreen,andinsect repellantfromallinteriorsurfacesor permanentdamagemayresult.
Yourdealermayhaveproductsfor cleaningtheinterior.Usecleaners specificallydesignedforthe surfacesbeingcleanedtoprevent permanentdamage.Toprevent overspray,applyallcleanersdirectly tothecleaningcloth.Cleaners shouldberemovedquickly.Never allowcleanerstoremainonthe surfacebeingcleanedforextended periodsoftime.
Cleanersmaycontainsolventsthat canbecomeconcentratedinthe interior.Beforeusingcleaners,read andadheretoallsafetyinstructions onthelabel.Whilecleaningthe interior,maintainadequate ventilationbyopeningthedoorsand windows.
Topreventdamage, donotclean theinteriorusingthefollowing cleanersortechniques:
- Neverusearazororanyother sharpobjecttoremoveasoil fromanyinteriorsurface.
- Neveruseabrushwithstiff bristles.
-
Neverrubanysurface aggressivelyorwithexcessive pressure.
-
Donotuselaundrydetergents ordishwashingsoapswith degreasers.Forliquidcleaners, useapproximately20drops per3.78L(1gal)ofwater.
Aconcentratedsoapsolutionwill leavearesiduethatcreates streaksandattractsdirt.Donot usesolutionsthatcontainstrong orcausticsoap. - Donotheavilysaturatethe upholsterywhencleaning.
- Donotusesolventsorcleaners containingsolvents.
InteriorGlass
Toclean, useaterryclothfabric dampenedwithwater. Wipedroplets leftbehindwithacleandrycloth. Commercialglasscleanersmaybe used, if necessary, aftercleaning theinteriorglasswithplainwater.
Notice: Topreventscratching, neveruseabrasivecleanerson automotiveglass.Abrasive cleanersoraggressivecleaning maydamagetherearwindow defogger.
Fabric/Carpet
Startbyvacuumingthesurface usingasoftbrushattachment.lfa rotatingbrushattachmentisbeing usedduringvacuuming,onlyuseit onthefloorcarpet.Beforecleaning, gentlyremoveasmuchofthesoil aspossibleusingoneofthe followingtechniques:
• Gentlyblotliquidswithapaper towel. Continueblottinguntilno moresoilcanberemoved.
- Forsolidsoils, removeasmuch aspossibleprioritovacuuming.
Toclean:
- Saturateacleanlint-free colorfastclothwithwaterorclub soda. Microfiberclothis recommendedtopreventlint transfertothefabricorcarpet.
- Remove excess moisture by gently wringing until water does not drip from the cleaning cloth.
- Startontheoutsideedgeofthe soilandgentlyrubtowardthe center. Rotatethecleaningcloth toacleanareafrequentlyto preventforcingthesoilintothe fabric.
- Continue gently rubbing the soiled area until there is no longer any color transfer from the soil to the cleaning cloth.
- If the soil is not completely removed, use a mild soap solution followed by only a club soda or plain water.
Ifthesoilisnotcompletely removed, it may be necessary to use a commercial upholstery cleaner or spot lifter. Testasmall hidden area for color fastness before using a commercial upholstery cleaner or spot lifter. If ring formation occurs, clean the entire fabric or carpet.
Following the cleaning process, a papertowel can be used to blot excess moisture.
InstrumentPanel, Leather, Vinyl, & Other Plastic Surfaces
Useasoftmicrofibercloth dampenedwithwatertoremove dustandloosedirt. For more thoroughcleaning, useasoft microfibercloth dampenedwith a mild soapsolution.
Notice: Soakingorsaturating leather, especially perforated leather, as well as other interior surfaces, may cause permanent damage. Wipe excess moisture from thesesurfaces after cleaning and allow them today naturally. Never use heat, steam, spotlifters or spotremovers. Do not use cleaner that contain silicone or wax-based products. Cleaners containing these solvent scan permanently change the appearance and feel of leather or soft trim and are not recommended.
Donotusecleanersthatincrease gloss,especiallyontheinstrument panel. Reflectedglarecandecrease visibilitythroughthewindshield undercertainconditions.
Notice: Useofairfreshenersmay causepermanentdamageto plasticsandpaintedsurfaces. Ifanairfreshenercomesin contactwithanyplasticor paintedsurfaceinthevehicle, blotimmediatelyandcleanwitha softclothdampenedwithamild soapsolution.Damagecausedby airfreshenerswouldnotbe coveredbythevehiclewarranty.
CareofSafetyBelts
Keepbeltscleananddry.

WARNING
Donotbleachordyesafetybelts. Itmayseverelyweakenthem. In acrash, they might not be able to provide adequate protection. Cleansafetybeltsonly with mild soap and lukewarmwater.
FloorMats

WARNING
Ifafloormatisthewrongsizeor isnotproperlyinstalled, itcan interferewiththepedals. Interferencewiththepedalscan causeunintendedacceleration and/orincreasedstopping distancewhichcancauseacrash andinjury. Makesurethefloor matdoesnotinterferewiththe pedals.
Usethefollowingguidelinesfor properfloormatusage.
- Theoriginalequipmentfloor matsweredesignedforthe vehicle.Ifthefloormatsneed replacing,itisrecommended thatGMcertifiedfloormatsbe purchased.Non-GMfloormats maynotfitproperlyandmay interferewiththepedals.Always checkthatthefloormatsdonot interferewiththepedals.
- Usethefloormatwiththe correctsideup.Donotturn itover.
- Donotplaceanythingontopof theriversidefloormat.
• Useonlyasinglefloormaton thedriverside. - Donotplaceonefloormaton topofanother.
Service and Maintenance
GeneralInformation
GeneralInformation......11-1
MaintenanceSchedule
MaintenanceSchedule.....11-3
SpecialApplicationServices
SpecialApplication
Services....11-9
Additional Maintenance and Care
AdditionalMaintenance
andCare....11-10
RecommendedFluids, Lubricants,andParts
RecommendedFluidsand Lubricants....11-13
MaintenanceReplacement Parts....11-16
MaintenanceRecords
MaintenanceRecords.....11-17
GeneralInformation
This maintenance section applies to vehicles with a gasoline engine. For diesel engine vehicles, seethen maintenance schedule section in the Duramax Diesel Supplement.
Yourvehicleisanimportant investment. Thissectiondescribes therequiredmaintenanceforthe vehicle.Followthischeduletohelp protectagainstmajorrepair expensesresultingfromneglector inadequatemaintenance.Itmay alsohelptomaintainthevalueof thevehicleifitissold.Itisthe responsibilityoftheownertohave allrequiredmaintenanceperformed.
11-2ServiceandMaintenance
Yourdealerhastrainedtechnicians whocanperformrequired maintenanceusinggenuine replacementparts. They have up-to-datetoolsandequipmentfor fastandaccuratediagnostics. Manydealershaveextended eveningandSaturdayhours, courtesytransportation, andonline schedulingtoassistwithservice needs.
Yourdealerrecognizesthe importanceofproviding competitivelypricedmaintenance andrepairservices.Withtrained technicians, the dealeristheplace forroutinemaintenancesuchasoil changesandtirerotationsand additionalmaintenanceitemslike tires, brakes, batteries,andwiper blades.
Notice: Damagecaused by improper maintenance can lead to costly repairs and may not be covered by the vehicle warranty. Maintenance intervals, checks, inspections, recommended fluids, and lubricants are important to keep the vehicle in good working condition.
The Tire Rotation and Required Services are theresponsibility of the vehicle owner. It is recommended to have your dealer perform these services every 12000 km/7,500 mi. Proper vehicle maintenance help to keep the vehicle in good working condition, improves fueleconomy, and reduces vehicle emissions.
Becauseofthewaypeopleuse vehicles,maintenanceneedsvary. Theremayneetobemore frequentchecksandservices. TheAdditionalRequired Services-Normalarefor vehiclesthat:
- Carrypassengersandcargo withinrecommendedlimitson the TireandLoadingInformation label.SeeVehicleLoadLimits onpage9-17.
- Aredrivenonreasonableroad surfaceswithinlegaldriving limits.
- Usetherecommendedfuel.See RecommendedFuelon page9-80.
Refertotheinformationinthe MaintenanceScheduleAdditional RequiredServices-Normalchart.
TheAdditionalRequired Services-Severeareforvehicles thatare:
• Mainlydriveninheavycitytraffic inhotweather.
• Mainlydriveninhillyor mountainousterrain.
• Frequentlytowingatraler.
• Usedforhighspeedor competitivedriving.
• Usedfortaxi, police, ordelivery service.
Refertotheinformationinthe MaintenanceScheduleAdditional RequiredServices-Severechart.

WARNING
Performingmaintenanceworkcan bedangerousandcancause seriousinjury.Perform maintenanceworkonlyifthe requiredinformation,propertools, andequipmentareavailable. Iftheyarenot,seeyourdealerto haveatrainedtechniciandothe work.SeeDoingYourOwn ServiceWorkonpage10-4.
Maintenance Schedule
OwnerChecksandServices
AtEachFuelStop
- Checktheengineoillevel.See EngineOilonpage10-7.
OnceaMonth
- Checkthetireinflation pressures. See TirePressureon page 10-65.
• Inspectthetiresforwear.See TireInspectiononpage10-71. - Checkthewindshieldwasher fluidlevel.See WasherFluidon page10-29.
EngineOilChange
WhentheCHANGEENGINEOIL SOONmessagedisplays,havethe engineoilandfilterchangedwithin thenext1000km/600mi.Ifdriven underthebestconditions,the engineoillifesystemmightnot indicateetheneedforvehicleservice formorethanayear.Theengineoil andfiltermustbechangedatleast onceayearandtheoillifesystem mustbereset.Yourtraineddealer techniciancanperformthiswork. Iftheengineoillifesystemisreset accidentally,servicethevehicle within5000km/3,000misincethe lastservice.Resettheoillife systemwhentheoilischanged. SeeEngineOilLifeSystemon page 10-10.
TireRotationandRequired ServicesEvery12000km/7,500mi
Rotate the tires, if recommended for the vehicle, and perform the followingservices. See Tire Rotation on page 10-72.
- Checkengineoillevelandoil lifepercentage.Ifneeded, changeengineoilandfilter,and resetoillifesystem.SeeEngine Oilonpage10-7andEngineOil LifeSystemonpage10-10.
- Checkenginecoolantlevel.See EngineCoolantonpage10-21.
-
Checkwindshieldwasherfluid level. See WasherFluidon page 10-29.
-
Visuallyinspectwindshieldwiper bladesforwear, cracking, orcontamination. See Exterior Careonpage 10-106. Replace wornordamagedwiperblades. See WiperBlade Replacement on page 10-40.
- Checktireinflationpressures. See TirePressureon page10-65.
• Inspecttirewear. See Tire Inspectiononpage10-71.
• Visuallycheckforfluidleaks. - Inspectengineaircleanerfilter. SeeEngineAirCleaner/Filteron page10-18.
-
Inspectbrakesystem.
-
Visuallyinspectsteering, suspension, and chassis components for damaged, loose, or missing parts or sign of wear. See Exterior Care on page 10-106.
- Checkrestraintsystem components.SeeSafetySystem Checkonpage3-23.
- Visuallyinspectfuelsystemfor damageorleaks.
• Visuallyinspectexhaustsystem andnearbyheatshieldsfor looseordamagedparts.
• Lubricatebodycomponents.See ExteriorCareonpage10-106.
- Checkstarterswitch.SeeStarter SwitchCheckonpage10-38.
- Checkautomatictransmission shiftlockcontrolfunction.See AutomaticTransmissionShift LockControlFunctionCheckon page10-39.
- Checkignitiontransmissionlock. SeeIgnitionTransmissionLock Checkonpage10-39.
- Checkparkingbrakeand automatictransmissionpark mechanism.SeeParkBrakeand P(Park)MechanismCheckon page10-40.
- Checkacceleratorpedalfor damage, higheffort, orbinding. Replace if needed.
- Visuallyinspectgasstrutfor signsofwear,cracks,orother damage.Checktheholdopen abilityofthestrut.Seeyour dealerifserviceisrequired.
- Inspectsunrooftrackandseal, ifequipped.SeeSunroof(Crew Cab)onpage2-24orSunroof (ExtendedCab)onpage2-23.
- Checkhybridlowpressure coolantlevel,ifequipped.
11-6ServiceandMaintenance
| Maintenance ScheduleAdditional RequiredServices – Normal | 12 000 km/7,500 mi | 24 000 km/15,000 mi | 36 000 km/22,500 mi | 48 000 km/30,000 mi | 60 000 km/37,500 mi | 72 000 km/45,000 mi | 84 000 km/52,500 mi | 96 000 km/60,000 mi | 108 000 km/67,500 mi | 120 000 km/75,000 mi | 132 000 km/82,500 mi | 144 000 km/90,000 mi | 156 000 km/97,500 mi | 168 000 km/105,000 mi | 180 000 km/112,500 mi | 192 000 km/120,000 mi | 204 000 km/127,500 mi | 216 000 km/135,000 mi | 228 000 km/142,500 mi | 240 000 km/150,000 mi |
| Rotate tires and perform Required Services. Check engine oil level and oil life percentage. Change engine oil and filter, if needed. | √ | √ | √ | √ | √ | √ | √ | √ | √ | √ | √ | √ | √ | √ | √ | √ | √ | √ | √ | √ |
| Inspect evaporative control system. (a) | √ | √ | √ | |||||||||||||||||
| Replace engine air cleaner filter. (b) | √ | √ | √ | |||||||||||||||||
| Replace spark plugs. Inspect spark plug wires. | √ | |||||||||||||||||||
| Change automatic transmission fluid and filter. For diesel engines, see the Duramax Diesel Supplement. | √ | |||||||||||||||||||
| Change transfer case fluid, if equipped with 4WD. (c) | √ | |||||||||||||||||||
| Drain, flush, and fill engine cooling system. (d) | √ | |||||||||||||||||||
| Drain, flush, and fill hybrid low pressure cooling system, if equipped. (d) | √ | |||||||||||||||||||
| Visually inspect accessory drive belts. (e) | √ |
Footnotes—Maintenance ScheduleAdditionalRequired Services—Normal
a) Checkallfuelandvaporlines and hosesforproperhook-up, routing, and condition. Check that the purgevalve, if the vehicle has one, works properly. Replace as needed.
b) Oreveryfouryears, whichever comesfirst.
c) Donotdirectlypowerwash the transfercaseoutputseals. High pressurewatercanovercomethe sealsandcontaminatethetransfer casefluid. Contaminatedfluidwill decreasethelifeofthetransfer caseandshouldbereplaced.
d) Oreveryfiveyears, whichever comesfirst. See CoolingSystemon page 10-20.
e)Orevery10years,whichever comesfirst.Inspectforfraying, excessivecracking,ordamage; replace,ifneeded.
11-8ServiceandMaintenance
| Maintenance ScheduleAdditional RequiredServices – Severe | 12 000 km/7,500 mi | 24 000 km/15,000 mi | 36 000 km/22,500 mi | 48 000 km/30,000 mi | 60 000 km/37,500 mi | 72 000 km/45,000 mi | 84 000 km/52,500 mi | 96 000 km/60,000 mi | 108 000 km/67,500 mi | 120 000 km/75,000 mi | 132 000 km/82,500 mi | 144 000 km/90,000 mi | 156 000 km/97,500 mi | 168 000 km/105,000 mi | 180 000 km/112,500 mi | 192 000 km/120,000 mi | 204 000 km/127,500 mi | 216 000 km/135,000 mi | 228 000 km/142,500 mi | 240 000 km/150,000 mi |
| Rotate tires and perform RequiredServices. Check engine oil level andoil life percentage. Change engine oiland filter, if needed. | √ | √ | √ | √ | √ | √ | √ | √ | √ | √ | √ | √ | √ | √ | √ | √ | √ | √ | √ | √ |
| Change transfer case fluid for 4WD fullsize pick-up only – extreme severeservice. (a) | √ | √ | √ | √ | √ | √ | ||||||||||||||
| Inspect evaporative control system. (b) | √ | √ | √ | |||||||||||||||||
| Replace engine air cleaner filter. (c) | √ | √ | √ | |||||||||||||||||
| Change automatic transmission fluid andfilter. For diesel engines, see the DuramaxDiesel Supplement. | √ | √ | √ | |||||||||||||||||
| Change transfer case fluid, if equippedwith 4WD. (d) | √ | √ | √ | |||||||||||||||||
| Replace spark plugs. Inspect sparkplug wires. | √ | |||||||||||||||||||
| Drain, flush, and fill engine coolingsystem. (e) | √ | |||||||||||||||||||
| Drain, flush, and fill hybrid low pressurecooling system, if equipped. (e) | √ | |||||||||||||||||||
| Visually inspect accessory drive belts. (f) | √ |
Footnotes—Maintenance ScheduleAdditionalRequired Services—Severe
a) Extremeservice. For vehicles mainly driven off-road in four-wheel drive or used in farming, mining, forestry, Department of Natural Resources (DNR), or snow plowing.
b) Checkallfuelandvaporlines and hosesforproperhook-up, routing, and condition. Check that the purgevalve, if the vehicle has one, works properly. Replace as needed.
c) Oreveryfouryears, whichever comesfirst.
d) Donotdirectlypowerwashthe transfercaseoutputseals. High pressurewatercanovercomethe sealsandcontaminatethetransfer casefluid. Contaminatedfluidwill decreasethelifeofthetransfer caseandshouldbereplaced.
e) Oreveryfiveyears, whichever comesfirst. See CoolingSystemon page 10-20.
f) Orevery10years, whichever comesfirst. Inspectforfraying, excessivecracking, ordamage; replace, ifneeded.
SpecialApplication Services
- VehicleswithDualWheels: Checkdualwheelnuttorqueat 160km/100mi,1600km/1,000miand9700km/6,000mi.
- SevereCommercialUse VehiclesOnly:Lubricatechassis componentsevery5000km/3,000mi.
• Haveunderbodyflushingservice performedonceayear.
Additional Maintenance and Care
Yourvehicleisanimportant investmentandcaringforitproperly mayhelptoavoidfuturecostly repairs.Tomaintainvehicle performance,additional maintenanceservicesmaybe required.Itisrecommended thatyourdealerperformthese services—theirtraineddealer techniciansknowyourvehiclebest. Yourdealercanalsoperforma thoroughassessmentwitha multi-pointinspectiontorecommend whenyourvehiclemayneed attention.Thefollowinglistis intendedtoexplaintheservicesand conditionstolookforthatmay indicatesservicesarerequired.
Battery
The battery-supplies power to start the engine and operate any additionalelectrical accessories.
• Toavoidbreak-downorfailureto startthevehicle, maintaina batterywithfullcrankingpower.
- Traineddealertechnicianshave thediagnosticequipmenttotest thebatteryandensurethatthe connectionsandcablesare corrosion-free.
Belts
- Beltsmayneedreplacingifthey squeakorshowsignsof crackingorsplitting.
- Traineddealertechnicianscan inspectthebeltsand recommendreplacementwhen necessary.

Brakes
Brakesstopthevehicleandare crucialtosafedriving.
- Signsofbrakewearmayinclude chirping,grinding,orsquealing noises,ordifficultystopping.
- Traineddealertechnicianshave accesstotoolsandequipment toinspectthebrakesand recommendqualityparts engineeredforthevehicle.
Fluids
Properfluidlevelsandapproved fluidsprotectthevehicle'ssystems andcomponents.See RecommendedFluidsand Lubricantsonpage11-13forGM approvedfluids.
• Engineoilandwindshield washerfluidlevelsshouldbe checkedateveryfuelfill.
- Instrumentclusterlightsmay comeontoindicatethatfluids maybelowandneedtobe filled.
Hoses
Hosestransportfluidsandshould beregularlyinspectedtoensure thattherearenocracksorleaks. Withamulti-pointinspection,your dealercaninspectthehosesand adviseifreplacementisneeded.
Lamps
Properlyworkingheadlamps, taillamps, and brakelamps are important to see and be seen on theroad.
- Signsthattheheadlampsneed attentionincludedimming,failure tolight,cracking,ordamage. Thebrakelampsneedtobe checkedperiodicallytoensure thattheylightwhenbraking.
- Withamulti-pointinspection, yourdealercancheckthelamps andnoteanyconcerns.
ShocksandStruts
Shocksandstrutshelpaidincontrol forasmootherride.
- Signsofwearmayinclude steeringwheelvibration,bounce/swaywhilebraking,longer stoppingdistance,oruneventirewear.
- Aspartofthemulti-point inspection, trained dealer technicians can visually inspect the shocks and struts for signs of leaking, blown seals, ordamage, and can advise when service is needed.
Tires
Tiresneedtobeproperlyinflated, rotated, and balanced. Maintaining the tirescansavemoney, fuel, and can reduceetheriskoftirefailure.
- Signsthatthetiresneedtobe replacedincludethreeormore visibletreadwearindicators;cord orfabricshowingthroughthe rubber;cracksorcutsinthe treadorsidewall;orabulgeor splitinthetire.
- Traineddealertechnicianscan inspectandrecommendtheright tires. Yourdealercanalso providetire/wheelbalancing servicestoensuresmooth vehicleoperationatallspeeds. Yourdealersellsandservices namebrandtires.
11-12ServiceandMaintenance
VehicleCare
Tohelpkeepthevehiclelookinglike new, vehiclecareproductsare availablefromyourdealer. For informationonhowtocleanand protectthevehicle'sinteriorand exterior, seeInteriorCareon page 10-109 and ExteriorCareon page 10-106.
WheelAlignment
Wheelalignmentiscriticalfor ensuringthatthetiresdeliver optimalwearandperformance.
- Signsthatthealignmentmay needtobeadjustedinclude pulling,impropervehicle handling,orunusualtirewear.
- Yourdealerhastherequired equipmenttoensureproper wheelalignment.
Windshield
Forsafety, appearance, and the bestviewing, keep the windshield clean and clear.
• Signsofdamageinclude scratches,cracks,andchips.
- Traineddealertechnicianscan inspectthewindshield and recommendproperreplacement ifneeded.
WiperBlades
Wiperbladesneedtobecleaned andkeptingoodconditionto provideaclearview.
- Signsofwearincludestreaking, skippingacrossthewindshield, andwornorsplitrubber.
- Traineddealertechnicianscan checkthewiperbladesand replacethemwhenneeded.
RecommendedFluids,Lubricants,andParts
RecommendedFluidsandLubricants
This maintenance section applies to vehicles with gasoline engine. If the vehicle has diesel engine and/or an Allison Transmission, seethemaintenances schedule section in the Duramax Diesel Supplement.
Fluidsandlubricantsidentifiedbelowbyname, partnumber, orspecification can be obtained from your dealer.
| UsageFluid/Lubricant | |
| EngineOil | Useonlyengineoillicensedtothedexos1specification,orequivalent,of theproperSAEviscositygrade.ACDelcodexos1SyntheticBlendis recommended.SeeEngineOilonpage10-7. |
| EngineCoolant | 50/50mixtureofclean,drinkablewateranduseonlyDEX-COOLcoolant.SeeEngineCoolantonpage10-21. |
| HydraulicBrakeSystem | DOT3HydraulicBrakeFluid(GMPartNo.12377967,in Canada89021320). |
| HydraulicClutchSystem | DOT3HydraulicBrakeFluid(GMPartNo.12377967,in Canada89021320). |
| WindshieldWasher | Automotivewindshieldwasherfluidthatmeetsregionalfreezeprotection requirements. |
| PowerSteeringSystemGMPower | SteeringFluid(GMPartNo.89021184,inCanada89021186). |
| AutomaticTransmissionDEXRON | ®-VIAutomaticTransmissionFluid. |
11-14ServiceandMaintenance
| UsageFluid/Lubricant | |
| ManualTransmission | SynchroneshTransmissionFluid(GMPartNo.12345349,in Canada10953465). |
| KeyLockCylinders | Multi-PurposeLubricant,Superlube(GMPartNo.12346241,in Canada10953474). |
| FloorShiftLinkage | LubriplateLubricantAerosol(GMPartNo.12346293,inCanada992723) orlubricantmeetingrequirementsofNLGI#2CategoryLBorGC-LB. |
| ChassisLubrication | ChassisLubricant(GMPartNo.12377985,inCanada88901242)or lubricantmeetingrequirementsofNLGI#2,CategoryLBorGC-LB. |
| FrontAxle(1500Series)-Four-Wheel Drive | SAE80W-90AxleLubricant(GMPartNo.89021671,in Canada89021672). |
| FrontAxle(1500,2500HD,and 3500HDSeries) | SAE75W-90SyntheticAxleLubricant(GMPartNo.89021677,in Canada89021678). |
| RearAxle | SAE75W-90SyntheticAxleLubricant(GMPartNo.89021677,in Canada89021678). |
| TransferCase(Four-WheelDrive)DEX | RON®-VIAutomaticTransmissionFluid. |
| FrontAxlePropshaftSplineor One-PiecePropshaftSpline (Two-WheelDrivewith4-SpeedAuto. Trans.) | SplineLubricant,SpecialLubricant(GMPartNo.12345879,in Canada10953511). |
| RearDrivelineCenterSpline | ChassisLubricant(GMPartNo.12377985,inCanada88901242)or lubricantmeetingrequirementsofNLGI#2,CategoryLBorGC-LB. |
| HoodHinges | Multi-PurposeLubricant,Superlube(GMPartNo.12346241,in Canada10953474). |
| BodyDoorHingePins,Tailgate HingeandLinkage,andFuelDoor Hinge | Multi-PurposeLubricant,Superlube(GMPartNo.12346241,in Canada10953474). |
| TailgateHandlePivotPoints,Hinges, LatchBolt,andLinkage | Multi-PurposeLubricant,Superlube(GMPartNo.12346241,in Canada10953474). |
| WeatherstripConditioning | WeatherstripLubricant(GMPartNo.3634770,inCanada10953518)or DielectricSiliconeGrease(GMPartNo.12345579,inCanada992887). |
| WeatherstripSqueaks | SyntheticGreasewithTeflon,Superlube(GMPartNo.12371287,in Canada10953437). |
MaintenanceReplacementParts
Replacementpartsidentifiedbelowbyname, partnumber, orspecification can be obtained from your dealer.
If your vehicle has adiesel engine, seethe Duramax diesels supplement form more information.
| PartGMPartNumberACDelcoPartNumber | ||
| EngineAirCleaner/Filter | ||
| StandardFilter15908916*A3086C* | ||
| HighCapacityFilter15908915A3085C | ||
| OilFilter | ||
| 4.3LV625010792PF47 | ||
| 4.8LV8;5.3LV8;6.0LV8;6.2LV8 | 89017524PF48 | |
| SparkPlugs | ||
| 4.3LV612568387 41-101 | ||
| 4.8LV8;5.3LV8;6.0LV8;6.2LV8 | 12621258 | 41-110 |
| Wiper Blades – 55.0 cm (21.6 in) | 25877402 | — |
| *15908915(A3085C)high-capacityaircleanerfiltermaybesubstituted. | ||
MaintenanceRecords
After the scheduled services are performed, record the date, odometer reading, who performed the service, and the type of services performed in the boxes provided. Retain all maintain an uncereceipts.
| Date | Odometer Reading | ServicedByServices | Performed |
11-18ServiceandMaintenance
| Date | Odometer Reading | ServicedByServices | Performed |
11-20ServiceandMaintenance
| Date | Odometer Reading | ServicedByServices | Performed |
TechnicalData
VehicleIdentification
VehicleIdentification
Number(VIN)......12-1
ServicePartsIdentification
Label.....12-1
VehicleData
Capacitiesand
Specifications......12-2
EngineDriveBeltRouting...12-6
VehicleIdentification
VehicleIdentification Number(VIN)

Thislegalidentifierisinthefront corneroftheinstrumentpanel, on theleftsideofthevehicle.Itcanbe seenthroughthewindshieldfrom outside. TheVINalsoappearson theVehicleCertificationandService Partslabelsandcertificatesoftitle and registration.
Engineldentification
TheeighthcharacterintheVINis theenginecode. Thiscode identifiesthevehicle'sengine, specifications, and replacement parts. See "EngineSpecifications" under Capacities and Specifications on page 12-2 for the vehicle's enginecode.
ServiceParts IdentificationLabel
Thislabel, ontheinsideoftheglove box, hasthefollowinginformation:
• VehicleIdentification Number(VIN).
- Modeldesignation.
- Paintinformation.
• Productionoptionsandspecial equipment.
Donotremovethislabelfromthe vehicle.
VehicleData
CapacitiesandSpecifications
The following approximate capacities are given in metric and English conversions. See Recommended Fluids and Lubricantsonpage11-13formoreinformation.
If the vehicle has adiesel engine, seethe Duramax diesels supplement form more information.
| Application | Capacities | |
| MetricEnglish | ||
| AirConditioningRefrigerantR134a | Fortheairconditioningsystemrefrigerantcharge amount,seetherefrigerantlabellocatedunderthe hood.Seeyourdealerformoreinformation. | |
| CoolingSystem | ||
| 4.3LV61500Series15.6L16.5qt | ||
| 4.8LV81500Series16.0L16.9qt | ||
| 5.3LV81500Series16.0L16.9qt | ||
| 6.0LV82500Seriesand3500Series15.5L16.4qt | ||
| 6.2LV81500Series15.9L16.8qt | ||
TechnicalData12-3
| Application | Capacities | |
| MetricEnglish | ||
| EngineOilwithFilter | ||
| 4.3LV64.3L4.5qt | ||
| 4.8LV8;5.3LV8;6.0LV8;6.2LV85.7L6.0qt | ||
| FuelTank | ||
| 1500SeriesStandardandShortBox98.4L26.0gal | ||
| 1500SeriesLongBox128.7L34.0gal | ||
| 2500Seriesand3500SeriesStandardBox136.3L36.0gal | ||
| 2500Seriesand3500SeriesLongBox | 136.3L36.0gal | |
| 3500SeriesChassisCab | 240.4L63.5gal | |
| 3500ChassisCab-FrontTank | 89.0L23.5gal | |
| 3500ChassisCab-RearTank(ifequipped) | 151.4L40.0gal | |
| TransferCaseFluid | 1.5L1.6qt | |
12-4 TechnicalData
| Application | Capacities | |
| MetricEnglish | ||
| TransmissionFluid-Automatic(PanRemovalandFilterReplacement) | ||
| 4-SpeedTransmission4L60-EElectronicTransmission4.7L5.0qt | ||
| 6-SpeedTransmission6L80-E5.7L6.0qt | ||
| 6-SpeedTransmission6L90-E6.0L6.3qt | ||
| 6-SpeedTransmissionAllison7.0L7.4qt | ||
| TransmissionFluid-Manual(DrainandRefill) | ||
| 1500Series4.4L4.6qt | ||
| 3500Series3.5L3.7qt | ||
| WheelNutTorque190N•m140ftlb | ||
| Allcapacitiesareapproximate.Whenadding,besuretofilltotheapproximatelevel,asrecommendedinthis manual.Recheckfluidlevelafterfilling. | ||
EngineSpecifications
| EngineVINCodeSparkPlugGap | ||
| 4.3LV6(LU3)X1.52mm(0.060in) | ||
| 4.8LV8(L20)A1.02mm(0.040in) | ||
| 5.3LV8FlexFuelwithActiveFuelManagementTM (IronBlock)(LMG) | 01.02mm(0.040in) | |
| 5.3LV8FlexFuelwithActiveFuelManagementTM (AluminumBlock)(LC9) | 71.02mm(0.040in) | |
| 6.0LV8FlexFuelwithActiveFuelManagementTM (AluminumBlock)(LZ1) | J1.02mm(0.040in) | |
| 6.0LV8(IronBlock)(L96)G1.02mm(0.040in) | ||
| 6.2LV8FlexFuel(AluminumBlock)(L9H)21.02mm(0.040in) | ||
EngineDriveBeltRouting
natural_image
Diagram of a mechanical or geometric arrangement with multiple spheres connected by lines and one arrow indicating direction (no text or symbols)V6Engines
natural_image
Abstract geometric diagram of interconnected spheres with connecting lines (no text or symbols)V8Engines
If the vehicle has a diesel engine, seethe Duramax diesels supplement form more information.
If the vehicle is a hybrid, se the hybrids supplement form more information.

information Provided by
DEALER
第十一节 总计标准
Customer Information
CustomerInformation
CustomerSatisfaction Procedure(U.S.and Canada)....13-2
CustomerSatisfaction Procedure(Mexico)......13-4
CustomerAssistanceOffices (U.S.andCanada)......13-5
CustomerAssistanceOffices (Mexico)....13-6
CustomerAssistanceforText Telephone(TTY)Users(U.S. andCanada)....13-7
OnlineOwnerCenter.....13-7
GMMobilityReimbursement Program(U.S.and Canada)....13-8
RoadsideAssistanceProgram (U.S.andCanada)......13-8
Roadside Assistance Program(Mexico)......13-11
SchedulingService Appointments(U.S.and Canada)....13-15
Courtesy Transportation Program(U.S.and Canada)....13-15
CollisionDamageRepair (U.S.andCanada)......13-17
ServicePublications OrderingInformation.....13-19
ReportingSafetyDefects
Reporting Safety Defect to the United States Government....13-20
Reporting Safety Defect to the Canadian Government....13-21
Reporting Safety Defect to General Motors....13-21
VehicleDataRecordingand Privacy
VehicleDataRecordingand Privacy....13-21
EventDataRecorders.....13-22 OnStar ^® .....13-23
NavigationSystem......13-23
RadioFrequency Identification(RFID)......13-23
RadioFrequency Statement....13-23
CustomerInformation
CustomerSatisfaction Procedure(U.S.and Canada)
Yoursatisfactionandgoodwillare importanttoyourdealerandto Chevrolet.Normally,anyconcerns withthesaletransactionorthe operationofthevehiclewillbe resolvedbyyourdealer'ssalesor servicedepartments.Sometimes, however,despitethebestintentions ofallconcerned,misunderstandings canoccur.Ifyourconcernhasnot beenresolvedoyoursatisfaction, thefollowingstepsshouldbetaken:
STEPONE: Discuss your concern with a member of dealership management. Normally, concerns can be quickly resolved at that level. If them matter has already been reviewed with the sales, service, or parts manager, contact the owner of your dealership or the general manager.
STEPTWO: If after contacting a member of dealership management, it appears your concern cannot be resolved by your dealership without further help, in the U.S., call the Chevrolet Customer Assistance Center at 1-800-222-1020. In Canada, call General Motors of Canada Customer Care Centreat 1-800-263-3777 (English), or 1-800-263-7854 (French).
Weencourageyoutocallthe toll-freenumberinordertogiveyour inquirypromptattention.Havethe followinginformationavailableto givetheCustomerAssistance representative:
- VehicleIdentification Number(VIN). This is available from the vehicleregistration or title, or the plate at the top of the instrument panel and visible through the windshield.
• Dealershipnameandlocation.
• Vehicledeliverydate and presentmileage.
When contacting Chevrolet, remember that your concern will likely be resolved at a dealer's facility. That is why we suggest following Step One first.
STEPTHREE—U.S.Owners:
BothGeneralMotorsandyour dealerarecommittedtomaking sureyouarecompletely satisfied withyournewvehicle. However, ifyoucontinuetoremainunsatisfied afterfollowingtheprocedure outlinedinStepsOneandTwo,you canfilewiththeBetterBusiness Bureau(BBB)AutoLine ^® Program toenforceyourrights.
TheBBBAutoLineProgramisan out-of-courtprogramadministered bytheCouncilofBetterBusiness Bureaustosettleautomotive disputesregardingvehiclerepairsor theinterpretationoftheNewVehicle LimitedWarranty.Althoughyoumay berequiredtoresorttothisinformal disputeresolutionprogrampriorto filingacourtaction,useofthe programisfreeofchargeandyour casewillgenerallybeheardwithin 40days.Ifyoudonotagreewiththe decisiongiveninyourcase,you mayrejectitandproceedwithany othervenueforreliefavailable toyou.
YoumaycontacttheBBBAuto LineProgramusingthetoll-free telephonenumberorwritethemat thefollowingaddress:
BBBAutoLineProgram CouncilofBetterBusiness Bureaus,Inc. 4200WilsonBoulevard Suite800 Arlington,VA22203-1838
Telephone:1-800-955-5100 www.dr.bbb.org/goauto
Thisprogramisavailableinall 50statesandtheDistrictof Columbia. Eligibility is limited by vehicleage, mileage, and other factors. General Motors reserves therighttochangeeligibility limitations and/or discontinue its participation in this program.
STEPTHREE—Canadian
Owners: Intheeventthatyoudo notfeelyourconcernshavebeen addressedafterfollowingthe procedureoutlinedinStepsOne andTwo, GeneralMotorsofCanada Limitedwantsyoutobeawareofits participationinano-charge Mediation/ArbitrationProgram. GeneralMotorsofCanadaLimited hascommittedtobindingarbitration ofownerdisputesinvolving factory-relatedvehicleservice claims. Theprogramprovidesfor thereviewofthefactsinvolvedby animpartialthirdpartyarbiter,and mayincludeaninformalhearing beforethearbiter. Theprogramis designedsothattheentiredispute settlementprocess,fromthetime youfileyourcomplainttothefinal decision,shouldbecompletedin about70days. Webelieveour impartialprogramoffersadvantages overcourtsinmostjurisdictions becauseitisinformal,quick,and freeofcharge.
For further information concerning eligibility in the Canadian Motor Vehicle Arbitration Plan (CAMVAP), call toll-free 1-800-207-0685, or call the General Motors Customer Care Centre, 1-800-263-3777 (English), 1-800-263-7854 (French), or writeto:
TheMediation/ArbitrationProgram c/oCustomerCareCentre GeneralMotorsofCanadaLimited MailCode:CA1-163-005 1908ColonelSamDrive Oshawa,OntarioL1H8P7
Yourinquiryshouldbeaccompanied bytheVehicleIdentification Number(VIN).
CustomerSatisfaction Procedure(Mexico)

text_image
GM Garantía PLUSDidyougettheWarrantyExtension Plan?Thisplanisrecommendedby GeneralMotorstosupplementthe warrantyincludedwiththenew vehiclepurchase.
Seeyourdealerfordetails.
CustomerAssistance Procedure
Ownersatisfactionandgoodwillare veryimportanttoyourdealer and General Motors.
Normally, any problem with the transaction, sale, or usage of the vehicle must be handled by your dealer sales or service departments.
However, were cognizethat despite the good intention of all parties involved, sometimes a misunderstanding may occur.
If you have a problem that has not been satisfactorily handled through then normal means, we suggest the following steps:
STEPONE
Explainyourcasetoyourdealer serviceagent, servicemanager, dealersalesagent, orsales manager, dependingonyourcase.
Makesurethattheyhaveall necessaryinformation.Theyare interestedinyourcontinual satisfaction.
STEPTWO
If you are not satisfied, please contact the general manager your dealership owner to ask for their help. If they are not able to resolve your case, ask them to contact the right people at General Motors for support, if needed.

STEPTHREE
If your case is not resolved in reasonable amount to time by your dealer, please call the General Motors Customer Assistance Center (CAC) and provide the following information:
- Name
- Address
- Phonenumber
- Modelyear
- Brand
- Mileage
- Deliverydate
- Dealershipname
- Dealershipaddress
• VehicleIdentification Number(VIN)
• Descriptionoftheproblem
See Customer Assistance Offices (U.S. and Canada) on page 13-5 or Customer Assistance Offices (Mexico) on page 13-6.
CustomerAssistance Offices(U.S.andCanada)
Chevroletencouragescustomers tocallthetoll-freenumberfor assistance. However, if customer wishestowriteore-mail Chevrolet, the letters should be addressed to:
UnitedStates
ChevroletMotorDivision ChevroletCustomerAssistance Center P.O.Box33170 Detroit,MI48232-5170 www.Chevrolet.com
1-800-222-1020 1-800-833-2438(ForText TelephoneDevices(TTYs)) RoadsideAssistance: 1-800-243-8872
FromPuertoRico:
1-800-496-9992(English) 1-800-496-9993(Spanish)
From U.S. Virgin Islands: 1-800-496-9994
Canada
General Motors of Canada Limited Customer Care Centre, Mail Code: CA1-163-005 1908 Colonel Sam Drive Oshawa, Ontario L1H8P7 www.gm.ca
1-800-263-3777(English) 1-800-263-7854(French) 1-800-263-3830(ForText Telephonedevices(TTYs)) RoadsideAssistance: 1-800-268-6800
Overseas
PleasecontactthelocalGeneral MotorsBusinessUnit.
13-6 Customer Information
Mexico, Central America, and Caribbean Islands/Countries (Except Puerto Rico and U.S. Virgin Islands)
General Motors de Mexico, S. de R.L. de C.V.
CustomerAssistanceCenter Av.EjercitoNacional#843
Col.Granada C.P.11520,Mexico,D.F.
01-800-466-0800
LongDistance:011-52-53290800
CustomerAssistance Offices(Mexico)
TocontacttheCustomerAssistance Center(CAC), usethephone numberslisted in this section. Customerassistance is available Monday through Friday, 08:00 to 20:00 hours, and Saturdays from 08:00 to 15:00 hours.
Alle-mailinquiriestotheCustomer AssistanceCenter(CAC)shouldbe sentto:cac.chevrolet@gm.com.
Mexico
FromMexicoCity
5329-0811
FromOtherMexicoLocations
01-800-466-0811
UnitedStatesandCanada
1-866-466-8190
CostaRica
00-800-052-1005
Guatemala
1-800-999-5252
Panama
00-800-052-0001
DominicanRepublic
1-888-751-5301
EISalvador
800-6273
Honduras
800-0122-6101

Information Provided by: DEALER
CustomerAssistancefor TextTelephone(TTY) Users(U.S.andCanada)
Toassistcustomerswhoaredeaf, hardofhearing,orspeech-impaired andwhouseTextTelephones (TTYs),ChevrolethasTTY equipmentavailableatitsCustomer AssistanceCenter.AnyTTYuserin theU.S.cancommunicatewith Chevroletbydialing: 1-800-833-2438.TTYusersin Canadacandial1-800-263-3830.
OnlineOwnerCenter
Manageyourvehicle(U.S.)at chevrolet.com.Clickon "Owners,"then"ManageMy Chevrolet/OwnersLogin."
Information and services customized for your specific vehicle—all in one convenient place.
• Digitalownermanual, warranty information, and more.
• Storageforonlineservice and maintenancerecords.
• Chevroletdealerlocator for servicenationwide.
• Exclusiveprivilegesandoffers.
- Recallnoticesforyourspecific vehicle.
• OnStarandGMCardmember ServicesEarningssummaries.
OtherHelpfulLinks
Chevrolet—www.chevrolet.com
ChevroletMerchandise—www.chevymall.com
HelpCenter—www.chevrolet.com/pages/mds/helpcenter/faq.do
- FAQ
- ContactUs
ChevroletOwnerCentre (Canada)chevroletowner.ca
TakeatriptotheChevroletOwner Centre:
- Chatlivewithonlinehelp representatives.
- UsetheVehicleToolssection.
- Accessthirdpartyenthusiast sitesandsocialmedianetworks.
- Locateownerresourcessuchas lease-end,financing,and warrantyinformation.
13-8 Customer Information
- Retrieve your favorite articles, quizzes, tips and multimedia galleries organized into the Features and Auto Care Sections.
• Downloadtheownermanualfor yourvehicle,quicklyandeasily.
• Findthe Chevrolet-recommended maintenanceservicesforyour vehicle.
GMMobility ReimbursementProgram (U.S.andCanada)
GM MOBILITY™
Thisprogramisavailable to qualified applicants for cost reimbursement of eligible aftermarket adaptive equipment required for the vehicle, such as handcontrol or raw wheelchair/ scooter lift for the vehicle.
Formoreinformationonthelimited offer,visitwww.gmmobility.comor calltheGMMobilityAssistance Centerat1-800-323-9935.Text Telephone(TTY)users,call 1-800-833-9935.
General Motors of Canada also has a Mobility Program. Call 1-800-GM-DRIVE (463-7483) for details. TTY users call 1-800-263-3830.
Roadside Assistance Program(U.S.and Canada)
For U.S.-purchased vehicles, call 1-800-243-8872; (TextTelephone (TTY): 1-888-889-2438).
For Canadian-purchased vehicles, call 1-800-268-6800.
Serviceisavailable24hoursaday, 365daysayear.
CallingforAssistance
WhencallingRoadsideAssistance, havethefollowinginformation ready:
- Yourname,homeaddress,and hometelephonenumber.
• Telephonenumberofyour location. - Locationofthevehicle.
• Model, year, color, and license platenumberofthevehicle. - Odometerreading, Vehicle IdentificationNumber(VIN), and deliverydateofthevehicle.
• Descriptionoftheproblem.
Coverage
Servicesareprovidedupto5years/160000km(100,000mi),whichever comesfirst.
IntheU.S.,anyonedrivingthe vehicleiscovered.InCanada,a persondrivingthevehiclewithout permissionfromtheownerisnot covered.
RoadsideAssistanceisnotapartof theNewVehicleLimitedWarranty. ChevroletandGeneralMotors of CanadaLimitedreservetherightto makeanychangesordiscontinue theRoadsideAssistanceprogramat anytimewithoutnotification.
Chevrolet and General Motors of Canada Limited reservether right to limits services or payment to an owner or driver if they decide the claims are made too often, or the sametype of claim is mademany times.
ServicesProvided
• EmergencyFuelDelivery: Deliveryofenoughfuelforthe vehicletogettothenearest servicestation.
- Lock-OutService:Serviceto unlockthevehicleifyouare lockedout.Aremoteunlockmay beavailableifyyouhaveOnStar. Forsecurityreasons,thedriver mustpresentidentification beforethisserviceisgiven.
- EmergencyTowfromaPublic RoadorHighway:Towtothe nearestChevroletdealerfor warrantyservice,orifthevehicle wasinacrashandcannotbe driven.Assistanceisalsogiven whenthevehicleisstuckinthe sand,mud,orsnow.
13-10 Customer Information
- FlatTireChange:Serviceto changeaflattirewiththespare tire. Thesparetire, ifequipped, mustbeingoodconditionand properlyinflated. Itistheowner's responsibilityfortherepairor replacementofthetireifitisnot coveredbythewarranty.
- BatteryJumpStart: Serviceto jumpstartadeadbattery.
ServicesNotIncludedin RoadsideAssistance
- Impoundtowingcausedby violationofanylaws.
- Legalfines.
- Mounting, dismounting, or changing of snowtires, chains, or other traction devices.
- Towingorservicesforvehicles drivenonanon-publicroador highway.
ServicesSpecifictoCanadian PurchasedVehicles
- FuelDelivery:Reimbursement isapproximately\$5Canadian. Dieselfueldeliverymaybe restricted.Propaneandother fuelsarenotprovidedthrough thisservice.
- Lock-OutService: Vehicle registration is required.
-
TripRoutingService: Detailed mapsofNorthAmericaare providedwhenrequestedeither withthemostdirectrouteorthe mostscenicroute.Thereisa limitofsixrequestsperyear. Additionaltravelinformationis alsoavailable.Allowthree weeksfordelivery.
-
TriplInterruptionBenefitsand Assistance:Mustbeover 250kilometersfromwhere yourtripwasstartedto qualify.GeneralMotorsof CanadaLimitedrequires pre-authorization,original detailedreceipts,andacopyof therepairorders.Once authorizationhasbeenreceived,theRoadsideAssistanceadvisor willhelptomakearrangements andexplainhowtoreceive payment.
- AlternativeService:If assistancecannotbeprovided rightaway,theRoadside Assistanceadvisormaygive permissiontogetlocal emergencyroadservice.Youwill receivepayment,upto\$100, aftersendingtheoriginalreceipt toRoadsideAssistance. Mechanicalfailuresmaybe covered,howeveranycostfor partsandlaborforrepairsnot coveredbythewarrantyarethe ownerresponsibility.
Roadside Assistance Program(Mexico)
Asanewowner,yourvehicleis automaticallyenrolledinthe RoadsideAssistanceprogram.The servicesareavailableatnocost underthetermsandconditionsof theprogram.TheRoadside Assistanceprogramisnotpartof, orincluded,inthecoverage providedbytheNewVehicle LimitedWarranty.
Roadside Assistance provides assistance to the driver and passengers while driving the vehicle within your city of residence or on any passable road in Mexico, the United States, and Canada. Services are subject to the limitations described in the following pages. Program coverage varies by country.
Roadside Assistance is available 24 hours, day, 365 days of the year.
This program expires two years from the date of the invoice for the vehicle, regardless of vehicle mileage and changes in vehicle ownership.
Formoreinformationaboutthe renewalofthisprogramattheend ofitsterm,contacttheChevrolet CustomerAssistanceCenterat 01-800-466-0800.
ServicesProvided
- FlatTireChange:Ifunableto changeaflattire,Roadside Assistancewillprovidetowing servicetothenearestauthorized Chevroletdealership.Itisthe owner'sresponsibilityforthe repairorreplacementofthetire. Thisserviceislimitedtothe transferofthevehicletotherpairfacility.
• EmergencyFuelDelivery: Deliveryofenoughfuelforthe vehicletogettothenearest servicestation.
- Lock-OutService:Serviceto unlockthevehicleifyouare lockedout.
- BatteryJumpStart:Serviceto jumpstartadeadbattery.
• *EmergencyMessages: Transmissionofurgentphone messages.
• *EmergencyCalls:Callfor emergencyservices.
- *DealershipLocation Assistance:Information regardingaddressesand telephonenumbersforChevrolet dealers.
13-12 Customer Information
- EmergencyTowing: Towtothe nearestdealerforwarranty serviceifthevehiclecannotbe driven.
If the vehicle is involved in an accident during the commission of acrime, administrative violation, or breach of traffic regulations, Roadside Assistance will not provide service. When the vehicle is not accessible to be towed, all maneuvers required to access it will beat the owner's expense.
Ifthevehicleisinanothercity outsideofyourresidence, RoadsideAssistanceislimited to movingthevehicletothe nearestdealer.Ifyouwouldlike thevehiclemovedtoadifferent dealer,youwillbeaskedto coverthedifferenceincostat thetimeofthemove.
If the vehicle cannot be received by the nearest Chevrolet dealer duetoscheduling conflicts, the vehicle will be taken to as safe, place where it will remain for up to 48 hours until it can be taken to the dealer. If the storage costs exceed the amount authorized, the owner is responsible to pay the difference at the time of service. Contact Roadside Assistance form more information on authorized amounts.
- *Triplnterruption: Thisservice is provided if you are prevented from further usage of your vehicle while traveling and it is not possible for the nearest Chevrolet dealership to repair the vehicle thesameday, requiring the vehicle to stay at the dealership for an night or more. If this happens, in addition to the previously listed services
andpriortoconfirmationbythe dealership,youareentitledto chooseoneofthefollowing alternatives,withinthelimitsof existingRoadsideAssistance programguidelines.Ifthecosts exceedtheamountauthorized fortheseservices,youmustpay thedifferenceatthetimeof service.
Roadside Assistance will coordinate hotel accommodations for all vehicle travelers foruptotwonights.
Arentalcarwillbeprovidedfor uptotwodaysandthevehicle mustbereturnedtoitsoriginal destination,excludingvehicles withacarryingcapacitygreater than3.5tons.
Complimentary Transportation: If you prefer to continue your trip to the intended destination or return to your place of residence, and the tripe requires more than eight hours driving on theroad, transportation for the driver and passengers by first class bus or coach commercial airlinewill be provided to a location chosen by Roadside Assistance, depending on availability at the chosen destination. Restrictions apply based on vehicle specifications.
If you are on the road, taxi servicetothenearest bus station or airport will be provided.
- *Complimentary TransportationforVehicle PickUp:Transportationtopick upyourvehicleafterrepairsare complete. Oncethedealerhas reportedthatthevehiclehas beenrepaired, Roadside Assistancewillprovidebusor commercialairlineone-way service(subjecttoavailability) forthepersondesignatedbyyou tocollectyourvehicleatthe dealership'slocationifyouorthe designatedpersonarenotinthe sametownorcityasthe dealership.
*Theseservicesarenotprovidedfor U.S.orCanadaresidents.All servicesprovidedintheU.S.and Canadaareattheowner'sexpense andwillbereimbursedbyRoadside Assistance.
ServicesNotIncludedinRoadside Assistance
RoadsideAssistancedoesnot coverorreimburseservicesforthe following:
• Eventscausedbyfraudorbad faithbythedriver.
- Vehicleimmobilizationsituations duetoamajorforceor unforeseencircumstances, such as naturalphenomenaofan extraordinarynature, earthquakes, volcaniceruptions, andothercyclonicstorms.
- Vehicleimmobilizationsituations arising from car accidents caused by the driver of the vehicle or third parties. This means any occurrence that causes physical injury to the occupants and/or the vehicle caused by external forces.
13-14 Customer Information
- Actsofterrorism, riotoruproar, armedforcesorpoliceactions which preventtimelydelivery of assistance services.
- Foodservice,beverages, telephonecalls,orotherextra costs.Accommodationcosts applyonlytoMexicoperthe termsandconditionsofthe RoadsideAssistanceprogram.
- Anydamagetothevehicle without intent, derived from the services provided.
- Costoftowingatrailerwhen choosingaChevroletdealerthat isnearesttothetemporary storagefacilityforthedisabled vehicle.
- Costofallmaneuversrequired toaccessthevehiclewhenitis notavailabletobetowed.
• Costoffuelprovided.
Routinevehiclerepaircostsarenot coveredbytheRoadside Assistanceprogram.Formore information,seeyournewvehicle warranty.
ContactingRoadsideAssistance
RoadsideAssistanceservicesareof nocosttoyouandavailable 24hoursaday,365daysayear. Costsareonlyincurredinsituations thatexceedthelimitsofthe program,someofwhicharelisted previouslyinthissection.
TocontactRoadsideAssistanceby phone, usethefollowingnumbers:
Mexico
01-800-466-0800
UnitedStates
1-866-466-8901
Canada
1-800-268-6800
Chevroletreservestherighttomake anychangesordiscontinuethe RoadsideAssistanceprogramat anytimewithoutnotification.
SchedulingService Appointments(U.S.and Canada)
Whenthevehiclerequireswarranty service,contactyourdealer and requestanappointment.By schedulingaserviceappointment andadvisingtheserviceconsultant ofyourtransportationneeds,your dealercanhelpminimizeyour inconvenience.
If the vehicle cannot be scheduled into the serviced department immediately, keep driving it until it can be scheduled for service, unless, of course, the problem is safety related. If it is, please call your dealership, let them know this, and ask for instructions.
If your dealer requests you to bring the vehicle for service, you are urged todos to easily in the work day as possible to allow for same-day repair.
Courtesy Transportation Program(U.S.and Canada)
Toenhanceyourownership experience,weandourparticipating dealersareproudtoofferCourtesy Transportation,acustomersupport programforvehicleswiththe Bumper-to-Bumper(BaseWarranty CoverageperiodinCanada), extendedpowertrain,and/or hybrid-specificwarrantiesinboth theU.S.andCanada.
SeveralCourtesyTransportation optionsareavailabletoassistin reducinginconveniencewhen warrantyrepairsarerequired.
Courtesy Transportation is not a part of the New Vehicle Limited Warranty. A separate booklet entitled "Limited Warranty and Owner Assistance Information" furnished with each new vehicle provides detailed warranty coverage information.
TransportationOptions
Warrantyservicecangenerallybe completedwhileyouwait. However, ifyouareunabletowait, GMhelps tominimizeinconvenienceby providingseveraltransportation options. Dependingonthe circumstances,yourdealercanoffer oneofthefollowing:
ShuttleService
Shuttleserviceisthepreferred meansofofferingCourtesy Transportation.Dealersmayprovide shuttleservicetogetyoutoyour destinationwithminimalinterruption ofyourdailyschedule.Thisincludes one-wayorround-tripshuttleservice withinreasonabletimeanddistance parametersofyourdealer'sarea.

PublicTransportationorFuel Reimbursement
If the vehiclerequires overnight warranty repairs, and public transportation is used instead of your dealer's shuttleservice, the expense must be supported by original receipts and can only be up to them maximum amount allowed by GM for shuttleservice. In addition, for U.S. customers, should you arrangetransportation through a friend or relative, limited reimbursement for reasonable fuel expenses may be available. Claim amount should reflect actual costs and be supported by original receipts. See your dealer for information regarding the allowance amounts for reimbursement off fuel or other transportation costs.
CourtesyRentalVehicle
Yourdealermayarrangetoprovide youwithacourtesyrentalvehicleor reimburseyouforarentalvehicle thatyouobtainifthevehicleiskept foranovernightwarrantyrepair. Rentalreimbursementwillbelimited andmustbesupportedbyoriginal receipts. Thisrequiresthatyousign andcompletearentalagreement andmeetstate/provincial,local,and rentalvehicleproviderrequirements. Requirementsvaryandmayinclude minimumagerequirements, insurancecoverage,creditcard,etc. Youareresponsibleforfuelusage chargesandmayalsobe responsiblefortaxes,levies,usage fees,excessiveemileage,orrental usagebeyondthecompletionofthe repair.
Itmaynotbepossibletoprovide a likevehicleasacourtesyrental.
Additional Program Information
Allprogramoptions,suchasshuttle service,maynotbeavailableat everydealer.Pleasecontactyour dealerforspecificinformation aboutavailability.AllCourtesy Transportationarrangementswillbe administeredbyappropriatedealer personnel.
General Motors reserve the righttounilaterally modify, change, or discontinue Courtesy Transportation at any time and to resolve all question so claim eligibility pursuant to the terms and conditions described herein at its solediscretion.
CollisionDamageRepair (U.S.andCanada)
If the vehicle is involved in a collision and it is damaged, have the damage repaired by a qualified technician using the proper equipment and quality replacement parts. Poorly performed collision repairs diminish the vehicular resale value, and safety performance can be compromised in subsequent collisions.
CollisionParts
GenuineGMCollisionpartsarenew partsmadewiththesamematerials andconstructionmethodsasthe partswithwhichthevehiclewas originallybuilt.GenuineGM Collisionpartsarethebestchoiceto ensurethatthevehicle'sdesigned appearance,durability,andsafety arepreserved.TheuseofGenuine GMpartscanhelpmaintaintheGM NewVehicleLimitedWarranty.
Recycledoriginalequipmentparts mayalsobeusedforrepair. These partsaretypicallyremovedfrom vehiclesthatweretotallossesin priorcrashes.Inmostcases,the partsbeingrecycledarefrom undamagedsectionsofthevehicle. ArecycledoriginalequipmentGM partmaybeanacceptablechoiceto maintainthevehicle'soriginally designedappearanceandsafety performance;however,thehistoryof thesepartsisnotknown.Suchparts arenotcoveredbytheGMNew VehicleLimitedWarranty,andany relatedfailuresarenotcoveredby thatwarranty.
Aftermarketcollisionpartsarealso available. Thesearemadeby companiesotherthanGMandmay nothavebeentestedforthevehicle. Asaresult, thesepartsmayfit poorly, exhibitprematuredurability/corrosionproblems, and may not
performproperlyinsubsequent collisions. Aftermarketpartsarenot coveredbytheGMNewVehicle LimitedWarranty, andanyvehicle failurerelatedtosuchpartsisnot coveredbythatwarranty.
RepairFacility
GMalsorecommendsthatyou chooseacollisionrepairfacilitythat meetsyourneedsbeforeyouever needcollisionrepairs. Yourdealer mayhaveacollisionrepaircenter withGM-trainedtechniciansand state-of-the-artequipment,orbe abletorecommendacollisionrepair centerthathasGM-trained techniciansandcomparable equipment.
InsuringtheVehicle
ProtectyourinvestmentintheGM vehiclewithcomprehensiveand collisioninsurancecoverage.There aresignificantdifferencesinthe qualityofcoverageaffordedby variousinsurancepolicyterms. Manyinsurancepoliciesprovide reducedprotectiontotheGM vehiclebylimitingcompensationfor damagerepairstroughtheuseof aftermarketcollisionparts.Some insurancecompanieswillnot specifyaftermarketcollisionparts. Whenpurchasinginsurance,we recommendthatyouensurethatthe vehiclewillberepairedwithGM originalequipmentcollisionparts. Ifsuchinsurancecoverageisnot availablefromyourcurrent insurancecarrier,considerswitching toanotherinsurancecarrier.
If the vehicle is leased, the leasing company may require you to have insurance that ensures repairs with Genuine GM Original Equipment Manufacturer (OEM) parts or Genuine Manufacturer replacement parts. Read the lease carefully, as you maybe charged at the end of the lease for poor quality repairs.
IfaCrashOccurs
Iftherehasbeenaninjury,call emergencyservicesforhelp.Donot leavethesceneofacrashuntilall mattershavebeentakencareof. Movethevehicleonlyifitsposition putsyouindanger,oryouare instructedtomoveitbyapolice officer.
Giveonlythenecessaryinformation topoliceandotherpartiesinvolved inthecrash.
Foremergencytowingsee RoadsideAssistanceProgram(U.S. andCanada)onpage 13-8or RoadsideAssistanceProgram (Mexico) on page 13-11.
Gatherthefollowinginformation:
- Drivename, address, and telephonenumber.
• Driverlicensenumber. - Ownername, address, and telephonenumber.
• Vehiclelicenseplatenumber.
• Vehiclemake, model, and modelyear.
• VehicleIdentification Number(VIN).
• Insurancecompanyandpolicy number. - Generaldescriptionofthe damagetotheothervehicle.
Choose areputablerepairfacility that uses quality replacement parts. See "CollisionParts" earlier in this section.
If the airbag has inflated, see What Will You See after an Airbag Inflates? on page 3-32.
ManagingtheVehicleDamage RepairProcess
Intheeventthatthevehiclerequires damagerepairs, GMrecommends thatyoutakeanactiveroleinits repair. If you have apre-determined repair facility of choice, takethe vehicle there, or have it towed there. Specify to the facility that any required replacement collision parts be originalequipment parts, either new Genuine GM parts or recycled original GM parts. Remember, recycled part will not be recovered by the GM vehicle warranty.
Insurancepaysthebillfortherepair, butyoumustlivewiththerepair. Dependingonyourpolicylimits, yourinsurancecompanymay initiallyvaluetherepairusing aftermarketparts.Discussthiswith therepairprofessional,andinsiston GenuineGMparts.Remember, ifthevehicleisleased,youmaybe obligatedtohavethevehicle repairedwithGenuineGMparts, evenifyourinsurancecoverage doesnotpaythefullcost.
Ifanotherparty'sinsurance companyispayingfortherepairs, youarenotobligatedtoaccepta repairvaluationbasedonthat insurancecompany'scollisionpolicy repairlimits,asyouhaveno contractuallimitswiththatcompany. Insuchcases,youcanhavecontrol oftherepairandpartschoicesas longasthecoststayswithin reasonablelimits.
ServicePublications OrderingInformation
ServiceManuals
ServiceManualshavethediagnosis andrepairinformationonthe engines,transmission,axle, suspension,brakes,electrical, steering,body,etc.
ServiceBulletins
ServiceBulletinsgiveadditional technicalserviceinformation neededtoknowledgeablyservice General Motors cars and trucks.
Eachbulletincontainsinstructions toassistinthediagnosis and serviceofthevehicle.
OwnerInformation
Ownerpublicationsarewritten specificallyforownersandintended toprovidebasicoperational informationaboutthevehicle.The OwnerManualincludesthe MaintenanceScheduleforall models.
In-Portfolio: IncludesaPortfolio, OwnerManual, and Warranty Booklet.
RETAILSELLPRICE: \$35.00(U.S.) plushandlingand shippingfees.
WithoutPortfolio:Owner Manualonly.
RETAILSELLPRICE: \$25.00(U.S.) plushandlingand shippingfees.
CurrentandPastModels
TechnicalServiceBulletinsand Manualsareavailableforcurrent andpastmodelGMvehicles.
ORDERTOLLFREE: 1-800-551-4123Monday–Friday 8:00AM–6:00PMEasternTime
ForCreditCardOrdersOnly (VISA-MasterCard-Discover), visit Helm, Inc. at: www.helminc.com.
Orwriteto:
Helm, Incorporated Attention: CustomerService 47911 HalyardDrive Plymouth, MI48170
Pricesaresubjecttochangewithout noticeandwithoutincurring obligation.Allowampletimefor delivery.
All listed prices are quoted in U.S. funds. Make checks payable in U.S. funds.
ReportingSafety Defects
ReportingSafetyDefects totheUnitedStates Government
If you believethat your vehicle has a defect which could cause acrashor could cause injury or death, you should immediately inform the National Highway Traffic Safety Administration (NHTSA) in addition to notifying General Motors.
IfNHTSAreceivessimilar complaints, it may open an investigation, and if it find that asafety defect exists in a group of vehicles, it may order a recall and remedycampaign. However, NHTSA cannot become involved in individual problems between you, your dealer, or General Motors.
TocontactNHTSA,youmaycall theVehicleSafetyHotline toll-freeat1-888-327-4236 (TTY:1-800-424-9153);goto http://www.safercar.gov;or writeto:
Administrator, NHTSA 1200 New Jersey Avenue, S.E. Washington, D.C. 20590
Youcanalsoobtainother informationaboutmotor vehiclesafetyfrom http://www.safercar.gov.

ReportingSafetyDefects totheCanadian Government
IfyouliveinCanada, and you believethatthevehiclehasasafety defect, notify TransportCanada immediately, and notify General Motors of Canada Limited. Call Transport Canada at 1-800-333-0510 or writeto:
TransportCanada RoadSafetyBranch 80rueNoel Gatineau, QCJ8Z0A1
ReportingSafetyDefects toGeneralMotors
In addition to notifying NHTSA (or Transport Canada) in asituation likethis, notify General Motors.
Call1-800-222-1020, orwrite:
ChevroletMotorDivision ChevroletCustomerAssistance Center P.O.Box33170 Detroit,MI48232-5170
InCanada, call 1-800-263-3777 (English) or 1-800-263-7854 (French), or write:
General Motors of Canada Limited Customer Care Centre, Mail Code: CA1-163-005 1908 Colonel Sam Drive Oshawa, Ontario L1H8P7
VehicleData Recordingand Privacy
ThisGMvehiclehasanumberof sophisticatedcomputersthatrecord informationaboutthevehicle's performanceandhowitisdriven. Forexample,thevehicleuses computermodulestomonitorand controlengineandtransmission performance,tomonitorthe conditionsforairbagdeployment anddeployairbagsinacrash,and, ifsoequipped,topprovideantilock brakingtohelpthedrivercontrolthe vehicle. Thesemodulesmaystore datatohelpyourdealertechnician servicethevehicle.Somemodules mayalsostoredataabouthowyou operatethevehicle,suchasrateof fuelconsumptionoraveragespeed. Thesemodulesmayalsoretainthe owner'spersonalpreferences,such asradiopresets,seatpositions,and temperaturesettings.

EventDataRecorders
ThisvehiclehasanEventData Recorder(EDR). Themainpurpose of an EDRistorecord, incertain crashornearcrash-likesituations, such as an airbag deploymentor hitting a road obstacle, data that will assist in understanding how a vehicle's systems performed. The EDR is designed to record data related to vehicledynamics and safety systems for a short period of time, typically 30 seconds or less. The EDR in this vehicle is designed to record such data as:
• Howvarious systems in the vehicle were operating.
- Whetherornotthedriverand passengersafetybeltswere buckled/fastened.
- Howfar, ifatall, thedriver was pressing the accelerator and/or brake pedal.
• Howfastthevehiclewas traveling.
This data can help provide better understanding of the circumstances in which crashes and injuries occur.
Important: EDRdatais recorded by the vehicle only if an trivial crash situation occurs; nodatais recorded by the EDR under normal driving conditions and non-personal data (e.g., name, gender, age, and crash location) is recorded. However, other parties, such as law enforcement, could combine the EDR data with the type of personally identifying datar routinely acquired during a crash investigation.
ToreaddatarecordedbyanEDR, specialequipmentisrequired, and accesstothevehicleortheEDRis needed. In addition to the vehicle manufacturer, other parties, such as lawenforcement, that havethe specialequipment, can read the information if they have access to the vehicle or the EDR.
GMwillnotaccessthisdataor shareitwithothersexcept:withthe consentofthevehicleowner, ifthevehicleisleased, withthe consentofthelessee;inresponse toanofficialrequestbypoliceor similargovernmentoffice;aspartof GM'sdefenseoflitigationthrough thediscoveryprocess;or, as requiredbylaw.DatathatGM collectsorreceivesmayalsobe usedforGMresearchneedsormay bemadeavailabletoothersfor researchpurposes,whereaneedis shownandthedataisnottiedtoa specificvehicleorvehicleowner.
OnStar®
If the vehicle is equipped with an active On Star system, that system may also record data in crash or near crash-likes situations. The On Star Terms and Conditions provides information on data collection and use and is available at www.onstar.com (U.S.) or www.onstar.ca (Canada), or by pressing the button and speaking to an advisor. See On Star Overview page 14-1.
NavigationSystem
If the vehicle has an navigation system, use of the system may result in the storage of destinations, addresses, telephonenumber, and other trip information. Referto the navigation manual for information on stored data and for deletion instructions.
RadioFrequency Identification(RFID)
RFIDtechnologyisusedinsome vehiclesforfunctionssuchastire pressuremonitoringandignition systemsecurity,aswellasin connectionwithconveniencessuch askeyfobsforremotedoorlocking/unlockingandstarting,and in-vehicletransmittersforgarage dooropeners.RFIDtechnologyin GMvehiclesdoesnotuseorrecord personalinformationorlinkwithany otherGMsystemcontaining personalinformation.
RadioFrequency Statement
This vehicle hassystems that operate on radio frequency that comply with Part 15 of the Federal Communications Commission (FCC) rules and with Industry Canada Standards RSS-GEN/210/220/310.
Operationissubjecttothefollowing twoconditions:
- Thedevicemaynotcause harmfulinterference.
- The device must accept any interference received, including interference that may cause undesired operation of the device.
Changesormodificationstoanyof thesesystemsbyotherthanan authorizedservicefacilitycouldvoid authorizationtousethisequipment.
13-24CustomerInformation
NOTES

DEALER
法定代表人:王志忠
OnStar
OnStarOverview
OnStarOverview......14-1
OnStarServices
Emergency......14-2
Security......14-2
Navigation....14-2
Connections......14-4
Diagnostics......14-5
OnStarAdditionallInformation
OnStarAdditional
Information......14-5
OnStarOverview

Ifequipped, this vehicle has a comprehensive, in-vehiclesystem that can connect to alive Advisor for Emergency, Security, Navigation, Connection, and Diagnostic Services.
TheOnStarsystemstatuslightis nexttotheOnStarbuttons.Ifthe statuslightis:
• SolidGreen:Systemisready.
- FlashingGreen:Onacall.
- Red:Indicatesaproblem.
Push 📄 or call 1-888-4-ONSTAR (1-888-466-7827)tospeaktoan Advisor.
Push to:
• Makeacall, endacall, oransweranincomingcall.
- GiveOnStarHands-FreeCalling voicecommands.
- GiveOnStarTurn-by-Turn Navigationvoicecommands. RequirestheavailableDirections andConnectionsserviceplan.
Push@toconnecttoalive Advisorto:
- Verifyaccountinformationor updatecontactinformation.
• Getdrivingdirections.Requires theavailableDirectionsand Connectionsserviceplan. - ReceiveOn-Demand Diagnosticsforacheckonthe vehicle'skeyoperatingsystems.
- ReceiveRoadsideAssistance.
Push ⚠ togetapriorityconnection toanEmergencyAdvisoravailable 24/7to:
• Gethelpforanemergency.
- BeaGoodSamaritanor respondtoanAMBERAlert.
• Getcrisisassistance and evacuation routes.
OnStarServices
Emergency
WithAutomaticCrashResponse, thebuilt-insystemcanautomatically connecttohelpinacrashevenif youcannotaskforit.
Push ✉toconnecttoan EmergencyAdvisor.GPS technologyisusedtoidentifythe vehiclelocationandcanprovide criticalinformationtoemergency personnel.TheAdvisorisalso trainedtooffercriticalassistancein emergencysituations.
Security
OnStarprovidesserviceslikeStolen VehicleAssistance, Remotelgnition Block, and RoadsideAssistance, ifthevehicleisequippedwiththese services. OnStarcanunlockthe vehicledoorsremotely, ifitis equippedwithautomaticdoorlocks, and can help police locate the vehicle if it is stolen.

Navigation
OnStarnavigationrequiresthe DirectionsandConnections serviceplan.
Push Ⓞtoreceiveddirectionsor havethemsenttothevehicle navigationscreen.Destinationscan alsobeforwardedtothevehicle fromGoogleMaps™ or MapQuest.com.TheOnStar mappingdatabaseiscontinuously updated.Visitwww.onstar.comfor coveragemaps.
Turn-by-TurnNavigation
- Push 📄 toconnecttoalive Advisor.
- Requestdirections.
- Directions are downloaded to the vehicle.
- Follow the voice-guided commands.
UsingVoiceCommands DuringaPlannedRoute
CancelRoute
1.Push 📄. Systemresponds: "OnStarready," thenatone.Say "Cancelroute." System responds: "Wouldyouliketo cancelroutedirectionstoyour destination?"
2. Say "Yes." Systemresponds: "OK, route canceled."
3. Say "Goodbye." Exitsvoice commands.
RoutePreview
1.Push 📋. Systemresponds: "OnStarready," thenatone.
2. Say "RoutePreview." System respondswiththenextthree maneuvers.
3. Say "Goodbye." Exits voice commands.
Repeat
1.Push 📞. Systemresponds: "OnStarready," thenatone.
2. Say "Repeat." System responds with the last direction given, then responds with "OnStarready," then at one.
3. Say "Goodbye." Exitsvoice commands.
GetMyDestination
1.Push 📄. Systemresponds: "OnStarready," thenatone.
2. Say "Getmydestination." Systemrespondswithmilesto thedestination, thenresponds with "OnStarready," thenatone.
3. Say "Goodbye." Exitsvoice commands.
OtherNavigationServices AvailablefromOnStar
OnStareNav: Allowssubscribers tosenddestinationsfromGoogle MapsandMapQuest.comtotheir Turn-by-TurnNavigationor screen-basednavigationsystem. Whenready,thedirectionswillbe downloadedtothevehicle.
DestinationDownload:Push thenrequesttheAdvisorto downloaddirectionstothe navigationsysteminthevehicle. Afterthecallends, pushthe "Go" buttononthenavigationscreento begindrivingdirections.
Destinationscanalsobe downloadedonthego. For informationabouteNav, Destination Download, andcoveragemapsvisit www.onstar.com.

Connections
OnStarHands-FreeCallingallows callstobemadeandreceivedfrom thevehicle. Thevehiclecanalsobe controlledfromacellphonethrough theOnStarmobileapp.See www.onstar.comforcoveragemaps.
Hands-FreeCalling
1.Push Systemresponds: "OnStarready."
2. Say "Dial." Systemresponds: "Pleasesaythenameornumber tocall."
3. Saytheentirenumberwithout pausing,includinga"1"andthe areacode.Systemresponds: "OKcalling."
RetrieveMyNumber
1.Push Systemresponds: "OnStarready."
2. Say "MyNumber." System responds: "YourOnStar Hands-FreeCallingnumberis."
EndaCall
Push Systemresponds: "Call ended."
StoreaNameTagforSpeed Dialing
1.Push Systemresponds: "OnStarready."
2. Say "Store." Systemresponds: "Please say thenumber you would like to store."
3. Saytheentirenumberwithout pausing.Systemresponds: "Pleasesaythenametag."
- Pickanametag. "System responds:" Abouttostore
. Doesthat soundOK?" - Say "Yes" or "No" to try again. Systemresponds: "OK, storing
."
PlaceaCallUsingaStored Number
1.Push Systemresponds: "OnStarready."
2. Say "Call
VerifyMinutesandExpiration
Push☐andsay"minutes"then "verify"tocheckhowmanyminutes remainandtheirexpirationdate.

OnStarMobileApp
WithaniPhone®or Android™-basedmobiledevice,an OnStarmobileappcanbe downloaded.Thevehiclecanbe remotestarted,ifequipped,orthe doorscanbeunlockedfrom anywherethereiscellphone service.Itcanalsocheckthefuel level,tirepressure,andoillife. ItcanconnecttoanOnStarAdvisor anytime.ForOnStarmobileapp compatibilityorfurtherinformation, seewww.onstar.com.
Diagnostics
OnStarVehicleDiagnosticswill performvehiclecheckevery month.Itwillchecktheengine, transmission,antilockbrakes,and majorvehiclesystems.Italso checksthetirepressures,ifthe vehicleisequippedwiththeTire PressureMonitoringSystem.Ifa diagnosticscheckisneeded betweene-mails,push ,andan Advisorcanrunacheck.
OnStarAdditional Information
TransferringService
Push@torequestaccounttransfer eligibilityinformation.TheAdvisor canassistincancelingorremoving accountinformation.IfOnStar receivesinformationthatvehicle ownershiphaschanged,OnStar maysendavoicemessagetothe vehicle,requestingupdatedaccount information.
ReactivationforSubsequent Owners
Push@andfollowthepromptsto speaktoanAdvisorassoonas possibleafteracquiringthevehicle. TheAdvisorwillupdatevehicle recordsandwillexplaintheOnStar serviceoffersandoptionsavailable.
HowOnStarServiceWorks
AutomaticCrashResponse, EmergencyServices,CrisisAssist, StolenVehicleAssistance,Vehicle Diagnostics,RemoteDoorUnlock, RoadsideAssistance,Turn-by-Turn Navigation,andHands-FreeCalling areavailableonmostvehicles.Not allOnStarservicesareavailable everywhereoronallvehicles. For moreinformation,afulldescription ofOnStarservices,system limitations,andOnStartermsand conditions,seewww.onstar.com (U.S.)orwww.onstar.ca(Canada); contactOnStarat1-888-4-ONSTAR (1-888-466-7827)orTTY 1-877-248-2080;orpush to speakwithanAdvisor.OnStar servicesrequireavehicleelectrical system,wirelessservice,andGPS satellitetechnologiestobeavailable andoperatingforfeaturesto functionproperly.Thesesystems maynotoperateifthebatteryis dischargedordisconnected.

OnStarservicecannotworkunless yourvehicleisinaplacewhere OnStarhasanagreementwitha wirelessserviceproviderforservice inthatarea,andthewireless serviceproviderhascoverage, networkcapacity,reception,and technologycompatiblewithOnStar's service.Serviceinvolvinglocation informationaboutthevehiclecannot workunlessGPSsignalsare available,unobstructed,and compatiblewiththeOnStar hardware.OnStarservicemaynot workiftheOnStarequipmentisnot properlyinstalledorithasnotbeen properlymaintained.Ifequipmentor softwareisadded,connected, ormodified,OnStarservicemaynot work.Otherproblemsbeyond OnStar'scontrolmayprevent servicesuchashills,tallbuildings, tunnels,weather,electricalsystem designandarchitectureofthe vehicle,damagetothevehicleina crash,orwirelessphonenetwork congestionorjamming.
SeeRadioFrequencyStatementon page13-23forinformation regardingPart15oftheFederal CommunicationsCommission(FCC) rulesandIndustryCanada StandardsRSS-GEN/210/220/310.
ServicesforPeoplewith Disabilities
Advisorsprovideservicestohelp subscriberswithphysicaldisabilities andmedicalconditions.
Push 📊 forhelpwith:
- Locatingagasstationwithan attendanttopumpgas.
• Findingahotel,restaurant,etc., thatmeetsaccessibilityneeds.
• Providingdirectionstothe closesthospitalorpharmacyin urgentsituations.
TTYUsers
OnStarhastheabilityto communicatetothedeaf, hard-of-hearing,orspeech-impaired customerswhileinthevehicle.The availabledealer-installedTTY systemcanprovidein-vehicle accesstoalloftheOnStarservices, exceptVirtualAdvisorandOnStar Turn-by-TurnNavigation.
Onstar.com
The website provides access to account information, manages the OnStars subscription, and allows viewing of videos of each service. Get subscription plan pricing and signup for OnStar Vehicle Diagnostics. Click on the "My Account" tab on the homepage.
OnStarPersonalIdentification Number(PIN)
APINisneededtoaccesssomeof theOnStarservices,likeRemote DoorUnlockandStolenVehicle Assistance.Youwillbepromptedto changethePINthefirsttimewhen speakingwithanAdvisor.To changetheOnStarPIN,callOnStar andprovidetheAdvisorwiththe currentnumber.
Warranty
OnStarequipmentmaybe warrantedaspartofthenew-vehicle limitedwarranty. Themanufacturer ofthevehiclefurnishesdetailed warrantyinformation.
Languages
The vehicle can be programmed to respond in Frenchor Spanish. Push and ask an Advisor. Advisors cans speak Frenchor Spanish.
PotentialIssues
Some OnStarservices are disabled after fivedays. On Star cannot perform Remote Door Unlockor Stolen Vehicle Assistance after the vehicle has been off continuously for fivedays. After fivedays, On Star can contact Roadside Assistance and alocksmith to help gain access to the vehicle.
GlobalPositioning System(GPS)
- ObstructionoftheGPScan occurinlargecitywithtall buildings;inparkinggarages;aroundairports;intunnels, underpasses,orparking garages;orinanareawithvery densetrees.IfGPSsignalsare notavailable,theOnStarsystem shouldstilloperatetocall OnStar.However,OnStarcould havedifficultyidentifyingthe exactlocation.
- Inemergency situations, OnStar canusethelaststoredGPS locationtosendtoemergency responders.
- A temporary loss of GPS can cause loss of the ability to send a Turn-by-Turn Navigation route. The Advisorm may give a verbal route or may ask for a callback after the vehicle is driven into an open area.
CellularandGPSAntennas
Avoidplacingitemsoverornearthe antennatopreventblockingcellular andGPSsignalreception.Cellular receptionisrequiredforOnStarto sendremotesignalstothevehicle.

UnabletoConnecttoOnStar Message
If there is limited cellular coverage or the cellular network has reached maximum capacity, this message may come on. Push ☑ to try the call again or try again after driving a few miles into another cellular area.
VehicleandPowerIssues
OnStarservicesrequireavehicle electricalsystem,wirelessservice, andGPSsatellitetechnologiestobe availableandoperatingforfeatures tofunctionproperly.Thesesystems maynotoperateifthebatteryis dischargedordisconnected.
Add-onElectricalEquipment
TheOnStarsystemisintegrated intotheelectricalarchitectureofthe vehicle.Donotaddanyelectrical equipment.SeeAdd-OnElectrical Equipmentonpage9-119.Added electricalequipmentmayinterfere withtheoperationoftheOnStar systemandcauseittonotoperate.
Privacy
ThecompleteOnStarPrivacy Statementmaybefoundat www.onstar.com.Privacy-sensitive usersofwirelesscommunications arecautionedthattheprivacyofany informationsentviawirelesscellular communicationscannotbeassured. Thirdpartiesmayunlawfully interceptoraccesstransmissions andprivatecommunicationswithout consent.
A
Accessoriesand
Modifications......10-4
AccessoryPower......9-32
ActiveFuelManagement ^® .....9-37
Add-OnElectrical
Equipment......9-119
AddingaSnowPlowor
SimilarEquipment......9-119
Additional Information,
OnStar ^® 14-5
Adjustable Throttle and
BrakePedal....9-27
Adjustments
Lumbar, FrontSeats......3-6
AirCleaner/Filter,Engine.....10-18
AirVents....8-11
AirbagSystem
Check....3-44
HowDoesanAirbag
Restrain?......3-31
PassengerSensing
System......3-37
WhatMakesanAirbag
Inflate?......3-31
AirbagSystem(cont'd)
WhatWillYouSeeafteran
AirbagInflates?......3-32
WhenShouldanAirbag
Inflate?......3-29
WhereAretheAirbags?......3-27
Airbags
AddingEquipmenttothe
Vehicle....3-43
LightOn-Off....5-21
On-OffLight....5-21
On-OffSwitch....3-33
PassengerStatusIndicator...5-23
ReadinessLight......5-20
ServicingAirbag-Equipped
Vehicles....3-42
SystemCheck....3-25
AlarmSystem
Anti-theft....2-13
AM-FMRadio....7-9
Antenna
SatelliteRadio....7-15
Anti-theft
AlarmSystem......2-13
AlarmSystemMessages.....5-50
AntilockBrake
System(ABS)......9-61
WarningLight....5-28
AppearanceCare
Exterior.....10-106
Roadside......13-8,13-11
AudioPlayers......7-16
CD....7-16
CD/DVD....7-23
AudioSystem
FixedMastAntenna......7-15
RadioReception......7-14
RearSeat(RSA)....7-50
Theft-DeterrentFeature......7-2
Automatic
DoorLocks......2-10
HeadlampSystem......6-4
Transmission....9-39
Transmission
Fluid....10-11,10-14

Information Provided by
DEALER
i-2INDEX
AutomaticTransmission
ManualMode....9-43
ShiftLockControl
FunctionCheck......10-39
Auxiliary
Devices....7-35
RoofMountedLamp......6-7
Axle,Front......10-35
Axle,Rear....10-36
B
Battery....10-33
JumpStarting......10-96
LoadManagement......6-10
PowerProtection......6-11
VoltageandCharging
Messages....5-43
BladeReplacement,Wiper...10-40
Bluetooth....7-52
Brake
PedalandAdjustable
Throttle....9-27
SystemWarningLight......5-27
Brakes....10-30
Antilock....9-61
Assist....9-64
Fluid....10-31
Parking....9-63
SystemMessages......5-43
Braking....9-4
Break-In, New Vehicle.....9-27
BulbReplacement......10-48
CenterHigh-Mounted
Stoplamp(CHMSL)and
CargoLamp......10-46
FogLamps......6-7
HalogenBulbs......10-44
HeadlampAiming......10-41
Headlamps....10-43
Headlamps, FrontTurn
Signal, Sidemarker, and
ParkingLamps......10-44
LicensePlateLamps.....10-47
BulbReplacement(cont'd)
Pick-upBoxIdentification
andFenderMarker
Lamps....10-45
Taillamps....10-45
Taillamps, TurnSignal,
Stoplamps,and
Back-upLamps......10-46
BuyingNewTires......10-75
C
Calibration....5-6
California
FuelRequirements......9-81
PerchlorateMaterials
Requirements......10-3
Warning......10-3
Camera,RearVision......9-74
CanadianVehicleOwners......iii
Capacitiesand
Specifications......12-2

Information Provided by
DEALER
CarbonMonoxide
EngineExhaust......9-37
Tailgate....2-11
WinterDriving....9-14
CargoLamp......6-8
Cautions, Danger, and
Warnings......iv
CDPlayer....7-16
CD/DVDPlayer....7-23
CenterConsoleStorage......4-2
CenterHigh-Mounted
Stoplamp(CHMSL)and
CargoLamp......10-46
CenterSeat....3-5
Chains,Tire....10-81
ChargingSystemLight......5-24
Check
EngineLight....5-25
Ignition
TransmissionLock......10-39
ChildRestraints
InfantsandYoung
Children....3-48
LowerAnchorsand
TethersforChildren......3-54
OlderChildren....3-45
Securing....3-63,3-65
Systems....3-50
CigaretteLighter....5-11
CircuitBreakers......10-49
Cleaning
ExteriorCare 10-106
InteriorCare....10-109
ClimateControlSystems ...8-1,8-4
AirConditioning......8-1,8-4
DualAutomatic....8-5
Heating....8-1,8-4
Clock....5-8
Cluster,Instrument......5-13
Clutch, Hydraulic.....10-18
CollisionDamageRepair .....13-17
Compass....5-6
Connections,OnStar ^® .....14-4
ControlofaVehicle....9-3
ConvexMirrors......2-16
Coolant
Engine....10-21
Engine Temperature
Gauge 5-17
CoolingSystem......10-20
EngineMessages ....5-45
CourtesyTransportation
Program......13-15
CruiseControl....9-69
Light....5-33
Cupholders......4-1
CustomerAssistance......13-7
Offices....13-5,13-6
TextTelephone(TTY)
Users......13-7
CustomerInformation
ServicePublications
OrderingInformation .....13-19
CustomerSatisfaction
Procedure......13-2, 13-4

Information Provided by
DEALER
i-4INDEX
D
DamageRepair, Collision.....13-17
Danger,Warnings, and
Cautions......iv
DataRecorders, Event.....13-22
DaytimeRunning
Lamps(DRL)......6-3
DefensiveDriving......9-3
DelayedLocking......2-9
Devices,Auxiliary......7-35
Diagnostics,OnStar ^® .....14-5
DistractedDriving....9-2
DomeLamps....6-9
Door
AjarMessages......5-44
DelayedLocking......2-9
Locks....2-8
PowerLocks....2-9
RearDoors....2-11
DriveBeltRouting,Engine.....12-6
DriverInformation
Center(DIC)......5-33
Driving
Characteristicsand
TowingTips....9-86
Defensive....9-3
Drunk....9-3
ForBetterFuelEconomy.....1-39
HighwayHypnosis......9-12
HillandMountainRoads.....9-13
IftheVehicleisStuck......9-16
LossofControl....9-5
Off-Road....9-6
Off-RoadRecovery......9-5
VehicleLoadLimits......9-17
WetRoads....9-12
Winter....9-14
DualAutomaticClimate
ControlSystem......8-5
DualTire
Rotation.....10-74
DVD
RearSeatEntertainment
System......7-40
DVD/CDPlayer....7-23
E
E85Fuel....9-83
Electrical Equipment,
Add-On....9-119
ElectricalSystem
EngineCompartment
FuseBlock......10-49
FusesandCircuit
Breakers.....10-49
InstrumentPanelFuse
Block....10-54
Overload....10-48
Emergency,OnStar ^® .....14-2
Engine
AirCleaner/Filter......10-18
CheckandServiceEngine
SoonLight....5-25
CompartmentOverview......10-6
Coolant....10-21
CoolantHeater....9-32
CoolantTemperature
Gauge....5-17
Engine(cont'd)
CoolingSystem......10-20
CoolingSystemMessages...5-45
DriveBeltRouting......12-6
Exhaust......9-37
Fan....10-27
OilLifeSystem......10-10
OilMessages......5-46
OilPressureGauge......5-16
OverheatedProtection
OperatingMode......10-27
Overheating....10-24
PowerMessages......5-47
PressureLight......5-31
RunningWhileParked......9-38
Starting....9-30
EntryLighting......6-10
Equipment, Towing......9-106
EventDataRecorders......13-22
ExitLighting......6-10
Extender, SafetyBelt......3-23
ExteriorLampControls......6-1
ExteriorLampsOffReminder...6-3
F
Fan
Engine....10-27
FastIdleSystem......9-31
Features
Memory....1-14
Filter,
EngineAirCleaner.....10-18
Flash-to-Pass......6-3
Flashers,HazardWarning......6-5
FlatTire....10-82
Changing....10-84
FloorMats....10-112
Fluid
Automatic
Transmission.....10-11,10-14
Brakes....10-31
Four-WheelDrive
TransferCase......9-47
PowerSteering.....10-28
Washer....10-29
FogLamps
BulbReplacement......6-7
FoldingMirrors....2-18
Four-WheelDrive......10-33,9-47
Four-Wheel-DriveLight......5-29
FrontAxle....10-35
FrontFogLamp
Light....5-33
FrontSeats
Adjustment....3-3
HeatedandVentilated......3-10
Fuel....9-79
Additives....9-82
E85(85%Ethanol)......9-83
EconomyDriving......1-39
FillingaPortableFuel
Container....9-85
FillingtheTank....9-84
ForeignCountries......9-81
GasolineSpecifications.....9-81
Gauge....5-15
LowFuelWarningLight.....5-32
Management,Active......9-37
Recommended....9-80
Requirements, California.....9-81
SystemMessages......5-47
Full-SizeSpareTire......10-95

Information Provided by
DEALER
兹,严风□□□□
i-6INDEX
Fuses
EngineCompartment
FuseBlock......10-49
FusesandCircuit
Breakers.....10-49
InstrumentPanelFuse
Block....10-54
G
GarageDoorOpener......5-61
Programming......5-62
Gasoline
Specifications....9-81
Gauges
EngineCoolant
Temperature....5-17
EngineOilPressure......5-16
Fuel....5-15
Odometer....5-14
Speedometer....5-14
Tachometer....5-14
TripOdometer....5-14
Gauges(cont'd)
Voltmeter....5-18
WarningLightsand
Indicators......5-12
GeneralInformation
ServiceandMaintenance.....11-1
Towing....9-86
VehicleCare....10-3
GlassReplacement......10-41
GloveBox......4-1
GMMobilityReimbursement
Program......13-8
H
HalogenBulbs....10-44
HazardWarningFlashers......6-5
HeadRestraints....3-2
Headlamps
Aiming....10-41
Automatic....6-4
BulbReplacement......10-43
DaytimeRunning
Lamps(DRL)......6-3
Flash-to-Pass......6-3
Headlamps(cont'd)
Headlamps, FrontTurn
Signal, Sidemarker, and
ParkingLamps......10-44
High-BeamOnLight......5-32
High/LowBeamChanger.....6-3
HeatedandVentilatedFront
Seats......3-10
HeatedMirrors....2-19
Heater
EngineCoolant....9-32
HeatingandAir
Conditioning....8-1,8-4
High-BeamOnLight......5-32
High-SpeedOperation......10-66
HighwayHypnosis......9-12
HillandMountainRoads......9-13
HillStartAssist(HSA)......9-65
Hood....10-5
Horn....5-5
HowtoWearSafetyBelts
Properly....3-15
HydraulicClutch......10-18

Information Provided by:
DEALER
|
IdleSystem
Fast....9-31
IgnitionPositions......9-28
IgnitionTransmissionLock
Check....10-39
Immobilizer....2-14
InfantsandYoungChildren
Restraints....3-48
Infotainment......7-1
InstrumentCluster......5-13
InstrumentPanel
StorageArea......4-1
Introduction......iii
J
JumpStarting.....10-96
K
KeyandLockMessages.....5-47
KeylessEntry
Remote(RKE)System......2-3
Keys......2-2
L
Labeling, TireSidewall.....10-58
Lamps
AuxiliaryRoof
MountedLamp......6-7
Cargo....6-8
DaytimeRunning(DRL)......6-3
Dome......6-9
ExteriorControls......6-1
ExteriorLampsOff
Reminder 6-3
LicensePlate......10-47
MalfunctionIndicator......5-25
Messages......5-47
Pick-upBoxIdentification andFenderMarker......10-45
Reading......6-9
Taillamps....10-45
LapBelt....3-22
Lap-ShoulderBelt......3-17
LATCHSystem
ReplacingPartsaftera Crash....3-62
LATCH, LowerAnchorsand
TethersforChildren......3-54
Lighter, Cigarette.....5-11
Lighting
Entry 6-10
Exit......6-10
IlluminationControl......6-8
Lights
AirbagOn-Off....5-21
AirbagReadiness......5-20
AntilockBrakeSystem (ABS)Warning......5-28
BrakeSystemWarning......5-27
ChargingSystem......5-24
CruiseControl....5-33
EngineOilPressure......5-31
Flash-to-Pass......6-3
Four-Wheel-Drive....5-29
FrontFogLamp 5-33
High-BeamOn....5-32
High/LowBeamChanger.....6-3
LowFuelWarning......5-32
SafetyBeltReminders......5-19

Information Provided by: DEALER
i-8INDEX
Lights(cont'd)
Security......5-32
StabiliTrak® OFF......5-30
TirePressure....5-30
Tow/HaulMode......5-29
TractionControlSystem (TCS)/StabiliTrak ^® .....5-30
LockingRearAxle....9-69
Locks
AutomaticDoor......2-10
DelayedLocking......2-9
Door....2-8
LockoutProtection......2-10
PowerDoor......2-9
Safety....2-10
LossofControl......9-5
LowFuelWarningLight......5-32
LowerAnchorsandTethers forChildren(LATCH
System)....3-54
LumbarAdjustment......3-6
FrontSeats......3-6
M
Maintenance
Records......11-17
MaintenanceSchedule
RecommendedFluids andLubricants......11-13
TransferCase......9-47
MalfunctionIndicatorLamp....5-25
ManualMirrors......2-16
ManualMode....9-43
ManualTransmission......9-46
Fluid....10-18
ManualWindows......2-21
MemoryFeatures......1-14
MemorySeats......3-8
Messages
AirbagSystem......5-49
Anti-theftAlarmSystem......5-50
BatteryVoltageand Charging....5-43
BrakeSystem......5-43
DoorAjar....5-44
EngineCoolingSystem......5-45
EngineOil....5-46
Engine Power 5-47
Fuel System 5-47
Messages(cont'd)
KeyandLock....5-47
Lamp....5-47
ObjectDetectionSystem.....5-48
RideControlSystem......5-48
StartingtheVehicle......5-50
Tire....5-50
Transmission......5-51
Vehicle....5-43
VehicleReminder......5-51
WasherFluid......5-52
Mirrors
AutomaticDimming
Rearview......2-20
Convex....2-16
Folding....2-18
Heated....2-19
Manual....2-16
ManualRearview......2-19
ParkTilt....2-19
Power......2-17
TrailerTow......2-16
MonitorSystem, Tire
Pressure....10-67

N
Navigation
OnStar ^® 14-2
VehicleDataRecording
andPrivacy......13-23
NewVehicleBreak-In......9-27
NoiseControlSystem......10-37
0
ObjectDetectionSystem
Messages......5-48
Odometer....5-14
Trip....5-14
Off-Road....9-6
Driving....9-6
Recovery....9-5
Oil
Engine....10-7
EngineOilLifeSystem.....10-10
EngineOilPressure
Gauge....5-16
Messages......5-46
PressureLight......5-31
OlderChildren,Restraints.....3-45
OnlineOwnerCenter......13-7
OnStar®
AdditionalInformation......14-5
Connections......14-4
Diagnostics....14-5
Emergency....14-2
Navigation......14-2
Overview......14-1
Security......14-2
System, InBrief......1-40
Operation, Infotainment
System......7-3
Ordering
ServicePublications......13-19
Outlets
Power....5-10
OverheatedEngine
Protection
OperatingMode......10-27
Overheating,Engine......10-24
Overview,OnStar ^® .....14-1
P
Park
ShiftingInto......9-34
ShiftingOutof....9-35
TiltMirrors....2-19
Parking....9-36
Assist,Ultrasonic....9-72
Brake....9-63
BrakeandP(Park)
MechanismCheck......10-40
OverThingsThatBurn......9-36
PassengerAirbagStatus
Indicator....5-23
PassengerSensingSystem...3-37
PerchlorateMaterials
Requirements, California.....10-3
Personalization
Vehicle....5-52
Phone
Bluetooth....7-52
i-10INDEX
Pick-upBoxIdentification
andFenderMarker
Lamps....10-45
PickupConversionto
ChassisCab......9-123
Power
DoorLocks....2-9
Mirrors....2-17
Outlets......5-10
Protection, Battery......6-11
RetainedAccessory(RAP)...9-32
SeatAdjustment......3-5
SteeringFluid......10-28
Windows....2-21
Pregnancy, Using Safety
Belts....3-22
Privacy
RadioFrequency
Identification(RFID)......13-23
Program
CourtesyTransportation....13-15
Proposition65Warning,
California....10-3
R
RadioFrequency
Identification(RFID)......13-23
Statement......13-23
Radios
AM-FMRadio....7-9
CD/DVDPlayer....7-23
Reception......7-14
Satellite....7-11
ReadingLamps......6-9
RearAxle....10-36
Locking....9-69
RearDoors....2-11
RearSeatAudio(RSA)
System......7-50
RearSeatEntertainment
System......7-40
RearSeatAudio(RSA)......7-50
RearSeats......3-12,3-13
RearVisionCamera(RVC)....9-74
RearWindows....2-22
RearviewMirrors......2-19
AutomaticDimming......2-20
RecliningSeatbacks......3-7
Recommended
Fuel....9-80
RecommendedFluidsand
Lubricants....11-13
Records
Maintenance....11-17
Recreational Vehicle
Towing....10-101
ReimbursementProgram,
GMMobility......13-8
RemoteKeylessEntry
(RKE)System......2-2,2-3
RemoteVehicleStart......2-5
Replacement
Glass....10-41
ReplacementBulbs......10-48
ReplacementParts
Airbags....3-45
Maintenance....11-16
ReplacingAirbagSystem.....3-45

Information Provided by
DEALER
ReplacingLATCHSystem
PartsafteraCrash......3-62
ReplacingSafetyBelt
SystemPartsafteraCrash...3-24
Reporting Safety Defects
Canadian Government.....13-21
General Motors.....13-21
U.S. Government.....13-20
Restraints
WheretoPut......3-52
RetainedAccessory Power(RAP)....9-32
RideControlSystems
Messages......5-48
Roads
Driving, Wet....9-12
Roadside Assistance Program....13-8,13-11
Roof
Sunroof....2-23,2-24
Rotation, Tires......10-72
Routing,EngineDriveBelt.....12-6
RunningtheVehicleWhile
Parked....9-38
S
SafetyBelts....3-14
Care....3-24
Extender....3-23
HowtoWearSafetyBelts
Properly....3-15
LapBelt....3-22
Lap-ShoulderBelt....3-17
Reminders....5-19
ReplacingafteraCrash.....3-24
UseDuringPregnancy......3-22
SafetyDefectsReporting
CanadianGovernment.....13-21
GeneralMotors....13-21
U.S.Government....13-20
SafetyLocks....2-10
SafetySystemCheck....3-23
SatelliteRadio....7-11
SchedulingAppointments.....13-15 Seats
Adjustment, Front......3-3
CenterSeat....3-5
HeadRestraints....3-2
Seats(cont'd)
HeatedandVentilated
Front....3-10
LumbarAdjustment, Front.....3-6
Memory....3-8
PowerAdjustment, Front.....3-5
Rear....3-12,3-13
RecliningSeatbacks......3-7
SecuringChild
Restraints....3-63,3-65
Security
Light....5-32
OnStar ^ ....14-2
Vehicle ....2-13
Service
Accessories and Modifications....10-4
DoingYourOwnWork....10-4
EngineSoonLight....5-25
MaintenanceRecords....11-17
Maintenance, General Information....11-1
PartsIdentificationLabel....12-1
i-12INDEX
Service(cont'd)
PublicationsOrdering
Information......13-19
SchedulingAppointments...13-15
ServicingtheAirbag......3-42
ShiftLockControlFunction
Check, Automatic
Transmission......10-39
Shifting
IntoPark....9-34
OutofPark....9-35
Signals, Turnand
Lane-Change......6-6
SnowPlow....9-119
Specificationsand
Capacities....12-2
Speedometer....5-14
StabiliTrak
OFFLight....5-30
System......9-65
StartAssist,Hills......9-65
StartVehicle,Remote......2-5
StarterSwitchCheck......10-38
StartingtheEngine......9-30
StartingtheVehicle
Messages......5-50
Steering....9-4
Fluid,Power......10-28
WheelAdjustment......5-2
WheelControls....5-3
StoplampsandBack-upLamps
BulbReplacement......10-46
StorageAreas
CenterConsole......4-2
GloveBox......4-1
InstrumentPanel......4-1
StuckVehicle....9-16
SunVisors....2-23
Sunroof....2-23,2-24
Switches
AirbagOn-Off....3-33
Symbols......iv
System
Infotainment......7-1
NoiseControl......10-37
T
Tachometer....5-14
Tailgate....2-11
Taillamps....10-45
BulbReplacement......10-46
TextTelephone(TTY)Users...13-7
Theft-DeterrentSystems.....2-14
Immobilizer....2-14
Throttle,Adjustable......9-27
Time....5-8
Tires
BuyingNewTires......10-75
Chains....10-81
Changing....10-84
Designations......10-61
DifferentSize.....10-77
DualRotation....10-74
Full-SizeSpare......10-95
IfaTireGoesFlat......10-82
InflationMonitorSystem....10-68

Information Provided by:
DEALER
Tires(cont'd)
Inspection......10-71
Messages......5-50
Pressure....10-66
PressureLight......5-30
PressureMonitorSystem...10-67
Rotation....10-72
SidewallLabeling......10-58
Terminology and Definitions....10-62
UniformTireQuality Grading....10-78
WheelAlignmentandTire Balance.....10-79
WheelReplacement......10-80
WhenItIsTimeforNew Tires....10-75
Tow/HaulMode......9-44
Tow/HaulModeLight......5-29
Towing
DrivingCharacteristics......9-86
Equipment....9-106
GeneralInformation......9-86
Recreational Vehicle.....10-101
Trailer....9-90
TrailerSway Control(TSC)....9-118
Vehicle....10-101
Traction
ControlSystem(TCS)/StabiliTrak® Light....5-30
Trailer
SwayControl(TSC)......9-118
TowMirrors....2-16
Towing....9-90
TransferCase......9-47
Transmission
Automatic....9-39
Fluid,Automatic.....10-11,10-14
Fluid,Manual....10-18
Messages......5-51
TransportationProgram,
Courtesy......13-15
TripOdometer....5-14
Truck-CamperLoading
Information......9-25
TurnandLane-Change
Signals......6-6
TurnSignal
BulbReplacement......10-46
U
UltrasonicParkingAssist.....9-72
UniformTireQuality
Grading....10-78
UniversalRemoteSystem.....5-61
Operation......5-67
Programming......5-62
UsingThisManual......iv

Information Provided by: DEALER
i-14INDEX
V
Vehicle
CanadianOwners......iii
Control....9-3
Identification
Number(VIN)......12-1
LoadLimits....9-17
Messages......5-43
Personalization......5-52
ReminderMessages......5-51
RemoteStart......2-5
Security......2-13
Towing....10-101
VehicleCare
TirePressure......10-65
Ventilation,Air......8-11
Visors....2-23
VoltmeterGauge......5-18
W
Warning
BrakeSystemLight......5-27
WarningLights, Gauges,
andIndicators......5-12
Warnings......iv
CautionsandDanger......iv
HazardFlashers......6-5
WasherFluid......10-29
Messages......5-52
Wheels
AlignmentandTire
Balance....10-79
DifferentSize......10-77
Replacement......10-80
WhenItIsTimeforNew
Tires....10-75
WheretoPuttheRestraint....3-52
Windows....2-20
Manual 2-21
Power 2-21
Rear....2-22
Windshield
Wiper/Washer....5-5
Winter
Driving....9-14
WiperBladeReplacement....10-40