Mondeo (2007) - Car FORD - Free user manual and instructions
Find the device manual for free Mondeo (2007) FORD in PDF.

User questions about Mondeo (2007) FORD
0 question about this device. Answer the ones you know or ask your own.
Ask a new question about this device
Download the instructions for your Car in PDF format for free! Find your manual Mondeo (2007) - FORD and take your electronic device back in hand. On this page are published all the documents necessary for the use of your device. Mondeo (2007) by FORD.
USER MANUAL Mondeo (2007) FORD
natural_image
Black-and-white photo of a smiling man in a car, smiling while seated (no visible text or symbols)The information contained in this publication was correct at the time of going to print. In the interest of development the right is reserved to change specifications, design or equipment at any time without notice and without incurring any obligations. This publication, or part thereof, may not be reproduced nor translated without our approval. Errors and omissions excepted.
© Ford Motor Company 2009
All rights reserved.
Part number: 9S7J-19A321-DA (CG3536en) 06/2009 20090622094208

Mixed Sources
Product group from well-managed forests, controlled sources and recycled wood or fiber
www.fsc.org Cert no. SGS-COC-2452 © 1996 Forest Stewardship Council
Introduction
About this handbook....7
Symbols glossary....7
Parts and accessories....7
Quick start
Quick start....10
Child safety
Child seats....19
Booster cushions....20
Child seat positioning....22
ISOFIX anchor points....24
Child safety locks....25
Occupant protection
Principle of operation....27
Fastening the seat belts....29
Seat belt height adjustment....29
Seat belt reminder....30
Using seat belts during pregnancy.....30
Disabling the passenger airbag......30
Keys and remote controls
General information on radio frequencies....32
Programming the remote control.....32
Changing the remote control battery....32
Locks
Locking and unlocking....36
Global opening and closing......38
Keyless entry....40
Engine immobiliser
Principle of operation....43
Coded keys....43
Arming the engine immobiliser......43
Disarming the engine immobiliser.....43
Alarm
Principle of operation....44
Arming the alarm....46
Disarming the alarm....46
Steering wheel
Adjusting the steering wheel......47
Audio control....47
Wipers and washers
Windscreen wipers......49
Autowipers....49
Windscreen washers....50
Rear window wiper and washers.....50
Headlamp washers....51
Checking the wiper blades....51
Changing the wiper blades....51
Lighting
Lighting control....53
Autolamps....54
Front fog lamps....54
Rear fog lamps....54
Adjusting the headlamps - Vehicles With: Adaptive Front Lighting/Xenon Headlamps....55
Headlamp levelling....55
Hazard warning flashers....56
Adaptive front lighting system (AFS)....56
Direction indicators....58
Interior lamps....58
Removing a headlamp....59
Changing a bulb....60
Bulb specification chart....67
Windows and mirrors
Electric windows....69
Exterior mirrors....71
Electric exterior mirrors....71
Table of contents
Auto-dimming mirror....73
Instruments
Gauges....74
Warning lamps and indicators....76
Audible warnings and indicators......78
Information displays
General information....79
Trip computer....88
Personalised settings....90
Information messages....92
Climate control
Principle of operation....101
Air vents....101
Manual climate control....102
Automatic climate control.....104
Heated windows and mirrors.....106
Auxiliary heater....107
Electric sunroof....111
Seats
Sitting in the correct position....115
Manual seats....115
Electric seats....116
Head restraints....118
Rear seats....118
Heated seats....119
Ventilated seats....119
Convenience features
Sun blinds....121
Instrument lighting dimmer.....121
Clock....121
Cigar lighter....121
Ashtray....122
Auxiliary power sockets....122
Cup holders....123
Glove box....123
Storage compartments......123
Map pockets....124
Memory function....124
Glasses holder....125
CD changer....125
Auxiliary input (AUX IN) socket......125
USB port....126
Starting the engine
General information....127
Ignition switch....127
Keyless starting....127
Steering wheel lock....129
Starting a petrol engine....129
Starting a petrol engine - E85......130
Starting a diesel engine....131
Diesel particulate filter (DPF)....131
Switching off the engine....132
Engine heater....132
Fuel and refuelling
Fuel quality - Petrol....133
Fuel quality - E85....133
Fuel quality - Diesel....133
Catalytic converter....134
Fuel filler flap....134
Refuelling....135
Refuelling - E85....135
Fuel consumption....135
Technical specifications....136
Transmission
Manual transmission....138
Automatic transmission....138
Brakes
Principle of operation....141
Hints on driving with ABS....141
Parking brake....141
Stability control
Principle of operation....142
Using stability control....142
Hill start assist
Principle of operation....143
Using hill start assist....143
Active suspension
Principle of operation....146
Using active suspension....146
Parking aid
Principle of operation....147
Using the parking aid....147
Cruise control
Principle of operation....149
Using cruise control....149
Adaptive cruise control (ACC)
Principle of operation....151
Using ACC....152
Forward alert function....155
Load carrying
General information....157
Luggage anchor points.....157
Sliding loadspace floor....158
Rear under floor storage....160
Cargo nets....160
Luggage covers....161
Roof racks and load carriers....162
Dog guard....162
Load retaining fixtures....164
Towing
Towing a trailer....166
Detachable tow ball....166
Driving hints
Running-in....170
General driving points - Vehicles With: Sports Suspension....170
Cold weather precautions.....170
Driving through water....170
Emergency equipment
First aid kit....171
Warning triangle....171
Status after a collision
Inspecting safety system components....172
Fuses
Fuse box locations....173
Changing a fuse....175
Fuse specification chart....176
Vehicle recovery
Towing points....185
Towing the vehicle on four wheels.....185
Maintenance
General information....187
Opening and closing the bonnet.....188
Engine compartment overview - 1.6L Duratec-16V Ti-VCT (Sigma)....189
Engine compartment overview - 2.0L Duratec-HE (MI4)....190
Engine compartment overview - 2.3L Duratec-HE (MI4)....191
Engine compartment overview - 2.5L Duratec (VI5)....192
Engine compartment overview - 1.8L Duratorq-TDCi (Lynx) Diesel....193
Engine compartment overview - 2.0L Duratorq-TDCi (DW) Diesel....194
Engine compartment overview - 2.2L Duratorq-TDCi (DW) Diesel....195
Engine oil dipstick - 1.6L Duratec-16V Ti-VCT (Sigma)....196
Engine oil dipstick - 2.0L Duratec-HE (MI4)/2.3L Duratec-HE (MI4)......196
Engine oil dipstick - 2.5L Duratec (VI5)....196
Engine oil dipstick - 1.8L Duratorq-TDCi (Lynx) Diesel....196
Engine oil dipstick - 2.0L Duratorq-TDCi (DW) Diesel/2.2L Duratorq-TDCi (DW) Diesel....197
Engine oil check....197
Engine coolant check....197
Brake and clutch fluid check....198
Power steering fluid check....198
Washer fluid check....199
Technical specifications....199
Vehicle care
Cleaning the exterior......202
Cleaning the interior....202
Repairing minor paint damage......203
Vehicle battery
Using booster cables....204
Battery connection points.....205
Wheels and tyres
General information....206
Changing a road wheel....206
Tyre repair kit....210
Run flat tyres....216
Tyre care....217
Using winter tyres....217
Using snow chains....217
Tyre pressure monitoring system.....218
Technical specifications....219
Vehicle identification
Vehicle identification plate......222
Vehicle identification number (VIN).....222
Technical specifications
Technical specifications....223
Telephone
General information....231
Telephone setup....231
Bluetooth setup....232
Telephone controls....233
Using the telephone - Vehicles Without: Navigation System......233
Using the telephone - Vehicles With: Navigation System....236
Voice control
Principle of operation....238
Using voice control....238
Audio unit commands....239
Telephone commands....250
Navigation system commands.....254
Climate control commands.....254
Connectivity
General information....257
Connecting an external device......258
Connecting an external device - Vehicles With: Bluetooth....258
Using a USB device....259
Using an iPod....261
Navigation introduction
Road Safety....265
Navigation system
Getting started....266
Table of contents
Appendices
Type approvals....268
Type approvals....268
Type approvals....268
Electromagnetic compatibility.....269
ABOUT THIS HANDBOOK
Thank you for choosing Ford. We recommend that you take some time to get to know your vehicle by reading this handbook. The more that you know about it, the greater the safety and pleasure you will get from driving it.
WARNING

Always drive with due care and attention when using and operating the controls and features on your vehicle.
Symbols on your vehicle


When you see these symbols, read and follow the relevant instructions in this handbook before touching or attempting adjustment of any kind.
PARTS AND ACCESSORIES
Note: This handbook describes product features and options available throughout the range, sometimes even before they are generally available. It may describe options not fitted to your vehicle.
Note: Always use and operate your vehicle in line with all applicable laws and regulations.
Note: Pass on this handbook when selling your vehicle. It is an integral part the vehicle.
SYMBOLS GLOSSARY
Symbols in this handbook
WARNING

You risk death or serious injury to yourself and others if you do not follow the instructions highlighted the warning symbol.
CAUTION

You risk damaging your vehicle if you do not follow the instructions highlighted by the caution symbol.
Now you can be sure that your Ford parts are Ford parts
Your Ford has been built to the highest standards using high quality Ford Original Parts. As a result, you can enjoy driving i for many years.
Should the unexpected occur and a major part needs replacing, we recommend that you accept nothing less than Ford Original Parts.
The use of Ford Original Parts ensures that your vehicle is repaired to its pre-accident condition and maintains its maximum residual value.
Ford Original Parts match Ford's stringent safety requirements and high standards of fit, finish and reliability. Quite simply, they represent the best overall repair value, including parts and labour costs.
Now it is easier to tell if you have really been given Ford Original Parts. The Ford logo is clearly visible on the following parts if they are Ford Original Parts. If your vehicle has to be repaired, look for the clearly visible Ford branding and make sure that only Ford Original Parts have been used.
Look for the Ford logo on the following parts
Sheet metal
- Bonnet
- Doors
• Luggage compartment lid or tailgate
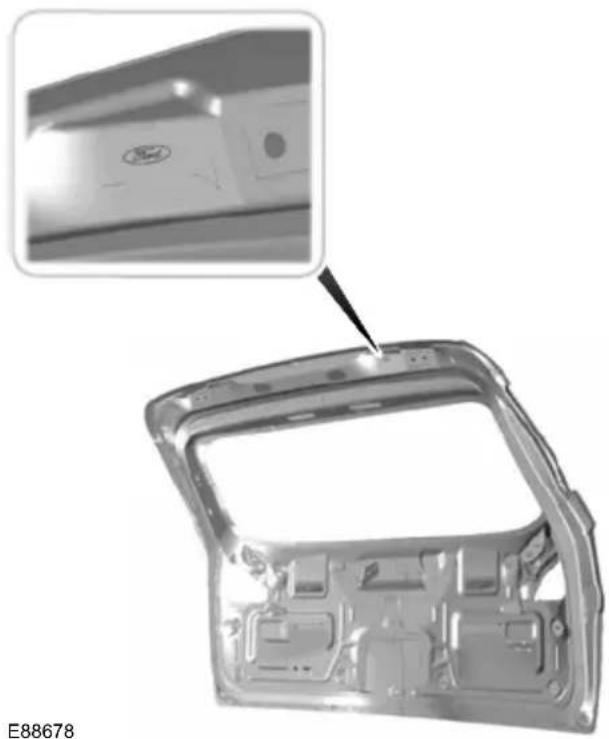
natural_image
Exterior view of a car body panel with an inset close-up showing a component detail (no text or symbols visible)Bumper and radiator grille
- Radiator grille
- Front and rear bumper

natural_image
Front view of a Ford car's head and grille, showing structural details with no visible text or symbols.E88505
Exterior mirror

natural_image
3D rendered mechanical component with a close-up inset showing a detail (no text or symbols visible)E88506
Glass
- Rear window
- Side glass
- Windscreen
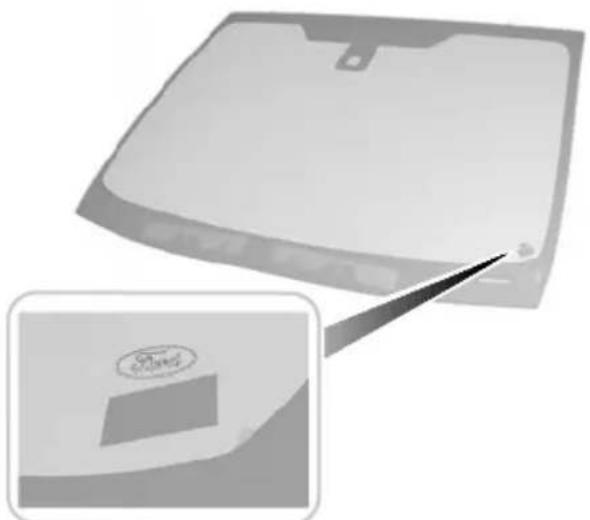
natural_image
Exterior view of a modern office building (no signage)E88507
Lighting
- Rear lamps
- Headlamp

text_image
Ford 0.2710E88508
Quick start
QUICK START
Instrument panel overview - left-hand drive

text_image
A CB G HFE I J K L M V O N U T S R Q PE87719
Quick start
Instrument panel overview - right-hand drive

text_image
I J K L M H G C D E F B A O N VPT S R Q UE87720
A Lighting controls. See Lighting control (page 53).
B Air vents. See Air vents (page 101).
C Direction indicators. See Direction indicators (page 58). Telephone control buttons. See Telephone controls (page 233). Voice control buttons. See Using voice control (page 238).
D Instrument cluster. See Gauges (page 74).
E Information display controls. See Information displays (page 79).
F Wiper lever. See Windscreen wipers (page 49).
G Start Button. See Keyless starting (page 127).
H Audio or navigation unit. See separate handbook.
I Stability control (ESP) switch. See Using stability control (page 142).
Quick start
J Parking aid switch. See Using the parking aid (page 147).
K Hazard warning flasher switch. See Hazard warning flashers (page 56).
L Passenger airbag deactivation warning lamp. See Disabling the passenger airbag (page 30).
M Heated windscreen and heated rear window switches. See Heated windows and mirrors (page 106).
N Climate controls. See Manual climate control (page 102). See Automatic climate control (page 104).
O Cigar lighter. See Cigar lighter (page 121).
P Ignition switch. See Ignition switch (page 127).
Q Cruise control switches. See Using cruise control (page 149). Adaptive cruise control switches. See Using ACC (page 152).
R Steering wheel adjustment lever. See Adjusting the steering wheel (page 47).
Horn.S
T Cruise control switches. See Using cruise control (page 149). Adaptive cruise control switches. See Using ACC (page 152).
U Driver Knee airbag. See Principle of operation (page 27).
V Storage compartment. See Storage compartments (page 123).
Keyless entry

natural_image
Top-down diagram of a vehicle inside a body cavity, no text or symbols presentUnlocking the vehicle

natural_image
3D rendered object resembling a car or connector with a white arrow pointing to a component (no text or symbols visible)Passive locking and unlocking requires a E78278 valid passive key to be located within one of the three external detection ranges.
Pull a door handle to unlock all the doors and the luggage compartment lid and disarm the alarm.
Quick start
Locking the vehicle

natural_image
Close-up of a car handle with a black arrow pointing to a specific part (no text or symbols visible)E87384

natural_image
Close-up of a Ford logo on the side of a vehicle's door, with a small inset showing a black arrow pointing to a specific area (no text or symbols visible)E87435
See Keyless entry (page 40).
Adjusting the steering wheel
WARNING

Never adjust the steering wheel when the vehicle is moving.

text_image
2 2 1E95178
natural_image
3D rendered image of a car steering wheel with a black arrow pointing to the number 3 (no text or symbols on the component itself)E95179
See Adjusting the steering wheel (page 47).
Quick start
Autowipers
text_image
E70696 A B C DSingle wipeA
AutowipersB
Normal wipeC
High speed wipeD
natural_image
Close-up of a circular industrial control knob with directional indicators (no text or symbols)E70719
The headlamps will come on and go off automatically depending on the ambient light.
See Lighting control (page 53).
Electric folding mirrors

natural_image
Close-up of a car interior showing a car seatbelt with a black arrow pointing to the left side (no text or symbols visible)E72623
See Electric exterior mirrors (page 71).
Quick start
Information displays

natural_image
Close-up of a mechanical component with a central button labeled 'OK' and directional arrows, no readable text or symbols beyond the button.Use the arrow buttons to navigate through the menus and press OK to make a selection.
See Information displays (page 79).
Manual climate control
Heating the interior quickly

text_image
0 1 2 3 4 A/CE71377
Cooling the interior quickly
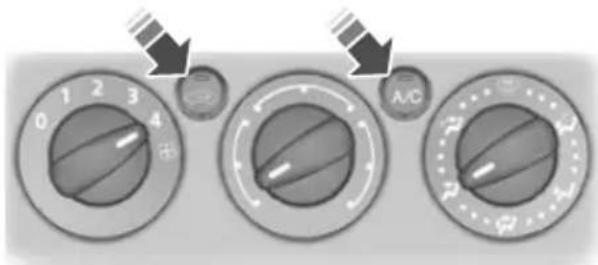
text_image
0 1 2 3 4 A/CE71381
Defrosting and demisting the windscreen
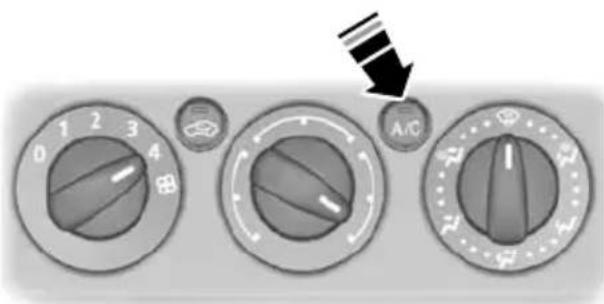
text_image
0 1 2 3 4 A/CE71382
See Manual climate control (page 102).
Automatic climate control

text_image
- F + AUTO -A/CE70304
See Automatic climate control (page 104).
Memory function
WARNING

Do not use the memory store function when the vehicle is moving.
Quick start
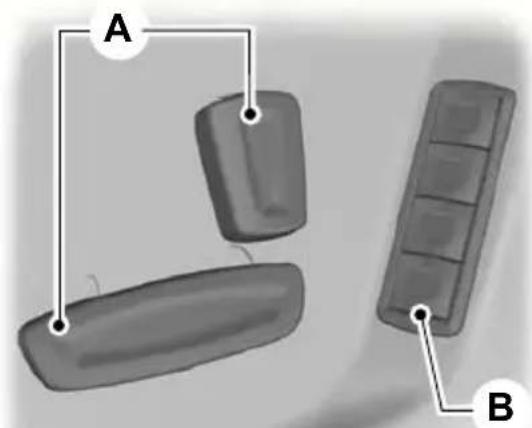
natural_image
Diagram showing three labeled parts (A, B) with connecting lines, no text or symbols presentE86768
Seat adjustment controls.A Memory pre-set buttons.B
- Turn the ignition on.
- Adjust the seat and exterior mirrors to the desired position.
- Press and hold the desired pre-set button B until a single chime sounds to confirm.
See Memory function (page 124).
Engine idle speed after starting
The engine may idle at a higher speed than normal immediately after starting from cold.
See Starting the engine (page 127). E86613
Keyless starting

text_image
Ford POWERE85766
Press the start button.
See Keyless starting (page 127).
Diesel particulate filter (DPF)
WARNING
Do not park or idle your vehicle over dry leaves, dry grass or other combustible materials. The DPF regeneration process creates very high exhaust gas temperatures and the exhaust will radiate a considerable amount of heat during and after DPF regeneration, and after you have switched the engine off. This is a potential fire hazard.
See Diesel particulate filter (DPF) (page 131).
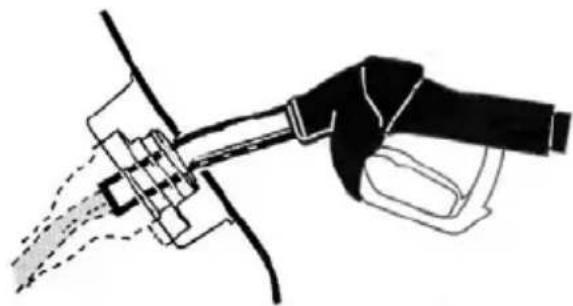
Fuel filler flap

natural_image
Close-up of a mechanical component with a circular housing and a belt, showing an arrow indicating direction (no text or symbols)Press the flap to open it. Open the flap fully until it engages.
Quick start
natural_image
Line drawing of a hand holding a tool with a spray nozzle, no text or symbols presentE119080
Insert the fuel nozzle up to and including the first notch on the nozzle. Keep it resting on the cover of the fuel pipe opening.
WARNING

We recommend that you wait at least 10 seconds before removing the fuel nozzle to allow any residua fuel to drain into the fuel tank.
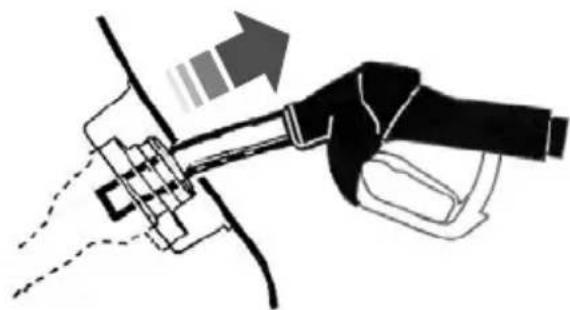
natural_image
Diagram of a hand holding a tool with an arrow indicating direction (no text or symbols present)E119081
Slightly raise the fuel nozzle to remove it.
See Fuel filler flap (page 134).
Manual transmission
Selecting reverse gear

natural_image
3D illustration of a mechanical component with an upward arrow and a dot on its base (no text or symbols)E99067
On some vehicles it is necessary to raise the collar whilst selecting reverse gear.
See Manual transmission (page 138).
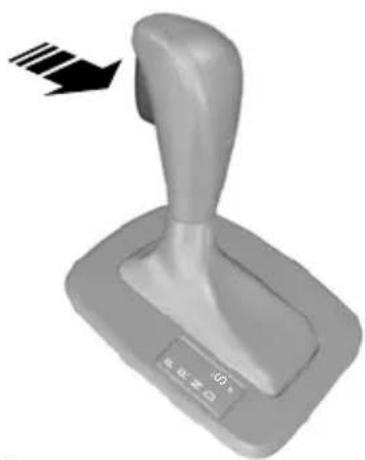
^a Automatic transmission
Selector lever positions
natural_image
3D rendered image of a gray mechanical lever with a black arrow indicating motion (no text or symbols)E80836
ParkP
ReverseR
NeutralN
Quick start
DriveD
Manual shifting and sport modeS
WARNING

Apply the brakes before moving the selector lever and keep them applied until you are ready to move
off.
See Automatic transmission (page 138).
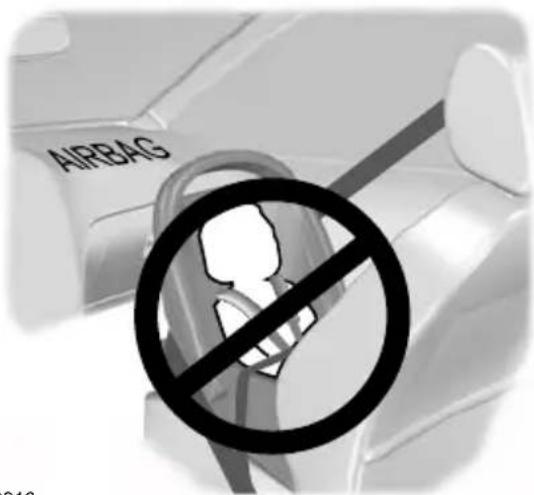
CHILD SEATS
text_image
AIRBAGE68916
Only child restraints certified to ECE-R44.03 (or later) have been tested and approved for use in your vehicle. A choice of these are available from your Dealer.
Child restraints for different mass groups
Use the correct child restraint as follows:
Baby safety seat
WARNINGS
Secure children that are less than 150 centimetres tall or less than 12 years of age in a suitable, approved child restraint, in the rear seat.
Original text according to ECE R94.01: Extreme Hazard! Do not use a rearward facing child restraint on E68918 a seat protected by an air bag in front of it! Secu
Read and follow the manufacturer's instructions when you are fitting a child restraint.
Do not modify child restraints in any way.
Do not hold a child on your lap when the vehicle is moving.
Do not leave unattended children in your vehicle.
If your vehicle has been involved in an accident, have the child restraints checked by properly trained technicians.

natural_image
3D rendered illustration of a car seat with a curved handle and seatbelt (no text or symbols)Secure children that weigh less than 13 kilograms in a rearward facing baby safety seat (Group 0+) in the rear seat.
Child safety seat

natural_image
3D illustration of a child seated in a car seat, no text or symbols presentE68920
Secure children that weigh between 13 and 18 kilograms in a child safety seat (Group 1) in the rear seat.
BOOSTER CUSHIONS
WARNINGS

Do not install a booster seat or a booster cushion with only the lap strap of the seat belt.

Do not install a booster seat or a booster cushion with a seat belt that is slack or twisted.

Do not put the seat belt under your child's arm or behind its back.

Do not use pillows, books or towels to boost your child's height.

Make sure that your children sit in an upright position.

Secure children that weigh more than 15 kilogrammes but are less than 150 centimetres tall in a ter seat or a booster cushion.
Booster seat

natural_image
Silhouette of a person sitting on a chair with a seatbelt, no text or symbols presentE70710
We recommend that you use a booster seat that combines a cushion with a backrest instead of a booster cushion only. The raised seating position will allow you to position the shoulder strap of the adult seat belt over the centre of your child's shoulder and the lap strap tightly across its hips.
Booster cushion

natural_image
Simple line drawing of a seated human figure holding a long rod, no text or symbols presentE68924
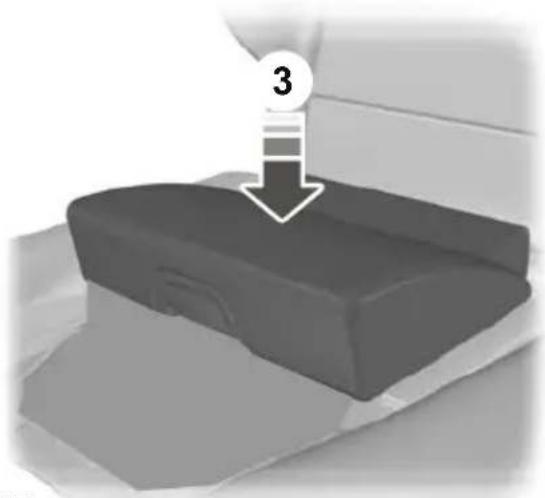
Integrated booster cushion
WARNINGS

Do not use the raised integrated booster cushion together with a child safety seat.

The integrated booster cushion can be used for children that weigh between 22 and 36 kilogrammes and 79 pounds).
CAUTION

Remove the rear seat head restraint unless the child's head exceeds the ^E94861 top of the backrest. See Head restraints (page 118).
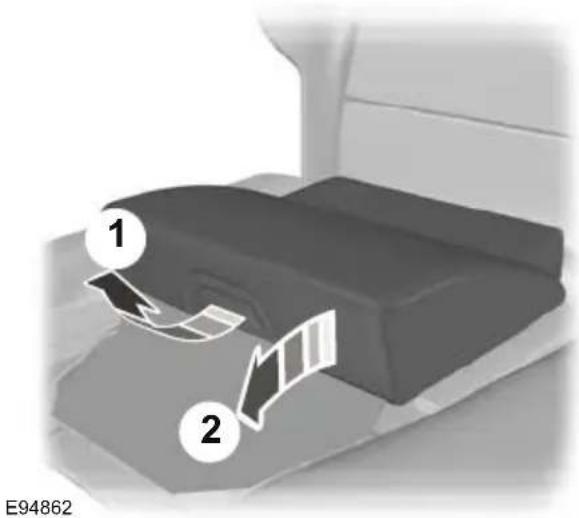
Unlocking

text_image
1 2 E94860Note: Make sure that the locking mechanism is fully engaged.
natural_image
3D rendered object with a downward arrow and number 3 label, no readable text or symbolsThe raised seating position will allow you to position the shoulder strap of the adult seat belt over the centre of your child's shoulder and the lap strap tightly across its hips.
Locking
Note: Make sure that there are no obstructions in the linkage area before locking the integrated booster cushion.
text_image
1 2 E94862Note: Make sure that the locking mechanism is fully engaged.

text_image
3 E94870CHILD SEAT POSITIONING
WARNINGS
When using a child restraint with a support leg on a second row seat, make sure the support leg rests securely on the floor.
When using a forward facing child seat on a second row seat, always remove the head restraint from that seat.
When fitting a child seat using the vehicle seat belts make sure the belts are not slack.
Note: When using a child restraint on a front seat, it may prove difficult to tighten the lap section of the seat belt without slack remaining. If this is the case, adjust the seatback to the fully upright position and raise the height of the seat. See Seats (page 115).
| Mass group categoriesSeating positions | |||||
| IIIIIIIO+0 | |||||
| Up to 10 kg | kg | 22 - 36 kg15 - 2 | |||
| with airbag ON | Front passenger USEAT'UF'XX | ||||
| Front passenger seat with airbag OFF | U1 | U1 | U1 | U1 | U1 |
| Rear seats | U | U | U | U | U |
X Not suitable for children in this mass group.
U Suitable for universal category child restraints approved for use in this mass group
U ^1 Suitable for universal category child restraints approved for use in this mass grou However, we recommend that you secure children in a government approved child restraint, in the rear seat.
UF ^1 Suitable for universal category forward facing child restraints approved for use this mass group. However, we recommend that you secure children in a governn approved child restraint, in the rear seat.
ISOFIX child restraints
| Mass group categoriesSeating positions | |||||
| IIIIIIIO+0 | |||||
| Up to 10 kg | kg | 22 - 36 kg15 · | |||
| restraints | XXIL, IUF**IL | ||||
| Rear seat ISOFIX classes* | E | C, D, E | D | A, B, B1, | C, XX |
X Not suitable for children in this mass group.
IUF Suitable for universal category ISOFIX child restraints approved for use in this group.
IL Suitable for the following ISOFIX child restraints: Roemer Duo ISOFIX (group 1), Roemer Babysafe ISOFIX (group 0+). In addition, any semi-universal ISOFIX child restraint m be used if indicated in the child seat manufacturers vehicle list.
* As defined by ECE-R16.
Note: ** When you are purchasing an ISOFIX restraint, make sure that you know the correct mass group and ISOFIX size class for the intended seating locations.
Note: ** Make sure that the top tether mechanism does not interfere with the lug cover.
ISOFIX ANCHOR POINTS
WARNING

Use an anti-rotation device when using the ISOFIX system. We recommend the use of a top tether or support leg.
Your vehicle is fitted with ISOFIX anchor points that accommodate universally approved ISOFIX child restraints.
The ISOFIX system comprises two rigid attachment arms on the child restraint that attach to anchor points on the outboard rear seats, where the cushion and backrest meet. Tether anchor points are fitted behind the outboard rear seats for child restraints with a top tether.
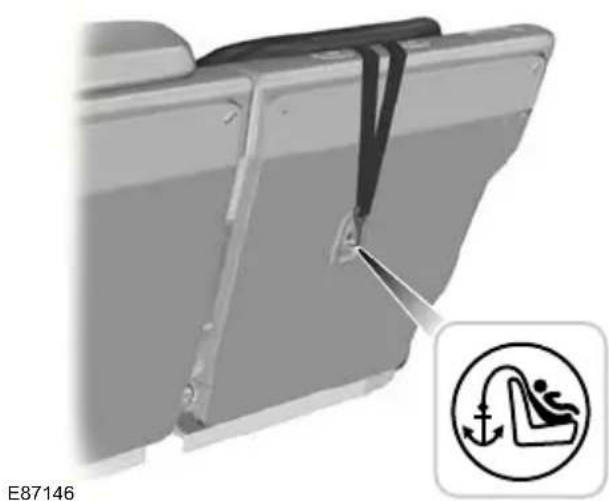
Top tether anchor points
natural_image
Mechanical assembly diagram showing a bracket with a fastener and a circular icon indicating a person in a seat (no text or symbols on the diagram itself)
natural_image
Close-up of a car seatbelt with a circular warning symbol (no text or labels)E93616

natural_image
Close-up of a car seatbelt with a diagonal band and a person inside, showing no text or symbols.E93514
Attaching a child seat with top tethers
WARNING

Do not attach a tether strap to anything other than the correct tether anchor point.
Note: Where applicable, remove the luggage cover to ease installation. See Luggage covers (page 161).
Note: On 4-door vehicles, make sure the tether strap tightening mechanism remains accessible when the seatback is fully engaged.
Child safety

natural_image
3D rendered image of a car seat assembly with a directional arrow indicating motion (no text or symbols)E87591

text_image
ISOFIX E87145-
Place the child seat on the back seat cushion and fold the relevant seatback forwards. See Rear seats (page 118).
-
Remove the head restraint. See Head restraints (page 118).
Push the child seat back firmly to engage the ISOFIX lower anchor points.
- Tighten the tether strap in line with the child seat manufacturer's instructions.
WARNING

Make sure the top tether strap is slack or twisted and is properly located on the anchor point.
CHILD SAFETY LOCKS
[Non-Text]
WARNING
- Route the tether strap to the anchor point.

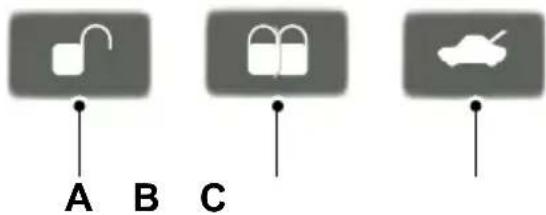
You cannot open the doors from inside if you have put the child safety locks on.
WARNING

Make sure that the seatback is secure and fully engaged in the catch.
- Push the seatback to the upright position.
Child safety

text_image
A B E73697LockA
UnlockB
Driver and front passenger airbags
Airbags
WARNINGS
Do not modify the front of your vehicle in any way. This could adversely affect deployment of the airbags.
Original text according to ECE R94.01: Extreme Hazard! Do not use a rearward facing child restraint on a seat protected by an airbag in front of it!

text_image
30° 30°E74302
Wear a seat belt and keep sufficient distance between yourself and the steering wheel. Only when you use the seat belt properly, can it hold you in a position that allows the airbag to achieve its optimum effect. See Sitting in the correct position (page 115). The driver and front passenger airbags will deploy during significant frontal collisions or collisions that are up to 30 degrees from the left or the right. The airbags will inflate within a few thousandths of a second and deflate on contact with the occupants, thus
Have repairs to the steering wheel, cushioning forward body movement. steering column, seats, airbags and During minor frontal collisions, overturns, seat belts carried out by a properly rear collisions and side collisions, the driver trained technician. and front passenger airbags will not deploy.
Keep the areas in front of the airbags free from obstruction. Do not affix anything to or over the airbag covers.
Do not poke sharp objects into areas where airbags are fitted. This could damage and adversely affect deployment of the airbags.
Use seat covers designed for s with side airbags. Have these fit by a properly trained technician.
Driver knee airbag
CAUTION
Do not attempt to open the driver knee airbag cover.
Note: You will hear a loud bang and see a cloud of harmless powdery residue if airbag deploys. This is normal.
Note: Only wipe airbag covers with a damp cloth.
The driver knee airbag will deploy during frontal collisions or collisions that are up to 30 degrees from the left or the right. The airbag will inflate within a few thousandths of a second and deflate on contact with the occupants, thus providing a cushion between the driver's knees and the steering column. During overturns, rear collisions and side collisions, the knee airbag will not deploy.
For item location: See Quick start (page 10).
Note: The knee airbag has a lower deployment threshold than the front airbags. During a minor collision, it is possible that only the knee airbag deploys.
Side airbags
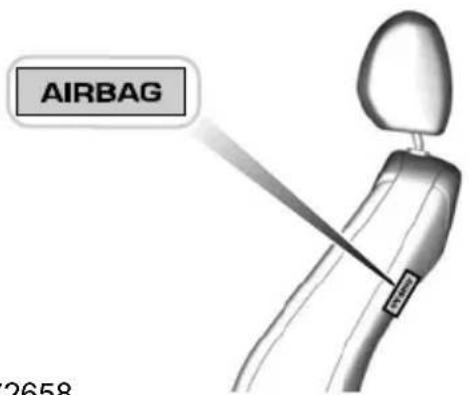
text_image
AIRBAG 2658E72658
Side airbags are fitted inside the seatback of the front seats. A label indicates that side airbags are fitted to your vehicle.
The side airbags will deploy during significant lateral collisions. The airbags will inflate within a few thousandths of a second and deflate on contact with the occupants, thus providing protection for the chest and shoulder areas. During minor lateral collisions, overturns, front collisions and rear collisions, the side airbags will not deploy.
Curtain airbags

natural_image
Top-down schematic of a vehicle showing internal components and airflow direction (no text or symbols)E75004
Curtain airbags are fitted inside the trim panels over the front and rear side windows. Moulded badges in the B-pillar trim panels indicate that curtain airbags are fitted to your vehicle.
The curtain airbags will deploy during significant lateral collisions. The airbag will inflate within a few thousandths of a second and deflate on contact with the occupants, thus providing protection for the head. During minor lateral collisions, front collisions, rear collisions, or overturns the curtain airbags will not deploy.
Seat belts
WARNINGS
Wear a seat belt and keep sufficient distance between yourself and the steering wheel. Only when you use the seat belt properly, can it hold you in a position to achieve its optimum effect. See Sitting in the correct position (page 115).
Never use a seat belt for more than one person.
Use the correct buckle for each seat belt.
WARNINGS

Do not use a seat belt that is slack or twisted.

Do not wear thick clothing. The seat belt must fit tightly around your body to achieve its optimum effect.

Position the shoulder strap of the seat belt over the centre of your shoulder and position the lap strap / across your hips.
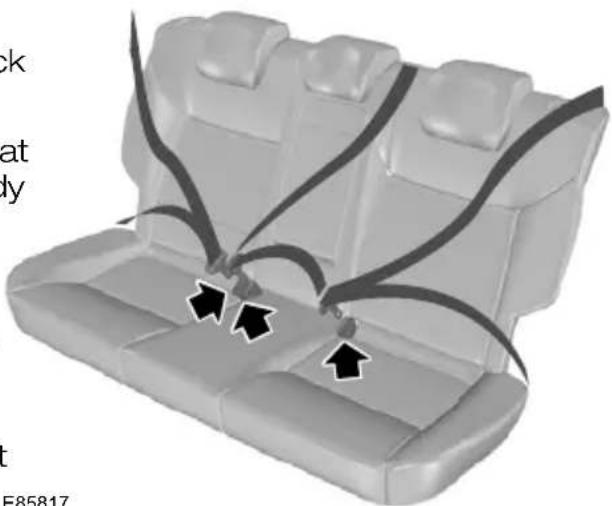
natural_image
3D diagram of a car seat with black arrows indicating seatbelting points (no text or symbols)The driver and front passenger seat belt retractors are fitted with a seat belt pretensioner. Seat belt pretensioners E85817 have a lower deployment threshold than Pull the belt out steadily. It may lock if you the airbags. During minor collisions, it is pull it sharply or if the vehicle is on a slc possible that only the seat belt pretensioners will deploy.
FASTENING THE SEAT BELTS
WARNING

Insert the tongue into the buckle until you hear a distinct click. You have not fastened the seat belt erly if you do not hear a click.

natural_image
Car seatbelt buckle diagram showing a black arrow pointing to the seat (no text or symbols present)E74124
Press the red button on the buckle to release the belt. Let it retract completely and smoothly.
SEAT BELT HEIGHT ADJUSTMENT

natural_image
Medical illustration of a knee joint with a black arrow pointing to a specific area (no text or symbols present)E87511
Note: Lifting the slider slightly while pressing the locking button makes it easier to release the locking mechanism.
To raise or lower, press the locking button on the adjuster and move as necessary.
SEAT BELT REMINDER
WARNING

The occupant protection system will only provide optimum protection when you use the seat belt proper!
WARNING

Position the seat belt correctly for your safety and that of your unborn child. Do not use only the lap strap she shoulder strap.

The seat belt reminder warning lamp illuminates and an audible warning will sound if the driver' Position the lap strap comfortably across your hips and low beneath your pregnant abdomen. Position the shoulder strap between your breasts, above and to the side of your pregnant abdomen.
or front seat passenger's seat belt has not been fastened and the vehicle exceeds a relatively low speed. It will also illuminate if the driver's or front seat passenger's seat belt is unfastened when the vehicle is moving. The audible warning will go off after five minutes but the seat belt reminder warning lamp will remain on until the driver's or front seat passenger's seat belt is fastened.
DISABLING THE PASSENGER AIRBAG
Deactivating the seat belt reminder
See your dealer.
USING SEAT BELTS DURING PREGNANCY

natural_image
Two identical human figures seated in car seats, viewed from the side (no text or symbols)
Make sure that the passenger airbag is disabled when using a rearward facing child restraint on the passenger seat.
E71313
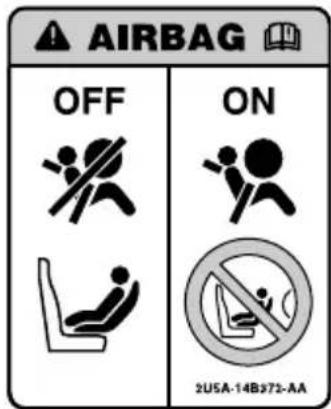
text_image
AIRBAG OFF ON 2USA-14B372-AAE68587
Occupant protection
Fitting the passenger airbag deactivation switch
WARNING

If you need to fit a child restraint a seat protected by an operational airbag in front of it, have a passenger airbag deactivation switch fitted. Ask your dealer for further information.
Enabling the passenger airbag
WARNING

Make sure that the passenger airbag is enabled when you are not using a child restraint on the frontenger seat.
Turn the switch to position B.
Note: The key switch is located in the glove compartment with an airbag deactivation lamp in the instrument panel.
If the airbag warning lamp illuminates or flashes when you are driving, this indicates a malfunction. See Warning lamps and indicators (page 76). Remove the child restraint and have the system checked immediately.
Disabling the passenger airbag
E71312
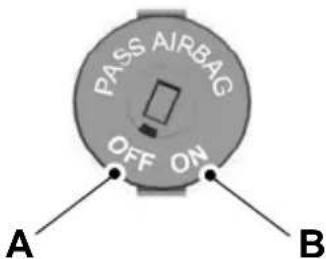
text_image
PASS AIRBAG OFF ON A BDisabledA
EnabledB
Turn the switch to position A.
When you switch the ignition on, check that the passenger airbag deactivation warning lamp illuminates.
GENERALINFORMATION RADIO FREQUENCIES
CAUTION
The radio frequency used by your remote control can also be used by other short distance radio transmissions (e.g. amateur radios, medical equipment, wireless headphones, remote controls and alarm systems). If the frequencies are jammed, you will not be able to use your remote control. You can lock and unlock the doors with the key.
Reprogramming the unlocking function
Note: When you press the unlock button either all the doors are unlocked or only the driver's door is unlocked. Pressing the unlock button again unlocks all the doors. Press and hold the unlock and lock buttons on the remote key simultaneously for at least four seconds with the ignition off. The direction indicators will flash twice to confirm the change.
To return to the original unlocking function, repeat the process.
Note: You could unlock the doors if you press the buttons on the remote control unintentionally.
The operating range between your remote control and your vehicle varies depending on the environment.
PROGRAMMING THE REMOTE CONTROL
You can programme a maximum of eight remote controls to use with your vehicle (including any supplied with your vehicle).
Programming a new remote control
- Insert the key in the ignition.
- Cycle the key from position 0 to 11 and then back to 0 four times in quick succession (about once a second).
-
Remove the key from the ignition and press any button on the remote control.
-
Reinsert the key and turn to position E74383
II then 0. Remove the key and to the remote control to confirm programming has been successful.
CHANGING THE REMOTE CONTROL BATTERY

Make sure that you dispose of old batteries in an environmentally friendly way.
Seek advice from your local authority regarding recycling.
Remote control with a folding key blade
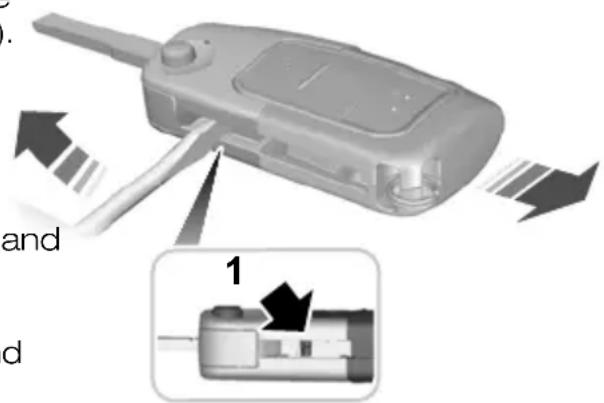
text_image
Diagram showing a device with labeled parts and directional arrows, including a zoomed-in detail labeled '1'- Insert a screwdriver as far as possible into the slot on the side of the remote control, push it towards the key blade and remove the key blade.
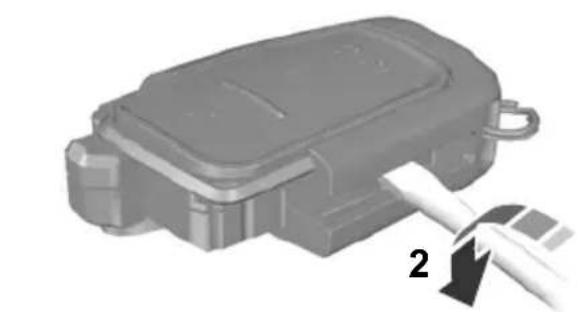
natural_image
Mechanical component with a tool inserted, showing a numbered callout (no text or symbols on the object itself)E74384
- Twist the screwdriver in the position shown to start separating the two halves of the remote control.
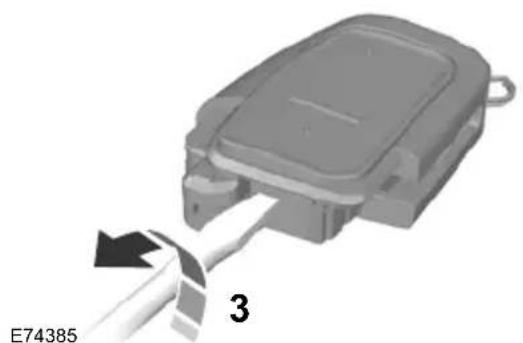
natural_image
3D diagram of a mechanical component with a cable inserted, labeled E74385 (no text or symbols on the object itself)- Twist the screwdriver in the position shown to separate the two halves of the remote control.
CAUTION
Do not touch the battery contacts the printed circuit board with the screwdriver.
-
Carefully prise out the battery with screwdriver.
-
Install a new battery (3V CR 2032) the + facing downwards.
-
Assemble the two halves of the remote control.
-
Install the key blade.
Remote control without a folding key blade
Type 1
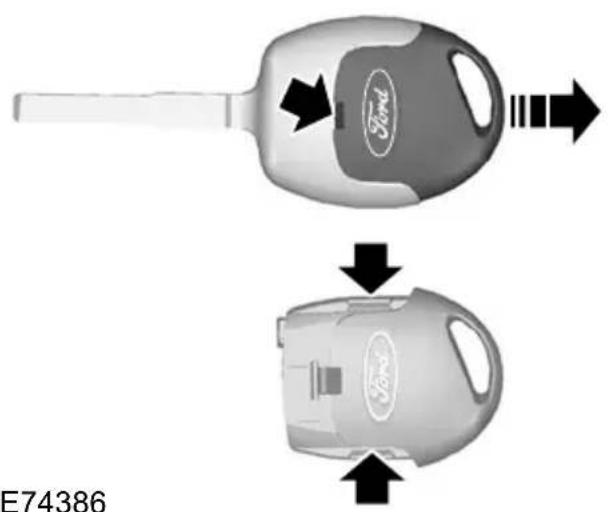
natural_image
Two Ford brand car parts with arrows indicating flow or movement, no visible text or symbols on the parts themselves.E74386
-
Insert a screwdriver into the recess on the back of the key and remove the key blade.
-
Release the retaining clips with the screwdriver and separate the two halves of the remote control.
CAUTION
Do not touch the battery contacts or the printed circuit board with the screwdriver.
-
Carefully prise out the battery with the screwdriver.
-
Install a new battery (3V CR 2032) with the + facing upwards.
-
Assemble the two halves of the remote control.
-
Install the key blade.
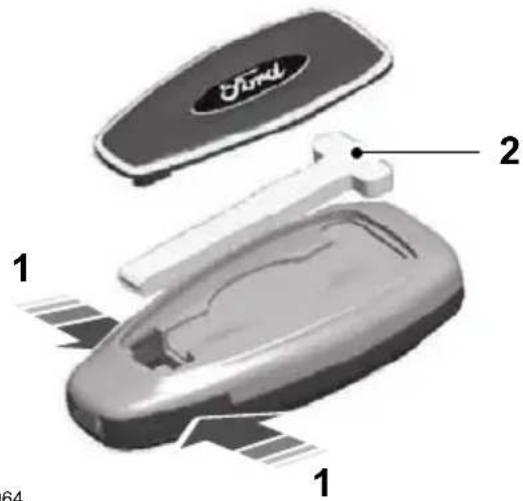
Type 2
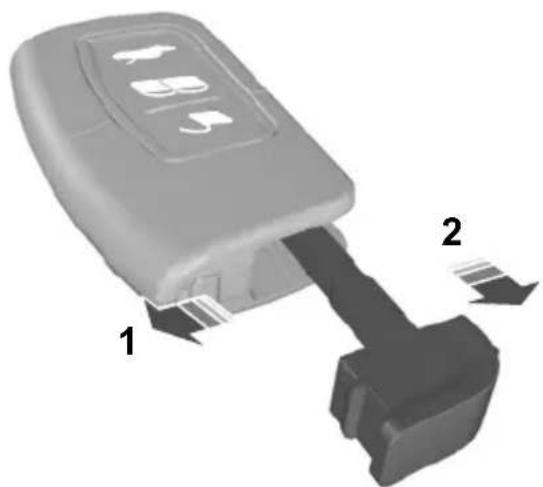
natural_image
3D diagram of a car key inserted into a housing, showing two labeled parts (1 and 2) without any text or symbols.E78284
- Slide the release slider in the direction of the arrow.
- Remove the key blade.
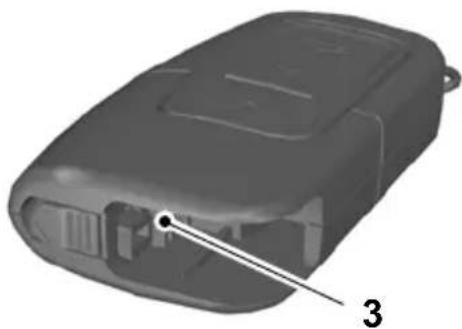
natural_image
3D model of a black plastic electronic device with labeled component '3' (no text or symbols on body)E105064
- Twist a flat bladed screwdriver in the position shown to separate the two halves of the remote control.
CAUTION

Do not touch the battery contacts the printed circuit board with the screwdriver.
- Carefully prise out the battery with the screwdriver.
-
Install a new battery (3V CR 2032) with the + facing downwards.
-
Assemble the two halves of the remote control.
- Install the key blade.
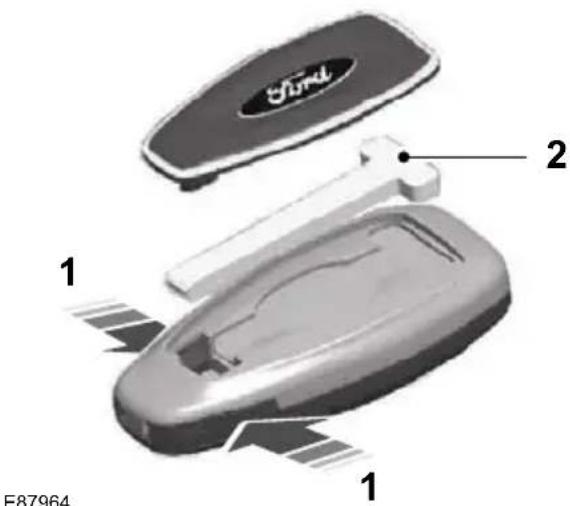
Type 3
text_image
Ford 1 2 1 64E87964
- Press and hold the pushbuttons on the edges to release the cover. Carefully remove the cover.
- Remove the key blade.

natural_image
3D rendered object with a labeled point '3' pointing to a smooth surface (no text or symbols beyond the label)E105362
CB. Twist a flat bladed screwdriver in the position shown to separate the two halves of the remote control.

natural_image
3D model of a gray handheld device with labeled parts (no text or symbols on body)E119190
- Carefully insert the screwdriver in the position shown to open the remote control.
CAUTION

Do not touch the battery contacts or the printed circuit board with the screwdriver.
- Carefully prise out the battery with the screwdriver.
- Install a new battery (3V CR 2032) with the + facing downwards.
- Assemble the two halves of the remote control.
- Install the key blade.
LOCKING AND UNLOCKING
Locking and unlocking confirmation
Central locking
You can only centrally lock the doors if they are all closed.
Note: The driver's door can be unlocke with the key. This needs to be used if remote control or keyless entry is not functioning.
Note: Central locking also locks and unlocks the fuel filler flap.
Double locking
When you unlock the doors, the direction indicators will flash once.
When you lock the doors, the direction indicators will flash twice.
Note: If your vehicle has double locking, the direction indicators will only flash twice once you have activated double locking.
Locking and unlocking the doors with the key
WARNING

Do not activate double locking when persons or animals are inside the vehicle. You will not be able to ask the doors from the inside if you double locked them.
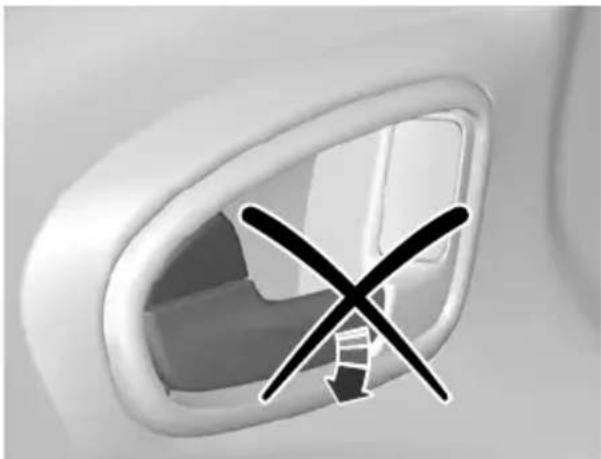
natural_image
Close-up of a car intake corner with a black X symbol indicating no change or restriction (no text or symbols present)E71961
text_image
B A A BE71962
UnlockA
LockB
Double locking is a theft protection feature that prevents someone from opening the doors from the inside. You can only double lock the doors if they are all close
^a Double locking the doors with the key
Turn the key to the lock position twice within three seconds to double lock the doors.
Locking and unlocking the doors and the luggage compartment lid with the remote control
text_image
A B CE87379
UnlockA
LockB
C Luggage compartment lid unlock
Locking and unlocking the doors from inside
Driver's door
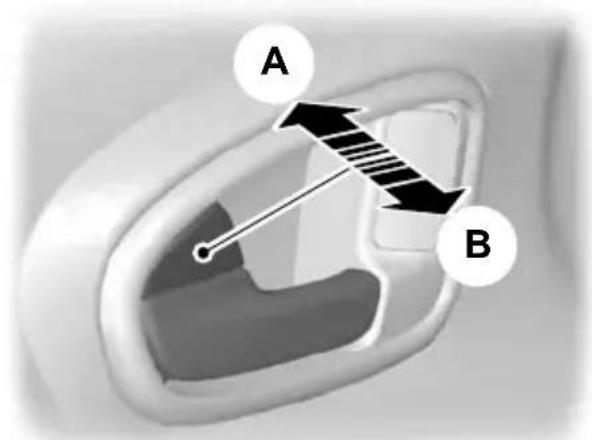
text_image
A BE71958
Locking the doors and the luggage compartment lid with the remote control
Lock all doorsA
Unlock all doorsB
Press button B once.
Front and rear passenger doors
Double locking the doors and the luggage compartment lid with the remote control
Press button B twice within three seconds.

natural_image
Close-up of a white airplane seatbelt with a black arrow icon pointing to the side panel (no text or symbols)E98653
To lock the front and rear passenger doors individually, press the button and close the door when leaving the vehicle.
Luggage compartment lid
Opening the luggage compartment lid with the remote control
Press button C on the remote control twice within three seconds.
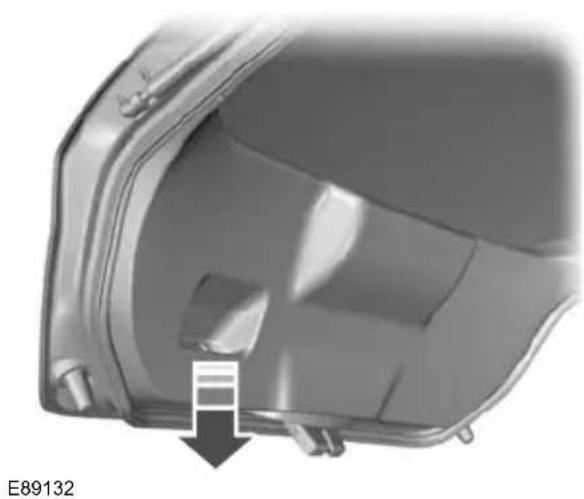
Closing the luggage compartment lid
4-door
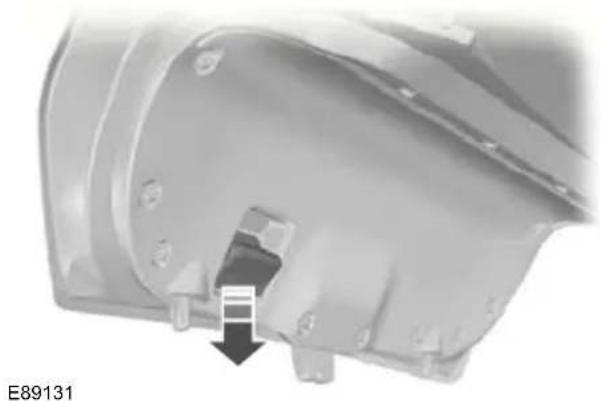
natural_image
Close-up of a mechanical component with a black arrow pointing to a small feature, no visible text or symbols.5-door
natural_image
Close-up of a mechanical component with a highlighted section and arrow indicator (no readable text or symbols)Estate
natural_image
3D rendering of a car body panel with a downward arrow indicating a component detail (no text or symbols present)E89133
A recessed grip is incorporated inside the luggage compartment lid to facilitate closing.
Automatic relocking
The doors will relock automatically if you do not open a door within 45 seconds of unlocking the doors with the remote control. The door locks and the alarm will return to their previous state.
Reprogramming the unlocking function
The unlocking function may be reprogrammed so that only the driver's door is unlocked. See Programming the remote control (page 32).
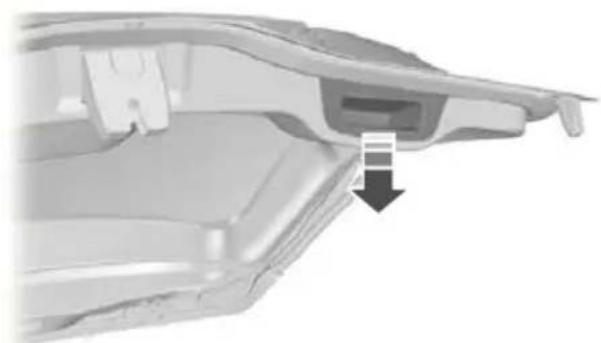
GLOBAL OPENING AND CLOSING
You can also operate the electric windows with the ignition off via the global opening and global closing function.
Note: Global closing will only operate if you have set the memory correctly for each window. See Electric windows (page 69).
Global opening
text_image
Diagram showing car door with downward arrows and a padlock icon, likely indicating lock or unlock operation.E71955
To close all the windows, press and hold the lock button for at least three seconds. Press any button again to stop the closing function. The anti-trap function is also active during global closing.
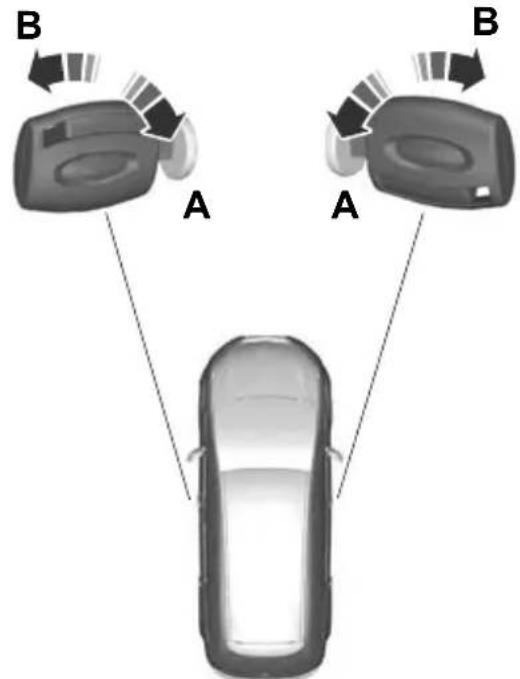
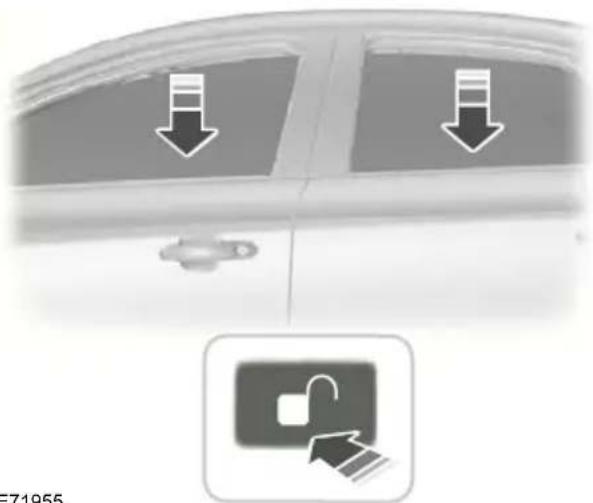
Vehicles with keyless entry

natural_image
Close-up of a car door handle with a black arrow pointing to the handle area (no text or symbols visible)To open all the windows, press and hold the unlock button for at least three seconds. Press either the lock or the unlock button again to stop the opening function.
Global closing
Vehicles without keyless entry
WARNING

Take care when using global closing. In an emergency, press a button immediately to stop.

natural_image
Side view of a car with directional arrows and a lock icon (no text or symbols)E71956
WARNING

Take care when using global closing. In an emergency, press the button on the driver's door handle op.
Note: Global closing can be activated using the button on the driver's door handle. Global opening and closing can also be activated using the buttons on the passive key.
To close all the windows, press and hold the button on the driver's door handle for at least two seconds. The anti-trap function is also active during global closing.
KEYLESS ENTRY
General information
WARNING

The keyless entry system may not function if the key is close to met objects or electronic devices such mobile phones.
Note: If the door handles are pulled repeatedly during a short period of time without the presence of a valid passive key, the system will become inoperable for 30 seconds.
The passive entry system will not function if:
- The passive key frequencies are jammed.
• The passive key battery is flat.
Note: If the passive entry system does not function, you will need to use the key blade to lock and unlock your vehicle.
The keyless system allows the driver to operate the vehicle without the use of a E87384 key or remote control.
Passive locking and unlocking requires a valid passive key to be located within one of the three external detection ranges. These are located approximately one and a half metres from the driver and front passenger door handles and the luggage compartment lid.
Passive key
The vehicle can be locked and unlocked with the passive key. The passive key can also be used as a remote control. See Locking and unlocking (page 36).
Locking the vehicle
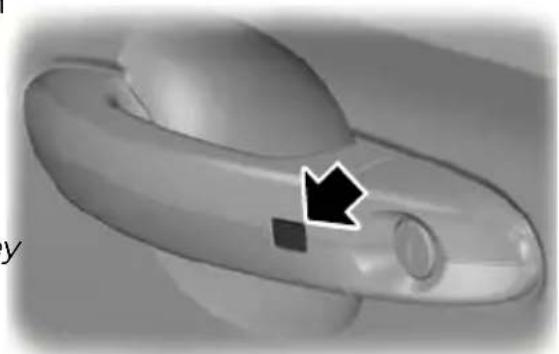
natural_image
Close-up of a 3D-printed object with a black arrow pointing to a small feature (no text or symbols visible)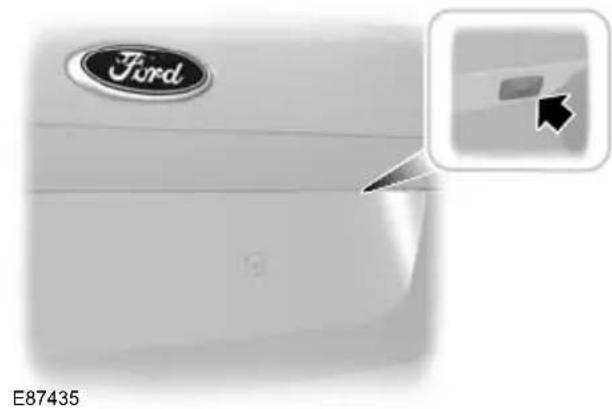
natural_image
Close-up of a Ford logo on a white car surface, with a small inset showing a cursor clicking a button (no text or symbols on the main body)
natural_image
Top-down view of a vehicle head with a rectangular body and rounded body, no visible text or symbolsWARNING

The vehicle does not lock itself automatically. If no locking button pressed, the vehicle will remain locked.
Note: If locking from the luggage compartment lid, the passive key must be within the luggage compartment lid detection range.
Locking buttons are located on each of the front doors and the luggage compartment lid.
To activate central locking and arm the alarm:
- Press a locking button once.
To activate double locking, to arm the alarm and the interior sensors:
- Press a locking button twice within three seconds.
Note: Once activated, the vehicle will remain locked for approximately three seconds. This is to allow you to pull a door handle and check if the vehicle is locked. Pull one of the door handles or the When the delay period is over, the door luggage compartment lid handle.
can be opened again, provided the passive key is within the respective detection range.
Luggage compartment lid
Note: The luggage compartment lid cannot be closed and will pop back up the passive key is located inside the luggage compartment.
Note: If a second valid passive key is located within the luggage compartment lid detection range, the luggage compartment lid can be closed.
Unlocking the vehicle
Note: If the vehicle remains locked for is longer than five days, the system will ente an energy-saving mode. This is to reduce the discharge of the vehicle battery. When the vehicle is unlocked while in this mode the reaction time of the system may be little longer than normal. Unlocking the vehicle once will deactivate the energy-saving mode.

natural_image
3D rendered image of a mechanical component with a handle and circular end (no text or symbols visible)E78278
door
Bull one of the door handles or the luggage compartment lid handle.
Note: A valid passive key must be located within the detection range of that door.
One long flash of the direction indicators confirms that all the doors, the luggage compartment lid and the fuel filler flap have been unlocked and that the alarm has been disarmed.
Unlocking only the driver's door
If the unlocking function is reprogrammed so that only the driver's door is unlocked ( See Keys and remote controls (page 32). ), note the following:
If the driver's door is the first door which is opened, the other doors and the luggage compartment lid will remain locked. All the other doors can be unlocked from inside the vehicle by pressing the unlock button next to the driver's door handle. Doors can be unlocked individually by pulling the interior door handles on those doors.
If the front passenger door or one of the rear doors is the first door which is opened, all the doors and the luggage compartment lid will be unlocked.
Disabled keys
Any keys left inside the vehicle interior when it is locked will be disabled.
A disabled key cannot be used to turn the ignition on or start the engine.
In order to use these passive keys again; they have to be enabled.
To enable all your passive keys, unlock the vehicle using a passive key or the remote control unlocking function.
All passive keys will then be enabled if ignition is turned on or the vehicle is started using a valid key.
Locking and unlocking the doors with the key blade
Type 1

natural_image
3D diagram of a car keychain with labeled parts (1 and 2), showing internal components without any text or symbols.- Slide the release slider in the direction of the arrow and pull out the key blade with your thumb.
- Remove the key blade and insert it into the lock.
theType 2
text_image
E87964 1 2 1- Carefully remove the cover.
- Remove the key blade and insert it into the lock.
The engine immobiliser is a theft protection system that prevents someone from starting the engine with an incorrectly coded key. If you are unable to start the engine with a correctly coded key, this indicates a malfunction. The message Immobiliser active will appear in the information display when you switch on the ignition. Have the immobiliser checked immediately.
CODED KEYS
Note: Do not shield your keys with metal objects. This may prevent the receiver from recognising your key as a valid one.
Note: Have all of your remaining keys erased and recoded if you lose a key. Ask your dealer for further information. Have replacement keys recoded together with your existing keys.
If you lose a key, you can obtain a replacement from your Ford Dealer. If possible, provide them with the key number from the tag provided with the original keys. You can also obtain additional keys from your Ford Dealer.
ARMING THE ENGINE IMMOBILISER
The engine immobiliser is armed automatically a short time after you have switched the ignition off.
DISARMING THE ENGINE IMMOBILISER
The engine immobiliser is disarmed automatically when you switch the ignition on with a correctly coded key.
If the message Immobiliser active appears in the information display, your key has not been recognised. Remove the key and try again.
Your vehicle may be equipped with one of the following alarm systems:
• Perimeter alarm.
• Perimeter alarm with interior sensors.
- Category one alarm with interior sensors and battery back-up sounder.
- Category one alarm with interior sensors, battery back-up sounder and tilt sensors.
Perimeter alarm
The perimeter alarm is a deterrent again unauthorised access to your vehicle through the doors and the bonnet. It also protects the audio unit.
Interior sensors
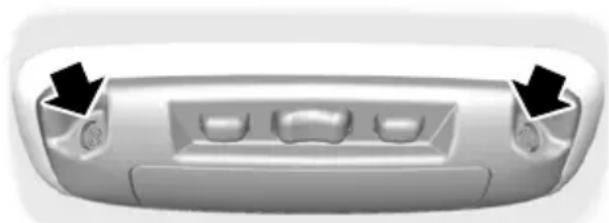
natural_image
Front view of a car rear bumper with three slots and two arrows pointing to the side (no text or symbols)E71401
WARNING

The sensors in the interior lamp unit must not be covered up. Do not activate the alarm with full guard if any persons, animals or other moving objects are inside the vehicle.
The sensors act as a deterrent against unauthorised intrusion by sensing any movement within the vehicle.
Battery back-up sounder
The battery back-up sounder is an extra alarm system which will sound a siren when the alarm is triggered. It is armed directly when you lock the vehicle. The sounder has its own battery and will sound an alarm siren even if someone disconnects the vehicle battery or the battery back-up sounder itself.
Tilt sensors
The tilt sensors detect if someone attempts to steal a wheel or tow the vehicle away by sensing changes in the inclination of the vehicle.
Note: When travelling on a ferry with the alarm armed, deactivate the tilt sensors by selecting reduced guard. This will prevent the alarm from being triggered by the movement.
Triggering the alarm
Once armed, the alarm is triggered in any of the following ways:
- If someone opens a door, the tailgate or the bonnet without a valid key or remote control.
- If someone removes the audio or navigation system.
- If the ignition is turned to position I, II or III without a valid key.
• If the interior sensors detect movement within the vehicle. - On vehicles with a battery back-up sounder, if someone disconnects the vehicle battery or the battery back-up sounder itself.
- If the tilt sensors detect a change in the inclination of the vehicle.
If the alarm is triggered, the alarm horn will sound for 30 seconds and the hazard warning flasher will flash for five minutes.
Any further attempts to perform one of the above will trigger the alarm again.
Full and reduced guard
Full guard
Full guard is the standard setting.
In full guard, the interior and tilt sensors are activated when you arm the alarm.
Note: This may result in false alarms if animals or moving objects are inside the vehicle or, on vehicles with tilt sensors, when travelling on a ferry.
Reduced guard
In reduced guard, the interior and tilt sensors are deactivated when you arm the alarm.
Note: You can set the alarm to reduced guard for the current ignition cycle only. The next time you switch on the ignition, the alarm will be reset to full guard.
Ask on Exit
You can set the information display to ask you each time which level of guard you wish to set.
If you select Ask on Exit, the message
Reduced guard? appears in the instrument cluster display each time you switch the ignition off.
If you wish to arm the alarm with reduced guard, press the OK button when this E74509 message appears.
If you wish to arm the alarm with full leave the vehicle without pressing the button.
Selecting full or reduced guard
Note: Selecting Reduced does not set the alarm permanently to reduced guard. It sets it to reduced guard only for the current ignition cycle. If you regularly set the alarm to reduced guard, select Ask on Exit.
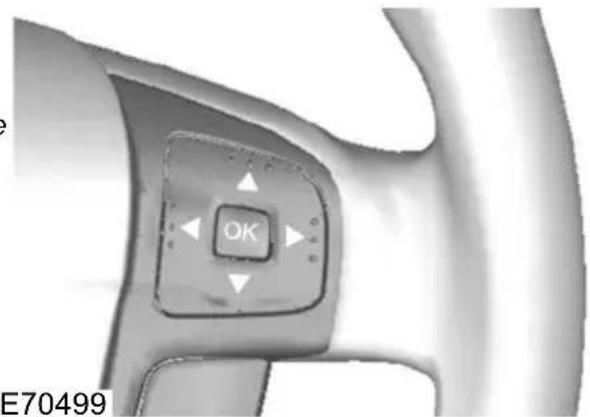
text_image
OK E70499
text_image
Alarm Full Guard Reduced Ask on Exit-
Press the right arrow button on the guard steering wheel to enter the main menu. OK
-
Highlight Setup with the up and down arrow buttons and press the right arrow button.
-
Highlight Alarm and press the right arrow button.
-
Highlight Reduced or Full guard. IfPerimeter alarm
you prefer to be asked each time you switch off the ignition, select Ask on Exit.
-
Press the OK button to confirm the selection.
-
Press the left arrow button to exit the menu. To return to the trip computer display directly, hold the left arrow button pressed.
Information messages
See Information messages (page 92).
Perimeter alarm
Disarm and silence the alarm by unlocking the doors and switching the ignition on, or unlocking the doors or the luggage
compartment lid with the remote control.
Category one alarm
Disarm and silence the alarm by unlocking the doors and switching the ignition on within 12 seconds, or unlocking the doors or the luggage compartment lid with the remote control.
ARMING THE ALARM
To arm the alarm, lock the vehicle. See Locks (page 36).
DISARMING THE ALARM
Vehicles without keyless entry
Perimeter alarm
Disarm and silence the alarm by unlocking the doors with the key and switching the ignition on with a correctly coded key, or unlocking the doors or the luggage compartment lid with the remote control.
Category one alarm
Disarm and silence the alarm by unlocking the doors with the key and switching the ignition on with a correctly coded key within 12 seconds, or unlocking the doors or the luggage compartment lid with the remote control.
Vehicles with keyless entry
Note: A valid passive key must be located within the detection range of that door for keyless entry. See Keyless entry (page 40).
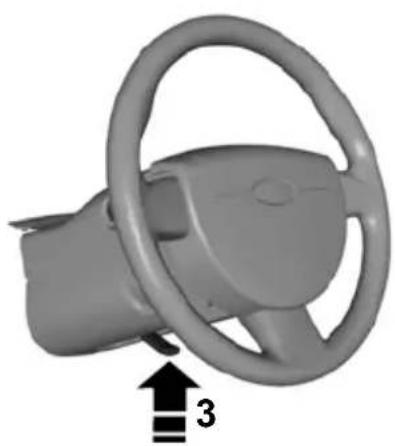
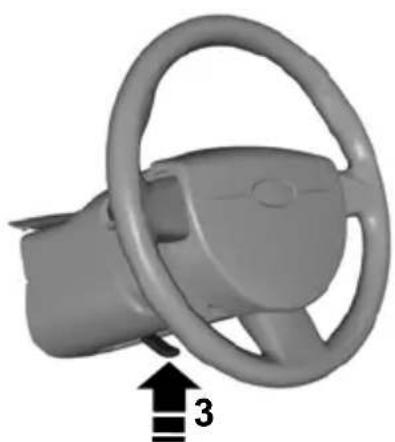
ADJUSTING THE STEERING WHEEL
WARNING

Never adjust the steering wheel when the vehicle is moving.
WARNING

Make sure that you fully engage the locking lever when returning it to its original position.
AUDIO CONTROL
Note: Make sure that you are sitting in the correct position. See Sitting in the correct position (page 115).

text_image
2 2 1 E95178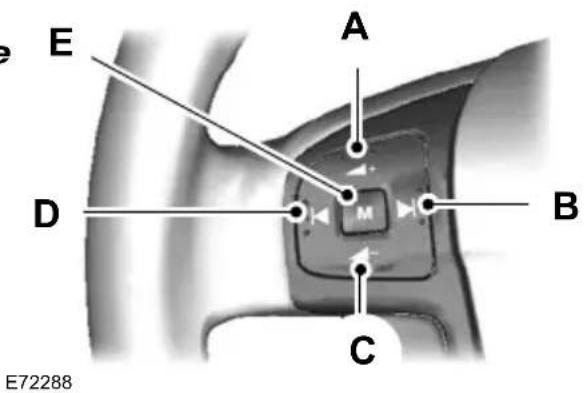
text_image
E A D M B C E72288Volume upA
Seek upB
Volume downC
Seek downD
ModeE
natural_image
3D rendered image of a car steering wheel with a black arrow and number 3 pointing to the wheel (no text or symbols on the component itself)E95179
Mode
Press and hold the mode button to select the audio source.
Press the mode button to:
- tune the radio to the next preset station
- play the next CD
• play the other side of a cassette tape - accept an incoming telephone call.
• end a telephone call.
Seek
Press a seek button to:
- tune the radio to the next station up or down the frequency band
• play the next or the previous CD track - fast forward or rewind the cassette tape.
Press and hold a seek button to:
- tune the radio up or down the frequency band
- seek through a CD track.
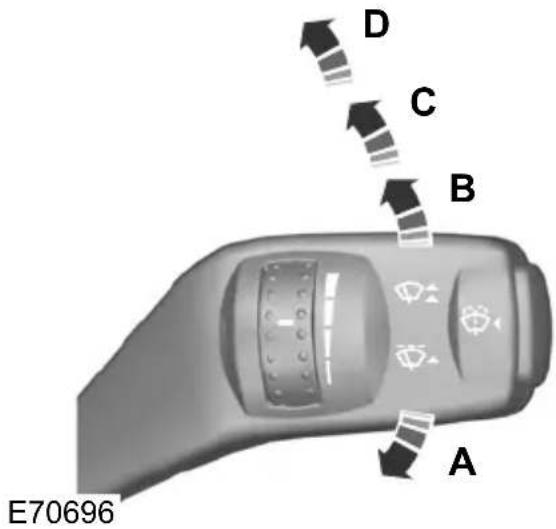
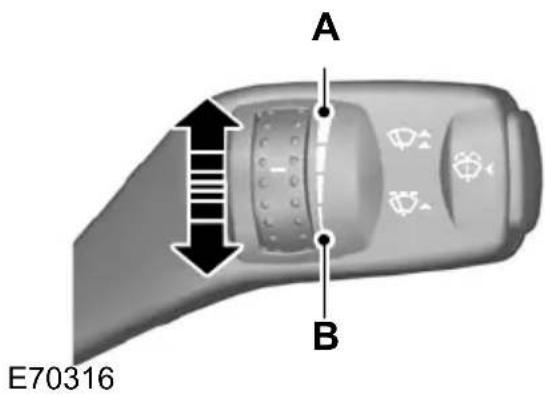
WINDSCREEN WIPERS

text_image
E70696 A B C DSingle wipeA
Intermittent wipeB
Normal wipeC
High speed wipeD
Intermittent wipe
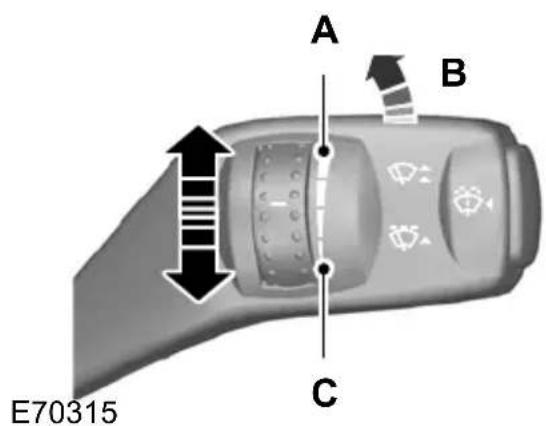
text_image
A B C E70315Short wipe intervalA
Intermittent wipeB
Long wipe intervalC
AUTOWIPERS
CAUTIONS
Do not switch autowipers on in dry weather conditions. The rain sensor is very sensitive and the wipers may operate if dirt, mist or flies hit the windscreen.
Replace the wiper blades as soon as they begin to leave bands of water and smears. If you do not replace them, the rain sensor will continue to detect water on the windscreen and the wipers will operate, even though the majority of the windscreen is dry.
Fully defrost the windscreen in icy conditions before you switch autowipers on.
Switch autowipers off before you enter a car wash.

text_image
A B C E70315High sensitivityA
B On
Low sensitivityC
If you switch autowipers on, the wipers will not cycle until water is detected on the windscreen. The rain sensor will the continuously measure the amount of water on the windscreen and adjust the speed of the wipers automatically.
Adjust the sensitivity of the rain sensor using the rotary control. With low sensitivity, the wipers will operate when the sensor detects a lot of water on the windscreen. With high sensitivity, the wipers will operate if the sensor detects a small amount of water on the windscreen.
WINDSCREEN WASHERS
WARNING

Do not operate the windscreen washers for more than 10 seconds or when the reservoir is empty.
Note: The washer jets are heated when the ignition is on.
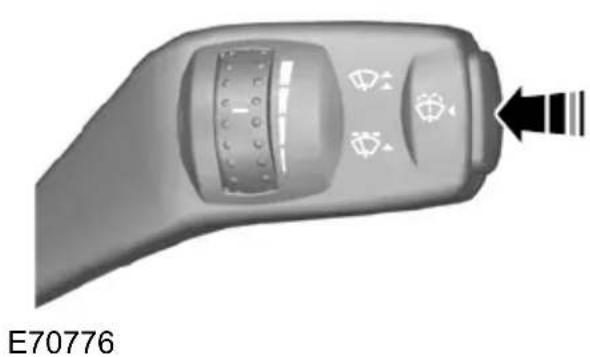
natural_image
Close-up of a car control panel with directional arrows and icons, no readable text or symbols beyond the label 'E70776'REAR WINDOW WIPER AND WASHERS
Intermittent wipe

natural_image
3D rendered image of a handheld device with a black arrow pointing to a button (no text or symbols visible)E70777
Reverse gear wipe
The rear window wiper will operate automatically when you select reverse gear if the wiper lever is in position B, C or D.
Washer
WARNING

Do not operate the rear window washer for more than 10 seconds or when the reservoir is empty.
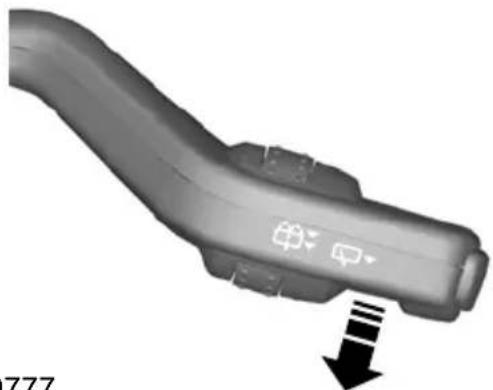
natural_image
3D rendered image of a curved mechanical component with directional arrows indicating movement (no text or symbols)E70777
Pull the lever fully towards the steering wheel and hold it to operate the washer.
HEADLAMP WASHERS
The headlamp washers will operate with the windscreen washers when the headlamps are on.
Note: To stop the washer fluid reservoir emptying quickly, the headlamp washers will not operate every time that you use the windscreen washers.
CHECKING THE WIPER BLADES

natural_image
Mechanical component with a black arrow pointing to a section, no visible text or symbolsE66644
Run the tip of your fingers over the edge of the blade to check for roughness.
Clean the wiper blade lips with water applied with a soft sponge.
CHANGING THE WIPER BLADES
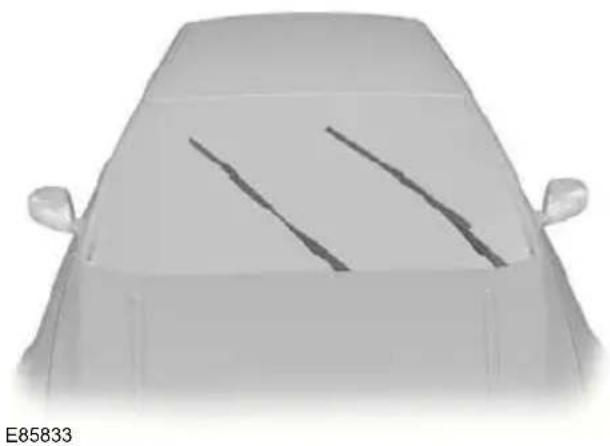
Windscreen wiper blades
CAUTIONS
Set the windscreen wipers in the service position to change the wiper blades.
CAUTIONS
You can use the service position in winter to provide easier access to the wiper blades for freeing them from snow and ice. The windscreen-wipers will return to their normal position as soon as you switch on the ignition so make sure that you fully defrost the windscreen before you switch on the ignition.
Service position
natural_image
Front view of a car with visible lane markings on the windshield (no text or symbols)
natural_image
Close-up of a remote control panel with directional arrows and display icons (no text or symbols)E75188
Switch off the ignition and move the wipe lever to position A within three seconds. ^1 Release the lever when the windscreen wipers have moved to the service position.
Changing the windscreen wiper blades
Set the windscreen wipers in the servic position and lift the wiper arms.

text_image
1 2E72899
- Press the locking button.
- Remove the wiper blade.
Note: Make sure that the wiper blade locks into place.
- Install in the reverse order.
Rear window wiper blades
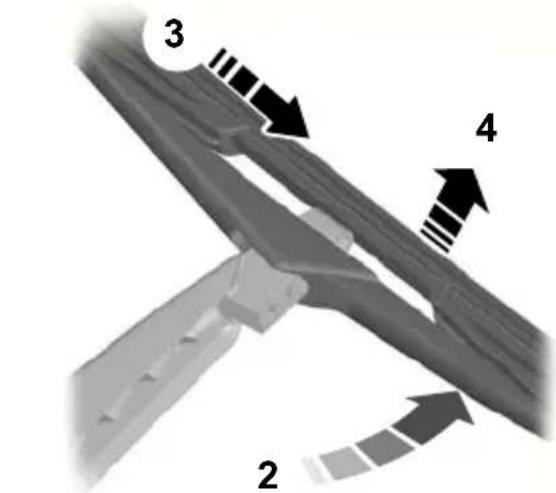
Changing the rear window wiper blades - Estate
- Lift the wiper arm.
text_image
3 4 2E86456
- Position the wiper blade at right angles to the wiper arm.
-
Disengage the wiper blade from the wiper arm.
-
Remove the wiper blade.
Note: Make sure that the wiper blade locks into place. - Install in the reverse order.
Changing the rear window wiper blades - 5-door
- Lift the wiper arm.
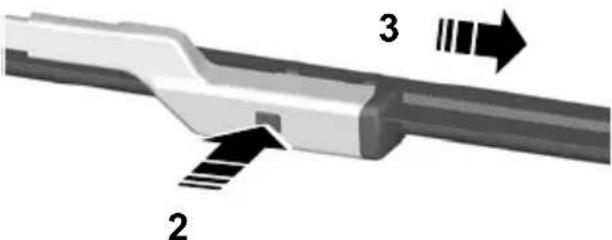
text_image
Technical diagram of a mechanical component with labeled parts 2, 3 and directional arrows indicating flow or movement.E86457
- Press the locking button.
- Remove the wiper blade.
Note: Make sure that the wiper blade locks into place.
4. Install in the reverse order.
LIGHTING CONTROL
Lighting control positions

text_image
A B C E70718A Off
Side and tail lampsB
HeadlampsC
Parking lamps
CAUTION

Prolonged use of the parking lamps will discharge the battery.
Switch off the ignition.
Both sides
Set the lighting control to position B.
One side

natural_image
3D diagram of a curved object with directional arrows labeled A and B, no text or symbols presentE75505
Right-hand sideA
Left-hand sideB
Main and dipped beam
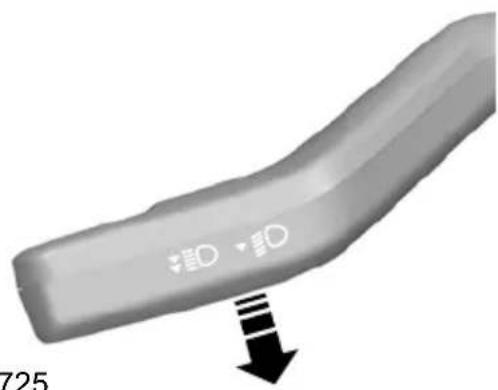
natural_image
Close-up of a gray ergonomic device handle with a black arrow pointing downward (no text or symbols visible)E70725
Pull the lever fully towards the steering wheel to switch between main and dipped beam.
Headlamp flasher
Pull the lever slightly towards the steering wheel.
Home safe lighting
Switch the ignition off and pull the direction indicator lever towards the steering wheel to switch the headlamps on. You will hear a short tone. The headlamps will go off automatically after three minutes with any door open, or 30 seconds after the last door has been closed.
With all doors closed, but within the 30 E70721 second delay, opening any door will result in the three minute timer starting again.
The home safe lights can be cancelled either pulling the direction indicator lever towards the steering wheel again or by turning the ignition switch on.
AUTOLAMPS

natural_image
Circular diagram with a stylized sun icon and directional symbols (no text or labels)E70719
Note: If you have switched autolamps on, you can only switch the main beam on when autolamps has switched the headlamps on.
The headlamps will come on and go off automatically depending on the ambient light.
FRONT FOG LAMPS
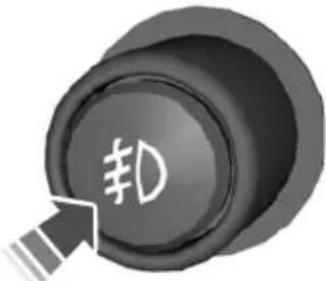
text_image
钩WARNING
Only use the front fog lamps when visibility is considerably restricted by fog, snow or rain.
REAR FOG LAMPS

natural_image
Close-up of a black circular button with speaker symbol and arrow icon (no text or numbers)E70720
WARNINGS
Only use the rear fog lamps when visibility is restricted to less than 50 metres.
Do not use the rear fog lamps when it is raining or snowing and visibility is more than 50 metres.
ADJUSTING THE HEADLAMPS - VEHICLES WITH: ADAPTIVE FRONT LIGHTING/XENON HEADLAMPS
To adjust the headlamps for driving on the left or right hand side of the road, see your dealer.
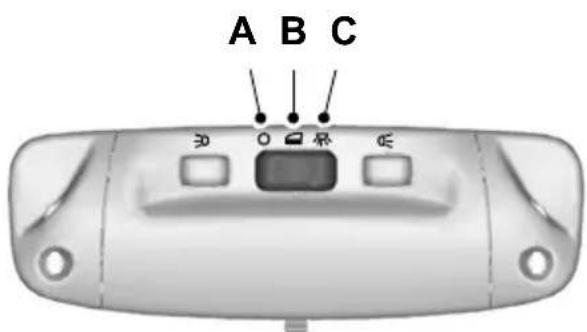
HEADLAMP LEVELLING
Note: Vehicles with Xenon headlamps are equipped with automatic headlamp levelling.
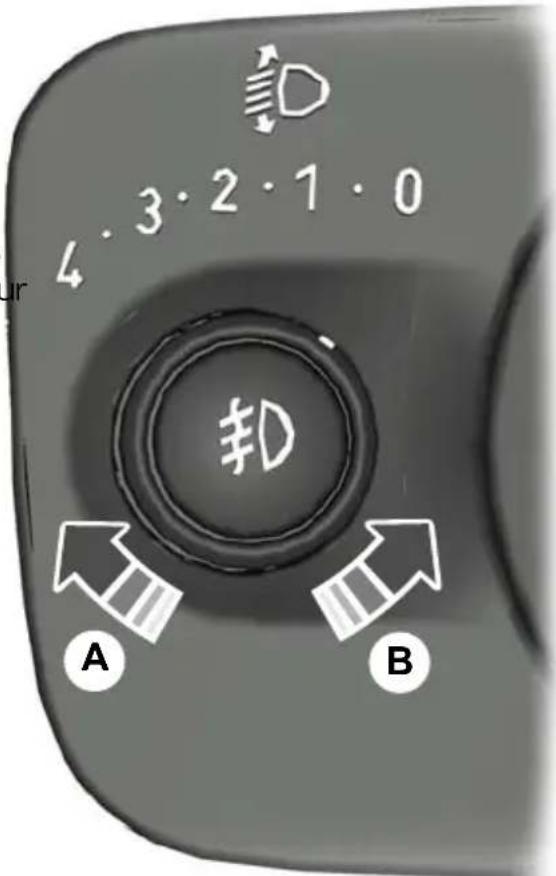
text_image
4.3·2·1·0 #D A BE70722
Raised headlamp beamsA
Lowered headlamp beamsB
You can adjust the level of the headlamp beams according to the vehicle load.
Recommended headlamp levelling switch positions
| Load | compartmentFront seats | Switch positionLoad i | |
| Second row seats | |||
| 0--1-2 | |||
| --1-2 | 0 (0.52) | ||
| -31-2 | 1 (0.52) | ||
Lighting
| Load | compartmentFront seats | Switch positionL | |
| Second row seats | |||
| 1-2 | 3 | Max^1 | 3 (0.52) |
| 1 | - | Max^1 | 4 (1.52) |
^1 See Vehicle identification (page 222).
^2 Vehicles with active suspension.
HAZARD WARNING FLASHERS

For item location: See Quick start (page 10).
Note: Depending on applicable laws and regulations in the country for which your vehicle was originally built, the hazard warning flashers may flash if you brake heavily.
ADAPTIVE FRONT LIGHTING SYSTEM (AFS)

text_image
A B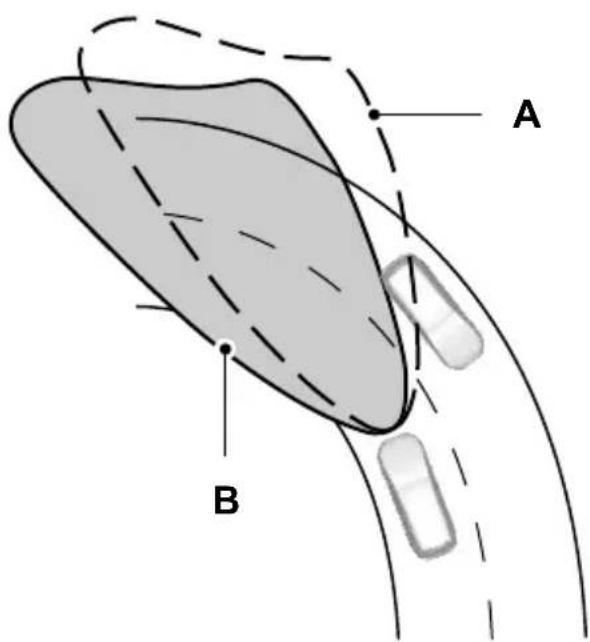
text_image
A BE72897
without AFSA
with AFSB
The AFS adjusts the headlamp dipped beam depending on vehicle direction and speed. It improves visibility when you are driving at night and helps to reduce headlamp glare for oncoming drivers.
The system will not operate when the vehicle is stationary, when you have switched on the daytime running lamps or when you have selected reverse gear.
A message will appear in the information display if the system malfunctions. See Information messages (page 92).
The headlamps will move to a fixed central or dipped position. Have the system checked as soon as possible.
Cornering lamps

text_image
A B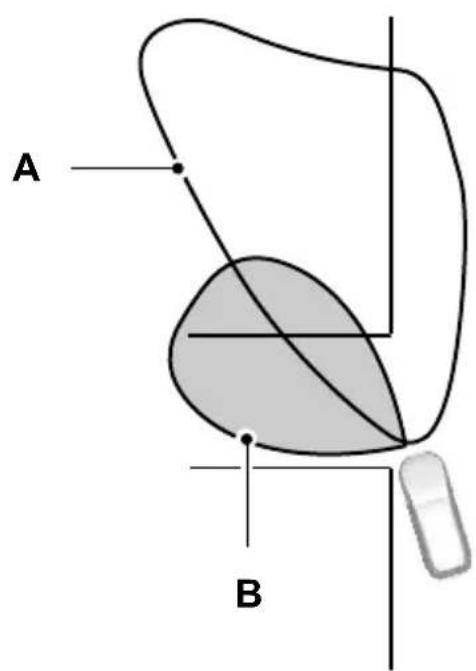
text_image
A BE72898
Headlamp beamA
Cornering lamp beamB
The cornering lamps illuminate the inside of a corner when you are turning.
DIRECTION INDICATORS

natural_image
3D rendered object with directional arrows indicating movement or flow, no visible text or symbolsE70727
Note: Tap the lever up or down to make the direction indicators flash only three times.
INTERIOR LAMPS
Courtesy lamp
text_image
A B C 30 0 1 2 3E71945
A Off
Door contactB
C On
If you set the switch to position B, the courtesy lamp will come on when you unlock or open a door or the luggage compartment lid. If you leave a door open with the ignition switch off, the courtesy lamp will go off automatically after some time to prevent the vehicle battery from discharging. To switch it back on, switch on the ignition for a short time.
The courtesy lamp will also come on when you switch off the ignition. It will go off automatically after a short time or when you start or restart the engine.
If you set the switch to position C with the ignition switch off, the courtesy lamp will come on. It will go off automatically after a short time to prevent the vehicle battery from discharging. To switch it back on, switch on the ignition for a short time.
Reading lamps

text_image
Device control panel with Chinese function labels and directional arrows indicating action buttonsE71946
If you switch off the ignition, the reading lamps will go off automatically after some time to prevent the vehicle battery from discharging. To switch them back on, switch on the ignition for a short time.
Vanity mirror lamps

text_image
A BE72900
A Off
B On

natural_image
Technical diagram of a mechanical component with two black arrows pointing to specific areas (no text or symbols present)E85995
- Remove the screws.
If you switch off the ignition, the vanity mirror lamps will go off automatically after a short time to prevent the vehicle battery from discharging. To switch them back on, switch on the ignition for a short time.
REMOVING A HEADLAMP
WARNING

Have Xenon bulbs changed by a trained technician. There is a risk of electric shock.

natural_image
Close-up of industrial machinery components with a black arrow pointing to a component (no visible text or symbols)E88843
- Open the bonnet. See Opening and ^3 . Remove the plastic screw and closing the bonnet (page 188). retainer.
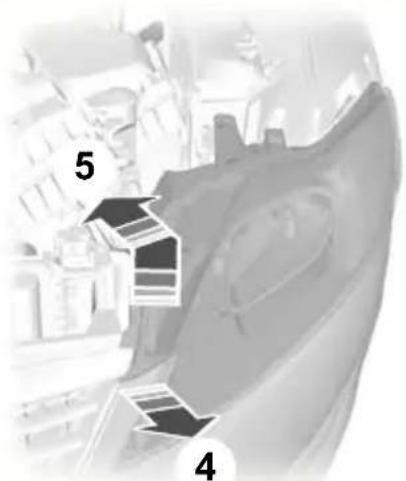
text_image
5 4E85996
- Carefully pull the corner of the grille and bumper towards the front of the vehicle.
- Carefully lift the corner of the headlamp and push it as far as possible towards the back of the vehicle.

text_image
6 7E88982
- Carefully pull the headlamp towards the centre of the vehicle, behind the grille and bumper, to disengage it from the lower outer fixing point.
- Remove the headlamp.
CAUTION
When fitting the headlamp, take care not to damage the locating points.
Note: When fitting the headlamp, make sure that you fully engage the headlamp in the lower outer fixing point.
Note: When fitting the headlamp, tighten the front screw first and then the rear screw.
CHANGING A BULB
WARNINGS

Switch the lights and the ignition off.

Let the bulb cool down before removing it.

Have Xenon bulbs changed by a trained technician. There is a risk of electric shock.
CAUTIONS
Do not touch the glass of the bulb.
Only fit bulbs of the correct specification. See Bulb specification chart (page 67).
Note: The following instructions describe how to remove the bulbs. Fit replacements in the reverse order unless otherwise stated.
Headlamp
Note: Remove the covers to gain access to the bulbs.
Direction indicator
- Remove the headlamp. See Removing a headlamp (page 59).

natural_image
Mechanical component diagram showing a valve assembly with three numbered parts (no text or symbols)E72259
- Turn the bulb holder anti-clockwise and remove it.
- Gently press the bulb into the bulb holder, turn it anti-clockwise and remove it.
Headlamp main beam
- Remove the headlamp. See Removing a headlamp (page 59).

text_image
Technical diagram showing a mechanical assembly with labeled components 2 and 3, likely illustrating a gear or valve mechanism.E72261
- Disconnect the electrical connector.
- Release the clip and remove the bulb.
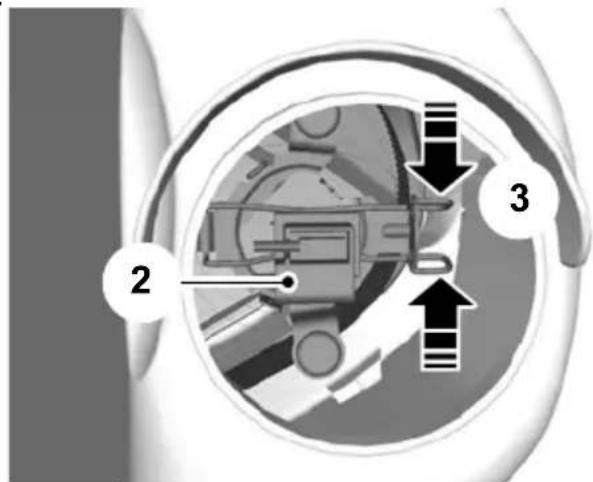
Headlamp dipped beam
- Remove the headlamp. See Removing a headlamp (page 59).

text_image
2 3 E72260- Turn the bulb holder anti-clockwise and remove it.
- Remove the bulb.
Cornering lamp
- Remove the headlamp. See Removing a headlamp (page 59).
text_image
Diagram of a mechanical or electrical component with labeled parts 2, 3, and directional arrows indicating flow or movement.E72262
- Disconnect the electrical connector.
- Release the clip and remove the bulb.
b.
Side repeaters

text_image
E85999 1 2 3
text_image
Diagram showing a car interior component with labeled parts 2 and 3, indicating parts of the device's internal structure.E72265
2. Remove the lamp.
3. Remove the bulb.
- Carefully remove the side repeater.
- Hold the bulb holder, turn the housing anti-clockwise and remove it.
- Remove the bulb.
Approach lamp

natural_image
Close-up of a white plastic electronic device with a black arrow pointing to a component, labeled '1' (no text or symbols on the device itself)Front fog lamps
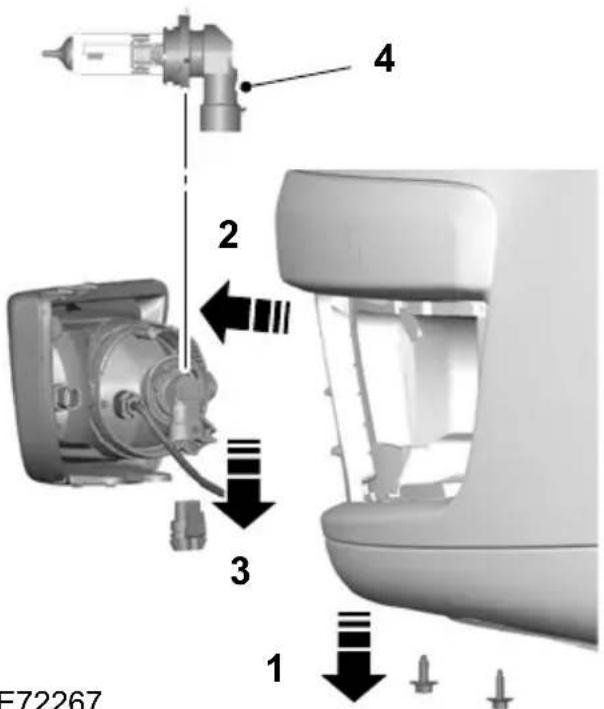
text_image
4 2 3 1 E72267E72264
Note: Position the mirror glass as far inwards as possible.
- Insert a screwdriver into the gap between the mirror housing and the mirror glass and release the metal retaining clip.
E72267
Note: You cannot separate the fog lamp bulb from the bulb holder.
Note: Do not remove the screws.
-
Loosen the screws.
-
Remove the lamp.
- Disconnect the electrical connector.
- Turn the bulb holder anti-clockwise and remove it.
Rear lamps
Direction indicator, tail and brake lamp
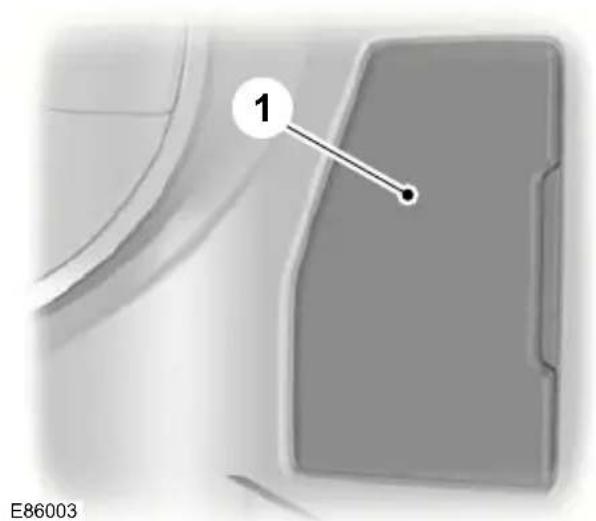
text_image
1 E86003- Remove the trim panel.
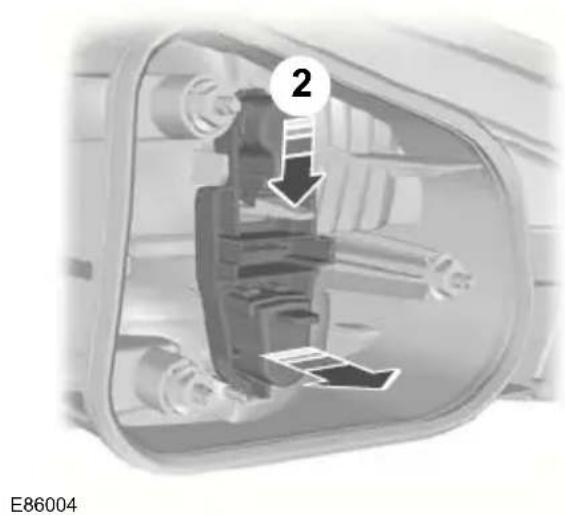
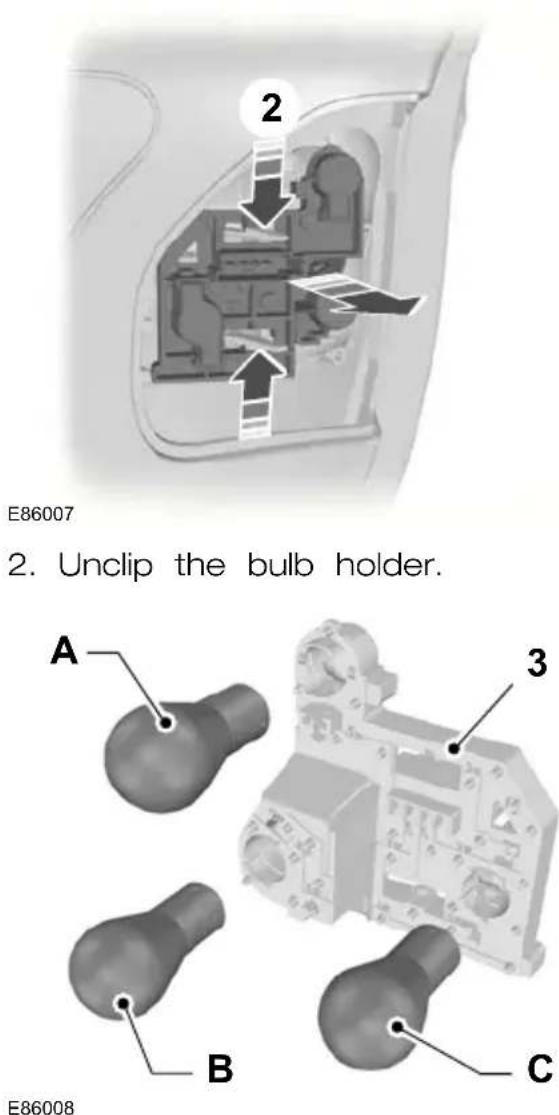
text_image
2 E86004- Unclip the bulb holder.

text_image
A B 3 E86005Direction indicatorA
Tail and brake lampB
- Gently press the bulb into the bulb holder, turn it anti-clockwise and remove it.
Reversing lamp, tail lamp and fog lamp

natural_image
Technical diagram showing a mechanical component with a labeled part (1) and no visible text or symbols on the main structure.- Remove the trim panel.
Reversing lampA
Tail lampB
Fog lampC
3. Gently press the bulb into the bulb holder, turn it anti-clockwise and remove it.
Central high mounted brake lamp
Remove the trim panel
4-door

text_image
13E87617
1. Detach the clips.
5-door
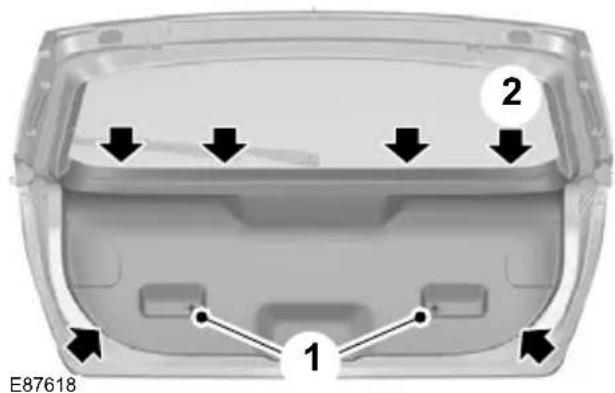
text_image
E87618 1 2- Remove the screws.
- Detach the clips.
Estate

natural_image
Close-up of a white plastic container with a black arrow pointing to the side (no text or symbols on the container itself)- Detach the clips.
Remove the lamp

text_image
E87620 1 2 1
natural_image
Front view of a Ford car's head panel with a numbered badge (3) and E86002 label, no readable text or symbols beyond the badge.- Remove the lamp.

text_image
4 3 01- Insert a suitable object into the holes.4. Unclip the bulb holder.
- Carefully pull the lamp towards the front of the vehicle to release the spring clips.
- Remove the bulb.
Number plate lamp
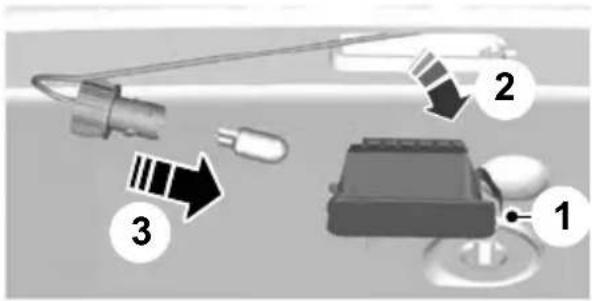
text_image
Diagram showing three labeled components of a device or sensor device with arrows indicating direction or flow.E72789
- Carefully release the spring clip.
- Remove the lamp.
- Remove the bulb.
Interior lamp
Vehicles without interior sensors
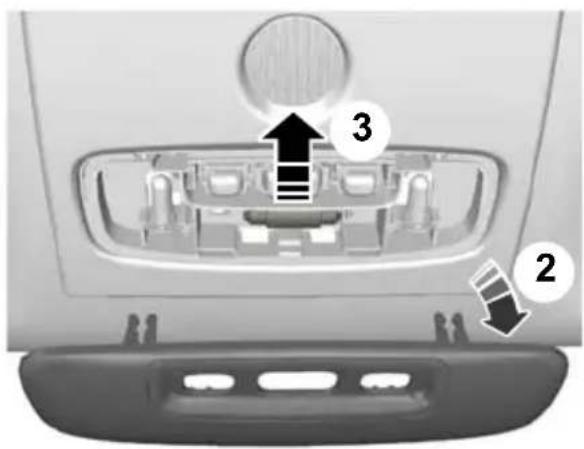
text_image
Diagram of car rear vent with labeled parts and directional arrows indicating flow or movementE72788
- Carefully prise out the lens.
- Remove the lens.
- Remove the bulb.
Vehicles with interior sensors

natural_image
Interior view of a car's backrest and rearview compartment showing internal components (no text or symbols)E72787
- Carefully prise out the lens.
- Remove the lens.
- Remove the bulb.
Reading lamps
Vehicles without interior sensors

text_image
Diagram of car backrest with labeled compartments and directional arrows indicating movement or flowE72796
- Carefully prise out the lens.
- Remove the lens.
- Remove the bulb.
Vehicles with interior sensors

text_image
Diagram showing car rearview and internal components with numbered labels 1 and 2 indicating parts of the lid.E72786
- Carefully prise out the lamp.
- Turn the bulb holder anti-clockwise and remove it.
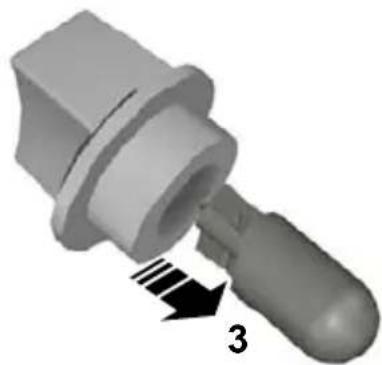
natural_image
3D rendered mechanical component with a threaded end and arrow indicating direction (no text or symbols)E73939
- Remove the bulb.
Vanity mirror lamp

natural_image
Close-up of a mechanical component with an arrow pointing to a section, no visible text or symbolsE72785
- Carefully prise out the lamp.
- Remove the bulb.
Luggage compartment lamp

natural_image
3D rendered mechanical component with directional arrows indicating movement or force (no text or symbols)E72784
- Carefully prise out the lamp.
- Remove the bulb.
BULB SPECIFICATION CHART
| Power (watt)Specific | ||
| 21PY21WFront di | ||
| 55H1Headlamp n |
Lighting
| Power (watt)Specificati | ||
| 55H7Headlamp dipp | ||
| 55H1Cornering lamp | ||
| 5W5WSide repeated | ||
| 5W5Approach lamp | ||
| H8Front fog | lamp 35^1 | |
| H11Front fog | lamp 55^1 | |
| 5W5WSide lamp | ||
| 21PY21WRear direct | ||
| Brake and tail lamp | 21/5P21/5W | |
| Tail lamp | 4P21/4W | |
| Rear fog lamp | 21/5P21/5W | |
| Reversing lamp | P21W | 21 |
| Central high mounted brake lamp | 5 x W5W | 5 |
| 5W5WNumber plat | ||
| Interior lamp | Festoon | 10 |
| Reading lamp | BA 9s | 5 |
| 5W5WVanity mirror | ||
| 5W5WLuggage cor | ||
^1 Fit a replacement with the same rating as the one you have removed.
ELECTRIC WINDOWS
WARNING

Do not operate the electric windows unless they are free from obstruction.
Note: If you operate the switches often during a short period of time, the system might become inoperable for a certain time to prevent damage due to overheating.
Note: You can operate the windows for several minutes after you switch off the ignition. They will be deactivated as soon as a door is opened.
Note: If you operate both the switch or switches on the door trim panel of the the relevant door and the switch for that driver's door.
window on the driver's door at the same time, the window will stop moving.
Switch on the ignition to operate the electric windows.
Global opening and global closing
You can also operate the electric windows with the ignition off via the global opening and global closing function. See Global opening and closing (page 38).
Note: Global opening and global closing will open or close the windows automatically only on vehicles equipped with four electric windows.
Note: Global closing will only operate if you have set the memory correctly for each window.
Driver's door switches

natural_image
Diagram of a mechanical assembly with multiple components and directional arrows (no text or symbols)You can operate all the windows with the switches on the door trim panel of the driver's door.
Front and rear passengers' door switches

natural_image
Close-up of a car's front panel with two arrows pointing to the left side (no text or symbols visible)E70849
Opening and closing the windows automatically
Press or lift the switch to the second action point and release it. Press or lift it again to stop the windows.
Safety switch for rear windows
Note: You can always operate the rear windows from the driver's door.
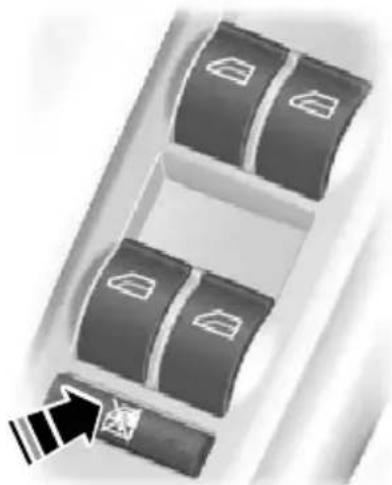
natural_image
Diagram of a mechanical or electrical component with multiple compartments and a directional arrow (no text or symbols)E70850
A switch in the driver's door disables the rear electric window switches.
The light in the switch illuminates and the lights in the rear window switches go off when the rear windows are disabled.
Anti-trap function
WARNING

Careless closing of the windows can override the protection function and cause injuries.
The electric windows will stop automatically while closing and reverse some distance if there is an obstacle in the way.
Overriding the anti-trap function
CAUTION
While you close the window for the third time, the anti-trap function is disabled. Make sure there are no obstacles in the way of the closing window.
To override this protection function when there is a resistance, for example, in the winter, proceed as follows:
- Close the window twice until it reaches the resistance and let it reverse.
- Close the window a third time to the resistance. The anti-trap function is disabled and you cannot close the window automatically. The window will override the resistance and you can close it fully.
- If the window does not close after the third attempt, have it checked by a properly trained technician.
Resetting the memory of the electric windows
WARNING
the off! The anti-trap function is deactivated until you have reset the memory.
After the battery has been disconnected from the vehicle you must reset the memory separately for each window:
- Lift the switch until the window is fully closed. Hold the switch lifted for one more second.
- Release the switch and lift it again, two or three times, for one more second.
- Open the window and try to close it automatically.
- Reset and repeat procedure if the window does not close automatically.
Safety mode
WARNING
The anti-trap function is not active during this procedure.
If the system detects a malfunction, it enters a safety mode. The windows will move for only about 0.5 seconds at a time and then stop again. Close the windows by pressing the switch again when the windows stop moving. Have this checked immediately.
EXTERIOR MIRRORS
WARNING

Do not overestimate the distance of the objects that you see in the convex mirror. Objects seen in ex mirrors will appear smaller and er away than they actually are.
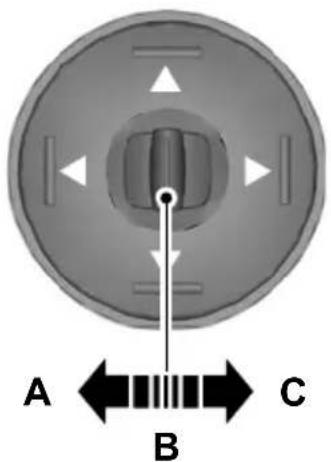
text_image
A B CE70846
Manual folding mirrors
Folding
Push the mirror towards the door window glass.
Left-hand mirrorA
B Off
Right-hand mirrorC
Unfolding
Make sure that you fully engage the mirror in its support when returning it to its original position.
Mirror tilting positions
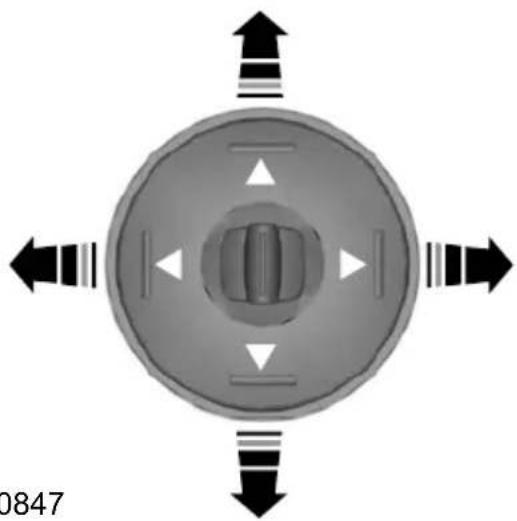
natural_image
Top-down view of a circular mechanical component with four directional arrows indicating rotation or force directions (no text or symbols)E70847
The electric exterior mirrors are fitted with a heating element that will defrost or demist the mirror glass. See Heated windows and mirrors (page 106).
Electric folding mirrors
Automatic folding and unfolding
Note: If the mirrors have been folded using the manual fold button they can be unfolded using the manual fold button. The mirrors will fold automatically when you lock the vehicle with the key, the remote control or a keyless entry system request. The mirrors will unfold when you unlock the vehicle with the key, the remote control, a keyless entry system request, the driver's interior door handle or starting the engine.
Manual folding and unfolding
The electric folding mirrors operate with the ignition on.
Note: You can operate the mirrors (mirror, tilting and folding) for several minutes after you switch off the ignition. They will be deactivated as soon as a door is opened.
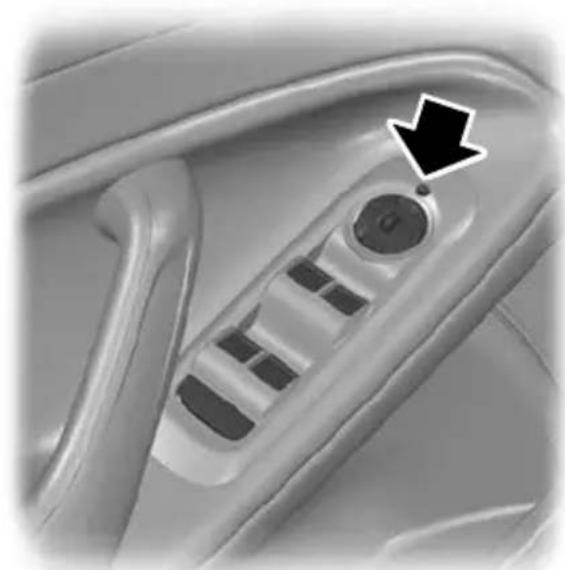
natural_image
Close-up of a car seatbelt mechanism with a black arrow pointing to the handle (no text or symbols visible)E72623
Press the button to fold or unfold the mirrors.
If you press the switch again while the mirrors are moving, they will stop and reverse the direction of movement.
Note: When the mirrors are operated often during a short period of time, the system may become inoperable for a period of time to prevent damage due to overheating.
Reverse mirror dipping
Depending on the switch position (A or C), the relevant exterior mirror will dip whenever you select reverse gear, giving you a view of the kerb.
Note: You can disable this feature by leaving the switch in position B.
The exterior mirror will return to the original position:
If the vehicle speed exceeds 10 km/h (6 mph).
Approximately 10 seconds after reverse gear has been disengaged.
• If the switch is returned to position B.
When you first use this feature, the mirror will dip to a preset position. This position can be adjusted using the following sequence:
- Turn the ignition on. Do not start the engine.
- Select the desired exterior mirror (A or C).
- Select reverse gear, the selected exterior mirror will adjust to a preset position.
- Adjust the mirror to the required dipped position.
- Disengage reverse gear or press and hold the desired memory pre-set button until a single chime sounds to confirm. See Memory function (page 124).
The settings will be stored automatically.
AUTO-DIMMING MIRROR

natural_image
Exterior view of a car front mirror (no text or symbols visible)E71028
The auto-dimming mirror will adjust automatically when hit by glaring light from behind. It will not work when you have selected reverse gear.
GAUGES
Type 1 and 2
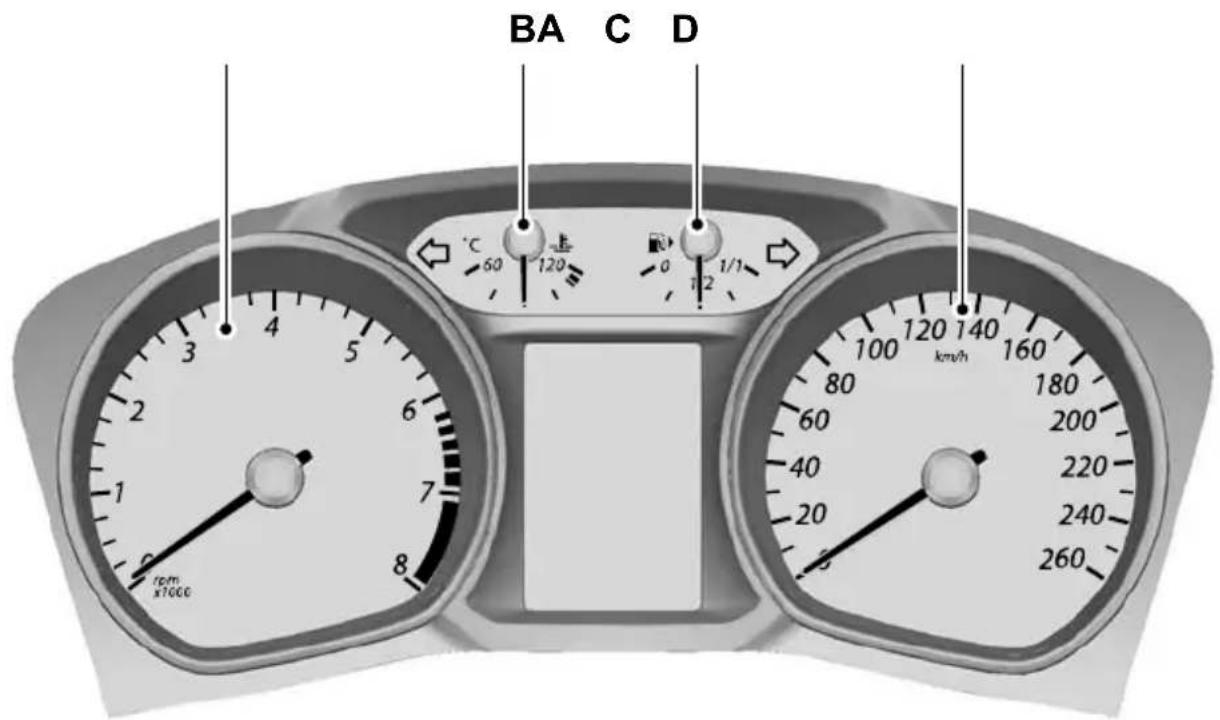
text_image
BA C D °C 60 120 0 1/2 1/1 rpm x1000 km/hE72984
TachometerA
Engine coolant temperature gaugeB
Fuel gaugeC
SpeedometerD
Type 3

text_image
A 6.1V/h 5 4 3 2 1 0 C0 730.8 km 10.31 053.658 km P B 120 140 160 180 -200 -220 -240 -260 E D CE87713
TachometerA
SpeedometerB
Engine coolant temperature gaugeC
Fuel gaugeD
E Message centre. See Information displays (page 79).
Engine coolant temperature gauge
Shows the temperature of the engine coolant. At normal operating temperature, the needle will remain in the centre section.
CAUTION
Do not restart the engine until the cause of overheating has been resolved.
If the needle moves towards 120^ C, the engine is overheating. Stop the engine, switch the ignition off and determine the cause once the engine has cooled down. See Engine coolant check (page 197).
Fuel gauge
The arrow adjacent to the fuel pump symbol tells you on which side of your vehicle the fuel filler cap is located.
WARNING LAMPS AND INDICATORS
The following warning lamps and indicators will illuminate briefly when you switch the ignition on to confirm that the system is operational:
- ABS
- Airbag
- Brake system
- Engine
- Frost
- Ignition
• Oil pressure (all except 2.5L Duratec)
• Stability control (ESP).
If a warning or indicator lamp does not illuminate when the ignition is switched on, it indicates a malfunction. Have the system checked by properly trained technician.
ABS warning lamp

If it illuminates when you are driving, this indicates a malfunction. You will continue to have normal braking (without ABS).
Have the system checked by a properly trained technician as soon as possible.
Airbag warning lamp

If it illuminates while driving, this indicates a malfunction. Have the system checked by a properly trained technician.
Brake system lamp
It illuminates when the parking brake is engaged.
WARNING

Reduce your speed gradually and stop your vehicle as soon as it is safe to do so. Use your brakes with
If it illuminates when you are driving, check that the parking brake is not engaged. If the parking brake is not engaged, this indicates a malfunction. Have the system checked by a properly trained technician immediately.
Cruise control indicator

It will illuminate when you have set a speed using the cruise control system. See Using
cruise control (page 149). On vehicles with adaptive cruise control (ACC), the indicator will illuminate when ACC is active. See Using ACC (page 152).
Direction indicators
Flashes during operation. A sudden increase in the rate of flashing warns of a failed
indicator bulb. See Changing a bulb (page 60).
Engine warning lamp

If it illuminates with the engine running, this indicates a malfunction. If it flashes when
you are driving, reduce the speed of your vehicle immediately. If it continues to flash, avoid heavy acceleration or deceleration. Have the system checked by a properly trained technician immediately.
CAUTION
If the engine warning lamp illuminates in conjunction with a message, have the system checked as soon as possible.
Forward alert indicator
It will illuminate when this feature is active. See Forward alert function (page 155).
Front fog lamp indicator

It will illuminate when you switch the front fog lamps on.
Frost warning lamp
WARNING

Even if the temperature rises to above 4^ C (39.2°F) there is no guarantee that the road is free of roads caused by inclement weather.

It will illuminate and glow orange when the outside air temperature is between 4°C
(39.2°F) and 0°C (32°F). It will glow red when the temperature is below 0°C (32°F).
Glow plug indicator

See Starting a diesel engine (page 131).
Headlamp indicator

It will illuminate when you switch the headlamp dipped beam or the side and tail lamps on.
Ignition warning lamp
If it illuminates when you are driving, this indicates a malfunction. Switch off all
unnecessary electrical equipment. Have the system checked by a properly trained technician immediately.
Low fuel level warning lamp

If it illuminates, refuel as soon as possible.
Main beam indicator

It will illuminate when you switch the headlamp main beam on. It will flash when you use the
headlamp flasher.
Message indicator

It will illuminate when a new message is stored in the information display. See
Information messages (page 92).
Oil pressure warning lamp
CAUTION

Do not resume your journey if it illuminates despite the level being correct. Have the system checked a properly trained technician mediately.
If it stays on after starting or illuminates when driving, this indicates a malfunction. Stop
your vehicle as soon as it is safe to do and switch the engine off. Check the engine oil level. See Engine oil check (page 197).
Rear fog lamp indicator
It will illuminate when you switch the rear fog lamps on.
Seat belt reminder

See Seat belt reminder (page 30).
Shift indicator

It will illuminate to inform you that shifting to a higher gear may give better fuel economy and lower CO2 emissions. It will not illuminate during periods of high acceleration, braking or when the clutch pedal is pressed.
Stability control (ESP) warning lamp

While driving, it flashes during activation of the system. After switching on the ignition, if it does not illuminate or illuminates continuously while driving, this indicates a malfunction. During a malfunction, the system switches off. Have the system checked by a properly trained technician as soon as possible.
If you switch ESP off, the warning lamp will illuminate. The lamp will go out when you switch the system back on or when you switch the ignition off.
AUDIBLE WARNINGS AND INDICATORS
Switching the chimes on and off
You can deactivate certain chimes.
To set which chimes should sound:
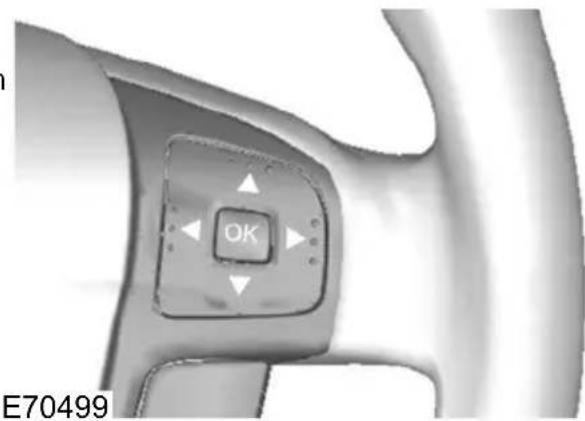
text_image
OK E70499-
Press the right arrow button on the steering wheel to enter the main menu.
-
Highlight Setup with the up and down arrow buttons and press the right arrow button.
-
Highlight Chimes and press the right arrow button.
-
Highlight the chime and press the OK button to switch the chime on and off.
-
Press the left arrow button to exit the menu. Press and hold the left arrow button to return to the main menu display.
GENERAL INFORMATION
WARNING

Do not operate the information display controls when the vehicle is moving.
Note: The information display will remain on for several minutes after you switch the ignition.
Various systems on your vehicle can be controlled using the buttons on your steering wheel. Corresponding information is displayed in the information display.
For detailed instructions on audio, navigation, phone etc. refer to the appropriate manual.
Controls

text_image
OK E70499Instrument cluster functions
| Type 3Type 2T comp | |||
| XXXTrip | |||
| XXXInformation | |||
| XXXClock set | |||
| XX-Display se | |||
| XX-Park heate |
Press the up and down arrow buttons:
• to scroll through the trip computer displays
• to scroll through and highlight the options within a menu.
Press the right arrow button:
• to enter the main menu from the trip computer displays
• to enter a sub-menu.
Press the left arrow button to exit a menu.
Hold the left arrow button pressed at any time to return to the main menu display (escape button).
Note: The system will return to the trip computer displays automatically if you do not press any button for a period of time
Press the OK button to choose and confirm a setting.
Information displays
| Type 3Type 2Type | |||
| X--Navigation cc | |||
| X--CD control | |||
| X--CD changer | |||
| X--Radio control | |||
| X--Phone contrc | |||
| X--Auxiliary input |
Type 1
Press the up and down arrow buttons on the steering wheel to scroll through the trip computer displays. See Trip computer (page 88).
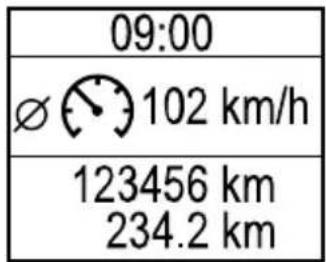
text_image
09:00 Ø 102 km/h 123456 km 234.2 kmE80604
Menu structure

flowchart
graph TD
    A["Reset trip"] --> B["Information"]
    B --> C["Clock"]
    D["Tripodometer"] --> E["Avg. fuel"]
    D --> F["Avg. speed"]
    D --> G["All values"]
    H["Messages"] --> I["Set clock"]
    I --> J["24 Hour mode"]
    I --> K["12 Hour mode"]
E87751
Type 2
| 09:00 |
| Average Fuel6.3 1100km |
| 123456 km234.2 km |
E74426
Press the up and down arrow buttons on the steering wheel to scroll through the trip computer displays. See Trip computer (page 88).
Menu structure
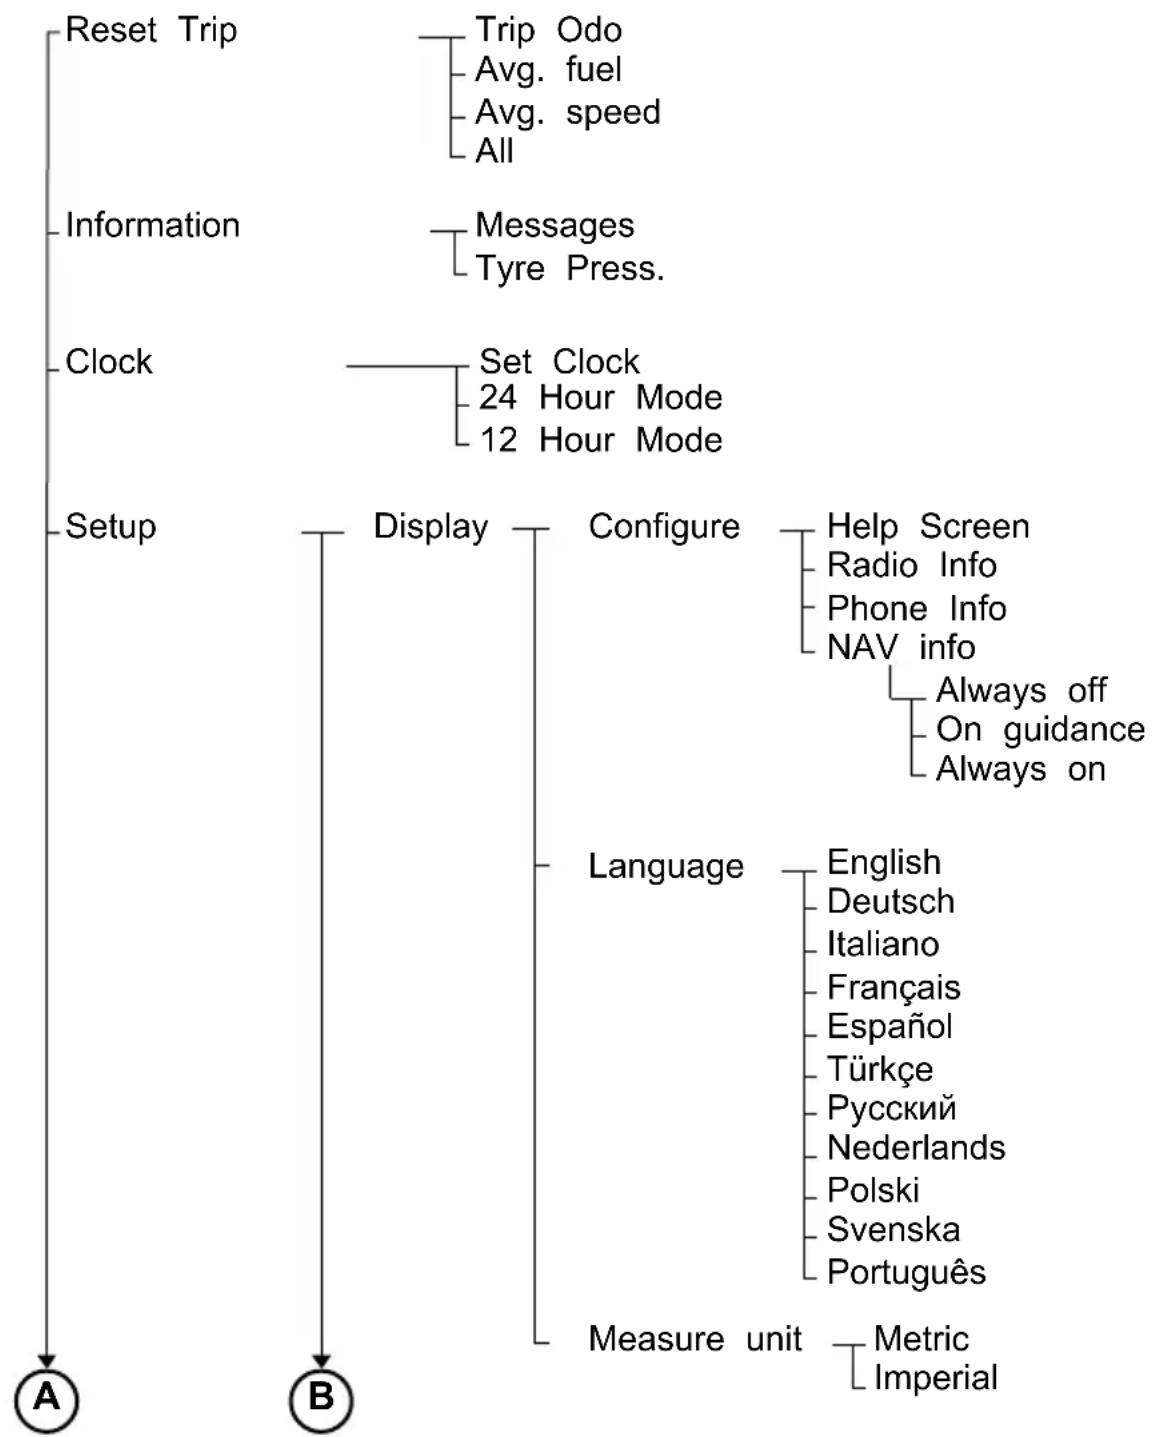
flowchart
graph TD
    A["Reset Trip"] --> B["Information"]
    B --> C["Clock"]
    C --> D["Setup"]
    D --> E["Display"]
    E --> F["Configure"]
    F --> G["Language"]
    G --> H["Measure unit"]
    H --> I["Metric Imperial"]
    F --> J["Help Screen"]
    F --> K["Radio Info"]
    F --> L["Phone Info"]
    F --> M["NAV info"]
    F --> N["Always off"]
    F --> O["On guidance"]
    F --> P["Always on"]
    G --> Q["English"]
    G --> R["Deutsch"]
    G --> S["Italiano"]
    G --> T["Français"]
    G --> U["Espanol"]
    G --> V["Türkçe"]
    G --> W["Pycский"]
    G --> X["Nederlands"]
    G --> Y["Polski"]
    G --> Z["Svenska"]
    G --> AA["Português"]
E87752

flowchart
graph TD
    A["Parkheater"] --> B["Chimes"]
    A --> C["Forw. Alert"]
    A --> D["Tyre Pressure"]
    A --> E["Alarm"]
    A --> F["Aux. Heater"]

    B --> G["Low Fuel"]
    B --> H["General info."]
    B --> I["General warn."]
    B --> J["Home light"]
    B --> K["ACC warning"]
    B --> L["FA warning"]

    C --> M["Sensitivity"]
    C --> N["Warn Audible"]

    D --> O["Off"]
    D --> P["Auto"]
    D --> Q["Manual"]

    E --> R["Check"]
    E --> S["Low load"]
    E --> T["High load"]

    F --> U["Full guard"]
    F --> V["Reduced"]
    F --> W["Ask on exit"]

    F --> X["Time 1"]
    F --> Y["Time 2"]

    X --> Z["Set Time"]
    X --> AA["Monday"]
    X --> AB["Tuesday"]
    X --> AC["Wednesday"]
    X --> AD["Thursday"]
    X --> AE["Friday"]
    X --> AF["Saturday"]
    X --> AG["Sunday"]

    Y --> AH["Set Time"]
    Y --> AI["Monday"]
    Y --> AJ["Tuesday"]
    Y --> AK["Wednesday"]
    Y --> AL["Thursday"]
    Y --> AM["Friday"]
    Y --> AN["Saturday"]
    Y --> AO["Sunday"]

    Z --> AP["Once"]
    Z --> AQ["Active now"]
E87753
Type 3
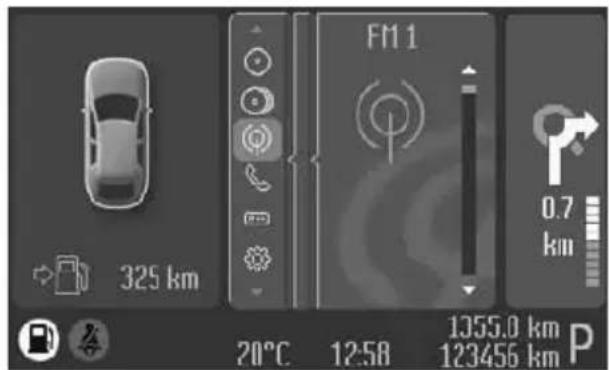
text_image
325 km F1 1 0.7 km 20°C 12:58 1355.0 km P 123456 kmE88048
Use the controls to scroll through the menu displays.
Device list
The highlighted icon shows the current menu in use.

Navigation

CD

CD changer

Radio

Phone
Trip computer

Settings

Auxiliary input
Menu structure
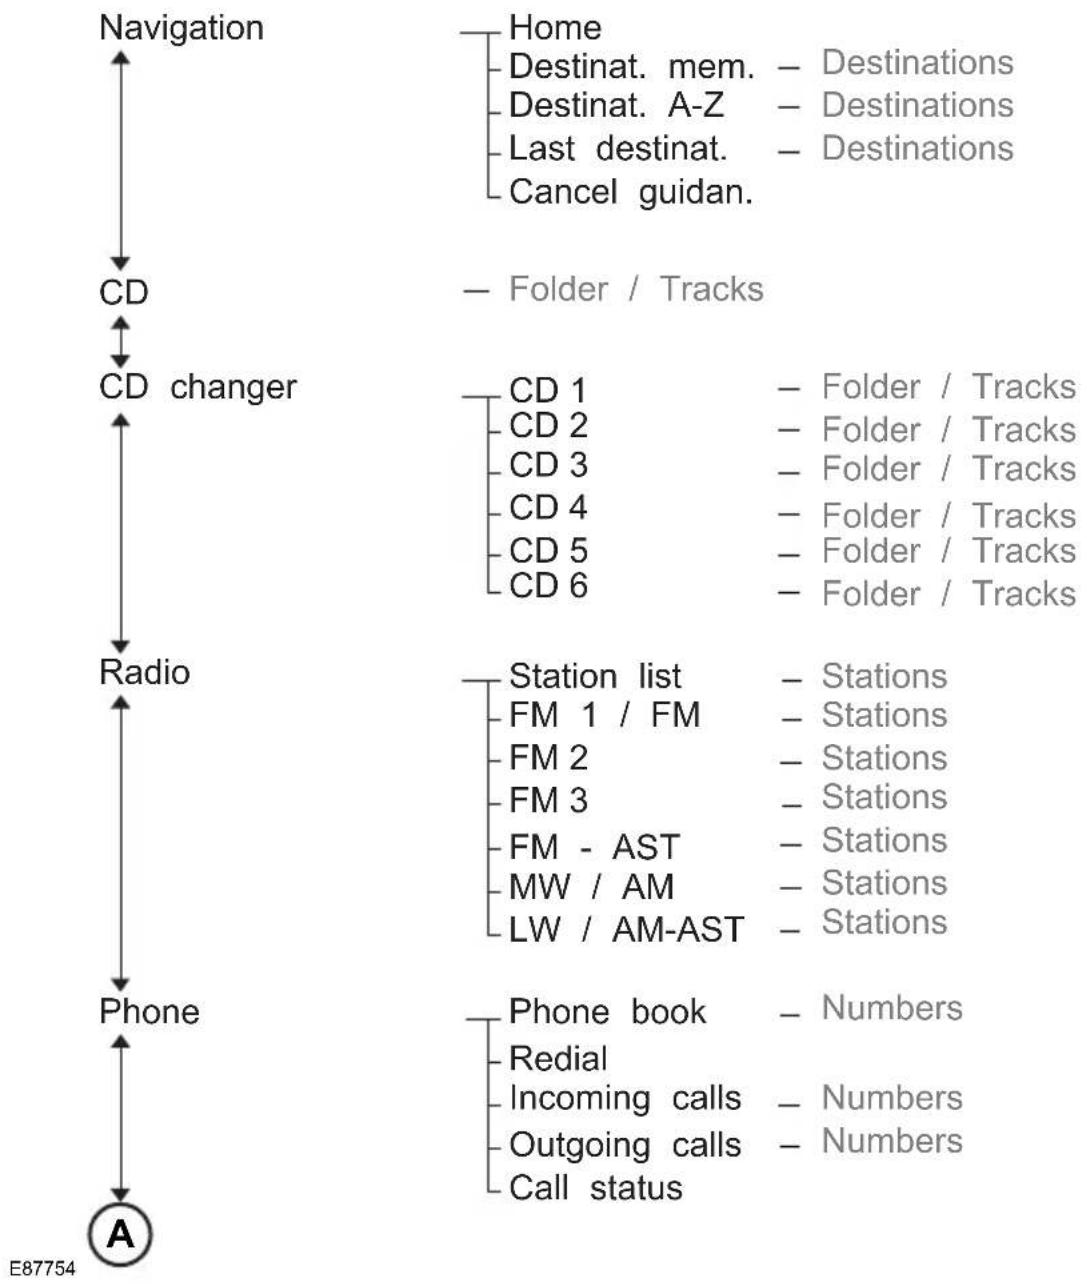
flowchart
graph TD
    A["Navigation"] --> B["CD"]
    B --> C["CD changer"]
    C --> D["Radio"]
    D --> E["Phone"]
    E --> F["A"]

    G["Home"] --> H["Destination. mem. - Destinations"]
    G --> I["Destination. A-Z - Destinations"]
    G --> J["Last destinat. - Destinations"]
    G --> K["Cancel guidan."]

    L["Folder / Tracks"] --> M["CD 1 - Folder / Tracks"]
    L --> N["CD 2 - Folder / Tracks"]
    L --> O["CD 3 - Folder / Tracks"]
    L --> P["CD 4 - Folder / Tracks"]
    L --> Q["CD 5 - Folder / Tracks"]
    L --> R["CD 6 - Folder / Tracks"]

    S["Station list"] --> T["FM 1 / FM - Stations"]
    S --> U["FM 2 - Stations"]
    S --> V["FM 3 - Stations"]
    S --> W["FM - AST - Stations"]
    S --> X["MW / AM - Stations"]
    S --> Y["LW / AM-AST - Stations"]

    Z["Phone book"] --> AA["Redial"]
    Z --> AB["Incoming calls - Numbers"]
    Z --> AC["Outgoing calls - Numbers"]
    Z --> AD["Call status"]

    AE["E87754"] --> AF

flowchart
graph TD
    A["A"] --> B["Trip computer"]
    B --> C["Settings"]
    C --> D["Information"]
    D --> E["Messages"]
    E --> F["Tyre Pressure"]
    C --> G["Clock"]
    G --> H["Set Clock"]
    H --> I["24-hour mode"]
    H --> J["12-hour mode"]
    C --> K["Setup"]
    K --> L["Display"]
    L --> M["Colour themes"]
    M --> N["Configure"]
    N --> O["Help Screen"]
    N --> P["NAV info"]
    N --> Q["Always off"]
    N --> R["On guidance"]
    N --> S["Always on"]
    K --> T["Language"]
    T --> U["English"]
    T --> V["Deutsch"]
    T --> W["Italiano"]
    T --> X["Français"]
    T --> Y["Espanol"]
    T --> Z["Türkçe"]
    T --> AA["Pycский"]
    T --> AB["Nederlands"]
    T --> AC["Polski"]
    T --> AD["Svenska"]
    T --> AE["Português"]
    K --> AF["Measure unit"]
    AF --> AG["Metric Imperial"]

Chimes
Low Fuel General info. General warn. Home light ACC warning FA warning
Forw Alert
Sensitivity Warn Audible
Early Normal Late
Hill Launch
Off Auto Manual
Tyre Pressure
Check Low load High load
Alarm
Full guard Reduced Ask on exit
Aux Heater
E87756

flowchart
graph TD
    A["A"] --> B["B"]
    B --> C["Auxiliary input"]
    C --> D["Time 1"]
    D --> E["Set Time"]
    E --> F["Monday"]
    E --> G["Tuesday"]
    E --> H["Wednesday"]
    E --> I["Thursday"]
    E --> J["Friday"]
    E --> K["Saturday"]
    E --> L["Sunday"]
    D --> M["Time 2"]
    M --> N["Set Time"]
    N --> O["Monday"]
    N --> P["Tuesday"]
    N --> Q["Wednesday"]
    N --> R["Thursday"]
    N --> S["Friday"]
    N --> T["Saturday"]
    N --> U["Sunday"]
    M --> V["Once"]
    M --> W["Active now"]
TRIP COMPUTER
Odometer
Registers the total mileage of the vehicle.
Tripmeter
Registers the mileage of individual journeys.
Distance to empty
Indicates the approximate distance the vehicle will travel on the fuel remaining in the tank. Changes in driving pattern may cause the value to vary.
Average fuel consumption
Indicates the average fuel consumption since the function was last reset.
Average speed
Indicates the average speed calculated since the function was last reset.
Outside air temperature
Shows the outside air temperature.
Type 1 and 2

text_image
10:20 Average Fuel 6.3 1/100km 123456 km 234.2 km A B CE74428
A. Trip computer
B. Odometer
C. Tripometer
The trip computer includes the following information displays:

flowchart
graph TD
    A["Average fuel"] --> B["Average speed"]
    B --> C["Outside air"]
    C --> D["Reset Trip"]
    D --> E["Dist. to empty"]
E74441
Resetting the trip computer using the main menu
To reset a particular display:
- Press the right arrow button on the steering wheel to enter the main menu.
- Highlight Reset Trip with the up and down arrow buttons and press the right arrow button.
- Highlight the function to be reset.
- Press the right arrow button to select the function.
- Hold the OK button pressed.
To reset all three displays, select All values and hold the OK button pressed.
Type 3

text_image
F11 0.7 km 325 km 12:58 1355.0 km P 123456 kmE88049
Trip computerA
Press the OK button on the steering wheel to cycle through the different trip computer displays. To reset a value, press and hold the OK button.
Press the up and down arrow buttons on the steering wheel to scroll through the trip computer displays.
Note: The position of the trip computer display may vary depending on the information shown in the display.
Resetting the trip computer using the main menu
To reset a particular display:
-
Highlight Trip Computer with the up and down arrow buttons and press the right arrow button.
-
Highlight the function to be reset.
- Hold the OK button pressed.
PERSONALISED SETTINGS
The following information is displayed in the information display if you have selected it:
Help screen, radio, navigation and phone information
The help screen appears for a few seconds when you switch the ignition on. ^5
If the radio, navigation or telephone is operating, information relating to this system is displayed in the information display.
To select which information is displayed in the information display:
Type 1 and 2
- Press the right arrow button on the steering wheel to enter the main menu.
- Highlight Setup with the up and down arrow buttons and press the right arrow button.
- Highlight Display and press the right arrow button.
- Highlight Configure and press the right arrow button.
- To toggle the Help screen, Radio Info and Phone Info on and off, highlight the desired setting and pressTo the OK button to confirm the setting.be
- Press the left arrow button to exit the menu. Hold the left arrow button pressed to return to the trip computer display.
Type 3
- Highlight Settings with the up and down arrow buttons and press the right arrow button.
- Highlight Setup with the up and down arrow buttons and press the right arrow button.
- Highlight Display and press the right arrow button.
- Highlight Configure and press the right arrow button.
- To toggle the Help screen and NAV Info on and off, highlight the desired setting and press the OK button to confirm the setting.
Navigation information
You can also choose when the navigation information is displayed in the information display. Three options are available:
• Always off: No navigation information is displayed in the information display.
- On guidance: The navigation
own information will only appear when the
navigation system provides a
guidance instruction. This function is
t only available on certain navigation
systems.
- Always on: Navigation information will always appear in the information display when the navigation system is operating.
set when navigation information should displayed:
type 1 and 2
Press the right arrow button on the steering wheel to enter the main menu.
-
Highlight Setup with the up and down arrow buttons and press the right arrow button.
-
Highlight Display and press the right2. arrow button.
- Highlight Configure and press the right arrow button.
- Highlight Nav Info and press the right arrow button.
- Highlight the desired setting and press the OK button to confirm the setting5.
- Press the left arrow button to exit the menu. Hold the left arrow button 6. pressed to return to the trip computer display.
Type 3
- Highlight Settings with the up and down arrow buttons and press the right arrow button.
- Highlight Setup with the up and down arrow buttons and press the right 2. arrow button.
- Highlight Display and press the right arrow button.
- Highlight Configure and press the right arrow button.
- Highlight Nav Info and press the right arrow button.
- Highlight the desired setting and press the OK button to confirm the setting
Language
A choice of eleven languages are available:
English, German, Italian, French, Spanish, Turkish, Russian, Dutch, Polish, Swedish and Portuguese.
Type 1 and 2
- Press the right arrow button on the steering wheel to enter the main menu.
Highlight Setup with the up and down arrow buttons and press the right arrow button.
- Highlight Display and press the right arrow button.
- Highlight Language and press the right arrow button.
Highlight the desired setting and press the OK button to confirm the setting.
Press the left arrow button to exit the menu. Hold the left arrow button pressed to return to the trip computer display.
Type 3
- Highlight Settings with the up and down arrow buttons and press the right arrow button.
- Highlight Setup with the up and down arrow buttons and press the right arrow button.
- Highlight Display and press the right arrow button.
- Highlight Language and press the right arrow button.
- Highlight the desired setting and press the OK button to confirm the setting.
Units of measure
Note: The outside air temperature is only displayed in degrees Celsius and cannot be set to degrees Fahrenheit.
To select metric or imperial units:
Type 1 and 2
- Press the right arrow button on the steering wheel to enter the main menu.
-
Highlight Setup with the up and down arrow buttons and press the right arrow button.
-
Highlight Display and press the right arrow button.
- Highlight Measure Unit and press the right arrow button.
- Highlight the desired setting and press the OK button to confirm the setting
- Press the left arrow button to return to exit the menu. Hold the left arrow button pressed to return to the trip computer display.
With instrument cluster type 3, certain messages need to be confirmed before you can access the menus.
Message indicator

The message indicator illuminates to supplement some messages. It will be red or amber depending on the severity of the message and will remain on until the cause of the message has been rectified.
Type 3
- Highlight Settings with the up and down arrow buttons and press the right arrow button.
- Highlight Setup with the up and down arrow buttons and press the right arrow button.
- Highlight Display and press the right arrow button.
- Highlight Measure Unit and press the right arrow button.
- Highlight the desired setting and press the OK button to confirm the setting
Message symbols

See Owner's handbook.
Have the system checked at the next service.

Have the system checked as soon as possible.
Stop your vehicle as soon as it is safe to do so.
INFORMATION MESSAGES
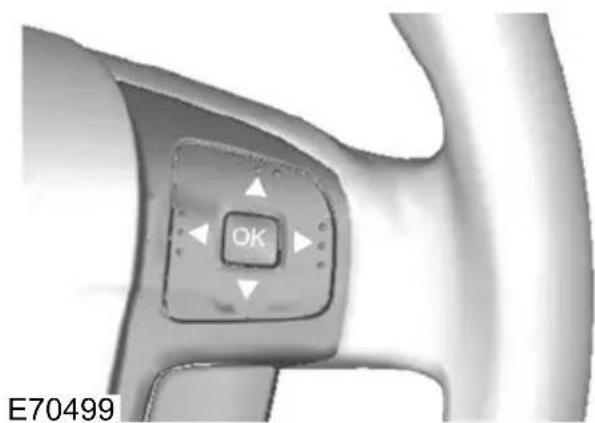
natural_image
Close-up of a mechanical component with a central button labeled 'OK' and directional arrows, no readable text or symbols beyond the button.Press OK to acknowledge and remove some messages from the information display. Other messages will be removed automatically after a short time.
Viewing current messages
Type 1 and 2
- Press the right arrow button on the steering wheel to enter the main menu.
- Highlight Information with the up and down arrow buttons and press the right arrow button.
- Highlight Messages and press the right arrow button.
- Use the up and down buttons to view the current messages.
Type 3
d1. Press the right arrow button on the steering wheel to enter the main menu.
Information displays
-
Highlight Settings with the up and down arrow buttons and press the right arrow button.
-
Highlight Information with the up and down arrow buttons and press the right arrow button.
-
Highlight Messages and press the right arrow button.
-
Use the up and down buttons to view the current messages.
Active suspension
| Message | warning lamp | MeaningMessage |
| amberIVDC | The function suspension has malfunctioned. Have this checked as soon as possible. See usingactive suspension(page 146). | |
| -IVDC | The active suspension is set to the comfort setting. | |
| -IVDC | The active suspension is set to the normal setting. | |
| The active suspension is set to the sport setting |
Alarm
| Message | warning lamp | MeaningMessage |
| amberAlarm | triggeralarm has been triggered. Check your vehicle for signs of unauthorised access. | |
| service reqd. | -Alarm system | themalarm has malfunctioned. Have this checked as soon as possible. |
Battery and charging system
| Message | warning lamp | MeaningMessage |
| Overvoltage: Stop safely! | red | The charging system voltage is above its normal operating range. Stop your vehicle as soon as it is safe to do so and switch off the ignition.Have this checked as soon as possible. |
| amberLow | Battery battery voltage is low. Have this checked as soon as possible. |
Climate control
| Message | warning lamp | MeaningMessage |
| The auxiliary heater is on.amberAux. Heat |
Cruise control and Adaptive cruise control (ACC)
| Message | warning lamp | MeaningMessage |
| active | Cruise control is on.-Cruise control | |
| standby | Cruise control is on standby.-Cruise contro | |
| -ACC unavability control (ESP) may be switched off.Switch ESP back on and try ACC again. Otherwise try switching the ignition off and on to clear this message. | ||
| amberACC | ThelfACD has malfunctioned. Have this checked as soon as possible. | |
| amberClean | There sense be something blocking the radar sensor. Clear any dirt, snow, water or other objects from the front grille area. | |
| malfunction | amberForward | Forward alert has malfunctioned. Have this checked as soon as possible. |
Doors open
| Message | warning lamp | MeaningMessage |
| The driver side front door is open.redDrive | ||
| door open | The driver side rear door is open.redDrive | |
| open | The passenger side front door is open.redPa | |
| rear door open | The passenger side rear door is open.redPa | |
| open | The luggage compartment is open.redLugga | |
| The bonnet is open.redBonnet open |
Engine immobiliser
| Message | warning lamp | MeaningMessage |
| Immobiliser active | amber | The engine immobiliser is on. SeeEngine immobiliser(page 43). |
Hill launch assist (HLA)
| Message | warning lamp | MeaningMessage |
| Hill Launch not available | amber | HLA has malfunctioned. Have this checked as soon as possible. |
| Hill Launch Assist active | - | HLA is on. |
| Hill Launch Assist off | - | HLA is off. |
| Please use park brake ! | amber | HLA is deactivated due to a malfunction.the parking brake normally on hills. Seestart assist(page 143). |
Keyless system
| Message | warning lamp | MeaningMessage |
| tion | redSteering | The steering system has malfunctioned. Have this checked as soon as possible. |
| A valid passive key has not been recognised.amb | ||
| Press STOP | amberCar | Operating is still running. Switch the ignition off.See Keyless starting(page 127). |
| amberKey | Outside passive key has not been detected inside the vehicle. | |
| Change the battery as soon as possible.amberk | ||
| Retry | -Steering | The steering lock is still active. Press the start button. |
Lighting
| Message | warning lamp | MeaningMessage |
| malfunction | amberFront | lthes adaptive front lighting system (AFS) has malfunctioned. Have this checked as soon as possible. |
| fault | -Low beam | One Bulb both of the headlamp dipped beam bulbs have blown. Check the headlamp dipped beam bulbs. SeeChanging a bulb(page 60). |
| Rear fog light: Bulb fault | - | One or both of the rear fog lamp bulbs have blown. Check the rear fog lamp bulbs. SeeChanging a bulb(page 60). |
| Stop lamps: Bulb fault | - | One or both of the brake lamp bulbs have blown. Check the brake lamp bulbs. SeeChanging a bulb(page 60). |
| Trailer stopl.: Bulb fault | - | One or both of the brake lamp bulbs on your trailer have blown. Check the brake lamp bulbs on your trailer. |
| Trailer turnl.: Bulb fault | - | One or both of the direction indicator bulbs on your trailer have blown. Check the direction indicator bulbs on your trailer. |
Maintenance
| Message | warning lamp | MeaningMessage |
| redEngine | The function system has malfunctioned. Have this checked as soon as possible. | |
| level | amberCheck | The engine oil level is low. Check the engine oil level as soon as possible. SeeEngine oil check(page 197). |
| fuel | amberWater | The detected water in the fuel. Have this checked a soon as possible. |
| level | -Low washer | The washer fluid level is low. Check the washer fluid level. SeeWasher fluid check(page 199). |
| -Service | The engine oil needs to be changed. Have the engine oil changed as soon as possible. |
Occupant protection
| Message | warning lamp | MeaningMessage |
| Have the system checked as soon as possible. |
Parking brake
| Message | warning lamp | MeaningMessage |
| applied | amberPark | Release the brake when driving. Failure to do so will result in the rear brakes overheating. |
| applied | redPark | Release the brake when driving. Failure to do so will result in the rear brakes overheating. |
Power steering
| Message | warning lamp | MeaningMessage |
| malfunction | amberPower | The power steering system has malfunctioned. Have this checked as soon as possible. |
Stability control (ESP)
| Message | warning lamp | MeaningMessage |
| Stability control is off.-ESP off | ||
| -ESP maltability control has malfunctioned. Have this checked as soon as possible. | ||
Transmission
| Message | warning lamp | MeaningMessage |
| malfunction | redTransmission has malfunctioned. Have this checked as soon as possible. | |
| temperatur | amberTransmission is over heating. Have this checked as soon as possible. | |
Tyre pressure monitoring system
| Message | warning lamp | MeaningMessage |
| redCheck | ...They tyre indicated has continued to deflate. Check the tyre and inflate it to the recommended pressure. SeeTechnical specifications(page 219). | |
| Check tyre pressures | red | One or more of the tyres are significantly under-inflated. This message may be displayed after a new sensor has been installed. Check the tyres and inflate them to the recommended pressure. SeeTechnical specifications(page 219). |
Information displays
| Message | warning lamp | MeaningMessage |
| amberCheck | The. type indicated is significantly under-inflated. Check your tyres and inflate them to the recommended pressure. SeeTechnical specifications(page 219). | |
| malfunction | amberTyre | You could have installed a temporary spare wheel. Install a correctly inflated full size wheel with a sensor as soon as possible. When a malfunction occurs, the system may not be able to detect or signal low tyre pressure. |
| Up to three sensors have malfunctioned, an unapproved accessory is interfering with the system or a general malfunction has been detected. Have the system checked as soon as possible. When a malfunction occurs, the system may not be able to detect or signal low tyre pressure. | ||
| speed | amberInflate | Tyresty for pressures are not suitable for driving at 160 km/h (100 mph). Inflate the tyres to the recommended pressure. SeeTechnical specifications(page 219). This message will be displayed for only a few seconds with a low tyre pressure warning. |
| detected | -Tyre sensors have installed wheels and tyres that do not have sensors. The tyre pressures will not be monitored. | |
| All sensors have malfunctioned or an unapproved accessory is interfering with the system. Have this checked as soon as possible. | ||
Information displays
Voice control
| Message | warning lamp | MeaningMessage |
| Please speak | Voice control is on.-Voice control | |
| recognised | Check voice control.-Voice control Not | |
| allowed | Voice control is not allowed in this mode.-Voice |
Keep the air intakes forward of the windscreen free from obstruction (snow, leaves etc.) to allow the climate control system to function effectively.
Recirculated air
CAUTION

Prolonged use of recirculated air may cause the windows to mist up. If the windows mist up, follow the settings for defrosting and demisting the windscreen.
The air currently in the passenger compartment will be recirculated. Outside air will not enter the vehicle.
Heating
Heating performance depends on the temperature of the engine coolant.
Air conditioning
Note: The air conditioning operates only when the temperature is above 4^ C ( 39^ F).
Note: If you use the air conditioning, the fuel consumption of your vehicle will be higher.
Air is directed through the evaporator where it is cooled. Humidity is extracted from the air to help keep the windows free of mist. The resulting condensation is directed to the outside of the vehicle and it is therefore normal if you see a small ^E89129 pool of water under your vehicle.
General information on controlling the interior climate
Fully close all the windows.
Warming the interior
Direct the air towards your feet. In cold humid weather conditions, direct some of the air towards the windscreen and the door windows.
Cooling the interior
Direct the air towards your face.
AIR VENTS
Front air vents

natural_image
Close-up of a circular mechanical dial with directional arrows indicating motion (no text or symbols)E71942
Rear air vents

text_image
A BOpenA
CloseB
MANUAL CLIMATE CONTROL
Air distribution control
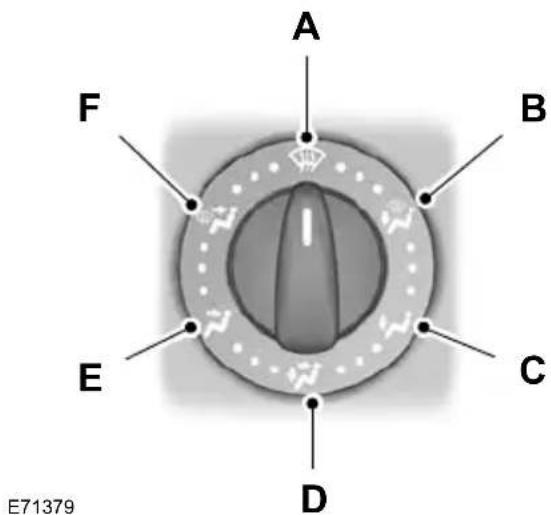
text_image
A F B E C D E71379WindscreenA
Footwell and windscreenB
FootwellC
Face level and footwellD
Face levelE
Face level and windscreenF
You can set the air distribution control any position between the symbols.
Blower

text_image
A 0 1 2 3 4E75470
A Off
Note: If you switch the blower off, the windscreen may mist up.
Recirculated air

Press the button to toggle between outside air and recirculated air.
Heating the interior quickly
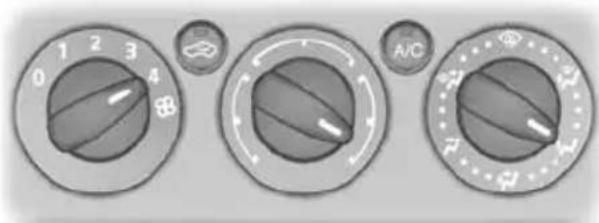
text_image
0 1 2 3 4 A/CE71377
Ventilation
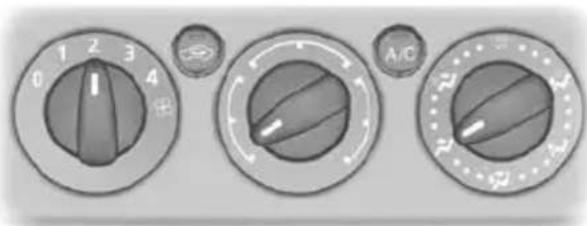
text_image
0 1 2 3 4 A/CE71378
Set the air distribution control, blower and air vents to suit your requirements. E71381
Air conditioning
Switching the air conditioning on and off
A/C
If you turn the blower off, the air conditioning will turn off. When you turn the blower on again, the air conditioning will come on automatically.
Cooling with outside air

text_image
0 1 2 3 4 A/CE71380
Cooling the interior quickly
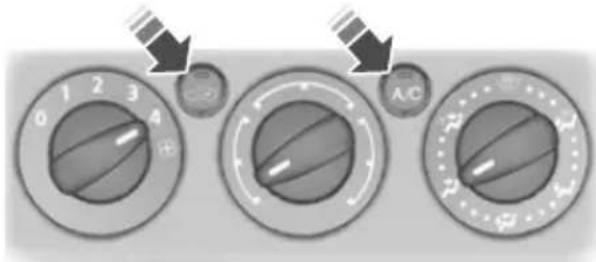
text_image
0 1 2 3 4 A/CDefrosting and demisting the windscreen

text_image
0 1 2 3 4 A/CE71382
When the temperature is above 4^ C ( 39^ F), the air conditioning will switch on automatically. Make sure that the blower is on. The indicator in the switch will illuminate during defrosting and demisting.
If you move the air distribution control to a position other than A, the A/C will remain on.
You can switch the air conditioning and recirculated air on and off while the air distribution control is set to position A.
If necessary, switch the heated windows on. See Heated windows and mirrors (page 106).
Reducing interior air humidity
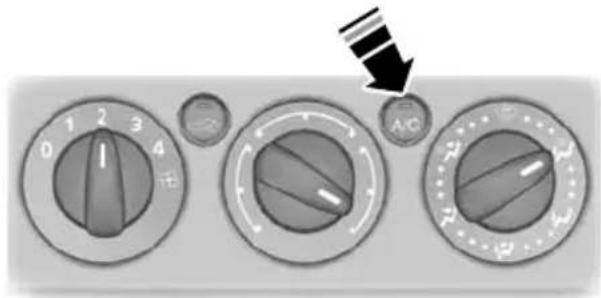
text_image
0 1 2 3 4 A/CE71383
AUTOMATIC CLIMATE CONTROL
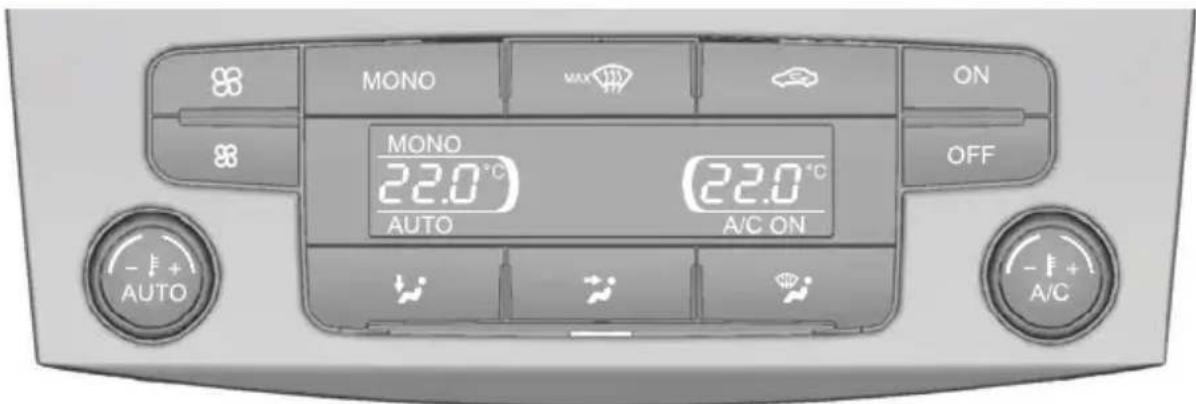
text_image
MONO MAX ON MONO 22.0 °C AUTO 22.0 °C A/C ON OFF AUTO - + + A/CE80737
The system controls the temperature, amount and distribution of the air flow automatically and adjusts them according to the driving and weather conditions. Press the AUTO button to switch auto mode on.
The system in your vehicle is dual-zone automatic climate control. When the system is in mono mode, all the temperature zones are linked to the driver's zone. When you switch mono mode off, the dual-zone system allows you to set different temperatures for the driver's and front passenger's side.
Note: Avoid adjusting the settings when the vehicle interior is extremely hot or cold. The automatic climate control adjusts to the current circumstances automatically. For the system to function properly, the side and centre vents should be fully open.
Note: At low outside temperatures, when the system is in auto mode, the air stream will be directed to the windscreen and the side windows as long as the engine is cold.
Note: For information on the automatic climate control, on vehicles fitted with a combined Navigation and automatic climate control system, see separate handbook.
Setting the temperature


E70304
You can set the temperature between 16°C (61°F) and 28°C (82°F) in steps of 0.5°C (1°F). In position LO (below 16°C [61°F]) the system will switch to permanent cooling, in position HI (above 28°C [82°F]) to permanent heating, and will not regulate a stable temperature.
Mono mode
In mono mode, the temperature settings for both the driver's and passenger's side are linked. If you adjust the temperature using the rotary control on the driver's side, the same temperature will be set for the passenger's side. MONO is shown in the display.
To switch mono mode off
Select a temperature for the passenger's side using the rotary control on the passenger's side. Mono mode will switch
off and MONO disappears from the display. The temperature for the driver's side will remain unchanged. You can not adjust the driver's and passenger's side temperatures independently of each other. The temperatures are shown in the display. You can set a difference of up 4°C (7°F).
Note: If you set a difference of greater than 4^ C ( 7^ F), the temperature on the other side will be adjusted so that the difference remains at 4^ C ( 7^ F).
Note: If you set one of the sides to HI LO, both sides will be set to HI or LO.
To switch mono mode back on

Press the MONO button. MONO is shown in the display, and the passenger's side temperature will be adjusted to the driver's side temperature.
Blower
High speed

Low speed

Use the buttons to adjust the blower for speed.
The blower setting is shown in the display

To return to auto mode, press the AUTC button.
Air distribution
To adjust air distribution, press the desired button. Any combination of settings can be selected simultaneously.

text_image
A B CE70308
FootwellA
Face levelB
WindscreenC
Windscreen defrosting and demisting

When you select windscreen defrosting C and demisting, A, B and C switch off automatically and the air conditioning switches on. Outside air will flow into the vehicle. You cannot select recirculated air.
The blower speed and the temperature control operate automatically and cannot be adjusted manually. The blower is set to high speed and the temperature to When you select windscreen defrosting and demisting, the heated screens switch on automatically and switch off after a short time.
To return to auto mode, press the AUTO button.
Note: To defrost or demist the rear side windows, adjust the rear air vents. See
Air vents (page 101).
Switching the air conditioning on and off

Press the button. A/C OFF or A/C ON is shown in the display.
Recirculated air

Press the button to change between automatic mode and recirculated air.
Note: When the system is in auto mode and the interior and exterior air temperatures are quite hot, the system selects recirculated air automatically to maximise cooling of the interior. Once the selected temperature is reached, the system will automatically reselect automatic mode.
Switching the automatic climate control on and off
E70980
Use the buttons to switch the system on and off.
When switched off, the heating, ventilation and air conditioning system is switched off and recirculated air is selected.
HEATED WINDOWS AND ©MIRRORS
Heated windows
Use the heated windows to defrost or demist the windscreen or rear window.
Note: The heated windows operate only when the engine is running.
Heated windscreen

Heated rear window
Heated exterior mirrors
Electric exterior mirrors are fitted with a heating element that will defrost or demin the mirror glass. They will switch on automatically when you switch the heated rear window on.
AUXILIARY HEATER
Parking heater
WARNING

The parking heater must not be operated at filling stations, near sources of combustible vapours or or in enclosed spaces.
The parking heater operates independently of the vehicle heater by heating the engine's coolant circuit. It is fed from the vehicle fuel tank. You can also use it while the vehicle is in motion help the vehicle heater warm up the interior more quickly.
Used properly, the parking heater provides the following benefits:
- It preheats the interior of the vehicle.correctly. See Clock (page 121).
- It keeps the windows clear of ice in To programme the heating times: the event of frost and prevents condensation.
- It avoids cold starts and allows the engine to reach operating temperature sooner.
Note: The parking heater will only operate if there is at least 7.5 litres (1.6 gallons) of fuel in the fuel tank and the ambient temperature is below 15^ C ( 59^ F). The heater will not operate if the battery is low.
Note: The heating depends on the outside air temperature.
Note: When the parking heater is activated, exhaust fumes may come from under the sides of the vehicle. This is normal.
Note: On vehicles with a manual heating, ventilation and air conditioning system, the heating of the vehicle interior is dependent on the temperature, air distribution and blower control settings.
To prevent the battery from discharging:
- Once the parking heater has performed one heating cycle, the next programmed heating cycle will only be carried out if you have started the vehicle's engine in between.
• After a heating cycle, drive the vehicle for at least the period of the heating cycle.
Programming the parking heater
Note: The programmed time is the time at which you wish the vehicle to be warr and ready to drive, not the time at which the heater switches on.
Note: You must programme the times at least 70 minutes in advance of the time you wish to set.
Note: You must set the time and date

natural_image
Close-up of a mechanical component with a central button labeled 'OK' and directional arrows, no readable text or symbols beyond the button.- Press the right arrow button on the steering wheel to enter the main menu.
- Highlight Setup with the up and down arrow buttons and press the right arrow button.
- Highlight Park Heater and press the right arrow button.
| Park Heater | |
| Program 1 | |
| Program 2 | |
| One-Time | |
| Active now | |
E74467
- The functions Program 1 and Program 2 allow you to programme up to two heating cycles for each day of the week. These times will remain stored and the heater will warm up the vehicle at these times on these days every week.
- The function One-Time allows you to programme one heating cycle for one specific day.
• The function Active now automatically switches on the heater.
Programming the functions Program 1 and Program 2
| Program 1 | |
| [07:55] | |
| □Monday | |
| □Tuesday | |
| ☑Wednesday | |
| □Thursday | |
| □Friday | |
E74468
- Highlight Program 1 and press the right arrow button.
- Highlight the day on which the heater should warm up the vehicle.
- Press the OK button to confirm the selection. A cross appears in the box next to the day to show that this day is selected.
-
Continue in the same way to select all the days on which the heater should warm up the vehicle.
-
To set the time at which the vehicle Active now
should be warmed up, highlight the time at the top of the display and press the right arrow button.
-
Press the OK button and the hours flash. Use the up and down arrow buttons to adjust the individual setting and the left and right arrow buttons move to the next or previous setting
-
When you have finished, press the button again to confirm the selection.
Highlight Active now and press the OK button. A cross appears in the box next to the function to show that the heater is activated.
To deactivate the heater, highlight Active now and press the OK button again.
Diesel auxiliary heater (depending on country)

text_image
Parkheater Program 1 07:55 01:12:2006 OK = changeE74469
The diesel auxiliary heater (PTC electrical heater) aids in warming the engine and the vehicle interior on vehicles with a diesel engine. It is switched on or off automatically depending on the outside air temperature, the coolant temperature and the alternator load.
Fuel operated heater (depending on country)
The fuel operated heater aids in warming the engine and the vehicle interior on vehicles with a petrol or diesel engine. It is switched on or off automatically depending on the outside air temperature and the coolant temperature, unless you You can use the function Program 2 have deactivated it. When the fuel set a second cycle, for example different operated heater is operating, Aux. times on different days or twice on the Heater on is displayed in the information same day. The programming procedure display. See Information displays is the same as for the function Program (page 79).
1.
To deactivate the fuel operated heater:
Programming the function One-Time
-
Highlight One-Time and press the right arrow button.
-
Press the OK button and the hours flash. Use the up and down arrow buttons to adjust the individual settings and the left and right arrow buttons to move to the next or previous setting.
-
When you have finished, press the OK button again to confirm the selection.E70499
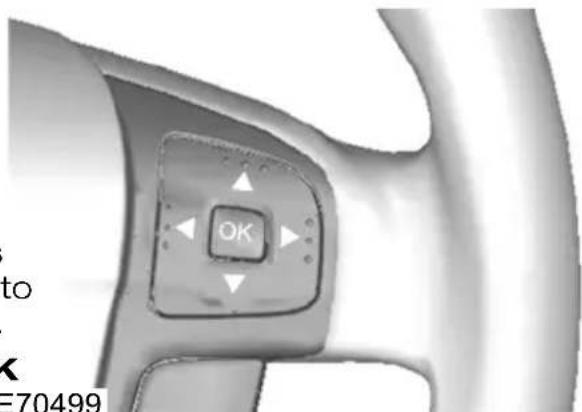
text_image
OK to K E70499- Press the right arrow button on the steering wheel to enter the main menu.
- Highlight Setup with the up and down arrow buttons and press the right arrow button.
- Highlight Aux. Heater and press the OK button to toggle the heater on and off. A cross appears in the box when the heater is activated.
- Press the left arrow button to exit the menu. Hold the left arrow button pressed to return to the trip computer display.
Remote starting
The parking heater may be started and switched off from a distance of up to 5 metres (1640 feet) using the supplied remote control transmitter. This range will vary depending upon local conditions and terrain, as well as battery condition. The remote control transmitter will indicate whether or not the signal has been received. The parking heater will operate for a maximum of 50 minutes.
Starting
Hold the transmitter with the antenna upwards and press the ON button for 12 seconds. The LED on the transmitter lights up green to confirm the signal has been received.
Switching off
Hold the transmitter with the antenna upwards and press the OFF button for - 2 seconds. The LED on the transmitte lights up red to confirm the signal has been received.
Remote start in combination with direct start or timer

natural_image
Line drawing of a device casing with internal compartments labeled 'O', 'E', and 'N' (no text or symbols beyond labels)Remote start is integrated with normal heater control. Parking heaters started with direct start or timer functions can be switched off with the remote control transmitter and vice versa.
Feedback during starting and switching off
The LED on the transmitter illuminates green for about two seconds. This indicates the signal has been received by the vehicle and the heater has started.
The LED on the transmitter illuminates red for about two seconds. This indicates the signal has been received by the vehicle and the heater has switched off.
The LED on the transmitter flashes green for red for about two seconds. This indicates the signal was not transmitted correctly. Repeat the transmission.
Note: Transmitter range is dependant upon distance and local conditions such as buildings, etc.
The LED on the transmitter illuminates orange for about two seconds before showing green or red. This indicates the transmitter batteries are weak and should be changed.
The LED on the transmitter flashes orang for about 5 seconds. This indicates that the signal was not transmitted. The transmitter batteries are discharged and should be changed as soon as possible
Changing the remote control battery
Make sure that you dispose of old batteries in an environmentally friendly way. Seek advice from your local author regarding recycling.

text_image
Technical diagram of a device with labeled parts 1 and 2, showing internal components and structural details.E114361
- Insert a screwdriver or other suitable tool into the slot on the back of the remote control, and unscrew the compartment cover.
CAUTION

Do not touch the battery contacts the printed circuit board with the screwdriver.
- Carefully prise out the battery.
- Install a new battery (3.3V type CR1-3N) with the + facing upwards.
- Re-assemble the remote control.
Programming the transmitter
Further transmitters may be used with the remote system, please consult your dealer. Up to a maximum of 3 separate remote controls may be added. When adding extra transmitters these must be programmed separately.
Note: The heater must be switched off during programming.
iNote: The programming procedure may be repeated as often as is required. The oldest programmed transmitter will be deleted each time.
- Install the battery in the new transmitter.
- Turn off the power to the receiver by removing fuse F32 from the engine compartment fuse box. See Fuse specification chart (page 176).
- Wait for at least 5 seconds.
- Reconnect power to the receiver by replacing the fuse, and press the OFF button on the new transmitter within 5 seconds until the LED light turns off
- The new transmitter is now programmed.
ELECTRIC SUNROOF
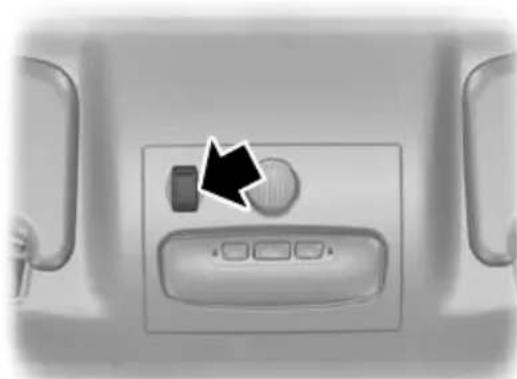
natural_image
Interior view of a vehicle air conditioner unit with control panel and door (no visible text or symbols)E78054
WARNING

Before operating the electric sunroof you should verify it is free of obstructions and ensure that children and/or pets are not in the proximity of the sunroof opening. Failure to do so could result in serious personal injury. It is the primary responsibility of the supervising adults to never leave a child unattended in a vehicle and to never leave the keys in an unattended vehicle.
Note: When the switches are operated often during a short period of time, the system might become inoperable for a certain time to prevent damage due to overheating.
Note: The electric sunroof can also be operated with the ignition off via the global opening and global closing function. See Global opening and closing (page 38).
There are two ways of opening the sunroof - the rear of the sunroof lifts open or the sunroof opens from the front, sliding back under the roof. The sunroof opens and closes whilst the switch is pressed.
Switch on the ignition to operate the electric sunroof.
The power sunroof is operated by a switch located between the sun visors.
Opening and closing the sunroof

natural_image
Close-up of a car wheel rim with directional arrows indicating motion or movement (no text or symbols)E72188
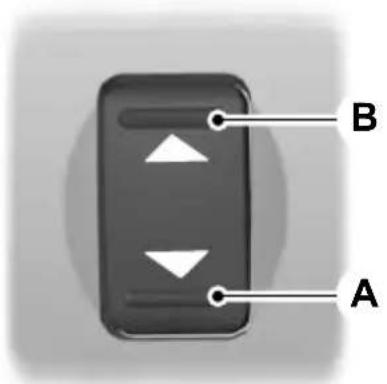
text_image
B APress to closeA
Press to openB
Tilting the sunroof

natural_image
Close-up of a car wheel with a downward arrow indicating motion or force, no visible text or symbolsE72189

text_image
B AE72185
Press to openA
Press to closeB
Opening and closing the sunroof automatically
Note: When opening automatically, the sunroof will stop about 8 cm from the opened position. This position reduces the buffeting noise which is sometimes heard when the sunroof is fully open. sunroof will only stop automatically in the position when the sunroof is opened automatically.
To open or close the sunroof automatically press either side of the switch to the second action point and release it completely. Press again to stop.
When the closed position is reached, the sunroof stops automatically.
Sunroof anti-trap protection
WARNINGS

The anti-trap function is deactivated until the memory has been reset.
Careless closing of the window can cause injuries.

Careless closing of the electric sunroof can override the anti-trap protection and cause injuries.
The sunroof will stop automatically while closing and reverse some distance if there is an obstacle in the way.
To override anti-trap protection when there is a resistance, e. g. in the winter, proceed as follows:
WARNING

While the sunroof is being closed for the third time, the anti-trap function is disabled. Make sure there are noacles in the way of the closing roof.
Close the sunroof a third time to the resistance. The anti-trap function is disabled and the sunroof cannot be closed automatically. The sunroof will override the resistance and can then be closed fully.
If the sunroof does not close after the third attempt, have it checked by an expert.
Sunroof safety mode
WARNING

The anti-trap function is not active during this procedure. Make sure that there are no obstacles in the of the closing sunroof.
If the system detects a malfunction, it enters a safety mode. The sunroof will move for only about 0.5 seconds at a time and then stop again. Close the sunroof by pressing the button again when the sunroof stops moving. When the rear of the sunroof is lifted, lift the rear all the way and then close the sunroof. Have the system checked by an expert immediately.
Sunroof relearning
WARNING

The anti-trap function is not active during this procedure. Make sure that there are no obstacles in the of the closing sunroof.
In case the sunroof no longer closes properly, follow this relearning procedure:
- Tilt the rear of the sunroof as far as possible. Release the button.
- Press and hold the same button again for 30 seconds until you see the sunroof move.
- Release the button and immediately press and hold it again. The sunroof will close, open fully and then close again. Do not release the button before the sunroof has reached the closed position for the second time.
If the button is not pressed continuously, the relearning function will be interrupted. Start the procedure once more from the beginning.
SITTING IN THE CORRECT POSITION

text_image
Max. 30° E68595- hold the steering wheel with your arms slightly bent.
- bend your legs slightly so that you can press the pedals fully.
- position the shoulder strap of the seat belt over the centre of your shoulder and position the lap strap tightly across your hips.
Make sure that your driving position is comfortable and that you can maintain full control of your vehicle.
MANUAL SEATS
Moving the seats backwards and forwards
WARNINGS

Do not adjust the seats when the vehicle is moving.

Only when you use the seat belt properly, can it hold you in a position that allows the airbag to achieve its hum effect.
When you use them properly, the seat, head restraint, seat belt and airbags will provide optimum protection in the event of a collision. We recommend that you:
- sit in an upright position with the base of your spine as far back as possible.
• do not recline the seatback more than 30 degrees.
- adjust the head restraint so that the top of it is level with the top of your head and as far forwards as possible, remaining comfortable.
- keep sufficient distance between yourself and the steering wheel. We recommend a minimum of 250 millimetres (10 inches) between your breastbone and the airbag cover.

text_image
Diagram showing car seat assembly with labeled parts and directional arrows indicating movement or positioning.WARNING

Rock the seat backwards and forwards after releasing the lever to make sure that it is fully engaged in match.
Adjusting the lumbar support

natural_image
Line drawing of a car seat assembly with no text or symbolsE70729
Adjusting the height of the driver's seat
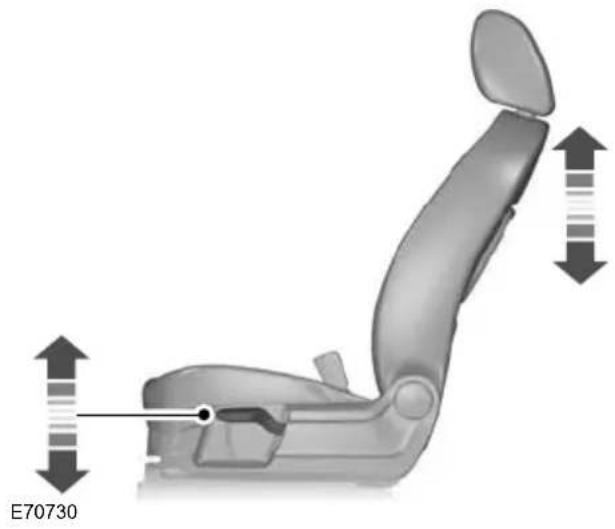
natural_image
3D rendering of a car seat assembly with directional arrows indicating movement or positioning (no text or symbols)Adjusting the angle of the seatback
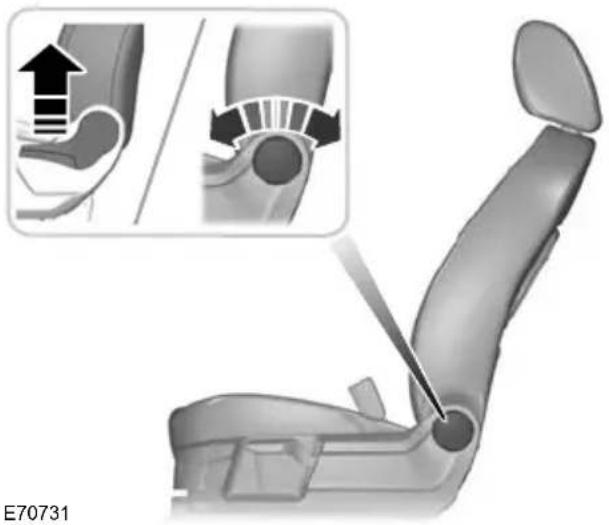
natural_image
3D illustration of a car seat assembly with an inset showing a hand pressing a joint (no text or symbols present)ELECTRIC SEATS
2-way electric seat
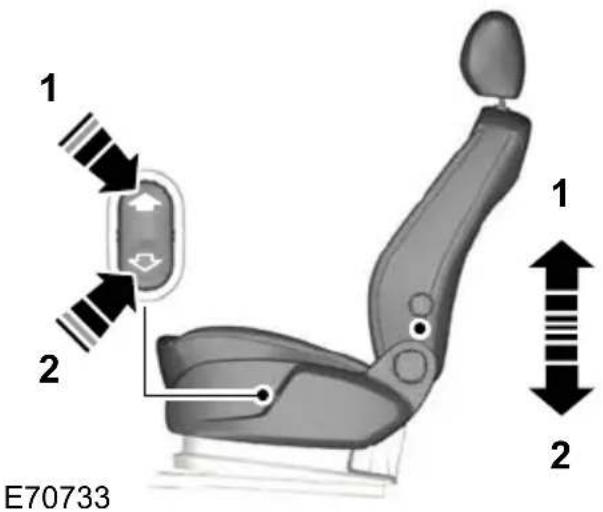
text_image
1 2 E70733 1 28-way electric seat
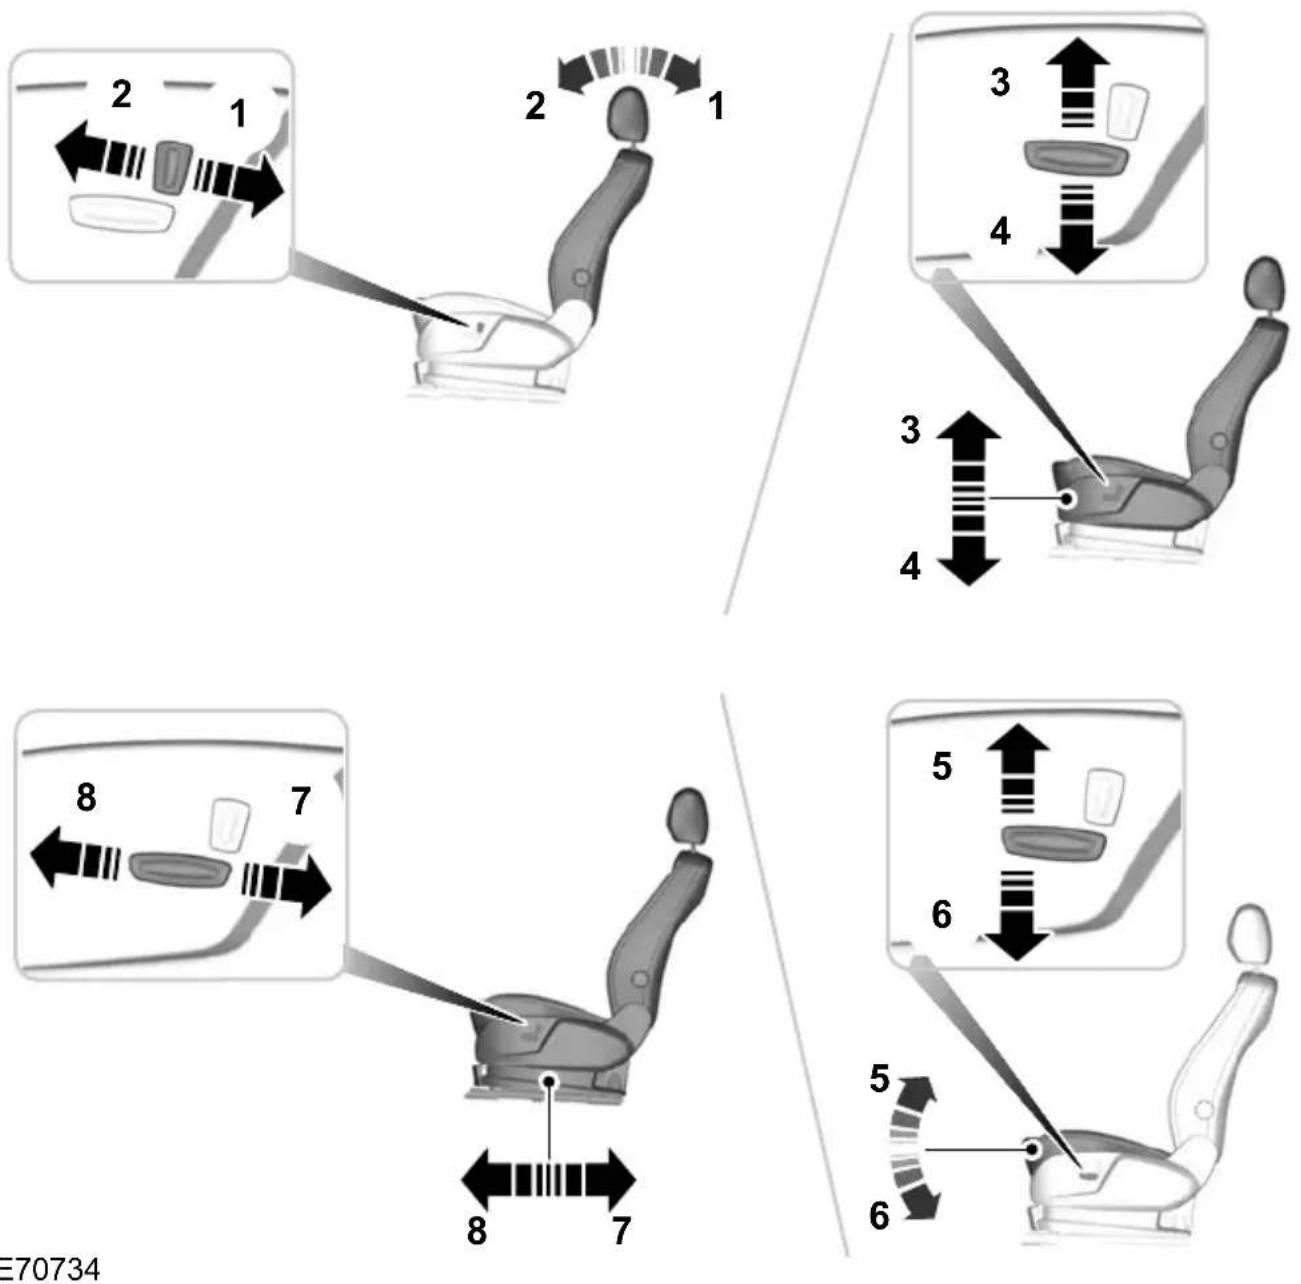
E70734
HEAD RESTRAINTS
Adjusting the head restraint
WARNINGS

Raise the rear head restraint when the rear seat is occupied by a passenger.

When using a forward facing child restraint on a rear seat, always remove the head restraint from that-
seat.
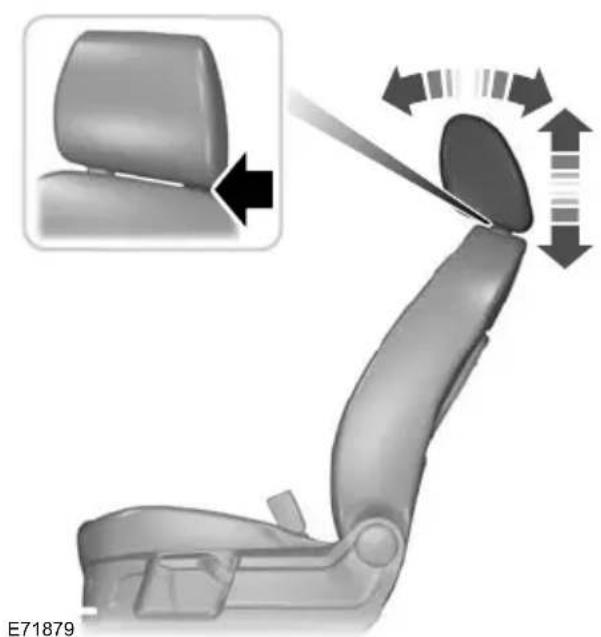
natural_image
Car seat assembly diagram showing left side of seat with arrow indicating rotation direction (no text or symbols)Adjust the head restraint so that the top of it is level with the top of your head and as far forwards as possible, remaining 1. Pr comfortable.
Removing the head restraint
Press the locking buttons and remove the head restraint.
REAR SEATS
WARNINGS

When folding the seatbacks down, take care not to get your fingers caught between the seatback and frame.

Make sure that the seats and the seatbacks are secure and fully engaged in their catches.
Folding the seatbacks down
CAUTION

Lower the head restraints.

text_image
1 2 1 11- Press the unlock buttons down and hold them there.
- Push the seatback forwards.
Creating a level load floor
WARNING

Make sure the red indicator is not showing when you engage the seat in the catches.
CAUTION

Lower the head restraints.

text_image
1 2 3 2 12E86612
- Insert your fingers between the seat cushion and seatback and fold the seat cushion forwards.
- Press the unlock buttons down and hold them there.
- Push the seatback forwards.
Folding the seatbacks up
WARNING

When folding the seatbacks up, make sure that the belts are visible to an occupant and not caught behind the seat.
HEATED SEATS
CAUTION

Operating this function with the engine off will drain the battery.

natural_image
3D rendered image of a car seat with black and gray panels, no text or symbols visibleE70601

natural_image
Close-up of a calculator with icons and arrows indicating function call (no readable text or symbols)E71224
Note: The settings are stored when you switch off the ignition.
VENTILATED SEATS
CAUTION

Operating this function with the engine off will drain the battery.
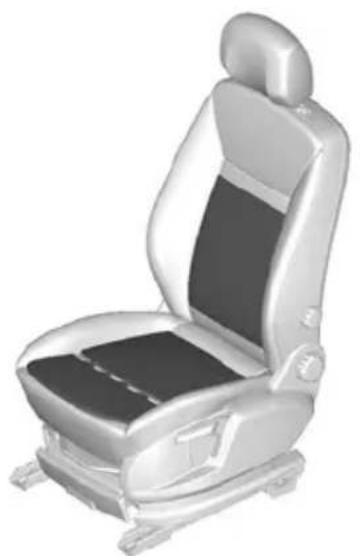
natural_image
3D rendered image of a car seat with black and white panels, no text or symbols visibleE70601
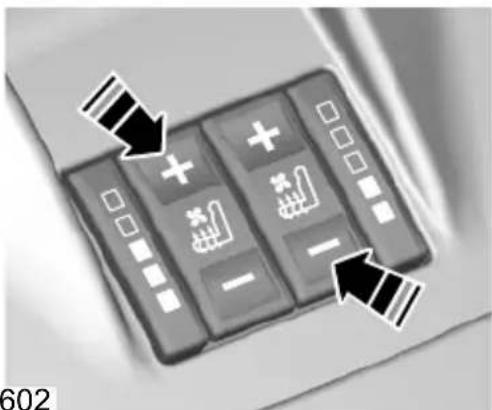
natural_image
Close-up of a black calculator with icons and arrows pointing to function buttons (no readable text or symbols)E70602
Note: The settings are stored when the ignition is switched off.
Note: When the seat is being ventilated, the heater may switch on automatically. This is to prevent the flow of air becoming uncomfortably cool.
Note: The air in the vehicle interior is used to ventilate the seats. The cooling effect therefore depends on the temperature of the vehicle interior. Switch on the air conditioning if necessary and set the air distribution to footwell. See Climate control (page 101).
SUN BLINDS
Pull the blind up and attach it to the hooks (A).
Side windows

text_image
A AE74809
Rear window

natural_image
Interior view of a vehicle dashboard with directional arrows and an up arrow indicator (no text or symbols)E86514
INSTRUMENT LIGHTING DIMMER
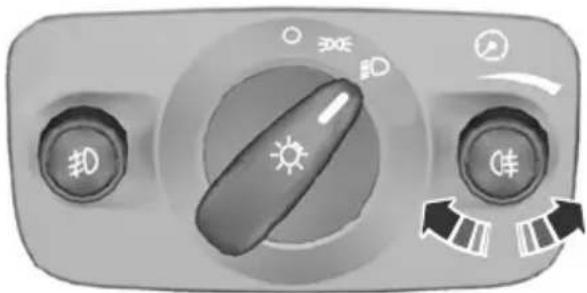
natural_image
Control panel with sun icon, directional arrows, and control buttons (no readable text or symbols)E70723
CLOCK
Note: Some navigation systems will automatically set the date and time on the clock using GPS signals.
Note: See General information (page 79).
- From the main menu, select the clock function.
- Select the option required.
- Press OK.
- Using the right, left, up and down arrow buttons, select and change the value.
- Press OK.
CIGAR LIGHTER
CAUTIONS
If you use the socket when the engine is not running, the battery may discharge.
Do not hold the cigar lighter element pressed in.
Note: Switch the ignition on to use the Re cigar lighter. You can also use it for up to
30 minutes after you have switched the ignition off.
Note: You can use the socket to power 12 volt appliances that have a maximum current rating of 15 Amperes. Use only Ford accessory connectors or connectors specified for use with SAE standard sockets.
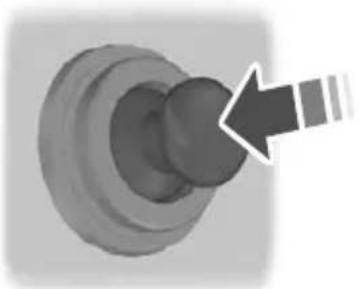
natural_image
3D rendered mechanical component with a curved arrow pointing to a circular feature (no text or symbols)E72972
Press the element in to use the cigar lighter. It will pop out automatically.
ASHTRAY
Front ashtray

natural_image
Close-up of a mechanical component with a highlighted internal section and an arrow indicating direction (no text or symbols)To empty, pull out the complete ashtray.
Rear ashtray

natural_image
Close-up of a mechanical component with a highlighted internal part (no visible text or symbols)E73705
To remove the ashtray, open it, press it down against the spring and remove it.
AUXILIARY POWER SOCKETS
CAUTION
If you use the socket when the engine is not running, the battery may discharge.
Note: You can use the socket when the ignition is switched off.
Note: You can use the socket to power 12 volt appliances that have a maximum current rating of 15 Amperes. Use only Ford accessory connectors or connectors specified for use with SAE standard sockets.

text_image
12V E86470CUP HOLDERS
WARNING

Do not place hot drinks in the cup holders when the vehicle is moving.
GLOVE BOX
Cooled glove box
Note: You can cool the glove box using air from the air conditioning system.

natural_image
Mechanical component diagram showing a rotating valve mechanism (no text or symbols)STORAGECOMPARTMENTS
WARNING

Do not drive with any storage compartment lid open. Make sure that you secure the lid before ing off.
CAUTION

Do not keep heat-sensitive items and liquids in any storage compartment.
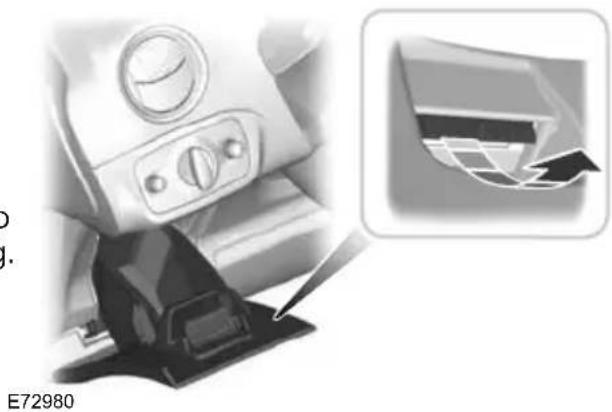
natural_image
Close-up of a car seatbelt mechanism with a magnified inset showing a mechanical component (no text or symbols visible)
natural_image
3D rendering of a mechanical device with an open lid and internal components (no text or symbols visible)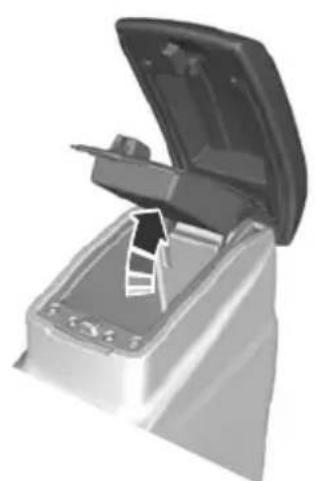
natural_image
3D illustration of a mechanical device with an open lid and internal components (no text or symbols visible)E72905

natural_image
Diagram showing two car seats labeled A and B, with no visible text or symbols on the seats themselves.E86768
MAP POCKETS

natural_image
3D icon of a computer monitor with a black downward arrow on the screen (no text or symbols)E74686
MEMORY FUNCTION
WARNINGS

Before activating the seat memory, make sure that the area immediately surrounding the seat is clear of obstructions and that all occupants are clear of moving parts.

Do not use the memory store function when the vehicle is moving.
A Seat adjustment controls See Electric seats (page 116).
Memory pre-set buttonsB
Up to four different driver's seat and exterior mirror positions can be stored in the memory. Your preferred setting for the reverse mirror dipping feature can also be stored. See Electric exterior mirrors (page 71).
Setting a memory pre-set
Passive setting
The vehicle stores the seating and mirror positions for up to four remote controls or passive keys. Next time the vehicle is unlocked, the position of the seat and mirrors will adjust to the last used position.
Each time you turn the ignition off, the current seat and mirror settings are stored on the remote control or passive key used.
Active setting
- Turn the ignition on.
-
Adjust the seat and exterior mirrors to the desired position.
-
Press and hold the desired pre-set button B until a single chime sounds to confirm.
CD CHANGER
This is located in the luggage compartment.
Recalling a stored seat position
Note: To stop seat movement during a recall, press any driver seat adjustment control, any of the memory buttons or any mirror control switch. Seat movement will also stop if you move the vehicle.
AUXILIARY INPUT (AUX IN) SOCKET
Passive recall
Note: If more than one passive key is in range, the memory function will move to the settings of the first key stored.
When you unlock the vehicle with the remote control or pull the driver door handle with a passive key in range, the seat and mirrors will move to the position stored on that remote control or passive key.
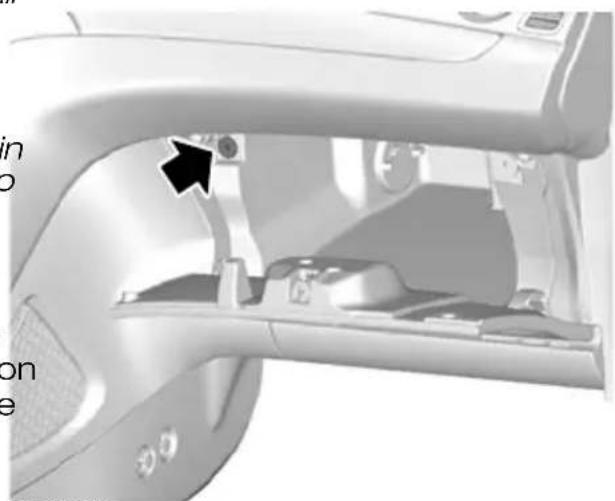
natural_image
Close-up of a car interior showing the dashboard and steering wheel (no text or symbols visible)Active recall
E71969
Press the pre-set button associated with the desired driving position. The seat and mirrors will move to the position stored on that pre-set. See separate audio handbook.
GLASSES HOLDER
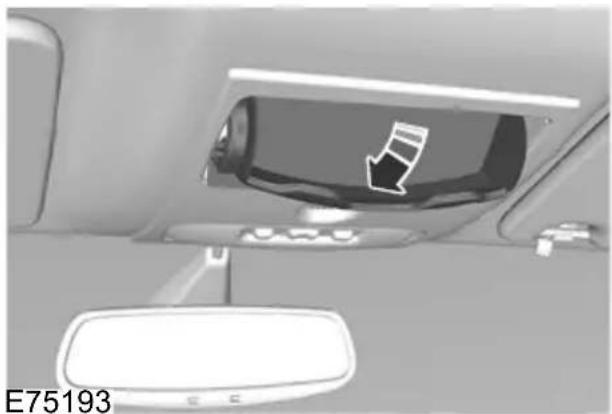
natural_image
Interior view of a car showing the rearview mirror and dashboard (no text or symbols visible)USB PORT
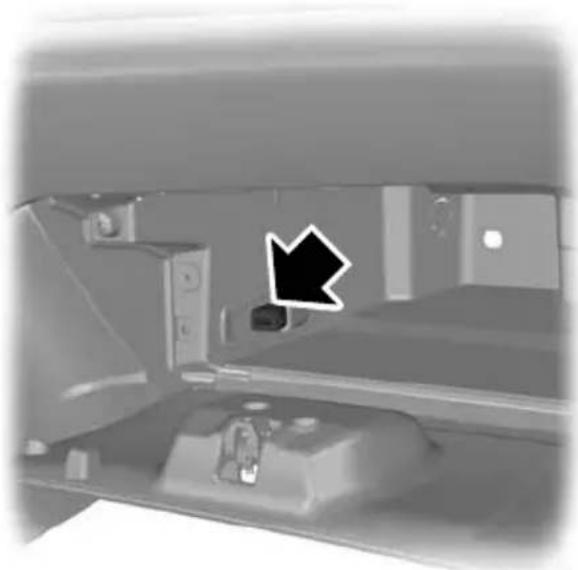
natural_image
Interior view of a vehicle showing a black arrow pointing to a vehicle's side panel (no visible text or symbols)E104423
See Connectivity (page 257).
GENERAL INFORMATION
General points on starting
II The ignition is switched on. All electrica circuits are operational. Warning lamps and indicators illuminate. This is the key position when driving. You must also
If the battery has been disconnected the select it when being towed.
vehicle may exhibit some unusual driving characteristics for approx. 8 kilometres (5 miles) after reconnecting the battery.
III The starter motor is activated. Release the key as soon as the engine starts.
This is because the engine management system must realign itself with the engine.
Any unusual driving characteristics during this period may be disregarded.
KEYLESS STARTING
WARNINGS
Starting the engine by towing or pushing
WARNING

To prevent damage you must not push or tow start your vehicle. Use booster cables and a booster
battery. See Using booster cables (page 204).

The keyless starting system may not function if the key is close to metal objects or electronic devices such mobile phones.

Always check that the steering wheel lock is deactivated before attempting to move your vehicle.
See Steering wheel lock (page 129).
IGNITION SWITCH
WARNING

Never return the key to position 0 or 1 when the vehicle is in motion.
Note: A valid passive key must be located inside the vehicle to switch the ignition on and start the engine.
Note: To start your engine you must also fully depress the brake or clutch pedal, depending on the transmission fitted.
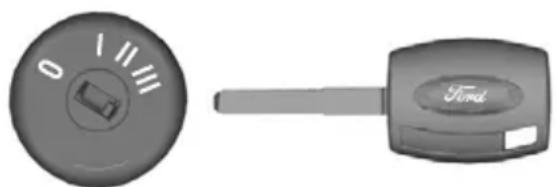
natural_image
Two car key components: a circular dial with '0' and a rectangular key with 'Ford' label (no text or symbols on the keys themselves)E72128
E85766

text_image
Ford POWERIgnition on
- The ignition is off.
Press the start button once. All electrical circuits are operational, warning lamps
The ignition and all main electrical circuited indicators illuminate. are disabled.
Note: Do not leave the ignition key in this position for too long to avoid discharging the battery.
Starting with automatic transmission
Type 1
Note: Releasing the brake pedal during engine start will stop the engine cranking and return to ignition on.
- Make sure the transmission is in P or N.
- Fully depress the brake pedal.
- Press the start button.
Starting with manual transmission
Note: Releasing the clutch pedal during engine start will stop the engine cranking and return to ignition on.
- Fully depress the clutch pedal.
- Press the start button.
Starting a diesel engine
Note: Engine cranking may not commence until the engine glow plug cycle has been completed. This may take several seconds in extremely cold conditions.
Note: Continue to press the clutch or brake pedal until engine cranking begins.
Failure to start
The passive starting system will not function if:
• The passive key frequencies are jammed.
• The passive key battery is flat.
If you are unable to start your vehicle out the following procedure.
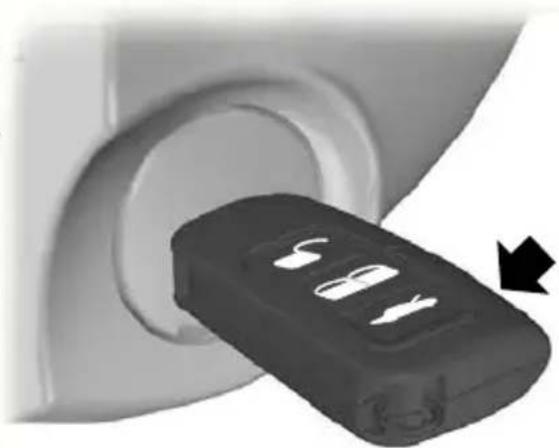
natural_image
Close-up of a black 3D button with four slots, partially inserted into a circular opening (no text or symbols visible)- Hold the key next to the steering column shroud exactly as shown.
- With the key in this position you can use the start button to switch the ignition on and start your vehicle.
Type 2
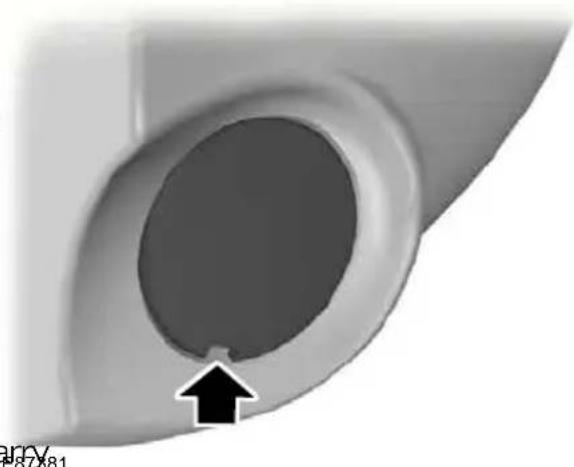
natural_image
Close-up of a mechanical component with a circular hole and an arrow pointing to it (no text or symbols visible)- Carefully prise out the cover.

natural_image
Close-up of a mechanical component with a black arrow pointing to a circular feature (no text or symbols visible)E85767
- Insert the key into the key holder.
- With the key in this position you can use the start button to switch the ignition on and start your vehicle.
Stopping the engine
When your vehicle is stationary, press the start button to stop the engine. The ignition, all electrical circuits, warning lamps and indicators will be switched off
STEERING WHEEL LOCK
WARNING

Always check that the steering is unlocked before attempting to move your vehicle.
Vehicles without keyless starting
To activate the steering wheel lock;
- Remove the key from the ignition switch.
- Turn the steering wheel.
Vehicles with keyless starting
Note: The steering wheel lock will not activate when the ignition is on or the vehicle is moving.
Your vehicle has an electronically controlled steering wheel lock. This operates automatically.
The steering wheel lock will activate after a short period of time once you have parked your vehicle and the passive key is outside of the vehicle.
Deactivating the steering wheel lock
Switch the ignition on, or:
'Veehicles with automatic transmission
- Press the brake pedal.
Vehicles with manual transmission
- Press the clutch pedal.
STARTING A PETROL ENGINE
Note: You can only operate the starter for a maximum of 30 seconds at a time.
Cold or hot engine
All vehicles
CAUTION
When the temperature is below -20°C (-4°F), switch the ignition on for at least one second before starting the engine. This will make sure that the maximum fuel pressure is established for starting the engine.
Vehicles with manual transmission
Note: Do not touch the accelerator pedal.
-
Fully depress the clutch pedal.
-
Start the engine.
Vehicles with automatic transmission
Note: Do not touch the accelerator pedal.
- Select park or neutral.
- Fully depress the brake pedal.
- Start the engine.
All vehicles
If the engine does not start within 15 seconds, wait for a short period and try again.
If the engine does not start after three attempts, wait 10 seconds and follow the
Flooded engine procedure.
If you have difficulty starting the engine when the temperature is below -25^ (-13°F), press the accelerator pedal between 1/4 to 1/2 of its travel and try a
Flooded engine
Vehicles with manual transmission
- Fully depress the clutch pedal.
- Fully depress the accelerator pedal and hold it there.
- Start the engine.
Vehicles with automatic transmission
- Select park or neutral.
- Fully depress the accelerator pedal and hold it there.
- Fully depress the brake pedal.
- Start the engine.
All vehicles
If the engine does not start, repeat the Cold or hot engine procedure.
Engine idle speed after starting
The speed at which the engine idles immediately after starting will vary depending on the engine temperature.
If the engine is cold then the idle speed will automatically be increased in order to heat the catalytic converter as quickly as possible. This ensures that vehicle emissions are kept to an absolute minimum.
The idle speed will slowly decrease to the normal level as the catalytic converter warms up.
STARTING A PETROL ENGINE - E85
For general information on starting a petrol engine. See Starting a petrol engine (page 129).
Starting at low ambient temperatures
When the temperature is lower than -10^ ( 14^ ) and the vehicle is filled with E85, an engine block heater should be used to facilitate starting. See Engine heater (page 132). Failure to do this will result in a non start.
If the temperature is expected to remain below -10^ ( 14^ ), it is recommended that you increase the proportion of petrol in the tank by topping up with 95 octane unleaded petrol if the tank is not already full. About 10 litres (2.2 gallons) of petrol will reduce the proportion of E85 in a 34 full tank from 85% to 70% and will considerably improve cold start capability.
If, at very low temperatures, the tank is filled with only E85 and there is no way to use an engine block heater, you may experience difficulties starting the engine.
If the engine fails to start, proceed as follows:
- Fully depress the accelerator pedal.
- Turn the ignition key to position III.
CAUTION

Release the ignition key as soon the engine has started.
- Gradually release the accelerator pedal after 5 seconds of engine cranking or as the engine speed
If the engine fails to start, repeat steps
2 and 3, or connect an engine block heater for two hours before attempting another start.
During starting, the fuel injectors are turned off as long as the accelerator peq is depressed. This can be used to drain excessive fuel from the intake manifold after several unsuccessful starting attempts.
If the battery has been disconnected or after the fuel type has been changed, title is idle speed may be irregular. This will improve after 10 to 30 seconds.

Switch the ignition on and wait until the glow plug indicator goes off.
Vehicles with manual transmission
Note: Do not touch the accelerator as pedal.
- Fully depress the clutch pedal.
- Start the engine.
Vehicles with automatic transmission
- Select park or neutral.
- Fully depress the brake pedal.
- Start the engine.
DIESEL PARTICULATE FILTER (DPF)
The DPF forms part of the emissions reduction systems fitted to your vehicle. It filters harmful diesel particulates (soot) from the exhaust gas.
Regeneration
STARTING A DIESEL ENGINE
Cold or hot engine
All vehicles
Note: When the temperature is below -15°C (5°F), you may need to crank the engine for up to 25 seconds. If you consistently operate the vehicle in such temperatures, we recommend that you have an engine block heater fitted.
Note: Continue cranking the engine until it starts.
Note: You can only operate the starter for a maximum of 30 seconds at a time.
WARNING

Do not park or idle your vehicle ove dry leaves, dry grass or other combustible materials. The DPF regeneration process creates very high exhaust gas temperatures and the exhaust will radiate a considerable amount of heat during and after DPF regeneration, and after you have switched the engine off. This is a potential fire hazard.
Unlike a normal filter which requires periodic replacement, the DPF has been designed to regenerate, or clean itself to maintain operating efficiency. The regeneration process takes place automatically. However, some driving conditions mean that you may need to support the regeneration process.
ENGINE HEATER
CAUTION
Make sure you disconnect the power cable from the engine heater connector before driving away.
If you drive only short distances or your Note: The engine heater connector is journeys contain frequent stopping and located in the radiator grille at the front of starting, occasional trips with the following your vehicle.
conditions could assist the regeneration process:
- Drive your vehicle, preferably on a main road or motorway, for up to 20 minutes avoiding prolonged idling, but always observing speed limits and road conditions.
- Do not switch off the ignition.
- Use a lower gear than normal to maintain a higher engine speed during this journey, where appropriate.

natural_image
Mechanical assembly diagram showing a rotating component with an arrow indicating motion (no text or symbols)SWITCHING OFF THE ENGINE
Connect the engine heater for 2 to 3 hours before starting the engine.
Vehicles with a turbocharger
CAUTION
Do not switch the engine off when it is running at high speed. If you do, the turbocharger will continue running after the engine oil pressure has dropped to zero. This will lead to premature turbocharger bearing wear.
Release the accelerator pedal. Wait until the engine has reached idle speed and then switch it off.
FUEL QUALITY - PETROL
Note: We recommend that you use only high quality fuel without additives or other engine treatments.
CAUTION

Do not use leaded petrol or petrol with additives containing other metallic compounds (e.g.
manganese-based). They could damage the emission system.
Use minimum 95 octane unleaded petrol that meets the specification define by EN 228, or equivalent.
Note: Your vehicle will operate well on commercial quality 95 octane unleaded petrol, but only high quality E85 offers the same protection and performance.
Use minimum 95 octane unleaded petrol that meets the specification defined by EN 228, or equivalent. You can also use a mixture of unleaded petrol and E85
Long-term storage
Due to small amounts of corrosive impurities that may be found in the E85, it is recommended that you fill the tank with only 95 octane unleaded petrol prior to long-term storage of your vehicle.
FUEL QUALITY - E85
WARNINGS

Do not modify the fuel system configuration or the components in the system.

Do not replace the fuel system or the components with parts not specially designed to be used with
CAUTIONS

Do not use leaded petrol or petrol with additives containing other metallic compounds (e.g.
manganese-based). They could damage the emission system.

Do not use methanol instead of E8
FUEL QUALITY - DIESEL
WARNING

Do not mix diesel with oil, petrol or other liquids. This could cause a chemical reaction.
CAUTION

Do not add kerosene, paraffin or petrol to diesel. This could cause damage to the fuel system.
Note: We recommend that you use only high quality fuel without additives or other engine treatments.
Note: We do not recommend the prolonged use of additives intended to prevent fuel waxing.
Use diesel that meets the specification defined by EN 590, or equivalent.
Note: We recommend that you use only You can use diesel that contains up to 5 high quality fuel without additives or other RME (bio diesel). engine treatments.
Note: When using E85, you may experience a higher fuel consumption.
Long-term storage
Most diesel fuels contain bio-diesel, it is recommended to fill the tank with purely mineral diesel (where available) or add an anti-oxidant prior to long-term storage of your vehicle exceeding two months. Your dealer can help you with a suitable anti-oxidant.
CATALYTIC CONVERTER
WARNING

Do not park or idle your vehicle dry leaves, dry grass or other combustible materials. The exhaust will radiate a considerable amount of heat during use, and after you have switched the engine off. This is a potential fire hazard.
Driving with a catalytic converter
CAUTIONS

Avoid running out of fuel.

Do not crank the engine for long periods.

Do not run the engine when a spar plug lead is disconnected.

Do not push-start or tow-start your vehicle. Use booster cables. See Using booster cables (page 204)

Do not switch the ignition off when driving.
FUEL FILLER FLAP
WARNINGS

Take care when refuelling to avoid - spilling any residual fuel from the fuel nozzle.
WARNINGS

Do not use any kind of flames or heat near the fuel system. The fuel system is under pressure. There is k of injury if the fuel system is leaking.
CAUTION
If you use a high pressure spray to wash your vehicle, only spray the fuel filler flap briefly from a distance not less than 20 centimetres (8 inches).
Note: Central locking also locks and unlocks the fuel filler flap. See Locking and unlocking (page 36).

natural_image
Close-up of a mechanical component with a circular housing and a curved handle, showing no visible text or symbols.E86613
Press the flap to open it. Open the flap fully until it engages.
When you insert the fuel nozzle, a spring loaded inhibitor will open if the correct size nozzle is detected. This will prevent filling up with the wrong fuel.
WARNING

Stop refuelling after the fuel nozzle stops the second time. Additional fuel will fill the expansion space in fuel tank which could lead to fuel flowing. Fuel spillage could be rdedous to other road users.

natural_image
Line drawing of a hand holding a tool with spray nozzle (no text or symbols)E119080
Insert the fuel nozzle up to and including the first notch on the nozzle. Keep it resting on the cover of the fuel pipe opening.
WARNING

We recommend that you wait at least 10 seconds before removing the fuel nozzle to allow any resid fuel to drain into the fuel tank.

natural_image
Diagram of a hand holding a tool with an arrow indicating direction (no text or symbols present)E119081
Slightly raise the fuel nozzle to remove
Vehicles with diesel engine
A funnel is located in the spare wheel Use this when refilling with a fuel can.
REFUELLING
CAUTION
Do not attempt to start the engine if you have filled the fuel tank with the incorrect fuel. This could damage the engine. Have the system checked by a properly trained technician immediately.
REFUELLING - E85
CAUTION
Do not attempt to start the engine if you have filled the fuel tank with the incorrect fuel. This could damage the engine. Have the system checked by a properly trained technician immediately.
After refuelling, allow 5 minutes of normal engine operation above 48 km/h (30 mph) to reduce the risk of an increased engine restart time.
FUEL CONSUMPTION
The CO2 and fuel consumption figures are derived from laboratory tests according to EEC Directive 80/1268/EEC and subsequent amendments and are carried out by all vehicle manufacturers.
They are intended as a comparison between makes and models of vehicles. They are not intended to represent the real world fuel consumption you may get from your vehicle. Real world fuel consumption is governed by many factors including; driving style, high speed driving, well, stop/start driving, air conditioning usage, the accessories fitted and towing etc.
Your Ford dealer can give you advice on improving your fuel consumption.
TECHNICAL SPECIFICATIONS
4-door and 5-door
Fuel consumption figures
| Variant | CombinedEx | CO2 emis-sions | ||
| I/100 km (mpg) | I/100 km (mpg) | I/100 km (mpg) | g/km | |
| 1707.2 (39.2)5.6 | ||||
| 2.0L Duratec-HE Stage IV (145 PS) | 1897.9 (35.8)6 ( | |||
| 2.0L Duratec-HE Stage V (145 PS) | 1847.9 (35.8)6 ( | |||
| 2239.3 (30.4)6.7 | ||||
| 2229.3 (30.4)6.8 | ||||
| 1.8L Duratorq-TDCi (100 PS) | 7.3 (38.7) | 4.6 (61.4) | 5.6 (50.4) | 149 |
| 1.8L Duratorq-TDCi (125 PS) ECONETIC | 4.4 (64.2) | 6.85(41(5)3.3) | 139 | |
| 1.8L Duratorq-TDCi (125 PS) | 7.5 (37.7) | 4.8 (58.9) | 5.8 (48.7) | 154 |
| 2.0L Duratorq-TDCi, 6-speed manual transmission | 4.9 | (57.6)1565(37(27.9) | ||
| 2.0L Duratorq-TDCi (115 PS), 6-speed manual trans-mission ECONETIC | 6.6 (42.8) | 4.4 (64.2) | 5.2 (54.3) | 139 |
| 2.0L Duratorq-TDCi (136 PS), 6-speed automatic transmission | 7.1 (39.8)5.5 | (511879.7 (29.1) | ||
| 2.2L Duratorq-TDCi (175 PS), 6-speed manual trans-mission | 8.4(33.6)45.6)4 | 9 (5765) |
Estate
Fuel consumption figures
| Variant | CombinedEx | CO2 emis-sions | ||
| I/100 km (mpg) | I/100 km (mpg) | I/100 km (mpg) | g/km | |
| 1707.2 (39.2)5 | ||||
| 2.0L Duratec-HE Stage IV (145 PS) | 1897.9 (35.8)6 | |||
| 2.0L Duratec-HE Stage V (145 PS) | 1847.9 (35.8)6 | |||
| 2.3L Duratec-HE (161 PS), 6-speed automatic trans-mission | 2239.3 (30.4)6 | |||
| 2229.3 (30.4)6 | ||||
| 1.8L Duratorq-TDCi | 7.4 (38.2) | 4.7 (60.1) | 5.7 (49.6) | 151 |
| 1.8L Duratorq-TDCi (125 PS) ECONETIC | 4.5 | (57.6)14.25.(40.97.9) | ||
| 1.8L Duratorq-TDCi (125 PS) | 7.6 (37.2) | 4.9 (62.8) | 5.9 (52.3) | 156 |
| 2.0L Duratorq-TD@i9 | (57.6)15.65.(37.27.9) | |||
| 2.0L Duratorq-TDCi (115 PS), 6-speed manual trans-mission ECONETIC | 6.6 (42.8) | 4.4 (64.2) | 5.2 (54.3) | 139 |
| 2.0L Duratorq-TDCi (136 PS), 6-speed automatic transmission | 7.1 (39.8)5.5 | (51.8)79.7 (29.1) | ||
| 2.2L Duratorq-TDCi, 6-speed manual transmission | 8.4(33.6)45.6)4.9 | (57.6)5 | ||
MANUAL TRANSMISSION
All vehicles
AUTOMATICTRANSMISSION
Selector lever positions
CAUTIONS

Do not engage reverse gear when the vehicle is moving. This can cause damage to the transmission.

Do not apply any undue lateral force to the gear lever when changing from 5th to 4th gear. This could lead to the vertical selection of 2nd gear and can se damage to the transmission.
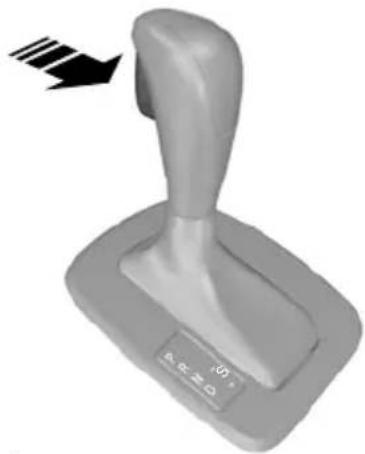
natural_image
3D rendered image of a gray lever handle with a black arrow indicating motion or force (no text or symbols on the lever itself)Selecting reverse gear
On some vehicles it is necessary to raise the collar whilst selecting reverse gear. F80836
E80836
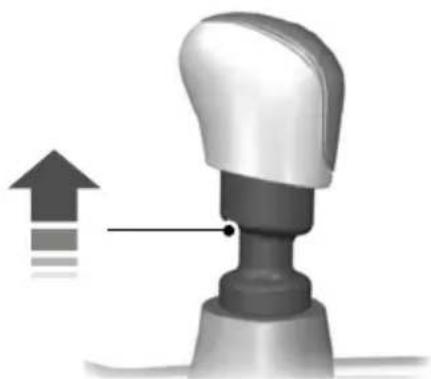
natural_image
3D illustration of a robotic arm with an upward arrow and motion indicator (no text or symbols)ParkP
ReverseR
NeutralN
DriveD
Sport mode and manual shiftingS
WARNING

Apply the brakes before moving the selector lever and keep them applied until you are ready to move
Note: A cold engine has a higher idle speed. This will increase the tendency for your vehicle to creep when you have selected a drive gear.
Press the button on the selector lever to select reverse and park.
The selector lever position will be shown in the information display.
E99067
Park
Sport mode and manual shifting
WARNINGS

Select park only when your vehicle is stationary.

Apply the parking brake and select park before leaving your vehicle. Make sure that the tor lever is latched in position.
Note: An audible warning will sound if you open the driver's door and you have not selected park.
In this position, power is not transmitted to the drive wheels and the transmission is locked. You can start the engine with the selector lever in this position.
Reverse
WARNING

Select reverse only when your vehicle is stationary and the engine is at idle speed.
Neutral
In this position, power is not transmitted to the drive wheels but the transmission is not locked. You can start the engine with the selector lever in this position.
Drive
Select drive to shift automatically through the forward gears.

text_image
PRND + S 1 2 PRND SE80837
Note: A shift will occur only when the vehicle speed and the engine speed are appropriate.
Note: When you select position S, a gear change may occur depending on the accelerator pedal position in relation to actual vehicle speed.
Activate sport mode by moving the selector lever to position S. Sport mode will remain active until you shift manually up or down the gears.
Select manual shifting to shift manually through the forward gears. Push the selector lever forwards to shift down and pull it backwards to shift up.
Drive modes
The transmission will select the appropriate gear for optimum performance based on ambient temperature, road gradient, vehicle load and driver input.
Hints on driving with an automatic transmission
Moving off
-
Release the parking brake.
-
Release the brake pedal and press the accelerator pedal.
Stopping
- Release the accelerator pedal and press the brake pedal.
- Apply the parking brake.
Kickdown
Press the accelerator pedal fully with the selector lever in the drive position to select the next lowest gear for optimum performance. Release the accelerator pedal when you no longer require kickdown.
Emergency park position release lever
Use the lever to move the selector lever from the park position in the event of an electrical malfunction or if your vehicle has a flat battery.
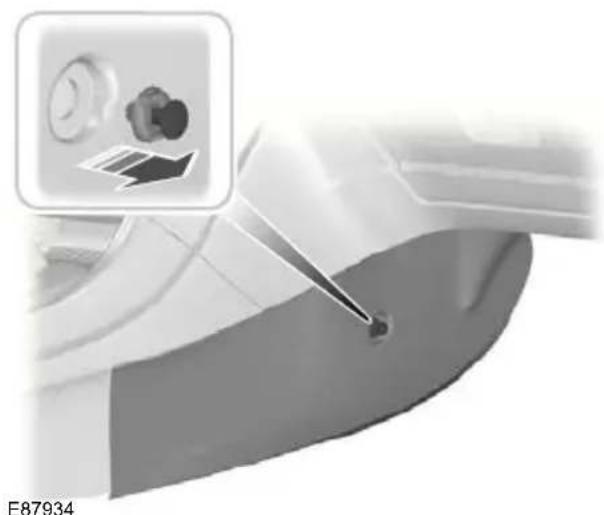
natural_image
Close-up of a car interior with a tool interacting with the seat (no visible text or symbols)- Remove the centre console side panel.

natural_image
Industrial machinery component with a curved arrow indicating motion or force direction (no visible text or symbols)Note: The lever is yellow.
- Insert a flat-bladed screwdriver into the slot and turn the screwdriver clockwise 90 degrees.
Wet brake discs result in reduced braking efficiency. Dab the brake pedal when driving from a car wash to remove the film of water.
ABS
WARNING

The ABS does not relieve you of your responsibility to drive with due care and attention.
The ABS helps you to maintain full stee and directional stability when you brake heavily in an emergency, by preventing the road wheels from locking.
HINTS ON DRIVING WITH ABS
When the ABS is operating, the brake pedal will pulse. This is normal. Maintain pressure on the brake pedal.
The ABS will not eliminate the dangers inherent when:
- you drive too close to the vehicle in front of you.
• the vehicle is aquaplaning.
• you take corners too fast.
• the road surface is poor.
PARKING BRAKE
Applying the parking brake

text_image
ng film E66567E66567
WARNING

Make sure that the parking brake is applied before you release the lever.
Note: Do not press the release button when you apply the parking brake.
- Press the brake pedal firmly.
- Pull the parking brake lever upwards to its fullest extent.
Parking on a hill
If you have to park facing uphill, select fir: gear and turn the front wheels away from the kerb. If you have to park facing downhill, select reverse gear and turn the front wheels towards the kerb.
Releasing the parking brake
- Press the brake pedal firmly.
- Pull the parking brake lever upwards slightly, press the release button and push the lever downwards.
Electronic stability programme (ESP)
WARNING

ESP does not relieve you of your responsibility to drive with due care and attention.

flowchart
graph TD
    A1["A"] --> B1["B"]
    B1 --> B2["B"]
    B2 --> B3["A"]
    B3 --> A4["A"]
    A4 --> B4["B"]
    B4 --> B5["B"]
    B5 -.-> B3
    style A fill:#fff,stroke:#000
    style B fill:#ccc,stroke:#000
    style A fill:#fff,stroke:#000
    style B fill:#ccc,stroke:#000
    style B3 fill:#ccc,stroke:#000
    style A4 fill:#fff,stroke:#000
    style B5 fill:#ccc,stroke:#000
E72903
without ESPA
with ESPB
The ESP supports stability when the vehicle starts to slide away from your intended path. This is performed by braking individual wheels and reducing engine torque as needed.
The system also provides an enhanced traction control function by reducing engine torque if the wheels spin when you accelerate. This improves your ability to pull away on slippery roads or loose surfaces, and improves comfort by limiting wheel spin in hairpin bends.
Stability control (ESP) warning lamp
The ESP warning lamp will flash when the system is operating. See Warning lamps and indicators (page 76).
Emergency brake assist
WARNING

Emergency brake assist does not relieve you of your responsibility to drive with due care and attention.
Emergency brake assist will detect when you brake heavily by measuring the rate at which you press the brake pedal. It will provide maximum braking efficiency as long as you press the pedal. Emergency brake assist can reduce stopping distances in critical situations.
USING STABILITY CONTROL

Press and hold the switch for one second. The switch will illuminate. A message will be shown in the display. See Information messages (page 92).
Press the switch again to turn the system on. The system will be switched on automatically every time you switch the ignition on.
The system makes it easier to pull away when the vehicle is on a slope without the need to use the parking brake.
When the system is active, the vehicle will remain stationary on the slope for two to three seconds after you release the brake pedal. During this time, you have time to move your foot from the brake to the accelerator pedal and pull away. The brakes are released automatically once the engine has developed sufficient drive to prevent the vehicle from rolling down the slope. This is an advantage when pulling away on a slope, for example from a car park ramp, traffic lights or when reversing uphill into a parking space.
WARNING

The system does not replace the parking brake. When you leave the vehicle, always apply the parking
brake and select first or reverse gear.
USING HILL START ASSIST
E70499
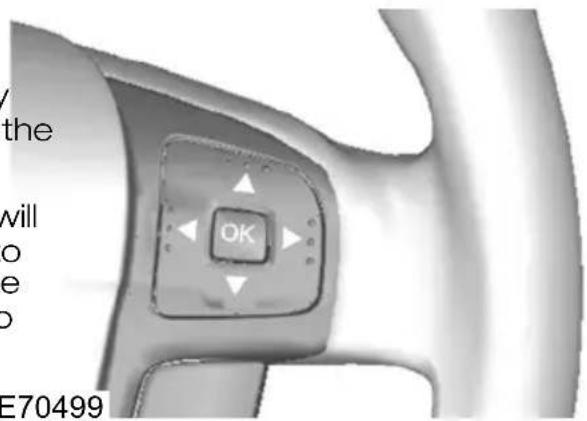
text_image
/ the will o e o E70499| Hill Launch |
| ○ Off |
| ○ Auto |
| ○ Manual |
E74629
The system can operate in either automatic or manual mode. If you select automatic mode, the system is activated automatically when the vehicle is on a slope and you press the brake pedal. If2, you select manual mode, you must activate the system using the brake pedal.
To set the system mode:
Press the right arrow button on the steering wheel to enter the main menu.
Highlight Setup with the up and down buttons and press the right arrow button.
-
Highlight Hill Launch and press the right arrow button.
-
Highlight the desired setting and press the OK button to confirm the setting. If Off is selected, the system is switched off and cannot be activated either automatically or manually.
-
Press the left arrow button to exit the menu. To return to the trip computer display directly, hold the left arrow button pressed.
Note: When the system is in manual 2 activation mode, only use the system when pulling away uphill on gradients greater than 3%. If the vehicle is on the flat or on a downhill slope, an active system will make it difficult to pull away smoothly.
Activating the system
WARNINGS

You must remain in the vehicle once you have activated the system. Any _4 attempt to leave the vehicle will tivate the system automatically.

The system is active only if the message Hill Launch Assist active is displayed in the information display. During all times you are responsible for controlling the vehicle, supervising the system and intervening, if required.
You can activate the system only if the following conditions have been met:
• The engine is running.
- The system is switched on (automatic or manual mode).
• The parking brake is fully disengaged. ^4
- On vehicles with manual transmission, the clutch pedal is pressed.
- On vehicles with automatic transmission, the driver door is closed.
• No failure mode is present.
To activate the system in automatic mode:
-
Press the brake pedal to bring the vehicle to a complete standstill. Keep the brake pedal depressed.
-
If the sensors detect that the vehicle is on a slope and the right driving direction is selected (first gear if the vehicle is pointing uphill, reverse gear if the vehicle is pointing downhill), the system will be activated automatically. Hill Launch Assist active will appear in the display.
- When you remove your foot from the brake pedal, the vehicle will remain on the slope without rolling away for approximately two to three seconds.
- Pull away using the accelerator and clutch pedal. The brakes will be released automatically.
To activate the system in manual mode:
- Press the brake pedal to bring the vehicle to a complete standstill. Keep the brake pedal depressed.
- Quickly jab the brake pedal further until Hill Launch Assist active appears in the display. The system is now active.
-
When you remove your foot from the brake pedal, the vehicle will remain on the slope without rolling away for approximately two to three seconds.
-
Pull away using the accelerator and clutch pedal. The brakes will be released automatically.
WARNING

When the system is active and the system detects a failure, the system is deactivated and the message
Please use park brake! followed by Hill Launch A .not available will be displayed. The vehicle is still safe to be driven and can be repaired during the next service. The message Hill Launch
A. not available will also be displayed with manual activation during a failure or if one of the activation criteria is not met. If you have switched the system off, no messages will be displayed.
Deactivating the system
To deactivate the system, perform one of the following:
- Apply the parking brake.
- Wait for two to three seconds until the system deactivates automatically.
- If a forward gear was selected when the system became active, select reverse gear.
- If reverse gear was selected when the system became active, select a forward gear.
Hill Launch Assist off will appear in the instrument cluster display.
PRINCIPLE OF OPERATION System malfunction
The active suspension provides improved handling, comfort and stability by continuously adjusting the damper properties to the current road and drivin conditions. This system in conjunction with the ABS system offers the benefit of potentially shorter stopping distances on rough road surfaces.
Depending on your preferences and driving style, you can choose between three different settings:
The active suspension system will switch off automatically if it malfunctions. The suspension will be set to a fail-safe condition that will enable you to continue driving but you will not be able to change the suspension setting. Have this checked as soon as possible.
Comfort
This provides a softer driving feel.
Normal
Normal setting.
Sport
This provides a harder, sportier ride.
USING ACTIVE SUSPENSION
Selecting a setting
Note: After you select a setting, you may not immediately notice a difference in the vehicle's handling. The effect of the continuously controlled damping depends on the road surface and driving conditions.

text_image
Comfort Normal Sport E70475You can change the setting while driving.
The parking aid does not relieve your responsibility to drive with due care and attention.
CAUTIONS

Vehicles fitted with a trailer tow module not approved by us may not correctly detect obstacles.

The sensors may not detect objects in heavy rain or other conditions that cause disruptive reflections.

The sensors may not detect object with surfaces that absorb ultrasonic waves.

The parking aid does not detect obstacles moving away from the vehicle. They will only be detected tly after they start to move towards vehicle again.

Take particular care when reversing with a tow ball arm or rear fitted accessories e.g. a bicycle carrier, as
the rear parking aid will only indicate the distance from the bumper to the obstacle

If you use a high pressure spray to wash your vehicle, only spray the sensors briefly from a distance not than 20 centimetres (8 inches).
Note: On vehicles fitted with a tow ball arm, the parking aid is deactivated automatically when any trailer lamps (or lighting boards) are connected to the 13-pin socket via a trailer tow module we have approved.
Note: Keep the sensors free from dirt, ice and snow. Do not clean with sharp objects.
Note: The parking aid may emit false tones if it detects a signal using the same frequency as the sensors or if the vehicle is fully laden.
Note: The outer sensors may detect the side walls of a garage. If the distance between the outer sensor and the side wall remains constant for three seconds, the tone will switch off. As you continue, the inner sensors will detect rearward objects.
\$USING THE PARKING AID
Switching the parking aid on and off
Note: The parking aid switches off automatically when you start the engine or when you exceed 16 km/h (10 mph).
Note: The front and rear sensors are always activated or deactivated together.
The parking aid is per default off. To switch the parking aid on, press the switch in the instrument panel or select reverse gear.
The light in the switch illuminates when the parking aid is activated.
To turn it off, press the switch again.
Manoeuvring with the parking aid
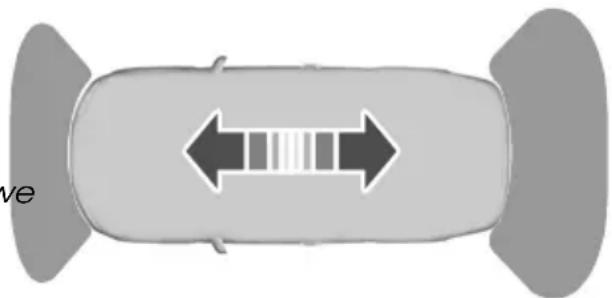
natural_image
Top-down view of a car with bidirectional arrow and internal grid pattern (no text or symbols)E72902
Note: If a high pitch warning tone sounds for three seconds and the light in the switch is flashing, it indicates a malfunction. The system will be disabled. Have the system checked by properly trained technicians.
You will hear an intermittent tone at a distance of up to approximately 150 centimetres (59 inches) between the obstacle and rear bumper, 80 centimetres (31 inches) between the obstacle and front bumper and 50 centimetres (20 inches) to the side. Decreasing the distance accelerates the intermittent tone. A continuous tone will start at a distance of less than 30 centimetres (12 inches).
You will hear an alternating tone from the front and rear if obstacles are closer than 30 centimetres (12 inches) to the front and rear bumpers.
Cruise control allows you to control your speed using the switches on the steering wheel. You can use cruise control when you exceed 30 km/h (20 mph).
USING CRUISE CONTROL
WARNING

Do not use cruise control in heavy traffic, on twisty roads or when the road surface is slippery.
Switching cruise control on
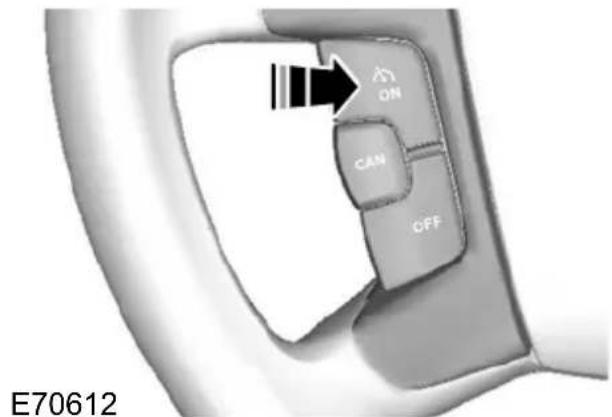
text_image
ON CAN OFF E70612Setting a speed
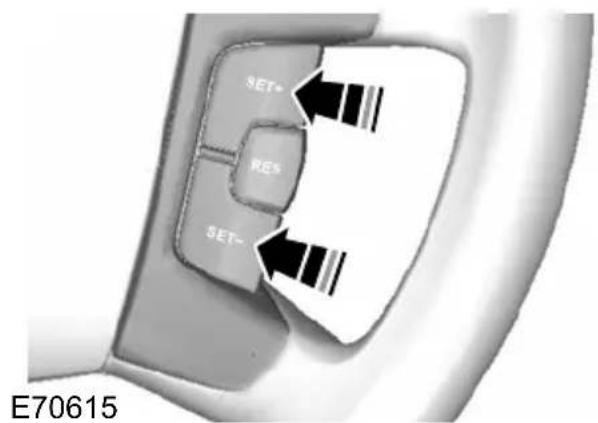
text_image
SET+ RES SET- E70615Press the SET+ switch or the SET-switch to store and maintain your current speed. The cruise control indicator illuminates.
Changing the set speed
WARNING

When you are going downhill, your speed may increase above the set speed. The system will not apply the brakes. Change down a gear and press the RES switch to assist the system in maintaining the set speed.
Note: If you accelerate by pressing the accelerator pedal, the set speed will not change. When you release the accelerator pedal, you will return to the speed that you previously set.
Press the SET+ switch or the SET-switch to accelerate or decelerate.
Cancelling the set speed
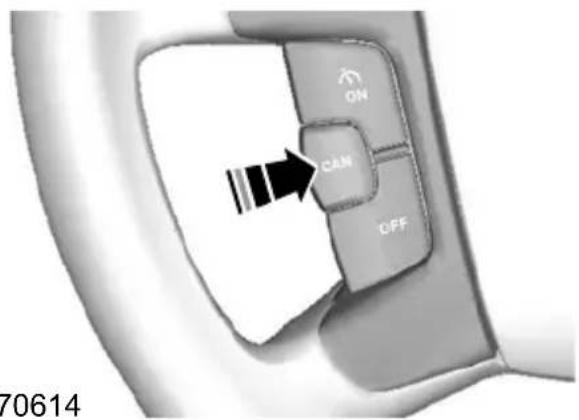
text_image
ON CAN OFF 70614E70614
Press the brake pedal or the CAN switch The system will no longer control your speed. The cruise control indicator will go off but the system will retain the speed that you previously set.
Resuming the set speed

text_image
SET+ RES SET- E70616Press the RES switch. The cruise control indicator illuminates and the system will attempt to resume the speed that you previously set.
Switching cruise control off

text_image
ON CAN OFF E70613Press the OFF switch. The system will not retain the speed that you previously set. The cruise control indicator will go off.
The adaptive cruise control system is designed to help you maintain a gap from the vehicle ahead or a set road speed if there is no slower vehicle ahead. The gu system is intended to provide enhanced operation of the vehicle when following other vehicles which are in the same lane and travelling in the same direction.
WARNINGS

Adaptive cruise control is not a collision warning or avoidance system. The separate forward alert function provides a collision warning and mitigation feature. See Forward alert function (page 155). You must intervene if the system does not detect a vehicle•in front.

Adaptive cruise control cannot cover all traffic, weather and road conditions.

When driving you are responsible for maintaining the correct distance and speed, even when adaptive The radar sensor is mounted behind the front grille, immediately to the right of the Ford badge (when viewed from the front of the vehicle).
When using ACC, follow the strict guidelines below:
- Only use adaptive cruise control when conditions are favourable, for example on motorways and main roads with steady free flowing traffic.
- Do not use in poor visibility, specifically fog, heavy rain, spray or snow.
- Do not use on icy or slippery roads.
- It is your responsibility to stay alert, drive safely and be in control of the vehicle at all times.
- in Keep the front of the vehicle free from dirt, metal badges or objects, including vehicle front protectors and additional lights which may prevent the sensor from operating.
- Do not use ACC when entering or leaving a motorway.
and speed, even when adaptive The radar sensor has a limited field of cruise control is used. You must always vision. In some situations it may detect a pay attention to the traffic conditions and vehicle other than the one expected or intervene when adaptive cruise control is not detect any vehicle at all. not maintaining a suitable speed or suitable distance.

The adaptive cruise control does not brake for slow or stationary vehicles.

When ACC is activated, you may hear some unusual sounds during automatic braking. This is normal and caused by the automatic braking system.
The adaptive cruise control system is based on the use of a radar sensor which projects a beam directly forward of the vehicle. This beam will detect any vehicle ahead within the system's range.
Detection beam issues
A

natural_image
Top-down view of three cars on a road with a spotlight, no text or symbols visibleB

natural_image
Top-down diagram of a vehicle showing three components: a car, a sensor, and a light bulb (no text or symbols)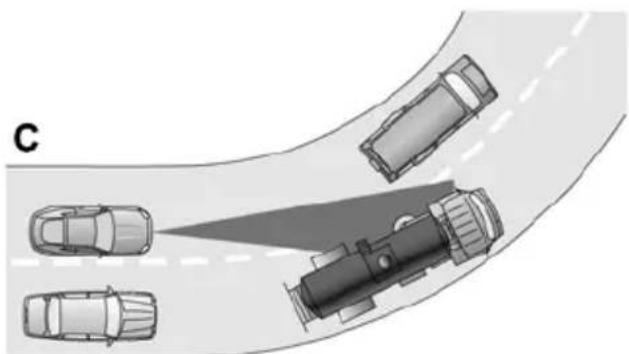
natural_image
Top-down diagram of a road with several cars, one highlighted by a light beam (no text or symbols)E71621L
WARNING

In these cases ACC may brake late or unexpectedly. The driver should stay alert and intervene if necessary.
Automatic braking with ACC
Adaptive cruise control will automatically brake for you, if required to maintain the set gap between your vehicle and the one detected in front. This braking capacity is limited to approximately 30% of the total manual braking capacity to ensure smooth and comfortable cruising. If the car needs to brake more heavily than this, and you do not intervene by braking manually, an alarm will sound and a warning symbol will be displayed in the cluster.
WARNING

You must take immediate action once alerted, as the ACC braking will not be sufficient to keep a safe nce to the vehicle in front.
USING ACC
Detection issues can occur:
- When driving on a different line to the vehicle in front (A).
- With vehicles that edge into your lane that can only be detected once they have moved fully into your lane (B). Motorcycles may be detected late, or not at all.
- There may be issues with the detection of vehicles in front when going into and coming out of a bend (C). The detection beam will not follow sharp curves in the road.
The system is operated by adjustment controls mounted on the steering wheel. The system is deactivated when the brakes or clutch are used, the gear selector is moved to a neutral position or if the accelerator pedal is depressed for a longer period. The system will change to standby mode, allowing you full manual control of the vehicle.
Note: If the accelerator is depressed for a short period, for example when overtaking, the system is temporarily deactivated and then reactivated when the accelerator pedal is released. ACC override is displayed in the information display.

text_image
E A B CAN D C E82310ACC on/offA
ACC cancelB
Forward alert on/offC
ACC gap increaseD
ACC gap decreaseE
Press the SET+ switch or the SET-switch to select your desired cruise speed. The speed is displayed in the information display and stored as the set speed. The ACC indicator illuminates.
Note: Vehicle speed may be increased and decreased at intervals of 5 km/h or 5 mph. Smaller increases of 1 km/h or 1 mph may be set by pressing the RES switch.
Changing the set speed
Press the SET+ switch or the SET-switch to accelerate or decelerate.
Note: If the system does not react to these changes the reason may be that the gap interval to the vehicle in front prevents an increase in speed.
Switching ACC on
Press switch A. The system is set to standby mode and Standby is displayed in the information display.
Setting a speed

text_image
SET* RESE SET- E70615Note: The system must be in Standby mode.
Setting the vehicle gap

text_image
14:22 155 km/h 325 km 123456 km 456.7 kmE82311
The distance between you and the vehicle detected in front is maintained by a variable setting. There are five steps which are represented by horizontal bars displayed in the information display. One bar denotes the smallest gap and five bars indicate the largest gap. These bars are shown empty when in standby mode and filled when in active mode.
If no vehicle is detected in front, then only your vehicle is displayed in the information display below the bars. The system will maintain the set speed when conditions permit. The set gap is maintained and ____ displayed.
If a vehicle is detected by the sensor, display will show another vehicle above the horizontal bars:

text_image
14:22 155 km/h 325 km 123456 km 456.7 kmE82312
This is a follow mode, and the system accelerate or decelerate as necessary to maintain the set gap.
Press switch E to decrease the gap or switch D to increase the gap. The gap selected will be represented by the number of bars in the display. The recommended gap setting is three to five bars.
Note: The gap setting is time dependant and therefore the distance will automatically adjust with your speed. For example on a gap setting of three bars, the time gap is 1.8 seconds. This will mean that at a speed of 100 km/h (62 mph), distance to the vehicle in front will be maintained at 50 metres (164 feet)
CAUTION
Use the appropriate gap setting in accordance with local traffic regulations.
the Cancelling ACC
Press either the brake or clutch pedal, or switch B. The system will return to standby mode but will retain the set speed and gap in the memory. The ACC indicator will go off.
Resuming ACC
Press the RES switch. The ACC indicator illuminates and the system will resume with the previously set speed and vehicle gap setting if conditions permit.
Switching ACC off
Press switch A.
Note: Pressing switch A does not return the system to standby mode. The stored speed is not retained.
Note: To temporarily deactivate the system press switch B.
Automatic deactivation
The system is dependent on various other safety systems, for example ABS and ESP. If any of these systems are malfunctioning or reacting to an emergency, the system is automatically deactivated.
In the event of automatic deactivation a signal will sound and the message ACC cancel is displayed in the information display. You must then intervene and adapt your driving and speed to vehicles in front.
An automatic deactivation can be due to the:
- vehicle speed falling below 30 km/h (20 mph)
- wheels lose traction
- brake temperature is high, for example when driving on mountainous or hilly roads
• engine speed is too low - radar sensor is covered
- parking brake or electric parking brake slow (EPB) is applied.
If the engine speed drops too low, a message is displayed in the information display instructing you to change down gear (manual transmission only). If you not follow this recommendation then the system will go into automatic deactivation mode.
Note: The system will not operate if the electronic stability programme (ESP) has been manually switched off.
FORWARD ALERT FUNCTION
WARNINGS

Never wait for a collision warning. When driving you are responsible for maintaining the correct distance speed, even when the system is

The system will only react to vehicles in front travelling in the same direction and will not react to or stationary vehicles.

Never drive in a manner to provoke the system. The system is designed to assist in emergencies only.
The system alerts you by warning chimes and a visual warning in the information display. When forward alert is activated a red flashing warning triangle is displayed in the information display.
Note: You can deactivate the warning chimes by using the buttons on the steering wheel. See Audible warnings and indicators (page 78).
The system does not operate in all driving situations and traffic, weather and road
The system assists you by warning of the conditions.
risk of a collision, and reducing the sever of a collision with a vehicle in front. This works by using two methods:
• You are alerted to a potential collision so you may brake earlier than normal
- Brake support is activated to enable full braking effectiveness.
The collision alerts will only occur if the system is switched on, however the brake support is always on and cannot be turned off. Warnings are both visual and audible. Brake support is activated automatically if necessary to reduce the collision speed. The brake support system only reduces the collision speed if you brake immediately once alerted.
The radar sensor detects vehicles in front that are driving in the same direction as you. If the risk of collision still increases
after the initial warning then brake support is activated. Brake support prepares the brake system for rapid braking and the brakes are applied gently, which may be noticed as a slight jerk. If the brake pedal is depressed sufficiently quickly then braking is implemented with full brake function, even if the force on the pedal is slight.
CAUTION
Warnings may be triggered late, be absent or triggered unnecessarily if the traffic situation means that the radar sensor cannot accurately detect a vehicle in front. The system uses the same radar sensors as adaptive cruise control (ACC) and therefore has the same limitations. See Principle of operation (page 151).
Note: The system may be used with or without the ACC system being activated.
Switching forward alert on/off
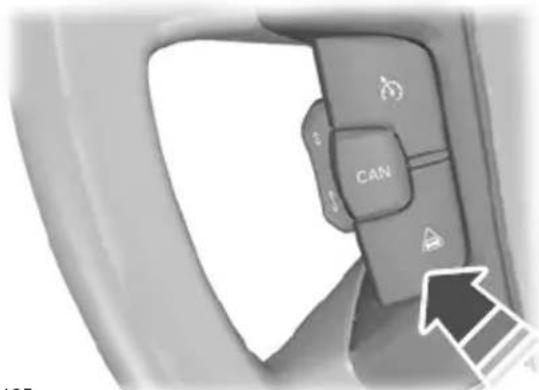
text_image
CANE94165
The indicator will illuminate.
Adjusting the warning sensitivity
You may adjust the system warning sensitivity using the buttons on the steering wheel. See General information (page 79).
This controls how early the visual and audible warning is activated.
GENERAL INFORMATION
WARNINGS

Use load securing straps to an approved standard, e.g. DIN.

Make sure that you secure all loose items properly.

Place luggage and other loads as low and as far forward as possible within the luggage or loadspace.

Do not drive with the tailgate or rear door open. Exhaust fumes may enter the vehicle. E97377

Do not exceed the maximum front LUGG and rear axle loads for your vehicle. See Vehicle identification (page Estate
222).

Heavy loads, when placed in the passenger compartment, should be on folded rear seats as shown. See
Rear seats (page 118).
CAUTIONS

Do not allow items to contact the rear windows.

Do not use any abrasive materials to clean the interior of the rear windows.

Do not install stickers or labels to the interior of the rear windows.
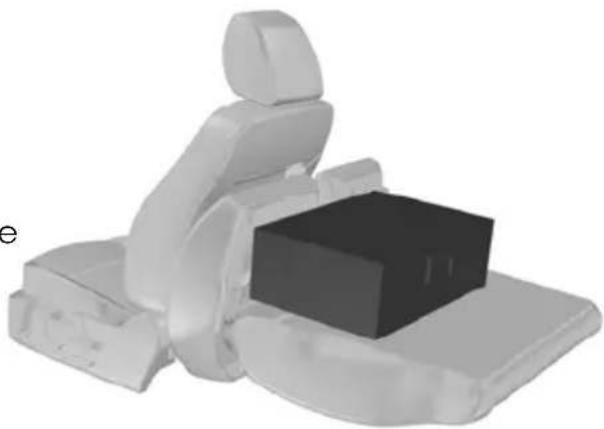
natural_image
3D rendered illustration of a person sitting in a chair with a box placed on the seat (no text or symbols visible)
natural_image
Top-down view of a transparent car hood with a circular inset showing a gear mechanism (no text or symbols)E86912
4-door and 5-door
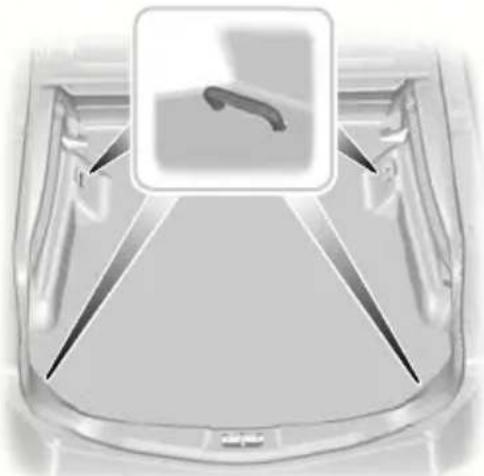
natural_image
Top-down view of a transparent car trunk with a highlighted interior detail (no text or symbols)E86913
SLIDING LOADSPACE FLOOR
WARNING

Do not slide the loadspace floor rearwards when the vehicle is standing on an incline of 15 degrees or more and facing uphill.
CAUTION

The maximum permissible weight on the sliding loadspace floor is 200 kilogrammes (441 pounds).
The maximum permissible weight on the end of the sliding loadspace floor when the floor is in the fully extended position (slid outside the luggage compartment) is 120 kilogrammes (265 pounds).

natural_image
3D rendering of a car trunk with visible internal components and two black arrows pointing to one area (no text or symbols)E74810
Press the unlocking handle and pull the loadspace floor rearwards. It will stop and engage at a midway position.

natural_image
Interior view of a car trunk with a visible battery cover and arrow indicating direction (no text or symbols)E74811
To slide it out fully, press the unlocking handle again and pull it out until it engages in the end position.
To slide it forwards, press the unlocking handle and push it forwards.
Note: You do not have to exert as much pressure on the unlocking handle if you push the loadspace floor forwards slightly when operating it.
Storage compartment
A storage compartment is located in the floor at the rear of the luggage compartment.
To gain access to the storage compartment, lift up the sliding loadspace floor as follows:
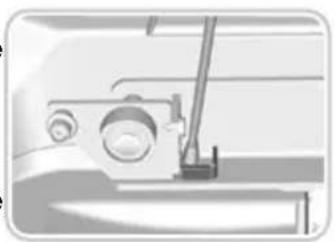
natural_image
Pure mechanical diagram showing a sewing machine without any text, numbers, or symbols
text_image
1 2 E74812
natural_image
Interior view of a car trunk with an open storage compartment and a numbered component (3), no visible text or symbols.E74813
- Press the unlocking handle and pull the loadspace floor rearwards a short way.
- Lift up the rear of the floor (1).
- Push the floor forwards until it engages at the front (2).
- Release the support leg from the clip on the underside of the floor.
- Insert the end into the square retainer in the left-hand rail (3).
- Lift the storage compartment cover using the loop.
To return the loadspace floor to the normal position:
- Hold the floor with one hand and release the support leg with the other hand.
-
Insert the support leg back into the clip.
-
Lower the floor.
- Press the unlocking handle and pull the loadspace floor rearwards until it drops into position on the rails.
REAR UNDER FLOOR STORAGE
Vehicles with a sliding loadspace floor
Raise the loadspace floor to gain access to the storage compartment. See Sliding loadspace floor (page 158).
Vehicles without a sliding loadspace floor
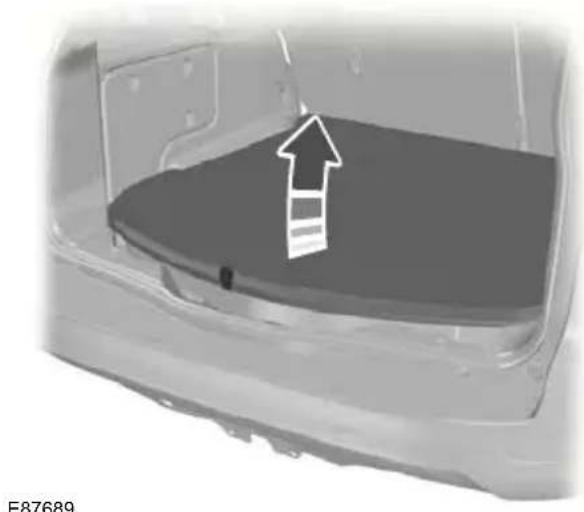
natural_image
3D rendering of a car rear bumper with a white arrow pointing to the back panel (no text or symbols)CARGO NETS
Luggage retention net Installing the net

natural_image
Hand holding a small object with an arrow pointing to it, no visible text or symbolsE87052
- Push the ends of the upper bar towards each other and insert them into the retainers on the roof. Push the bar forwards into the narrow section of the retainers.
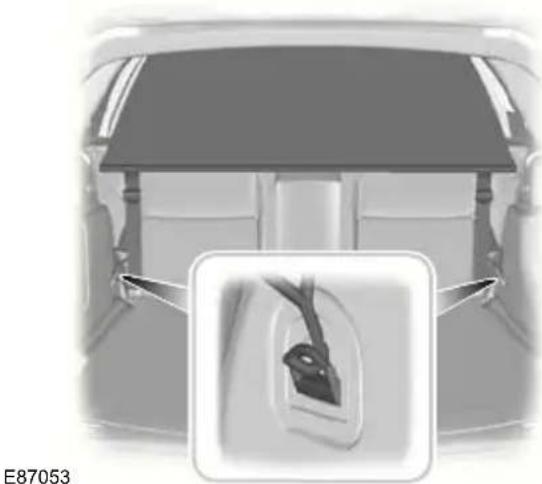
natural_image
Top-down view of a car backrest with a close-up inset showing the side panel (no text or symbols)- Attach the net to the luggage anchor points. See Luggage anchor points (page 157).

natural_image
Top-down view of a car showing seatbelt and rear canopy, with a magnified inset highlighting the seatbelt detail (no text or symbols)- Tighten the belts.
Removing the net
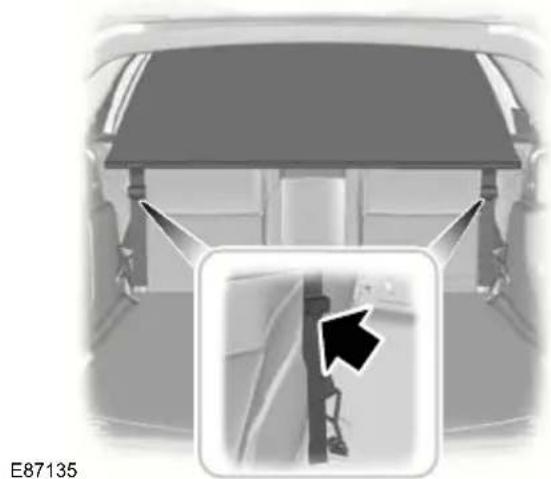
natural_image
Interior view of a car showing rear seats and seatbelt structure with a black arrow pointing to a specific side panel (no text or symbols)- Release the belts.
- Remove the net from the luggage anchor points.
- Remove the upper bars.
LUGGAGE COVERS
WARNING

Do not place objects on the luggage cover.
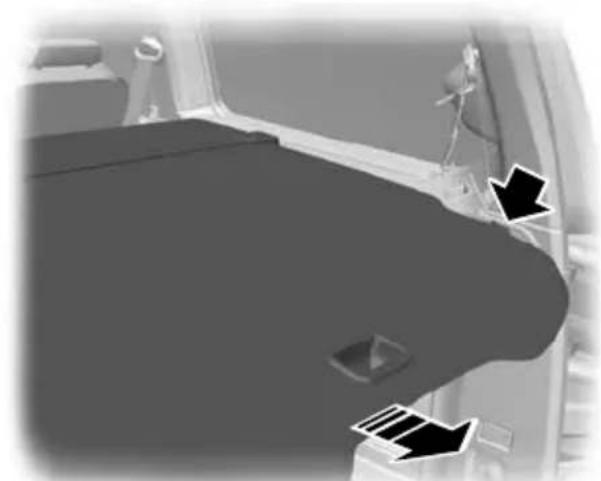
natural_image
Interior view of a vehicle showing the hood and side panel with directional arrows (no text or symbols)E72969
Pull out the cover and secure it in the retaining points.
Release it from the retaining points and let it roll back into the case. Clip the retaining hook onto the case.
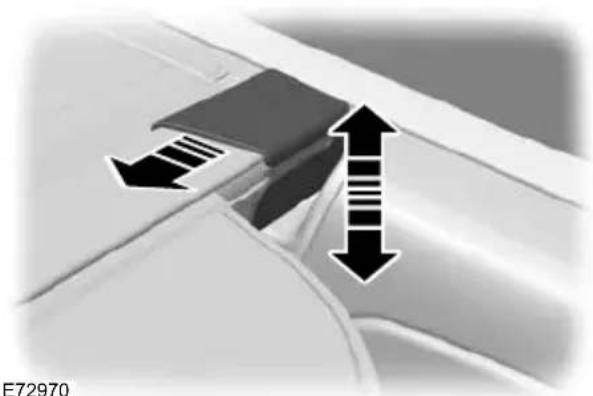
natural_image
Close-up of a car's side profile showing two directional arrows indicating movement or force (no text or symbols)To remove or install the cover, push either end of the case inwards.
ROOF RACKS AND LOAD CARRIERS
Roof rack
WARNINGS
If you use a roof rack, the fuel consumption of your vehicle will be higher and you may experience different driving characteristics.
Read and follow the manufacturer's instructions when you are fitting a roof rack.
CAUTION
Do not exceed the maximum permissible roof load of 75 kilogrammes (165 pounds) (including the roof rack).
Check the security of the roof rack and tighten its fittings as follows:
- before starting
• after driving 50 kilometres (30 miles)
• at 1 000 kilometres (600 miles) intervals.
To minimise windnoise when the roof rack is not in use, cross rails should be moved rearwards and placed together. To reduce fuel consumption, cross rails should be removed when not in use.
DOG GUARD
CAUTION
Keep a distance of at least one centimetre between the dog guard and the seats in front of it.
Installing behind the front seats

natural_image
3D rendered human figure with a black arrow pointing to the arm (no text or symbols)E86848
- Push the ends of the bar on the grille towards each other and insert them into the retainers on the roof. Push the bar forwards into the narrow section of the retainers.

natural_image
Mechanical assembly diagram showing a bracket mounted on a base with no visible text or symbolsE87782
- Attach the dog guard to the lower anchor points. Do not tighten the screws.
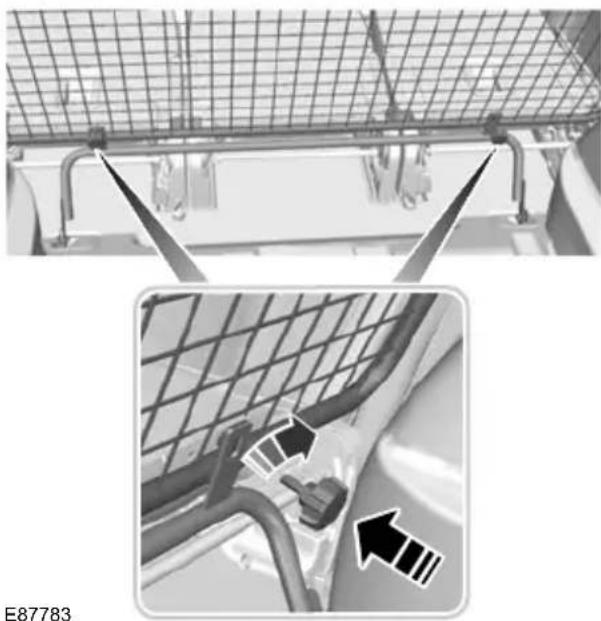
natural_image
Close-up of a mechanical assembly with grid mesh and pipe connections, showing structural details (no text or symbols)E87783
- Attach the grille to the lower bar with the handwheels. Do not tighten the handwheels.
- Tighten the screws at the lower anchor points.
- Tighten the handwheels.
Installing behind the rear seats

natural_image
3D rendered mechanical component with a black arrow pointing to a curved feature (no text or symbols)E86848
- Push the ends of the bar on the grille towards each other and insert them into the retainers on the roof. Push the bar forwards into the narrow section of the retainers.

natural_image
Top-down view of a car trunk with visible seats and ventilation grating (no text or symbols)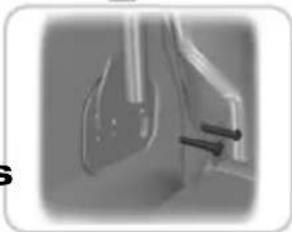
natural_image
Close-up of a medical or laboratory device with two black arrows pointing to a component (no visible text or symbols)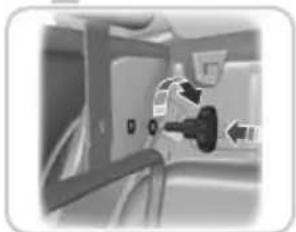
natural_image
Close-up of a car interior showing a black plug inserted into the seat, with no visible text or symbols.E104424
- Remove two screws from both the luggage anchor points. See Luggage anchor points (page 157).
- Attach the lower bar to the grille with the handwheels. Do not tighten the handwheels.
- Attach the dog guard lower bar to the luggage anchor points, secure with the new supplied screws.
- Tighten the handwheels.
Remove in the reverse order.
LOAD RETAINING FIXTURES Installing the load bracket
WARNING

Do not exceed the maximum permissible load of 60 kilogrammes (132 pounds) on two load retaining fixtures and 30 kilogrammes (66 pounds on one.
Check the security of the load retaining fixtures and tighten its fittings as follows:
- before starting
• after driving 50 kilometres (30 miles)
• at 1 000 kilometres (600 miles) intervals.
Installing the load retaining fixtures
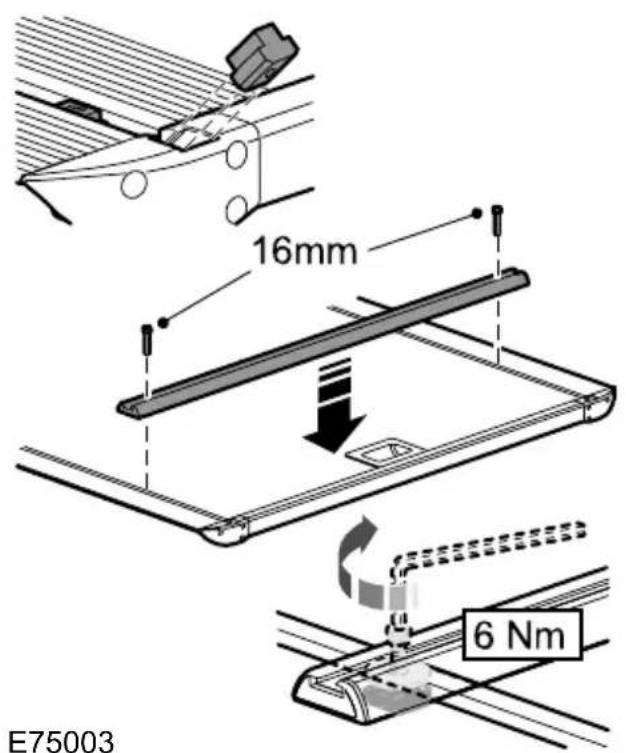
text_image
16mm 6 Nm E75003WARNINGS

Install the load bracket with the longest section towards the rear of the vehicle. If you install it the wrong round, it may not hold the box in the event of an accident.

Do not exceed the maximum permissible load of 20 kilogrammes (44 pounds).
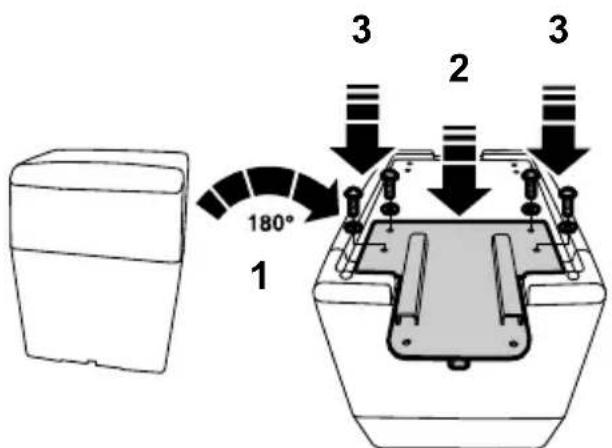
text_image
180° 1 2 3 3E76378
- Turn the box over.
- Position the load bracket.
- Secure the load bracket with four screws.

natural_image
Diagram showing two mechanical components with bolts and arrows indicating motion (no text or symbols)E76379
- Slide the captured bolts onto the load retaining fixture.
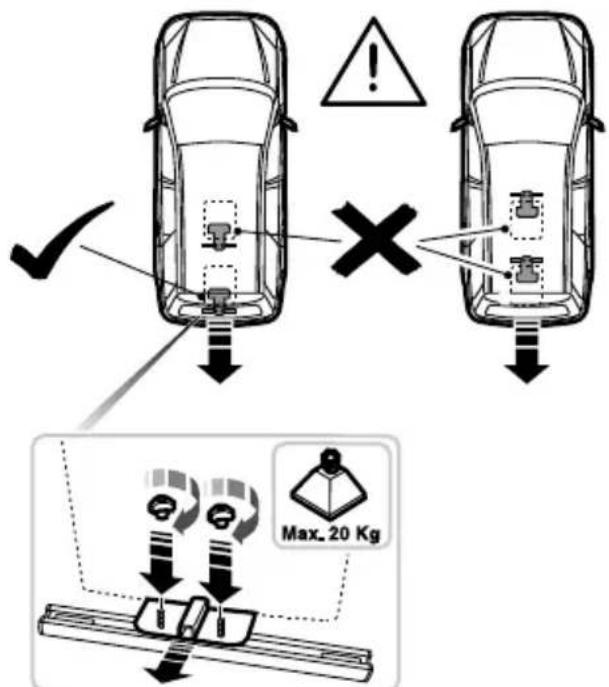
text_image
✓ × Max. 20 KgE76380
- Secure the load bracket with the two wing nuts.
- Remove in the reverse order.
TOWING A TRAILER
Change down a gear before you reach a steep downhill gradient.
WARNINGS

Do not exceed 100 km/h (62 mph)
DETACHABLE TOW BALL

The rear tyre pressures must be increased by 0.2 bar (3 psi) above specification. See Technical
specifications (page 219).

Do not exceed the maximum gross train weight stated on the vehicle identification plate. See Vehicle
identification (page 222).
Note: Not all vehicles are suitable or approved to have tow bars fitted. Check with your dealer first.
Place loads as low and central to the axle(s) of the trailer as possible. If you are towing with an unladen vehicle, the load in the trailer should be placed toward the nose, within the maximum nose load, as this gives the best stability.
Note: The maximum trailer nose weight can be found in the original vehicle documents (confirmation of conformity). Alternatively refer to your dealer.
The stability of the vehicle to trailer combination is very much dependant on E71328 the quality of the trailer.
In high altitude regions above 1 000 metres (3 281 feet), the stipulated maximum permitted gross train weight must be reduced by 10% for every additional 1 000 metres (3 281 feet).
WARNINGS

When not in use, always transport the tow ball arm securely fastened in the luggage compartment.

Take special care when fitting the tow ball arm as the safety of the vehicle and the trailer depends on

Do not use any tools for mounting or dismounting the tow ball arm. Do not modify the trailer coupling. Do disassemble or repair the tow ball arm.

natural_image
Mechanical component with curved and flanged parts, no visible text or symbolsA 13-pin trailer socket and the tow ball arm seat are provided underneath the rear bumper. Turn the trailer socket down through 90 degrees until it engages in the end position.
Steep gradients
WARNING

The overrun brake on a trailer is not controlled by ABS.
Unlocking the tow ball arm mechanism
Inserting the tow ball arm
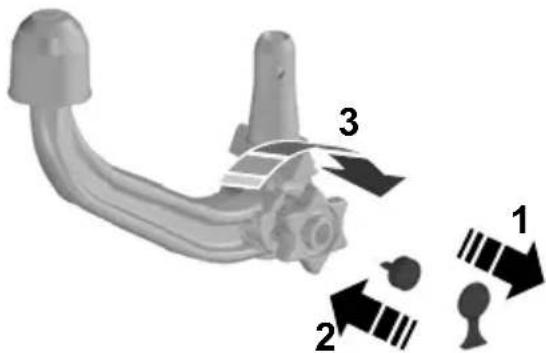
text_image
Diagram of a mechanical component with numbered parts and directional arrows indicating motion or assembly.E71329
-
Remove the protecting cap (1). Insert the key and turn it clockwise to unlock (2).
-
Hold the tow ball arm. Pull the handwheel out and turn it clockwise until it clicks (3).
-
The red mark on the handwheel must align with the green mark on the tow ball.
-
Release the handwheel. The tow ball arm is unlocked.
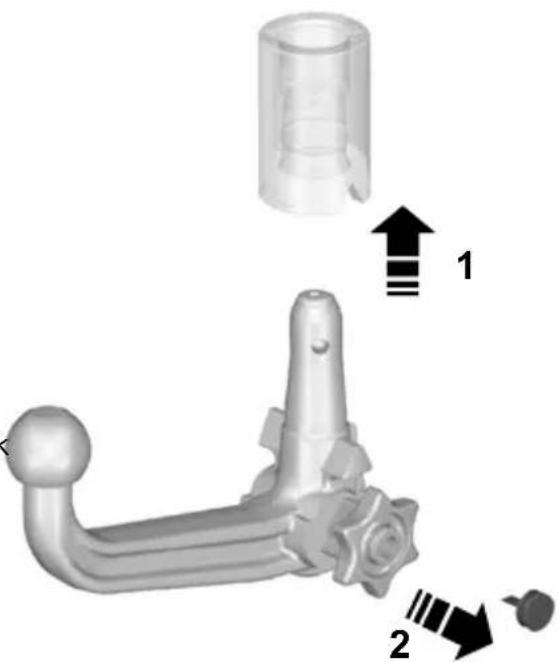
natural_image
3D mechanical component diagram showing a lever and cylindrical part with directional arrows (no text or symbols)71330
WARNING

The tow ball arm may only be inserted when completely unlocked.
- Pull out the plug.
- Insert the tow ball arm vertically and press it upwards until it engages (1). Do not hold your hand near the handwheel.
- The green mark on the handwheel must align with the green mark on the tow ball.
- To lock, turn the key anti-clockwise and remove the key (2).
- Pull the protecting cap from the key bow and press it onto the lock.
Towing
Driving with a trailer
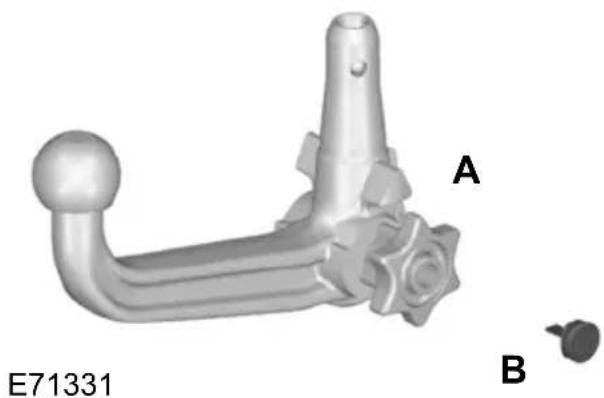
natural_image
3D rendered mechanical component with labeled parts A and B, no readable text or symbols beyond labelsWARNING
If any of the below conditions cannot be met, do not use the tow bar and have it checked by a properly trained technician.
Removing the tow ball arm
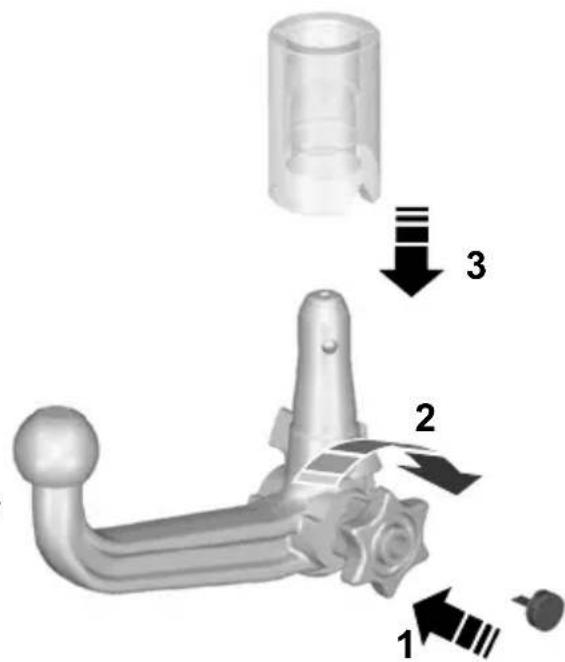
text_image
Technical diagram of a mechanical component with numbered parts and directional arrows indicating assembly stepsBefore starting your journey, make sure that the tow ball arm is properly locked.E71332 Check:
• the green marks are aligned.
- the handwheel (A) is correctly fitted to the tow ball arm.
• you have removed the key (B).
- the tow ball arm is securely positioned. It must not move when jerked.
- Unhitch the trailer.
- Remove the protecting cap. Press the cap into the key bow. Insert the key and unlock (1).
- Hold the tow ball arm. Pull the d. handwheel out, turn it clockwise against the stop (2) and remove the tow ball arm (3).
- Release the handwheel.
When unlocked in this way, the tow ball arm can be reinserted at any time.
Driving without a trailer
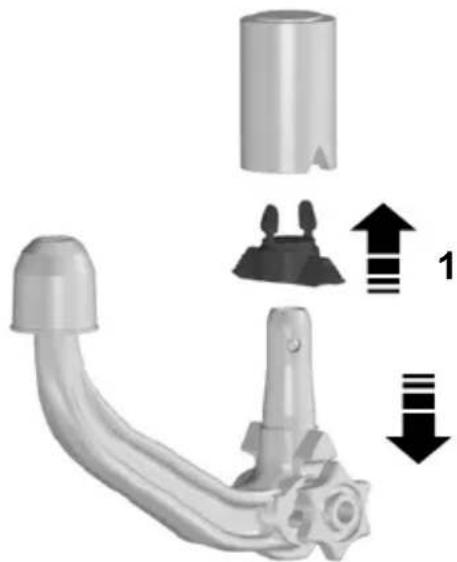
natural_image
Mechanical component diagram showing a curved pipe with a cylindrical housing and a gear-like extension, with directional arrows indicating movement (no text or symbols)E94771
- Remove the tow ball arm.
- Insert the plug into its seat (1).
WARNING

Never unlock the tow ball arm with the trailer attached.
Maintenance
CAUTION

Remove the tow ball arm and protect the seat with the plug before steam cleaning your vehicle.
Keep the system clean. Periodically lubricate bearings, sliding surfaces, and locking balls with resin-free grease or oil and the lock with graphite.
Keep a note of the key number. In case of loss, replacement keys are available from the manufacturer by stating the 4-digit key number.
RUNNING-IN
Tyres
WARNING

New tyres need to be run-in for approximately 500 kilometres (300 miles). During this time, you may experience different driving characteristics.
Brakes and clutch
WARNING

Avoid heavy use of the brakes and clutch if possible for the first 150 kilometres (100 miles) in town and for the first 1 500 kilometres (1 000 mile) on motorways.
Engine
CAUTION

Avoid driving too fast during the first 1 500 kilometres (1 000 miles). Vary your speed frequently and change up through the gears early. Do not labo the engine.
GENERAL DRIVING POINTS - VEHICLES WITH: SPORTS SUSPENSION
The distance between the underside of your vehicle and the ground is reduced compared to other models. Drive with extreme care to avoid damage to your vehicle.
COLD WEATHER PRECAUTIONS
The functional operation of some components and systems can be affected at temperatures below -30^ (-22^) .
DRIVING THROUGH WATER
Driving through water
CAUTIONS
Drive through water in an emergency only, and not as part of normal driving.
es! Engine damage can occur if water enters the air filter.
In an emergency, the vehicle can be driven through water to a maximum depth of 200 mm and at a maximum speed of 10 km/h (6 mph). Extra caution should be texercised when driving through flowing water.
When driving in water, maintain a low speed and do not stop the vehicle. After driving through water, and as soon as it is safe to do so:
- Depress the brake pedal lightly and check that full brake function is achieved.
- Check that the horn works.
- Check that the vehicle's lights are fully operational.
- Check the power assistance of the steering system.
FIRST AID KIT
Space is provided in the luggage compartment.
4-door
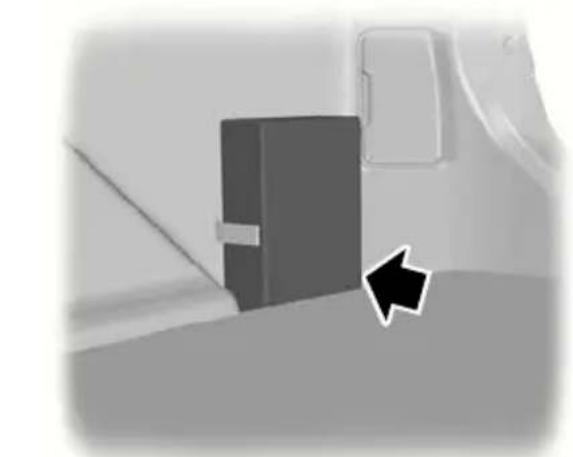
natural_image
Close-up of a mechanical component with a black arrow pointing to a section (no visible text or symbols)E87654
5-door

natural_image
Illustration of a car interior with a 3D block and arrow pointing to the side (no text or symbols)E87655
Estate
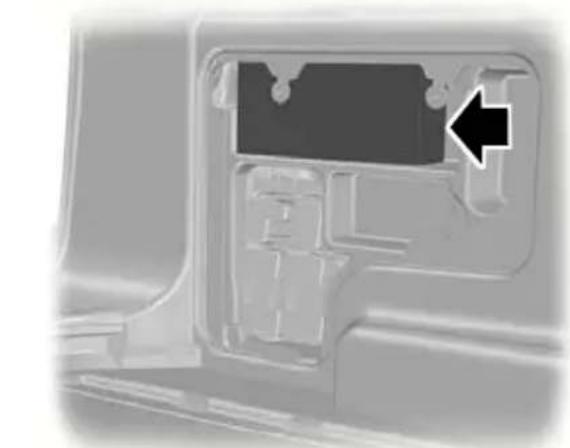
natural_image
Close-up of a mechanical component with a black arrow pointing to a specific part (no text or symbols visible)E87656
WARNING TRIANGLE
4-door and 5-door
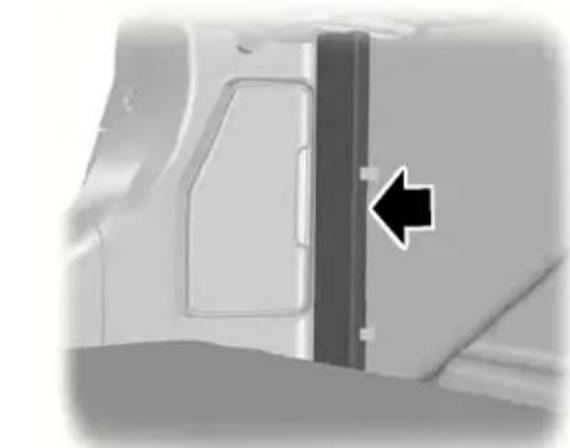
natural_image
Close-up of a vehicle door panel with a black arrow pointing to a side panel (no text or symbols visible)E87657
Space is provided in the luggage compartment.
Estate and vehicles with tyre repair kit
Space is provided under the carpet.
See Rear under floor storage (page 160).
INSPECTING SAFETY SYSTEM COMPONENTS
Seat belts
Belts subjected to strain, as a result of an accident, should be renewed and the anchorages checked by a properly trained technician.
FUSE BOX LOCATIONS
Engine compartment fuse box
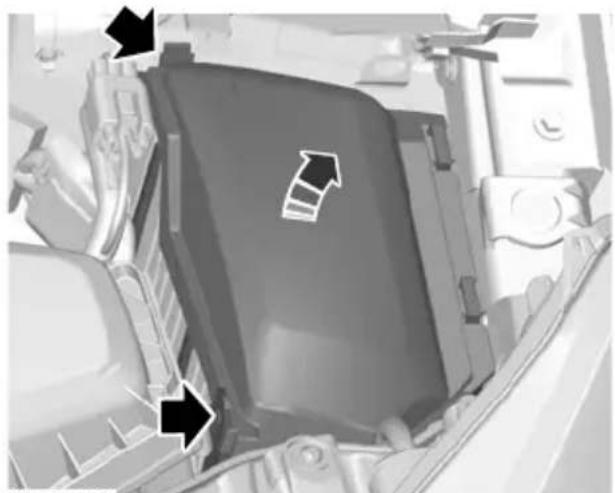
natural_image
Close-up of a mechanical component with directional arrows indicating movement or flow (no text or symbols visible)E72588
Central fuse box
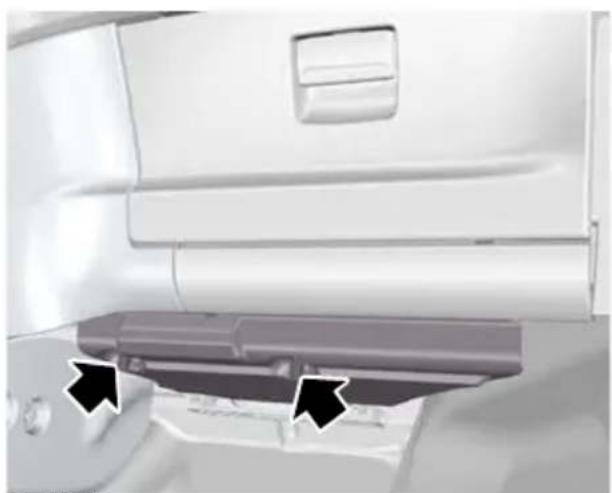
natural_image
Interior view of a vehicle showing a partially open rear door and a curved ramp, with two black arrows pointing to the side (no text or symbols visible)E72589
- Loosen the screws.

natural_image
Cross-sectional diagram of a vehicle chassis showing internal components and structural elements (no text or labels)E72590
-
Turn the knob through 90 degrees and release the fuse box from the retaining bracket.
-
Lower the fuse box and pull it towards you.

natural_image
Top-down view of a military aircraft carrier deck with an arrow pointing to its side panel (no visible text or symbols)E72622
-
Remove the cover to gain access to the fuses (vehicles with a cooled glove box).
-
Install in the reverse order.
Rear fuse box - 4-door and 5Rear fuse box - Estate door

natural_image
Close-up of a mechanical component with a labeled section (1), no visible text or symbols beyond the number.E87481
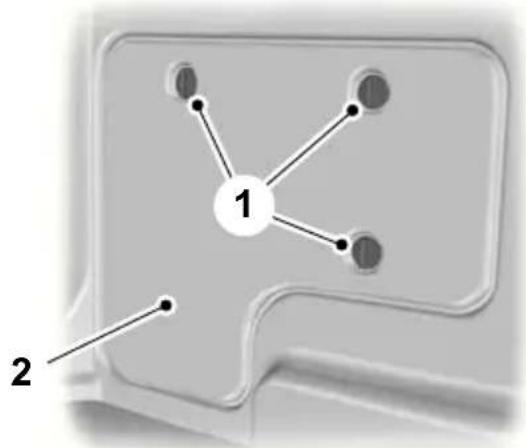
flowchart
graph TD
    A["1"] --> B["Node 1"]
    A --> C["Node 2"]
    A --> D["Node 3"]
    A --> E["Node 4"]
E87479
-
Remove the cover.
-
Release the catches.
- Remove the cover.
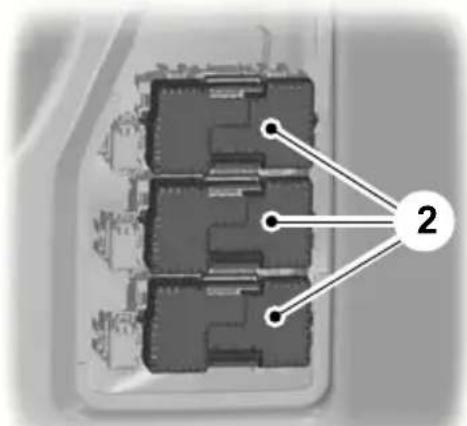
text_image
Diagram of a multi-layered electronic component with labeled connection points and numbered annotation '2'E87482
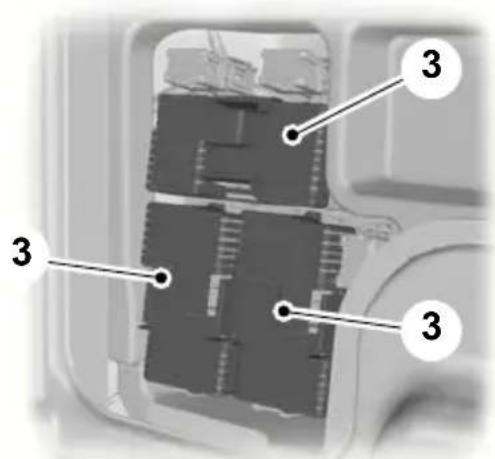
text_image
Diagram of a mechanical or electronic component with numbered annotations pointing to specific parts.E87480
- Remove the relevant fuse box cover.
- Remove the relevant fuse box cover.
CHANGING A FUSE
WARNINGS

Do not modify the electrical system of your vehicle in any way. Have repairs to the electrical system and the replacement of relays and high current fuses carried out by a properly trained technician.

Switch the ignition and all electrical equipment off before touching or attempting to change a fuse.
CAUTION

Fit a replacement fuse with the same rating as the one you have removed.
Note: You can identify a blown fuse by a break in the filament.
Note: All fuses, except high current fuses, are a push fit.
Note: A fuse puller is located in the engine compartment fuse box.
FUSE SPECIFICATION CHART
Engine compartment fuse box

text_image
F29 F35 F45 F28 F34 F44 F27 F33 F39 F43 F26 F25 F32 F38 F42 F21 F20 F24 F31 F37 F41 F19 F23 F30 F36 F40 F18 F22 F17 F16 F5 F4 F3 F8 F11 F14 F2 F7 F10 F13 F1 F6 F9 F12 F15E75525
| Fuse | Ampere rating | Circuits protectedColour | |
| Transmission control modulered10F1 | |||
| Glow plug monitoring (diesel engines)tan5F2 | |||
| F3 | 70^1 | brown | Engine cooling fan - twin fan (2.3L Duratec-HE) |
| F3 | 80^1 | clear | Electric hydraulic power steering (EHPAS)(2.0L Duratorq-TDCi) |
| Glow plugsyellow60F4 | |||
| Engine cooling fanyellow60F5 | |||
| red10F6 | HEGO sensors 1 (engine management),variable valve timing (engine management),CMS sensor, Oxygen sensor | ||
| Relay coilstan5F7 | |||
| Powertrain control modulered10F8 | |||
| red10F9 | MAF Sensor, Swirl Control Valve , FuelInjectors, CCV PTC Heater, Variable IntakeValve, Variable Exhaust Valve (engine management) | ||
| Engine control modulered10F10 | |||
| red10F11 | PCV Valve, VCV Valve, Water in Fuel Sensor,Sonic Purge Valve, Swirl Control Valve, Variable Intake Valve, EGR Valve, IVVT Oil ControlValve (engine management) | ||
| red10F12 | EGR Throttle, Variable Turbo Control Valve,Coil on Plug; Canister Purge Valve, PowerSteering Pressure Switch (engine manage-ment) | ||
| 15F13 | blue | Air conditioning relay | |
| 15F14 | blue | Diesel filter heater | |
| F15 | 40 | orange | Starter relay |
| F16 | 80 | clear | Diesel auxiliary heater (PTC) |
| F17 yellow60Central fuse box supply A | |||
| F18 yellow60Central fuse box supply B | |||
| F19 yellow60Bear fuse box supply C | |||
| F20 yellow60Bear fuse box supply D | |||
| Not used—F21 | |||
| Windscreen wiper modulegreen30F22 | |||
| F23 | 25^1 | clear | Heated rear window |
| Headlamp washergreen30F24 | |||
| ABS valvesgreen30F25 | |||
| ABS pumporange40F26 | |||
| Fuel fired heatergreen30F27 | |||
| Heater blowerorange40F28 | |||
| F29 Not used— | |||
| F30 Not used— | |||
| F31 | blue15 | Horn | |
| F32 | tan5 | Fuel fired heater - remote control | |
| F33 | tan5 | Light switch module, engine compartment fuse box coils | |
| orange40F34ed windscreen (left-hand side) | |||
| orange40F34ed windscreen (right-hand side) | |||
| F36 | tan5 | ABS | |
| F37 | 10 | red | Heated front washer jets |
| F38 | tan5 | Adaptive cruise control (ACC) | |
| F39 | blue15 | Adaptive front lighting system (AFS) | |
| F40 Not used— | |||
| F41 | 20 | yellow | Instrument panel |
| F42 | 10 | red | Engine controlmodule, transmission control module, electric hydraulic power steering (EHPAS) 15 feed |
| F43 | tan5 | Headlamp levelling, adaptive front lighting system (AFS) | |
| F44 | - | Not used-Rear window wiperblue15F45 | |
Fit a replacement with the same rating as the one you have removed.
Central fuse box
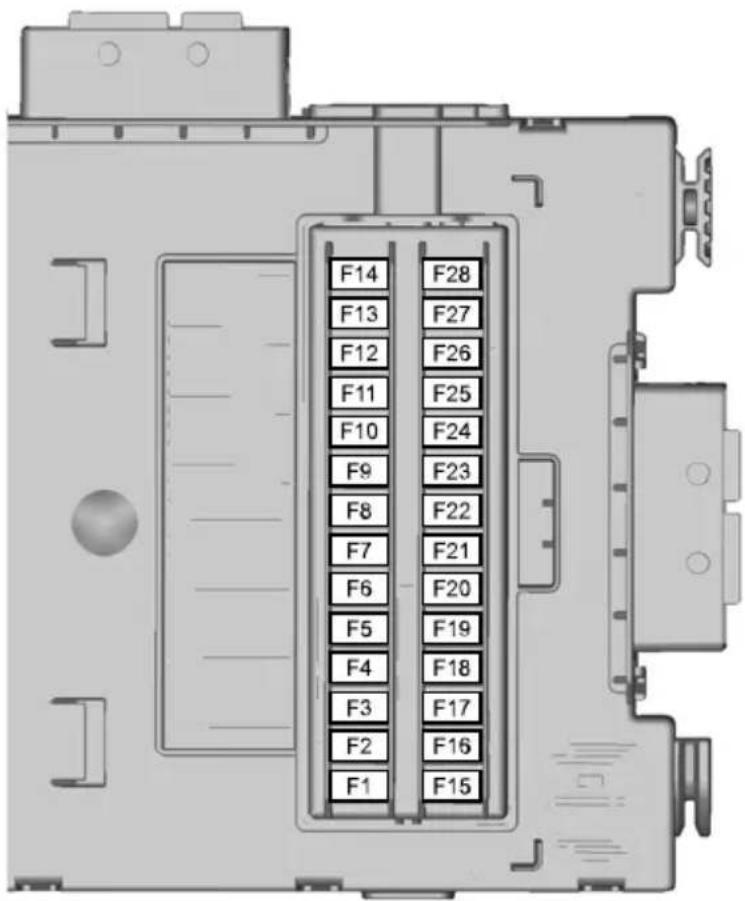
text_image
F14 F13 F12 F11 F10 F9 F8 F7 F6 F5 F4 F3 F2 F1 F28 F27 F26 F25 F24 F23 F22 F21 F20 F19 F18 F17 F16 F15E75527
| Fuse | Ampere rating | Circuits protectedColour | |
| Rain sensortan5F1 | |||
| SRS (airbag) supplyred10F2 | |||
| brown7.5F3 | Yaw rate sensor (ESP), accelerator pedal supply |
Fuses
| Fuse | Ampere rating | Circuits protectedColour | |
| Electronic feed, electronic fusebrown7.5F4 | |||
| Not used--F5 | |||
| Audio system (including voice control)blue15F6 | |||
| Steering wheel modulebrown7.5F7 | |||
| Instrume8t clustertan5 | |||
| blue15F9 | Main beam | ||
| 20F10 | yellow | Power sunroof | |
| brown7.5 | Reversing lamps | ||
| F12 | - | Not used- | |
| blue15F10 | Ront fog lamp | ||
| blue15F11 | Windscreen washers | ||
| 10F15 | red | Adaptive cruise control (ACC) | |
| F16 | - | Not used- | |
| 10F17 | red | Interior lamps | |
| tan5F18 | Engine immobiliser | ||
| blue15F19 | Cigar lighter | ||
| -F2 | Not used- | ||
| tan5F21 | Remote frequency receiver, Interior motion sensor | ||
| F22 | 20 | yellow | Fuel pump |
| F22 | brown7.5 | Fuel pump (2.2L Duratorq) | |
| -F2 | Not used- | ||
| F24 | tan5 | Ignition switch | |
| 10F25 | red | Fuel filler flap | |
| F26 | tan5 | Battery backup sounder (alarm system), OBD II (board computer diagnostics) | |
| tan5 | S27ering column unit, climate control module | ||
| Brake lamp switchtan5F28 |
Rear fuse box
4-door and 5-door
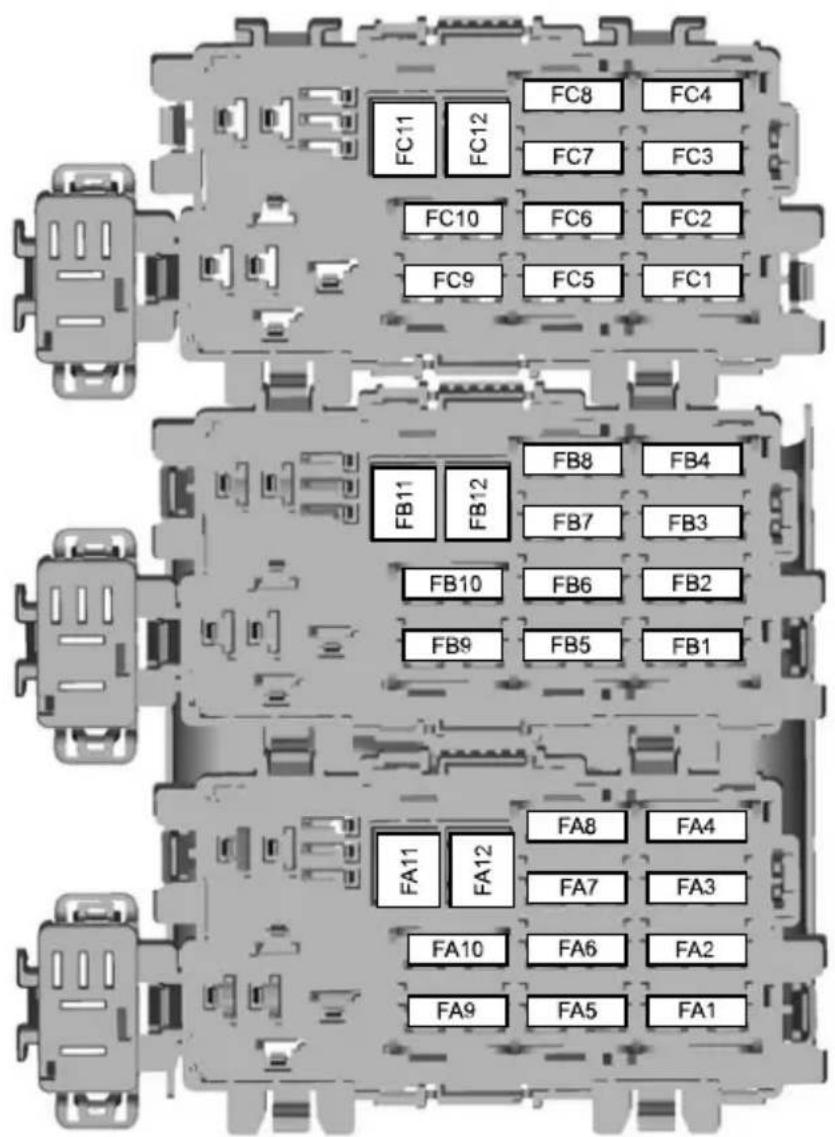
text_image
FC11 FC12 FC8 FC4 FC7 FC3 FC10 FC6 FC2 FC9 FC5 FC1 FB11 FB12 FB8 FB4 FB7 FB3 FB10 FB6 FB2 FB9 FB5 FB1 FA11 FA12 FA8 FA4 FA7 FA3 FA10 FA6 FA2 FA9 FA5 FA1E87483
Estate
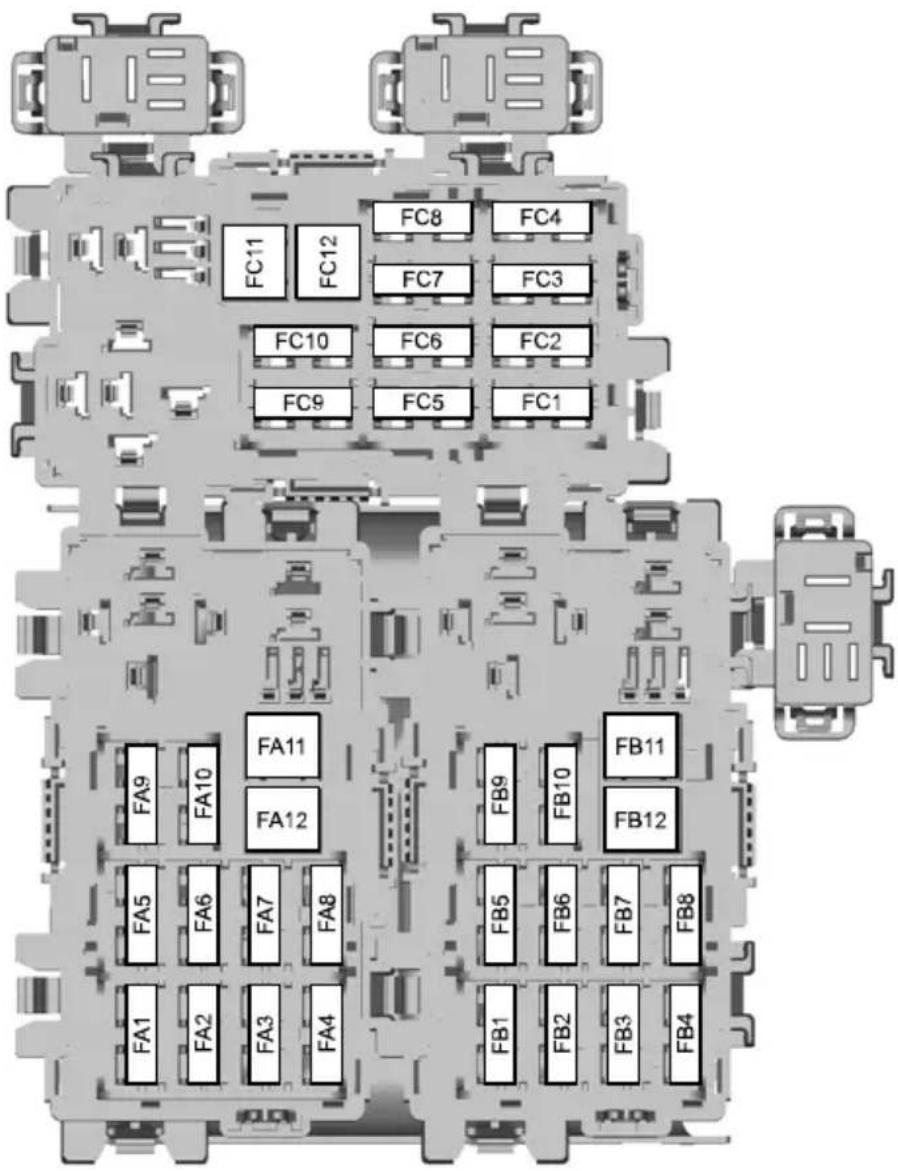
text_image
FC8 FC4 FC11 FC12 FC7 FC3 FC10 FC6 FC2 FC9 FC5 FC1 FA9 FA10 FA11 FA12 FB9 FB10 FB11 FB12 FA5 FA6 FA7 FA8 FB5 FB6 FB7 FB8 FA1 FA2 FA3 FA4 FB1 FB2 FB3 FB4E75526
| Fuse | Ampere rating | Circuits protectedColour | |
| Door module (left-hand front) (window u clear25FAdown, central locking, electric folding mir heated mirror) | |||
| clear25FA | Door module (right-hand front) (window up/ down, central locking, electric folding mirror, heated mirror) | ||
| clear25FA3 | Door module (left-hand rear) (window up/ down) | ||
| clear25FA4 | Door module (right-hand rear) (window up/ down) | ||
| Rear locking (without rear door modules)red10 | |||
| Auxiliary power socketblue15FA6 | |||
| Relay coilstan5FA7 | |||
| 20FA8 | yellow | Steering column lock | |
| -FA9 | - | Not used | |
| FA10 | 30 | green | Electric driver's seat |
| FA11 | 20 | yellow | Accessories, trailer module |
| -FA12 | - | Not used | |
| tan5FB | Parking aid module | ||
| blue15FB | Suspension module | ||
| blue15FB | Heated driver's seat | ||
| blue15FB | Heated front passenger seat | ||
| blue15FB | Heated front passenger seat | ||
| -FB6 | - | Not used | |
| blue15FB | Heated front passenger seat | ||
| -FB8 | - | Not used | |
| 30FB9 | green | Electric front passenger seat | |
| FB10 | red10 | Anti-theft alarm horn | |
| FB11 | - | - | Not used |
| FB12 | - | - | Not used |
| FC1 | - | - | Not used |
Fuses
| Fuse | Ampere rating | Circuits protectedColour | |
| Not used--FC2 | |||
| Not used--FC3 | |||
| Not used--FC4 | |||
| CD changer, rear seat entertainment sys | |||
| Not used--FC6 | |||
| Seat memory function moduletan5FC7 | |||
| Keyless entryyellow20FC8 | |||
| Not used—FC9 | |||
| FC10 | Not used— | ||
| FC11 | Not used— | ||
| FC12 | Not used— |
TOWING POINTS
CAUTION

The screw-in towing eye has a left-hand thread. Turn it anti-clockwise to install it.
The screw-in towing eye is located in the spare wheel well.
The towing eye must always be carried in the vehicle.
Front towing eye
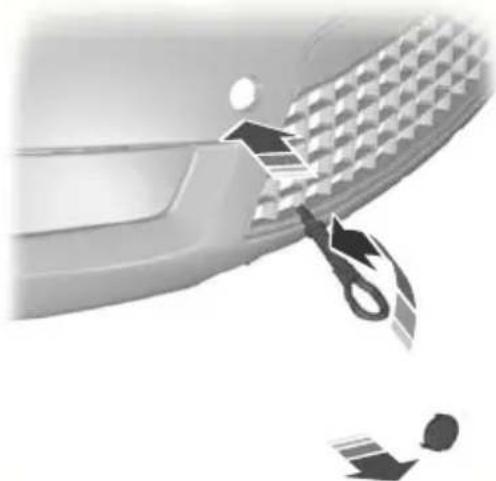
natural_image
Close-up of a car's side panel with a tool cutting down the dashboard area (no text or symbols visible)E87280
Rear towing eye

natural_image
Side view of a car's front bumper with tool icons indicating repair or cleaning steps (no text or symbols)E87282
Insert your finger into the hole on the underside of the cover and prise off the cover. Install the towing eye.
TOWING THE VEHICLE ON FOUR WHEELS
All vehicles
WARNINGS

Switch the ignition on when your vehicle is being towed. The steering lock will engage and the directionators and brake lamps will not work you do not.

The brake servo and the power steering pump do not operate unless the engine is running. Press brake pedal harder and allow forased stopping distances and heavier ing.
CAUTIONS

Too much tension in the tow rope could cause damage to your vehicle or the vehicle that is towing.

Do not use a rigid tow bar on the front towing eye.
Drive off slowly and smoothly without jerking the vehicle that is towing.
Vehicles with automatic transmission
CAUTIONS

Do not tow your vehicle faster than 50 km/h (30 mph) or further than 50 kilometres (30 miles).

If a speed of 50 km/h (30 mph) and a distance of 50 kilometres (30 miles) is to be exceeded the drive wheels at be lifted clear of the ground.
CAUTIONS

In the event of a mechanical failure of the transmission the drive wheels must be lifted clear of the ground.

Do not tow your vehicle backwards.

Select neutral when your vehicle is being towed.
GENERAL INFORMATION
Have your vehicle serviced regularly to help maintain its roadworthiness and resale value. There is a large network of Ford Authorised Repairers that are there to help you with their professional servicing expertise. We believe that their specially trained technicians are best qualified to service your vehicle properly and expertly. They are supported by a wide range of highly specialised tools developed specifically for servicing your vehicle.
In addition to regular servicing, we recommend that you carry out the following additional checks.
WARNINGS

Switch the ignition off before touching or attempting adjustment of any kind.

Do not touch the electronic ignition system parts after you have switched the ignition on or when the he is running. The system operates high voltage.

Keep your hands and clothing clear of the engine cooling fan. Under certain conditions, the fan may due to run for several minutes after have switched the engine off.
CAUTION

When carrying out maintenance checks, make sure that filler caps are fitted securely.
Daily checks
- Exterior lamps.
- Interior lamps.
- Warning lamps and indicators.
Check when refuelling
• Engine oil level. See Engine oil check (page 197).
Brake fluid level. See Brake and clutch fluid check (page 198).
- Washer fluid level. See Washer fluid check (page 199).
- Tyre pressures (when cold). See Technical specifications (page 219).
- Tyre condition. See Tyre care (page 217).
Monthly checks
• Engine coolant level (engine cold). See Engine coolant check (page 197).
- Pipes, hoses and reservoirs for leaks.
• Power steering fluid level. See Power steering fluid check (page 198).
Air conditioning operation.
Parking brake operation.
- Horn operation.
Tightness of wheel nuts. See
Technical specifications (page 219).
OPENING AND CLOSING THE BONNET
Opening the bonnet

natural_image
Interior view of a car showing the side panel and door handle (no text or symbols visible)
natural_image
Close-up of a Ford logo on a grille with an upward arrow symbol (no text or numbers present)E105063
Raise the bonnet slightly and move the catch upwards.
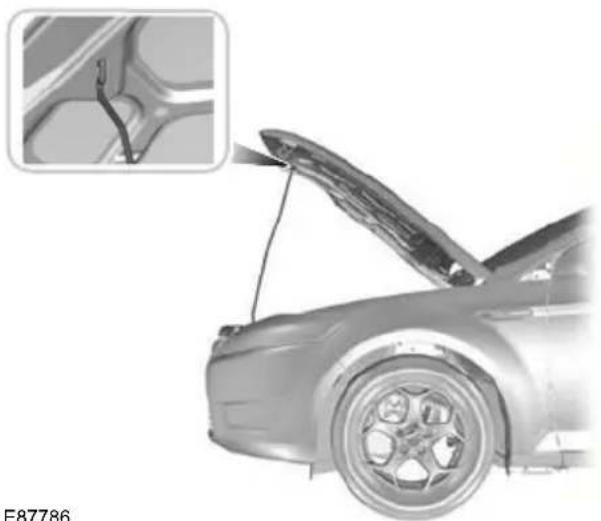
natural_image
Side view of a car with open hood and visible tire, showing structural details (no text or symbols)Open the bonnet and support it with the strut.
Closing the bonnet
WARNING

Make sure that the bonnet is closed properly.
Lower the bonnet and allow it to drop from under its own weight for the last 20 - 30 centimetres (8 - 11 inches).
ENGINE COMPARTMENT OVERVIEW - 1.6L DURATEC-16V TI-VCT (SIGMA)
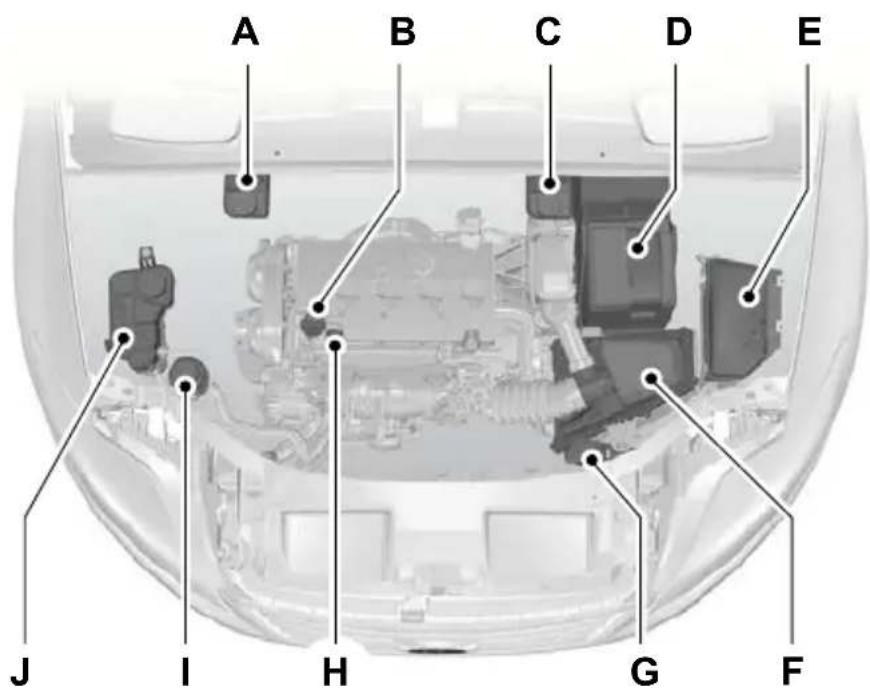
text_image
A B C D E J I H G FE87714
A Brake and clutch fluid reservoir (right-hand drive). See Brake and clutch fluid check (page 198).
B Engine oil filler capSee Engine oil check (page 197).
C Brake and clutch fluid reservoir (left-hand drive). See Brake and clutch fluid check (page 198).
D Battery. See Vehicle battery (page 204).
E Engine compartment fuse box. See Fuses (page 173). Air cleaner. No maintenance necessary.F
G Screen washer fluid reservoir. See Washer fluid check (page 199).
H Engine oil dipstick See Engine oil check (page 197).
I Power steering fluid reservoir. See Power steering fluid check (page 198).
J Engine coolant reservoir. See Engine coolant check (page 197).
^1 The filler caps and the engine oil dipstick are coloured for easy identification.
ENGINE COMPARTMENT OVERVIEW - 2.0L DURATEC-HE (MI4)
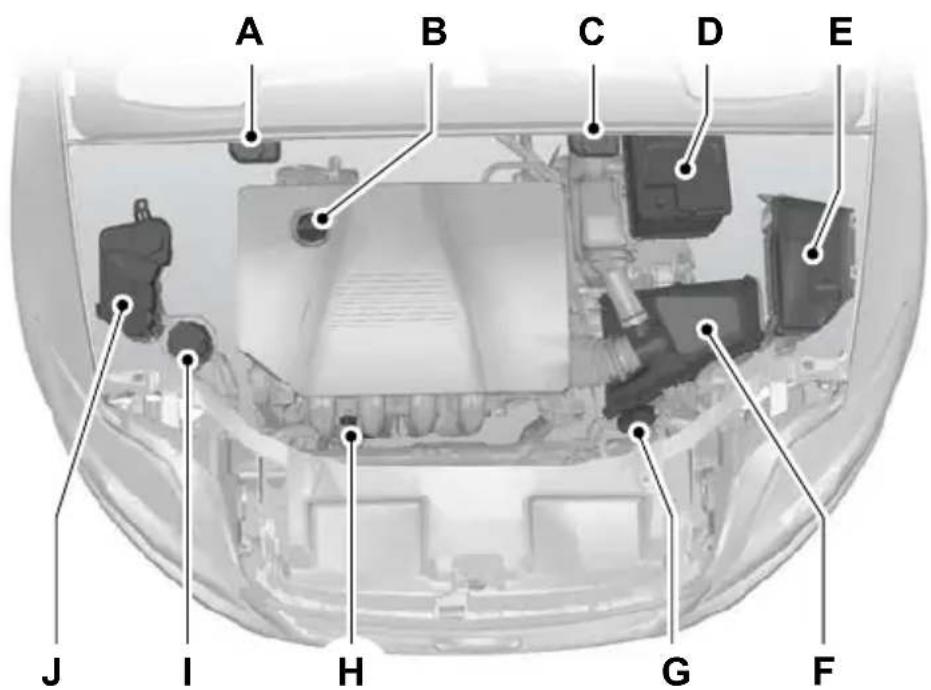
text_image
A B C D E J I H G FE73231
A Brake and clutch fluid reservoir (right-hand drive). See Brake and clutch fluid check (page 198).
B Engine oil filler cap See Engine oil check (page 197).
C Brake and clutch fluid reservoir (left-hand drive). See Brake and clutch fluid check (page 198).
D Battery. See Using booster cables (page 204).
E Engine compartment fuse box. See Fuse specification chart (page 176). Air cleaner. No maintenance necessary.F
G Screen washer fluid reservoir. See Washer fluid check (page 199).
H Engine oil dipstick See Engine oil check (page 197).
I Power steering fluid reservoir. See Power steering fluid check (page 198).
J Engine coolant reservoir. See Engine coolant check (page 197).
^1 The filler caps and the engine oil dipstick are coloured for easy identification.
ENGINE COMPARTMENT OVERVIEW - 2.3L DURATEC-HE (MI4)
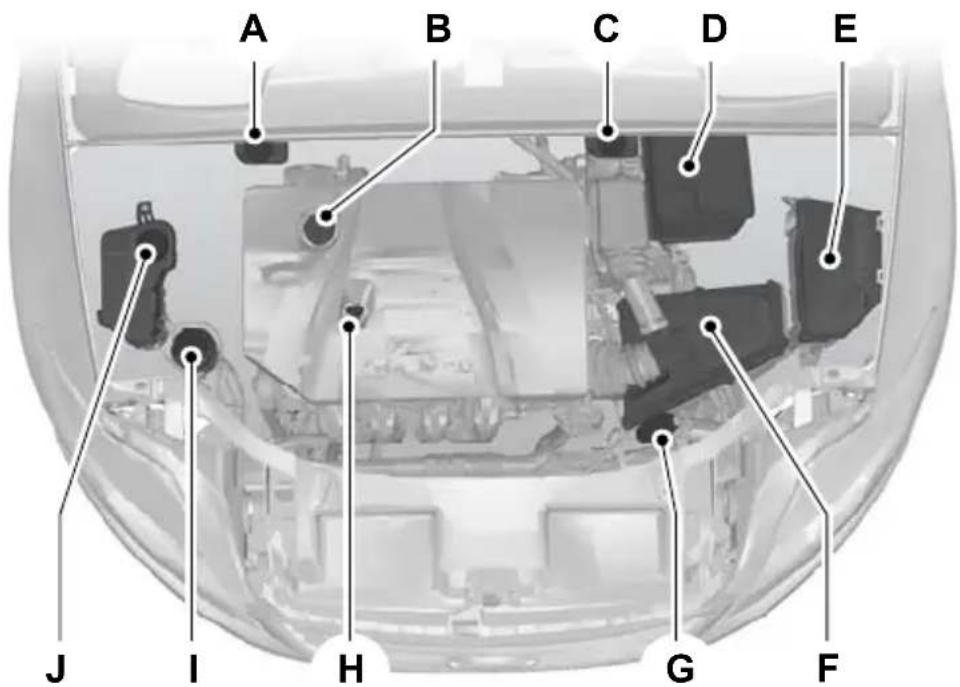
text_image
A B C D E J I H G FE81313
A Brake and clutch fluid reservoir (right-hand drive). See Brake and clutch fluid check (page 198).
B Engine oil filler capSee Engine oil check (page 197).
C Brake and clutch fluid reservoir (left-hand drive). See Brake and clutch fluid check (page 198).
D Battery. See Using booster cables (page 204).
E Engine compartment fuse box. See Fuse specification chart (page 17) Air cleaner. No maintenance necessary.F
G Screen washer fluid reservoir. See Washer fluid check (page 199).
H Engine oil dipstick See Engine oil check (page 197).
Power steering fluid reservoir. See Power steering fluid check (page 198).
J Engine coolant reservoir. See Engine coolant check (page 197).
^1 The filler caps and the engine oil dipstick are coloured for easy identification.
ENGINE COMPARTMENT OVERVIEW - 2.5L DURATEC (VI5)
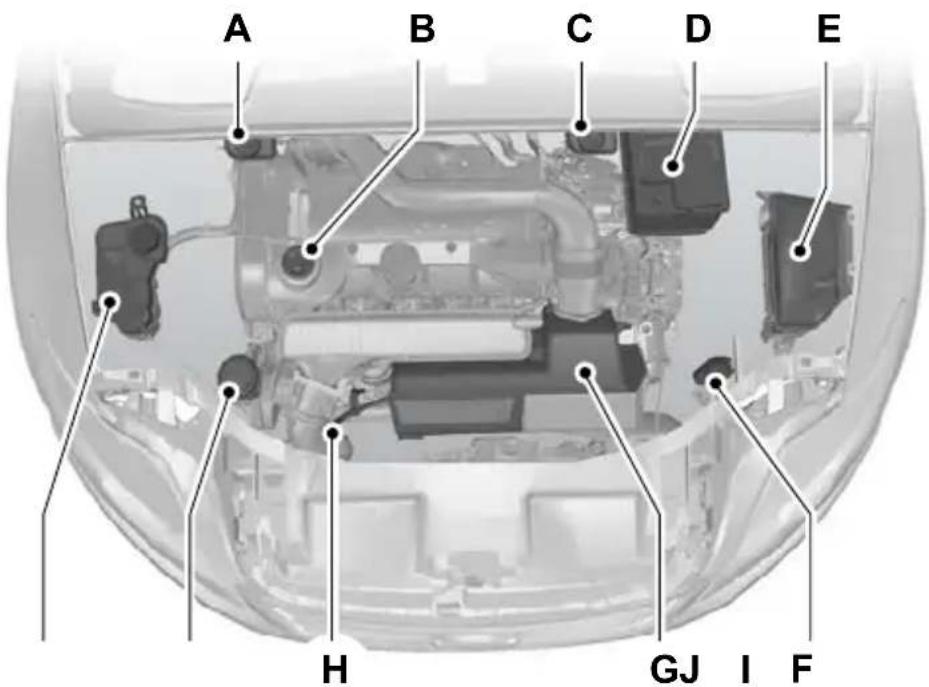
text_image
A B C D E H GJ I FE73232
A Brake and clutch fluid reservoir (right-hand drive). See Brake and clutch fluid check (page 198).
B Engine oil filler cap See Engine oil check (page 197).
C Brake and clutch fluid reservoir (left-hand drive). See Brake and clutch fluid check (page 198).
D Battery. See Using booster cables (page 204).
E Engine compartment fuse box. See Fuse specification chart (page 176).
F Screen washer fluid reservoir. See Washer fluid check (page 199). Air cleaner. No maintenance necessary.G
H Engine oil dipstick See Engine oil check (page 197).
I Power steering fluid reservoir. See Power steering fluid check (page 198).
J Engine coolant reservoir. See Engine coolant check (page 197).
^1 The filler caps and the engine oil dipstick are coloured for easy identification.
ENGINE COMPARTMENT OVERVIEW - 1.8L DURATORQ-TDC (LYNX) DIESEL
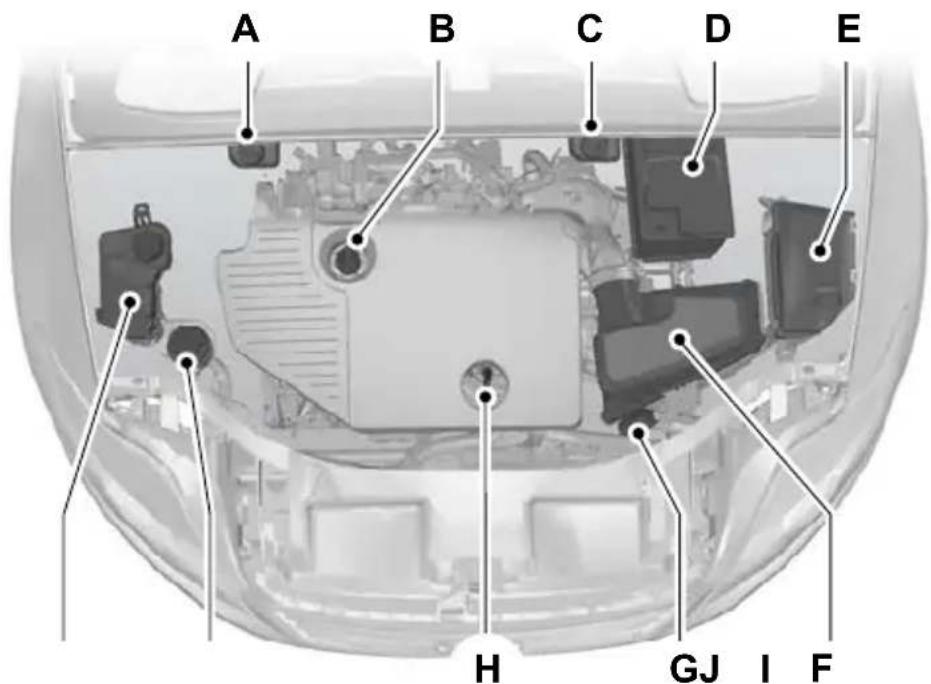
text_image
A B C D E H GJ I FE73233
A Brake and clutch fluid reservoir (right-hand drive). See Brake and clutch fluid check (page 198).
B Engine oil filler capSee Engine oil check (page 197).
C Brake and clutch fluid reservoir (left-hand drive). See Brake and clutch fluid check (page 198).
D Battery. See Using booster cables (page 204).
E Engine compartment fuse box. See Fuse specification chart (page 17) Air cleaner. No maintenance necessary.F
G Screen washer fluid reservoir. See Washer fluid check (page 199).
H Engine oil dipstick See Engine oil check (page 197).
I Power steering fluid reservoir. See Power steering fluid check (page 198).
J Engine coolant reservoir. See Engine coolant check (page 197).
^1 The filler caps and the engine oil dipstick are coloured for easy identification.
ENGINE COMPARTMENT OVERVIEW - 2.0L DURATORQ-TDCI (DW) DIESEL

text_image
A B C D E H GJ I FE73234
A Brake and clutch fluid reservoir (right-hand drive). See Brake and clutch fluid check (page 198).
B Engine oil filler cap See Engine oil check (page 197).
C Brake and clutch fluid reservoir (left-hand drive). See Brake and clutch fluid check (page 198).
D Battery. See Using booster cables (page 204).
E Engine compartment fuse box. See Fuse specification chart (page 176). Air cleaner. No maintenance necessary.F
G Screen washer fluid reservoir. See Washer fluid check (page 199).
H Engine oil dipstick See Engine oil check (page 197).
I Power steering fluid reservoir. See Power steering fluid check (page 198).
J Engine coolant reservoir. See Engine coolant check (page 197).
^1 The filler caps and the engine oil dipstick are coloured for easy identification.
ENGINE COMPARTMENT OVERVIEW - 2.2L DURATORQ-TDCI (DW) DIESEL
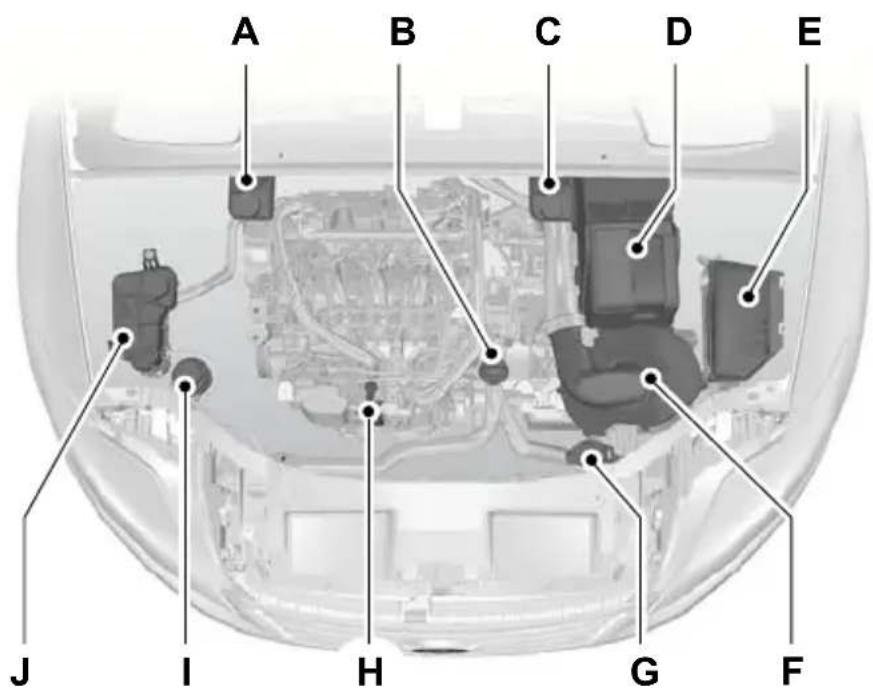
text_image
A B C D E J I H G FE87715
A Brake and clutch fluid reservoir (right-hand drive): See Brake and clutch fluid check (page 198).
B Engine oil filler capSee Engine oil check (page 197).
C Brake and clutch fluid reservoir (left-hand drive): See Brake and clutch fluid check (page 198).
D Battery: See Vehicle battery (page 204).
E Engine compartment fuse box: See Fuses (page 173). Air cleaner: No maintenance necessary.F
G Screen washer fluid reservoir: See Washer fluid check (page 199).
H Engine oil dipstick See Engine oil check (page 197).
I Power steering fluid reservoir: See Power steering fluid check (page 198).
J Engine coolant reservoir: See Engine coolant check (page 197).
^1 The filler caps and the engine oil dipstick are coloured for easy identification.
ENGINE OIL DIPSTICK - 1.6LENGINE OIL DIPSTICK - 2.5L DURATEC-16V TI-VCT DURATEC (VI5) (SIGMA)

text_image
A B E95540A MIN
B MAX
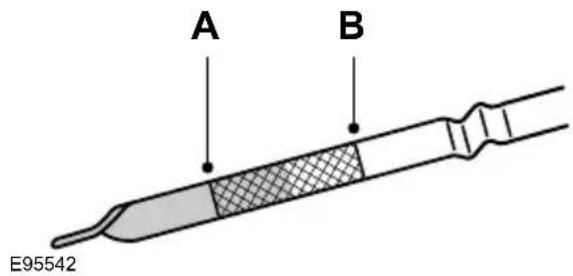
text_image
A B E95542A MIN
B MAX
ENGINE OIL DIPSTICK - 1.8L
ENGINE OIL DIPSTICK - 2.0DURATORQ-TDCI (LYNX)
DURATEC-HE (MI4)/2.3L DIESEL
DURATEC-HE (MI4)

text_image
A B E92036A MIN
B MAX

text_image
A BE95527
A MIN
B MAX
ENGINE OIL DIPSTICK - DURATORQ-TDCI (DW) DIESEL/2.2L DURATORQ-TDCI (DW) DIESEL
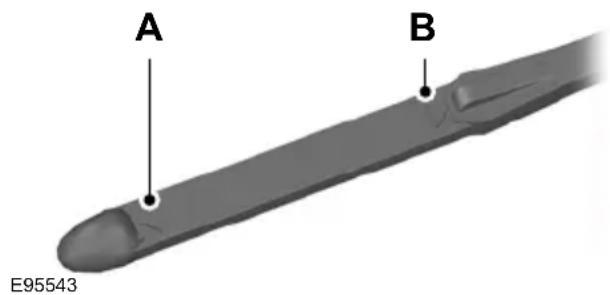
text_image
A B E95543A MIN
B MAX
ENGINE OIL CHECK
CAUTION
Do not use oil additives or other engine treatments. Under certain conditions, they could damage the engine.
Note: The oil consumption of new engines reaches its normal level after approximately 5 000 kilometres (3 000 miles).
Checking the oil level
CAUTION
Make sure that the level is between the MIN and the MAX marks.
Note: Check the level before starting the engine.
Note: Make sure that your vehicle is on level ground.
2.0 Note: Oil expands when it is hot. The level may therefore extend a few millimetres beyond the MAX mark.
Remove the dipstick and wipe it with a clean, lint free cloth. Replace the dipstick and remove it again to check the oil level. If the level is at the MIN mark, top up immediately.
Topping up
WARNINGS

Only top up when the engine is cold. If the engine is hot, wait 10 minutes for the engine to cool down.

Do not remove the filler cap when the engine is running.
Remove the filler cap.
CAUTION

Do not top up further than the MAX mark.
Top up with fluid that meets the Ford specification. See Technical specifications (page 199).
ENGINE COOLANT CHECK
Checking the coolant level
WARNING

Do not allow the fluid to touch your skin or eyes. If this happens, rinse the affected areas immediately with y of water and contact your doctor.
CAUTION

Make sure that the level is between the MIN and the MAX marks.
Note: Coolant expands when it is hot. The level may therefore extend beyond the MAX mark.
If the level is at the MIN mark, top up immediately.
Topping up
WARNINGS

Only top up when the engine is co If the engine is hot, wait 10 minute for the engine to cool down.

Do not remove the filler cap when the engine is running.

Do not remove the filler cap when the engine is hot. Wait for the engine to cool down.
Unscrew the cap slowly. Any pressure will escape slowly as you unscrew the cap.
CAUTIONS

Do not spill coolant on any part of engine.

Do not top up further than the mark.
Top up with fluid that meets the Ford specification. See Technical specifications (page 199).
BRAKE AND CLUTCH FLUID CHECK
WARNINGS

Do not allow the fluid to touch you skin or eyes. If this happens, rinse the affected areas immediately with plenty of water and contact your doctor.
WARNINGS

If the level is at the MIN mark, have the system checked by a properly trained technician as soon as able.
Note: The brake and the clutch systems are supplied from the same reservoir.
Top up with fluid that meets the Ford specification. See Technical specifications (page 199).
POWER STEERING FLUID CHECK
WARNING

Do not allow the fluid to touch your skin or eyes. If this happens, rinse the affected areas immediately with y of water and contact your doctor.

Make sure that the level is between the MIN and the MAX marks.
If the level is at the MIN mark, top up immediately.
Topping up
Remove the filler cap.
CAUTION

Do not top up further than the MAX mark.
WASHER FLUID CHECK
The front and rear washer systems are supplied from the same reservoir.
TECHNICAL SPECIFICATIONS
Vehicle fluids
| SpecificationRecommend | ||
| Engine oil | Castrol Engine Oil | WSS-M2C913-C |
| Power steering fluid | Ford or Motorcraft Power Steering Fluid | WSS-M2C204-A2 |
| Coolant | Motorcraft SuperPlus Anti-freeze | WSS-M97B44-D |
| Brake fluid | Ford or Motorcraft Super DOT 4 Brake Fluid | ESD-M6C57-A |
Providing it meets the specification defined by WSS-M2C913-C, you can also use Ford Engine Oil or an alternative engine oil.
Topping up the oil: If you are unable to find an oil that meets the specification by WSS-M2C913-C, you must use SAE 5W-30 (preferred), SAE 5W-40 (except vehicles with E85 fuel) or SAE 10W-40 that meets the specification defined by ACEA A5/B5 (preferred) or ACEA A3/B3. Using these oils can result in longer engine cranking periods, reduced engine performance, reduced fuel economy and increase emission levels.
Castrol engine oil recommended.

text_image
CastrolCapacities
| Capacity in litres (gallons)Iter | ||
| MAX markPower steerir | ||
| All | Windscreen and rear window washer system | 3.8 (0.8) |
| 1.6L Duratec-16V Ti-VCT | Engine lubrication system including the oil filter | - 4.1 (0.9) |
Maintenance
| Capacity in litres (gallons) | ||
| 1.6L Duratec-16V Ti-VCT | Engine lubrication system excluding the oil filter | - 3.8 (0.8) |
| 6.0 (1.3) | ||
| 70 (15.4) | ||
| 2.0L Duratec-HE | Engine lubrication system including the oil filter | - 4.3 (1.0) |
| 2.0L Duratec-HE | Engine lubrication system excluding the oil filter | - 3.9 (0.9) |
| 6.2 (1.4) | ||
| 70 (15.4) | ||
| 2.3L Duratec-HE | Engine lubrication system including the oil filter | - 4.3 (1.0) |
| 2.3L Duratec-HE | Engine lubrication system excluding the oil filter | - 3.9 (0.9) |
| 6.9 (1.5) | ||
| 70 (15.4) | ||
| 2.5L Duratec-ST | Engine lubrication system including the oil filter | - 5.8 (1.3) |
| 2.5L Duratec-ST | Engine lubrication system excluding the oil filter | - 5.5 (1.2) |
| 7.1 (1.6) | ||
| 70 (15.4) | ||
| 1.8L Duratorq-TDCi | Engine lubrication system including the oil filter | - 5.6 (1.2) |
| 1.8L Duratorq-TDCi | Engine lubrication system excluding the oil filter | - 5.0 (1.1) |
| 7.9 (1.7) | ||
| 70 (15.4) | ||
| 2.0L Duratorq-TDCi | Engine lubrication system including the oil filter | - 5.5 (1.2)Capacity in litres (gallons)Iter |
| 2.0L Duratorq-TDCi | Engine lubrication system excluding the oil filter | - 5.0 (1.1) |
| 8.1 (1.8)Engine cooling | ||
| 70 (15.4)Fuel tank2.0L | ||
| 2.2L Duratorq-TDCi | Engine lubrication system including the oil filter | - 6.0 (1.3) |
| 2.2L Duratorq-TDCi | Engine lubrication system excluding the oil filter | - 5.4 (1.2) |
| 8.4 (1.9)Engine cooling | ||
| 70 (15.4)Fuel tank2.2L |
CLEANING THE EXTERIOR
WARNING

If you use a car wash with a wax cycle, make sure that you remove the wax from the windscreen.
CAUTIONS

Some car wash installations use water at high pressure. This could damage certain parts of your vehic

Remove the aerial before using an automatic car wash.

Switch the heater blower off to prevent contamination of the fresh air filter.
We recommend that you wash your vehicle with a sponge and lukewarm water containing a car shampoo.
Cleaning the headlamps
CAUTIONS

Do not scrape the headlamp lenses or use abrasives, alcoholic solvents or chemical solvents to clean them.

Do not wipe the headlamps when they are dry.
Cleaning the rear window
CAUTION

Do not scrape the inside of the rea window or use abrasives or chemical solvents to clean it.
Use a clean, lint free cloth or a damp chamois leather to clean the inside of the rear window.
Cleaning the chrome trim
CAUTION

Do not use abrasives or chemical solvents. Use soapy water.
Body paintwork preservation
CAUTIONS

Do not polish your vehicle in strong sunshine.

Do not allow polish to touch plastic surfaces. It could be difficult to remove.

Do not apply polish to the windscreen or rear window. This could cause the wipers to become noisy and they not clear the window properly.
We recommend that you wax the paintwork once or twice a year.
CLEANING THE INTERIOR
Seat belts
WARNINGS

Do not use abrasives, or chemical solvents to clean them.

Do not allow moisture to penetrate the seat belt retractor mechanism.
Clean the seat belts with interior cleaner or water applied with a soft sponge. Let the seat belts dry naturally, away from artificial heat.
Instrument cluster screens, LCD screens, radio screens
WARNING

Do not use abrasives, alcoholic solvents or chemical solvents to clean them.
REPAIRING MINOR PAINT DAMAGE
CAUTION

Remove apparently harmless looking substances from the paintwork immediately (e.g. bird droppings, trees, insect remains, tar spots, road salt industrial fall out).
You should repair paintwork damage caused by stones from the road or minor scratches as soon as possible. A choice of products is available from your Ford Dealer. Read and follow the manufacturer's instructions.
USING BOOSTER CABLES
CAUTIONS

Connect batteries with only the same nominal voltage.

Always use booster cables with insulated clamps and adequate size cable.

Do not disconnect the battery from the vehicle's electrical system.
-
Position the vehicles so that they do not touch one another.
-
Switch off the engine and any electrical equipment.
-
Connect the positive (+) terminal of vehicle B with the positive (+) terminal of vehicle A (cable C).
-
Connect the negative (-) terminal of vehicle B to the ground connection of vehicle A (cable D). See Battery connection points (page 205).
To connect the booster cables

flowchart
graph TD
    A["Component A"] -->|Arrow to| B["Component B"]
    B -->|Arrow to| C["Component C"]
    C -->|Arrow to| D["Component D"]
    D -->|Arrow to| A
E102925
Flat battery vehicleA
Booster battery vehicleB
Positive connection cableC
Negative connection cableD
CAUTIONS
Do not connect to the negative (-) terminal of the flat battery.
Make sure that the cables are clear of any moving parts.
To start the engine
-
Run the engine of vehicle B at moderately high speed.
-
Start the engine of vehicle A.
-
Run both vehicles for a minimum of three minutes before disconnecting the cables.
CAUTION
Do not switch on the headlamps when disconnecting the cables. The peak voltage could blow the bulbs.
Disconnect the cables in the reverse order.
BATTERY CONNECTION POINTS
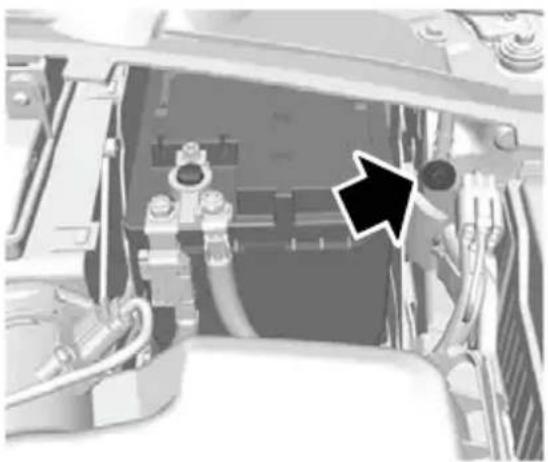
natural_image
Close-up of a mechanical assembly with hoses and connectors, no visible text or symbolsE114494
CAUTION

Do not connect to the negative (-) terminal of the flat battery.
GENERAL INFORMATION
CAUTIONS
Use only approved wheel and tyre sizes. Using other sizes could damage the vehicle and will make the National Type Approval invalid.
If you change the diameter of the tyres from that fitted at the factory, the speedometer may not display the correct speed. Take the vehicle to your dealer to have the engine management system reprogrammed.
A decal with tyre pressure data is located in the driver's door opening at the B-pillar.
Check and set the tyre pressure at the ambient temperature in which you are intending to drive the vehicle and when the tyres are cold.
CHANGING A ROAD WHEEL
Locking wheel nuts
You can obtain a replacement locking wheel nut key and replacement locking wheel nuts from your dealer using the reference number certificate.
Vehicles with a temporary spare wheel
WARNINGS

If the spare wheel differs from the other fitted wheels, these rules must be followed:

Do not exceed 80 km/h (50 mph)

Drive the shortest possible distances.

Do not fit more than one spare wheel on your vehicle at any one time.
WARNINGS

Do not use snow chains on this type of wheel.

Do not drive through an automatic car wash.

Do not carry out any tyre repairs on a temporary spare wheel.
CAUTION

The ground clearance of your vehicle will be reduced. Take care when parking next to a curb.
Note: Your vehicle may exhibit some unusual driving characteristics.
Vehicle jack
WARNINGS

The vehicle jack supplied with your vehicle should only be used when changing a wheel in emergency tions.

Before using the vehicle jack, check that it is not damaged or deformed and that the thread is lubricated and from foreign matter.

Never place anything between the jack and the ground, or the jack and the vehicle.
Note: Vehicles with a tyre repair kit or run flat tyres are not equipped with a vehicle jack or a wheel brace.
It is recommended to use a workshop type hydraulic jack for changing between summer and winter tyres.
Note: Use a jack with a minimum lifting capacity of 1.5 tonnes and a lifting plate with a minimum diameter of 80 millimetres (3.1 inches).
Vehicles without tyre repair kit or run flat tyres
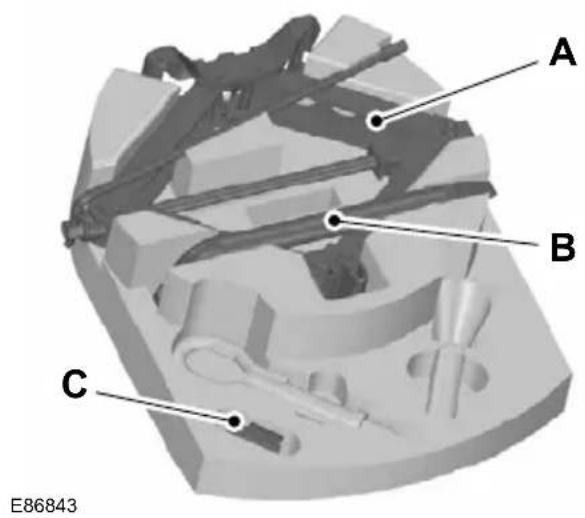
text_image
A B C E86843JackA
Wheel braceB
Space for locking wheel nut keyC
Your vehicle jack and wheel brace are located in the spare wheel well.
Jacking and lifting points
CAUTION
Use only the specified jacking points. If you use other positions, you may damage the body, steering, suspension, engine, braking system or the fuel lines.
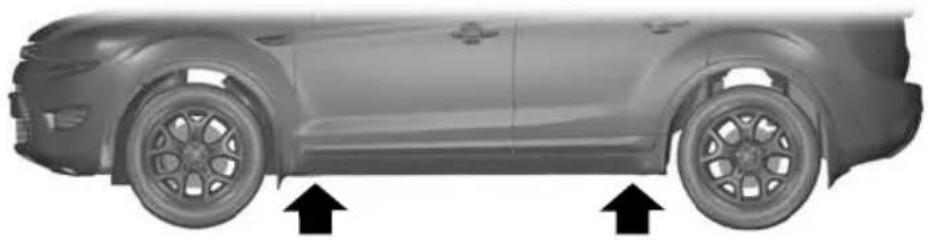
natural_image
Side profile of a car showing wheel rim and side panel, with two upward arrows indicating motion direction (no text or symbols)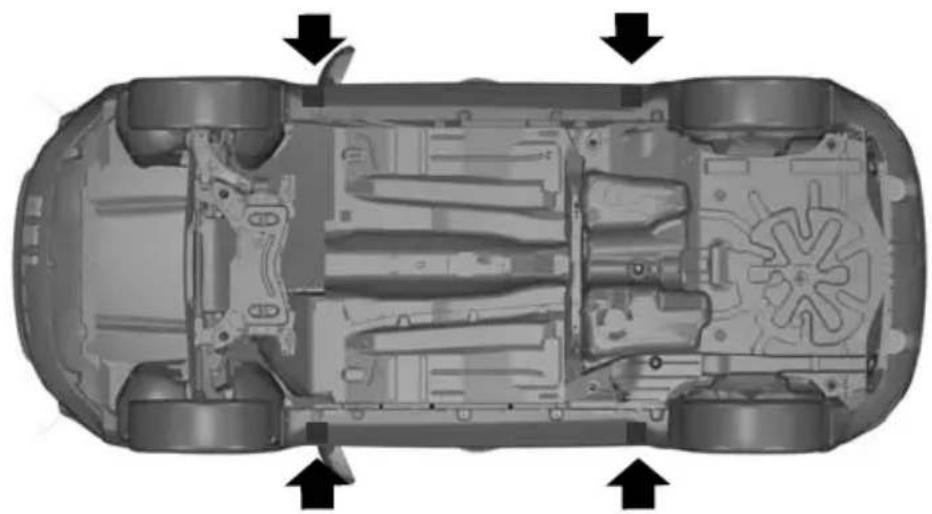
natural_image
Top-down schematic of an automotive chassis showing internal components and airflow direction arrows (no text or labels)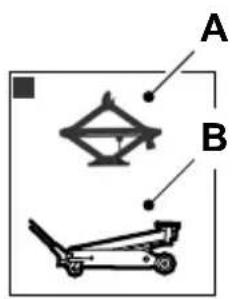
text_image
A BE92658
Emergency use onlyA MaintenanceB
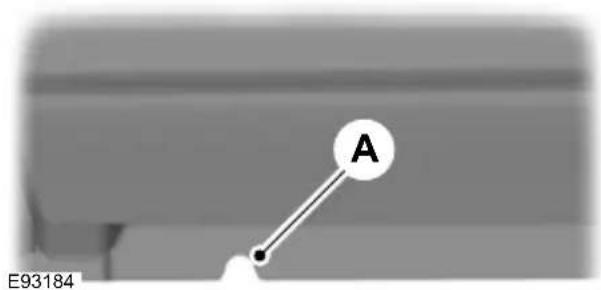
text_image
A E93184Indentations in the sills A show the location of the jacking points.

natural_image
Close-up of a mechanical assembly with a bracket and inset view (no visible text or symbols)E92932
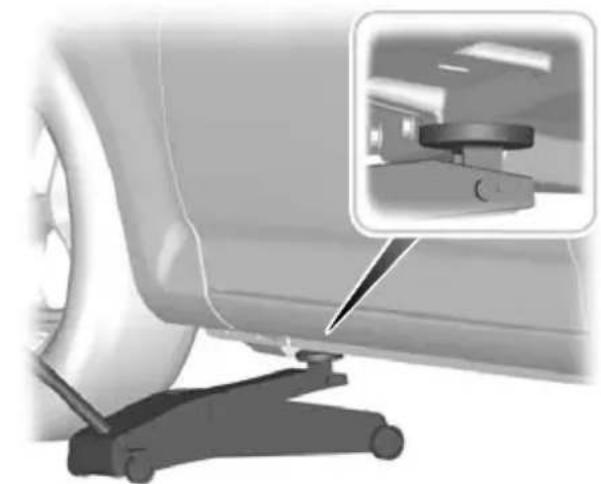
natural_image
Close-up of a car wheel and a mechanical lift with an inset showing a mounted device (no visible text or symbols)E93020
Vehicles with side skirts
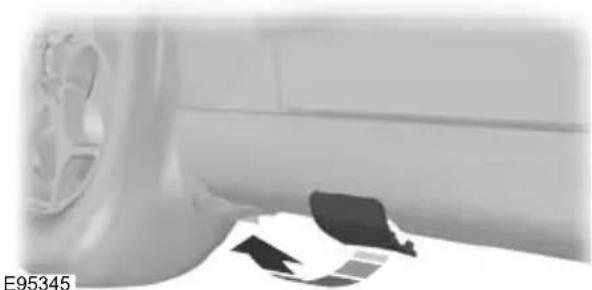
natural_image
Interior view of a vehicle showing a car wheel, dashboard, and seat cover (no visible text or symbols)Removing a road wheel
WARNINGS
Park your vehicle in such a position that neither the traffic nor you are hindered or endangered.
Set up a warning triangle.
Make sure that the vehicle is on firm, level ground with the wheels pointing straight ahead.
Switch off the ignition and apply the parking brake.
If your vehicle has a manual transmission, select first or reverse gear. If it has an automatic transmission, select park.
Have the passengers leave the vehicle.
Secure the diagonally opposite wheel with an appropriate block or wheel chock.
WARNINGS
Make sure that the arrows on directional tyres point in the direction of rotation when the vehicle is moving forwards. If you have to fit a spare wheel with the arrows pointing in the opposite direction, have the tyre refitted in the correct direction by a properly trained technician.
Do not work underneath the vehicle when it is supported only by a jack.
Make sure that the jack is vertical to the jacking point and the base is flat on the ground.

natural_image
Close-up of a car wheel with a tool inserted, showing the wheel rim and tire (no text or symbols visible)CAUTION
Do not lay alloy wheels face down the ground, this will damage the paint.
Note: The spare wheel is located under the floor cover in the luggage compartment.
- Insert the flat end of the wheel brace between the rim and the hub cover and carefully remove the hub cap or cover.
E71948
- Install the locking wheel nut key.
- Fully extend the wheel brace.
- Slacken the wheel nuts.
- Jack up the vehicle until the tyre is clear of the ground.
- Remove the wheel nuts and the e wheel.
Installing a road wheel
WARNINGS

Use only approved wheel and tyre sizes. Using other sizes could damage the vehicle and will make
the National Type Approval invalid. See Technical specifications (page 219).

Do not fit run flat tyres on vehicles that were not originally fitted with them. Please contact your dealer more details regarding compatibility.
CAUTION

Do not install alloy wheels using wheel nuts designed for use with steel wheels.
Wheels and tyres
Note: Make sure the wheel and hub contact surfaces are free from foreign matter.
Note: Make sure that the cones on the wheel nuts are against the wheel.
- Install the wheel.
- Install the wheel nuts finger tight.
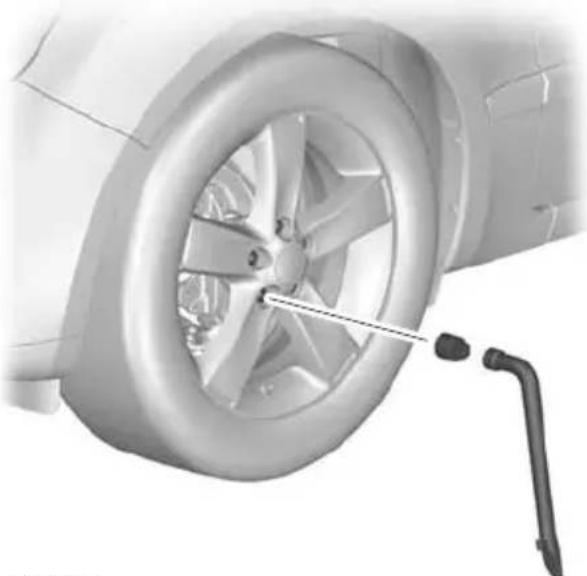
natural_image
Close-up of a car wheel with a tool inserted, showing the rim and wheel (no text or symbols visible)E71948
- Install the locking wheel nut key.
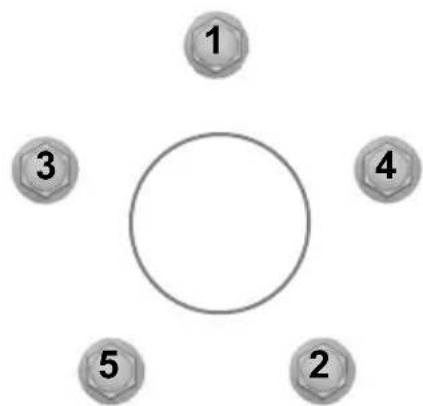
flowchart
graph TD
    A["1"] --> B[" "]
    C["3"] --> D[" "]
    E["4"] --> F[" "]
    G["2"] --> H["5"]
    I[" "] --> J[" "]
E75442
-
Partially tighten the wheel nuts in the sequence shown.
-
Lower the vehicle and remove the jack.
- Fully tighten the wheel nuts in the sequence shown. See Technical specifications (page 219).
- Install the hub cap or cover using the ball of your hand.
WARNING

Have the wheel nuts checked for tightness and the tyre pressure checked as soon as possible.
Note: If the spare wheel is different in size or construction to the road wheels, have this replaced as soon as possible.
TYRE REPAIR KIT
Your vehicle may not have a spare tyre. In this case it will have an emergency tyre repair kit that can be used to repair one flat tyre.
The tyre repair kit is located in the spare wheel well.
General information
WARNINGS
Depending on the type and extent of tyre damage, some tyres can only be partially sealed or not sealed at all. Loss of tyre pressure can affect vehicle handling, leading to loss of vehicle control.
Do not use the tyre repair kit if the tyre has already been damaged as a result of being driven under inflated.
Do not try to seal damage other than that located within the visible tread of the tyre.
Do not try to seal damage to the tyre's sidewall.
The tyre repair kit seals most tyre punctures [with a diameter of up to six millimetres (1/4 inch)] to temporarily restore mobility.
Observe the following rules when using the kit:
- Drive with caution and avoid making sudden steering or driving manoeuvres, especially if the vehicle is heavily loaded or you are towing a trailer.
- The kit will provide you with an emergency temporary repair, enabling you to continue your journey to the next vehicle or tyre dealer, or to drive a maximum distance of 200 kilometres (125 miles).
- Do not exceed a maximum speed of 80 km/h (50 mph).
- Keep the kit out of the reach of children.
- Only use the kit when the ambient temperature is between -30^ (-22°F) and +70^ (+158°F).
Using the tyre repair kit
WARNINGS

Compressed air can act as an explosive or propellant.

Never leave the tyre repair kit unattended while in use.
CAUTION

Do not keep the compressor operating for more than 10 minutes.
Note: Use the tyre repair kit only for vehicle with which it was supplied.
- Park your vehicle at the roadside so that you do not obstruct the flow of traffic and so that you are able to use the kit without being in danger.
- Apply the parking brake, even if you have parked on a level road, to make sure that the vehicle will not move.
- Do not attempt to remove foreign objects like nails or screws penetrating the tyre.
- Leave the engine running while the kit is in use, but not if the vehicle is in a enclosed or poorly ventilated area (for example, inside a building). In these circumstances, switch the compressor on with the engine turned off.
Replace the sealant bottle with a new one before the expiry date (see top of bottle) is reached.
- Inform all other users of the vehicle that the tyre has been temporarily sealed with the tyre repair kit and make them aware of the special driving conditions to be observed.
Inflating the tyre
WARNINGS

Check the sidewall of the tyre prior to inflation. If there are any cracks, bumps or similar damage, do not apt to inflate the tyre.

Do not stand directly beside the tyre while the compressor is pumping.

Watch the sidewall of the tyre. If any cracks, bumps or similar damage appear, turn off the compressor and the air out by means of the pressure
Relief valve B. Do not continue driving with this tyre.
WARNINGS

The sealant contains natural rubber latex. Avoid contact with skin and clothing. If this happens, rinse the ted areas immediately with plenty of r and contact your doctor.

If the tyre inflation pressure does not reach 1.8 bar (26 psi) within seven minutes, the tyre may have suffered massive damage, making a temporary or impossible. In this case, do not due driving with this tyre.
CAUTION

Screwing the bottle onto the bottle holder will pierce the seal of the bottle. Do not unscrew the bottle in the holder as the sealant will escape.

text_image
K A B C J D 50 80 H E G FE94973
Protective capA
Pressure relief valveB
HoseC
Orange capD
Bottle holderE
Pressure gaugeF
Power plug with cableG
Compressor switchH
Labell
Bottle lidJ
Sealant bottleK
- Open the lid of the tyre repair kit.
- Peel off the label I showing the maximum permissible speed of 80 km/h (50 mph) from the casing and attach it to the instrument panel in the driver's field of view. Make sure the label does not obscure anything important.
- Take the hose C and the power plug with cable G out of the kit.
- Unscrew the orange cap D and the bottle lid J.
- Screw the sealant bottle K clockwise into the bottle holder E fully tight.
- Remove the valve cap from the damaged tyre.
- Detach the protective cap A from the hose C and screw the hose C firmly onto the valve of the damaged tyre.
- Make sure that the compressor switch H is in position 0.
- Insert the power plug G into the cigar lighter socket or auxiliary power socket. See Cigar lighter (page 121). See Auxiliary power sockets (page 122).
- Start the engine.
-
Move the compressor switch H to position 1.
-
Inflate the tyre for no longer than seven minutes to an inflation pressure of minimum 1.8 bar (26 psi) and a maximum of 3.5 bar (51 psi). Move the compressor switch H to position O and check the current tyre pressure with pressure gauge F.
- Remove the power plug G from the cigar lighter socket or auxiliary power socket.
- Quickly unscrew the hose C from the tyre valve and replace the protective cap A. Fasten the valve cap again.
- Leave the sealant bottle K in the bottle holder E.
- Make sure the kit, the bottle lid and the orange cap are stored safely, but still easily accessible in the vehicle. The kit will be required again when you check the tyre pressure.
- Immediately drive approximately three kilometres (two miles) so that the sealant can seal the damaged area.
Note: When pumping in the sealant through the tyre valve, the pressure may rise up to 6 bar (87 psi) but will drop again after about 30 seconds.
WARNING
If you experience heavy vibrations, unsteady steering behaviour or noises while driving, reduce your speed and drive with caution to a place where it is safe for you to stop the veh Recheck the tyre and its pressure. If the tyre pressure is less than 1.3 bar (19 ps) or if there are any cracks, bumps or sim damage visible, do not continue driving with this tyre.
Checking the tyre pressure
- Stop the vehicle after driving approximately three kilometres (two miles). Check, and where necessary, adjust the pressure of the damaged tyre.
- Attach the kit and read the tyre pressure from the pressure gauge
- If the pressure of the sealant-filled ty is 1.3 bar (19 psi) or more, adjust it the specified pressure. See Technical specifications (page 219).
- Follow the inflation procedure once again to top up the tyre.
- Check the tyre pressure again from the pressure gauge F. If the tyre pressure is too high, deflate the tyre to the specified pressure using the pressure relief valve B.
- Once you have inflated the tyre to its correct tyre pressure, move the compressor switch H to position O, remove the power plug G from the socket, unscrew the hose C, fasten the valve cap and replace the protective cap A.
-
Leave the sealant bottle K in the bottle holder E and store the kit away safely in its original location.
-
Drive to the nearest tyre specialist to get the damaged tyre replaced. Before the tyre is removed from the rim, inform your tyre dealer that the tyre contains sealant. Renew the kit as soon as possible after it has been used once.
Note: Remember that emergency roadside tyre repair kits only provide temporary mobility. Regulations concerning tyre repair after usage of tyre repair kit may differ from country to country. You should consult a tyre specialist for advice.
WARNING
Before driving, make sure the tyre is adjusted to the recommended inflation pressure. See Technical specifications (page 219). Monitor the tyre pressure until the sealed tyre is replaced.
Empty sealant bottles can be disposed of together with normal household waste. Return remains of sealant to your dealer or dispose of it in compliance with local waste disposal regulations.
RUN FLAT TYRES
Principle of operation
Standard tyre

text_image
A B CE75207
A Wheel rim position with correct tyre pressure
B Wheel rim position with insufficient tyre pressure TyreC
Run flat tyre

text_image
B A D CE87667
A Wheel rim position with correct tyre pressure
B Wheel rim position with insufficient tyre pressure TyreC
Reinforced sidewallD
When a standard tyre experiences a drastic loss of inflation pressure, the rim of the wheel brings the full weight of the vehicle to bear on the collapsed sidewalls. You can barely manoeuvre the vehicle and the tyre is destroyed.
Run flat tyres have sturdy, reinforced sidewalls that support the rim should the tyre suffer a loss of inflation pressure.
What to do if a run flat tyre has a puncture
Due to the run-flat properties of these tyres, you may not notice any tyre defect. Your vehicle is equipped with a tyre pressure monitoring system that alerts you to any drop in tyre pressure. See
Technical specifications (page 219).
In the event of a tyre defect:
- immediately slow down to a maximum speed of 80 km/h (50 mph)
- avoid sudden or erratic braking and steering manoeuvres and be especially careful negotiating bends
• do not drive more than 80 kilometres (50 miles) after the defect is detected
• have the defective tyre replaced as soon as possible.
Replacing run flat tyres
WARNINGS

Make sure that the workshop is aware that your vehicle is equipped with special run flat tyres.

Never repair or reuse run flat tyres that are damaged or have been driven on run flat.
If a run flat tyre has to be replaced, have the respective wheel rim inspected for any damage.
WARNINGS

Do not fit a mixture of run flat and standard tyres. In isolated cases, a standard tyre can be temporarily Examine the tyres regularly for cuts, foreign objects and uneven wear of the tread. Uneven wear could mean that the wheel alignment is outside specification.
mounted on a vehicle otherwise equipped. Check the tyre pressures (including the with run flat tyres. It must be pointed on spare) when cold, every two weeks. to the driver that the standard tyre has no runflat properties. LUSING WINTER TYRES

Do not fit run flat tyres on vehicles that were not originally fitted with them. Please contact your dealer more details regarding compatibility.
USING WINTER TYRES
CAUTION

Make sure that you use the correct wheel nuts for the type of wheel the winter tyres are fitted to.
Run flat tyres may be sold and mounted only by specially trained and certified tyre dealers. If
TYRE CARE
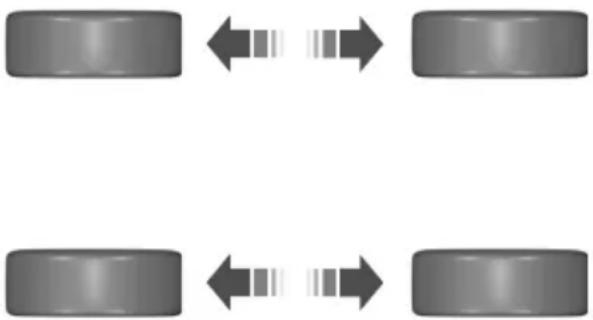
flowchart
graph TD
    A["Car Body 1"] <--> B["Car Body 2"]
    C["Car Body 3"] <--> D["Car Body 4"]
E70415
If winter tyres are used, make sure that the tyre pressures are correct. See Technical specifications (page 219).
USING SNOW CHAINS
WARNINGS

Do not exceed 50 km/h (30 mph).

Do not use snow chains on snow-free roads.

Do not fit snow chains to 235/45 R 17, 235/40 R 18 or T125/90 R 16 tyres.
To make sure the front and rear tyres of your vehicle wear evenly and last longer, we recommend that you swap the tyres from front to rear and vice versa at regular intervals of between 5 000 and 10 000 km (3 000 and 6 000 miles).
CAUTION
ular If your vehicle is fitted with wheel trims, remove them before fitting snow chains.
CAUTION

Do not scrub the sidewalls of the tyres when you are parking.
Note: The ABS will continue to operate normally.
Only use small link snow chains.
If you have to mount a kerb, do so slowly use snow chains on the front wheels and approach it with the wheels at right-angles to the kerb.
TYRE PRESSURE MONITORING SYSTEM
WARNINGS

The system does not relieve you of your responsibility to regularly check the tyre pressures.

The system will only provide a low tyre pressure warning. It will not inflate the tyres.

The system may take longer to detect low pressure in the tyres if you have fitted snow chains.

Do not drive on significantly under-inflated tyres. This may cause the tyres to overheat and fail.
Under-inflation reduces fuel efficiency, tyre tread life and may also affect your ability to drive the vehicle safely.
CAUTIONS

Do not bend or damage the valves when you are inflating the tyres.

Have tyres installed by properly trained technicians.
Checking the tyre pressures
Note: If the tyre pressures are greater than or equal to 3.3 bar (48 lbf/in²), you will see the + symbol below the pressure value. The system only measures pressure up to 3.3 bar (48 lbf/in²). The + symbol indicates that the tyre pressures may be higher.
Note: Type 3 instrument clusters have a slightly different menu structure. Select Settings first to access Information.
- Press the right arrow button on the steering wheel to enter the main menu.
- Highlight Information with the up and down buttons and press the right arrow button.
- Highlight Tyre Pressures with the up and down buttons and press the right arrow button.
- Highlight the desired setting and press the OK button to confirm the setting.
- Press the left arrow button to exit the menu. Hold the left arrow button pressed to return to the trip computer display.
The system monitors the pressure in the tyres using sensors located on the wheel and a receiver located in your vehicle. When the system detects low pressure in the tyres, a warning message is displayed in the information display. See Information messages (page 92).
If a low pressure warning message is displayed in the information display, check the tyre pressures as soon as possible and inflate them to the recommended pressure. See Technical specifications (page 219). If this happens frequently, have the cause determined and rectified as soon as possible.
Setting the vehicle load
Note: Type 3 instrument clusters have a slightly different menu structure. Select Settings first to access Setup.
Correct tyre pressure settings depend on vehicle load. See Technical specifications (page 219). The system can only detect low pressure if you have entered the current vehicle load.
- Press the right arrow button on the steering wheel to enter the main menu.
- Highlight Setup with the up and down buttons and press the right arrow button.
Wheels and tyres
-
Highlight Tyre Pressures with the up and down buttons and press the right arrow button.
-
Highlight the desired setting and press the OK button to confirm the setting.
-
Press the left arrow button to exit the menu. Hold the left arrow button pressed to return to the trip computer display.
TECHNICAL SPECIFICATIONS
Wheel nut torque
| Nm (lb-ft)Wheel type | |
| 140 (103)All |
Tyre pressures (cold tyres)
Up to 80 km/h (50 mph)
Tyre pressures
| Tyre sizeVariant | Full loadNormal load | ||||
| bar (lbf/in2) | RearFrontRe | ||||
| bar (lbf/in2) | bar (lbf/in2) | bar (lbf/in2) | |||
| 4.2 (61)4.2 (61) | |||||
Up to 160 km/h (100 mph)
Tyre pressures
| Tyre sizeVariant | Full loadNormal loa | ||||
| bar (lbf/in2) | bar (lbf/in2) | bar (lbf/in2) | RearFrontRe | ||
| 2.8 (41)2.51,61 | |||||
| 2.0L Durate2.8IE(41)2.21536 | |||||
| 2.0L Durate2.8IE(41)2.23536 | |||||
Wheels and tyres
| Tyre sizeVariant | Full loadNormal load | ||||
| bar (lbf/in2) | bar (lbf/in2) | bar (lbf/in2) | RearFrontRearF | ||
| 2.8 (41)2.5 (36)2 | |||||
| 2.8 (41)2.5 (36)2 | |||||
| 2.8 (41)2.5 (36)2 | |||||
| 2.8 (41)2.5 (36)2 | |||||
| 2.8 (41)2.5 (36)2 | |||||
| 2.8 (41)2.5 (36)2 | |||||
| 2.8 (41)2.5 (36)2 | |||||
| 2.8 (41)2.5 (36)2 | |||||
| 2.8 (41)2.5 (36)2 | |||||
| 2.8 (41)2.5 (36)2 | |||||
| 2.8 (41)2.5 (36)2 | |||||
| 2.8 (41)2.5 (36)2 | |||||
| 2.8 (41)2.5 (36)2 | |||||
| 2.8 (41)2.5 (36)2 | |||||
| 2.8 (41)2.5 (36)2 | |||||
| 2.8 (41)2.5 (36)2 | |||||
Continuous speed in excess of 160 km/h (100 mph)
Tyre pressures
| Tyre sizeVariant | Full loadNormal load | ||||
| bar (lbf/in2) | RearFrontRearF | ||||
| bar (lbf/in2) | bar (lbf/in2) | bar (lbf/in2) | |||
| 2.8 (41)2.5 (36)2 | |||||
Wheels and tyres
| Tyre sizeVariant | Full loadNormal load | ||||
| bar (lbf/in2) | bar (lbf/in2) | bar (lbf/in2) | RearFrontRe | ||
| 2.8 (41)2.5 (36) | |||||
| 2.8 (41)2.5 (36) | |||||
| 2.8 (41)2.5 (36) | |||||
| 2.8 (41)2.6 (38) | |||||
| 2.8 (41)2.6 (38) | |||||
| 2.8 (41)2.6 (38) | |||||
| 3 (44)2.7 (39) | |||||
| 3 (44)2.7 (39) | |||||
| 3 (44)2.7 (39) | |||||
| 2.6 (38) | 2.23 (32)2.4 (35) | ||||
| 2.8 (41)2.5 (36) | |||||
| 2.8 (41)2.5 (36) | |||||
| 2.8 (41)2.5 (36) | |||||
| 2.8 (41)2.5 (36) | |||||
| 2.8 (41)2.5 (36) | |||||
| 2.6 (38) | |||||
| 2.8 (41)2.5 (36) | |||||
| 2.8 (41)2.5 (36) | |||||
| 2.8 (41)2.5 (36) | |||||
| 2.8 (41)2.5 (36) | |||||
| 2.5 (36) | |||||
| 2.8 (41)2.5 (36) | |||||
| 2.8 (41)2.5 (36) | |||||
| 3 (44)2.7 (39) | |||||
| 3 (44)2.7 (39) | |||||
| 3 (44)2.7 (39) | |||||
VEHICLE IDENTIFICATION PLATE
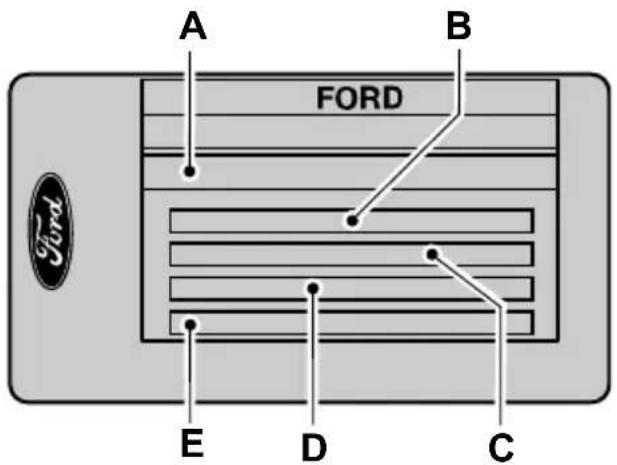
text_image
A B FORD E D CE85610
Vehicle identification numberA Gross vehicle weightB
Gross train weightC Maximum front axle weightD Maximum rear axle weightE
VEHICLE IDENTIFICATION NUMBER (VIN)
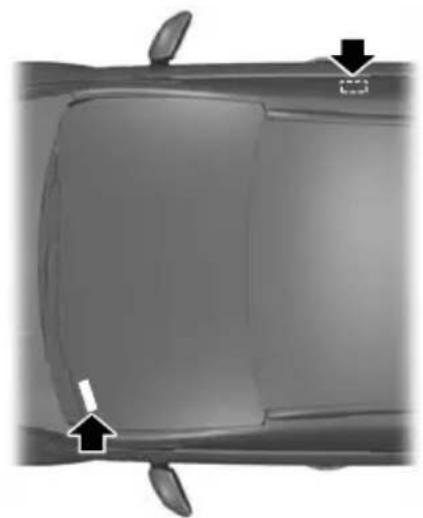
natural_image
Top-down view of a car's side panel showing front and rear panels with arrows indicating movement or change (no text or symbols)E87496
The vehicle identification number is stamped into the floor panel on the right-hand side, beside the front seat. It is also shown on the left-hand side of the instrument panel.
The vehicle identification number and maximum weights are shown on a plate located on the lock side of the passenger door aperture at the bottom.
TECHNICAL SPECIFICATIONS
Vehicle dimensions
4-door

text_image
D A
text_image
C E BE87088
| Dimension descriptionItem | Dimension in mm (inches) | |
| 4 844 (190.7)Maxi | ||
| 2 078 (81.8)Overa | ||
| C | Overall height at EC kerb weight | 1 453 - 1 500(57.2 - 59.1) |
Technical specifications
| Dimension descriptionItem | Dimension in mm (inches) | |
| 2 850 (112.2)WheelbaseD | ||
| E | Front track | 1 579 - 1 589 (62.2 - 62.6) |
| E | Rear track | 1 595 - 1 605 (62.8 - 63.2) |
5-door
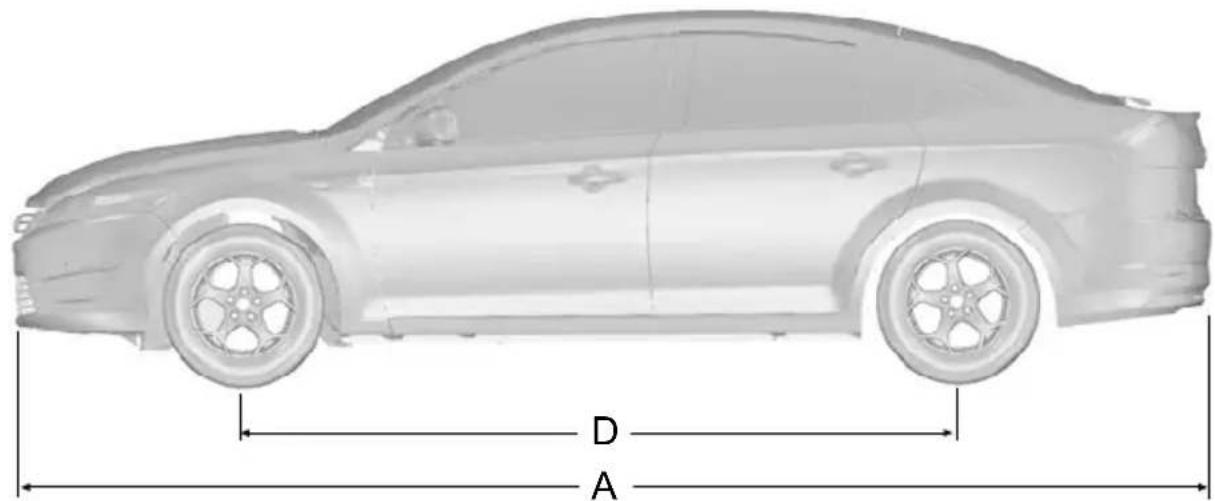
text_image
D AE87089

text_image
C E BTechnical specifications
| Dimension descriptionItem | Dimension in mm (inches) | |
| A | Maximum length | 4 778 - 4 802 (188.1 - 189.1) |
| B | Overall width including exterior mirrors | 2 078 (81.8) |
| C | Overall height at EC kerb weight | 1 453 - 1 500 (57.2 - 59.1) |
| 2 850 (112.2)Wheel | ||
| E | Front track | 1 579 - 1 589 (62.2 - 62.6) |
| E | Rear track | 1 595 - 1 605 (62.8 - 63.2) |
Estate
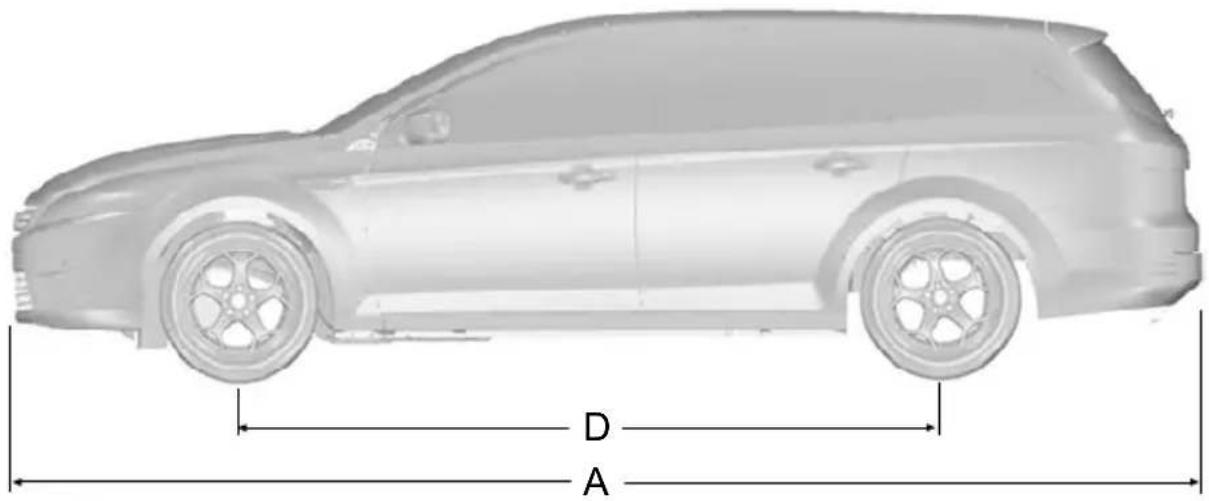
text_image
D A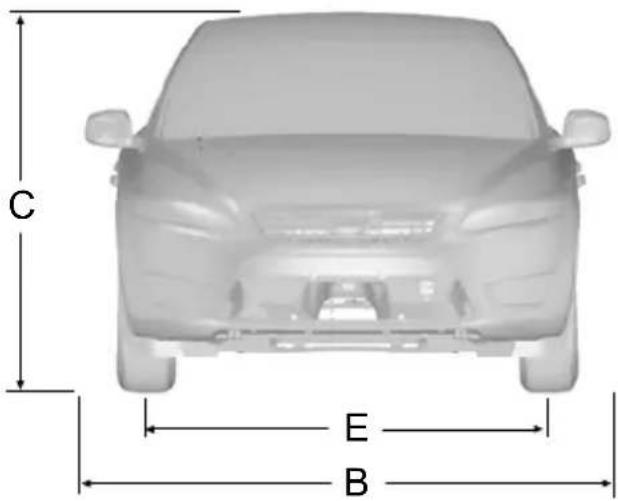
text_image
C E BE87090
| Dimension descriptionItem | Dimension in mm (inches) | |
| A | Maximum length | 4 830 - 4 856 (190.2 - 191.2) |
| 2 078 (81.8)Overall width | ||
| C | Overall height at EC kerb weight without roof | bars 1 466 - 1 512 (57.7 - 59.5) |
| 1 502 - 1 548 (59.1 - 61)Ove | ||
| 2 850 (112.2)WheelbaseD |
Technical specifications
| Dimension descriptionItem | Dimension in mm (inches) | |
| E | Front track | 1 579 - 1 589 (62.2 62.6) |
| E | Rear track | 1 595 - 1 605 (62.8 63.2) |
Towing equipment dimensions
4-door

text_image
A B C D E F GE87091
| Dimension descriptionItem | Dimension in mm (inches) | |
| 102 (4)Bumper | ||
| 1 (0.04)Attachm |
Technical specifications
| Dimension descriptionItem | Dimension in mm (inches) | |
| 1 150 (45.3)Whee | ||
| 438 (17.2)Centre | ||
| 876 (34.5)Inner s | ||
| 434 (17.1)Centre | ||
| 707 (27.8)Centre |
el centre of tow side of of tow of tow
5-door
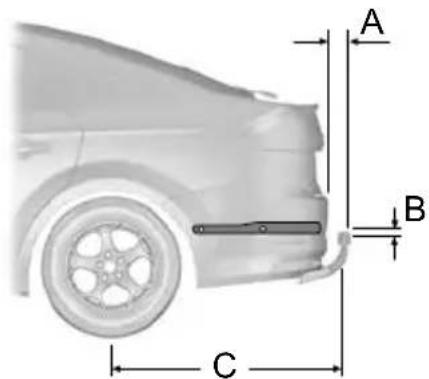
text_image
A B C
text_image
D E F GE87092
Technical specifications
| Dimension descriptionItem | Dimension in mm (inches) | |
| 100 (3.9)Bumper | ||
| 90 (3.5)Bumper | ||
| 1 (0.04)Attachme | ||
| 1 082 (42.6)Whee | ||
| 438 (17.2)Centre | ||
| 876 (34.5)Inner | ||
| 364 (14.3)Centre | ||
| Centre of tow ball - centre 2. attachment | point 637 (25.1) |
Estate
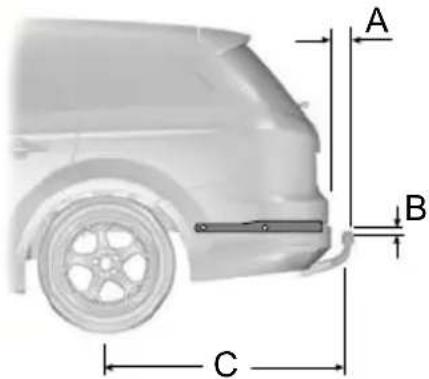
text_image
A B C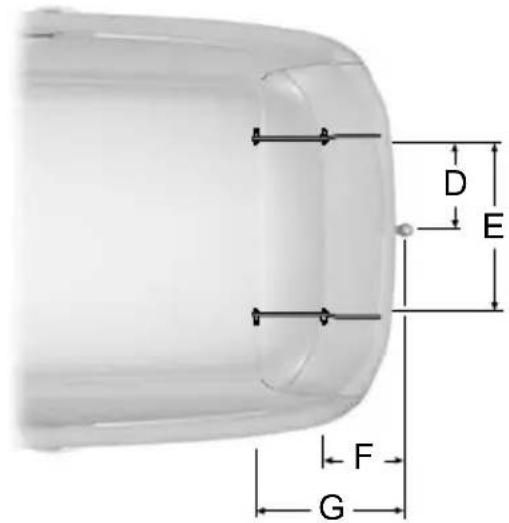
text_image
D E F GE87093
Technical specifications
| Dimension descriptionItem | Dimension in mm (inches) | |
| 100 - 110 (3.9 - 4.3)Bumperment point | ||
| 1 (0.04)Attachment | ||
| 1 134 - 1 144 (44.7 - 45)Wheof tow | ||
| 438 (17.2)Centre | ||
| 876 (34.5)Inner side of | ||
| 419 - 429 (16.5 - 16.9)Centre | ||
| 692 - 702 (27.2 - 27.6)Centre |
GENERAL INFORMATION
CAUTION

Using the system with the engine will drain the battery.
TELEPHONE SETUP
Phonebook
Note: It may be necessary to confirm phonebook access to the Bluetooth system via the mobile phone.
This section describes the functions and features of the Bluetooth mobile phone hands free system.
The Bluetooth mobile phone part of the system provides interaction with the audio or navigation system and your mobile phone. It allows you to use the audio navigation system to make and receive calls without having to use your mobile phone.
After start up access to the phonebook list can be delayed for several minutes, depending upon the size.
Phonebook categories
Depending on your phonebook entry, different categories can be displayed in the audio unit.
For example:
Compatibility of phones
CAUTION

As no common agreement exists, mobile phone manufacturers are able to implement a variety of profiles in their Bluetooth devices. Because of this, an incompatibility can occur between the phone and hands-free system, which in some cases may significantly degrade the system performance. To avoid this situation, only recommended phones should be used.
Please visit the website www.ford-mobile-connectivity.com for full details.
Phones with Symbian operating system
Note: Certain phones require a special file to be installed to enable full phonebo access via Bluetooth.
This is referred to as a SIS file and will available to download via the Ford website.
www.ford-
mobile-connectivity.com.
| MobileM | |
| OfficeO | |
| HomeH | |
| F | Fax |
the Note: Entries may be displayed without in a category attachment.
The category can also be indicated as an icon:

Phone

Mobile

Home

Office

Fax
Making a phone an active phone
Handling of phones
Up to six Bluetooth devices can be
When using the system for the first time bonded to the vehicle system.
no phone is connected to the system.
After switching on the ignition and the audio unit, the Bluetooth phone must be bonded to the system.
Note: If there is an ongoing call when the phone in use is selected as the new active phone, the call is transferred to the vehicle audio system.
Bluetooth phone
Note: Even if connected to the car system, your phone can still be used in the usual way.
After bonding a Bluetooth phone to the system, this becomes the active phone.
For further information refer to the phor menu.
Requirements for Bluetooth connection
Select the phone from the active phone menu.
The following are required before a Bluetooth phone connection can be
Turning the ignition and radio or navigation unit back on again, the last active phone is picked up by the system.
Note: In some cases the Bluetooth connection must also be confirmed on the phone.
made.
Bond another Bluetooth phone
Bond a new Bluetooth phone as described in the requirements for a Bluetooth connection.
Phones stored in the system are accessible by using the phone list on the audio unit.
Note: A maximum of six devices may be bonded. If six Bluetooth devices have already been bonded, one of these has to be debonded in order to bond a new device.
The Bluetooth feature must be activated on the phone and on the audio unit. Make sure the Bluetooth menu option in the audio unit is set to ON. For information on phone settings, refer to your phone user guide.
-
The private mode must not be activated on the Bluetooth phone.
-
Search for audio device.
-
Select Ford Audio.
the. Enter the code number shown on the vehicle display using the phone keypad. If no code number is shown on the display, enter the Bluetooth PIN number 0000 using the phone keypad. Now enter the Bluetooth PIN number shown on the vehicle display.
BLUETOOTH SETUP
Note: A phone call will be disconnected if the audio unit is switched off. If the ignition key is turned to the off position the phone call will remain in progress.
Before you can use your telephone with your vehicle it must be bonded to the vehicle telephone system.
TELEPHONE CONTROLS
Remote control
Voice, accept and reject button

text_image
1 2 VOICEE87662
Voice button1
Accept and reject button2
The VOICE button is used to activate or3 switch off the Voice control.
On vehicles with an accept and reject 4 button, phone calls can be accepted and rejected by pressing the appropriate button.
Note: Some audio units have the accept and reject buttons on the front bezel. ^5 These operate in the same way.
USING THE TELEPHONE - VEHICLES WITHOUT: NAVIGATION SYSTEM
This chapter describes the phone functions of the audio unit.
Note: Refer to your audio guide for details of the controls.
An active phone must be present.
Even if connected to the audio unit, your phone can still be used in the usual way Note: You can exit the phone menu by pressing any source button CD, AM/FM or AUX.
Making a call
Dialling a number using voice control
Phone numbers can be dialled using voice control. See Telephone commands (page 250).
Dialling a number using the address book
You can access your phone address book via Bluetooth. The entries will appear in the unit display.
-
Press the PHONE or the call accept button.
-
Press the MENU button.
-
Keep pressing the MENU button until PHONEBOOK appears.
-
Press the seek buttons to select the and desired phone number.
Note: Press and hold the seek button to skip to the next letter in the alphabet.
- Press the PHONE or the call accept button to dial the selected phone number.
Dialling a number using the address book - Sony radio
You can access your phone address book via Bluetooth. The entries will appear in the unit display.
-
Press the PHONE button.
-
Press the seek button until the phone book is shown.
-
Press the up/down arrow buttons to select the desired phone number.
Note: Press and hold the up/down arrow buttons to skip to the next letter in the alphabet.
- Press the PHONE or the call accept5. button to dial the selected phone number.
Press the PHONE or the call accept button to dial the desired phone number.
Dialling a number using the telephone keypad
If you have an audio unit with a teleph keypad (buttons 0-9, * and #):
- Press the call accept button. Press the PHONE button if you have a So radio.
- Dial the number using the telephone keypad on the audio unit.
- Press the call accept button.
Note: If you enter an incorrect digit whilst entering a phone number, press the seek left button to erase the last digit. A long press will erase the complete string of digits.
Press and hold 0 to enter a + digit.
Ending a call
Calls can be ended by pressing the call reject button.
Audio units without a telephone keypad can also end a call by pressing either PHONE, CD, AM/FM or ON/OFF, or by pressing the MODE button on the remote control
Redialling a number
- Press the PHONE or the call accept button.
- Press the MENU button.
- Select the CALL OUT list or the CALL IN list. On some audio units, select the MISSED, INCOMING or OUTGOING calls list.
Note: If the active phone does not provide a call out list, the last outgoing number/entry can be redialled.
- Press the seek button on the audio unit.
Redialling a number - Sony radio
- Press the PHONE or the call accept
one button. - Press the seek button until the desired list is displayed.
Note: If the active phone does not provide a call out list, the last outgoing call number/entry can be redialled.
3. Press the up/down buttons to select the desired phone number.
1st. Press the PHONE or the call accept ek button to dial the phone number.
Redialling the last dialled number - Sony radio
- Press the call accept button.
- Press the call accept button a second time to dial the number.
Receiving an incoming call
Accepting an incoming call
Incoming calls can be accepted by pressing either the call accept button, the PHONE button or the MODE button on the remote control.
Rejecting an incoming call
Incoming calls can be rejected by pressing the call reject button.
Audio units without a telephone keypad can also reject a call by pressing either PHONE, CD, AM/FM or ON/OFF.
Receiving a second incoming call
call Note: The second incoming call function must be activated in your phone.
If there is an incoming call whilst there . Press the preset number required an ongoing call, a beep will be heard and (using the station preset buttons 1 - you will have the option to end the active 6).
call and to accept the incoming call.
Accepting a second incoming call
Second incoming calls can be accepted by pressing either the call accept button, the PHONE button, or the MODE button on the remote control.
Rejecting a second incoming call
Second incoming calls can be rejected by pressing the call reject button. Units without a telephone keypad can also 4, reject a second incoming call by pressing the CD button, or the AM/FM button.
Muting the microphone
During a call, it is possible to mute the microphone. Whilst muted, confirmation will appear in the display.
Audio units with green call accept button
Press the call accept button. Press the button once again to turn this function off.
Audio units without green call accept button
Press the seek up or down button. Press the button once again to turn this function off.
Changing the active phone
Note: Phones must be bonded to the system before they can be made active,
Using the station storage button
Note: This process is only for audio unit without a telephone keypad.
- Press the PHONE button on the audio unit.
Using the audio unit menu
Note: After bonding a phone to the system, this becomes the active phone.
Press the PHONE or call accept button.
- Press the MENU button on the audio unit.
Select the ACTIVE PHONE option on the audio unit. - Scroll through the different stored phone by using the seek buttons to display the bonded phones.
- Press the MENU button to select the phone which is to be the active phone
Debonding a bonded phone
A bonded phone can be deleted from the system at any time, unless a phone call is in progress.
- Press the PHONE or call accept off button.
- Press the MENU button on the audio unit.
- Select the DEBOND option on the less audio unit.
Scroll through the different phones by using the seek buttons and display the phone to be debonded.
- Press the MENU button to select the phone which is to be debonded.
Debonding a bonded phone - Sony radio
A bonded phone can be deleted from the system at any time, unless a phone call is in progress.
-
Press the PHONE button.
-
Press the up/down arrow buttons until you reach the DEBOND option.
- Scroll through the different phones by using the seek buttons and display the phone to be debonded.
- Press the OK button to be debond.
USING THE TELEPHONE - VEHICLES WITH: NAVIGATION SYSTEM
This chapter describes the phone functions of the Navigation System.
Note: Refer to your Navigation System guide for details of the controls.
An active phone must be present.
Even if connected to the Navigation System, your phone can still be used in the usual way.
Making a call
Dialling a number
Phone numbers can be dialled using voic control. See Voice control (page 238).
Ending a call
Calls can be ended by pressing either the END button, the MODE button on the remote switch or the ON/OFF button of the navigation system.
Redialling a number
- Press the PHONE button on the uni
- Select REDIAL.
Receiving an incoming call
Accepting an incoming call
Incoming calls can be accepted by pressing either the call accept button, the MODE button on the remote control, the PHONE button on the unit or by using the ACCEPT option in the menu.
Rejecting an incoming call
Incoming calls can be rejected by pressing either the call reject button, the CD or AM/FM buttons on the unit, or by using the REJECT option in the menu.
Receiving a second incoming call
Note: The second incoming call function must be activated in your phone.
If there is an incoming call, whilst there is an ongoing call, a beep will be heard and you will have the option to end the active call and to accept the incoming call.
Accepting a second incoming call
Second incoming calls can be accepted by pressing either the call accept button, the MODE button on the remote control, the PHONE button on the unit or by using the ACCEPT option in the menu.
Note: This will cancel the ongoing call.
Rejecting a second incoming call
Second incoming calls can be rejected by pressing either the call reject button, or one of the following buttons on the unit: CD, AM/FM.
Muting the microphone
During a call, it is possible to mute the microphone. Whilst muted, confirmation will appear in the display.
DVD navigation units
Press the mute button (symbol of a microphone with a line through it). Press the button once again to turn this function off.
CD navigation units
Press the microphone mute button. Press the button once again to turn this function off.
Changing the active phone
Note: Phones must be bonded to the system before they can be made active.
Note: After bonding a phone to the system, this becomes the active phone.
- Press the PHONE button on the unit.
- Using the BT SETTINGS option in the menu, select the active phone from the list.
Debonding a bonded phone
A bonded phone can be deleted from the system at any time, unless a phone call is in progress.
- Press the PHONE button on the unit.
- Select the BT SETTINGS option in the menu.
- Select the DEBOND option in the menu.
- Select the phone from the list.
Using the system with the engine will drain the battery.
Voice recognition enables operation of the system without the need to divert your attention from the road ahead in order to change settings, or receive feedback from the system.
Whenever you issue one of the defined commands with the system active, the voice recognition system converts your command into a control signal for the system. Your inputs take the form of dialogues or commands. You are guided through these dialogues by announcements or questions.
Please familiarise yourself with the functions of the system before using void recognition.
Supported commands
The voice control system allows you to control the following vehicle functions:
- Bluetooth phone
- radio
• CD Player/CD Changer
• external device (USB)
• external device (iPod) - SD card
• automatic climate control - navigation system (DVD units only - refer to separate DVD navigation handbook).
Note: The voice control system is language specific. If you require the system to operate in another language please consult your dealer.
System response
As you work through a voice session the system will prompt you with a beep tone each time the system is ready to proceed.
Do not try to give any commands until the beep tone has been heard. The voice control system will repeat each spoken command back to you.
to you are not sure how to continue say "HELP" for assistance or "CANCEL" if you do not wish to continue.
The "HELP" function provides only a subset of the available voice commands. Detailed explanations of all possible voice commands can be found on the following pages.
Voice commands
All voice commands should be given using a natural speaking voice, as if speaking to a passenger or on the phone. Your voice level should be dependant on the surrounding noise level inside or outside the vehicle but do not shout.
USING VOICE CONTROL
System operation
The order and content of the voice controls are given in the following lists. The tables show the sequence of user voice commands and system responses for each available function.
<> indicates a number or stored name tag to be inserted by the user.
Short cuts
There are a number of voice command short cuts available, which allow you to control some vehicle features without having to follow the complete command menu. These are:
- phone: "MOBILE NAME", "DIAL NUMBER", "DIAL NAME", and "REDIAL"
- CD player/CD changer: "DISC" and "TRACK"
- automatic climate control: "TEMPERATURE", "AUTO MODE", "DEFROSTING/DEMISTING ON" and "DEFROSTING/DEMISTING OFF"
• radio: "TUNE NAME"
• external device (USB): "TRACK"
• external device (iPod): "TRACK"
• SD card: "TRACK".
Start communicating with the system
Before you can start talking to the system you first have to press the VOICE or MODE button for each operation and CI wait until the system answers with a beep. See (page 238).
Press the button again to cancel the voice session.
Name tag
The name tag functionality can support the phone, audio and navigation features by using the "STORE NAME" function. You can assign name tags to items such as favourite radio stations and personal phone contacts. See Audio unit commands (page 239). See Telephone commands (page 250). See
Navigation system commands (page 254).
• Store up to 20 name tags per function
- The average recording time for each name tag is approximately 2-3 seconds.
AUDIO UNIT COMMANDS
CD Player
You can control playback directly by voice control.
Overview
The overview below shows the available voice commands. The following lists will give further information about the complete command menu in selected examples.
| "CD PLAYER" |
| "HELP" |
| "PLAY" |
| "TRACK"* |
| "SHUFFLE ALL" |
| "SHUFFLE FOLDER** |
| "SHUFFLE OFF" |
| "REPEAT FOLDER** |
| "REPEAT TRACK" |
| "REPEAT OFF" |
* Can be used as a shortcut.
** Only available if the CD contains audio data files like MP3 or WMA.
Track
You can choose a track on your CD directly.
| System answerUser saysSteps | ||
| "CD PLAYER""CD PLAYER"1 | ||
| 2 | "TRACK"* | "TRACK NUMBER PLEASE" |
| 3 | "<a number between 1 and 99>" | "TRACK |
* Can be used as a shortcut.
** Additionally, numbers can be spoken as up to four single digits (for example "2", "5" for track 245)
Shuffle all
To set random playback.
| System answerUser saysSteps | ||
| "CD PLAYER""CD PLAYER"1 | ||
| "SHUFFLE ALL"2 |
CD Changer
Overview
The overview below shows the available voice commands. The following lists will give further information about the complete command menu in selected examples.
| "CD CHANGER" |
| "HELP" |
| "PLAY" |
| "DISC"* |
| "TRACK"* |
| "SHUFFLE ALL" |
| "SHUFFLE CD" |
| "SHUFFLE FOLDER** |
| "SHUFFLE OFF" |
| "REPEAT CD" |
| "REPEAT FOLDER** |
| "REPEAT TRACK" |
| "REPEAT OFF" |
* Can be used as a shortcut.
** Only available if the CD contains audio data files like MP3 or WMA.
Disc
If you have a CD changer you can choose the disc number.
| System answerUser saysSt | ||
| "CD CHANGER""CD CHANGE | ||
| 2 | "DISC"* | "DISC NUMBER PLEASE" |
| "DISC " " "a number |
* Can be used as a shortcut.
Track
You can choose a track on your CD directly.
| System answerUser saysSteps | ||
| "CD CHANGER""CD CHANGER"1 | ||
| 2 | "TRACK"* | "TRACK NUMBER PLEASE" |
| 3 | "<a number between 1 and 99>" | "TRACK |
* Can be used as a shortcut.
** Additionally, numbers can be spoken as up to four single digits (for example "2", "5" for track 245)
Shuffle CD
To set random playback within the CD contents.
| System answerUser saysSteps | ||
| "CD CHANGER""CD CHANGER"1 | ||
| "SHUFFLE CD"2 |
Radio
The radio voice commands support the functionality of the radio and allow you tune radio stations by voice control.
Overview
The overview below shows the available voice commands. The following lists will to give further information about the complete command menu.
| "RADIO" |
| "HELP" |
| "AM" |
| "FM" |
| "TUNE NAME*" |
| "DELETE NAME" |
| "DELETE DIRECTORY" |
| "PLAY DIRECTORY" |
| "STORE NAME" |
Voice control
| "RADIO" |
| "PLAY" |
* Can be used as a shortcut.
Tune frequency
This function allows you to tune your radio by voice commands.
| System answerUser saysSte | ||
| "RADIO""RADIO"1 | ||
| "AM FREQUENCY PLEASE""AM"2 | ||
| "FM FREQUENCY PLEASE""FM" | ||
| 3 | "* | "TUNE " |
* The frequency may be entered in a variety of ways. Refer below for representative examples.
FM band: 87.5 - 108.0 in increments of •0.1 "Five thirty one" (531)
• "Eighty nine point nine" (89.9)
- "Ninety" (90.0)
• "One hundred point five" (100.5)
• "One zero one point one" (101.1)
• "One zero eight" (108.0)
• "Nine hundred" (900)
• "Fourteen forty" (1440)
• "Fifteen zero three" (1503)
• "Ten eighty" (1080)
Store name
AM/MW band: 531 - 1602 in incrementsIf you have tuned a radio station, you can store it with a name in the directory. of 9
AM/LW band: 153 - 281 in increments of 1
| System answerUser saysSte | ||
| "RADIO""RADIO"1 | ||
| "STORE NAME""STORE NAME PLEASE" | ||
| "REPEAT NAME PLEASE"" | ||
| ""4 | "STORING NAME""STORED" |
Tune name
This function allows you to call up a stored radio station.
| System answerUser saysSteps | ||
| "RADIO""RADIO"1 | ||
| 2 | "TUNE NAME* | "NAME PLEASE" |
| "TUNE ""3 |
* Can be used as a shortcut.
Delete name
This function allows you to delete a stored radio station.
| System answerUser saysSteps | ||
| "RADIO""RADIO"1 | ||
| "NAME PLEASE""DELETE NAME" | ||
| "DELETE ""3"CONFIRM YES OR NO" | ||
| "DELETED""YES"4 | ||
| "COMMAND CANCELLED""NO" |
Play directory
This function allows you to let the system tell you all of the stored radio stations.
| System answerUser saysSteps | ||
| "RADIO""RADIO"1 | ||
| 2 | "PLAY DIRECTORY" | "PLAY |
Delete directory
This function allows you to delete all stored radio stations at once.
| System answerUser saysSt | ||
| "RADIO""RADIO"1 | ||
| "DELETE DIRECTORY""DELETE D"CONFIRM YES OR NO" | ||
| "RADIO DIRECTORY DELETED""YES"( | ||
| "COMMAND CANCELLED""NO" |
Play
This function switches the audio source to the radio mode.
| System answerUser saysSte | ||
| "RADIO""RADIO"1 | ||
| "PLAY"2 |
Auxiliary input
This function allows you to switch the audio source to the attached auxiliary input device.
| System answerUser saysSte | ||
| "EXTERNAL DEVICE""EXTERNAL | ||
| 2 "LINE IN""LINE IN" |
External devices - USB
These voice commands support the functionality of an external USB device which may be connected to the audio unit.
Overview
The overview below shows the available voice commands. The following lists will give further information about the complete command menu in selected examples.
| "EXTERNAL DEVICE", "USB" |
| "HELP" |
| "PLAY" |
| "TRACK"* |
| "PLAYLIST"** |
| "FOLDER"** |
| "SHUFFLE ALL" |
| "SHUFFLE FOLDER" |
| "SHUFFLE PLAYLIST" |
| "SHUFFLE OFF" |
| "REPEAT TRACK" |
| "REPEAT FOLDER" |
| "REPEAT OFF" |
* Can be used as a shortcut.
** Playlists and folders activated by voice control must be assigned special filenames See General information (page 257).
USB play
This function allows you to switch the audio source to the attached USB device.
| System answerUser saysSteps | ||
| "EXTERNAL DEVICE""EXTERNAL D | ||
| "USB""USB"2 | ||
| "PLAY"3 |
USB Track
You can choose a track on your USB device directly.
| System answerUser saysSte | ||
| "EXTERNAL DEVICE""EXTERNAL | ||
| "USB""USB"2 | ||
| "TRACK NUMBER PLEASE""TRACK | ||
| 4 | "<a number between 1 and 99>" | "TRACK |
* Additionally, numbers can be spoken as up to four single digits (for example "2"5" for track 245)
External devices - iPod
These voice commands support the functionality of an iPod which may be connected to the audio unit.
Overview
The overview below shows the available voice commands. The following lists will give further information about the complete command menu in selected examples.
| "EXTERNAL DEVICE", "IPOD" |
| "HELP" |
| "PLAY" |
| "TRACK"* |
| "PLAYLIST"** |
| "SHUFFLE ALL" |
| "SHUFFLE PLAYLIST" |
| "SHUFFLE OFF" |
| "REPEAT TRACK" |
| "REPEAT OFF" |
* Can be used as a shortcut.
** Playlists activated by voice control must be assigned special filenames. See Ger information (page 257).
iPod Track
You can choose a track off the all titles list of your iPod directly.
| System answerUser saysSteps | ||
| "EXTERNAL DEVICE""EXTERNAL D | ||
| "IPOD""IPOD"2 | ||
| 3 | "TRACK"* | "TRACK NUMBER PLEASE" |
| 4 | "<a number between 1 and 99>" | "TRACK |
* Can be used as a shortcut.
** Additionally, numbers can be spoken as up to five single digits (for example "5", "4", "5", "3" for track 52453), to a limit of 65535.
iPod playlist
You can choose a playlist from your iPod directly.
| System answerUser saysSteps | ||
| "EXTERNAL DEVICE""EXTERNAL D | ||
| "IPOD""IPOD"2 | ||
| 3 | "PLAYLIST"* | "PLAYLIST NUMBER PLEASE" |
| "PLAYLIST"""a number k |
* Playlists activated by voice control must be assigned special filenames. See Gener information (page 257).
SD Card
These voice commands support the functionality of an SD card which has suitable audio files written to it.
Overview
The overview below shows the available voice commands. The following lists will give further information about the complete command menu in selected examples.
| "SD CARD" |
| "HELP" |
Voice control
| "SD CARD" |
| "PLAY" |
| "TRACK"* |
| "SHUFFLE ALL" |
| "SHUFFLE FOLDER" |
| "SHUFFLE OFF" |
| "REPEAT TRACK" |
| "REPEAT FOLDER" |
| "REPEAT OFF" |
* Can be used as a shortcut.
SD card play
This function allows you to switch the audio source to the SD card audio files.
| System answerUser saysSt | ||
| "SD CARD""SD CARD"1 | ||
| "PLAY"2 |
SD card track
You can choose a track on your SD card directly.
| System answerUser saysSte | ||
| "SD CARD""SD CARD"1 | ||
| 2 | "TRACK"* | "TRACK NUMBER PLEASE" |
| 3 | "<a number between 1 and 99>" | "TRACK |
* Can be used as a shortcut.
** Additionally, numbers can be spoken as up to four single digits (for example "2"5" for track 245).
TELEPHONE COMMANDS
Phone
Your phone system allows you to create an additional phonebook. The stored entries can be dialled by voice control. Phone numbers stored by using voice control are stored on the vehicle system and not in your phone.
Overview
The overview below shows the available voice commands. The following lists will give further information about the complete command menu in selected examples.
| "PHONE" |
| "HELP" |
| "MOBILE NAME* |
| "DIAL NUMBER"* |
| "DIAL NAME* |
| "DELETE NAME" |
| "DELETE DIRECTORY" |
| "PLAY DIRECTORY" |
| "STORE NAME" |
| "REDIAL"* |
| "ACCEPT CALLS" |
| "REJECT CALLS" |
* Can be used as a shortcut.
Create a phonebook
Store name
New entries can be stored with the "STORE NAME" command. This feature can be used to dial a number by calling up the name instead of the full phone number.
| System answerUser saysSt | ||
| "PHONE""PHONE"1 | ||
| "STORE NAME""STORE NAME"NAME PLEASE" | ||
| "REPEAT NAME PLEASE"" | ||
| "STORING NAME""4"STORED"NUMBER PLEASE" | ||
| "" | ||
| "STORING NUMBER""STORE"6""NUMBER STORED" |
Delete name
Stored names can also be deleted from the directory.
| System answerUser saysSte | ||
| "PHONE""PHONE"1 | ||
| "NAME PLEASE""DELETE NAM | ||
| ""3 | "DELETE" "CONFIRM YES OR NO" | |
| 4 | "YES" | ""DELETED" |
| "NO" | "COMMAND CANCELLED" |
Play directory
Use this function to let the system tell you all stored entries.
| System answerUser saysSte | ||
| "PHONE""PHONE"1 | ||
| 2 | "PLAY DIRECTORY" | "PLAY DIRECTORY" |
Voice control
Delete directory
This function allows you to delete all entries in one go.
| System answerUser saysSteps | ||
| "PHONE""PHONE"1 | ||
| "DELETE DIRECTORY""DELETE DIR"CONFIRM YES OR NO" | ||
| "DIRECTORY DELETED""YES"3 | ||
| "COMMAND CANCELLED""NO" |
Phone functions
Mobile name
This function allows you to access phone numbers stored with a name tag in your mobile phone.
| System answerUser saysSteps | ||
| "PHONE""PHONE"1 | ||
| 2 | "MOBILE NAME*" | "MOBILE NAME" "<phone dependent dialogue>" |
* Can be used as a shortcut.
Dial number
Phone numbers can be dialled after giving the name tag voice command.
| System answerUser saysSteps | ||
| "PHONE""PHONE"1 | ||
| 2 | "DIAL NUMBER"* | "NUMBER PLEASE" |
| "<phone number>"<phone number CONTINUE?" | ||
| 4 | "DIAL" | "DIALLING" |
| "<repeat last part of number>"CORRE |
Voice control
| System answerUser saysSt | ||
| CONTINUE?" |
* Can be used as a shortcut.
Dial name
Phone numbers can be dialled after giving the name tag voice command.
| System answerUser saysSt | ||
| "PHONE""PHONE"1 | ||
| 2 | "DIAL NAME" | "NAME PLEASE" |
| "DIAL ""3"CONFIRM YES OR NO" | ||
| "DIALLING""YES"4 | ||
| "COMMAND CANCELLED""NO" |
* Can be used as a shortcut.
Redial
This function allows you to redial the last dialled phone number.
| System answerUser saysSt | ||
| "PHONE""PHONE"1 | ||
| 2 | "REDIAL"* | "REDIAL" "CONFIRM YES OR NO" |
| "DIALLING""YES"3 | ||
| "COMMAND CANCELLED""NO" |
* Can be used as a shortcut.
DTMF (Tone dialling)
This function transfers spoken numbers into DTMF tones. For example, to make a remote enquiry to your home answer in machine or to enter a PIN number etc.
Note: DTMF can only be used during an ongoing call. Press the VOICE button and wait for the system prompt.
Can only be used with vehicles installed with a dedicated VOICE button.
| System answerUser saysSteps | ||
| "NUMBER PLEASE"1 | ||
| "<numbers 1 to 9, zero, hash, star>"2 | ||
Main settings
Reject calls
Calls can be set to be automatically rejected using voice control.
| System answerUser saysSteps | ||
| "PHONE""PHONE"1 | ||
| "REJECT CALLS""REJECT CALLS | ||
| "ACCEPT CALLS" | "ACCEPT CALLS" |
* use this command to turn the reject mode off
NAVIGATION SYSTEM COMMANDS
Please refer to your separate Navigation handbook for details of the command menus.
CLIMATE CONTROL COMMANDS
Climate
The climate voice commands supports the functionality of the fan speed, temperature and mode settings. Not all functions are available on all vehicles.
Overview
The overview below shows the available voice commands. The following lists will give further information about the complete command menu in selected examples.
Voice control
| "CLIMATE" |
| "HELP" |
| "FAN"* |
| "DEFROSTING/DEMISTING ON" |
| "DEFROSTING/DEMISTING OFF" |
| "TEMPERATURE"* |
| "AUTO MODE" |
* Can be used as a shortcut. On vehicles fitted with an English language module "FAN" shortcut is not available.
Fan
This function allows you to adjust the fan speed.
| System answerUser saysSt | ||
| "CLIMATE""CLIMATE"1 | ||
| 2 | ""FAN"* | "FAN SPEED PLEASE" |
| 3 | "FAN MINIMUM""MINIMUM" | |
| "FAN | ||
| "FAN MAXIMUM""MAXIMUM" |
* Can be used as a shortcut. On vehicles fitted with an English language module "FAN" shortcut is not available.
Defrosting/Demisting
| System answerUser saysSteps | ||
| "CLIMATE""CLIMATE"1 | ||
| 2 | "DEFROSTING ON/DEMISTING ON"* | "DEFROSTING ON/DEMISTING ON" |
| "DEFROSTING OFF/DEMISTING OFF"* | "DEFROSTING OFF/DEMISTING OFF" |
* Can be used as a shortcut.
Temperature
This function allows you to adjust the temperature.
| System answerUser saysSteps | ||
| "CLIMATE""CLIMATE"1 | ||
| 2 | "TEMPERATURE"* | "TEMPERATURE PLEASE" |
| 3 | "TEMPERATURE MINIMUM""MINIMUM" | |
| "<a number between 15 and 29 °C with 0.5 increments>" or "<a number between 59 and 84 °F>" | "TEMPERATURE | |
| "TEMPERATURE MAXIMUM""MAXIMUM" |
* Can be used as a shortcut.
Auto mode
| System answerUser saysSteps | ||
| "CLIMATE""CLIMATE"1 | ||
| 2 | "AUTO MODE" | "AUTO MODE" |
* Can be used as a shortcut. Can be deactivated by selecting a different temperature or fan speed.
GENERAL INFORMATION
CAUTIONS
Take care when handling external devices with exposed electrical connectors (such as the USB plug). Always replace the protective cap/shield when possible. There may be a risk of electrostatic discharge causing damage to the device.
Do not touch or handle the USB socket in the vehicle. Cover the socket when not in use.
Only use USB Mass-Storage device compliant devices.
Always switch your audio unit to a different source (for example the radio) before unplugging the USB device.
Do not install or connect USB hubs or splitters.
Note: The system is only designed to recognize and read suitable audio files from a USB device that conforms to the USB Mass-Storage device class or an iPod. Not all available USB devices can be guaranteed to function with the system.
Note: It is possible to connect compatible devices with a trailing USB lead as well those that plug into the vehicle USB socket directly (for example USB memory sticks and pen drives).
Note: Some USB devices with a higher power consumption may not be compatible (for example some larger hard drives).
Note: Access time to read the files on the external device will vary depending upon factors such as the file structure, size and device content.
The system supports a range of external devices, to fully integrate with your audio unit via the USB and auxiliary input sockets. Once connected, control of the external device is possible via the audio unit.
A list of typical compatible devices are shown below:
• USB memory sticks
• USB portable hard drives
• MP3 players with USB connection
- iPod media players (refer to www.ford-mobile -connectivity.com for latest compatibility list).
The system is USB 2.0 full speed compatible, USB 1.1 host compliant and supports FAT 16/32 file systems.
Information on audio file structures for external devices
USB
Create only a single partition on the USB device.
If playlists are created, they must contain correct file paths referenced to the USB device. It is recommended to create the playlist after the audio files have been transferred to the USB device.
Playlists must be created in .m3u format. %Audio files must be in .mp3 format.
Do not exceed the following limits:
• 1000 items per folder (files, folders and playlists)
- 5000 folders per USB device (including playlists)
• 8 subfolder levels.
To enable voice control for custom playlists and folders, follow the procedure below:
- Create folders named with the structure "Ford<*>" where <*> is a number 1-10. For example "Ford3" without an extension.
- Create playlists named with the structure "Ford<*>.m3u" where <*> is a number 1-10. For example "Ford5.m3u" without any space between "Ford" and the number.
Thereafter, custom folders and playlists will be selectable with voice control. See Audio unit commands (page 239).
iPod
To enable voice control for custom playlists, create playlists named with the structure "Ford<*>" where <*> is a number 1-10. For example "Ford7" without any space between "Ford" and the number.
Thereafter, playlists will be selectable with voice control. See Audio unit commands (page 239).
CONNECTINGANEXTERNAL DEVICE
WARNING

Make sure the external device is securely mounted within the vehicle, and that trailing connections do not obstruct any of the driving controls.
External devices may be connected using the auxiliary input socket and the USB port. See Auxiliary input (AUX IN) socket (page 125). See USB port (pag 126).
Connection
Plug in the device, and if necessary secure it to prevent movement within the vehicle.
Connecting an iPod
For optimum convenience and audio quality, we recommend that you purchase a dedicated single connection lead available from your dealer.
Alternatively, it is possible to connect your iPod using the standard iPod USB cable and a separate 3.5mm audio jack lead. If using this method preset the iPod volume to maximum and turn off any equalizer settings before making the connections:
- Connect the headphone output of the iPod to the AUX IN socket.
- Connect the USB cable from the iPod to the vehicle USB socket.
CONNECTINGANEXTERNAL DEVICE - VEHICLES WITH: BLUETOOTH
Connecting a Bluetooth audio device
CAUTION
As various standards exist, manufacturers are able to implement a variety of profiles in their Bluetooth devices. Because of this, an incompatibility can occur between the Bluetooth device and the system, which in some cases may limit system functionality. To avoid this situation, only recommended devices should be used.
gPlease visit the website
www.ford-mobile-connectivity.com for full details.
Bonding the device
Note: Some audio and navigation units have a separate Bluetooth audio menu. Use this to access setup and control.
To connect the device to the system follow the same procedure as for Bluetooth hands free phones. See
Bluetooth setup (page 232).
Operating the device
Select Bluetooth audio as the active source.
Tracks can be accessed by skipping forwards and backwards using the steering wheel controls, or directly from the audio unit controls.
USING A USB DEVICE
Various icons are used to identify types of audio file, folders etc.

USB device is the active source

Folder

Playlist

Album

Artist

Filename

Track title

Information not available
Sony radio
Operation
Select the USB device as the audio source by repeatedly pressing the
CD/AUX button until USB appears in the display. After first connecting the USB device, the first track within the first folder will start to play automatically.
Subsequently, following audio source switching, the position of playback on the USB device is remembered.
To browse the device contents, press the up/down arrow key or the OK button once.
The display will show the track information, together with other important information described below:
- A vertical scroll bar on the right side of the display shows the current position of the folder view.
- ">" after an entry indicates a further level down is readable (for example a folder named after an album, with individual album tracks within that folder).
- "<" before the list indicates that a further level up is readable.
- Icons to the left of track/folder text indicate the type of file/folder. Refer to the list for an explanation of these icons.
To navigate the USB device contents, use the up/down arrow keys to scroll through lists, and the left/right keys to move up or down within the folder hierarchy. Once your desired track, playlist or folder is highlighted, press the OK button to select playback.
Note: If you wish to jump to the top level browse the device contents, press the of the USB device contents, press and SELECT button once.
hold the left arrow key.
Audio control
Press the left and right arrow keys to skip backwards and forwards through tracks.
Press and hold the left/right arrow keys to enable fast rewind/fast forward through track content.
Press the up/down arrow key or the OK button to browse the device contents.
Press the MENU key to enter the USB menu. It is possible to enable shuffle and repeat functions here with respect to folders and playlists.
Press the SCAN button to scan the whole device, current folder or a playlist if it is in operation.
Press the INFO button to display the following:
- filename
- title
- artist
- album
- track number and playing time.
Repeated button presses will scroll through these displays.
CD Navigation units
Operation
Select the USB device as the audio source by pressing the CD/AUX button until DEVICES appears in the display. Select DEVICES and then select USB from the available device list. After first connecting the USB device, the first track within the first folder will start to play automatically. Subsequently, following audio source switching, the position of playback on the USB device is remembered.
The display will show the track information, together with other important information described below:
A vertical scroll bar on the right side of the display shows the current position of the folder view.
">" after an entry indicates a further level down is readable (for example a folder named after an album, with individual album tracks within that folder).
"<" to the left hand side of the display indicates that a further level up is readable.
Icons to the left of track/folder text indicate the type of file/folder. Refer to the list for an explanation of these icons.
To navigate the USB device contents, use the rotary scroll/select button to browse through lists. Push the button to expand the contents within the highlighted playlist or folder, or to commence playback of a particular track. Press ESC to go up one level.
Audio control
Press the SEEK up and down keys to skip backwards and forwards through tracks.
Press and hold the SEEK keys to enable fast rewind/fast forward through track content.
Rotate or press the SELECT button to browse the device contents.
Press SHUFFLE or REPEAT buttons to enable shuffle and repeat functions with respect to folders and playlists. Different options may appear depending upon whether or not a playlist is in operation.
Press the SCAN button to scan the current playlist if it is in operation, or the complete USB device or folder.
Press the INFO button to display the following:
- filename
- title
- artist
- album
- track number and playing time.
DVD Navigation units
Operation
Select the USB device as the audio source by pressing the CD/AUX button until the USB button appears to the left the display. Select USB from the available device list.
Note: Some devices may be shown but not selectable, depending if the device connected or not.
After first connecting the USB device, the first track within the first folder will start play automatically. Subsequently, following audio source switching, the position of playback on the USB device is remembered.
To browse the device contents, press the scroll up or down arrow button.
The display will show the track information, together with other important information described below:
- A vertical scroll bar on the right side the display shows the current position of the folder view.
-
"> " after an entry indicates a further level down is readable (for example a folder named after an album, with individual album tracks within that folder).
-
"<" to the left hand side of the display indicates that a further level up is readable.
- Icons to the left of track/folder text indicate the type of file/folder. Refer to the list for an explanation of these icons.
To navigate the USB device contents, use the scroll buttons to browse through lists.
Push the button to expand the contents within the highlighted playlist or folder, or to commence playback of a particular track. Press the left arrow key to go up one level.
Audio control
Press the SEEK up and down keys to skip backwards and forwards through tracks.
Press and hold the SEEK keys to enable fast rewind/fast forward through track content.
Press the scroll bar arrow keys to browse the device contents.
to Press SHUFFLE or REPEAT buttons to enable shuffle and repeat functions with respect to folders and playlists.
Press the SCAN button to scan the current playlist if it is in operation, or the complete USB device or folder.
Press the INFO button to display the following:
- filename
• of title
artist - album
- track number and playing time.
USING AN IPOD
Various icons are used to identify types of audio file, folders etc.

iPod is the active source

iPod playlist

iPod artist

iPod album

iPod genre

iPod song

iPod generic category

iPod generic media file
The display will show the track information, together with other important information described below:
- A vertical scroll bar on the right side of the display shows the current position of the list view.
- "> " after an entry indicates a further level down is readable (for example all albums by a particular artist).
- "<" before the list indicates that a further level up is readable.
- An icon on the left side indicates the type of the currently displayed list (for example list of albums). Refer to the list for an explanation of these icons.
To navigate the iPod contents, use the up/down arrow keys to scroll through lists, and the left/right keys to move up or down within the hierarchy. Once your desired track, playlist, album, artist or genre is highlighted, press the OK button to select playback.
Note: If you wish to jump to the top level of the iPod contents, press and hold the left arrow key.
Sony radio
Operation
Select the iPod as the audio source by repeatedly pressing the CD/AUX button until iPod appears in the display.
The iPod menu list for browsing content will be available through the radio display
Navigation of the contents follows the same principles as for iPod standalone use (for example search by artist, title, etc.). To browse the iPod contents, pres the up/down arrow key or the OK button once.
Audio control
Press the left and right arrow keys to skip backwards and forwards through tracks.
Press and hold the left/right arrow keys to enable fast rewind/fast forward through track content.
Press the up/down arrow key or the OK button to browse the iPod contents.
Press the MENU key to enter the iPod menu. It is possible to enable shuffle and repeat functions here. It is also possible to enable the iPod "Shuffle songs" option directly from the top level.
Press the SCAN button to scan the currently selected tracks.
Press the INFO button to display the following:
- title
- artist
- track number and playing time.
Repeated button presses will scroll through these displays.
CD Navigation units
Operation
To navigate the iPod contents, use the rotary scroll/select button to browse through lists. Push the button to expand the contents within the highlighted playlist, album, artist, genre or to commence playback of a particular track. Press ESC to go up one level.
Audio control
Press the SEEK up and down keys to skip backwards and forwards through tracks.
Select the iPod as the audio source by pressing the CD/AUX button until DEVICES appears in the display. Select DEVICES and then select iPod from the available device list.
The iPod menu list for browsing contents will be available through the display.
Navigation of the contents follows the same principles as for iPod standalone use (for example search by artist, title, etc.). To browse the iPod contents, pre the SELECT button once.
The display will show the track information, together with other important information described below:
Press and hold the SEEK keys to enable fast rewind/fast forward through track content.
Rotate or press the SELECT button to browse the iPod contents.
Press the MENU key to enter the iPod menu. It is possible to enable shuffle and repeat functions here. It is also possible to enable the iPod "Shuffle songs" option directly from the top level.
Press the SCAN button to scan the currently selected tracks.
Press the INFO button to display the following:
- A vertical scroll bar on the right side. the display shows the current position of the list view.
- ">" after an entry indicates a further level down is readable (for example albums by a particular artist).
- "<" before the list indicates that a further level up is readable.
- An icon on the left side indicates the type of the currently displayed list (for example list of albums). Refer to the list for an explanation of these icons.
of title ? artist
- track number and playing time.
DVD Navigation units
Operation
Select the iPod as the audio source by
expressing the CD/AUX button until the iPod button appears to the left of the display. Select iPod from the available device list.
Note: Some devices may be shown but not selectable, depending if the device is connected or not.
The iPod menu list for browsing contentPress the SCAN button to scan the will be available through the display. currently selected tracks.
Navigation of the contents follows the same principles as for iPod standalone use (for example search by artist, title, etc.). To browse the iPod contents, press the scroll up or down arrow button.
Press the INFO button to display the following:
title
- artist
- track number and playing time.
The display will show the track information, together with other important information described below:
- A vertical scroll bar on the right side of the display shows the current position of the list view.
- "> " after an entry indicates a further level down is readable (for example all albums by a particular artist).
- "<" before the list indicates that a further level up is readable.
- An icon on the left side indicates the type of the currently displayed list (for example list of albums). Refer to the list for an explanation of these icons.
To navigate the iPod contents, use the scroll buttons to browse through lists. Push the button to expand the contents within the highlighted playlist, album, artist, genre or to commence playback of a particular track. Press the left arrow key to go up one level.
Audio control
Press the SEEK up and down keys to skip backwards and forwards through tracks.
Press and hold the SEEK keys to enable fast rewind/fast forward through track content.
Press the scroll bar arrow keys to browse the iPod contents.
Press the MENU key to enter the iPod menu. It is possible to enable shuffle and repeat functions here. It is also possible to enable the iPod "Shuffle songs" option directly from the top level.
ROAD SAFETY
WARNINGS

The system provides you with information designed to help you reach your destination quickly and safely.

For reasons of safety, the driver should only program the system when the vehicle is stationary.

The system provides no assistance with respect to stop signs, traffic lights, areas under construction or other important safety information.

Do not use the system until you have familiarised yourself with its operation.

Only view the system display when driving conditions permit.
Safety information
Read and follow all stated safety precautions. Failure to do so may increase your risk of collision and personal injury. Ford Motor Company shall not be liable for any damages of any type arising from failure to follow these guidelines.
If detailed viewing of route instructions is necessary, pull off the road when it is safe to do so and park your vehicle.
Do not use the navigation system to locate emergency services.
To use the system as effectively and safely as possible, always use the latest navigation information. Your dealer will be able to assist with this.
GETTING STARTED
CAUTION

Using the system with the engine off will drain the battery.
Note: You will be charged when sending and receiving text messages.
Note: Refer to your phone handbook for all phone functions and operation.
Note: Keep the activation code (printed on the installation guide) in a safe place.
Note: Retain the activation text message in your mobile phone inbox.
Compatibility of phones
CAUTION
As no common agreement exists, mobile phone manufacturers are able to implement a variety of profiles in their Bluetooth devices. Because of this, an incompatibility can occur between the phone and hands-free system, which in some cases may significantly degrade the system performance. To avoid this situation, only recommended phones should be used.
Please visit the website www.ford-mobile-connectivity.com for full details.
Installing the micro SD card
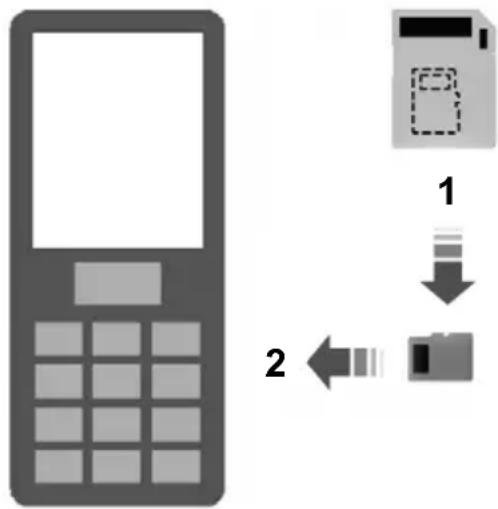
flowchart
graph TD
    A["Mobile Phone"] -->|1| B["Physical Card"]
    B -->|2| C["Send to Card"]
E114212
- Remove the micro SD card from the adaptor.
- Insert the micro SD card into the mobile phone.
Activating the mobile phone navigation system
Note: The radio must be switched on before connecting the mobile phone to the in-car GPS receiver.
Note: The Ford Mobile Navigation must be installed and activated on your mobile phone.
Note: It is possible to activate up to a maximum of three phones.
Note: Detailed instructions are available on the micro SD card and at www.ford-mobile-connectivity.com.
- Switch the radio on.
text_image
Ford Navig...E114213
- Switch your mobile phone on and start the "Ford Mobile Navigation".
- Choose "Select Destination".
- Choose "Enter Address".
- Change route options if necessary and start the route guidance.
- The vehicle display will show the turn information. Voice instructions are heard via the vehicle speakers.
Note: Your mobile phone will display your current position.
- You are able to exit the application and continue your route guidance after restarting the application.
TYPE APPROVALS
FCC/INDUSTRY CANADA NOTICE
This device complies with Part 15 of the FCC Rules. Operation is subject to the following two conditions: (1) this device may not cause harmful interference, and (2) this device must accept any interference received, including interference that may cause undesired operation.
FCC ID: WJLRX-42
IC: 7847A-RX42
Changes or modifications to your device not expressly approved by the party responsible for compliance can void the user's authority to operate the equipment.
RX-42 - declaration of conformity
We, the party responsible for compliance, declare under our sole responsibility that the Handset Integration product RX-42 is in conformity with the provisions of the following Council Directive: 1999/5/EC. A copy of the Declaration of Conformity can be found at:
www.novero.com/declaration_of_conformity
The Bluetooth word mark and logos are owned by the Bluetooth SIG, Inc. and any use of such marks by Ford Motor Company is under license. Other trademarks and trade names are those of their respective owners.
TYPE APPROVALS
iPod is a trademark of Apple Inc.
TYPE APPROVALS

text_image
NAVTEQ ON BOARD™© 2008 NAVTEQ B.V. All rights reserved.
Appendices
| AT | “© Bundesamt für Eich- und Vermessungswesen” |
| PL | “© EuroGeographics” |
| FR | “source: Géoroute® IGN France & BD Carto® IGN France” |
| DE | “Die Grundlagendaten wurden mit Genehmigung der zuständigen Behörden entnommen” |
| GB | “Based upon Crown Copyright material.” |
| GR | “Copyright Geomatics Ltd.” |
| IT | “La Banca Dati Italiana è stata prodotta usando quale riferimento anche cartografia numerica ed al tratto prodotta e fornita dalla Regione Toscana.” |
| NO | “Copyright © 2000; Norwegian Mapping Authority” |
| PT | “Source: lgeoE - Portugal” |
| ES | “Información geográfica propiedad del CNIG” |
| SE | “Based upon electronic data © National Land Survey Sweden.” |
| CH | “Topografische Grundlage: © Bundesamt für Landestopographie” |
ELECTROMAGNETIC COMPATIBILITY
WARNINGS

Your vehicle has been tested and certified to European legislations relating to electromagnetic compatibility (2004/104/EC). It is your responsibility to ensure that any equipment you have fitted complies with applicable local legislations. Have any equipment fitted by properly trained technicians.
WARNINGS

Radio frequency (RF) transmitter equipment (e.g. cellular telephones, amateur radio transmitters etc.) may be fitted to your vehicle if they comp the parameters shown in the table v. There are no special provisions or itions for installations or use.

Do not mount any transceiver, microphones, speakers, or any other item in the deployment path e airbag system.

Do not fasten antenna cables to original vehicle wiring, fuel pipes and brake pipes.
Appendices
WARNINGS
WARNINGS

Keep antenna and power cables least 100mm from any electronic
atmodules and airbags.

text_image
6 4 1 2 3 8 7 5E85998
| Frequency Band MHz | (Peak RMS) | Antenna PositionsMaximum ou |
| 3, 850 W1 - 30 | ||
| 2, 350 W30 - 54 | ||
| 1, 2, 3, 4, 550 W68 - 87.5 | ||
| 1, 2, 3, 4, 550 W142 - 176 | ||
| 1, 2, 3, 4, 550 W380 - 512 | ||
| 806 - 940 | ^1) | 1, 2, 3, 4, ^1 , ^76 10 W (2 W |
| 1200 - 1400 | 210 W | |
| 1710 - 1885 | 10 W ( ^1 W) | 1, 2, 3, 4, ^1 , ^76 |
| 1885 - 2025 | 10 W ( ^1 W) | 1, 2, 3, 4, ^1 , ^76 |
| 2400 - 2500 | 0.1 W | All positions |
^1 Only for GSM/3G cellular phones, with a patch antenna installed inside of the front windscreen.
Note: After the installation of RF
transmitters, check for disturbances from and to all electrical equipment in the vehicle, both in the standby and transmit modes.
Check all electrical equipment:
• with the ignition ON
• with the engine running
• during a road test at various speeds.
Check that electromagnetic fields generated inside the vehicle cabin by the transmitter installed do not exceed human exposure limits specified in EU directive 2004/40/EC.
A
A/C
See: Climate control....101
About this handbook....7
ABS
See: Brakes....141
ABS driving hints
See: Hints on driving with ABS......141
ACC
See: Adaptive cruise control (ACC)......151
Accessories
See: Parts and accessories....7
See: Using ACC....152
Active suspension....146
Principle of operation....146
Active suspension
See: Using active suspension....146
Adaptive cruise control (ACC)......151
Principle of operation....151
Adaptive cruise control
See: Using ACC....152
Adaptive front lighting system
(AFS)....56
Cornering lamps....57
Adjusting the headlamps - Vehicles
With: Adaptive Front Lighting/Xenon
Headlamps....55
Adjusting the steering wheel......47
AFS
See: Adaptive front lighting system (AFS)....56
Air conditioning
See: Climate control....101
Air vents....101
Front air vents....101
Rear air vents....101
Alarm....44
Principle of operation....44
Appendices......268
Arming the alarm....46
Arming the engine immobiliser......43
Ashtray....122
Front ashtray....122
Rear ashtray....122
Audible warnings and indicators......78
Switching the chimes on and off....78
Audio control....47
Mode....47
Seek....48
Audio unit commands....239
Auxiliary input....245
CD Changer....240
CD Player....239
External devices - iPod......247
External devices - USB......245
Radio....242
SD Card....248
Auto-dimming mirror....73
Autolamps....54
Automatic climate control....104
Air distribution....105
Blower....105
Mono mode....105
Recirculated air....106
Setting the temperature....105
Switching the air conditioning on and off....106
Switching the automatic climate control on and off....106
Windscreen defrosting and demisting....106
Automatic transmission....138
Drive modes....139
Emergency park position release lever....140
Hints on driving with an automatic transmission....139
Selector lever positions....138
Autowipers....49
Auxiliary heater....107
Changing the remote control battery.....111
Diesel auxiliary heater (depending on country)....109
Feedback during starting and switching off....110
Fuel operated heater (depending on country)....109
Parking heater....107
Programming the transmitter....111
Remote start in combination with direct start or timer....110
Remote starting....110
Auxiliary input (AUX IN) socket......125
Auxiliary power sockets......122
B
Battery connection points.....205
Bluetooth setup....232
Handling of phones....232
Requirements for Bluetooth connection....232
Bonnet lock
See: Opening and closing the bonnet.....188
Booster cables
See: Using booster cables....204
Booster cushions....20
Booster cushion....20
Booster seat....20
Integrated booster cushion....21
Brake and clutch fluid check....198
Brakes....141
Principle of operation....141
Bulb changing
See: Changing a bulb....60
Bulb specification chart....67
C
Cargo nets....160
Luggage retention net....160
Car wash
See: Cleaning the exterior....202
Catalytic converter....134
Driving with a catalytic converter......134
CD changer....125
Changing a bulb....60
Approach lamp....62
Central high mounted brake lamp......64
Front fog lamps....62
Headlamp....60
Interior lamp....66
Luggage compartment lamp......67
Number plate lamp....66
Reading lamps....66
Rear lamps....63
Side repeaters....62
Vanity mirror lamp....67
Changing a fuse....175
Changing a road wheel....206
Installing a road wheel....209
Jacking and lifting points....207
Locking wheel nuts....206
Removing a road wheel....208
Vehicle jack....206
Vehicles with a temporary spare wheel....206
Changing the remote control battery....32
Remote control with a folding key blade....32
Remote control without a folding key blade....33
Changing the wiper blades....51
Rear window wiper blades....52
Windscreen wiper blades....51
Checking the wiper blades....51
Child safety....19
Child safety locks......25
Child seat positioning....22
Child seats....19
Child restraints for different mass groups....19
Cigar lighter....121
Cleaning the exterior......202
Body paintwork preservation......202
Cleaning the chrome trim....202
Cleaning the headlamps....202
Cleaning the rear window....202
Cleaning the interior......202
Instrument cluster screens, LCD screens, radio screens....203
Seat belts....202
Climate control....101
Principle of operation....101
Climate control commands......254
Climate....254
Clock....121
Coded keys....43
Cold weather precautions......170
Connecting an external device......258
Connection....258
Connecting an external device -
Vehicles With: Bluetooth......258
Connecting a Bluetooth audio device....258
Connectivity....257
General information....257
Convenience features.....121
Coolant check
See: Engine coolant check....197
Cruise control....149
Principle of operation....149
Cruise control
See: Using cruise control.....149
Cup holders....123
D
Detachable tow ball....166
Driving with a trailer....168
Driving without a trailer....169
Inserting the tow ball arm....167
Maintenance....169
Removing the tow ball arm....168
Unlocking the tow ball arm mechanism....167
Diesel particulate filter (DPF)......131
Regeneration....131
Direction indicators....58
Disabling the passenger airbag......30
Disabling the passenger airbag....31
Enabling the passenger airbag......31
Fitting the passenger airbag deactivation switch....31
Disarming the alarm....46
Vehicles with keyless entry......46
Vehicles without keyless entry......46
Disarming the engine immobiliser......43
Dog guard....162
Installing behind the front seats......162
Installing behind the rear seats......163
DPF
See: Diesel particulate filter (DPF)......131
Driving hints.....170
Driving through water....170
Driving through water 170
E
Electric exterior mirrors....71
Electric folding mirrors....72
Mirror tilting positions....71
Reverse mirror dipping....72
Electric seats....116
2-way electric seat....116
8-way electric seat....117
Electric sunroof....111
Opening and closing the sunroof......112
Opening and closing the sunroof automatically....113
Sunroof anti-trap protection....113
Sunroof relearning....114
Sunroof safety mode....114
Tilting the sunroof....113
Electric windows....69
Anti-trap function....70
Driver's door switches....69
Front and rear passengers' door switches....69
Global opening and global closing......69
Opening and closing the windows automatically....69
Resetting the memory of the electric windows....70
Safety mode....70
Safety switch for rear windows......69
Electromagnetic compatibility.....269
Emergency equipment......171
Engine compartment overview - 1.6L Duratec-16V Ti-VCT (Sigma)......189
Engine compartment overview - 1.8L Duratorq-TDCi (Lynx) Diesel.....193
Engine compartment overview - 2.0L Duratec-HE (MI4)....190
Engine compartment overview - 2.0L Duratorq-TDCi (DW) Diesel....194
Engine compartment overview - 2.2L Duratorq-TDCi (DW) Diesel....195
Engine compartment overview - 2.3L Duratec-HE (MI4)....191
Engine compartment overview - 2.5L Duratec (VI5)....192
Engine coolant check....197 Checking the coolant level....197 Topping up....198
Engine heater....132
Engine immobiliser....43 Principle of operation....43
Engine oil check....197 Checking the oil level....197
Topping up....197
Engine oil dipstick - 1.6L Duratec-16V Ti-VCT (Sigma)....196
Engine oil dipstick - 1.8L Duratorq-TDCi (Lynx) Diesel....196
Engine oil dipstick - 2.0L Duratec-HE (MI4)/2.3L Duratec-HE (MI4)....196
Engine oil dipstick - 2.0L Duratorq-TDCi (DW) Diesel/2.2L Duratorq-TDCi (DW) Diesel....197
Engine oil dipstick - 2.5L Duratec (VI5)....196
Exterior mirrors....71 Manual folding mirrors....71
F
Fastening the seat belts....29
First aid kit....171
Fog lamp See: Front fog lamps....54
Forward alert function....155 Adjusting the warning sensitivity....156 Switching forward alert on/off....156
Front fog lamps....54
Fuel and refuelling....133 Technical specifications....136
Fuel burning heater See: Auxiliary heater....107
Fuel consumption....135
Fuel consumption See: Technical specifications....136
Fuel filler flap....134 Vehicles with diesel engine....135
Fuel quality - Diesel....133 Long-term storage....134
Fuel quality - E85....133 Long-term storage....133
Fuel quality - Petrol....133
Fuse box locations....173 Central fuse box....173 Engine compartment fuse box....173 Rear fuse box - 4-door and 5-door....174 Rear fuse box - Estate....174
Fuses....173
Fuse specification chart....176 Central fuse box....179 Engine compartment fuse box....176 Rear fuse box....181
G
Gauges....74 Engine coolant temperature gauge....75 Fuel gauge....76
Gearbox See: Transmission....138
General driving points - Vehicles With: Sports Suspension....170
General information on radio frequencies....32
Getting started....266 Activating the mobile phone navigation system....266
Compatibility of phones....266 Installing the micro SD card....266
Glasses holder....125
Global opening and closing....38 Global closing....39 Global opening....39
Glove box....123 Cooled glove box....123
H
Handbrake See: Parking brake....141
Hazard warning flashers......56
Headlamp adjustment See: Adjusting the headlamps - Vehicles With: Adaptive Front Lighting/Xenon Headlamps....55
Headlamp levelling....55 Recommended headlamp levelling switch positions....55
Headlamp washers....51 Head restraints....118
Adjusting the head restraint....118 Removing the head restraint....118
Heated seats....119
Heated windows and mirrors....106 Heated exterior mirrors....107 Heated windows....106
Heating See: Climate control....101
Hill launch assist See: Using hill start assist....143
Hill start assist....143
Principle of operation....143
Hints on driving with ABS......141
HLA
See: Hill start assist....143
See: Using hill start assist....143
|
Ignition switch....127
Immobiliser
See: Engine immobiliser....43
Information displays....79
General information....79
Information messages....92
Active suspension....93
Alarm....93
Battery and charging system....94
Climate control....94
Cruise control and Adaptive cruise control (ACC)....94
Doors open....95
Engine immobiliser....95
Hill launch assist (HLA)....95
Keyless system....96
Lighting....96
Maintenance....97
Message indicator....92
Message symbols....92
Occupant protection....97
Parking brake....97
Power steering....98
Stability control (ESP)......9
Transmission....98
Tyre pressure monitoring system......98
Viewing current messages....92
Voice control....100
Inspecting safety system
components....172
Seat belts....172
Instrument lighting dimmer......121
Instruments....74
Interior lamps....58
Courtesy lamp....58
Reading lamps....58
Vanity mirror lamps....59
Introduction......7
ISOFIX anchor points....24
Attaching a child seat with top tethers....24
Top tether anchor points......24
J
Jump starting
See: Using booster cables....204
K
Keyless entry....40
Disabled keys....42
General information....40
Locking and unlocking the doors with the key blade....42
Locking the vehicle....40
Passive key....40
Unlocking the vehicle....41
Keyless starting....127
Failure to start....128
Ignition on....127
Starting a diesel engine....128
Starting with automatic transmission.....128
Starting with manual transmission......128
Stopping the engine....129
Keys and remote controls....32
L
Lighting control....53
Headlamp flasher....53
Home safe lighting....54
Lighting control positions....53
Main and dipped beam....53
Parking lamps....53
Lighting....53
Load carriers
See: Roof racks and load carriers.....162
Load carrying....157
General information....157
Load retaining fixtures......164
Installing the load bracket....164
Installing the load retaining fixtures......164
Locking and unlocking....36
Automatic relocking....38
Central locking....36
Double locking....36
Double locking the doors with the key....36
Locking and unlocking confirmation......36
Locking and unlocking the doors and the luggage compartment lid with the remote control....37
Locking and unlocking the doors from inside....37
Locking and unlocking the doors with the key....36
Luggage compartment lid....38
Reprogramming the unlocking function....38
Locks....36
Luggage anchor points......157
4-door and 5-door....158
Estate....157
Luggage covers....161
M
Maintenance....187
General information....187
Technical specifications....199
Manual climate control.....102
Air conditioning....103
Air distribution control....102
Blower....102
Heating the interior quickly....102
Recirculated air....102
Ventilation....103
Manual seats....115
Adjusting the angle of the seatback.....116
Adjusting the height of the driver's seat....116
Adjusting the lumbar support......116
Moving the seats backwards and forwards....115
Manual transmission....138
All vehicles....138
Selecting reverse gear....138
Map pockets....124
Memory function....124
Recalling a stored seat position....125
Setting a memory pre-set......124
Message centre
See: Information displays....79
Mirrors
See: Heated windows and mirrors......106
See: Windows and mirrors......69
N
Navigation introduction......265
Navigation system commands.....254
Navigation system......266
O
Occupant protection....27
Principle of operation......27
Oil check
See: Engine oil check....197
See: Opening and closing the bonnet.....188
O
Opening and closing the bonnet.....188
Closing the bonnet....188
Opening the bonnet....188
P
Parking aid....147
Principle of operation....147
Parking aid
See: Using the parking aid....147
Parking brake....141
Applying the parking brake....141
Parking on a hill....141
Releasing the parking brake....141
Parts and accessories....7
Look for the Ford logo on the following parts 8
Now you can be sure that your Ford parts are Ford parts....7
Personalised settings....90
Help screen, radio, navigation and phone information....90
Language....91
Navigation information....90
Units of measure....91
Power steering fluid check....198
Topping up....198
Programming the remote control......32
Programming a new remote control.....32
Reprogramming the unlocking function....32
Q
Quick start....10
Adjusting the steering wheel....13
Autolamps....14
Automatic climate control....15
Automatic transmission....17
Autowipers....14
Diesel particulate filter (DPF)....16
Electric folding mirrors....14
Engine idle speed after starting....16
Fuel filler flap....16
Information displays....15
Instrument panel overview - left-hand drive....10
Instrument panel overview - right-hand drive....11
Keyless entry....12
Keyless starting....16
Manual climate control....15
Manual transmission....17
Memory function....15
R
Rear fog lamps....54
Rear seats....118
Creating a level load floor....118
Folding the seatbacks down....118
Folding the seatbacks up....119
Rear under floor storage....160
Vehicles with a sliding loadspace floor....160
Vehicles without a sliding loadspace floor....160
Rear window wiper and washers.....50
Intermittent wipe....50
Reverse gear wipe....50
Washer....50
Refuelling - E85....135
Refuelling....135
Remote control battery See: Changing the remote control battery....32
Remote control programming See: Programming the remote control.....32
Removing a headlamp....59
Repairing minor paint damage......203
Road Safety....265 Safety information....265
Roof racks and load carriers.....162
Roof rack....162
Run flat tyres....216
Principle of operation....216
Replacing run flat tyres....216
What to do if a run flat tyre has a puncture....216
Running-in....170
Brakes and clutch....170
Engine....170
Tyres....170
S
Seat belt height adjustment......29
Seat belt reminder....30
Deactivating the seat belt reminder......30
Seats......115
Sitting in the correct position......115
Sliding loadspace floor....158 Storage compartment....159
Snow chains See: Using snow chains....217
Speed control See: Cruise control....149
Stability control....142 Principle of operation....142
Stability control See: Using stability control....142
Starter switch See: Ignition switch.....127
Starting a diesel engine....131 Cold or hot engine....131
Starting a petrol engine - E85......130
Starting at low ambient temperatures 130
Starting a petrol engine....129
Cold or hot engine....129
Engine idle speed after starting....130
Flooded engine....130
Starting the engine....127
General information....127
Status after a collision....172
Steering wheel lock....129
Vehicles with keyless starting....129
Vehicles without keyless starting.....129
Steering wheel....47
Storage compartments......123
Sun blinds....121
Sunroof
See: Electric sunroof....111
Switching off the engine....132
Vehicles with a turbocharger....132
Symbols glossary......7
Symbols in this handbook....7
Symbols on your vehicle....7
T
Technical specifications....223
Technical specifications....223
Telephone commands....250
Create a phonebook....250
Main settings....254
Phone....250
Phone functions....252
Telephone controls....233
Remote control....233
Telephone setup....231
Bond another Bluetooth phone......232
Making a phone an active phone......232
Phonebook....231
Phonebook categories......231
Telephone....231
General information....231
Telephone
See: Using the telephone - Vehicles With:
Navigation System......236
See: Using the telephone - Vehicles Without:
Navigation System......233
Towing a trailer....166
Steep gradients....166
Towing points....185
Towing the vehicle on four wheels....185
All vehicles....185
Vehicles with automatic transmission....185
Towing....166
Transmission....138
Trip computer......88
Average fuel consumption......88
Average speed....88
Distance to empty....88
Odometer....88
Outside air temperature....88
Tripmeter....88
Type 1 and 2....89
Type 3....89
Type approvals....268
FCC/INDUSTRY CANADA NOTICE......268
RX-42 - declaration of conformity......268
Tyre care....217
Tyre pressure monitoring system.....218
Checking the tyre pressures....218
Setting the vehicle load....218
Tyre pressures
See: Technical specifications....219
Tyre repair kit....210
Checking the tyre pressure....215
General information....210
Inflating the tyre....211
Using the tyre repair kit....211
Tyres
See: Wheels and tyres....206
U
USB port....126
Using ACC....152
Automatic deactivation....154
Cancelling ACC....154
Changing the set speed....153
Resuming ACC....154
Setting a speed....153
t: Setting the vehicle gap....153
Switching ACC off....154
Switching ACC on....153
Using active suspension....146
Selecting a setting....146
System malfunction....146
Using an iPod....261
CD Navigation units....263
DVD Navigation units....263
Sony radio....262
Using a USB device....259
CD Navigation units....260
DVD Navigation units....261
Sony radio....259
Using booster cables....204
To connect the booster cables.....204
To start the engine....204
Using cruise control....149
Cancelling the set speed....149
Changing the set speed....149
Resuming the set speed....150
Setting a speed....149
Switching cruise control off....150
Switching cruise control on....149
Using hill start assist....143
Activating the system....144
Deactivating the system....145
Using seat belts during pregnancy.....30
Using snow chains....217
Using stability control....142
Using the parking aid....147
Manoeuvring with the parking aid.....147
Switching the parking aid on and off.....147
Using the telephone - Vehicles With:
Navigation System......236
Changing the active phone....237
Debonding a bonded phone....237
Making a call....236
Muting the microphone....236
Receiving an incoming call....236
Receiving a second incoming call......236
Using the telephone - Vehicles Without:
Navigation System......233
Changing the active phone....235
Debonding a bonded phone....235
Debonding a bonded phone - Sony radio....235
Making a call....233
Muting the microphone....235
Receiving an incoming call....234
Receiving a second incoming call.....234
Using voice control....238
Name tag....239
System operation....238
Using winter tyres......217
V
Vehicle battery....204
Vehicle care....202
Vehicle identification number (VIN) 222
Vehicle identification plate......222
Vehicle identification......222
Vehicle recovery....185
Ventilated seats....119
Ventilation
See: Climate control....101
Vents
See: Air vents....101
VIN
See: Vehicle identification number (VIN)....222
Voice control....238
Principle of operation....238
W
Warning lamps and indicators......76
ABS warning lamp....76
Airbag warning lamp....76
Brake system lamp....76
Cruise control indicator....76
Direction indicators....76
Engine warning lamp....76
Forward alert indicator....77
Front fog lamp indicator....77
Frost warning lamp....77
Glow plug indicator....77
Headlamp indicator....77
Ignition warning lamp....77
Low fuel level warning lamp....77
Main beam indicator....77
Message indicator....77
Oil pressure warning lamp....77
Rear fog lamp indicator....78
Seat belt reminder....78
Shift indicator....78
Stability control (ESP) warning lamp.....78
Index
Warning triangle....171
4-door and 5-door....171
Estate and vehicles with tyre repair kit....171
Washer fluid check....199
Washers
See: Wipers and washers.....49
Washing
See: Cleaning the exterior....202
Wheels and tyres....206
General information....206
Technical specifications....219
Windows and mirrors....69
Windscreen washers....50
Windscreen wipers......49
Intermittent wipe....49
Winter tyres
See: Using winter tyres......217
Wipers and washers....49


