Everio GZ-EX310 - Camcorder JVC - Free user manual and instructions
Find the device manual for free Everio GZ-EX310 JVC in PDF.

User questions about Everio GZ-EX310 JVC
0 question about this device. Answer the ones you know or ask your own.
Ask a new question about this device
Download the instructions for your Camcorder in PDF format for free! Find your manual Everio GZ-EX310 - JVC and take your electronic device back in hand. On this page are published all the documents necessary for the use of your device. Everio GZ-EX310 by JVC.
USER MANUAL Everio GZ-EX310 JVC
natural_image
3D rendered mechanical component with no visible text or symbolsTable of Contents
Beginner's Guide 4
Holiday Season/Christmas 5
Wedding 6
Travel 7
Amusement Park 9
Getting Started
Verifying the Accessories 11
Charging the Battery Pack 12
Grip Adjustment 13
Using as a Hand Strap 13
Inserting an SD Card 13
Types of Usable SD Card 14
Using the Touch Screen 15
Adjusting the Touch Panel 15
Names of Buttons and Functions on the LCD Monitor ..... 16
Clock Setting 18
Resetting the Clock 19
Changing the Display Language 20
Holding this Unit 20
Tripod Mounting 21
Using this Unit Overseas 21
Charging the Battery Pack Overseas 21
Setting the Clock to Local Time when Traveling 22
Setting Daylight Saving Time 22
Optional Accessories 23
Recording
Taking Videos in Auto Mode 24
Capturing Still Images During Video Recording 26
Taking Still Images in Auto Mode 27
Zooming 30
Manual Recording 30
Shooting According to Scene (Subject) 32
Adjusting Focus Manually 33
Adjusting Brightness 34
Setting Backlight Compensation 35
Setting White Balance 36
Taking Close-up Shots 37
Recording with Effects 38
Recording with Animation Effects (ANIMATION EFFECT) . 39
Recording with Face Decorations (DECORATE FACE EFFECT) 41
Recording with Decorative Stamps (STAMP) 42
Recording with Personal Handwriting (HANDWRITING EFFECT) 43
Capturing Subjects Clearly (TOUCH PRIORITY AE/AF) ..... 44
Capturing Smiles Automatically (SMILE SHOT) 45
Capturing Pets Automatically (PET SHOT) 46
Registering Human Face Personal Authentication Information
48
Setting SMILE%/NAME DISPLAY 50
Editing the Registered Face Information 51
Reducing Camera Shake 52
Marking the Video While Recording 53
Slow-motion (High-speed) Recording 53
Recording at Intervals (TIME-LAPSE RECORDING) 54
Recording Stop-Motion Videos (STOP-MOTION REC) ...... 56
Recording Automatically by Sensing Movements (AUTO REC) 57
Taking Group Shots (Self-timer) 58
Recording Videos with Date and Time 60
Checking the Remaining Recording Time 61
Playback
Playing Back Videos 64
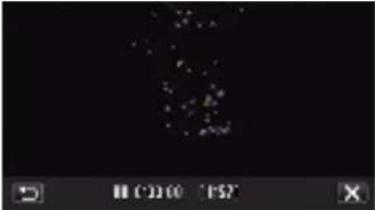
Normal Playback 66
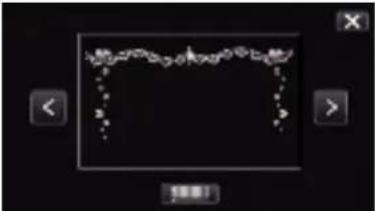
MARKING PLAYBACK 66
DIGEST PLAYBACK 70
PLAYBACK PLAYLIST 72
PLAYBACK OTHER FILE 73
Playing Back Still Images 74
Slideshow Playback 75
Searching for a Specific Video/Still Image by Date 76
Connecting to and Viewing on TV 77
Connecting via the HDMI Mini Connector 77
Connecting via the AV Connector 79
Playing Back a DVD or Blu-ray Disc Created on this Unit ..... 79
Digest Playback on a Blu-ray or DVD Player 79
Editing
Deleting Unwanted Files 80
Deleting the Currently Displayed File 80
Deleting Selected Files 80
Protecting Files 81
Protecting/Releasing Protection of the Currently Displayed File 81
Protecting/Releasing Protection of Selected Files 82
Capturing a Still Image in the Video During Playback 83
Combining Videos Recorded by Seamless Recording 83
Capturing a Required Part in the Video (TRIMMING) 84
Creating Playlists from the Recorded Videos 85
Creating Playlists with Selected Files 85
Creating Playlists by Date 87
Editing Playlists 88
Deleting Playlists 89
Copying
Creating Discs with a BD Writer (External Blu-ray Drive) ..... 90
Preparing a BD Writer (External Blu-ray Drive) 91
Creating a Disc 92
Playing Back with a BD Writer (External Blu-ray Drive) ..... 98
Creating Discs with a DVD Writer 98
Preparing a DVD Writer (CU-VD3) 99
Preparing a DVD Writer (CU-VD50) 99
Creating a Disc 100
Playing Back with a DVD Writer 105
Creating a Disc Using a Connected Blu-ray Recorder ..... 105
Dubbing Files to a Disc by Connecting to a DVD Recorder . 106
Dubbing Files to a VHS Tape by Connecting to a VCR ..... 107
Using a USB External Hard Disk Drive 108
Preparing a USB External Hard Disk Drive 109
Copying All Files 109
Playing Back Files in the USB External Hard Disk Drive .. 110
Deleting Folders in the USB External Hard Disk Drive ..... 111
Formatting the USB External Hard Disk Drive 111
Copying Files to an SD Card (GZ-EX355) 112
Moving Files to an SD Card (GZ-EX355) 113
Copying to Windows PC (GZ-EX355/GZ-EX310) 114
Verifying System Requirements (Guideline) 114
Installing the Provided Software 115
Backing Up Files 116
Recording Videos to Discs 117
Backing Up Files Without Using Provided Software ..... 119
List of Files and Folders 120
Copying to Windows PC (GZ-E300) 121
Verifying System Requirements (Guideline) 121
Installing the Provided Software (Built-in) 122
Backing Up All Files 123
Organizing Files 124
Recording Videos to Discs 125
Backing Up Files Without Using Provided Software ..... 127
List of Files and Folders 128
Copying to Mac Computer 129
Using Wi-Fi (GZ-EX355/GZ-EX310)
Wi-Fi Capabilities 130
Operating Environment 131
Precautions on Using Wi-Fi 131
Image Monitoring via Direct Connection (DIRECT MONITORING) 132
Image Monitoring via an Access Point at Home (INDOOR MONITORING) 135
Image Monitoring via the Internet (OUTDOOR MONITORING) 140
Sending Still Images via E-mail upon Detection of Face or Movement (DETECT/MAIL) 142
Record and Send Videos via E-mail (VIDEO MAIL) 144
Image Monitoring on TV (TV MONITORING) 145
EASY STORAGE 146
Recording the Location Information 147
Using the Pan Cradle (Sold Separately) 150
Changing the Settings 152
Setting the Password (DIRECT MONITORING/INDOOR MONITORING/OUTDOOR MONITORING) 155
Setting the Enforced Group Owner (DIRECT MONITORING) 156
Changing the HTTP Port (DIRECT MONITORING/INDOOR MONITORING/OUTDOOR MONITORING) 156
Setting the UPnP of this Camera (OUTDOOR MONITORING) 157
Obtaining a Dynamic DNS (DDNS) Account 157
Setting Dynamic DNS on this Camera (OUTDOOR MONITORING) 158
Setting the Sender's E-mail Address of the Camera ..... 159
Registering the Recipient's E-mail Address of the Camera 161
Setting the Detection Method of this Camera (DETECT/MAIL SETTING) 163
Setting the Detection Interval of this Camera (DETECT/MAIL SETTING) 163
Setting Self Recording on this Camera (DETECT/MAIL SETTING) 164
Registering the Access Points of the Camera to Connect (ACCESS POINTS) 164
Setting the Password (DIRECT MONITORING) 170
Enabling the MAC Address Filter (TV MONITORING) ..... 170
Registering the MAC Address (TV MONITORING) ..... 171
Checking the MAC Address of this Camera 171
Protecting the Network Settings with a Password 172
Initializing the Wi-Fi Settings 173
Changing the Panning Speed 173
Using Smartphone Applications 175
Indications on the Screen 175
Using the Markings 176
Using the Game Score 176
Transferring Videos (AVCHD format) 179
Transferring Videos (iFrame format) 182
Transferring Still Images 184
Smartphone Application Settings 186
Using the Wi-Fi Function from a Web Browser 188
Indications on the Screen 188
Troubleshooting 191
Wi-Fi Specifications 196
Using Wi-Fi by Creating a QR Code (GZ-EX355/GZ-EX310)
DIRECT MONITORING 199
INDOOR MONITORING 202
OUTDOOR MONITORING 207
DETECT/MAIL 212
VIDEO MAIL 216
TV MONITORING 220
Settings Menu
Operating the Menu 224
Operating the Top Menu 224
Operating the Shortcut Menu 225
RECORD SETTING Menu (video) 226
SPECIAL RECORDING Menu (video) 230
RECORD SETTING Menu (still image) 231
SPECIAL RECORDING Menu (still image) 233
PLAYBACK SETTING Menu (video) 234
EDIT Menu (video) 235
PLAYBACK SETTING Menu (still image) 236
EDIT Menu (still image) 237
SETUP (video/still image) 238
CONNECTION SETTINGS (video/still image) 241
MEDIA SETTINGS (video/still image) 242
USB CONNECTION MENU 243
Names of Parts
Indications on the LCD monitor
Troubleshooting
When the unit is not working properly 250
Battery Pack 251
Recording 251
Card 252
Playback 252
Editing/Copying 253
Computer 254
Screen/Image 254
Other Problems 255
Error Message? 256
Maintenance
Specifications
Basic Way to Hold a Camcorder \~ Recording Stable Images \~

natural_image
Person in white shirt and black trousers holding a small object outdoors, surrounded by greenery (no visible text or symbols)This is the standard way of shooting while standing up. Be sure to master this basic technique in order to achieve stable images.
[Getting Ready]
1 Open your feet to the width of your shoulders.
2 Keep the elbow of your right arm, which is holding the camcorder, close to your side.
3 Hold the LCD monitor with your left hand and adjust the angle accordingly.
Extending Your Hands to Shoot \~ High-Angle Shooting \~

natural_image
Man in white shirt and black trousers raising a small object outdoors, surrounded by trees (no visible text or symbols)Extend your hand when your subject is being hidden behind a crowd of people.
[Getting Ready]
1 Open your feet to the width of your shoulders.
2 Extend your right hand and hold the camcorder over your head.
3 Hold the LCD monitor with your left hand and adjust the angle accordingly.
Caution :
- Use this way of shooting only as a last resort as it is difficult to achieve stable images.
- Set to the wide angle as much as possible as the image will be prone to camera shake.
- Be considerate. Do not inconvenience the people around you.
Squatting and Shooting at Eye Level

natural_image
Person taking a photo outdoors, holding a camera, surrounded by trees and grass (no visible text or symbols)Staying low is a common position to take when shooting small children. By recording from the eye level of the child, you can capture all his cute expressions clearly.
[Getting Ready]
1 Kneel down with your left knee while keeping your right foot on the ground.
2 Place the elbow of your right arm, which is holding the camcorder, on your right knee.
3 Hold the LCD monitor with your left hand and adjust the angle accordingly.
Panning
- Refer to the operating instructions found in the animation on the Detailed User Guide. Use this method to shoot a wide angle of view.
[Getting Ready]
1 Shoot by rotating your body instead of moving your arms while keeping the basic way of holding a camcorder as stated above.
2 Stand facing the direction where the rotation will stop.
3 Twist your upper body to the direction where recording will start.
4 Press the start button and record for 2 seconds, then slowly twist back your body to face the front.
Record for another 2 seconds while facing the front, then press the stop button.
(The 90 degrees rotation should take about 5 seconds, giving the feeling of a slow motion.)
Holiday Season/Christmas
Record the happy Christmas celebration with your family!

natural_image
Santa Claus and child sitting on a decorated Christmas tree, no visible text or symbolsPhoto by 101st CAB, Wings of Destiny Creative Commons Attribution-No Derivative Works 3.0
Decorating the Tree and Preparing the Dinner
The decoration of tree and preparation of dinner are part of the joy of Christmas. Be sure to record these happy family times!
- Decorating the tree

natural_image
Child arranging a Christmas tree decorated with ornaments and decorations (no visible text or symbols)A tree is the most important thing to bring out the mood of Christmas. Simply the scene of all family members engaging in the decorating of a fir tree with various colorful ornaments is full of the feeling of happiness.
■ Preparing the Dinner

natural_image
Interior view of a formal dining table with various plates, glasses, and a floral arrangement (no visible text or symbols)Photo by Manicosity Creative Commons Attribution-No Derivative Works 3.0 Record the scenes as everyone helps to prepare the feast of the night. You can film the mother who is cooking, the children who are helping, and of course, the process of making a cake!
Recording the Christmas Party

natural_image
Group of men seated around a decorated table in a dimly lit room (no visible text or symbols)Photo by InnerSpirit Creative Commons Attribution-No Derivative Works 3.0 After all preparations, it is finally the Christmas party itself. Not only should you record the candle-blowing scene, but also the smiles of the family while being surrounded by good food, or even the father who is slightly drunk from champagne!
Finding the Presents

natural_image
Child standing beside a Christmas-themed table with decorated items including a Christmas tree, socks, and stuffed animals (no visible text or symbols)For children, the greatest joy of Christmas is receiving presents the next morning. Their expression of delight when finding a present next to their pillow is a recording opportunity not to be missed. Get ready to shoot before the children wake up!
Wedding
Create an awesome wedding video for the bride and groom!

natural_image
Interior view of a formal banquet hall with attendees seated at long tables facing a long table, no visible text or signage.Discussing and Planning Before the Event
Before the day of the wedding reception, it is important to discuss with the bride and groom about various details such as the order of the ceremony and whether there are any entertainment programs or change of clothes. By understanding the preferences of the bride and groom, you will be able to shoot more appropriately.
■ Finding out the route of entrance

natural_image
Wedding ceremony in front of a stone castle with people gathered around (no visible text or signage)The highlight of a wedding reception is the entrance of the bride and groom. Find out which door they will enter from and the route they will take from the person-in-charge of the wedding hall in advance. Set up the tripod at a place where you can follow the couple using zoom without having to move around.
■ Number of times and timing of clothes-changing
Find out the timing of any changing of clothes so as to capture the scene well when the bride and groom enter again.
You can also make use the time while the bride and groom are changing to record comments of well wishes from the guests.
Finding the Right Angle to Capture Both Bride and Groom
■ Composing the picture with the groom in front and the guests at the back

natural_image
Group photo of a smiling man in a suit with boutonnieres, surrounded by other men in suits (no visible text or symbols)The main characters of a wedding are of course the bride and groom. Record their expressions clearly during the toast, speech, entertainment programs, and other scenes. Another recommendation is to capture the face shots of the guests, then pan towards the groom. Picture composition containing the crowd of guests only lacks fun, so be sure to pay attention to the shooting angle and size.
Recording the Expressions and Comments of Guests
■ Setting the shot from eye level to chest level

natural_image
Man in formal suit and bow tie holding document (no visible text or symbols)You can record comments from the guest by going around asking, "Please say a few words for the bride and groom". This can be done at the guests' waiting room, when the bride and groom are changing, or during the entertainment programs.
Advanced Operation with Two Camcorders
If video-editing is to be done, record using two camcorders so that a video with varying scenes can be created. You can try asking a close friend who has a camcorder at home. Set the borrowed camcorder on a tripod to focus on taking close-up shots of the bride and groom. In this way, the other camcorder can be moved around to record other scenes, enabling an interesting video with changing scenes to be created through editing and compilation. As most people own at least a digital camera nowadays, even if you are really unable to find an extra camcorder, inserting still pictures to the video at various points is also a good way to add variety. Do give it a try!
Closing up on the bride and groom all the time

natural_image
Wedding couple posing for a photo outdoors, one holding flowers and the other waving (no visible text or symbols) Recording the congratulatory messages from friends at the same time

natural_image
Man in suit speaking at podium outdoors with pine trees and flowers in background (no visible text or symbols)Travel
Capture all the good times of your domestic or overseas trips!

natural_image
Silhouettes of people on a boat at sunset with bright sun and water reflections (no text or symbols visible)Bringing the Necessary Equipment
The necessary things to bring on a trip depends on your traveling purpose and the destination. For overseas trips in particular, you have to think about what to bring in accordance to the local conditions. Here are some suggestions for your consideration.
Camcorder
Think about how many hours of shooting you will usually perform in a day. Be sure to prepare enough recording medium especially for long overseas trips.
If you are recording in SD cards, get ready the sufficient number of cards, including some for backup.
Battery Pack
Prepare a battery pack that is ready for three times the expected recording time in a day. For example, if you plan to record for 2 hours a day, prepare a battery pack that is ready for 6 hours (actual recording time). For a day trip, you can prepare a battery with low capacity but for a long trip do prepare a few batteries with high capacities.
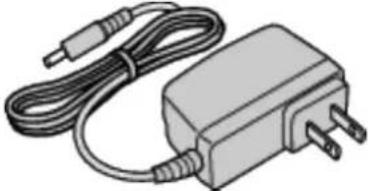
AC Adapter
The JVC AC adapter supports voltages from 110 V to 240 V, and hence can be used anywhere in the world.
Bring along the adapter if you are traveling for a long time. Charge the battery pack while sleeping so that you can record with full battery power the next day.
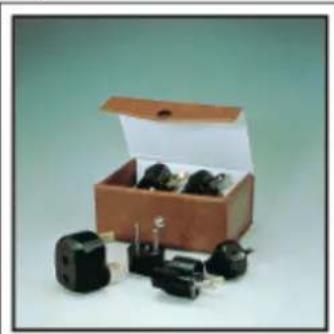
■ Power Plug Adapter
natural_image
Open cardboard box containing several small electronic components, including capacitors and relays (no visible text or labels)The shape of the power plug varies according to countries. Be sure to check the shape of the power plug beforehand, and bring the appropriate power plug adapter.
"Charging the Battery Pack Overseas" (p. 21)
Battery Charger

natural_image
Black plastic enclosure with a rectangular housing and internal slots (no text or symbols visible)Recording cannot be performed when an AC adapter is connected to the camcorder for battery charging. You can bring an additional battery charger to charge battery packs if you plan to use the camcorder for recording at night. You can also charge multiple battery packs by using both the battery charger and this camcorder at the same time.
Tripod

natural_image
tripod-mounted camera with tripod and tripod base (no visible text or symbols)A tripod is an essential item to take stable images. Select an appropriate tripod in accordance to your purpose and style of traveling, such as a compact one to be used on a table or one that is at least 1 m tall.
Recording the Excitement Before Departure
It may be a little abrupt to start your travel video at the destination suddenly. Record also the preparations prior to departure if it is a family trip, or the time when everyone is gathered at the meeting place if you are traveling with your friends. For overseas trips, taking a shot of the signs and displays at the airport of the flight you are taking may be useful for future reference.

text_image
出発口区 DEPARTURES
text_image
UAI UNITED UA8 Canadian CP4 UNITED UA8 RTH American AA6 UA8Using Pan at the Places of Interest
Tourists spots with beautiful scenery or historical sites are places that you would certainly want to record. To capture the magnificence of a scene which cannot be fitted into a single frame, try the panning technique. Refer to "Shooting Tips" found in the "Beginner's Guide" on this website on how to use panning effectively. In addition, you may also like to take a shot of the signs or monuments that can often be found at the tourist spots.

natural_image
Exterior view of a modern high-rise residential complex under a clear blue sky, with mountains in the background (no signage or text visible)
natural_image
Coastal beach scene with turquoise ocean, sandy shore, and modern buildings under a clear blue sky (no visible text or symbols)Showing Everyone Having a Good Time
When taking a video, it is rather dull to shoot only the scenery or historical sites. Talk about your feelings while recording the breath-taking scenery of an attraction so that it will be an interesting scene to view later.
Amusement Park
Take more shots of the smiling faces of everyone in the family!

natural_image
Two men sitting outdoors, one in white shirt and the other in orange shirt, with a large golden sculpture in the background (no visible text or symbols)Taking Videos or Still Images According to the Attraction
You may choose to take videos all the time. However, you may want to take some still images too.
The following section explains the scenarios suitable for taking videos or still images.
■ Scenarios suitable for taking videos

natural_image
Crowd on an amusement park ride with orange seats and a blue carabiner in the background (no visible text or signage)Scenarios with changes in body movement are suitable for taking videos. This includes situations where there are rapid changes in facial expressions or voices of surprise and delight.
*Some amusement parks do not allow passengers to perform any recording. Be sure to check beforehand.
[Examples]
- Merry-go-round, go kart, coffee cup, etc.
■ Scenarios suitable for taking still images (photos)

natural_image
Exterior view of a pink and white roller coaster with passengers in flight (no visible text or symbols)Scenarios with little movement of the subject are suitable for taking still images.
Try to take the still images from an angle such that the surroundings can be seen clearly.
[Examples]
- Carousal, ferris wheel, fun bicycle rides, etc.
Inducing Responses by Calling Out

natural_image
Two people riding a roller coaster under clear blue sky (no text or symbols visible)Videos with no waving of hands nor laughter are not only dull when you view them later, but also put the capability of the audio-recording function of the camcorder to a waste. When recording, induce more reactions by enthusiastically waving your hands or shouting out "Is it fun?" and the like.
Capturing the Best Moment in a Video as a Still Image
Shots with the eyes closed are often taken by accident. To reduce such mistakes, make use of the function to capture still images from videos.
As videos are actually continuous recording of 60 still images within 1 minute, using this function allows you to select the best moment and save it as a still image.
"Capturing a Still Image in the Video During Playback" (p. 83)

natural_image
Two dolphins leaping out of water with a wooden pier and shoreline in the background (no text or symbols visible)Photo by just that good guy jim
Creative Commons Attribution-No Derivative Works 3.0
Video Playback in Progress

natural_image
Two dolphins leaping out of the ocean, splashing and mid-air (no text or symbols visible)Creative Commons Attribution-No Derivative Works 3.0

natural_image
Two dolphins leaping out of water with splashes, near a shoreline (no text or symbols visible)Photo by just that good guy jim
Creative Commons Attribution-No Derivative Works 3.0
Video Playback in Progress
Advanced Operation with Backlight Compensation
When the subject's face is in backlight or when the expression cannot be seen clearly, the Intelligent Auto function of this unit automatically increases
its brightness for recording. If Intelligent Auto fails to function as expected or if the brightness correction is insufficient, you can increase the brightness by using backlight compensation in the Manual mode.
"Setting Details" (p. 35)
■

natural_image
Close-up portrait of a smiling child with short hair (no text or symbols visible)-

natural_image
Close-up portrait of a smiling boy with short blonde hair (no text or symbols visible)Verifying the Accessories
If any of the items are missing or defective, consult your JVC dealer or the nearest JVC service center.
| Illustration Description | |
 | AC AdapterAC-V11UConnects to this unit to charge the battery pack.It can also be used when recording or playing back videos indoors. |
 | Battery PackBN-VG107U(GZ-E300)BN-VG114U(GZ-EX355/GZ-EX310)Attaches to this unit to supply power. |
 | AV CableQAM1322-001Connects this unit to a TV to play back recorded images on the TV.Consult your nearest JVC service center if you need to purchase the AV cable. |
 | USB Cable(Type A - Mini Type B)Connects this unit to a computer. |
 | CD-ROM(GZ-EX355/GZ-EX310)For installing the provided software on a computer. |
 | Basic User GuideRead well and keep in a safe place where it can be accessed easily when necessary. |
Memo :
• SD cards are sold separately.
"Types of Usable SD Card" (p. 14)
- When using the AC adapter overseas, please prepare a commercially available converter plug for the country or region of visit.
"Charging the Battery Pack Overseas" (p. 21)
Charging the Battery Pack
Charge the battery pack immediately after purchase and when the remaining battery power is low.
The battery pack is not charged at the time of purchase.
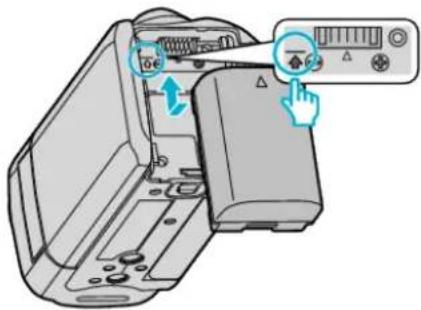
1 Attach the battery pack.
text_image
Diagram showing a printer's door panel with control buttons and a hand cursor, indicating action or operation.- Align the top of the battery with the mark on this unit, and slide in until the battery clicks into place.
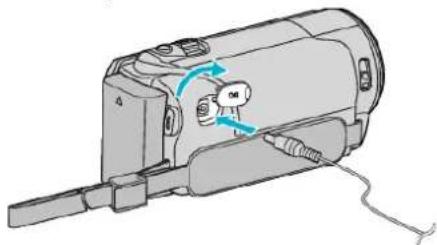
2 Connect the AC adapter to the DC connector.
natural_image
Technical line drawing of a mechanical device with no visible text or symbols3 Plug in the power.
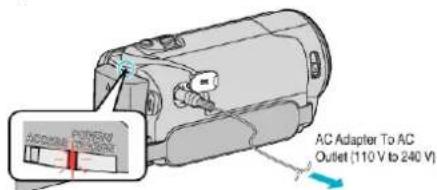
text_image
AC Adapter To AC Outlet (110 V to 240 V)- The charging lamp blinks when charging is in progress. It goes out when charging is finished.
| Warning |
| Make sure not to insert the battery pack in the wrong direction.It may cause damage to the unit and battery pack. |
Caution :
Be sure to use JVC battery packs.
- If you use any other battery packs besides JVC battery packs, safety and performance cannot be guaranteed.
- Charging Time: Approx. 1 h 50 m (using supplied battery pack, BN-VG107U) Approx. 2 h 30 m (using supplied battery pack, BN-VG114U)
- The charging time is when the unit is used at 25°C (77°F). If the battery pack is charged outside the room temperature range of 10°C to 35°C (50°F to 95°F), charging may take a longer time or it may not start. CHARGE lamp blinks 2 times in a slow cycle for notification if the battery charge does not start. Also, please note that the recordable and playable time may also be shortened under some usage conditions such as at low temperature.
- If malfunctions (overvoltage, etc) occur, or if any battery manufactured other than JVC is attempted for battery charge, charging stops. In these cases, the CHARGE lamp blinks quickly for notification.
Be sure to use the supplied AC adapter.
- If you use any other AC adapters besides the supplied AC adapter, malfunctions may occur.
- You can record or play back videos while the AC adapter is connected. (Battery charging cannot be performed during recording or playback.) Remove the battery when the unit is to be used for a long time. Performance of the battery may drop if it is left attached to the unit.
Rechargeable Batteries :
- When using the battery in a low temperature environment (10°C (50°F) or below), the operating time may be shortened, or it may not function properly. When using this unit outdoors in the winter weather, warm the battery, such as by placing it in the pocket, before attaching it. (Keep away from direct contact with a warm pack.)
- Do not expose the battery to excessive heat, such as direct sunlight or fire.
- After removing the battery, store it in a dry place between 15°C to 25°C (59°F to 77°F).
- Keep a 30% battery level (☐) if the battery pack is not to be used for a long period of time. In addition, fully charge and then fully discharge the battery pack every 6 months, then continue to store it at a 30% battery level (☐).
Memo :
- You can connect this unit to the AC adapter to record for long hours indoors. (Battery charging begins when the LCD monitor is closed.)
Detaching the Battery Pack
To detach the battery pack, perform the above steps in reverse order.

text_image
Diagram of a handheld device with labeled parts, showing hand operating the component and numbered callouts.Slide the battery release lever to detach the battery from this unit.
Approximate Battery Charging Time (Using AC Adapter)
| Battery Pack Charging time | |
| BN-VG107U(Supplied: GZ-E300) | 1 h 50 m |
| BN-VG114U(Supplied: GZ-EX355/GZ-EX310) | 2 h 30 m |
| BN-VG121U 3 h 30 m | |
| BN-VG138U 6 h 10 m |
- When the battery life is reached, the recording time becomes shorter even if the battery pack is fully charged. (Replace the battery pack with a new one.)
*The charging time is when the unit is used at 25°C (77°F). If the battery pack is charged outside the room temperature range of 10°C to 35°C (50°F to 95°F), charging may take a longer time or it may not start. The recordable and playable time may also be shortened under some usage conditions such as at low temperature.
"Approximate Recording Time (Using Battery)" (p. 63)
Grip Adjustment
1

2
3

1 Open the lever on the strap lock
2 Adjust the length of the belt
3 Close the lever
Caution :
- Be sure to fasten the grip belt properly.
If the belt is loose, this unit may drop and result in injuries or damages.
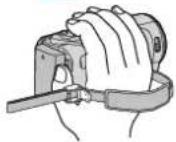
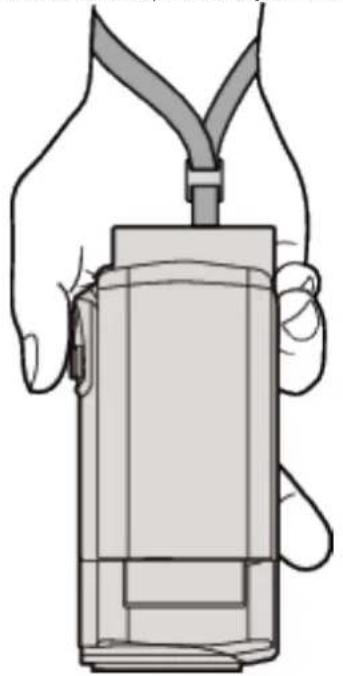
Using as a Hand Strap
Adjust the length of the belt and loop it around your wrist.
natural_image
Line drawing of a hand holding a cylindrical device with a handle, no text or symbols presentInserting an SD Card
When a commercially available SD card is inserted, recordings can still be made to the card without stopping when the remaining recording time on the built-in memory runs out.
Insert a commercially available SD card before recording.
"Types of Usable SD Card" (p. 14)
"Approximate Video Recording Time" (p. 62)
1 Close the LCD monitor.
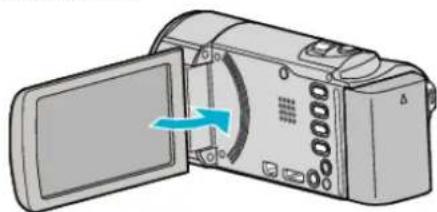
natural_image
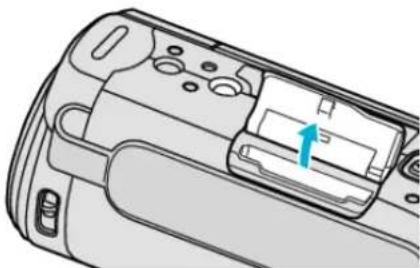
Illustration of a digital camera with an open screen and blue arrow indicating rotation (no text or symbols)2 Open the cover.
natural_image
Diagram of a camera module with an internal component and a blue arrow indicating direction (no text or symbols)3 Insert an SD card.
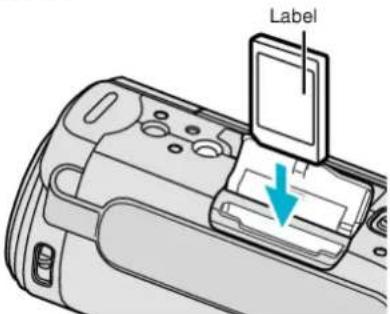
text_image
Label- Insert with the label facing outward.
Warning
- Make sure not to insert the SD card in the wrong direction. It may cause damage to the unit and SD card.
- Turn off the power of this unit before inserting or removing an SD card.
- Do not touch the metal contact area when inserting the SD card.
Memo :
- When "SEAMLESS RECORDING" is set to "ON", recordings can still be made to the SD card without stopping when the remaining recording time on the built-in memory runs out.
"SEAMLESS RECORDING (GZ-EX355)" (p. 227) - Both videos and still images can be recorded on one SD card. It is recommended to confirm the video operation of the SD card before usage.
- To record to the SD card, it is necessary to perform media settings.
- To use SD cards that have been used on other devices, it is necessary to format (initialize) the SD card using "FORMAT SD CARD" from media settings.
"FORMAT SD CARD" (p. 242)
Removing the Card
Push the SD card inward once, then pull it out straight.
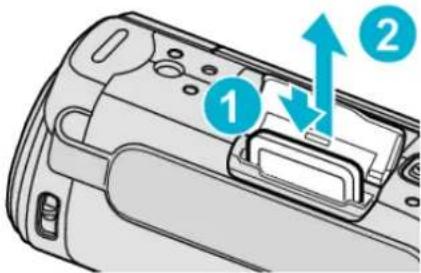
text_image
Diagram of a device's internal components with numbered labels and directional arrows indicating movement or flow.Types of Usable SD Card
The following SD cards can be used on this unit.
Operations are confirmed on the SD cards from the following manufacturers.
- Panasonic
• TOSHIBA - SanDisk
SD Card

natural_image
Generic gray icon of a flash drive with a black 'S' logo on the screen (no text or symbols beyond the graphic)• This unit supports 256 MB to 2 GB SD cards.
- Use a Class 4 or higher compatible SD card (2 GB) for video recording.
SDHC Card

natural_image
Generic hard disk drive icon with 'SD HC' and 'HC' text, no additional symbols or text present- Use a Class 4 or higher compatible SDHC card (4 GB to 32 GB) for video recording.
SDXC Card

natural_image
Generic gray-scale image of a 3.2-inch CD-ROM with no visible text or symbols on its body.- Use a Class 4 or higher compatible SDXC card (Max. 128 GB) for video recording.
Memo :
- Using SD cards (including SDHC/SDXC cards) other than those specified above may result in recording failure or data loss.
- This unit is not guaranteed to operate with all SD cards. Some SD cards may not work due to specification changes, etc.
- To record videos with "VIDEO QUALITY" set to "UXP", use of a Class 6 or higher compliant SDHC/SDXC card is recommended.
- To select "iFrame" in the video recording format, use a Class 6 or higher compliant SDHC/SDXC card.
- Class 4 and Class 6 are guaranteed to have a minimum transfer rate of 4 MB/s and 6 MB/s respectively during reading or writing of data.
- You can also use a Class 10 compliant SDHC/SDXC card.
- Both videos and still images can be recorded on one SD card. It is recommended to confirm the video operation of the SD card before usage.
- To protect the data, do not touch the terminals of the SD card.
- UHS-I SDHC/SDXC cards can be used in the same manner as standard SDHC/SDXC cards. UHS Speed Class is not supported.
When your computer cannot recognize the SDXC card
Confirm and update the OS of your computer.
| Windows XP | Make sure that the operating system version is SP2 or higher.Download and install the updating program (KB955704) from the following URL.http://www.microsoft.com/downloads/details.aspx?FamilyID=1cbe3906-ddd1-4ca2-b727-c2dff5e30f61&displaylang=en |
| Windows Vista | Make sure that the operating system version is SP1 or higher.Download and install the updating program (KB975823) from the following URL.32 bit versionhttp://www.microsoft.com/downloads/en/details.aspx?FamilyID=2d1abe01-0942-4f8a-abb2-2ad529de00a164 bit versionhttp://www.microsoft.com/downloads/en/details.aspx?FamilyID=7d54c53f-017c-4ea5-ae08-34c3452ba315 |
| Windows 7 Download and install the updating program (KB976422) from the following URL.32 bit versionhttp://www.microsoft.com/downloads/en/details.aspx?FamilyID=3ee91fc2-a9bc-4ee1-aca3-2a9aff5915ea64 bit versionhttp://www.microsoft.com/downloads/en/details.aspx?FamilyID=73f766dd-7127-4445-b860-47084587155f | |
| Mac OS X10.4 Tiger /Mac OS X10.5 Leopard | Not compatible. |
| Mac OS X10.6 Snow Leopard | Update the OS version to 10.6.5 or later. |
Using the Touch Screen
Icon operation buttons, thumbnails, and menu items are displayed on the touch screen according to the mode in use.
- There are two ways to operate the touch screen, namely "tap" and "drag". The following are some examples.
A Tap the displayed button (icon) or thumbnail (file) on the touch screen to make selection.
B Drag the thumbnails on the touch screen to search for the desired file.
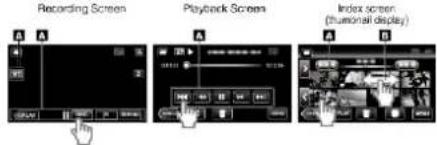
text_image
Recording Screen Playback Screen Index screen (thumeral display)Memo :
- The following is a screen of the model with Wi-Fi functions.
- The touch screen of this unit is pressure-sensitive. When the touch screen does not respond smoothly, apply slightly more force to your fingertip.
- Tap the buttons (icons) on the touch screen accurately. The buttons may not respond if they are not tapped on the right area.
- Do not press or rub with excessive force.
- Do not operate the touch screen using an object with a sharp tip.
- Pressing two or more places at a time may cause a malfunction.
- Perform "TOUCH SCREEN ADJUST" if the reactive area of the screen is misaligned with the touched area. (Adjust by lightly tapping with a corner of an SD card, etc. Do not press with an object with a sharp tip or do not press hard.)
"Adjusting the Touch Panel" (p. 15)
Adjusting the Touch Panel
Adjusts the response position of the buttons on the touch screen.
1 Tap "MENU".

text_image
M WT D <text_image
TOP MENU ?text_image
SETUP TOUCH SCREEN ADJUSTtext_image
PRESS THE + MARK 1/3text_image
+ CONFIRM THE ADJUSTMENT PRESS + MARK AGAIN 1/3text_image
COMPLETED OKCaution :
\- Do not tap areas other than the “+” mark during touch screen adjustment (steps 4 - 5). Doing so may cause the touch screen to malfunction.Memo :
- Adjust by lightly tapping with a corner of an SD card, etc. - Do not press with an object with a sharp tip or do not press hard.Names of Buttons and Functions on the LCD Monitor
The following screens are displayed during the video and still image modes, and operate as the touch screens. Recording Screen (Video/Still Image) text_image
1 2 WT 3 PLAY REC MENU 4 5 6 7 8 SD LAPlayback Screen (Video)
text_image
00:01:23 00:12:34 REC MENU ① ② ③ ④ ⑥Playback Screen (Still Image)
text_image
Index Screen (Thumbnail Display) Display
text_image
Screenshot of a media player interface with numbered UI elements for recording and playback controlsMenu screen (recording mode)
text_image
Screenshot of a device interface with numbered UI elements and icons, likely for app or system management.Menu screen ( playback mode)
text_image
TOP MENU ① ② ③ ④ ⑤ ⑦ ⑥Clock Setting
The "SET DATE/TIME!" screen appears when you turn on this unit for the first time after purchase, when it has not been used for a long time, or when the clock is not set yet. Set the clock before recording. 1 Open the LCD monitor. natural_image
Illustration of a digital camera with an open screen and a blue arrow indicating rotation (no text or symbols)text_image
SET DATE/TIME! YES NOtext_image
CLOCK SETTING DEC DATE TIME 24 2013 10 : 00 AM SETtext_image
CLOCK/AREA SETTING GMT SAVEMemo :
• The clock can be reset again later. "Resetting the Clock" (p. 19) - When using this unit overseas, you can set it to the local time for recording. "Setting the Clock to Local Time when Traveling" (p. 22) - "SET DATE/TIME!" is displayed when you turn on this unit after it has not been used for a prolonged period. Connect the AC adapter for more than 24 hours to charge the internal clock battery of this unit before setting the clock. - The following is a screen of the model with Wi-Fi functions. GZ-E300 is not equipped with Wi-Fi function.Resetting the Clock
Set the clock with "CLOCK ADJUST" from the menu. 1 Tap "MENU". text_image
M WT D PLAY REC MENUtext_image
TOP MENU ?text_image
SETUP CLOCK ADJUSTtext_image
CLOCK ADJUST CLOCK SETTING OK Canceltext_image
CLOCK SETTING DEC DATE TIME 24 2013 10 : 00 AM SETtext_image
CLOCK/AREA SETTING GMT SAVEChanging the Display Language
The language on the display can be changed. \*The following is a screen of the model with Wi-Fi functions. 1 Tap "MENU". text_image
M WT D PLAY REC MENUtext_image
TOP MENU ?text_image
SETUP LANGUAGEtext_image
LANGUAGE ENGLISHHolding this Unit
When holding this unit, keep your elbows close to your sides to prevent camera shake. natural_image
Illustration of a person holding a digital camera, with two red circles highlighting the camera's lens area (no text or symbols present)Caution :
- Be careful not to drop this unit during transportation. - Guardians should pay close attention when this unit is being used by children.Memo :
\- If camera shake is excessive, use the image stabilizer. "Reducing Camera Shake" (p. 52)Tripod Mounting
This unit can be mounted on a tripod (or monopod). This is useful for preventing camera shake and recording from the same position. natural_image
Technical line drawings of a camera setup with tripod-mounted base and tripod-mounted camera (no text or symbols)Caution :
\- To prevent injuries or damages which may result if this unit falls off, read the instruction manual of the tripod (or monopod) to be used and make sure that it is securely attached.Memo :
- It is recommended to use a tripod or monopod when recording in conditions prone to camera shake (such as in dark places or when zoomed to the telephoto end). - Set the image stabilizer to (OFF) when using a tripod for recording. "Reducing Camera Shake" (p. 52)Using this Unit Overseas
The shape of the power outlet varies according to countries and regions. To charge the battery pack, you need a converter plug that matches the shape of the outlet. "Charging the Battery Pack Overseas" (p. 21) Change the date and time display to the local time by selecting your travel destination in "AREA SETTING" of "CLOCK ADJUST". "Setting the Clock to Local Time when Traveling" (p. 22) When "ON" is selected in "DST SETTING" of "CLOCK ADJUST", the time is set 1 hour ahead. "Setting Daylight Saving Time" (p. 22)Charging the Battery Pack Overseas
The shape of the power outlet varies according to countries and regions. To charge the battery pack, you need a converter plug that matches the shape of the outlet.| A | B | BF | C | O |
| North America | Europe | Oceania | Middle East | ||||
| United States | A | Iceland | C | Australia | C | Israel | C |
| Canada | A | Ireland | C | Guam | A | Iran | C |
| Mexico | A | United Kingdom | B.BF | Tahiti | C | Kuwait | B.C |
| Italy | C | Tonga | C | Jordan | B.BF | ||
| Asia | Austria | C | New Zealand | C | |||
| Japan | A | Netherlands | C | Hit | C | Africa | |
| India | B.C.BF | Canary Islands | C | Algeria | A,B.BF,C | ||
| Indonesia | C | Greece | C | Latin | Egypt | B.BF,C | |
| Singapore | B.BF | Switzerland | C | Argentina | C | Guinea | C |
| Sri Lanka | B.C.BF | Sweden | C | Colombia | A | Kenya | B.C |
| Thailand | A.BF,C | Spain | A.C | Jamaica | A | Zambia | B.BF |
| South Korea | A.C | Denmark | C | Chile | B.C | Tanzania | B.BF |
| China | A.B.BF,C,O | Germany | C | Haiti | A | Republic of South Africa | B.C.BF |
| Nepal | C | Norway | C | Panama | A | ||
| Pakistan | B.C | Hungary | C | Bahamas | A | Mozambique | C |
| Bangladesh | C | Finland | C | Puerto Rico | A | Morocco | C |
| Philippines | A.B.F,O | France | C | Brazil | A.C | ||
| Vietnam | A.C | Belgium | C | Venezuela | A | ||
| Hong Kong Special Administrative Region B.BF | Poland | B.C | Peru | A.C | |||
| Macau Special Administrative Region B.C | Portugal | B.C | |||||
| Malaysia | B.B.F.C | Romania | C | ||||
Setting the Clock to Local Time when Traveling
Change the date and time display to the local time by selecting your travel destination in "AREA SETTING" of "CLOCK ADJUST". Restore the region settings after you returned from the trip. 1 Tap "MENU". text_image
M WT M D ← PLAY REC MENUtext_image
TOP MENU ?text_image
SETUP CLOCK ADJUSTtext_image
CLOCK ADJUST I'm sure, I'll know? AREA SETTING I'm sure, I'll know?text_image
AREA SETTING GMT SAVEMemo :
- Setting "AREA SETTING" changes the clock time such that time difference is accounted for. After returning to your country, re-select the region that was set initially to restore the original clock settings. - The following is a screen of the model with Wi-Fi functions.Setting Daylight Saving Time
When "ON" is selected in "DST SETTING" of "CLOCK ADJUST", the time is set 1 hour ahead. 1 Tap "MENU". text_image
M WT D << PLAY REC MENUtext_image
TOP MENU ?text_image
SETUP CLOCK ADJUSTtext_image
CLOCK ADJUST 1 满足 0 满足 0 2 满足 0 满足 0 DST SETTINGtext_image
DST SETTING DAYLIGHT SAVING TIME (DST) CURRENT SETTING: OFF ON OFFMemo :
• What is daylight saving time? Daylight saving time is the system of setting the clock 1 hour ahead for a fixed period in summer. It is used mainly in the Western countries. - Restore the daylight saving time settings after you returned from the trip. - The following is a screen of the model with Wi-Fi functions.Optional Accessories
You can record for a longer time by using the optional battery pack.| Product Name Description | |
| Battery PackBN-VG114UBN-VG121UBN-VG138U | Provides a longer recording time. It can also be used as a spare battery pack. |
| Battery ChargerAA-VG1AA-VF8 | Enables the battery pack to be charged without using this unit. |
| HDMI Mini CableVX-HD310VX-HD315 | Allows viewing in high picture quality when connected to a TV.Transmits video, audio, and control signals between devices. |
Memo :
- The optional accessories above may not be supported in some regions. - For more information, refer to the catalog. - For details on the provided accessories, refer to "Verifying the Accessories". "Verifying the Accessories" (p. 11)Approximate Recording Time (Using Battery)
GZ-EX355/GZ-EX310| Battery Pack | Actual recording time | Continuous recording time(Maximum Recording Time) |
| BN-VG114U(Supplied) | 1 h 5 m 2 h | |
| BN-VG121U 1 | h 40 m 3 h 5 m | |
| BN-VG138U 3 | h 5 h 30 m |
| Battery Pack | Actual recording time | Continuous recording time(Maximum Recording Time) |
| BN-VG107U(Supplied) | 40 m 1 h 5 m | |
| BN-VG114U 1 | h 15 m 2 h 10 m | |
| BN-VG121U 1 | h 55 m 3 h 15 m | |
| BN-VG138U 3 | h 20 m 5 h 45 m |
Taking Videos in Auto Mode
You can record without worrying about the setting details by using the Intelligent Auto mode. Settings such as exposure and focus will be adjusted automatically to suit the shooting conditions. - In case of specific shooting scenes such as person etc., its icon is displayed on the screen. - Before recording an important scene, it is recommended to conduct a trial recording. 1 Open the lens cover. natural_image
Mechanical component diagram showing a connector with a highlighted section and a close-up of the internal button (no text or symbols present)text_image
Diagram showing a digital camera with an open lid, a hand cursor icon pointing to the right, and a close-up of its screen.text_image
WT LA D PLAY REC MENUtext_image
i.A. intelligent AUTO M MANUALtext_image
START STOPtext_image
1 2 3 4 5 6 7 8 9 10 11 10:10 10:00:00 [2:04] [PLAY] REC MENU| Display Icon Description | ||
| 1 | Video Quality Displays the icon of the “VIDEO QUALITY” setting selected in the recording menu. “VIDEO QUALITY” (p. 228) | |
| 2 | TOUCH PRIORITY AE/AF | Displays the setting of “TOUCH PRIORITY AE/ AF”. By default, it is set to “FACE TRACKING”. “Capturing Subjects Clearly (TOUCH PRIORITY AE/AF)” (p. 44) |
| 3 | Time Displays the current time. “Clock Setting” (p. 18) | |
| 4 | Image Stabilizer Displays the image stabilizer setting. “Reducing Camera Shake” (p. 52) | |
| 5 | Recording Media Displays the icon of the media where videos are recorded to. The recording media can be changed. (GZ-EX355 only) “REC MEDIA FOR VIDEO (GZ-EX355)” (p. 242) “REC MEDIA FOR IMAGE (GZ-EX355)” (p. 242) | |
| 6 | Battery Indicator Displays the approximate remaining battery power during use. “Checking the Remaining Recording Time” (p. 61) | |
| 7 | Recording Mode Displays the current recording mode of i.A. (Intelligent Auto) or M (Manual). | |
| 8 | Setting Scenes of Intelligent Auto | Displays scenes detected automatically in the Intelligent Auto function. Multiple scenes may be detected. |
| 9 | SEAMLESS RECORDING (GZ-EX355 only) | Displays the seamless recording icon when it is set. appears if seamless recording cannot be performed. “SEAMLESS RECORDING (GZ-EX355)” (p. 227) |
| 10 | Remaining Recording Time | Displays the remaining time for video recording. “Checking the Remaining Recording Time” (p. 61) |
| 11 | Scene Counter (Recorded Time) | Displays the elapsed time of the video that is currently being recorded. |
| Display Icon Description | |
| Captures one's skin beautifully. | |
| Allows people to be captured naturally. | |
| Record a group of people with the most suitable settings. | |
| Record the smiling face clearly. | |
| Records while focusing on a near object. | |
| Focuses at a far distance and captures a sharp image with vivid colors. | |
| Records in dark places with minimal noise in the overall image. | |
| Allows night scenes to be captured accurately with minimal noise in the overall image. | |
| Prevents colors from fading even when recording in a bright environment, such as snowfield and beaches. | |
| Prevents colors from fading when recording a subject in a spotlight. | |
| Reproduces the green color of trees vividly. | |
| Reproduces the colors of sunset naturally. | |
| Adjusts settings so that the subject does not appear too dark due to backlight. | |
| Records while emphasizing the brightness of the colors. | |
| Reproduces the natural colors of the outdoors during the day. | |
| Reproduces the natural colors of the indoors in a cold-color illumination. | |
| Reproduces the natural colors of the indoors in a warm-color illumination. | |
| Selects the most suitable settings for handheld shooting. | |
| Selects the most suitable settings when a tripod is used for shooting. | |
Memo :
- Scenes can be detected according to the shooting conditions and automatically adjusted in Intelligent Auto mode. - Multiple scenes may be detected depending on the recording conditions. - Some functions may not work properly depending on the shooting conditions. Operation Buttons for Video Recording text_image
1 2 WT 3 SD LA D 8| Operation Buttons | Description | |
| 1 | Video/Still Image Mode | Switches between video and still image modes. |
| 2 | T/W Zoom Allows the same functions as the zoom lever to be performed. Camera shake that often occurs when using the zoom lever can be minimized. “Zooming” (p. 30) | |
| 3 | Playback Mode Switches to the playback mode. | |
| 4 / 5 | Recording Start REC Record-Standby REC | Functions as the START/STOP button. |
| 6 | Mark By tapping the icon while recording is in progress, you can mark a particular scene to make it easier to find it. | |
| 7 | MENU Displays the various menus of video recording. “Operating the Menu” (p. 224) | |
| 8 | Display Button D Switches the display between full (D) and simple (D) with every tap of the button. • Simple display: Some displays disappear after approximately 3 seconds. • Full display: Displays everything. The display button changes from D to D. • When the power is turned off, simple display (D) will be set. | |
| 9 | Recording Mode i.A./M | Switches the recording mode. |
Using the Silent Mode
When the Silent mode is used, the LCD monitor darkens and operation sounds will not be output. Use this mode to record quietly in dark places such as during a performance. text_image
MANNERUseful Settings for Recording
- When "QUICK RESTART" is set to "ON", this unit turns on immediately if you open the LCD monitor within 5 minutes after the power is turned off by closing the monitor. "QUICK RESTART" (p. 239) - When "AUTO POWER OFF" is set to "ON", this unit turns itself off automatically to conserve power when it is not operated for 5 minutes. (only when using the battery pack) "AUTO POWER OFF" (p. 239) - When "TOUCH PRIORITY AE/AF" is set to "FACE TRACKING", this unit detects faces and automatically adjusts its brightness and focus to record the faces more clearly. "Capturing Subjects Clearly (TOUCH PRIORITY AE/AF)" (p. 44) - If the remaining space on the built-in memory runs out while "SEAMLESS RECORDING" is set to "ON", recording continues after switching to the SD card. (GZ-EX355 only) "SEAMLESS RECORDING (GZ-EX355)" (p. 227) - When "DATE/TIME RECORDING" is used, the date and time can be recorded together with the video. "Recording Videos with Date and Time" (p. 60)Caution :
- Do not expose the lens to direct sunlight. - Do not use this unit in the rain, snow, or places with high humidity like the bathroom. - Do not use this unit in places subject to excessive humidity or dust, as well as places exposed to steam or smoke directly. - The power may turn off to protect the circuit if the temperature of this unit rises too much. - Do not remove the battery pack, AC adapter, or SD card when the access lamp is lighted. The recorded data may become unreadable. - This unit is a microcomputer-controlled device. Electrostatic discharge, external noise and interference (from a TV, a radio, etc.) might prevent it from functioning properly. In such a case, turn off the power, then remove the AC adapter and battery pack. This unit will be reset. - Disclaimer \- We shall not be held responsible for loss of recorded contents when recording videos/audio or playback cannot be operated due to malfunctions in this unit, provided parts, or SD card. - Once deleted, recorded contents (data), including data loss due to malfunctions in this unit, cannot be restored. Please be forewarned. - JVC will not be responsible for any lost data. Please be forewarned. - In order for quality improvement, defective recording medium is subject to be analyzed. Therefore, it may not be returned.Memo :
- Check the remaining recording time in the media before you start shooting. If there is not enough space, move (copy) the data to a computer or disc. - When there are many files in the media, it may take time for them to be displayed on the playback screen. Wait for a while as the access lamp appears blinking, which indicates normal operation. • Do not forget to make copies after recording! - Recording stops automatically as it cannot be performed for 12 or more consecutive hours according to specifications. (It may take some time to resume recording.) - For long recordings, the file is split into two or more files if the size exceeds 4 GB. - You can connect this unit to the AC adapter to record for long hours indoors. \- Depending on the shooting conditions, the four corners of the screen may appear dark, but this is not a malfunction. In this case, change the shooting conditions by moving the zoom lever, etc.Capturing Still Images During Video Recording
text_image
SNAPSHOTMemo :
- The size of the still image that is captured in the video mode is 1,920 x 1,080. • Operation is invalid under the following conditions: \- when menu is being displayed \- when remaining recording time or battery power is being displayed - when any functions in "SPECIAL RECORDING" is setTaking Still Images in Auto Mode
You can record without worrying about the setting details by using the Intelligent Auto mode. 1 Open the lens cover. natural_image
Mechanical component diagram showing a connector with a highlighted button and a small inset view of the right-hand valve (no text or symbols present)text_image
Diagram showing a digital camera with an open lid and a hand cursor icon interacting with the screen.text_image
M WT D PLAY MENUtext_image
i.A. Intelligent AUTO M MANUALtext_image
SNPS-CT Press halfwaytext_image
PRESSfully Press fullytext_image
1 2 3 4 5 6 7 1920 1/125 0.0 10:10 6630 PHOTO PHOTO : ⑨ : 10| Display Icon Description | |
| 1 | Image Size Displays the icon of the image size.• The size of still images can be changed.“IMAGE SIZE” (p. 232) |
| 2 | TOUCH PRIORITY AE/AFDisplays the setting of “TOUCH PRIORITY AE/ AF”. By default, it is set to “FACE TRACKING”.“Capturing Subjects Clearly (TOUCH PRIORITY AE/AF)” (p. 44) |
| 3 | Time Displays the current time.“Clock Setting” (p. 18) |
| 4 | Recording media Displays the icon of the media where still images are recorded to.The recording media can be changed.“REC MEDIA FOR IMAGE (GZ-EX355)”(p. 242) |
| 5 | Battery Indicator Displays the approximate remaining battery power during use.“Checking the Remaining Recording Time”(p. 61) |
| 6 | Recording Mode Displays the current recording mode of i.A.(Intelligent Auto) or M (Manual). |
| 7 | Setting Scenes of Intelligent AutoDisplays scenes detected automatically in the Intelligent Auto function. Multiple scenes may be detected. |
| 8 | Remaining Number of ShotsDisplays the remaining number of shots for still image recording.“Approximate Number of Still Images (Unit: Number of Shots)” (p. 62) |
| 9 | Recording in Progress“PHOTO” appears when a still image is being captured. |
| 10 | Focus Lights up in green when focused. |
| 11 | Shutter Speed Displays the shutter speed. |
| Display Icon Description | |
| Captures one's skin beautifully. | |
| Allows people to be captured naturally. | |
| Record a group of people with the most suitable settings. | |
| Record the smiling face clearly. | |
| Records while focusing on a near object. | |
| Focuses at a far distance and captures a sharp image with vivid colors. | |
| Records in dark places with minimal noise in the overall image. | |
| Allows night scenes to be captured accurately with minimal noise in the overall image. | |
| Prevents colors from fading even when recording in a bright environment, such as snowfield and beaches. | |
| Prevents colors from fading when recording a subject in a spotlight. | |
| Reproduces the green color of trees vividly. | |
| Reproduces the colors of sunset naturally. | |
| Adjusts settings so that the subject does not appear too dark due to backlight. | |
| Records while emphasizing the brightness of the colors. | |
| Reproduces the natural colors of the outdoors during the day. | |
| Reproduces the natural colors of the indoors in a cold-color illumination. | |
| Reproduces the natural colors of the indoors in a warm-color illumination. | |
| Selects the most suitable settings for handheld shooting. | |
| Selects the most suitable settings when a tripod is used for shooting. | |
Memo :
- Scenes can be detected according to the shooting conditions and automatically adjusted in Intelligent Auto mode. - Multiple scenes may be detected depending on the recording conditions. - Some functions may not work properly depending on the shooting conditions. Operation Buttons for Still Image Recording text_image
① ② WT ③ PLAY ④ O ⑤ MENU ⑦ [6630] ⑥ D| Operation Buttons | Description | |
| 1 | Video/Still Image Mode | Switches between video and still image modes. |
| 2 | T/W Zoom Allows | the same functions as the zoom lever to be performed. Camera shake that often occurs when using the zoom lever can be minimized. “Zooming” (p. 30) |
| 3 | Playback Mode | Switches to the playback mode. |
| 4 | Snapshot | Functions as the SNAPSHOT button. However, focus cannot be set by pressing halfway. |
| 5 | MENU Displays the | various menus of still image recording. “Operating the Menu” (p. 224) |
| 6 | Display Button D | Switches the display between full (D) and simple (D) with every tap of the button. • Simple display: Some displays disappear after approximately 3 seconds. • Full display: Displays everything. The display button changes from D to D'. • When the power is turned off, simple display (D) will be set. |
| 7 | Recording Mode i.A.M | Switches the recording mode. |
Using the Silent Mode
When the Silent mode is used, the LCD monitor darkens and operation sounds will not be output. Use this mode to record quietly in dark places such as during a performance. text_image
MANNERUseful Settings for Recording
- When "QUICK RESTART" is set to "ON", this unit turns on immediately if you open the LCD monitor within 5 minutes after the power is turned off by closing the monitor. "QUICK RESTART" (p. 239) - When "AUTO POWER OFF" is set to "ON", this unit turns itself off automatically to conserve power when it is not operated for 5 minutes. (only when using the battery pack) "AUTO POWER OFF" (p. 239) - When "TOUCH PRIORITY AE/AF" is set to "FACE TRACKING", this unit detects faces and automatically adjusts its brightness and focus to record the faces more clearly. "Capturing Subjects Clearly (TOUCH PRIORITY AE/AF)" (p. 44)Caution :
- Do not expose the lens to direct sunlight. - Do not use this unit in the rain, snow, or places with high humidity like the bathroom. - Do not use this unit in places subject to excessive humidity or dust, as well as places exposed to steam or smoke directly. - The power may turn off to protect the circuit if the temperature of this unit rises too much. - Do not remove the battery pack, AC adapter, or SD card when the access lamp is lighted. The recorded data may become unreadable. - This unit is a microcomputer-controlled device. Electrostatic discharge, external noise and interference (from a TV, a radio, etc.) might prevent it from functioning properly. In such a case, turn off the power, then remove the AC adapter and battery pack. This unit will be reset.Memo :
- Before recording an important scene, it is recommended to conduct a trial recording. - Depending on the shooting conditions, the four corners of the screen may appear dark, but this is not a malfunction. In this case, change the shooting conditions by moving the zoom lever, etc.Zooming
The angle of view can be adjusted using zoom. - Use the W end (wide angle end) to shoot a wider field of view. - Use the T end (telephoto end) to magnify the subject for shooting.    • The following zoom options are available: - Optical Zoom (1 - 40x) - Digital Zoom (41 - 200x) - You can also use the zoom (T/W) button on the touch screen to zoom. Zoom Button (T/W) text_image
WT iA D PLAY REC MENUMemo :
- When digital zoom is used, the image becomes grainy as it is digitally enlarged. • The zoom ratio range can be changed. "ZOOM" (p. 228)Manual Recording
You can adjust settings, such as brightness, by using the manual mode. Manual recording can be set for both video and still image modes. \*The following is a screen of the model with Wi-Fi functions. 1 Open the lens cover. natural_image
Technical illustration of a mechanical device with a highlighted component and a close-up view of its internal structure (no text or symbols)text_image
Diagram of a digital camera with a hand icon pointing to the right side, labeled in Chinese.text_image
iA WT D PLAY REC MENUtext_image
i.A. intelligent AUTO M MANUALtext_image
M WT D PLAY REC MENUtext_image
TOP MENU ?text_image
RECORD SETTING OFF A WB A A OFF OFF ?| Name Description | |
| SCENE SELECT | Recordings that suit the shooting conditions can be performed easily."Shooting According to Scene (Subject)"(p. 32) |
| FOCUS | Use manual focus if the subject is not focused automatically."Adjusting Focus Manually" (p. 33) |
| BRIGHTNESS ADJUST | Overall brightness on the screen can be adjusted.Use this when recording in a dark or bright location."Adjusting Brightness" (p. 34) |
| BACKLIGHT COMP. | Corrects the image when the subject appears dark due to backlight.Use this when shooting against the light."Setting Backlight Compensation" (p. 35) |
| WHITE BALANCE | Overall color on the screen can be adjusted.Use this when the color on the screen appears differently from the actual color."Setting White Balance" (p. 36) |
| TELE MACRO | Use this to take close-up (macro) shots of the subject."Taking Close-up Shots" (p. 37) |
Shooting According to Scene (Subject)
Common scenes that are often encountered can be recorded with the most suitable settings. \*The following is a screen of the model with Wi-Fi functions. 1 Select the Manual recording mode. text_image
WT iA D «PLAY REC MENUtext_image
i.A. intelligent AUTO M MANUALtext_image
M WT D PLAY REC MENUtext_image
TOP MENU ?text_image
RECORD SETTING OFF A WB A A OFF A OFFtext_image
SCENE SELECT OFF OFF NIGHTALIVE SPOTLIGHT| Setting Effect | |
NIGHTALIVE Increases gain and brightens the scene automatically using a slow shutter when the surrounding is dark.To prevent camera shake, use a tripod.OFF ON  | |
SPOTLIGHT Prevents the human subject from appearing too bright under light.OFF ON  | |
Memo :
\- All scenes of "SCENE SELECT" cannot be set during "TIME-LAPSE RECORDING", "HIGH SPEED RECORDING", or "AUTO REC".Adjusting Focus Manually
Set this when the focus is not clear in Intelligent Auto or when manual focusing is desired. \*The following is a screen of the model with Wi-Fi functions. 1 Select the Manual recording mode. text_image
WT IA D <text_image
i.A. intelligent AUTO M MANUALtext_image
M WT D PLAY REC MENUtext_image
TOP MENU ?text_image
RECORD SETTING OFF A WB A A OFF B OFFtext_image
FOCUS AUTO M MANUALtext_image
M D PLAY SET REC MENUtext_image
WT M D <Adjusting Brightness
You can adjust the brightness to your preferred level. \*The following is a screen of the model with Wi-Fi functions. 1 Select the Manual recording mode. text_image
iA WT D PLAY REC MENUtext_image
i.A. Intelligent AUTO M MANUALtext_image
M WT Dtext_image
TOP MENU ?text_image
RECORD SETTING OFF A WB A A OFF OFF5 Tap "MANUAL".
text_image
BRIGHTNESS ADJUST AUTO M MANUAL6 Adjust the brightness value.
text_image
±0.0 M D PLAY SET REC MENU7 Tap "SET" to confirm.
text_image
+2.0 M D <Memo :
\- Settings can be adjusted separately for videos and still images.Setting Backlight Compensation
You can correct the image when the subject appears too dark due to backlight. \*The following is a screen of the model with Wi-Fi functions.1 Select the Manual recording mode.
text_image
IA. WT D PLAY REC MENUtext_image
i.A. Intelligent AUTO M MANUAL2 Tap "MENU".
text_image
M WT D <3 Tap "RECORD SETTING".
text_image
TOP MENU ?4 Tap "BACKLIGHT COMP.".
text_image
RECORD SETTING OFF A WB A A DFF DFF ?5 Tap "ON" or "ADVANCE".
text_image
BACKLIGHT COMP. OFF ON ADVANCE| Setting Details | |
| OFF Backlight compensation is disabled. | |
| ON Backlight compensation is enabled. | |
| ADVANCE Should be selected for a better backlight compensation effect. | |
Setting White Balance
You can set the color tone to suit the light source. \*The following is a screen of the model with Wi-Fi functions.1 Select the Manual recording mode.
text_image
iA WT D PLAY REC MENUtext_image
i.A. Intelligent AUTO M MANUAL2 Tap "MENU".
text_image
M WT D PLAY REC MENU3 Tap "RECORD SETTING".
text_image
TOP MENU ?4 Tap "WHITE BALANCE".
text_image
RECORD SETTING OFF A WB A A OFF OFFtext_image
AUTO A B G SET REC| Setting Details | |
| AUTO Adjusts automatically to the natural colors. | |
| MWB Use this when the problem of unnatural colors is not resolved. | |
| FINE Set this when shooting outdoors on a sunny day. | |
| CLOUD Set this when shooting on a cloudy day or inside a shade. | |
| HALOGEN Set this when shooting under illumination such as a video light. | |
| MARINE:BLUE Set this when shooting the sea at deep water area (water appears blue) using an optional marine case. | |
| MARINE:GREEN Set this when shooting the sea at shallow water area (water appears green) using an optional marine case. | |
Using MWB
1 Hold a sheet of plain white paper in front of the lens so that the white paper fills the screen. 2 Position the cursor to "MWB", and press and hold "SET". Or, press and hold the "MWB" icon. 3 Release your touch after the menu disappears and lights up.Memo :
\- The setting will not change if "MWB" is being tapped too fast (less than 1 second).Taking Close-up Shots
You can take close-up shots of an object using the tele macro function. \*The following is a screen of the model with Wi-Fi functions. natural_image
Two-panel image: left shows a blue flower with green leaves; right shows a close-up of a small insect on a red box (no text or symbols visible)text_image
iA WT D < PLAY REC MENUtext_image
i.A. Intelligent AUTO M MANUALtext_image
M WT D PLAY REC MENUtext_image
TOP MENU ?4 Tap "TELE MACRO".
text_image
RECORD SETTING OFF A WB A A OFF B OFF5 Tap "ON".
text_image
TELE MACRO OFF ON OFF ON| Setting Details | |
| OFF Enables close-up shots up to 1 m at the telephoto (T) end. Enables close-up shots up to 5 cm at the wide angle (W) end. | |
| ON Enables close-up shots up to 50 cm at the telephoto (T) end. Enables close-up shots up to 5 cm at the wide angle (W) end. |
Caution :
\- When you are not taking close-up shots, set "TELE MACRO" to "OFF". Otherwise, the image may be blur.Recording with Effects
You can add animation effects to video recordings. The animation effects appear when smiles are detected or when the screen is touched.| Type of Effect Description of Effect | |
| ANIMATION EFFECT | Records videos with animation effects. “Recording with Animation Effects (ANIMATION EFFECT)” (p. 39) |
| DECORATE FACE EFFECT | Detects faces and enables decorations such as crowns or sunglasses to be added. “Recording with Face Decorations (DECORATE FACE EFFECT)” (p. 41) |
| STAMP Records videos with various decorative stamps. “Recording with Decorative Stamps (STAMP)” (p. 42) | |
| HANDWRITING EFFECT | Records videos with your personal handwriting or drawing. “Recording with Personal Handwriting (HANDWRITING EFFECT)” (p. 43) |
Recording with Animation Effects (ANIMATION EFFECT)
You can add animation effects to video recordings. The animation effects appear when smiles are detected or when the screen is touched. \*The following is a screen of the model with Wi-Fi functions.1 Open the LCD monitor.
text_image
Diagram showing a digital camera with control panel and hand cursor icon interacting with screen2 Tap "MENU".
text_image
M WT D PLAY REC MENU3 Tap "SPECIAL RECORDING". (Go to step 4.)
Alternatively, tap "ANIMATION EFFECT" in the shortcut menu. (Go to step 5.) text_image
TOP MENU ?4 Tap "ANIMATION EFFECT".
text_image
SPECIAL RECORDING H-SPEED OFF 视频视频播放器 视频视频播放器 视频视频播放器 TIVE-AFF 视频视频播放器 视频视频播放器 视频视频播放器5 Select a desired effect and tap "SET".
text_image
< > SET| During Setting After Setting Note | ||
 |  | Animation (effect) appears when smiles are detected. |
 |  | Animation (effect) appears when smiles are detected. |
 |  | Animation (effect) appears when smiles are detected. |
 |  | Animation (effect) appears when smiles are detected. |
 |  | Animation (effect) appears when the screen is touched. |
 |  | Animation (effect) appears when the screen is touched. |
 |  | Animation (effect) appears when the screen is touched. |
 |  | Animation (effect) appears when the screen is touched. |
Recording with Face Decorations (DECORATE FACE EFFECT)
Detects faces and enables decorations such as crowns or sunglasses to be added. \*The following is a screen of the model with Wi-Fi functions. 1 Open the LCD monitor. text_image
Diagram showing a digital camera with a hand cursor icon interacting with it, alongside its screen interface.text_image
M WT D PLAY REC MENUtext_image
TOP MENU ?text_image
SPECIAL RECORDING H-SPEED OFF 播放器播放器 OFF 播放器播放器 播放器播放器 TIVE-A PFE OFF 播放器播放器 OFF 播放器播放器natural_image
Simple graphic of a red-framed glasses on black background with control buttons (no text or symbols)Recording with Decorative Stamps (STAMP)
Records videos with various decorative stamps. \*The following is a screen of the model with Wi-Fi functions. 1 Open the LCD monitor. text_image
Diagram showing a digital camera with control panel and hand icon interacting with screentext_image
M WT D PLAY REC MENUtext_image
TOP MENU ?text_image
SPECIAL RECORDING HI-5PEED OFF OFF OFF OFF OFF OFF OFF OFF OFF OFF OFF OFF OFF OFF OFF OFF OFF OFF OFF OFF OFF OFF OFF OFF OFF OFF OFF OFF OFF OFF OFF OFF OFF OFF OFF OFF OFF OFF OFF OFF OFF OFF OFF OFF OFF OFF OFF OFF OFF OFF OFF FF FF FF FF FF FF FF FF FF FF FF FF FF FF FF FF FF FF FF FF FF FF FF FF FF FF FF FF FF FF FF FF FF FF FF FF FF FF FF FF FF FF FF FF FF FF FF FF FF FF Ftext_image
SPECIAL RECORDING 12.45 12.45 12.45natural_image
Two people riding a roller coaster under clear sky, no visible text or symbolsnatural_image
Person riding a motorcycle under clear sky, no visible text or symbolsnatural_image
Group of people outdoors with heart and star symbols overlaying (no readable text or symbols)Recording with Personal Handwriting (HANDWRITING EFFECT)
Records videos with your personal handwriting or drawing. \*The following is a screen of the model with Wi-Fi functions. 1 Open the LCD monitor. text_image
Diagram showing a digital camera with labeled components and a hand icon interacting with the screentext_image
M WT D ← PLAY REC MENUtext_image
TOP MENU ?text_image
SPECIAL RECORDING HI-SPEED OFF OFF OFF OFF OFF OFF OFF OFF OFF OFF OFF OFFtext_image
SPECIAL RECORDING 12:45 12:45 12:45natural_image
Two people in a roller coaster with motion blur, captured under clear sky (no visible text or symbols)natural_image
Two people waving near a motorcycle under clear sky (no visible text or symbols)text_image
Photo of a person on a motorcycle with overlaid red waveform and playback controls, showing time and position valuesMemo :
- If the writings and drawings appear to be misaligned, correct the touch position. "Adjusting the Touch Panel" (p. 15) - The writings and drawings are deleted when the handwriting mode ends or when the power is turned off.Capturing Subjects Clearly (TOUCH PRIORITY AE/AF)
"TOUCH PRIORITY AE/AF" is a function that adjusts focus and brightness based on a tapped position. By registering the face of a person beforehand, you can enable tracking of the person even without specific selection during recording. This function is available for both videos and still images. \*The following is a screen of the model with Wi-Fi functions.1 Open the LCD monitor.
text_image
Diagram showing a digital camera with a hand cursor icon pointing to the right side of the screen.2 Tap "MENU".
text_image
M WT D PLAY REC MENU3 Tap "RECORD SETTING".
text_image
TOP MENU ?4 Tap> on the lower right of the screen.
text_image
RECORD SETTING OFF A WB A A OFF OFF5 Tap "TOUCH PRIORITY AE/AF".
text_image
RECORD SETTING AE AF ON OFF OFF OFF OFF OFF OFF OFF OFF OFF OFF OFF OFF OFF OFF OFF OFF OFF OFF OFF OFF OFF OFF OFF OFF OFF OFF OFF OFF OFF OFF OFF OFF OFF OFF OFF OFF OFF OFF OFF OFF OFF OFF OFF OFF OFF OFF OFF OFF OFF OFF Off6 Tap the desired setting.
text_image
TOUCH PRIORITY AE/AF OFF OFF PET TRACKING AREA SELECT FACE TRACKING COLOR TRACKING ?natural_image
Astronaut performing a high jump with a child's hand raised, against a clear sky (no visible text or symbols)natural_image
A white cat sitting inside a wire cage in a fenced enclosure, with no visible text or symbols.natural_image
A man and a child in an inflatable raft on water, with floating floating objects in the background (no visible text or symbols)natural_image
Nighttime cityscape featuring illuminated buildings and waterfront reflection (no visible text or symbols)| Setting Details | |
| OFF Deactivates the function. | |
| FACE TRACKING | appears on the screen. Recording is performed while tracking and automatically adjusting the tapped face (subject) with appropriate focus and brightness. In addition, a blue frame appears around the tapped face (subject). (When the face of a person is registered, it becomes the main subject and the blue frame appears even without specific selection.) |
| PET TRACKING | appears on the screen. Recording is performed while tracking and automatically adjusting the face of the tapped pet (subject) with appropriate brightness. In addition, a blue frame appears around the tapped pet (subject). |
| COLOR TRACKING | appears on the screen. Recording is performed while tracking and automatically adjusting the tapped color (subject) with appropriate focus. In addition, a blue frame appears around the tapped color (subject). |
| AREA SELECT | appears on the screen. Recording is performed while automatically adjusting the tapped area (fixed position) with appropriate focus and brightness. In addition, a white frame appears around the tapped area.AREA SELECT in TOUCH PRIORITY AE/AF is only available within the optical zoom range. (unavailable when digital zoom is being used) |
Memo :
- When "TOUCH PRIORITY AE/AF" is set, "FOCUS" will be set to "AUTO" automatically. - Tap the selected position (face/color/area) again to cancel the setting. (Setting remains for registered faces.) - Tap on an unselected position (face/color/area) to reset. - If the camera loses track of a subject, tap the subject again. - Settings are canceled when zoom operation is performed. ("AREA SELECT" only) - When "FACE TRACKING" is set after face registration, the blue frame appears around the face with the highest priority registered. - When recording registered faces using "FACE TRACKING", focus and brightness will be adjusted automatically even without specific selection. In addition, registered faces may be tracked back again even if they are lost. Therefore, it is recommended to register the faces that are often being recorded by this camera beforehand. "Registering Human Face Personal Authentication Information" (p. 48) \- When "COLOR TRACKING" is set, the targeted subject (color) may change if similar colors are detected. In this case, tap the subject again. The targeted subject (color) may also be tracked back again if it appears in the center of the screen within a specific time.Caution :
- Subjects near the sides of the LCD monitor may not respond or be recognized when tapped. In this case, move the subject to the center and tap again. - "FACE TRACKING" may not work properly depending on the shooting conditions (distance, angle, brightness, etc.) and the subject (direction of face, etc.). It is also particularly difficult to detect faces in backlight. - "PET TRACKING" may not work properly depending on the type of pet, shooting conditions (distance, angle, brightness, etc.) and the subject (direction of face, etc.). It is also particularly difficult to detect faces of pets that are totally black, covered in long hair, or in backlight. - "COLOR TRACKING" may not function properly in the following cases: - when recording subjects with no contrast - when recording subjects that are moving at high speed - when recording in a dark place - when the surrounding brightness changes - "AREA SELECT" is not available while the digital zoom is in use. - When “FACE TRACKING” is set, the subject may be lost if the camera is moved vertically or horizontally very fast. For unregistered faces, they cannot be tracked back again. To track back the subject, tap on it again. For registered faces, focus and brightness will be adjusted automatically even without specific selection. In addition, registered faces may be tracked back again even if they are lost. Therefore, it is recommended to register the faces that are often being recorded by this camera beforehand. "Registering Human Face Personal Authentication Information" (p. 48)Capturing Smiles Automatically (SMILE SHOT)
"SMILE SHOT" automatically captures a still image upon detection of a smile. This function is available for both videos and still images. Set "TOUCH PRIORITY AE/AF" to "FACE TRACKING" before selecting "SMILE SHOT". "Capturing Subjects Clearly (TOUCH PRIORITY AE/AF)" (p. 44) \*The following is a screen of the model with Wi-Fi functions.1 Open the LCD monitor.
text_image
Diagram showing a digital camera with a hand cursor icon pointing to the right side of the screen, indicating playback control.2 Tap "MENU".
text_image
M WT D < PLAY REC MENU3 Tap "RECORD SETTING". (Go to step 4.)
Alternatively, tap "SMILE SHOT" in the shortcut menu. (Go to step 6.) text_image
TOP MENU ?4 Tap > on the lower right of the screen.
text_image
RECORD SETTING OFF A WB A A OFF OFF5 Tap "SMILE SHOT".
text_image
RECORD SETTING AE AF ON ON OFF ?6 Tap "ON".
text_image
SMILE SHOT OFF OFF ON ONtext_image
WT M D PLAY REC MENUMemo :
- The camera is able to detect up to 16 faces. Smile levels will be displayed for up to 3 of the largest faces displayed on the screen. - This function may not work properly depending on the shooting conditions (distance, angle, brightness, etc.) and the subject (direction of face, smile level, etc.). It is also difficult to detect a smile in backlight. - After a smile is detected and captured, it takes time before the next recording may be performed. - "SMILE SHOT" does not work in the following cases: - when menu is being displayed - when remaining recording time or battery power is being displayed - when any functions in "SPECIAL RECORDING" is setCaution :
- If "TOUCH PRIORITY AE/AF" is not set to "FACE TRACKING", "SMILE SHOT" will not work. - If appropriate results cannot be obtained, record with "SMILE SHOT" set to "OFF".Capturing Pets Automatically (PET SHOT)
"PET SHOT" automatically captures a still image upon detection of the face of a pet, such as dogs or cats. This function is available for both videos and still images. \*The following is a screen of the model with Wi-Fi functions. 1 Open the LCD monitor. text_image
Diagram showing a digital camera with a hand icon pointing to the right side of the screen, labeled in Chinese.text_image
M WT D PLAY REC MENUtext_image
TOP MENU ?text_image
RECORD SETTING OFF A WB A A OFF OPP ?text_image
RECORD SETTING ON ON ON ON ON ON ON ON ON ON ON ON ON ON ON ON ON ON ON ON ON ON ON ON ON ON ON ON ON ON ON ON ON ON ON ON ON ON ON ON ON ON ON ON ON ON ON ON ON ON OKtext_image
PET SHOT OFF ON OFF ONnatural_image
Cat sitting on a fur mat inside a cage, with no visible text or symbols in the image itself.Memo :
• The camera is able to detect up to 6 faces of pets. - "PET SHOT" may not work properly depending on the type of pet, shooting conditions (distance, angle, brightness, etc.) and the subject (direction of face, etc.). It is also particularly difficult to detect faces of pets that are totally black, covered in long hair, or in backlight. - Subjects other than your pet may be detected by mistake sometimes. Make use of "PET SHOT" only for pets such as dogs or cats. • After a pet is detected and captured, it takes time before the next recording may be performed. - "PET SHOT" does not work in the following cases: - when menu is being displayed - when remaining recording time or battery power is being displayed - when any functions in "SPECIAL RECORDING" is set "Recording with Effects" (r§ p. 38)Caution :
- When "PET SHOT" is set to "ON", "TOUCH PRIORITY AE/AF" will be set to "PET TRACKING" automatically. Even when "PET SHOT" is set to "ON", if "TOUCH PRIORITY AE/AF" is not set to "PET TRACKING", "PET SHOT" will be set to "OFF" automatically. - If appropriate results cannot be obtained, record with "PET SHOT" set to "OFF".Registering Human Face Personal Authentication Information
By registering the face of a person beforehand, focus and brightness can be adjusted automatically by the face tracking function. Up to 6 faces, together with names and priority levels, can be registered. It is recommended to register the faces that are often being recorded by this camera beforehand. \*The following is a screen of the model with Wi-Fi functions. 1 Open the LCD monitor. text_image
Diagram showing a digital camera with an open lid and a hand icon pointing to the right side of the screen.text_image
M WT D ← PLAY REC MENUtext_image
TOP MENU ?text_image
SETUP FACE REGISTRATION ?? ?? ?text_image
FACE REGISTRATION REGISTER NEW FACE EDIT CANCELtext_image
NEED TO FIT FACE IN FRAME STOPtext_image
RECORD THE FRONT VIEW RECORD STOPtext_image
CURRENT RECORDING IS OK, MORE FACE DATA WILL IMPROVE FACE RECOGNITION ACCURACY, CONTINUE RECORDING? YES NOtext_image
ROTATE THE FACE SLOWLY STOPtext_image
RECORD FRONT OF SMILING FACE SMILE 75% STOPtext_image
RECORDING COMPLETED ENTER A NAME OK STOPtext_image
A/a/1 . @ ABC DEF DELETE ← GHI JKL MNO → PQRS TUV WXYZ REG. - + CANCELtext_image
TOUCH ORDER TO RECOGNIZE 1 JOHN 2 MIKE 3 KEN REG. STOPtext_image
REGISTERED OKMemo :
- Faces may not be registered correctly in the following cases: - when the face appears either too small or too large compared to the frame - when it is too dark or too bright - when the face appears horizontal or slanted - when a part of the face is hidden - when there are multiple faces within the frame - To increase the accuracy of face recognition, fit only one face within the frame and register in a bright environment. - Faces may not be recognized correctly depending on the shooting conditions and environment. In this case, register the face again. - Faces may not be recognized correctly during recording if the face recognition level is low. In this case, register the face again. - Face tracking and name display may not work properly depending on the registered faces, shooting conditions (distance, angle, brightness, etc.), and expressions. - Face tracking and name display may not work properly for people with similar facial features, such as siblings, parents, children, etc.Setting SMILE%/NAME DISPLAY
"SMILE%/NAME DISPLAY" allows you to set the items to display when faces are detected. This item is only displayed when "TOUCH PRIORITY AE/AF" is set to "FACE TRACKING". "Capturing Subjects Clearly (TOUCH PRIORITY AE/AF)" (p. 44) \*The following is a screen of the model with Wi-Fi functions. 1 Open the LCD monitor. text_image
Diagram showing a digital camera with an open button and a hand icon pointing to the right button, indicating a touch function.text_image
M WT D << PLAY REC MENUtext_image
TOP MENU ?text_image
RECORD SETTING OFF A WB A A OFF OFF ?text_image
RECORD SETTING A B C D E F G H I J K L M N O P Q R S T U V W X Y Z A B C D E F G H I J K L M N O P Q R S T U V W Xtext_image
SMILE%/NAME DISPLAY OFF OFF ON ON| Setting Details | |
| OFF Displays only the frames when faces are detected. | |
| ON Displays the frames, names, and smile levels (%) when faces are detected. |
text_image
SMILE JOHN SMILE EARTMemo :
- The camera is able to detect up to 16 faces. Smile levels will be displayed for up to 3 of the largest faces displayed on the screen. - Some faces may not be detected depending on the shooting environment. - You can register personal authentication information like face, name, and priority level of person before recording. - Up to 3 registered names will be displayed according to the priority level. "Registering Human Face Personal Authentication Information" (p. 48) - "SMILE%/NAME DISPLAY" is set to "ON" when the demo mode is activated. "DEMO MODE" (p. 239)Editing the Registered Face Information
Editing the Registered Face Information
You can change the name, priority level, and face information that are registered. \*The following is a screen of the model with Wi-Fi functions. 1 Tap "MENU". text_image
M WT Dtext_image
TOP MENU ?text_image
SETUP FACE REGISTRATIONtext_image
FACE REGISTRATION REGISTER NEW FACE EDIT CANCELtext_image
TOUCH PERSON TO EDIT 1 JOHN 2 MIKE KEN STOPtext_image
RECORD AGAIN CHANGE NAME CHANGE ORDER OF PRIORITY STOPCanceling (Deleting) the Registered Face Information
You can cancel (delete) the face information that is registered. \*The following is a screen of the model with Wi-Fi functions. 1 Tap "MENU". text_image
M WT Dtext_image
TOP MENU ?text_image
SETUP FACE REGISTRATIONtext_image
FACE REGISTRATION REGISTER NEW FACE EDIT CANCELtext_image
TOUCH PERSON TO CANCEL 1 JOHN 2 MIKE 3 KEN STOPtext_image
TOUCH PERSON TO CANCEL 1 JOHN MIKE 3 SET ← STOPtext_image
CANCEL SELECTED PERSON? YES NOReducing Camera Shake
When the image stabilizer is set, camera shake during video recording can be effectively reduced. 1 Open the LCD monitor. text_image
Diagram showing a digital camera with control panel and hand cursor icon interacting with screentext_image
Diagram showing a device with a hand pressing a button labeled '《》' (Figure 1) and a control knob icon.| Setting Details | |
| OFF | Deactivates image stabilizer. |
| ON | Reduces camera shake under normal shooting conditions. |
| ON (AIS)(video mode only) | Reduces camera shake more effectively when shooting bright scenes on the wide angle end. Only on the wide angle end (approx. 5x). |
Memo :
- It is recommended to set the image stabilizer to "OFF" when shooting a subject of little movement with the unit on a tripod. - Complete stabilization may not be possible if camera shake is excessive. - When "ON (AIS)" is set, the angle of view becomes narrower. In the enhanced AIS mode, the angle of view becomes even narrower than "ON (AIS)". - Image stabilization only starts when the SNAPSHOT button is pressed halfway during still image recording.Marking the Video While Recording
You can mark a specific scene while recording video. When a mark is made, the marked position is recorded to make it easy to find the position and start a digest playback. \- The mark function can be used only for videos recorded in AVCHD format. (Videos recorded in iFrame format is not supported.) 1 Open the LCD monitor. text_image
Diagram showing a digital camera with an open lid, a hand cursor icon pointing to it, and a close-up of its screen.text_image
START /STOPtext_image
M WT D << PLAY || REC □ MENUtext_image
M WT D < PLAY REC MENUMemo :
• Refer to the below for playing back the marked scenes. "MARKING PLAYBACK" (p. 66) \- By installing a specialized application in your smartphone, the mark operation can be done from the smartphone. (GZ-EX310/355) "Using the Markings" (p. 176)Slow-motion (High-speed) Recording
You can record videos in slow-motion by increasing the recording speed to emphasize the movements, and play back the slow-motion video smoothly. This is a handy function for checking movements, such as golf swings. (Video file in AVCHD only)| Recording Speed 300 fps | |
| Image size 720×480 | |
| Maximum Recording Time 144 m | |
| Maximum Playback Time 12 h | |
| Image Size when Connected to Monitor 1920×1080 |
text_image
Diagram showing a digital camera with control panel and hand icon interacting with screentext_image
M WT Dtext_image
TOP MENU ?text_image
SPECIAL RECORDING HI-5PEED OFF OFF 视频播放控制 视频播放控制 视频播放控制 TIME&APR OFF OFF 视频播放控制 视频播放控制text_image
HIGH SPEED RECORDING OFF OFF ON ONtext_image
START /STOPRecording at Intervals (TIME-LAPSE RECORDING)
This function enables the changes of a scene that occur slowly over a long period to be shown within a short time by taking frames of it at a certain interval. This is useful for making observations such as the opening of a flower bud. (Video file in AVCHD only) \*The following is a screen of the model with Wi-Fi functions. 1 Open the LCD monitor. text_image
Diagram showing a digital camera with a hand cursor icon interacting with it, alongside its screen and control panel.text_image
M WT D PLAY REC MENUtext_image
TOP MENU ?text_image
SPECIAL RECORDING HI-SPEED OFF OFF OFF TIME-Lapse OFF OFF OFF OFFtext_image
TIME-LAPSE RECORDING OFF 2 10 1 5 20 OFF 2SEC 2SEC INTERVAL 10SEC 1SEC 5SEC 1SEC 5SEC INTERVAL 20SEC 20SEC INTERVALtext_image
START STOPIndications During Time-Lapse Recording
text_image
SD 40 SEG 0:00:00.00 0:00:00 [7:56] ① ② ③ ④| Display Description | |
| 1 | Recording interval Displays the recording interval that is set. |
| 2 | Recorded Time Displays the actual recorded time of the video. Recorded time increases in units of frames. |
| 3 | Actual Elapsed Time Displays the actual elapsed time after recording starts. |
| 4 | Remaining Recording Time Remaining time left to record with the currently selected video quality. |
Time-Lapse Setting
The greater the number of seconds, the longer the recording interval.| Setting Details | |
| OFF Deactivates the function. | |
| 1SEC INTERVAL Takes a frame at 1-second intervals.Recorded videos will be played back at 30 times speed. | |
| 2SEC INTERVAL Takes a frame at 2-second intervals.Recorded videos will be played back at 60 times speed. | |
| 5SEC INTERVAL Takes a frame at 5-second intervals.Recorded videos will be played back at 150 times speed. | |
| 10SEC INTERVAL Takes a frame at 10-second intervals.Recorded videos will be played back at 300 times speed. | |
| 20SEC INTERVAL Takes a frame at 20-second intervals.Recorded videos will be played back at 600 times speed. | |
| 40SEC INTERVAL Takes a frame at 40-second intervals.Recorded videos will be played back at 1 200 times speed. | |
| 80SEC INTERVAL Takes a frame at 80-second intervals.Recorded videos will be played back at 2 400 times speed. | |
Caution :
- This function does not support the iFrame recording format. • Audio cannot be recorded during time-lapse recording. - Zooming, simultaneous still image recording, and image stabilizer are not available in time-lapse recording. - When recording is stopped with the recorded time less than "0:00:00:17", the video will not be saved. - Seamless recording is disabled in time-lapse recording.Memo :
- Settings of time-lapse recording are reset when the power is turned off. To start time-lapse recording again, it is necessary to make the selection once more. - Recording stops automatically 99 hours after it is started. - Make use of a tripod and AC adapter for time-lapse recordings with long intervals. It is also recommended to fix the focus and white balance manually. "Tripod Mounting" (p. 21) "Adjusting Focus Manually" (p. 33) "Setting White Balance" (p. 36)Recording Stop-Motion Videos (STOP-MOTION REC)
By pressing the SNAPSHOT button, 2 frames of still images are recorded, and stop-motion videos are created by piecing these images together. (Video files in AVCHD only) \*The following is a screen of the model with Wi-Fi functions.1 Open the LCD monitor.
text_image
Diagram showing a digital camera with control panel and hand icon interacting with screen, alongside a close-up of its screen.2 Tap "MENU".
text_image
M WT D PLAY REC MENU3 Tap "SPECIAL RECORDING".
text_image
TOP MENU ?4 Tap "STOP-MOTION REC".
text_image
SPECIAL RECORDING HI-SPEED OFF 新播放器控制 新播放器控制 新播放器控制 HIV-SPRING OFF 新播放器控制 新播放器控制 新播放器控制5 Tap "ON".
text_image
STOP-MOTION REC OFF ON OFF ON6 Press the SNAPSHOT button to start recording.
text_image
SNAPSHOTCaution :
- Audio cannot be recorded during "STOP-MOTION REC". - This function does not support the iFrame recording format. - When recording is stopped with the recorded time less than "0:00:00:17" (or less than 8 snapshots), the video will not be saved. - Simultaneous still image recording and image stabilizer are not available during "STOP-MOTION REC". - "SEAMLESS RECORDING" is not available during "STOP-MOTION REC". - When "STOP-MOTION REC" is set, the power-saving mode is deactivated. - "TOUCH PRIORITY AE/AF", "SMILE SHOT", "PET SHOT" and "AUTO REC" are not available.Recording Automatically by Sensing Movements (AUTO REC)
This function enables the unit to record automatically by sensing the changes in subject's movement (brightness) within the red frame displayed on the LCD monitor. It can be set for both video and still image modes. \*The following is a screen of the model with Wi-Fi functions. 1 Open the LCD monitor. text_image
Diagram showing a digital camera with a hand cursor icon pointing to the right side of the screen, labeled in Chinese.text_image
M WT D PLAY REC MENUtext_image
TOP MENU ?text_image
SPECIAL RECORDING HI-SPEED OFF OFF OFF OFF OFF OFF OFF OFF OFF OFF OFF OFF OFF OFF OFF OFF OFF OFF OFF OFF OFF OFF OFF OFF OFF OFF OFF OFF OFF OFF OFF OFF OFF OFF OFF OFF OFF OFF OFF OFF OFF OFF OFF OFF OFF OFF OFF OFF OFF OFF OFF FF OKtext_image
AUTO REC OFF OFF ON ONtext_image
0:00:00[0:00]Caution :
- Digital zoom, image stabilizer, self-timer, and continuous shooting are not available after "AUTO REC" is set. - "AUTO REC" cannot be used together with "TIME-LAPSE RECORDING". When both are set, priority is given to "TIME-LAPSE RECORDING". - "IMAGE SIZE" cannot be changed after "AUTO REC" is selected. Set it before selecting "AUTO REC". - The auto power off and power-saving modes are not available after "AUTO REC" is set.Memo :
- Recording stops when there are no changes for 5 seconds during video recording. - Settings of "AUTO REC" are not saved when the power is turned off. - Recording may not start when the movements of the subject within the red frame are too fast or the changes in brightness are too small. - Recording may start due to changes in brightness even if there is no movement within the red frame. - While zooming, recording cannot be started.Taking Group Shots (Self-timer)
The 10-second self-timer and Face Detection self-timer are convenient functions for taking group photos. The 2-second self-timer is useful for preventing camera shake caused by pressing the shutter button. \*The following is a screen of the model with Wi-Fi functions.Memo :
When shooting a photo using the self-timer function, use of a tripod is recommended. "Tripod Mounting" (p. 21)Using the 2-/10-second Self-timer
1 Open the LCD monitor.
text_image
Diagram showing a digital camera with labeled buttons and a hand icon interacting with the right button.2 Tap "MENU".
text_image
WT M D <3 Tap "RECORD SETTING".
text_image
TOP MENU ?4 Tap > on the lower right of the screen.
text_image
RECORD SETTING OFF A WB A A OFF B OFF ?5 Tap "SELF-TIMER".
text_image
RECORD SETTING A E OFF 播放和播放器 播放和播放器 播放和播放器 OFF ON OFF 播放和播放器 播放和播放器6 Tap "2SEC" or "10SEC".
text_image
SELF-TIMER OFF OFF 10SEC 2SEC FACE DETECTION7 Set the focus on the subject.
text_image
SNPS-01 Press halfway8 Take a still image.
text_image
IMPER Press fullyUsing the Face Detection Self-timer
Pressing the SNAPSHOT button starts face detection, and shooting is performed three seconds after another person enters the frame. This function is useful when you want to include the photographer in the group photo. 1 Open the LCD monitor and select the still image mode. text_image
Diagram showing a digital camera with control panel and hand icon interacting with screentext_image
WT M D <text_image
TOP MENU Eiffeltext_image
RECORD SETTING OFF A WB A A OFF OFF OFFtext_image
RECORD SETTING OFF ON OFF OKtext_image
SELF-TIMER OFF OFF 10SEC 2SEC FACE DETECTIONtext_image
SNAPSHOTtext_image
PhotographerMemo :
\- The "FACE DETECTION" function may fail to detect faces depending on the shooting environment.Recording Videos with Date and Time
You can record videos together with the date and time. Set this when you want to save the file with date and time display. (The date and time cannot be deleted after recording.) \*The following is a screen of the model with Wi-Fi functions. 1 Open the LCD monitor. text_image
Diagram showing a digital camera with labeled buttons and a finger icon interacting with the right side of the screen.text_image
M WT D ←PLAY REC MENUtext_image
TOP MENU ?text_image
SPECIAL RECORDING HI-SPEED OFF 新音频视频 新音频视频 新音频视频 新音频视频 新音频视频 新音频视频 新音频视频 新音频视频 新音频视频text_image
SPECIAL RECORDING 12:45 ?text_image
< SETtext_image
Digital interface screenshot showing a hand cursor clicking a button with a blue arrow and timer, displayed in a video player interface.text_image
START /STOPChecking the Remaining Recording Time
You can check the remaining recording time on the built-in memory and SD card as well as the remaining battery power. 1 Open the LCD monitor. text_image
Diagram showing a digital camera with a hand gesture pointing to the right side of the screen, labeled in Chinese.text_image
INFOtext_image
MAX RECORDING TIME UKF CH-46m XF FP FP FREE USEDtext_image
REMAINING BATTERY 100% 50% 0% MAX TIME 120 MINMemo :
\- You can change to the desired video quality by tapping on it from the remaining recording time display. Approximate Video Recording Time| Picture quality Built-in memory (GZ-EX355 only) | |
| UXP 1 h 20 m | |
| XP 1 h 50 m | |
| SP 2 h 40 m | |
| EP 6 h 40 m | |
| SSW 5 h 10 m | |
| SEW 10 h 40 m | |
| iFrame (1280x720) 55 m | |
| iFrame (960x540) 1 h 10 m | |
| Picture quality SDHC/SDXC card | |||||||
| 4GB 8GB 16GB | 32GB 48GB | 64GB 128GB | |||||
| UXP 20 m 40 m 1 h 20 m 2 h 50 m 4 h 10 m 5 h 40 m 11 h 30 m | |||||||
| XP 30 m 1 h 2 h 4 h 6 h 8 h 10 m 16 h 20 m | |||||||
| SP 40 m 1 h 20 m 2 h 50 m 5 h 50 m 8 h 30 m 11 h 30 m 23 h 10 m | |||||||
| EP | 1 h 40 m | 3 h 30 m | 7 h 10 m | 14 h 40 m | 21 h 30 m | 28 h 50 m | 57 h 50 m |
| SSW | 1 h 20 m | 2 h 40 m | 5 h 30 m | 11 h 20 m | 16 h 40 m | 22 h 20 m | 44 h 50 m |
| SEW | 2 h 50 m | 5 h 40 m | 11 h 30 m | 23 h 30 m | 34 h 30 m | 46 h 10 m | 92 h 40 m |
| iFrame (1280x720) (GZ-EX355/GZ-EX310) | 10 m 30 m 1 h | 2 h 3 h 4 h 8 h | |||||
| iFrame (960x540) (GZ-EX355/GZ-EX310) | 15 m 40 m 1 h | 10 m 2 h 40 m | 3 h 50 m 5 h 10 m | 10 h 30 m | |||
| Image size | Built-in memory (GZ-EX355 only) | SDHC/SDXC card | |||
| 16GB | 4GB | 8GB | 16GB | 32GB | |
| 3840X2160(8M)(16:9) | 3000 | 800 | 1600 | 3200 | 6600 |
| 1920x1080(2M)(16:9) | 9999 | 3100 | 6500 | 9999 | 9999 |
| 1440x1080(1.5M)(4:3) | 9999 | 4200 | 8500 | 9999 | 9999 |
| 640x480(0.3M)(4:3) | 9999 | 9999 | 9999 | 9999 | 9999 |
| Battery Pack Actual recording time Continuous recording time | (Maximum Recording Time) |
| BN-VG114U(Supplied) | 1 h 5 m 1 h 55 m |
| BN-VG121U 1 h 40 m 3 h 5 m | |
| BN-VG138U 3 h 5 h 30 m |
| Battery Pack Actual recording time Continuous recording time | (Maximum Recording Time) |
| BN-VG107U(Supplied) | 40 m 1 h 5 m |
| BN-VG114U 1 h 15 m 2 h 10 m | |
| BN-VG121U 1 h 55 m 3 h 15 m | |
| BN-VG138U 3 h 20 m 5 h 45 m |
Playing Back Videos
The followings are the types of playback that can be performed by this unit.| Normal Playback | Plays back the recorded videos. |
| Mark Playback(Mark playback/ game playback) | The scenes marked while recording the video and the scoring scenes recorded in the game recording mode (by using the smartphone application) can be searched.Also, marked scenes and goal scenes can be extracted for playback; extracted scenes can be saved as a playlist.To start, tap [PLAY] on the playback screen.For the game recording mode, refer to the game score settings. (GZ-EX355/EX310)"Game Score Settings" (p. 186) |
| DIGEST PLAYBACK | From the recorded video, scenes with a smile detected, scenes with a person whose face is registered, and scenes that are marked manually are extracted and pieced together for a digest playback.When "AUTO" is selected, recorded video is digested in the pre-set length of time.Start the playback from "DIGEST PLAYBACK" in the "PLAYBACK SETTING" menu. |
| PLAYBACK PLAYLIST | Plays back the playlists that you have created.Start the playback from "PLAYBACK PLAYLIST" in the "PLAYBACK SETTING" menu. |
■ Switching to the video playback screen
1 Open the LCD monitor. text_image
Diagram showing a digital camera with a hand cursor interacting with it, alongside its screen interface and control buttons.text_image
iA WT D PLAY REC MENUtext_image
Screenshot of a media player interface with video thumbnails and playback controlsOperation Buttons for Video Playback
During Index Screen Display text_image
Screenshot of a mobile app interface with numbered UI elements for recording and playback controls| Display Description | ||
| 1 | Video/Still Image Mode | Switches between video and still image modes. |
| 2 | Date Moves to the previous/next date | |
| 3 | > Displays the next index screen (thumbnail display)You can perform the same operation with the zoom lever. | |
| 4 | < Displays the previous index screen (thumbnail display)You can perform the same operation with the zoom lever. | |
| 5 | < | |
| 6 | PLAY | Moves to the mark playback mode.“ MARKING PLAYBACK ” (p. 66) |
| 7 | Displays the index screen (thumbnail display) to perform deletion | |
| 8 | Switches between the index screen of the built-in memory and SD card | |
| 9 | MENU Displays the menu screen | |
| 10 | Thumbnail (File) Tap | on thumbnail - Starts playbackDrag to right - Scrolls to the right to show the previous index screen (thumbnail display)Drag to left - Scrolls to the left to show the next index screen (thumbnail display)Images with the same underlined color indicates the same recording date. |
| Display Description | ||
| 1 | Video/Still Image Mode | Switches between video and still image modes. |
| 2 | Date Moves to the previous/next date | |
| 3 | > Displays the next index screen (thumbnail display)You can perform the same operation with the zoom lever. | |
| 4 | < Displays the previous index screen (thumbnail display)You can perform the same operation with the zoom lever. | |
| 5 | < | |
| 6 | PLAY | Moves to the mark playback mode.“ MARKING PLAYBACK ” (p. 66) |
| 7 | Displays the index screen (thumbnail display) to perform deletion | |
| 8 | Switches between the index screen of the built-in memory and SD card | |
| 9 | MENU Displays the menu screen | |
| 10 | Thumbnail (File) Tap | on thumbnail - Starts playbackDrag to right - Scrolls to the right to show the previous index screen (thumbnail display)Drag to left - Scrolls to the left to show the next index screen (thumbnail display)Images with the same underlined color indicates the same recording date. |
text_image
1 2 3 0:01:23 0:12:34 4 5 6 7 8 ←REC → ← REC → MENU 9 10 11 12| Display Description | |||
| 1 | Video/Still Image Mode | Switches between video and still image modes. | |
| 2 | Timeline Bar Tap on a random position - Moves to the tapped positionDrag playback point to the left or right - Starts playback from the new positionTap on a random position - Moves to the tapped position | ||
| 3 | Pointer Displays the current estimated playback position within the scene | ||
| 4 | Returns to the beginning of the scene Returns to the previous scene if tapped at the beginning of a scene.Allows the same functions as the zoom lever to be performs while pausing playback. | ||
| 5 | Reverse search (speed increases with each tap) | ||
| 5 | Reverse slow-motion / Press and hold to start reverse slow playback | ||
| 6 | ▶/■| | | | | | | | | | | | | | | | | | | | | | | | | | | | | | | | | | | | | | | | | | | | | | | | | | | | | | | | | | | | | | | | | | | | | | | | | | | | | | | | | | | | | | | | | | | | | | | | | | | | | | ▶▶ | Forward search (speed increases with each tap) |
| 7 | |▶ | Forward slow-motion / Press and hold to start slow playback | |
| 8 | Advances to the next sceneAllows the same functions as the zoom lever to be performs while pausing playback. | ||
| 9 | <<REC Switches to the recording mode. | ||
| 10 | Stop (returns to index screen) | ||
| 11 | Deletes the currently displayed video. | ||
| 12 | MENU Displays the menu screen | ||
Memo :
- Tap or drag on the operation area of the touch screen. - Operations buttons on the touch screen disappear if the unit is not operated for about 5 seconds. Tap on the screen to display the operation buttons again. - You can search for a specific file by the recording date. "Searching for a Specific Video/Still Image by Date" (p. 76) - The recording date and time can be displayed on the screen during playback. "DISPLAY DATE/TIME" (p. 234) - Displays the approximate remaining battery power during use. - The following is a screen of the model with the built-in memory.Adjusting the Volume of Videos
You can use the zoom/volume lever to control the volume. Turn down the volume text_image
- VOL.+ W T Turn up the volumeCaution :
- Make a backup of important recorded data. It is recommended to copy your important recorded data to a DVD or other recording media for storage. - This unit is a microcomputer-controlled device. Electrostatic discharge, external noise and interference (from a TV, a radio, etc.) might prevent it from functioning properly. In such a case, turn off the power, then remove the AC adapter and battery pack. This unit will be reset. - Disclaimer - We shall not be held responsible for loss of recorded contents when recording videos/audio or playback cannot be operated due to malfunctions in this unit, provided parts, or SD card. - Once deleted, recorded contents (data), including data loss due to malfunctions in this unit, cannot be restored. Please be forewarned. - JVC will not be responsible for any lost data. Please be forewarned. - In order for quality improvement, defective recording medium is subject to be analyzed. Therefore, it may not be returned.Checking the Recording Date and Other Information
You can display the recording date and duration of the selected file. 1 Pause the playback and press the INFO button. \- To return to the playback screen, press the INFO button or tap X. text_image
EATE TIME FIR TIME QUALITY PROTECT GPS INFO EAST TIME OFF NONENormal Playback
Plays back the recorded videos. \*The following is a screen of the model with the built-in memory. 1 Open the LCD monitor. text_image
Diagram showing a digital camera with control panel and finger icon interacting with screen, alongside a close-up of the screen.text_image
iA WT D PLAY REC MENUtext_image
Screenshot of a media player interface with video thumbnails and playback controlsMARKING PLAYBACK
- The scenes marked while recording the video and the scoring scenes recorded in the game recording mode (by using the smartphone application) can be searched. Also, marked scenes and goal scenes can be extracted for playback; extracted scenes can be saved as a playlist. - Switch to the mark playback mode by tapping 📄PLAY on the video playback screen. - The following is a screen of the model with Wi-Fi functions and built-in memory. 1 Open the LCD monitor. text_image
Diagram showing a digital camera with labeled buttons and a finger icon pointing to the right side of the screen.text_image
iA WT D PLAY REC MENUtext_image
Screenshot of a media player interface with multiple video thumbnails and playback controlstext_image
MARKING PLAYBACK DIGEST GAME SETtext_image
SELECT DATE ALL SCENEStext_image
ALL SCENES ALL MARKINGS MANUAL MARKING GOAL MARKINGtext_image
SD 0:01:23 REC MENUtext_image
NORMAL MARKING P/B PLAYBACK AGAIN SAVE TO PLAYLIST SELECT DATEIndications during the Marking Playback
During the Normal Marking Playback text_image
HOME 1-1 VISITOR 0:01:23| Display Description | |
| 1 | Mark Delete button Deletes the mark that is currently displayed. |
| 2 | Playback Mark ButtonEnter a mark while playback is in progress. |
| 3 | Elapsed Time Displayed the playback time of the video. |
| 4 | “” icon displayed “P” icon displayedIndicates that the current scene is marked. Indicates that recording of the score is in progress. |
| 5 | Score Displays the score of the game (displayed only if the score is registered.) |
text_image
HOME 1-1 VISITOR 0:01:23 REC DOST MENU| Display Description | ||
| 1 | Date and time display | - |
| 2 | Mark Delete button De | letes the mark that is currently displayed. |
| 3 | DIGEST Playback Cancel Button | Moves to the normal mark playback. |
| 4 | Elapsed Time Displayed the playback time of the video. | |
| 5 | “☐” icon displayed “P” icon displayed | Indicates that the current scene is marked. Indicates that recording of the score is in progress. |
| 6 | Score Displays the score of the game (displayed only if the score is registered.) | |
Memo :
\- Once a scene is marked, the next mark won't be made within 5 seconds.GAME PLAYBACK (GZ-EX355/EX310)
• Game playback is a function to playback the goal scenes and/or marked scene that is recorded by the smartphone application Everiwo sync. 2. - To start, tap PLAY on the playback screen. - For the game recording mode, refer to "Game Score Settings" (p. 186). - The following is a screen of the model with Wi-Fi functions and built-in memory. 1 Open the LCD monitor. text_image
Diagram showing a digital camera with labeled buttons and a hand icon interacting with the right button.text_image
iA WT D «PLAY REC MENUtext_image
Screenshot of a media player interface with playback controls and preview thumbnailstext_image
MARKING PLAYBACK DIGEST GAME SETtext_image
GAME PLAYBACK DIGEST SETtext_image
1:00:00:00:00 ED 0:01:23 CREC MENUIndications during the Game Playback
■ During the Normal Game Playback
text_image
HOME 1-1 VISITOR GAME 0:01:23| Display Description | |
| 1 | Mark Delete button Deletes the mark that is currently displayed. |
| 2 | Playback Mark ButtonEnter a mark while playback is in progress. |
| 3 | Recorded time Displays the time that the video is recorded. |
| 4 | “” icon displayed “P” icon displayedIndicates that the current scene is marked. Indicates that recording of the score is in progress. |
| 5 | Game playback modeIndicates that the game playback is in progress. |
| 6 | Score Displays the score of the game (displayed only if the score is registered.) |
■ During the DIGEST/Game Playback
text_image
HOME 1.1 VISITOR GAME 0:01:23 REC DOST MENU| Display | Description | |
| 1 | Date and time display | - |
| 2 | Mark Delete button De | letes the mark that is currently displayed. |
| 3 | DIGEST Playback Cancel Button | Moves to the normal mark playback. |
| 4 | Recorded time Displays the time that the video is recorded. | |
| 5 | “” icon displayed “P” icon displayed | Indicates that the current scene is marked. Indicates that recording of the score is in progress. |
| 6 | Game playback mode | Indicates that the game playback is in progress. |
| 7 | Score Displays the score of the game (displayed only if the score is registered.) | |
Memo :
\- Once a scene is marked, the next mark won't be made within 5 seconds.Adjusting the Marked Playback Position
Specify the length of time before and after the marked position for playing back the marked video. The maximum length of playback time per mark is 20 seconds. \- The following is a screen of the model with Wi-Fi functions and built-in memory. 1 Open the LCD monitor. text_image
Diagram showing a digital camera with labeled buttons and a hand icon pointing to the right button.text_image
iA. WT D «PLAY REC MENUtext_image
Screenshot of a media player interface with playback controls and preview thumbnailstext_image
MARKING PLAYBACK DIGEST GAME SETtext_image
SETTINGS P/B TIME PER SCENE 20 SEC P/B POSITION ADJUSTtext_image
P/B TIME PER SCENE 10 SEC 10SEC 20 SEC 20SECtext_image
P/B POSITION ADJUST SETDIGEST PLAYBACK
You can play back a digest of the recorded videos (Digest Playback). This is useful for checking the content of the videos quickly. \- The following is a screen of the model with the built-in memory. 1 Open the LCD monitor. text_image
Diagram showing a digital camera with labeled buttons and a hand icon interacting with the right button.text_image
iA WT D PLAY REC MENUtext_image
Screenshot of a media player interface with multiple video thumbnails and control buttonstext_image
TOP MENU 视频音乐视频 视频音乐视频 视频音乐视频 视频音乐视频text_image
PLAYBACK SETTING 1200 2000 300 1200 2000 300 DIGEST PLAYBACK 1200 2000 300text_image
SELECT DATE 1.000 00:00 (退) 1.000 00:00 (退) 1.000 00:00 (退) NEXT ← ×text_image
DIGEST PLAYBACK AUTO SMILING FACE SCENE REGISTERED FACE SCN MARKED SCENEtext_image
DIGEST TIME 1 min 5 min 15 min 45 min 3 min 10 min 30 min 60 min RECtext_image
XP 0:01:23 0:12:34 REC DIGEST MENU■ Types of Digest Playback
Select the types of Digest Playback from the following. When "AUTO" is selected, playback is performed by shortening the video to the pre-set length of time.| Item Details | |
| AUTO Playback is | performed by shortening the video to the pre-set length of time.Depending on the recording time of the video, playback time can be selected from: 1 minute, 3 minutes, 5 minutes, 10 minutes, 15 minutes, 30 minutes, 45 minutes and 60 minutes. All the recorded parts (recording time is less than 1 minute) are played back. |
| SMILING FACE SCENE | Playback the scenes with detected smiles as a digest. Set “SMILE SHOT” in “RECORD SETTING” to ON.“Capturing Smiles Automatically (SMILE SHOT)”(p. 45) |
| REGISTERED FACE SCN | Playback the scenes mainly with a person whose face is registered“Registering Human Face Personal Authentication Information”(p. 48) |
| MARKED SCENE | Start a digest playback by piecing the scenes that are marked during recording. |
PLAYBACK PLAYLIST
Plays back the playlists that you have created. \- The following is a screen of the model with the built-in memory. 1 Open the LCD monitor. text_image
Diagram showing a digital camera with an open lid and a hand cursor icon interacting with it, alongside a close-up of its screen.text_image
iA WT D PLAY REC MENUtext_image
Screenshot of a media player interface with playback controls and preview thumbnailstext_image
TOP MENU 视频视频编辑 视频视频剪辑 视频视频剪辑 视频视频剪辑 ?text_image
PLAYBACK SETTING 1200 5000 500 1200 5000 500 1200 5000 500 PLAYBACK PLAYLISTtext_image
PLAYBACK PLAYLIST 02 2013.10.10 PM01:00 CHECKPLAYBACK OTHER FILE
The management information of a video may be damaged if recording is not performed correctly, such as turning off the power in the middle of recording. You can perform the following operations to play back the videos with defective management information. \- The following is a screen of the model with the built-in memory. 1 Open the LCD monitor. text_image
Diagram showing a digital camera with control panel and finger icon interacting with screentext_image
iA WT D «PLAY REC MENUtext_image
Screenshot of a media player interface with playback controls and preview thumbnailstext_image
TOP MENU 图层图像预设 图层图像预设 图层图像预设 图层图像预设 ?text_image
PLAYBACK SETTING PLAYBACK OTHER FILEtext_image
Screenshot of a media player interface with video thumbnails and playback controlsMemo :
- An MTS file is created in the EXTMOV folder when management information is corrupted. - Depending on the condition of the damaged file, playback might fail or may not run smoothly.Playing Back Still Images
You can select and play back the recorded still images from an index screen (thumbnail display). \- The following is a screen of the model with the built-in memory. 1 Open the LCD monitor. text_image
Diagram showing a digital camera with an open lid, a hand cursor icon pointing to the right, and a close-up of its screen.text_image
M WT D <text_image
Screenshot of a video editing interface with multiple preview thumbnails and control buttonsOperation Buttons for Still Image Playback
During Index Screen Display text_image
Screenshot of a digital camera interface with numbered UI elements and navigation buttons| Display Description | ||
| 1 | Video/Still Image Mode | Switches between video and still image modes. |
| 2 | Date Moves to the previous/next date | |
| 3 | > Displays the next index screen (thumbnail display)You can perform the same operation with the zoom lever. | |
| 4 | < Displays the previous index screen (thumbnail display)You can perform the same operation with the zoom lever. | |
| 5 | <<REC Switches to the recording mode. | |
| 6 | Displays the index screen (thumbnail display) to perform deletion | |
| 7 | Switches between the index screen of the built-in memory and SD card | |
| 8 | MENU Displays the menu screen | |
| 9 | File (Still Image) Tap on thumbnail - Starts playbackDrag to right - Scrolls to the right to show the previous index screen (thumbnail display)Drag to left - Scrolls to the left to show the next index screen (thumbnail display) | |
text_image
| Display Description | ||
| 1 | Video/Still Image Mode | Switches between video and still image modes. |
| 2 | Rotates to the left (rotates by -90° with each tap) | |
| 3 | Rotates to the right (rotates by 90° with each tap) | |
| 4 | Returns to the previous still image• You can perform the same operation with the zoom lever. | |
| 5 | ▶ / || Starts/pauses | slideshow“Slideshow Playback” (p. 75) |
| 6 | ▶▶ | Advances to the next still image• You can perform the same operation with the zoom lever. |
| 7 | <<REC Switches to the recording mode. | |
| 8 | ☑ | Returns to index screen |
| 9 | Deletes the currently displayed still image. | |
| 10 | MENU Displays the menu screen | |
Memo :
- Tap or drag on the operation area of the touch screen. - Operations buttons on the touch screen disappear if the unit is not operated for about 5 seconds. Tap on the screen to display the operation buttons again. - You can rotate a still image 90° to the right or left during playback. Rotation applies to the on-screen display only. - You can search for a specific file by the recording date. This is useful when searching from a large number of files. "Searching for a Specific Video/Still Image by Date" (p. 76)Caution :
\- This unit is a microcomputer-controlled device. Electrostatic discharge, external noise and interference (from a TV, a radio, etc.) might prevent it from functioning properly. In such a case, turn off the power, then remove the AC adapter and battery pack. This unit will be reset.Slideshow Playback
Still images can be played back in a slideshow. Tap ▶ during still image playback to start the slideshow. text_image
Screenshot of a 3D media player control interface with playback controls and navigation buttonsMemo :
- Effects can be added to the transitions in slideshow playback. "SLIDE SHOW EFFECTS" (p. 236)Searching for a Specific Video/Still Image by Date
When there is a large number of recorded videos and still images, it is difficult to look for the desired file from the index screen. Use the search function to find the file you want. You can search and play videos or still images according to recording dates. \- The following is a screen of the model with the built-in memory.1 Tap "MENU".
text_image
Screenshot of a media player interface with video thumbnails and playback controls2 Tap "PLAYBACK SETTING".
text_image
TOP MENU 图层和图像库 图层和图像库 图层和图像库 图层和图像库 ?3 Tap "SEARCH DATE".
text_image
PLAYBACK SETTING SEARCH DATE 1 搜索 2 搜索 3 搜索 4 搜索 5 搜索 6 搜索 7 搜索 8 搜索 9 搜索 10 搜索 11 搜索 12 搜索 13 搜索 14 搜索 15 搜索 16 搜索 17 搜索 18 搜索 19 搜索 20 搜索 21 搜索 22 搜索 23 搜索 24 搜索 25 搜索 26 搜索 27 搜索 28 搜索 29 搜索 30 搜索 31 搜索 32 搜索 33 搜索 34 搜索 35 搜索 36 搜索 37 搜索 38 搜索 39 搜索 40 搜索 41 搜索 42 搜索 43 搜索 44 搜索 45 搜索 46 搜索 47 搜索 48 搜索 49 搜索 50 搜索 51 搜索 52 搜索 53 搜索 54 搜索 55 搜索 56 搜索 57 搜索 58 搜索 59 搜索 60 搜索 61 搜索 62 搜索 63 搜索 64 搜索 65 搜索 66 搜索 67 搜索 68 搜索 69 搜索 70 搜索 71 搜索 72 搜索 73 搜索 74 搜索 75 搜索 76 搜索 77 搜索 78 搜索 79 搜索 80 搜索 81 搜索 82 搜索 83 搜索 84 搜索 85 搜索 86 搜索 87 搜索 88 搜索 89 搜索 90 搜索 91 搜索 92 搜索 93 搜索 94 搜索 95 搜索 96 搜索 97 搜索 98 搜索 99 搜索 1004 Tap a recording date, then tap "NEXT".
text_image
SEARCH DATE DEC.24.2013 DEC.24.2013 NEXT5 Tap on the file to start playback.
text_image
SEARCH DATE REC MENUConnecting to and Viewing on TV
You can connect this unit to a TV for playback. The image quality on TV varies with the type of TV and the connecting cable. Select the connector that best suits your TV. - Refer also to the instruction manual of the TV in use. "Connecting via the HDMI Mini Connector" (p. 77) "Connecting via the AV Connector" (p. 79) - To display the date and time on TV, set both "DISPLAY DATE/TIME" and "DISPLAY ON TV" to "ON". "DISPLAY DATE/TIME" (p. 234) "DISPLAY ON TV" (p. 241) Unnatural Displays on TV| Trouble Action | |
| Images do not appear on the TV properly. | Disconnect the cable and connect again.Turn off and on this unit again.Images may not appear properly when the remaining battery power is low. Use an AC adapter. |
| Images are projected vertically on the TV. | Set “VIDEO OUTPUT” in the “CONNECTION SETTINGS” menu to “4:3”.“VIDEO OUTPUT” (p. 241) |
| Images are projected horizontally on the TV. | Adjust the TV's screen accordingly. |
| The color of images looks strange. | Adjust the TV's screen accordingly. |
| HDMI-CEC functions do not work properly, and the TV does not work in conjunction with this unit. | TVs may operate differently depending on the specifications, even if they are HDMI-CEC compliant. Therefore, the HDMI-CEC functions of this unit cannot be guaranteed to operate in combination with all the TVs. In such cases, set “HDMI CONTROL” to “OFF”.“HDMI CONTROL” (p. 241) |
| The language on the display changed. | It may occur when you connect this unit to a TV with different language setting using an HDMI mini cable. |
Caution :
\- Do not remove the recording medium or perform any other operation (such as turning off the power) while accessing files. Also, be sure to use the provided AC adapter, as the data on the recording medium may be corrupted if the battery becomes exhausted during operation. If the data on the recording medium becomes corrupted, format the recording medium to use the medium again.Connecting via the HDMI Mini Connector
If you are using an HDTV, you can play back in HD quality by connecting to the HDMI mini connector. - Use a High Speed HDMI mini cable as the HDMI mini cable when not using the provided one. - Use a High Speed HDMI mini cable as the HDMI mini cable. • Refer also to the instruction manual of the TV in use. - The following is a screen of the model with the built-in memory. 1 Connect to a TV. text_image
To HDMI Mini Connector HDMI HDMI Connector Input TVtext_image
AC Adapter To AC Outlet (110 V to 240 V)text_image
External Inputtext_image
Screenshot of a media player interface with playback controls and preview thumbnailsMemo :
- Change the settings in "HDMI OUTPUT" according to the connection. "HDMI OUTPUT" (pp. 241) - When connected to the TV via the HDMI mini cable, images and sounds may not be output properly depending on the TV connected. In such cases, perform the following operations. 1) Disconnect the HDMI mini cable and connect it again. 2) Turn off and on this unit again. - For questions about the TV or method of connection, contact your TV's manufacturer.Operating in Conjunction with TV via HDMI
Connecting this unit to an HDMI-CEC enabled TV using the HDMI mini cable allows linked operations with the TV to be performed. \- HDMI-CEC (Consumer Electronics Control) is an industry standard that enables interoperability between HDMI-CEC compliant devices that are connected via HDMI cables.Memo :
- Not all HDMI control devices comply with the HDMI-CEC standard. The HDMI control function of this unit will not work when connected to these devices. - This unit is not guaranteed to operate with all HDMI-CEC enabled devices. - Depending on the specifications of each HDMI-CEC enabled device, some functions may not work with this unit. (For details, refer to the instruction manual of your TV.) - Unintended operations may occur with some connected devices. In these cases, set "HDMI CONTROL" to "OFF". "HDMI CONTROL" (p. 241)Preparations
- Connect an HDMI mini cable between this unit and the TV. "Connecting via the HDMI Mini Connector" (p. 77) - Turn on the TV and set the HDMI-CEC related setting to "ON". (For details, refer to the instruction manual of the TV.) - Set "HDMI CONTROL" in the CONNECTION SETTINGS menu to "ON". "HDMI CONTROL" (p. 241)Operation Method 1
1 Turn on this unit. 2 Select the playback mode. 3 Connect the HDMI mini cable. - TV turns on automatically and switches to HDMI input mode when this unit is turned on.Operation Method 2
1 Turn off the TV. • This unit turns off automatically.Memo :
- Depending on the TV connected, the display language of this unit will automatically switch to the language that is selected for the TV when this unit is turned on. (This is applicable only if this unit supports the language selected for the TV.) To use this unit with a language that differs from the display language of the TV, set "HDMI CONTROL" to "OFF". - The display language of the TV will not switch automatically, even if the display language of this unit is changed. - These functions may not work correctly when devices such as amplifier and selector are connected. Set "HDMI CONTROL" to "OFF". - If HDMI-CEC does not work properly, turn off and on this unit again.Connecting via the AV Connector
To playback videos on TV, connect the provided AV cable (P/N QAM1322-001) to the AV terminal of this unit. • Refer also to the instruction manual of the TV in use. - The following is a screen of the model with the built-in memory. 1 Connect to a TV. flowchart
graph LR
    A["AV"] --> B["To AV Connector"]
    B --> C["Yellow"]
    B --> D["White"]
    B --> E["Red"]
    C --> F["Video Input"]
    D --> G["Video Input"]
    E --> H["Audio Input (L)"]
    E --> I["Audio Input (R)"]
    J["TV"] --> C
text_image
AC Adapter To AC Outlet (110 V to 240 V)text_image
External Inputtext_image
Screenshot of a media player interface with playback controls and preview thumbnailsMemo :
- For questions about the TV or method of connection, contact your TV's manufacturer. • AV cable (P/N: QAM1322-001) Wiring specifications (for video/audio) of the 4-pole mini plug are described in the following. For purchasing, consult your nearest JVC service center. text_image
Video (yellow) Grounding wire Audio (Rch: red) Audio (Lch: white)Playing Back a DVD or Blu-ray Disc Created on this Unit
DVDs or Blu-ray discs created using the backup function on this unit can be played back on TV using an optional DVD writer (DVDs only) with playback function (CU-VD50) or a normal DVD or Blu-ray disc player. DVDs can also be played back on this unit by connecting the optional DVD writer with playback function. "Playing Back with a DVD Writer" (p. 105) "Playing Back with a BD Writer (External Blu-ray Drive)" (p. 98) - For details on how to play back on a normal DVD or Blu-ray disc player, refer to the instruction manual of the player.| Playback Device DVD | (AVCHD format) | Blu-ray Disc |
| DVD writer connected to this unit | √ | - |
| BD writer (external Blu-ray drive) connected to this unit | √ | √ |
| DVD player/DVD Recorder | √* - | |
| Blu-ray player/Blu-ray Recorder | √* | √ |
| DVD writer with playback function (CU-VD50) | √ | - |
Caution :
\- DVDs that are created in AVCHD format cannot be played back on DVD players with standard quality. You may not be able to remove the disc from the player.Digest Playback on a Blu-ray or DVD Player
You can play back a few seconds from each scene of the recorded videos in the created disc. 1 Load the created disc on a player. 2 Select "DIGEST PLAYBACK" on the TV. • The digest is played back continuously. text_image
1/2 DIGEST PLAYBACKMemo :
• To normal playback/To index menu 1) Press the top menu button on the remote control of the player during digest playback. 2) Select the desired item. - "DIGEST PLAYBACK" menu is not available when the disc is created using the provided LoiLoFit for Everio software. - Digest Playback is not available when playing back by connecting this unit to a DVD writer or external Blu-ray drive.Deleting Unwanted Files
Delete unwanted videos and still images when the space in the recording media is running out. Doing so frees up more space in the recording media. "Deleting the Currently Displayed File" (p. 80) "Deleting Selected Files" (p. 80)Memo :
- Deleted files cannot be restored. - When files in a playlist are deleted, the playlist changes. - Files that are protected cannot be deleted. Release protection before deleting the file. "Protecting Files" (p. 81) \- Be sure to back up important files on a computer. "Backing Up Files" (p. 116)Deleting the Currently Displayed File
Deletes the currently displayed file.Caution :
\- Deleted files cannot be restored.1 Tap 面.
text_image
XP 0:01:23 0:12:34 REC MENU2 Tap "YES".
text_image
DELETE? (REMAINING SCENES: 0030) PLAYLISTS THAT INCLUDE THIS SCENE ARE ALTERED OR DELETED YES NODeleting Selected Files
Deletes the selected files. \- The following is a screen of the model with the built-in memory.Caution :
\- Deleted files cannot be restored.1 Open the LCD monitor.
text_image
Diagram showing a digital camera with labeled buttons and a finger icon pointing to the right side of the screen.2 Tap “<

text_image
M
WT
D
PLAY REC MENU
\- While the video mode is shown in the image, the same operations apply for the still image mode.
3 Tap 画.

text_image
Screenshot of a media player interface with multiple video thumbnails and playback controls
4 Tap on the files to delete.

text_image
DELETE
SEL ALL REL ALL SET QUIT
- appears on the selected files.
To remove √ from a file, tap on the file again.
- Tap "SEL ALL" to select all files.
- Tap "REL ALL" to release all selections.
5 Tap "SET".

text_image
DELETE
SEL ALL REL ALL SET QUIT
6 Tap "EXECUTE" to confirm the deletion.

text_image
DELETE?
REMAINING SCENES:0030
PLAYLISTS THAT INCLUDE THIS
SCENE ARE ALTERED OR DELETED
EXECUTE
STOP
RETURN
• After deleting is complete, tap "OK".
- To cancel the deletion, tap "QUIT".
Protecting Files
Prevent important videos/still images from being deleted accidentally by protecting them.
"Protecting/Releasing Protection of the Currently Displayed File" (p. 81)
"Protecting/Releasing Protection of Selected Files" (p. 82)
Caution :
\- When the recording media is formatted, even the protected files will be deleted.
Protecting/Releasing Protection of the Currently Displayed File
Protects or releases protection of the currently displayed file.
1 Tap "MENU".

text_image
XP
0:01:23
0:12:34
REC
MENU
2 Tap "EDIT".

text_image
TOP MENU
?
3 Tap "PROTECT/CANCEL".

text_image
EDIT
PROTECT/CANCEL
1 滤色 2 滤色 3 滤色 4
1 滤色 2 滤色 3 滤色 4
1 滤色 2 滤色 3 滤色 4
4 Tap "YES".

text_image
XP
PROTECT?
YES NO
- Tap ◀◀◀/▶▶▶ to select the previous or next file.
• After setting, tap "OK".
Protecting/Releasing Protection of Selected Files
Protects or releases protection of the selected files.
\- The following is a screen of the model with the built-in memory.
1 Open the LCD monitor.

text_image
Diagram showing a digital camera with an open lid and a hand cursor icon interacting with it, alongside a close-up of its screen.
- Tap 📋 or 📄 to select the video or still image mode.
- Tap 📄 or 🏠 on the recording screen to display the mode switching screen.
Tap 📁 to switch to the video mode 🏠.
Tap ☐ to switch to the still image mode ☐.
(You can also use the 📋/Button on this unit.)
2 Tap “<
text_image
M
WT
D
←PLAY REC MENU
text_image
M WT D PLAY REC MENU3 Tap 画.
text_image
Screenshot of a media player interface with multiple video thumbnails and playback controls4 Tap on the files to delete.
text_image
DELETE SEL ALL REL ALL SET QUITtext_image
DELETE SEL ALL REL ALL SET QUITtext_image
DELETE? REMAINING SCENES:0030 PLAYLISTS THAT INCLUDE THIS SCENE ARE ALTERED OR DELETED EXECUTE STOP RETURNProtecting Files
Prevent important videos/still images from being deleted accidentally by protecting them. "Protecting/Releasing Protection of the Currently Displayed File" (p. 81) "Protecting/Releasing Protection of Selected Files" (p. 82)Caution :
\- When the recording media is formatted, even the protected files will be deleted.Protecting/Releasing Protection of the Currently Displayed File
Protects or releases protection of the currently displayed file. 1 Tap "MENU". text_image
XP 0:01:23 0:12:34 REC MENUtext_image
TOP MENU ?text_image
EDIT PROTECT/CANCEL 1 滤色 2 滤色 3 滤色 4 1 滤色 2 滤色 3 滤色 4 1 滤色 2 滤色 3 滤色 4text_image
XP PROTECT? YES NOProtecting/Releasing Protection of Selected Files
Protects or releases protection of the selected files. \- The following is a screen of the model with the built-in memory. 1 Open the LCD monitor. text_image
Diagram showing a digital camera with an open lid and a hand cursor icon interacting with it, alongside a close-up of its screen.text_image
M WT D ←PLAY REC MENUtext_image
Screenshot of a media player interface with multiple video thumbnails and control buttonstext_image
TOP MENU 图层管理器 图层管理器 图层管理器 图层管理器 图层管理器text_image
EDIT PROTECT/CANCELtext_image
PROTECT/CANCEL SEL ALL REL ALL SETtext_image
PROTECT/CANCEL SEL ALL REL ALL SETCapturing a Still Image in the Video During Playback
You can capture still images of the scenes you like in the recorded videos. \- The following is a screen of the model with the built-in memory. 1 Open the LCD monitor. text_image
Diagram showing a digital camera with labeled buttons and a finger icon pointing to the right side of the screen.text_image
iA WT D PLAY REC MENUtext_image
Screenshot of a media player interface with playback controls and preview thumbnailstext_image
XP 0:01:23 0:12:34 REC MENUtext_image
SNAPSHOTMemo :
• Still images are captured with a size of 1920×1080. - Captured still images are stored in the media where the video is being played back from.Combining Videos Recorded by Seamless Recording
Videos that are recorded on two separate media and with "SEAMLESS RECORDING" in the video recording menu enabled can be combined into a single video. "SEAMLESS RECORDING (GZ-EX355)" (p. 227) \- The following is a screen of the model with the built-in memory. 1 Open the LCD monitor. text_image
Diagram showing a digital camera with labeled buttons and a hand icon pointing to the right button.text_image
iA WT Dtext_image
Screenshot of a media player interface with playback controls and preview thumbnailstext_image
TOP MENU 图层管理器 图层管理器 图层管理器 图层管理器 图层管理器text_image
EDIT SEAMLESS REC CTRLtext_image
SEAMLESS REC CTRL COMBINE SCENEStext_image
THE ABOVE SCENE IS FOUND COMBINE WITH THIS SCENE? YES NOtext_image
SELECT THE MEDIA TO STORE THE COMBINED SCENES BUILT-IN MEMORY SD CARDtext_image
START COMBINING THE SCENES? YES NOMemo :
- Seamless videos cannot be combined if there is not enough free space in the built-in memory or SD card. Check the amount of remaining free space before combining. - Seamless recording can be performed if the video recording format is iFrame.How to Enable Seamless Video Recording Again
To start seamless recording again after the previous session is complete, it is necessary to combine seamless videos, or delete the combination information of the seamless videos. To delete the combination information of seamless videos, select "DEL COMBINED SCENES" in step 6.Capturing a Required Part in the Video (TRIMMING)
Select the required part of a video and save it as a new video file. - The original video remains in its existing location. - The following is a screen of the model with the built-in memory. 1 Open the LCD monitor. text_image
Diagram showing a digital camera with labeled parts and a hand cursor icon interacting with the screen.text_image
iA WT D PLAY REC MENUtext_image
Screenshot of a media player interface with playback controls and preview thumbnailstext_image
TOP MENU 图层和图像 图层和图像 图层和图像 图层和图像 ?text_image
EDIT TRIMMINGtext_image
TRIMMING QUITtext_image
XP TRIMMING 50 0:01:23 0:12:34 A :--- A B :--- STOPtext_image
XP TRIMMING 0:01:23 0:12:34 A 0:00:23 A B B :------ STOPtext_image
XP TRIMMING 5D 0:01:23 0:12:34 A 0:00:23 A B 0:12:34 SET STOPtext_image
DO YOU WANT TO CAPTURE A SPECIFIC AREA? YES NOCreating Playlists from the Recorded Videos
A list created by selecting your favorite videos from the recorded ones is called a playlist. By creating a playlist, you can play back only your favorite videos in the order you like. The original video file remains even when it is registered to a playlist. • To create a new playlist "Creating Playlists with Selected Files" (p. 85) "Creating Playlists by Date" (p. 87) • To edit or delete a created playlist "Editing Playlists" (p. 88) "Deleting Playlists" (p. 89) Memo : - When a video file is deleted or moved, the same file will be removed from the playlist. - Videos recorded in the iFrame format can not be selected when creating a playlist.Creating Playlists with Selected Files
Create a playlist by arranging the files one by one. - The following is a screen of the model with the built-in memory. 1 Open the LCD monitor. text_image
Diagram showing a digital camera with control panel and finger icon interacting with screen, alongside a close-up of its screen.text_image
iA WT D «PLAY REC MENUtext_image
Screenshot of a media player interface with playback controls and preview thumbnailstext_image
TOP MENU 视频效果推荐 视频效果推荐 视频效果推荐 视频效果推荐 ?text_image
EDIT EDIT PLAYLISTtext_image
EDIT PLAYLIST NEW LIST EDIT DELETEtext_image
EDIT PLAYLIST CREATE FROM SCENE CREATE BY DATEtext_image
FROM SCENE 0/999 TOTAL 00h00m QUITtext_image
0/999 TOTAL 00h00m ADD QUITtext_image
FROM SCENE 0/999 TOTAL 00h00m DVD 01 DVD(DL)1 SAVEtext_image
QUIT PLAYLIST. SAVE EDITED CONTENTS? YES NOCreating Playlists by Date
Create a playlist by arranging multiple files according to recording date. \- The following is a screen of the model with the built-in memory. 1 Open the LCD monitor. text_image
Diagram showing a digital camera with control panel and hand icon interacting with screentext_image
iA WT D «PLAY REC MENU3 Tap "MENU".
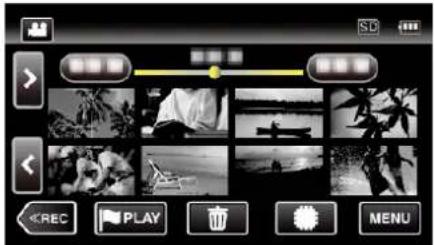
text_image
Screenshot of a media player interface with video thumbnails and playback controls4 Tap "EDIT".

text_image
EDIT EDIT PLAYLIST6 Tap "NEW LIST".

text_image
EDIT PLAYLIST NEW LIST EDIT DELETE7 Tap "CREATE BY DATE".

text_image
EDIT PLAYLIST CREATE FROM SCENE CREATE BY DATE8 Tap on the video of the date to add to playlist.
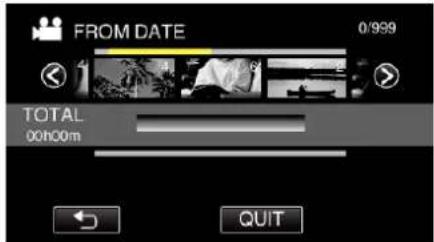
text_image
FROM DATE 0/999 TOTAL 00h00m QUIT- appears on the selected video. Tap ↩ to deselect.
- Tap on the selected video again to check all the videos of the same date. After checking, tap ↩.
- Tap </> or move the zoom lever to display the previous/next video.
- The number on the video indicates the number of videos recorded on the same day.
9 Tap "ADD", and insert the video image.
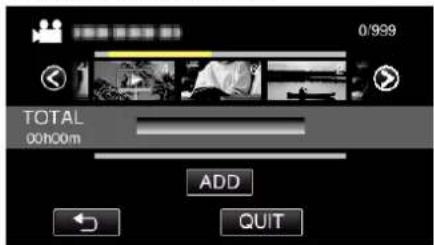
text_image
0/999 TOTAL 00h00m ADD QUIT- Repeat steps 8-9 and arrange the videos in the playlist.
- To change the position of a video in the playlist (lower row), select the insertion point with / after step 8 and tap "ADD".
- ▶ appears when the inserted video is selected. Tap ↩ to deselect.
- Tap on the selected video again to check all the videos of the same date. After checking, tap ↩.
- To delete of a video in the playlist (lower row), tap the video, then tap "CANCEL".
10 After arranging, tap "SAVE".
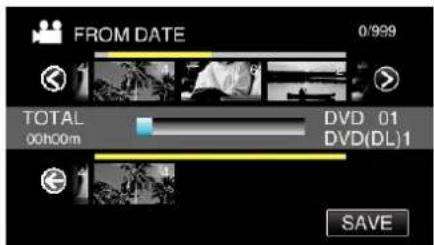
text_image
FROM DATE 0/999 TOTAL 00h00m DVD 01 DVD(DL)1 SAVE11 Tap "YES".

text_image
QUIT PLAYLIST. SAVE EDITED CONTENTS? YES NOMemo :
- Tap X on each screen to exit the menu.
Editing Playlists
You can change the content of a created playlist.
However, the playlists created from Digest Playback cannot be changed.
- The following is a screen of the model with the built-in memory.
1 Open the LCD monitor.
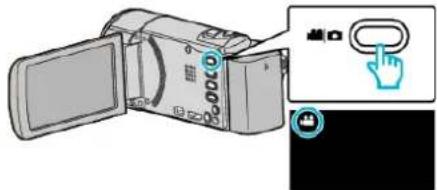
text_image
Diagram showing a digital camera with labeled buttons and a hand icon interacting with the right button.- Check if the recording mode is 📁.
- If the mode is ☐ still image, tap ☐ on the recording screen to display the mode switching screen.
Tap 📁 to switch the mode to video. (You can also use the 📋/☐ button on this unit.)
2 Tap “<<PLAY” to select the playback mode.

text_image
iA WT D PLAY REC MENU
3 Tap "MENU".
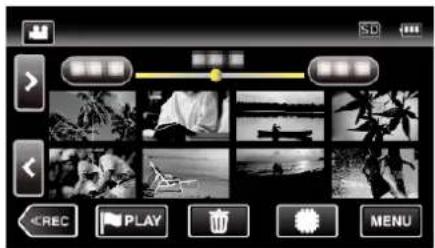
text_image
Screenshot of a media player interface with video thumbnails and playback controls4 Tap "EDIT".

text_image
EDIT EDIT PLAYLIST6 Tap "EDIT".
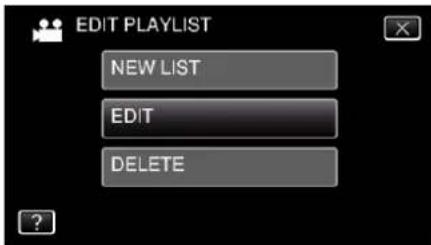
text_image
EDIT PLAYLIST NEW LIST EDIT DELETE7 Tap on the playlist to edit, and tap "NEXT".

text_image
EDIT PLAYLIST NEXT8 Tap on the video (upper row) to arrange in the playlist.
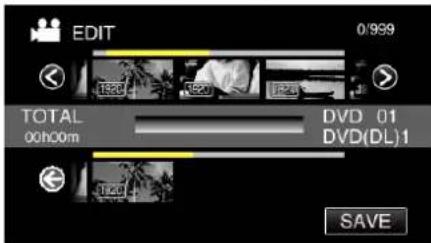
text_image
EDIT 0/999 TOTAL DVD 01 DVD(DL)1 00h00m SAVE- appears on the selected video. Tap ↩ to deselect.
- Tap on the selected video again to check the video. After checking, tap ↩.
- Tap </> or move the zoom lever to display the previous/next video.
• 1920 indicates the size of the video.
9 Tap "ADD", and insert the video image.

text_image
0/999 TOTAL 00h00m DVD 01 DVD(DL)1 ADD SAVE- Repeat steps 8-9 and arrange the videos in the playlist.
- To change the position of a video in the playlist (lower row), select the insertion point with / after step 8 and tap "ADD".
- ▶ appears when the inserted video is selected. Tap ↩ to deselect.
- Tap on the selected video again to check the video. After checking, tap ↩.
- To delete of a video in the playlist (lower row), tap the video, then tap "CANCEL".
• 1920 indicates the size of the video.
10 After arranging, tap "SAVE".
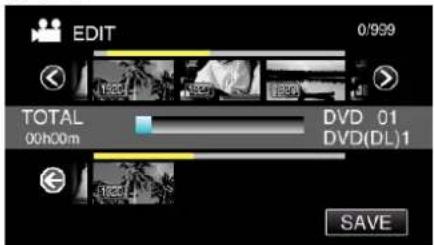
text_image
EDIT 0/999 TOTAL 00h00m DVD 01 DVD(DL)1 SAVE11 Tap "YES".

text_image
QUIT PLAYLIST. SAVE EDITED CONTENTS? YES NOMemo :
- Tap X on each screen to exit the menu.
Deleting Playlists
Delete the playlists that you have created.
- The following is a screen of the model with the built-in memory.
1 Open the LCD monitor.
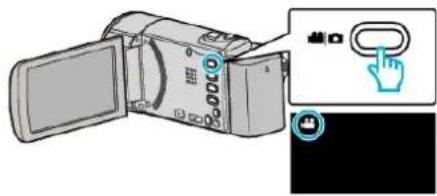
text_image
Diagram showing a digital camera with an open screen and a hand cursor icon interacting with it, alongside a close-up of its screen.- Check if the recording mode is 📁.
- If the mode is 📄 still image, tap 📄 on the recording screen to display the mode switching screen.
Tap 📄 to switch the mode to video. (You can also use the 📋/Button on this unit.)
2 Tap “<<PLAY” to select the playback mode.
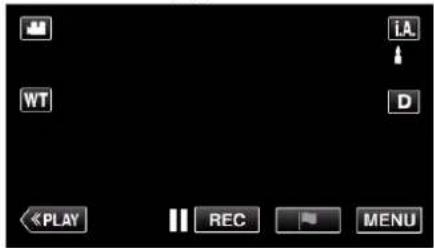
text_image
iA WT D «PLAY REC MENU
3 Tap "MENU".
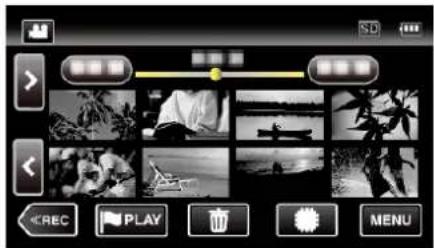
text_image
Screenshot of a music player interface with playback controls and preview thumbnails4 Tap "EDIT".

text_image
TOP MENU [图片] [图片] [图片]5 Tap "EDIT PLAYLIST".

text_image
EDIT PLAYLIST NEW LIST EDIT DELETE7 Tap on the playlist to delete, and tap "NEXT".
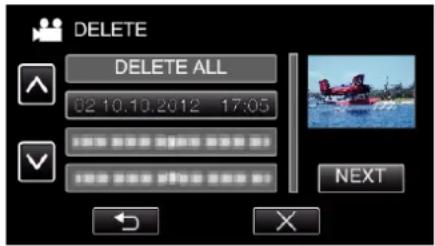
text_image
DELETE DELETE ALL 02 10.10.2012 17:05 NEXT- All created playlists will be deleted when "DELETE ALL" is selected.
8 Tap "YES" to confirm the deletion.

text_image
DELETE PLAYLIST? YES NO• After deleting, tap "OK".
- After deleting is complete, the screen returns to the delete playlist selection screen.
Memo :
- Tap × on each screen to exit the menu.
Creating Discs with a BD Writer (External Blu-ray Drive)
*The JVC external Blu-ray drive is known as "BD writer".
You can copy the recorded files to discs or play back the created discs using an optional BD writer (external Blu-ray drive).
Compatible BD Writers (External Blu-ray Drives)
You can use BE08LU20 from LG. (as of December, 2012)
Creating Discs with a BD Writer (External Blu-ray Drive)
■ Preparing a BD Writer (External Blu-ray Drive)
"Preparing a BD Writer (External Blu-ray Drive)" (p. 91)
■ Copying to Discs
"Copying All Files" (p. 92)
"Copying Files by Date" (p. 93)
"Copying Selected Playlists" (p. 95)
"Copying Selected Files" (p. 96)
Select and copy the desired videos or still images individually.
■ Other Operations
"Playing Back with a BD Writer (External Blu-ray Drive)" (p. 98)
Memo :
- Videos in iFrame format cannot be backed up.
- The recordable time on the disc varies according to the way of recording.
- When there are many files to back up, it may take time for the backup to be completed. Wait for a while as the access lamp appears blinking, which indicates normal operation.
- Date and time information as saved as subtitles in the created discs.
Preparing a BD Writer (External Blu-ray Drive)
Memo :
- When connecting this unit to the BD writer (external Blu ray drive), use an Mini-A (male) - B (male) USB conversion cable. Please note that the supplied USB cable cannot be used for this purpose.
- To use the USB cable provided with the BD writer (external Blu-ray drive), purchase the following USB conversion cable.
(Part number: QAM0852-001) * Mini-A (Male) - A (Female)
*Consult your nearest service center.
1 Remove the AC adapter and battery pack from this unit.
2 Open the LCD monitor.

natural_image
Diagram of a digital camera with an open screen and a blue arrow indicating rotation (no text or symbols)3 Connect the USB cable and the AC adapter.
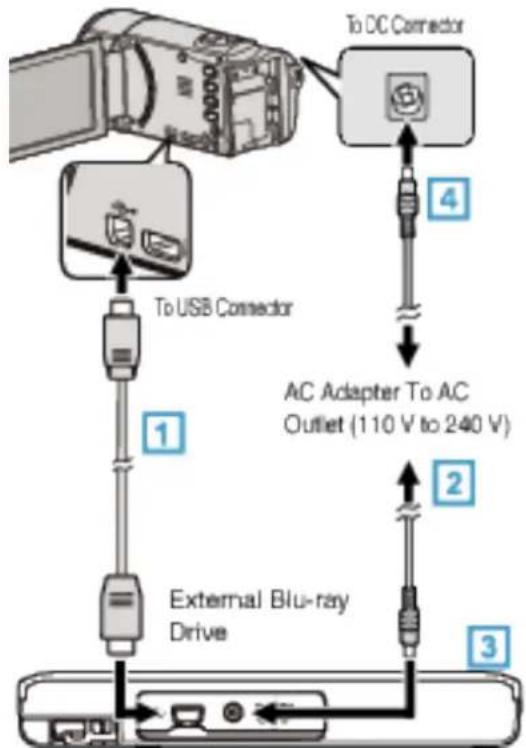
flowchart
graph TD
    A["Computer"] --> B["To USB Connector"]
    B --> C["External Blu-ray Drive"]
    C --> D["AC Adapter To AC Outlet (110 V to 240 V)"]
    D --> E["To DC Connector"]
    E --> F["Device Icon"]
    style A fill:#f9f,stroke:#333
    style B fill:#ccf,stroke:#333
    style C fill:#cfc,stroke:#333
    style D fill:#fcc,stroke:#333
    style E fill:#cff,stroke:#333
1 Connect the USB cable of the BD writer (external Blu-ray drive) to this unit.
- The USB cable provided with this unit cannot be used.
2 Connect the AC adapter of the BD writer (external Blu-ray drive).
Turn on the BD writer (external Blu-ray drive).
4 Connect the AC adapter to this unit.
- This unit powers on automatically when the AC adapter is connected.
- This unit turns on and the "BACK-UP" menu appears.
- While the USB cable is connected, the "BACK-UP" menu is displayed.
- Refer also to the instruction manual of the BD writer (external Blu-ray drive).
4 Insert a new disc.

text_image
Diagram showing three-step folding or assembly process of a device, labeled 1 to 3 with magnified views.1 Press the eject button to open the disc tray.
2 Load a new disc properly.
3 Press the eject button to close the disc tray.
Caution :
- Be sure to turn off the power when connecting the devices. Otherwise, electric shocks or malfunctions may occur.
- Do not connect the AC adapter provided with this unit to the BD writer.
- Do not connect the AC adapter provided with the BD writer to this unit.
Creating a Disc
Creating a Disc
1 Preparing a BD Writer (External Blu-ray Drive)
- Insert a new disc into the BD writer (external Blu-ray drive). "Preparing a BD Writer (External Blu-ray Drive)" (p. 91)
2 Copy files to the disc with the following methods.
"Copying All Files" (p. 92) "Copying Files by Date" (p. 93) "Copying Selected Playlists" (p. 95) "Copying Selected Files" (p. 96)
Copying All Files
All videos or still images recorded on this unit will be copied.
You can also select and copy only the videos or still images that have never been copied.
- The following is a screen of the model with the built-in memory.
1 Select video or still image mode.
2 Tap "CREATE FROM ALL" (video) or "SAVE ALL" (still image).
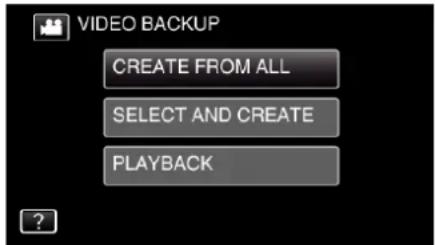
text_image
VIDEO BACKUP CREATE FROM ALL SELECT AND CREATE PLAYBACK- While the video mode is shown in the image, the same operations apply for the still image mode. - Tap 🖱️ to switch between the video and still image modes.
3 Tap "Blu-ray DISC" or "DVD(AVCHD)".

text_image
CREATE FROM ALL CHANGE REC. MEDIA Blu-ray DISC DVD(AVCHD)- The media changes to the tapped item. Select the appropriate setting according to the disc. - Selecting "Blu-ray DISC" enables you to save videos in a Blu-ray disc in the high definition quality. - Selecting "DVD(AVCHD)" enables you to save videos in a DVD in the high definition quality.
4 Tap the media you would like to make a backup.

text_image
CREATE FROM ALL SELECT THE MEDIA TO BACK UP BUILT-IN MEMORY SD CARD5 Tap the desired method.
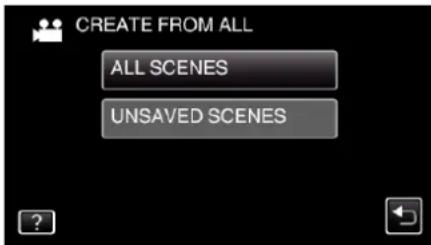
text_image
CREATE FROM ALL ALL SCENES UNSAVED SCENES- "ALL SCENES" (video)/"ALL IMAGES" (still image): All videos or still images in this unit are copied.
- "UNSAVED SCENES" (video)/"UNSAVED IMAGES" (still image):
Videos or still images that have never been copied are automatically selected and copied.
6 Tap "EXECUTE".

text_image
ALL SCENES REQUIRED DISC SPACE DVD:2 / DVD(DL):1 PREPARE AN EMPTY DISC EXECUTE RETURN- The number of discs required to copy the files is displayed. Prepare the discs accordingly.
7 Tap "AUTO" or "BY DATE". (mode only)

text_image
ALL SCENES CREATE HEADLINES ON THE TOP MENU SELECT THE SORT METHOD AUTO BY DATE- When "AUTO" is selected, videos with similar recording dates are displayed in groups. - When "BY DATE" is selected, videos are displayed according to recording dates.
8 Tap "EXECUTE".
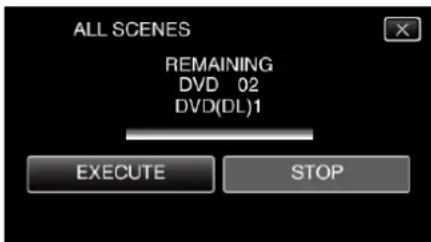
text_image
ALL SCENES REMAINING DVD 02 DVD(DL)1 EXECUTE STOP- When "INSERT THE NEXT DISC TO CREATE OR PRESS STOP TO EXIT" appears, change the disc.
9 Tap "OK" when "COMPLETED" is displayed.

text_image
ALL SCENES COMPLETED OK10 Press and hold the ⏻ button for 2 seconds or more to turn off this unit and disconnect the USB cable.
Caution :
- Do not turn off the power or remove the USB cable until copying is complete.
- Files that are not on the index screen during playback cannot be copied. Special files cannot be copied either.
- All DVDs will be finalized automatically.
While files cannot be added to the DVD-R/DVD-RW later, files can still be added to the BD-R/BD-RE. - DVDs that are created in "DVD(AVCHD)" format are playable only on AVCHD compatible devices.
Memo :
- To check the created disc, refer to “Playing Back with a BD Writer (External Blu-ray Drive)” (p. 98)”.
"Playing Back with a BD Writer (External Blu-ray Drive)" (p. 98)
Copying Files by Date
Videos or still images are sorted and copied according to the date on which they were recorded.
- The following is a screen of the model with the built-in memory.
1 Select video or still image mode.
2 Tap "SELECT AND CREATE" (video) or "SELECT AND SAVE" (still image).
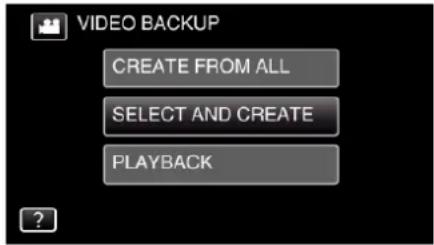
text_image
VIDEO BACKUP CREATE FROM ALL SELECT AND CREATE PLAYBACK- While the video mode is shown in the image, the same operations apply for the still image mode.
- Tap 🏠 to switch between the video and still image modes.
3 Tap "Blu-ray DISC" or "DVD(AVCHD)".

text_image
SELECT AND CREATE CHANGE REC. MEDIA Blu-ray DISC DVD(AVCHD)- The media changes to the tapped item. Select the appropriate setting according to the disc.
- Selecting "Blu-ray DISC" enables you to save videos in a Blu-ray disc in the high definition quality.
- Selecting "DVD(AVCHD)" enables you to save videos in a DVD in the high definition quality.
4 Tap the media you would like to make a backup.

text_image
SELECT AND CREATE SELECT THE MEDIA TO BACK UP BUILT-IN MEMORY SD CARD5 Tap "CREATE BY DATE" (video) or "SAVE BY DATE" (still image).

text_image
SELECT AND CREATE CREATE BY DATE CREATE BY PLAYLIST SELECT FROM SCENES- While the video mode is shown in the image, the same operations apply for the still image mode.
6 Tap to select a recording date.
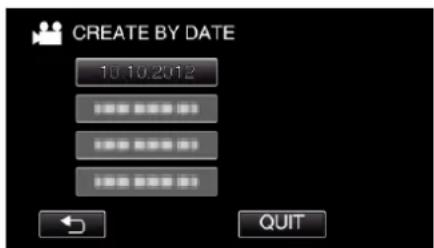
text_image
CREATE BY DATE 10.10.2012 QUITMemo :
- You cannot select more than one recording date for copying.
To copy files from multiple recording dates, it is recommended to copy by creating a playlist.
"Creating Playlists from the Recorded Videos" (p. 85)
"Copying Selected Playlists" (p. 95)
7 Tap "EXECUTE".

text_image
CREATE BY DATE REQUIRED DISC SPACE DVD:2 / DVD(DL):1 PREPARE AN EMPTY DISC CHECK EXECUTE RETURN- The number of discs required to copy the files is displayed. Prepare the discs accordingly.
8 Tap "AUTO" or "BY DATE". (mode only)

text_image
CREATE BY DATE CREATE HEADLINES ON THE TOP MENU SELECT THE SORT METHOD AUTO BY DATE- When "AUTO" is selected, videos with similar recording dates are displayed in groups.
- When "BY DATE" is selected, videos are displayed according to recording dates.
9 Tap "EXECUTE".
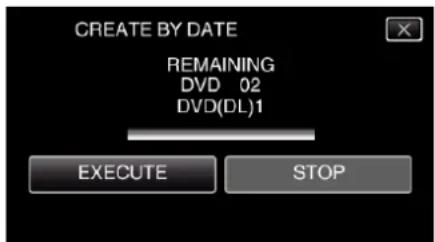
text_image
CREATE BY DATE REMAINING DVD 02 DVD(DL)1 EXECUTE STOP- When "INSERT THE NEXT DISC TO CREATE OR PRESS STOP TO EXIT" appears, change the disc.
10 Tap "OK" when "COMPLETED" is displayed.

text_image
CREATE BY DATE COMPLETED OK11 Press and hold the ⏻ button for 2 seconds or more to turn off this unit and disconnect the USB cable.
Caution :
- Do not turn off the power or remove the USB cable until copying is complete.
- Files that are not on the index screen during playback cannot be copied. Special files cannot be copied either.
- All DVDs will be finalized automatically. While files cannot be added to the DVD-R/DVD-RW later, files can still be added to the BD-R/BD-RE.
- DVDs that are created in "DVD(AVCHD)" format are playable only on AVCHD compatible devices.
Memo :
- To check the created disc, refer to “Playing Back with a BD Writer (External Blu-ray Drive)” (p. 98)”.
"Playing Back with a BD Writer (External Blu-ray Drive)" (p. 98)
- To check the created disc, refer to “Playing Back with a BD Writer (External Blu-ray Drive)” (p. 98) ”. "Playing Back with a BD Writer (External Blu-ray Drive)” (p. 98)
Copying Selected Playlists
Arrange and copy the created playlists in the order you like.
- The following is a screen of the model with the built-in memory.
1 Select video mode.
2 Tap "SELECT AND CREATE".
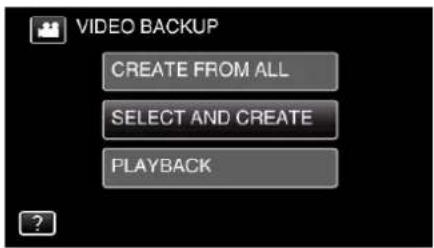
text_image
VIDEO BACKUP CREATE FROM ALL SELECT AND CREATE PLAYBACK3 Tap "Blu-ray DISC" or "DVD(AVCHD)".
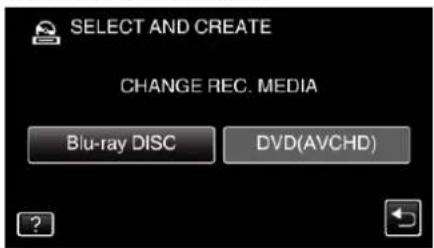
text_image
SELECT AND CREATE CHANGE REC. MEDIA Blu-ray DISC DVD(AVCHD)- The media changes to the tapped item. Select the appropriate setting according to the disc.
- Selecting "Blu-ray DISC" enables you to save videos in a Blu-ray disc in the high definition quality.
- Selecting "DVD(AVCHD)" enables you to save videos in a DVD in the high definition quality.
4 Tap the media you would like to make a backup.

text_image
SELECT AND CREATE SELECT THE MEDIA TO BACK UP BUILT-IN MEMORY SD CARD5 Tap "CREATE BY PLAYLIST".
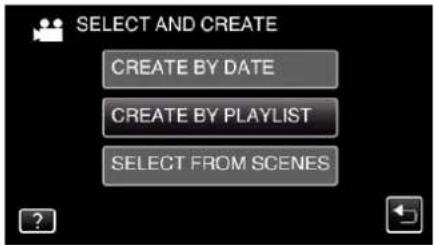
text_image
SELECT AND CREATE CREATE BY DATE CREATE BY PLAYLIST SELECT FROM SCENES6 Tap on the playlist to copy to disc.

text_image
CREATE BY PLAYLIST 0/999 TOTAL 00h00m QUIT- ▶ appears on the selected playlist (upper row). Tap ↩ to deselect.
- Tap on the selected playlist again to check the content of the playlist. After checking, tap ↩.
- Tap ◀ or move the zoom lever to display the previous/next playlist.
7 Tap "ADD" to insert a playlist.
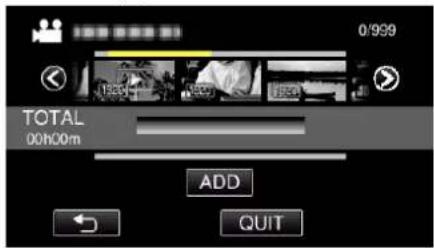
text_image
0/999 TOTAL 00h00m ADD QUIT- Repeat steps 6-7 and arrange the playlists.
- To change the position of a playlist (lower row), select the insertion point with / after step 6 and tap "ADD".
- ▶ appears when the inserted playlist is selected. Tap ↩ to deselect.
- Tap on the selected playlist again to check the content of the playlist. After checking, tap ↩.
- To delete of a video in the playlist (lower row), tap the video, then tap "CANCEL".
8 After arranging, tap "SAVE".

text_image
CREATE BY PLAYLIST 0/999 TOTAL 00h00m DVD 01 DVD(DL)1 SAVE9 Tap "EXECUTE".
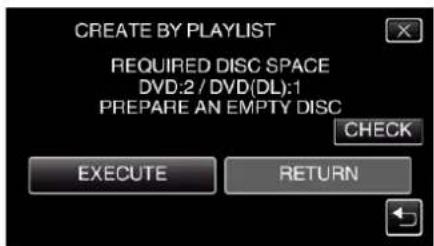
text_image
CREATE BY PLAYLIST REQUIRED DISC SPACE DVD:2 / DVD(DL):1 PREPARE AN EMPTY DISC CHECK EXECUTE RETURN- The number of discs required to copy the files is displayed. Prepare the discs accordingly.
- Tap "CHECK" to check the content.
10 Tap "OK".

text_image
CREATE BY PLAYLIST THE DISC TOP MENU HEADLINE WILL DISPLAY EITHER THE PLAYLIST OR THE DATE OK11 Tap "EXECUTE".
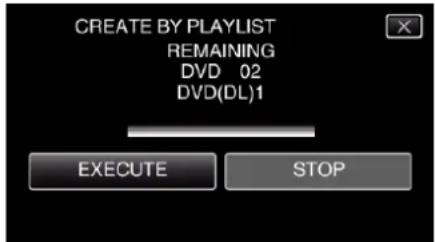
text_image
CREATE BY PLAYLIST REMAINING DVD 02 DVD(DL)1 EXECUTE STOP- When "INSERT THE NEXT DISC TO CREATE OR PRESS STOP TO EXIT" appears, change the disc.
12 Tap "OK" when "COMPLETED" is displayed.

text_image
CREATE BY PLAYLIST COMPLETED OK13 Press and hold the ⏻ button for 2 seconds or more to turn off this unit and disconnect the USB cable.
Caution :
- Do not turn off the power or remove the USB cable until copying is complete.
- Files that are not on the index screen during playback cannot be copied. Special files cannot be copied either.
- All DVDs will be finalized automatically. While files cannot be added to the DVD-R/DVD-RW later, files can still be added to the BD-R/BD-RE.
- DVDs that are created in "DVD(AVCHD)" format are playable only on AVCHD compatible devices.
Memo :
- A list of playlists is displayed on the top menu of the created DVD.
- To check the created disc, refer to “Playing Back with a BD Writer (External Blu-ray Drive)” (p. 98)”.
"Playing Back with a BD Writer (External Blu-ray Drive)" (p. 98)
• To create a playlist
"Creating Playlists from the Recorded Videos" (p. 85)
Copying Selected Files
Select and copy the desired videos or still images individually.
- The following is a screen of the model with the built-in memory.
1 Select video or still image mode.
2 Tap "SELECT AND CREATE" (video) or "SELECT AND SAVE" (still image).

text_image
VIDEO BACKUP CREATE FROM ALL SELECT AND CREATE PLAYBACK- While the video mode is shown in the image, the same operations apply for the still image mode.
- Tap 🎨 to switch between the video and still image modes.
3 Tap "Blu-ray DISC" or "DVD(AVCHD)".
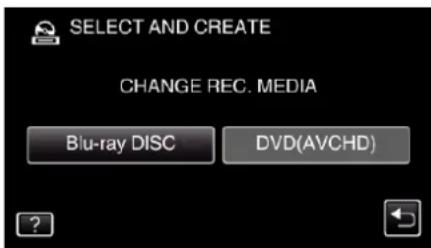
text_image
SELECT AND CREATE CHANGE REC. MEDIA Blu-ray DISC DVD(AVCHD)- The media changes to the tapped item. Select the appropriate setting according to the disc.
- Selecting "Blu-ray DISC" enables you to save videos in a Blu-ray disc in the high definition quality.
- Selecting "DVD(AVCHD)" enables you to save videos in a DVD in the high definition quality.
4 Tap the media you would like to make a backup.

text_image
SELECT AND CREATE SELECT THE MEDIA TO BACK UP BUILT-IN MEMORY SD CARD5 Tap "SELECT FROM SCENES" (video) or "SELECT FROM IMAGES" (still image).
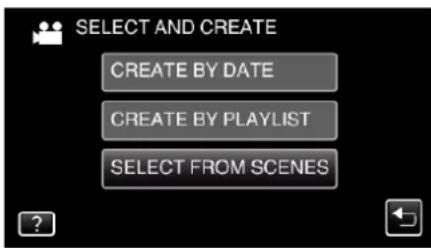
text_image
SELECT AND CREATE CREATE BY DATE CREATE BY PLAYLIST SELECT FROM SCENES- While the video mode is shown in the image, the same operations apply for the still image mode.
6 Tap on the videos or still images to copy.
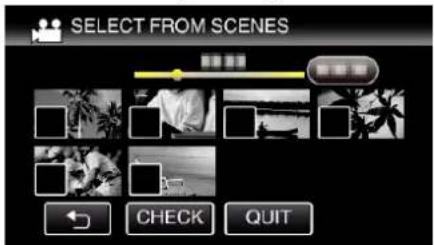
text_image
SELECT FROM SCENES ← CHECK QUIT- √ appears on the selected files. To remove √ from a file, tap on the file again.
- Tap "CHECK" to check the file. After checking, tap ↩.
7 After selecting all the files, tap "SAVE".
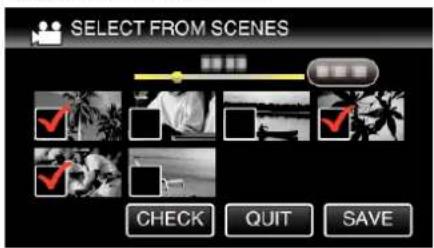
text_image
SELECT FROM SCENES CHECK QUIT SAVE8 Tap "EXECUTE".

text_image
SELECT FROM SCENES REQUIRED DISC SPACE DVD:2 / DVD(DL):1 PREPARE AN EMPTY DISC EXECUTE RETURN- The number of discs required to copy the files is displayed. Prepare the discs accordingly.
9 Tap "AUTO" or "BY DATE". (mode only)

text_image
SELECT FROM SCENES CREATE HEADLINES ON THE TOP MENU SELECT THE SORT METHOD AUTO BY DATE- When "AUTO" is selected, videos with similar recording dates are displayed in groups.
- When "BY DATE" is selected, videos are displayed according to recording dates.
10 Tap "EXECUTE".

text_image
SELECT FROM SCENES REMAINING DVD 02 DVD(DL)1 EXECUTE STOP- When "INSERT THE NEXT DISC TO CREATE OR PRESS STOP TO EXIT" appears, change the disc.
11 Tap "OK" when "COMPLETED" is displayed.

text_image
SELECT FROM SCENES COMPLETED OK12 Press and hold the ⏻ button for 2 seconds or more to turn off this unit and disconnect the USB cable.
Caution :
- Do not turn off the power or remove the USB cable until copying is complete.
- Files that are not on the index screen during playback cannot be copied. Special files cannot be copied either.
- All DVDs will be finalized automatically. While files cannot be added to the DVD-R/DVD-RW later, files can still be added to the BD-R/BD-RE.
- DVDs that are created in "DVD(AVCHD)" format are playable only on AVCHD compatible devices.
Memo :
- To check the created disc, refer to “Playing Back with a BD Writer (External Blu-ray Drive)” (p. 98)”.
"Playing Back with a BD Writer (External Blu-ray Drive)" (p. 98)
Playing Back with a BD Writer (External Blu-ray Drive)
You can play back the Blu-ray discs created on this unit.
1 Connect this unit to the BD write and TV.
(If this unit is not connected to a TV, images can be played back on the LCD monitor of this unit.)

flowchart
graph LR
    A["USB Cable"] --> B["HDMI Mini Cable"]
    B --> C["Computer"]
"Preparing a BD Writer (External Blu-ray Drive)" (p. 91)
"Connecting to and Viewing on TV" (p. 77)
- Insert a disc to play back into the BD writer.
2 Tap "PLAYBACK" in the "BACK-UP" menu.

text_image
VIDEO BACKUP CREATE FROM ALL SELECT AND CREATE PLAYBACK- An index screen (thumbnail display) of the videos in the disc appears.
3 Tap on the file to start playback.
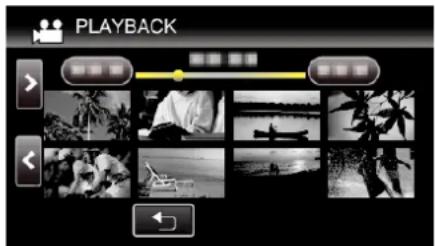
text_image
PLAYBACK- For details on video playback, refer to ““Operation Buttons for Video Playback” (p. 64)”.
"Operation Buttons for Video Playback" (p. 64)
- To exit, stop playback and turn off the camcorder by pressing the ⏻ button for about 2 seconds. Then, disconnect the USB cable.
Memo :
- To play back the recorded image on TV, connect this unit via the HDMI mini cable or the AV cord while this unit is connected to the BD writer (external Blu-ray drives).
"Connecting via the HDMI Mini Connector" (p. 77)
"Connecting via the AV Connector" (p. 79)
Creating Discs with a DVD Writer
You can copy the recorded files to discs or play back the created discs using an optional DVD writer.
Creating Discs with a DVD Writer
■ Preparing a DVD Writer
"Preparing a DVD Writer (CU-VD3)" (p. 99)
"Preparing a DVD Writer (CU-VD50)" (p. 99)
■ Copying to Discs
"Copying All Files" (p. 100)
"Copying Files by Date" (p. 101)
"Copying Selected Playlists" (p. 102)
"Copying Selected Files" (p. 104)
■ Other Operations
"Playing Back with a DVD Writer" (p. 105)
Memo :
- Images recorded in UXP mode cannot be copied to a DVD writer.
- Videos in iFrame format cannot be backed up.
- When there are many files to back up, it may take time for the backup to be completed. Wait for a while as the access lamp appears blinking, which indicates normal operation.
- Date and time information as saved as subtitles in the created discs.
Preparing a DVD Writer (CU-VD3)
1 Remove the AC adapter and battery pack from this unit.
2 Open the LCD monitor.
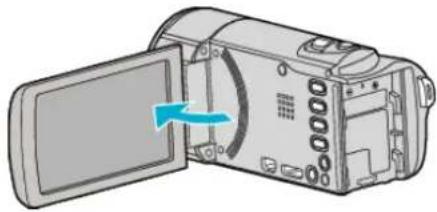
natural_image
Diagram of a digital camera showing the open screen and internal panel, with a blue arrow indicating the direction (no text or symbols present)3 Connect the USB cable and the AC adapter.

flowchart
graph TD
    A["To USB Connector"] --> B["To DC Connector"]
    B --> C["AC Adapter To AC Outlet (110 V to 240 V)"]
    C --> D["DVD Writer"]
    D --> E["Ground"]
1 Connect the USB cable of the DVD writer to this unit.
2 Connect the AC adapter of the DVD writer.
• Turn on the DVD writer.
3 Connect the AC adapter to this unit.
- This unit powers on automatically when the AC adapter is connected.
- This unit turns on and the "BACK-UP" menu appears.
- While the USB cable is connected, the "BACK-UP" menu is displayed.
• Refer also to the instruction manual of the DVD writer.
4 Insert a new disc.
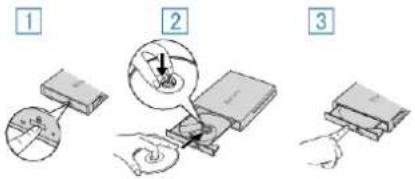
text_image
Diagram illustrating three-step assembly process: adding a component, adding a tool, and connecting to a device.1 Press the eject button to open the disc tray.
2 Pull out the tray completely and load a new disc properly.
3 Push the disc tray in until it clicks into place.
Caution :
- Be sure to turn off the power when connecting the devices. Otherwise, electric shocks or malfunctions may occur.
Preparing a DVD Writer (CU-VD50)
1 Remove the AC adapter and battery pack from this unit.
2 Open the LCD monitor.

natural_image
Diagram of a digital camera with an open screen and a blue arrow indicating rotation (no text or symbols)3 Connect the USB cable and the AC adapter.

flowchart
graph TD
    A["To USB Connector"] --> B["DVD Writer"]
    B --> C["AC Adapter To AC Outlet (110 V to 240 V)"]
    C --> D["To DC Connector"]
    D --> E["2"]
    E --> F["3"]
    F --> G["4"]
1 Connect the USB cable provided with the DVD writer.
2 Connect the AC adapter of the DVD writer.
-
Turn on the DVD writer.
3 Connect the AC adapter to this unit. -
This unit powers on automatically when the AC adapter is connected.
- This unit turns on and the "BACK-UP" menu appears.
- While the USB cable is connected, the "BACK-UP" menu is displayed.
• Refer also to the instruction manual of the DVD writer.
4 Insert a new disc.

text_image
Diagram showing four-step assembly or manufacturing process with numbered steps and mechanical components1 Press the eject button.
2 Pull out the disc tray.
3 Pull out the tray completely and load a new disc properly.
4 Push the disc tray in until it clicks into place.
Caution :
- Be sure to turn off the power when connecting the devices. Otherwise, electric shocks or malfunctions may occur.
Memo :
- All buttons on the DVD writer CU-VD50, other than the power and eject buttons, will not work when connected to this unit.
Creating a Disc
1 Prepare a DVD writer.
- Insert a new disc into the DVD writer.
"Preparing a DVD Writer (CU-VD3)" (p. 99)
"Preparing a DVD Writer (CU-VD50)" (p. 99)
2 Copy files to the disc with the following methods.
"Copying All Files" (p. 100)
"Copying Files by Date" (p. 101)
"Copying Selected Playlists" (p. 102)
"Copying Selected Files" (p. 104)
Copying All Files
All videos or still images recorded on this unit will be copied.
You can also select and copy only the videos or still images that have never been copied.
- The following is a screen of the model with the built-in memory.
1 Select video or still image mode.
2 Tap "CREATE FROM ALL" (video) or "SAVE ALL" (still image).
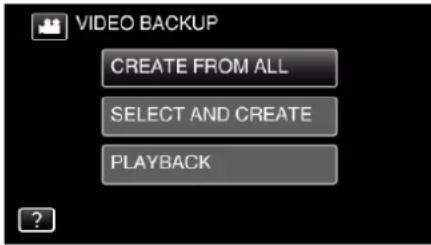
text_image
VIDEO BACKUP CREATE FROM ALL SELECT AND CREATE PLAYBACK- While the video mode is shown in the image, the same operations apply for the still image mode.
- Tap 🏠 to switch between the video and still image modes.
3 Tap the media you would like to make a backup.

text_image
CREATE FROM ALL SELECT THE MEDIA TO BACK UP BUILT-IN MEMORY SD CARD4 Tap the desired method.
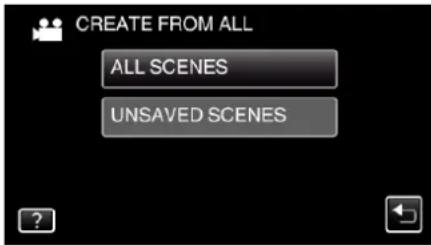
text_image
CREATE FROM ALL ALL SCENES UNSAVED SCENES- While the video mode is shown in the image, the same operations apply for the still image mode.
- "ALL SCENES" (video)/"ALL IMAGES" (still image):
All videos or still images in this unit are copied. - “UNSAVED SCENES” (video)/“UNSAVED IMAGES” (still image):
Videos or still images that have never been copied are automatically selected and copied.
5 Tap "EXECUTE".

text_image
ALL SCENES REQUIRED DISC SPACE DVD:2 / DVD(DL):1 PREPARE AN EMPTY DISC EXECUTE RETURN- The number of discs required to copy the files is displayed. Prepare the discs accordingly.
6 Tap "AUTO" or "BY DATE". (mode only)

text_image
ALL SCENES CREATE HEADLINES ON THE TOP MENU SELECT THE SORT METHOD AUTO BY DATE- When "AUTO" is selected, videos with similar recording dates are displayed in groups.
- When "BY DATE" is selected, videos are displayed according to recording dates.
7 Tap "EXECUTE".
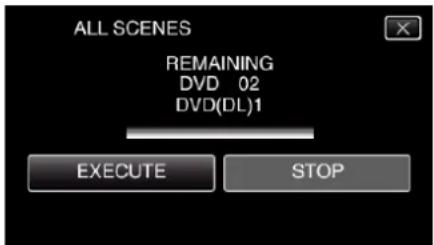
text_image
ALL SCENES REMAINING DVD 02 DVD(DL)1 EXECUTE STOP- When "INSERT THE NEXT DISC TO CREATE OR PRESS STOP TO EXIT" appears, change the disc.
8 Tap "OK" when "COMPLETED" is displayed.
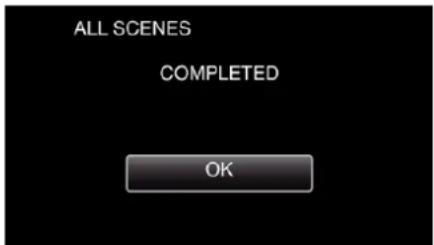
text_image
ALL SCENES COMPLETED OK9 Press and hold the ⏻ button for 2 seconds or more to turn off this unit and disconnect the USB cable.
Caution :
- Do not turn off the power or remove the USB cable until copying is complete.
- Files that are not on the index screen during playback cannot be copied. Special files cannot be copied either.
- All DVDs will be finalized automatically. Files cannot be added to the DVD-R/DVD-RW later.
Memo :
- To check the created disc, refer to “Playing Back with a DVD Writer” (p. 105)”.
"Playing Back with a DVD Writer" (p. 105)
Copying Files by Date
Videos or still images are sorted and copied according to the date on which they were recorded.
- The following is a screen of the model with the built-in memory.
1 Select video or still image mode.
2 Tap "SELECT AND CREATE" (video) or "SELECT AND SAVE" (still image).
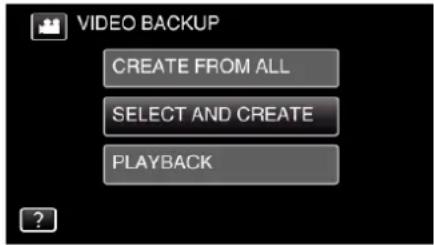
text_image
VIDEO BACKUP CREATE FROM ALL SELECT AND CREATE PLAYBACK- While the video mode is shown in the image, the same operations apply for the still image mode.
- Tap 🏠 to switch between the video and still image modes.
3 Tap the media you would like to make a backup.

text_image
SELECT AND CREATE SELECT THE MEDIA TO BACK UP BUILT-IN MEMORY SD CARD4 Tap "CREATE BY DATE" (video) or "SAVE BY DATE" (still image).

text_image
SELECT AND CREATE CREATE BY DATE CREATE BY PLAYLIST SELECT FROM SCENES- While the video mode is shown in the image, the same operations apply for the still image mode.
5 Tap to select a recording date.
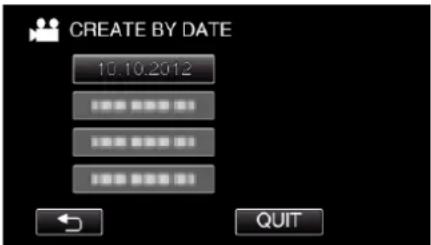
- You cannot select more than one recording date for copying. To copy files from multiple recording dates, it is recommended to copy by creating a playlist.
"Creating Playlists from the Recorded Videos" (p. 85)
"Copying Selected Playlists" (p. 102)
6 Tap "EXECUTE".
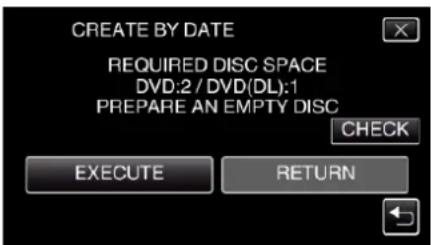
text_image
CREATE BY DATE REQUIRED DISC SPACE DVD:2 / DVD(DL):1 PREPARE AN EMPTY DISC CHECK EXECUTE RETURN- The number of discs required to copy the files is displayed.
Prepare the discs accordingly.
- Tap "CHECK" to check the content.
7 Tap "AUTO" or "BY DATE". (mode only)

text_image
CREATE BY DATE CREATE HEADLINES ON THE TOP MENU SELECT THE SORT METHOD AUTO BY DATE- When "AUTO" is selected, videos with similar recording dates are displayed in groups.
- When "BY DATE" is selected, videos are displayed according to recording dates.
8 Tap "EXECUTE".
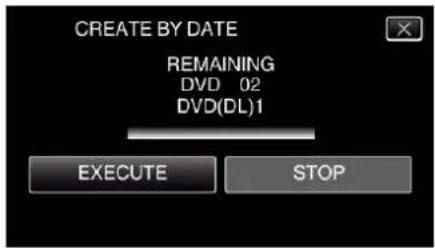
text_image
CREATE BY DATE REMAINING DVD 02 DVD(DL)1 EXECUTE STOP- When "INSERT THE NEXT DISC TO CREATE OR PRESS STOP TO EXIT" appears, change the disc.
9 Tap "OK" when "COMPLETED" is displayed.
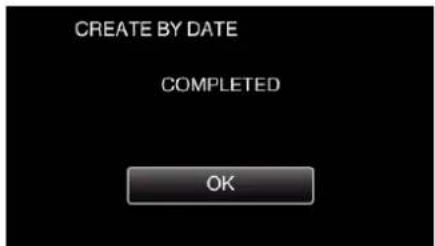
text_image
CREATE BY DATE COMPLETED OK10 Press and hold the ⏻ button for 2 seconds or more to turn off this unit and disconnect the USB cable.
Caution :
- Do not turn off the power or remove the USB cable until copying is complete.
- Files that are not on the index screen during playback cannot be copied. Special files cannot be copied either.
- All DVDs will be finalized automatically. Files cannot be added to the DVD-R/DVD-RW later.
Memo :
- To check the created disc, refer to “Playing Back with a DVD Writer” (p. 105)”.
"Playing Back with a DVD Writer" (p. 105)
Copying Selected Playlists
Arrange and copy the created playlists in the order you like.
- The following is a screen of the model with the built-in memory.
1 Select video mode.
2 Tap "SELECT AND CREATE".

text_image
VIDEO BACKUP CREATE FROM ALL SELECT AND CREATE PLAYBACK3 Tap the media you would like to make a backup.

text_image
SELECT AND CREATE SELECT THE MEDIA TO BACK UP BUILT-IN MEMORY SD CARD4 Tap "CREATE BY PLAYLIST".

text_image
SELECT AND CREATE CREATE BY DATE CREATE BY PLAYLIST SELECT FROM SCENES5 Tap on the playlist to copy to disc.

text_image
CREATE BY PLAYLIST 0/999 TOTAL 00h00m QUIT- ▶ appears on the selected playlist (upper row). Tap ↩ to deselect.
- Tap on the selected playlist again to check the content of the playlist. After checking, tap ↩.
- Tap < / > or move the zoom lever to display the previous/next playlist.
6 Tap "ADD" to insert a playlist.

text_image
0/999 TOTAL 00h00m ADD QUIT- Repeat steps 5-6 and arrange the playlists.
- To change the position of a playlist (lower row), select the insertion point with / after step 5 and tap "ADD".
- ▶ appears when the inserted playlist is selected. Tap ↩ to deselect.
- Tap on the selected playlist again to check the content of the playlist. After checking, tap ↩.
- To delete of a video in the playlist (lower row), tap the video, then tap "CANCEL".
7 After arranging, tap "SAVE".
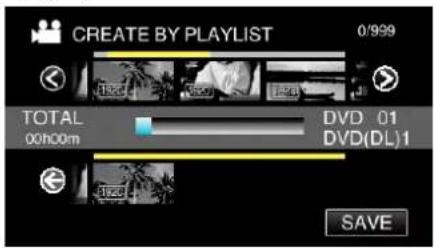
text_image
CREATE BY PLAYLIST 0/999 TOTAL 00h00m DVD 01 DVD(DL)1 SAVE8 Tap "EXECUTE".
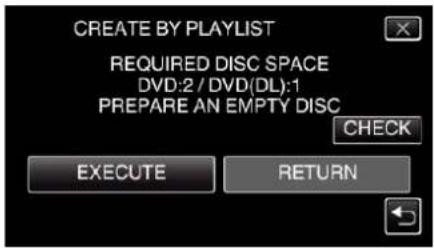
text_image
CREATE BY PLAYLIST REQUIRED DISC SPACE DVD:2 / DVD(DL):1 PREPARE AN EMPTY DISC CHECK EXECUTE RETURN- The number of discs required to copy the files is displayed. Prepare the discs accordingly.
- Tap "CHECK" to check the content. After checking, tap ↩.
9 Tap "OK".

text_image
CREATE BY PLAYLIST THE DISC TOP MENU HEADLINE WILL DISPLAY EITHER THE PLAYLIST OR THE DATE OK10 Tap "EXECUTE".

text_image
CREATE BY PLAYLIST REMAINING DVD 02 DVD(DL)1 EXECUTE STOP- When "INSERT THE NEXT DISC TO CREATE OR PRESS STOP TO EXIT" appears, change the disc.
11 Tap "OK" when "COMPLETED" is displayed.

text_image
CREATE BY PLAYLIST COMPLETED OK12 Press and hold the ⏻ button for 2 seconds or more to turn off this unit and disconnect the USB cable.
Caution :
- Do not turn off the power or remove the USB cable until copying is complete.
- Files that are not on the index screen during playback cannot be copied. Special files cannot be copied either.
- All DVDs will be finalized automatically. Files cannot be added to the DVD-R/DVD-RW later.
Memo :
- A list of playlists is displayed on the top menu of the created DVD.
- To check the created disc, refer to “Playing Back with a DVD Writer” (p. 105)”.
"Playing Back with a DVD Writer" (p. 105)
• To create a playlist
"Creating Playlists from the Recorded Videos" (v ^2 p. 85)
Copying Selected Files
Select and copy the desired videos or still images individually.
- The following is a screen of the model with the built-in memory.
1 Select video or still image mode.
2 Tap "SELECT AND CREATE" (video) or "SELECT AND SAVE" (still image).

text_image
VIDEO BACKUP CREATE FROM ALL SELECT AND CREATE PLAYBACK- While the video mode is shown in the image, the same operations apply for the still image mode.
- Tap 📁 to switch between the video and still image modes.
3 Tap the media you would like to make a backup.

text_image
SELECT AND CREATE SELECT THE MEDIA TO BACK UP BUILT-IN MEMORY SD CARD4 Tap "SELECT FROM SCENES" (video) or "SELECT FROM IMAGES" (still image).
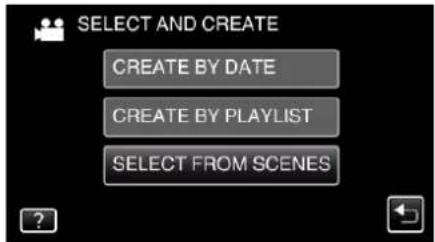
text_image
SELECT AND CREATE CREATE BY DATE CREATE BY PLAYLIST SELECT FROM SCENES- While the video mode is shown in the image, the same operations apply for the still image mode.
5 Tap on the videos or still images to copy.

text_image
SELECT FROM SCENES CHECK QUIT- √ appears on the selected files. To remove √ from a file, tap on the file again.
- Tap "CHECK" to check the file. After checking, tap ↩.
- While the video mode is shown in the image, the same operations apply for the still image mode.
6 After selecting all the files, tap "SAVE".
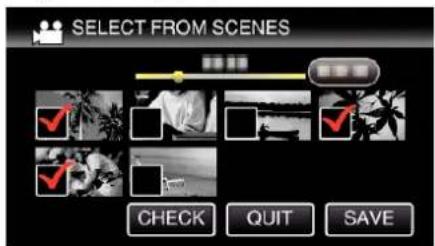
text_image
SELECT FROM SCENES CHECK QUIT SAVE- While the video mode is shown in the image, the same operations apply for the still image mode.
7 Tap "EXECUTE".
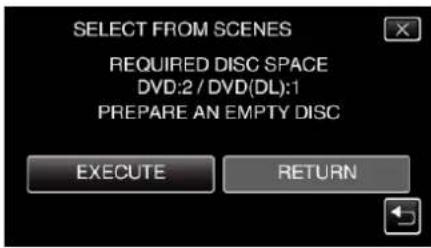
text_image
SELECT FROM SCENES REQUIRED DISC SPACE DVD:2 / DVD(DL):1 PREPARE AN EMPTY DISC EXECUTE RETURN- The number of discs required to copy the files is displayed. Prepare the discs accordingly.
8 Tap "AUTO" or "BY DATE". (mode only)

text_image
SELECT FROM SCENES CREATE HEADLINES ON THE TOP MENU SELECT THE SORT METHOD AUTO BY DATE- When "AUTO" is selected, videos with similar recording dates are displayed in groups.
- When "BY DATE" is selected, videos are displayed according to recording dates.
9 Tap "EXECUTE".
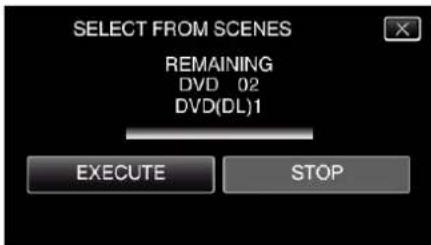
text_image
SELECT FROM SCENES REMAINING DVD 02 DVD(DL)1 EXECUTE STOP- When "INSERT THE NEXT DISC TO CREATE OR PRESS STOP TO EXIT" appears, change the disc.
10 Tap "OK" when "COMPLETED" is displayed.
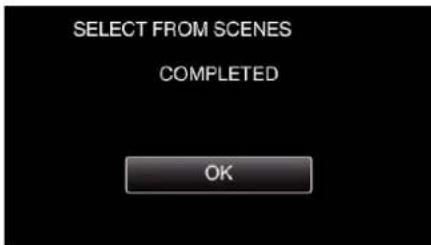
text_image
SELECT FROM SCENES COMPLETED OK11 Press and hold the ⏻ button for 2 seconds or more to turn off this unit and disconnect the USB cable.
Caution :
- Do not turn off the power or remove the USB cable until copying is complete.
- Files that are not on the index screen during playback cannot be copied. Special files cannot be copied either.
- All DVDs will be finalized automatically. Files cannot be added to the DVD-R/DVD-RW later.
Memo :
- To check the created disc, refer to “Playing Back with a DVD Writer” (p. 105)”.
"Playing Back with a DVD Writer" (p. 105)
Playing Back with a DVD Writer
You can play back the DVDs created on this unit.
1 Connect this unit to the DVD writer and TV.
(If this unit is not connected to a TV, images can be played back on the LCD monitor of this unit.)

flowchart
graph LR
    A["USB Cable"] --> B["HDMI Mini Cable"]
    B --> C["Computer"]
"Preparing a DVD Writer (CU-VD3)" (uF p. 99)
"Preparing a DVD Writer (CU-VD50)" (p. 99)
2 Tap "PLAYBACK" in the "BACK-UP" menu.
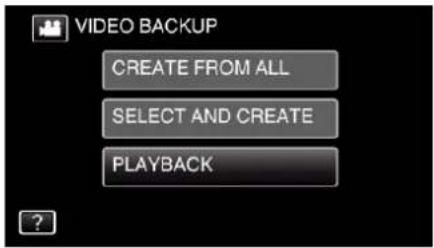
text_image
VIDEO BACKUP CREATE FROM ALL SELECT AND CREATE PLAYBACK• An index screen (thumbnail display) of the videos in the disc appears.
3 Tap on the file to start playback.

natural_image
Black-and-white photo editing interface with multiple video thumbnails and control buttons (no readable text or symbols)- Tap "→" to return to the "BACK-UP" menu.
- For details on video playback, refer to “Operation Buttons for Video Playback” (p. 64)”.
"Operation Buttons for Video Playback" (p. 64)
- To exit, stop playback and turn off the camcorder by pressing the ⏻ button for about 2 seconds. Then, disconnect the USB cable.
Memo :
- To play back the recorded image on TV, connect this unit via the HDMI mini cable or the AV Cord while this unit is connected to the DVD writer.
"Connecting via the HDMI Mini Connector" (e.g. p. 77)
"Connecting via the AV Connector" (p. 79)
Creating a Disc Using a Connected Blu-ray Recorder
You can create discs using a Blu-ray recorder by connecting it to this unit using a USB cable.
- The following is a screen of the model with the built-in memory.
1 Remove the AC adapter and battery pack from this unit.
2 Open the LCD monitor.

natural_image
Diagram of a digital camera with an open screen and a blue arrow indicating rotation (no text or symbols)3 Connect to a Blu-ray recorder.

text_image
AC Adapter To AC Outlet (110 V to 240 V) To DC Connector To USB Connector USB Cable (Provided) To USB Connector Blu-ray Recorder① Connect using the provided USB cable.
2 Connect the AC adapter to this unit.
- This unit powers on automatically when the AC adapter is connected.
- This unit powers on automatically when the AC adapter is connected, and the "SELECT DEVICE" screen is displayed.
- Be sure to use the supplied AC adapter.
- This unit turns on and the "SELECT DEVICE" screen appears.
4 Tap "CONNECT TO OTHER".

text_image
SELECT DEVICE SELECT DEVICE TYPE TO CONNECT CONNECT TO OTHER5 Tap the desired media.

text_image
CONNECT TO OTHER SELECT MEDIA TO OPEN BUILT-IN MEMORY SD CARD- The following screen is displayed after the camera operation is completed.

text_image
CONNECT TO OTHER SD CARD- Operations are to be performed on the Blu-ray recorder after the screen switches.
6 Perform dubbing on the Blu-ray recorder.
• Refer also to the instruction manual of the Blu-ray recorder.
- After dubbing is complete, disconnect the USB cable. Operations cannot be performed on this unit until the USB cable is disconnected.
Dubbing Files to a Disc by Connecting to a DVD Recorder
You can dub videos in standard quality by connecting to a DVD recorder.
- Refer also to the instruction manuals of the TV and DVD recorder.
1 Remove the AC adapter and battery pack from this unit.
2 Open the LCD monitor.
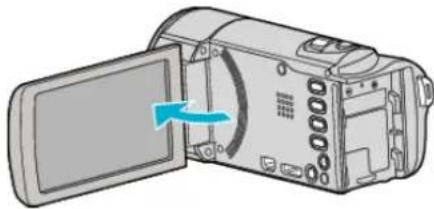
natural_image
Illustration of a digital camera with an open screen and a blue arrow indicating rotation (no text or symbols)3 Connect to a DVD recorder.
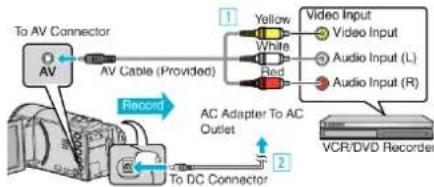
flowchart
graph TD
    A["To AV Connector"] --> B["AV Cable (Provided)"]
    B --> C["Record"]
    C --> D["AC Adapter To AC Outlet"]
    D --> E["To DC Connector"]
    F["Video Input"] --> G["Video Input"]
    H["Video Input"] --> I["Audio Input (L)"]
    J["Video Input"] --> K["Audio Input (R)"]
    L["VCR/DVD Recorder"] --> M["Output"]
1 Connect using the provided AV cable.
2 Connect the AC adapter to this unit.
- This unit powers on automatically when the AC adapter is connected.
- Be sure to use the supplied AC adapter.
4 Tap “<<PLAY” to select the playback mode.
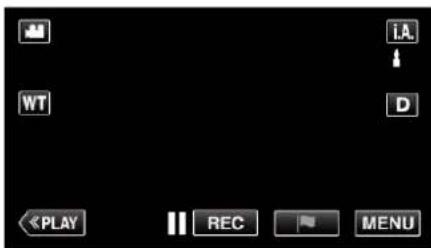
text_image
iA WT D PLAY REC MENU
5 Prepare the TV/DVD recorder for recording.
- Switch to a compatible external input.
- Insert a disc (DVD-R, etc.) into the DVD recorder.
6 Prepare this unit for playback.
- Set "VIDEO OUTPUT" in the "CONNECTION SETTINGS" menu to the aspect ratio ("4:3" or "16:9") of the connecting TV.
"VIDEO OUTPUT" (p. 241)
7 Start recording.
- Start playback on this unit and press the record button on the recorder.
"Playing Back Videos" (p. 64)
• After playback is complete, stop the recording.
Memo :
• AV cable (P/N: QAM1322-001)
Wiring specifications (for video/audio) of the 4-pole mini plug are described in the following.
For purchasing, consult your nearest JVC service center.
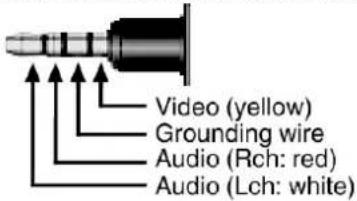
text_image
Video (yellow) Grounding wire Audio (Rch: red) Audio (Lch: white)Memo :
- When there are many videos to dub, you can create a playlist in advance and play it back so that all your favorite videos can be dubbed at once.
"Creating Playlists with Selected Files" (p. 85)
"PLAYBACK PLAYLIST" (p. 72)
- To include the recording date and time during dubbing, set "DISPLAY DATE/TIME" in the "PLAYBACK SETTING" menu to "ON". Or, set "DISPLAY ON TV" in the "CONNECTION SETTINGS" menu to "ON".
Dubbing Files to a VHS Tape by Connecting to a VCR
You can dub videos in standard quality by connecting to a VCR.
• Refer also to the instruction manuals of the TV and VCR.
1 Remove the AC adapter and battery pack from this unit.
2 Open the LCD monitor.

natural_image
Diagram of a digital camera with an open screen and blue arrow indicating rotation (no text or symbols)3 Connect to a VCR/DVD recorder.
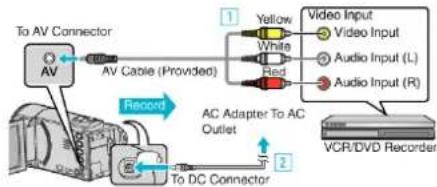
flowchart
graph TD
    A["To AV Connector"] --> B["AV Cable (Provided)"]
    B --> C["Yellow"]
    B --> D["White"]
    B --> E["Red"]
    C --> F["Video Input"]
    D --> G["Audio Input (L)"]
    E --> H["Audio Input (R)"]
    I["Record"] --> J["AC Adapter To AC Outlet"]
    K["To DC Connector"] --> L["VCR/DVD Recorder"]
① Connect using the provided AV cable.
2 Connect the AC adapter to this unit.
- This unit powers on automatically when the AC adapter is connected.
- Be sure to use the supplied AC adapter.
4 Tap “<<PLAY” to select the playback mode.

text_image
iA WT D «PLAY REC MENU
5 Prepare the TV/VCR for recording.
- Switch to a compatible external input.
- Insert a video tape.
6 Prepare this unit for playback.
- Set "VIDEO OUTPUT" in the "CONNECTION SETTINGS" menu to the aspect ratio ("4:3" or "16:9") of the connecting TV.
"VIDEO OUTPUT" (p. 241)
7 Start recording.
- Start playback on this unit and press the record button on the recorder.
"Playing Back Videos" (p. 64)
• After playback is complete, stop the recording.
Memo :
• AV cable (P/N: QAM1322-001)
Wiring specifications (for video/audio) of the 4-pole mini plug are described in the following.
For purchasing, consult your nearest JVC service center.

text_image
Video (yellow) Grounding wire Audio (Rch: red) Audio (Lch: white)Memo :
- When there are many videos to dub, you can create a playlist in advance and play it back so that all your favorite videos can be dubbed at once.
"Creating Playlists with Selected Files" (p. 85)
"PLAYBACK PLAYLIST" (p. 72) - To include the recording date and time during dubbing, set "DISPLAY DATE/TIME" in the "PLAYBACK SETTING" menu to "ON". Or, set "DISPLAY ON TV" in the "CONNECTION SETTINGS" menu to "ON".
Using a USB External Hard Disk Drive
You can copy video and still image files to a USB external hard disk drive from this unit. You can also play the files in the USB external hard disk drive on this unit.
- Refer also to the instruction manual of the external hard disk drive.
Compatible External Hard Disk Drives
You can use the "LaCie Hard Disk Sleek black design USB2.0" series from LaCie.
Memo :
Before purchasing, check the compatible devices on the LaCie website.
• LaCie
http://www.lacie.com/home.htm?cc=1
- USB external hard disk drives up to 2 TB can be used.
Copying and Playback with a USB External Hard Disk Drive
"Preparing a USB External Hard Disk Drive" (p. 109)
"Copying All Files" (p. 109)
"Playing Back Files in the USB External Hard Disk Drive" (p. 110)
"Deleting Folders in the USB External Hard Disk Drive" (p. 111)
Memo :
- Format the USB external hard disk drive when connecting it to this unit for the first time. (All data will be deleted.)
"Formatting the USB External Hard Disk Drive" (p. 111) - Refer to the help file of the provided LoiLoFit for Everio software when you use the PC to operate the data in the USB external hard disk drive directly copied from this unit.
- USB external hard disk drives with the capacity over 2 TB cannot be used.
- Copying may take time. (For example, saving 1 hour video in XP mode takes about 20 minutes.)
- When there are many files to back up, it may take time for the backup to be completed. Wait for a while as the access lamp appears blinking, which indicates normal operation.
- Sound or video may be interrupted during playback.
Caution :
- Do not connect a USB hub between this unit and the USB external hard disk drive.
- Disconnect the USB external hard disk drive when using other USB devices such as DVD writer, external Blu-ray drive, or another USB external hard disk drive.
- Avoid the following operations during copying and playing back. - Turning off the unit or the USB external hard disk drive. - Disconnecting the USB cable.
- Do not format the USB external hard disk drive using the PC. If you did, format again using this unit. (All the data in the USB external hard disk drive will be erased.)
- Avoid the following operations using the PC. - Deleting files or folders in the USB external hard disk drive. - Moving files or folders in the USB external hard disk drive. - Changing the name of files or folders in the USB external hard disk drive.
These operations make the data impossible to be played back on this unit.
- When you use the PC to edit the data in the USB external hard disk drive, copy the data to the PC before editing. Editing the data in the USB external hard disk drive directly from the PC makes the data impossible to be played back on this unit.
- Videos in iFrame format cannot be backed up.
Preparing a USB External Hard Disk Drive
Memo :
- When connecting to the external hard disk drive, use a USB cable indicated below. The USB cable provided with this unit cannot be used.
- To use the USB cable provided with the USB external hard disk drive, purchase the following USB conversion cable.
(Part number: QAM0852-001) * Mini-A (Male) - A (Female) *Consult your nearest service center.
1 Remove the AC adapter and battery pack from this unit.
2 Open the LCD monitor.

natural_image
Diagram of a digital camera with an open screen and a blue arrow indicating rotation (no text or symbols)3 Connect the USB cable and the AC adapter.
To USB Connector
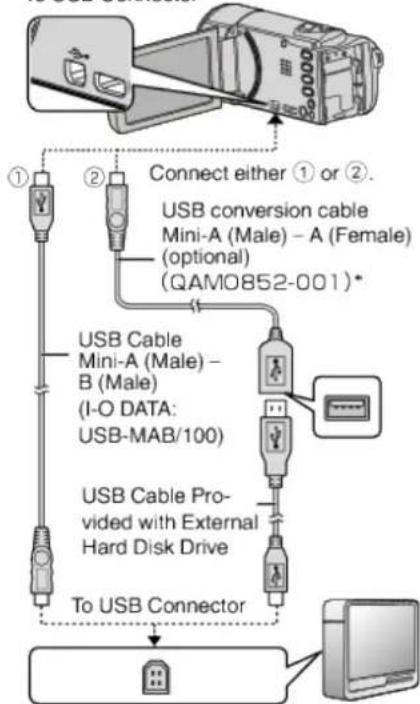
flowchart
graph TD
    A["Device"] -->|Connect either ① or ②| B["USB Cable Mini-A (Male) - B (Male)"]
    B --> C["USB Cable Provided with External Hard Disk Drive"]
    C --> D["To USB Connector"]
    D --> E["Computer"]
    style A fill:#f9f,stroke:#333
    style E fill:#ccf,stroke:#333
*Consult your nearest service center.
1 Connect the USB cable with the USB external hard disk drive.
2 Connect the AC adapter of the USB external hard disk drive.
-
Turn on the external hard disk drive.
3 Connect the AC adapter to this unit. -
This unit turns on and the "BACK-UP" menu appears.
- While the USB cable is connected, the "BACK-UP" menu is displayed.
- Refer also to the instruction manual of the external hard disk drive.
Caution :
- Be sure to turn off the power when connecting the devices. Otherwise, electric shocks or malfunctions may occur.
- Do not connect a USB hub between this unit and the USB external hard disk drive.
Copying All Files
All videos or still images recorded on this unit will be copied.
You can also select and copy only the videos or still images that have never been copied.
- The following is a screen of the model with the built-in memory.
1 Select video or still image mode.
2 Tap "BACK UP".
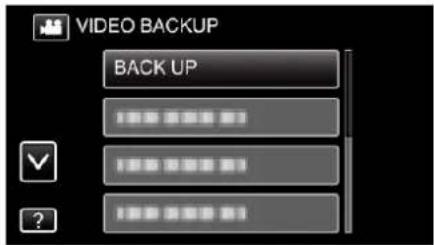
text_image
VIDEO BACKUP BACK UP- While the video mode is shown in the image, the same operations apply for the still image mode.
- Tap the 🎯 icon to switch between the video and still image modes.
3 Tap the media you would like to make a backup.

text_image
CREATE FROM ALL SELECT THE MEDIA TO BACK UP BUILT-IN MEMORY SD CARD4 Tap the desired method.

text_image
BACK UP ALL SCENES UNSAVED SCENES- “ALL SCENES” (video)/“ALL IMAGES” (still image):
All videos or still images in this unit are copied. - "UNSAVED SCENES" (video)/"UNSAVED IMAGES" (still image):
Videos or still images that have never been copied are automatically selected and copied.
5 Check that there is sufficient remaining space on the hard disk drive and tap "YES".

text_image
ALL SCENES 15 SCENES REQ SPACE : 147MB FREE SPACE : 1,007,768MB START TO BACKUP? YES NO- Backup starts when "YES" is tapped.
6 Tap "OK" when "COMPLETED" is displayed.

text_image
ALL SCENES SAVED OK7 Press and hold the ⏻ button for 2 seconds or more to turn off this unit and disconnect the USB cable.
Caution :
- Do not turn off the power or remove the USB cable until copying is complete.
- Files that are not on the index screen during playback cannot be copied. Special files cannot be copied either.
- Copying may take time. (For example, saving 1 hour video in XP mode takes about 20 minutes.)
Playing Back Files in the USB External Hard Disk Drive
Videos or still images saved in an external hard disk drive can be played back on this unit.
1 Tap "PLAYBACK".
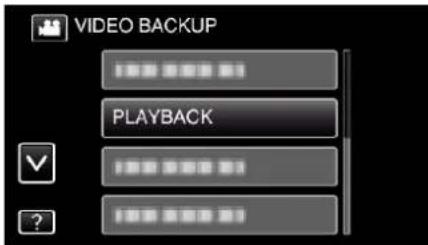
text_image
VIDEO BACKUP PLAYBACK2 Select video or still image mode.

natural_image
Two black rectangular buttons with white camera and video icons on a black background (no text or symbols)• If step 2 is not displayed, go to step 3.
- If the backup files of video or still image are not made, these icons won't be displayed.
3 Tap on the folder to play back.

text_image
PLAYBACK [播放按钮] [播放按钮] [播放按钮]- Tap “→” to return to the “BACK-UP” menu.
4 Tap on the file to play back.
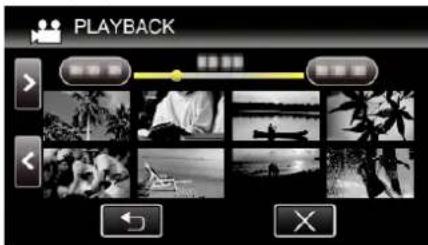
text_image
PLAYBACK- Tap “→” to return to the folder index screen.
- For details on video playback, refer to "Operation Buttons for Video Playback" (p. 64).
"Operation Buttons for Video Playback" (v p. 64) - To exit, stop playback and turn off the camcorder by pressing the ⏻ button for about 2 seconds. Then, disconnect the USB cable.
Memo :
• Sound or video may be interrupted during playback.
Deleting Folders in the USB External Hard Disk Drive
Files that are copied to the external hard disk drive can be deleted.
Caution :
- Deleted files cannot be restored.
- Be sure to back up important files on a PC.
"Backing Up Files" (p. 116)
1 Select video or still image mode.
2 Tap "DELETE".

text_image
VIDEO BACKUP 100% 000% 01 100% 000% 02 100% 000% 03 DELETE- While the video mode is shown in the image, the same operations apply for the still image mode.
- Tap the 🎯 icon to switch between the video and still image modes.
3 Tap on the folder to delete.

text_image
DELETE DELETE FOLDER CONTENTS4 Tap "YES".
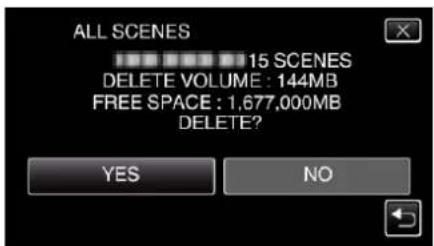
text_image
ALL SCENES 15 SCENES DELETE VOLUME : 144MB FREE SPACE : 1,677,000MB DELETE? YES NO• After deleting, tap "OK".
Formatting the USB External Hard Disk Drive
All files on the external hard disk drive can be deleted.
Caution :
- All data on the external hard disk drive will be deleted when it is formatted. Copy all files on the external hard disk drive to a computer before formatting.
1 Select video or still image mode.
2 Tap "FORMAT".
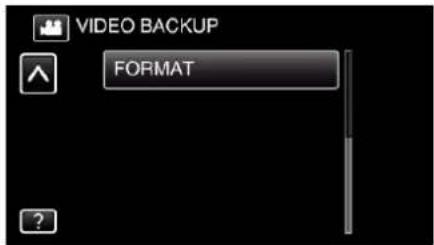
text_image
VIDEO BACKUP FORMAT- While the video mode is shown in the image, the same operations apply for the still image mode.
- Tap the 📁 icon to switch between the video and still image modes.
3 Tap "YES".

text_image
FORMAT DO YOU WANT TO FORMAT? IF YES, ALL DATA WILL BE ERASED. YES NO• After formatting, tap "OK".
Copying Files to an SD Card (GZ-EX355)
You can copy videos and still images from the built-in memory to SD card. Copying still images to cards makes it convenient to bring them to the shop for printing (developing).
Caution :
• Make sure that there is enough space left in the destination medium.
- Videos in the SD card cannot be copied to the built-in memory.
1 Open the LCD monitor.
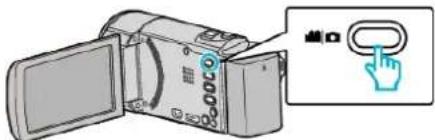
text_image
Diagram showing a digital camera with a hand icon pointing to the right side of the screen, labeled in Chinese.- Tap 📋 or 📋 to select the video or still image mode.
2 Tap “<

text_image
M
WT
D
<< PLAY REC MENU
• The mode changes between recording and playback with every tap.
3 Tap "MENU".

text_image
Screenshot of a media player interface with playback controls and preview thumbnails
4 Tap "EDIT".

text_image
TOP MENU
?
5 Tap "COPY".

text_image
EDIT
COPY
6 Tap on the files to copy.

text_image
QUANTITY:0030
SEL ALL REL ALL SET QUIT
- ✓ appears on the selected files.
To remove ✓ from a file, tap on the file again.
- Tap "SEL ALL" to select all files
- Tap "REL ALL" to release all selections.
7 Tap "SET".

text_image
QUANTITY:0030
SEL ALL REL ALL SET QUIT
\- "SET" is deactivated when no file is selected.
8 Tap "YES".

text_image
COPY VIDEO
COPY QUANTITY:30
START COPY?
YES NO
- Copying starts.
• After copying, tap "OK".
Moving Files to an SD Card (GZ-EX355)
You can move videos and still images from the built-in memory to SD card. Files that are moved will be deleted from the built-in memory. Moving still images to SD cards makes it convenient to bring them to the shop for printing (developing).
Caution :
- Make sure that there is enough space left in the destination medium.
- Videos in the SD card cannot be moved to the built-in memory.
1 Open the LCD monitor.

text_image
Diagram showing a digital camera with a hand icon pointing to the right side of the screen, labeled in Chinese.
\- Tap 📁 or 📋 to select the video or still image mode.
2 Tap "<

text_image
M
WT
D
←PLAY REC MENU
\- The mode changes between recording and playback with every tap.
3 Tap "MENU".

text_image
Screenshot of a media player interface with playback controls and preview thumbnails
4 Tap "EDIT".

text_image
TOP MENU
?
5 Tap "MOVE".

text_image
EDIT
MOVE
6 Tap on the files to move.

text_image
QUANTITY:0030
SEL ALL REL ALL SET QUIT
- √ appears on the selected files.
To remove √ from a file, tap on the file again.
- Tap "SEL ALL" to select all files.
- Tap "REL ALL" to release all selections.
7 Tap "SET".

text_image
QUANTITY:0030
SEL ALL REL ALL SET QUIT
\- "SET" is deactivated when no file is selected.
8 Tap "YES".

text_image
MOVE VIDEO
MOVE QUANTITY:30
START MOVING?
YES NO
- Moving of files starts
• After moving, tap "OK".
Copying to Windows PC (GZ-EX355/GZ-EX310)
You can copy files to a computer using the provided software.
Discs can also be created using the computer's DVD or Blu-ray drive.
If the provided software is not installed, this unit will be recognized as an external storage when connected.
Memo :
• To record to discs, a recordable DVD or Blu-ray drive is required for the computer in use.
- Still images cannot be recorded to discs using the provided software.
- Videos recorded in the iFrame format can not be copied.
- In order to record on the Blu-ray disc, it is necessary to upgrade to the paid version of LoiLoFit for Everio.
For details, refer to the following link.
http://loilo.tv/jp/product/33/page/27
\- Backing up of files using other softwares is not supported.
Trouble with Using the Provided Software LoiLoFit for Everio
Consult the customer service center below.
http://loilo.tv/us/product/LoiLoFit\_for\_Everio
\- For details on how to upload to YouTube, refer to "Help" in LoiLoFit for Everio.
Verifying System Requirements (Guideline)
Right-click on "Computer" (or "My Computer") in the "Start" menu and select "Properties" to check the following items.
Windows Vista/Windows 7
\- Refer to the operating instructions found in the animation on the Detailed User Guide.
Windows XP
\- Refer to the operating instructions found in the animation on the Detailed User Guide.
Windows Vista/Windows 7 Windows XP OS Windows Vista 32/64-bitHome Basic or Home Premium(Pre-installed versions only) Service Pack 2Windows 7 32/64-bitHome Premium(Pre-installed versions only) Service Pack 1 Windows XPHome Edition or Professional(Pre-installed versions only) Service Pack 3 CPU Intel Core 2 Duo, CPU 2 GHz or higher RAM At least 2 GB Graphics (during playback/backing up):Intel 965 or later, NVIDIA Geforce 6000 series or later, ATI Radeon 9600 or later(during video editing/creating a disc/converting video/uploading):Intel G45 or later, NVIDIA Geforce 8000 series or later (except for 8800GTX and 8300), ATI Radeon HD2000 series or later (except for 2900)
■ Other requirements
• VRAM: 256MB or higher
- Microsoft .NET Framework 3.5 SP1 needs to be installed.
- To edit/playback videos, the use of a computer with Intel Core i7 (4 core) CPU is recommended.
Memo :
- If your PC does not meet the above system requirements, operations of the provided software cannot be guaranteed.
- Depending on the PC environment, even if the operating environment is adequate, 1 frame per second may be reduced during video playback.
- There is no guarantee that the operations will work with all computer environments.
- For more information, contact your PC's manufacturer.
Installing the Provided Software
You can display the recorded images in calendar format and perform editing using the provided software.
Windows Vista/Windows 7
\- Refer to the operating instructions found in the animation on the Detailed User Guide.
Windows XP
\- Refer to the operating instructions found in the animation on the Detailed User Guide.
Backing Up Files
Before making backup, make sure that enough free space is left in the computer's hard disk (HDD).
Backup will not start if there is not enough free space.
1 Remove the AC adapter and battery pack from this unit.
2 Open the LCD monitor.

natural_image
Illustration of a digital camera with an open screen and a blue arrow indicating the direction (no text or symbols present)
3 Connect the USB cable and the AC adapter.

flowchart
graph TD
    A["Device"] -->|To DC Connector| B["Computer"]
    A -->|USB Cable (Provided)| C["User Interface"]
    C --> D["User Interface"]
    D --> E["User Interface"]
    style A fill:#f9f,stroke:#333
    style B fill:#ccf,stroke:#333
    style C fill:#cfc,stroke:#333
    style D fill:#fcc,stroke:#333
1 Connect using the provided USB cable.
2 Connect the AC adapter to this unit.
\- This unit powers on automatically when the AC adapter is connected.
\- Be sure to use the supplied AC adapter.
3 The "SELECT DEVICE" menu appears.
4 Tap "CONNECT TO PC".

text_image
SELECT DEVICE
SELECT DEVICE
TYPE TO CONNECT
CONNECT TO PC
5 Tap "BACK UP".

text_image
CONNECT TO PC
BACK UP
- Tap × to exit the menu.
- Tap to return to the previous screen.
- The provided software LoiLoFit for Everio starts up on the computer. The subsequent operations are to be performed on the computer.
6 Select the files to back up.

text_image
① Click
② Click
\- Click "Select all" to select all the files at once.
7 After selecting, click "Next".

text_image
OK
Cancel
View
Add
Add
Add
Add
Add
Add
Add
Add
Add
Add
Add
Add
Add
Add
Add
Add
Add
Add
Add
Add
Add
Add
Add
Add
Add
Add
Add
Add
Add
Add
Add
Add
Add
Add
Add
Add
Add
Add
Add
Add
Add
Add
Add
Add
Add
Add
Add
Add
Add
Add
Click
8 Click "Yes" to start backup.

text_image
LoLoFit
I've selected files and be backed up
Back-Up File Size: 1.565 KB
Used Space Back-Up File Size
Available Spoco: 272 GB / 298 GB
Y1 (1) N0
Click
- Backup starts.
- The tab on the right side becomes blank when the backup is completed.

text_image
Screenshot of a video editing software interface showing timeline, preview thumbnails, and playback controls
Memo :
- Videos recorded in the iFrame format can not be copied.
- Before making backup, load the SD card in which the videos and still images are stored on this unit.
- After backing up your files using the provided software, they cannot be restored to this unit.
- Delete unwanted videos before making backup. It takes time to back up many videos.
"Deleting Unwanted Files" (p. 80)
Disconnecting this Unit from Computer
1 Click "Safely Remove Hardware and Eject Media".

text_image
Safely Remove Hardware and Eject Media
9:31 PM
9/27/2010
Click
2 Click "Safely Remove USB Mass Storage Device".
3 (For Windows Vista) Click "OK".
4 Disconnect the USB cable and close the LCD monitor.
Recording Videos to Discs
1 Insert a new disc into the PC's recordable DVD or Blu-ray drive.
2 Click "Disk" to select the disc type.

text_image
Click
3 Select the date that the desired videos for saving on the disc was recorded.

text_image
Click
4 Select the files to save.

text_image
① Click
② Click
5 Click "Next".

text_image
OK
Cancel
Click
6 Sort the files in your desired order.

text_image
Drag
Drop
7 Click "Create Disk".

text_image
Click
8 After copying, click "Cancel".

text_image
Disk creation successful.
Would you like to create another disk with the same contents?
Create another disk
Cancel
Click
\- Click "Cancel" to end creating the disc.
Memo :
- The following types of discs can be used on the provided software LoiLoFit for Everio.
DVD-R
DVD-R DL
DVD-RW
- In order to record on the Blu-ray disc, it is necessary to upgrade to the paid version of LoiLoFit for Everio.
For details, refer to the following link.
http://loilo.tv/jp/product/33/page/27
- Videos recorded in the iFrame format can not be copied.
- Depending on the PC environment, even if the operating environment is adequate, 1 frame per second may be reduced during video playback.
- To view the help file of LoiLoFit for Everio, select "Help" from the LoiLoFit for Everio's menu bar or press F1 on the keyboard.
- If you are unable to activate while creating a disc, complete activation by following the instruction on the screen.
Backing Up Files Without Using Provided Software
Copy the files to a computer using the following method.
1 Remove the AC adapter and battery pack from this unit.
2 Open the LCD monitor.

natural_image
Diagram of a digital camera with an open screen and a blue arrow indicating rotation (no text or symbols)
3 Connect the USB cable and the AC adapter.

text_image
AC Adapter To AC
Outlet (110 V to 240 V)
To DC Connector
To USB
Connector
USB Cable
(Provided)
To USB
Connector
Computer
1 Connect using the provided USB cable.
2 Connect the AC adapter to this unit.
- This unit powers on automatically when the AC adapter is connected.
- Be sure to use the supplied AC adapter.
3 The "SELECT DEVICE" menu appears.
4 Tap "CONNECT TO PC".

text_image
SELECT DEVICE
SELECT DEVICE
TYPE TO CONNECT
CONNECT TO PC
5 Tap "PLAYBACK ON PC".

text_image
CONNECT TO PC
PLAYBACK ON PC
- Tap × to exit the menu.
- Tap to return to the previous screen.
- Close the LoiLoFit for Everio program, if it starts.
- The following screen is displayed after the camera operation is completed.

text_image
PLAYBACK ON PC
\- Operations are to be performed on the computer after the screen switches.
6 Select "Computer" (Windows Vista) / "My Computer" (Windows XP) / "Computer" (Windows 7) from the "Start" menu, then click on the "JVCCAM\_MEM" or "JVCCAM\_SD" icon.
\- Open the folder with the desired files. "List of Files and Folders" (p. 120)
7 Copy the files to any folder in the computer (desktop, etc).
Memo :
- To edit/view the files, use a software that supports iFrame (video)/AVCHD (video)/JPEG (still image) files.
- The above operations on computer may vary with the system used.
Disconnecting this Unit from Computer
1 Click "Safely Remove Hardware and Eject Media".

text_image
Safely Remove Hardware and Eject Media
9:31 PM
9/27/2010
Click
2 Click "Safely Remove USB Mass Storage Device".
3 (For Windows Vista) Click "OK".
4 Disconnect the USB cable and close the LCD monitor.
List of Files and Folders
Folders and files are created in the SD card as shown below.
They are created only when necessary.

flowchart
graph TD
    A["[JVCCAM_MEM"] (Built-In Memory] --> B["[DCIM"]]
    C["[JVCCAM_SD"] (SD Card)] --> B
    B --> D["[100JVCSO"]]
    D --> E["PIC_0001.JPG"]
    D --> F["PIC_0002.JPG"]
    D --> G["PIC_0003.JPG"]
    D --> H["PIC_0004.MP4"]
    E --> I["Still Image File"]
    F --> I
    G --> I
    H --> I
    B --> J["[AVCHD"] (Built-In Memory)]
    J --> K["[BDMV"]]
    K --> L["[STREAM"]]
    L --> M["XXXXX.MTS"]
    M --> N["(Video File)"]
    L --> O["[BACKUP"]]
    L --> P["[CLIPINF"]]
    L --> Q["[PLAYLIST"]]
    L --> R["[INDEX.BDM"]]
    L --> S["[MOVIEOBJ.BDM"]]
    O --> T["[EXTMOV"]]
    T --> U["DEM_0000.MTS"]
    U --> V["(Demo Video File)"]
    U --> W["*There may be no demo video file."]
    T --> X["MOV_0001.MTS"]
    T --> Y["MOV_0002.MTS"]
    T --> Z["MOV_0003.MTS"]
    U --> AA["(Video files with defective management information)"]
    T --> AB["[PRIVATE"] (Management Information)]
    AB --> AC["[AVCHD"] (SD Card)]
    AC --> AD["[JVC"]]
Caution :
\- When the camera and PC are connected by an USB cable, recorded media are read-only.
Copying to Windows PC (GZ-E300)
You can copy files to a computer using the provided software.
Discs can also be created using the computer's DVD or Blu-ray drive.
If the provided software is not installed, this unit will be recognized as an external storage when connected.
Memo :
- To record to discs, a recordable DVD or Blu-ray drive is required for the computer in use.
- Still images cannot be recorded to discs using the provided software.
- Backing up of files using other softwares is not supported.
Trouble with Using the Provided Software Everio MediaBrowser 4
Consult the customer service center below.
\- Pixel a User Support Center
Telephone USA and Canada (English): +1-800-458-4029 (toll-free)Europe (UK, Germany, France, and Spain)(English/German/French/Spanish): +800-1532-4865 (toll-free)Other Countries in Europe(English/German/French/Spanish): +44-1489-564-764Asia (Philippines) (English): +63-2-438-0090China (Chinese): 10800-163-0014 (toll-free) Homepage http://www.pixela.co.jp/oem/jvc/mediabrowser/e/
\- For details on how to use the software, refer to "MediaBrowser Help" in the "Help" menu of Everio MediaBrowser 4.

text_image
Help(H)
MediaBrowser Help(H) F1
Check the latest version online
Click for Latest Product Info
Version info(A)
Mon Tue Wed
Verifying System Requirements (Guideline)
Right-click on "Computer" (or "My Computer") in the "Start" menu and select "Properties" to check the following items.
Windows Vista/Windows 7
\- Refer to the operating instructions found in the animation on the Detailed User Guide.
Windows XP
\- Refer to the operating instructions found in the animation on the Detailed User Guide.
Windows Vista/Windows 7 Windows XP OS Windows Vista 32/64-bitHome Basic or Home Premium(Pre-installed versions only) Service Pack 2Windows 7 32/64-bitHome Premium(Pre-installed versions only) Service Pack 1 Windows XPHome Edition or Professional(Pre-installed versions only) Service Pack 3 CPU Intel Core Duo CPU 1.66 GHz or higher(Intel Core 2 Duo, CPU 2.13 GHz or higher recommended) Intel Core Duo, CPU 1.66 GHz or higher(Intel Core 2 Duo, CPU 2.13 GHz or higher recommended) RAM At least 2 GB At least 1 GB Video editing Intel Core i7, CPU 2.53 GHz or higher recommended Intel Core i7, CPU 2.53 GHz or higher recommended
■ Other requirements
Display: 1024×768 pixels or above (1280×1024 pixels or above recommended)
Graphic: Intel G965 or higher recommended
Memo :
- If your PC does not meet the above system requirements, operations of the provided software cannot be guaranteed.
- There is no guarantee that the operations will work with all computer environments.
- For more information, contact your PC's manufacturer.
Installing the Provided Software (Built-in)
You can display the recorded images in calendar format and perform editing using the provided software.
Preparations
Connect this unit to a computer with a USB cable.
1 Remove the AC adapter and battery pack from this unit.
2 Open the LCD monitor.

natural_image
Diagram of a digital camera with an open screen and blue arrow indicating rotation (no text or symbols)
3 Connect the USB cable and the AC adapter.

flowchart
graph TD
    A["AC Adapter To AC Outlet (110 V to 240 V)"] -->|To DC Connector| B["Computer"]
    C["USB Cable (Provided)"] --> D["To USB Connector"]
    E["USB Cable (Provided)"] --> F["To USB Connector"]
    G["Computer"] --> H["USB Cable"]
1 Connect using the provided USB cable.
2 Connect the AC adapter to this unit.
\- This unit powers on automatically when the AC adapter is connected.
\- Be sure to use the supplied AC adapter.
3 The "SELECT DEVICE" menu appears.
4 Tap "CONNECT TO PC".

text_image
SELECT DEVICE
SELECT DEVICE
TYPE TO CONNECT
CONNECT TO PC
5 Tap "PLAYBACK ON PC".

text_image
CONNECT TO PC
PLAYBACK ON PC
- Tap × to exit the menu.
- Tap to return to the previous screen.
- "Everio Software Setup" appears on the computer. Operations are to be performed on the computer after the screen switches.
Memo :
- If "Everio Software Setup" doesn't appear, double-click "JVCCAM\_APP" in "My Computer" or "Computer", then double-click "install (or Install.exe)"
- If the auto play dialog box appears, select "Open folder to view files" and click "OK". Then, click "install (or Install.exe)" in the folder.
Installation Procedure
■ Windows Vista/Windows 7
\- Refer to the operating instructions found in the animation on the Detailed User Guide.
Windows XP
\- Refer to the operating instructions found in the animation on the Detailed User Guide.
Backing Up All Files
Before making backup, make sure that enough free space is left in the computer's hard disk (HDD).
Backup will not start if there is not enough free space.
1 Remove the AC adapter and battery pack from this unit.
2 Open the LCD monitor.

natural_image
Illustration of a digital camera with an open screen and blue arrow indicating rotation (no text or symbols)
3 Connect the USB cable and the AC adapter.

flowchart
graph TD
    A["Device"] -->|To USB Connector| B["USB Cable (Provided)"]
    A -->|To USB Connector| C["Computer"]
    D["AC Adapter To AC Outlet (110 V to 240 V)"] -->|To DC Connector| E["Computer"]
1 Connect using the provided USB cable.
2 Connect the AC adapter to this unit.
\- This unit powers on automatically when the AC adapter is connected.
\- Be sure to use the supplied AC adapter.
3 The "SELECT DEVICE" menu appears.
4 Tap "CONNECT TO PC".

text_image
SELECT DEVICE
SELECT DEVICE
TYPE TO CONNECT
CONNECT TO PC
5 Tap "BACK UP".

text_image
CONNECT TO PC
BACK UP
\- Tap × to exit the menu.
\- Tap to return to the previous screen.
\- The provided software Everio MediaBrowser 4 starts up on the computer.
The subsequent operations are to be performed on the computer.
6 Select the source of the image file.

text_image
① Click
Step 1
View: Selection
② Click
Click "Next"
Click "All volume in camcorder"
7 Start backup.

text_image
Saving Destination (PC)
Step 2
Confirm
Start OK
Cancel
OK Cancel OK
Cancel OK
Start OK
Cancel OK
Click
\- Backup starts.
8 After backup is complete, click "OK".

text_image
Everio MediaBrowser 4
Finished successfully.
OK
Click
Memo :
- Before making backup, load the SD card in which the videos and still images are stored on this unit.
- If you encounter any problems with the provided software Everio MediaBrowser 4, please consult the "Pixela User Support Center".
Telephone USA and Canada (English): +1-800-458-4029 (toll-free)Europe (UK, Germany, France, and Spain)(English/German/French/Spanish): +800-1532-4865 (toll-free)Other Countries in Europe(English/German/French/Spanish): +44-1489-564-764Asia (Philippines) (English): +63-2-438-0090China (Chinese): 10800-163-0014 (toll-free) Homepage http://www.pixela.co.jp/oem/jvc/mediabrowser/e/
\- Delete unwanted videos before making backup. It takes time to back up many videos.
"Deleting Unwanted Files" (p. 80)
Disconnecting this Unit from Computer
1 Click "Safely Remove Hardware and Eject Media".

text_image
Safely Remove Hardware and Eject Media
9:31 PM
9/27/2010
Click
2 Click "Safely Remove USB Mass Storage Device".
3 (For Windows Vista) Click "OK".
4 Disconnect the USB cable and close the LCD monitor.
Organizing Files
After backing up your files, organize them by adding labels such as "Family Trip" or "Athletic Meet".
This is useful not only for creating discs, but for viewing the files too.
1 Double-click on the Everio MediaBrowser 4 icon.
• The provided software starts up.

Гурго
Media Bro...

Evero
MediaBro...
2 Display the month of the files to organize.

text_image
Click
2016
Recording Month
3 Create a user list.

text_image
Click
Recording Date
B/2015
① Input the name of the new user list
List Name
Enter List name.
0000
OK Cancel
② Click
\- A new user list is added to the user list library.
4 Click on the recording day.
\- The thumbnails of the files recorded on the day are displayed.
Recording Date

text_image
New Booklet
File Edit View Help
Set As
New Booklet
6/2018
New Booklet
New Booklet
New Booklet
New Booklet
New Booklet
New Booklet
New Booklet
New Booklet
New Booklet
New Booklet
New Booklet
New Booklet
New Booklet
New Booklet
New Booklet
New Booklet
New Booklet
New Booklet
New Booklet
New Booklet
New Booklet
New Booklet
New Booklet
New Booklet
New Booklet
New Booklets
New Booklets
New Booklets
New Booklets
New Booklets
New Booklets
New Booklets
New Booklets
New Booklets
New Booklets
New Booklets
New Booklets
New Booklets
New Booklets
New Booklets
New Booklets
New Booklets
New Booklets
New Booklets
New Booklets
New Booklets
New Booklets
New Booklets
New Booklets
New Booklets
New Booktimes
New Booktimes
New Booktimes
New Booktimes
New Booktimes
New Booktimes
New Booktimes
New Booktimes
New Booktimes
New Booktimes
New Booktimes
New Booktimes
New Booktimes
New Booktimes
New Booktimes
New Booktimes
New Booktimes
New Booktimes
New Booktimes
New Booktimes
New Booktimes
New Booktimes
New Booktimes
New Booktimes
New Booktimes
New Booklines
5 Register files to the created user list.
User List
Thumbnails

text_image
Drag
Drop
Identifying Video or Still Image :
- You can select files using the "SELECT" menu on the top right of the screen.
- Check the video/still image icon on the top right corner of the thumbnail.

text_image
Image showing a red agricultural machine on water with an inset image labeled 'Video' and 'Still Image', likely illustrating a video recording setup.
Memo :
\- If you encounter any problems with the provided software Everio MediaBrowser 4, please consult the "Pixela User Support Center".
Telephone USA and Canada (English): +1-800-458-4029 (toll-free)Europe (UK, Germany, France, and Spain)(English/German/French/Spanish): +800-1532-4865 (toll-free)Other Countries in Europe(English/German/French/Spanish): +44-1489-564-764Asia (Philippines) (English): +63-2-438-0090China (Chinese): 10800-163-0014 (toll-free) Homepage http://www.pixela.co.jp/oem/jvc/mediabrowser/e/
Recording Videos to Discs
Copy the files that are arranged using the user list to discs.
1 Insert a new disc into the PC's recordable DVD drive.
2 Select the desired user list.

text_image
Sun/Water
Start: 12 March 2016 (Wednesday) - May 1
Date: 9/2016
Time: 00:00
Day: 01:00
Week: 02:00
Month: 03:00
Day: 04:00
Week: 05:00
Month: 06:00
Day: 07:00
Week: 08:00
Month: 09:00
Day: 10:00
Week: 11:00
Month: 12:00
Day: 13:00
Week: 14:00
Month: 15:00
Day: 16:00
Week: 17:00
Month: 18:00
Day: 19:00
Week: 20:00
Month: 21:00
Day: 22:00
Week: 23:00
Month: 24:00
Day: 25:00
Week: 26:00
Month: 27:00
Day: 28:00
Week: 29:00
Month: 30:00
Day: 31:00
Week: 32:00
Month: 33:00
Day: 34:00
Week: 35:00
Month: 36:00
Day: 37:00
Week: 38:00
Month: 39:00
Day: 40:00
Week: 41:00
Month: 42:00
Day: 43:00
Week: 44:00
Month: 45:00
Day: 46:00
Week: 47:00
Month: 48:00
Day: 49:00
Week: 50:00
Month: 51:00
Day: 52:00
Week: 53:00
Month: 54:00
Day: 55:00
Week: 56:00
Month: 57:00
Day: 58:00
Week: 59:00
Month: 60:00
Day: 61:00
Week: 62:00
Month: 63:00
Day: 64:00
Week: 65:00
Month: 66:00
Day: 67:00
Week: 68:00
Month: 69:00
Day: 70:00
Week: 71:00
Month: 72:00
Day: 73:00
Week: 74:00
Month: 75:00
Day: 76:00
Week: 77:00
Month: 78:00
Day: 79:00
Week: 80:00
Month: 81:00
Day: 82:00
Week: 83:00
Month: 84:00
Day: 85:00
Week: 86:00
Month: 87:00
Day: 88:00
Week: 89:00
Month: 90:00
Day: 91:00
Week: 92:00
Month: 93:00
Day: 94:00
Week: 95:00
Month: 96:00
Day: 97:00
Week: 98:00
Month:
Click
3 Select the disc type.

text_image
Create Disc
Step 1
DOOD
Step 1
Disc type selection
Select the disc type to create and the project type then click apart.
Disc type:
Disc type selected to create
Disc type:
Disc type selected to create
Click
4 Select the files to copy to disc in order.

text_image
Create Box
Box 1
OKOO
Drag
Step 1
AVCHD: Select the Files
Drop
Click
- Click "Settings" to select the disc type.
- Click "Select all" to select all the displayed files.
• After selecting, click "Next".
5 Set the title of the top menu of the disc.

text_image
Create Dues
Step 1
Step 2
Step 3
AVCHD Confirm
Click after this design is going.
AVCHD: 0.0000000000000000000000000000000000000000000000000000000000000000000000000000
Click
- Click "Settings" to select the menu background.
• After setting, click "Start".
6 After copying is complete, click "OK".

text_image
Everio MediaBrowser 4
Finished successfully.
OK
Click
Memo :
- The following types of discs can be used on the provided software Everio MediaBrowser 4.
DVD-R
DVD-R DL
DVD-RW
DVD+R
DVD+R DL
DVD+RW
\- The following formats are supported by the provided software Everio MediaBrowser 4.
AVCHD
For details, refer to the Pixela homepage.
http://www Covera.co.jp/oem/jvc/mediabrowser/e/
- Use Everio MediaBrowser 4 Player to play back an AVCHD disc. Refer to the help file of the provided Everio MediaBrowser 4 software to operate.
- When copying videos recorded in UXP recording mode to create an AVCHD disc, the videos need to be converted to XP recording mode before copying. Therefore, it may take a longer time than copying videos recorded in other modes.
- To view the help file of Everio MediaBrowser 4, select "Help" from the Everio MediaBrowser 4's menu bar or press F1 on the keyboard.
- If you encounter any problems with the provided software Everio MediaBrowser 4, please consult the "Pixela User Support Center".
Telephone USA and Canada (English): +1-800-458-4029 (toll-free)Europe (UK, Germany, France, and Spain)(English/German/French/Spanish): +800-1532-4865 (toll-free)Other Countries in Europe(English/German/French/Spanish): +44-1489-564-764Asia (Philippines) (English): +63-2-438-0090China (Chinese): 10800-163-0014 (toll-free) Homepage http://www.pixela.co.jp/oem/jvc/mediabrowser/e/
Backing Up Files Without Using Provided Software
Copy the files to a computer using the following method.
1 Remove the AC adapter and battery pack from this unit.
2 Open the LCD monitor.

natural_image
Diagram of a digital camera with an open screen and a blue arrow indicating rotation (no text or symbols)
3 Connect the USB cable and the AC adapter.

text_image
AC Adapter To AC
Outlet (110 V to 240 V)
To DC Connector
To USB
Connector
USB Cable
(Provided)
To USB
Connector
Computer
1 Connect using the provided USB cable.
2 Connect the AC adapter to this unit.
- This unit powers on automatically when the AC adapter is connected.
- Be sure to use the supplied AC adapter.
3 The "SELECT DEVICE" menu appears.
4 Tap "CONNECT TO PC".

text_image
SELECT DEVICE
SELECT DEVICE
TYPE TO CONNECT
CONNECT TO PC
5 Tap "PLAYBACK ON PC".

text_image
CONNECT TO PC
PLAYBACK ON PC
- Tap × to exit the menu.
- Tap to return to the previous screen.
- Close the Everio MediaBrowser 4 program, if it starts.
- The following screen is displayed after the camera operation is completed.

text_image
PLAYBACK ON PC
\- Operations are to be performed on the computer after the screen switches.
6 Select "Computer" (Windows Vista) / "My Computer" (Windows XP) / "Computer" (Windows 7) from the "Start" menu, then click on the "JVCCAM\_MEM" or "JVCCAM\_SD" icon.
\- Open the folder with the desired files. "List of Files and Folders" (p. 128)
7 Copy the files to any folder in the computer (desktop, etc).
Caution :
\- When the folders or files are deleted/moved/renamed in the computer, they cannot be played back on this unit anymore.
Memo :
- To edit/view the files, use a software that supports AVCHD (video)/JPEG (still image) files.
- The above operations on computer may vary with the system used.
Disconnecting this Unit from Computer
1 Click "Safely Remove Hardware and Eject Media".

text_image
Safely Remove Hardware and Eject Media
9:31 PM
9/27/2010
Click
2 Click "Safely Remove USB Mass Storage Device".
3 (For Windows Vista) Click "OK".
4 Disconnect the USB cable and close the LCD monitor.
List of Files and Folders
Folders and files are created in the built-in memory and SD card as shown below. They are created only when necessary.

flowchart
graph TD
    A["JVCCAM_MEM"] --> B["[DCIM"]]
    A --> C["[100JVCSO"]]
    A --> D["[101JVCSO"]]
    A --> E["[102JVCSO"]]
    B --> F["PIC_0001.JPG"]
    B --> G["PIC_0002.JPG"]
    B --> H["PIC_0003.JPG"]
    F --> I["Still Image File"]
    G --> I
    H --> I
    I --> J["AVCHD"]
    I --> K["BDMV"]
    J --> L["[STREAM"]]
    L --> M["XXXXX.MTS"]
    M --> N["(Video File)"]
    L --> O["[BACKUP"]]
    O --> P["[CLIPINF"]]
    P --> Q["[PLAYLIST"]]
    Q --> R["[INDEX.BDM"]]
    R --> S["[MOVIEOBJ.BDM"]]
    L --> T["[EXTMOV"]]
    T --> U["DEM_0000.MTS"]
    U --> V["(Demo Video File)"]
    U --> W["*There may be no demo video file."]
    U --> X["(Video files with defective management information)"]
    T --> Y["MOV_0001.MTS"]
    Y --> Z["MOV_0002.MTS"]
    Y --> AA["MOV_0003.MTS"]
    T --> AB["PRIVATE"]
    AB --> AC["[AVCHD"]]
    AC --> AD["(Management Information)"]
    AD --> AE["[JVC"]]
    style A fill:#f9f,stroke:#333
    style B fill:#f9f,stroke:#333
    style C fill:#f9f,stroke:#333
    style J fill:#ccf,stroke:#333
    style M fill:#cfc,stroke:#333
    style N fill:#fcc,stroke:#333
    style O fill:#fcc,stroke:#333
    style P fill:#fcc,stroke:#333
    style Q fill:#fcc,stroke:#333
    style R fill:#fcc,stroke:#333
    style S fill:#fcc,stroke:#333
    style T fill:#fcc,stroke:#333
    style U fill:#fcc,stroke:#333
    style V fill:#fcc,stroke:#333
    style W fill:#fcc,stroke:#333
    style X fill:#fcc,stroke:#333
    style Y fill:#fcc,stroke:#333
    style Z fill:#fcc,stroke:#333
Caution :
\- When the camera and PC are connected by an USB cable, recorded media are read-only.
Copying to Mac Computer
Copy the files to a Mac computer using the following method.
1 Remove the AC adapter and battery pack from this unit.
2 Open the LCD monitor.

natural_image
Diagram of a digital camera with an open screen and a blue arrow indicating rotation (no text or symbols)
3 Connect the USB cable and the AC adapter.

text_image
AC Adapter To AC
Outlet (110 V to 240 V)
To DC Connector
To USB
Connector
USB Cable
(Provided)
To USB
Connector
Computer
1 Connect using the provided USB cable.
2 Connect the AC adapter to this unit.
- This unit powers on automatically when the AC adapter is connected.
- Be sure to use the supplied AC adapter.
3 The "SELECT DEVICE" menu appears.
\- This unit turns on and the "SELECT DEVICE" menu appears.
4 Tap "CONNECT TO PC".

text_image
SELECT DEVICE
SELECT DEVICE
TYPE TO CONNECT
CONNECT TO PC
5 Tap "PLAYBACK ON PC".

text_image
CONNECT TO PC
PLAYBACK ON PC
- Tap × to exit the menu.
- Tap to return to the previous screen.
- The following screen is displayed after the camera operation is completed.

text_image
PLAYBACK ON PC
\- The "JVCCAM\_MEM" or "JVCCAM\_SD" icon appears on the desktop.
6 Start iMovie.
\- The subsequent operations are to be performed on the Mac computer.
Caution :
- When the camera and PC are connected by an USB cable, recorded media are read-only.
- MTS files that are copied to a Mac computer cannot be imported to iMovie. To use MTS files with iMovie, import the files using iMovie.
Memo :
- To edit/view the files, use a software that supports iFrame (video)/AVCHD (video)/JPEG (still image) files.
- When removing this unit from the computer, drag and drop the "JVCCAM\_MEM" or "JVCCAM\_SD" icon on the desktop to the trash bin.
iMovie and iPhoto
You can import files from this unit to a computer using Apple's iMovie'08, '09, '11 (video) or iPhoto (still image).
To verify the system requirements, select "About This Mac" from the Apple menu. You can determine the operating system version, processor and amount of memory.
- For the latest information on iMovie or iPhoto, refer to the Apple website.
- For details on how to use iMovie or iPhoto, refer to the help file of the respective softwares.
- There is no guarantee that the operations will work with all computer environments.
Wi-Fi Capabilities
This unit is equipped with Wi-Fi function.
You can do the following using a smartphone or computer via wireless connection.
Name of Function Capability DIRECT MONITORING You can check the image on the camera via direct 1-to-1 connection (Wi-Fi Direct) with a smartphone (or computer), without the need for an access point (wireless LAN router).Recording of videos and still images may be performed while monitoring.(Videos and still images cannot be recorded while monitoring from the computer browser.)“Image Monitoring via Direct Connection (DIRECT MONITORING)”(p. 132) INDOOR MONITORING Connect to the smartphone (or PC) via access point at home using the wireless LAN router, to monitor images captured by the camcorder.Recording of videos and still images may be performed while monitoring.(Videos and still images cannot be recorded while monitoring from the computer browser.)“Image Monitoring via an Access Point at Home (INDOOR MONITORING)”(p. 135) OUTDOOR MONITORING You can check the image on the camera via internet connection with a smartphone (or computer) while you are outside.Recording of videos and still images may be performed while monitoring.(Videos and still images cannot be recorded while monitoring from the computer browser.)“Image Monitoring via the Internet (OUTDOOR MONITORING)”(p. 140) DETECT/MAIL A still image is automatically captured and sent via e-mail when faces or movements are detected by the camera.You can also set to record videos on the camera during detection.“Sending Still Images via E-mail upon Detection of Face or Movement (DETECT/MAIL)”(p. 142) VIDEO MAIL Videos of up to 15 seconds can be recorded and sent via e-mail.“Record and Send Videos via E-mail (VIDEO MAIL)”(p. 144) TV MONITORING Connect this unit to the DLNA compatible TV via access point at hope using the wireless LAN router. EASY STORAGE Save all the videos and still images that have not backed up to your computer, which is connected via wireless network. The management file is saved as well. Record of the location information You can record the location information of the venue where recording is taking place via direct connection (Wi-Fi Direct) with a smartphone supporting the GPS function.The recorded location information can be used on the software provided with this unit.“Recording the Location Information”(p. 147) Pan Cradle (sold separately) Panning operation (changing the camera to the left/right direction) can be remotely controlled via smartphone by setting the camera on the pan cradle (sold separately).“Using the Pan Cradle (Sold Separately)”(p. 150)For how to connect the pan cradle, efer to the instruction manual of the Pan Cradle for further details.
Terms Used in this Guide :
- In this guide, operations on the touch panel are described as "tap".
- While the names of the buttons on a smartphone are written as "MENU" or "RETURN", they may vary according to the smartphone in use.
Refer also to the instruction manual of your smartphone.
Operating Environment
To check the image on the camera from a computer or smartphone, and to transfer videos/still images, it is necessary to meet the following requirements.
Android Smartphone and Tablet Device
1 OS: Android2.3 or higher
(This unit is not guaranteed to operate with all models.)
2 Supports GPS function (for GPS recording)
3 Able to connect to the internet or Google Play ("Everio sync. 2" required for software installation)
iPhone/iPad/iPod touch
1 OS: iOS5.1 or higher
(This unit is not guaranteed to operate with all models.)
2 Able to connect to the internet or "App Store™" (required for software installation)
Computer
To check the image on the camera from a computer browser and to transfer videos/still images, it is necessary to meet the following requirements.
1 OS: Windows 7
2 Supports wireless LAN or wired LAN
(To connect the camera and computer directly by using the DIRECT MONITORING function, support for wireless LAN is required.)
3 Installation of Windows Media Player 12 or later
\- Confirmed operating environment: Internet Explorer 9 or later
Caution :
\- There is no guarantee that the operations will work with all computer environments. For example, the video download feature of mobile safari browser, etc. is not supported.
Precautions on Using Wi-Fi
Cautions on Wi-Fi Function
• Operation is not guaranteed on all devices.
- This function is not designed for disaster or crime prevention.
- To prevent the situation of forgetting to turn off the power, this unit will turn off automatically after 10 days of continuous usage.
- Leaving the LCD monitor open makes it easier to receive radio waves. Therefore, it is recommended to open the LCD monitor when using the Wi-Fi function.
• Security of Wireless LAN
An advantage of wireless LAN is that instead of using a LAN cable, it transmits information using radio waves, thus enabling LAN connection to be established within the area covered by the radio waves. However, as radio waves penetrate through objects (such as walls) within the range that they cover, security issues, such as interception of transmission or illegal access, may arise if security settings are not configured.
Before you connect to the network in a wireless LAN environment, read through the instruction manual for the wireless LAN device in use, and configure the security settings accordingly. Failure to do so may increase the risk of personal information being intercepted, such as user names, passwords, and the content of your mails, or illegal access to the network.
\- Due to the design of wireless LAN, note that security may be breached by unusual or unforeseeable means.
\- For more details on wireless LAN and network security, please consult the manufacturer of your wireless LAN device.
\- JVC shall not be liable for any security issues, troubles, damages or losses arising from the use of this feature.
Radio Waves Used by this Product
This product makes use of radio waves in the ISM band (2.4 GHz).
Although a radio station license is not required for using this product, please take note of the following.
■ Do not use this product near the following places.
- Industrial, scientific, or medical equipment, such as microwave ovens and pacemakers
- Industrial, scientific, or medical equipment, such as microwave ovens and pacemakers
- Specified low-power radio stations (radio station license not required)
- Bluetooth devices
Equipment such as the above mentioned devices makes use of the same frequency bandwidth as that of Wi-Fi.
Using this product near the above equipment may cause radio wave interference, and result in communication failure or a drop in communication speed. In this case, turn off the power of devices that are not in use.
■ Avoid using this product near a TV or radio set.
TV or radio sets make use of a radio wave frequency bandwidth that is different from that of Wi-Fi, and therefore has no effect on communication by this product or the TV/radio set.
However, when a TV/radio set is placed close to a Wi-Fi product, electromagnetic waves emitted by the Wi-Fi product may cause noise to occur in the sound or images of the TV/radio.
\- Communication may not be carried out properly near radio equipment or broadcasting stations. In this case, change the location accordingly.
■ Radio signals are unable to penetrate through reinforced steel, metal, or concrete.
The radio waves used by this product are unable to penetrate through reinforced steel, metal, or concrete materials.
It may difficult for communication to be established if two rooms or floors are separated by these materials.
\*Communication may also get weaker when there are human subjects or parts of the body in between the Wi-Fi devices.
- Do not connect to wireless networks that you do not have authorization for.
Once connected, it may be considered as unauthorized access and legal actions can be taken against you.
■ Do not use the Wi-Fi function outside the country of purchase.
Depending on the country, there may be restrictions on the use of radio waves and any violations could be punishable by law.
Exporting/Bringing the Unit Overseas
Permission from the U.S. government may be required when bringing the unit to an export controlled country set by the U.S. government (such as Cuba, Iraq, North Korea, Iran, Rwanda, and Syria. As of December, 2012). For more information, consult the U.S. Embassy Commercial Service.
Image Monitoring via Direct Connection (DIRECT MONITORING)
You can check the image on the camera via direct connection (Wi-Fi Direct) with a smartphone (or computer), without the need for an access point (wireless LAN router).
\- Recording of videos and still images may be performed while monitoring.

flowchart
graph TD
    A["Wi-Fi"] --> B["Device 1"]
    A --> C["Device 2"]
    B -.-> D["Mobile Phone"]
    C -.-> D
    style A fill:#f9f,stroke:#333
    style B fill:#ccf,stroke:#333
    style C fill:#ccf,stroke:#333
    style D fill:#fff,stroke:#333
Caution :
- This function is not designed for disaster or crime prevention.
- To prevent the situation of forgetting to turn off the power, this unit will turn off automatically after 10 days of continuous usage.
- When not monitoring from a smartphone (or computer), the focus of the camera is fixed.
- Even when monitoring from a smartphone (or computer), the focus of the camera will be fixed if not operated for more than 3 hours. (Focus works again when the camera is operated.)
- You may have difficulty establishing a connection via direct monitoring in an environment where the camera is placed away from the smartphone (or computer). In this case, connect using the access point (wireless LAN router).
"Image Monitoring via an Access Point at Home (INDOOR MONITORING)"
(註 p. 135)
What You Need
• Smartphone or Windows computer
(A wireless LAN that is compatible with WPA2 is necessary.)
Settings Required in Advance
Set up your camera and smartphone (or computer) by performing the following operations.
For a smartphone with WPS support, refer to the "Wi-Fi Protected Setup (WPS)".
\*WPS is a method to connect the camera and the smartphone wirelessly by easy button operations.
Connecting the Smartphone to the Camera Wirelessly
Connect the smartphone to the camera by either of the following methods.
■ Connection by entering the Wi-Fi password
1 Tap "MENU".
(Operation on this camera)
Set the camera to the recording mode.

text_image
M
WT
M
D
←PLAY
REC
MENU
• The top menu appears.
2 Tap the "Wi-Fi" (💡) icon.
(Operation on this camera)

text_image
TOP MENU
?
3 Tap the "DIRECT MONITORING" (☐) icon in the "Wi-Fi" menu. (Operation on this camera)

text_image
Wi-Fi
新安智能设备
新安智能设备
新安智能设备
新安智能设备
新安智能设备
新安智能设备
新安智能设备
4 Tap "START" (→).
(Operation on this camera)

text_image
DIRECT MONITORING
OK
Cancel
OK
Cancel
OK
Cancel
HTTP
OK
Cancel
\- When iFrame is selected for "VIDEO REC FORMAT", the following display appears and recording mode is switched to the 60i mode in AVCHD.

text_image
DIRECT MONITORING
VIDEO RECORDING AT 60i
WHEN USING Wi-Fi
5 Check the SSID and the PASS being displayed on the screen of the camera.

text_image
DIRECT MONITORING
SET UP WI-FI SETTING ON
CONNECTING DEVICE
SSID:..........
PASS:..........
STOP
WPS
6 Select the SSID in step 5 from the Wi-Fi network selection screen of your smartphone, and enter the PASS on the password screen. (Operation on the smartphone (or computer))

natural_image
Illustration of a hand holding a smartphone with a pen, no text or symbols present
\- For details on connecting your smartphone (or computer) to a Wi-Fi network, please refer to the instruction manual of the phone terminal in use.
7 A connection is established and 🔔 appears on the camera's screen.

natural_image
Close-up of purple iris flowers with green foliage, no visible text or symbols
■ Connection by Wi-Fi Protected Setup (WPS)
1 Tap "MENU".
(Operation on this camera)
Set the camera to the recording mode.

text_image
M
WT
D
• The top menu appears.
2 Tap the "Wi-Fi" (💡) icon.
(Operation on this camera)

text_image
TOP MENU
?
3 Tap the "DIRECT MONITORING" (☐) icon in the "Wi-Fi" menu. (Operation on this camera)

text_image
Wi-Fi
智能家庭管理
智能家庭管理
智能家庭管理
智能家庭管理
智能家庭管理
智能家庭管理
4 Tap "START" (→).
(Operation on this camera)

text_image
DIRECT MONITORING
?
HTTP
\- When iFrame is selected for "VIDEO REC FORMAT", the following display appears and recording mode is switched to the 60i mode in AVCHD.

text_image
DIRECT MONITORING
VIDEO RECORDING AT 60i
WHEN USING Wi-Fi
5 Tap "WPS".
(Operation on this camera)

text_image
DIRECT MONITORING
SET UP WI-FI SETTING ON
CONNECTING DEVICE
SSID:..........
PASS:..........
STOP
WPS
6 Activate WPS on the smartphone (or computer) within 2 minutes. (Operation on the smartphone (or computer))

natural_image
Illustration of a hand holding a smartphone with a pen, no text or symbols present
• To activate WPS, refer to the instruction manual of the device in use.
7 A connection is established and 🔔 appears on the camera's screen.

natural_image
Close-up of purple iris flowers with green foliage, captured in a photo editing interface (no text or symbols on the flower image itself)
Monitoring the Images from a Smartphone (or Computer)
■ Smartphone (Android / iPhone)
Memo :
\- Prior to use this function, a smartphone application needs to be installed on the smartphone.
"Installing Smartphone Applications" (p. 175)
1 Start "Everio sync. 2" on the smartphone after setting DIRECT MONITORING.

natural_image
Illustration of a hand holding a smartphone with a pen, no text or symbols present
2 Tap "DIRECT MONITORING".

text_image
Everio sync.2
DIRECT MONITORING
CONNECT TO THE CAMERA
DIRECTLY.
YOU CAN USE THE GAME
SCORING FUNCTION.
INDOOR MONITORING
CONNECT VIA ACCESS POINT.
NEED TO REGISTER ACCESS
POINT.
OUTDOOR MONITORING
CONNECT VIA INTERNET.
NEED TO REGISTER ACCESS
POINT AND DDNS.
?
Demo
3 The recording screen is displayed.

text_image
Index
Monitor
PAUSE
T
Tele
Rec
Snapshot
Wide
Pause
Marking
Game Score
\- How to operate from a smartphone "Using Smartphone Applications" (p. 175)
■ Computer (Windows 7)
1 Tap the URL button shown on the camera's screen. (displayed when the computer and the camera are connected wirelessly.)

natural_image
Close-up of purple iris flowers with green foliage, captured via a photo editing interface (no text or symbols on the flower image itself)
\- The URL for the computer to connect to appears.
2 Check the URL being displayed on the camera screen, which starts from "http://".

text_image
CAMERA NETWORK INFO.
URL(LAN):http://**********
**********/
QUIT
\- After checking the URL, tap "QUIT" to return to the previous screen.
3 Start Internet Explorer (web browser) on the computer and enter the URL.

text_image
File name: Internet Log cover
1000000000
\- Operations from the Web browser
"Using the Wi-Fi Function from a Web Browser" (p. 188)
Image Monitoring via an Access Point at Home (INDOOR MONITORING)
Connect to the wireless LAN router at home, the camera and a smartphone (or computer) via access point wirelessly.
From a smartphone (or computer) in connection, you can monitor the images captured by the camera.
\- Recording of videos and still images may be performed while monitoring.

flowchart
graph TD
    A["WiFi"] --> B["Mobile Phone"]
    B --> C["Smartphone"]
    D["Home Icon"] --> E["Human Icon"]
    F["Human Icon"] --> G["Human Icon"]
Caution :
- This function is not designed for disaster or crime prevention.
- To prevent the situation of forgetting to turn off the power, this unit will turn off automatically after 10 days of continuous usage.
- When not monitoring from a smartphone (or computer), the focus of the camera is fixed.
- Even when monitoring from a smartphone (or computer), the focus of the camera will be fixed if not operated for more than 3 hours. (Focus works again when the camera is operated.)
What You Need
• Smartphone or Windows computer
- Wireless LAN router (use a product that has a Wi-Fi certification logo)
- Depending on the wireless LAN router in use and signal strength, you may experience connection problems or slow connections.
Memo :
Operation Method
Connect the camera to the access point (wireless LAN router)

natural_image
Simple line icons showing a printer, a syringe, and a smartphone (no text or symbols)
Connect the camera to the access point by either of the following methods.
■ Wi-Fi Protected Setup (WPS) Registration
Follow the operations below if the access point (wireless LAN router) in use supports WPS.
1 Tap "MENU".
(Operation on this camera)

text_image
M
WT
D
PLAY REC MENU
• The top menu appears.
2 Tap the "Wi-Fi" (💡) icon. (Operation on this camera)

text_image
TOP MENU
?
3 Tap > on the lower right of the screen. (Operation on this camera)

text_image
Wi-Fi
帮助您能够使用
帮助您能够使用
帮助您能够使用
帮助您能够使用
帮助您能够使用
帮助您能够使用
4 Tap "COMMON Wi-Fi SETTING". (Operation on this camera)

text_image
Wi-Fi
Wi-Fi
5 Tap "ACCESS POINTS". (Operation on this camera)

text_image
COMMON WI-FI SETTING
ACCESS POINTS
1.000 2.000 3.000
1.000 2.000 3.000
1.000 2.000 3.000
6 Tap "ADD".
(Operation on this camera)

text_image
ACCESS POINTS
ADD
7 Tap "EZ REGISTRATION WPS". (Operation on this camera)

text_image
ADD
EZ REGISTRATION WPS
1.000 2.000 3.000
1.000 2.000 3.000
1.000 2.000 3.000
8 Activate WPS of the access point (wireless LAN router) within 2 minutes.
• To activate WPS, refer to the instruction manual of the device in use.
9 After registration is complete, tap "OK" on the camera's screen. (Operation on this camera)

text_image
REGISTERED
SSID:******
ENCRYPTION METHOD
WPA2
OK
■ Search the access point, and select from the list.
Set the name (SSID) of the access point (wireless LAN router) and the password beforehand.
1 Tap "MENU". (Operation on this camera)

text_image
M
WT
D
PLAY REC MENU
• The top menu appears.
2 Tap the "Wi-Fi" (💡) icon. (Operation on this camera)

text_image
TOP MENU
?
3 Tap > on the lower right of the screen. (Operation on this camera)

text_image
Wi-Fi
我的电脑
我的电脑
我的电脑
我的电脑
我的电脑
4 Tap "COMMON Wi-Fi SETTING". (Operation on this camera)

text_image
Wi-Fi
Wi-Fi
5 Tap "ACCESS POINTS". (Operation on this camera)

text_image
COMMON WI-FI SETTING
ACCESS POINTS
6 Tap "ADD". (Operation on this camera)

text_image
ACCESS POINTS
ADD
7 Tap "SEARCH". (Operation on this camera)

text_image
ADD
SEARCH
?
- The search results appear on the camera's screen.
- "UNABLE TO FIND THE ACCESS POINT" message appears if there is no access point in the surrounding area.
8 Tap the name (SSID) of the desired access point from the list of search results.
(Operation on this camera)

text_image
SEARCH
SEARCH AGAIN
9 Register a password.
(Operation on this camera)

text_image
PASSWORD
A/a/1 . @ ABC DEF DELETE
← GHI JKL MNO →
PQRS TUV WXYZ
SET - + CANCEL
- Tap on the on-screen keyboard to enter characters. The character changes with every tap.
"ABC", for example, enter "A" by tapping once, "B" by tapping twice, or "C" by tapping 3 times.
- Tap "DELETE" to delete a character.
- Tap "CANCEL" to exit.
- Tap "A/a/1" to select character input type from upper case letter, lower case letter, and number.
- Tap or to move one space to the left or right.
- The password is not required if the wireless LAN router is not security protected.
10 After registration is complete, tap "OK" on the camera's screen. (Operation on this camera)

text_image
REGISTERED
SSID:**
ENCRYPTION METHOD
WPA2
OK
- Other methods, such as "Manual Registration" and "WPS PIN Registration" are also available. Refer to the following link for details. "Registering the Access Points of the Camera to Connect (ACCESS POINTS)" (p. 164)
Connecting the smartphone (or computer) to the access point (wireless LAN router)

natural_image
Simple line icons showing a folder, a battery, and a smartphone (no text or symbols)
- Connect the smartphone (or computer) to the access point (wireless LAN router) at home.
- For details on connections, refer to the instruction manuals of the device in use or the wireless LAN router.
- This setting is unnecessary if the smartphone (or computer) has already been connected to the access point (wireless LAN router) at home.
Monitoring the images by connecting the smartphone and the camera

natural_image
Simple line icons showing a camera, a syringe, and a smartphone (no text or symbols)
\- Install "Everio sync. 2" on the smartphone in advance.
"Installing Smartphone Applications" (p. 175)
■ Operation on this camera
1 Tap "MENU".
(Operation on this camera)

text_image
M
WT
D
< PLAY REC MENU
• The top menu appears.
2 Tap the "Wi-Fi" (💡) icon. (Operation on this camera)

text_image
TOP MENU
?
3 Tap "INDOOR MONITORING" ( operation on this camera)

text_image
Wi-Fi
智能驾驶监控
智能驾驶监控
智能驾驶监控
智能驾驶监控
智能驾驶监控
智能驾驶监控
智能驾驶监控
智能驾驶监控
智能驾驶监控
智能驾驶监控
智能驾驶监控
智能驾驶监控
智能驾驶监控
智能驾驶监控
智能驾驶监控
智能驾驶监控
智能驾驶监控
智能驾驶监控
智能驾驶监控
智能驾驶监控
智能驾驶监控
智能驾驶监控
智能驾驶监控
智能驾驶监控
智能驾驶监控
智能驾驶监测
智能驾驶监测
智能驾驶监测
智能驾驶监测
智能驾驶监测
智能驾驶监测
智能驾驶监测
智能驾驶监测
智能驾驶监测
智能驾驶监测
智能驾驶监测
智能驾驶监测
智能驾驶监测
智能驾驶监测
智能驾驶监测
智能驾驶监测
智能驾驶监测
智能驾驶监测
智能驾驶监测
智能驾驶监测
智能驾驶监测
智能驾驶监测
智能驾驶监测
智能驾驶监测
智能驾驶监测
智能驾驶检测
智能驾驶检测
智能驾驶检测
智能驾驶检测
智能驾驶检测
智能驾驶检测
智能驾驶检测
智能驾驶检测
智能驾驶检测
智能驾驶检测
智能驾驶检测
智能驾驶检测
智能驾驶检测
智能驾驶检测
智能驾驶检测
智能驾驶检测
智能驾驶检测
智能驾驶检测
智能驾驶检测
智能驾驶检测
智能驾驶检测
智能驾驶检测
智能驾驶检测
智能驾驶检测
智能驾驶检测
智能驾驶检单
智能驾驶检单
智能驾驶检单
智能驾驶检单
智能驾驶检单
智能驾驶检单
智能驾驶检单
智能驾驶检单
智能驾驶检单
智能驾驶检单
智能驾驶检单
智能驾驶检单
智能驾驶检单
智能驾驶检单
智能驾驶检单
智能驾驶检单
智能驾驶检单
智能驾驶检单
智能驾驶检单
智能驾驶检单
智能驾驶检单元
4 Tap "START" (→). (Operation on this camera)

text_image
INDOCR MONITORING
HTTP
高级浏览器管理
高级浏览器管理
高级浏览器管理
5 Start making a connection. (Operation on this camera)

text_image
INDOOR MONITORING
CONNECTING
SSID:******
STOP
\- Name (SSID) of the access point (wireless LAN router) in connection is displayed.
6 The following is displayed when the camera is connected to the access point.

natural_image
Close-up of purple iris flowers with green foliage, displayed in a photo editing interface (no text or symbols on the flower image itself)
\- Tap "URL" to display the URL required for connecting the camera from browser.
■ Operation on the smartphone
1 Start "Everio sync. 2" on the smartphone after setting INDOOR MONITORING.

natural_image
Illustration of a hand holding a smartphone with a pen, no text or symbols present
\- Tap "START" in INDOOR MONITORING on the camera to start.
2 Tap "INDOOR MONITORING".

text_image
Everio sync.2
DIRECT MONITORING
CONNECT TO THE CAMERA
DIRECTLY.
YOU CAN USE THE GAME
SCORING FUNCTION.
INDOOR MONITORING
CONNECT VIA ACCESS POINT.
NEED TO REGISTER ACCESS
POINT.
OUTDOOR MONITORING
CONNECT VIA INTERNET.
NEED TO REGISTER ACCESS
POINT AND DDNS.
?
Demo
3 The recording screen is displayed.

text_image
Index
Monitor
PAUSE
Tele
Rec
Snapshot
Wide
Pause
Marking
Game Score
\- How to operate from a smartphone "Using Smartphone Applications" (p. 175)
■ Monitoring from the computer (Windows7)
1 Tap the URL button shown on the camera's screen. (displayed when the computer and the camera are connected wirelessly.)

natural_image
Close-up of purple iris flowers with green foliage, no visible text or symbols
\- The URL for the computer to connect to appears.
2 Check the URL being displayed on the camera screen, which starts from "http://".

text_image
CAMERA NETWORK INFO.
URL(LAN):http://**********
**********/
QUIT
\- After checking the URL, tap "QUIT" to return to the previous screen.
3 Start Internet Explorer (web browser) on the computer and enter the URL.

text_image
Private Internet User
100% CI
4 Log in with your username and password.
- The username is "everio" and the default password is "0000".
"Changing the Settings" (p. 153)
• Operations from the Web browser
"Using the Wi-Fi Function from a Web Browser" (p. 188)
Image Monitoring via the Internet (OUTDOOR MONITORING)
You can check the image on the camera via internet connection with a smartphone (or computer).
\* To use this function, it is necessary to prepare for an UPnP (Universal Plug and Play) compatible wireless LAN router, and an internet connection from which the global IP address can be obtained.
\- Recording of videos and still images may be performed while monitoring.

flowchart
graph LR
    A["Device"] --> B["Satellite"]
    B --> C["Global"]
    C --> D["Mobile"]
    style A fill:#f9f,stroke:#333
    style D fill:#bbf,stroke:#333
Setting Multiple Cameras in the Same Network :

flowchart
graph TD
    A["Input"] --> B["Module 1"]
    A --> C["Module 2"]
    A --> D["Module 3"]
    B --> E["Output"]
    C --> E
    D --> E
\- To set up multiple cameras, you need to fix the HTTP ports for each of the cameras.
"Changing the HTTP Port
(DIRECT MONITORING/INDOOR MONITORING/OUTDOOR
MONITORING)" (p. 155)
What You Need
• Smartphone or Windows computer
\- Wireless LAN router that supports UPnP (use a product that has a Wi-Fi certification logo)
To check whether UPnP is supported, please refer to the instruction manual of the wireless LAN router in use.
\- Internet connection with an obtainable global IP address
\* Global IP address is an IP address that is specific in all over the internet. For more information, contact your internet service provider.
Memo :
\- Depending on the wireless LAN router in use and signal strength, you may experience connection problems or slow connections.
\- When the zoom or pan cradle is operated by using the smartphone or computer, it may take longer for responses as compared to the manual operations.
Settings Required in Advance
To operate, it is necessary to connect the camera to the internet via an access point (UPnP compatible wireless LAN router) in the house. As such, the following 3 settings are required.
\*The above settings are not necessary if they have already been set for other functions.
1 Registering an access point
"Registering the Access Points of the Camera to Connect (ACCESS POINTS)" (p. 164)
2 Obtaining a dynamic DNS account
"Obtaining a Dynamic DNS (DDNS) Account" (p. 157)
3 Setting the account on this camera
"Setting Dynamic DNS on this Camera (OUTDOOR MONITORING)"
(p. 158)
Caution :
\- Even if registration is done correctly to the camera, access may be temporarily unavailable such as when the dynamic DNS server is down. To check whether the dynamic DNS server is working properly, access and check the DDNS server with a computer, etc.
https://dd3.jvckenwood.com/user/
Operation Method
■ Operation on this camera
Memo :
\- Prior to use this function, a smartphone application needs to be installed on the smartphone.
"Installing Smartphone Applications" (p. 175)
1 Tap "MENU".
(Operation on this camera)

text_image
M
WT
D
<
• The top menu appears.
2 Tap the "Wi-Fi" (💡) icon.
(Operation on this camera)

text_image
TOP MENU
?
3 Tap "OUTDOOR MONITORING" (☐).
(Operation on this camera)

text_image
Wi-Fi
国家智能交通站
国家智能交通站
国家智能交通站
国家智能交通站
国家智能交通站
国家智能交通站
4 Tap "START" (→).
(Operation on this camera)

text_image
OUTDOOR MONITORING
DDNS
HTTP
UPnP
5 Start making a connection.
(Operation on this camera)

text_image
OUTDOOR MONITORING
CONNECTING
SSID:******
STOP
\- Name (SSID) of the access point (wireless LAN router) in connection is displayed.
6 The following is displayed when the camera is connected to the access point.

natural_image
Close-up of purple iris flowers with green foliage, captured in a photo editing interface (no text or symbols on the flower image itself)
- The URL (WAN) for the smartphone to connect to appears. (Does not appear if DDNS is not set or set incorrectly.)
- "XUPnP" is displayed when UPnP cannot be used.
7 Check the URL (WAN).

text_image
CAMERA NETWORK INFO.
USE THE URL BELOW TO CONNECT
FROM AN OUTSIDE LOCATION
URL(WAN):http://*****
QUIT
- After checking the URL, tap "QUIT" to return to the previous screen.
- "XUPnP" is displayed when UPnP cannot be used.
■ Operation on the smartphone
1 Start "Everio sync. 2" on the smartphone after setting "OUTDOOR MONITORING".

natural_image
Illustration of a hand holding a smartphone with a pen, no text or symbols present
\- Tap "START" in OUTDOOR MONITORING on the camera to start.
2 Tap "OUTDOOR MONITORING".

text_image
Everio sync.2
DIRECT MONITORING
CONNECT TO THE CAMERA
DIRECTLY.
YOU CAN USE THE GAME
SCORING FUNCTION.
INDOOR MONITORING
CONNECT VIA ACCESS POINT.
NEED TO REGISTER ACCESS
POINT.
OUTDOOR MONITORING
CONNECT VIA INTERNET.
NEED TO REGISTER ACCESS
POINT AND DDNS.
?
Demo
3 Log in with your username and password. (if authentication cannot be achieved)

text_image
START
HTTP AUTHORIZATION
AUTHORIZATION FAILED
CHECK USER NAME AND PASSWORD
USERNAME
PASSWORD
OK CANCEL
\- The username is "everio" and the default password is "0000". "Changing the Settings" (p. 153)
4 The recording screen is displayed.

text_image
Index
Monitor
PAUSE
T
Tele
Rec
Snapshot
Wide
Pause
Marking
Game Score
\- How to operate from a smartphone "Using Smartphone Applications" (p. 175)
■ Monitoring from the computer (Windows7)
1 On the Internet Explorer (web browser), enter the URL (WAN) that is checked by "Operation on this camera".

text_image
File selection: Internet Explorer
100%DBYK
2 Log in with your username and password.
- The username is "everio" and the default password is "0000".
"Changing the Settings" (p. 153)
• Operations from the Web browser
"Using the Wi-Fi Function from a Web Browser" (p. 188)
Caution :
- To monitor images while you are out, make sure in advance that you can establish a connection via the Internet by entering the URL (WAN) displayed in "Network Information".
However, you cannot monitor (operate) in the same way as while you are out when your smartphone (or computer) is connected via access point (wireless LAN router) at home.
- Start using after changing the password.
If the password is not changed, there is a high risk of unauthorized access from others.
Also, avoid using easily guessable passwords, such as birth dates. You are recommended to change your password periodically.
"Setting the Password (DIRECT MONITORING/INDOOR MONITORING/OUTDOOR MONITORING)" (p. 155)
\- There is no guarantee that the operations will work with all computer environments. For example, the video download feature of mobile safari browser, etc. is not supported.
Caution :
- Too much usage may cause high communication fees to be incurred, and there may be a limit to the volume of communication. For more details, please check your Internet or smartphone subscription.
- If the network connection is slow, video images may appear jumpy, or audio sound may be interrupted or delayed.
- This function is not designed for disaster or crime prevention.
- To prevent the situation of forgetting to turn off the power, this unit will turn off automatically after 10 days of continuous usage.
- When not monitoring from a smartphone (or computer), the focus of the camera is fixed.
- Even when monitoring from a smartphone (or computer), the focus of the camera will be fixed if not operated for more than 3 hours. (Focus works again when the camera is operated.)
Sending Still Images via E-mail upon Detection of Face or Movement (DETECT/MAIL)
A still image is automatically captured and sent via e-mail when faces or movements are detected by the camera.

flowchart
graph LR
    A["Folder"] --> B["Envelope Icon"]
    B --> C["Printer Icon"]
Memo :
- Size of the still images shot by DETECT/MAIL is 640 x 360.
- Operation via connection to a smartphone (or computer) using "INDOOR MONITORING"/"OUTDOOR MONITORING" may be performed even during detection standby.
- When the camera is connected to a smartphone (or computer), "DETECT/MAIL SETTING" will be temporarily unavailable.
- You can set to record videos on this unit automatically during detection.
"Recording on this unit" (p. 153)
- To prevent too many e-mails from being sent in case of detections occurring frequently, you can set the interval of e-mail delivery.
"Setting detection interval" (p. 153)
What You Need
- Wireless LAN router (use a product that has a Wi-Fi certification logo)
- Internet connection
- Account for sending e-mails (Supports SMTP. E-mail services that is only accessible from the web cannot be used.)
Settings Required in Advance
To send e-mails, the following settings are required in advance.
\*The above settings are not necessary if they have already been set for other functions.
1 Registering an access point
"Registering the Access Points of the Camera to Connect (ACCESS POINTS)" (p. 164)
2 Setting the account for sending e-mails
"Setting the Sender's E-mail Address of the Camera" (p. 159)
3. Registering the recipient's e-mail address for notification mails (up to 8 addresses)
"Registering the Recipient's E-mail Address of the Camera" (p. 161)
Operation Method
1 Tap "MENU".
Set the camera to the recording mode.

text_image
M
WT
D
← PLAY REC MENU
\- The top menu appears.
2 Tap the "Wi-Fi" (💡) icon.

text_image
TOP MENU
?
3 Tap "DETECT/MAIL" (☐).

text_image
Wi-Fi
智能家庭管理器
智能家庭管理器
智能家庭管理器
智能家庭管理器
智能家庭管理器
智能家庭管理器
4 Tap "DETECT/MAIL ATTN.".

text_image
DETECT/MAIL
1.0
REC ON
5 Select "DETECT/MAIL ATTN.", then tap ↩.

text_image
DETECT/MAIL ATTN.
- To display the 🔒 icon, tap the e-mail address.
- To cancel the e-mail address, press the icon one more time.
- Up to 8 e-mail addresses can be selected.
6 Tap "START" (→).

text_image
DETECT/MAIL
10 MHz
REC ON
7 Start making a connection.

text_image
DETECT/MAIL
CONNECTING
SSID:******
STOP
8 DETECT/MAIL detection standby

text_image
DETECT/MAIL
"MOTION DETECTION"
DETECTION ON STANDB/
URL
STOP
• Detection is suspended for the first 5 seconds.
9 DETECT/MAIL detection in progress (an e-mail is automatically sent out after detection is completed)

text_image
DETECT/MAIL
"MOTION DETECTION"
MOTION DETECTION
IN PROGRESS
PHOTO
STOP
- The "PHOTO" icon appears on the screen for about 2 seconds upon detection.
- Images are captured automatically when moving subjects or human faces appear on the camera's screen. (The PHOTO icon appears on the screen upon detection.)
- The captured still images will be sent via e-mail to the selected recipients.
10 Detection suspended

text_image
DETECT/MAIL
"MOTION DETECTION"
DETECTION SUSPENDED DUE TO
CHANGE IN DETECTION INTERVAL
URL
STOP
- Until the next detection is made, detection is suspended for the pre-set length of time.
- "DETECTION INTERVAL" can be selected from 15 seconds, 1 minute, 3 minutes, 10 minutes, 30 minutes and 60 minutes.
"Setting the Detection Interval of this Camera (DETECT/MAIL SETTING)" (p. 163)
Caution :
- This function is not designed for disaster or crime prevention.
• To prevent the situation of forgetting to turn off the power, this unit will turn off automatically after 10 days of continuous usage.
- While on standby for notification mails, the focus is fixed. Perform the camera settings first, then enable notification mails.
Focus may not be set correctly if the notification mails start before camera settings are made. In this case, disable notification mails temporarily, then enable it again.
- Be careful not to cause too much sending of e-mails. Depending on the internet provider that provides the e-mail service, the e-mails may be marked as spam or the usage limited may be exceeded.
Be sure to check the terms of the internet provider in advance to find out if there are any restrictions on the number or size of e-mails that can be sent.
- When setting another person as the recipient, be sure to obtain his/her consent in advance.
- If you reply to the received e-mail by using this unit, the receiver can not check your replied e-mail by using this unit.
Check the e-mails sent by this unit from computer, etc.
- JVC will not be responsible for any trouble that occurs upon the sending of mails.
Record and Send Videos via E-mail (VIDEO MAIL)
Videos of up to 15 seconds can be recorded and sent via e-mail. With this function, short videos can be delivered easily even on a daily basis, such as to show the growing up of small children to their distant grandparents.

flowchart
graph LR
    A["Battery"] --> B["Email"]
    B --> C["Mobile Device Icon"]
Memo :
\- Specifications of the videos sent via video mail are as follows:
System: MP4
Video:
\- H.264/MPEG-4 AVC baseline profile codec
\- 640 x 360 resolution
\- 30p frame rate
\- 1 Mbps bit rate
Audio:
\- Advanced Audio Coding (AAC) system
\- 48 kHz sampling rate
\- 16 bit
\- 2 channels
What You Need
- Wireless LAN router (use a product that has a Wi-Fi certification logo)
- Internet connection
- Account for sending e-mails (Supports SMTP. E-mail services that is only accessible from the web cannot be used.)
Settings Required in Advance
To send e-mails, the following settings are required in advance.
\*The above settings are not necessary if they have already been set for other functions.
1 Registering an access point
"Registering the Access Points of the Camera to Connect (ACCESS
POINTS)" (p. 164)
2 Setting the account for sending e-mails
"Setting the Sender's E-mail Address of the Camera" (p. 159)
3 Registering the recipient's e-mail address (up to 8 addresses)
"Registering the Recipient's E-mail Address of the Camera" (p. 161)
Operation Method
1 Tap "MENU".
Set the camera to the recording mode

text_image
M
WT
D
← PLAY REC MENU
• The top menu appears.
2 Tap the "Wi-Fi" (💡) icon.

text_image
TOP MENU
?
3 Tap "VIDEO MAIL" (✗).

text_image
Wi-Fi
智能家庭设置
智能家庭设置
智能家庭设置
智能家庭设置
智能家庭设置
智能家庭设置
智能家庭设置
4 Tap "VIDEO MAIL ADDRESS".

text_image
VIDEO MAIL
返回新邮件
返回新邮件
返回新邮件
5 Select "VIDEO MAIL ADDRESS", then tap ↩.

text_image
VIDEO MAIL ADDRESS
1234 888 888
1234 888 888
1234 888 888
1234 888 888
- To display the 📁 icon, tap the e-mail address.
- To cancel the e-mail address, press the icon one more time.
- Up to 8 e-mail addresses can be selected.
6 Tap "START" (→).

text_image
VIDEO MAIL
返回要连接到
返回要连接到
返回要连接到
7 Press the START/STOP button to start recording.

text_image
START
/STOP
\- Or, tap the REC on screen.
8 Recording starts after the 5-second countdown.
\- Recording starts immediately after pressing the START/STOP button again during the countdown.

text_image
4
\- You can allow the recording to be performed for 15 seconds or press the START/STOP button to stop.
9 Tap "SEND".

text_image
VIDEO MAIL
SEND THIS VIDEO?
SEND STOP
PLAY TO CHECK
- Sending of the video mail starts.
- To check the file, tap "PLAY TO CHECK".
- When it is complete, tap "OK".
Caution :
- Be careful not to cause too much sending of e-mails. Depending on the internet provider that provides the e-mail service, the e-mails may be marked as spam or the usage limited may be exceeded.
Be sure to check the terms of the internet provider in advance to find out if there are any restrictions on the number or size of e-mails that can be sent.
- When setting another person as the recipient, be sure to obtain his/her consent in advance.
- Depending on the e-mail service provider, the sending of video mail may not be supported.
- Too much usage may cause high communication fees to be incurred, and there may be a limit to the volume of communication. For more details, please check your Internet or smartphone subscription.
- If you reply to the received e-mail by using this unit, the receiver can not check your replied e-mail by using this unit.
Check the e-mails sent by this unit from computer, etc.
- JVC will not be responsible for any trouble that occurs upon the sending of mails.
- Videos captured via video mail are not saved to the camera or SD card.
- Videos that have already been captured cannot be sent.
Image Monitoring on TV (TV MONITORING)
You can connect this unit to a DLNA compatible TV wirelessly to playback still images on this unit on the TV screen. (This function may not be available depending on the DLNA device in use.)
Connect via access point (wireless LAN router) at home.
What You Need
• DLNA compatible device
- Wireless LAN router (use a product that has a Wi-Fi certification logo)
Settings Required in Advance
1 Connect the camera to the access point (wireless LAN router).
"Registering the Access Points of the Camera to Connect (ACCESS POINTS)" (p. 164)
2. Connecting the DLNA compatible device to the access point (this function is available for a connection via cables as well)
\*The above settings are not necessary if they have already been set for other functions.
Operation Method
1 Tap "MENU".
(Operation on this camera)

text_image
M
WT
D
<
• The top menu appears.
2 Tap the "Wi-Fi" (💡) icon.
(Operation on this camera)

text_image
TOP MENU
?
3 Tap "TV MONITORING" (☐).
(Operation on this camera)

text_image
Wi-Fi
网络设备安装
网络设备安装
网络设备安装
网络设备安装
网络设备安装
网络设备安装
网络设备安装
4 Tap "START" (→).
(Operation on this camera)

text_image
TV MONITORING
MAC
MAC
5 Start making a connection.
(Operation on this camera)

text_image
TV MONITORING
CONNECTING
SSID:******
STOP
6 Connection in progress

text_image
TV MONITORING
NOW PROCESSING
STOP
7 After the connection is completed, wait for the DLNA device to start up. (Operation on this camera)

text_image
TV MONITORING
QUIT
\- If a considerable number of videos/still images are recorded in the camera, it may take some time to start.
8 Operate from the DLNA device
- From the DLNA device, access to the still image folder on Everio to select the images to playback.
- For operation details, refer to the instruction manual of the DLNA device in use.
9 Images appear on the monitor of the DLNA device (Operation on DLNA device)

natural_image
Close-up of three purple iris flowers with yellow centers, surrounded by green foliage (no text or symbols visible)
\- From the following instructions, perform operations on the DLNA device.
For details on using the TV, refer to the instruction manual of the TV in use.
Memo :
\- If the DLNA compatible TV in use cannot detect Everio, tap "STOP" to start from the step 1 again.
Caution :
- This function is not designed for disaster or crime prevention.
- We do not guarantee the compatibility of all the DLNA compatible TVs.
- This function is available when a connection to the access point is made with wires as well.
- To prevent the situation of forgetting to turn off the power, this unit will turn off automatically after 10 days of continuous usage.
EASY STORAGE
You can save the videos and still images to your computer by following easy steps.
Connect to the computer wirelessly via access point at home (wireless LAN router).
What You Need
• Computer (install LoiLoFit for Everio in your computer)
"Installing the Provided Software" (p. 115)
- Wireless LAN router (use a product that has a Wi-Fi certification logo)
Settings Required in Advance
1 Registration of the required information for connecting the camera to the access point (wireless LAN router) is necessary.
"Registering the Access Points of the Camera to Connect (ACCESS POINTS)" (v ^2 p. 164)
2 It is also necessary to connect the computer to the access point in advance.
\*The above settings are not necessary if they have already been set for other functions.
Operation Method
1 Tap "MENU". (Operation on this camera)

text_image
M
WT
D
• The top menu appears.
2 Tap the shortcut menu (5). (Operation on this camera)

text_image
TOP MENU
?
3 Tap "EASY STORAGE". (Operation on this camera)

text_image
SHORTCUT MENU
返回到帐户
返回到帐户
返回到帐户
OFF
OK
OFF
4 Start making a connection. (Operation on this camera)

text_image
EASY STORAGE
CONNECTING
SSID:******
STOP
5 Connection is established; backup starts. (Operation on this camera)

text_image
EASY STORAGE
NOW PROCESSING
STOP
6 Everio Watcher appears on the task bar of the computer.
• To see the status of backing up and remaining time, move the arrow to it.
7 Backup is completed.
(Operation on this camera)

text_image
EASY STORAGE
BACKUP COMPLETED
TOUCH "OK" OR
WAIT 10 SECONDS FOR CAMERA
TO POWER OFF AUTOMATICALLY
OK
\- Tap "OK", or wait for about 10 seconds to turn off the power automatically.
Memo :
•
•
Recording the Location Information
You can record the location information of the venue where recording is taking place via direct connection (Wi-Fi Direct) with a smartphone.

flowchart
graph TD
    A["Wi-Fi"] --> B["Laptop"]
    B --> C["GPS"]
    C --> D["Smartphone"]
    style A fill:#f9f,stroke:#333
    style B fill:#ccf,stroke:#333
    style C fill:#cfc,stroke:#333
    style D fill:#fcc,stroke:#333
Memo :
\- To obtain the location information, it is necessary to connect the smartphone to the camera and start the smartphone application. Also, setting the "LOC INFO TRANS INT" for the smartphone application is necessary.
"Smartphone Application Settings" (p. 186)
• Activate the GPS function of the smartphone in advance.
\- The recorded location information can be used on the software provided with this unit.
What You Need
\- Smartphone
Settings Required in Advance
Set up your camera and smartphone by performing the following operations. For a smartphone with WPS support, refer to the "Wi-Fi Protected Setup (WPS)".
\*WPS is a method to connect the camera and the smartphone wirelessly by easy button operations.
■ Connection by entering the Wi-Fi password
1 Tap "MENU".
(Operation on this camera)
Set the camera to the recording mode.

text_image
M
WT
D
<< PLAY REC MENU
• The top menu appears.
2 Tap the "Wi-Fi" (💡) icon.
(Operation on this camera)

text_image
TOP MENU
?
3 Tap the "DIRECT MONITORING" (☐) icon in the "Wi-Fi" menu. (Operation on this camera)

text_image
Wi-Fi
智能家庭管理器
智能家庭管理器
智能家庭管理器
智能家庭管理器
智能家庭管理器
智能家庭管理器
智能家庭管理器
智能家庭管理器
智能家庭管理器
智能家庭管理器
智能家庭管理器
智能家庭管理器
智能家庭管理器
智能家庭管理器
智能家庭管理器
智能家庭管理器
智能家庭管理器
智能家庭管理器
智能家庭管理器
智能家庭管理器
智能家庭管理服务器
智能家庭管理服务器
智能家庭管理服务器
智能家庭管理服务器
智能家庭管理服务器
智能家庭管理服务器
智能家庭管理服务器
智能家庭管理服务器
智能家庭管理服务器
智能家庭管理服务器
智能家庭管理服务器
智能家庭管理服务器
智能家庭管理服务器
智能家庭管理服务器
智能家庭管理服务器
智能家庭管理服务器
智能家庭管理服务器
智能家庭管理服务器
智能家庭管理服务器
智能家庭管理服务器
智能家庭管理服务
4 Tap "START" (→).
(Operation on this camera)

text_image
DIRECT MONITORING
OK
Cancel
OK
Cancel
OK
Cancel
HTTP
Cancel
\- When iFrame is selected for "VIDEO REC FORMAT", the following display appears and recording mode is switched to the 60i mode in AVCHD.

text_image
DIRECT MONITORING
VIDEO RECORDING AT 60i
WHEN USING Wi-Fi
5 Check the SSID and the PASS being displayed on the screen of the camera.

text_image
DIRECT MONITORING
SET UP WI-FI SETTING ON
CONNECTING DEVICE
SSID:..........
PASS:..........
STOP
WPS
6 Select the SSID in step 5 from the Wi-Fi network selection screen of your smartphone, and enter the PASS on the password screen. (Operation on the smartphone (or computer))

natural_image
Illustration of a hand holding a smartphone and a pen, no text or symbols present
\- For details on connecting your smartphone (or computer) to a Wi-Fi network, please refer to the instruction manual of the phone terminal in use.
7 A connection is established and 🔔 appears on the camera's screen.

natural_image
Close-up of purple iris flowers with green foliage, no visible text or symbols
■ Connection by Wi-Fi Protected Setup (WPS)
1 Tap "MENU".
(Operation on this camera)
Set the camera to the recording mode.

text_image
M
WT
D
←PLAY REC MENU
• The top menu appears.
2 Tap the "Wi-Fi" (💡) icon.
(Operation on this camera)

text_image
TOP MENU
?
3 Tap the "DIRECT MONITORING" (图标) icon in the "Wi-Fi" menu. (Operation on this camera)

text_image
Wi-Fi
新客智能设备
新客智能设备
新客智能设备
新客智能设备
新客智能设备
新客智能设备
4 Tap "START" (→).
(Operation on this camera)

text_image
DIRECT MONITORING
返回数据源
返回数据源
返回数据源
返回数据源
返回数据源
返回数据源
返回数据源
返回数据源
返回数据源
返回数据源
返回数据源
返回数据源
返回数据源
返回数据源
返回数据源
返回数据源
返回数据源
返回数据源
返回数据源
返回数据源
返回数据源
返回数据源
返回数据源
返回数据源
返回数据源
返回数据源源
返回数据源源
返回数据源源
返回数据源源
返回数据源源
返回数据源源
返回数据源源
返回数据源源
返回数据源源
返回数据源源
返回数据源源
返回数据源源
返回数据源源
返回数据源源
返回数据源源
返回数据源源
返回数据源源
返回数据源源
返回数据源源
返回数据源源
返回数据源源
返回数据源源
返回数据源源
返回数据源源
返回数据源源
返回数据源
返回数据源源
返回数据源源
返回数据源源
返回数据源源
返回数据源源
返回数据源源
返回数据源源
返回数据源源
返回数据源源
返回数据源源
返回数据源源
返回数据源源
返回数据源源
返回数据源源
返回数据源源
返回数据源源
返回数据源源
返回数据源源
返回数据源源
返回数据源源
返回数据源源
返回数据源源
返回数据源源
返回数据源
返回数据源
返回数据源
返回数据源
返回数据源
返回数据源
返回数据源
返回数据源
返回数据源
返回数据源
返回数据源
返回数据源
返回数据源
返回数据源
返回数据源
返回数据源
返回数据源
返回数据源
返回数据源
返回数据源
返回数据源
返回数据源
返回数据源
返回数据源
返回数据原
\- When iFrame is selected for "VIDEO REC FORMAT", the following display appears and recording mode is switched to the 60i mode in AVCHD.

text_image
DIRECT MONITORING
VIDEO RECORDING AT 60i
WHEN USING Wi-Fi
5 Tap "WPS".
(Operation on this camera)

text_image
DIRECT MONITORING
SET UP WI-FI SETTING ON
CONNECTING DEVICE
SSID:******
PASS:******
STOP
WPS
6 Activate WPS on the smartphone (or computer) within 2 minutes.
(Operation on the smartphone (or computer))
\- To activate WPS, refer to the instruction manual of the device in use.
7 A connection is established and 🔔 appears on the camera's screen.

natural_image
Close-up of purple iris flowers with green foliage, captured via a video editing interface (no text or symbols on the flower image itself)
Operation Method
1 Activate the GPS function of the smartphone. (Operation on the smartphone)

natural_image
Illustration of a hand holding a smartphone with a pen inserted (no text or symbols visible)
\- For details on using the smartphone, refer to the instruction manual of the device in use.
2 Start "Everio sync. 2" on the smartphone.

natural_image
Illustration of a hand holding a smartphone with a pen, no text or symbols present
3 Tap "DIRECT MONITORING".

text_image
Everio sync.2
DIRECT MONITORING
CONNECT TO THE CAMERA
DIRECTLY.
YOU CAN USE THE GAME
SCORING FUNCTION.
INDOOR MONITORING
CONNECT VIA ACCESS POINT.
NEED TO REGISTER ACCESS
POINT.
OUTDOOR MONITORING
CONNECT VIA INTERNET.
NEED TO REGISTER ACCESS
POINT AND DDNS.
?
Demo
4 Monitor screen is displayed.

text_image
Index
Monitor
PAUSE
Tele
Rec
Snapshot
Wide
Pause
Marking
Game Score
\- To change the time interval for obtaining the GPS location information (OFF-15 sec.), tap ❖.
"Smartphone Application Settings" (p. 186)
5 Receiving the location information (Display on this camera)

text_image
DIRECT MONITORING
0:00:00 [2:04]
URL REC QUIT
\- When the GPS location information is received from the smartphone, an icon (A) is displayed on the camera screen.
6 Start recording.
(Operation on this camera)

text_image
START
/STOP
\- Press the "START/STOP" button to start a normal recording.
Memo :
- Manual recording cannot be performed.
- It is not possible to switch to the playback mode.
Using the Pan Cradle (Sold Separately)
Panning operation (moving the camera to the left/right, horizontal direction) can be controlled via smartphone by setting the camera on the pan cradle. To use a pan cradle, change the setting of "AV TERMINAL" in advance. Change the setting from the menu screen of the camera.
■ Changing the setting of the AV terminal.
\- By default, the AV terminal is set to "AV". To use a pan cradle, change the setting as described in the following steps.
1 Tap "MENU".
(Operation on this camera)

text_image
M
WT
D
PLAY REC MENU
2 Tap "CONNECTION SETTINGS".

text_image
TOP MENU
?
3 Tap "AV TERMINAL".

text_image
CONNECTION SETTINGS
AV TERMINAL
4 Tap "PAN CRADLE".

text_image
AV TERMINAL
AV
PAN CRADLE
\- Tap X to exit the setting screen.
■ Setting the camera to the pan cradle.
\- For how to connect the pan cradle and the camera, refer to the instruction manual of the pan cradle for further details.
1 Set the camera to the pan cradle.

natural_image
Technical line drawing of a mechanical device with a probe inserted, no visible text or symbols
\- For how to connect the pan cradle and the camera, refer to the instruction manual of the pan cradle for further details.
2 Set the power of the pan cradle to "ON".

text_image
DC
OFF AS ON
3 Wait until the pan cradle stops the rotation.

natural_image
Mechanical device with blue circular arrows indicating rotational motion (no text or symbols)
\- When the power is turned ON, pan cradle moves to the left/right to adjust the position.
■ Operations from the smartphone application
\- Connect the camera and the smartphone via DIRECT MONITORING or INDOOR MONITORING/OUTDOOR MONITORING.
"Image Monitoring via Direct Connection (DIRECT MONITORING)"
(p. 132)
"Image Monitoring via an Access Point at Home (INDOOR MONITORING)"
(p. 135)
"Image Monitoring via the Internet (OUTDOOR MONITORING)"
(p. 140)
1 Start "Everio sync. 2".

natural_image
Illustration of a hand holding a smartphone and a pen, no text or symbols present
\- Start the application after confirming that the smartphone is connected to this camera.
2 Tap the connection method.

text_image
Everio sync.2
DIRECT MONITORING
CONNECT TO THE CAMERA
DIRECTLY.
YOU CAN USE THE GAME
SCORING FUNCTION.
INDOOR MONITORING
CONNECT VIA ACCESS POINT.
NEED TO REGISTER ACCESS
POINT.
OUTDOOR MONITORING
CONNECT VIA INTERNET.
NEED TO REGISTER ACCESS
POINT AND DDNS.
?
Demo
3 Tap to perform the panning operation.

text_image
Index
Monitor
←° PAUSE
← Pan
Pan
Tele Rec Snapshot
Wide Pause
Marking Game Score
Memo :
\- Speed of the panning operation can be set in two steps.
"Changing the Panning Speed" (u p. 173)
Changing the Settings
To use the Wi-Fi function, it may be necessary to perform some settings on the camera and smartphone (or computer).
\- Registering the access points to connect (wireless LAN router)
"Registering the Access Points of the Camera to Connect (ACCESS POINTS)" (E p. 164)
\- Obtaining a dynamic DNS account
"Obtaining a Dynamic DNS (DDNS) Account" (p. 157)
\- Setting the account on this camera
"Setting Dynamic DNS on this Camera (OUTDOOR MONITORING)" (r.s. p. 158)
\- Setting the sender's e-mail address
"Setting the Sender's E-mail Address of the Camera" (p. 159)
\- Registering the recipient's e-mail address
"Registering the Recipient's E-mail Address of the Camera" (p. 161)
Menu Settings
Setting Details DIRECT MONITORING Configures various settings related to DIRECT MONITORING.·PASSWORDSets the password to access the camera.“Setting the Password (DIRECT MONITORING/INDOOR MONITORING/OUTDOOR MONITORING)”(€p. 155)·ENFORCED GROUP OWNER (Default: “ON”)Set whether or not to get the owner group permissions.·OFF: Set this if connection to devices that support Wi-Fi Direct fails. (When set to OFF, connection to devices that do not support Wi-Fi Direct will be disabled.)·ON: It is recommended to set this usually.“Setting the Enforced Group Owner (DIRECT MONITORING)”(€p. 156)·HTTP PORT (Default: “80”)Changes the port number to access to the camera.“Changing the HTTP Port (DIRECT MONITORING/INDOOR MONITORING/OUTDOOR MONITORING)”(€p. 156) INDOOR MONITORING Configures various settings related to INDOOR MONITORING.·PASSWORD (Default: “0000”)Selects the password to access the camera.“Setting the Password (DIRECT MONITORING/INDOOR MONITORING/OUTDOOR MONITORING)”(€p. 155)·HTTP PORT (Default: “80”)Changes the port number to access to the camera.“Changing the HTTP Port (DIRECT MONITORING/INDOOR MONITORING/OUTDOOR MONITORING)”(€p. 156) OUTDOOR MONITORING Configures various settings related to OUTDOOR MONITORING.·PASSWORD (Default: “0000”)Selects the password to access the camera.“Setting the Password (DIRECT MONITORING/INDOOR MONITORING/OUTDOOR MONITORING)”(€p. 155)·UPnP (Default: “ON”)Sets the UPnP of the camera.·OFF: Disables UPnP.·ON: Enables UPnP.“Setting the UPnP of this Camera (OUTDOOR MONITORING)”(€p. 157)·DDNS SETTINGConfigures various settings related to DDNS.“Setting Dynamic DNS on this Camera (OUTDOOR MONITORING)”(€p. 158)·HTTP PORT (Default: “80”)Changes the port number to access to the camera.“Changing the HTTP Port (DIRECT MONITORING/INDOOR MONITORING/OUTDOOR MONITORING)”(€p. 156) DETECT/MAIL Configures various settings related to notification mails.·DETECT/ MAIL ATTN.Selects the recipient’s e-mail address for Detect/Mail.“Sending Still Images via E-mail upon Detection of Face or Movement (DETECT/MAIL)”(€p. 142)·MAIL SETTINGSets the e-mail addresses of the sender and recipient.“Setting the Sender’s E-mail Address of the Camera”(€p. 159)“Registering the Recipient’s E-mail Address of the Camera”(€p. 161)·DETECTION METHOD (Default: “MOTION DETECTION”)Sets the detection method to start recording.·MOTION DETECTION: Starts recording upon detection of subject’s movements.·FACE DETECTION: Starts recording upon detection of human faces.“Setting the Detection Method of this Camera (DETECT/MAIL SETTING)”(€p. 163)·DETECTION INTERVAL (Default: “10 minutes”)Sets the time period to enable detection again after the previous one.“Setting the Detection Interval of this Camera (DETECT/MAIL SETTING)”(€p. 163)·SELF RECORDING (Default: “ON”)Sets whether to record videos on this camera during detection.·OFF: Does not record videos on this camera.·ON: Records videos on this camera.“Setting Self Recording on this Camera (DETECT/MAIL SETTING)”(€p. 164) VIDEO MAIL ·VIDEO MAIL ADDRESS Selects the recipient's e-mail address for video mails.“Sending Still Images via E-mail upon Detection of Face or Movement (DETECT/MAIL)” (p. 142)MAIL SETTINGSets the e-mail addresses of the sender and recipient.“Setting the Sender's E-mail Address of the Camera” (p. 159)“Registering the Recipient's E-mail Address of the Camera” (p. 161) TV MONITORING MAC ADDRESS FILTER (Default: “OFF”)By setting to “ON”, Everio can be searched from the device (TV monitor); the MAC address of the device needs to be registered to Everio in advance.OFF: Disables UPnP.ON: Enables UPnP.“Enabling the MAC Address Filter (TV MONITORING)” (p. 170)MAC ADDRESS LISTMAC address of the TV monitor can be registered to the camera.“Registering the MAC Address (TV MONITORING)” (p. 171) COMMON Wi-Fi SETTING Configures various settings related to the network.ACCESS POINTSAdds, deletes, or perform LAN settings of access points (wireless LAN router).“Registering the Access Points of the Camera to Connect (ACCESS POINTS)” (p. 164)MAIL SETTINGSets the e-mail addresses of the sender and recipient.“Setting the Sender's E-mail Address of the Camera” (p. 159)“Registering the Recipient's E-mail Address of the Camera” (p. 161)MAC ADDRESS (Media Access Control address)Displays the MAC address of the camera.(The above shows the MAC address when connected to an access point, while the below shows the address during direct connection.)“Checking the MAC Address of this Camera” (p. 171)SET FROM QR CODEPerform the Wi-Fi setting after the camera reads the QR code generated by following the instruction in Detailed User Guide.“Using Wi-Fi by Creating a QR Code (GZ-EX355/GZ-EX310)” (p. 198)LOCK SETTTINGSSets a password to prevent others from seeing the network settings.“Protecting the Network Settings with a Password” (p. 172)INITIALIZATIONReturns the network settings to their default values.“Initializing the Wi-Fi Settings” (p. 173)
Setting the Password (DIRECT MONITORING/INDOOR MONITORING/OUTDOOR MONITORING)
Sets the password required to access the camera.
\- Up to 8 characters (alphabets, numbers and symbols only), case-sensitive.
1 Tap "MENU".
(Operation on this camera)

text_image
M
WT
D
PLAY REC MENU
• The top menu appears.
2 Tap the "Wi-Fi" (💡) icon.
(Operation on this camera)

text_image
TOP MENU
?
3 Tap "INDOOR MONITORING" (💡) or "OUTDOOR MONITORING" (💡).
(Operation on this camera)

text_image
Wi-Fi
返回设置
返回设置
返回设置
返回设置
返回设置
返回设置
4 Tap "PASSWORD".
(Operation on this camera)

text_image
INDOOR MONITORING
HTTP
请勿使用密码
请勿使用密码
请勿使用密码
5 Register a password.
(Operation on this camera)

text_image
PASSWORD
A/a/1 . @ ABC DEF DELETE
← GHI JKL MNO →
PQRS TUV WXYZ
SET - + CANCEL
- By default, the password is set to "0000". (INDOOR MONITORING/OUTDOOR MONITORING)
- Tap on the on-screen keyboard to enter characters. The character changes with every tap.
"ABC", for example, enter "A" by tapping once, "B" by tapping twice, or "C" by tapping 3 times.
- Tap "DELETE" to delete a character.
- Tap "CANCEL" to exit.
- Tap "A/a/1" to select character input type from upper case letter, lower case letter, and number.
- Tap ← or → to move one space to the left or right.
6 Tap "SET".
(Operation on this camera)
\- Settings will not be saved until "SET" is tapped.
Changing the HTTP Port (DIRECT MONITORING/INDOOR MONITORING/OUTDOOR MONITORING)
Changes the port number to access to the camera.
Valid when setting up multiple cameras for Outdoor Monitoring.
1 Tap "MENU". (Operation on this camera)

text_image
M
WT
D
<
• The top menu appears.
2 Tap the "Wi-Fi" (💡) icon. (Operation on this camera)

text_image
TOP MENU
?
3 Tap "DIRECT MONITORING"/"INDOOR MONITORING"/"OUTDOOR MONITORING".
(Operation on this camera)
4 Tap "HTTP PORT". (Operation on this camera)
5 Enter a port number.
(Operation on this camera)
Setting the Enforced Group Owner (DIRECT MONITORING)
Sets whether to enforce authorization of the group owner.
1 Tap "MENU".
(Operation on this camera)

text_image
M
WT
D
PLAY REC MENU
• The top menu appears.
2 Tap the "Wi-Fi" (💡) icon.
(Operation on this camera)

text_image
TOP MENU
?
3 Tap the "DIRECT MONITORING" (图标) icon in the "Wi-Fi" menu. (Operation on this camera)

text_image
Wi-Fi
智能家庭娱乐
智能家庭娱乐
智能家庭娱乐
智能家庭娱乐
智能家庭娱乐
智能家庭娱乐
智能家庭娱乐
智能家庭娱乐
智能家庭娱乐
智能家庭娱乐
智能家庭娱乐
智能家庭娱乐
智能家庭娱乐
智能家庭娱乐
智能家庭娱乐
智能家庭娱乐
智能家庭娱乐
智能家庭娱乐
智能家庭娱乐
智能家庭娱乐
智能家庭娱乐
智能家庭娱乐
智能家庭娱乐
智能家庭娱乐
智能家庭娱乐
智能家庭乐
4 Tap "ENFORCED GROUP OWNER".
(Operation on this camera)

text_image
DIRECT MONITORING
OK
OK
HTTP
OK
5 Tap "ON" or "OFF".

text_image
ENFORCED GROUP OWNER
OFF
ON
OFF
ON
\- It is recommended to select "ON" usually.
If connection to devices that support Wi-Fi Direct fails, set to "OFF".
Memo :
\- When set to "OFF", connection to devices that do not support Wi-Fi Direct will be disabled.
Changing the HTTP Port (DIRECT MONITORING/INDOOR MONITORING/OUTDOOR MONITORING)
Changes the port number to access to the camera.
Valid when setting up multiple cameras for Outdoor Monitoring.
1 Tap "MENU".
(Operation on this camera)

text_image
M
WT
D
PLAY REC MENU
• The top menu appears.
2 Tap the "Wi-Fi" (💡) icon.
(Operation on this camera)

text_image
TOP MENU
?
3 Tap "DIRECT MONITORING"/"INDOOR MONITORING"/"OUTDOOR MONITORING".
(Operation on this camera)
4 Tap "HTTP PORT".
(Operation on this camera)
5 Enter a port number.
(Operation on this camera)
Setting the UPnP of this Camera (OUTDOOR MONITORING)
Sets the UPnP of the camera.
1 Tap "MENU".
(Operation on this camera)

text_image
M
WT
D
• The top menu appears.
2 Tap the "Wi-Fi" (💡) icon.
(Operation on this camera)

text_image
TOP MENU
?
3 Tap "OUTDOOR MONITORING" (☐).
(Operation on this camera)

text_image
Wi-Fi
4 Tap "UPnP".
(Operation on this camera)

text_image
OUTDOOR MONITORING
DDNS
HTTP
UPnP
OK
5 Tap "ON" or "OFF" to make a selection.

text_image
UPnP
OFF ON
OFF ON
- Select "ON" to enable UPnP.
- Select "OFF" to disable UPnP.
Obtaining a Dynamic DNS (DDNS) Account
By obtaining a dynamic DNS account, this unit may be used on the web as usual even if the IP address changes when making an access to this unit via internet.
\- Only the JVC dynamic DNS service can be set on this camera.
To obtain (register) an account, perform the following steps.
1 Access the following URL from a browser and register for an account. (Operation on a computer or smartphone)
https://dd3.jvckenwood.com/user/
Set your e-mail address as the username.
2 Check that you have received a confirmation e-mail to the address used in registration, and access the URL stated in the e-mail. (Operation on a computer or smartphone)
3 Set the username and password used in registration on the camera. (Operation on this camera)
"Setting Dynamic DNS on this Camera (OUTDOOR MONITORING)" (p. 158)
4 Execute OUTDOOR MONITORING.
(Operation on this camera)
If "OUTDOOR MONITORING" is executed while dynamic DNS settings are enabled, the camera will access the dynamic DNS server.
5 Tap "CAMERA NETWORK INFO." to check that the URL (WAN) is displayed.
(Registration complete)
"Image Monitoring via the Internet (OUTDOOR MONITORING)" (p. 140)
Caution :
- Registration will be canceled if you do not access the dynamic DNS server from the camera within 3 days.
Perform the registration again in this case.
- Registration will not be complete if the username and password set on this camera are incorrect. Be sure to check that they are correct.
- Successful registration will be canceled too if you do not access the dynamic DNS server for 1 year.
Setting Dynamic DNS on this Camera (OUTDOOR MONITORING)
Sets the dynamic DNS information of the obtained account on the camera. "Obtaining a Dynamic DNS (DDNS) Account" (p. 157)
1 Tap "MENU".
(Operation on this camera)

text_image
M
WT
D
PLAY REC MENU
• The top menu appears.
2 Tap the "Wi-Fi" (💡) icon.
(Operation on this camera)

text_image
TOP MENU
?
3 Tap "OUTDOOR MONITORING" (☐).
(Operation on this camera)

text_image
Wi-Fi
网络视频监控
网络视频监控
网络视频监控
网络视频监控
网络视频监控
网络视频监控
网络视频监控
4 Tap "DDNS SETTING".
(Operation on this camera)

text_image
OUTDOOR MONITORING
DDNS
HTTP
UPnP
?
5 Tap "DDNS", then tap "ON".
(Operation on this camera)
6 Enter the DDNS settings (username/password). (Operation on this camera)

text_image
USERNAME
A/a/1 . @ ABC DEF DELETE
← GHI JKL MNO →
PQRS TUV WXYZ
SET - + CANCEL
- Tap on the on-screen keyboard to enter characters. The character changes with every tap.
"ABC", for example, enter "A" by tapping once, "B" by tapping twice, or "C" by tapping 3 times.
- Tap "DELETE" to delete a character.
- Tap "CANCEL" to exit.
- Tap "A/a/1" to select character input type from upper case letter, lower case letter, and number.
- Tap or to move one space to the left or right.
• After setting, tap "SET".
Memo :
\- Only the JVC dynamic DNS service can be set on this camera.
Setting the Sender's E-mail Address of the Camera
Sets the address to be used for sending e-mails on the camera.
Memo :
\- By using Gmail as the sender's mail address, some of the settings can be omitted.
Use of Gmail is recommended for users who have a Gmail account.
1 Tap "MENU".
(Operation on this camera)

text_image
M
WT
D
PLAY REC MENU
• The top menu appears.
2 Tap the "Wi-Fi" (💡) icon.
(Operation on this camera)

text_image
TOP MENU
?
3 Tap > on the lower right of the screen.
(Operation on this camera)

text_image
Wi-Fi
智能家庭智能
智能家庭智能
智能家庭智能
智能家庭智能
智能家庭智能
智能家庭智能
智能家庭智能
4 Tap "COMMON Wi-Fi SETTING".
(Operation on this camera)

text_image
Wi-Fi
Wi-Fi
5 Tap "MAIL SETTING".
(Operation on this camera)

text_image
COMMON WI-FI SETTING
MAIL SETTING
6 Tap "SENDER'S EMAIL".
(Operation on this camera)

text_image
MAIL SETTING
RECIPIENT'S EMAIL
SENDER'S EMAIL
SEND TEST EMAIL
7 Tap "NEXT".
(Operation on this camera)

text_image
EMAIL ADDRESS
ENTER THE EMAIL ADDRESS
FOR "DETECT/MAIL" AND
"VIDEO MAIL" TRANSMISSION
NEXT
\- Tap "CHANGE" to change the contents that are already set.
\- Enter the e-mail address and tap "SET".

text_image
SENDER'S EMAIL
**********************************************************************
A/a/1 - @ ABC DEF DELETE
← GHI JKL MNO →
PQRS TUV WXYZ
SET - + CANCEL
- Tap on the on-screen keyboard to enter characters. The character changes with every tap.
- Tap "DELETE" to delete a character.
- Tap "CANCEL" to exit.
- Tap "A/a/1" to select character input type from upper case letter, lower case letter, and number.
- Tap or to move one space to the left or right.
- After setting, tap "SET".
8 Tap "NEXT".
(In case of Gmail, tap "SKIP")
(Operation on this camera)

text_image
SMTP SERVER
SMTP SERVER HAS BEEN SET
AS FOLLOWS
CAN BE CHANGED IF REQUIRED
smtp.gmail.com
CHANGE Skip
- Tap "CHANGE" to change the contents that are already set.
- Enter the SMTP server and tap "SET".

text_image
SMTP SERVER
※※※※※※※※※※※※※
A/a/1 . @ ABC DEF DELETE
← GHI JKL MNO →
PQRS TUV WXYZ
SET - + CANCEL
- Tap on the on-screen keyboard to enter characters. The character changes with every tap.
- Tap "DELETE" to delete a character.
- Tap "CANCEL" to exit.
- Tap "A/a/1" to select character input type from upper case letter, lower case letter, and number.
- Tap ← or → to move one space to the left or right.
• After setting, tap "SET".
9 Tap "CHANGE" to change the SMTP port.
(In case of Gmail, tap "SKIP")
(Operation on this camera)

text_image
SMTP SERVER
SMTP SERVER HAS BEEN SET
AS FOLLOWS
CAN BE CHANGED IF REQUIRED
587
CHANGE Skip
\- Change the SMTP port number (if necessary) and tap "SET".

text_image
SMTP PORT
1 2 3 DELETE
← 4 5 6 →
7 8 9
SET 0 CANCEL
- Tap on the on-screen keyboard to enter characters. The character changes with every tap.
- Tap "DELETE" to delete a character.
- Tap "CANCEL" to exit.
- Tap ← or → to move one space to the left or right.
• After setting, tap "SET".
10 Tap "CHANGE" to change the authentication.
(In case of Gmail, tap "SKIP")
(Operation on this camera)

text_image
AUTHENTICATION METHOD
SMTP SERVER AUTHENTICATION
METHOD IS SET AS FOLLOWS
SMTP(TLS)
CHANGE Skip
\- Tap the desired "AUTHENTICATE METHOD".

text_image
AUTHENTICATE METHOD
NONE
SMTP
SMTP(SSL)
SMTP(TLS)
11 Tap "NEXT".
(In case of Gmail, tap "SKIP")
(Operation on this camera)

text_image
USERNAME
USERNAME HAS BEEN SET
AS FOLLOWS
CAN BE CHANGED IF REQUIRED
TEST
CHANGE Skip
- The following does not appear if "AUTHENTICATE METHOD" is set to "NONE".
- Tap "CHANGE" to change the contents that are already set.
\- Enter the username and tap "SET".

text_image
USERNAME
**************************
A/a/1 . @ ABC DEF DELETE
← GHI JKL MNO →
PQRS TUV WXYZ
SET - + CANCEL
- Tap on the on-screen keyboard to enter characters. The character changes with every tap.
- Tap "DELETE" to delete a character.
- Tap "CANCEL" to exit.
- Tap "A/a/1" to select character input type from upper case letter, lower case letter, and number.
- Tap ← or → to move one space to the left or right.
• After setting, tap "SET".
12 Tap "NEXT".
(Operation on this camera)

text_image
PASSWORD
PLEASE ENTER PASSWORD
NEXT
- The following does not appear if "AUTHENTICATE METHOD" is set to "NONE".
- Tap "CHANGE" to change the contents that are already set.
- Enter the password and tap "SET".

text_image
PASSWORD
* * * * * * *
A/a/1 . @ ABC DEF DELETE
← GHI JKL MNO →
PQRS TUV WXYZ
SET - + CANCEL
- Tap on the on-screen keyboard to enter characters. The character changes with every tap.
- Tap "DELETE" to delete a character.
- Tap "CANCEL" to exit.
- Tap "A/a/1" to select character input type from upper case letter, lower case letter, and number.
- Tap ← or → to move one space to the left or right.
• After setting, tap "SET".
13 Tap "QUIT" or "SEND TEST EMAIL".
(Operation on this camera)

text_image
CONTENTS SET AS FOLLOWS
EMAIL ADDRESS : text@gmail.com
SMTP SERVER : smtp.gmail.com
SMTP PORT : 587
AUTHENTICATE METHOD : SMTP(TLS)
USERNAME : test
QUIT SEND TEST EMAIL
SENDER'S EMAIL Enter the sender's e-mail address. SMTP SERVER Enter the SMTP server address. SMTP PORT Set this when the SMTP port number needs to be changed. AUTHENTICATE METHOD Set this when the authentication method needs to be changed. USERNAME Enter the username. PASSWORD Enter the password.
Caution :
- It is necessary to obtain an e-mail account in advance.
- Some web-based mail addresses do not support this feature.
- These are Gmail settings as of December 2012.
Perform setting manually if changes have been made to the Gmail specifications.
- To make use of addresses other than Gmail, please consult the mail service provider (Internet provider, etc.) for information on the settings.
Registering the Recipient's E-mail Address of the Camera
Registers the e-mail addresses of recipients on the camera.
1 Tap "MENU".
(Operation on this camera)

text_image
M
WT
D
<
• The top menu appears.
2 Tap the "Wi-Fi" (💡) icon.
(Operation on this camera)

text_image
TOP MENU
?
3 Tap > on the lower right of the screen.
(Operation on this camera)

text_image
Wi-Fi
智能家庭管理器
智能家庭管理器
智能家庭管理器
智能家庭管理器
智能家庭管理器
智能家庭管理器
智能家庭管理器
4 Tap "COMMON Wi-Fi SETTING".
(Operation on this camera)

text_image
Wi-Fi
智能驾驶监控器
Wi-Fi
智能驾驶监控器
5 Tap "MAIL SETTING".
(Operation on this camera)

text_image
COMMON WI-FI SETTING
MAIL SETTING
6 Tap "RECIPIENT'S EMAIL".
(Operation on this camera)

text_image
MAIL SETTING
RECIPIENT'S EMAIL
SENDER'S EMAIL
SEND TEST EMAIL
7 Tap "ADD".
(Operation on this camera)

text_image
RECIPIENT'S EMAIL
ADD
8 Enter the recipient's e-mail address.

text_image
RECIPIENT'S EMAIL
A/a/1 . @ ABC DEF DELETE
← GHI JKL MNO →
PQRS TUV WXYZ
SET - + CANCEL
- Tap on the on-screen keyboard to enter characters. The character changes with every tap.
"ABC", for example, enter "A" by tapping once, "B" by tapping twice, or "C" by tapping 3 times.
- Tap "DELETE" to delete a character.
- Tap "CANCEL" to exit.
- Tap "A/a/1" to select character input type from upper case letter, lower case letter, and number.
- Tap ← or → to move one space to the left or right.
• After setting, tap "SET".
9 After tapping "DETECT/MAIL" or "VIDEO MAIL" depending on the function in use, tap "SET".

text_image
RECIPIENT'S EMAIL
SELECT FUNCTION TO SET THIS
EMAIL ADDRESS AS RECEIVER
ADDRESS THEN TOUCH "SET"
abc@def.com
DETECT/MAIL
VIDEO MAIL
SET
- An icon (💡) appears after tapping "DETECT/MAIL", and the recipient's e-mail address for the Detect/Mail.
- An icon (💡) appears after tapping "VIDEO MAIL", and the recipient's e-mail address for the VIDEO MAIL.
• To cancel, press the icon one more time.
Memo :
\- Up to 8 e-mail addresses can be registered as recipients.
Caution :
- When setting another person as the recipient, be sure to obtain his/her consent in advance.
- Check whether notifications indicating errors have been sent to the sender's e-mail address. (Make use of a computer or similar devices as it is not possible to check from the camera.)
If no notifications are received: Refer to "Unable to send e-mails." and adjust the settings accordingly.
If notifications are received: Check the content of the notification.
\*Note
Do not continue sending e-mails with the same settings if you receive error notifications. Depending on the provider, you may be marked as a sender of spam (junk mail).
Setting the Detection Method of this Camera (DETECT/MAIL SETTING)
Sets the detection method to start recording.
1 Tap "MENU".
(Operation on this camera)

text_image
M
WT
D
PLAY REC MENU
• The top menu appears.
2 Tap the "Wi-Fi" (💡) icon.
(Operation on this camera)

text_image
TOP MENU
?
3 Tap "DETECT/MAIL" (💡).
(Operation on this camera)

text_image
Wi-Fi
我的家庭智能
我的家庭智能
我的家庭智能
我的家庭智能
我的家庭智能
我的家庭智能
我的家庭智能
4 Tap "DETECTION METHOD".
(Operation on this camera)

text_image
DETECT/MAIL
10 MHz
REC ON
5 Tap "MOTION DETECTION" or "FACE DETECTION" to make a selection.

text_image
DETECTION METHOD
MOTION
DETECTION
FACE
DETECTION
\- Select "MOTION DETECTION" to start recording upon detection of subject's movements.
\- Select "FACE DETECTION" to start recording upon detection of human faces.
Setting the Detection Interval of this Camera (DETECT/MAIL SETTING)
Sets the time period to enable detection again after the previous one.
1 Tap "MENU".
(Operation on this camera)

text_image
M
WT
D
PLAY REC MENU
• The top menu appears.
2 Tap the "Wi-Fi" (💡) icon.
(Operation on this camera)

text_image
TOP MENU
?
3 Tap "DETECT/MAIL" (💡).
(Operation on this camera)

text_image
Wi-Fi
智能家庭体验
智能家庭体验
智能家庭体验
智能家庭体验
智能家庭体验
智能家庭体验
智能家庭体验
智能家庭体验
4 Tap "DETECTION INTERVAL".
(Operation on this camera)

text_image
DETECT/MAIL
10 MIN
取消
取消
取消
取消
取消
取消
取消
5 Tap the desired detection interval.

text_image
DETECTION INTERVAL
€ 15
SEC
15SEC
€ 3
MIN
3 MIN
€ 30
MIN
30 MIN
€ 1
MIN
1 MIN
• 10
MIN
10 MIN
€ 60
MIN
60 MIN
?
\- Set the interval to perform detection. By default, it is set to 10 minutes.
Setting Self Recording on this Camera (DETECT/MAIL SETTING)
Sets whether to record videos on this camera during detection.
1 Tap "MENU".
(Operation on this camera)

text_image
M
WT
D
← PLAY REC MENU
• The top menu appears.
2 Tap the "Wi-Fi" (💡) icon.
(Operation on this camera)

text_image
TOP MENU
?
3 Tap "DETECT/MAIL" (☐).
(Operation on this camera)

text_image
Wi-Fi
我的电脑设备
我的电脑设备
我的电脑设备
我的电脑设备
我的电脑设备
我的电脑设备
4 Tap "SELF RECORDING".
(Operation on this camera)

text_image
DETECT/MAIL
10 M/s
REC ON
5 Tap "ON" or "OFF" to make a selection.

text_image
SELF RECORDING
OFF
ON
OFF
ON
- Select "ON" to record videos on this camera.
- Select "OFF" not to record videos on this camera.
Registering the Access Points of the Camera to Connect (ACCESS POINTS)
There are 4 ways to register the access points (wireless LAN router) for connection.
Wi-Fi Protected Setup (WPS) Registration This is the easiest way of registration. Authentication method and wireless LAN setup are performed automatically in WPS, allowing easy registration of connection settings between devices. Search and Register A search is conducted to locate access points. Select and register an access point from the list of search results. Manual Registration Enter the name and authentication method manually to register an access point. WPS PIN Registration Enter the WPS PIN code of the camera to the access point to register.
Memo :
\- By registering multiple access points, you can change connection to another access point by tapping on the desired one from the list.
■ Wi-Fi Protected Setup (WPS) Registration
1 Tap "MENU".
(Operation on this camera)

text_image
M
WT
D
PLAY REC MENU
• The top menu appears.
2 Tap the "Wi-Fi" (💡) icon.
(Operation on this camera)

text_image
TOP MENU
?
3 Tap > on the lower right of the screen.
(Operation on this camera)

text_image
Wi-Fi
新客智能设备
新客智能设备
新客智能设备
新客智能设备
新客智能设备
新客智能设备
4 Tap "COMMON Wi-Fi SETTING".
(Operation on this camera)

text_image
Wi-Fi
Wi-Fi
5 Tap "ACCESS POINTS". (Operation on this camera)

text_image
COMMON WI-FI SETTING
ACCESS POINTS
?
6 Tap "ADD".
(Operation on this camera)

text_image
ACCESS POINTS
ADD
7 Tap "EZ REGISTRATION WPS". (Operation on this camera)

text_image
ADD
EZ REGISTRATION WPS
100% 250% 30%
100% 250% 30%
100% 250% 30%
8 Activate WPS of the access point (wireless LAN router) within 2 minutes.
• To activate WPS, refer to the instruction manual of the device in use.
9 After registration is complete, tap "OK" on the camera's screen. (Operation on this camera)

text_image
REGISTERED
SSID:**
ENCRYPTION METHOD
WPA2
OK
■ Search and Register
1 Tap "MENU". (Operation on this camera)

text_image
M
WT
D
PLAY REC MENU
• The top menu appears.
2 Tap the "Wi-Fi" (💡) icon. (Operation on this camera)

text_image
TOP MENU
?
3 Tap > on the lower right of the screen. (Operation on this camera)

text_image
Wi-Fi
网络数据采集器
网络数据采集器
网络数据采集器
网络数据采集器
网络数据采集器
网络数据采集器
网络数据采集器
4 Tap "COMMON Wi-Fi SETTING". (Operation on this camera)

text_image
Wi-Fi
Wi-Fi
5 Tap "ACCESS POINTS". (Operation on this camera)

text_image
COMMON WI-FI SETTING
ACCESS POINTS
?
6 Tap "ADD". (Operation on this camera)

text_image
ACCESS POINTS
ADD
7 Tap "SEARCH".
(Operation on this camera)

text_image
ADD
SEARCH
?
\- The search results appear on the camera's screen.
8 Tap the name (SSID) of the desired access point from the list of search results.
(Operation on this camera)

text_image
SEARCH
SEARCH AGAIN
9 Register a password.
(Operation on this camera)

text_image
PASSWORD
A/a/1 . @ ABC DEF DELETE
← GHI JKL MNO →
PQRS TUV WXYZ
SET - + CANCEL
- Tap on the on-screen keyboard to enter characters. The character changes with every tap.
"ABC", for example, enter "A" by tapping once, "B" by tapping twice or "C" by tapping 3 times.
- Tap "DELETE" to delete a character.
- Tap "CANCEL" to exit.
- Tap "A/a/1" to select character input type from upper case letter, lower case letter, and number.
- Tap ← or → to move one space to the left or right.
- The password is not required if the wireless LAN router is not security protected.
10 After registration is complete, tap "OK" on the camera's screen. (Operation on this camera)

text_image
REGISTERED
SSID:******
ENCRYPTION METHOD
WPA2
OK
■ Manual Registration
1 Tap "MENU".
(Operation on this camera)

text_image
M
WT
D
←PLAY
REC
MENU
• The top menu appears.
2 Tap the "Wi-Fi" (💡) icon.
(Operation on this camera)

text_image
TOP MENU
?
3 Tap > on the lower right of the screen. (Operation on this camera)

text_image
Wi-Fi
智能家庭管理
智能家庭管理
智能家庭控制
智能家庭管理
智能家庭管理
智能家庭控制
4 Tap "COMMON Wi-Fi SETTING". (Operation on this camera)

text_image
Wi-Fi
Wi-Fi
5 Tap "ACCESS POINTS". (Operation on this camera)

text_image
COMMON WI-FI SETTING
ACCESS POINTS
?
6 Tap "ADD". (Operation on this camera)

text_image
ACCESS POINTS
ADD
7 Tap "MANUAL".
(Operation on this camera)

text_image
ADD
MANUAL
?
8 Enter the name (SSID) of the access point (wireless LAN router) and tap "SET".
(Operation on this camera)

text_image
SSID
A/a/1 . @ ABC DEF DELETE
← GHI JKL MNO →
PQRS TUV WXYZ
SET - + CANCEL
- Tap on the on-screen keyboard to enter characters. The character changes with every tap.
"ABC", for example, enter "A" by tapping once, "B" by tapping twice, or "C" by tapping 3 times.
- Tap "DELETE" to delete a character.
- Tap "CANCEL" to exit.
- Tap "A/a/1" to select character input type from upper case letter, lower case letter, and number.
- Tap or to move one space to the left or right.
9 Select the type of authentication method (security).
(Operation on this camera)

text_image
TYPE OF SECURITY
NONE
WEP
WPA
WPA2
\- Select according to the setting of your router.
10 When authentication method is not set to "NONE", enter a password and tap "SET".
(Operation on this camera)

text_image
PASSWORD
A/a/1 . @ ABC DEF DELETE
← GHI JKL MNO →
PQRS TUV WXYZ
SET - + CANCEL
- Tap on the on-screen keyboard to enter characters. The character changes with every tap.
"ABC", for example, enter "A" by tapping once, "B" by tapping twice, or "C" by tapping 3 times.
- Tap "DELETE" to delete a character.
- Tap "CANCEL" to exit.
- Tap "A/a/1" to select character input type from upper case letter, lower case letter, and number.
- Tap ← or → to move one space to the left or right.
11 After registration is complete, tap "OK" on the camera's screen.
(Operation on this camera)

text_image
REGISTERED
SSID:******
ENCRYPTION METHOD
WPA2
OK
WPS PIN Registration
1 Tap "MENU".
(Operation on this camera)

text_image
M
WT
M
D
← PLAY
REC
MENU
• The top menu appears.
2 Tap the "Wi-Fi" (💡) icon.
(Operation on this camera)

text_image
TOP MENU
?
3 Tap > on the lower right of the screen.
(Operation on this camera)

text_image
Wi-Fi
智能家庭管理
智能家庭管理
智能家庭管理
智能家庭管理
智能家庭管理
智能家庭管理
4 Tap "COMMON Wi-Fi SETTING".
(Operation on this camera)

text_image
Wi-Fi
Wi-Fi
5 Tap "ACCESS POINTS".
(Operation on this camera)

text_image
COMMON WI-FI SETTING
ACCESS POINTS
?
6 Tap "ADD".
(Operation on this camera)

text_image
ACCESS POINTS
ADD
7 Tap "WPS PIN".
(Operation on this camera)

text_image
ADD
WPS PIN
[新版] [新版] [新版]
[新版] [新版] [新版]
[新版] [新版] [新版]
• The PIN code appears.
8 Enter the PIN code displayed on the camera to the access point (wireless LAN router).
\- For details on how to enter the PIN code, refer to the instruction manual of the device in use.
9 Tap "START".
(Operation on this camera)

text_image
WPS PIN
PIN:******
ENTER THIS NUMBER
TO ACCESS POINT
THEN TOUCH "START"
START QUIT
\- Tap "START" after entering PIN code to the wireless LAN router. (Connection cannot be established if "START" is tapped before entering the code.)
10 After registration is complete, tap "OK" on the camera's screen.
(Operation on this camera)

text_image
REGISTERED
SSID:******
ENCRYPTION METHOD
WPA2
OK
Editing LAN Settings of Access Points (Wireless LAN Router)
Change accordingly such as when you want to fix the IP address for the camera.
1 Tap "MENU".
(Operation on this camera)
- Tap "USE" to use the selected access point.
- Tap "DELETE" to delete the registered access point.
7 Perform the LAN settings. (when "DHCP" is set to "OFF")
(Operation on this camera)
\- The top menu appears.
2 Tap the "Wi-Fi" (💡) icon.
(Operation on this camera)
3 Tap > on the lower right of the screen.
(Operation on this camera)
- After setting, tap "OK".
• LAN settings comprise of the following items.
DHCP ON: Obtains IP address from the DHCP server
automatically.
OFF: Settings of "IP ADDRESS", "SUBNET
MASK", "DEFAULT GATEWAY", "PRIMARY
DNS", and "SECONDARY DNS" are required.
IP ADDRESS Enter the IP address.
SUBNET MASK Enter the subnet mask.
DEFAULT
Enter the default gateway.
GATEWAY
PRIMARY DNS /
Enter the IP addresses of the primary and
SECONDARY DNS
secondary DNS servers.
4 Tap "COMMON Wi-Fi SETTING".
(Operation on this camera)
5 Tap "ACCESS POINTS".
(Operation on this camera)
6 Tap "LAN SETTINGS".
(Operation on this camera)
Setting the Password (DIRECT MONITORING)
Sets the password for direct monitoring. (8 to 32 characters)
1 Tap "MENU".
(Operation on this camera)

text_image
M
WT
D
<
• The top menu appears.
2 Tap the "Wi-Fi" (💡) icon.
(Operation on this camera)

text_image
TOP MENU
?
3 Tap the "DIRECT MONITORING" (💡) icon in the "Wi-Fi" menu. (Operation on this camera)

text_image
Wi-Fi
家庭智能监控
家庭智能监控
家庭智能监控
家庭智能监控
家庭智能监控
家庭智能监控
4 Tap "PASSWORD".
(Operation on this camera)

text_image
DIRECT MONITORING
超链接驱动器
超链接驱动器
超链接驱动器
超链接驱动器
HTTP
超链接驱动器
5 Register a password.
(Operation on this camera)

text_image
PASSWORD
A/a/1 . @ ABC DEF DELETE
← GHI JKL MNO →
PQRS TUV WXYZ
SET - + CANCEL
- Tap on the on-screen keyboard to enter characters. The character changes with every tap.
"ABC", for example, enter "A" by tapping once, "B" by tapping twice, or "C" by tapping 3 times.
- Tap "DELETE" to delete a character.
- Tap "CANCEL" to exit.
- Tap "A/a/1" to select character input type from upper case letter, lower case letter, and number.
- Tap ← or → to move one space to the left or right.
• After setting, tap "SET".
6 Tap "SET".
(Operation on this camera)
- Settings will not be saved until "SET" is tapped.
Enabling the MAC Address Filter (TV MONITORING)
By enabling "MAC ADDRESS FILTER", Everio can be searched from the device (TV monitor); the MAC address of the device needs to be registered to Everio in advance.
1 Tap "MENU".
(Operation on this camera)

text_image
M
WT
D
PLAY REC MENU
• The top menu appears.
2 Tap the "Wi-Fi" (💡) icon.
(Operation on this camera)

text_image
TOP MENU
?
3 Tap "TV MONITORING".
4 Tap "MAC ADDRESS FILTER".
5 Select "ON" or "OFF".
Memo :
\- If "MAC ADDRESS FILTER" is enabled while no MAC address is registered, Everio can not be searched from all the devices.
Registering the MAC Address (TV MONITORING)
Register the MAC address of the TV monitor to Everio.
1 Tap "MENU".
(Operation on this camera)

text_image
M
WT
D
<
• The top menu appears.
2 Tap the "Wi-Fi" (💡) icon.
(Operation on this camera)

text_image
TOP MENU
?
3 Tap "TV MONITORING".
4 Tap "MAC ADDRESS LIST".
5 Tap "ADD".
6 Enter the MAC address of the TV monitor.
- Tap on the on-screen keyboard to enter characters.
- Tap "DELETE" to delete a character.
- Tap "CANCEL" to exit.
- Tap "A/a/1" to change the characters.
- Tap ← or → to move one space to the left or right.
• After setting, tap "SET".
- For details on checking the MAC address for registration, refer to the instruction manual of the device in use.
Checking the MAC Address of this Camera
Displays the MAC address of the camera.
1 Tap "MENU".
(Operation on this camera)

text_image
M
WT
D
PLAY REC MENU
• The top menu appears.
2 Tap the "Wi-Fi" (💡) icon.
(Operation on this camera)

text_image
TOP MENU
?
3 Tap > on the lower right of the screen.
(Operation on this camera)

text_image
Wi-Fi
智能驾驶管理器
智能驾驶管理器
智能驾驶管理器
智能驾驶管理器
智能驾驶管理器
智能驾驶管理器
智能驾驶管理器
4 Tap "COMMON Wi-Fi SETTING".
(Operation on this camera)

text_image
Wi-Fi
智能驾驶辅助器
Wi-Fi
智能驾驶辅助器
5 Tap "MAC ADDRESS".
(Operation on this camera)

text_image
COMMON WI-FI SETTING
MAC ADDRESS
• The MAC address of the camera appears.
(The above shows the address during direct connection, while the below shows the MAC address when connected to an access point.)
- After setting, tap "SET".
• After checking, tap "SET".
Protecting the Network Settings with a Password
Sets a password to lock and protect the network settings.
1 Tap "MENU".
(Operation on this camera)

text_image
M
WT
D
<
• The top menu appears.
2 Tap the "Wi-Fi" (💡) icon.
(Operation on this camera)

text_image
TOP MENU
?
3 Tap > on the lower right of the screen.
(Operation on this camera)

text_image
Wi-Fi
网络管理服务
网络管理服务
网络管理服务
网络管理服务
网络管理服务
网络管理服务
4 Tap "COMMON Wi-Fi SETTING".
(Operation on this camera)

text_image
Wi-Fi
智能语音服务
Wi-Fi
智能语音服务
5 Tap "LOCK SETTINGS".
(Operation on this camera)

text_image
COMMON WI-FI SETTING
LOCK SETTINGS
INITIALIZATION
6 Set a password (up to 4 characters).
(Operation on this camera)

text_image
PASSWORD
1 2 3 DELETE
← 4 5 6 →
7 8 9
SET 0 CANCEL
- Enter the 4-digit numbers.
- Tap "DELETE" to delete a character.
- Tap "CANCEL" to exit.
- Tap ← or → to move one space to the left or right.
• After setting, tap "SET".
Initializing the Wi-Fi Settings
Returns the Wi-Fi settings to their default values.
1 Tap "MENU".
(Operation on this camera)

text_image
M
WT
D
<< PLAY REC MENU
• The top menu appears.
2 Tap the "Wi-Fi" (💡) icon.
(Operation on this camera)

text_image
TOP MENU
?
3 Tap > on the lower right of the screen.
(Operation on this camera)

text_image
Wi-Fi
智能家庭智能设备
智能家庭智能设备
智能家庭智能设备
智能家庭智能设备
智能家庭智能设备
智能家庭智能设备
智能家庭智能设备
智能家庭智能设备
智能家庭智能设备
智能家庭智能设备
智能家庭智能设备
智能家庭智能设备
智能家庭智能设备
智能家庭智能设备
智能家庭智能设备
智能家庭智能设备
智能家庭智能设备
智能家庭智能设备
智能家庭智能设备
智能家庭智能设备
智能家庭智能
智能家庭智能设备
智能家庭智能设备
智能家庭智能设备
智能家庭智能设备
智能家庭智能设备
智能家庭智能设备
智能家庭智能设备
智能家庭智能设备
智能家庭智能设备
智能家庭智能设备
智能家庭智能设备
智能家庭智能设备
智能家庭智能设备
智能家庭智能设备
智能家庭智能设备
智能家庭智能设备
智能家庭智能设备
智能家庭智能设备
智能家庭智能设备
智能家庭智能 equipment
4 Tap "COMMON Wi-Fi SETTING".
(Operation on this camera)

text_image
Wi-Fi
智能驾驶管理器
Wi-Fi
智能驾驶管理器
5 Tap "INITIALIZATION".
(Operation on this camera)

text_image
COMMON WI-FI SETTING
LOCK SETTINGS
INITIALIZATION
6 Tap "YES".
(Operation on this camera)

text_image
INITIALIZATION
DO YOU WANT THE SETTINGS
RESET TO THE FACTORY PRESET?
YES NO
\- To cancel, tap "NO".
\- When "YES" is tapped, the network settings return to their default values.
Changing the Panning Speed
Change the operation speed of the pan cradle (sold separately) via smartphone.
Select either of the 2: "HIGH SPEED" or "LOW SPEED".
\- For details on how to use a pan cradle, refer to the following "Using the Pan Cradle (Sold Separately)" (p. 150)
■ Change the setting via smartphone
1 Tap
Confirm that the camera and a smartphone are connected via Wi-Fi, and the monitor screen is displayed on the smartphone.

text_image
Index
Monitor
←° PAUSE
Pan
Pan
T
Tele
W
Wide
Rec
Pause
Snapshot
Marking
Game Score
2 Tap "PAN OPERATION SPEED".

text_image
SETTINGS
MONITOR
MONITORING
DISPLAY THE MONITOR SCREEN
PAN OPERATION SPEED
SET THE OPERATION SPEED OF
THE PAN OPERATION
LOC INFO TRANS INT
GPS SENDS LOCATION INFORMATION 15SEC
TO THE CAMERA WHEN USING DIRECT
MONITORING
VIDEO TRANSFER (AVCHD Index)
LENGTH 300SEC
RESOLUTION (pixel)
GAME SCORE
GAME SCORE SETTING
3 Tap "HIGH SPEED" or "LOW SPEED".

text_image
MONITOR
MONITORING
DISPLAY THE MONITOR SCREEN
PAN OPERATION SPEED
PAN OPERATION SPEED
HIGH SPEED
LOW SPEED
CANCEL
RESOLUTION (pixel)
GAME SCORE
GAME SCORE SETTING
Using Smartphone Applications
- By installing the "Everio sync. 2" smartphone software, images on the camera can be checked from a distance, and recording videos/still images and zooming operation can be performed.
- You can also send images recorded by the camera to the smartphone via Wi-Fi, to enjoy the recorded images on your smartphone or tablet.
Installing Smartphone Applications


natural_image
Illustration of a hand holding a smartphone with a pencil, no text or symbols present
■ Android Smartphone
1 Tap "Play store" on the application list.
2 Search for the "Everio sync. 2" application.
3 Tap on the "Everio sync. 2" application.
- The detailed information of the application is displayed.
4 Tap "Install".
- For applications that access data or functions of this unit, a screen that shows the data or functions that will be used is displayed.
5 Confirm the content and tap "Download".
- Downloading starts.
Deleting the Application
1 Tap "Play store" on the application list.
2 Press the menu button and tap "My apps".
• A list of previously downloaded applications is displayed.
3 Tap on the "Everio sync. 2" application.
4 Tap "Uninstall", then tap "OK".
The specifications of Google Play are subject to changes without prior notice.
For operating details, refer to the help file of Google Play.
Memo :
■ iPhone/iPad/iPod touch
1 Tap "App Store" on the home screen.
2 Search for the "Everio sync. 2" application.
3 Tap on the "Everio sync. 2" application.
- The detailed information of the application is displayed.
4 Tap "FREE"→"Install".
- Enter your password on the password entry screen.
- Downloading starts.
- The downloaded application will be added to the home screen automatically.
Deleting the Application
1 Press and hold the "Everio sync. 2" application on the home screen.
2 Tap × to confirm the deletion.
Memo :
The specifications of App Store™ are subject to changes without prior notice.
For operating details, refer to the help file of App Store™.
Operating the Smartphone Applications
• Indications on the screen
"Indications on the Screen" (p. 175)
• Transferring videos
"Transferring Videos (AVCHD format)" (p. 179)
"Transferring Videos (iFrame format)" (p. 182)
• Transferring still images
"Transferring Still Images" (p. 184)
- Changing the settings
"Smartphone Application Settings" (p. 186)
Indications on the Screen
■ Initial Screen

text_image
Everio sync.2
Direct
MONITORING
CONNECT TO THE CAMERA
DIRECTLY. YOU CAN USE THE GAME
COPYING FUNCTION.
INDOOR
MONITORING
CONNECT VIA ACCESS POINT. NEED
TO REGISTER ACCESS POINT.
OUTDOOR
MONITORING
CONNECT VIA INTERNET. NEED TO
REGISTER ACCESS POINT AND
POUSE.
?
Demo
To Settings
Screen
Connect to the
camera directly
Connect via
access point
Connect via
internet
To Demo
Screen
To Help Screen
■ Recording Screen

text_image
To Index Screen
To Settings Screen
Running on AC Adapter
Running on Battery (icon shown on left is when battery power is less than 30 %)
Enable/Disable GPS (icon shown is when disabled)
Record-Standby
Recording in Progress
Zoom Button
Video Recording Start Button
Still Image Recording Button
Video Recording Stop Button
Marking
Game Score
To Game Score Screen
To Marking Screen
■ Index Screen (AVCHD Video/iFrame Video/Still image)

text_image
To Monitor Screen
Monitor Index To Settings Screen
23:43
[0Ch:07m18s]
22:43
[0Ch:01m9s]
Thumbnail
17:16
[0Ch:02m10s]
Recording Date/Time
Playback Time
14:19
[0Ch:00m36s]
AVCHD iFrame Still Image Types of image
Transfer Screen

text_image
Back
Transfer
00:00:00 - 00:05:00
00:05:00 - 00:07:18
Checkbox
To Transfer Screen
■ Game Score Screen

text_image
Game Start button
Recording Start button
Game Over button
Recording Stop button
HOME
VISITOR
Score sheet
Goal button
1 2 1
1 2
3
3
Cancel button
Mark button
Monitor button
Caution :
\- "Everio sync. 2" for iPhone/iPad cannot be used when the iPhone/iPad is connected to the mobile phone network. To make use of this feature, connect to the camera or an access point via Wi-Fi.
Using the Markings
Enter the mark to make it easy to find the scene later.
■ Common for Android and iOS
1 Tap "Marking" while recording the video.

text_image
Index
Monitor
←° PAUSE
Pan
Pan
T
Tele
W
Wide
Rec
Pause
Snapshot
Marking
Game Score
2 Tap the mark icon (☐) at the scene you want to mark.

text_image
Marking
Monitor
- Once a scene is marked, the next mark won't be made within 5 seconds.
- Tap "Monitor" to return to the monitor screen.
■ Screen display of the camera while marking

text_image
DIRECT MONITORING
0:00:18 [0:52]
REC
\- The mark icon is displayed when a scene is marked.
Using the Game Score
The scores of various sport games can be recorded with video images. Also, the recorded position can be marked to make it easy to find the scenes you want to view later.
■ Common for Android and iOS
1 Tap "Game Score".

text_image
Index
Monitor
←° PAUSE
Pan
Pan
T
Tele
W
Wide
Rec
Pause
Snapshot
Marking
Game Score
2 Tap the scorecard.

text_image
Game Score
Game Start
HOME
0
VISITOR
0
Monitor
- Proceed to step 5 to keep the team settings unchanged.
3 Tap "TEAM SELECTION".

text_image
Game Score
Game
Start
HOME
VISITOR
TEAM SELECTION
TEAM LIST
Monitor
- Tap "TEAM LIST" to change the team name and color, and to add a team.
4 Select the team, then tap "OK".

text_image
Game Score
Game
Start
TEAM SELECTION
TEAM 1
HOME
TEAM 1
VISITOR
OK CANCEL
Monitor
5 Tap ● to start recording the video.

text_image
Game Score
Game Start
HOME
0
VISITOR
0
Monitor
6 When the game is started, tap "Game Start".

text_image
Game Score
Game Start
HOME
0
VISITOR
0
Monitor
7 Tap the number when the score is added.

text_image
Game Score
Home
0
1 2
3 4
VISITOR
0
1 2
3 4
Monitor
- Tap the number button of the scored team.
• To modify the score, tap the scorecard.
- Tap the "Undo" button to cancel the latest score entry.
- When the score is registered, next entry cannot be made for 5 seconds.
8 Mark the favotite scenes.

text_image
Game Score
HOME
VISITOR
Undo
Monitor
- Mark the favorite scenes by tapping the flag icon (☐)
- Once a scene is marked, the next mark won't be made within 5 seconds.
9 When the game is ended, tap "Game End".

text_image
Game Score
Home 2
1 2
3 4
VISITOR 3
1 2
3 4
Undo Monitor
- Tap "OK" if "DO YOU WANT TO EXIT?" appears.
• After the end of the game, video recording is carried on until recording is stopped.
- Tap "Monitor" to return to the monitor screen in Step 1.
Memo :
- Team name and color, the background of the screen can be set prior to recording.
- Select the score button depending on the type of the games.
- The next score won't be registered within 5 seconds after the marking operation. But the score can be registered right after the marking operation by changing the game score setting.
"Game Score Settings" (p. 186)
■ Screen display of the camera while recording the game score

text_image
HOME 2-1 VISITOR
GAME
0:00:25 [0:51]
REC
1 Team name and score
Team name can be set prior to recording. (use alphabets and numbers)
"Game Score Settings" (p. 186)
2 Game score recording icon
Transferring Videos (AVCHD format)
Transfer videos recorded in AVCHD format to the smartphone.
\- The video to be forwarded is converted to the following format.
Item Details System MP4 Video Code dec H. 264/MPEG-4 AVC Baseline Profile Resolution* Bit rate is indicated in ( ) 1280X720 (3.6Mbps)640X480 (1.5Mbps) Frame rate 30p Bit rate 3.6 Mbps or 1.5 Mbps Audio Coding system AAC
1 Start "Everio sync. 2" on the smartphone.

natural_image
Illustration of a hand holding a smartphone and a pen, no text or symbols present
\- Start the application after confirming that the smartphone is connected to this camera.
2 Select the connection type to the camera.

text_image
Everio sync.2
DIRECT MONITORING
CONNECT TO THE CAMERA
DIRECTLY.
YOU CAN USE THE GAME
SCORING FUNCTION.
INDOOR MONITORING
CONNECT VIA ACCESS POINT.
NEED TO REGISTER ACCESS
POINT.
OUTDOOR MONITORING
CONNECT VIA INTERNET.
NEED TO REGISTER ACCESS
POINT AND DDNS.
?
Demo
- Tap the current connection type.
• Recording screen appears.
3 Tap "Index".

text_image
Index
Monitor
←° PAUSE
Pan
Pan
Tele
Rec
Snapshot
Wide
Pause
Marking
Game Score
4 In the index screen, tap the desired images to transfer.

text_image
Monitor
Index
23:43
[00h07m18s]
22:43
[00h01m08s]
17:16
[00h02m10s]
14:19
[00h00m36s]
AVCHD
iFrame
Still Image
\- Confirm that the "AVCHD" tab is indicated in the lower part of the screen.
5 Files are displayed as a split files by certain lengths of time. Enter the check mark (①) to the files to transfer, and tap the transfer mark icon (②) on the lower right.

text_image
Back Transfer Manual
00:00:00 - 00:05:00
00:05:00 - 00:07:18
①
②
- Number of the selected image files is indicated next to the check mark in lower left.
- To set the length of video you are transferring, refer to the below instructions.
"Smartphone Application Settings" (p. 186)
6 Tap "TRANSFER".

text_image
YOU CAN TRANSFER VIDEOS
OR STILL IMAGES TO THE
SMARTPHONE
TRANSFER CANCEL
\- Tap "CANCEL" to cancel the operation.
7 "TRANSFER" starts.

text_image
PREPARING TO TRANSFER
1/1
1%
CANCEL
\- Tap "CANCEL" to cancel the operation.
8 After transferring is complete, tap "OK".

text_image
COMPLETED
OK
CHECK
SHARE
- To play back and check the video, tap "CHECK". (Android only)
- To upload the video, tap "SHARE". (Android only)
Tap the desired service, then proceed to the uploading process. To make use of a service, it is necessary to perform registration beforehand.
■ Transferring manually
You can set the length of transferred video.
1 Tap "MANUAL" in step 5.
2 At the start point, enter the starting time of the video.
Specify the lengths of the video by using the slider bar. (10 to 300 sec)
3 After confirming the setting, tap "TRANSFER", and then tap "TRANSFER" one more time.

text_image
Rack Transfer
START POINT 00h10m
+
+
10
-
10
Start point of the
video transfer
LENGTH OF VIDEO 60SEC
Length of the trans-
ferred video
TRANSFER
- Tap “+”-” to set the start point of the video transfer (minutes/seconds).
- Length of the transferred video can be adjusted by using the slider bar.
- The longer the length of the transferred video is set, the longer it takes to transfer the video.
Transferring Videos (iFrame format)
Transfer videos recorded in iFrame format to the smartphone. (Depending on the smartphone in use, videos may not be played back.)
\- Transferred videos are sent in the original file format.
1 Start "Everio sync. 2" on the smartphone.

natural_image
Illustration of a hand holding a smartphone with a pen, no text or symbols present
\- Start the application after confirming that the smartphone is connected to this camera.
2 Select the connection type to the camera.

text_image
Everio sync.2
DIRECT MONITORING
CONNECT TO THE CAMERA
DIRECTLY.
YOU CAN USE THE GAME
SCORING FUNCTION.
INDOOR MONITORING
CONNECT VIA ACCESS POINT.
NEED TO REGISTER ACCESS
POINT.
OUTDOOR MONITORING
CONNECT VIA INTERNET.
NEED TO REGISTER ACCESS
POINT AND DDNS.
?
Demo
- Tap the current connection type.
• Recording screen appears.
3 Tap "Index".

text_image
Index
Monitor
←←° PAUSE →
Pan
Pan
Tele
Rec
Snapshot
Wide
Pause
Marking
Game Score
4 Select "iFrame" from the tabs in the lower part of the screen.

text_image
Monitor
Index
19:50
[00h00m04s]
13:49
[00h00m08s]
11:00
[00h00m01s]
11:00
[00h00m01s]
AVCHD
iFrame
Still Image
- Tap "Monitor" to return to the monitor screen.
- Tap ✪ to move to the setting screen.
5 In the index screen, tap the desired images to transfer.

text_image
Monitor
Index
19:50
[00h00m04s]
13:49
[00h00m08s]
11:00
[00h00m01s]
11:00
[00h00m01s]
AVCHD
iFrame
Still Image
- Tap "Monitor" to return to the monitor screen.
- Tap ✪ to move to the setting screen.
6 Tap "TRANSFER".

text_image
YOU CAN TRANSFER VIDEOS
OR STILL IMAGES TO THE
SMARTPHONE
TRANSFER CANCEL
\- Tap "CANCEL" to cancel the operation.
7 "TRANSFER" starts.

text_image
PREPARING TO TRANSFER
1/1
1%
CANCEL
\- Tap "CANCEL" to cancel the operation.
8 After transferring is complete, tap "OK".

text_image
COMPLETED
OK
CHECK
SHARE
- To play back and check the video, tap "CHECK". (Android only)
- To upload the video, tap "SHARE". (Android only)
Tap the desired service, then proceed to the uploading process. To make use of a service, it is necessary to perform registration beforehand.
Transferring Still Images
You can transfer recorded still images to your smartphone.
If the aspect ratio of the original still image is 4:3, the image is reduced by 1600X1200 when transferred.
If the aspect ratio of the original still image is 16:9, the image is reduced by 1920X1080 when transferred.
1 Start "Everio sync. 2" on the smartphone.

natural_image
Illustration of a hand holding a smartphone and a pen, no text or symbols present
0 Start the application after confirming that the smartphone is connected to this camera.
2 Select the connection type to the camera.

text_image
Everio sync.2
DIRECT MONITORING
CONNECT TO THE CAMERA
DIRECTLY.
YOU CAN USE THE GAME
SCORING FUNCTION.
INDOOR MONITORING
CONNECT VIA ACCESS POINT.
NEED TO REGISTER ACCESS
POINT.
OUTDOOR MONITORING
CONNECT VIA INTERNET.
NEED TO REGISTER ACCESS
POINT AND DDNS.
?
Demo
0 Tap the current connection type.
0 Recording screen appears.
3 Tap "Index".

text_image
Index
Monitor
←° PAUSE
Pan
Pan
Tele
Rec
Snapshot
Wide
Pause
Marking
Game Score
4 Select the "Still Image" tab in the lower part of the screen, and tap the index screen.

text_image
Monitor Index
13:59
13:48
13:48
13:47
AVCHD iFrame Still Image
0 Tap "Monitor" to return to the monitor screen.
0 Tap Q to move to the setting screen.
5 Enter the check in the checkbox (A) to the still images to transfer, and tap the transfer mark icon (B) on the lower right.

text_image
Back
Transfer
13:59
13:48
13:48
13:47
1
- Tap "Monitor" to return to the monitor screen.
- Tap ⚙ to move to the setting screen.
6 Tap "TRANSFER".

text_image
YOU CAN TRANSFER VIDEOS
OR STILL IMAGES TO THE
SMARTPHONE
TRANSFER CANCEL
\- Tap "CANCEL" to cancel the operation.
7 "TRANSFER" starts.

text_image
PREPARING TO TRANSFER
1/1
1%
CANCEL
\- Tap "CANCEL" to cancel the operation.
8 After transferring is complete, tap "OK".

text_image
COMPLETED
OK
CHECK
SHARE
- To play back and check the still image, tap "CHECK". (Android only)
- To upload the still image, tap "SHARE". (Android only) Tap the desired service, then proceed to the uploading process. To make use of a service, it is necessary to perform registration beforehand.
Smartphone Application Settings
You can change the settings of the smartphone applications.
■ Common for Android and iOS
1 Tap

text_image
Index
Monitor
←° PAUSE
Pan
Pan
T
Tele
W
Wide
Rec
Pause
Snapshot
Marking
Game Score
2 Tap the desired setting.

text_image
SETTINGS
MONITOR
MONITORING
DISPLAY THE MONITOR SCREEN
PAN OPERATION SPEED
SET THE OPERATION SPEED OF THE
PAN OPERATION
LOC INFO TRANS INT
GPS SENDS LOCATION INFORMATION 15SEC
TO THE CAMERA WHEN USING DIRECT
MONITORING
VIDEO TRANSFER (AVCHD Index)
LENGTH 300SEC
RESOLUTION (pixel)
GAME SCORE
GAME SCORE SETTING
Item Details MONITORING Turns on off the monitoring function of the screen. (Enter a check mark to set to “ON”) PAN SPEED FOR OPERATING Select the panning speed of the pan cradle (optional) from high speed/low speed. LOC INFO TRANS INT Select the time interval for obtaining the GPS location information while the direct monitoring is in use. (Off - 15 SEC) VID LENGTH TO TRANS Set the length of video being transferred to the smartphone. (10 - 300SEC)Available for videos in AVCHD format only.
VID SIZE TO TRANS Select the resolution of the video being transferred to the smartphone. ("1280×720" or "640×360") Available for videos in AVCHD format only. GAME SCORE SETTING Enter the recording methods of the game score, as well as the team information. "Game Score Settings" (p. 186) URL Enter the URL of the camera that is connected to the smartphone via wireless network. HTTP AUTHORIZATION Set the user name and the password for INDOOR MONITORING/OUTDOOR MONITORING.The default username is "everio" (fixed) and the password is "0000".(can be changed from camera) CHANGE BACKGROUND COLOR Select the background. NOT TO SLEEP MODE Set to prevent the smartphone from entering into the sleep mode while the application is in use.(Enter a check mark to disactivate the sleep mode.) HELP Displays the help file. LICENSE AGREEMENT Displays the license agreement of the software. (Android only)
Memo :
\- When connecting to INDOOR MONITORING/OUTDOOR MONITORING, you will be prompted to enter the URL or HTTP authorization if they are not entered or entered incorrectly.
Game Score Settings
Enter the recording methods of the game score, as well as the team information.
■ Common for Android and iOS
1 Tap ♣.

text_image
Index
Monitor
←° | PAUSE
Pan
Pan
T
Tele
W
Wide
Rec
Pause
Snapshot
Marking
Game Score
2 Tap "GAME SCORE SETTING".

text_image
SETTINGS
MONITOR
MONITORING
DISPLAY THE MONITOR SCREEN
PAN OPERATION SPEED
SET THE OPERATION SPEED OF THE
PAN OPERATION
LOC INFO TRANS INT
GPS SENDS LOCATION INFORMATION 15SEC
TO THE CAMERA WHEN USING DIRECT
MONITORING
VIDEO TRANSFER (AVCHD Index)
LENGTH 300SEC
RESOLUTION (pixel)
GAME SCORE
GAME SCORE SETTING
3 Tap the desired setting.

text_image
GAME SCORE SETTING
TEAM LIST
SET THE TEAM NAME AND TEAM COLOR
SCORE BUTTON SETTING
YOU CAN CHANGE THE NUMBER OF
BUTTONS AND NUMBER TO BE ADDED IN
THE SETTING
CHANGE THE BACKGROU
PRIORITIZE THE SCORE
YOU CAN ENTER THE SCORE WITHIN 5
SECONDS AFTER MARKING
HELP
Item Details TEAM LIST Set the team name and the color.To display “HOME” and “VISITOR”, tap 1“TEAM LIST”.2“TEAM NAME” and “TEAM COLOR” can be set by tapping each button.3 Select “TEAM NAME” to display the screen for entering the team name. Tap the column to enter the team name, and press “OK”.4Select “TEAM COLOR” by tapping the desired color from the color palette.Tap the + button to add a new team. SCORE BUTTON SETTING Tap “Button Setting” to select up to 4 buttons. Each number indicates the score that can be added once.Select the button(s) depending on the type of the games.

 (1 button) (2 button) (3 button) (4 button)
CHANGE BACKGROUND COLOR Set the background color of the game score screen. PRIORITIZE THE SCORE The score can be entered within 5 seconds after the mark operation by selecting the checkbox. However, the marked position is changed when the score is registered. HELP Displays the help file.
Memo :
\- When registering the team name, the “\” mark being entered by the smartphone is displayed as “\” (backslash) on this camera.
Using the Wi-Fi Function from a Web Browser
You can connect to the camera and make use of the Wi-Fi function from the web browser of a computer.
• Indications on the screen
"Indications on the Screen" (p. 188)
Indications on the Screen
■ Recording Screen

text_image
To DETECT/MAIL SETTING Screen
To Still Image Index Screen
To Video Index Screen
Reload
Everio
JIVE
STARTING
10:40:00:00
STOP OFF
T
W
2.3.2.01
2.3.2.02
2.3.2.03
2.3.2.04
2.3.2.05
2.3.2.06
2.3.2.07
2.3.2.08
2.3.2.09
2.3.2.10
2.3.2.11
2.3.2.12
2.3.2.13
2.3.2.14
2.3.2.15
2.3.2.16
2.3.2.17
2.3.2.18
2.3.2.19
2.3.2.20
2.3.2.21
2.3.2.22
2.3.2.23
2.3.2.24
2.3.2.25
2.3.2.26
2.3.2.27
2.3.2.28
2.3.2.29
2.3.2.30
2.3.2.31
2.3.2.32
2.3.2.33
2.3.2.34
2.3.2.35
2.3.2.36
2.3.2.37
2.3.2.38
2.3.2.39
2.3.2.40
2.3.2.41
2.3.2.42
2.3.2.43
2.3.2.44
2.3.2.45
2.3.2.46
2.3.2.47
2.3.2.48
2.3.2.49
2.3.2.50
2.3.2.51
2.3.2.52
2.3.2.53
2.3.2.54
2.3.2.55
2.3.2.56
2.3.2.57
2.3.2.58
2.3.2.59
2.3.2.60
2.3.2.61
2.3.2.62
2.3.2.63
2.3.2.64
2.3.2.65
2.3.2.66
2.3.2.67
2.3.2.68
2, 1, 1, 1, 1, 1, 1, 1, 1, 1, 1, 1, 1, 1, 1, 1, 1, 1, 1, 1, 1, 1, 1, 1, 1, 1, 1, 1, 1, 1, 1, 1, 1, 1, 1
Stream Format Selection (click "SET" to apply)Select the video format when monitoring from a browser.

Full HD: 1920x1080 / MPEG-2 TS format
SD: 720x480 / MPEG-2 TS format
MotionJPEG: 640x360 / MotionJPEG format
Memo :
\- The full screen button is not displayed when the stream format is MotionJPEG.
Caution :
\- Features of the stream format are as follows:
Full HD/SD (MPEG-2 TS format)
\- Sound of the camera can be checked from the browser.
\- Recording operations cannot be performed from the browser.
MotionJPEG
\- Sound of the camera cannot be played back from the browser.
\- Recording and zoom operations can be performed from the browser.
\- The monitor's image stops automatically after monitoring is performed continuously for 12 hours in Full HD or SD. (To resume, press the reload button)
\- To use Full HD or SD, it is necessary to install Media Player 12 in advance.
\- Lagging of the screen may be caused by the network speed or computer performance.
\- If lagging is severe, reload the screen regularly.
(It may take some time for the screen to be displayed after reloading.)
\- For Full HD, make use of a computer with the following system requirements.
CPU Intel Core 2 Duo 2 GHz or higher
2 GB memory or higher
■ Video index (AVCHD)

text_image
Everio
JVC
40 CMX
R145
LTD:700.6178
V210
Fan...
600 Max
< 73 >
90°/°C" 50"
(左上) 90°/°C" 50"
(右上) 90°/°C" 50"
(左下) 90°/°C" 50"
(右下) 90°/°C" 50"
(左上) 90°/°C" 50"
(右上) 90°/°C" 50"
(左下) 90°/°C" 50"
(右下) 90°/°C" 50"
■ Video index (iFrame)

text_image
Everio
40:00
JVC
JVC
27:10
fun.
50:00
20(3/3)
1:16:25
20(3/3)
1:16:25
50:00
• To download a video, click on the thumbnail.
■ Still Image Index Screen

text_image
Everio
JVC
V2HD
Fm.
V10000
V10000
V10000
V10000
V10000
V10000
V10000
V10000
V10000
V10000
V10000
V10000
V10000
V10000
V10000
V2P 2P 2P 2P
V2P 2P 2P 2P
V2P 2P 2P 2P
V2P 2P 2P 2P
V2P 2P 2P 2P
V2P 2P 2P 2P
V2P 2P 2P 2P
V2P 2P 2P 2P
V2P 2P 3P 3P
V2P 2P 3P 3P
V2P 2P 3P 3P
V2P 2P 3P 3P
V2P 2P 3P 3P
V2P 2P 3P 3P
V2P 2P 3P 3P
V2P 2P 3P 3P
V2P 2P V1 P1 P1 P1 P1 P1 P1 P1 P1 P1 P1 P1 P1 P1 P1 P1 P1 P1 P1 P1 P1 P1 P1 P1 P1 P1 P1 P1 P1 P1 P1 P1 P1 P1 P1 P1 P1 P1 P1 P1 P1 P1 P1 P1 P1 P1 P1 P1 P1 P1 P1
\- To download a still image, click on the thumbnail.
■ DETECT/MAIL SETTING Screen
Notification mail settings such as detection method and recipient's e-mail address can be changed even when the camera is out of reach.
Registered e-mail addresses of recipients in Everio (Up to 8)
\*A check mark appears on the selected address.

text_image
Everio
10 DDR
N/C
D:\DATA\ID.
JVC
•
•
•
•
•
•
•
•
•
•
•
•
•
•
•
•
•
•
•
•
•
•
•
•
•
•
•
•
•
•
•
•
•
•
•
•
•
•
•
•
•
•
•
•
•
•
•
•
•
•
-
Notification Mail Settings


text_image
Detection Interval

(click "REG." to apply)
Troubleshooting
Direct Monitoring
Trouble Action Unable to connect to camera.(URL required) Check whether the Wi-Fi connection is established successfully.Check whether Wi-Fi is connected to “DIRECT-**EVERIO”.Check whether the smartphone (or computer) is connected to the camera.Try again after powering off and on the camera and the terminal (smartphone or computer). Unable to browse internet on the computer when it is connected to the camera. The camera operates as an access point during direct monitoring.Most computers (or smartphones) cannot be connected to multiple access points at the same time.As such, internet browsing becomes temporarily unavailable if the computer (or smartphone) has been connected to the internet via wireless LAN.Reconnect the computer to the wireless LAN router that is usually used for internet connection. If the computer connects to the camera unintentionally, remove the camera connection from the computer. (The registered name is “DIRECT-**EVERIO”.)Stop direct monitoring on the camera. Video or audio is interrupted or delayed If the network speed is slow, videos and audio sound may be interrupted, or delay may become significant(For web browser) Lagging may become significant due to the performance of the computer.If the stream format is set to “Full HD”, change to “SD” or “Motion-JPEG” and try again.“Wi-Fi Specifications” (p. 196)(For web browser) If lagging is severe, reload the screen regularly.(For smartphone) Try to change the place and time to locate an environment with good signal strength. The unit turns off automatically. To prevent the situation of forgetting to turn off the power, this unit will turn off automatically after 10 days of continuous usage. Unable to set focus. When not monitoring from a smartphone (or computer), the focus of the camera is fixed.Even when monitoring from a smartphone (or computer), the focus of the camera will be fixed if not operated for more than 3 hours. (Focus works again when the camera is operated.) Connection gets disconnected, or a “UNABLE TO CONNECT” message is displayed Establish connection again at a place with good signal strength. Transmission speed may drop, or connection may fail if the devices are placed too far away from each other, when there are objects in between, or when microwave ovens or other wireless devices are in use.If connection cannot be established again, restart the terminal (smartphone or computer).If the camera is too far away from the smartphone (or computer), connection for direct monitoring may be difficult to be established depending on the environment. In this case, connect via an access point (wireless LAN router).
Access Point (Wireless LAN Router)
Trouble Action Unable to find an access point (wireless LAN router). Check whether the distance from the access point (wireless LAN router) is too far, or whether there are shielding materials in between.If the access point (wireless LAN router) in use goes into the SSID stealth mode, perform manual registration or disable the stealth mode temporarily before registering.In an environment with multiple access points, you may not be able to find the desired access point through searching. In this case, add the access point manually. Unable to connect to access point (wireless LAN router). Check that the password is correct.For manual connection, check that the SSID or authentication method is correct. Unsure of which access point (wireless LAN router) to use. If the settings of the access point (wireless LAN router) have never been changed from their default values check the following.- Check whether an adhesive label indicating the initial settings is attached to the body of the access point (wireless LAN router).- Check for the default settings in the instruction manual of the access point (wireless LAN router). Unsure of password for the access point (wireless LAN router). Refer to the instruction manual of the access point (wireless LAN router) in use. Unable to connect via Wi-Fi Protected Setup (WPS). Simple connection methods other than WPS are not supported. Conduct a search for the access point to connect.Turn off the power of the camera, then try again.
INDOOR MONITORING (connection at home)
Trouble Action Unable to connect to camera.(URL required) Check whether the Wi-Fi connection is established successfully.Check to ensure that the camera and the terminal (smartphone or computer) are connected to the same access point.Try again after powering off and on the camera and the terminal (smartphone or computer). Unsure of URL to access from a web browser. After INDOOR MONITORING is started, tap “CAMERA NETWORK INFO.” shown on the camera’s screen. Enter the address as shown in “URL(LAN):” into the web browser to access it. No image and sound when accessing from a web browser. If you have installed third-party video players, images and sounds may not be played back properly.If the stream format is set to “Motion-JPEG” when transferring to the web browser, no sound will be output from the browser.If recording of the video is in progress, no sound will be output from the browser. Unable to access the entered URL. (cannot be found) Check that the camera is properly connected to an access point (wireless LAN router). (appears on the camera’s screen.)Check that the computer is properly connected to an access point (wireless LAN router). Connection should be possible if it is connected to the internet.Check that the URL is correct. Unable to access the entered URL.(password required) Enter your username and password.The username is “everio” (fixed) and the default password is “0000” (can be changed). Video or audio is interrupted or delayed If the network speed is slow, videos and audio sound may be interrupted, or delay may become significant(For web browser) Lagging may become significant due to the performance of the computer.If the stream format is set to “Full HD”, change to “SD” or “Motion-JPEG” and try again.“Wi-Fi Specifications” (p. 196)(For web browser) If lagging is severe, reload the screen regularly.(For smartphone) Try to change the place and time to locate an environment with good signal strength. The unit turns off automatically. To prevent the situation of forgetting to turn off the power, this unit will turn off automatically after 10 days of continuous usage. Unable to set focus. When not monitoring from a smartphone (or computer), the focus of the camera is fixed.Even when monitoring from a smartphone (or computer), the focus of the camera will be fixed if not operated for more than 3 hours. (Focus works again when the camera is operated.) Connection gets disconnected, or a “UNABLE TO CONNECT” message is displayed Establish connection again at a place with good signal strength. Transmission speed may drop, or connection may fail if the devices are placed too far away from each other, when there are objects in between, or when microwave ovens or other wireless devices are in use.If connection cannot be established again, restart the terminal (smartphone or computer). Screen does not refresh or remains black Check if the camera and the access point are properly connected.Images cannot be detected on the terminal (smartphone or computer) if the camera is disconnected from the access point halfway through.
OUTDOOR MONITORING (connection from the Internet)
Trouble Action Unsure of URL to access from a web browser. After OUTDOOR MONITORING is started, tap “CAMERA NETWORK INFO.” shown on the camera’s screen.Enter the address as shown in “URL(WAN):” into the web browser to access it. The URL (WAN) does not appear in the network information. The URL (WAN) will not appear if dynamic DNS is not set on the camera.To set dynamic DNS, perform the following steps.1. Obtain an account with JVC dynamic DNS service using your computer. (URL?)2. Log in to JVC DNS and obtain the dynamic DNS service. (How?)3. Set the obtained dynamic DNS username and password on the camera.*Only the JVC dynamic DNS service can be set on this camera.The URL (WAN) will not appear if dynamic DNS is not set on the camera.To set dynamic DNS, perform the following steps.1. Obtain an account with JVC dynamic DNS service using your computer.https://dd3.jvckenwood.com/user/2. Log in to JVC DNS and obtain the dynamic DNS service.3. Set the obtained dynamic DNS username and password on the camera.*Only the JVC dynamic DNS service can be set on this camera. Unable to access the entered URL. (cannot be found) This function cannot be used in an environment with two or more routers.Check that the dynamic DNS username and password are correct.The router in use is not compatible with UPnP, or UPnP is turned off. Check the instruction manual of the router in use, and turn on UPnP.The “UPnP” of the camera is set to “OFF”. (By default, it is set to “ON”).Set “UPnP” to “ON”.Depending on the terms of service with your provider, it may not be possible to obtain a global IP address.“Confirming global IP address” (p. 140)Check whether a terminal that uses port 80 (such as web servers) has been set in the network, or if a specific terminal has been set to use port 80 on the router. In such case, change the “HTTP Port” of the camera.“Changing the HTTP Port(DIRECT MONITORING/INDOOR MONITORING/OUTDOOR MONITORING)” (p. 155)Try again after powering off and on the camera and the terminal (smartphone or computer). Video or audio is interrupted or delayed If the network speed is slow, videos and audio sound may be interrupted, or delay may become significant(For web browser) Lagging may become significant due to the performance of the computer.If the stream format is set to “Full HD”, change to “SD” or “Motion-JPEG” and try again.“Wi-Fi Specifications” (p. 196)(For web browser) If lagging is severe, reload the screen regularly.(For smartphone) Try to change the place and time to locate an environment with good signal strength. The unit turns off automatically. To prevent the situation of forgetting to turn off the power, this unit will turn off automatically after 10 days of continuous usage. Unable to set focus. When not monitoring from a smartphone (or computer), the focus of the camera is fixed.Even when monitoring from a smartphone (or computer), the focus of the camera will be fixed if not operated for more than 3 hours. (Focus works again when the camera is operated.) Connection gets disconnected, or a “UNABLE TO CONNECT” message is displayed Establish connection again at a place with good signal strength. Transmission speed may drop, or connection may fail if the devices are placed too far away from each other, when there are objects in between, or when microwave ovens or other wireless devices are in use.If connection cannot be established again, restart the terminal (smartphone or computer). Screen does not refresh or remains black Check if the camera and the access point are properly connected.Images cannot be detected on the terminal (smartphone or computer) if the camera is disconnected from the access point halfway through. “×UPnP” is displayed. This appears when UPnP has failed. Check whether the wireless LAN router in use is compatible with UPnP.(Refer to the instruction manual of the wireless LAN router in use, or consult the manufacturer of the routerWhen the wireless LAN router in use is compatible with UPnP, turn on the UPnP function.If the icon does not disappear even when the UPnP function is enabled, turn off and on the power of the wireless LAN router in use as well as the camera, then try again. Unable to connect although “×UPnP” is displayed. When “UPnP” is set to “OFF”, “×UPnP” will not appear. In such cases, set “UPnP” to “ON”.When port 80 has been used by other devices via UPnP, connection cannot be established. Reconnect the camera.
- When the "HTTP Port" of the camera (set to "80" by default) is used by another device, connection cannot be established. Change the "HTTP Port" of the camera.
"Changing the HTTP Port
(DIRECT MONITORING/INDOOR MONITORING/OUTDOOR MONITORING)" (p. 155)
E-mail (Notification Mail, Video Mail)
Trouble Action Unable to send e-mails. Check that the settings of the e-mail server are correct.Check that the settings of the sender's e-mail address are correct.Check that the username and password are correct.If you are using an e-mail service that is not from your provider, it may be necessary to change the SMTP settings.Some free e-mail services from web browsers or e-mail softwares (SMTP) may have default SMTP settings that do not allow e-mails to be sent.Change the SMTP settings to allow sending of e-mails before use. Sent e-mails are not received. Check whether notifications indicating errors have been sent to the sender's e-mail address. (Make use of a computer or similar devices as it is not possible to check from the camera.)- If no notifications are received: Refer to “Unable to send e-mails.” and adjust the settings accordingly.- If notifications are received: Check the content of the notification.*Note: Do not continue sending e-mails with the same settings if you receive error notifications. Depending on the provider, you may be marked as a sender of spam (junk mail). Unable to attach images to e-mails. Depending on the provider, some attached files may be deleted. Make use of other free e-mail services. The unit turns off automatically. To prevent the situation of forgetting to turn off the power, this unit will turn off automatically after 10 days of continuous usage. Unable to set focus. (For DETECT/MAIL SETTING) While on standby for notification mails, the focus is fixed. Perform the camera settings first, then enable notification mails.Focus may not be set correctly if the notification mails start before camera settings are made. In this case, disable notification mails temporarily, then enable it again.
Vide/Still Image Transmission
Trouble Action Unable to transfer videos and still images to smartphone (or computer). • Check the amount of remaining free space in the destination medium (smartphone or computer).
Wi-Fi Specifications
Wi-Fi Specifications
Item Details Wireless LAN Standard IEEE802.11b/g/n (2.4GHz band) Wi-Fi security Encryption: WEP, WPA, WPA2 *WPA and WPA2 are supported only by the personal mode (PSK).
DIRECT MONITORING / INDOOR MONITORING / OUTDOOR MONITORING
■ When Using Everio sync. 2
Item Details Supported Terminals iPhone/iPad/iPod touch iOS 5.1 or laterAndroid: Android 2.3 or laterThere is no guarantee that the operations will work with all terminals.“Everio sync. 2” for iPhone/iPad cannot be used when the iPhone/iPad is connected to the mobile phone network.To make use of this feature, connect to the camera or an access point via Wi-Fi.A network environment with a minimum line speed of about 5.3 Mbps is recommended for both the camerasending the data and the smartphone terminal receiving the data.If the network speed is too low, video images may appear jumpy, or audio sound may be interrupted or delayed. Monitor Screen Video: JPEG 640x360 max. 15 fpsAudio: linear PCM 8kHz 16 bits 1ch Video Transmission Video: MP4-compliant H 264 Baseline Profile 640x360 or 1280x720 30pAudio: AAC 48kHz 16 bits 2ch Still Image Transmission JPEG format
■ When Using Web Browser
Item Details Operating Environment Windows 7: Internet Explorer 9 or a later version, and Windows Media Player 12 or a later version are installedFor Full HD, make use of a computer with the following system requirements.- CPU: Intel Core 2 Duo 2 GHz or higher- Memory: 2 GB or higherA network environment with the following line speed is recommended for both the camera sending the data and the PC receiving the data.- MotionJPEG: approx. 1.7 Mbps or higher- Full HD: approx. 10 Mbps or higher- SD: approx. 3 Mbps or higherIf the network speed is too low, video images may appear jumpy, or audio sound may be interrupted or delayed. Monitor Screen MotionJPEGVideo: JPEG 640x360 max. 5 fpsAudio: nilFull HDVideo: MPEG-2 TS compliant H.264 High Profile 1920x1080 60iAudio: AAC 48kHz 16 bits 2chSDVideo: MPEG-2 TS compliant H.264 Main Profile 720x480 60iAudio: AAC 48kHz 16 bits 2ch Video Transmission MPEG-2TS format (no conversion) Still Image Transmission JPEG format (no conversion)
VIDEO MAIL
Item Details Video MP4-compliant H.264 Baseline Profile 640x360 30p Audio AAC 48kHz 16 bits 2ch Time Max. 15 seconds
DETECT/MAIL
Item Details Still Image Transmission JPEG 640x360
DIRECT MONITORING
You can monitor images being captured by Everio to your smartphone or PC. While you are busy, you can monitor your baby who is sleeping in the room next door.
INDOOR MONITORING
Images being captured by Everio can be set to your PC or smartphone when your children return home, via the wireless LAN router.
OUTDOOR MONITORING
Images being captured by Everio can be sent to the grandparents' PC or smartphone, by the wireless LAN (Wi-Fi spot) via the Internet.
DETECT/MAIL
When your child returns home while you are away, a still image is sent to you by e-mail.
VIDEO MAIL
Let's send video messages (Good morning, Good night) to your father or husband who is on the business trip.
TV MONITORING
A DLNA compatible TV may be used to display and play back the images.
DIRECT MONITORING
Setting (Once setting is done, start from the "Regular Operation" below)
Create a QR code.
■ Enter values in the required items for direct monitoring.
- Password: set a password to connect this camera to the device by direct monitoring. (8 to 63 characters (64 characters in case of hexadecimal))
- Enforced Group Owner: setting used to enable a connection with a device that does not support Wi-Fi Direct. Normally set to "ON".
- HTTP Port: Normally set to "80".
Display the screen for reading the QR code.
1 Tap "MENU".
(Operation on this camera)

text_image
M
WT
D
PLAY REC MENU
• The top menu appears.
2 Tap the "Wi-Fi" (💡) icon.
(Operation on this camera)

text_image
TOP MENU
?
3 Tap > on the lower right of the screen.
(Operation on this camera)

text_image
Wi-Fi
智能家庭管理器
智能家庭管理器
智能家庭管理器
智能家庭管理器
智能家庭管理器
智能家庭管理器
4 Tap "COMMON Wi-Fi SETTING".
(Operation on this camera)

text_image
Wi-Fi
网络连接器
Wi-Fi
网络连接器
5 Tap "SET FROM QR CODE".

text_image
COMMON WI-FI SETTING
SET FROM QR CODE
6 Tap "EXECUTE".

text_image
SET FROM QR CODE
Wi-Fi SETTING CAN BE SET
USING WEB USER GUIDE OR
SMART USER GUIDE
EXECUTE
STOP
Read a QR code.
1 Read a QR code.
(Operation on this camera)

text_image
PLEASE READ QR CODE
2 Tap "YES".

text_image
SET FROM QR CODE
CHANGE THE SETTING OF
DIRECT MONITORING
PREVIOUS SETTING WILL BE
OVERWRITTEN
YES NO
3 Tap "OK".

text_image
SET FROM QR CODE
SETTINGS COMPLETED
OK NEXT
- Step 2-E is displayed.
- Set contents are saved.
■ Regular Operation
Connecting the Smartphone to the Camera Wirelessly
■ Connection by entering the Wi-Fi password
1 Tap "MENU".
(Operation on this camera)
Set the camera to the recording mode.

text_image
M
WT
D
<< PLAY REC MENU
• The top menu appears.
2 Tap the "Wi-Fi" (💡) icon. (Operation on this camera)

text_image
TOP MENU
?
3 Tap the "DIRECT MONITORING" (☐) icon in the "Wi-Fi" menu. (Operation on this camera)

text_image
Wi-Fi
智能家庭管理器
智能家庭管理器
智能家庭管理器
智能家庭管理器
智能家庭管理器
智能家庭管理器
智能家庭管理器
4 Tap "START" (→). (Operation on this camera)

text_image
DIRECT MONITORING
→
ON
OK
OK
OK
HTTP
OK
- When iFrame is selected for "VIDEO REC FORMAT", the following display appears and recording mode is switched to the 60i mode in AVCHD.
- This display disappears automatically after approximately 3 seconds, but disappears immediately if the screen is tapped.

text_image
DIRECT MONITORING
VIDEO RECORDING AT 60i
WHEN USING Wi-Fi
5 Check the SSID and the PASS being displayed on the screen of the camera.

text_image
DIRECT MONITORING
SET UP WI-FI SETTING ON
CONNECTING DEVICE
SSID:******
PASS:******
STOP
WPS
6 Select the SSID in step 5 from the Wi-Fi network selection screen of your smartphone, and enter the PASS on the password screen.
(Operation on the smartphone (or computer))

natural_image
Illustration of a hand holding a smartphone with a stylus, no text or symbols present
\- For details on connecting your smartphone (or computer) to a Wi-Fi network, please refer to the instruction manual of the phone terminal in use.
7 A connection is established and 🔔 appears on the camera's screen.

natural_image
Close-up of purple flowers with green foliage, no visible text or symbols
■ Connection by Wi-Fi Protected Setup (WPS)
1 Tap "MENU". (Operation on this camera)
Set the camera to the recording mode

text_image
M
WT
D
←PLAY
REC
MENU
• The top menu appears.
2 Tap the "Wi-Fi" (💡) icon. (Operation on this camera)

text_image
TOP MENU
?
3 Tap the "DIRECT MONITORING" (☐) icon in the "Wi-Fi" menu. (Operation on this camera)

text_image
Wi-Fi
智能家庭管理
智能家庭管理
智能家庭管理
智能家庭管理
智能家庭管理
智能家庭管理
4 Tap "START" (→). (Operation on this camera)

text_image
DIRECT MONITORING
?
- When iFrame is selected for "VIDEO REC FORMAT", the following display appears and recording mode is switched to the 60i mode in AVCHD.
- This display disappears automatically after approximately 3 seconds, but disappears immediately if the screen is tapped.

text_image
DIRECT MONITORING
VIDEO RECORDING AT 60i
WHEN USING Wi-Fi
5 Tap "WPS".
(Operation on this camera)

text_image
DIRECT MONITORING
SET UP WI-FI SETTING ON
CONNECTING DEVICE
SSID:******
PASS:******
STOP
WPS
6 Activate WPS on the smartphone (or computer) within 2 minutes. (Operation on the smartphone (or computer))

natural_image
Illustration of a hand holding a smartphone with a pen inserted (no text or symbols visible)
\- To activate WPS, refer to the instruction manual of the device in use.
7 A connection is established and 🔔 appears on the camera's screen.

natural_image
Close-up of purple iris flowers with green foliage, captured in a photo editing interface (no text or symbols on the flower image itself)
Monitoring the Images from a Smartphone (or Computer)
■ Smartphone (Android / iPhone)
Memo :
\- Prior to use this function, a smartphone application needs to be installed on the smartphone.
"Installing Smartphone Applications" (p. 175)
1 Start "Everio sync. 2" on the smartphone after setting DIRECT MONITORING.

natural_image
Illustration of a hand holding a smartphone with a pen, no text or symbols present
2 Tap "DIRECT MONITORING".

text_image
Everio sync.2
DIRECT MONITORING
CONNECT TO THE CAMERA
DIRECTLY.
YOU CAN USE THE GAME
SCORING FUNCTION.
INDOOR MONITORING
CONNECT VIA ACCESS POINT.
NEED TO REGISTER ACCESS
POINT.
OUTDOOR MONITORING
CONNECT VIA INTERNET.
NEED TO REGISTER ACCESS
POINT AND DDNS.
?
Demo
3 The recording screen is displayed.

text_image
Index
Monitor
PAUSE
Tele
Rec
Snapshot
Wide
Pause
Marking
Game Score
4 Operate from a smartphone

natural_image
Illustration of a hand holding a smartphone and a camera with sound waves (no text or symbols)
\- How to operate from a smartphone "Using Smartphone Applications" (p. 175)
■ Computer (Windows 7)
1 Tap the URL button shown on the camera's screen. (displayed when the computer and the camera are connected wirelessly.)

natural_image
Close-up of purple iris flowers with green foliage, captured under a photo editing interface (no text or symbols on the flower image itself)
\- The URL for the computer to connect to appears.
2 Check the URL being displayed on the camera screen, which starts from "http://".

text_image
CAMERA NETWORK INFO.
URL(LAN):http://****************/
****************/
QUIT
\- After checking the URL, tap "QUIT" to return to the previous screen.
3 Start Internet Explorer (web browser) on the computer and enter the URL.

text_image
1000CDBYK
INDOOR MONITORING
Setting (Once setting is done, start from the “Regular Operation” below)
Create a QR code.
■ Enter values in the required items for indoor monitoring.
- Password: set a password to connect this camera to the device via access point. (Not more than 8 characters)
- HTTP Port: Normally set to "80".
Display the screen for reading the QR code.
1 Tap "MENU". (Operation on this camera)

text_image
M
WT
D
PLAY REC MENU
• The top menu appears.
2 Tap the "Wi-Fi" (💡) icon. (Operation on this camera)

text_image
TOP MENU
?
3 Tap > on the lower right of the screen. (Operation on this camera)

text_image
Wi-Fi
搜索数据源
搜索数据源
搜索数据源
搜索数据源
搜索数据源
搜索数据源
搜索数据源
搜索数据源
搜索数据源
搜索数据源
搜索数据源
搜索数据源
搜索数据源
搜索数据源
搜索数据源
搜索数据源
搜索数据源
搜索数据源
搜索数据源
搜索数据源
搜索数据源
搜索数据源
搜索数据源
搜索数据源
搜索数据源
搜索数据源源
搜索数据源源
搜索数据源源
搜索数据源源
搜索数据源源
搜索数据源源
搜索数据源源
搜索数据源源
搜索数据源源
搜索数据源源
搜索数据源源
搜索数据源源
搜索数据源源
搜索数据源源
搜索数据源源
搜索数据源源
搜索数据源源
搜索数据源源
搜索数据源源
搜索数据源源
搜索数据源源
搜索数据源源
搜索数据源源
搜索数据源源
搜索数据源源
搜索数据源
4 Tap "COMMON Wi-Fi SETTING". (Operation on this camera)

text_image
Wi-Fi
Wi-Fi
5 Tap "SET FROM QR CODE".

text_image
COMMON WI-FI SETTING
SET FROM QR CODE
6 Tap "EXECUTE".

text_image
SET FROM QR CODE
Wi-Fi SETTING CAN BE SET
USING WEB USER GUIDE OR
SMART USER GUIDE
EXECUTE
STOP
Read a QR code.
1 Read a QR code.
(Operation on this camera)

text_image
PLEASE READ QR CODE
2 Tap "YES".

text_image
SET FROM QR CODE
CHANGE THE SETTING OF
INDOOR MONITORING
PREVIOUS SETTING WILL BE
OVERWRITTEN
YES NO
3 Tap "OK".

text_image
SET FROM QR CODE
SETTINGS COMPLETED
OK NEXT
- Step 2-⑤ is displayed.
- Set contents are saved.
Registering the access points (wireless LAN router) to this unit
■ Wi-Fi Protected Setup (WPS) Registration
1 Tap "MENU". (Operation on this camera)

text_image
M
WT
D
<
• The top menu appears.
2 Tap the "Wi-Fi" (💡) icon. (Operation on this camera)

text_image
TOP MENU
?
3 Tap > on the lower right of the screen. (Operation on this camera)

text_image
Wi-Fi
智能家庭健康
智能家庭健康
智能家庭健康
智能家庭健康
智能家庭健康
智能家庭健康
智能家庭健康
4 Tap "COMMON Wi-Fi SETTING". (Operation on this camera)

text_image
Wi-Fi
智能家庭智能
Wi-Fi
5 Tap "ACCESS POINTS". (Operation on this camera)

text_image
COMMON WI-FI SETTING
ACCESS POINTS
6 Tap "ADD". (Operation on this camera)

text_image
ACCESS POINTS
ADD
7 Tap "EZ REGISTRATION WPS". (Operation on this camera)

text_image
ADD
EZ REGISTRATION WPS
[ ] [ ] [ ] [ ] [ ] [ ] [ ] [ ] [ ] [ ] [ ] [ ] [ ] [ ] [ ] [ ] [ ] [ ] [ ] [ ] [ ] [ ] [ ] [ ] [ ] [ ] [ ] [ ] [ ] [ ] [ ] [ ] [ ] [ ] [ ] [ ] [ ] [ ] [ ] [ ] [ ] [ ] [ ] [ ] [ ] [ ] [ ] [ ] [ ] [ ] [ ]
8 Activate WPS of the access point (wireless LAN router) within 2 minutes.
• To activate WPS, refer to the instruction manual of the device in use.
9 After registration is complete, tap "OK" on the camera's screen. (Operation on this camera)

text_image
REGISTERED
SSID:******
ENCRYPTION METHOD
WPA2
OK
■ Search the access point, and select from the list.
Set the name (SSID) of the access point (wireless LAN router) and the password beforehand.
1 Tap "MENU".
(Operation on this camera)

text_image
M
WT
D
← PLAY
REC
MENU
• The top menu appears.
2 Tap the "Wi-Fi" (💡) icon. (Operation on this camera)

text_image
TOP MENU
?
3 Tap > on the lower right of the screen. (Operation on this camera)

text_image
Wi-Fi
智能家庭智能
智能家庭智能
智能家庭智能
智能家庭智能
智能家庭智能
智能家庭智能
智能家庭智能
4 Tap "COMMON Wi-Fi SETTING". (Operation on this camera)

text_image
Wi-Fi
Wi-Fi
5 Tap "ACCESS POINTS". (Operation on this camera)

text_image
COMMON Wi-Fi SETTING
ACCESS POINTS
[兼容 要推荐] [兼容 要推荐] [兼容 要推荐]
6 Tap "ADD". (Operation on this camera)

text_image
ACCESS POINTS
ADD
7 Tap "SEARCH". (Operation on this camera)

text_image
ADD
SEARCH
1.000 2.000 3.000
1.000 2.000 3.000
1.000 2.000 3.000
\- The search results appear on the camera's screen.
8 Tap the name (SSID) of the desired access point from the list of search results.
(Operation on this camera)

text_image
SEARCH
SEARCH AGAIN
9 Register a password.
(Operation on this camera)

text_image
PASSWORD
A/a/1 . @ ABC DEF DELETE
← GHI JKL MNO →
PQRS TUV WXYZ
SET - + CANCEL
\- Tap on the on-screen keyboard to enter characters. The character changes with every tap.
"ABC", for example, enter "A" by tapping once, "B" by tapping twice, or "C" by tapping 3 times.
- Tap "DELETE" to delete a character.
- Tap "CANCEL" to exit.
- Tap "A/a/1" to select character input type from upper case letter, lower case letter, and number.
- Tap or to move one space to the left or right.
- The password is not required if the wireless LAN router is not security protected.
10 After registration is complete, tap "OK" on the camera's screen. (Operation on this camera)

text_image
REGISTERED
SSID:******
ENCRYPTION METHOD
WPA2
OK
\- Other methods, such as "Manual Registration" and "WPS PIN Registration" are also available. Refer to the following link for details. "Registering the Access Points of the Camera to Connect (ACCESS POINTS)" (p. 164)
Connecting the smartphone (or computer) to the access point (wireless LAN router)
- Connect the smartphone (or computer) to the access point (wireless LAN router) at home.
- This setting is unnecessary if the smartphone (or computer) has already been connected to the access point (wireless LAN router) at home.
■ Regular Operation
Monitoring the images by connecting the smartphone and the camera
■ Operation on this camera
1 Tap "MENU".
(Operation on this camera)

text_image
M
WT
D
PLAY REC MENU
• The top menu appears.
2 Tap the "Wi-Fi" (💡) icon. (Operation on this camera)

text_image
TOP MENU
?
3 Tap "INDOOR MONITORING" (Operation on this camera)

text_image
Wi-Fi
智能家庭智能
智能家庭智能
智能家庭智能
智能家庭智能
智能家庭智能
智能家庭智能
智能家庭智能
4 Tap "START" (→). (Operation on this camera)

text_image
INDOOR MONITORING
HTTP
网络数据管理器
网络数据管理器
网络数据管理器
5 Start making a connection. (Operation on this camera)

text_image
INDOOR MONITORING
CONNECTING
SSID:******
STOP
\- Name (SSID) of the access point (wireless LAN router) in connection is displayed.
6 The following is displayed when the camera is connected to the access point.

natural_image
Close-up of purple iris flowers with green foliage, captured in a photo editing interface (no text or symbols on the flower image itself)
\- Tap "URL" to display the URL required for connecting the camera from browser.
■ Operation on the smartphone
Memo :
- Prior to use this function, a smartphone application needs to be installed on the smartphone.
"Installing Smartphone Applications" (p. 175)
1 Start "Everio sync. 2" on the smartphone after setting "INDOOR MONITORING".

natural_image
Illustration of a hand holding a smartphone with a pen, no text or symbols present
\- Tap "START" in INDOOR MONITORING on the camera to start.
2 Tap "INDOOR MONITORING".

text_image
Everio sync.2
DIRECT MONITORING
CONNECT TO THE CAMERA
DIRECTLY.
YOU CAN USE THE GAME
SCORING FUNCTION.
INDOOR MONITORING
CONNECT VIA ACCESS POINT.
NEED TO REGISTER ACCESS
POINT.
OUTDOOR MONITORING
CONNECT VIA INTERNET.
NEED TO REGISTER ACCESS
POINT AND DDNS.
?
Demo
3 The recording screen is displayed.

text_image
Index
Monitor
PAUSE
Tele
Rec
Snapshot
Wide
Pause
Marking
Game Score
• How to operate from a smartphone
"Using Smartphone Applications" (p. 175)
■ Monitoring from the computer (Windows7)
1 Tap the URL button shown on the camera's screen. (displayed when the computer and the camera are connected wirelessly.)

natural_image
Close-up of purple iris flowers with green foliage, no visible text or symbols
• The URL for the computer to connect to appears.
2 Check the URL being displayed on the camera screen, which starts from "http://".

text_image
CAMERA NETWORK INFO.
URL(LAN):http://**********
**********/
QUIT
\- After checking the URL, tap "QUIT" to return to the previous screen.
3 Start Internet Explorer (web browser) on the computer and enter the URL.

text_image
SOME DRIN
4 Log in with your username and password.
- The username is "everio" and the default password is "0000".
"Changing the Settings" (p. 153)
• Operations from the Web browser
"Using the Wi-Fi Function from a Web Browser" (p. 188)
OUTDOOR MONITORING
Setting (Once setting is done, start from the “Regular Operation” below)
Obtaining a Dynamic DNS Account
By obtaining a dynamic DNS account, this unit may be used on the web as usual even if the IP address changes when making an access to this unit via internet.
\- Only the JVC dynamic DNS service can be set on this camera.
To obtain (register) an account, perform the following steps.
1 Access the following URL from a browser and register for an account. (Operation on a computer or smartphone)
https://dd3.jvckenwood.com/user/
Set your e-mail address as the username.
2 Check that you have received a confirmation e-mail to the address used in registration, and access the URL stated in the e-mail.
(Operation on a computer or smartphone)
3 Set the username and password used in registration on the camera. (Operation on this camera)
"Setting Dynamic DNS on this Camera (OUTDOOR MONITORING)" (p. 158)
4 Execute OUTDOOR MONITORING. (Operation on this camera)
If "OUTDOOR MONITORING" is executed while dynamic DNS settings are enabled, the camera will access the dynamic DNS server.
5 Tap "CAMERA NETWORK INFO." to check that the URL (WAN) is displayed.
(Registration complete)
"Image Monitoring via the Internet (OUTDOOR MONITORING)" (p. 140)
Caution :
- Registration will be canceled if you do not access the dynamic DNS server from the camera within 3 days.
Perform the registration again in this case.
- Registration will not be complete if the username and password set on this camera are incorrect. Be sure to check that they are correct.
- Successful registration will be canceled too if you do not access the dynamic DNS server for 1 year.
Create a QR code.
■ Enter values in the required items for outdoor monitoring.
- Password: set a password to connect this camera to the device via access point. (Not more than 8 characters)
- DDNS: Set the connection environment to the internet. Normally set to "ON".
- User name (DDNS): set an user name for the obtained DDNS account.
- Password (DDNS): set a password for the obtained DDNS account.
- UPnP: Set to "ON" if the UPnP protocol may be used to connect the device to the network.
- HTTP Port: Set the port number for connecting to the internet. Normally set to "80".
Display the screen for reading the QR code.
1 Tap "MENU".
(Operation on this camera)

text_image
M
WT
D
<< PLAY REC MENU
\- The top menu appears.
2 Tap the "Wi-Fi" (💡) icon. (Operation on this camera

text_image
TOP MENU
?
3 Tap> on the lower right of the screen. (Operation on this camera)

text_image
Wi-Fi
网络连接器功能
网络连接器功能
网络连接器功能
网络连接器功能
网络连接器功能
网络连接器功能
网络连接器功能
网络连接器功能
网络连接器功能
网络连接器功能
网络连接器功能
网络连接器功能
网络连接器功能
网络连接器功能
网络连接器功能
网络连接器功能
网络连接器功能
网络连接器功能
网络连接器功能
网络连接器功能
网络连接器
4 Tap "COMMON Wi-Fi SETTING". (Operation on this camera)

text_image
Wi-Fi
Wi-Fi
5 Tap "SET FROM QR CODE".

text_image
COMMON WI-FI SETTING
SET FROM QR CODE
6 Tap "EXECUTE".

text_image
SET FROM QR CODE
Wi-Fi SETTING CAN BE SET
USING WEB USER GUIDE OR
SMART USER GUIDE
EXECUTE
STOP
Read a QR code.
1 Read a QR code.
(Operation on this camera)

text_image
PLEASE READ QR CODE
2 Tap "YES".

text_image
SET FROM QR CODE
CHANGE THE SETTING OF
OUTDOOR MONITORING
PREVIOUS SETTING WILL BE
OVERWRITTEN
YES NO
3 Tap "OK".

text_image
SET FROM QR CODE
SETTINGS COMPLETED
OK NEXT
- Step 2-⑤ is displayed.
- Set contents are saved.
Registering the access points (wireless LAN router) to this unit
■ Wi-Fi Protected Setup (WPS) Registration
1 Tap "MENU".
(Operation on this camera)

text_image
M
WT
D
<
• The top menu appears.
2 Tap the "Wi-Fi" (💡) icon.
(Operation on this camera)

text_image
TOP MENU
?
3 Tap> on the lower right of the screen.
(Operation on this camera)

text_image
Wi-Fi
智能驾驶辅助
智能驾驶辅助
智能驾驶辅助
智能驾驶辅助
智能驾驶辅助
智能驾驶辅助
4 Tap "COMMON Wi-Fi SETTING".
(Operation on this camera)

text_image
Wi-Fi
智能驾驶系统
Wi-Fi
智能驾驶系统
5 Tap "ACCESS POINTS".
(Operation on this camera)

text_image
COMMON WI-FI SETTING
ACCESS POINTS
6 Tap "ADD".
(Operation on this camera)

text_image
ACCESS POINTS
ADD
7 Tap "EZ REGISTRATION WPS".
(Operation on this camera)

text_image
ADD
EZ REGISTRATION WPS
?
8 Activate WPS of the access point (wireless LAN router) within 2 minutes.
\- To activate WPS, refer to the instruction manual of the device in use.
9 After registration is complete, tap "OK" on the camera's screen. (Operation on this camera)

text_image
REGISTERED
SSID:**
ENCRYPTION METHOD
WPA2
OK
■ Search the access point, and select from the list.
Set the name (SSID) of the access point (wireless LAN router) and the password beforehand.
1 Tap "MENU".
(Operation on this camera)

text_image
M
WT
D
<< PLAY REC MENU
• The top menu appears.
2 Tap the "Wi-Fi" (💡) icon. (Operation on this camera)

text_image
TOP MENU
?
3 Tap > on the lower right of the screen. (Operation on this camera)

text_image
Wi-Fi
智能家庭管理器
智能家庭管理器
智能家庭管理器
智能家庭管理器
智能家庭管理器
智能家庭管理器
智能家庭管理器
4 Tap "COMMON Wi-Fi SETTING". (Operation on this camera)

text_image
Wi-Fi
Wi-Fi
5 Tap "ACCESS POINTS". (Operation on this camera)

text_image
COMMON W/FI SETTING
ACCESS POINTS
6 Tap "ADD". (Operation on this camera)

text_image
ACCESS POINTS
ADD
7 Tap "SEARCH". (Operation on this camera)

text_image
ADD
SEARCH
?
?
?
\- The search results appear on the camera's screen.
8 Tap the name (SSID) of the desired access point from the list of search results.
(Operation on this camera)

text_image
SEARCH
SEARCH AGAIN
9 Register a password. (Operation on this camera)

text_image
PASSWORD
A/a/1 . @ ABC DEF DELETE
← GHI JKL MNO →
PQRS TUV WXYZ
SET - + CANCEL
- Tap on the on-screen keyboard to enter characters. The character changes with every tap.
"ABC", for example, enter "A" by tapping once, "B" by tapping twice, or "C" by tapping 3 times.
- Tap "DELETE" to delete a character.
- Tap "CANCEL" to exit.
- Tap "A/a/1" to select character input type from upper case letter, lower case letter, and number.
- Tap ← or → to move one space to the left or right.
- The password is not required if the wireless LAN router is not security protected.
10 After registration is complete, tap "OK" on the camera's screen. (Operation on this camera)

text_image
REGISTERED
SSID:******
ENCRYPTION METHOD
WPA2
OK
\- Other methods, such as "Manual Registration" and "WPS PIN Registration" are also available. Refer to the following link for details. "Registering the Access Points of the Camera to Connect (ACCESS POINTS)" (p. 164)
■ Regular Operation
Connect this camera to a smartphone (or computer).
1 Tap "MENU".
(Operation on this camera)

text_image
M
WT
D
<
• The top menu appears.
2 Tap the "Wi-Fi" (💡) icon. (Operation on this camera)

text_image
TOP MENU
?
3 Tap "OUTDOOR MONITORING" (Operation on this camera)

text_image
Wi-Fi
图层智能驾驶器
图层智能驾驶器
图层智能驾驶器
图层智能驾驶器
图层智能驾驶器
图层智能驾驶器
图层智能驾驶器
图层智能驾驶器
4 Tap "START" (→). (Operation on this camera)

text_image
OUTDOOR MONITORING
DDNS
HTTP
UPnP
OK
5 Start making a connection. (Operation on this camera)

text_image
OUTDOOR MONITORING
CONNECTING
SSID:******
STOP
\- Name (SSID) of the access point (wireless LAN router) in connection is displayed.
6 The following is displayed when the camera is connected to the access point.

natural_image
Close-up of purple iris flowers with green foliage, captured via a photo editing interface (no text or symbols on the flower image itself)
\- The URL (WAN) for the smartphone to connect to appears.
(Does not appear if DDNS is not set or set incorrectly.)
\- “XUPnP” is displayed when UPnP cannot be used.
7 Check the URL (WAN).

text_image
CAMERA NETWORK INFO.
USE THE URL BELOW TO CONNECT
FROM AN OUTSIDE LOCATION
URL(WAN):http://*****
QUIT
- After checking the URL, tap "QUIT" to return to the previous screen.
- “XUPnP” is displayed when UPnP cannot be used.
■ Operation on the smartphone
Memo :
\- Prior to use this function, a smartphone application needs to be installed on the smartphone.
"Installing Smartphone Applications" (p. 175)
1 Start "Everio sync. 2" on the smartphone after setting OUTDOOR MONITORING.

natural_image
Illustration of a hand holding a smartphone with a pen, no text or symbols present
\- Tap "START" in OUTDOOR MONITORING on the camera to start.
2 Tap "OUTDOOR MONITORING".

text_image
Everio sync.2
DIRECT MONITORING
CONNECT TO THE CAMERA
DIRECTLY.
YOU CAN USE THE GAME
SCORING FUNCTION.
INDOOR MONITORING
CONNECT VIA ACCESS POINT.
NEED TO REGISTER ACCESS
POINT.
OUTDOOR MONITORING
CONNECT VIA INTERNET.
NEED TO REGISTER ACCESS
POINT AND DDNS.
Demo
3 Log in with your username and password. (if authentication cannot be achieved)

text_image
START
HTTP AUTHORIZATION
AUTHORIZATION FAILED
CHECK USER NAME AND PASSWORD
USERNAME
PASSWORD
OK CANCEL
\- The username is "everio" and the default password is "0000". "Changing the Settings" (€ p. 153)
4 The recording screen is displayed.

text_image
Index
Monitor
PAUSE
Tele
Rec
Snapshot
Wide
Pause
Marking
Game Score
5 Operate from a smartphone

natural_image
Illustration of a hand holding a smartphone with a pen, no text or symbols present
\- How to operate from a smartphone "Using Smartphone Applications" (p. 175)
■ Monitoring from the computer (Windows7)
1 On the Internet Explorer (web browser), enter the URL (WAN) that is checked by "Operation on this camera".

text_image
SODUCDBM
2 Log in with your username and password.
- The username is "everio" and the default password is "0000". "Changing the Settings" (p. 153)
• Operations from the Web browser
DETECT/MAIL
Setting (Once setting is done, start from the “Regular Operation” below)
Create a QR code.
Memo :
\- Perform operations in step 2 and 3 after creating a QR code, and read the QR code one by one by the camera.
■ Enter values in the required items for setting the recipient's e-mail address.
\- E-mail address: set the recipient's e-mail address.
\- E-mail function: set the function of the e-mail that is transmitted to the recipient's e-mail address.
\- Up to 8 e-mail addresses can be set.
■ Enter values in the required items for setting the sender's e-mail address.
• E-mail address: set the sender's e-mail address.
■ Enter values in the required items for setting the e-mail server (SMTP server).
\- SMTP server: set the name of the e-mail server (SMTP server) from which an e-mail account is obtained.
\- SMTP port number: set according to the condition when the e-mail account is obtained. Normally set to "25".
\- SMTP authentication method: set according to the condition when the e-mail account is obtained.
\- User name: set if the SMTP authentication method is set to other than "None". (same as the registered user name (account name) when the e-mail account is obtained)
\- Password: set if the SMTP authentication method is set to other than "None". (same as the registered password when the e-mail account is obtained)
■ Enter values in the required items for setting notification mails.
\- Detection method: set the detection method of when to start recording video for notification e-mails.
\- Detecting interval: select the time period to enable detection again after the previous one.
\- Self recording: specify whether to save the detected video on the camera (ON) or not (OFF).
Display the screen for reading the QR code.
1 Tap "MENU".
(Operation on this camera)

text_image
M
WT
D
<
• The top menu appears.
2 Tap the "Wi-Fi" (WiFi) icon.
(Operation on this camera)

text_image
TOP MENU
?
3 Tap > on the lower right of the screen. (Operation on this camera)

text_image
Wi-Fi
数据管理器
数据管理器
数据管理器
数据管理器
数据管理器
数据管理器
4 Tap "COMMON Wi-Fi SETTING". (Operation on this camera)

text_image
Wi-Fi
智能驾驶器
Wi-Fi
智能驾驶器
5 Tap "SET FROM QR CODE".

text_image
COMMON WI-FI SETTING
SET FROM QR CODE
6 Tap "EXECUTE".

text_image
SET FROM QR CODE
Wi-Fi SETTING CAN BE SET
USING WEB USER GUIDE OR
SMART USER GUIDE
EXECUTE
STOP
Read a QR code.
1 Read a QR code.
(Operation on this camera)

text_image
PLEASE READ QR CODE
2 Tap "YES".

text_image
SET FROM QR CODE
CHANGE THE SETTING OF
"DETECT/MAIL"
PREVIOUS SETTING WILL BE
OVERWRITTEN
YES NO
\- Contents of the screen vary depending on the QR code that is read by this unit.
3 Tap "OK".

text_image
SET FROM QR CODE
SETTINGS COMPLETED
OK NEXT
- Step 2-⑤ is displayed.
- Set contents are saved.
Registering the access points (wireless LAN router) to this unit
■ Wi-Fi Protected Setup (WPS) Registration
1 Tap "MENU".
(Operation on this camera)

text_image
M
WT
D
PLAY REC MENU
• The top menu appears.
2 Tap the "Wi-Fi" (💡) icon.
(Operation on this camera)

text_image
TOP MENU
?
3 Tap > on the lower right of the screen.
(Operation on this camera)

text_image
Wi-Fi
我的电脑
我的电脑
我的电脑
我的电脑
我的电脑
4 Tap "COMMON Wi-Fi SETTING".
(Operation on this camera)

text_image
Wi-Fi
Wi-Fi
5 Tap "ACCESS POINTS".
(Operation on this camera)

text_image
COMMON WI-FI SETTING
ACCESS POINTS
6 Tap "ADD".
(Operation on this camera)

text_image
ACCESS POINTS
ADD
7 Tap "EZ REGISTRATION WPS".
(Operation on this camera)

text_image
ADD
EZ REGISTRATION WPS
?
8 Activate WPS of the access point (wireless LAN router) within 2 minutes.
• To activate WPS, refer to the instruction manual of the device in use.
9 After registration is complete, tap "OK" on the camera's screen.
(Operation on this camera)

text_image
REGISTERED
SSID:**
ENCRYPTION METHOD
WPA2
OK
■ Search the access point, and select from the list.
Set the name (SSID) of the access point (wireless LAN router) and the password beforehand.
1 Tap "MENU".
(Operation on this camera)

text_image
M
WT
D
PLAY REC MENU
• The top menu appears.
2 Tap the "Wi-Fi" (💡) icon.
(Operation on this camera)

text_image
TOP MENU
3 Tap > on the lower right of the screen. (Operation on this camera)

text_image
Wi-Fi
智能家庭管理
智能家庭管理
智能家庭管理
智能家庭管理
智能家庭管理
智能家庭管理
智能家庭管理
智能家庭管理
智能家庭管理
智能家庭管理
智能家庭管理
智能家庭管理
智能家庭管理
智能家庭管理
智能家庭管理
智能家庭管理
智能家庭管理
智能家庭管理
智能家庭管理
智能家庭管理
智能家庭管理
智能家庭管理
智能家庭管理
智能家庭管理
智能家庭管理
智能家庭管理系统
4 Tap "COMMON Wi-Fi SETTING". (Operation on this camera)

text_image
Wi-Fi
Wi-Fi
5 Tap "ACCESS POINTS". (Operation on this camera)

text_image
COMMON WI-FI SETTING
ACCESS POINTS
?
6 Tap "ADD".
(Operation on this camera)

text_image
ACCESS POINTS
ADD
7 Tap "SEARCH".
(Operation on this camera)

text_image
ADD
SEARCH
[自动] [自动] [自动]
[自动] [自动] [自动]
[自动] [自动] [自动]
\- The search results appear on the camera's screen.
8 Tap the name (SSID) of the desired access point from the list of search results.
(Operation on this camera)

text_image
SEARCH
SEARCH AGAIN
9 Register a password.
(Operation on this camera)

text_image
PASSWORD
A/a/1 . @ ABC DEF DELETE
← GHI JKL MNO →
PQRS TUV WXYZ
SET - + CANCEL
- Tap on the on-screen keyboard to enter characters. The character changes with every tap.
"ABC", for example, enter "A" by tapping once, "B" by tapping twice, or "C" by tapping 3 times.
- Tap "DELETE" to delete a character.
- Tap "CANCEL" to exit.
- Tap "A/a/1" to select character input type from upper case letter, lower case letter, and number.
- Tap ← or → to move one space to the left or right.
- The password is not required if the wireless LAN router is not security protected.
10 After registration is complete, tap "OK" on the camera's screen. (Operation on this camera)

text_image
REGISTERED
SSID:******
ENCRYPTION METHOD
WPA2
OK
\- Other methods, such as "Manual Registration" and "WPS PIN Registration" are also available. Refer to the following link for details. "Registering the Access Points of the Camera to Connect (ACCESS POINTS)" (註 p. 164)
■ Regular Operation
Sending a Notification Mail.
1 Tap "MENU".
Set the camera to the recording mode.

text_image
M
WT
D
←PLAY
REC
MENU
• The top menu appears.
2 Tap the "Wi-Fi" (💡) icon.

text_image
TOP MENU
?
3 Tap "DETECT/MAIL" (💡).

text_image
Wi-Fi
网络连接器
网络连接器
网络连接器
网络连接器
网络连接器
网络连接器
网络连接器
4 Tap "DETECT/MAIL ATTN."

text_image
DETECT/MAIL
10 MEC
REC ON
5 Select "DETECT/MAIL ATTN.", then tap ↩.

text_image
DETECT/MAIL ATTN.
- To display the 🔒 icon, tap the e-mail address.
- To cancel the e-mail address, press the icon one more time.
- Up to 8 e-mail addresses can be selected.
6 Tap "START" (→).

text_image
DETECT/MAIL
10
MIL
REC ON
7 Start making a connection.

text_image
DETECT/MAIL
CONNECTING
SSID:******
STOP
8 DETECT/MAIL detection standby

text_image
DETECT/MAIL
"MOTION DETECTION"
DETECTION ON STAND BY
URL
STOP
idLPnP
• Detection is suspended for the first 5 seconds.
9 DETECT/MAIL detection in progress (an e-mail is automatically sent out after detection is completed)

text_image
DETECT/MAIL
'MOTION DETECTION'
MOTION DETECTION
IN PROGRESS
PHOTO
STOP
- The "PHOTO" icon appears on the screen for about 2 seconds upon detection.
- Images are captured automatically when moving subjects or human faces appear on the camera's screen. (The PHOTO icon appears on the screen upon detection.)
- The captured still images will be sent via e-mail to the selected recipients.
10 Detection suspended

text_image
DETECT/MAIL
"MOTION DETECTION"
DETECTION SUSPENDED DUE TO
CHANGE IN DETECTION INTERVAL
URL
STOP
- Until the next detection is made, detection is suspended for the pre-set length of time.
- "DETECTION INTERVAL" can be selected from 15 seconds, 1 minute, 3 minutes, 10 minutes, 30 minutes and 60 minutes.
"Setting the Detection Interval of this Camera (DETECT/MAIL SETTING)" (p. 163)
Check the incoming e-mail.
VIDEO MAIL
Setting (Once setting is done, start from the "Regular Operation" below)
Create a QR code.
Memo :
- Perform operations in step 2 and 3 after creating a QR code, and read the QR code one by one by the camera.
■ Enter values in the required items for setting the recipient's e-mail address.
- E-mail address: set the recipient's e-mail address.
- E-mail function: set the function of the e-mail that is transmitted to the recipient's e-mail address.
- Up to 8 e-mail addresses can be set.
■ Enter values in the required items for setting the sender's e-mail address.
• E-mail address: set the sender's e-mail address.
■ Enter values in the required items for setting the e-mail server (SMTP server).
- SMTP server: set the name of the e-mail server (SMTP server) from which an e-mail account is obtained.
- SMTP port number: set according to the condition when the e-mail account is obtained. Normally set to "25".
- SMTP authentication method: set according to the condition when the e-mail account is obtained.
- User name: set if the SMTP authentication method is set to other than "None". (same as the registered user name (account name) when the e-mail account is obtained)
- Password: set if the SMTP authentication method is set to other than "None". (same as the registered password when the e-mail account is obtained)
Display the screen for reading the QR code.
1 Tap "MENU".
(Operation on this camera)

text_image
M
WT
D
PLAY REC MENU
• The top menu appears.
2 Tap the "Wi-Fi" (💡) icon.
(Operation on this camera)

text_image
TOP MENU
?
3 Tap > on the lower right of the screen.
(Operation on this camera)

text_image
Wi-Fi
智能驾驶辅助
智能驾驶辅助
智能驾驶辅助
智能驾驶辅助
智能驾驶辅助
智能驾驶辅助
智能驾驶辅助
4 Tap "COMMON Wi-Fi SETTING". (Operation on this camera)

text_image
Wi-Fi
Wi-Fi
5 Tap "SET FROM QR CODE".

text_image
COMMON WI-FI SETTING
SET FROM QR CODE
6 Tap "EXECUTE".

text_image
SET FROM QR CODE
Wi-Fi SETTING CAN BE SET
USING WEB USER GUIDE OR
SMART USER GUIDE
EXECUTE STOP
Read a QR code.
1 Read a QR code.
(Operation on this camera)

text_image
PLEASE READ QR CODE
2 Tap "YES".

text_image
SET FROM QR CODE
REGISTER RECEIVER ADDRESS
UNABLE TO ADD IF 8 ADDRESSES
HAVE ALREADY BEEN
REGISTERED
YES NO
\- Contents of the screen vary depending on the QR code that is read by this unit.
3 Tap "OK".

text_image
SET FROM QR CODE
SETTINGS COMPLETED
OK NEXT
- Step 2-⑤ is displayed.
- Set contents are saved.
Registering the access points (wireless LAN router) to this unit
■ Wi-Fi Protected Setup (WPS) Registration
1 Tap "MENU".
(Operation on this camera)

text_image
M
WT
D
PLAY REC MENU
• The top menu appears.
2 Tap the "Wi-Fi" (💡) icon.
(Operation on this camera)

text_image
TOP MENU
?
3 Tap > on the lower right of the screen.
(Operation on this camera)

text_image
Wi-Fi
智能家庭监控
智能家庭监控
智能家庭监控
智能家庭监控
智能家庭监控
智能家庭监控
智能家庭监控
4 Tap "COMMON Wi-Fi SETTING".
(Operation on this camera)

text_image
Wi-Fi
Wi-Fi
5 Tap "ACCESS POINTS".
(Operation on this camera)

text_image
COMMON WI-FI SETTING
ACCESS POINTS
?
6 Tap "ADD".
(Operation on this camera)

text_image
ACCESS POINTS
ADD
7 Tap "EZ REGISTRATION WPS".
(Operation on this camera)

text_image
ADD
EZ REGISTRATION WPS
?
8 Activate WPS of the access point (wireless LAN router) within 2 minutes.
• To activate WPS, refer to the instruction manual of the device in use.
9 After registration is complete, tap "OK" on the camera's screen.
(Operation on this camera)

text_image
REGISTERED
SSID:**
ENCRYPTION METHOD
WPA2
OK
■ Search the access point, and select from the list.
Set the name (SSID) of the access point (wireless LAN router) and the password beforehand.
1 Tap "MENU".
(Operation on this camera)

text_image
M
WT
D
• The top menu appears.
2 Tap the "Wi-Fi" (💡) icon.
(Operation on this camera)

text_image
TOP MENU
3 Tap > on the lower right of the screen. (Operation on this camera)

text_image
Wi-Fi
智能家庭管理
智能家庭管理
智能家庭管理
智能家庭管理
智能家庭管理
智能家庭管理
智能家庭管理
智能家庭管理
智能家庭管理
智能家庭管理
智能家庭管理
智能家庭管理
智能家庭管理
智能家庭管理
智能家庭管理
智能家庭管理
智能家庭管理
智能家庭管理
智能家庭管理
智能家庭管理
智能家庭管理
智能家庭管理
智能家庭管理
智能家庭管理
智能家庭管理
智能家庭管理系统
4 Tap "COMMON Wi-Fi SETTING". (Operation on this camera)

text_image
Wi-Fi
Wi-Fi
5 Tap "ACCESS POINTS". (Operation on this camera)

text_image
COMMON WI-FI SETTING
ACCESS POINTS
?
6 Tap "ADD".
(Operation on this camera)

text_image
ACCESS POINTS
ADD
7 Tap "SEARCH".
(Operation on this camera)

text_image
ADD
SEARCH
[自动] [自动] [自动]
[自动] [自动] [自动]
[自动] [自动] [自动]
\- The search results appear on the camera's screen.
8 Tap the name (SSID) of the desired access point from the list of search results.
(Operation on this camera)

text_image
SEARCH
SEARCH AGAIN
9 Register a password.
(Operation on this camera)

text_image
PASSWORD
A/a/1 . @ ABC DEF DELETE
← GHI JKL MNO →
PQRS TUV WXYZ
SET - + CANCEL
- Tap on the on-screen keyboard to enter characters. The character changes with every tap.
"ABC", for example, enter "A" by tapping once, "B" by tapping twice, or "C" by tapping 3 times.
- Tap "DELETE" to delete a character.
- Tap "CANCEL" to exit.
- Tap "A/a/1" to select character input type from upper case letter, lower case letter, and number.
- Tap or to move one space to the left or right.
- The password is not required if the wireless LAN router is not security protected.
10 After registration is complete, tap "OK" on the camera's screen. (Operation on this camera)

text_image
REGISTERED
SSID:******
ENCRYPTION METHOD
WPA2
OK
\- Other methods, such as "Manual Registration" and "WPS PIN Registration" are also available. Refer to the following link for details. "Registering the Access Points of the Camera to Connect (ACCESS POINTS)" (p. 164)
■ Regular Operation
Record videos to send a video mail.
1 Tap "MENU".
Set the camera to the recording mode.

text_image
M
WT
D
←PLAY
REC
MENU
• The top menu appears.
2 Tap the "Wi-Fi" (💡) icon.

text_image
TOP MENU
?
3 Tap "VIDEO MAIL" (✉).

text_image
Wi-Fi
智能家庭管理器
智能家庭管理器
智能家庭管理器
智能家庭管理器
智能家庭管理器
智能家庭管理器
4 Tap "VIDEO MAIL ATTN."

text_image
VIDEO MAIL
返回到帐户
返回到帐户
返回到帐户
5 Select "DETECT/MAIL ATTN.", then tap ↩.

text_image
DETECT/MAIL ATTN.
- To display the 🔒 icon, tap the e-mail address.
- To cancel the e-mail address, press the icon one more time.
- Up to 8 e-mail addresses can be selected.
6 Tap "START" (→).

text_image
VIDEO MAIL
向导要连接到
要连接到
要连接到
7 Press the START/STOP button to start recording.

text_image
START
/STOP
- Or, tap the REC on screen.
8 Recording starts after the 5-second countdown.

text_image
4
- You can allow the recording to be performed for 15 seconds or press the START/STOP button to stop.
9 Tap "SEND".

text_image
VIDEO MAIL
SEND THIS VIDEO?
SEND STOP
PLAY TO CHECK
- Sending of the video mail starts.
- To check the file, tap "PLAY TO CHECK".
- When it is complete, tap "OK".
Check the incoming e-mail.
TV MONITORING
Setting (Once setting is done, start from the “Regular Operation” below)
Create a QR code.
■ Enter values in the required items for the TV monitor.
- MAC address filter: set to "ON" if monitoring images with a specific TV device.
- Add the MAC address: register the physical address when monitoring images with a specific TV device. (Up to 8 addresses can be registered)
Display the screen for reading the QR code.
1 Tap "MENU".
(Operation on this camera)

text_image
M
WT
D
<
• The top menu appears.
2 Tap the "Wi-Fi" (💡) icon.
(Operation on this camera)

text_image
TOP MENU
?
3 Tap > on the lower right of the screen. (Operation on this camera)

text_image
Wi-Fi
智能驾驶辅助
智能驾驶辅助
智能驾驶辅助
智能驾驶辅助
智能驾驶辅助
智能驾驶辅助
智能驾驶辅助
4 Tap "COMMON Wi-Fi SETTING". (Operation on this camera)

text_image
Wi-Fi
智能驾驶器
Wi-Fi
5 Tap "SET FROM QR CODE".

text_image
COMMON WI-FI SETTING
SET FROM QR CODE
6 Tap "EXECUTE".

text_image
SET FROM QR CODE
Wi-Fi SETTING CAN BE SET
USING WEB USER GUIDE OR
SMART USER GUIDE
EXECUTE STOP
Read a QR code.
1 Read a QR code.
(Operation on this camera)

text_image
PLEASE READ QR CODE
2 Tap "YES".

text_image
SET FROM QR CODE
REGISTER THE MAC ADDRESS
UNABLE TO REGISTER IF
8 ADDRESSES HAVE ALREADY
BEEN REGISTERED
YES NO
3 Tap "OK".

text_image
SET FROM QR CODE
SETTINGS COMPLETED
OK NEXT
- Step 2-⑤ is displayed.
- Set contents are saved.
Registering the access points (wireless LAN router) to this unit
■ Wi-Fi Protected Setup (WPS) Registration
1 Tap "MENU". (Operation on this camera)

text_image
M
WT
D
<< PLAY REC MENU
• The top menu appears.
2 Tap the "Wi-Fi" (💡) icon. (Operation on this camera)

text_image
TOP MENU
?
3 Tap > on the lower right of the screen. (Operation on this camera)

text_image
Wi-Fi
智能家庭管理
智能家庭管理
智能家庭管理
智能家庭管理
智能家庭管理
智能家庭管理
智能家庭管理
4 Tap "COMMON Wi-Fi SETTING". (Operation on this camera)

text_image
Wi-Fi
Wi-Fi
5 Tap "ACCESS POINTS". (Operation on this camera)

text_image
COMMON WIFI SETTING
ACCESS POINTS
6 Tap "ADD". (Operation on this camera)

text_image
ACCESS POINTS
ADD
7 Tap "EZ REGISTRATION WPS". (Operation on this camera)

text_image
ADD
EZ REGISTRATION WPS
?
8 Activate WPS of the access point (wireless LAN router) within 2 minutes.
• To activate WPS, refer to the instruction manual of the device in use.
9 After registration is complete, tap "OK" on the camera's screen. (Operation on this camera)

text_image
REGISTERED
SSID:******
ENCRYPTION METHOD
WPA2
OK
■ Search the access point, and select from the list.
Set the name (SSID) of the access point (wireless LAN router) and the password beforehand.
1 Tap "MENU". (Operation on this camera)

text_image
M
WT
D
←PLAY
REC
MENU
• The top menu appears.
2 Tap the "Wi-Fi" (💡) icon. (Operation on this camera)

text_image
TOP MENU
?
3 Tap > on the lower right of the screen. (Operation on this camera)

text_image
Wi-Fi
我的电脑搜索
我的电脑搜索
我的电脑搜索
我的电脑搜索
我的电脑搜索
我的电脑搜索
4 Tap "COMMON Wi-Fi SETTING". (Operation on this camera)

text_image
Wi-Fi
Wi-Fi
5 Tap "ACCESS POINTS".
(Operation on this camera)

text_image
COMMON WI-FI SETTING
ACCESS POINTS
[兼容 1] [兼容 2]
[兼容 3] [兼容 4]
6 Tap "ADD".
(Operation on this camera)

text_image
ACCESS POINTS
ADD
7 Tap "SEARCH".
(Operation on this camera)

text_image
ADD
SEARCH
[推荐 重新搜索]
[推荐 重新搜索]
[推荐 重新搜索]
\- The search results appear on the camera's screen.
8 Tap the name (SSID) of the desired access point from the list of search results.
(Operation on this camera)

text_image
SEARCH
SEARCH AGAIN
9 Register a password.
(Operation on this camera)

text_image
PASSWORD
A/a/1 . @ ABC DEF DELETE
← GHI JKL MNO →
PQRS TUV WXYZ
SET - + CANCEL
\- Tap on the on-screen keyboard to enter characters. The character changes with every tap.
"ABC", for example, enter "A" by tapping once, "B" by tapping twice, or "C" by tapping 3 times.
- Tap "DELETE" to delete a character.
- Tap "CANCEL" to exit.
- Tap "A/a/1" to select character input type from upper case letter, lower case letter, and number.
- Tap ← or → to move one space to the left or right.
- The password is not required if the wireless LAN router is not security protected.
10 After registration is complete, tap "OK" on the camera's screen. (Operation on this camera)

text_image
REGISTERED
SSID:******
ENCRYPTION METHOD
WPA2
OK
\- Other methods, such as "Manual Registration" and "WPS PIN Registration" are also available. Refer to the following link for details. "Registering the Access Points of the Camera to Connect (ACCESS POINTS)" (vF p. 164)
■ Regular Operation
Connect the TV to the access point.
- Connect the DLNA compatible TV to the access point (this function is available for a connection via cables as well)
- For details on connecting your TV to a Wi-Fi network, please refer to the instruction manual of the TV in use.
Connecting This Camera to the TV
1 Tap "MENU".
(Operation on this camera)

text_image
M
WT
D
←PLAY
REC
MENU
• The top menu appears.
2 Tap the "Wi-Fi" (💡) icon.
(Operation on this camera)

text_image
TOP MENU
?
3 Tap "TV MONITORING" (☐).
(Operation on this camera)

text_image
Wi-Fi
智能家庭管理
智能家庭管理
智能家庭管理
智能家庭管理
智能家庭管理
智能家庭管理
4 Tap "START" (→).
(Operation on this camera)

text_image
TV MONITORING
MAC
MAC
5 Start making a connection.
(Operation on this camera)

text_image
TV MONITORING
CONNECTING
SSID:******
STOP
6 Connection in progress

text_image
TV MONITORING
NOW PROCESSING
STOP
7 After the connection is completed, wait for the DLNA device to start up. (Operation on this camera)

text_image
TV MONITORING
QUIT
\- If a considerable number of videos/still images are recorded in the camera, it may take some time to start.
8 Images appear on the monitor of the DLNA device (Operation on DLNA device)

natural_image
Close-up of three purple iris flowers with yellow centers, surrounded by green foliage (no text or symbols visible)
\- From the following instructions, perform operations on the DLNA device.
For details on using the TV, refer to the instruction manual of the TV in use.
Memo :
- If no image is displayed during TV monitoring, tap "STOP" to start from step 1.
- If the DLNA compatible TV in use cannot detect Everio, tap "STOP" to start from the step 1 again.
Operating the Menu
There are two types of menus in this unit.
- TOP MENU: Menu that contains all the items specific to the video recording, still image recording, video playback, and still image playback modes respectively.
- SHORTCUT MENU: Menu that contains the recommended functions for video/still image recording.
Operating the Top Menu
You can configure various settings using the menu.
\- The following is a screen of the model with Wi-Fi functions.
1 Tap "MENU".
• The top menu appears.
- The menu differs according to the mode in use.

text_image
M
WT
D
2 Tap the desired menu.

text_image
TOP MENU
?
3 Tap the desired setting.

text_image
RECORD SETTING
OFF
A
WB A
A
OFF
B
OFF
Memo :
• To display the previous/next menu
Tap < or >.
• To exit the screen
Tap × (quit).
• To display the help file
Tap ? (help) and tap the item.
Help file may not be available for some items.
Operating the Shortcut Menu

You can configure various settings of the recommended functions in the video/still image recording mode using the shortcut menu.
\- The following is a screen of the model with Wi-Fi functions.
1 Tap "MENU".

text_image
M
WT
M
D
←PLAY
REC
MENU
2 Tap the shortcut icon (5).

text_image
TOP MENU
?
• The shortcut menu appears.
3 Tap the desired menu and setting.

text_image
SHORTCUT MENU
ON
OFF
\- Allows settings of "EASY STORAGE", "ANIMATION EFFECT", "DECORATE FACE EFFECT", "SMILE SHOT", "SMILE%/NAME DISPLAY" and "BACKLIGHT COMP. (manual mode only)".

text_image
SHORTCUT MENU
OK
Off
Cancel
\- Allows settings of "EASY STORAGE", "SMILE SHOT", "SMILE%/NAME DISPLAY" and "BACKLIGHT COMP. (manual mode only)".
Memo :
• To return to the top menu
Tap ↩ (return).
• To exit the screen
Tap × (quit).
• To display the help file
Tap ? (help) and tap the item.
RECORD SETTING Menu (video)

SCENE SELECT
Settings to suit the shooting condition can be selected.
"Shooting According to Scene (Subject)" (p. 32)
\*Displayed only in the manual recording mode.
FOCUS
Focus can be adjusted manually.
"Adjusting Focus Manually" (p. 33)
\*Displayed only in the manual recording mode.
BRIGHTNESS ADJUST
Adjusts the overall brightness of the screen.
"Adjusting Brightness" (p. 34)
\*Displayed only in the manual recording mode.
BACKLIGHT COMP.
Corrects the image when the subject appears dark due to backlight.
"Setting Backlight Compensation" (p. 35)
\*Displayed only in the manual recording mode.
WHITE BALANCE
Adjusts the color according to the light source.
"Setting White Balance" (p. 36)
\*Displayed only in the manual recording mode.
TELE MACRO
Enables close-up shots when using the telephoto (T) end of the zoom.
"Taking Close-up Shots" (p. 37)
\*Displayed only in the manual recording mode.
TOUCH PRIORITY AE/AF
Automatically adjusts focus and brightness based on the subjects' faces or selected area.
"Capturing Subjects Clearly (TOUCH PRIORITY AE/AF)" (p. 44)
LIGHT (GZ-EX355)
Turns on/off the light.
Setting Details OFF Does not light up. AUTO Lights up automatically when the surrounding is dark. ON Lights up at all times.
GAIN UP
Makes the subject appear bright automatically when recording in dark places.
Setting Details OFF Deactivates the function. ON Electrically brightens the scene when it is dark. AUTO SLOW-SHUTTER Slows down the shutter speed to brighten the scene when it is dark.
Memo :
\- Although "AUTO SLOW-SHUTTER" brightens the scene more than "ON", movements of the subject may become unnatural.
WIND CUT
Reduces the noise caused by wind.
Setting Details OFF Deactivates the function. ON Activates the function. AUTO Activate the function automatically.
SHUTTER MODE
Continuous shooting settings can be adjusted.
Setting Details RECORD ONE SHOT Records one still image. CONTINUOUS SHOOTING Records still images continuously while the SNAPSHOT button is pressed.
Memo :
- "LOW SPEED" is set in the video mode.
- The size of the still image that is captured in the video mode is 1,920 × 1,080 .
• Some SD cards may not support continuous shooting.
- The continuous shooting speed will drop if this function is used repeatedly.
SMILE SHOT
Automatically captures a still image upon detection of a smile.
"Capturing Smiles Automatically (SMILE SHOT)" (p. 45)
SMILE%/NAME DISPLAY
Displays the names and smile levels (%) when faces are detected.
"Setting SMILE%/NAME DISPLAY" (p. 50)
PET SHOT
Automatically captures a still image upon detection of the face of a pet, such as dogs or cats.
"Capturing Pets Automatically (PET SHOT)" (p. 46)
SEAMLESS RECORDING (GZ-EX355)
Continues recording on the SD card without stopping when the remaining space on the built-in memory runs out.
Setting Details OFF Does not switch recording media automatically. ON Switches recording media automatically.
Memo :
- Seamless recording cannot be performed if there is not enough free space in the SD card.
- 📁x appears if seamless recording cannot be performed.
- To start seamless recording again after the previous session is complete, it is necessary to combine seamless videos, or delete the combination information of the seamless videos.
- Seamless recording can be performed if the video recording format is iFrame.
"Combining Videos Recorded by Seamless Recording" (p. 83)
VIDEO REC FORMAT
Select the recording format from "AVCHD", or "iFrame" which is suitable for importing to "iMovie".
Setting Details AVCHD Records in AVCHD format. iFrame (GZ-EX355/GZ-EX310) Record in iFrame format, which is suitable for importing to iMovie.
Memo :
\- iFrame is a recording format to be handled by the Mac computer. Operation on the Windows PC is not guaranteed.
VIDEO QUALITY
Sets the video quality.
Setting Details (if the video recording format is AVCHD) UXP Enables recording in the best picture quality. Applies to Blu-ray discs only. Videos taken in high-definition quality cannot be saved to DVDs. XP Enables recording in high picture quality. SP Enables recording in standard quality. EP Enables long recordings. SSW Enables recording in the best picture quality. SEW Enables recording in the best picture quality. (if the video recording format is iFrame) iFrame(1280x720)(GZ-EX355/GZ-EX310) Records videos that are suitable for editing in 1280x720 resolution. iFrame(960x540)(GZ-EX355/GZ-EX310) Records videos that are suitable for editing in 960x540 resolution.
Memo :
- Set to "UXP" or "XP" mode when recording fast-moving scenes or scenes with extreme changes of brightness to avoid noise.
- Use an BD writer (external Blu-ray drive) to save videos recorded in "UXP" mode.
- You can change to the desired "VIDEO QUALITY" by tapping on it from the remaining recording time display.
ZOOM
Sets the maximum zoom ratio.
Setting Details 40x Enables recording with 1 - 40x optical zoom Set this when digital zoom is not desired. 60x DYNAMIC(55x DYNAMIC) Enables recording with 1 - 40x optical zoom and 41 - 60x dynamic zoom, when the image stabilizer is in normal mode or set to off.(Enables recording with 1 - 40x optical zoom and 41 - 55x dynamic zoom, when the image stabilizer is in active mode, or when the camera is set to the iFrame mode.) 120x DIGITAL(110x DIGITAL) Enables recording with 1 - 40x optical zoom and 41 - 120x digital zoom, when the camera is set to the AVCHD mode.(Enables recording with 1 - 40x optical zoom and 41 - 110x digital zoom, when the camera is set to the iFrame mode.) 200x DIGITAL Enables recording with 1 - 40x optical zoom and 41 - 200x digital zoom.
Memo :
- When digital zoom is used, the image becomes grainy as it is digitally enlarged.
- The angle of view changes when the image stabilizer is turned on or off.
ZOOM MIC
Sets the zoom microphone.
Setting Details OFF Deactivates the zoom microphone. ON Records audio sounds in the same direction as the zoom operation.
MIC LEVEL
Make the adjustments such that "MIC LEVEL" does not turn red.
Setting Details OFF Hides display of microphone input level. ON Shows display of microphone input level.
MIC LEVEL SETTING
Sets the microphone level.
Make the adjustments such that "MIC LEVEL" does not turn red.
Setting Details +2 Increases the microphone input level. +1 Increases the microphone input level slightly. 0 The microphone input level is not changed. -1 Decreases the microphone input level slightly. -2 Decreases the microphone input level.
K2 TECHNOLOGY
Reduces the degradation of sound quality caused by digital signal processing, and records a sound quality close to the original.
Setting Details OFF Deactivates K2 TECHNOLOGY. ON Activates K2 TECHNOLOGY.
SPECIAL RECORDING Menu (video)

HIGH SPEED RECORDING
You can record videos in slow-motion by increasing the recording speed to emphasize the movements, and play back the slow-motion video smoothly. This is a handy function for checking movements, such as golf swings.
"Slow-motion (High-speed) Recording" (p. 53)
TIME-LAPSE RECORDING
This function enables the changes of a scene that occur slowly over a long period to be shown within a short time by taking frames of it at a certain interval. This is useful for making observations such as the opening of a flower bud.
"Recording at Intervals (TIME-LAPSE RECORDING)" (p. 54)
STOP-MOTION REC
By pressing the SNAPSHOT button, 2 frames of still images are recorded, and stop-motion videos are created by piecing these images together. "Recording Stop-Motion Videos (STOP-MOTION REC)" (p. 56)
AUTO REC
Starts recording automatically by sensing the changes in subject's movement (brightness) within the red frame displayed on the LCD monitor. "Recording Automatically by Sensing Movements (AUTO REC)" (p. 57)
ANIMATION EFFECT
Records videos with animation effects.
"Recording with Animation Effects (ANIMATION EFFECT)" (p. 39)
DECORATE FACE EFFECT
Detects faces and enables decorations such as crowns or sunglasses to be added. "Recording with Face Decorations (DECORATE FACE EFFECT)" (p. 41)
STAMP
Records videos with various decorative stamps.
"Recording with Decorative Stamps (STAMP)" (p. 42)
HANDWRITING EFFECT
Records videos with your personal handwriting or drawing.
If the writings and drawings appear to be misaligned, correct the touch position.
"Recording with Personal Handwriting (HANDWRITING EFFECT)" (p. 43)
DATE/TIME RECORDING
You can record videos together with the date and time.
Set this when you want to save the file with date and time display.
(The date and time cannot be deleted after recording.)
"Recording Videos with Date and Time" (p. 60)
RECORD SETTING Menu (still image)

SCENE SELECT
Settings to suit the shooting condition can be selected.
"Shooting According to Scene (Subject)" (p. 32)
\*Displayed only in the manual recording mode.
FOCUS
Focus can be adjusted manually.
"Adjusting Focus Manually" (p. 33)
\*Displayed only in the manual recording mode.
BRIGHTNESS ADJUST
Adjusts the overall brightness of the screen.
"Adjusting Brightness" (p. 34)
\*Displayed only in the manual recording mode.
BACKLIGHT COMP.
Corrects the image when the subject appears dark due to backlight.
"Setting Backlight Compensation" (p. 35)
\*Displayed only in the manual recording mode.
WHITE BALANCE
Adjusts the color according to the light source.
"Setting White Balance" (p. 36)
\*Displayed only in the manual recording mode.
TELE MACRO
Enables close-up shots when using the telephoto (T) end of the zoom.
"Taking Close-up Shots" (p. 37)
\*Displayed only in the manual recording mode.
TOUCH PRIORITY AE/AF
Automatically adjusts focus and brightness based on the subjects' faces or selected area.
"Capturing Subjects Clearly (TOUCH PRIORITY AE/AF)" (p. 44)
SELF-TIMER
Use this when taking a group photo.
"Taking Group Shots (Self-timer)" (p. 58)
GAIN UP
Makes the subject appear bright automatically when recording in dark places.
Setting Details OFF Deactivates the function. ON Electrically brightens the scene when it is dark.
Memo :
\- Setting can be adjusted separately for videos.
"GAIN UP (Video)" (p. 226)
SHUTTER MODE
Continuous shooting settings can be adjusted.
Setting Details RECORD ONE SHOT Records one still image. CONTINUOUS SHOOTING Records still images continuously while the SNAPSHOT button is pressed.
Memo :
- Some SD cards may not support continuous shooting.
- The continuous shooting speed will drop if this function is used repeatedly.
SMILE SHOT
Automatically captures a still image upon detection of a smile.
"Capturing Smiles Automatically (SMILE SHOT)" (p. 45)
SMILE%/NAME DISPLAY
Displays the names and smile levels (%) when faces are detected.
"Setting SMILE%/NAME DISPLAY" (p. 50)
PET SHOT
Automatically captures a still image upon detection of the face of a pet, such as dogs or cats.
"Capturing Pets Automatically (PET SHOT)" (p. 46)
IMAGE SIZE
Sets the image size (number of pixels) for still images.
Setting Details 3840X2160(8M)1920X1080(2M) Takes still images with aspect ratio 16:9.The sides of still images recorded in 16:9 aspect ratio may be cut off when printed. 1440X1080(1.5M)640X480(0.3M) Takes still images with aspect ratio 4:3.
SPECIAL RECORDING Menu (still image)

AUTO REC
Starts recording automatically by sensing the changes in subject's movement (changes in brightness) within the red frame displayed on the LCD monitor. "Recording Automatically by Sensing Movements (AUTO REC)" (p. 57)
PLAYBACK SETTING Menu (video)

SEARCH DATE
Narrows down the video index screen according to recording dates.
"Searching for a Specific Video/Still Image by Date" (vπ p. 76)
DISPLAY DATE/TIME
Sets whether to display the recording date and time during video playback.
Setting Details OFF Does not display the date and time during playback. ON Displays the date and time during playback.
DIGEST PLAYBACK
Plays back a digest of the recorded videos.
" DIGEST PLAYBACK " (p. 70)
PLAYBACK PLAYLIST
Plays back the playlists that you have created.
"PLAYBACK PLAYLIST" (p. 72)
PLAYBACK OTHER FILE
Plays videos with defective management information.
"PLAYBACK OTHER FILE" (p. 73)
EDIT Menu (video)

PROTECT/CANCEL
Protects files from being deleted accidentally.
"Protecting/Releasing Protection of the Currently Displayed File" (p. 81)
"Protecting/Releasing Protection of Selected Files" (p. 82)
COPY
Copies files from the built-in memory to the SD card.
"Copying Files to an SD Card (GZ-EX355)" (n: p. 112)
MOVE
Moves files from the built-in memory to the SD card. Files that are moved will be deleted from the built-in memory.
"Moving Files to an SD Card (GZ-EX355)" (p. 113)
EDIT PLAYLIST
A list in which your favorite videos are arranged is called a playlist.
By creating a playlist, you can play back only your favorite videos in the order you like.
The original video file remains even when it is registered to a playlist.
"Creating Playlists with Selected Files" (p. 85)
"Creating Playlists by Date" (p. 87)
"Editing Playlists" (p. 88)
TRIMMING
Select the required part of a video and save it as a new video file.
The original video remains in its existing location.
"Capturing a Required Part in the Video (TRIMMING)" (p. 84)
SEAMLESS REC CTRL (GZ-EX355)
Videos that are recorded on two separate media and with "SEAMLESS RECORDING" in the video recording menu enabled can be combined into a single video.
"Combining Videos Recorded by Seamless Recording" (p. 83)
PLAYBACK SETTING Menu (still image)

SEARCH DATE
Narrows down the still image index screen according to recording dates.
"Searching for a Specific Video/Still Image by Date" (p. 76)
SLIDE SHOW EFFECTS
Sets the transition effects in slideshow playback.
Setting Details SLIDE Switches the screen by sliding in from right to left. BLINDS Switches the screen by dividing into vertical strips. CHECKERBOARD Switches the screen by changing through a checkered pattern. RANDOM Switches the screen with a random effect from SLIDE, “BLINDS”, and “CHECKERBOARD”.
Memo :
\- Slideshow effects are not available when playing back still images in external devices (such as USB external hard disk drives).
EDIT Menu (still image)

PROTECT/CANCEL
Protects files from being deleted accidentally.
"Protecting/Releasing Protection of the Currently Displayed File" (p. 81)
"Protecting/Releasing Protection of Selected Files" (p. 82)
COPY (GZ-EX355)
Copies files from the built-in memory to the SD card.
"Copying Files to an SD Card (GZ-EX355)" (p. 112)
MOVE (GZ-EX355)
Moves files from the built-in memory to the SD card. Files that are moved to the SD card will be deleted from the built-in memory.
"Moving Files to an SD Card (GZ-EX355)" (p. 113)
SETUP (video/still image)

Mobile User Guide
Displays the QR code to access the Mobile User Guide.

text_image
MOBILE USER GUIDE
URL:
\- The portal site appears when the QR code has been read correctly. Select the model name of your camera to display its Mobile User Guide.
Memo :
- To read the QR code, a relevant application is required. Enter the URL in the internet browser manually if the QR code cannot be read.
- The Mobile User Guide is supported by Android devices and iPhone. You can view it on standard browsers such as Google Chrome (Android) and Mobile Safari (iPhone).
• QR Code is a registered trademark of Denso Wave Incorporated.
CLOCK ADJUST
Resets the current time or sets to the local time when using this unit overseas.
"Clock Setting" (p. 18)
"Setting the Clock to Local Time when Traveling" (p. 22)
"Setting Daylight Saving Time" (p. 22)
DATE DISPLAY STYLE
Sets the order of year, month, day and the time display format (24H/12H).
Sorting Order Time Display month.day.year 12h year.month.day 24h day.month.year -
LANGUAGE
The language on the display can be changed.
"Changing the Display Language" (p. 20)
FACE REGISTRATION (recording only)
Registers the faces of people who are often shot with this unit.
"Registering Human Face Personal Authentication Information" (p. 48)
MONITOR BRIGHTNESS
Sets the brightness of the LCD monitor.
Setting Details AUTO Sets the brightness automatically to “4” when using outdoors and to “3” when using indoors. 4 Brightens the backlight of the monitor regardless of the surrounding conditions. 3 Sets to the standard brightness. 2 Darkens the backlight of the monitor regardless of the surrounding conditions. 1 Sets to dim brightness. Helps to save battery life when selected.
OPERATION SOUND
Turns on or off the operation sound.
Setting Details OFF Turns off the operation sound. ON Turns on the operation sound.
AUTO POWER OFF
Prevents the situation of forgetting to turn off the power when this is set.
Setting Details OFF Power is not turned off even if this unit is not operated for 5 minutes. ON Turns off the power automatically if this unit is not operated for 5 minutes.
Memo :
- When using battery, power is turned off automatically if this unit is not operated for 5 minutes.
- When using the AC adapter, this unit goes into standby mode.
QUICK RESTART
Enables the power to turn on quickly when the LCD monitor is opened again within 5 minutes.
Setting Details OFF Deactivates the function. ON Enables the power to turn on quickly when the LCD monitor is opened again within 5 minutes.
Memo :
\- The power consumption within 5 minutes after the LCD monitor is closed is reduced.
DEMO MODE
Plays a demonstration of the special features of this unit.
Setting Details OFF Deactivates the function. ON Plays a demonstration of the special features of this unit.
Memo :
- This mode is not available in the playback mode.
- "SMILE%/NAME DISPLAY" is set to "ON" when the demo mode is activated.
"Setting SMILE%/NAME DISPLAY" (p. 50)
TOUCH SCREEN ADJUST
Adjusts the response position of the buttons on the touch screen.
"Adjusting the Touch Panel" (p. 15)
FACTORY PRESET
Returns all the settings to their default values.
FIRMWARE UPDATE
Updates the functions of this unit to the latest version.
For details, refer to the JVC homepage.
(When no program to update the software of this unit is available, nothing will be provided on the homepage.)
http://www3.jvckenwood.com/english/support/index.html
PC SOFTWARE UPDATE
Updates the built-in PC software of this unit to the latest version.
For details, refer to the JVC homepage.
(When no program to update the computer software is available, nothing will be provided on the homepage.)
http://www3.jvckenwood.com/english/support/index.html
OPEN SOURCE LICENSES (recording only)
Displays the open source software licenses that are used in this unit.
CONNECTION SETTINGS (video/still image)

DISPLAY ON TV
Displays icons and date/time on a TV screen.
Setting Details OFF Does not display icons and date/time on TV. ON Displays icons and date/time on TV.
VIDEO OUTPUT
Sets the aspect ratio (16:9 or 4:3) according to the connecting TV.
Setting Details 4:3 Select this when connecting to a conventional TV (4:3). 16:9 Select this when connecting to a widescreen TV (16:9).
HDMI OUTPUT
Sets the output from the HDMI connector of this unit when it is connected to a TV.
Setting Details AUTO It is recommended to select “AUTO” usually. 480p Select this when the video is not output in “AUTO” correctly.
HDMI CONTROL
Sets whether to link operations with an HDMI-CEC compliant TV.
Setting Details OFF Turns off linked operations. ON Turns on linked operations.
AV TERMINAL
Set the output connector of PAN CRADLE.
Setting Details AV Set this when the output is made via the AV connector. PAN CRADLE Set this to use the Pan Cradle.
MEDIA SETTINGS (video/still image)

REC MEDIA FOR VIDEO (GZ-EX355)
Sets the recording/playback media of videos.
Setting Details BUILT-IN MEMORY Records videos to this unit's built-in memory. SD CARD Records videos to the SD card.
REC MEDIA FOR IMAGE (GZ-EX355)
Sets the recording/playback media of still images.
Setting Details BUILT-IN MEMORY Records still images to this unit's built-in memory. SD CARD Records still images to the SD card.
FORMAT BUILT-IN MEM. (GZ-EX355)
Deletes all files on the built-in memory.
Setting Details FILE Deletes all files on the built-in memory. FILE + MANAGEMENT NO Deletes all files on the built-in memory and resets the folder and file numbers to "1". (File number of the AVCHD video file starts from "0".)
Caution :
- All data on the built-in memory will be deleted when it is formatted.
Copy all files on the built-in memory to a computer before formatting.
- Make sure that the battery pack is fully charged or connect the AC adapter as the formatting process may take some time.
FORMAT SD CARD
Deletes all files on the SD card.
Setting Details FILE Deletes all files on the SD card. FILE + MANAGEMENT NO Deletes all files on the SD card and resets the folder and file numbers to "1".
Caution :
• Not available for selection when no SD card is inserted.
- All data on the SD card will be deleted when it is formatted.
Copy all files on the SD card to a computer before formatting.
- Make sure that the battery pack is fully charged or connect the AC adapter as the formatting process may take some time.
USB CONNECTION MENU
Displayed when connecting the AC adapter after this unit is connected via USB.
GZ-EX355/GZ-EX310
PLAYBACK ON PC
- Displays videos recorded by this unit by using the LoiLoFit for Everio.
"Installing the Provided Software" (p. 115)
- Saves videos recorded by this unit on your computer without using the provided software.
"Backing Up Files Without Using Provided Software" (p. 119)
"Copying to Mac Computer" (p. 129)
CREATE DISC
Save videos recorded by this unit on a disc by using the BD/DVD drive on your computer and the LoiLoFit for Everio. To create a Blu-ray disc, purchase a paid version of LoiLoFit for Everio.
http://loilo.tv/jp/product/33/page/27
DIRECT DISC
Save videos recorded by this unit on a disc by using the BD/DVD drive on your computer. To create a Blu-ray disc, purchase a paid version of LoiLoFit for Everio.
http://loilo.tv/jp/product/33/page/27
UPLOAD
Upload videos recorded by this unit to website for sharing files by using the LoiLoFit for Everio.
BACK UP
Backup videos recorded by this unit to your computer by using the LoiLoFit for Everio. "Backing Up Files" (p. 116)
Memo :
- Before making backup, load the SD card in which the videos are stored on this unit.
- After backing up your files using the provided software, they cannot be restored to this unit.
- Delete unwanted videos before making backup. It takes time to back up many videos.
"Deleting Unwanted Files" (p. 80)
GZ-E300
PLAYBACK ON PC
- Displays videos recorded by this unit by using the Everio MediaBrowser 4.
"Installing the Provided Software (Built-in)" (p. 122)
- Saves videos recorded by this unit on your computer without using the provided software.
"Backing Up Files Without Using Provided Software" (p. 127)
"Copying to Mac Computer" (p. 129)
CREATE DISC
Save videos recorded by this unit on a disc by using the BD/DVD drive on your computer and the Everio MediaBrowser 4.
DIRECT DISC
Save videos recorded by this unit on a disc by using the BD/DVD drive on your computer.
UPLOAD
Upload videos recorded by this unit to website for sharing files by using the Everio MediaBrowser 4.
BACK UP
Backup videos recorded by this unit to your computer using the Everio MediaBrowser 4. "Backing Up All Files" (p. 123)
Memo :
- Before making backup, load the SD card in which the videos are stored on this unit.
- After backing up your files using the provided software, they cannot be restored to this unit.
- Delete unwanted videos before making backup. It takes time to back up many videos.
"Deleting Unwanted Files" (p. 80)
Front

text_image
Technical diagram of a device with numbered parts labeled 1 to 4
① SNAPSHOT (Still Image Recording) Button
\- Takes a still image.
② Zoom/Volume Lever
- During shooting: Adjusts the shooting range.
- During playback (index screen): Moves to the next or previous page.
- During video playback: Adjusts the volume.
③ Lens Cover
- Do not touch the lens and lens cover.
- Do not cover the lens with your fingers during recording.
④ Stereo Microphone
\- Do not cover the microphone with your fingers during video recording.
Rear

text_image
Technical diagram of a mechanical device with numbered components for identification
① DC Connector
\- Connects to an AC adapter to charge the battery.
② ACCESS (Access) Lamp
\- Lights up/blinks during recording or playback. Do not remove the battery pack, AC adapter, or SD card.
③ POWER/CHARGE (Power/Charge) Lamp
- Lights up: Power "ON"
- Blinks: Charging in progress
• Goes out: Charging finished
4 START/STOP (Video Recording) Button
• Starts/stops video recording.
⑤ Strap Lock
⑥ Grip Belt
\- Pass your hand through the grip belt to hold this unit firmly. "Grip Adjustment" (p. 13)
⑦ Lens Cover Switch
\- Opens and closes the lens cover.
Bottom

text_image
Technical diagram of a digital camera module with numbered parts for identification
① Tripod Mounting Hole
"Tripod Mounting" (p. 21)
② SD Card Slot
\- Insert an optional SD card.
"Inserting an SD Card" (p. 13)
③ Battery Release Lever
"Charging the Battery Pack" (p. 12)
④ Battery Mount
Interior

text_image
Diagram of a digital camera with numbered parts for identification
① Speaker
• Outputs audio sound during video playback.
② / (Video/Still Image) Button
\- Switches between video and still image modes.
③ SILENT Button
\- Press and hold the SILENT button to turn on the Silent mode. The Silent mode can be cancelled by holding down the button again.
"Using the Silent Mode" (p. 26)
④ (Image Stabilizer) Button
\- The setting of image stabilizer changes with every press while video recording is stopped.
"Reducing Camera Shake" (p. 52)
⑤ INFO (Information) Button
- Recording: Displays the remaining time (for video only) and battery power.
- Playback: Displays file information such as recording date.
⑥ AV Connector
\- Connects to the AV connector of a TV, etc.
⑦ (Power) Button
\- Press and hold to turn the power on/off while the LCD monitor is opened.
⑧ HDMI mini connector
\- Connects to TV using an HDMI mini cable.
⑨ USB Connector
\- Connects to computer using a USB cable.
LCD Monitor

natural_image
Diagram of a device with a blue pointer and numbered label (1), no readable text or symbols present.
① LCD Monitor
- Turns the power on/off by opening and closing.
- Enables self-portraits to be taken by rotating the monitor.

text_image
180°
90°
"Using the Touch Screen" (p. 15)
"Names of Buttons and Functions on the LCD Monitor" (p. 16)
Caution :
\- Do not press against the surface with force or subject it to strong impact. Doing so may damage or break the screen.
Common Recording Indications

text_image
1
2 3 4 5 6 7 8 9 10 11 12
10.45
±0.0
10X W T
13
14
15
16
① TOUCH PRIORITY AE/AF
"Capturing Subjects Clearly (TOUCH PRIORITY AE/AF)" (p. 44)
② Backlight Compensation
"Setting Backlight Compensation" (p. 35)
③ Auto REC
"Recording Automatically by Sensing Movements (AUTO REC)" (p. 57)
④ Tele Macro
"Taking Close-up Shots" (p. 37)
⑤ Scene Select
"Shooting According to Scene (Subject)" (u p. 32)
6 WHITE BALANCE
"Setting White Balance" (p. 36)
⑦ Time
"Clock Setting" (p. 18)
8 SMILE SHOT
"Capturing Smiles Automatically (SMILE SHOT)" (p. 45)
9 Media
"REC MEDIA FOR VIDEO (GZ-EX355)" (p. 242)
"REC MEDIA FOR IMAGE (GZ-EX355)" (p. 242)
⑩ Battery Indicator
"Checking the Remaining Recording Time" (p. 61)
⑪ CONTINUOUS SHOOTING
"SHUTTER MODE (Still Image)" (p. 231)
12 Recording Mode
"Taking Videos in Auto Mode" (p. 24)
"Manual Recording" (p. 30)
⑬ Setting Scenes of Intelligent Auto
- Displays scenes detected automatically in the Intelligent Auto function. Multiple scenes may be detected.
"Scenes of Intelligent Auto" (p. 25)
14 SILENT MODE
"Using the Silent Mode" (p. 26)
15 Zoom
"ZOOM" (p. 228)
16 Focus
"Adjusting Focus Manually" (p. 33)
⑰ Brightness
"Adjusting Brightness" (p. 34)
Video Recording

text_image
1
2
3
4
5
6
7
0:00:12:34
0:12:34[0:10:00]
8
9
1SEC
① Video Mode
"Interior" (p. 245)
② Video Quality
"VIDEO QUALITY" (p. 228)
③ TIME-LAPSE RECORDING(1SEC)
"Recording at Intervals (TIME-LAPSE RECORDING)" (p. 54)
④ Image Stabilizer
"Reducing Camera Shake" (p. 52)
⑤ Seamless Recording (GZ-EX355)
"SEAMLESS RECORDING (GZ-EX355)" (p. 227)
6 Wind Cut
"WIND CUT" (p. 227)
⑦ Time-Lapse Recording Counter
"Recording at Intervals (TIME-LAPSE RECORDING)" (p. 54)
⑧ Remaining Recording Time
"Checking the Remaining Recording Time" (p. 61)
⑨ Scene Counter
Still Image Recording

text_image
1
2
[920]
3
[9990]
4
5
PHOTO
6
① Still Image Mode
"Interior" (p. 245)
② Image Size
"IMAGE SIZE" (p. 232)
③ Self-Timer
"Taking Group Shots (Self-timer)" (p. 58)
④ Remaining Number of Shots
"Checking the Remaining Recording Time" (p. 62)
⑤ Focus
⑥ Recording in Progress
Video Playback

text_image
1
2
3
4
5
6
7
00:01:23
00:12:34
1SEC
1980p
10
11
12
1
① Video Mode
"Interior" (p. 245)
② Video Quality
"VIDEO QUALITY" (p. 228)
③ Operation Indicator
"Operation Buttons for Video Playback" (p. 64)
④ Date/Time
• Displays the recording date and time.
⑤ Media
"FORMAT BUILT-IN MEM. (GZ-EX355)" (p. 242)
⑥ Battery Indicator
"Checking the Remaining Recording Time" (p. 61)
⑦ Playback Time
"Playing Back Videos" (p. 64)
⑧ Time-Lapse Playback
"Time-Lapse Setting" (p. 55)
⑨ External Storage Playback
"Playing Back with a DVD Writer" (p. 105)
"Playing Back with a BD Writer (External Blu-ray Drive)" (p. 98)
"Playing Back Files in the USB External Hard Disk Drive" (p. 110)
10 1080p Output
"HDMI OUTPUT" (p. 241)
⑪ SILENT MODE
"Using the Silent Mode" (p. 26)
⑫ Scene Counter
Still Image Playback

text_image
1
2 3
4
5 6
100-0001
10:00
7
8
9
1080p
REC
MENU
① Still Image Mode
"Interior" (p. 245)
② Folder Number
③ File Number
④ Date/Time
\- Displays the recording date and time.
⑤ Media
"REC MEDIA FOR IMAGE (GZ-EX355)" (r·p. 242)
⑥ Battery Indicator
"Checking the Remaining Recording Time" (p. 61)
⑦ SILENT MODE
"Using the Silent Mode" (p. 26)
⑧ External Storage Playback
"Playing Back with a DVD Writer" (p. 105)
"Playing Back with a BD Writer (External Blu-ray Drive)" (p. 98)
"Playing Back Files in the USB External Hard Disk Drive" (p. 110)
⑨ 1080p Output
"HDMI OUTPUT" (p. 241)
When the unit is not working properly
Turning Off the Power
1 Close the LCD monitor.

natural_image
Diagram of a digital camera with an open screen and blue arrow indicating rotation (no text or symbols)
2 Remove the AC adapter and battery pack from this unit, reattach them, open the LCD monitor and this unit powers on automatically. (Reset complete)
Battery Pack
Unable to turn on the power when using the battery pack.
Recharge the battery pack.
"Charging the Battery Pack" (p. 12)
Check whether the terminals are dirty.
If the terminal of this unit or the battery pack is dirty, wipe it with a cotton swab or something similar.
If you use any other battery packs besides JVC battery packs, safety and performance cannot be guaranteed. Be sure to use JVC battery packs.
Short usage time even after charging.
Battery deterioration occurs when a battery pack is charged repeatedly.
Replace the battery pack with a new one.
"Optional Accessories" (p. 23)
Unable to charge the battery pack.
When the battery pack is fully charged, the lamp does not flash.
Check whether the terminals are dirty.
If the terminal of this unit or the battery pack is dirty, wipe it with a cotton swab or something similar.
Using a non-original AC adapter may result in damage to this unit. Be sure to use an original AC adapter.
The remaining battery display is not correct.
Remaining battery power is not displayed when the AC adapter is connected.
If this unit is used for long periods of time in high or low temperatures, or if the battery pack is repeatedly charged, the amount of remaining battery may not be displayed correctly.
Recording
Recording cannot be performed.
Check the 📋 / 📋 button.
"Interior" (p. 245)
When there are multiple light sources and depending on the shooting conditions, exposure and focus may not be adjusted correctly in the Intelligent Auto mode. In this case, adjust the settings manually.
"Adjusting Focus Manually" (p. 33)
Recording stops automatically.
Recording stops automatically as it cannot be performed for 12 or more consecutive hours according to specifications. (It may take some time to resume recording.)
Turn off this unit, wait for a while, and turn it on again. (This unit stops automatically to protect the circuit when the temperature rises.)
The continuous shooting speed of still images is slow.
The continuous shooting speed will drop if this function is used repeatedly. Continuous shooting speed may drop depending on the SD card or under certain recording conditions.
The focus is not adjusted automatically.
If you are recording in a dark place or a subject that has no contrast between dark and light, adjust the focus manually.
"Adjusting Focus Manually" (p. 33)
Wipe the lens with a lens cleaning cloth.
Cancel manual focus on the manual recording menu.
"Adjusting Focus Manually" (p. 33)
Zoom does not work.
Digital zoom is not available in the still image recording mode.
Zoom operation is not available in time-lapse recording. (Simultaneous still image recording and image stabilizer are also not available.)
To use digital zoom, set "ZOOM" in the menu accordingly.
"ZOOM" (p. 228)
Mosaic-type noise occurs when recording scenes with fast movements or extreme changes in brightness.
Set the "VIDEO QUALITY" to "UXP" or "XP" for recording.
"VIDEO QUALITY" (p. 228)
Card
Cannot insert the SD card.
Make sure not to insert the SD card in the wrong direction.
"Inserting an SD Card" (p. 13)
Unable to copy to SD card.
Set "REC MEDIA FOR VIDEO"/"REC MEDIA FOR IMAGE" to SD card. (GZ-EX355)
"REC MEDIA FOR VIDEO (GZ-EX355)" (p. 242)
"REC MEDIA FOR IMAGE (GZ-EX355)" (p. 242)
To use SD cards that have been used on other devices, it is necessary to format (initialize) the SD card using "FORMAT SD CARD" from media settings.
"FORMAT SD CARD" (p. 242)
Playback
Sound or video is interrupted.
Sometimes playback is interrupted at the connecting section between two scenes. This is not a malfunction.
There is no sound.
When the Silent mode is used, operation and playback sounds will not be output. Turn off the Silent mode.
"Using the Silent Mode" (p. 26)
Set "OPERATION SOUND" in the common menu to "ON".
"OPERATION SOUND" (p. 239)
Audio sound is not recorded for videos taken in HIGH SPEED RECORDING/TIME-LAPSE RECORDING.
"Slow-motion (High-speed) Recording" (p. 53)
"Recording at Intervals (TIME-LAPSE RECORDING)" (v ^2 p. 54)
The same image is displayed for a long time.
Use a high speed SD card (Class 4 or higher).
"Types of Usable SD Card" (p. 14)
Clean the terminals of the SD card with a dry cotton swab or something similar.
Execute "FORMAT SD CARD" in the "MEDIA SETTINGS" menu. (All data will be deleted.)
"FORMAT SD CARD" (p. 242)
The motion is choppy.
Use a high speed SD card (Class 4 or higher).
"Types of Usable SD Card" (p. 14)
Clean the terminals of the SD card with a dry cotton swab or something similar.
Execute "FORMAT SD CARD" in the MEDIA SETTINGS menu. (All data will be deleted.)
"FORMAT SD CARD" (p. 242)
Verify the system requirements of your computer when using LoiLoFit for Everio to play back. (GZ-EX355/GZ-EX310)
"Verifying System Requirements (Guideline)" (p. 114)
Verify the system requirements of your computer when using Everio
MediaBrowser 4 to play back. (GZ-E300)
"Verifying System Requirements (Guideline)" (p. 121)
Cannot find a recorded file.
Cancel the date search function.
"Searching for a Specific Video/Still Image by Date" (p. 76)
Change the playback media by tapping 🎨/SD on the touch screen. (GZ-EX355)
"Operation Buttons for Video Playback" (p. 64)
"Operation Buttons for Still Image Playback" (p. 74)
Select "PLAYBACK OTHER FILE" in the menu. (Video files that have damaged management information can be played back.)
"PLAYBACK OTHER FILE" (p. 73)
Images do not appear on the TV properly.
Disconnect the cable and connect again.
"Connecting via the HDMI Mini Connector" (p. 77)
Turn off and on this unit again.
Images are projected vertically on the TV.
Set "VIDEO OUTPUT" in the "MEDIA SETTINGS" menu to "4:3".
"VIDEO OUTPUT" (p. 241)
Adjust the TV's screen accordingly.
The image displayed on TV is too small.
Set "VIDEO OUTPUT" in the "MEDIA SETTINGS" menu to "16:9".
"VIDEO OUTPUT" (p. 241)
When connected to the TV via the HDMI mini cable, proper images and sounds are not output.
Images and sounds may not be output properly depending on the TV connected. In such cases, perform the following operations.
① Disconnect the HDMI mini cable and connect it again.
② Turn off and on this unit again.
"Connecting via the HDMI Mini Connector" (p. 77)
Editing/Copying
Unable to delete file.
Files (videos/still images) that are protected cannot be deleted. Release protection before deleting the file.
"Protecting Files" (p. 81)
Unable to copy/move files to SD card. (GZ-EX355)
If the SD card is write protected, set it to off.
Unable to create DVD with a DVD writer.
Connect the USB cable correctly.
"Preparing a DVD Writer (CU-VD50)" (p. 99)
"Preparing a DVD Writer (CU-VD3)" (p. 99)
Unable to create disc with a BD writer (external Blu-ray drive).
Connect the USB cable correctly.
"Preparing a BD Writer (External Blu-ray Drive)" (p. 91)
BACK-UP menu does not disappear.
While the USB cable is connected, the "BACK UP" menu is displayed.
Unable to turn off the BACK-UP menu.
Turn off the power of this unit and the DVD writer, or remove the AC adapter.
Unable to delete folder in USB external hard disk drive.
Delete the folder using a computer.
(When files are added or folders moved/renamed with a computer, they cannot be deleted on this unit.)
Computer
Unable to copy files to the computer's HDD.
If the provided software LoiLoFit for Everio is not installed, some functions may not work properly.
"Installing the Provided Software" (p. 115)
Before making backup, make sure that enough free space is left in the computer's hard disk (HDD).
Unable to copy files to DVD or Blu-ray disc with a PC.
To record to discs, a recordable DVD or Blu-ray drive is required for the computer in use.
Cannot upload the file to YouTube.
Check if you have created an account with YouTube. (You need a YouTube account to upload files to YouTube.)
Changing videos to the file format for uploading cannot be performed on this unit.
Refer to the help file of the provided software LoiLoFit for Everio Refer to the help file of the provided software Everio MediaBrowser 4
I am using a Mac computer.
Copy the files to a Mac computer using the following method.
"Copying to Mac Computer" (p. 129)
The computer cannot recognize the SDXC card.
Confirm and update the OS of your computer.
"When your computer cannot recognize the SDXC card" (p. 14)
Screen/Image
The LCD monitor is difficult to see.
The LCD monitor may be difficult to see if used in bright areas such as under direct sunlight.
A band or a ball of bright light appears on the LCD monitor.
Change the direction of this unit to prevent the light source from coming into view. (A band or a ball of bright light may appear when there is a bright light source near this unit, but this is not a malfunction.)
The recorded subject is too dark.
Use backlight compensation when the background is bright and the subject is dark.
"Setting Backlight Compensation" (p. 35)
Use "NIGHTALIVE" in SCENE SELECT.
"Shooting According to Scene (Subject)" (p. 32)
Use "GAIN UP" in the menu.
“GAIN UP” (p. 226)
Set "BRIGHTNESS ADJUST" in the recording menu to the "+" side.
"Adjusting Brightness" (u p. 34)
The recorded subject is too bright.
Set the backlight compensation to "OFF" if it is being used.
"Setting Backlight Compensation" (p. 35)
Set "BRIGHTNESS ADJUST" in the recording menu to the "-" side.
"Adjusting Brightness" (p. 34)
The color looks strange. (Too bluish, too reddish, etc.)
Wait for a while until natural colors are achieved. (It may take some time for white balance to be adjusted.)
Set "WHITE BALANCE" in the recording menu to "MANUAL". Select from
“FINE”/“CLOUD”/“HALOGEN”/“MARINE:BLUE”/“MARINE:GREEN” according to the light source.
Select "MWB" and adjust accordingly.
Set "WHITE BALANCE" in the recording menu to "MANUAL". Select from "FINE"/"CLOUD"/"HALOGEN" according to the light source. Select "MWB" and adjust accordingly.
"Setting White Balance" (p. 36)
The color looks different.
Set "WHITE BALANCE" in the recording menu accordingly.
"Setting White Balance" (p. 36)
There are bright or dark spots on the screen.
While the LCD monitor screen has more than 99.99% effective pixels, 0.01% of the pixels may be bright spots (red, blue, green) or dark spots. This is not a malfunction. The spots will not be recorded.
Other Problems
The buttons on the touch screen do not work.
Tap the buttons on the touch screen with your fingers or the stylus pen.
The buttons may not respond if you touch them with your fingernails or with gloves on.
Save the recorded data before requesting service.
①Connect to computer using a USB cable.
The "SELECT DEVICE" menu appears.
②Press and hold the START/STOP button for more than 2 seconds.
The "PLAYBACK ON PC" appears.
Operations are to be performed on the computer after the screen switches.
The image is grainy.
When digital zoom is used, the image becomes grainy as it is digitally enlarged.
This unit heats up.
This is not a malfunction. (This unit may become warm when used for a long time.) Stop using the unit if it gets too warm.
The language on the display changed.
It may occur when you connect this unit to a TV with different language setting using an HDMI mini cable.
"Operating in Conjunction with TV via HDMI" (p. 78)
When connected to the TV via the HDMI mini cable, proper images and sounds are not output.
Images and sounds may not be output properly depending on the TV connected. In such cases, perform the following operations.
① Disconnect the HDMI mini cable and connect it again.
② Turn off and on this unit again.
"Connecting via the HDMI Mini Connector" (p. 77)
HDMI-CEC functions do not work properly, and the TV does not work in conjunction with this unit.
TVs may operate differently depending on the specifications, even if they are HDMI-CEC compliant. Therefore, the HDMI-CEC functions of this unit cannot be guaranteed to operate in combination with all the TVs. In such cases, set "HDMI CONTROL" to "OFF".
"HDMI CONTROL" (p. 241)
The unit operates slowly when switching between video mode and still image mode, or when switching the power on or off.
It is recommended that you copy all videos and still images onto your computer, and erase the files from this unit. (If there are many recorded files on this unit, it takes time for the unit to respond.)
This unit does not function properly and error messages appear.
This unit is a microcomputer-controlled device. Electrostatic discharge, external noise and interference (from a TV, a radio, etc.) might prevent it from functioning properly. In such a case, turn off the power, then remove the AC adapter and battery pack. This unit will be reset.
Operation disabled since the POWER/CHARGE lamp and the ACCESS lamp are blinking
After closing the LCD monitor, remove power source (battery and AC adapter). Then, attach the battery and AC adapter again, and turn on the power by opening the LCD monitor. If these operations won't solve the problem, contact your JVC dealer or the JVC service center.
Disclaimer
- We shall not be held responsible for loss of recorded contents when recording videos/audio or playback cannot be operated due to malfunctions in this unit, provided parts, or SD card.
- Once deleted, recorded contents (data), including data loss due to malfunctions in this unit, cannot be restored. Please be forewarned.
\- JVC will not be responsible for any lost data. Please be forewarned.
- In order for quality improvement, defective recording medium is subject to be analyzed. Therefore, it may not be returned.
Error Message?
CHECK LENS COVER
Open the lens cover.
SET DATE/TIME!
Connect the AC adapter, charge the battery for more than 24 hours and set the clock. (If the message still appears, the clock battery is exhausted.
Consult your nearest JVC dealer.)
"Clock Setting" (p. 18)
COMMUNICATION ERROR
Reconnect the USB cable.
Turn off this unit and the devices connected to it, and turn them on again.
Reattach the battery pack.
FORMAT ERROR! (GZ-EX355)
Check the operating procedure, and perform once again.
"FORMAT BUILT-IN MEM. (GZ-EX355)" (p. 242)
Turn off and on this unit again.
ERROR IN BUILT-IN MEMORY! (GZ-EX355)
Turn off and on this unit again.
If the above does not solve the problem, back up your files and execute
"FORMAT BUILT-IN MEM." in the "MEDIA SETTINGS" menu. (All data will be deleted.)
"FORMAT BUILT-IN MEM. (GZ-EX355)" (p. 242)
MEMORY CARD ERROR!
Check that the card is supported by this unit.
"Types of Usable SD Card" (p. 14)
Turn off and on this unit again.
Remove the AC adapter and battery pack, then remove and re-insert the SD card.
Remove any dirt from the SD card terminals.
If the above does not solve the problem, back up your files and execute
"FORMAT SD CARD" in the "COMMON" menu. (All data will be deleted.)
"FORMAT SD CARD" (p. 242)
NOT FORMATTED
Select "OK", then select "YES" on the "DO YOU WANT TO FORMAT?" screen.
RECORDING FAILURE
Turn off and on this unit again.
CANNOT TAKE MORE STILL IMAGES AT THIS TIME
Stop video recording before taking still images. (If the SD card is removed and inserted during video recording, still images cannot be recorded.)
PLAYBACK FAILED
Remove and re-insert the SD card.
"Inserting an SD Card" (p. 13)
Remove any dirt from the SD card terminals.
Insert the SD card before turning on the power.
Do not subject this unit to any strong impact or vibration.
VIDEO MANAGEMENT FILE IS DAMAGED, RECOVERY IS REQUIRED TO RECORD/PLAYBACK, RECOVER?
Select "OK" to restore. (Videos that cannot be restored will not be displayed on the index screen, but you may be able to play them back using
"PLAYBACK OTHER FILE" in the menu.)
"PLAYBACK OTHER FILE" (p. 73)
UNSUPPORTED SCENE!
Use files recorded with this unit. (Files recorded with other devices may not be playable.)
UNSUPPORTED FILE!
Use files recorded with this unit. (Files recorded with other devices may not be playable.)
THIS FILE IS PROTECTED
Switch off the "PROTECT/CANCEL" function in the "EDIT" menu.
"Protecting Files" (p. 81)
CHECK CARD'S WRITE PROTECTION SWITCH
Set the write protect switch of the SD card to off.
INSUFFICIENT AVAILABLE SPACE
Delete files, or move files to a computer or other devices.
Replace the SD card with a new one.
Seamless videos cannot be combined if there is not enough free space in the built-in memory (GZ-EX355) or SD card. Check the amount of remaining free space before combining.
RECORDABLE MANAGEMENT CAPACITY LEVEL HAS BEEN REACHED
① Move the files or folders to a computer or other device. (Back up your files.)
② Select "FILE + MANAGEMENT NO" in "FORMAT BUILT-IN MEM." or "FORMAT SD CARD" of the media settings menu. (All data on the built-in memory or SD card will be deleted.)
"FORMAT BUILT-IN MEM. (GZ-EX355)" (p. 242)
"FORMAT SD CARD" (p. 242)
SCENE QUANTITY EXCEEDED LIMIT
① Move the files or folders to a computer or other device. (Back up your files.)
② Select "FILE + MANAGEMENT NO" in "FORMAT BUILT-IN MEM." or "FORMAT SD CARD" of the media settings menu. (All data on the built-in memory or SD card will be deleted.)
"FORMAT BUILT-IN MEM. (GZ-EX355)" (p. 242)
"FORMAT SD CARD" (p. 242)
NUMBER OF FOLDERS OVERFLOW
① Move the files or folders to a computer or other device. (Back up your files.)
② Select "FILE + MANAGEMENT NO" in "FORMAT BUILT-IN MEM." or "FORMAT SD CARD" of the media settings menu. (All data on the built-in memory or SD card will be deleted.)
"FORMAT BUILT-IN MEM. (GZ-EX355)" (p. 242)
"FORMAT SD CARD" (p. 242)
FILE QUANTITY LIMIT EXCEEDED
① Move the files or folders to a computer or other device. (Back up your files.)
② Select "FILE + MANAGEMENT NO" in "FORMAT BUILT-IN MEM." or "FORMAT SD CARD" of the media settings menu. (All data on the built-in memory or SD card will be deleted.)
"FORMAT BUILT-IN MEM. (GZ-EX355)" (p. 242)
"FORMAT SD CARD" (p. 242)
PLAYLIST QUANTITY EXCEEDS LIMIT
Reduce the number of the playlist to 99 files or less. (Up to 99 playlists can be created.)
CANCELLED BECAUSE PLAYLIST AMOUNT EXCEEDED MAXIMUM LIMIT
When creating a DVD, reduce the number of playlists to be saved.
Reduce the number of videos to add to the playlist to 999 files.
"Creating Playlists from the Recorded Videos" (vss p. 85)
PROCESSING CANCELLED DUE TO LIMITED SPACE FOR OPERATION
Reduce the number of videos to add to the playlist to 999 files.
"Creating Playlists from the Recorded Videos" (p. 85)
NO FILES (GZ-EX355)
Change the setting of "REC MEDIA FOR IMAGE" or "REC MEDIA FOR VIDEO" in the "COMMON" menu, and check that files are not recorded to the other media.
"REC MEDIA FOR IMAGE (GZ-EX355)" (p. 242)
RECORDING CANCELLED (GZ-EX355)
Set "REC MEDIA FOR VIDEO" to "SD CARD", then record to an SD card.
"REC MEDIA FOR VIDEO (GZ-EX355)" (p. 242)
Turn off and on this unit again.
Protect the unit from vibration and shock.
CAMERA TEMPERATURE IS HIGH PLEASE TURN CAMERA OFF TO ALLOW IT TO COOL DOWN PLEASE WAIT
Turn off the power of this unit, let and it cool down before turning on the power again.
POWER IS OFF, OR USB DEVICE IS UNSUPPORTED
Turn on the power of the connected USB device.
Connect the AC adapter to the DVD writer or BD writer (external Blu-ray drive).
INSERT DISC
Open the tray of the DVD writer or BD writer (external Blu-ray drive), check and reset the DVD or Blu-ray disc, then close the tray. Replace the disc in the DVD writer or BD writer (external Blu-ray drive).
CHANGE DISC
Open the tray of the DVD writer or BD writer (external Blu-ray drive), check and reset the DVD or Blu-ray disc, then close the tray. Replace the disc in the DVD writer or BD writer (external Blu-ray drive).
Perform regular maintenance of this unit to enable it to be used for a long time.
Caution :
\- Be sure to detach the battery pack, AC adapter, and power plug before performing any maintenance.
Camcorder
- Wipe this unit with a dry, soft cloth to remove any dirt.
- When it is extremely dirty, soak the cloth in a solution of neutral detergent, wipe the body with it, and then use a clean cloth to remove the detergent.
Caution :
- Do not use solvents such as benzene, thinner, or alcohol. Doing so may cause damage to the unit.
- When using a chemical cloth or cleaner, be sure to observe the warning labels and instructions of the product.
- Do not leave the device in contact with rubber or plastic products for a long time.
Lens/LCD Monitor
- Use a lens blower (commercially available) to remove any dust, and a cleaning cloth (commercially available) to wipe off any dirt.
Mold may form if the lens is left dirty.
- You can use a commercially available anti-reflection or protective film on the screen.
However, depending on the thickness of the film, operations on the touch screen may not be performed smoothly or the screen may darken slightly.
Camera
Item Details Power supply Using AC adapter: DC 5.2 VUsing battery pack: DC 3.6 V (GZ-EX355/GZ-EX310)Using battery pack: DC 3.5 V - 3.6 V (GZ-E300) Power consumption (GZ-EX355/GZ-EX310)2.3 W (MONITOR BRIGHTNESS: 3 (standard))(GZ-E300)2.2 W (MONITOR BRIGHTNESS: 3 (standard))Rated Current Consumption: 1A Dimensions (mm) 50 x 57 x 116 (2" x 2-1/4" x 4-5/8")(W x H x D: excluding grip belt) Mass (GZ-EX355/GZ-EX310)Approx. 200 g (0.44 lbs) (camera only),Approx. 240 g (0.53 lbs) (including supplied batterypack)(GZ-E300)Approx. 195 g (0.43 lbs) (camera only),Approx. 225 g (0.5 lbs) (including supplied batterypack) Operating environment Allowable operating temperature: 0°C to 40°C(32°F to 104°F)Allowable storage temperature: -20°C to 50°C(-4°F to 122°F)Allowable relative humidity: 35 % to 80 % Image pickup device 1/5.8" 2,510,000 pixels (CMOS, back-illuminated) Recording area (Video) AVCHD mode1,010,000 to 2,290,000 pixels (image stabilizer:off, dynamic zoom: ON)iFrame mode920,000 to 1,770,000 pixels (dynamic zoom: ON) Recording area (Still image) 1,710,000 pixels (4:3) (image stabilizer: OFF)2,290,000 pixels (16:9) (image stabilizer: OFF) Lens F1.8 - 6.3, f= 2.9 mm to 116.0 mmVideoAVCHD mode35 mm conversion: 40.5 mm to 2,430 mm (dynamiczoom: ON)35 mm conversion: 40.5 mm to 1,620 mm (dynamiczoom: OFF)iFrame mode35 mm conversion: 46.0 mm to 2,530 mm (dynamiczoom: ON)35 mm conversion: 46.0 mm to 1,840 mm (dynamiczoom: OFF)Still Image35 mm conversion: 49.5 mm to 1,980 mm (4:3)35 mm conversion: 40.5 mm to 1,620 mm (16:9) Lowest illumination 3 lux1 lux (SCENE SELECT: NIGHTALIVE) Zoom (during video recording) Optical zoom: Up to 40xDynamic zoom: Up to 60xDigital zoom: Up to 200x Zoom (during still image recording) Optical zoom: Up to 40x LCD monitor 3.0", 230,000 pixels, color LCD Recording media SDSDHC/SDXC card (commercially available)"Types of Usable SD Card" (€ p. 14) Clock battery Rechargeable battery
Connectors
Item Details HDMI output connector HDMI mini connector AV output connector Video output: 1.0 V (p-p), 75 ΩAudio output: 300 mV (rms), 1 KΩ USB connector Mini USB Type AB, USB 2.0 compliant
Video (AVCHD)
Item Details Recording/Playback format AVCHD standardVideo: MPEG-4 AVC/H.264Audio: Dolby Digital 2ch Extension .MTS Signal system NTSC standard Image quality (Video) UXP1920 x 1080 pixelsAverage Approximate 24 MbpsXP1920 x 1080 pixelsAverage Approximate 17 MbpsSP1920 x 1080 pixelsAverage Approximate 12 MbpsEP1920 x 1080 pixelsAverage Approximate 4.8 MbpsSSW(16:9)720 x 480 pixels (Interlaced)Average Approximate 6.2 MbpsSEW(16:9)720 x 480 pixels (Interlaced)Average Approximate 3 Mbps Sound quality (Audio) 48 kHz, 256 kbps
Videos (iFrame) (GZ-EX355/GZ-EX310)
Item Details Recording/Playback format MP4 standardVideo: MPEG-4 AVC/H.264Audio: AAC (2ch) Extension .MP4 Signal system NTSC standard Image quality(Video) 1280x7201280 x 720 pixelsMax 36 Mbps, average approx. 34 Mbps960x540960 x 540 pixelsMax 28 Mbps, average approx. 26 Mbps Sound quality(Audio) 48 kHz, average 128 kbps
Still Image
Item Details Recording format JPEG standard Extension .JPG Image size “Approximate Number of Still Images (Unit: Number of Shots)” (€' p. 62)
AC Adapter (AC-V11U)
Item Details Power supply AC 110 V to 240 V, 50 Hz/60 Hz Output DC 5.2 V, 1 A Allowable operating temperature 0°C to 40°C (32°F to 104°F)(10°C to 35°C (50°F to 95°F) during charging) Dimensions (mm) 66 x 28 x 47 (2-5/8" x 1-1/8" x 1-7/8") (W x H x D: excluding cord and AC plug) Mass Approx. 71 g (0 .15 lbs)
Battery Pack (BN-VG107U) (GZ-E300)
Item Details Power voltage 3.5 V 3.6 V Capacity 700 mAh Dimensions (mm) 31 x 21.5 x 43 (1-1/4" x 7/8" x 1-3/4") (W x H x D) Mass Approx. 26 g (0.06 lbs)
Battery Pack (BN-VG114U) (GZ-EX355/GZ-EX310)
Item Details Power voltage 3.6 V Capacity 1400 mAh Dimensions (mm) 31 x 21.5 x 43 (1-1/4" x 7/8" x 1-3/4") (W x H x D) Mass Approx. 40 g (0.09 lbs)
Memo :
\- The specifications and appearance of this product are subject to changes for further improvement without prior notice.
JVC
text_image
M WT D << PLAY REC MENU3 Tap "MENU".
text_image
Screenshot of a media player interface with playback controls and preview thumbnails4 Tap "EDIT".
text_image
TOP MENU ?5 Tap "COPY".
text_image
EDIT COPY6 Tap on the files to copy.
text_image
QUANTITY:0030 SEL ALL REL ALL SET QUIT7 Tap "SET".
text_image
QUANTITY:0030 SEL ALL REL ALL SET QUIT8 Tap "YES".
text_image
COPY VIDEO COPY QUANTITY:30 START COPY? YES NOMoving Files to an SD Card (GZ-EX355)
You can move videos and still images from the built-in memory to SD card. Files that are moved will be deleted from the built-in memory. Moving still images to SD cards makes it convenient to bring them to the shop for printing (developing).Caution :
- Make sure that there is enough space left in the destination medium. - Videos in the SD card cannot be moved to the built-in memory.1 Open the LCD monitor.
text_image
Diagram showing a digital camera with a hand icon pointing to the right side of the screen, labeled in Chinese.2 Tap "<

text_image
M
WT
D
←PLAY REC MENU
\- The mode changes between recording and playback with every tap.
3 Tap "MENU".

text_image
Screenshot of a media player interface with playback controls and preview thumbnails
4 Tap "EDIT".

text_image
TOP MENU
?
5 Tap "MOVE".

text_image
EDIT
MOVE
6 Tap on the files to move.

text_image
QUANTITY:0030
SEL ALL REL ALL SET QUIT
- √ appears on the selected files.
To remove √ from a file, tap on the file again.
- Tap "SEL ALL" to select all files.
- Tap "REL ALL" to release all selections.
7 Tap "SET".

text_image
QUANTITY:0030
SEL ALL REL ALL SET QUIT
\- "SET" is deactivated when no file is selected.
8 Tap "YES".

text_image
MOVE VIDEO
MOVE QUANTITY:30
START MOVING?
YES NO
- Moving of files starts
• After moving, tap "OK".
Copying to Windows PC (GZ-EX355/GZ-EX310)
You can copy files to a computer using the provided software.
Discs can also be created using the computer's DVD or Blu-ray drive.
If the provided software is not installed, this unit will be recognized as an external storage when connected.
Memo :
• To record to discs, a recordable DVD or Blu-ray drive is required for the computer in use.
- Still images cannot be recorded to discs using the provided software.
- Videos recorded in the iFrame format can not be copied.
- In order to record on the Blu-ray disc, it is necessary to upgrade to the paid version of LoiLoFit for Everio.
For details, refer to the following link.
http://loilo.tv/jp/product/33/page/27
\- Backing up of files using other softwares is not supported.
Trouble with Using the Provided Software LoiLoFit for Everio
Consult the customer service center below.
http://loilo.tv/us/product/LoiLoFit\_for\_Everio
\- For details on how to upload to YouTube, refer to "Help" in LoiLoFit for Everio.
Verifying System Requirements (Guideline)
Right-click on "Computer" (or "My Computer") in the "Start" menu and select "Properties" to check the following items.
Windows Vista/Windows 7
\- Refer to the operating instructions found in the animation on the Detailed User Guide.
Windows XP
\- Refer to the operating instructions found in the animation on the Detailed User Guide.
Windows Vista/Windows 7 Windows XP OS Windows Vista 32/64-bitHome Basic or Home Premium(Pre-installed versions only) Service Pack 2Windows 7 32/64-bitHome Premium(Pre-installed versions only) Service Pack 1 Windows XPHome Edition or Professional(Pre-installed versions only) Service Pack 3 CPU Intel Core 2 Duo, CPU 2 GHz or higher RAM At least 2 GB Graphics (during playback/backing up):Intel 965 or later, NVIDIA Geforce 6000 series or later, ATI Radeon 9600 or later(during video editing/creating a disc/converting video/uploading):Intel G45 or later, NVIDIA Geforce 8000 series or later (except for 8800GTX and 8300), ATI Radeon HD2000 series or later (except for 2900)
■ Other requirements
• VRAM: 256MB or higher
- Microsoft .NET Framework 3.5 SP1 needs to be installed.
- To edit/playback videos, the use of a computer with Intel Core i7 (4 core) CPU is recommended.
Memo :
- If your PC does not meet the above system requirements, operations of the provided software cannot be guaranteed.
- Depending on the PC environment, even if the operating environment is adequate, 1 frame per second may be reduced during video playback.
- There is no guarantee that the operations will work with all computer environments.
- For more information, contact your PC's manufacturer.
Installing the Provided Software
You can display the recorded images in calendar format and perform editing using the provided software.
Windows Vista/Windows 7
\- Refer to the operating instructions found in the animation on the Detailed User Guide.
Windows XP
\- Refer to the operating instructions found in the animation on the Detailed User Guide.
Backing Up Files
Before making backup, make sure that enough free space is left in the computer's hard disk (HDD).
Backup will not start if there is not enough free space.
1 Remove the AC adapter and battery pack from this unit.
2 Open the LCD monitor.

natural_image
Illustration of a digital camera with an open screen and a blue arrow indicating the direction (no text or symbols present)
3 Connect the USB cable and the AC adapter.

flowchart
graph TD
A["Device"] -->|To DC Connector| B["Computer"]
A -->|USB Cable (Provided)| C["User Interface"]
C --> D["User Interface"]
D --> E["User Interface"]
style A fill:#f9f,stroke:#333
style B fill:#ccf,stroke:#333
style C fill:#cfc,stroke:#333
style D fill:#fcc,stroke:#333
1 Connect using the provided USB cable.
2 Connect the AC adapter to this unit.
\- This unit powers on automatically when the AC adapter is connected.
\- Be sure to use the supplied AC adapter.
3 The "SELECT DEVICE" menu appears.
4 Tap "CONNECT TO PC".

text_image
SELECT DEVICE
SELECT DEVICE
TYPE TO CONNECT
CONNECT TO PC
5 Tap "BACK UP".

text_image
CONNECT TO PC
BACK UP
- Tap × to exit the menu.
- Tap to return to the previous screen.
- The provided software LoiLoFit for Everio starts up on the computer. The subsequent operations are to be performed on the computer.
6 Select the files to back up.

text_image
① Click
② Click
\- Click "Select all" to select all the files at once.
7 After selecting, click "Next".

text_image
OK
Cancel
View
Add
Add
Add
Add
Add
Add
Add
Add
Add
Add
Add
Add
Add
Add
Add
Add
Add
Add
Add
Add
Add
Add
Add
Add
Add
Add
Add
Add
Add
Add
Add
Add
Add
Add
Add
Add
Add
Add
Add
Add
Add
Add
Add
Add
Add
Add
Add
Add
Add
Add
Click
8 Click "Yes" to start backup.

text_image
LoLoFit
I've selected files and be backed up
Back-Up File Size: 1.565 KB
Used Space Back-Up File Size
Available Spoco: 272 GB / 298 GB
Y1 (1) N0
Click
- Backup starts.
- The tab on the right side becomes blank when the backup is completed.

text_image
Screenshot of a video editing software interface showing timeline, preview thumbnails, and playback controls
Memo :
- Videos recorded in the iFrame format can not be copied.
- Before making backup, load the SD card in which the videos and still images are stored on this unit.
- After backing up your files using the provided software, they cannot be restored to this unit.
- Delete unwanted videos before making backup. It takes time to back up many videos.
"Deleting Unwanted Files" (p. 80)
Disconnecting this Unit from Computer
1 Click "Safely Remove Hardware and Eject Media".

text_image
Safely Remove Hardware and Eject Media
9:31 PM
9/27/2010
Click
2 Click "Safely Remove USB Mass Storage Device".
3 (For Windows Vista) Click "OK".
4 Disconnect the USB cable and close the LCD monitor.
Recording Videos to Discs
1 Insert a new disc into the PC's recordable DVD or Blu-ray drive.
2 Click "Disk" to select the disc type.

text_image
Click
3 Select the date that the desired videos for saving on the disc was recorded.

text_image
Click
4 Select the files to save.

text_image
① Click
② Click
5 Click "Next".

text_image
OK
Cancel
Click
6 Sort the files in your desired order.

text_image
Drag
Drop
7 Click "Create Disk".

text_image
Click
8 After copying, click "Cancel".

text_image
Disk creation successful.
Would you like to create another disk with the same contents?
Create another disk
Cancel
Click
\- Click "Cancel" to end creating the disc.
Memo :
- The following types of discs can be used on the provided software LoiLoFit for Everio.
DVD-R
DVD-R DL
DVD-RW
- In order to record on the Blu-ray disc, it is necessary to upgrade to the paid version of LoiLoFit for Everio.
For details, refer to the following link.
http://loilo.tv/jp/product/33/page/27
- Videos recorded in the iFrame format can not be copied.
- Depending on the PC environment, even if the operating environment is adequate, 1 frame per second may be reduced during video playback.
- To view the help file of LoiLoFit for Everio, select "Help" from the LoiLoFit for Everio's menu bar or press F1 on the keyboard.
- If you are unable to activate while creating a disc, complete activation by following the instruction on the screen.
Backing Up Files Without Using Provided Software
Copy the files to a computer using the following method.
1 Remove the AC adapter and battery pack from this unit.
2 Open the LCD monitor.

natural_image
Diagram of a digital camera with an open screen and a blue arrow indicating rotation (no text or symbols)
3 Connect the USB cable and the AC adapter.

text_image
AC Adapter To AC
Outlet (110 V to 240 V)
To DC Connector
To USB
Connector
USB Cable
(Provided)
To USB
Connector
Computer
1 Connect using the provided USB cable.
2 Connect the AC adapter to this unit.
- This unit powers on automatically when the AC adapter is connected.
- Be sure to use the supplied AC adapter.
3 The "SELECT DEVICE" menu appears.
4 Tap "CONNECT TO PC".

text_image
SELECT DEVICE
SELECT DEVICE
TYPE TO CONNECT
CONNECT TO PC
5 Tap "PLAYBACK ON PC".

text_image
CONNECT TO PC
PLAYBACK ON PC
- Tap × to exit the menu.
- Tap to return to the previous screen.
- Close the LoiLoFit for Everio program, if it starts.
- The following screen is displayed after the camera operation is completed.

text_image
PLAYBACK ON PC
\- Operations are to be performed on the computer after the screen switches.
6 Select "Computer" (Windows Vista) / "My Computer" (Windows XP) / "Computer" (Windows 7) from the "Start" menu, then click on the "JVCCAM\_MEM" or "JVCCAM\_SD" icon.
\- Open the folder with the desired files. "List of Files and Folders" (p. 120)
7 Copy the files to any folder in the computer (desktop, etc).
Memo :
- To edit/view the files, use a software that supports iFrame (video)/AVCHD (video)/JPEG (still image) files.
- The above operations on computer may vary with the system used.
Disconnecting this Unit from Computer
1 Click "Safely Remove Hardware and Eject Media".

text_image
Safely Remove Hardware and Eject Media
9:31 PM
9/27/2010
Click
2 Click "Safely Remove USB Mass Storage Device".
3 (For Windows Vista) Click "OK".
4 Disconnect the USB cable and close the LCD monitor.
List of Files and Folders
Folders and files are created in the SD card as shown below.
They are created only when necessary.

flowchart
graph TD
A["[JVCCAM_MEM"] (Built-In Memory] --> B["[DCIM"]]
C["[JVCCAM_SD"] (SD Card)] --> B
B --> D["[100JVCSO"]]
D --> E["PIC_0001.JPG"]
D --> F["PIC_0002.JPG"]
D --> G["PIC_0003.JPG"]
D --> H["PIC_0004.MP4"]
E --> I["Still Image File"]
F --> I
G --> I
H --> I
B --> J["[AVCHD"] (Built-In Memory)]
J --> K["[BDMV"]]
K --> L["[STREAM"]]
L --> M["XXXXX.MTS"]
M --> N["(Video File)"]
L --> O["[BACKUP"]]
L --> P["[CLIPINF"]]
L --> Q["[PLAYLIST"]]
L --> R["[INDEX.BDM"]]
L --> S["[MOVIEOBJ.BDM"]]
O --> T["[EXTMOV"]]
T --> U["DEM_0000.MTS"]
U --> V["(Demo Video File)"]
U --> W["*There may be no demo video file."]
T --> X["MOV_0001.MTS"]
T --> Y["MOV_0002.MTS"]
T --> Z["MOV_0003.MTS"]
U --> AA["(Video files with defective management information)"]
T --> AB["[PRIVATE"] (Management Information)]
AB --> AC["[AVCHD"] (SD Card)]
AC --> AD["[JVC"]]
Caution :
\- When the camera and PC are connected by an USB cable, recorded media are read-only.
Copying to Windows PC (GZ-E300)
You can copy files to a computer using the provided software.
Discs can also be created using the computer's DVD or Blu-ray drive.
If the provided software is not installed, this unit will be recognized as an external storage when connected.
Memo :
- To record to discs, a recordable DVD or Blu-ray drive is required for the computer in use.
- Still images cannot be recorded to discs using the provided software.
- Backing up of files using other softwares is not supported.
Trouble with Using the Provided Software Everio MediaBrowser 4
Consult the customer service center below.
\- Pixel a User Support Center
Telephone USA and Canada (English): +1-800-458-4029 (toll-free)Europe (UK, Germany, France, and Spain)(English/German/French/Spanish): +800-1532-4865 (toll-free)Other Countries in Europe(English/German/French/Spanish): +44-1489-564-764Asia (Philippines) (English): +63-2-438-0090China (Chinese): 10800-163-0014 (toll-free) Homepage http://www.pixela.co.jp/oem/jvc/mediabrowser/e/
\- For details on how to use the software, refer to "MediaBrowser Help" in the "Help" menu of Everio MediaBrowser 4.

text_image
Help(H)
MediaBrowser Help(H) F1
Check the latest version online
Click for Latest Product Info
Version info(A)
Mon Tue Wed
Verifying System Requirements (Guideline)
Right-click on "Computer" (or "My Computer") in the "Start" menu and select "Properties" to check the following items.
Windows Vista/Windows 7
\- Refer to the operating instructions found in the animation on the Detailed User Guide.
Windows XP
\- Refer to the operating instructions found in the animation on the Detailed User Guide.
Windows Vista/Windows 7 Windows XP OS Windows Vista 32/64-bitHome Basic or Home Premium(Pre-installed versions only) Service Pack 2Windows 7 32/64-bitHome Premium(Pre-installed versions only) Service Pack 1 Windows XPHome Edition or Professional(Pre-installed versions only) Service Pack 3 CPU Intel Core Duo CPU 1.66 GHz or higher(Intel Core 2 Duo, CPU 2.13 GHz or higher recommended) Intel Core Duo, CPU 1.66 GHz or higher(Intel Core 2 Duo, CPU 2.13 GHz or higher recommended) RAM At least 2 GB At least 1 GB Video editing Intel Core i7, CPU 2.53 GHz or higher recommended Intel Core i7, CPU 2.53 GHz or higher recommended
■ Other requirements
Display: 1024×768 pixels or above (1280×1024 pixels or above recommended)
Graphic: Intel G965 or higher recommended
Memo :
- If your PC does not meet the above system requirements, operations of the provided software cannot be guaranteed.
- There is no guarantee that the operations will work with all computer environments.
- For more information, contact your PC's manufacturer.
Installing the Provided Software (Built-in)
You can display the recorded images in calendar format and perform editing using the provided software.
Preparations
Connect this unit to a computer with a USB cable.
1 Remove the AC adapter and battery pack from this unit.
2 Open the LCD monitor.

natural_image
Diagram of a digital camera with an open screen and blue arrow indicating rotation (no text or symbols)
3 Connect the USB cable and the AC adapter.

flowchart
graph TD
A["AC Adapter To AC Outlet (110 V to 240 V)"] -->|To DC Connector| B["Computer"]
C["USB Cable (Provided)"] --> D["To USB Connector"]
E["USB Cable (Provided)"] --> F["To USB Connector"]
G["Computer"] --> H["USB Cable"]
1 Connect using the provided USB cable.
2 Connect the AC adapter to this unit.
\- This unit powers on automatically when the AC adapter is connected.
\- Be sure to use the supplied AC adapter.
3 The "SELECT DEVICE" menu appears.
4 Tap "CONNECT TO PC".

text_image
SELECT DEVICE
SELECT DEVICE
TYPE TO CONNECT
CONNECT TO PC
5 Tap "PLAYBACK ON PC".

text_image
CONNECT TO PC
PLAYBACK ON PC
- Tap × to exit the menu.
- Tap to return to the previous screen.
- "Everio Software Setup" appears on the computer. Operations are to be performed on the computer after the screen switches.
Memo :
- If "Everio Software Setup" doesn't appear, double-click "JVCCAM\_APP" in "My Computer" or "Computer", then double-click "install (or Install.exe)"
- If the auto play dialog box appears, select "Open folder to view files" and click "OK". Then, click "install (or Install.exe)" in the folder.
Installation Procedure
■ Windows Vista/Windows 7
\- Refer to the operating instructions found in the animation on the Detailed User Guide.
Windows XP
\- Refer to the operating instructions found in the animation on the Detailed User Guide.
Backing Up All Files
Before making backup, make sure that enough free space is left in the computer's hard disk (HDD).
Backup will not start if there is not enough free space.
1 Remove the AC adapter and battery pack from this unit.
2 Open the LCD monitor.

natural_image
Illustration of a digital camera with an open screen and blue arrow indicating rotation (no text or symbols)
3 Connect the USB cable and the AC adapter.

flowchart
graph TD
A["Device"] -->|To USB Connector| B["USB Cable (Provided)"]
A -->|To USB Connector| C["Computer"]
D["AC Adapter To AC Outlet (110 V to 240 V)"] -->|To DC Connector| E["Computer"]
1 Connect using the provided USB cable.
2 Connect the AC adapter to this unit.
\- This unit powers on automatically when the AC adapter is connected.
\- Be sure to use the supplied AC adapter.
3 The "SELECT DEVICE" menu appears.
4 Tap "CONNECT TO PC".

text_image
SELECT DEVICE
SELECT DEVICE
TYPE TO CONNECT
CONNECT TO PC
5 Tap "BACK UP".

text_image
CONNECT TO PC
BACK UP
\- Tap × to exit the menu.
\- Tap to return to the previous screen.
\- The provided software Everio MediaBrowser 4 starts up on the computer.
The subsequent operations are to be performed on the computer.
6 Select the source of the image file.

text_image
① Click
Step 1
View: Selection
② Click
Click "Next"
Click "All volume in camcorder"
7 Start backup.

text_image
Saving Destination (PC)
Step 2
Confirm
Start OK
Cancel
OK Cancel OK
Cancel OK
Start OK
Cancel OK
Click
\- Backup starts.
8 After backup is complete, click "OK".

text_image
Everio MediaBrowser 4
Finished successfully.
OK
Click
Memo :
- Before making backup, load the SD card in which the videos and still images are stored on this unit.
- If you encounter any problems with the provided software Everio MediaBrowser 4, please consult the "Pixela User Support Center".
Telephone USA and Canada (English): +1-800-458-4029 (toll-free)Europe (UK, Germany, France, and Spain)(English/German/French/Spanish): +800-1532-4865 (toll-free)Other Countries in Europe(English/German/French/Spanish): +44-1489-564-764Asia (Philippines) (English): +63-2-438-0090China (Chinese): 10800-163-0014 (toll-free) Homepage http://www.pixela.co.jp/oem/jvc/mediabrowser/e/
\- Delete unwanted videos before making backup. It takes time to back up many videos.
"Deleting Unwanted Files" (p. 80)
Disconnecting this Unit from Computer
1 Click "Safely Remove Hardware and Eject Media".

text_image
Safely Remove Hardware and Eject Media
9:31 PM
9/27/2010
Click
2 Click "Safely Remove USB Mass Storage Device".
3 (For Windows Vista) Click "OK".
4 Disconnect the USB cable and close the LCD monitor.
Organizing Files
After backing up your files, organize them by adding labels such as "Family Trip" or "Athletic Meet".
This is useful not only for creating discs, but for viewing the files too.
1 Double-click on the Everio MediaBrowser 4 icon.
• The provided software starts up.

Гурго
Media Bro...

Evero
MediaBro...
2 Display the month of the files to organize.

text_image
Click
2016
Recording Month
3 Create a user list.

text_image
Click
Recording Date
B/2015
① Input the name of the new user list
List Name
Enter List name.
0000
OK Cancel
② Click
\- A new user list is added to the user list library.
4 Click on the recording day.
\- The thumbnails of the files recorded on the day are displayed.
Recording Date

text_image
New Booklet
File Edit View Help
Set As
New Booklet
6/2018
New Booklet
New Booklet
New Booklet
New Booklet
New Booklet
New Booklet
New Booklet
New Booklet
New Booklet
New Booklet
New Booklet
New Booklet
New Booklet
New Booklet
New Booklet
New Booklet
New Booklet
New Booklet
New Booklet
New Booklet
New Booklet
New Booklet
New Booklet
New Booklet
New Booklet
New Booklets
New Booklets
New Booklets
New Booklets
New Booklets
New Booklets
New Booklets
New Booklets
New Booklets
New Booklets
New Booklets
New Booklets
New Booklets
New Booklets
New Booklets
New Booklets
New Booklets
New Booklets
New Booklets
New Booklets
New Booklets
New Booklets
New Booklets
New Booklets
New Booklets
New Booktimes
New Booktimes
New Booktimes
New Booktimes
New Booktimes
New Booktimes
New Booktimes
New Booktimes
New Booktimes
New Booktimes
New Booktimes
New Booktimes
New Booktimes
New Booktimes
New Booktimes
New Booktimes
New Booktimes
New Booktimes
New Booktimes
New Booktimes
New Booktimes
New Booktimes
New Booktimes
New Booktimes
New Booktimes
New Booklines
5 Register files to the created user list.
User List
Thumbnails

text_image
Drag
Drop
Identifying Video or Still Image :
- You can select files using the "SELECT" menu on the top right of the screen.
- Check the video/still image icon on the top right corner of the thumbnail.

text_image
Image showing a red agricultural machine on water with an inset image labeled 'Video' and 'Still Image', likely illustrating a video recording setup.
Memo :
\- If you encounter any problems with the provided software Everio MediaBrowser 4, please consult the "Pixela User Support Center".
Telephone USA and Canada (English): +1-800-458-4029 (toll-free)Europe (UK, Germany, France, and Spain)(English/German/French/Spanish): +800-1532-4865 (toll-free)Other Countries in Europe(English/German/French/Spanish): +44-1489-564-764Asia (Philippines) (English): +63-2-438-0090China (Chinese): 10800-163-0014 (toll-free) Homepage http://www.pixela.co.jp/oem/jvc/mediabrowser/e/
Recording Videos to Discs
Copy the files that are arranged using the user list to discs.
1 Insert a new disc into the PC's recordable DVD drive.
2 Select the desired user list.

text_image
Sun/Water
Start: 12 March 2016 (Wednesday) - May 1
Date: 9/2016
Time: 00:00
Day: 01:00
Week: 02:00
Month: 03:00
Day: 04:00
Week: 05:00
Month: 06:00
Day: 07:00
Week: 08:00
Month: 09:00
Day: 10:00
Week: 11:00
Month: 12:00
Day: 13:00
Week: 14:00
Month: 15:00
Day: 16:00
Week: 17:00
Month: 18:00
Day: 19:00
Week: 20:00
Month: 21:00
Day: 22:00
Week: 23:00
Month: 24:00
Day: 25:00
Week: 26:00
Month: 27:00
Day: 28:00
Week: 29:00
Month: 30:00
Day: 31:00
Week: 32:00
Month: 33:00
Day: 34:00
Week: 35:00
Month: 36:00
Day: 37:00
Week: 38:00
Month: 39:00
Day: 40:00
Week: 41:00
Month: 42:00
Day: 43:00
Week: 44:00
Month: 45:00
Day: 46:00
Week: 47:00
Month: 48:00
Day: 49:00
Week: 50:00
Month: 51:00
Day: 52:00
Week: 53:00
Month: 54:00
Day: 55:00
Week: 56:00
Month: 57:00
Day: 58:00
Week: 59:00
Month: 60:00
Day: 61:00
Week: 62:00
Month: 63:00
Day: 64:00
Week: 65:00
Month: 66:00
Day: 67:00
Week: 68:00
Month: 69:00
Day: 70:00
Week: 71:00
Month: 72:00
Day: 73:00
Week: 74:00
Month: 75:00
Day: 76:00
Week: 77:00
Month: 78:00
Day: 79:00
Week: 80:00
Month: 81:00
Day: 82:00
Week: 83:00
Month: 84:00
Day: 85:00
Week: 86:00
Month: 87:00
Day: 88:00
Week: 89:00
Month: 90:00
Day: 91:00
Week: 92:00
Month: 93:00
Day: 94:00
Week: 95:00
Month: 96:00
Day: 97:00
Week: 98:00
Month:
Click
3 Select the disc type.

text_image
Create Disc
Step 1
DOOD
Step 1
Disc type selection
Select the disc type to create and the project type then click apart.
Disc type:
Disc type selected to create
Disc type:
Disc type selected to create
Click
4 Select the files to copy to disc in order.

text_image
Create Box
Box 1
OKOO
Drag
Step 1
AVCHD: Select the Files
Drop
Click
- Click "Settings" to select the disc type.
- Click "Select all" to select all the displayed files.
• After selecting, click "Next".
5 Set the title of the top menu of the disc.

text_image
Create Dues
Step 1
Step 2
Step 3
AVCHD Confirm
Click after this design is going.
AVCHD: 0.0000000000000000000000000000000000000000000000000000000000000000000000000000
Click
- Click "Settings" to select the menu background.
• After setting, click "Start".
6 After copying is complete, click "OK".

text_image
Everio MediaBrowser 4
Finished successfully.
OK
Click
Memo :
- The following types of discs can be used on the provided software Everio MediaBrowser 4.
DVD-R
DVD-R DL
DVD-RW
DVD+R
DVD+R DL
DVD+RW
\- The following formats are supported by the provided software Everio MediaBrowser 4.
AVCHD
For details, refer to the Pixela homepage.
http://www Covera.co.jp/oem/jvc/mediabrowser/e/
- Use Everio MediaBrowser 4 Player to play back an AVCHD disc. Refer to the help file of the provided Everio MediaBrowser 4 software to operate.
- When copying videos recorded in UXP recording mode to create an AVCHD disc, the videos need to be converted to XP recording mode before copying. Therefore, it may take a longer time than copying videos recorded in other modes.
- To view the help file of Everio MediaBrowser 4, select "Help" from the Everio MediaBrowser 4's menu bar or press F1 on the keyboard.
- If you encounter any problems with the provided software Everio MediaBrowser 4, please consult the "Pixela User Support Center".
Telephone USA and Canada (English): +1-800-458-4029 (toll-free)Europe (UK, Germany, France, and Spain)(English/German/French/Spanish): +800-1532-4865 (toll-free)Other Countries in Europe(English/German/French/Spanish): +44-1489-564-764Asia (Philippines) (English): +63-2-438-0090China (Chinese): 10800-163-0014 (toll-free) Homepage http://www.pixela.co.jp/oem/jvc/mediabrowser/e/
Backing Up Files Without Using Provided Software
Copy the files to a computer using the following method.
1 Remove the AC adapter and battery pack from this unit.
2 Open the LCD monitor.

natural_image
Diagram of a digital camera with an open screen and a blue arrow indicating rotation (no text or symbols)
3 Connect the USB cable and the AC adapter.

text_image
AC Adapter To AC
Outlet (110 V to 240 V)
To DC Connector
To USB
Connector
USB Cable
(Provided)
To USB
Connector
Computer
1 Connect using the provided USB cable.
2 Connect the AC adapter to this unit.
- This unit powers on automatically when the AC adapter is connected.
- Be sure to use the supplied AC adapter.
3 The "SELECT DEVICE" menu appears.
4 Tap "CONNECT TO PC".

text_image
SELECT DEVICE
SELECT DEVICE
TYPE TO CONNECT
CONNECT TO PC
5 Tap "PLAYBACK ON PC".

text_image
CONNECT TO PC
PLAYBACK ON PC
- Tap × to exit the menu.
- Tap to return to the previous screen.
- Close the Everio MediaBrowser 4 program, if it starts.
- The following screen is displayed after the camera operation is completed.

text_image
PLAYBACK ON PC
\- Operations are to be performed on the computer after the screen switches.
6 Select "Computer" (Windows Vista) / "My Computer" (Windows XP) / "Computer" (Windows 7) from the "Start" menu, then click on the "JVCCAM\_MEM" or "JVCCAM\_SD" icon.
\- Open the folder with the desired files. "List of Files and Folders" (p. 128)
7 Copy the files to any folder in the computer (desktop, etc).
Caution :
\- When the folders or files are deleted/moved/renamed in the computer, they cannot be played back on this unit anymore.
Memo :
- To edit/view the files, use a software that supports AVCHD (video)/JPEG (still image) files.
- The above operations on computer may vary with the system used.
Disconnecting this Unit from Computer
1 Click "Safely Remove Hardware and Eject Media".

text_image
Safely Remove Hardware and Eject Media
9:31 PM
9/27/2010
Click
2 Click "Safely Remove USB Mass Storage Device".
3 (For Windows Vista) Click "OK".
4 Disconnect the USB cable and close the LCD monitor.
List of Files and Folders
Folders and files are created in the built-in memory and SD card as shown below. They are created only when necessary.

flowchart
graph TD
A["JVCCAM_MEM"] --> B["[DCIM"]]
A --> C["[100JVCSO"]]
A --> D["[101JVCSO"]]
A --> E["[102JVCSO"]]
B --> F["PIC_0001.JPG"]
B --> G["PIC_0002.JPG"]
B --> H["PIC_0003.JPG"]
F --> I["Still Image File"]
G --> I
H --> I
I --> J["AVCHD"]
I --> K["BDMV"]
J --> L["[STREAM"]]
L --> M["XXXXX.MTS"]
M --> N["(Video File)"]
L --> O["[BACKUP"]]
O --> P["[CLIPINF"]]
P --> Q["[PLAYLIST"]]
Q --> R["[INDEX.BDM"]]
R --> S["[MOVIEOBJ.BDM"]]
L --> T["[EXTMOV"]]
T --> U["DEM_0000.MTS"]
U --> V["(Demo Video File)"]
U --> W["*There may be no demo video file."]
U --> X["(Video files with defective management information)"]
T --> Y["MOV_0001.MTS"]
Y --> Z["MOV_0002.MTS"]
Y --> AA["MOV_0003.MTS"]
T --> AB["PRIVATE"]
AB --> AC["[AVCHD"]]
AC --> AD["(Management Information)"]
AD --> AE["[JVC"]]
style A fill:#f9f,stroke:#333
style B fill:#f9f,stroke:#333
style C fill:#f9f,stroke:#333
style J fill:#ccf,stroke:#333
style M fill:#cfc,stroke:#333
style N fill:#fcc,stroke:#333
style O fill:#fcc,stroke:#333
style P fill:#fcc,stroke:#333
style Q fill:#fcc,stroke:#333
style R fill:#fcc,stroke:#333
style S fill:#fcc,stroke:#333
style T fill:#fcc,stroke:#333
style U fill:#fcc,stroke:#333
style V fill:#fcc,stroke:#333
style W fill:#fcc,stroke:#333
style X fill:#fcc,stroke:#333
style Y fill:#fcc,stroke:#333
style Z fill:#fcc,stroke:#333
Caution :
\- When the camera and PC are connected by an USB cable, recorded media are read-only.
Copying to Mac Computer
Copy the files to a Mac computer using the following method.
1 Remove the AC adapter and battery pack from this unit.
2 Open the LCD monitor.

natural_image
Diagram of a digital camera with an open screen and a blue arrow indicating rotation (no text or symbols)
3 Connect the USB cable and the AC adapter.

text_image
AC Adapter To AC
Outlet (110 V to 240 V)
To DC Connector
To USB
Connector
USB Cable
(Provided)
To USB
Connector
Computer
1 Connect using the provided USB cable.
2 Connect the AC adapter to this unit.
- This unit powers on automatically when the AC adapter is connected.
- Be sure to use the supplied AC adapter.
3 The "SELECT DEVICE" menu appears.
\- This unit turns on and the "SELECT DEVICE" menu appears.
4 Tap "CONNECT TO PC".

text_image
SELECT DEVICE
SELECT DEVICE
TYPE TO CONNECT
CONNECT TO PC
5 Tap "PLAYBACK ON PC".

text_image
CONNECT TO PC
PLAYBACK ON PC
- Tap × to exit the menu.
- Tap to return to the previous screen.
- The following screen is displayed after the camera operation is completed.

text_image
PLAYBACK ON PC
\- The "JVCCAM\_MEM" or "JVCCAM\_SD" icon appears on the desktop.
6 Start iMovie.
\- The subsequent operations are to be performed on the Mac computer.
Caution :
- When the camera and PC are connected by an USB cable, recorded media are read-only.
- MTS files that are copied to a Mac computer cannot be imported to iMovie. To use MTS files with iMovie, import the files using iMovie.
Memo :
- To edit/view the files, use a software that supports iFrame (video)/AVCHD (video)/JPEG (still image) files.
- When removing this unit from the computer, drag and drop the "JVCCAM\_MEM" or "JVCCAM\_SD" icon on the desktop to the trash bin.
iMovie and iPhoto
You can import files from this unit to a computer using Apple's iMovie'08, '09, '11 (video) or iPhoto (still image).
To verify the system requirements, select "About This Mac" from the Apple menu. You can determine the operating system version, processor and amount of memory.
- For the latest information on iMovie or iPhoto, refer to the Apple website.
- For details on how to use iMovie or iPhoto, refer to the help file of the respective softwares.
- There is no guarantee that the operations will work with all computer environments.
Wi-Fi Capabilities
This unit is equipped with Wi-Fi function.
You can do the following using a smartphone or computer via wireless connection.
Name of Function Capability DIRECT MONITORING You can check the image on the camera via direct 1-to-1 connection (Wi-Fi Direct) with a smartphone (or computer), without the need for an access point (wireless LAN router).Recording of videos and still images may be performed while monitoring.(Videos and still images cannot be recorded while monitoring from the computer browser.)“Image Monitoring via Direct Connection (DIRECT MONITORING)”(p. 132) INDOOR MONITORING Connect to the smartphone (or PC) via access point at home using the wireless LAN router, to monitor images captured by the camcorder.Recording of videos and still images may be performed while monitoring.(Videos and still images cannot be recorded while monitoring from the computer browser.)“Image Monitoring via an Access Point at Home (INDOOR MONITORING)”(p. 135) OUTDOOR MONITORING You can check the image on the camera via internet connection with a smartphone (or computer) while you are outside.Recording of videos and still images may be performed while monitoring.(Videos and still images cannot be recorded while monitoring from the computer browser.)“Image Monitoring via the Internet (OUTDOOR MONITORING)”(p. 140) DETECT/MAIL A still image is automatically captured and sent via e-mail when faces or movements are detected by the camera.You can also set to record videos on the camera during detection.“Sending Still Images via E-mail upon Detection of Face or Movement (DETECT/MAIL)”(p. 142) VIDEO MAIL Videos of up to 15 seconds can be recorded and sent via e-mail.“Record and Send Videos via E-mail (VIDEO MAIL)”(p. 144) TV MONITORING Connect this unit to the DLNA compatible TV via access point at hope using the wireless LAN router. EASY STORAGE Save all the videos and still images that have not backed up to your computer, which is connected via wireless network. The management file is saved as well. Record of the location information You can record the location information of the venue where recording is taking place via direct connection (Wi-Fi Direct) with a smartphone supporting the GPS function.The recorded location information can be used on the software provided with this unit.“Recording the Location Information”(p. 147) Pan Cradle (sold separately) Panning operation (changing the camera to the left/right direction) can be remotely controlled via smartphone by setting the camera on the pan cradle (sold separately).“Using the Pan Cradle (Sold Separately)”(p. 150)For how to connect the pan cradle, efer to the instruction manual of the Pan Cradle for further details.
Terms Used in this Guide :
- In this guide, operations on the touch panel are described as "tap".
- While the names of the buttons on a smartphone are written as "MENU" or "RETURN", they may vary according to the smartphone in use.
Refer also to the instruction manual of your smartphone.
Operating Environment
To check the image on the camera from a computer or smartphone, and to transfer videos/still images, it is necessary to meet the following requirements.
Android Smartphone and Tablet Device
1 OS: Android2.3 or higher
(This unit is not guaranteed to operate with all models.)
2 Supports GPS function (for GPS recording)
3 Able to connect to the internet or Google Play ("Everio sync. 2" required for software installation)
iPhone/iPad/iPod touch
1 OS: iOS5.1 or higher
(This unit is not guaranteed to operate with all models.)
2 Able to connect to the internet or "App Store™" (required for software installation)
Computer
To check the image on the camera from a computer browser and to transfer videos/still images, it is necessary to meet the following requirements.
1 OS: Windows 7
2 Supports wireless LAN or wired LAN
(To connect the camera and computer directly by using the DIRECT MONITORING function, support for wireless LAN is required.)
3 Installation of Windows Media Player 12 or later
\- Confirmed operating environment: Internet Explorer 9 or later
Caution :
\- There is no guarantee that the operations will work with all computer environments. For example, the video download feature of mobile safari browser, etc. is not supported.
Precautions on Using Wi-Fi
Cautions on Wi-Fi Function
• Operation is not guaranteed on all devices.
- This function is not designed for disaster or crime prevention.
- To prevent the situation of forgetting to turn off the power, this unit will turn off automatically after 10 days of continuous usage.
- Leaving the LCD monitor open makes it easier to receive radio waves. Therefore, it is recommended to open the LCD monitor when using the Wi-Fi function.
• Security of Wireless LAN
An advantage of wireless LAN is that instead of using a LAN cable, it transmits information using radio waves, thus enabling LAN connection to be established within the area covered by the radio waves. However, as radio waves penetrate through objects (such as walls) within the range that they cover, security issues, such as interception of transmission or illegal access, may arise if security settings are not configured.
Before you connect to the network in a wireless LAN environment, read through the instruction manual for the wireless LAN device in use, and configure the security settings accordingly. Failure to do so may increase the risk of personal information being intercepted, such as user names, passwords, and the content of your mails, or illegal access to the network.
\- Due to the design of wireless LAN, note that security may be breached by unusual or unforeseeable means.
\- For more details on wireless LAN and network security, please consult the manufacturer of your wireless LAN device.
\- JVC shall not be liable for any security issues, troubles, damages or losses arising from the use of this feature.
Radio Waves Used by this Product
This product makes use of radio waves in the ISM band (2.4 GHz).
Although a radio station license is not required for using this product, please take note of the following.
■ Do not use this product near the following places.
- Industrial, scientific, or medical equipment, such as microwave ovens and pacemakers
- Industrial, scientific, or medical equipment, such as microwave ovens and pacemakers
- Specified low-power radio stations (radio station license not required)
- Bluetooth devices
Equipment such as the above mentioned devices makes use of the same frequency bandwidth as that of Wi-Fi.
Using this product near the above equipment may cause radio wave interference, and result in communication failure or a drop in communication speed. In this case, turn off the power of devices that are not in use.
■ Avoid using this product near a TV or radio set.
TV or radio sets make use of a radio wave frequency bandwidth that is different from that of Wi-Fi, and therefore has no effect on communication by this product or the TV/radio set.
However, when a TV/radio set is placed close to a Wi-Fi product, electromagnetic waves emitted by the Wi-Fi product may cause noise to occur in the sound or images of the TV/radio.
\- Communication may not be carried out properly near radio equipment or broadcasting stations. In this case, change the location accordingly.
■ Radio signals are unable to penetrate through reinforced steel, metal, or concrete.
The radio waves used by this product are unable to penetrate through reinforced steel, metal, or concrete materials.
It may difficult for communication to be established if two rooms or floors are separated by these materials.
\*Communication may also get weaker when there are human subjects or parts of the body in between the Wi-Fi devices.
- Do not connect to wireless networks that you do not have authorization for.
Once connected, it may be considered as unauthorized access and legal actions can be taken against you.
■ Do not use the Wi-Fi function outside the country of purchase.
Depending on the country, there may be restrictions on the use of radio waves and any violations could be punishable by law.
Exporting/Bringing the Unit Overseas
Permission from the U.S. government may be required when bringing the unit to an export controlled country set by the U.S. government (such as Cuba, Iraq, North Korea, Iran, Rwanda, and Syria. As of December, 2012). For more information, consult the U.S. Embassy Commercial Service.
Image Monitoring via Direct Connection (DIRECT MONITORING)
You can check the image on the camera via direct connection (Wi-Fi Direct) with a smartphone (or computer), without the need for an access point (wireless LAN router).
\- Recording of videos and still images may be performed while monitoring.

flowchart
graph TD
A["Wi-Fi"] --> B["Device 1"]
A --> C["Device 2"]
B -.-> D["Mobile Phone"]
C -.-> D
style A fill:#f9f,stroke:#333
style B fill:#ccf,stroke:#333
style C fill:#ccf,stroke:#333
style D fill:#fff,stroke:#333
Caution :
- This function is not designed for disaster or crime prevention.
- To prevent the situation of forgetting to turn off the power, this unit will turn off automatically after 10 days of continuous usage.
- When not monitoring from a smartphone (or computer), the focus of the camera is fixed.
- Even when monitoring from a smartphone (or computer), the focus of the camera will be fixed if not operated for more than 3 hours. (Focus works again when the camera is operated.)
- You may have difficulty establishing a connection via direct monitoring in an environment where the camera is placed away from the smartphone (or computer). In this case, connect using the access point (wireless LAN router).
"Image Monitoring via an Access Point at Home (INDOOR MONITORING)"
(註 p. 135)
What You Need
• Smartphone or Windows computer
(A wireless LAN that is compatible with WPA2 is necessary.)
Settings Required in Advance
Set up your camera and smartphone (or computer) by performing the following operations.
For a smartphone with WPS support, refer to the "Wi-Fi Protected Setup (WPS)".
\*WPS is a method to connect the camera and the smartphone wirelessly by easy button operations.
Connecting the Smartphone to the Camera Wirelessly
Connect the smartphone to the camera by either of the following methods.
■ Connection by entering the Wi-Fi password
1 Tap "MENU".
(Operation on this camera)
Set the camera to the recording mode.

text_image
M
WT
M
D
←PLAY
REC
MENU
• The top menu appears.
2 Tap the "Wi-Fi" (💡) icon.
(Operation on this camera)

text_image
TOP MENU
?
3 Tap the "DIRECT MONITORING" (☐) icon in the "Wi-Fi" menu. (Operation on this camera)

text_image
Wi-Fi
新安智能设备
新安智能设备
新安智能设备
新安智能设备
新安智能设备
新安智能设备
新安智能设备
4 Tap "START" (→).
(Operation on this camera)

text_image
DIRECT MONITORING
OK
Cancel
OK
Cancel
OK
Cancel
HTTP
OK
Cancel
\- When iFrame is selected for "VIDEO REC FORMAT", the following display appears and recording mode is switched to the 60i mode in AVCHD.

text_image
DIRECT MONITORING
VIDEO RECORDING AT 60i
WHEN USING Wi-Fi
5 Check the SSID and the PASS being displayed on the screen of the camera.

text_image
DIRECT MONITORING
SET UP WI-FI SETTING ON
CONNECTING DEVICE
SSID:..........
PASS:..........
STOP
WPS
6 Select the SSID in step 5 from the Wi-Fi network selection screen of your smartphone, and enter the PASS on the password screen. (Operation on the smartphone (or computer))

natural_image
Illustration of a hand holding a smartphone with a pen, no text or symbols present
\- For details on connecting your smartphone (or computer) to a Wi-Fi network, please refer to the instruction manual of the phone terminal in use.
7 A connection is established and 🔔 appears on the camera's screen.

natural_image
Close-up of purple iris flowers with green foliage, no visible text or symbols
■ Connection by Wi-Fi Protected Setup (WPS)
1 Tap "MENU".
(Operation on this camera)
Set the camera to the recording mode.

text_image
M
WT
D
• The top menu appears.
2 Tap the "Wi-Fi" (💡) icon.
(Operation on this camera)

text_image
TOP MENU
?
3 Tap the "DIRECT MONITORING" (☐) icon in the "Wi-Fi" menu. (Operation on this camera)

text_image
Wi-Fi
智能家庭管理
智能家庭管理
智能家庭管理
智能家庭管理
智能家庭管理
智能家庭管理
4 Tap "START" (→).
(Operation on this camera)

text_image
DIRECT MONITORING
?
HTTP
\- When iFrame is selected for "VIDEO REC FORMAT", the following display appears and recording mode is switched to the 60i mode in AVCHD.

text_image
DIRECT MONITORING
VIDEO RECORDING AT 60i
WHEN USING Wi-Fi
5 Tap "WPS".
(Operation on this camera)

text_image
DIRECT MONITORING
SET UP WI-FI SETTING ON
CONNECTING DEVICE
SSID:..........
PASS:..........
STOP
WPS
6 Activate WPS on the smartphone (or computer) within 2 minutes. (Operation on the smartphone (or computer))

natural_image
Illustration of a hand holding a smartphone with a pen, no text or symbols present
• To activate WPS, refer to the instruction manual of the device in use.
7 A connection is established and 🔔 appears on the camera's screen.

natural_image
Close-up of purple iris flowers with green foliage, captured in a photo editing interface (no text or symbols on the flower image itself)
Monitoring the Images from a Smartphone (or Computer)
■ Smartphone (Android / iPhone)
Memo :
\- Prior to use this function, a smartphone application needs to be installed on the smartphone.
"Installing Smartphone Applications" (p. 175)
1 Start "Everio sync. 2" on the smartphone after setting DIRECT MONITORING.

natural_image
Illustration of a hand holding a smartphone with a pen, no text or symbols present
2 Tap "DIRECT MONITORING".

text_image
Everio sync.2
DIRECT MONITORING
CONNECT TO THE CAMERA
DIRECTLY.
YOU CAN USE THE GAME
SCORING FUNCTION.
INDOOR MONITORING
CONNECT VIA ACCESS POINT.
NEED TO REGISTER ACCESS
POINT.
OUTDOOR MONITORING
CONNECT VIA INTERNET.
NEED TO REGISTER ACCESS
POINT AND DDNS.
?
Demo
3 The recording screen is displayed.

text_image
Index
Monitor
PAUSE
T
Tele
Rec
Snapshot
Wide
Pause
Marking
Game Score
\- How to operate from a smartphone "Using Smartphone Applications" (p. 175)
■ Computer (Windows 7)
1 Tap the URL button shown on the camera's screen. (displayed when the computer and the camera are connected wirelessly.)

natural_image
Close-up of purple iris flowers with green foliage, captured via a photo editing interface (no text or symbols on the flower image itself)
\- The URL for the computer to connect to appears.
2 Check the URL being displayed on the camera screen, which starts from "http://".

text_image
CAMERA NETWORK INFO.
URL(LAN):http://**********
**********/
QUIT
\- After checking the URL, tap "QUIT" to return to the previous screen.
3 Start Internet Explorer (web browser) on the computer and enter the URL.

text_image
File name: Internet Log cover
1000000000
\- Operations from the Web browser
"Using the Wi-Fi Function from a Web Browser" (p. 188)
Image Monitoring via an Access Point at Home (INDOOR MONITORING)
Connect to the wireless LAN router at home, the camera and a smartphone (or computer) via access point wirelessly.
From a smartphone (or computer) in connection, you can monitor the images captured by the camera.
\- Recording of videos and still images may be performed while monitoring.

flowchart
graph TD
A["WiFi"] --> B["Mobile Phone"]
B --> C["Smartphone"]
D["Home Icon"] --> E["Human Icon"]
F["Human Icon"] --> G["Human Icon"]
Caution :
- This function is not designed for disaster or crime prevention.
- To prevent the situation of forgetting to turn off the power, this unit will turn off automatically after 10 days of continuous usage.
- When not monitoring from a smartphone (or computer), the focus of the camera is fixed.
- Even when monitoring from a smartphone (or computer), the focus of the camera will be fixed if not operated for more than 3 hours. (Focus works again when the camera is operated.)
What You Need
• Smartphone or Windows computer
- Wireless LAN router (use a product that has a Wi-Fi certification logo)
- Depending on the wireless LAN router in use and signal strength, you may experience connection problems or slow connections.
Memo :
Operation Method
Connect the camera to the access point (wireless LAN router)

natural_image
Simple line icons showing a printer, a syringe, and a smartphone (no text or symbols)
Connect the camera to the access point by either of the following methods.
■ Wi-Fi Protected Setup (WPS) Registration
Follow the operations below if the access point (wireless LAN router) in use supports WPS.
1 Tap "MENU".
(Operation on this camera)

text_image
M
WT
D
PLAY REC MENU
• The top menu appears.
2 Tap the "Wi-Fi" (💡) icon. (Operation on this camera)

text_image
TOP MENU
?
3 Tap > on the lower right of the screen. (Operation on this camera)

text_image
Wi-Fi
帮助您能够使用
帮助您能够使用
帮助您能够使用
帮助您能够使用
帮助您能够使用
帮助您能够使用
4 Tap "COMMON Wi-Fi SETTING". (Operation on this camera)

text_image
Wi-Fi
Wi-Fi
5 Tap "ACCESS POINTS". (Operation on this camera)

text_image
COMMON WI-FI SETTING
ACCESS POINTS
1.000 2.000 3.000
1.000 2.000 3.000
1.000 2.000 3.000
6 Tap "ADD".
(Operation on this camera)

text_image
ACCESS POINTS
ADD
7 Tap "EZ REGISTRATION WPS". (Operation on this camera)

text_image
ADD
EZ REGISTRATION WPS
1.000 2.000 3.000
1.000 2.000 3.000
1.000 2.000 3.000
8 Activate WPS of the access point (wireless LAN router) within 2 minutes.
• To activate WPS, refer to the instruction manual of the device in use.
9 After registration is complete, tap "OK" on the camera's screen. (Operation on this camera)

text_image
REGISTERED
SSID:******
ENCRYPTION METHOD
WPA2
OK
■ Search the access point, and select from the list.
Set the name (SSID) of the access point (wireless LAN router) and the password beforehand.
1 Tap "MENU". (Operation on this camera)

text_image
M
WT
D
PLAY REC MENU
• The top menu appears.
2 Tap the "Wi-Fi" (💡) icon. (Operation on this camera)

text_image
TOP MENU
?
3 Tap > on the lower right of the screen. (Operation on this camera)

text_image
Wi-Fi
我的电脑
我的电脑
我的电脑
我的电脑
我的电脑
4 Tap "COMMON Wi-Fi SETTING". (Operation on this camera)

text_image
Wi-Fi
Wi-Fi
5 Tap "ACCESS POINTS". (Operation on this camera)

text_image
COMMON WI-FI SETTING
ACCESS POINTS
6 Tap "ADD". (Operation on this camera)

text_image
ACCESS POINTS
ADD
7 Tap "SEARCH". (Operation on this camera)

text_image
ADD
SEARCH
?
- The search results appear on the camera's screen.
- "UNABLE TO FIND THE ACCESS POINT" message appears if there is no access point in the surrounding area.
8 Tap the name (SSID) of the desired access point from the list of search results.
(Operation on this camera)

text_image
SEARCH
SEARCH AGAIN
9 Register a password.
(Operation on this camera)

text_image
PASSWORD
A/a/1 . @ ABC DEF DELETE
← GHI JKL MNO →
PQRS TUV WXYZ
SET - + CANCEL
- Tap on the on-screen keyboard to enter characters. The character changes with every tap.
"ABC", for example, enter "A" by tapping once, "B" by tapping twice, or "C" by tapping 3 times.
- Tap "DELETE" to delete a character.
- Tap "CANCEL" to exit.
- Tap "A/a/1" to select character input type from upper case letter, lower case letter, and number.
- Tap or to move one space to the left or right.
- The password is not required if the wireless LAN router is not security protected.
10 After registration is complete, tap "OK" on the camera's screen. (Operation on this camera)

text_image
REGISTERED
SSID:**
ENCRYPTION METHOD
WPA2
OK
- Other methods, such as "Manual Registration" and "WPS PIN Registration" are also available. Refer to the following link for details. "Registering the Access Points of the Camera to Connect (ACCESS POINTS)" (p. 164)
Connecting the smartphone (or computer) to the access point (wireless LAN router)

natural_image
Simple line icons showing a folder, a battery, and a smartphone (no text or symbols)
- Connect the smartphone (or computer) to the access point (wireless LAN router) at home.
- For details on connections, refer to the instruction manuals of the device in use or the wireless LAN router.
- This setting is unnecessary if the smartphone (or computer) has already been connected to the access point (wireless LAN router) at home.
Monitoring the images by connecting the smartphone and the camera

natural_image
Simple line icons showing a camera, a syringe, and a smartphone (no text or symbols)
\- Install "Everio sync. 2" on the smartphone in advance.
"Installing Smartphone Applications" (p. 175)
■ Operation on this camera
1 Tap "MENU".
(Operation on this camera)

text_image
M
WT
D
< PLAY REC MENU
• The top menu appears.
2 Tap the "Wi-Fi" (💡) icon. (Operation on this camera)

text_image
TOP MENU
?
3 Tap "INDOOR MONITORING" ( operation on this camera)

text_image
Wi-Fi
智能驾驶监控
智能驾驶监控
智能驾驶监控
智能驾驶监控
智能驾驶监控
智能驾驶监控
智能驾驶监控
智能驾驶监控
智能驾驶监控
智能驾驶监控
智能驾驶监控
智能驾驶监控
智能驾驶监控
智能驾驶监控
智能驾驶监控
智能驾驶监控
智能驾驶监控
智能驾驶监控
智能驾驶监控
智能驾驶监控
智能驾驶监控
智能驾驶监控
智能驾驶监控
智能驾驶监控
智能驾驶监控
智能驾驶监测
智能驾驶监测
智能驾驶监测
智能驾驶监测
智能驾驶监测
智能驾驶监测
智能驾驶监测
智能驾驶监测
智能驾驶监测
智能驾驶监测
智能驾驶监测
智能驾驶监测
智能驾驶监测
智能驾驶监测
智能驾驶监测
智能驾驶监测
智能驾驶监测
智能驾驶监测
智能驾驶监测
智能驾驶监测
智能驾驶监测
智能驾驶监测
智能驾驶监测
智能驾驶监测
智能驾驶监测
智能驾驶检测
智能驾驶检测
智能驾驶检测
智能驾驶检测
智能驾驶检测
智能驾驶检测
智能驾驶检测
智能驾驶检测
智能驾驶检测
智能驾驶检测
智能驾驶检测
智能驾驶检测
智能驾驶检测
智能驾驶检测
智能驾驶检测
智能驾驶检测
智能驾驶检测
智能驾驶检测
智能驾驶检测
智能驾驶检测
智能驾驶检测
智能驾驶检测
智能驾驶检测
智能驾驶检测
智能驾驶检测
智能驾驶检单
智能驾驶检单
智能驾驶检单
智能驾驶检单
智能驾驶检单
智能驾驶检单
智能驾驶检单
智能驾驶检单
智能驾驶检单
智能驾驶检单
智能驾驶检单
智能驾驶检单
智能驾驶检单
智能驾驶检单
智能驾驶检单
智能驾驶检单
智能驾驶检单
智能驾驶检单
智能驾驶检单
智能驾驶检单
智能驾驶检单元
4 Tap "START" (→). (Operation on this camera)

text_image
INDOCR MONITORING
HTTP
高级浏览器管理
高级浏览器管理
高级浏览器管理
5 Start making a connection. (Operation on this camera)

text_image
INDOOR MONITORING
CONNECTING
SSID:******
STOP
\- Name (SSID) of the access point (wireless LAN router) in connection is displayed.
6 The following is displayed when the camera is connected to the access point.

natural_image
Close-up of purple iris flowers with green foliage, displayed in a photo editing interface (no text or symbols on the flower image itself)
\- Tap "URL" to display the URL required for connecting the camera from browser.
■ Operation on the smartphone
1 Start "Everio sync. 2" on the smartphone after setting INDOOR MONITORING.

natural_image
Illustration of a hand holding a smartphone with a pen, no text or symbols present
\- Tap "START" in INDOOR MONITORING on the camera to start.
2 Tap "INDOOR MONITORING".

text_image
Everio sync.2
DIRECT MONITORING
CONNECT TO THE CAMERA
DIRECTLY.
YOU CAN USE THE GAME
SCORING FUNCTION.
INDOOR MONITORING
CONNECT VIA ACCESS POINT.
NEED TO REGISTER ACCESS
POINT.
OUTDOOR MONITORING
CONNECT VIA INTERNET.
NEED TO REGISTER ACCESS
POINT AND DDNS.
?
Demo
3 The recording screen is displayed.

text_image
Index
Monitor
PAUSE
Tele
Rec
Snapshot
Wide
Pause
Marking
Game Score
\- How to operate from a smartphone "Using Smartphone Applications" (p. 175)
■ Monitoring from the computer (Windows7)
1 Tap the URL button shown on the camera's screen. (displayed when the computer and the camera are connected wirelessly.)

natural_image
Close-up of purple iris flowers with green foliage, no visible text or symbols
\- The URL for the computer to connect to appears.
2 Check the URL being displayed on the camera screen, which starts from "http://".

text_image
CAMERA NETWORK INFO.
URL(LAN):http://**********
**********/
QUIT
\- After checking the URL, tap "QUIT" to return to the previous screen.
3 Start Internet Explorer (web browser) on the computer and enter the URL.

text_image
Private Internet User
100% CI
4 Log in with your username and password.
- The username is "everio" and the default password is "0000".
"Changing the Settings" (p. 153)
• Operations from the Web browser
"Using the Wi-Fi Function from a Web Browser" (p. 188)
Image Monitoring via the Internet (OUTDOOR MONITORING)
You can check the image on the camera via internet connection with a smartphone (or computer).
\* To use this function, it is necessary to prepare for an UPnP (Universal Plug and Play) compatible wireless LAN router, and an internet connection from which the global IP address can be obtained.
\- Recording of videos and still images may be performed while monitoring.

flowchart
graph LR
A["Device"] --> B["Satellite"]
B --> C["Global"]
C --> D["Mobile"]
style A fill:#f9f,stroke:#333
style D fill:#bbf,stroke:#333
Setting Multiple Cameras in the Same Network :

flowchart
graph TD
A["Input"] --> B["Module 1"]
A --> C["Module 2"]
A --> D["Module 3"]
B --> E["Output"]
C --> E
D --> E
\- To set up multiple cameras, you need to fix the HTTP ports for each of the cameras.
"Changing the HTTP Port
(DIRECT MONITORING/INDOOR MONITORING/OUTDOOR
MONITORING)" (p. 155)
What You Need
• Smartphone or Windows computer
\- Wireless LAN router that supports UPnP (use a product that has a Wi-Fi certification logo)
To check whether UPnP is supported, please refer to the instruction manual of the wireless LAN router in use.
\- Internet connection with an obtainable global IP address
\* Global IP address is an IP address that is specific in all over the internet. For more information, contact your internet service provider.
Memo :
\- Depending on the wireless LAN router in use and signal strength, you may experience connection problems or slow connections.
\- When the zoom or pan cradle is operated by using the smartphone or computer, it may take longer for responses as compared to the manual operations.
Settings Required in Advance
To operate, it is necessary to connect the camera to the internet via an access point (UPnP compatible wireless LAN router) in the house. As such, the following 3 settings are required.
\*The above settings are not necessary if they have already been set for other functions.
1 Registering an access point
"Registering the Access Points of the Camera to Connect (ACCESS POINTS)" (p. 164)
2 Obtaining a dynamic DNS account
"Obtaining a Dynamic DNS (DDNS) Account" (p. 157)
3 Setting the account on this camera
"Setting Dynamic DNS on this Camera (OUTDOOR MONITORING)"
(p. 158)
Caution :
\- Even if registration is done correctly to the camera, access may be temporarily unavailable such as when the dynamic DNS server is down. To check whether the dynamic DNS server is working properly, access and check the DDNS server with a computer, etc.
https://dd3.jvckenwood.com/user/
Operation Method
■ Operation on this camera
Memo :
\- Prior to use this function, a smartphone application needs to be installed on the smartphone.
"Installing Smartphone Applications" (p. 175)
1 Tap "MENU".
(Operation on this camera)

text_image
M
WT
D
<
• The top menu appears.
2 Tap the "Wi-Fi" (💡) icon.
(Operation on this camera)

text_image
TOP MENU
?
3 Tap "OUTDOOR MONITORING" (☐).
(Operation on this camera)

text_image
Wi-Fi
国家智能交通站
国家智能交通站
国家智能交通站
国家智能交通站
国家智能交通站
国家智能交通站
4 Tap "START" (→).
(Operation on this camera)

text_image
OUTDOOR MONITORING
DDNS
HTTP
UPnP
5 Start making a connection.
(Operation on this camera)

text_image
OUTDOOR MONITORING
CONNECTING
SSID:******
STOP
\- Name (SSID) of the access point (wireless LAN router) in connection is displayed.
6 The following is displayed when the camera is connected to the access point.

natural_image
Close-up of purple iris flowers with green foliage, captured in a photo editing interface (no text or symbols on the flower image itself)
- The URL (WAN) for the smartphone to connect to appears. (Does not appear if DDNS is not set or set incorrectly.)
- "XUPnP" is displayed when UPnP cannot be used.
7 Check the URL (WAN).

text_image
CAMERA NETWORK INFO.
USE THE URL BELOW TO CONNECT
FROM AN OUTSIDE LOCATION
URL(WAN):http://*****
QUIT
- After checking the URL, tap "QUIT" to return to the previous screen.
- "XUPnP" is displayed when UPnP cannot be used.
■ Operation on the smartphone
1 Start "Everio sync. 2" on the smartphone after setting "OUTDOOR MONITORING".

natural_image
Illustration of a hand holding a smartphone with a pen, no text or symbols present
\- Tap "START" in OUTDOOR MONITORING on the camera to start.
2 Tap "OUTDOOR MONITORING".

text_image
Everio sync.2
DIRECT MONITORING
CONNECT TO THE CAMERA
DIRECTLY.
YOU CAN USE THE GAME
SCORING FUNCTION.
INDOOR MONITORING
CONNECT VIA ACCESS POINT.
NEED TO REGISTER ACCESS
POINT.
OUTDOOR MONITORING
CONNECT VIA INTERNET.
NEED TO REGISTER ACCESS
POINT AND DDNS.
?
Demo
3 Log in with your username and password. (if authentication cannot be achieved)

text_image
START
HTTP AUTHORIZATION
AUTHORIZATION FAILED
CHECK USER NAME AND PASSWORD
USERNAME
PASSWORD
OK CANCEL
\- The username is "everio" and the default password is "0000". "Changing the Settings" (p. 153)
4 The recording screen is displayed.

text_image
Index
Monitor
PAUSE
T
Tele
Rec
Snapshot
Wide
Pause
Marking
Game Score
\- How to operate from a smartphone "Using Smartphone Applications" (p. 175)
■ Monitoring from the computer (Windows7)
1 On the Internet Explorer (web browser), enter the URL (WAN) that is checked by "Operation on this camera".

text_image
File selection: Internet Explorer
100%DBYK
2 Log in with your username and password.
- The username is "everio" and the default password is "0000".
"Changing the Settings" (p. 153)
• Operations from the Web browser
"Using the Wi-Fi Function from a Web Browser" (p. 188)
Caution :
- To monitor images while you are out, make sure in advance that you can establish a connection via the Internet by entering the URL (WAN) displayed in "Network Information".
However, you cannot monitor (operate) in the same way as while you are out when your smartphone (or computer) is connected via access point (wireless LAN router) at home.
- Start using after changing the password.
If the password is not changed, there is a high risk of unauthorized access from others.
Also, avoid using easily guessable passwords, such as birth dates. You are recommended to change your password periodically.
"Setting the Password (DIRECT MONITORING/INDOOR MONITORING/OUTDOOR MONITORING)" (p. 155)
\- There is no guarantee that the operations will work with all computer environments. For example, the video download feature of mobile safari browser, etc. is not supported.
Caution :
- Too much usage may cause high communication fees to be incurred, and there may be a limit to the volume of communication. For more details, please check your Internet or smartphone subscription.
- If the network connection is slow, video images may appear jumpy, or audio sound may be interrupted or delayed.
- This function is not designed for disaster or crime prevention.
- To prevent the situation of forgetting to turn off the power, this unit will turn off automatically after 10 days of continuous usage.
- When not monitoring from a smartphone (or computer), the focus of the camera is fixed.
- Even when monitoring from a smartphone (or computer), the focus of the camera will be fixed if not operated for more than 3 hours. (Focus works again when the camera is operated.)
Sending Still Images via E-mail upon Detection of Face or Movement (DETECT/MAIL)
A still image is automatically captured and sent via e-mail when faces or movements are detected by the camera.

flowchart
graph LR
A["Folder"] --> B["Envelope Icon"]
B --> C["Printer Icon"]
Memo :
- Size of the still images shot by DETECT/MAIL is 640 x 360.
- Operation via connection to a smartphone (or computer) using "INDOOR MONITORING"/"OUTDOOR MONITORING" may be performed even during detection standby.
- When the camera is connected to a smartphone (or computer), "DETECT/MAIL SETTING" will be temporarily unavailable.
- You can set to record videos on this unit automatically during detection.
"Recording on this unit" (p. 153)
- To prevent too many e-mails from being sent in case of detections occurring frequently, you can set the interval of e-mail delivery.
"Setting detection interval" (p. 153)
What You Need
- Wireless LAN router (use a product that has a Wi-Fi certification logo)
- Internet connection
- Account for sending e-mails (Supports SMTP. E-mail services that is only accessible from the web cannot be used.)
Settings Required in Advance
To send e-mails, the following settings are required in advance.
\*The above settings are not necessary if they have already been set for other functions.
1 Registering an access point
"Registering the Access Points of the Camera to Connect (ACCESS POINTS)" (p. 164)
2 Setting the account for sending e-mails
"Setting the Sender's E-mail Address of the Camera" (p. 159)
3. Registering the recipient's e-mail address for notification mails (up to 8 addresses)
"Registering the Recipient's E-mail Address of the Camera" (p. 161)
Operation Method
1 Tap "MENU".
Set the camera to the recording mode.

text_image
M
WT
D
← PLAY REC MENU
\- The top menu appears.
2 Tap the "Wi-Fi" (💡) icon.

text_image
TOP MENU
?
3 Tap "DETECT/MAIL" (☐).

text_image
Wi-Fi
智能家庭管理器
智能家庭管理器
智能家庭管理器
智能家庭管理器
智能家庭管理器
智能家庭管理器
4 Tap "DETECT/MAIL ATTN.".

text_image
DETECT/MAIL
1.0
REC ON
5 Select "DETECT/MAIL ATTN.", then tap ↩.

text_image
DETECT/MAIL ATTN.
- To display the 🔒 icon, tap the e-mail address.
- To cancel the e-mail address, press the icon one more time.
- Up to 8 e-mail addresses can be selected.
6 Tap "START" (→).

text_image
DETECT/MAIL
10 MHz
REC ON
7 Start making a connection.

text_image
DETECT/MAIL
CONNECTING
SSID:******
STOP
8 DETECT/MAIL detection standby

text_image
DETECT/MAIL
"MOTION DETECTION"
DETECTION ON STANDB/
URL
STOP
• Detection is suspended for the first 5 seconds.
9 DETECT/MAIL detection in progress (an e-mail is automatically sent out after detection is completed)

text_image
DETECT/MAIL
"MOTION DETECTION"
MOTION DETECTION
IN PROGRESS
PHOTO
STOP
- The "PHOTO" icon appears on the screen for about 2 seconds upon detection.
- Images are captured automatically when moving subjects or human faces appear on the camera's screen. (The PHOTO icon appears on the screen upon detection.)
- The captured still images will be sent via e-mail to the selected recipients.
10 Detection suspended

text_image
DETECT/MAIL
"MOTION DETECTION"
DETECTION SUSPENDED DUE TO
CHANGE IN DETECTION INTERVAL
URL
STOP
- Until the next detection is made, detection is suspended for the pre-set length of time.
- "DETECTION INTERVAL" can be selected from 15 seconds, 1 minute, 3 minutes, 10 minutes, 30 minutes and 60 minutes.
"Setting the Detection Interval of this Camera (DETECT/MAIL SETTING)" (p. 163)
Caution :
- This function is not designed for disaster or crime prevention.
• To prevent the situation of forgetting to turn off the power, this unit will turn off automatically after 10 days of continuous usage.
- While on standby for notification mails, the focus is fixed. Perform the camera settings first, then enable notification mails.
Focus may not be set correctly if the notification mails start before camera settings are made. In this case, disable notification mails temporarily, then enable it again.
- Be careful not to cause too much sending of e-mails. Depending on the internet provider that provides the e-mail service, the e-mails may be marked as spam or the usage limited may be exceeded.
Be sure to check the terms of the internet provider in advance to find out if there are any restrictions on the number or size of e-mails that can be sent.
- When setting another person as the recipient, be sure to obtain his/her consent in advance.
- If you reply to the received e-mail by using this unit, the receiver can not check your replied e-mail by using this unit.
Check the e-mails sent by this unit from computer, etc.
- JVC will not be responsible for any trouble that occurs upon the sending of mails.
Record and Send Videos via E-mail (VIDEO MAIL)
Videos of up to 15 seconds can be recorded and sent via e-mail. With this function, short videos can be delivered easily even on a daily basis, such as to show the growing up of small children to their distant grandparents.

flowchart
graph LR
A["Battery"] --> B["Email"]
B --> C["Mobile Device Icon"]
Memo :
\- Specifications of the videos sent via video mail are as follows:
System: MP4
Video:
\- H.264/MPEG-4 AVC baseline profile codec
\- 640 x 360 resolution
\- 30p frame rate
\- 1 Mbps bit rate
Audio:
\- Advanced Audio Coding (AAC) system
\- 48 kHz sampling rate
\- 16 bit
\- 2 channels
What You Need
- Wireless LAN router (use a product that has a Wi-Fi certification logo)
- Internet connection
- Account for sending e-mails (Supports SMTP. E-mail services that is only accessible from the web cannot be used.)
Settings Required in Advance
To send e-mails, the following settings are required in advance.
\*The above settings are not necessary if they have already been set for other functions.
1 Registering an access point
"Registering the Access Points of the Camera to Connect (ACCESS
POINTS)" (p. 164)
2 Setting the account for sending e-mails
"Setting the Sender's E-mail Address of the Camera" (p. 159)
3 Registering the recipient's e-mail address (up to 8 addresses)
"Registering the Recipient's E-mail Address of the Camera" (p. 161)
Operation Method
1 Tap "MENU".
Set the camera to the recording mode

text_image
M
WT
D
← PLAY REC MENU
• The top menu appears.
2 Tap the "Wi-Fi" (💡) icon.

text_image
TOP MENU
?
3 Tap "VIDEO MAIL" (✗).

text_image
Wi-Fi
智能家庭设置
智能家庭设置
智能家庭设置
智能家庭设置
智能家庭设置
智能家庭设置
智能家庭设置
4 Tap "VIDEO MAIL ADDRESS".

text_image
VIDEO MAIL
返回新邮件
返回新邮件
返回新邮件
5 Select "VIDEO MAIL ADDRESS", then tap ↩.

text_image
VIDEO MAIL ADDRESS
1234 888 888
1234 888 888
1234 888 888
1234 888 888
- To display the 📁 icon, tap the e-mail address.
- To cancel the e-mail address, press the icon one more time.
- Up to 8 e-mail addresses can be selected.
6 Tap "START" (→).

text_image
VIDEO MAIL
返回要连接到
返回要连接到
返回要连接到
7 Press the START/STOP button to start recording.

text_image
START
/STOP
\- Or, tap the REC on screen.
8 Recording starts after the 5-second countdown.
\- Recording starts immediately after pressing the START/STOP button again during the countdown.

text_image
4
\- You can allow the recording to be performed for 15 seconds or press the START/STOP button to stop.
9 Tap "SEND".

text_image
VIDEO MAIL
SEND THIS VIDEO?
SEND STOP
PLAY TO CHECK
- Sending of the video mail starts.
- To check the file, tap "PLAY TO CHECK".
- When it is complete, tap "OK".
Caution :
- Be careful not to cause too much sending of e-mails. Depending on the internet provider that provides the e-mail service, the e-mails may be marked as spam or the usage limited may be exceeded.
Be sure to check the terms of the internet provider in advance to find out if there are any restrictions on the number or size of e-mails that can be sent.
- When setting another person as the recipient, be sure to obtain his/her consent in advance.
- Depending on the e-mail service provider, the sending of video mail may not be supported.
- Too much usage may cause high communication fees to be incurred, and there may be a limit to the volume of communication. For more details, please check your Internet or smartphone subscription.
- If you reply to the received e-mail by using this unit, the receiver can not check your replied e-mail by using this unit.
Check the e-mails sent by this unit from computer, etc.
- JVC will not be responsible for any trouble that occurs upon the sending of mails.
- Videos captured via video mail are not saved to the camera or SD card.
- Videos that have already been captured cannot be sent.
Image Monitoring on TV (TV MONITORING)
You can connect this unit to a DLNA compatible TV wirelessly to playback still images on this unit on the TV screen. (This function may not be available depending on the DLNA device in use.)
Connect via access point (wireless LAN router) at home.
What You Need
• DLNA compatible device
- Wireless LAN router (use a product that has a Wi-Fi certification logo)
Settings Required in Advance
1 Connect the camera to the access point (wireless LAN router).
"Registering the Access Points of the Camera to Connect (ACCESS POINTS)" (p. 164)
2. Connecting the DLNA compatible device to the access point (this function is available for a connection via cables as well)
\*The above settings are not necessary if they have already been set for other functions.
Operation Method
1 Tap "MENU".
(Operation on this camera)

text_image
M
WT
D
<
• The top menu appears.
2 Tap the "Wi-Fi" (💡) icon.
(Operation on this camera)

text_image
TOP MENU
?
3 Tap "TV MONITORING" (☐).
(Operation on this camera)

text_image
Wi-Fi
网络设备安装
网络设备安装
网络设备安装
网络设备安装
网络设备安装
网络设备安装
网络设备安装
4 Tap "START" (→).
(Operation on this camera)

text_image
TV MONITORING
MAC
MAC
5 Start making a connection.
(Operation on this camera)

text_image
TV MONITORING
CONNECTING
SSID:******
STOP
6 Connection in progress

text_image
TV MONITORING
NOW PROCESSING
STOP
7 After the connection is completed, wait for the DLNA device to start up. (Operation on this camera)

text_image
TV MONITORING
QUIT
\- If a considerable number of videos/still images are recorded in the camera, it may take some time to start.
8 Operate from the DLNA device
- From the DLNA device, access to the still image folder on Everio to select the images to playback.
- For operation details, refer to the instruction manual of the DLNA device in use.
9 Images appear on the monitor of the DLNA device (Operation on DLNA device)

natural_image
Close-up of three purple iris flowers with yellow centers, surrounded by green foliage (no text or symbols visible)
\- From the following instructions, perform operations on the DLNA device.
For details on using the TV, refer to the instruction manual of the TV in use.
Memo :
\- If the DLNA compatible TV in use cannot detect Everio, tap "STOP" to start from the step 1 again.
Caution :
- This function is not designed for disaster or crime prevention.
- We do not guarantee the compatibility of all the DLNA compatible TVs.
- This function is available when a connection to the access point is made with wires as well.
- To prevent the situation of forgetting to turn off the power, this unit will turn off automatically after 10 days of continuous usage.
EASY STORAGE
You can save the videos and still images to your computer by following easy steps.
Connect to the computer wirelessly via access point at home (wireless LAN router).
What You Need
• Computer (install LoiLoFit for Everio in your computer)
"Installing the Provided Software" (p. 115)
- Wireless LAN router (use a product that has a Wi-Fi certification logo)
Settings Required in Advance
1 Registration of the required information for connecting the camera to the access point (wireless LAN router) is necessary.
"Registering the Access Points of the Camera to Connect (ACCESS POINTS)" (v ^2 p. 164)
2 It is also necessary to connect the computer to the access point in advance.
\*The above settings are not necessary if they have already been set for other functions.
Operation Method
1 Tap "MENU". (Operation on this camera)

text_image
M
WT
D
• The top menu appears.
2 Tap the shortcut menu (5). (Operation on this camera)

text_image
TOP MENU
?
3 Tap "EASY STORAGE". (Operation on this camera)

text_image
SHORTCUT MENU
返回到帐户
返回到帐户
返回到帐户
OFF
OK
OFF
4 Start making a connection. (Operation on this camera)

text_image
EASY STORAGE
CONNECTING
SSID:******
STOP
5 Connection is established; backup starts. (Operation on this camera)

text_image
EASY STORAGE
NOW PROCESSING
STOP
6 Everio Watcher appears on the task bar of the computer.
• To see the status of backing up and remaining time, move the arrow to it.
7 Backup is completed.
(Operation on this camera)

text_image
EASY STORAGE
BACKUP COMPLETED
TOUCH "OK" OR
WAIT 10 SECONDS FOR CAMERA
TO POWER OFF AUTOMATICALLY
OK
\- Tap "OK", or wait for about 10 seconds to turn off the power automatically.
Memo :
•
•
Recording the Location Information
You can record the location information of the venue where recording is taking place via direct connection (Wi-Fi Direct) with a smartphone.

flowchart
graph TD
A["Wi-Fi"] --> B["Laptop"]
B --> C["GPS"]
C --> D["Smartphone"]
style A fill:#f9f,stroke:#333
style B fill:#ccf,stroke:#333
style C fill:#cfc,stroke:#333
style D fill:#fcc,stroke:#333
Memo :
\- To obtain the location information, it is necessary to connect the smartphone to the camera and start the smartphone application. Also, setting the "LOC INFO TRANS INT" for the smartphone application is necessary.
"Smartphone Application Settings" (p. 186)
• Activate the GPS function of the smartphone in advance.
\- The recorded location information can be used on the software provided with this unit.
What You Need
\- Smartphone
Settings Required in Advance
Set up your camera and smartphone by performing the following operations. For a smartphone with WPS support, refer to the "Wi-Fi Protected Setup (WPS)".
\*WPS is a method to connect the camera and the smartphone wirelessly by easy button operations.
■ Connection by entering the Wi-Fi password
1 Tap "MENU".
(Operation on this camera)
Set the camera to the recording mode.

text_image
M
WT
D
<< PLAY REC MENU
• The top menu appears.
2 Tap the "Wi-Fi" (💡) icon.
(Operation on this camera)

text_image
TOP MENU
?
3 Tap the "DIRECT MONITORING" (☐) icon in the "Wi-Fi" menu. (Operation on this camera)

text_image
Wi-Fi
智能家庭管理器
智能家庭管理器
智能家庭管理器
智能家庭管理器
智能家庭管理器
智能家庭管理器
智能家庭管理器
智能家庭管理器
智能家庭管理器
智能家庭管理器
智能家庭管理器
智能家庭管理器
智能家庭管理器
智能家庭管理器
智能家庭管理器
智能家庭管理器
智能家庭管理器
智能家庭管理器
智能家庭管理器
智能家庭管理器
智能家庭管理服务器
智能家庭管理服务器
智能家庭管理服务器
智能家庭管理服务器
智能家庭管理服务器
智能家庭管理服务器
智能家庭管理服务器
智能家庭管理服务器
智能家庭管理服务器
智能家庭管理服务器
智能家庭管理服务器
智能家庭管理服务器
智能家庭管理服务器
智能家庭管理服务器
智能家庭管理服务器
智能家庭管理服务器
智能家庭管理服务器
智能家庭管理服务器
智能家庭管理服务器
智能家庭管理服务器
智能家庭管理服务
4 Tap "START" (→).
(Operation on this camera)

text_image
DIRECT MONITORING
OK
Cancel
OK
Cancel
OK
Cancel
HTTP
Cancel
\- When iFrame is selected for "VIDEO REC FORMAT", the following display appears and recording mode is switched to the 60i mode in AVCHD.

text_image
DIRECT MONITORING
VIDEO RECORDING AT 60i
WHEN USING Wi-Fi
5 Check the SSID and the PASS being displayed on the screen of the camera.

text_image
DIRECT MONITORING
SET UP WI-FI SETTING ON
CONNECTING DEVICE
SSID:..........
PASS:..........
STOP
WPS
6 Select the SSID in step 5 from the Wi-Fi network selection screen of your smartphone, and enter the PASS on the password screen. (Operation on the smartphone (or computer))

natural_image
Illustration of a hand holding a smartphone and a pen, no text or symbols present
\- For details on connecting your smartphone (or computer) to a Wi-Fi network, please refer to the instruction manual of the phone terminal in use.
7 A connection is established and 🔔 appears on the camera's screen.

natural_image
Close-up of purple iris flowers with green foliage, no visible text or symbols
■ Connection by Wi-Fi Protected Setup (WPS)
1 Tap "MENU".
(Operation on this camera)
Set the camera to the recording mode.

text_image
M
WT
D
←PLAY REC MENU
• The top menu appears.
2 Tap the "Wi-Fi" (💡) icon.
(Operation on this camera)

text_image
TOP MENU
?
3 Tap the "DIRECT MONITORING" (图标) icon in the "Wi-Fi" menu. (Operation on this camera)

text_image
Wi-Fi
新客智能设备
新客智能设备
新客智能设备
新客智能设备
新客智能设备
新客智能设备
4 Tap "START" (→).
(Operation on this camera)

text_image
DIRECT MONITORING
返回数据源
返回数据源
返回数据源
返回数据源
返回数据源
返回数据源
返回数据源
返回数据源
返回数据源
返回数据源
返回数据源
返回数据源
返回数据源
返回数据源
返回数据源
返回数据源
返回数据源
返回数据源
返回数据源
返回数据源
返回数据源
返回数据源
返回数据源
返回数据源
返回数据源
返回数据源源
返回数据源源
返回数据源源
返回数据源源
返回数据源源
返回数据源源
返回数据源源
返回数据源源
返回数据源源
返回数据源源
返回数据源源
返回数据源源
返回数据源源
返回数据源源
返回数据源源
返回数据源源
返回数据源源
返回数据源源
返回数据源源
返回数据源源
返回数据源源
返回数据源源
返回数据源源
返回数据源源
返回数据源源
返回数据源
返回数据源源
返回数据源源
返回数据源源
返回数据源源
返回数据源源
返回数据源源
返回数据源源
返回数据源源
返回数据源源
返回数据源源
返回数据源源
返回数据源源
返回数据源源
返回数据源源
返回数据源源
返回数据源源
返回数据源源
返回数据源源
返回数据源源
返回数据源源
返回数据源源
返回数据源源
返回数据源源
返回数据源
返回数据源
返回数据源
返回数据源
返回数据源
返回数据源
返回数据源
返回数据源
返回数据源
返回数据源
返回数据源
返回数据源
返回数据源
返回数据源
返回数据源
返回数据源
返回数据源
返回数据源
返回数据源
返回数据源
返回数据源
返回数据源
返回数据源
返回数据源
返回数据原
\- When iFrame is selected for "VIDEO REC FORMAT", the following display appears and recording mode is switched to the 60i mode in AVCHD.

text_image
DIRECT MONITORING
VIDEO RECORDING AT 60i
WHEN USING Wi-Fi
5 Tap "WPS".
(Operation on this camera)

text_image
DIRECT MONITORING
SET UP WI-FI SETTING ON
CONNECTING DEVICE
SSID:******
PASS:******
STOP
WPS
6 Activate WPS on the smartphone (or computer) within 2 minutes.
(Operation on the smartphone (or computer))
\- To activate WPS, refer to the instruction manual of the device in use.
7 A connection is established and 🔔 appears on the camera's screen.

natural_image
Close-up of purple iris flowers with green foliage, captured via a video editing interface (no text or symbols on the flower image itself)
Operation Method
1 Activate the GPS function of the smartphone. (Operation on the smartphone)

natural_image
Illustration of a hand holding a smartphone with a pen inserted (no text or symbols visible)
\- For details on using the smartphone, refer to the instruction manual of the device in use.
2 Start "Everio sync. 2" on the smartphone.

natural_image
Illustration of a hand holding a smartphone with a pen, no text or symbols present
3 Tap "DIRECT MONITORING".

text_image
Everio sync.2
DIRECT MONITORING
CONNECT TO THE CAMERA
DIRECTLY.
YOU CAN USE THE GAME
SCORING FUNCTION.
INDOOR MONITORING
CONNECT VIA ACCESS POINT.
NEED TO REGISTER ACCESS
POINT.
OUTDOOR MONITORING
CONNECT VIA INTERNET.
NEED TO REGISTER ACCESS
POINT AND DDNS.
?
Demo
4 Monitor screen is displayed.

text_image
Index
Monitor
PAUSE
Tele
Rec
Snapshot
Wide
Pause
Marking
Game Score
\- To change the time interval for obtaining the GPS location information (OFF-15 sec.), tap ❖.
"Smartphone Application Settings" (p. 186)
5 Receiving the location information (Display on this camera)

text_image
DIRECT MONITORING
0:00:00 [2:04]
URL REC QUIT
\- When the GPS location information is received from the smartphone, an icon (A) is displayed on the camera screen.
6 Start recording.
(Operation on this camera)

text_image
START
/STOP
\- Press the "START/STOP" button to start a normal recording.
Memo :
- Manual recording cannot be performed.
- It is not possible to switch to the playback mode.
Using the Pan Cradle (Sold Separately)
Panning operation (moving the camera to the left/right, horizontal direction) can be controlled via smartphone by setting the camera on the pan cradle. To use a pan cradle, change the setting of "AV TERMINAL" in advance. Change the setting from the menu screen of the camera.
■ Changing the setting of the AV terminal.
\- By default, the AV terminal is set to "AV". To use a pan cradle, change the setting as described in the following steps.
1 Tap "MENU".
(Operation on this camera)

text_image
M
WT
D
PLAY REC MENU
2 Tap "CONNECTION SETTINGS".

text_image
TOP MENU
?
3 Tap "AV TERMINAL".

text_image
CONNECTION SETTINGS
AV TERMINAL
4 Tap "PAN CRADLE".

text_image
AV TERMINAL
AV
PAN CRADLE
\- Tap X to exit the setting screen.
■ Setting the camera to the pan cradle.
\- For how to connect the pan cradle and the camera, refer to the instruction manual of the pan cradle for further details.
1 Set the camera to the pan cradle.

natural_image
Technical line drawing of a mechanical device with a probe inserted, no visible text or symbols
\- For how to connect the pan cradle and the camera, refer to the instruction manual of the pan cradle for further details.
2 Set the power of the pan cradle to "ON".

text_image
DC
OFF AS ON
3 Wait until the pan cradle stops the rotation.

natural_image
Mechanical device with blue circular arrows indicating rotational motion (no text or symbols)
\- When the power is turned ON, pan cradle moves to the left/right to adjust the position.
■ Operations from the smartphone application
\- Connect the camera and the smartphone via DIRECT MONITORING or INDOOR MONITORING/OUTDOOR MONITORING.
"Image Monitoring via Direct Connection (DIRECT MONITORING)"
(p. 132)
"Image Monitoring via an Access Point at Home (INDOOR MONITORING)"
(p. 135)
"Image Monitoring via the Internet (OUTDOOR MONITORING)"
(p. 140)
1 Start "Everio sync. 2".

natural_image
Illustration of a hand holding a smartphone and a pen, no text or symbols present
\- Start the application after confirming that the smartphone is connected to this camera.
2 Tap the connection method.

text_image
Everio sync.2
DIRECT MONITORING
CONNECT TO THE CAMERA
DIRECTLY.
YOU CAN USE THE GAME
SCORING FUNCTION.
INDOOR MONITORING
CONNECT VIA ACCESS POINT.
NEED TO REGISTER ACCESS
POINT.
OUTDOOR MONITORING
CONNECT VIA INTERNET.
NEED TO REGISTER ACCESS
POINT AND DDNS.
?
Demo
3 Tap to perform the panning operation.

text_image
Index
Monitor
←° PAUSE
← Pan
Pan
Tele Rec Snapshot
Wide Pause
Marking Game Score
Memo :
\- Speed of the panning operation can be set in two steps.
"Changing the Panning Speed" (u p. 173)
Changing the Settings
To use the Wi-Fi function, it may be necessary to perform some settings on the camera and smartphone (or computer).
\- Registering the access points to connect (wireless LAN router)
"Registering the Access Points of the Camera to Connect (ACCESS POINTS)" (E p. 164)
\- Obtaining a dynamic DNS account
"Obtaining a Dynamic DNS (DDNS) Account" (p. 157)
\- Setting the account on this camera
"Setting Dynamic DNS on this Camera (OUTDOOR MONITORING)" (r.s. p. 158)
\- Setting the sender's e-mail address
"Setting the Sender's E-mail Address of the Camera" (p. 159)
\- Registering the recipient's e-mail address
"Registering the Recipient's E-mail Address of the Camera" (p. 161)
Menu Settings
Setting Details DIRECT MONITORING Configures various settings related to DIRECT MONITORING.·PASSWORDSets the password to access the camera.“Setting the Password (DIRECT MONITORING/INDOOR MONITORING/OUTDOOR MONITORING)”(€p. 155)·ENFORCED GROUP OWNER (Default: “ON”)Set whether or not to get the owner group permissions.·OFF: Set this if connection to devices that support Wi-Fi Direct fails. (When set to OFF, connection to devices that do not support Wi-Fi Direct will be disabled.)·ON: It is recommended to set this usually.“Setting the Enforced Group Owner (DIRECT MONITORING)”(€p. 156)·HTTP PORT (Default: “80”)Changes the port number to access to the camera.“Changing the HTTP Port (DIRECT MONITORING/INDOOR MONITORING/OUTDOOR MONITORING)”(€p. 156) INDOOR MONITORING Configures various settings related to INDOOR MONITORING.·PASSWORD (Default: “0000”)Selects the password to access the camera.“Setting the Password (DIRECT MONITORING/INDOOR MONITORING/OUTDOOR MONITORING)”(€p. 155)·HTTP PORT (Default: “80”)Changes the port number to access to the camera.“Changing the HTTP Port (DIRECT MONITORING/INDOOR MONITORING/OUTDOOR MONITORING)”(€p. 156) OUTDOOR MONITORING Configures various settings related to OUTDOOR MONITORING.·PASSWORD (Default: “0000”)Selects the password to access the camera.“Setting the Password (DIRECT MONITORING/INDOOR MONITORING/OUTDOOR MONITORING)”(€p. 155)·UPnP (Default: “ON”)Sets the UPnP of the camera.·OFF: Disables UPnP.·ON: Enables UPnP.“Setting the UPnP of this Camera (OUTDOOR MONITORING)”(€p. 157)·DDNS SETTINGConfigures various settings related to DDNS.“Setting Dynamic DNS on this Camera (OUTDOOR MONITORING)”(€p. 158)·HTTP PORT (Default: “80”)Changes the port number to access to the camera.“Changing the HTTP Port (DIRECT MONITORING/INDOOR MONITORING/OUTDOOR MONITORING)”(€p. 156) DETECT/MAIL Configures various settings related to notification mails.·DETECT/ MAIL ATTN.Selects the recipient’s e-mail address for Detect/Mail.“Sending Still Images via E-mail upon Detection of Face or Movement (DETECT/MAIL)”(€p. 142)·MAIL SETTINGSets the e-mail addresses of the sender and recipient.“Setting the Sender’s E-mail Address of the Camera”(€p. 159)“Registering the Recipient’s E-mail Address of the Camera”(€p. 161)·DETECTION METHOD (Default: “MOTION DETECTION”)Sets the detection method to start recording.·MOTION DETECTION: Starts recording upon detection of subject’s movements.·FACE DETECTION: Starts recording upon detection of human faces.“Setting the Detection Method of this Camera (DETECT/MAIL SETTING)”(€p. 163)·DETECTION INTERVAL (Default: “10 minutes”)Sets the time period to enable detection again after the previous one.“Setting the Detection Interval of this Camera (DETECT/MAIL SETTING)”(€p. 163)·SELF RECORDING (Default: “ON”)Sets whether to record videos on this camera during detection.·OFF: Does not record videos on this camera.·ON: Records videos on this camera.“Setting Self Recording on this Camera (DETECT/MAIL SETTING)”(€p. 164) VIDEO MAIL ·VIDEO MAIL ADDRESS Selects the recipient's e-mail address for video mails.“Sending Still Images via E-mail upon Detection of Face or Movement (DETECT/MAIL)” (p. 142)MAIL SETTINGSets the e-mail addresses of the sender and recipient.“Setting the Sender's E-mail Address of the Camera” (p. 159)“Registering the Recipient's E-mail Address of the Camera” (p. 161) TV MONITORING MAC ADDRESS FILTER (Default: “OFF”)By setting to “ON”, Everio can be searched from the device (TV monitor); the MAC address of the device needs to be registered to Everio in advance.OFF: Disables UPnP.ON: Enables UPnP.“Enabling the MAC Address Filter (TV MONITORING)” (p. 170)MAC ADDRESS LISTMAC address of the TV monitor can be registered to the camera.“Registering the MAC Address (TV MONITORING)” (p. 171) COMMON Wi-Fi SETTING Configures various settings related to the network.ACCESS POINTSAdds, deletes, or perform LAN settings of access points (wireless LAN router).“Registering the Access Points of the Camera to Connect (ACCESS POINTS)” (p. 164)MAIL SETTINGSets the e-mail addresses of the sender and recipient.“Setting the Sender's E-mail Address of the Camera” (p. 159)“Registering the Recipient's E-mail Address of the Camera” (p. 161)MAC ADDRESS (Media Access Control address)Displays the MAC address of the camera.(The above shows the MAC address when connected to an access point, while the below shows the address during direct connection.)“Checking the MAC Address of this Camera” (p. 171)SET FROM QR CODEPerform the Wi-Fi setting after the camera reads the QR code generated by following the instruction in Detailed User Guide.“Using Wi-Fi by Creating a QR Code (GZ-EX355/GZ-EX310)” (p. 198)LOCK SETTTINGSSets a password to prevent others from seeing the network settings.“Protecting the Network Settings with a Password” (p. 172)INITIALIZATIONReturns the network settings to their default values.“Initializing the Wi-Fi Settings” (p. 173)
Setting the Password (DIRECT MONITORING/INDOOR MONITORING/OUTDOOR MONITORING)
Sets the password required to access the camera.
\- Up to 8 characters (alphabets, numbers and symbols only), case-sensitive.
1 Tap "MENU".
(Operation on this camera)

text_image
M
WT
D
PLAY REC MENU
• The top menu appears.
2 Tap the "Wi-Fi" (💡) icon.
(Operation on this camera)

text_image
TOP MENU
?
3 Tap "INDOOR MONITORING" (💡) or "OUTDOOR MONITORING" (💡).
(Operation on this camera)

text_image
Wi-Fi
返回设置
返回设置
返回设置
返回设置
返回设置
返回设置
4 Tap "PASSWORD".
(Operation on this camera)

text_image
INDOOR MONITORING
HTTP
请勿使用密码
请勿使用密码
请勿使用密码
5 Register a password.
(Operation on this camera)

text_image
PASSWORD
A/a/1 . @ ABC DEF DELETE
← GHI JKL MNO →
PQRS TUV WXYZ
SET - + CANCEL
- By default, the password is set to "0000". (INDOOR MONITORING/OUTDOOR MONITORING)
- Tap on the on-screen keyboard to enter characters. The character changes with every tap.
"ABC", for example, enter "A" by tapping once, "B" by tapping twice, or "C" by tapping 3 times.
- Tap "DELETE" to delete a character.
- Tap "CANCEL" to exit.
- Tap "A/a/1" to select character input type from upper case letter, lower case letter, and number.
- Tap ← or → to move one space to the left or right.
6 Tap "SET".
(Operation on this camera)
\- Settings will not be saved until "SET" is tapped.
Changing the HTTP Port (DIRECT MONITORING/INDOOR MONITORING/OUTDOOR MONITORING)
Changes the port number to access to the camera.
Valid when setting up multiple cameras for Outdoor Monitoring.
1 Tap "MENU". (Operation on this camera)

text_image
M
WT
D
<
• The top menu appears.
2 Tap the "Wi-Fi" (💡) icon. (Operation on this camera)

text_image
TOP MENU
?
3 Tap "DIRECT MONITORING"/"INDOOR MONITORING"/"OUTDOOR MONITORING".
(Operation on this camera)
4 Tap "HTTP PORT". (Operation on this camera)
5 Enter a port number.
(Operation on this camera)
Setting the Enforced Group Owner (DIRECT MONITORING)
Sets whether to enforce authorization of the group owner.
1 Tap "MENU".
(Operation on this camera)

text_image
M
WT
D
PLAY REC MENU
• The top menu appears.
2 Tap the "Wi-Fi" (💡) icon.
(Operation on this camera)

text_image
TOP MENU
?
3 Tap the "DIRECT MONITORING" (图标) icon in the "Wi-Fi" menu. (Operation on this camera)

text_image
Wi-Fi
智能家庭娱乐
智能家庭娱乐
智能家庭娱乐
智能家庭娱乐
智能家庭娱乐
智能家庭娱乐
智能家庭娱乐
智能家庭娱乐
智能家庭娱乐
智能家庭娱乐
智能家庭娱乐
智能家庭娱乐
智能家庭娱乐
智能家庭娱乐
智能家庭娱乐
智能家庭娱乐
智能家庭娱乐
智能家庭娱乐
智能家庭娱乐
智能家庭娱乐
智能家庭娱乐
智能家庭娱乐
智能家庭娱乐
智能家庭娱乐
智能家庭娱乐
智能家庭乐
4 Tap "ENFORCED GROUP OWNER".
(Operation on this camera)

text_image
DIRECT MONITORING
OK
OK
HTTP
OK
5 Tap "ON" or "OFF".

text_image
ENFORCED GROUP OWNER
OFF
ON
OFF
ON
\- It is recommended to select "ON" usually.
If connection to devices that support Wi-Fi Direct fails, set to "OFF".
Memo :
\- When set to "OFF", connection to devices that do not support Wi-Fi Direct will be disabled.
Changing the HTTP Port (DIRECT MONITORING/INDOOR MONITORING/OUTDOOR MONITORING)
Changes the port number to access to the camera.
Valid when setting up multiple cameras for Outdoor Monitoring.
1 Tap "MENU".
(Operation on this camera)

text_image
M
WT
D
PLAY REC MENU
• The top menu appears.
2 Tap the "Wi-Fi" (💡) icon.
(Operation on this camera)

text_image
TOP MENU
?
3 Tap "DIRECT MONITORING"/"INDOOR MONITORING"/"OUTDOOR MONITORING".
(Operation on this camera)
4 Tap "HTTP PORT".
(Operation on this camera)
5 Enter a port number.
(Operation on this camera)
Setting the UPnP of this Camera (OUTDOOR MONITORING)
Sets the UPnP of the camera.
1 Tap "MENU".
(Operation on this camera)

text_image
M
WT
D
• The top menu appears.
2 Tap the "Wi-Fi" (💡) icon.
(Operation on this camera)

text_image
TOP MENU
?
3 Tap "OUTDOOR MONITORING" (☐).
(Operation on this camera)

text_image
Wi-Fi
4 Tap "UPnP".
(Operation on this camera)

text_image
OUTDOOR MONITORING
DDNS
HTTP
UPnP
OK
5 Tap "ON" or "OFF" to make a selection.

text_image
UPnP
OFF ON
OFF ON
- Select "ON" to enable UPnP.
- Select "OFF" to disable UPnP.
Obtaining a Dynamic DNS (DDNS) Account
By obtaining a dynamic DNS account, this unit may be used on the web as usual even if the IP address changes when making an access to this unit via internet.
\- Only the JVC dynamic DNS service can be set on this camera.
To obtain (register) an account, perform the following steps.
1 Access the following URL from a browser and register for an account. (Operation on a computer or smartphone)
https://dd3.jvckenwood.com/user/
Set your e-mail address as the username.
2 Check that you have received a confirmation e-mail to the address used in registration, and access the URL stated in the e-mail. (Operation on a computer or smartphone)
3 Set the username and password used in registration on the camera. (Operation on this camera)
"Setting Dynamic DNS on this Camera (OUTDOOR MONITORING)" (p. 158)
4 Execute OUTDOOR MONITORING.
(Operation on this camera)
If "OUTDOOR MONITORING" is executed while dynamic DNS settings are enabled, the camera will access the dynamic DNS server.
5 Tap "CAMERA NETWORK INFO." to check that the URL (WAN) is displayed.
(Registration complete)
"Image Monitoring via the Internet (OUTDOOR MONITORING)" (p. 140)
Caution :
- Registration will be canceled if you do not access the dynamic DNS server from the camera within 3 days.
Perform the registration again in this case.
- Registration will not be complete if the username and password set on this camera are incorrect. Be sure to check that they are correct.
- Successful registration will be canceled too if you do not access the dynamic DNS server for 1 year.
Setting Dynamic DNS on this Camera (OUTDOOR MONITORING)
Sets the dynamic DNS information of the obtained account on the camera. "Obtaining a Dynamic DNS (DDNS) Account" (p. 157)
1 Tap "MENU".
(Operation on this camera)

text_image
M
WT
D
PLAY REC MENU
• The top menu appears.
2 Tap the "Wi-Fi" (💡) icon.
(Operation on this camera)

text_image
TOP MENU
?
3 Tap "OUTDOOR MONITORING" (☐).
(Operation on this camera)

text_image
Wi-Fi
网络视频监控
网络视频监控
网络视频监控
网络视频监控
网络视频监控
网络视频监控
网络视频监控
4 Tap "DDNS SETTING".
(Operation on this camera)

text_image
OUTDOOR MONITORING
DDNS
HTTP
UPnP
?
5 Tap "DDNS", then tap "ON".
(Operation on this camera)
6 Enter the DDNS settings (username/password). (Operation on this camera)

text_image
USERNAME
A/a/1 . @ ABC DEF DELETE
← GHI JKL MNO →
PQRS TUV WXYZ
SET - + CANCEL
- Tap on the on-screen keyboard to enter characters. The character changes with every tap.
"ABC", for example, enter "A" by tapping once, "B" by tapping twice, or "C" by tapping 3 times.
- Tap "DELETE" to delete a character.
- Tap "CANCEL" to exit.
- Tap "A/a/1" to select character input type from upper case letter, lower case letter, and number.
- Tap or to move one space to the left or right.
• After setting, tap "SET".
Memo :
\- Only the JVC dynamic DNS service can be set on this camera.
Setting the Sender's E-mail Address of the Camera
Sets the address to be used for sending e-mails on the camera.
Memo :
\- By using Gmail as the sender's mail address, some of the settings can be omitted.
Use of Gmail is recommended for users who have a Gmail account.
1 Tap "MENU".
(Operation on this camera)

text_image
M
WT
D
PLAY REC MENU
• The top menu appears.
2 Tap the "Wi-Fi" (💡) icon.
(Operation on this camera)

text_image
TOP MENU
?
3 Tap > on the lower right of the screen.
(Operation on this camera)

text_image
Wi-Fi
智能家庭智能
智能家庭智能
智能家庭智能
智能家庭智能
智能家庭智能
智能家庭智能
智能家庭智能
4 Tap "COMMON Wi-Fi SETTING".
(Operation on this camera)

text_image
Wi-Fi
Wi-Fi
5 Tap "MAIL SETTING".
(Operation on this camera)

text_image
COMMON WI-FI SETTING
MAIL SETTING
6 Tap "SENDER'S EMAIL".
(Operation on this camera)

text_image
MAIL SETTING
RECIPIENT'S EMAIL
SENDER'S EMAIL
SEND TEST EMAIL
7 Tap "NEXT".
(Operation on this camera)

text_image
EMAIL ADDRESS
ENTER THE EMAIL ADDRESS
FOR "DETECT/MAIL" AND
"VIDEO MAIL" TRANSMISSION
NEXT
\- Tap "CHANGE" to change the contents that are already set.
\- Enter the e-mail address and tap "SET".

text_image
SENDER'S EMAIL
**********************************************************************
A/a/1 - @ ABC DEF DELETE
← GHI JKL MNO →
PQRS TUV WXYZ
SET - + CANCEL
- Tap on the on-screen keyboard to enter characters. The character changes with every tap.
- Tap "DELETE" to delete a character.
- Tap "CANCEL" to exit.
- Tap "A/a/1" to select character input type from upper case letter, lower case letter, and number.
- Tap or to move one space to the left or right.
- After setting, tap "SET".
8 Tap "NEXT".
(In case of Gmail, tap "SKIP")
(Operation on this camera)

text_image
SMTP SERVER
SMTP SERVER HAS BEEN SET
AS FOLLOWS
CAN BE CHANGED IF REQUIRED
smtp.gmail.com
CHANGE Skip
- Tap "CHANGE" to change the contents that are already set.
- Enter the SMTP server and tap "SET".

text_image
SMTP SERVER
※※※※※※※※※※※※※
A/a/1 . @ ABC DEF DELETE
← GHI JKL MNO →
PQRS TUV WXYZ
SET - + CANCEL
- Tap on the on-screen keyboard to enter characters. The character changes with every tap.
- Tap "DELETE" to delete a character.
- Tap "CANCEL" to exit.
- Tap "A/a/1" to select character input type from upper case letter, lower case letter, and number.
- Tap ← or → to move one space to the left or right.
• After setting, tap "SET".
9 Tap "CHANGE" to change the SMTP port.
(In case of Gmail, tap "SKIP")
(Operation on this camera)

text_image
SMTP SERVER
SMTP SERVER HAS BEEN SET
AS FOLLOWS
CAN BE CHANGED IF REQUIRED
587
CHANGE Skip
\- Change the SMTP port number (if necessary) and tap "SET".

text_image
SMTP PORT
1 2 3 DELETE
← 4 5 6 →
7 8 9
SET 0 CANCEL
- Tap on the on-screen keyboard to enter characters. The character changes with every tap.
- Tap "DELETE" to delete a character.
- Tap "CANCEL" to exit.
- Tap ← or → to move one space to the left or right.
• After setting, tap "SET".
10 Tap "CHANGE" to change the authentication.
(In case of Gmail, tap "SKIP")
(Operation on this camera)

text_image
AUTHENTICATION METHOD
SMTP SERVER AUTHENTICATION
METHOD IS SET AS FOLLOWS
SMTP(TLS)
CHANGE Skip
\- Tap the desired "AUTHENTICATE METHOD".

text_image
AUTHENTICATE METHOD
NONE
SMTP
SMTP(SSL)
SMTP(TLS)
11 Tap "NEXT".
(In case of Gmail, tap "SKIP")
(Operation on this camera)

text_image
USERNAME
USERNAME HAS BEEN SET
AS FOLLOWS
CAN BE CHANGED IF REQUIRED
TEST
CHANGE Skip
- The following does not appear if "AUTHENTICATE METHOD" is set to "NONE".
- Tap "CHANGE" to change the contents that are already set.
\- Enter the username and tap "SET".

text_image
USERNAME
**************************
A/a/1 . @ ABC DEF DELETE
← GHI JKL MNO →
PQRS TUV WXYZ
SET - + CANCEL
- Tap on the on-screen keyboard to enter characters. The character changes with every tap.
- Tap "DELETE" to delete a character.
- Tap "CANCEL" to exit.
- Tap "A/a/1" to select character input type from upper case letter, lower case letter, and number.
- Tap ← or → to move one space to the left or right.
• After setting, tap "SET".
12 Tap "NEXT".
(Operation on this camera)

text_image
PASSWORD
PLEASE ENTER PASSWORD
NEXT
- The following does not appear if "AUTHENTICATE METHOD" is set to "NONE".
- Tap "CHANGE" to change the contents that are already set.
- Enter the password and tap "SET".

text_image
PASSWORD
* * * * * * *
A/a/1 . @ ABC DEF DELETE
← GHI JKL MNO →
PQRS TUV WXYZ
SET - + CANCEL
- Tap on the on-screen keyboard to enter characters. The character changes with every tap.
- Tap "DELETE" to delete a character.
- Tap "CANCEL" to exit.
- Tap "A/a/1" to select character input type from upper case letter, lower case letter, and number.
- Tap ← or → to move one space to the left or right.
• After setting, tap "SET".
13 Tap "QUIT" or "SEND TEST EMAIL".
(Operation on this camera)

text_image
CONTENTS SET AS FOLLOWS
EMAIL ADDRESS : text@gmail.com
SMTP SERVER : smtp.gmail.com
SMTP PORT : 587
AUTHENTICATE METHOD : SMTP(TLS)
USERNAME : test
QUIT SEND TEST EMAIL
SENDER'S EMAIL Enter the sender's e-mail address. SMTP SERVER Enter the SMTP server address. SMTP PORT Set this when the SMTP port number needs to be changed. AUTHENTICATE METHOD Set this when the authentication method needs to be changed. USERNAME Enter the username. PASSWORD Enter the password.
Caution :
- It is necessary to obtain an e-mail account in advance.
- Some web-based mail addresses do not support this feature.
- These are Gmail settings as of December 2012.
Perform setting manually if changes have been made to the Gmail specifications.
- To make use of addresses other than Gmail, please consult the mail service provider (Internet provider, etc.) for information on the settings.
Registering the Recipient's E-mail Address of the Camera
Registers the e-mail addresses of recipients on the camera.
1 Tap "MENU".
(Operation on this camera)

text_image
M
WT
D
<
• The top menu appears.
2 Tap the "Wi-Fi" (💡) icon.
(Operation on this camera)

text_image
TOP MENU
?
3 Tap > on the lower right of the screen.
(Operation on this camera)

text_image
Wi-Fi
智能家庭管理器
智能家庭管理器
智能家庭管理器
智能家庭管理器
智能家庭管理器
智能家庭管理器
智能家庭管理器
4 Tap "COMMON Wi-Fi SETTING".
(Operation on this camera)

text_image
Wi-Fi
智能驾驶监控器
Wi-Fi
智能驾驶监控器
5 Tap "MAIL SETTING".
(Operation on this camera)

text_image
COMMON WI-FI SETTING
MAIL SETTING
6 Tap "RECIPIENT'S EMAIL".
(Operation on this camera)

text_image
MAIL SETTING
RECIPIENT'S EMAIL
SENDER'S EMAIL
SEND TEST EMAIL
7 Tap "ADD".
(Operation on this camera)

text_image
RECIPIENT'S EMAIL
ADD
8 Enter the recipient's e-mail address.

text_image
RECIPIENT'S EMAIL
A/a/1 . @ ABC DEF DELETE
← GHI JKL MNO →
PQRS TUV WXYZ
SET - + CANCEL
- Tap on the on-screen keyboard to enter characters. The character changes with every tap.
"ABC", for example, enter "A" by tapping once, "B" by tapping twice, or "C" by tapping 3 times.
- Tap "DELETE" to delete a character.
- Tap "CANCEL" to exit.
- Tap "A/a/1" to select character input type from upper case letter, lower case letter, and number.
- Tap ← or → to move one space to the left or right.
• After setting, tap "SET".
9 After tapping "DETECT/MAIL" or "VIDEO MAIL" depending on the function in use, tap "SET".

text_image
RECIPIENT'S EMAIL
SELECT FUNCTION TO SET THIS
EMAIL ADDRESS AS RECEIVER
ADDRESS THEN TOUCH "SET"
abc@def.com
DETECT/MAIL
VIDEO MAIL
SET
- An icon (💡) appears after tapping "DETECT/MAIL", and the recipient's e-mail address for the Detect/Mail.
- An icon (💡) appears after tapping "VIDEO MAIL", and the recipient's e-mail address for the VIDEO MAIL.
• To cancel, press the icon one more time.
Memo :
\- Up to 8 e-mail addresses can be registered as recipients.
Caution :
- When setting another person as the recipient, be sure to obtain his/her consent in advance.
- Check whether notifications indicating errors have been sent to the sender's e-mail address. (Make use of a computer or similar devices as it is not possible to check from the camera.)
If no notifications are received: Refer to "Unable to send e-mails." and adjust the settings accordingly.
If notifications are received: Check the content of the notification.
\*Note
Do not continue sending e-mails with the same settings if you receive error notifications. Depending on the provider, you may be marked as a sender of spam (junk mail).
Setting the Detection Method of this Camera (DETECT/MAIL SETTING)
Sets the detection method to start recording.
1 Tap "MENU".
(Operation on this camera)

text_image
M
WT
D
PLAY REC MENU
• The top menu appears.
2 Tap the "Wi-Fi" (💡) icon.
(Operation on this camera)

text_image
TOP MENU
?
3 Tap "DETECT/MAIL" (💡).
(Operation on this camera)

text_image
Wi-Fi
我的家庭智能
我的家庭智能
我的家庭智能
我的家庭智能
我的家庭智能
我的家庭智能
我的家庭智能
4 Tap "DETECTION METHOD".
(Operation on this camera)

text_image
DETECT/MAIL
10 MHz
REC ON
5 Tap "MOTION DETECTION" or "FACE DETECTION" to make a selection.

text_image
DETECTION METHOD
MOTION
DETECTION
FACE
DETECTION
\- Select "MOTION DETECTION" to start recording upon detection of subject's movements.
\- Select "FACE DETECTION" to start recording upon detection of human faces.
Setting the Detection Interval of this Camera (DETECT/MAIL SETTING)
Sets the time period to enable detection again after the previous one.
1 Tap "MENU".
(Operation on this camera)

text_image
M
WT
D
PLAY REC MENU
• The top menu appears.
2 Tap the "Wi-Fi" (💡) icon.
(Operation on this camera)

text_image
TOP MENU
?
3 Tap "DETECT/MAIL" (💡).
(Operation on this camera)

text_image
Wi-Fi
智能家庭体验
智能家庭体验
智能家庭体验
智能家庭体验
智能家庭体验
智能家庭体验
智能家庭体验
智能家庭体验
4 Tap "DETECTION INTERVAL".
(Operation on this camera)

text_image
DETECT/MAIL
10 MIN
取消
取消
取消
取消
取消
取消
取消
5 Tap the desired detection interval.

text_image
DETECTION INTERVAL
€ 15
SEC
15SEC
€ 3
MIN
3 MIN
€ 30
MIN
30 MIN
€ 1
MIN
1 MIN
• 10
MIN
10 MIN
€ 60
MIN
60 MIN
?
\- Set the interval to perform detection. By default, it is set to 10 minutes.
Setting Self Recording on this Camera (DETECT/MAIL SETTING)
Sets whether to record videos on this camera during detection.
1 Tap "MENU".
(Operation on this camera)

text_image
M
WT
D
← PLAY REC MENU
• The top menu appears.
2 Tap the "Wi-Fi" (💡) icon.
(Operation on this camera)

text_image
TOP MENU
?
3 Tap "DETECT/MAIL" (☐).
(Operation on this camera)

text_image
Wi-Fi
我的电脑设备
我的电脑设备
我的电脑设备
我的电脑设备
我的电脑设备
我的电脑设备
4 Tap "SELF RECORDING".
(Operation on this camera)

text_image
DETECT/MAIL
10 M/s
REC ON
5 Tap "ON" or "OFF" to make a selection.

text_image
SELF RECORDING
OFF
ON
OFF
ON
- Select "ON" to record videos on this camera.
- Select "OFF" not to record videos on this camera.
Registering the Access Points of the Camera to Connect (ACCESS POINTS)
There are 4 ways to register the access points (wireless LAN router) for connection.
Wi-Fi Protected Setup (WPS) Registration This is the easiest way of registration. Authentication method and wireless LAN setup are performed automatically in WPS, allowing easy registration of connection settings between devices. Search and Register A search is conducted to locate access points. Select and register an access point from the list of search results. Manual Registration Enter the name and authentication method manually to register an access point. WPS PIN Registration Enter the WPS PIN code of the camera to the access point to register.
Memo :
\- By registering multiple access points, you can change connection to another access point by tapping on the desired one from the list.
■ Wi-Fi Protected Setup (WPS) Registration
1 Tap "MENU".
(Operation on this camera)

text_image
M
WT
D
PLAY REC MENU
• The top menu appears.
2 Tap the "Wi-Fi" (💡) icon.
(Operation on this camera)

text_image
TOP MENU
?
3 Tap > on the lower right of the screen.
(Operation on this camera)

text_image
Wi-Fi
新客智能设备
新客智能设备
新客智能设备
新客智能设备
新客智能设备
新客智能设备
4 Tap "COMMON Wi-Fi SETTING".
(Operation on this camera)

text_image
Wi-Fi
Wi-Fi
5 Tap "ACCESS POINTS". (Operation on this camera)

text_image
COMMON WI-FI SETTING
ACCESS POINTS
?
6 Tap "ADD".
(Operation on this camera)

text_image
ACCESS POINTS
ADD
7 Tap "EZ REGISTRATION WPS". (Operation on this camera)

text_image
ADD
EZ REGISTRATION WPS
100% 250% 30%
100% 250% 30%
100% 250% 30%
8 Activate WPS of the access point (wireless LAN router) within 2 minutes.
• To activate WPS, refer to the instruction manual of the device in use.
9 After registration is complete, tap "OK" on the camera's screen. (Operation on this camera)

text_image
REGISTERED
SSID:**
ENCRYPTION METHOD
WPA2
OK
■ Search and Register
1 Tap "MENU". (Operation on this camera)

text_image
M
WT
D
PLAY REC MENU
• The top menu appears.
2 Tap the "Wi-Fi" (💡) icon. (Operation on this camera)

text_image
TOP MENU
?
3 Tap > on the lower right of the screen. (Operation on this camera)

text_image
Wi-Fi
网络数据采集器
网络数据采集器
网络数据采集器
网络数据采集器
网络数据采集器
网络数据采集器
网络数据采集器
4 Tap "COMMON Wi-Fi SETTING". (Operation on this camera)

text_image
Wi-Fi
Wi-Fi
5 Tap "ACCESS POINTS". (Operation on this camera)

text_image
COMMON WI-FI SETTING
ACCESS POINTS
?
6 Tap "ADD". (Operation on this camera)

text_image
ACCESS POINTS
ADD
7 Tap "SEARCH".
(Operation on this camera)

text_image
ADD
SEARCH
?
\- The search results appear on the camera's screen.
8 Tap the name (SSID) of the desired access point from the list of search results.
(Operation on this camera)

text_image
SEARCH
SEARCH AGAIN
9 Register a password.
(Operation on this camera)

text_image
PASSWORD
A/a/1 . @ ABC DEF DELETE
← GHI JKL MNO →
PQRS TUV WXYZ
SET - + CANCEL
- Tap on the on-screen keyboard to enter characters. The character changes with every tap.
"ABC", for example, enter "A" by tapping once, "B" by tapping twice or "C" by tapping 3 times.
- Tap "DELETE" to delete a character.
- Tap "CANCEL" to exit.
- Tap "A/a/1" to select character input type from upper case letter, lower case letter, and number.
- Tap ← or → to move one space to the left or right.
- The password is not required if the wireless LAN router is not security protected.
10 After registration is complete, tap "OK" on the camera's screen. (Operation on this camera)

text_image
REGISTERED
SSID:******
ENCRYPTION METHOD
WPA2
OK
■ Manual Registration
1 Tap "MENU".
(Operation on this camera)

text_image
M
WT
D
←PLAY
REC
MENU
• The top menu appears.
2 Tap the "Wi-Fi" (💡) icon.
(Operation on this camera)

text_image
TOP MENU
?
3 Tap > on the lower right of the screen. (Operation on this camera)

text_image
Wi-Fi
智能家庭管理
智能家庭管理
智能家庭控制
智能家庭管理
智能家庭管理
智能家庭控制
4 Tap "COMMON Wi-Fi SETTING". (Operation on this camera)

text_image
Wi-Fi
Wi-Fi
5 Tap "ACCESS POINTS". (Operation on this camera)

text_image
COMMON WI-FI SETTING
ACCESS POINTS
?
6 Tap "ADD". (Operation on this camera)

text_image
ACCESS POINTS
ADD
7 Tap "MANUAL".
(Operation on this camera)

text_image
ADD
MANUAL
?
8 Enter the name (SSID) of the access point (wireless LAN router) and tap "SET".
(Operation on this camera)

text_image
SSID
A/a/1 . @ ABC DEF DELETE
← GHI JKL MNO →
PQRS TUV WXYZ
SET - + CANCEL
- Tap on the on-screen keyboard to enter characters. The character changes with every tap.
"ABC", for example, enter "A" by tapping once, "B" by tapping twice, or "C" by tapping 3 times.
- Tap "DELETE" to delete a character.
- Tap "CANCEL" to exit.
- Tap "A/a/1" to select character input type from upper case letter, lower case letter, and number.
- Tap or to move one space to the left or right.
9 Select the type of authentication method (security).
(Operation on this camera)

text_image
TYPE OF SECURITY
NONE
WEP
WPA
WPA2
\- Select according to the setting of your router.
10 When authentication method is not set to "NONE", enter a password and tap "SET".
(Operation on this camera)

text_image
PASSWORD
A/a/1 . @ ABC DEF DELETE
← GHI JKL MNO →
PQRS TUV WXYZ
SET - + CANCEL
- Tap on the on-screen keyboard to enter characters. The character changes with every tap.
"ABC", for example, enter "A" by tapping once, "B" by tapping twice, or "C" by tapping 3 times.
- Tap "DELETE" to delete a character.
- Tap "CANCEL" to exit.
- Tap "A/a/1" to select character input type from upper case letter, lower case letter, and number.
- Tap ← or → to move one space to the left or right.
11 After registration is complete, tap "OK" on the camera's screen.
(Operation on this camera)

text_image
REGISTERED
SSID:******
ENCRYPTION METHOD
WPA2
OK
WPS PIN Registration
1 Tap "MENU".
(Operation on this camera)

text_image
M
WT
M
D
← PLAY
REC
MENU
• The top menu appears.
2 Tap the "Wi-Fi" (💡) icon.
(Operation on this camera)

text_image
TOP MENU
?
3 Tap > on the lower right of the screen.
(Operation on this camera)

text_image
Wi-Fi
智能家庭管理
智能家庭管理
智能家庭管理
智能家庭管理
智能家庭管理
智能家庭管理
4 Tap "COMMON Wi-Fi SETTING".
(Operation on this camera)

text_image
Wi-Fi
Wi-Fi
5 Tap "ACCESS POINTS".
(Operation on this camera)

text_image
COMMON WI-FI SETTING
ACCESS POINTS
?
6 Tap "ADD".
(Operation on this camera)

text_image
ACCESS POINTS
ADD
7 Tap "WPS PIN".
(Operation on this camera)

text_image
ADD
WPS PIN
[新版] [新版] [新版]
[新版] [新版] [新版]
[新版] [新版] [新版]
• The PIN code appears.
8 Enter the PIN code displayed on the camera to the access point (wireless LAN router).
\- For details on how to enter the PIN code, refer to the instruction manual of the device in use.
9 Tap "START".
(Operation on this camera)

text_image
WPS PIN
PIN:******
ENTER THIS NUMBER
TO ACCESS POINT
THEN TOUCH "START"
START QUIT
\- Tap "START" after entering PIN code to the wireless LAN router. (Connection cannot be established if "START" is tapped before entering the code.)
10 After registration is complete, tap "OK" on the camera's screen.
(Operation on this camera)

text_image
REGISTERED
SSID:******
ENCRYPTION METHOD
WPA2
OK
Editing LAN Settings of Access Points (Wireless LAN Router)
Change accordingly such as when you want to fix the IP address for the camera.
1 Tap "MENU".
(Operation on this camera)
- Tap "USE" to use the selected access point.
- Tap "DELETE" to delete the registered access point.
7 Perform the LAN settings. (when "DHCP" is set to "OFF")
(Operation on this camera)
\- The top menu appears.
2 Tap the "Wi-Fi" (💡) icon.
(Operation on this camera)
3 Tap > on the lower right of the screen.
(Operation on this camera)
- After setting, tap "OK".
• LAN settings comprise of the following items.
DHCP ON: Obtains IP address from the DHCP server
automatically.
OFF: Settings of "IP ADDRESS", "SUBNET
MASK", "DEFAULT GATEWAY", "PRIMARY
DNS", and "SECONDARY DNS" are required.
IP ADDRESS Enter the IP address.
SUBNET MASK Enter the subnet mask.
DEFAULT
Enter the default gateway.
GATEWAY
PRIMARY DNS /
Enter the IP addresses of the primary and
SECONDARY DNS
secondary DNS servers.
4 Tap "COMMON Wi-Fi SETTING".
(Operation on this camera)
5 Tap "ACCESS POINTS".
(Operation on this camera)
6 Tap "LAN SETTINGS".
(Operation on this camera)
Setting the Password (DIRECT MONITORING)
Sets the password for direct monitoring. (8 to 32 characters)
1 Tap "MENU".
(Operation on this camera)

text_image
M
WT
D
<
• The top menu appears.
2 Tap the "Wi-Fi" (💡) icon.
(Operation on this camera)

text_image
TOP MENU
?
3 Tap the "DIRECT MONITORING" (💡) icon in the "Wi-Fi" menu. (Operation on this camera)

text_image
Wi-Fi
家庭智能监控
家庭智能监控
家庭智能监控
家庭智能监控
家庭智能监控
家庭智能监控
4 Tap "PASSWORD".
(Operation on this camera)

text_image
DIRECT MONITORING
超链接驱动器
超链接驱动器
超链接驱动器
超链接驱动器
HTTP
超链接驱动器
5 Register a password.
(Operation on this camera)

text_image
PASSWORD
A/a/1 . @ ABC DEF DELETE
← GHI JKL MNO →
PQRS TUV WXYZ
SET - + CANCEL
- Tap on the on-screen keyboard to enter characters. The character changes with every tap.
"ABC", for example, enter "A" by tapping once, "B" by tapping twice, or "C" by tapping 3 times.
- Tap "DELETE" to delete a character.
- Tap "CANCEL" to exit.
- Tap "A/a/1" to select character input type from upper case letter, lower case letter, and number.
- Tap ← or → to move one space to the left or right.
• After setting, tap "SET".
6 Tap "SET".
(Operation on this camera)
- Settings will not be saved until "SET" is tapped.
Enabling the MAC Address Filter (TV MONITORING)
By enabling "MAC ADDRESS FILTER", Everio can be searched from the device (TV monitor); the MAC address of the device needs to be registered to Everio in advance.
1 Tap "MENU".
(Operation on this camera)

text_image
M
WT
D
PLAY REC MENU
• The top menu appears.
2 Tap the "Wi-Fi" (💡) icon.
(Operation on this camera)

text_image
TOP MENU
?
3 Tap "TV MONITORING".
4 Tap "MAC ADDRESS FILTER".
5 Select "ON" or "OFF".
Memo :
\- If "MAC ADDRESS FILTER" is enabled while no MAC address is registered, Everio can not be searched from all the devices.
Registering the MAC Address (TV MONITORING)
Register the MAC address of the TV monitor to Everio.
1 Tap "MENU".
(Operation on this camera)

text_image
M
WT
D
<
• The top menu appears.
2 Tap the "Wi-Fi" (💡) icon.
(Operation on this camera)

text_image
TOP MENU
?
3 Tap "TV MONITORING".
4 Tap "MAC ADDRESS LIST".
5 Tap "ADD".
6 Enter the MAC address of the TV monitor.
- Tap on the on-screen keyboard to enter characters.
- Tap "DELETE" to delete a character.
- Tap "CANCEL" to exit.
- Tap "A/a/1" to change the characters.
- Tap ← or → to move one space to the left or right.
• After setting, tap "SET".
- For details on checking the MAC address for registration, refer to the instruction manual of the device in use.
Checking the MAC Address of this Camera
Displays the MAC address of the camera.
1 Tap "MENU".
(Operation on this camera)

text_image
M
WT
D
PLAY REC MENU
• The top menu appears.
2 Tap the "Wi-Fi" (💡) icon.
(Operation on this camera)

text_image
TOP MENU
?
3 Tap > on the lower right of the screen.
(Operation on this camera)

text_image
Wi-Fi
智能驾驶管理器
智能驾驶管理器
智能驾驶管理器
智能驾驶管理器
智能驾驶管理器
智能驾驶管理器
智能驾驶管理器
4 Tap "COMMON Wi-Fi SETTING".
(Operation on this camera)

text_image
Wi-Fi
智能驾驶辅助器
Wi-Fi
智能驾驶辅助器
5 Tap "MAC ADDRESS".
(Operation on this camera)

text_image
COMMON WI-FI SETTING
MAC ADDRESS
• The MAC address of the camera appears.
(The above shows the address during direct connection, while the below shows the MAC address when connected to an access point.)
- After setting, tap "SET".
• After checking, tap "SET".
Protecting the Network Settings with a Password
Sets a password to lock and protect the network settings.
1 Tap "MENU".
(Operation on this camera)

text_image
M
WT
D
<
• The top menu appears.
2 Tap the "Wi-Fi" (💡) icon.
(Operation on this camera)

text_image
TOP MENU
?
3 Tap > on the lower right of the screen.
(Operation on this camera)

text_image
Wi-Fi
网络管理服务
网络管理服务
网络管理服务
网络管理服务
网络管理服务
网络管理服务
4 Tap "COMMON Wi-Fi SETTING".
(Operation on this camera)

text_image
Wi-Fi
智能语音服务
Wi-Fi
智能语音服务
5 Tap "LOCK SETTINGS".
(Operation on this camera)

text_image
COMMON WI-FI SETTING
LOCK SETTINGS
INITIALIZATION
6 Set a password (up to 4 characters).
(Operation on this camera)

text_image
PASSWORD
1 2 3 DELETE
← 4 5 6 →
7 8 9
SET 0 CANCEL
- Enter the 4-digit numbers.
- Tap "DELETE" to delete a character.
- Tap "CANCEL" to exit.
- Tap ← or → to move one space to the left or right.
• After setting, tap "SET".
Initializing the Wi-Fi Settings
Returns the Wi-Fi settings to their default values.
1 Tap "MENU".
(Operation on this camera)

text_image
M
WT
D
<< PLAY REC MENU
• The top menu appears.
2 Tap the "Wi-Fi" (💡) icon.
(Operation on this camera)

text_image
TOP MENU
?
3 Tap > on the lower right of the screen.
(Operation on this camera)

text_image
Wi-Fi
智能家庭智能设备
智能家庭智能设备
智能家庭智能设备
智能家庭智能设备
智能家庭智能设备
智能家庭智能设备
智能家庭智能设备
智能家庭智能设备
智能家庭智能设备
智能家庭智能设备
智能家庭智能设备
智能家庭智能设备
智能家庭智能设备
智能家庭智能设备
智能家庭智能设备
智能家庭智能设备
智能家庭智能设备
智能家庭智能设备
智能家庭智能设备
智能家庭智能设备
智能家庭智能
智能家庭智能设备
智能家庭智能设备
智能家庭智能设备
智能家庭智能设备
智能家庭智能设备
智能家庭智能设备
智能家庭智能设备
智能家庭智能设备
智能家庭智能设备
智能家庭智能设备
智能家庭智能设备
智能家庭智能设备
智能家庭智能设备
智能家庭智能设备
智能家庭智能设备
智能家庭智能设备
智能家庭智能设备
智能家庭智能设备
智能家庭智能设备
智能家庭智能 equipment
4 Tap "COMMON Wi-Fi SETTING".
(Operation on this camera)

text_image
Wi-Fi
智能驾驶管理器
Wi-Fi
智能驾驶管理器
5 Tap "INITIALIZATION".
(Operation on this camera)

text_image
COMMON WI-FI SETTING
LOCK SETTINGS
INITIALIZATION
6 Tap "YES".
(Operation on this camera)

text_image
INITIALIZATION
DO YOU WANT THE SETTINGS
RESET TO THE FACTORY PRESET?
YES NO
\- To cancel, tap "NO".
\- When "YES" is tapped, the network settings return to their default values.
Changing the Panning Speed
Change the operation speed of the pan cradle (sold separately) via smartphone.
Select either of the 2: "HIGH SPEED" or "LOW SPEED".
\- For details on how to use a pan cradle, refer to the following "Using the Pan Cradle (Sold Separately)" (p. 150)
■ Change the setting via smartphone
1 Tap
Confirm that the camera and a smartphone are connected via Wi-Fi, and the monitor screen is displayed on the smartphone.

text_image
Index
Monitor
←° PAUSE
Pan
Pan
T
Tele
W
Wide
Rec
Pause
Snapshot
Marking
Game Score
2 Tap "PAN OPERATION SPEED".

text_image
SETTINGS
MONITOR
MONITORING
DISPLAY THE MONITOR SCREEN
PAN OPERATION SPEED
SET THE OPERATION SPEED OF
THE PAN OPERATION
LOC INFO TRANS INT
GPS SENDS LOCATION INFORMATION 15SEC
TO THE CAMERA WHEN USING DIRECT
MONITORING
VIDEO TRANSFER (AVCHD Index)
LENGTH 300SEC
RESOLUTION (pixel)
GAME SCORE
GAME SCORE SETTING
3 Tap "HIGH SPEED" or "LOW SPEED".

text_image
MONITOR
MONITORING
DISPLAY THE MONITOR SCREEN
PAN OPERATION SPEED
PAN OPERATION SPEED
HIGH SPEED
LOW SPEED
CANCEL
RESOLUTION (pixel)
GAME SCORE
GAME SCORE SETTING
Using Smartphone Applications
- By installing the "Everio sync. 2" smartphone software, images on the camera can be checked from a distance, and recording videos/still images and zooming operation can be performed.
- You can also send images recorded by the camera to the smartphone via Wi-Fi, to enjoy the recorded images on your smartphone or tablet.
Installing Smartphone Applications


natural_image
Illustration of a hand holding a smartphone with a pencil, no text or symbols present
■ Android Smartphone
1 Tap "Play store" on the application list.
2 Search for the "Everio sync. 2" application.
3 Tap on the "Everio sync. 2" application.
- The detailed information of the application is displayed.
4 Tap "Install".
- For applications that access data or functions of this unit, a screen that shows the data or functions that will be used is displayed.
5 Confirm the content and tap "Download".
- Downloading starts.
Deleting the Application
1 Tap "Play store" on the application list.
2 Press the menu button and tap "My apps".
• A list of previously downloaded applications is displayed.
3 Tap on the "Everio sync. 2" application.
4 Tap "Uninstall", then tap "OK".
The specifications of Google Play are subject to changes without prior notice.
For operating details, refer to the help file of Google Play.
Memo :
■ iPhone/iPad/iPod touch
1 Tap "App Store" on the home screen.
2 Search for the "Everio sync. 2" application.
3 Tap on the "Everio sync. 2" application.
- The detailed information of the application is displayed.
4 Tap "FREE"→"Install".
- Enter your password on the password entry screen.
- Downloading starts.
- The downloaded application will be added to the home screen automatically.
Deleting the Application
1 Press and hold the "Everio sync. 2" application on the home screen.
2 Tap × to confirm the deletion.
Memo :
The specifications of App Store™ are subject to changes without prior notice.
For operating details, refer to the help file of App Store™.
Operating the Smartphone Applications
• Indications on the screen
"Indications on the Screen" (p. 175)
• Transferring videos
"Transferring Videos (AVCHD format)" (p. 179)
"Transferring Videos (iFrame format)" (p. 182)
• Transferring still images
"Transferring Still Images" (p. 184)
- Changing the settings
"Smartphone Application Settings" (p. 186)
Indications on the Screen
■ Initial Screen

text_image
Everio sync.2
Direct
MONITORING
CONNECT TO THE CAMERA
DIRECTLY. YOU CAN USE THE GAME
COPYING FUNCTION.
INDOOR
MONITORING
CONNECT VIA ACCESS POINT. NEED
TO REGISTER ACCESS POINT.
OUTDOOR
MONITORING
CONNECT VIA INTERNET. NEED TO
REGISTER ACCESS POINT AND
POUSE.
?
Demo
To Settings
Screen
Connect to the
camera directly
Connect via
access point
Connect via
internet
To Demo
Screen
To Help Screen
■ Recording Screen

text_image
To Index Screen
To Settings Screen
Running on AC Adapter
Running on Battery (icon shown on left is when battery power is less than 30 %)
Enable/Disable GPS (icon shown is when disabled)
Record-Standby
Recording in Progress
Zoom Button
Video Recording Start Button
Still Image Recording Button
Video Recording Stop Button
Marking
Game Score
To Game Score Screen
To Marking Screen
■ Index Screen (AVCHD Video/iFrame Video/Still image)

text_image
To Monitor Screen
Monitor Index To Settings Screen
23:43
[0Ch:07m18s]
22:43
[0Ch:01m9s]
Thumbnail
17:16
[0Ch:02m10s]
Recording Date/Time
Playback Time
14:19
[0Ch:00m36s]
AVCHD iFrame Still Image Types of image
Transfer Screen

text_image
Back
Transfer
00:00:00 - 00:05:00
00:05:00 - 00:07:18
Checkbox
To Transfer Screen
■ Game Score Screen

text_image
Game Start button
Recording Start button
Game Over button
Recording Stop button
HOME
VISITOR
Score sheet
Goal button
1 2 1
1 2
3
3
Cancel button
Mark button
Monitor button
Caution :
\- "Everio sync. 2" for iPhone/iPad cannot be used when the iPhone/iPad is connected to the mobile phone network. To make use of this feature, connect to the camera or an access point via Wi-Fi.
Using the Markings
Enter the mark to make it easy to find the scene later.
■ Common for Android and iOS
1 Tap "Marking" while recording the video.

text_image
Index
Monitor
←° PAUSE
Pan
Pan
T
Tele
W
Wide
Rec
Pause
Snapshot
Marking
Game Score
2 Tap the mark icon (☐) at the scene you want to mark.

text_image
Marking
Monitor
- Once a scene is marked, the next mark won't be made within 5 seconds.
- Tap "Monitor" to return to the monitor screen.
■ Screen display of the camera while marking

text_image
DIRECT MONITORING
0:00:18 [0:52]
REC
\- The mark icon is displayed when a scene is marked.
Using the Game Score
The scores of various sport games can be recorded with video images. Also, the recorded position can be marked to make it easy to find the scenes you want to view later.
■ Common for Android and iOS
1 Tap "Game Score".

text_image
Index
Monitor
←° PAUSE
Pan
Pan
T
Tele
W
Wide
Rec
Pause
Snapshot
Marking
Game Score
2 Tap the scorecard.

text_image
Game Score
Game Start
HOME
0
VISITOR
0
Monitor
- Proceed to step 5 to keep the team settings unchanged.
3 Tap "TEAM SELECTION".

text_image
Game Score
Game
Start
HOME
VISITOR
TEAM SELECTION
TEAM LIST
Monitor
- Tap "TEAM LIST" to change the team name and color, and to add a team.
4 Select the team, then tap "OK".

text_image
Game Score
Game
Start
TEAM SELECTION
TEAM 1
HOME
TEAM 1
VISITOR
OK CANCEL
Monitor
5 Tap ● to start recording the video.

text_image
Game Score
Game Start
HOME
0
VISITOR
0
Monitor
6 When the game is started, tap "Game Start".

text_image
Game Score
Game Start
HOME
0
VISITOR
0
Monitor
7 Tap the number when the score is added.

text_image
Game Score
Home
0
1 2
3 4
VISITOR
0
1 2
3 4
Monitor
- Tap the number button of the scored team.
• To modify the score, tap the scorecard.
- Tap the "Undo" button to cancel the latest score entry.
- When the score is registered, next entry cannot be made for 5 seconds.
8 Mark the favotite scenes.

text_image
Game Score
HOME
VISITOR
Undo
Monitor
- Mark the favorite scenes by tapping the flag icon (☐)
- Once a scene is marked, the next mark won't be made within 5 seconds.
9 When the game is ended, tap "Game End".

text_image
Game Score
Home 2
1 2
3 4
VISITOR 3
1 2
3 4
Undo Monitor
- Tap "OK" if "DO YOU WANT TO EXIT?" appears.
• After the end of the game, video recording is carried on until recording is stopped.
- Tap "Monitor" to return to the monitor screen in Step 1.
Memo :
- Team name and color, the background of the screen can be set prior to recording.
- Select the score button depending on the type of the games.
- The next score won't be registered within 5 seconds after the marking operation. But the score can be registered right after the marking operation by changing the game score setting.
"Game Score Settings" (p. 186)
■ Screen display of the camera while recording the game score

text_image
HOME 2-1 VISITOR
GAME
0:00:25 [0:51]
REC
1 Team name and score
Team name can be set prior to recording. (use alphabets and numbers)
"Game Score Settings" (p. 186)
2 Game score recording icon
Transferring Videos (AVCHD format)
Transfer videos recorded in AVCHD format to the smartphone.
\- The video to be forwarded is converted to the following format.
Item Details System MP4 Video Code dec H. 264/MPEG-4 AVC Baseline Profile Resolution* Bit rate is indicated in ( ) 1280X720 (3.6Mbps)640X480 (1.5Mbps) Frame rate 30p Bit rate 3.6 Mbps or 1.5 Mbps Audio Coding system AAC
1 Start "Everio sync. 2" on the smartphone.

natural_image
Illustration of a hand holding a smartphone and a pen, no text or symbols present
\- Start the application after confirming that the smartphone is connected to this camera.
2 Select the connection type to the camera.

text_image
Everio sync.2
DIRECT MONITORING
CONNECT TO THE CAMERA
DIRECTLY.
YOU CAN USE THE GAME
SCORING FUNCTION.
INDOOR MONITORING
CONNECT VIA ACCESS POINT.
NEED TO REGISTER ACCESS
POINT.
OUTDOOR MONITORING
CONNECT VIA INTERNET.
NEED TO REGISTER ACCESS
POINT AND DDNS.
?
Demo
- Tap the current connection type.
• Recording screen appears.
3 Tap "Index".

text_image
Index
Monitor
←° PAUSE
Pan
Pan
Tele
Rec
Snapshot
Wide
Pause
Marking
Game Score
4 In the index screen, tap the desired images to transfer.

text_image
Monitor
Index
23:43
[00h07m18s]
22:43
[00h01m08s]
17:16
[00h02m10s]
14:19
[00h00m36s]
AVCHD
iFrame
Still Image
\- Confirm that the "AVCHD" tab is indicated in the lower part of the screen.
5 Files are displayed as a split files by certain lengths of time. Enter the check mark (①) to the files to transfer, and tap the transfer mark icon (②) on the lower right.

text_image
Back Transfer Manual
00:00:00 - 00:05:00
00:05:00 - 00:07:18
①
②
- Number of the selected image files is indicated next to the check mark in lower left.
- To set the length of video you are transferring, refer to the below instructions.
"Smartphone Application Settings" (p. 186)
6 Tap "TRANSFER".

text_image
YOU CAN TRANSFER VIDEOS
OR STILL IMAGES TO THE
SMARTPHONE
TRANSFER CANCEL
\- Tap "CANCEL" to cancel the operation.
7 "TRANSFER" starts.

text_image
PREPARING TO TRANSFER
1/1
1%
CANCEL
\- Tap "CANCEL" to cancel the operation.
8 After transferring is complete, tap "OK".

text_image
COMPLETED
OK
CHECK
SHARE
- To play back and check the video, tap "CHECK". (Android only)
- To upload the video, tap "SHARE". (Android only)
Tap the desired service, then proceed to the uploading process. To make use of a service, it is necessary to perform registration beforehand.
■ Transferring manually
You can set the length of transferred video.
1 Tap "MANUAL" in step 5.
2 At the start point, enter the starting time of the video.
Specify the lengths of the video by using the slider bar. (10 to 300 sec)
3 After confirming the setting, tap "TRANSFER", and then tap "TRANSFER" one more time.

text_image
Rack Transfer
START POINT 00h10m
+
+
10
-
10
Start point of the
video transfer
LENGTH OF VIDEO 60SEC
Length of the trans-
ferred video
TRANSFER
- Tap “+”-” to set the start point of the video transfer (minutes/seconds).
- Length of the transferred video can be adjusted by using the slider bar.
- The longer the length of the transferred video is set, the longer it takes to transfer the video.
Transferring Videos (iFrame format)
Transfer videos recorded in iFrame format to the smartphone. (Depending on the smartphone in use, videos may not be played back.)
\- Transferred videos are sent in the original file format.
1 Start "Everio sync. 2" on the smartphone.

natural_image
Illustration of a hand holding a smartphone with a pen, no text or symbols present
\- Start the application after confirming that the smartphone is connected to this camera.
2 Select the connection type to the camera.

text_image
Everio sync.2
DIRECT MONITORING
CONNECT TO THE CAMERA
DIRECTLY.
YOU CAN USE THE GAME
SCORING FUNCTION.
INDOOR MONITORING
CONNECT VIA ACCESS POINT.
NEED TO REGISTER ACCESS
POINT.
OUTDOOR MONITORING
CONNECT VIA INTERNET.
NEED TO REGISTER ACCESS
POINT AND DDNS.
?
Demo
- Tap the current connection type.
• Recording screen appears.
3 Tap "Index".

text_image
Index
Monitor
←←° PAUSE →
Pan
Pan
Tele
Rec
Snapshot
Wide
Pause
Marking
Game Score
4 Select "iFrame" from the tabs in the lower part of the screen.

text_image
Monitor
Index
19:50
[00h00m04s]
13:49
[00h00m08s]
11:00
[00h00m01s]
11:00
[00h00m01s]
AVCHD
iFrame
Still Image
- Tap "Monitor" to return to the monitor screen.
- Tap ✪ to move to the setting screen.
5 In the index screen, tap the desired images to transfer.

text_image
Monitor
Index
19:50
[00h00m04s]
13:49
[00h00m08s]
11:00
[00h00m01s]
11:00
[00h00m01s]
AVCHD
iFrame
Still Image
- Tap "Monitor" to return to the monitor screen.
- Tap ✪ to move to the setting screen.
6 Tap "TRANSFER".

text_image
YOU CAN TRANSFER VIDEOS
OR STILL IMAGES TO THE
SMARTPHONE
TRANSFER CANCEL
\- Tap "CANCEL" to cancel the operation.
7 "TRANSFER" starts.

text_image
PREPARING TO TRANSFER
1/1
1%
CANCEL
\- Tap "CANCEL" to cancel the operation.
8 After transferring is complete, tap "OK".

text_image
COMPLETED
OK
CHECK
SHARE
- To play back and check the video, tap "CHECK". (Android only)
- To upload the video, tap "SHARE". (Android only)
Tap the desired service, then proceed to the uploading process. To make use of a service, it is necessary to perform registration beforehand.
Transferring Still Images
You can transfer recorded still images to your smartphone.
If the aspect ratio of the original still image is 4:3, the image is reduced by 1600X1200 when transferred.
If the aspect ratio of the original still image is 16:9, the image is reduced by 1920X1080 when transferred.
1 Start "Everio sync. 2" on the smartphone.

natural_image
Illustration of a hand holding a smartphone and a pen, no text or symbols present
0 Start the application after confirming that the smartphone is connected to this camera.
2 Select the connection type to the camera.

text_image
Everio sync.2
DIRECT MONITORING
CONNECT TO THE CAMERA
DIRECTLY.
YOU CAN USE THE GAME
SCORING FUNCTION.
INDOOR MONITORING
CONNECT VIA ACCESS POINT.
NEED TO REGISTER ACCESS
POINT.
OUTDOOR MONITORING
CONNECT VIA INTERNET.
NEED TO REGISTER ACCESS
POINT AND DDNS.
?
Demo
0 Tap the current connection type.
0 Recording screen appears.
3 Tap "Index".

text_image
Index
Monitor
←° PAUSE
Pan
Pan
Tele
Rec
Snapshot
Wide
Pause
Marking
Game Score
4 Select the "Still Image" tab in the lower part of the screen, and tap the index screen.

text_image
Monitor Index
13:59
13:48
13:48
13:47
AVCHD iFrame Still Image
0 Tap "Monitor" to return to the monitor screen.
0 Tap Q to move to the setting screen.
5 Enter the check in the checkbox (A) to the still images to transfer, and tap the transfer mark icon (B) on the lower right.

text_image
Back
Transfer
13:59
13:48
13:48
13:47
1
- Tap "Monitor" to return to the monitor screen.
- Tap ⚙ to move to the setting screen.
6 Tap "TRANSFER".

text_image
YOU CAN TRANSFER VIDEOS
OR STILL IMAGES TO THE
SMARTPHONE
TRANSFER CANCEL
\- Tap "CANCEL" to cancel the operation.
7 "TRANSFER" starts.

text_image
PREPARING TO TRANSFER
1/1
1%
CANCEL
\- Tap "CANCEL" to cancel the operation.
8 After transferring is complete, tap "OK".

text_image
COMPLETED
OK
CHECK
SHARE
- To play back and check the still image, tap "CHECK". (Android only)
- To upload the still image, tap "SHARE". (Android only) Tap the desired service, then proceed to the uploading process. To make use of a service, it is necessary to perform registration beforehand.
Smartphone Application Settings
You can change the settings of the smartphone applications.
■ Common for Android and iOS
1 Tap

text_image
Index
Monitor
←° PAUSE
Pan
Pan
T
Tele
W
Wide
Rec
Pause
Snapshot
Marking
Game Score
2 Tap the desired setting.

text_image
SETTINGS
MONITOR
MONITORING
DISPLAY THE MONITOR SCREEN
PAN OPERATION SPEED
SET THE OPERATION SPEED OF THE
PAN OPERATION
LOC INFO TRANS INT
GPS SENDS LOCATION INFORMATION 15SEC
TO THE CAMERA WHEN USING DIRECT
MONITORING
VIDEO TRANSFER (AVCHD Index)
LENGTH 300SEC
RESOLUTION (pixel)
GAME SCORE
GAME SCORE SETTING
Item Details MONITORING Turns on off the monitoring function of the screen. (Enter a check mark to set to “ON”) PAN SPEED FOR OPERATING Select the panning speed of the pan cradle (optional) from high speed/low speed. LOC INFO TRANS INT Select the time interval for obtaining the GPS location information while the direct monitoring is in use. (Off - 15 SEC) VID LENGTH TO TRANS Set the length of video being transferred to the smartphone. (10 - 300SEC)Available for videos in AVCHD format only.
VID SIZE TO TRANS Select the resolution of the video being transferred to the smartphone. ("1280×720" or "640×360") Available for videos in AVCHD format only. GAME SCORE SETTING Enter the recording methods of the game score, as well as the team information. "Game Score Settings" (p. 186) URL Enter the URL of the camera that is connected to the smartphone via wireless network. HTTP AUTHORIZATION Set the user name and the password for INDOOR MONITORING/OUTDOOR MONITORING.The default username is "everio" (fixed) and the password is "0000".(can be changed from camera) CHANGE BACKGROUND COLOR Select the background. NOT TO SLEEP MODE Set to prevent the smartphone from entering into the sleep mode while the application is in use.(Enter a check mark to disactivate the sleep mode.) HELP Displays the help file. LICENSE AGREEMENT Displays the license agreement of the software. (Android only)
Memo :
\- When connecting to INDOOR MONITORING/OUTDOOR MONITORING, you will be prompted to enter the URL or HTTP authorization if they are not entered or entered incorrectly.
Game Score Settings
Enter the recording methods of the game score, as well as the team information.
■ Common for Android and iOS
1 Tap ♣.

text_image
Index
Monitor
←° | PAUSE
Pan
Pan
T
Tele
W
Wide
Rec
Pause
Snapshot
Marking
Game Score
2 Tap "GAME SCORE SETTING".

text_image
SETTINGS
MONITOR
MONITORING
DISPLAY THE MONITOR SCREEN
PAN OPERATION SPEED
SET THE OPERATION SPEED OF THE
PAN OPERATION
LOC INFO TRANS INT
GPS SENDS LOCATION INFORMATION 15SEC
TO THE CAMERA WHEN USING DIRECT
MONITORING
VIDEO TRANSFER (AVCHD Index)
LENGTH 300SEC
RESOLUTION (pixel)
GAME SCORE
GAME SCORE SETTING
3 Tap the desired setting.

text_image
GAME SCORE SETTING
TEAM LIST
SET THE TEAM NAME AND TEAM COLOR
SCORE BUTTON SETTING
YOU CAN CHANGE THE NUMBER OF
BUTTONS AND NUMBER TO BE ADDED IN
THE SETTING
CHANGE THE BACKGROU
PRIORITIZE THE SCORE
YOU CAN ENTER THE SCORE WITHIN 5
SECONDS AFTER MARKING
HELP
Item Details TEAM LIST Set the team name and the color.To display “HOME” and “VISITOR”, tap 1“TEAM LIST”.2“TEAM NAME” and “TEAM COLOR” can be set by tapping each button.3 Select “TEAM NAME” to display the screen for entering the team name. Tap the column to enter the team name, and press “OK”.4Select “TEAM COLOR” by tapping the desired color from the color palette.Tap the + button to add a new team. SCORE BUTTON SETTING Tap “Button Setting” to select up to 4 buttons. Each number indicates the score that can be added once.Select the button(s) depending on the type of the games. (1 button) (2 button) (3 button) (4 button)
CHANGE BACKGROUND COLOR Set the background color of the game score screen. PRIORITIZE THE SCORE The score can be entered within 5 seconds after the mark operation by selecting the checkbox. However, the marked position is changed when the score is registered. HELP Displays the help file.
Memo :
\- When registering the team name, the “\” mark being entered by the smartphone is displayed as “\” (backslash) on this camera.
Using the Wi-Fi Function from a Web Browser
You can connect to the camera and make use of the Wi-Fi function from the web browser of a computer.
• Indications on the screen
"Indications on the Screen" (p. 188)
Indications on the Screen
■ Recording Screen

text_image
To DETECT/MAIL SETTING Screen
To Still Image Index Screen
To Video Index Screen
Reload
Everio
JIVE
STARTING
10:40:00:00
STOP OFF
T
W
2.3.2.01
2.3.2.02
2.3.2.03
2.3.2.04
2.3.2.05
2.3.2.06
2.3.2.07
2.3.2.08
2.3.2.09
2.3.2.10
2.3.2.11
2.3.2.12
2.3.2.13
2.3.2.14
2.3.2.15
2.3.2.16
2.3.2.17
2.3.2.18
2.3.2.19
2.3.2.20
2.3.2.21
2.3.2.22
2.3.2.23
2.3.2.24
2.3.2.25
2.3.2.26
2.3.2.27
2.3.2.28
2.3.2.29
2.3.2.30
2.3.2.31
2.3.2.32
2.3.2.33
2.3.2.34
2.3.2.35
2.3.2.36
2.3.2.37
2.3.2.38
2.3.2.39
2.3.2.40
2.3.2.41
2.3.2.42
2.3.2.43
2.3.2.44
2.3.2.45
2.3.2.46
2.3.2.47
2.3.2.48
2.3.2.49
2.3.2.50
2.3.2.51
2.3.2.52
2.3.2.53
2.3.2.54
2.3.2.55
2.3.2.56
2.3.2.57
2.3.2.58
2.3.2.59
2.3.2.60
2.3.2.61
2.3.2.62
2.3.2.63
2.3.2.64
2.3.2.65
2.3.2.66
2.3.2.67
2.3.2.68
2, 1, 1, 1, 1, 1, 1, 1, 1, 1, 1, 1, 1, 1, 1, 1, 1, 1, 1, 1, 1, 1, 1, 1, 1, 1, 1, 1, 1, 1, 1, 1, 1, 1, 1
Stream Format Selection (click "SET" to apply)Select the video format when monitoring from a browser.

Full HD: 1920x1080 / MPEG-2 TS format
SD: 720x480 / MPEG-2 TS format
MotionJPEG: 640x360 / MotionJPEG format
Memo :
\- The full screen button is not displayed when the stream format is MotionJPEG.
Caution :
\- Features of the stream format are as follows:
Full HD/SD (MPEG-2 TS format)
\- Sound of the camera can be checked from the browser.
\- Recording operations cannot be performed from the browser.
MotionJPEG
\- Sound of the camera cannot be played back from the browser.
\- Recording and zoom operations can be performed from the browser.
\- The monitor's image stops automatically after monitoring is performed continuously for 12 hours in Full HD or SD. (To resume, press the reload button)
\- To use Full HD or SD, it is necessary to install Media Player 12 in advance.
\- Lagging of the screen may be caused by the network speed or computer performance.
\- If lagging is severe, reload the screen regularly.
(It may take some time for the screen to be displayed after reloading.)
\- For Full HD, make use of a computer with the following system requirements.
CPU Intel Core 2 Duo 2 GHz or higher
2 GB memory or higher
■ Video index (AVCHD)

text_image
Everio
JVC
40 CMX
R145
LTD:700.6178
V210
Fan...
600 Max
< 73 >
90°/°C" 50"
(左上) 90°/°C" 50"
(右上) 90°/°C" 50"
(左下) 90°/°C" 50"
(右下) 90°/°C" 50"
(左上) 90°/°C" 50"
(右上) 90°/°C" 50"
(左下) 90°/°C" 50"
(右下) 90°/°C" 50"
■ Video index (iFrame)

text_image
Everio
40:00
JVC
JVC
27:10
fun.
50:00
20(3/3)
1:16:25
20(3/3)
1:16:25
50:00
• To download a video, click on the thumbnail.
■ Still Image Index Screen

text_image
Everio
JVC
V2HD
Fm.
V10000
V10000
V10000
V10000
V10000
V10000
V10000
V10000
V10000
V10000
V10000
V10000
V10000
V10000
V10000
V2P 2P 2P 2P
V2P 2P 2P 2P
V2P 2P 2P 2P
V2P 2P 2P 2P
V2P 2P 2P 2P
V2P 2P 2P 2P
V2P 2P 2P 2P
V2P 2P 2P 2P
V2P 2P 3P 3P
V2P 2P 3P 3P
V2P 2P 3P 3P
V2P 2P 3P 3P
V2P 2P 3P 3P
V2P 2P 3P 3P
V2P 2P 3P 3P
V2P 2P 3P 3P
V2P 2P V1 P1 P1 P1 P1 P1 P1 P1 P1 P1 P1 P1 P1 P1 P1 P1 P1 P1 P1 P1 P1 P1 P1 P1 P1 P1 P1 P1 P1 P1 P1 P1 P1 P1 P1 P1 P1 P1 P1 P1 P1 P1 P1 P1 P1 P1 P1 P1 P1 P1 P1
\- To download a still image, click on the thumbnail.
■ DETECT/MAIL SETTING Screen
Notification mail settings such as detection method and recipient's e-mail address can be changed even when the camera is out of reach.
Registered e-mail addresses of recipients in Everio (Up to 8)
\*A check mark appears on the selected address.

text_image
Everio
10 DDR
N/C
D:\DATA\ID.
JVC
•
•
•
•
•
•
•
•
•
•
•
•
•
•
•
•
•
•
•
•
•
•
•
•
•
•
•
•
•
•
•
•
•
•
•
•
•
•
•
•
•
•
•
•
•
•
•
•
•
•
-
Notification Mail Settings


text_image
Detection Interval

(click "REG." to apply)
Troubleshooting
Direct Monitoring
Trouble Action Unable to connect to camera.(URL required) Check whether the Wi-Fi connection is established successfully.Check whether Wi-Fi is connected to “DIRECT-**EVERIO”.Check whether the smartphone (or computer) is connected to the camera.Try again after powering off and on the camera and the terminal (smartphone or computer). Unable to browse internet on the computer when it is connected to the camera. The camera operates as an access point during direct monitoring.Most computers (or smartphones) cannot be connected to multiple access points at the same time.As such, internet browsing becomes temporarily unavailable if the computer (or smartphone) has been connected to the internet via wireless LAN.Reconnect the computer to the wireless LAN router that is usually used for internet connection. If the computer connects to the camera unintentionally, remove the camera connection from the computer. (The registered name is “DIRECT-**EVERIO”.)Stop direct monitoring on the camera. Video or audio is interrupted or delayed If the network speed is slow, videos and audio sound may be interrupted, or delay may become significant(For web browser) Lagging may become significant due to the performance of the computer.If the stream format is set to “Full HD”, change to “SD” or “Motion-JPEG” and try again.“Wi-Fi Specifications” (p. 196)(For web browser) If lagging is severe, reload the screen regularly.(For smartphone) Try to change the place and time to locate an environment with good signal strength. The unit turns off automatically. To prevent the situation of forgetting to turn off the power, this unit will turn off automatically after 10 days of continuous usage. Unable to set focus. When not monitoring from a smartphone (or computer), the focus of the camera is fixed.Even when monitoring from a smartphone (or computer), the focus of the camera will be fixed if not operated for more than 3 hours. (Focus works again when the camera is operated.) Connection gets disconnected, or a “UNABLE TO CONNECT” message is displayed Establish connection again at a place with good signal strength. Transmission speed may drop, or connection may fail if the devices are placed too far away from each other, when there are objects in between, or when microwave ovens or other wireless devices are in use.If connection cannot be established again, restart the terminal (smartphone or computer).If the camera is too far away from the smartphone (or computer), connection for direct monitoring may be difficult to be established depending on the environment. In this case, connect via an access point (wireless LAN router).
Access Point (Wireless LAN Router)
Trouble Action Unable to find an access point (wireless LAN router). Check whether the distance from the access point (wireless LAN router) is too far, or whether there are shielding materials in between.If the access point (wireless LAN router) in use goes into the SSID stealth mode, perform manual registration or disable the stealth mode temporarily before registering.In an environment with multiple access points, you may not be able to find the desired access point through searching. In this case, add the access point manually. Unable to connect to access point (wireless LAN router). Check that the password is correct.For manual connection, check that the SSID or authentication method is correct. Unsure of which access point (wireless LAN router) to use. If the settings of the access point (wireless LAN router) have never been changed from their default values check the following.- Check whether an adhesive label indicating the initial settings is attached to the body of the access point (wireless LAN router).- Check for the default settings in the instruction manual of the access point (wireless LAN router). Unsure of password for the access point (wireless LAN router). Refer to the instruction manual of the access point (wireless LAN router) in use. Unable to connect via Wi-Fi Protected Setup (WPS). Simple connection methods other than WPS are not supported. Conduct a search for the access point to connect.Turn off the power of the camera, then try again.
INDOOR MONITORING (connection at home)
Trouble Action Unable to connect to camera.(URL required) Check whether the Wi-Fi connection is established successfully.Check to ensure that the camera and the terminal (smartphone or computer) are connected to the same access point.Try again after powering off and on the camera and the terminal (smartphone or computer). Unsure of URL to access from a web browser. After INDOOR MONITORING is started, tap “CAMERA NETWORK INFO.” shown on the camera’s screen. Enter the address as shown in “URL(LAN):” into the web browser to access it. No image and sound when accessing from a web browser. If you have installed third-party video players, images and sounds may not be played back properly.If the stream format is set to “Motion-JPEG” when transferring to the web browser, no sound will be output from the browser.If recording of the video is in progress, no sound will be output from the browser. Unable to access the entered URL. (cannot be found) Check that the camera is properly connected to an access point (wireless LAN router). (appears on the camera’s screen.)Check that the computer is properly connected to an access point (wireless LAN router). Connection should be possible if it is connected to the internet.Check that the URL is correct. Unable to access the entered URL.(password required) Enter your username and password.The username is “everio” (fixed) and the default password is “0000” (can be changed). Video or audio is interrupted or delayed If the network speed is slow, videos and audio sound may be interrupted, or delay may become significant(For web browser) Lagging may become significant due to the performance of the computer.If the stream format is set to “Full HD”, change to “SD” or “Motion-JPEG” and try again.“Wi-Fi Specifications” (p. 196)(For web browser) If lagging is severe, reload the screen regularly.(For smartphone) Try to change the place and time to locate an environment with good signal strength. The unit turns off automatically. To prevent the situation of forgetting to turn off the power, this unit will turn off automatically after 10 days of continuous usage. Unable to set focus. When not monitoring from a smartphone (or computer), the focus of the camera is fixed.Even when monitoring from a smartphone (or computer), the focus of the camera will be fixed if not operated for more than 3 hours. (Focus works again when the camera is operated.) Connection gets disconnected, or a “UNABLE TO CONNECT” message is displayed Establish connection again at a place with good signal strength. Transmission speed may drop, or connection may fail if the devices are placed too far away from each other, when there are objects in between, or when microwave ovens or other wireless devices are in use.If connection cannot be established again, restart the terminal (smartphone or computer). Screen does not refresh or remains black Check if the camera and the access point are properly connected.Images cannot be detected on the terminal (smartphone or computer) if the camera is disconnected from the access point halfway through.
OUTDOOR MONITORING (connection from the Internet)
Trouble Action Unsure of URL to access from a web browser. After OUTDOOR MONITORING is started, tap “CAMERA NETWORK INFO.” shown on the camera’s screen.Enter the address as shown in “URL(WAN):” into the web browser to access it. The URL (WAN) does not appear in the network information. The URL (WAN) will not appear if dynamic DNS is not set on the camera.To set dynamic DNS, perform the following steps.1. Obtain an account with JVC dynamic DNS service using your computer. (URL?)2. Log in to JVC DNS and obtain the dynamic DNS service. (How?)3. Set the obtained dynamic DNS username and password on the camera.*Only the JVC dynamic DNS service can be set on this camera.The URL (WAN) will not appear if dynamic DNS is not set on the camera.To set dynamic DNS, perform the following steps.1. Obtain an account with JVC dynamic DNS service using your computer.https://dd3.jvckenwood.com/user/2. Log in to JVC DNS and obtain the dynamic DNS service.3. Set the obtained dynamic DNS username and password on the camera.*Only the JVC dynamic DNS service can be set on this camera. Unable to access the entered URL. (cannot be found) This function cannot be used in an environment with two or more routers.Check that the dynamic DNS username and password are correct.The router in use is not compatible with UPnP, or UPnP is turned off. Check the instruction manual of the router in use, and turn on UPnP.The “UPnP” of the camera is set to “OFF”. (By default, it is set to “ON”).Set “UPnP” to “ON”.Depending on the terms of service with your provider, it may not be possible to obtain a global IP address.“Confirming global IP address” (p. 140)Check whether a terminal that uses port 80 (such as web servers) has been set in the network, or if a specific terminal has been set to use port 80 on the router. In such case, change the “HTTP Port” of the camera.“Changing the HTTP Port(DIRECT MONITORING/INDOOR MONITORING/OUTDOOR MONITORING)” (p. 155)Try again after powering off and on the camera and the terminal (smartphone or computer). Video or audio is interrupted or delayed If the network speed is slow, videos and audio sound may be interrupted, or delay may become significant(For web browser) Lagging may become significant due to the performance of the computer.If the stream format is set to “Full HD”, change to “SD” or “Motion-JPEG” and try again.“Wi-Fi Specifications” (p. 196)(For web browser) If lagging is severe, reload the screen regularly.(For smartphone) Try to change the place and time to locate an environment with good signal strength. The unit turns off automatically. To prevent the situation of forgetting to turn off the power, this unit will turn off automatically after 10 days of continuous usage. Unable to set focus. When not monitoring from a smartphone (or computer), the focus of the camera is fixed.Even when monitoring from a smartphone (or computer), the focus of the camera will be fixed if not operated for more than 3 hours. (Focus works again when the camera is operated.) Connection gets disconnected, or a “UNABLE TO CONNECT” message is displayed Establish connection again at a place with good signal strength. Transmission speed may drop, or connection may fail if the devices are placed too far away from each other, when there are objects in between, or when microwave ovens or other wireless devices are in use.If connection cannot be established again, restart the terminal (smartphone or computer). Screen does not refresh or remains black Check if the camera and the access point are properly connected.Images cannot be detected on the terminal (smartphone or computer) if the camera is disconnected from the access point halfway through. “×UPnP” is displayed. This appears when UPnP has failed. Check whether the wireless LAN router in use is compatible with UPnP.(Refer to the instruction manual of the wireless LAN router in use, or consult the manufacturer of the routerWhen the wireless LAN router in use is compatible with UPnP, turn on the UPnP function.If the icon does not disappear even when the UPnP function is enabled, turn off and on the power of the wireless LAN router in use as well as the camera, then try again. Unable to connect although “×UPnP” is displayed. When “UPnP” is set to “OFF”, “×UPnP” will not appear. In such cases, set “UPnP” to “ON”.When port 80 has been used by other devices via UPnP, connection cannot be established. Reconnect the camera.
- When the "HTTP Port" of the camera (set to "80" by default) is used by another device, connection cannot be established. Change the "HTTP Port" of the camera.
"Changing the HTTP Port
(DIRECT MONITORING/INDOOR MONITORING/OUTDOOR MONITORING)" (p. 155)
E-mail (Notification Mail, Video Mail)
Trouble Action Unable to send e-mails. Check that the settings of the e-mail server are correct.Check that the settings of the sender's e-mail address are correct.Check that the username and password are correct.If you are using an e-mail service that is not from your provider, it may be necessary to change the SMTP settings.Some free e-mail services from web browsers or e-mail softwares (SMTP) may have default SMTP settings that do not allow e-mails to be sent.Change the SMTP settings to allow sending of e-mails before use. Sent e-mails are not received. Check whether notifications indicating errors have been sent to the sender's e-mail address. (Make use of a computer or similar devices as it is not possible to check from the camera.)- If no notifications are received: Refer to “Unable to send e-mails.” and adjust the settings accordingly.- If notifications are received: Check the content of the notification.*Note: Do not continue sending e-mails with the same settings if you receive error notifications. Depending on the provider, you may be marked as a sender of spam (junk mail). Unable to attach images to e-mails. Depending on the provider, some attached files may be deleted. Make use of other free e-mail services. The unit turns off automatically. To prevent the situation of forgetting to turn off the power, this unit will turn off automatically after 10 days of continuous usage. Unable to set focus. (For DETECT/MAIL SETTING) While on standby for notification mails, the focus is fixed. Perform the camera settings first, then enable notification mails.Focus may not be set correctly if the notification mails start before camera settings are made. In this case, disable notification mails temporarily, then enable it again.
Vide/Still Image Transmission
Trouble Action Unable to transfer videos and still images to smartphone (or computer). • Check the amount of remaining free space in the destination medium (smartphone or computer).
Wi-Fi Specifications
Wi-Fi Specifications
Item Details Wireless LAN Standard IEEE802.11b/g/n (2.4GHz band) Wi-Fi security Encryption: WEP, WPA, WPA2 *WPA and WPA2 are supported only by the personal mode (PSK).
DIRECT MONITORING / INDOOR MONITORING / OUTDOOR MONITORING
■ When Using Everio sync. 2
Item Details Supported Terminals iPhone/iPad/iPod touch iOS 5.1 or laterAndroid: Android 2.3 or laterThere is no guarantee that the operations will work with all terminals.“Everio sync. 2” for iPhone/iPad cannot be used when the iPhone/iPad is connected to the mobile phone network.To make use of this feature, connect to the camera or an access point via Wi-Fi.A network environment with a minimum line speed of about 5.3 Mbps is recommended for both the camerasending the data and the smartphone terminal receiving the data.If the network speed is too low, video images may appear jumpy, or audio sound may be interrupted or delayed. Monitor Screen Video: JPEG 640x360 max. 15 fpsAudio: linear PCM 8kHz 16 bits 1ch Video Transmission Video: MP4-compliant H 264 Baseline Profile 640x360 or 1280x720 30pAudio: AAC 48kHz 16 bits 2ch Still Image Transmission JPEG format
■ When Using Web Browser
Item Details Operating Environment Windows 7: Internet Explorer 9 or a later version, and Windows Media Player 12 or a later version are installedFor Full HD, make use of a computer with the following system requirements.- CPU: Intel Core 2 Duo 2 GHz or higher- Memory: 2 GB or higherA network environment with the following line speed is recommended for both the camera sending the data and the PC receiving the data.- MotionJPEG: approx. 1.7 Mbps or higher- Full HD: approx. 10 Mbps or higher- SD: approx. 3 Mbps or higherIf the network speed is too low, video images may appear jumpy, or audio sound may be interrupted or delayed. Monitor Screen MotionJPEGVideo: JPEG 640x360 max. 5 fpsAudio: nilFull HDVideo: MPEG-2 TS compliant H.264 High Profile 1920x1080 60iAudio: AAC 48kHz 16 bits 2chSDVideo: MPEG-2 TS compliant H.264 Main Profile 720x480 60iAudio: AAC 48kHz 16 bits 2ch Video Transmission MPEG-2TS format (no conversion) Still Image Transmission JPEG format (no conversion)
VIDEO MAIL
Item Details Video MP4-compliant H.264 Baseline Profile 640x360 30p Audio AAC 48kHz 16 bits 2ch Time Max. 15 seconds
DETECT/MAIL
Item Details Still Image Transmission JPEG 640x360
DIRECT MONITORING
You can monitor images being captured by Everio to your smartphone or PC. While you are busy, you can monitor your baby who is sleeping in the room next door.
INDOOR MONITORING
Images being captured by Everio can be set to your PC or smartphone when your children return home, via the wireless LAN router.
OUTDOOR MONITORING
Images being captured by Everio can be sent to the grandparents' PC or smartphone, by the wireless LAN (Wi-Fi spot) via the Internet.
DETECT/MAIL
When your child returns home while you are away, a still image is sent to you by e-mail.
VIDEO MAIL
Let's send video messages (Good morning, Good night) to your father or husband who is on the business trip.
TV MONITORING
A DLNA compatible TV may be used to display and play back the images.
DIRECT MONITORING
Setting (Once setting is done, start from the "Regular Operation" below)
Create a QR code.
■ Enter values in the required items for direct monitoring.
- Password: set a password to connect this camera to the device by direct monitoring. (8 to 63 characters (64 characters in case of hexadecimal))
- Enforced Group Owner: setting used to enable a connection with a device that does not support Wi-Fi Direct. Normally set to "ON".
- HTTP Port: Normally set to "80".
Display the screen for reading the QR code.
1 Tap "MENU".
(Operation on this camera)

text_image
M
WT
D
PLAY REC MENU
• The top menu appears.
2 Tap the "Wi-Fi" (💡) icon.
(Operation on this camera)

text_image
TOP MENU
?
3 Tap > on the lower right of the screen.
(Operation on this camera)

text_image
Wi-Fi
智能家庭管理器
智能家庭管理器
智能家庭管理器
智能家庭管理器
智能家庭管理器
智能家庭管理器
4 Tap "COMMON Wi-Fi SETTING".
(Operation on this camera)

text_image
Wi-Fi
网络连接器
Wi-Fi
网络连接器
5 Tap "SET FROM QR CODE".

text_image
COMMON WI-FI SETTING
SET FROM QR CODE
6 Tap "EXECUTE".

text_image
SET FROM QR CODE
Wi-Fi SETTING CAN BE SET
USING WEB USER GUIDE OR
SMART USER GUIDE
EXECUTE
STOP
Read a QR code.
1 Read a QR code.
(Operation on this camera)

text_image
PLEASE READ QR CODE
2 Tap "YES".

text_image
SET FROM QR CODE
CHANGE THE SETTING OF
DIRECT MONITORING
PREVIOUS SETTING WILL BE
OVERWRITTEN
YES NO
3 Tap "OK".

text_image
SET FROM QR CODE
SETTINGS COMPLETED
OK NEXT
- Step 2-E is displayed.
- Set contents are saved.
■ Regular Operation
Connecting the Smartphone to the Camera Wirelessly
■ Connection by entering the Wi-Fi password
1 Tap "MENU".
(Operation on this camera)
Set the camera to the recording mode.

text_image
M
WT
D
<< PLAY REC MENU
• The top menu appears.
2 Tap the "Wi-Fi" (💡) icon. (Operation on this camera)

text_image
TOP MENU
?
3 Tap the "DIRECT MONITORING" (☐) icon in the "Wi-Fi" menu. (Operation on this camera)

text_image
Wi-Fi
智能家庭管理器
智能家庭管理器
智能家庭管理器
智能家庭管理器
智能家庭管理器
智能家庭管理器
智能家庭管理器
4 Tap "START" (→). (Operation on this camera)

text_image
DIRECT MONITORING
→
ON
OK
OK
OK
HTTP
OK
- When iFrame is selected for "VIDEO REC FORMAT", the following display appears and recording mode is switched to the 60i mode in AVCHD.
- This display disappears automatically after approximately 3 seconds, but disappears immediately if the screen is tapped.

text_image
DIRECT MONITORING
VIDEO RECORDING AT 60i
WHEN USING Wi-Fi
5 Check the SSID and the PASS being displayed on the screen of the camera.

text_image
DIRECT MONITORING
SET UP WI-FI SETTING ON
CONNECTING DEVICE
SSID:******
PASS:******
STOP
WPS
6 Select the SSID in step 5 from the Wi-Fi network selection screen of your smartphone, and enter the PASS on the password screen.
(Operation on the smartphone (or computer))

natural_image
Illustration of a hand holding a smartphone with a stylus, no text or symbols present
\- For details on connecting your smartphone (or computer) to a Wi-Fi network, please refer to the instruction manual of the phone terminal in use.
7 A connection is established and 🔔 appears on the camera's screen.

natural_image
Close-up of purple flowers with green foliage, no visible text or symbols
■ Connection by Wi-Fi Protected Setup (WPS)
1 Tap "MENU". (Operation on this camera)
Set the camera to the recording mode

text_image
M
WT
D
←PLAY
REC
MENU
• The top menu appears.
2 Tap the "Wi-Fi" (💡) icon. (Operation on this camera)

text_image
TOP MENU
?
3 Tap the "DIRECT MONITORING" (☐) icon in the "Wi-Fi" menu. (Operation on this camera)

text_image
Wi-Fi
智能家庭管理
智能家庭管理
智能家庭管理
智能家庭管理
智能家庭管理
智能家庭管理
4 Tap "START" (→). (Operation on this camera)

text_image
DIRECT MONITORING
?
- When iFrame is selected for "VIDEO REC FORMAT", the following display appears and recording mode is switched to the 60i mode in AVCHD.
- This display disappears automatically after approximately 3 seconds, but disappears immediately if the screen is tapped.

text_image
DIRECT MONITORING
VIDEO RECORDING AT 60i
WHEN USING Wi-Fi
5 Tap "WPS".
(Operation on this camera)

text_image
DIRECT MONITORING
SET UP WI-FI SETTING ON
CONNECTING DEVICE
SSID:******
PASS:******
STOP
WPS
6 Activate WPS on the smartphone (or computer) within 2 minutes. (Operation on the smartphone (or computer))

natural_image
Illustration of a hand holding a smartphone with a pen inserted (no text or symbols visible)
\- To activate WPS, refer to the instruction manual of the device in use.
7 A connection is established and 🔔 appears on the camera's screen.

natural_image
Close-up of purple iris flowers with green foliage, captured in a photo editing interface (no text or symbols on the flower image itself)
Monitoring the Images from a Smartphone (or Computer)
■ Smartphone (Android / iPhone)
Memo :
\- Prior to use this function, a smartphone application needs to be installed on the smartphone.
"Installing Smartphone Applications" (p. 175)
1 Start "Everio sync. 2" on the smartphone after setting DIRECT MONITORING.

natural_image
Illustration of a hand holding a smartphone with a pen, no text or symbols present
2 Tap "DIRECT MONITORING".

text_image
Everio sync.2
DIRECT MONITORING
CONNECT TO THE CAMERA
DIRECTLY.
YOU CAN USE THE GAME
SCORING FUNCTION.
INDOOR MONITORING
CONNECT VIA ACCESS POINT.
NEED TO REGISTER ACCESS
POINT.
OUTDOOR MONITORING
CONNECT VIA INTERNET.
NEED TO REGISTER ACCESS
POINT AND DDNS.
?
Demo
3 The recording screen is displayed.

text_image
Index
Monitor
PAUSE
Tele
Rec
Snapshot
Wide
Pause
Marking
Game Score
4 Operate from a smartphone

natural_image
Illustration of a hand holding a smartphone and a camera with sound waves (no text or symbols)
\- How to operate from a smartphone "Using Smartphone Applications" (p. 175)
■ Computer (Windows 7)
1 Tap the URL button shown on the camera's screen. (displayed when the computer and the camera are connected wirelessly.)

natural_image
Close-up of purple iris flowers with green foliage, captured under a photo editing interface (no text or symbols on the flower image itself)
\- The URL for the computer to connect to appears.
2 Check the URL being displayed on the camera screen, which starts from "http://".

text_image
CAMERA NETWORK INFO.
URL(LAN):http://****************/
****************/
QUIT
\- After checking the URL, tap "QUIT" to return to the previous screen.
3 Start Internet Explorer (web browser) on the computer and enter the URL.

text_image
1000CDBYK
INDOOR MONITORING
Setting (Once setting is done, start from the “Regular Operation” below)
Create a QR code.
■ Enter values in the required items for indoor monitoring.
- Password: set a password to connect this camera to the device via access point. (Not more than 8 characters)
- HTTP Port: Normally set to "80".
Display the screen for reading the QR code.
1 Tap "MENU". (Operation on this camera)

text_image
M
WT
D
PLAY REC MENU
• The top menu appears.
2 Tap the "Wi-Fi" (💡) icon. (Operation on this camera)

text_image
TOP MENU
?
3 Tap > on the lower right of the screen. (Operation on this camera)

text_image
Wi-Fi
搜索数据源
搜索数据源
搜索数据源
搜索数据源
搜索数据源
搜索数据源
搜索数据源
搜索数据源
搜索数据源
搜索数据源
搜索数据源
搜索数据源
搜索数据源
搜索数据源
搜索数据源
搜索数据源
搜索数据源
搜索数据源
搜索数据源
搜索数据源
搜索数据源
搜索数据源
搜索数据源
搜索数据源
搜索数据源
搜索数据源源
搜索数据源源
搜索数据源源
搜索数据源源
搜索数据源源
搜索数据源源
搜索数据源源
搜索数据源源
搜索数据源源
搜索数据源源
搜索数据源源
搜索数据源源
搜索数据源源
搜索数据源源
搜索数据源源
搜索数据源源
搜索数据源源
搜索数据源源
搜索数据源源
搜索数据源源
搜索数据源源
搜索数据源源
搜索数据源源
搜索数据源源
搜索数据源源
搜索数据源
4 Tap "COMMON Wi-Fi SETTING". (Operation on this camera)

text_image
Wi-Fi
Wi-Fi
5 Tap "SET FROM QR CODE".

text_image
COMMON WI-FI SETTING
SET FROM QR CODE
6 Tap "EXECUTE".

text_image
SET FROM QR CODE
Wi-Fi SETTING CAN BE SET
USING WEB USER GUIDE OR
SMART USER GUIDE
EXECUTE
STOP
Read a QR code.
1 Read a QR code.
(Operation on this camera)

text_image
PLEASE READ QR CODE
2 Tap "YES".

text_image
SET FROM QR CODE
CHANGE THE SETTING OF
INDOOR MONITORING
PREVIOUS SETTING WILL BE
OVERWRITTEN
YES NO
3 Tap "OK".

text_image
SET FROM QR CODE
SETTINGS COMPLETED
OK NEXT
- Step 2-⑤ is displayed.
- Set contents are saved.
Registering the access points (wireless LAN router) to this unit
■ Wi-Fi Protected Setup (WPS) Registration
1 Tap "MENU". (Operation on this camera)

text_image
M
WT
D
<
• The top menu appears.
2 Tap the "Wi-Fi" (💡) icon. (Operation on this camera)

text_image
TOP MENU
?
3 Tap > on the lower right of the screen. (Operation on this camera)

text_image
Wi-Fi
智能家庭健康
智能家庭健康
智能家庭健康
智能家庭健康
智能家庭健康
智能家庭健康
智能家庭健康
4 Tap "COMMON Wi-Fi SETTING". (Operation on this camera)

text_image
Wi-Fi
智能家庭智能
Wi-Fi
5 Tap "ACCESS POINTS". (Operation on this camera)

text_image
COMMON WI-FI SETTING
ACCESS POINTS
6 Tap "ADD". (Operation on this camera)

text_image
ACCESS POINTS
ADD
7 Tap "EZ REGISTRATION WPS". (Operation on this camera)

text_image
ADD
EZ REGISTRATION WPS
[ ] [ ] [ ] [ ] [ ] [ ] [ ] [ ] [ ] [ ] [ ] [ ] [ ] [ ] [ ] [ ] [ ] [ ] [ ] [ ] [ ] [ ] [ ] [ ] [ ] [ ] [ ] [ ] [ ] [ ] [ ] [ ] [ ] [ ] [ ] [ ] [ ] [ ] [ ] [ ] [ ] [ ] [ ] [ ] [ ] [ ] [ ] [ ] [ ] [ ] [ ]
8 Activate WPS of the access point (wireless LAN router) within 2 minutes.
• To activate WPS, refer to the instruction manual of the device in use.
9 After registration is complete, tap "OK" on the camera's screen. (Operation on this camera)

text_image
REGISTERED
SSID:******
ENCRYPTION METHOD
WPA2
OK
■ Search the access point, and select from the list.
Set the name (SSID) of the access point (wireless LAN router) and the password beforehand.
1 Tap "MENU".
(Operation on this camera)

text_image
M
WT
D
← PLAY
REC
MENU
• The top menu appears.
2 Tap the "Wi-Fi" (💡) icon. (Operation on this camera)

text_image
TOP MENU
?
3 Tap > on the lower right of the screen. (Operation on this camera)

text_image
Wi-Fi
智能家庭智能
智能家庭智能
智能家庭智能
智能家庭智能
智能家庭智能
智能家庭智能
智能家庭智能
4 Tap "COMMON Wi-Fi SETTING". (Operation on this camera)

text_image
Wi-Fi
Wi-Fi
5 Tap "ACCESS POINTS". (Operation on this camera)

text_image
COMMON Wi-Fi SETTING
ACCESS POINTS
[兼容 要推荐] [兼容 要推荐] [兼容 要推荐]
6 Tap "ADD". (Operation on this camera)

text_image
ACCESS POINTS
ADD
7 Tap "SEARCH". (Operation on this camera)

text_image
ADD
SEARCH
1.000 2.000 3.000
1.000 2.000 3.000
1.000 2.000 3.000
\- The search results appear on the camera's screen.
8 Tap the name (SSID) of the desired access point from the list of search results.
(Operation on this camera)

text_image
SEARCH
SEARCH AGAIN
9 Register a password.
(Operation on this camera)

text_image
PASSWORD
A/a/1 . @ ABC DEF DELETE
← GHI JKL MNO →
PQRS TUV WXYZ
SET - + CANCEL
\- Tap on the on-screen keyboard to enter characters. The character changes with every tap.
"ABC", for example, enter "A" by tapping once, "B" by tapping twice, or "C" by tapping 3 times.
- Tap "DELETE" to delete a character.
- Tap "CANCEL" to exit.
- Tap "A/a/1" to select character input type from upper case letter, lower case letter, and number.
- Tap or to move one space to the left or right.
- The password is not required if the wireless LAN router is not security protected.
10 After registration is complete, tap "OK" on the camera's screen. (Operation on this camera)

text_image
REGISTERED
SSID:******
ENCRYPTION METHOD
WPA2
OK
\- Other methods, such as "Manual Registration" and "WPS PIN Registration" are also available. Refer to the following link for details. "Registering the Access Points of the Camera to Connect (ACCESS POINTS)" (p. 164)
Connecting the smartphone (or computer) to the access point (wireless LAN router)
- Connect the smartphone (or computer) to the access point (wireless LAN router) at home.
- This setting is unnecessary if the smartphone (or computer) has already been connected to the access point (wireless LAN router) at home.
■ Regular Operation
Monitoring the images by connecting the smartphone and the camera
■ Operation on this camera
1 Tap "MENU".
(Operation on this camera)

text_image
M
WT
D
PLAY REC MENU
• The top menu appears.
2 Tap the "Wi-Fi" (💡) icon. (Operation on this camera)

text_image
TOP MENU
?
3 Tap "INDOOR MONITORING" (Operation on this camera)

text_image
Wi-Fi
智能家庭智能
智能家庭智能
智能家庭智能
智能家庭智能
智能家庭智能
智能家庭智能
智能家庭智能
4 Tap "START" (→). (Operation on this camera)

text_image
INDOOR MONITORING
HTTP
网络数据管理器
网络数据管理器
网络数据管理器
5 Start making a connection. (Operation on this camera)

text_image
INDOOR MONITORING
CONNECTING
SSID:******
STOP
\- Name (SSID) of the access point (wireless LAN router) in connection is displayed.
6 The following is displayed when the camera is connected to the access point.

natural_image
Close-up of purple iris flowers with green foliage, captured in a photo editing interface (no text or symbols on the flower image itself)
\- Tap "URL" to display the URL required for connecting the camera from browser.
■ Operation on the smartphone
Memo :
- Prior to use this function, a smartphone application needs to be installed on the smartphone.
"Installing Smartphone Applications" (p. 175)
1 Start "Everio sync. 2" on the smartphone after setting "INDOOR MONITORING".

natural_image
Illustration of a hand holding a smartphone with a pen, no text or symbols present
\- Tap "START" in INDOOR MONITORING on the camera to start.
2 Tap "INDOOR MONITORING".

text_image
Everio sync.2
DIRECT MONITORING
CONNECT TO THE CAMERA
DIRECTLY.
YOU CAN USE THE GAME
SCORING FUNCTION.
INDOOR MONITORING
CONNECT VIA ACCESS POINT.
NEED TO REGISTER ACCESS
POINT.
OUTDOOR MONITORING
CONNECT VIA INTERNET.
NEED TO REGISTER ACCESS
POINT AND DDNS.
?
Demo
3 The recording screen is displayed.

text_image
Index
Monitor
PAUSE
Tele
Rec
Snapshot
Wide
Pause
Marking
Game Score
• How to operate from a smartphone
"Using Smartphone Applications" (p. 175)
■ Monitoring from the computer (Windows7)
1 Tap the URL button shown on the camera's screen. (displayed when the computer and the camera are connected wirelessly.)

natural_image
Close-up of purple iris flowers with green foliage, no visible text or symbols
• The URL for the computer to connect to appears.
2 Check the URL being displayed on the camera screen, which starts from "http://".

text_image
CAMERA NETWORK INFO.
URL(LAN):http://**********
**********/
QUIT
\- After checking the URL, tap "QUIT" to return to the previous screen.
3 Start Internet Explorer (web browser) on the computer and enter the URL.

text_image
SOME DRIN
4 Log in with your username and password.
- The username is "everio" and the default password is "0000".
"Changing the Settings" (p. 153)
• Operations from the Web browser
"Using the Wi-Fi Function from a Web Browser" (p. 188)
OUTDOOR MONITORING
Setting (Once setting is done, start from the “Regular Operation” below)
Obtaining a Dynamic DNS Account
By obtaining a dynamic DNS account, this unit may be used on the web as usual even if the IP address changes when making an access to this unit via internet.
\- Only the JVC dynamic DNS service can be set on this camera.
To obtain (register) an account, perform the following steps.
1 Access the following URL from a browser and register for an account. (Operation on a computer or smartphone)
https://dd3.jvckenwood.com/user/
Set your e-mail address as the username.
2 Check that you have received a confirmation e-mail to the address used in registration, and access the URL stated in the e-mail.
(Operation on a computer or smartphone)
3 Set the username and password used in registration on the camera. (Operation on this camera)
"Setting Dynamic DNS on this Camera (OUTDOOR MONITORING)" (p. 158)
4 Execute OUTDOOR MONITORING. (Operation on this camera)
If "OUTDOOR MONITORING" is executed while dynamic DNS settings are enabled, the camera will access the dynamic DNS server.
5 Tap "CAMERA NETWORK INFO." to check that the URL (WAN) is displayed.
(Registration complete)
"Image Monitoring via the Internet (OUTDOOR MONITORING)" (p. 140)
Caution :
- Registration will be canceled if you do not access the dynamic DNS server from the camera within 3 days.
Perform the registration again in this case.
- Registration will not be complete if the username and password set on this camera are incorrect. Be sure to check that they are correct.
- Successful registration will be canceled too if you do not access the dynamic DNS server for 1 year.
Create a QR code.
■ Enter values in the required items for outdoor monitoring.
- Password: set a password to connect this camera to the device via access point. (Not more than 8 characters)
- DDNS: Set the connection environment to the internet. Normally set to "ON".
- User name (DDNS): set an user name for the obtained DDNS account.
- Password (DDNS): set a password for the obtained DDNS account.
- UPnP: Set to "ON" if the UPnP protocol may be used to connect the device to the network.
- HTTP Port: Set the port number for connecting to the internet. Normally set to "80".
Display the screen for reading the QR code.
1 Tap "MENU".
(Operation on this camera)

text_image
M
WT
D
<< PLAY REC MENU
\- The top menu appears.
2 Tap the "Wi-Fi" (💡) icon. (Operation on this camera

text_image
TOP MENU
?
3 Tap> on the lower right of the screen. (Operation on this camera)

text_image
Wi-Fi
网络连接器功能
网络连接器功能
网络连接器功能
网络连接器功能
网络连接器功能
网络连接器功能
网络连接器功能
网络连接器功能
网络连接器功能
网络连接器功能
网络连接器功能
网络连接器功能
网络连接器功能
网络连接器功能
网络连接器功能
网络连接器功能
网络连接器功能
网络连接器功能
网络连接器功能
网络连接器功能
网络连接器
4 Tap "COMMON Wi-Fi SETTING". (Operation on this camera)

text_image
Wi-Fi
Wi-Fi
5 Tap "SET FROM QR CODE".

text_image
COMMON WI-FI SETTING
SET FROM QR CODE
6 Tap "EXECUTE".

text_image
SET FROM QR CODE
Wi-Fi SETTING CAN BE SET
USING WEB USER GUIDE OR
SMART USER GUIDE
EXECUTE
STOP
Read a QR code.
1 Read a QR code.
(Operation on this camera)

text_image
PLEASE READ QR CODE
2 Tap "YES".

text_image
SET FROM QR CODE
CHANGE THE SETTING OF
OUTDOOR MONITORING
PREVIOUS SETTING WILL BE
OVERWRITTEN
YES NO
3 Tap "OK".

text_image
SET FROM QR CODE
SETTINGS COMPLETED
OK NEXT
- Step 2-⑤ is displayed.
- Set contents are saved.
Registering the access points (wireless LAN router) to this unit
■ Wi-Fi Protected Setup (WPS) Registration
1 Tap "MENU".
(Operation on this camera)

text_image
M
WT
D
<
• The top menu appears.
2 Tap the "Wi-Fi" (💡) icon.
(Operation on this camera)

text_image
TOP MENU
?
3 Tap> on the lower right of the screen.
(Operation on this camera)

text_image
Wi-Fi
智能驾驶辅助
智能驾驶辅助
智能驾驶辅助
智能驾驶辅助
智能驾驶辅助
智能驾驶辅助
4 Tap "COMMON Wi-Fi SETTING".
(Operation on this camera)

text_image
Wi-Fi
智能驾驶系统
Wi-Fi
智能驾驶系统
5 Tap "ACCESS POINTS".
(Operation on this camera)

text_image
COMMON WI-FI SETTING
ACCESS POINTS
6 Tap "ADD".
(Operation on this camera)

text_image
ACCESS POINTS
ADD
7 Tap "EZ REGISTRATION WPS".
(Operation on this camera)

text_image
ADD
EZ REGISTRATION WPS
?
8 Activate WPS of the access point (wireless LAN router) within 2 minutes.
\- To activate WPS, refer to the instruction manual of the device in use.
9 After registration is complete, tap "OK" on the camera's screen. (Operation on this camera)

text_image
REGISTERED
SSID:**
ENCRYPTION METHOD
WPA2
OK
■ Search the access point, and select from the list.
Set the name (SSID) of the access point (wireless LAN router) and the password beforehand.
1 Tap "MENU".
(Operation on this camera)

text_image
M
WT
D
<< PLAY REC MENU
• The top menu appears.
2 Tap the "Wi-Fi" (💡) icon. (Operation on this camera)

text_image
TOP MENU
?
3 Tap > on the lower right of the screen. (Operation on this camera)

text_image
Wi-Fi
智能家庭管理器
智能家庭管理器
智能家庭管理器
智能家庭管理器
智能家庭管理器
智能家庭管理器
智能家庭管理器
4 Tap "COMMON Wi-Fi SETTING". (Operation on this camera)

text_image
Wi-Fi
Wi-Fi
5 Tap "ACCESS POINTS". (Operation on this camera)

text_image
COMMON W/FI SETTING
ACCESS POINTS
6 Tap "ADD". (Operation on this camera)

text_image
ACCESS POINTS
ADD
7 Tap "SEARCH". (Operation on this camera)

text_image
ADD
SEARCH
?
?
?
\- The search results appear on the camera's screen.
8 Tap the name (SSID) of the desired access point from the list of search results.
(Operation on this camera)

text_image
SEARCH
SEARCH AGAIN
9 Register a password. (Operation on this camera)

text_image
PASSWORD
A/a/1 . @ ABC DEF DELETE
← GHI JKL MNO →
PQRS TUV WXYZ
SET - + CANCEL
- Tap on the on-screen keyboard to enter characters. The character changes with every tap.
"ABC", for example, enter "A" by tapping once, "B" by tapping twice, or "C" by tapping 3 times.
- Tap "DELETE" to delete a character.
- Tap "CANCEL" to exit.
- Tap "A/a/1" to select character input type from upper case letter, lower case letter, and number.
- Tap ← or → to move one space to the left or right.
- The password is not required if the wireless LAN router is not security protected.
10 After registration is complete, tap "OK" on the camera's screen. (Operation on this camera)

text_image
REGISTERED
SSID:******
ENCRYPTION METHOD
WPA2
OK
\- Other methods, such as "Manual Registration" and "WPS PIN Registration" are also available. Refer to the following link for details. "Registering the Access Points of the Camera to Connect (ACCESS POINTS)" (p. 164)
■ Regular Operation
Connect this camera to a smartphone (or computer).
1 Tap "MENU".
(Operation on this camera)

text_image
M
WT
D
<
• The top menu appears.
2 Tap the "Wi-Fi" (💡) icon. (Operation on this camera)

text_image
TOP MENU
?
3 Tap "OUTDOOR MONITORING" (Operation on this camera)

text_image
Wi-Fi
图层智能驾驶器
图层智能驾驶器
图层智能驾驶器
图层智能驾驶器
图层智能驾驶器
图层智能驾驶器
图层智能驾驶器
图层智能驾驶器
4 Tap "START" (→). (Operation on this camera)

text_image
OUTDOOR MONITORING
DDNS
HTTP
UPnP
OK
5 Start making a connection. (Operation on this camera)

text_image
OUTDOOR MONITORING
CONNECTING
SSID:******
STOP
\- Name (SSID) of the access point (wireless LAN router) in connection is displayed.
6 The following is displayed when the camera is connected to the access point.

natural_image
Close-up of purple iris flowers with green foliage, captured via a photo editing interface (no text or symbols on the flower image itself)
\- The URL (WAN) for the smartphone to connect to appears.
(Does not appear if DDNS is not set or set incorrectly.)
\- “XUPnP” is displayed when UPnP cannot be used.
7 Check the URL (WAN).

text_image
CAMERA NETWORK INFO.
USE THE URL BELOW TO CONNECT
FROM AN OUTSIDE LOCATION
URL(WAN):http://*****
QUIT
- After checking the URL, tap "QUIT" to return to the previous screen.
- “XUPnP” is displayed when UPnP cannot be used.
■ Operation on the smartphone
Memo :
\- Prior to use this function, a smartphone application needs to be installed on the smartphone.
"Installing Smartphone Applications" (p. 175)
1 Start "Everio sync. 2" on the smartphone after setting OUTDOOR MONITORING.

natural_image
Illustration of a hand holding a smartphone with a pen, no text or symbols present
\- Tap "START" in OUTDOOR MONITORING on the camera to start.
2 Tap "OUTDOOR MONITORING".

text_image
Everio sync.2
DIRECT MONITORING
CONNECT TO THE CAMERA
DIRECTLY.
YOU CAN USE THE GAME
SCORING FUNCTION.
INDOOR MONITORING
CONNECT VIA ACCESS POINT.
NEED TO REGISTER ACCESS
POINT.
OUTDOOR MONITORING
CONNECT VIA INTERNET.
NEED TO REGISTER ACCESS
POINT AND DDNS.
Demo
3 Log in with your username and password. (if authentication cannot be achieved)

text_image
START
HTTP AUTHORIZATION
AUTHORIZATION FAILED
CHECK USER NAME AND PASSWORD
USERNAME
PASSWORD
OK CANCEL
\- The username is "everio" and the default password is "0000". "Changing the Settings" (€ p. 153)
4 The recording screen is displayed.

text_image
Index
Monitor
PAUSE
Tele
Rec
Snapshot
Wide
Pause
Marking
Game Score
5 Operate from a smartphone

natural_image
Illustration of a hand holding a smartphone with a pen, no text or symbols present
\- How to operate from a smartphone "Using Smartphone Applications" (p. 175)
■ Monitoring from the computer (Windows7)
1 On the Internet Explorer (web browser), enter the URL (WAN) that is checked by "Operation on this camera".

text_image
SODUCDBM
2 Log in with your username and password.
- The username is "everio" and the default password is "0000". "Changing the Settings" (p. 153)
• Operations from the Web browser
DETECT/MAIL
Setting (Once setting is done, start from the “Regular Operation” below)
Create a QR code.
Memo :
\- Perform operations in step 2 and 3 after creating a QR code, and read the QR code one by one by the camera.
■ Enter values in the required items for setting the recipient's e-mail address.
\- E-mail address: set the recipient's e-mail address.
\- E-mail function: set the function of the e-mail that is transmitted to the recipient's e-mail address.
\- Up to 8 e-mail addresses can be set.
■ Enter values in the required items for setting the sender's e-mail address.
• E-mail address: set the sender's e-mail address.
■ Enter values in the required items for setting the e-mail server (SMTP server).
\- SMTP server: set the name of the e-mail server (SMTP server) from which an e-mail account is obtained.
\- SMTP port number: set according to the condition when the e-mail account is obtained. Normally set to "25".
\- SMTP authentication method: set according to the condition when the e-mail account is obtained.
\- User name: set if the SMTP authentication method is set to other than "None". (same as the registered user name (account name) when the e-mail account is obtained)
\- Password: set if the SMTP authentication method is set to other than "None". (same as the registered password when the e-mail account is obtained)
■ Enter values in the required items for setting notification mails.
\- Detection method: set the detection method of when to start recording video for notification e-mails.
\- Detecting interval: select the time period to enable detection again after the previous one.
\- Self recording: specify whether to save the detected video on the camera (ON) or not (OFF).
Display the screen for reading the QR code.
1 Tap "MENU".
(Operation on this camera)

text_image
M
WT
D
<
• The top menu appears.
2 Tap the "Wi-Fi" (WiFi) icon.
(Operation on this camera)

text_image
TOP MENU
?
3 Tap > on the lower right of the screen. (Operation on this camera)

text_image
Wi-Fi
数据管理器
数据管理器
数据管理器
数据管理器
数据管理器
数据管理器
4 Tap "COMMON Wi-Fi SETTING". (Operation on this camera)

text_image
Wi-Fi
智能驾驶器
Wi-Fi
智能驾驶器
5 Tap "SET FROM QR CODE".

text_image
COMMON WI-FI SETTING
SET FROM QR CODE
6 Tap "EXECUTE".

text_image
SET FROM QR CODE
Wi-Fi SETTING CAN BE SET
USING WEB USER GUIDE OR
SMART USER GUIDE
EXECUTE
STOP
Read a QR code.
1 Read a QR code.
(Operation on this camera)

text_image
PLEASE READ QR CODE
2 Tap "YES".

text_image
SET FROM QR CODE
CHANGE THE SETTING OF
"DETECT/MAIL"
PREVIOUS SETTING WILL BE
OVERWRITTEN
YES NO
\- Contents of the screen vary depending on the QR code that is read by this unit.
3 Tap "OK".

text_image
SET FROM QR CODE
SETTINGS COMPLETED
OK NEXT
- Step 2-⑤ is displayed.
- Set contents are saved.
Registering the access points (wireless LAN router) to this unit
■ Wi-Fi Protected Setup (WPS) Registration
1 Tap "MENU".
(Operation on this camera)

text_image
M
WT
D
PLAY REC MENU
• The top menu appears.
2 Tap the "Wi-Fi" (💡) icon.
(Operation on this camera)

text_image
TOP MENU
?
3 Tap > on the lower right of the screen.
(Operation on this camera)

text_image
Wi-Fi
我的电脑
我的电脑
我的电脑
我的电脑
我的电脑
4 Tap "COMMON Wi-Fi SETTING".
(Operation on this camera)

text_image
Wi-Fi
Wi-Fi
5 Tap "ACCESS POINTS".
(Operation on this camera)

text_image
COMMON WI-FI SETTING
ACCESS POINTS
6 Tap "ADD".
(Operation on this camera)

text_image
ACCESS POINTS
ADD
7 Tap "EZ REGISTRATION WPS".
(Operation on this camera)

text_image
ADD
EZ REGISTRATION WPS
?
8 Activate WPS of the access point (wireless LAN router) within 2 minutes.
• To activate WPS, refer to the instruction manual of the device in use.
9 After registration is complete, tap "OK" on the camera's screen.
(Operation on this camera)

text_image
REGISTERED
SSID:**
ENCRYPTION METHOD
WPA2
OK
■ Search the access point, and select from the list.
Set the name (SSID) of the access point (wireless LAN router) and the password beforehand.
1 Tap "MENU".
(Operation on this camera)

text_image
M
WT
D
PLAY REC MENU
• The top menu appears.
2 Tap the "Wi-Fi" (💡) icon.
(Operation on this camera)

text_image
TOP MENU
3 Tap > on the lower right of the screen. (Operation on this camera)

text_image
Wi-Fi
智能家庭管理
智能家庭管理
智能家庭管理
智能家庭管理
智能家庭管理
智能家庭管理
智能家庭管理
智能家庭管理
智能家庭管理
智能家庭管理
智能家庭管理
智能家庭管理
智能家庭管理
智能家庭管理
智能家庭管理
智能家庭管理
智能家庭管理
智能家庭管理
智能家庭管理
智能家庭管理
智能家庭管理
智能家庭管理
智能家庭管理
智能家庭管理
智能家庭管理
智能家庭管理系统
4 Tap "COMMON Wi-Fi SETTING". (Operation on this camera)

text_image
Wi-Fi
Wi-Fi
5 Tap "ACCESS POINTS". (Operation on this camera)

text_image
COMMON WI-FI SETTING
ACCESS POINTS
?
6 Tap "ADD".
(Operation on this camera)

text_image
ACCESS POINTS
ADD
7 Tap "SEARCH".
(Operation on this camera)

text_image
ADD
SEARCH
[自动] [自动] [自动]
[自动] [自动] [自动]
[自动] [自动] [自动]
\- The search results appear on the camera's screen.
8 Tap the name (SSID) of the desired access point from the list of search results.
(Operation on this camera)

text_image
SEARCH
SEARCH AGAIN
9 Register a password.
(Operation on this camera)

text_image
PASSWORD
A/a/1 . @ ABC DEF DELETE
← GHI JKL MNO →
PQRS TUV WXYZ
SET - + CANCEL
- Tap on the on-screen keyboard to enter characters. The character changes with every tap.
"ABC", for example, enter "A" by tapping once, "B" by tapping twice, or "C" by tapping 3 times.
- Tap "DELETE" to delete a character.
- Tap "CANCEL" to exit.
- Tap "A/a/1" to select character input type from upper case letter, lower case letter, and number.
- Tap ← or → to move one space to the left or right.
- The password is not required if the wireless LAN router is not security protected.
10 After registration is complete, tap "OK" on the camera's screen. (Operation on this camera)

text_image
REGISTERED
SSID:******
ENCRYPTION METHOD
WPA2
OK
\- Other methods, such as "Manual Registration" and "WPS PIN Registration" are also available. Refer to the following link for details. "Registering the Access Points of the Camera to Connect (ACCESS POINTS)" (註 p. 164)
■ Regular Operation
Sending a Notification Mail.
1 Tap "MENU".
Set the camera to the recording mode.

text_image
M
WT
D
←PLAY
REC
MENU
• The top menu appears.
2 Tap the "Wi-Fi" (💡) icon.

text_image
TOP MENU
?
3 Tap "DETECT/MAIL" (💡).

text_image
Wi-Fi
网络连接器
网络连接器
网络连接器
网络连接器
网络连接器
网络连接器
网络连接器
4 Tap "DETECT/MAIL ATTN."

text_image
DETECT/MAIL
10 MEC
REC ON
5 Select "DETECT/MAIL ATTN.", then tap ↩.

text_image
DETECT/MAIL ATTN.
- To display the 🔒 icon, tap the e-mail address.
- To cancel the e-mail address, press the icon one more time.
- Up to 8 e-mail addresses can be selected.
6 Tap "START" (→).

text_image
DETECT/MAIL
10
MIL
REC ON
7 Start making a connection.

text_image
DETECT/MAIL
CONNECTING
SSID:******
STOP
8 DETECT/MAIL detection standby

text_image
DETECT/MAIL
"MOTION DETECTION"
DETECTION ON STAND BY
URL
STOP
idLPnP
• Detection is suspended for the first 5 seconds.
9 DETECT/MAIL detection in progress (an e-mail is automatically sent out after detection is completed)

text_image
DETECT/MAIL
'MOTION DETECTION'
MOTION DETECTION
IN PROGRESS
PHOTO
STOP
- The "PHOTO" icon appears on the screen for about 2 seconds upon detection.
- Images are captured automatically when moving subjects or human faces appear on the camera's screen. (The PHOTO icon appears on the screen upon detection.)
- The captured still images will be sent via e-mail to the selected recipients.
10 Detection suspended

text_image
DETECT/MAIL
"MOTION DETECTION"
DETECTION SUSPENDED DUE TO
CHANGE IN DETECTION INTERVAL
URL
STOP
- Until the next detection is made, detection is suspended for the pre-set length of time.
- "DETECTION INTERVAL" can be selected from 15 seconds, 1 minute, 3 minutes, 10 minutes, 30 minutes and 60 minutes.
"Setting the Detection Interval of this Camera (DETECT/MAIL SETTING)" (p. 163)
Check the incoming e-mail.
VIDEO MAIL
Setting (Once setting is done, start from the "Regular Operation" below)
Create a QR code.
Memo :
- Perform operations in step 2 and 3 after creating a QR code, and read the QR code one by one by the camera.
■ Enter values in the required items for setting the recipient's e-mail address.
- E-mail address: set the recipient's e-mail address.
- E-mail function: set the function of the e-mail that is transmitted to the recipient's e-mail address.
- Up to 8 e-mail addresses can be set.
■ Enter values in the required items for setting the sender's e-mail address.
• E-mail address: set the sender's e-mail address.
■ Enter values in the required items for setting the e-mail server (SMTP server).
- SMTP server: set the name of the e-mail server (SMTP server) from which an e-mail account is obtained.
- SMTP port number: set according to the condition when the e-mail account is obtained. Normally set to "25".
- SMTP authentication method: set according to the condition when the e-mail account is obtained.
- User name: set if the SMTP authentication method is set to other than "None". (same as the registered user name (account name) when the e-mail account is obtained)
- Password: set if the SMTP authentication method is set to other than "None". (same as the registered password when the e-mail account is obtained)
Display the screen for reading the QR code.
1 Tap "MENU".
(Operation on this camera)

text_image
M
WT
D
PLAY REC MENU
• The top menu appears.
2 Tap the "Wi-Fi" (💡) icon.
(Operation on this camera)

text_image
TOP MENU
?
3 Tap > on the lower right of the screen.
(Operation on this camera)

text_image
Wi-Fi
智能驾驶辅助
智能驾驶辅助
智能驾驶辅助
智能驾驶辅助
智能驾驶辅助
智能驾驶辅助
智能驾驶辅助
4 Tap "COMMON Wi-Fi SETTING". (Operation on this camera)

text_image
Wi-Fi
Wi-Fi
5 Tap "SET FROM QR CODE".

text_image
COMMON WI-FI SETTING
SET FROM QR CODE
6 Tap "EXECUTE".

text_image
SET FROM QR CODE
Wi-Fi SETTING CAN BE SET
USING WEB USER GUIDE OR
SMART USER GUIDE
EXECUTE STOP
Read a QR code.
1 Read a QR code.
(Operation on this camera)

text_image
PLEASE READ QR CODE
2 Tap "YES".

text_image
SET FROM QR CODE
REGISTER RECEIVER ADDRESS
UNABLE TO ADD IF 8 ADDRESSES
HAVE ALREADY BEEN
REGISTERED
YES NO
\- Contents of the screen vary depending on the QR code that is read by this unit.
3 Tap "OK".

text_image
SET FROM QR CODE
SETTINGS COMPLETED
OK NEXT
- Step 2-⑤ is displayed.
- Set contents are saved.
Registering the access points (wireless LAN router) to this unit
■ Wi-Fi Protected Setup (WPS) Registration
1 Tap "MENU".
(Operation on this camera)

text_image
M
WT
D
PLAY REC MENU
• The top menu appears.
2 Tap the "Wi-Fi" (💡) icon.
(Operation on this camera)

text_image
TOP MENU
?
3 Tap > on the lower right of the screen.
(Operation on this camera)

text_image
Wi-Fi
智能家庭监控
智能家庭监控
智能家庭监控
智能家庭监控
智能家庭监控
智能家庭监控
智能家庭监控
4 Tap "COMMON Wi-Fi SETTING".
(Operation on this camera)

text_image
Wi-Fi
Wi-Fi
5 Tap "ACCESS POINTS".
(Operation on this camera)

text_image
COMMON WI-FI SETTING
ACCESS POINTS
?
6 Tap "ADD".
(Operation on this camera)

text_image
ACCESS POINTS
ADD
7 Tap "EZ REGISTRATION WPS".
(Operation on this camera)

text_image
ADD
EZ REGISTRATION WPS
?
8 Activate WPS of the access point (wireless LAN router) within 2 minutes.
• To activate WPS, refer to the instruction manual of the device in use.
9 After registration is complete, tap "OK" on the camera's screen.
(Operation on this camera)

text_image
REGISTERED
SSID:**
ENCRYPTION METHOD
WPA2
OK
■ Search the access point, and select from the list.
Set the name (SSID) of the access point (wireless LAN router) and the password beforehand.
1 Tap "MENU".
(Operation on this camera)

text_image
M
WT
D
• The top menu appears.
2 Tap the "Wi-Fi" (💡) icon.
(Operation on this camera)

text_image
TOP MENU
3 Tap > on the lower right of the screen. (Operation on this camera)

text_image
Wi-Fi
智能家庭管理
智能家庭管理
智能家庭管理
智能家庭管理
智能家庭管理
智能家庭管理
智能家庭管理
智能家庭管理
智能家庭管理
智能家庭管理
智能家庭管理
智能家庭管理
智能家庭管理
智能家庭管理
智能家庭管理
智能家庭管理
智能家庭管理
智能家庭管理
智能家庭管理
智能家庭管理
智能家庭管理
智能家庭管理
智能家庭管理
智能家庭管理
智能家庭管理
智能家庭管理系统
4 Tap "COMMON Wi-Fi SETTING". (Operation on this camera)

text_image
Wi-Fi
Wi-Fi
5 Tap "ACCESS POINTS". (Operation on this camera)

text_image
COMMON WI-FI SETTING
ACCESS POINTS
?
6 Tap "ADD".
(Operation on this camera)

text_image
ACCESS POINTS
ADD
7 Tap "SEARCH".
(Operation on this camera)

text_image
ADD
SEARCH
[自动] [自动] [自动]
[自动] [自动] [自动]
[自动] [自动] [自动]
\- The search results appear on the camera's screen.
8 Tap the name (SSID) of the desired access point from the list of search results.
(Operation on this camera)

text_image
SEARCH
SEARCH AGAIN
9 Register a password.
(Operation on this camera)

text_image
PASSWORD
A/a/1 . @ ABC DEF DELETE
← GHI JKL MNO →
PQRS TUV WXYZ
SET - + CANCEL
- Tap on the on-screen keyboard to enter characters. The character changes with every tap.
"ABC", for example, enter "A" by tapping once, "B" by tapping twice, or "C" by tapping 3 times.
- Tap "DELETE" to delete a character.
- Tap "CANCEL" to exit.
- Tap "A/a/1" to select character input type from upper case letter, lower case letter, and number.
- Tap or to move one space to the left or right.
- The password is not required if the wireless LAN router is not security protected.
10 After registration is complete, tap "OK" on the camera's screen. (Operation on this camera)

text_image
REGISTERED
SSID:******
ENCRYPTION METHOD
WPA2
OK
\- Other methods, such as "Manual Registration" and "WPS PIN Registration" are also available. Refer to the following link for details. "Registering the Access Points of the Camera to Connect (ACCESS POINTS)" (p. 164)
■ Regular Operation
Record videos to send a video mail.
1 Tap "MENU".
Set the camera to the recording mode.

text_image
M
WT
D
←PLAY
REC
MENU
• The top menu appears.
2 Tap the "Wi-Fi" (💡) icon.

text_image
TOP MENU
?
3 Tap "VIDEO MAIL" (✉).

text_image
Wi-Fi
智能家庭管理器
智能家庭管理器
智能家庭管理器
智能家庭管理器
智能家庭管理器
智能家庭管理器
4 Tap "VIDEO MAIL ATTN."

text_image
VIDEO MAIL
返回到帐户
返回到帐户
返回到帐户
5 Select "DETECT/MAIL ATTN.", then tap ↩.

text_image
DETECT/MAIL ATTN.
- To display the 🔒 icon, tap the e-mail address.
- To cancel the e-mail address, press the icon one more time.
- Up to 8 e-mail addresses can be selected.
6 Tap "START" (→).

text_image
VIDEO MAIL
向导要连接到
要连接到
要连接到
7 Press the START/STOP button to start recording.

text_image
START
/STOP
- Or, tap the REC on screen.
8 Recording starts after the 5-second countdown.

text_image
4
- You can allow the recording to be performed for 15 seconds or press the START/STOP button to stop.
9 Tap "SEND".

text_image
VIDEO MAIL
SEND THIS VIDEO?
SEND STOP
PLAY TO CHECK
- Sending of the video mail starts.
- To check the file, tap "PLAY TO CHECK".
- When it is complete, tap "OK".
Check the incoming e-mail.
TV MONITORING
Setting (Once setting is done, start from the “Regular Operation” below)
Create a QR code.
■ Enter values in the required items for the TV monitor.
- MAC address filter: set to "ON" if monitoring images with a specific TV device.
- Add the MAC address: register the physical address when monitoring images with a specific TV device. (Up to 8 addresses can be registered)
Display the screen for reading the QR code.
1 Tap "MENU".
(Operation on this camera)

text_image
M
WT
D
<
• The top menu appears.
2 Tap the "Wi-Fi" (💡) icon.
(Operation on this camera)

text_image
TOP MENU
?
3 Tap > on the lower right of the screen. (Operation on this camera)

text_image
Wi-Fi
智能驾驶辅助
智能驾驶辅助
智能驾驶辅助
智能驾驶辅助
智能驾驶辅助
智能驾驶辅助
智能驾驶辅助
4 Tap "COMMON Wi-Fi SETTING". (Operation on this camera)

text_image
Wi-Fi
智能驾驶器
Wi-Fi
5 Tap "SET FROM QR CODE".

text_image
COMMON WI-FI SETTING
SET FROM QR CODE
6 Tap "EXECUTE".

text_image
SET FROM QR CODE
Wi-Fi SETTING CAN BE SET
USING WEB USER GUIDE OR
SMART USER GUIDE
EXECUTE STOP
Read a QR code.
1 Read a QR code.
(Operation on this camera)

text_image
PLEASE READ QR CODE
2 Tap "YES".

text_image
SET FROM QR CODE
REGISTER THE MAC ADDRESS
UNABLE TO REGISTER IF
8 ADDRESSES HAVE ALREADY
BEEN REGISTERED
YES NO
3 Tap "OK".

text_image
SET FROM QR CODE
SETTINGS COMPLETED
OK NEXT
- Step 2-⑤ is displayed.
- Set contents are saved.
Registering the access points (wireless LAN router) to this unit
■ Wi-Fi Protected Setup (WPS) Registration
1 Tap "MENU". (Operation on this camera)

text_image
M
WT
D
<< PLAY REC MENU
• The top menu appears.
2 Tap the "Wi-Fi" (💡) icon. (Operation on this camera)

text_image
TOP MENU
?
3 Tap > on the lower right of the screen. (Operation on this camera)

text_image
Wi-Fi
智能家庭管理
智能家庭管理
智能家庭管理
智能家庭管理
智能家庭管理
智能家庭管理
智能家庭管理
4 Tap "COMMON Wi-Fi SETTING". (Operation on this camera)

text_image
Wi-Fi
Wi-Fi
5 Tap "ACCESS POINTS". (Operation on this camera)

text_image
COMMON WIFI SETTING
ACCESS POINTS
6 Tap "ADD". (Operation on this camera)

text_image
ACCESS POINTS
ADD
7 Tap "EZ REGISTRATION WPS". (Operation on this camera)

text_image
ADD
EZ REGISTRATION WPS
?
8 Activate WPS of the access point (wireless LAN router) within 2 minutes.
• To activate WPS, refer to the instruction manual of the device in use.
9 After registration is complete, tap "OK" on the camera's screen. (Operation on this camera)

text_image
REGISTERED
SSID:******
ENCRYPTION METHOD
WPA2
OK
■ Search the access point, and select from the list.
Set the name (SSID) of the access point (wireless LAN router) and the password beforehand.
1 Tap "MENU". (Operation on this camera)

text_image
M
WT
D
←PLAY
REC
MENU
• The top menu appears.
2 Tap the "Wi-Fi" (💡) icon. (Operation on this camera)

text_image
TOP MENU
?
3 Tap > on the lower right of the screen. (Operation on this camera)

text_image
Wi-Fi
我的电脑搜索
我的电脑搜索
我的电脑搜索
我的电脑搜索
我的电脑搜索
我的电脑搜索
4 Tap "COMMON Wi-Fi SETTING". (Operation on this camera)

text_image
Wi-Fi
Wi-Fi
5 Tap "ACCESS POINTS".
(Operation on this camera)

text_image
COMMON WI-FI SETTING
ACCESS POINTS
[兼容 1] [兼容 2]
[兼容 3] [兼容 4]
6 Tap "ADD".
(Operation on this camera)

text_image
ACCESS POINTS
ADD
7 Tap "SEARCH".
(Operation on this camera)

text_image
ADD
SEARCH
[推荐 重新搜索]
[推荐 重新搜索]
[推荐 重新搜索]
\- The search results appear on the camera's screen.
8 Tap the name (SSID) of the desired access point from the list of search results.
(Operation on this camera)

text_image
SEARCH
SEARCH AGAIN
9 Register a password.
(Operation on this camera)

text_image
PASSWORD
A/a/1 . @ ABC DEF DELETE
← GHI JKL MNO →
PQRS TUV WXYZ
SET - + CANCEL
\- Tap on the on-screen keyboard to enter characters. The character changes with every tap.
"ABC", for example, enter "A" by tapping once, "B" by tapping twice, or "C" by tapping 3 times.
- Tap "DELETE" to delete a character.
- Tap "CANCEL" to exit.
- Tap "A/a/1" to select character input type from upper case letter, lower case letter, and number.
- Tap ← or → to move one space to the left or right.
- The password is not required if the wireless LAN router is not security protected.
10 After registration is complete, tap "OK" on the camera's screen. (Operation on this camera)

text_image
REGISTERED
SSID:******
ENCRYPTION METHOD
WPA2
OK
\- Other methods, such as "Manual Registration" and "WPS PIN Registration" are also available. Refer to the following link for details. "Registering the Access Points of the Camera to Connect (ACCESS POINTS)" (vF p. 164)
■ Regular Operation
Connect the TV to the access point.
- Connect the DLNA compatible TV to the access point (this function is available for a connection via cables as well)
- For details on connecting your TV to a Wi-Fi network, please refer to the instruction manual of the TV in use.
Connecting This Camera to the TV
1 Tap "MENU".
(Operation on this camera)

text_image
M
WT
D
←PLAY
REC
MENU
• The top menu appears.
2 Tap the "Wi-Fi" (💡) icon.
(Operation on this camera)

text_image
TOP MENU
?
3 Tap "TV MONITORING" (☐).
(Operation on this camera)

text_image
Wi-Fi
智能家庭管理
智能家庭管理
智能家庭管理
智能家庭管理
智能家庭管理
智能家庭管理
4 Tap "START" (→).
(Operation on this camera)

text_image
TV MONITORING
MAC
MAC
5 Start making a connection.
(Operation on this camera)

text_image
TV MONITORING
CONNECTING
SSID:******
STOP
6 Connection in progress

text_image
TV MONITORING
NOW PROCESSING
STOP
7 After the connection is completed, wait for the DLNA device to start up. (Operation on this camera)

text_image
TV MONITORING
QUIT
\- If a considerable number of videos/still images are recorded in the camera, it may take some time to start.
8 Images appear on the monitor of the DLNA device (Operation on DLNA device)

natural_image
Close-up of three purple iris flowers with yellow centers, surrounded by green foliage (no text or symbols visible)
\- From the following instructions, perform operations on the DLNA device.
For details on using the TV, refer to the instruction manual of the TV in use.
Memo :
- If no image is displayed during TV monitoring, tap "STOP" to start from step 1.
- If the DLNA compatible TV in use cannot detect Everio, tap "STOP" to start from the step 1 again.
Operating the Menu
There are two types of menus in this unit.
- TOP MENU: Menu that contains all the items specific to the video recording, still image recording, video playback, and still image playback modes respectively.
- SHORTCUT MENU: Menu that contains the recommended functions for video/still image recording.
Operating the Top Menu
You can configure various settings using the menu.
\- The following is a screen of the model with Wi-Fi functions.
1 Tap "MENU".
• The top menu appears.
- The menu differs according to the mode in use.

text_image
M
WT
D
2 Tap the desired menu.

text_image
TOP MENU
?
3 Tap the desired setting.

text_image
RECORD SETTING
OFF
A
WB A
A
OFF
B
OFF
Memo :
• To display the previous/next menu
Tap < or >.
• To exit the screen
Tap × (quit).
• To display the help file
Tap ? (help) and tap the item.
Help file may not be available for some items.
Operating the Shortcut Menu

You can configure various settings of the recommended functions in the video/still image recording mode using the shortcut menu.
\- The following is a screen of the model with Wi-Fi functions.
1 Tap "MENU".

text_image
M
WT
M
D
←PLAY
REC
MENU
2 Tap the shortcut icon (5).

text_image
TOP MENU
?
• The shortcut menu appears.
3 Tap the desired menu and setting.

text_image
SHORTCUT MENU
ON
OFF
\- Allows settings of "EASY STORAGE", "ANIMATION EFFECT", "DECORATE FACE EFFECT", "SMILE SHOT", "SMILE%/NAME DISPLAY" and "BACKLIGHT COMP. (manual mode only)".

text_image
SHORTCUT MENU
OK
Off
Cancel
\- Allows settings of "EASY STORAGE", "SMILE SHOT", "SMILE%/NAME DISPLAY" and "BACKLIGHT COMP. (manual mode only)".
Memo :
• To return to the top menu
Tap ↩ (return).
• To exit the screen
Tap × (quit).
• To display the help file
Tap ? (help) and tap the item.
RECORD SETTING Menu (video)

SCENE SELECT
Settings to suit the shooting condition can be selected.
"Shooting According to Scene (Subject)" (p. 32)
\*Displayed only in the manual recording mode.
FOCUS
Focus can be adjusted manually.
"Adjusting Focus Manually" (p. 33)
\*Displayed only in the manual recording mode.
BRIGHTNESS ADJUST
Adjusts the overall brightness of the screen.
"Adjusting Brightness" (p. 34)
\*Displayed only in the manual recording mode.
BACKLIGHT COMP.
Corrects the image when the subject appears dark due to backlight.
"Setting Backlight Compensation" (p. 35)
\*Displayed only in the manual recording mode.
WHITE BALANCE
Adjusts the color according to the light source.
"Setting White Balance" (p. 36)
\*Displayed only in the manual recording mode.
TELE MACRO
Enables close-up shots when using the telephoto (T) end of the zoom.
"Taking Close-up Shots" (p. 37)
\*Displayed only in the manual recording mode.
TOUCH PRIORITY AE/AF
Automatically adjusts focus and brightness based on the subjects' faces or selected area.
"Capturing Subjects Clearly (TOUCH PRIORITY AE/AF)" (p. 44)
LIGHT (GZ-EX355)
Turns on/off the light.
Setting Details OFF Does not light up. AUTO Lights up automatically when the surrounding is dark. ON Lights up at all times.
GAIN UP
Makes the subject appear bright automatically when recording in dark places.
Setting Details OFF Deactivates the function. ON Electrically brightens the scene when it is dark. AUTO SLOW-SHUTTER Slows down the shutter speed to brighten the scene when it is dark.
Memo :
\- Although "AUTO SLOW-SHUTTER" brightens the scene more than "ON", movements of the subject may become unnatural.
WIND CUT
Reduces the noise caused by wind.
Setting Details OFF Deactivates the function. ON Activates the function. AUTO Activate the function automatically.
SHUTTER MODE
Continuous shooting settings can be adjusted.
Setting Details RECORD ONE SHOT Records one still image. CONTINUOUS SHOOTING Records still images continuously while the SNAPSHOT button is pressed.
Memo :
- "LOW SPEED" is set in the video mode.
- The size of the still image that is captured in the video mode is 1,920 × 1,080 .
• Some SD cards may not support continuous shooting.
- The continuous shooting speed will drop if this function is used repeatedly.
SMILE SHOT
Automatically captures a still image upon detection of a smile.
"Capturing Smiles Automatically (SMILE SHOT)" (p. 45)
SMILE%/NAME DISPLAY
Displays the names and smile levels (%) when faces are detected.
"Setting SMILE%/NAME DISPLAY" (p. 50)
PET SHOT
Automatically captures a still image upon detection of the face of a pet, such as dogs or cats.
"Capturing Pets Automatically (PET SHOT)" (p. 46)
SEAMLESS RECORDING (GZ-EX355)
Continues recording on the SD card without stopping when the remaining space on the built-in memory runs out.
Setting Details OFF Does not switch recording media automatically. ON Switches recording media automatically.
Memo :
- Seamless recording cannot be performed if there is not enough free space in the SD card.
- 📁x appears if seamless recording cannot be performed.
- To start seamless recording again after the previous session is complete, it is necessary to combine seamless videos, or delete the combination information of the seamless videos.
- Seamless recording can be performed if the video recording format is iFrame.
"Combining Videos Recorded by Seamless Recording" (p. 83)
VIDEO REC FORMAT
Select the recording format from "AVCHD", or "iFrame" which is suitable for importing to "iMovie".
Setting Details AVCHD Records in AVCHD format. iFrame (GZ-EX355/GZ-EX310) Record in iFrame format, which is suitable for importing to iMovie.
Memo :
\- iFrame is a recording format to be handled by the Mac computer. Operation on the Windows PC is not guaranteed.
VIDEO QUALITY
Sets the video quality.
Setting Details (if the video recording format is AVCHD) UXP Enables recording in the best picture quality. Applies to Blu-ray discs only. Videos taken in high-definition quality cannot be saved to DVDs. XP Enables recording in high picture quality. SP Enables recording in standard quality. EP Enables long recordings. SSW Enables recording in the best picture quality. SEW Enables recording in the best picture quality. (if the video recording format is iFrame) iFrame(1280x720)(GZ-EX355/GZ-EX310) Records videos that are suitable for editing in 1280x720 resolution. iFrame(960x540)(GZ-EX355/GZ-EX310) Records videos that are suitable for editing in 960x540 resolution.
Memo :
- Set to "UXP" or "XP" mode when recording fast-moving scenes or scenes with extreme changes of brightness to avoid noise.
- Use an BD writer (external Blu-ray drive) to save videos recorded in "UXP" mode.
- You can change to the desired "VIDEO QUALITY" by tapping on it from the remaining recording time display.
ZOOM
Sets the maximum zoom ratio.
Setting Details 40x Enables recording with 1 - 40x optical zoom Set this when digital zoom is not desired. 60x DYNAMIC(55x DYNAMIC) Enables recording with 1 - 40x optical zoom and 41 - 60x dynamic zoom, when the image stabilizer is in normal mode or set to off.(Enables recording with 1 - 40x optical zoom and 41 - 55x dynamic zoom, when the image stabilizer is in active mode, or when the camera is set to the iFrame mode.) 120x DIGITAL(110x DIGITAL) Enables recording with 1 - 40x optical zoom and 41 - 120x digital zoom, when the camera is set to the AVCHD mode.(Enables recording with 1 - 40x optical zoom and 41 - 110x digital zoom, when the camera is set to the iFrame mode.) 200x DIGITAL Enables recording with 1 - 40x optical zoom and 41 - 200x digital zoom.
Memo :
- When digital zoom is used, the image becomes grainy as it is digitally enlarged.
- The angle of view changes when the image stabilizer is turned on or off.
ZOOM MIC
Sets the zoom microphone.
Setting Details OFF Deactivates the zoom microphone. ON Records audio sounds in the same direction as the zoom operation.
MIC LEVEL
Make the adjustments such that "MIC LEVEL" does not turn red.
Setting Details OFF Hides display of microphone input level. ON Shows display of microphone input level.
MIC LEVEL SETTING
Sets the microphone level.
Make the adjustments such that "MIC LEVEL" does not turn red.
Setting Details +2 Increases the microphone input level. +1 Increases the microphone input level slightly. 0 The microphone input level is not changed. -1 Decreases the microphone input level slightly. -2 Decreases the microphone input level.
K2 TECHNOLOGY
Reduces the degradation of sound quality caused by digital signal processing, and records a sound quality close to the original.
Setting Details OFF Deactivates K2 TECHNOLOGY. ON Activates K2 TECHNOLOGY.
SPECIAL RECORDING Menu (video)

HIGH SPEED RECORDING
You can record videos in slow-motion by increasing the recording speed to emphasize the movements, and play back the slow-motion video smoothly. This is a handy function for checking movements, such as golf swings.
"Slow-motion (High-speed) Recording" (p. 53)
TIME-LAPSE RECORDING
This function enables the changes of a scene that occur slowly over a long period to be shown within a short time by taking frames of it at a certain interval. This is useful for making observations such as the opening of a flower bud.
"Recording at Intervals (TIME-LAPSE RECORDING)" (p. 54)
STOP-MOTION REC
By pressing the SNAPSHOT button, 2 frames of still images are recorded, and stop-motion videos are created by piecing these images together. "Recording Stop-Motion Videos (STOP-MOTION REC)" (p. 56)
AUTO REC
Starts recording automatically by sensing the changes in subject's movement (brightness) within the red frame displayed on the LCD monitor. "Recording Automatically by Sensing Movements (AUTO REC)" (p. 57)
ANIMATION EFFECT
Records videos with animation effects.
"Recording with Animation Effects (ANIMATION EFFECT)" (p. 39)
DECORATE FACE EFFECT
Detects faces and enables decorations such as crowns or sunglasses to be added. "Recording with Face Decorations (DECORATE FACE EFFECT)" (p. 41)
STAMP
Records videos with various decorative stamps.
"Recording with Decorative Stamps (STAMP)" (p. 42)
HANDWRITING EFFECT
Records videos with your personal handwriting or drawing.
If the writings and drawings appear to be misaligned, correct the touch position.
"Recording with Personal Handwriting (HANDWRITING EFFECT)" (p. 43)
DATE/TIME RECORDING
You can record videos together with the date and time.
Set this when you want to save the file with date and time display.
(The date and time cannot be deleted after recording.)
"Recording Videos with Date and Time" (p. 60)
RECORD SETTING Menu (still image)

SCENE SELECT
Settings to suit the shooting condition can be selected.
"Shooting According to Scene (Subject)" (p. 32)
\*Displayed only in the manual recording mode.
FOCUS
Focus can be adjusted manually.
"Adjusting Focus Manually" (p. 33)
\*Displayed only in the manual recording mode.
BRIGHTNESS ADJUST
Adjusts the overall brightness of the screen.
"Adjusting Brightness" (p. 34)
\*Displayed only in the manual recording mode.
BACKLIGHT COMP.
Corrects the image when the subject appears dark due to backlight.
"Setting Backlight Compensation" (p. 35)
\*Displayed only in the manual recording mode.
WHITE BALANCE
Adjusts the color according to the light source.
"Setting White Balance" (p. 36)
\*Displayed only in the manual recording mode.
TELE MACRO
Enables close-up shots when using the telephoto (T) end of the zoom.
"Taking Close-up Shots" (p. 37)
\*Displayed only in the manual recording mode.
TOUCH PRIORITY AE/AF
Automatically adjusts focus and brightness based on the subjects' faces or selected area.
"Capturing Subjects Clearly (TOUCH PRIORITY AE/AF)" (p. 44)
SELF-TIMER
Use this when taking a group photo.
"Taking Group Shots (Self-timer)" (p. 58)
GAIN UP
Makes the subject appear bright automatically when recording in dark places.
Setting Details OFF Deactivates the function. ON Electrically brightens the scene when it is dark.
Memo :
\- Setting can be adjusted separately for videos.
"GAIN UP (Video)" (p. 226)
SHUTTER MODE
Continuous shooting settings can be adjusted.
Setting Details RECORD ONE SHOT Records one still image. CONTINUOUS SHOOTING Records still images continuously while the SNAPSHOT button is pressed.
Memo :
- Some SD cards may not support continuous shooting.
- The continuous shooting speed will drop if this function is used repeatedly.
SMILE SHOT
Automatically captures a still image upon detection of a smile.
"Capturing Smiles Automatically (SMILE SHOT)" (p. 45)
SMILE%/NAME DISPLAY
Displays the names and smile levels (%) when faces are detected.
"Setting SMILE%/NAME DISPLAY" (p. 50)
PET SHOT
Automatically captures a still image upon detection of the face of a pet, such as dogs or cats.
"Capturing Pets Automatically (PET SHOT)" (p. 46)
IMAGE SIZE
Sets the image size (number of pixels) for still images.
Setting Details 3840X2160(8M)1920X1080(2M) Takes still images with aspect ratio 16:9.The sides of still images recorded in 16:9 aspect ratio may be cut off when printed. 1440X1080(1.5M)640X480(0.3M) Takes still images with aspect ratio 4:3.
SPECIAL RECORDING Menu (still image)

AUTO REC
Starts recording automatically by sensing the changes in subject's movement (changes in brightness) within the red frame displayed on the LCD monitor. "Recording Automatically by Sensing Movements (AUTO REC)" (p. 57)
PLAYBACK SETTING Menu (video)

SEARCH DATE
Narrows down the video index screen according to recording dates.
"Searching for a Specific Video/Still Image by Date" (vπ p. 76)
DISPLAY DATE/TIME
Sets whether to display the recording date and time during video playback.
Setting Details OFF Does not display the date and time during playback. ON Displays the date and time during playback.
DIGEST PLAYBACK
Plays back a digest of the recorded videos.
" DIGEST PLAYBACK " (p. 70)
PLAYBACK PLAYLIST
Plays back the playlists that you have created.
"PLAYBACK PLAYLIST" (p. 72)
PLAYBACK OTHER FILE
Plays videos with defective management information.
"PLAYBACK OTHER FILE" (p. 73)
EDIT Menu (video)

PROTECT/CANCEL
Protects files from being deleted accidentally.
"Protecting/Releasing Protection of the Currently Displayed File" (p. 81)
"Protecting/Releasing Protection of Selected Files" (p. 82)
COPY
Copies files from the built-in memory to the SD card.
"Copying Files to an SD Card (GZ-EX355)" (n: p. 112)
MOVE
Moves files from the built-in memory to the SD card. Files that are moved will be deleted from the built-in memory.
"Moving Files to an SD Card (GZ-EX355)" (p. 113)
EDIT PLAYLIST
A list in which your favorite videos are arranged is called a playlist.
By creating a playlist, you can play back only your favorite videos in the order you like.
The original video file remains even when it is registered to a playlist.
"Creating Playlists with Selected Files" (p. 85)
"Creating Playlists by Date" (p. 87)
"Editing Playlists" (p. 88)
TRIMMING
Select the required part of a video and save it as a new video file.
The original video remains in its existing location.
"Capturing a Required Part in the Video (TRIMMING)" (p. 84)
SEAMLESS REC CTRL (GZ-EX355)
Videos that are recorded on two separate media and with "SEAMLESS RECORDING" in the video recording menu enabled can be combined into a single video.
"Combining Videos Recorded by Seamless Recording" (p. 83)
PLAYBACK SETTING Menu (still image)

SEARCH DATE
Narrows down the still image index screen according to recording dates.
"Searching for a Specific Video/Still Image by Date" (p. 76)
SLIDE SHOW EFFECTS
Sets the transition effects in slideshow playback.
Setting Details SLIDE Switches the screen by sliding in from right to left. BLINDS Switches the screen by dividing into vertical strips. CHECKERBOARD Switches the screen by changing through a checkered pattern. RANDOM Switches the screen with a random effect from SLIDE, “BLINDS”, and “CHECKERBOARD”.
Memo :
\- Slideshow effects are not available when playing back still images in external devices (such as USB external hard disk drives).
EDIT Menu (still image)

PROTECT/CANCEL
Protects files from being deleted accidentally.
"Protecting/Releasing Protection of the Currently Displayed File" (p. 81)
"Protecting/Releasing Protection of Selected Files" (p. 82)
COPY (GZ-EX355)
Copies files from the built-in memory to the SD card.
"Copying Files to an SD Card (GZ-EX355)" (p. 112)
MOVE (GZ-EX355)
Moves files from the built-in memory to the SD card. Files that are moved to the SD card will be deleted from the built-in memory.
"Moving Files to an SD Card (GZ-EX355)" (p. 113)
SETUP (video/still image)

Mobile User Guide
Displays the QR code to access the Mobile User Guide.

text_image
MOBILE USER GUIDE
URL:
\- The portal site appears when the QR code has been read correctly. Select the model name of your camera to display its Mobile User Guide.
Memo :
- To read the QR code, a relevant application is required. Enter the URL in the internet browser manually if the QR code cannot be read.
- The Mobile User Guide is supported by Android devices and iPhone. You can view it on standard browsers such as Google Chrome (Android) and Mobile Safari (iPhone).
• QR Code is a registered trademark of Denso Wave Incorporated.
CLOCK ADJUST
Resets the current time or sets to the local time when using this unit overseas.
"Clock Setting" (p. 18)
"Setting the Clock to Local Time when Traveling" (p. 22)
"Setting Daylight Saving Time" (p. 22)
DATE DISPLAY STYLE
Sets the order of year, month, day and the time display format (24H/12H).
Sorting Order Time Display month.day.year 12h year.month.day 24h day.month.year -
LANGUAGE
The language on the display can be changed.
"Changing the Display Language" (p. 20)
FACE REGISTRATION (recording only)
Registers the faces of people who are often shot with this unit.
"Registering Human Face Personal Authentication Information" (p. 48)
MONITOR BRIGHTNESS
Sets the brightness of the LCD monitor.
Setting Details AUTO Sets the brightness automatically to “4” when using outdoors and to “3” when using indoors. 4 Brightens the backlight of the monitor regardless of the surrounding conditions. 3 Sets to the standard brightness. 2 Darkens the backlight of the monitor regardless of the surrounding conditions. 1 Sets to dim brightness. Helps to save battery life when selected.
OPERATION SOUND
Turns on or off the operation sound.
Setting Details OFF Turns off the operation sound. ON Turns on the operation sound.
AUTO POWER OFF
Prevents the situation of forgetting to turn off the power when this is set.
Setting Details OFF Power is not turned off even if this unit is not operated for 5 minutes. ON Turns off the power automatically if this unit is not operated for 5 minutes.
Memo :
- When using battery, power is turned off automatically if this unit is not operated for 5 minutes.
- When using the AC adapter, this unit goes into standby mode.
QUICK RESTART
Enables the power to turn on quickly when the LCD monitor is opened again within 5 minutes.
Setting Details OFF Deactivates the function. ON Enables the power to turn on quickly when the LCD monitor is opened again within 5 minutes.
Memo :
\- The power consumption within 5 minutes after the LCD monitor is closed is reduced.
DEMO MODE
Plays a demonstration of the special features of this unit.
Setting Details OFF Deactivates the function. ON Plays a demonstration of the special features of this unit.
Memo :
- This mode is not available in the playback mode.
- "SMILE%/NAME DISPLAY" is set to "ON" when the demo mode is activated.
"Setting SMILE%/NAME DISPLAY" (p. 50)
TOUCH SCREEN ADJUST
Adjusts the response position of the buttons on the touch screen.
"Adjusting the Touch Panel" (p. 15)
FACTORY PRESET
Returns all the settings to their default values.
FIRMWARE UPDATE
Updates the functions of this unit to the latest version.
For details, refer to the JVC homepage.
(When no program to update the software of this unit is available, nothing will be provided on the homepage.)
http://www3.jvckenwood.com/english/support/index.html
PC SOFTWARE UPDATE
Updates the built-in PC software of this unit to the latest version.
For details, refer to the JVC homepage.
(When no program to update the computer software is available, nothing will be provided on the homepage.)
http://www3.jvckenwood.com/english/support/index.html
OPEN SOURCE LICENSES (recording only)
Displays the open source software licenses that are used in this unit.
CONNECTION SETTINGS (video/still image)

DISPLAY ON TV
Displays icons and date/time on a TV screen.
Setting Details OFF Does not display icons and date/time on TV. ON Displays icons and date/time on TV.
VIDEO OUTPUT
Sets the aspect ratio (16:9 or 4:3) according to the connecting TV.
Setting Details 4:3 Select this when connecting to a conventional TV (4:3). 16:9 Select this when connecting to a widescreen TV (16:9).
HDMI OUTPUT
Sets the output from the HDMI connector of this unit when it is connected to a TV.
Setting Details AUTO It is recommended to select “AUTO” usually. 480p Select this when the video is not output in “AUTO” correctly.
HDMI CONTROL
Sets whether to link operations with an HDMI-CEC compliant TV.
Setting Details OFF Turns off linked operations. ON Turns on linked operations.
AV TERMINAL
Set the output connector of PAN CRADLE.
Setting Details AV Set this when the output is made via the AV connector. PAN CRADLE Set this to use the Pan Cradle.
MEDIA SETTINGS (video/still image)

REC MEDIA FOR VIDEO (GZ-EX355)
Sets the recording/playback media of videos.
Setting Details BUILT-IN MEMORY Records videos to this unit's built-in memory. SD CARD Records videos to the SD card.
REC MEDIA FOR IMAGE (GZ-EX355)
Sets the recording/playback media of still images.
Setting Details BUILT-IN MEMORY Records still images to this unit's built-in memory. SD CARD Records still images to the SD card.
FORMAT BUILT-IN MEM. (GZ-EX355)
Deletes all files on the built-in memory.
Setting Details FILE Deletes all files on the built-in memory. FILE + MANAGEMENT NO Deletes all files on the built-in memory and resets the folder and file numbers to "1". (File number of the AVCHD video file starts from "0".)
Caution :
- All data on the built-in memory will be deleted when it is formatted.
Copy all files on the built-in memory to a computer before formatting.
- Make sure that the battery pack is fully charged or connect the AC adapter as the formatting process may take some time.
FORMAT SD CARD
Deletes all files on the SD card.
Setting Details FILE Deletes all files on the SD card. FILE + MANAGEMENT NO Deletes all files on the SD card and resets the folder and file numbers to "1".
Caution :
• Not available for selection when no SD card is inserted.
- All data on the SD card will be deleted when it is formatted.
Copy all files on the SD card to a computer before formatting.
- Make sure that the battery pack is fully charged or connect the AC adapter as the formatting process may take some time.
USB CONNECTION MENU
Displayed when connecting the AC adapter after this unit is connected via USB.
GZ-EX355/GZ-EX310
PLAYBACK ON PC
- Displays videos recorded by this unit by using the LoiLoFit for Everio.
"Installing the Provided Software" (p. 115)
- Saves videos recorded by this unit on your computer without using the provided software.
"Backing Up Files Without Using Provided Software" (p. 119)
"Copying to Mac Computer" (p. 129)
CREATE DISC
Save videos recorded by this unit on a disc by using the BD/DVD drive on your computer and the LoiLoFit for Everio. To create a Blu-ray disc, purchase a paid version of LoiLoFit for Everio.
http://loilo.tv/jp/product/33/page/27
DIRECT DISC
Save videos recorded by this unit on a disc by using the BD/DVD drive on your computer. To create a Blu-ray disc, purchase a paid version of LoiLoFit for Everio.
http://loilo.tv/jp/product/33/page/27
UPLOAD
Upload videos recorded by this unit to website for sharing files by using the LoiLoFit for Everio.
BACK UP
Backup videos recorded by this unit to your computer by using the LoiLoFit for Everio. "Backing Up Files" (p. 116)
Memo :
- Before making backup, load the SD card in which the videos are stored on this unit.
- After backing up your files using the provided software, they cannot be restored to this unit.
- Delete unwanted videos before making backup. It takes time to back up many videos.
"Deleting Unwanted Files" (p. 80)
GZ-E300
PLAYBACK ON PC
- Displays videos recorded by this unit by using the Everio MediaBrowser 4.
"Installing the Provided Software (Built-in)" (p. 122)
- Saves videos recorded by this unit on your computer without using the provided software.
"Backing Up Files Without Using Provided Software" (p. 127)
"Copying to Mac Computer" (p. 129)
CREATE DISC
Save videos recorded by this unit on a disc by using the BD/DVD drive on your computer and the Everio MediaBrowser 4.
DIRECT DISC
Save videos recorded by this unit on a disc by using the BD/DVD drive on your computer.
UPLOAD
Upload videos recorded by this unit to website for sharing files by using the Everio MediaBrowser 4.
BACK UP
Backup videos recorded by this unit to your computer using the Everio MediaBrowser 4. "Backing Up All Files" (p. 123)
Memo :
- Before making backup, load the SD card in which the videos are stored on this unit.
- After backing up your files using the provided software, they cannot be restored to this unit.
- Delete unwanted videos before making backup. It takes time to back up many videos.
"Deleting Unwanted Files" (p. 80)
Front

text_image
Technical diagram of a device with numbered parts labeled 1 to 4
① SNAPSHOT (Still Image Recording) Button
\- Takes a still image.
② Zoom/Volume Lever
- During shooting: Adjusts the shooting range.
- During playback (index screen): Moves to the next or previous page.
- During video playback: Adjusts the volume.
③ Lens Cover
- Do not touch the lens and lens cover.
- Do not cover the lens with your fingers during recording.
④ Stereo Microphone
\- Do not cover the microphone with your fingers during video recording.
Rear

text_image
Technical diagram of a mechanical device with numbered components for identification
① DC Connector
\- Connects to an AC adapter to charge the battery.
② ACCESS (Access) Lamp
\- Lights up/blinks during recording or playback. Do not remove the battery pack, AC adapter, or SD card.
③ POWER/CHARGE (Power/Charge) Lamp
- Lights up: Power "ON"
- Blinks: Charging in progress
• Goes out: Charging finished
4 START/STOP (Video Recording) Button
• Starts/stops video recording.
⑤ Strap Lock
⑥ Grip Belt
\- Pass your hand through the grip belt to hold this unit firmly. "Grip Adjustment" (p. 13)
⑦ Lens Cover Switch
\- Opens and closes the lens cover.
Bottom

text_image
Technical diagram of a digital camera module with numbered parts for identification
① Tripod Mounting Hole
"Tripod Mounting" (p. 21)
② SD Card Slot
\- Insert an optional SD card.
"Inserting an SD Card" (p. 13)
③ Battery Release Lever
"Charging the Battery Pack" (p. 12)
④ Battery Mount
Interior

text_image
Diagram of a digital camera with numbered parts for identification
① Speaker
• Outputs audio sound during video playback.
② / (Video/Still Image) Button
\- Switches between video and still image modes.
③ SILENT Button
\- Press and hold the SILENT button to turn on the Silent mode. The Silent mode can be cancelled by holding down the button again.
"Using the Silent Mode" (p. 26)
④ (Image Stabilizer) Button
\- The setting of image stabilizer changes with every press while video recording is stopped.
"Reducing Camera Shake" (p. 52)
⑤ INFO (Information) Button
- Recording: Displays the remaining time (for video only) and battery power.
- Playback: Displays file information such as recording date.
⑥ AV Connector
\- Connects to the AV connector of a TV, etc.
⑦ (Power) Button
\- Press and hold to turn the power on/off while the LCD monitor is opened.
⑧ HDMI mini connector
\- Connects to TV using an HDMI mini cable.
⑨ USB Connector
\- Connects to computer using a USB cable.
LCD Monitor

natural_image
Diagram of a device with a blue pointer and numbered label (1), no readable text or symbols present.
① LCD Monitor
- Turns the power on/off by opening and closing.
- Enables self-portraits to be taken by rotating the monitor.

text_image
180°
90°
"Using the Touch Screen" (p. 15)
"Names of Buttons and Functions on the LCD Monitor" (p. 16)
Caution :
\- Do not press against the surface with force or subject it to strong impact. Doing so may damage or break the screen.
Common Recording Indications

text_image
1
2 3 4 5 6 7 8 9 10 11 12
10.45
±0.0
10X W T
13
14
15
16
① TOUCH PRIORITY AE/AF
"Capturing Subjects Clearly (TOUCH PRIORITY AE/AF)" (p. 44)
② Backlight Compensation
"Setting Backlight Compensation" (p. 35)
③ Auto REC
"Recording Automatically by Sensing Movements (AUTO REC)" (p. 57)
④ Tele Macro
"Taking Close-up Shots" (p. 37)
⑤ Scene Select
"Shooting According to Scene (Subject)" (u p. 32)
6 WHITE BALANCE
"Setting White Balance" (p. 36)
⑦ Time
"Clock Setting" (p. 18)
8 SMILE SHOT
"Capturing Smiles Automatically (SMILE SHOT)" (p. 45)
9 Media
"REC MEDIA FOR VIDEO (GZ-EX355)" (p. 242)
"REC MEDIA FOR IMAGE (GZ-EX355)" (p. 242)
⑩ Battery Indicator
"Checking the Remaining Recording Time" (p. 61)
⑪ CONTINUOUS SHOOTING
"SHUTTER MODE (Still Image)" (p. 231)
12 Recording Mode
"Taking Videos in Auto Mode" (p. 24)
"Manual Recording" (p. 30)
⑬ Setting Scenes of Intelligent Auto
- Displays scenes detected automatically in the Intelligent Auto function. Multiple scenes may be detected.
"Scenes of Intelligent Auto" (p. 25)
14 SILENT MODE
"Using the Silent Mode" (p. 26)
15 Zoom
"ZOOM" (p. 228)
16 Focus
"Adjusting Focus Manually" (p. 33)
⑰ Brightness
"Adjusting Brightness" (p. 34)
Video Recording

text_image
1
2
3
4
5
6
7
0:00:12:34
0:12:34[0:10:00]
8
9
1SEC
① Video Mode
"Interior" (p. 245)
② Video Quality
"VIDEO QUALITY" (p. 228)
③ TIME-LAPSE RECORDING(1SEC)
"Recording at Intervals (TIME-LAPSE RECORDING)" (p. 54)
④ Image Stabilizer
"Reducing Camera Shake" (p. 52)
⑤ Seamless Recording (GZ-EX355)
"SEAMLESS RECORDING (GZ-EX355)" (p. 227)
6 Wind Cut
"WIND CUT" (p. 227)
⑦ Time-Lapse Recording Counter
"Recording at Intervals (TIME-LAPSE RECORDING)" (p. 54)
⑧ Remaining Recording Time
"Checking the Remaining Recording Time" (p. 61)
⑨ Scene Counter
Still Image Recording

text_image
1
2
[920]
3
[9990]
4
5
PHOTO
6
① Still Image Mode
"Interior" (p. 245)
② Image Size
"IMAGE SIZE" (p. 232)
③ Self-Timer
"Taking Group Shots (Self-timer)" (p. 58)
④ Remaining Number of Shots
"Checking the Remaining Recording Time" (p. 62)
⑤ Focus
⑥ Recording in Progress
Video Playback

text_image
1
2
3
4
5
6
7
00:01:23
00:12:34
1SEC
1980p
10
11
12
1
① Video Mode
"Interior" (p. 245)
② Video Quality
"VIDEO QUALITY" (p. 228)
③ Operation Indicator
"Operation Buttons for Video Playback" (p. 64)
④ Date/Time
• Displays the recording date and time.
⑤ Media
"FORMAT BUILT-IN MEM. (GZ-EX355)" (p. 242)
⑥ Battery Indicator
"Checking the Remaining Recording Time" (p. 61)
⑦ Playback Time
"Playing Back Videos" (p. 64)
⑧ Time-Lapse Playback
"Time-Lapse Setting" (p. 55)
⑨ External Storage Playback
"Playing Back with a DVD Writer" (p. 105)
"Playing Back with a BD Writer (External Blu-ray Drive)" (p. 98)
"Playing Back Files in the USB External Hard Disk Drive" (p. 110)
10 1080p Output
"HDMI OUTPUT" (p. 241)
⑪ SILENT MODE
"Using the Silent Mode" (p. 26)
⑫ Scene Counter
Still Image Playback

text_image
1
2 3
4
5 6
100-0001
10:00
7
8
9
1080p
REC
MENU
① Still Image Mode
"Interior" (p. 245)
② Folder Number
③ File Number
④ Date/Time
\- Displays the recording date and time.
⑤ Media
"REC MEDIA FOR IMAGE (GZ-EX355)" (r·p. 242)
⑥ Battery Indicator
"Checking the Remaining Recording Time" (p. 61)
⑦ SILENT MODE
"Using the Silent Mode" (p. 26)
⑧ External Storage Playback
"Playing Back with a DVD Writer" (p. 105)
"Playing Back with a BD Writer (External Blu-ray Drive)" (p. 98)
"Playing Back Files in the USB External Hard Disk Drive" (p. 110)
⑨ 1080p Output
"HDMI OUTPUT" (p. 241)
When the unit is not working properly
Turning Off the Power
1 Close the LCD monitor.

natural_image
Diagram of a digital camera with an open screen and blue arrow indicating rotation (no text or symbols)
2 Remove the AC adapter and battery pack from this unit, reattach them, open the LCD monitor and this unit powers on automatically. (Reset complete)
Battery Pack
Unable to turn on the power when using the battery pack.
Recharge the battery pack.
"Charging the Battery Pack" (p. 12)
Check whether the terminals are dirty.
If the terminal of this unit or the battery pack is dirty, wipe it with a cotton swab or something similar.
If you use any other battery packs besides JVC battery packs, safety and performance cannot be guaranteed. Be sure to use JVC battery packs.
Short usage time even after charging.
Battery deterioration occurs when a battery pack is charged repeatedly.
Replace the battery pack with a new one.
"Optional Accessories" (p. 23)
Unable to charge the battery pack.
When the battery pack is fully charged, the lamp does not flash.
Check whether the terminals are dirty.
If the terminal of this unit or the battery pack is dirty, wipe it with a cotton swab or something similar.
Using a non-original AC adapter may result in damage to this unit. Be sure to use an original AC adapter.
The remaining battery display is not correct.
Remaining battery power is not displayed when the AC adapter is connected.
If this unit is used for long periods of time in high or low temperatures, or if the battery pack is repeatedly charged, the amount of remaining battery may not be displayed correctly.
Recording
Recording cannot be performed.
Check the 📋 / 📋 button.
"Interior" (p. 245)
When there are multiple light sources and depending on the shooting conditions, exposure and focus may not be adjusted correctly in the Intelligent Auto mode. In this case, adjust the settings manually.
"Adjusting Focus Manually" (p. 33)
Recording stops automatically.
Recording stops automatically as it cannot be performed for 12 or more consecutive hours according to specifications. (It may take some time to resume recording.)
Turn off this unit, wait for a while, and turn it on again. (This unit stops automatically to protect the circuit when the temperature rises.)
The continuous shooting speed of still images is slow.
The continuous shooting speed will drop if this function is used repeatedly. Continuous shooting speed may drop depending on the SD card or under certain recording conditions.
The focus is not adjusted automatically.
If you are recording in a dark place or a subject that has no contrast between dark and light, adjust the focus manually.
"Adjusting Focus Manually" (p. 33)
Wipe the lens with a lens cleaning cloth.
Cancel manual focus on the manual recording menu.
"Adjusting Focus Manually" (p. 33)
Zoom does not work.
Digital zoom is not available in the still image recording mode.
Zoom operation is not available in time-lapse recording. (Simultaneous still image recording and image stabilizer are also not available.)
To use digital zoom, set "ZOOM" in the menu accordingly.
"ZOOM" (p. 228)
Mosaic-type noise occurs when recording scenes with fast movements or extreme changes in brightness.
Set the "VIDEO QUALITY" to "UXP" or "XP" for recording.
"VIDEO QUALITY" (p. 228)
Card
Cannot insert the SD card.
Make sure not to insert the SD card in the wrong direction.
"Inserting an SD Card" (p. 13)
Unable to copy to SD card.
Set "REC MEDIA FOR VIDEO"/"REC MEDIA FOR IMAGE" to SD card. (GZ-EX355)
"REC MEDIA FOR VIDEO (GZ-EX355)" (p. 242)
"REC MEDIA FOR IMAGE (GZ-EX355)" (p. 242)
To use SD cards that have been used on other devices, it is necessary to format (initialize) the SD card using "FORMAT SD CARD" from media settings.
"FORMAT SD CARD" (p. 242)
Playback
Sound or video is interrupted.
Sometimes playback is interrupted at the connecting section between two scenes. This is not a malfunction.
There is no sound.
When the Silent mode is used, operation and playback sounds will not be output. Turn off the Silent mode.
"Using the Silent Mode" (p. 26)
Set "OPERATION SOUND" in the common menu to "ON".
"OPERATION SOUND" (p. 239)
Audio sound is not recorded for videos taken in HIGH SPEED RECORDING/TIME-LAPSE RECORDING.
"Slow-motion (High-speed) Recording" (p. 53)
"Recording at Intervals (TIME-LAPSE RECORDING)" (v ^2 p. 54)
The same image is displayed for a long time.
Use a high speed SD card (Class 4 or higher).
"Types of Usable SD Card" (p. 14)
Clean the terminals of the SD card with a dry cotton swab or something similar.
Execute "FORMAT SD CARD" in the "MEDIA SETTINGS" menu. (All data will be deleted.)
"FORMAT SD CARD" (p. 242)
The motion is choppy.
Use a high speed SD card (Class 4 or higher).
"Types of Usable SD Card" (p. 14)
Clean the terminals of the SD card with a dry cotton swab or something similar.
Execute "FORMAT SD CARD" in the MEDIA SETTINGS menu. (All data will be deleted.)
"FORMAT SD CARD" (p. 242)
Verify the system requirements of your computer when using LoiLoFit for Everio to play back. (GZ-EX355/GZ-EX310)
"Verifying System Requirements (Guideline)" (p. 114)
Verify the system requirements of your computer when using Everio
MediaBrowser 4 to play back. (GZ-E300)
"Verifying System Requirements (Guideline)" (p. 121)
Cannot find a recorded file.
Cancel the date search function.
"Searching for a Specific Video/Still Image by Date" (p. 76)
Change the playback media by tapping 🎨/SD on the touch screen. (GZ-EX355)
"Operation Buttons for Video Playback" (p. 64)
"Operation Buttons for Still Image Playback" (p. 74)
Select "PLAYBACK OTHER FILE" in the menu. (Video files that have damaged management information can be played back.)
"PLAYBACK OTHER FILE" (p. 73)
Images do not appear on the TV properly.
Disconnect the cable and connect again.
"Connecting via the HDMI Mini Connector" (p. 77)
Turn off and on this unit again.
Images are projected vertically on the TV.
Set "VIDEO OUTPUT" in the "MEDIA SETTINGS" menu to "4:3".
"VIDEO OUTPUT" (p. 241)
Adjust the TV's screen accordingly.
The image displayed on TV is too small.
Set "VIDEO OUTPUT" in the "MEDIA SETTINGS" menu to "16:9".
"VIDEO OUTPUT" (p. 241)
When connected to the TV via the HDMI mini cable, proper images and sounds are not output.
Images and sounds may not be output properly depending on the TV connected. In such cases, perform the following operations.
① Disconnect the HDMI mini cable and connect it again.
② Turn off and on this unit again.
"Connecting via the HDMI Mini Connector" (p. 77)
Editing/Copying
Unable to delete file.
Files (videos/still images) that are protected cannot be deleted. Release protection before deleting the file.
"Protecting Files" (p. 81)
Unable to copy/move files to SD card. (GZ-EX355)
If the SD card is write protected, set it to off.
Unable to create DVD with a DVD writer.
Connect the USB cable correctly.
"Preparing a DVD Writer (CU-VD50)" (p. 99)
"Preparing a DVD Writer (CU-VD3)" (p. 99)
Unable to create disc with a BD writer (external Blu-ray drive).
Connect the USB cable correctly.
"Preparing a BD Writer (External Blu-ray Drive)" (p. 91)
BACK-UP menu does not disappear.
While the USB cable is connected, the "BACK UP" menu is displayed.
Unable to turn off the BACK-UP menu.
Turn off the power of this unit and the DVD writer, or remove the AC adapter.
Unable to delete folder in USB external hard disk drive.
Delete the folder using a computer.
(When files are added or folders moved/renamed with a computer, they cannot be deleted on this unit.)
Computer
Unable to copy files to the computer's HDD.
If the provided software LoiLoFit for Everio is not installed, some functions may not work properly.
"Installing the Provided Software" (p. 115)
Before making backup, make sure that enough free space is left in the computer's hard disk (HDD).
Unable to copy files to DVD or Blu-ray disc with a PC.
To record to discs, a recordable DVD or Blu-ray drive is required for the computer in use.
Cannot upload the file to YouTube.
Check if you have created an account with YouTube. (You need a YouTube account to upload files to YouTube.)
Changing videos to the file format for uploading cannot be performed on this unit.
Refer to the help file of the provided software LoiLoFit for Everio Refer to the help file of the provided software Everio MediaBrowser 4
I am using a Mac computer.
Copy the files to a Mac computer using the following method.
"Copying to Mac Computer" (p. 129)
The computer cannot recognize the SDXC card.
Confirm and update the OS of your computer.
"When your computer cannot recognize the SDXC card" (p. 14)
Screen/Image
The LCD monitor is difficult to see.
The LCD monitor may be difficult to see if used in bright areas such as under direct sunlight.
A band or a ball of bright light appears on the LCD monitor.
Change the direction of this unit to prevent the light source from coming into view. (A band or a ball of bright light may appear when there is a bright light source near this unit, but this is not a malfunction.)
The recorded subject is too dark.
Use backlight compensation when the background is bright and the subject is dark.
"Setting Backlight Compensation" (p. 35)
Use "NIGHTALIVE" in SCENE SELECT.
"Shooting According to Scene (Subject)" (p. 32)
Use "GAIN UP" in the menu.
“GAIN UP” (p. 226)
Set "BRIGHTNESS ADJUST" in the recording menu to the "+" side.
"Adjusting Brightness" (u p. 34)
The recorded subject is too bright.
Set the backlight compensation to "OFF" if it is being used.
"Setting Backlight Compensation" (p. 35)
Set "BRIGHTNESS ADJUST" in the recording menu to the "-" side.
"Adjusting Brightness" (p. 34)
The color looks strange. (Too bluish, too reddish, etc.)
Wait for a while until natural colors are achieved. (It may take some time for white balance to be adjusted.)
Set "WHITE BALANCE" in the recording menu to "MANUAL". Select from
“FINE”/“CLOUD”/“HALOGEN”/“MARINE:BLUE”/“MARINE:GREEN” according to the light source.
Select "MWB" and adjust accordingly.
Set "WHITE BALANCE" in the recording menu to "MANUAL". Select from "FINE"/"CLOUD"/"HALOGEN" according to the light source. Select "MWB" and adjust accordingly.
"Setting White Balance" (p. 36)
The color looks different.
Set "WHITE BALANCE" in the recording menu accordingly.
"Setting White Balance" (p. 36)
There are bright or dark spots on the screen.
While the LCD monitor screen has more than 99.99% effective pixels, 0.01% of the pixels may be bright spots (red, blue, green) or dark spots. This is not a malfunction. The spots will not be recorded.
Other Problems
The buttons on the touch screen do not work.
Tap the buttons on the touch screen with your fingers or the stylus pen.
The buttons may not respond if you touch them with your fingernails or with gloves on.
Save the recorded data before requesting service.
①Connect to computer using a USB cable.
The "SELECT DEVICE" menu appears.
②Press and hold the START/STOP button for more than 2 seconds.
The "PLAYBACK ON PC" appears.
Operations are to be performed on the computer after the screen switches.
The image is grainy.
When digital zoom is used, the image becomes grainy as it is digitally enlarged.
This unit heats up.
This is not a malfunction. (This unit may become warm when used for a long time.) Stop using the unit if it gets too warm.
The language on the display changed.
It may occur when you connect this unit to a TV with different language setting using an HDMI mini cable.
"Operating in Conjunction with TV via HDMI" (p. 78)
When connected to the TV via the HDMI mini cable, proper images and sounds are not output.
Images and sounds may not be output properly depending on the TV connected. In such cases, perform the following operations.
① Disconnect the HDMI mini cable and connect it again.
② Turn off and on this unit again.
"Connecting via the HDMI Mini Connector" (p. 77)
HDMI-CEC functions do not work properly, and the TV does not work in conjunction with this unit.
TVs may operate differently depending on the specifications, even if they are HDMI-CEC compliant. Therefore, the HDMI-CEC functions of this unit cannot be guaranteed to operate in combination with all the TVs. In such cases, set "HDMI CONTROL" to "OFF".
"HDMI CONTROL" (p. 241)
The unit operates slowly when switching between video mode and still image mode, or when switching the power on or off.
It is recommended that you copy all videos and still images onto your computer, and erase the files from this unit. (If there are many recorded files on this unit, it takes time for the unit to respond.)
This unit does not function properly and error messages appear.
This unit is a microcomputer-controlled device. Electrostatic discharge, external noise and interference (from a TV, a radio, etc.) might prevent it from functioning properly. In such a case, turn off the power, then remove the AC adapter and battery pack. This unit will be reset.
Operation disabled since the POWER/CHARGE lamp and the ACCESS lamp are blinking
After closing the LCD monitor, remove power source (battery and AC adapter). Then, attach the battery and AC adapter again, and turn on the power by opening the LCD monitor. If these operations won't solve the problem, contact your JVC dealer or the JVC service center.
Disclaimer
- We shall not be held responsible for loss of recorded contents when recording videos/audio or playback cannot be operated due to malfunctions in this unit, provided parts, or SD card.
- Once deleted, recorded contents (data), including data loss due to malfunctions in this unit, cannot be restored. Please be forewarned.
\- JVC will not be responsible for any lost data. Please be forewarned.
- In order for quality improvement, defective recording medium is subject to be analyzed. Therefore, it may not be returned.
Error Message?
CHECK LENS COVER
Open the lens cover.
SET DATE/TIME!
Connect the AC adapter, charge the battery for more than 24 hours and set the clock. (If the message still appears, the clock battery is exhausted.
Consult your nearest JVC dealer.)
"Clock Setting" (p. 18)
COMMUNICATION ERROR
Reconnect the USB cable.
Turn off this unit and the devices connected to it, and turn them on again.
Reattach the battery pack.
FORMAT ERROR! (GZ-EX355)
Check the operating procedure, and perform once again.
"FORMAT BUILT-IN MEM. (GZ-EX355)" (p. 242)
Turn off and on this unit again.
ERROR IN BUILT-IN MEMORY! (GZ-EX355)
Turn off and on this unit again.
If the above does not solve the problem, back up your files and execute
"FORMAT BUILT-IN MEM." in the "MEDIA SETTINGS" menu. (All data will be deleted.)
"FORMAT BUILT-IN MEM. (GZ-EX355)" (p. 242)
MEMORY CARD ERROR!
Check that the card is supported by this unit.
"Types of Usable SD Card" (p. 14)
Turn off and on this unit again.
Remove the AC adapter and battery pack, then remove and re-insert the SD card.
Remove any dirt from the SD card terminals.
If the above does not solve the problem, back up your files and execute
"FORMAT SD CARD" in the "COMMON" menu. (All data will be deleted.)
"FORMAT SD CARD" (p. 242)
NOT FORMATTED
Select "OK", then select "YES" on the "DO YOU WANT TO FORMAT?" screen.
RECORDING FAILURE
Turn off and on this unit again.
CANNOT TAKE MORE STILL IMAGES AT THIS TIME
Stop video recording before taking still images. (If the SD card is removed and inserted during video recording, still images cannot be recorded.)
PLAYBACK FAILED
Remove and re-insert the SD card.
"Inserting an SD Card" (p. 13)
Remove any dirt from the SD card terminals.
Insert the SD card before turning on the power.
Do not subject this unit to any strong impact or vibration.
VIDEO MANAGEMENT FILE IS DAMAGED, RECOVERY IS REQUIRED TO RECORD/PLAYBACK, RECOVER?
Select "OK" to restore. (Videos that cannot be restored will not be displayed on the index screen, but you may be able to play them back using
"PLAYBACK OTHER FILE" in the menu.)
"PLAYBACK OTHER FILE" (p. 73)
UNSUPPORTED SCENE!
Use files recorded with this unit. (Files recorded with other devices may not be playable.)
UNSUPPORTED FILE!
Use files recorded with this unit. (Files recorded with other devices may not be playable.)
THIS FILE IS PROTECTED
Switch off the "PROTECT/CANCEL" function in the "EDIT" menu.
"Protecting Files" (p. 81)
CHECK CARD'S WRITE PROTECTION SWITCH
Set the write protect switch of the SD card to off.
INSUFFICIENT AVAILABLE SPACE
Delete files, or move files to a computer or other devices.
Replace the SD card with a new one.
Seamless videos cannot be combined if there is not enough free space in the built-in memory (GZ-EX355) or SD card. Check the amount of remaining free space before combining.
RECORDABLE MANAGEMENT CAPACITY LEVEL HAS BEEN REACHED
① Move the files or folders to a computer or other device. (Back up your files.)
② Select "FILE + MANAGEMENT NO" in "FORMAT BUILT-IN MEM." or "FORMAT SD CARD" of the media settings menu. (All data on the built-in memory or SD card will be deleted.)
"FORMAT BUILT-IN MEM. (GZ-EX355)" (p. 242)
"FORMAT SD CARD" (p. 242)
SCENE QUANTITY EXCEEDED LIMIT
① Move the files or folders to a computer or other device. (Back up your files.)
② Select "FILE + MANAGEMENT NO" in "FORMAT BUILT-IN MEM." or "FORMAT SD CARD" of the media settings menu. (All data on the built-in memory or SD card will be deleted.)
"FORMAT BUILT-IN MEM. (GZ-EX355)" (p. 242)
"FORMAT SD CARD" (p. 242)
NUMBER OF FOLDERS OVERFLOW
① Move the files or folders to a computer or other device. (Back up your files.)
② Select "FILE + MANAGEMENT NO" in "FORMAT BUILT-IN MEM." or "FORMAT SD CARD" of the media settings menu. (All data on the built-in memory or SD card will be deleted.)
"FORMAT BUILT-IN MEM. (GZ-EX355)" (p. 242)
"FORMAT SD CARD" (p. 242)
FILE QUANTITY LIMIT EXCEEDED
① Move the files or folders to a computer or other device. (Back up your files.)
② Select "FILE + MANAGEMENT NO" in "FORMAT BUILT-IN MEM." or "FORMAT SD CARD" of the media settings menu. (All data on the built-in memory or SD card will be deleted.)
"FORMAT BUILT-IN MEM. (GZ-EX355)" (p. 242)
"FORMAT SD CARD" (p. 242)
PLAYLIST QUANTITY EXCEEDS LIMIT
Reduce the number of the playlist to 99 files or less. (Up to 99 playlists can be created.)
CANCELLED BECAUSE PLAYLIST AMOUNT EXCEEDED MAXIMUM LIMIT
When creating a DVD, reduce the number of playlists to be saved.
Reduce the number of videos to add to the playlist to 999 files.
"Creating Playlists from the Recorded Videos" (vss p. 85)
PROCESSING CANCELLED DUE TO LIMITED SPACE FOR OPERATION
Reduce the number of videos to add to the playlist to 999 files.
"Creating Playlists from the Recorded Videos" (p. 85)
NO FILES (GZ-EX355)
Change the setting of "REC MEDIA FOR IMAGE" or "REC MEDIA FOR VIDEO" in the "COMMON" menu, and check that files are not recorded to the other media.
"REC MEDIA FOR IMAGE (GZ-EX355)" (p. 242)
RECORDING CANCELLED (GZ-EX355)
Set "REC MEDIA FOR VIDEO" to "SD CARD", then record to an SD card.
"REC MEDIA FOR VIDEO (GZ-EX355)" (p. 242)
Turn off and on this unit again.
Protect the unit from vibration and shock.
CAMERA TEMPERATURE IS HIGH PLEASE TURN CAMERA OFF TO ALLOW IT TO COOL DOWN PLEASE WAIT
Turn off the power of this unit, let and it cool down before turning on the power again.
POWER IS OFF, OR USB DEVICE IS UNSUPPORTED
Turn on the power of the connected USB device.
Connect the AC adapter to the DVD writer or BD writer (external Blu-ray drive).
INSERT DISC
Open the tray of the DVD writer or BD writer (external Blu-ray drive), check and reset the DVD or Blu-ray disc, then close the tray. Replace the disc in the DVD writer or BD writer (external Blu-ray drive).
CHANGE DISC
Open the tray of the DVD writer or BD writer (external Blu-ray drive), check and reset the DVD or Blu-ray disc, then close the tray. Replace the disc in the DVD writer or BD writer (external Blu-ray drive).
Perform regular maintenance of this unit to enable it to be used for a long time.
Caution :
\- Be sure to detach the battery pack, AC adapter, and power plug before performing any maintenance.
Camcorder
- Wipe this unit with a dry, soft cloth to remove any dirt.
- When it is extremely dirty, soak the cloth in a solution of neutral detergent, wipe the body with it, and then use a clean cloth to remove the detergent.
Caution :
- Do not use solvents such as benzene, thinner, or alcohol. Doing so may cause damage to the unit.
- When using a chemical cloth or cleaner, be sure to observe the warning labels and instructions of the product.
- Do not leave the device in contact with rubber or plastic products for a long time.
Lens/LCD Monitor
- Use a lens blower (commercially available) to remove any dust, and a cleaning cloth (commercially available) to wipe off any dirt.
Mold may form if the lens is left dirty.
- You can use a commercially available anti-reflection or protective film on the screen.
However, depending on the thickness of the film, operations on the touch screen may not be performed smoothly or the screen may darken slightly.
Camera
Item Details Power supply Using AC adapter: DC 5.2 VUsing battery pack: DC 3.6 V (GZ-EX355/GZ-EX310)Using battery pack: DC 3.5 V - 3.6 V (GZ-E300) Power consumption (GZ-EX355/GZ-EX310)2.3 W (MONITOR BRIGHTNESS: 3 (standard))(GZ-E300)2.2 W (MONITOR BRIGHTNESS: 3 (standard))Rated Current Consumption: 1A Dimensions (mm) 50 x 57 x 116 (2" x 2-1/4" x 4-5/8")(W x H x D: excluding grip belt) Mass (GZ-EX355/GZ-EX310)Approx. 200 g (0.44 lbs) (camera only),Approx. 240 g (0.53 lbs) (including supplied batterypack)(GZ-E300)Approx. 195 g (0.43 lbs) (camera only),Approx. 225 g (0.5 lbs) (including supplied batterypack) Operating environment Allowable operating temperature: 0°C to 40°C(32°F to 104°F)Allowable storage temperature: -20°C to 50°C(-4°F to 122°F)Allowable relative humidity: 35 % to 80 % Image pickup device 1/5.8" 2,510,000 pixels (CMOS, back-illuminated) Recording area (Video) AVCHD mode1,010,000 to 2,290,000 pixels (image stabilizer:off, dynamic zoom: ON)iFrame mode920,000 to 1,770,000 pixels (dynamic zoom: ON) Recording area (Still image) 1,710,000 pixels (4:3) (image stabilizer: OFF)2,290,000 pixels (16:9) (image stabilizer: OFF) Lens F1.8 - 6.3, f= 2.9 mm to 116.0 mmVideoAVCHD mode35 mm conversion: 40.5 mm to 2,430 mm (dynamiczoom: ON)35 mm conversion: 40.5 mm to 1,620 mm (dynamiczoom: OFF)iFrame mode35 mm conversion: 46.0 mm to 2,530 mm (dynamiczoom: ON)35 mm conversion: 46.0 mm to 1,840 mm (dynamiczoom: OFF)Still Image35 mm conversion: 49.5 mm to 1,980 mm (4:3)35 mm conversion: 40.5 mm to 1,620 mm (16:9) Lowest illumination 3 lux1 lux (SCENE SELECT: NIGHTALIVE) Zoom (during video recording) Optical zoom: Up to 40xDynamic zoom: Up to 60xDigital zoom: Up to 200x Zoom (during still image recording) Optical zoom: Up to 40x LCD monitor 3.0", 230,000 pixels, color LCD Recording media SDSDHC/SDXC card (commercially available)"Types of Usable SD Card" (€ p. 14) Clock battery Rechargeable battery
Connectors
Item Details HDMI output connector HDMI mini connector AV output connector Video output: 1.0 V (p-p), 75 ΩAudio output: 300 mV (rms), 1 KΩ USB connector Mini USB Type AB, USB 2.0 compliant
Video (AVCHD)
Item Details Recording/Playback format AVCHD standardVideo: MPEG-4 AVC/H.264Audio: Dolby Digital 2ch Extension .MTS Signal system NTSC standard Image quality (Video) UXP1920 x 1080 pixelsAverage Approximate 24 MbpsXP1920 x 1080 pixelsAverage Approximate 17 MbpsSP1920 x 1080 pixelsAverage Approximate 12 MbpsEP1920 x 1080 pixelsAverage Approximate 4.8 MbpsSSW(16:9)720 x 480 pixels (Interlaced)Average Approximate 6.2 MbpsSEW(16:9)720 x 480 pixels (Interlaced)Average Approximate 3 Mbps Sound quality (Audio) 48 kHz, 256 kbps
Videos (iFrame) (GZ-EX355/GZ-EX310)
Item Details Recording/Playback format MP4 standardVideo: MPEG-4 AVC/H.264Audio: AAC (2ch) Extension .MP4 Signal system NTSC standard Image quality(Video) 1280x7201280 x 720 pixelsMax 36 Mbps, average approx. 34 Mbps960x540960 x 540 pixelsMax 28 Mbps, average approx. 26 Mbps Sound quality(Audio) 48 kHz, average 128 kbps
Still Image
Item Details Recording format JPEG standard Extension .JPG Image size “Approximate Number of Still Images (Unit: Number of Shots)” (€' p. 62)
AC Adapter (AC-V11U)
Item Details Power supply AC 110 V to 240 V, 50 Hz/60 Hz Output DC 5.2 V, 1 A Allowable operating temperature 0°C to 40°C (32°F to 104°F)(10°C to 35°C (50°F to 95°F) during charging) Dimensions (mm) 66 x 28 x 47 (2-5/8" x 1-1/8" x 1-7/8") (W x H x D: excluding cord and AC plug) Mass Approx. 71 g (0 .15 lbs)
Battery Pack (BN-VG107U) (GZ-E300)
Item Details Power voltage 3.5 V 3.6 V Capacity 700 mAh Dimensions (mm) 31 x 21.5 x 43 (1-1/4" x 7/8" x 1-3/4") (W x H x D) Mass Approx. 26 g (0.06 lbs)
Battery Pack (BN-VG114U) (GZ-EX355/GZ-EX310)
Item Details Power voltage 3.6 V Capacity 1400 mAh Dimensions (mm) 31 x 21.5 x 43 (1-1/4" x 7/8" x 1-3/4") (W x H x D) Mass Approx. 40 g (0.09 lbs)
Memo :
\- The specifications and appearance of this product are subject to changes for further improvement without prior notice.
JVC
text_image
M WT D ←PLAY REC MENU3 Tap "MENU".
text_image
Screenshot of a media player interface with playback controls and preview thumbnails4 Tap "EDIT".
text_image
TOP MENU ?5 Tap "MOVE".
text_image
EDIT MOVE6 Tap on the files to move.
text_image
QUANTITY:0030 SEL ALL REL ALL SET QUIT7 Tap "SET".
text_image
QUANTITY:0030 SEL ALL REL ALL SET QUIT8 Tap "YES".
text_image
MOVE VIDEO MOVE QUANTITY:30 START MOVING? YES NOCopying to Windows PC (GZ-EX355/GZ-EX310)
You can copy files to a computer using the provided software. Discs can also be created using the computer's DVD or Blu-ray drive. If the provided software is not installed, this unit will be recognized as an external storage when connected.Memo :
• To record to discs, a recordable DVD or Blu-ray drive is required for the computer in use. - Still images cannot be recorded to discs using the provided software. - Videos recorded in the iFrame format can not be copied. - In order to record on the Blu-ray disc, it is necessary to upgrade to the paid version of LoiLoFit for Everio. For details, refer to the following link. http://loilo.tv/jp/product/33/page/27 \- Backing up of files using other softwares is not supported.Trouble with Using the Provided Software LoiLoFit for Everio
Consult the customer service center below. http://loilo.tv/us/product/LoiLoFit\_for\_Everio \- For details on how to upload to YouTube, refer to "Help" in LoiLoFit for Everio.Verifying System Requirements (Guideline)
Right-click on "Computer" (or "My Computer") in the "Start" menu and select "Properties" to check the following items.Windows Vista/Windows 7
\- Refer to the operating instructions found in the animation on the Detailed User Guide.Windows XP
\- Refer to the operating instructions found in the animation on the Detailed User Guide.| Windows Vista/Windows 7 Windows XP | ||
| OS Windows Vista | 32/64-bitHome Basic or Home Premium(Pre-installed versions only) Service Pack 2Windows 7 32/64-bitHome Premium(Pre-installed versions only) Service Pack 1 | Windows XPHome Edition or Professional(Pre-installed versions only) Service Pack 3 |
| CPU Intel Core 2 | Duo, CPU 2 GHz or higher | |
| RAM At least 2 GB | ||
| Graphics (during | playback/backing up):Intel 965 or later, NVIDIA Geforce 6000 series or later, ATI Radeon 9600 or later(during video editing/creating a disc/converting video/uploading):Intel G45 or later, NVIDIA Geforce 8000 series or later (except for 8800GTX and 8300), ATI Radeon HD2000 series or later (except for 2900) | |
■ Other requirements
• VRAM: 256MB or higher - Microsoft .NET Framework 3.5 SP1 needs to be installed. - To edit/playback videos, the use of a computer with Intel Core i7 (4 core) CPU is recommended.Memo :
- If your PC does not meet the above system requirements, operations of the provided software cannot be guaranteed. - Depending on the PC environment, even if the operating environment is adequate, 1 frame per second may be reduced during video playback. - There is no guarantee that the operations will work with all computer environments. - For more information, contact your PC's manufacturer.Installing the Provided Software
You can display the recorded images in calendar format and perform editing using the provided software.Windows Vista/Windows 7
\- Refer to the operating instructions found in the animation on the Detailed User Guide.Windows XP
\- Refer to the operating instructions found in the animation on the Detailed User Guide.Backing Up Files
Before making backup, make sure that enough free space is left in the computer's hard disk (HDD). Backup will not start if there is not enough free space. 1 Remove the AC adapter and battery pack from this unit. 2 Open the LCD monitor. natural_image
Illustration of a digital camera with an open screen and a blue arrow indicating the direction (no text or symbols present)flowchart
graph TD
A["Device"] -->|To DC Connector| B["Computer"]
A -->|USB Cable (Provided)| C["User Interface"]
C --> D["User Interface"]
D --> E["User Interface"]
style A fill:#f9f,stroke:#333
style B fill:#ccf,stroke:#333
style C fill:#cfc,stroke:#333
style D fill:#fcc,stroke:#333
text_image
SELECT DEVICE SELECT DEVICE TYPE TO CONNECT CONNECT TO PCtext_image
CONNECT TO PC BACK UPtext_image
① Click ② Clicktext_image
OK Cancel View Add Add Add Add Add Add Add Add Add Add Add Add Add Add Add Add Add Add Add Add Add Add Add Add Add Add Add Add Add Add Add Add Add Add Add Add Add Add Add Add Add Add Add Add Add Add Add Add Add Add Clicktext_image
LoLoFit I've selected files and be backed up Back-Up File Size: 1.565 KB Used Space Back-Up File Size Available Spoco: 272 GB / 298 GB Y1 (1) N0 Clicktext_image
Screenshot of a video editing software interface showing timeline, preview thumbnails, and playback controlsMemo :
- Videos recorded in the iFrame format can not be copied. - Before making backup, load the SD card in which the videos and still images are stored on this unit. - After backing up your files using the provided software, they cannot be restored to this unit. - Delete unwanted videos before making backup. It takes time to back up many videos. "Deleting Unwanted Files" (p. 80)Disconnecting this Unit from Computer
1 Click "Safely Remove Hardware and Eject Media". text_image
Safely Remove Hardware and Eject Media 9:31 PM 9/27/2010 ClickRecording Videos to Discs
1 Insert a new disc into the PC's recordable DVD or Blu-ray drive. 2 Click "Disk" to select the disc type. text_image
Clicktext_image
Clicktext_image
① Click ② Clicktext_image
OK Cancel Clicktext_image
Drag Droptext_image
Clicktext_image
Disk creation successful. Would you like to create another disk with the same contents? Create another disk Cancel ClickMemo :
- The following types of discs can be used on the provided software LoiLoFit for Everio. DVD-R DVD-R DL DVD-RW - In order to record on the Blu-ray disc, it is necessary to upgrade to the paid version of LoiLoFit for Everio. For details, refer to the following link. http://loilo.tv/jp/product/33/page/27 - Videos recorded in the iFrame format can not be copied. - Depending on the PC environment, even if the operating environment is adequate, 1 frame per second may be reduced during video playback. - To view the help file of LoiLoFit for Everio, select "Help" from the LoiLoFit for Everio's menu bar or press F1 on the keyboard. - If you are unable to activate while creating a disc, complete activation by following the instruction on the screen.Backing Up Files Without Using Provided Software
Copy the files to a computer using the following method. 1 Remove the AC adapter and battery pack from this unit. 2 Open the LCD monitor. natural_image
Diagram of a digital camera with an open screen and a blue arrow indicating rotation (no text or symbols)text_image
AC Adapter To AC Outlet (110 V to 240 V) To DC Connector To USB Connector USB Cable (Provided) To USB Connector Computertext_image
SELECT DEVICE SELECT DEVICE TYPE TO CONNECT CONNECT TO PCtext_image
CONNECT TO PC PLAYBACK ON PCtext_image
PLAYBACK ON PCMemo :
- To edit/view the files, use a software that supports iFrame (video)/AVCHD (video)/JPEG (still image) files. - The above operations on computer may vary with the system used.Disconnecting this Unit from Computer
1 Click "Safely Remove Hardware and Eject Media". text_image
Safely Remove Hardware and Eject Media 9:31 PM 9/27/2010 ClickList of Files and Folders
Folders and files are created in the SD card as shown below. They are created only when necessary. flowchart
graph TD
A["[JVCCAM_MEM"] (Built-In Memory] --> B["[DCIM"]]
C["[JVCCAM_SD"] (SD Card)] --> B
B --> D["[100JVCSO"]]
D --> E["PIC_0001.JPG"]
D --> F["PIC_0002.JPG"]
D --> G["PIC_0003.JPG"]
D --> H["PIC_0004.MP4"]
E --> I["Still Image File"]
F --> I
G --> I
H --> I
B --> J["[AVCHD"] (Built-In Memory)]
J --> K["[BDMV"]]
K --> L["[STREAM"]]
L --> M["XXXXX.MTS"]
M --> N["(Video File)"]
L --> O["[BACKUP"]]
L --> P["[CLIPINF"]]
L --> Q["[PLAYLIST"]]
L --> R["[INDEX.BDM"]]
L --> S["[MOVIEOBJ.BDM"]]
O --> T["[EXTMOV"]]
T --> U["DEM_0000.MTS"]
U --> V["(Demo Video File)"]
U --> W["*There may be no demo video file."]
T --> X["MOV_0001.MTS"]
T --> Y["MOV_0002.MTS"]
T --> Z["MOV_0003.MTS"]
U --> AA["(Video files with defective management information)"]
T --> AB["[PRIVATE"] (Management Information)]
AB --> AC["[AVCHD"] (SD Card)]
AC --> AD["[JVC"]]
Caution :
\- When the camera and PC are connected by an USB cable, recorded media are read-only.Copying to Windows PC (GZ-E300)
You can copy files to a computer using the provided software. Discs can also be created using the computer's DVD or Blu-ray drive. If the provided software is not installed, this unit will be recognized as an external storage when connected.Memo :
- To record to discs, a recordable DVD or Blu-ray drive is required for the computer in use. - Still images cannot be recorded to discs using the provided software. - Backing up of files using other softwares is not supported.Trouble with Using the Provided Software Everio MediaBrowser 4
Consult the customer service center below. \- Pixel a User Support Center| Telephone USA and Canada (English): +1-800-458-4029 (toll-free)Europe (UK, Germany, France, and Spain)(English/German/French/Spanish): +800-1532-4865 (toll-free)Other Countries in Europe(English/German/French/Spanish): +44-1489-564-764Asia (Philippines) (English): +63-2-438-0090China (Chinese): 10800-163-0014 (toll-free) |
| Homepage http://www.pixela.co.jp/oem/jvc/mediabrowser/e/ |
text_image
Help(H) MediaBrowser Help(H) F1 Check the latest version online Click for Latest Product Info Version info(A) Mon Tue WedVerifying System Requirements (Guideline)
Right-click on "Computer" (or "My Computer") in the "Start" menu and select "Properties" to check the following items.Windows Vista/Windows 7
\- Refer to the operating instructions found in the animation on the Detailed User Guide.Windows XP
\- Refer to the operating instructions found in the animation on the Detailed User Guide.| Windows Vista/Windows 7 Windows XP | ||
| OS Windows Vista | 32/64-bitHome Basic or Home Premium(Pre-installed versions only) Service Pack 2Windows 7 32/64-bitHome Premium(Pre-installed versions only) Service Pack 1 | Windows XPHome Edition or Professional(Pre-installed versions only) Service Pack 3 |
| CPU Intel Core Duo | CPU 1.66 GHz or higher(Intel Core 2 Duo, CPU 2.13 GHz or higher recommended) | Intel Core Duo, CPU 1.66 GHz or higher(Intel Core 2 Duo, CPU 2.13 GHz or higher recommended) |
| RAM At least 2 GB | At least 1 GB | |
| Video editing Intel | Core i7, CPU 2.53 GHz or higher recommended Intel Core i7, CPU | 2.53 GHz or higher recommended |
■ Other requirements
Display: 1024×768 pixels or above (1280×1024 pixels or above recommended) Graphic: Intel G965 or higher recommendedMemo :
- If your PC does not meet the above system requirements, operations of the provided software cannot be guaranteed. - There is no guarantee that the operations will work with all computer environments. - For more information, contact your PC's manufacturer.Installing the Provided Software (Built-in)
You can display the recorded images in calendar format and perform editing using the provided software.Preparations
Connect this unit to a computer with a USB cable. 1 Remove the AC adapter and battery pack from this unit. 2 Open the LCD monitor. natural_image
Diagram of a digital camera with an open screen and blue arrow indicating rotation (no text or symbols)flowchart
graph TD
A["AC Adapter To AC Outlet (110 V to 240 V)"] -->|To DC Connector| B["Computer"]
C["USB Cable (Provided)"] --> D["To USB Connector"]
E["USB Cable (Provided)"] --> F["To USB Connector"]
G["Computer"] --> H["USB Cable"]
text_image
SELECT DEVICE SELECT DEVICE TYPE TO CONNECT CONNECT TO PCtext_image
CONNECT TO PC PLAYBACK ON PCMemo :
- If "Everio Software Setup" doesn't appear, double-click "JVCCAM\_APP" in "My Computer" or "Computer", then double-click "install (or Install.exe)" - If the auto play dialog box appears, select "Open folder to view files" and click "OK". Then, click "install (or Install.exe)" in the folder.Installation Procedure
■ Windows Vista/Windows 7
\- Refer to the operating instructions found in the animation on the Detailed User Guide.Windows XP
\- Refer to the operating instructions found in the animation on the Detailed User Guide.Backing Up All Files
Before making backup, make sure that enough free space is left in the computer's hard disk (HDD). Backup will not start if there is not enough free space. 1 Remove the AC adapter and battery pack from this unit. 2 Open the LCD monitor. natural_image
Illustration of a digital camera with an open screen and blue arrow indicating rotation (no text or symbols)flowchart
graph TD
A["Device"] -->|To USB Connector| B["USB Cable (Provided)"]
A -->|To USB Connector| C["Computer"]
D["AC Adapter To AC Outlet (110 V to 240 V)"] -->|To DC Connector| E["Computer"]
text_image
SELECT DEVICE SELECT DEVICE TYPE TO CONNECT CONNECT TO PCtext_image
CONNECT TO PC BACK UPtext_image
① Click Step 1 View: Selection ② Click Click "Next" Click "All volume in camcorder"text_image
Saving Destination (PC) Step 2 Confirm Start OK Cancel OK Cancel OK Cancel OK Start OK Cancel OK Clicktext_image
Everio MediaBrowser 4 Finished successfully. OK ClickMemo :
- Before making backup, load the SD card in which the videos and still images are stored on this unit. - If you encounter any problems with the provided software Everio MediaBrowser 4, please consult the "Pixela User Support Center".| Telephone USA and Canada (English): +1-800-458-4029 (toll-free)Europe (UK, Germany, France, and Spain)(English/German/French/Spanish): +800-1532-4865 (toll-free)Other Countries in Europe(English/German/French/Spanish): +44-1489-564-764Asia (Philippines) (English): +63-2-438-0090China (Chinese): 10800-163-0014 (toll-free) |
| Homepage http://www.pixela.co.jp/oem/jvc/mediabrowser/e/ |
Disconnecting this Unit from Computer
1 Click "Safely Remove Hardware and Eject Media". text_image
Safely Remove Hardware and Eject Media 9:31 PM 9/27/2010 ClickOrganizing Files
After backing up your files, organize them by adding labels such as "Family Trip" or "Athletic Meet". This is useful not only for creating discs, but for viewing the files too. 1 Double-click on the Everio MediaBrowser 4 icon. • The provided software starts up.  Гурго Media Bro...  Evero MediaBro... 2 Display the month of the files to organize. text_image
Click 2016 Recording Monthtext_image
Click Recording Date B/2015 ① Input the name of the new user list List Name Enter List name. 0000 OK Cancel ② Click4 Click on the recording day.
\- The thumbnails of the files recorded on the day are displayed. Recording Date text_image
New Booklet File Edit View Help Set As New Booklet 6/2018 New Booklet New Booklet New Booklet New Booklet New Booklet New Booklet New Booklet New Booklet New Booklet New Booklet New Booklet New Booklet New Booklet New Booklet New Booklet New Booklet New Booklet New Booklet New Booklet New Booklet New Booklet New Booklet New Booklet New Booklet New Booklet New Booklets New Booklets New Booklets New Booklets New Booklets New Booklets New Booklets New Booklets New Booklets New Booklets New Booklets New Booklets New Booklets New Booklets New Booklets New Booklets New Booklets New Booklets New Booklets New Booklets New Booklets New Booklets New Booklets New Booklets New Booklets New Booktimes New Booktimes New Booktimes New Booktimes New Booktimes New Booktimes New Booktimes New Booktimes New Booktimes New Booktimes New Booktimes New Booktimes New Booktimes New Booktimes New Booktimes New Booktimes New Booktimes New Booktimes New Booktimes New Booktimes New Booktimes New Booktimes New Booktimes New Booktimes New Booktimes New Booklines5 Register files to the created user list.
User List Thumbnails text_image
Drag DropIdentifying Video or Still Image :
- You can select files using the "SELECT" menu on the top right of the screen. - Check the video/still image icon on the top right corner of the thumbnail. text_image
Image showing a red agricultural machine on water with an inset image labeled 'Video' and 'Still Image', likely illustrating a video recording setup.Memo :
\- If you encounter any problems with the provided software Everio MediaBrowser 4, please consult the "Pixela User Support Center".| Telephone | USA and Canada (English): +1-800-458-4029 (toll-free)Europe (UK, Germany, France, and Spain)(English/German/French/Spanish): +800-1532-4865 (toll-free)Other Countries in Europe(English/German/French/Spanish): +44-1489-564-764Asia (Philippines) (English): +63-2-438-0090China (Chinese): 10800-163-0014 (toll-free) |
| Homepage | http://www.pixela.co.jp/oem/jvc/mediabrowser/e/ |
Recording Videos to Discs
Copy the files that are arranged using the user list to discs. 1 Insert a new disc into the PC's recordable DVD drive. 2 Select the desired user list. text_image
Sun/Water Start: 12 March 2016 (Wednesday) - May 1 Date: 9/2016 Time: 00:00 Day: 01:00 Week: 02:00 Month: 03:00 Day: 04:00 Week: 05:00 Month: 06:00 Day: 07:00 Week: 08:00 Month: 09:00 Day: 10:00 Week: 11:00 Month: 12:00 Day: 13:00 Week: 14:00 Month: 15:00 Day: 16:00 Week: 17:00 Month: 18:00 Day: 19:00 Week: 20:00 Month: 21:00 Day: 22:00 Week: 23:00 Month: 24:00 Day: 25:00 Week: 26:00 Month: 27:00 Day: 28:00 Week: 29:00 Month: 30:00 Day: 31:00 Week: 32:00 Month: 33:00 Day: 34:00 Week: 35:00 Month: 36:00 Day: 37:00 Week: 38:00 Month: 39:00 Day: 40:00 Week: 41:00 Month: 42:00 Day: 43:00 Week: 44:00 Month: 45:00 Day: 46:00 Week: 47:00 Month: 48:00 Day: 49:00 Week: 50:00 Month: 51:00 Day: 52:00 Week: 53:00 Month: 54:00 Day: 55:00 Week: 56:00 Month: 57:00 Day: 58:00 Week: 59:00 Month: 60:00 Day: 61:00 Week: 62:00 Month: 63:00 Day: 64:00 Week: 65:00 Month: 66:00 Day: 67:00 Week: 68:00 Month: 69:00 Day: 70:00 Week: 71:00 Month: 72:00 Day: 73:00 Week: 74:00 Month: 75:00 Day: 76:00 Week: 77:00 Month: 78:00 Day: 79:00 Week: 80:00 Month: 81:00 Day: 82:00 Week: 83:00 Month: 84:00 Day: 85:00 Week: 86:00 Month: 87:00 Day: 88:00 Week: 89:00 Month: 90:00 Day: 91:00 Week: 92:00 Month: 93:00 Day: 94:00 Week: 95:00 Month: 96:00 Day: 97:00 Week: 98:00 Month: Click3 Select the disc type.
text_image
Create Disc Step 1 DOOD Step 1 Disc type selection Select the disc type to create and the project type then click apart. Disc type: Disc type selected to create Disc type: Disc type selected to create Click4 Select the files to copy to disc in order.
text_image
Create Box Box 1 OKOO Drag Step 1 AVCHD: Select the Files Drop Click5 Set the title of the top menu of the disc.
text_image
Create Dues Step 1 Step 2 Step 3 AVCHD Confirm Click after this design is going. AVCHD: 0.0000000000000000000000000000000000000000000000000000000000000000000000000000 Click6 After copying is complete, click "OK".
text_image
Everio MediaBrowser 4 Finished successfully. OK ClickMemo :
- The following types of discs can be used on the provided software Everio MediaBrowser 4. DVD-R DVD-R DL DVD-RW DVD+R DVD+R DL DVD+RW \- The following formats are supported by the provided software Everio MediaBrowser 4. AVCHD For details, refer to the Pixela homepage. http://www Covera.co.jp/oem/jvc/mediabrowser/e/ - Use Everio MediaBrowser 4 Player to play back an AVCHD disc. Refer to the help file of the provided Everio MediaBrowser 4 software to operate. - When copying videos recorded in UXP recording mode to create an AVCHD disc, the videos need to be converted to XP recording mode before copying. Therefore, it may take a longer time than copying videos recorded in other modes. - To view the help file of Everio MediaBrowser 4, select "Help" from the Everio MediaBrowser 4's menu bar or press F1 on the keyboard. - If you encounter any problems with the provided software Everio MediaBrowser 4, please consult the "Pixela User Support Center".| Telephone USA and Canada (English): +1-800-458-4029 (toll-free)Europe (UK, Germany, France, and Spain)(English/German/French/Spanish): +800-1532-4865 (toll-free)Other Countries in Europe(English/German/French/Spanish): +44-1489-564-764Asia (Philippines) (English): +63-2-438-0090China (Chinese): 10800-163-0014 (toll-free) |
| Homepage http://www.pixela.co.jp/oem/jvc/mediabrowser/e/ |
Backing Up Files Without Using Provided Software
Copy the files to a computer using the following method. 1 Remove the AC adapter and battery pack from this unit. 2 Open the LCD monitor. natural_image
Diagram of a digital camera with an open screen and a blue arrow indicating rotation (no text or symbols)text_image
AC Adapter To AC Outlet (110 V to 240 V) To DC Connector To USB Connector USB Cable (Provided) To USB Connector Computertext_image
SELECT DEVICE SELECT DEVICE TYPE TO CONNECT CONNECT TO PCtext_image
CONNECT TO PC PLAYBACK ON PCtext_image
PLAYBACK ON PCCaution :
\- When the folders or files are deleted/moved/renamed in the computer, they cannot be played back on this unit anymore.Memo :
- To edit/view the files, use a software that supports AVCHD (video)/JPEG (still image) files. - The above operations on computer may vary with the system used.Disconnecting this Unit from Computer
1 Click "Safely Remove Hardware and Eject Media". text_image
Safely Remove Hardware and Eject Media 9:31 PM 9/27/2010 ClickList of Files and Folders
Folders and files are created in the built-in memory and SD card as shown below. They are created only when necessary. flowchart
graph TD
A["JVCCAM_MEM"] --> B["[DCIM"]]
A --> C["[100JVCSO"]]
A --> D["[101JVCSO"]]
A --> E["[102JVCSO"]]
B --> F["PIC_0001.JPG"]
B --> G["PIC_0002.JPG"]
B --> H["PIC_0003.JPG"]
F --> I["Still Image File"]
G --> I
H --> I
I --> J["AVCHD"]
I --> K["BDMV"]
J --> L["[STREAM"]]
L --> M["XXXXX.MTS"]
M --> N["(Video File)"]
L --> O["[BACKUP"]]
O --> P["[CLIPINF"]]
P --> Q["[PLAYLIST"]]
Q --> R["[INDEX.BDM"]]
R --> S["[MOVIEOBJ.BDM"]]
L --> T["[EXTMOV"]]
T --> U["DEM_0000.MTS"]
U --> V["(Demo Video File)"]
U --> W["*There may be no demo video file."]
U --> X["(Video files with defective management information)"]
T --> Y["MOV_0001.MTS"]
Y --> Z["MOV_0002.MTS"]
Y --> AA["MOV_0003.MTS"]
T --> AB["PRIVATE"]
AB --> AC["[AVCHD"]]
AC --> AD["(Management Information)"]
AD --> AE["[JVC"]]
style A fill:#f9f,stroke:#333
style B fill:#f9f,stroke:#333
style C fill:#f9f,stroke:#333
style J fill:#ccf,stroke:#333
style M fill:#cfc,stroke:#333
style N fill:#fcc,stroke:#333
style O fill:#fcc,stroke:#333
style P fill:#fcc,stroke:#333
style Q fill:#fcc,stroke:#333
style R fill:#fcc,stroke:#333
style S fill:#fcc,stroke:#333
style T fill:#fcc,stroke:#333
style U fill:#fcc,stroke:#333
style V fill:#fcc,stroke:#333
style W fill:#fcc,stroke:#333
style X fill:#fcc,stroke:#333
style Y fill:#fcc,stroke:#333
style Z fill:#fcc,stroke:#333
Caution :
\- When the camera and PC are connected by an USB cable, recorded media are read-only.Copying to Mac Computer
Copy the files to a Mac computer using the following method. 1 Remove the AC adapter and battery pack from this unit. 2 Open the LCD monitor. natural_image
Diagram of a digital camera with an open screen and a blue arrow indicating rotation (no text or symbols)text_image
AC Adapter To AC Outlet (110 V to 240 V) To DC Connector To USB Connector USB Cable (Provided) To USB Connector Computertext_image
SELECT DEVICE SELECT DEVICE TYPE TO CONNECT CONNECT TO PCtext_image
CONNECT TO PC PLAYBACK ON PCtext_image
PLAYBACK ON PCCaution :
- When the camera and PC are connected by an USB cable, recorded media are read-only. - MTS files that are copied to a Mac computer cannot be imported to iMovie. To use MTS files with iMovie, import the files using iMovie.Memo :
- To edit/view the files, use a software that supports iFrame (video)/AVCHD (video)/JPEG (still image) files. - When removing this unit from the computer, drag and drop the "JVCCAM\_MEM" or "JVCCAM\_SD" icon on the desktop to the trash bin.iMovie and iPhoto
You can import files from this unit to a computer using Apple's iMovie'08, '09, '11 (video) or iPhoto (still image). To verify the system requirements, select "About This Mac" from the Apple menu. You can determine the operating system version, processor and amount of memory. - For the latest information on iMovie or iPhoto, refer to the Apple website. - For details on how to use iMovie or iPhoto, refer to the help file of the respective softwares. - There is no guarantee that the operations will work with all computer environments.Wi-Fi Capabilities
This unit is equipped with Wi-Fi function. You can do the following using a smartphone or computer via wireless connection.| Name of Function Capability | |
| DIRECT MONITORING | You can check the image on the camera via direct 1-to-1 connection (Wi-Fi Direct) with a smartphone (or computer), without the need for an access point (wireless LAN router).Recording of videos and still images may be performed while monitoring.(Videos and still images cannot be recorded while monitoring from the computer browser.)“Image Monitoring via Direct Connection (DIRECT MONITORING)”(p. 132) |
| INDOOR MONITORING | Connect to the smartphone (or PC) via access point at home using the wireless LAN router, to monitor images captured by the camcorder.Recording of videos and still images may be performed while monitoring.(Videos and still images cannot be recorded while monitoring from the computer browser.)“Image Monitoring via an Access Point at Home (INDOOR MONITORING)”(p. 135) |
| OUTDOOR MONITORING | You can check the image on the camera via internet connection with a smartphone (or computer) while you are outside.Recording of videos and still images may be performed while monitoring.(Videos and still images cannot be recorded while monitoring from the computer browser.)“Image Monitoring via the Internet (OUTDOOR MONITORING)”(p. 140) |
| DETECT/MAIL | A still image is automatically captured and sent via e-mail when faces or movements are detected by the camera.You can also set to record videos on the camera during detection.“Sending Still Images via E-mail upon Detection of Face or Movement (DETECT/MAIL)”(p. 142) |
| VIDEO MAIL | Videos of up to 15 seconds can be recorded and sent via e-mail.“Record and Send Videos via E-mail (VIDEO MAIL)”(p. 144) |
| TV MONITORING | Connect this unit to the DLNA compatible TV via access point at hope using the wireless LAN router. |
| EASY STORAGE | Save all the videos and still images that have not backed up to your computer, which is connected via wireless network. The management file is saved as well. |
| Record of the location information | You can record the location information of the venue where recording is taking place via direct connection (Wi-Fi Direct) with a smartphone supporting the GPS function.The recorded location information can be used on the software provided with this unit.“Recording the Location Information”(p. 147) |
| Pan Cradle (sold separately) | Panning operation (changing the camera to the left/right direction) can be remotely controlled via smartphone by setting the camera on the pan cradle (sold separately).“Using the Pan Cradle (Sold Separately)”(p. 150)For how to connect the pan cradle, efer to the instruction manual of the Pan Cradle for further details. |
Operating Environment
To check the image on the camera from a computer or smartphone, and to transfer videos/still images, it is necessary to meet the following requirements.Android Smartphone and Tablet Device
1 OS: Android2.3 or higher (This unit is not guaranteed to operate with all models.) 2 Supports GPS function (for GPS recording) 3 Able to connect to the internet or Google Play ("Everio sync. 2" required for software installation)iPhone/iPad/iPod touch
1 OS: iOS5.1 or higher (This unit is not guaranteed to operate with all models.) 2 Able to connect to the internet or "App Store™" (required for software installation)Computer
To check the image on the camera from a computer browser and to transfer videos/still images, it is necessary to meet the following requirements. 1 OS: Windows 7 2 Supports wireless LAN or wired LAN (To connect the camera and computer directly by using the DIRECT MONITORING function, support for wireless LAN is required.) 3 Installation of Windows Media Player 12 or later \- Confirmed operating environment: Internet Explorer 9 or laterCaution :
\- There is no guarantee that the operations will work with all computer environments. For example, the video download feature of mobile safari browser, etc. is not supported.Precautions on Using Wi-Fi
Cautions on Wi-Fi Function
• Operation is not guaranteed on all devices. - This function is not designed for disaster or crime prevention. - To prevent the situation of forgetting to turn off the power, this unit will turn off automatically after 10 days of continuous usage. - Leaving the LCD monitor open makes it easier to receive radio waves. Therefore, it is recommended to open the LCD monitor when using the Wi-Fi function. • Security of Wireless LAN An advantage of wireless LAN is that instead of using a LAN cable, it transmits information using radio waves, thus enabling LAN connection to be established within the area covered by the radio waves. However, as radio waves penetrate through objects (such as walls) within the range that they cover, security issues, such as interception of transmission or illegal access, may arise if security settings are not configured. Before you connect to the network in a wireless LAN environment, read through the instruction manual for the wireless LAN device in use, and configure the security settings accordingly. Failure to do so may increase the risk of personal information being intercepted, such as user names, passwords, and the content of your mails, or illegal access to the network. \- Due to the design of wireless LAN, note that security may be breached by unusual or unforeseeable means. \- For more details on wireless LAN and network security, please consult the manufacturer of your wireless LAN device. \- JVC shall not be liable for any security issues, troubles, damages or losses arising from the use of this feature.Radio Waves Used by this Product
This product makes use of radio waves in the ISM band (2.4 GHz). Although a radio station license is not required for using this product, please take note of the following.■ Do not use this product near the following places.
- Industrial, scientific, or medical equipment, such as microwave ovens and pacemakers - Industrial, scientific, or medical equipment, such as microwave ovens and pacemakers - Specified low-power radio stations (radio station license not required) - Bluetooth devices Equipment such as the above mentioned devices makes use of the same frequency bandwidth as that of Wi-Fi. Using this product near the above equipment may cause radio wave interference, and result in communication failure or a drop in communication speed. In this case, turn off the power of devices that are not in use.■ Avoid using this product near a TV or radio set.
TV or radio sets make use of a radio wave frequency bandwidth that is different from that of Wi-Fi, and therefore has no effect on communication by this product or the TV/radio set. However, when a TV/radio set is placed close to a Wi-Fi product, electromagnetic waves emitted by the Wi-Fi product may cause noise to occur in the sound or images of the TV/radio. \- Communication may not be carried out properly near radio equipment or broadcasting stations. In this case, change the location accordingly.■ Radio signals are unable to penetrate through reinforced steel, metal, or concrete.
The radio waves used by this product are unable to penetrate through reinforced steel, metal, or concrete materials. It may difficult for communication to be established if two rooms or floors are separated by these materials. \*Communication may also get weaker when there are human subjects or parts of the body in between the Wi-Fi devices.- Do not connect to wireless networks that you do not have authorization for.
Once connected, it may be considered as unauthorized access and legal actions can be taken against you.■ Do not use the Wi-Fi function outside the country of purchase.
Depending on the country, there may be restrictions on the use of radio waves and any violations could be punishable by law.Exporting/Bringing the Unit Overseas
Permission from the U.S. government may be required when bringing the unit to an export controlled country set by the U.S. government (such as Cuba, Iraq, North Korea, Iran, Rwanda, and Syria. As of December, 2012). For more information, consult the U.S. Embassy Commercial Service.Image Monitoring via Direct Connection (DIRECT MONITORING)
You can check the image on the camera via direct connection (Wi-Fi Direct) with a smartphone (or computer), without the need for an access point (wireless LAN router). \- Recording of videos and still images may be performed while monitoring. flowchart
graph TD
A["Wi-Fi"] --> B["Device 1"]
A --> C["Device 2"]
B -.-> D["Mobile Phone"]
C -.-> D
style A fill:#f9f,stroke:#333
style B fill:#ccf,stroke:#333
style C fill:#ccf,stroke:#333
style D fill:#fff,stroke:#333
Caution :
- This function is not designed for disaster or crime prevention. - To prevent the situation of forgetting to turn off the power, this unit will turn off automatically after 10 days of continuous usage. - When not monitoring from a smartphone (or computer), the focus of the camera is fixed. - Even when monitoring from a smartphone (or computer), the focus of the camera will be fixed if not operated for more than 3 hours. (Focus works again when the camera is operated.) - You may have difficulty establishing a connection via direct monitoring in an environment where the camera is placed away from the smartphone (or computer). In this case, connect using the access point (wireless LAN router). "Image Monitoring via an Access Point at Home (INDOOR MONITORING)" (註 p. 135)What You Need
• Smartphone or Windows computer (A wireless LAN that is compatible with WPA2 is necessary.)Settings Required in Advance
Set up your camera and smartphone (or computer) by performing the following operations. For a smartphone with WPS support, refer to the "Wi-Fi Protected Setup (WPS)". \*WPS is a method to connect the camera and the smartphone wirelessly by easy button operations.Connecting the Smartphone to the Camera Wirelessly
Connect the smartphone to the camera by either of the following methods.■ Connection by entering the Wi-Fi password
1 Tap "MENU".
(Operation on this camera) Set the camera to the recording mode. text_image
M WT M D ←PLAY REC MENU2 Tap the "Wi-Fi" (💡) icon.
(Operation on this camera) text_image
TOP MENU ?3 Tap the "DIRECT MONITORING" (☐) icon in the "Wi-Fi" menu. (Operation on this camera)
text_image
Wi-Fi 新安智能设备 新安智能设备 新安智能设备 新安智能设备 新安智能设备 新安智能设备 新安智能设备4 Tap "START" (→).
(Operation on this camera) text_image
DIRECT MONITORING OK Cancel OK Cancel OK Cancel HTTP OK Canceltext_image
DIRECT MONITORING VIDEO RECORDING AT 60i WHEN USING Wi-Fi5 Check the SSID and the PASS being displayed on the screen of the camera.
text_image
DIRECT MONITORING SET UP WI-FI SETTING ON CONNECTING DEVICE SSID:.......... PASS:.......... STOP WPS6 Select the SSID in step 5 from the Wi-Fi network selection screen of your smartphone, and enter the PASS on the password screen. (Operation on the smartphone (or computer))
natural_image
Illustration of a hand holding a smartphone with a pen, no text or symbols present7 A connection is established and 🔔 appears on the camera's screen.
natural_image
Close-up of purple iris flowers with green foliage, no visible text or symbols■ Connection by Wi-Fi Protected Setup (WPS)
1 Tap "MENU".
(Operation on this camera) Set the camera to the recording mode. text_image
M WT D2 Tap the "Wi-Fi" (💡) icon.
(Operation on this camera) text_image
TOP MENU ?3 Tap the "DIRECT MONITORING" (☐) icon in the "Wi-Fi" menu. (Operation on this camera)
text_image
Wi-Fi 智能家庭管理 智能家庭管理 智能家庭管理 智能家庭管理 智能家庭管理 智能家庭管理4 Tap "START" (→).
(Operation on this camera) text_image
DIRECT MONITORING ? HTTPtext_image
DIRECT MONITORING VIDEO RECORDING AT 60i WHEN USING Wi-Fi5 Tap "WPS".
(Operation on this camera) text_image
DIRECT MONITORING SET UP WI-FI SETTING ON CONNECTING DEVICE SSID:.......... PASS:.......... STOP WPSnatural_image
Illustration of a hand holding a smartphone with a pen, no text or symbols presentnatural_image
Close-up of purple iris flowers with green foliage, captured in a photo editing interface (no text or symbols on the flower image itself)Monitoring the Images from a Smartphone (or Computer)
■ Smartphone (Android / iPhone)
Memo :
\- Prior to use this function, a smartphone application needs to be installed on the smartphone. "Installing Smartphone Applications" (p. 175) 1 Start "Everio sync. 2" on the smartphone after setting DIRECT MONITORING. natural_image
Illustration of a hand holding a smartphone with a pen, no text or symbols presenttext_image
Everio sync.2 DIRECT MONITORING CONNECT TO THE CAMERA DIRECTLY. YOU CAN USE THE GAME SCORING FUNCTION. INDOOR MONITORING CONNECT VIA ACCESS POINT. NEED TO REGISTER ACCESS POINT. OUTDOOR MONITORING CONNECT VIA INTERNET. NEED TO REGISTER ACCESS POINT AND DDNS. ? Demotext_image
Index Monitor PAUSE T Tele Rec Snapshot Wide Pause Marking Game Score■ Computer (Windows 7)
1 Tap the URL button shown on the camera's screen. (displayed when the computer and the camera are connected wirelessly.) natural_image
Close-up of purple iris flowers with green foliage, captured via a photo editing interface (no text or symbols on the flower image itself)text_image
CAMERA NETWORK INFO. URL(LAN):http://********** **********/ QUITtext_image
File name: Internet Log cover 1000000000Image Monitoring via an Access Point at Home (INDOOR MONITORING)
Connect to the wireless LAN router at home, the camera and a smartphone (or computer) via access point wirelessly. From a smartphone (or computer) in connection, you can monitor the images captured by the camera. \- Recording of videos and still images may be performed while monitoring. flowchart
graph TD
A["WiFi"] --> B["Mobile Phone"]
B --> C["Smartphone"]
D["Home Icon"] --> E["Human Icon"]
F["Human Icon"] --> G["Human Icon"]
Caution :
- This function is not designed for disaster or crime prevention. - To prevent the situation of forgetting to turn off the power, this unit will turn off automatically after 10 days of continuous usage. - When not monitoring from a smartphone (or computer), the focus of the camera is fixed. - Even when monitoring from a smartphone (or computer), the focus of the camera will be fixed if not operated for more than 3 hours. (Focus works again when the camera is operated.)What You Need
• Smartphone or Windows computer - Wireless LAN router (use a product that has a Wi-Fi certification logo) - Depending on the wireless LAN router in use and signal strength, you may experience connection problems or slow connections.Memo :
Operation Method
Connect the camera to the access point (wireless LAN router)
natural_image
Simple line icons showing a printer, a syringe, and a smartphone (no text or symbols)■ Wi-Fi Protected Setup (WPS) Registration
Follow the operations below if the access point (wireless LAN router) in use supports WPS. 1 Tap "MENU". (Operation on this camera) text_image
M WT D PLAY REC MENUtext_image
TOP MENU ?text_image
Wi-Fi 帮助您能够使用 帮助您能够使用 帮助您能够使用 帮助您能够使用 帮助您能够使用 帮助您能够使用text_image
Wi-Fi Wi-Fitext_image
COMMON WI-FI SETTING ACCESS POINTS 1.000 2.000 3.000 1.000 2.000 3.000 1.000 2.000 3.000text_image
ACCESS POINTS ADDtext_image
ADD EZ REGISTRATION WPS 1.000 2.000 3.000 1.000 2.000 3.000 1.000 2.000 3.000text_image
REGISTERED SSID:****** ENCRYPTION METHOD WPA2 OK■ Search the access point, and select from the list.
Set the name (SSID) of the access point (wireless LAN router) and the password beforehand. 1 Tap "MENU". (Operation on this camera) text_image
M WT D PLAY REC MENUtext_image
TOP MENU ?text_image
Wi-Fi 我的电脑 我的电脑 我的电脑 我的电脑 我的电脑text_image
Wi-Fi Wi-Fitext_image
COMMON WI-FI SETTING ACCESS POINTStext_image
ACCESS POINTS ADDtext_image
ADD SEARCH ?text_image
SEARCH SEARCH AGAINtext_image
PASSWORD A/a/1 . @ ABC DEF DELETE ← GHI JKL MNO → PQRS TUV WXYZ SET - + CANCELtext_image
REGISTERED SSID:** ENCRYPTION METHOD WPA2 OKConnecting the smartphone (or computer) to the access point (wireless LAN router)
natural_image
Simple line icons showing a folder, a battery, and a smartphone (no text or symbols)Monitoring the images by connecting the smartphone and the camera
natural_image
Simple line icons showing a camera, a syringe, and a smartphone (no text or symbols)■ Operation on this camera
1 Tap "MENU". (Operation on this camera) text_image
M WT D < PLAY REC MENUtext_image
TOP MENU ?text_image
Wi-Fi 智能驾驶监控 智能驾驶监控 智能驾驶监控 智能驾驶监控 智能驾驶监控 智能驾驶监控 智能驾驶监控 智能驾驶监控 智能驾驶监控 智能驾驶监控 智能驾驶监控 智能驾驶监控 智能驾驶监控 智能驾驶监控 智能驾驶监控 智能驾驶监控 智能驾驶监控 智能驾驶监控 智能驾驶监控 智能驾驶监控 智能驾驶监控 智能驾驶监控 智能驾驶监控 智能驾驶监控 智能驾驶监控 智能驾驶监测 智能驾驶监测 智能驾驶监测 智能驾驶监测 智能驾驶监测 智能驾驶监测 智能驾驶监测 智能驾驶监测 智能驾驶监测 智能驾驶监测 智能驾驶监测 智能驾驶监测 智能驾驶监测 智能驾驶监测 智能驾驶监测 智能驾驶监测 智能驾驶监测 智能驾驶监测 智能驾驶监测 智能驾驶监测 智能驾驶监测 智能驾驶监测 智能驾驶监测 智能驾驶监测 智能驾驶监测 智能驾驶检测 智能驾驶检测 智能驾驶检测 智能驾驶检测 智能驾驶检测 智能驾驶检测 智能驾驶检测 智能驾驶检测 智能驾驶检测 智能驾驶检测 智能驾驶检测 智能驾驶检测 智能驾驶检测 智能驾驶检测 智能驾驶检测 智能驾驶检测 智能驾驶检测 智能驾驶检测 智能驾驶检测 智能驾驶检测 智能驾驶检测 智能驾驶检测 智能驾驶检测 智能驾驶检测 智能驾驶检测 智能驾驶检单 智能驾驶检单 智能驾驶检单 智能驾驶检单 智能驾驶检单 智能驾驶检单 智能驾驶检单 智能驾驶检单 智能驾驶检单 智能驾驶检单 智能驾驶检单 智能驾驶检单 智能驾驶检单 智能驾驶检单 智能驾驶检单 智能驾驶检单 智能驾驶检单 智能驾驶检单 智能驾驶检单 智能驾驶检单 智能驾驶检单元text_image
INDOCR MONITORING HTTP 高级浏览器管理 高级浏览器管理 高级浏览器管理text_image
INDOOR MONITORING CONNECTING SSID:****** STOPnatural_image
Close-up of purple iris flowers with green foliage, displayed in a photo editing interface (no text or symbols on the flower image itself)■ Operation on the smartphone
1 Start "Everio sync. 2" on the smartphone after setting INDOOR MONITORING. natural_image
Illustration of a hand holding a smartphone with a pen, no text or symbols presenttext_image
Everio sync.2 DIRECT MONITORING CONNECT TO THE CAMERA DIRECTLY. YOU CAN USE THE GAME SCORING FUNCTION. INDOOR MONITORING CONNECT VIA ACCESS POINT. NEED TO REGISTER ACCESS POINT. OUTDOOR MONITORING CONNECT VIA INTERNET. NEED TO REGISTER ACCESS POINT AND DDNS. ? Demotext_image
Index Monitor PAUSE Tele Rec Snapshot Wide Pause Marking Game Score■ Monitoring from the computer (Windows7)
1 Tap the URL button shown on the camera's screen. (displayed when the computer and the camera are connected wirelessly.) natural_image
Close-up of purple iris flowers with green foliage, no visible text or symbolstext_image
CAMERA NETWORK INFO. URL(LAN):http://********** **********/ QUITtext_image
Private Internet User 100% CIImage Monitoring via the Internet (OUTDOOR MONITORING)
You can check the image on the camera via internet connection with a smartphone (or computer). \* To use this function, it is necessary to prepare for an UPnP (Universal Plug and Play) compatible wireless LAN router, and an internet connection from which the global IP address can be obtained. \- Recording of videos and still images may be performed while monitoring. flowchart
graph LR
A["Device"] --> B["Satellite"]
B --> C["Global"]
C --> D["Mobile"]
style A fill:#f9f,stroke:#333
style D fill:#bbf,stroke:#333
flowchart
graph TD
A["Input"] --> B["Module 1"]
A --> C["Module 2"]
A --> D["Module 3"]
B --> E["Output"]
C --> E
D --> E
What You Need
• Smartphone or Windows computer \- Wireless LAN router that supports UPnP (use a product that has a Wi-Fi certification logo) To check whether UPnP is supported, please refer to the instruction manual of the wireless LAN router in use. \- Internet connection with an obtainable global IP address \* Global IP address is an IP address that is specific in all over the internet. For more information, contact your internet service provider.Memo :
\- Depending on the wireless LAN router in use and signal strength, you may experience connection problems or slow connections. \- When the zoom or pan cradle is operated by using the smartphone or computer, it may take longer for responses as compared to the manual operations.Settings Required in Advance
To operate, it is necessary to connect the camera to the internet via an access point (UPnP compatible wireless LAN router) in the house. As such, the following 3 settings are required. \*The above settings are not necessary if they have already been set for other functions. 1 Registering an access point "Registering the Access Points of the Camera to Connect (ACCESS POINTS)" (p. 164) 2 Obtaining a dynamic DNS account "Obtaining a Dynamic DNS (DDNS) Account" (p. 157) 3 Setting the account on this camera "Setting Dynamic DNS on this Camera (OUTDOOR MONITORING)" (p. 158)Caution :
\- Even if registration is done correctly to the camera, access may be temporarily unavailable such as when the dynamic DNS server is down. To check whether the dynamic DNS server is working properly, access and check the DDNS server with a computer, etc. https://dd3.jvckenwood.com/user/Operation Method
■ Operation on this camera
Memo :
\- Prior to use this function, a smartphone application needs to be installed on the smartphone. "Installing Smartphone Applications" (p. 175) 1 Tap "MENU". (Operation on this camera) text_image
M WT D <text_image
TOP MENU ?text_image
Wi-Fi 国家智能交通站 国家智能交通站 国家智能交通站 国家智能交通站 国家智能交通站 国家智能交通站text_image
OUTDOOR MONITORING DDNS HTTP UPnPtext_image
OUTDOOR MONITORING CONNECTING SSID:****** STOPnatural_image
Close-up of purple iris flowers with green foliage, captured in a photo editing interface (no text or symbols on the flower image itself)7 Check the URL (WAN).
text_image
CAMERA NETWORK INFO. USE THE URL BELOW TO CONNECT FROM AN OUTSIDE LOCATION URL(WAN):http://***** QUIT■ Operation on the smartphone
1 Start "Everio sync. 2" on the smartphone after setting "OUTDOOR MONITORING".
natural_image
Illustration of a hand holding a smartphone with a pen, no text or symbols present2 Tap "OUTDOOR MONITORING".
text_image
Everio sync.2 DIRECT MONITORING CONNECT TO THE CAMERA DIRECTLY. YOU CAN USE THE GAME SCORING FUNCTION. INDOOR MONITORING CONNECT VIA ACCESS POINT. NEED TO REGISTER ACCESS POINT. OUTDOOR MONITORING CONNECT VIA INTERNET. NEED TO REGISTER ACCESS POINT AND DDNS. ? Demo3 Log in with your username and password. (if authentication cannot be achieved)
text_image
START HTTP AUTHORIZATION AUTHORIZATION FAILED CHECK USER NAME AND PASSWORD USERNAME PASSWORD OK CANCEL4 The recording screen is displayed.
text_image
Index Monitor PAUSE T Tele Rec Snapshot Wide Pause Marking Game Score■ Monitoring from the computer (Windows7)
1 On the Internet Explorer (web browser), enter the URL (WAN) that is checked by "Operation on this camera".
text_image
File selection: Internet Explorer 100%DBYK2 Log in with your username and password.
- The username is "everio" and the default password is "0000". "Changing the Settings" (p. 153) • Operations from the Web browser "Using the Wi-Fi Function from a Web Browser" (p. 188)Caution :
- To monitor images while you are out, make sure in advance that you can establish a connection via the Internet by entering the URL (WAN) displayed in "Network Information". However, you cannot monitor (operate) in the same way as while you are out when your smartphone (or computer) is connected via access point (wireless LAN router) at home. - Start using after changing the password. If the password is not changed, there is a high risk of unauthorized access from others. Also, avoid using easily guessable passwords, such as birth dates. You are recommended to change your password periodically. "Setting the Password (DIRECT MONITORING/INDOOR MONITORING/OUTDOOR MONITORING)" (p. 155) \- There is no guarantee that the operations will work with all computer environments. For example, the video download feature of mobile safari browser, etc. is not supported.Caution :
- Too much usage may cause high communication fees to be incurred, and there may be a limit to the volume of communication. For more details, please check your Internet or smartphone subscription. - If the network connection is slow, video images may appear jumpy, or audio sound may be interrupted or delayed. - This function is not designed for disaster or crime prevention. - To prevent the situation of forgetting to turn off the power, this unit will turn off automatically after 10 days of continuous usage. - When not monitoring from a smartphone (or computer), the focus of the camera is fixed. - Even when monitoring from a smartphone (or computer), the focus of the camera will be fixed if not operated for more than 3 hours. (Focus works again when the camera is operated.)Sending Still Images via E-mail upon Detection of Face or Movement (DETECT/MAIL)
A still image is automatically captured and sent via e-mail when faces or movements are detected by the camera. flowchart
graph LR
A["Folder"] --> B["Envelope Icon"]
B --> C["Printer Icon"]
Memo :
- Size of the still images shot by DETECT/MAIL is 640 x 360. - Operation via connection to a smartphone (or computer) using "INDOOR MONITORING"/"OUTDOOR MONITORING" may be performed even during detection standby. - When the camera is connected to a smartphone (or computer), "DETECT/MAIL SETTING" will be temporarily unavailable. - You can set to record videos on this unit automatically during detection. "Recording on this unit" (p. 153) - To prevent too many e-mails from being sent in case of detections occurring frequently, you can set the interval of e-mail delivery. "Setting detection interval" (p. 153)What You Need
- Wireless LAN router (use a product that has a Wi-Fi certification logo) - Internet connection - Account for sending e-mails (Supports SMTP. E-mail services that is only accessible from the web cannot be used.)Settings Required in Advance
To send e-mails, the following settings are required in advance. \*The above settings are not necessary if they have already been set for other functions. 1 Registering an access point "Registering the Access Points of the Camera to Connect (ACCESS POINTS)" (p. 164) 2 Setting the account for sending e-mails "Setting the Sender's E-mail Address of the Camera" (p. 159) 3. Registering the recipient's e-mail address for notification mails (up to 8 addresses) "Registering the Recipient's E-mail Address of the Camera" (p. 161)Operation Method
1 Tap "MENU". Set the camera to the recording mode. text_image
M WT D ← PLAY REC MENUtext_image
TOP MENU ?text_image
Wi-Fi 智能家庭管理器 智能家庭管理器 智能家庭管理器 智能家庭管理器 智能家庭管理器 智能家庭管理器text_image
DETECT/MAIL 1.0 REC ONtext_image
DETECT/MAIL ATTN.text_image
DETECT/MAIL 10 MHz REC ONtext_image
DETECT/MAIL CONNECTING SSID:****** STOPtext_image
DETECT/MAIL "MOTION DETECTION" DETECTION ON STANDB/ URL STOPtext_image
DETECT/MAIL "MOTION DETECTION" MOTION DETECTION IN PROGRESS PHOTO STOPtext_image
DETECT/MAIL "MOTION DETECTION" DETECTION SUSPENDED DUE TO CHANGE IN DETECTION INTERVAL URL STOPCaution :
- This function is not designed for disaster or crime prevention. • To prevent the situation of forgetting to turn off the power, this unit will turn off automatically after 10 days of continuous usage. - While on standby for notification mails, the focus is fixed. Perform the camera settings first, then enable notification mails. Focus may not be set correctly if the notification mails start before camera settings are made. In this case, disable notification mails temporarily, then enable it again. - Be careful not to cause too much sending of e-mails. Depending on the internet provider that provides the e-mail service, the e-mails may be marked as spam or the usage limited may be exceeded. Be sure to check the terms of the internet provider in advance to find out if there are any restrictions on the number or size of e-mails that can be sent. - When setting another person as the recipient, be sure to obtain his/her consent in advance. - If you reply to the received e-mail by using this unit, the receiver can not check your replied e-mail by using this unit. Check the e-mails sent by this unit from computer, etc. - JVC will not be responsible for any trouble that occurs upon the sending of mails.Record and Send Videos via E-mail (VIDEO MAIL)
Videos of up to 15 seconds can be recorded and sent via e-mail. With this function, short videos can be delivered easily even on a daily basis, such as to show the growing up of small children to their distant grandparents. flowchart
graph LR
A["Battery"] --> B["Email"]
B --> C["Mobile Device Icon"]
Memo :
\- Specifications of the videos sent via video mail are as follows: System: MP4 Video: \- H.264/MPEG-4 AVC baseline profile codec \- 640 x 360 resolution \- 30p frame rate \- 1 Mbps bit rate Audio: \- Advanced Audio Coding (AAC) system \- 48 kHz sampling rate \- 16 bit \- 2 channelsWhat You Need
- Wireless LAN router (use a product that has a Wi-Fi certification logo) - Internet connection - Account for sending e-mails (Supports SMTP. E-mail services that is only accessible from the web cannot be used.)Settings Required in Advance
To send e-mails, the following settings are required in advance. \*The above settings are not necessary if they have already been set for other functions. 1 Registering an access point "Registering the Access Points of the Camera to Connect (ACCESS POINTS)" (p. 164) 2 Setting the account for sending e-mails "Setting the Sender's E-mail Address of the Camera" (p. 159) 3 Registering the recipient's e-mail address (up to 8 addresses) "Registering the Recipient's E-mail Address of the Camera" (p. 161)Operation Method
1 Tap "MENU". Set the camera to the recording mode text_image
M WT D ← PLAY REC MENUtext_image
TOP MENU ?text_image
Wi-Fi 智能家庭设置 智能家庭设置 智能家庭设置 智能家庭设置 智能家庭设置 智能家庭设置 智能家庭设置text_image
VIDEO MAIL 返回新邮件 返回新邮件 返回新邮件text_image
VIDEO MAIL ADDRESS 1234 888 888 1234 888 888 1234 888 888 1234 888 888text_image
VIDEO MAIL 返回要连接到 返回要连接到 返回要连接到text_image
START /STOPtext_image
49 Tap "SEND".
text_image
VIDEO MAIL SEND THIS VIDEO? SEND STOP PLAY TO CHECKCaution :
- Be careful not to cause too much sending of e-mails. Depending on the internet provider that provides the e-mail service, the e-mails may be marked as spam or the usage limited may be exceeded. Be sure to check the terms of the internet provider in advance to find out if there are any restrictions on the number or size of e-mails that can be sent. - When setting another person as the recipient, be sure to obtain his/her consent in advance. - Depending on the e-mail service provider, the sending of video mail may not be supported. - Too much usage may cause high communication fees to be incurred, and there may be a limit to the volume of communication. For more details, please check your Internet or smartphone subscription. - If you reply to the received e-mail by using this unit, the receiver can not check your replied e-mail by using this unit. Check the e-mails sent by this unit from computer, etc. - JVC will not be responsible for any trouble that occurs upon the sending of mails. - Videos captured via video mail are not saved to the camera or SD card. - Videos that have already been captured cannot be sent.Image Monitoring on TV (TV MONITORING)
You can connect this unit to a DLNA compatible TV wirelessly to playback still images on this unit on the TV screen. (This function may not be available depending on the DLNA device in use.) Connect via access point (wireless LAN router) at home.What You Need
• DLNA compatible device - Wireless LAN router (use a product that has a Wi-Fi certification logo)Settings Required in Advance
1 Connect the camera to the access point (wireless LAN router). "Registering the Access Points of the Camera to Connect (ACCESS POINTS)" (p. 164) 2. Connecting the DLNA compatible device to the access point (this function is available for a connection via cables as well) \*The above settings are not necessary if they have already been set for other functions.Operation Method
1 Tap "MENU". (Operation on this camera) text_image
M WT D <text_image
TOP MENU ?text_image
Wi-Fi 网络设备安装 网络设备安装 网络设备安装 网络设备安装 网络设备安装 网络设备安装 网络设备安装text_image
TV MONITORING MAC MACtext_image
TV MONITORING CONNECTING SSID:****** STOPtext_image
TV MONITORING NOW PROCESSING STOPtext_image
TV MONITORING QUITnatural_image
Close-up of three purple iris flowers with yellow centers, surrounded by green foliage (no text or symbols visible)Memo :
\- If the DLNA compatible TV in use cannot detect Everio, tap "STOP" to start from the step 1 again.Caution :
- This function is not designed for disaster or crime prevention. - We do not guarantee the compatibility of all the DLNA compatible TVs. - This function is available when a connection to the access point is made with wires as well. - To prevent the situation of forgetting to turn off the power, this unit will turn off automatically after 10 days of continuous usage.EASY STORAGE
You can save the videos and still images to your computer by following easy steps. Connect to the computer wirelessly via access point at home (wireless LAN router).What You Need
• Computer (install LoiLoFit for Everio in your computer) "Installing the Provided Software" (p. 115) - Wireless LAN router (use a product that has a Wi-Fi certification logo)Settings Required in Advance
1 Registration of the required information for connecting the camera to the access point (wireless LAN router) is necessary. "Registering the Access Points of the Camera to Connect (ACCESS POINTS)" (v ^2 p. 164) 2 It is also necessary to connect the computer to the access point in advance. \*The above settings are not necessary if they have already been set for other functions.Operation Method
1 Tap "MENU". (Operation on this camera) text_image
M WT Dtext_image
TOP MENU ?text_image
SHORTCUT MENU 返回到帐户 返回到帐户 返回到帐户 OFF OK OFFtext_image
EASY STORAGE CONNECTING SSID:****** STOPtext_image
EASY STORAGE NOW PROCESSING STOPtext_image
EASY STORAGE BACKUP COMPLETED TOUCH "OK" OR WAIT 10 SECONDS FOR CAMERA TO POWER OFF AUTOMATICALLY OKRecording the Location Information
You can record the location information of the venue where recording is taking place via direct connection (Wi-Fi Direct) with a smartphone. flowchart
graph TD
A["Wi-Fi"] --> B["Laptop"]
B --> C["GPS"]
C --> D["Smartphone"]
style A fill:#f9f,stroke:#333
style B fill:#ccf,stroke:#333
style C fill:#cfc,stroke:#333
style D fill:#fcc,stroke:#333
Memo :
\- To obtain the location information, it is necessary to connect the smartphone to the camera and start the smartphone application. Also, setting the "LOC INFO TRANS INT" for the smartphone application is necessary. "Smartphone Application Settings" (p. 186) • Activate the GPS function of the smartphone in advance. \- The recorded location information can be used on the software provided with this unit.What You Need
\- SmartphoneSettings Required in Advance
Set up your camera and smartphone by performing the following operations. For a smartphone with WPS support, refer to the "Wi-Fi Protected Setup (WPS)". \*WPS is a method to connect the camera and the smartphone wirelessly by easy button operations.■ Connection by entering the Wi-Fi password
1 Tap "MENU". (Operation on this camera) Set the camera to the recording mode. text_image
M WT D << PLAY REC MENUtext_image
TOP MENU ?text_image
Wi-Fi 智能家庭管理器 智能家庭管理器 智能家庭管理器 智能家庭管理器 智能家庭管理器 智能家庭管理器 智能家庭管理器 智能家庭管理器 智能家庭管理器 智能家庭管理器 智能家庭管理器 智能家庭管理器 智能家庭管理器 智能家庭管理器 智能家庭管理器 智能家庭管理器 智能家庭管理器 智能家庭管理器 智能家庭管理器 智能家庭管理器 智能家庭管理服务器 智能家庭管理服务器 智能家庭管理服务器 智能家庭管理服务器 智能家庭管理服务器 智能家庭管理服务器 智能家庭管理服务器 智能家庭管理服务器 智能家庭管理服务器 智能家庭管理服务器 智能家庭管理服务器 智能家庭管理服务器 智能家庭管理服务器 智能家庭管理服务器 智能家庭管理服务器 智能家庭管理服务器 智能家庭管理服务器 智能家庭管理服务器 智能家庭管理服务器 智能家庭管理服务器 智能家庭管理服务4 Tap "START" (→).
(Operation on this camera) text_image
DIRECT MONITORING OK Cancel OK Cancel OK Cancel HTTP Canceltext_image
DIRECT MONITORING VIDEO RECORDING AT 60i WHEN USING Wi-Fi5 Check the SSID and the PASS being displayed on the screen of the camera.
text_image
DIRECT MONITORING SET UP WI-FI SETTING ON CONNECTING DEVICE SSID:.......... PASS:.......... STOP WPS6 Select the SSID in step 5 from the Wi-Fi network selection screen of your smartphone, and enter the PASS on the password screen. (Operation on the smartphone (or computer))
natural_image
Illustration of a hand holding a smartphone and a pen, no text or symbols present7 A connection is established and 🔔 appears on the camera's screen.
natural_image
Close-up of purple iris flowers with green foliage, no visible text or symbols■ Connection by Wi-Fi Protected Setup (WPS)
1 Tap "MENU".
(Operation on this camera) Set the camera to the recording mode. text_image
M WT D ←PLAY REC MENU2 Tap the "Wi-Fi" (💡) icon.
(Operation on this camera) text_image
TOP MENU ?3 Tap the "DIRECT MONITORING" (图标) icon in the "Wi-Fi" menu. (Operation on this camera)
text_image
Wi-Fi 新客智能设备 新客智能设备 新客智能设备 新客智能设备 新客智能设备 新客智能设备4 Tap "START" (→).
(Operation on this camera) text_image
DIRECT MONITORING 返回数据源 返回数据源 返回数据源 返回数据源 返回数据源 返回数据源 返回数据源 返回数据源 返回数据源 返回数据源 返回数据源 返回数据源 返回数据源 返回数据源 返回数据源 返回数据源 返回数据源 返回数据源 返回数据源 返回数据源 返回数据源 返回数据源 返回数据源 返回数据源 返回数据源 返回数据源源 返回数据源源 返回数据源源 返回数据源源 返回数据源源 返回数据源源 返回数据源源 返回数据源源 返回数据源源 返回数据源源 返回数据源源 返回数据源源 返回数据源源 返回数据源源 返回数据源源 返回数据源源 返回数据源源 返回数据源源 返回数据源源 返回数据源源 返回数据源源 返回数据源源 返回数据源源 返回数据源源 返回数据源源 返回数据源 返回数据源源 返回数据源源 返回数据源源 返回数据源源 返回数据源源 返回数据源源 返回数据源源 返回数据源源 返回数据源源 返回数据源源 返回数据源源 返回数据源源 返回数据源源 返回数据源源 返回数据源源 返回数据源源 返回数据源源 返回数据源源 返回数据源源 返回数据源源 返回数据源源 返回数据源源 返回数据源源 返回数据源 返回数据源 返回数据源 返回数据源 返回数据源 返回数据源 返回数据源 返回数据源 返回数据源 返回数据源 返回数据源 返回数据源 返回数据源 返回数据源 返回数据源 返回数据源 返回数据源 返回数据源 返回数据源 返回数据源 返回数据源 返回数据源 返回数据源 返回数据源 返回数据原text_image
DIRECT MONITORING VIDEO RECORDING AT 60i WHEN USING Wi-Fitext_image
DIRECT MONITORING SET UP WI-FI SETTING ON CONNECTING DEVICE SSID:****** PASS:****** STOP WPSnatural_image
Close-up of purple iris flowers with green foliage, captured via a video editing interface (no text or symbols on the flower image itself)Operation Method
1 Activate the GPS function of the smartphone. (Operation on the smartphone) natural_image
Illustration of a hand holding a smartphone with a pen inserted (no text or symbols visible)natural_image
Illustration of a hand holding a smartphone with a pen, no text or symbols presenttext_image
Everio sync.2 DIRECT MONITORING CONNECT TO THE CAMERA DIRECTLY. YOU CAN USE THE GAME SCORING FUNCTION. INDOOR MONITORING CONNECT VIA ACCESS POINT. NEED TO REGISTER ACCESS POINT. OUTDOOR MONITORING CONNECT VIA INTERNET. NEED TO REGISTER ACCESS POINT AND DDNS. ? Demotext_image
Index Monitor PAUSE Tele Rec Snapshot Wide Pause Marking Game Scoretext_image
DIRECT MONITORING 0:00:00 [2:04] URL REC QUITtext_image
START /STOPMemo :
- Manual recording cannot be performed. - It is not possible to switch to the playback mode.Using the Pan Cradle (Sold Separately)
Panning operation (moving the camera to the left/right, horizontal direction) can be controlled via smartphone by setting the camera on the pan cradle. To use a pan cradle, change the setting of "AV TERMINAL" in advance. Change the setting from the menu screen of the camera.■ Changing the setting of the AV terminal.
\- By default, the AV terminal is set to "AV". To use a pan cradle, change the setting as described in the following steps.1 Tap "MENU".
(Operation on this camera) text_image
M WT D PLAY REC MENU2 Tap "CONNECTION SETTINGS".
text_image
TOP MENU ?3 Tap "AV TERMINAL".
text_image
CONNECTION SETTINGS AV TERMINAL4 Tap "PAN CRADLE".
text_image
AV TERMINAL AV PAN CRADLE■ Setting the camera to the pan cradle.
\- For how to connect the pan cradle and the camera, refer to the instruction manual of the pan cradle for further details. 1 Set the camera to the pan cradle. natural_image
Technical line drawing of a mechanical device with a probe inserted, no visible text or symbolstext_image
DC OFF AS ONnatural_image
Mechanical device with blue circular arrows indicating rotational motion (no text or symbols)■ Operations from the smartphone application
\- Connect the camera and the smartphone via DIRECT MONITORING or INDOOR MONITORING/OUTDOOR MONITORING. "Image Monitoring via Direct Connection (DIRECT MONITORING)" (p. 132) "Image Monitoring via an Access Point at Home (INDOOR MONITORING)" (p. 135) "Image Monitoring via the Internet (OUTDOOR MONITORING)" (p. 140) 1 Start "Everio sync. 2". natural_image
Illustration of a hand holding a smartphone and a pen, no text or symbols presenttext_image
Everio sync.2 DIRECT MONITORING CONNECT TO THE CAMERA DIRECTLY. YOU CAN USE THE GAME SCORING FUNCTION. INDOOR MONITORING CONNECT VIA ACCESS POINT. NEED TO REGISTER ACCESS POINT. OUTDOOR MONITORING CONNECT VIA INTERNET. NEED TO REGISTER ACCESS POINT AND DDNS. ? Demotext_image
Index Monitor ←° PAUSE ← Pan Pan Tele Rec Snapshot Wide Pause Marking Game ScoreMemo :
\- Speed of the panning operation can be set in two steps. "Changing the Panning Speed" (u p. 173)Changing the Settings
To use the Wi-Fi function, it may be necessary to perform some settings on the camera and smartphone (or computer). \- Registering the access points to connect (wireless LAN router) "Registering the Access Points of the Camera to Connect (ACCESS POINTS)" (E p. 164) \- Obtaining a dynamic DNS account "Obtaining a Dynamic DNS (DDNS) Account" (p. 157) \- Setting the account on this camera "Setting Dynamic DNS on this Camera (OUTDOOR MONITORING)" (r.s. p. 158) \- Setting the sender's e-mail address "Setting the Sender's E-mail Address of the Camera" (p. 159) \- Registering the recipient's e-mail address "Registering the Recipient's E-mail Address of the Camera" (p. 161) Menu Settings| Setting Details | |
| DIRECT MONITORING Configures various settings related to DIRECT MONITORING.·PASSWORDSets the password to access the camera.“Setting the Password (DIRECT MONITORING/INDOOR MONITORING/OUTDOOR MONITORING)”(€p. 155)·ENFORCED GROUP OWNER (Default: “ON”)Set whether or not to get the owner group permissions.·OFF: Set this if connection to devices that support Wi-Fi Direct fails. (When set to OFF, connection to devices that do not support Wi-Fi Direct will be disabled.)·ON: It is recommended to set this usually.“Setting the Enforced Group Owner (DIRECT MONITORING)”(€p. 156)·HTTP PORT (Default: “80”)Changes the port number to access to the camera.“Changing the HTTP Port (DIRECT MONITORING/INDOOR MONITORING/OUTDOOR MONITORING)”(€p. 156) | |
| INDOOR MONITORING Configures various settings related to INDOOR MONITORING.·PASSWORD (Default: “0000”)Selects the password to access the camera.“Setting the Password (DIRECT MONITORING/INDOOR MONITORING/OUTDOOR MONITORING)”(€p. 155)·HTTP PORT (Default: “80”)Changes the port number to access to the camera.“Changing the HTTP Port (DIRECT MONITORING/INDOOR MONITORING/OUTDOOR MONITORING)”(€p. 156) | |
| OUTDOOR MONITORING Configures various settings related to OUTDOOR MONITORING.·PASSWORD (Default: “0000”)Selects the password to access the camera.“Setting the Password (DIRECT MONITORING/INDOOR MONITORING/OUTDOOR MONITORING)”(€p. 155)·UPnP (Default: “ON”)Sets the UPnP of the camera.·OFF: Disables UPnP.·ON: Enables UPnP.“Setting the UPnP of this Camera (OUTDOOR MONITORING)”(€p. 157)·DDNS SETTINGConfigures various settings related to DDNS.“Setting Dynamic DNS on this Camera (OUTDOOR MONITORING)”(€p. 158)·HTTP PORT (Default: “80”)Changes the port number to access to the camera.“Changing the HTTP Port (DIRECT MONITORING/INDOOR MONITORING/OUTDOOR MONITORING)”(€p. 156) | |
| DETECT/MAIL Configures various settings related to notification mails.·DETECT/ MAIL ATTN.Selects the recipient’s e-mail address for Detect/Mail.“Sending Still Images via E-mail upon Detection of Face or Movement (DETECT/MAIL)”(€p. 142)·MAIL SETTINGSets the e-mail addresses of the sender and recipient.“Setting the Sender’s E-mail Address of the Camera”(€p. 159)“Registering the Recipient’s E-mail Address of the Camera”(€p. 161)·DETECTION METHOD (Default: “MOTION DETECTION”)Sets the detection method to start recording.·MOTION DETECTION: Starts recording upon detection of subject’s movements.·FACE DETECTION: Starts recording upon detection of human faces.“Setting the Detection Method of this Camera (DETECT/MAIL SETTING)”(€p. 163)·DETECTION INTERVAL (Default: “10 minutes”)Sets the time period to enable detection again after the previous one.“Setting the Detection Interval of this Camera (DETECT/MAIL SETTING)”(€p. 163)·SELF RECORDING (Default: “ON”)Sets whether to record videos on this camera during detection.·OFF: Does not record videos on this camera.·ON: Records videos on this camera.“Setting Self Recording on this Camera (DETECT/MAIL SETTING)”(€p. 164) | |
| VIDEO MAIL | ·VIDEO MAIL ADDRESS |
| Selects the recipient's e-mail address for video mails.“Sending Still Images via E-mail upon Detection of Face or Movement (DETECT/MAIL)” (p. 142)MAIL SETTINGSets the e-mail addresses of the sender and recipient.“Setting the Sender's E-mail Address of the Camera” (p. 159)“Registering the Recipient's E-mail Address of the Camera” (p. 161) | |
| TV MONITORING | MAC ADDRESS FILTER (Default: “OFF”)By setting to “ON”, Everio can be searched from the device (TV monitor); the MAC address of the device needs to be registered to Everio in advance.OFF: Disables UPnP.ON: Enables UPnP.“Enabling the MAC Address Filter (TV MONITORING)” (p. 170)MAC ADDRESS LISTMAC address of the TV monitor can be registered to the camera.“Registering the MAC Address (TV MONITORING)” (p. 171) |
| COMMON Wi-Fi SETTING Configures various settings related to the network.ACCESS POINTSAdds, deletes, or perform LAN settings of access points (wireless LAN router).“Registering the Access Points of the Camera to Connect (ACCESS POINTS)” (p. 164)MAIL SETTINGSets the e-mail addresses of the sender and recipient.“Setting the Sender's E-mail Address of the Camera” (p. 159)“Registering the Recipient's E-mail Address of the Camera” (p. 161)MAC ADDRESS (Media Access Control address)Displays the MAC address of the camera.(The above shows the MAC address when connected to an access point, while the below shows the address during direct connection.)“Checking the MAC Address of this Camera” (p. 171)SET FROM QR CODEPerform the Wi-Fi setting after the camera reads the QR code generated by following the instruction in Detailed User Guide.“Using Wi-Fi by Creating a QR Code (GZ-EX355/GZ-EX310)” (p. 198)LOCK SETTTINGSSets a password to prevent others from seeing the network settings.“Protecting the Network Settings with a Password” (p. 172)INITIALIZATIONReturns the network settings to their default values.“Initializing the Wi-Fi Settings” (p. 173) | |
Setting the Password (DIRECT MONITORING/INDOOR MONITORING/OUTDOOR MONITORING)
Sets the password required to access the camera. \- Up to 8 characters (alphabets, numbers and symbols only), case-sensitive. 1 Tap "MENU". (Operation on this camera) text_image
M WT D PLAY REC MENUtext_image
TOP MENU ?text_image
Wi-Fi 返回设置 返回设置 返回设置 返回设置 返回设置 返回设置text_image
INDOOR MONITORING HTTP 请勿使用密码 请勿使用密码 请勿使用密码text_image
PASSWORD A/a/1 . @ ABC DEF DELETE ← GHI JKL MNO → PQRS TUV WXYZ SET - + CANCELChanging the HTTP Port (DIRECT MONITORING/INDOOR MONITORING/OUTDOOR MONITORING)
Changes the port number to access to the camera. Valid when setting up multiple cameras for Outdoor Monitoring. 1 Tap "MENU". (Operation on this camera) text_image
M WT D <text_image
TOP MENU ?Setting the Enforced Group Owner (DIRECT MONITORING)
Sets whether to enforce authorization of the group owner. 1 Tap "MENU". (Operation on this camera) text_image
M WT D PLAY REC MENUtext_image
TOP MENU ?text_image
Wi-Fi 智能家庭娱乐 智能家庭娱乐 智能家庭娱乐 智能家庭娱乐 智能家庭娱乐 智能家庭娱乐 智能家庭娱乐 智能家庭娱乐 智能家庭娱乐 智能家庭娱乐 智能家庭娱乐 智能家庭娱乐 智能家庭娱乐 智能家庭娱乐 智能家庭娱乐 智能家庭娱乐 智能家庭娱乐 智能家庭娱乐 智能家庭娱乐 智能家庭娱乐 智能家庭娱乐 智能家庭娱乐 智能家庭娱乐 智能家庭娱乐 智能家庭娱乐 智能家庭乐text_image
DIRECT MONITORING OK OK HTTP OKtext_image
ENFORCED GROUP OWNER OFF ON OFF ONChanging the HTTP Port (DIRECT MONITORING/INDOOR MONITORING/OUTDOOR MONITORING)
Changes the port number to access to the camera. Valid when setting up multiple cameras for Outdoor Monitoring. 1 Tap "MENU". (Operation on this camera) text_image
M WT D PLAY REC MENUtext_image
TOP MENU ?Setting the UPnP of this Camera (OUTDOOR MONITORING)
Sets the UPnP of the camera. 1 Tap "MENU". (Operation on this camera) text_image
M WT Dtext_image
TOP MENU ?text_image
Wi-Fitext_image
OUTDOOR MONITORING DDNS HTTP UPnP OKtext_image
UPnP OFF ON OFF ONObtaining a Dynamic DNS (DDNS) Account
By obtaining a dynamic DNS account, this unit may be used on the web as usual even if the IP address changes when making an access to this unit via internet. \- Only the JVC dynamic DNS service can be set on this camera. To obtain (register) an account, perform the following steps. 1 Access the following URL from a browser and register for an account. (Operation on a computer or smartphone) https://dd3.jvckenwood.com/user/ Set your e-mail address as the username. 2 Check that you have received a confirmation e-mail to the address used in registration, and access the URL stated in the e-mail. (Operation on a computer or smartphone) 3 Set the username and password used in registration on the camera. (Operation on this camera) "Setting Dynamic DNS on this Camera (OUTDOOR MONITORING)" (p. 158) 4 Execute OUTDOOR MONITORING. (Operation on this camera) If "OUTDOOR MONITORING" is executed while dynamic DNS settings are enabled, the camera will access the dynamic DNS server. 5 Tap "CAMERA NETWORK INFO." to check that the URL (WAN) is displayed. (Registration complete) "Image Monitoring via the Internet (OUTDOOR MONITORING)" (p. 140)Caution :
- Registration will be canceled if you do not access the dynamic DNS server from the camera within 3 days. Perform the registration again in this case. - Registration will not be complete if the username and password set on this camera are incorrect. Be sure to check that they are correct. - Successful registration will be canceled too if you do not access the dynamic DNS server for 1 year.Setting Dynamic DNS on this Camera (OUTDOOR MONITORING)
Sets the dynamic DNS information of the obtained account on the camera. "Obtaining a Dynamic DNS (DDNS) Account" (p. 157) 1 Tap "MENU". (Operation on this camera) text_image
M WT D PLAY REC MENUtext_image
TOP MENU ?text_image
Wi-Fi 网络视频监控 网络视频监控 网络视频监控 网络视频监控 网络视频监控 网络视频监控 网络视频监控text_image
OUTDOOR MONITORING DDNS HTTP UPnP ?text_image
USERNAME A/a/1 . @ ABC DEF DELETE ← GHI JKL MNO → PQRS TUV WXYZ SET - + CANCELMemo :
\- Only the JVC dynamic DNS service can be set on this camera.Setting the Sender's E-mail Address of the Camera
Sets the address to be used for sending e-mails on the camera.Memo :
\- By using Gmail as the sender's mail address, some of the settings can be omitted. Use of Gmail is recommended for users who have a Gmail account.1 Tap "MENU".
(Operation on this camera) text_image
M WT D PLAY REC MENU2 Tap the "Wi-Fi" (💡) icon.
(Operation on this camera) text_image
TOP MENU ?3 Tap > on the lower right of the screen.
(Operation on this camera) text_image
Wi-Fi 智能家庭智能 智能家庭智能 智能家庭智能 智能家庭智能 智能家庭智能 智能家庭智能 智能家庭智能4 Tap "COMMON Wi-Fi SETTING".
(Operation on this camera) text_image
Wi-Fi Wi-Fi5 Tap "MAIL SETTING".
(Operation on this camera) text_image
COMMON WI-FI SETTING MAIL SETTING6 Tap "SENDER'S EMAIL".
(Operation on this camera) text_image
MAIL SETTING RECIPIENT'S EMAIL SENDER'S EMAIL SEND TEST EMAIL7 Tap "NEXT".
(Operation on this camera) text_image
EMAIL ADDRESS ENTER THE EMAIL ADDRESS FOR "DETECT/MAIL" AND "VIDEO MAIL" TRANSMISSION NEXTtext_image
SENDER'S EMAIL ********************************************************************** A/a/1 - @ ABC DEF DELETE ← GHI JKL MNO → PQRS TUV WXYZ SET - + CANCEL8 Tap "NEXT".
(In case of Gmail, tap "SKIP") (Operation on this camera) text_image
SMTP SERVER SMTP SERVER HAS BEEN SET AS FOLLOWS CAN BE CHANGED IF REQUIRED smtp.gmail.com CHANGE Skiptext_image
SMTP SERVER ※※※※※※※※※※※※※ A/a/1 . @ ABC DEF DELETE ← GHI JKL MNO → PQRS TUV WXYZ SET - + CANCEL9 Tap "CHANGE" to change the SMTP port.
(In case of Gmail, tap "SKIP") (Operation on this camera) text_image
SMTP SERVER SMTP SERVER HAS BEEN SET AS FOLLOWS CAN BE CHANGED IF REQUIRED 587 CHANGE Skiptext_image
SMTP PORT 1 2 3 DELETE ← 4 5 6 → 7 8 9 SET 0 CANCEL10 Tap "CHANGE" to change the authentication.
(In case of Gmail, tap "SKIP") (Operation on this camera) text_image
AUTHENTICATION METHOD SMTP SERVER AUTHENTICATION METHOD IS SET AS FOLLOWS SMTP(TLS) CHANGE Skiptext_image
AUTHENTICATE METHOD NONE SMTP SMTP(SSL) SMTP(TLS)11 Tap "NEXT".
(In case of Gmail, tap "SKIP") (Operation on this camera) text_image
USERNAME USERNAME HAS BEEN SET AS FOLLOWS CAN BE CHANGED IF REQUIRED TEST CHANGE Skiptext_image
USERNAME ************************** A/a/1 . @ ABC DEF DELETE ← GHI JKL MNO → PQRS TUV WXYZ SET - + CANCEL12 Tap "NEXT".
(Operation on this camera) text_image
PASSWORD PLEASE ENTER PASSWORD NEXTtext_image
PASSWORD * * * * * * * A/a/1 . @ ABC DEF DELETE ← GHI JKL MNO → PQRS TUV WXYZ SET - + CANCEL13 Tap "QUIT" or "SEND TEST EMAIL".
(Operation on this camera) text_image
CONTENTS SET AS FOLLOWS EMAIL ADDRESS : text@gmail.com SMTP SERVER : smtp.gmail.com SMTP PORT : 587 AUTHENTICATE METHOD : SMTP(TLS) USERNAME : test QUIT SEND TEST EMAIL| SENDER'S EMAIL | Enter the sender's e-mail address. |
| SMTP SERVER Enter | the SMTP server address. |
| SMTP PORT Set this | when the SMTP port number needs to be changed. |
| AUTHENTICATE METHOD | Set this when the authentication method needs to be changed. |
| USERNAME Enter the username. | |
| PASSWORD Enter the password. | |
Caution :
- It is necessary to obtain an e-mail account in advance. - Some web-based mail addresses do not support this feature. - These are Gmail settings as of December 2012. Perform setting manually if changes have been made to the Gmail specifications. - To make use of addresses other than Gmail, please consult the mail service provider (Internet provider, etc.) for information on the settings.Registering the Recipient's E-mail Address of the Camera
Registers the e-mail addresses of recipients on the camera. 1 Tap "MENU". (Operation on this camera) text_image
M WT D <text_image
TOP MENU ?text_image
Wi-Fi 智能家庭管理器 智能家庭管理器 智能家庭管理器 智能家庭管理器 智能家庭管理器 智能家庭管理器 智能家庭管理器text_image
Wi-Fi 智能驾驶监控器 Wi-Fi 智能驾驶监控器text_image
COMMON WI-FI SETTING MAIL SETTINGtext_image
MAIL SETTING RECIPIENT'S EMAIL SENDER'S EMAIL SEND TEST EMAIL7 Tap "ADD".
(Operation on this camera) text_image
RECIPIENT'S EMAIL ADD8 Enter the recipient's e-mail address.
text_image
RECIPIENT'S EMAIL A/a/1 . @ ABC DEF DELETE ← GHI JKL MNO → PQRS TUV WXYZ SET - + CANCEL9 After tapping "DETECT/MAIL" or "VIDEO MAIL" depending on the function in use, tap "SET".
text_image
RECIPIENT'S EMAIL SELECT FUNCTION TO SET THIS EMAIL ADDRESS AS RECEIVER ADDRESS THEN TOUCH "SET" abc@def.com DETECT/MAIL VIDEO MAIL SETMemo :
\- Up to 8 e-mail addresses can be registered as recipients.Caution :
- When setting another person as the recipient, be sure to obtain his/her consent in advance. - Check whether notifications indicating errors have been sent to the sender's e-mail address. (Make use of a computer or similar devices as it is not possible to check from the camera.) If no notifications are received: Refer to "Unable to send e-mails." and adjust the settings accordingly. If notifications are received: Check the content of the notification. \*Note Do not continue sending e-mails with the same settings if you receive error notifications. Depending on the provider, you may be marked as a sender of spam (junk mail).Setting the Detection Method of this Camera (DETECT/MAIL SETTING)
Sets the detection method to start recording. 1 Tap "MENU". (Operation on this camera) text_image
M WT D PLAY REC MENUtext_image
TOP MENU ?text_image
Wi-Fi 我的家庭智能 我的家庭智能 我的家庭智能 我的家庭智能 我的家庭智能 我的家庭智能 我的家庭智能text_image
DETECT/MAIL 10 MHz REC ONtext_image
DETECTION METHOD MOTION DETECTION FACE DETECTIONSetting the Detection Interval of this Camera (DETECT/MAIL SETTING)
Sets the time period to enable detection again after the previous one. 1 Tap "MENU". (Operation on this camera) text_image
M WT D PLAY REC MENUtext_image
TOP MENU ?text_image
Wi-Fi 智能家庭体验 智能家庭体验 智能家庭体验 智能家庭体验 智能家庭体验 智能家庭体验 智能家庭体验 智能家庭体验text_image
DETECT/MAIL 10 MIN 取消 取消 取消 取消 取消 取消 取消text_image
DETECTION INTERVAL € 15 SEC 15SEC € 3 MIN 3 MIN € 30 MIN 30 MIN € 1 MIN 1 MIN • 10 MIN 10 MIN € 60 MIN 60 MIN ?Setting Self Recording on this Camera (DETECT/MAIL SETTING)
Sets whether to record videos on this camera during detection.1 Tap "MENU".
(Operation on this camera) text_image
M WT D ← PLAY REC MENU2 Tap the "Wi-Fi" (💡) icon.
(Operation on this camera) text_image
TOP MENU ?3 Tap "DETECT/MAIL" (☐).
(Operation on this camera) text_image
Wi-Fi 我的电脑设备 我的电脑设备 我的电脑设备 我的电脑设备 我的电脑设备 我的电脑设备4 Tap "SELF RECORDING".
(Operation on this camera) text_image
DETECT/MAIL 10 M/s REC ON5 Tap "ON" or "OFF" to make a selection.
text_image
SELF RECORDING OFF ON OFF ONRegistering the Access Points of the Camera to Connect (ACCESS POINTS)
There are 4 ways to register the access points (wireless LAN router) for connection.| Wi-Fi Protected Setup (WPS) Registration | This is the easiest way of registration. Authentication method and wireless LAN setup are performed automatically in WPS, allowing easy registration of connection settings between devices. |
| Search and Register | A search is conducted to locate access points. Select and register an access point from the list of search results. |
| Manual Registration | Enter the name and authentication method manually to register an access point. |
| WPS PIN Registration | Enter the WPS PIN code of the camera to the access point to register. |
Memo :
\- By registering multiple access points, you can change connection to another access point by tapping on the desired one from the list.■ Wi-Fi Protected Setup (WPS) Registration
1 Tap "MENU".
(Operation on this camera) text_image
M WT D PLAY REC MENU2 Tap the "Wi-Fi" (💡) icon.
(Operation on this camera) text_image
TOP MENU ?3 Tap > on the lower right of the screen.
(Operation on this camera) text_image
Wi-Fi 新客智能设备 新客智能设备 新客智能设备 新客智能设备 新客智能设备 新客智能设备4 Tap "COMMON Wi-Fi SETTING".
(Operation on this camera) text_image
Wi-Fi Wi-Fitext_image
COMMON WI-FI SETTING ACCESS POINTS ?text_image
ACCESS POINTS ADDtext_image
ADD EZ REGISTRATION WPS 100% 250% 30% 100% 250% 30% 100% 250% 30%text_image
REGISTERED SSID:** ENCRYPTION METHOD WPA2 OK■ Search and Register
1 Tap "MENU". (Operation on this camera) text_image
M WT D PLAY REC MENUtext_image
TOP MENU ?text_image
Wi-Fi 网络数据采集器 网络数据采集器 网络数据采集器 网络数据采集器 网络数据采集器 网络数据采集器 网络数据采集器text_image
Wi-Fi Wi-Fitext_image
COMMON WI-FI SETTING ACCESS POINTS ?text_image
ACCESS POINTS ADD7 Tap "SEARCH".
(Operation on this camera) text_image
ADD SEARCH ?8 Tap the name (SSID) of the desired access point from the list of search results.
(Operation on this camera) text_image
SEARCH SEARCH AGAIN9 Register a password.
(Operation on this camera) text_image
PASSWORD A/a/1 . @ ABC DEF DELETE ← GHI JKL MNO → PQRS TUV WXYZ SET - + CANCEL10 After registration is complete, tap "OK" on the camera's screen. (Operation on this camera)
text_image
REGISTERED SSID:****** ENCRYPTION METHOD WPA2 OK■ Manual Registration
1 Tap "MENU".
(Operation on this camera) text_image
M WT D ←PLAY REC MENU2 Tap the "Wi-Fi" (💡) icon.
(Operation on this camera) text_image
TOP MENU ?3 Tap > on the lower right of the screen. (Operation on this camera)
text_image
Wi-Fi 智能家庭管理 智能家庭管理 智能家庭控制 智能家庭管理 智能家庭管理 智能家庭控制4 Tap "COMMON Wi-Fi SETTING". (Operation on this camera)
text_image
Wi-Fi Wi-Fi5 Tap "ACCESS POINTS". (Operation on this camera)
text_image
COMMON WI-FI SETTING ACCESS POINTS ?6 Tap "ADD". (Operation on this camera)
text_image
ACCESS POINTS ADD7 Tap "MANUAL".
(Operation on this camera) text_image
ADD MANUAL ?8 Enter the name (SSID) of the access point (wireless LAN router) and tap "SET".
(Operation on this camera) text_image
SSID A/a/1 . @ ABC DEF DELETE ← GHI JKL MNO → PQRS TUV WXYZ SET - + CANCEL9 Select the type of authentication method (security).
(Operation on this camera) text_image
TYPE OF SECURITY NONE WEP WPA WPA210 When authentication method is not set to "NONE", enter a password and tap "SET".
(Operation on this camera) text_image
PASSWORD A/a/1 . @ ABC DEF DELETE ← GHI JKL MNO → PQRS TUV WXYZ SET - + CANCEL11 After registration is complete, tap "OK" on the camera's screen.
(Operation on this camera) text_image
REGISTERED SSID:****** ENCRYPTION METHOD WPA2 OKWPS PIN Registration
1 Tap "MENU".
(Operation on this camera) text_image
M WT M D ← PLAY REC MENU2 Tap the "Wi-Fi" (💡) icon.
(Operation on this camera) text_image
TOP MENU ?3 Tap > on the lower right of the screen.
(Operation on this camera) text_image
Wi-Fi 智能家庭管理 智能家庭管理 智能家庭管理 智能家庭管理 智能家庭管理 智能家庭管理4 Tap "COMMON Wi-Fi SETTING".
(Operation on this camera) text_image
Wi-Fi Wi-Fi5 Tap "ACCESS POINTS".
(Operation on this camera) text_image
COMMON WI-FI SETTING ACCESS POINTS ?6 Tap "ADD".
(Operation on this camera) text_image
ACCESS POINTS ADD7 Tap "WPS PIN".
(Operation on this camera) text_image
ADD WPS PIN [新版] [新版] [新版] [新版] [新版] [新版] [新版] [新版] [新版]8 Enter the PIN code displayed on the camera to the access point (wireless LAN router).
\- For details on how to enter the PIN code, refer to the instruction manual of the device in use.9 Tap "START".
(Operation on this camera) text_image
WPS PIN PIN:****** ENTER THIS NUMBER TO ACCESS POINT THEN TOUCH "START" START QUIT10 After registration is complete, tap "OK" on the camera's screen.
(Operation on this camera) text_image
REGISTERED SSID:****** ENCRYPTION METHOD WPA2 OKEditing LAN Settings of Access Points (Wireless LAN Router)
Change accordingly such as when you want to fix the IP address for the camera. 1 Tap "MENU". (Operation on this camera) - Tap "USE" to use the selected access point. - Tap "DELETE" to delete the registered access point. 7 Perform the LAN settings. (when "DHCP" is set to "OFF") (Operation on this camera) \- The top menu appears. 2 Tap the "Wi-Fi" (💡) icon. (Operation on this camera) 3 Tap > on the lower right of the screen. (Operation on this camera) - After setting, tap "OK". • LAN settings comprise of the following items. DHCP ON: Obtains IP address from the DHCP server automatically. OFF: Settings of "IP ADDRESS", "SUBNET MASK", "DEFAULT GATEWAY", "PRIMARY DNS", and "SECONDARY DNS" are required. IP ADDRESS Enter the IP address. SUBNET MASK Enter the subnet mask. DEFAULT Enter the default gateway. GATEWAY PRIMARY DNS / Enter the IP addresses of the primary and SECONDARY DNS secondary DNS servers. 4 Tap "COMMON Wi-Fi SETTING". (Operation on this camera) 5 Tap "ACCESS POINTS". (Operation on this camera) 6 Tap "LAN SETTINGS". (Operation on this camera)Setting the Password (DIRECT MONITORING)
Sets the password for direct monitoring. (8 to 32 characters) 1 Tap "MENU". (Operation on this camera) text_image
M WT D <text_image
TOP MENU ?text_image
Wi-Fi 家庭智能监控 家庭智能监控 家庭智能监控 家庭智能监控 家庭智能监控 家庭智能监控text_image
DIRECT MONITORING 超链接驱动器 超链接驱动器 超链接驱动器 超链接驱动器 HTTP 超链接驱动器text_image
PASSWORD A/a/1 . @ ABC DEF DELETE ← GHI JKL MNO → PQRS TUV WXYZ SET - + CANCELEnabling the MAC Address Filter (TV MONITORING)
By enabling "MAC ADDRESS FILTER", Everio can be searched from the device (TV monitor); the MAC address of the device needs to be registered to Everio in advance. 1 Tap "MENU". (Operation on this camera) text_image
M WT D PLAY REC MENUtext_image
TOP MENU ?Memo :
\- If "MAC ADDRESS FILTER" is enabled while no MAC address is registered, Everio can not be searched from all the devices.Registering the MAC Address (TV MONITORING)
Register the MAC address of the TV monitor to Everio. 1 Tap "MENU". (Operation on this camera) text_image
M WT D <text_image
TOP MENU ?Checking the MAC Address of this Camera
Displays the MAC address of the camera. 1 Tap "MENU". (Operation on this camera) text_image
M WT D PLAY REC MENUtext_image
TOP MENU ?text_image
Wi-Fi 智能驾驶管理器 智能驾驶管理器 智能驾驶管理器 智能驾驶管理器 智能驾驶管理器 智能驾驶管理器 智能驾驶管理器text_image
Wi-Fi 智能驾驶辅助器 Wi-Fi 智能驾驶辅助器text_image
COMMON WI-FI SETTING MAC ADDRESSProtecting the Network Settings with a Password
Sets a password to lock and protect the network settings. 1 Tap "MENU". (Operation on this camera) text_image
M WT D <text_image
TOP MENU ?text_image
Wi-Fi 网络管理服务 网络管理服务 网络管理服务 网络管理服务 网络管理服务 网络管理服务text_image
Wi-Fi 智能语音服务 Wi-Fi 智能语音服务text_image
COMMON WI-FI SETTING LOCK SETTINGS INITIALIZATIONtext_image
PASSWORD 1 2 3 DELETE ← 4 5 6 → 7 8 9 SET 0 CANCELInitializing the Wi-Fi Settings
Returns the Wi-Fi settings to their default values. 1 Tap "MENU". (Operation on this camera) text_image
M WT D << PLAY REC MENUtext_image
TOP MENU ?text_image
Wi-Fi 智能家庭智能设备 智能家庭智能设备 智能家庭智能设备 智能家庭智能设备 智能家庭智能设备 智能家庭智能设备 智能家庭智能设备 智能家庭智能设备 智能家庭智能设备 智能家庭智能设备 智能家庭智能设备 智能家庭智能设备 智能家庭智能设备 智能家庭智能设备 智能家庭智能设备 智能家庭智能设备 智能家庭智能设备 智能家庭智能设备 智能家庭智能设备 智能家庭智能设备 智能家庭智能 智能家庭智能设备 智能家庭智能设备 智能家庭智能设备 智能家庭智能设备 智能家庭智能设备 智能家庭智能设备 智能家庭智能设备 智能家庭智能设备 智能家庭智能设备 智能家庭智能设备 智能家庭智能设备 智能家庭智能设备 智能家庭智能设备 智能家庭智能设备 智能家庭智能设备 智能家庭智能设备 智能家庭智能设备 智能家庭智能设备 智能家庭智能设备 智能家庭智能 equipmenttext_image
Wi-Fi 智能驾驶管理器 Wi-Fi 智能驾驶管理器text_image
COMMON WI-FI SETTING LOCK SETTINGS INITIALIZATIONtext_image
INITIALIZATION DO YOU WANT THE SETTINGS RESET TO THE FACTORY PRESET? YES NOChanging the Panning Speed
Change the operation speed of the pan cradle (sold separately) via smartphone. Select either of the 2: "HIGH SPEED" or "LOW SPEED". \- For details on how to use a pan cradle, refer to the following "Using the Pan Cradle (Sold Separately)" (p. 150)■ Change the setting via smartphone
1 Tap Confirm that the camera and a smartphone are connected via Wi-Fi, and the monitor screen is displayed on the smartphone. text_image
Index Monitor ←° PAUSE Pan Pan T Tele W Wide Rec Pause Snapshot Marking Game Scoretext_image
SETTINGS MONITOR MONITORING DISPLAY THE MONITOR SCREEN PAN OPERATION SPEED SET THE OPERATION SPEED OF THE PAN OPERATION LOC INFO TRANS INT GPS SENDS LOCATION INFORMATION 15SEC TO THE CAMERA WHEN USING DIRECT MONITORING VIDEO TRANSFER (AVCHD Index) LENGTH 300SEC RESOLUTION (pixel) GAME SCORE GAME SCORE SETTINGtext_image
MONITOR MONITORING DISPLAY THE MONITOR SCREEN PAN OPERATION SPEED PAN OPERATION SPEED HIGH SPEED LOW SPEED CANCEL RESOLUTION (pixel) GAME SCORE GAME SCORE SETTINGUsing Smartphone Applications
- By installing the "Everio sync. 2" smartphone software, images on the camera can be checked from a distance, and recording videos/still images and zooming operation can be performed. - You can also send images recorded by the camera to the smartphone via Wi-Fi, to enjoy the recorded images on your smartphone or tablet. Installing Smartphone Applications  natural_image
Illustration of a hand holding a smartphone with a pencil, no text or symbols present■ Android Smartphone
1 Tap "Play store" on the application list. 2 Search for the "Everio sync. 2" application. 3 Tap on the "Everio sync. 2" application. - The detailed information of the application is displayed. 4 Tap "Install". - For applications that access data or functions of this unit, a screen that shows the data or functions that will be used is displayed. 5 Confirm the content and tap "Download". - Downloading starts.Deleting the Application
1 Tap "Play store" on the application list. 2 Press the menu button and tap "My apps". • A list of previously downloaded applications is displayed. 3 Tap on the "Everio sync. 2" application. 4 Tap "Uninstall", then tap "OK". The specifications of Google Play are subject to changes without prior notice. For operating details, refer to the help file of Google Play.Memo :
■ iPhone/iPad/iPod touch
1 Tap "App Store" on the home screen. 2 Search for the "Everio sync. 2" application. 3 Tap on the "Everio sync. 2" application. - The detailed information of the application is displayed. 4 Tap "FREE"→"Install". - Enter your password on the password entry screen. - Downloading starts. - The downloaded application will be added to the home screen automatically.Deleting the Application
1 Press and hold the "Everio sync. 2" application on the home screen. 2 Tap × to confirm the deletion.Memo :
The specifications of App Store™ are subject to changes without prior notice. For operating details, refer to the help file of App Store™.Operating the Smartphone Applications
• Indications on the screen "Indications on the Screen" (p. 175) • Transferring videos "Transferring Videos (AVCHD format)" (p. 179) "Transferring Videos (iFrame format)" (p. 182) • Transferring still images "Transferring Still Images" (p. 184) - Changing the settings "Smartphone Application Settings" (p. 186)Indications on the Screen
■ Initial Screen text_image
Everio sync.2 Direct MONITORING CONNECT TO THE CAMERA DIRECTLY. YOU CAN USE THE GAME COPYING FUNCTION. INDOOR MONITORING CONNECT VIA ACCESS POINT. NEED TO REGISTER ACCESS POINT. OUTDOOR MONITORING CONNECT VIA INTERNET. NEED TO REGISTER ACCESS POINT AND POUSE. ? Demo To Settings Screen Connect to the camera directly Connect via access point Connect via internet To Demo Screen To Help Screentext_image
To Index Screen To Settings Screen Running on AC Adapter Running on Battery (icon shown on left is when battery power is less than 30 %) Enable/Disable GPS (icon shown is when disabled) Record-Standby Recording in Progress Zoom Button Video Recording Start Button Still Image Recording Button Video Recording Stop Button Marking Game Score To Game Score Screen To Marking Screentext_image
To Monitor Screen Monitor Index To Settings Screen 23:43 [0Ch:07m18s] 22:43 [0Ch:01m9s] Thumbnail 17:16 [0Ch:02m10s] Recording Date/Time Playback Time 14:19 [0Ch:00m36s] AVCHD iFrame Still Image Types of imagetext_image
Back Transfer 00:00:00 - 00:05:00 00:05:00 - 00:07:18 Checkbox To Transfer Screentext_image
Game Start button Recording Start button Game Over button Recording Stop button HOME VISITOR Score sheet Goal button 1 2 1 1 2 3 3 Cancel button Mark button Monitor buttonCaution :
\- "Everio sync. 2" for iPhone/iPad cannot be used when the iPhone/iPad is connected to the mobile phone network. To make use of this feature, connect to the camera or an access point via Wi-Fi.Using the Markings
Enter the mark to make it easy to find the scene later.■ Common for Android and iOS
1 Tap "Marking" while recording the video. text_image
Index Monitor ←° PAUSE Pan Pan T Tele W Wide Rec Pause Snapshot Marking Game Scoretext_image
Marking Monitortext_image
DIRECT MONITORING 0:00:18 [0:52] RECUsing the Game Score
The scores of various sport games can be recorded with video images. Also, the recorded position can be marked to make it easy to find the scenes you want to view later.■ Common for Android and iOS
1 Tap "Game Score". text_image
Index Monitor ←° PAUSE Pan Pan T Tele W Wide Rec Pause Snapshot Marking Game Scoretext_image
Game Score Game Start HOME 0 VISITOR 0 Monitortext_image
Game Score Game Start HOME VISITOR TEAM SELECTION TEAM LIST Monitortext_image
Game Score Game Start TEAM SELECTION TEAM 1 HOME TEAM 1 VISITOR OK CANCEL Monitortext_image
Game Score Game Start HOME 0 VISITOR 0 Monitortext_image
Game Score Game Start HOME 0 VISITOR 0 Monitortext_image
Game Score Home 0 1 2 3 4 VISITOR 0 1 2 3 4 Monitortext_image
Game Score HOME VISITOR Undo Monitortext_image
Game Score Home 2 1 2 3 4 VISITOR 3 1 2 3 4 Undo MonitorMemo :
- Team name and color, the background of the screen can be set prior to recording. - Select the score button depending on the type of the games. - The next score won't be registered within 5 seconds after the marking operation. But the score can be registered right after the marking operation by changing the game score setting. "Game Score Settings" (p. 186)■ Screen display of the camera while recording the game score
text_image
HOME 2-1 VISITOR GAME 0:00:25 [0:51] RECTransferring Videos (AVCHD format)
Transfer videos recorded in AVCHD format to the smartphone. \- The video to be forwarded is converted to the following format.| Item Details | ||
| System MP4 | ||
| Video Code | dec H. 264/MPEG-4 AVC Baseline Profile | |
| Resolution* Bit rate is indicated in ( ) | 1280X720 (3.6Mbps)640X480 (1.5Mbps) | |
| Frame rate 30p | ||
| Bit rate 3.6 Mbps or 1.5 Mbps | ||
| Audio Coding system AAC | ||
1 Start "Everio sync. 2" on the smartphone.
natural_image
Illustration of a hand holding a smartphone and a pen, no text or symbols present2 Select the connection type to the camera.
text_image
Everio sync.2 DIRECT MONITORING CONNECT TO THE CAMERA DIRECTLY. YOU CAN USE THE GAME SCORING FUNCTION. INDOOR MONITORING CONNECT VIA ACCESS POINT. NEED TO REGISTER ACCESS POINT. OUTDOOR MONITORING CONNECT VIA INTERNET. NEED TO REGISTER ACCESS POINT AND DDNS. ? Demo3 Tap "Index".
text_image
Index Monitor ←° PAUSE Pan Pan Tele Rec Snapshot Wide Pause Marking Game Scoretext_image
Monitor Index 23:43 [00h07m18s] 22:43 [00h01m08s] 17:16 [00h02m10s] 14:19 [00h00m36s] AVCHD iFrame Still Imagetext_image
Back Transfer Manual 00:00:00 - 00:05:00 00:05:00 - 00:07:18 ① ②text_image
YOU CAN TRANSFER VIDEOS OR STILL IMAGES TO THE SMARTPHONE TRANSFER CANCELtext_image
PREPARING TO TRANSFER 1/1 1% CANCELtext_image
COMPLETED OK CHECK SHARE■ Transferring manually
You can set the length of transferred video. 1 Tap "MANUAL" in step 5. 2 At the start point, enter the starting time of the video. Specify the lengths of the video by using the slider bar. (10 to 300 sec) 3 After confirming the setting, tap "TRANSFER", and then tap "TRANSFER" one more time. text_image
Rack Transfer START POINT 00h10m + + 10 - 10 Start point of the video transfer LENGTH OF VIDEO 60SEC Length of the trans- ferred video TRANSFERTransferring Videos (iFrame format)
Transfer videos recorded in iFrame format to the smartphone. (Depending on the smartphone in use, videos may not be played back.) \- Transferred videos are sent in the original file format. 1 Start "Everio sync. 2" on the smartphone. natural_image
Illustration of a hand holding a smartphone with a pen, no text or symbols presenttext_image
Everio sync.2 DIRECT MONITORING CONNECT TO THE CAMERA DIRECTLY. YOU CAN USE THE GAME SCORING FUNCTION. INDOOR MONITORING CONNECT VIA ACCESS POINT. NEED TO REGISTER ACCESS POINT. OUTDOOR MONITORING CONNECT VIA INTERNET. NEED TO REGISTER ACCESS POINT AND DDNS. ? Demotext_image
Index Monitor ←←° PAUSE → Pan Pan Tele Rec Snapshot Wide Pause Marking Game Scoretext_image
Monitor Index 19:50 [00h00m04s] 13:49 [00h00m08s] 11:00 [00h00m01s] 11:00 [00h00m01s] AVCHD iFrame Still Imagetext_image
Monitor Index 19:50 [00h00m04s] 13:49 [00h00m08s] 11:00 [00h00m01s] 11:00 [00h00m01s] AVCHD iFrame Still Imagetext_image
YOU CAN TRANSFER VIDEOS OR STILL IMAGES TO THE SMARTPHONE TRANSFER CANCELtext_image
PREPARING TO TRANSFER 1/1 1% CANCELtext_image
COMPLETED OK CHECK SHARETransferring Still Images
You can transfer recorded still images to your smartphone. If the aspect ratio of the original still image is 4:3, the image is reduced by 1600X1200 when transferred. If the aspect ratio of the original still image is 16:9, the image is reduced by 1920X1080 when transferred. 1 Start "Everio sync. 2" on the smartphone. natural_image
Illustration of a hand holding a smartphone and a pen, no text or symbols presenttext_image
Everio sync.2 DIRECT MONITORING CONNECT TO THE CAMERA DIRECTLY. YOU CAN USE THE GAME SCORING FUNCTION. INDOOR MONITORING CONNECT VIA ACCESS POINT. NEED TO REGISTER ACCESS POINT. OUTDOOR MONITORING CONNECT VIA INTERNET. NEED TO REGISTER ACCESS POINT AND DDNS. ? Demotext_image
Index Monitor ←° PAUSE Pan Pan Tele Rec Snapshot Wide Pause Marking Game Scoretext_image
Monitor Index 13:59 13:48 13:48 13:47 AVCHD iFrame Still Imagetext_image
Back Transfer 13:59 13:48 13:48 13:47 1text_image
YOU CAN TRANSFER VIDEOS OR STILL IMAGES TO THE SMARTPHONE TRANSFER CANCELtext_image
PREPARING TO TRANSFER 1/1 1% CANCELtext_image
COMPLETED OK CHECK SHARESmartphone Application Settings
You can change the settings of the smartphone applications.■ Common for Android and iOS
1 Tap
text_image
Index Monitor ←° PAUSE Pan Pan T Tele W Wide Rec Pause Snapshot Marking Game Score2 Tap the desired setting.
text_image
SETTINGS MONITOR MONITORING DISPLAY THE MONITOR SCREEN PAN OPERATION SPEED SET THE OPERATION SPEED OF THE PAN OPERATION LOC INFO TRANS INT GPS SENDS LOCATION INFORMATION 15SEC TO THE CAMERA WHEN USING DIRECT MONITORING VIDEO TRANSFER (AVCHD Index) LENGTH 300SEC RESOLUTION (pixel) GAME SCORE GAME SCORE SETTING| Item | Details |
| MONITORING Turns on | off the monitoring function of the screen. (Enter a check mark to set to “ON”) |
| PAN SPEED FOR OPERATING | Select the panning speed of the pan cradle (optional) from high speed/low speed. |
| LOC INFO TRANS INT | Select the time interval for obtaining the GPS location information while the direct monitoring is in use. (Off - 15 SEC) |
| VID LENGTH TO TRANS | Set the length of video being transferred to the smartphone. (10 - 300SEC)Available for videos in AVCHD format only. |
| VID SIZE TO TRANS Select the resolution of the video being transferred to the smartphone. ("1280×720" or "640×360") Available for videos in AVCHD format only. | |
| GAME SCORE SETTING | Enter the recording methods of the game score, as well as the team information. "Game Score Settings" (p. 186) |
| URL Enter the URL of the camera that is connected to the smartphone via wireless network. | |
| HTTP AUTHORIZATION | Set the user name and the password for INDOOR MONITORING/OUTDOOR MONITORING.The default username is "everio" (fixed) and the password is "0000".(can be changed from camera) |
| CHANGE BACKGROUND COLOR | Select the background. |
| NOT TO SLEEP MODE Set to prevent the smartphone from entering into the sleep mode while the application is in use.(Enter a check mark to disactivate the sleep mode.) | |
| HELP Displays the help file. | |
| LICENSE AGREEMENT | Displays the license agreement of the software. (Android only) |
Memo :
\- When connecting to INDOOR MONITORING/OUTDOOR MONITORING, you will be prompted to enter the URL or HTTP authorization if they are not entered or entered incorrectly.Game Score Settings
Enter the recording methods of the game score, as well as the team information.■ Common for Android and iOS
1 Tap ♣.
text_image
Index Monitor ←° | PAUSE Pan Pan T Tele W Wide Rec Pause Snapshot Marking Game Score2 Tap "GAME SCORE SETTING".
text_image
SETTINGS MONITOR MONITORING DISPLAY THE MONITOR SCREEN PAN OPERATION SPEED SET THE OPERATION SPEED OF THE PAN OPERATION LOC INFO TRANS INT GPS SENDS LOCATION INFORMATION 15SEC TO THE CAMERA WHEN USING DIRECT MONITORING VIDEO TRANSFER (AVCHD Index) LENGTH 300SEC RESOLUTION (pixel) GAME SCORE GAME SCORE SETTINGtext_image
GAME SCORE SETTING TEAM LIST SET THE TEAM NAME AND TEAM COLOR SCORE BUTTON SETTING YOU CAN CHANGE THE NUMBER OF BUTTONS AND NUMBER TO BE ADDED IN THE SETTING CHANGE THE BACKGROU PRIORITIZE THE SCORE YOU CAN ENTER THE SCORE WITHIN 5 SECONDS AFTER MARKING HELP| Item | Details | |||
| TEAM LIST Set the team name and the color.To display “HOME” and “VISITOR”, tap 1“TEAM LIST”.2“TEAM NAME” and “TEAM COLOR” can be set by tapping each button.3 Select “TEAM NAME” to display the screen for entering the team name. Tap the column to enter the team name, and press “OK”.4Select “TEAM COLOR” by tapping the desired color from the color palette.Tap the + button to add a new team. | ||||
| SCORE BUTTON SETTING | Tap “Button Setting” to select up to 4 buttons. Each number indicates the score that can be added once.Select the button(s) depending on the type of the games. (1 button) (2 button) (3 button) (4 button) | |||
| CHANGE BACKGROUND COLOR | Set the background color of the game score screen. |
| PRIORITIZE THE SCORE | The score can be entered within 5 seconds after the mark operation by selecting the checkbox. However, the marked position is changed when the score is registered. |
| HELP Displays the help file. | |
Using the Wi-Fi Function from a Web Browser
You can connect to the camera and make use of the Wi-Fi function from the web browser of a computer. • Indications on the screen "Indications on the Screen" (p. 188)Indications on the Screen
■ Recording Screen
text_image
To DETECT/MAIL SETTING Screen To Still Image Index Screen To Video Index Screen Reload Everio JIVE STARTING 10:40:00:00 STOP OFF T W 2.3.2.01 2.3.2.02 2.3.2.03 2.3.2.04 2.3.2.05 2.3.2.06 2.3.2.07 2.3.2.08 2.3.2.09 2.3.2.10 2.3.2.11 2.3.2.12 2.3.2.13 2.3.2.14 2.3.2.15 2.3.2.16 2.3.2.17 2.3.2.18 2.3.2.19 2.3.2.20 2.3.2.21 2.3.2.22 2.3.2.23 2.3.2.24 2.3.2.25 2.3.2.26 2.3.2.27 2.3.2.28 2.3.2.29 2.3.2.30 2.3.2.31 2.3.2.32 2.3.2.33 2.3.2.34 2.3.2.35 2.3.2.36 2.3.2.37 2.3.2.38 2.3.2.39 2.3.2.40 2.3.2.41 2.3.2.42 2.3.2.43 2.3.2.44 2.3.2.45 2.3.2.46 2.3.2.47 2.3.2.48 2.3.2.49 2.3.2.50 2.3.2.51 2.3.2.52 2.3.2.53 2.3.2.54 2.3.2.55 2.3.2.56 2.3.2.57 2.3.2.58 2.3.2.59 2.3.2.60 2.3.2.61 2.3.2.62 2.3.2.63 2.3.2.64 2.3.2.65 2.3.2.66 2.3.2.67 2.3.2.68 2, 1, 1, 1, 1, 1, 1, 1, 1, 1, 1, 1, 1, 1, 1, 1, 1, 1, 1, 1, 1, 1, 1, 1, 1, 1, 1, 1, 1, 1, 1, 1, 1, 1, 1Memo :
\- The full screen button is not displayed when the stream format is MotionJPEG.Caution :
\- Features of the stream format are as follows: Full HD/SD (MPEG-2 TS format) \- Sound of the camera can be checked from the browser. \- Recording operations cannot be performed from the browser. MotionJPEG \- Sound of the camera cannot be played back from the browser. \- Recording and zoom operations can be performed from the browser. \- The monitor's image stops automatically after monitoring is performed continuously for 12 hours in Full HD or SD. (To resume, press the reload button) \- To use Full HD or SD, it is necessary to install Media Player 12 in advance. \- Lagging of the screen may be caused by the network speed or computer performance. \- If lagging is severe, reload the screen regularly. (It may take some time for the screen to be displayed after reloading.) \- For Full HD, make use of a computer with the following system requirements. CPU Intel Core 2 Duo 2 GHz or higher 2 GB memory or higher ■ Video index (AVCHD) text_image
Everio JVC 40 CMX R145 LTD:700.6178 V210 Fan... 600 Max < 73 > 90°/°C" 50" (左上) 90°/°C" 50" (右上) 90°/°C" 50" (左下) 90°/°C" 50" (右下) 90°/°C" 50" (左上) 90°/°C" 50" (右上) 90°/°C" 50" (左下) 90°/°C" 50" (右下) 90°/°C" 50"text_image
Everio 40:00 JVC JVC 27:10 fun. 50:00 20(3/3) 1:16:25 20(3/3) 1:16:25 50:00text_image
Everio JVC V2HD Fm. V10000 V10000 V10000 V10000 V10000 V10000 V10000 V10000 V10000 V10000 V10000 V10000 V10000 V10000 V10000 V2P 2P 2P 2P V2P 2P 2P 2P V2P 2P 2P 2P V2P 2P 2P 2P V2P 2P 2P 2P V2P 2P 2P 2P V2P 2P 2P 2P V2P 2P 2P 2P V2P 2P 3P 3P V2P 2P 3P 3P V2P 2P 3P 3P V2P 2P 3P 3P V2P 2P 3P 3P V2P 2P 3P 3P V2P 2P 3P 3P V2P 2P 3P 3P V2P 2P V1 P1 P1 P1 P1 P1 P1 P1 P1 P1 P1 P1 P1 P1 P1 P1 P1 P1 P1 P1 P1 P1 P1 P1 P1 P1 P1 P1 P1 P1 P1 P1 P1 P1 P1 P1 P1 P1 P1 P1 P1 P1 P1 P1 P1 P1 P1 P1 P1 P1 P1text_image
Everio 10 DDR N/C D:\DATA\ID. JVC • • • • • • • • • • • • • • • • • • • • • • • • • • • • • • • • • • • • • • • • • • • • • • • • • • -text_image
Detection IntervalTroubleshooting
Direct Monitoring| Trouble Action | |
| Unable to connect to camera.(URL required) | Check whether the Wi-Fi connection is established successfully.Check whether Wi-Fi is connected to “DIRECT-**EVERIO”.Check whether the smartphone (or computer) is connected to the camera.Try again after powering off and on the camera and the terminal (smartphone or computer). |
| Unable to browse internet on the computer when it is connected to the camera. | The camera operates as an access point during direct monitoring.Most computers (or smartphones) cannot be connected to multiple access points at the same time.As such, internet browsing becomes temporarily unavailable if the computer (or smartphone) has been connected to the internet via wireless LAN.Reconnect the computer to the wireless LAN router that is usually used for internet connection. If the computer connects to the camera unintentionally, remove the camera connection from the computer. (The registered name is “DIRECT-**EVERIO”.)Stop direct monitoring on the camera. |
| Video or audio is interrupted or delayed | If the network speed is slow, videos and audio sound may be interrupted, or delay may become significant(For web browser) Lagging may become significant due to the performance of the computer.If the stream format is set to “Full HD”, change to “SD” or “Motion-JPEG” and try again.“Wi-Fi Specifications” (p. 196)(For web browser) If lagging is severe, reload the screen regularly.(For smartphone) Try to change the place and time to locate an environment with good signal strength. |
| The unit turns off automatically. | To prevent the situation of forgetting to turn off the power, this unit will turn off automatically after 10 days of continuous usage. |
| Unable to set focus. | When not monitoring from a smartphone (or computer), the focus of the camera is fixed.Even when monitoring from a smartphone (or computer), the focus of the camera will be fixed if not operated for more than 3 hours. (Focus works again when the camera is operated.) |
| Connection gets disconnected, or a “UNABLE TO CONNECT” message is displayed | Establish connection again at a place with good signal strength. Transmission speed may drop, or connection may fail if the devices are placed too far away from each other, when there are objects in between, or when microwave ovens or other wireless devices are in use.If connection cannot be established again, restart the terminal (smartphone or computer).If the camera is too far away from the smartphone (or computer), connection for direct monitoring may be difficult to be established depending on the environment. In this case, connect via an access point (wireless LAN router). |
| Trouble Action | |
| Unable to find an access point (wireless LAN router). | Check whether the distance from the access point (wireless LAN router) is too far, or whether there are shielding materials in between.If the access point (wireless LAN router) in use goes into the SSID stealth mode, perform manual registration or disable the stealth mode temporarily before registering.In an environment with multiple access points, you may not be able to find the desired access point through searching. In this case, add the access point manually. |
| Unable to connect to access point (wireless LAN router). | Check that the password is correct.For manual connection, check that the SSID or authentication method is correct. |
| Unsure of which access point (wireless LAN router) to use. | If the settings of the access point (wireless LAN router) have never been changed from their default values check the following.- Check whether an adhesive label indicating the initial settings is attached to the body of the access point (wireless LAN router).- Check for the default settings in the instruction manual of the access point (wireless LAN router). |
| Unsure of password for the access point (wireless LAN router). | Refer to the instruction manual of the access point (wireless LAN router) in use. |
| Unable to connect via Wi-Fi Protected Setup (WPS). | Simple connection methods other than WPS are not supported. Conduct a search for the access point to connect.Turn off the power of the camera, then try again. |
| Trouble Action | |
| Unable to connect to camera.(URL required) | Check whether the Wi-Fi connection is established successfully.Check to ensure that the camera and the terminal (smartphone or computer) are connected to the same access point.Try again after powering off and on the camera and the terminal (smartphone or computer). |
| Unsure of URL to access from a web browser. | After INDOOR MONITORING is started, tap “CAMERA NETWORK INFO.” shown on the camera’s screen. Enter the address as shown in “URL(LAN):” into the web browser to access it. |
| No image and sound when accessing from a web browser. | If you have installed third-party video players, images and sounds may not be played back properly.If the stream format is set to “Motion-JPEG” when transferring to the web browser, no sound will be output from the browser.If recording of the video is in progress, no sound will be output from the browser. |
| Unable to access the entered URL. (cannot be found) | Check that the camera is properly connected to an access point (wireless LAN router). (appears on the camera’s screen.)Check that the computer is properly connected to an access point (wireless LAN router). Connection should be possible if it is connected to the internet.Check that the URL is correct. |
| Unable to access the entered URL.(password required) | Enter your username and password.The username is “everio” (fixed) and the default password is “0000” (can be changed). |
| Video or audio is interrupted or delayed | If the network speed is slow, videos and audio sound may be interrupted, or delay may become significant(For web browser) Lagging may become significant due to the performance of the computer.If the stream format is set to “Full HD”, change to “SD” or “Motion-JPEG” and try again.“Wi-Fi Specifications” (p. 196)(For web browser) If lagging is severe, reload the screen regularly.(For smartphone) Try to change the place and time to locate an environment with good signal strength. |
| The unit turns off automatically. | To prevent the situation of forgetting to turn off the power, this unit will turn off automatically after 10 days of continuous usage. |
| Unable to set focus. | When not monitoring from a smartphone (or computer), the focus of the camera is fixed.Even when monitoring from a smartphone (or computer), the focus of the camera will be fixed if not operated for more than 3 hours. (Focus works again when the camera is operated.) |
| Connection gets disconnected, or a “UNABLE TO CONNECT” message is displayed | Establish connection again at a place with good signal strength. Transmission speed may drop, or connection may fail if the devices are placed too far away from each other, when there are objects in between, or when microwave ovens or other wireless devices are in use.If connection cannot be established again, restart the terminal (smartphone or computer). |
| Screen does not refresh or remains black | Check if the camera and the access point are properly connected.Images cannot be detected on the terminal (smartphone or computer) if the camera is disconnected from the access point halfway through. |
| Trouble Action | |
| Unsure of URL to access from a web browser. | After OUTDOOR MONITORING is started, tap “CAMERA NETWORK INFO.” shown on the camera’s screen.Enter the address as shown in “URL(WAN):” into the web browser to access it. |
| The URL (WAN) does not appear in the network information. | The URL (WAN) will not appear if dynamic DNS is not set on the camera.To set dynamic DNS, perform the following steps.1. Obtain an account with JVC dynamic DNS service using your computer. (URL?)2. Log in to JVC DNS and obtain the dynamic DNS service. (How?)3. Set the obtained dynamic DNS username and password on the camera.*Only the JVC dynamic DNS service can be set on this camera.The URL (WAN) will not appear if dynamic DNS is not set on the camera.To set dynamic DNS, perform the following steps.1. Obtain an account with JVC dynamic DNS service using your computer.https://dd3.jvckenwood.com/user/2. Log in to JVC DNS and obtain the dynamic DNS service.3. Set the obtained dynamic DNS username and password on the camera.*Only the JVC dynamic DNS service can be set on this camera. |
| Unable to access the entered URL. (cannot be found) | This function cannot be used in an environment with two or more routers.Check that the dynamic DNS username and password are correct.The router in use is not compatible with UPnP, or UPnP is turned off. Check the instruction manual of the router in use, and turn on UPnP.The “UPnP” of the camera is set to “OFF”. (By default, it is set to “ON”).Set “UPnP” to “ON”.Depending on the terms of service with your provider, it may not be possible to obtain a global IP address.“Confirming global IP address” (p. 140)Check whether a terminal that uses port 80 (such as web servers) has been set in the network, or if a specific terminal has been set to use port 80 on the router. In such case, change the “HTTP Port” of the camera.“Changing the HTTP Port(DIRECT MONITORING/INDOOR MONITORING/OUTDOOR MONITORING)” (p. 155)Try again after powering off and on the camera and the terminal (smartphone or computer). |
| Video or audio is interrupted or delayed | If the network speed is slow, videos and audio sound may be interrupted, or delay may become significant(For web browser) Lagging may become significant due to the performance of the computer.If the stream format is set to “Full HD”, change to “SD” or “Motion-JPEG” and try again.“Wi-Fi Specifications” (p. 196)(For web browser) If lagging is severe, reload the screen regularly.(For smartphone) Try to change the place and time to locate an environment with good signal strength. |
| The unit turns off automatically. | To prevent the situation of forgetting to turn off the power, this unit will turn off automatically after 10 days of continuous usage. |
| Unable to set focus. | When not monitoring from a smartphone (or computer), the focus of the camera is fixed.Even when monitoring from a smartphone (or computer), the focus of the camera will be fixed if not operated for more than 3 hours. (Focus works again when the camera is operated.) |
| Connection gets disconnected, or a “UNABLE TO CONNECT” message is displayed | Establish connection again at a place with good signal strength. Transmission speed may drop, or connection may fail if the devices are placed too far away from each other, when there are objects in between, or when microwave ovens or other wireless devices are in use.If connection cannot be established again, restart the terminal (smartphone or computer). |
| Screen does not refresh or remains black | Check if the camera and the access point are properly connected.Images cannot be detected on the terminal (smartphone or computer) if the camera is disconnected from the access point halfway through. |
| “×UPnP” is displayed. This appears when UPnP has failed. | Check whether the wireless LAN router in use is compatible with UPnP.(Refer to the instruction manual of the wireless LAN router in use, or consult the manufacturer of the routerWhen the wireless LAN router in use is compatible with UPnP, turn on the UPnP function.If the icon does not disappear even when the UPnP function is enabled, turn off and on the power of the wireless LAN router in use as well as the camera, then try again. |
| Unable to connect although “×UPnP” is displayed. | When “UPnP” is set to “OFF”, “×UPnP” will not appear. In such cases, set “UPnP” to “ON”.When port 80 has been used by other devices via UPnP, connection cannot be established. Reconnect the camera. |
| Trouble Action | |
| Unable to send e-mails. | Check that the settings of the e-mail server are correct.Check that the settings of the sender's e-mail address are correct.Check that the username and password are correct.If you are using an e-mail service that is not from your provider, it may be necessary to change the SMTP settings.Some free e-mail services from web browsers or e-mail softwares (SMTP) may have default SMTP settings that do not allow e-mails to be sent.Change the SMTP settings to allow sending of e-mails before use. |
| Sent e-mails are not received. | Check whether notifications indicating errors have been sent to the sender's e-mail address. (Make use of a computer or similar devices as it is not possible to check from the camera.)- If no notifications are received: Refer to “Unable to send e-mails.” and adjust the settings accordingly.- If notifications are received: Check the content of the notification.*Note: Do not continue sending e-mails with the same settings if you receive error notifications. Depending on the provider, you may be marked as a sender of spam (junk mail). |
| Unable to attach images to e-mails. | Depending on the provider, some attached files may be deleted. Make use of other free e-mail services. |
| The unit turns off automatically. | To prevent the situation of forgetting to turn off the power, this unit will turn off automatically after 10 days of continuous usage. |
| Unable to set focus. (For DETECT/MAIL SETTING) | While on standby for notification mails, the focus is fixed. Perform the camera settings first, then enable notification mails.Focus may not be set correctly if the notification mails start before camera settings are made. In this case, disable notification mails temporarily, then enable it again. |
| Trouble Action | |
| Unable to transfer videos and still images to smartphone (or computer). | • Check the amount of remaining free space in the destination medium (smartphone or computer). |
Wi-Fi Specifications
Wi-Fi Specifications| Item Details | |
| Wireless LAN Standard IEEE802.11b/g/n (2.4GHz band) | |
| Wi-Fi security Encryption: WEP, WPA, WPA2 | *WPA and WPA2 are supported only by the personal mode (PSK). |
DIRECT MONITORING / INDOOR MONITORING / OUTDOOR MONITORING
■ When Using Everio sync. 2| Item Details | |
| Supported Terminals iPhone/iPad/iPod touch | iOS 5.1 or laterAndroid: Android 2.3 or laterThere is no guarantee that the operations will work with all terminals.“Everio sync. 2” for iPhone/iPad cannot be used when the iPhone/iPad is connected to the mobile phone network.To make use of this feature, connect to the camera or an access point via Wi-Fi.A network environment with a minimum line speed of about 5.3 Mbps is recommended for both the camerasending the data and the smartphone terminal receiving the data.If the network speed is too low, video images may appear jumpy, or audio sound may be interrupted or delayed. |
| Monitor Screen Video: JPEG 640x360 max. | 15 fpsAudio: linear PCM 8kHz 16 bits 1ch |
| Video Transmission Video: MP4-compliant H | 264 Baseline Profile 640x360 or 1280x720 30pAudio: AAC 48kHz 16 bits 2ch |
| Still Image Transmission JPEG format |
| Item Details | |
| Operating Environment Windows 7: | Internet Explorer 9 or a later version, and Windows Media Player 12 or a later version are installedFor Full HD, make use of a computer with the following system requirements.- CPU: Intel Core 2 Duo 2 GHz or higher- Memory: 2 GB or higherA network environment with the following line speed is recommended for both the camera sending the data and the PC receiving the data.- MotionJPEG: approx. 1.7 Mbps or higher- Full HD: approx. 10 Mbps or higher- SD: approx. 3 Mbps or higherIf the network speed is too low, video images may appear jumpy, or audio sound may be interrupted or delayed. |
| Monitor Screen | MotionJPEGVideo: JPEG 640x360 max. 5 fpsAudio: nilFull HDVideo: MPEG-2 TS compliant H.264 High Profile 1920x1080 60iAudio: AAC 48kHz 16 bits 2chSDVideo: MPEG-2 TS compliant H.264 Main Profile 720x480 60iAudio: AAC 48kHz 16 bits 2ch |
| Video Transmission MPEG-2TS format (no conversion) | |
| Still Image Transmission JPEG format (no conversion) |
| Item | Details |
| Video MP4-compliant H.264 Baseline Profile | 640x360 30p |
| Audio AAC 48kHz 16 bits 2ch | |
| Time Max. 15 seconds |
| Item Details | |
| Still Image Transmission JPEG 640x360 |
DIRECT MONITORING
You can monitor images being captured by Everio to your smartphone or PC. While you are busy, you can monitor your baby who is sleeping in the room next door.INDOOR MONITORING
Images being captured by Everio can be set to your PC or smartphone when your children return home, via the wireless LAN router.OUTDOOR MONITORING
Images being captured by Everio can be sent to the grandparents' PC or smartphone, by the wireless LAN (Wi-Fi spot) via the Internet.DETECT/MAIL
When your child returns home while you are away, a still image is sent to you by e-mail.VIDEO MAIL
Let's send video messages (Good morning, Good night) to your father or husband who is on the business trip.TV MONITORING
A DLNA compatible TV may be used to display and play back the images.DIRECT MONITORING
Setting (Once setting is done, start from the "Regular Operation" below)Create a QR code.
■ Enter values in the required items for direct monitoring. - Password: set a password to connect this camera to the device by direct monitoring. (8 to 63 characters (64 characters in case of hexadecimal)) - Enforced Group Owner: setting used to enable a connection with a device that does not support Wi-Fi Direct. Normally set to "ON". - HTTP Port: Normally set to "80".Display the screen for reading the QR code.
1 Tap "MENU". (Operation on this camera) text_image
M WT D PLAY REC MENUtext_image
TOP MENU ?text_image
Wi-Fi 智能家庭管理器 智能家庭管理器 智能家庭管理器 智能家庭管理器 智能家庭管理器 智能家庭管理器text_image
Wi-Fi 网络连接器 Wi-Fi 网络连接器text_image
COMMON WI-FI SETTING SET FROM QR CODEtext_image
SET FROM QR CODE Wi-Fi SETTING CAN BE SET USING WEB USER GUIDE OR SMART USER GUIDE EXECUTE STOPRead a QR code.
1 Read a QR code. (Operation on this camera) text_image
PLEASE READ QR CODEtext_image
SET FROM QR CODE CHANGE THE SETTING OF DIRECT MONITORING PREVIOUS SETTING WILL BE OVERWRITTEN YES NOtext_image
SET FROM QR CODE SETTINGS COMPLETED OK NEXT■ Regular Operation
Connecting the Smartphone to the Camera Wirelessly
■ Connection by entering the Wi-Fi password
1 Tap "MENU". (Operation on this camera) Set the camera to the recording mode. text_image
M WT D << PLAY REC MENUtext_image
TOP MENU ?text_image
Wi-Fi 智能家庭管理器 智能家庭管理器 智能家庭管理器 智能家庭管理器 智能家庭管理器 智能家庭管理器 智能家庭管理器text_image
DIRECT MONITORING → ON OK OK OK HTTP OKtext_image
DIRECT MONITORING VIDEO RECORDING AT 60i WHEN USING Wi-Fitext_image
DIRECT MONITORING SET UP WI-FI SETTING ON CONNECTING DEVICE SSID:****** PASS:****** STOP WPSnatural_image
Illustration of a hand holding a smartphone with a stylus, no text or symbols presentnatural_image
Close-up of purple flowers with green foliage, no visible text or symbolstext_image
M WT D ←PLAY REC MENUtext_image
TOP MENU ?text_image
Wi-Fi 智能家庭管理 智能家庭管理 智能家庭管理 智能家庭管理 智能家庭管理 智能家庭管理text_image
DIRECT MONITORING ?text_image
DIRECT MONITORING VIDEO RECORDING AT 60i WHEN USING Wi-Fitext_image
DIRECT MONITORING SET UP WI-FI SETTING ON CONNECTING DEVICE SSID:****** PASS:****** STOP WPSnatural_image
Illustration of a hand holding a smartphone with a pen inserted (no text or symbols visible)natural_image
Close-up of purple iris flowers with green foliage, captured in a photo editing interface (no text or symbols on the flower image itself)Monitoring the Images from a Smartphone (or Computer)
■ Smartphone (Android / iPhone)
Memo :
\- Prior to use this function, a smartphone application needs to be installed on the smartphone. "Installing Smartphone Applications" (p. 175) 1 Start "Everio sync. 2" on the smartphone after setting DIRECT MONITORING. natural_image
Illustration of a hand holding a smartphone with a pen, no text or symbols presenttext_image
Everio sync.2 DIRECT MONITORING CONNECT TO THE CAMERA DIRECTLY. YOU CAN USE THE GAME SCORING FUNCTION. INDOOR MONITORING CONNECT VIA ACCESS POINT. NEED TO REGISTER ACCESS POINT. OUTDOOR MONITORING CONNECT VIA INTERNET. NEED TO REGISTER ACCESS POINT AND DDNS. ? Demotext_image
Index Monitor PAUSE Tele Rec Snapshot Wide Pause Marking Game Scorenatural_image
Illustration of a hand holding a smartphone and a camera with sound waves (no text or symbols)■ Computer (Windows 7)
1 Tap the URL button shown on the camera's screen. (displayed when the computer and the camera are connected wirelessly.) natural_image
Close-up of purple iris flowers with green foliage, captured under a photo editing interface (no text or symbols on the flower image itself)text_image
CAMERA NETWORK INFO. URL(LAN):http://****************/ ****************/ QUITtext_image
1000CDBYKINDOOR MONITORING
Setting (Once setting is done, start from the “Regular Operation” below)Create a QR code.
■ Enter values in the required items for indoor monitoring. - Password: set a password to connect this camera to the device via access point. (Not more than 8 characters) - HTTP Port: Normally set to "80".Display the screen for reading the QR code.
1 Tap "MENU". (Operation on this camera) text_image
M WT D PLAY REC MENUtext_image
TOP MENU ?text_image
Wi-Fi 搜索数据源 搜索数据源 搜索数据源 搜索数据源 搜索数据源 搜索数据源 搜索数据源 搜索数据源 搜索数据源 搜索数据源 搜索数据源 搜索数据源 搜索数据源 搜索数据源 搜索数据源 搜索数据源 搜索数据源 搜索数据源 搜索数据源 搜索数据源 搜索数据源 搜索数据源 搜索数据源 搜索数据源 搜索数据源 搜索数据源源 搜索数据源源 搜索数据源源 搜索数据源源 搜索数据源源 搜索数据源源 搜索数据源源 搜索数据源源 搜索数据源源 搜索数据源源 搜索数据源源 搜索数据源源 搜索数据源源 搜索数据源源 搜索数据源源 搜索数据源源 搜索数据源源 搜索数据源源 搜索数据源源 搜索数据源源 搜索数据源源 搜索数据源源 搜索数据源源 搜索数据源源 搜索数据源源 搜索数据源text_image
Wi-Fi Wi-Fitext_image
COMMON WI-FI SETTING SET FROM QR CODEtext_image
SET FROM QR CODE Wi-Fi SETTING CAN BE SET USING WEB USER GUIDE OR SMART USER GUIDE EXECUTE STOPRead a QR code.
1 Read a QR code. (Operation on this camera) text_image
PLEASE READ QR CODEtext_image
SET FROM QR CODE CHANGE THE SETTING OF INDOOR MONITORING PREVIOUS SETTING WILL BE OVERWRITTEN YES NOtext_image
SET FROM QR CODE SETTINGS COMPLETED OK NEXTRegistering the access points (wireless LAN router) to this unit
■ Wi-Fi Protected Setup (WPS) Registration
1 Tap "MENU". (Operation on this camera) text_image
M WT D <text_image
TOP MENU ?text_image
Wi-Fi 智能家庭健康 智能家庭健康 智能家庭健康 智能家庭健康 智能家庭健康 智能家庭健康 智能家庭健康text_image
Wi-Fi 智能家庭智能 Wi-Fitext_image
COMMON WI-FI SETTING ACCESS POINTStext_image
ACCESS POINTS ADDtext_image
ADD EZ REGISTRATION WPS [ ] [ ] [ ] [ ] [ ] [ ] [ ] [ ] [ ] [ ] [ ] [ ] [ ] [ ] [ ] [ ] [ ] [ ] [ ] [ ] [ ] [ ] [ ] [ ] [ ] [ ] [ ] [ ] [ ] [ ] [ ] [ ] [ ] [ ] [ ] [ ] [ ] [ ] [ ] [ ] [ ] [ ] [ ] [ ] [ ] [ ] [ ] [ ] [ ] [ ] [ ]text_image
REGISTERED SSID:****** ENCRYPTION METHOD WPA2 OK■ Search the access point, and select from the list.
Set the name (SSID) of the access point (wireless LAN router) and the password beforehand. 1 Tap "MENU". (Operation on this camera) text_image
M WT D ← PLAY REC MENUtext_image
TOP MENU ?text_image
Wi-Fi 智能家庭智能 智能家庭智能 智能家庭智能 智能家庭智能 智能家庭智能 智能家庭智能 智能家庭智能text_image
Wi-Fi Wi-Fitext_image
COMMON Wi-Fi SETTING ACCESS POINTS [兼容 要推荐] [兼容 要推荐] [兼容 要推荐]text_image
ACCESS POINTS ADDtext_image
ADD SEARCH 1.000 2.000 3.000 1.000 2.000 3.000 1.000 2.000 3.000text_image
SEARCH SEARCH AGAINtext_image
PASSWORD A/a/1 . @ ABC DEF DELETE ← GHI JKL MNO → PQRS TUV WXYZ SET - + CANCELtext_image
REGISTERED SSID:****** ENCRYPTION METHOD WPA2 OKConnecting the smartphone (or computer) to the access point (wireless LAN router)
- Connect the smartphone (or computer) to the access point (wireless LAN router) at home. - This setting is unnecessary if the smartphone (or computer) has already been connected to the access point (wireless LAN router) at home.■ Regular Operation
Monitoring the images by connecting the smartphone and the camera
■ Operation on this camera
1 Tap "MENU". (Operation on this camera) text_image
M WT D PLAY REC MENUtext_image
TOP MENU ?text_image
Wi-Fi 智能家庭智能 智能家庭智能 智能家庭智能 智能家庭智能 智能家庭智能 智能家庭智能 智能家庭智能text_image
INDOOR MONITORING HTTP 网络数据管理器 网络数据管理器 网络数据管理器text_image
INDOOR MONITORING CONNECTING SSID:****** STOPnatural_image
Close-up of purple iris flowers with green foliage, captured in a photo editing interface (no text or symbols on the flower image itself)■ Operation on the smartphone
Memo :
- Prior to use this function, a smartphone application needs to be installed on the smartphone. "Installing Smartphone Applications" (p. 175) 1 Start "Everio sync. 2" on the smartphone after setting "INDOOR MONITORING". natural_image
Illustration of a hand holding a smartphone with a pen, no text or symbols presenttext_image
Everio sync.2 DIRECT MONITORING CONNECT TO THE CAMERA DIRECTLY. YOU CAN USE THE GAME SCORING FUNCTION. INDOOR MONITORING CONNECT VIA ACCESS POINT. NEED TO REGISTER ACCESS POINT. OUTDOOR MONITORING CONNECT VIA INTERNET. NEED TO REGISTER ACCESS POINT AND DDNS. ? Demotext_image
Index Monitor PAUSE Tele Rec Snapshot Wide Pause Marking Game Score■ Monitoring from the computer (Windows7)
1 Tap the URL button shown on the camera's screen. (displayed when the computer and the camera are connected wirelessly.) natural_image
Close-up of purple iris flowers with green foliage, no visible text or symbolstext_image
CAMERA NETWORK INFO. URL(LAN):http://********** **********/ QUITtext_image
SOME DRINOUTDOOR MONITORING
Setting (Once setting is done, start from the “Regular Operation” below)
Obtaining a Dynamic DNS Account
By obtaining a dynamic DNS account, this unit may be used on the web as usual even if the IP address changes when making an access to this unit via internet. \- Only the JVC dynamic DNS service can be set on this camera. To obtain (register) an account, perform the following steps. 1 Access the following URL from a browser and register for an account. (Operation on a computer or smartphone) https://dd3.jvckenwood.com/user/ Set your e-mail address as the username. 2 Check that you have received a confirmation e-mail to the address used in registration, and access the URL stated in the e-mail. (Operation on a computer or smartphone) 3 Set the username and password used in registration on the camera. (Operation on this camera) "Setting Dynamic DNS on this Camera (OUTDOOR MONITORING)" (p. 158) 4 Execute OUTDOOR MONITORING. (Operation on this camera) If "OUTDOOR MONITORING" is executed while dynamic DNS settings are enabled, the camera will access the dynamic DNS server. 5 Tap "CAMERA NETWORK INFO." to check that the URL (WAN) is displayed. (Registration complete) "Image Monitoring via the Internet (OUTDOOR MONITORING)" (p. 140)Caution :
- Registration will be canceled if you do not access the dynamic DNS server from the camera within 3 days. Perform the registration again in this case. - Registration will not be complete if the username and password set on this camera are incorrect. Be sure to check that they are correct. - Successful registration will be canceled too if you do not access the dynamic DNS server for 1 year.Create a QR code.
■ Enter values in the required items for outdoor monitoring. - Password: set a password to connect this camera to the device via access point. (Not more than 8 characters) - DDNS: Set the connection environment to the internet. Normally set to "ON". - User name (DDNS): set an user name for the obtained DDNS account. - Password (DDNS): set a password for the obtained DDNS account. - UPnP: Set to "ON" if the UPnP protocol may be used to connect the device to the network. - HTTP Port: Set the port number for connecting to the internet. Normally set to "80".Display the screen for reading the QR code.
1 Tap "MENU". (Operation on this camera) text_image
M WT D << PLAY REC MENUtext_image
TOP MENU ?text_image
Wi-Fi 网络连接器功能 网络连接器功能 网络连接器功能 网络连接器功能 网络连接器功能 网络连接器功能 网络连接器功能 网络连接器功能 网络连接器功能 网络连接器功能 网络连接器功能 网络连接器功能 网络连接器功能 网络连接器功能 网络连接器功能 网络连接器功能 网络连接器功能 网络连接器功能 网络连接器功能 网络连接器功能 网络连接器text_image
Wi-Fi Wi-Fitext_image
COMMON WI-FI SETTING SET FROM QR CODEtext_image
SET FROM QR CODE Wi-Fi SETTING CAN BE SET USING WEB USER GUIDE OR SMART USER GUIDE EXECUTE STOPRead a QR code.
1 Read a QR code. (Operation on this camera) text_image
PLEASE READ QR CODE2 Tap "YES".
text_image
SET FROM QR CODE CHANGE THE SETTING OF OUTDOOR MONITORING PREVIOUS SETTING WILL BE OVERWRITTEN YES NO3 Tap "OK".
text_image
SET FROM QR CODE SETTINGS COMPLETED OK NEXTRegistering the access points (wireless LAN router) to this unit
■ Wi-Fi Protected Setup (WPS) Registration
1 Tap "MENU".
(Operation on this camera) text_image
M WT D <2 Tap the "Wi-Fi" (💡) icon.
(Operation on this camera) text_image
TOP MENU ?3 Tap> on the lower right of the screen.
(Operation on this camera) text_image
Wi-Fi 智能驾驶辅助 智能驾驶辅助 智能驾驶辅助 智能驾驶辅助 智能驾驶辅助 智能驾驶辅助4 Tap "COMMON Wi-Fi SETTING".
(Operation on this camera) text_image
Wi-Fi 智能驾驶系统 Wi-Fi 智能驾驶系统5 Tap "ACCESS POINTS".
(Operation on this camera) text_image
COMMON WI-FI SETTING ACCESS POINTS6 Tap "ADD".
(Operation on this camera) text_image
ACCESS POINTS ADD7 Tap "EZ REGISTRATION WPS".
(Operation on this camera) text_image
ADD EZ REGISTRATION WPS ?8 Activate WPS of the access point (wireless LAN router) within 2 minutes.
\- To activate WPS, refer to the instruction manual of the device in use.9 After registration is complete, tap "OK" on the camera's screen. (Operation on this camera)
text_image
REGISTERED SSID:** ENCRYPTION METHOD WPA2 OK■ Search the access point, and select from the list.
Set the name (SSID) of the access point (wireless LAN router) and the password beforehand.1 Tap "MENU".
(Operation on this camera) text_image
M WT D << PLAY REC MENUtext_image
TOP MENU ?text_image
Wi-Fi 智能家庭管理器 智能家庭管理器 智能家庭管理器 智能家庭管理器 智能家庭管理器 智能家庭管理器 智能家庭管理器text_image
Wi-Fi Wi-Fitext_image
COMMON W/FI SETTING ACCESS POINTStext_image
ACCESS POINTS ADDtext_image
ADD SEARCH ? ? ?text_image
SEARCH SEARCH AGAINtext_image
PASSWORD A/a/1 . @ ABC DEF DELETE ← GHI JKL MNO → PQRS TUV WXYZ SET - + CANCELtext_image
REGISTERED SSID:****** ENCRYPTION METHOD WPA2 OK■ Regular Operation
Connect this camera to a smartphone (or computer).
1 Tap "MENU". (Operation on this camera) text_image
M WT D <text_image
TOP MENU ?text_image
Wi-Fi 图层智能驾驶器 图层智能驾驶器 图层智能驾驶器 图层智能驾驶器 图层智能驾驶器 图层智能驾驶器 图层智能驾驶器 图层智能驾驶器text_image
OUTDOOR MONITORING DDNS HTTP UPnP OKtext_image
OUTDOOR MONITORING CONNECTING SSID:****** STOPnatural_image
Close-up of purple iris flowers with green foliage, captured via a photo editing interface (no text or symbols on the flower image itself)text_image
CAMERA NETWORK INFO. USE THE URL BELOW TO CONNECT FROM AN OUTSIDE LOCATION URL(WAN):http://***** QUIT■ Operation on the smartphone
Memo :
\- Prior to use this function, a smartphone application needs to be installed on the smartphone. "Installing Smartphone Applications" (p. 175) 1 Start "Everio sync. 2" on the smartphone after setting OUTDOOR MONITORING. natural_image
Illustration of a hand holding a smartphone with a pen, no text or symbols presenttext_image
Everio sync.2 DIRECT MONITORING CONNECT TO THE CAMERA DIRECTLY. YOU CAN USE THE GAME SCORING FUNCTION. INDOOR MONITORING CONNECT VIA ACCESS POINT. NEED TO REGISTER ACCESS POINT. OUTDOOR MONITORING CONNECT VIA INTERNET. NEED TO REGISTER ACCESS POINT AND DDNS. Demotext_image
START HTTP AUTHORIZATION AUTHORIZATION FAILED CHECK USER NAME AND PASSWORD USERNAME PASSWORD OK CANCELtext_image
Index Monitor PAUSE Tele Rec Snapshot Wide Pause Marking Game Scorenatural_image
Illustration of a hand holding a smartphone with a pen, no text or symbols present■ Monitoring from the computer (Windows7)
1 On the Internet Explorer (web browser), enter the URL (WAN) that is checked by "Operation on this camera". text_image
SODUCDBMDETECT/MAIL
Setting (Once setting is done, start from the “Regular Operation” below)Create a QR code.
Memo :
\- Perform operations in step 2 and 3 after creating a QR code, and read the QR code one by one by the camera. ■ Enter values in the required items for setting the recipient's e-mail address. \- E-mail address: set the recipient's e-mail address. \- E-mail function: set the function of the e-mail that is transmitted to the recipient's e-mail address. \- Up to 8 e-mail addresses can be set. ■ Enter values in the required items for setting the sender's e-mail address. • E-mail address: set the sender's e-mail address. ■ Enter values in the required items for setting the e-mail server (SMTP server). \- SMTP server: set the name of the e-mail server (SMTP server) from which an e-mail account is obtained. \- SMTP port number: set according to the condition when the e-mail account is obtained. Normally set to "25". \- SMTP authentication method: set according to the condition when the e-mail account is obtained. \- User name: set if the SMTP authentication method is set to other than "None". (same as the registered user name (account name) when the e-mail account is obtained) \- Password: set if the SMTP authentication method is set to other than "None". (same as the registered password when the e-mail account is obtained) ■ Enter values in the required items for setting notification mails. \- Detection method: set the detection method of when to start recording video for notification e-mails. \- Detecting interval: select the time period to enable detection again after the previous one. \- Self recording: specify whether to save the detected video on the camera (ON) or not (OFF).Display the screen for reading the QR code.
1 Tap "MENU". (Operation on this camera) text_image
M WT D <text_image
TOP MENU ?text_image
Wi-Fi 数据管理器 数据管理器 数据管理器 数据管理器 数据管理器 数据管理器text_image
Wi-Fi 智能驾驶器 Wi-Fi 智能驾驶器text_image
COMMON WI-FI SETTING SET FROM QR CODEtext_image
SET FROM QR CODE Wi-Fi SETTING CAN BE SET USING WEB USER GUIDE OR SMART USER GUIDE EXECUTE STOPRead a QR code.
1 Read a QR code. (Operation on this camera) text_image
PLEASE READ QR CODEtext_image
SET FROM QR CODE CHANGE THE SETTING OF "DETECT/MAIL" PREVIOUS SETTING WILL BE OVERWRITTEN YES NO3 Tap "OK".
text_image
SET FROM QR CODE SETTINGS COMPLETED OK NEXT■ Wi-Fi Protected Setup (WPS) Registration
1 Tap "MENU".
(Operation on this camera) text_image
M WT D PLAY REC MENU2 Tap the "Wi-Fi" (💡) icon.
(Operation on this camera) text_image
TOP MENU ?3 Tap > on the lower right of the screen.
(Operation on this camera) text_image
Wi-Fi 我的电脑 我的电脑 我的电脑 我的电脑 我的电脑4 Tap "COMMON Wi-Fi SETTING".
(Operation on this camera) text_image
Wi-Fi Wi-Fi5 Tap "ACCESS POINTS".
(Operation on this camera) text_image
COMMON WI-FI SETTING ACCESS POINTS6 Tap "ADD".
(Operation on this camera) text_image
ACCESS POINTS ADD7 Tap "EZ REGISTRATION WPS".
(Operation on this camera) text_image
ADD EZ REGISTRATION WPS ?8 Activate WPS of the access point (wireless LAN router) within 2 minutes.
• To activate WPS, refer to the instruction manual of the device in use.9 After registration is complete, tap "OK" on the camera's screen.
(Operation on this camera) text_image
REGISTERED SSID:** ENCRYPTION METHOD WPA2 OK■ Search the access point, and select from the list.
Set the name (SSID) of the access point (wireless LAN router) and the password beforehand.1 Tap "MENU".
(Operation on this camera) text_image
M WT D PLAY REC MENU2 Tap the "Wi-Fi" (💡) icon.
(Operation on this camera) text_image
TOP MENUtext_image
Wi-Fi 智能家庭管理 智能家庭管理 智能家庭管理 智能家庭管理 智能家庭管理 智能家庭管理 智能家庭管理 智能家庭管理 智能家庭管理 智能家庭管理 智能家庭管理 智能家庭管理 智能家庭管理 智能家庭管理 智能家庭管理 智能家庭管理 智能家庭管理 智能家庭管理 智能家庭管理 智能家庭管理 智能家庭管理 智能家庭管理 智能家庭管理 智能家庭管理 智能家庭管理 智能家庭管理系统text_image
Wi-Fi Wi-Fitext_image
COMMON WI-FI SETTING ACCESS POINTS ?text_image
ACCESS POINTS ADDtext_image
ADD SEARCH [自动] [自动] [自动] [自动] [自动] [自动] [自动] [自动] [自动]text_image
SEARCH SEARCH AGAINtext_image
PASSWORD A/a/1 . @ ABC DEF DELETE ← GHI JKL MNO → PQRS TUV WXYZ SET - + CANCELtext_image
REGISTERED SSID:****** ENCRYPTION METHOD WPA2 OK■ Regular Operation
Sending a Notification Mail.
1 Tap "MENU". Set the camera to the recording mode. text_image
M WT D ←PLAY REC MENUtext_image
TOP MENU ?text_image
Wi-Fi 网络连接器 网络连接器 网络连接器 网络连接器 网络连接器 网络连接器 网络连接器text_image
DETECT/MAIL 10 MEC REC ONtext_image
DETECT/MAIL ATTN.text_image
DETECT/MAIL 10 MIL REC ONtext_image
DETECT/MAIL CONNECTING SSID:****** STOPtext_image
DETECT/MAIL "MOTION DETECTION" DETECTION ON STAND BY URL STOP idLPnPtext_image
DETECT/MAIL 'MOTION DETECTION' MOTION DETECTION IN PROGRESS PHOTO STOPtext_image
DETECT/MAIL "MOTION DETECTION" DETECTION SUSPENDED DUE TO CHANGE IN DETECTION INTERVAL URL STOPVIDEO MAIL
Setting (Once setting is done, start from the "Regular Operation" below)Create a QR code.
Memo :
- Perform operations in step 2 and 3 after creating a QR code, and read the QR code one by one by the camera. ■ Enter values in the required items for setting the recipient's e-mail address. - E-mail address: set the recipient's e-mail address. - E-mail function: set the function of the e-mail that is transmitted to the recipient's e-mail address. - Up to 8 e-mail addresses can be set. ■ Enter values in the required items for setting the sender's e-mail address. • E-mail address: set the sender's e-mail address. ■ Enter values in the required items for setting the e-mail server (SMTP server). - SMTP server: set the name of the e-mail server (SMTP server) from which an e-mail account is obtained. - SMTP port number: set according to the condition when the e-mail account is obtained. Normally set to "25". - SMTP authentication method: set according to the condition when the e-mail account is obtained. - User name: set if the SMTP authentication method is set to other than "None". (same as the registered user name (account name) when the e-mail account is obtained) - Password: set if the SMTP authentication method is set to other than "None". (same as the registered password when the e-mail account is obtained)Display the screen for reading the QR code.
1 Tap "MENU". (Operation on this camera) text_image
M WT D PLAY REC MENUtext_image
TOP MENU ?text_image
Wi-Fi 智能驾驶辅助 智能驾驶辅助 智能驾驶辅助 智能驾驶辅助 智能驾驶辅助 智能驾驶辅助 智能驾驶辅助text_image
Wi-Fi Wi-Fitext_image
COMMON WI-FI SETTING SET FROM QR CODEtext_image
SET FROM QR CODE Wi-Fi SETTING CAN BE SET USING WEB USER GUIDE OR SMART USER GUIDE EXECUTE STOPRead a QR code.
1 Read a QR code. (Operation on this camera) text_image
PLEASE READ QR CODEtext_image
SET FROM QR CODE REGISTER RECEIVER ADDRESS UNABLE TO ADD IF 8 ADDRESSES HAVE ALREADY BEEN REGISTERED YES NOtext_image
SET FROM QR CODE SETTINGS COMPLETED OK NEXTtext_image
M WT D PLAY REC MENUtext_image
TOP MENU ?text_image
Wi-Fi 智能家庭监控 智能家庭监控 智能家庭监控 智能家庭监控 智能家庭监控 智能家庭监控 智能家庭监控text_image
Wi-Fi Wi-Fitext_image
COMMON WI-FI SETTING ACCESS POINTS ?text_image
ACCESS POINTS ADDtext_image
ADD EZ REGISTRATION WPS ?text_image
REGISTERED SSID:** ENCRYPTION METHOD WPA2 OKtext_image
M WT Dtext_image
TOP MENUtext_image
Wi-Fi 智能家庭管理 智能家庭管理 智能家庭管理 智能家庭管理 智能家庭管理 智能家庭管理 智能家庭管理 智能家庭管理 智能家庭管理 智能家庭管理 智能家庭管理 智能家庭管理 智能家庭管理 智能家庭管理 智能家庭管理 智能家庭管理 智能家庭管理 智能家庭管理 智能家庭管理 智能家庭管理 智能家庭管理 智能家庭管理 智能家庭管理 智能家庭管理 智能家庭管理 智能家庭管理系统text_image
Wi-Fi Wi-Fitext_image
COMMON WI-FI SETTING ACCESS POINTS ?text_image
ACCESS POINTS ADDtext_image
ADD SEARCH [自动] [自动] [自动] [自动] [自动] [自动] [自动] [自动] [自动]text_image
SEARCH SEARCH AGAINtext_image
PASSWORD A/a/1 . @ ABC DEF DELETE ← GHI JKL MNO → PQRS TUV WXYZ SET - + CANCELtext_image
REGISTERED SSID:****** ENCRYPTION METHOD WPA2 OK■ Regular Operation
Record videos to send a video mail.
1 Tap "MENU". Set the camera to the recording mode. text_image
M WT D ←PLAY REC MENUtext_image
TOP MENU ?text_image
Wi-Fi 智能家庭管理器 智能家庭管理器 智能家庭管理器 智能家庭管理器 智能家庭管理器 智能家庭管理器text_image
VIDEO MAIL 返回到帐户 返回到帐户 返回到帐户text_image
DETECT/MAIL ATTN.text_image
VIDEO MAIL 向导要连接到 要连接到 要连接到text_image
START /STOPtext_image
4text_image
VIDEO MAIL SEND THIS VIDEO? SEND STOP PLAY TO CHECKTV MONITORING
Setting (Once setting is done, start from the “Regular Operation” below)Create a QR code.
■ Enter values in the required items for the TV monitor. - MAC address filter: set to "ON" if monitoring images with a specific TV device. - Add the MAC address: register the physical address when monitoring images with a specific TV device. (Up to 8 addresses can be registered)Display the screen for reading the QR code.
1 Tap "MENU". (Operation on this camera) text_image
M WT D <text_image
TOP MENU ?text_image
Wi-Fi 智能驾驶辅助 智能驾驶辅助 智能驾驶辅助 智能驾驶辅助 智能驾驶辅助 智能驾驶辅助 智能驾驶辅助text_image
Wi-Fi 智能驾驶器 Wi-Fitext_image
COMMON WI-FI SETTING SET FROM QR CODEtext_image
SET FROM QR CODE Wi-Fi SETTING CAN BE SET USING WEB USER GUIDE OR SMART USER GUIDE EXECUTE STOPRead a QR code.
1 Read a QR code. (Operation on this camera) text_image
PLEASE READ QR CODEtext_image
SET FROM QR CODE REGISTER THE MAC ADDRESS UNABLE TO REGISTER IF 8 ADDRESSES HAVE ALREADY BEEN REGISTERED YES NOtext_image
SET FROM QR CODE SETTINGS COMPLETED OK NEXTtext_image
M WT D << PLAY REC MENUtext_image
TOP MENU ?text_image
Wi-Fi 智能家庭管理 智能家庭管理 智能家庭管理 智能家庭管理 智能家庭管理 智能家庭管理 智能家庭管理text_image
Wi-Fi Wi-Fitext_image
COMMON WIFI SETTING ACCESS POINTStext_image
ACCESS POINTS ADDtext_image
ADD EZ REGISTRATION WPS ?text_image
REGISTERED SSID:****** ENCRYPTION METHOD WPA2 OK■ Search the access point, and select from the list.
Set the name (SSID) of the access point (wireless LAN router) and the password beforehand. 1 Tap "MENU". (Operation on this camera) text_image
M WT D ←PLAY REC MENUtext_image
TOP MENU ?text_image
Wi-Fi 我的电脑搜索 我的电脑搜索 我的电脑搜索 我的电脑搜索 我的电脑搜索 我的电脑搜索text_image
Wi-Fi Wi-Fi5 Tap "ACCESS POINTS".
(Operation on this camera) text_image
COMMON WI-FI SETTING ACCESS POINTS [兼容 1] [兼容 2] [兼容 3] [兼容 4]6 Tap "ADD".
(Operation on this camera) text_image
ACCESS POINTS ADD7 Tap "SEARCH".
(Operation on this camera) text_image
ADD SEARCH [推荐 重新搜索] [推荐 重新搜索] [推荐 重新搜索]8 Tap the name (SSID) of the desired access point from the list of search results.
(Operation on this camera) text_image
SEARCH SEARCH AGAIN9 Register a password.
(Operation on this camera) text_image
PASSWORD A/a/1 . @ ABC DEF DELETE ← GHI JKL MNO → PQRS TUV WXYZ SET - + CANCEL10 After registration is complete, tap "OK" on the camera's screen. (Operation on this camera)
text_image
REGISTERED SSID:****** ENCRYPTION METHOD WPA2 OK■ Regular Operation
Connect the TV to the access point.
- Connect the DLNA compatible TV to the access point (this function is available for a connection via cables as well) - For details on connecting your TV to a Wi-Fi network, please refer to the instruction manual of the TV in use.Connecting This Camera to the TV
1 Tap "MENU".
(Operation on this camera) text_image
M WT D ←PLAY REC MENU2 Tap the "Wi-Fi" (💡) icon.
(Operation on this camera) text_image
TOP MENU ?3 Tap "TV MONITORING" (☐).
(Operation on this camera) text_image
Wi-Fi 智能家庭管理 智能家庭管理 智能家庭管理 智能家庭管理 智能家庭管理 智能家庭管理4 Tap "START" (→).
(Operation on this camera) text_image
TV MONITORING MAC MAC5 Start making a connection.
(Operation on this camera) text_image
TV MONITORING CONNECTING SSID:****** STOP6 Connection in progress
text_image
TV MONITORING NOW PROCESSING STOP7 After the connection is completed, wait for the DLNA device to start up. (Operation on this camera)
text_image
TV MONITORING QUIT8 Images appear on the monitor of the DLNA device (Operation on DLNA device)
natural_image
Close-up of three purple iris flowers with yellow centers, surrounded by green foliage (no text or symbols visible)Memo :
- If no image is displayed during TV monitoring, tap "STOP" to start from step 1. - If the DLNA compatible TV in use cannot detect Everio, tap "STOP" to start from the step 1 again.Operating the Menu
There are two types of menus in this unit. - TOP MENU: Menu that contains all the items specific to the video recording, still image recording, video playback, and still image playback modes respectively. - SHORTCUT MENU: Menu that contains the recommended functions for video/still image recording.Operating the Top Menu
You can configure various settings using the menu. \- The following is a screen of the model with Wi-Fi functions. 1 Tap "MENU". • The top menu appears. - The menu differs according to the mode in use. text_image
M WT Dtext_image
TOP MENU ?text_image
RECORD SETTING OFF A WB A A OFF B OFFOperating the Shortcut Menu
 You can configure various settings of the recommended functions in the video/still image recording mode using the shortcut menu. \- The following is a screen of the model with Wi-Fi functions. 1 Tap "MENU". text_image
M WT M D ←PLAY REC MENUtext_image
TOP MENU ?text_image
SHORTCUT MENU ON OFFtext_image
SHORTCUT MENU OK Off CancelMemo :
• To return to the top menu Tap ↩ (return). • To exit the screen Tap × (quit). • To display the help file Tap ? (help) and tap the item.RECORD SETTING Menu (video)
SCENE SELECT
Settings to suit the shooting condition can be selected. "Shooting According to Scene (Subject)" (p. 32) \*Displayed only in the manual recording mode.FOCUS
Focus can be adjusted manually. "Adjusting Focus Manually" (p. 33) \*Displayed only in the manual recording mode.BRIGHTNESS ADJUST
Adjusts the overall brightness of the screen. "Adjusting Brightness" (p. 34) \*Displayed only in the manual recording mode.BACKLIGHT COMP.
Corrects the image when the subject appears dark due to backlight. "Setting Backlight Compensation" (p. 35) \*Displayed only in the manual recording mode.WHITE BALANCE
Adjusts the color according to the light source. "Setting White Balance" (p. 36) \*Displayed only in the manual recording mode.TELE MACRO
Enables close-up shots when using the telephoto (T) end of the zoom. "Taking Close-up Shots" (p. 37) \*Displayed only in the manual recording mode.TOUCH PRIORITY AE/AF
Automatically adjusts focus and brightness based on the subjects' faces or selected area. "Capturing Subjects Clearly (TOUCH PRIORITY AE/AF)" (p. 44)LIGHT (GZ-EX355)
Turns on/off the light.| Setting Details | |
| OFF Does not light up. | |
| AUTO Lights up automatically when the surrounding is dark. | |
| ON Lights up at all times. |
GAIN UP
Makes the subject appear bright automatically when recording in dark places.| Setting | Details |
| OFF Deactivates the function. | |
| ON Electrically brightens the scene when it is dark. | |
| AUTO SLOW-SHUTTER Slows down the shutter speed to brighten the scene when it is dark. |
Memo :
\- Although "AUTO SLOW-SHUTTER" brightens the scene more than "ON", movements of the subject may become unnatural.WIND CUT
Reduces the noise caused by wind.| Setting Details | |
| OFF Deactivates the function. | |
| ON Activates the function. | |
| AUTO Activate the function automatically. |
SHUTTER MODE
Continuous shooting settings can be adjusted.| Setting Details | |
| RECORD ONE SHOT Records one still image. | |
| CONTINUOUS SHOOTING Records still images continuously while the SNAPSHOT button is pressed. |
Memo :
- "LOW SPEED" is set in the video mode. - The size of the still image that is captured in the video mode is 1,920 × 1,080 . • Some SD cards may not support continuous shooting. - The continuous shooting speed will drop if this function is used repeatedly.SMILE SHOT
Automatically captures a still image upon detection of a smile. "Capturing Smiles Automatically (SMILE SHOT)" (p. 45)SMILE%/NAME DISPLAY
Displays the names and smile levels (%) when faces are detected. "Setting SMILE%/NAME DISPLAY" (p. 50)PET SHOT
Automatically captures a still image upon detection of the face of a pet, such as dogs or cats. "Capturing Pets Automatically (PET SHOT)" (p. 46)SEAMLESS RECORDING (GZ-EX355)
Continues recording on the SD card without stopping when the remaining space on the built-in memory runs out.| Setting Details | |
| OFF Does not switch recording media automatically. | |
| ON Switches recording media automatically. | |
Memo :
- Seamless recording cannot be performed if there is not enough free space in the SD card. - 📁x appears if seamless recording cannot be performed. - To start seamless recording again after the previous session is complete, it is necessary to combine seamless videos, or delete the combination information of the seamless videos. - Seamless recording can be performed if the video recording format is iFrame. "Combining Videos Recorded by Seamless Recording" (p. 83)VIDEO REC FORMAT
Select the recording format from "AVCHD", or "iFrame" which is suitable for importing to "iMovie".| Setting | Details |
| AVCHD Records in AVCHD format. | |
| iFrame (GZ-EX355/GZ-EX310) | Record in iFrame format, which is suitable for importing to iMovie. |
Memo :
\- iFrame is a recording format to be handled by the Mac computer. Operation on the Windows PC is not guaranteed. VIDEO QUALITY Sets the video quality.| Setting Details | |
| (if the video recording format is AVCHD) | |
| UXP Enables recording in the best picture quality. | Applies to Blu-ray discs only. Videos taken in high-definition quality cannot be saved to DVDs. |
| XP Enables recording in high picture quality. | |
| SP Enables recording in standard quality. | |
| EP Enables long recordings. | |
| SSW Enables recording in the best picture quality. | |
| SEW Enables recording in the best picture quality. | |
| (if the video recording format is iFrame) | |
| iFrame(1280x720)(GZ-EX355/GZ-EX310) | Records videos that are suitable for editing in 1280x720 resolution. |
| iFrame(960x540)(GZ-EX355/GZ-EX310) | Records videos that are suitable for editing in 960x540 resolution. |
Memo :
- Set to "UXP" or "XP" mode when recording fast-moving scenes or scenes with extreme changes of brightness to avoid noise. - Use an BD writer (external Blu-ray drive) to save videos recorded in "UXP" mode. - You can change to the desired "VIDEO QUALITY" by tapping on it from the remaining recording time display. ZOOM Sets the maximum zoom ratio.| Setting Details | |
| 40x Enables recording with 1 - 40x optical zoom | Set this when digital zoom is not desired. |
| 60x DYNAMIC(55x DYNAMIC) | Enables recording with 1 - 40x optical zoom and 41 - 60x dynamic zoom, when the image stabilizer is in normal mode or set to off.(Enables recording with 1 - 40x optical zoom and 41 - 55x dynamic zoom, when the image stabilizer is in active mode, or when the camera is set to the iFrame mode.) |
| 120x DIGITAL(110x DIGITAL) | Enables recording with 1 - 40x optical zoom and 41 - 120x digital zoom, when the camera is set to the AVCHD mode.(Enables recording with 1 - 40x optical zoom and 41 - 110x digital zoom, when the camera is set to the iFrame mode.) |
| 200x DIGITAL Enables recording with 1 - 40x | optical zoom and 41 - 200x digital zoom. |
Memo :
- When digital zoom is used, the image becomes grainy as it is digitally enlarged. - The angle of view changes when the image stabilizer is turned on or off. ZOOM MIC Sets the zoom microphone.| Setting | Details |
| OFF Deactivates the zoom microphone. | |
| ON Records audio sounds in the same direction as the zoom operation. | |
| Setting | Details |
| OFF Hides display of microphone input level. | |
| ON Shows display of microphone input level. |
MIC LEVEL SETTING
Sets the microphone level. Make the adjustments such that "MIC LEVEL" does not turn red.| Setting Details | |
| +2 Increases the microphone input level. | |
| +1 Increases the microphone input level slightly. | |
| 0 The microphone input level is not changed. | |
| -1 Decreases the microphone input level slightly. | |
| -2 Decreases the microphone input level. |
K2 TECHNOLOGY
Reduces the degradation of sound quality caused by digital signal processing, and records a sound quality close to the original.| Setting Details | |
| OFF Deactivates K2 TECHNOLOGY. | |
| ON Activates K2 TECHNOLOGY. |
SPECIAL RECORDING Menu (video)
HIGH SPEED RECORDING
You can record videos in slow-motion by increasing the recording speed to emphasize the movements, and play back the slow-motion video smoothly. This is a handy function for checking movements, such as golf swings. "Slow-motion (High-speed) Recording" (p. 53)TIME-LAPSE RECORDING
This function enables the changes of a scene that occur slowly over a long period to be shown within a short time by taking frames of it at a certain interval. This is useful for making observations such as the opening of a flower bud. "Recording at Intervals (TIME-LAPSE RECORDING)" (p. 54)STOP-MOTION REC
By pressing the SNAPSHOT button, 2 frames of still images are recorded, and stop-motion videos are created by piecing these images together. "Recording Stop-Motion Videos (STOP-MOTION REC)" (p. 56)AUTO REC
Starts recording automatically by sensing the changes in subject's movement (brightness) within the red frame displayed on the LCD monitor. "Recording Automatically by Sensing Movements (AUTO REC)" (p. 57)ANIMATION EFFECT
Records videos with animation effects. "Recording with Animation Effects (ANIMATION EFFECT)" (p. 39)DECORATE FACE EFFECT
Detects faces and enables decorations such as crowns or sunglasses to be added. "Recording with Face Decorations (DECORATE FACE EFFECT)" (p. 41)STAMP
Records videos with various decorative stamps. "Recording with Decorative Stamps (STAMP)" (p. 42)HANDWRITING EFFECT
Records videos with your personal handwriting or drawing. If the writings and drawings appear to be misaligned, correct the touch position. "Recording with Personal Handwriting (HANDWRITING EFFECT)" (p. 43)DATE/TIME RECORDING
You can record videos together with the date and time. Set this when you want to save the file with date and time display. (The date and time cannot be deleted after recording.) "Recording Videos with Date and Time" (p. 60)RECORD SETTING Menu (still image)
SCENE SELECT
Settings to suit the shooting condition can be selected. "Shooting According to Scene (Subject)" (p. 32) \*Displayed only in the manual recording mode.FOCUS
Focus can be adjusted manually. "Adjusting Focus Manually" (p. 33) \*Displayed only in the manual recording mode.BRIGHTNESS ADJUST
Adjusts the overall brightness of the screen. "Adjusting Brightness" (p. 34) \*Displayed only in the manual recording mode.BACKLIGHT COMP.
Corrects the image when the subject appears dark due to backlight. "Setting Backlight Compensation" (p. 35) \*Displayed only in the manual recording mode.WHITE BALANCE
Adjusts the color according to the light source. "Setting White Balance" (p. 36) \*Displayed only in the manual recording mode.TELE MACRO
Enables close-up shots when using the telephoto (T) end of the zoom. "Taking Close-up Shots" (p. 37) \*Displayed only in the manual recording mode.TOUCH PRIORITY AE/AF
Automatically adjusts focus and brightness based on the subjects' faces or selected area. "Capturing Subjects Clearly (TOUCH PRIORITY AE/AF)" (p. 44)SELF-TIMER
Use this when taking a group photo. "Taking Group Shots (Self-timer)" (p. 58)GAIN UP
Makes the subject appear bright automatically when recording in dark places.| Setting | Details |
| OFF Deactivates the function. | |
| ON Electrically brightens the scene when it is dark. | |
Memo :
\- Setting can be adjusted separately for videos. "GAIN UP (Video)" (p. 226)SHUTTER MODE
Continuous shooting settings can be adjusted.| Setting | Details |
| RECORD ONE SHOT Records one still image. | |
| CONTINUOUS SHOOTING Records still images continuously while the SNAPSHOT button is pressed. | |
Memo :
- Some SD cards may not support continuous shooting. - The continuous shooting speed will drop if this function is used repeatedly.SMILE SHOT
Automatically captures a still image upon detection of a smile. "Capturing Smiles Automatically (SMILE SHOT)" (p. 45)SMILE%/NAME DISPLAY
Displays the names and smile levels (%) when faces are detected. "Setting SMILE%/NAME DISPLAY" (p. 50)PET SHOT
Automatically captures a still image upon detection of the face of a pet, such as dogs or cats. "Capturing Pets Automatically (PET SHOT)" (p. 46)IMAGE SIZE
Sets the image size (number of pixels) for still images.| Setting Details | |
| 3840X2160(8M)1920X1080(2M) | Takes still images with aspect ratio 16:9.The sides of still images recorded in 16:9 aspect ratio may be cut off when printed. |
| 1440X1080(1.5M)640X480(0.3M) | Takes still images with aspect ratio 4:3. |
SPECIAL RECORDING Menu (still image)
AUTO REC
Starts recording automatically by sensing the changes in subject's movement (changes in brightness) within the red frame displayed on the LCD monitor. "Recording Automatically by Sensing Movements (AUTO REC)" (p. 57)PLAYBACK SETTING Menu (video)
SEARCH DATE
Narrows down the video index screen according to recording dates. "Searching for a Specific Video/Still Image by Date" (vπ p. 76)DISPLAY DATE/TIME
Sets whether to display the recording date and time during video playback.| Setting Details | |
| OFF Does not display the date and time during playback. | |
| ON Displays the date and time during playback. | |
DIGEST PLAYBACK
Plays back a digest of the recorded videos. " DIGEST PLAYBACK " (p. 70)PLAYBACK PLAYLIST
Plays back the playlists that you have created. "PLAYBACK PLAYLIST" (p. 72)PLAYBACK OTHER FILE
Plays videos with defective management information. "PLAYBACK OTHER FILE" (p. 73)EDIT Menu (video)
PROTECT/CANCEL
Protects files from being deleted accidentally. "Protecting/Releasing Protection of the Currently Displayed File" (p. 81) "Protecting/Releasing Protection of Selected Files" (p. 82)COPY
Copies files from the built-in memory to the SD card. "Copying Files to an SD Card (GZ-EX355)" (n: p. 112)MOVE
Moves files from the built-in memory to the SD card. Files that are moved will be deleted from the built-in memory. "Moving Files to an SD Card (GZ-EX355)" (p. 113)EDIT PLAYLIST
A list in which your favorite videos are arranged is called a playlist. By creating a playlist, you can play back only your favorite videos in the order you like. The original video file remains even when it is registered to a playlist. "Creating Playlists with Selected Files" (p. 85) "Creating Playlists by Date" (p. 87) "Editing Playlists" (p. 88)TRIMMING
Select the required part of a video and save it as a new video file. The original video remains in its existing location. "Capturing a Required Part in the Video (TRIMMING)" (p. 84)SEAMLESS REC CTRL (GZ-EX355)
Videos that are recorded on two separate media and with "SEAMLESS RECORDING" in the video recording menu enabled can be combined into a single video. "Combining Videos Recorded by Seamless Recording" (p. 83)PLAYBACK SETTING Menu (still image)
SEARCH DATE
Narrows down the still image index screen according to recording dates. "Searching for a Specific Video/Still Image by Date" (p. 76)SLIDE SHOW EFFECTS
Sets the transition effects in slideshow playback.| Setting Details | |
| SLIDE Switches the screen by sliding in from right to left. | |
| BLINDS Switches the screen by dividing into vertical strips. | |
| CHECKERBOARD Switches the screen by changing through a checkered pattern. | |
| RANDOM Switches the screen with a random effect from SLIDE, “BLINDS”, and “CHECKERBOARD”. | |
Memo :
\- Slideshow effects are not available when playing back still images in external devices (such as USB external hard disk drives).EDIT Menu (still image)
PROTECT/CANCEL
Protects files from being deleted accidentally. "Protecting/Releasing Protection of the Currently Displayed File" (p. 81) "Protecting/Releasing Protection of Selected Files" (p. 82)COPY (GZ-EX355)
Copies files from the built-in memory to the SD card. "Copying Files to an SD Card (GZ-EX355)" (p. 112)MOVE (GZ-EX355)
Moves files from the built-in memory to the SD card. Files that are moved to the SD card will be deleted from the built-in memory. "Moving Files to an SD Card (GZ-EX355)" (p. 113)SETUP (video/still image)
Mobile User Guide
Displays the QR code to access the Mobile User Guide. text_image
MOBILE USER GUIDE URL:Memo :
- To read the QR code, a relevant application is required. Enter the URL in the internet browser manually if the QR code cannot be read. - The Mobile User Guide is supported by Android devices and iPhone. You can view it on standard browsers such as Google Chrome (Android) and Mobile Safari (iPhone). • QR Code is a registered trademark of Denso Wave Incorporated.CLOCK ADJUST
Resets the current time or sets to the local time when using this unit overseas. "Clock Setting" (p. 18) "Setting the Clock to Local Time when Traveling" (p. 22) "Setting Daylight Saving Time" (p. 22)DATE DISPLAY STYLE
Sets the order of year, month, day and the time display format (24H/12H).| Sorting Order Time Display | |
| month.day.year 12h | |
| year.month.day 24h | |
| day.month.year - |
LANGUAGE
The language on the display can be changed. "Changing the Display Language" (p. 20)FACE REGISTRATION (recording only)
Registers the faces of people who are often shot with this unit. "Registering Human Face Personal Authentication Information" (p. 48)MONITOR BRIGHTNESS
Sets the brightness of the LCD monitor.| Setting | Details |
| AUTO Sets the brightness automatically to “4” when using outdoors and to “3” when using indoors. | |
| 4 Brightens the backlight of the monitor regardless of the surrounding conditions. | |
| 3 Sets to the standard brightness. | |
| 2 Darkens the backlight of the monitor regardless of the surrounding conditions. | |
| 1 Sets to dim brightness. | Helps to save battery life when selected. |
OPERATION SOUND
Turns on or off the operation sound.| Setting Details | |
| OFF Turns off the operation sound. | |
| ON Turns on the operation sound. |
AUTO POWER OFF
Prevents the situation of forgetting to turn off the power when this is set.| Setting Details | |
| OFF Power is not turned off even if this unit is not operated for 5 minutes. | |
| ON Turns off the power automatically if this unit is not operated for 5 minutes. | |
Memo :
- When using battery, power is turned off automatically if this unit is not operated for 5 minutes. - When using the AC adapter, this unit goes into standby mode.QUICK RESTART
Enables the power to turn on quickly when the LCD monitor is opened again within 5 minutes.| Setting Details | |
| OFF Deactivates the function. | |
| ON Enables the power to turn on quickly when the LCD monitor is opened again within 5 minutes. | |
Memo :
\- The power consumption within 5 minutes after the LCD monitor is closed is reduced.DEMO MODE
Plays a demonstration of the special features of this unit.| Setting Details | |
| OFF Deactivates the function. | |
| ON Plays a demonstration of the special features of this unit. | |
Memo :
- This mode is not available in the playback mode. - "SMILE%/NAME DISPLAY" is set to "ON" when the demo mode is activated. "Setting SMILE%/NAME DISPLAY" (p. 50)TOUCH SCREEN ADJUST
Adjusts the response position of the buttons on the touch screen. "Adjusting the Touch Panel" (p. 15)FACTORY PRESET
Returns all the settings to their default values.FIRMWARE UPDATE
Updates the functions of this unit to the latest version. For details, refer to the JVC homepage. (When no program to update the software of this unit is available, nothing will be provided on the homepage.) http://www3.jvckenwood.com/english/support/index.htmlPC SOFTWARE UPDATE
Updates the built-in PC software of this unit to the latest version. For details, refer to the JVC homepage. (When no program to update the computer software is available, nothing will be provided on the homepage.) http://www3.jvckenwood.com/english/support/index.htmlOPEN SOURCE LICENSES (recording only)
Displays the open source software licenses that are used in this unit.CONNECTION SETTINGS (video/still image)
DISPLAY ON TV
Displays icons and date/time on a TV screen.| Setting Details | |
| OFF Does not display icons and date/time on TV. | |
| ON Displays icons and date/time on TV. | |
VIDEO OUTPUT
Sets the aspect ratio (16:9 or 4:3) according to the connecting TV.| Setting Details | |
| 4:3 Select this when connecting to a conventional TV (4:3). | |
| 16:9 Select this when connecting to a widescreen TV (16:9). | |
HDMI OUTPUT
Sets the output from the HDMI connector of this unit when it is connected to a TV.| Setting Details | |
| AUTO It is recommended to select “AUTO” usually. | |
| 480p Select this when the video is not output in “AUTO” correctly. | |
HDMI CONTROL
Sets whether to link operations with an HDMI-CEC compliant TV.| Setting Details | |
| OFF Turns off linked operations. | |
| ON Turns on linked operations. |
AV TERMINAL
Set the output connector of PAN CRADLE.| Setting Details | |
| AV Set this when the output is made via the AV connector. | |
| PAN CRADLE Set this to use the Pan Cradle. | |
MEDIA SETTINGS (video/still image)
REC MEDIA FOR VIDEO (GZ-EX355)
Sets the recording/playback media of videos.| Setting Details | |
| BUILT-IN MEMORY Records videos to this unit's built-in memory. | |
| SD CARD Records videos to the SD card. | |
REC MEDIA FOR IMAGE (GZ-EX355)
Sets the recording/playback media of still images.| Setting Details | |
| BUILT-IN MEMORY Records still images to this unit's built-in memory. | |
| SD CARD Records still images to the SD card. | |
FORMAT BUILT-IN MEM. (GZ-EX355)
Deletes all files on the built-in memory.| Setting Details | |
| FILE Deletes all files on the built-in memory. | |
| FILE + MANAGEMENT NO Deletes all files on the built-in memory and resets the folder and file numbers to "1". (File number of the AVCHD video file starts from "0".) | |
Caution :
- All data on the built-in memory will be deleted when it is formatted. Copy all files on the built-in memory to a computer before formatting. - Make sure that the battery pack is fully charged or connect the AC adapter as the formatting process may take some time.FORMAT SD CARD
Deletes all files on the SD card.| Setting Details | |
| FILE Deletes all files on the SD card. | |
| FILE + MANAGEMENT NO Deletes all files on the SD card and resets the folder and file numbers to "1". | |
Caution :
• Not available for selection when no SD card is inserted. - All data on the SD card will be deleted when it is formatted. Copy all files on the SD card to a computer before formatting. - Make sure that the battery pack is fully charged or connect the AC adapter as the formatting process may take some time.USB CONNECTION MENU
Displayed when connecting the AC adapter after this unit is connected via USB.GZ-EX355/GZ-EX310
PLAYBACK ON PC
- Displays videos recorded by this unit by using the LoiLoFit for Everio. "Installing the Provided Software" (p. 115) - Saves videos recorded by this unit on your computer without using the provided software. "Backing Up Files Without Using Provided Software" (p. 119) "Copying to Mac Computer" (p. 129)CREATE DISC
Save videos recorded by this unit on a disc by using the BD/DVD drive on your computer and the LoiLoFit for Everio. To create a Blu-ray disc, purchase a paid version of LoiLoFit for Everio. http://loilo.tv/jp/product/33/page/27DIRECT DISC
Save videos recorded by this unit on a disc by using the BD/DVD drive on your computer. To create a Blu-ray disc, purchase a paid version of LoiLoFit for Everio. http://loilo.tv/jp/product/33/page/27UPLOAD
Upload videos recorded by this unit to website for sharing files by using the LoiLoFit for Everio.BACK UP
Backup videos recorded by this unit to your computer by using the LoiLoFit for Everio. "Backing Up Files" (p. 116)Memo :
- Before making backup, load the SD card in which the videos are stored on this unit. - After backing up your files using the provided software, they cannot be restored to this unit. - Delete unwanted videos before making backup. It takes time to back up many videos. "Deleting Unwanted Files" (p. 80)GZ-E300
PLAYBACK ON PC
- Displays videos recorded by this unit by using the Everio MediaBrowser 4. "Installing the Provided Software (Built-in)" (p. 122) - Saves videos recorded by this unit on your computer without using the provided software. "Backing Up Files Without Using Provided Software" (p. 127) "Copying to Mac Computer" (p. 129)CREATE DISC
Save videos recorded by this unit on a disc by using the BD/DVD drive on your computer and the Everio MediaBrowser 4.DIRECT DISC
Save videos recorded by this unit on a disc by using the BD/DVD drive on your computer.UPLOAD
Upload videos recorded by this unit to website for sharing files by using the Everio MediaBrowser 4.BACK UP
Backup videos recorded by this unit to your computer using the Everio MediaBrowser 4. "Backing Up All Files" (p. 123)Memo :
- Before making backup, load the SD card in which the videos are stored on this unit. - After backing up your files using the provided software, they cannot be restored to this unit. - Delete unwanted videos before making backup. It takes time to back up many videos. "Deleting Unwanted Files" (p. 80)Front
text_image
Technical diagram of a device with numbered parts labeled 1 to 4Rear
text_image
Technical diagram of a mechanical device with numbered components for identificationBottom
text_image
Technical diagram of a digital camera module with numbered parts for identificationInterior
text_image
Diagram of a digital camera with numbered parts for identificationLCD Monitor
natural_image
Diagram of a device with a blue pointer and numbered label (1), no readable text or symbols present.① LCD Monitor
- Turns the power on/off by opening and closing. - Enables self-portraits to be taken by rotating the monitor. text_image
180° 90°Caution :
\- Do not press against the surface with force or subject it to strong impact. Doing so may damage or break the screen. Common Recording Indications text_image
1 2 3 4 5 6 7 8 9 10 11 12 10.45 ±0.0 10X W T 13 14 15 16text_image
1 2 3 4 5 6 7 0:00:12:34 0:12:34[0:10:00] 8 9 1SECtext_image
1 2 [920] 3 [9990] 4 5 PHOTO 6text_image
1 2 3 4 5 6 7 00:01:23 00:12:34 1SEC 1980p 10 11 12 1Still Image Playback
text_image
1 2 3 4 5 6 100-0001 10:00 7 8 9 1080p REC MENUWhen the unit is not working properly
Turning Off the Power
1 Close the LCD monitor. natural_image
Diagram of a digital camera with an open screen and blue arrow indicating rotation (no text or symbols)Battery Pack
Unable to turn on the power when using the battery pack.
Recharge the battery pack. "Charging the Battery Pack" (p. 12) Check whether the terminals are dirty. If the terminal of this unit or the battery pack is dirty, wipe it with a cotton swab or something similar. If you use any other battery packs besides JVC battery packs, safety and performance cannot be guaranteed. Be sure to use JVC battery packs.Short usage time even after charging.
Battery deterioration occurs when a battery pack is charged repeatedly. Replace the battery pack with a new one. "Optional Accessories" (p. 23)Unable to charge the battery pack.
When the battery pack is fully charged, the lamp does not flash. Check whether the terminals are dirty. If the terminal of this unit or the battery pack is dirty, wipe it with a cotton swab or something similar. Using a non-original AC adapter may result in damage to this unit. Be sure to use an original AC adapter.The remaining battery display is not correct.
Remaining battery power is not displayed when the AC adapter is connected. If this unit is used for long periods of time in high or low temperatures, or if the battery pack is repeatedly charged, the amount of remaining battery may not be displayed correctly.Recording
Recording cannot be performed.
Check the 📋 / 📋 button. "Interior" (p. 245) When there are multiple light sources and depending on the shooting conditions, exposure and focus may not be adjusted correctly in the Intelligent Auto mode. In this case, adjust the settings manually. "Adjusting Focus Manually" (p. 33)Recording stops automatically.
Recording stops automatically as it cannot be performed for 12 or more consecutive hours according to specifications. (It may take some time to resume recording.) Turn off this unit, wait for a while, and turn it on again. (This unit stops automatically to protect the circuit when the temperature rises.)The continuous shooting speed of still images is slow.
The continuous shooting speed will drop if this function is used repeatedly. Continuous shooting speed may drop depending on the SD card or under certain recording conditions.The focus is not adjusted automatically.
If you are recording in a dark place or a subject that has no contrast between dark and light, adjust the focus manually. "Adjusting Focus Manually" (p. 33) Wipe the lens with a lens cleaning cloth. Cancel manual focus on the manual recording menu. "Adjusting Focus Manually" (p. 33)Zoom does not work.
Digital zoom is not available in the still image recording mode. Zoom operation is not available in time-lapse recording. (Simultaneous still image recording and image stabilizer are also not available.) To use digital zoom, set "ZOOM" in the menu accordingly. "ZOOM" (p. 228)Mosaic-type noise occurs when recording scenes with fast movements or extreme changes in brightness.
Set the "VIDEO QUALITY" to "UXP" or "XP" for recording. "VIDEO QUALITY" (p. 228)Card
Cannot insert the SD card.
Make sure not to insert the SD card in the wrong direction. "Inserting an SD Card" (p. 13)Unable to copy to SD card.
Set "REC MEDIA FOR VIDEO"/"REC MEDIA FOR IMAGE" to SD card. (GZ-EX355) "REC MEDIA FOR VIDEO (GZ-EX355)" (p. 242) "REC MEDIA FOR IMAGE (GZ-EX355)" (p. 242) To use SD cards that have been used on other devices, it is necessary to format (initialize) the SD card using "FORMAT SD CARD" from media settings. "FORMAT SD CARD" (p. 242)Playback
Sound or video is interrupted.
Sometimes playback is interrupted at the connecting section between two scenes. This is not a malfunction.There is no sound.
When the Silent mode is used, operation and playback sounds will not be output. Turn off the Silent mode. "Using the Silent Mode" (p. 26) Set "OPERATION SOUND" in the common menu to "ON". "OPERATION SOUND" (p. 239) Audio sound is not recorded for videos taken in HIGH SPEED RECORDING/TIME-LAPSE RECORDING. "Slow-motion (High-speed) Recording" (p. 53) "Recording at Intervals (TIME-LAPSE RECORDING)" (v ^2 p. 54)The same image is displayed for a long time.
Use a high speed SD card (Class 4 or higher). "Types of Usable SD Card" (p. 14) Clean the terminals of the SD card with a dry cotton swab or something similar. Execute "FORMAT SD CARD" in the "MEDIA SETTINGS" menu. (All data will be deleted.) "FORMAT SD CARD" (p. 242)The motion is choppy.
Use a high speed SD card (Class 4 or higher). "Types of Usable SD Card" (p. 14) Clean the terminals of the SD card with a dry cotton swab or something similar. Execute "FORMAT SD CARD" in the MEDIA SETTINGS menu. (All data will be deleted.) "FORMAT SD CARD" (p. 242) Verify the system requirements of your computer when using LoiLoFit for Everio to play back. (GZ-EX355/GZ-EX310) "Verifying System Requirements (Guideline)" (p. 114) Verify the system requirements of your computer when using Everio MediaBrowser 4 to play back. (GZ-E300) "Verifying System Requirements (Guideline)" (p. 121)Cannot find a recorded file.
Cancel the date search function. "Searching for a Specific Video/Still Image by Date" (p. 76) Change the playback media by tapping 🎨/SD on the touch screen. (GZ-EX355) "Operation Buttons for Video Playback" (p. 64) "Operation Buttons for Still Image Playback" (p. 74) Select "PLAYBACK OTHER FILE" in the menu. (Video files that have damaged management information can be played back.) "PLAYBACK OTHER FILE" (p. 73)Images do not appear on the TV properly.
Disconnect the cable and connect again. "Connecting via the HDMI Mini Connector" (p. 77) Turn off and on this unit again.Images are projected vertically on the TV.
Set "VIDEO OUTPUT" in the "MEDIA SETTINGS" menu to "4:3". "VIDEO OUTPUT" (p. 241) Adjust the TV's screen accordingly.The image displayed on TV is too small.
Set "VIDEO OUTPUT" in the "MEDIA SETTINGS" menu to "16:9". "VIDEO OUTPUT" (p. 241)When connected to the TV via the HDMI mini cable, proper images and sounds are not output.
Images and sounds may not be output properly depending on the TV connected. In such cases, perform the following operations. ① Disconnect the HDMI mini cable and connect it again. ② Turn off and on this unit again. "Connecting via the HDMI Mini Connector" (p. 77)Editing/Copying
Unable to delete file.
Files (videos/still images) that are protected cannot be deleted. Release protection before deleting the file. "Protecting Files" (p. 81)Unable to copy/move files to SD card. (GZ-EX355)
If the SD card is write protected, set it to off.Unable to create DVD with a DVD writer.
Connect the USB cable correctly. "Preparing a DVD Writer (CU-VD50)" (p. 99) "Preparing a DVD Writer (CU-VD3)" (p. 99)Unable to create disc with a BD writer (external Blu-ray drive).
Connect the USB cable correctly. "Preparing a BD Writer (External Blu-ray Drive)" (p. 91)BACK-UP menu does not disappear.
While the USB cable is connected, the "BACK UP" menu is displayed.Unable to turn off the BACK-UP menu.
Turn off the power of this unit and the DVD writer, or remove the AC adapter.Unable to delete folder in USB external hard disk drive.
Delete the folder using a computer. (When files are added or folders moved/renamed with a computer, they cannot be deleted on this unit.)Computer
Unable to copy files to the computer's HDD.
If the provided software LoiLoFit for Everio is not installed, some functions may not work properly. "Installing the Provided Software" (p. 115) Before making backup, make sure that enough free space is left in the computer's hard disk (HDD).Unable to copy files to DVD or Blu-ray disc with a PC.
To record to discs, a recordable DVD or Blu-ray drive is required for the computer in use.Cannot upload the file to YouTube.
Check if you have created an account with YouTube. (You need a YouTube account to upload files to YouTube.) Changing videos to the file format for uploading cannot be performed on this unit. Refer to the help file of the provided software LoiLoFit for Everio Refer to the help file of the provided software Everio MediaBrowser 4I am using a Mac computer.
Copy the files to a Mac computer using the following method. "Copying to Mac Computer" (p. 129)The computer cannot recognize the SDXC card.
Confirm and update the OS of your computer. "When your computer cannot recognize the SDXC card" (p. 14)Screen/Image
The LCD monitor is difficult to see.
The LCD monitor may be difficult to see if used in bright areas such as under direct sunlight.A band or a ball of bright light appears on the LCD monitor.
Change the direction of this unit to prevent the light source from coming into view. (A band or a ball of bright light may appear when there is a bright light source near this unit, but this is not a malfunction.)The recorded subject is too dark.
Use backlight compensation when the background is bright and the subject is dark. "Setting Backlight Compensation" (p. 35) Use "NIGHTALIVE" in SCENE SELECT. "Shooting According to Scene (Subject)" (p. 32) Use "GAIN UP" in the menu. “GAIN UP” (p. 226) Set "BRIGHTNESS ADJUST" in the recording menu to the "+" side. "Adjusting Brightness" (u p. 34)The recorded subject is too bright.
Set the backlight compensation to "OFF" if it is being used. "Setting Backlight Compensation" (p. 35) Set "BRIGHTNESS ADJUST" in the recording menu to the "-" side. "Adjusting Brightness" (p. 34)The color looks strange. (Too bluish, too reddish, etc.)
Wait for a while until natural colors are achieved. (It may take some time for white balance to be adjusted.) Set "WHITE BALANCE" in the recording menu to "MANUAL". Select from “FINE”/“CLOUD”/“HALOGEN”/“MARINE:BLUE”/“MARINE:GREEN” according to the light source. Select "MWB" and adjust accordingly. Set "WHITE BALANCE" in the recording menu to "MANUAL". Select from "FINE"/"CLOUD"/"HALOGEN" according to the light source. Select "MWB" and adjust accordingly. "Setting White Balance" (p. 36)The color looks different.
Set "WHITE BALANCE" in the recording menu accordingly. "Setting White Balance" (p. 36)There are bright or dark spots on the screen.
While the LCD monitor screen has more than 99.99% effective pixels, 0.01% of the pixels may be bright spots (red, blue, green) or dark spots. This is not a malfunction. The spots will not be recorded.Other Problems
The buttons on the touch screen do not work.
Tap the buttons on the touch screen with your fingers or the stylus pen. The buttons may not respond if you touch them with your fingernails or with gloves on. Save the recorded data before requesting service. ①Connect to computer using a USB cable. The "SELECT DEVICE" menu appears. ②Press and hold the START/STOP button for more than 2 seconds. The "PLAYBACK ON PC" appears. Operations are to be performed on the computer after the screen switches.The image is grainy.
When digital zoom is used, the image becomes grainy as it is digitally enlarged.This unit heats up.
This is not a malfunction. (This unit may become warm when used for a long time.) Stop using the unit if it gets too warm.The language on the display changed.
It may occur when you connect this unit to a TV with different language setting using an HDMI mini cable. "Operating in Conjunction with TV via HDMI" (p. 78)When connected to the TV via the HDMI mini cable, proper images and sounds are not output.
Images and sounds may not be output properly depending on the TV connected. In such cases, perform the following operations. ① Disconnect the HDMI mini cable and connect it again. ② Turn off and on this unit again. "Connecting via the HDMI Mini Connector" (p. 77)HDMI-CEC functions do not work properly, and the TV does not work in conjunction with this unit.
TVs may operate differently depending on the specifications, even if they are HDMI-CEC compliant. Therefore, the HDMI-CEC functions of this unit cannot be guaranteed to operate in combination with all the TVs. In such cases, set "HDMI CONTROL" to "OFF". "HDMI CONTROL" (p. 241)The unit operates slowly when switching between video mode and still image mode, or when switching the power on or off.
It is recommended that you copy all videos and still images onto your computer, and erase the files from this unit. (If there are many recorded files on this unit, it takes time for the unit to respond.)This unit does not function properly and error messages appear.
This unit is a microcomputer-controlled device. Electrostatic discharge, external noise and interference (from a TV, a radio, etc.) might prevent it from functioning properly. In such a case, turn off the power, then remove the AC adapter and battery pack. This unit will be reset.Operation disabled since the POWER/CHARGE lamp and the ACCESS lamp are blinking
After closing the LCD monitor, remove power source (battery and AC adapter). Then, attach the battery and AC adapter again, and turn on the power by opening the LCD monitor. If these operations won't solve the problem, contact your JVC dealer or the JVC service center.Disclaimer
- We shall not be held responsible for loss of recorded contents when recording videos/audio or playback cannot be operated due to malfunctions in this unit, provided parts, or SD card. - Once deleted, recorded contents (data), including data loss due to malfunctions in this unit, cannot be restored. Please be forewarned. \- JVC will not be responsible for any lost data. Please be forewarned. - In order for quality improvement, defective recording medium is subject to be analyzed. Therefore, it may not be returned.Error Message?
CHECK LENS COVER
Open the lens cover.SET DATE/TIME!
Connect the AC adapter, charge the battery for more than 24 hours and set the clock. (If the message still appears, the clock battery is exhausted. Consult your nearest JVC dealer.) "Clock Setting" (p. 18)COMMUNICATION ERROR
Reconnect the USB cable. Turn off this unit and the devices connected to it, and turn them on again. Reattach the battery pack.FORMAT ERROR! (GZ-EX355)
Check the operating procedure, and perform once again. "FORMAT BUILT-IN MEM. (GZ-EX355)" (p. 242) Turn off and on this unit again.ERROR IN BUILT-IN MEMORY! (GZ-EX355)
Turn off and on this unit again. If the above does not solve the problem, back up your files and execute "FORMAT BUILT-IN MEM." in the "MEDIA SETTINGS" menu. (All data will be deleted.) "FORMAT BUILT-IN MEM. (GZ-EX355)" (p. 242)MEMORY CARD ERROR!
Check that the card is supported by this unit. "Types of Usable SD Card" (p. 14) Turn off and on this unit again. Remove the AC adapter and battery pack, then remove and re-insert the SD card. Remove any dirt from the SD card terminals. If the above does not solve the problem, back up your files and execute "FORMAT SD CARD" in the "COMMON" menu. (All data will be deleted.) "FORMAT SD CARD" (p. 242)NOT FORMATTED
Select "OK", then select "YES" on the "DO YOU WANT TO FORMAT?" screen.RECORDING FAILURE
Turn off and on this unit again.CANNOT TAKE MORE STILL IMAGES AT THIS TIME
Stop video recording before taking still images. (If the SD card is removed and inserted during video recording, still images cannot be recorded.)PLAYBACK FAILED
Remove and re-insert the SD card. "Inserting an SD Card" (p. 13) Remove any dirt from the SD card terminals. Insert the SD card before turning on the power. Do not subject this unit to any strong impact or vibration.VIDEO MANAGEMENT FILE IS DAMAGED, RECOVERY IS REQUIRED TO RECORD/PLAYBACK, RECOVER?
Select "OK" to restore. (Videos that cannot be restored will not be displayed on the index screen, but you may be able to play them back using "PLAYBACK OTHER FILE" in the menu.) "PLAYBACK OTHER FILE" (p. 73)UNSUPPORTED SCENE!
Use files recorded with this unit. (Files recorded with other devices may not be playable.)UNSUPPORTED FILE!
Use files recorded with this unit. (Files recorded with other devices may not be playable.)THIS FILE IS PROTECTED
Switch off the "PROTECT/CANCEL" function in the "EDIT" menu. "Protecting Files" (p. 81)CHECK CARD'S WRITE PROTECTION SWITCH
Set the write protect switch of the SD card to off.INSUFFICIENT AVAILABLE SPACE
Delete files, or move files to a computer or other devices. Replace the SD card with a new one. Seamless videos cannot be combined if there is not enough free space in the built-in memory (GZ-EX355) or SD card. Check the amount of remaining free space before combining.RECORDABLE MANAGEMENT CAPACITY LEVEL HAS BEEN REACHED
① Move the files or folders to a computer or other device. (Back up your files.) ② Select "FILE + MANAGEMENT NO" in "FORMAT BUILT-IN MEM." or "FORMAT SD CARD" of the media settings menu. (All data on the built-in memory or SD card will be deleted.) "FORMAT BUILT-IN MEM. (GZ-EX355)" (p. 242) "FORMAT SD CARD" (p. 242)SCENE QUANTITY EXCEEDED LIMIT
① Move the files or folders to a computer or other device. (Back up your files.) ② Select "FILE + MANAGEMENT NO" in "FORMAT BUILT-IN MEM." or "FORMAT SD CARD" of the media settings menu. (All data on the built-in memory or SD card will be deleted.) "FORMAT BUILT-IN MEM. (GZ-EX355)" (p. 242) "FORMAT SD CARD" (p. 242)NUMBER OF FOLDERS OVERFLOW
① Move the files or folders to a computer or other device. (Back up your files.) ② Select "FILE + MANAGEMENT NO" in "FORMAT BUILT-IN MEM." or "FORMAT SD CARD" of the media settings menu. (All data on the built-in memory or SD card will be deleted.) "FORMAT BUILT-IN MEM. (GZ-EX355)" (p. 242) "FORMAT SD CARD" (p. 242)FILE QUANTITY LIMIT EXCEEDED
① Move the files or folders to a computer or other device. (Back up your files.) ② Select "FILE + MANAGEMENT NO" in "FORMAT BUILT-IN MEM." or "FORMAT SD CARD" of the media settings menu. (All data on the built-in memory or SD card will be deleted.) "FORMAT BUILT-IN MEM. (GZ-EX355)" (p. 242) "FORMAT SD CARD" (p. 242)PLAYLIST QUANTITY EXCEEDS LIMIT
Reduce the number of the playlist to 99 files or less. (Up to 99 playlists can be created.)CANCELLED BECAUSE PLAYLIST AMOUNT EXCEEDED MAXIMUM LIMIT
When creating a DVD, reduce the number of playlists to be saved. Reduce the number of videos to add to the playlist to 999 files. "Creating Playlists from the Recorded Videos" (vss p. 85)PROCESSING CANCELLED DUE TO LIMITED SPACE FOR OPERATION
Reduce the number of videos to add to the playlist to 999 files. "Creating Playlists from the Recorded Videos" (p. 85)NO FILES (GZ-EX355)
Change the setting of "REC MEDIA FOR IMAGE" or "REC MEDIA FOR VIDEO" in the "COMMON" menu, and check that files are not recorded to the other media. "REC MEDIA FOR IMAGE (GZ-EX355)" (p. 242)RECORDING CANCELLED (GZ-EX355)
Set "REC MEDIA FOR VIDEO" to "SD CARD", then record to an SD card. "REC MEDIA FOR VIDEO (GZ-EX355)" (p. 242) Turn off and on this unit again. Protect the unit from vibration and shock.CAMERA TEMPERATURE IS HIGH PLEASE TURN CAMERA OFF TO ALLOW IT TO COOL DOWN PLEASE WAIT
Turn off the power of this unit, let and it cool down before turning on the power again.POWER IS OFF, OR USB DEVICE IS UNSUPPORTED
Turn on the power of the connected USB device. Connect the AC adapter to the DVD writer or BD writer (external Blu-ray drive).INSERT DISC
Open the tray of the DVD writer or BD writer (external Blu-ray drive), check and reset the DVD or Blu-ray disc, then close the tray. Replace the disc in the DVD writer or BD writer (external Blu-ray drive).CHANGE DISC
Open the tray of the DVD writer or BD writer (external Blu-ray drive), check and reset the DVD or Blu-ray disc, then close the tray. Replace the disc in the DVD writer or BD writer (external Blu-ray drive). Perform regular maintenance of this unit to enable it to be used for a long time.Caution :
\- Be sure to detach the battery pack, AC adapter, and power plug before performing any maintenance.Camcorder
- Wipe this unit with a dry, soft cloth to remove any dirt. - When it is extremely dirty, soak the cloth in a solution of neutral detergent, wipe the body with it, and then use a clean cloth to remove the detergent.Caution :
- Do not use solvents such as benzene, thinner, or alcohol. Doing so may cause damage to the unit. - When using a chemical cloth or cleaner, be sure to observe the warning labels and instructions of the product. - Do not leave the device in contact with rubber or plastic products for a long time.Lens/LCD Monitor
- Use a lens blower (commercially available) to remove any dust, and a cleaning cloth (commercially available) to wipe off any dirt. Mold may form if the lens is left dirty. - You can use a commercially available anti-reflection or protective film on the screen. However, depending on the thickness of the film, operations on the touch screen may not be performed smoothly or the screen may darken slightly. Camera| Item Details | |
| Power supply Using AC adapter: DC 5.2 VUsing battery pack: DC 3.6 V (GZ-EX355/GZ-EX310)Using battery pack: DC 3.5 V - 3.6 V (GZ-E300) | |
| Power consumption (GZ-EX355/GZ-EX310)2.3 W (MONITOR BRIGHTNESS: 3 (standard))(GZ-E300)2.2 W (MONITOR BRIGHTNESS: 3 (standard))Rated Current Consumption: 1A | |
| Dimensions (mm) 50 x 57 x 116 (2" x 2-1/4" x 4-5/8")(W x H x D: excluding grip belt) | |
| Mass (GZ-EX355/GZ-EX310)Approx. 200 g (0.44 lbs) (camera only),Approx. 240 g (0.53 lbs) (including supplied batterypack)(GZ-E300)Approx. 195 g (0.43 lbs) (camera only),Approx. 225 g (0.5 lbs) (including supplied batterypack) | |
| Operating environment | Allowable operating temperature: 0°C to 40°C(32°F to 104°F)Allowable storage temperature: -20°C to 50°C(-4°F to 122°F)Allowable relative humidity: 35 % to 80 % |
| Image pickup device | 1/5.8" 2,510,000 pixels (CMOS, back-illuminated) |
| Recording area (Video) | AVCHD mode1,010,000 to 2,290,000 pixels (image stabilizer:off, dynamic zoom: ON)iFrame mode920,000 to 1,770,000 pixels (dynamic zoom: ON) |
| Recording area (Still image) | 1,710,000 pixels (4:3) (image stabilizer: OFF)2,290,000 pixels (16:9) (image stabilizer: OFF) |
| Lens F1.8 - 6.3, f= 2.9 mm to 116.0 mmVideoAVCHD mode35 mm conversion: 40.5 mm to 2,430 mm (dynamiczoom: ON)35 mm conversion: 40.5 mm to 1,620 mm (dynamiczoom: OFF)iFrame mode35 mm conversion: 46.0 mm to 2,530 mm (dynamiczoom: ON)35 mm conversion: 46.0 mm to 1,840 mm (dynamiczoom: OFF)Still Image35 mm conversion: 49.5 mm to 1,980 mm (4:3)35 mm conversion: 40.5 mm to 1,620 mm (16:9) | |
| Lowest illumination 3 lux1 lux (SCENE SELECT: NIGHTALIVE) | |
| Zoom (during video recording) | Optical zoom: Up to 40xDynamic zoom: Up to 60xDigital zoom: Up to 200x |
| Zoom (during still image recording) | Optical zoom: Up to 40x |
| LCD monitor 3.0", 230,000 pixels, color LCD | |
| Recording media SDSDHC/SDXC card (commercially available)"Types of Usable SD Card" (€ p. 14) | |
| Clock battery Rechargeable battery | |
| Item Details | |
| HDMI output connector | HDMI mini connector |
| AV output connector | Video output: 1.0 V (p-p), 75 ΩAudio output: 300 mV (rms), 1 KΩ |
| USB connector Mini | USB Type AB, USB 2.0 compliant |
| Item Details | |
| Recording/Playback format | AVCHD standardVideo: MPEG-4 AVC/H.264Audio: Dolby Digital 2ch |
| Extension .MTS | |
| Signal system NTSC | standard |
| Image quality (Video) | UXP1920 x 1080 pixelsAverage Approximate 24 MbpsXP1920 x 1080 pixelsAverage Approximate 17 MbpsSP1920 x 1080 pixelsAverage Approximate 12 MbpsEP1920 x 1080 pixelsAverage Approximate 4.8 MbpsSSW(16:9)720 x 480 pixels (Interlaced)Average Approximate 6.2 MbpsSEW(16:9)720 x 480 pixels (Interlaced)Average Approximate 3 Mbps |
| Sound quality (Audio) | 48 kHz, 256 kbps |
| Item Details | |
| Recording/Playback format | MP4 standardVideo: MPEG-4 AVC/H.264Audio: AAC (2ch) |
| Extension .MP4 | |
| Signal system NTSC | standard |
| Image quality(Video) | 1280x7201280 x 720 pixelsMax 36 Mbps, average approx. 34 Mbps960x540960 x 540 pixelsMax 28 Mbps, average approx. 26 Mbps |
| Sound quality(Audio) | 48 kHz, average 128 kbps |
| Item Details | |
| Recording format JPEG standard | |
| Extension .JPG | |
| Image size “Approximate Number of Still Images (Unit: Number of Shots)” (€' p. 62) | |
| Item Details | |
| Power supply AC 110 | V to 240 V, 50 Hz/60 Hz |
| Output DC 5.2 V, 1 A | |
| Allowable operating temperature | 0°C to 40°C (32°F to 104°F)(10°C to 35°C (50°F to 95°F) during charging) |
| Dimensions (mm) 66 | x 28 x 47 (2-5/8" x 1-1/8" x 1-7/8") (W x H x D: excluding cord and AC plug) |
| Mass Approx. 71 g (0 | .15 lbs) |
| Item Details | |
| Power voltage 3.5 V | 3.6 V |
| Capacity 700 mAh | |
| Dimensions (mm) 31 x 21.5 x 43 (1-1/4" x 7/8" x 1-3/4") (W x H x D) | |
| Mass Approx. 26 g (0.06 lbs) | |
| Item Details | |
| Power voltage 3.6 V | |
| Capacity 1400 mAh | |
| Dimensions (mm) 31 x 21.5 x 43 (1-1/4" x 7/8" x 1-3/4") (W x H x D) | |
| Mass Approx. 40 g (0.09 lbs) | |