MD-254 - NAS SITECOM - Free user manual and instructions
Find the device manual for free MD-254 SITECOM in PDF.

User questions about MD-254 SITECOM
0 question about this device. Answer the ones you know or ask your own.
Ask a new question about this device
Download the instructions for your NAS in PDF format for free! Find your manual MD-254 - SITECOM and take your electronic device back in hand. On this page are published all the documents necessary for the use of your device. MD-254 by SITECOM.
USER MANUAL MD-254 SITECOM
text_image
home storage center STORE & SHAREMD-253/254
Home Storage Center Manual
Table of contents
Introduction.... 3
Features 4
Package contents 4
Product layout....5
System requirements ....6
Preparing the home storage center....7
Easy installation....8
Configuring the Home Storage Center Windows 8
Packages installation 15
AutoSave Installation 16
Using the Home Storage Center.... 19
Configuring the Home Storage Center Mac 20
Configuring Timemachine.... 28
Web configuration.... 30
Status 31
Setup 33
System settings 33
Network settings 34
Disk settings 35
User settings 38
User management 39
BitTorrent.... 43
iTunes server.... 45
Toolbox 48
Reboot 48
Firmware update.... 49
Intranet Upgrade.... 49
Internet Upgrade 49
Package management 50
Configuration and usage.... 51
USB Backup 52
Addendum: Choosing a storage scheme 53
Introduction
The Sitecom MD-253/254 Home Storage Center makes it easy to share your documents, music and videos across your network or even on to the internet. The device can hold up to two 3.5" SATA drives of any capacity, supporting JBOD, RAID 0 and RAID 1, offering flexibility and security.
The MD-253/254 allows to easily share data over the internet through the built-in FTP server. User management makes it possible to share data unrestricted to the internet or to restrict access to certain users which then can be assigned to folders and given read and/or write permissions.
Backup your USB storage by means of pressing a button.
The home storage center also doubles as a download station as it supports FTP downloading and a Bit Torrent download client.
In addition the home storage center can stream music, video or photos to any UPnP AV compatible Media Player.
The included CD contains:
- The Sitecom Installer to easily setup the Home storage center for first time use and map drives to your computer.
- Sitecom package installer.
- Backup software to easily set up an automated backup task for your files.
Features
- Two HDD bays for 3"5 SATA Hard drives of any capacity.
- One USB port for extra storage options.
- High performance Gigabit LAN.
■ Supports JBOD, RAID 0 and RAID 1.
- Simplified installation by a step by step utility.
- Easy automated backup with included backup software.
- User and folder management.
- One touch USB backup
- iTunes server.
■ Built-in FTP server and client.
- Bit Torrent client.
- UPnP AV server for streaming music to any compatible media-player.
Package contents
■ Home Storage Center
- CD-ROM with utilities and documentation
- Quick Installation Guide
■ Power adapter 12V - 4A
- Cat 5e cable

natural_image
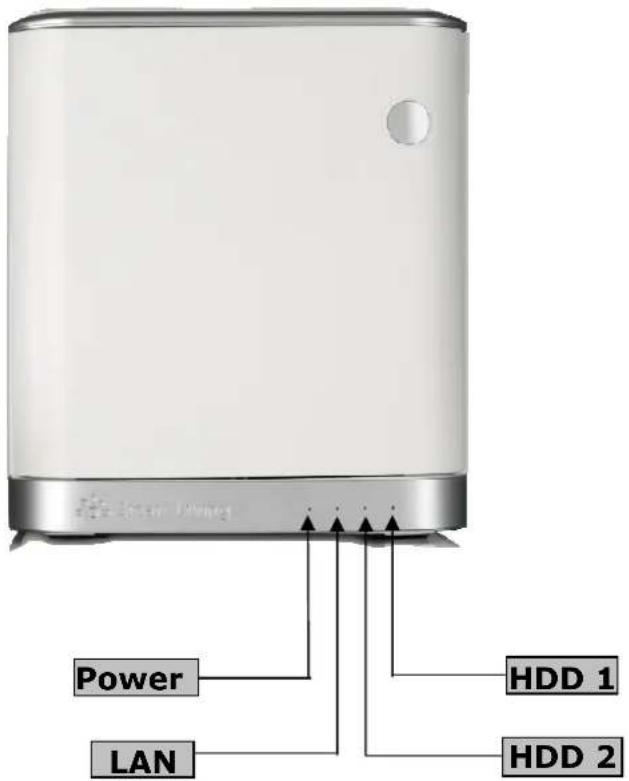
White rectangular electronic device with a circular button and gray trim, no visible text or symbols on the body.Product layout
text_image
Power LAN HDD 1 HDD 2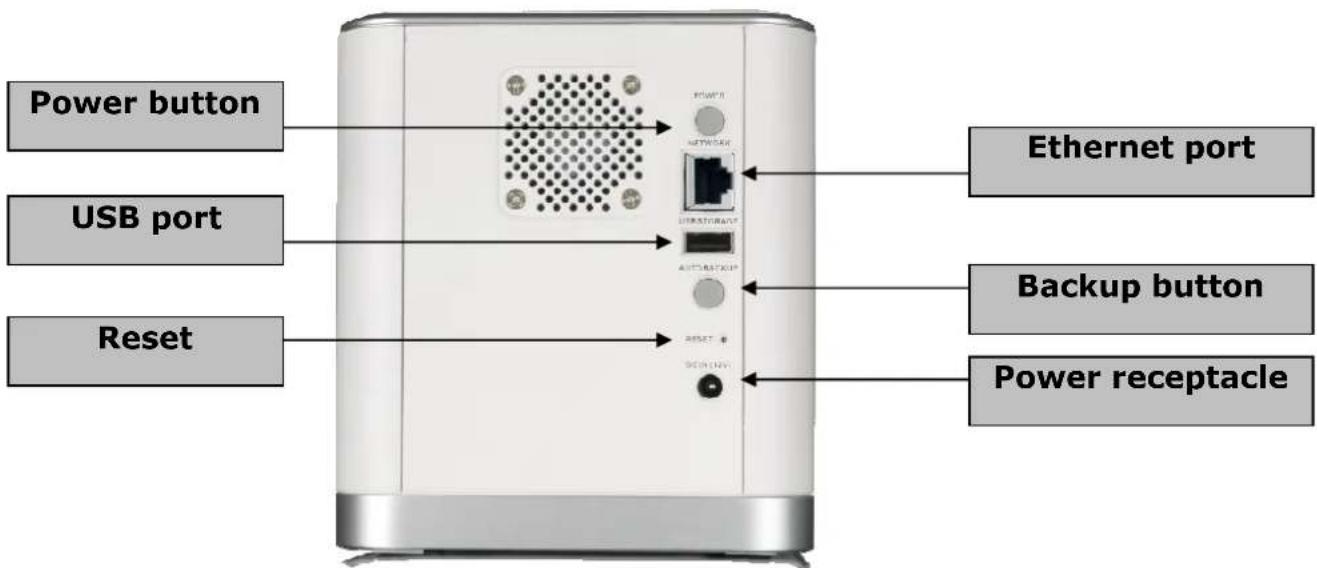
text_image
Power button USB port Reset Ethernet port Backup button Power receptacleSystem requirements
- Computer with: 1GHz processor/20 MB available space/CD-ROM drive.
- At least one 3"5 SATA HDD.
- Windows XP (with Service Pack 2), Vista or Windows 7.
- Mac OSX 10.4 or higher (You can use the network functionality. The installation and backup software is windows only).
Preparing the Home Storage Center
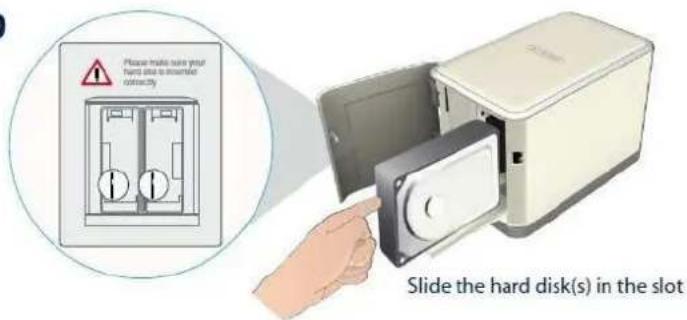
1 Place the hard disk(s) in the Home Storage Center
A

text_image
A Push the door to openB

text_image
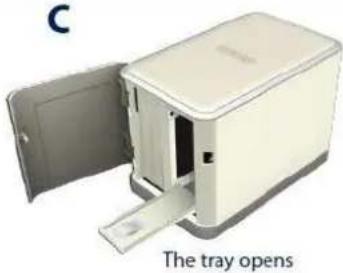
B Push the tray to openC
natural_image
Exterior view of a beige rectangular device with open lid and internal slots, labeled 'The tray opens' (no other text or symbols visible)D
text_image
Please make sure your hand slide to inserted racksically Slide the hard disk(s) in the slotE

natural_image
Illustration of a hand opening a closed tray device (no text or symbols on the device itself)F

natural_image
White rectangular box with lid and label 'Close the door' below (no other text or symbols)2 Connect the Home Storage Center to your network

text_image
Network cable Router3 Connect the power plug

text_image
Push to turn on the deviceEasy installation
Configuring the Home Storage Center Windows
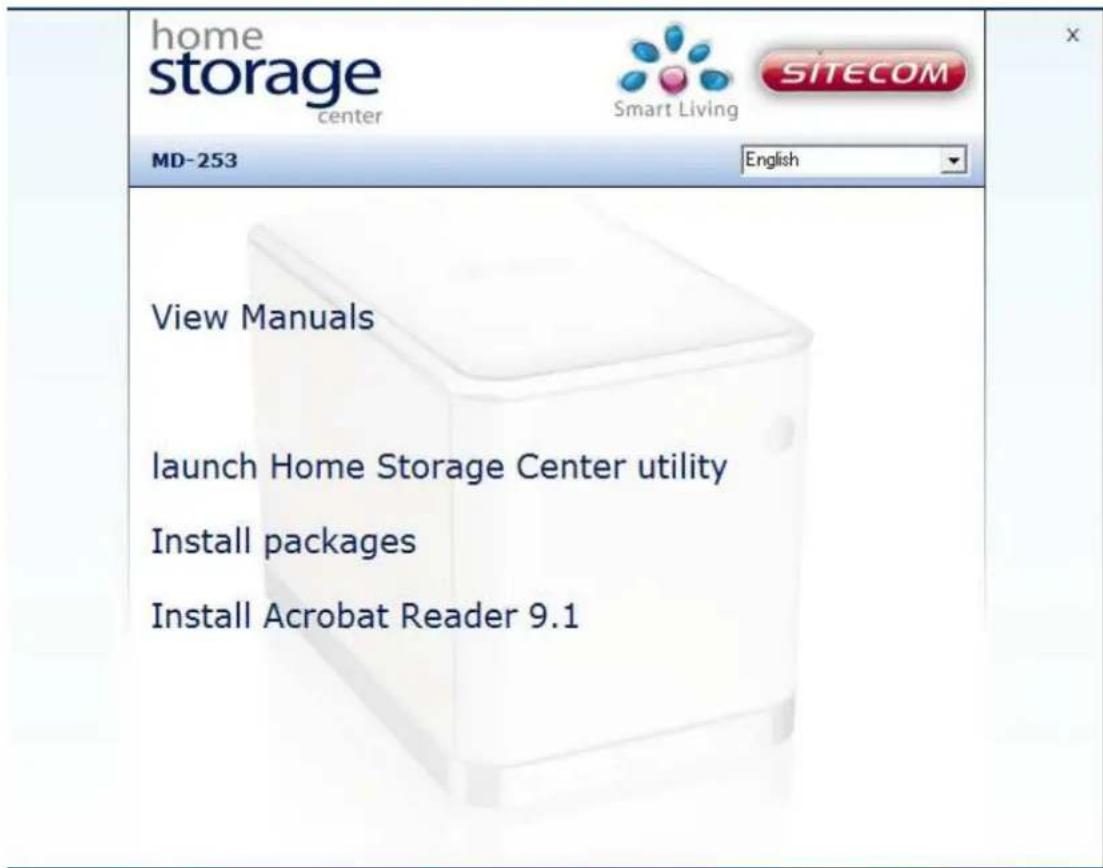
Insert the CD-Rom to your CD-Rom drive. The CD will start and present you an option menu. Select 'Launch Home Storage Center Utility'
text_image
home storage center Smart Living SITECOM MD-253 English View Manuals launch Home Storage Center utility Install packages Install Acrobat Reader 9.1The Sitecom Home Storage Center Installer offers an easy step by step installation flow. This makes it possible for even the least experienced user to have the home storage server up and running in a few clicks.
Note:
Microsoft .Net framework is required for the installer to run. If .Net framework is not installed on your computer the installation CD will install .Net framework 3.5 now
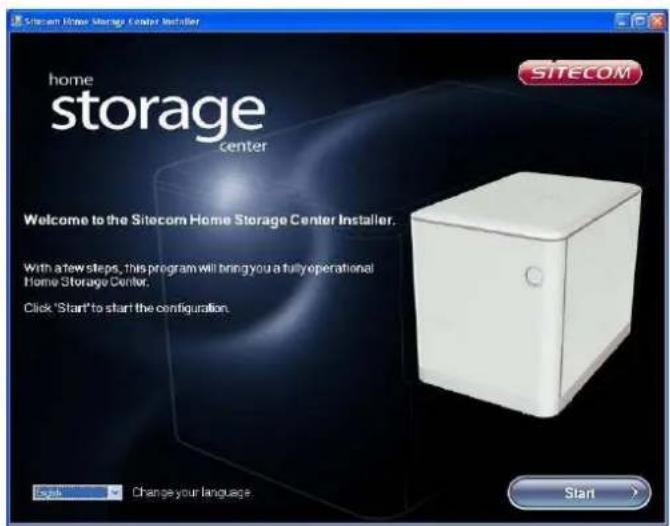
- Select your language from the drop down box. Press Start to continue.
text_image
Home storage center Welcome to the Sitecom Home Storage Center Installer. With a few steps, this program will bring you a fully operational Home Storage Center. Click 'Start' to start the configuration. Sub Change your language SITECOM Start- The installer is now detecting the 'Home Storage Center'. Wait till the progress bar is completely filled.
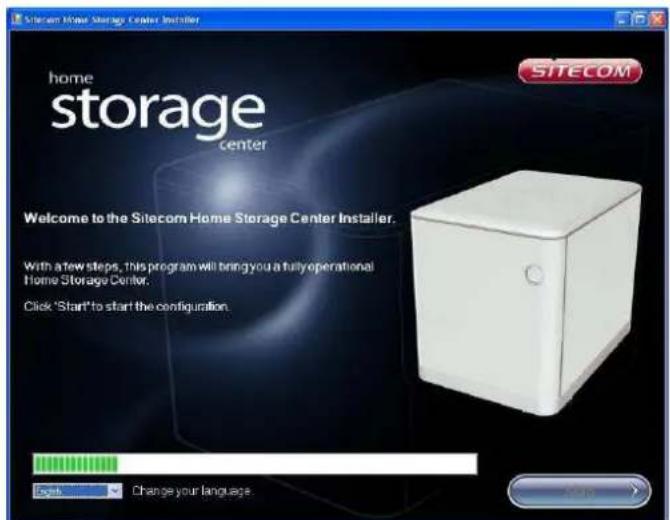
text_image
Sitecom Home Storage Center Installer home storage center SITECOM Welcome to the Sitecom Home Storage Center Installer. With a few steps, this program will bring you a fully operational Home Storage Center. Click 'Start' to start the configuration. Cash Change your language.- You may be required to unblock the installer in the windows firewall. Windows will automatically request this action, select Unblock to allow the Sitecom Installer to scan your network for the 'Home storage center'.
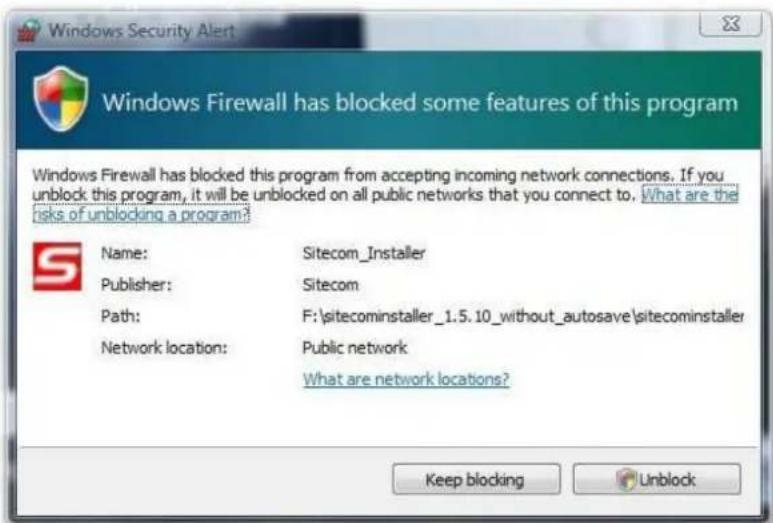
text_image
Windows Firewall has blocked some features of this program Windows Firewall has blocked this program from accepting incoming network connections. If you unblock this program, it will be unblocked on all public networks that you connect to. What are the risks of unblocking a program? Name: Sitecom_Installer Publisher: Sitecom Path: F:\sitecominstaller_1.5.10_without_autosave\sitecominstaller Network location: Public network What are network locations? Keep blocking UnlockWarning: If there are is any additional firewall software installed, such as McAfee, Norton, Panda e.g. you may be required to unblock the Sit ecom installer in this software.
Please refer to the documentation of your firewall software.
- After the detection is finished the installer will show the detected hard drives. Click Next to continue the installation.
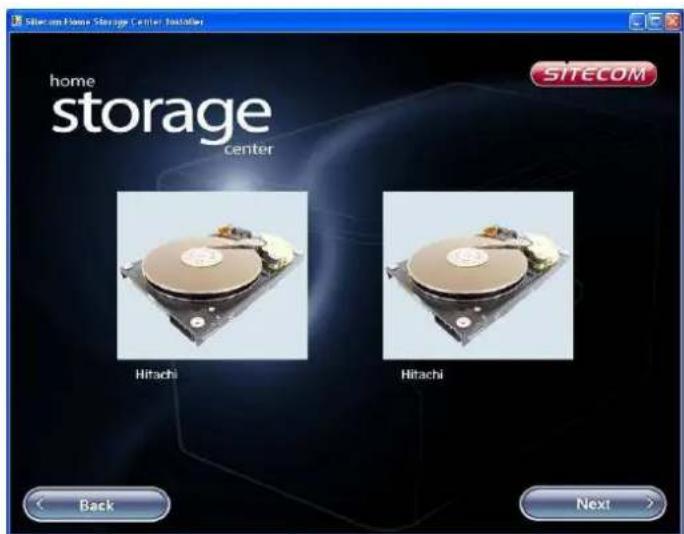
text_image
Sitecom Home Storage Center Installer home storage center SITECOM Hitachi Hitachi Back Next >If any of the inserted Hard drives is not detected:
Unplug the power receptacle and check the connection of the hard drive.

text_image
home storage center SITECOM Device Size SMART Hitachi 372 GB Ready Hitachi 372 GB Ready Back Format Disk >Note: When 2 hard drives are inserted the installer will automatically format the drives using RAID 1 for data reliability. (See addendum for more information on storage schemes.)
To change the 'Home storage center' to a different storage scheme, see chapter web configuration->Setup->Disk Settings.
- Choose a name for your 'Home storage center'. This is how the storage center will be recognized within your network. Press Next to continue.
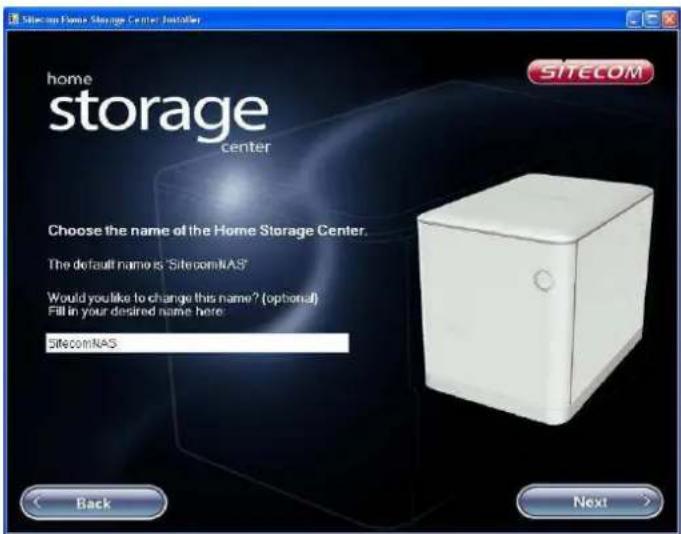
text_image
Sitecom NASA Storage Center - Installer home storage center SITECOM Choose the name of the Home Storage Center. The default name is "SitecomNAS" Would you like to change this name? (optional) Fill in your desired name here: SitecomNAS Back Next >- Now we will create a public share. This folder is for general usage and allows anonymous access. (See Web configuration->User management -> shared folder management.)
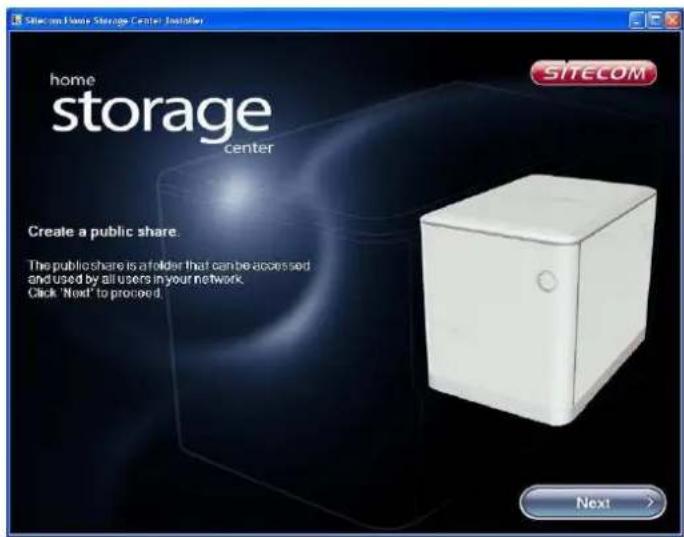
text_image
Home storage center Create a public share. The public share is a folder that can be accessed and used by all users in your network. Click "Next" to proceed. SITECOM NextNote: to change the properties of this folder See Web configuration->User management -> shared folder management.
- Choose the maximum size for the public folder. Enter '0' for maximum. Click Next to continue.
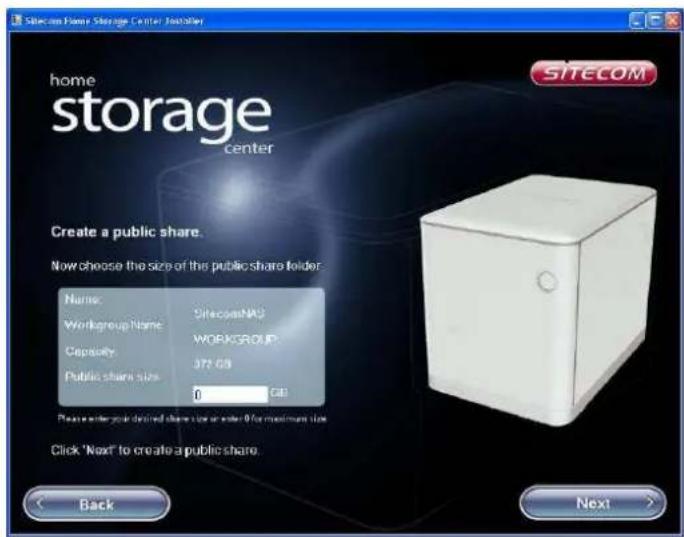
text_image
Sitecom Power Storage Center Installer home storage center Create a public share. Now choose the size of the public share folder: Name: Workgroup Name: Capacity: Public share size: DirectcomNAS WORKGROUP 375 GB 0 GB Please enter your desired share size or enter 0 for maximum size Click "Next" to create a public share. Back Next >- The share can now be mapped to a drive letter. Choose a desired drive letter from the drop down box. This is how the share will appear in 'My computer'. Click Next to continue.

text_image
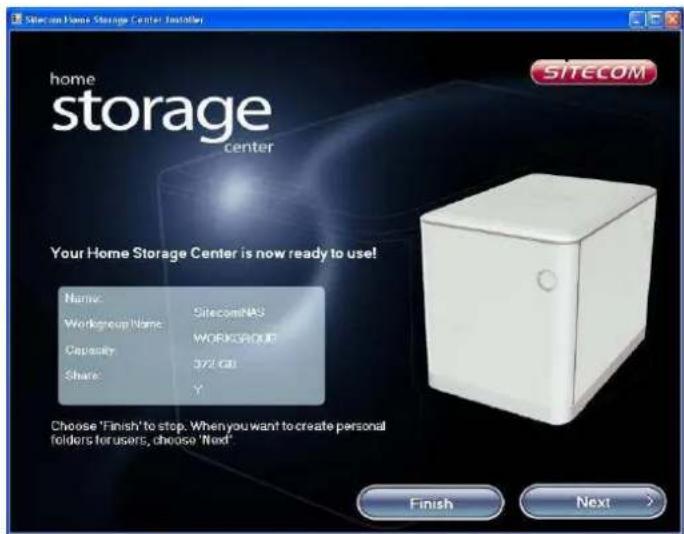
Sitecom Home Storage Center Installer home storage center SITECOM Create a public share. Now adding the public share to 'My Computer' to make it visible. Choose your desired drive letter: Back Next >- Your 'Home storage center' is now ready for use. And the public folder has been created and mapped to a drive letter. Select Finish to stop the installer, or click Next to create a personal folder.
text_image
Sitecom Home Storage Center Installer home storage center SITECOM Your Home Storage Center is now ready to use! Name: SitecomNAS Workgroup Name: WORKGROUP Capacity: 372 GB Share: Y Choose 'Finish' to stop. When you want to create personal folders for users, choose 'Next' Finish Next >Note: A personal folder is a secured share, only accessible with a username and password to change the properties of this folder See Web configuration->User management -> shared folder management.
- Enter a user name and password; these credentials will be required to access the personal folder. Choose a desired drive letter from the drop down box. Click Next to continue.

text_image
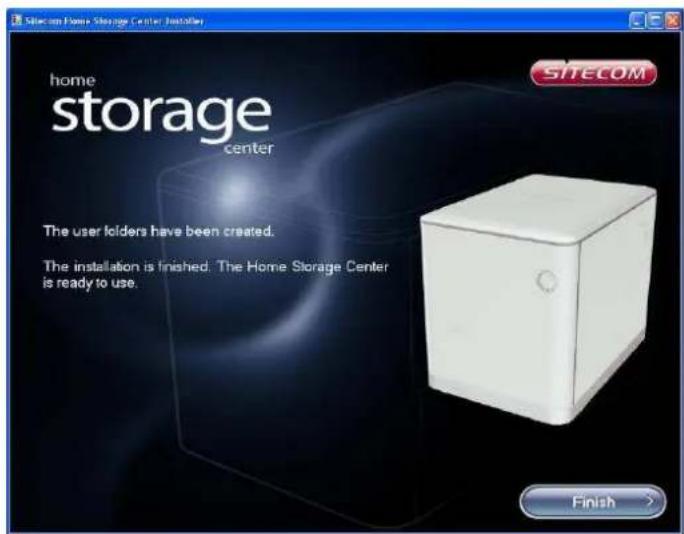
Sitecom Free Storage Center Installer home storage center Option You can create a separate folder for each user. You are able to create several folders. To create a folder, fill in the fields below. Folder Name: User Name: Password: Repeat Password: Drive letter: X: Back Next- The personal folder has been created and mapped. Click Finish. The backup software installation will now be started.
text_image
Sitecom Home Storage Center Installer home storage center The user folders have been created. The installation is finished. The Home Storage Center is ready to use. FinishPackages installation
The package installer allows you to expand the functionalities of your Home Storage Center.
Select the packages you wish to install and click 'Finish' to install these packages and continue to autosave.

text_image
Sitecom Home Storage Center Installer home storage center You can expand the functionalities of your Home Storage Center by installing additional software packages. These packages will be installed on the harddrive of your Home Storage Center. Select the packages you wish to install and select 'Install Packages' You can always install these packages manually at a later stage. Selected Service Size Print Server 0.98 MB Logitech Squeezebox Server 50 MB TwonkyMedia 1.0 MB TimeMachine 2.4 MB Please see the full manual on the CD-Rom for more information about these packages and the manual installation. FinishNote:
Twonkymedia will always be installed as this package updates the Twonky server installed already on the 'Home Storage Center' to the latest version.
AutoSave Installation
After the Installer is finished, it will automatically start the installation for your free backup software, AutoSave.
Autosave will automatically backup your photos, music and documents the Home Storage Center.
1. Click Next to start the installation

text_image
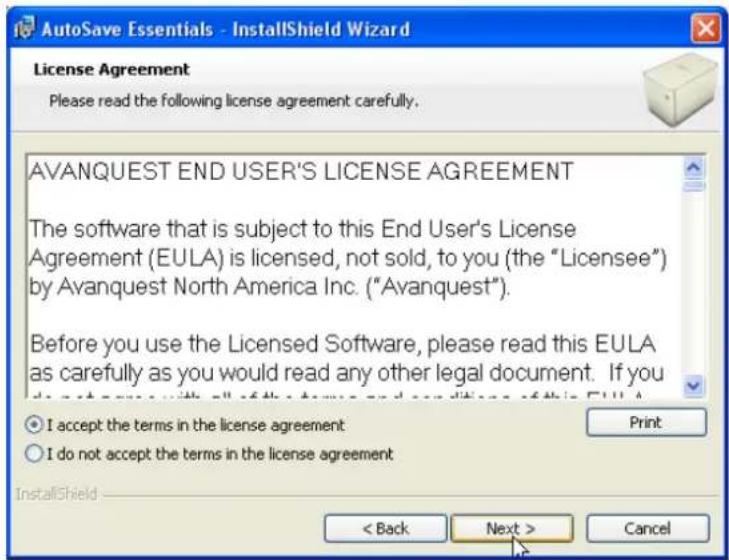
AutoSave Essentials - InstallShield Wizard Welcome to the InstallShield Wizard for AutoSave Essentials The InstallShield(R) Wizard will install AutoSave Essentials on your computer. To continue, click Next. WARNING: This program is protected by copyright law and international treaties. < Back Next > Cancel Sitecom autosave2. Select 'I accept the terms in the license agreement' and click Next.
text_image
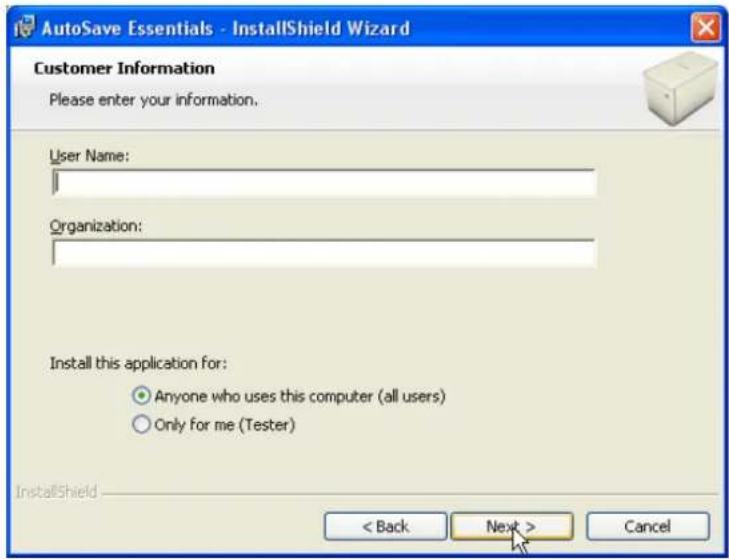
AutoSave Essentials - InstallShield Wizard License Agreement Please read the following license agreement carefully. AVANQUEST END USER'S LICENSE AGREEMENT The software that is subject to this End User's License Agreement (EULA) is licensed, not sold, to you (the "Licensee") by Avanquest North America Inc. ("Avanquest"). Before you use the Licensed Software, please read this EULA as carefully as you would read any other legal document. If you do not accept the terms in the license agreement. I do not accept the terms in the license agreement. InstallShield < Back Next > Cancel- Fill in an optional name and organization and click Next.
text_image
AutoSave Essentials - InstallShield Wizard Customer Information Please enter your information. User Name: Organization: Install this application for: Anyone who uses this computer (all users) Only for me (Tester) InstallShield < Back Next > Cancel- Click Next to install AutoSave to the default location on your computer.
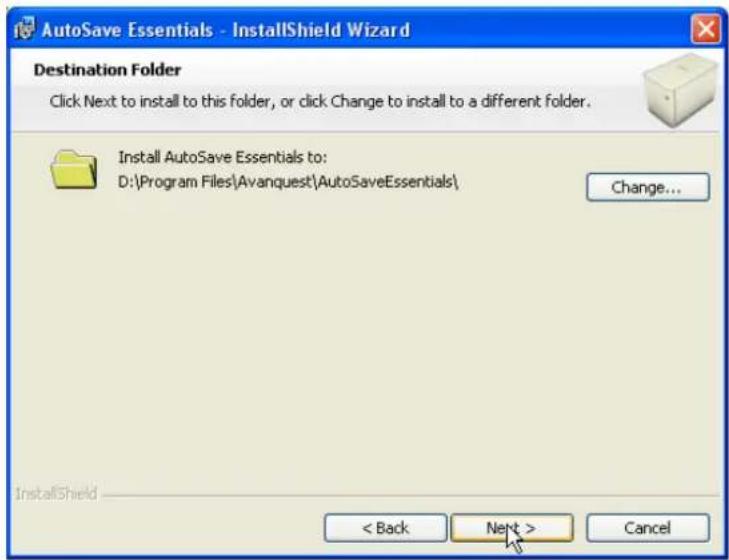
text_image
AutoSave Essentials - InstallShield Wizard Destination Folder Click Next to install to this folder, or click Change to install to a different folder. Install AutoSave Essentials to: D:\Program Files\Avanquest\AutoSaveEssentials\ Change... InstallShield < Back Next > Cancel5. Click Next to begin the Installation.

text_image
AutoSave Essentials - InstallShield Wizard Ready to Install the Program The wizard is ready to begin installation. Click Install to begin the installation. If you want to review or change any of your installation settings, click Back. Click Cancel to exit the wizard. InstallShield < Back Install Cancel6. Click finish to end the installation and launch AutoSave

text_image
AutoSave Essentials - InstallShield Wizard InstallShield Wizard Completed The InstallShield Wizard has successfully installed AutoSave Essentials. Click Finish to exit the wizard. ✓ Launch AutoSave Essentials Sitecom autosave < Back Finish CancelNote : AutoSave will backup the files from your computer to your personal share. If you have not configured a personal share, AutoSave will backup to the public share.
In this situation AutoSave will warn you and gives you the opportunity to stop the backup process.
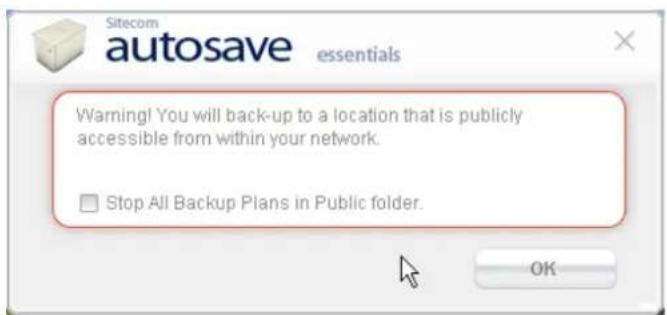
text_image
Sitecom autosave essentials Warning! You will back-up to a location that is publicly accessible from within your network. □ Stop All Backup Plans in Public folder. OKIf you want to change the backup location, files or schedule, please see the AutoSave manual on CD-Rom for detailed instructions.
Using the Home Storage Center
After this installation is finished you'll have at least a new 'Public on SitecomNAS' network drive in you're my Computer environment. If you have made a personal share you'll also find it in the same location.

text_image
My Computer File Edit View Favorites Tools Help Back Search Folders Address My Computer System Tasks View system information Add or remove programs Change a setting Other Places My Network Places My Documents Shared Documents Control Panel Details Files Stored on This Computer Shared Documents Tester's Documents Hard Disk Drives WinYsta (C:) WinXP (D:) GHOST (H:) Devices with Removable Storage DVD-RAM Drive (E:) Removable Disk (F:) Network Drives User on 'SiteconNas (10.0.0.19) (Y1) public on 'SiteconNas (10.0.0.19) (Z1) My ComputerYou can drag and drop files to and from these networks drive just like you would do on your normal C drive.
Configuring the Home Storage Center Mac
When inserting the CD a window appears. Click the Install Home Storage Center packet installer.

text_image
SitecomHSC 1 item, Zero KB available Smart Living home storage center STORE & SHARE Install Home Storage CenterClick Continue in the introduction page.

text_image
Install Sitecom Home Storage Center Welcome to the Sitecom Home Storage Center Installer SITECOM Introduction Detect NAS Public share Private Share Extra Packages Destination Select Installation Type Installation Summary home storage center You will be guided through the steps necessary to install this software. Go Back ContinueThe installer is now detecting the 'Home Storage Center'. Wait till the progress bar is completely filled.
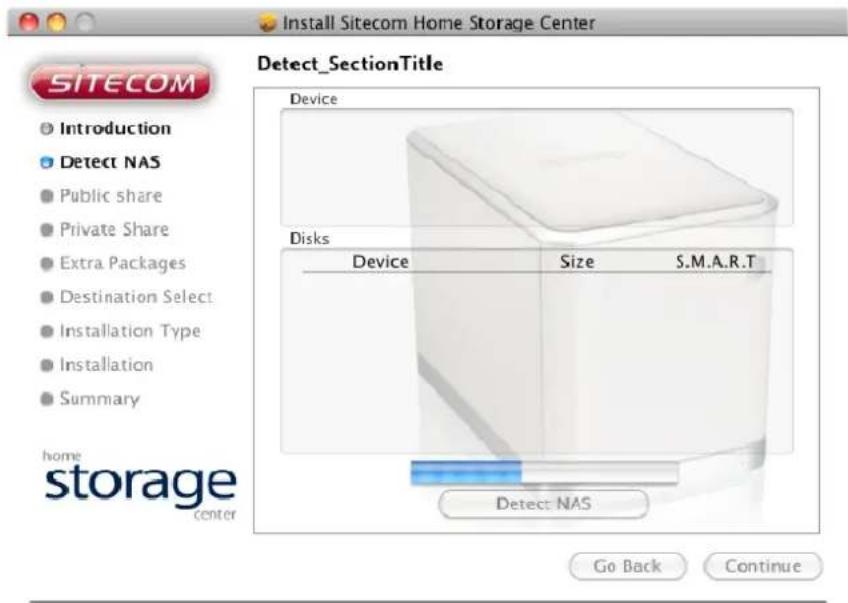
text_image
Install Sitecom Home Storage Center Detect_SectionTitle Device Disks Device Size S.M.A.R.T Detect: NAS Go Back Continue SITECOM Introduction Detect NAS Public share Private Share Extra Packages Destination Select Installation Type Installation Summary home storage centerAfter the detection is finished the installer will show the detected hard drives. Click Continue to continue the installation.
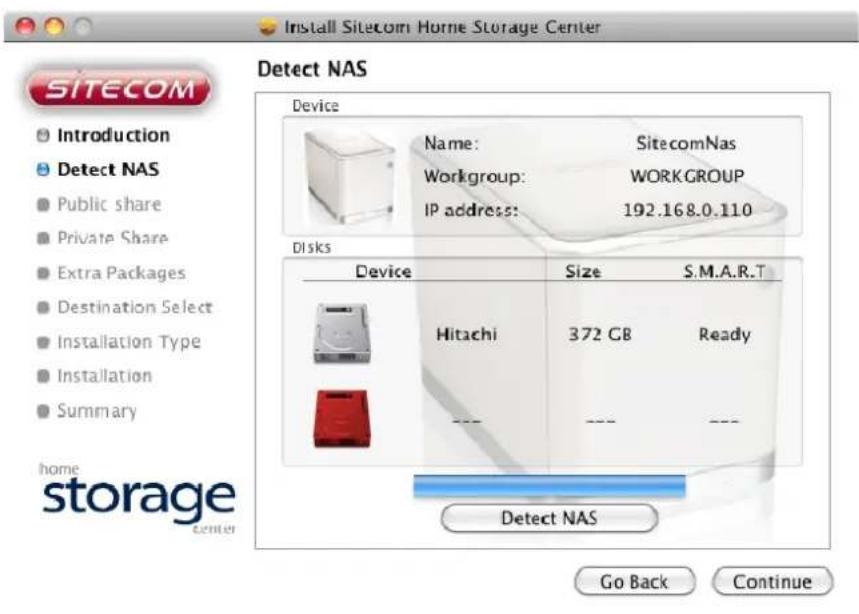
text_image
Install Sitecom Home Storage Center Detect NAS Device Name: SitecomNas Workgroup: WORKGROUP IP address: 192.168.0.110 Disks Device Size S.M.A.R.T Hitachi 372 GB Ready --- --- --- Detect NAS Go Back ContinueIf any of the inserted Hard drives is not detected: Unplug the power receptacle and check the connection of the hard drive.
Click OK to format the disk(s) in the NAS.
Format Disk
Your disk(s) are going to be formatted. All you data will be lost.
Cancel
OK
Note: When 2 hard drives are inserted the installer will automatically format the drives using RAID 1 for data reliability. (See addendum for more information on storage schemes.)
To change the 'Home storage center' to a different storage scheme, see chapter web configuration->Setup->Disk Settings.
The disk(s) are being formatted, this could take some time.

text_image
Install Sitecom Home Storage Center SITECOM Public share Introduction Detect NAS Public share Private Share Extra Packages Destination Select Installation Type Installation Installation Summary home storage center Disk(s) being formatted. Please wait... Go Back ContinueNow we will create a public share. This folder is for general usage and allows anonymous access. (See Web configuration->User management -> shared folder management.)
The installer will create an alias to the share in your user folder. Click Browse if you want to select an alternative location for the alias.
Choose the maximum size for the public folder. Enter '0' for maximum. Click Continue to continue.
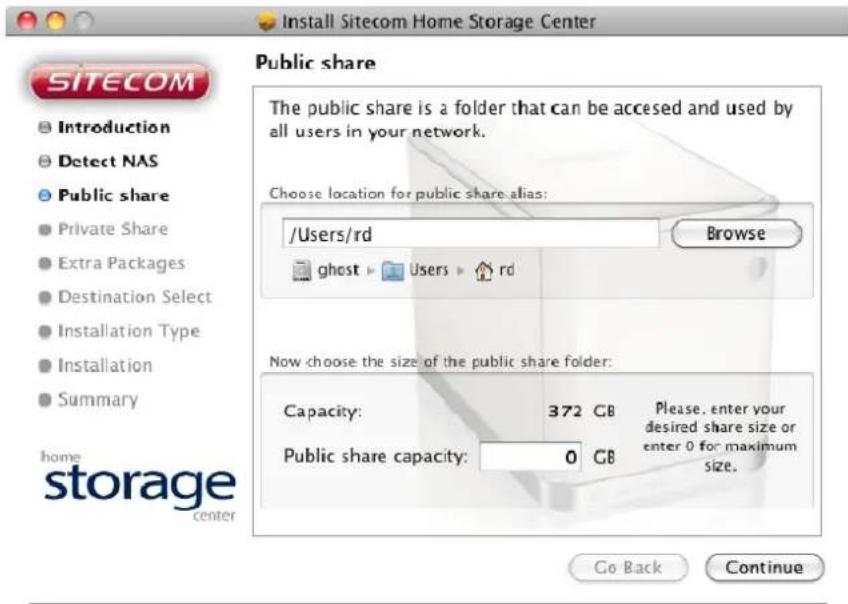
text_image
Install Sitecom Home Storage Center SITECOM Introduction Detect NAS Public share Private Share Extra Packages Destination Select Installation Type Installation Summary home storage center Public share The public share is a folder that can be accessed and used by all users in your network. Choose location for public share alias: /Users/rd Browse ghost ▶ Users ▶ rd Now choose the size of the public share folder: Capacity: 372 GB Please, enter your desired share size or enter 0 for maximum size. Public share capacity: 0 GBIn the next step you can create an optional private share.
Note: A private share is a secured share, only accessible with a username and password. To change the properties of this folder See Web configuration->User management -> shared folder management.
Fill in a folder name, username and password for the share. If the box is checked, the username and password will be stored in your keychain. The installer will create an alias to the share in your user folder. Click Browse if you want to select an alternative location for the alias.
Click Continue.

text_image
Install Sitecom Home Storage Center SITECOM Introduction Detect NAS Public share Private Share Extra Packages Destination Select Installation Type Installation Summary home storage center Private Share You can create a separate folder for each user. (leave all the fields blank if you do not want to create a private folder) Folder Name: sitecom User Name: Sitecom Password: ............. Repeat Password: ............. Remember this password in my keychain. Choose location for private share alias: /Users/rd Browse ghost: Users rd Go Back ContinueThe package installer allows you to expand the functionalities of your Home Storage Center. These packages are installed on the harddrive and consume a little part of your storage capacity
Select the packages you wish to install and click 'Finish' to install these packages

text_image
Install Sitecom Home Storage Center SITECOM • Introduction • Detect NAS • Public share • Private Share • Extra Packages • Destination Select • Installation Type • Installation • Summary home storage center Install package You can expand the functionalities of your Home Storage Center by installing additional software packages. These packages will be installed on the harddrive of your Home Storage Center. Select the packages you wish to install and select 'Install Packages'. You can always install these packages manually at a later stage. Please see the full manual on the CD-Rom for more information about these packages and the manual installation. Squeeze Box Server ✓ Print Server ✓ Time Machine □ Go Back ContinueWhen Time Machine support has been selected a warning message will be shown
Time Machine compatibility
Because of the way Apple handles timemachine, Sitecom cannot guarantee total compatibility with this function. There is a small chance (some of) your files will not be backed up correctly and functionality in the future is not guaranteed. You will use the Home Storage Center with Time Machine at your own risk. A list with alternative backup utilities can be found in the box. Do you accept these terms?
Don't Accept
Accept
The selected packages will be installed. NOTE: This could take up to 5 minutes when all packages are selected

text_image
Install Sitecom Home Storage Center SITECOM • Introduction • Detect NAS • Public share • Private Share • Extra Packages • Destination Select • Installation Type • Installation • Summary home storage center Go Back Continue Install package Installing packages. Please, be patient. This can take several minutesThe installer will write configuration files to your computer, click Install to continue.

text_image
Install Sitecom Home Storage Center SITECOM Standard Install on "ghost" Introduction Detect NAS Public share Private Share Extra Packages Destination Select Installation Type Installation Summary home storage center This will take 4 KB of space on your computer. Click Install to perform a standard installation of this software on the disk "ghost". Change Install Location... Go Back InstallThe installation prompts you for the root password of the computer. Fill in the password and username. Click OK to continue.

text_image
Type your password to allow installer to make changes. Name: your_user_name Password: ******** Details Cancel OKThe installation is finished, click Close.

text_image
Install Stecom Home Storage Center The installation was completed successfully. SITECOM Introduction Detect NAS Public share Private Share Extra Packages Destination Select Installation Type Installation Summary home storage center The installation was successful. The software was installed. Go Back CloseThe aliases to the shares can be found in your home folder or in the folder of your choice.
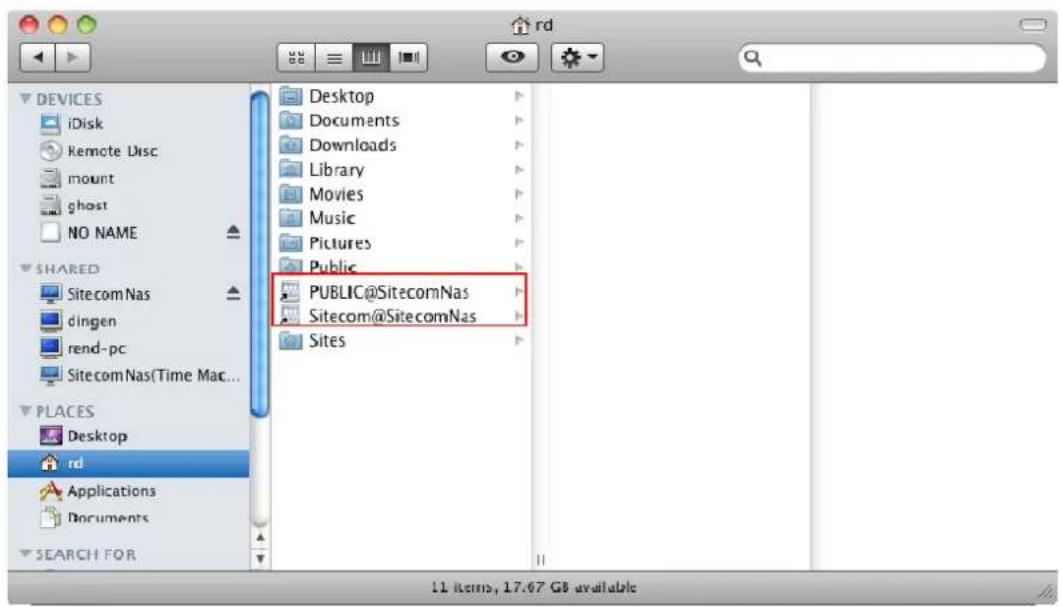
text_image
RD DEVICES iDisk Remote Disc mount ghost NO NAME SHARED SitecomNas dingen rend-pc SitecomNas(Time Mac... PLACES Desktop rd Applications Documents SEARCH FOR Desktop Documents Downloads Library Movies Music Pictures Public PUBLIC@SitecomNas Sitecom@SitecomNas SitesConfiguring Time Machine
Click the Time Machine icon to start the configuration

natural_image
Circular metallic button with a white circular icon featuring a clock and arrow, surrounded by a green light-blue background (no text or symbols)A message appears to inform you Time Machine has not yet been configured, click Set Up Time Machine.

text_image
You haven't selected a location for Time Machine backups. To select a location for backups, set up Time Machine. Cancel Set Up Time MachineClick Select Backup Disk...
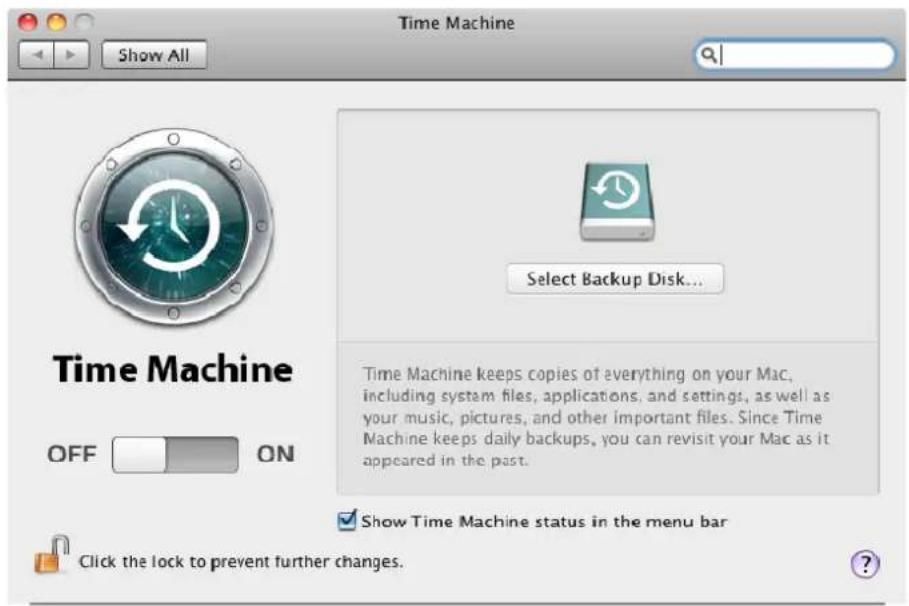
text_image
Time Machine Show All Select Backup Disk... Time Machine keeps copies of everything on your Mac, including system files, applications, and settings, as well as your music, pictures, and other important files. Since Time Machine keeps daily backups, you can revisit your Mac as it appeared in the past. Show Time Machine status in the menu bar Click the lock to prevent further changes.Select the TimeMachine on "SitecomNas(Time Machine)" and click Use for Backup
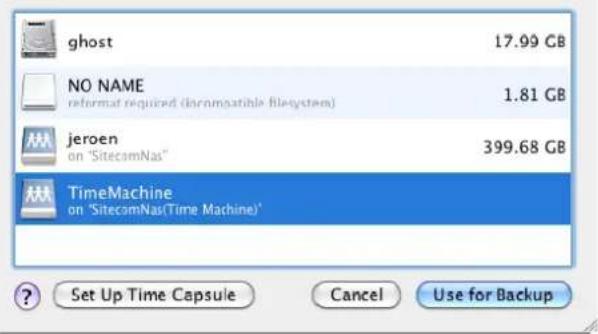
text_image
ghost 17.99 GB NO NAME 1.81 GB reformat required (incompatible filesystem) jeroen on 'SitecomNas' 399.68 GB TimeMachine on 'SitecomNas(Time Machine)' Set Up Time Capsule Cancel Use for BackupYou'll be prompted for a username and a password. This is the default username and password of the userinterface of the Sitecom Home Storage Center. By default this is username: Admin and password: Admin

text_image
Enter your name and password for the server "SitecomNas" so that Time Machine can access it. Name: admin Password: ••••• Cancel ConnectTima Machine is now ready for use and your Mac computer will now automatically backup to your Sitecom Home Storage Center.

text_image
Time Machine Show All Name: TimeMachine SitecomNus Available: -- Oldest Backup: -- Latest Backup: -- Options... Next Backup: 113 seconds... Time Machine keeps: • Fourly backups for the past 24 hours • Daily backups for the past month • Weekly backups for all previous months The oldest backups are deleted when your disk becomes full. Show Time Machine status in the menu bar Click the lock to prevent further changes.Web configuration
Open your web browser (Firefox, Internet explorer, Chrome or any other web browser).

natural_image
Row of five computer browser logos: e, s, g, b, and 0 (no text or symbols beyond logos)Enter the hostname you have set in the installer software in the previous chapter (default: SitecomNas) in the address bar.

You will be prompted for a username and password.

text_image
Web Server Authentication Username Password Apply CancelFill in the username and password. The default credentials are:
Username : admin Password : admin
After logging in you will see the graphical user interface (GUI) of the device.
Status
All information regarding the current configuration settings can be found here. The system, event and connection log pages log all latest events allowing good insight in the security and stability of the setup.

text_image
storage center Home SITECOM Status Setup User Settings Services Toolbox Choose your language Status System Log Event Log Connection Log System Information Device name : SitecomNAS Workgroup name : WORKGROUP Date & Time : 2008 / 11 / 26 15:00 Firmware Version : CD32N_v2.1.16 Network Information IP Address : 192.168.0.198 MAC Address : 00:40:D0:13:C3:39 Service information Shared folder : On FTP Server : On UPnP AV server : On Itunes Server : Off www.sitecom.com © 1996 - 2009 Sitecom Europe BV, all rights reservedThis page gives an overview of the current network settings and which services are activated.
System/Event/Connection log

text_image
home storage center Status Setup User Settings Services Toolbox Choose your language Status System Log Event Log Connection Log System Log Jan 1 00:00:19 (none) kernel: kdogd 1.5.0, log source = /proc/kmsg started. Jan 1 00:00:19 (none) kernel: Linux version 2.6.24.4 (root@flash) (gcc version 4.2.4) #182 Thu Aug 6 10:28:24 CST 20 Jan 1 00:00:19 (none) kernel: CPU: ARM926EJ-S [41069265] revision 5 (ARMv5TEU), cr=00053177 Jan 1 00:00:19 (none) kernel: Machino: Oxsemi NAS Jan 1 00:00:19 (none) kernel: ignoring unrecognised tag 0x00000000 Jan 1 00:00:19 (none) kernel: Memory policy: ECC disabled, Data cache writeback Jan 1 00:00:19 (none) kernel: On node 0 totalpages: 16384 Jan 1 00:00:19 (none) kernel: DMA zone: 128 pages used for memmap Jan 1 00:00:19 (none) kernel: DMA zone: 0 pages reserved Jan 1 00:00:19 (none) kernel: DMA zone: 16256 pages, LIFO batch:3 Jan 1 00:00:19 (none) kernel: Normal zone: 0 pages used for memmap Jan 1 00:00:19 (none) kernel: Movable zone: 0 pages used for memmap Jan 1 00:00:19 (none) kernel: CPUO: D VIVT write-back cache Jan 1 00:00:19 (none) kernel: CPUO: I cache: 32768 bytes, associativity 4, 32 byte lines, 256 sets Jan 1 00:00:19 (none) kernel: CPUO: D cache: 32768 bytes, associativity 4, 32 byte lines, 256 sets Jan 1 00:00:19 (none) kernel: Built I zoneists in Zone order, mobility grouping on Total pages: 16256 Jan 1 00:00:19 (none) kernel: Kernel command line: console=tty50,115200 root=/dev/ram0 mw init= initrd=0x4aC0C0C Jan 1 00:00:19 (none) kernel: PID hash table entries: 256 (order, 8, 1024 bytes) Jan 1 00:00:19 (none) kernel: console [tty50] enabled Jan 1 00:00:19 (none) kernel: Dentry cache hash table entries: 8192 (order, 3, 32768 bytes)www.sitecom.com © 1996-2009 Sitarom Europe BV, all rights reserved.
The logs give an overview of all latest logged system events. If there is not enough internal memory for all events, logs of older events are deleted, but logs of the latest events are retained.
Setup
Here you can configure the Home Storage Center.
Tip: These settings are also included in the Sitecom installer which offers a much easier installation flow.
System settings

text_image
storage home center SITECOM Status Setup User Settings Services Toolbox Choose your language System Settings Network Settings Disk Settings Date and Time Settings System Settings Devicename: SitecomNAS Workgroup: WORKGROUP Password: ******** Applywww.sitecom.com © 1996 - 2009 Sibecam Europe BV, all rights reserved
Device name: Enter a desired name for your Home Storage Center. This will be the name of the device within your network.
Workgroup: Choose the name of the Workgroup the Home Storage Center has to be added to.
Note: Can only be used if 'Microsoft Network' is enabled.
Password: Allows you to change the default password of the storage center.
Default: Admin
Click 'Apply' for any of the changes to take effect.
Network settings
Here the local network settings are configured.

text_image
storage home center Status Setup User Settings Services Toolbox Choose your language System Settings Network Settings Disk Settings Date and Time Settings IP Settings Type: Dynamic IP Static IP IP Address: 192.168.0.198 Subnet Mask: 255.259.255.0 Default Gateway: 192.168.0.1 Primary DNS: 168.95.1.1 Secundory DNS: 168.95.192.1 Jumbo Frame: Enable Disable MAC Address : MAC Address: 00.40.D0.13.C3.39 Applywww.sitecom.com | © 1996 - 2009 Sitecom Europe BV, all rights reserved
Type: Select either Dynamic IP to automatically acquire network setting from a DHCP server within the network (i.e. router) or choose Static to set the network parameters manually.
IP address: Enter the desired IP address for this device.
Subnet mask: Specify the subnet mask for the IP address.
Default gateway: Specify the IP address of the upstream router.
Primary/Secondary DNS: Specify the IP address of the DNS server.
Jumbo Frame: Here you can choose to enable or disable Jumbo frames.
Note: enabling Jumbo frames will only have effect when all other peripherals within the network also support Jumbo frames.)
Click 'Apply' for any of the changes to take effect.
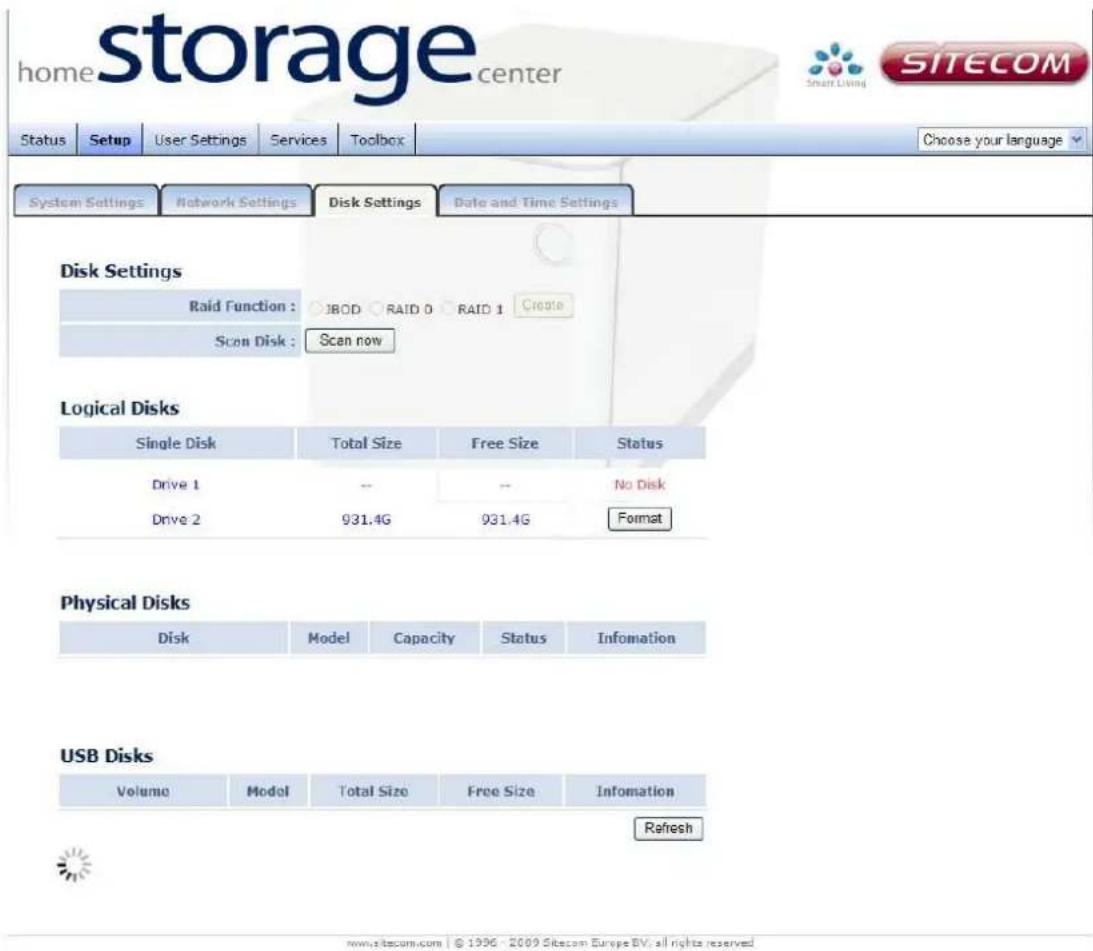
Disk settings
text_image
storage home center SITECOM Status Setup User Settings Services Toolbox Choose your language System Settings Network Settings Disk Settings Date and Time Settings Disk Settings Raid Function : JBOD RAID 0 RAID 1 Create Scan Disk : Scan now Logical Disks Single Disk Total Size Free Size Status Drive 1 -- -- No Disk Drive 2 931.4G 931.4G Format Physical Disks Disk Model Capacity Status Infomation USB Disks Volume Model Total Size Free Size Infomation Refresh www.sitecom.com © 1996 - 2009 Sitecom Europe BV: all rights reservedRAID function: Choose JBOD, RAID 0 or RAID 1.
Note: for more information about these data storage schemes please see Addendum.
Scan Disk: Scan the connected hard drives for errors.
Format: Formats the disk drive.
Warning: this will delete all data from the drive.
Refresh: This will reload the page.
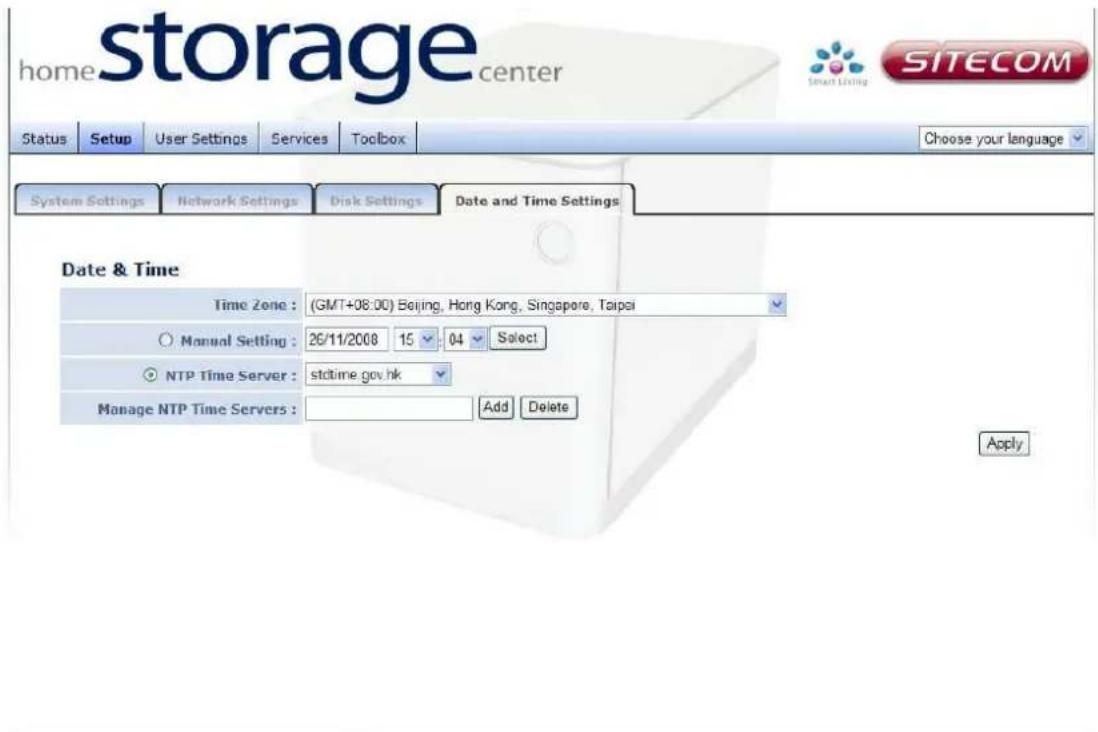
Date and time settings
text_image
storage home center SITECOM Status Setup User Settings Services Toolbox Choose your language System Settings Network Settings Disk Settings Date and Time Settings Date & Time Time Zone : (GMT+08:00) Beijing, Hong Kong, Singapore, Taipei Manual Setting : 26/11/2008 15 04 Select NTP Time Server : stdtime.gov.hk Manage NTP Time Servers : Add Delete Applywww.sita.com | © 1996 - 2009 Sitecom Europe BV, all rights reserved
Time zone: Select your time zone from the drop-down list.
Manual setting: Select the corresponding radio button to manually set current date and time.

text_image
Manual Setting : 22/09/2009 13 : 28 Select DateTime Picker - Wind... about:blank September ≤ 2009 ≥ September 2009 Su Mo Tu We Th Fr Sa 1 2 3 4 5 6 7 8 9 10 11 12 13 14 15 16 17 18 19 20 21 22 24 25 26 27 28 29 30 Click to manually select the correct date.NTP time server: Place a check in the corresponding radio button and select a time server if you would like to synchronize the device's clock to a Network Time Server over the internet.
Manage NTP time servers: Add or delete a NTP timeserver address from the list.
Click 'Apply' for any of the changes to take effect.
User settings
In the User settings menu, access to the storage center and users are managed.
In the User management section you can create, delete or modify users and assign quotas to these users.
Shared folder management allows configuring all folders on the storage center. Set permissions, limitations and assign users to the folders.
text_image
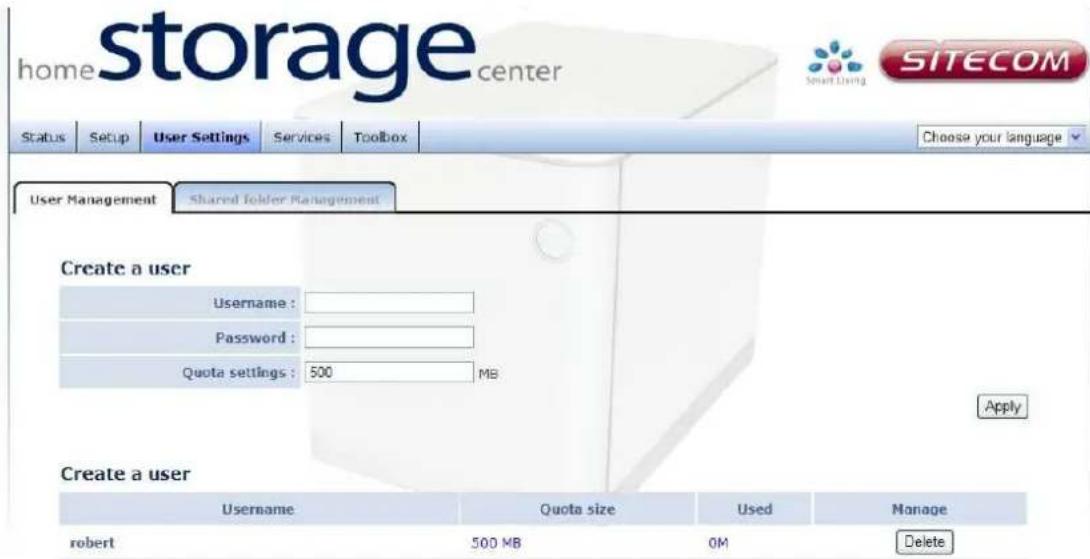
storage home center SITECOM Status Setup User Settings Services Toolbox Choose your language User Management Shared Folder Management Create a user Username : Password : Quota settings : 500 MB Apply Create a user Username Quota size Used Manage robert 500 MB 0M Delete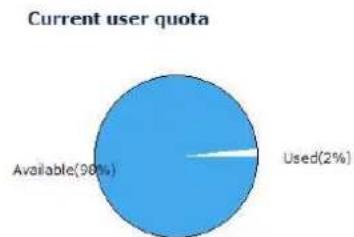
pie
Current user quota | Category | Percentage (%) | | :--- | :--- | | Available | 98 | | Used | 2 |User management
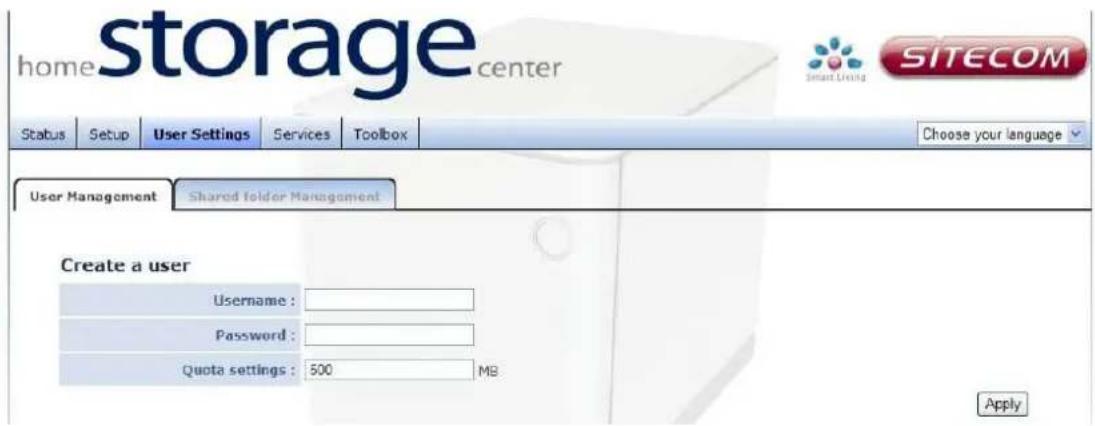
Create a user
text_image
storage home center SITECOM Status Setup User Settings Services Toolbox Choose your language User Management Shared Folder Management Create a user Username : Password : Quota settings : 500 MB ApplyUsername: Enter a desired username.
Password: Enter a password for the username.
Quota settings: Enter a value to restrict the user to a maximum capacity or enter 0 for unlimited.
Click 'Apply' for any of the changes to take effect.

flowchart
graph TD
    A["Create a user"] --> B["Username"]
    B --> C["Quota size"]
    C --> D["Used"]
    D --> E["Manage"]
    E --> F["Delete"]
    G["Modify User"] --> H["Username: robert"]
    G --> I["Password: "]
    G --> J["Quota settings: Unlimited 500 MB"]
    J --> K["Apply Cancel"]
    L["Click 'Delete' to remove the user."] --> M["End"]
Enter the desired settings and click 'apply'.
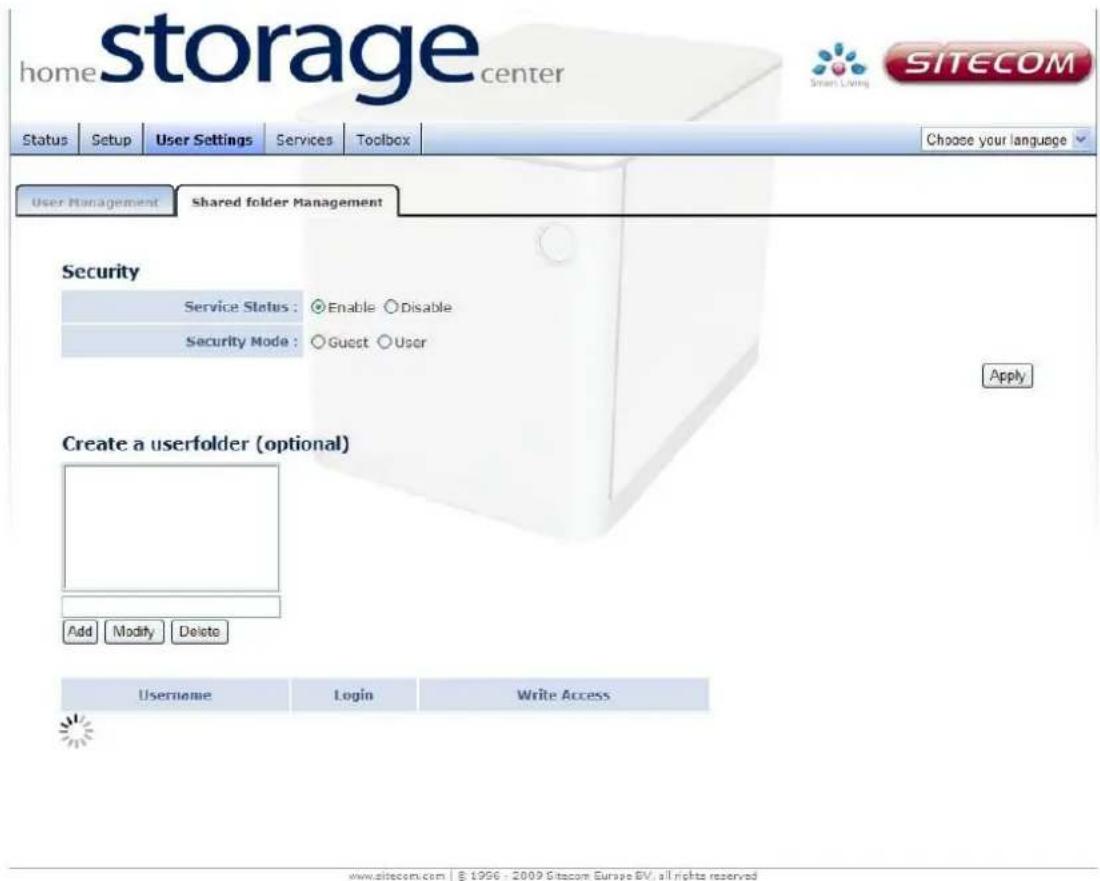
Shared folder management
text_image
storage center Home Status Setup User Settings Services Toolbox Choose your language User Management Shared folder Management Security Service Status : Enable Disable Security Mode : Guest User Apply Create a userfolder (optional) Add Modify Delete Username Login Write Access www.sitecom.com | © 1996 - 2009 Sitecom Europe BV, all rights reservedService status: Enable or Disable Samba.
(Note: disabling Samba will disable local sharing)
Security mode: 'Guest' will allow restricted access for anonymous users. 'User' will only allow access to users created in user management.
Click 'Apply' for any of the changes to take effect.
Create a user folder: Click 'add'. A popup window will appear.
Fill in a Folder Name and Security Mode. If 'Personal' is chosen, users have to be added to the folder in the next step.

text_image
Modify Folder Folder Name User Security Mode Anonymous Personal Apply CancelHighlight the new folder. If it is an 'Anonymous' folder the table below will show the Anonymous settings which always allows login and write access.
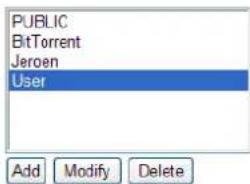
text_image
PUBLIC BitTorrent Jeroen User Add Modify Delete| Username | Login | Write Access |
| Anonymous | allow disallow | allow disallow |
If the selected folder is a Personal folder the table below will show the User settings for this folder for all users you have created.

text_image
PUBLIC BitTorrent Jeroen User Add Modify Delete| Username | Login | Write Access |
| jeroen | ○ allow ○ disallow | ○ allow ○ disallow |
Services
BitTorrent
The downloaded files are stored in the BitTorrent folder, which by default is not mapped to your computer. You can access it via Network -> [Home Storage Center Name] -> Bittorrent on any Windows computer.

text_image
storage center home SITECOM Status Setup User Settings Services Toolbox Choose your language Bittorent Ilunes Server UPnP AV server FTP Server General Settings Service Status : Enable Disable Port number : 6831 Limit upload speed : 300 kB/s Limit download speed : 20 kB/s Maximum connections : 5 Connections Apply Add Bittorrent Select a Bittorrent : Browse Apply Cancel Current downloads Delete Start Stop Name Status Completed Size Ratio www.sitecom.com | © 1996 - 2009 Sitecom Europe BV, all rights reservedService status: Enable or disable the BitTorrent server.
Port number: Enter a port number for BitTorrent.
Note: Depending on your network it may be required to open the port in your router. Please refer to the documentation of your router.
Limit upload speed: Enter a maximum upload speed or enter 0 for unlimited.
Limit download speed: Enter a maximum download speed or enter 0 for unlimited.
Maximum connections: Maximum total simultaneous connections the Home Storage Center can make.
Add a BitTorrent: Click browse and select a .torrent file to upload. Once confirmed with 'Apply' the download progress is shown in current downloads.
Click 'Apply' for any of the changes to take effect.
Current downloads: Here current progress of the torrents is shown. To Delete, Start or Stop a download, click the corresponding radio-button and select an action.
Current downloads

text_image
Delete Start Stop Name Status Completed Size Ratio Fedora-12-Alpha-x86_64-DVD Leeching 0.0% 3.28G 0.00 Click on the Torrent name for more details. store home sitecom Storage_center Status Setup User Settings Services Toolbox Choose your language Bittorrent Itunes Scr Torrent Information Name Fedora-12-Alpha-x86_64-DVD Info hash 2eceee0ee63c09ddb97ce04c04b6542838b216909 Number of pieces 13436 Piece size 262144 Total size 3522119199 Number of files 2 File Fedora-12-Alpha-x86_64-CHECKSUM (1567) Fedora-12-Alpha-x86_64-DVD.iso (3522117632) Status Add Bittorrent Completed Download Download Ratio Upload Upload Ratio Ratio Connections Available Select 0.1% 5.81M 123.32kB/s 1.06M 30.67kB/s 0.00 5 100.0% Cancel Current downloads Delete Start Stop Name Wayte Completed Size Ratio Fedora-12-Alpha-x86_64-DVD Leeching 0.0% 3.28G 0.00ITunes server
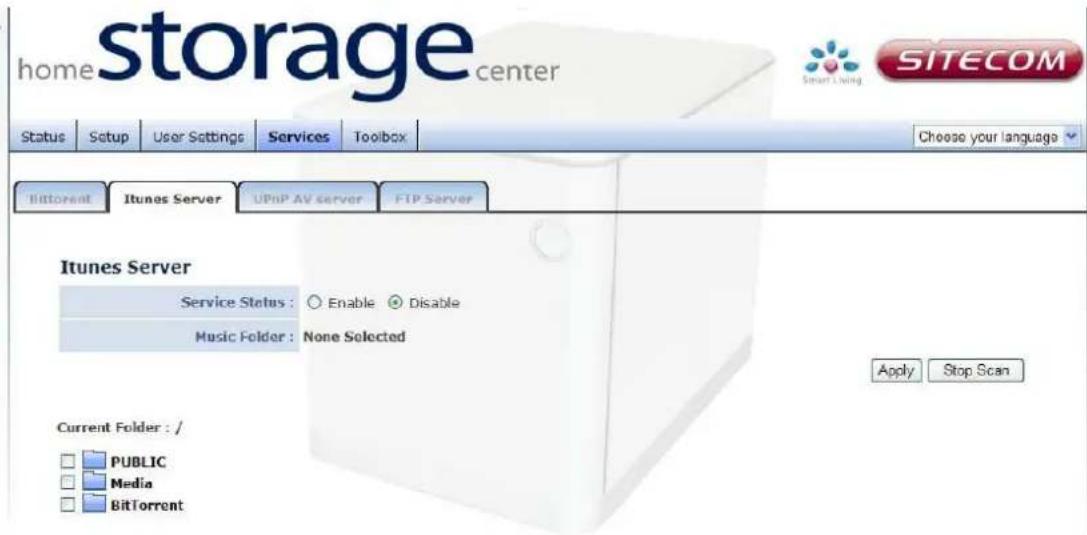
The iTunes server makes it easy to share your music files with other iTunes applications within your network.
text_image
storage center home SITECOM Status Setup User Settings Services Toolbox Choose your language Bittorrent iTunes Server UPnP AV server FTP Server Itunes Server Service Status : Enable Disable Music Folder : None Selected Apply Stop Scan Current Folder : / PUBLIC Media BitTorrentwww.sitecom.com | © 1996 - 2009 Sitecom Europe BV, all rights reserved
Service status: Enable or disable the iTunes server. If enable is chosen a music folder must be selected.
Music folder: To select and share a music folder. Select a folder using the corresponding check box and click apply.
Click 'Apply' for any of the changes to take effect.
Note: If the service is enabled you will see a shared server within your iTunes application.
UPnP AV server
The Twonky media server turns your 'Home storage center' into a DLNA certified multimedia server. Easily watch your pictures or stream music and video over other devices such as media players, PS3 and many other DLNA compatible devices.

text_image
Twonky MEDIA TwonkyMedia Configuration: Server status Version 4.4.19 Server type: TwonkyMedia Used memory: 0 KB Configuration file at: /usr/local/TwonkyVision/twonkyvision-mediaserver.ini Last database change: Content Music tracks: 0 Photos: 0 Videos: 0 Radio stations: 0 License information: The Server is registered. Server Server uptime: 0 days, 0:11:45 hours Server built date: 2009-08-28 Server restart pending: no Network interfaces: 127.0.0.1 192.168.0.199Twonky will automatically serve the files stored in the 'Media' folder, located in the Public Share on the Home Storage Center, to any UPnP AV/DLNA certified device to play.
For more information, see the Twonky manual on CD-Rom.
FTP server
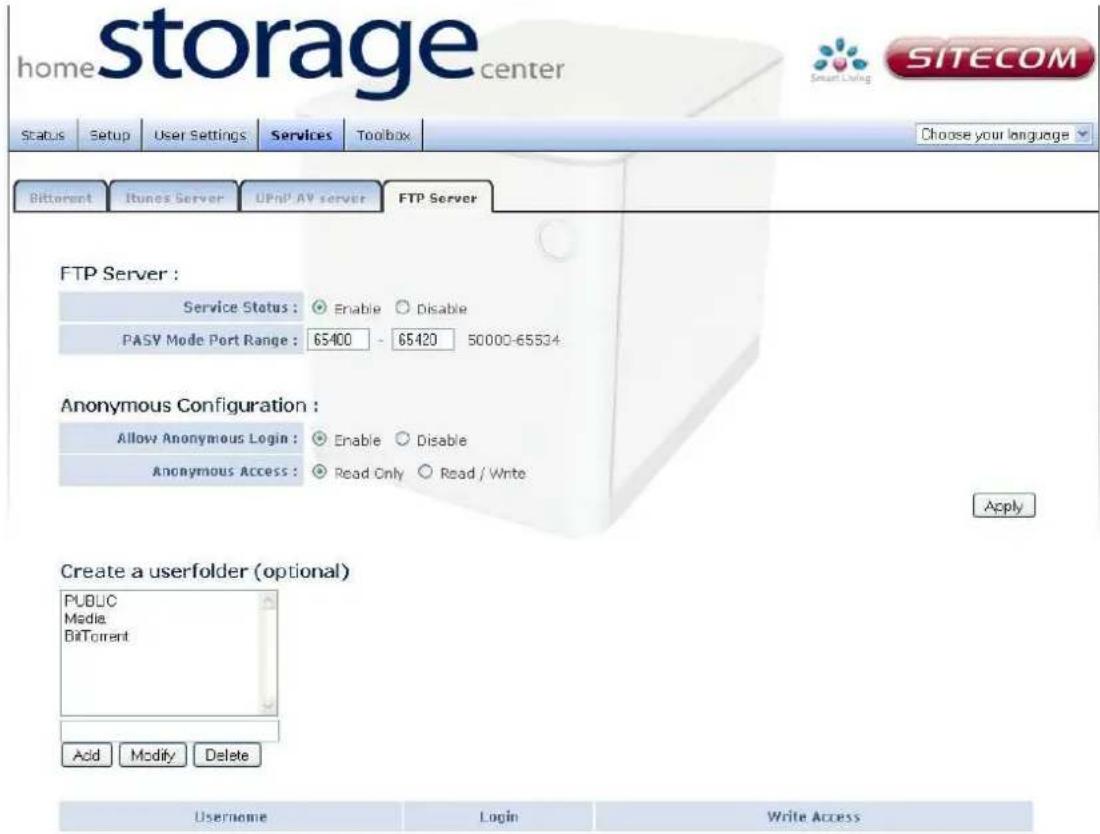
The FTP server makes it possible to easily share files on the internet. On this page FTP access can be managed and the server parameters configured.
text_image
storage home center SITECOM Status Setup User Settings Services Toolbox Choose your language Bitterent iTunes Server UPnP AV server FTP Server FTP Server : Service Status : Enable Disable PASY Mode Port Range : 65400 - 65420 50000-65534 Anonymous Configuration : Allow Anonymous Login : Enable Disable Anonymous Access : Read Only Read / Write Apply Create a userfolder (optional) PUBLIC Media BitTorrent Add Modify Delete Username Login Write Accesswww.sitecom.com | © 1996 - 2009 Sitecom Europe BV, all rights reserved
Service status: Enable or disable the FTP server.
PASV Mode Port Range: Enter the port range you would like to use for passive FTP server mode.
Allow anonymous login: Choose here to allow anonymous users to access the storage center by FTP.
Note: if you want to login to the FTP server as an anonymous user. The username is 'anonymous' and an email address must be entered in the password field.
Anonymous Access: Here the permissions can be set for the anonymous user to either 'Read only' or 'Allow Read and Write'.
Toolbox
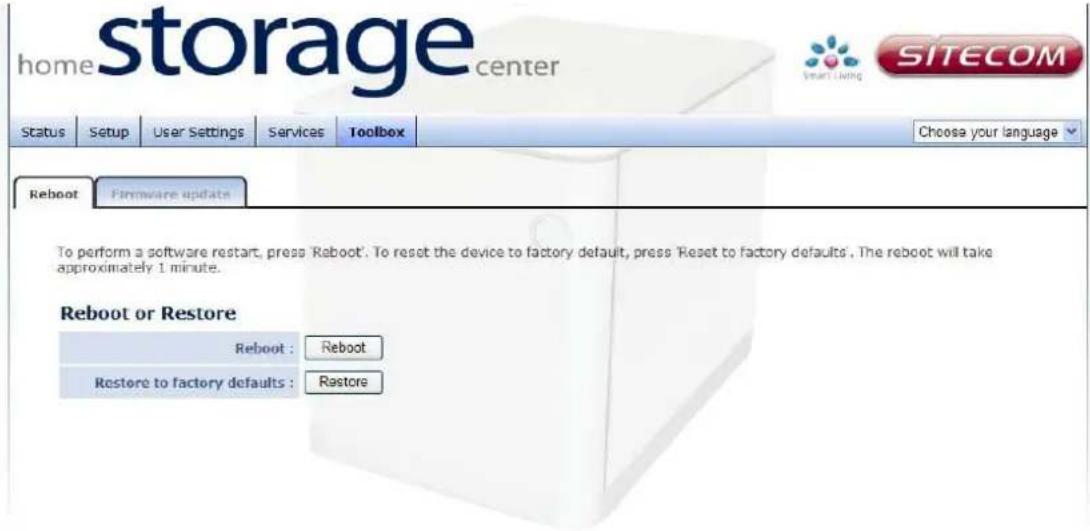
Reboot
text_image
home storage center Status Setup User Settings Services Toolbox Choose your language Reboot Firmware update To perform a software restart, press 'Reboot'. To reset the device to factory default, press 'Reset to factory defaults'. The reboot will take approximately 1 minute. Reboot or Restore Reboot : Reboot Restore to factory defaults : Restorewww.sitecom.com | © 1996 - 2008 Sitecom Europe BV, all rights reserved
When the storage center shows abnormal behavior it may be required to restart the device. Click 'Reboot' to restart the device.
To undo all current settings click 'Restore'.
Note: This will erase all current settings.
Firmware update
This tool allows you to upgrade the firmware.
Intranet Upgrade
To upgrade the firmware, you need to download the firmware file to your local hard disk, and enter that file name and path in the appropriate field on this page. You can also use the Browse button to find the firmware file on your PC.
Once you've selected the new firmware file, click

text_image
storage center home SITECOM Status Setup User Settings Services Toolbox Choose your language Rel About Firmware update Intranet Upgrade This page allows you to upgrade the Storage Center firmware. Browse to and select the upgrade file and click 'apply'. File Path : Browse... Internet Upgrade Firmware Version : Apply Cancel Check DownloadInternet Upgrade
Click 'Check' to check which version is only.
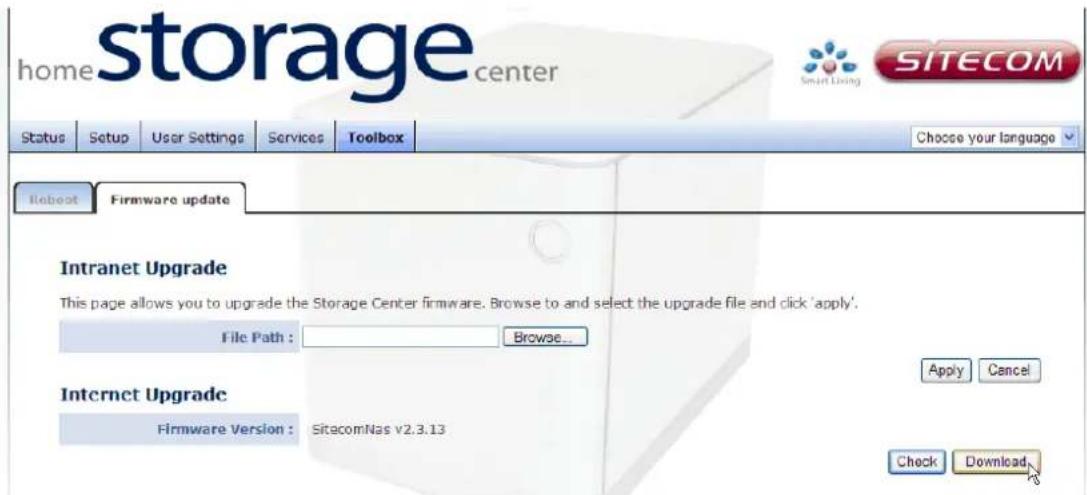
text_image
storage center home SITECOM Status Setup User Settings Services Toolbox Choose your language Reboot Firmware update Intranet Upgrade This page allows you to upgrade the Storage Center firmware. Browse to and select the upgrade file and click 'apply'. File Path : Browse... Internet Upgrade Firmware Version : SitacomNas v2.3.13 Apply Cancel Check DownloadIf the online version is newer as the current version, please click 'download' to upgrade to the new version.
Package management (MD-254 only)
Package management allows you to manage additional packages for the Home storage center. These packages can be installed through the 'Easy installation wizard' the 'Package installation wizard' or manually.
The 'Package installation wizard' can be started from the CD-Rom by selecting package installation from the Splash screen that is shown when the CD-Rom is inserted or browse the contents of the CD-Rom and Run "inspackage.exe"
To install packages manually, place the package you wish to install in the '/Public/Packages' folder on the 'Home storage center'.
The package you have copied should be visible if you log into the interface of the home storage center and go to Toolbox -> Package Management. To install that package, click on it from the Install package list.

text_image
home storage center SITECOM Status Setup User Settings Services Toolbox Choose your language ▼ Reboot Firmware update Package ManagementInstall Package
Current Folder: /PUBLIC/Packages
SitecomNas_pkg_PrinterServer_3.8.33.bin
SitecomNas_pkg_SqueezeCenter_7.5.2.bin
SitecomNas_pkg_TimeMachine_2.0.5.bin
SitecomNas_pkg_Twonkymedia_6.0.3.2.bin
Once the package is installed it becomes visible in the current package list.
Current package
| ☐ | Package name | Version | URL | Status |
| ☐ | PrinterServer | 3.8.33 | siteconnas | ON |
| ☐ | SqueezeCenter | 7.5.2 | siteconnas:9005 | ON |
| ☐ | TimeMachine | 2.0.5 | siteconnas | ON |
| ☐ | Twonkymedia | 6.0.3.2 | siteconnas | ON |
www.bocem.com [ © 1996 • 2011 Sitecom Europe BV, all rights reserved
From here you can choose to either 'Start', 'Stop' or 'Delete' the selected package.
Configuration and usage
Print server
The printserver package gives your Home storage center support for host based USB-printers, no additional configuration in the home storage center is required. For usage the operating system must be configured for network printing. (for more information about how to set up network printing in Windows 7 please see Addendum : Setting up printing in Windows 7 )
TimeMachine
TimeMachine is a backup utility intended for use with Apple OS based computers. Configuration of this service should be done on the system that should be backed up.
Twonkymedia
The Twonkymedia package upgrades the TwonkyServer from version 4.4.19 to 6.0.32 the Twonky server can be configured by clicking on Services - > UPnP AV server. For more information, see the Twonky manual on CD-Rom.
SqueezeCenter
SqueezeCenter is server software initially developed to run on a PC. It supports common digital audio formats (.MP3, .FLAC, .Ogg, Vorbis, .WMA, .AAC, .WAV, etc.) and streams them to its players. SqueezeCenter serves your music collections stored on your Home Storage Center without the need to have a PC running 24/7. SqueezeCenter comes with a web-based administration interface where you can install, control, monitor your SqueezeCenter. Click the URL link of the SqueezeCenter from the Current Package list to access the SqueezeCenter interface.
USB Backup
You can use the USB port on the back of the Home Storage Center to make a complete backup of the content on any USB Mass Storage device, such as a removable hard drive or USB stick.

text_image
USB port Backup buttonInsert the USB device into the USB port, and press the Backup button for 5 seconds. The complete content of the USB device will be copied into a folder on the Public share.
Note: The content will be publicly available on your network. Move the content to a private share if you wish to secure it.
Addendum: Choosing a storage scheme
The Home Storage Center supports 3 different storage schemes. The following will outline the benefits and disadvantages of each of these schemes.
JBOD (Just a Bunch Of Disks)
Advantages: Minimum of 1 hard drive is allowed. Total storage capacity is total of all hard drives together.
Disadvantages: If a hard drive fails all data on that drive is lost.
Raid 0 (Striping)
Advantages: Faster read and write speeds.
Disadvantages: Minimum of 2 hard drives. If one drive fails all data is lost. The smallest drive in the array determines the total capacity, example:
HDD1 is 500GB HDD2 is 500GB Total Capacity 1000GB
Raid 1 (Mirroring)
Advantages: If one drive fails no data will be lost.
Disadvantages: The total storage capacity is equal to the largest hard drive.