AZP6 - Docking Station PHILIPS - Free user manual and instructions
Find the device manual for free AZP6 PHILIPS in PDF.

User questions about AZP6 PHILIPS
0 question about this device. Answer the ones you know or ask your own.
Ask a new question about this device
Download the instructions for your Docking Station in PDF format for free! Find your manual AZP6 - PHILIPS and take your electronic device back in hand. On this page are published all the documents necessary for the use of your device. AZP6 by PHILIPS.
USER MANUAL AZP6 PHILIPS
Always there to help you
Register your product and get support at www.philips.com/welcome
AZP6/12

text_image
Question? Contact Philips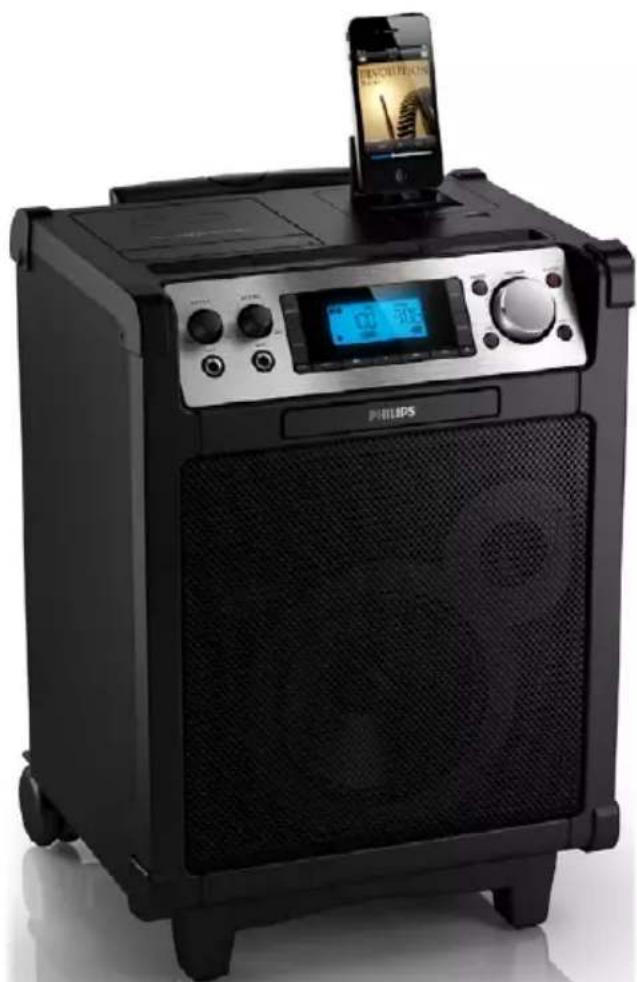
natural_image
Black Philips electronic device with a digital display and smartphone on top (no visible text or symbols on the device body)User manual 1
2 Your portable speaker system 4
Introduction 4
What's in the box 4
Overview the main unit 5
3 Get started 7
Connect power 7
Charge built-in battery 7
Turn on 7
4 Play 8
Play CD 8
Play from USB devices 8
Control play 8
Select repeat/shuffle mode 8
Display play information 8
Program tracks 8
5 Play tape 9
6 Play iPod/iPhone 10
Compatible iPod/iPhone models 10
Load the iPod/iPhone 10
Listen to the iPod/iPhone 10
Charge the iPod/iPhone 11
Remove the iPod/iPhone 11
7 Adjust sound 11
Adjust volume level 11
Enhance bass 11
Select a preset sound effect 11
8 Other features 12
Karaoke 12
Headphone 12
Listen to an external device 12
9 Product information 13
Specifications 13
Maintenance 13
10 Troubleshooting 14
1 Important
Safety
① Read and follow all instructions.
② Keep these instructions.
③ Heed all warnings.
④ Do not use this product near water. This product is not waterproof.
⑤ Clean only with dry cloth.
⑥ Do not block any ventilation openings. Install in accordance with the manufacturer's instructions.
⑦ Protect the power cord from being walked on or pinched, particularly at plugs, convenience receptacles, and the point where they exit from the apparatus.
⑧ Only use attachments/accessories specified by the manufacturer.
⑨ Use only with the cart, stand, tripod, bracket, or table specified by the manufacturer or sold with the apparatus. When a cart is used, use caution when moving the cart/apparatus combination to avoid injury from tip-over.

⑩ Unplug this product during lightning storms or when unused for long periods of time.
⑪ Refer all servicing to qualified service personnel. Servicing is required when this product has been damaged in any way, such as power supply cord or plug is damaged, liquid has been spilled or objects have fallen into this product, the product has been exposed to rain or moisture, does not operate normally, or has been dropped.
⑫ Batteries (battery pack or batteries installed) shall not be exposed to excessive heat such as sunshine, fire or the like.
⑬ Danger of explosion if battery is incorrectly replaced.
⑭ This product shall not be exposed to dripping or splashing.
⑮ Do not place any sources of danger on this product (e.g. liquid filled objects, lighted candles).
⑯ Keep this product away from direct sunlight, naked flames or other heat sources.
⑰ Do not be seated on this product.
⑱ Remove the iPod/iPhone/iPad when towing this product.
⑲ Where the MAINS plug or an appliance coupler is used as the disconnect device, the disconnect device shall remain readily operable.

Warning
- Never remove the casing of this product.
- Never lubricate any part of this product.
- Never place this product on other electrical equipment
- Never look into the laser beam inside this product.
- Make sure that you always have easy access to the power cord, plug or adaptor to disconnect this product from the power.

Caution
- Use of controls or adjustments or performance of procedures other than herein may result in hazardous radiation exposure or other unsafe operation.
Hearing safety

Warning
• To prevent possible hearing damage, do not listen at high volume levels for long periods.
Listen at a moderate volume.
- Using earphones at a high volume can impair your hearing. This product can produce sounds in decibel ranges that may cause hearing loss for a normal person, even for exposure less than a minute. The
higher decibel ranges are offered for those that may have already experienced some hearing loss.
- Sound can be deceiving. Over time your hearing 'comfort level' adapts to higher volumes of sound. So after prolonged listening, what sounds 'normal' can actually be loud and harmful to your hearing. To guard against this, set your volume to a safe level before your hearing adapts and leave it there.
To establish a safe volume level:
- Set your volume control at a low setting.
- Slowly increase the sound until you can hear it comfortably and clearly, without distortion.
Listen for reasonable periods of time:
- Prolonged exposure to sound, even at normally 'safe' levels, can also cause hearing loss.
- Be sure to use your equipment reasonably and take appropriate breaks.
Be sure to observe the following guidelines when using your earphones.
- Listen at reasonable volumes for reasonable periods of time.
- Be careful not to adjust the volume as your hearing adapts.
- Do not turn up the volume so high that you can't hear what's around you.
- You should use caution or temporarily discontinue use in potentially hazardous situations. Do not use earphones while operating a motorized vehicle, cycling, skateboarding, etc.; it may create a traffic hazard and is illegal in many areas.
Notice
Any changes or modifications made to this device that are not expressly approved by Philips Consumer Lifestyle may void the user's authority to operate the equipment.
Compliance

This product complies with the radio interference requirements of the European Community.
This apparatus includes this label:

text_image
CLASS 1 LASER PRODUCTCare of the environment

Your product is designed and manufactured with high quality materials and components, which can be recycled and reused.

When this crossed-out wheeled bin symbol is attached to a product it means that the product is covered by the European Directive 2002/96/EC.
Please inform yourself about the local separate collection system for electrical and electronic products.
Please act according to your local rules and do not dispose of your old products with your normal household waste. Correct disposal of your old product helps to prevent potential negative consequences for the environment and human health.

Your product contains batteries covered by the European Directive 2006/66/EC, which cannot be disposed with normal household waste.
Please inform yourself about the local rules on separate collection of batteries because correct disposal helps to prevent negative consequences for environmental and human health.
Always bring your product to a professional to remove the built-in battery.
Environmental information
All unnecessary packaging has been omitted.
We have tried to make the packaging easy to
separate into three materials: cardboard (box), polystyrene foam (buffer) and polyethylene (bags, protective foam sheet.) Your system consists of materials which can be recycled and reused if disassembled by a specialized company. Please observe the local regulations regarding the disposal of packaging materials, exhausted batteries and old equipment.
Trademark notice
Made for

iPod iPhone
"Made for iPod" and "Made for iPhone" mean that an electronic accessory has been designed to connect specifically to iPod or iPhone respectively, and has been certified by the developer to meet Apple performance standards. Apple is not responsible for the operation of this device or its compliance with safety and regulatory standards. Please note that the use of this accessory with iPod or iPhone may affect wireless performance. iPod and iPhone are trademarks of Apple Inc., registered in the U.S. and other countries.
Copyright
Recording and playback of material might require consent. See Copyright Act 1956 and The Performer's Protection Acts 1958 to 1972.

Be responsible Respect copyrights
The making of unauthorized copies of copy-protected material, including computer programs, files, broadcasts and sound recordings, may be an infringement of copyrights and constitute a criminal offence. This equipment should not be used for such purposes.

Note
• The type plate is located at the rear of the apparatus.
2 Your portable speaker system
Introduction
With this product, you can enjoy audio from:
- cassette tapes
- CD or MP3 disc
- iPod/iPhone
• other external devices
You can enrich sound output with:
• Dynamic Bass Boost (DBB)
• Digital Sound Control (DSC)
The product supports these media formats:


What's in the box
Check and identify the contents of the package:
- Portable speaker system
- AC power cord
- Wired microphone
- User manual
- Quick start guide
Overview the main unit
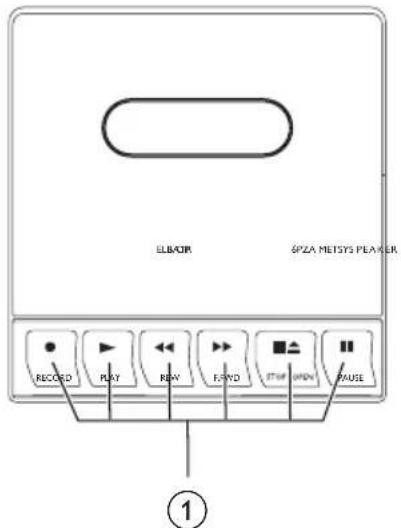
Top and front view
text_image
ELB/OP GPZA METSYS PEAKER RECOED PLAY BUY FLYD STOP IMPH PAUSE ①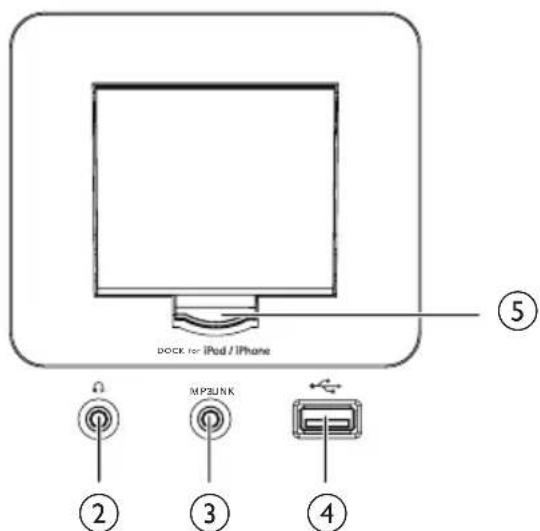
text_image
DOCK for iPod / iPhone ⑤ MP3UNK ② ③ ④
text_image
⑥ ⑦ ⑧ ⑨ ⑩ ⑪ ⑫ ⑫ ⑬ VOLUME STANLEY LOGS USB PHILIPS ⑬ ⑬ ⑭ ⑮ ⑯ ⑰ ㉑ ㉒ ㉓ ㉔ ㉕ ㉖ ㉗ ㉘ ㉙ ㉚ ㉛ ㉜ ㉝ ㉞ ㉟ ㉳ ㉴ ㉵ ㉶ ㉷ ㉸ ㉹ ㉺ ㉻ ㉒ ㉓ ㉔ ㉕ ㉖ ㉗ ㉘ ㉙ ㉚ ㉛ ㉜ ㉝ ㉞ ㉟ ㉳ ㉟ ㉟A* CRO MODE AIR = AIR = AIR = AIR① Tape controls
• :Start cassette record.
• :Start cassette play.
• /◀. Fast rewind/forward cassette
- ■ Stop cassette play/record.Open the cassette holder.
- :Pause play or record.
②
- Headphone socket.
③ MP3-LINK
- Connector (3.5mm) for an external audio device.
④
- USB port.
⑤ Dock for iPod/iPhone
⑥ MIC 1/2 volume knobs
⑦ DISPLAY
- Set the display information.
⑧ LCD screen
- Display current status.
⑨ PROG
• Program tracks in DISC/USB mode.
⑩ SOURCE
- Select a source: DISC, USB, DOCK (for iPod/iPhone), TAPE, MP3-LINK, AUX.
⑪ STANDBY
- Turn on the unit, or switch to standby mode.
⑫ Slot for iPad
⑬ Disc compartment cover
⑭ DSC
- Select a preset sound setting.
⑮ VOLUME
- Rotate to adjust the volume level.
⑯ DBB
- Tum the dynamic bass boost (DBB) on/off.
⑰ MODE
- Set repeat/shuffle play mode.
18
- Eject the disc compartment cover.
19
- Press to skip to previous/next track.
- Press and hold to backward/forward within the current track.
20
- Stop CD/USB playback.
- Erase a program.
21
- Start or pause CD/USB/iPod/iPhone playback.
② ALB-/ALB+
- Skip to previous/next album.
②3 ECHO
- Adjust echo sound effect.
⑳ MIC 1/2 sockets
text_image
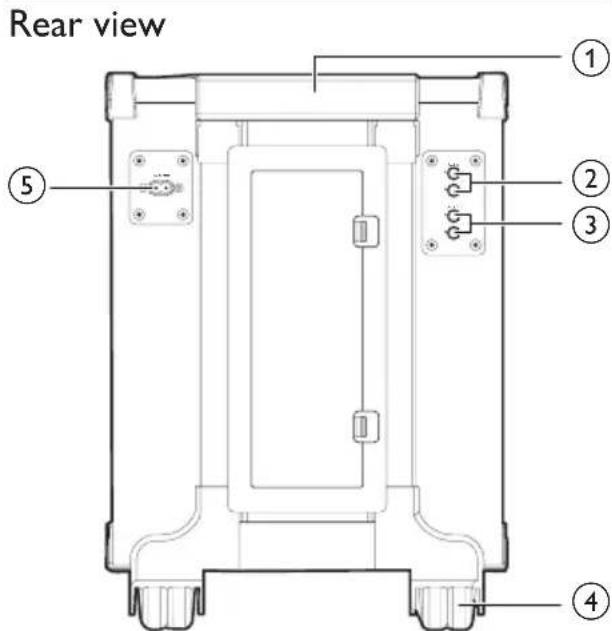
Rear view ① ② ③ ④ ⑤① Towing handle
② AUX IN sockets
③ AUX OUT sockets
④ Wheel
⑤ AC MAINS
- AC power socket
3 Get started

Caution
- Use of controls or adjustments or performance of procedures other than herein may result in hazardous radiation exposure or other unsafe operation.
Always follow the instructions in this chapter in sequence.
If you contact Philips, you will be asked for the model and serial number of this apparatus. The model number and serial number are on the rear of the apparatus. Write the numbers here: Model No. ____ Serial No. ____
Connect power

Caution
- Risk of product damage! Make sure that the power supply voltage corresponds to the voltage printed on the rear of the main unit.

Note
- The type plate is located on the rear of the main unit.
1 Connect the AC power cord to AC MAINS jack on the back of the main unit.
2 Connect the power plug to the power supply socket.
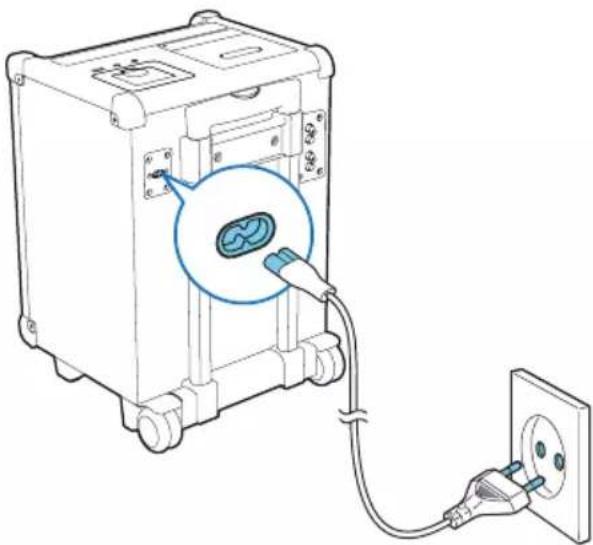
natural_image
Line drawing of an electrical device with a plug and cable, showing a close-up of a component with a magnified inset (no text or symbols)
Tip
• To use the built-in battery as power supply, unplug the power cord from the power supply socket.
Charge built-in battery
With the built-in Li-ion battery, this portable speaker systemcanwork without AC power. To charge the built-in Li-ion battery,
- Connect the main unit to AC power. → The main unit is charged automatically.
Turn on
Press ⏻
→ The unit switches to the last selected source.
Switch modes
Automatically switch the modes:
• After the unit keeps inactive for 15 minutes, it automatically switches to standby mode.
Manually switch the modes:
- Press STANDBY to switch the unit between working mode and standby mode.
4 Play
Play CD
1 Press SOURCE repeatedly to select DISC source.
2 Press ▲ to eject the cover of disc compartment.
3 Load a disc with the printed side facing outwards.
4 Close the cover of disc compartment.
5 Press ▶to start play.
Play from USB devices

Note
- Ensure that the USB device contains playable audio contents for supported formats.
1 Insert the USB device into the connector.
2 Press SOURCE repeatedly to select USB source.
3 Press ALB-/ALB+ to select a folder.
4 Press 1 to select a file.
5 Press ▶to start play.
- To stop play, press
• To pause or resume play, press ▶II
Control play
During play, follow the instructions below to control play.
Buttons Functions
| ▶II | Pause or resume play. |
| ■ | Stop play. |
Press to skip to previous/next track.
- Press and hold to search within a track.

Note
• To avoid short mute, do not playback the CD when towing this product.
Select repeat/shuffle mode
1 During play, press MODE repeatedly to select a repeat/shuffle option.
• : the current track is played repeatedly.
• ALB: the current album is played repeatedly.
• call the tracks are played repeatedly.
- x : all tracks are played in a random order.
2 To return to normal play, press MODE repeatedly until no repeat/shuffle option is displayed.
- You may also press ■o cancel repeat/shuffle play.

Tip
- Shuffle play is not available when programmed tracks are played.
Display play information
During play, press DISPLAY repeatedly to view different play information.
Program tracks
You can program a maximum of 20 tracks.
1 In DISC/USB mode, at the stop position, press PROG to activate the program mode.
→ [PROG] (program) starts to blinks.
2 For MP3/WMA tracks, press ALB-/ALB+ to select an album.
3 Press 1/4 to select a track number, then press PROG to confirm.
4 Repeat steps 2 to 3 to program more tracks.
5 Press ▶ play the programmed tracks. → During play, [PROG] (program) is displayed.
- To erase a program, in the stop position, press ■.
5 Play tape

Note
- When you play or record a tape, the sound source cannot be changed.
1 Press SOURCE to select the tape source.
2 Open the tape button cover.
3 Press ■ to open the tape door.
4 Load the tape with the open side upward and the full spool to the left.
5 Press ▶ to start play.
• To pause/resume play, press ||
• To rewind or fast-forwarded, press ◀◀ / ▶.
- To record, press ●
- To stop play, press ■.▲
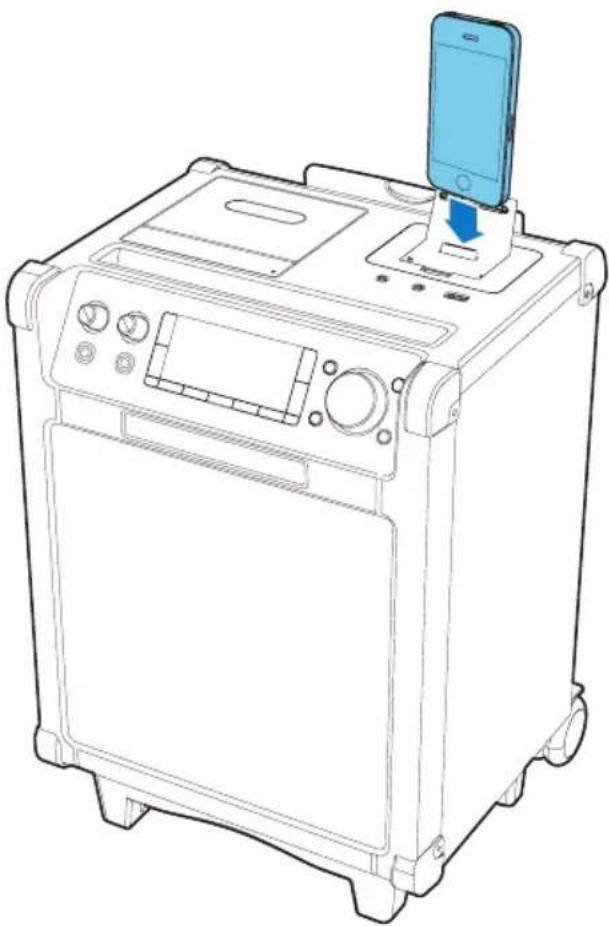
6 Play iPod/iPhone
This system is equipped with a dock for iPod/ iPhone. You can enjoy audio from the docked system through the powerful speakers.

Warning
- Do not play iPod/iPhone when you tow this unit to avoid damage.
Compatible iPod/iPhone models
This portable speaker system supports the following iPod/iPhone models.
- iPhone 4S
- iPhone 4
- iPhone 3GS
- iPhone 3G
- iPhone
- iPod touch (1st, 2nd, 3rd, and 4th generations)
- iPod nano (1st, 2nd, 3rd, 4th, 5th, and 6th generations)
Load the iPod/iPhone
1 Push the lock key to open the lid of the dock.
2 Load the iPod/iPhone onto the dock.
natural_image
Line drawing of a portable electronic device with a smartphone on top, showing control panel and buttons (no text or symbols)Listen to the iPod/iPhone
1 Press SOURCE repeatedly to select DOCK source.
2 Play the selected track on your docked iPod/iPhone.
• To pause/resume the play, press ▶ II
- To skip to previous/next track: press /▶▶
Charge the iPod/iPhone

Note
- Before you charge an iPod/iPhone, make sure that this portable speaker system is powered through the AC power source.
Once the iPod/iPhone is docked and recognized, it is charged automatically.
Remove the iPod/iPhone
1 Unload the iPod/iPhone from the dock.
2 Flip down the lid to hide the dock.
7 Adjust sound
Adjust volume level
During play, rotate VOLUME knob clockwise/counter-clockwise to increase/decrease the volume level.

Tip
- You can adjust the volume level from VOL 01 to VOL 31, VOL MIN and VOL MAX.
Enhance bass
During play, press DBB to turn the dynamic bass boost on or off.
→ If DBB is activated, is displayed.
Select a preset sound effect
During play, press DSC repeatedly to select a sound effect:
• [POP] (pop)
• [JAZZ] (jazz)
- [CLASSIC] (classic)
• [ROCK] (rock)
8 Other features
Karaoke
You can connect a microphone and sing along with a music source.
1 Tum microphone volume to the minimum level.
2 Connect a microphone to the MIC 1/2 jack of the unit.
3 Press SOURCE repeatedly to select a source and start play.
4 Sing through the microphone.
• To adjust the volume of the source, rotate VOLUME knob.
• To adjust the volume of the microphone, rotate MIC 1/2 volume knobs.
• To adjust the echo level, press ECHO repeatedly.
Headphone
Plug headphones (not supplied) into the HEADPHONE connector on the unit to listen through the headphones.
Listen to an external device
You can listen to an external audio device through this portable speaker system. For audio players with headphone sockets
1 Press SOURCE repeatedly to select MP3-LINK source.
2 Connect the MP3 link cable to:
- the MP3-LINK jack (3.5mm) on the unit.
• the headphone jack on an external device.
3 Start to play the device.

Tip
- You can load your iPad into the slot for iPad when you connect your iPad to MP3-LINK jack.
For audio players with red/white audio output sockets
1 Press SOURCE repeatedly to select AUX IN source.
2 Connect the audio cables (white/red jacks, not supplied) to:
- the AUX IN jacks on the back of the unit.
- the audio out sockets on an external device.
3 Start to play the device.
9 Product information

Note
- Product information is subject to change without prior notice.
Specifications
General
| AC power input 100V-240V~, 50/60Hz | |
| Built-in battery 14.6V | ==, 2,200mAh |
| Operation power consumption | 40 W |
| Standby power consumption | <0.5 W |
| USB Direct version 2.0 FS | |
| Dimensions (W × H × D) | 328.3 × 464 × 309 mm |
| Weight 8.6 kg | |
Amplifier
| Frequency Response | 60 - 16000 Hz, ±3 dB |
| Signal to Noise Ratio | >65 dBA |
| Aux Input (MP3 link) | 0.5 V RMS 20kohm |
Disc
| Laser type Semiconductor | |
| Disc diameter 12 cm, 8 cm | |
| Supported discs CD-DA, CD-R,CD-RW, WMA-CD,MP3-CD | |
| Audio DAC | 24 Bits, 44.1 kHz |
| Total harmonicdistortion | < 1% |
| Frequency response | 60 Hz -16 kHz |
| S/N Ratio | > 62 dB |
Maintenance
Clean the cabinet
- Use a soft cloth slightly moistened with a mild detergent solution. Do not use a solution containing alcohol, spirits, ammonia or abrasives.
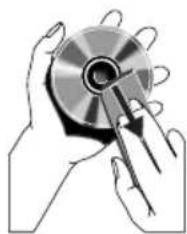
Clean discs
- When a disc becomes dirty, clean it with a cleaning cloth. Wipe the disc from the centre out.
natural_image
Illustration of hands holding a CD or DVD disc with a pen inserted (no text or symbols visible)- Do not use solvents such as benzene, thinner, commercially available cleaners, or antistatic spray intended for analogue records.
Clean the disc lens
• After prolonged use, dirt or dust may accumulate at the disc lens. To ensure good play quality, clean the disc lens with Philips CD lens cleaner or any commercially available cleaner. Follow the instructions supplied with cleaner.
10 Troubleshooting

Warning
- Risk of electric shock. Never remove the casing of the player.
To keep the warranty valid, never try to repair the system yourself.
If you encounter problems when using the player, check the following points before requesting service. If the problem remains unsolved, register your player and get support at www.philips.com/welcome.
No power
• Make sure that the power cord is connected securely.
• Make sure that there is power at the power supply socket.
• Make sure that the built-in battery is fully charged.
No sound
- Adjust the volume.
- Ensure that the track played is of a compatible format.
Display does not function properly./No reaction to operation of any of the controls.
1 Disconnect the AC power cord.
2 Connect the AC power cord after a few seconds.
Cannot play disc
- Ensure that the disc label is inserted with the printed side facing up.
- Wipe the disc with fibre cleaning cloth from the centre to the edge in a straight line.
- This disc may be defective. Play another disc.
- Ensure that the CD is a finalised CD/CD-R/CD-RW.
- Ensure that the laser lens is clean.
- Ensure that the CD is not encoded with copyright protection technologies.
The CD skips tracks
- Ensure that the CD is not damaged or dirty.
- Ensure that program/shuffle mode is deactivated.
Poor cassette sound quality
- Ensure that heads in the cassette holder are clean.
- Ensure that a NORMAL (IECI) cassette tape is used for record.
Cassette does not work for record
- Ensure that cassette tabs are not broken.

text_image
PHILIPSSpecifications are subject to change without notice
All rights reserved.
AZP6_12_UM_Book 1_V2.0
