MD-272 - Media player SITECOM - Free user manual and instructions
Find the device manual for free MD-272 SITECOM in PDF.

User questions about MD-272 SITECOM
0 question about this device. Answer the ones you know or ask your own.
Ask a new question about this device
Download the instructions for your Media player in PDF format for free! Find your manual MD-272 - SITECOM and take your electronic device back in hand. On this page are published all the documents necessary for the use of your device. MD-272 by SITECOM.
USER MANUAL MD-272 SITECOM
natural_image
Exterior view of a black rectangular electronic device with ports and indicators (no readable text or symbols)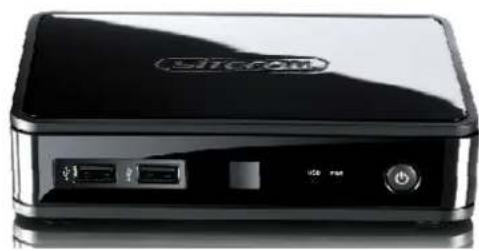
natural_image
Black Siemens SIM-AM device with USB port and power button (no visible text or symbols on body)Introduction
Congratulations on your purchase of the Sitecom MD-272/MD-273 TV Media Player. The MD-272/273 TV Media Player supports playback of the most common file formats of digital video, audio and photo media. Attach the media player via standard AV or HDMI cables to a standard or high-definition TV. The compact size of the device allows you to take it with you to anyone you like and share your digital content.
Photos
• Display slide shows with music
- Zoom, pan, move and rotate photos
Video
- Fast forward, rewind, pause, zoom, and pan
- View subtitles
Music
- Fast forward, rewind, pause, shuffle, and repeat
- Playlist support
Network
- Connect the TV Media Player via cable or wireless to your home network
- Play Media from a NAS or computer directly to your TV
Online
- Connect the TV Media Player via cable or wireless to the internet
• View Media from popular applications such as YouTube and MediaFly - Use popular online applications such as Facebook
Index
1 Key Features ....4
2 Package Contents......5
3 Cautions....6
3.1 Usage Cautions.... 6
3.2 Power....6
3.3 Radio Interference 6
3.4 Repair 6
3.5 Disposing of the Player 6
3.6 Hard Disk Cautions (MD-272 only) 6
3.7 Other....7
4 Product Layout....8
4.1.1 Front Panel MD-272....8
4.1.2 Front Panel MD-273....9
4.2.1 Back Panel MD-272 10
4.2.2 Back Panel MD-273 11
4.3 Remote Control 12
5 Getting Started....14
5.1 Installation Requirements.... 14
5.2 Installation Procedure.... 14
6 Navigating the menu....18
6.1 Menu Language 18
6.2 Output Resolution 18
6.3 Home Menu 20
6.4 Settings Menu 22
6.4.1 System 22
6.4.2 Audio 25
6.4.3 Video 28
6.4.4 Network 31
6.4.5 MISC....31
6.5 Music Menu 33
6.5.1 Playing Audio 33
6.5.2 Browsing Files 34
6.6 Photos Menu 38
6.6.1 Display & Slide Show 38
6.6.2 Browsing Files 39
6.7 Movies 42
6.7.1 Video Player....42
6.7.2 Browsing Files 46
6.7.3 Network playback 48
6.8 Online....50
7 Appendix....56
7.1 Copyrights and Trademarks 56
7.2 Warranty 56
7.3 GPL Statement .... 56
Revision 1.0
© Sitecom Europe BV 2011
Note: All the information contained in this manual was correct at the time of publication. However, as our engineers are always updating and improving the product, your device's software may have a slightly different appearance or modified functionality than presented in this manual.
1 Key Features
The key features of MD-272/273 TV Media Player include:
• HDMI interface for digital audio and high-definition video.
- Composite interface (RCA, yellow/white/red) for analogue AV connection.
• Video output resolution includes 480i (using the composite interface), or 480p, 576p, 720i, 720p, 1080i, and 1080p (available when using the HDMI interface).
• Built-in screensaver.
- Remote Control included.
• Dolby Digital and DTS support.
- Ethernet connection for network connectivity.
Supported file types
| Video Audio Photo Playlist Subtitles | ||||
| Mpeg 1 MP3 (CBR, VBR) GIF PLS SRT (UTF-8) | ||||
| Mpeg 2 MP2 BMP M3U SMI | ||||
| Mpeg 4 (ASP) | WAV/PCM/LPCM | JPEG | SUB | |
| Mpeg 4 (AVC HD/H.264) | AAC (Mpeg 4) | TIF/TIFF | ASS | |
| WMV9 AC3 (Dolby) | PNG SSA | |||
| VC-1 | FLAC | |||
| MKV | WMA | |||
| Xvid | WMA Pro | |||
| DivX | Ogg Vorbis | |||
| AVI (MPEG4, Xvid, AVC) | ||||
| VOB/ISO/IFO | ||||
| DVR-MS | ||||
| ASF | ||||
| MOV(MPEG4, H.264) | ||||
| DAT (VCD/SVCD) | ||||
| FLV | ||||
2 Package Contents
Open the package carefully, and make sure that none of the items listed below are missing. Do not discard the packing materials, in case of return; the unit must be shipped back in its original package.
The contents of the package of the MD-272/273 TV Media Player are:
- TV Media Player
- HDMI Cable
- RCA Cable
- Remote control with batteries
- 12V DC adapter
- Quick Installation Guide
• CD-ROM with additional manuals
• USB cable (MD-272 only)
3 Cautions
This player's design and manufacturer has your safety in mind. In order to safely and effectively use this player, please read the following before usage.
3.1 Usage Cautions
User should not modify this player. If commercial hard disk is being used, the environmental temperature should be within +5 +35 degrees Celsius.
3.2 Power
The player's power voltage is DC 12V.
When using this player, please connect the supplied AC adapter or AC adapter cable to the player's power jack. When placing the adapter cable, make sure it can not get damaged or be subject to pressure. To reduce the risk of electric shock, unplug the adapter first before cleaning it. Never connect the adapter to the player in a humid or dusty area. Do not replace the adapter or cable's wire or connector.
3.3 Radio Interference
- If not properly shielded, almost all electronic devices will get radio interference. Under some conditions, your player might get interference.
- The design of this player has followed the FCC/CE standard, and has followed the following rules:
(1) This player may not cause harmful interference;
(2) This player could accept some interference received including interference that may cause undesired operation.
3.4 Repair
If the player has a problem, you should take it to an appointed repair centre and let the specialists do the repair, never repair the player yourself, you might damage the player or endanger yourself or your data.
3.5 Disposing of the Player
When you dispose of the player, be sure to dispose it appropriately. Some countries may regulate disposal of electrical device, please consult with your local authority.
3.6 Hard Disk Cautions (MD-272 only)
The player uses an internal hard disk for data storage, in normal case, format or repair is not required. You should carefully read the
- Physical impact may create bad sectors on the hard disk, you can use CHKDSK to fix the problem.
- All data stored on the player may be lost due to physical impact, electrical shock, power surge, HDD format etc. Please backup your data regularly.
- It is suggested to do a defragmentation after a long period of usage.
- Regularly backup the data in the hard disk so that it can be recovered in the event of data corruption or loss. Our company takes no responsibility for loss of data stored on the hard disk.
3.7 Other
When using this player, please do not let the player come into contact with water or other liquid, if water is accidentally spilled on the player, please use a dry cloth to absorb the spillage. Electronic products are vulnerable, when using please avoid shaking or hitting the player, and do not press the buttons too hard.
- Do not let the player come into contact with water or other liquid.
- Do not disassemble the player, repair the player or change the design of the player, any damage done will not be included in the repair policy.
- Do not press the buttons of the remote too hard.
- Avoid hitting the player with a hard object, avoid shaking the player and stay away from magnetic fields.
- If during electrostatic discharge or a strong electromagnetic field the product will malfunction, unplug the power cable. The product will return to normal performance the next time it is powered on.
4 Product Layout
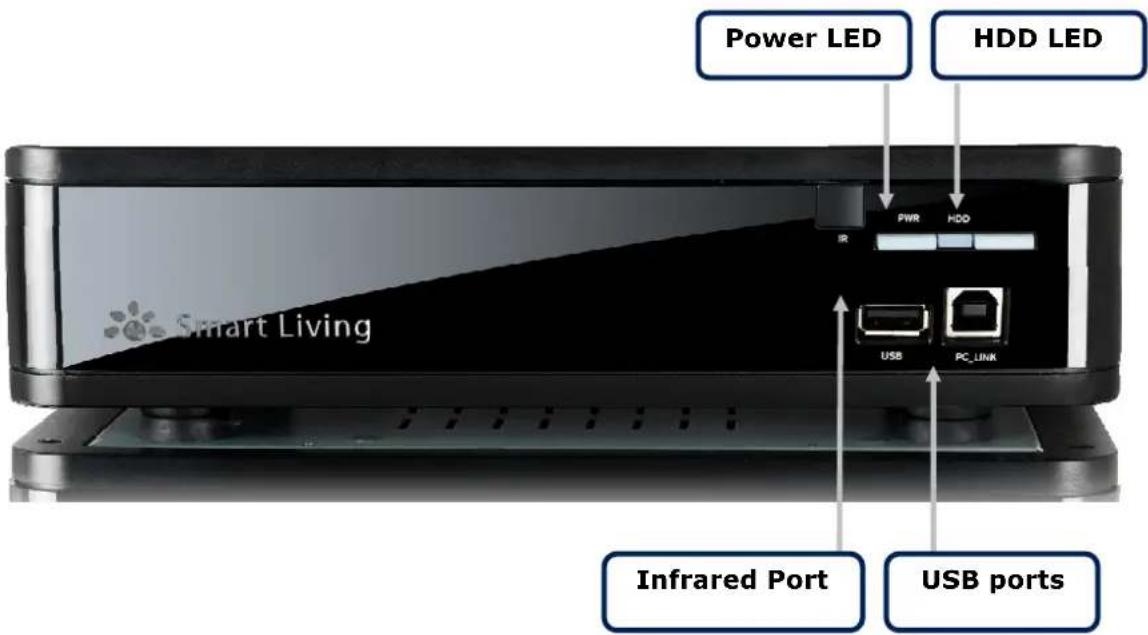
4.1.1 Front Panel MD-272
text_image
Power LED HDD LED Smart Living R PWR HDD USB PC LINK Infrared Port USB ports| Item Description | |
| USB PortsInfraRed Port Point | Use thes to connect the Media Player to your PC or to connect external storage to the MD-272. |
| Hard disk LEDPower LED The LED | The Remote Control at the InfraRed Receiver.The LED lights green when the Hard disk inside the MD-272 is active.lights blue when the MD-272 is switched on. |
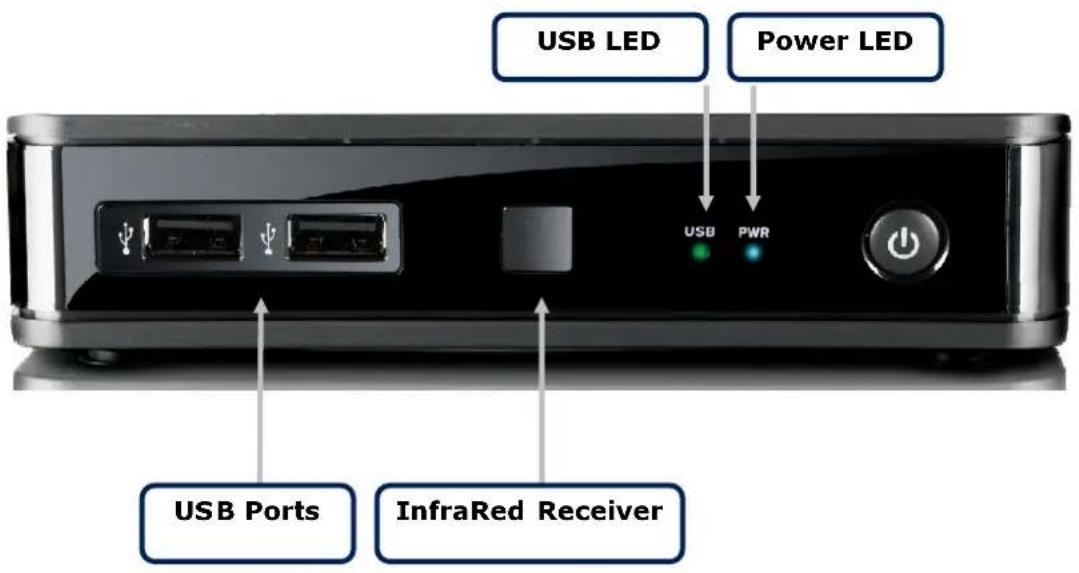
4.1.2 Front Panel MD-273
text_image
USB LED Power LED USB PWR USB Ports InfraRed Receiver| Item Description | |
| USB Ports Use these to connect the Media Player to your external storage. | |
| InfraRed Receiver | Point the Remote Control at the InfraRed Receiver. |
| USB LED The LED | lights green when external storage is connected. |
| Power LED The LED | lights blue when the MD-273 is switched on. |
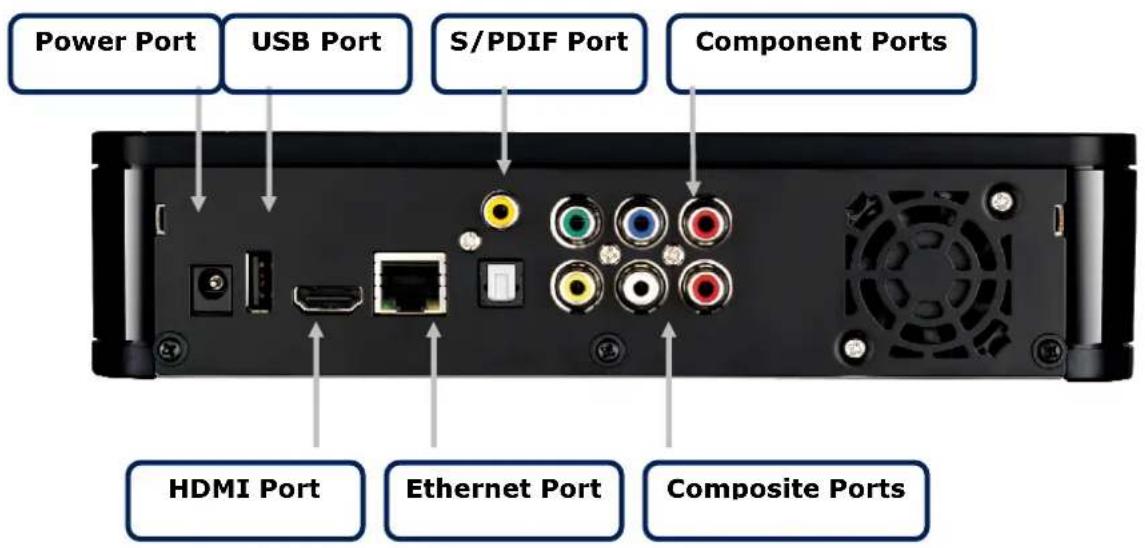
4.2.1 Back Panel MD-272
text_image
Power Port USB Port S/PDIF Port Component Ports HDMI Port Ethernet Port Composite Ports| Item Description | |
| Power Connector Connect the 12V DC Adapter to this port.USB Port Use this to connect USB external storageS/PDIF Ports Use these to connect a coaxial or optical cable. | |
| Component Ports Use these to connect a component video cable. | |
| HDMI Port Use this to connect a digital Television. | |
| Ethernet Port Use this to connect to your home network. | |
| Composite Ports Use these to connect a composite audio/video cable. | |
4.2.2 Back Panel MD-273
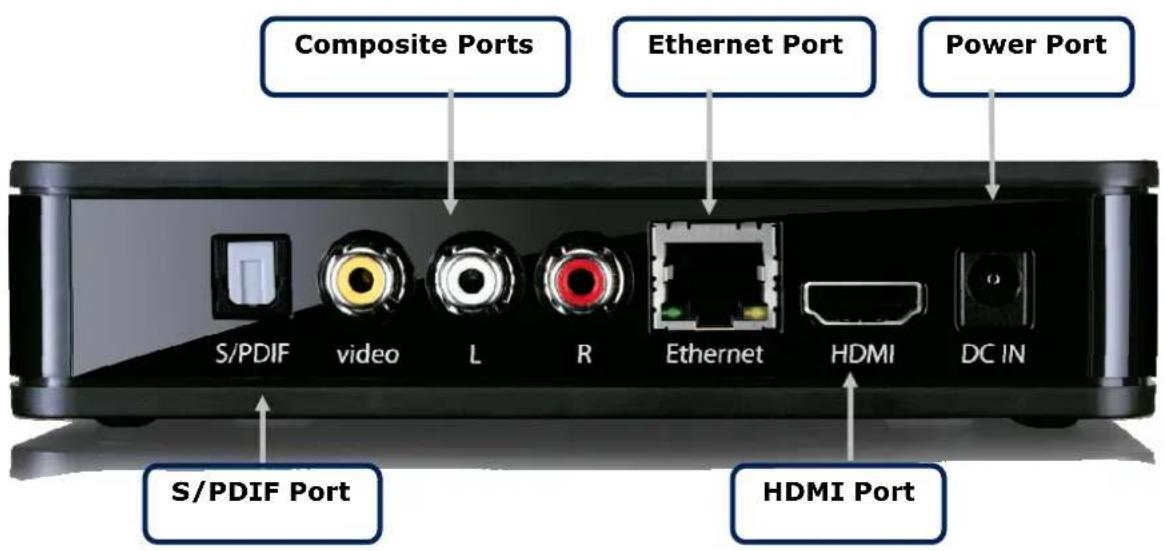
text_image
Composite Ports Ethernet Port Power Port S/PDIF video L R Ethernet HDMI DC IN S/PDIF Port HDMI Port| Item Description | |
| Power Connector | Connect the 12V DC Adapter to this port. |
| Ethernet Port Use this to connect to your home network. | |
| S/PDIF Port Use these to connect a optical audio cable. | |
| Composite Ports Use these to connect a composite audio/video cable. | |
| HDMI Port Use this to connect a digital Television. | |
4.3 Remote Control
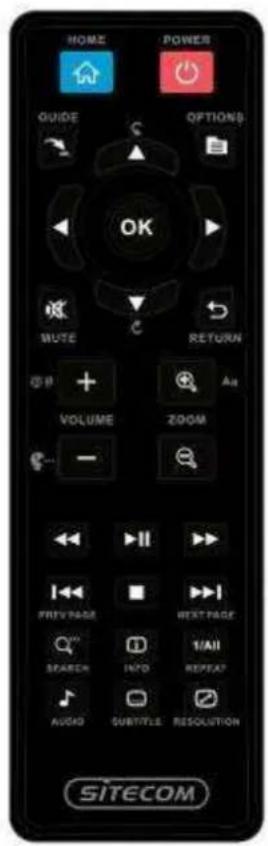
text_image
HOME POWER GUIDE OPTIONS OK MUTE RETURN VOLUME Zoom - I/II FIRV PAGE NEXT PAGE SEARCH INFO 1/All REPEAT AUDIO SUBTITLE RESOLUTION SITECOM| Button Function | or Description |
| Power Turn the TV Media Player on or off. | |
| Home Go to the Homepage. | |
| Menu Arrows Use these to select the file or menu option you want displayed. | |
| Ok Choose the option/action/file that's currently highlighted. | |
| Return Return to the previous menu page. | |
| Mute Mute the sound. | |
| Options | View options for playback of the file type used. Use the navigation buttons and OK button to select an option. |
| Playback Buttons | Standard playback functions for Play/Pause, Fast Forward, Fast Reverse and Stop. |
| Previous/Next | Play or view the previous file or next file in the folder. |
| Search Go to the Search menu. |
| Repeat Repeat the playing file. |
| Audio Choose the audio stream while watching video. |
| Subtitle Choose the subtitle stream while watching video. |
| Resolution Show the currently used resolution. |
| Info Show information about the playing file. |
| Volume Select the volume output. |
| Zoom Zoom in or out on the photo or video. |
5 Getting Started
Before beginning the installation, please read through the installation procedure described in this manual.
5.1 Installation Requirements
To begin using the TV Media Player, you will need:
- A television set (TV) with either a HDMI connection or available AV composite cable connections for audio and video.
• The TV Media Player connected to the TV. - A USB hard disk or USB flash memory device with a USB 2.0 cable containing media files (video, music and digital photos).
5.2 Installation Procedure
The TV Media Player installation procedure is summarized below:
- Transfer digital video, digital photo and digital music or audio files to the TV Media Player (MD-272 only).
- Connect the TV Media Player to a TV.
- Connect the power to the TV Media Player.
- Connect the USB hard disk containing stored digital media to the TV Media Player and power on the hard disk.
- Connect the Ethernet cable to the Ethernet port (if the device is used on a local network).
5.2.1 Transfer Media files to the TV Media Player (MD-272 only)
Transfer your favourite content, like your music, videos and photos, from your computer to the MD-272 via the USB connector. You can connect the MD-272 like any other USB storage. You don't need to put the files in any order, the Portable TV Media Player will sort them out in the right categories for Music, Videos and Photos.
5.2.2 Connecting the TV Media Player
Below is a summary of the audio and video connection options. The pages that follow have illustrations of the various connection types.
Video Connections
To connect video to your TV, there are several options. If your TV or home entertainment system is equipped with a HDMI port, use a HDMI cable for the video and audio connection. Alternatively, the media player video output can be supplied through the composite video connection (A/V port). The MD-272 also features a component connection for higher image quality on TV's that haven't got a HDMI connection.
- Composite Video
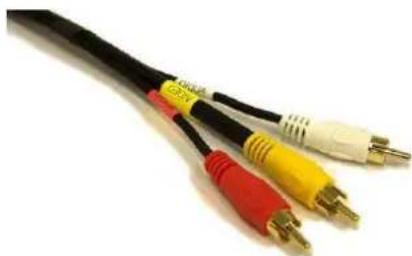
natural_image
Close-up of a black and red audio/video cable with three colored connectors (yellow, red, white) against a white background.Plug the supplied RCA cable into the A/V port on the rear panel of the TV Media Player and the opposite end of the cable into the composite video in connector on your TV.
- HDMI Video
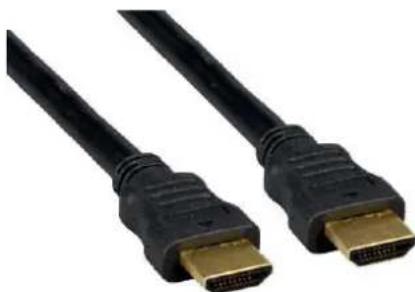
natural_image
Close-up of two black HDMI cables with gold connectors (no text or symbols visible)Plug the HDMI cable into the HDMI connector on the back panel of the TV Media Player. Plug the opposite end to the matching HDMI connector on your television or audio video system. HDMI provides the best video quality resolution up to 1080p, plus audio support.
- Component Video (MD-272 only)
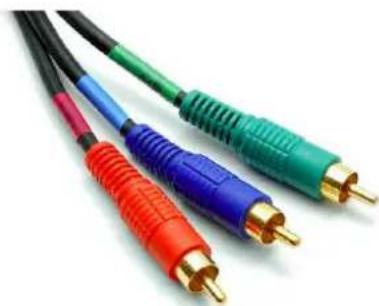
natural_image
Close-up of three colored audio/video cables (black, blue, red) with gold connectors, no text or symbols visible.Plug the component cable into the corresponding ports on the back panel of the TV Media Player. Plug the opposite ends to the corresponding ports on your television or audio video system. Component provides the best video quality resolution up to 1080p, but without audio.
Audio Connections
The TV Media Player supports digital audio over HDMI or S/PDIF. Alternatively a RCA analogue connection for the stereo audio signal can be used.
- Analogue Audio (RCA)
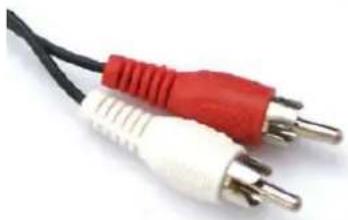
natural_image
Close-up of two audio/video cables with red and white connectors (no text or symbols visible)Plug the supplied RCA cable into the A/V port and the red and white connectors into the colour-coded Audio connectors of your stereo receiver. Connect the red plugs to the Right (R) jacks and the white plugs to the Left (L) jacks.
• Digital Audio (S/PDIF)
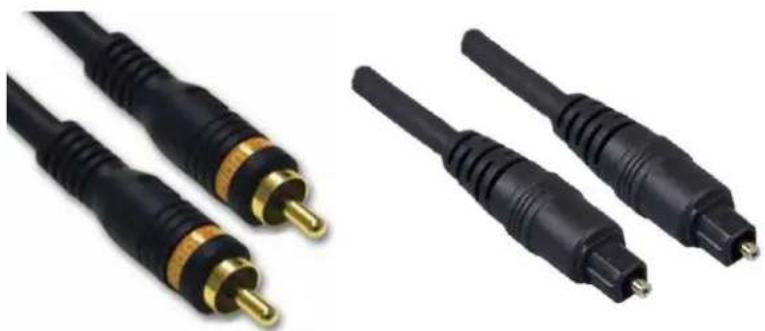
natural_image
Close-up of two black audio/video cables with gold connectors, shown from different angles (no text or symbols visible)Plug a coaxial or optical cable into the corresponding port on the back of the TV Mediaplayer. Connect the other end to the corresponding port on your Television set or Audio receiver.
5.2.3 Connect power to the TV Media Player
Connect the supplied 12V DC adapter to a free wall socket. Connect the other end to the designated port on the back of the TV Media Player.
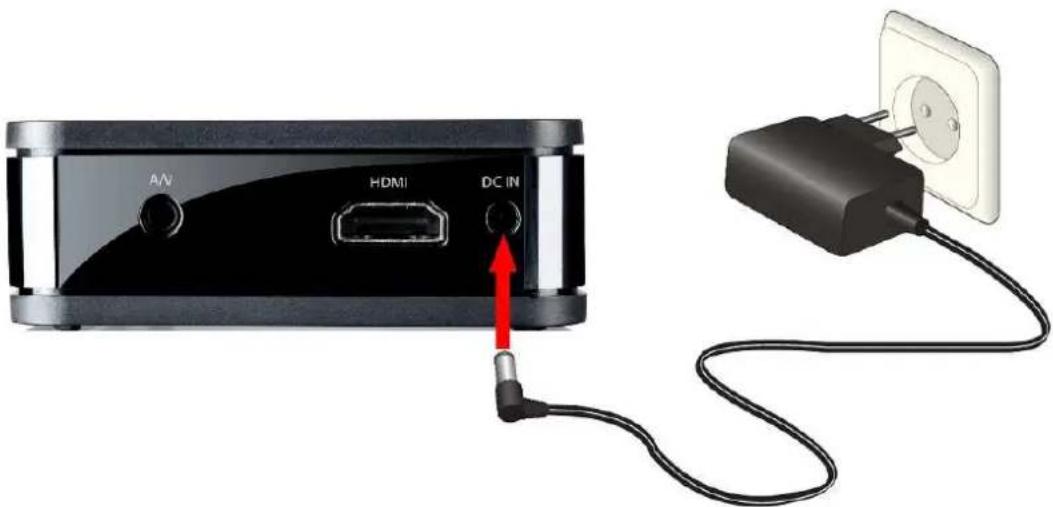
text_image
A/V HDMI DC IN5.2.4 Connect USB to the TV Media Player
The TV Media Player automatically searches the disk for supported media content. If there is a large volume of digital media, it might take several minutes to completely scan the disk, however the files that have already been scanned can be played. Some USB hard drives require a separate power source to use it, so make sure the USB disk is powered on and connected. Often USB hard disks have LED indicators that let you know if it is powered on and if it is connected. Check the user guide of the USB hard disk for more information.
5.2.5 Connect Ethernet to the TV Media Player
The TV Media Player includes an Ethernet port to connect the TV Media Player to a local network in order to use digital media stored on servers connected to the network. Connect a Cat5 or higher certified cable to the designated port on the TV Media Player. Connect the other end of the cable to a hub, switch, modem or router.
6 Navigating the menu
Once the TV Media Player is connected and the (USB) hard disk contains digital media files it automatically begins searching for supported media. The TV Media Player can be used while it is still scanning for content. Turn on the TV and direct it to the input used for the TV Media Player to view the main menu interface. If this is the first time accessing the interface or if the TV Media Player has just been powered on, the initial setup will ask you a couple of questions.
6.1 Menu Language
Initial Setup -> Menu Language

text_image
Language English Español Français Deutsch Italiano NederlandsSelect from the list of languages.
Use the 'Up' and 'Down' buttons to select the item, press 'OK' to confirm.
6.2 Output Resolution
Initial Setup -> Resolution
text_image
TV system 720P 50Hz 720P 60Hz 1080i 50Hz 1080i 60Hz 1080P 50Hz 1080P 60HzUse this setting to select the video display resolution when using the HDMI interface. The default setting is Auto.
Note: Full HD quality can be received when the mode is set to 1080p. Please note that your TV needs to be capable of showing this resolution. 720p and up cannot be selected if the TV is connected via the composite connection.
6.3 Home Menu
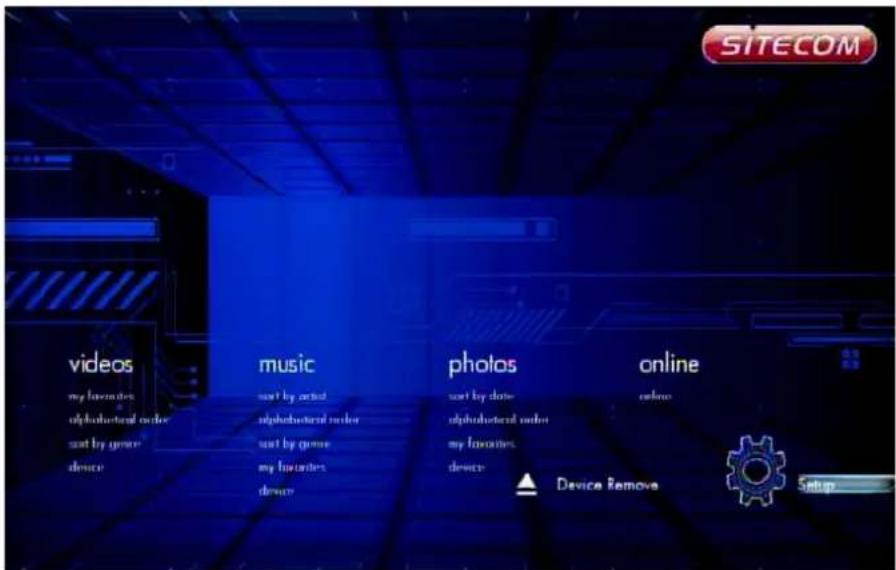
Every time you start the system, you will see the Home Menu.
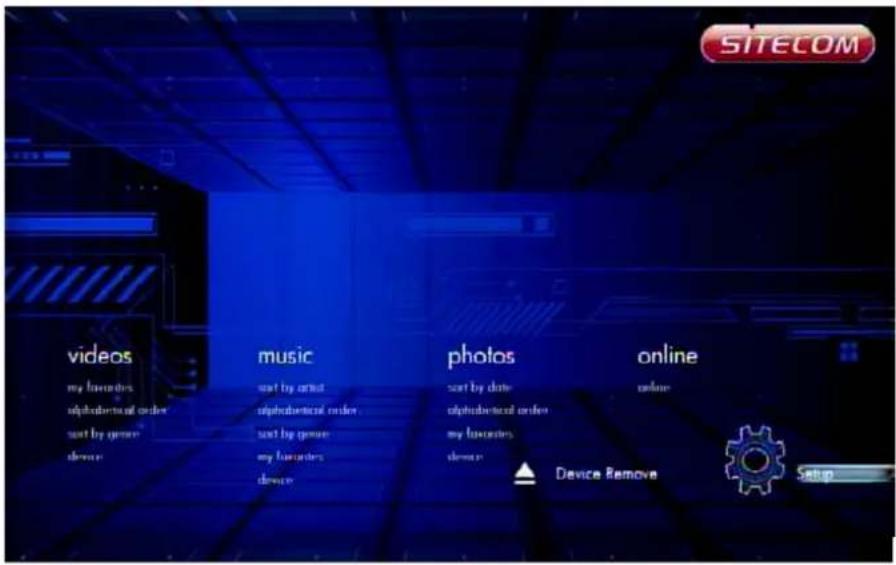
text_image
SITECOM videos my favorites alphabetical order sort by genre device music sort by audio alphabetical order sort by genre my favorites device photos sort by date alphabetical order my favorites device online online ▲ Device Remove SetupAt the Home Menu, use the arrow keys 'Left' and 'Right' buttons to select each item, to enter the item please press 'OK' button. Each item is described as below.
6.3.1 Setup

natural_image
3D rendered gear with eight teeth and central bore (no text or symbols)To set the system functions such as System, Audio, video, etc.
6.3.2 Music

natural_image
Illustration of a CD or DVD disc with a musical note symbol (no text or labels)In the Music menu you can browse through your music files and play them.
6.3.3 Photos

natural_image
Illustration of a camera with a yellow sticky note and a gray rectangular body (no text or symbols)In the Photo menu you can browse through your photos and view them.
6.3.4 Movies

natural_image
Illustration of a film reel with a metallic blade (no text or symbols)In the Movies menu you can browse through the videos and watch them.
These are all items in the Home Menu. In the next chapters these items will be described in more detail.
6.4 Settings Menu
It is recommended to use the Setup menu before first using the system.

text_image
SITECOM videos my favorites alphabetical order sort by genre device music sort by actual alphabetical order sort by genre my favorites device photos sort by date alphabetical order my favorites device online online ▲ Device Remove SetupIn the Home Menu, use the 'Left' and 'Right' buttons to select 'Settings' and press the 'OK' button to enter the menu.
6.4.1 System
Settings -> System
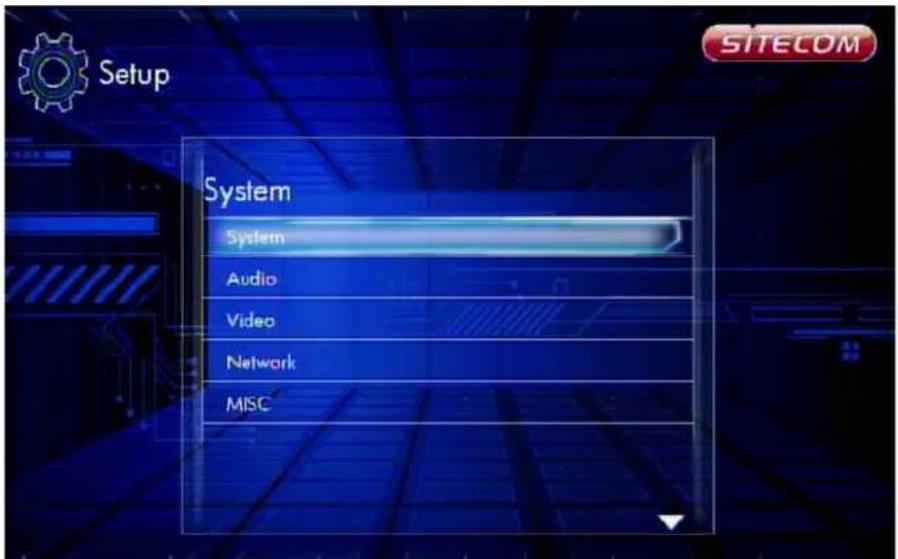
text_image
Setup System System Audio Video Network MISC6.4.1.1 Menu Language
Settings -> System -> Menu Language
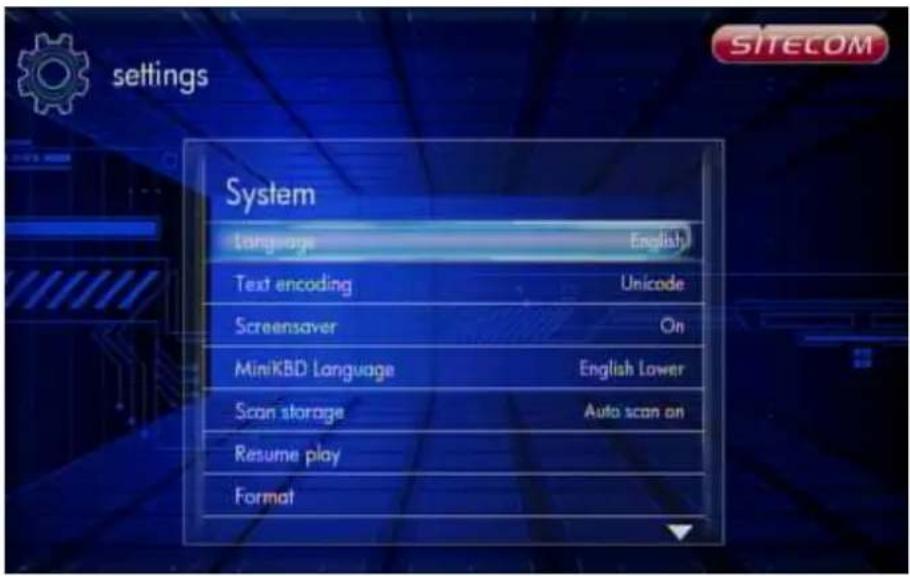
text_image
settings System Language English Text encoding Unicode Screensaver On MiniKBD Language English Lower Scan storage Auto scan on Resume play FormatPress the 'OK' button to enter the multi-language list and use the arrow key 'Up' and 'Down' buttons to select the language. Press the 'OK' button to confirm.
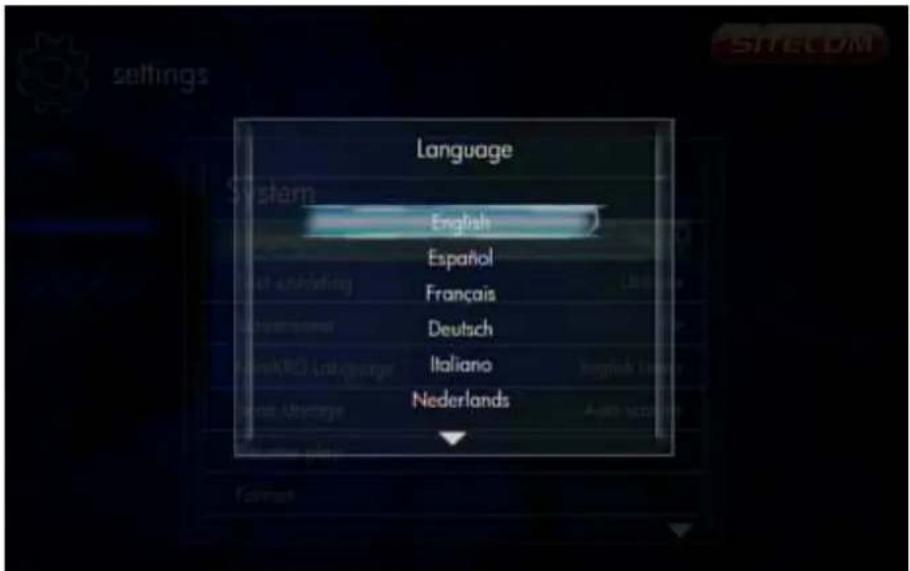
text_image
Language English Español Français Deutsch Italiano Nederlands6.4.1.2 Text Encoding
Settings -> System -> Text Encoding
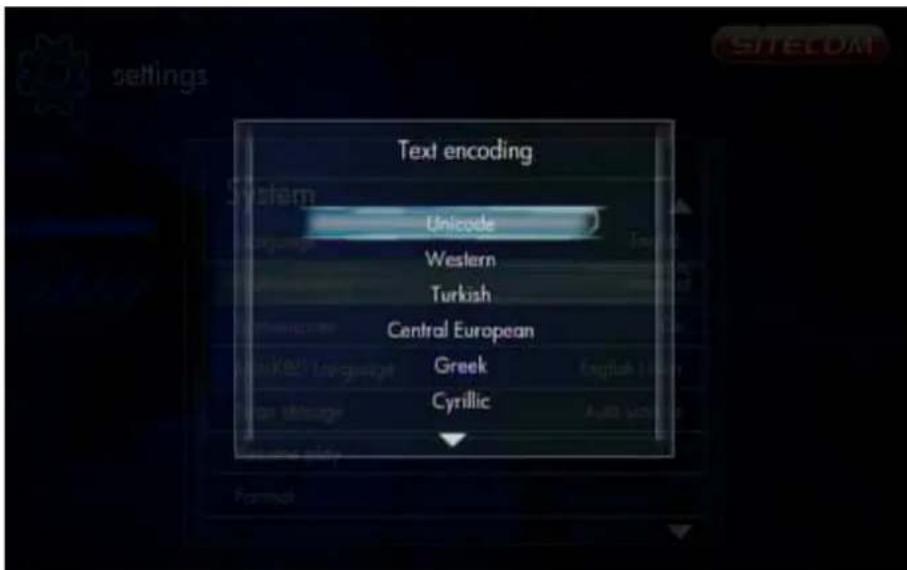
text_image
Text encoding Unicode Western Turkish Central European Greek CyrillicYou can choose the different encoding types; Unicode (UTF8), Simplified Chinese (GBK), Traditional Chinese (BIG5), Turkish, etc. Press the 'Up' and 'Down' buttons to select the item and press the 'OK' button to confirm.
6.4.1.3 DLNA DMR
Settings -> System -> DLNA DMR
Turn on or off the DLNA DMR function. When it is on, you can select the media files on your DLNA server, and select "Play on device", the file will be sent to this player and playback automatically. Windows Media Player 12 in Windows 7 supports this function and you can apply it to play the media on this player.
6.4.1.4 Device Name
Settings -> System -> Device Name
When the NAS function is on, the PC can see the player as the device name here. The default name is based on the unique MAC Address of the player and you can change it to your desired name.
6.4.1.5 Screen Saver
Settings -> System -> Screen Saver
Enable or disable the screen saver function. Use the 'Up' and 'Down' buttons to select "On" or "Off". Press the 'OK' button to confirm.
6.4.1.6 Scan storage
Settings -> System -> Scan storage
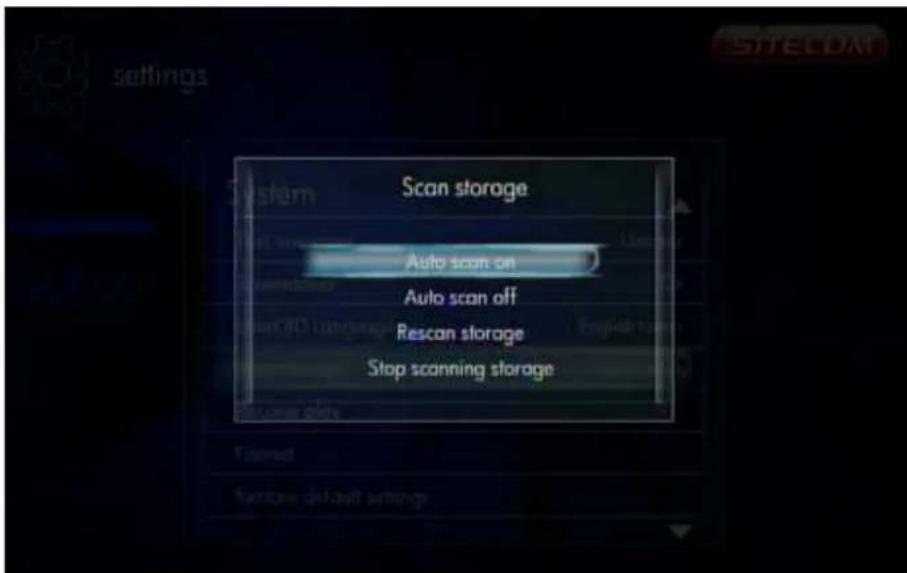
text_image
Scan storage Auto scan on Auto scan off Rescan storage Stop scanning storageSet the scan mode of the storage detection.
Auto scan on - system will scan the storage automatically.
Auto scan off - system will not scan the storage.
Rescan storage - manually scan the storage.
Stop scanning storage - do not scan the storage.
Please use the 'Up' and 'Down' buttons to select and press the 'OK' button to confirm.
6.4.1.7 Resume Play
Settings -> System -> Resume Play
The device supports a video resume play function. Use this item to enable or disable the resume play function.
6.4.1.8 Format (MD-272 only)
Use this setting to format the internal storage of the TV Media Player.
Warning: You will lose all content on the storage!
6.4.1.9 Factory Default
Settings -> System -> Restore Default Settings
Use this setting to restore all TV Media Player system preferences and media playback settings to their default factory values. This is done to correct performance problems caused by a failed firmware upgrade or a faulty configuration setting.
6.4.2 Audio
Settings -> Audio
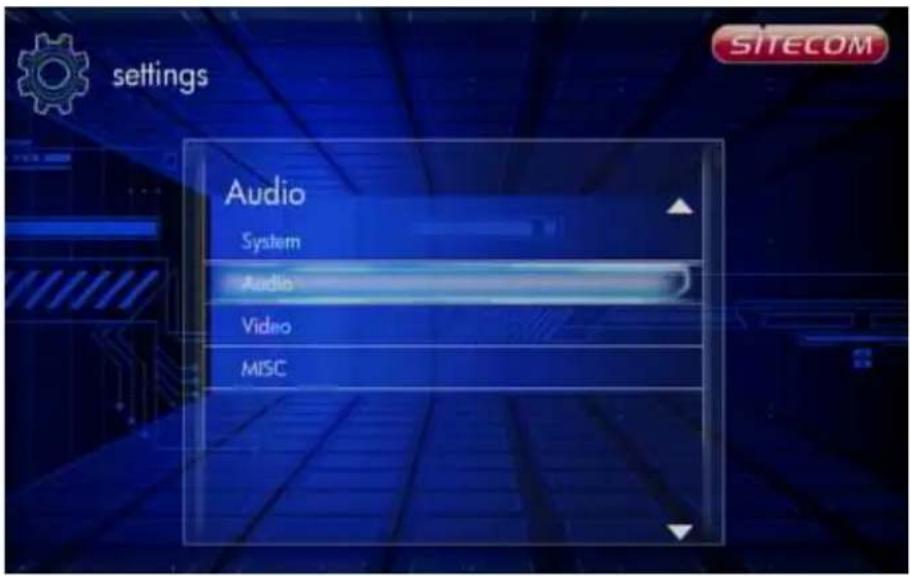
text_image
settings Audio System Audio Video MISC6.4.2.1 Night Mode
Settings -> Audio -> Night Mode
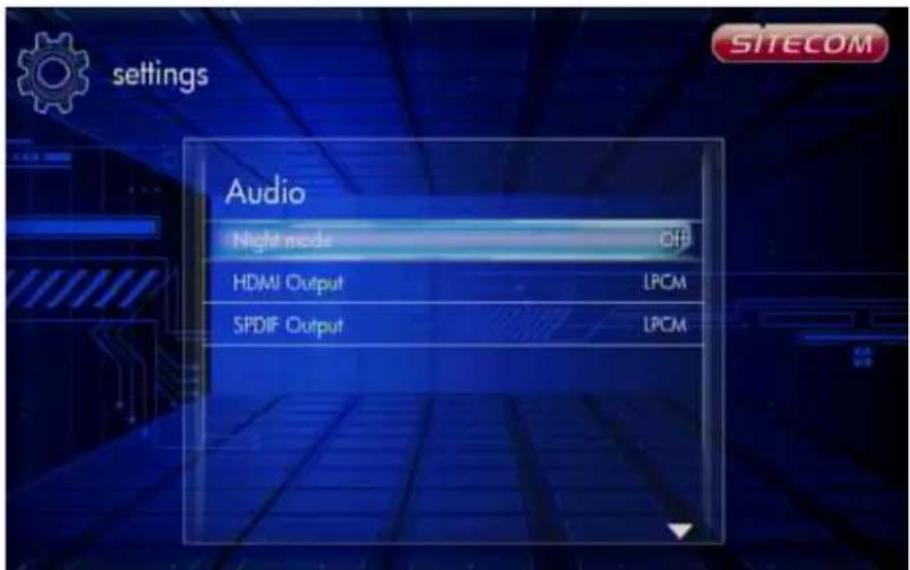
text_image
Audio Night mode OFF HDMI Output LPCM SPDIF Output LPCMThis setting is to switch the "Night Mode". With this setting you can limit the maximum volume output.
6.4.2.2 HDMI Output
Settings -> Audio -> HDMI Output
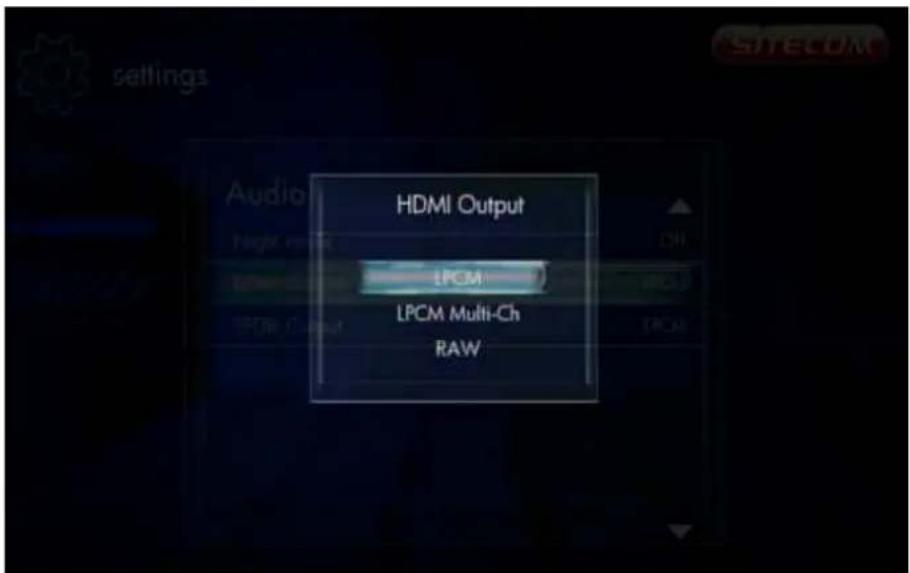
text_image
HDMI Output LPCM LPCM Multi-Ch RAWThis setting is to switch the audio output over the HDMI connection. You can choose between:
LCPM - Linear pulse code modulation two channel LCPM Multi-Channel - Linear pulse code modulation Multi-Channel 5.1, 7.1 RAW - Audio Raw data.
Use the 'Up' and 'Down' buttons to select an item and press the 'OK' button to confirm.
6.4.2.3 SPDIF Output
Settings -> Audio -> SPDIF Output
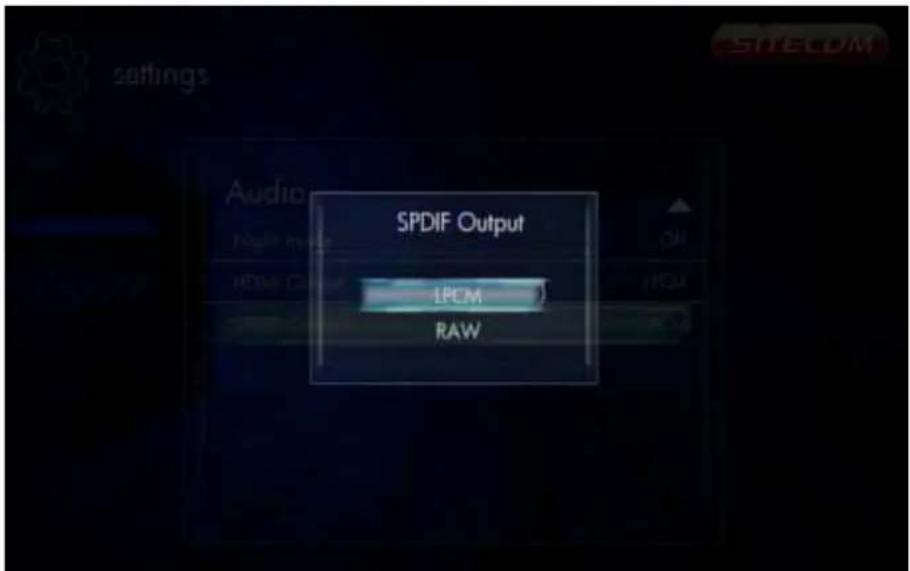
text_image
SPDIF Output LPCM RAWThis setting is to switch the Audio SPDIF output. You can choose between:
LCPM - Linear pulse code modulation two channel RAW - Audio Raw data.
Use the 'Up' and 'Down' buttons to select an item and press the 'OK' button to confirm.
6.4.3 Video
Settings -> Video
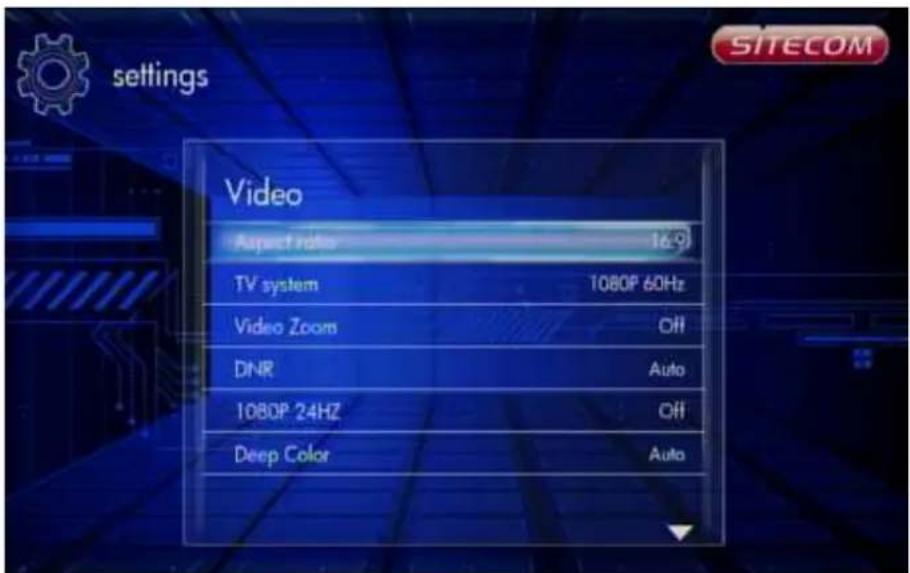
text_image
settings Video Aspect ratio 16.9 TV system 1080P 60Hz Video Zoom OFF DNR Auto 1080P 24HZ OFF Deep Color Auto6.4.3.1 Aspect Ratio
Settings -> Video -> Aspect Ratio
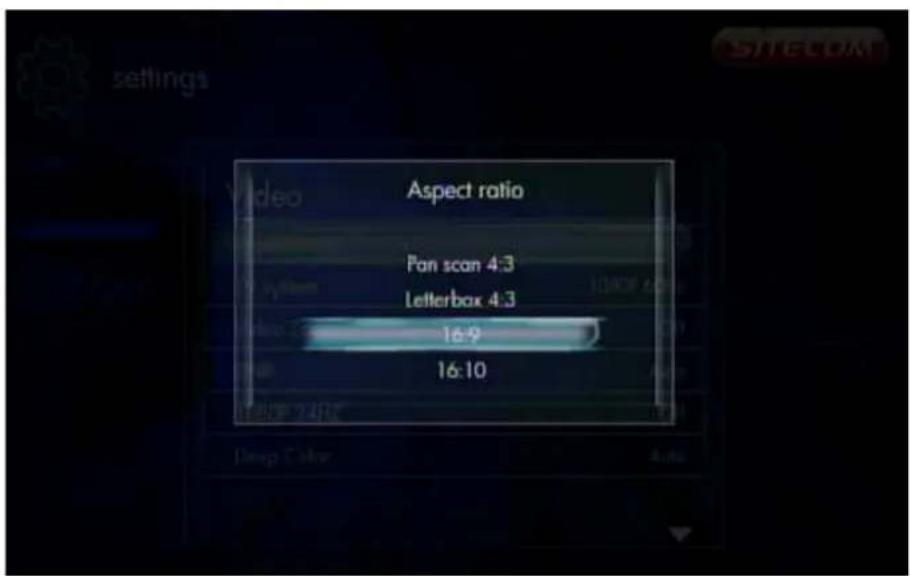
text_image
Aspect ratio Pan scan 4:3 Letterbox 4:3 16:9 16:10Use this setting to choose screen ratio. You can choose between:
Pan & Scan 4:3 - 16:9 picture in 4:3 screen mode with and adjusted ratio to meet 4:3. Letter Box 4:3 - 16:9 picture in 4:3 screen mode with the black bars top and bottom. 16:9 16:10
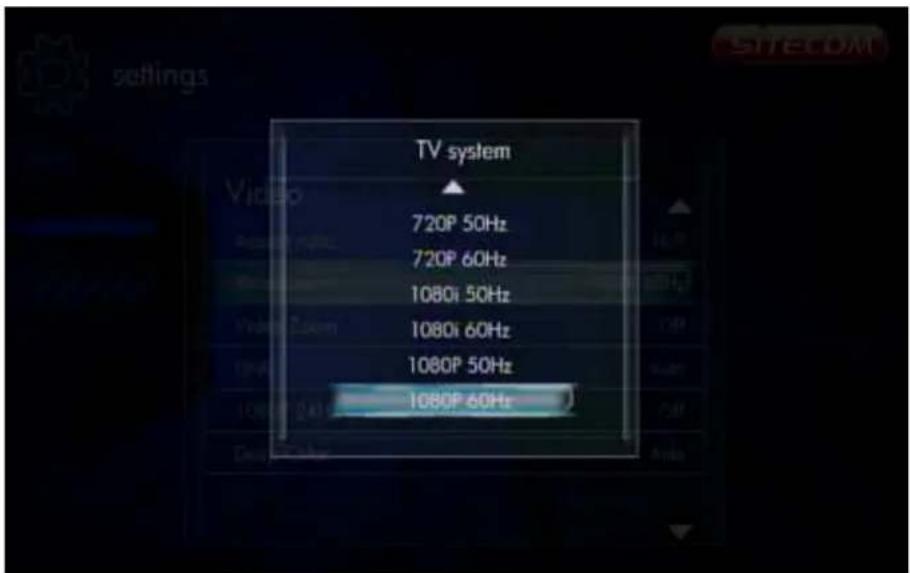
6.4.3.2 TV System
Settings -> Video -> TV System
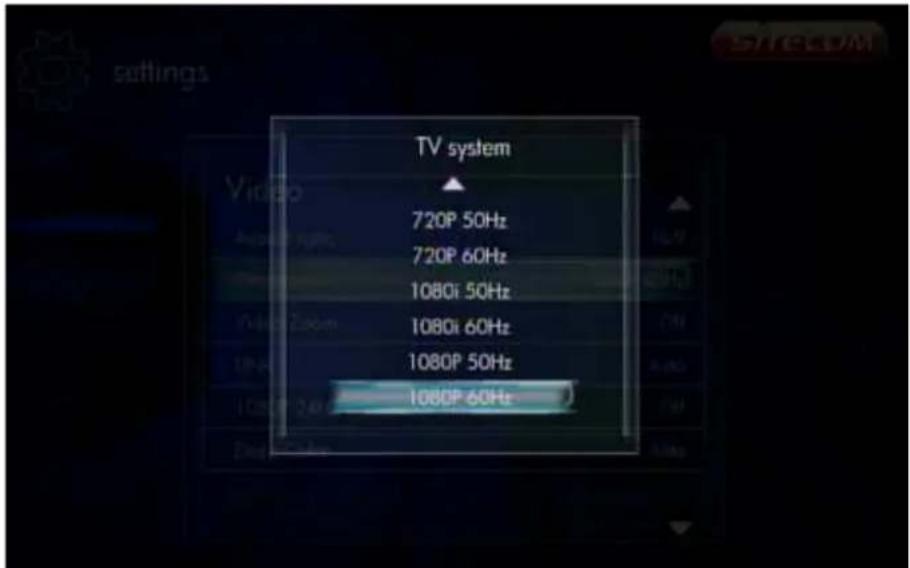
text_image
TV system 720P 50Hz 720P 60Hz 1080i 50Hz 1080i 60Hz 1080P 50Hz 1080P 60HzUse this setting to choose the resolution and TV system. You can choose between:
NTSC - National Television System Committee
PAL - Phase Alternating Line
480P
576P
720P 50Hz
720P 60Hz
1080i 50Hz
1080i 60Hz
1080P 50Hz - Full HD
1080P 60Hz - Full HD
6.4.3.3 Video Zoom
Settings -> Video -> Video Zoom
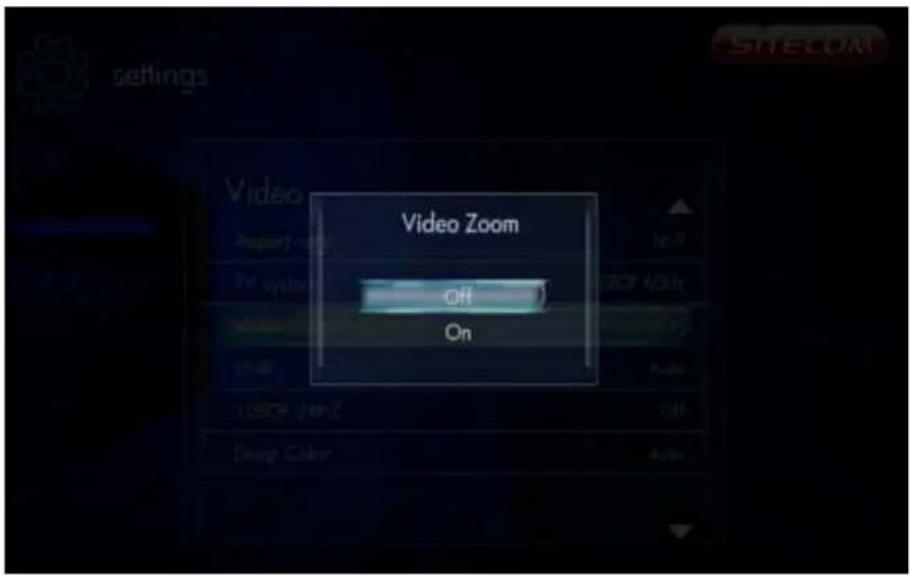
text_image
Video Zoom Off OnUse this function to set the video zoom in/out function.
6.4.3.4 Digital Noise Reduction
Settings -> Video -> Digital Noise Reduction
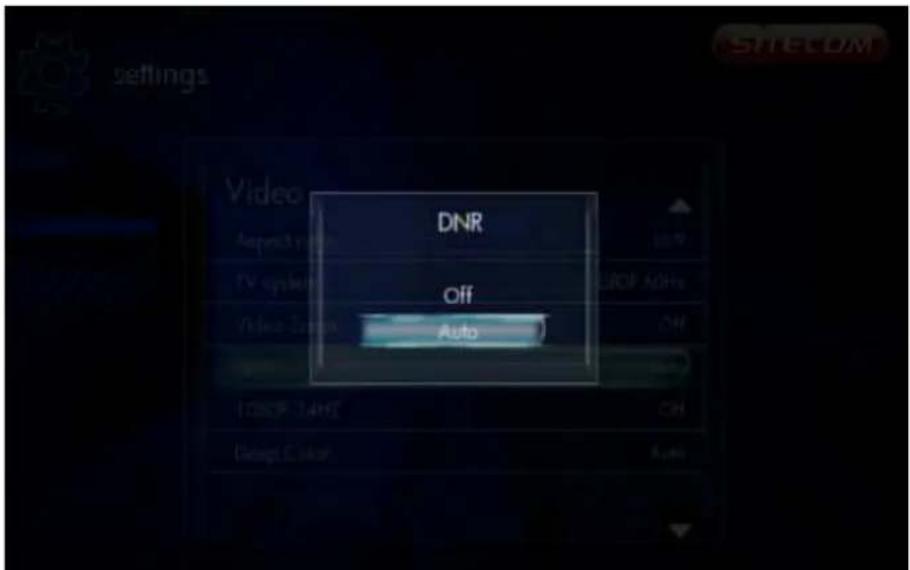
text_image
DNR Off AutoUse this function to enable or disable the digital noise reduction.
6.4.3.5 1080P 24HZ
Settings -> Video -> 1080P 24HZ
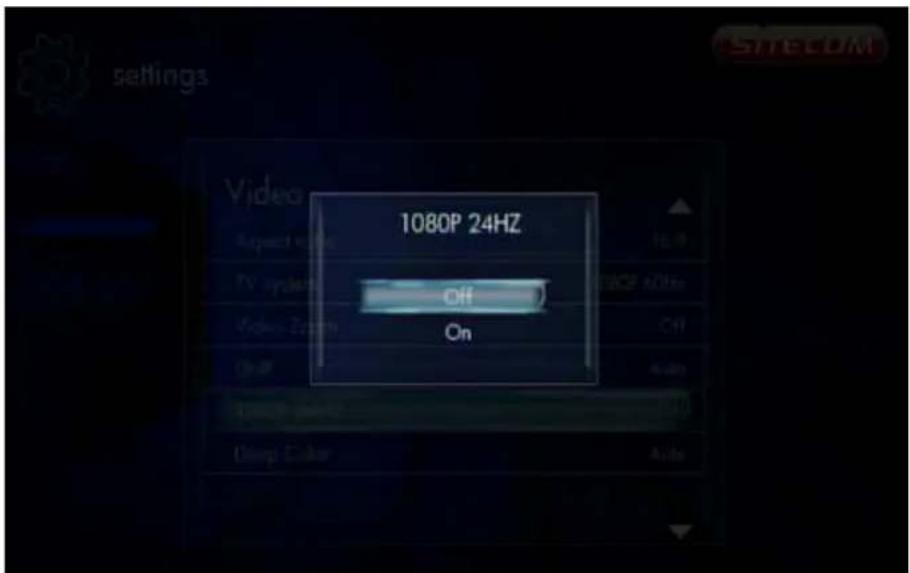
text_image
1080P 24HZ Off OnIf the TV supports 1080P 24HZ, you can turn on this option.
6.4.4 Network
Settings -> Network
6.4.4.1 Wired LAN Setup
Settings -> Network -> Wired LAN Setup
Set "DHCP IP" or "Fixed IP" for the Ethernet LAN IP configuration of this player.
6.4.4.2 Network Attached Storage
Settings -> Network -> NAS
Switch the NAS function on or off.
6.4.4.3 Network Info
Settings -> Network -> Network Info
Display network information like IP Address, MAC Address and etc.
6.4.5 MISC
Settings -> MISC
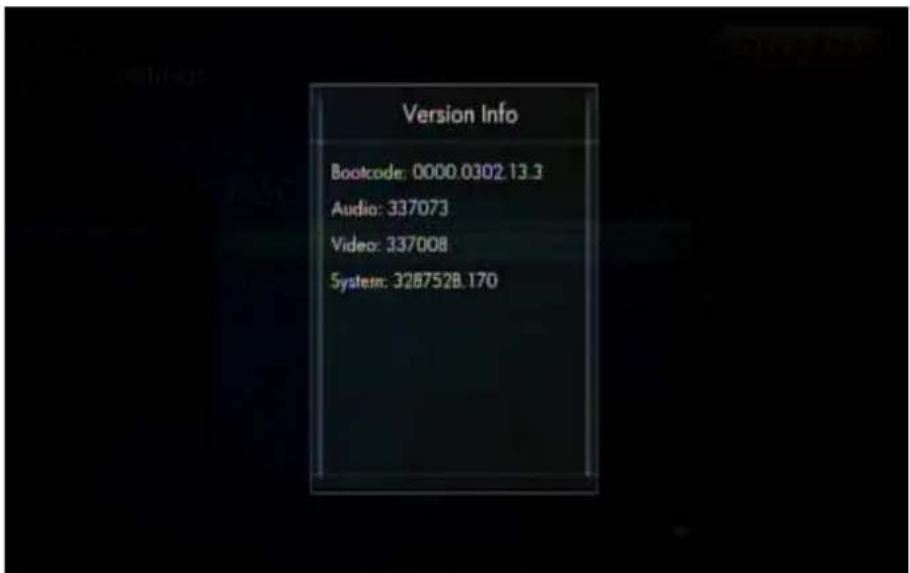
text_image
Version Info Bootcode: 0000.0302.13.3 Audio: 337073 Video: 337008 System: 328752B.170Various miscellaneous settings.
Version Info - Select this setting to display the current hardware and firmware configuration.
Firmware upgrade - Use this setting to update the new firmware if there is any.
Important: Make sure the TV Media Player's AC power adapter remains connected during the firmware update. A power disruption during the update process can corrupt the system firmware.
To update the firmware:
- Go to www.sitecom.com and download the latest firmware update.
- Unzip the firmware package.
- Copy firmware file to the root of the TV Media Player via the USB connection.
- Connect the TV Media Player to the TV system.
- Select Settings -> MISC -> Firmware upgrade.
6.5 Music Menu
In the Music menu you can browse through your music files and play them.

text_image
SITECOM videos my favorites alphabeted order set by genre device music set by artist alphabeted order set by genre my favorites device photos set by date alphabeted order my favorites device online online Device Remove Setup6.5.1 Playing Audio
Music -> press 'OK' or 'Play' button
If you want to play the selected music file, press the 'OK' button or the 'Play' button to start playback. During playback, you can press the following buttons:
'FFWD' to fast forward through the song,
'FREV' to fast reverse through the song,
'Next' to jump to the next song in play list,
'Previous' to jump to the previous song in play list,
'VOL+/-' to increase or decrease the volume,
'Stop' to stop play,
'Return' will return to file browser, while still continuing to play.
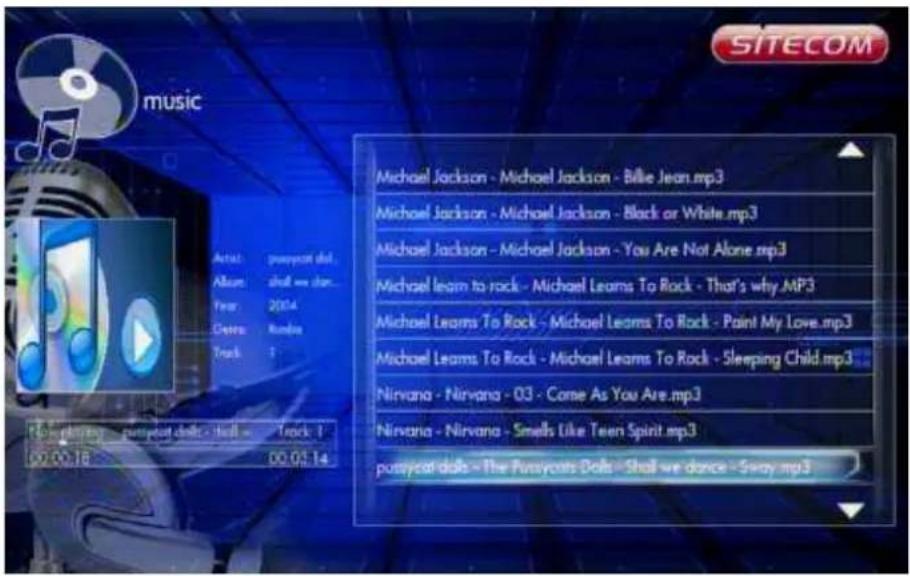
text_image
music Michael Jackson - Michael Jackson - Billie Jean.mp3 Michael Jackson - Michael Jackson - Black or White.mp3 Michael Jackson - Michael Jackson - You Are Not Alone.mp3 Michael learn to rock - Michael Leams To Rock - That's why.mp3 Michael Leams To Rock - Michael Leams To Rock - Paint My Love.mp3 Michael Leams To Rock - Michael Leams To Rock - Sleeping Child.mp3 Nirvana - Nirvana - 03 - Come As You Are.mp3 Nirvana - Nirvana - Smells Like Teen Spirit.mp3 putyscat dolo - The Pusyscats Dolo - Shall we dance - Sway.mp3You can press the 'Option' button to select the 'Repeat Mode' during playback:
□ Repeat Off
□ Repeat One
□ Repeat All
□ Shuffle Loop
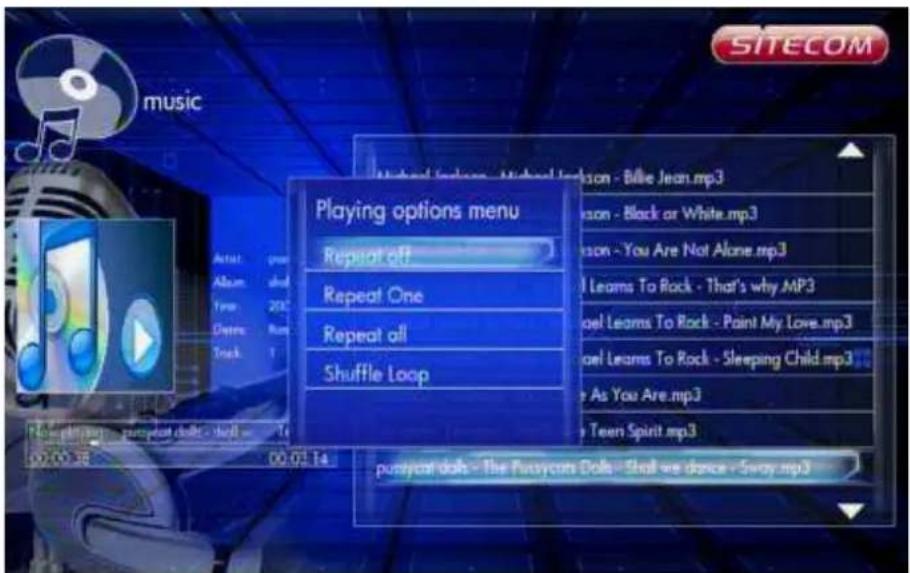
text_image
SITECOM music Playing options menu Repeat off Repeat One Repeat all Shuffle Loop Music - Billie Jean.mp3 Music - Black or White.mp3 Music - You Are Not Alone.mp3 I Learn To Rock - That's why.MP3 Icel Learms To Rock - Paint My Love.mp3 Icel Learms To Rock - Sleeping Child.mp3 As You Are.mp3 Teen Spirit.mp3 pursycast doth - The Pursycast Doth - Shall we dance - Sway.mp36.5.2 Browsing Files
Music -> press 'Option' button

text_image
SITECOM music sorted by: Artist Option menu Change layout sorted by Add to playlist View playlist -Others - { }-WWE-RAW .mp3 -Others - 00_FinalFantasyX2.wav -Others - 00_no artist - AudioTrack 05.wav -Others - 11 Prayer Of St Francis.m4a -Others - 2 unlimited - Twilight zone.mp3 -Others - 56kb32khz(st).mp3 -Others - Ace of Base - Beautiful life.mp3 -Others - Alice Cooper - Polson.mp3 -Others - AIA_1000_new.wavPressing the 'Option' button in the Music browser will pop up the Option window which can switch the browsing file mode. You have the following options:
□ Thumbnail
□ List
□ Preview
Use the arrow 'Up' and 'Down' buttons to select and press the 'OK' button to confirm.
6.5.2.2 Thumbnails
Music -> Press 'Option' button -> Thumbnails
text_image
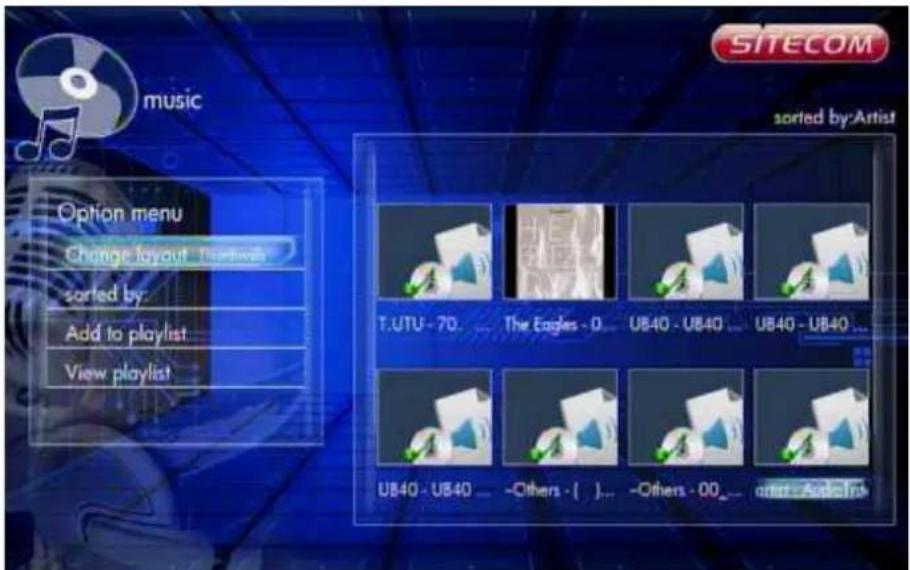
SITECOM music sorted by:Artist Option menu Change layout: The Eagle sorted by: Add to playlist View playlist T.UTU - 70 ... The Eagles - 0 ... UB40 - UB40 ... UB40 - UB40 ... UB40 - UB40 ... -Others - [ ]... -Others - 00... artist = Add ToIf there is at least one image file in the directory then the directory will have a thumbnail which is made from this image file. Otherwise it will have a normal thumbnail made from the default directory picture.
6.5.2.3 List
Music -> Press 'Option' button -> List
text_image
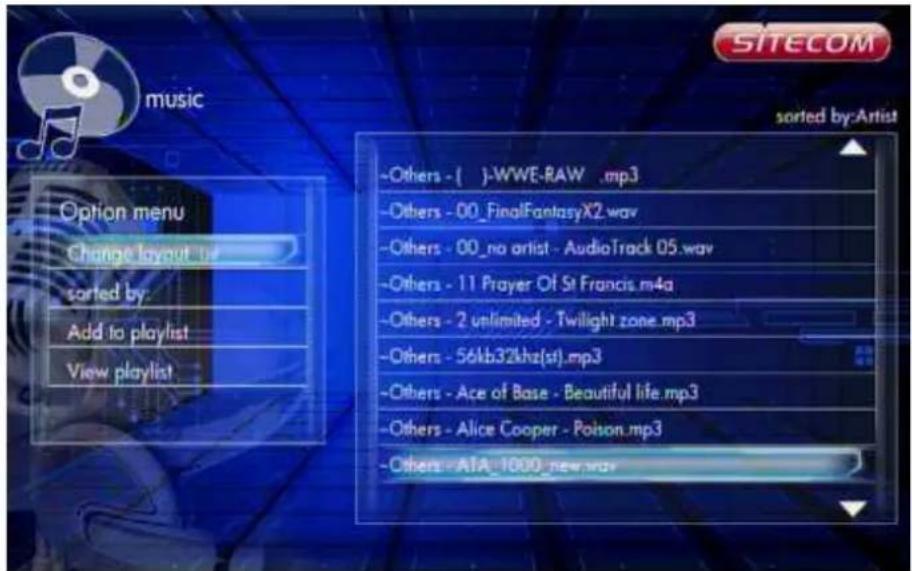
SITECOM music sorted by: Artist Option menu Change layout by sorted by: Add to playlist View playlist -Others - [ ].WWE-RAW .mp3 -Others - 00_FinalFantasyX2.wav -Others - 00_no artist - AudioTrack 05.wav -Others - 11 Prayer Of St Francis.m4a -Others - 2 unlimited - Twilight zone.mp3 -Others - 56kb32khz(st).mp3 -Others - Ace of Base - Beautiful life.mp3 -Others - Alice Cooper - Poison.mp3 -Others - AIA_1000_new.wavThe Music file browser display files as a 'List'.
6.5.2.4 Preview
Music -> Press 'Option' button -> Preview
text_image
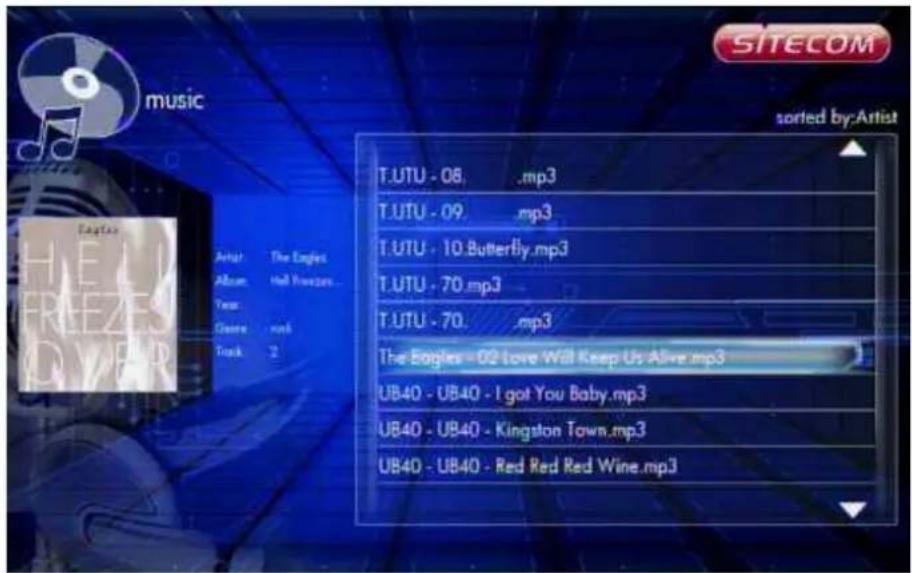
music T.UTU - 08 .mp3 T.UTU - 09 .mp3 T.UTU - 10. Butterfly.mp3 T.UTU - 70.mp3 T.UTU - 70 .mp3 The Eagles - 02 Love Will Keep Us Alive.mp3 UB40 - UB40 - I got You Baby.mp3 UB40 - UB40 - Kingston Town.mp3 UB40 - UB40 - Red Red Red Wine.mp3Use this option to preview the file information. When you focus on a file, it will show the information in the preview window on the left.
6.5.2.8 Sort by Artist
Music -> Press 'Option' button -> Sorted by -> Artists
The files are sorted by Artists.
6.5.2.8 Sort by Alphabet
Music -> Press 'Option' button -> Sorted by -> Alphabet
The files are sorted by Alphabet
6.5.2.9 Sort by Genre
Music -> Press 'Option' button -> Sorted by -> Genre
The files are classified by Genre.
6.6 Photos Menu
In the Photos menu you can browse through your photos and view them.

text_image
SITECOM videos my favorites alphabeted order sort by genre device music sort by artist alphabeted order sort by genre my favorites device phalos sort by date alphabeted order my favorites device online online Device Remove Setup6.6.1 Display & Slide Show
Photos -> press 'OK' or 'Play' button
If you want to display the selected image file or use the slide show in full screen, press the 'OK' button or 'Play' button to start the operation. During display, you can press the following buttons:
"Next" to jump to the next file in the play list, 'Previous' to jump to the previous file in the play list, 'Zoom' to zoom in/out 2X, 4X, 8X, 16X 'Stop' or 'Return' to stop playing.
Press the 'Info' button to display information about the image file.
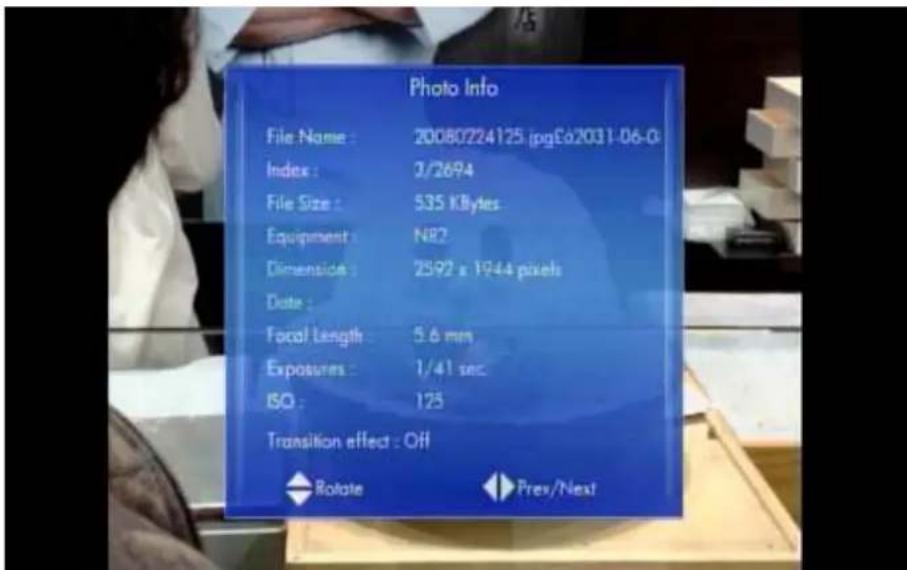
text_image
Photo Info File Name : 20080224125 (pgE62031-06-0) Index : 3/2694 File Size : 535 KBytes Equipment : N87 Dimenside : 2592 x 1944 pixels Date : Focal Length : 5.6 mm Exposures : 1/41 sec ISO : 125 Transition effect : Off Rotate Prev/NextDuring playback, you can press the 'Option' button to change the slide show settings. You can use the following settings:
Repeat off – To Stop Slide Show. Repeat all – To show all files in the play list. Shuffle Loop - Randomly select file in the play list during Slide Show
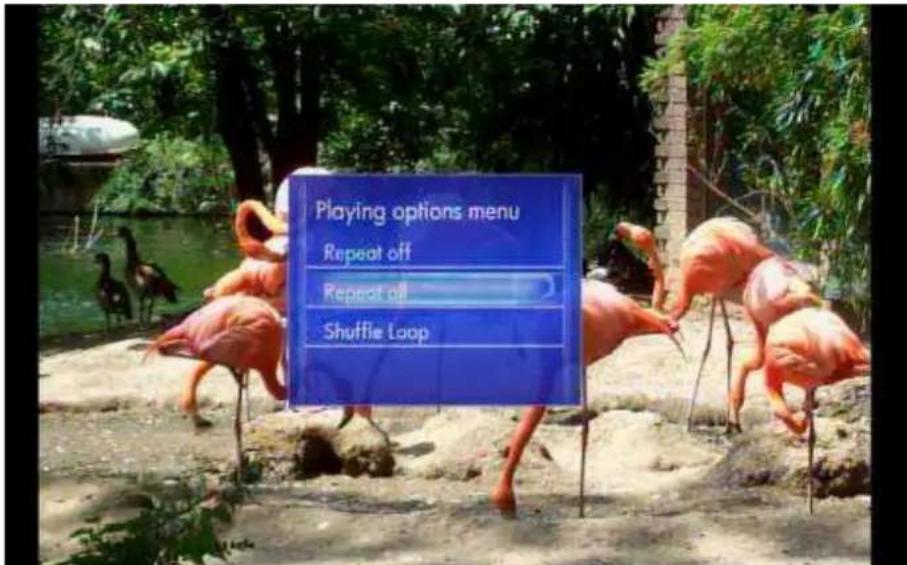
text_image
Playing options menu Repeat off Repeat off Shuffle Loop6.6.2 Browsing Files
Photos -> press 'Option' button
Pressing the 'Option' button in the Photo browser will pop up the Option window where you can change the following settings:
Start Slideshow Slideshow settings Sorted by Alphabet Date My Favorites
Change Layout Add to slideshow
Use the arrow 'Up' and 'Down' buttons to select and press 'OK' button to confirm.
6.6.2.1 Slideshow settings
Photos -> Press 'Option button -> Slideshow settings
Here you can set the slide transition time from 2 to 30 seconds. You can also set the slide transitions.
6.6.2.2 Sort by Alphabet
Photos -> Press 'Option' button -> Sorted by -> Alphabet
The files are sorted by Alphabet
6.6.2.3 Sort by Date
Photos -> Press 'Option' button -> Sorted by -> Date
The files are sorted by Date.
6.6.2.4 Sort by Favorites
Photos -> Press 'Option' button -> Sorted by -> Favorites
The files are classified by Favorites.
6.6.2.5 Thumbnails
Photos -> Press 'Option' button -> Change layout -> Thumbnails
text_image
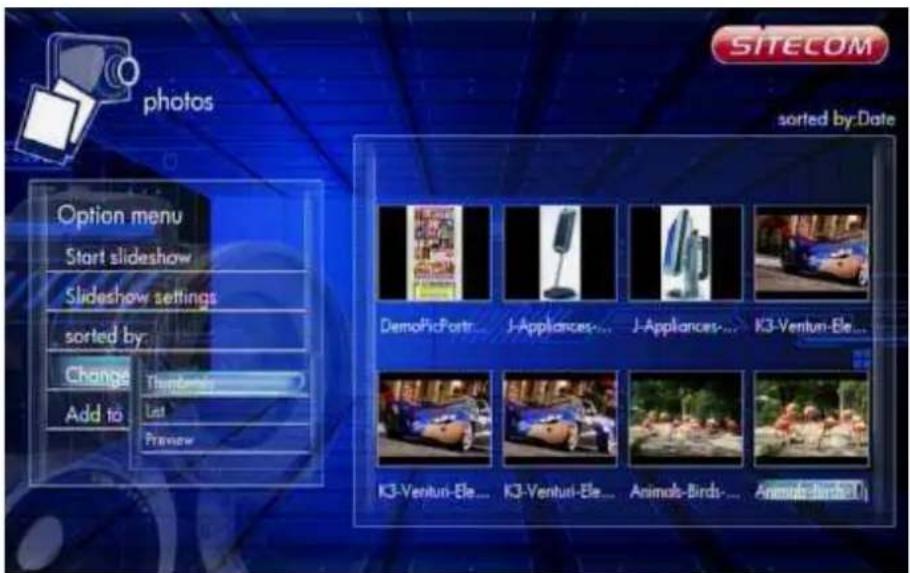
photos SITECOM sorted by:Date Option menu Start slideshow Slideshow settings sorted by: Change Add to Thundering Last Preview DemoPicPortr... J-Appliances... J-Appliances... K3-Ventun-Ele... K3-Ventun-Ele... K3-Venturi-Ele... Animals-Birds... Animals-Birds...Directory Thumbnail – If there is at least one image file in the directory then the directory will have a thumbnail which is made from this image file. Otherwise it will have
a normal thumbnail made from the default directory picture.
File Thumbnail - All the photos have their thumbnail made from themselves.
6.6.2.6 List
Photos -> Press 'Option' button -> Change layout -> List

text_image
photo SITECOM sorted by: Date Option menu Start slideshow Slideshow settings sorted by: Change Thumbnails Add to List Preview DemoPicPortraitCelebrities X35oft.jpg 2009-10-14 Wed DemoPicPortraitCelebritiesX3 NiceText.jpg 2009-10-14 Wed J-Appliances-DeskStand.jpg 2009-10-14 Wed J-Appliances-Extensia.jpg 2009-10-14 Wed K3-Venturi-Elec-31.jpg 2009-10-01 Thu K3-Venturi-Elec-32.jpg 2009-10-01 Thu K3-Venturi-Elec-33.jpg 2009-10-01 Thu Animals-Birds-0.jpg 2009-09-23 Wed Animals-Birds-1.jpg 2009-09-23 WedPhotos file browser display files by 'List'.
6.6.2.7 Preview
Photos -> Press 'Option' button -> Change layout -> Preview

text_image
photo SITECOM sorted by:Date DemoPicPortraitCelebrities X35oft.jpg 2009-10-14 Wed DemoPicPortraitCelebritiesX3 NiceText.jpg 2009-10-14 Wed J-Appliances-DeskStand.jpg 2009-10-14 Wed J-Appliances-Extensia.jpg 2009-10-14 Wed K3-Venturi-Elec-31.jpg 2009-10-01 Thu K3-Venturi-Elec-32.jpg 2009-10-01 Thu K3-Venturi-Elec-33.jpg 2009-10-01 Thu Animals-Birds-0.jpg 2009-09-23 Wed Animals-Birds-1.jpg 2009-09-23 WedUse this option to preview the file information. When you focus on a file, it will show the information in the preview window on the left.
6.7 Movies
In the Movies menu you can browse through your videos and watch them.
text_image
SITECOM videos my favorites alphabeted order sort by games device music sort by artist alphabeted order sort by games my favorites device photos sort by date alphabeted order my favorites devices online online Device Remove Setup6.7.1 Video Player
Movies -> press 'OK' or 'Play' button
If you want to play the selected video file in full screen, press 'OK' button or 'Play' button to start the operation. During playback, you can press the following buttons:
'Left' to skip back 10 sec.
'Right' to jump 10 sec forward.
'FF' to fast forward 1.5x, 2x, 4x, 8x, 16x, 32x.
'FR' to fast rewind 1x, 1.5x, 2x, 4x, 8x, 16x, 32x.
"Next" to jump to the next chapter in the video.
'Previous' to jump to the previous chapter in the video.
'Zoom' to zoom in/out 2X, 3X, 4X, 8X
'Stop' or 'Return' to stop playing.
Press the 'Info' button to display information about the video file.

text_image
Imax - Africa - 1080-80Mb.avi File: 001/001 Chapter: 001/001 Size: 3471 Mb/fts GDS Video: MPEG2 1972x1080 29.97fps Audio: ACI 6ch 480Hz 10.1129 35.12.46During playback, you can also press the 'Option' button to change playback settings.
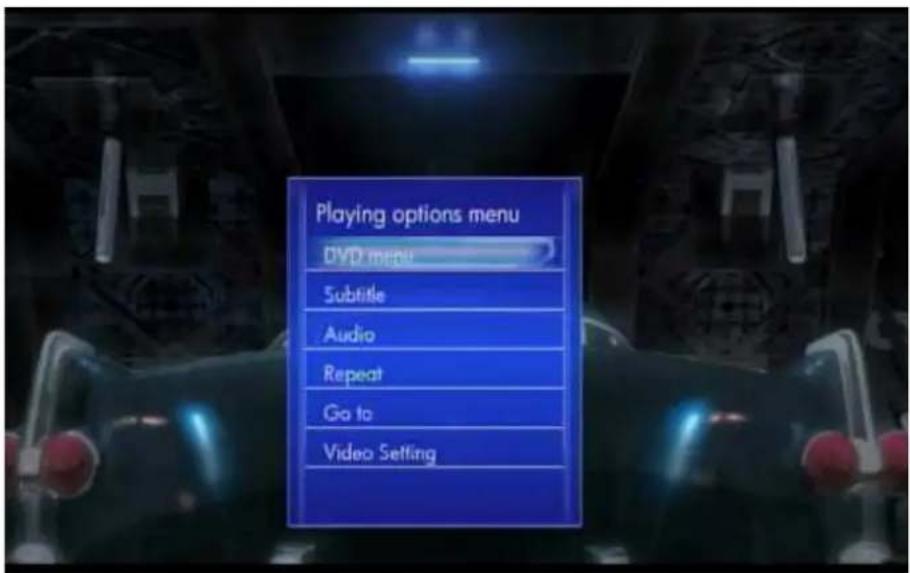
text_image
Playing options menu DVD menu Subtitle Audio Repeat Go to Video Setting6.7.1.1 DVD Menu
Movies -> Playback -> press 'Option' button -> DVD Menu
When playing a DVD, this will return you to the DVD main menu.
6.7.1.2 Subtitle
Movies -> Playback -> press 'Option' button -> Subtitle

text_image
Well, that's one way to go. But maybe you want to slow down.To set the national language subtitles, you have the following options:
Show subtitle
Position of subtitles: 0 \~ 640
Font size : 3 \~ 40
Synchronous tuning
National language
Subtitle colour
Use the arrow keys 'Left' and 'Right' to select the item, 'Up' and 'Down' to adjust the value. Press 'Return' to resume playing.
6.7.1.3 Audio
Movies -> Playback -> press 'Option' button -> Audio
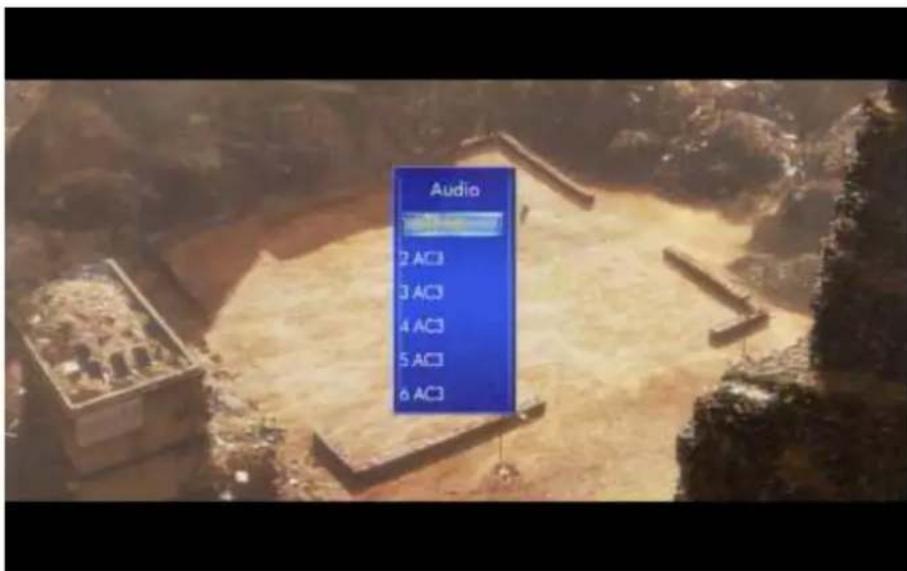
text_image
Audio 2 AC3 3 AC3 4 AC3 5 AC3 6 AC3With this setting you can select the different Audio streams.
Use the 'Up' and 'Down' buttons to select the audio mode and 'OK' button to confirm. Press 'Return' to resume playback.
6.7.1.4 Go to
Movies -> Playback -> press 'Option' button -> Go to
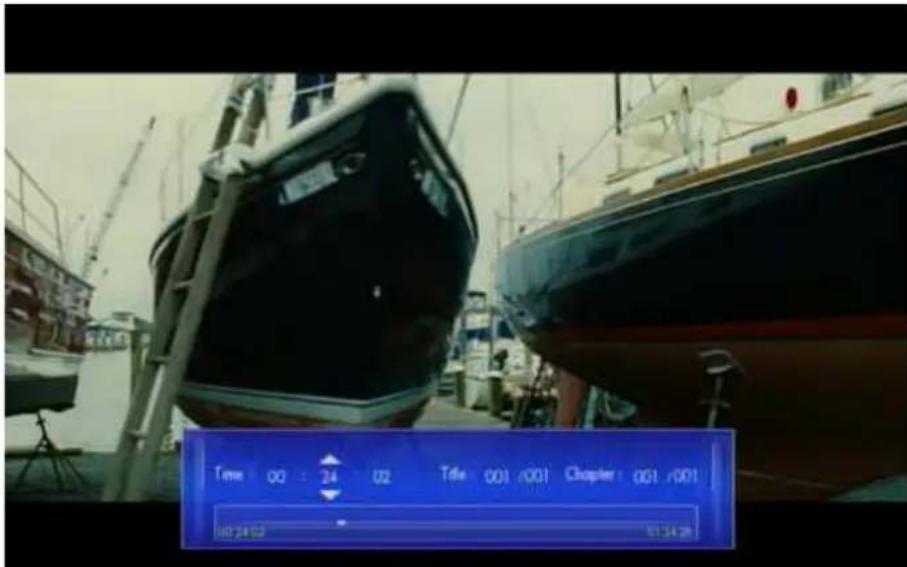
text_image
Time 00:24 02 Title 001/001 Chapter 001/001 00:24:02 01:34:28With this function you can time shift to the location you want.
There are three types of jump mode:
Use the arrow keys 'Left' and 'Right' to select an item and 'Up' and 'Down' to adjust the value. Press 'Return' to resume playback.
6.7.1.5 Video Setting
Movies -> Playback -> press 'Option' button -> Video Setting

text_image
Video Setting Intersection 0 —— 25 Contrast 0 —— 25 Saturation 0 —— 25 How 0 —— 25 Custom SettingBrightness – Change the brightness level
Contrast – Change the contrast level
Saturation - Change the saturation
Hue - Change the hue
Use the arrow keys 'Up' and 'Down' to select an item and 'Left' and 'Right' to adjust the value. Press 'OK' to resume playback.
6.7.2 Browsing Files
6.7.2.1 Thumbnails
Movies -> Press 'Option' button -> Change layout -> Thumbnails
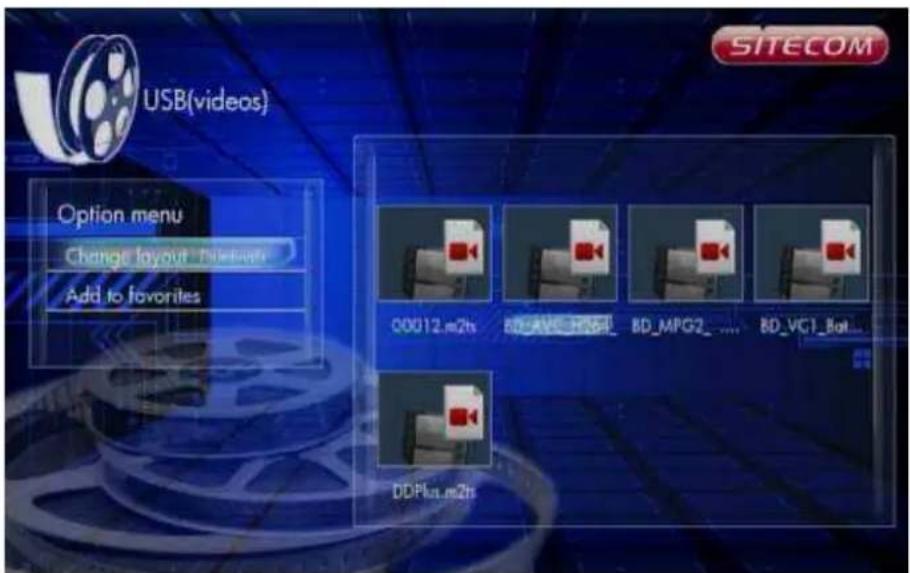
text_image
USB(videos) Option menu Change layout: The follows Add to favorites SITECOM 00012.m2h BD_AVE_H564_ BD_MPG2_ .... BD_VG1_Bot... DDPlus.m2hDirectory Thumbnail – If there is at least one image file in the directory then the directory will have a thumbnail which is made from this image file. Otherwise it will have a normal thumbnail made from the default directory picture.
File Thumbnail - All the photos have their thumbnail made from themselves.
6.7.2.2 List
Movies -> Press 'Option' button -> Change layout -> List

text_image
USB(videos) Option menu Change layout.net Add to favorites 00012.m2s BD_AVC_H26E_WAILE.m2s BD_MPG2_.m2s BD_VC1_Batman.m2s DDPlus.m2s SITECOMMovies file browser display files by 'List'.
6.7.2.3 Preview
Movies -> Press 'Option' button -> Change layout -> Preview
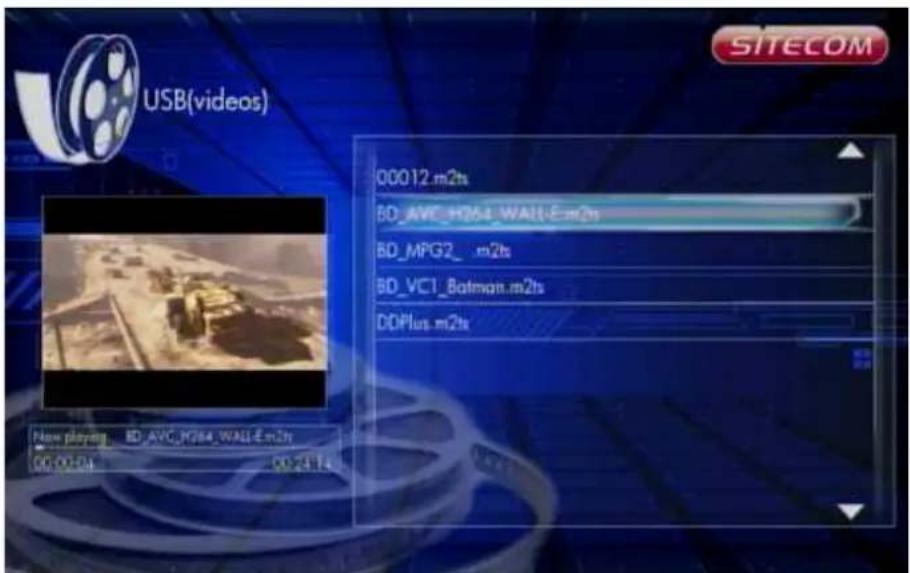
text_image
USB(videos) 00012.m2ts BD_AVC_H264_WALL-E.m2ts BD_MPG2_ m2ts BD_VC1_Batmqn.m2ts DDPlus.m2ts New playmg BD AVC_PG564_WALL-E.m2ty 00:00:04 00:24:14 SITECOMUse this option to preview the file information. When you focus on a file, it will show the information in the preview window on the left.
6.7.2.4 Sort by Alphabet
Movies -> Press 'Option' button -> Sorted by -> Alphabet
The files are sorted by Alphabet.
6.7.2.5 Sort by Genre
Movies -> Press 'Option' button -> Sorted by -> Genre
The files are classified by Genre.
6.7.2.6 Sort by Favorites
Movies -> Press 'Option' button -> Sorted by -> Favorites
The files are sorted by Favorites.
6.7.3 Network playback
text_image
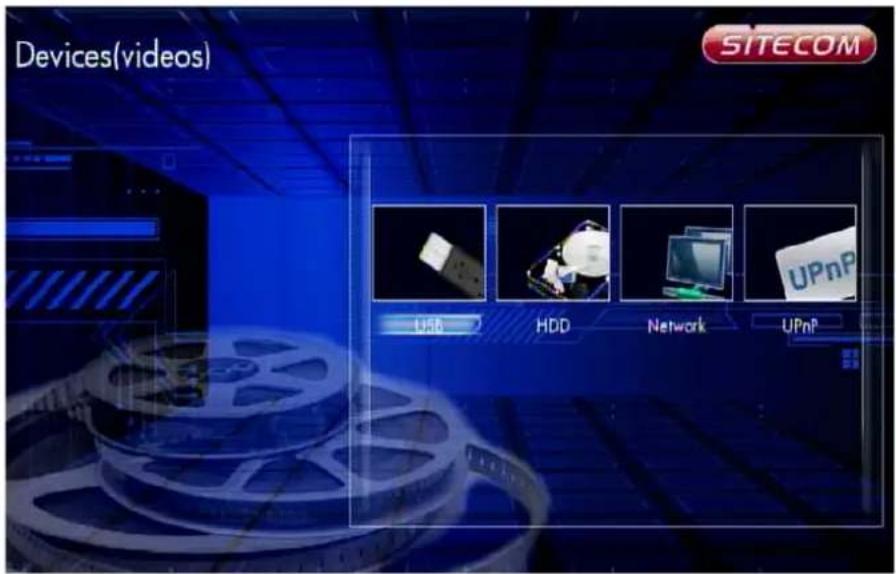
Devices(videos) SITECOM USB HDD Network UPnPMovies -> Device -> Network
Music -> Device -> Network
Photos -> Device -> Network
Select "Device" in the videos/music/photos of home menu. Select "Network" to browse the network. Select your PC in the network list to enter. Browse the folder and select the file to playback.
UPnP
Once your TV Media Player is connected to your network, and you have made the correct network settings, you can play media files through your network. If you want to share media files on your computer in order to let the media player play these files, you can setup your computer as a UPnP server. We will explain how to setup your computer as a UPnP server in the following steps.
Create a UPnP server
Your computer does not share media by default. You will have to install a UPnP media server on your computer to add this functionality. If you are using Windows XP, Windows Vista or Windows 7, you can use the built-in UPnP media service of Windows Media Player. If you enable this option, your media player can access the music library on your computer. Follow the steps below to enable this option:
- Click 'Start'.
- Click 'Programs'.
- Click 'Windows Media Player'.
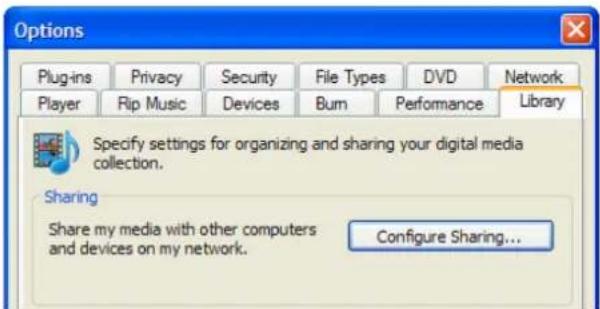
- Click 'Tools', then click 'Options'. The following screen will be displayed:
text_image
Options Plugins Privacy Security File Types DVD Network Player Rip Music Devices Burn Performance Library Specify settings for organizing and sharing your digital media collection. Sharing Share my media with other computers and devices on my network. Configure Sharing...- Go to the 'Library' tab in the left upper corner of the options window.
- Now click 'Configure sharing...'
- Check the "Share my media" checkbox and click OK.

text_image
Media Sharing Share music, pictures, and video on your network Learn about sharing Online Sharing settings ✓ Share my media- A list with detected devices will appear within a few seconds.
- Click the name of your TV Media Player.
- Click 'Allow'.
- Click 'Ok'.
- Click 'Ok'.
- All files in the media library of Windows Media Player will be shared with your media player from now on. The media library will be accessible using the remote control and display of the media player.
Note: Steps above are taken with Windows Media Player 11, available for download at http://www.microsoft.com/windows/windowsmedia/player/.
6.8 Online
Select the Online option in the main menu to view the various internet functions of the TV Media Player
6.8.1 YouTube XL
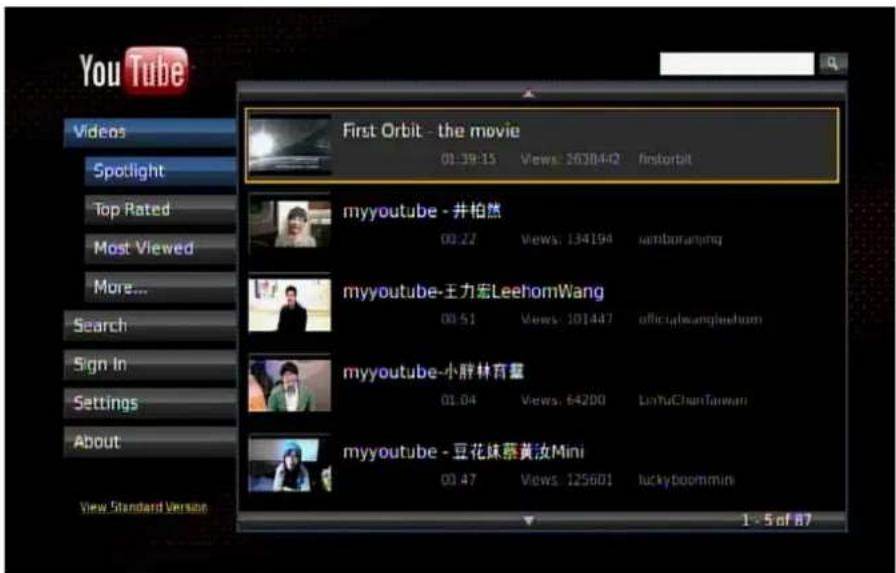
Enter YouTube-XL and you can see the video list in the right panel. Now you can just press the direction key to highlight a video to play, but we suggest to setup language and your location first.
Select "Settings" and then select "Set Language" to select the language for the interface or "Set Geography" to select your location.
text_image
You Tube Videos Spotlight Top Rated Most Viewed More... Search Sign In Settings About View Standard Version First Orbit - the movie 01:39:15 Views: 26384-2 firstorbit myyoutube - 井柏然 00:22 Views: 134194 memberarang myyoutube-王力宏LeehomWang 00:51 Views: 101447 officialsample.com myyoutube-小胖林育慧 01:04 Views: 64200 LinyuChunTaiwan myyoutube - 豆花妹蔡黄汝Mini 00:47 Views: 125601 luckyboommin 1 - 5 of 87Available options:
Videos: select the category like "Spotlight", "Top Rated"... to sort the videos in the right panel. Select "More..." to choose more categories. Select the video in the right panel to play.
Search: Type in a keyword to find the video file.
Sign In: Login to YouTube with your account name and password, and your favourite video list will display on screen.
Note: You can plug in a USB mouse & keyboard to enter your account information.
Settings: Change settings like language and geography. You can also check the options if you want to apply them:
"Play next video when current video ends."
"Filter videos that may not be suitable for minors"
text_image
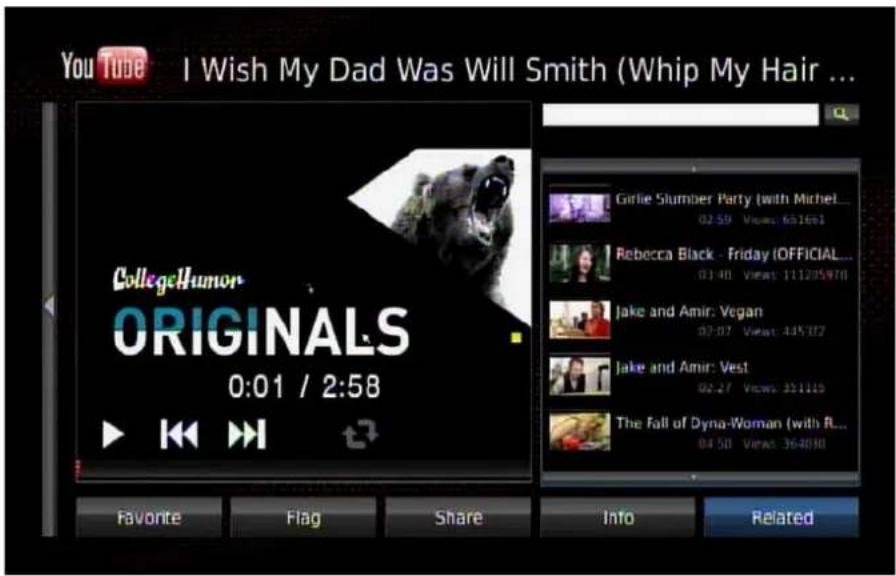
YouTube I Wish My Dad Was Will Smith (Whip My Hair ... CollegeHumor ORIGINALS 0:01 / 2:58 Favorite Flag Share Into Related Girlie Slumber Party (with Michel... 02:59 Views: 631691 Rebecca Black - Friday (OFFICIAL... 01:48 Views: 111205970 Jake and Amir: Vegan 02:07 Views: 445702 Jake and Amir: Vest 02:27 Views: 331110 The Fall of Dyna-Woman (with R... 04:50 Views: 364830Click a video to play. You can use the playback controls on the remote control to control the playback. If a USB mouse is plugged in, move the cursor on the video and the on-screen menu will pop up for you to control it.
Available options:
Search bar: select it to input a keyword to search the video.
Favorite: Add it to your favorite list.
Flag: report it if you feel uncomfortable about this video.
Share: E-mail this link to a friend.
Info: Display the information of the current video.
Related: sort the related video list.
In the video playback screen you can press the "Zoom +" key on the remote control for full screen playback. Press "Zoom -" to return to the video list.
To exit YouTube-XL, press the "Return" key to return to main menu.
6.8.2 Web Kit
Click the icon to see the page below. You can select the links to visit the web sites.

text_image
SITECOM sina新浪 facebook esri BBC WeatherBug yelpYou can plug in your USB mouse and USB keyboard for control and input. To input a text or URL, you need to select the text field, use the remote control to press "OK" to open the virtual keyboard, and then input the text on the USB keyboard.
6.8.3 Mediafly
text_image
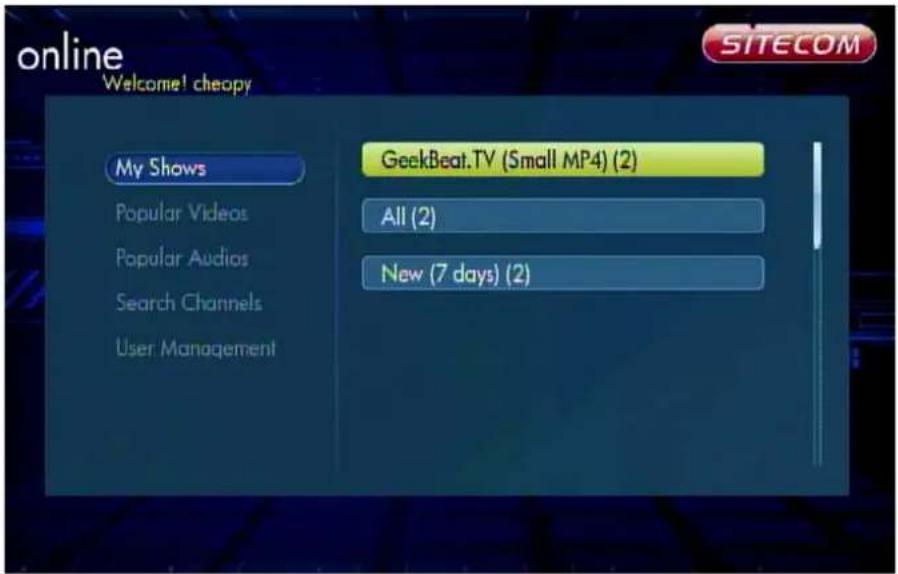
online Welcome! cheopy My Shows Popular Videos Popular Audios Search Channels User Management GeekBeat.TV (Small MP4) (2) All (2) New (7 days) (2)Select the categories like "My Shows", "Popular Videos", "Popular Audios" to see the online video/audio. Select "Search Channels" to input a keyword to search the channel. Select "User Management" to login/add your personal account. If you do not have a Mediafly account, visit the web site www.mediafly.com to get one.
6.8.4 vTuner
text_image
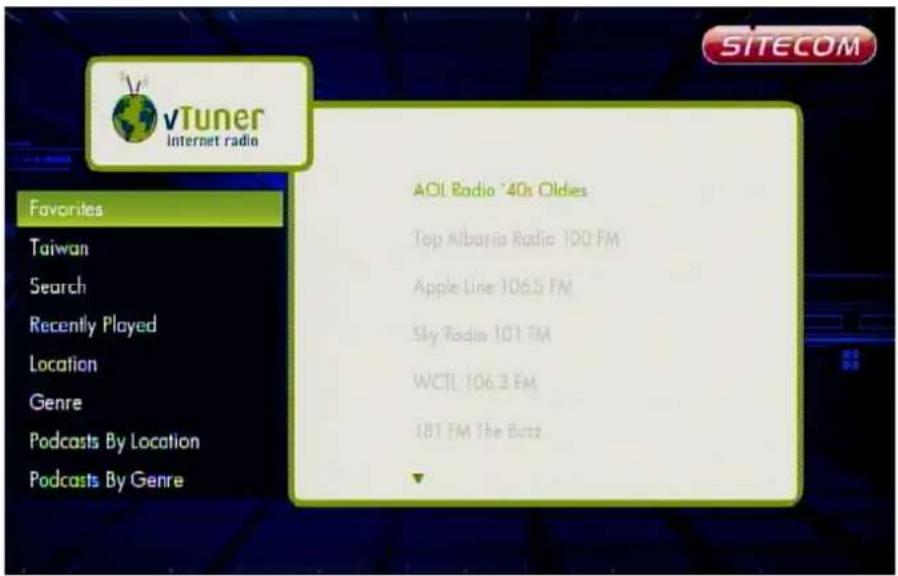
vTuner Internet radio Favorites Taiwan Search Recently Played Location Genre Podcasts By Location Podcasts By Genre ADL Radio '40s Oldies Top Albania Radio 100 FM Apple Line 106.5 FM Sky Radio 101 FM WCTL 106.3 FM 181 FM The Bets SITECOMSelect the category to browse and play. Press the return key to go back to the previous page. Press the stop key to stop the audio playback.
| Option | |
| Favorites Browse the | favorite list and select one to play. In audio playback, select "Delete from Favorites" to delete it. |
| "Country" Browse the | local list and select one to play. In the audio playback, select "Add to Favorites" to add to Favorites. |
| Search Enter a keyword to search the audio. | |
| Recently Played Browse the favorite list and select one to play. | |
| Location Select your location. | |
| Genre Browse the genre to find your audio channels. | |
| Podcasts By Location | Browse podcast by location. |
| Podcasts By Genre Browse podcast by genre. | |
| New Stations Browse the new stations. | |
| Most Popular Stations | Browse the most popular stations. |
6.8.5 Flickr
Select "Search Photos" to enter a keyword to search. Select "Previous page" and "Next page" to change the page.
6.8.6 Picasa
Select "Search for Photo" to enter a keyword to search.
Select "Login" to login with your ID and display the "Public" photos in this account.
Select "Remove ID" to delete the login ID which is added here.
When selecting "Search for Photo" or login the album, choose a photo in the list.
Press "Prev" "Next" and "Zoom" keys to navigate.
6.8.7 Yahoo! WEATHER
text_image
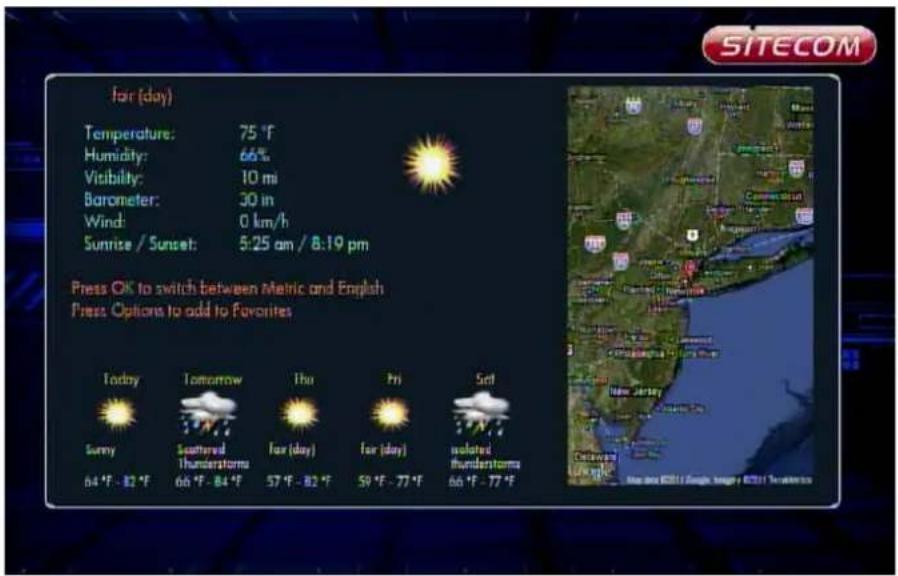
Fair (day) Temperature: 75 °F Humidity: 66% Visibility: 10 mi Barometer: 30 in Wind: 0 km/h Sunrise / Sunset: 5:25 am / 8:19 pm Press OK to switch between Metric and English Press Options to add to Favorites Today Sunny 64 °F - 82 °F Tomorrow Southered Thunderstorms 66 °F - 84 °F Thu Fair (day) 57 °F - 82 °F Fri Fair (day) 59 °F - 77 °F Sat isolated Thunderstorms 66 °F - 77 °FSelect "Add Favorite" and browse to a country and select a city. Press the info key to open the menu, and add it to the favourite. You can now access it from the frontpage. Press "OK" key to select a city and see the weather forecast. In the weather forecast, press "OK" key to change the units and the info key to add it to favourites. Press the direction keys to move the map. Press Prev/Next key to zoom out/in the map.
6.8.8 Yahoo! FINANCE

text_image
Add stock to favorite list MSFT 74.76 0.00 0.00% INTC 32.21 0.00 0.00% SPY 138.51 0.00 0.00% DIA 124.23 0.00 0.00% IBM 167.50 0.00 0.00% QQQ 57.43 0.00 0.00% Microsoft Corpora 24.76 Change 0.00 Percentage 0.00% Year High 29.46 Year Low 22.73 Volume 29800 P/E 9.84 Press Info to delete selected stockInput your Stock symbol to display data and chart.
Reference link: http://finance.yahoo.com/
Choose "Add Stock to Favorite list" and input the stock symbol and country code like 2485.tw to display. The Stock information will be updated in 30 seconds. To delete one, choose it and press the info key to delete it.
| Region Country code | |
| USA N/A |


Lunny
64°F - 12°F
Scattered
66°F - 84°F
or (day)
57°F-82°F
for (day)
50*6-77*1
isolated
66°F=77°F

text_image
Map image showing geographic locations with labeled markers and a watermark at the bottom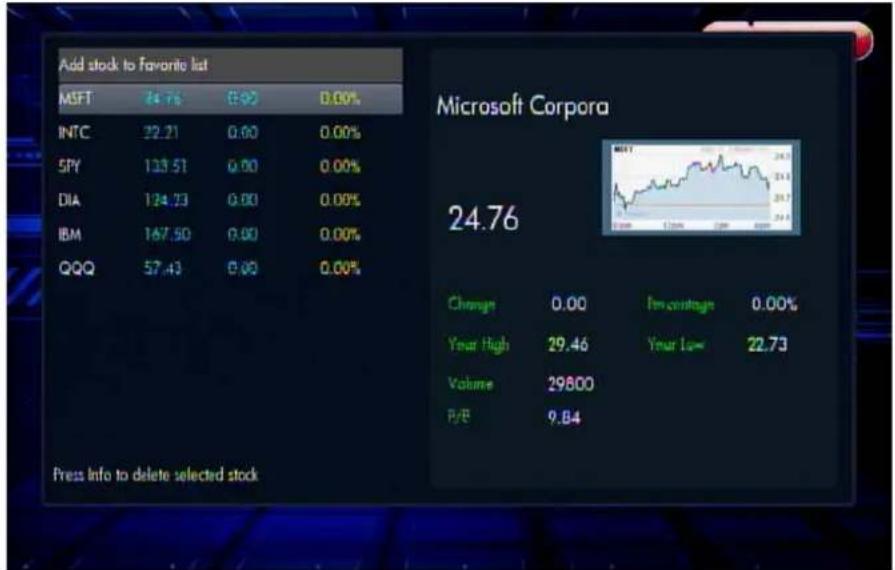
text_image
Add stock to Favorite list MSFT 24.76 €90 0.00% INTC 22.21 0.00 0.00% SPY 133.51 0.00 0.00% DIA 124.73 0.00 0.00% IBM 167.50 0.00 0.00% QQQ 57.43 0.00 0.00% Microsoft Corpora 24.76 Change 0.00 % change 0.00% Your High 29.46 Your Low 22.73 Volume 29800 P/E 9.84 Press Info to delete selected stock| Hong Kong .HK | |
| Taiwan .TW | |
| Shanghai .SS | |
| Shenzhen .SZ | |
| Canada .TO | |
| Australia .AX |
To display indexes, input the text in the table.
| Indexes Text | |
| Nasdaq ^IXIC | |
| S&P 500 ^GSPC | |
| Treasury Yield 30 ^TYX | |
| Hang Seng Indexes | ^HSI |
| Nikkei 225 ^N225 | |
| Straits Times Index | ^STI |
| Shenzhen B share ^SZSB | |
| TSEC weighted ^TWII |
7 Appendix
7.1 Copyrights and Trademarks
7.1.1 Copyrights
All rights reserved. No part of this manual may be reproduced, or transmitted in any form or by any means, whether electronically or mechanically, without the express written permission from the copyright holder.
Copyrighted materials, such as software, music files, or movies, are protected by local law, and may not be illegally copied or used without permission from the copyright owner.
7.1.2 Trademarks
Microsoft and Windows are registered trademarks of Microsoft Corporation. All other trademarks are property of their respective holders.
7.2 Warranty
What your warranty does not cover:
- Acts of nature, such as fire or static discharge.
- Damage from unauthorized repair, alteration or accident.
- Damage from misuse or neglect.
- A unit that has been modified or incorporated into other products or is used for institutional or other commercial purposes.
- Loss of customer's software, firmware, information, or memory data.
- Improper handling or installation.
7.3 GPL Statement
This product contains free software which is licensed under the GNU General Public License. To obtain a copy of our open source software, please visit our website and look for the appropriate download section. However, please be noted that we can not provide guarantee with the source code, and there is also no technical support for the source code from us.