MS811dn - Printer LEXMARK - Free user manual and instructions
Find the device manual for free MS811dn LEXMARK in PDF.

User questions about MS811dn LEXMARK
0 question about this device. Answer the ones you know or ask your own.
Ask a new question about this device
Download the instructions for your Printer in PDF format for free! Find your manual MS811dn - LEXMARK and take your electronic device back in hand. On this page are published all the documents necessary for the use of your device. MS811dn by LEXMARK.
USER MANUAL MS811dn LEXMARK
Important: Click here before using this guide.
October 2012 www.lexmark.com
Machine type(s):
4063
Model(s):
210, 230, 23E, 410, 430, 630, 63E
Contents
Safety information....6
Overview....8
Using this guide....8
Finding information about the printer....8
Selecting a location for the printer....10
Additional printer setup....12
Installing internal options....12
Installing hardware options....29
Attaching cables....33
Setting up the printer software....35
Networking....37
Verifying printer setup....45
Using MS810n, MS810dn, MS811n, MS811dn, MS812dn....46
Learning about the printer....46
Loading paper and specialty media....49
Printing....70
Managing your printer....76
Using MS810de....88
Learning about the printer....88
Printer configurations 88
Using the printer control panel....90
Understanding the colors of the Sleep button and indicator lights....90
Understanding the home screen 91
Using the touch-screen buttons 92
Setting up and using the home screen applications....94
Finding the IP address of the computer....94
Finding the IP address of the printer 95
Accessing the Embedded Web Server 95
Customizing the home screen 95
Activating the home screen applications....96
Exporting and importing a configuration....98
Loading paper and specialty media....98
Setting the paper size and type 98
Configuring Universal paper settings....99
Loading the 250- or 550-sheet tray....99
Loading the 2100-sheet tray....106
Loading the multipurpose feeder ....113
Linking and unlinking trays 118
Printing....119
Printing a document 119
Printing from a flash drive 121
Printing confidential and other held jobs 123
Printing information pages 124
Canceling a print job 125
Managing your printer....126
Finding advanced networking and administrator information....126
Checking the virtual display 126
Configuring supply notifications from the Embedded Web Server 126
Modifying confidential print settings....127
Copying printer settings to other printers....127
Printing a menu settings page 128
Printing a network setup page....128
Checking the status of parts and supplies 128
Saving energy....129
Restoring factory default settings....132
Securing the printer 132
Using MS812de....137
Learning about the printer....137
Printer configurations....137
Using the printer control panel....139
Understanding the colors of the Sleep button and indicator lights....139
Understanding the home screen ....140
Using the touch-screen buttons 141
Setting up and using the home screen applications....144
Finding the IP address of the computer....144
Finding the IP address of the printer 144
Accessing the Embedded Web Server 145
Customizing the home screen 145
Activating the home screen applications....145
Exporting and importing a configuration....148
Loading paper and specialty media....148
Setting the paper size and type 148
Configuring Universal paper settings....149
Loading the 250- or 550-sheet tray....149
Loading the 2100-sheet tray....156
Loading the multipurpose feeder 163
Linking and unlinking trays 168
Printing....169
Printing a document 169
Printing from a flash drive 171
Printing confidential and other held jobs 173
Printing information pages 174
Canceling a print job 175
Managing your printer....175
Finding advanced networking and administrator information....175
Checking the virtual display....175
Configuring supply notifications from the Embedded Web Server 176
Modifying confidential print settings....177
Copying printer settings to other printers 177
Printing a menu settings page 177
Printing a network setup page....178
Checking the status of parts and supplies 178
Saving energy....178
Restoring factory default settings....182
Securing the memory before moving the printer....182
Paper and specialty media guide....187
Using specialty media....187
Paper guidelines....188
Supported paper sizes, types, and weights....192
Understanding the printer menus....197
Menus list....197
Paper menu....198
Reports menu....209
Network/Ports menu....210
Security menu....223
Settings menu....228
Help menu....252
Saving money and the environment....254
Saving paper and toner....254
Recycling....255
Maintaining the printer....257
Ordering supplies....257
Storing supplies....260
Replacing supplies....260
Cleaning the printer parts....266
Moving the printer....267
Clearing jams....270
Avoiding jams....270
Understanding jam messages and locations....272
[x]-page jam, lift front cover to remove cartridge. [200–201]....274
[x]-page jam, open upper rear door. [202]....276
[x]-page jam, open upper and lower rear door. [231-234]....277
[x]-page jam, remove standard bin jam. [203]....280
[x]-page jam, remove tray 1 to clear duplex. [235–239]....280
[x]-page jam, open tray [x]. [24x]....281
[x]-page jam, clear manual feeder. [250]....282
[x]-page jam, remove paper, open stapler door. Leave paper in bin. [455–457]....283
[x]-page jam, remove paper, open finisher rear door. Leave paper in bin. [451]....287
[x]-page jam, remove paper, open expander rear door. Leave paper in bin. [41y.xx]....288
[x]-page jam, remove paper, open mailbox rear door. Leave paper in bin. [43y.xx]....290
Troubleshooting....292
Understanding the printer messages....292
Solving printer problems....309
Solving home screen applications problems....344
Embedded Web Server does not open....344
Contacting customer support....345
Notices....346
Product information....346
Edition notice....346
Power consumption....350
Index....364
Safety information
Connect the power cord to a properly grounded electrical outlet that is near the product and easily accessible.
Do not place or use this product near water or wet locations.
CAUTION—POTENTIAL INJURY: This product uses a laser. Use of controls or adjustments or performance of procedures other than those specified herein may result in hazardous radiation exposure.
This product uses a printing process that heats the print media, and the heat may cause the media to release emissions. You must understand the section in your operating instructions that discusses the guidelines for selecting print media to avoid the possibility of harmful emissions.
CAUTION—POTENTIAL INJURY: The lithium battery in this product is not intended to be replaced. There is a danger of explosion if a lithium battery is incorrectly replaced. Do not recharge, disassemble, or incinerate a lithium battery. Discard used lithium batteries according to the manufacturer's instructions and local regulations.
CAUTION—HOT SURFACE: The inside of the printer might be hot. To reduce the risk of injury from a hot component, allow the surface to cool before touching.
CAUTION—POTENTIAL INJURY: To reduce the risk of equipment instability, load each tray separately. Keep all other trays closed until needed.
CAUTION—POTENTIAL INJURY: The printer weight is greater than 18 kg (40 lb) and requires two or more trained personnel to lift it safely.
CAUTION—POTENTIAL INJURY: Before moving the printer, follow these guidelines to avoid personal injury or printer damage:
- Turn off the printer, and then unplug the power cord from the electrical outlet.
- Disconnect all cords and cables from the printer.
- If two or more optional finishers are installed, then remove the finishers individually from the printer.
Notes:
—Make sure to remove the topmost finisher first.
- To remove the finisher, hold the finisher on both sides, and then lift the latches to unlock the finisher.
- If the printer does not have a caster base but is configured with optional trays, then remove the trays.
Note: Slide the latch on the right side of the optional tray toward the front of the tray until it clicks into place.
- Use the handholds located on both sides of the printer to lift it.
- Make sure your fingers are not under the printer when you set it down.
- Make sure there is adequate clearance around the printer.
- Use only the power cord provided with this product or the manufacturer's authorized replacement.
CAUTION—SHOCK HAZARD: If you are accessing the controller board or installing optional hardware or memory devices sometime after setting up the printer, then turn the printer off, and unplug the power cord from the electrical outlet before continuing. If you have any other devices attached to the printer, then turn them off as well, and unplug any cables going into the printer.
CAUTION—SHOCK HAZARD: To avoid the risk of electrical shock when cleaning the exterior of the printer, unplug the power cord from the electrical outlet and disconnect all cables from the printer before proceeding.
Use only the power cord provided with this product or the manufacturer's authorized replacement.

CAUTION—SHOCK HAZARD: Make sure that all external connections (such as Ethernet and telephone system connections) are properly installed in their marked plug-in ports.
This product is designed, tested, and approved to meet strict global safety standards with the use of specific manufacturer's components. The safety features of some parts may not always be obvious. The manufacturer is not responsible for the use of other replacement parts.

CAUTION—POTENTIAL INJURY: Do not cut, twist, bind, crush, or place heavy objects on the power cord. Do not subject the power cord to abrasion or stress. Do not pinch the power cord between objects such as furniture and walls. If any of these things happen, a risk of fire or electrical shock results. Inspect the power cord regularly for signs of such problems. Remove the power cord from the electrical outlet before inspecting it.
Refer service or repairs, other than those described in the user documentation, to a service representative.

CAUTION—SHOCK HAZARD: Do not set up this product or make any electrical or cabling connections, such as a power cord, a fax feature or USB cable, during a lightning storm.

CAUTION—TIPPING HAZARD: Floor-mounted configurations require additional furniture for stability. You must use either a printer stand or printer base if you are using a high-capacity input tray or more than one input option. If you purchased a printer with a similar configuration, you may need additional furniture. For more information, see www.lexmark.com/multifunctionprinters.
SAVE THESE INSTRUCTIONS.
Overview
Using this guide
This User's Guide provides general and specific information on using the printer models that are listed on the cover page.
The following chapters contain information applicable to all printer models:
- Selecting a location for the printer
•Additional printer setup
•Paper and specialty media guide
•Understanding printer menus
•Saving money and the environment - Maintaining the printer
•Clearing jams - Troubleshooting
To find instructions for your printer:
- Use the table of contents.
- Use the Search function or the Find toolbar of your application to search for page content.
Finding information about the printer
| What are you looking for? Find it here | |
| Initial setup instructions:•Connecting the printer•Installing the printer software | Setup documentation—The setup documentation came with the printer and is also available on the Lexmark Web site athttp://support.lexmark.com. |
| Additional setup and instructions for using the printer:•Selecting and storing paper and specialty media•Loading paper•Configuring printer settings•Viewing and printing documents and photos•Setting up and using the printer software•Configuring the printer on a network•Caring for and maintaining the printer•Troubleshooting and solving problems | User's Guide and Quick Reference Guide—The guides are available on the Software and Documentation CD.For updates, visit our Web site athttp://support.lexmark.com. |
| Instructions for:•Connecting the printer to an Ethernet network•Troubleshooting printer connection problems | Networking Guide—Open the Software and Documentation CD, and then look for Printer and Software Documentation under the Pubs folder. From the list of publications, click the Networking Guide link. |
| Help using the printer software Windows or Mac Help—Open a printer software programor application, and then click Help.Click ? to view context-sensitive information.Notes:Help is automatically installed with the printer software.The printer software is located in the printer program folder or on the desktop, depending on your operating system. | |
| The latest supplemental information, updates, and customer support:DocumentationDriver downloadsLive chat supportE-mail supportVoice support | Lexmark Support Web site—http://support.lexmark.comNote: Select your country or region, and then select your product to view the appropriate support site.Support telephone numbers and hours of operation for your country or region can be found on the Support Web site or on the printed warranty that came with your printer.Record the following information (located on the store receipt and at the back of the printer), and have it ready when you contact customer support so that they may serve you faster:Machine Type numberSerial numberDate purchasedStore where purchased |
| Warranty information Warranty information varies by country or region:In the US—See the Statement of Limited Warranty included with this printer, or athttp://support.lexmark.com.In other countries and regions—See the printed warranty that came with your printer. | |
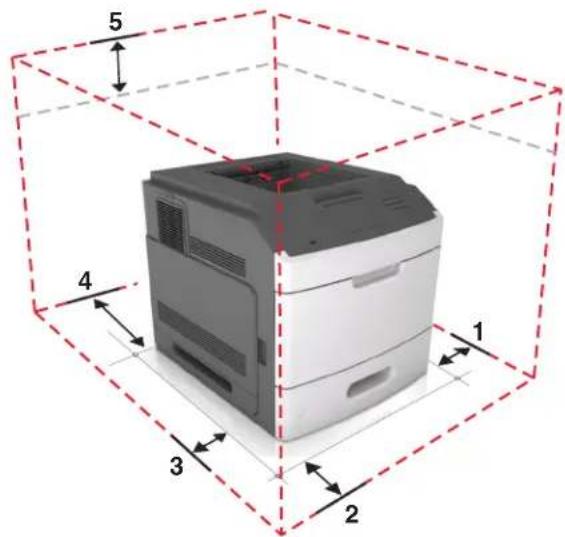
Selecting a location for the printer

CAUTION—POTENTIAL INJURY: The printer weight is greater than 18 kg (40 lb) and requires two or more trained personnel to lift it safely.
When selecting a location for the printer, leave enough room to open trays, covers, and doors. If you plan to install any hardware options, then leave enough room for them also. It is important to:
- Set up the printer near a properly grounded and easily accessible electrical outlet.
- Make sure airflow in the room meets the latest revision of the ASHRAE 62 standard or the CEN Technical Committee 156 standard.
- Provide a flat, sturdy, and stable surface.
- Keep the printer:
—Clean, dry, and free of dust.
—Away from stray staples and paper clips.
—Away from the direct airflow of air conditioners, heaters, or ventilators.
—Free from direct sunlight and humidity extremes.
- Observe the recommended temperatures and avoid fluctuations:
| Ambient temperature | 15.6 to 32.2°C (60 to 90°F) |
| Storage temperature | -40 to 43.3°C (-40 to 110°F) |

text_image
5 4 1 3 2| 1 Right side 152 mm (6 in.) |
| 2 Front 508 mm (20 in.) |
| 3 Left side 152 mm (6 in.) |
| 4 Rear 152 mm (6 in.) |
| 5 Top 115 mm (4.5 in.) |
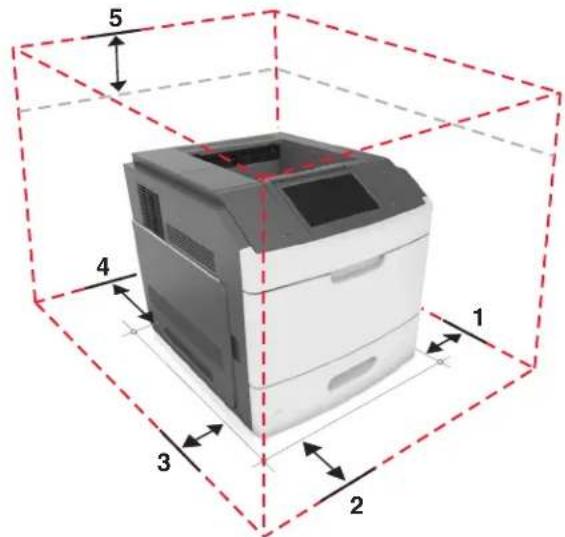
text_image
5 4 1 3 2| 1 Right side 152 mm (6 in.) |
| 2 Front 508 mm (20 in.) |
| 3 Left side 152 mm (6 in.) |
| 4 Rear 152 mm (6 in.) |
| 5 Top 115 mm (4.5 in.) |
text_image
5 4 3 2 1| 1 Right side 152 mm (6 in.) |
| 2 Front 508 mm (20 in.) |
| 3 Left side 152 mm (6 in.) |
| 4 Rear 152 mm (6 in.) |
| 5 Top 115 mm (4.5 in.) |
Additional printer setup
Installing internal options

CAUTION—SHOCK HAZARD: If you are accessing the controller board or installing optional hardware or memory devices sometime after setting up the printer, then turn the printer off, and then unplug the power cord from the electrical outlet before continuing. If you have any other devices attached to the printer, then turn them off as well, and unplug any cables going into the printer.
Available internal options
•Memory card
-DDR3 DIMM
-Flash memory
- Fonts
•Firmware cards
-Forms and Bar Code
—PRESCRIBE
-IPDS
- Printer hard disk
•Lexmark ™ Internal Solutions Ports (ISP)
-Parallel 1284-B interface
-MarkNet ™ N8350 802.11 b/g/n wireless printer server
-RS-232-C serial interface
Accessing the controller board
Note: This task requires a flat-head screwdriver.

CAUTION—SHOCK HAZARD: If you are accessing the controller board or installing optional hardware or memory devices sometime after setting up the printer, then turn the printer off, and unplug the power cord from the electrical outlet before continuing. If you have any other devices attached to the printer, then turn them off as well, and unplug any cables going into the printer.
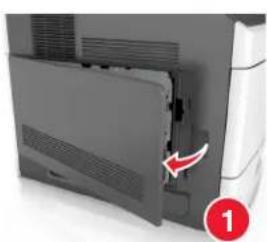
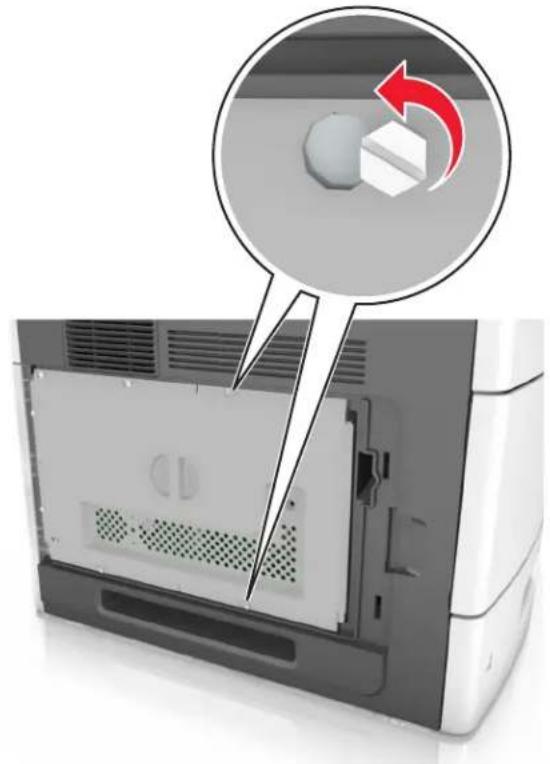
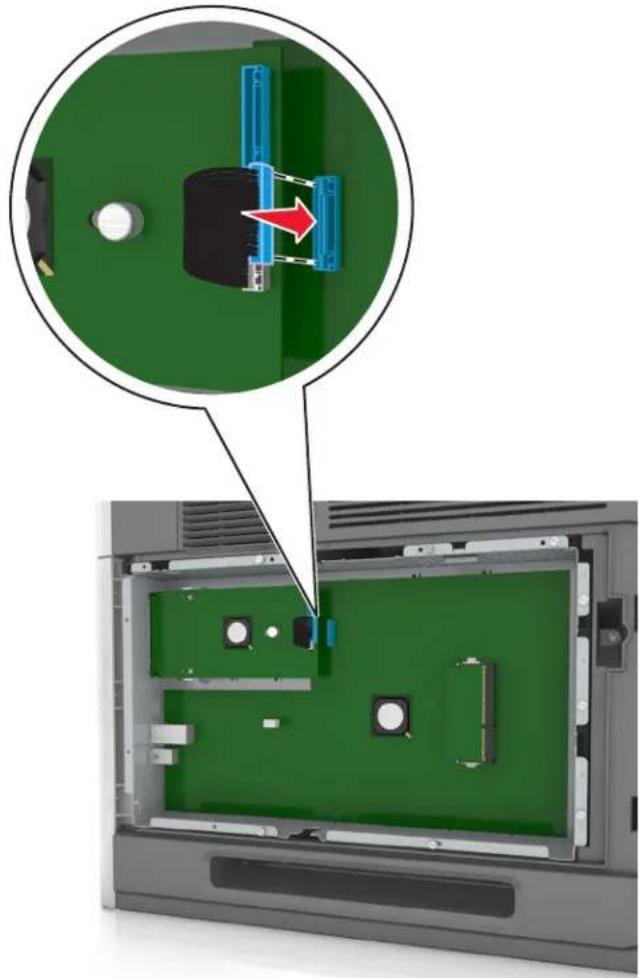
1 Remove the controller board access cover.
natural_image
Close-up of a mechanical device with a red arrow pointing to a component, no visible text or symbols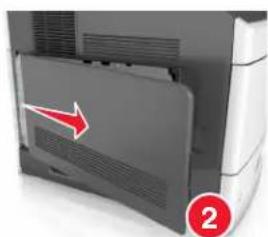
natural_image
Close-up of a printer's front panel with a red arrow pointing to its side panel (no text or symbols visible)2 Using a screwdriver, loosen the screws on the controller board shield.
natural_image
Diagram of a printer's internal structure showing a paper feeding into a printer with a magnified view highlighting the part (no text or symbols present)3 Remove the shield.

text_image
Diagram of a printer internal structure with numbered annotations highlighting components4 Use the following illustration to locate the appropriate connector:
Warning—Potential Damage: Controller board electronic components are easily damaged by static electricity. Touch a metal surface on the printer first before touching any controller board electronic component or connector.

text_image
Diagram of an open electronic device showing internal components with numbered labels| 1 Lexmark Internal Solutions Port or printer hard disk connector |
| 2 Option card connector |
| 3 Memory card connector |
5 Align the screws with the holes on the shield, and then reattach the shield.

text_image
Diagram of an open computer oven with labeled parts and magnified view highlighting features6 Tighten the screws on the shield.

natural_image
Diagram of a printer's internal structure showing a paper airplane being opened, with a magnified view highlighting the part (no text or symbols present)7 Reattach the access cover.
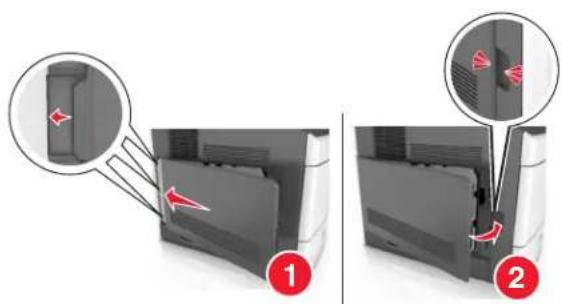
natural_image
Two-step diagram showing a printer's internal structure before and after disassembly, with arrows indicating movement (no text or symbols present)Installing a memory card

CAUTION—SHOCK HAZARD: If you are accessing the controller board or installing optional hardware or memory devices sometime after setting up the printer, then turn the printer off, and unplug the power cord from the electrical outlet before continuing. If you have any other devices attached to the printer, then turn them off as well, and unplug any cables going into the printer.
Warning—Potential Damage: Controller board electronic components are easily damaged by static electricity. Touch something metal on the printer first before touching any controller board electronic components or connectors.
An optional memory card can be purchased separately and attached to the controller board.
1 Access the controller board.
For more information, see "Accessing the controller board" on page 12.
2 Unpack the memory card.
Warning—Potential Damage: Do not touch the connection points along the edge of the card. Doing so may cause damage.
3 Align the notch (1) on the memory card with the ridge (2) on the connector.
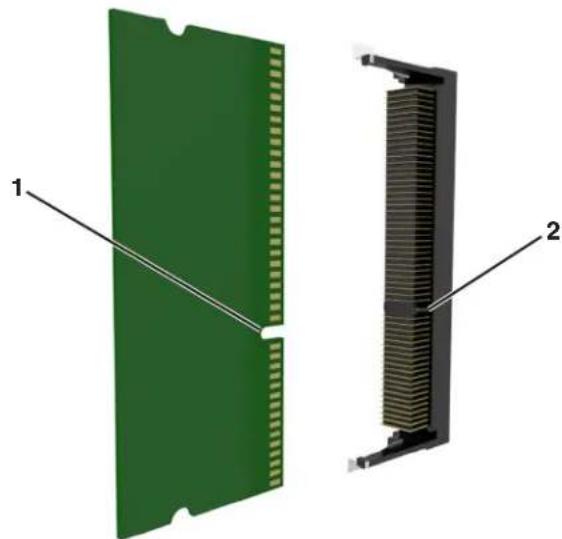
natural_image
Diagram of a green PCB with two views: one showing internal structure and the other showing a heat sink (no text or symbols present)4 Push the memory card straight into the connector, and then push the card toward the controller board wall until it clicks into place.

natural_image
Diagram showing a green circuit board with a red arrow pointing to its left side of a black thermal or heat sink component (no text or symbols present)5 Reattach the controller board shield, and then the controller board access cover.
Installing an Internal Solutions Port
The controller board supports one optional Lexmark Internal Solutions Port (ISP).
Note: This task requires a flat-head screwdriver.

CAUTION—SHOCK HAZARD: If you are accessing the controller board or installing optional hardware or memory devices sometime after setting up the printer, then turn the printer off, and unplug the power cord from the electrical outlet before continuing. If you have any other devices attached to the printer, then turn them off as well, and unplug any cables going into the printer.
Warning—Potential Damage: Controller board electronic components are easily damaged by static electricity. Touch something metal on the printer first before touching any controller board electronic components or connectors.
1 Access the controller board.
For more information, see "Accessing the controller board" on page 12.
2 If an optional printer hard disk is installed, then remove the printer hard disk first.
For more information, see "Removing a printer hard disk" on page 27.
3 Unpack the ISP kit.

text_image
Diagram of a green computer motherboard with labeled components including connectors, parts, and connectors| 1 ISP solution |
| 2 Screw for attaching the plastic bracket to the ISP |
| 3 Screws for attaching the ISP mounting bracket to the controller board shield |
| 4 Plastic bracket |
4 Remove the metal cover from the ISP opening.
a Loosen the screw.
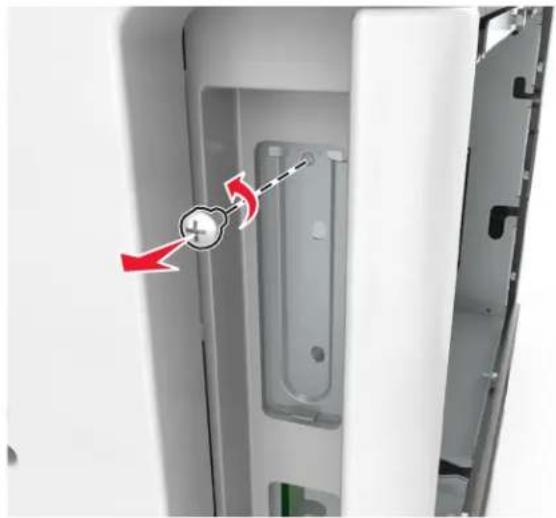
natural_image
Close-up of a white refrigerator interior with a hand holding a plus sign, showing red arrows indicating motion (no text or symbols)b Lift the metal cover, and then pull it out completely.
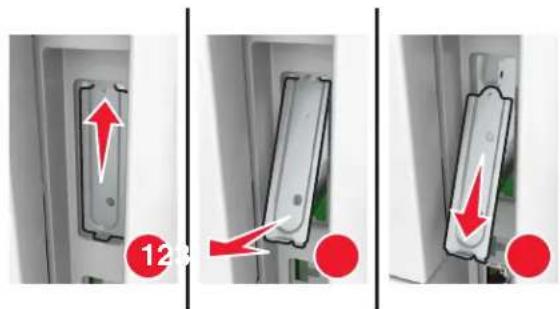
text_image
Diagram showing three steps of a door lock mechanism with red arrows indicating direction and numbered callouts5 Align the posts of the plastic bracket with the holes on the controller board cage, and then press the plastic bracket on the controller board cage until it clicks into place.
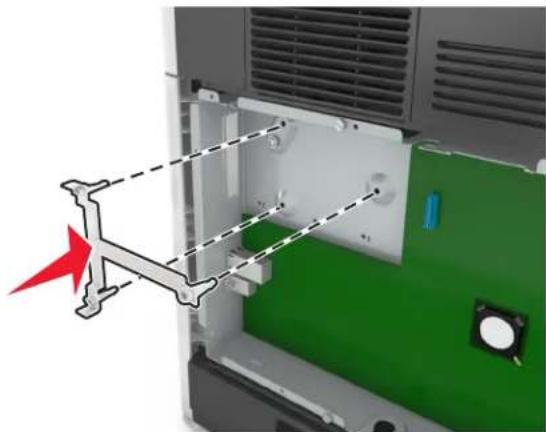
natural_image
Interior view of a computer case with green insulation and a red arrow indicating a component (no text or symbols)Note: Make sure that the plastic bracket has latched completely, and that the plastic bracket is seated firmly on the controller board cage.
6 Install the ISP on the plastic bracket.

natural_image
Interior view of an electronic device showing a green circuit board with heat sinks and a red arrow indicating a component (no text or symbols present)Note: Hold the ISP at an angle over the plastic bracket so that any overhanging connectors will pass through the ISP opening in the controller board cage.
7 Lower the ISP toward the plastic bracket until the ISP is seated between the guides of the plastic bracket.

natural_image
Interior view of an electronic device showing green circuit board with internal components and a magnified inset highlighting a red arrow (no text or symbols present)8 Use the provided thumbscrew for the ISP to attach the plastic bracket to the ISP.
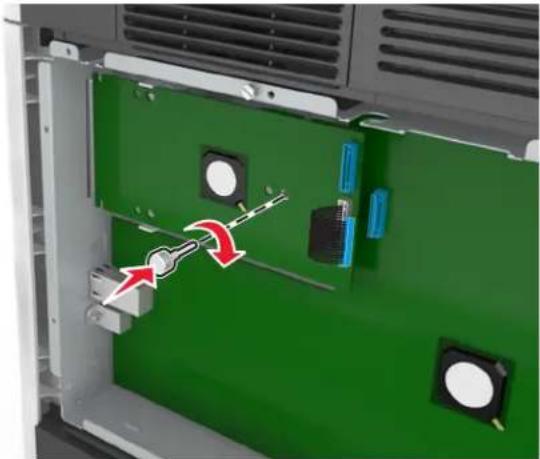
natural_image
Interior view of an electronic device showing a green panel with labeled components and a red arrow indicating rotation or movement (no text or symbols present)Note: Turn the screw clockwise, enough to hold the ISP in place, but do not tighten it yet.
9 Attach the two provided screws to secure the ISP mounting bracket to the controller board shield.
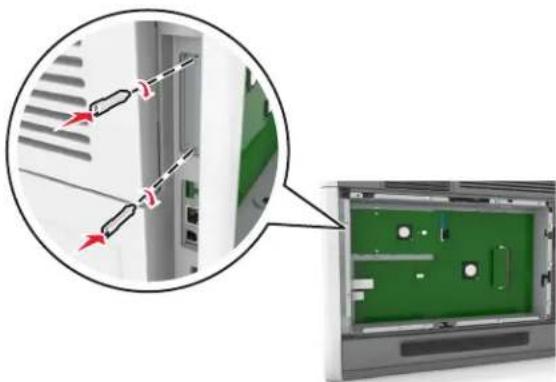
natural_image
Diagram showing a device with internal components and a close-up view of the interior panel (no text or symbols visible)10 Tighten the thumbscrew that is attached to the ISP.
Warning—Potential Damage: Do not screw it on too tightly.
11 Connect the ISP solution interface cable into the receptacle of the controller board.
natural_image
Interior view of an electronic device showing a green circuit board with a highlighted component and a magnified inset highlighting the internal structure (no text or symbols visible)Note: The plugs and receptacles are color-coded.
Installing an optional card

CAUTION—SHOCK HAZARD: If you are accessing the controller board or installing optional hardware or memory devices sometime after setting up the printer, then turn the printer off, and unplug the power cord from the electrical outlet before continuing. If you have other devices attached to the printer, then turn them off as well, and unplug any cables going into the printer.
Warning—Potential Damage: Controller board electronic components are easily damaged by static electricity. Touch a metal surface on the printer before touching any controller board electronic components or connectors.
1 Access the controller board.
For more information, see "Accessing the controller board" on page 12.
2 Unpack the optional card.
Warning—Potential Damage: Avoid touching the connection points along the edge of the card.
3 Holding the card by its sides, align the plastic pins (1) on the card with the holes (2) on the controller board.

text_image
Diagram showing a device with labeled components and a red arrow indicating transformation or alignment, alongside an inset image of a mechanical assembly.4 Push the card firmly into place as shown in the illustration.

natural_image
3D diagram of a device with green circuit board and black wall connectors, showing internal components connected by red lines (no text or symbols)Warning—Potential Damage: Improper installation of the card may cause damage to the card and the controller board.
Note: The entire length of the connector on the card must touch and be flushed against the controller board.
5 Close the controller board access door.
Note: When the printer software and any hardware options are installed, it may be necessary to manually add the options in the printer driver to make them available for print jobs. For more information, see "Updating available options in the printer driver" on page 36.
Installing a printer hard disk
Note: This task requires a flat-head screwdriver.

CAUTION—SHOCK HAZARD: If you are accessing the controller board or installing optional hardware or memory devices sometime after setting up the printer, then turn the printer off, and unplug the power cord from the electrical outlet before continuing. If you have any other devices attached to the printer, then turn them off as well, and unplug any cables going into the printer.
Warning—Potential Damage: Controller board electronic components are easily damaged by static electricity. Touch something metal on the printer first before touching any controller board electronic components or connectors.
1 Access the controller board.
For more information, see "Accessing the controller board" on page 12.
2 Unpack the printer hard disk.
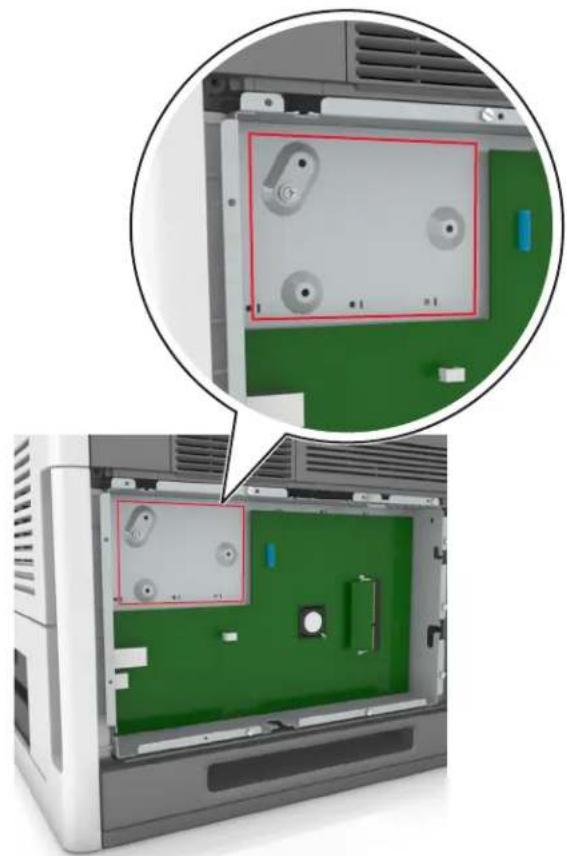
3 Locate the appropriate connector on the controller board cage.
natural_image
Interior view of an open computer case showing internal components and a magnified view of the disc (no text or symbols visible)Note: If an optional ISP is currently installed, then the printer hard disk must be installed onto the ISP.
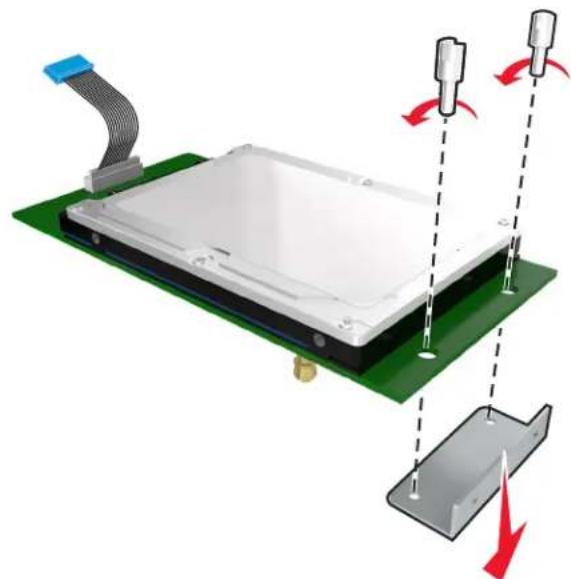
To install a printer hard disk onto the ISP:
a Remove the screws attached to the printer hard disk mounting bracket, and then remove the bracket.
natural_image
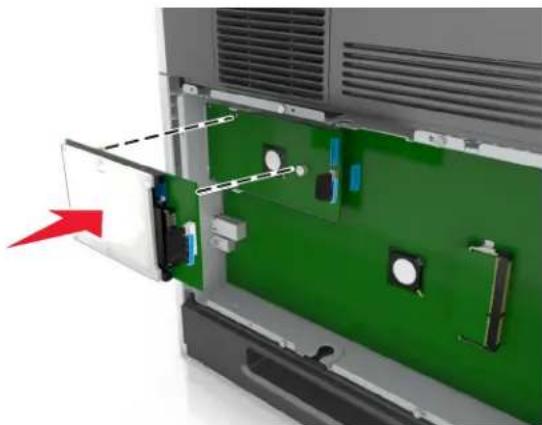
Diagram of a device with a green circuit board and red directional arrows indicating motion or force, no text or symbols present.b Align the standoffs of the printer hard disk to the holes in the ISP, and then press the printer hard disk down until the standoffs are in place.
Installation warning: Hold only the edges of the printed circuit board assembly. Do not touch or press on the center of the printer hard disk. Doing so may cause damage.
natural_image
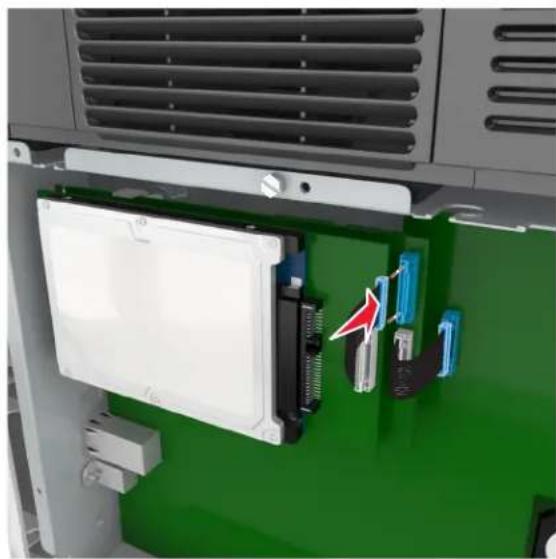
Interior view of a computer drive bay showing green circuit board and internal components (no text or symbols visible)c Insert the plug of the printer hard disk interface cable into the receptacle of the ISP.
Note: The plugs and receptacles are color-coded.
natural_image
Interior view of a green electronic device with visible internal components and a red arrow pointing to a component (no text or symbols)To install a printer hard disk directly on the controller board cage:
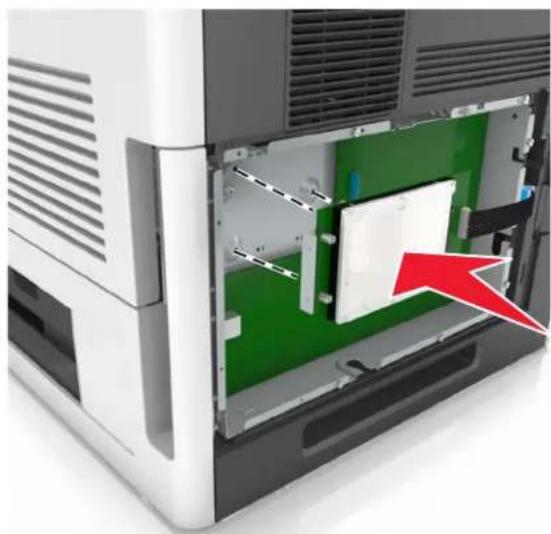
a Align the standoffs of the printer hard disk to the holes in the controller board cage, and then press the printer hard disk down until the standoffs are in place.
Installation warning: Hold only the edges of the printed circuit board assembly. Do not touch or press on the center of the printer hard disk. Doing so may cause damage.
natural_image
Interior view of a computer tower with green and white panels, showing internal components and a red arrow pointing to a component (no text or symbols visible)b Use the two provided screws to attach the printer hard disk mounting bracket.

natural_image
Diagram showing a computer motherboard with a green internal component and red arrows indicating connection points (no text or symbols present)c Insert the plug of the printer hard disk interface cable into the receptacle of the controller board.
Note: The plugs and receptacles are color-coded.

natural_image
Interior view of a computer monitor showing the internal components and a magnified view of the device's internal structure (no text or symbols visible)Removing a printer hard disk
Note: This task requires a flat-head screwdriver.

CAUTION—SHOCK HAZARD: If you are accessing the controller board or installing optional hardware or memory devices sometime after setting up the printer, then turn the printer off, and unplug the power cord from the electrical outlet before continuing. If you have any other devices attached to the printer, then turn them off as well, and unplug any cables going into the printer.
Warning—Potential Damage: Controller board electronic components are easily damaged by static electricity. Touch a metal surface on the printer before touching any controller board electronic components or connectors.
1 Access the controller board.
For more information, see "Accessing the controller board" on page 12.
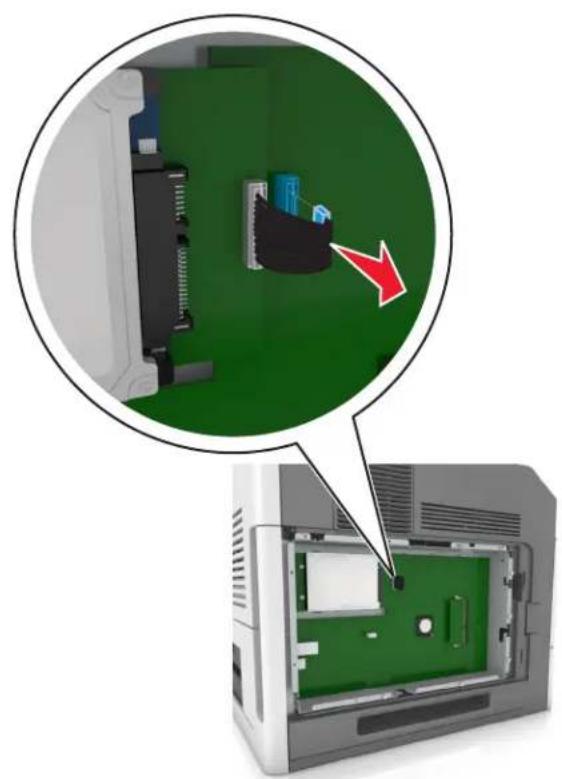
2 Unplug the printer hard disk interface cable from the controller board, leaving the cable attached to the printer hard disk. To unplug the cable, squeeze the paddle at the plug of the interface cable to disengage the latch before pulling out the cable.
natural_image
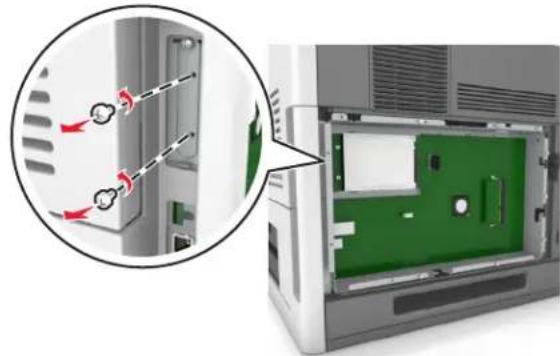
Diagram showing a computer monitor internal structure with a magnified view of the main panel (no text or symbols present)3 Remove the screws holding the printer hard disk in place.
natural_image
Diagram showing a computer chassis with internal components and a close-up view of the device's internal structure (no text or symbols visible)4 Remove the printer hard disk.
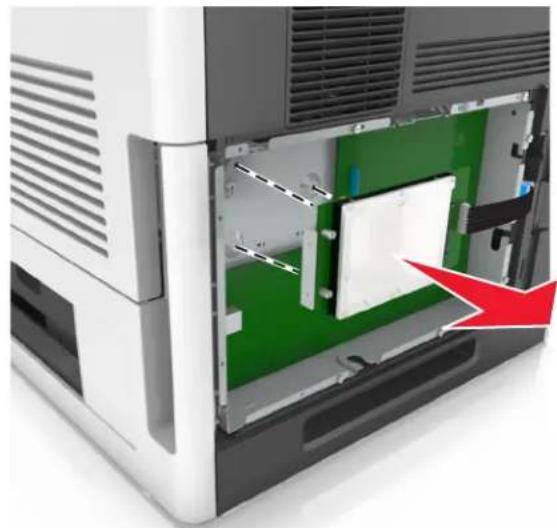
natural_image
Interior view of a computer or server unit showing internal components with a red arrow pointing to a component (no text or symbols visible)5 Set aside the printer hard disk.
Installing hardware options
Order of installation
CAUTION—POTENTIAL INJURY: The printer weight is greater than 18 kg (40 lb) and requires two or more trained personnel to lift it safely.
CAUTION—SHOCK HAZARD: If you are accessing the controller board or installing optional hardware or memory devices sometime after setting up the printer, then turn the printer off, and unplug the power cord from the electrical outlet before continuing. If you have any other devices attached to the printer, then turn them off as well, and unplug any cables going into the printer.
CAUTION—TIPPING HAZARD: Floor-mounted configurations require additional furniture for stability. You must use either a printer stand or printer base if you are using multiple input options. If you purchased a printer with a similar configuration, then you may need additional furniture. For more information, see www.lexmark.com/multifunctionprinters.
Install the printer and any hardware options you have purchased in the following order:
•Caster base
•2100-sheet tray or spacer
- Optional 550- or 250-sheet tray
•Printer
For more information on installing a caster base, optional 550- or 250-sheet tray, spacer, or 2100-sheet tray, see the setup sheet that came with the option.
Installing optional trays
CAUTION—POTENTIAL INJURY: The printer weight is greater than 18 kg (40 lb) and requires two or more trained personnel to lift it safely.
CAUTION—SHOCK HAZARD: If you are accessing the controller board or installing optional hardware or memory devices sometime after setting up the printer, then turn the printer off, and unplug the power cord from the electrical outlet before continuing. If you have any other devices attached to the printer, then turn them off as well, and unplug any cables going into the printer.
CAUTION—TIPPING HAZARD: Floor-mounted configurations require additional furniture for stability. You must use either a printer stand or printer base if you are using multiple input options. If you purchased a printer with a similar configuration, then you may need additional furniture. For more information, see www.lexmark.com/multifunctionprinters.
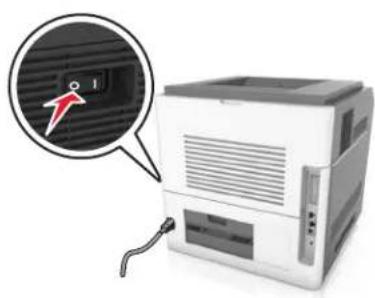
1 Turn off the printer using the power switch, and then unplug the power cord from the electrical outlet.
natural_image
Illustration of a computer with a red arrow pointing to a ventilation grille (no text or symbols)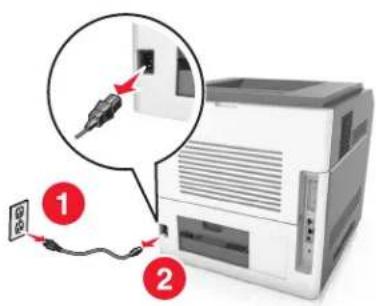
text_image
Diagram showing cable connection to a printer with labeled parts and magnified detail view2 Unpack the optional tray, and then remove all packing material.
3 Pull out the tray completely from the base.
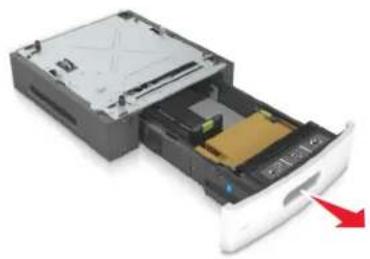
natural_image
Disassembled CD or DVD drive with a red arrow pointing to the disc (no text or symbols visible)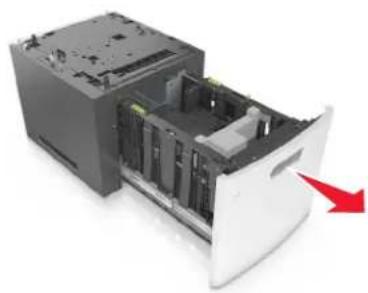
natural_image
Interior view of a computer drive bay with a red arrow pointing to a component (no text or symbols visible)4 Remove any packing material from inside the tray.
5 Insert the tray into the base.
6 Place the tray near the printer.
7 Align the optional tray with the caster base.
Note: Make sure to lock the wheels of the caster base to secure the printer.

natural_image
3D rendering of a mechanical device with a red arrow indicating a downward force or change, no visible text or symbols.8 Align the printer with the tray, and then slowly lower the printer into place.
Note: Optional trays lock together when stacked.
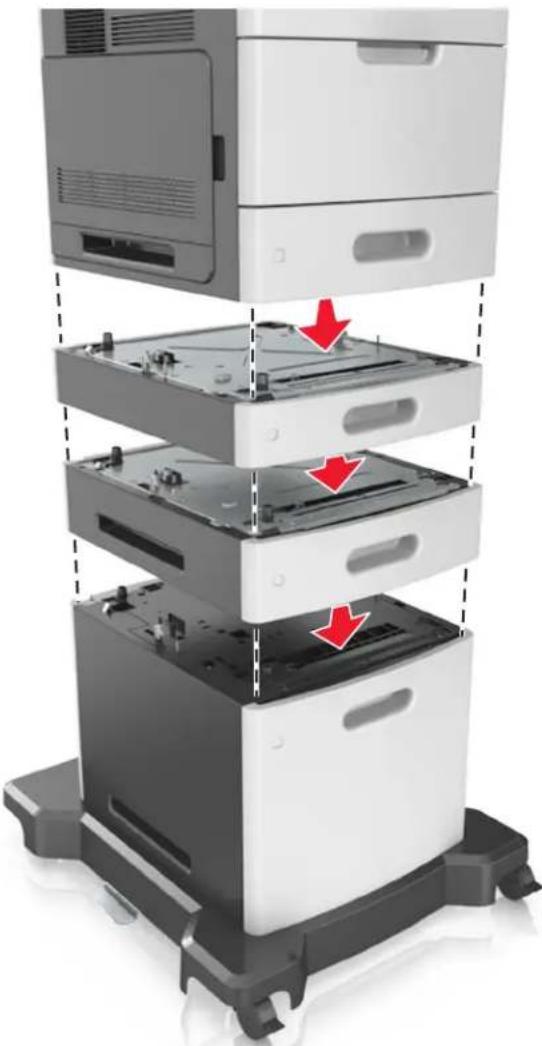
natural_image
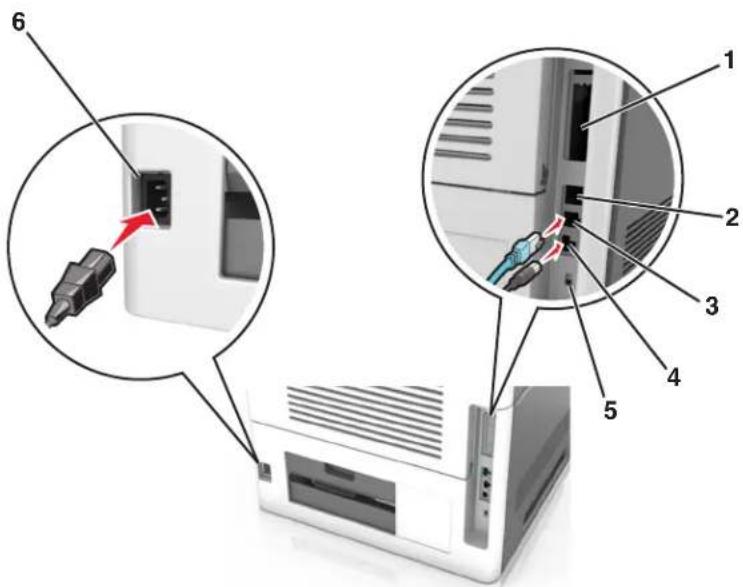
Stacked views of a multi-tiered printer or scanner with visible internal components and red arrows indicating features (no text or symbols)9 Connect the power cord to the printer, then to a properly grounded electrical outlet, and then turn on the printer.

text_image
Diagram showing connection between a server rack and a device, with labeled parts 1 and 2 indicating cable or wiring details.
natural_image
Illustration of a medical or laboratory equipment unit with a magnified circular inset showing a red pointer (no text or symbols)Note: When the printer software and any optional trays are installed, you may need to manually add the options in the printer driver to make them available for print jobs. For more information, see "Updating available options in the printer driver" on page 36.
To uninstall the optional trays, slide the latch on the right side of the printer toward the front of the printer until it clicks into place, and then remove stacked trays one at a time from the top to the bottom.
Attaching cables

CAUTION—POTENTIAL INJURY: Do not set up this product or make any electrical or cabling connections, such as a power cord, a fax feature, or USB cable, during a lightning storm.
Connect the printer to the computer using a USB cable or Ethernet cable.
Make sure to match the following:
•The USB symbol on the cable with the USB symbol on the printer
•The appropriate Ethernet cable to the Ethernet port
•The appropriate parallel cable with the parallel port
text_image
Diagram showing a printer with labeled parts, including a connector pin and internal wiring connections.| Use the To | ||
| 1 | Parallel port Connect the printer to a computer. Note: This can also be used in installing an optional Internal Solutions Port (ISP). | |
| 2 | USB port Attach an optional wireless network adapter. | |
| 3 | Ethernet port Connect the printer to a network. | |
| 4 | USB printer port Connect the printer to a computer. | |
| 5 | Security slot Attach a lock that will secure the controller board. | |
| 6 | Printer power cord socket | Connect the printer to a properly grounded electrical outlet. |
Warning—Potential Damage: Do not touch the USB cable, any wireless network adapter, or the printer in the area shown while actively printing. Loss of data or a malfunction can occur.
Organizing the cables
Note: This feature is available only if you purchase optional trays and a caster base.
After attaching the Ethernet cable and power cord, neatly tuck the cables in the channels at the back of the printer.

natural_image
Illustration of a computer monitor with cable and a magnified inset showing internal components (no text or symbols)Setting up the printer software
Installing the printer software
Notes:
- If you installed the printer software on the computer before but need to reinstall the software, then uninstall the current software first.
- Close all open software programs before installing the printer software.
1 Obtain a copy of the software installer package.
• From the Software and Documentation CD that came with your printer.
•From our Web site:
Go to http://support.lexmark.com, and then navigate to:
SUPPORT & DOWNLOAD > select your printer > select your operating system
2 Double-click the software installer package.
Wait for the installation dialog to appear.
If you are using a Software and Documentation CD and the installation dialog does not appear, then do the following:
In Windows 8
From the Search charm, type run, and then navigate to:
Apps list > Run > type D: \setup.exe > OK.
In Windows 7 or earlier
a Click or click Start, and then click Run.
b In the Start Search or Run dialog, type D:\setup.exe.
c Press Enter, or click OK.
In Macintosh
Click the CD icon on the desktop.
Note: D is the letter of your CD or DVD drive.
3 Click Install, and then follow the instructions on the computer screen.
Updating available options in the printer driver
When any hardware options are installed, you may need to manually add the options in the printer driver to make them available for use.
For Windows users
1 Open the printers folder.
In Windows 8
From the Search charm, type run, and then navigate to:
Apps list > Run > type control printers > OK
In Windows 7 or earlier
a Click or click Start, and then click Run.
b In the Start Search or Run dialog, type control printers.
c Press Enter, or click OK.
2 Depending on your device, do either of the following:
- Press and hold the printer you want to update.
• Right-click the printer you want to update.
3 From the menu that appears, do either of the following:
- For Windows 7 or later, select Printer properties.
- For earlier versions, select Properties.
4 Click the Configuration tab.
5 Do either of the following:
- Click Update Now - Ask Printer.
- Under Configuration Options, manually add any installed hardware options.
6 Click Apply.
For Macintosh users
1 From the Apple menu, navigate to either of the following:
- System Preferences > Print & Scan > select your printer > Options & Supplies > Driver
- System Preferences > Print & Fax > select your printer > Options & Supplies > Driver
2 Add any installed hardware options, and then click OK.
Networking
Notes:
- Purchase a MarkNet N8350 wireless network adapter first before setting up the printer on a wireless network. For information on installing the wireless network adapter, see the instruction sheet that came with the adapter.
- A Service Set Identifier (SSID) is a name assigned to a wireless network. Wired Equivalent Privacy (WEP), Wi-Fi Protected Access (WPA), WPA2, and 802.1X-RADIUS are types of security used on a network.
Preparing to set up the printer on an Ethernet network
To configure your printer to connect to an Ethernet network, organize the following information before you begin:
Note: If your network automatically assigns IP addresses to computers and printers, continue on to installing the printer.
•A valid, unique IP address for the printer to use on the network
•The network gateway
•The network mask
•A nickname for the printer (optional)
Note: A printer nickname can make it easier for you to identify your printer on the network. You can choose to use the default printer nickname, or assign a name that is easier for you to remember.
You will need an Ethernet cable to connect the printer to the network and an available port where the printer can physically connect to the network. Use a new network cable when possible to avoid potential problems caused by a damaged cable.
Installing the printer on an Ethernet network
For Windows users
1 Obtain a copy of the software installer package.
- From the Software and Documentation CD that came with your printer.
•From our Web site:
Go to http://support.lexmark.com, and then navigate to:
SUPPORT & DOWNLOAD > select your printer > select your operating system
2 Double-click the software installer package.
Wait for the installation dialog to appear.
If you are using the Software and Documentation CD and the installation dialog does not appear, then do the following:
In Windows 8
From the Search charm, type run, and then navigate to:
Apps list > Run > type: D:\setup.exe > OK
In Windows 7 or earlier
a Click or click Start, and then click Run.
b In the Start Search or Run dialog, type D:\setup.exe.
c Press Enter, or click OK.
Note: D is the letter of your CD or DVD drive.
3 Click Install, and then follow the instructions on the computer screen.
4 Select Ethernet connection, and then click Continue.
5 Attach the Ethernet cable when instructed to do so.
6 Select the printer from the list, and then click Continue.
Note: If the configured printer does not appear in the list, then click Modify Search.
7 Follow the instructions on the computer screen.
For Macintosh users
1 Allow the network DHCP server to assign an IP address to the printer.
2 Obtain the printer IP address either:
•From the printer control panel
•From the TCP/IP section in the Network/Ports menu
- By printing a network setup page or menu settings page, and then finding the TCP/IP section
Note: You will need the IP address if you are configuring access for computers on a different subnet than the printer.
3 Install the printer driver on the computer.
a Insert the Software and Documentation CD, and then double-click the installer package for the printer.
b Follow the instructions on the computer screen.
c Select a destination, and then click Continue.
d From the Easy Install screen, click Install.
e Type the user password, and then click OK.
All the necessary applications are installed on the computer.
f Click Close when installation is complete.
4 Add the printer.
- For IP printing:
a From the Apple menu, navigate to either of the following:
— System Preferences > Print & Scan
— System Preferences > Print & Fax
b Click +.
c Click the IP tab.
d Type the printer IP address in the address field, and then click Add.
- For AppleTalk printing:
Notes:
—Make sure AppleTalk is activated on your printer.
—This feature is supported only in Mac OS X version 10.5.
a From the Apple menu, navigate to:
System Preferences > Print & Fax
b Click +, and then navigate to:
AppleTalk > select your printer > Add
Preparing to set up the printer on a wireless network
Notes:
- Make sure your wireless network adapter is installed in your printer and working properly. For more information, see the instruction sheet that came with the wireless network adapter.
- Make sure your access point (wireless router) is turned on and is working properly.
Make sure you have the following information before setting up the printer on a wireless network:
- SSID—The SSID is also referred to as the network name.
- Wireless Mode (or Network Mode)—The mode is either infrastructure or ad hoc.
- Channel (for ad hoc networks)—The channel defaults to automatic for infrastructure networks.
Some ad hoc networks will also require the automatic setting. Check with your system support person if you are not sure which channel to select.
• Security Method—There are four basic options for Security Method:
—WEP key
If your network uses more than one WEP key, then enter up to four in the provided spaces. Select the key currently in use on the network by selecting the default WEP transmit key.
—WPA or WPA2 preshared key or passphrase
WPA includes encryption as an additional layer of security. The choices are AES or TKIP. Encryption must be set for the same type on the router and on the printer, or the printer will not be able to communicate on the network.
-802.1X-RADIUS
If you are installing the printer on an 802.1X network, then you may need the following:
- Authentication type
•Inner authentication type
•802.1X user name and password
•Certificates
—No security
If your wireless network does not use any type of security, then you will not have any security information.
Note: We do not recommend using an unsecured wireless network.
Notes:
- If you do not know the SSID of the network that your computer is connected to, then launch the wireless utility of the computer network adapter, and then look for the network name. If you cannot find the SSID or the security information for your network, then see the documentation that came with the access point, or contact your system support person.
- To find the WPA/WPA2 preshared key or passphrase for the wireless network, see the documentation that came with the access point, see the Embedded Web Server associated with the access point, or consult your system support person.
Connecting the printer to a network using the Wireless Setup Wizard
Before you begin, make sure that:
-
A wireless network adapter is installed in the printer and is working properly. For more information, see the instruction sheet that came with the wireless network adapter.
•The Ethernet cable is disconnected from the printer.
•Active NIC is set to Auto. To set this to Auto, navigate to one of the following: -
Settings > OK > Network/Ports > OK > Active NIC > OK > Auto > OK
-
Network/Ports > Active NIC > Auto
-
Network/Ports > Active NIC > Auto > Submit
Note: Make sure to turn off the printer, then wait for at least five seconds, and then turn on the printer.
1 From the printer control panel, navigate to one of the following:
- Settings > OK > Network/Ports > OK > Network [x] > OK > Network [x] Setup > OK > Wireless > OK > Wireless Connection Setup > OK
• > Network/Ports > Network [x] > Network [x] Setup > Wireless > Wireless Connection Setup -
Network/Ports > Network [x] > Network [x] Setup > Wireless > Wireless Connection Setup
2 Select a wireless connection setup.
| Use To | |
| Search for networks Show available wireless connections. Note: This menu shows all broadcast secured or unsecured SSIDs. | |
| Enter a network name Manually enter the SSID. Note: Make sure to enter the correct SSID. | |
| Wi-Fi Protected Setup Connect the printer to a wireless network using Wi-Fi Protected Setup. | |
3 Follow the instructions on the printer display.
Connecting the printer to a wireless network using the Wi-Fi Protected Setup
Before connecting the printer to a wireless network, make sure that:
- The access point (wireless router) is Wi-Fi Protected Setup (WPS) certified or WPS-compatible. For more information, see the documentation that came with your access point.
- A wireless network adapter installed in your printer is attached and working properly. For more information, see the instruction sheet that came with the wireless network adapter.
Using the Push Button Configuration method
1 Depending on your printer model, navigate to either of the following:
- Settings > OK > Networks/Ports > OK > Network [x] > OK > Network [x] Setup > OK > Wireless > OK > Wi-Fi Protected Setup > OK > Start Push Button Method
-
Network/Ports > Network [x] > Network [x] Setup > Wireless > Wi-Fi Protected Setup > Start Push Button Method
-
Network/Ports > Network [x] > Network [x] Setup > Wireless > Wi-Fi Protected Setup > Start Push Button Method
2 Follow the instructions on the printer display.
Using the Personal Identification Number (PIN) method
1 Depending on your printer model, navigate to either of the following:
- Settings > OK > Networks/Ports > OK > Network [x] > OK > Network [x] Setup > OK > Wireless > OK > Wi-Fi Protected Setup > OK > Start PIN Method
-
Network/Ports > Network [x] > Network [x] Setup > Wireless > Wi-Fi Protected Setup > Start PIN Method
-
Network/Ports > Network [x] > Network [x] Setup > Wireless > Wi-Fi Protected Setup > Start PIN Method
2 Copy the eight-digit WPS PIN.
3 Open a Web browser, and then type the IP address of your access point in the address field.
Notes:
- The IP address appears as four sets of numbers separated by periods, such as 123.123.123.123.
- If you are using a proxy server, then temporarily disable it to load the Web page correctly.
4 Access the WPS settings. For more information, see the documentation that came with your access point.
5 Enter the eight-digit PIN, and then save the setting.
Connecting the printer to a wireless network using the Embedded Web Server
Before you begin, make sure that:
- Your printer is connected temporarily to an Ethernet network.
- A wireless network adapter is installed in your printer and working properly. For more information, see the instruction sheet that came with the wireless network adapter.
1 Open a Web browser, and then type the printer IP address in the address field.
Notes:
- View the printer IP address on the printer control panel. The IP address appears as four sets of numbers separated by periods, such as 123.123.123.123.
- If you are using a proxy server, then temporarily disable it to load the Web page correctly.
2 Click Settings > Network/Ports > Wireless.
3 Modify the settings to match the settings of your access point (wireless router).
Note: Make sure to enter the correct SSID, security method, preshared key or passphrase, network mode, and channel.
4 Click Submit.
5 Turn off the printer, and then disconnect the Ethernet cable. Then wait for at least five seconds, and then turn the printer back on.
6 To verify if your printer is connected to the network, print a network setup page. Then in the Network Card [x] section, see if the status is Connected.
Changing port settings after installing a new network Internal Solutions Port
When a new Lexmark Internal Solutions Port (ISP) is installed in the printer, the printer configurations on computers that access the printer must be updated since the printer will be assigned a new IP address. All computers that access the printer must be updated with this new IP address.
Notes:
- If the printer has a static IP address, then you do not need to make any changes to the computer configurations.
- If the computers are configured to use the network name, instead of an IP address, then you do not need to make any changes to your computer configurations.
- If you are adding a wireless ISP to a printer previously configured for an Ethernet connection, then make sure the printer is disconnected from the Ethernet network when you configure the printer to operate wirelessly. If the printer is connected to the Ethernet network, then the wireless configuration completes, but the wireless ISP is inactive. To activate the wireless ISP, disconnect the printer from the Ethernet network, turn off the printer, and then turn it back on.
- Only one network connection is active at a time. To switch between Ethernet and wireless connection types, turn off the printer, connect the cable (to switch to an Ethernet connection) or disconnect the cable (to switch to a wireless connection), and then turn the printer back on.
For Windows users
1 Open a Web browser, and then type the printer IP address in the address field.
Notes:
- View the printer IP address on the printer control panel. The IP address appears as four sets of numbers separated by periods, such as 123.123.123.123.
- If you are using a proxy server, then temporarily disable it to load the Web page correctly.
2 Open the printers folder.
In Windows 8
From the Search charm, type Run and then navigate to:
Apps list > Run > type control printers > OK
In Windows 7 or earlier
a Click , or click Start and then click Run.
b In the Start Search or Run dialog, type control printers.
c Press Enter, or click OK.
3 To select the printer that has changed, do either of the following:
- Press and hold the printer, and then select Printer properties.
- Right-click the printer, and then select Printer properties (Windows 7 or later) or Properties (earlier versions).
Note: If there is more than one copy of the printer, then update all of them with the new IP address.
4 Click the Ports tab.
5 Select the port from the list, and then click Configure Port.
6 Type the new IP address in the "Printer Name or IP Address" field.
7 Click OK > Close.
For Macintosh users
1 Open a Web browser, and then type the printer IP address in the address field.
Notes:
- View the printer IP address on the printer control panel. The IP address appears as four sets of numbers separated by periods, such as 123.123.123.123.
- If you are using a proxy server, then temporarily disable it to load the Web page correctly.
2 Add the printer.
- For IP printing:
a From the Apple menu, navigate to either of the following:
— System Preferences > Print & Scan
— System Preferences > Print & Fax
b Click+.
c Click the IP tab.
d Type the printer IP address in the address field, and then click Add.
- For AppleTalk printing:
Notes:
—Make sure AppleTalk is activated on your printer.
—This feature is supported only in Mac OS X version 10.5.
a From the Apple menu, navigate to:
System Preferences > Print & Fax
b Click +, and then navigate to:
AppleTalk > select the printer > Add
Setting up serial printing
Use serial printing to print when the computer is far from the printer or to print at a reduced speed.
After installing the serial or communication (COM) port, configure the printer and the computer. Make sure you have connected the serial cable to the COM port on your printer.
1 Set the parameters in the printer.
a From the printer control panel, navigate to the menu for the port settings.
b Locate the menu for the serial port settings, and then adjust the settings, if necessary.
c Save the modified settings, and then print a menu settings page.
2 Install the printer driver.
a Obtain a copy of the software installer package.
• From the Software and Documentation CD that came with your printer
•From our Web site:
Go to http://support.lexmark.com, and then navigate to:
SUPPORT & DOWNLOAD > select your printer > select your operating system
b Double-click the software installer package.
Wait for the installation dialog to appear.
If you are using the Software and Documentation CD and the installation dialog does not appear, then do the following:
In Windows 8
From the Search charm type run, and then navigate to:
Apps list > Run > type D: \setup.exe > OK
In Windows 7 or earlier
1 Click 📄 or click Start, and then click Run.
2 In the Start Search or Run dialog, type D:\setup.exe.
3 Press Enter or click OK.
Note: D is the letter of your CD or DVD drive.
c Click Install.
d Follow the instructions on the computer screen.
e Select Advanced, and then click Continue.
f From the Configure Printer Connection dialog, select a port.
g If the port is not in the list, then click Refresh, or navigate to:
Add port > select a port type > enter the necessary information > OK
h Click Continue > Finish.
3 Set the COM port parameters.
After installing the printer driver, set the serial parameters in the COM port assigned to the printer driver.
Note: Make sure the serial parameters in the COM port match the serial parameters you set in the printer.
a Open Device Manager.
In Windows 8
From the Search charm, type run and then navigate to:
Apps list > Run > type devmgmt.msc > OK
In Windows 7 or earlier
1 Click 📄 or click Start, and then click Run.
2 In the Start Search or Run dialog, type devmgmt.msc.
3 Press Enter or click OK.
b Double-click Ports (COM & LPT) to expand the list of available ports.
c Do either of the following:
- Press and hold the COM port where you attached the serial cable to your computer (example: COM1).
- Right-click the COM port where you attached the serial cable to your computer (example: COM1).
d From the menu that appears, select Properties.
e On the Port Settings tab, set the serial parameters to the same serial parameters set in the printer. Check the serial heading of the menu settings page for the printer settings.
f Click OK, and then close all the dialogs.
g Print a test page to verify printer installation.
Verifying printer setup
When all hardware and software options are installed and the printer is turned on, verify that the printer is set up correctly by printing the following:
- Menu settings page—Use this page to verify that all printer options are installed correctly. A list of installed options appears toward the bottom of the page. If an option you installed is not listed, then it is not installed correctly. Remove the option, and then install it again.
For more information, see the following:
- "Printing a menu settings page" on page 78 for non-touch-screen printer models
- “Printing a menu settings page” on page 128 or “Printing a menu settings page” on page 177 for touch-screen printer models
- Network setup page—Use this page to verify the network connection. This page also provides important information that aids network printing configuration.
Note: Make sure your printer has Ethernet or wireless capability and is attached to a network.
For more information, see the following:
- "Printing a network setup page" on page 79 for non-touch-screen printer models
- “Printing a network setup page” on page 128 or “Printing a network setup page” on page 178 for touch-screen printer models
Using MS810n, MS810dn, MS811n, MS811dn, MS812dn
Learning about the printer
Printer configurations
Basic model
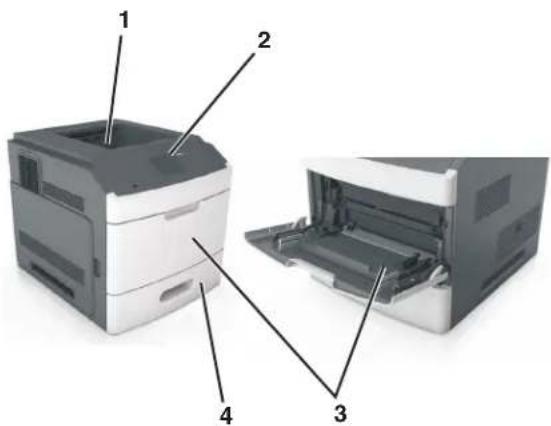
text_image
Diagram of a printer showing labeled parts: front view, side view, and internal structure with numbered annotations.| 1 Standard bin | |
| 2 Printer control panel | |
| 3 Multipurpose feeder | |
| 4 | Standard 550-sheet tray (Tray 1) |
Fully configured model

CAUTION—TIPPING HAZARD: Floor-mounted configurations require additional furniture for stability. You must use either a printer stand or printer base if you are using multiple input options. If you purchased a printer with a similar configuration, then you may need additional furniture. For more information, see www.lexmark.com/multifunctionprinters.
The following illustration shows the maximum number of optional finishers and trays that are supported by the printer. For more information on other configurations, visit http://support.lexmark.com.

text_image
Diagram of two stacked electronic devices with numbered components labeled for identification.| Hardware option | Alternative hardware option | |
| 1 Staple finisher | •Output expander•4-bin mailbox | |
| 2 4-bin mailbox | •Output expander• High-capacity output expander•Staple finisher | |
| 3 Caster base None | ||
| 4 2100-sheet tray None | ||
| 5 | 550-sheet tray | 250-sheet tray |
| 6 | 250-sheet tray | 550-sheet tray |
| 7 4-bin mailbox Output expander | ||
| 8 | Output expander | 4-bin mailbox |
In a configuration with two or more optional finishers:
•The staple finisher must always be on top.
- The high-capacity output expander must always be at the bottom.
- The output expander is the only finisher that can be placed on top of the high-capacity output expander.
•The output expander and mailbox may be installed in any order.
When using optional trays:
• Always use a caster base when the printer is configured with a 2100-sheet tray.
- The 2100-sheet tray must always be at the bottom of a configuration.
- A maximum of four optional trays may be configured with the printer.
- The optional 250- and 550-sheet trays may be installed in any order.
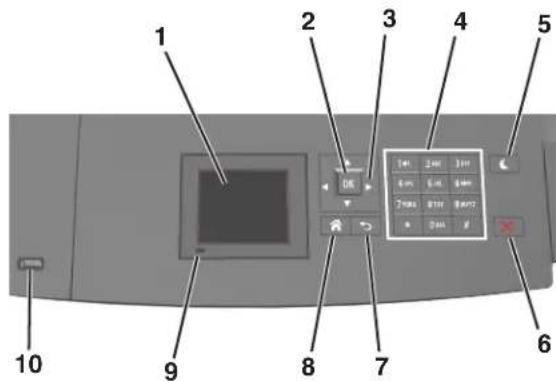
Using the printer control panel
text_image
1 2 3 4 5 6 7 8 9 10 OK 1: 2: 3: 4: 5: 6: 7: 8: 9: 10: 11: 12: 13: 14: 15: 16: 17: 18: 19: 20: 21: 22: 23: 24: 25: 26: 27: 28: 29: 30: 31: 32: 33: 34: 35: 36: 37: 38: 39: 40: 41: 42: 43: 44: 45: 46: 47: 48: 49: 50: 51: 52: 53: 54: 55: 56: 57: 58: 59: 60: 61: 62: 63: 64: 65: 66: 67: 68: 69: 70: 71: 72: 73: 74: 75: 76: 77: 78: 79: 80: 81: 82: 83: 84: 85: 86: 87: 88: 89: 90: 91: 92: 93: 94: 95: 96: 97: 98: 99: 100| Use the To | ||
| 1 Display | •View the printer status.•Set up and operate the printer. | |
| 2 Select button Submit changes made in the printer settings. | ||
| 3 Arrow buttons Scroll up and down or left and right. | ||
| 4 Keypad Enter numbers, letters, or symbols. | ||
| 5 Sleep button Enable Sleep mode or Hibernate mode.Do the following to wake the printer from Sleep mode:•Press any hard button.•Pull out Tray 1 or load paper in the multipurpose feeder.•Open a door or cover.•Send a print job from the computer.•Perform a power-on reset with the main power switch.•Attach a device to the USB port on the printer. | ||
| 6 Stop or Cancel button Stop all printer activity. | ||
| 7 Back button Return to the previous screen. | ||
| 8 Home button Go to the home screen. | ||
| 9 Indicator light Check the status of the printer. | ||
| 10 USB port Connect a flash drive to the printer.Note: Only the front USB port supports flash drives. | ||
Understanding the colors of the Sleep button and indicator lights
The colors of the Sleep button and indicator lights on the printer control panel signify a certain printer status or condition.
Indicator light color and its corresponding printer status
| Indicator light Printer status | |
| Off The printer is off or in Hibernate mode. | |
| Blinking green The printer is warming up, processing data, or printing. | |
| Solid green The printer is on, but idle. | |
| Blinking red The printer requires user intervention. | |
Sleep button light color and its corresponding printer status
| Sleep button light Printer status | |
| Off The printer is off, idle or in Ready state. | |
| Solid amber The printer is in Sleep mode. | |
| Blinking amber The printer is entering or waking from Hibernate mode. | |
| Blinking amber for 0.1 second, then goes completely off for 1.9 seconds in a slow, pulsing pattern | The printer is in Hibernate mode. |
Loading paper and specialty media
The selection and handling of paper and specialty media can affect how reliably documents print. For more information, see “Avoiding jams” on page 270 and “Storing paper” on page 191.
Setting the paper size and type
1 From the printer control panel, navigate to:

text_image
> Settings > OK > Paper Menu > OK > Paper Size/Type > OK2 Press the up or down arrow button to select the tray or feeder, and then press OK.
3 Press the up or down arrow button to select the paper size, and then press OK.
4 Press the up or down arrow button to select the paper type, and then press OK to change the settings.
Configuring Universal paper settings
The Universal paper size is a user-defined setting that lets you print on paper sizes that are not preset in the printer menus.
Notes:
- The smallest supported Universal size is 70 x 127 mm (2.76 x 5 inches) for one-sided printing and 105 x 148 mm (4.13 x 5.83 inches) for two-sided (duplex) printing.
- The largest supported Universal size is 216 x 356 mm (8.5 x 14 inches) for one-sided and two-sided printing.
- When printing on paper less than 210 mm (8.3 inches) wide, the printer may print at a reduced speed after a period of time to ensure the best print performance.
- If you regularly print large jobs on narrow paper, then you may use the MS710 Series printer models, which print batches of 10 or more pages of narrow paper at a faster speed. For more information on the MS710 Series printer models, contact your Lexmark sales representative.
From the printer control panel, navigate to:

flowchart
graph LR
    A["Settings"] --> B["OK"]
    B --> C["Paper Menu"]
    C --> D["OK"]
    D --> E["Universal Setup"]
    E --> F["OK"]
    F --> G["Units of Measure"]
    G --> H["OK"]
    H --> I["select unit of measure"]
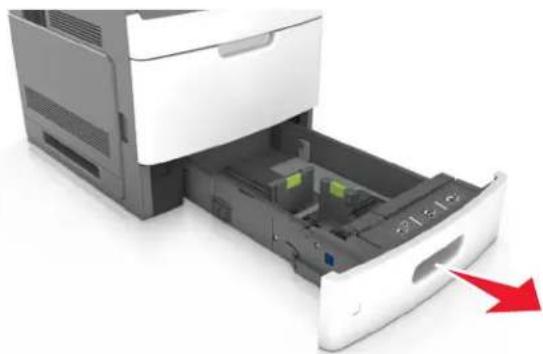
Loading the 250- or 550-sheet tray
CAUTION—POTENTIAL INJURY: To reduce the risk of equipment instability, load each tray separately. Keep all other trays closed until needed.
1 Pull out the tray.
Notes:
- When loading folio-, legal-, or Oficio-size paper, lift the tray slightly and pull it out completely.
- Avoid removing trays while a job prints or while Busy appears on the display. Doing so may cause a jam.
natural_image
3D rendering of a printer drawer with internal components and a red arrow pointing to the drawer (no text or symbols visible)2 Squeeze and slide the width guide to the correct position for the size of the paper being loaded until it clicks into place.

text_image
Diagram of a printer drawer with labeled parts and an inset showing a printer's internal structure with arrows and a green indicator.Note: Use the paper size indicators at the bottom of the tray to help position the guides.

natural_image
Interior view of a printer drawer with a magnified inset showing internal components (no text or symbols visible)3 Unlock the length guide, and then squeeze and slide the guide to the correct position for the size of the paper being loaded.

text_image
Diagram of a printer drawer with numbered annotations highlighting internal components and parts, likely for assembly or cleaning instructions.Notes:
- Lock the length guide for all paper sizes.
- Use the paper size indicators at the bottom of the tray to help position the guides.

natural_image
Interior view of a white electronic device drawer with a magnified inset showing internal components (no text or symbols visible)4 Flex the sheets back and forth to loosen them, and then fan them. Do not fold or crease the paper. Straighten the edges on a level surface.

text_image
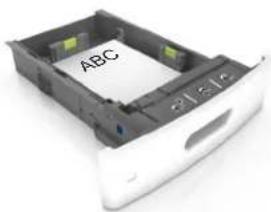
Diagram illustrating three-step folding or retraction process with arrows indicating direction of movement5 Load the paper stack with the printable side facedown.
Note: Make sure the paper or envelope is loaded properly.
- There are different ways of loading letterhead depending on whether an optional staple finisher is installed or not.
Without an optional staple finisher With an optional staple finisher

natural_image
White paper feeding into a black tray with a labeled paper sheet (no text or symbols visible)One-sided printing

natural_image
White file drawer with black plastic casing and visible internal compartments (no text or symbols)One-sided printing
natural_image
White electronic device with internal components labeled ABC, showing no readable text or symbols beyond the labelTwo-sided printing

natural_image
3D rendering of a white electronic device with a black tray and green indicator lights, labeled 'ABC' on the front panel (no other text or symbols visible)Two-sided printing
- If you are loading prepunched paper for use with the staple finisher, then make sure the holes on the long edge of the paper are on the right side of the tray.

text_image
One-sided printing Two-sided printing ABC ABCNote: If the holes on the long edge of the paper are on the left side of the tray, then a jam may occur.
- Do not slide the paper into the tray. Load paper as shown in the illustration.
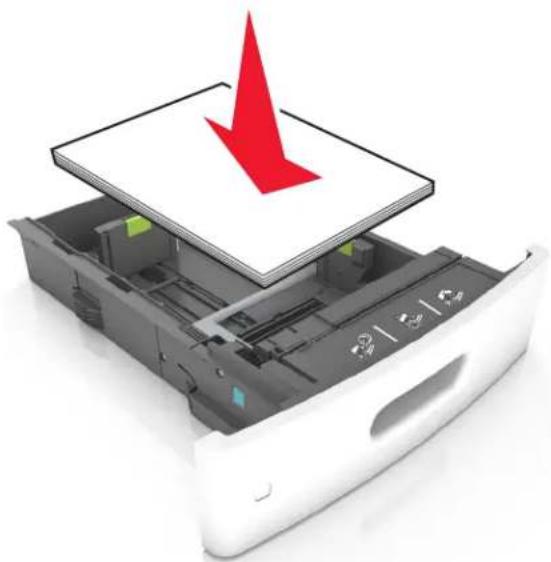
natural_image
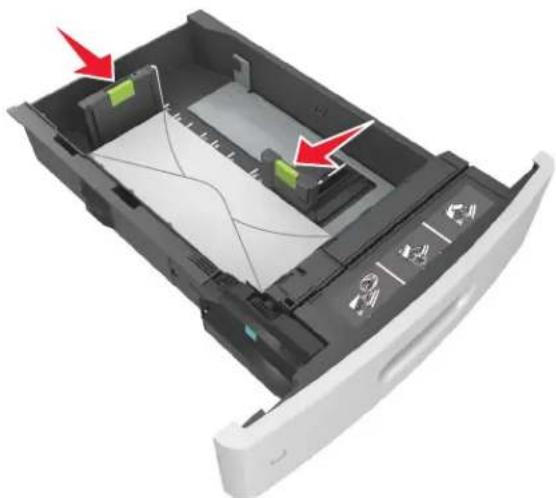
3D illustration of a printer drawer with a red downward arrow indicating compression or loss (no text or symbols)- If you are loading envelopes, then make sure that the flap side is facing up and the envelopes are on the left side of the tray.
natural_image
Interior view of a printer drawer with highlighted compartments and arrows indicating features (no text or symbols)- Make sure the paper is below the solid line, which is the maximum paper fill indicator.
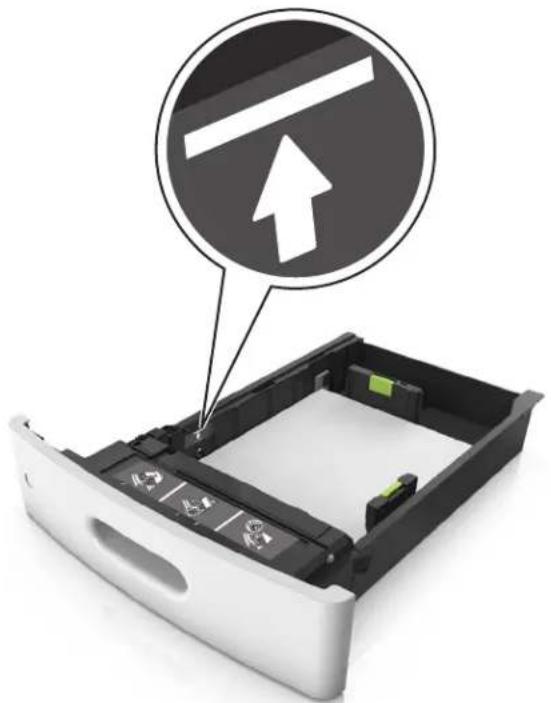
natural_image
Interior view of a printer drawer with a circular warning sign pointing to a white strip (no text or symbols on the diagram itself)Warning—Potential Damage: Overfilling the tray can cause paper jams.
- When using card stock, labels, or other types of specialty media, make sure the paper is below the dashed line, which is the alternate paper fill indicator.
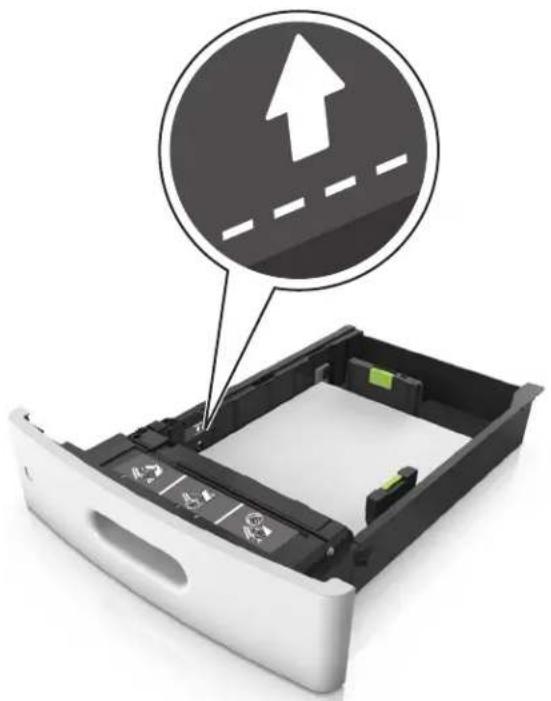
natural_image
Exterior view of a white electronic device drawer with a circular annotation highlighting a road ahead (no text or symbols on the device itself)6 For custom- or Universal-size paper, adjust the paper guides to lightly touch the sides of the stack, and then lock the length guide.
7 Insert the tray.

natural_image
Exterior view of a printer drawer with a paper feeding into the holder, showing internal components and a red arrow pointing to the page (no text or symbols visible)8 From the printer control panel, set the paper size and paper type in the Paper menu to match the paper loaded in the tray.
Note: Set the correct paper size and type to avoid paper jams and print quality problems.
Loading the 2100-sheet tray

CAUTION—POTENTIAL INJURY: To reduce the risk of equipment instability, load each tray separately. Keep all other trays closed until needed.
1 Pull out the tray.
2 Adjust the width and length guides.
Loading A5-size paper
a Pull up and slide the width guide to the position for A5.
text_image
Diagram showing two views of a server rack with labeled components and red arrows indicating movement or force.b Squeeze and slide the length guide to the position for A5 until it clicks into place.

natural_image
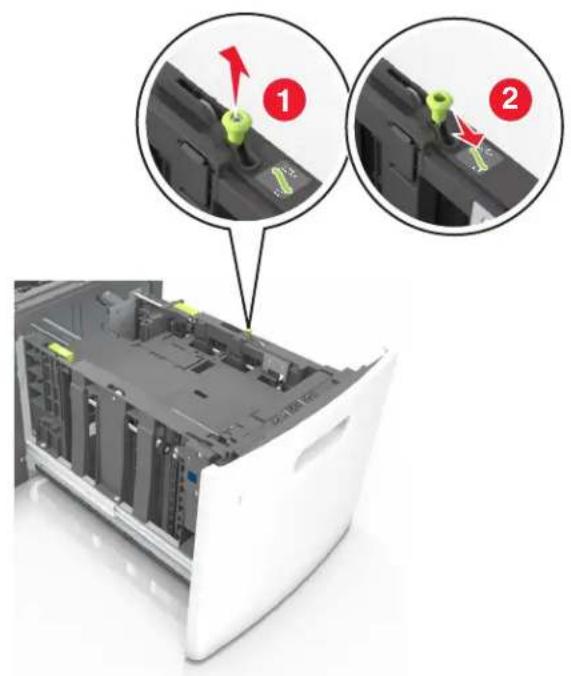
Interior view of a server rack with highlighted internal components and two magnified views (no text or symbols)c Remove the A5 length guide from its holder.
natural_image
3D mechanical assembly diagram showing two stages of a vertical assembly with green structural elements and red directional arrows indicating motion (no text or symbols)d Insert the A5 length guide into its designated slot.
Note: Press the A5 length guide until it clicks into place.

natural_image
Two 3D mechanical assembly diagrams showing green and red directional arrows indicating movement or force (no text or symbols)Loading A4-, letter-, legal-, oficio-, and folio-size paper
a Pull up and slide the width guide to the correct position for the size of the paper being loaded.

natural_image
Interior view of a server rack with two close-up insets showing green tool tips and red arrows indicating movement (no text or symbols)b If the A5 length guide is still attached to the length guide, then remove it from its place. If the A5 length guide is not attached, then proceed to step d.

natural_image
3D diagram of a device with a green vertical panel and red arrow indicating compression or stress, no text or symbols present.c Put the A5 length guide in its holder.

text_image
Technical diagram showing two mechanical assembly steps with red arrows indicating motion or force directions, labeled ① and ②.d Squeeze the length guide and slide it to the correct position for the size of the paper being loaded until it clicks into place.

natural_image
3D rendering of a computer tower internal structure with highlighted components and red arrows indicating motion (no text or symbols)3 Flex and fan the sheets to loosen them, and then fan them. Do not fold or crease the paper. Straighten the edges on a level surface.

text_image
Diagram illustrating three-step folding or retraction process with arrows indicating direction of movement4 Load the paper stack with the printable side facedown.
Note: Make sure the paper is loaded properly.
- There are different ways for loading letterhead depending on whether an optional staple finisher is installed or not.
Without an optional staple finisher With an optional staple finisher

text_image
ABC 2018One-sided printing

natural_image
3D rendering of a white electronic device with a paper lid labeled 'ABC' inserted, showing internal components (no readable text beyond label)One-sided printing

text_image
ABCTwo-sided printing

natural_image
White electronic device with a paper label showing 'ABC' on its side, no readable text or symbols beyond the label.Two-sided printing
- If you are loading prepunched paper for use with the staple finisher, then make sure the holes on the long edge of the paper are on the right side of the tray.

text_image
One-sided printing Two-sided printing ABC ABCNote: If the holes on the long edge of the paper are on the left side of the tray, then a jam may occur.
•Make sure the paper is below the maximum paper fill indicator.

natural_image
Interior view of a computer drive bay with a highlighted internal component and directional arrow (no text or symbols)Warning—Potential Damage: Overfilling the tray can cause paper jams.
5 Insert the tray.
Note: Press the paper stack down while inserting the tray.
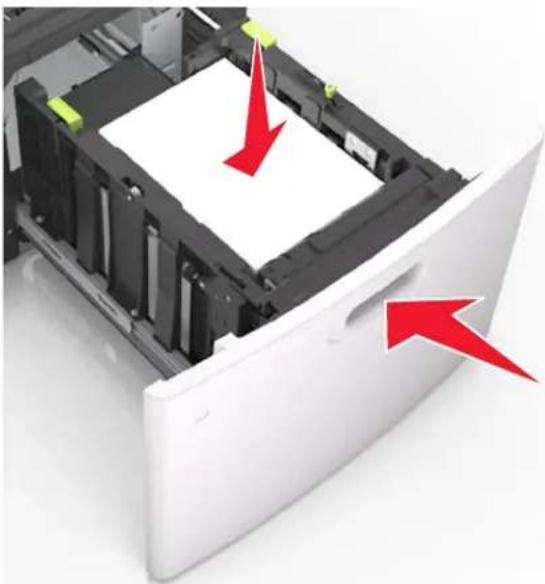
natural_image
3D rendering of a white electronic device with a paper lid and red arrows pointing to internal components (no text or symbols visible)6 From the printer control panel, set the size and type in the Paper menu to match the paper loaded in the tray.
Note: Set the correct paper size and type to avoid paper jams and print quality problems.
Loading the multipurpose feeder
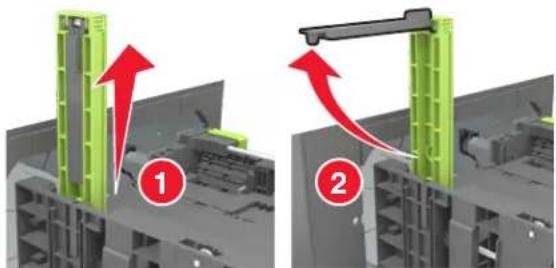
1 Pull down the multipurpose feeder door.
Note: Do not load or close the multipurpose feeder while a job is printing.

natural_image
Exterior view of a printer with a red arrow indicating compression or disassembly (no text or symbols visible)2 Pull the multipurpose feeder extender.

natural_image
Exterior view of a printer with open lid and paper feed, showing internal structure and a red arrow indicating action (no text or symbols)Note: Guide the extender gently so that the multipurpose feeder is fully extended and open.
3 Slide the width guide to the correct position for the size of the paper being loaded.

text_image
Diagram showing a printer or printer with labeled parts and a red arrow pointing to a component, indicating a specific part.Note: Use the paper size indicators on the bottom of the tray to help position the guides.
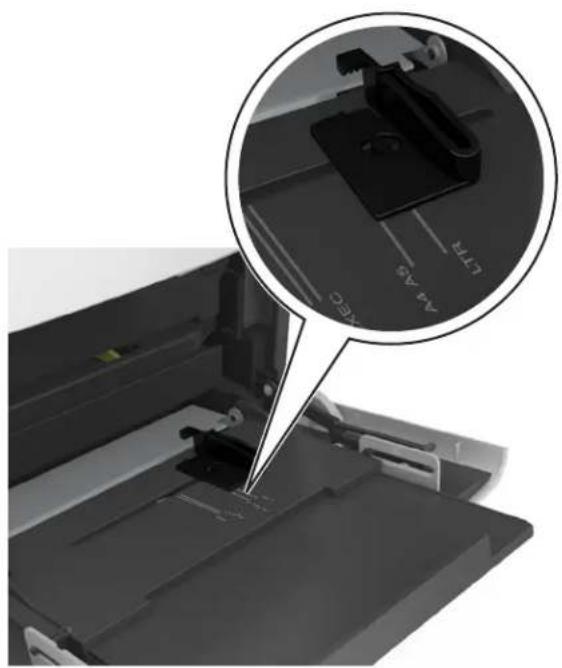
natural_image
Close-up of a printer's internal structure with a magnified inset showing the blade and base (no text or symbols visible)4 Prepare the paper or specialty media for loading.
- Flex sheets of paper back and forth to loosen them, and then fan them. Do not fold or crease the paper. Straighten the edges on a level surface.
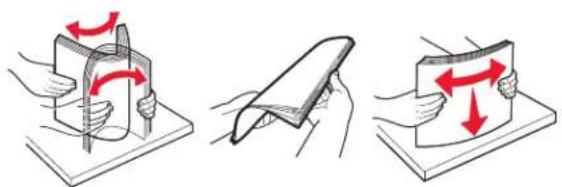
natural_image
Three-step illustration showing a folding process: cutting through a sheet with red arrows indicating rotation, then folding into a flat surface (no text or symbols)- Hold transparencies by the edges, and then fan them. Straighten the edges on a level surface.

natural_image
Illustration showing two hand positions: one stretching a curved surface, the other holding a flat object with red directional arrows (no text or symbols)Note: Avoid touching the printable side of the transparencies. Be careful not to scratch them.
- Flex the stack of envelopes back and forth to loosen them, and then fan them. Straighten the edges on a level surface.

natural_image
Two-step illustration showing hands holding a card and a closed envelope with red arrows indicating movement (no text or symbols)5 Load paper or specialty media.
Note: Slide the stack gently into the multipurpose feeder until it comes to a stop.
- Load only one size and type of paper or specialty media at a time.
- Make sure the paper fits loosely in the multipurpose feeder, lies flat, and is not bent or wrinkled.
- There are different ways of loading letterhead depending on whether an optional staple finisher is installed or not.
Without an optional staple finisher With an optional staple finisher

text_image
ABCOne-sided printing

natural_image
Close-up of a printer's internal structure with a paper labeled 'ABC' inserted (no additional text or symbols visible)One-sided printing

text_image
ABCTwo-sided printing

natural_image
Close-up of a printer's open door with a paper labeled 'A5C' (no other text or symbols visible)Two-sided printing
- If you are loading prepunched paper for use with the staple finisher, then make sure the holes on the long edge of the paper are on the right side of the tray.
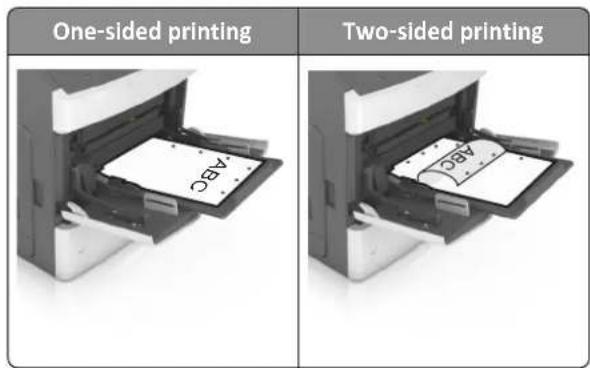
text_image
One-sided printing Two-sided printing A8C A8CNote: If the holes on the long edge of the paper are on the left side of the tray, then a jam may occur.
- Load envelopes with the flap side down and on the left of the multipurpose feeder.

natural_image
Close-up of a printer's internal structure showing paper feed and paper sheet being inserted (no text or symbols visible)Warning—Potential Damage: Never use envelopes with stamps, clasps, snaps, windows, coated linings, or self-stick adhesives. These envelopes may severely damage the printer.
•Make sure the paper or specialty media is below the maximum paper fill indicator.

natural_image
Close-up of a printer's front panel with a magnified inset showing a red arrow pointing to the printer's side panel (no text or symbols visible)Warning—Potential Damage: Overfilling the feeder can cause paper jams.
6 For custom- or Universal-size paper, adjust the width guides to lightly touch the sides of the stack.
7 From the printer control panel, set the paper size and paper type in the Paper menu to match the paper loaded in the tray.
Note: Set the correct paper size and type to avoid paper jams and print quality problems.
Linking and unlinking trays
Linking and unlinking trays
1 Open a Web browser, and then type the printer IP address in the address field.
Notes:
- View the printer IP address on the printer control panel in the TCP/IP section under the Network/Ports menu. The IP address appears as four sets of numbers separated by periods, such as 123.123.123.123.
- If you are using a proxy server, then temporarily disable it to load the Web page correctly.
2 Click Settings > Paper Menu.
3 Change the paper size and type settings for the trays you are linking.
- To link trays, make sure the paper size and type for the tray match that of the other tray.
- To unlink trays, make sure the paper size or type for the tray does not match that of the other tray.
4 Click Submit.
Note: You can also change the paper size and type settings using the printer control panel. For more information, see "Setting the paper size and type" on page 49.
Warning—Potential Damage: Paper loaded in the tray should match the paper type name assigned in the printer. The temperature of the fuser varies according to the specified paper type. Printing issues may occur if settings are not properly configured.
Creating a custom name for a paper type
Using the Embedded Web Server
1 Open a Web browser, and then type the printer IP address in the address field.
Notes:
- View the printer IP address in the TCP/IP section in the Network/Ports menu. The IP address appears as four sets of numbers separated by periods, such as 123.123.123.123.
- If you are using a proxy server, then temporarily disable it to load the Web page correctly.
2 Click Settings > Paper Menu > Custom Names.
3 Select a custom name, and then type a new custom paper type name.
4 Click Submit.
5 Click Custom Types, and then verify if the new custom paper type name has replaced the custom name.
Using the printer control panel
1 From the printer control panel, navigate to:

2 Select a custom name, and then type a new custom paper type name.
3 Press

4 Press Custom Types, and then verify if the new custom paper type name has replaced the custom name.
Assigning a custom paper type
Using the Embedded Web Server
1 Open a Web browser, and then type the printer IP address in the address field.
Notes:
- View the printer IP address in the TCP/IP section in the Network/Ports menu. The IP address appears as four sets of numbers separated by periods, such as 123.123.123.123.
- If you are using a proxy server, then temporarily disable it to load the Web page correctly.
2 Click Settings > Paper Menu > Custom Types.
3 Select a custom paper type name, and then select a paper type.
Note: Paper is the factory default paper type for all user-defined custom names.
4 Click Submit.
Using the printer control panel
1 From the printer control panel, navigate to:

Settings > OK > Paper Menu > OK > Custom Types
2 Select a custom paper type name, and then select a paper type.
Note: Paper is the factory default paper type for all user-defined custom names.
3 Press

Printing
Printing a document
Printing a document
1 From the Paper menu on the printer control panel, set the paper type and size to match the paper loaded.
2 Send the print job:
For Windows users
a With a document open, click File > Print.
b Click Properties, Preferences, Options, or Setup.
c Adjust the settings, if necessary.
d Click OK > Print.
For Macintosh users
a Customize the settings in the Page Setup dialog if necessary:
1 With a document open, choose File > Page Setup.
2 Choose a paper size or create a custom size to match the paper loaded.
3 Click OK.
b Customize the settings in the Page Setup dialog if necessary:
1 With a document open, choose File > Print.
If necessary, click the disclosure triangle to see more options.
2 From the Print dialog and pop-up menus adjust the settings if necessary.
Note: To print on a specific paper type, adjust the paper type setting to match the paper loaded, or select the appropriate tray or feeder.
3 Click Print.
Adjusting toner darkness
Using the Embedded Web Server
1 Open a Web browser, and then type the IP address of the printer in the address field.
Notes:
- View the printer IP address in the TCP/IP section in the Network/Ports menu. The IP address appears as four sets of numbers separated by periods, such as 123.123.123.123.
- If you are using a proxy server, then temporarily disable it to load the Web page correctly.
2 Click Settings > Print Settings > Quality Menu > Toner Darkness.
3 Adjust the toner darkness, and then click Submit.
Using the printer control panel
1 From the printer control panel, navigate to:

text_image
> Settings >OK > Print Settings >OK > Quality Menu >OK > Toner Darkness
Printing from a flash drive
Supported flash drives and file types
Notes:
- High-speed USB flash drives must support the full-speed standard. Low-speed USB devices are not supported.
- USB flash drives must support the File Allocation Table (FAT) system. Devices formatted with New Technology File System (NTFS) or any other file system are not supported.
| Recommended flash drives File type | |
| Lexar JumpDrive FireFly (512MB and 1GB)SanDisk Cruzer Micro (512MB and 1GB)Sony Micro Vault Classic (512MB and 1GB) | Documents:pdfxpsImages:dcx.gif.jpeg or .jpgbmppcx.tiff or .tif.png.fls |
Printing from a flash drive
Notes:
- Before printing an encrypted PDF file, you will be prompted to enter the file password from the printer control panel.
- You cannot print files for which you do not have printing permissions.
1 Insert a flash drive into the USB port.
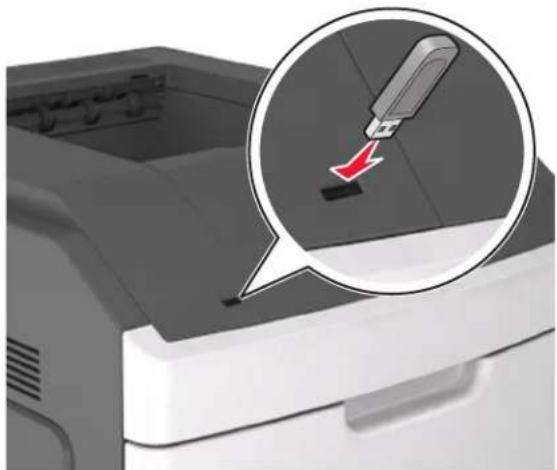
natural_image
Illustration of a printer with a magnified view showing a tip tool interacting with the base (no text or symbols present)Notes:
- A flash drive icon appears on the printer control panel and in the held jobs icon when a flash drive is installed.
- If you insert the flash drive when the printer requires attention, such as when a jam has occurred, then the printer ignores the flash drive.
- If you insert the flash drive while the printer is processing other print jobs, then Busy appears. After these print jobs are processed, you may need to view the held jobs list to print documents from the flash drive.
Warning—Potential Damage: Do not touch the printer or the flash drive in the area shown while actively printing, reading, or writing from the memory device. Loss of data can occur.

text_image
Image showing a printer with a prohibition symbol indicating no littering, featuring a circular icon highlighting a specific object.2 From the printer control panel, select the document you want to print.
3 Press the left or right arrow button to specify the number of copies for printing, and then press OK.
Notes:
- Do not remove the flash drive from the USB port until the document has finished printing.
- If you leave the flash drive in the printer after leaving the initial USB menu screen, then access held jobs from the printer control panel to print files from the flash drive.
Printing confidential and other held jobs
Storing print jobs in the printer
1 From the printer control panel, navigate to:
Settings > OK > Security > OK > Confidential Print > select the print job type
| Print job type Description | |
| Max Invalid PIN Limits the number of times an invalid PIN can be entered.Note:When the limit is reached, the print jobs for that user name and PIN are deleted. | |
| Confidential Job Expiration Lets you hold print jobs in the computer until you enter the PIN from the printer control panel.Note:The PIN is set from the computer. It must be four digits, using the numbers 0–9. | |
| Repeat Job Expiration | Lets you print and store print jobs in the printer memory for reprinting. |
| Verify Job Expiration Lets you print one copy of a print job while the printer holds the remaining copies. It allows you to examine if the first copy is satisfactory. The print job is automatically deleted from the printer memory once all copies are printed. | |
| Reserve Job Expiration | Lets you store print jobs for printing at a later time. The print jobs are held until deleted from the Held Jobs menu. |
| Notes:Confidential, Verify, Reserve, and Repeat print jobs may be deleted if the printer requires extra memory to process additional held jobs.You can set the printer to store print jobs in the printer memory until you start the print job from the printer control panel.All print jobs that can be initiated by the user at the printer are called held jobs. | |
2 Press

Printing confidential and other held jobs
Note: Confidential and Verify print jobs are automatically deleted from memory after printing. Repeat and Reserve jobs are held in the printer until you choose to delete them.
For Windows users
1 With a document open, click File > Print.
2 Click Properties, Preferences, Options, or Setup.
3 Click Print and Hold.
5 Click OK or Print.
6 From the printer control panel, release the print job.
4 Select the print job type (Confidential, Repeat, Reserve, or Verify), and then assign a user name. For a confidential print job, also enter a four-digit PIN.
- For confidential print jobs, navigate to:
Held jobs > select your user name > Confidential Jobs > enter the PIN > select the print job > specify the number of copies > Print
•For other print jobs, navigate to:
Held jobs > select your user name > select the print job > specify the number of copies > Print
For Macintosh users
1 With a document open, choose File > Print.
If necessary, click the disclosure triangle to see more options.
2 From the print options or Copies & Pages pop-up menu, choose Job Routing.
3 Select the print job type (Confidential, Repeat, Reserve, or Verify), and then assign a user name. For a confidential print job, also enter a four-digit PIN.
4 Click OK or Print.
5 From the printer control panel, release the print job:
•For confidential print jobs, navigate to:
Held jobs > select your user name > Confidential Jobs > enter the PIN > select the print job > specify the number of copies > Print
•For other print jobs, navigate to:
Held jobs > select your user name > select the print job > specify the number of copies > Print
Printing information pages
Printing a font sample list
1 From the printer control panel, navigate to:

Settings > OK > Reports > OK > Print Fonts
2 Press the up or down arrow button to select the font setting.
3 Press

Note: The PPDS fonts appear only when the PPDS data stream is activated.
Printing a directory list
From the printer control panel, navigate to:

Settings > Reports > OK > Print Directory > OK
Note: The Print Directory menu item appears only when an optional flash memory or printer hard disk is installed.
Canceling a print job
Canceling a print job from the printer control panel
From the printer control panel, press


Canceling a print job from the computer
For Windows users
1 Open the printers folder.
In Windows 8
From the Search charm, type Run, and then navigate to: Apps list >Run >type control printers >OK
In Windows 7 or earlier
a Click 📁, or click Start and then click Run.
b In the Start Search or Run dialog, type control printers.
c Press Enter, or click OK.
2 Double-click the printer icon.
3 Select the print job you want to cancel.
4 Click Delete.
For Macintosh users
1 From the Apple menu, navigate to either of the following:
- System Preferences > Print & Scan > select your printer > Open Print Queue
- System Preferences > Print & Fax > select your printer > Open Print Queue
2 From the printer window, select the print job you want to cancel, and then delete it.
Managing your printer
Finding advanced networking and administrator information
This chapter covers basic administrative support tasks using the Embedded Web Server. For more advanced system support tasks, see the Networking Guide on the Software and Documentation CD or the Embedded Web Server Administrator's Guide on the Lexmark Web site at http://support.lexmark.com.
Checking the virtual display
1 Open a Web browser, and then type the printer IP address in the address field.
Notes:
- View the printer IP address in the TCP/IP section in the Network/Ports menu. The IP address appears as four sets of numbers separated by periods, such as 123.123.123.123.
- If you are using a proxy server, then temporarily disable it to load the Web page correctly.
2 Check the virtual display that appears at the top left corner of the screen.
The virtual display works as an actual display would work on a printer control panel.
Configuring supply notifications from the Embedded Web Server
You can determine how you would like to be notified when supplies run nearly low, low, very low, or reach their end-of-life by setting the selectable alerts.
Notes:
- Selectable alerts can be set on the toner cartridge, imaging unit, and maintenance kit.
- All selectable alerts can be set for nearly low, low, and very low supply conditions. Not all selectable alerts can be set for the end-of-life supply condition. E-mail selectable alert is available for all supply conditions.
- The percentage of estimated remaining supply that prompts the alert can be set on some supplies for some supply conditions.
1 Open a Web browser, and then type the printer IP address in the address field.
Notes:
- View the printer IP address in the TCP/IP section in the Network/Ports menu. The IP address appears as four sets of numbers separated by periods, such as 123.123.123.123.
- If you are using a proxy server, then temporarily disable it to load the Web page correctly.
2 Click Settings > Print Settings > Supply Notifications.
3 From the drop-down menu for each supply, select one of the following notification options:
| Notification Description | |
| Off The normal printer behavior for all supplies occurs. | |
| E-mail Only | The printer generates an e-mail when the supply condition is reached. The status of the supply appears on the menus page and status page. |
| Warning | The printer displays the warning message and generates an e-mail about the status of the supply. The printer does not stop when the supply condition is reached. |
| Continuable Stop^1 | The printer stops processing jobs when the supply condition is reached, and the user needs to press a button to continue printing. |
| Non Continuable Stop^1,2 | The printer stops processing jobs when the supply condition is reached. The supply must be replaced to continue printing. |
| ^1 The printer generates an e-mail about the status of the supply when supply notification is enabled. ^2 The printer stops when some supplies become empty to prevent damage. | |
4 Click Submit.
Modifying confidential print settings
Note: This feature is available only in network printers or printers connected to print servers.
1 Open a Web browser, and then type the printer IP address in the address field.
Notes:
- View the printer IP address in the TCP/IP section in the Network/Ports menu. The IP address appears as four sets of numbers separated by periods, such as 123.123.123.123.
- If you are using a proxy server, then temporarily disable it to load the Web page correctly.
2 Click Configuration > Other Settings tab > Security > Confidential Print Setup.
3 Modify the settings:
- Set a maximum number of PIN entry attempts. When a user exceeds a specific number of PIN entry attempts, all of the jobs for that user are deleted.
- Set an expiration time for confidential print jobs. When a user has not printed the jobs within the specified time, all of the jobs for that user are deleted.
4 Save the modified settings.
Copying printer settings to other printers
Note: This feature is available only in network printers.
1 Open a Web browser, and then type the printer IP address in the address field.
Notes:
- View the printer IP address in the TCP/IP section in the Network/Ports menu. The IP address appears as four sets of numbers separated by periods, such as 123.123.123.123.
- If you are using a proxy server, then temporarily disable it to load the Web page correctly.
2 Click the Copy Printer Settings.
3 To change the language, select a language from the drop-down menu, and then click Click here to submit language.
4 Click Printer Settings.
5 Type the IP addresses of the source and target printers in their appropriate fields.
Note: If you want to add or remove a target printer, then click Add Target IP or Remove Target IP.
6 Click Copy Printer Settings.
Printing a menu settings page
Print a menu settings page to review the current menu settings and to verify if the printer options are installed correctly.
Note: If you have not changed any menu settings, then the menu settings page lists all the factory default settings. When you select and save other settings from the menus, they replace the factory default settings as user default settings. A user default setting remains in effect until you access the menu again, choose another value, and save it.
From the printer control panel, navigate to:
Settings > OK >Reports > OK >Menu Settings Page > OK
Printing a network setup page
If the printer is attached to a network, then print a network setup page to verify the network connection. This page also provides important information that aids network printing configuration.
1 From the printer control panel, navigate to:

text_image
> Settings >OK >Reports >OK >Network Setup Page >OK2 Check the first section of the network setup page, and then confirm that the status is Connected.
If the status is Not Connected, then the LAN drop may not be active, or the network cable may be malfunctioning. Consult your system support person for a solution, and then print another network setup page.
Checking the status of parts and supplies
A message appears on the printer display when a replacement supply item is needed or when maintenance is required.
Notes:
•Each gauge displays the estimated life left for the supply or part.
- All page life estimates for supplies assume printing on a single side of letter- or A4-size plain paper.
Checking the status of parts and supplies on the printer control panel
From the printer control panel, navigate to:

Checking the status of parts and supplies from the Embedded Web Server
Note: Make sure the computer and printer are connected to the same network.
1 Open a Web browser, and then type the printer IP address in the address field.
Notes:
- View the printer IP address in the TCP/IP section in the Network/Ports menu. The IP address appears as four sets of numbers separated by periods, such as 123.123.123.123.
- If you are using a proxy server, then temporarily disable it to load the Web page correctly.
2 Click Device Status > More Details.
Saving energy
Using Eco-Mode
1 Open a Web browser, and then type the printer IP address in the address field.
Notes:
- View the printer IP address in the TCP/IP section in the Network/Ports menu. The IP address appears as four sets of numbers separated by periods, such as 123.123.123.123.
- If you are using a proxy server, then temporarily disable it to load the Web page correctly.
2 Click Settings > General Settings > Eco-Mode.
3 Select a setting.
| Use To | |
| Off | Use the factory default settings for all settings associated with Eco-Mode.Notes:Settings that were changed when other modes were selected are reset to the factory default settings.Off supports the performance specifications of the printer. |
| Energy Reduce | energy use, especially when the printer is idle.Notes:Printer engine motors do not start until a document is ready to print. You may notice a short delay before the first page is printed.The printer enters Sleep mode after one minute of inactivity.The printer display is turned off when the printer is in Sleep mode.Lights on the staple finisher and other optional finishers are turned off when the printer is in Sleep mode. |
| Energy/Paper | Use all the settings associated with Energy and Paper modes. |
| Plain Paper Enable the automatic two-sided (duplex) printing feature. | |
4 Click Submit.
Reducing printer noise
Enable Quiet mode to reduce the printer noise.
1 From the printer control panel, navigate to:

Settings >

Settings >

General Settings >

Quiet Mode >

2 Select a setting.
| Use To | |
| On Reduce printer noise. | Notes:•Print jobs process at a reduced speed.•Printer engine motors do not start until a document is ready to print. There is a short delay before the first page is printed.•The alarm control and cartridge alarm sounds are turned off.•The printer ignores the Advance Start command. |
| Off Use factory default settings. | Note:This setting supports the performance specifications of the printer. |
3 Press

Adjusting Sleep mode
To save energy, decrease the number of minutes before the printer enters Sleep mode. Select from 1 to 120. The factory default setting is 30 minutes.
Note: The printer still accepts print jobs when in Sleep mode.
Using the Embedded Web Server
1 Open a Web browser, and then type the printer IP address in the address field.
Notes:
- View the printer IP address in the TCP/IP section in the Network/Ports menu. The IP address appears as four sets of numbers separated by periods, such as 123.123.123.123.
- If you are using a proxy server, then temporarily disable it to load the Web page correctly.
2 Navigate to:
Settings > General Settings > Timeouts
3 In the Sleep Mode field, enter the number of minutes you want the printer to wait before it enters Sleep mode.
4 Click Submit.
Using the printer control panel
1 From the printer control panel, navigate to:

Settings > OK > Settings > OK > General Settings > OK > Timeouts > OK > Sleep Mode > OK
2 In the Sleep Mode field, select the number of minutes you want the printer to wait before it enters Sleep mode.
3 Press

Using Hibernate mode
Hibernate is an ultra-low-power operating mode. When operating in Hibernate mode, all other systems and devices are powered down safely.
Notes:
- Make sure to wake the printer from Hibernate mode before sending a print job. A hard reset or a long press of the Sleep button wakes the printer from Hibernate mode.
- If the printer is in Hibernate mode, then the Embedded Web Server is disabled.
Using the Embedded Web Server
1 Open a Web browser, and then type the printer IP address in the address field.
Notes:
- View the printer IP address in the TCP/IP section in the Network/Ports menu. The IP address appears as four sets of numbers separated by periods, such as 123.123.123.123.
- If your are using a proxy server, then temporarily disable it to load the Web page correctly.
2 Click Settings > General Settings > Sleep Button Settings.
3 From the "Press Sleep Button" or "Press and Hold Sleep Button" drop-down menu, select Hibernate.
4 Click Submit.
Using the printer control panel
1 From the printer control panel, navigate to:

text_image
> Settings > OK > Settings > OK > General Settings > OK2 Press the arrow buttons until Press Sleep Button or Press and Hold Sleep Button appears, and then press OK.
3 Press the arrow buttons until Hibernate appears, and then press OK.
Notes:
- When Press Sleep Button is set to Hibernate, a short press of the Sleep button sets the printer to Hibernate mode.
- When Press and Hold Sleep Button is set to Hibernate, a long press of the Sleep button sets the printer to Hibernate mode.
Adjusting the brightness of the printer display
To save energy, or if you have trouble reading the display, adjust its brightness settings.
Using the Embedded Web Server
1 Open a Web browser, and then type the printer IP address in the address field.
Notes:
- View the printer IP address in the TCP/IP section in the Network/Ports menu. The IP address appears as four sets of numbers separated by periods, such as 123.123.123.123.
- If you are using a proxy server, then temporarily disable it to load the Web page correctly.
2 Click Settings > General Settings.
3 In the Screen Brightness field, enter the brightness percentage you want for the display.
4 Click Submit.
Restoring factory default settings
If you want to keep a list of the current menu settings for reference, then print a menu settings page before restoring the factory default settings. For more information, see "Printing a menu settings page" on page 78.
If you want a more comprehensive method of restoring the printer factory default settings, then perform the Wipe All Settings option. For more information, see "Erasing non-volatile memory" on page 85.
Warning—Potential Damage: Restoring factory defaults returns most printer settings to the original factory default settings. Exceptions include the display language, custom sizes and messages, and network/port menu settings. All downloads stored in the RAM are deleted. Downloads stored in the flash memory or in the printer hard disk are not affected.
From the printer control panel, navigate to:

text_image
> Settings >OK > Settings >OK > General Settings >OK > Factory Defaults >OK > Restore Now > OKSecuring the printer
Using the security lock feature
The printer is equipped with a security lock feature. When a lock compatible with most laptop computers is attached, the printer is locked. When locked, the controller board shield and the controller board cannot be removed. Attach a security lock to the printer in the location shown.
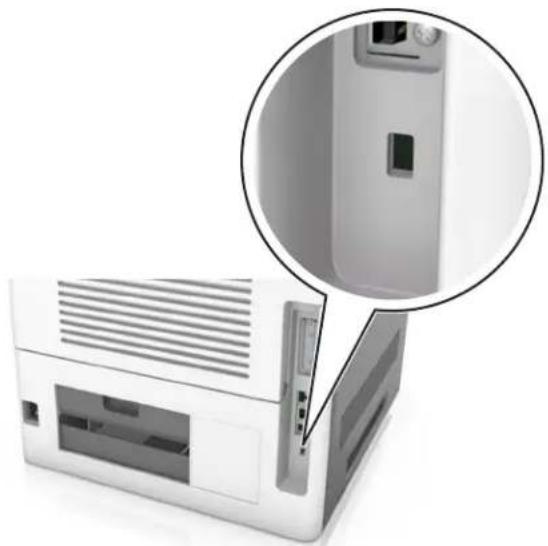
natural_image
Exterior view of a white electronic device with a close-up inset showing internal components (no text or symbols visible)Statement of Volatility
Your printer contains various types of memory that can store device and network settings, and user data.
| Type of memory Description | |
| Volatile memory | Your printer uses standard random access memory (RAM) to temporarily buffer user data during simple print jobs. |
| Non-volatile memory Your printer may use two forms of non- | volatile memory:EEPROM and NAND (flash memory). Both types are used to store the operating system, device settings, network information, bookmark settings, and embedded solutions. |
| Hard disk memory Some printers have a hard disk drive insta | led. The printerhard disk is designed for device-specific functionality. This lets the device retain buffered user data from complex print jobs, as well as form data, and font data. |
Erase the content of any installed printer memory in the following circumstances:
•The printer is being decommissioned.
•The printer hard disk is being replaced.
•The printer is being moved to a different department or location.
•The printer is being serviced by someone from outside your organization.
- The printer is being removed from your premises for service.
•The printer is being sold to another organization.
Disposing of a printer hard disk
Note: Some printer models may not have a printer hard disk installed.
In high-security environments, it may be necessary to take additional steps to make sure that confidential data stored in the printer hard disk cannot be accessed when the printer—or its hard disk—is removed from your premises.
- Degaussing—Flushes the hard disk with a magnetic field that erases stored data
- Crushing—Physically compresses the hard disk to break component parts and render them unreadable
- Milling—Physically shreds the hard disk into small metal bits
Note: Most data can be erased electronically, but the only way to guarantee that all data is completely erased is to physically destroy each hard disk where data is stored.
Erasing volatile memory
The volatile memory (RAM) installed in your printer requires a power source to retain information. To erase the buffered data, turn off the printer.
Erasing non-volatile memory
Erase individual settings, device and network settings, security settings, and embedded solutions by following these steps:
1 Turn off the printer.
2 Hold down 2 and 6 on the keypad while turning the printer on. Release the buttons only when the screen with the progress bar appears.
The printer performs a power-on sequence, and then the Configuration menu appears. When the printer is fully turned on, a list of functions appears on the printer display.
3 Press the up or down arrow button until Wipe All Settings appears.
The printer will restart several times during this process.
Note: Wipe All Settings securely removes device settings, solutions, jobs, and passwords from the printer memory.
4 Navigate to:
Back > Exit Config Menu
The printer will perform a power-on reset, and then return to normal operating mode.
Erasing printer hard disk memory
Note: Some printer models may not have a printer hard disk installed.
Configuring Disk Wiping in the printer menus lets you remove residual confidential material left by print jobs by securely overwriting files that have been marked for deletion.
Using the printer control panel
1 Turn off the printer.
2 Hold down 2 and 6 while turning the printer on. Release the buttons only when the screen with the progress bar appears.
The printer performs a power-on sequence, and then the Configuration menu appears. When the printer is fully turned on, a list of functions appears on the printer display.
3 Press the up or down arrow button until Wipe Disk appears, and then select one of the following:
- Wipe disk (fast)—This lets you overwrite the disk with all zeroes in a single pass.
- Wipe disk (secure)—This lets you overwrite the disk with random bit patterns several times, followed by a verification pass. A secure overwrite is compliant with the DoD 5220.22-M standard for securely erasing data from a hard disk. Highly confidential information should be wiped using this method.
4 Press the up or down arrow button until Yes appears, and then proceed with disk wiping.
Notes:
- A status bar will indicate the progress of the disk wiping task.
- Disk wiping can take from several minutes to more than an hour, during which the printer will be unavailable for other user tasks.
5 Navigate to:
Back > Exit Config Menu
The printer will perform a power-on reset, and then return to normal operating mode.
Configuring printer hard disk encryption
Enable hard disk encryption to prevent loss of sensitive data in the event the printer or its hard disk is stolen.
Note: Some printer models may not have a printer hard disk installed.
Using the Embedded Web Server
1 Open a Web browser, and then type the printer IP address in the address field.
Notes:
- View the printer IP address in the TCP/IP section in the Network/Ports menu. The IP address appears as four sets of numbers separated by periods, such as 123.123.123.123.
- If you are using a proxy server, then temporarily disable it to load the Web page correctly.
2 Click Settings > Security > Disk Encryption.
Note: Disk Encryption appears in the Security menu only when a formatted, non-defective printer hard disk is installed.
3 From the Disk Encryption menu, select Enable.
Notes:
- Enabling disk encryption will erase the content of the printer hard disk.
- Disk encryption can take from several minutes to more than an hour, during which the printer will be unavailable for other user tasks.
Using the printer control panel
1 Turn off the printer.
2 Hold down 2 and 6 while turning the printer on. Release the buttons only when the screen with the progress bar appears.
The printer performs a power-on sequence, and then the Configuration menu appears. When the printer is fully turned on, a list of functions appears on the printer display.
3 Navigate to:
Disk Encryption > Enable
Note: Enabling disk encryption will erase the contents of the printer hard disk.
4 Select Yes to proceed with disk wiping.
Notes:
- Do not turn off the printer during the encryption process. Doing so may result in loss of data.
- Disk encryption can take from several minutes to more than an hour, during which the printer will be unavailable for other user tasks.
- A status bar will indicate the progress of the disk wiping task. After the disk has been encrypted, the printer will return to the screen for enabling or disabling disk encryption.
5 Navigate to:
Back > Exit Config Menu
The printer will perform a power-on reset, and then return to normal operating mode.
Finding printer security information
In high-security environments, it may be necessary to take additional steps to make sure that confidential data stored in the printer cannot be accessed. For more information, visit the Lexmark security Web page or see the Embedded Web Server Administrator's Guide.
1 Go to http://support.lexmark.com, and then navigate to:
Support & Downloads > Tech Library > Manuals & Guides
2 In the Keyword field, type Embedded Web Server, and then click Filter.
3 Click Embedded Web Server to launch the document.
Using MS810de
Learning about the printer
Printer configurations
Basic model

text_image
Diagram of a printer showing labeled parts: front view, side view, and internal structure with numbered annotations.| 1 Standard bin | |
| 2 Printer control panel | |
| 3 Multipurpose feeder | |
| 4 | Standard 550-sheet tray (Tray 1) |
Fully configured model

CAUTION—TIPPING HAZARD: Floor-mounted configurations require additional furniture for stability. You must use either a printer stand or printer base if you are using multiple input options. If you purchased a printer with a similar configuration, then you may need additional furniture. For more information, see www.lexmark.com/multifunctionprinters.
The following illustration shows the maximum number of optional finishers and trays that are supported by the printer. For more information on other configurations, visit www.lexmark.com/multifunctionprinters.
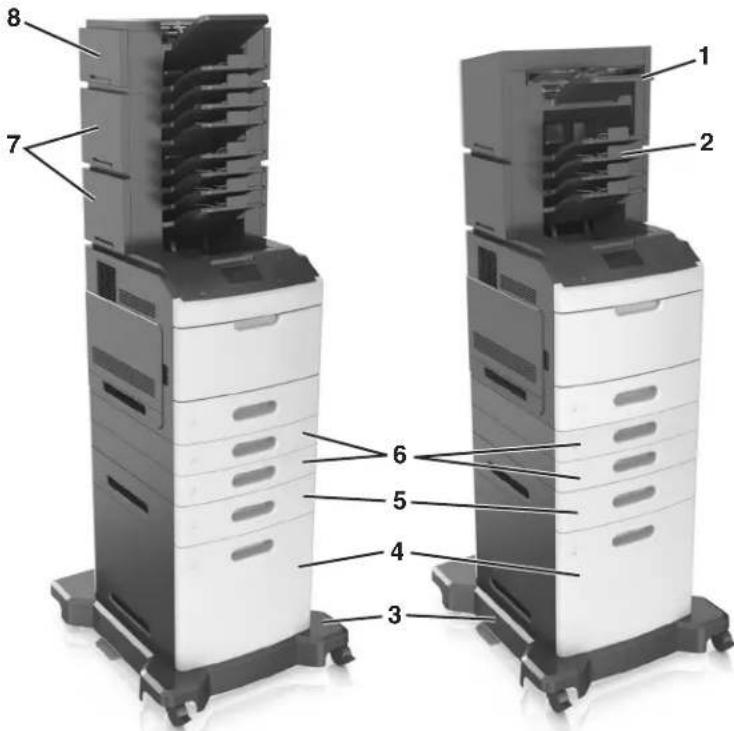
text_image
Diagram of two stacked electronic devices with numbered components, likely illustrating a rack or storage system layout.| Hardware option | Alternative hardware option | |
| 1 Staple finisher | •Output expander•4-bin mailbox | |
| 2 4-bin mailbox | •Output expander• High-capacity output expander•Staple finisher | |
| 3 Caster base None | ||
| 4 2100-sheet tray None | ||
| 5 | 550-sheet tray | 250-sheet tray |
| 6 | 250-sheet tray | 550-sheet tray |
| 7 4-bin mailbox Output expander | ||
| 8 | Output expander | 4-bin mailbox |
- In a configuration with three optional finishers, the output expander and mailbox may be installed in any order.
•In a configuration with two optional finishers:
—The staple finisher must always be on top.
— The high-capacity output expander must always be at the bottom.
— The output expander is the only finisher that can be placed on top of the high-capacity output expander.
- When using optional trays:
- Always use a caster base when the printer is configured with a 2100-sheet tray.
- The 2100-sheet tray must always be at the bottom of a configuration.
—A maximum of four optional trays may be configured with the printer. - The optional 250- and 550-sheet trays may be installed in any order.
Using the printer control panel
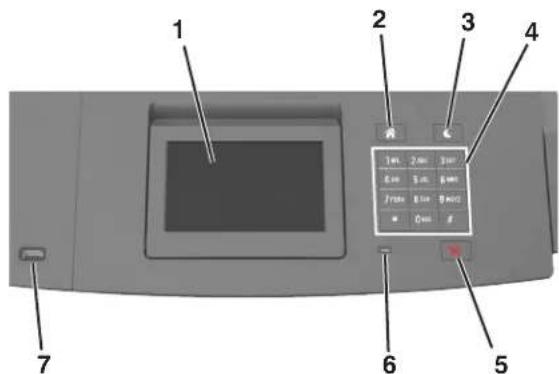
text_image
1 2 3 4 5 6 7 8 9 10 11 12 13 14 15 16 17 18 19 20 21 22 23 24 25 26 27 28 29 30 31 32 33 34 35 36 37 38 39 40 41 42 43 44 45 46 47 48 49 50 51 52 53 54 55 56 57 58 59 60 61 62 63 64 65 66 67 68 69 70| Use the To | ||
| 1 Display | •View the printer status.•Set up and operate the printer. | |
| 2 Home button Go to the home screen. | ||
| 3 Sleep button Enable Sleep mode or Hibernate mode.Do the following to wake the printer from Sleep Mode:•Press any hard button.•Pull out Tray 1 or load paper in the multipurpose feeder.•Open a door or cover.•Send a print job from the computer.•Perform a power-on reset with the main power switch.•Attach a device to the USB port on the printer. | ||
| 4 Keypad Enter numbers, letters, or symbols. | ||
| 5 Stop or Cancel button Stop all printer activity. | ||
| 6 Indicator light Check the status of the printer. | ||
| 7 USB port Connect a flash drive to the printer.Note: Only the front USB port supports flash drives. | ||
Understanding the colors of the Sleep button and indicator lights
The colors of the Sleep button and indicator lights on the printer control panel signify a certain printer status or condition.
Indicator light color and its corresponding printer status
| Indicator light Printer status | |
| Off The printer is off or in Hibernate mode. | |
| Blinking green The printer is warming up, processing data, or printing. | |
| Solid green The printer is on, but idle. | |
| Blinking red The printer requires user intervention. | |
Sleep button light color and its corresponding printer status
| Sleep button light Printer status | |
| Off The printer is off, idle or in Ready state. | |
| Solid amber The printer is in Sleep mode. | |
| Blinking amber The printer is entering or waking from Hibernate mode. | |
| Blinking amber for 0.1 second, then goes completely off for 1.9 seconds in a slow, pulsing pattern | The printer is in Hibernate mode. |
Understanding the home screen
When the printer is turned on, the display shows a basic screen, referred to as the home screen. Use the home screen buttons and icons to initiate an action.
Note: Your home screen may vary depending on your home screen customization settings, administrative setup, and active embedded solutions.

text_image
1 57.184.95.214 Change Language Bookmarks Held Jobs USB Ready.| Touch To | ||
| 1 Change Language Change the primary language of the printer. | ||
| 2 | Bookmarks | Create, organize, and save a set of bookmarks (URLs) into a tree view of folders and file links.Note:The tree view does not include bookmarks created within Forms and Favorites, and the ones in the tree are not usable in Forms and Favorites. |
| 3 Held Jobs Display all current held jobs. | ||
| 4 USB View, select, or print photos and documents from a flash drive. Note: This icon appears only when you return to the home screen while a memory card or flash drive is connected to the printer. | ||
| 5 Menus Access printer menus. Note: These menus are available only when the printer is in ready state. | ||
| 6 Status message bar | • Show the current printer status such as Ready or Busy. • Show printer conditions such as Imaging unit low or Cartridge Low. • Show intervention messages and the instructions on how to clear them. | |
| 7 Status/Supplies | • Show a printer warning or error message whenever the printer requires intervention to continue processing. • View more information on the printer warning or message, and on how to clear it. | |
| 8 Tips | View a context-sensitive help information. | |
This may also appear on the home screen:
| Touch To | |
| Search Held Jobs Search current held jobs. | |
| Jobs by user Access print jobs saved by user. | |
| Profiles and Solutions Access profiles and solutions. | |
Features
| Feature Description | |
Attendance message alert | If an attendance message affects a function, then this icon appears and the red indicator light blinks. |
Warning | If an error condition occurs, then this icon appears. |
| Printer IP addressExample: 123.123.123.123 | The IP address of your printer is located at the top left corner of the home screen and appears as four sets of numbers separated by periods. You can use the IP address when accessing the Embedded Web Server to view and remotely configure printer settings even when you are not physically near the printer. |
Using the touch-screen buttons
Note: Your home screen may vary, depending on your home screen customization settings, administrative setup, and active embedded solutions.

text_image
1 2 3 4 5| Touch the To | ||
| 1 Radio button Select or clear an item. | ||
| 2 Up arrow Scroll up. | ||
| 3 Down arrow Scroll down. | ||
| 4 Accept button Save a setting. | ||
| 5 Cancel button | •Cancel an action or a selection.•Return to the previous screen. | |
Other touch-screen buttons
| Touch To | |
 | Return to the home screen. |
 | Open a context-sensitive Help dialog on the printer control panel. |
 | Scroll to the left. |
 | Scroll to the right. |
Setting up and using the home screen applications
Notes:
- Your home screen may vary, depending on your home screen customization settings, administrative setup, and active embedded applications. Some applications are supported only in select printer models.
- There may be additional solutions and applications available for purchase. For more information, visit www.lexmark.com or inquire at your point of purchase.
Finding the IP address of the computer
Note: Make sure that you know how your printer and computer are connected to the network (Ethernet or wireless).
The computer IP address is required when setting up home screen applications, such as:
- Forms and Favorites
•Multi Send - Scan to Network
For Windows users
1 Open the command window.
In Windows 8
From the Search charm, type run, and then navigate to:
Apps list > Run > type cmd > OK
In Windows 7 or earlier
a Click 📄 or click Start, and then click Run.
b In the Start Search or Run dialog, type cmd.
c Press Enter, or click OK.
2 Type ipconfig, and then click Go or press Enter.
Note: Type ipconfig /all to see additional useful information.
3 Look for IP Address.
The IP address appears as four sets of numbers separated by periods, such as 123.123.123.123.
For Macintosh users
Note: This is applicable only in Mac OS X version 10.5 or later.
1 From the Apple menu, navigate to:
System Preferences > Network
2 Click Ethernet, Wi-Fi, or AirPort.
3 Click Advanced > TCP/IP.
4 Look for IPv4 Address.
Finding the IP address of the printer
Note: Make sure your printer is connected to a network or to a print server.
You can find the printer IP address:
- From the top left corner of the printer home screen.
- From the TCP/IP section in the Network/Ports menu.
- By printing a network setup page or menu settings page, and then finding the TCP/IP section.
Note: An IP address appears as four sets of numbers separated by periods, such as 123.123.123.123.
Accessing the Embedded Web Server
The Embedded Web Server is the printer Web page that lets you view and remotely configure printer settings even when you are not physically near the printer.
1 Obtain the printer IP address:
•From the printer control panel home screen
•From the TCP/IP section in the Network/Ports menu
- By printing a network setup page or menu settings page, and then finding the TCP/IP section
Note: An IP address appears as four sets of numbers separated by periods, such as 123.123.123.123.
2 Open a Web browser, and then type the printer IP address in the address field.
3 Press Enter.
Note: If you are using a proxy server, then temporarily disable it to load the Web page correctly.
Customizing the home screen
1 Open a Web browser, and then type the printer IP address in the address field.
Note: View the printer IP address on the printer home screen. The IP address appears as four sets of numbers separated by periods, such as 123.123.123.123.
2 Do one or more of the following:
•Show or hide the icons of basic printer functions.
a Click Settings > General Settings > Home screen customization.
b Select the check boxes to specify which icons appear on the home screen.
Note: If you clear a check box beside an icon, then the icon does not appear on the home screen.
c Click Submit.
- Customize the icon for an application. For more information, see “Finding information about the home screen applications” on page 96 or see the documentation that came with the application.
Activating the home screen applications
Finding information about the home screen applications
Your printer comes with preinstalled home screen applications. Before you can use these applications, you must first activate and set up these applications using the Embedded Web Server. For more information on accessing the Embedded Web Server, see “Accessing the Embedded Web Server” on page 95.
For more information on configuring and using the home screen applications, do the following:
1 Go to http://support.lexmark.com, and then do either of the following:
- Click Business Solutions, and then select the name of the application.
- Click Software and Solutions, and then select either of the following:
- Scan to Network—Find information about the Scan to Network application.
- Other Applications—Find information about the other applications.
2 Click the Manuals tab, and then select the document for the home screen application.
Using Background and Idle Screen
Icon Description

The application lets you customize the background and idle screen of your printer home screen.
1 From the home screen, navigate to:
Change Background > select background to use
2 Touch

Setting up Forms and Favorites
Note: A later version of this User's Guide may contain a direct link to the Administrator's Guide of this application. To check for updates of this User's Guide, go to http://support.lexmark.com.
Use To

natural_image
Icon showing a document with horizontal lines and a globe, symbolizing global information or website (no text present)Streamline work processes by letting you quickly find and print frequently used online forms directly from the printer home screen.
Note: The printer must have permission to access the network folder, FTP site, or Web site where the bookmark is stored. From the computer where the bookmark is stored, use sharing, security, and firewall settings to allow the printer at least a read access. For help, see the documentation that came with your operating system.
1 Open a Web browser, and then type the printer IP address in the address field.
Note: View the printer IP address on the printer home screen. The IP address appears as four sets of numbers separated by periods, such as 123.123.123.123.
2 Click Settings > Apps > Apps Management > Forms and Favorites.
3 Click Add, and then customize the settings.
Notes:
• See the mouse-over help beside each field for a description of the setting.
- To make sure the location settings of the bookmark are correct, type the correct IP address of the host computer where the bookmark is located. For more information on obtaining the IP address of the host computer, see "Finding the IP address of the computer" on page 94.
- Make sure the printer has access rights to the folder where the bookmark is located.
4 Click Apply.
To use the application, touch Forms and Favorites on the printer home screen, and then navigate through form categories, or search for forms based on a form number, name, or description.
Understanding Eco-Settings
Icon Description

The application lets you easily manage energy consumption, noise, toner, and paper usage settings to help reduce the environmental impact of your printer.
Setting up Remote Operator Panel
This application shows the printer control panel on your computer screen and lets you interact with the printer control panel, even when you are not physically near the network printer. From your computer screen, you can view the printer status, release held print jobs, create bookmarks, and do other print-related tasks you might normally do while standing at the network printer.
1 Open a Web browser, and then type the printer IP address in the address field.
Note: View the printer IP address on the printer home screen. The IP address appears as four sets of numbers separated by periods, such as 123.123.123.123.
2 Click Settings > Remote Operator Panel Settings.
3 Select the Enabled check box, and then customize the settings.
4 Click Submit.
To use the application, click Remote Operator Panel > Launch VNC Applet.
Exporting and importing a configuration
You can export configuration settings into a text file, and then import the file to apply the settings to other printers.
1 Open a Web browser, and then type the printer IP address in the address field.
Note: View the printer IP address on the printer home screen. The IP address appears as four sets of numbers separated by periods, such as 123.123.123.123.
2 To export or import a configuration for one application, do the following:
a Click Settings > Apps > Apps Management.
b From the list of installed applications, click the name of the application you want to configure.
c Click Configure, and then do either of the following:
- To export a configuration to a file, click Export, and then follow the instructions on the computer screen to save the configuration file.
Notes:
- When saving the configuration file, you can type a unique file name or use the default name.
- If a "JVM Out of Memory" error occurs, then repeat the export process until the configuration file is saved.
- To import a configuration from a file, click Import, and then browse to the saved configuration file that was exported from a previously configured printer.
Notes:
- Before importing the configuration file, you can choose to preview it first or load it directly.
- If a timeout occurs and a blank screen appears, then refresh the Web browser, and then click Apply.
3 To export or import a configuration for multiple applications, do the following:
a Click Settings > Import/Export.
b Do either of the following:
- To export a configuration file, click Export Embedded Solutions Settings File, and then follow the instructions on the computer screen to save the configuration file.
•To import a configuration file, do the following:
1 Click Import Embedded Solutions Settings File > Choose File, and then browse to the saved configuration file that was exported from a previously configured printer.
2 Click Submit.
Loading paper and specialty media
The selection and handling of paper and specialty media can affect how reliably documents print. For more information, see “Avoiding jams” on page 270 and “Storing paper” on page 191.
Setting the paper size and type
From the home screen navigate to:

Paper Menu > Paper Size/Type > select a tray > select the paper size or type >

Configuring Universal paper settings
The Universal paper size is a user-defined setting that lets you print on paper sizes that are not preset in the printer menus.
Notes:
- The smallest supported Universal size is 70 x 127 mm (2.76 x 5 inches) for one-sided printing and 105 x 148 mm (4.13 x 5.83 inches) for two-sided (duplex) printing.
- The largest supported Universal size is 216 x 356 mm (8.5 x 14 inches) for one-sided and two-sided printing.
- When printing on paper less than 210 mm (8.3 inches) wide, the printer may print at a reduced speed after a period of time to ensure the best print performance.
- If you regularly print large jobs on narrow paper, then you may use the MS710 Series printer models, which print batches of 10 or more pages of narrow paper at a faster speed. For more information on the MS710 Series printer models, contact your Lexmark sales representative.
1 From the home screen, navigate to:

Paper Menu > Universal Setup > Units of Measure > select a unit of measure
2 Touch Portrait Width or Portrait Height.
3 Select the width or height, and then touch.
Loading the 250- or 550-sheet tray

CAUTION—POTENTIAL INJURY: To reduce the risk of equipment instability, load each tray separately. Keep all other trays closed until needed.
1 Pull out the tray.
Notes:
- When loading folio-, legal-, or Oficio-size paper, lift the tray slightly and pull it out completely.
- Do not remove trays while a job prints or while Busy appears on the display. Doing so may cause a jam.

natural_image
3D rendering of a printer with open drawer and internal compartments, showing no visible text or symbols2 Squeeze and slide the width guide to the correct position for the size of the paper being loaded until it clicks into place.
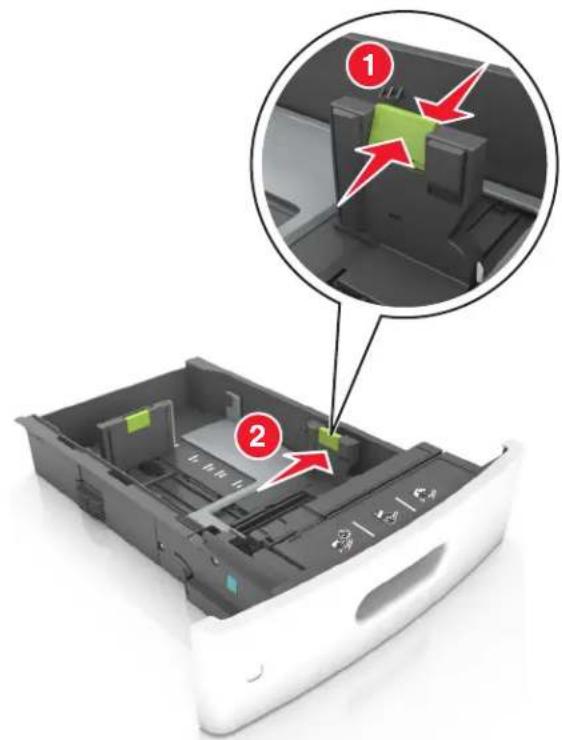
text_image
Diagram of a printer drawer with labeled parts and zoomed-in view highlighting a green componentNote: Use the paper size indicators at the bottom of the tray to help position the guides.

natural_image
Interior view of a printer drawer with a magnified inset showing internal components (no text or symbols visible)3 Unlock the length guide, and then squeeze and slide the guide to the correct position for the size of the paper being loaded.

text_image
Diagram of a printer drawer with numbered annotations highlighting internal components and parts, likely for assembly or cleaning instructions.Notes:
- Lock the length guide for all paper sizes.
- Use the paper size indicators at the bottom of the tray to help position the guides.
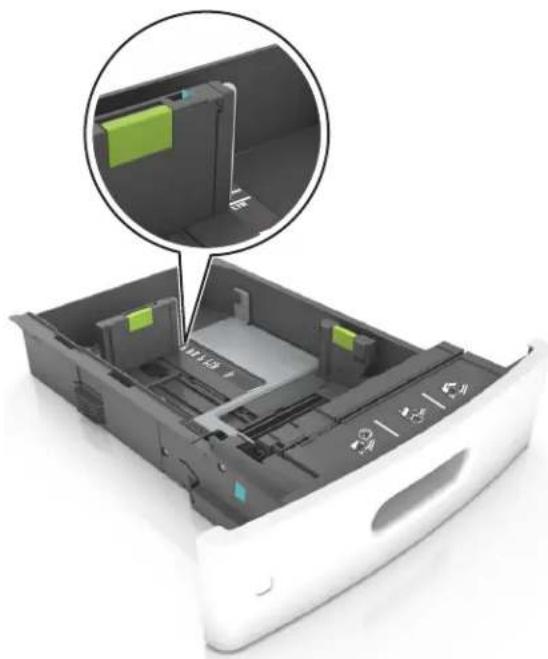
natural_image
Interior view of a white electronic device drawer with a magnified inset showing internal components (no text or symbols visible)4 Flex the sheets back and forth to loosen them, and then fan them. Do not fold or crease the paper. Straighten the edges on a level surface.
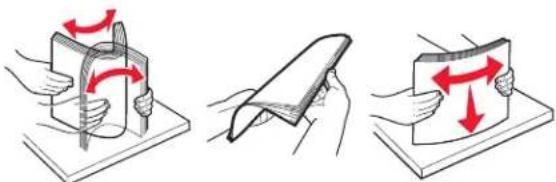
text_image
Diagram illustrating three-step folding or retraction process with arrows indicating direction of movement5 Load the paper stack with the printable side facedown.
Note: Make sure the paper or envelope is loaded properly.
- There are different ways of loading letterhead depending on whether an optional staple finisher is installed or not.
Without an optional staple finisher With an optional staple finisher

text_image
ABCOne-sided printing

natural_image
White file drawer with black plastic casing and visible internal compartments (no text or symbols)One-sided printing
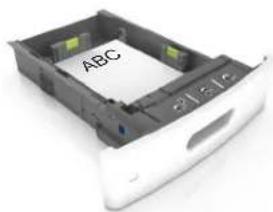
natural_image
White electronic device with a labeled paper sheet marked 'ABC' on its side (no additional text or symbols visible)Two-sided printing
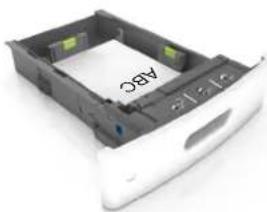
natural_image
3D rendering of a white electronic device with a black internal panel and labeled 'A8C' on the side (no other text or symbols visible)Two-sided printing
- If you are loading prepunched paper for use with the staple finisher, then make sure the holes on the long edge of the paper are on the right side of the tray.

text_image
One-sided printing Two-sided printing ABC ABCNote: If the holes on the long edge of the paper are on the left side of the tray, then a jam may occur.
- Do not slide the paper into the tray. Load paper as shown in the illustration.

natural_image
3D illustration of a white drawer with an open lid and a red downward arrow indicating compression or reduction (no text or symbols)- If you are loading envelopes, then make sure that the flap side is facing up and the envelopes are on the left side of the tray.
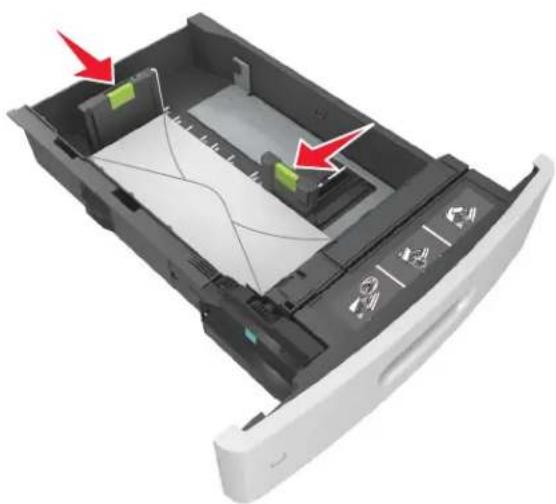
natural_image
3D rendering of a printer drawer with internal compartments and arrows indicating parts (no text or symbols)- Make sure the paper is below the solid line, which is the maximum paper fill indicator.

natural_image
Interior view of a printer drawer with a circular annotation highlighting a directional traffic sign (no text or symbols on the diagram itself)Warning—Potential Damage: Overfilling the tray can cause paper jams.
- When using card stock, labels, or other types of specialty media, make sure the paper is below the dashed line, which is the alternate paper fill indicator.

natural_image
Exterior view of a white electronic device drawer with a circular annotation highlighting a road ahead (no text or symbols on the device itself)6 For custom- or Universal-size paper, adjust the paper guides to lightly touch the sides of the stack, and then lock the length guide.
7 Insert the tray.
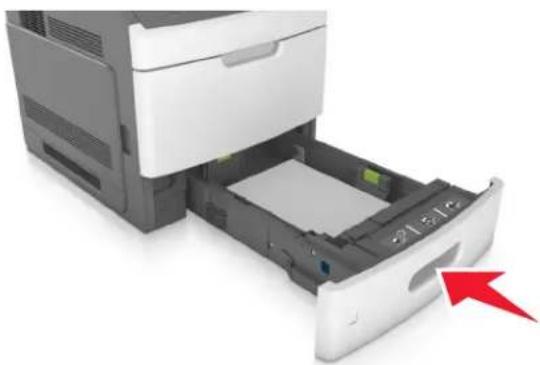
natural_image
Exterior view of a printer drawer with a paper feeding into the holder, showing internal components and a red arrow pointing to the page (no text or symbols visible)8 From the printer control panel, set the paper size and paper type in the Paper menu to match the paper loaded in the tray.
Note: Set the correct paper size and type to avoid paper jams and print quality problems.
Loading the 2100-sheet tray

CAUTION—POTENTIAL INJURY: To reduce the risk of equipment instability, load each tray separately. Keep all other trays closed until needed.
1 Pull out the tray.
2 Adjust the width and length guides.
Loading A5-size paper
a Pull up and slide the width guide to the position for A5.

text_image
Diagram showing two views of a server rack with labeled components and red arrows indicating movement or force.b Squeeze and slide the length guide to the position for A5 until it clicks into place.
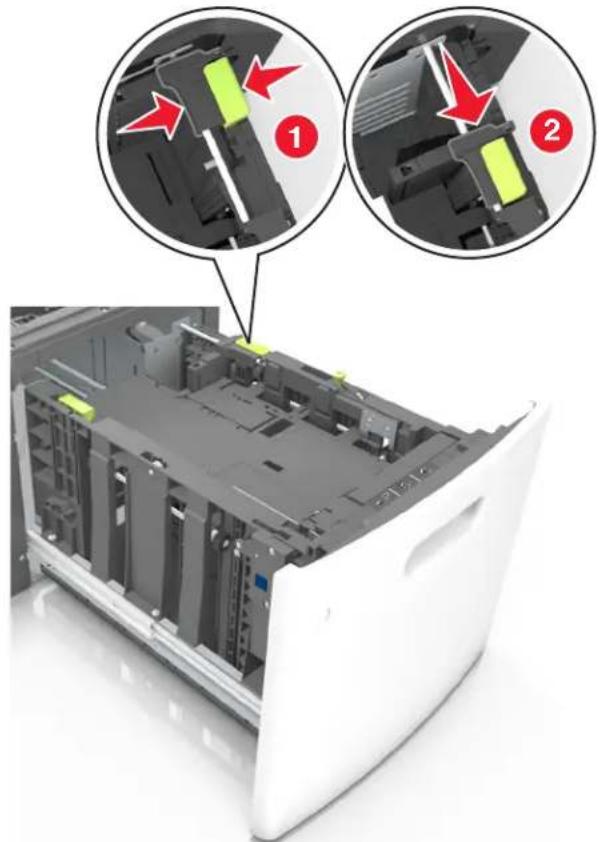
natural_image
Interior view of a server rack with highlighted internal components and two magnified views (no text or symbols)c Remove the A5 length guide from its holder.

natural_image
3D mechanical assembly diagram showing two stages of a vertical assembly with green structural elements and red directional arrows indicating motion (no text or symbols)d Insert the A5 length guide into its designated slot.
Note: Press the A5 length guide until it clicks into place.

natural_image
Two 3D mechanical assembly diagrams showing green and red directional arrows indicating movement or force (no text or symbols)Loading A4-, letter-, legal-, Oficio-, and Folio-size paper
a Pull up and slide the width guide to the correct position for the size of the paper being loaded.

text_image
Diagram showing two views of a server rack with labeled components and red arrows indicating movement or force directions.b If the A5 length guide is still attached to the length guide, then remove it from its place. If the A5 length guide is not attached, then proceed to step d.

natural_image
3D diagram of a device with a green vertical panel and red arrow indicating compression or stress, no text or symbols present.c Put the A5 length guide in its holder.
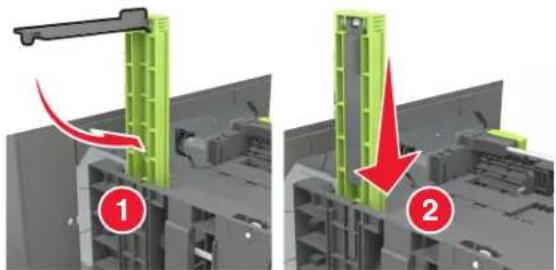
text_image
Technical diagram showing two mechanical assembly steps with red arrows indicating motion or force directions, labeled ① and ②.d Squeeze the length guide and slide it to the correct position for the size of the paper being loaded until it clicks into place.

natural_image
Interior view of a computer tower showing internal components and a magnified view of the device (no text or symbols visible)3 Flex sheets of paper back and forth to loosen them, and then fan them. Do not fold or crease the paper. Straighten the edges on a level surface.

natural_image
Three-step illustration showing a folding or rolling process with red arrows indicating direction (no text or symbols)4 Load the paper stack with the printable side facedown.
Note: Make sure the paper is loaded properly.
- There are different ways of loading letterhead depending on whether an optional staple finisher is installed or not.
Without an optional staple finisher With an optional staple finisher

text_image
ABC 2018One-sided printing

natural_image
3D rendering of a white electronic device with a paper lid labeled 'ABC' inserted, showing internal components (no readable text beyond label)One-sided printing

text_image
ABCTwo-sided printing

natural_image
White electronic device with a paper label showing 'ABC' on its side, no readable text or symbols beyond the label.Two-sided printing
- If you are loading prepunched paper for use with the staple finisher, then make sure the holes on the long edge of the paper are on the right side of the tray.

text_image
One-sided printing Two-sided printing ABC ABCNote: If the holes on the long edge of the paper are on the left side of the tray, then a jam may occur.
• Make sure the paper is below the maximum paper fill indicator.

natural_image
Interior view of a computer drive bay with a highlighted internal component and directional arrow (no text or symbols)Warning—Potential Damage: Overfilling the tray can cause paper jams.
5 Insert the tray.
Note: Press the paper stack down while inserting the tray.

natural_image
3D rendering of a white electronic device with black casing and red arrows pointing to internal components (no text or symbols)6 From the printer control panel, set the paper size and type in the Paper menu to match the paper loaded in the tray.
Note: Set the correct paper size and type to avoid paper jams and print quality problems.
Loading the multipurpose feeder
1 Pull down the multipurpose feeder door.
Note: Do not load or close the multipurpose feeder while a job is printing.
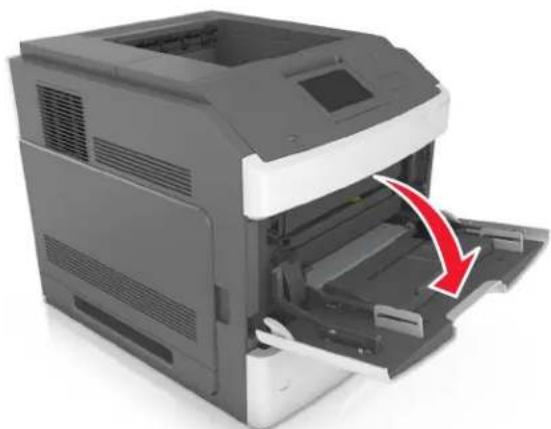
natural_image
Exterior view of a printer with a red arrow indicating compression or disassembly (no text or symbols visible)2 Pull the multipurpose feeder extender.

natural_image
Exterior view of a printer with open lid and paper feed, showing internal structure and a red arrow indicating action (no text or symbols)Note: Guide the extender gently so that the multipurpose feeder is fully extended and open.
3 Slide the width guide to the correct position for the size of the paper being loaded.

text_image
Diagram showing a printer or printer with labeled parts and a red arrow pointing to a component, indicating a specific part.Note: Use the paper size indicators on the bottom of tray to help position the guides.

natural_image
Close-up of a printer's internal structure with a magnified inset showing part details (no readable text or symbols)4 Prepare the paper or specialty media for loading.
- Flex sheets of paper back and forth to loosen them, and then fan them. Do not fold or crease the paper. Straighten the edges on a level surface.

natural_image
Three-step illustration showing a folding process: cutting through a sheet with red arrows indicating rotation, then folding into a flat surface (no text or symbols)- Hold transparencies by the edges, and then fan them. Straighten the edges on a level surface.
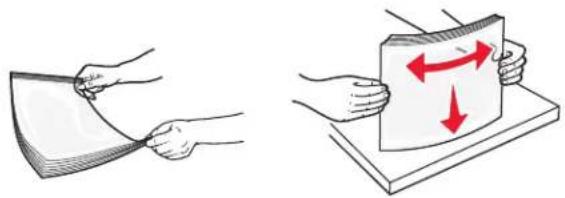
natural_image
Illustration showing two hand positions: one stretching a curved surface, the other holding a flat object with red directional arrows (no text or symbols)Note: Avoid touching the printable side of the transparencies. Be careful not to scratch them.
- Flex the stack of envelopes back and forth to loosen them, and then fan them. Straighten the edges on a level surface.

natural_image
Two-step illustration showing hands holding a card and a closed envelope, with red arrows indicating movement or force direction (no text or symbols)5 Load the paper or specialty media.
Note: Slide the stack gently into the multipurpose feeder until it comes to a stop.
- Load only one size and type of paper or specialty media at a time.
• Make sure the paper fits loosely in the multipurpose feeder, lies flat, and is not bent or wrinkled.
- There are different ways of loading letterhead depending on whether an optional staple finisher is installed or not.
Without an optional staple finisher With an optional staple finisher
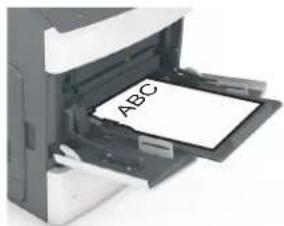
text_image
ABCOne-sided printing

natural_image
Close-up of a printer's internal structure with a paper labeled 'ABC' inserted (no readable text or symbols beyond label)One-sided printing

text_image
ABCTwo-sided printing

natural_image
Close-up of a printer's open door with a paper labeled 'A5C' (no other text or symbols visible)Two-sided printing
- If you are loading prepunched paper for use with the staple finisher, then make sure the holes on the long edge of the paper are on the right side of the tray.

text_image
One-sided printing Two-sided printing ABC ABCNote: If the holes on the long edge of the paper are on the left side of the tray, then a jam may occur.
- Load envelopes with the flap side down and on the left of the multipurpose feeder.
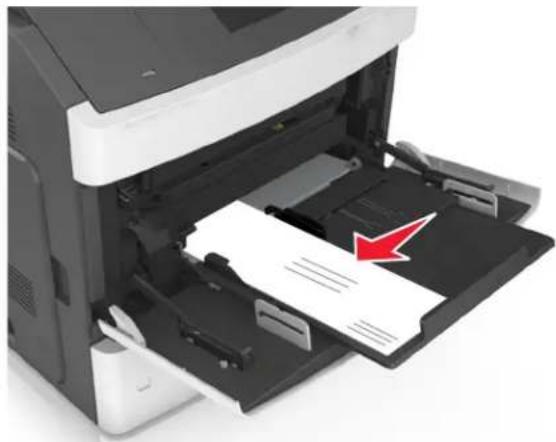
natural_image
Close-up of a printer's internal structure showing paper feed and paper sheet being inserted (no text or symbols visible)Warning—Potential Damage: Never use envelopes with stamps, clasps, snaps, windows, coated linings, or self-stick adhesives. These envelopes may severely damage the printer.
•Make sure the paper or specialty media is below the maximum paper fill indicator.

natural_image
Close-up of a printer's internal structure with a red arrow pointing to the paper edge (no text or symbols visible)Warning—Potential Damage: Overfilling the feeder can cause paper jams.
6 For custom- or Universal-size paper, adjust the width guides to lightly touch the sides of the stack.
7 From the Paper menu on the printer control panel, set the paper size and type in the Paper menu to match the paper loaded in the tray.
Note: Set the correct paper size and type to avoid paper jams and print quality problems.
Linking and unlinking trays
Linking and unlinking trays
1 Open a Web browser, and then type the printer IP address in the address field.
Notes:
- View the printer IP address on the printer home screen. The IP address appears as four sets of numbers separated by periods, such as 123.123.123.123.
- If you are using a proxy server, then temporarily disable it to load the Web page correctly.
2 Click Settings > Paper Menu.
3 Change the paper size and type settings for the trays you are linking.
- To link trays, make sure the paper size and type for the tray match that of the other tray.
- To unlink trays, make sure the paper size or type for the tray does not match that of the other tray.
4 Click Submit.
Note: You can also change the paper size and type settings using the printer control panel. For more information, see "Setting the paper size and type" on page 98.
Warning—Potential Damage: Paper loaded in the tray should match the paper type name assigned in the printer. The temperature of the fuser varies according to the specified paper type. Printing issues may occur if settings are not properly configured.
Creating a custom name for a paper type
Using the Embedded Web Server
1 Open a Web browser, and then type the printer IP address in the address field.
Notes:
- View the printer IP address on the printer home screen. The IP address appears as four sets of numbers separated by periods, such as 123.123.123.123.
- If you are using a proxy server, then temporarily disable it to load the Web page correctly.
2 Click Settings > Paper Menu > Custom Names.
3 Select a custom name, and then type a custom paper type name.
4 Click Submit.
5 Click Custom Types, and then verify if the new custom paper type name has replaced the custom name.
Using the printer control panel
1 From the home screen, navigate to:

Paper Menu > Custom Names
2 Select a custom name, and then type a custom paper type name.
3 Touch

4 Touch Custom Types, and then verify that the new custom paper type name has replaced the custom name.
Assigning a custom paper type
Using the Embedded Web Server
Assign a custom paper type name to a tray when linking or unlinking trays.
1 Open a Web browser, and then type the printer IP address in the address field.
Notes:
- View the printer IP address on the printer home screen. The IP address appears as four sets of numbers separated by periods, such as 123.123.123.123. - If you are using a proxy server, then temporarily disable it to load the Web page correctly.
2 Click Settings > Paper Menu > Custom Types.
3 Select a custom paper type name, and then select a paper type
Note: Paper is the factory default paper type for all user-defined custom names.
4 Click Submit.
Using the printer control panel
1 From the home screen, navigate to:

Paper Menu > Custom Types
2 Select a custom paper type name, and then select a paper type
Note: Paper is the factory default paper type for all user-defined custom names.
3 Touch

Printing
Printing a document
Printing forms
Use the Forms and Favorites application to quickly and easily access frequently used forms or other information that is regularly printed. Before you can use this application, first set it up on the printer. For more information, see "Setting up Forms and Favorites" on page 96.
1 From the printer home screen, navigate to:
Forms and Favorites > select the form from the list > enter the number of copies > adjust other settings
2 Depending on your printer model, touch


or Submit.
Printing a document
1 From the Paper menu on the printer control panel, set the paper type and size to match the paper loaded.
2 Send the print job:
For Windows users
a With a document open, click File > Print.
b Click Properties, Preferences, Options, or Setup.
c Adjust the settings, if necessary.
d Click OK > Print.
For Macintosh users
a Customize the settings in the Page Setup dialog:
1 With a document open, choose File > Page Setup.
2 Choose a paper size or create a custom size to match the paper loaded.
3 Click OK.
b Customize the settings in the Print dialog:
1 With a document open, choose File > Print.
If necessary, click the disclosure triangle to see more options.
2 From the Print dialog and pop-up menus, adjust the settings if necessary.
Note: To print on a specific paper type, adjust the paper type setting to match the paper loaded, or select the appropriate tray or feeder.
3 Click Print.
Adjusting toner darkness
Using the Embedded Web Server
1 Open a Web browser, and then type the printer IP address in the address field.
Notes:
- View the printer IP address on the printer home screen. The IP address appears as four sets of numbers separated by periods, such as 123.123.123.123.
- If you are using a proxy server, then temporarily disable it to load the Web page correctly.
2 Click Settings > Print Settings > Quality Menu > Toner Darkness.
3 Adjust the setting, and then click Submit.
Using the printer control panel
1 From the home screen, navigate to:

Settings > Print Settings > Quality Menu > Toner Darkness
2 Adjust the setting, and then touch

Printing from a flash drive
Supported flash drives and file types
Notes:
- High-speed USB flash drives must support the full-speed standard. Low-speed USB devices are not supported.
- USB flash drives must support the File Allocation Table (FAT) system. Devices formatted with New Technology File System (NTFS) or any other file system are not supported.
| Recommended flash drives File type | |
| Lexar JumpDrive FireFly (512MB and 1GB)SanDisk Cruzer Micro (512MB and 1GB)Sony Micro Vault Classic (512MB and 1GB) | Documents:pdfxpsImages:dcxgifjpeg or .jpgbmppcx.tiff or .tif.png.fls |
Printing from a flash drive
Notes:
- Before printing an encrypted PDF file, you will be prompted to type the file password from the printer control panel.
- You cannot print files for which you do not have printing permissions.
1 Insert a flash drive into the USB port.
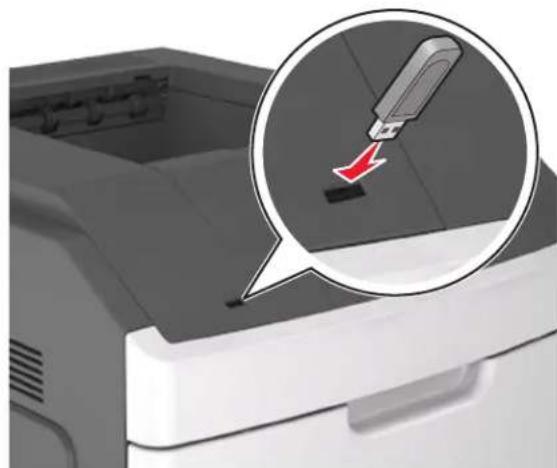
natural_image
Illustration of a printer with a magnified view showing a tip tool interacting with the print (no text or symbols present)Notes:
•A flash drive icon appears on the printer home screen when a flash drive is inserted.
- If you insert the flash drive when the printer requires attention, such as when a jam has occurred, then the printer ignores the flash drive.
- If you insert the flash drive while the printer is processing other print jobs, then Busy appears. After these print jobs are processed, you may need to view the held jobs list to print documents from the flash drive.
Warning—Potential Damage: Do not touch the printer or the flash drive in the area shown while actively printing, reading, or writing from the memory device. Loss of data can occur.
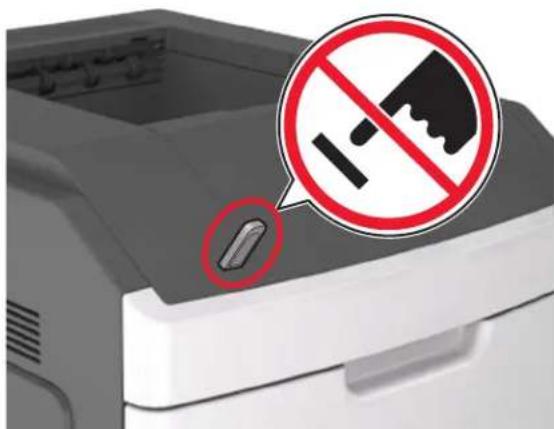
text_image
Image showing a printer with a prohibition symbol indicating no littering, featuring a tool icon and a magnified view of the device.2 From the printer control panel, touch the document you want to print.
3 Touch the arrows to specify the number of copies for printing, and then touch Print.
Notes:
- Do not remove the flash drive from the USB port until the document has finished printing.
- If you leave the flash drive in the printer after leaving the initial USB menu screen, then touch Held Jobs on the home screen to print files from the flash drive.
Printing confidential and other held jobs
Storing print jobs in the printer
1 From the home screen, navigate to:

Security > Confidential Print > select a print job type
| Use To | |
| Max Invalid PIN Limit the number of times | an invalid PIN can be entered.Note:When the limit is reached, the print jobs for that user name and PIN are deleted. |
| Confidential Job Expiration | Hold print jobs in the computer until you enter the PIN from the printer control panel.Note:The PIN is set from the computer. It must be four digits, using the numbers 0–9. |
| Repeat Job Expiration Print and store print | jobs in the printer memory. |
| Verify Job Expiration Print one copy of a print job and hold the remaining copies. It lets you examine if the first copy is satisfactory or not. The print job is automatically deleted from the printer memory when all copies are printed. | |
| Reserve Job Expiration Store print jobs for printing at a later time.Note:The print jobs are held until deleted from the Held Jobs menu. | |
| Notes:Confidential, Verify, Reserve, and Repeat print jobs may be deleted if the printer requires extra memory to process additional held jobs.You can set the printer to store print jobs in the printer memory until you start the print job from the printer control panel.All print jobs that can be initiated by the user at the printer are calledheld jobs. | |
Printing confidential and other held jobs
Note: Confidential and Verify print jobs are automatically deleted from memory after printing. Repeat and Reserve jobs are held in the printer until you delete them.
For Windows users
1 With a document open, click File > Print.
2 Click Properties, Preferences, Options, or Setup.
3 Click Print and Hold.
4 Select the print job type (Confidential, Repeat, Reserve, or Verify), and then assign a user name. For a confidential print job, also enter a four-digit PIN.
5 Click OK or Print.
6 From the printer home screen, release the print job.
- For confidential print jobs, navigate to:
Held jobs > select your user name > Confidential Jobs > enter the PIN > Print
•For other print jobs, navigate to:
Held jobs > select your user name > select the print job > specify the number of copies > Print
For Macintosh users
1 With a document open, choose File > Print.
If necessary, click the disclosure triangle to see more options.
2 From the print options or Copies & Pages pop-up menu, choose Job Routing.
3 Select the print job type (Confidential, Repeat, Reserve, or Verify), and then assign a user name. For a confidential print job, also enter a four-digit PIN.
4 Click OK or Print.
5 From the printer home screen, release the print job.
•For confidential print jobs, navigate to:
Held jobs > select your user name > Confidential Jobs > enter the PIN > Print
•For other print jobs, navigate to:
Held jobs > select your user name > select the print job > specify the number of copies > Print
Printing information pages
Printing a font sample list
1 From the home screen, navigate to:

Reports > Print Fonts
2 Touch PCL Fonts or PostScript Fonts.
Printing a directory list
A directory list shows the resources stored in a flash memory or in the printer hard disk.
From the home screen, navigate to:

Reports > Print Directory
Canceling a print job
Canceling a print job from the printer control panel
1 From the printer control panel, touch Cancel Jobs or press ✗ on the keypad.
2 Touch the print job you want to cancel, and then touch Delete Selected Jobs.
Canceling a print job from the computer
For Windows users
1 Open the printers folder.
In Windows 8
From the Search charm, type run, and then navigate to:
Apps list > Run > type control printers > OK
In Windows 7 or earlier
a Click 📄 or click Start, and then click Run.
b In the Start Search or Run dialog, type control printers.
c Press Enter, or click OK.
2 Double-click the printer icon.
3 Select the print job you want to cancel.
4 Click Delete.
For Macintosh users
1 From the Apple menu, navigate to either of the following:
- System Preferences > Print & Scan > select your printer > Open Print Queue
- System Preferences > Print & Fax > select your printer > Open Print Queue
2 From the printer window, select the print job you want to cancel, and then delete it.
Managing your printer
Finding advanced networking and administrator information
This chapter covers basic administrative support tasks using the Embedded Web Server. For more advanced system support tasks, see the Networking Guide on the Software and Documentation CD or the Embedded Web Server Administrator's Guide at http://support.lexmark.com.
Checking the virtual display
1 Open a Web browser, and then type the printer IP address in the address field.
Notes:
- View the printer IP address on the printer home screen. The IP address appears as four sets of numbers separated by periods, such as 123.123.123.123.
- If you are using a proxy server, then temporarily disable it to load the Web page correctly.
2 Check the virtual display that appears at the top left corner of the screen.
The virtual display works as an actual display would work on a printer control panel.
Configuring supply notifications from the Embedded Web Server
You can determine how you would like to be notified when supplies run nearly low, low, very low, or reach their end-of-life by setting the selectable alerts.
Notes:
- Selectable alerts can be set on the toner cartridge, imaging unit, and maintenance kit.
- All selectable alerts can be set for nearly low, low, and very low supply conditions. Not all selectable alerts can be set for the end-of-life supply condition. E-mail selectable alert is available for all supply conditions.
- The percentage of estimated remaining supply that prompts the alert can be set on some supplies for some supply conditions.
1 Open a Web browser, and then type the printer IP address in the address field.
Notes:
- View the printer IP address on the printer home screen. The IP address appears as four sets of numbers separated by periods, such as 123.123.123.123.
- If you are using a proxy server, then temporarily disable it to load the Web page correctly.
2 Click Settings > Print Settings > Supply Notifications.
3 From the drop-down menu for each supply, select one of the following notification options:
| Notification Description | |
| Off The normal printer behavior for all supplies occurs. | |
| E-mail Only | The printer generates an e-mail when the supply condition is reached. The status of the supply appears on the menus page and status page. |
| Warning | The printer displays the warning message and generates an e-mail about the status of the supply. The printer does not stop when the supply condition is reached. |
| Continuable Stop^1 | The printer stops processing jobs when the supply condition is reached, and the user needs to press a button to continue printing. |
| Non Continuable Stop^1,2 | The printer stops processing jobs when the supply condition is reached. The supply must be replaced to continue printing. |
| ^1 The printer generates an e-mail about the status of the supply when supply notification is enabled. ^2 The printer stops when some supplies become empty to prevent damage. | |
4 Click Submit.
Modifying confidential print settings
Note: This feature is available only in network printers or printers connected to print servers.
1 Open a Web browser, and then type the printer IP address in the address field.
Notes:
- View the printer IP address on the printer home screen. The IP address appears as four sets of numbers separated by periods, such as 123.123.123.123.
- If you are using a proxy server, then temporarily disable it to load the Web page correctly.
2 Click Configuration > Other Settings tab > Security > Confidential Print Setup.
3 Modify the settings:
- Set a maximum number of PIN entry attempts. When a user exceeds that number, all of the jobs for that user are deleted.
- Set an expiration time for confidential print jobs. When a user has not printed the jobs within that time, all of the jobs for that user are deleted.
4 Save the modified settings.
Copying printer settings to other printers
Note: This feature is available only in network printers.
1 Open a Web browser, and then type the printer IP address in the address field.
Notes:
- View the printer IP address on the printer home screen. The IP address appears as four sets of numbers separated by periods, such as 123.123.123.123.
- If you are using a proxy server, then temporarily disable it to load the Web page correctly.
2 Click Copy Printer Settings.
3 To change the language, select a language from the drop-down menu, and then click Click here to submit language.
4 Click Printer Settings.
5 Type the IP addresses of the source and target printers.
Note: If you want to add or remove target printers, then click Add Target IP or Remove Target IP.
6 Click Copy Printer Settings.
Printing a menu settings page
From the home screen, navigate to:

Reports > Menu Settings Page
Printing a network setup page
If the printer is attached to a network, then print a network setup page to verify the network connection. This page also provides important information that aids network printing configuration.
1 From the home screen, navigate to:

Reports > Network Setup Page
2 Check the first section of the network setup page and confirm that the status is Connected.
If the status is Not Connected, then the LAN drop may not be active, or the network cable may be malfunctioning. Consult your system support person for a solution, and then print another network setup page.
Checking the status of parts and supplies
A message appears on the printer display when a replacement supply item is needed or when maintenance is required.
Notes:
•Each gauge displays the estimated life left for the supply or part.
- All page life estimates for supplies assume printing on a single side of letter- or A4-size plain paper.
Checking the status of parts and supplies on the printer control panel
From the home screen, touch Status/Supplies > View Supplies.
Checking the status of parts and supplies from the Embedded Web Server
Note: Make sure the computer and the printer are connected to the same network.
1 Open a Web browser, and then type the printer IP address in the address field.
Notes:
- View the printer IP address on the home screen. The IP address appears as four sets of numbers separated by periods, such as 123.123.123.123.
- If you are using a proxy server, then temporarily disable it to load the Web page correctly.
2 Click Device Status > More Details.
Saving energy
Using Eco-Mode
1 Open a Web browser, and then type the printer IP address in the address field.
Notes:
- View the printer IP address on the printer home screen. The IP address appears as four sets of numbers separated by periods, such as 123.123.123.123.
- If you are using a proxy server, then temporarily disable it to load the Web page correctly.
2 Click Settings > General Settings > Eco-Mode.
3 Select a setting.
| Use To | |
| Off | Use the factory default settings for all settings associated with Eco-Mode.Notes:Settings that were changed when other modes were selected are reset to the factory default settings.Off supports the performance specifications of the printer. |
| Energy Reduce | energy use, especially when the printer is idle.Notes:Printer engine motors do not start until a document is ready to print. You may notice a short delay before the first page is printed.The printer enters Sleep mode after one minute of inactivity.The printer display is turned off when the printer is in Sleep mode.Lights on the staple finisher and other optional finishers are turned off when the printer is in Sleep mode. |
| Energy/Paper | Use all the settings associated with Energy and Paper modes. |
| Plain Paper Enable the automatic two-sided (duplex) printing feature. | |
4 Click Submit.
Reducing printer noise
Enable Quiet mode to reduce printer noise.
1 Open a Web browser, and then type the printer IP address in the address field.
Notes:
- View the printer IP address on the printer home screen. The IP address appears as four sets of numbers separated by periods, such as 123.123.123.123.
- If you are using a proxy server, then temporarily disable it to load the Web page correctly.
2 Click Settings > General Settings > Quiet Mode.
3 Select a setting.
| Use To | |
| On Reduce printer noise. | Notes:•Print jobs process at a reduced speed.•Printer engine motors do not start until a document is ready to print. There is a short delay before the first page is printed.•The alarm control and cartridge alarm sounds are turned off.•The printer ignores the Advance Start command. |
| Off Use factory default settings. | Note:This setting supports the performance specifications of the printer. |
4 Click Submit.
Adjusting Sleep mode
To save energy, decrease the number of minutes before the printer enters Sleep mode. Select from 1 to 120. The factory default setting is 30 minutes.
Using the Embedded Web Server
1 Open a Web browser, and then type the printer IP address in the address field.
Notes:
- View the printer IP address on the printer home screen. The IP address appears as four sets of numbers separated by periods, such as 123.123.123.123.
- If you are using a proxy server, then temporarily disable it to load the Web page correctly.
2 Click Settings > General Settings > Timeouts.
3 In the Sleep Mode field, enter the number of minutes you want for the printer to wait before it enters Sleep Mode.
4 Click Submit.
Using the printer control panel
1 From the home screen, navigate to:

Settings > General Settings > Timeouts > Sleep Mode
2 In the Sleep Mode field, select the number of minutes you want for the printer to wait before it enters Sleep Mode.
3 Touch

Using Hibernate Mode
Hibernate is an ultra-low power operating mode. When operating in Hibernate mode, the printer is essentially off, and all other systems and devices are powered down safely.
Note: The Hibernate and Sleep modes can be scheduled.
Using the Embedded Web Server
1 Open a Web browser, and then type the printer IP address in the address field.
Notes:
- View the printer IP address on the printer home screen. The IP address appears as four sets of numbers separated by periods, such as 123.123.123.123.
- If you are using a proxy server, then temporarily disable it to load the Web page correctly.
2 Click Settings > General Settings > Sleep Button Settings.
3 From the Press Sleep Button or Press and Hold Sleep Button drop-down menu, select Hibernate.
4 Click Submit.
Using the printer control panel
1 From the home screen, navigate to:

Settings > General Settings
2 Touch Press Sleep Button or Press and Hold Sleep Button.
3 Touch Hibernate > √.
Adjusting the brightness of the display
To save energy, or if you are have trouble reading your display, adjust the brightness of the display.
Available settings range from 20–100. The factory default setting is 100.
Using the Embedded Web Server
1 Open a Web browser, and then type the printer IP address in the address field.
Notes:
- View the printer IP address on the home screen. The IP address appears as four sets of numbers separated by periods, such as 123.123.123.123.
- If you are using a proxy server, then temporarily disable it to load the Web page correctly.
2 Click Settings > General Settings.
3 In the Screen Brightness field, enter the brightness percentage you want for the display.
4 Click Submit.
Using the printer control panel
1 From the home screen, navigate to:

Settings > General Settings > Screen Brightness
2 In the Screen Brightness field, enter the brightness percentage you want for the display.
3 Touch

Restoring factory default settings
If you want to keep a list of the current menu settings for reference, then print a menu settings page before restoring the factory default settings. For more information, see "Printing a menu settings page" on page 128.
If you want a more comprehensive method of restoring the printer factory default settings, then perform the Wipe All Settings option. For more information, see "Erasing non-volatile memory" on page 134.
Warning—Potential Damage: Restoring factory defaults returns most printer settings to the original factory default settings. Exceptions include the display language, custom sizes and messages, and network/port menu settings. All downloads stored in the RAM are deleted. Downloads stored in the flash memory or in a printer hard disk are not affected.
From the home screen, navigate to:

Settings > General Settings > Factory Defaults > Restore Now >

Securing the printer
Using the security lock feature
The printer is equipped with a security lock feature. When a lock compatible with most laptop computers is attached, the printer is locked. When locked, the controller board shield and the controller board cannot be removed. Attach a security lock to the printer in the location shown.

natural_image
Exterior view of a white electronic device with a close-up inset showing internal components (no text or symbols visible)Statement of Volatility
Your printer contains various types of memory that can store device and network settings, and user data.
| Type of memory Description | |
| Volatile memory | Your printer uses standard random access memory (RAM) to temporarily buffer user data during simple print jobs. |
| Non-volatile memory Your printer may use two forms of non- | volatile memory:EEPROM and NAND (flash memory). Both types are used to store the operating system, device settings, network information, bookmark settings, and embedded solutions. |
| Hard disk memory Some printers have a hard disk drive insta | led. The printerhard disk is designed for device-specific functionality. This lets the device retain buffered user data from complex print jobs, as well as form data, and font data. |
Erase the content of any installed printer memory in the following circumstances:
•The printer is being decommissioned.
•The printer hard disk is being replaced.
- The printer is being moved to a different department or location.
- The printer is being serviced by someone from outside your organization.
•The printer is being removed from your premises for service.
•The printer is being sold to another organization.
Disposing of a printer hard disk
Note: Some printer models may not have a printer hard disk installed.
In high-security environments, it may be necessary to take additional steps to make sure that confidential data stored in the printer hard disk cannot be accessed when the printer—or its hard disk—is removed from your premises.
- Degaussing—Flushes the hard disk with a magnetic field that erases stored data
- Crushing—Physically compresses the hard disk to break component parts and render them unreadable
- Milling—Physically shreds the hard disk into small metal bits
Note: Most data can be erased electronically, but the only way to guarantee that all data is completely erased is to physically destroy each hard disk where data is stored.
Erasing volatile memory
The volatile memory (RAM) installed in your printer requires a power source to retain information. To erase the buffered data, simply turn off the printer.
Erasing non-volatile memory
Erase individual settings, device and network settings, security settings, and embedded solutions by following these steps:
1 Turn off the printer.
2 Hold down 2 and 6 on the keypad while turning the printer on. Release the buttons only when the screen with the progress bar appears.
The printer performs a power-on sequence, and then the Configuration menu appears. When the printer is fully turned on, a list of functions appears on the printer display instead of the standard home screen icons.
3 Touch Wipe All Settings.
The printer will restart several times during this process.
Note: Wipe All Settings securely removes device settings, solutions, jobs, and passwords from the printer memory.
4 Touch Back > Exit Config Menu.
The printer will perform a power-on reset, and then return to normal operating mode.
Erasing printer hard disk memory
Note: Some printer models may not have a printer hard disk installed.
Configuring Disk Wiping in the printer menus lets you remove residual confidential material left by print jobs by securely overwriting files that have been marked for deletion.
Using the printer control panel
1 Turn off the printer.
2 Hold down 2 and 6 while turning the printer on. Release the buttons only when the screen with the progress bar appears.
The printer performs a power-on sequence, and then the Configuration menu appears. When the printer is fully turned on, a list of functions appears on the printer display.
3 Touch Wipe Disk, and then touch one of the following:
- Wipe disk (fast)—This lets you overwrite the disk with all zeroes in a single pass.
- Wipe disk (secure)—This lets you overwrite the disk with random bit patterns several times, followed by a verification pass. A secure overwrite is compliant with the DoD 5220.22-M standard for securely erasing data from a hard disk. Highly confidential information should be wiped using this method.
4 Touch Yes to proceed with disk wiping.
Notes:
- A status bar will indicate the progress of the disk wiping task.
- Disk wiping can take from several minutes to more than an hour, during which the printer will be unavailable for other user tasks.
5 Touch Back > Exit Config Menu.
The printer will perform a power-on reset, and then return to normal operating mode.
Configuring printer hard disk encryption
Enable hard disk encryption to prevent loss of sensitive data in the event the printer or its hard disk is stolen.
Note: Some printer models may not have a printer hard disk installed.
Using the Embedded Web Server
1 Open a Web browser, and then type the printer IP address in the address field.
Notes:
- View the printer IP address on the printer home screen. The IP address appears as four sets of numbers separated by periods, such as 123.123.123.123.
- If you are using a proxy server, then temporarily disable it to load the Web page correctly.
2 Click Settings > Security > Disk Encryption.
Note: Disk Encryption appears in the Security Menu only when a formatted, non-defective printer hard disk is installed.
3 From the Disk encryption menu, select Enable.
Notes:
- Enabling disk encryption will erase the contents of the printer hard disk.
- Disk encryption can take from several minutes to more than an hour, during which the printer will be unavailable for other user tasks.
4 Click Submit.
Using the printer control panel
1 Turn off the printer.
2 Hold down 2 and 6 while turning the printer on. Release the buttons only when the screen with the progress bar appears.
The printer performs a power-on sequence, and then the Configuration menu appears. When the printer is fully turned on, a list of functions appears on the printer display.
3 Touch Disk Encryption > Enable.
Note: Enabling disk encryption will erase the contents of the printer hard disk.
4 Touch Yes to proceed with disk wiping.
Notes:
- Do not turn off the printer during the encryption process. Doing so may result in loss of data.
- Disk encryption can take from several minutes to more than an hour, during which the printer will be unavailable for other user tasks.
- A status bar will indicate the progress of the disk wiping task. After the disk has been encrypted, the printer will return to the Enable/Disable screen.
5 Touch Back > Exit Config Menu.
The printer will perform a power-on reset, and then return to normal operating mode.
Finding printer security information
In high-security environments, you may need to take additional steps to make sure that confidential data stored in the printer cannot be accessed. For more information, visit the Lexmark security Web page or see the Embedded Web Server Administrator's Guide.
1 Go to http://support.lexmark.com, and then navigate to:
Support & Downloads > Tech Library > Manuals & Guides
2 Type Embedded Web Server in the keyword field, and then click Filter.
3 Click Embedded Web Server to launch the document.
Using MS812de
Learning about the printer
Printer configurations
Basic model
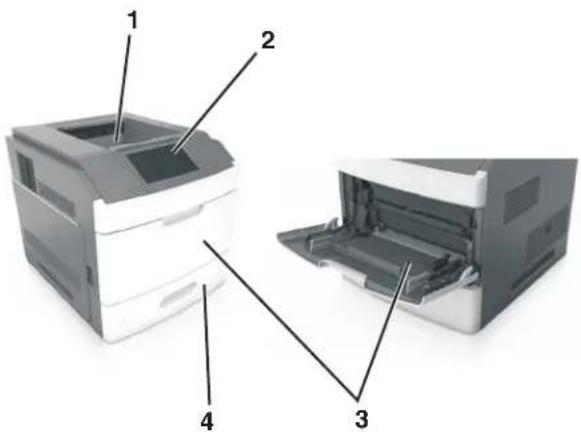
text_image
Diagram of a printer showing labeled parts: front view, side view, and internal structure with numbered annotations.| 1 Standard bin | |
| 2 Printer control panel | |
| 3 Multipurpose feeder | |
| 4 | Standard 550-sheet tray (Tray 1) |
Fully configured model

CAUTION—TIPPING HAZARD: Floor-mounted configurations require additional furniture for stability. You must use either a printer stand or printer base if you are using multiple input options. If you purchased a printer with a similar configuration, then you may need additional furniture. For more information, see www.lexmark.com/multifunctionprinters.
The following illustration shows the maximum number of optional finishers and trays that are supported by the printer. For more information on other configurations, visit www.lexmark.com/multifunctionprinters.
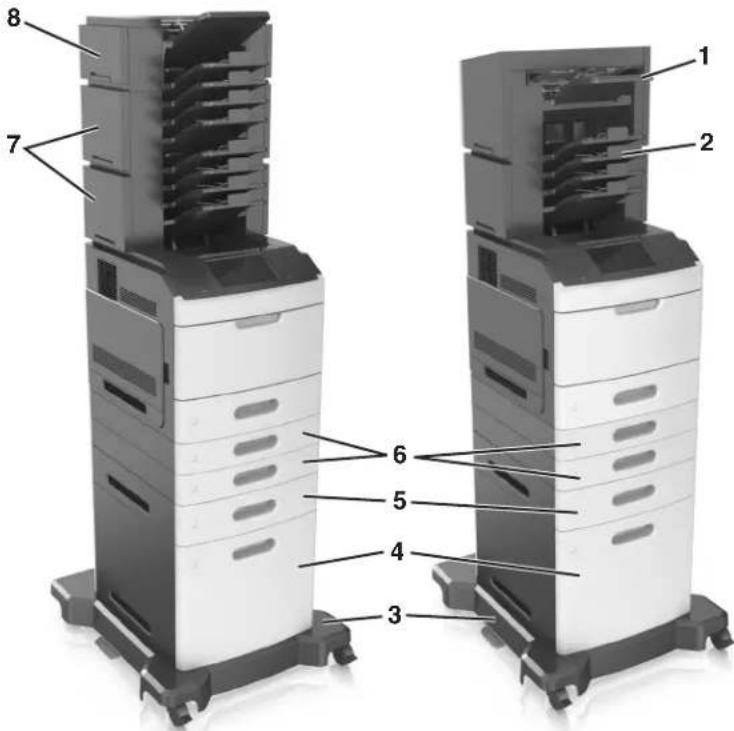
text_image
Diagram of two stacked electronic devices with numbered components, likely illustrating a system or data storage setup.| Hardware option | Alternative hardware option | |
| 1 Staple finisher | •Output expander•4-bin mailbox | |
| 2 4-bin mailbox | •Output expander• High-capacity output expander•Staple finisher | |
| 3 Caster base None | ||
| 4 2100-sheet tray None | ||
| 5 | 550-sheet tray | 250-sheet tray |
| 6 | 250-sheet tray | 550-sheet tray |
| 7 4-bin mailbox Output expander | ||
| 8 | Output expander | 4-bin mailbox |
- In a configuration with three optional finishers, the output expander and mailbox may be installed in any order.
•In a configuration with two optional finishers:
—The staple finisher must always be on top.
— The high-capacity output expander must always be at the bottom.
— The output expander is the only finisher that can be placed on top of the high-capacity output expander.
- When using optional trays:
- Always use a caster base when the printer is configured with a 2100-sheet tray.
- The 2100-sheet tray must always be at the bottom of a configuration.
—A maximum of four optional trays may be configured with the printer. - The optional 250- and 550-sheet trays may be installed in any order.
Using the printer control panel
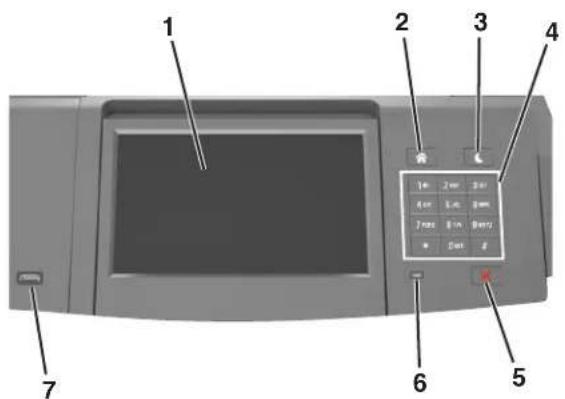
text_image
1 2 3 4 5 6 7| Use the To | ||
| 1 Display | •View the status of the printer.•Set up and operate the printer. | |
| 2 Home button Go to the home screen. | ||
| 3 Sleep button Enable Sleep mode or Hibernate mode.Do the following to wake the printer from Sleep mode:•Press and release the Sleep button.•Touch the screen or press any hard button.•Open a tray, cover, or door.•Send a print job from the computer.•Perform a power-on reset with the main power switch.•Attach a device to a USB port. | ||
| 4 Keypad Enter numbers, letters, or symbols on the printer. | ||
| 5 Stop or Cancel button Stop all printer activity. | ||
| 6 Indicator light Check the status of the printer. | ||
| 7 USB port Connect a USB Bluetooth adapter or a flash drive to the printer.Note: Only the front USB port supports flash drives. | ||
Understanding the colors of the Sleep button and indicator lights
The colors of the Sleep button and indicator lights on the printer control panel signify a certain printer status or condition.
Indicator light color and its corresponding printer status
| Indicator light Printer status | |
| Off The printer is off or in Hibernate mode. | |
| Blinking green The printer is warming up, processing data, or printing. | |
| Solid green The printer is on, but idle. | |
| Blinking red The printer requires user intervention. | |
Sleep button light color and its corresponding printer status
| Sleep button light Printer status | |
| Off The printer is off, idle or in Ready state. | |
| Solid amber The printer is in Sleep mode. | |
| Blinking amber The printer is entering or waking from Hibernate mode. | |
| Blinking amber for 0.1 second, then goes completely off for 1.9 seconds in a slow, pulsing pattern | The printer is in Hibernate mode. |
Understanding the home screen
When the printer is turned on, the display shows a basic screen, referred to as the home screen. Use the home screen buttons and icons to initiate an action.
Note: Your home screen may vary depending on your home screen customization settings, administrative setup, and active embedded solutions.
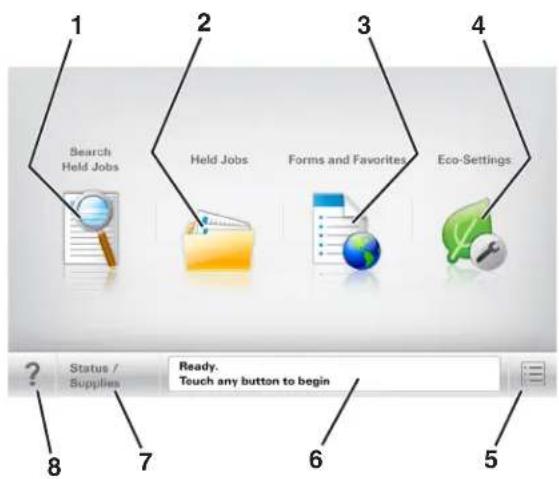
flowchart
graph TD
    A["1 Search Held Jobs"] --> B["2 Held Jobs"]
    B --> C["3 Forms and Favorites"]
    C --> D["4 Eco-Settings"]
    D --> E["5"]
    E --> F["6"]
    F --> G["7 Status / Supplies"]
    G --> H["8 Ready. Touch any button to begin"]
| Touch To | ||
| 1 | Search Held Jobs Search | current held jobs. |
| 2 | Held Jobs Display all current held jobs. | |
| 3 | Forms and Favorites Access frequently used online forms. | |
| 4 | Eco-Settings | Adjust energy consumption, noise, toner and paper usage. |
| 5 | Menus Access printer menus. | Note: These menus are available only when the printer is in Ready state. |
| 6 | Status message bar | Show the current printer status such as Ready or Busy.Show printer conditions such as Imaging unit low or Cartridge Low.Show intervention messages and the instructions on how to clear them. |
| 7 | Status/Supplies | Show a printer warning or error message whenever the printer requires intervention to continue processing.View more information on the printer warning or message, and on how to clear it. |
| 8 | Tips | Open a context-sensitive Help information on the printer control panel. |
Features
| Feature Description | |
Attendance message alert | If an attendance message affects a function, then this icon appears and the red indicator light blinks. |
Warning | If an error condition occurs, then this icon appears. |
| Printer IP addressExample: 123.123.123.123 | The IP address of your network printer is located at the top left corner of the home screen and appears as four sets of numbers separated by periods. You can use the IP address when accessing the Embedded Web Server so you can view and remotely configure printer settings even when you are not physically near the printer. |
Using the touch-screen buttons
Note: Your home screen, icons, and buttons may vary, depending on your home screen customization settings, administrative setup, and active embedded solutions.

text_image
1 2 3 Menus > Paper Menu Default Source Tray 1 Paper Size/ Type Configure MP Cassette Substitute Size Statement/A5 Paper Texture ? Back Submit 7 6 5 4 8| Touch To | ||
1 Left arrow | Scroll to the left. | |
2 Right arrow | Scroll to the right. | |
3 Up arrow | Scroll up. | |
4 Down arrow | Scroll down. | |
| 5 Submit Submit changes made in the printer settings. | ||
| 6 B a c | k Return to the previous screen. | |
7 Home | Return to the home screen. | |
| 8 Tips |  | Open a context-sensitive Help dialog on the printer control panel. |
Other touch-screen buttons
| Touch To | |
Accept  | Save settings. |
Cancel  | •Cancel an action or a selection.•Leave a screen and return to the previous screen without saving changes. |
Increase  | Select a higher value. |
Decrease  | Select a lower value. |
Exit  | Leave the current screen. |
Search  | Search current held jobs. |
Warning  | View a warning or error message. |
Setting up and using the home screen applications
Notes:
- Your home screen may vary, depending on your home screen customization settings, administrative setup, and active embedded applications. Some applications are supported only in select printer models.
- There may be additional solutions and applications available for purchase. For more information, visit www.lexmark.com or inquire at your point of purchase.
Finding the IP address of the computer
Note: Make sure that you know how your printer and computer are connected to the network (Ethernet or wireless).
For Windows users
1 Open the command window.
In Windows 8
From the Search charm, type run, and then navigate to:
Apps list > Run > type cmd > OK
In Windows 7 or earlier
a Click or click Start, and then click Run.
b In the Start Search or Run dialog, type cmd.
c Press Enter, or click OK.
2 Type ipconfig, and then click Go or press Enter.
Note: Type ipconfig /all to see additional useful information.
3 Look for IP Address.
The IP address appears as four sets of numbers separated by periods, such as 123.123.123.123.
For Macintosh users
Note: This is applicable only in Mac OS X version 10.5 or later.
1 From the Apple menu, navigate to:
System Preferences > Network
2 Click Ethernet, Wi-Fi, or AirPort.
3 Click Advanced > TCP/IP.
4 Look for IPv4 Address.
Finding the IP address of the printer
Note: Make sure your printer is connected to a network or to a print server.
You can find the printer IP address:
- From the top left corner of the printer home screen.
- From the TCP/IP section in the Network/Ports menu.
- By printing a network setup page or menu settings page, and then finding the TCP/IP section.
Note: An IP address appears as four sets of numbers separated by periods, such as 123.123.123.123.
Accessing the Embedded Web Server
The Embedded Web Server is the printer Web page that lets you view and remotely configure printer settings even when you are not physically near the printer.
1 Obtain the printer IP address:
•From the printer control panel home screen
•From the TCP/IP section in the Network/Ports menu
- By printing a network setup page or menu settings page, and then finding the TCP/IP section
Note: An IP address appears as four sets of numbers separated by periods, such as 123.123.123.123.
2 Open a Web browser, and then type the printer IP address in the address field.
3 Press Enter.
Note: If you are using a proxy server, then temporarily disable it to load the Web page correctly.
Customizing the home screen
1 Open a Web browser, and then type the printer IP address in the address field.
Note: View the printer IP address on the printer home screen. The IP address appears as four sets of numbers separated by periods, such as 123.123.123.123.
2 Do one or more of the following:
•Show or hide icons of basic printer functions.
a Click Settings > General Settings > Home screen customization.
b Select the check boxes to specify which icons appear on the printer home screen.
Note: If you clear a check box beside an icon, then the icon does not appear on the home screen. c Click Submit.
- Customize the icon for an application. For more information, see “Finding information about the home screen applications” on page 145 or see the documentation that came with the application.
Activating the home screen applications
Finding information about the home screen applications
Your printer comes with preinstalled home screen applications. Before you can use these applications, you must first activate and set up these applications using the Embedded Web Server. For more information on accessing the Embedded Web Server, see “Accessing the Embedded Web Server” on page 95.
For more information on configuring and using the home screen applications, do the following:
1 Go to http://support.lexmark.com, and then do either of the following:
- Click Business Solutions, and then select the name of the application.
- Click Software and Solutions, and then select either of the following:
- Scan to Network—Find information about the Scan to Network application.
- Other Applications—Find information about the other applications.
2 Click the Manuals tab, and then select the document for the home screen application.
Using Background and Idle Screen
| Use To | |
 | Customize the background and idle screen of your printer home screen. |
From the home screen, navigate to:
Change Background > select background to use > Apply
Setting up Forms and Favorites
Note: A later version of this User's Guide may contain a direct link to the Administrator's Guide of this application. To check for updates of this User's Guide, visit http://support.lexmark.com.
| Use To | |
 | Quickly find and print frequently used online forms directly from the printer home screen.Note:The printer must have permission to access the network folder, FTP site, or Web site where the bookmark is stored. From the computer where the bookmark is stored, use sharing, security, and firewall settings to allow the printer at least areadaccess. For help, see the documentation that came with your operating system. |
1 Open a Web browser, and then type the printer IP address in the address field.
Note: View the printer IP address on the printer home screen. The IP address appears as four sets of numbers separated by periods, such as 123.123.123.123.
2 Click Settings > Apps > Apps Management > Forms and Favorites.
3 Click Add, and then customize the settings.
Notes:
• See the mouse-over help beside each field for a description of the setting.
- To make sure the location settings of the bookmark are correct, type the correct IP address of the host computer where the bookmark is located. For more information on obtaining the IP address of the host computer, see "Finding the IP address of the computer" on page 94.
- Make sure the printer has access rights to the folder where the bookmark is located.
4 Click Apply.
To use the application, touch Forms and Favorites on the printer home screen, and then navigate through form categories, or search for forms based on a form number, name, or description.
Understanding Eco-Settings
Use To

Manage energy consumption, noise, toner, and paper usage settings to help reduce the environmental impact of your printer.
Setting up Remote Operator Panel
This application shows the printer control panel on your computer screen and lets you interact with the printer control panel, even when you are not physically near the network printer. From your computer screen, you can view the printer status, release held print jobs, create bookmarks, and do other print-related tasks you might normally perform on the network printer.
1 Open a Web browser, and then type the printer IP address in the address field.
Note: View the printer IP address on the printer home screen. The IP address appears as four sets of numbers separated by periods, such as 123.123.123.123.
2 Click Settings > Remote Operator Panel Settings.
3 Select the Enabled check box, and then customize the settings.
4 Click Submit.
To use the application, click Remote Operator Panel > Launch VNC Applet.
Exporting and importing a configuration
You can export configuration settings into a text file, and then import the file to apply the settings to other printers.
1 Open a Web browser, and then type the printer IP address in the address field.
Note: View the printer IP address on the printer home screen. The IP address appears as four sets of numbers separated by periods, such as 123.123.123.123.
2 To export or import a configuration for one application, do the following:
a Click Settings > Apps > Apps Management.
b From the list of installed applications, click the name of the application you want to configure.
c Click Configure, and then do either of the following:
- To export a configuration to a file, click Export, and then follow the instructions on the computer screen to save the configuration file.
Notes:
- When saving the configuration file, you can type a unique file name or use the default name.
- If a "JVM Out of Memory" error occurs, then repeat the export process until the configuration file is saved.
- To import a configuration from a file, click Import, and then browse to the saved configuration file that was exported from a previously configured printer.
Notes:
- Before importing the configuration file, you can choose to preview it first or load it directly.
- If a timeout occurs and a blank screen appears, then refresh the Web browser, and then click Apply.
3 To export or import a configuration for multiple applications, do the following:
a Click Settings > Import/Export.
b Do either of the following:
- To export a configuration file, click Export Embedded Solutions Settings File, and then follow the instructions on the computer screen to save the configuration file.
•To import a configuration file, do the following:
1 Click Import Embedded Solutions Settings File > Choose File, and then browse to the saved configuration file that was exported from a previously configured printer.
2 Click Submit.
Loading paper and specialty media
The selection and handling of paper and specialty media can affect how reliably documents print. For more information, see “Avoiding jams” on page 270 and “Storing paper” on page 191.
Setting the paper size and type
From the home screen navigate to:

Paper Menu > Paper Size/Type > select a tray > select a paper size or type > Submit
Notes:
- The paper size is automatically set according to the position of the paper guides in each tray except the multipurpose feeder.
- The paper size for the multipurpose feeder must be set manually from the Paper Size menu.
- The paper type must be set manually for all trays that do not contain plain paper.
Configuring Universal paper settings
Universal paper size is a user-defined setting that lets you print on paper sizes that are not preset in the printer menus.
Notes:
- The smallest supported Universal size is 70 x 127 mm (2.76 x 5 inches) for one-sided printing and 105 x 148 mm (4.13 x 5.83 inches) for two-sided (duplex) printing.
- The largest supported Universal size is 216 x 356 mm (8.5 x 14 inches) for one-sided and two-sided printing.
- When printing on paper less than 210 mm (8.3 inches) wide, the printer may print at a reduced speed after a period of time to ensure the best print performance.
- If you regularly print large jobs on narrow paper, then you may use the MS710 Series printer models, which print batches of 10 or more pages of narrow paper at a faster speed. For more information on the MS710 Series printer models, contact your Lexmark sales representative.
1 From the home screen, navigate to:

Paper Menu > Universal Setup > Units of Measure > select a unit of measure
2 Touch Portrait Width or Portrait Height.
3 Select the width or height, and then touch Submit.
Loading the 250- or 550-sheet tray

CAUTION—POTENTIAL INJURY: To reduce the risk of equipment instability, load each tray separately. Keep all other trays closed until needed.
1 Pull out the tray.
Notes:
- When loading folio-, legal-, or Oficio-size paper, lift the tray slightly and then pull it out completely.
- Do not remove trays while a job prints or while Busy appears on the display. Doing so may cause a jam.
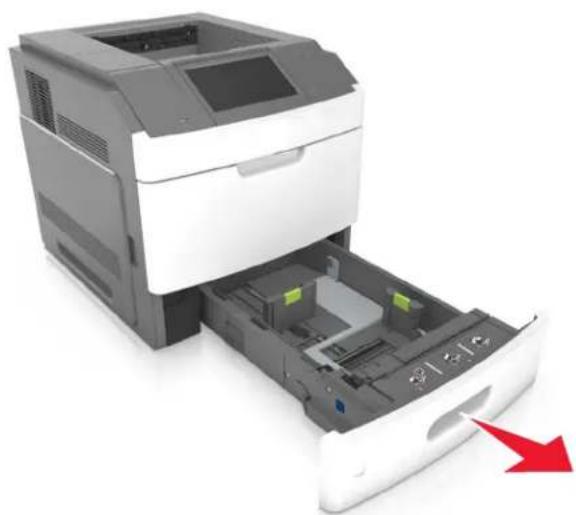
natural_image
Exterior view of a white and gray printer with a red arrow pointing to its side panel (no text or symbols visible)2 Squeeze and slide the width guide to the correct position for the size of the paper being loaded until it clicks into place.

text_image
Diagram of a printer drawer with labeled parts and an inset magnified view showing a green component being inserted.Note: Use the paper size indicators at the bottom of the tray to help position the guides.

natural_image
Interior view of a white plastic drawer with a magnified inset showing internal components (no text or symbols visible)3 Unlock the length guide, and then squeeze and slide the guide to the correct position for the size of the paper being loaded.

text_image
Diagram of a printer drawer with numbered annotations highlighting internal components and green areas, likely illustrating a printing or assembly process.Notes:
- Lock the length guide for all paper sizes.
- Use the paper size indicators at the bottom of the tray to help position the guides.
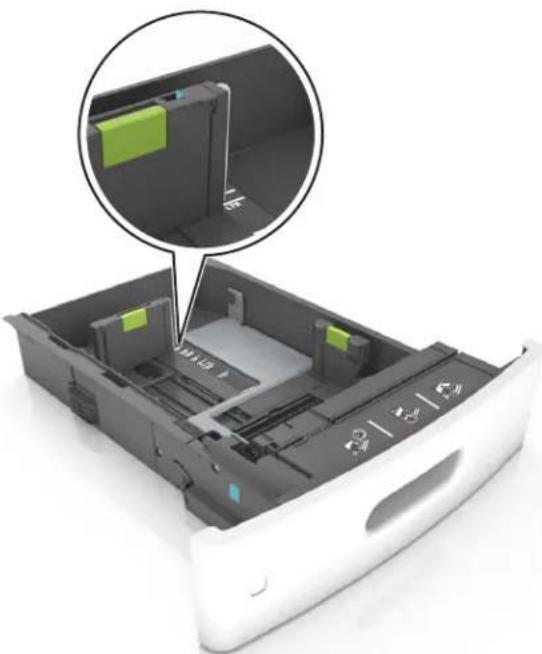
natural_image
3D rendering of a white electronic device drawer with internal compartments and a magnified inset showing a green-labeled component (no text or symbols visible)4 Flex the sheets back and forth to loosen them, and then fan them. Do not fold or crease the paper. Straighten the edges on a level surface.
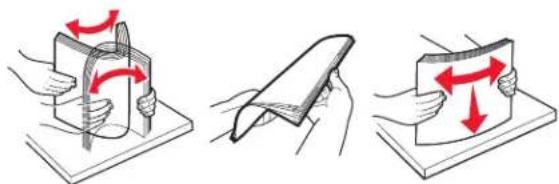
text_image
Diagram illustrating three-step folding or retraction process with red arrows indicating direction of movement5 Load the paper stack with the printable side facedown.
Note: Make sure the paper or envelope is loaded properly.
- There are different ways of loading letterhead depending on whether an optional staple finisher is installed or not.
Without an optional staple finisher With an optional staple finisher

text_image
ABCOne-sided printing

natural_image
3D rendering of a white paper feed organizer with black plastic casing and green labels (no readable text or symbols)One-sided printing
Without an optional staple finisher With an optional staple finisher

natural_image
White electronic device with labeled internal components (no readable text or symbols)Two-sided printing
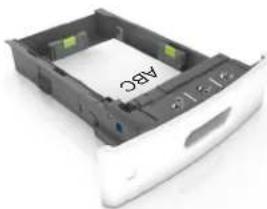
natural_image
White and black plastic drawer with a labeled 'AAG' on the side (no other text or symbols visible)Two-sided printing
- If you are loading prepunched paper for use with the staple finisher, then make sure the holes on the long edge of the paper are on the right side of the tray.
| One-sided printing | Two-sided printing |
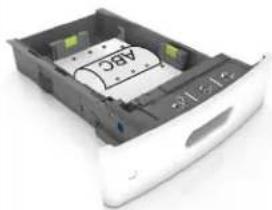 | 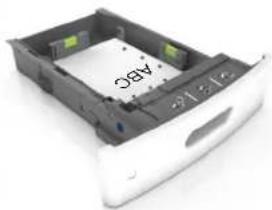 |
Note: If the holes on the long edge of the paper are on the left side of the tray, then a jam may occur.
- Do not slide the paper into the tray. Load paper as shown in the illustration.

natural_image
3D illustration of a white electronic device with a red downward arrow indicating compression or reduction, no text or symbols present.- If you are loading envelopes, then make sure that the flap side is facing up and the envelopes are on the left side of the tray.
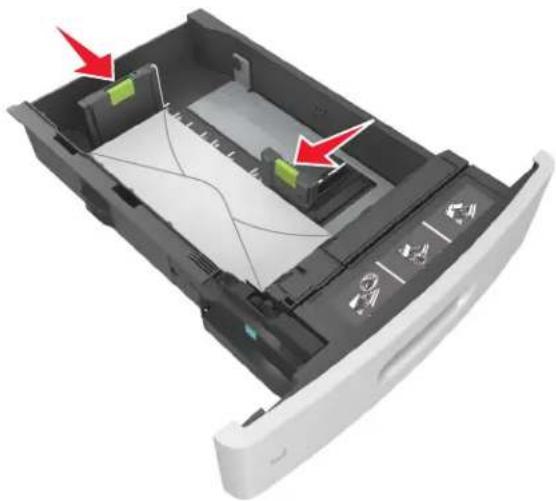
natural_image
Interior view of a white paper feeding drawer with green components and red arrows indicating flow or movement (no text or symbols)• Make sure the paper is below the solid line, which is the maximum paper fill indicator.

natural_image
3D rendering of a printer drawer with a circular annotation highlighting a traffic sign (no text or symbols on the diagram itself)Warning—Potential Damage: Overfilling the tray can cause paper jams.
- When using card stock, labels, or other types of specialty media, make sure the paper is below the dashed line, which is the alternate paper fill indicator.

natural_image
Exterior view of a white electronic device drawer with a circular annotation highlighting a road ahead (no text or symbols on the device itself)6 For custom- or Universal-size paper, adjust the paper guides to lightly touch the sides of the stack, and then lock the length guide.
7 Insert the tray.

natural_image
Exterior view of a printer drawer with a paper feeding into the holder, showing internal components and a red arrow pointing to the paper (no text or symbols visible)8 From the printer control panel, set the paper size and paper type in the Paper menu to match the paper loaded in the tray.
Note: Set the correct paper size and type to avoid paper jams and print quality problems.
Loading the 2100-sheet tray

CAUTION—POTENTIAL INJURY: To reduce the risk of equipment instability, load each tray separately. Keep all other trays closed until needed.
1 Pull out the tray.
2 Adjust the width and length guides.
Loading A5-size paper
a Pull up and slide the width guide to the position for A5.

text_image
Diagram showing two views of a server rack with labeled components and red arrows indicating movement or force.b Squeeze and slide the length guide to the position for A5 until it clicks into place.

natural_image
Interior view of a server rack with highlighted internal components and two magnified views (no text or symbols)c Remove the A5 length guide from its holder.

natural_image
3D mechanical assembly diagram showing two stages of a vertical assembly with green structural elements and red directional arrows (no text or symbols)d Insert the A5 length guide into its designated slot.
Note: Press the A5 length guide until it clicks into place.
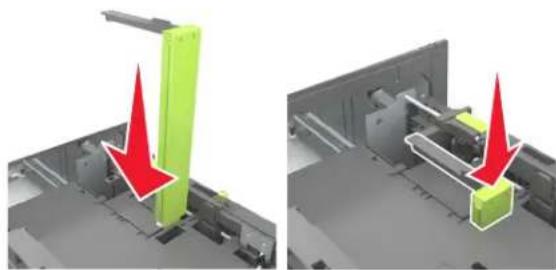
natural_image
Two 3D mechanical assembly diagrams showing green and red directional arrows indicating movement or force (no text or symbols)Loading A4-, letter-, legal-, oficio-, and folio-size paper
a Pull up and slide the width guide to the correct position for the size of the paper being loaded.

text_image
Diagram showing two views of a server rack with labeled components and directional arrows indicating movement or assembly.b If the A5 length guide is still attached to the length guide, then remove it from its place. If the A5 length guide is not attached, then proceed to step d.
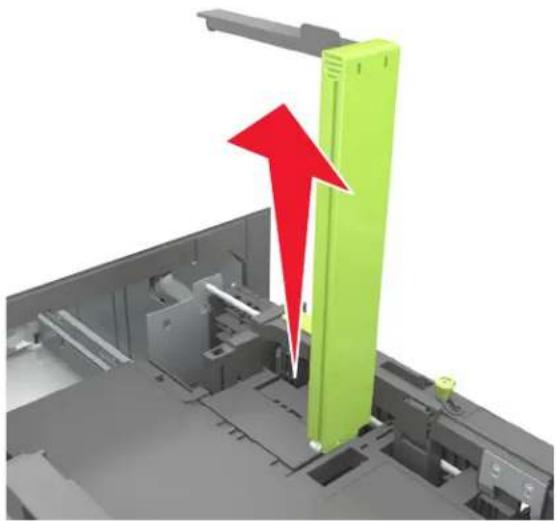
natural_image
3D diagram of a device with a green vertical panel and red arrow indicating compression or disassembly (no text or symbols)c Put the A5 length guide in its holder.

text_image
Technical diagram showing two mechanical assembly steps with red arrows indicating motion or force directions, labeled ① and ②.d Squeeze the length guide and slide it to the correct position for the size of the paper being loaded until it clicks into place.
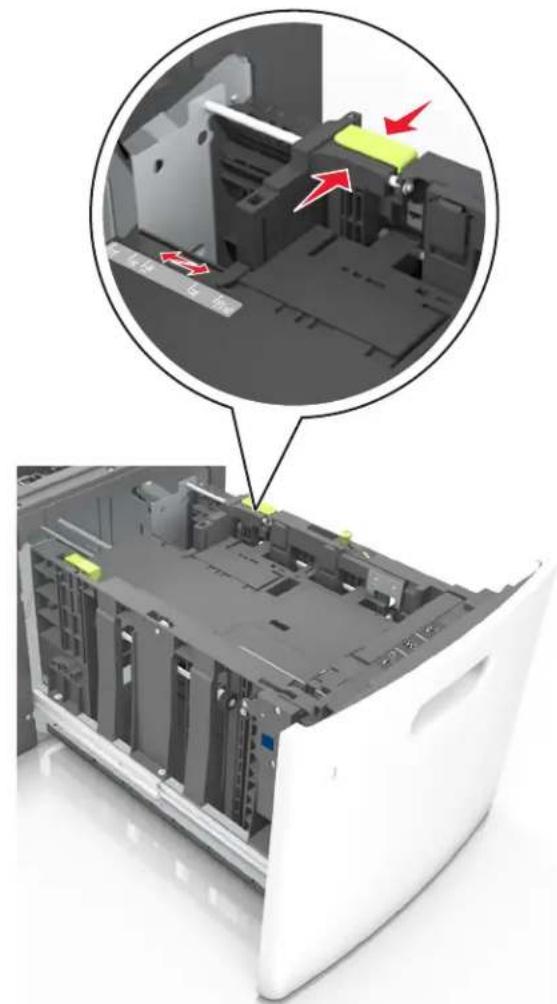
natural_image
Interior view of a computer tower showing internal components and a magnified view of the device (no text or symbols visible)3 Flex sheets of paper back and forth to loosen them, and then fan them. Do not fold or crease the paper. Straighten the edges on a level surface.

natural_image
Three-step illustration showing a folding or rolling process with red arrows indicating direction (no text or symbols)4 Load the paper stack with the printable side facedown.
Note: Make sure the paper is loaded properly.
- There are different ways of loading letterhead depending on whether an optional staple finisher is installed or not.
Without an optional staple finisher With an optional staple finisher
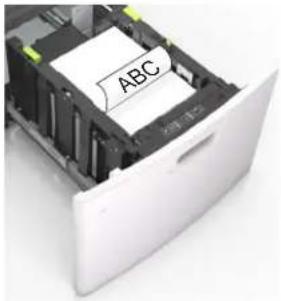
text_image
ABC 2018One-sided printing
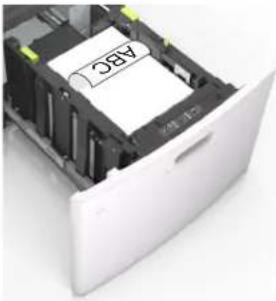
natural_image
3D rendering of a white electronic device with a paper lid labeled 'ABC' inserted, showing internal components (no readable text beyond label)One-sided printing
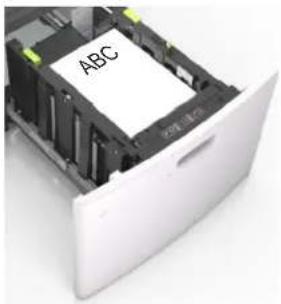
text_image
ABCTwo-sided printing
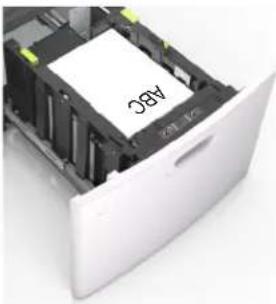
natural_image
White electronic device with a paper label showing 'ABC' on its side, no readable text or symbols beyond the label.Two-sided printing
- If you are loading prepunched paper for use with the staple finisher, then make sure the holes on the long edge of the paper are on the right side of the tray.
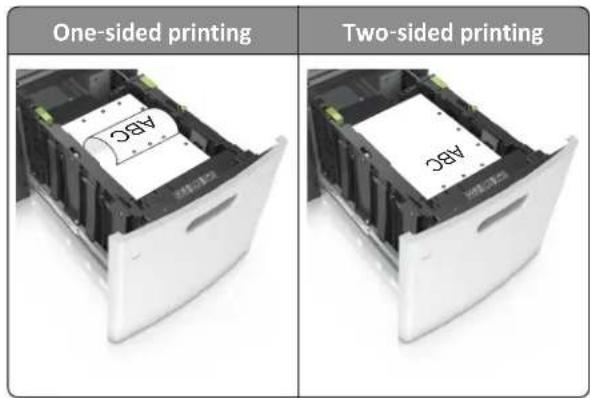
text_image
One-sided printing Two-sided printing ABC ABCNote: If the holes on the long edge of the paper are on the left side of the tray, then a jam may occur.
- Make sure the paper is below the maximum paper fill indicator.
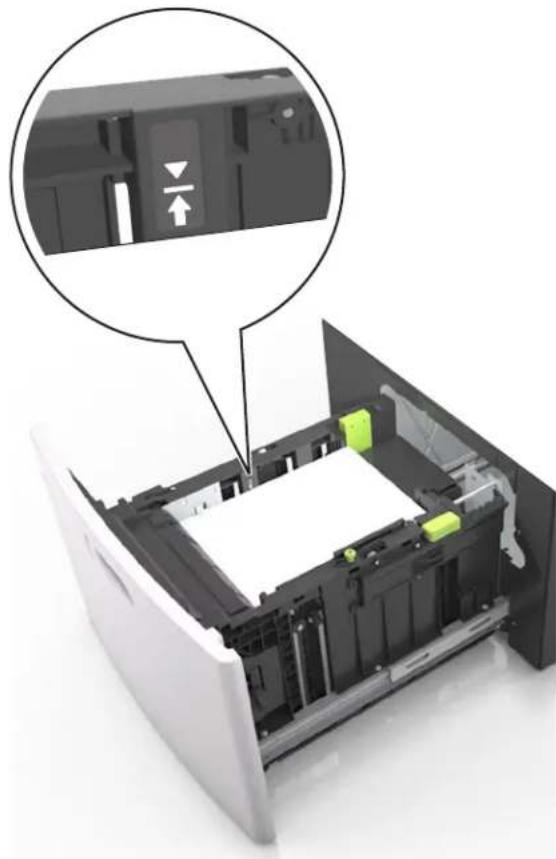
natural_image
Interior view of a computer drive bay with a highlighted internal component and directional arrow (no text or symbols)Warning—Potential Damage: Overfilling the tray can cause paper jams.
5 Insert the tray.
Note: Press the paper stack down while inserting the tray.
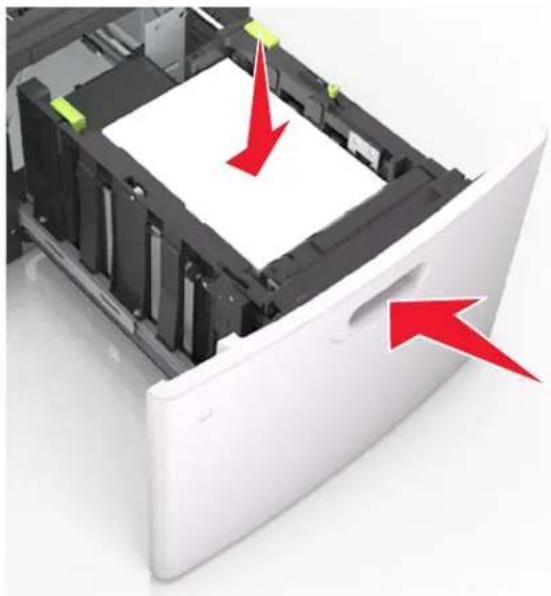
natural_image
3D rendering of a white electronic device with black casing and red arrows pointing to internal components (no text or symbols)6 From the printer control panel, set the paper size and type in the Paper menu to match the paper loaded.
Note: Set the correct paper size and type to avoid paper jams and print quality problems.
Loading the multipurpose feeder
1 Pull down the multipurpose feeder door.
Note: Do not load or close the multipurpose feeder while a job is printing.
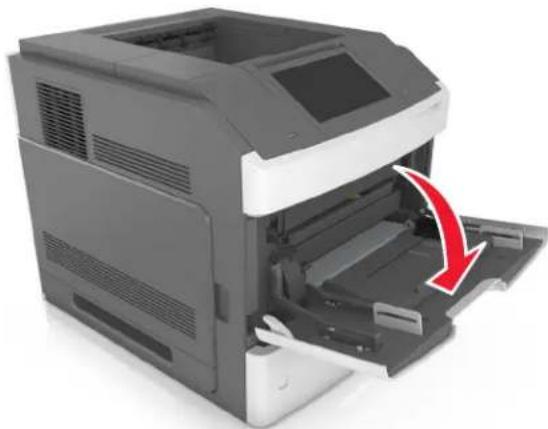
natural_image
3D rendering of a printer with a red arrow indicating compression or disassembly (no text or symbols visible)2 Using the handle, pull the multipurpose feeder extender.
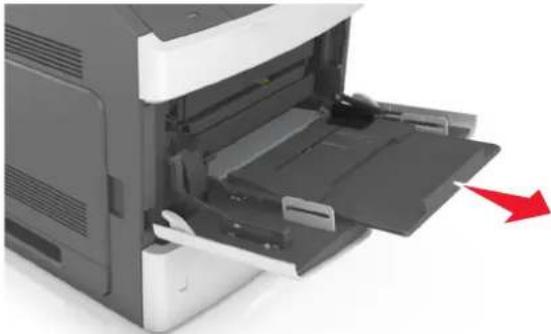
natural_image
Exterior view of a printer with open lid and paper feed, showing internal structure and a red arrow indicating action (no text or symbols)Note: Guide the extender gently so that the multipurpose feeder is fully extended and open.
3 Slide the width guide to the correct position for the size of the paper being loaded.
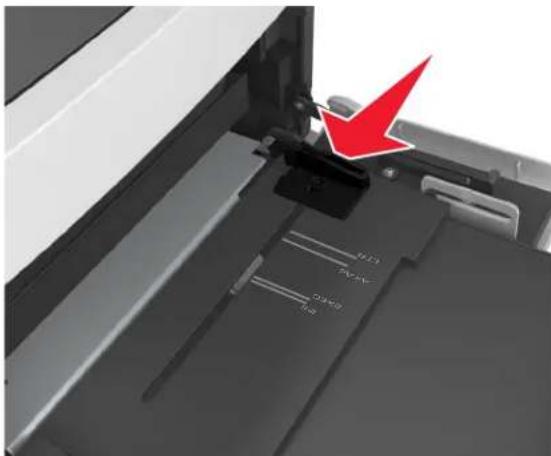
text_image
Diagram showing a printer or printer with labeled parts and a red arrow pointing to a component, indicating a specific part.Note: Use the paper size indicators on the bottom of tray to help position the guides.
4 Prepare the paper or specialty media for loading.
- Flex sheets of paper back and forth to loosen them, and then fan them. Do not fold or crease the paper. Straighten the edges on a level surface.
- Hold transparencies by the edges, and then fan them. Straighten the edges on a level surface.
Note: Avoid touching the printable side of the transparencies. Be careful not to scratch them.
- Flex the stack of envelopes back and forth to loosen them, and then fan them. Straighten the edges on a level surface.
5 Load the paper or specialty media.
Note: Slide the stack gently into the multipurpose feeder until it comes to a stop.
- Load only one size and type of paper or specialty media at a time.
• Make sure the paper fits loosely in the multipurpose feeder, lies flat and is not bent or wrinkled.
- There are different ways of loading letterhead depending on whether an optional staple finisher is installed or not.
Without an optional staple finisher With an optional staple finisher

text_image
ABCOne-sided printing

natural_image
Close-up of a printer's internal structure with a paper labeled 'ABC' inserted (no additional text or symbols visible)One-sided printing
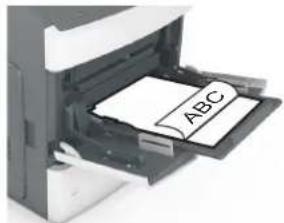
text_image
ABCTwo-sided printing
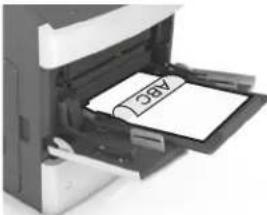
natural_image
Close-up of a printer's open door with a paper labeled 'A8C' (no other text or symbols visible)Two-sided printing
- If you are loading prepunched paper for use with the staple finisher, then make sure the holes on the long edge of the paper are on the right side of the tray.

text_image
One-sided printing Two-sided printing ABC ABCNote: If the holes on the long edge of the paper are on the left side of the tray, then a jam may occur.
- Load envelopes with the flap side down and on the left of the multipurpose feeder.

natural_image
Close-up of a printer's internal structure showing paper feed and paper sheet being inserted (no text or symbols visible)Warning—Potential Damage: Never use envelopes with stamps, clasps, snaps, windows, coated linings, or self-stick adhesives. These envelopes may severely damage the printer.
•Make sure the paper or specialty media is below the maximum paper fill indicator.
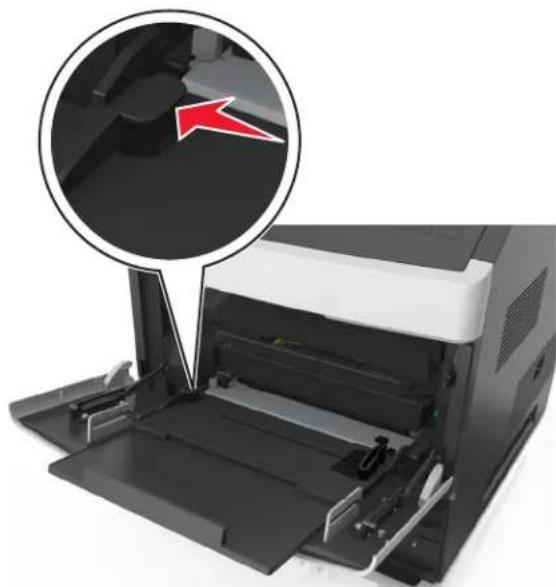
natural_image
Close-up of a printer's front panel with a magnified inset showing a red arrow pointing to the paper edge (no text or symbols visible)Warning—Potential Damage: Overfilling the feeder can cause paper jams.
6 For custom- or Universal-size paper, adjust the width guides to lightly touch the sides of the stack.
7 From the printer control panel, set the paper size and type in the Paper menu to match the paper loaded in the tray.
Note: Set the correct paper size and type to avoid paper jams and print quality problems.
Linking and unlinking trays
Linking and unlinking trays
1 Open a Web browser, and then type the printer IP address in the address field.
Notes:
- View the printer IP address on the printer home screen. The IP address appears as four sets of numbers separated by periods, such as 123.123.123.123.
- If you are using a proxy server, then temporarily disable it to load the Web page correctly.
2 Click Settings > Paper Menu.
3 Change the paper size and type settings for the trays you are linking.
- To link trays, make sure the paper size and type for the tray match that of the other tray.
- To unlink trays, make sure the paper size or type for the tray does not match that of the other tray.
4 Click Submit.
Note: You can also change the paper size and type settings using the printer control panel. For more information, see "Setting the paper size and type" on page 148.
Warning—Potential Damage: Paper loaded in the tray should match the paper type name assigned in the printer. The temperature of the fuser varies according to the specified paper type. Printing issues may occur if settings are not properly configured.
Creating a custom name for a paper type
Using the Embedded Web Server
1 Open a Web browser, and then type the printer IP address in the address field.
Notes:
- View the printer IP address on the printer home screen. The IP address appears as four sets of numbers separated by periods, such as 123.123.123.123.
- If you are using a proxy server, then temporarily disable it to load the Web page correctly.
2 Click Settings > Paper Menu > Custom Names.
3 Select a custom name, and then type a custom paper type name.
4 Click Submit.
5 Click Custom Types, and then verify if the new custom paper type name has replaced the custom name.
Using the printer control panel
1 From the home screen, navigate to:

Paper Menu > Custom Names
2 Select a custom name, and then type a custom paper type name.
3 Touch Submit.
4 Touch Custom Types, and then verify if the new custom paper type name has replaced the custom name.
Assigning a custom paper type
Using the Embedded Web Server
Assign a custom paper type name to a tray when linking or unlinking trays.
1 Open a Web browser, and then type the printer IP address in the address field.
Notes:
- View the printer IP address on the printer home screen. The IP address appears as four sets of numbers separated by periods, such as 123.123.123.123.
- If you are using a proxy server, then temporarily disable it to load the Web page correctly.
2 Click Settings > Paper Menu > Custom Types.
3 Select a custom paper type name, and then select a paper type.
Note: Paper is the factory default paper type for all user-defined custom names.
4 Click Submit.
Using the printer control panel
1 From the home screen, navigate to:

Paper Menu > Custom Types
2 Select a custom paper type name, and then select a paper type.
Note: Paper is the factory default paper type for all user-defined custom names.
3 Touch Submit.
Printing
Printing a document
Printing forms
Use the Forms and Favorites application to quickly and easily access frequently used forms or other information that is regularly printed. Before you can use this application, first set it up on the printer. For more information, see “Setting up Forms and Favorites” on page 146.
1 From the printer home screen, navigate to:
Forms and Favorites > select the form from the list > enter the number of copies > adjust other settings
2 Depending on your printer model, touch 📄, √, or Submit.

Printing a document
1 From the printer control panel, set the paper type and size to match the paper loaded.
2 Send the print job:
For Windows users
a With a document open, click File > Print.
b Click Properties, Preferences, Options, or Setup.
c Adjust the settings, if necessary.
d Click OK > Print.
For Macintosh users
a Customize the settings in the Page Setup dialog:
1 With a document open, choose File > Page Setup.
2 Choose a paper size or create a custom size to match the paper loaded.
3 Click OK.
b Customize the settings in the Print dialog:
1 With a document open, choose File > Print.
If necessary, click the disclosure triangle to see more options.
2 From the print options pop-up menus, adjust the settings, if necessary.
Note: To print on a specific paper type, adjust the paper type setting to match the paper loaded, or select the appropriate tray or feeder.
3 Click Print.
Adjusting toner darkness
1 Open a Web browser, and then type the printer IP address in the address field.
Notes:
- View the printer IP address on the printer home screen. The IP address appears as four sets of numbers separated by periods, such as 123.123.123.123.
- If you are using a proxy server, then temporarily disable it to load the Web page correctly.
2 Click Settings > Print Settings > Quality Menu > Toner Darkness.
3 Adjust the toner darkness, and then click Submit.
Using the printer control panel
1 From the home screen, navigate to:

Settings > Print Settings > Quality Menu > Toner Darkness
2 Adjust the setting, and then touch Submit.
Printing from a flash drive
Supported flash drives and file types
Notes:
- High-speed USB flash drives must support the full-speed standard. Low-speed USB devices are not supported.
- USB flash drives must support the File Allocation Table (FAT) system. Devices formatted with New Technology File System (NTFS) or any other file system are not supported.
| Recommended flash drives File type | |
| Lexar JumpDrive FireFly (512MB and 1GB)SanDisk Cruzer Micro (512MB and 1GB)Sony Micro Vault Classic (512MB and 1GB) | Documents:pdfxpsImages:dcxgifjpeg or .jpgbmppcx.tiff or .tif.png.fls |
Printing from a flash drive
Notes:
- Before printing an encrypted PDF file, you will be prompted to type the file password from the printer control panel.
- You cannot print files for which you do not have printing permissions.
1 Insert a flash drive into the USB port.

natural_image
Illustration of a printer with a magnified view showing a tip tool interacting with the print (no text or symbols present)Notes:
- A flash drive icon appears on the printer home screen when a flash drive is inserted.
- If you insert the flash drive when the printer requires attention, such as when a jam has occurred, then the printer ignores the flash drive.
- If you insert the flash drive while the printer is processing other print jobs, then Busy appears. After these print jobs are processed, you may need to view the held jobs list to print documents from the flash drive.
Warning—Potential Damage: Do not touch the USB cable, any wireless network adapter, any connector, the memory device, or the printer in the areas shown while actively printing, reading, or writing from the memory device. Loss of data can occur.

text_image
Image showing a printer with a prohibition symbol indicating no smoking or anti-smoking, featuring a tool icon and a red circle highlighting a specific device.2 From the printer control panel, touch the document you want to print.
3 Touch the arrows to specify the number of copies for printing, and then touch Print.
Notes:
- Do not remove the flash drive from the USB port until the document has finished printing.
- If you leave the flash drive in the printer after leaving the initial USB menu screen, then touch Held Jobs on the home screen to print files from the flash drive.
Printing confidential and other held jobs
Storing print jobs in the printer
1 From the printer control panel, navigate to:

Security > Confidential Print > select the print job type
| Use To | |
| Max Invalid PIN Limit the number of times | as an invalid PIN can be entered.Note:When the limit is reached, the print jobs for that user name and PIN are deleted. |
| Confidential Job Expiration Hold print jobs | bs in the computer until you enter the PIN from the printer control panel.Note:The PIN is set from the computer. It must be four digits, using the numbers 1–9. |
| Repeat Job Expiration Print and store print jobs in the printer memory. | |
| Verify Job Expiration Print one copy of a print job and hold the remaining copies. It allows you to examine if the first copy is satisfactory. The print job is automatically deleted from the printer memory when all copies are printed. | |
| Reserve Job Expiration Store print jobs for printing at a later time.Note:The print jobs are held until deleted from the Held Jobs menu. | |
| Notes:Confidential, Verify, Reserve, and Repeat print jobs may be deleted if the printer requires extra memory to process additional held jobs.You can set the printer to store print jobs in the printer memory until you start the print job from the printer control panel.All print jobs that can be initiated by the user at the printer are calledheld jobs. | |
2 Touch Submit.
Printing confidential and other held jobs
Note: Confidential and Verify print jobs are automatically deleted from memory after printing. Repeat and Reserve jobs are held in the printer until you delete them.
For Windows users
1 With a document open, click File > Print.
2 Click Properties, Preferences, Options, or Setup.
3 Click Print and Hold.
4 Select the print job type (Confidential, Repeat, Reserve, or Verify), and then assign a user name. For a confidential print job, also enter a four-digit PIN.
5 Click OK or Print.
6 From the printer home screen, release the print job.
•For confidential print jobs, navigate to:
Held jobs > select your user name > Confidential Jobs > enter the PIN > select the print job > specify the number of copies > Print
•For other print jobs, navigate to:
Held jobs > select your user name > select the print job > specify the number of copies > Print
For Macintosh users
1 With a document open, choose File > Print.
If necessary, click the disclosure triangle to see more options.
2 From the print options or Copies & Pages pop-up menu, choose Job Routing.
3 Select the print job type (Confidential, Repeat, Reserve, or Verify), and then assign a user name. For a confidential print job, also enter a four-digit PIN.
4 Click OK or Print.
5 From the printer home screen, release the print job.
•For confidential print jobs, navigate to:
Held jobs > select your user name > Confidential Jobs > enter the PIN > select the print job > specify the number of copies > Print
•For other print jobs, navigate to:
Held jobs > select your user name > select the print job > specify the number of copies > Print
Printing information pages
Printing a font sample list
1 From the home screen, navigate to:

Reports > Print Fonts
2 Touch PCL Fonts or PostScript Fonts.
Printing a directory list
A directory list shows the resources stored in a flash memory or in the printer hard disk.
From the home screen, navigate to:

Reports > Print Directory
Canceling a print job
Canceling a print job from the printer control panel
1 Touch Cancel Jobs on the printer control panel, or press ✗ on the keypad.
2 Touch the print job you want to cancel, and then touch Delete Selected Jobs.
Canceling a print job from the computer
For Windows users
1 Open the printers folder.
In Windows 8
From the Search charm, type Run, and then navigate to:
Apps list > Run > type control printers > OK
In Windows 7 or earlier
a Click 📄, or click Start and then click Run.
b In the Start Search or Run dialog, type control printers.
c Press Enter, or click OK.
2 Double-click the printer icon.
3 Select the print job you want to cancel.
4 Click Delete.
For Macintosh users
1 From the Apple menu, navigate to either of the following:
- System Preferences > Print & Scan > select your printer > Open Print Queue
- System Preferences > Print & Fax > select your printer > Open Print Queue
2 From the printer window, select the print job you want to cancel, and then delete it.
Managing your printer
Finding advanced networking and administrator information
This chapter covers basic administrative support tasks using the Embedded Web Server. For more advanced system support tasks, see the Networking Guide on the Software and Documentation CD and the Embedded Web Server Administrator's Guide on the Lexmark Web site at http://support.lexmark.com.
Checking the virtual display
1 Open a Web browser, and then type the printer IP address in the address field.
Notes:
- View the printer IP address on the printer home screen. The IP address appears as four sets of numbers separated by periods, such as 123.123.123.123.
- If you are using a proxy server, then temporarily disable it to load the Web page correctly.
2 Check the virtual display that appears in the top left corner of the screen.
The virtual display works as an actual display would work on a printer control panel.
Configuring supply notifications from the Embedded Web Server
You can determine how you would like to be notified when supplies run nearly low, low, very low, or reach their end-of-life by setting the selectable alerts.
Notes:
- Selectable alerts can be set on the toner cartridge, imaging unit, and maintenance kit.
- All selectable alerts can be set for nearly low, low, and very low supply conditions. Not all selectable alerts can be set for the end-of-life supply condition. E-mail selectable alert is available for all supply conditions.
- The percentage of estimated remaining supply that prompts the alert can be set on some supplies for some supply conditions.
1 Open a Web browser, and then type the printer IP address in the address field.
Notes:
- View the printer IP address in the TCP/IP section in the Network/Ports menu. The IP address appears as four sets of numbers separated by periods, such as 123.123.123.123.
- If you are using a proxy server, then temporarily disable it to load the Web page correctly.
2 Click Settings > Print Settings > Supply Notifications.
3 From the drop-down menu for each supply, select one of the following notification options:
| Notification Description | |
| Off The normal printer beh | avior for all supplies occurs. |
| E-mail Only | The printer generates an e-mail when the supply condition is reached. The status of the supply will appear on the menus page and status page. |
| Warning The printer displays the warning message and generates an email about the status of the supply. The printer does not stop when the supply condition is reached. | |
| Continuable Stop^1 | The printer stops processing jobs when the supply condition is reached, and the user needs to press a button to continue printing. |
| Non Continuable Stop^1,2 | The printer stops when the supply condition is reached. The supply must be replaced to continue printing. |
| ^1 The printer generates an e-mail about the status of the supply when supply notification is enabled. ^2 The printer stops when some supplies become empty to prevent damage. | |
4 Click Submit.
Modifying confidential print settings
Note: This feature is available only in network printers or printers connected to print servers.
1 Open a Web browser, and then type the printer IP address in the address field.
Notes:
- View the printer IP address on the printer home screen. The IP address appears as four sets of numbers separated by periods, such as 123.123.123.123.
- If you are using a proxy server, then temporarily disable it to load the Web page correctly.
2 Click Configuration > Other Settings tab > Security > Confidential Print Setup.
3 Modify the settings:
- Set a maximum number of PIN entry attempts. When a user exceeds a specific number of PIN entry attempts, all of the jobs for that user are deleted.
- Set an expiration time for confidential print jobs. When a user has not printed the jobs within the specified time, all of the jobs for that user are deleted.
4 Save the modified settings.
Copying printer settings to other printers
Note: This feature is available only in network printers.
1 Open a Web browser, and then type the printer IP address in the address field.
Notes:
- View the printer IP address on the printer home screen. The IP address appears as four sets of numbers separated by periods, such as 123.123.123.123.
- If you are using a proxy server, then temporarily disable it to load the Web page correctly.
2 Click Copy Printer Settings.
3 To change the language, select a language from the drop-down menu, and then click Click here to submit language.
4 Click Printer Settings.
5 Type the IP addresses of the source and target printers.
Note: If you want to add or remove target printers, then click Add Target IP or Remove Target IP.
6 Click Copy Printer Settings.
Printing a menu settings page
From the home screen, navigate to:

Reports > Menu Settings Page
Printing a network setup page
If the printer is attached to a network, then print a network setup page to verify the network connection. This page also provides important information that aids network printing configuration.
1 From the home screen, navigate to:

Reports > Network Setup Page
2 Check the first section of the network setup page and confirm that the status is Connected.
If the status is Not Connected, then the LAN drop may not be active, or the network cable may be malfunctioning. Consult your system support person for a solution, and then print another network setup page.
Checking the status of parts and supplies
A message appears on the printer display when a replacement supply item is needed or when maintenance is required.
Notes:
•Each gauge displays the estimated life left for the supply or part.
- All page life estimates for supplies assume printing on a single side of letter- or A4-size plain paper.
Checking the status of parts and supplies on the printer control panel
From the home screen, navigate to:
Status/Supplies > View Supplies
Checking the status of parts and supplies from the Embedded Web Server
Note: Make sure that the computer and printer are connected to the same network.
1 Open a Web browser, and then type the printer IP address in the address field.
Notes:
- View the printer IP address on the home screen. The IP address appears as four sets of numbers separated by periods, such as 123.123.123.123.
- If you are using a proxy server, then temporarily disable it to load the Web page correctly.
2 Click Device Status > More Details.
Saving energy
Using Eco-Mode
1 Open a Web browser, and then type the printer IP address in the address field.
Notes:
- View the printer IP address on the printer home screen. The IP address appears as four sets of numbers separated by periods, such as 123.123.123.123.
- If you are using a proxy server, then temporarily disable it to load the Web page correctly.
2 Click Settings > General Settings > Eco-Mode.
3 Select a setting.
| Use To | |
| Off | Use the factory default settings for all settings associated with Eco-Mode.Notes:Settings that were changed when other modes were selected are reset to the factory default settings.Off supports the performance specifications of the printer. |
| Energy Reduce | energy use, especially when the printer is idle.Notes:Printer engine motors do not start until a document is ready to print. You may notice a short delay before the first page is printed.The printer enters Sleep mode after one minute of inactivity.The printer display is turned off when the printer is in Sleep mode.Lights on the staple finisher and other optional finishers are turned off when the printer is in Sleep mode. |
| Energy/Paper | Use all the settings associated with Energy and Paper modes. |
| Plain Paper Enable the automatic two-sided (duplex) printing feature. | |
4 Click Submit.
Reducing printer noise
Enable Quiet mode to reduce printer noise.
1 Open a Web browser, and then type the printer IP address in the address field.
Notes:
- View the printer IP address on the printer home screen. The IP address appears as four sets of numbers separated by periods, such as 123.123.123.123.
- If you are using a proxy server, then temporarily disable it to load the Web page correctly.
2 Click Settings > General Settings > Quiet Mode.
3 Select a setting.
| Use To | |
| On Reduce printer noise. | Notes:•Print jobs process at a reduced speed.•Printer engine motors do not start until a document is ready to print. There is a short delay before the first page is printed.•The alarm control and cartridge alarm sounds are turned off.•The printer will ignore the Advance Start command. |
| Off Use factory default settings. | Note: This setting supports the performance specifications of the printer. |
4 Click Submit.
Adjusting Sleep mode
To save energy, decrease the number of minutes before the printer enters Sleep mode.
Select from 1 to 120 minutes. The factory default setting is 30 minutes.
Using the Embedded Web Server
1 Open a Web browser, and then type the printer IP address in the address field.
Notes:
- View the printer IP address on the printer home screen. The IP address appears as four sets of numbers separated by periods, such as 123.123.123.123.
- If you are using a proxy server, then temporarily disable it to load the Web page correctly.
2 Click Settings > General Settings > Timeouts.
3 In the Sleep Mode field, enter the number of minutes you want the printer to wait before it enters Sleep mode.
4 Click Submit.
Using the printer control panel
1 From the home screen, navigate to:

Settings > General Settings > Timeouts > Sleep Mode
2 In the Sleep Mode field, select the number of minutes you want the printer to wait before it enters Sleep mode, and then touch Submit.
Using Hibernate mode
Hibernate is an ultra-low-power operating mode. When operating in Hibernate mode, the printer is essentially off, and all other systems and devices are turned off safely.
Note: The Hibernate and Sleep modes can be scheduled.
Using the Embedded Web Server
1 Open a Web browser, and then type the printer IP address in the address field.
Notes:
- View the printer IP address on the printer home screen. The IP address appears as four sets of numbers separated by periods, such as 123.123.123.123.
- If you are using a proxy server, then temporarily disable it to load the Web page correctly.
2 Click Settings > General Settings > Sleep Button Settings.
3 From the "Press Sleep Button" or "Press and Hold Sleep Button" drop-down menu, select Hibernate.
4 Click Submit.
Using the printer control panel
1 From the home screen, navigate to:

Settings > General Settings
2 From the "Press Sleep Button" or "Press and Hold Sleep Button" menu, select Hibernate, and then touch Submit.
Adjusting the brightness of the printer display
To save energy, or if you are have trouble reading from the display, adjust the brightness of the display.
Select from 20 to 100. The factory default setting is 100.
Using the Embedded Web Server
1 Open a Web browser, and then type the printer IP address in the address field.
Notes:
- View the printer IP address on the printer home screen. The IP address appears as four sets of numbers separated by periods, such as 123.123.123.123.
- If you are using a proxy server, then temporarily disable it to load the Web page correctly.
2 Click Settings > General Settings.
3 In the Screen Brightness field, enter the brightness percentage you want for the display.
4 Click Submit.
Using the printer control panel
1 From the home screen, navigate to:

Settings > General Settings > Screen Brightness
2 In the Screen Brightness field, enter the brightness percentage you want for the display, and then touch Submit.
Restoring factory default settings
If you want to keep a list of the current menu settings for reference, then print a menu settings page before restoring the factory default settings. For more information, see "Printing a menu settings page" on page 177.
If you want a more comprehensive method of restoring the printer factory default settings, then perform the Wipe All Settings option. For more information, see “Erasing non-volatile memory” on page 183.
Warning—Potential Damage: Restoring factory defaults returns most printer settings to the original factory default settings. Exceptions include the display language, custom sizes and messages, and network/port menu settings. All downloads stored in the RAM are deleted. Downloads stored in the flash memory or in a printer hard disk are not affected.
From the home screen, navigate to:

Settings > General Settings > Factory Defaults > Restore Now > Submit
Securing the memory before moving the printer
Using the security lock feature
The printer is equipped with a security lock feature. When a lock compatible with most laptop computers is attached, the printer is locked. When locked, the controller board shield and the controller board cannot be removed. Attach a security lock to the printer in the location shown.
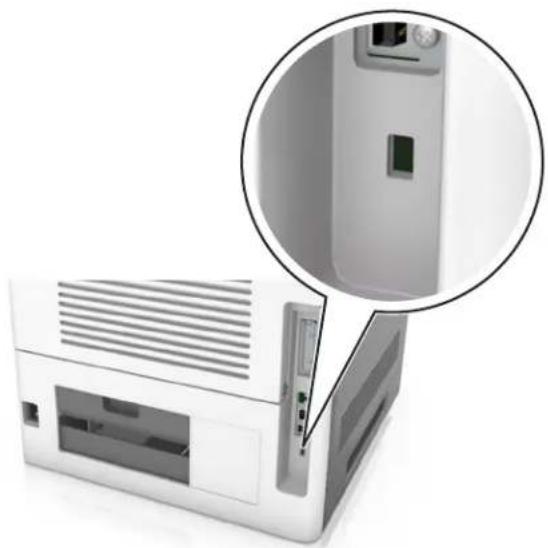
natural_image
Diagram of a computer with an inset close-up showing internal components (no text or symbols visible)Statement of Volatility
Your printer contains various types of memory that can store device and network settings, and user data.
| Type of memory Description | |
| Volatile memory Your printer uses standard random access memory (RAM) to temporarily buffer user data during simple print jobs. | |
| Non-volatile memory Your printer may use two forms of non-volatile memory: EEPROM and NAND (flash memory). Both types are used to store the operating system, device settings, network information, bookmark settings, and embedded solutions. | |
| Hard disk memory Some printers have a hard disk drive installed. The printer hard disk is designed for device-specific functionality. This lets the device retain buffered user data from complex print jobs, as well as form data, and font data. | |
Erase the content of any installed printer memory in the following circumstances:
•The printer is being decommissioned.
•The printer hard disk is being replaced.
•The printer is being moved to a different department or location.
- The printer is being serviced by someone from outside your organization.
- The printer is being removed from your premises for service.
•The printer is being sold to another organization.
Disposing of a printer hard disk
Note: Some printer models may not have a printer hard disk installed.
In high-security environments, it may be necessary to take additional steps to make sure that confidential data stored in the printer hard disk cannot be accessed when the printer—or its hard disk—is removed from your premises.
- Degaussing—Flushes the hard disk with a magnetic field that erases stored data
- Crushing—Physically compresses the hard disk to break component parts and render them unreadable
- Milling—Physically shreds the hard disk into small metal bits
Note: Most data can be erased electronically, but the only way to guarantee that all data is completely erased is to physically destroy each hard disk where data is stored.
Erasing volatile memory
The volatile memory (RAM) installed in your printer requires a power source to retain information. To erase the buffered data, simply turn off the printer.
Erasing non-volatile memory
Erase individual settings, device and network settings, security settings, and embedded solutions by following these steps:
1 Turn off the printer.
2 Hold down 2 and 6 while turning the printer on. Release the buttons only when the screen with the progress bar appears.
The printer performs a power-on sequence, and then the Configuration menu appears. When the printer is fully turned on, a list of functions appears on the printer display, instead of the standard home screen icons.
3 Touch Wipe All Settings.
The printer restarts several times during this process.
Note: Wipe All Settings securely removes device settings, solutions, jobs, and passwords from the printer memory.
4 Touch Back > Exit Config Menu.
The printer will perform a power-on reset, and then return to normal operating mode.
Erasing printer hard disk memory
Note: Some printer models may not have a printer hard disk installed.
Configuring Disk Wiping in the printer menus lets you remove residual confidential material left by print jobs by securely overwriting files that have been marked for deletion.
Using the printer control panel
1 Turn off the printer.
2 Hold down 2 and 6 while turning the printer on. Release the buttons only when the screen with the progress bar appears.
The printer performs a power-on sequence, and then the Configuration menu appears. When the printer is fully turned on, a list of functions appears on the printer display.
3 Touch Wipe Disk, and then touch one of the following:
- Wipe disk (fast)—This lets you overwrite the disk with all zeroes in a single pass.
- Wipe disk (secure)—This lets you overwrite the disk with random bit patterns several times, followed by a verification pass. A secure overwrite is compliant with the DoD 5220.22-M standard for securely erasing data from a printer hard disk. Highly confidential information should be wiped using this method.
4 Touch Yes to proceed with disk wiping.
Notes:
•A status bar indicates the progress of the disk wiping task.
- Disk wiping can take from several minutes to more than an hour, during which the printer will be unavailable for other user tasks.
5 Touch Back > Exit Config Menu.
The printer undergoes a power-on reset, and then returns to normal operating mode.
Configuring printer hard disk encryption
Enable hard disk encryption to prevent loss of sensitive data in the event the printer or its hard disk is stolen.
Note: Some printer models may not have a printer hard disk installed.
Using the Embedded Web Server
1 Open a Web browser, and then type the printer IP address in the address field.
Notes:
- View the printer IP address in the TCP/IP section in the Network/Ports menu. The IP address appears as four sets of numbers separated by periods, such as 123.123.123.123.
- If you are using a proxy server, then temporarily disable it to load the Web page correctly.
2 Click Settings > Security > Disk Encryption.
Note: Disk Encryption appears in the Security Menu only when a formatted, non-defective printer hard disk is installed.
3 From the Disk encryption menu, select Enable.
Notes:
- Enabling disk encryption will erase the contents of the printer hard disk.
- Disk encryption can take from several minutes to more than an hour, during which the printer will be unavailable for other user tasks.
4 Click Submit.
Using the printer control panel
1 Turn off the printer.
2 Hold down 2 and 6 while turning the printer on. Release the buttons only when the screen with the progress bar appears.
The printer performs a power-on sequence, and then the Configuration menu appears. When the printer is fully turned on, a list of functions appears on the printer display.
3 Touch Disk Encryption > Enable.
Note: Enabling disk encryption will erase the contents of the printer hard disk.
4 Touch Yes to proceed with disk wiping.
Notes:
- Do not turn off the printer during the encryption process. Doing so may result in loss of data.
- Disk encryption can take from several minutes to more than an hour, during which the printer will be unavailable for other user tasks.
- A status bar will indicate the progress of the disk wiping task. After the disk has been encrypted, the printer will return to the Enable/Disable screen.
5 Touch Back > Exit Config Menu.
The printer will perform a power-on reset, and then return to normal operating mode.
Finding printer security information
In high-security environments, it may be necessary to take additional steps to make sure that confidential data stored in the printer cannot be accessed. For more information, visit the Lexmark security Web page and see the Embedded Web Server Administrator's Guide.
1 Go to http://support.lexmark.com, and then navigate to:
Support & Downloads > Tech Library > Manuals & Guides
2 Type Embedded Web Server in the keyword field, and then click Filter.
3 Click Embedded Web Server to launch the document.
Paper and specialty media guide
Notes:
- Make sure the paper size, type, and weight are set correctly on the computer or printer control panel.
- Flex, fan, and straighten specialty media before loading it.
- The printer may print at a reduced speed to prevent damage to the fuser.
- For more information on card stock and labels, see the Card Stock & Label Guide on the Lexmark Web site at http://support.lexmark.com.
Using specialty media
Tips on using card stock
Card stock is heavy, single-ply specialty media. Many of its variable characteristics, such as moisture content, thickness, and texture, can significantly affect print quality.
- From the printer control panel, set the paper size, type, texture, and weight in the Paper menu to match the card stock loaded in the tray.
- Print samples on the card stock being considered for use before buying large quantities.
- Specify the paper texture and weight from the tray settings to match the paper loaded in the tray.
- Preprinting, perforation, and creasing may significantly affect the print quality and cause jams or other paper feed problems.
- Before loading the card stock on the tray, flex and fan the card stock to loosen them. Straighten the edges on a level surface.
Tips on using envelopes
- From the printer control panel, set the paper size, type, texture, and weight in the Paper menu to match the envelopes loaded in the tray.
- Print samples on the envelopes being considered for use before buying large quantities.
- Use envelopes designed specifically for laser printers.
- For best performance, use envelopes made from 90-g / m^2 (24-lb) paper or 25% cotton.
- Use only new envelopes from undamaged packages.
- To optimize performance and minimize jams, do not use envelopes that:
—Have excessive curl or twist.
—Are stuck together or damaged in any way.
—Have windows, holes, perforations, cutouts, or embossing.
—Have metal clasps, string ties, or folding bars.
—Have an interlocking design.
—Have postage stamps attached.
—Have any exposed adhesive when the flap is in the sealed or closed position.
—Have bent corners.
—Have rough, cockle, or laid finishes.
- Adjust the width guides to fit the width of the envelopes.
- Before loading the envelopes on the tray, flex the stack of envelopes back and forth to loosen them, and then fan them. Straighten the edges on a level surface.
Note: A combination of high humidity (over 60%) and high printing temperature may wrinkle or seal envelopes.
Tips on using labels
- From the printer control panel, set the paper size, type, texture, and weight in the Paper menu to match the labels loaded in the tray.
- Print samples on labels being considered for use before buying large quantities.
- For more information on label printing, characteristics, and design, see the Card Stock & Label Guide on the Lexmark Web site at http://support.lexmark.com.
- Use labels designed specifically for laser printers.
- Do not use labels with slick backing material.
- Do not use labels with exposed adhesive.
- Use full label sheets. Partial sheets may cause labels to peel off during printing, resulting in a jam. Partial sheets also contaminate the printer and the cartridge with adhesive, and could void the printer and toner cartridge warranties.
- Before loading labels on the tray, flex and fan labels to loosen them. Straighten the edges on a level surface.
Note: Vinyl and polyester labels are supported only in the MS710 Series printer models.
Tips on using transparencies
- From the printer control panel, set the paper size, type, texture, and weight in the Paper menu to match the transparencies loaded in the tray.
- Print a test page on the transparencies being considered for use before buying large quantities.
- Use transparencies designed specifically for laser printers.
- Avoid getting fingerprints on the transparencies to prevent print quality problems.
- Before loading transparencies, flex and fan the sheets to prevent them from sticking together.
- When printing on large volumes of transparencies, make sure to print by batches of only up to 20 with an interval of at least three minutes between batches, to prevent the transparencies from sticking together in the bin. You can also remove transparencies from the bin by batches of 20.
Paper guidelines
Paper characteristics
The following paper characteristics affect print quality and reliability. Consider these factors before printing on them:
Weight
The printer trays and multipurpose feeder can automatically feed paper weights between 60–176 g/m ^2 (16–47-lb) grain long paper. The 2100-sheet tray can automatically feed paper weights up to 60–135 g/m ^2 (16–36-lb) grain long paper. Paper lighter than 60 g/m ^2 (16 lb) might not be stiff enough to feed properly, and may cause jams.
Note: Two-sided printing is supported for 60–176 g/m ^2 (16–47-lb) paper.
Curl
Curl is the tendency for paper to curl at its edges. Excessive curl can cause paper feeding problems. Curl can occur after the paper passes through the printer, where it is exposed to high temperatures. Storing paper unwrapped in hot, humid, cold, or dry conditions, even in the trays, can contribute to paper curling prior to printing and can cause feeding problems.
Smoothness
Paper smoothness directly affects print quality. If paper is too rough, toner cannot fuse to it properly. If paper is too smooth, it can cause paper feeding or print quality issues. Always use paper between 100 and 300 Sheffield points; smoothness between 150 and 250 Sheffield points produces the best print quality.
Moisture content
The amount of moisture in paper affects both print quality and the ability of the printer to feed the paper correctly. Leave paper in its original wrapper until it is time to use it. This limits the exposure of paper to moisture changes that can degrade its performance.
Store paper in its original wrapper in the same environment as the printer for 24 to 48 hours before printing. Extend the time several days if the storage or transportation environment is very different from the printer environment. Thick paper may also require a longer conditioning period.
Grain direction
Grain refers to the alignment of the paper fibers in a sheet of paper. Grain is either grain long, running the length of the paper, or grain short, running the width of the paper.
For 60–176 g/m ^2 (16–47-lb) paper, grain long paper is recommended.
Fiber content
Most high-quality xerographic paper is made from 100% chemically treated pulped wood. This content provides the paper with a high degree of stability, resulting in fewer paper feeding problems and better print quality. Paper containing fibers such as cotton can negatively affect paper handling.
Selecting paper
Using the appropriate paper prevents jams and helps ensure trouble-free printing.
To help avoid paper jams and poor print quality:
•Always use new, undamaged paper.
- Before loading paper, know the recommended printable side of the paper. This information is usually indicated on the paper package.
- Do not use paper that has been cut or trimmed by hand.
- Do not mix paper sizes, types, or weights in the same tray; mixing results in jams.
- Do not use coated papers unless they are specifically designed for electrophotographic printing.
Selecting preprinted forms and letterhead
- Use grain long for 60–90-g/m ^2 (16–24-lb) paper.
- Use only forms and letterhead printed using an offset lithographic or engraved printing process.
- Avoid paper with rough or heavily textured surfaces.
- Use inks that are not affected by the resin in toner. Inks that are oxidation-set or oil-based generally meet these requirements; latex inks might not.
- Print samples on preprinted forms and letterheads considered for use before buying large quantities. This determines whether or not the ink in the preprinted form or letterhead will affect print quality.
- When in doubt, contact your paper supplier.
Using recycled paper and other office papers
As an environmentally conscientious company, Lexmark supports the use of recycled paper produced specifically for use in laser (electrophotographic) printers.
While no blanket statement can be made that all recycled paper will feed well, Lexmark consistently tests papers that represent recycled cut size copier papers available on the global market. This scientific testing is conducted with rigor and discipline. Many factors are taken into consideration both separately and as a whole, including the following:
- Amount of post-consumer waste (Lexmark tests up to 100% post-consumer waste content.)
- Temperature and humidity conditions (Testing chambers simulate climates from all over the world.)
- Moisture content (Business papers should have low moisture: 4–5%.)
- Bending resistance and proper stiffness means optimum feeding through the printer.
•Thickness (impacts how much can be loaded into a tray) - Surface roughness (measured in Sheffield units, impacts print clarity and how well toner fuses to the paper)
- Surface friction (determines how easily sheets can be separated)
- Grain and formation (impacts curling, which also influences the mechanics of how the paper behaves as it moves through the printer)
•Brightness and texture (look and feel)
Recycled papers are better than ever; however, the amount of recycled content in a paper affects the degree of control over foreign matter. And while recycled papers are one good path to printing in an environmentally responsible manner, they are not perfect. The energy required to de-ink and deal with additives such as colorants and “glue” often generates more carbon emissions than does normal paper production. However, using recycled papers enables better resource management overall.
Lexmark concerns itself with the responsible use of paper in general based on life cycle assessments of its products. To gain a better understanding of the impact of printers on the environment, the company commissioned a number of life cycle assessments and found that paper was identified as the primary contributor (up to 80%) of carbon emissions caused throughout the entire life of a device (from design to end-of-life). This is due to the energy-intensive manufacturing processes required to make paper.
Thus, Lexmark seeks to educate customers and partners on minimizing the impact of paper. Using recycled paper is one way. Eliminating excessive and unnecessary paper consumption is another. Lexmark is well-equipped to help
customers minimize printing and copying waste. In addition, the company encourages purchasing paper from suppliers who demonstrate their commitment to sustainable forestry practices.
Lexmark does not endorse specific suppliers, although a converter's product list for special applications is maintained. However, the following paper choice guidelines will help alleviate the environmental impact of printing:
1 Minimize paper consumption.
2 Be selective about the origin of wood fiber. Buy from suppliers who carry certifications such as the Forestry Stewardship Council (FSC) or The Program for the Endorsement of Forest Certification (PEFC). These certifications guarantee that the paper manufacturer uses wood pulp from forestry operators that employ environmentally and socially responsible forest management and restoration practices.
3 Choose the most appropriate paper for printing needs: normal 75 or 80 g/m ^2 certified paper, lower weight paper, or recycled paper.
Unacceptable paper examples
Test results indicate that the following paper types are at risk for use with laser printers:
- Chemically treated papers used to make copies without carbon paper, also known as carbonless papers
- Preprinted papers with chemicals that may contaminate the printer
- Preprinted papers that can be affected by the temperature in the printer fuser
- Preprinted papers that require a registration (the precise location on the page) greater than ± 2.3 mm ( ± 0.9 in.), such as optical character recognition (OCR) forms. In some cases, registration can be adjusted with a software application to successfully print on these forms.)
•Coated papers (erasable bond), synthetic papers, thermal papers - Rough-edged, rough or heavily textured surface papers or curled papers
•Recycled papers that fail EN12281:2002 (European testing)
•Paper weighing less than 60 g/m ^2 (16 lb)
•Multiple part forms or documents
For more information about Lexmark, visit www.lexmark.com. General sustainability-related information can be found at the Environmental Sustainability link.
Storing paper
Use these paper storage guidelines to help avoid jams and uneven print quality:
- For best results, store paper where the temperature is 21^ C ( 70^ F) and the relative humidity is 40 percent. Most label manufacturers recommend printing in a temperature range of 18–24^ C ( 65–75^ F) with relative humidity between 40 and 60 percent.
- Store paper in cartons, on a pallet or shelf, rather than on the floor.
- Store individual packages on a flat surface.
- Do not store anything on top of individual paper packages.
- Take paper out of the carton or wrapper only when you are ready to load it in the printer. The carton and wrapper help keep the paper clean, dry, and flat.
Supported paper sizes, types, and weights
The following tables provide information on standard and optional paper sources and the types of paper they support.
Note: For an unlisted paper size, select the closest larger listed size.
Paper types and weights supported by the printer
The printer engine supports 60–176-g/m ^2 (16–47-lb) paper weights.
| Paper type | 250- or 550-sheet trays | 2100-sheet tray | Multipurpose feeder | Duplex |
| Paper | √ | √ | √ | √ |
| Card stock X | √ | √ | √ | |
| Plain Envelope X X | √ | √ | ||
| Rough Envelope | √ | X | √ | X |
| Paper labels | √ | X | √ | X |
| Pharmacy labels | √ | X | √ | √ |
| Transparencies* X X | √ | √ |
* Print on transparencies by batches of only up to 20 to prevent them from sticking together. For more information, see "Tips on using transparencies" on page 188.
Paper sizes supported by the printer
Note: When printing on paper less than 210 mm (8.3 inches) wide, the printer may print at a reduced speed after a period of time to ensure the best print performance.
| Paper size ^1 | Dimensions Standard or optional 250- or 550-sheet tray | Optional 2100-sheet tray | Multipurpose feeder | Duplex |
| A4 210 x 297 mm | (8.3 x 11.7 in.) | √ | √ | √ |
| A5 148 x 210 mm | (5.8 x 8.3 in.) | √ | 2 | √ |
| A6 105 x 148 mm | (4.1 x 5.8 in.) | √ | x | √ |
^1 If your preferred default paper size cannot be set in the printer control panel, then you may select common paper sizes that correspond to the position of the length guide in the tray from the Paper Size/Type menu. If the paper size is not available, then select Universal or turn off tray size sensing. For more information, contact customer support.
^2 Paper is supported in long-edge orientation.
^3 Universal is supported in duplex mode only if the width is from 105 mm (4.13 in.) to 216 mm (8.5 in.), and the length is from 148 mm (5.83 in.) to 356 mm (14 in.).
| Paper size1 | Dimensions Standard or optional 250- or 550-sheet tray | Optional 2100-sheet tray | Multipurpose feeder | Duplex |
| JIS B5 182 x 257 mm | (7.2 x 10.1 in.) | √ | X | √ |
| Letter 216 x 279 mm | (8.5 x 11 in.) | √ | √ | √ |
| Legal 216 x 356 mm | (8.5 x 14 in.) | √ | √ | √ |
| Executive 184 x 267 mm | (7.3 x 10.5 in.) | √ | X | √ |
| Oficio 216 x 340 mm | (8.5 x 13.4 in.) | √ | √ | √ |
| Folio 216 x 330 mm | (8.5 x 13 in.) | √ | √ | √ |
| Statement 140 x 216 mm | (5.5 x 8.5 in.) | √ | X | √ |
| Universal3 | 105 x 148 mm to 216 x 356 mm (4.13 x 5.83 in. to 8.5 x 14 in.) | √ | X | √ |
| 70 x 127 mm to 216 x 356 mm (2.76 x 5 to 8.5 x 14 in.) | X | X | √ | |
| 7 3/4 Envelope (Monarch) | 98 x 191 mm (3.9 x 7.5 in.) | √ | X | √ |
| 9 Envelope 98 x 225 mm | (3.9 x 8.9 in.) | √ | X | √ |
| 10 Envelope 105 x 241 mm | (4.1 x 9.5 in.) | √ | X | √ |
| DL Envelope 110 x 220 mm | (4.3 x 8.7 in.) | √ | X | √ |
| C5 Envelope 162 x 229 mm | (6.38 x 9.01 in.) | √ | X | √ |
| B5 Envelope 176 x 250 mm | (6.93 x 9.84 in.) | √ | X | √ |
^1 If your preferred default paper size cannot be set in the printer control panel, then you may select common paper sizes that correspond to the position of the length guide in the tray from the Paper Size/Type menu. If the paper size is not available, then select Universal or turn off tray size sensing. For more information, contact customer support.
^2 Paper is supported in long-edge orientation.
^3 Universal is supported in duplex mode only if the width is from 105 mm (4.13 in.) to 216 mm (8.5 in.), and the length is from 148 mm (5.83 in.) to 356 mm (14 in.).
| Paper size ^1 | Dimensions Standard or optional 250- or 550-sheet tray | Optional 2100-sheet tray | Multipurpose feeder | Duplex |
| Other Envelope 98 x 162 mm(3.9 x 6.4 in.) to 176 x 250 mm(6.9 x 9.8 in.) | √ | X | √ | X |
| ^1 If your preferred default paper size cannot be set in the printer control panel, then you may select common paper sizes that correspond to the position of the length guide in the tray from the Paper Size/Type menu. If the paper size is not available, then select Universal or turn off tray size sensing. For more information, contact customer support. ^2 Paper is supported in long-edge orientation. ^3 Universal is supported in duplex mode only if the width is from 105 mm (4.13 in.) to 216 mm (8.5 in.), and the length is from 148 mm (5.83 in.) to 356 mm (14 in.). | ||||
Paper sizes, types, and weights supported by the finishers
Supported paper sizes
| Paper size | 4-bin mailbox | Output expander and high-capacity output expander | Staple finisher Staple, hole punch finisher |
| A6 | √ | √ | X |
| A5 | √ | √ | 2 |
| JIS B5 | √ | √ | X |
| Executive | √ | √ | X |
| Letter | √ | √ | √ |
| A4 | √ | √ | √ |
| Legal | √ | √ | √ |
| Folio | √ | √ | √ |
| Oficio | √ | √ | √ |
| Statement | √ | √ | 1 |
| Universal | √ | √ | 3 |
| Envelopes | X | √ | X |
| ^1 The finisher stacks the paper but does not staple or punch holes in it. ^2 The finisher staples the paper if it is loaded long edge first. ^3 The finisher staples the paper if its width is between 8.27 and 8.54 inches but does not punch holes in it. | |||
Supported paper types and weights
| Paper type | Paper weight | 4-bin mailbox | Output expander and high-capacity output expander | Staple finisher | Staple, hole punch finisher |
| Plain Paper | 90–176 g/m2(24–47 lb) | X | ✓ | X | X |
| 60–90 g/m2(16–24 lb) | ✓ | ✓ | ✓ | ✓ | |
| Card Stock | 163 g/m2(90 lb) | X | ✓ | ^1 | ^1 |
| 199 g/m2(110 lb) | X | ✓ | X | X | |
| Transparency2 | 146 g/m2(39 lb) | X | ✓ | ^1 | ^1 |
| Recycled | 90–176 g/m2(24–47 lb) | X | ✓ | X | X |
| 60–90 g/m2(16–24 lb) | ✓ | ✓ | ✓ | ✓ | |
| Paper labels | 180 g/m2(48 lb) | X | ✓ | X | X |
| Dual web and Integrated | 180 g/m2(48 lb) | X | ✓ | X | X |
| Bond | 90–176 g/m2(24–47 lb) | X | ✓ | X | X |
| 60–90 g/m2(16–24 lb) | ✓ | ✓ | ✓ | ✓ | |
| Envelope | 105 g/m2(28 lb) | X | ✓ | X | X |
| Letterhead | 90–176 g/m2(24–47 lb) | X | ✓ | X | X |
| 60–90 g/m2(16–24 lb) | ✓ | ✓ | ✓ | ✓ | |
| Preprinted | 90–176 g/m2(24–47 lb) | X | ✓ | X | X |
| 60–90 g/m2(16–24 lb) | ✓ | ✓ | ✓ | ✓ |
^1 The finisher stacks the paper but does not staple or punch holes in it.
^2 Print on transparencies by batches of only up to 20 to prevent them from sticking together. For more information, see “Tips on using transparencies” on page 188.
| Paper type | Paper weight | 4-bin mailbox | Output expander and high-capacity output expander | Staple finisher Staple, hole punch finisher |
| Colored Paper | 90–176 g/m2(24–47 lb) | X | √ | X |
| 60–90 g/m2(16–24 lb) | √ | √ | √ | |
| 1 The finisher stacks the paper but does not staple or punch holes in it.2 Print on transparencies by batches of only up to 20 to prevent them from sticking together. For more information, see “Tips on using transparencies” on page 188. | ||||
Understanding the printer menus
Menus list
Paper Menu Reports Network/Ports
| Default Source | Menu Settings Page | Active NIC |
| Paper Size/Type | Device Statistics | Standard Network ^2 |
| Configure MP | Stapler Test | Standard USB |
| Substitute Size | Network Setup Page ^1 | Parallel [x] |
| Paper Texture | Profiles List | Serial [x] |
| Paper Weight | Print Fonts | SMTP Setup |
| Paper Loading | Print Directory | |
| Custom Types | Asset Report |
Custom Names ^3
Custom Bin Names ^3
Universal Setup
Bin Setup
Security Settings Help
| Edit Security Setups4 | General Settings | Print All Guides |
| Miscellaneous Security Settings3 | Flash Drive Menu | Print Quality |
| Confidential Print | Print Settings | Printing Guide |
| Disk Wiping | Print Defects Guide | |
| Security Audit Log | Information Guide | |
| Set Date and Time | Supplies Guide |
^1 Depending on the printer setup, this menu item appears as Network Setup Page or Network [x] Setup Page.
^2 Depending on the printer setup, this menu item appears as Standard Network or Network [x].
^3 This menu appears only in touch-screen printer models.
^4 This menu appears only in select touch-screen printer models.
Paper menu
Default Source menu
| Use To | |
| Default SourceTray [x]MP FeederManual PaperManual Envelope | Set a default paper source for all print jobs.Notes:Tray 1 (standard tray) is the factory default setting.From the Paper menu, set Configure MP to "Cassette" for MP Feeder to appear as a menu setting.If two trays contain paper of the same size and type, and the trays have the same settings, then the trays are automatically linked. When one tray is empty, the print job continues using the linked tray. |
Paper Size/Type menu
| Use To | |
| Tray [x] SizeA4A5A6JIS-B5LetterLegalExecutiveOficio (Mexico)FolioStatementUniversal7 3/4 Envelope9 Envelope10 EnvelopeDL EnvelopeC5 EnvelopeB5 EnvelopeOther Envelope | Specify the paper size loaded in each tray.Notes:Letter is the U.S. factory default setting. A4 is the international factory default setting.If two trays contain paper of the same size and type, and the trays have the same settings, then the trays are automatically linked. The multipurpose feeder may also be linked. When one tray is empty, the print job continues using the linked tray.The A6 paper size is supported only in Tray 1 and in the multipurpose feeder. |
| Note: Only installed trays and feeders are listed in this menu. | |
| Tray [x] TypePlain PaperCard StockTransparencyRecycledLabelsBondEnvelopeRough EnvelopeLetterheadPreprintedColored PaperLight PaperHeavy PaperRough/CottonCustom Type [x] | Specify the paper type loaded in each tray.Notes:Plain Paper is the factory default setting for Tray 1. Custom Type [x] is the factory default setting for all other trays.If available, a user-defined name will appear instead of Custom Type [x].Use this menu to configure automatic tray linking. |
| MP Feeder SizeA4A5A6JIS B5LetterLegalExecutiveOficio (Mexico)FolioStatementUniversal7 3/4 Envelope9 Envelope10 EnvelopeDL EnvelopeC5 EnvelopeB5 EnvelopeOther Envelope | Specify the paper size loaded in the multipurpose feeder.Notes:Letter is the U.S. factory default setting. A4 is the international factory default setting.From the Paper menu, set Configure MP to “Cassette” for MP Feeder Size to appear as a menu.The multipurpose feeder does not automatically detect paper size. Make sure to set the paper size value. |
| Note: Only installed trays and feeders are listed in this menu. | |
| MP Feeder TypePlain PaperCard StockTransparencyRecycledLabelsBondEnvelopeRough EnvelopeLetterheadPreprintedColored PaperLight PaperHeavy PaperRough/CottonCustom Type [x] | Specify the paper type loaded in the multipurpose feeder.Notes:Plain Paper is the factory default setting.From the Paper menu, set Configure to “Cassette” for MP Feeder Type to appear as a menu. |
| Manual Paper SizeA4A5A6JIS B5LetterLegalExecutiveOficio (Mexico)FolioStatementUniversal | Specify the paper size being manually loaded.Note:Letter is the U.S. factory default setting. A4 is the international factory default setting. |
| Manual Paper TypePlain PaperCard StockTransparencyRecycledLabelsBondLetterheadPreprintedColored PaperLight PaperHeavy PaperRough/CottonCustom Type [x] | Specify the paper type being manually loaded.Notes:Plain Paper is the factory default setting.From the Paper menu, set Configure MP to “Manual” for Manual Paper Type to appear as a menu. |
| Note: Only installed trays and feeders are listed in this menu. | |
| Manual Envelope Size7 3/4 Envelope9 Envelope10 EnvelopeDL EnvelopeC5 EnvelopeB5 EnvelopeOther Envelope | Specify the envelope size being manually loaded.Note: 10 Envelope is the U.S. factory default setting. DL Envelope is the international factory default setting. |
| Manual Envelope TypeEnvelopeRough EnvelopeCustom Type [x] | Specify the envelope type being manually loaded.Note: Envelope is the factory default setting. |
| Note: Only installed trays and feeders are listed in this menu. | |
Configure MP menu
| Use To | |
| Configure MPCassetteManualFirst | Determine when the printer selects paper from the multipurpose feeder.Notes:Cassette is the factory default setting. Cassette configures the multipurpose feeder as the automatic paper source.Manual sets the multipurpose feeder only for manual-feed print jobs.First configures the multipurpose feeder as the primary paper source. |
Substitute Size menu
| Use To | |
| Substitute SizeOffStatement/A5Letter/A4All Listed | Substitute a specified paper size if the requested paper size is not available.Notes:All Listed is the factory default setting. All available substitutions are allowed.Off indicates that no size substitutions are allowed.Setting a size substitution lets the print job continue without Change Paper appearing. |
Paper Texture menu
| Use To | |
| Plain TextureSmoothNormalRough | Specify the relative texture of the plain paper loaded in a specific tray.Note: Normal is the factory default setting. |
| Card Stock TextureSmoothNormalRough | Specify the relative texture of the card stock loaded in a specific tray.Notes:Normal is the factory default setting.These options appear only if card stock is supported. |
| Transparency TextureSmoothNormalRough | Specify the relative texture of the transparencies loaded in a specific tray.Note: Normal is the factory default setting. |
| Recycled TextureSmoothNormalRough | Specify the relative texture of the recycled paper loaded in a specific tray.Note: Normal is the factory default setting. |
| Labels TextureSmoothNormalRough | Specify the relative texture of the labels loaded in a specific tray.Note: Normal is the factory default setting. |
| Vinyl Labels TextureSmoothNormalRough | Specify the relative texture of the vinyl labels loaded in a specific tray.Note: Normal is the factory default setting. |
| Bond TextureSmoothNormalRough | Specify the relative texture of the bond paper loaded in a specific tray.Note: Rough is the factory default setting. |
| Envelope TextureSmoothNormalRough | Specify the relative texture of the envelopes loaded in a specific tray.Note: Normal is the factory default setting. |
| Rough Envelope TextureRough | Specify the relative texture of the rough envelopes loaded in a specific tray.Note: Rough is the factory default setting. |
| Letterhead TextureSmoothNormalRough | Specify the relative texture of the letterhead loaded in a specific tray.Note: Normal is the factory default setting. |
| Preprinted TextureSmoothNormalRough | Specify the relative texture of the preprinted paper loaded in a specific tray.Note: Normal is the factory default setting. |
| Colored TextureSmoothNormalRough | Specify the relative texture of the colored paper loaded in a specific tray.Note: Normal is the factory default setting. |
| Light TextureSmoothNormalRough | Specify the relative texture of the light paper loaded in a specific tray.Note: Normal is the factory default setting. |
| Heavy TextureSmoothNormalRough | Specify the relative texture of the heavy paper loaded in a specific tray.Note: Normal is the factory default setting. |
| Rough/Cotton TextureRough | Specify the relative texture of the rough or cotton paper loaded in a specific tray.Note: Rough is the factory default setting. |
| Custom [x] TextureSmoothNormalRough | Specify the relative texture of the custom paper loaded in a specific tray.Note: Normal is the factory default setting. |
Paper Weight menu
| Use To | |
| Plain WeightLightNormalHeavy | Specify the relative weight of the plain paper loaded.Note: Normal is the factory default setting. |
| Card Stock WeightLightNormalHeavy | Specify the relative weight of the card stock loaded.Note: Normal is the factory default setting. |
| Transparency WeightLightNormalHeavy | Specify the relative weight of the transparencies loaded.Note: Normal is the factory default setting. |
| Recycled WeightLightNormalHeavy | Specify the relative weight of the recycled paper loaded.Note: Normal is the factory default setting. |
| Labels WeightLightNormalHeavy | Specify the relative weight of the labels loaded.Note: Normal is the factory default setting. |
| Vinyl Labels WeightLightNormalHeavy | Specify the relative weight of the vinyl labels loaded.Note: Normal is the factory default setting. |
| Bond WeightLightNormalHeavy | Specify the relative weight of the bond paper loaded.Note: Normal is the factory default setting. |
| Envelope WeightLightNormalHeavy | Specify the relative weight of the envelope loaded.Note: Normal is the factory default setting. |
| Rough Envelope WeightLightNormalHeavy | Specify the relative weight of the rough envelope loaded.Note: Normal is the factory default setting. |
| Letterhead WeightLightNormalHeavy | Specify the relative weight of the letterhead loaded.Note: Normal is the factory default setting. |
| Preprinted WeightLightNormalHeavy | Specify the relative weight of the preprinted paper loaded.Note: Normal is the factory default setting. |
| Colored WeightLightNormalHeavy | Specify the relative weight of the colored paper loaded.Note: Normal is the factory default setting. |
| Light WeightLight | Specify that the weight of the paper loaded is light. |
| Heavy WeightHeavy | Specify that the weight of the paper loaded is heavy. |
| Rough/Cotton WeightLightNormalHeavy | Specify the relative weight of the cotton or rough paper loaded.Note: Normal is the factory default setting. |
| Custom [x] WeightLightNormalHeavy | Specify the relative weight of the custom paper loaded.Notes:Normal is the factory default setting.The options appear only when the custom type is supported. |
Paper Loading menu
| Use To | |
| Card Stock LoadingDuplexOff | Determine and set two-sided printing for all print jobs with Card Stock as the paper type. |
| Recycled LoadingDuplexOff | Determine and set two-sided printing for all print jobs with Recycled as the paper type. |
| Labels LoadingDuplexOff | Determine and set two-sided printing for all print jobs with Labels as the paper type. |
| Vinyl Labels LoadingDuplexOff | Determine and set two-sided printing for all print jobs with Vinyl Labels as the paper type. |
| Bond LoadingDuplexOff | Determine and set two-sided printing for all print jobs with Bond as the paper type. |
| Letterhead LoadingDuplexOff | Determine and set two-sided printing for all print jobs with Letterhead as the paper type. |
| Preprinted LoadingDuplexOff | Determine and set two-sided printing for all print jobs with Preprinted as the paper type. |
| Colored LoadingDuplexOff | Determine and set two-sided printing for all print jobs with Colored as the paper type. |
| Light LoadingDuplexOff | Determine and set two-sided printing for all print jobs with Light as the paper type. |
| Notes:Off is the factory default setting for all Paper Loading menu selections.Duplex sets the printer default to two-sided printing for every print job unless one-sided printing is selected from Print Properties or the print dialog, depending on your operating system. | |
| Heavy LoadingDuplexOff | Determine and set two-sided printing for all print jobs with Heavy as the paper type. |
| Rough/Cotton LoadingDuplexOff | Determine and set two-sided printing for all print jobs with Rough or Cotton as the paper type. |
| Custom [x] LoadingDuplexOff | Determine and set two-sided printing for all print jobs with Custom [x] as the paper type.Note:Custom [x] Loading is available only when the custom type is supported. |
| Notes:Off is the factory default setting for all Paper Loading menu selections.Duplex sets the printer default to two-sided printing for every print job unless one-sided printing is selected from Print Properties or the print dialog, depending on your operating system. | |
Custom Types menu
| Use To | |
| Custom Type [x]PaperCard StockTransparencyRough/CottonLabelsVinyl LabelsEnvelope | Associate a paper or specialty media type with a factory default custom type name or a user-defined custom name created from the Embedded Web Server or from MarkVisionTM Professional.Notes:•Paper is the factory default setting.• The custom media type must be supported by the selected tray or multipurpose feeder in order to print from that source. |
| RecycledPaperCard StockTransparencyRough/CottonLabelsVinyl LabelsEnvelope | Specify a paper type when Recycled is selected in other menus.Notes:•Paper is the factory default setting.• The custom media type must be supported by the selected tray or multipurpose feeder in order to print from that source. |
Custom Names menu
| Use To | |
| Custom Name [x] | Specify a custom name for a paper type. This name replaces the Custom Type [x] name in the printer menus.Note:This menu item appears only in touch-screen printer models. |
Custom Bin Names menu
Note: This menu appears only in touch-screen printer models.
| Use To | |
| Standard Bin Specify a custom name for the standard bin. | |
| Bin [x] Specify a custom name for Bin [x]. |
Universal Setup menu
| Use To | |
| Units of MeasureInchesMillimeters | Identify the units of measure.Notes:Inches is the US factory default setting.Millimeters is the international factory default setting. |
| Portrait Width3-8.5 inches76-216 mm | Set the portrait width.Notes:If the width exceeds the maximum, then the printer uses the maximum width allowed.8.5 inches is the US factory default setting. You can increase the width in 0.01-inch increments.216 mm is the international factory default setting. You can increase the width in 1-mm increments. |
| Portrait Height3-14.17 inches76-360 mm | Set the portrait height.Notes:If the height exceeds the maximum, then the printer uses the maximum height allowed.14 inches is the US factory default setting. You can increase the height in 0.01-inch increments.356 mm is the international factory default setting. You can increase the height in 1-mm increments. |
| Feed DirectionShort EdgeLong Edge | Specify the feed direction if the paper can be loaded in either direction.Notes:Short Edge is the factory default setting.Long Edge appears only when the longest edge is shorter than the maximum width supported in the tray. |
Bin Setup menu
| Use To | |
| Output BinStandard BinBin [x] | Specify the default bin.Notes:If multiple bins are assigned the same name, then the name appears only once in the menu.Standard Bin is the factory default setting. |
| Configure BinsMailboxLinkMail OverflowLink OptionalType Assignment | Specify configuration options for bins.Notes:Mailbox is the factory default setting. This setting treats each bin as a separate mailbox.Link configures all available bins as one large bin.Mail Overflow configures each bin as a separate mailbox.Link Optional links all available bins except the standard bin and only appears when at least two optional bins are installed.Type Assignment assigns each paper type to a bin or linked bin set.Bins assigned the same name are automatically linked unless Link Optional is selected. |
| Overflow BinStandard BinBin [x] | Specify an alternative bin when a designated bin is full.Notes:Standard Bin is the factory default setting.If multiple bins are assigned the same name, then the name only appears once in the bin list.[x] can be any number between 1 and 12 if the appropriate optional bins are installed. |
| Assign Type/BinPlain Paper BinCard Stock BinTransparency BinRecycled BinLabels BinVinyl Labels BinBond BinEnvelope BinRough Envelope BinLetterhead BinPreprinted BinColored BinLight Paper BinHeavy Paper BinRough/Cotton BinCustom [x] Bin | Select a bin for each supported paper type.For each type, select the following options:DisabledStandard BinBin [x]Notes:Disabled is the factory default setting.[x] can be any number between 1 and 12 if the appropriate optional bins are installed.If multiple bins are assigned the same name, then the name only appears once in the bin list. |
Reports menu
Reports menu
| Use To | |
| Menu Settings Page | Print a report containing information about the paper loaded in trays, installed memory, total page count, alarms, timeouts, printer control panel language, TCP/IP address, status of supplies, status of the network connection, and other information. |
| Device Statistics | Print a report containing printer statistics such as supply information and details about printed pages. |
| Stapler Test | Print a report that confirms that the staple finisher is functioning properly.Note: This menu appears only if an optional staple finisher is installed. |
| Network Setup Page | Print a report containing information about the network printer settings, such as the TCP/IP address information.Note: This menu item appears only in network printers or in printers connected to print servers. |
| Network [x] Setup Page | Print a report containing information about the network printer settings, such as the TCP/IP address information.Notes:This menu item is available only when more than one network option is installed.This menu item appears only in network printers or in printers connected to print servers. |
| Profiles List Print a list of profiles stored in the printer. Note: This menu item appears only when LDSS is enabled. | |
| Print Fonts PCL Fonts PostScript Fonts | Print a report of all the fonts available for the printer language currently set in the printer. Note: A separate list is available for PCL and PostScript emulations. |
| Print Directory | Print a list of all the resources stored in an optional flash memory card or printer hard disk. Notes: ·Job Buffer Size must be set to 100%. ·Make sure the optional flash memory or printer hard disk is installed correctly and working properly. ·This menu item appears only when an optional flash drive or printer hard disk is installed. |
| Asset Report | Print a report containing printer asset information, such as serial number and model name. |
Network/Ports menu
Active NIC menu
| Use To | |
| Active NICAuto[list of available network cards] | Allow the printer to connect to a network.Notes:•Auto is the factory default setting.•This menu item appears only if an optional network adapter is installed. |
Standard Network or Network [x] menu
Note: Only active ports appear in this menu. All inactive ports are omitted.
| Use To | |
| PCL SmartSwitchOnOff | Set the printer to automatically switch to PCL emulation when a print job requires it, regardless of the default printer language.Notes:On is the factory default setting.If PCL SmartSwitch is disabled, then the printer does not examine incoming data and it uses the default printer language specified in the Setup menu. |
| PS SmartSwitchOnOff | Set the printer to automatically switch to PS emulation when a print job requires it, regardless of the default printer language.Notes:On is the factory default setting.If PS SmartSwitch is disabled, then the printer does not examine incoming data and it uses the default printer language specified in the Setup menu. |
| NPA ModeOffAuto | Set the printer to perform the special processing required for bidirectional communication following the conventions defined by the NPA protocol.Notes:Auto is the factory default setting.Changing this setting from the printer control panel, and then exiting the menus causes the printer to restart. The menu selection is then updated. |
| Network BufferAuto3KB to [maximum size allowed] | Set the size of the network input buffer.Notes:Auto is the factory default setting.The value can be changed in 1KB increments.The maximum size allowed depends on the amount of memory in the printer, the size of the other link buffers, and whether Resource Save is set to On or Off.To increase the maximum size range for the Network Buffer, disable or reduce the size of the parallel, serial, and USB buffers.Changing this setting from the printer control panel and then exiting the menus causes the printer to restart. The menu selection is then updated. |
| Job BufferingOffOnAuto | Temporarily store print jobs in the printer hard disk before printing. This menu only appears when a formatted disk is installed.Notes:Off is the factory default setting.On buffers print jobs on the printer hard disk.Auto buffers print jobs only when the printer is busy processing data from another input port.Changing this setting from the printer control panel, and then exiting the menus causes the printer to restart. The menu selection is then updated. |
| Mac Binary PSOnOffAuto | Set the printer to process Macintosh binary PostScript print jobs.Notes:Auto is the factory default setting.Off filters print jobs using the standard protocol.On processes raw binary PostScript print jobs. |
| Standard Network Setup OR Network [x] SetupReportsNetwork CardTCP/IPIPv6WirelessAppleTalk | Show and set the printer network settings.Note:The Wireless menu appears only when the printer is connected to a wireless network. |
Reports menu
To access the menu, navigate to either of the following:
• Network/Ports > Standard Network > Standard Network Setup > Reports
• Network/Ports > Network [x] > Network [x] Setup > Reports
| Use To | |
| Print Setup Page | Print a report containing information about the network printer settings, such as the TCP/IP address. |
Network Card menu
To access the menu, navigate to either of the following:
• Network/Ports > Standard Network > Standard Network Setup > Network Card
• Network/Ports > Network [x] > Network [x] Setup > Network Card
| Use To | |
| View Card StatusConnectedDisconnected | View the connection status of the wireless network adapter. |
| View Card Speed View the speed of an active wireless network adapter. | |
| Network AddressUAA LAA | View the network addresses. |
| Job Timeout0, 10–225 seconds | Set the amount of time it takes for a network print job to be canceled.Notes:“90 seconds” is the factory default setting.A setting value of 0 disables the timeout.If a value between 1 and 9 is selected, then Invalid appears on the display, and the value is not saved. |
| Banner PageOffOn | Allow the printer to print a banner page.Note: Off is the factory default setting. |
TCP/IP menu
To access the menu, navigate to either of the following:
• Network/Ports > Standard Network > Standard Network Setup > TCP/IP
• Network/Ports > Network [x] > Network [x] Setup > TCP/IP
Note: This menu is available only in network printers or printers attached to print servers.
| Use To | |
| Set Hostname Set the current TCP/IP | host name. Note: This can be changed only from the Embedded Web Server. |
| IP Address View or change the current | TCP/IP address. Note: Manually setting the IP address sets the Enable DHCP and Enable Auto IP settings to Off. It also sets Enable BOOTP and Enable RARP to Off on systems that support BOOTP and RARP. |
| Netmask View or change the current | TCP/IP netmask. |
| Gateway View or change the current | TCP/IP gateway. |
| Enable DHCP On Off | Specify the DHCP address and parameter assignment. Note: On is the factory default setting. |
| Enable RARP On Off | Specify the RARP address assignment setting. Note: Off is the factory default setting. |
| Enable BOOTP On Off | Specify the BOOTP address assignment setting. Note: On is the factory default setting. |
| Enable AutoIP Yes No | Specify the Zero Configuration Networking setting. Note: Yes is the factory default setting. |
| Enable FTP/TFTP Yes No | Enable the built-in FTP server, which lets you send files to the printer using File Transfer Protocol. Note: Yes is the factory default setting. |
| Enable HTTP Server Yes No | Enable the built-in Web server (Embedded Web Server). When enabled, the printer can be monitored and managed remotely using a Web browser. Note: Yes is the factory default setting. |
| WINS Server Address View or change | the current WINS server address. |
| Enable DDNS Yes No | View or change the current DDNS setting. Note: Yes is the factory default setting. |
| Enable mDNS Yes No | View or change the current mDNS setting. Note: Yes is the factory default setting. |
| DNS Server Address View or change | the current DNS server address. |
| Backup DNS Server Address View or | change the backup DNS server addresses. |
| Backup DNS Server Address 2 | |
| Backup DNS Server Address 3 | |
| Enable HTTPSYesNo | View or change the current HTTPS setting.Note: Yes is the factory default setting. |
IPv6 menu
To access the menu, navigate to either of the following:
• Network/Ports > Standard Network > Standard Network Setup > IPv6
• Network/Ports > Network [x] > Network [x] Setup > IPv6
Note: This menu is available only in network printers or printers that are attached to print servers.
| Use To | |
| Enable IPv6OnOff | Enable IPv6 in the printer.Note: On is the factory default setting. |
| Auto ConfigurationOnOff | Specify whether or not the wireless network adapter accepts the automatic IPv6 address configuration entries provided by a router.Note: On is the factory default setting. |
| View Hostname Set the host name. | Note: These settings can be changed only from the Embedded Web Server. |
| View Address | |
| View Router Address | |
| Enable DHCPv6OnOff | Enable DHCPv6 in the printer.Note: On is the factory default setting. |
Wireless menu
Note: This menu is available only in printers connected to a wireless network or printer models that have a wireless network adapter.
To access the menu, navigate to:
Network/Ports > Network [x] > Network [x] Setup > Wireless
| Use To | |
| Wi-Fi Protected SetupStart Push Button MethodStart PIN Method | Establish a wireless network and enable network security.Notes:•Start Push Button Method connects the printer to a wireless network when buttons on both the printer and the access point (wireless router) are pressed within a given period of time.•Start PIN Method connects the printer to a wireless network when a PIN on the printer is entered into the wireless settings of the access point. |
| Enable/Disable WPS Auto-detectionEnableDisable | Automatically detect the connection method that an access point with WPS uses—Start Push Button Method or Start PIN Method.Note: Disable is the factory default setting. |
| Network ModeBSS TypeInfrastructureAd hoc | Specify the network mode.Notes:• Infrastructure is the factory default setting. This lets the printer access a network using an access point.• Ad hoc configures wireless connection directly between the printer and a computer. |
| Compatibility802.11b/g802.11b/g/n | Specify the wireless standard for the wireless network.Note: 802.11b/g/n is the factory default setting. |
| Choose Network Select an available network for | the printer to use. |
| View Signal Quality View the quality of the wireless connection. | |
| View Security Mode View the encryption method | for the wireless network. |
AppleTalk menu
Note: This menu appears only in printer models that are connected to an Ethernet network or when an optional wireless network adapter is installed.
To access the menu, navigate to either of the following:
- Network/Ports > Standard Network > Standard Network Setup > AppleTalk
• Network/Ports > Network [x] > Network [x] Setup > AppleTalk
| Use To | |
| ActivateYesNo | Enable or disable AppleTalk support.Note: Yes is the factory default setting. |
| View Name Show the assigned AppleTalk name. | Note: The AppleTalk name can be changed only from the Embedded Web Server. |
| View Address Show the assigned AppleTalk address. | Note: The AppleTalk address can be changed only from the Embedded Web Server. |
| Set Zone[list of zones available on the network] | Provide a list of AppleTalk zones available on the network.Note: The default zone for the network is the factory default setting. |
Standard USB menu
| Use To | |
| PCL SmartSwitchOnOff | Set the printer to automatically switch to PCL emulation when a print job received through a USB port requires it, regardless of the default printer language.Notes:On is the factory default setting.When set to Off, the printer does not examine incoming data. The printer uses PostScript emulation if the PS SmartSwitch is set to On. It uses the default printer language specified in the Setup menu if the PS SmartSwitch is set to Off. |
| PS SmartSwitchOnOff | Set the printer to automatically switch to PS emulation when a print job received through a USB port requires it, regardless of the default printer language.Notes:On is the factory default setting.When set to Off, the printer does not examine incoming data. The printer uses PCL emulation if the PCL SmartSwitch is set to On. It uses the default printer language specified in the Setup menu if the PCL SmartSwitch is set to Off. |
| NPA ModeOnOffAuto | Set the printer to perform the special processing required for bidirectional communication following the conventions defined by the NPA protocol.Notes:Auto is the factory default setting. Auto sets the printer to examine data, determine the format, and then process it appropriately.The printer automatically restarts when changing the setting from the printer control panel. The menu selection is then updated. |
| USB BufferDisabledAuto3K to [maximum size allowed] | Set the size of the USB input buffer.Notes:•Auto is the factory default setting.•Disabled turns off job buffering. Any jobs already buffered on the printer hard disk are printed before normal processing resumes.•The USB buffer size value can be changed in 1-K increments.• The maximum size allowed depends on the amount of memory in the printer, the size of the other link buffers, and whether Resource Save is set to On or Off.•To increase the maximum size range for the USB Buffer, disable or reduce the size of the parallel, serial, and network buffers.• The printer automatically restarts when the setting is changed from the printer control panel. The menu selection is then updated. |
| Job BufferingOffOnAuto | Temporarily store print jobs in the printer hard disk before printing.Notes:•Off is the factory default setting.•On buffers jobs on the printer hard disk.•Auto buffers print jobs only if the printer is busy processing data from another input port.•Changing this setting from the printer control panel and then exiting the menus causes the printer to restart. The menu selection is then updated. |
| Mac Binary PSOnOffAuto | Set the printer to process Macintosh binary PostScript print jobs.Notes:•Auto is the factory default setting.•On processes raw binary PostScript print jobs.•Off filters print jobs using the standard protocol. |
| ENA AddressYYY.YYY.YYY.YYY | Set the network address information for an external print server.Note:This menu is available only when the printer is attached to an external print server through the USB port. |
| ENA NetmaskYYY.YYY.YYY.YYY | Set the netmask information for an external print server.Note:This menu is available only when the printer is attached to an external print server through the USB port. |
| ENA GatewayYYY.YYY.YYY.YYY | Set the gateway information for an external print server.Note:This menu is available only when the printer is attached to an external print server through the USB port. |
Parallel [x] menu
Note: This menu appears only when an optional parallel card is installed.
| Use To | |
| PCL SmartSwitchOnOff | Set the printer to automatically switch to PCL emulation when a print job received through a serial port requires it, regardless of the default printer language.Notes:On is the factory default setting.When set to Off, the printer does not examine incoming data. The printer uses PostScript emulation if PS SmartSwitch is set to On. It uses the default printer language specified in the Setup menu if PS SmartSwitch is set to Off. |
| PS SmartSwitchOnOff | Set the printer to automatically switch to PS emulation when a print job received through a serial port requires it, regardless of the default printer language.Notes:On is the factory default setting.When set to Off, the printer does not examine incoming data. The printer uses PCL emulation if PCL SmartSwitch is set to On. It uses the default printer language specified in the Setup menu if PCL SmartSwitch is set to Off. |
| NPA ModeOnOffAuto | Set the printer to perform the special processing required for bidirectional communication following the conventions defined by the NPA protocol.Notes:Auto is the factory default setting.Changing this setting from the printer control panel and then exiting the menus causes the printer to restart. The menu selection is then updated. |
| Parallel BufferDisabledAuto3K to [maximum size allowed] | Set the size of the parallel input buffer.Notes:Auto is the factory default setting.Disabled turns off job buffering. Any print jobs already buffered on the printer hard disk are printed before normal processing resumes.The parallel buffer size setting can be changed in 1-KB increments.The maximum size allowed depends on the amount of memory in the printer, the size of the other link buffers, and whether Resource Save is set to On or Off.To increase the maximum size range for the Parallel Buffer, disable or reduce the size of the USB, serial, and network buffers.Changing this setting from the printer control panel and then exiting the menus causes the printer to restart. The menu selection is then updated. |
| Job BufferingOffOnAuto | Temporarily store print jobs on the printer hard disk before printing.Notes:Off is the factory default setting.On buffers print jobs on the printer hard disk.Auto buffers print jobs only if the printer is busy processing data from another input port.Changing this setting from the printer control panel and then exiting the menus causes the printer to restart. The menu selection is then updated. |
| Advanced StatusOnOff | Enable bidirectional communication through the parallel port.Notes:On is the factory default setting.Off disables parallel port negotiation. |
| ProtocolStandardFastbytes | Specify the parallel port protocol.Notes:Fastbytes is the factory default setting. It provides compatibility with most existing parallel ports and is the recommended setting.Standard tries to resolve parallel port communication problems. |
| Honor InitOnOff | Determine if the printer honors printer hardware initialization requests from the computer.Notes:Off is the factory default setting.The computer requests initialization by activating the Init signal from the parallel port. Many personal computers activate the Init signal each time the computer is turned on. |
| Parallel Mode 2OnOff | Determine if the parallel port data is sampled on the leading or trailing edge of a strobe.Note: On is the factory default setting. |
| Mac Binary PSOnOffAuto | Set the printer to process Macintosh binary PostScript print jobs.Notes:Auto is the factory default setting.Off filters print jobs using the standard protocol.On processes raw binary PostScript print jobs. |
| ENA AddressYYY.YYY.YYY.YYY | Set the network address information for an external print server.Note: This menu item is available only if the printer is attached to an external print server through the USB port. |
| ENA NetmaskYYY.YYY.YYY.YYY | Set the netmask information for an external print server.Note: This menu item is available only if the printer is attached to an external print server through the USB port. |
| ENA GatewayYYY.YYY.YYY.YYY | Set the gateway information for an external print server.Note: This menu item is available only if the printer is attached to an external print server through the USB port. |
Serial [x] menu
Note: This menu appears only when an optional serial card is installed.
| Use To | |
| PCL SmartSwitchOnOff | Set the printer to automatically switch to PCL emulation when a print job received through a serial port requires it, regardless of the default printer language.Notes:On is the factory default setting.When set to Off, the printer does not examine incoming data. The printer uses PostScript emulation if PS SmartSwitch is set to On. It uses the default printer language specified in the Setup menu if PS SmartSwitch is set to Off. |
| PS SmartSwitchOnOff | Set the printer to automatically switch to PS emulation when a print job received through a serial port requires it, regardless of the default printer language.Notes:On is the factory default setting.When set to Off, the printer does not examine incoming data. The printer uses PCL emulation if PCL SmartSwitch is set to On. It uses the default printer language specified in the Setup menu if PCL SmartSwitch is set to Off. |
| NPA ModeOnOffAuto | Set the printer to perform the special processing required for bidirectional communication following the conventions defined by the NPA protocol.Notes:Auto is the factory default setting. Auto sets the printer to examine data, determine the format, and then processes it appropriately.When set to On, the printer performs NPA processing. If the data is not in NPA format, it is rejected as bad data.When set to Off, the printer does not perform NPA processing.Changing this setting from the printer control panel and then exiting the menus causes the printer to restart. The menu selection is then updated. |
| Serial BufferDisabledAuto3K to [maximum size allowed] | Set the size of the serial input buffer.Notes:Auto is the factory default setting.Disabled turns off job buffering. Any jobs already buffered on the disk are printed before normal processing is resumed.The serial buffer size setting can be changed in 1-KB increments.The maximum size allowed depends on the amount of memory in the printer, the size of the other link buffers, and whether Resource Save is set to On or Off.To increase the maximum size range for the Serial Buffer, disable or reduce the size of the parallel, serial, and network buffers.Changing this setting from the printer control panel and then exiting the menus causes the printer to restart. The menu selection is then updated. |
| Job BufferingOffOnAuto | Temporarily store print jobs on the printer hard disk before printing.Notes:Off is the factory default setting. The printer does not buffer print jobs on the printer hard disk.On buffers print jobs on the printer hard disk.Auto buffers print jobs only if the printer is busy processing data from another input port.Changing this setting from the printer control panel and then exiting the menus causes the printer to restart. The menu selection is then updated. |
| ProtocolDTRDTR/DSRXON/XOFFXON/XOFF/DTRXONXOFF/DTRDSR | Select the hardware and software handshaking settings for the serial port.Notes:DTR is the factory default setting.DTR/DSR is a hardware handshaking setting.XON/XOFF is a software handshaking setting.XON/XOFF/DTR and XON/XOFF/DTR/DSR are combined hardware and software handshaking settings. |
| Robust XONOnOff | Determine whether the printer communicates availability to the computer.Notes:Off is the factory default setting.This menu item applies only to the serial port if Serial Protocol is set to XON/XOFF. |
| Baud1200240048009600192003840057600115200138200172800230400345600 | Specify the rate at which data can be received through the serial port.Notes:9600 is the factory default setting.138200, 172800, 230400, and 345600 baud rates are only displayed in the Standard Serial menu. These settings do not appear in the Serial Option 1, Serial Option 2, or Serial Option 3 menus. |
| Data Bits78 | Specify the number of data bits sent in each transmission frame.Note:8 is the factory default setting. |
| ParityEvenOddNoneIgnore | Set the parity for serial input and output data frames.Note: None is the factory default setting. |
| Honor DSROnOff | Determine whether the printer uses the DSR Signal.Notes:•Off is the factory default setting.• DSR is a handshaking signal used by most serial cables. The serial port uses DSR to distinguish data sent by the computer from data created by electrical noise in the serial cable. The electrical noise can cause stray characters to print. Set this to On to prevent stray characters from printing. |
SMTP Setup menu
| Use To | |
| Primary SMTP Gateway Specify SMTP server gate | ateway and port information. Note: 25 is the default SMTP gateway port. |
| Primary SMTP Gateway Port | |
| Secondary SMTP Gateway | |
| Secondary SMTP Gateway Port | |
| SMTP Timeout 5–30 | Specify the amount of time in seconds before the server stops trying to send an e-mail. Note: 30 is the factory default setting. |
| Reply Address Specify a reply address of up to 128 characters in the e-mail sent by the printer. | |
| Use SSL Disabled Negotiate Required | Set the printer to use SSL for increased security when connecting to the SMTP server. Notes: •Disabled is the factory default setting. •When the Negotiate setting is used, the SMTP server determines if SSL will be used. |
| SMTP Server Authentication No authentication required Login/Plain CRAM-MD5 Digest-MD5 NTLM Kerberos 5 | Specify the type of user authentication required for printing privileges. Note: “No authentication required” is the factory default setting. |
| Device-Initiated E-mailNoneUse Device SMTP Credentials | Specify what credentials will be used when communicating to the SMTP server. Some SMTP servers require credentials to send an e-mail.Notes:None is the factory default setting for Device-Initiated E-mail and User-Initiated E-mail.Device Userid and Device Password are used to log in to the SMTP server when Use Device SMTP Credentials is selected.User-Initiated E-mail, Kerberos 5 Realm, and NTLM Domain appear only in touch-screen printer models. |
| User-Initiated E-mailNoneUse Device SMTP CredentialsUse Session User ID & PasswordUse Session E-mail address & PasswordPrompt User | |
| Device Userid | |
| Device Password | |
| Kerberos 5 Realm | |
| NTLM Domain | |
Security menu
Edit Security Setups menu
Note: This menu appears only in select touch-screen printer models.
| Use To | |
| Edit Backup PasswordUse Backup Password•Off•OnPassword | Create a backup password.Notes:•Off is the factory default setting for “Use Backup Password.”•This menu appears only if a backup password exists. |
| Edit Building BlocksInternal AccountsNTLMSimple Kerberos SetupKerberos SetupActive DirectoryLDAPLDAP+GSSAPIPasswordPIN | Edit settings for Internal Accounts, NTLM, Simple Kerberos Setup, Kerberos Setup, Active Directory, LDAP, Password, and PIN. |
| Edit Security Templates[list of available templates] | Add or edit a security template. |
| Edit Access ControlsAdministrative MenusFunction AccessManagementSolutionsCancel jobs at the Device | Control access to printer menus, firmware updates, held jobs, and other access points. |
Miscellaneous Security Settings menu
Note: This menu appears only in touch-screen printer models.
| Use To | |
| Login RestrictionsLogin failuresFailure time frameLockout timePanel Login TimeoutRemote Login Timeout | Limit the number and time frames of failed login attempts from the printer control panel before all users are locked out.Notes:“Login failures” specifies the number of failed login attempts before users are locked out. Settings range from 1 to 10. 3 attempts is the factory default setting.“Failure time frame” specifies the time frame during which failed login attempts can be made before users are locked out. Settings range from 1 to 60 minutes. 5 minutes is the factory default setting.“Lockout time” specifies how long users are locked out after exceeding the login failures limit. Settings range from 1 to 60 minutes. 5 minutes is the factory default setting.Panel Login Timeout specifies how long the printer remains idle on the printer control panel before automatically logging the user off. Settings range from 1 to 900 seconds. 30 seconds is the factory default setting.Remote Login Timeout specifies how long a remote interface remains idle before automatically logging the user off. Settings range from 1 to 120 seconds. 10 minutes is the factory default setting. |
| Minimum PIN Length1–16 | Limit the digit length of the PIN.Note:4 is the factory default setting. |
Confidential Print menu
| Use To | |
| Max Invalid PINOff2–10 | Limit the number of times an invalid PIN can be entered.Notes:This menu appears only when a formatted, non-defective printer hard disk is installed.Once the limit is reached, the print jobs for that user name and PIN are deleted. |
| Note: Off is the factory default setting. | |
| Confidential Job ExpirationOff1 hour4 hours24 hours1 week | Limit the amount of time a confidential print job stays in the printer before it is deleted.Notes:If the “Confidential Job Expiration” setting is changed while confidential print jobs reside in the printer RAM or printer hard disk, then the expiration time for those print jobs does not change to the new default value.If the printer is turned off, then all confidential jobs held in the printer RAM are deleted. |
| Repeat Job ExpirationOff1 hour4 hours24 hours1 week | Set a time limit on how long the printer stores print jobs. |
| Verify Job ExpirationOff1 hour4 hours24 hours1 week | Set a time limit on how long the printer stores print jobs needing verification. |
| Reserve Job ExpirationOff1 hour4 hours24 hours1 week | Set a time limit on how long the printer stores print jobs for printing at a later time. |
| Note: Off is the factory default setting. | |
Disk Wiping menu
Disk Wiping erases only print job data on the printer hard disk that are not currently in use by the file system. All permanent data on the printer hard disk are preserved, such as downloaded fonts, macros, and held jobs.
Note: This menu appears only when a formatted, non-defective printer hard disk is installed.
| Use To | |
| Wiping ModeAuto | Specify the mode for disk wiping. |
| Automatic MethodSingle passMultiple pass | Mark all disk space used by a previous print job. This method does not permit the file system to reuse this space until it has been cleared.Notes:“Single pass” is the factory default setting.Only automatic wiping enables users to activate disk wiping without having to turn the printer off for an extended amount of time.Highly confidential information should be wiped using only the Multiple pass method. |
Security Audit Log menu
| Use To | |
| Export Log Let an authorized user export | port the audit log.Notes:To export the audit log from the printer control panel, a flash drive must be attached to the printer.The audit log can be downloaded from the Embedded Web Server and saved on a computer. |
| Delete LogYesNo | Specify whether or not audit logs are deleted.Note: Yes is the factory default setting. |
| Configure LogEnable AuditYesNoEnable Remote SyslogNoYesRemote Syslog Facility0–23Severity of events to log0–7 | Specify how and whether or not audit logs are created.Notes:Enable Audit determines if events are recorded in the secure audit log and remote syslog. No is the factory default setting.Enable Remote Syslog determines if logs are sent to a remote server. No is the factory default setting.Remote Syslog Facility determines the value used to send logs to the remote syslog server. 4 is the factory default setting.If the security audit log is activated, then the severity value of each event is recorded. 4 is the factory default setting. |
Set Date and Time menu
| Use To | |
| Current Date and Time Show the current date and time settings for the printer. | |
| Manually Set Date and Time [input date/time] | Enter the date and time.Notes:For touch-screen printer models, date and time are set in YYYY-MM-DD HH:MM format.Manually setting the date and time sets Enable NTP to No.For non-touch-screen printer models, the wizard lets you set the date and time in YYYY-MM-DD-HH:MM format. |
| Time Zone[list of time zones] | Select the time zone.Note:GMT is the factory default setting for non-touch-screen printer models. |
| Automatically observe DSTOnOff | Set the printer to use the applicable daylight saving time (DST) start and end times associated with the printer Time Zone setting.Note:On is the factory default setting. |
| Enable NTPOnOff | Enable Network Time Protocol, which synchronizes the clocks of devices on a network.Notes:On is the factory default setting.The setting is turned off if you manually set the date and time. |
Settings menu
General Settings
General Settings menu
| Use To | |
| Display LanguageEnglishFrancaisDeutschItalianoEspanolDanskNorskNederlandsSvenskaPortugueseSuomiRussianPolskiGreekMagyarTurkceCeskySimplified ChineseTraditional ChineseKoreanJapanese | Set the language of the text that appears on the printer display.Note: Not all languages are available for all printer models. |
| Show Supply EstimatesShow estimatesDo not show estimates | Get an estimate on the status of supplies.Notes:•“Show estimates” displays the estimated supply status in pages on the printer control panel, printer Web page, and on the Menu Settings and the Device Statistics reports.•“Do not show estimates” hides the estimated supply status in any location. |
| Eco-ModeOffEnergyEnergy/PaperPaper | Minimize the use of energy, paper, or specialty media.Notes:For touch-screen printer models,touch Eco-Mode, and then select from the options.Off is the factory default setting. Off resets the printer to its factory default settings.Energy minimizes the power used by the printer.Performance may be affected, but print quality is not.Energy/Paper minimizes the use of power and of paper and specialty media.Paper minimizes the amount of paper and specialty media needed for a print job. Performance may be affected, but print quality is not. |
| Quiet ModeOffOn | Reduce the amount of noise produced by the printer.Notes:For touch-screen printer models,touch Quiet Mode, and then select from the options.Off is the factory default setting. This setting supports the performance specifications for your printer.On configures the printer to produce as little noise as possible. This setting is best suited for printing text and line art.Selecting Photo from the printer driver may disable Quiet mode and provide better print quality and full-speed printing. |
| Run Initial setupYesNo | Instruct the printer to run the setup wizard.Notes:Yes is the factory default setting.After completing the setup wizard by selecting Done at the Country select screen, the default becomes No. |
| KeyboardKeyboard TypeEnglishFrancaisFrancais CanadienDeutschItalianoEspanolGreekDanskNorskNederlandsSvenskaSuomiPortugueseRussianPolskiSwiss GermanSwiss FrenchKoreanMagyarTurkishCzechSimplified ChineseTraditional ChineseJapaneseCustom Key 1Custom Key 2 | Specify a language and custom key information for the printer control panel keyboard. The additional tabs enable access to accent marks and symbols from the keypad on the printer control panel.Notes:This menu appears only in touch-screen printer models.Custom Key 2 appears only in select touch-screen printer models. |
| Paper SizesUSMetric | Specify the unit of measurement for paper sizes.Notes:US is the factory default setting.The initial setting is determined by your country or region selection in the initial setup wizard. |
| Displayed InformationLeft sideRight side | Specify what is displayed on the upper left and right corners of the printer control panel.For the “Left side” and “Right side” options, select from the following options:NoneIP AddressHostnameContact NameLocationDate/Time mDNS/DDNS Service NameZero Configuration NameCustom Text [x]Model NameNotes:This menu appears only in touch-screen printer models.IP Address is the factory default setting for Left side.Date/Time is the factory default setting for Right side. |
| Displayed Information (continued)Custom Text [x] | Customize displayed information that will appear on the upper left and right corners of the printer control panel.Note: This menu appears only in touch-screen printer models. |
| Displayed Information (continued)Black Toner | Customize the displayed information for Black Toner.Select from the following options:When to displayDo not displayDisplayMessage to DisplayDefaultAlternateDefault[text entry]Alternate[text entry]Notes:This menu appears only in touch-screen printer models.“Do not display” is the factory default setting for “When to display.”Default is the factory default setting for “Message to Display.” |
| Displayed Information (continued)Paper JamLoad PaperService Errors | Customize the displayed information for Paper Jam, Load Paper, and Service Errors.Select from the following options:DisplayYesNoMessage to DisplayDefaultAlternateDefault[text entry]Alternate[text entry]Notes:This menu appears only in touch-screen printer models.No is the factory default setting for “Display.”Default is the factory default setting for “Message to Display.” |
| Home screen customizationChange LanguageSearch Held JobsHeld JobsUSB DriveProfiles and SolutionsBookmarksJobs by user | Change the icons and buttons that appear on the printer control panel.For each icon or button, select from the following options:DisplayDo not displayNotes:“Profiles and Solutions” appears only in touch-screen printer models.Display is the factory default setting for Search Held Jobs, Held jobs, and USB Drive.“Do not display” is the factory default setting for “Change Language,” “Profiles and Solutions,” “Bookmarks,” and “Jobs by user.” |
| Home screen customizationForms and FavoritesBackground and Idle ScreenEco-Settings | Change the icons and buttons that appear on the printer control panel.For each icon or button, select from the following options:DisplayDo not displayNotes:“Forms and Favorites,” “Background and Idle Screen,” and “Eco-Settings” appear only in touch-screen printer models.Display is the factory default setting. |
| Date FormatMM-DD-YYYYDD-MM-YYYYYYYY-MM-DD | Format the printer date.Notes:This menu appears only in touch-screen printer models.MM-DD-YYYY is the US factory default setting. |
| Time Format12 hour A.M./P.M.24 hour clock | Format the printer time.Note: This menu appears only in touch-screen printer models. |
| Screen Brightness20–100 | Specify the brightness of the display.Notes:This menu appears only in touch-screen printer models.100 is the factory default setting. |
| Output LightingNormal/Standby ModeOffDimBright | Set the amount of light from the bin.Notes:If Eco-Mode is set to Energy or Energy/Paper, then the factory default setting is Dim.If Eco-Mode is set to Off or set to Paper, then the factory default setting is Bright.This menu appears only when an indicator light is installed on the bin or when an optional bin with an indicator light is added. |
| Audio FeedbackButton FeedbackOnOffVolume1–10 | Specify whether icons and buttons have audio feedback.Notes:This menu appears only in touch-screen printer models.On is the factory default setting for Button Feedback.5 is the factory default setting for Volume. |
| Show BookmarksYesNo | Specify whether bookmarks are displayed from the Held Jobs area.Notes:This menu appears only in touch-screen printer models.Yes is the factory default setting. When Yes is selected, bookmarks appear in the Held Jobs area. |
| Web Page Refresh Rate30–300 | Specify the number of seconds between Embedded Web Server refreshes.Notes:This menu appears only in touch-screen printer models.120 is the factory default setting. |
| Contact Name Specify a contact name for the printer. | Notes:This menu appears only in touch-screen printer models.The contact name will be stored on the Embedded Web Server. |
| Location Specify the location of the printer. | Notes:This menu appears only in touch-screen printer models.The location will be stored on the Embedded Web Server. |
| AlarmsAlarm ControlCartridge AlarmStaple AlarmHole Punch Alarm | Set an alarm to sound when the printer requires user intervention.For each alarm type, select from the following options:OffSingleContinuousNotes:Single is the factory default setting for Alarm Control. Single sounds three quick beeps.Off is the factory default setting for Cartridge Alarm, Staple Alarm, and Hole Punch Alarm. Off means no alarm will sound.Continuous repeats three beeps every 10 seconds. |
| TimeoutsStandby ModeDisabled1-240 | Specify the number of minutes of inactivity before the printer enters a lower power state.Notes:Standby Mode appears only in touch-screen printer models.15 is the factory default setting. |
| TimeoutsSleep ModeDisabled1-120 | Set the amount of time the printer waits after a job is printed before it goes into a reduced power state.Notes:30 is the factory default setting.Disabled appears only when Energy Conserve is set to Off.Lower settings conserve more energy, but may require longer warm-up times.Select a high setting if the printer is in constant use. Under most circumstances, this keeps the printer ready to print with minimum warm-up time. |
| TimeoutsHibernate TimeoutDisabled1 hour2 hours3 hours6 hours1 day2 days3 days1 week2 weeks1 month | Set the printer to operate at a low power state.Notes:When the Hibernate Timeout timer expires, the printer uses Ethernet connection to check the value of “Hibernate Timeout on Connection.”If “Hibernate Timeout on Connection” is set to “Do Not Hibernate,” then the printer never automatically hibernates.If “Hibernate Timeout on Connection” is set to “Hibernate,” then the printer follows the Hibernate Timeout value, except when it is set to Disabled level.Disabled is the factory default setting except for European Union countries, Canada, and Switzerland.“3 days” is the factory default setting for European Union countries, Canada, and Switzerland. |
| TimeoutsScreen Timeout15–300 sec | Set the amount of time in seconds the printer waits before returning the display to a ready state.Note:“30 sec” is the factory default setting. |
| TimeoutsProlong Screen TimeoutOffOn | Set the printer to continue the specified job without returning to the home screen when the Screen Timeout timer expires.Notes:Prolong Screen Timeout appears only in touch-screen printer models.On allows the user to reset the Screen Timeout timer instead of returning to ready state.Off follows the normal Screen Timeout value.Off is the factory default setting. |
| TimeoutsPrint TimeoutDisabled1–255 sec | Set the amount of time in seconds the printer waits to receive an end-of-job message before canceling the remainder of the print job.Notes:“90 sec” is the factory default setting.When the timer expires, any partially printed page still in the printer is printed, and then the printer checks to see if any new print jobs are waiting.Print Timeout is available only when using PCL emulation.This setting has no effect on PostScript emulation print jobs. |
| TimeoutsWait TimeoutDisabled15–65535 sec | Set the amount of time in seconds the printer waits for additional data before canceling a print job.Notes:“40 sec” is the factory default setting.Wait Timeout is available only when the printer is using PostScript emulation. This setting has no effect on PCL emulation print jobs. |
| TimeoutsJob Hold Timeout5–255 sec | Set the amount of time the printer waits for user intervention before it holds jobs that require unavailable resources and continues to print other jobs in the print queue.Notes:“30 sec” is the factory default setting.This menu appears only when a printer hard disk is installed. |
| Error RecoveryAuto RebootReboot when idleReboot alwaysReboot neverMax Auto Reboots1–20 | Set the printer to restart when an error is encountered.Notes:“Reboot always” is the factory default setting for Auto Reboot.5 is the factory default setting for Max Auto Reboots.If the printer performs the same number of automatic reboots that is set in the printer within a certain amount of time, then the printer shows the applicable error instead of rebooting. |
| Error RecoveryMax Auto Reboots1–20 | Set the number of automatic reboots that the printer can perform.Notes:5 is the factory default setting.If the printer performs a number of automatic reboots that is the same as the menu setting within a certain amount of time, then the printer displays the applicable error instead of rebooting. |
| Print RecoveryAuto ContinueDisabled5–255 | Let the printer automatically continue printing from certain offline situations when these are not resolved within the specified time period.Note: Disabled is the factory default setting. |
| Print RecoveryJam RecoveryOnOffAuto | Specify whether the printer reprints jammed pages.Notes:Auto is the factory default setting. The printer reprints jammed pages unless the memory required to hold the pages is needed for other printer tasks.On sets the printer to always reprint jammed pages.Off sets the printer to never reprint jammed pages. |
| Print RecoveryJam AssistOnOff | Set the printer to check for jammed paper automatically.Note: On is the factory default setting. |
| Print RecoveryPage ProtectOffOn | Let the printer successfully print a page that may not have printed otherwise.Notes:Off is the factory default setting. Off prints a partial page when there is not enough memory to print the whole page.On sets the printer to process the whole page so that the entire page prints. |
| Hibernate Timeout on ConnectionDo Not HibernateHibernate | To set the printer to follow the setting of “Hibernate Timeout” even when an active Ethernet connection exists.Notes:If “Hibernate Timeout on Connection” is set to “Do Not Hibernate,” then the printer never automatically hibernates.If “Hibernate Timeout on Connection” is set to “Hibernate,” then the printer follows the value of the “Hibernate Timeout” setting, except when it is set to Disabled.“Do Not Hibernate” is the factory default setting. |
| Press Sleep ButtonDo nothingSleepHibernate | Determine how the printer, while in idle state, reacts to a short press of the Sleep button.Note:Sleep is the factory default setting. |
| Press and Hold Sleep ButtonDo nothingSleepHibernate | Determine how the printer, while in idle state, reacts when you press and hold the Sleep button.Note:“Do nothing” is the factory default setting. |
| Factory DefaultsDo Not RestoreRestore Now | Restore the printer settings to the factory default settings.Notes:Do Not Restore is the factory default setting. Do Not Restore keeps the user-defined settings.Restore Now returns all printer settings to the factory default settings except Network/Ports menu settings. All downloads stored in the RAM are deleted. Downloads stored in the flash memory or in the printer hard disk are not affected. |
| Custom Home MessageOffIP AddressHostnameContact NameLocationZero Configuration NameCustom Text 1 | Select Custom Home Messages on the printer display.Note:This menu appears only in non-touch-screen printer models. |
| Export Configuration Package Export | Export the printer configuration package to a flash drive. Note: The configuration package cannot be exported unless a flash drive is attached to the printer. |
Flash Drive Menu
Print Settings menu
| Use To | |
| Copies1-999 | Specify a default number of copies for each print job.Note: 1 is the factory default setting. |
| Paper SourceTray [x]MP FeederManual PaperManual Envelope | Set a default paper source for all print jobs.Note: Tray 1 is the factory default setting. |
| Collate(1,1,1) (2,2,2)(1,2,3) (1,2,3) | Stack the pages of a print job in sequence when printing multiple copies.Note: “(1,1,1) (2,2,2)” is the factory default setting. |
| Sides (Duplex)1 sided2 sided | Specify whether prints are on one side or on both sides of the page.Note: 1 sided is the factory default setting. |
| StapleOffOn | Specify whether prints are stapled.Notes:•Off is the factory default setting.•On allows the printer to staple print jobs.•This menu appears only when a supported staple finisher is installed. |
| Hole PunchOffOn | Specify whether prints have holes for binding.Notes:•Off is the factory default setting.•This menu appears only when a supported staple, hole punch finisher is installed. |
| Hole Punch Mode2 holes3 holes4 holes | Specify the number of holes to be made on the prints.Notes:•“3 holes” is the factory default setting.•This menu appears only when a supported staple, hole punch finisher is installed. |
| Duplex BindingLong EdgeShort Edge | Define the way duplexed pages are bound and printed.Notes:•Long Edge assumes binding along the long edge of the page (left edge for portrait and top edge for landscape). This is the factory default setting.•Short Edge assumes binding along the short edge of the page (top edge for portrait and left edge for landscape). |
| Paper Saver OrientationAutoLandscapePortrait | Specify the orientation of a multiple-page document.Notes:•Auto is the factory default setting.•This setting affects jobs if the value of the Paper Saver setting in the same menu is not set to Off. |
| Paper SaverOff2-Up3-Up4-Up6-Up9-Up12-Up16-Up | Specify that multiple-page images be printed on one side of a paper.Notes:•Off is the factory default setting.•The number selected is the number of page images that will print per side. |
| Paper Saver BorderNoneSolid | Print a border on each page image when using N-Up (pages per side).Notes:•None is the factory default setting.•This setting affects jobs if the value of the Paper Saver setting in the same menu is not set to Off. |
| Paper Saver OrderingHorizontalReverse HorizontalReverse VerticalVertical | Specify the positioning of multiple-page images when using N-Up (pages per side).Notes:•Horizontal is the factory default setting.•Positioning depends on the number of page images and whether they are in portrait or landscape orientation.•This setting affects jobs if the value of the Paper Saver setting in the same menu is not set to Off. |
| Separator SheetsOffBetween CopiesBetween JobsBetween Pages | Specify if blank separator sheets are inserted.Notes:Off is the factory default setting.Between Copies inserts a blank sheet between each copy of a print job if Collate is set to On. If Collate is set to Off, then a blank page is inserted between each set of printed pages, such as after all page 1's and after all page 2's.Between Jobs inserts a blank sheet between print jobs.Between Pages inserts a blank sheet between each page of the print job. This setting is useful when printing on transparencies or when inserting blank pages in a document for notes. |
| Separator Sheet SourceTray [x]Manual Feeder | Specify the paper source for separator sheets.Note: Tray 1 is the factory default setting. |
| Blank PagesDo Not PrintPrint | Specify if blank pages are inserted in a print job.Note: Do Not Print is the factory default setting. |
Print Settings
Setup menu
| Use To | |
| Printer LanguagePCL EmulationPS Emulation | Set the default printer language.Notes:PCL Emulation is the factory default setting.PostScript emulation uses a PostScript interpreter for processing print jobs.PCL Emulation uses a PCL interpreter for processing print jobs.Setting a printer language default does not prevent a software program from sending print jobs that use another printer language. |
| Job WaitingOnOff | Determine if print jobs are removed from the print queue when they require unavailable printer options or custom settings. These print jobs are stored in a separate print queue, so other jobs print normally. When the missing information or options, or both are obtained, the stored jobs print.Notes:Off is the factory default setting.This menu appears only if a non-read-only printer hard disk is installed. This requirement ensures that stored jobs are not deleted if the printer loses power. |
| Print AreaNormalFit to PageWhole Page | Set the logical and physical printable area.Notes:Normal is the factory default setting. When attempting to print data in the non-printable area defined by the Normal setting, the printer clips the image at the boundary.Fit to Page fits the page content into the selected paper size.Whole Page allows the image to be moved into the non-printable area defined by the Normal setting, but the printer clips the image at the Normal setting boundary. This setting affects only pages printed using a PCL 5e interpreter and has no effect on pages printed using the PCL XL or PostScript interpreter. |
| Download TargetRAMFlashDisk | Set the storage location for downloads.Notes:RAM is the factory default setting. Storing downloads in the RAM is temporary.Storing downloads in a flash memory or in a printer hard disk places them in permanent storage. Downloads remain in the flash memory or printer hard disk even when the printer is turned off.This menu item appears only if an optional flash memory or printer hard disk is installed. |
| Resource SaveOnOff | Specify how the printer handles temporary downloads, such as fonts and macros stored in the RAM, when the printer receives a print job that requires more than the available memory.Notes:Off is the factory default setting. Off sets the printer to retain downloads only until memory is needed. Downloads are deleted in order to process print jobs.On sets the printer to retain downloads during language changes and printer resets. If the printer runs out of memory, then Memory Full [38] appears on the printer display, but downloads are not deleted. |
| Print All OrderAlphabeticalOldest FirstNewest First | Specify the order in which held and confidential jobs are printed when Print All is selected.Notes:This menu appears only in touch-screen printer models.Alphabetical is the factory default setting. |
Finishing menu
| Use To | |
| Sides (Duplex)1 sided2 sided | Specify whether two-sided (duplex) printing is set as the default for all print jobs.Notes:“1 sided” is the factory default setting.You can set two-sided printing from the printer software.For Windows users:Click File > Print, and then click Properties, Preferences, Options, or Setup.For Macintosh users:Choose File > Print, and then adjust the settings from the Print dialog and pop-up menus. |
| Duplex BindingLong EdgeShort Edge | Define the way duplexed pages are bound and printed.Notes:Long Edge is the factory default setting. Long Edge assumes binding along the long edge of the page (left edge for portrait and top edge for landscape).Short Edge assumes binding along the short edge of the page (top edge for portrait and left edge for landscape). |
| Copies1-999 | Specify the default number of copies for each print job.Note: 1 is the factory default setting. |
| Blank PagesDo Not PrintPrint | Specify whether blank pages are inserted in a print job.Note: Do Not Print is the factory default setting. |
| Collate(1,1,1) (2,2,2)(1,2,3) (1,2,3) | Stack the pages of a print job in sequence when printing multiple copies.Notes:“(1,1,1) (2,2,2)” is the factory default setting.On stacks the print job in sequence. |
| Separator SheetsOffBetween CopiesBetween JobsBetween Pages | Specify whether blank separator sheets are inserted.Notes:None is the factory default setting.Between Copies inserts a blank sheet between each copy of a print job if Collate is set to “(1,2,3) (1,2,3).” If Collate is set to “(1,1,1) (2,2,2),” then a blank page is inserted between each set of printed pages, such as after all page 1's and after all page 2's.Between Jobs inserts a blank sheet between print jobs.Between Pages inserts a blank sheet between each page of a print job. This setting is useful when printing transparencies or when inserting blank pages in a document. |
| Separator SourceTray [x]Manual Feeder | Specify the paper source for separator sheets.Notes:Tray 1 (standard tray) is the factory default setting.From the Paper menu, set Configure MP to "Cassette" for Manual Feeder to appear as a menu setting. |
| Paper SaverOff2-Up3-Up4-Up6-Up9-Up12-Up16-Up | Print multiple-page images on one side of a paper.Notes:Off is the factory default setting.The number selected is the number of page images that will print per side. |
| Paper Saver OrderingHorizontalReverse HorizontalReverse VerticalVertical | Specify the positioning of multiple-page images when using Paper Saver.Notes:Horizontal is the factory default setting.Positioning depends on the number of page images and whether they are in portrait or landscape orientation. |
| Paper Saver OrientationAutoLandscapePortrait | Specify the orientation of a multiple-page document.Note:Auto is the factory default setting. The printer chooses between portrait and landscape. |
| Paper Saver BorderNoneSolid | Print a border when using Paper Saver.Note: None is the factory default setting. |
| Staple JobOffOn | Specify whether printed output is stapled.Notes:Off is the factory default setting.This menu appears only when a supported staple finisher is installed. |
| Run Stapler Test | Print a report that confirms that the staple finisher is functioning properly.Note: This menu appears only when a supported staple finisher is installed. |
| Hole PunchOnOff | Specify whether holes will be created on printed outputs for the purpose of collecting the sheets in a binder or folder.Notes:Off is the factory default setting.This menu appears only when a supported staple, hole punch finisher is installed. |
| Hole Punch Mode2 holes3 holes4 holes | Specify the number of holes to be created on printed outputs for the purpose of collecting the sheets in a binder or folder.Notes:“3 holes” is the US factory default setting. “4 holes” is the international factory default setting.This menu appears only when a supported staple, hole punch finisher is installed. |
| Offset PagesNoneBetween CopiesBetween Jobs | Offset pages at certain instances.Notes:None is the factory default setting.Between Copies offsets each copy of a print job if Collate is set to On. If Collate is set to Off, then each set of printed pages are offset, such as all page 1's and all page 2's.Between Jobs sets the same offset position for the entire print job regardless of the number of copies printed.This menu appears only when a supported staple finisher is installed. |
Quality menu
| Use To | |
| Print Resolution300 dpi600 dpi1200 dpi1200 Image Q2400 Image Q | Specify the printed output resolution in dots per inch.Note: 600 dpi is the factory default setting. |
| Pixel BoostOffFontsHorizontallyVerticallyBoth directionsIsolated | Enable more pixels to print in clusters for clarity, in order to enhance images horizontally or vertically, or to enhance fonts.Note: Off is the factory default setting. |
| Toner Darkness1–10 | Lighten or darken the printed output.Notes:8 is the factory default setting.Selecting a smaller number can help conserve toner. |
| Enhance Fine LinesOnOff | Enable a print mode preferable for files such as architectural drawings, maps, electrical circuit diagrams, and flow charts.Notes:Off is the factory default setting.You can set this option from the printer software. For Windows users, click File > Print, and then click Properties, Preferences, Options, or Setup. For Macintosh users, choose File > Print, and then adjust the settings from the Print dialog and pop-up menus.To set this option using the Embedded Web Server, type the network printer IP address in the Web browser address field. |
| Gray CorrectionAutoOff | Automatically adjust the contrast enhancement applied to images.Note: Auto is the factory default setting. |
| Brightness-6 to 6 | Adjust the printed output either by lightening or darkening it. You can conserve toner by lightening the output.Note: 0 is the factory default setting. |
| Contrast0–5 | Adjust the contrast of printed objects.Note: 0 is the factory default setting. |
Job Accounting menu
Note: This menu item appears only when a formatted, non-defective printer hard disk is installed. Make sure the printer hard disk is not read/write- or write-protected.
| Use To | |
| Job Accounting LogOffOn | Determine and set if the printer creates a log of the print jobs it receives.Note: Off is the factory default setting. |
| Job Accounting Utilities Print and delete log files or export them to a flash drive. | |
| Accounting Log FrequencyWeeklyMonthly | Determine and set how often a log file is created.Note: Monthly is the factory default setting. |
| Log Action at End of FrequencyNoneE-mail Current LogE-mail & Delete Current LogPost Current LogPost & Delete Current Log | Determine and set how the printer responds when the frequency threshold expires.Note: None is the factory default setting. |
| Disk Near Full LevelOff1–99 | Specify the maximum size of the log file before the printer executes Disk Near Full Action.Note: 5 is the factory default setting. |
| Disk Near Full ActionNoneE-mail Current LogE-mail & Delete Current LogE-mail & Delete Oldest LogPost Current LogPost & Delete Current LogPost & Delete Oldest LogDelete Current LogDelete Oldest LogDelete All LogsDelete All But Current | Determine and set how the printer responds when the printer hard disk is nearly full.Notes:None is the factory default setting.The value defined in Disk Near Full Level determines when this action is triggered. |
| Disk Full ActionNoneE-mail & Delete Current LogE-mail & Delete Oldest LogPost & Delete Current LogPost & Delete Oldest LogDelete Current LogDelete Oldest LogDelete All LogsDelete All But Current | Determine and set how the printer responds when disk usage reaches the maximum limit (100MB).Note: None is the factory default setting. |
| URL to Post Logs Determine and set w | where the printer posts job accounting logs. |
| E-mail to Send Logs | Specify the e-mail address to which the printer sends job accounting logs. |
| Log File Prefix Specify the prefix you want for the log file name.Note: The current host name defined in the TCP/IP menu is used as the default log file prefix. | |
Utilities menu
| Use To | |
| Remove Held JobsConfidentialHeldNot RestoredAll | Delete confidential and held jobs from the printer hard disk.Notes:Selecting a setting affects only print jobs that are resident in the printer.Bookmarks, print jobs on flash drives, and other types of held jobs are not affected.Not Restored removes all Print and Hold jobs that are not restored from the printer hard disk or memory. |
| Format FlashYesNo | Format the flash memory.Warning—Potential Damage: Do not turn off the printer while the flash memory is being formatted.Notes:Yes deletes all data stored in flash memory.No cancels the format request.Flash memory refers to the memory added by installing a flash memory card in the printer.The flash memory option card must not be read/write- or write-protected.This menu item appears only when a non-defective flash memory card is installed. |
| Delete Downloads on DiskDelete NowDo Not Delete | Delete downloads from the printer hard disk, including all held jobs, buffered jobs, and parked jobs.Notes:Delete Now sets the printer to delete the downloads and allows the display to return to the originating screen after the deletion.Do Not Delete sets the printer display to return to the main Utilities menu for touch-screen printer models. When selected in non-touch-screen printer models, Do Not Delete sets the printer to return to the originating screen after the deletion. |
| Activate Hex Trace Assist in isolating | the source of a print job problem.Notes:When activated, all data sent to the printer is printed in hexadecimal and character representation, and control codes are not executed.To exit or deactivate Hex Trace, turn off or reset the printer. |
| Coverage EstimatorOffOn | Provide an estimate of the percentage coverage of toner on a page. The estimate is printed on a separate page at the end of each print job.Note: Off is the factory default setting. |
XPS menu
| Use To | |
| Print Error PagesOffOn | Print a page containing information on errors, including XML markup errors.Note: Off is the factory default setting. |
PDF menu
| Use To | |
| Scale to FitYesNo | Scale page content to fit the selected paper size.Note: No is the factory default setting. |
| AnnotationsDo Not PrintPrint | Print annotations in a PDF.Note: Do Not Print is the factory default setting. |
PostScript menu
| Use To | |
| Print PS ErrorOnOff | Print a page containing the PostScript error.Note: Off is the factory default setting. |
| Lock PS Startup ModeOnOff | Disable the SysStart file.Note: Off is the factory default setting. |
| Font PriorityResidentFlash/Disk | Establish the font search order.Notes:•Resident is the factory default setting.•This menu item is available only when a formatted flash memory option card or printer hard disk is installed and operating properly.• Make sure the flash memory option or printer hard disk is not read/write-, write-, or password-protected.•Job Buffer Size must not be set to 100%. |
PCL Emul menu
| Use To | |
| Font SourceResidentDiskDownloadFlashAll | Specify the set of fonts used by the Font Name menu.Notes:“Resident” is the factory default setting. Resident shows the factory default set of fonts downloaded in the RAM.“Flash” and “Disk” settings show all fonts resident in that option.The flash option must be properly formatted and cannot be read/write-, write-, or password-protected.“Download” shows all the fonts downloaded in the RAM.“All” shows all fonts available to any option. |
| Font NameCourier 10 | Identify a specific font and the option where it is stored.Note: Courier 10 is the factory default setting. Courier 10 shows the font name, font ID, and the storage location in the printer. The font source abbreviation is R for Resident, F for Flash, K for Disk, and D for Download. |
| Symbol Set10U PC-812U PC-850 | Specify the symbol set for each font name.Notes:10U PC-8 is the US factory default setting. 12U PC-850 is the international factory default setting.A symbol set is a set of alphabetic and numeric characters, punctuation, and special symbols. Symbol sets support the different languages or specific programs such as math symbols for scientific text. Only the supported symbol sets are shown. |
| PCL Emulation SettingsPoint Size1.00–1008.00 | Change the point size for scalable typographic fonts.Notes:12 is the factory default setting.Point size refers to the height of the characters in the font. One point equals approximately 0.014 inch.Point sizes can be increased or decreased in 0.25-point increments. |
| PCL Emulation SettingsPitch0.08–100 | Specify the font pitch for scalable monospaced fonts.Notes:10 is the factory default setting.Pitch refers to the number of fixed-space characters per inch (cpi).Pitch can be increased or decreased in 0.01-cpi increments.For nonscalable monospaced fonts, the pitch appears on the display but it cannot be changed. |
| PCL Emulation SettingsOrientationPortraitLandscape | Specify the orientation of text and graphics on the page.Notes:Portrait is the factory default setting. Portrait prints text and graphics parallel to the short edge of the page.Landscape prints text and graphics parallel to the long edge of the page. |
| PCL Emulation SettingsLines per Page1–255 | Specify the number of lines that print on each page.Notes:60 is the US factory default setting. 64 is the international default setting.The printer sets the amount of space between each line based on the Lines per Page, Paper Size, and Orientation settings. Select the Paper Size and Orientation you want before setting Lines per Page. |
| PCL Emulation SettingsA4 Width198 mm203 mm | Set the printer to print on A4-size paper.Notes:“198 mm” is the factory default setting.The 203-mm setting sets the width of the page to allow printing of eighty 10-pitch characters. |
| PCL Emulation SettingsAuto CR after LFOnOff | Specify whether the printer automatically performs a carriage return (CR) after a line feed (LF) control command.Note: Off is the factory default setting. |
| PCL Emulation SettingsAuto LF after CROnOff | Specify whether the printer automatically performs a line feed (LF) after a carriage return (CR) control command.Note: Off is the factory default setting. |
| Tray RenumberAssign MP FeederOffNone0-199Assign Tray [x]OffNone0-199Assign Manual PaperOffNone0-199Assign Manual EnvOffNone0-199 | Configure the printer to work with printer software or programs that use different source assignments for trays and feeders.Notes:“Off” is the factory default setting.“None” ignores the Select Paper Feed command. This option appears only when it is selected by the PCL 5 interpreter.“0-199” allows a custom setting to be assigned. |
| Tray RenumberView Factory DefaultsMPF Default = 8T1 Default = 1T1 Default = 4T1 Default = 5T1 Default = 20T1 Default = 21Env Default = 6MPaper Default = 2MEnv Default = 3 | Display the factory default setting assigned to each tray or feeder. |
| Tray RenumberRestore DefaultsYesNo | Restore all tray and feeder assignments to the factory default settings. |
HTML menu
| Use To | ||
| Font Name | Joanna MT | Set the default font for HTML documents. |
| Albertus MT | Letter Gothic | Note: The Times font is used in HTML documents that do not specify a font. |
| Antique Olive | Lubalin Graph | |
| Apple Chancery | Marigold | |
| Arial MT | MonaLisa Recut | |
| Avant Garde | Monaco | |
| Bodoni | New CenturySbk | |
| Bookman | New York | |
| Chicago | Optima | |
| Clarendon | Oxford | |
| Cooper Black | Palatino | |
| Copperplate | StempelGaramond | |
| Coronet | Taffy | |
| Courier | Times | |
| Eurostile | TimesNewRoman | |
| Garamond | Univers | |
| Geneva | Zapf Chancery | |
| Gill Sans | NewSansMTJA | |
| Goudy | NewSansMTCS | |
| Helvetica | NewSansMTCT | |
| Hoefler Text | NewSansMTKO | |
| Intl CG Times | ||
| Intl Courier | ||
| Intl Univers | ||
| Use To | |
| Font Size1–255 pt | Set the default font size for HTML documents.Notes:12 pt is the factory default setting.Font size can be increased in 1-point increments. |
| Scale1–400% | Scale the default font for HTML documents.Notes:100% is the factory default setting.Scaleg can be increased in 1% increments. |
| OrientationPortraitLandscape | Set the page orientation for HTML documents.Note: Portrait is the factory default setting. |
| Margin Size8–255 mm | Set the page margin for HTML documents.Notes:19 mm is the factory default setting.Margin size can be increased in 1-mm increments. |
| BackgroundsDo Not PrintPrint | Specify whether to print backgrounds on HTML documents.Note: Print is the factory default setting. |
Image menu
| Use To | |
| Auto FitOnOff | Select the optimal paper size, scaling, and orientation.Note: On is the factory default setting. It overrides scaling and orientation settings for some images. |
| InvertOnOff | Invert bitonal monochrome images.Notes:•Off is the factory default setting.•This setting does not apply to GIF or JPEG images. |
| ScalingAnchor Top LeftBest FitAnchor CenterFit Height/WidthFit HeightFit Width | Scale the image to fit the selected paper size.Notes:•Best Fit is the factory default setting.•When Auto Fit is set to On, Scaling is automatically set to Best Fit. |
| OrientationPortraitLandscapeReverse PortraitReverse Landscape | Set the image orientation.Note: Portrait is the factory default setting. |
Help menu
The Help menu consists of a series of Help pages that are stored in the printer as PDFs. They contain information about using the printer and performing printing tasks.
English, French, German, and Spanish translations are stored in the printer. Other translations are available at http://support.lexmark.com.
| Menu item Description | |
| Print All Guides Prints all the guides | |
| Print Quality Provides information about solving print quality issues | |
| Printing Guide Provides information about loading paper and other specialty media | |
| Media Guide Provides a list of the paper sizes supported in trays and feeders | |
| Print Defects Guide Provides information about resolving print defects | |
| Menu Map Provides a list of the printer control panel menus and settings | |
| Information Guide Provides help in locating additional information | |
| Connection Guide | Provides information about connecting the printer locally (USB) or to a network |
| Moving Guide Provides instructions for safely moving the printer | |
| Supplies Guide Provides part numbers for ordering supplies | |
Saving money and the environment
Lexmark is committed to environmental sustainability and is continually improving its printers to reduce their impact on the environment. We design with the environment in mind, engineer our packaging to reduce materials, and provide collection and recycling programs. For more information, see:
•The Notices chapter
• The Environmental Sustainability section of the Lexmark Web site at www.lexmark.com/environment
• The Lexmark recycling program at www.lexmark.com/recycle
By selecting certain printer settings or tasks, you may be able to reduce your printer's impact even further. This chapter outlines the settings and tasks that may yield a greater environmental benefit.
Saving paper and toner
Studies show that as much as 80% of the carbon footprint of a printer is related to paper usage. You can significantly reduce your carbon footprint by using recycled paper and the following printing suggestions, such as printing on both sides of the paper and printing multiple pages on one side of a single sheet of paper.
For information on how you can quickly save paper and energy using one printer setting, see the following:
- "Using Eco-Mode" on page 79 for non-touch-screen printer models
- "Using Eco-Mode" on page 129 and "Using Eco-Mode" on page 178 for touch-screen printer models
Using recycled paper
As an environmentally conscious company, Lexmark supports the use of recycled office paper produced specifically for use in laser printers. For more information on recycled papers that work well with your printer, see “Using recycled paper and other office papers” on page 190.
Conserving supplies
Use both sides of the paper
If your printer model supports duplex printing, then you can control whether print appears on one or two sides of the paper by selecting 2-sided printing from the Print dialog or from the Lexmark Toolbar.
Place multiple pages on one sheet of paper
You can print up to 16 consecutive pages of a multiple-page document onto one side of a single sheet of paper by selecting a setting from the Multipage printing (N-Up) section of the Print dialog screen.
Check your first draft for accuracy
Before printing or making multiple copies of a document:
- Use the preview feature, which you can select from the Print dialog or from the Lexmark Toolbar to see how the document will look like before you print it.
- Print one copy of the document to check its content and format for accuracy.
Avoid paper jams
Correctly set the paper type and size to avoid paper jams. For more information, see “Avoiding jams” on page 270.
Recycling
Lexmark provides collection programs and environmentally progressive approaches to recycling. For more information, see:
•The Notices chapter
• The Environmental Sustainability section of the Lexmark Web site at www.lexmark.com/environment
- The Lexmark recycling program at www.lexmark.com/recycle
Recycling Lexmark products
To return Lexmark products for recycling:
1 Go to www.lexmark.com/recycle.
2 Find the product type you want to recycle, and then select your country or region from the list.
3 Follow the instructions on the computer screen.
Note: Printer supplies and hardware not listed in the Lexmark collection program may be recycled through your local recycling center. Contact your local recycling center to determine the items they accept.
Recycling Lexmark packaging
Lexmark continually strives to minimize packaging. Less packaging helps to ensure that Lexmark printers are transported in the most efficient and environmentally sensitive manner and that there is less packaging to dispose of. These efficiencies result in fewer greenhouse emissions, energy savings, and natural resource savings.
Lexmark cartons are 100% recyclable where corrugated recycling facilities exist. Facilities may not exist in your area.
The foam used in Lexmark packaging is recyclable where foam recycling facilities exist. Facilities may not exist in your area.
When you return a cartridge to Lexmark, you can reuse the box that the cartridge came in. Lexmark will recycle the box.
Returning Lexmark cartridges for reuse or recycling
Lexmark Cartridge Collection Program diverts millions of Lexmark cartridges from landfills annually by making it both easy and free for Lexmark customers to return used cartridges to Lexmark for reuse or recycling. One hundred percent of the empty cartridges returned to Lexmark are either reused or demanufactured for recycling. Boxes used to return the cartridges are also recycled.
To return Lexmark cartridges for reuse or recycling, follow the instructions that came with your printer or cartridge and use the prepaid shipping label. You can also do the following:
1 Go to www.lexmark.com/recycle.
2 From the Toner Cartridges section, select your country or region.
3 Follow the instructions on the computer screen.
Maintaining the printer
Warning—Potential Damage: Failure to maintain optimum printer performance, or to replace parts and supplies, may cause damage to your printer.
Ordering supplies
To order parts and supplies in the U.S., contact Lexmark at 1-800-539-6275 for information about Lexmark authorized supplies dealers in your area. In other countries or regions, visit the Lexmark Web site at www.lexmark.com or contact the place where you purchased the printer.
Using genuine Lexmark parts and supplies
Your Lexmark printer is designed to function best with genuine Lexmark supplies and parts. Use of third-party supplies or parts may affect the performance, reliability, or life of the printer and its imaging components. Use of third-party supplies or parts can affect warranty coverage. Damage caused by the use of third-party supplies or parts is not covered by the warranty. All life indicators are designed to function with Lexmark supplies and parts, and may deliver unpredictable results if third-party supplies or parts are used. Imaging component usage beyond the intended life may damage your Lexmark printer or its associated components.
Estimated number of remaining pages
The estimated number of remaining pages is based on the recent printing history of the printer. Its accuracy may vary significantly and is dependent on many factors, such as actual document content, print quality settings, and other printer settings.
The accuracy of the estimated number of remaining pages may decrease when the actual printing consumption is different from the historical printing consumption. Consider the variable level of accuracy before purchasing or replacing supplies based on the estimate. Until an adequate print history is obtained on the printer, initial estimates assume future supplies consumption based on the International Organization for Standardization* test methods and page content.
* Average continuous black declared cartridge yield in accordance with ISO/IEC 19752.
Ordering toner cartridges
Notes:
•Estimated cartridge yield is based on the ISO/IEC 19752 standard.
- Extremely low print coverage for extended periods of time may negatively affect actual yield.
| Item Return Program cartridge | |
| For the United States and Canada | |
| Toner Cartridge 521 | |
| * This toner cartridge is supported only in MS811n, MS811dn, MS812dn, and MS812de printer models.For more information on countries located in each region, visit www.lexmark.com/regions. | |
| High Yield Toner Cartridge 521H | |
| Extra High Yield Toner Cartridge 521X* | |
| For the European Union, European Economic Area , and Switzerland | |
| Toner Cartridge 522 | |
| High Yield Toner Cartridge 522H | |
| Extra High Yield Toner Cartridge 522X* | |
| For the Asia Pacific Region (includes Australia and New Zealand) | |
| Toner Cartridge 523 | |
| High Yield Toner Cartridge 523H | |
| Extra High Yield Toner Cartridge 523X* | |
| For Latin America (includes Puerto Rico and Mexico) | |
| Toner Cartridge 524 | |
| High Yield Toner Cartridge 524H | |
| Extra High Yield Toner Cartridge 524X* | |
| For Africa, Middle East, Central Eastern Europe, and Commonwealth of Independent States | |
| Toner Cartridge 525 | |
| High Yield Toner Cartridge 525H | |
| Extra High Yield Toner Cartridge 525X* | |
| * This toner cartridge is supported only in MS811n, MS811dn, MS812dn, and MS812de printer models. For more information on countries located in each region, visit www.lexmark.com/regions. | |
| Item Regular cartridge | |
| Worldwide | |
| High Yield Toner Cartridge | 520HA ^1 |
| Extra High Yield Toner Cartridge | 520XA ^2 |
| ^1 This cartridge is supported only in MS810n and MS810dn printer models. ^2 This cartridge is supported only in MS811n, MS811dn, MS812dn, and MS812de printer models. | |
Ordering an imaging unit
Extremely low print coverage for extended periods of time may cause imaging unit parts to fail prior to exhaustion of toner.
For more information on replacing the imaging unit, see the instruction sheet that came with the supply.
| Part name Lexmark Return Program Regular | |
| Imaging unit 520Z 520ZA |
Ordering staple cartridges
| Part name Part number | |
| Staple cartridges 25A0013 |
Ordering a roller kit
For more information on replacing the roller kit, see the instruction sheet that came with the part.
Lexmark roller kit and part number
| Type Part number | |
| Printer engine roller maintenance kit 40X7706 |
Ordering a maintenance kit
To identify the supported fuser type, view the label on the fuser. Do either of the following:
- Remove the toner cartridge and the imaging unit. The two-digit fuser type code (such as 00 or 01) can be seen on the front of the fuser.
Warning—Potential Damage: Do not expose the imaging unit to direct light for more than 10 minutes. Extended exposure to light may cause print quality problems.
- Pull down the printer rear door. The two-digit fuser type code (such as 00 or 01) can be seen on the rear of the fuser.
Notes:
- Using certain types of paper may require more frequent replacement of the maintenance kit.
- The separator roller, fuser, pick roller assembly, and transfer roller are all included in the maintenance kit and can be individually ordered and replaced if necessary.
- For more information on replacing the maintenance kit, see the instruction sheet that came with the supply.
Lexmark Return Program fuser maintenance kits and part numbers for MS810, MS811, and MS812
| Fuser maintenance kit type Part number | |
| Type 00 40X8420 | |
| Type 01 40X8421 | |
| Type 02 40X8422 | |
| Type 03 40X8423 | |
| Type 04 40X8424 | |
Lexmark regular fuser maintenance kits and part numbers for MS810, MS811, and MS812
| Fuser maintenance kit type Part number | |
| Type 05 40X8425 | |
| Type 06 40X8426 | |
| Type 07 40X8427 | |
| Type 08 40X8428 | |
| Type 09 40X8429 | |
Storing supplies
Choose a cool, clean storage area for the printer supplies. Store supplies right side up in their original packing until you are ready to use them.
Do not expose supplies to:
- Direct sunlight
•Temperatures above 35°C (95°F)
•High humidity above 80%
• Salty air
•Corrosive gases
•Heavy dust
Replacing supplies
Replacing the toner cartridge
1 Lift the front cover, and then pull down the multipurpose feeder door.
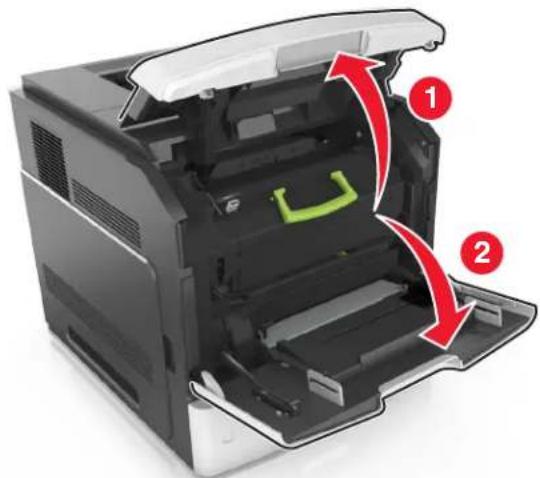
natural_image
Interior view of a printer showing internal structure with red arrows indicating motion (no text or symbols)2 Pull the cartridge out of the printer using the handle.
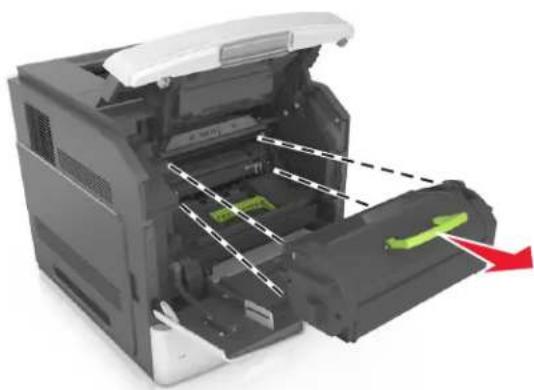
natural_image
3D rendering of a printer with internal components and a red arrow indicating motion (no text or symbols)3 Unpack the new toner cartridge, then remove the packing material, and then shake the cartridge to redistribute the toner.
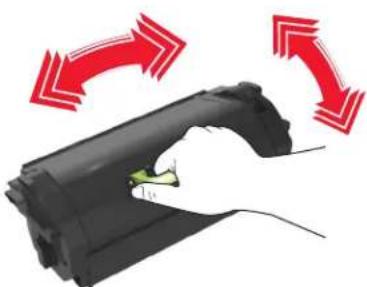
natural_image
Hand holding a black cylindrical device with red arrows indicating rotational or directional movement (no text or symbols)4 Insert the toner cartridge into the printer by aligning the side rails of the cartridge with the arrows on the side rails inside the printer.
Note: Make sure the cartridge is fully pushed in.
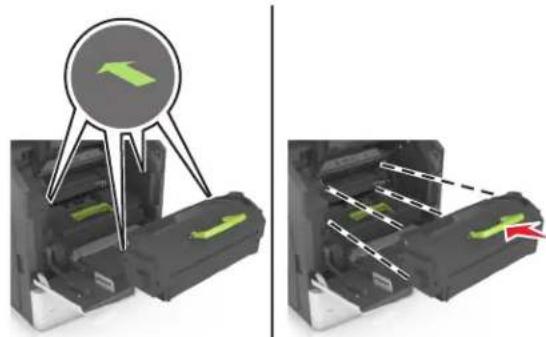
natural_image
Two-panel illustration showing a device being inserted into a paper holder, with arrows indicating the process (no text or symbols present)Warning—Potential Damage: When replacing a toner cartridge, do not leave the imaging unit exposed to direct light for an extended period of time. Extended exposure to light may cause print quality problems.
5 Close the multipurpose feeder door and the front cover.
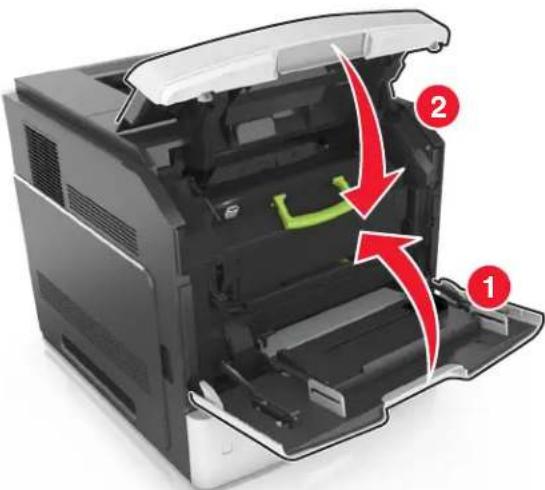
text_image
Diagram of a printer internal structure with numbered annotations indicating parts of the printer's internal mechanism.Replacing the imaging unit
1 Lift the front cover, and then pull down the multipurpose feeder door.
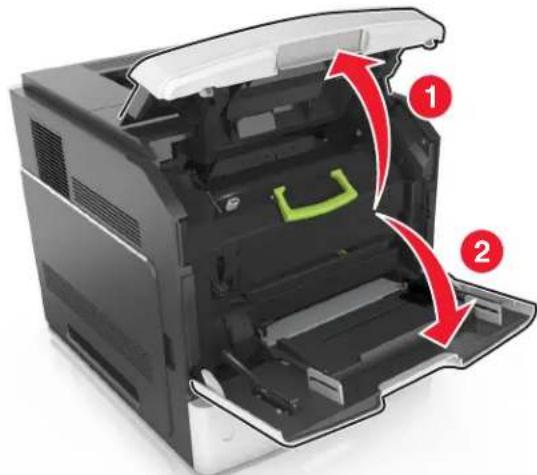
natural_image
Interior view of a printer showing internal structure with red arrows indicating movement or flow (no text or symbols present)2 Pull out the toner cartridge from the printer using the handle.
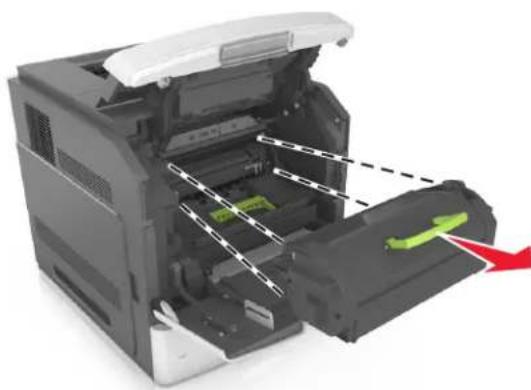
natural_image
3D rendering of a printer internal structure with green and red arrows indicating motion or movement (no text or symbols)3 Lift the green handle, and then pull out the imaging unit from the printer.

natural_image
Two views of a printer's internal structure showing green components and black plastic casing (no text or symbols visible)4 Unpack the new imaging unit, and then shake it.

natural_image
Illustration of a hand inserting a device into a device with red arrows indicating rotation (no text or symbols)5 Remove all packing material from the imaging unit.
Warning—Potential Damage: Do not expose the imaging unit to direct light for more than 10 minutes. Extended exposure to light may cause print quality problems.
Warning—Potential Damage: Do not touch the photoconductor drum. Doing so may affect the print quality of future print jobs.
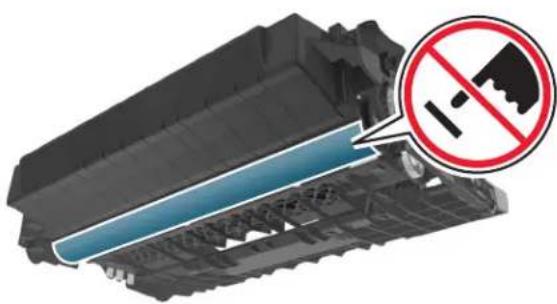
natural_image
3D illustration of a battery pack with a blue insulation and a red prohibition symbol (no text or labels)6 Insert the imaging unit into the printer by aligning the arrows on the side rails of the imaging unit with the arrows on the side rails inside the printer.
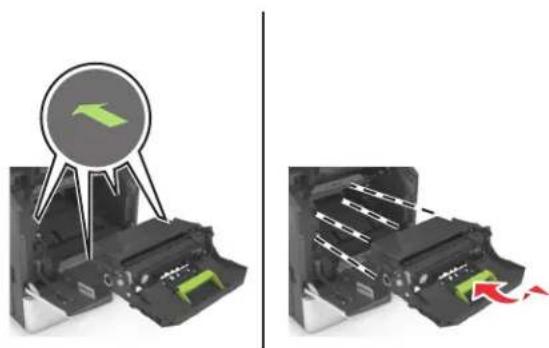
natural_image
Two-panel illustration showing a printer with a green receipt and a circular arrow symbol, alongside an open printer with a red arrow indicating motion (no text or symbols)7 Insert the toner cartridge into the printer by aligning the side rails of the cartridge with the arrows on the side rails inside the printer.

natural_image
Two-panel illustration showing a printer's internal structure before and after disassembly, with no visible text or symbols.8 Close the multipurpose feeder door and the front cover.
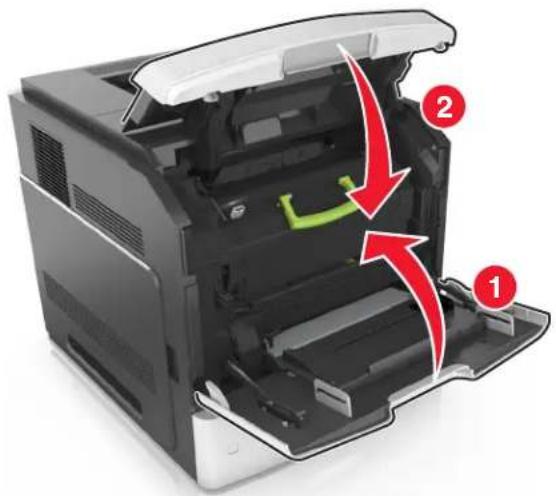
text_image
Diagram of a printer showing internal structure with numbered annotations (1, 2) indicating parts of the printer's internal components.Replacing a staple cartridge
1 Open the stapler door.

natural_image
3D illustration of a device's internal structure with a green folder and red arrow indicating direction (no text or symbols)2 Pull down the latch of the staple cartridge holder, and then pull the holder out of the finisher.
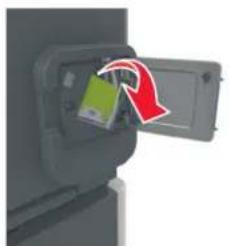
natural_image
Close-up of a device's internal components, showing a green card being inserted into a black folder with a red arrow indicating rotation (no text or symbols visible)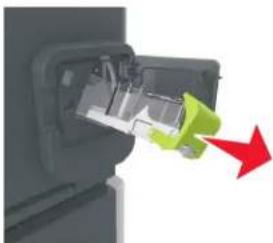
natural_image
Close-up of a mechanical component with a green and red arrow indicating direction (no text or symbols visible)3 Squeeze both sides of the empty staple case with your fingers, and then remove the staple case from the cartridge.

text_image
Diagram of a battery pack with numbered components and red arrows indicating flow or movement4 Insert the front side of the new staple case into the staple cartridge, and then push the rear side into the cartridge.
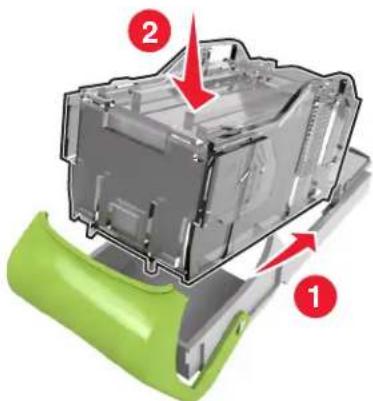
text_image
Diagram of a device component with numbered parts and red arrows indicating features5 Push the staple cartridge into the finisher until it clicks into place.
6 Close the stapler door.
Cleaning the printer parts
Cleaning the printer
Note: You may need to perform this task after every few months.
Warning—Potential Damage: Damage to the printer caused by improper handling is not covered by the printer warranty.
1 Make sure that the printer is turned off and unplugged from the electrical outlet.

CAUTION—SHOCK HAZARD: To avoid the risk of electrical shock when cleaning the exterior of the printer, unplug the power cord from the electrical outlet and disconnect all cables from the printer before proceeding.
2 Remove paper from the standard bin and multipurpose feeder.
3 Remove any dust, lint, and pieces of paper around the printer using a soft brush or vacuum.
4 Dampen a clean, lint-free cloth with water, and use it to wipe the outside of the printer.
Warning—Potential Damage: Do not use household cleaners or detergents to prevent damage to the exterior of the printer.
5 Make sure all areas of the printer are dry before sending a new print job.
Emptying the hole punch box
1 Pull out the hole punch box.
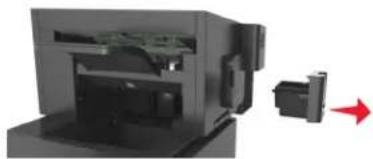
natural_image
3D rendering of a mechanical device with internal components and a red arrow indicating direction (no text or symbols)2 Empty the container.

natural_image
Illustration of a printer with internal components and a small container pouring liquid into it (no text or symbols visible)3 Insert the emptied hole punch box back into the finisher until it clicks into place.
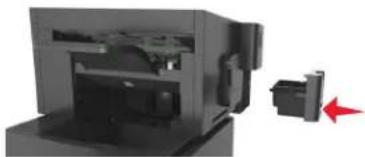
natural_image
3D rendering of a mechanical device with internal components and a red arrow indicating direction (no text or symbols)Moving the printer

CAUTION—POTENTIAL INJURY: The printer weight is greater than 18 kg (40 lb) and requires two or more trained personnel to lift it safely.
Before moving the printer

CAUTION—POTENTIAL INJURY: Before moving the printer, follow these guidelines to avoid personal injury or printer damage:
- Turn off the printer, and then unplug the power cord from the electrical outlet.
- Disconnect all cords and cables from the printer.
- If two or more optional finishers are installed, then remove the finishers individually from the printer.
Notes:
—Make sure to remove the topmost finisher first.
— To remove the finisher, hold the finisher on both sides, and then lift the latches to unlock the finisher.
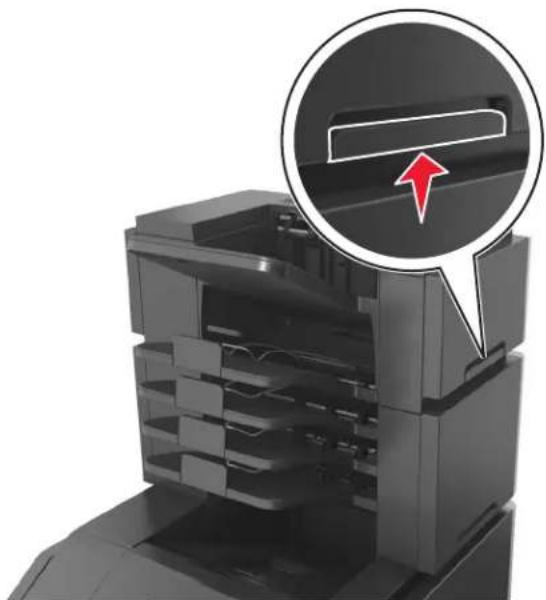
natural_image
3D rendering of a printer with a magnified inset showing internal structure and a red arrow pointing to a component (no text or symbols)- If the printer does not have a caster base but is configured with optional trays, then remove the trays.
Note: Slide the latch on the right side of the optional tray toward the front of the tray until it clicks into place.

natural_image
Illustration of a printer with a magnified inset showing a red lightning bolt inside the paper (no text or symbols)-
Use the handholds located on both sides of the printer to lift it.
•Make sure your fingers are not under the printer when you set it down. -
Make sure there is adequate clearance around the printer.
- Use only the power cord provided with this product or the manufacturer's authorized replacement.
Warning—Potential Damage: Damage to the printer caused by improper moving is not covered by the printer warranty.
Moving the printer to another location
The printer and its hardware options can be safely moved to another location by following these precautions:
- Any cart used to move the printer must have a surface able to support the full footprint of the printer.
- Any cart used to move the hardware options must have a surface able to support the dimensions of the hardware options.
- Keep the printer in an upright position.
- Avoid severe jarring movements.
Shipping the printer
When shipping the printer, use the original packaging or call the place of purchase for a relocation kit.
Clearing jams
Carefully select paper and specialty media and load them properly to avoid paper jams. For more information, see "Avoiding jams" on page 270. If jams occur, then follow the steps outlined in this chapter.
Note: Jam recovery is set to Auto by default. The printer reprints jammed pages unless the memory required to hold the pages is needed for other printer tasks.
Avoiding jams
Load paper properly
•Make sure paper lies flat in the tray.

text_image
Correct loading of paper Incorrect loading of paper- Do not remove a tray while the printer is printing.
- Do not load a tray while the printer is printing. Load it before printing, or wait for a prompt to load it.
- Do not load too much paper. Make sure the stack height is below the maximum paper fill indicator.
- Do not slide the paper into the tray. Load paper as shown in the illustration.

natural_image
3D illustration of a white drawer with a red downward arrow overlay, indicating a reduction or compression process (no text or symbols present)- Make sure the guides in the tray or the multipurpose feeder are properly positioned and are not pressing tightly against the paper or envelopes.
- Push the tray firmly into the printer after loading paper.
- If you are loading prepunched paper for use with the staple finisher, then make sure the holes on the long edge of the paper are on the right side of the tray. For more information, see the "Loading paper and specialty media" section of the User's Guide.
Allow the paper to enter the optional mailbox bins properly
- Make sure to adjust the bin extender so that the paper size indicators match the size of the paper used.

natural_image
3D rendering of a mechanical device with internal components and a red arrow indicating a motion or force (no text or symbols)Notes:
- If the bin extender is shorter than the size of the paper you are printing on, then the paper causes a jam in the mailbox bin. For example, if you are printing on a legal-size paper and the bin extender is set to letter-size, then a jam occurs.
- If the bin extender is longer than the size of the paper you are printing on, then the edges become uneven and the paper is not stacked properly. For example, if you are printing on a letter-size paper and the bin extender is set to legal-size, then the paper does not stack properly.
- If paper needs to be returned to the mailbox bin, then insert the paper under the bin arm, and then push the paper all the way back.

text_image
Diagram showing a mechanical assembly with labeled parts 1 and 2, highlighting a specific feature in the process.Note: If the paper is not under the bin arm, then a jam occurs due to an overfilled bin.
Use recommended paper
- Use only recommended paper or specialty media.
- Do not load wrinkled, creased, damp, bent, or curled paper.
- Flex, fan, and straighten paper or specialty media before loading it.

natural_image
Three-step illustration showing a folding or rolling process: cutting a flat sheet, folding a flat sheet with red arrows indicating rotation, and holding a flat sheet with a downward arrow (no text or symbols)- Do not use paper that has been cut or trimmed by hand.
- Do not mix paper sizes, weights, or types in the same tray.
- Make sure the paper size and type are set correctly on the computer or printer control panel.
•Store paper per manufacturer recommendations.
Understanding jam messages and locations
When a jam occurs, a message indicating the jam location and information to clear the jam appears on the printer display. Open the doors, covers, and trays indicated on the display to remove the jam.
Notes:
- When Jam Assist is set to On, Discarding pages appears on the display and the printer flushes blank or pages with partial prints to the standard bin after a jammed page is cleared. Check your printed output for blank pages.
- When Jam Recovery is set to On or Auto, the printer reprints jammed pages. However, the Auto setting reprints jammed pages if adequate printer memory is available.

text_image
Labeled diagram of a printer with numbered parts showing internal structure and eye area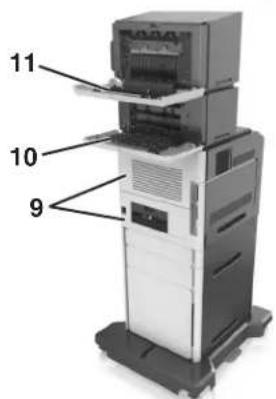
text_image
11 10 9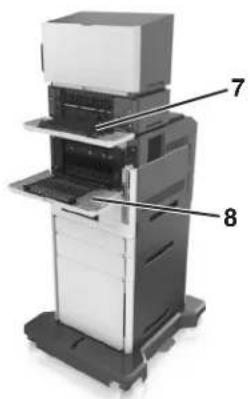
natural_image
Illustration of a multi-tiered printer with labeled parts (7 and 8), showing internal structure without any text or symbols beyond labels.| Jam location Printer | message What to do | ||
| 1 | Staple finisher | [x]-page jam, remove paper, open stapler door. Leave paper in bin. [455–457] | Remove paper from the stapler bin, open the stapler door, then remove the staple cartridge, and then remove the jammed staples. |
| 2 | Standard bin | [x]-page jam, remove standard bin jam. [203] | Remove jammed paper from the standard bin. |
| 3 | Inside the printer | [x]-page jam, lift front cover to remove cartridge. [200–201] | Open the front cover and the multipurpose feeder, then remove the toner cartridge and the imaging unit, and then remove the jammed paper. |
| 4 | Multipurpose feeder | [x]-page jam, clear manual feeder. [250] | Remove all paper from the multipurpose feeder, and then remove the jammed paper. |
| 5 | Duplex area | [x]-page jam, remove tray 1 to clear duplex. [235–239] | Pull out tray 1 completely, then push down the front duplex flap, and then remove the jammed paper. |
| 6 | Trays | [x]-page jam, open tray [x]. [24x] | Pull out the indicated tray, and then remove the jammed paper. |
| 7 | Output expander | [x]-page jam, remove paper, open expander rear door. Leave paper in bin. [41y.xx] | Open the rear door of the output expander, and then remove the jammed paper. |
| 8 | Upper rear door | [x]-page jam, open upper rear door. [202] | Open the rear door of the printer, and then remove the jammed paper. |
| 9 | Upper door and rear duplex area | [x]-page jam, open upper and lower rear door. [231–234] | Open the rear door of the printer and the rear duplex area, and then remove the jammed paper. |
| 10 | Mailbox | [x]-page jam, remove paper, open mailbox rear door. Leave paper in bin. [43y.xx] | Open the rear door of the mailbox, and then remove the jammed paper. |
| 11 | Staple finisher rear door | [x]-page jam, remove paper, open finisher rear door. Leave paper in bin. [451] | Open the rear door of the staple finisher, and then remove the jammed paper. |
[x]-page jam, lift front cover to remove cartridge. [200–201]
![LEXMARK MS811dn - [x]-page jam, lift front cover to remove cartridge. [200–201] - 1](/content/2026/06/1236802/images/1d544b427728f03925c7bdeeac13b856db912b14558be702d12916141b905f13.jpg)
CAUTION—HOT SURFACE: The inside of the printer might be hot. To reduce the risk of injury from a hot component, allow the surface to cool before touching.
1 Lift the front cover, and then pull down the multipurpose feeder door.
![LEXMARK MS811dn - [x]-page jam, lift front cover to remove cartridge. [200–201] - 2](/content/2026/06/1236802/images/d8cb06fd72f76f16d56803d99d450a3961648adc474a7ee7d190c9c9813c1d81.jpg)
text_image
Diagram of an HP printer internal structure with numbered annotations indicating component directions2 Lift the green handle, and then pull the toner cartridge out of the printer.
![LEXMARK MS811dn - [x]-page jam, lift front cover to remove cartridge. [200–201] - 3](/content/2026/06/1236802/images/03c885fceb4150b5278eef4bc82cd6c74b3ffabe6e0b1dd691c2801f4b737ebf.jpg)
natural_image
3D rendering of a printer's internal structure showing paper feed, paper tray, and printer slot (no text or symbols visible)3 Place the cartridge aside.
4 Lift the green handle, and then pull the imaging unit out of the printer.
![LEXMARK MS811dn - [x]-page jam, lift front cover to remove cartridge. [200–201] - 4](/content/2026/06/1236802/images/9021e447f1f27a9d135adf7d66668b3967bd824789ec9b674399af97485439e7.jpg)
natural_image
Two-step diagram showing printer internal structure with green arrows indicating motion (no text or symbols)5 Place the imaging unit aside on a flat, smooth surface.
Warning—Potential Damage: Do not expose the imaging unit to direct light for more than 10 minutes. Extended exposure to light may cause print quality problems.
6 Pull the jammed paper gently to the right, and then remove it from the printer.
Note: Make sure all paper fragments are removed.
![LEXMARK MS811dn - [x]-page jam, lift front cover to remove cartridge. [200–201] - 5](/content/2026/06/1236802/images/876835b43c1e3030c0edef8c7f82cf367e41ba16b441e248edfc9340b47c7118.jpg)
natural_image
Two views of a printer's internal structure showing paper feeding and discoloration (no text or symbols visible)Warning—Potential Damage: The jammed paper may be covered with toner, which can stain garments and skin.
7 Install the imaging unit.
![LEXMARK MS811dn - [x]-page jam, lift front cover to remove cartridge. [200–201] - 6](/content/2026/06/1236802/images/4b382edd8c3360cd17c3ed7d554e4869730f8290a8be7f3172ef0b7b0c0b7bb3.jpg)
natural_image
Two-panel illustration showing a printer with a green arrow icon and its internal structure, alongside a close-up of the printer's internal components (no text or symbols)Note: Use the arrows on the side of the printer as a guide.
8 Insert the cartridge into the printer, and then push the green handle back into place.
![LEXMARK MS811dn - [x]-page jam, lift front cover to remove cartridge. [200–201] - 7](/content/2026/06/1236802/images/874171edcc72174d2210b895047f9c22ffb10798c5e5bf897811100f1ddcf02b.jpg)
natural_image
Two-panel diagram showing a device with green arrows pointing to a circular component and a dashed line indicating alignment or alignment (no text or symbols)Notes:
- Align the arrows on the guides of the toner cartridge with the arrows in the printer. - Make sure the cartridge is fully pushed in.
9 Close the multipurpose feeder door and the front cover.

text_image
Diagram of a printer internal structure with numbered annotations indicating process flow or movement10 Do either of the following to clear the message and continue printing:
- For touch-screen printer models, touch √ or Done.
- For non-touch-screen printer models, select Next > OK > Clear the jam, press OK > OK.
[x]-page jam, open upper rear door. [202]
![LEXMARK MS811dn - [x]-page jam, open upper rear door. [202] - 1](/content/2026/06/1236802/images/e3db2903f7339141a8f009953487c0b01029139f86063aa18f77653f16c1667a.jpg)
CAUTION—HOT SURFACE: The inside of the printer might be hot. To reduce the risk of injury from a hot component, allow the surface to cool before touching.
1 Pull down the rear door.
![LEXMARK MS811dn - [x]-page jam, open upper rear door. [202] - 2](/content/2026/06/1236802/images/0432585cbe24f9eee266f4f9820f61c7cd53c184b78a7f411a47b6503106aef7.jpg)
natural_image
3D rendering of a server rack with a red arrow indicating compression or disassembly (no text or symbols visible)2 Firmly grasp the jammed paper on each side, and then gently pull it out.
Note: Make sure all paper fragments are removed.
![LEXMARK MS811dn - [x]-page jam, open upper rear door. [202] - 3](/content/2026/06/1236802/images/c58ddba2ef0fc5dfc8b1261c803a8acdd06f513591fdc8bd94c430e12b1b164f.jpg)
natural_image
3D rendering of a computer tower with visible internal components and red arrows indicating ports (no text or symbols)3 Close the rear door.
4 Do either of the following to clear the message and continue printing:
- For touch-screen printer models, touch √ or Done.
- For non-touch-screen printer models, select Next > OK > Clear the jam, press OK > OK.
[x]-page jam, open upper and lower rear door. [231-234]
![LEXMARK MS811dn - [x]-page jam, open upper and lower rear door. [231-234] - 1](/content/2026/06/1236802/images/726d94a2bec8d7c206ea64b9da5ffee6cde1674470b1db2c27906f3b5b3519f8.jpg)
CAUTION—HOT SURFACE: The inside of the printer might be hot. To reduce the risk of injury from a hot component, allow the surface to cool before touching.
1 Pull down the rear door.
![LEXMARK MS811dn - [x]-page jam, open upper and lower rear door. [231-234] - 2](/content/2026/06/1236802/images/20d28c1e1b98a9c1707618913ff76ee4f89cdce26a6ae16036b7f326bdd6112e.jpg)
natural_image
3D rendering of a server rack with a red arrow indicating compression or disassembly (no text or symbols present)2 Firmly grasp the jammed paper on each side, and then gently pull it out.
Note: Make sure all paper fragments are removed.
![LEXMARK MS811dn - [x]-page jam, open upper and lower rear door. [231-234] - 3](/content/2026/06/1236802/images/e787ba78cc0b045d843069c44ee4d8d187ffb69bd7cb4f401c6c8a8a907f3c31.jpg)
natural_image
3D rendering of a server rack with two red arrows pointing to internal components (no text or symbols visible)3 Close the rear door.
4 Push the back of the standard tray.
![LEXMARK MS811dn - [x]-page jam, open upper and lower rear door. [231-234] - 4](/content/2026/06/1236802/images/dd39fc675acb6efc4f381b0c14c4708d40f2bf348791693dc175a405e882ab9f.jpg)
natural_image
3D rendering of a white and gray computer drive with ventilation slots and a red arrow pointing to the front panel (no text or symbols visible)5 Press down the rear duplex flap, then firmly grasp the jammed paper, and then gently pull the paper out. Note: Make sure all paper fragments are removed.
![LEXMARK MS811dn - [x]-page jam, open upper and lower rear door. [231-234] - 5](/content/2026/06/1236802/images/d1591ded55f79d28c6bd622d971a0d59fadab941fc9e4d142c74648ae192a224.jpg)
text_image
Diagram showing a printer with labeled parts (1 and 2) and a magnified view of the printer's internal structure, highlighting a red arrow.6 Insert the standard tray.
7 Do either of the following to clear the message and continue printing:
- For touch-screen printer models, touch √ or Done.
- For non-touch-screen printer models, select Next > OK > Clear the jam, press OK > OK.
[x]-page jam, remove standard bin jam. [203]
1 Firmly grasp the jammed paper on each side, and then gently pull it out.
Note: Make sure all paper fragments are removed.
![LEXMARK MS811dn - [x]-page jam, remove standard bin jam. [203] - 1](/content/2026/06/1236802/images/1ffdbf59aa3684365d0979cf5b3aaf165dfb8942949af029a3af50c70c967df3.jpg)
natural_image
3D diagram of a mechanical component with red arrows indicating direction (no text or symbols)2 Do either of the following to clear the message and continue printing:
- For touch-screen printer models, touch √ or Done.
- For non-touch-screen printer models, select Next > OK > Clear the jam, press OK > OK.
[x]-page jam, remove tray 1 to clear duplex. [235-239]
1 Pull out the tray completely.
Note: Lift the tray slightly and pull it out.
![LEXMARK MS811dn - [x]-page jam, remove tray 1 to clear duplex. [235-239] - 1](/content/2026/06/1236802/images/0d5a5eea6f7769c35537b47b77f55c6f1163b12f4d8cf5f41f9a0faefdf56f0e.jpg)
text_image
Diagram showing printer printing process with numbered steps: first, second, and third.2 Push down the front duplex flap, then firmly grasp the jammed paper, and then gently pull the paper to the right and out of the printer.
Note: Make sure all paper fragments are removed.
![LEXMARK MS811dn - [x]-page jam, remove tray 1 to clear duplex. [235-239] - 2](/content/2026/06/1236802/images/233a9a1f46db6aaf975209314b0f10e6253d9b59318da57e5f5c2450fd6f120c.jpg)
text_image
Diagram of a printer's internal structure with numbered annotations indicating components 1 and 23 Insert the tray.
4 Do either of the following to clear the message and continue printing:
• For touch-screen printer models, touch
![LEXMARK MS811dn - [x]-page jam, remove tray 1 to clear duplex. [235-239] - 3](/content/2026/06/1236802/images/3b4d9a4a5cce754c3cfc7010fec1bade2ff18eeaf5f3e0ba9f8fdd2ebd5f83d6.jpg)
or Done.
- For non-touch-screen printer models, select Next >
![LEXMARK MS811dn - [x]-page jam, remove tray 1 to clear duplex. [235-239] - 4](/content/2026/06/1236802/images/1023cc2f9d019331c38191c69267c98959de0254da4066bbb2426d724f30cc15.jpg)
Clear the jam, press OK > OK
[x]-page jam, open tray [x]. [24x]
1 Check which tray is indicated on the printer display, and then pull the tray.
![LEXMARK MS811dn - [x]-page jam, open tray [x]. [24x] - 1](/content/2026/06/1236802/images/1f098f1918542313abb7f0d727cb2fff8e6333b76e0da04ea166f500145b2dfd.jpg)
natural_image
3D illustration of a printer drawer with paper inside, showing internal structure and a red arrow indicating compression (no text or symbols)2 Firmly grasp the jammed paper on each side, and then gently pull it out.
Note: Make sure all paper fragments are removed.
![LEXMARK MS811dn - [x]-page jam, open tray [x]. [24x] - 2](/content/2026/06/1236802/images/cd79130a7572884f8ff8dea72e40d839928bd8e02b2fee58b1cf0852b7356bbc.jpg)
natural_image
3D rendering of a printer drawer with paper inside, showing internal compartments and a red arrow indicating motion (no text or symbols)3 Insert the tray.
4 Do either of the following to clear the message and continue printing:
- For touch-screen printer models, touch √ or Done.
- For non-touch-screen printer models, select Next > OK > Clear the jam, press OK > OK.
[x]-page jam, clear manual feeder. [250]
1 From the multipurpose feeder, firmly grasp the jammed paper on each side, and then gently pull it out.
Note: Make sure all paper fragments are removed.
![LEXMARK MS811dn - [x]-page jam, clear manual feeder. [250] - 1](/content/2026/06/1236802/images/1a74595d7b1581c54f786ebe75e490eb5afa61e76f0765854a0fa8b9ab69f796.jpg)
natural_image
Illustration of a printer with paper feed and two red arrows indicating flow or movement (no text or symbols)2 Flex the sheets of paper back and forth to loosen them. Do not fold or crease the paper. Straighten the edges on a level surface.
3 Reload paper into the multipurpose feeder.
4 Slide the paper guide until it lightly rests against the edge of the paper.
![LEXMARK MS811dn - [x]-page jam, clear manual feeder. [250] - 2](/content/2026/06/1236802/images/663174ad258383ec4b3305606860b7c03c25874144b1dfe118e96d05f4a97324.jpg)
natural_image
Close-up of a printer's internal structure with a magnified inset showing a printer's lid and paper plane (no text or symbols visible)5 Do either of the following to clear the message and continue printing:
- For touch-screen printer models, touch √ or Done.
- For non-touch-screen printer models, select Next > OK > Clear the jam, press OK > OK.
[x]-page jam, remove paper, open stapler door. Leave paper in bin. [455–457]
1 From the stapler bin, firmly grasp the jammed paper on each side, and then gently pull it out.
Note: Make sure all paper fragments are removed.
![LEXMARK MS811dn - [x]-page jam, remove paper, open stapler door. Leave paper in bin. [455–457] - 1](/content/2026/06/1236802/images/5516fc335713a3454921b7b5a4f297e8c233d57aeeef6d16df0c9b01bb039ff8.jpg)
natural_image
3D rendering of a mechanical device with red arrows indicating compression or disassembly (no text or symbols)2 Open the stapler door.
![LEXMARK MS811dn - [x]-page jam, remove paper, open stapler door. Leave paper in bin. [455–457] - 2](/content/2026/06/1236802/images/7cca2c2e01cb6a28ec725965c378b8b4abcd1873caac096c2a73a09c7a310399.jpg)
natural_image
Close-up of a device's internal structure showing a green card inside, with a red arrow indicating direction (no text or symbols)3 Pull down the latch of the staple cartridge holder, and then pull the holder out of the printer.
![LEXMARK MS811dn - [x]-page jam, remove paper, open stapler door. Leave paper in bin. [455–457] - 3](/content/2026/06/1236802/images/fabf69ff575ffec50ccf5ceca7cf0b31ddce0480a5290153bc4f287de4678eac.jpg)
natural_image
Two-panel diagram showing a device being inserted into a container, with red arrows indicating the process (no text or symbols present)4 Use the metal tab to lift the staple guard, and then remove any loose staples.
![LEXMARK MS811dn - [x]-page jam, remove paper, open stapler door. Leave paper in bin. [455–457] - 4](/content/2026/06/1236802/images/ae3ae1c7a10aa06b2973d24e54077d119bf18b4d7e6b39d0e64845eb47459292.jpg)
natural_image
3D cutaway diagram of a battery pack showing internal components and fluid flow direction (no text or symbols)5 Press down the staple guard until it clicks into place.
![LEXMARK MS811dn - [x]-page jam, remove paper, open stapler door. Leave paper in bin. [455–457] - 5](/content/2026/06/1236802/images/b39f58f4fc9b4d7696def47067e4e2edee061971d03430ef12c8915e66884a2d.jpg)
natural_image
3D rendering of a mechanical assembly with green and gray components, showing internal structure and a red arrow indicating direction (no text or symbols)6 Press the staples against the metal bracket.
![LEXMARK MS811dn - [x]-page jam, remove paper, open stapler door. Leave paper in bin. [455–457] - 6](/content/2026/06/1236802/images/84290d5dd6fb719de2c81a4d4a44b4ae1e2ae9d8110cd874d2b33742084ba3d3.jpg)
natural_image
3D cutaway view of a battery pack with internal compartments and a red arrow indicating a specific area (no text or symbols present)Note: If the staples are at the rear of the cartridge, then shake the cartridge downward to bring the staples near the metal bracket.
![LEXMARK MS811dn - [x]-page jam, remove paper, open stapler door. Leave paper in bin. [455–457] - 7](/content/2026/06/1236802/images/b6957ca14320928e2a5b1159f96496ea062017fd92e73c515f409538b495bb08.jpg)
natural_image
3D diagram of a device interior with red directional arrows indicating movement or flow (no text or symbols)7 Push the cartridge holder firmly back into the stapler unit until the cartridge holder clicks into place.
8 Close the stapler door.
9 Do either of the following to clear the message and continue printing:
- For touch-screen printer models, touch √ or Done.
- For non-touch-screen printer models, select Next > OK > Clear the jam, press OK > OK.
[x]-page jam, remove paper, open finisher rear door. Leave paper in bin. [451]
1 Open the rear staple finisher door.
![LEXMARK MS811dn - [x]-page jam, remove paper, open finisher rear door. Leave paper in bin. [451] - 1](/content/2026/06/1236802/images/9c0b0a9c6b86e04833a90c9b4f587e726a5bda1c7828fcb68f5b21308f9b7b67.jpg)
natural_image
3D illustration of a printer with a red arrow indicating compression or disassembly (no text or symbols present)2 Firmly grasp the jammed paper on each side, and then gently pull it out.
Note: Make sure all paper fragments are removed.
![LEXMARK MS811dn - [x]-page jam, remove paper, open finisher rear door. Leave paper in bin. [451] - 2](/content/2026/06/1236802/images/afb7c94422a1bd5e6866bcf52a03f47716c307cdefdc0fcc843b992dae41c27e.jpg)
natural_image
3D rendering of an open printer with visible internal components and red arrows indicating parts (no text or symbols)3 Close the staple finisher door.
4 Do either of the following to clear the message and continue printing:
- For touch-screen printer models, touch √ or Done.
- For non-touch-screen printer models, select Next > OK > Clear the jam, press OK > OK.
[x]-page jam, remove paper, open expander rear door. Leave paper in bin. [41y.xx]
1 Open the rear output expander door.
![LEXMARK MS811dn - [x]-page jam, remove paper, open expander rear door. Leave paper in bin. [41y.xx] - 1](/content/2026/06/1236802/images/825ac445d037c60bb3fa9cf104f5af5f8978697c9c72c88a5e1d43b56a67ab5d.jpg)
natural_image
3D rendering of a printer with a red arrow indicating compression or disassembly (no text or symbols visible)2 Firmly grasp the jammed paper on each side, and then gently pull it out.
Note: Make sure all paper fragments are removed.
![LEXMARK MS811dn - [x]-page jam, remove paper, open expander rear door. Leave paper in bin. [41y.xx] - 2](/content/2026/06/1236802/images/4d4ed310a54f5760588deb8c6ff876ab79f1f48134dc78b7bcd0cf8554c7202c.jpg)
natural_image
3D rendering of a printer with open lid and paper feed, showing internal structure and red arrows indicating ports (no text or symbols)3 Close the rear output expander door.
4 Do either of the following to clear the message and continue printing:
- For touch-screen printer models, touch √ or Done.
- For non-touch-screen printer models, select Next > OK > Clear the jam, press OK > OK.
[x]-page jam, remove paper, open mailbox rear door. Leave paper in bin. [43y.xx]
1 Open the rear mailbox door.
![LEXMARK MS811dn - [x]-page jam, remove paper, open mailbox rear door. Leave paper in bin. [43y.xx] - 1](/content/2026/06/1236802/images/1b87f998694ec2debb5398997d2bf157d5decd57c6af84638e40ba6785e54673.jpg)
natural_image
3D rendering of a printer with a red arrow indicating compression or disassembly (no text or symbols visible)2 Firmly grasp the jammed paper on each side, and then gently pull it out.
Note: Make sure all paper fragments are removed.
![LEXMARK MS811dn - [x]-page jam, remove paper, open mailbox rear door. Leave paper in bin. [43y.xx] - 2](/content/2026/06/1236802/images/f481719353f482eeffe3ffe79b9e5ead2fdc0535a5bc37e41282c3f520620deb.jpg)
natural_image
3D rendering of a printer with paper being inserted, showing internal structure and red arrows indicating process flow (no text or symbols)3 Close the rear mailbox door.
4 If the jam is in the mailbox bin, then firmly grasp the jammed paper, and then gently pull it out.
Note: Make sure all paper fragments are removed.
![LEXMARK MS811dn - [x]-page jam, remove paper, open mailbox rear door. Leave paper in bin. [43y.xx] - 3](/content/2026/06/1236802/images/5045241c530416fd63afd62b333333d9068debd51b93a1115541a868a3aae695.jpg)
natural_image
3D rendering of a printer's internal structure with a red arrow indicating compression or disassembly (no text or symbols present)5 Do either of the following to clear the message and continue printing:
• For touch-screen printer models, touch √ or Done.
- For non-touch-screen printer models, select Next > OK > Clear the jam, press OK > OK.
Troubleshooting
Understanding the printer messages
Cartridge, imaging unit mismatch [41.xy]
1 Check if both the toner cartridge and imaging unit are MICR (Magnetic Ink Character Recognition) or non-MICR supplies.
Note: For a list of supported supplies, see the “Ordering supplies” section of the User's Guide or visit www.lexmark.com.
2 Change the toner cartridge or imaging unit so that both are MICR or non-MICR supplies.
Notes:
- Use a MICR toner cartridge and imaging unit for printing checks and other similar documents.
- Use a non-MICR toner cartridge and imaging unit for regular print jobs.
Cartridge low [88.xy]
You may need to order a toner cartridge. If necessary, select Continue on the printer control panel to clear the message and continue printing. For non-touch-screen printer models, press OK to confirm.
Cartridge nearly low [88.xy]
If necessary, select Continue on the printer control panel to clear the message and continue printing. For non-touch-screen printer models, press OK to confirm.
Cartridge very low, [x] estimated pages remain [88.xy]
You may need to replace the toner cartridge very soon. For more information, see the “Replacing supplies” section of the User’s Guide.
If necessary, select Continue on the printer control panel to clear the message and continue printing. For non-touch-screen printer models, press OK to confirm.
Change [paper source] to [custom string] load [orientation]
Try one or more of the following:
- Load the correct paper size and type in the tray, verify the paper size and type settings are specified in the Paper menu on the printer control panel, and then select Finished changing paper. For non-touch-screen printer models, press OK to confirm.
- Touch Cancel job to cancel the print job.
Change [paper source] to [custom type name] load [orientation]
Try one or more of the following
- Load the correct paper size and type in the tray, verify the paper size and type settings are specified in the Paper menu on the printer control panel, and then select Finished changing paper. For non-touch-screen printer models, press OK to confirm.
- Cancel the print job.
Change [paper source] to [paper size] load [orientation]
Try one or more of the following:
- Load the correct paper size and type in the tray, verify the paper size and type settings are specified in the Paper menu on the printer control panel, and then select Finished changing paper. For non-touch-screen printer models, press OK to confirm.
- Cancel the print job.
Change [paper source] to [paper type] [paper size] load [orientation]
Try one or more of the following:
- Load the correct paper size and type in the tray, verify the paper size and type settings are specified in the Paper menu on the printer control panel, and then select Finished changing paper. For non-touch-screen printer models, press OK to confirm.
- Cancel the print job.
Check tray [x] connection
Try one or more of the following:
- Turn off the printer, and then turn it back on.
If the error occurs a second time, then:
1 Turn off the printer.
2 Unplug the power cord from the electrical outlet.
3 Remove the specified tray.
4 Reattach the tray.
5 Connect the power cord to a properly grounded electrical outlet.
6 Turn the printer back on.
If the error occurs again, then:
1 Turn off the printer.
2 Unplug the power cord from the electrical outlet.
3 Remove the tray.
4 Contact customer support.
- To clear the message and resume the job, select Continue on the printer control panel. For non-touch-screen printer models, press OK to confirm.
Close door or insert cartridge
The toner cartridge is missing or not installed properly. Insert the cartridge, and then close all doors and covers.
Close front door
Close the front door of the printer.
Complex page, some data may not have printed [39]
Try one or more of the following:
- From the printer control panel, select Continue to ignore the message and continue printing. For non-touch-screen printer models, press OK to confirm.
- Cancel the current print job. For non-touch-screen printer models, press OK to confirm.
•Install additional printer memory.
Configuration change, some held jobs were not restored [57]
Held jobs are invalidated because of any of the following possible changes in the printer:
•The printer firmware has been updated.
•The tray for the print job is removed.
- The print job is sent from a flash drive that is no longer attached to the USB port.
- The printer hard disk contains print jobs that were stored when the hard disk was installed in a different printer model.
From the printer control panel, select Continue to clear the message. For non-touch-screen printer models, press to confirm.
Defective flash detected [51]
Try one or more of the following:
-Replace the defective flash memory card.
- From the printer control panel, select Continue to ignore the message and continue printing. For non-touch-screen printer models, press OK to confirm.
- Cancel the current print job.
Disk must be formatted for use in this device
From the printer control panel, select Format disk to format the printer hard disk and clear the message.
Note: Formatting deletes all the files stored in the printer hard disk.
Disk near full. Securely clearing disk space.
Try one or more of the following:
- Select Continue to clear the message. For non-touch-screen printer models, press OK to confirm.
- Delete fonts, macros, and other data stored in the printer hard disk.
•Install a hard disk with higher capacity.
Empty the hole punch box
Try one or more of the following:
•Empty the hole punch box.
- Select Continue on the printer control panel to clear the message and continue printing.
- Cancel the print job.
Error reading USB drive. Remove USB.
An unsupported USB device is inserted. Remove the USB device, and then insert a supported one.
Error reading USB hub. Remove hub.
An unsupported USB hub has been inserted. Remove the USB hub, and then install a supported one.
Imaging unit low [84.xy]
You may need to order an imaging unit. If necessary, select Continue on the printer control panel to clear the message and continue printing. For non-touch-screen printer models, press OK to confirm.
Imaging unit nearly low [84.xy]
If necessary, select Continue on the printer control panel to clear the message and continue printing. For non-touch-screen printer models, press OK to confirm.
Imaging unit very low, [x] estimated pages remain [84.xy]
You may need to replace the imaging unit very soon. For more information, see the "Replacing supplies" section of the User's Guide.
If necessary, select Continue on the printer control panel to clear the message and continue printing. For
non-touch-screen printer models, press OK to confirm.
Incompatible output bin [x] [59]
Try one or more of the following:
- Remove the indicated bin.
- Select Continue on the printer control panel to clear the message and continue printing without using the specified bin. For non-touch-screen printer models, press OK to confirm.
Incompatible tray [x] [59]
Try one or more of the following:
- Remove the specified tray.
- From the printer control panel, select Continue to clear the message and continue printing without using the specified tray. For non-touch-screen printer models, press OK to confirm.
Incorrect paper size, open [paper source] [34]
Try one or more of the following:
- Load the correct size of paper in the tray.
- From the printer control panel, select Continue to clear the message and print using a different tray. For non-touch-screen printer models, press OK to confirm.
- Check the tray length and width guides and make sure the paper is loaded properly in the tray.
- Make sure the correct paper size and type are specified in the Printing Preferences or in the Print dialog.
- Make sure the paper size and type are specified in the Paper menu on the printer control panel.
- Make sure that the paper size is correctly set. For example, if MP Feeder Size is set to Universal, then make sure the paper is large enough for the data being printed.
- Cancel the print job.
Insert hole punch box
Insert the hole punch box into the finisher, and then select Continue on the printer control panel to clear the message.
For non-touch-screen printer models, press OK to confirm.
Insert staple cartridge
Try one or more of the following:
- Insert a staple cartridge. For more information, see the instruction sheet that came with the supply.
- Select Continue to clear the message and print without using the staple finisher. For non-touch-screen printer models, press OK to confirm.
Insert Tray [x]
Try one or more of the following:
- Insert the specified tray into the printer.
- Cancel the print job.
- Reset the active bin for a linked set of bins by selecting Reset active bin on the printer control panel.
Install bin [x]
Try one or more of the following:
•Install the specified bin:
1 Turn off the printer.
2 Unplug the power cord from the electrical outlet.
3 Install the specified bin.
4 Connect the power cord to a properly grounded electrical outlet.
5 Turn the printer back on.
- Cancel the print job.
- Reset active bin
Install Tray [x]
Try one or more of the following:
•Install the specified tray:
1 Turn off the printer.
2 Unplug the power cord from the electrical outlet.
3 Install the specified tray.
4 Connect the power cord to a properly grounded electrical outlet.
5 Turn the printer back on.
- Cancel the print job.
- Reset the active bin.
Insufficient memory for Flash Memory Defragment operation [37]
Try one or more of the following:
- From the printer control panel, select Continue to stop the defragmentation and continue printing. For non-touch-screen printer models, press OK to confirm.
- Delete fonts, macros, and other data from the printer memory.
•Install additional printer memory.
Insufficient memory, some Held Jobs were deleted [37]
The printer deleted some held jobs in order to process current jobs.
Select Continue to clear the message. For non-touch-screen printer models, press OK to confirm.
Insufficient memory, some held jobs will not be restored [37]
Try one or more of the following:
- From the printer control panel, select Continue to clear the message. For non-touch-screen printer models, press OK to confirm.
- Delete other held jobs to free up additional printer memory.
Insufficient memory to collate job [37]
Try one or more of the following:
- From the printer control panel, select Continue to print the part of the job already stored and begin collating the rest of the print job. For non-touch-screen printer models, press OK to confirm.
- Cancel the current print job.
Insufficient memory to support Resource Save feature [35]
Install additional printer memory or select Continue on the printer control panel to disable Resource Save, clear the message, and continue printing. For non-touch-screen printer models, press OK to confirm.
Load staples
Try one or more of the following:
- Replace or insert the specified staple cartridge in the finisher.
- Select Continue to clear the message and continue printing.
- Cancel the print job.
Load [paper source] with [custom string] [paper orientation]
Try one or more of the following:
- Load the tray or feeder with the correct size and type of paper.
- To use the tray that has the correct size or type of paper, select Finished loading paper on the printer control panel.
For non-touch-screen printer models, press OK to confirm.
Note: If the printer finds a tray that has the correct size and type of paper, then it feeds from that tray. If the printer cannot find a tray that has the correct size and type of paper, then it prints from the default paper source.
- Cancel the current job.
Load [paper source] with [custom type name] [paper orientation]
Try one or more of the following:
- Load the tray or feeder with the correct size and type of paper.
- To use the tray that has the correct size or type of paper, select Finished loading paper on the printer control panel.
For non-touch-screen printer models, press OK to confirm.
Note: If the printer finds a tray that has the correct size and type of paper, then it feeds from that tray. If the printer cannot find a tray that has the correct size and type of paper, then it prints from the default paper source.
- Cancel the current job.
Load [paper source] with [paper size] [paper orientation]
Try one or more of the following:
- Load the tray or feeder with the correct size of paper.
- To use the tray or feeder that has the correct size of paper, select Finished loading paper on the printer control
panel. For non-touch-screen printer models, press OK to confirm.
Note: If the printer finds a tray that has the correct size and type of paper, then it feeds from that tray. If the printer cannot find a tray that has the correct size and type of paper, then it prints from the default paper source.
- Cancel the current job.
Load [paper source] with [paper type] [paper size] [paper orientation]
Try one or more of the following:
- Load the tray or feeder with the correct size and type of paper.
- To use the tray or feeder that has the correct size and type of paper, select Finished loading paper on the printer
control panel. For non-touch-screen printer models, press OK to confirm.
Note: If the printer finds a tray that has the correct size and type of paper, then it feeds from that tray. If the printer cannot find a tray that has the correct size and type of paper, then it prints from the default paper source.
- Cancel the current job.
Load manual feeder with [custom string] [paper orientation]
Try one or more of the following:
- Load the feeder with the correct size and type of paper.
- Depending on your printer model, touch Continue or press OK to clear the message and continue printing.
Note: If no paper is loaded in the feeder when Continue or OK is selected, then the printer automatically overrides the request, and then prints from an automatically selected tray.
- Cancel the current job.
Load manual feeder with [custom type name] [paper orientation]
Try one or more of the following:
- Load the multipurpose feeder with the correct size and type of paper.
- Depending on your printer model, touch Continue or press OK to clear the message and continue printing.
Note: If no paper is loaded in the feeder when Continue or OK is selected, then the printer manually overrides the request, and then prints from an automatically selected tray.
- Cancel the current job.
Load manual feeder with [paper size] [paper orientation]
Try one or more of the following:
- Load the multipurpose feeder with the correct size of paper.
- Depending on your printer model, touch Continue or press OK to clear the message and continue printing.
Note: If no paper is loaded in the feeder when Continue or OK is selected, then the printer manually overrides the request, and then prints from an automatically selected tray.
- Cancel the current job.
Load manual feeder with [paper type] [paper size] [paper orientation]
Try one or more of the following:
- Load the multipurpose feeder with the correct size and type of paper.
- Depending on your printer model, touch Continue or press OK to clear the message and continue printing.
Note: If no paper is loaded in the feeder when Continue or OK is selected, then the printer manually overrides the request, and then prints from an automatically selected tray.
- Cancel the current job.
Maintenance kit low [80.xy]
You may need to order a maintenance kit. For more information, contact customer support at http://support.lexmark.com or your service representative. If necessary, select Continue to clear the message and continue printing. For non-touch-screen printer models, press OK to confirm.
Maintenance kit nearly low [80.xy]
For more information, contact customer support at http://support.lexmark.com or your service representative. If necessary, select Continue to clear the message and continue printing. For non-touch-screen printer models,
press OK to confirm.
Maintenance kit very low, [x] estimated pages remain [80.xy]
You may need to replace the maintenance kit very soon. For more information, contact customer support at http://support.lexmark.com or your service representative.
If necessary, select Continue on the printer control panel to clear the message and continue printing. For non-touch-screen printer models, press OK to confirm.
Memory full [38]
Try one or more of the following:
- From the printer control panel, select Cancel job to clear the message. For non-touch-screen printer models, press
![LEXMARK MS811dn - Memory full [38] - 1](/content/2026/06/1236802/images/b9a43e98d29b542de4693fd240a7f473cf88f034f5f499065283a88b9d8f820f.jpg)
to confirm.
•Install additional printer memory.
Network [x] software error [54]
Try one or more of the following:
- From the printer control panel, select Continue to continue printing. For non-touch-screen printer models, press
![LEXMARK MS811dn - Network [x] software error [54] - 1](/content/2026/06/1236802/images/945f563fe520d75fecb26a643c8abb6f00667c19879110d63b087ab4fdc4a743.jpg)
to confirm.
- Turn off the printer, wait for about 10 seconds, and then turn the printer back on.
- Update the network firmware in the printer or print server. For more information, contact customer support.
Non-Lexmark [supply type], see User's Guide [33.xy]
Note: The supply type can be toner cartridge or imaging unit.
The printer has detected a non-Lexmark supply or part installed in the printer.
Your Lexmark printer is designed to function best with genuine Lexmark supplies and parts. Use of third-party supplies or parts may affect the performance, reliability, or life of the printer and its imaging components.
All life indicators are designed to function with Lexmark supplies and parts and may deliver unpredictable results if third-party supplies or parts are used. Imaging component usage beyond the intended life may damage your Lexmark printer or associated components.
Warning—Potential Damage: Use of third-party supplies or parts can affect warranty coverage. Damage caused by the use of third-party supplies or parts may not be covered by the warranty.
To accept any and all of these risks and to proceed with the use of non-genuine supplies or parts in your printer, press and hold ✗ and the # button on the printer control panel simultaneously for 15 seconds.
For non-touch-screen printer models, press OK and on the printer control panel simultaneously for 15 seconds to clear the message and continue printing.
If you do not wish to accept these risks, then remove the third-party supply or part from your printer, and then install a genuine Lexmark supply or part.
Note: For a list of supported supplies, see the "Ordering supplies" section of the User's Guide or visit www.lexmark.com.
Not enough free space in flash memory for resources [52]
Try one or more of the following:
- From the printer control panel, select Continue to clear the message and continue printing. For non-touch-screen
printer models, press OK to confirm. - Delete fonts, macros, and other data stored in the flash memory.
- Upgrade to a larger capacity flash memory card.
Note: Downloaded fonts and macros that are not previously stored in the flash memory are deleted.
PPDS font error [50]
Try one or more of the following:
- From the printer control panel, select Continue to clear the message and continue printing. For non-touch-screen printer models, press OK to confirm.
- If the printer cannot find the requested font, then from the printer control panel, navigate to:
PPDS menu > Best Fit > On
The printer will find a similar font and reformat the affected text.
- Cancel the current print job.
Paper changes needed
Try one or more of the following:
- Select Use current supplies on the printer control panel to clear the message and continue printing.
For non-touch-screen printer models, press OK to confirm.
- Cancel the current print job.
Parallel port [x] disabled [56]
Try one or more of the following:
- Select Continue to clear the message. For non-touch-screen printer models, press OK to confirm.
The printer discards any data received through the parallel port. - Select Reset active bin to reset the bin for a linked set of bins.
Reattach bin [x]
Try one or more of the following:
- Turn off the printer, and then turn it back on.
•Reattach the specified bin.
1 Turn off the printer.
2 Unplug the power cord from the electrical outlet.
3 Remove the specified bin.
4 Reattach the bin.
5 Connect the power cord to a properly grounded electrical outlet.
6 Turn the printer back on.
- Remove the specified bin:
1 Turn off the printer.
2 Unplug the power cord from the electrical outlet.
3 Remove the specified bin.
4 Contact customer support.
- Select Continue on the printer control panel to clear the message and print without using the specified bin. For non-touch-screen printer models, press OK to confirm.
Reattach bins [x] - [y]
Try one or more of the following:
- Turn off the printer, and then turn it back on.
•Reattach the specified bins:
1 Turn off the printer.
2 Unplug the power cord from the electrical outlet.
3 Remove the specified bins.
4 Reattach the bins.
5 Connect the power cord to a properly grounded electrical outlet.
6 Turn the printer back on.
- Remove the specified bins:
1 Turn off the printer.
2 Unplug the power cord from the electrical outlet.
3 Remove the specified bins.
4 Contact customer support.
Select Continue on the printer control panel to clear the message and print without using the specified bins. For non-touch-screen printer models, press OK to confirm.
Reinstall missing or unresponsive cartridge [31.xy]
Try one or more of the following:
- Check if the toner cartridge is missing. If missing, install the toner cartridge.
For information on installing the cartridge, see the "Replacing supplies" section of the User's Guide. - If the toner cartridge is installed, then remove the unresponsive toner cartridge, and then reinstall it.
Note: If the message appears after reinstalling the supply, then the cartridge is defective. Replace the toner cartridge.
Reinstall missing or unresponsive fuser [31.xy]
Try one or more of the following:
- Remove the unresponsive fuser, and then reinstall it.
Note: If the message appears after reinstalling the supply, then the fuser is defective. Replace the fuser.
•Install the missing fuser.
For more information on installing the fuser, see the instruction sheet that came with the part.
Reinstall missing or unresponsive imaging unit [31.xy]
Try one or more of the following:
- Check if the imaging unit is missing. If missing, install the imaging unit.
For information on installing the imaging unit, see the "Replacing supplies" section of the User's Guide.
- If the imaging unit is installed, then remove the unresponsive imaging unit, and then reinstall it.
Note: If the message appears after reinstalling the supply, then the imaging unit is defective. Replace the imaging unit.
Remove defective disk [61]
Remove and replace the defective printer hard disk.
Remove packaging material, [area name]
1 Remove any remaining packaging material from the specified location.
2 Select Continue to clear the message and continue printing. For non-touch-screen printer models, press OK to confirm.
Remove paper from all bins
Bins have reached their capacity. Remove paper from all bins to clear the message and continue printing.
If removing the paper does not clear the message, then select Continue on the printer control panel. For non-touch-screen printer models, press OK to confirm.
Remove paper from bin [x]
Remove paper from the specified bin. The printer automatically detects paper removal and resumes printing.
If removing the paper does not clear the message, then select Continue on the printer control panel. For non-touch-screen printer models, press OK to confirm.
Remove paper from [linked set bin name]
Remove paper from the specified bin. The printer automatically detects paper removal and resumes printing.
If removing the paper does not clear the message, then select Continue on the printer control panel. For non-touch-screen printer models, press OK to confirm.
Remove paper from standard output bin
Remove the paper stack from the standard bin. The printer automatically detects paper removal and resumes printing. If removing the paper does not clear the message, then select Continue on the printer control panel. For non-touch-screen printer models, press OK to confirm.
Replace cartridge, 0 estimated pages remain [88.xy]
Replace the toner cartridge to clear the message and continue printing. For more information, see the instruction sheet that came with the supply or see the “Replacing supplies” section of the User’s Guide.
Note: If you do not have a replacement cartridge, then see the “Ordering supplies” section of the User’s Guide or visit www.lexmark.com.
Replace cartridge, printer region mismatch [42.xy]
Install a toner cartridge that matches the region number of the printer. x indicates the value of the printer region. y indicates the value of the cartridge region. x and y can have the following values:
List of printer and toner cartridge regions
| Region number Region | ||||
| 0 | G | I | o | b |
| 1 United States, Canada | ||||
| 2 European Economic Area (EEA), Switzerland | ||||
| 3 Asia Pacific, Australia, New Zealand | ||||
| 4 Latin America | ||||
| 5 Africa, Middle East, rest of Europe | ||||
| 9 | I | n | v | a |
Notes:
- The x and y values are the .xy of the error code shown on the printer control panel.
•The x and y values must match for printing to continue.
Replace imaging unit, 0 estimated pages remain [84.xy]
Replace the imaging unit to clear the message and continue printing. For more information, see the instruction sheet that came with the supply or see the “Replacing supplies” section of the User’s Guide.
Note: If you do not have a replacement imaging unit, then see the “Ordering supplies” section of the User’s Guide or visit www.lexmark.com.
Replace maintenance kit, 0 estimated pages remain [80.xy]
Contact customer support at http://support.lexmark.com or your service representative, and then report the message. The printer is scheduled for maintenance.
Replace roller kit [81.xx]
1 Replace the roller kit. For more information, see the instruction sheet that came with the part.
2 Press to clear the message and continue printing.
Replace unsupported cartridge [32.xy]
Remove the toner cartridge, and then install a supported one to clear the message and continue printing. For more information, see the instruction sheet that came with the supply or see the "Replacing supplies" section of the User's Guide.
Note: If you do not have a replacement cartridge, then see the "Ordering supplies" section of the User's Guide or visit www.lexmark.com.
Replace unsupported fuser [32.xy]
Remove the fuser, and then install a supported one. For more information, see the instruction sheet that came with the part.
Replace unsupported imaging unit [32.xy]
Remove the imaging unit, and then install a supported one to clear the message and continue printing. For more information, see the instruction sheet that came with the supply or see the "Replacing supplies" section of the User's Guide.
Note: If you do not have a replacement imaging unit, then see the "Ordering supplies" section of the User's Guide or visit www.lexmark.com.
Restore held jobs?
Try one or more of the following:
- Select Restore on the printer control panel to restore all held jobs stored in the printer hard disk. For non-touch-screen printer models, press OK to confirm.
- Select Do not restore if you do not want any print jobs to be restored. For non-touch-screen printer models, press OK to confirm.
Serial port [x] disabled [56]
Try one or more of the following:
- Select Continue to clear the message. For non-touch-screen printer models, press OK to confirm.
The printer discards any data received through the specified serial port. - Select Reset active bin to reset the active bin for a linked set of bins.
- Make sure the Serial Buffer menu is set to Enabled.
Some held jobs were not restored
Select Continue to clear the message. For non-touch-screen printer models, press OK to confirm.
Note: Held jobs that are not restored remain in the printer hard disk and are inaccessible.
Standard network software error [54]
Try one or more of the following:
- From the printer control panel, select Continue to continue printing. For non-touch-screen printer models, press
OK to confirm.
- Turn off the printer and then turn it back on.
- Update the network firmware in the printer or print server. For more information, contact customer support.
Standard USB port disabled [56]
From the printer control panel, select Continue to clear the message. For non-touch-screen printer models, press to confirm.
OK
Notes:
•The printer discards any data received through the USB port.
- Make sure the USB Buffer menu is not set to Disabled.
Supply needed to complete job
A supply needed to complete the job is missing. Cancel the current job.
Too many bins attached [58]
1 Turn off the printer.
2 Unplug the power cord from the electrical outlet.
3 Remove the extra bins.
4 Connect the power cord to a properly grounded electrical outlet.
5 Turn the printer back on.
Too many disks installed [58]
1 Turn off the printer.
2 Unplug the power cord from the electrical outlet.
3 Remove the extra printer hard disks.
4 Connect the power cord to a properly grounded electrical outlet.
5 Turn the printer back on.
Too many flash options installed [58]
1 Turn off the printer.
2 Unplug the power cord from the electrical outlet.
3 Remove the extra flash memory.
4 Connect the power cord to a properly grounded electrical outlet.
5 Turn the printer back on.
Too many trays attached [58]
1 Turn off the printer.
2 Unplug the power cord from the electrical outlet.
3 Remove the extra trays.
4 Connect the power cord to a properly grounded electrical outlet.
5 Turn the printer back on.
Tray [x] paper size unsupported
The paper size in the specified tray is unsupported. Replace it with a supported paper size.
Unformatted flash detected [53]
Try one or more of the following:
- From the printer control, select Continue to stop the defragmentation and continue printing. For non-touch-screen printer models, press OK to confirm.
- Format the flash memory.
Note: If the error message remains, then the flash memory may be defective and need to be replaced.
Unsupported disk
1 Remove the unsupported disk, and then install a supported one.
2 Select Continue to clear the message and continue printing. For non-touch screen printer models, press OK to confirm.
Unsupported option in slot [x] [55]
1 Turn off the printer.
2 Unplug the power cord from the wall outlet.
3 Remove the unsupported option card from the printer controller board, and then replace it with a supported card.
4 Connect the power cord to a properly grounded electrical outlet.
5 Turn the printer back on.
USB port [x] disabled [56]
Try one or more of the following:
- Select Continue to clear the message. For non-touch-screen printer models, press OK to confirm.
The printer discards any data received through the specified serial port. - Select Reset active bin to reset the active bin for a linked set of bins.
• Make sure the USB Buffer menu is enabled.
Solving printer problems
- "Printer does not respond" on page 310
- "Printing problems" on page 312
- "Hardware and internal option problems" on page 319
• "Paper feed problems" on page 323 - "Print quality problems" on page 325
Printer does not respond
The printer is not responding
| Action Yes No | ||
| Step 1Make sure the printer is turned on.Is the printer turned on? | Go to step 2. Turn on the printer. | |
| Step 2Check if the printer is in Sleep mode or Hibernate mode.Is the printer in Sleep mode or Hibernate mode? | Press the Sleep button to wake the printer from Sleep mode or Hibernate mode. | Go to step 3. |
| Step 3Check if one end of the power cord is plugged into the printer and the other to a properly grounded electrical outlet.Is the power cord plugged into the printer and a properly grounded electrical outlet? | Go to step 4. Plug one end of the power cord into the printer and the other to a properly grounded electrical outlet. | |
| Step 4Check other electrical equipment plugged into the electrical outlet.Does other electrical equipment work? | Unplug the other electrical equipment, and then turn on the printer. If the printer does not work, then reconnect the other electrical equipment. | Go to step 5. |
| Step 5Check if the cables connecting the printer and the computer are inserted in the correct ports.Are the cables inserted in the correct ports? | Go to step 6. Make sure to match the following:•The USB symbol on the cable with the USB symbol on the printer•The appropriate Ethernet cable with the Ethernet port | |
| Step 6Make sure the electrical outlet is not turned off by a switch or breaker.Is the electrical outlet turned off by a switch or breaker? | Turn on the switch or reset the breaker. | Go to step 7. |
| Step 7Check if the printer is plugged into any surge protectors, uninterruptible power supplies, or extension cords.Is the printer plugged into any surge protectors, uninterruptible power supplies, or extension cords? | Connect the printer power cord directly to a properly grounded electrical outlet. | Go to step 8. |
| Step 8Check if one end of the printer cable is plugged into a port on the printer and the other to the computer, print server, option, or other network device.Is the printer cable securely attached to the printer and the computer, print server, option, or other network device? | Go to step 9. Connect the printer cable securely to the printer and the computer, print server, option, or other network device. | |
| Step 9Make sure to install all hardware options properly and remove any packing material.Are all hardware options properly installed and all packing material removed? | Go to step 10. Turn off the printer, remove all packing materials, then reinstall the hardware options, and then turn on the printer. | |
| Step 10Check if you have selected the correct port settings in the printer driver.Are the port settings correct? | Go to step 11. Use correct printer driver settings. | |
| Step 11Check the installed printer driver.Is the correct printer driver installed? | Go to step 12. Install the correct printer driver. | |
| Step 12Turn off the printer, then wait for about 10 seconds, and then turn the printer back on.Is the printer working? | The problem is solved. Contact customer support. | |
Printer display is blank
| Action Yes No | ||
| Step 1Press the Sleep button on the printer control panel.Does Ready appear on the printer display? | The problem is solved. | Go to step 2. |
| Step 2Turn off the printer, then wait for about 10 seconds, and then turn the printer back on.Do Please wait and Ready appear on the printer display? | The problem is solved. | Turn off the printer, and then contact customer support. |
Printing problems
Confidential and other held jobs do not print
| Action Yes No | ||
| Step 1a From the printer control panel, open the Held Jobs folder, and then verify that your print job is listed.b Resend the print job.For more information, see “Printing confidential and other held jobs” on page 74 for non-touch-screen printer models.For touch-screen printer models, see “Printing confidential and other held jobs” on page 124 or “Printing confidential and other held jobs” on page 173.Did the jobs print? | The problem is solved. | Go to step 2. |
| Step 2Do one or more of the following:Delete the print job, and then resend it.If you are printing PDF files, then generate a new file, and then print it again.Did the jobs print? | The problem is solved. | Go to step 3. |
| Step 3a Increase the printer memory. Do one or more of the following:Delete some print jobs.Install additional printer memory.b Resend the print job.Did the jobs print? | The problem is solved. | Contact customer support. |
Envelope seals when printing
| Action Yes No | ||
| a Use envelopes that have been stored in a dry environment.Note: Printing on envelopes with high moisture content can seal the flaps.b Resend the print job.Does the envelope seal when printing? | Contact customer support. | The problem is solved. |
Error message about reading the flash drive appears
| Action Yes No | ||
| Step 1Check if the flash drive is inserted into the front USB slot.Note: The flash drive will not work if it is inserted into the rear USB slot.Is the flash drive inserted into the front USB slot? | Go to step 2. Insert the | flash driveinto the front USB slot. |
| Step 2Check if the indicator light on the printer control panel is blinking green.Note:A green blinking light indicates that the printer is busy.Is the indicator light blinking green? | Wait until the printer is ready, then view the held jobs list, and then print the documents. | Go to step 3. |
| Step 3a Check for an error message on the display.b Clear the message.Does the error message still appear? | Go to step 4. The problem is solved. | |
| Step 4Check if the flash drive is supported.For more information on tested and approved USB flash drives, see “Supported flash drives and file types” on page 71 for non-touch-screen printer models.For touch-screen printer models, see “Supported flash drives and file types” on page 121 and “Supported flash drives and file types” on page 171.Does the error message still appear? | Go to step 5. The problem is solved. | |
| Step 5Check if the USB slot is disabled by the system support person.Does the error message still appear? | Contact customersupport. | The problem is solved. |
Incorrect characters print
| Action Yes No | ||
| Step 1Make sure the printer is not in Hex Trace mode.Note: If Ready Hex appears on the printer display, then turn off the printer, and then turn it back on to deactivate Hex Trace mode.Is the printer in Hex Trace mode? | Deactivate Hex Trace mode. | Go to step 2. |
| Step 2a From the printer control panel, select Standard Network or Network [x], and then set SmartSwitch to On.b Resend the print job.Do incorrect characters print? | Contact customer support. | The problem is solved. |
Job prints from the wrong tray or on the wrong paper
| Action Yes No | ||
| Step 1a Check if you are printing on paper that is supported by the tray.b Resend the print job.Did the job print from the correct tray or on the correct paper? | The problem is solved. | Go to step 2. |
| Step 2a From the Paper menu on the printer control panel, set the paper size and type to match the paper loaded in the tray.b Resend the print job.Did the job print from the correct tray or on the correct paper? | The problem is solved. | Go to step 3. |
| Step 3a Depending on your operating system, open Printing Preferences or the Print dialog, and then specify the paper type.b Resend the print job.Did the job print from the correct tray or on the correct paper? | The problem is solved. | Go to step 4. |
| Step 4a Check if the trays are not linked.b Resend the print job.Did the job print from the correct tray or on the correct paper? | The problem is solved. | Contact customer support. |
Large jobs do not collate
| Action Yes No | ||
| Step 1a From the Finishing menu on the printer control panel, set Collate to (1,2,3) (1,2,3).b Resend the print job.Did the job print and collate correctly? | The problem is solved. | Go to step 2. |
| Step 2a From the printer software, set Collate to (1,2,3) (1,2,3).Note: Setting Collate to (1,1,1) (2,2,2) in the software overrides the setting in the Finishing menu.b Resend the print job.Did the job print and collate correctly? | The problem is solved. | Go to step 3. |
| Step 3Reduce the complexity of the print job by eliminating the number and size of fonts, the number and complexity of images, and the number of pages in the job.Did the job print and collate correctly? | The problem is solved. | Contact customer support. |
Multiple-language PDF files do not print
| Action Yes No | ||
| Step 1a Check if the print options for the PDF output are set to embed all fonts.b Generate a new PDF file, and then resend the print job.Do the files print? | The problem is solved. | Go to step 2. |
| Step 2a Open the document you want to print in Adobe Acrobat.b Click File > Print > Advanced > Print As Image > OK > OK.Do the files print? | The problem is solved. | Contact customer support. |
Print job takes longer than expected
| Action Yes No | ||
| Step 1Change the environmental settings of the printer.a From the printer control panel, navigate to:Settings > General Settingsb Select Eco-Mode or Quiet Mode, and then select Off.Note: Disabling Eco-Mode or Quiet Mode may increase the consumption of energy or supplies, or both.Did the job print? | The problem is solved. | Go to step 2. |
| Step 2Reduce the number and size of fonts, the number and complexity of images, and the number of pages in the print job, and then resend the jobDid the job print? | The problem is solved. | Go to step 3. |
| Step 3a Remove held jobs stored in the printer memory.b Resend the print job.Did the job print? | The problem is solved. | Go to step 4. |
| Step 4a Disable the Page Protect feature.From the printer control panel, navigate to:Settings > General Settings > Print Recovery > Page Protect > Offb Resend the print job.Did the job print? | The problem is solved. | Go to step 5. |
| Step 5Install additional printer memory, and then resend the print job.Did the job print? | The problem is solved. | Contact customer support. |
Print jobs do not print
| Action Yes No | ||
| Step 1a From the document you are trying to print, open the Print dialog and check if you have selected the correct printer.Note: If the printer is not the default printer, then you must select the printer for each document that you want to print.b Resend the print job.Do the jobs print? | The problem is solved. | Go to step 2. |
| Step 2a Check if the printer is plugged in and turned on, and if Ready appears on the printer display.b Resend the print job.Do the jobs print? | The problem is solved. | Go to step 3. |
| Step 3If an error message appears on the printer display, then clear the message.Note: The printer continues to print after clearing the message.Do the jobs print? | The problem is solved. | Go to step 4. |
| Step 4a Check if the ports (USB, serial, or Ethernet) are working and if the cables are securely connected to the computer and the printer.Note: For more information, see the setup documentation that came with the printer.b Resend the print job.Do the jobs print? | The problem is solved. | Go to step 5. |
| Step 5a Turn off the printer, then wait for about 10 seconds, and then turn the printer back on.b Resend the print job.Do the jobs print? | The problem is solved. | Go to step 6. |
| Step 6a Remove, and then reinstall the printer software. For more information, see “Installing the printer software” on page 35.Note: The printer software is available athttp://support.lexmark.com.b Resend the print job.Do the jobs print? | The problem is solved. | Contact customer support. |
Printing slows down
Notes:
- When printing using narrow paper, the printer prints at a reduced speed to prevent damage to the fuser.
- The printer speed may be reduced when printing for long periods of time, or printing at elevated temperatures.
| Action Yes No | ||
| Step 1a Make sure the size of the paper loaded in the tray matches the fuser type.Note: Use a 110-volt fuser for printing on letter-size paper and a 220-volt fuser for printing on A4-size paper.b Resend the print job.Does the print speed increase? | The problem is solved. | Go to step 2. |
| Step 2a Replace the fuser. For more information on installing the fuser, see the instruction sheet that came with the part.b Resend the print job.Does the print speed increase? | The problem is solved. | Contact customer support. |
Tray linking does not work
Notes:
•The trays can detect paper length.
- The multipurpose feeder does not automatically detect the paper size. You must set the size from the Paper Size/Type menu.
| Action Yes No | ||
| Step 1a Open the trays, and then check if they contain paper of the same size and type.•Check if the paper guides are in the correct positions for the size of the paper loaded in each tray.•Check if the paper size indicators on the paper guides are aligned with the paper size indicators on the tray.b Resend the print job.Do the trays link correctly? | The problem is solved. | Go to step 2. |
| Step 2a From the printer control panel, set the paper size and type in the Paper menu to match the paper loaded in the trays to be linked.Note: The paper size and type must match for trays to be linked.b Resend the print job.Do the trays link correctly? | The problem is solved. | Contact customer support. |
Unexpected page breaks occur
| Action Yes No | ||
| Step 1Adjust the print timeout settings.a From the printer control panel, navigate to:Settings > General Settings > Timeouts > Print Timeoutb Select a higher setting and then, depending on your printer model,select OK or Submit.c Resend the print job.Did the file print correctly? | The problem is solved. | Go to step 2. |
| Step 2a Check the original file for manual page breaks.b Resend the print job.Did the file print correctly? | The problem is solved. | Contact customer support. |
Hardware and internal option problems
2100-sheet tray problems
| Action Yes No | ||
| Step 1a Pull out the tray, and then do one or more of the following:Make sure paper lies flat in the tray.Check for paper jams or misfeeds.Check if the paper size indicators on the paper guides are aligned with the paper size indicators on the tray.Check if the paper guides are aligned against the edges of the paper.Make sure the paper is below the maximum paper fill indicator.Check if you are printing on a recommended paper size and type.Check if the paper or specialty media meets specifications and is not damaged.b Insert the tray properly.Note:Press the paper stack down while inserting the tray.Does the tray operate properly? | The problem is solved. | Go to step 2. |
| Step 2Turn off the printer, then wait about 10 seconds, and then turn it back on.Does the tray operate properly? | The problem is solved. | Go to step 3. |
| Step 3Print a menu settings page, and then check if the tray is listed in the Installed Features list.Note:If the tray is listed in the menu settings page, but paper jams when it enters or exits the tray, then it may not be properly installed.Is the tray listed in the menu settings page? | Go to step 4. For more information, see the setup sheet that came with the 2100-sheet tray. | |
| Step 4Check if the tray is available in the printer driver.Note:You may need to manually add the tray in the printer driver to make it available for print jobs. For more information, see “Updating available options in the printer driver” on page 36.Is the tray available in the printer driver? | Go to step 5. Manually add the tray in the printer driver. | |
| Step 5Check if the tray is selected.From the application you are using, select the tray. If you are using Mac OS X version 9, then make sure the printer is set up in Chooser.Does the tray operate properly? | The problem is solved. Contact customer support. | |
Cannot detect internal option
| Action Yes No | ||
| Step 1Turn off the printer, then wait for about 10 seconds, and then turn on the printer.Does the internal option operate correctly? | The problem is solved. | Go to step 2. |
| Step 2Check if the internal option is properly installed in the controller board.a Turn off the printer using the power switch, and then unplug the power cord from the electrical outlet.b Make sure the internal option is installed in the appropriate connector in the controller board.c Connect the power cord to the printer, then to a properly grounded electrical outlet, and then turn on the printer.Is the internal option properly installed in the controller board? | Go to step 3. Connect the internal option to the controller board. | |
| Step 3Print a menu settings page, and then check to see if the internal option is listed in the Installed Features list.Is the internal option listed in the menu settings page? | Go to step 4. Reinstall the internal option. | |
| Step 4a Check if the internal option is selected.It may be necessary to manually add the internal option in the printer driver to make it available for print jobs. For more information, see “Updating available options in the printer driver” on page 36.b Resend the print job.Does the internal option operate correctly? | The problem is solved. | Contact customer support. |
Internal print server does not operate correctly
| Action Yes No | ||
| Step 1Reinstall the internal print server.a Remove, and then install the internal print server. For more information, see “Installing an Internal Solutions Port” on page 17.b Print a menu settings page, and then check if the internal print server is listed in the Installed Features list.Is the internal print server listed in the Installed Features list? | Go to step 2. Check if the internal print server is supported by the printer.Note: An internal print server from another printer may not work with this printer. | |
| Step 2Check the cable and the internal print server connection.Use the correct cable, and then check if it is securely connected to the internal print server.Does the internal print server operate correctly? | The problem is solved. Contact customer support. | |
Internal Solutions Port does not operate correctly
| Action Yes No | ||
| Step 1Make sure the Internal Solutions Port (ISP) is installed.a Install the ISP. For more information, see “Installing an Internal Solutions Port” on page 17.b Print a menu settings page, and then check if the ISP is listed in the Installed Features list.Is the ISP listed in the Installed Features list? | Go to step 2. Check if you have a supported ISP.Note: An ISP from another printer may not work on this printer. | |
| Step 2Check the cable and the ISP connection.a Use the correct cable, and then make sure it is securely connected to the ISP.b Check if the ISP solution interface cable is securely connected into the receptacle of the controller board.Note: The ISP solution interface cable and the receptacle on the controller board are color-coded.Does the Internal Solutions Port operate correctly? | The problem is solved. | Contact customer support. |
Tray problems
| Action Yes No | ||
| Step 1a Pull out the tray, and then do one or more of the following:Check for paper jams or misfeeds.Check if the paper size indicators on the paper guides are aligned with the paper size indicators on the tray.If you are printing on custom-size paper, then make sure that the paper guides rest against the edges of the paper.Make sure the paper is below the maximum paper fill indicator.Make sure paper lies flat in the tray.b Check if the tray closes properly.Is the tray working? | The problem is solved. | Go to step 2. |
| Step 2a Turn off the printer, then wait about 10 seconds, and then turn the printer back on.b Resend the print job.Is the tray working? | The problem is solved. | Go to step 3. |
| Step 3Check if the tray is installed and recognized by the printer.Print a menu settings page, and then check if the tray is listed in the Installed Features list.Is the tray listed in the menu settings page? | Go to step 4. Reinstall the | Tray. For more information, see the setup documentation that came with the tray. |
| Step 4Check if the tray is available in the printer driver.Note:If necessary, manually add the tray in the printer driver to make it available for print jobs. For more information, see “Updating available options in the printer driver” on page 36.Is the tray available in the printer driver? | The problem is solved. | Contact customer support. |
USB/parallel interface card does not operate correctly
| Action Yes No | ||
| Step 1Make sure the USB or parallel interface card is installed.a Install the USB or parallel interface card. For more information, see “Installing an Internal Solutions Port” on page 17.b Print a menu settings page, and then check if the USB or parallel interface card is listed in the Installed Features list.Is the USB or parallel interface card listed in the Installed Features list? | Go to step 2. Check if you have a supported USB or parallel interface card.Note:A USB or parallel interface card from another printer may not work on this printer. | |
| Step 2Check the cable and the USB or parallel interface card connection.Use the correct cable, and then make sure it is securely connected to the USB or parallel interface card.Does the USB or parallel interface card operate correctly? | The problem is solved. Contact customer support. |
Paper feed problems
Jammed pages are not reprinted
| Action Yes No | ||
| a Turn on jam recovery.1 From the printer control panel, navigate to:Settings > General Settings > Print Recovery > Jam Recovery2 Select On or Auto.3 Depending on your printer model, press OK or touch Submit.b Resend the pages that did not print.Were the jammed pages reprinted? | The problem is solved. | Contact customer support. |
Paper frequently jams
| Action Yes No | ||
| Step 1a Pull out the tray, and then do one or more of the following:Make sure paper lies flat in the tray.Check if the paper size indicators on the paper guides are aligned with the paper size indicators on the tray.Check if the paper guides are aligned against the edges of the paper.Make sure the paper is below the maximum paper fill indicator.Check if you are printing on a recommended paper size and type.b Insert the tray properly.If jam recovery is enabled, then the print jobs will reprint automatically.Do paper jams still occur frequently? | Go to step 2. The problem is solved. | |
| Step 2a Load paper from a fresh package.Note: Paper absorbs moisture due to high humidity. Store paper in its original wrapper until you use it.b Resend the print job.Do paper jams still occur frequently? | Go to step 3. The problem is solved. | |
| Step 3a Review the tips on avoiding jams. For more information, see “Avoiding jams” on page 270.b Follow the recommendations, and then resend the print job.Do paper jams still occur frequently? | Contact customer support. | The problem is solved. |
Paper jam message remains after jam is cleared
| Action Yes No | ||
| a Do either of the following:For touch-screen printer models, touch √ or Done.For non-touch-screen printer models, select Next > OK > Clear the jam, press OK > OK .b Follow the instructions on the printer display.Does the paper jam message remain? | Contact customer support. | The problem is solved. |
Print quality problems
Characters have jagged or uneven edges

text_image
ABC DEF| Action Yes No | ||
| Step 1a Print a font sample list to check if the fonts you are using are supported by the printer.1 From the printer control panel, navigate to:Menus > Reports > Print Fonts2 Select PCL Fonts or PostScript Fonts.b Resend the print job.Are you using fonts that are supported by the printer? | Go to step 2. Select a font that is supported by the printer. | |
| Step 2Check if the fonts installed on the computer are supported by the printer.Are the fonts installed on the computer supported by the printer? | The problem is solved. Contact customer support. |
Clipped pages or images
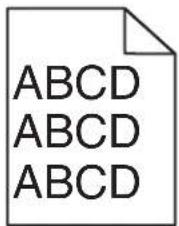
text_image
ABCD ABCD ABCD
text_image
Leading edge Trailing edge| Action Yes No | ||
| Step 1a Move the width and length guides in the tray to the correct positions for the paper loaded.b Resend the print job.Is the page or image clipped? | Go to step 2. The problem is solved. | |
| Step 2From the printer control panel, set the paper size and type in the Paper menu to match the paper loaded in the tray.Do the paper size and type match the paper loaded in the tray? | Go to step 3. Do one or | more of the following:Specify the paper size from the tray settings to match the paper loaded in the tray.Change the paper loaded in the tray to match the paper size specified in the tray settings. |
| Step 3a Depending on your operating system, specify the paper size from Printing Preferences or from the Print dialog.b Resend the print job.Is the page or image clipped? | Go to step 4. The problem is solved. | |
| Step 4a Reinstall the imaging unit.1 Remove the toner cartridge.2 Remove the imaging unit.Warning—Potential Damage: Do not expose the imaging unit to direct light for more than 10 minutes. Extended exposure to light may cause print quality problems.3 Install the imaging unit, and then the cartridge.b Resend the print job.Is the page or image clipped? | Contact customer support. | The problem is solved. |
Compressed images appear on prints
Note: Printing on letter-size paper using a 220-volt fuser compresses images.
| Action Yes No | ||
| Step 1a Make sure the size of the paper loaded in the tray matches the fuser type.Note: Use a 110-volt fuser for printing on letter-size paper and a 220-volt fuser for printing on A4-size paper.b Resend the print job.Do compressed images still appear? | The problem is solved. | Go to step 2. |
| Step 2a Replace the fuser. For more information on installing the fuser, see the instruction sheet that came with the part.b Resend the print job.Do compressed images still appear? | The problem is solved. | Contact customer support. |
Gray background on prints
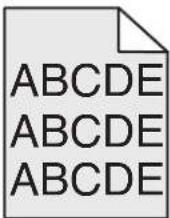

| Action Yes No | ||
| Step 1a From the Quality Menu on the printer control panel, decrease the toner darkness.Note: 8 is the factory default setting.b Resend the print job.Did the gray background disappear from the prints? | The problem is solved. | Go to step 2. |
| Step 2Reinstall the imaging unit and the toner cartridge.a Remove the toner cartridge.b Remove the imaging unit.Warning—Potential Damage: Do not expose the imaging unit to direct light for more than 10 minutes. Extended exposure to light can cause print quality problems.c Install the imaging unit, and then the cartridge.d Resend the print job.Did the gray background disappear from the prints? | The problem is solved. | Go to step 3. |
| Step 3Replace the imaging unit, and then resend the print job.Did the gray background disappear from the prints? | The problem is solved. | Contact customer support. |
Horizontal voids appear on prints

text_image
Leading edge Trailing edge| Action Yes No | ||
| Step 1a Make sure your software program is using a correct fill pattern.b Resend the print job.Do horizontal voids appear on prints? | Go to step 2. The problem is solved. | |
| Step 2a Load the specified tray or feeder with a recommended type of paper.b Resend the print job.Do horizontal voids appear on prints? | Go to step 3. The problem is solved. | |
| Step 3a Redistribute the toner in the imaging unit.1 Remove the toner cartridge, and then the imaging unit.2 Firmly shake the imaging unit.Warning—Potential Damage: Do not expose the imaging unit to direct light for more than 10 minutes. Extended exposure to light may cause print quality problems.3 Reinstall the imaging unit, and then the cartridge.b Resend the print job.Do horizontal voids appear on prints? | Go to step 4. The problem is solved. | |
| Step 4Replace the imaging unit, and then resend the print job.Do horizontal voids appear on prints? | Contact customer support. | The problem is solved. |
Incorrect margins on prints
ABC DEF
| Action Yes No | ||
| Step 1a Move the width and length guides in the tray to the correct positions for the paper size loaded.b Resend the print job.Are the margins correct? | The problem is solved. | Go to step 2. |
| Step 2From the printer control panel, set the paper size in the Paper menu to match the paper loaded in the tray.Does the paper size match the paper loaded in the tray? | Go to step 3. Do one or more of the following:Specify the paper size from the tray settings to match the paper loaded in the tray.Change the paper loaded in the tray to match the paper size specified in the tray settings. | |
| Step 3a Depending on your operating system, specify the paper size from Printing Preferences or from the Print dialog.b Resend the print job.Are the margins correct? | The problem is solved. | Contact customer support. |
Paper curl
| Action Yes No | ||
| Step 1Move the width and length guides in the tray to the correct positions for the size of the paper loaded.Are the width and length guides positioned correctly? | Go to step 2. Adjust the | width and length guides. |
| Step 2From the printer control panel, set the paper type and weight in the Paper menu to match the paper loaded in the tray.Do the paper type and weight match the type and weight of the paper in the tray? | Go to step 3. Specify the | paper type and weight from the tray settings to match the paper loaded in the tray. |
| Step 3a Depending on your operating system, specify the paper type and weight from Printing Preferences or from the Print dialog.b Resend the print job.Is the paper still curled? | Go to step 4. The problem is solved. | |
| Step 4a Remove the paper from the tray, and then turn it over.b Resend the print job.Is the paper still curled? | Go to step 5. The problem is solved. | |
| Step 5a Load paper from a fresh package.Note:Paper absorbs moisture due to high humidity. Store paper in its original wrapper until you use it.b Resend the print job.Is the paper still curled? | Contact customer support. | The problem is solved. |
Print irregularities
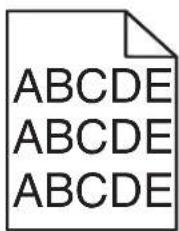
text_image
ABCDE ABCDE ABCDE
text_image
Leading edge Trailing edge| Action Yes No | ||
| Step 1a Move the width and length guides in the tray to the correct positions for the size of the paper loaded in the tray.b Resend the print job.Do print irregularities still appear? | Go to step 2. The problem is solved. | |
| Step 2From the printer control panel, set the paper size and type in the Paper menu to match the paper loaded in the tray.Do the printer settings match the type and weight of the paper loaded in the tray? | Go to step 3. Specify the paper size and type from the tray settings to match the paper loaded in the tray. | |
| Step 3a Depending on your operating system, specify the paper type and weight from Printing Preferences or from the Print dialog.b Resend the print job.Do print irregularities still appear? | Go to step 4. The problem is solved. | |
| Step 4Check if the paper loaded in the tray has texture or rough finishes.Are you printing on textured or rough paper? | From the printer control panel, set the paper texture in the Paper menu to match the paper loaded in the tray. | Go to step 5. |
| Step 5a Load paper from a fresh package.Note:Paper absorbs moisture due to high humidity. Store paper in its original wrapper until you use it.b Resend the print job.Do print irregularities still appear? | Go to step 6. The problem is solved. | |
| Step 6Replace the imaging unit, and then resend the print job.Do print irregularities still appear? | Contact customer support at http://support.lexmark.com or your service representative. | The problem is solved. |
Print is too dark
ABC DEF
| Action Yes No | ||
| Step 1a From the Quality menu on the printer control panel, reduce the toner darkness.Note: 8 is the factory default setting.b Resend the print job.Is the print still too dark? | Go to step 2. The problem is solved. | |
| Step 2a From the printer control panel, set the paper type, texture and weight in the Paper menu to match the paper loaded in the tray.b Resend the print job.Is the tray set to the type, texture, and weight of the paper loaded? | Go to step 3. Do one or more of the following:Specify the paper type, texture, and weight from the tray settings to match the paper loaded in the tray.Change the paper loaded in the tray to match the paper type, texture and weight specified in the tray settings. | |
| Step 3a Depending on your operating system, specify the paper type, texture and weight from Printing Preferences or from the Print dialog.b Resend the print job.Is the print still too dark? | Go to step 4. The problem is solved. | |
| Step 4Check if the paper loaded in the tray has texture or rough finishes.Are you printing on textured or rough paper? | From the printer control panel, change the texture settings in the Paper Texture menu to match the paper you are printing on. | Go to step 5. |
| Step 5a Load paper from a fresh package.Note: Paper absorbs moisture due to high humidity. Store paper in its original wrapper until you use it.b Resend the print job.Is the print still too dark? | Go to step 6. The problem is solved. | |
| Step 6Replace the imaging unit, and then resend the print job.Is the print still too dark? | Contact customer support. | The problem is solved. |
Print is too light

text_image
ABC DEF| Action Yes No | ||
| Step 1a From the Quality menu on the printer control panel, increase the toner darkness.Note: 8 is the factory default setting.b Resend the print job.Is the print still too light? | Go to step 2. The problem is solved. | |
| Step 2From the printer control panel, set the paper type, texture, and weight in the Paper menu to match the paper loaded in the tray.Is the tray set to the type, texture, and weight of the paper loaded? | Go to step 3. Change the paper type, texture, and weight to match the paper loaded in the tray. | |
| Step 3a Depending on your operating system, specify the paper type, texture, and weight from Printing Preferences or from the Print dialog.b Resend the print job.Is the print still too light? | Go to step 4. The problem is solved. | |
| Step 4Make sure that the paper has no texture or rough finishes.Are you printing on textured or rough paper? | From the printer control panel, change the texture settings in the Paper Texture menu to match the paper you are printing on. | Go to step 5. |
| Step 5a Load paper from a fresh package.Note:Paper absorbs moisture due to high humidity. Store paper in its original wrapper until you use it.b Resend the print job.Is the print still too light? | Go to step 6. The problem is solved. | |
| Step 6a Redistribute the toner in the imaging unit.1 Remove the toner cartridge, and then the imaging unit.2 Firmly shake the imaging unit.Warning—Potential Damage:Do not expose the imaging unit to direct light for more than 10 minutes. Extended exposure to light may cause print quality problems.3 Install the imaging unit, and then the cartridge.b Resend the print job.Is the print still too light? | Go to step 7. The problem is solved. | |
| Step 7Replace the imaging unit, and then resend the print job.Is the print still too light? | Contact customer support. | The problem is solved. |
Printer is printing blank pages

natural_image
Blank white document page with a corner bookmark (no text or symbols)| Action Yes No | ||
| Step 1a Check if there is packing material left on the imaging unit.1 Remove the toner cartridge, and then the imaging unit.2 Check if the packing material is properly removed from the imaging unit.Warning—Potential Damage: Do not expose the imaging unit to direct light for more than 10 minutes. Extended exposure to light may cause print quality problems.3 Reinstall the imaging unit, and then the cartridge.b Resend the print job.Is the printer still printing blank pages? | Go to step 2. The problem is solved. | |
| Step 2a Redistribute the toner in the imaging unit.1 Remove the toner cartridge, and then the imaging unit.2 Firmly shake the imaging unit.Warning—Potential Damage: Do not expose the imaging unit to direct light for more than 10 minutes. Extended exposure to light may cause print quality problems.3 Reinstall the imaging unit, and then the cartridge.b Resend the print job.Is the printer still printing blank pages? | Go to step 3. The problem is solved. | |
| Step 3Replace the imaging unit, and then resend the print job.Is the printer still printing blank pages? | Contact customer support. | The problem is solved. |
Printer is printing solid black pages
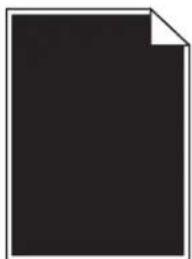
natural_image
Solid black document page with a small corner detail (no text or symbols)| Action Yes No | ||
| Step 1a Reinstall the imaging unit.1 Remove the toner cartridge, and then the imaging unit.Warning—Potential Damage: Do not expose the imaging unit to direct light for more than 10 minutes. Extended exposure to light may cause print quality problems.2 Install the imaging unit, and then the cartridge.b Resend the print job.Is the printer printing solid black pages? | Go to step 2. The problem is solved. | |
| Step 2Replace the imaging unit, and then resend the print job.Is the printer printing solid black pages? | Contact customer support. | The problem is solved. |
Repeating defects appear on prints
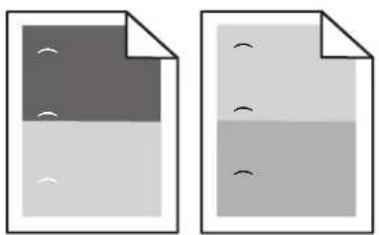
natural_image
Two document icons side by side, one with a gray fill and two white-outlined eyes, the other with a gray fill and two white-outlined eyes (no text or symbols)| Action Yes No | ||
| Step 1a Replace the imaging unit if the distance between the defects is equal to any of the following:•47.8 mm (1.88 in.)•96.8 mm (3.81 in.)•28.5 mm (1.12 in.)b Resend the print job.Do repeating defects still appear on prints? | Go to step 2. The problem is solved. | |
| Step 2a Replace the fuser if the distance between the defects is equal to either of the following:•94.25 mm (3.71 in.)•95.2 mm (3.75 in.)b Resend the print job.Do repeating defects still appear on prints? | Contact customer support. | The problem is solved. |
Shadow images appear on prints


| Action Yes No | ||
| Step 1Load paper with the correct paper type and weight in the tray.Is paper with the correct paper type and weight loaded in the tray? | Go to step 2. Load paper | with the correct paper type and weight in the tray. |
| Step 2From the printer control panel, set the paper type and weight in the Paper menu to match the paper loaded in the tray.Is the tray set to the type and weight of the paper loaded? | Go to step 3. Change the paper | loaded in the tray to match the paper type and weight specified in the tray settings. |
| Step 3a Depending on your operating system, specify the paper type and weight from Printing Preferences or from the Print dialog.b Resend the print job.Do shadow images still appear on prints? | Go to step 4. The problem is solved. | |
| Step 4Replace the imaging unit, and then resend the print job.Do shadow images still appear on prints? | Contact customer support. | The problem is solved. |
Skewed print
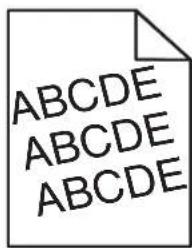
text_image
ABCDE ABCDE ABCDE| Action Yes No | ||
| Step 1a Move the width and length guides in the tray to the correct positions for the size of the paper loaded.b Resend the print job.Is the print still skewed? | Go to step 2. The problem is solved. | |
| Step 2a Check if you are printing on a paper that is supported by the tray.b Resend the print job.Is the print still skewed? | Contact customer support. | The problem is solved. |
Streaked horizontal lines appear on prints
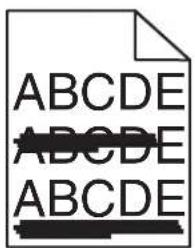
text_image
ABCDE ABCDE ABCDE| Action Yes No | ||
| Step 1a Depending on your operating system, specify the tray or feeder from Printing Preferences or the Print dialog.b Resend the print job.Do streaked horizontal lines appear on prints? | Go to step 2. The problem is solved. | |
| Step 2From the printer control panel, set the paper type and weight in the Paper menu to match the paper loaded in the tray.Do the paper type and weight match the type and weight of the paper in the tray? | Go to step 3. Change the paper type and weight to match the paper loaded in the tray. | |
| Step 3a Load paper from a fresh package.Note:Paper absorbs moisture due to high humidity. Store paper in its original wrapper until you use it.b Resend the print job.Do streaked horizontal lines appear on prints? | Go to step 4. The problem is solved. | |
| Step 4a Reinstall the imaging unit.1 Remove the toner cartridge, and then the imaging unit.Warning—Potential Damage: Do not expose the imaging unit to direct light for more than 10 minutes. Extended exposure to light may cause print quality problems.2 Install the imaging unit, and then the cartridge.b Resend the print job.Do streaked horizontal lines appear on prints? | Go to step 5. The problem is solved. | |
| Step 5Replace the imaging unit, and then resend the print job.Do streaked horizontal lines appear on prints? | Contact customer support. | The problem is solved. |
Streaked vertical lines appear on prints


| Action Yes No | ||
| Step 1a Depending on your operating system, specify the paper type, texture, and weight from Printing Preferences or from the Print dialog.b Resend the print job.Do streaked vertical lines appear on prints? | Go to step 2. The problem is solved. | |
| Step 2From the printer control panel, set the paper texture, type, and weight in the Paper menu to match the paper loaded in the tray.Do the paper texture, type, and weight match the paper in the tray? | Go to step 3. Do one or more of the following:Specify the paper texture, type, and weight from the tray settings to match the paper loaded in the tray.Change the paper loaded in the tray to match the paper texture, type, and weight specified in the tray settings. | |
| Step 3a Load paper from a fresh package.Note: Paper absorbs moisture due to high humidity. Store paper in its original wrapper until you use it.b Resend the print job.Do streaked vertical lines appear on prints? | Go to step 4. The problem is solved. | |
| Step 4a Reinstall the imaging unit.1 Remove the toner cartridge, and then the imaging unit.Warning—Potential Damage: Do not expose the imaging unit to direct light for more than 10 minutes. Extended exposure to light may cause print quality problems.2 Install the imaging unit, and then the cartridge.b Resend the print job.Do streaked vertical lines appear on prints? | Go to step 5. The problem is solved. | |
| Step 5Replace the imaging unit, and then resend the print job.Do streaked vertical lines appear on prints? | Contact customer support at http://support.lexmark.com or your service representative. | The problem is solved. |
Toner fog or background shading appears on prints

text_image
ABCDE ABCDE ABCDE| Action Yes No | ||
| Step 1a Reinstall the imaging unit.1 Remove the toner cartridge, and then the imaging unit.Warning—Potential Damage: Do not expose the imaging unit to direct light for more than 10 minutes. Extended exposure to light may cause print quality problems.2 Install the imaging unit, and then the cartridge.b Resend the print job.Did the toner fog or background shading disappear from the prints? | The problem is solved. | Go to step 2. |
| Step 2Replace the imaging unit, and then resend the print job.Did the toner fog or background shading disappear from the prints? | The problem is solved. | Contact customer support. |
Toner specks appear on prints
| Action Yes No | ||
| Replace the imaging unit, and then resend the print job.Do toner specks appear on prints? | Contact customer support. | The problem is solved. |
Toner rubs off
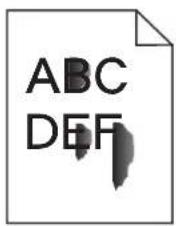
text_image
ABC DEF
text_image
Leading edge Trailing edge| Action Yes No | ||
| Step 1From the Paper menu on the printer control panel, check the paper type and weight.Do the paper type and weight match the paper loaded in the tray? | Go to step 2. Specify the paper type and weight from the tray settings to match the paper loaded in the tray. | |
| Step 2Check if you are printing on paper with texture or rough finishes.Are you printing on textured or rough paper? | From the Paper menu on the printer control panel, set the paper texture. | Go to step 3. |
| Step 3a From the Paper Weight menu on the printer control panel, set Heavy Weight to Heavy.b Resend the print job.Does the toner rub off? | Go to step 4. The problem is solved. | |
| Step 4a Enable Quiet mode.From the printer control panel, navigate to:Settings > General Settings > Quiet Mode > Onb Resend the print job.Does the toner rub off? | Contact customer support. | The problem is solved. |
Transparency print quality is poor
| Action Yes No | ||
| Step 1From the printer control panel, set the paper type in the Paper menu to match the paper loaded in the tray.Is the paper type for the tray set to Transparency? | Go to step 2. Set the paper type to Transparency. | |
| Step 2a Check if you are using a recommended type of transparency.b Resend the print job.Is the print quality still poor? | Contact customer support. | The problem is solved. |
Uneven print density

text_image
ABCDE ABCDE| Action Yes No | ||
| Replace the imaging unit, and then resend the print job.Is the print density uneven? | Contact customer support. | The problem is solved. |
Vertical voids appear on prints

text_image
Leading edge Trailing edge| Action Yes No | ||
| Step 1a Make sure your software program is using a correct fill pattern.b Resend the print job.Do vertical voids appear on prints? | Go to step 2. The problem is solved. | |
| Step 2a From the printer control panel, set the paper type and weight in the Paper menu to match the paper loaded in the tray.b Resend the print job.Do vertical voids appear on prints? | Go to step 3. The problem is solved. | |
| Step 3Check if you are using a recommended type of paper.a Load the specified tray or feeder with a recommended type of paper.b Resend the print job.Do vertical voids appear on prints? | Go to step 4. The problem is solved. | |
| Step 4a Redistribute the toner in the imaging unit.1 Remove the toner cartridge, and then the imaging unit.2 Firmly shake the imaging unit.Warning—Potential Damage: Do not expose the imaging unit to direct light for more than 10 minutes. Extended exposure to light may cause print quality problems.3 Reinstall the imaging unit, and then the cartridge.b Resend the print job.Do vertical voids appear on prints? | Go to step 5. The problem is solved. | |
| Step 5Replace the imaging unit, and then resend the print job.Do vertical voids appear on prints? | Contact customer support. | The problem is solved. |
Solving home screen applications problems
This troubleshooting step applies only to touch-screen printer models.
An application error has occurred
| Action Yes No | ||
| Step 1Check the system log for relevant details.a Open a Web browser, and then type the printer IP address in the address field.If you do not know the IP address of the printer, then you can:View the IP address on the printer home screen.Print a network setup page or the menu settings pages, and then locate the IP address in the TCP/IP section.Note: An IP address appears as four sets of numbers separated by periods, such as 123.123.123.123.b Click Settings > Apps > Apps Management > System tab > Log.c From the Filter menu, select an application status.d From the Application menu, select an application, and then click Submit.Does an error message appear in the log? | Go to step 2. Contact | customersupport. |
| Step 2Resolve the error.Is the application working now? | The problem is solved. | Contact customersupport. |
Embedded Web Server does not open
| Action Yes No | ||
| Step 1Make sure the printer IP address is correct.View the printer IP address:From the printer home screenFrom the TCP/IP section in the Network/Ports menuBy printing a network setup page or menu settings page, and then finding the TCP/IP sectionNote: An IP address appears as four sets of numbers separated by periods, such as 123.123.123.123.Is the printer IP address correct? | Go to step 2. Type the correct | printer IP address in the address field of your Web browser.Note: Depending on the network settings, you may need to type “https://” instead of “http://” before the printer IP address to access the Embedded Web Server. |
| Step 2Check if the printer is turned on.Is the printer turned on? | Go to step 3. Turn on the printer. | |
| Step 3Check if the network connection is working.Is the network connection working? | Go to step 4. Contact your system support person. | |
| Step 4Make sure the cable connections to the printer and print server are secure.For more information, see the setup documentation that came with the printer.Are the cable connections to the printer and print server secure? | Go to step 5. Tighten the cable connection. | |
| Step 5Temporarily disable the Web proxy servers.Note: Proxy servers may block or restrict you from accessing certain Web sites including the Embedded Web Server.Are the Web proxy servers disabled? | Go to step 6. Contact your system support person. | |
| Step 6Access the Embedded Web Server again by typing the correct IP address in the address field.Did the Embedded Web Server open? | The problem is solved. | Contact customer support. |
Contacting customer support
When you contact customer support, you will need to be able to describe the problem you are experiencing, the message on the printer display, and the troubleshooting steps you have already taken to find a solution.
You need to know your printer model type and serial number. For more information, see the label at the back of the printer. The serial number is also listed on the menu settings page.
Lexmark has various ways to help you solve your printing problem. Visit the Lexmark Web site at http://support.lexmark.com, and then select one of the following:
| Tech Library | You can browse our library of manuals, support documentation, drivers, and other downloads to help you solve common problems. |
| You can send an e-mail to the Lexmark team, describing your problem. A service representative will respond and provide you with information to solve your problem. | |
| Live chat | You can chat directly with a service representative. They can work with you to solve your printer problem or provide assistance through Assisted Service where the service representative can remotely connect to your computer through the Internet to troubleshoot problems, install updates, or complete other tasks to help you successfully use your Lexmark product. |
Telephone support is also available. In the U.S. or Canada, call 1-800-539-6275. For other countries or regions, visit http://support.lexmark.com.
Notices
Product information
Product name:
Lexmark MS810n, MS810dn, MS811n, MS811dn, MS812dn, MS810de, MS812de
Machine type:
4063
Model(s):
210, 230, 23E, 410, 430, 630, 63E
Edition notice
October 2012
The following paragraph does not apply to any country where such provisions are inconsistent with local law: LEXMARK INTERNATIONAL, INC., PROVIDES THIS PUBLICATION “AS IS” WITHOUT WARRANTY OF ANY KIND, EITHER EXPRESS OR IMPLIED, INCLUDING, BUT NOT LIMITED TO, THE IMPLIED WARRANTIES OF MERCHANTABILITY OR FITNESS FOR A PARTICULAR PURPOSE. Some states do not allow disclaimer of express or implied warranties in certain transactions; therefore, this statement may not apply to you.
This publication could include technical inaccuracies or typographical errors. Changes are periodically made to the information herein; these changes will be incorporated in later editions. Improvements or changes in the products or the programs described may be made at any time.
References in this publication to products, programs, or services do not imply that the manufacturer intends to make these available in all countries in which it operates. Any reference to a product, program, or service is not intended to state or imply that only that product, program, or service may be used. Any functionally equivalent product, program, or service that does not infringe any existing intellectual property right may be used instead. Evaluation and verification of operation in conjunction with other products, programs, or services, except those expressly designated by the manufacturer, are the user's responsibility.
For Lexmark technical support, visit http://support.lexmark.com.
For information on supplies and downloads, visit www.lexmark.com.
© 2012 Lexmark International, Inc.
All rights reserved.
GOVERNMENT END USERS
The Software Program and any related documentation are "Commercial Items," as that term is defined in 48 C.F.R. 2.101, "Computer Software" and "Commercial Computer Software Documentation," as such terms are used in 48 C.F.R. 12.212 or 48 C.F.R. 227.7202, as applicable. Consistent with 48 C.F.R. 12.212 or 48 C.F.R. 227.7202-1 through 227.7207-4, as applicable, the Commercial Computer Software and Commercial Software Documentation are licensed to the U.S. Government end users (a) only as Commercial Items and (b) with only those rights as are granted to all other end users pursuant to the terms and conditions herein.
Trademarks
Lexmark, Lexmark with diamond design, MarkNet, and MarkVision are trademarks of Lexmark International, Inc., registered in the United States and/or other countries.
Mac and the Mac logo are trademarks of Apple Inc., registered in the U.S. and other countries.
PCL® is a registered trademark of the Hewlett-Packard Company. PCL is Hewlett-Packard Company's designation of a set of printer commands (language) and functions included in its printer products. This printer is intended to be compatible with the PCL language. This means the printer recognizes PCL commands used in various application programs, and that the printer emulates the functions corresponding to the commands.
The following terms are trademarks or registered trademarks of these companies:
| Albertus The Monotype | Corporation plc |
| Antique Olive Monsieur | Marcel OLIVE |
| Apple-Chancery Apple Computer, Inc. | |
| Arial The Monotype Corporation plc | |
| CG Times | Based on Times New Roman under license from The Monotype Corporation plc, is a product of Agfa Corporation |
| Chicago Apple Computer, Inc. | |
| Clarendon Linotype-Hell AG and/or its subsidiaries | |
| Eurostile Nebiolo | |
| Geneva Apple Computer, Inc. | |
| GillSans The Monotype Corporation plc | |
| Helvetica Linotype-Hell AG and/or its subsidiaries | |
| Hoefler Jonathan Hoefler Type Foundry | |
| ITC Avant Garde Gothic International Typeface Corporation | |
| ITC Bookman International Typeface Corporation | |
| ITC Mona Lisa International Typeface Corporation | |
| ITC Zapf Chancery | International Typeface Corporation |
| Joanna | The Monotype Corporation plc |
| Marigold | Arthur Baker |
| Monaco | Apple Computer, Inc. |
| New York | Apple Computer, Inc. |
| Oxford | Arthur Baker |
| Palatino | Linotype-Hell AG and/or its subsidiaries |
| Stempel Garamond | Linotype-Hell AG and/or its subsidiaries |
| Taffy | Agfa Corporation |
| Times New Roman | The Monotype Corporation plc |
| Univers Linotype-Hell AG and/or its subsidiaries | |
All other trademarks are the property of their respective owners.
Licensing notices
All licensing notices associated with this product can be viewed from the root directory of the installation software CD.
Noise emission levels
The following measurements were made in accordance with ISO 7779 and reported in conformance with ISO 9296.
Note: Some modes may not apply to your product.
| 1-meter average sound pressure, dBA | |
| Printing MS810: 57 dBA; MS811: 58 dBA; MS812: 58 dBA | |
| Ready 32 dBA for all models | |
Values are subject to change. See www.lexmark.com for current values.
EU waste electronics information

text_image
Prohibition sign for a trash bin with red X marks and a black base symbolThe WEEE logo signifies specific recycling programs and procedures for electronic products in countries of the European Union. We encourage the recycling of our products.
If you have further questions about recycling options, click EU Waste Electronics Information.
Product disposal
Do not dispose of the printer or supplies in the same manner as normal household waste. Consult your local authorities for disposal and recycling options.
Static sensitivity notice

This symbol identifies static-sensitive parts. Do not touch in the areas near these symbols without first touching the metal frame of the printer.
ENERGY STAR
Any Lexmark product bearing the ENERGY STAR emblem on the product or on a start-up screen is certified to comply with Environmental Protection Agency (EPA) ENERGY STAR requirements as configured when shipped by Lexmark.

Temperature information
| Ambient temperature 15.6 to 32.2°C (60 to 90°F) | |
| Shipping and storage temperature -40 to 43.3°C (-40 to 110°F) |
Laser notice
The printer is certified in the U.S. to conform to the requirements of DHHS 21 CFR Chapter I, Subchapter J for Class I (1) laser products, and elsewhere is certified as a Class I laser product conforming to the requirements of IEC 60825-1.
Class I laser products are not considered to be hazardous. The printer contains internally a Class IIIb (3b) laser that is nominally a 10 milliwatt gallium arsenide laser operating in the wavelength of 787-800 nanometers. The laser system and printer are designed so there is never any human access to laser radiation above a Class I level during normal operation, user maintenance, or prescribed service condition.
Laser advisory label
A laser notice label may be affixed to this printer as shown:
DANGER - Invisible laser radiation when cartridges are removed and interlock defeated. Avoid exposure to laser beam.
Product power consumption
The following table documents the power consumption characteristics of the product.
Note: Some modes may not apply to your product.
| Mode Description Power consumption (Watts) | ||
| Printing The | product is generating hard-copy output from electronic inputs. | MS810: 700 W; MS811: 770 W; MS812: 830 W |
| Copy The product | product is generating hard-copy output from hard-copy original documents. | N/A |
| Scan The product | is scanning hard-copy documents. N/A | |
| Ready The product | is waiting for a print job. MS810n, MS810dn, MS811n, MS811dn, MS812dn: 55 W; MS810de, MS812de: 60 W (Ready 1); all printer models: 30 W (Ready 2) | |
| Sleep Mode | The product is in a high-level energy-saving mode. | MS810n, MS810dn, MS811n, MS811dn, MS812dn: 4.1 W; MS810de: 5.5 W; MS812de: 7 W |
| Hibernate | The product is in a low-level energy-saving mode. | 0.5 W |
| Off The product | is plugged into an electrical outlet, but the power switch is turned off. | 0.1 W |
The power consumption levels listed in the previous table represent time-averaged measurements. Instantaneous power draws may be substantially higher than the average.
Values are subject to change. See www.lexmark.com for current values.
Sleep Mode
This product is designed with an energy-saving mode called Sleep Mode. The Sleep Mode saves energy by lowering power consumption during extended periods of inactivity. The Sleep Mode is automatically engaged after this product is not used for a specified period of time, called the Sleep Mode Timeout.
Factory default Sleep Mode Timeout for this product (in minutes): 30
By using the configuration menus, the Sleep Mode Timeout can be modified between 1 minute and 180 minutes. Setting the Sleep Mode Timeout to a low value reduces energy consumption, but may increase the response time of the product. Setting the Sleep Mode Timeout to a high value maintains a fast response, but uses more energy.
Hibernate Mode
This product is designed with an ultra-low power operating mode called Hibernate mode. When operating in Hibernate Mode, all other systems and devices are powered down safely.
The Hibernate mode can be entered in any of the following methods:
•Using the Hibernate Timeout
•Using the Schedule Power modes
•Using the Sleep/Hibernate button
| Factory default Hibernate Timeout for this product in all countries or regions except for EU countries and Switzerland | Disabled |
| Factory default value for this product in EU countries or regions and Switzerland 3 days |
The amount of time the printer waits after a job is printed before it enters Hibernate mode can be modified between one hour and one month.
Off mode
If this product has an off mode which still consumes a small amount of power, then to completely stop product power consumption, disconnect the power supply cord from the electrical outlet.
Total energy usage
It is sometimes helpful to calculate the total product energy usage. Since power consumption claims are provided in power units of Watts, the power consumption should be multiplied by the time the product spends in each mode in order to calculate energy usage. The total product energy usage is the sum of each mode's energy usage.
STATEMENT OF LIMITED WARRANTY FOR LEXMARK LASER PRINTERS, LEXMARK LED PRINTERS, AND LEXMARK MULTIFUNCTION LASER PRINTERS
Lexmark International, Inc., Lexington, KY
This limited warranty applies to the United States and Canada. For customers outside the U.S., refer to the country-specific warranty information that came with your product.
This limited warranty applies to this product only if it was originally purchased for your use, and not for resale, from Lexmark or a Lexmark Remarketer, referred to in this statement as “Remarketer.”
Limited warranty
Lexmark warrants that this product:
—Is manufactured from new parts, or new and serviceable used parts, which perform like new parts
—Is, during normal use, free from defects in material and workmanship
If this product does not function as warranted during the warranty period, contact a Remarketer or Lexmark for repair or replacement (at Lexmark's option).
If this product is a feature or option, this statement applies only when that feature or option is used with the product for which it was intended. To obtain warranty service, you may be required to present the feature or option with the product.
If you transfer this product to another user, warranty service under the terms of this statement is available to that user for the remainder of the warranty period. You should transfer proof of original purchase and this statement to that user.
Limited warranty service
The warranty period starts on the date of original purchase as shown on the purchase receipt and ends 12 months later provided that the warranty period for any supplies and for any maintenance items included with the printer shall end earlier if it, or its original contents, are substantially used up, depleted, or consumed. Fuser Units, Transfer/Transport Units, Paper Feed items, if any, and any other items for which a Maintenance Kit is available are substantially consumed when the printer displays a “Life Warning” or “Scheduled Maintenance” message for such item.
To obtain warranty service you may be required to present proof of original purchase. You may be required to deliver your product to the Remarketer or Lexmark, or ship it prepaid and suitably packaged to a Lexmark designated location. You are responsible for loss of, or damage to, a product in transit to the Remarketer or the Lexmark designated location.
When warranty service involves the exchange of a product or part, the item replaced becomes the property of the Remarketer or Lexmark. The replacement may be a new or repaired item.
The replacement item assumes the remaining warranty period of the original product.
Replacement is not available to you if the product you present for exchange is defaced, altered, in need of a repair not included in warranty service, damaged beyond repair, or if the product is not free of all legal obligations, restrictions, liens, and encumbrances.
As part of your warranty service and/or replacement, Lexmark may update the firmware in your printer to the latest version. Firmware updates may modify printer settings and cause counterfeit and/or unauthorized products, supplies, parts, materials (such as toners and inks), software, or interfaces to stop working. Authorized use of genuine Lexmark products will not be impacted.
Before you present this product for warranty service, remove all print cartridges, programs, data, and removable storage media (unless directed otherwise by Lexmark).
For further explanation of your warranty alternatives and the nearest Lexmark authorized servicer in your area contact Lexmark on the World Wide Web.
Remote technical support is provided for this product throughout its warranty period. For products no longer covered by a Lexmark warranty, technical support may not be available or only be available for a fee.
Extent of limited warranty
Lexmark does not warrant uninterrupted or error-free operation of any product or the durability or longevity of prints produced by any product.
Warranty service does not include repair of failures caused by:
—Modification or unauthorized attachments
—Accidents, misuse, abuse or use inconsistent with Lexmark user's guides, manuals, instructions or guidance
—Unsuitable physical or operating environment
—Maintenance by anyone other than Lexmark or a Lexmark authorized servicer
—Operation of a product beyond the limit of its duty cycle
—Use of printing media outside of Lexmark specifications
—Refurbishment, repair, refilling or remanufacture by a third party of products, supplies or parts
—Products, supplies, parts, materials (such as toners and inks), software, or interfaces not furnished by Lexmark
TO THE EXTENT PERMITTED BY APPLICABLE LAW, NEITHER LEXMARK NOR ITS THIRD PARTY SUPPLIERS OR REMARKETERS MAKE ANY OTHER WARRANTY OR CONDITION OF ANY KIND, WHETHER EXPRESS OR IMPLIED, WITH RESPECT TO THIS PRODUCT, AND SPECIFICALLY DISCLAIM THE IMPLIED WARRANTIES OR CONDITIONS OF MERCHANTABILITY, FITNESS FOR A PARTICULAR PURPOSE, AND SATISFACTORY QUALITY. ANY WARRANTIES THAT MAY NOT BE DISCLAIMED UNDER APPLICABLE LAW ARE LIMITED IN DURATION TO THE WARRANTY PERIOD. NO WARRANTIES, EXPRESS OR IMPLIED, WILL APPLY AFTER THIS PERIOD. ALL INFORMATION, SPECIFICATIONS, PRICES, AND SERVICES ARE SUBJECT TO CHANGE AT ANY TIME WITHOUT NOTICE.
Limitation of liability
Your sole remedy under this limited warranty is set forth in this document. For any claim concerning performance or nonperformance of Lexmark or a Remarketer for this product under this limited warranty, you may recover actual damages up to the limit set forth in the following paragraph.
Lexmark's liability for actual damages from any cause whatsoever will be limited to the amount you paid for the product that caused the damages. This limitation of liability will not apply to claims by you for bodily injury or damage to real property or tangible personal property for which Lexmark is legally liable. IN NO EVENT WILL LEXMARK BE LIABLE FOR ANY LOST PROFITS, LOST SAVINGS, INCIDENTAL DAMAGE, OR OTHER ECONOMIC OR CONSEQUENTIAL DAMAGES. This is true even if you advise Lexmark or a Remarketer of the possibility of such damages. Lexmark is not liable for any claim by you based on a third party claim.
This limitation of remedies also applies to claims against any Suppliers and Remarketers of Lexmark. Lexmark's and its Suppliers' and Remarketers' limitations of remedies are not cumulative. Such Suppliers and Remarketers are intended beneficiaries of this limitation.
Additional rights
Some states do not allow limitations on how long an implied warranty lasts, or do not allow the exclusion or limitation of incidental or consequential damages, so the limitations or exclusions contained above may not apply to you.
This limited warranty gives you specific legal rights. You may also have other rights that vary from state to state.
Modular component notice
This product may contain the following modular component(s):
Lexmark Regulatory Type/LEX-M01-005; FCC ID: IYLLEXM01005; Industry Canada IC: 2376A-M01005
Patent acknowledgment
The use of this product or service is subject to the reasonable, non-discriminatory terms in the Intellectual Property Rights (IPR) Disclosure of Certicom Corp. at the IETF for Elliptic Curve Cryptography (ECC) Cipher Suites for Transport Layer Security (TLS) implemented in the product or service.
The use of this product or service is subject to the reasonable, non-discriminatory terms in the Intellectual Property Rights (IPR) Disclosure of Certicom Corp. at the IETF for TLS Elliptic Curve Cipher Suites with SHA-256/382 and AES Galois Counter Mode (GCM) implemented in the product or service.
The use of this product or service is subject to the reasonable, non-discriminatory terms in the Intellectual Property Rights (IPR) Disclosure of Certicom Corp. at the IETF for TLS Suite B Profile for Transport Layer Security (TLS) implemented in the product or service.
The use of this product or service is subject to the reasonable, non-discriminatory terms in the Intellectual Property Rights (IPR) Disclosure of Certicom Corp. at the IETF for Addition of the Camellia Cipher Suites to Transport Layer Security (TLS) implemented in the product or service.
The use of certain patents in this product or service is subject to the reasonable, non-discriminatory terms in the Intellectual Property Rights (IPR) Disclosure of Certicom Corp. at the IETF for AES-CCM ECC Cipher Suites for TLS implemented in the product or service.
The use of this product or service is subject to the reasonable, non-discriminatory terms in the Intellectual Property Rights (IPR) Disclosure of Certicom Corp. at the IETF for IKE and IKEv2 Authentication Using the Elliptic Curve Digital Signature Algorithm (ECDSA) implemented in the product or service.
The use of this product or service is subject to the reasonable, non-discriminatory terms in the Intellectual Property Rights (IPR) Disclosure of Certicom Corp. at the IETF for Suite B Cryptographic Suites for IPSec implemented in the product or service.
The use of this product or service is subject to the reasonable, non-discriminatory terms in the Intellectual Property Rights (IPR) Disclosure of Certicom Corp. at the IETF for Algorithms for Internet Key Exchange version 1 (IKEv1) implemented in the product or service.
Multiple model information
The following information applies to all MS810, MS811, and MS812 printer models except for the MS812de printer model.
Federal Communications Commission (FCC) compliance information statement
This product has been tested and found to comply with the limits for a Class B digital device, pursuant to Part 15 of the FCC Rules. Operation is subject to the following two conditions: (1) this device may not cause harmful interference, and (2) this device must accept any interference received, including interference that may cause undesired operation.
The FCC Class B limits are designed to provide reasonable protection against harmful interference when the equipment is operated in a residential installation. This equipment generates, uses, and can radiate radio frequency energy and,
if not installed and used in accordance with the instructions, may cause harmful interference to radio communications. However, there is no guarantee that interference will not occur in a particular installation. If this equipment does cause harmful interference to radio or television reception, which can be determined by turning the equipment off and on, the user is encouraged to try to correct the interference by one or more of the following measures:
- Reorient or relocate the receiving antenna.
- Increase the separation between the equipment and receiver.
- Connect the equipment into an outlet on a circuit different from that to which the receiver is connected.
- Consult your point of purchase or service representative for additional suggestions.
The manufacturer is not responsible for radio or television interference caused by using other than recommended cables or by unauthorized changes or modifications to this equipment. Unauthorized changes or modifications could void the user's authority to operate this equipment.
Note: To assure compliance with FCC regulations on electromagnetic interference for a Class B computing device, use a properly shielded and grounded cable such as Lexmark part number 1021231 for parallel attach or 1021294 for USB attach. Use of a substitute cable not properly shielded and grounded may result in a violation of FCC regulations.
Any questions regarding this compliance information statement should be directed to:
Director of Lexmark Technology & Services
Lexmark International, Inc.
740 West New Circle Road
Lexington, KY 40550
(859) 232-3000
Industry Canada compliance statement
This Class B digital apparatus meets all requirements of the Canadian Interference-Causing Equipment Standard ICES-003.
European Community (EC) directives conformity
This product is in conformity with the protection requirements of EC Council directives 2004/108/EC, 2006/95/EC and 2009/125/EC on the approximation and harmonization of the laws of the Member States relating to electromagnetic compatibility, safety of electrical equipment designed for use within certain voltage limits and the ecodesign of energy-related products.
The manufacturer of this product is: Lexmark International, Inc., 740 West New Circle Road, Lexington, KY, 40550 USA. The authorized representative is: Lexmark International Technology Hungária Kft., 8 Lechner Ödön fasor, Millennium Tower III, 1095 Budapest HUNGARY, A declaration of conformity to the requirements of the Directives is available upon request from the Authorized Representative.
This product satisfies the Class B limits of EN 55022 and safety requirements of EN 60950.
Regulatory notices for wireless products
This section contains the following regulatory information pertaining to wireless products that contain transmitters, for example, but not limited to, wireless network cards or proximity card readers.
Exposure to radio frequency radiation
The radiated output power of this device is far below the radio frequency exposure limits of the FCC and other regulatory agencies. A minimum separation of 20 cm (8 inches) must be maintained between the antenna and any persons for this device to satisfy the RF exposure requirements of the FCC and other regulatory agencies.
Industry Canada (Canada)
This device complies with Industry Canada specification RSS-210. Operation is subject to the following two conditions: (1) this device may not cause interference, and (2) this device must accept any interference, including interference that may cause undesired operation of the device.
This device has been designed to operate only with the antenna provided. Use of any other antenna is strictly prohibited per regulations of Industry Canada.
To prevent radio interference to the licensed service, this device is intended to be operated indoors and away from windows to provide maximum shielding. Equipment (or its transmit antenna) that is installed outdoors is subject to licensing.
The installer of this radio equipment must ensure that the antenna is located or pointed such that it does not emit RF fields in excess of Health Canada limits for the general population; consult Safety Code 6, obtainable from Health Canada's Web site www.hc-sc.gc.ca/rpb.
The term "IC:" before the certification/registration number only signifies that the Industry Canada technical specifications were met.
Industry Canada (Canada)
Notice to users in the European Union
This product is in conformity with the protection requirements of EC Council directives 2004/108/EC, 2006/95/EC, 1999/5/EC, and 2009/125/EC on the approximation and harmonization of the laws of the Member States relating to electromagnetic compatibility, safety of electrical equipment designed for use within certain voltage limits, radio equipment and telecommunications terminal equipment and on the ecodesign of energy-related products.
Compliance is indicated by the CE marking.

The manufacturer of this product is: Lexmark International, Inc., 740 West New Circle Road, Lexington, KY, 40550 USA. The authorized representative is: Lexmark International Technology Hungária Kft., 8 Lechner Ödön fasor, Millennium Tower III, 1095 Budapest HUNGARY, A declaration of conformity to the requirements of the Directives is available upon request from the Authorized Representative.
This product satisfies the Class B limits of EN 55022 and safety requirements of EN 60950.
Products equipped with 2.4GHz Wireless LAN option are in conformity with the protection requirements of EC Council directives 2004/108/EC, 2006/95/EC, 1999/5/EC, and 2009/125/EC on the approximation and harmonization of the laws of the Member States relating to electromagnetic compatibility, safety of electrical equipment designed for use within certain voltage limits and on radio equipment and telecommunications terminal equipment and on the ecodesign of energy-related products.
Compliance is indicated by the CE marking.

Operation is allowed in all EU and EFTA countries, but is restricted to indoor use only.
The manufacturer of this product is: Lexmark International, Inc., 740 West New Circle Road, Lexington, KY, 40550 USA. The authorized representative is: Lexmark International Technology Hungária Kft., 8 Lechner Ödön fasor, Millennium Tower III, 1095 Budapest HUNGARY, A declaration of conformity to the requirements of the Directives is available upon request from the Authorized Representative.
This product may be used in the countries indicated in the table below.
| AT BE BG CH | CY CZ DE DK | EE | ||||||
| EL ES FI FR HR | HU IE IS IT | |||||||
| LI | LT | LU | LV | MT | NL | NO | PL | PT |
| RO | SE SI SK TR | UK |
| Česky | Společnost Lexmark International, Inc. tímto prohlašuje, že výrobek tento výrobek je ve shodě se základními požadavky a dalšími příslušnými ustanoveními směrnice 1999/5/ES. |
| Dansk | Lexmark International, Inc. erklærer herved, at dette produkt overholder de væsentlige krav og øvrige relevante krav i direktiv 1999/5/EF. |
| Deutsch | Hiermit erklärt Lexmark International, Inc., dass sich das Gerät dieses Gerät in Übereinstimmung mit den grundlegenden Anforderungen und den übrigen einschlägigen Bestimmungen der Richtlinie 1999/5/EG befindet. |
| Ελληνική | ME THN ΠΑΡΟΥΣΑ Η ΕΧΜΑΡΚ ΙΝΤΕΝΑΤΙΟΛ, INC. ΔΗΛΩΝΕΙ ΟΤΙ ΑΥΤΟ ΤΟ ΠΡΟΪΟΝ ΣΥΜΜΟΡΦΩΝΕΤΑΙ ΠΡΟΣ ΤΙΣ ΟΥΣΙΩΔΕΙΣ ΑΠΑΙΤΗΣΕΙΣ ΚΑΙ ΤΙΣ ΛΟΙΠΕΣ ΣΧΕΤΙΚΕΣ ΔΙΑΤΑΞΕΙΣ ΤΗΣ ΟΔΗΓΙΑΣ 1999/5/ΕΚ. |
| English | Hereby, Lexmark International, Inc., declares that this type of equipment is in compliance with the essential requirements and other relevant provisions of Directive 1999/5/EC. |
| Español | Por medio de la presente, Lexmark International, Inc. declara que este producto cumple con los requisitos esenciales y cualesquiera otras disposiciones aplicables o exigibles de la Directiva 1999/5/CE. |
| Eesti Käes | levaga kinnitab Lexmark International, Inc., et seade see toode vastab direktiivi 1999/5/EÜ põhinõuetele ja nimetatud direktiivist tulenevatele muudele asjakohastele sätetele. |
| Suomi Lexmark International, Inc. vakuuttaa täten, että tämä tuote on direktiivin 1999/5/EY oleellisten vaatimusten ja muiden sitä koskevien direktiivin ehtojen mukainen. | |
| Français | Par la présente, Lexmark International, Inc. déclare que l'appareil ce produit est conforme aux exigences fondamentales et autres dispositions pertinentes de la directive 1999/5/CE. |
| Magyar Alul | rott, Lexmark International, Inc. nyilatkozom, hogy a termék megfelel a vonatkozó alapvető követelményeknek és az 1999/5/EC irányelv egyéb előírásainak. |
| Íslenska | Hér með lýsir Lexmark International, Inc. yfir því að þessi vara er í samræmi við grunnkröfur og aðrar kröfur, sem gerðar eru í tilskipun 1999/5/EC. |
| Italiano | Con la presente Lexmark International, Inc. dichiara che questo questo prodotto è conforme ai requisiti essenziali ed alle altre disposizioni pertinenti stabilite dalla direttiva 1999/5/CE. |
| Latviski | Ar šo Lexmark International, Inc. deklarē, ka šis izstrādājums atbilst Direktīvas 1999/5/EK būtiskajām prasībām un citiem ar to saistītajiem noteikumiem. |
| Lietuvių | Šiuo Lexmark International, Inc. deklaruoja, kad šis produktas atitinka esminius reikalavimus ir kitas 1999/5/EB direktyvos nuostatas. |
| Malti | Bil-preženti, Lexmark International, Inc., jiddikjara li dan il-prodott huwa konformi mal-ħtiġijiet essenzjali u ma dispożizzjonijiet oħrajn relevanti li jinsabu fid-Direttiva 1999/5/KE. |
| Nederlands | Hierbij verklaart Lexmark International, Inc. dat het toestel dit product in overeenstemming is met de essentiële eisen en de andere relevante bepalingen van richtlijn 1999/5/EG. |
| Norsk | Lexmark International, Inc. erklærer herved at dette produktet er i samsvar med de grunnleggende krav og øvrige relevante krav i direktiv 1999/5/EF. |
| Polski | Niniejszym Lexmark International, Inc. oświadcza, że niniejszy produkt jest zgodny z zasadniczymi wymogami oraz pozostałymi stosownymi postanowieniami Dyrektywy 1999/5/EC. |
| Português | A Lexmark International Inc. declara que este este produto está conforme com os requisitos essenciais e outras disposições da Diretiva 1999/5/CE. |
| Slovensky | Lexmark International, Inc. týmto vyhlasuje, že tento produkt spĺňa základné požiadavky a všetky príslušné ustanovenia smernice 1999/5/ES. |
| Slovensko | Lexmark International, Inc. izjavlja, da je ta izdelek v skladu z bistvenimi zahtevami in ostalimi relevantnimi določili direktive 1999/5/ES. |
| Svenska | Härmed intygar Lexmark International, Inc. att denna produkt står i överensstämmelse med de väsentliga egenskapskrav och övriga relevanta bestämmelser som framgår av direktiv 1999/5/EG. |
Model-specific information
The following information applies only to the MS812de printer model.
Hibernate Mode
This product is designed with an ultra-low power operating mode called Hibernate mode. When operating in Hibernate Mode, all other systems and devices are powered down safely.
The Hibernate mode can be entered in any of the following methods:
•Using the Hibernate Timeout
•Using the Schedule Power modes
•Using the Sleep/Hibernate button
Factory default Hibernate Timeout Disabled
The amount of time the printer waits after a job is printed before it enters Hibernate mode can be modified between one hour and one month.
Federal Communications Commission (FCC) compliance information statement
This product has been tested and found to comply with the limits for a Class A digital device, pursuant to Part 15 of the FCC Rules. Operation is subject to the following two conditions: (1) this device may not cause harmful interference, and (2) this device must accept any interference received, including interference that may cause undesired operation.
The FCC Class A limits are designed to provide reasonable protection against harmful interference when the equipment is operated in a commercial environment. This equipment generates, uses, and can radiate radio frequency energy and, if not installed and used in accordance with the instruction manual, may cause harmful interference to radio communications. Operation of this equipment in a residential area is likely to cause harmful interference, in which case the user will be required to correct the interference at his own expense.
The manufacturer is not responsible for any radio or television interference caused by using other than recommended cables or by unauthorized changes or modifications to this equipment. Unauthorized changes or modifications could void the user's authority to operate this equipment.
Note: To assure compliance with FCC regulations on electromagnetic interference for a Class A computing device, use a properly shielded and grounded cable such as Lexmark part number 1021231 for parallel attach or 1021294 for USB attach. Use of a substitute cable not properly shielded and grounded may result in a violation of FCC regulations.
Industry Canada compliance statement
This Class A digital apparatus meets all requirements of the Canadian Interference-Causing Equipment Standard ICES-003.
European Community (EC) directives conformity
This product is in conformity with the protection requirements of EC Council directives 2004/108/EC and 2006/95/EC on the approximation and harmonization of the laws of the Member States relating to electromagnetic compatibility and safety of electrical equipment designed for use within certain voltage limits.
The manufacturer of this product is: Lexmark International, Inc., 740 West New Circle Road, Lexington, KY, 40550 USA. The authorized representative is: Lexmark International Technology Hungária Kft., 8 Lechner Ödön fasor, Millennium Tower III, 1095 Budapest HUNGARY, A declaration of conformity to the requirements of the Directives is available upon request from the Authorized Representative.
This product satisfies the Class A limits of EN 55022 and safety requirements of EN 60950.
Radio interference notice
Warning
This is a product that complies with the emission requirements of EN55022 Class A limits and immunity requirements of EN55024. This product is not intended to be used in residential/domestic environments.
This is a Class A product. In a domestic environment, this product may cause radio interference, in which case the user may be required to take adequate measures.
Regulatory notices for wireless products
This section contains the following regulatory information pertaining to wireless products that contain transmitters, for example, but not limited to, wireless network cards or proximity card readers.
Exposure to radio frequency radiation
The radiated output power of this device is far below the radio frequency exposure limits of the FCC and other regulatory agencies. A minimum separation of 20 cm (8 inches) must be maintained between the antenna and any persons for this device to satisfy the RF exposure requirements of the FCC and other regulatory agencies.
Industry Canada (Canada)
This device complies with Industry Canada specification RSS-210. Operation is subject to the following two conditions: (1) this device may not cause interference, and (2) this device must accept any interference, including interference that may cause undesired operation of the device.
This device has been designed to operate only with the antenna provided. Use of any other antenna is strictly prohibited per regulations of Industry Canada.
To prevent radio interference to the licensed service, this device is intended to be operated indoors and away from windows to provide maximum shielding. Equipment (or its transmit antenna) that is installed outdoors is subject to licensing.
The installer of this radio equipment must ensure that the antenna is located or pointed such that it does not emit RF fields in excess of Health Canada limits for the general population; consult Safety Code 6, obtainable from Health Canada's Web site www.hc-sc.gc.ca/rpb.
The term "IC:" before the certification/registration number only signifies that the Industry Canada technical specifications were met.
Industry Canada (Canada)
Notice to users in the European Union
Products bearing the CE mark are in conformity with the protection requirements of EC Council directives 2004/108/EC, 2006/95/EC, and 1999/5/EC on the approximation and harmonization of the laws of the Member States relating to electromagnetic compatibility, safety of electrical equipment designed for use within certain voltage limits, and on radio equipment and telecommunications terminal equipment.
Compliance is indicated by the CE marking.

The manufacturer of this product is: Lexmark International, Inc., 740 West New Circle Road, Lexington, KY, 40550 USA. The authorized representative is: Lexmark International Technology Hungária Kft., 8 Lechner Ödön fasor, Millennium Tower III, 1095 Budapest HUNGARY, A declaration of conformity to the requirements of the Directives is available upon request from the Authorized Representative.
This product satisfies the Class A limits of EN 55022 and safety requirements of EN 60950.
Products equipped with 2.4GHz Wireless LAN option are in conformity with the protection requirements of EC Council directives 2004/108/EC, 2006/95/EC, and 1999/5/EC on the approximation and harmonization of the laws of the Member States relating to electromagnetic compatibility, safety of electrical equipment designed for use within certain voltage limits and on radio equipment and telecommunications terminal equipment.
Compliance is indicated by the CE marking.

Operation is allowed in all EU and EFTA countries, but is restricted to indoor use only.
The manufacturer of this product is: Lexmark International, Inc., 740 West New Circle Road, Lexington, KY, 40550 USA. The authorized representative is: Lexmark International Technology Hungária Kft., 8 Lechner Ödön fasor, Millennium Tower III, 1095 Budapest HUNGARY, A declaration of conformity to the requirements of the Directives is available upon request from the Authorized Representative.
This product may be used in the countries indicated in the table below.
| AT BE BG CH | CY CZ DE DK | EE | ||||||
| EL ES FI FR HR | HU IE IS IT | |||||||
| LI | LT | LU | LV | MT | NL | NO | PL | PT |
| RO | SE SI SK TR | UK |
| Česky | Společnost Lexmark International, Inc. tímto prohlašuje, že výrobek tento výrobek je ve shodě se základními požadavky a dalšími příslušnými ustanoveními směrnice 1999/5/ES. |
| Dansk | Lexmark International, Inc. erklærer herved, at dette produkt overholder de væsentlige krav og øvrige relevante krav i direktiv 1999/5/EF. |
| Deutsch | Hiermit erklärt Lexmark International, Inc., dass sich das Gerät dieses Gerät in Übereinstimmung mit den grundlegenden Anforderungen und den übrigen einschlägigen Bestimmungen der Richtlinie 1999/5/EG befindet. |
| Ελληνική | ΜΕ ΤΗΝ ΠΑΡΟΥΣΑ Η ΣΧΜΑΡΚ ΙΝΤΕΝΑΤΙΟΝΑΛ, INC. ΔΗΛΩΝΕΙ ΟΤΙ ΑΥΤΟ ΤΟ ΠΡΟΪΟΝ ΣΥΜΜΟΡΦΩΝΕΤΑΙ ΠΡΟΣ ΤΙΣ ΟΥΣΙΩΔΕΙΣ ΑΠΑΙΤΗΣΕΙΣ ΚΑΙ ΤΙΣ ΛΟΙΠΕΣ ΣΧΕΤΙΚΕΣ ΔΙΑΤΑΞΕΙΣ ΤΗΣ ΟΔΗΓΙΑΣ 1999/5/EK. |
| English | Hereby, Lexmark International, Inc., declares that this type of equipment is in compliance with the essential requirements and other relevant provisions of Directive 1999/5/EC. |
| Español | Por medio de la presente, Lexmark International, Inc. declara que este producto cumple con los requisitos esenciales y cualesquiera otras disposiciones aplicables o exigibles de la Directiva 1999/5/CE. |
| Eesti | Käesolevaga kinnitab Lexmark International, Inc., et seade see toode vastab direktiivi 1999/5/EÜ põhinõuetele ja nimetatud direktiivist tulenevatele muudele asjakohastele sätetele. |
| Suomi | Lexmark International, Inc. vakuuttaa täten, että tämä tuote on direktiivin 1999/5/EY oleellisten vaatimusten ja muiden sitä koskevien direktiivin ehtojen mukainen. |
| Français | Par la présente, Lexmark International, Inc. déclare que l'appareil ce produit est conforme aux exigences fondamentales et autres dispositions pertinentes de la directive 1999/5/CE. |
| Magyar | Alulírott, Lexmark International, Inc. nyilatkozom, hogy a termék megfelel a vonatkozó alapvető követelményeknek és az 1999/5/EC irányelv egyéb előírásainak. |
| Íslenska | Hér með lýsir Lexmark International, Inc. yfir því að þessi vara er í samræmi við grunnkröfur og aðrar kröfur, sem gerðar eru í tilskipun 1999/5/EC. |
| Italiano | Con la presente Lexmark International, Inc. dichiara che questo questo prodotto è conforme ai requisiti essenziali ed alle altre disposizioni pertinenti stabilite dalla direttiva 1999/5/CE. |
| Latviski | Ar šo Lexmark International, Inc. deklarē, ka šis izstrādājums atbilst Direktīvas 1999/5/EK būtiskajām prasībām un citiem ar to saistītajiem noteikumiem. |
| Lietuvių | Šiuo Lexmark International, Inc. deklaruoja, kad šis produktas atitinka esminius reikalavimus ir kitas 1999/5/EB direktyvos nuostatas. |
| Malti | Bil-preženti, Lexmark International, Inc., jiddikjara li dan il-prodott huwa konformi mal-ħtiġijiet essenzjali u ma dispożizzjonijiet oħrajn relevanti li jinsabu fid-Direttiva 1999/5/KE. |
| Nederlands | Hierbij verklaart Lexmark International, Inc. dat het toestel dit product in overeenstemming is met de essentiële eisen en de andere relevante bepalingen van richtlijn 1999/5/EG. |
| Norsk | Lexmark International, Inc. erklærer herved at dette produktet er i samsvar med de grunnleggende krav og øvrige relevante krav i direktiv 1999/5/EF. |
| Polski | Niniejszym Lexmark International, Inc. oświadcza, że niniejszy produkt jest zgodny z zasadniczymi wymogami oraz pozostałymi stosownymi postanowieniami Dyrektywy 1999/5/EC. |
| Português | A Lexmark International Inc. declara que este este produto está conforme com os requisitos essenciais e outras disposições da Diretiva 1999/5/CE. |
| Slovensky | Lexmark International, Inc. týmto vyhlasuje, že tento produkt splňa základné požiadavky a všetky príslušné ustanovenia smernice 1999/5/ES. |
| Slovensko | Lexmark International, Inc. izjavlja, da je ta izdelek v skladu z bistvenimi zahtevami in ostalimi relevantnimi določili direktive 1999/5/ES. |
| Svenska | Härmed intygar Lexmark International, Inc. att denna produkt står i överensstämmelse med de väsentliga egenskapskrav och övriga relevanta bestämmelser som framgår av direktiv 1999/5/EG. |
Index
Numerics
2100-sheet tray
loading 57, 106, 156
550-sheet tray
installing 29
Symbols
[x]-page jam, clear manual feeder. [250] 282
[x]-page jam, lift front cover to remove cartridge. [200–201] 274
[x]-page jam, open tray [x]. [24x] 281
[x]-page jam, open upper and lower rear door. [231–234] 277
[x]-page jam, open upper rear door. [202] 276
[x]-page jam, remove paper, open expander rear door. Leave paper in bin. [41y.xx] 288
[x]-page jam, remove paper, open finisher rear door. Leave paper in bin. [451] 287
[x]-page jam, remove paper, open mailbox rear door. Leave paper in bin. [43y.xx] 290
[x]-page jam, remove paper, open stapler door. Leave paper in bin. [455–457] 283
[x]-page jam, remove standard bin jam. [203] 280
[x]-page jam, remove tray 1 to clear duplex. [235–239] 280
A
accessing the Embedded Web
Server 95, 145
Active NIC menu 210
adjusting brightness
Embedded Web Server 131, 181
printer control panel 131
printer display 181
adjusting display
brightness 131, 181
adjusting printer display
brightness 82
adjusting Sleep mode 81, 130, 180
adjusting toner
darkness 71, 120, 170
administrator settings Embedded Web Server 76
AppleTalk menu 215
attaching cables 33
available internal options 12
avoiding jams 191
avoiding paper jams 270
B
Background and Idle Screen using 96, 146
Bin Setup menu 208
buttons, printer control
panel 48, 90
buttons, touch screen
using 92, 141
C
cables
Ethernet 33
USB 33
canceling
print job, from computer 76, 125, 175
canceling a print job
from a computer 76, 125, 175
from the printer control panel 75, 125, 175
cannot open Embedded Web
Server 344
card stock
loading 64, 113, 163 tips 187
Cartridge low [88.xy] 292
Cartridge nearly low [88.xy] 292
Cartridge very low, [x] estimated pages remain [88.xy] 292
Cartridge, imaging unit mismatch [41.xy] 292
Change [paper source] to [custom string] load [orientation] 292
Change [paper source] to [custom type name] load [orientation] 293
Change [paper source] to [paper size] load [orientation] 293
Change [paper source] to [paper type] [paper size] load
[orientation] 293
Check tray [x] connection 293
checking an unresponsive printer 310
checking status of parts and
supplies 79, 128, 178
checking the status of parts and supplies 79, 128, 178
checking the virtual display using the Embedded Web Server 76, 126, 175
checking virtual display using the Embedded Web Server 175
cleaning exterior of the printer 266
cleaning the printer 266
Close door or insert cartridge 294
Complex page, some data may not have printed [39] 294
compressed images appear on prints 326
confidential jobs modifying print settings 77, 1
confidential print jobs 73, 123, 173 printing from a Macintosh computer 74, 124, 173
printing from Windows 74, 124, 173
Confidential Print menu 224
Configuration change, some held jobs were not restored [57] 294
configuration information wireless network 39
configurations printer 46, 88, 137
Configure MP menu 201
configuring multiple printers 78, 127, 177
supply notifications, imaging unit 77, 126, 176
supply notifications, maintenance kit 77, 126, 176
supply notifications, toner cartridge 77, 126, 176
configuring port settings 42
configuring supply
notifications 126, 176
configuring supply notifications
from the Embedded Web Server 77
connecting to a wireless network
using PBC, Push Button
Configuration method 41
using PIN, Personal Identification
Number method 41
using the Embedded Web
Server 41
using wireless setup wizard 40
conservation settings
brightness, adjusting 82, 131, 181
conserving supplies 254
Eco-Mode 79, 129, 178
Hibernate Mode 131
Hibernate mode 82, 181
Quiet mode 80, 129, 179
Sleep mode 81, 130, 180
conserving supplies 254
contacting customer support 345
control panel, printer
indicator light 49, 90, 139
Sleep button light 49, 90, 139
controller board
accessing 12
creating custom name
paper type 118
Custom Bin Names menu 207
Custom Names menu 206
custom paper type
assigning 70, 169
custom paper type name
assigning 119
creating 69, 168
Custom Type [x]
assigning a paper type 70
changing name 168
creating custom name 118
Custom Type [x] name
creating 69
Custom Types menu 206
customer support
contacting 345
D
Default Source menu 198
Defective flash detected [51] 294
device and network settings erasing 85
device and network settings
information
erasing 134, 183
directory list
printing 75, 125, 174
Disk must be formatted for use in
this device 295
Disk near full. Securely clearing disk
space. 295
disk wiping 86, 134, 184
Disk Wiping menu 225
display troubleshooting
printer display is blank 311
display, printer control panel 48, 90
adjusting brightness 82, 131, 181
disposing of printer hard
disk 84, 133, 182
documents, printing
from Macintosh 70, 120, 170
from Windows 70, 120, 170
Eco-Mode setting 79, 129, 178
Eco-Settings
about 97
understanding 147
Edit Security Setups menu 223
embedded solutions
erasing 85
embedded solutions information
erasing 134, 183
Embedded Web Server
accessing 95, 145
adjusting brightness 82
administrator
settings 76, 126, 175
checking the status of
parts 79, 128, 178
checking the status of
supplies 79, 128, 178
copying settings to other
printers 78, 127, 177
modifying confidential print
settings 77, 127, 177
networking settings 76, 126, 175
problem accessing 344
Embedded Web Server
Administrator's Guide
where to
find 76, 87, 126, 136, 175, 185
E
emission
notices 348, 354, 355, 356, 357,
359, 360, 361
Empty the hole punch box 295
emptying the hole punch box 267
encrypting the printer hard
disk 86, 135, 184
envelopes
loading 64, 113, 163
tips on using 187
environmental settings
conserving supplies 254
display brightness,
adjusting 131, 181
Eco-Mode 79, 129, 178
Hibernate Mode 131
Hibernate mode 82, 181
printer display brightness,
adjusting 82
Quiet mode 80, 129, 179
Sleep mode 81, 130, 180
erasing hard disk memory 86, 134
erasing non-volatile
memory 85, 134, 183
erasing printer hard disk
memory 184
erasing volatile
memory 85, 133, 183
Error reading USB drive. Remove
USB. 295
Error reading USB hub. Remove
hub. 295
Ethernet network
preparing to set up for Ethernet
printing 37
Ethernet network setup
using Macintosh 37
using Windows 37
Ethernet networking
Macintosh 37
Windows 37
Ethernet port 33
Ethernet setup
preparing for an 37
exporting a configuration
using the Embedded Web
Server 98, 148
exterior of the printer
cleaning 266
F
factory defaults
restoring 132, 182
factory defaults, restoring 83
FCC notices 354, 356, 359, 360
finding more information about the printer 8
finding printer IP address 95, 144
finisher
finishing features 194
supported paper sizes 194
finisher features 194
Finishing menu 242
firmware card 12
flash drive
printing from 72, 122, 172
flash drives
supported file types 71, 121, 171
font sample list
printing 75, 124, 174
Forms and Favorites
setting up 96, 146
G
General Settings menu 228
green settings
Eco-Mode 79, 129, 178
Hibernate Mode 131
Hibernate mode 82, 181
Quiet mode 80, 129, 179
H
held jobs 73, 123, 173
printing from a Macintosh
computer 74, 124, 173
printing from
Windows 74, 124, 173
Help menu 252
Hibernate Mode using 131
Hibernate mode using 82, 181
hiding icons on the home
screen 95, 145
hole punch box
emptying 267
Home button
printer control panel 48, 90, 139
home screen
buttons, understanding 91, 140
customizing 95, 145
hiding icons 95, 145
showing icons 95, 145
home screen applications
configuring 96, 145
finding information 96, 145
home screen buttons
understanding 91, 140
HTML menu 251
|
icons on the home screen
hiding 95, 145
showing 95, 145
Image menu 252
imaging unit
ordering 258
Imaging unit low [84.xy] 295
Imaging unit nearly low [84.xy] 295
Imaging unit very low, [x] estimated
pages remain [84.xy] 295
importing a configuration
using the Embedded Web
Server 98, 148
Incompatible output bin [x]
[59] 296
Incompatible tray [x] [59] 296
Incorrect paper size, open [paper
source] [34] 296
indicator light 139
printer control panel 48, 90
individual settings
erasing 85
individual settings information
erasing 134, 183
Insert hole punch box 296
Insert staple cartridge 296
Insert Tray [x] 297
Install bin [x] 297
Install Tray [x] 297
installing an Internal Solutions
Port 17
installing an optional card 21
installing options
order of installation 29
installing printer hard disk 23
installing printer on a network
Ethernet networking 37
installing printer software
adding options 36
installing printer software
(Windows) 35
Insufficient memory for Flash
Memory Defragment operation
[37] 297
Insufficient memory to collate job
[37] 298
Insufficient memory to support
Resource Save feature [35] 298
Insufficient memory, some Held
Jobs were deleted [37] 297
Insufficient memory, some held
jobs will not be restored [37] 298
internal options 12
internal print server
troubleshooting 321
Internal Solutions Port
changing port settings 42
installing 17
troubleshooting 321
IP address of computer
finding 94, 144
IP address, printer
finding 95, 144
IPv6 menu 214
J
jams
accessing 272
avoiding 270
understanding messages 272
jams, clearing
behind rear door 276, 277
in duplex area 280
in finisher rear door 287
in multipurpose feeder 282
in rear expander door 288
in rear mailbox door 290
in standard bin 280
in staple finisher 283
in the tray 281
inside the printer 274
Job Accounting menu 245
K
keypad
printer control panel 48, 90, 139
L
labels, paper
tips 188
letterhead
loading, 2100-sheet
tray 57, 106, 156
loading, multipurpose
feeder 64, 113, 163
loading, trays 50, 99, 149
linking trays 69, 118, 119, 168, 169
Load [paper source] with [custom
string] [paper orientation] 298
Load [paper source] with [custom
type name] [paper orientation] 299
Load [paper source] with [paper
size] [paper orientation] 299
Load [paper source] with [paper
type] [paper size] [paper
orientation] 299
Load manual feeder with [custom
string] [paper orientation] 299
Load manual feeder with [custom
type name] [paper orientation] 300
Load manual feeder with [paper
size] [paper orientation] 300
Load manual feeder with [paper
type] [paper size] [paper
orientation] 300
Load staples 298
loading
2100-sheet tray 57, 106, 156
card stock 64, 113, 163
envelopes 64, 113, 163
letterhead in 2100-sheet
tray 57, 106, 156
letterhead in multipurpose
feeder 64, 113, 163
letterhead in trays 50, 99, 149
multipurpose feeder 64, 113, 163
optional 250-sheet
tray 50, 99, 149
optional 550-sheet
tray 50, 99, 149
standard 250-sheet tray 50
standard 550-sheet tray 50, 99
standard tray 149
transparencies 64, 113, 163
lock, security 84, 132, 182
M
maintenance kit
ordering 259
Maintenance kit low [80.xy] 300
Maintenance kit nearly low
[80.xy] 300
Maintenance kit very low, [x]
estimated pages remain
[80.xy] 301
memory
types installed on
printer 84, 133, 182
memory card 12
installing 15
Memory full [38] 301
menu settings
loading on multiple
printers 78, 127, 177
menu settings page
printing 78, 128, 177
menus
Active NIC 210
AppleTalk 215
Bin Setup 208
Confidential Print 224
Configure MP 201
Custom Bin Names 207
Custom Names 206
Custom Types 206
Default Source 198
Disk Wiping 225
Edit Security Setups 223
Finishing 242
General Settings 228
Help 252
HTML 251
Image 252
IPv6 214
Job Accounting 245
list of 197
Miscellaneous 224
Network [x] 210
Network Card 212
Network Reports 212
Paper Loading 205
Paper Size/Type 198
Paper Texture 202
Paper Weight 203
Parallel [x] 217
PCL Emul 248
PDF 247
PostScript 248
Print Settings 238
Quality 244
Reports 209
Security Audit Log 226
Serial [x] 219
Set Date and Time 226
Setup 240
SMTP Setup menu 222
Standard Network 210
Standard USB 216
Substitute Size 201
TCP/IP 213
Universal Setup 207
Utilities 246
Wireless 214
XPS 247
Miscellaneous menu 224
moving the printer 10, 11, 267, 269
multipurpose feeder
loading 64, 113, 163
N
Network [x] menu 210
Network [x] software error
[54] 301
Network Card menu 212
Network Reports menu 212
network settings
Embedded Web Server 76
network setup page
printing 79, 128, 178
Networking Guide
where to find 76, 126, 175
noise emission levels 348
noise, printer
reducing 80, 129
Non-Lexmark [supply type], see
User's Guide [33.xy] 301
non-volatile memory 84, 133, 182
erasing 85, 134, 183
Not enough free space in flash
memory for resources [52] 302
notices 347, 348, 349, 350, 351,
354, 355, 356, 357, 359, 360, 361,
362
number of remaining pages
estimate 257
0
optional 250-sheet tray
loading 50, 99, 149
optional 550-sheet tray
loading 50, 99, 149
optional card
installing 21
options
550-sheet tray, installing 29
firmware cards 12
Internal Solutions Port, installing 17
memory card 12, 15
printer hard disk, installing 23
printer hard disk, removing 27
updating in printer driver 36
ordering
imaging unit 258
maintenance kit 259
roller kit 259
staple cartridges 259
ordering supplies
toner cartridges 257
P
paper
characteristics 188
letterhead 190
preprinted forms 190
recycled 190
selecting 189
setting size 49
setting type 49
storing 188, 191
unacceptable 190
Universal size setting 49, 99, 149
using recycled 254
Paper changes needed 302
paper characteristics 188
paper feed troubleshooting
message remains after jam is cleared 324
paper jams
avoiding 270
paper jams, clearing
behind rear door 276, 277
in duplex area 280
in finisher rear door 287
in multipurpose feeder 282
in rear expander door 288
in rear mailbox door 290
in standard bin 280
in staple finisher 283
in the tray 281
inside the printer 274
Paper Loading menu 205
paper size
setting 98, 148
Paper Size/Type menu 198
paper sizes
supported 192
Paper Texture menu 202
paper type
setting 98, 148
paper types
supported 192
Paper Weight menu 203
paper weights
supported 192
Parallel [x] menu 217
Parallel port [x] disabled [56] 302
parts
checking status 79, 128, 178
checking, from printer control panel 128
checking, on the printer control panel 178
checking, using the Embedded Web Server 79, 128, 178
using genuine Lexmark 257
parts and supplies, status of checking, on printer control panel 79
PCL Emul menu 248
PDF menu 247
Personal Identification Number
method
using 41
port settings
configuring 42
PostScript menu 248
PPDS font error [50] 302
preparing to set up the printer on
an Ethernet network 37
print irregularities 330
print job
canceling from the printer control panel 75
canceling, from
computer 76, 125, 175
print quality troubleshooting
blank pages 334
characters have jagged edges 325
clipped pages or images 325
compressed images appear on prints 326
gray background on prints 327
horizontal voids appear on prints 328
print irregularities 330
print is too dark 332
print is too light 333
printer is printing solid black pages 335
repeating defects appear on prints 336
shadow images appear on prints 337
skewed print 337
streaked horizontal lines appear on prints 338
streaked vertical lines 339
toner fog or background shading appears on prints 340
toner rubs off 341
toner specks appear on prints 341
transparency print quality is poor 342
uneven print density 342
white streaks 343
Print Settings menu 238
print troubleshooting
envelope seals when printing 312
error reading flash drive 313
held jobs do not print 312
incorrect characters print 314
incorrect margins on prints 329
jammed pages are not reprinted 323
job prints from wrong tray 314
job prints on wrong paper 314
jobs do not print 316
Large jobs do not collate 315
multiple-language PDF files do not print 315
paper curl 330
paper frequently jams 324
print job takes longer than expected 316
tray linking does not work 318
unexpected page breaks occur 319
printer
configurations 46, 88, 137
finishing features 194
minimum clearances 10, 11
models 46, 88, 137
moving 10, 11, 267, 269
selecting a location 10, 11
shipping 269
printer control panel
adjusting brightness 82
factory defaults,
restoring 83, 132, 182
indicator light 49, 90, 139
parts 48, 90, 139
Sleep button light 49, 90, 139
using 48, 90, 139
printer control panel, virtual
display
using the Embedded Web Server 76, 126
printer hard disk
disposing of 84, 133, 182
encrypting 86, 135, 184
installing 23
removing 27
wiping 86, 134, 184
printer hard disk
encryption 86, 135, 184
printer hard disk memory erasing 86, 134, 184
printer information where to find 8
printer IP address finding 95, 144
printer is printing blank pages 334
printer messages
[x]-page jam, clear manual feeder. [250] 282
[x]-page jam, lift front cover to remove cartridge. [200–201] 274
[x]-page jam, open tray [x]. [24x] 281
[x]-page jam, open upper and lower rear door. [231-234] 277
[x]-page jam, open upper rear door. [202] 276
[x]-page jam, remove paper, open expander rear door. Leave paper in bin. [41y.xx] 288
[x]-page jam, remove paper, open finisher rear door. Leave paper in bin. [451] 287
[x]-page jam, remove paper, open mailbox rear door. Leave paper in bin. [43y.xx] 290
[x]-page jam, remove paper, open stapler door. Leave paper in bin. [455-457] 283
[x]-page jam, remove standard bin jam. [203] 280
[x]-page jam, remove tray 1 to clear duplex. [235–239] 280
Cartridge low [88.xy] 292
Cartridge nearly low [88.xy] 292
Cartridge very low, [x] estimated pages remain [88.xy] 292
Cartridge, imaging unit mismatch [41.xy] 292
Change [paper source] to [custom string] load [orientation] 292
Change [paper source] to [custom type name] load [orientation] 293
Change [paper source] to [paper size] load [orientation] 293
Change [paper source] to [paper type] [paper size] load [orientation] 293
Check tray [x] connection 293
Close door or insert cartridge 294
Complex page, some data may not have printed [39] 294
Configuration change, some held jobs were not restored [57] 294
Defective flash detected [51] 294
Disk must be formatted for use in this device 295
Disk near full. Securely clearing disk space. 295
Empty the hole punch box 295
Error reading USB drive. Remove USB. 295
Error reading USB hub. Remove hub. 295
Imaging unit low [84.xy] 295
Imaging unit nearly low [84.xy] 295
Imaging unit very low, [x] estimated pages remain [84.xy] 295
Incompatible output bin [x] [59] 296
Incompatible tray [x] [59] 296
Incorrect paper size, open [paper source] [34] 296
Insert hole punch box 296
Insert staple cartridge 296
Insert Tray [x] 297
Install bin [x] 297
Install Tray [x] 297
Insufficient memory for Flash Memory Defragment operation [37] 297
Insufficient memory to collate job [37] 298
Insufficient memory to support Resource Save feature [35] 298
Insufficient memory, some Held Jobs were deleted [37] 297
Insufficient memory, some held jobs will not be restored [37] 298
Load [paper source] with [custom string] [paper orientation] 298
Load [paper source] with [custom type name] [paper orientation] 299
Load [paper source] with [paper size] [paper orientation] 299
Load [paper source] with [paper type] [paper size] [paper orientation] 299
Load manual feeder with [custom string] [paper orientation] 299
Load manual feeder with [custom type name] [paper orientation] 300
Load manual feeder with [paper size] [paper orientation] 300
Load manual feeder with [paper type] [paper size] [paper orientation] 300
Load staples 298
Maintenance kit low [80.xy] 300
Maintenance kit nearly low [80.xy] 300
Maintenance kit very low, [x] estimated pages remain [80.xy] 301
Memory full [38] 301
Network [x] software error [54] 301
Non-Lexmark [supply type], see User's Guide [33.xy] 301
Not enough free space in flash memory for resources [52] 302
Paper changes needed 302
Parallel port [x] disabled [56] 302
PPDS font error [50] 302
Reattach bin [x] 302
Reattach bins [x] - [y] 303
Reinstall missing or unresponsive cartridge [31.xy] 303
Reinstall missing or unresponsive imaging unit [31.xy] 304
Remove defective disk [61] 304
Remove packaging material, [area name] 304
Remove paper from [linked set bin name] 304
Remove paper from all bins 304
Remove paper from bin [x] 304
Remove paper from standard output bin 305
Replace cartridge, 0 estimated pages remain [88.xy] 305
Replace cartridge, printer region mismatch [42.xy] 305
Replace imaging unit, 0 estimated pages remain [84.xy] 305
Replace maintenance kit, 0 estimated pages remain [80.xy] 306
Replace missing or unresponsive fuser [31.xy] 304
Replace roller kit [81.xx] 306
Replace unsupported cartridge [32.xy] 306
Replace unsupported fuser [32.xy] 306
Replace unsupported imaging unit [32.xy] 306
Restore held jobs? 306
Serial port [x] disabled [56] 307
Some held jobs were not restored 307
Standard network software error [54] 307
Standard USB port disabled [56] 307
Supply needed to complete job 307
Too many bins attached [58] 307
Too many disks installed [58] 308
Too many flash options installed [58] 308
Too many trays attached [58] 308
Tray [x] paper size unsupported 308
Unformatted flash detected [53] 308
Unsupported disk 309
Unsupported option in slot [x] [55] 309
Unsupported USB hub, please remove 295
USB port [x] disabled [56] 309
printer options troubleshooting
internal option is not detected 320
internal print server 321
Internal Solutions Port 321
tray problems 322
USB/parallel interface card 323
printer options, troubleshooting 2100-sheet tray problems 319
printer problems, solving basic 310
printer setup verifying 45
printer software, installing
(Windows) 35
printing
canceling, from printer control panel 125, 175
directory list 75, 125, 174
font sample list 75, 124, 174
forms 119, 169
from flash drive 72, 122, 172
from Macintosh 70, 120, 170
from Windows 70, 120, 170
menu settings page 78, 128, 177
network setup page 79, 128, 178
printing a directory list 125, 174
printing a document 70, 120, 170
printing a font sample list 124, 174
printing a menu settings
page 128, 177
printing a network setup
page 79, 128, 178
printing confidential and other held jobs
from a Macintosh computer 74, 124, 173
from Windows 74, 124, 173
printing forms 119, 169
printing from a flash
drive 72, 122, 172
printing slows down 317
publications
where to find 8
Push Button Configuration method using 41
Q
Quality menu 244
Quiet mode 80, 129
using 179
R
Reattach bin [x] 302
Reattach bin [x] - [y] 303
recycled paper using 190, 254
recycling
Lexmark packaging 255
Lexmark products 255
toner cartridges 255
reducing noise 80, 129
reducing printer noise 179
Reinstall missing or unresponsive cartridge [31.xy] 303
Reinstall missing or unresponsive imaging unit [31.xy] 304
Remote Operator Panel setting up 97, 147
Remove defective disk [61] 304
Remove packaging material, [area name] 304
Remove paper from [linked set bin name] 304
Remove paper from all bins 304
Remove paper from bin [x] 304
Remove paper from standard output bin 305
removing printer hard disk 27
repeat print jobs 73, 123, 173
printing from a Macintosh computer 74, 124, 173
printing from
Windows 74, 124, 173
repeating defects appear on prints 336
Replace cartridge, 0 estimated pages remain [88.xy] 305
Replace cartridge, printer region mismatch [42.xy] 305
Replace imaging unit, 0 estimated pages remain [84.xy] 305
Replace maintenance kit, 0 estimated pages remain [80.xy] 306
Replace missing or unresponsive fuser [31.xy] 304
Replace roller kit [81.xx] 306
Replace unsupported cartridge [32.xy] 306
Replace unsupported fuser [32.xy] 306
Replace unsupported imaging unit [32.xy] 306
replacing a staple cartridge 265
replacing supplies staple cartridge
replacing the toner cartridge 260, 262
Reports menu 209
reserve print jobs 73, 173
printing from a Macintosh computer 74, 124, 173
printing from Windows 74, 124, 173
Restore held jobs? 306
restoring factory default
settings 132, 182
roller kit ordering 259
S
safety information 6, 7
security modifying confidential print settings 77, 127, 177
Security Audit Log menu 226
security lock 84, 132, 182
security settings erasing 85
security settings information erasing 134, 183
security Web page where to find 87, 136, 185
selecting a location for the printer 10, 11
selecting paper 189
Serial [x] menu 219
Serial port [x] disabled [56] 307
serial printing setting up 44
Set Date and Time menu 226
setting paper size 49, 98, 148 paper type 49, 98, 148 TCP/IP address 213
setting the Universal paper size 99, 149
setting Universal paper size 49
setting up serial printing 44
setting up the printer on an Ethernet network (Macintosh only) 37
on an Ethernet network (Windows only) 37
Setup menu 240
shipping the printer 269
showing icons on the home
screen 95, 145
Sleep button printer control panel 48, 90, 139
Sleep mode adjusting 81, 130, 180
SMTP Setup menu 222
Some held jobs were not restored 307
standard 250-sheet tray loading 50, 149
standard 550-sheet tray loading 50, 99, 149
Standard Network menu 210
Standard network software error [54] 307
standard tray loading 50, 99, 149
Standard USB menu 216
Standard USB port disabled [56] 307
staple cartridge replacing 265
staple cartridges ordering 259
statement of volatility 84, 133, 182
status of parts checking 128, 178
status of parts and supplies checking 79
status of supplies checking 128, 178
Stop or Cancel button printer control panel 48, 90, 139
storing paper 191 supplies 20
storing print jobs 73, 123, 173
streaked horizontal lines appear on prints 338
streaked vertical lines appear on prints 339
streaks appear 343
Substitute Size menu 201
supplies checking status 79, 128, 178 checking, from printer control panel 128
checking, on the printer control panel 178
checking, using the Embedded Web Server 79, 128, 178
conserving 254
storing 260
using genuine Lexmark 257
using recycled paper 254
supplies, ordering
imaging unit 258
maintenance kit 259
roller kit 259
staple cartridges 259
toner cartridges 257
Supply needed to complete job 307
supply notifications configuring 77, 126, 176
supported flash drives 71, 121, 171
supported paper sizes 192
supported paper types 192
supported paper weights 192
T
TCP/IP menu 213
tips card stock 187
labels, paper 188
on using envelopes 187
transparencies 188
tips on using envelopes 187
toner cartridge
replacing 260, 262
toner cartridges
ordering 257
recycling 255
toner darkness adjusting 71, 120, 170
Too many bins attached [58] 307
Too many disks installed [58] 308
Too many flash options installed [58] 308
Too many trays attached [58] 308
touch screen
buttons, using 92, 141
transparencies
loading 64, 113, 163
tips 188
Tray [x] paper size
unsupported 308
trays
linking 69, 118, 119, 168, 169
unlinking 69, 118, 119, 168, 169
troubleshooting
an application error has occurred 344
cannot open Embedded Web Server 344
checking an unresponsive printer 310
contacting customer support 345
solving basic printer problems 310
troubleshooting, display
printer display is blank 311
troubleshooting, paper feed message remains after jam is cleared 324
troubleshooting, print
envelope seals when printing 312
error reading flash drive 313
held jobs do not print 312
incorrect characters print 314
incorrect margins on prints 329
jammed pages are not reprinted 323
job prints from wrong tray 314
job prints on wrong paper 314
jobs do not print 316
Large jobs do not collate 315
multiple-language PDF files do not print 315
paper curl 330
paper frequently jams 324
print job takes longer than expected 316
tray linking does not work 318
unexpected page breaks occur 319
troubleshooting, print quality blank pages 334
characters have jagged edges 325
clipped pages or images 325
compressed images appear on prints 326
gray background on prints 327
horizontal voids appear on prints 328
print irregularities 330
print is too dark 332
print is too light 333
printer is printing solid black pages 335
repeating defects appear on prints 336
shadow images appear on prints 337
skewed print 337
streaked horizontal lines appear on prints 338
streaked vertical lines 339
toner fog or background shading appears on prints 340
toner rubs off 341
toner specks appear on prints 341
transparency print quality is poor 342
uneven print density 342
white streaks on a page 343
troubleshooting, printer options 2100-sheet tray problems 319
internal option is not detected 320
internal print server 321
Internal Solutions Port 321
tray problems 322
USB/parallel interface card 323
troubleshooting, printing printing slows down 317
U
understanding the home screen 91, 140
uneven print density 342
Unformatted flash detected [53] 308
Universal Paper Size setting 99
Universal paper size setting 49, 149
Universal Setup menu 207 unlinking
trays 69, 118, 119, 168, 169
Unsupported disk 309
Unsupported option in slot [x] [55] 309
Unsupported USB hub, please remove 295
updating options in printer driver 36
USB port 33
printer control panel 48, 90, 139
USB port [x] disabled [56] 309
USB/parallel interface card troubleshooting 323
User's Guide
using 8
using Forms and Favorites 119, 169
using Hibernate Mode 131
using Hibernate mode 82, 181
using Quiet mode 179
using recycled paper 254
using the printer control panel 48, 90, 139
using the touch-screen
buttons 92, 141
Utilities menu 246
v
verify print jobs 73, 123, 173
printing from a Macintosh computer 74, 124, 173
printing from
Windows 74, 124, 173
verifying printer setup 45
vertical voids appear 343
virtual display
checking, using Embedded Web Server 76, 126, 175
voids appear 343
volatile memory 84, 133, 182 erasing 85, 133, 183
volatility
statement of 84, 133, 182
W
wiping the printer hard
disk 86, 134, 184
Wireless menu 214
wireless network configuration information 39
wireless network setup using the Embedded Web Server 41
wireless setup wizard using 40
X
XPS menu 247