Phaser 6280DN - Printer XEROX - Free user manual and instructions
Find the device manual for free Phaser 6280DN XEROX in PDF.

User questions about Phaser 6280DN XEROX
0 question about this device. Answer the ones you know or ask your own.
Ask a new question about this device
Download the instructions for your Printer in PDF format for free! Find your manual Phaser 6280DN - XEROX and take your electronic device back in hand. On this page are published all the documents necessary for the use of your device. Phaser 6280DN by XEROX.
USER MANUAL Phaser 6280DN XEROX
Unpublished rights reserved under the copyright laws of the United States. Contents of this publication may not be reproduced in any form without permission of Xerox Corporation.
Copyright protection claimed includes all forms of matters of copyrightable materials and information now allowed by statutory or judicial law or hereinafter granted, including without limitation, material generated from the software programs which are displayed on the screen such as styles, templates, icons, screen displays, looks, etc.
XEROX®, CentreWare®, Phaser®, PrintingScout™, and Walk-Up® are trademarks of Xerox Corporation in the United States and/or other countries.
Adobe® and PostScript® are trademarks of Adobe Systems Incorporated in the United States and/or other countries.
Apple®, Bonjour®, ColorSync®, EtherTalk®, Macintosh®, and Mac OS® are trademarks of Apple Computer, Inc. in the United States and/or other countries.
PCL® is a trademark of Hewlett-Packard Corporation in the United States and/or other countries.
Microsoft®, Vista™, Windows®, and Windows Server™ are trademarks of Microsoft Corporation in the United States and/or other countries.
Novell®, NetWare®, and IPX/SPX™ are trademarks of Novell, Incorporated in the United States and/or other countries.
As an ENERGY STAR® partner, Xerox Corporation has determined that this product meets the ENERGY STAR guidelines for energy efficiency. The ENERGY STAR name and logo are registered U.S. marks.

text_image
energyENERGY STAR
Contents
1 Printer Information
User Safety....8
Electrical Safety....8
Laser Safety 9
Maintenance Safety 9
Operational Safety....9
Moving the Printer 12
Safety Symbols Marked on Product 13
Printer Specifications.... 14
Regulatory Information 15
United States (FCC Regulations) 15
Canada (Regulations) 15
European Union 16
Material Safety Data Sheet.... 17
Product Recycling and Disposal 18
European Union 18
North America....19
Other Countries.... 19
2 Printer Features
Main Components and Their Functions.... 21
Front View.... 21
Rear View 22
Internal View 22
Options 24
Control Panel 25
Control Panel Layout.... 25
Display.... 25
Information Pages.... 26
Power Saver Mode 27
Exiting the Power Saver Mode 27
Checking Status of Print Data.... 28
Checking in Windows.... 28
Displaying Optional Accessory Configuration and Paper Tray Settings.... 29
More Information.... 30
Resources 30
3 Network Basics
Overview of Network Setup and Configuration.... 32
Choosing a Connection Method.... 33
Connecting via Ethernet (Recommended) 33
Connecting via USB 34
Configuring the Network Address 35
TCP/IP and IP Addresses 35
Dynamic Methods of Setting the Printer's IP Address 36
Manually Setting the Printer's IP Address. 37
Installing the Printer Drivers 39
Available Drivers 39
Windows 2000 or Later....40
Macintosh OS X, Version 10.3 and Higher.... 41
4 Printing Basics
Supported Paper and Media 46
Paper Usage Guidelines 46
Paper That Can Damage Your Printer 48
Paper Storage Guidelines.... 48
About Paper 49
Setting Paper Types and Sizes 51
Setting Paper Trays 51
Setting Paper Types.... 51
Setting Paper Sizes....52
Loading Paper 53
Loading Paper in Tray 1 (MPT)....53
Loading Paper in Trays 2-3 56
Selecting Printing Options 60
Selecting Printing Preferences (Windows).... 60
Selecting Options for an Individual Job (Windows) 61
Selecting Options for an Individual Job (Macintosh).... 63
Printing on Both Sides of the Paper 66
Automatic 2-Sided Printing Guidelines....66
Selecting 2-Sided Printing 67
Contents
Printing on Specialty Media....68
Printing Transparencies 68
Printing Envelopes 70
Printing Labels....73
Printing Glossy Paper....78
Printing Custom Size or Long Paper 83
Defining Custom Paper Sizes 83
Printing on Custom Size Paper 84
Printing Confidential Documents - Secure Print 86
About Secure Print 86
Configuring Secure Print.... 86
Print After Checking Printing Result - Proof Print 88
About Proof Print 88
Configuring Proof Print.... 88
5 Using the Control Panel Menus
Control Panel Menus 91
Menu Configuration.... 91
Changing Menu Settings 92
Description of Menu Items 93
Tray Settings 93
Information Pages 95
Billing Meters....96
Admin Menu....96
Menu List....105
6 Print Quality
Print-Quality Problems....107
Color Registration....111
Automatic Color Registration Adjustment....111
Manual Color Registration Adjustment 111
Enabling/Disabling Automatic Color Registration 113
Run Black....114
7 Troubleshooting
Paper Jams....116
Preventing and Clearing Paper Jams 116
Paper Jams in Tray 1 (MPT)....117
Paper Jams in the Paper Tray 120
Paper Jams at the Fuser 123
When Long Paper Jams 124
Paper Jams at the Duplex Unit.... 125
Paper Jams in the Optional Sheet Feeder 127
Problems With the Printer 131
Enabling Options....134
Control Panel Error Messages 135
Messages About Supplies....135
Messages About the Printer and Other Items 136
Getting Help....139
Control Panel Messages 139
PrintingScout Alerts 139
Online Support Assistant 139
Web Links 140
8 Maintenance
Cleaning the Printer....142
Cleaning the Exterior....142
Cleaning the Interior 142
Ordering Supplies 143
Consumables 143
Routine Maintenance Items 143
When to Order Supplies 143
Recycling Supplies 144
Managing the Printer 145
Checking/Managing the Printer with CentreWare IS....145
Checking Printer Status with PrintingScout....145
Checking Printer Status Through E-mail 146
Checking Page Counts.... 149
Moving the Printer 150
Index
Printer Information
1
This chapter includes:
- User Safety on page 8
• Printer Specifications on page 14
• Regulatory Information on page 15
• Material Safety Data Sheet on page 17
• Product Recycling and Disposal on page 18
User Safety
Your printer and the recommended supplies have been designed and tested to meet strict safety requirements. Attention to the following information ensures the continued safe operation of your printer.
Electrical Safety
- Use the power cord supplied with your printer.
- Plug the power cord directly into a properly grounded electrical outlet. Make sure each end of the cord is securely connected. If you do not know if an outlet is grounded, ask an electrician to check the outlet.
- Do not use a ground adapter plug to connect the printer to an electrical outlet that does not have a ground connection terminal.
- Do not use an extension cord or power strip.
- Verify that the printer is plugged into an outlet that is capable of providing the correct voltage and power. Review the printer's electrical specification with an electrician if necessary.
Warning: Avoid the potential of electrical shock by ensuring that the printer is properly grounded. Electrical products may be hazardous if misused.
- Do not place the printer in an area where people might step on the power cord.
- Do not place objects on the power cord.
- Do not block the ventilation openings. These openings are provided to prevent overheating of the printer.
- Do not drop paper clips or staples into the printer.
Warning: Do not push objects into slots or openings on the printer. Making contact with a voltage point or shorting out a part could result in fire or electrical shock.
If you notice unusual noises or odors:
- Turn off the printer immediately.
- Disconnect the power cord from the electrical outlet.
- Call an authorized service representative to correct the problem.
The power cord is attached to the printer as a plug-in device at the back of the printer. If it is necessary to disconnect all electrical power from the printer, disconnect the power cord from the electrical outlet.
Warning: Do not remove the covers or guards that are fastened with screws unless you are installing optional equipment and are specifically instructed to do so. Power should be OFF when performing these installations. Except for user-installable options, there are no parts that you can maintain or service behind these covers.
Note: Leave the printer on for optimum performance; it does not pose a safety hazard. If however the printer will not be used over an extended period of time, it should be turned off and unplugged.
The following are hazards to your safety:
- The power cord is damaged or frayed.
- Liquid is spilled into the printer.
- The printer is exposed to water.
If any of these conditions occur, do the following:
- Turn off the printer immediately.
- Disconnect the power cord from the electrical outlet.
- Call an authorized service representative.
Laser Safety
With specific regard to lasers, this printer complies with laser product performance standards set by governmental, national, and international agencies and is certified as a Class 1 Laser Product. The printer does not emit hazardous light because the beam is totally enclosed during all modes of customer operation and maintenance.
Maintenance Safety
- Do not attempt any maintenance procedure that is not specifically described in the documentation supplied with your printer.
- Do not use aerosol cleaners. The use of supplies that are not approved may cause poor performance and could create a hazardous condition.
- Do not attempt to open, reuse, or burn any consumables or routine maintenance items. For information on Xerox supplies recycling programs, go to www.xerox.com/gwa.
Operational Safety
Your printer and supplies were designed and tested to meet strict safety requirements. These include safety agency examination, approval, and compliance with established environmental standards. Your attention to the following safety guidelines helps to ensure the continued, safe operation of your printer.
Printer Location
Place the printer in a dust-free area within a temperature range of 41^ F to 90^ F ( 5^ C to 32^ C) and a relative humidity range of 15 percent to 85 percent.
Humidity should be 70 percent or below at 90^ F, and temperature should be 82^ F or below at 85 percent humidity.
Note: Sudden temperature fluctuations can affect print quality. Rapid heating of a cold room can cause condensation inside the machine, directly interfering with image transfer.
Printer Clearance
Place the printer in an area where there is adequate space for ventilation, operation, and servicing. The recommended minimal spacing is:
Overhead Clearance:
• 35 cm (13.8 in.) above the printer
Total Height Requirements:
• Printer: 47 cm (18.5 in.)
- Add 14 cm (5.5 in.) for the 550-Sheet Feeder.
Other Clearances:
• 13 cm (5 in.) behind the printer
- 60 cm (23.6 in.) in front of the printer
- 10 cm (3.9 in.) on the left side of the printer
- 10 cm (3.9 in.) on the right side of the printer
Operational Guidelines
- Do not block or cover the slots and openings on the printer. The printer may overheat without adequate ventilation.
- For optimum performance, use the printer at elevations below 3,500 m (11,480 ft.).
- Do not place the printer near a heat source.
- Do not place the printer in direct sunlight to avoid exposing light-sensitive components when the doors are open.
-
Do not place the printer in line with the cold air flow from an air conditioning system.
-
Place the printer on a level, solid non-vibrating surface with adequate strength for the weight of the printer. It should be within 1^ of horizontal with all four feet in solid contact with the surface. The printer weight with the duplex unit and consumables is 29.25 kg (64.5 lb.).
- Do not place the printer in locations exposed to magnetic forces.
- Do not place the printer in damp locations.
- Do not place the printer in locations susceptible to vibrations.
Printing Safety Guidelines
- Wait 10-15 seconds between turning the printer off and on.
- Keep hands, hair, neckties, etc., away from the exit and feed rollers.
When the printer is printing:
- Do not remove the paper source tray that you selected in either the printer driver or control panel.
- Do not open the doors.
- Do not move the printer.
Printer Supplies
- Use the supplies specifically designed for your printer. The use of unsuitable materials may cause poor performance and a possible safety hazard.
- Follow all warnings and instructions marked on, or supplied with, the printer, options, and supplies.
Caution: Use of non-Xerox supplies is not recommended. The Xerox Warranty, Service Agreements, and Total Satisfaction Guarantee do not cover damage, malfunction, or degradation of performance caused by use of non-Xerox supplies, or the use of Xerox supplies not specified for this printer. The Total Satisfaction Guarantee is available in the United States and Canada. Coverage may vary outside these areas; please contact your local representative for details.
Moving the Printer
Follow these guidelines to avoid injuring yourself or damaging the printer:
- Turn off the printer and unplug all power cables before moving the printer.

natural_image
Line drawing of a computer monitor connected to a power outlet via cable (no text or symbols)• Always use two people to lift the printer.
• Always lift the printer from the designated lift points.

text_image
24.5 kg 54 lb.6280-040
- Carry the printer without tilting it.
Caution: Do not tilt the printer more than 10 degrees to the front/back or right/left. Tilting more than 10 degrees may lead to consumables inside the printer spilling out.
Note: The rear side of this printer is heavier than the front. Be aware of this weight difference when moving the printer.
- Do not place any food or liquids on the printer.
Caution: Damage to the printer resulting from improper moving or failure to repackage the printer properly for shipment, is not covered by the warranty, service agreement, or Total Satisfaction Guarantee. The Total Satisfaction Guarantee is available in the United States and Canada. Coverage may vary outside these areas; please contact your local representative for details.
See also:
Moving the Printer on page 150
Safety Symbols Marked on Product
 | Use caution (or draws attention to a particular component). See the manual(s) for information. | |
 | Hot surface on or in the printer. Use caution to avoid personal injury. | |
 |  | It may take 30 minutes for the fuser to cool down. |
 | Do not touch the item. | |
Printer Specifications
| Item Contents | |
| Dimensions | 400 (W) × 490 (D) × 473 (H) mm |
| Weight Printer: 24.4 kg (54 lb.) including print cartridges | |
| 550 Sheet Feeder (optional): 7.9 kg (17.4 lb.) | |
| Duplex Unit (optional): 1 kg (2.2 lb.) | |
| Warm-up time | 20 seconds or less (when power is switched on, temperature: 22°C) |
| However, the printer's electrical system is ready 10 seconds after switching on the printer. | |
| Continuous print speed *1 | Color: |
| 1 sided print: 25 sheets/min *2 | |
| 2 sided print: 17 pages/min *3 | |
| Black-and-white: | |
| 1 sided print: 30 sheets/min *2 | |
| 2 sided print: 20 pages/min *3 | |
| Important | |
| *1 The print speed may decrease due to paper type, such as transparency or envelope; size, and printing conditions. The print speed may decrease due to image quality adjustment. | |
| *2 Continuous print speed of documents that are all in A4. | |
| *3 Continuous print speed of documents in A4. | |
| Resolution | Data processing resolution: 600 × 600 dpi (25.4 dots/mm): Multivalued (25.4 dots/mm) |
| Output resolution: 600 dpi (25.4 dots/mm) | |
| Power source 110-127 V~, 50/60 Hz, 8 A | |
| 220-240 V~, 50/60 Hz, 4 A | |
| Power consumption AC 110 - 127 V: | |
| Sleep Mode: 9 W*4 or less | |
| Standby: less than 95 W (fuser on), | |
| Continuous color printing: less than 460 W, | |
| Continuous monochrome printing: less than 460 W | |
| AC 220 - 240 V: | |
| Sleep Mode: 9 W or less | |
| Standby: less than 95 W (fuser on), | |
| Continuous color printing: less than 460 W, | |
| Continuous monochrome printing: less than 460 W | |
| This printer does not consume electric power when the power switch is turned off even if the printer is connected to an AC outlet. | |
| ENERGY STAR qualified printer: | |
| Default time to Power Saver is 30 minutes | |
| *4 W = Watts. | |
Regulatory Information
This product has been tested to electromagnetic emission and immunity standards. These standards are designed to mitigate interference caused or received by this product in a typical office environment.
United States (FCC Regulations)
This equipment has been tested and found to comply with the limits for a Class B digital device, pursuant to Part 15 of the FCC Rules. These limits are designed to provide reasonable protection against harmful interference in a residential environment. This equipment generates, uses, and can radiate radio frequency energy. If it is not installed and used in accordance with these instructions, it may cause harmful interference to radio communications. However, there is no guarantee that interference will not occur in a particular installation. If this equipment does cause harmful interference to radio or television reception, which can be determined by turning the equipment off and on, the user is encouraged to try to correct the interference by one or more of the following measures:
- Reorient or relocate the receiver.
- Increase the separation between the equipment and receiver.
- Connect the equipment into an outlet on a circuit different from that to which the receiver is connected.
- Consult your reseller or an experienced radio/television technician for help.
Any changes or modifications not expressly approved by Xerox could void the user's authority to operate the equipment. To ensure compliance with Part 15 of the FCC rules, use shielded interface cables.
Canada (Regulations)
This Class B digital apparatus complies with Canadian ICES-003.
The CE mark applied to this product symbolizes Xerox's declaration of conformity with the following applicable Directives of the European Union as of the dates indicated:
• December 12, 2006: Low Voltage Directive 2006/95/EC
- December 15, 2004: Electromagnetic Compatibility Directive 2004/108/EC
This product, if used properly in accordance with the user's instructions, is neither dangerous for the consumer nor for the environment.
To ensure compliance with European Union regulations, use shielded interface cables.
A signed copy of the Declaration of Conformity for this product can be obtained from Xerox.
Material Safety Data Sheet
For Material Safety Data information regarding your Phaser 6280 printer, go to:
• United States and Canada: www.xerox.com/msds
• European Union : www.xerox.com/environment_europe
For the Customer Support Center phone numbers, go to www.xerox.com/office/contacts.
Product Recycling and Disposal
European Union
Some equipment may be used in both a domestic/household and a professional/business application.
Domestic/Household Environment

Application of this symbol on your equipment is confirmation that you should not dispose of the equipment in the normal household waste stream.
In accordance with European legislation, end of life electrical and electronic equipment subject to disposal must be segregated from household waste.
Private households within EU member states may return used electrical and electronic equipment to designated collection facilities free of charge. Please contact your local disposal authority for information.
In some member states, when you purchase new equipment, your local retailer may be required to take back your old equipment free of charge. Please ask you retailer for information.
Professional/Business Environment

Application of this symbol on your equipment is confirmation that you must dispose of this equipment in compliance with agreed national procedures.
In accordance with European legislation, end of life electrical and electronic equipment subject to disposal must be managed within agreed procedures.
Prior to disposal, please contact your local reseller or Xerox representative for end of life takeback information.
North America
Xerox operates an equipment takeback and reuse/recycle program. Contact your Xerox sales representative (1-800-ASK-XEROX) to determine whether this Xerox product is part of the program. For more information about Xerox environmental programs, visit www.xerox.com/environment.
If you are managing the disposal of your Xerox product, please note that the product may contain, lead, mercury, perchlorate, and other materials whose disposal may be regulated due to environmental considerations. The presence of these materials is fully consistent with global regulations applicable at the time that the product was placed on the market. For recycling and disposal information, contact your local authorities. In the United States, you may also refer to the Electronic Industries Alliance web site: www.eiae.org Perchlorate Material - This product may contain one or more Perchlorate-containing devices, such as batteries. Special handling may apply, please see www.dtsc.ca.gov/hazardouswaste/perchlorate.
Other Countries
Please contact your local waste authorities and request disposal guidance.
Printer Features
2
This chapter includes:
• Main Components and Their Functions on page 21
• Control Panel on page 25
• Power Saver Mode on page 27
- Checking Status of Print Data on page 28
- Displaying Optional Accessory Configuration and Paper Tray Settings on page 29
• More Information on page 30
Main Components and Their Functions
This section includes:
- Front View on page 21
• Rear View on page 22
- Internal View on page 22
Front View

text_image
Labeled diagram of a printer with numbered parts for identification6280-001
- Front door A
- Output tray
- Control panel
- Button A for opening the front door
- Power switch
- Tray 1 (MPT)
- Tray 2
- Tray 3 / 550 Sheet Feeder
Rear View

text_image
1 2 3 4 6280-002- Power cord connector
-
USB port
-
Network connector
- Optional memory slot
Internal View

text_image
1 2 3 4 6280-003- Fuser
- Print cartridge
- Transfer unit
- Button A for opening the front door

natural_image
Technical line drawing of a mechanical device with internal components and a labeled part (no text or symbols beyond label)- Duplex unit
Phaser 6280 Configurations
| Features | Printer Configuration | |
| 6280N 6280DN | ||
| Memory Configuration* 256 MB 256 MB | ||
| Print Speed (Color/Mono) 25/30 25/30 | ||
| Letter | 26/31 26/31 | |
| A4 | 25/30 25/30 | |
| Resolutions (dpi) | ||
| Standard 600 x 600 x 1 bit 600 x 600 x 1 bit | ||
| Enhanced 600 x 600 x 4 bit 600 x 600 x 4 bit | ||
| Ethernet Interface 10/100 Base-T 10/100 Base-T | ||
| Tray 1 (MPT) (150 Sheet) Standard Standard | ||
| Tray 2 (250 Sheets) Standard Standard | ||
| 550-Sheet Feeder | Optional | Optional |
| Duplex Unit | Optional | Standard |
| Wireless LAN | Optional | Optional |
| Duplex (Color/Mono) | ||
| Letter | 18/21 18/21 | |
| A4 | 17/20 17/20 | |
* All configurations have one memory slot supporting 256 MB/512 MB/1024 MB DDR2 DIMMs, to a maximum of 1152 MB. Standard memories are soldered on board.
Options
You can order additional memory, trays, multi-protocol card, and a duplex unit if these items are not standard on your printer.
Memory
The printer features one slot that accepts 256, 512 or 1024 MB of DDR2 DIMMs.
Duplex Unit
The duplex unit enables 2-sided printing.
Additional Trays
• 550-Sheet Feeder (Tray 3)
Hard Drive
Use the hard drive for:
- Secure print (see Printing Confidential Documents - Secure Print on page 85)
• Proof print (see Print After Checking Printing Result - Proof Print on page 87) - Saved printing
- Storing additional fonts and macros.
Control Panel
This section includes:
• Control Panel Layout on page 25
- Display on page 25
- Menu Map on page 26
• Information Pages on page 26
Control Panel Layout

text_image
1 Phase 6280 2 3 4 UMT Wate Up 5 6 7 8 9 6280-005- Display indicates status messages, menus, and toner levels.
- Menu button
Scrolls to the menu operation. Switches the display between the menus and print screen. - OK button
Sets the menu values. Also prints reports and lists. - Wake Up button
This light is on in power saver mode. Push the button to exit power saver mode. -
Cancel Job button
Cancels the current print job. -
Up Arrow button
Scrolls upward through the menus.
Down Arrow button
Scrolls downward through the menus.
Back Arrow button
Scrolls backwards through the menus, or displays the Walk-Up Features menu.
Forward Arrow button
Scrolls forward through the menus.
- Error
The red light indicates an error condition.
- Ready
The green light indicates that the printer is ready to receive data from the computer. If the light is blinking, the printer is busy receiving data.
Display
There are two types of screens:
- Print screen (for displaying printer status)
- Menu screen (for configuring settings)
Information Pages
Your printer comes with a set of information pages to help you obtain the best results from your printer. Access these pages from the control panel. Print the Menu Map to see where these information pages are located in the control panel menu structure.
Menu Map
The Menu Map helps you navigate the control panel menus. To print the Menu Map:
- On the control panel, press the Menu button, select Information Pages, and then press the OK button.
- Select Menu Map, and then press the OK button to print.
Note: Print the Menu Map to see other information pages available for printing.
Configuration Page
To print the Configuration page to view current information about your printer, do the following:
- On the control panel, press the Menu button, select Information Pages, and then press the OK button.
- Select Configuration, and then press the OK button to print.
Demo Page
To print a demo page, do the following:
- On the control panel, press the Menu button, select Information Pages, and then press the OK button.
- Select Demo Pg, and then press the OK button to print.
Power Saver Mode
The printer is equipped with a Power Saver mode to reduce power consumption when it is left idle.
When no print data is received for 30 minutes (default), the printer will enter Power Saver mode.
The time ranges that can be specified for the printer to enter Power Saver mode are 5 to 60 minutes. Consumption of power during the Power Saver mode is 7 W or less and the time required to exit from Power Saver mode to a print-ready status is about 20 seconds.
See also:
Changing the Power Saver Time on page 92
Exiting the Power Saver Mode
The printer automatically cancels Power Saver mode once it receives data from the computer.
To cancel the Power Saver mode manually, press the Wake Up button.
Checking Status of Print Data
Checking in Windows
Printer information and status are displayed on the Status window. Double-click the PrintingScout printer icon on the task bar at the bottom right of the screen. From the displayed window, check the column Status.
You can change the display contents with the button on the left of the Printer Status window.
Status Setting button: Displays the Status Setting screen and allows you to check the printer name, printer connection port, and printer status.
For more information about PrintingScout, see the help:
- From the Start menu, select Programs.
- Select Xerox Office Printing.
- Select PrintingScout.
- Select PrintingScout Help.
Checking in CentreWare Internet Services
You can check the status of the print job sent to the printer at the Jobs tab of CentreWare Internet Services. To reach CentreWare Internet Services, see Starting CentreWare IS on page 145.
Displaying Optional Accessory Configuration and Paper Tray Settings
Print the Configuration page to view the current optional information about your printer, including duplex unit, hard drive, and paper trays:
- On the control panel, press the Menu button, select Information Pages, and then press the OK button.
- Select Configuration, and then press the OK button to print.
More Information
Obtain information regarding your printer and its capabilities from the following sources.
Resources
Information Source
Installation Guide* Packaged with printer
Quick Use Guide* Packaged with printer
User Guide (PDF)* Software and Documentation CD-ROM
Quick Start Tutorials (English only) www.xerox.com/office/6280support
Video Tutorials www.xerox.com/office/6280support
Recommended Media List Recommended Media List (United States)
Recommended Media List (Europe)
Online Support Assistant www.xerox.com/office/6280support
Technical Support www.xerox.com/office/6280support
Information pages Control panel menu
* Also available on the Support website.
Network Basics
3
This chapter includes:
• Overview of Network Setup and Configuration on page 32
- Choosing a Connection Method on page 33
- Configuring the Network Address on page 35
• Installing the Printer Drivers on page 39
This chapter provides basic information about setting up and connecting to your printer.
See also: (English Only)
Using CentreWare Internet Services tutorial www.office.xerox.com
Using the Windows Printer Driver tutorial www.office.xerox.com
Overview of Network Setup and Configuration
To set up and configure over the network:
- Connect the printer to the network using the recommended hardware and cables.
- Turn on the printer and the computer.
- Print the Configuration page and keep it for referencing network settings.
- Set the printer's IP address. To do this, see Dynamic Methods of Setting the Printer's IP Address on page 36.
- Install the driver software on the computer from the Software and Documentation CD-ROM. For information on driver installation, see the section in this chapter for the specific operating system you are using.
- Print a Configuration page to verify the new settings.
Note: If the Software and Documentation CD-ROM is not available, you can download the latest driver from www.xerox.com/drivers.
Choosing a Connection Method
Connect the printer via Ethernet or USB. A USB connection is a direct connection and is not used for networking. An Ethernet connection is used for networking. Hardware and cabling requirements vary for the different connection methods. Cabling and hardware are generally not included with your printer and must be purchased separately. This section includes:
• Connecting via Ethernet (Recommended) on page 33
- Connecting via USB on page 34
Connecting via Ethernet (Recommended)
Ethernet can be used for one or more computers. It supports many printers and systems on an Ethernet network. An Ethernet connection is recommended because it is faster than a USB connection. It also allows you direct access to CentreWare Internet Services (IS). The CentreWare IS web interface enables you to manage, configure, and monitor networked printers from your desktop. To reach CentreWare Internet Services, see Starting CentreWare IS on page 145.
Network Connection
Depending on your particular setup, the following hardware and cabling is required for Ethernet.
- If you are connecting to one computer, an Ethernet RJ-45 crossover cable is required.
- If you are connecting to one or more computers with an Ethernet hub, or cable or DSL router, two or more twisted-pair (category 5/RJ-45) cables are required. (One cable for each device.)
If you are connecting to one or more computers with a hub, connect the computer to the hub with one cable, and then connect the printer to the hub with the second cable. Connect to any port on the hub except the uplink port.
See also:
Configuring the Network Address on page 35
Installing the Printer Drivers on page 39
Connecting via USB
If you are connecting to one computer, a USB connection offers fast data speeds. A USB connection is not as fast as an Ethernet connection. To use USB, PC users must have Windows 2000/XP/Server 2003 or newer. Macintosh users must use Mac OS X, version 10.3 and higher.
USB Connection
A USB connection requires a standard A/B USB cable. This cable is not included with your printer and must be purchased separately. Verify that you are using the correct USB cable for your connection (2.0 for best results).
- Connect one end of the USB cable to the printer and turn it on.
- Connect the other end of the USB cable to the computer.
See also:
Installing the Printer Drivers on page 39
Configuring the Network Address
This section includes:
• TCP/IP and IP Addresses on page 35
Dynamic Methods of Setting the Printer's IP Address on page 36
- Manually Setting the Printer's IP Address on page 37
TCP/IP and IP Addresses
If your computer is on a large network, contact your network administrator for the appropriate TCP/IP addresses and additional configuration information.
If you are creating your own small Local Area Network or connecting the printer directly to your computer using Ethernet, follow the procedure for automatically setting the printer's Internet Protocol (IP) address.
PCs and printers primarily use TCP/IP protocols to communicate over an Ethernet network. With TCP/IP protocols, each printer and computer must have a unique IP address. It is important that the addresses are similar, but not the same; only the last digit needs to be different. For example, your printer can have the address 192.168.1.2 while your computer has the address 192.168.1.3. Another device can have the address 192.168.1.4.
Generally, Macintosh computers use either TCP/IP or the Bonjour protocol to talk to a networked printer. For Mac OS X systems, TCP/IP is preferred. Unlike TCP/IP, however, Bonjour does not require printers or computers to have IP addresses.
Many networks have a Dynamic Host Configuration Protocol (DHCP) server. A DHCP server automatically programs an IP address into every PC and printer on the network that is configured to use DHCP. A DHCP server is built into most cable and DSL routers. If you use a cable or DSL router, see your router's documentation for information on IP addressing.
See also:
Online Support Assistant at www.xerox.com/office/6280support
Dynamic Methods of Setting the Printer's IP Address
There are two protocols available for dynamically setting the printer's IP address:
- DHCP (enabled by default on all Phaser printers)
- Auto IP
You can turn on/off both protocols using the control panel, or use CentreWare IS to turn on/off DHCP.
Note: You can view the printer's IP address at any time. On the control panel, select Menu.
Then select Information Pgs and press the OK button. Finally, select Configuration, and then press the OK button.
Using the Control Panel
To turn on/off either the DHCP or AutoIP protocol:
- On the control panel, select the Menu button.
- Select the Admin menu, and then press the OK button.
- Select the Network Setup menu, and then press the OK button.
- Select the TCP/IP menu, and then press the OK button.
- Select IPv4, and then press the OK button.
- Select Get IP Address, and then press the OK button.
- Select DHCP, and then press the OK button.
Using CentreWare IS
To turn on/off the DHCP protocol:
- Launch your web browser.
- Enter the printer's IP address in the browser's Address field (http://xxx.xxx.xxx.xxx).
- Select Properties.
- Select the Protocols folder on the left navigation panel.
- Select TCP/IP.
- In the Get IP Address field, select the DHCP/Autonet option.
- Click the Save Changes button.
Manually Setting the Printer's IP Address
Note: Verify that your computer has a properly configured IP address for your network. Contact your network administrator for more information.
If you are on a network without a DHCP server, or in an environment where the network administrator assigns printer IP addresses, you can use this method to manually set the IP address. Manually setting the IP address overrides DHCP and AutoIP. Alternatively, if you are in a small office with a single PC and use a dialup modem connection, you can manually set the IP address.
Information Required for Manual IP Addressing
| Information Comments | |
| Internet Protocol (IP) address of the printer | Format is xxx.xxx.xxx.xxx, where xxx represents a decimal number from 0–255. |
| Network Mask Get this information from your network administrator. | |
| Default Router/Gateway address Router address is required to communicate with the host device from anywhere other than the local network segment. | |
Using the Control Panel
To manually set the IP address:
- On the control panel, select the Menu button.
- Select the Admin menu, and then press the OK button.
- Select the Network Setup menu, and then press the OK button.
-
Select the TCP/IP menu, and then press the OK button.
-
Select IPv4, and then press the OK button.
-
Select IP Address use the arrows to configure the IP values, and then press the OK button.
Changing or Modifying the IP Address Using CentreWare IS
CentreWare IS provides a simple interface that enables you to manage, configure, and monitor networked printers from your desktop using an embedded web server. For complete information about CentreWare IS, click the Help button in CentreWare IS to go to the CentreWare IS Online Help.
After setting the printer's IP address, you can modify TCP/IP settings using CentreWare IS.
- Launch your web browser.
- Enter the printer's IP address in the browser's Address field (http://xxx.xxx.xxx.xxx).
- Click Properties.
- Select the Protocols folder on the left sidebar.
- Select TCP/IP.
- Enter or modify the settings, and then click Save Changes at the bottom of the page. Your printer reboots. Now use the new IP address to reach CWIS.
Installing the Printer Drivers
This section includes:
• Available Drivers on page 39
• Windows 2000 or Later on page 40
• Macintosh OS X, Version 10.3 and Higher on page 41
Available Drivers
To access special printing options, use a Xerox printer driver.
Xerox provides drivers for a variety of page description languages and operating systems.
The following printer drivers are available:
| Printer Driver Source* Description | ||
| Windows PostScript Driver (also used for Windows Vista) | CD-ROM and Web | The PostScript driver is recommended to take full advantage of your system's custom features and genuine Adobe® PostScript®. (Default printer driver.) |
| PCL6 CD-ROM and | Web | The Printer Command Language driver can be used for applications requiring PCL. |
| Mac OS X (version 10.3 and higher) Driver | CD-ROM and Web | This driver enables printing from a Mac OS X (version 10.3 and higher) operating system. |
| UNIX Web only This driver enables printing from a UNIX operating system. | ||
| Linux CD-ROM This driver enables printing from a Linux operating system. | ||
* Go to www.xerox.com/drivers for the latest printer drivers.
Windows 2000 or Later
To install the printer driver from the Software and Documentation CD-ROM:
- Insert the CD-ROM into the computer's CD-ROM drive. If the installer does not launch, do the following:
a. Click Start, and then click Run.
b. In the Run window, type:
- Click the Language button, select your language, and click OK.
- Select Install Printer Driver.
- Click I Agree to accept the license agreement, and show the Xerox Print Driver Installation window.
- Select the Phaser 6280 driver and click Install to show the Installation Options window.
- Select either PostScript and/or PCL 6 and click OK.
- Click Install to start the installation.
- When the installation is complete, select any of the following from the Installation Status window:
- Set Printer As Default
- Print A Test Page
- Share Printer
- Click Finish.
Note: PrintingScout is a separate option from the printer driver. To install PrintingScout, click Install PrintingScout in the Software and Documentation CD-ROM. Then follow the wizard to complete installation.
See also:
Online Support Assistant at www.xerox.com/office/6280support
Macintosh OS X, Version 10.3 and Higher
Set up your printer using Bonjour (Rendezvous), create a desktop USB connection, or use an LPD/LPR connection for Macintosh OS X, version 10.3 and higher.
Macintosh OS X, Version 10.3
Bonjour (Rendezvous) Connection
To install the printer driver from the Software and Documentation CD-ROM:
- Insert the CD-ROM into the CD-ROM drive.
- Double-click the Phaser 6280 icon on your desktop, and then:
a. Click Phaser 6280 Installer.
b. Type your password, and click OK.
c. Click Continue at the Introduction window.
d. Read the license agreement, click Continue, and click Agree.
e. Click Install. When the driver is finished installing, your browser opens to an online registration form.
f. Fill out the online registration and close the browser.
g. Click Quit on the Finish Up window.
-
When installation is complete, in the dock, click Finder > Printer Setup Utility.
-
Click the Add button.
- Confirm that the first drop-down menu is set to Bonjour (Rendezvous).
- Select the printer in the window.
- Select Xerox from the list of manufacturers in the Printer Model drop-down menu.
- Select the appropriate printer model from the list of available devices.
- Click the Add button.
See also:
Online Support Assistant at www.xerox.com/office/6280support
USB Connection
To install the printer driver from the Software and Documentation CD-ROM:
- Insert the CD-ROM into the CD-ROM drive.
- Double-click the Phaser 6280 icon on your desktop, and then:
a. Click Phaser 6280 Installer.
b. Type your password, and click OK.
c. Click Continue at the Introduction window.
d. Read the license agreement, click Continue, and click Agree.
e. Click Install. When the driver is finished installing, your browser opens to an online registration form.
f. Fill out the online registration and close the browser.
g. Click Quit on the Finish Up window.
-
When installation is complete, in the dock, click Finder > Printer Setup Utility.
-
Click the Add button.
- Select USB from the top drop-down menu.
- Select the printer in the top window.
- Select Xerox from the manufacturers in the Printer Model drop-down menu.
- Select the appropriate printer configuration from the list of available printers.
- Click the Add button.
LPR Connection
To install the printer driver from the Software and Documentation CD-ROM:
- Insert the CD-ROM into the CD-ROM drive and select the VISE installer to install the printer software.
- Once installation is complete, open the Printer Setup Utility for Mac OS X, version 10.3.x.
Note: To locate utilities on the Macintosh hard drive, open the Applications folder, and then open the Utilities folder.
- Click the Add button.
- Select IP Printing from the first pull-down menu.
- Select LPD/LPR from the second pull-down menu.
- Enter the printer's IP address in the Printer Address field.
- Verify that the Queue Name field is blank.
- Select Xerox from the Printer Model pull-down menu, and then select the corresponding PPD file.
- Click the Add button. The printer is added to the list.
Macintosh OS X, Version 10.4
Bonjour or USB Connection
To install the printer driver from the Software and Documentation CD-ROM:
- Insert the CD-ROM into the CD-ROM drive.
-
Double-click the Phaser 6280 icon on your desktop, and then:
a. Click Phaser 6280 Installer.
b. Type your password, and click OK.
c. Click Continue at the Introduction window.
d. Read the license agreement, click Continue, and click Agree.
e. Click Install. When the driver is finished installing, your browser opens to an online registration form.
f. Fill out the online registration and close the browser.
g. Click Quit on the Finish Up window. -
In the dock, click Finder > Printer Setup Utility.
-
Click the Add button.
-
Select the Default Browser in the Printer Browser window
-
Select the Xerox Phaser 6280 Bonjour printer in the list of available printers.
If Printer Browser does not show the appropriate printer, select Xerox from the lower drop-down menu.
-
Click the Add button.
-
Select the optional configurations: memory, paper tray, storage devise, or duplex unit, and click Continue.
LPD Connection
To install the printer driver from the Software and Documentation CD-ROM:
- Insert the CD-ROM into the CD-ROM drive and select the VISE installer to install the printer software.
- Once installation is complete, open the Printer Setup Utility.
Note: To locate utilities on the Macintosh hard drive, open the Applications folder, and then open the Utilities folder.
-
Click the Add button.
-
Select IP Printer from the upper left corner of the Printer Browser.
-
Select LPD from the pull-down menu.
-
Enter the printer's IP address in the Address field.
-
Make sure Queue Name is blank.
-
Click Printer Model > Xerox, and select the corresponding printer model PPD file.
-
Click the Add button. The printer is added to the list.
Macintosh OS X, Version 10.5
Bonjour or USB Connection
To install the printer driver from the Software and Documentation CD-ROM:
- Insert the CD-ROM into the CD-ROM drive.
-
Double-click the Phaser 6280 icon on your desktop, and then:
a. Click Phaser 6280 Installer.
b. Type your password, and click OK.
c. Click Continue at the Introduction window.
d. Read the license agreement, click Continue, and click Agree.
e. Click Install. When the driver is finished installing, your browser opens to an online registration form.
f. Fill out the online registration and close the browser.
g. Click Quit on the Finish Up window. -
Click the Apple menu > System Preferences > Print & Fax.
-
Click +, and click the IP address.
-
Click the menu and select Line Printer Daemon - LPD.
-
Type the printer's IP address in Address.
-
Click Print Using > Phaser 6280.
-
Click Add.
-
Select the optional features, and click Continue.
LPD Connection
To install the printer driver from the Software and Documentation CD-ROM:
- Insert the CD-ROM into the CD-ROM drive and select the VISE installer to install the printer software.
- Click the Apple menu > System Preferences > Print and Fax.
- Click +, and click Add Printer.
- Click IP icon at the top of the window.
- Type the printer's IP address in the Address field.
- Make sure Queue is blank.
- Click Print Using > Xerox, and select the corresponding printer model PPD file.
- Click the Add button. The printer is added to the list.
- Close the Print and Fax window.
Printing Basics
4
This chapter includes:
• Supported Paper and Media on page 46
- About Paper on page 48
- Setting Paper Types and Sizes on page 50
- Loading Paper on page 52
• Selecting Printing Options on page 59
• Printing on Both Sides of the Paper on page 65
• Printing on Specialty Media on page 67
• Printing Custom Size or Long Paper on page 82
• Printing Confidential Documents - Secure Print on page 85
• Print After Checking Printing Result - Proof Print on page 87
Supported Paper and Media
This section includes:
• Paper Usage Guidelines on page 46
• Paper That Can Damage Your Printer on page 47
• Paper Storage Guidelines on page 47
Your printer is designed to be used with a variety of paper types. Follow the guidelines in this section to ensure the best print quality and to avoid jams.
For best results, use Xerox printing media specified for your Phaser 6280 printer. They are guaranteed to produce excellent results with your printer.
To order paper, transparencies, or other specialty media, contact your local reseller or go to www.xerox.com/office/6280supplies.
Caution: Damage caused by using unsupported paper, transparencies, and other specialty media is not covered by the Xerox warranty, service agreement, or Total Satisfaction Guarantee. The Total Satisfaction Guarantee is available in the United States and Canada. Coverage may vary outside these areas; please contact your local representative for details.
See also:
Recommended Media List (United States)
Recommended Media List (Europe)
Paper Usage Guidelines
The printer trays accommodate most sizes and types of paper, transparencies, or other specialty media. Follow these guidelines when loading paper and media in the trays:
- Envelopes and transparencies can be printed from Tray 1 (MPT) only.
- Fan paper, transparencies, or other specialty media before loading in the paper tray.
- Do not print on label stock once a label has been removed from a sheet.
- Use only paper envelopes. Do not use envelopes with windows, metal clasps, or adhesives with release strips.
- All envelopes should be printed single-sided only.
- Some wrinkling and embossing may occur when printing envelopes.
- Do not overload the paper trays. Do not load paper above the fill line on the inside of the paper guide.
- Adjust the paper guides to fit the paper size. For Trays 2–3, the paper guides click into place when they are adjusted correctly.
- If excessive jams occur, use paper or other media from a new package.
See also:
Printing Transparencies on page 67
Printing Envelopes on page 69
Printing Labels on page 72
Printing Glossy Paper on page 77
Printing Custom Size or Long Paper on page 82
Paper That Can Damage Your Printer
Your printer is designed to use a variety of media types for print jobs. However, some media can cause poor output quality, increased paper jams, or damage to your printer.
Unacceptable media includes:
- Rough or porous media
- Plastic media other than supported transparencies
• Paper that has been folded or wrinkled - Paper with staples
- Envelopes with windows or metal clasps
- Padded envelopes
• Non-laser glossy or coated paper - Perforated media
Paper Storage Guidelines
Providing good storage conditions for your paper and other media contributes to optimum print quality.
- Store paper in dark, cool, relatively dry locations. Most paper items are susceptible to damage from ultraviolet (UV) and visible light. UV radiation, which is emitted by the sun and fluorescent bulbs, is particularly damaging to paper items. The intensity and length of exposure to visible light on paper items should be reduced as much as possible.
- Maintain constant temperatures and relative humidity.
- Avoid attics, kitchens, garages, and basements for storing paper. Inside walls are drier than outside walls where moisture can collect.
- Store paper flat. Paper should be stored on pallets, cartons, shelves, or in cabinets.
- Avoid having food or drinks in the area where paper is stored or handled.
- Do not open sealed packages of paper until you are ready to load them into the printer. Leave paper in the original packaging. For most commercial cut-size grades, the ream wrapper contains an inner lining that protects the paper from moisture loss or gain.
- Leave the media inside the bag until you are ready to use it; reinsert unused media in the bag and reseal it for protection. Some specialty media is packaged inside resealable plastic bags.
About Paper
Using unsuitable paper may lead to paper jams, poor print quality, breakdown and damage to your printer. In order to use the features of this printer effectively, use the suggested paper that is recommended here.
Usable Paper
The types of paper that can be used on this printer are as follows:
| Paper Tray Size Paper Type (Weight) Loading Capacity | |||
| Tray 1 (MPT) Letter (8.5 x 11 in.),Legal (8.5 x 14 in.),Executive (7.25 x 10.5 in.),Folio (8.5 x 13 in),#10 Commercial (4.1 x 9.5 in.)Monarch (3.8 x 7.5 in.)A4 (210 x 297 mm)A5 (148 x 210 mm)B5 (182 x 257 mm)DL (110 x 220 mm)C5 (162 x 229 mm)Custom:76.2–127 mm (3–5 in.)216–355.6 mm (8.5–14 in.) | Plain (65–120 g/m2)(17–32 lb. Bond)Thin Card Stock (100–163 g/m2)(37–60 lb. Cover)Thick Card Stock (160–220 g/m2)(60–80 lb. Cover)Glossy Paper (100–160 g/m2) (37–60 lb. Cover)Thick Glossy Paper (160 220 g/m2,60–80 lb. Cover)LabelsTransparencyPaper Envelope | 150 sheets(Standard paper)or 15 mm or below | |
| Tray 2Tray 3 | Letter (8.5 x 11 in.),Legal (8.5 x 14 in.),Executive (7.25 x 10.5 in.)Folio (8.5 x 13 in),A4 (210 x 297 mm)A5 (148 x 210 mm)B5 (182 x 257 mm)Custom:148– 215.9 mm (5.83–8.5 in.)210–355.6 mm (8.27–14 in.) | Plain (65–120 g/m2)(17–32 lb. Bond)Thin Card Stock (100–163 g/m2)(37–60 lb. Cover)Thick Card Stock (160–220 g/m2)(60–80 lb. Cover)Glossy Paper (100–160 g/m2)(37–60 lb. Cover)Thick Glossy Paper (160 200 g/m2,60–80 lb. Cover)Labels | Tray 2 holds250 sheets.Tray 3 holds550 sheets.(Standard paper)or 27.6 mm or below |
For details on how to load envelopes, see Printing Envelopes on page 69.
Printing on paper that has different settings from the paper size or paper type selected on the print driver, or loading paper into an unsuitable paper tray for printing, may lead to paper jams. To ensure that printing is correctly done, select the correct paper size, paper type, and paper tray.
The printed image may fade due to moisture, such as water, rain or vapor. For details, contact your reseller.
See also:
Recommended Media List (United States)
Recommended Media List (Europe)
2-Sided Printing Paper Types and Sizes
The available paper types and sizes for 2-sided printing are as follows:
Paper Size Paper Type
| A4 (210 x 297 mm) Plain, Thin Card Stock, Glossy | |
| B5 JIS (182 x 257 mm) | (65–163 g/m ^2 , 17–43 lb. Bond) |
| A5 A5 (148 x 210 mm) | Custom SizesWidth: 148–215.9 mm (5.83–8.5 in.) |
| Letter (8.5 x 11 in.) | Height: 210–355.6 mm (8.27–14 in.) |
| Folio (8.5 x 13 in.) | |
| Legal (8.5 x 14 in.) | |
| Executive (7.25 x 10.5 in.) | |
| Custom | |
Setting Paper Types and Sizes
Setting Paper Trays
When loading paper in Tray 3 or the 550-Sheet Feeder (optional), it is necessary to set the paper type on the control panel.
When loading paper in Tray 1 (MPT), set the paper size and type on the control panel when printing. When MPT Mode has been set to Panel Specified (default) on the control panel, you can set the paper size and type on the control panel.
This section describes how to set the paper size and type on the control panel.
Note: When you set MPT Mode to Panel Specified, printing will be performed only when the settings for the paper size and type configured on the print driver match the settings on the control panel. When the settings on the print driver and control panel do not match, follow the instructions displayed on the control panel.
You can also display the message to set the paper size and type on the control panel every time you load paper into each tray.
See also:
Description of Menu Items on page 93
Setting Paper Types
Caution: Paper type settings must match those of the actual paper loaded in the trays. Otherwise, print-quality problems can occur.
- Press the Menu button to display the Menu screen.
- Select Tray Settings, and then press the OK button.
- Select the tray, and then press the OK button.
- Select Paper Type, and then press the OK button.
- Select the correct paper type for the loaded paper, and then press the OK button.
- Press the Menu button.
Setting Paper Sizes
- Press the Menu button to display the Menu screen.
- Select Tray Settings, and then press the OK button.
- Select the tray, and then press the OK button.
- Select Paper Size for Custom Size only, and then press the OK button.
Note: Select Driver Size when you set a custom size paper from Tray 1 (MPT).
- Select the paper size, and then press the OK button.
- Press the Menu button.
Loading Paper
This section includes:
- Loading Paper in Tray 1 (MPT) on page 52
- Loading Paper in Trays 2-3 on page 55
Loading Paper in Tray 1 (MPT)
Use Tray 1 (MPT) for a wide range of media including:
- Plain paper
- Card stock
- L a b e l s
- Envelopes
- Transparencies
- Glossy paper
- Specialty media including business cards, postcards, trifold brochures, and weatherproof paper
- Pre-printed paper (paper already printed on one side)
- Custom size paper
See also:
About Paper on page 48
Using Tray 1 video tutorial at www.xerox.com/office/6280support
Loading Paper in Tray 1 (MPT)
In addition to plain paper, Tray 1 (MPT) can use various other sizes and types of print media, such as envelopes and transparencies.
Make sure of the following points when loading paper in Tray 1 (MPT).
You can load up to 150 sheets or a stack of paper (65 – 220 g/m ^2 , 17 – 40 lb. Bond, 40 – 80 lb. Cover) less than 15 mm high. Sizes can start from 3 x 5".
- Tray 1 (MPT) accepts print media within the following dimensions:
- Width: 76.2 - 216.0 mm (3 - 8.5 in.)
• Length: 127.0 – 355.6 mm (5 – 14 in.)
- You can load media that is 65 – 163 g/m ^2 (17 – 43 lb. Bond) for duplex printing.
Make sure of the following points to avoid any troubles during printing.
- Do not load different types of paper at the same time.
- Use high quality paper for laser printers to print at high quality. See About Paper on page 48.
- Do not remove or add paper to Tray 1 (MPT) when printing, or if there is any paper still in the tray. Doing so may cause a paper jam.
- Do not put any objects other than paper on Tray 1 (MPT). Also, do not push or force down Tray 1 (MPT).
• Always load paper short-edge feed.
To load paper in Tray 1 (MPT):
- Gently pull open the Tray 1 (MPT) cover.

natural_image
Line drawing of a printer with a red arrow indicating a drop or compression process (no text or symbols present)- Slide the width guides to the edge of the tray. The width guides should be fully extended.

text_image
m30000 m300006280-019
- Insert all media facedown and top edge first into Tray 1 (MPT).

natural_image
Line drawing of a printer with a red arrow pointing to the base panel (no text or symbols present)6280-011
Note: Do not force the paper.
- Slide the width guides until they rest lightly against the edge of the paper stack.

text_image
Diagram of a printer with red arrows indicating parts of the lid and base, showing internal structure and assembly.6280-020
Note: Be careful not to bend the paper.
If Tray 1 (MPT) is configured for Driver Size, configure the paper size and type in the print driver.
When MPT Mode is set to Panel Specified, you need to set the paper type and size settings for the tray on the control panel in advance.
See also:
Setting Paper Types and Sizes on page 50
Loading Paper in Trays 2-3
Use Trays 2-3 for a wide range of media including:
- Plain paper
- Th i n c a r d s t o c k
- Glossy paper
- Labels
See also:
Printing on Specialty Media on page 67
Loading Paper in Trays 2-3
This section describes how to load paper in the standard and optional paper trays. All trays are loaded the same way.
Caution: Do not remove the tray during printing. It may cause a paper jam.
- Pull the tray out of the printer until it stops. Hold the tray with both hands, lift the front slightly, and remove it from the printer.

natural_image
Line drawing of a printer with a red arrow indicating compression or disassembly (no text or symbols present)6280-012
- Slide the width guides to the edge of the tray. The width guides should be fully extended.

natural_image
Technical diagram of a mechanical assembly with red arrows indicating internal components (no text or symbols present)6280-013
Note: When loading paper that is 216 mm (8.5 in.) wide, such as Letter or Legal size paper, set the tab on the side of the tray to the [8.5] position.
- Squeeze the green tab on the length guide, and then slide the tray until the arrow lines up with the appropriate paper size. The guide clicks into place.

text_image
Diagram showing a component with red arrows indicating flow or movement, and a magnified inset highlighting a highlighted green component.- Before loading the print media, flex the sheets back and forth, and then fan them. Straighten the edges of the stack on a level surface.

- Place the print media into the tray with the print side face-up.
Note: Do not exceed the maximum fill line in the tray. Overfilling the tray may cause paper jams.
- Slide the width guides and length guide until they rest lightly against the edge of the print media stack.

natural_image
Technical line drawing of a mechanical device with red arrows indicating directional flow (no text or symbols)- Insert the tray into the printer, and push until it stops.

natural_image
Line drawing of a printer with red arrows indicating internal components (no text or symbols)6280-017
Caution: Do not use excessive force on the tray. Doing so could damage the tray or the inside of the printer.
Selecting Printing Options
This section includes:
• Selecting Printing Preferences (Windows) on page 59
- Selecting Options for an Individual Job (Windows) on page 60
- Selecting Options for an Individual Job (Macintosh) on page 62
Selecting Printing Preferences (Windows)
Printer preferences control all of your print jobs, unless you override them specifically for a job. For example, if you want to use automatic 2-sided printing for most jobs, set this option in printer settings.
To select printer preferences:
-
Select one of the following options:
-
Windows 2000 and Windows Server 2003: Click Start, select Settings, and then click Printers.
- Windows XP: Click Start, Settings, and then select Printers and Faxes.
-
Windows Vista: Click Start, and then click Printers.
-
In the Printers folder, right-click the icon for your printer.
-
From the pop-up menu, select Printing Preferences or Properties.
-
To set standard printing options:
a. Select the Advanced tab, and then click the Printing Defaults button.
b. Make selections on the driver tabs, and then click the OK button to save your selections. You return to the Properties window.
- To activate optional features for a postscript driver:
a. Click the Device Settings tab in the Properties window.
b. Activate the options by selecting from the menus next to either Memory, Paper Tray Configuration, Storage Device, and/or Duplex Unit.
c. Click OK.
- To activate optional features for a PCL driver:
a. Click the Options tab in the Properties window.
b. In the Items field, select either Memory Capacity, Hard Disk, Duplex Unit, 550 Sheet Feeder, or RAM Disk.
c. Click the Settings for menu, and select Available or, for Memory Capacity, select the new setting.
d. Click OK.
Note: For more information about Windows printer driver options, click the Help button on the printer driver tab to view the online help.
Selecting Options for an Individual Job (Windows)
If you want to use special printing options for a particular job, change the driver settings before sending the job to the printer. For example, if you want to use Photo print-quality mode for a particular graphic, select this setting in the driver before printing that job.
- With the desired document or graphic open in your application, access the Print dialog box.
- Select the Phaser 6280 printer, select the Properties button to open the printer driver.
- Make selections from the driver tabs. See the following table for specific printing options.
Note: In Windows 2000, Windows XP, and Windows Server 2003, you can save current printing options with a distinctive name and apply them to other print jobs. Select either the Advanced, Paper/Output, Image Options, or Layout tab, and then select a Saved Setting. Click the Help button for more information.
-
Click the OK button to save your selections.
-
Print the job.
See the following table for specific PCL printing options:
PCL Printing Options for Windows Operating Systems
| Operating System Driver Tab Printing Options | |
| Windows Vista, Windows 2000, Windows XP, or Windows Server 2003 | Paper/Output tab • Job TypeDocument size, paper type, and tray selection2-sided printingFeed orientationSaved SettingsCovers/SeparatorsTransparency SeparatorsPrinter Status |
| Image Options tab • Output Color Print QualityImage adjustment, image type, image correctionImage SettingsColor BalanceProfile Settings | |
| Layout tab • Pages per sheet (N-up)Image OrientationBooklet/Poster/Mixed Document/Rotation layoutO u t p u t S i z eMargin Shift | |
| Watermarks/Overlaystab• W a t e r m a r k sO v e r l a y s | |
| Advanced tab • Skip Blank PagesDraft ModeBanner SheetS i z e M i s m a t c hGraphics SettingsFont Settings | |
Note: If your driver does not display the options listed in the table above, see Enabling Options on page 134 for more information.
See the following table for specific PostScript printing options:
PostScript Printing Options for Windows Operating Systems
| Operating System Driver Tab Printing Options | |
| Windows Vista, Windows 2000, Windows XP, or Windows Server 2003 | Paper/Output tab • Job Type• Document size, paper type, and tray selection• 2-sided printing• Orientation• Output Color• Printer Status• Saved Settings |
| Image Options tab • Image Settings• Color corrections• Brightness• Color Balance | |
| Layout tab • Pages per sheet (N-up)• Fit to new paper size• Booklet layout | |
| Advanced tab • Transparency Separators• Image options: reduce/enlarge, image smoothing• Details: blank pages, tray mapping | |
Note: If your driver does not display the options listed in the table above, see Enabling Options on page 134 for more information.
Selecting Options for an Individual Job (Macintosh)
To select print settings for a particular job, change the driver settings before sending the job to the printer.
- With the document open in your application, click File, and then click Print.
- Select the desired printing options from the menus and drop-down lists that are displayed.
Note: In Macintosh OS X, click Save Preset on the Print menu screen to save the current printer settings. You can create multiple presets and save each with its own distinctive name and printer settings. To print jobs using specific printer settings, click the applicable saved preset in the Presets list.
- Click Print to print the job.
See the following table for specific printing options:
Macintosh PostScript Driver Settings
| Operating System Driver Drop-Down Title Printing Options | |
| Mac OS X, Version 10.4 and 10.5 | Copies & Pages • C o p i e s• Pages |
| Layout • Pages per sheet• Layout direction• Border• 2-sided printing | |
| Scheduler • Print document (now, at a specified time, on hold)• Priority (urgent, high, medium, low) | |
| Paper Handling • Page order• Print (all, odd, even)• Destination paper size | |
| ColorSync • Color conversion• Quartz filter | |
| Cover Page • Print cover page (none, before document, after document)• Cover page type• Billing information | |
| Error Handling • PostScript errors• Tray Switching | |
| Paper Feed • Paper source | |
| Job Type • Secure prints• P r o o f p r i n t s | |
| Job Control• User account• Administrator account | |
| Printer Features• Print quality/color• Color adjustment• Color balance (C, M, Y, K)• Media handling• Printer specific options | |
| Summary• Summarizes the driver selections | |
| Color Matching (10.5 only)• Color sync or in printer• Profile selection | |
| Supply Levels• Cyan toner cartridge• Magenta toner cartridge• Yellow toner cartridge• Black toner cartridge | |
Macintosh PostScript Driver Settings (Continued)
| Operating System | Driver Drop-Down Title | Printing Options |
| Mac OS X, Version 10.3 | Copies & Pages • C o p i e s• Pages | |
| Layout • Pages per sheet• Layout direction• Border• Two-sided printing | ||
| Output Options • P D F• P o s t s c r i p t | ||
| Scheduler • Print document (now, at a specified time, on hold)• Priority (urgent, high, medium, low) | ||
| Paper Handling • Reverse page order• Print (all, odd, even) | ||
| ColorSync • Color matching• Quartz filter | ||
| Cover Page • Print cover page (none, before document, after document)• Cover page type• Billing information | ||
| Error Handling • PostScript errors• Tray Switching | ||
| Paper Feed • Paper source | ||
| Job Type • Secure prints, personal prints, proof prints, and saved prints | ||
| Job Control • User account• Administrator account | ||
| Image Quality | • Print quality• RGB color corrections neutral grays• Image smoothing | |
| Printer Features | • Print quality/color• Color adjustment• Color balance (C, M, Y, K)• Media handling• Printer specific options | |
| Summary | • Summarizes the driver selections | |
Printing on Both Sides of the Paper
This section includes:
• Automatic 2-Sided Printing Guidelines on page 65
• Binding Edge Options on page 66
- Selecting 2-Sided Printing on page 66
Note: For information about manual two-sided printing, go to the Online Support Assistant at www.xerox.com/office/6280support.
Automatic 2-Sided Printing Guidelines
Automatic 2-sided printing is available from the Phaser 6280DN configuration. Before printing a 2-sided document, verify that the paper is a supported size for the tray. For a list of supported paper sizes, see Supported Paper and Media on page 46. The following paper and media cannot be used for 2-sided printing:
- Transparencies
- Envelopes
- L a b e l s
- Any die-cut specialty media, such as business cards
- Th i ck c a r d s t o c k
See also:
2-Sided Printing Paper Types and Sizes on page 49
Supported Paper and Media on page 46
When you use the printer driver to select 2-sided printing, also select the binding edge, which determines how the pages turn. The actual outcome depends on the orientation (portrait or landscape) of images on the page, as displayed in the following illustrations.
Selecting 2-Sided Printing
To select automatic 2-sided printing:
- Insert paper in the tray. For more information, see Loading Paper on page 52.
- In the printer driver, select 2-sided printing as shown in the following table, and then press the OK button.
To select automatic 2-sided printing:
| Operating System Steps | |
| Windows Vista, Windows 2000, Windows XP, or Windows Server 2003 | 1. Select the Paper/Output tab.2. Click 2-Sided Print, and select either Flip on Long Edge or Flip on Short Edge. |
| Mac OS X, version 10.3 and higher | 1. In the Print dialog box, select Layout from the menu under the Presets menu.2. Select Long-edged printing or Short-edged printing. |
Note: If your driver does not display the options listed in the table above, see Enabling Options on page 134 for more information.
See also:
Loading Paper in Tray 1 (MPT) on page 52
Loading Paper in Trays 2-3 on page 55
Printing on Specialty Media
This section includes:
• Printing Transparencies on page 67
• Printing Envelopes on page 69
- Printing Labels on page 72
• Printing Glossy Paper on page 77
• Printing Custom Size or Long Paper on page 82
Printing Transparencies
Transparencies can be printed from all trays. They should be printed on one side only. For best results, use only recommended Xerox transparencies.
To order paper, transparencies, or other specialty media, contact your local reseller or go to www.xerox.com/office/6280supplies.
Caution: Damage caused by using unsupported paper, transparencies, and other specialty media is not covered by the Xerox warranty, service agreement, or Total Satisfaction Guarantee. The Total Satisfaction Guarantee is available in the United States and Canada. Coverage may vary outside these areas; please contact your local representative for details.
See also:
Recommended Media List (United States)
Recommended Media List (Europe)
Guidelines
- Remove all paper before loading transparencies in the tray.
- Do not load more than 25 sheets in Tray 1 (MPT). Overloading the tray may cause the printer to jam.
- Handle transparencies by the edges using both hands to avoid fingerprints and creases, which may cause poor print quality.
- Fan transparencies before loading in the paper tray.
This section explains how to print on transparencies.
Loading Transparencies
Note: Transparencies with a white frame and full-color transparencies cannot be used.
- After carefully fanning a small stack of transparencies, load them into Tray 1 (MPT) with the side to be printed facing down. Load no more than 25 transparencies at a time.

natural_image
Line drawing of a printer with a red arrow pointing to the internal structure (no text or symbols)6280-011
- Slide the paper guides to the size of the transparencies.
- Pull out the output tray extension when loading paper, such as transparencies.
Printing on Transparencies
When MPT Mode is set to Panel Specified, you need to set the paper type and size settings for the tray on the control panel in advance. See Setting Paper Types and Sizes on page 50.
Printing transparencies continuously may lead to the output transparencies sticking to each other. Remove the transparencies from the output tray after about 20 sheets, and then fan them to lower their temperatures.
Using the PostScript Driver
To print on transparencies using the PostScript print driver, display the Paper/Output tab.
- From the File menu, select Print.
- Select this printer as the printer to be used and click Preferences or Properties.
- Select the Paper/Output tab.
- From Paper Type, select Transparency.
-
From Paper Tray, select Tray 1 (MPT).
-
From Paper Size, select the size of the original document.
-
Click OK.
-
Click Print in the Print dialog box to start printing.
Using the PCL Driver
To print on transparencies using the PCL print driver, display the Paper/Output tab.
- From the File menu, select Print.
- Select this printer as the printer to be used and click Preferences or Properties.
- Select the Paper/Output tab.
- From Paper Tray, select Tray 1 (MPT).
- Select Transparency from Paper Type.
- From Paper Size, select the size of the original document.
- Click OK.
- Click Print in the Print dialog box to start printing.
Printing Envelopes
Envelopes can be printed only from Tray 1 (MPT).
Guidelines
- Successful envelope printing is highly dependent on the quality and construction of the envelopes. Use envelopes made specifically for laser printers.
- It is recommended that you maintain constant temperatures and relative humidity.
- Store unused envelopes in their packaging to avoid the effects of moisture and dryness which can affect print quality and cause wrinkling. Excessive moisture can cause the envelopes to seal before or during printing.
- Avoid padded envelopes; purchase envelopes that lie flat on a surface.
- Remove air bubbles from the envelopes before loading by setting a heavy book on top of the envelopes.
- If wrinkling or embossing problems occur, use a different brand of envelopes made specifically for laser printers.
Caution: Never use envelopes with windows or metal clasps; they can damage the printer. Damage caused by using unsupported envelopes is not covered under the Xerox warranty, service agreement, or Total Satisfaction Guarantee. The Total Satisfaction Guarantee is available in the United States and Canada. Coverage may vary outside these areas, please contact your local representative for details.
Loading Envelopes
To load envelopes, insert the envelopes with the flaps closed and at the right side. The print side must be facing down. You can load envelopes up to the maximum fill line in the tray at one time.
The following explains how to load envelopes in Tray 1 (MPT).
Note: The reverse side of the envelope cannot be printed on. Envelopes can get wrinkled or the print quality is reduced depending on the type used.
See also:
About Paper on page 48
To load envelopes in Tray 1 (MPT):
- Insert the envelopes with the side to be printed facedown.

natural_image
Line drawing of a printer with a red arrow indicating a component or insertion (no text or symbols present)- Slide the paper guides to the size of the envelope.
Printing on Envelopes
When MPT Mode is set to Panel Specified, you need to set the paper type and size settings for the tray on the control panel in advance. See Setting Paper Types and Sizes on page 50.
Using the PostScript Driver
To print on envelopes using the PostScript print driver, display the Paper/Output tab.
- From the File menu, select Print.
- Select this printer as the printer to be used and click Preferences or Properties.
- Select the Paper/Output tab.
- From Paper Type, select Envelope.
- From Paper Tray, select Tray 1 (MPT).
- From Paper Size, select the size of the original document.
- Click OK.
- Click Print in the Print dialog box to start printing.
Using the PCL Driver
To print on envelopes using the PCL print driver, display the Paper/Output tab.
- From the File menu, select Print.
- Select this printer as the printer to be used and click Preferences or Properties.
- Select the Paper/Output tab.
- From Paper Tray, select Tray 1 (MPT).
- From Paper Type, select Envelope.
- From Paper Size, select the size of the original document.
- Select the Layout tab.
- From Fit to New Paper Size, select the size of the envelope, and then click OK.
- If necessary, click Booklet/Poster/Mixed Document/Rotation, and select Image Rotation 180deg.
- Click OK.
- Click Print in the Print dialog box to start printing.
Printing Labels
Labels can be printed from all trays.
To order paper, transparencies, or other specialty media, contact your local reseller or go to www.xerox.com/office/6280supplies.
See also:
About Paper on page 48
Guidelines
- Do not use vinyl labels.
- Print only on one side of the sheet of labels.
- Do not use any sheet where labels are missing; it may damage the printer.
- Store unused labels flat in their original packaging. Leave the sheets of labels inside the original packaging until ready to use. Return any unused sheets of labels to the original packaging and reseal it.
- Do not store labels in extremely dry or humid conditions or extremely hot or cold conditions. Storing them in extreme conditions may cause print-quality problems or cause them to jam in the printer.
- Rotate stock frequently. Long periods of storage in extreme conditions can cause labels to curl and jam the printer.
Printing Labels from Tray 1 (MPT)
- Gently pull open the Tray 1 (MPT) cover and open the paper guides.

text_image
Diagram showing a printer with red arrows indicating down or up motion, and an inset magnified view of the printer's internal structure.6280-045
- Fan the labels to release sheets that are stuck together.

natural_image
Illustration of two hands holding a folded paper with red arrows indicating bidirectional movement (no text or symbols)
natural_image
Illustration of hands performing a roll-up or folding operation with red arrows indicating direction (no text or symbols present)6280-015
-
Insert the labels into Tray 1 (MPT), and adjust the paper guides to fit the sheets.
-
Place the side to be printed facedown with the top of the sheets entering first.
- Do not load more than 25 sheets.

text_image
MAX6280-046
- In the printer driver, select either Labels as the paper type or Tray 1 (MPT) as the paper tray, and click OK.
- If the printer is set to Panel Specified, the control panel asks for media type and size.
Printing Labels from Trays 2-3
- Pull the tray out of the printer.

natural_image
Line drawing of a printer with a red arrow indicating compression or disassembly (no text or symbols present)6280-012
-
If necessary, open the paper guides:
-
Squeeze the green tab on the length guide, and then slide the tray until the arrow lines up with the appropriate paper size. The guide clicks into place.
- Slide the green side guides outward.

text_image
Technical diagram showing mechanical assembly with red arrows indicating directional flow, including a component highlighted in inset.- Fan the label sheets to release sheets that are stuck together.

text_image
Illustration showing two-step folding or folding process with red arrows indicating movement direction and directional arrows on a folded paper.6280-015
- Insert the label sheets into the tray. Place the side to be printed face up with the top of the page toward the front of the printer.
Note: Do not load the paper above the fill line indicated on the tray. Overloading the tray may cause jams. The following illustration indicates the maximum fill line for transparencies, labels, and glossy paper.

text_image
MAX MAX6280-048
- If necessary, press the paper guides inward to fit the sheets.
Note: When the paper guides are adjusted correctly, there may be a small space between the labels and the guides.

natural_image
Technical line drawing of a mechanical device casing with red arrows indicating directional flow (no text or symbols)6280-016
- Insert the tray into the tray slot, and push the tray completely into the printer.

natural_image
Line drawing of a printer with a paper feeding into a slot, showing red arrows indicating flow or movement (no text or symbols present)6280-017
- On the control panel, select the paper type:
a. Select Menu.
b. Select Tray Settings, and then press the OK button.
c. Select Tray 2 or Tray 3 and then press the OK button.
d. Select Paper Type, and then press the OK button.
e. Select Labels, and then press the OK button.
- In the printer driver, select either Labels as the paper type or the appropriate tray as the paper tray.
Printing Glossy Paper
Glossy paper can be printed from any tray. It can be printed on both sides.
To order paper, transparencies, or other specialty media, contact your local reseller or go to www.xerox.com/office/6280supplies.
Guidelines
- Do not open sealed packages of glossy paper until you are ready to load them into the printer.
- Leave glossy paper in the original wrapper, and leave the packages in the shipping carton until ready to use.
- Remove all other paper from the tray before loading glossy paper.
- Load only the amount of glossy paper you are planning to use. Do not leave glossy paper in the tray when you are finished printing. Reinsert unused glossy paper in the original wrapper and seal.
- Rotate stock frequently. Long periods of storage in extreme conditions can cause glossy paper to curl and jam the printer.
Printing Glossy Paper from Tray 1 (MPT)
- Gently pull open the Tray 1 (MPT) cover and open the paper guides.

text_image
Diagram showing a printer with red arrows indicating process flow, including a magnified inset highlighting internal components.6280-045
- Fan the glossy paper to release sheets that are stuck together.

natural_image
Illustration of two hands holding a folded document with red arrows indicating bidirectional movement (no text or symbols)
natural_image
Illustration of hands holding a folded paper or document with red arrows indicating movement or force direction (no text or symbols present)6280-015
-
Insert the glossy paper into Tray 1 (MPT), and adjust the paper guides to fit the paper.
-
Place the side to be printed facedown.
- Do not load more than 25 sheets.

text_image
MAX6280-046
- In the printer driver, select either Glossy Paper as the paper type or Tray 1 (MPT) as the paper tray, and click OK.
- If the printer is set to Panel Specified, the control panel asks for media type and size.
Printing Glossy Paper from Trays 2-3
- Pull the tray out of the printer.

natural_image
Line drawing of a printer with a red arrow indicating a process or insertion, no text or symbols present.6280-012
-
If necessary, open the paper guides:
-
Squeeze the green tab on the length guide, and then slide the tray until the arrow lines up with the appropriate paper size. The guide clicks into place.
- Slide the green side guides outward.

text_image
Technical diagram showing mechanical assembly with red arrows indicating directional flow, including a component highlighted in inset.- Fan the paper to release sheets that are stuck together.

natural_image
Illustration of two hands holding a folded document with red arrows indicating bidirectional movement (no text or symbols)
natural_image
Illustration of hands performing a roll-up exercise with red arrows indicating motion (no text or symbols)6280-015
- Insert the paper into the tray.
Note: Do not load the paper above the fill line indicated on the tray. Overloading the tray may cause jams. The following illustration indicates the maximum fill line for transparencies, labels, and glossy paper.

text_image
MAX MAX6280-048
- If necessary, press the paper guides inward to fit the paper.
Note: When the paper guides are adjusted correctly, there may be a small space between the paper and the guides.

natural_image
Technical line drawing of a mechanical device casing with red arrows indicating directional flow (no text or symbols)6280-016
- Insert the tray into the tray slot, and push the tray completely into the printer.

natural_image
Line drawing of a printer with a paper feeding into a slot, showing red arrows indicating flow or movement (no text or symbols present)6280-017
- On the control panel, select the glossy paper type:
a. Select Menu.
b. Select Tray Settings, and then press the OK button.
c. Select Tray 2 or Tray 3 and then press the OK button.
d. Select Paper Type, and then press the OK button.
e. Select Glossy Paper, and then press the OK button.
- In the printer driver, select either Glossy Paper as the paper type or the appropriate tray as the paper tray.
Printing Custom Size or Long Paper
This section explains how to print on custom size paper, such as long paper using the PCL print driver.
Custom size paper can be loaded in each tray. The way to load custom size paper in the paper tray is the same as the one to load standard size paper. The way to load custom size paper in Tray 1 (MPT) is the same as the one to load standard size paper.
When MPT Mode is set to Panel Specified, you need to set the paper type and size settings for the tray on the control panel in advance.
See also:
Loading Paper in Trays 2-3 on page 55
Loading Paper in Tray 1 (MPT) on page 52
Setting Paper Types and Sizes on page 50
Defining Custom Paper Sizes
Before printing, set the custom size on the print driver.
Note: When setting the paper size on the print driver and control panel, be sure to specify the same size as the actual paper used. Setting the wrong size for printing will cause printer failure. This is especially true if you configure a bigger size when using a narrow width paper.
Using the PCL Driver
On the PCL print driver, set the custom size in the Custom Paper Size dialog box. This section explains the procedure using Windows XP as an example.
For Windows 2000 or later, an administrator's password only allows users with administrator rights to change the settings. Users without the rights of administrator can only check the contents.
When configuring the Custom Paper Size dialog box in Windows 2000 or later, settings of other printers on the computer will also be affected as the form data base of the computer is used by a local printer. For a shared printer on the network, settings of other shared printers on the same network in another computer will also be affected as the form data base on the server with existing print queue is used.
-
To start, do the following:
-
Windows 2000-XP: Click Start > Settings > Printers and Faxes.
• Windows Vista: Click Start > Printers.
Right-click the printer and select Properties.
- Select the Configuration tab.
- Click Custom Paper Size.
-
Use the Details list box to select the custom setup you want to define.
-
Specify the length of the short edge and long edge under Settings For. You can specify the values either by entering them directly or using the Up Arrow and Down Arrow buttons. The length of the short edge cannot be longer than the long edge, even if it is within the specified range. The length of the long edge cannot be shorter than the short edge, even if it is within the specified range.
- To assign a paper name, select the Name Paper Size check box, and then enter the name in Paper Name. Up to 14 characters can be used for the paper name.
- If necessary, repeat steps 4 to 6 to define another custom size.
- Click OK twice.
Using the PostScript Driver
On the PostScript print driver, set the custom size in the Custom Paper Size dialog box. This section explains the procedure using Windows XP as an example.
-
To start, do the following:
-
Windows 2000-XP: Click Start > Settings > Printers and Faxes.
• Windows Vista: Click Start > Printers.
Right-click the printer and select Properties.
- Select the General tab.
- Click the Printing Preferences button.
- From Paper Size, select Custom Paper Size.
- Specify the length of the short edge and long edge under Custom Size Settings. You can specify the values either by entering them directly. The length of the short edge cannot be longer than the long edge, even if it is within the specified range. The length of the long edge cannot be shorter than the short edge, even if it is within the specified range.
- Click OK three times.
Printing on Custom Size Paper
Use the following procedures to print using either the PCL or PostScript drivers.
Using the PCL Driver
The procedure to print on custom size paper using the PCL print driver is as follows.
- From the File menu, select Print.
- Select this printer as the printer to be used and click Preferences or Properties.
- Select the Paper/Output tab.
- Select the appropriate paper tray from Paper Tray.
- Select the appropriate paper type from Paper Type.
- From Paper Size, select the size of the original document.
- Click the Layout tab.
- The Fit to New Paper Size menu defaults to Same As Paper Size.
- Click OK.
- Click Print in the Print dialog box to start printing.
Using the PostScript Driver
The procedure to print on custom size paper using the PostScript print driver is as follows.
- From the File menu, select Print.
- Select this printer as the printer to be used and click Preferences or Properties.
- Select the Paper/Output tab.
- From Paper Size, select Custom Page Size.
- Specify the length of the short edge and long edge under Custom Size Settings. You can specify the values either by entering them directly. The length of the short edge cannot be longer than the long edge, even if it is within the specified range. The length of the long edge cannot be shorter than the short edge, even if it is within the specified range.
- Click OK twice.
- Select the appropriate paper tray from Paper Tray.
- Select the appropriate paper type from Paper Type and click OK.
- Click Print in the Print dialog box to start printing.
Printing Confidential Documents - Secure Print
When the hard drive or additional memory is added, you can use the secure print feature.
Note: The data stored in the RAM disk is erased when the printer is switched off.
About Secure Print
Secure Print is a feature that allows you to assign a password to a print job from the computer, send it to the printer for temporarily storing, and start printing the data from the control panel. You can also store the print data in the printer without attaching a password. By storing frequently-used data in the printer, you can print the data with just an operation from the printer, and without sending the data from the computer repeatedly.
Note: You can select whether to delete secure print data after printing.
See also:
Printing from the Control Panel on page 88
System Setup on page 98
Configuring Secure Print
The procedure to configure Secure Print using the PCL or PostScript print driver is as follows.
Follow the steps for the secure print settings at the computer and send data to the printer for printing. Then, follow the steps for the output procedure at the printer to output the printed pages.
Printing from the Computer
Note: Ensure the RAM disk is set to available. You can find this under the Options tab using the PCL print driver or the Device Settings tab using the PostScript print driver. The RAM disk also needs to be enabled via the control panel. For instructions about enabling options, see Enabling Options on page 134.
- From the File menu, select Print.
- Select the printer, and click Preferences or Properties.
- Click the Paper/Output tab.
- In the Job Type field, select Secure Print.
- Click the Setup button.
- In the Username field, enter your user name.
- In the Password field, enter a numeric password.
- If you want to use a specified document name to access the document from the control panel:
a. In the Retrieve Document Name field, select Enter Document Name.
b. In the Document Name field, enter the name that will appear on the control panel.
- If you want the printer to automatically name the document using a time stamp, in the Retrieve Document Name field, select Use Existing Name.
- Click OK twice to accept the Secure Print settings, and then click Print to send the job. Now follow the instructions in Printing from the Control Panel, below, to continue printing the job.
Printing from the Control Panel
This section explains the procedure to print data stored in the printer by Secure Print.
Note: You can also delete, without printing, secure print data stored in the printer. See System Setup on page 98.
- On the control panel, press the Back Arrow button to display the Walk-Up Features menu.
- Select Secure Print, and then press the OK button.
- Select your user name, and then press the OK button.
- Press the Up Arrow or Down Arrow button to scroll to the correct number for the first digit of the numeric password, and then press the Forward Arrow button to accept that digit.
Note: The digit becomes an asterisk after you press the Forward Arrow button.
- Repeat Step 4 for each digit of the password, and then press the OK button.
- If you submitted more than one secure print job, select the name of the job that you want to print, and then press the OK button.
- Select Del after Print or Print and Save, and then press the OK button.
- Scroll to the desired number of copies, and then press the OK button to print the job.
The displayed user ID (up to 8 characters) is the User ID specified in the Secure Print dialog box of the Paper/Output tab of the print driver.
For the password, enter the Password set in the Secure Print dialog box of the Paper/Output tab of the print driver. If Password is not configured, there will be no setting on the control panel.
The document name displayed (up to 12 characters) is the Document Name specified in the Secure Print dialog box of the Basic tab of the print driver.
Note: To use Secure Print and Proof Print, you must have a minimum of 256 MB memory installed and the RAM Disk must be enabled. For instructions about enabling options, see Enabling Options on page 134.
Print After Checking Printing Result - Proof Print
When the hard drive or additional memory is added, you can use the proof print feature.
Note: The data stored in the RAM disk is erased when the printer is switched off.
About Proof Print
Proof Print is a feature that allows you to store the print data of multiple copies in the memory, print out only the first set to check the print result and if satisfactory, print the remaining copies from the control panel.
Proof print data that has become redundant can be deleted using the control panel. See Printing from the Control Panel on page 88.
To delete all proof print data that has become redundant, see System Setup on page 98.
Configuring Proof Print
The procedure to configure Proof Print using the PCL or PostScript print driver is as follows.
First of all, carry out the proof print settings at the computer and send data to the printer for printing. Then, carry out the output procedure at the printer to output the printed pages.
Printing from the Computer
Note: Ensure the RAM disk is set to available. You can find this under the Options tab using the PCL print driver or the Device Settings tab using the PostScript print driver. The RAM disk also needs to be enabled via the control panel. For instructions about enabling options, see Enabling Options on page 134.
- From the File menu, select Print.
- Select the printer, and click Preferences or Properties.
- Click the Paper/Output tab.
- In the Job Type field, select Proof Print.
- Click the Setup button.
- In the Username field, enter your user name.
- If you want to use a specified document name to access the document from the control panel:
a. In the Retrieve Document Name field, select Enter Document Name.
b. In the Document Name field, enter the name that will appear on the control panel.
-
If you want the printer to automatically name the document using a time stamp, in the Retrieve Document Name field, select Use Existing Name.
-
Click OK twice to accept the Secure Print settings, and then click Print to send the job. Now follow the instructions in Printing from the Control Panel, below, to continue printing the job.
Printing from the Control Panel
This section explains the procedure to print and delete data stored in the printer by Proof Print.
- On the control panel, press the menu. Back Arrow button to display the Walk-Up Features
- Select Proof Print, and then press the OK button.
- Select your user name, and then press the OK button.
- If you submitted more than one proof print job, select the name of the job that you want to print, and then press the OK button.
- Select Del after Print or Print and Save, and then press the OK button to print the job.
- Scroll to the desired number of copies, and then press the OK button to print the job.
Note: The user ID displayed (up to 8 characters) is the User ID set in the Proof Print dialog box of the Paper/Output tab of the print driver.
The document name displayed (up to 12 characters) is the Document Name set in the Proof Print dialog box of the Paper/Output tab of the print driver.
Note: To use Secure Print and Proof Print, you must have a minimum of 256 MB memory installed and the RAM Disk must be enabled. For instructions about enabling options, see Enabling Options on page 134.
Using the Control Panel Menus 5
This chapter includes:
• Control Panel Menus on page 91
• Description of Menu Items on page 93
- Menu List on page 105
Control Panel Menus
This section includes:
- Menu Configuration on page 91
- Changing Menu Settings on page 92
Menu Configuration
The menus that can be accessed from the control panel are as follows:
| Menu Content |
| Information Pages Use the Information Pages menu to print various types of reports and lists. |
| Admin Menu • Network SetupUse this menu to configure the network settings for the printer.• USB SetupUse this menu to configure the USB interface.• System SetupUse this menu to make the printer operation settings, such as for alarm and Power Saver mode.• Maintenance ModeUse this menu to initialize the NVM, or to adjust the configurations for each type of paper.• PCL SetupUse this menu to configure the PCL settings.• PostScript SetupUse this menu to configure the PostScript settings.• Control PanelUse this menu to specify whether to limit the menu operations with a panel lock. |
| Tray Settings Use the Tray Settings menu to define the print media loaded in each tray. |
| Billing Meters Use the Billing Meters menu to display the printed paper counts on the control panel. |
Each menu is configured in different levels. Set the printer settings by selecting the objective menus or items structure level.
See also:
Description of Menu Items on page 93
Changing Menu Settings
Changing the Power Saver Time
In this example, you set the transitional time to the Power Saver Mode.
- To display the menu screen, press the Menu button at the print screen.
- Press the Up Arrow or Down Arrow button until Admin Menu is displayed, and then press the Forward Arrow or OK button.
- Press the Up Arrow or Down Arrow button until System Setup is displayed, and then press the Forward Arrow or OK button.
- Press the Up Arrow or Down Arrow button until PowerSaver Time is displayed, and then press the Forward Arrow or OK button.
- Press the Up Arrow or Down Arrow button to change the number of minutes that the printer will wait before entering Power Saver mode.
- Press the OK button to confirm your settings. The settings that have been confirmed are displayed with the affix “*”.
- Press the Menu button to quit the menu operation and return to the print screen.
- Ready to print.
Note: If you want to change values after you have confirmed them by pressing the OK button, you need to set them from the start again.
Initializing Configured Values
Display the item you want to initialize, and then press both the Up Arrow and Down Arrow buttons at the same time.
Once the change process is completed, the factory defaults will be displayed. Press the OK button to confirm the value.
Description of Menu Items
This section includes:
- Tray Settings on page 93
• Information Pages on page 95
• Billing Meters on page 96 - Admin Menu on page 96
Tray Settings
There are three submenus under the Tray Settings menu: Tray 1 (MPT), Tray 2, and Tray 3. You can set paper size and paper type for each tray under these menus. (Display Pop-up and MPT Mode can only be set for Tray 1 (MPT).)
Tray 3 is displayed only when the optional sheet feeder is installed.
The settings menu for Tray 1 (MPT) is displayed only when the MPT Mode is set to Panel Specified.
Common Settings for Tray 1 (MPT), Tray 2, and Tray 3
Item Description
Paper Type Specifies the type of paper loaded in each tray.
- Tray 1 (MPT) (default: Thin Card Stock)
- Tray 2 (default: Plain)
- Tray 3 (default: Plain)
For details, refer to Setting Paper Types and Sizes on page 50.
Paper Size Specify the paper size and orientation for each tray.
- Tray 1 (MPT) (default: Driver Size)
- Tray 2 (default: Auto)
- Tray 3 (default: Auto)
For details, refer to Setting Paper Types on page 50.
Settings Exclusive to Tray 1 (MPT)
| Item Description | |
| Display Popup Specifies whether or not to display the message that prompts you to set the paper size and type every time you load paper in the Tray 1 (MPT).When you selectOn, the message that prompts you to set the paper size and type is displayed.The default isOff. | |
| MPT Mode | Specifies the way to set the paper type and size settings to be loaded in Tray 1 (MPT).Panel Specified (default)You can specify the paper type and size settings on the control panel. Printing can be done only when the settings on the print driver matches the settings on the control panel. When a mismatch of paper sizes occurs, follow the instructions displayed on the control panel.DriverSpecifiedYou cannot specify the settings on the control panel. Printing is done using the settings on the print driver. |
When the size or type of paper that is loaded is different from the setting, the print quality may fall or paper may jam. Specify the correct paper type and size.
When installing the optional sheet feeders if Paper Tray is set to Auto on the print driver, the feeding tray is automatically specified according to the setting on the control panel. Also, when the paper size and type setting for each tray is the same, printing continues by changing the feeding tray if the paper in the specified tray has run out.
Information Pages
Prints various types of reports and lists.
- The information pages are printed on A4 size paper. Load A4 size paper into the tray.
- For the procedure for printing information pages, refer to Printing Information Pages on page 95.
| Reports Description |
| Menu Map Prints a map of the control panel menus. |
| Demo Page You can print a sample of the document to check the printer's performance. |
| Configuration Prints status of the printer, such as hardware configuration and network information. Print this report to check whether optional accessories have been correctly installed. |
| PCL Fonts List Prints information on PCL fonts and samples of these fonts. |
| PCL Macro List Prints a list of PCL macros. |
| PS Fonts List Prints information on PS fonts and samples of these fonts. |
| Job History Prints information on printing result, such as whether data from the computer has been printed correctly. The status of a maximum of 22 jobs can be printed on the Job History Report.Use the control panel to set whether to print the Job History Report automatically for every 22 jobs completed. For details, refer to System Setup on page 98. |
| Error History Prints information of up to the latest 42 errors that occurred in this printer. |
| Print Meter Prints a print meter. |
| Stored Documents Prints a list of documents stored in the printer when using the secure print and sample print feature.For details, refer to Printing Confidential Documents - Secure Print on page 85 and Print After Checking Printing Result - Proof Print on page 87. |
Printing Information Pages
Information pages are printed from the control panel.
- Press the Menu button to display the Menu screen.
- Press the Up Arrow or Down Arrow button until Information Pgs is displayed, and then press the Forward Arrow or OK button.
- Press the Up Arrow or Down Arrow button until the desired report/list is displayed, and then press the OK button. The selected information page is printed.
Billing Meters
Displays the number of processed print jobs on the control panel. The meter is divided according to the color modes.
Item Description
| Color Impressions Displays the total number of pages printed in color. |
| Black Impressions Displays the total number of pages printed in black/white. |
| Total Impressions Displays the total number of pages printed. |
See also:
Checking Page Counts on page 149
Admin Menu
This menu contains these submenus:
- Network Setup
- U S B S e t u p
- System Setup
- Maintenance Mode
- P C L S e t u p
- PostScript Setup
• Control Panel
Network Setup
Specifies printer settings affecting jobs sent to the printer through a network port.
- The settings in the Network Setup menu cannot be set when entering this menu during printing.
- You need to restart the printer to activate the new settings. After making the settings, turn off the printer and then turn it on again.
| Item Description | |
| Ethernet Specifies the communication speed and the modes of Ethernet. | |
| • Auto (default)Automatically changes between 10M Half Duplex, 10M Full Duplex, 100M Half Duplex, and 100M Full Duplex. | |
| • 1 0 M B a s e H a l f | |
| • 10M Base Full | |
| • 1 0 0 M B a s e H a l f | |
| • 1 0 0 M B a s e F u l l | |
| TCP/IP Specifies the settings to use the TCP/IP protocol. | |
| Protocol | Set Enable when using the protocol. When Disable is selected, the protocol cannot be activated. |
| • LPR (default: Enable) | |
| • Port 9100 (default: Enable) | |
| • IPP (default: Enable) | |
| • SMB TCP/IP | |
| • S M B N e t B E U I | |
| • FTP (default: Enable) | |
| • WSD (default: Enable) | |
| • SNMP (default: Enable) | |
| • Email Alerts (default: Enable) | |
| • CentreWare IS (default: Enable) | |
| • Bonjour (mDNS) (default: Enable) | |
| IPP is displayed only when the optional multi protocol card is installed. | |
| Host Access List Specifies blocking the reception of data from certain IP addresses. | |
| Reset Defaults | Initializes network data stored in NVM. The NVM is a nonvolatile memory that stores the printer settings even after power off. Initializing the NVM will revert the value for each item of the Wired Network menu to default. |
| Adobe Protocol | Specifies the PostScript communication protocol: Standard, BCP, TBCP, Binary, or Auto. |
USB Setup
Use USB Setup for setting the USB port's status.
Item Description
Port Status Select either Enable or Disable.
Adobe Protocol Specifies the PostScript communication protocol: Standard, BCP, TBCP, Binary, or Auto.
System Setup
System Setup menu is used to make the printer operation settings, such as for alarm and power saver mode.
Item Description
PowerSaver Timer Specify the transitional time to Power Saver between 5 and 60 minutes in increments of 1 minute.
- 5 min. to 60 min. (default: 30 min.)
• For details, refer to Power Saver Mode on page 27
Audio Tones Specifies whether to turn on the alarm when an error occurs in the printer. You cannot adjust the sound volume.
• Control Panel (default: Off)
- Invalid Key (default: Off)
• Machine Ready (default: Off)
• Job Complete (default: Off)
- Fault Tone (default: Off)
- Alert Tone (default: Off)
- Out of Paper (default: Off)
- Low Toner Alert (default: Off)
- Base Tone (default: Off)
Fault Time-Out Sets the fault time-out function.
Time-Out You can cancel a printing process when it goes beyond a set time period. Set the time until the print job is canceled. When this timeout expires, the print job is canceled.
- 5 sec. to 300 sec. (default: 30 sec.)
Specifies the amount of time in increments of 1 second the printer waits for additional data before it cancels the job.
- Off
Cannot cancel.
| Item Description |
| Auto Log Print Specifies whether to automatically print information about the printed data that has been processed in the printer (Job History Report).Off (default)Select this if you do not want to print the Job History Report automatically even if the number of print jobs exceeds 22.OnAutomatically prints a report when the number of print jobs reaches 22.You cannot set this during printing.You can print the Job History Report from the Information Pgs menu.You need to restart the printer to activate the new settings. After making the settings, turn off the printer and then turn it on again. |
| Print ID Select this to print the user ID on a specified position.Off (default)User ID is not printed.Top LeftPrints the user ID on the top left of the sheet of paper.Top RightPrints the user ID on the top right of the sheet of paper.Bottom LeftPrints the user ID on the bottom left of the sheet of paper.Bottom RightPrints the user ID on the bottom right of the sheet of paper. |
| Print Text Specifies whether the printer outputs PDL data, which is not supported by the printer, as text when the printer receives it. Text data is printed on A4 or Letter size paper.Off (default)Does not print the received data.OnPrints the received data as text data. |
| Banner Sheet Specifies the settings for the banner sheet.Insert Position (default: Off)Selects the position to output the banner sheet from Off, Front, Back, and Front & Back. When Off is selected, the banner sheet is not printed.Specify Tray (default: Tray 1 (MPT))Specifies the tray from which the banner sheet is output: Tray 1 (MPT), Tray 2, or Tray 3.Tray 3 is displayed only when the optional sheet feeder is installed. |
| Odd Page 2 Sided If the optional duplex mode is installed, use to select the process for the last odd page in a 2-sided print job. Select either 1 Sided or 2 Sided. |
| Start Up Page Select On to print a Configuration page after starting the printer. Select Off to turn this function off. |
| Language Specifies the language that is displayed on the control panel and Information pages. |
Item Description
| RAM Disk Allocates memory to the RAM Disk file system for the secure print, collating jobs, and Sample print features.EnableAllocates memory for using the secure print and proof print features.Disable (default)Does not allocate memory for using the secure print and proof print features.This item is displayed when at least 256 MB of memory are added. |
| Size Mismatch Specifies the action to take when the driver paper size settings do not match the control panel size settings.Off (default)Select this to display a message prompting you to load paper.Larger SizeSelect this to replace the paper with a longer size paper before printing in 100% magnification ratio.Nearest SizeSelect this to replace the paper with the nearest size paper before printing in 100% magnification ratio.Tray 1(MPT) FeedSelect this to print on paper loaded in Tray 1 (MPT).If a computer issues the instruction about paper selection, it overwrites this setting. |
| mm/inch Set the units for the custom paper size to millimeters (mm) or inches.millimeter (mm) (default)The paper size is displayed in millimetersinch (")The paper size is displayed in inches. |
Maintenance Mode
Use this menu to initialize the NVM, or to adjust the configurations for each type of paper.
| Item Description | |
| FW Version Displays the current firmware version. | |
| Auto Regi Adjust | Adjust the color registration automatically. Selecting On adjusts the color registration automatically. The default is On. |
| Adjust ColorRegi | Correct the color registration manually. For details, refer to Color Registration on page 111. • Auto Adjust Correct the color registration. • Color Regi Chart Prints the correction chart. • Enter Number Enter the number to correct the registration. |
| Init PrintMeter Initializes the print meter. | |
| Initialize NVM Initializes the settings stored in the NVM except for the network settings. The NVM is a nonvolatile memory that stores the printer settings even after the power is turned off. After executing this function and restarting the printer, all the menu parameters are reset to their default values. • You cannot execute this menu during printing. • You need to restart the printer to activate this setting. After making the setting, turn off the printer and then turn it on again. | |
| Clear Storage Clears stored information. | |
| Format HDD Formats the hard drive. | |
PCL Setup
Specifies the settings for the PCL.
| Item Description | |
| Paper Tray Specifies the paper tray to be used for printing. | |
| • Auto (default)The tray is selected automatically when print data is sent. | |
| • T r a y 1 (M P T) | |
| • T r a y 2 | |
| • T r a y 3 | |
| Paper Size Specifies the paper size to be printed. | |
| • A4 | |
| • B5 | |
| • A5 | |
| • 8 . 5 x 1 1 | |
| • 8 . 5 x 1 3 | |
| • 8 . 5 x 1 4 | |
| • 7.25x10.5 | |
| • Monarch Env | |
| • D L E n v e l o p e | |
| • C 5 E n v e l o p e | |
| • Com 10 Env | |
| • New Custom Size | |
| Orientation The paper printing direction can be selected from Portrait and Landscape. The default is Portrait. | |
| 2 Sided Specifies the 2-sided printing settings: | |
| • 2-Sided PrintSpecifies whether to perform 2-sided printing. The default is Off. | |
| • Binding EdgeSpecifies the binding direction from Flip Long Edge or Flip Short Edge.The default is Flip Long Edge. | |
| Font | Specifies the font used. The default is Courier. |
| Symbol Set | Specifies the font for symbols. The default is ROMAN-8. |
| Font Size | Specifies the font size. The default is 12.00. You can specify a value between 4.00 and 50.00 in increments of 0.25. |
| Font Pitch | Specifies the character spacing. The default is 10.00. You can specify a value between 6.00 and 24.00 in increments of 0.01. |
| Form Line | Specifies the form line (the number of lines per form). The default is 60. You can specify a value between 5 and 128 in increments of 1. |
| Quantity | Specifies the copies to be printed between 1 to 999. The default is 1. |
| Item | Description |
| Image Enhance Selects whether to perform image enhancement.Image enhancement is a feature that makes the boundary line between black and white smoother to decrease jags and enhance the visual appearance. The default is On. | |
| Hex Dump Specifies whether to print the data sent from a computer in the ASCII code corresponding to the hexadecimal notation format in order to check the data contents. The default is Disable. | |
| Draft Mode Specifies whether to print in draft mode. The default is Disable. | |
| Line Termination Sets the line termination.Off (default)The line termination command is not added.CR=CR, LF=LF, FF=FFAdd-LFThe LF command is added.CR=CR-LF, LF=LF, FF=FFAdd-CRThe CR command is added.CR=CR, LF=CR-LF, FF=CR-FFCR-XXThe CR and LF commands are added.CR=CR-LF, LF=CR-LF, FF=CR-FF | |
| Default Color | Specifies the color mode to Color or Black. This settings is used when the color printing mode setting is not specified for the print job that is sent to the printer.Black (default)Prints in black and white mode.ColorPrints is the color mode. |
PostScript Setup
Specifies the PostScript settings.
| Item Description | |
| PS Error Report Turns error reporting on or off. | |
| PS Job Time-Out Turns the time-out off, or selects the length of time before timing-out. | |
| Init PS Disk Initializes the HDD area that PostScript uses. | |
| Paper Select Mode Selects a paper tray. | |
| Default Color | Sets the default asColororBlack. |
Control Panel
Specifies whether to limit menu operations with a password to avoid changing the printer settings by accident.
Item Description
Panel Lock Specifies whether to limit the menu operations with a password. Selecting On requires the operator to enter the password. If On is set, then you must enter the password to use the Admin Menu. The default is Off.
Menu List
The Menu Map helps you navigate the control panel menus. To print the Menu Map:
- On the control panel, press the Menu button, select Information Pgs, and then press the OK button.
- Select Menu Map, and then press the OK button to print.
Note: Print the Menu Map to see other information pages available for printing.
| Main operation and buttons on the control panel | |
| Display/close the Menu screen | Menu button |
| Switch between the menu levels | Forward Arrow button (moves one level downwards) or Back Arrow button (moves one level upwards) |
| Switch between menu or items in the same level | Up Arrow button (displays the previous menu or item) or Down Arrow button (displays the next menu or item) |
| Move the cursor(_) of the setting value the right or left | Forward Arrow button (moves to the right) or Back Arrow button (moves to the left) |
| Confirm setting OK button | |
| Reset settings to default value | Press Up Arrow and Down Arrow button at the same time. |
See also:
Description of Menu Items on page 93
Print Quality
6
This chapter includes:
• Print-Quality Problems on page 107
• Color Registration on page 111
Print-Quality Problems
When the print quality is poor, select the closest symptom from the following table to correct the problem.
If the print quality does not improve after carrying out the appropriate action, contact Xerox Customer Support or your reseller.
Note: To enhance print quality, print cartridges for many models of equipment have been designed to cease functioning at a predetermined point.
Symptom Reason/Action
Faded printouts Multiple colors faded:

natural_image
Illustration of three yellow flowers with green leaves (no text or symbols)- The print cartridges are not Xerox print cartridges.
Verify that the print cartridges (C/M/Y/K) meet specifications, and replace if necessary. - The paper is outside the recommended specification range.
Replace the media with a recommend size and type, and confirm that your control panel settings are correct. See About Paper on page 48. - The paper is damp.
Replace the paper. See About Paper on page 48. - The transfer unit is old or damaged.
Replace the transfer unit. - The high-voltage supply is defective.
See the Xerox Support website, www.xerox.com/office/6280support, for assistance.

natural_image
Color swatch with four horizontal bands: light blue, pink, yellow, and gray (no text or symbols)Only one color faded:
- Check the condition of the print cartridge, and replace as necessary.
| Symptom Reason/Action | |
| Stray black dots or white areas (drop outs) | The paper is outside the recommended specification range.Replace the paper with a recommended size and type, and confirm that your control panel settings are correct. SeeAbout Paperon page 48. |
 | The transfer unit is old or damaged.Replace the transfer unit. |
| The print cartridges are not Xerox print cartridges.• Check the condition of the print cartridge, and replace as necessary.• Verify that the print cartridges (C/M/Y/K) meet specifications, and replace if necessary. | |
| Vertical black or color streaks | Multiple colored streaks or lines:• The transfer unit, or fuser, is old or damaged.Check the condition of the transfer unit and fuser, and replace as necessary. |
 | • The print cartridges are not Xerox print cartridges.Verify that the print cartridges (C/M/Y/K) meet specifications, and replace if necessary. |
| Streak in only one color:• Check the condition of the print cartridge, and replace as necessary.Verify that the print cartridge meets specifications, and replace if necessary. | |
| Recurring smudges Dirt in the paper path. | |
 | Print several blank sheets. |
| The paper is outside the recommended specification range.Replace the paper with a recommended size and type, and confirm that your control panel settings are correct. SeeAbout Paperon page 48. | |
| The transfer unit, or fuser, is old or damaged.Check the condition of the transfer unit and fuser, and replace as necessary. | |
| Toner smears when rubbed | The paper is damp.Replace the paper. SeeAbout Paperon page 48. |
| The paper is outside the recommended specification range.Replace the paper with a recommend size and type, and confirm that your print driver settings are correct. SeeAbout Paperon page 48. | |
 | The print cartridges are not Xerox print cartridges.Verify that the print cartridges (C/M/Y/K) meet specifications, and replace if necessary. |
| The fuser is old or damaged.Replace the fuser. | |
| Blank pages Two or more sheets may be feeding at once. | |
 | Remove the paper stack from the tray, fan it, and reinsert it. |
| The print cartridges are not Xerox print cartridges.Verify that the print cartridges (C/M/Y/K) meet specifications, and replace if necessary. | |
| The transfer unit is old or damaged.Replace the transfer unit. | |
| The high-voltage supply is defective.See the Xerox Support website,www.xerox.com/office/6280support,for assistance. | |
| Hair-like marks appear in or around black half-tone printing Shadows appear around areas of dense black printing | The paper was left unwrapped for a long time (especially in a dry environment).Replace the paper. SeeAbout Paperon page 48. |
| The paper is outside the recommended specification range.Replace the paper with a recommended size and type, and confirm that your print driver settings are correct. SeeAbout Paperon page 48. | |
| The transfer unit is old or damaged.Replace the transfer unit. | |
| Color around the edge of printing is incorrect | The color registration is incorrect.Adjust the color registration. SeeColor Registrationon page 111. |
| Colored dots are printed at regular intervals (about 28 mm) | The print cartridge is dirty.Clean the print cartridge. |
| Partial blanks, creased paper, or blotted printing | The paper is damp.Replace the paper. |
 | The paper is outside the recommended specification range.Replace the paper with a recommended size and type. SeeAbout Paperon page 48. |
| The transfer unit, or fuser, is not installed correctly.Reinstall the transfer unit and/or fuser. | |
| The print cartridges are not Xerox print cartridges.Verify that the print cartridges (C/M/Y/K) meet specifications, and replace if necessary. | |
| Condensation inside the printer causes partial blanks or creased paper.Turn the printer on, and leave it on, for at least one hour to get rid of the condensation. If the problems still occurs, see the Xerox Support website,www.xerox.com/office/6280support, for assistance. | |
| Vertical blanks The laser is being blocked. | |
 | Remove the print cartridges and clean all debris from the laser len(s) with a lint free cloth. |
| The transfer unit, or fuser, is old or damaged.Check the condition of the transfer unit and fuser, and replace as necessary. | |
| The print cartridges are not Xerox print cartridges.• Check the condition of the print cartridge, and replace as necessary.Verify that the print cartridges (C/M/Y/K) meet specifications, and replace if necessary. | |
| Slanted printing The paper guides in Tray 2, Tray 3, or Tray 1 (MPT) are not set correctly. | |
 | Reset the paper guides in Tray 2, Tray 3, or Tray 1 (MPT). SeeLoading Paper in Trays 2-3on page 55. |
| Horizontal bands, approximately 22 mm wide, appear vertically every 73 mm | The print cartridge has been exposed to too much light; possibly from leaving the front door open too long.Replace the print cartridge. |
| Colors are blurry or there is white area around objects | Color to color alignment is not correctUse the automatic color registration. SeeColor Registrationon page 111. |
Color Registration
Color registration can be adjusted by the printer automatically, or you can manually adjust it. Color registration should be adjusted any time the printer is moved.
For more information, see Checking Page Counts on page 149.
Automatic Color Registration Adjustment
Use the following procedure to perform automatic color registration adjustment.
Note: An automatic color registration adjustment is performed every time a new print cartridge is installed.
- Press the Menu button to display the Menu screen.
- Press the Up Arrow or Down Arrow button until Admin Menu is displayed, and then press the Forward Arrow or OK button.
- Press the Up Arrow or Down Arrow button until Maintenance Mode is displayed, and then press the Forward Arrow or OK button.
- Press the Up Arrow or Down Arrow button until Adjust ColorRegi is displayed, and then press the Forward Arrow or OK button.
- Press the Up Arrow or Down Arrow button until Auto Adjust is displayed, and then press the Forward Arrow or OK button.
- Press the OK button when Are you sure? is displayed.
The adjustment is complete when Ready is displayed on the control panel.
Manual Color Registration Adjustment
You can fine tune color registration by performing a manual adjustment of color registration.
Printing the Color Registration Correction Chart
- Press the Menu button to display the Menu screen.
- Press the Up Arrow or Down Arrow button until Admin Menu is displayed, and then press the Forward Arrow or OK button.
- Press the Up Arrow or Down Arrow button until Maintenance Mode is displayed, and then press the Forward Arrow or OK button.
- Press the Up Arrow or Down Arrow button until Adjust ColorRegi is displayed, and then press the Forward Arrow or OK button.
- Press the Up Arrow or Down Arrow button until Color Regi Chart is displayed, then press the OK button. The Color Registration Correction Chart is printed. When printing is finished, the print screen is displayed again.
Determining Values
From the lines to the right of the Y (yellow), M (magenta), and C (cyan) pattern, find the values of the straightest lines.
When “0” is the value nearest the straightest line, you do not need to adjust the color registration. When the value is not “0”, follow the procedure outlined in “Entering Values”.
Note: You can also use the densest colors of the grid to find the straightest lines. The colors printed at the highest density are those next to the straightest lines.
Entering Values
Using the control panel, enter the values that you found in the Color Registration Correction Chart to make adjustments.
- Press the Menu button to display the Menu screen.
- Press the Up Arrow or Down Arrow button until Admin Menu is displayed, then press the Forward Arrow or OK button.
- Press the Up Arrow or Down Arrow button until Maintenance Mode is displayed, then press the Forward Arrow or OK button.
- Press the Up Arrow or Down Arrow button until Adjust ColorRegi is displayed, then press the Forward Arrow or OK button.
- Press the Up Arrow or Down Arrow button until Enter Number is displayed, then press the Forward Arrow or OK button.
- Press the Up Arrow or Down Arrow button until you reach the value displayed on the chart.
- Press the Forward Arrow button once and move the cursor to the next value.
- Repeat steps 6 and 7 to continue adjusting the color registration.
- Press the OK button twice.
- Press the Up Arrow or Down Arrow button until Color Reg Chart displays, then press the Forward Arrow or OK button. The Color Registration Correction Chart is printed with the new values. When printing is finished, the print screen is displayed again.
- Color registration adjustment is complete when the straightest Y (yellow), M (magenta), and C (cyan) lines are next to the "0" line.
If "0" is not next to the straightest lines, determine the values and adjust again.
Note: After printing the Color Registration Correction Chart, do not turn off the printer until the printer motor has stopped running.
Enabling/Disabling Automatic Color Registration
Use the following procedure to enable/disable automatic color registration when a new print cartridge is installed.
- Press the Menu button to display the Menu screen.
- Press the Up Arrow or Down Arrow button until Admin Menu is displayed, and then press the Forward Arrow or OK button.
- Press the Up Arrow or Down Arrow button until Maintenance Mode is displayed, and then press the Forward Arrow or OK button.
- Press the Up Arrow or Down Arrow button until Auto Regi Adj is displayed, and then press the Forward Arrow or OK button.
- Press the Up Arrow or Down Arrow button to turn automatic color registration On or Off.
Run Black
When a color laser printer runs out of toner, users are typically unable to print until a new toner cartridge is installed. When a Phaser 6280 runs out of cyan, magenta, or yellow toner it can still print in black and white. This feature is known as “Run Black.”
To activate Run Black mode if a color toner runs out in the middle of a print job:
- Cancel the job.
- Click File > Print > Preferences or Properties.
- Click the Paper / Output tab, and under Output Color, select Black and White.
- Resend your print job.
Note: All color toner cartridges must remain installed in the printer when switching to Run Black mode.
Troubleshooting
7
This chapter includes:
• Paper Jams on page 116
• Problems With the Printer on page 131
• Control Panel Error Messages on page 135
• Getting Help on page 139
See also:
Troubleshooting video tutorials at www.xerox.com/office/6280support
Print-Quality Problems on page 107
Paper Jams
This section includes:
• Preventing and Clearing Paper Jams on page 116
• Paper Jams in Tray 1 (MPT) on page 117
• Paper Jams in the Paper Tray on page 120
• Paper Jams at the Fuser on page 123
• When Long Paper Jams on page 124
• Paper Jams at the Duplex Unit on page 125
• Paper Jams in the Optional Sheet Feeder on page 127
See also:
User Safety on page 8
Preventing and Clearing Paper Jams
To reduce the occurrence of paper jams, follow the guidelines and instructions in Printing Basics on page 45. It includes information about supported paper and media, guides for usage, and instructions for properly loading paper in the trays.
Caution: When removing jammed paper, make sure that no pieces of torn paper are left in the printer. A piece of paper remaining in the printer can cause a fire. If a sheet of paper is wrapped around the heat roller, or when clearing a jammed paper that is difficult or impossible to see, do not try to remove it by yourself. Turn off the printer immediately, and refer to the Xerox Support website, www.xerox.com/office/6280support.
Warning: The fuser and the surrounding area are hot and can cause burns.
Paper Jams in Tray 1 (MPT)
Follow this procedure to remove paper jammed in Tray 1 (MPT).
- Pull the jammed paper out of Tray 1 (MPT), and remove any remaining paper from the tray.

natural_image
Line drawing of a printer with paper feed and control panel (no text or symbols)6280-021
- Close Tray 1 (MPT).
- Push the button and open the front cover.

natural_image
Illustration of a hand pressing down on a computer monitor with red arrows indicating action (no text or symbols)6280-022
Warning: Some components inside the printer, such as the fuser and surrounding area, are hot and can cause burns.
- Carefully remove any jammed paper in the printer. Confirm that there are no scraps of paper left inside.

natural_image
Line drawing of a mechanical device with internal components and a red arrow indicating direction (no text or symbols)6280-023
Caution: Prolonged exposure to light may damage the print cartridge.
- Close the front cover.
- Remove the tray from the printer.

natural_image
Line drawing of a printer with a red arrow indicating compression or disassembly (no text or symbols present)6280-024
- Carefully pull out any jammed paper remaining inside the printer.

text_image
6280-025 6280-025- Insert the tray into the printer and push until it stops.

natural_image
Line drawing of a printer with red arrows indicating internal components (no text or symbols)Caution: Do not use excessive force on the tray. Doing so could damage the tray or the inside of the printer.
Paper Jams in the Paper Tray
Follow the procedure below to remove paper jammed in the paper tray.
- Gently remove the tray from the printer.

natural_image
Line drawing of a printer with a red arrow indicating compression or disassembly (no text or symbols present)6280-024
- Remove all the jammed and/or creased paper from the tray.

natural_image
Technical line drawing of a mechanical device with a red arrow indicating direction (no text or symbols present)6280-035
- If there is jammed paper remaining inside the printer, pull it out carefully to avoid tearing it.

natural_image
Line drawing of a printer with a red downward arrow indicating compression or disassembly (no text or symbols on the device itself)- Press the button and open the front cover. Remove any scraps of paper remaining inside the printer.

natural_image
Illustration of a hand pressing down on a computer device with red arrows indicating action (no text or symbols)Caution: Prolonged exposure to light may damage the print cartridge.
Warning: Some components inside the printer, such as the fuser and surrounding area, are hot and can cause burns.
- Close the front cover.

natural_image
Diagram of a printer's internal structure with a red arrow indicating the paper direction (no text or symbols present)6280-027
- Insert the tray into the printer, and push until it stops.

natural_image
Line drawing of a printer with a paper slot and red arrows indicating process flow (no text or symbols)6280-017
Caution: Do not use excessive force on the tray. Doing so could damage the tray or the inside of the printer.
Paper Jams at the Fuser
- Press the button and open the front cover.

natural_image
Line drawing of a hand pressing down on a computer device with red arrows indicating action (no text or symbols)6280-022
- Lift the levers at both ends of the fuser (1), and remove the jammed paper (2). If the paper is torn, remove any scraps of paper remaining inside the printer.
Warning: Some components inside the printer, such as the fuser and surrounding area, are hot and can cause burns.

text_image
Diagram of a printer with labeled parts and red directional arrows indicating process flow or movement.6280-028
Caution: Prolonged exposure to light may damage the print cartridge.
- Open the cover of the fuser and remove the jammed paper.

natural_image
Diagram of a computer tower with an arrow pointing to the top panel (no text or symbols present)6280-029
- Close the front cover.

natural_image
Diagram of a printer internal structure with a red arrow indicating the process (no text or symbols present)6280-027
When Long Paper Jams
When long paper (longer than 356~mm ) jams inside the printer, cut the paper as needed, then remove it in the proper way depending on the place that the paper jam occurs.
Caution: If it is difficult to open the front cover, do not force it. Turn the power off immediately. Refer to the Xerox Support website, www.xerox.com/office/6280support, for assistance.
Paper Jams at the Duplex Unit
- Push the button and open the front cover.

natural_image
Line drawing of a hand pressing down on a computer monitor with red arrows indicating action (no text or symbols)6280-022
Warning: Some components inside the printer, such as the fuser and surrounding area, are hot and can cause burns.
- Carefully pull out the jammed paper from the duplex unit. If jammed paper cannot be found, go to the next step.

natural_image
Line drawing of a computer monitor with a hand inserting a clip into the case (no text or symbols)6280-031
Caution: Prolonged exposure to light may damage the print cartridge.
- Hold the knobs of the transfer unit as shown in the following illustration and open the unit fully.

natural_image
Illustration of a printer being inserted into a slot, with a magnified inset showing the process (no text or symbols present)6280-032
- Remove the jammed paper. Confirm that there are no scraps of paper left inside the transfer belt unit.

natural_image
Technical line drawing of a printer internal structure with no visible text or symbols6280-033
-
Close the transfer belt unit.
-
Close the front cover.

natural_image
Diagram of a printer's internal structure with a red arrow indicating the paper direction (no text or symbols present)6280-027
Paper Jams in the Optional Sheet Feeder
- Open the trays until you find the jammed paper.

natural_image
Line drawing of a printer with red arrows indicating internal processing or movement (no text or symbols)6280-034
Note: Paper jammed in the lower tray can block the trays above it, preventing you from opening them. Look for the jammed paper sequentially, starting with the lowest tray.
- Remove all jammed and/or creased paper from the tray.

natural_image
Technical line drawing of a mechanical device with a red arrow indicating direction (no text or symbols present)6280-035
- Pull the jammed paper out carefully to avoid tearing it. If the paper is torn, confirm that there are no scraps of paper remaining inside the printer.

natural_image
Line drawing of a printer with a red downward arrow indicating compression or disassembly (no text or symbols present)6280-036
- Push the button and open the front cover. Confirm that there are no scraps of paper remaining inside the printer.

text_image
Diagram showing a hand pressing down on a printer with red arrows indicating downward motion, likely illustrating a process or mechanical change.6280-037
Caution: Prolonged exposure to light may damage the print cartridge.
Warning: Some components inside the printer, such as the fuser and surrounding area, are hot and can cause burns.
- Close the front cover.

natural_image
Line drawing of a printer's internal structure with a red arrow indicating the component (no text or symbols present)6280-038
- Insert the trays into the printer. Push the trays in until they stop.

natural_image
Line drawing of a printer with red arrows indicating internal components (no text or symbols)6280-039
Caution: Do not use excessive force on the tray. Doing so could damage the tray or the inside of the printer.
Problems With the Printer
If you encounter a problem with your printer, use the following table to troubleshoot and fix the problem. For additional troubleshooting information, see Getting Help on page 139.
Warning: Never open or remove printer covers that are secured with screws unless specifically instructed in the manual. A high voltage component can cause electric shock. Do not try to alter the printer configuration, or modify any parts. An unauthorized modification can cause smoke or fire.
Caution: Probable causes of trouble are that the printer, computer, server or other hardware is not correctly set for the network environment you are using, or a printer restriction has been exceeded.
| Symptom Reason/Action | |
| No power Is the power to the printer turned off?Press the power button to the On position to turn on the power. | |
| Symptom Reason/Action | |
| Error indicator is on Is there an error message displayed on the control panel?Check the displayed message and correct the error. | |
| Error indicator is blinking | An error that you cannot correct by yourself has occurred.Record the displayed error message or error code, turn off the power, pull out the power plug from the outlet. Refer to the Xerox Support website, www.xerox.com/office/6280support. |
| Light of the Ready indicator is on and blinking but there is no print output | There are jobs remaining in the printer.Cancel printing or force the remaining data to be printed.To forcibly print the job, press the OK button. To cancel the job, press the Cancel button. |
| Top section of printed document is missing. The top and side margins are incorrect. | Are the paper tray guides in the correct positions?Set the length guide and the width guides to the correct positions. See Loading Paper in Trays 2-3 on page 55. |
| Check that the paper size on the print driver or the control panel is correctly set.See the Online Help for the print driver. See Setting Paper Types and Sizes on page 50. | |
| Check that the margin setting is correct on the print driver. (PCL only)See the Online Help for the print driver. | |
| Condensation has occurred inside the printer | Turn the printer on, and leave it on, for at least one hour to get rid of the condensation. If the problem continues, refer to the Xerox Support website, www.xerox.com/office/6280support. |
| Paper cannot be fed.Paper jams.Multiple paper are fed.Paper is fed at an angle.Paper is wrinkled. | Is the paper correctly loaded?Load the paper correctly. For labels, transparencies, or envelopes, fan them well to allow air to enter between each sheet before loading. See Loading Paper in Trays 2-3 on page 55. |
| Is the paper damp?Replace with paper from a new ream. See Loading Paper in Trays 2-3 on page 55. | |
| The paper used is not suitable.Load the correct type of paper. See About Paper on page 48. | |
| Is the paper tray set correctly?Push the paper tray completely into the printer. | |
| Is the printer placed on a flat location?Place the printer on a stable flat surface. | |
| Are the paper tray guides set in the correct positions?Set the guides to the correct positions. See Loading Paper in Trays 2-3 on page 55. | |
| Paper is fed more than 1 sheet at a time.Multiple feeding of paper may occur before the sheets of paper loaded in the tray are used up. Remove the paper, fan it, and load again. Replenish paper only when all the sheets of the loaded paper are used up. | |
Symptom Reason/Action
| Unusual noises The printer is not level. |
| Reposition the printer on a flat, stable surface. |
| The paper tray is not inserted properly.Push the paper tray completely into the printer. |
| There is a foreign object inside the printer.Turn off the printer and remove the foreign object. Refer to the Xerox Support website, www.xerox.com/office/6280support, for assistance. |
Enabling Options
If your options are not working, do the following to enable the options:
PostScript Driver
-
To start, do the following:
-
Windows 2000-XP: Click Start > Settings > Printers and Faxes.
• Windows Vista: Click Start > Printers.
Right-click the printer and select Properties.
- Click the Device Settings tab.
- Under Installable Options, select Available for the option that you want to enable.
- Click the OK button.
PCL Driver
-
To start, do the following:
-
Windows 2000-XP: Click Start > Settings > Printers and Faxes.
• Windows Vista: Click Start > Printers.
Right-click the printer and select Properties.
- Click the Options tab.
- Click the option you want to enable to highlight it.
- In the Settings for field, select Available.
- Click the OK button.
Control Panel Error Messages
This section describes the messages displayed on the control panel.
Messages About Supplies
| Message Condition/Reason/Action | |
| 010-351Replace Fuser | Time to replace the fuser.Replace the old fuser with a new one. |
| 010-359Fuser CRUM Error | The fuser is not installed correctly or is not working correctly due to damage or malfunction. Reinstall the fuser. |
| 010-317Insert Fuser | The fuser is not installed.Install the fuser. |
| XXX^*1 CRUM Error Restart Printer / Error 093 - NNN^*2 Restart Printer | The XXX print cartridge is not installed correctly or is not working correctly due to damage or malfunction.Reinstall the print cartridge. See Checking/Managing the Printer with CentreWare IS on page 145. |
| Check CartridgeXXX Cartridge | Sealing tape is still attached to the XXX print cartridge.Remove the sealing tape from the displayed print cartridge. |
| Insert Transfer Unit | The transfer unit is not installed correctly or is not working correctly due to damage or malfunction. Reinstall the transfer unit. |
| Insert XXX Cartridge | The XXX print cartridge is not installed. Install the XXX print cartridge.See Checking/Managing the Printer with CentreWare IS on page 145. |
| Insert Transfer Unit | The transfer unit is not installed. Install the transfer unit. |
| Ready to Print%S XXX LowReplace Soon | The XXX print cartridge is nearly empty.Purchase a new print cartridge.See Checking/Managing the Printer with CentreWare IS on page 145. |
| Ready to PrintTransfer UnitReplace Soon | It is nearly time to replace the transfer unit.Purchase a new transfer unit. |
| Replace XXX Cartridge | The print cartridge has become empty.Replace the old print cartridge with a new one. |
| ReplaceTransfer Unit | Time to replace the transfer unit.Replace the old transfer unit with a new one. |
^*1 XXX indicates one of the following: the Yellow Toner (Y), Cyan Toner (C), Magenta Toner (M), or Black Toner (K).
^*2 NNN indicates a numeric value.
Messages About the Printer and Other Items
| Message Condition/Reason/Action | |
| Over Heat Please Wait / Error 042-700 Please Wait | The printer's internal temperature is too high.The printer has been stopped. Wait 1 hour before restarting the printer. Ensure the printer has adequate cooling space around it, and that the cooling vents are not blocked. |
| Tray Missing 024-946 / Tray Missing Insert Tray 2 | Tray 2 is pulled out. Push Tray 2 into the correct position. |
| Tray Missing 024-947 / Tray Missing Insert Tray 3 | Tray 3 is pulled out. Push Tray 3 into the correct position. |
| Jam at Tray 1 (MPT), 2, or 3 Check Tray 1 (MPT), 2, or 3 Open Door A | Paper is jammed inside Tray 1 (MPT), 2, or 3.Remove the jammed paper. Open and close the front cover. See Paper Jams on page 116. |
| Door A Open Close Door A | The front cover is open.Close the front cover. |
| Disabled Function Error 016-158 | The user is not registered to print in color when using an authentication function.Contact your administrator. |
| Invalid Job Press OK Button Error 016-799 | When the configuration of the printer on the print driver does not conform to the printer you are using, this message appears.Press the Cancel button to cancel the print job.Make sure that the configuration of the printer on the print driver conforms to the printer you are using. |
| Invalid User Error 016-757 | The user is not registered to print on the printer when using an authentication function.Contact the administrator. |
| Limit Exceeded Press OK Button | The user has exceeded the limit on the number of pages that can be printed when using an authentication function.Contact the administrator. |
| Invalid User Press OK Button | The user is not registered to print on the printer when using an authentication function.Contact the administrator. |
| Jam at Duplexer Open Door A Lift Transfer Unit | Paper is jammed inside the printer.Press the button to open the front cover and remove the jammed paper. See Paper Jams on page 116. |
| Open Door A Remove Paper & Check Paper Type | Paper is jammed inside the printer.Press the button to open the front cover and remove the jammed paper. Check the paper type. See Paper Jams on page 116. |
| Out of MemoryPress OK ButtonError 016-718 | The printer memory is full and cannot continue processing the current print job.Press the OK button to clear the message, cancel the current print job, and conduct the next print job, if any.Press the Cancel button to cancel the print job.Press the Left Arrow button to open the Walk-Up Features menu and delete the job being held.if the problem has not been corrected, turn the printer off and then on again.To avoid this error in the future, do the following:Delete unnecessary fonts, macros, and other data in printer memory.Install additional printer memory. |
| PDL ErrorPress OK ButtonError 016-720 | Error relating to PCL emulation problems has occurred.Press the OK button to clear the message, cancel the current print job, and conduct the next print job, if any.Press the Cancel button to cancel the print job. |
| Disk FullPress OK ButtonError 016-982 | RAM disk memory is full and cannot continue processing the current print job.Press the OK button to clear the message, cancel the current print job, and conduct the next print job, if any.Press the Cancel button to cancel the print job.Press the Left Arrow button to open the Walk-Up Features menu and delete the current job.To avoid this error in the future, do the following:Reduce the number of print pages, such as splitting the print data.Increase free memory space by deleting unnecessary data in the RAM disk. |
| Ready to Print %SOver HeatTurned Halfmode | The printer's internal temperature is too high.Processing on the printer has been slowed down. When the internal temperature falls, the processing speed will automatically increase. |
| Ready to Print %SNon-Xerox Toner | The printer is in the custom toner mode.Though some of the print cartridges reach the end of their lives, you can continue printing. |
| Restart Printer 116-NNN^3 | Error NNN-NNN relates to printer problems.Turn the printer off and then on.If the error continues, refer to the Xerox Support website,www.xerox.com/office/6280support. |
| 550 Feeder ErrorRestart Printer /Error 072-215Restart Printer | The 550-Sheet Feeder (optional) is not installed correctly or is not working correctly due to damage or malfunction.Reinstall the sheet feeder. |
| Duplexer Error | The Duplex Unit (optional) is not installed correctly or is not working correctly due to damage or malfunction. |
| Restart Printer | |
| Error 072-215 | Reinstall the Duplex Unit. |
| RAM Error | Additional memory (optional) is not installed correctly or is not working correctly due to damage or malfunction. |
| Restart Printer | |
| Error 116-316 | Reinstall the additional memory. |
| RAM Error | An unsupported additional memory (optional) is installed. |
| Restart Printer | Replace the specified additional memory. |
| Error 116-320 | |
| Load Tray 1 (MPT), 2, or 3 | The correct paper is not set in Tray xxxx. |
| or | Set the following size, direction, and type of paper into the tray: XXXX. xxx indicates the number of the tray or Tray 1 (MPT). See Loading Paper in Trays 2-3 on page 55. |
^*3 NNN indicates a numeric value.
Getting Help
This section includes:
• Control Panel Messages on page 139
• PrintingScout Alerts on page 139
• Online Support Assistant on page 139
• Web Links on page 140
Xerox provides several automatic diagnostic tools to help you produce and maintain print quality.
Control Panel Messages
The control panel provides you with information and troubleshooting help. When an error or warning condition occurs, the control panel displays a message informing you of the problem.
PrintingScout Alerts
PrintingScout is a tool that is included on the Software and Documentation CD-ROM. It automatically checks the printer status when you send a print job. If the printer is unable to print your job, PrintingScout automatically displays an alert on your computer screen to let you know that the printer needs attention.
PrintingScout is unavailable for Windows Vista.
Online Support Assistant
The Online Support Assistant is a knowledge base that provides instructions and troubleshooting help to solve your printer problems. You can find solutions for print quality, media jams, software installation, and much more.
To access the Online Support Assistant, go to www.xerox.com/office/6280support.
Web Links
Xerox provides several websites that offer additional help on your Phaser 6280 printer. A set of Xerox links is installed in your web browser's Favorites folder when you install the Xerox printer drivers on your computer.
| Resource Link | |
| Technical support information for your printer, includes online Technical Support, Recommended Media List, Online Support Assistant, driver downloads, documentation, video tutorials, and much more: | www.xerox.com/office/6280support |
| Supplies for your printer: www.xerox.com/office/6280supplies | |
| A resource for tools and information, such as interactive tutorials, printing templates, helpful tips, and customized features to meet your individual needs: | www.xerox.com/office/businessresourcecenter |
| Local sales and support center: www.xerox.com/office/contacts | |
| Printer registration: www.xerox.com/office/register | |
| Material Safety Data Sheets identify materials, and provide information on safely handling and storing hazardous materials: | www.xerox.com/msds(U.S. and Canada)www.xerox.com/environment_europe(European Union) |
| Information about recycling supplies: www.xerox.com/gwa | |
Maintenance
8
This chapter includes:
• Cleaning the Printer on page 142
- Ordering Supplies on page 143
• Managing the Printer on page 145
• Checking Page Counts on page 149
- Moving the Printer on page 150
See also: Small Business Resource Center at www.office.xerox.com
Cleaning the Printer
This section describes how to clean the printer in order to maintain it in good condition and print clean printouts all the time.
Warning: Be sure to turn off and unplug the printer before accessing the interior of the printer for cleaning, maintenance, or fault clearance. Access to a live printer's interior can cause electric shock.
Cleaning the Exterior
Clean the exterior of the printer about once a month. Wipe the parts with a wet but well-wrung soft cloth. Then wipe with another dry soft cloth. For stubborn stains, apply a small amount of neutral detergent, and gently wipe the stain off.
Note: Do not spray the detergent directly on the printer. The liquid detergent may enter the printer through a gap and cause problems. Never use cleaning agents other than water or neutral detergent.
Cleaning the Interior
After clearing paper jams or replacing the print cartridge, inspect the inside of the printer before closing the printer covers.
Warning: Never touch a labeled area found on or near the heat roller in the fuser. You can get burned. If a sheet of paper is wrapped around the heat roller, do not try to remove it by yourself to avoid injuries or burns. Switch off the printer immediately. Refer to the Xerox Support website, www.xerox.com/office/6280support.
- Remove any remaining pieces of paper.
- Remove any dust or stains with a dry clean cloth.
Ordering Supplies
This section includes:
• Consumables on page 143
• Routine Maintenance Items on page 143
• When to Order Supplies on page 143
• Recycling Supplies on page 144
Certain consumables and routine maintenance items need to be ordered occasionally. Each supply includes installation instructions.
Consumables
Genuine Xerox Print Cartridges (Cyan, Magenta, Yellow, and Black):
- Standard capacity
• High capacity
Note: Each print cartridge includes installation instructions on the box.
Note: To enhance print quality, print cartridges for many models of equipment have been designed to cease functioning at a predetermined point.
Routine Maintenance Items
Routine maintenance items are printer parts that have a limited life and require periodic replacement. Replacements may be parts or kits. Routine maintenance items are typically customer replaceable.
- F u s e r
- Transfer unit
- Feed roller kit
When to Order Supplies
The control panel displays a warning when the supply nears its replacement time. Verify that you have replacements on hand. It is important to order these supplies when the messages first appear to avoid interruptions to your printing. The control panel displays an error message when the supply must be replaced.
To order supplies, contact your local reseller or go to the Xerox Supplies website at www.xerox.com/office/6280supplies.
Caution: Use of non-Xerox supplies is not recommended. The Xerox Warranty, Service Agreements, and Total Satisfaction Guarantee do not cover damage, malfunction, or degradation of performance caused by use of non-Xerox supplies, or the use of Xerox supplies not specified for this printer. The Total Satisfaction Guarantee is available in the United States and Canada. Coverage may vary outside these areas; please contact your local representative for details.
Recycling Supplies
For information on Xerox supplies recycling programs, go to www.xerox.com/gwa.
Managing the Printer
This section includes:
- Checking/Managing the Printer with CentreWare IS on page 145
- Checking Printer Status with PrintingScout on page 145
- Checking Printer Status Through E-mail on page 146
Checking/Managing the Printer with CentreWare IS
When the printer is installed in a TCP/IP environment, you can check printer status and configure settings using a web browser on a network computer. You can also use CentreWare IS to check the remaining volume of consumables and the paper loaded in this printer.
Note: When using the printer as a local printer, you cannot use CentreWare IS. For details about checking the status of a local printer, refer to Checking Printer Status with PrintingScout on page 145.
The following browsers can be used with CentreWare IS:
- Netscape 7 or later
- Internet Explorer version 5 or later
Starting CentreWare IS
Use the following procedure to start CentreWare IS.
- Launch your web browser.
- Enter the printer's IP address in the browser's Address field (http://xxx.xxx.xxx.xxx).
The CentreWare IS screen appears.
Using Online Help
For details regarding the items that can be set in each CentreWare IS screen, click the Help button to display the Online Help.
Note: Clicking the Help button displays the online manual on the Xerox website.
Checking Printer Status with PrintingScout
PrintingScout is a tool that is installed with your Xerox printer driver. It automatically checks the printer status when you send a print job. PrintingScout can check the paper size that is loaded into the trays, the status of the output tray, and the remaining amount of consumables, such as print cartridges.
Starting PrintingScout
Double-click the PrintingScout icon on the task bar or right-click the icon and select Select Printer.
If the PrintingScout icon is not displayed on the task bar, open PrintingScout from the Start menu:
-
From the Start menu, select Programs, then Xerox Office Printing, then PrintingScout, and then Activate PrintingScout.
-
The Select Printer screen appears.
For details about the functions of PrintingScout, refer to the Online Help.
Checking Printer Status Through E-mail
When connected in a network environment where sending and receiving of e-mail is possible, the printer can send an e-mail report to specified e-mail addresses containing the following information:
- The network settings and the printer status
- The error status which has occurred on the printer
Setting the E-mail Environment
Activate CentreWare IS, and on the Properties tab, configure the following settings according to your e-mail environment. After configuring the settings on each screen, always click Apply and turn off/on the printer to reboot. For details about each item, refer to the Online Help for CentreWare IS.
| Item Item to be configured Description | ||
| E-mail Alerts SysAdmin E-mail Address Set the e-mail address to which notices about changes in printer status or errors are sent. | ||
| Notification Items Set the contents of the notices to send in the e-mail. | ||
| Port Status | StatusMessenger | Select Enable. |
| Protocol Settings > E-mail | Printer's E-mail Address, SMTP Server Address, SMTP Server Port Number, E-mail Send Authentication, Login Name, Password, SMTP Server Connection Status, POP3 Server Address, POP3 Server Port Number, Login Name, Password, POP3 Server Check Interval, APOP Settings, POP3 Server Connection Status | Select appropriate settings for sending and receiving e-mail. |
| Permitted E-mail Address When setting the permission for checking information and changing the settings for an e-mail address, input the e-mail address that is permitted to receive the e-mail. If no address is input here, the printer receives e-mails from all users. | ||
| Password When setting the password for access to the printer (both read only and read/write), check the Use Password check box to set the password. | ||
Checking the Printer Status with E-mail
This section describes cautions when sending e-mail to the printer to check the printer status.
- You can specify any title for the e-mail when checking the printer status or changing the printer settings.
- Use the commands described in the next section to create the text of the e-mail.
Commands That Can Be Used in E-mail Text
Use each command according to the following rules.
- Prefix all commands with “#”, and specify the #Password command at the top of the e-mail.
- Command lines without “#” are ignored.
- Write one command on each line and separate each command and parameter with a space or a tab.
When the same command is written two or more times in one e-mail, the second and subsequent commands are ignored.
| Command Parameter Description | |
| #Password Password Use this command at the top of the e-mail when a password for read only or full access is set. You can omit this command when the password is not set. | |
| #NetworkInfo Set this when you want to check information on the network settings list. | |
| #Status Set this when you want to check the printer status. | |
| #SetMsgAddr Recipient E-mail address | Use this command to specify the e-mail address to which e-mail reports are sent to. This command can only be used when the full access password is specified by the #Password command. |
Example of Commands
- When the read only password is "ronly", and to check the printer status:
Password ronly
Status
- When the full access password is "admin", and to set the recipient e-mail address to "service@xerox.com":
Password admin
SetMsgAddr service@xerox.com
- When the full access password is "admin", and to set the recipient e-mail address to "service@xerox.com", then confirm the setting result on the network settings list:
Password admin
SetMsgAddr service@xerox.com
NetworkInfo
Note: Describe the “#SetMsgAddr” command before the “#NetworkInfo” command. If they are written in reverse, the information retrieved by the “#NetworkInfo” command and the result of executing the “#SetMsgAddr” command may differ.
Checking Page Counts
The total number of printed pages can be checked at the control panel. Three meters are available: Total Impressions, Color Impressions, and Black Impressions.
The billing meter counts the number of pages printed properly. Single side print (including N-up) is counted as one impression, and 2-sided print (including N-up) is counted as two. During duplex printing, if an error occurs after one side is printed properly, it is counted as one.
When printing color data, that has been converted by using ICC profile on an application, with the Color (Auto) setting, the data is printed by color even if it seems to be black and white data on the monitor. In that case, Color Impressions is increased.
Note: Grayscale images printed with the composite black setting count as color pages, because color consumables are used. This is the default setting on most printers.
When doing 2 sided printing, a blank page may be inserted automatically depending on the settings on the application. In this case, the blank page is counted as one page.
Use the following procedure to check a meter:
- Press the Menu button.
- Press either the Up Arrow or Down Arrow button until Billing Meter is displayed, and then press the Forward Arrow or OK button.
- Press the Up Arrow or Down Arrow button until the desired meter is displayed.
- After checking, press the Menu button.
Moving the Printer
Carry out the following procedure when moving the printer.
To view precautions and guidelines for safely moving your printer, see User Safety on page 8.
The printer, configured with the optional accessories, paper trays, and consumables, weighs 24.5 kg (54 lb.).
When moving the equipment, make sure that there are two or more persons carrying it.
When lifting the printer, be sure to observe the following points. Failure to do so may cause the printer to fall and result in injuries.
Two persons, one facing the front of the printer (control panel) and the other facing the back, should firmly grip the recessed areas on the bottom part of both sides of the printer. Never try to lift the printer by gripping any other areas.

text_image
24.5 kg 54 lb. 6280-040Warning: If the 550-Sheet Feeder (optional) has been installed, uninstall it before moving the printer. If these are not fixed securely to the printer, they may fall to the ground and cause injuries. For details on how to uninstall the options, refer to the instructions sheet that is bundled with each option.
Note: The front side of this printer is heavier than the rear. Take note of this difference in weight when moving the printer.
- Turn off the printer.
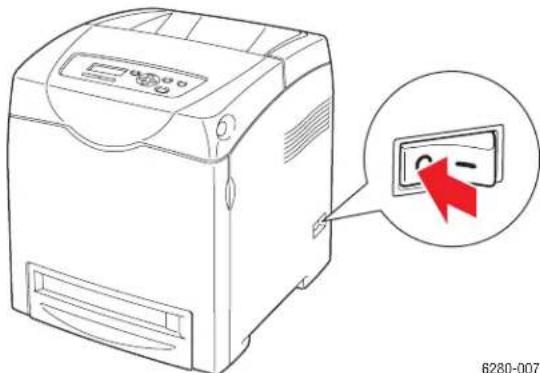
natural_image
Line drawing of a computer printer with a red arrow pointing to its screen (no text or symbols present)- Disconnect the power cord, interface cable, and any other cables.

natural_image
Diagram of a computer monitor connected to a cable, showing internal components and wiring (no text or symbols)Warning: To prevent electric shock, never touch the power plug with wet hands. When removing the power cord, make sure that you pull the plug and not the cord. Pulling the cord can damage it, which can lead to fire or electrical shock.
- Remove any paper in the output tray and return the paper stopper to its original position.
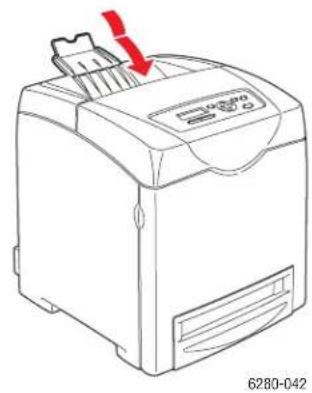
natural_image
Line drawing of a printer with a red arrow pointing to the paper edge (no text or symbols on the device itself)- Remove any paper in the Tray 1 (MPT), and then close the front cover. Keep the paper wrapped and away from humidity and dirt.
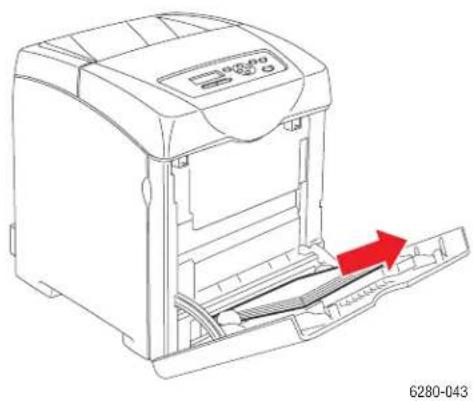
natural_image
Line drawing of a printer with a red arrow indicating the process, no text or symbols present- Pull out the paper tray from the printer and remove any paper in the tray, and then reinstall the tray. Keep the paper wrapped and away from humidity and dirt.
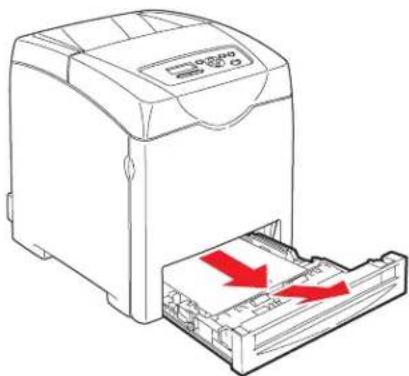
natural_image
Line drawing of a printer with a red arrow indicating compression or disassembly (no text or symbols present)6280-024
- Lift the printer and move it gently.
Note: If the printer is to be moved over a long distance, the print cartridges should be removed to prevent toner from spilling and the printer should be packed inside a box.
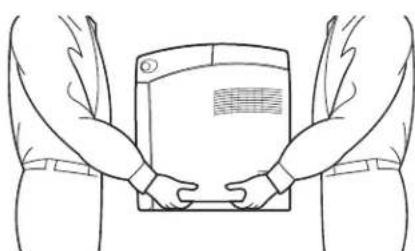
natural_image
Line drawing of two hands holding a rectangular device (no text or symbols)6280-044
- After transporting the printer, adjust the color registration before using it.
See also:
Color Registration on page 111
Index
Numerics
2-sided printing, 66
automatic, 66
binding edge options, 67
selecting, 67
A
AutoIP
manually setting the printer's IP address, 37
setting the printer's IP address dynamically, 36
automatic
2-sided printing, 66
available printer drivers, 39
B
billing meters, 96
total printed pages, 149
binding edge printing options, 67
C
caution symbols, 13
CentreWare IS
changing or modifying the printer's IP address, 38
checking status, 28
enabling DHCP, 36
managing printer, 145
online help for, 145
setting the printer's IP address dynamically, 36
starting, 145
changing the IP address using
CentreWare IS, 38
checking printed pages
how to check the meter, 149
choosing a network connection, 33
cleaning
printer, 142
printer exterior, 142
printer interior, 142
clearance
location of the printer, 10
color registration
adjusting, 111
automatic adjustment, 111
determining values, 112
enabling/disabling automatic adjustment, 113
entering values, 112
manual adjustment, 111
printing the correction chart, 111
configuration
optional accessories, 29
connection
Ethernet, 33
USB, 34
consumables, 143
error messages, 135
control panel, 25
Configuration page, 26
display, 25
error messages, 135
information pages, 26
layout, 25
Menu Map, 26
menus, 91
messages, 139
control panel menus
changing settings, 92
control panel, 104
description of, 93
information pages, 95
maintenance mode, 101
system settings, 98
tray settings, 93
custom paper
defining size
with PCL driver, 83
with PostScript driver, 84
custom size paper, 83
printing from Tray 1 (MPT), 84
supported for Tray 1 (MPT), 83
D
DHCP
enabled by default on Phaser printers, 36
enabling on the control panel, 36
enabling with CentreWare IS, 36
manually setting the printer's IP address, 37
setting the printer's IP address dynamically, 36
drivers
available, 39
description, 39
installing, 39
Macintosh, 39
Macintosh OS X version 10.3, 41
Macintosh OS X version 10.4, 43, 44
PCL, 39
PostScript, 39
selecting 2-sided printing, 67
UNIX/Linux, 39
Windows 2000 or later, 40
duplex unit, 24
dynamically setting the printer's IP
address, 36
E
electrical safety, 8
commands for, 148
enabling
options, 134
enabling AutoIP on the printer, 36
enabling DHCP on the printer, 36
envelopes, 70
guidelines, 70
printing from Tray 1 (MPT), 72
error and warning messages, 139
error messages
about consumables, 135
control panel, 135
Ethernet connection, 33
G
getting help, 139
Online Support Assistant, 139
PrintingScout alerts, 139
technical support, 30
glossy paper, 78
printing from Tray 1 (MPT), 78
printing from Trays 2-3, 80
printing guidelines, 78
guidelines
automatic 2-sided printing, 66
envelopes, 70
glossy paper, 78
labels, 73
operational, 10
paper storage, 48
paper usage, 46
printing on both sides of the paper, 66
printing safety, 11
H
help
resources, 30
how to check the meter, 149
I
information
about your printer, 30
information pages, 30
Installation Guide, 30
printer management tools, 30
Quick Use Guide, 30
resources, 30
technical support, 30
video tutorials, 30
web links, 30
information pages, 26
Configuration, 26
control panel menu, 95
Menu Map, 26
installing printer drivers, 39
Mac OS X, version 10.3, 41
Mac OS X, version 10.4, 43, 44
Windows 2000 or later, 40
IP address
changing or modifying using
CentreWare IS, 38
dynamically setting, 36
setting manually, 37
J
job
individual printing options
Macintosh, 63
Windows, 61
selecting printing options
Windows, 61
L
labels, 73
guidelines, 73
printing from Tray 1 (MPT), 73
printing from Trays 2-3, 75
laser safety, 9
loading paper
Tray 1 (MPT), 53
Trays 2-3, 56
Local Area Network (LAN), 35
location of the printer, 9
long paper, 83
M
Macintosh
PostScript driver settings, 63
selecting printing options for an
individual job, 63
Macintosh OS X version 10.3
printer drivers, 41
Macintosh OS X version 10.4, 43, 44
maintenance
ordering supplies, 143
routine maintenance items, 143
safety, 9
maintenance mode, 101
managing
printer, 145
manually setting the printer's IP
address, 37
overrides AutoIP, 37
overrides DHCP, 37
media
supported, 46
unacceptable types, 48
memory, 24
Menu Map, 26, 105
menu settings
changing, 92
Tray 1 (MPT), 94
menus
common tray settings, 93
tray settings, 93
messages
control panel, 139
PrintingScout, 139
meters
total page counts, 149
mode
power saver, 27
exiting, 27
modifying the IP address using
CentreWare IS, 38
moving
printer, 150
N
network
choosing a network connection, 33
creating a Local Area Network
(LAN), 35
setup and configuration, 32
TCP/IP and IP addresses, 35
network connection, 33
Ethernet, 33
0
Online Support Assistant, 139
operating systems
printer drivers, 39
operational guidelines, 10
operational safety, 9
options
550-sheet feeder, 24
duplex unit, 24
enabling, 134
memory, 24
multi-protocol card, 24
printer, 24
printing, 60
ordering supplies, 143
P
paper
custom sizes, 83
damaging to the printer, 48
envelopes, 70
glossy, 78
labels, 73
loading in the paper trays, 53
long paper, 83
printing on specialty media, 68
setting sizes, 52
setting trays, 51
setting types, 51
storage guidelines, 48
supported, 46
transparencies, 68
types, 46
unacceptable media types, 48
usage guidelines, 46
paper tray settings, 29
PCL, 39
PostScript, 39
power saver mode, 27
exiting, 27
pre-printed paper, 53
print quality
problems, 107
print status
checking, 28
printer
caution symbols, 13
changing or modifying the IP address
using CentreWare IS, 38
cleaning, 142
cleaning the exterior, 142
cleaning the interior, 142
clearance, 10
drivers, 39
enabling AutoIP, 36
enabling DHCP, 36
front view of, 21
information resources, 30
internal parts, 22
location, 9
main parts of, 21
managing, 145
moving, 150
options, 24
rear view of, 22
registration, 140
supplies, 11
printer driver
available, 39
installing, 39
Layout tab, 61
Macintosh, 39
Macintosh OS X version 10.3, 41
Macintosh OS X version 10.4, 43, 44
operating systems, 39
Output Options tab, 61
page description languages, 39
Paper/Quality tab, 61
PCL. 39
PostScript, 39
UNIX/Linux, 39
Windows 2000 or later, 40
printer status
checking via e-mail, 147
PrintingScout, 145
Status Messenger, 146
printing
2-sided, 67
automatic 2-sided, 66
binding edge options, 67
custom paper
with PCL driver, 84
with PostScript driver, 85
custom size or long paper, 83
envelopes, 70
with PCL driver, 72
with PostScript driver, 72
glossy paper, 78
labels, 73
Layout tab, 61
on both sides of the paper, 66
options
Macintosh, 63
selecting, 61, 63
Windows, 61
Output Options tab, 61
Paper Quality tab, 61
safety guidelines, 11
selecting 2-sided, 67
selecting individual job printing options
Macintosh, 63
Windows, 61
selecting options, 60
selecting printing preferences
(Windows), 60
transparencies, 68
with PCL driver, 70
with PostScript driver, 69
two-sided pages, 66
printing confidential document
secure print, 86
PrintingScout
alerts, 139
printer status, 145
proof print, 88
R
recycling supplies, 144
registering your printer, 140
regulatory information
Canada, 15
Europe, 16
United States, 15
resources
information, 30
routine maintenance items, 143
run black, 114
S
safety
electrical, 8
laser, 9
maintenance, 9
operational, 9
printing guidelines, 11
symbols, 13
safety symbols marked on product, 13
secure print, 86
selecting
2-sided printing, 67
printing options, 60
printing options for an individual job
Macintosh, 63
Windows, 61
printing preferences (Windows), 60
setting
printer's IP address dynamically, 36
printer's IP address manually, 37
setting up the network, 32
specialty media, 68
custom size paper, 83
envelopes, 70
glossy paper, 78
labels, 73
long paper, 83
transparencies, 68
Status Messenger
checking printer status, 146
commands, 148
configuring, 146
supplies, 11
ordering, 143
recycling, 144
when to order, 143
supported paper and media, 46
supported paper sizes and weights
Tray 1 (MPT), 49
Trays 2-3, 49
system settings, 98
T
TCP/IP addresses, 35
technical support, 30
transparencies, 68
guidelines, 68
printing from Tray 1 (MPT), 69
Tray 1 (MPT)
website resources, 140
loading paper, 53
printing custom size paper, 84
printing envelopes, 72
printing glossy paper, 78
printing labels, 73
printing transparencies, 69
settings, 94
trays
additional, 24
common settings, 93
options, 24
Trays 2-3
loading paper, 56
printing glossy paper, 80
printing labels, 75
troubleshooting
technical support, 30
turning off the printer, 12
two-sided printing, 66
automatic, 66
binding edge options, 67
selecting, 67
U
unacceptable paper and media, 48
usage guidelines
paper, 46
USB, 34
W
warning and error messages, 139
web links, 140
information, 30
website resources, 140
Windows
install printer drivers for Windows 2000
or later, 40
printing options, 61
selecting printing options for an
individual job, 61
Windows PostScript driver, 39
X
Xerox
supplies recycling programs, 144