Phaser 3040 - Printer XEROX - Free user manual and instructions
Find the device manual for free Phaser 3040 XEROX in PDF.

User questions about Phaser 3040 XEROX
0 question about this device. Answer the ones you know or ask your own.
Ask a new question about this device
Download the instructions for your Printer in PDF format for free! Find your manual Phaser 3040 - XEROX and take your electronic device back in hand. On this page are published all the documents necessary for the use of your device. Phaser 3040 by XEROX.
USER MANUAL Phaser 3040 XEROX
© 2011 Xerox Corporation. All Rights Reserved. Unpublished rights reserved under the copyright laws of the United States. Contents of this publication may not be reproduced in any form without permission of Xerox Corporation.
Copyright protection claimed includes all forms of matters of copyrightable materials and information now allowed by statutory or judicial law or hereinafter granted, including without limitation, material generated from the software programs which are displayed on the screen such as styles, templates, icons, screen displays, looks, and so on.
XEROX ^® and XEROX and Design ^® , Phaser ^® , PhaserSMART ^® , CentreWare ^® , PrintingScout ^® , Walk-Up ^® , WorkCentre ^® , FreeFlow ^® , SMARTsend ^® , Scan to PC Desktop ^® , MeterAssistant ^® , SuppliesAssistant ^® , Xerox Secure Access Unified ID System ^® , Xerox Extensible Interface Platform ^® , ColorQube ^® , Global Print Driver ^® , and Mobile Express Driver ^® are trademarks of Xerox Corporation in the United States and/or other countries.
Adobe ^® Reader ^® , Adobe ^® Type Manager ^® , ATM ^™ , Flash ^® , Macromedia ^® , Photoshop ^® , and PostScript ^® are trademarks of Adobe Systems Incorporated in the United States and/or other countries.
Apple ^® , AppleTalk ^® , Bonjour ^® , EtherTalk ^® , Macintosh ^® , Mac OS ^® , and TrueType ^® are trademarks of Apple Inc., registered in the U.S. and other countries.
HP-GL ^® , HP-UX ^® , and PCL ^® are trademarks of Hewlett-Packard Corporation in the United States and/or other countries.
IBM ^® and AIX ^® are trademarks of International Business Machines Corporation in the United States and/or other countries.
Microsoft ^® , Windows Vista ^® , Windows ^® , and Windows Server ^® are trademarks of Microsoft Corporation in the United States and other countries.
Novell ^® , NetWare ^® , NDPS ^® , NDS ^® , IPX ^™ , and Novell Distributed Print Services ^™ are trademarks of Novell, Inc. in the United States and other countries.
SGI ^® and IRIX ^® are trademarks of Silicon Graphics International Corp. or its subsidiaries in the United States and/or other countries.
UNIX ^® is a trademark in the United States and other countries, licensed exclusively through X/ Open Company Limited.
Document version 1.0: July 2011
Contents
1 Safety 7
Electrical Safety 8
General Guidelines 8
Power Cord 8
Operational Safety 10
Operational Guidelines....10
Ozone Release....10
Printer Location 10
Printer Supplies 11
Maintenance Safety 12
Printer Symbols....13
2 Printing 15
Supported Paper 16
Recommended Media 16
Ordering Paper 16
General Paper Loading Guidelines....16
Paper That Can Damage Your Printer 17
Paper Storage Guidelines....17
Supported Standard Paper Sizes....18
Custom Paper Sizes....18
Supported Types and Weights.... 18
Loading Paper 19
Loading Paper in the Main Tray....19
Printing on Both Sides of the Paper 21
Setting Up 2-Sided Printing....21
Loading Paper for Manual 2-Sided Printing....22
3 Maintenance 23
Cleaning the Printer 24
General Precautions....24
Cleaning the Exterior 24
Cleaning the Interior 25
Ordering Supplies 26
Consumables 26
When to Order Supplies 26
Toner Cartridges 27
Recycling Supplies 28
Managing the Printer 29
Printer Setting Utility 29
Checking Page Counts 31
Moving the Printer....32
4 Troubleshooting 35
General Troubleshooting.... 36
Printer Does Not Turn On.... 36
The Printer Does Not Print 36
Printer Resets or Turns Off Frequently.... 37
Printer is Making Unusual Noises 37
Condensation has Formed Inside the Printer 38
Paper Jams 39
Minimizing Paper Jams 39
Locating Paper Jams 40
Clearing Paper Jams 41
Print-Quality Problems 46
Solving Print-Quality Problems....46
Controlling Print Quality 50
Paper and Media....50
Using the Printer Setting Utility 52
Adjusting the Fuser 52
Adjusting the Bias Transfer Roller 52
Adjusting the Altitude....53
Cleaning the Developer....53
Control Panel 54
Error Codes....55
Getting Help....56
Error and Status Messages 56
PrintingScout Alerts 56
Printer Setting Utility 57
More Information....57
A Specifications 59
Printer Configurations and Options....60
Available Configurations....60
Standard Features....60
Physical Specifications....61
Weights and Dimensions....61
Total Space Requirements....61
Clearance Requirements....61
Environmental Specifications....62
Temperature 62
Relative Humidity 62
Elevation....62
Electrical Specifications....63
Power Supply Voltage and Frequency 63
Power Consumption 63
Performance Specifications....64
Controller Specifications....65
Processor....65
Memory....65
Interfaces....65
B Regulatory Information 67
Basic Regulations....68
United States FCC Regulations....68
European Union 68
Turkey RoHS Regulation 69
Material Safety Data Sheets 70
C Recycling and Disposal 71
All Countries 72
North America....73
European Union....74
Domestic/Household Environment 74
Professional/Business Environment 74
Collection and Disposal of Equipment and Batteries 75
Note for the Battery Symbol....75
Battery Removal....75
Other Countries....76
Safety
1
This chapter includes:
• Electrical Safety 8
• Operational Safety 10
- Maintenance Safety 12
- Printer Symbols 13
Your printer and the recommended supplies have been designed and tested to meet strict safety requirements. Attention to the following information ensures the continued safe operation of your Xerox ^® printer.
Electrical Safety
This section includes:
- General Guidelines ....8
• Power Cord......8
General Guidelines

WARNINGS:
- Do not push objects into slots or openings on the printer. Touching a voltage point or shorting out a part could result in fire or electrical shock.
- Do not remove the covers or guards that are fastened with screws unless you are installing optional equipment and are instructed to do so. Turn off the printer when performing these installations. Disconnect the power cord when removing covers and guards for installing optional equipment. Except for user-installable options, there are no parts that you can maintain or service behind these covers.
The following are hazards to your safety:
- The power cord is damaged or frayed.
- Liquid is spilled into the printer.
- The printer is exposed to water.
- The printer emits smoke, or the surface is unusually hot.
- The printer emits unusual noise or odors.
- The printer causes a circuit breaker, fuse, or other safety device to activate.
If any of these conditions occur, do the following:
- Turn off the printer immediately.
- Disconnect the power cord from the electrical outlet.
- Call an authorized service representative.
Power Cord
- Use the power cord supplied with your printer.
- Plug the power cord directly into a properly grounded electrical outlet. Make sure that each end of the cord is securely connected. If you do not know if an outlet is grounded, ask an electrician to check the outlet.
- Do not use a ground adapter plug to connect the printer to an electrical outlet that does not have a ground connection terminal.

WARNING: Avoid the potential of electrical shock by ensuring that the printer is properly grounded. Electrical products can be hazardous if misused.
- Only use an extension cord or power strip designed to handle the electrical current capacity of the printer.
- Verify that the printer is plugged into an outlet that is providing the correct voltage and power. Review the electrical specification of the printer with an electrician if necessary.
- Do not place the printer in an area where people can step on the power cord.
- Do not place objects on the power cord.
- Replace the power cord if it becomes frayed or worn.
- Do not unplug or plug the power cord while the printer is turned on.
• To avoid electrical shock and damage to the cord, grasp the plug when unplugging the power cord.
The power cord is attached to the printer as a plug-in device on the back of the printer. If it is necessary to disconnect all electrical power from the printer, disconnect the power cord from the electrical outlet.
Operational Safety
Your printer and supplies were designed and tested to meet strict safety requirements. These include safety agency examination, approval, and compliance with established environmental standards.
Your attention to the following safety guidelines helps to ensure the continued, safe operation of your printer.
Operational Guidelines
- Do not remove the paper source tray that you selected in either the print driver or control panel while the printer is printing.
- Do not open the doors when the printer is printing.
- Do not move the printer when it is printing.
- Keep hands, hair, neckties, and so on away from the exit and feed rollers.
- Covers, which require tools for removal, protect the hazard areas within the printer. Do not remove the protective covers.
Ozone Release
This printer produces ozone during normal operation. The amount of ozone produced is dependent on print volume. Ozone is heavier than air and is not produced in amounts large enough to harm anyone. Install the printer in a well-ventilated room.
For more information in North America, go to:
• Phaser 3010 Printer: www.xerox.com/environment
• Phaser 3040 Printer: www.xerox.com/environment
In other markets, contact your local Xerox representative or go to:
- Phaser 3010 Printer: www.xerox.com/environment_europe
- Phaser 3040 Printer: www.xerox.com/environment_europe
Printer Location
- Place the printer on a level, solid, non-vibrating surface with adequate strength to hold its weight. The base printer weight without any packaging materials is approximately 4.6 kg (10.1 lb.).
- Do not block or cover the slots or openings on the printer. These openings are provided for ventilation and to prevent overheating of the printer.
- Place the printer in an area where there is adequate space for operation and servicing.
- Place the printer in a dust-free area.
- Do not store or operate the printer in an extremely hot, cold, or humid environment.
-
Do not place the printer near a heat source.
-
Do not place the printer in direct sunlight to avoid exposure to light-sensitive components.
- Do not place the printer where it is directly exposed to the cold air flow from an air conditioning system.
- Do not place the printer in locations susceptible to vibrations.
- For optimum performance, use the printer at elevations below 3100 m (10,170 ft.).
Printer Supplies
- Use the supplies designed for your printer. The use of unsuitable materials can cause poor performance and a possible safety hazard.
- Follow all warnings and instructions marked on, or supplied with, the product, options, and supplies.
• Store all consumable supplies in accordance with the instructions given on the package or container. - Keep all consumable supplies away from the reach of children.
- Never throw toner cartridges into an open flame.
- When handling toner cartridges, avoid skin or eye contact. Eye contact can cause irritation and inflammation. Do not attempt to disassemble the cartridge, which can increase the risk of skin or eye contact.

CAUTION: Use of non-Xerox ^® supplies is not recommended. The Xerox ^® Warranty, Service Agreement, and Total Satisfaction Guarantee do not cover damage, malfunction, or degradation of performance caused by use of non-Xerox ^® supplies, or the use of Xerox ^® supplies not specified for this printer. The Total Satisfaction Guarantee is available in the United States and Canada. Coverage could vary outside these areas. Please contact your Xerox representative for details.
Maintenance Safety
- Do not attempt any maintenance procedure that is not described in the documentation supplied with your printer.
- Do not use aerosol cleaners. Clean with a dry lint-free cloth only.
- Do not burn any consumables or routine maintenance items.
For more information on the Xerox ^® supplies recycling program, go to:
• Phaser 3010 Printer: www.xerox.com/gwa
• Phaser 3040 Printer: www.xerox.com/gwa
See also:
Cleaning the Printer on page 24
Moving the Printer on page 32
Printer Symbols
The following safety symbols appear on the printer.
| Symbol | Description |
 | Warning or Caution:Ignoring this warning could cause serious injury or even death. Ignoring this caution could damage property. |
 | Hot surface on or in the printer. Use caution to avoid personal injury. |
 | Do not burn the item. |
 | Do not touch components with this symbol. Personal injury could result. |
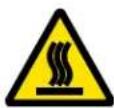
 | Hot surface. Wait the indicated time before handling. |
Printing
2
This chapter includes:
• Supported Paper 16
- Loading Paper.... 19
- Printing on Both Sides of the Paper 21
Supported Paper
This section includes:
• Recommended Media.... 16
- Ordering Paper 16
- General Paper Loading Guidelines.... 16
• Paper That Can Damage Your Printer .... 17
• Paper Storage Guidelines .... 17
• Supported Standard Paper Sizes 18
- Custom Paper Sizes 18
• Supported Types and Weights.... 18
Your printer is designed to use various paper and other media types. Follow the guidelines in this section to ensure the best print quality and to avoid jams.
For best results, use Xerox ^® paper and media recommended for your printer.
Recommended Media
A list of paper and media recommended for your printer is available at:
North America
• Phaser 3010 Printer: www.xerox.com/paper
• Phaser 3040 Printer: www.xerox.com/paper
European Union
• Phaser 3010 Printer: www.xerox.com/europaper
• Phaser 3040 Printer: www.xerox.com/europaper
Ordering Paper
Order supplies from your local reseller or go to:
• Phaser 3010 Printer: www.xerox.com/office/3010supplies
• Phaser 3040 Printer: www.xerox.com/office/3040Psupplies
General Paper Loading Guidelines
- Use only recommended Xerox ^ transparencies. Print quality could vary with other transparencies.
-
Do not print on label media once a label has been removed from a sheet.
-
Use only paper envelopes. Print envelopes 1-sided only.
- Do not overfill the paper trays. Do not load paper above the maximum fill line in the tray.
- Adjust the paper guides to fit the paper size.
- Fan paper before loading it in the paper tray.
- If excessive jams occur, use paper or other approved media from a new package.
Paper That Can Damage Your Printer
Some paper and other media types can cause poor output quality, increased paper jams, or damage your printer. Do not use the following:
- Rough or porous paper
- Inkjet paper
• Non-laser glossy or coated paper
• Paper that has been photocopied
• Paper that has been folded or wrinkled
• Paper with cutouts or perforations - Stapled paper
- Envelopes with windows, metal clasps, side seams, or adhesives with release strips
- Padded envelopes
- Plastic media

CAUTION: The Xerox ^® Warranty, Service Agreement, or Xerox ^® Total Satisfaction Guarantee does not cover damage caused by using unsupported paper or specialty media. The Xerox ^® Total Satisfaction Guarantee is available in the United States and Canada. Coverage could vary outside these areas. Please contact your local representative for details.
Paper Storage Guidelines
Storing your paper and other media properly contributes to optimum print quality.
- Store paper in dark, cool, relatively dry locations. Most paper is susceptible to damage from ultraviolet and visible light. Ultraviolet light, from the sun and fluorescent bulbs, is particularly damaging to paper.
- Reduce the exposure of paper to strong lights for long periods of time.
- Maintain constant temperatures and relative humidity.
- Avoid storing paper in attics, kitchens, garages, or basements. These spaces are more likely to collect moisture.
- Store paper flat, either on pallets, cartons, shelves, or in cabinets.
- Avoid having food or drinks in the area where paper is stored or handled.
- Do not open sealed packages of paper until you are ready to load them into the printer. Leave stored paper in the original packaging. The paper wrapper protects the paper from moisture loss or gain.
- Some special media is packaged inside resealable plastic bags. Store the media inside the bag until you are ready to use it. Keep unused media in the bag and reseal it for protection.
Supported Standard Paper Sizes
| European Standard Sizes | North American Standard Sizes |
| A4 (210 x 297 mm, 8.3 x 11.7 in.) | Executive (184 x 267 mm, 7.25 x 10.5 in.) |
| A5 (148 x 210 mm, 8.3 x 5.8 in.) | Letter (216 x 279 mm, 8.5 x 11 in.) |
| A6 (105 x 148 mm, 4.1 x 5.8 in.) | Legal (216 x 356 mm, 8.5 x 14 in.) |
| JIS B5 (182 x 257 mm, 7.2 x 10.1 in.) | Statement (140 x 216 mm, 5.5 x 8.5 in.) |
| ISO B5 (176 x 250 mm, 6.9 x 9.8 in.) | US Folio (216 x 330 mm, 8.5 x 13 in.) |
| C5 envelope (162 x 229 mm, 6.4 x 9 in.) | Monarch envelope (98 x 190 mm, 3.875 x 7.5 in.) |
| C6 envelope (114 x 162 mm, 4.5 x 6.38 in.) | No. 10 envelope (241 x 105 mm, 4.125 x 9.5 in.) |
| DL envelope (110 x 220 mm, 4.33 x 8.66 in.) | A7 envelope (133 x 184 mm, 5.25 x 7.25 in.) |
Custom Paper Sizes
Width: 76.2–216 mm (3–8.5 in.)
Length: 127–355.6 mm (5–14 in.)
Supported Types and Weights
The printer supports the following paper types with paper weights from 60–163 g/m ^2 (16 lb. Plain–60 lb. Cover):
- Plain
• Lightweight Cardstock - Labels
- Envelope
- Recycled
Loading Paper
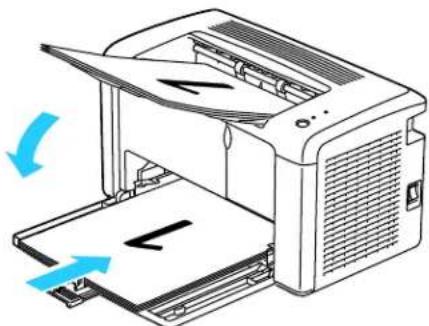
Loading Paper in the Main Tray
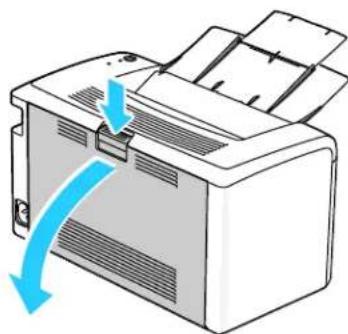
- Open the front cover.
- Pull the slide bar forward until it stops.
- Pull the length guide forward until it stops.
-
Move the width guides to the edges of the tray.
-
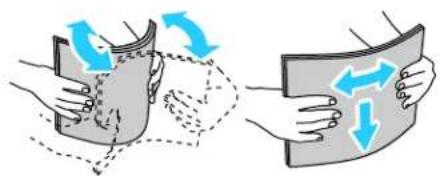
Flex the sheets back and forth and fan them, then align the edges of the stack on a level surface. This procedure separates any sheets that are stuck together and reduces the possibility of jams.
natural_image
Illustration of two hands holding a curved object with blue directional arrows indicating motion or movement (no text or symbols)-
Load the paper into the tray with the top edge going into the printer and the print side up.
-
Adjust the width guides until they touch the edges of the paper.
-
Push in the length guides and slide bar until they stop.
Note: Depending on the size of the paper, first push the slide bar toward the printer until it stops. Pinch the length guide and slide it in until it touches the paper edge.
- Place the paper cover on the main tray and align the tabs with the marks on the tray.
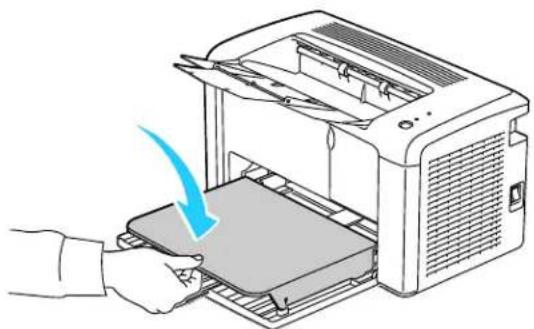
natural_image
Illustration of a printer being inserted into a tray, with a hand using the tool (no text or symbols visible)Printing
- Open the output tray and pull out the tray extension.
- To select the paper type and size, in the Printer Setting Utility, click the Printer Maintenance tab.
Note: If you are using custom size paper, select the Custom Size - Y and Custom Size - X dimensions.
- Click Apply New Settings.
Note: For details about using the Printer Setting Utility, click Help in the Printer Setting Utility window.
Printing on Both Sides of the Paper
This section includes:
- Setting Up 2-Sided Printing 21
- Loading Paper for Manual 2-Sided Printing 22
The Phaser 3010 Printer supports manual 2-sided printing. You can set printing preferences to print your jobs on both sides of the paper.
Use 2-Sided Printing to specify the page orientation for the printed output.
You can specify the page layout for 2-sided printing, which determines how the printed pages turn. These settings override the application page orientation settings.
| Portrait | Landscape | ||
 |  |  |  |
| Portrait2-Sided Print | Portrait2-Sided Print, Flip on Short Edge | Landscape2-Sided Print | Landscape2-Sided Print, Flip on Short Edge |
Setting Up 2-Sided Printing
To set up manual 2-sided printing:
- From the File menu, select Print.
- Select the printer from the Select Printer list, then click Properties.
- From the Duplex window on the Paper/Output tab, select Flip on Long Edge or Flip on Short Edge.
- Select the Paper Size and Paper Type to match the paper you are using.
- To close the Printing Preferences dialog box, click OK.
- To start printing, click Print.
Note: When you start manual 2-sided printing, the Manual Duplex Setup window appears. Do not close the window until you have completed the 2-sided printing. Once the window is closed, it cannot be reopened.
Printing
Loading Paper for Manual 2-Sided Printing
For manual 2-sided printing, the back sides of the pages are printed first in reverse order. For a six-page document, the pages are printed page 6, page 4, and then page 2. Once the even pages are printed, the paper is reloaded. The odd pages are printed page 1, page 3, and then page 5.
Note: Load letterhead into the main tray with the printed side down and the top going into the printer.
- Load the paper to print the even pages.

natural_image
Illustration of a printer with paper being inserted, showing paper sheet and printer outline (no text or symbols)Once the even pages have printed, the Error indicator lights and the Ready indicator flashes.
- Remove the printed pages from the output tray and reload them into the main tray without rotating or flipping the pages. The unprinted sides of the pages are facing up.
natural_image
Diagram of a printer with open lid and paper tray, showing blue arrows indicating motion (no text or symbols)- Press the button on the control panel.
Maintenance
3
This chapter includes:
- Cleaning the Printer 24
- Ordering Supplies 26
• Managing the Printer 29 - Moving the Printer 32
Cleaning the Printer
This section includes:
- General Precautions.... 24
- Cleaning the Exterior 24
- Cleaning the Interior 25
General Precautions

CAUTION: When cleaning your printer do not use organic or strong chemical solvents or aerosol cleaners. Do not pour fluids directly into any area. Use supplies and cleaning materials only as directed in this documentation.

WARNING: Keep all cleaning materials out of the reach of children.

WARNING: Do not use pressurized spray cleaning aids on or in the printer. Some pressurized sprays contain explosive mixtures and are not suitable for use in electrical applications. Use of such cleaners increase the risk of fire and explosion.

WARNING: Do not remove the covers or guards that are fastened with screws. You cannot maintain or service any parts that are behind these covers and guards. Do not attempt any maintenance procedure that is not described in the documentation supplied with your printer.

WARNING: Internal parts of the printer can be hot. Use caution when doors and covers are open.
- Do not place anything on top of the printer.
- Do not leave the covers and doors open for any length of time, especially in well-lit places. Light exposure can damage the imaging units.
- Do not open covers and doors during printing.
- Do not tilt the printer while it is in use.
- Do not touch the electrical contacts or gears. Doing so could damage the printer and cause the print quality to deteriorate.
- Make sure any parts removed during cleaning are replaced before you plug in the printer.
Cleaning the Exterior
Clean the exterior of the printer once a month.
- Wipe the paper tray, output tray, control panel, and other parts with a damp, soft cloth.
• After cleaning, wipe with a dry, soft cloth.
24 Phaser 3010/3040 Printer
User Guide
- For stubborn stains, apply a small amount of mild detergent to the cloth and gently wipe the stain off.

CAUTION: Do not spray detergent directly on the printer. Liquid detergent could enter the printer through a gap and cause problems. Never use cleaning agents other than water or mild detergent.
Cleaning the Interior
After clearing paper jams or replacing a toner cartridge, inspect the inside of the printer before closing the printer covers.
- Remove any remaining pieces of paper or debris. For details, see Clearing Paper Jams on page 41.
- Remove any dust or stains with a dry, clean cloth.

WARNING: Never touch a labeled area on or near the heat roller in the fuser. You can get burned. If a sheet of paper is wrapped around the heat roller, do not try to remove it immediately. Switch off the printer immediately and wait 20 minutes for the fuser to cool. Try to remove the jam after the printer has cooled.
Ordering Supplies
This section includes:
Consumables 26
- When to Order Supplies....26
- Toner Cartridges.... 27
• Recycling Supplies....28
Consumables
Consumables are printer supplies that get depleted during the operation of the printer. The consumable supply for this printer is the genuine Xerox ^® Black Toner Cartridge.
Notes:
• Each consumable includes installation instructions.
• Install only new cartridges in your printer. If a used toner cartridge is installed, then the toner remaining amount displayed could be inaccurate.
- To ensure print quality, the toner cartridge has been designed to cease functioning at a predetermined point.

CAUTION: Use of toner other than genuine Xerox ^® Toner can affect print quality and printer reliability. Xerox ^® Toner is the only toner designed and manufactured under strict quality controls by Xerox for specific use with this printer.
When to Order Supplies
The printer control panel displays a warning and PrintingScout displays a message when a supply nears its replacement time. Verify that you have replacements on hand. It is important to order these supplies when the messages first appear in PrintingScout to avoid interruptions to your printing. The control panel displays a warning and PrintingScout displays a message when the supply must be replaced.
Order supplies from your local reseller or go to:
• Phaser 3010 Printer: www.xerox.com/office/3010supplies
• Phaser 3040 Printer: www.xerox.com/office/3040Psupplies

CAUTION: Use of non-Xerox ^® supplies is not recommended. The Xerox ^® Warranty, Service Agreement, and Total Satisfaction Guarantee do not cover damage, malfunction, or degradation of performance caused by use of non-Xerox ^® supplies, or the use of Xerox ^® supplies not specified for this printer. The Total Satisfaction Guarantee is available in the United States and Canada. Coverage could vary outside these areas. Please contact your Xerox representative for details.
Toner Cartridges
This section includes:
- General Precautions.... 27
- Replacing the Toner Cartridge .... 28
General Precautions

WARNINGS:
- When replacing a toner cartridge, be careful not to spill the toner. If any toner spills, avoid contact with clothes, skin, eyes, and mouth. Do not inhale the toner dust.
- Keep toner cartridges out of the reach of children. If a child accidentally swallows toner, have the child spit out the toner, and rinse out their mouth with water. Consult a physician immediately.
- Use a damp cloth to wipe off spilled toner. Never use a vacuum cleaner to remove spills. Electric sparks inside the vacuum cleaner can cause a fire or explosion. If you spill a large volume of toner, contact your local Xerox representative.
- Never throw a toner cartridge into an open flame. Remaining toner in the cartridge can catch fire and cause burn injuries or an explosion.

WARNING: Do not remove the covers or guards that are fastened with screws. You cannot maintain or service any parts that are behind these covers and guards. Do not attempt any maintenance procedure that is not described in the documentation supplied with your printer.
To avoid damaging the printer, follow these guidelines:
- Do not place anything on top of the printer.
- Do not leave the covers and doors open for any length of time, especially in well-lit places. Light exposure can damage the imaging units.
- Do not open covers and doors during printing.
- Do not tilt the printer while in use.
- Do not touch the electrical contacts or gears. Doing so could damage the printer and cause the print quality to deteriorate.
- Ensure that any parts removed during cleaning are reinstalled before you plug in the printer.
Replacing the Toner Cartridge
The printer has one black toner cartridge.
When the toner cartridge reaches its usable life span, the control panel indicators light to show the status. PrintingScout displays a message in the Printer Status window describing the status.
Note: Each toner cartridge includes installation instructions.
| Indicator | Printer Status Message | Problem and Solution |
| Error on | Replace the toner cartridge or check that the toner cartridge is seated properly. | The toner cartridge is empty. Replace the toner cartridge with a new one. |
Recycling Supplies
For more information on the Xerox ^® supplies recycling program, go to:
• Phaser 3010 Printer: www.xerox.com/gwa
• Phaser 3040 Printer: www.xerox.com/gwa
Managing the Printer
This section includes:
• Printer Setting Utility 29
- Checking Page Counts 31
Printer Setting Utility
The Printer Setting Utility installs on your computer when you install the print driver. The Printer Setting Utility has three tabs that help you to monitor, maintain, and troubleshoot the printer.
Printer Settings Report
The Printer Settings Report tab provides a list of printer information, menu settings, information pages, and tray settings for monitoring the status of the printer. Use the information on this tab to help you configure settings for your printer, and to view page counts and system settings. The following menus are available:
• Printer Information provides information about the printer and its configuration.
- Menu Settings provides a list of settings for each printer menu.
- Information Pages provides printed settings, histories, and demo pages for troubleshooting and for checking the printer status, settings, and history.
- Tray Settings provides a list of the paper tray settings.
Printer Maintenance
The Printer Maintenance tab allows you to control and adjust system settings, adjust tray settings, and adjust printer operation for different paper types.
The following menus are available:
- System Settings adjusts settings such as time, date, and language.
- Adjust BTR specifies the Bias Transfer Roller voltage for printing on the selected paper type.
- Adjust Fuser offsets the fuser bias voltage for optimum print quality across a wide range of paper types.
• Density Adjustment provides an offset to correct for differences in paper density. - Adjust Altitude adjusts the altitude of the printer to obtain optimal printing results.
- Reset Defaults restores the system settings to the factory default settings.
- BTR Refresh specifies when to execute a routine to refresh the Bias Transfer Roller to prevent curling and improve paper separation.
- Tray Settings configures settings for the paper tray.
- Jam Recovery restores the printer to normal operation after a paper jam.
Diagnosis
The Diagnosis tab provides tools for troubleshooting and resolving printer faults and print-quality problems. The following menus are available:
• Chart Print prints selected charts for evaluating print quality and diagnosing print-quality problems.
- Clean Developer rotates the developer motors and stirs the toner cartridges to clear old toner from the developers.
- Refresh Mode cleans the toner in the toner cartridge when you must replace it, or stirs the toner in a new toner cartridge.
Checking Page Counts
You can check the total number of printed pages on the Configuration Page. The billing meter counts the number of pages printed.
To print the Configuration Page:
- To start the Printer Setting Utility, on your computer select Start > All Programs > Xerox Office Printing.
- Select your printer name, then select Printer Setting Utility.
- Click the Printer Settings Report tab.
- Click Information Pages, then click the Configuration Page button.
Moving the Printer
Follow these instructions when moving the printer:
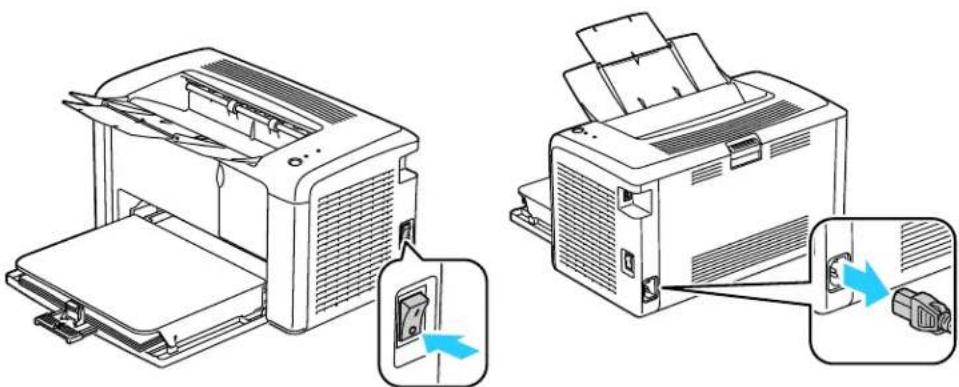
- Turn off the printer and disconnect the power cord and other cables from the back of the printer.
natural_image
Illustration of two printer machines with blue arrows indicating internal components (no text or symbols present)
WARNING: To prevent electric shock, never touch the power plug with wet hands. When removing the power cord, ensure that you pull the plug and not the cord. Pulling the cord can damage it, which can lead to fire or electric shock.
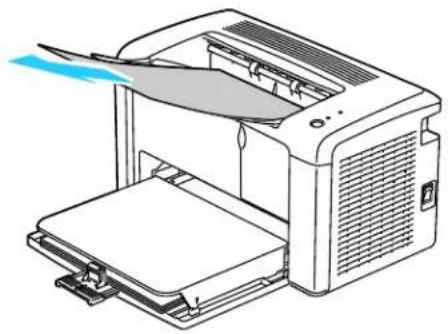
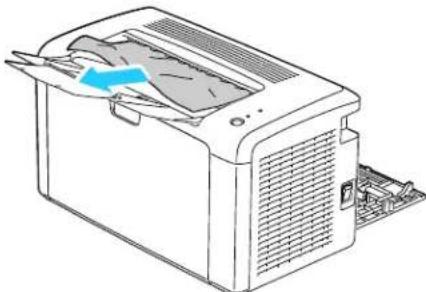
- Remove any paper or other media from the output tray. Close the output tray.
natural_image
Line drawing of a printer with paper inside, showing paper being inserted (no text or symbols)- Remove the paper cover.
Keep the paper cover, power cord, and USB cable together for reuse.

natural_image
Illustration of a printer being inserted into a paper holder, showing the printer's internal structure and airflow direction (no text or symbols)- Remove the paper from the paper tray.

natural_image
Illustration of a printer with a blue arrow indicating compression or disassembly (no text or symbols present)- Push in the length guides and slide bar until they stop.

text_image
Diagram illustrating a printer's internal structure and tool path, with Chinese annotations highlighting the process.Maintenance
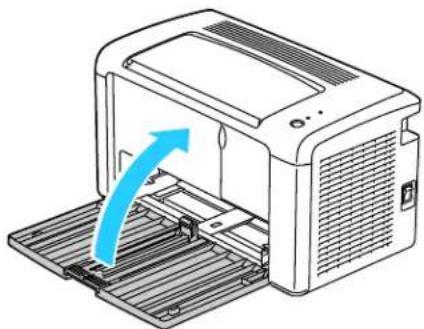
- Fold up the main tray extension.
natural_image
Illustration of a printer with a blue arrow indicating compression or shift (no text or symbols present)- Lift and carry the printer as shown in the illustration.
Note: The printer, including supplies, weighs 4.6 kg (10.1 lb.).
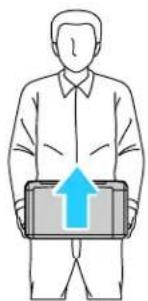
natural_image
Illustration of a person holding a device with an upward arrow (no text or symbols)
CAUTION: Failure to repackage the printer properly for shipment can result in damage not covered by the Xerox® Warranty, Service Agreement, or Total Satisfaction Guarantee. The Xerox® Warranty, Service Agreement, or Total Satisfaction Guarantee do not cover damage to the printer caused by improper moving.
When moving the printer do not tilt the printer more than 10 degrees to the front, back, left, or right:

natural_image
Four line drawings showing a laptop on an inclined plane with upward arrows indicating motion (no text or symbols)After moving the printer:
- Reinstall any parts you removed.
- Reconnect the printer to the cables and power cord.
- Plug in and turn on the printer.
34 Phaser 3010/3040 Printer User Guide
Troubleshooting
4
This chapter includes:
- General Troubleshooting 36
Paper Jams 39
• Print-Quality Problems 46
• Using the Printer Setting Utility 52
• Control Panel....54 - Error Codes.... 55
• Getting Help 56
General Troubleshooting
This section includes:
• Printer Does Not Turn On .... 36
• The Printer Does Not Print 36
• Printer Resets or Turns Off Frequently 37
• Printer is Making Unusual Noises.... 37
• Condensation has Formed Inside the Printer 38
This section contains procedures to help you locate and resolve problems. Resolve some problems by simply restarting the printer.
Printer Does Not Turn On
| Probable Causes | Solutions |
| The power switch is not turned on. | Turn on the switch. |
| The power cord is not correctly plugged into the outlet. | Turn off the printer power switch, and plug the power cord securely into the outlet. |
| Something is wrong with the outlet connected to the printer. | Plug another electrical appliance into the outlet and see if it operates properly.Try a different outlet. |
| The printer is connected to an outlet with a voltage or frequency that does not match the printer specifications. | Use a power source with the specifications listed in the Electrical Specifications on page 63. |

CAUTION: Plug the three-wire cord with grounding prong directly into a grounded AC outlet.
The Printer Does Not Print
| Probable Causes | Solutions |
| The printer is in Energy Saver mode. | Push the control panel button. |
| PrintingScout displays an error message. | Follow the instructions in the PrintingScout message to correct the problem. If the error persists, contact your Xerox representative. |
| The Error Indicator is on. | ·If the Ready Indicator is off, the printer is out of toner. Replace the toner cartridge.·If the Ready Indicator is flashing, load paper into the Main Tray. If the error persists, contact your Xerox representative. |
| The Error Indicator is blinking. | ·If the Ready Indicator is off, the printer has stopped working. Turn off the printer, then turn it on again. If the error persists, contact your Xerox representative.·If the Ready Indicator is flashing, the printer is canceling a job or initializing non-volatile memory. |
| Both control panel indicators are off. | Turn off the printer, confirm that the power cord is plugged in correctly to the printer and the outlet, then turn on the printer. If the error persists, contact your Xerox representative. |
| The Ready Indicator is flashing. | ·If the Ready Indicator is flashing, it is normal. A previous print job could be the problem. Use PrintingScout to delete all print jobs in the print queue.To force the printer to print, push the control panel button.Load the paper in the tray.·If the Ready Indicator is not flashing after you send a print job, check the USB connection between the printer and the computer. Turn off the printer, then turn it on again. |
Printer Resets or Turns Off Frequently
| Probable Causes | Solutions |
| The power cord is not plugged into the outlet correctly. | Turn off the printer, confirm that the power cord is plugged in correctly to the printer and the outlet, then turn on the printer. |
| A system error occurred. | Turn off the printer, then turn it on again. Print the Error History from the Information Pages of the Printer Setting Utility. If the error persists, contact your Xerox representative. For more information, see Printer Setting Utility on page 29. |
| The printer is connected to an uninterruptible power supply. | Turn off the printer, then connect the power cord to a suitable outlet. |
| The printer is connected to a power strip shared with other high-power devices. | Plug the printer directly into the outlet or into a power strip that is not shared with other high-power devices. |
Printer is Making Unusual Noises
| Probable Causes | Solutions |
| There is an obstruction or debris inside the printer. | Turn off the printer and remove the obstruction or debris. If you cannot remove it, contact your Xerox representative. |
Condensation has Formed Inside the Printer
Moisture can condense inside a printer where the humidity is above 85% or when a cold printer is located in a warm room. Condensation can form in a printer after it has been sitting in a cold room that is heated quickly.
| Probable Causes | Solutions |
| The printer has been sitting in a cold room. | Allow the printer to operate for several hours at room temperature. |
| The relative humidity of the room is too high. | Reduce the humidity in the room.Move the printer to a location where the temperature and relative humidity are within the operating specifications. |
Paper Jams
This section includes:
- Minimizing Paper Jams.... 39
- Locating Paper Jams....40
- Clearing Paper Jams 41
Minimizing Paper Jams
The printer is designed to function with minimal paper jams using Xerox ^® supported paper. Other paper types can cause jams. If supported paper is jamming frequently in one area, clean that area of the paper path.
The following can cause paper jams:
- Selecting the incorrect paper type in the print driver.
• Using damaged paper.
• Using unsupported paper. - Loading paper incorrectly.
• Overfilling the tray. - Adjusting the paper guides improperly.
Most jams can be prevented by following a simple set of rules:
• Use only supported paper. For details, see Supported Paper on page 16.
- Follow proper paper handling and loading techniques.
• Always use clean, undamaged paper.
- Avoid paper that is curled, torn, moist, creased, or folded.
- Fan the paper to separate the sheets before loading it into the tray.
- Observe the paper tray fill line; never overfill the tray.
- Adjust the paper guides on the trays after inserting the paper. A guide that is not properly adjusted can cause poor print quality, misfeeds, skewed prints, and printer damage.
- After loading the tray, select the correct paper type and size in the print driver.
- When printing, select the correct type and size in the print driver.
- Store paper in a dry location.
- Use only Xerox ^® paper designed for the printer.
Avoid the following:
- Polyester coated paper that is specially designed for inkjet printers.
- Paper that is folded, wrinkled, or excessively curled.
- Loading more than one type, size, or weight of paper in a tray at the same time.
Troubleshooting
• Overfilling the trays.
- Allowing the output tray to overfill.
For a detailed list of supported paper, go to:
• Phaser 3010 Printer: www.xerox.com/paper
• Phaser 3040 Printer: www.xerox.com/paper
Locating Paper Jams

WARNING: Never touch a labeled area on or near the heat roller in the fuser. You can get burned. If a sheet of paper is wrapped around the heat roller, do not try to remove it immediately. Switch off the printer immediately and wait 20 minutes for the fuser to cool. Try to remove the jam after the printer has cooled. If the error persists, contact your Xerox representative.

CAUTION: Do not attempt to clear any paper jams using tools or instruments. This can permanently damage the printer.
The following illustration shows where paper jams can occur along the paper path:

text_image
Diagram of a printer's internal structure with numbered parts for identification and assembly reference.- Output Tray
- Release Levers
- Transfer Belt
- Rear Cover
- Front Cover
- Main Tray
Clearing Paper Jams
This section includes:
- Clearing Paper Jams From the Front of the Printer 41
- Clearing Paper Jams From the Back of the Printer 42
- Clearing Paper Jams From the Output Tray 44
Clearing Paper Jams From the Front of the Printer
Note: To resolve the error displayed on the control panel you must clear all paper from the paper path.
- Remove the paper cover from the main tray.
natural_image
Illustration of a printer being inserted into a paper holder, showing the printer's internal structure and airflow direction (no text or symbols)- Remove any paper jammed at the front of the printer.
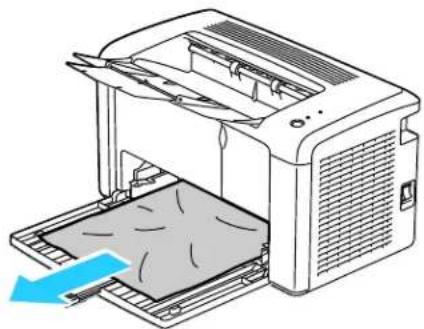
natural_image
Illustration of a printer with a blue arrow indicating compression or disassembly (no text or symbols present)Troubleshooting
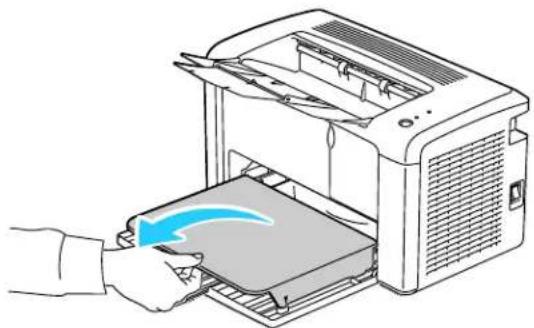
- Replace the paper cover on the main tray.

natural_image
Illustration of a printer being inserted into a tray, with a hand holding the tray (no text or symbols visible)- To restore the printer, press the button on the control panel according to the instructions in the Printer Status window of PrintingScout.
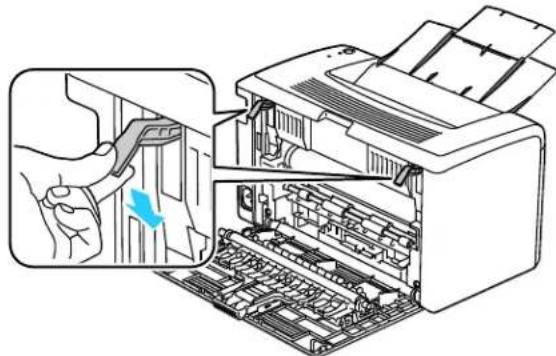
Clearing Paper Jams From the Back of the Printer
Note: To resolve the error displayed on the control panel you must clear all paper from the paper path.
- Push down on the rear cover release and pull the cover open.

natural_image
Illustration of a printer with blue arrows indicating compression or disassembly process (no text or symbols)- Lift the levers as shown.
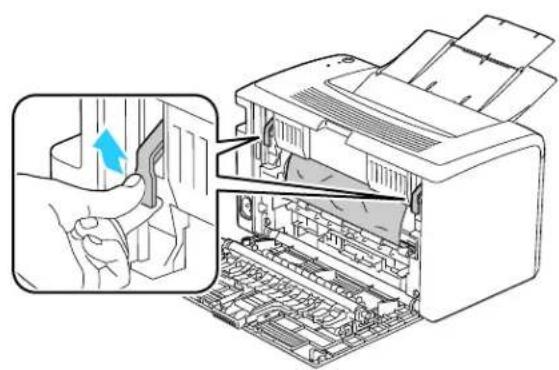
natural_image
Diagram of a printer being inserted into a circuit board, showing internal components and a hand interacting with the printer (no text or symbols present)42 Phaser 3010/3040 Printer User Guide
- Remove any jammed paper from the back of the printer.

natural_image
Diagram of a printer internal structure showing internal components and a blue arrow indicating a component (no text or symbols present)- Lower the levers to their original position.
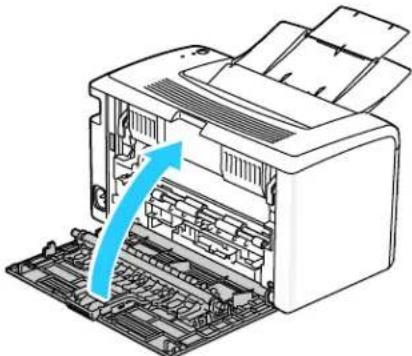
natural_image
Illustration of a printer's internal structure showing internal components and a hand operating the blade (no text or symbols present)- Close the rear cover.

natural_image
Diagram of a printer with an open circuit board and a blue arrow indicating the process (no text or symbols present)- To restore the printer, press the button on the control panel according to the instructions in the Printer Status window of PrintingScout.
Troubleshooting
Clearing Paper Jams From the Output Tray
Note: To resolve the error displayed on the control panel you must clear all paper from the paper path.
- Push down on the rear cover release and pull the cover open.
natural_image
Illustration of a printer with blue arrows indicating airflow or movement (no text or symbols)- Lift the levers as shown.

natural_image
Diagram of a printer being inserted into a paper airplane, showing internal structure and a hand inserting a component (no text or symbols present)- Remove any jammed paper from the back of the printer.

natural_image
Diagram of a printer with internal components and a blue arrow indicating a process (no text or symbols present)44 Phaser 3010/3040 Printer User Guide
- Remove any paper jammed in the output tray.
natural_image
Line drawing of a printer with a blue arrow indicating the blade (no text or symbols present)- Lower the levers to their original position.

natural_image
Illustration of a printer's internal structure showing a hand using a tool to clean or adjust the part (no text or symbols present)- Close the rear cover.
natural_image
Diagram of a printer with an open circuit board and a blue arrow indicating a process (no text or symbols present)- To restore the printer, press the button on the control panel according to the instructions in the Printer Status window of PrintingScout.
Print-Quality Problems
This section includes:
- Solving Print-Quality Problems.... 46
• Controlling Print Quality....50
• Paper and Media 50
Your printer is designed to produce consistently high-quality prints. If you observe print-quality problems, use the information in this section to troubleshoot the problem.
For more information, go to:
• Phaser 3010 Printer: www.xerox.com/office/3010support
• Phaser 3040 Printer: www.xerox.com/office/3040Psupport

CAUTION: The Xerox ^® Warranty, Service Agreement, or Xerox ^® Total Satisfaction Guarantee does not cover damage caused by using unsupported paper or specialty media. The Xerox ^® Total Satisfaction Guarantee is available in the United States and Canada. Coverage could vary outside these areas. Please contact your local representative for details.
Solving Print-Quality Problems
When the print quality is poor, select the closest symptom from the following table and see the corresponding solution to correct the problem. You can also print a Demo Page to more precisely determine the print-quality problem.
If the print quality does not improve after carrying out the appropriate action, contact your Xerox representative.
| Symptom | Solutions |
The output is too light.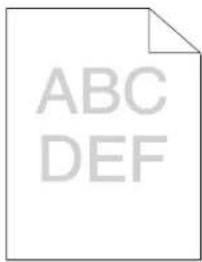 | Use PrintingScout to check the toner level. If the toner cartridge is near empty, replace it.Verify that the toner cartridge is approved for use in this printer, and replace it as needed. For best results, use a genuine Xerox®toner cartridge.Replace the paper with a recommended size and type, and confirm that your printer and print driver settings are correct.Verify that the paper is dry and that supported paper is used. If not, change the paper.Change the Paper Type settings in the print driver.On the Paper/Output tab in the Printing Preferences of the print driver, change the Paper Type setting.Use the Printer Setting Utility to change the paper type to match the paper. |
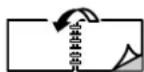
| Toner smears or print comes off.The output has stains on the back side.[IMAGE] | Change the Paper Type setting in the print driver. For example, change Plain to Lightweight Cardstock.On the Paper/Output tab in the Printing Preferences of the print driver, change the Paper Type setting.Verify that the paper is the correct size, type, and weight. If not, change the paper settings.Adjust the temperature of the fuser. SeeAdjusting the Fuseron page 52. |
| Random spots on the output, or the image is blurry.[IMAGE] | Ensure that the toner cartridge is installed correctly.If you used a non-genuine brand toner cartridge, install a genuine Xerox®toner cartridge. |
| The output is blank.[IMAGE] | Turn off the printer, then turn it on again.If the error persists, contact your Xerox representative. |
Streaks appear in the output. | Contact your Xerox representative. |
The output has a mottled appearance.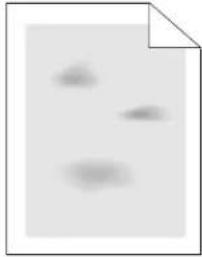 | Verify that the paper is the correct size, type, and weight. If not, change the paper settings.Adjust the bias transfer roller. SeeAdjusting the Bias Transfer Roller on page 52. |
Ghosting appears in the printed output.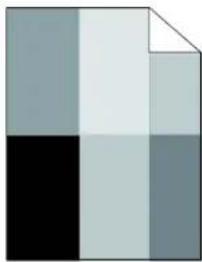 | Verify that the paper is the correct size, type, and weight for the printer and that it is loaded properly. If not, change the paper.Change the Paper Type settings in the print driver.On the Paper/Output tab in the Printing Preferences of the print driver, change the Paper Type setting.Use the Printer Setting Utility to change the paper type to match the paper.Adjust the bias transfer roller. SeeAdjusting the Bias Transfer Roller on page 52.Adjust the fuser. SeeAdjusting the Fuser on page 52. |
The printed output is foggy. | Clean the Developer. SeeCleaning the Developer on page 53. |
Auger marks appear on the printed output.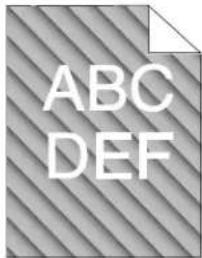 | Use PrintingScout to check the toner level. If the toner cartridge is near empty, replace it.Verify that the toner cartridge meets specifications, and replace it if necessary. For best results, use a genuine Xerox®toner cartridge.Clean the developer. SeeCleaning the Developeron page 53. |
The output print is wrinkled or stained. | Verify that the paper is the correct size, type, and weight for the printer and that it is loaded properly. If not, change the paper.Change the Paper Type settings in the print driver.On the Paper/Output tab in the Printing Preferences of the print driver, change the Paper Type setting.Use the Printer Setting Utility to change the paper type to match the paper. |
| Envelopes are wrinkled or creased when printed. | Check if the crease is within 30 mm of the four edges of the envelope.If yes, it is printing as expected. Your printer is not faulty.If not, take the following actions:For Number 10 envelopes, which are 220 mm or longer and have a flap along the long edge, rotate the envelope 180 degrees.For C5 envelopes, which are 220 mm or longer and have a flap along the short edge, load them with the flaps open, facing up.For Monarch or DL envelopes, which are shorter than 220 mm, load them long-edge feed with the flaps open and facing up.If the problem persists, use a different size envelope. |
The top margin is incorrect.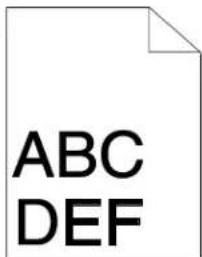 | Ensure that the paper is loaded properly.Ensure that the margins are set correctly in the application you are using. |
| The printed surface of the paper is bumpy. | 1. Print a solid image over the entire surface of one sheet of paper.2. Load the printed sheet into the tray with the printed side facing down.3. Print five blank pages to remove debris from the fuser rollers. |
 |
Controlling Print Quality
Various factors can affect the quality of the output of your printer. For consistent and optimum print quality, use paper designed for your printer and set the paper type correctly. Adjust the bias transfer roller and fuser for the paper type and weight you are using. Follow the guidelines in this section to maintain optimum print quality from your printer.
Temperature and humidity affect the quality of the printed output. The guaranteed range for optimal print quality is: 10–32°C (50–90°F) and 20–70% relative humidity.
Paper and Media
Your printer is designed to use various paper and other media types. Follow the guidelines in this section for the best print quality and to avoid jams:
- Use only Xerox ^® supported paper types and sizes. For details, see Supported Paper on page 16.
- Use only dry, undamaged paper.

CAUTION: Some paper and other media types can cause poor output quality, increased paper jams, or damage your printer. Do not use the following:
- Rough or porous paper.
- Inkjet paper.
• Non-laser glossy or coated paper.
• Paper that has been photocopied.
• Paper that has been folded or wrinkled.
• Paper with cutouts or perforations. - Stapled paper.
- Envelopes with windows, metal clasps, side seams, or adhesives with release strips.
- Padded envelopes.
- Plastic media.
- Make sure the paper type selected in your print driver matches the paper type on which you are printing.
- Store your paper and other media properly for optimum print quality. For details, see Paper Storage Guidelines on page 17.
Using the Printer Setting Utility
This section includes:
- Adjusting the Fuser 52
- Adjusting the Bias Transfer Roller....52
- Adjusting the Altitude 53
- Cleaning the Developer 53
The Printer Setting Utility installs on your computer when you install the print driver. The Printer Setting Utility has three tabs that help you to monitor, maintain, and troubleshoot the printer.
To use the Printer Setting Utility:
- To start the Printer Setting Utility, on your computer select Start > All Programs > Xerox Office Printing.
- Select your printer name, then select Printer Setting Utility.
- Click one of the tabs to view Printer Settings, perform Printer Maintenance, or use Diagnosis tools.
Adjusting the Fuser
Use Adjust Fuser for optimum print quality across a wide range of paper types. If the toner on a print is smearing or can be rubbed off the paper, increase the offset for the paper you are using. If the toner is blistered or mottled, decrease the offset for the paper you are using.
To adjust the fuser:
- Launch the Printer Setting Utility and select the Printer Maintenance tab.
- Click Adjust Fuser.
- Change the offset value for the paper that you are using.
- Click Apply New Settings.
Adjusting the Bias Transfer Roller
Use Adjust BTR to specify the bias transfer roller voltage for printing on the selected paper type. If the printed image is too light, increase the offset for the paper you are using. If the printed image is mottled or blotchy looking, decrease the offset for the paper you are using.
To adjust the bias transfer roller:
- Launch the Printer Setting Utility and select the Printer Maintenance tab.
- Click Adjust BTR.
- Change the offset value for the paper that you are using.
- Click Apply New Settings.
52 Phaser 3010/3040 Printer
User Guide
Adjusting the Altitude
Use Adjust Altitude to adjust the altitude of the printer to obtain optimal printing results. If the altitude setting is incorrect, it can cause print-quality problems. Adjust the altitude to match that of the location where the printer is installed.
To adjust the altitude:
- Launch the Printer Setting Utility and select the Printer Maintenance tab.
- Click Adjust Altitude.
- Select the altitude range to match that of the location where the printer is installed.
- Click Apply New Settings.
Cleaning the Developer
Clean Developer runs the developer motor and stirs the toner in the toner cartridge. Use Clean Developer to clean toner from a cartridge just before changing it or to refresh the toner after replacing a toner cartridge.
- Launch the Printer Setting Utility and select the Diagnosis tab.
- Click Clean Developer.
- Click Start.
Control Panel
The printer uses control panel lights to indicate printer status and errors.
| Indicator | Off | ON | Blinking | Slow Blinking |
| Error | — | [0400] | [070] | None. |
| Ready | — |  |   |   |
Error Codes
| Error Code | Status | Solutions | |
| — |  | Ready | Normal operation. |
| — |   | ·Downloading print.·Warming up.·Waking from Energy Saver Sleep mode.·Printing when the toner is low. | Normal operation. |
| — |   | In Energy Saver mode. | Normal operation. |
| ! |   | Out of paper. | Load paper, then press the button on the control panel. |
| Waiting for manual 2-sided printing. | Remove the paper from the output tray and reload it into the paper tray.See Loading Paper for Manual 2-Sided Printing on page 22. | ||
| Paper is jammed. | Clear the paper jam.See Clearing Paper Jams on page 41. | ||
| The wrong size paper is loaded. | Load the correct paper. | ||
  |   | Canceling the print job. | Wait for the print job to cancel. |
| Non-volatile memory is initializing. | Do not turn off the printer.Note:Interrupting the initialization of the non-volatile memory can damage the printer. | ||
 | — | Toner cartridge is empty. | Replace the toner cartridge. |
| The rear cover is open. | Close the rear cover. | ||
| Print engine error. | Turn off the printer, then turn it on again. | ||
  | — | The printer has a fatal error. | Turn off the printer, then turn it on again.Contact your Xerox representative. |
Getting Help
This section includes:
- Error and Status Messages.... 56
- PrintingScout Alerts.... 56
• Printer Setting Utility 57
• More Information 57
Your printer comes with utilities and resources to help you troubleshoot printing problems.
Error and Status Messages
The printer control panel provides information and troubleshooting help. When an error or warning condition occurs, the control panel indicators inform you of the problem.
PrintingScout Alerts
PrintingScout is a utility installed with your Xerox ^® print driver. It automatically checks the printer status when you send a print job. If the printer is unable to print, a PrintingScout alert appears on your computer screen to let you know that the printer needs attention. In the PrintingScout dialog box, click the alert to view instructions explaining how to fix the problem.
Note: PrintingScout is a Windows-only application.
Checking Printer Status With PrintingScout
The printer control panel displays a warning and PrintingScout displays a message when a supply nears its replacement time. Verify that you have replacements on hand. It is important to order these supplies when the messages first appear in PrintingScout to avoid interruptions to your printing. The control panel displays a warning and PrintingScout displays a message when the supply must be replaced.
To open PrintingScout, do one of the following:
- In the Windows taskbar, double-click the PrintingScout icon.
- From the Start menu, select Programs > Xerox Office Printing > PrintingScout > Activate PrintingScout.
For information on using PrintingScout, see the PrintingScout help. To see the help in the Windows taskbar, right-click the PrintingScout icon and select Help.
Printer Setting Utility
The Printer Setting Utility installs on your computer when you install the print driver. The Printer Setting Utility has three tabs that help you to monitor, maintain, and troubleshoot the printer. For details, see Printer Setting Utility on page 29.
More Information
| Resource | Location |
| Installation Guide | Packaged with the printer. |
| Recommended Media List | United States:Phaser 3010 Printer:www.xerox.com/paperPhaser 3040 Printer:www.xerox.com/paperEuropean Union:Phaser 3010 Printer:www.xerox.com/europaperPhaser 3040 Printer:www.xerox.com/europaper |
| Technical support information for your printer;including online technical support, Online Support Assistant, and driver downloads. | Phaser 3010 Printer:www.xerox.com/office/3010supportPhaser 3040 Printer:www.xerox.com/office/3040Psupport |
| Information Pages | Print Information Pages from the Printer Setting Utility. |
| Order supplies for your printer | Phaser 3010 Printer:www.xerox.com/office/3010suppliesPhaser 3040 Printer:www.xerox.com/office/3040Psupplies |
| A resource for tools and information, including interactive tutorials, printing templates, helpful tips, and customized features to meet your individual needs. | www.xerox.com/office/businessresourcecenter |
| Local sales and support center | Phaser 3010 Printer:www.xerox.com/office/worldcontactsPhaser 3040 Printer:www.xerox.com/office/worldcontacts |
| Printer registration | Phaser 3010 Printer:www.xerox.com/office/registerPhaser 3040 Printer:www.xerox.com/office/register |
| Xerox ^® Direct online store | www.direct.xerox.com/ |
Specifications
A
This appendix includes:
• Printer Configurations and Options 60
• Physical Specifications.... 61
• Environmental Specifications 62
• Electrical Specifications.... 63
• Performance Specifications.... 64
• Controller Specifications 65
Printer Configurations and Options
Available Configurations
The Phaser 3010 Printer and Phaser 3040 Printer are a black and white printers with USB connectivity.
Standard Features
| Feature | Phaser 3010 Printer | Phaser 3040 Printer |
| Print speed | Up to 20 ppm | Up to 24 ppm |
| Print resolution | 600 x 600 dpi1200 x 1200 dpi | 600 x 600 dpi1200 x 1200 dpi |
| Paper capacity | 150-sheet main tray100-sheet output tray | 150-sheet main tray100-sheet output tray |
| 2-Sided Printing | Manual only | Manual only |
| Maximum print size | Legal (216 x 356 mm, 8.5 x 14 in.) | Legal (216 x 356 mm, 8.5 x 14 in.) |
| Minimum print size | 76 x 127 mm, 3 x 5 in. | 76 x 127 mm, 3 x 5 in. |
| Control panel | One button and two indicators show printer status and indicate errors and warnings. | One button and two indicators show printer status and indicate errors and warnings. |
| Connectivity | Universal Serial Bus (USB 2.0) | Universal Serial Bus (USB 2.0) |
Physical Specifications
Weights and Dimensions
| Phaser 3010 Printer and Phaser 3040 Printer | |
| Width | 358 mm (14.1 in.) |
| Depth | 457.3 mm (18.0 in.) |
| Height | 282.7 mm (11.1 in.) |
| Weight | 4.6 kg (10.1 lb.) |
Total Space Requirements
| Phaser 3010 Printer and Phaser 3040 Printer | |
| Width | 558 mm (22 in.) |
| Depth | 926.8 mm (32.6 in.) |
| Height | 382.7 mm (15.1 in.) |
Clearance Requirements

text_image
10 cm (3.9 in.) 26.95 cm (10.6 in.) 46.15 cm (18.2 in.) 10 cm (3.9 in.)Environmental Specifications
Temperature
Optimum temperature: 10–32°C (50–90°F)
Relative Humidity
• Minimum–Maximum Humidity Range: 15–85% relative humidity at 28°C (82°F)
- Optimal Humidity Range: 20–70% relative humidity at 28°C (82°F)
Note: Under extreme environmental conditions, such as 10^ C and 85% relative humidity, defects can occur due to condensation.
Elevation
For optimum performance, use the printer at elevations below 3100 m (10,170 ft.).
Electrical Specifications
Power Supply Voltage and Frequency
| Power Supply Voltage Power Supply Frequency | |
| 110–127 VAC +/-10 %, (99–140 VAC) | 50 Hz +/- 3 Hz60 Hz +/- 3 Hz |
| 220–240 VAC +/-10 %, (198–264 VAC) | 50 Hz +/- 3 Hz60 Hz +/- 3 Hz |
Power Consumption
• Energy Saver Mode 2 (Sleep): 4 W or less
• Energy Saver Mode 1 (Low Power): 8 W or less
• Ready: 62 W or less with fuser on
• Continuous printing: 380 W or less
This printer does not consume electric power when the power switch is turned off even if the printer is connected to an AC outlet.
Performance Specifications
| Item | Specifications |
| Printer warm up time | Power on: 25 seconds or less.Recovery from sleep mode: 25 seconds or less.Note:Warm up time assumes an ambient temperature of 22^ ( 71.6^ ). |
Controller Specifications
Processor
150 MHz 4305 processor
Memory
64 MB standard memory
Interfaces
Universal Serial Bus (USB 2.0)
Regulatory Information
B
This appendix includes:
• Basic Regulations 68
• Material Safety Data Sheets....70
Basic Regulations
Xerox has tested this printer to electromagnetic emission and immunity standards. These standards are designed to mitigate interference caused or received by this printer in a typical office environment.
United States FCC Regulations
This equipment has been tested and found to comply with the limits for a Class B digital device, pursuant to Part 15 of the FCC Rules. These limits are designed to provide reasonable protection against harmful interference when the equipment is operated in a commercial environment. This equipment generates, uses, and can radiate radio frequency energy. If it is not installed and used in accordance with these instructions, it may cause harmful interference to radio communications. Operation of this equipment in a residential area is likely to cause harmful interference in which case the user will be required to correct the interference at his/her own expense.
If this equipment does cause harmful interference to radio or television reception, which can be determined by turning the equipment off and on, the user is encouraged to try to correct the interference by one or more of the following measures:
- Reorient or relocate the receiving antenna.
- Increase the separation between the equipment and receiver.
- Connect the equipment into an outlet on a circuit different from that to which the receiver is connected.
- Consult the dealer or an experienced radio/TV technician for help.
Changes or modifications to this equipment not approved by Xerox can void the authority of the user to operate this equipment.
Note: To ensure compliance with Part 15 of the FCC rules, use shielded interface cables.
European Union

CAUTION: This is a Class B product. In a domestic environment, this product can cause radio interference in which case the user could be required to take adequate measures.

The CE mark applied to this product symbolizes a declaration of conformity by Xerox with the following applicable Directives of the European Union as of the dates indicated:
• December 12, 2006: Low Voltage Directive 2006/95/EC
• December 15, 2004: Electromagnetic Compatibility Directive 2004/108/EC
• March 9, 1999: Radio & Telecommunications Terminal Equipment Directive 1999/5/EC
This printer, if used properly in accordance with the instructions, is not dangerous for the consumer or for the environment.
To ensure compliance with European Union regulations, use shielded interface cables.
A signed copy of the Declaration of Conformity for this printer can be obtained from Xerox.
Turkey RoHS Regulation
In compliance with Article 7 (d), we hereby certify “it is in compliance with the EEE regulation.”
For Material Safety Data information for your printer, go to:
North America
• Phaser 3010 Printer: www.xerox.com/msds
• Phaser 3040 Printer: www.xerox.com/msds
European Union
- Phaser 3010 Printer: www.xerox.com/environment_europe
- Phaser 3040 Printer: www.xerox.com/environment_europe
Recycling and Disposal
C
This appendix includes:
• All Countries 72
• North America 73
• European Union....74
• Other Countries....76
All Countries
If you are managing the disposal of your Xerox ^® product, please note that the printer may contain lead, mercury, perchlorate, and other materials whose disposal may be regulated due to environmental considerations. The presence of these materials is fully consistent with global regulations applicable at the time that the product was placed on the market. For recycling and disposal information, contact your local authorities. Perchlorate Material: This product may contain one or more Perchlorate-containing devices, such as batteries. Special handling may apply, please see www.dtsc.ca.gov/hazardouswaste/perchlorate.
North America
Xerox operates an equipment take-back and reuse/recycle program. To determine if this Xerox ^® product is part of the program, contact your Xerox representative (1-800-ASK-XEROX).
For more information about Xerox ^® environmental programs, go to:
• Phaser 3010 Printer: www.xerox.com/environment
• Phaser 3040 Printer: www.xerox.com/environment
European Union
Some equipment may be used in both a domestic/household and a professional/business application.
Domestic/Household Environment
Application of this symbol on your equipment is confirmation that you should not dispose of the equipment in the normal household waste stream.
In accordance with European legislation, end of life electrical and electronic equipment subject to disposal must be segregated from household waste.
Private households within EU member states may return used electrical and electronic equipment to designated collection facilities free of charge. Please contact your local disposal authority for information.
In some member states, when you purchase new equipment, your local retailer may be required to take back your old equipment free of charge. Please ask your retailer for information.
Professional/Business Environment
Application of this symbol on your equipment is confirmation that you must dispose of this equipment in compliance with agreed national procedures.
In accordance with European legislation, end of life electrical and electronic equipment subject to disposal must be managed within agreed procedures.
Prior to disposal, please contact your local reseller or Xerox representative for end of life take-back information.
Collection and Disposal of Equipment and Batteries
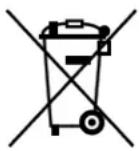
These symbols on the products and/or accompanying documents mean that used electrical and electronic products and batteries should not be mixed with general household waste.
For proper treatment, recovery, and recycling of old products and used batteries, please take them to applicable collection points, in accordance with your national legislation and the Directive 2002/96/EC and 2006/66/EC.
By disposing of these products and batteries correctly, you will help to save valuable resources and prevent any potential negative effects on human health and the environment which could otherwise arise from inappropriate waste handling.
For more information about collection and recycling of old products and batteries, please contact your local municipality, your waste disposal service or the point of sale where you purchased the items.
Penalties may be applicable for incorrect disposal of this waste, in accordance with national legislation.
Business Users in the European Union
If you wish to discard electrical and electronic equipment, please contact your dealer or supplier for further information.
Disposal Outside of the European Union
These symbols are only valid in the European Union. If you wish to discard these items, please contact your local authorities or dealer and ask for the correct method of disposal.
Note for the Battery Symbol
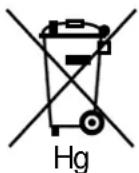
This wheeled bin symbol may be used in combination with a chemical symbol. This establishes compliance with the requirements set out by the Directive.
Battery Removal
Batteries should only be replaced by a MANUFACTURER-approved service facility.
Recycling and Disposal
Other Countries
Please contact your local waste management authority to request disposal guidance.