ThinkPad T410 - Laptop LENOVO - Free user manual and instructions
Find the device manual for free ThinkPad T410 LENOVO in PDF.

User questions about ThinkPad T410 LENOVO
0 question about this device. Answer the ones you know or ask your own.
Ask a new question about this device
Download the instructions for your Laptop in PDF format for free! Find your manual ThinkPad T410 - LENOVO and take your electronic device back in hand. On this page are published all the documents necessary for the use of your device. ThinkPad T410 by LENOVO.
USER MANUAL ThinkPad T410 LENOVO
ThinkPadT410andT410i HardwareMaintenanceManual
ThinkPadT410andT410i HardwareMaintenanceManual
Note
Before using this information and the product it supports, be sure to read the general information under "Notices" on page 193
FirstEdition(January2010)
©CopyrightLenovo2010.
LENOVOproducts, data, computersoftware, and services have been developed exclusively at private expense and are sold to governmental entities as commercial items as defined by 48C.F.R.2.101 with limited and restricted right spouse, reproduction and disclosure.
LIMITEDANDRESTRICTEDRIGHTSNOTICE: If products, data, computersoftware, or services are delivered pursuant a General Services Administration "GSA" contract, use, reproduction, or disclosure is subject to restrictions set forthinContractNo.GS-35F-05925.
©Lenovo2010
Contents
Aboutthismanual. . . . . . . . . . v
Safetyinformation. 1
Generalsafety. 2
Electricalsafety. 3
Safetyinspectionguide. 5
Handling device sthat a resensitivetoelectrostatic
discharge. 6
Groundingrequirements. 6
Safetynotices(multilingualtranslations). . . . . 7
Lasercompliancestatement(multilingual translations). 2 8
Importantserviceinformation. . . . . 3 9
StrategyforreplacingFRUs. 3 9
Strategyforreplacingaharddiskdrive. . . . 4 0
Importantnoticeforreplacingasystemboard.. 40
Howtouseerrormessage. 40
StrategyforreplacingFRUsforCTO,CMV,and
G AV. 4
Productdefinition. 4 1
FRUidentificationforCTO,CMV,andGAV
products. 4 1
Generalcheckout 4 3
Whattodofirst. 4 4
Checkoutguide . . . . . . . . . . . . . 4 5
DiagnosticsusingPC-DoctorforDOS ..... 4 5
LenovoThinkVantageToolbox(LenovoSystem
Toolbox). 4 8
PC-DoctorforRescueandRecovery. . . . . 4 8
FRUtests. 4 9
Powersystemcheckout. 5 1
Checkingthe ACadapter. 5 1
Checkingoperationalcharging. 5 2
Checkingthebatterypack 5 2
Checkingthebackupbattery 53
Relatedserviceinformation. . . . . . 5 5
Restoring the factory contents by using Recovery
DiscSet 5 5
Passwords. 5 6
Power-on password 5
Hard-disk password. 57
Supervisorpassword . . . . . . . . . . 5 7
How to remove the power-on password. . . . 57
Howtoremove thehard-diskpassword. . . . 5 8
Powermanagement 60
Screen blankmode. 6 0
Sleep(standby)mode . . . . . . . . . . 6 0
Hibernationmode . . . . . . . . . . . 6 1
Symptom-to-FRUindex 6 2
Numericerror codes. 6 2
Error messages 6 6
Beepsymptoms . . . . . . . . . . . . . 6 7
No-beepsymptoms. 6 7
LCD-related symptoms. 6 8
Intermittentproblems. 6 9
Undeterminedproblems. 6 9
Statusindicators. 71
Fnkeycombinations ..... 75
FRUreplacementnotices. . . . . . . 79
Screw notices. 7 9
Retainingserialnumbers. 80
Restoring the serial number of the system unit 80
RetainingtheUUID 80
Reading or writing the ECA information . . . 81
RemovingandreplacingaFRU ..... 8 3
Before servicing ThinkPad T410 and T410i . . . . 84
1010Batterypack. 8 5
1020ExpressCardblankbezel. 87
1030SerialUltrabaySlimdeviceortravelbezel .. 88
1040Hard diskdrive(HDD)slotcover, HDDrubber railsandHDDorstorageconverterandsolidstate drive(SSD).
1050DIMMslotcover. 9 1
1060DIMM(inbottomslot). 9 2
1070 PCI Express Mini Card for wireless WAN . . 93
1080Keyboard 9 5
1090DIMM(inslotunderkeyboard) ..... 1 0 1
1100 Backup battery . . . . . . . . . . . . 103
1110 PCI Express Mini Card for wireless LAN . . 105
1120 Keyboardbezelassembly,FPCcable,and
Bluetooth daughter card (BDC-2.1) . . . . . . 107
1130 SmartCard or Contactless SmartCard. . . . 112
1140 Modem daughter card (MDC) . . . . . . 114
1150 Speaker assembly ..... 115
1160 LCD unit . . . . . . . . . . . . . 117
1170 Fan assembly. . . . . . . . . . . . . 123
1180 CPU. 126
1190 Base cover assembly, I/O sub card, and I/O
sub card cable . . . . . . . . . . . . . 127
1200 Magnesium structure frame . . . . . . 133
1210Systemboard, DC-inconnectorcable, and
ExpressCardslotassembly. 13 5
2010LCDbezelassembly 1 38
2020LEDboard. 14 0
2030Integratedcamera 14 1
2040LCDpanelandLCDcable. . . . . . . 142
2050Cameracable. 14 4
2060WirelessLANantennaassemblyorwireless
LAN/WAN antenna assembly. . . . . . . . 146
2070 Hinges and LCD rear cover assembly . . . 148
Locations. 1 4 9 Recoverydiscs. 1 8 3
Frontview. . . . . . . . . . . . . . . . . 1 4 9 WindowsXPProfessional(32 bit)DVDs...183
Rearview. . . . . . . . . . . . . . . 1 5 1 Windows Vista Business (32 bit) DVDs . . . . 184
Bottomview. 1 5 2 Windows 7 Home Basic (32 bit) DVDs . . . . 185
Windows 7 Home Premium (32 bit) DVDs . . 186
Partslist 1 5 3 Windows 7 Home Premium (64 bit) DVDs . . 187
Windows 7 Professional (32 bit) DVDs . . . . 188
Overall. . . . . . . . . . . . . . . . . . . . . . . . . . . . . . . . . . . . . . . . . . . . . . . . . . . . . . . . . . . . . . . . 1 5 4 Windows 7 Professional (64 bit) DVDs. . . . 190
Keyboard 1 7 8 Commonservice tools. . . . . . . . . . . 1 9 1
Miscellaneousparts. 1 7 9
ACadapters. 1 8 1 Notices. 1 9 3
Powercords. 1 8 2 Trademarks. 1 9 4
Aboutthismanual
Thismanualcontainsserviceandreferenceinformationforthefollowing ThinkPad ^® products.
ThinkPadT410andT410i
MT2516,2518,2519,2522,2537,2538,and2539
Usethismanualalongwiththeadvanceddiagnosticteststotroubleshoot problems.
Important:
Thismanualisintendedonlyfortrainedservicetechnicianswhoarefamiliar withThinkPadproducts. Use this manual along with the advanced diagnostic teststotroubleshootproblemseffectively.
BeforeservicingaThinkPadproduct,besuretoreadalltheinformationunder
"Safetyinformation" onpage1 and "Importantserviceinformation" onpage39.
Safetyinformation
Thischapterpresentsfollowingsafetyinformationthatyouneedtobefamiliar withbeforeyouserviceaThinkPadNotebook.
•“Generalsafety”onpage2
•“Electricalsafety”onpage3
•“Safetyinspectionguide”onpage5
•"Handlingdevicesthataresensitivetoelectrostaticdischarge"onpage6
• "Groundingrequirements" on page 6
• "Safetynotices(multilingualtranslations)" on page 7
• "Lasercompliancestatement(multilingualtranslations)" on page 28
Generalsafety
Followtheserulestoensuregeneralsafety:
- Observegoodhousekeepingintheareaofthemachinesduringandafter maintenance.
-
Whenliftinganyheavyobject:
-
Makesurethatyoucanstand safely without slipping.
- Distributetheweightoftheobjectequallybetweenyourfeet.
- Use as low lifting force. Never moves suddenly to twist when you attempt to lift.
-
Liftbystandingorbypushingupwithyourlegmuscles; thisaction removes thestrainfromthemusclesinyourback. Donotattempttoliftanyobjectthat weighsmorethan16kg(35lb)orthatyouthinkistooheavyforyou.
-
Donotperformanyactionthatcauseshazardstothecustomer,orthatmakes theequipmentunsafe.
- Before you start the machine, makes sure that others servicetechnicians and the customer's personnel are not in a hazardous position.
- Placeremovedcoversandotherpartsinasafeplace,awayfromallpersonnel, whileyouareservicingthemachine.
- Keepyourtoolcaseawayfromwalkareassothatotherpeoplewillnottripover it.
- Donotwearlooseclothingthatcanbetrappedinthemovingpartsofamachine.Makesurethatyoursleevesarefastenedorrolledupaboveyourelbows.Ifyourhairislong,fastenit.
- Inserttheendsofyournecktieorscarfinsideclothingorfastenitwitha nonconductiveclip,about8centimeters(3inches)fromtheend.
- Donotwearjewelry, chains, metal-frame eyeglasses, or metalfasteners for your clothing.
Attention: Metalobjectsaregoodelectricalconductors.
- Wearsafetyglasseswhenyouarehammering,drilling,soldering,cuttingwire, attachingsprings,usingsolvents,orworkinginanyotherconditionsthatmight behazardoustoyoureyes.
- Afterservice,reinstallallsafetyshields,guards,labels,andgroundwires. Replaceanysafetydevicethatiswornordefective.
- Reinstallallcoverscorrectlybeforereturningthemachinetothecustomer.
- Fanlouversonthemachinehelptopreventoverheatingofinternalcomponents. Donotobstructfanlouversorcoverthemwithlabelsorstickers.
Electricalsafety
Observethefollowingruleswhenworkingonelectricalequipment.
Important:
Useonlyapprovedtoolsandtestequipment.Somehandtoolshavehandles coveredwithasoftmaterialthatdoesnotinsulateyouwhenworkingwithlive electricalcurrents.
Manycustomershave, neartheirequipment, rubberfloormatsthatcontainsmall conductivefiberstodecreaseelectrostaticdischarges. Donotusethistypeofmat toprotectyourselfromelectricalshock.
- Findtheroomemergencypower-off(EPO)switch, disconnectingswitch, or electrical outlet. If an electrical accident occurs, you can then operate the switch or unplug the power cord quickly.
- Donotworkaloneunderhazardousconditionsornearequipmentthathas hazardousvoltages.
- Disconnectallpowerbefore: - Performingamechanicalinspection - Workingnearpowersupplies - Removingorinstallingmainunits
- Before you start to work on the machine, unplug the power cord. If you cannot unplug it, ask the custom top power-off the wall box that supplies power to the machine, and to lock the wall box in the off position.
- If you need to work on a machine that has exposed electrical circuits, observe the following precautions: - Ensure that another person, familiar with the power-off controls, is nearyou.
Attention: Another person must be theretoswitchoff the power, if necessary.
-Useonlyonehandwhenworkingwithpowered-onelectricalequipment; keeptheotherhandinyourpocketorbehindyourback.
Attention: Anelectricalshockcanoccuronlywhenthereisacomplete circuit. By observing the aboverule, you may prevent acurrent from passing through your body.
-When using testers, set the controls correctly and use the approved probe leads and accessories forthatteter.
-Standonsuitablerubbermats(obtainedlocally,ifnecessary)toinsulateyou fromgroundssuchasmetalfloorstripsandmachineframes.
Observethespecialsafety precautions when you work with very high voltages; Instructions for these precautions are in the safety section of maintenance information. Use extreme care when measuring high voltages.
- Regularly inspect and maintain your electrical hand tools for safe operational condition.
•Donotusewornorbrokentoolsandtesters.
- Never assume that power has been disconnected from a circuit. First, check that it has been powered off.
•Alwayslookcarefullyforpossiblehazardsinyourworkarea.Examplesofthese hazardsaremoistfloors,nongroundedpowerextensioncables,powersurges, andmissingsafetygrounds.
- Donottouchliveelectricalcircuitswiththereflectivesurfaceofaplasticdental mirror.Thesurfaceisconductive;suchtouchingcancausepersonalinjuryand machinedamage.
- Do not service the following parts with the power on when they are removed from their normal operating places in a machine:
-Powersupplyunits
-Pumps
-Blowersandfans
-Motorgenerators
-Similarunitstolistedabove
Thispracticeensurescorrectgroundingoftheunits.
•Ifanelectricalaccidentoccurs:
-Usecaution;donotbecomeavictimyourself.
-Switchoffpower.
-Sendanotherpersontogetmedicalaid.
Safetyinspectionguide
The purpose of this inspection guide is to assist you in identifying potentially unsafe conditions. A each machine was designed and built, required safety items were installed top protect users and servic technicians from injury. This guide addresses only those items. You should use good judgment to identify potential safety hazards due to attachment of non-Think Pad features or options not covered by this inspection guide.
Ifanyunsafeconditionsarepresent,youmustdeterminehowseriousioustheapparent hazardcouldbeandwhetheryoucancontinuewithoutfirstcorrectingthe problem.
Considertheseconditionsandthesafetyhazardstheypresent:
- Electricalhazards,especiallyprimarypower(primaryvoltageontheframecan causeseriousorfatalelectricalshock)
•Explosivehazards,suchasadamagedCRTfaceorabulgingcapacitor
•Mechanicalhazards, such as loose or missing hardware
Todeterminewhetherthereareanypotentiallyunsafeconditions,usethe followingchecklistatthebeginningofeveryservicetask.Beginthecheckswith thepoweroff,andthepowercorddisconnected.
Checklist:
-
Check exterior covers for damage (loose, broken, or sharpedges).
-
Poweroffthecomputer.Disconnectthepowercord.
-
Check the power cord for:
a. Athird-wiregroundconnectorgoodcondition. Useametertomeasure third-wiregroundcontinuityfor0.1ohmorlessbetweentheexternal groundpinandtheframeground.
b. The powercord should be the types specified in the parts list.
c. Insulation must not be refractory or worn.
-
Check for cracked or bulging batteries.
-
Removethecover.
-
Check for any obvious non-Think Pad alterations. Use good judgment to the safety of any non-Think Pad alterations.
-
Checkinsidetheunitforanyobviousunsafeconditions, suchasmetalfilings, contamination, waterorotherliquids, orsignsoffireorsmokedamage.
-
Checkforworn, frayed, orpinchedcables.
-
Check that the power-supply cover fasteners (screws or rivets) haven not been removed to tampered with.
Handling device sthataresensitivetoelectrostaticdischarge
Anycomputerpartcontainingtransistorsorintegratedcircuits(ICs)shouldbe consideredsensitivetoelectrostaticdischarge(ESD.)ESDdamagecanoccurwhen thereisadifferenceinchargebetweenobjects.ProtectagainstESDdamageby equalizingthechargesothatthemachine,thepart,theworkmat,andtheperson handlingthepartareallatthesamecharge.
Notes:
- Useproduct-specificESDprocedureswhentheyexceedtherequirements notedhere.
- MakesurethattheESDprotectivedevicesyouusehavebeencertified(ISO 9000)asfullyeffective.
WhenhandlingESD-sensitiveparts:
- Keep the parts in protective packages until they are inserted into the product.
- Avoidcontactwithotherpeople.
- Wearagroundedwriststrapagainstyourskintoeliminatestaticonyourbody.
- Preventthepartfromtouchingyourclothing.Mostclothingisinsulativeand retainsachargeevenwhenyouarewearingawriststrap.
- Useagroundedworkmattoprovideastatic-freeworksurface. Thematis especially useful when handling ESD-sensitive devices.
- Selectagroundingsystem, such as those listed below, to provide protection that meets the specific servicerequirement.
Note:
The useofagroundingsystemtoguardagainstESDdamageisdesirablebutnot necessary.
-AttachtheESDgroundcliptoanyframeground,groundbraid,orgreen-wire ground.
-Whenworkingonadouble-insulatedorbattery-operatedsystem,useanESD commongroundorreferencepoint.Youcanusecoaxorconnector-outside shellsonthesesystems.
-Usetheroundgroundprongoftheacplugonac-operatedcomputers.
Groundingrequirements
Electricalgroundingofthecomputerisrequiredforoperatorsafetyandcorrect systemfunction.Propergroundingoftheelectricaloutletcanbeverifiedbya certifiedelectrician.
Safetynotices(multilingualtranslations)
Thesafetynoticesinthissectionareprovidedinthefollowinglanguages:
•English
•Arabic
•BrazilianPortuguese
•French
•German
•Hebrew
•Japanese
•Korean
•Spanish
•TraditionalChinese

DANGER
BeforethecomputerispoweredonafterFRUreplacement,makesureallscrews, springs,andothersmallpartsareinplaceandarenotleftlooseinsidethecomputer. Verifythisbyshakingthecomputerandlisteningforrattlingsounds.Metallicpartsor metalflakescancauseelectricalshorts.

DANGER
Somestandbybatteriescontainasmallamountofnickelandcadmium.Donot disassembleastandbybattery,rechargeit,throwitintofireorwater,orshort-circuitit. Disposeofthebatteryasrequiredbylocalordinancesorregulations.Useonlythe batteryintheappropriatepartslisting.Useofanincorrectbatterycanresultinignition orexplosionofthebattery.

DANGER
The batterypackcontainssmallamountsofnickel.Donotdisassembleit,throwitinto fireorwater,orshort-circuitit.Disposeofthebatterypackasrequiredbylocal ordinancesorregulations.Useonlythebatteryintheappropriatepartslistingwhen replacingthebatterypack.Useofanincorrectbatterycanresultinignitionorexplosion ofthebattery.

DANGER
Thelithium battery can cause a fire, an explosion, or a severe burn. Donotre chargeit, remove its polarized connector, disassemble it, heat above 100^ C ( 212^ F), incinerate it, orexpose its cell content stowater. Dispose of the battery as required by local ordinances or regulations. Use only the battery in the appropriate parts listing. Use of an incorrect battery can result in ignition on explosion of the battery.

DANGER
If the LCD breaks and the fluid from inside the LCD gets into your yes or any your hands, immediately wash the affected areas with water for at least 15 minutes. Seek medical care if an symptoms from the fluid are present after washing.

DANGER
Toavoidshock, donotremovetheplasticcoverthatprotectsthelowerpartofthe invertercard.

DANGER
Thoughthemainbatterieshavelowvoltage,ashortedorgroundedbatterycanproduce enoughcurrenttoburnpersonnelorcombustiblematerials.

DANGER
UnlesshotswapisallowedfortheFRUbeingreplaced,doasfollowsbeforeeremoving it:poweroffthecomputer,unplugallpowercordsfromelectricaloutlets,removethe batterypack,anddisconnectanyinterconnectingcables.
text_image
•English •Arabic •BrazilianPortuguese •French •German •Hebrew •Japanese •Korean •Spanish •TraditionalChineseSomemodelsofThinkPadNotebookareequippedfromthefactorywithanoptical storagedevicesuchasaCD-ROMdriveoraDVD-ROMdrive.Suchdevicesare alsosoldseparatelyasoptions.Ifoneofthesedrivesisinstalled,itiscertifiedin theU.S.toconformtotherequirementsoftheDepartmentofHealthandHuman Services21CodeofFederalRegulations(DHHS21CFR)SubchapterJforClass1 laserproducts.Elsewhere,thedriveiscertifiedtoconformtotherequirementsof theInternationalElectrotechnicalCommission(IEC)60825-1andCENELECEN 60825-1forClass1laserproducts.
IfaCD-ROMdrive,aDVD-ROMdrive,oranotherlaserdeviceisinstalled,note thefollowing:

CAUTION:
Useofcontrolsoradjustmentsorperformanceofproceduresotherthanthose specifiedhereinmightresultinhazardousradiationexposure.
Opening the CD-ROM drive, the DVD-ROM drive, or any other optical storage device could result in exposure to hazardous laser radiation. There are no serviceable parts in silidethosed drives. Donotopen.
ACD-ROMdrive,aDVD-ROMdrive,oranyotherstoragedeviceinstalledmay containanembeddedClass3AorClass3Blaserdiode.Notethefollowing:

DANGER
Emitsvisibleandinvisiblelaserradiationwhenopen.Donotstareintothe beam, donotviewdirectlywithopticalinstruments, and avoid direct exposure to the beam.
AdvisecustomerstocontacttheCustomerSupportCenterat800-426-7378iftheyneedassistanceinobtainingorinstallinganysoftwarefixes,drivers,andBIOS downloads.
CustomersinCanadashouldcalltheCustomerSupportCenterat800-565-3344 forassistanceordownloadinformation.
StrategyforreplacingFRUs
Beforereplacingparts:
Makesurethatallsoftwarefixes, drivers, and BIOSdownloads are installed before replacing any FRUs listed in this manual.
Afterasystemboarddisreplaced,ensurethatthelatestBIOSisloadedtothe systemboardbeforecompletingtheserviceaction.
Todownloadsoftwarefixes, drivers, and BIOS, doasfollows:
1.Gotohttp://www.lenovo.com/support
2. Enter the product number of the computer or press Auto-detect button on the screen.
3. SelectDownloadsanddrivers.
4. Followthedirectionsonthescreenandinstallthenecessarysoftware.
Use the following strategy to prevent unnecessary expense for replacing and servicing FRUs:
- If you are instructed to replace a FRU but there replacement does not correct the problem, reinstall the original FRU before you continue.
- Somecomputershavebothaprocessorboardandasystemboard. If you are instructed to replace either the processorboard or the system board, and replacing one of them does not correct the problem, reinstall that board, and then replace the other one.
- IfanadapteroradeviceconsistsofmorethanoneFRU,anyoftheFRUsmay bethecauseoftheerror.Beforereplacingtheadapterordevice,removethe FRUs,onebyone,toseefthesymptomschange.ReplaceonlytheFRUthat changedthesymptoms.
Attention: The setup configuration on the computer you a reservicing may have been customized. Running Automatic Configuration may alter the settings. Note the current configuration settings (using the View Configuration option); then, when service has been completed, verify that those settings remain ineffective.
Strategyforreplacingaharddiskdrive
Alwaystrytorunalow-levelformatbeforereplacingaharddiskdrive.Thiswill causeallcustomerdataontheharddisktobelost.Besurethatthecustomerhasa currentbackupofthedatabeforedoingthistask.
Attention: The drivestartupsequence in the computery you a reservicing may have been changed. Be extremely careful during write operations such as copying, saving, or formatting. If you select an incorrect drive, data or program scan be overwritten.
Importantnoticeforreplacingasystemboard
Some components mounted on asystem board are very sensitive. Improper handling of asystem board can cause damage to those components, and may cause asystem malfunction.
Attention: When handling asystemboard:
- Donotdropasystemboardorapplyanyexcessiveforcetoit.
- Avoidroughhandlingofanykind.
- Avoidbendingasystemboardandhardpushingtopreventcrackingateach BGA(BallGridArray)chipset.
Howtouseerrormessage
Use the error codes displayed on the screentodiagnose failures. If more than one error code is displayed, begin the diagnosis with the first error code. Whatever cause the first error code may also cause false error codes. If no error code is displayed, see whether the errors symptom is listed in the Symptom-to-FRU Index for the computer you are servicing.
StrategyforreplacingFRUsforCTO,CMV,andGAV
Productdefinition
DynamicConfigureToOrder(CTO)
ThisprovidestheabilityforacustomertoconfigureanIBM ^® oraLenovosolution fromaneSite, and havethisconfigurationsenttofulfillment, whereitisbuiltand shippeddirectlytothecustomer. Themachinelabel, ProductEntitlement Warehouse(PEW), eSupport, and the HMMwillloadtheseproductsasthe4-digit MTand3-digitmodel, wheremodel="CTO"(Example:1829-CTO).
CustomModelVariant(CMV)
This is a unique configuration that has been negotiated between IBM or Lenovo and the customer. A unique 4-digit MT and 3-digit model is provided to the customertoplaceorders (Example: 1829-W15). ACM Visaspecial bid offering. Therefore, it is NOT generally announced.
•TheMTMportionofthemachinelabelisthe4-digitMTand3-digitmodel, wheremodel="CTO"(Example:1829-CTO).ThePRODUCTIDportionofthe machinelabelisthe4-digitMTand3-digitCMVmodel(Example:1829-W15).
•ThePEWrecordisthe4-digitMTand3-digitmodel,wheremodel="CTO" (Example:1829-CTO).
•eSupportwillshowboththeCTOandCMVmachinetypemodels(Example: 1829-CTOand1829-W15willbefoundontheeSupportsite.)
•TheHMMwillhavethe4-digitMTand3-digitCTOmodelonly(Example: 1829-CTO).Again,CMVsarecustommodelsandarenotfoundintheHMM.
GeneralAnnounceVariant(GAV)
Thisisastandardmodel(fixedconfiguration).GAVsareannouncedandofferedto allcustomers.TheMTMportionofthemachinelabelisa4-digitMTand3-digit model,wheremodel=a"fixedpartnumber",not"CTO"(Example:1829-F1U). Also,PEW,eSupport,andtheHMMwilllisttheseproductsunderthesamefixed modelnumber.
FRUidentificationforCTO,CMV,andGAVproducts
There are three information resource identifiers which FRUs are used to support CTO, CMV, and GAV products. Thesesources are PEW, eSupport, and the HMM.
UsingPEW
- PEWistheprimarysourceforidentifyingFRUpartnumbersandFRU descriptionsforthekeycommoditiesforCTO,CMVandGAVproductsataMT -serialnumberlevel.Anexampleofkeycommoditiesareharddiskdrives, systemboards,microprocessors,LiquidCrystalDisplays(LCDs),andmemory.
- Remember, all CTO and CMV products are loaded in PEW under the 4-digit MT and 3-digit model, where model = "CTO" (Example: 1829-CTO). GAVs are loaded in PEW under the 4-digit MT and 3-digit model, where model = a "fixed part number", not "CTO" (Example: 1829-F1U).
-
PEWcanbeaccessedatthefollowingWebsite: http://www.lenovo.com/support/site.wss/document.do?Indocid=LOOK-WARNTY SelectWarrantylookup.InputtheMTandtheSerialnumberandthelistofkey commoditieswillbereturnedinthePEWrecordunderCOMPONENT INFORMATION.
-
Business Partners using Eclaim will access PEW when performing Entitlement Lookup.BusinessPartnerswillenterLocID,MTandSerial,andthekey commoditieswillbereturnedintheEclaimrecordunderSYSTEMDETAILS.
- AuthorizedIBMBusinessPartnerscanaccessEclaimatthefollowingWebsite: https://wca.eclaim.com
UsingeSupport
ForKeyCommodities(Examples-harddiskdrive,systemboard, microprocessor,LCD,andmemory)
- eSupportcanbeusedtoviewthelistofkeycommoditiesbuiltinaparticular machineserial(thisisthesamerecordfoundinPEW).
- eSupport can be accessed at the following Web site: http://www.lenovo.com/support
•Toviewthekeycommodities,clickonPARTSINFORMATION,thenPARTS LOOKUP.Typeinthemodeltypeandserialnumber.Thekeycommoditieswill bereturnedintheeSupportrecordunderPARTSShipPEDWITHYOUR SYSTEM.
FortheRemainingFRUs(thecompletelistofFRUsattheMTModellevel)
•eSupportcanbeusedtoviewthecompletelistofFRUsforamachinetypeand model.
- ToviewthecompletelistofFRUs,typeinthemachinetypeandmodel (Example:1829-CTO)underQUICKPATH.Under"ViewbyDocumentType" selectPARTSINFORMATION.Under"FilterbyCategory"selectSERVICE PARTS.Under"PartsInformationbyDate"selectSYSTEMSERVICEPARTS.The listofservicepartsbydescription,withapplicablemachinetypemodelandFRU willbedisplayed.
UsingtheHMM
ForKeyCommodities(Examples-harddiskdrive,systemboard, microprocessor,LCD,andmemory)
Use the HMMasaback-up to PEWande Support to view the completelist of FRUs at the MT Model level.
Generalcheckout
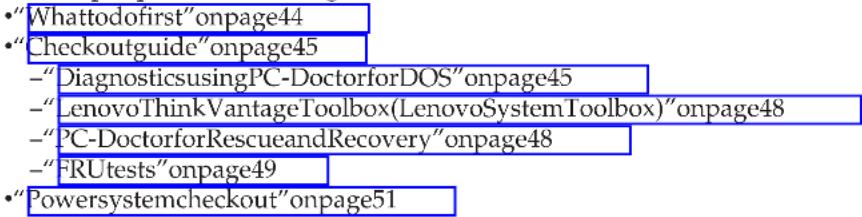
Thischapterpresentsfollowinginformation:
text_image
"Whattodofirst"onpage44 "Checkoutguide"onpage45 -"DiagnosticsusingPC-DoctorforDOS"onpage45 -"LenovoThinkVantageToolbox(LenovoSystemToolbox)"onpage48 -"PC-DoctorforRescueandRecovery"onpage48 -"FRUtests"onpage49 -"Powersystemcheckout"onpage51The descriptions in this chapter apply to any ThinkPad model that supports the PC-Doctor ^® for DOS diagnostics program. Some descriptions might not apply to your particular computer.
Beforeyougotothecheckoutguide,besuretoreadthefollowingimportantnotes.
Importantnotes:
- Onlycertifiedtrainedpersonnelshouldservicethecomputer.
- BeforereplacinganyFRU,readtheentirepageonremovingandreplacing FRUs.
- WhenyoureplaceFRUs,usenewnylon-coatedscrews.
- Beextremelycarefulduringsuchwriteoperationsascopying,saving,or formatting.Drivesinthecomputerthatyouareservicingsequencemight havebeenaltered.Ifyouselectanincorrectdrive,dataorprogramsmightbe overwritten.
- ReplaceaFRUonlywithanotherFRUofthecorrectmodel.Whenyou replaceaFRU,makesurethatthemodelofthemachineandtheFRUpart numberarecorrectbyreferringtotheFRUpartslist.
- AFRU should not bereplaced because of a single, unreproducible failure. Single failures can occur for a variety of reason that have nothing todow with a hardware defect, such as cosmic radiation, electrostatic discharge, or software errors. Consider replacing a FRU only when a problem recurs. If you suspect that a FRU is defective, clear the error log and run the test again. If the error does not recur, donot replace the FRU.
•BecarefulnottoreplaceanondefectiveFRU.
Whattodofirst
When youdoreturnaFRU, you must include the following information in the part exchange form or parts return form that you attach to it:
1.Nameandphonenumberofservicetechnician
2. Dateofservice
3. Dateon which the machine failed
4. Dateofpurchase
__5. Failuresymptoms, errorcodesappearingonthedisplay, and beep symptoms
__6.ProcedureindexandpagenumberinwhichthefailingFRUwasdetected
__7.FailingFRUnameandpartnumber
8.Machinetype,modelnumber,andserialnumber
9.Customer'snameandaddress
Noteforwarranty: During the warranty period, the customer may be responsible for repair costs if the computer damage was caused by misuse, accident, modification, unsuitable physical or operating environment, or improper maintenance by the customer.
Following isalistofsome common itemsthata re not covered under warranty and some symptom that might indicate that the system was subjected to stress beyond normal use.
Beforecheckingproblemswiththecomputer,determinewhetherthedamageis coveredunderthewarrantybyreferringtothefollowinglist:
The following are not covered under warranty:
• LCDpanelcracked from the application of excessive force or from being dropped
•Scratched(cosmetic)parts
•Distortion, deformation, or discoloration of the cosmetic parts
- Plasticparts, latches, pins, or connector that have been cracked or broken by excessive force
•Damagecausedbyliquidspilledintothesystem
- DamagecausedbytheimproperinsertionofaPCCardortheinstallationofan incompatiblecard
- Improperdiscinsertionoruseofanopticaldrive
- Diskettedrivedamagecausedbypressureonthediskettedrivecover,foreign materialinthedrive,ortheinsertionofadiskettewithmultiplelabels
• Damagedorbentdisketteejectbutton
•Fusesblownbyattachmentofanonsupporteddevice
•Forgottencomputerpassword(makingthecomputerunusable)
•Stickykeyscausedbyspillingaliquidontothekeyboard
•Useofanincorrectacadapteronlaptopproducts
The following symptoms might indicate damage caused by nonwarranted activities:
- Missingpartsmightbeasymptomofunauthorizedserviceormodification.
- If the spindle of a hard disk drive becomes noisy, it may have been subjected to excessive force, or dropped.
Checkoutguide
Use the following procedures as a guide in identifying and correcting problems with the ThinkPad Notebook.
Note: Thediagnostictests are intended to test only ThinkPad products. The use of non-ThinkPad products, prototype cards, or modified options can lead to false indications of errors and invalid system responses.
-
Identify the failingsymptoms inasmuch detail as possible.
-
Verify the symptoms. Trytore-creat the failure by running the diagnostic test or by repeating the operation.
DiagnosticsusingPC-DoctorforDOS
TheThinkPadNotebookhasatestprogramcalledPC-DoctorforDOS(hereafter calledPC-Doctor.)Youcandetecterrorsbyrunningthediagnosticstestincludedin PC-Doctor.
Note:
PC-DoctorforDOSisavailableatthefollowingWebsite:http://www.lenovo.com/support
TocreatethePC-DoctordiagnosticCD, follow the instructions on the Website.
Forsomepossibleconfigurationsofthecomputer,PC-Doctormightnotrun correctly.Toavoidthisproblem,youneedtoinitializethecomputersetupbyuse oftheBIOSSetupUtilitybeforeyourunPC-Doctor.
ToenterBIOSSetupUtility,doasfollows:
-
Turnonthecomputer.
-
When the Think Padlogocomesup, immediately press F1 to enter the BIOS Setup Utility.
Note: If asupervisor password has been set by the customer, BIOSSetup Utility men up appears after the password is entered. You can start the utility by pressing Enter instead of entering the supervisor password; however, you cannot change the parameter that are protected by the supervisor password.
OntheBIOSSetupUtilityscreen,pressF9,Enter,F10,andthenEnter.
Note: When you initialize the computer configuration, some devices are disabled, such as the serial port. If you test one of these devices, you will need to enable it by using Configuration utility for DOS. The utility is available on the following Website: http://www.lenovo.com/support
PC-Doctorcannotbeusedtotestadevicethatisinthedockingstation,evenifthe computersupportsthedockingstation.TotestaUSBdevice,connectittotheUSB connectorofthecomputer.
Testingthecomputer
Note: The PC-Doctor diagnostic CD does not support any optical drives connected through USB devices or any others. Its support only the internal optical drive of the ThinkPad Notebook.
Torunthetest,doasfollows:
- Turnoff the computer.
-
Makesurethattheinternalopticaldrivethatissupportedasastartupdevice is attachedtothecomputer.
-
Turnonthecomputer.
If the computer cannot be powered on, goto "Powersystemcheckout" on page 51, and check the powersources.
Ifanerrorcodeappears, goto "Symptom-to-FRUindex" on page 62.
-
WhentheThinkPadlogocomesup, immediatelypressF12toentertheBoot Menu.
-
Insert the PC-Doctor CD into the internal optical drive.
-
Press cursor keys to select ATAPI CDx (x: 0, 1, ...) and then press Enter.
-
Follow the instructions on the screen.
-
ThemainpanelofPC-Doctorappears.
-
Select Diagnostics with the arrow keys, and press Enter.
Note: You can select an item not only with the arrow keys, but also with the TrackPoint ^® pointer. Instead of pressing Enter, click the left button.
Apull-downmenuappears.(Itsexactformdependsonthemodel.)
Note:PC-Doctormenudoesnotmeantheformalsupportdevicelist.Some unsupporteddevicenamesmayappearinthePC-Doctormenu.

text_image
Diagnostics Interactive Tests Hardware Info Utility Quit F1=Help Run Normal Test Run Quick Test CPU/Coprocessor Systemboard Video Adapter Fixed Disks Diskette Drives Other Devices Communication Wireless LAN Advanced Memory Tests PC-DOCTOR 2.0 Copyright 2008 PC-Doctor, Inc. All Rights Reserved. Use the cursor keys and ESC to move in menus. Press ENTER to select.Theoptionsonthetestmenuareasfollows:
| DiagnosticsInteractiveTests | |
| RunNormalTestRunQuickTestCPU/CoprocessorSystemboardVideoAdapterFixedDisksDisketteDrivesOtherDevicesThinkPadDevicesCommunicationWirelessLANAdvancedMemoryTests | KeyboardVideoInternalSpeakerMouseDisketteSystemLoadOpticalDriveTestIntelWLANRadioTest |
| Note:In the Keyboard test in Interactive Tests, the Fn key should be held down for atleast2seconds;otherwise,itcannotbesensed.Video Adapter test supports only the LCD display on the ThinkPad Notebook. Ifyouhaveanexternalmonitorattachedtoyourcomputer,detachitbefore runningPC-DoctorforDOS.To test Digital Signature Chip, the security chip must be set to Active. | |
10.Runtheapplicablefunctiontest.
11.Followtheinstructionsonthescreen.Ifthereisaproblem,PC-Doctorshows messagesdescribingit.
- Toexitthetest, selectQuit—ExitDiag.
Tocancelthetest,pressEsc.
Note: After running PC-Doctor, check the time and date on the system and reset them if they are incorrect.
DetectingsysteminformationwithPC-Doctor
PC-Doctorcandetectthefollowingsysteminformation:
HardwareInfo
•SystemConfiguration
•MemoryContents
•PhysicalDiskDrives
•LogicalDiskDrives
•VGAInformation
•IDEDriveInfo
- PCIInformation
•PNPISAInfo
•SMBIOSInfo
•VESALCDInfo
•HardwareEventsLog
Utility
•RunExternalTests
•SurfaceScanHardDisk
•BenchmarkSystem
•DOSShell
•TechSupportForm
v BatteryRundown
v ViewTestLog
v PrintLog
v SaveLog
v FullEraseHardDrive
v QuickEraseHardDrive
LenovoThinkVantageToolbox(LenovoSystemToolbox)
LenovoThinkVantage® Toolbox(LenovoSystemToolboxinWindowsVista® and Windows® XP)isadiagnosticprogramthatworksthroughtheWindowsoperating system.Itenablesyoutoviewsymptomsofcomputerproblemsand solutionsfor them,andincludesautomaticnotificationwhenactionisrequired,computing assistance,advanceddiagnostics,anddiagnostichistory.
Note:
The latest Lenovo Think Vantage Toolbox (Lenovo System Toolbox) is available at the following Website: http://www.lenovo.com/support
ToinstallthelatestLenovoThinkVantageToolbox(LenovoSystemToolbox)on thecomputer,followtheinstructionsontheWebsite.
Torunthisprogram,doasfollows:
Windows7:
While the Windows operating system is running, press the Think Vantage button.
Youcanalsorunthisprogramaseitherofthefollowing:
v Click Start --> All Programs --> Lenovo ThinkVantage Tools --> System Health and Diagnostics.
v Click Start --> Control Panel --> System and Security --> Lenovo's System HealthandDiagnostics.
WindowsVistaandWindowsXP:
Click Start --> All Programs --> Lenovo Services --> Lenovo System Toolbox.
Followtheinstructionsonthescreen.LenovoThinkVantageToolbox(Lenovo SystemToolbox)alsohasproblemdeterminationaidsthatdeterminesoftwareand usageproblems.
For additional information about this program, seethe Help for the program.
PC-DoctorforRescueandRecovery
InsomemodelsofThinkPadNotebook,theRescueandRecovery ^® workspace enablesyoutorunthePC-Doctorprogramtotestthehardwarefeaturesofthe computer.
Torunthetest, click "RunDiagnostics" on the Rescue and Recovery mainscreen.
FRUtests
The followingtableshowsthetestforeachFRU.
Table1.FRUtests
| FRUApplicabletest | |
| System board | 1. Diagnostics --> CPU/Coprocessor2.Diagnostics-->Systemboard3.Ifthedockingstationortheportreplicatorisattached totheThinkPadNotebook,detachit.4.Placethecomputeronahorizontalsurface,andrun Diagnostics-->ThinkPadDevices-->HDDActive ProtectionTest.Note:Donotapplyanyphysicalshocktothecomputer whilethetestisrunning. |
| Power | Diagnostics --> ThinkPad Devices --> AC Adapter, Battery 1(Battery2) |
| LCDunit1.Diagnostics | -->VideoAdapter2.InteractiveTests-->Video |
| AudioEntertheBIOSSetup | upUtilityandchangeSerialATA(SATA)setting to Compatibility, and run Diagnostics --> Other Device-->ConexantAudio |
| SpeakerInteractiveTests | -->InternalSpeakerNote:OnceAudiotestisdone,thenosoundisheardthis test.Inthiscase,turnoffandturnonthecomputer.Then, runhistestagain. |
| Keyboard | 1. Diagnostics --> Systemboard --> Keyboard2.InteractiveTests-->Keyboard |
| Harddiskdriveor solidstatedrive | EntertheBIOSSetupUtilityandchangeSerialATA(SATA) setting to Compatibility, and run Diagnostics --> Fixed Disks |
| Youcanalsodiagnosethedrivewithoutstartingupthe operatingsystem.TodiagnosethedrivefromtheBIOS SetupUtility,doasfollows:1.Removeanydiskettefromthediskettedrive,andthen turnoffthecomputer.2.Turnonthecomputer.3.Whilethemessage,"Tointerruptnormalstartup,press theblueThinkVangatebutton,"isdisplayedatthelower leftofthescreen,pressF1toentertheBIOSSetup Utility.4.Usingcursorkeys,selectHDDdiagnosticprogram. Pressenter.5.Usingcursorkeys,selectMainharddiskdriveor Ultrabayharddiskdrive.6.PressEntertostartthediagnosticprogram. | |
| Diskette drive | 1. Diagnostics --> Diskette Drives2.InteractiveTests-->Diskette |
| Optical drive | 1. Diagnostics --> Other Devices--> Optical Drive2.InteractiveTests-->OpticalDriveTest |
| Memory1.IftwoDIMM | Isareinstalled,removeoneofthemandrun Diagnostics --> Advanced Memory Tests.2.Iftheproblemdoesnotrecur,returntheDIMMtoits place,removetheotherone,andrunthetestagain. |
| TrackPointor pointingdevice | IftheTrackPointdoesnotwork,checktheconfigurationas specifiedintheBIOSSetupUtility.IftheTrackPointis disabled,selectAutomatictoenableit.AfteryouusetheTrackPoint,thepointermaydriftonthe screenforashorttime.Thisdriftcanoccurwhenaslight, steadypressureisappliedtotheTrackPointpointer.This symptomisnotahardwareproblem.Ifthepointerstops afterashorttime,noserviceactionisnecessary.IfenablingtheTrackPointdoesnotcorrecttheproblem, continuewiththefollowing:•InteractiveTests-->Mouse |
| TouchPadIftheTouchP | Paddoesnotwork,checktheconfigurationas specifiedintheBIOSSetupUtility.IftheTouchPadis disabled,selectAutomatictoenableit.Ifenablingthe TouchPaddoesnotcorrecttheproblem,continuewiththe following:•InteractiveTests-->Mouse |
Powersystemcheckout
Toverifyasymptom, dothefollowing:
- Turnoff the computer.
- Removethebatterypack.
- Connect the acadapter.
- Check that power is supplied when you turn on the computer.
- Turnoff the computer.
6.Disconnecttheacadapterandinstallthechargedbatterypack. - Check that the battery packs supplies power when you turn on the computer.
If you suspect a power problem, se the appropriate one of the following power supply checkouts:
- "CheckingtheACadapter"
- "Checkingoperationalcharging" on page 52
- "Checkingthebatterypack" on page52
- "Checkingthebackupbattery" on page 53
CheckingtheACadapter
You are here because the computer fails only when the AC adapter is used.
- If the power problem occurs only when the docking station or the port replicator is used, replaced docking station or the port replicator.
- If the power-on-indicator does not turn on, check the power cord of the AC adapter for correct continuity and installation.
- If the computer does not charge during operation, goto "Checking operational charging" on page 52.
TochecktheACadapter,dothefollowing:
- UnplugtheACadaptercablefromthecomputer.
- Measure the output voltage at the plug of the AC adapter cable. Seethe following figure:

(20V)
| PinVoltage(Vdc) | |
| 1+20 | |
| 2 | 0 |
| 3Ground | |
Note: Output voltage of pinno.2 of the AC adapter may different from the one you are servicing.
- If the voltage is not correct, replace the AC adapter.
- If the voltage is acceptable, do the following:
•Replacethesystemboard.
- If the problem persists, goto "FRU tests" on page 49.
Note: Noise from the AC adapter does not always indicate a defect.
Checkingoperationalcharging
To check whether the battery charges properly during operation, use discharged battery pack or battery pack that has less than 50% of the total power remaining when installed in the computer.
Performoperationalcharging.Ifthebatterystatusindicatororicondoesnotturn on,removethebatterypackandletitreturntoroomtemperature.Reinstallthe batterypack.Ifthechargeindicatororiconstilldoesnotturnon,replace the batterypack.
If the charge indicator still does not turn on, replacethesystem board. Then reinstall the battery pack. If it is still not charged, goto then next section.
Checkingthebatterypack
BatterychargingdoesnotstartuntilthePowerManagerBatteryGaugeshowsthat lessthan96%ofthetotalpowerremains;underthisconditionthebatterypackcan chargeto100%ofitscapacity.Thisprotectsthebatterypackfrombeing overchargedorfromhavingashortenedlife.
Tocheckyourbattery,moveyourcursorortothePowerManagerBatteryGaugeicon intheicontrayoftheWindowstaskbarandwaitforamoment(butdonotclick), andthepercentageofbatterypowerremainingisdisplayed.Togetdetailed informationaboutthebattery,double-clickthePowerManagerBatteryGaugeicon.
Note: If the battery pack becomes shot, it may not be able to charge. Remove it from the computer and leave in room temperature for awhile. After it could down, reinstall and recharge it.
Tocheckthebatterypack,dothefollowing:
1.Poweroffthecomputer.
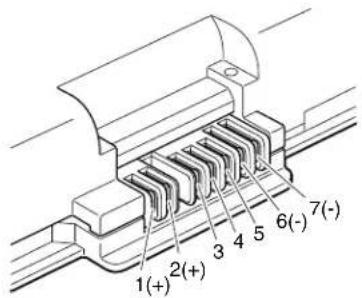
- Removethebatterypack and measure the voltage between battery terminals 1 (+) and 7 (-). Seethefollowing figure:
text_image
1(+) 2(+) 3 4 5 6(-) 7(-)| TerminalVoltage(Vdc) | |
| 1+0to+16.8 | |
| 7Ground(-) | |
- If the voltage is less than +11.0Vdc, the battery pack has been discharged.
Note: Recharging will take at least 3 hours, even if the indicator does not turn on.
If the voltage is still less than +11.0 Vd cafter recharging, replacethe battery.
- If the voltage is more than +11.0Vdc, measure the resistance between battery terminals 5 and 7. Theresistance must be 4 to 30KΩ.
Iftheresistanceisnotcorrect,replacethebatterypack.Iftheresistanceis correct,replacethesystemboard.
Checkingthebackupbattery
Dothefollowing:
- Poweroffthecomputer, and unplugtheacadapterfromit.
- Turnthecomputerupsidedown.
- Removethebatterypack(see "1010Batterypack" on page 85).
4.Removethebackupbattery(see"1100Backupbattery"onpage103). - Measure the voltage of the backup battery. Seethefollowing figure.
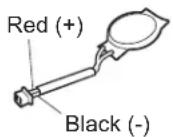
| WireVoltage(Vdc) |
| Red+2.5to+3.2 |
| BlackGround |
- If the voltage is correct, replacethesystemboard.
- If the voltage is not correct, replace the backup battery.
- If the backup battery discharges quickly after replacement, replacethesystem board.
Relatedserviceinformation
Thischapterpresentsfollowinginformation:
• "RestoringthefactorycontentsbyusingRecoveryDiscSet"
• "Passwords" on page 56
• "Powermanagement" on page 60
•“Symptom-to-FRUindex”onpage62
ServiceWebsite:
Whenthelatestmaintenancedisketteandthesystemprogramservicediskette becomeavailable,theywillbepostedonhttp://www.lenovo.com/spm
RestoringthefactorycontentsbyusingRecoveryDiscSet
Whentheharddiskdrive(HDD)orsolidstatedrive(SSD)isreplacedbecauseofa failure, noproductrecoveryprogramisonthenewdrive. In this case, you must usetheRecoveryDiscSetforthecomputer.OrdertheRecoveryDiscSetandthe driveatthesametimesothatyoucanrecoverthenewdrivewiththepre-installed softwarewhentheyarrive.Forinformationonwhichdiscstoorder,see"Recovery discs"onpage183.
Therecoverydiscsetconsistsoftheuserinstructionsandthefollowingsetof DVDstorestorethecomputertotheoriginalfactoryconfiguration.
OperatingSystemRecoveryDisc(onedisc)
ThisdiscrestorestheMicrosoft ^® Windowsoperatingsystem.Usethisdisc tostarttherecoveryprocess.
ApplicationsandDriversRecoveryDisc(oneormorediscs)
Thisdiscrestoresthepreinstalledapplicationsanddriversonthe computer.
SupplementalRecoveryDisc
Thisdiscontainsadditionalcontent,suchasupdatestothesoftwarethat waspreinstalledonthecomputer.Notallrecoverydiscsetscomewitha Supplemental Recovery Disc.
Notes:
- YoumusthaveaDVDdrivetousetherecoverydiscs. If you donothavean internal DVD drive, you can use an external USB DVD drive.
- Duringtherecoveryprocess, alldataonthedrivewillbedeleted. If possible, copy any important data or personal file that you want to keep on to remove media or an network drive before you start there recovery process.
Torestorethecomputertotheoriginalfactoryconfigurationusingtherecovery discset,dothefollowing:
Note: Recovery takes several hours. Thelengthoftimedependson themethod you use. If you user recovery discs, recovery takes at least five hours.
- MaketheCD/DVDdrivethefirststartupdeviceinthestartupsequence using the following procedure:
a. PressandholddowntheF1key, and then turn the computer. When the logoscreen is displayed for you hear repeating beeps, release the F1key. The Setup Utility program opens.
b. Use the arrow keys to select Startup → Boot.
c.SelecttheCD/DVDdriveasthe1stBootDevice.
-
Insert the Operating System Recovery Disc into the DVD drive.
-
PressF10tosavetheSetupUtilityconfigurationchanges.Followthe instructionsonthescreentobegintherecoveryprocess.
-
Select your language and click Next.
-
Read the license. If you agree with the terms and conditions, select I accept these terms and conditions and then click Next. If you do not agree with the termsandconditions,followtheinstructionsonthescreen.
-
Click Yes in the displayed window to begin the operating system recovery process.
-
Insert the Applications and Drivers Recovery Disc when prompted and then click OKtobegintheapplicationsanddriversrecoveryprocess.
-
If you have a Supplemental Recovery Disc, insert it when prompted and click Yes. If you do not have a Supplemental Recovery Disc, click No.
-
When allofthedata has been copied from the last discintheset and has been processed, removed discand restart the computer.
Note: Therestoftherecoveryprocessisfullyautomatedandnoactionis requiredbyyou. ThecomputerwillrestartintotheMicrosoftWindows desktopseveraltimesandyoumightexperienceperiodswhennoactivityis apparentonthescreenforseveralminutesatatime.Thisisnormal.
-
Whentherecoveryprocessiscomplete, theSetUpWindowsscreenis displayed. FollowtheinstructionsonthescreentocompletetheWindows setup.
-
After you have completed the Windows setup, you might want to restore the original startup sequence. Start the Setup Utility program and then press F9 to restore the default settings. Press F10 to save and exit the Setup Utility.
Note: Afterrestoringadrivetothefactorydefaultsettings, you might need to reinstallsomedevicedrivers.
Passwords
AsmanyasthreepasswordsmaybeneededforanyThinkPadNotebook:the power-onpassword(POP),thehard-diskpassword(HDP),andthesupervisor password(SVP).
Ifanyofthesepasswordshasbeenset,apromptforitappearsonthescreen wheneverthecomputeristurnedon.Thecomputerdoesnotstartuntilthe passwordisentered.
Exception: If only an SVP is installed, the password prompt does not appear when the operating system is booted.
Power-onpassword
Apower-onpassword(POP)protectsthesystemfrombeingpoweredonbyan unauthorizedperson.Thepasswordmustbeenteredbeforeanoperatingsystem canbebooted.ForhowtoremovethePOP,see"Howtoremovethepower-on password."
Hard-diskpassword
Therearetwohard-diskpasswords(HDPs):
-UserHDP—fortheuser
- MasterHDP—forthesystemadministrator,whocanuseittogetaccesstothe harddiskeveniftheuserhaschangedtheuserHDP
Note: There are two modes for the HDP: User only and Master + User. The Master+UsermoderequirestwoHDPs;thesystemadministratorentersbothin thesameoperation.ThesystemadministratorthenprovidestheuserHDPtothe systemuser.
Attention: If the user HDPhas been forgotten, check whether a master HDPhas beenset. Ifithas, it can be used for access to the hard disk drive. If a master HDP is available, neither Lenovonor Lenovo authorized servic technicians provide any service stores either the user or the master HDP, ortorecover data from the hard disk drive. The hard disk drive can be replaced for as scheduled fee.
ForhowtoremovethePOP, see "Howtoremovethehard-diskpassword" on page58.
Supervisorpassword
Asupervisor password(SVP)protectsthesysteminformationstoredintheBIOS SetupUtility.TheusermustentertheSVPinordertogetaccesstotheBIOSSetup Utilityandchangethesystemconfiguration.
Attention: If the SVPhasbeenforgottenandcannotbemadeavailabletothe servicetechnician, there is noserviceproceduretoresetthepassword. Thesystem boardmustbereplacedforascheduledfee.
Howtoremovethepower-onpassword
ToremoveaPOPthatyouhaveforgotten,dothefollowing:
(A)IfnoSVPhasbeenset:
- Turnoff the computer.
- Removethebatterypack.
Forhowtoremovethebatterypack,see"1010Batterypack"onpage85.
- Removethebackupbattery.
Forhowtoremovethebackupbattery,see"1100Backupbattery"onpage103.
- TurnonthecomputerandwaituntilthePOSTends.
AfterthePOSTends, thepasswordpromptdoesnotappear. ThePOPhasbeen removed.
- Reinstall the backup battery and the battery pack.
(B)IfanSVPhasbeensetandisknownbytheservicetechnician:
-
Turnonthecomputer.
-
When the ThinkPadlogocomesup, immediately press F1 to enter BIOS Setup Utility.
FormodelssupportingthePassphrasefunction,pressF1whilethePOPiconis appearingonthescreen;thenenterthePOP.Fortheothermodels,enterthePOP.
Note: To check whether the ThinkPad Notebook you are servicing supports the Passphrase function, enter the BIOSSetup Utility and goto Security --> Password. If the Using Passphrase item is displayed in the menu, this function is available on the ThinkPad Notebook.
-
Select Security, using the cursor directional keys to move down the menu.
-
SelectPassword.
-
SelectPower-OnPassword.
-
Type the current SVP in the Enter Current Password field. then leave the Enter NewPasswordfieldblank, and pressEntertwice.
-
In the Changeshavebeensavedwindow, pressEnter.
-
PressF10; then, in the Setup confirmation window, select Yes.
Howtoremovethehard-diskpassword
Attention: If User only mode is selected and the user HDP has been forgotten and cannot be made available to the servicetechnician, neither Lenovonor Lenovo authorized servicetechnicians provide any servicestoresettheuserHDPsorto recover data from the hard disk drive. The hard disk drive can be replaced for a scheduled fee.
ToremoveauserHDPthathasbeenforgotten,whentheSVPandthemasterHDPareknown,dothefollowing:
-
Turnonthecomputer.
-
When the ThinkPadlogocomesup, immediately press F1 to enter BIOS Setup Utility.
FormodelssupportingthePassphrasefunction,pressF1whileHDPiconis appearingonthescreen;thenenterthemasterHDP.Fortheothermodels, enterthemasterHDP.
Note: To check whether the ThinkPad Notebook you are servicing supports the Passphrase function, enter the BIOSSetup Utility and goto Security --> Password. If Using Passphrase item is displayed in the menu, this function is available on the ThinkPad Notebook.
-
Select Security, using the cursor directional keys to move down the menu.
-
SelectPassword.
-
Select Hard-disk x password, where x is the letter of the hard disk drive. A pop-upwindowopens.
6.SelectMasterHDP.
-
Type the current master HDP in the Enter Current Password field. then leave the EnterNewPasswordfieldblank, and press Entertwice.
-
PressF10.
-
SelectYesintheSetupConfigurationwindow. BothuserHDPandmasterHDPwillhavebeenremoved.
Powermanagement
Toreducepowerconsumption, thecomputerhasthreepowermanagementmodes: screenblank, sleep(standbyinWindowsXP), and hibernation.
Screenblankmode
If the timeset on the "Turnoffmonitor" timer in the operating system expires, the LCDbacklightturnsoff.
Toputthecomputerintoscreenblankmode,doasfollows:
-
PressFn+F3. Apanelforselectingapowerplan(inWindowsXP, power scheme) appears.
-
Select Power off display (keep current power plan) (in Windows XP, keep currentpowerscheme).
Youcanalsoputthecomputerintoscreenblankmode,pressThinkVantagebutton andusetheThinkVantageProductivityCenter.
Note: If the computerisa Windows7 model, it does not support ThinkVantage Productivity Center.
Toendscreenblankmodeandresumenormaloperation,pressanykey.
Sleep(standby)mode
Whenthecomputerentersleep(standby)mode, the following events occur in addition to what occurs in screen blank mode:
•TheLCDispoweredoff.
•Theharddiskdriveispoweredoff.
•TheCPUstops.
Toentersleep(standby)mode,pressFn+F4.
Note: You can change the action of the Fn+F4 key combination by changing the settings in PowerManager.
Incertaincircumstances, the computer goes into sleep (standby) mode automatically:
- Ifa "suspendtime" has been set on the timer, and the user does not do any operation with the keyboard, the TrackPoint, the hard disk, the parallel connector, orthedisketted rivewith in that time.
- If the battery indicator blinks orange, indicating that the battery power is slow.
Note: Evenifyoudonotsetthelow-batteryalarm, the charge indicator notifies you when the battery is slow, and then the computer enter the power-saving mode automatically.
Tocausethecomputertoreturnfromsleep(standby)modeandresumeoperation, dooneofthefollowing:
•PresstheFnkey.
•OpentheLCDcover.
•Turnonthepowerswitch.
Also, ineitherofthefollowingevents, thecomputerautomaticallyreturnsfrom sleep(standby)modeandresumesoperation:
•Theringindicator(RI)issignaledbyaserialdeviceoraPCCarddevice.
• Thetimesetontheresumetimerelapses.
Note: The computer does not accept any input immediately after it enters sleep (standby) mode. Wait a few seconds before taking any action to reenter operation mode.
Hibernationmode
Inhibernationmode, the following occurs:
- Thesystemstatus,RAM,VRAM,andsetupdataarestoredontheharddisk.
•Thesystemispoweredoff.
Note: If the computer enter the hibernation mod while it is docked to the docking station, donotundockit before resuming normal operation. If you do undockit and then try to resumen normal operation, you will get an error message, and you will have to start the system.
Tocausethecomputertoenterhibernationmode,doanyofthefollowing:
- PresstheFn+F12keys.
- If you have defined one of the following actions as the event that cause the system to go into hibernation mode, perform that action.
-Closingthelid.
-Pressingthepowerbutton.
-PressingFn+F4keys.
Also, the computer goes into hibernation mode automatically ineither of the following conditions:
- Ifa"hibernationtime"hasbeensetonthetimer,andiftheuserdoesnotdo anyoperationwiththekeyboard,theTrackPoint,theharddiskdrive,the parallelconnector,orthediskettedrivewithinthattime.
- If the timer conditions are satisfied in suspend mode.
Whenthepoweristurnedon, thecomputerreturnsfromhibernationmodeand resumesoperation. Thehibernationfileinthebootrecordontheharddiskdriveis read, andsystemstatusisrestoredfromtheharddiskdrive.
Symptom-to-FRUindex
Thissectioncontainsfollowinginformation:
• "Numericerrorcodes"
- "Errormessages" on page 66
• "Beepsymptoms" on page 67
• "No-beepsymptoms" on page 67
•"LCD-relatedsymptoms"onpage68
• "Intermittentproblems" on page 69
• "Undeterminedproblems" on page 69
Thesymptom-to-FRUindexinthissectionlistsymptomsanderrorsandtheir possiblecauses. Themostlikelycauseislistedfirst, inboldfacetype.
Note: DotheFRU replacementorotheractionsinthesequenceshowninthe columnheaded "FRUoraction,insequence." IfreplacingaFRUdoesnotsolve theproblem,puttheoriginalpartbackinthecomputer.Donotreplacea nondefectiveFRU.
This index can also help you determine, during regular servicing, what FRUs are likely to be to be replaced next.
AnumericerrorisdisplayedforeacherrordetectedinPOSTorsystemoperation. Inthedisplays, ncanbeanynumber.
If nonumericcode is displayed, check then narrative descriptions of symptoms. If the symptom is not described there, goto "Intermittent problems" on page 69.
Note:
ForadevicenotsupportedbydiagnosticcodesintheThinkPadNotebooks,see themanualforthatdevice.
Numericerrorcodes
Table2.Numericerrorcodes
| SymptomorerrorFRUoration,insequence | |
| 0175BadCRC1,stopPOSTtask—TheEEPROM checksumisnotcorrect. | Systemboard. |
| 0176SystemSecurity—Thesystemhasbeen tamperedwith. | 1.RunBIOSSetupUtility,andsavethe currentsettingbypassingF10.2.Systemboard. |
| 0177BadSVPdata,stopPOSTtask—The checksumofthesupervisorpasswordinthe EEPROMisnotcorrect. | Systemboard. |
| 0182BadCRC2.EnterBIOSSetupandloadSetup defaults.—ThechecksumoftheCRS2setting intheEEPROMisnotcorrect. | 1.RunBIOSSetupUtility.PressF9,and Entertoloadthedefaultsetting.Then savethecurrentsettingbypassingF10.2.Systemboard. |
| 0185Badstartupsequencesettings.EnterBIOS SetupandloadSetupdefaults. | 1.RunBIOSSetupUtility.PressF9,and Entertoloadthedefaultsetting.Then savethecurrentsettingbypassingF10. |
| 0187EAIDataaccesserror—TheaccesstoEEPROMisfailed. | Systemboard. |
| 0188InvalidRFIDSerilizationInformationArea. | Systemboard. |
| 0189InvalidRFIDconfigurationinformationarea—TheEEPROMchecksumisnotcorrect. | Systemboard. |
| 0190Criticalallow-batteryerror | 1.Chargethebatterypack.2.Batterypack. |
| 0191SystemSecurity—InvalidRemoteChangerequested. | 1.RunBIOSSetupUtility,andthensavecurrentsettingbypassingF10.2.Systemboard. |
| 0192SystemSecurity—EmbeddedSecurityhardwaretamperdetected. | Systemboard. |
| 0199SystemSecurity—Securitypasswordretrycountexceeded. | 1.RunBIOSSetupUtility,andthensavethecurrentsettingbypassingF10.2.Systemboard. |
| 01C9MorethanoneEthernetdevicesarefound.Removeoneofthem.Presstocontinue. | 1.RemovetheEthernetdevicethatyouinstalled;orpressEsctoignorethewarningmessage.2.Systemboard. |
| 01CAMorethanoneWirelessLANdevicesarefound.Removeoneofthem. | 1.RemovethewirelessLANdevicethatyouinstalled.2.Systemboard. |
| 0200Harddiskerror—Theharddiskisnotworking. | 1.Reseattheharddiskdrive.2.LoadSetupDefaultsinBIOSSetupUtility.3.Harddiskdrive.4.Systemboard. |
| 021xKeyboarderror. | Runinteractivetestsofthekeyboardandtheauxiliaryinputdevice. |
| 0220Monitortypeerror—MonitortypedoesnotmatchtheonespecifiedinCMOS. | LoadSetupDefaultsinBIOSSetupUtility. |
| 0230ShadowRAMerror—ShadowRAMfailsatoffsetnnnn. | Systemboard. |
| 0231SystemRAMerror—SystemRAMfailsatoffsetnnnn. | 1.DIMM.2.Systemboard. |
| 0232ExtendedRAMerror—ExtendedRAMfailsatoffsetnnnn. | 1.DIMM.2.Systemboard. |
| 0250Systembatteryerror—Systembatteryisdead. | 1.Chargethebackupbatteryformorethan8hoursbyconnectingtheacadapter.2.ReplacethebackupbatteryandrunBIOSSetupUtilitytoresetthetimeanddate. |
| 0251SystemCMOSchecksumbad—Default configurationused. | 1.Chargethebackupbatteryformore than8hoursbyconnectingtheac adapter.2.ReplacethebackupbatteryandrunBIOS SetupUtilitytoresetthetimeanddate. |
| 0252Passwordchecksumbad—Thepasswordis cleared. | ResetthepasswordbyrunningBIOSSetup Utility. |
| 0260Systemtimererror. | 1.Chargethebackupbatteryformore than8hoursbyconnectingtheac adapter.2.ReplacethebackupbatteryandrunBIOS SetupUtilitytoresetthetimeanddate.3.Systemboard. |
| 0270Real-timeclockerror. | 1.Chargethebackupbatteryformore than8hoursbyconnectingtheac adapter.2.ReplacethebackupbatteryandrunBIOS SetupUtilitytoresetthetimeanddate.3.Systemboard. |
| 0271Dateandtimeerror—Neitherthedatenor thetimeissetinthecomputer. | RunBIOSSetupUtilitytoresetthetime anddate. |
| 0280Previousbootincomplete—Default configurationused. | 1.Load“SetupDefault”inBIOSSetup Utility.2.DIMM.3.Systemboard. |
| 02F0CPUID:xxFailed. | 1.CPU.2.Systemboard. |
| 02F4EISACMOSnotwritable. | 1.LoadSetupDefaultsinBIOSSetup Utility.2.Replacethebackupbattery.3.Systemboard. |
| 02F5DMAtestfailed. | 1.DIMM.2.Systemboard. |
| 02F6SoftwareNMIfailed | 1.DIMM.2.Systemboard. |
| 02F7Fail-safetimerNMIfailed | 1.DIMM.2.Systemboard. |
| 1802Unauthorizednetworkcardisplugged in—TurnoffandremovetheminiPCI networkcard. | 1.RemoveMiniPCInetworkcard.2.Systemboard. |
| 1803Unauthorizeddaughtercardisplugged in—Turnoffandremovethedaughtercard. | 1.Removethedaughtercardthatyou installed.2.Systemboard. |
| 1804UnauthorizedWANcardisplugged in—PoweroffandremovetheWANcard. | 1.RemovetheWANcardthatyou installed.2.Systemboard. |
| 1805 UnauthorizedWirelessUSBcardisplugged in-PoweroffandremovetheWirelessUSB card. | 1.RemovetheWirelessUSBcardthatyou installed.2.Systemboard. |
| 1820 Morethanoneexternalfingerprintreaderis attached.Poweroffandremoveallbutthe readerthatyousetupwithinyourmain operatingsystem. | Removeallbutthereaderthatyousetup fortheauthentication. |
| 1830 Invalidmemoryconfiguration-Poweroff andinstallamemorymoduletoSlot-0or thelowerslot. | InstallDIMMinSlot-0,butnotinSlot-1.Note:FortheconstructionoftheDIMM slot,see“1060DIMM(inbottomslot)”on page92. |
| 2000 HardDriveActiveProtectionsensor diagnosticsfailed.Pressto continue.PresstoenterSETUP | 1.Undockdockingstationorport replicatorifitisattachedtothe ThinkPadNotebook.2.PlacetheThinkPadNotebookona horizontalsurface.Donotapplyany physicalshocktothecomputer.3.RunDiagnostics-->ThinkPadDevices-->HDDActiveProtectionTest. |
| 2010 Warning:Yourinternalharddiskdrive (HDD)maynotfunctioncorrectlyonthis system.EnsurethatyourHDDissupported onthissystemandthatthelatestHDD firmwareisinstalled. | Informthefollowinginformationtothe customer:Ifintheprimarybaythecustomer isusinganon-IBMornon-Lenovoharddisk drive(HDD),oranoldgenerationIBM HDDwhichisnotsupportedbythissystem, withtheriskinmind,thecustomercanstill useitbypassingESC.Ifintheprimary drivebaythecustomerisusingasupported IBM/LenovoHDDwithanoldfirmware, thecustomerneedstoupdateitsfirmwareto thelatest.Thelatestversionisavailableat http://www.lenovo.com/support |
| 2100 InitializationerroronHDD0(Mainhard diskdrive) | 1.Reseattheharddiskdrive.2.Mainharddiskdrive.3.Systemboard. |
| 2102 InitializationerroronHDD1(Ultrabayhard diskdrive) | 1.Reseattheharddiskdrive.2.UltrabayTM harddiskdrive.3.Systemboard. |
| 2110 ReaderoronHDD0(Mainharddiskdrive) | 1.Reseattheharddiskdrive.2.Mainharddiskdrive.3.Systemboard. |
| 2112 ReaderoronHDD1(Ultrabayharddisk drive) | 1.Reseattheharddiskdrive.2.Ultrabayharddiskdrive.3.Systemboard. |
Errormessages
Table3. Errormessages
| SymptomorerrorFRUoration,insequence | |
| Deviceaddressconflict.1.Load“SetupDefaults” | intheBIOS SetupUtility.2.Backupbattery.3.Systemboard. |
| Allocationerrorfordevice.1.Load“SetupDefaults” | intheBIOS SetupUtility.2.Backupbattery.3.Systemboard. |
| Failingbits:nnnn.1.DIMM. | 2.Systemboard. |
| Invalidsystemconfigurationdata.1.DIMM. | 2.Systemboard. |
| I/OdeviceIRQconflict.1.Load“SetupDefaults” | intheBIOS SetupUtility.2.Backupbattery.3.Systemboard. |
| Hibernationerror.1.Restorethesystemconfigurationto | whatitwasbeforethecomputer enteredhibernationmode.2.Ifmemorysizehasbeenchanged,re-createthehibernationfile. |
| Fanerror.1.Fan. | 2.Thermalgrease.3.Systemboard. |
| Thermalsensingerror.Systemboard. | |
| Cannotbootfromanydevice.Checkthestatusofde | devicewhichyouwant tobootfrom.Devicenotfound.1.Thedeviceyouwanttobootfrom.2.Systemboard.DeviceError.1.Thedeviceyouwanttobootfrom.2.Systemboard.Novalidoperatingsystem.1.Checkthattheoperatingsystemhasno failureandisinstalledcorrectly.2.Reinstalltheoperationsystem.Excludedfrombootorder.•EntertheBIOSSetupUtilityandaddthe deviceinbootorder. |
Beepsymptoms
Table4.Beepsymptoms
| SymptomorerrorFRUoration,insequence | |
| Onebeepandablank,unreadable,or flashingLCD. | 1.ReseattheLCDconnector.2.LCDassembly.3.ExternalCRT.4.Systemboard. |
| Onelongandtwoshortbeeps,andablank orunreadableLCD. | 1.Systemboard.2.LCDassembly.3.DIMM. |
| Twoshortbeepswitherrorcodes.POSTerror.See"Numericerrorcodes"onpage62. | |
| Twoshortbeepsandablankscreen.1.Systemboard. | 2.DIMM. |
| Threeshortbeeps,pause,threemoreshort beeps,andoneshortbeep. | 1.DIMM.2.Systemboard |
| Oneshortbeep,pause,threeshortbeeps, pause,threemoreshortbeeps,andoneshort beep. | |
| Onlythecursorappears.Reinstalltheoperatingsystem. | |
| Fourcyclesoffourshortbeepsandablank screen. | Systemboard(securitychip) |
| Fiveshortbeepsandablankscreen.Systemboard | |
No-beepsymptoms
Table5.No-beepsymptoms
| SymptomorerrorFRUoration,insequence | |
| Nobeep,power-onindicatoron,LCDblank,andnoPOST. | 1.Makesurethateveryconnectoris connectedtightlyandcorrectly.2.DIMM.3.Systemboard. |
| Nobeep,power-onindicatoron,andLCDblankduringPOST. | 1.ReseatDIMM.2.Systemboard. |
| Thepower-onpasswordpromptappears.Apower | onpasswordorasupervisor passwordisset.Typethepasswordand pressEnter. |
| Thehard-diskpasswordpromptappears.Ahard | diskpasswordisset.Typethe passwordandpressEnter. |
LCD-relatedsymptoms
Important: The TFTLCD forthenotebookcomputercontainsmanythin-film transistors(TFTs). The presence of a small number of dots that are missing, discolored, or always lighted discharacteristic of TFTLCD technology, but excessive pixel problemscan cause viewing concerns.
IftheLCDyouareservicinghastwoorlessvisibledefectivepixels,itshouldnot beconsideredfaulty.However,iftheLCDhasthreeormorevisibledefective pixels,itwillbedeemedasdefectivebyLenovoanditshouldbereplaced.
Notes:
- ThispolicyappliestoallThinkPadNotebookspurchasedon1January, 2008orlater.
- LenovowillnotprovidereplacementiftheLCDiswithinspecificationas we cannot guarantee that any replacement LCD will have zero pixel defects.
• OnepixelconsistsofR,G,Bsub-pixels.
Table6.LCD-relatedsymptoms
| SymptomorerrorFRUoration,insequence | |
| Nobeep,power-onindicatoron,anda blankLCDduringPOST. | Systemboard. |
| •LCDbacklightnotworking.•LCDtoodark.•LCDbrightnesscannotbeadjusted.•LCDcontrastcannotbeadjusted. | 1.ReseattheLCDconnectors.2.LCDassembly.3.Systemboard. |
| •LCDscreenunreadable.•Charactersmissingpixels.•Screenabnormal.•Wrongcolordisplayed. | 1.Seeimportantnotefor“LCD-related symptoms.”2.ReseatallLCDconnectors.3.LCDassembly.4.Systemboard. |
| Horizontalorverticallinesdisplayedon LCD. | LCDassembly. |
Intermittentproblems
Intermittentsystemhangproblemscanbeduetovarietyofcausesthathave nothingtodowithahardwaredefect,suchascosmicradiation,electrostatic discharge,orsoftwareerrors.FRUreplacementsshouldbeconsideredonlywhena problemrecurs.
When analyzing an intermittent problem, dothefollowing:
- Run the diagnostic test for the system board in loop mode at least 10 times.
- If no error is detected, donot replace any FRUs.
- If any error is detected, replace the FRU shown by the FRU code. Rerunthe test to verify that nomore error sexist.
Undeterminedproblems
If the diagnostic tests did not identify the adapter or device that has failed, if wrong devices are installed, or if the system simply is not operating, follow these procedure to isolate the failing FRU (donotisolate FRU sthathavenodefects).
Verify that all attached devices are supported by the computer.
Verify that the powersupply being used at the time of the failure is operating correctly. (See "Powersystemcheckout" on page 51.)
- Turnoff the computer.
- VisuallycheckeachFRUfordamage.ReplaceanydamagedFRU.
- Removeordisconnectallofthefollowingdevices:
a.Non-ThinkPaddevices
b.Devicesattachedtothedockingstationortheportreplicator
c.Printer,mouse,andotherexternaldevices
d.Batterypack
e.Harddiskdrive
f.Externaldiskettedriveoropticaldrive
g.DIMM
h. Opticaldiskordisketteintheinternaldrive
i.PCCards
-
Turnonthecomputer.
-
Determinewhethertheproblemhasbeensolved.
-
If the problem does not recur, reconnect theremoved devices one at a time until you find the failing FRU.
-
If the problem remains, replace the following FRUs one at a time (donot replace an on defective FRU):
a.Systemboard
b.LCDassembly
Statusindicators
Thischapterpresentsthesystemstatusindicatorthatshowthestatusofthe computer.
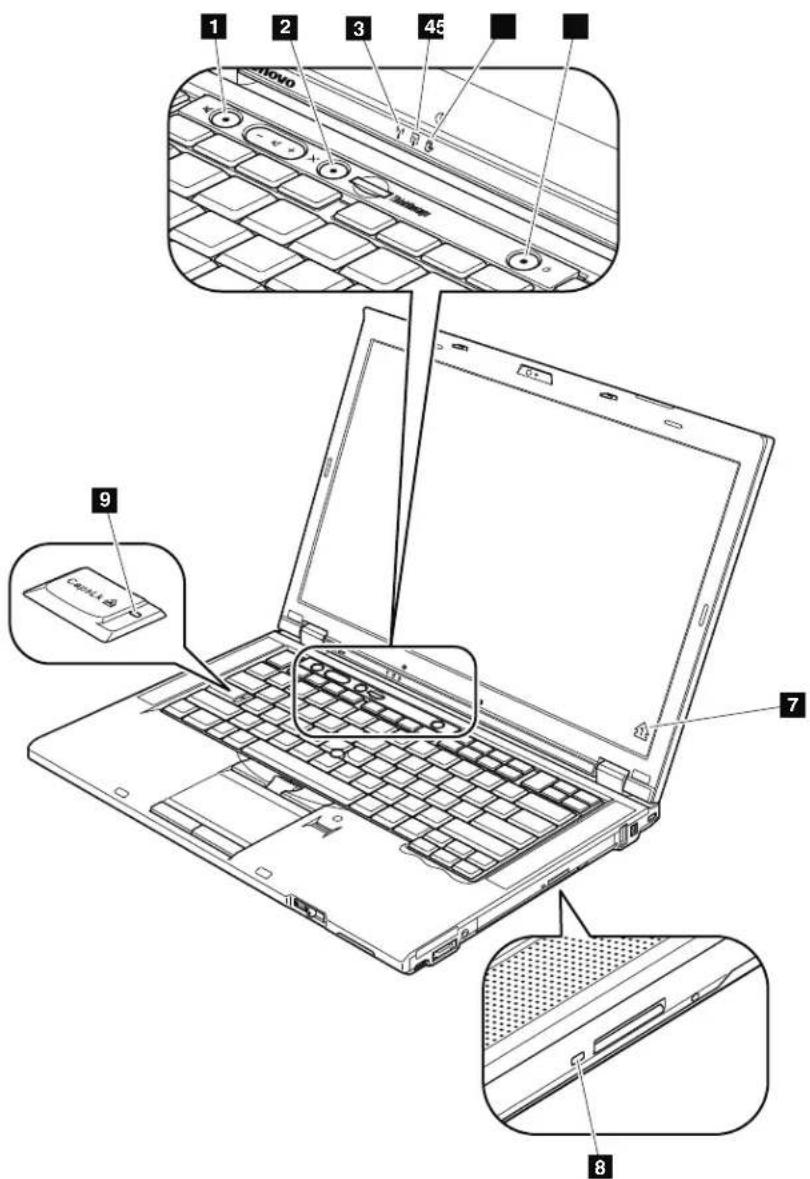
text_image
1 2 3 45 9 7 8
text_image
Diagram of a laptop with labeled ports and an inset showing two labeled buttons (10 and 11) pointing to the main panel.Table7.Statusindicators
| IndicatorMeaning | |
1Speakermute | Orange:Thespeakerisonmute.Tosetthespeakersonmuteor unmute,pressthespeakermutebutton. |
2Microphone mute | Orange:Themicrophoneisonmute.Noneoftherecording devicesisavailablewhilethemicrophonemuteisonby default. |
3WirelessLAN, WirelessWAN, orWiMAX status | Green:ThewirelessLANfeature(theIEEE802.11b/gstandard, 802.11a/b/g,or802.11n),wirelessWANfeature,or WiMaxfeatureison,andtheradiolinkisreadyforuse.Blinkinggreen:Dataisbeingtransmitted. |
| 4Bluetooth wirelessor WirelessUSB status[HCCG] | Green:TheBluetoothwirelessfeatureison,andtheradiolinkis readyforuse.Blinkinggreen:Dataisbeingtransmitted. |
5Deviceaccess , , | Green:Dataisbeingreadfromorwrittentotheharddisk drive,thediskettedrive,orthedriveintheSerial UltrabaySlimdevice.Whenthisindicatorison,donot putthecomputerintosleep(standby)modeorturnoff thecomputer.Note:Donotmovethesystemwhilethegreendeviceaccess lightison.Suddenphysicalshockcouldcausedriveerrors. |
| 6Poweron[OABV] | Green:Thecomputerisonandreadytouse.Thisindicator stayslitaroundthepower-onbuttonwheneverthe computerisonandisnotinsleep(standby)mode. |
7 Numericlock(On-screen indicator) | Bydefault,whenthenumericlockison,thenumericlock indicatorisdisplayedonthescreen. |
| 8 SerialUltrabaySlimdevice status | Green:ASerialUltrabaySlimdeviceisinstalledandinuse.Blinkinggreen:ASerialUltrabaySlimdeviceisintheprocessofbeing detached.Turnoff:ASerialUltrabaySlimdeviceisreadytobeattachedor detached. |
| 9 Capslock[WEBA] | Green:CapsLockmodeisenabled.ToenableordisableCaps Lockmode,presstheCapsLockkey. |
| 10 BatterystatusGreen:[DASC] | Thebatteryhasmorethan20%charge.Orange:Thebatteryhasbetween5%and20%charge.Fastblinkingorange:Thebatteryhaslessthan5%charge.Note:Thebatterymaybecharging.Slowblinkingorange:Thebatteryisbeingcharged.Whenitreaches20%,the blinkingcolorchangestogreen.Slowblinkinggreen:Thebatteryhasbetween20%and80%charge,and chargingiscontinuing.Whenthebatteryreaches80% charge,blinkingstops,butthechargingmaycontinue untilthebatteryis100%charged.Note:Ifthecomputerisoperatingonbatterypower,the batterystatusindicatordoesnotworkwhilethe computeristurnedofforisinsleep(standby)modeor hibernationmode.Quickblinkingorange:Aerrorhasbeenoccurredinthebattery.Thebatterystatusindicatorisoff:Thebatterypackofthecomputerisdetached. |
| 11 Sleep(standby forWindows XP)status[BASC] | Green:Thecomputerisinsleep(standby)mode.Blinkinggreen:Thecomputerisenteringsleep(standby)modeor hibernationmode,orisresumingnormaloperation. |
Fnkeycombinations
The following tables show the function of each combination of Fn with a function key.
Table8.Fnkeycombinations
| KeycombinationDescription | ||
| Fn+F1Reserved. | ||
| Fn+F2Lockthecomputer. | ||
| Fn+F3Selectapowerplan(inWindowsXP,powerscheme)thathasbeencreatedbyPowerManager,oradjustthepowerlevelbyusingtheslidercontrol.Whenyoupressthiscombination,apanelforselectingapowerplan(powerscheme)appears.Notes:Tousethiscombinationofthekeys,ThinkPadPMdevicedrivermusthavebeeninstalledonthecomputer.IfyouhavelloggedonwithanadministratoruserIDinWindowsXP,andyoupressFn+F3,thepanelforselectingapowerschemeappears.IfyouhavelloggedonwithanotheruserIDinWindowsXP,andyoupressFn+F3,thepaneldoesnotappear. | ||
| Fn+F4Putthecomputerinsleep(standby)mode.Toreturntonormaloperation,presstheFnkeyonly,withoutpressingafunctionkey.Notes:Tousethiscombinationofthekeys,ThinkPadPMdevicedrivermusthavebeeninstalledonthecomputer.Ifyouwanttousethecombinationtoputthecomputerintohibernationmodeordo-nothingmode(inWindowsXP,shutthecomputerdownorshowthepanelforturningoffthecomputer),changethesettingsinthePowerManager. | ||
| Fn+F5Enableordisablethebuilt-inwirelessnetworkingfeatures.IfyoupressFn+F5,alistofwirelessfeaturesisdisplayed.Youcanquicklychangethepowerstateofeachfeatureinthelist.Note:IfyouwanttouseFn+F5toenableordisablethewirelessfeatures,thefollowingdevicedriversmustbeinstalledonthecomputerbeforehand:•PowerManagementdriver•OnScreenDisplayUtility•Wirelessdevicedrivers | ||
| Fn+F6Changethecameraandaudiosettings.WhenyoupressFn+F6,thecameraandaudiosettingwindowisopenedandthecamerapreviewisturnedon.Note:Thecamerasettingsareaonlyappearsifthecomputerhasanintegratedcamera. | ||
| Fn+F7Applyapresentationschemedirectly,withnoneedtostartPresentationDirector.TodisablethisfunctionandusetheFn+F7keycombinationforswitchingadisplayoutputlocation,startPresentationDirector,andchangethesettings.Note:IfthecomputerisanWindows7model,itdoesnotsupportpresentationschemes,howevertheFn+F7combinationmightstillbeusedtoswitchdisplayoutputlocation. | ||
| Fn+F8ChangethesettingsoftheUltraNav® pointingdevice. | ||
| Fn+F9Reserved. | ||
| Fn+F10Reserved. | ||
| Fn+F11Reserved. | ||
| Fn+F12Putthecomputerintohibernationmode.Toreturntonormaloperation, pressthepowerbuttonforlessthanfourseconds.Notes:Tousethiscombinationofthekeys,ThinkPadPMdevicedriver musthavebeeninstalledonthecomputer.ThoughthescreenfadesoutimmediatelyafterFn+F12arepressed, thecomputerdoesnotenterthehibernationmodeimmediately.Do notmovethesystemuntilthesleep(standby)statusindicatorstops blinking.Movingthecomputerwhenitisenteringhibernation mightcausecorruptionoftheharddiskdrive. | ||
| Fn+PgUpTurntheThinkLight® onoroff.Note:ThisfunctionissupportedonlyontheThinkPadNotebooksthat havetheThinkLight.TheonoroffstatusoftheThinkLightisshown onthescreenforafewsecondswhenyoupressFn+PgUp. | ||
| Fn+HomeThecompututerdisplaybecomesbrighter.Thepurposeofthismethodistochangethebrightnesslevel temporarily.OnWindowsVista,thedefaultbrightnesslevelisloaded aftersleep(standby),hibernation,reboot,ordetachingorattachingan acadapter.Tochangethedefaultbrightnesslevel,changethesettings ofthePowerOptionintheControlPanelorusethePowerManager. | ||
| Fn+EndThecomputerdisplaybecomesdimmer.Thepurposeofthismethodistochangethebrightnesslevel temporarily.OnWindowsVista,thedefaultbrightnesslevelisloaded aftersleep(standby),hibernation,reboot,ordetachingorattachingan acadapter.Tochangethedefaultbrightnesslevel,changethesettings ofthePowerOptionintheControlPanelorusethePowerManager. | ||
| Fn+SpacebarEnabletheFullScreenMagnifierfunction. | ||
| Fn+PrtScHavethesamefunctionastheSysRqkey. | ||
| Fn+ScrLkEnableordisablethenumerickeypad.Theindicatorofnumericclock willbedisplayedonthescreen. | ||
| Fn+PauseHavethesamefunctionastheBreakkey. | ||
| Fn+cursorkeysThesekeycombinationsworkwithWindowsMediaPlayer.Theyhave thefollowingfunctions:Fn+downarrowkey:PlayerPauseFn+uparrowkey:StopFn+rightarrowkey:NextTrackFn+leftarrowkey:PreviousTrack | ||
FRUreplacementnotices
Thischapterpresentsnoticesrelatedtoremovingandreplacingparts.Readthis chaptercarefullybeforereplacinganyFRU.
Screwnotices
Loosescrewscancauseareliabilityproblem.IntheThinkPadNotebook,this problemisaddressedwithspecialnylon-coatedscrewsthathavethefollowing characteristics:
• They maintain tight connections.
•Theydonoteasilycomeloose,evenwithshockorvibration.
•Theyarehardertotighten.
•Eachoneshouldbeusedonlyonce.
Dothefollowingwhenyouservicethismachine:
- Keepthescrewkit(fortheP/N,see"Miscelaneousparts"onpage179)inyour toolbox.
•Alwaysusenewscrews.
- Useatorquescrewdriverifyyouhaveone.
Tightenscrewsasfollows:
•Plastictoplastic
Turnanadditional90degreesafterthescrewheadtouchesthesurfaceofthe plasticpart:

text_image
90 degrees more (Cross-section)•Logiccardtoplastic
Turnanadditional180degreesafterthescrewheadtouchesthesurfaceofthe logiccard:
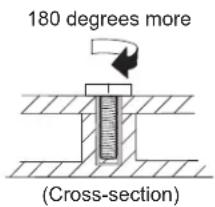
text_image
180 degrees more (Cross-section)•Torquedriver
If you have a torquedriver, referto the "Torque" columnforeachstep.
- Makesurethatyouusethecorrectscrew.Ifyouhaveatorquescrewdriver, tightenallscrewsfirmlytothetorqueshowninthetable.Neveruseascrew thatyouremoved.Useanewone.Makesurethatallofthescrewsare tightenedfirmly.
- Ensuretorquescrewdriversarecalibratedcorrectlyfollowingcountry specifications.
Retainingserialnumbers
Thissectionincludes the following descriptions:
• "Restoring the serial number of the system unit"
•“RetainingtheUUID”
• "ReadingorwritingtheECAinformation" on page 81
Restoring the serial number of the system unit
Whenthecomputerwasmanufactured,theEEPROMonthesystemboardwas loaded with the serial numbers of the system and all major components. These numbers need to remain the same throughout the life of the computer.
If youreplacethesystemboard, you must restore the serial number of the system unit to its original value.
Before replacing the system board, save the original serial number by doing the following:
-
InstalltheLENOVOThinkPadHardwareMaintenanceDisketteVersion1.76or later, and restart the computer.
-
From themainmenu, select 1. Set System Identification.
-
Select2. ReadS/NdatafromEEPROM.
The serial number of each device in your computer is displayed; the serial number of the system unit lists as follows:
•20:Serialnumber
Writedownthatnumber.
Note: Theserialnumberofthesystemunitisalsowrittenonthelabelattachedto thebottomofthecomputer.
Afteryouhavereplacedthesystemboard,restoretheserialnumberbydoingthe following:
-
InstalltheLENOVOThinkPadHardwareMaintenanceDisketteVersion1.76or laterandrestartthecomputer.
-
From themainmenu, select 1. Set System Identification.
-
Select1.AddS/NdatafromEEPROM.
Followtheinstructionsonthescreen.
If the MT Mand Product ID numbers differ from each other on there are label, use what is shown for the Product ID field. See example below:
MTMonrearlabel:
TTTT-CTOS/NSSSSSSS
ProductIDonrearlabel:
TTTT-MMM(UsethisnumberwhensettingSerialNumber)
Intheexample,theSerialNumbertobeinputis'1STTTTMMMSSSSSSS'.
RetainingtheUUID
The Universally Unique Identifier (UUID) is a 128-bit number uniquely assigned to your computer at production and stored in the EEPROM of your system board.
The algorithm that generates the number of designed to provide unique IDs until the year A.D.3400. Not wocomputers in the world have the same number.
Whenyoureplacethesystemboard,youmustsettheUUIDonthenewsystem boardasfollows:
-
InstalltheLENOVOThinkPadHardwareMaintenanceDisketteVersion1.76or later, and restart the computer.
-
From themainmenu, select 4. Assign UUID.
AnewUUIDiscreatedandwritten. If a valid UUIDal ready exists, it is not overwritten.
ReadingorwritingtheECAinformation
InformationonEngineeringChangeAnnouncements(ECA)arestoredinthe EEPROMofthesystemboard.Theelectronicstorageofthisinformationsimplifies theproceduretocheckiftheECAhasbeenpreviouslyappliedtoamachine.The machinedoesnotneedtobedisassembledtocheckfortheECAapplication.
TocheckwhatECAshavebeenpreviouslyappliedtothemachine,usetheECA InformationRead/WritefunctionontheLENOVOThinkPadHardware MaintenanceDisketteVersion1.76orlater.
-
InserttheLENOVOThinkPadHardwareMaintenanceDisketteVersion1.76or later, and restart the computer.
-
From themainmenu, select6. SetECAInformation.
-
To read ECA information, select 2. Read ECA/rework number from EEPROM and follow the instruction.
-
To read box build date, select 5. Read box build date from EEPROM, and followtheinstructiononthescreen.
AfteranECAhasbeenappliedtothemachine,theEEPROMmustbeupdatedto reflecttheECA'sapplication.UsetheLENOVOThinkPadHardwareMaintenance DisketteVersion1.76orlatertoupdatetheEEPROM.
Note: Only the ECAnumberisstored in the EEPROM. Themachinetype of the ECA is assumed by the same asthemachinetype of themachinethathad the ECA applied to it.
-
Insert the LENOVO ThinkPad Hardware Maintenance Diskette Version 1.76 or later, and restart the computer.
-
From themainmenu, select6. SetECAInformation.
-
To write ECA information, select 1. Write ECA/rework number from EEPROM, and follow the instruction.
-
To write box build date, select 4. Write box build date from EEPROM, and followtheinstructiononthescreen.
If the system board is being replaced, try to read the ECA information from the old system board and transfer the information to then ewsystem. If the system board is inoperable, this will not be possible.
RemovingandreplacingaFRU
Thischapterpresentsdirectionsanddrawingsforuseinremovingandreplacinga FRU.Besuretoobservethefollowinggeneralrules:
- Donottrytoserviceanycomputerunlessyouhavebeentrainedandcertified. Anuntrainedpersonrunstheriskofdamagingparts.
2.BeforereplacinganyFRU,review"FRUreplacementnotices"onpage79. - Begin by removing any FRU sthathavetoberemoved before the failing FRU. An such FRUs are listed at the top of the page. Removethemin the order in which they are listed.
- Follow the correct sequence in the steps for removing the FRU, as given in the drawings by then numbers in square callouts.
- Whenturning as screwtoreplaceaFRU, turnitinthedirectionas given by the arrowinthedrawing.
- When removing the FRU, move it in the direction as given by the arrow in the drawing.
- ToputthenewFRUinplace, reversetheremovalprocedure and follow any notesthatpertaintoreplacement. For information about connecting and arranging internalcables, see "Locations" on page 149.
- When replacing a FRU, use the correctscrew as shown in the procedures.

DANGER
BeforeeremovinganyFRU,turnoffthecomputer,unplugallpowercords fromelectricaloutlets,removethebatterypack,andthendisconnectany interconnectingcables.
Attention: AfterreplacingaFRU, donotturnonthecomputeruntilyouhave madesurethatallscrews, springs, and othersmallpartsareinplaceandnoneare looseinsidethecomputer. Verify this by shaking the computer gently and listening for rattlingsounds. Metallic partsormetalflakescan cause electrical shortcircuits.
Attention: Thesystemboardissensitiveto, and can be damaged by electrostatic discharge. Before touching it, establish personal grounding by touching a ground point with one hand or by using an electrostatic discharge (ESD) strap (P/N 6405959).
BeforeservicingThinkPadT410andT410i
SomemodelsoftheThinkPadT410andT410iyouareservicingmighthavethe SIMcardthatthecustomerhasinstalled.
If the computery you a reservicing has the SIM card, remove it before you start the servicing.
ToremovetheSIMcard,youneedtoremovethebatterypackfirst.(See"1010 Batterypack"onpage85.)

Afteryoufinishtheservicing, makesurethatyouinsertthecardbackintotheslot firmly.
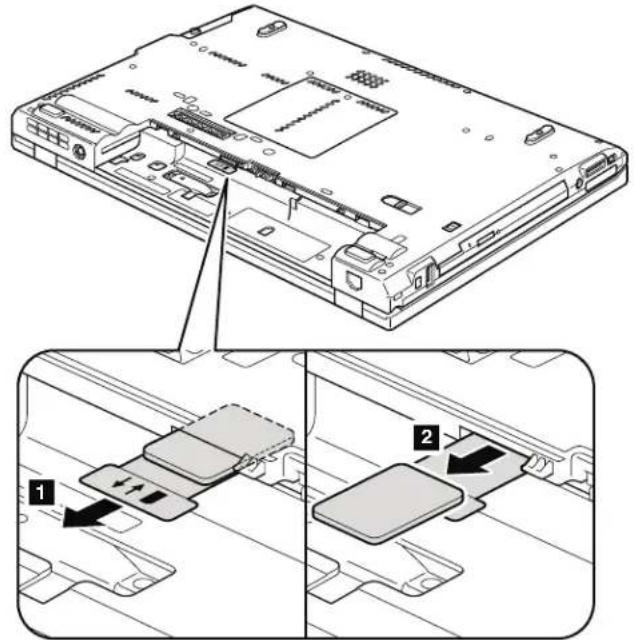
text_image
Technical diagram showing a laptop chassis with labeled components and directional arrows indicating assembly or movement.1010Batterypack
Importantnoticeforreplacingabatterypack:
ThinkVantageToolbox(inWindows7)andLenovoSystemToolbox(inWindows VistaandWindowsXP)haveanautomaticbatterydiagnostichthatdeterminesif thebatterypackisdefective.AbatterypackFRUshouldnotbereplacedunless thisdiagnosticshowsthatthebatteryisdefective.
The only exception to this is if the battery pack is physically damaged, customer is reporting a possible safety issue.
IfThinkVantageToolboxorLenovoSystemToolboxisnotinstalledinthe computer, the customers should download this program before an on-physically damaged batterypack is replaced. Not that a physically damaged batterypack is non-warranty replacement.
Table9. Removalstepsofbatterypack

DANGER
Useonlythebatteryspecifiedinthepartslistforyourcomputer.Anyother batterycouldigniteorexplode.
Table9. Removalstepsofbatterypack(continued)
Unlockthebatterylatch 1 .Holdingthebatterylatchintheunlockedposition 2 ,removethebatterypackinthedirectionsshownbyarrow 3 .
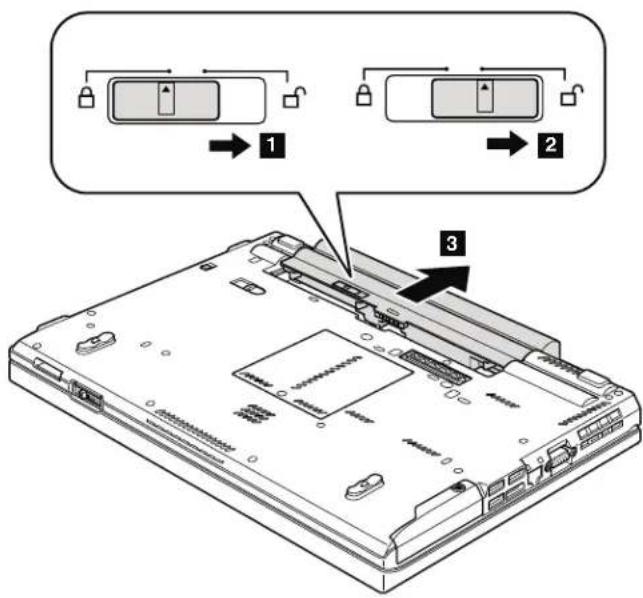
text_image
Diagram of a laptop rear panel with labeled components and directional arrows indicating assembly stepsWheninstalling:Installthebatterypackintheslot,andthenmakesurethat thebatterylatchisinthelockedposition.
1020ExpressCardblankbezel
Table10. RemovalstepsofExpressCardblankbezel
WhenyoupresstheExpressCardblankbezel 1 ,itpopsout 2 .
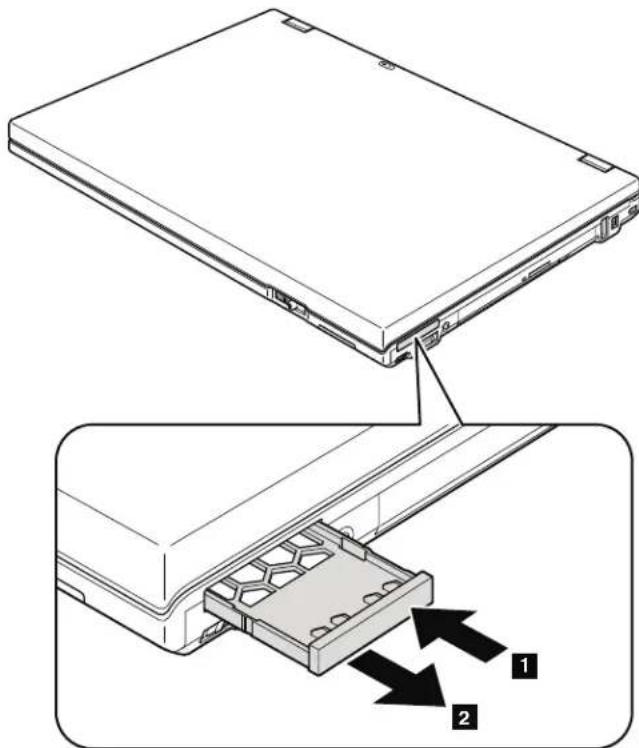
text_image
Technical diagram showing a laptop with labeled parts and two arrows indicating assembly stepsWheninstalling: Makesurethatthebezeliscorrectlyorientedasshowninthis figure.
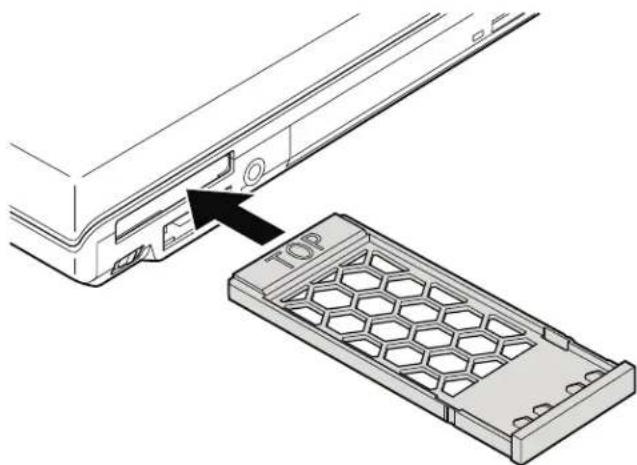
natural_image
Technical diagram showing a device with a hexagonal grid structure and an arrow pointing to a labeled top panel (no text or symbols beyond the label)1030SerialUltrabaySlimdeviceortravelbezel
Foraccess,removethisFRU:
"1010Batterypack" on page 85
Table11. RemovalstepsofSerialUltrabaySlimdeviceortravelbezel
Holdingthebaylocklatchintheunlockedposition 1, slidethebayejectlatch 2, and thenpullouttheUltrabaySlimMediaBaydeviceorthetravelbezelin thedirections shown by arrow 3.
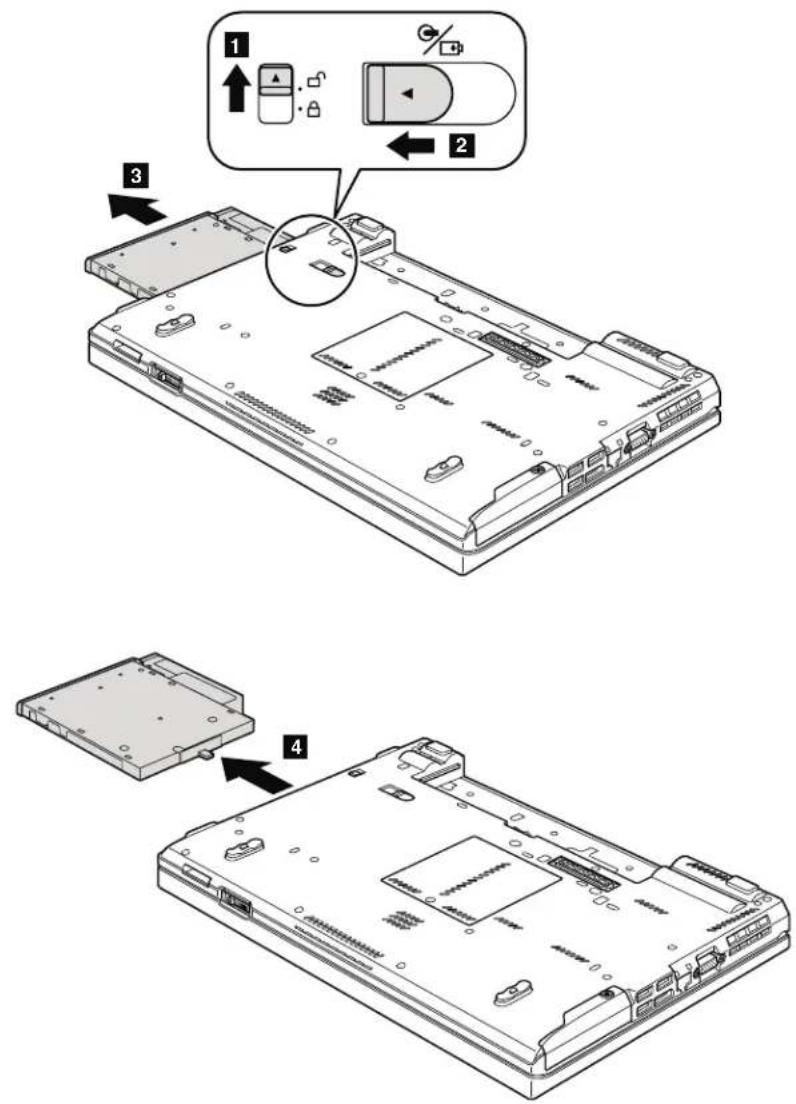
text_image
Technical diagram showing a device's internal structure with labeled parts and directional arrows indicating assembly or installation steps.1040Harddiskdrive(HDD)slotcover,HDDrubberrailsandHDDor storageconverterandsolidstatedrive(SSD)
Foraccess,removethisFRU:
•"1010Batterypack"onpage85
Attention:
- Do not drop the drive or apply any physical shock to it. The drive is sensitivetophysicalshock.Improperhandlingcancausedamageand permanentlossofdata.
- Beforeeremovingthedrive,havetheusermakeabackupcopyofallthe informationonitifpossible.
- Neverremovethedrivewhilethesystemisoperatingorisinsuspendmode.
Table12. RemovalstepsofHDDslotcover, HDDrubberrailsandHDDorstorageconverter and solidstatedrive(SSD)

text_image
Technical diagram showing a laptop with labeled parts and two views of the device's internal structure, including a close-up view of the internal component.| StepScrew(quantity)ColorTorque | |||
| 1 | M3×3mm,wafer-head,nylon-coated(1)Black0.392Nm | (4.0kgfcm) | |
Table12. RemovalstepsofHDDslotcover, HDDrubberrailsandHDDorstorageconverter and solidstatedrive(SSD)(continued)

natural_image
Diagram of an electronic device showing a connector inserted into a rack, with no visible text or symbols.ForHDDandHDDrubberrails:

natural_image
Technical diagram of a computer hard drive with labeled components (no text or symbols present)ForSSDandstorageconverter:
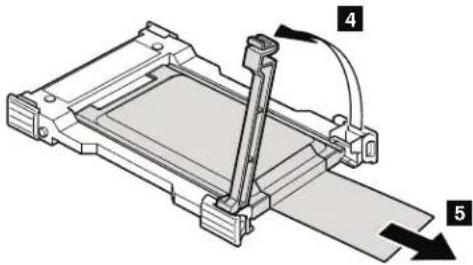
text_image
Technical diagram of a mechanical assembly with labeled components 4 and 5, showing a lever mechanism.Wheninstalling: MakesurethattheSSDconnectororHDDconnectoris attachedfirmly.
1050DIMMslotcover
Foraccess,removethisFRU:
• "1010Batterypack" onpage85
Table13. RemovalstepsofDIMMslotcover
Note: Loosenthescrew 1, butdonotremoveit.
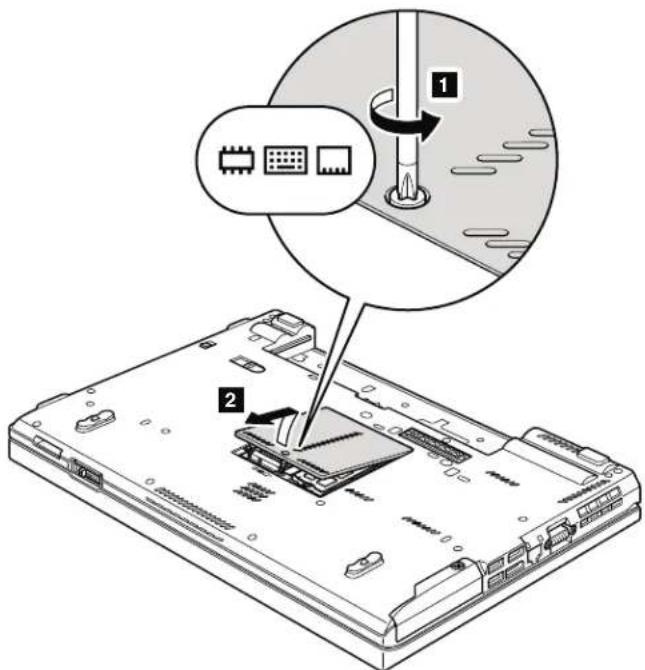
text_image
Diagram showing a device being inserted into a motherboard, with labeled parts and a magnified view highlighting the process.1060DIMM(inbottomslot)
Foraccess,removetheseFRUsinorder:
• "1010Batterypack" onpage85
• "1050DIMMslotcover" onpage91
Note: This product has two DIMM slots: one under the keyboard and another on the underside of the computer. If you install a DIMMin only one of the twoslots, install it in the slot located under the keyboard.
Table14. RemovalstepsofDIMM(inbottomslot)
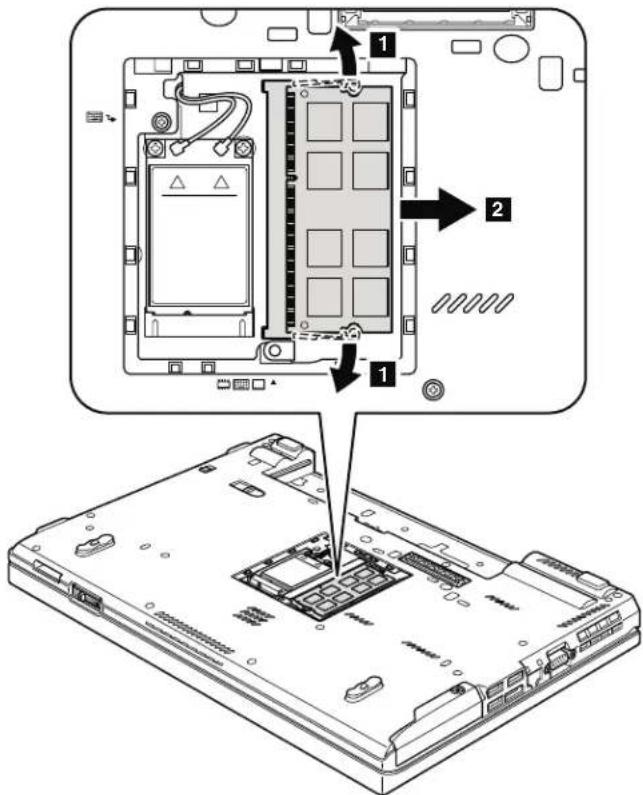
text_image
Technical diagram showing a device rear panel with labeled components and an exploded view of the internal structure.Wheninstalling:InsertthenotchedendoftheDIMMintothesocket.Pressthe DIMMfirmly,andpivotituntilitsnapsintotheplace.Makesurethatitis firmlyfixedintheslotanddoesnotmoveeasily.
1070PCIExpressMiniCardforwirelessWAN
Foraccess,removetheseFRUsinorder:
• "1010Batterypack" onpage85
•"1050DIMMslotcover"onpage91
Table15. RemovalstepsofPCIExpressMiniCardforwirelessWAN
Instep 3 ,unplugthejacksbyusingtheremovaltoolantennaRFconnector (P/N:08K7159)orpicktheconnectorswithyourfingersandgentlyunplug themindirectionofthearrow.

text_image
Technical diagram showing two views of an electronic device with labeled components and a close-up view of the internal structure.| StepScrew(quantity)ColorTorque | |||
| 2 | M2×3mm,wafer-head,nylon-coated(2)Black0.181Nm | (1.85kgfcm) | |
Table15. RemovalstepsofPCIExpressMiniCardforwirelessWAN(continued)
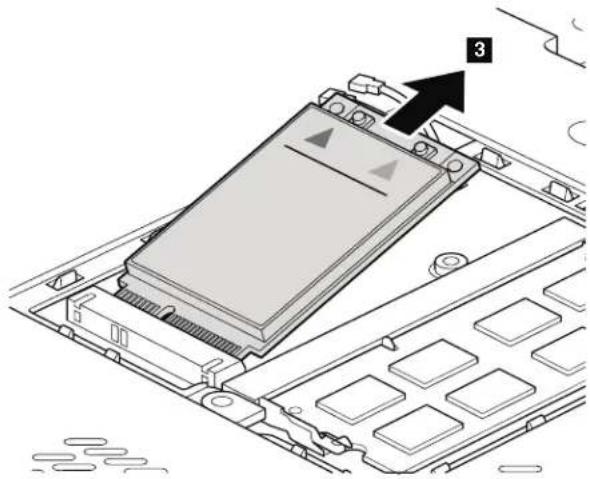
natural_image
Diagram of a device chassis with labeled component '3' and an arrow pointing to it (no text or symbols beyond label)Note: Plug the red cable into the jack labeled MAIN, and the blue cable into the jacklabeledAUXonthecard.
If the computery you a reservicing is a wireless WAN - readymodeland does not have the wireless WAN card, rout the antennacables and secure them with a tapeashown in this figure.
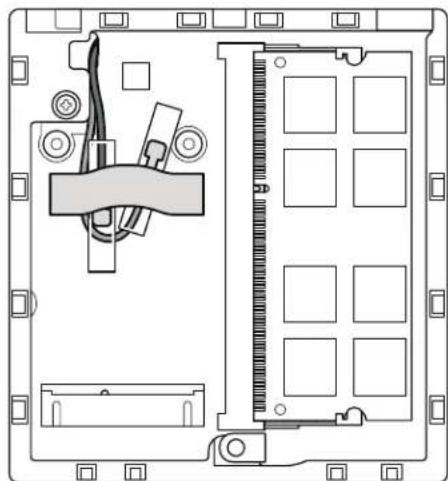
natural_image
Technical line drawing of an electronic device rear panel with internal components and mounting holes (no text or symbols)1080Keyboard
Foraccess,removetheseFRUsinorder:

Table16. Removalstepsofkeyboard

text_image
Technical diagram of an electronic device showing a component with labeled parts and a magnified view of the internal structure.| StepScrew(quantity)ColorTorque | |||
| 1 | M2×10mm,wafer-head,nylon-coated(1)Black0.181Nm | (1.85kgfcm) | |
Table16. Removalstepsofkeyboard(continued)
Pushdownthekeyboardalittletowardthearrow 2 todetachthefrontedge ofthekeyboardfromtheframe.
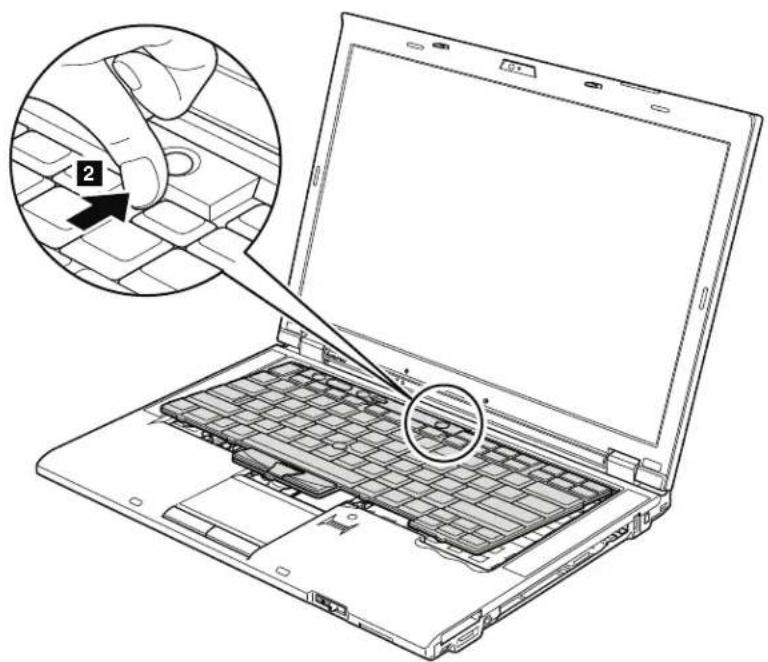
text_image
Diagram showing a hand inserting a component into a laptop keyboard, with an inset highlighting the step 2.Table16. Removalstepsofkeyboard(continued)
Liftthekeyboardalittleinthedirectionshownbyarrow 3, andthendetach theconnector 4.
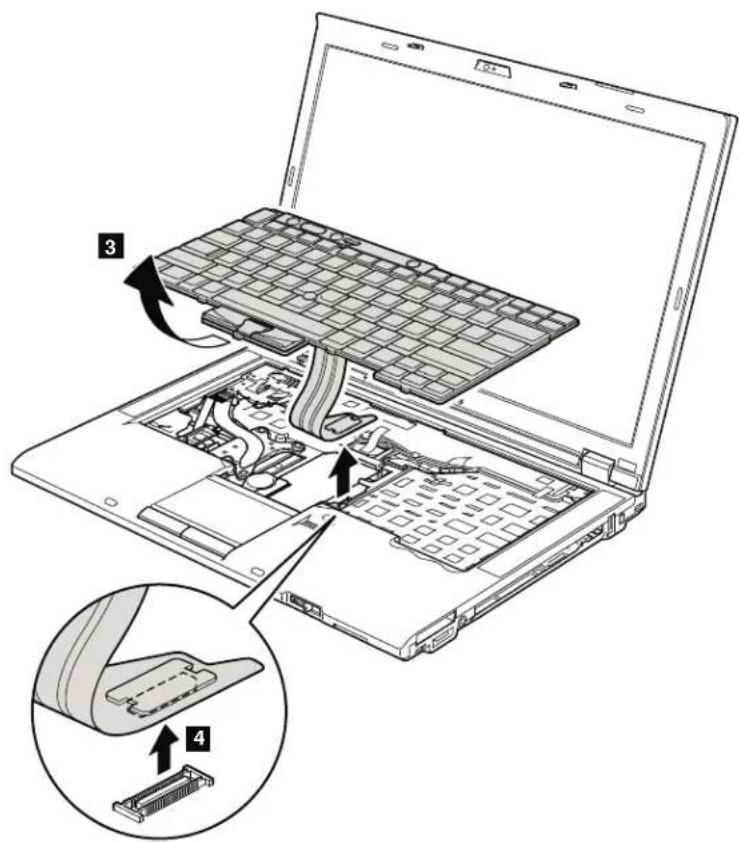
text_image
Laptop interior diagram with labeled components and a magnified view of internal hardware layoutWheninstallingthekeyboard,doasfollows:
Table17.Installationstepsofkeyboard
- Attachthekeyboardconnector.

natural_image
Laptop interior showing internal circuitry and a close-up of the rear panel with a connector (no text or symbols visible)Table17.Installationstepsofkeyboard(continued)
- Attachthekeyboardsothatthekeyboardedges a areundertheframeas showninthisfigure.
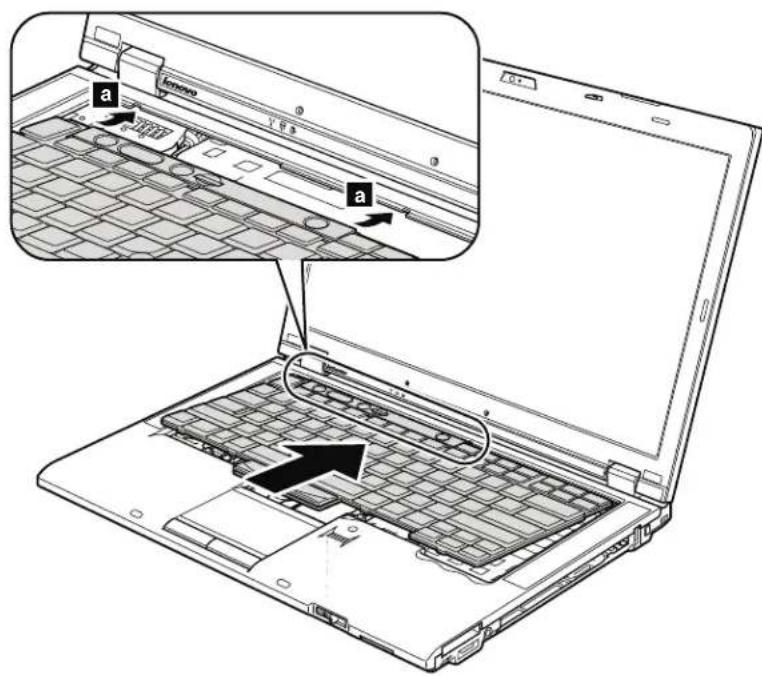
text_image
Laptop interior diagram with labeled parts and an inset showing a component with arrows indicating movement or assembly.- Tomakesurethatthefrontedgeofthekeyboarddishousedfirmly, gently pressthekeyswithyourthumbsandtrytoslidethekeyboardtowardyou.
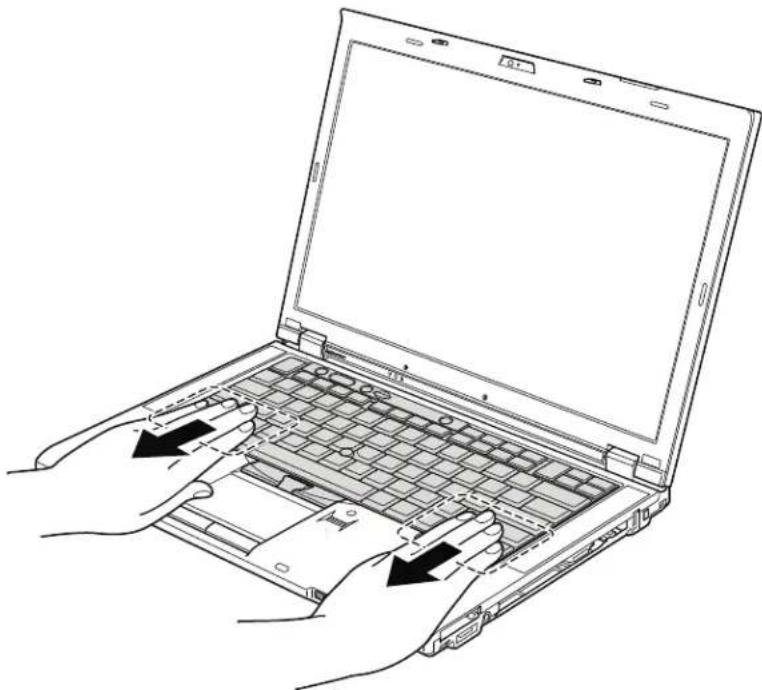
natural_image
Line drawing of hands operating a laptop with internal components (no text or symbols)Table17. Installationstepsofkeyboard(continued)
- Makesurethatfrontedgeofthekeyboard b isattachedfirmly.

text_image
Laptop diagram with labeled parts showing internal structure and highlighted areas- Secure the keyboard by tightening the screws from the bottom side of the computer.
1090DIMM(inslotunderkeyboard)
Foraccess,removetheseFRUsinorder:
•"1010Batterypack"onpage85
•"1050DIMMslotcover"onpage91
•"1080Keyboard"onpage95
Note: This product has two DIMM slots: one under the keyboard and another on the underside of the computer. If you install a DIMMin only one of the twoslots, install it in the slot located under the keyboard.
Table18. RemovalstepsofDIMM(inslotunderkeyboard)

natural_image
Line drawing of a laptop with internal components and an open circuit board (no text or symbols)Table18. RemovalstepsofDIMM(inslotunderkeyboard)(continued)
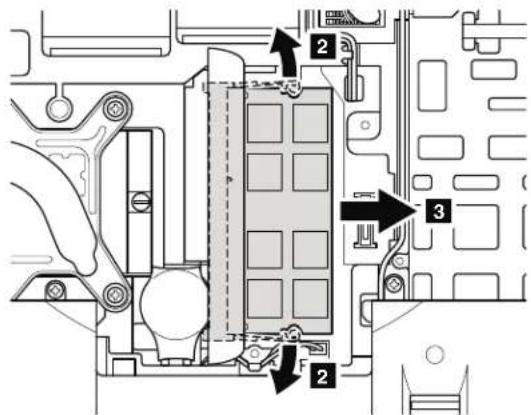
text_image
Technical diagram of a mechanical or electronic component with numbered parts and directional arrows indicating assembly or flow.Wheninstalling:InsertthenotchedendoftheDIMMintothesocket.Pressthe DIMMfirmly,andpivotituntilitsnapsintotheplace.Makesurethatitis firmlyfixedintheslotanddoesnotmoveeasily.
1100Backupbattery
Foraccess,removetheseFRUsinorder:
•"1010Batterypack"onpage85
•"1050DIMMslotcover"onpage91
•"1080Keyboard"onpage95
Table19. Removalstepsofbackupbattery

DANGER
Useonlythebatteryspecifiedinthepartslistforyourcomputer.Anyother batterycouldigniteorexplode.

text_image
Technical diagram showing a laptop with internal components and a close-up of the internal circuit board with labeled parts 1 and 2.Table19. Removalstepsofbackupbattery(continued)
Cablerouting: Attachthebackupbatteryandroutethecableasshowninthe figurebelowandmakesurethatthebatteryconnectorisattachedfirmly.

natural_image
Technical line drawing of a mechanical assembly with no visible text or symbols1110PCIExpressMiniCardforwirelessLAN
Foraccess,removetheseFRUsinorder:
•"1010Batterypack"onpage85
•"1050DIMMslotcover"onpage91
•"1080Keyboard"onpage95
Table20. RemovalstepsofPCIExpressMiniCardforwirelessLAN
Instep 1, unplugthejacksbyusingtheremovaltoolantennaRFconnector (P/N:08K7159)orpicktheconnectorswithyourfingersandgentlyunplug themindirectionofthearrow.
Note: Somemodelsmighthaveonlytwoantennacablesinstep 1.

text_image
Laptop interior diagram showing labeled components including cable, socket, and ventilation slots| StepScrew(quantity)ColorTorque | |||
| 2 | M2×3mm,wafer-head,nylon-coated(2)Black0.181Nm | (1.85kgfcm) | |
Table20. RemovalstepsofPCIExpressMiniCardforwirelessLAN(continued)

text_image
Technical diagram of an electronic component with numbered parts and a black arrow indicating a specific part labeled '3'Wheninstalling:
- InmodelswithwirelessLANcardthathastwoantennaconnectors,plugthe gray cable into the jack marked MAIN or M, and the black cable into the jack marked AUX or A on the card. If the computer you are servicing has three cables,putthewhitecableinthecableprotectiontubeandsecureitwitha tapeasshowninthisfigure.
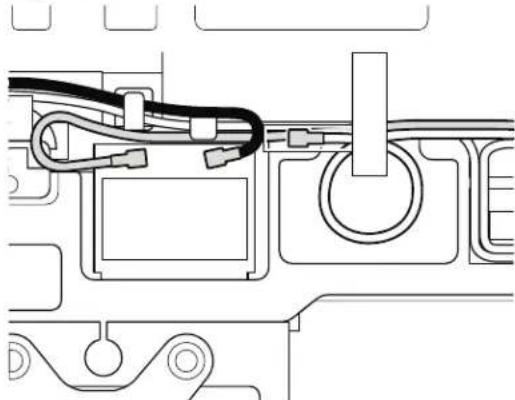
natural_image
Pure technical line drawing of a mechanical or electrical component with no text, numbers, or symbols• InmodelswithwirelessLANcardthathasthreeantennaconnectors, plug the graycable(MAIN) into the jack marked TR1, the whitecable(3rd) into jack marked RO or TR3, and the black cable (AUX) into jack marked TR2 on the card.
1120Keyboardbezelassembly, FPCcable, and Bluethoothdaughter card (BDC-2.1)
Foraccess,removetheseFRUsinorder:
•"1010Batterypack"onpage85
•"1020ExpressCardblankbezel"onpage87
•"1050DIMMslotcover"onpage91
•"1080Keyboard"onpage95
Note: FPC cable is attached on the underside of the keyboard bezel assembly. In some models, BDC is also attached on the underside of the keyboard bezel assembly. For themodels do not have BDC, skip steps from 8 to 10.
Table21. Removalstepsofkeyboardbezelassembly, FPCcable, and BDC-2.1

text_image
Labeled diagram of a computer chassis showing screw installation points on the rear panel| StepScrew(quantity)ColorTorque | |||
| 1 | M2×14mm,wafer-head,nylon-coated(6)Black0.181Nm | (1.85kgfcm) | |
| 2 | M2 × 3 mm, wafer-head, nylon-coated (3) | Black | 0.181 Nm(1.85kgfcm) |
Table21. Removalstepsofkeyboardbezelassembly, FPCcable, and BDC-2.1 (continued)

text_image
Laptop interior diagram with numbered components and visible circuitry| StepScrew(quantity)ColorTorque | |||
| 3 | M2×3mm,wafer-head,nylon-coated(4)Black0.181Nm | (1.85kgfcm) | |
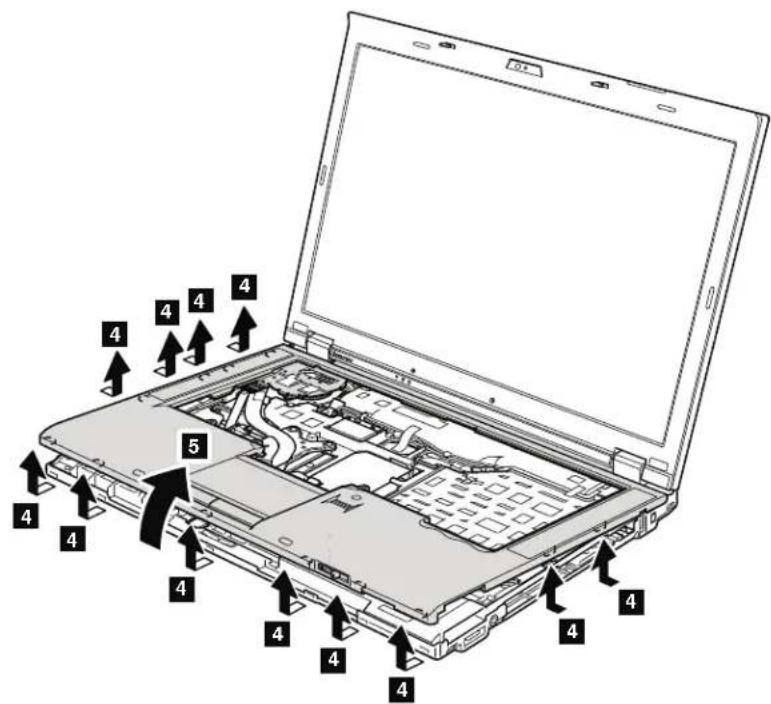
text_image
Laptop interior diagram with numbered component labels pointing to internal structureTable21. Removalstepsofkeyboardbezelassembly, FPCcable, and BDC-2.1 (continued)
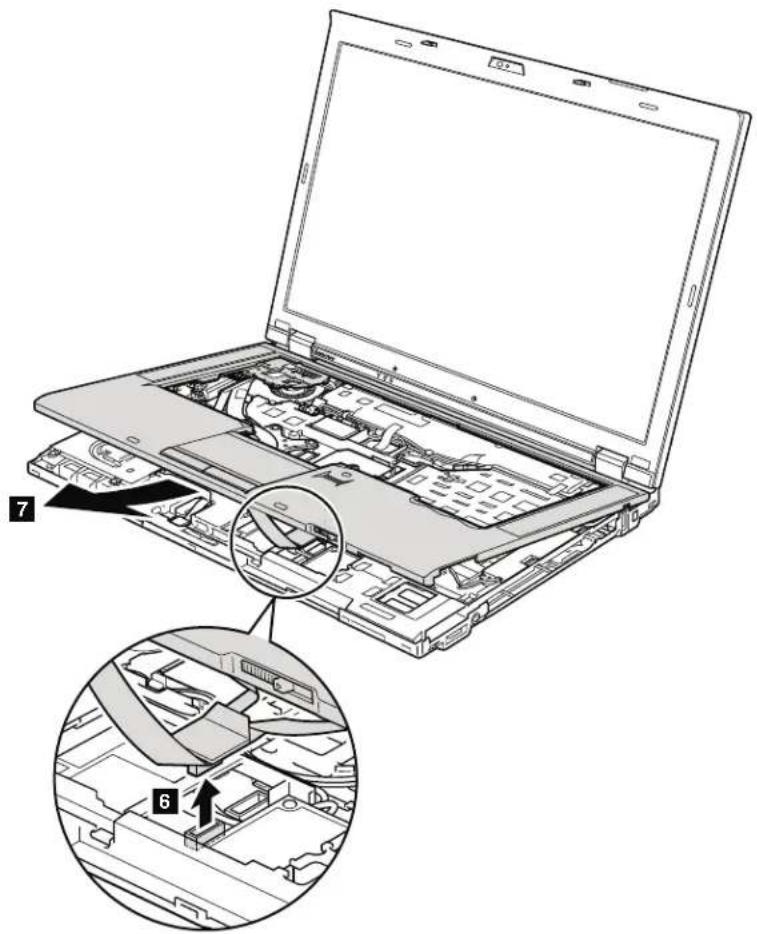
text_image
Laptop interior diagram with numbered annotations indicating component layout and assembly stepsWheninstalling: Makesurethattheconnectorisattachedfirmly.
Table21. Removalstepsofkeyboardbezelassembly, FPCcable, and BDC-2.1 (continued)

text_image
Technical diagram showing mechanical assembly with numbered components and directional arrows indicating motion or movement.Wheninstalling: Makesurethattheconnectorsareattachedfirmly.

text_image
15 14| StepScrew(quantity)ColorTorque | |||
| 14 | M2×3mm,wafer-head,nylon-coated(1)Black0.181Nm | (1.85kgfcm) | |
Table21. Removalstepsofkeyboardbezelassembly, FPCcable, and BDC-2.1 (continued)

text_image
16Wheninstalling: Makesurethattheconnectorisattachedfirmly.
1130SmartCardorContactlessSmartCard
Foraccess,removetheseFRUsinorder:
• "1010Batterypack" onpage85
• "1050DIMMslotcover" onpage91
•"1080Keyboard"onpage95
- "1120 Keyboard bezel assembly, FPC cable, and Bluetooth daughter card (BDC-2.1)"onpage107
Table22. RemovalstepsofSmartCardorContactlessSmartCard
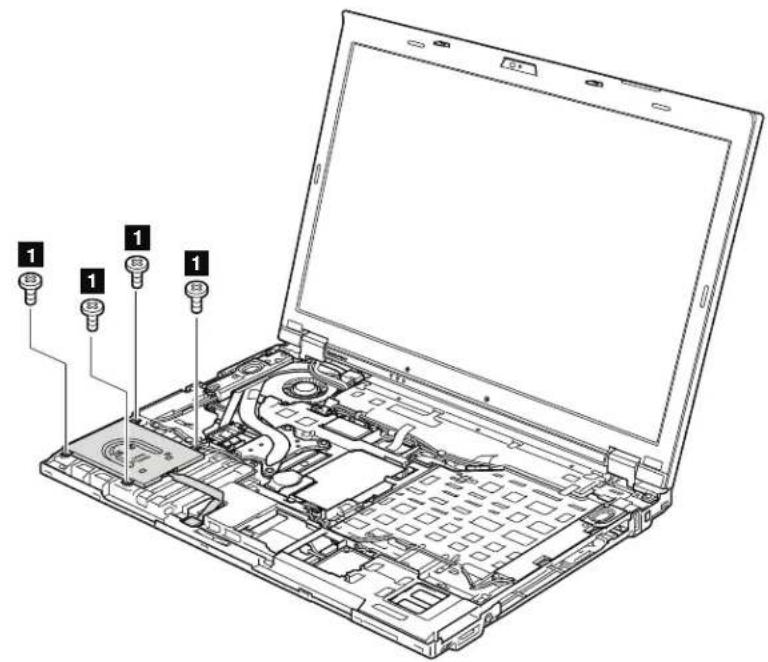
text_image
Laptop interior diagram with numbered component labels pointing to internal parts| StepScrew(quantity)ColorTorque | |||
| 1 M2×3mm,wafer-head,nylon-coated(4)Black0.181Nm | (1.85kgfcm) | ||
Table22. RemovalstepsofSmartCardorContactlessSmartCard(continued)
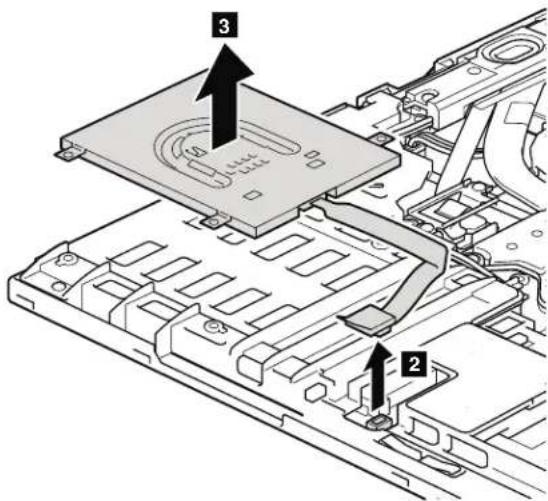
text_image
Technical diagram showing a device component with numbered parts and directional arrows indicating assembly or installation steps.Wheninstalling: Makesurethattheconnectorisattachedfirmly.
Table23.RemovalstepsofSmartCarddummyspacer
SomemodelshaveSmartCarddummyspacerasamiscellaneouspart.Forthose models,removethespacerasfollows:
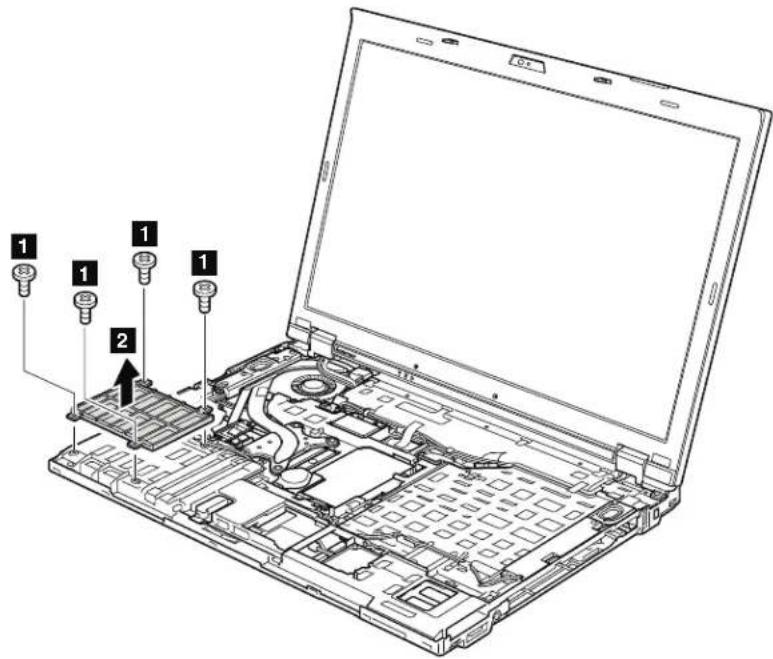
text_image
Laptop interior diagram with numbered component labels pointing to internal components| StepScrew(quantity)ColorTorque | |||
| 1 | M2×3mm,wafer-head,nylon-coated(4)Black0.181Nm | (1.85kgfcm) | |
1140Modemdaughtercard(MDC)
Foraccess,removetheseFRUsinorder:
• "1010Batterypack" onpage85
• "1050DIMMslotcover" onpage91
•"1080Keyboard"onpage95
- "1120 Keyboard bezel assembly, FPC cable, and Bluetooth daughter card (BDC-2.1)"onpage107
Table24. Removalstepsofmodemdaughtercard(MDC)
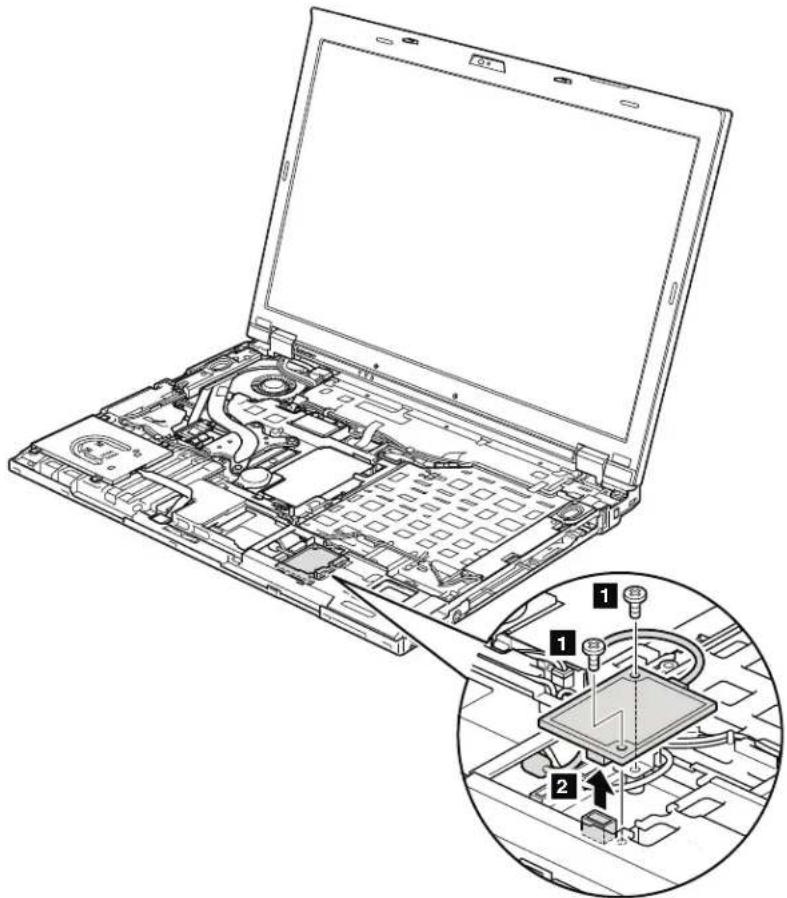
text_image
Laptop interior diagram with numbered component annotations and a magnified view of the circuit board assembly| StepScrew(quantity)ColorTorque | |||
| 1 M2×3mm,wafer-head,nylon-coated(2)Black0.181Nm | (1.85kgfcm) | ||
Wheninstalling: Makesurethattheconnectorisattachedfirmly.
1150Speakerassembly
Foraccess,removetheseFRUsinorder:
•"1010Batterypack"onpage85
•"1050DIMMslotcover"onpage91
•"1080Keyboard"onpage95
- "1120 Keyboard bezel assembly, FPC cable, and Bluetooth daughter card (BDC-2.1)" on page 107
Table25. Removalstepsofspeakerassembly
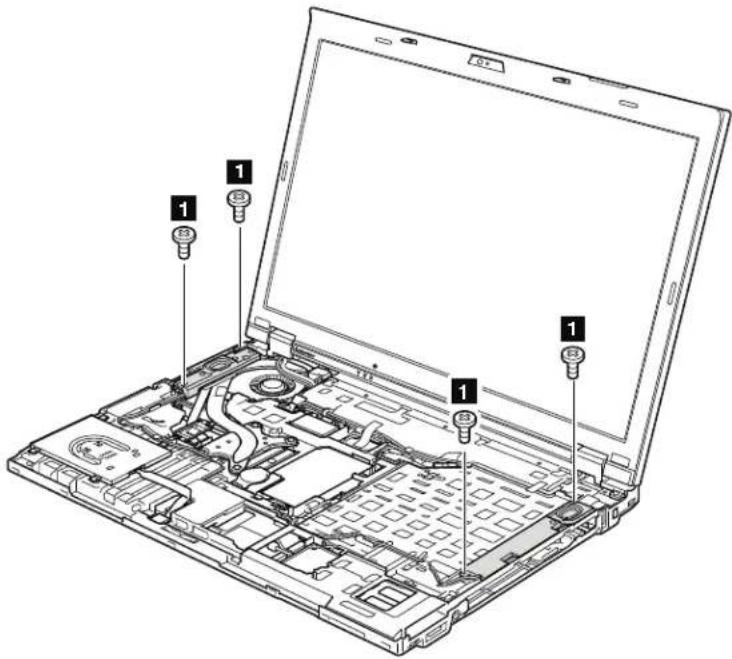
text_image
Laptop interior diagram with numbered component labels pointing to internal components| StepScrew(quantity)ColorTorque | |||
| 1 | M2×3mm,wafer-head,nylon-coated(4)Black0.181Nm | (1.85kgfcm) | |
Table25. Removalstepsofspeakerassembly(continued)
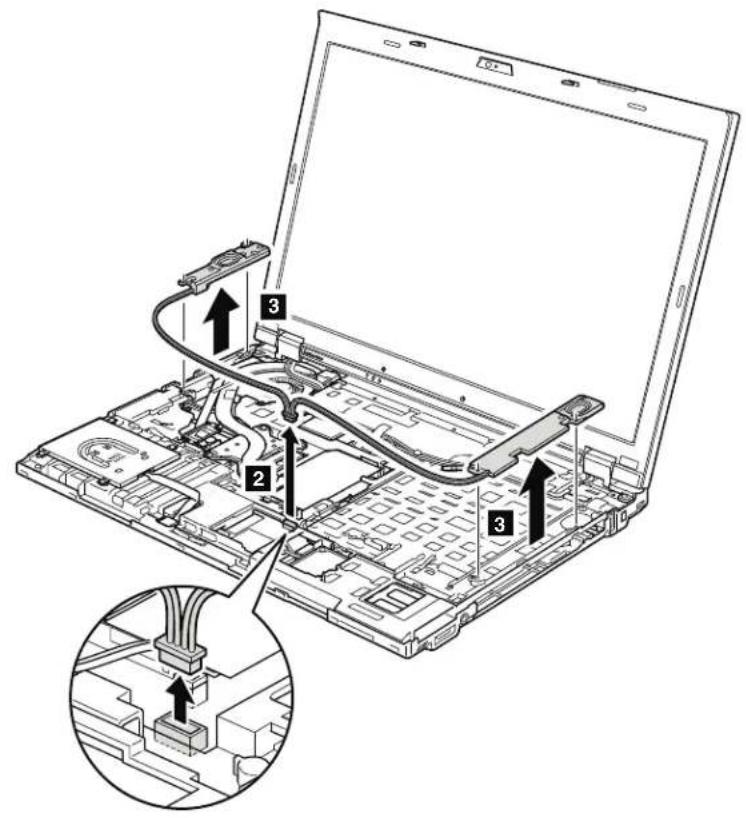
text_image
Laptop interior diagram with numbered components and a magnified view of the internal structureCablerouting: Attachthespeakerassembly and routethecableasshownin thisfigure, and makesurethatthespeakerconnectorisattached firmly.
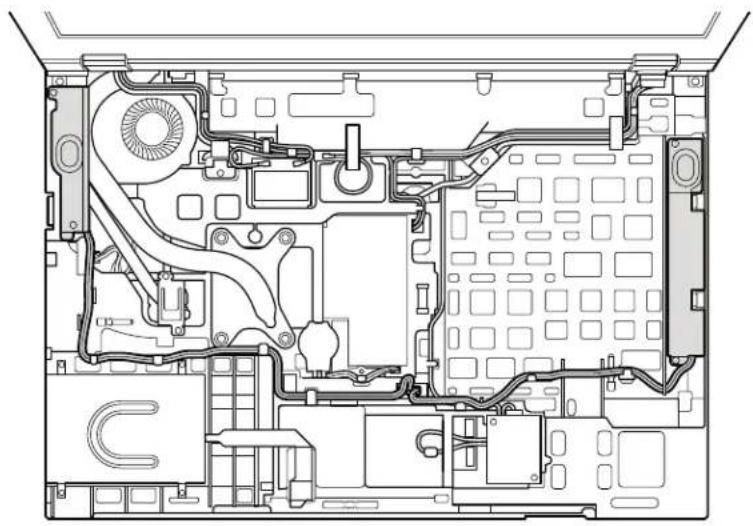
natural_image
Top-down schematic of a computer motherboard showing CPU socket, ventilation ducts, and drive bays (no text or labels)1160LCDunit
Foraccess,removetheseFRUsinorder:
•"1010Batterypack"onpage85
•"1020ExpressCardblankbezel"onpage87
•"1050DIMMslotcover"onpage91
•"1070PCIExpressMiniCardforwirelessWAN"onpage93
•"1080Keyboard"onpage95
• "110PCIExpressMiniCardforwirelessLAN" on page 105
- "1120 Keyboard bezel assembly, FPC cable, and Bluetooth daughter card (BDC-2.1)"onpage107
Table26. RemovalstepsofLCDunit

text_image
Technical diagram of a computer chassis with labeled components, showing internal circuitry and connectors.| StepScrew(quantity)ColorTorque | |||
| 1 | M2.5×6mm,wafer-head,nylon-coated(2)Black0.392Nm | (4.0kgfcm) | |
Table26. RemovalstepsofLCDunit(continued)
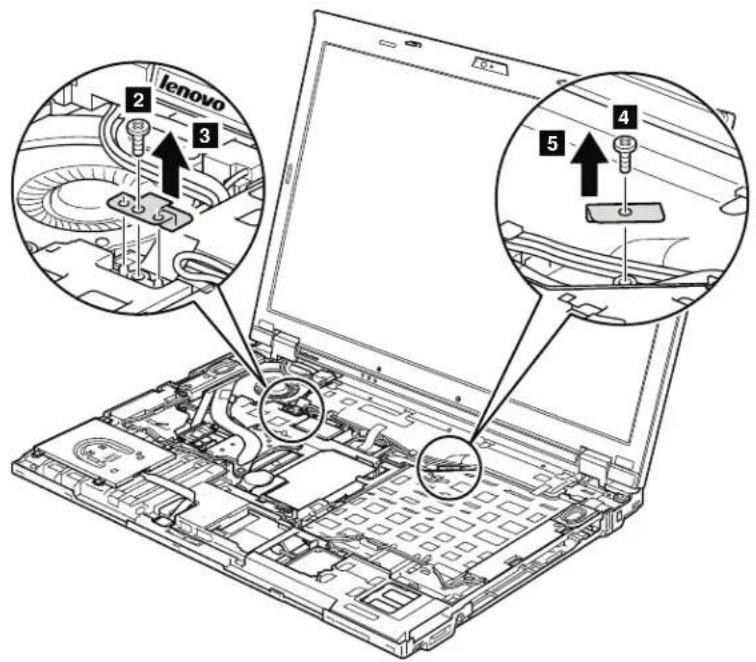
text_image
lenovo 2 3 4 5| StepScrew(quantity)ColorTorque | |||
| 2 | M2×3mm,wafer-head,nylon-coated(1)Black0.181Nm | (1.85kgfcm) | |
| 4 | M2×3mm,wafer-head,nylon-coated(1)Black0.181Nm | (1.85kgfcm) | |
Table26. RemovalstepsofLCDunit(continued)

text_image
Diagram of a laptop with numbered parts highlighting internal components and connections, including battery, switch, and cable assembly.| StepScrew(quantity)ColorTorque | |||
| 8 M2 | 5×6mm,wafer-head,nylon-coated(2)Black0.392 | Nm | (4.0kgfcm) |
Table26. RemovalstepsofLCDunit(continued)

text_image
10 10 10 10 10 10 9Wheninstalling:
• Makesurethatyouattachtheconnectorsandroutethecablesfirmly,andtape upintheproperpositionsasshowninthisfigure.
- When your outethecables, makes sure that they are not subjected to any tension. Tension could cause the cable stobedamaged by the cable guides, or awiretobebroken.
Table26. RemovalstepsofLCDunit(continued)
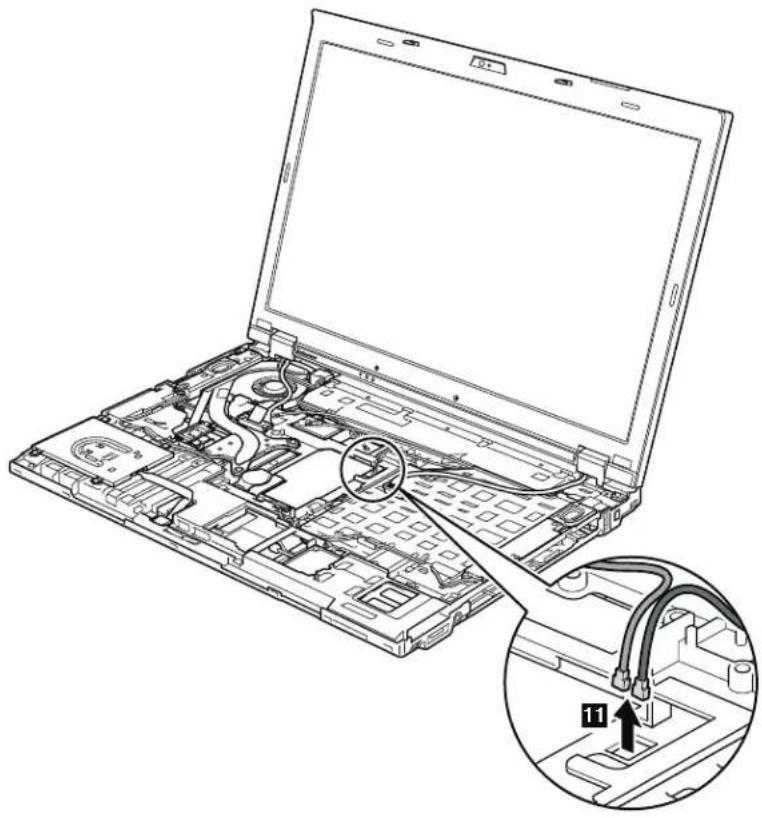
natural_image
Line drawing of a laptop with internal circuitry and cable connector, showing part assembly and mounting detail (no text or symbols)Table26. RemovalstepsofLCDunit(continued)
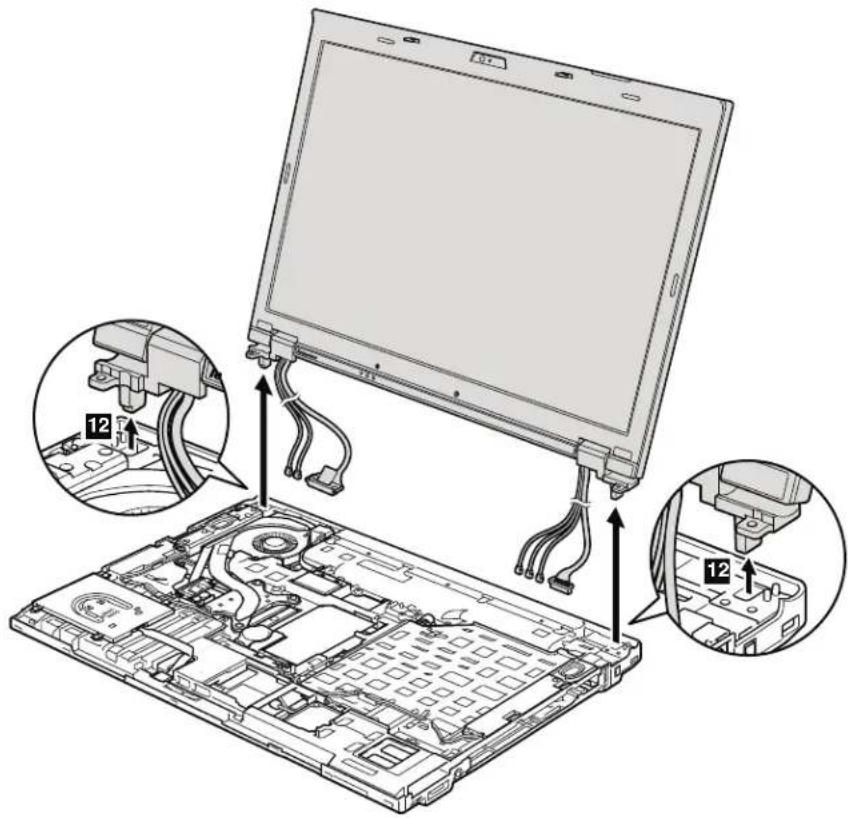
text_image
Technical diagram of a laptop with labeled components and wiring, showing exploded view and close-up views of internal circuitry.1170Fanassembly
Foraccess,removetheseFRUsinorder:
•"1010Batterypack"onpage85
•"1020ExpressCardblankbezel"onpage87
•"1050DIMMslotcover"onpage91
"1070PCIExpressMiniCardforwirelessWAN"onpage93
•"1080Keyboard"onpage95
• "110PCIExpressMiniCardforwirelessLAN" onpage105
- "1120 Keyboard bezel assembly, FPC cable, and Bluetooth daughter card (BDC-2.1)"onpage107
•"1150Speakerassembly"onpage115
•"1160LCDunit"onpage117
Table27. Removalstepsoffanassembly

text_image
Technical diagram showing a mechanical assembly with numbered components and a close-up of the internal structure.| StepScrew(quantity)ColorTorque | |||
| 1 | M2×3mm,wafer-head,nylon-coated(2)Black0.181Nm | (1.85kgfcm) | |
| 3 | M2×10mm,wafer-head,nylon-coated(4)Black0.181Nm | (1.85kgfcm) | |
Table27. Removalstepsoffanassembly(continued)
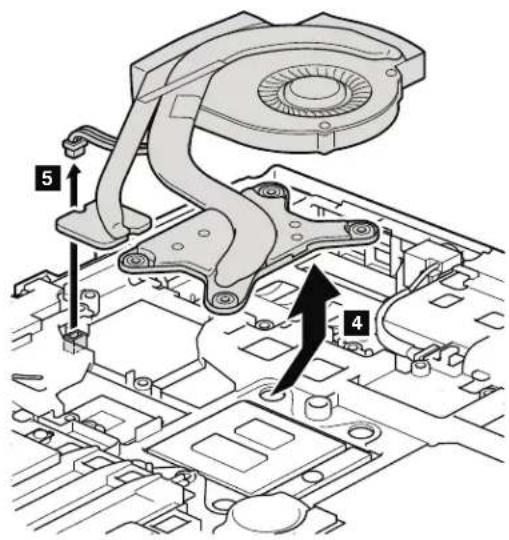
text_image
Technical diagram of a mechanical assembly with numbered components and directional arrows indicating parts of motion or assembly.Wheninstalling:
• Before you attach the fan assembly to the computer, apply thermal grease, at an amount of 0.2 grams, on the parts marked a as in the following figures. Either to much to less application of grease can cause thermal problem due to imperfect contact with a component. For the fan in the integrated graphics models, you need to peel the thin film off from the thermal rubber marked b.
For Discretegraphics models:

text_image
Technical diagram showing mechanical assembly with labeled parts a and b, likely illustrating a component or connection.Table27. Removalstepsoffanassembly(continued)
ForIntegratedgraphicsmodels:
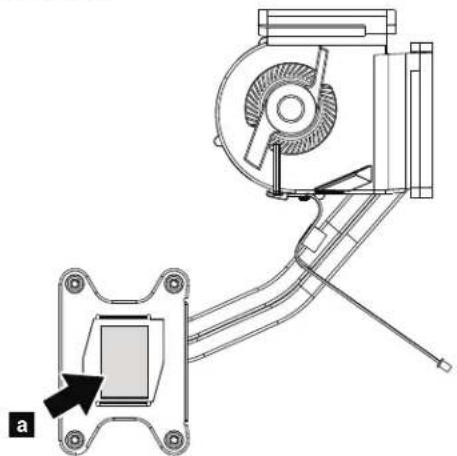
natural_image
Technical line drawing of a mechanical assembly with a component labeled 'a' and no visible text or symbols- Whenattachingthefanassemblytotheframe,takecarenottodamagethe heatsink( a )ofthefanassembly.
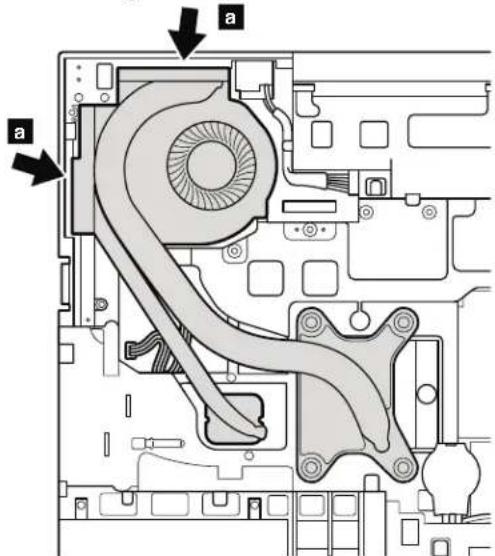
text_image
Technical diagram of a computer drive showing labeled components with arrows indicating parts 'a' and 'b'.•Makesurethatthefanconnectorisattachedfirmly.
1180CPU
Foraccess,removetheseFRUsinorder:
• "1010Batterypack" onpage85
• "1020ExpressCardblankbezel" onpage87
•"1050DIMMslotcover"onpage91
• "1070PCIExpressMiniCardforwirelessWAN" on page 93
•"1080Keyboard"onpage95
• "1110PCIExpressMiniCardforwirelessLAN" on page 105
- "1120 Keyboard bezel assembly, FPC cable, and Bluetooth daughter card (BDC-2.1)"onpage107
•"1150Speakerassembly"onpage115
•"1160LCDunit"onpage117
• "1170Fanassembly" on page 123
Attention: CPU is extremely sensitive. When you servicethe CPU, avoid any kind of rough handling.
Table28. RemovalstepsofCPU
Rotate the head of the screw in the directions shown by arrow 1 to lease the lock; then remove the CPU 2.
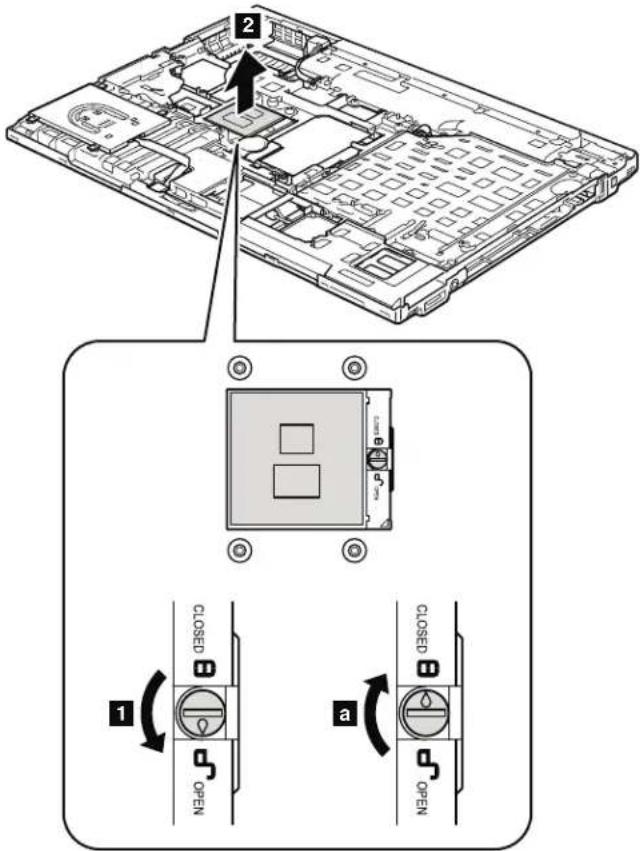
text_image
Technical diagram showing a laptop chassis with labeled components and two close-up views (a and 1) illustrating device state changes.Wheninstalling:PlacetheCPUontheCPUsocket,andthenrotatetheheadof thescrewinthedirectionshownbyarrow a tosecuretheCPU.
1190Basecoverassembly,I/Osubcard,andI/Osubcardcable
Foraccess,removetheseFRUsinorder:
•"1010Batterypack"onpage85
•"1020ExpressCardblankbezel"onpage87
• "1030SerialUltrabaySlimdeviceortravelbezel"onpage88
"1040Harddiskdrive(HDD)slotcover,HDDrubberrailsandHDDorstorage converterandsolidstatedrive(SSD)"onpage89
•"1050DIMMslotcover"onpage91
• "1070PCIExpressMiniCardforwirelessWAN" onpage93
•"1080Keyboard"onpage95
•"110PCIExpressMiniCardforwirelessLAN"onpage105
- "1120 Keyboard bezel assembly, FPC cable, and Bluetooth daughter card (BDC-2.1)" onpage107
•"1150Speakerassembly"onpage115
•"1160LCDunit"onpage117
•“1170Fanassembly”onpage123
Table29. Removalstepsofbasecoverassembly, I/Osubcard, and I/Osubcardcable
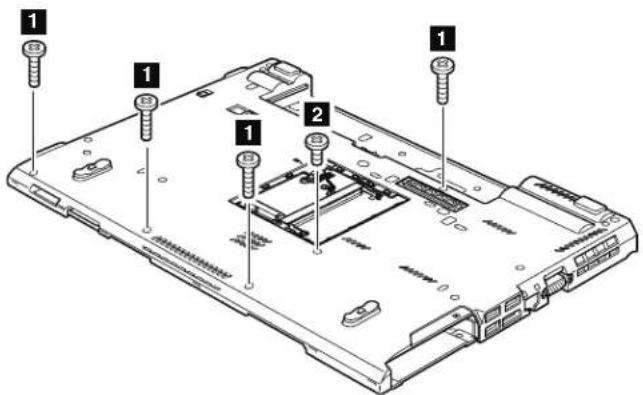
text_image
Labeled diagram of a computer chassis showing screw installation points and internal components| StepScrew(quantity)ColorTorque | |||
| 1 | M2×5mm,wafer-head,nylon-coated(4)Black0.181Nm | (1.85kgfcm) | |
| 2 | M2×10mm,wafer-head,nylon-coated(1)Black0.181Nm | (1.85kgfcm) | |
Table29. Removalstepsofbasecoverassembly, I/Osubcard, and I/Osubcard cable(continued)
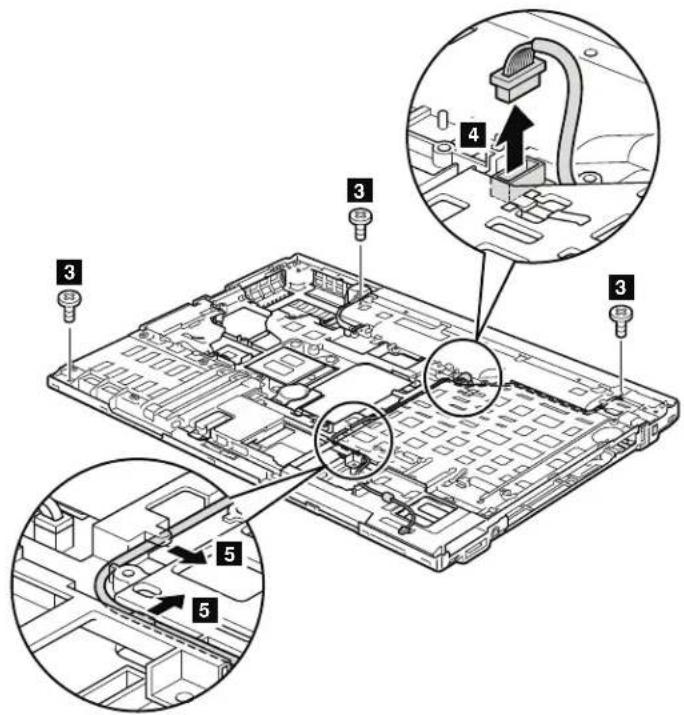
text_image
Technical diagram of an electronic device with numbered components and a close-up view highlighting internal structure.| StepScrew(quantity)ColorTorque | |||
| 3 | M2×3mm,wafer-head,nylon-coated(3)Black0.181Nm | (1.85kgfcm) | |
Wheninstalling: Makesurethattheconnectorisattachedfirmly.
Table29. Removalstepsofbasecoverassembly, I/Osubcard, and I/Osubcard cable(continued)
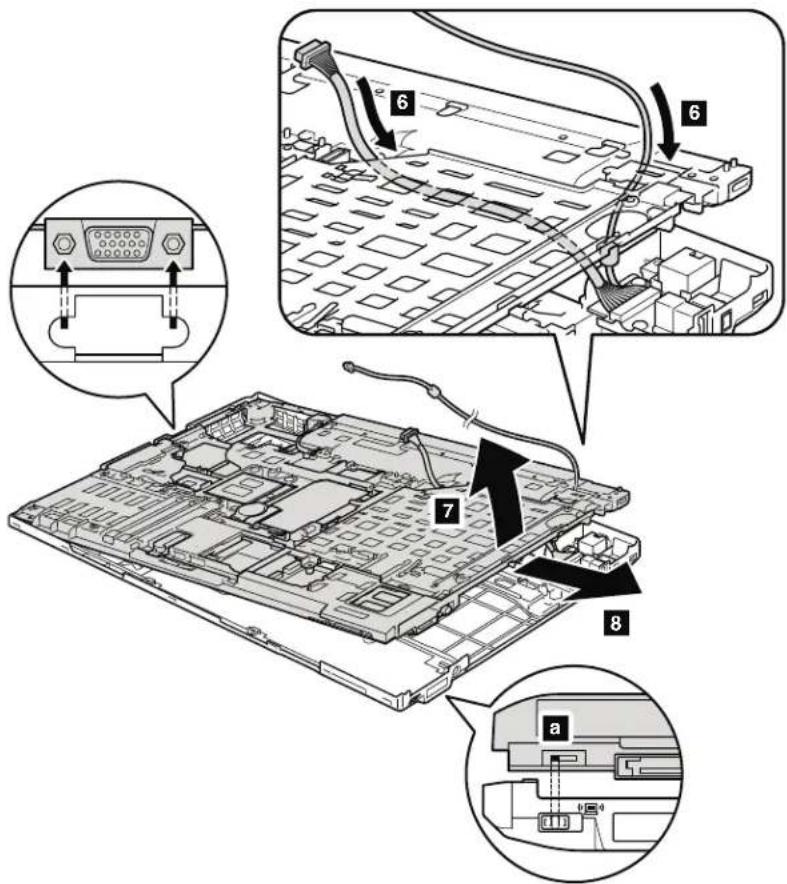
text_image
Technical diagram showing component assembly with labeled parts and annotations in ChineseWheninstalling: Makesurethatwirelessswitchisadjustedasshowninfigure a.
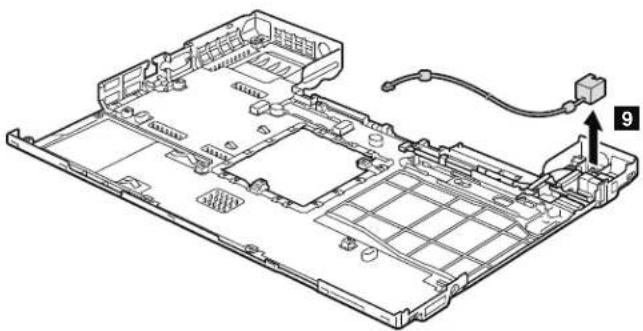
natural_image
Isometric technical diagram of a computer motherboard with labeled component 9 (no text or symbols beyond label)Table29. Removalstepsofbasecoverassembly, I/Osubcard, and I/Osubcard cable(continued)

text_image
Technical diagram showing a device's internal structure with numbered components, including a close-up view of the component.| StepScrew(quantity)ColorTorque | |||
| 11 | M2×3.5mm,flat-head,nylon-coated(2)Silver0.181Nm | (1.85kgfcm) | |
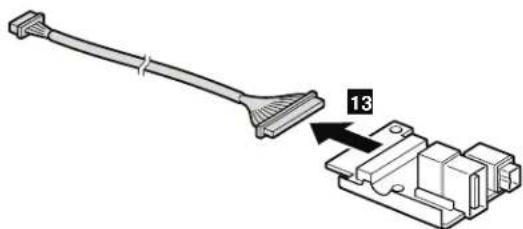
natural_image
Diagram of a cable connector with a numbered component (13), no text or symbols presentTable29. Removalstepsofbasecoverassembly, I/Osubcard, and I/Osubcard cable (continued)
Cablerouting: Makesurethatconnectorsarefirmlyattachedandroutethe cablesasshowninthisfigure.
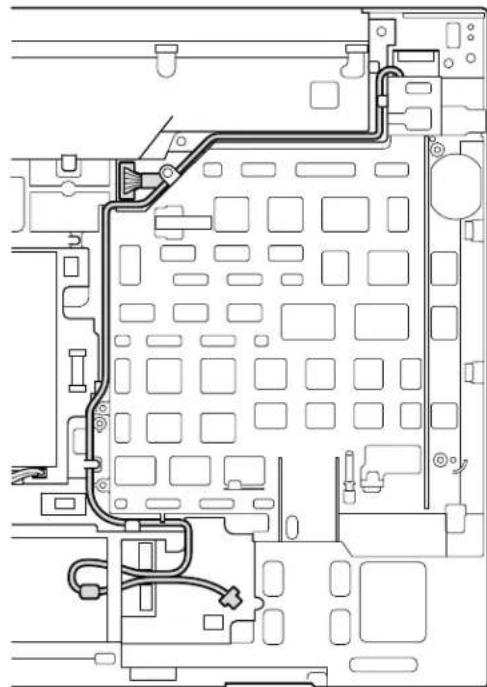
natural_image
Technical line drawing of a mechanical or electrical component with no visible text, numbers, or symbols.Note: Applyinglabelstothebasecover
ThenewbasecoverFRUisshippedwithakitcontaininglabelsofseveralkinds.
Whenyoureplacethebasecover,youneedtoapplythefollowinglabels:
18 Homologationlabel
Followinglabelsneedtobepeeledofffromtheoldbasecover,andneedtobe putonthenewbasecover.
1 Windowslicenselabel(COA)
2 QualcommWirelessWANlabel
3 EricssonwirelessWANlabel
4 WirelessLANMACaddresslabel
5 MACaddresslabel
6 SIRMlabels
7 Israellabel(76.3mm×31.6mm)
8 Wirelesscardlabel(onlyforBrazil)
9 Modemlabel(onlyforPRCmodel)
10 Bluetoothlabel(onlyforBrazil)
11 ChinawirelessWANlabel
12 Israellabel(63.5mmx19mm)
13 AnatelwirelessWANlabel(onlyforBrazil)
14 Vodafonelabel
15 ModemAMOMlabel(onlyforBrazil)
16 FCClabel
17 Informationlabel
19 Serialnumberlabel
20 Assettaglabel
Forsomemodels,youalsoneedtoapplyoneortwoFCClabels.Checktheold basecover;ifithasoneortwoFCClabels,findduplicatesoftheminthelabel kitandapplythemtothenewbasecover.
Forthelocationofeachlabel, referthefollowingfigure:

text_image
Labeled diagram of a computer chassis showing internal components and numbered parts1200Magnesiumstructureframe
Foraccess,removetheseFRUsinorder:
•"1010Batterypack"onpage85
•"1020ExpressCardblankbezel"onpage87
• "1030SerialUltrabaySlimdeviceortravelbezel" onpage88
"1040Harddiskdrive(HDD)slotcover,HDDrubberrailsandHDDorstorage converterandsolidstatedrive(SSD)"onpage89
•"1050DIMMslotcover"onpage91
• "1070PCIExpressMiniCardforwirelessWAN" onpage93
•"1080Keyboard"onpage95
•"110PCIExpressMiniCardforwirelessLAN"onpage105
- "1120 Keyboard bezel assembly, FPC cable, and Bluethooth daughter card (BDC-2.1)"onpage107
•"1150Speakerassembly"onpage115
•"1160LCDunit"onpage117
•"1170Fanassembly"onpage123
•"1180CPU"onpage126
•"1190Basecoverassembly,I/Osubcard,andl/Osubcardcable"onpage127
Table30. Removalstepsofmagnesiumstructureframe

text_image
Labeled diagram of a computer motherboard showing numbered components for assembly or maintenance reference.| StepScrew(quantity)ColorTorque | |||
| 1 | M2×10mm,wafer-head,nylon-coated(2)Black0.181Nm | (1.85kgfcm) | |
| 2 | M2×5mm,flat-head,nylon-coated(1)Black0.181Nm | (1.85kgfcm) | |
| 3 | M2×3mm,wafer-head,nylon-coated(1)Black0.181Nm | (1.85kgfcm) | |
| 4 | M2×5mm,wafer-head,nylon-coated(1)Black0.181Nm | (1.85kgfcm) | |
| 6 | Hexstud,nylon-coated(2) Silver0.392Nm | (4.0kgfcm) | |
Table30. Removalstepsofmagnesiumstructureframe(continued)

text_image
Technical diagram of a laptop chassis with labeled components and an inset showing internal wiring or wiring connections.1210Systemboard, DC-inconnectorcable, and ExpressCardslot assembly
Foraccess,removetheseFRUs,inorder:
•"1010Batterypack"onpage85
•"1020ExpressCardblankbezel"onpage87
• "1030SerialUltrabaySlimdeviceortravelbezel" onpage88
•"1040Harddiskdrive(HDD)slotcover,HDDrubberrailsandHDDorstorage converterandsolidstatedrive(SSD)"onpage89
•"1050DIMMslotcover"onpage91
•"1070PCIExpressMiniCardforwirelessWAN"onpage93
•"1080Keyboard"onpage95
• "1110PCIExpressMiniCardforwirelessLAN" on page 105
- "1120 Keyboard bezel assembly, FPC cable, and Bluethooth daughter card (BDC-2.1)"onpage107
•"1150Speakerassembly"onpage115
•"1160LCDunit"onpage117
•"1170Fanassembly"onpage123
•"1180CPU"onpage126
• "1190Basecoverassembly,I/Osubcard,andI/Osubcardcable" onpage127
Importantnoticesforhandlingthesystemboard:
Whenhandlingthesystemboard, bear the following in mind.
- Thesystemboardhasanaccelerometer,whichcanbebrokenbyapplying severalthousandsofG-forces.
Note: Droppingasystemboard from a height of as little as six inches that it falls flat on a hard bench can subject the accelerometer to as much as 6,000 G's of shock.
- Becarefulnottodropthesystemboardonabenchtopthathasahard surface,suchasmetal,wood,orcomposite.
- Ifasystemboardisdropped, youmusttestit, using PC-DoctorforDOS, to make sure that the HDDActiveProtectionstillfunctions (see below).
Note: If the test show that HDDActive Protection is not functioning, be sure to document the drop in any reject report, and replace the system board.
- Avoidroughhandlingofanykind.
- Ateverypointintheprocess,besurenottodroporstackthesystemboard.
- If you put a system board down, besuretoputit only on ap added surface such as an ESD motor conductive corrugated material.
Afterreplacingthesystemboard, runPC-DoctorforDOStomakesurethat HDDActiveProtectionstillfunctions. The procedureisasfollows:
-
Placethecomputeronahorizontalsurface.
-
Run Diagnostics --> ThinkPad Devices --> HDD Active Protection Test.
Attention: Donotapplyphysicalshocktothecomputerwhilethetestis running.
Table31. Removalstepsofsystemboard, DC-inconnectorcable, and ExpressCardslot assembly
Followingcomponentssolderedonthetopsideofthesystemboardare extremely sensitive. When you servicethesystemboard, avoid any kind of rough handling.
a CPU
b AccelerometerchipfortheHDDActiveProtectionSystem
c PCH(PlatformControllerHub)
d GPU(GraphicProcessingUnit):Discretegraphicschip
Note:GPU( d )isonlyfortheSwitchableGraphicsmodels.Integrated
GraphicsmodelsdonothaveGPUonthesystemboard.
ForSwitchableGraphicsmodels:
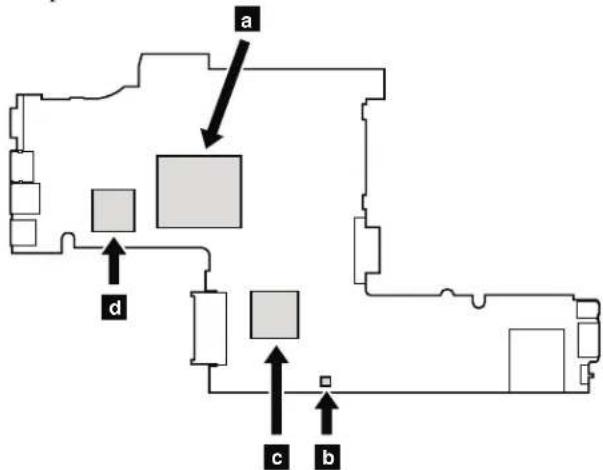
flowchart
graph TD
    A["Room 1"] --> B["Room 2"]
    B --> C["Room 3"]
    C --> D["Room 4"]
    D --> E["Room 5"]
    E --> F["Room 6"]
    F --> G["Room 7"]
    G --> H["Room 8"]
    H --> I["Room 9"]
    I --> J["Room 10"]
    J --> K["Room 11"]
    K --> L["Room 12"]
    L --> M["Room 13"]
    M --> N["Room 14"]
    N --> O["Room 15"]
    O --> P["Room 16"]
    P --> Q["Room 17"]
    Q --> R["Room 18"]
    R --> S["Room 19"]
    S --> T["Room 20"]
    T --> U["Room 21"]
    U --> V["Room 22"]
    V --> W["Room 23"]
    W --> X["Room 24"]
    X --> Y["Room 25"]
    Y --> Z["Room 26"]
    Z --> AA["Room 27"]
    AA --> AB["Room 28"]
    AB --> AC["Room 29"]
    AC --> AD["Room 30"]
    AD --> AE["Room 31"]
    AE --> AF["Room 32"]
    AF --> AG["Room 33"]
    AG --> AH["Room 34"]
    AH --> AI["Room 35"]
    AI --> AJ["Room 36"]
    AJ --> AK["Room 37"]
    AK --> AL["Room 38"]
    AL --> AM["Room 39"]
    AM --> AN["Room 40"]
    AN --> AO["Room 41"]
    AO --> AP["Room 42"]
    AP --> AQ["Room 43"]
    AQ --> AR["Room 44"]
    AR --> AS["Room 45"]
    AS --> AT["Room 46"]
    AT --> AU["Room 47"]
    AU --> AV["Room 48"]
    AV --> AW["Room 49"]
    AW --> AX["Room 50"]
ForIntegratedGraphicsmodels:

text_image
a c bTable31. Removalstepsofsystemboard, DC-inconnectorcable, and ExpressCardslot assembly(continued)

text_image
Diagram of a computer motherboard with numbered components for identification| StepScrew(quantity)ColorTorque | |||
| 1 | M2×10mm,wafer-head,nylon-coated(2)Black0.181Nm | (1.85kgfcm) | |
| 2 | M2×5mm,wafer-head,nylon-coated(1)Black0.181Nm | (1.85kgfcm) | |
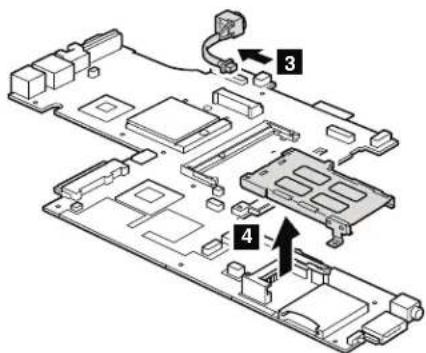
text_image
Technical diagram of an electronic device with labeled components and directional arrows indicating assembly or connection points.Wheninstalling: Makesurethattheconnectorisattachedfirmly.
2010LCDbezelassembly
Foraccess,removethefollowingFRU:
"1010Batterypack"onpage85
Table32. RemovalstepsofLCDbezelassembly
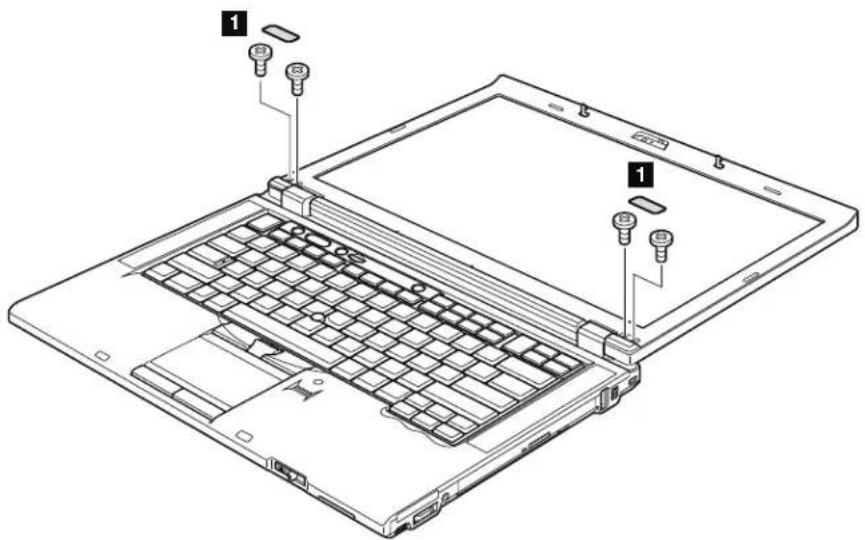
text_image
Laptop interior diagram with labeled parts, showing front and rear views of the keyboard and display area| StepScrewcapScrew | (quantity)ColorTorque | |||
| 1 | M2.5×6mm,wafer-head,nylon-coated(4) | Black0.392 | Nm(4.0kgfcm) | |
Table32. RemovalstepsofLCDbezelassembly(continued)

text_image
Laptop interior diagram with numbered component annotations and a magnified view of the internal structure2020LEDboard
Foraccess,removetheseFRUsinorder:
- "1010Batterypack"onpage85
- "2010LCDbezelassembly"onpage138
Table33. RemovalstepsofLEDboard

text_image
Laptop screen diagram with numbered component annotations and a magnified inset showing internal structure| StepScrew(quantity)ColorTorque | |||
| 1 | M2×3.5mm,flat-head,nylon-coated(2)Silver0.181Nm | (1.85kgfcm) | |
Wheninstalling: Makesurethattheconnectorisattachedfirmly.
2030Integratedcamera
Foraccess,removetheseFRUs,inorder:
• "1010Batterypack" onpage85
•“2010LCDbezelassembly”onpage138
Table34. Removalstepsofintegratedcamera
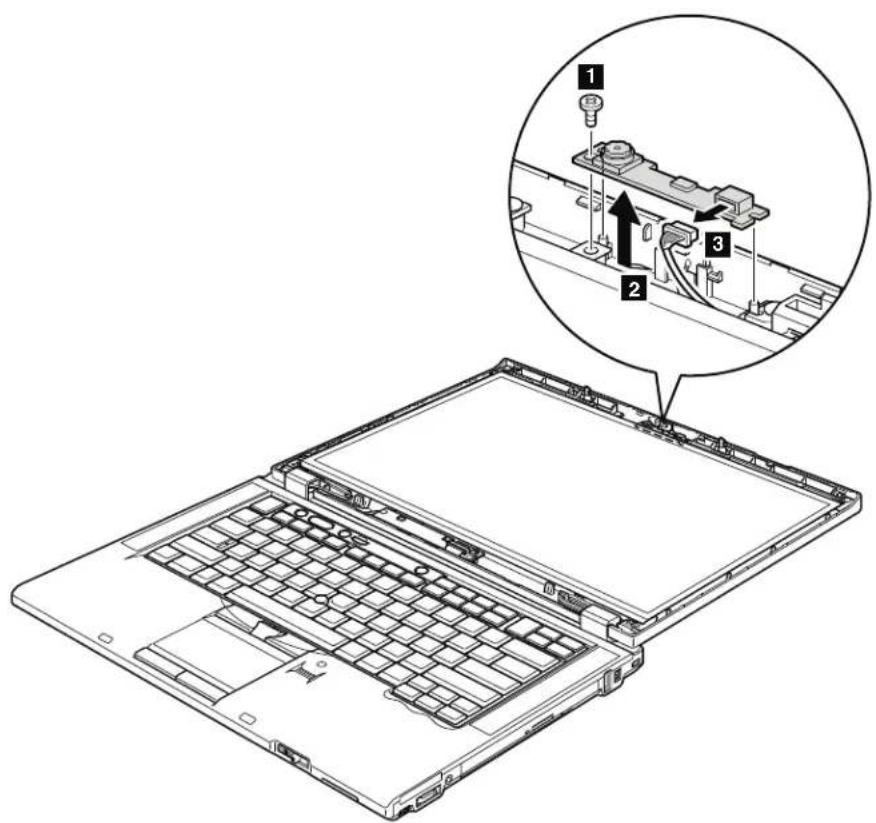
text_image
Laptop interior diagram with numbered component annotations and a magnified view of the internal structure| StepScrew(quantity)ColorTorque | |||
| 1 | M2×3.5mm,flat-head,nylon-coated(1)Silver0.181Nm | (1.85kgfcm) | |
Wheninstalling: Makesurethattheconnectorisattachedfirmly.
2040LCDpanelandLCDcable
Foraccess,removetheseFRUsinorder:
• "1010Batterypack" onpage85
• "1020ExpressCardblankbezel" onpage87
•"1050DIMMslotcover"onpage91
"1070PCIExpressMiniCardforwirelessWAN"onpage93
•"1080Keyboard"onpage95
"1110PCIExpressMiniCardforwirelessLAN"onpage105
- "1120 Keyboard bezel assembly, FPC cable, and Bluetooth daughter card (BDC-2.1)"onpage107
•"1150Speakerassembly"onpage115
•"1160LCDunit"onpage117
• "2010LCDbezelassembly" on page 138
• "2020LEDboard" on page 140
• "2030Integratedcamera" onpage141
Table35. RemovalstepsofLCDpanelandLCDcable
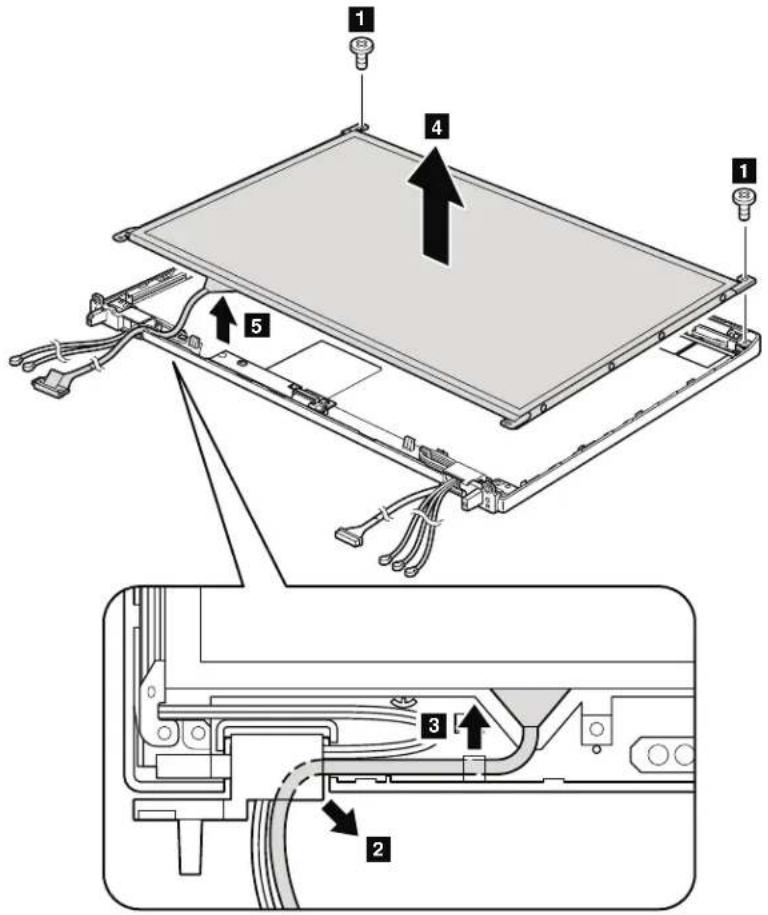
text_image
Technical diagram of an electronic device with labeled components and wiring, showing assembly steps and internal wiring connections.| StepScrew(quantity)ColorTorque | |||
| 1 M2 | 5×6mm,wafer-head,nylon-coated(2)Black0.392 | Nm | (4.0kgfcm) |
Table35. RemovalstepsofLCDpanelandLCDcable(continued)

text_image
Technical diagram of a rectangular panel with labeled components and directional arrows indicating assembly or assembly steps.| StepScrew(quantity)ColorTorque | |||
| 6 M2×3mm,wafer-head,nylon-coated(4)Black0.181Nm | (1.85kgfcm) | ||
Wheninstalling: WhenattachingtheLCDpaneltothecover, presstheleftand rightedgescoveredwithmetalgentlywithyourfingers.DONOTpressthe surfaceofthepanelorapplyanyexcessiveforcetothepanel.
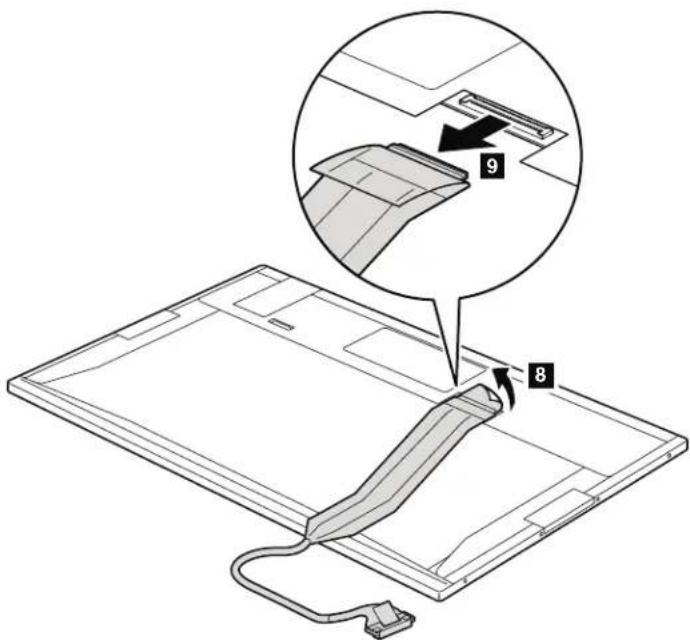
text_image
Diagram showing a device with labeled parts, including numbered annotations 8 and 9, indicating parts of the component.Wheninstalling: Makesurethattheconnectorisattachedfirmly.
2050Cameracable
Foraccess,removetheseFRUsinorder:
• "1010Batterypack" onpage85
• "1020ExpressCardblankbezel" onpage87
•"1050DIMMslotcover"onpage91
"1070PCIExpressMiniCardforwirelessWAN"onpage93
•"1080Keyboard"onpage95
"1110PCIExpressMiniCardforwirelessLAN"onpage105
- "1120 Keyboard bezel assembly, FPC cable, and Bluetooth daughter card (BDC-2.1)"onpage107
•"1150Speakerassembly"onpage115
•"1160LCDunit"onpage117
•“2010LCDbezelassembly”onpage138
• "2020LEDboard" on page 140
• "2030Integratedcamera" onpage141
•"2040LCDpanelandLCDcable"onpage142
Table36. Removalstepsofcameracable
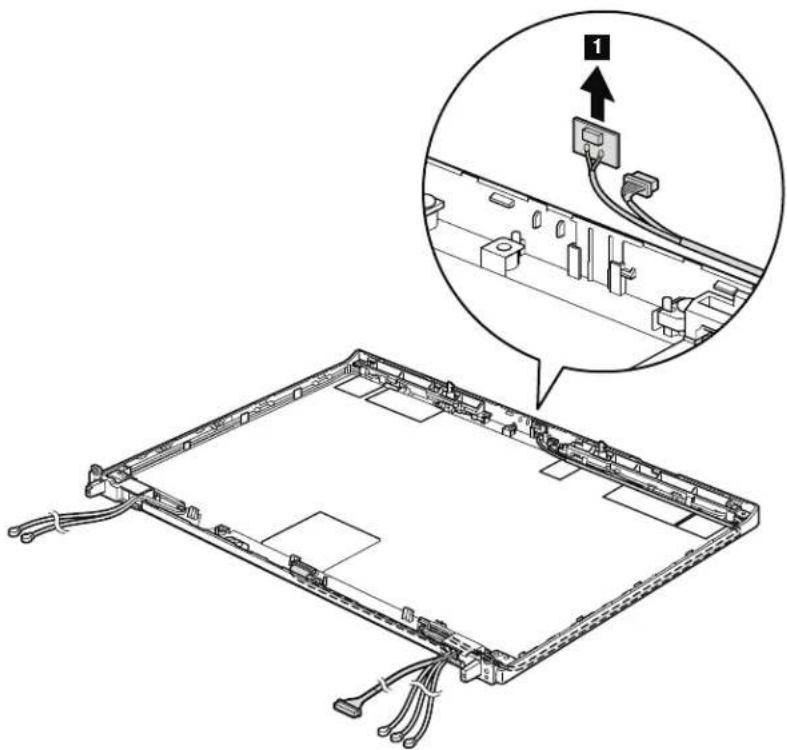
text_image
Technical diagram showing a laptop chassis with cable routing and a magnified inset highlighting a component labeled '1'Table36. Removalstepsofcameracable(continued)
Cablerouting: When you install the cable, routethe cable as shown in the figure below.

text_image
Diagram of a laptop front panel with labeled components and directional arrows indicating assembly or movement.2060WirelessLANantennaassemblyorwirelessLAN/WANantenna assembly
Foraccess,removetheseFRUsinorder:
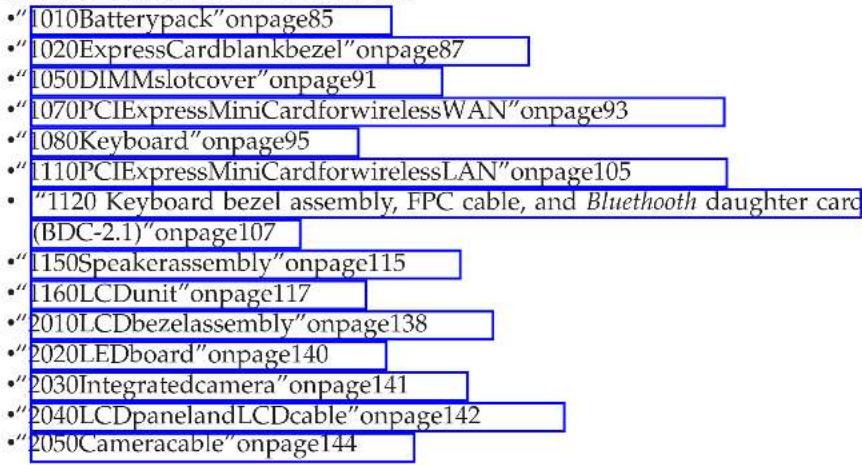
text_image
"1010Batterypack"onpage85 "1020ExpressCardblankbezel"onpage87 "1050DIMMslotcover"onpage91 "1070PCIExpressMiniCardforwirelessWAN"onpage93 "1080Keyboard"onpage95 "1110PCIExpressMiniCardforwirelessLAN"onpage105 "1120 Keyboard bezel assembly, FPC cable, and Bluetooth daughter card (BDC-2.1)"onpage107 "1150Speakerassembly"onpage115 "1160LCDunit"onpage117 "2010LCDbezelassembly"onpage138 "2020LEDboard"onpage140 "2030Integratedcamera"onpage141 "2040LCDpanelandLCDcable"onpage142 "2050Cameracable"onpage144Table37. RemovalstepsofwirelessLANantennaassemblyorwirelessLAN/WANantenna assembly

text_image
Diagram of a laptop back panel with labeled ports and directional arrows indicating movement or navigation.Cablerouting: When you install the antennakit, routethecables as shown in the figure above. As your routethecables, makes sure that they are not subjected to any tension. Tension could cause the cable stobe damaged by the cable guides, or a wiretobebroken.
Table37. RemovalstepsofwirelessLANantennaassemblyorwirelessLAN/WANantenna assembly(continued)
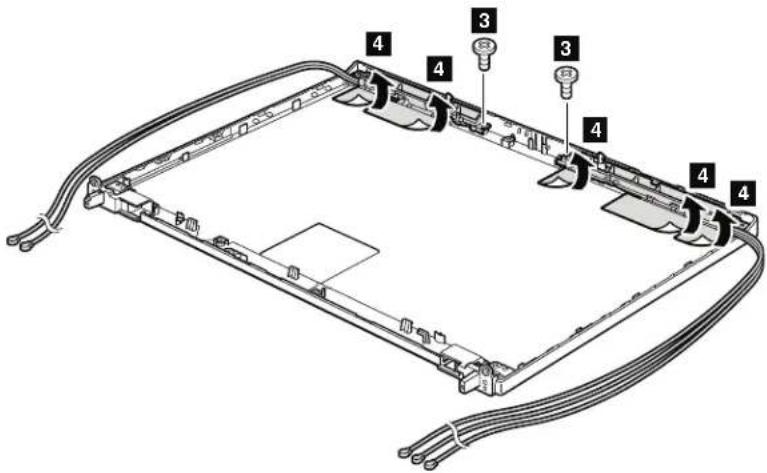
text_image
Technical diagram of a computer chassis with labeled components, showing cable routing and component layout.| StepScrew(quantity)ColorTorque | |||
| 3 | M2×3.5mm,flat-head,nylon-coated(2)Silver0.181Nm | (1.85kgfcm) | |
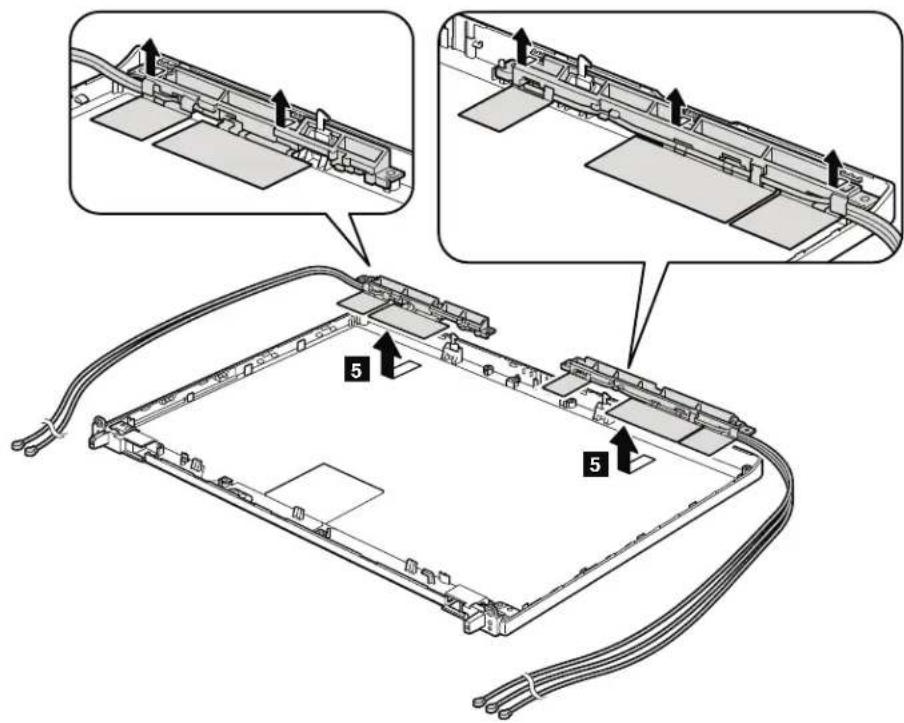
text_image
Technical diagram showing cable installation steps with numbered components and directional arrows indicating assembly or connection.2070HingesandLCDrearcoverassembly
Foraccess,removetheseFRUsinorder:
• "1010Batterypack" onpage85
• "1020ExpressCardblankbezel" onpage87
•"1050DIMMslotcover"onpage91
"1070PCIExpressMiniCardforwirelessWAN"onpage93
•"1080Keyboard"onpage95
"1110PCIExpressMiniCardforwirelessLAN"onpage105
- "1120 Keyboard bezel assembly, FPC cable, and Bluetooth daughter card (BDC-2.1)"onpage107
•"1150Speakerassembly"onpage115
•"1160LCDunit"onpage117
•"2010LCDbezelassembly"onpage138
• "2020LEDboard" on page 140
• "2030Integratedcamera" onpage141
•"2040LCDpanelandLCDcable"onpage142
•"2050Cameracable"onpage144
•"2060WirelessLANantennaassemblyorwirelessLAN/WANantenna assembly"onpage146
Table38. RemovalstepsofhingesandLCDrearcoverassembly

text_image
Technical diagram of a laptop chassis with labeled components and directional arrows indicating assembly or status.Wheninstalling:Attachthehingesasshowninthisfigure.

natural_image
Technical line drawing of a mechanical assembly with no visible text or symbols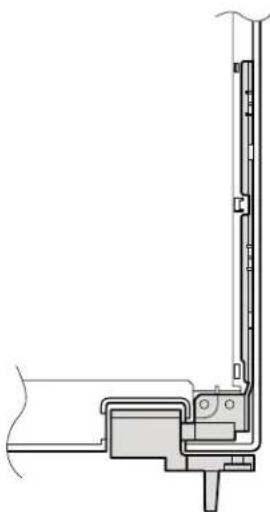
natural_image
Technical line drawing of a mechanical assembly or bracket (no text or symbols)Locations
ThischapterpresentsthelocationofThinkPadT410andT410ifeaturesandhardware.
Frontview
1 Integratedcamera(forsomemodels)
2 ThinkLight
3 Built-inmicrophone
4 Powerswitch
5 Built-inspeakers
6 Securitykeyhole
7 IEEE1394connector
8 Universalserialbus(USB)connector
9 SerialUltrabaySlimdriveortravelbezel
10 Comboaudiojack
11 eSATAconnector
12 ExpressCardslot
13 Fingerprintreader
14 Touchpadbuttons
15 Touchpad
16 TrackPointbuttons
17 TrackPointpointingstick
18 UltraNav
19 Volumecontrolbuttons
20 ThinkVantagebutton
21 Statusindicators
Note: For the description of each indicator, see "Status indicators" on page
71
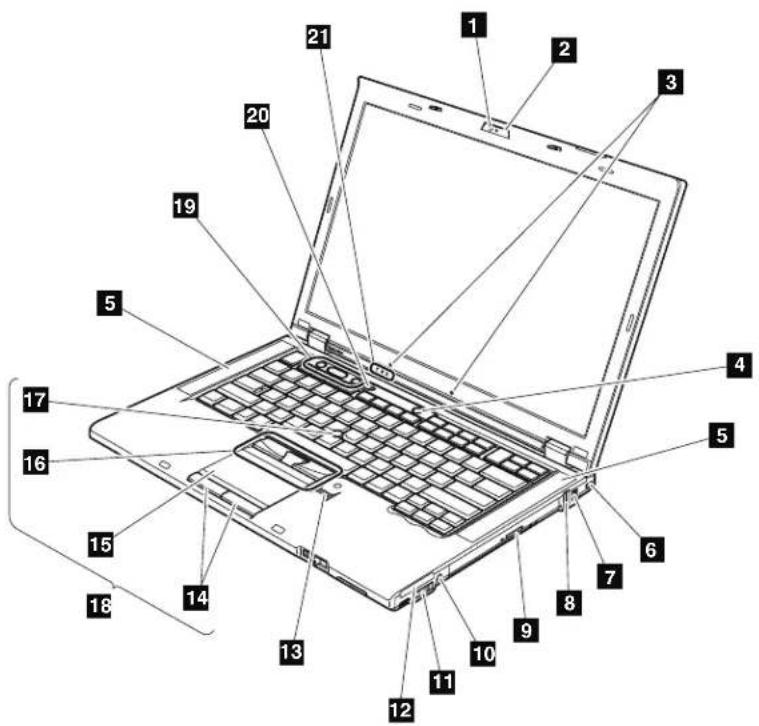
text_image
Labeled diagram of a laptop with numbered parts for identificationRearview
1 Statusindicators Note: For the description of each indicator, see "Statusindicators" on page 71
2 DisplayPort
3 HDDorSSD
4 Universalserialbus(USB)connectors
5 RJ-45(Ethernet)connector
6 Externalmonitorconnector
7 ACpowerconnector
8 RJ-11(modem)connector
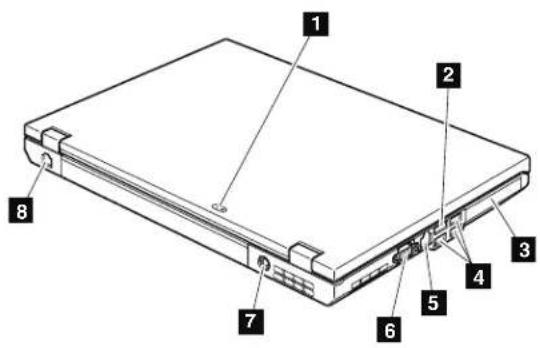
text_image
Labeled diagram of a laptop chassis showing eight numbered components for identification.Bottomview
1 Batterypack
2 Batterypacklatch
3 DIMMslot
4 Dockingconnector
5 LCDcoverlatch
6 MediaCardReaderslot
7 SerialUltrabaySlimlocklatch
8 SerialUltrabaySlimejectlatch
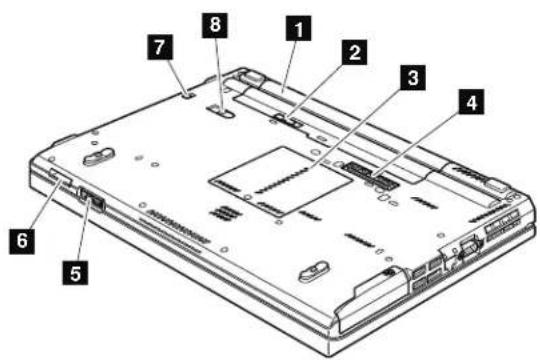
text_image
Labeled diagram of a computer rear panel showing numbered components for identificationPartslist
Thischaptercontainsfollowinglistsoftheserviceparts.
•“Overall”onpage154
•“LCDFRUs”onpage170
•“Keyboard”onpage178
•"Miscellaneousparts"onpage179
•“ACadapters”onpage181
•"Powercords"onpage182
•“Recoverydiscs”onpage183
•"Commonservicetools"onpage191
Notes:
•EachFRUisavailableforalltypesormodels,unlessspecifictypesormodels arespecified.
- FRUwithspecificmodelslistedanddescribedasxxU(whereUisanexample ofacountrydesignator)shouldbeusedforallmodelsendinginU.
- FRUwithspecificmodelslistedanddescribedas3Dx(where3Disan exampleofauniqueconfiguration)shouldbeusedforallofthesemodels, unlessspecificcountryorregiondesignatorisspecified.
- ACRU(customerreplaceableunit)isidentifiedbyasingleasterisk(*)ortwo asterisks(**)intheCRUIDcolumn.AnNintheCRUIDcolumnmeansthat thepartisnotaCRU.Asingleasterisk(*)meansthatthepartisaSelf-service CRU;twoasterisks(**)meansthatthepartisanOptional-serviceCRU.
ThinkPadNotebookscontainthefollowingtypesofCRUs:
Self-serviceCRUs
TheseCRUsunplugorareheldbynomorethantwoscrews.
ExamplesofthesetypesofCRUsincludeanACadapter,apower cord,abattery,andaharddiskdrive.OtherSelf-serviceCRUs dependingonproductdesignmayincludeamemory,awirelesscard,akeyboard,andapalmrestwithfingerprintreaderandtouchpad.
Optional-serviceCRUs
TheseCRUsareisolatedpartswithinthecomputerthatareconcealed byanaccesspanelthatistypicallysecuredbymorethantwoscrews.
Oncetheaccesspanelisremoved,thespecificCRUvisible.
•FRUsmarkedwith OP areavailableasoptions.
Overall

text_image
Exploded view diagram of a computer with numbered parts for identificationTable39.Partslist—Overall
| No.FRU(Overall)FRUno.CRU | ID | ||
| a - g | See"Miscellaneousparts"onpage179. | ||
| 1LCDunit(see"LCDFRUs"onpage170.) | |||
| 2Keyboardbezelassemblywithoutfingerprintreader•2516-CTO,A6x,ADx,AEx•2518-CTO,CHx,EMx,F3x,FPx,FQx,FSx,FTx,FUx,FVx,FWx,FXx•2519-CTO,86x,8Ax•2522-CTO,3Bx,3Kx,3Lx,52x,62x,63x,64x•2537-CTO•2538-CTO•2539-CTO | 60Y4955N | ||
| 2Keyboardbezelassemblywithfingerprintreader•2516-CTO,A2x,A3x,A4x,A5x,A7x,A8x,A9x,AAx,ABx,ACx,AFx,AGx,AHx,AJx,AKx,ALx,AMx,ANx•2518-CTO,C2x,C3x,C4x,C5x,C6x,C7x,C8x,C9x,CAx,CBx,CCx,CDx,CEx,CFx,CGx,CJx,CKx,CLx,CMx,CNx,CPx,CQx,CRx,CSx,CUx,CVx,CWx,CXx,CYx,CZx,D2x,D3x,D4x,D5x,D6x,D7x,D8x,D9x,DAx,DBx,DCx,DDx,DEx,DFx,DGx,DHx,DJx,DKx,DLx,DMx,DNx,DPx,DQx,DRx,DSx,DTx,DUx,DVx,DWx,DXx,DYx,DZx,E4x,E7x,E8x,E9x,EAX,EBx,ECx,EDx,EEx,EFx,EGx,ELx,ENx,EPx,EQx,ERx,ESx,ETx,EUx,EVx,EWx,EXx,EYx,EZx,F2x,F4x,F5x,F6x,F7x,F8x,F9x,FAx,FBx,FCx,FDx,FEx,FFx,FGx,FHx,FJx,FKx,FLx,FMx,FNx,FYx,FZx,G2x,G3x,G4x,G5x,G6x,G7x,G8x,G9x,GBx,GCx,GDx,GEx,GFx,GGx,GHx,GJx,GKx,GLx,GMx,GNx,GPx,GQx,GRx,GSx,GTx•2519-CTO,82x,83x,84x,85x,87x,88x,89x,8Bx•2522-CTO,30x,60x,22x,23x,24x,2Ax,2Bx,2Cx,2Dx,2Ex,2Fx,2Gx,2Hx,2Jx,2Kx,2Lx,2Mx,2Nx,2Px,2Qx,2Rx,2Sx,2Tx,2Ux,2Vx,2Wx,2Xx,2Yx,2Zx,32x,33x,34x,35x,36x,37x,38x,39x,3Ax,3Cx,3Dx,3Ex,3Fx,3Gx,3Hx,3Jx,3Mx,3Nx,3Px,3Qx,3Rx,3Sx,3Tx,3Ux,3Vx,3Wx,3Xx,3Yx,3Zx,42x,43x,44x,45x,46x,47x,25x,48x,49x,26x,4Ax,4Bx,53x,54x,55x,56x•2537-CTO,22x,23x,24x,25x,26x,92x,93x,94x,95x,96x,97x,98x,99x,9Ax,9Bx,9Cx,9Dx,9Ex,9Fx•2538-CTO•2539-CTO | 60Y4956N | ||
| 3Speakerassembly60Y5473N | |||
| 4Magnesiumstructureframeassembly60Y5472N | |||
| 5DVD-RAM/RWdrive45N7457* | |||
| 5DVD-RAM/RWdrive45N7451* | |||
| 5DVD-RAM/RWdrive45N7453* | |||
| 5Blu-raycombodrive•2516-CTO•2518-CTO•2519-CTO•2522-CTO•2537-CTO•2538-CTO•2539-CTO | 42T2605* | ||
| 5Travelcover45M2657 * | |||
| 61-GBDDR3-1066SDRAMSO-DIMM(PC3-8500)card•2516-CTO,AMx,ANx•2518-CTO,DWx,DYx,DZx,E4x,E7x,ENx,EPx,EQx,ERx,F4x,G5x,G6x,GSx,GTx•2519-CTO•2522-CTO,30x,3Kx,3Lx,,3Rx,3Sx,49x,54x,56x,64x•2537-CTO,9Cx•2538-CTO•2539-CTO | 55Y3712** | ||
| 62-GBDDR3-1066SDRAMSO-DIMM(PC3-8500)card•2516-CTO,A2x,A3x,A4x,A5x,A6x,A7x,A8x,A9x,AAx,ABx,ACx,ADx,AEx,AFx,AGx,AHx,AJx,AKx,ALx,AMx,ANx•2518-CTO,C2x,C3x,C4x,C5x,C6x,C7x,C8x,C9x,CAx,CBx,CCx,CDx,CEx,CFx,CGx,CHx,CJx,CKx,CLx,CMx,CNx,CPx,CQx,CRx,CSx,CUx,CVx,CWx,CXx,CYx,CZx,D2x,D3x,D4x,D5x,D6x,D7x,D8x,D9x,DAx,DBx,DCx,DDx,DFx,DFx,DGx,DHx,DJx,DKx,DLx,DMx,DNx,DPx,DQx,DRx,DSx,DTx,DUx,DVx,DWx,DXx,DYx,DZx,E4x,E7x,E8x,E9x,EAX,EBx,ECx,EDx,EEx,EFx,EGx,ELx,EMx,ENx,EPx,EQx,ERx,ETx,EUx,EVx,EWx,EX,EX,YX,EYX,EZX,F2x,F3x,F4x,F5x,F6x,F7x,F8x,F9x,FAx,FBx,FCx,FDx,FEx,FFx,FGx,FHx,FJx,FKx,FLx,FMx,FNx,FPx,FQx,FSx,FTx,FUx,FVx,FWx,FXx,FYx,FZX,G2x,G3x,G4x,G7x,G8x,G9x,GBx,GCx,GDx,GEx,GFx,GGx,GHx,GJx,GKx,GLx,GMx,GNx,GQx,GRx,G5x,G6x,GSx,GTx•2519-CTO,82x,83x,84x,85x,86x,87x,88x,89x,8Ax,8Bx•2522-CTO,60x,22x,23x,24x,25x,26x,2Ax,2Bx,2Cx,2Dx,2Ex,2Fx,2Gx,2Hx,2Jx,2Kx,2Lx,2Mx,2Nx,2Px,2Qx,2Rx,2Sx,2Tx,2Ux,2Vx,2Wx,2Xx,2Yx,2Zx,30x,32x,33x,34x,35x,36x,37x,38x,39x,3Ax,3Bx,3Cx,3Dx,3Ex,3Fx,3Cx,3Hx,3Jx,3Mx,3Nx,3Px,3Qx,3Rx,3Sx,3Tx,3Ux,3Vx,3Wx,3Xx,3Yx,3Zx,42x,43x,44x,45x,46x,47x,48x,49x,4Ax,4Bx,52x,53x,54x,55x,56x,62x,63x,64x•2537-CTO,22x,23x,24x,25x,26x,92x,93x,94x,95x,96x,97x,98x,99x,9Ax,9Bx,9Cx,9Dx,9Ex,9Fx•2538-CTO•2539-CTO | 55Y3713** | ||
| 64-GBDDR3-1066SDRAMSO-DIMM(PC3-8500)card•2516-CTO•2518-CTO,ESx,GPx•2519-CTO•2522-CTO•2537-CTO•2538-CTO•2539-CTO | 55Y3714** | ||
| 7I/Osubcardcable45M2906N | |||
| 8I/Osubcard63Y2122N | |||
| 9ExpressCardslotframe60Y5474N | |||
| 9ExpressCardslotframe60Y5475N | |||
Table39. Partslist—Overall(continued)
| No.FR | U(Overall)FRUno.CRU | ID | |
| 10Batterypack,Li-ion(4cell)25•2516-CTO•2518-CTO,CPx,CQx,CRx,CSx,CUx,CVx,CWx,CXx,CYx,CZx,D2x,D3x,D4x,D5x,D6x,D7x,D8x,D9x,DAx,DBx,DCx,DDx,DFx,DGx,DHx,DJx,DKx,DLx,DMx,DNx,DPx,DQx,DRx,DSx,DTx,E9x,EAx,EBx,ECx,EDx,EEx,EFx,EGx,FPx,FQx,FSx,FTx,FUx,FVx,FWx,FXx,GQx•2519-CTO•2522-CTO•2537-CTO•2538-CTO•2539-CTO | 42T4763* | ||
| 10Batterypack,Li-ion(4cell)25•2516-CTO•2518-CTO,CPx,CQx,CRx,CSx,CUx,CVx,CWx,CXx,CYx,CZx,D2x,D3x,D4x,D5x,D6x,D7x,D8x,D9x,DAx,DBx,DCx,DDx,DFX,DFX,DHx,DJx,DKx,DLx,DMx,DNx,DPx,DQx,DRx,DSx,DTx,E9x,EAx,EBx,ECx,EDx,EEx,EFx,EGx,FPx,FQx,FSx,FTx,FUx,FVx,FWx,FXx,GQx•2519-CTO•2522-CTO•2522-CTO•2537-CTO•2538-CTO•2539-CTO | 42T4765* | ||
| 10Batterypack,Li-ion(6cell)55+•2516-CTO,A2x,A3x,A4x,A5x,A6x,A7x,A8x,A9x,AAx,ACx,ADx,AFx,AGx,AHx,AJx,AKx,ALx,AMx,ANx•2518-CTO,C2x,C3x,C6x,C7x,C8x,C9x,CAx,CBx,CCx,CDx,CEx,CFx,CGx,CHx,CJx,CKx,CLx,CMx,CNx,DUx,DVx,DWx,DXx,DYx,DZx,E4x,E7x,E8x,ELx,EMx,ENx,EPx,EQx,ERx,ESx,ETx,EUx,EVx,EXy,EYx,F3x,F4x,F7x,F8x,F9x,FAx,FBx,FCx,FDx,FFx,FFx,FFx,FFx,FFx,FFx,FFx,FFx,FFx,FFx,FFx,FFx,FFx,FFx,FFx,FFx,FFx,FFx,FFx,FFx,FFx,FFx,FFx,FFx,FFx,FFx,FFx,FFx,FFx,FFx,FFx,FFx,FFx,FFf | 42T4791* |
Table39. Partslist—Overall(continued)
| No.FRU(Overall)FRUno.CRU | ID | |
| 10Batterypack,Li-ion(6cell)55+2516-CTO,A2x,A3x,A4x,A5x,A6x,A7x,A8x,A9x,AAx,ACx,ADx,AFx,AGx,AHx,AJx,AKx,ALx,AMx,ANx2518-CTO,C2x,C3x,C6x,C7x,C8x,C9x,CAx,CBx,CCx,CDx,CEx,CFx,CGx,CHx,CJx,CKx,CLx,CMx,CNx,DUx,DVx,DWx,DXx,DYx,DZx,E4x,E7x,E8x,ELx,EMx,ENx,EPx,EQx,ERx,ESx,ETx,EUx,EVx,EXx,EYx,EZx,F3x,F4x,F7x,F8x,F9x,FAx,FBx,FCx,FDx,FEx,FFx,FHx,FJx,FKx,FMx,FNx,FYx,FZx,G2x,G3x,G4x,G5x,G6x,G7x,G8x,G9x,GBx,GCx,GDx,GEx,GFx,GGx,GHx,GJx,GKx,GLx,GMx,GNx,GPx,GRx,GSx,GTx2519-CTO,82x,83x,84x,85x,86x,87x,88x,89x,8Ax,8Bx2522-CTO,22x,2Ax,2Cx,2Dx,2Ex,2Fx,2Gx,2Hx,2Jx,2Kx,2Lx,2Mx,2Px,2Qx,2Rx,2Sx,2Tx,2Ux,2Vx,2Xx,2Yx,2Zx,32x,33x,34x,35x,36x,37x,38x,39x,3Bx,3Cx,3Dx,3Ex,3Fx,3Gx,3Hx,3Kx,3Mx,3Nx,3Px,3Qx,3Rx,3Vx,3Yx,3Zx,42x,44x,45x,46x,25x,48x,49x,26x,4Bx,52x,53x,54x,55x,60x,62x,63x2537-CTO,22x,25x,26x,92x,93x,94x,95x,96x,97x,98x,99x,9Ax,9Bx,9Cx,9Dx,9Fx2538-CTO2539-CTO | 42T4793* | |
| 10Batterypack,Li-ion(6cell)55+2516-CTO,A2x,A3x,A4x,A5x,A6x,A7x,A8x,A9x,AAx,ACx,ADx,AFx,AGx,AHx,AJx,AKx,ALx,AMx,ANx2518-CTO,C2x,C3x,C6x,C7X,C8x,C9x,CAx,CBx,CCx,CDx,CEx,CFx,CGx,CHx,CJx,CKx,CLx,CMx,CNx,DUx,DVx,DWx,DXx,DYx,DZx,E4x,E7x,E8x,ELx,EMx,ENx,EPx,EQx,ERx,ESx,ETx,EUx,EVX,EXx,EYx,EZx,F3x,F4x,F7x,F8x,F9x,FAx,FBx,FCx,FDx,FEx,FFx,FHx,FJx,FKx,FMx,FNx,FYx,FZx,G2x,G3x,G4x,G5x,G6x,G7x,G8x,G9x,GBx,GCx,GDx,GEx,GFx,CGx,GHx,GJx,GKx,GLx,GMx,GNx,GPx,GRx,GSx,GTx2519-CTO,82x,83x,84x,85x,86x,87x,88x,89x,8Ax,8Bx2522-CTO,22x,2Ax,2Cx,2Dx,2Ea,2Fx,2Gx,2Hx,2Jx,2Kx,2Lx,2Mx,2Px,2Qx,2Rx,2Sx,2Tx,2Ux,2Vx,2Xx,2Yx,2Zx,32x,33x,34x,35x,36x,37x,38x,39x,3Bb,3Cx,3Dx,3Ex,3Fx,3Gx,3Hx,3Kx,3Mx,3Nx,3Px,3Qx,3Rx,3Vx,3Yx,3Zx,42x,44x,45x,46x,25x,48x,49x,26x,4Bx,52x,53x,60x,62x,63x2537-CTO,22x,25x,26x,92x,93x,94x,95x,96x,97x,98x,99x,9Ax,9Bx,9Cx,9Dx,9Fx2538-CTO2539-CTO | 42T14795* | |
| 10Batterypack,Li-ion(6cell)55+2516-CTO,A2x,A3x,A4x,A5x,A6x,A7x,A8x,A9x,AAx,ACx,ADx,AFx,AGx,AHx,AJx,AKx,ALx,AMx,ANx2518-CTO,C2x,C3x,C6x,c7x,C8x,C9x,CAx,CBx,CCx,CDx,CEx,CFx,CGx,CHx,CJx,CKx,CLx,CMx,CNx,DUx,DVx,DWx,DXx,DYx,DZx,E4x,E7x,E8x,ELx,EMx,ENx,EPx,EQx,ERx,ESx,ETx,EUx,EVX,EXx,EYx,EZx,F3x,F4x,F7x,F8x,F9x,FAx,FBx,FCx,FDx,FEx,FFx,FHx,FJx,FKx,FMx,FNx,FYx,FZx,G2x,G3x,G4x,G5x,G6x,G7x,G8x,G9x,GBx,GCx,GDx,GEx,FGx,CGx,GHx,GJx,GKx,GLx,GMx,GNx,GPx,GRx,GSx,GTx2519-CTO,82x,83x,84x,85x,86x,87x,88x,89x,8Ax,8Bx2522-CTO,22x,2Ax,2Cx,2Dy,2Ex,2Fx,2Gx,2Hx,2Jx,2Kx,2Lx,2Mx,2Px,2Qx,2Rx,2Sx,2Tx,2Ux,2Vx,2Xy,2Yx,2Zx,32x,33x,34x,35x,36x,37x,38x,39x,3Bb,3Cx,3Dx,3Ex,3Fx,3Gx,3Hx,3Kx,3Mx,3Nx,3Px,3Qx,3Rx,3Vx,3Yx,3Zx, 42x,44x,45x,46x,25x,48x,49x,26x,4Bx,52x,53x,54x,55x,60x,62x,63x2537-CTO,22x,25x,26x,92x,93x,94x,95x, 96x,97x,98x,99x,9Ax,9Bx,9Cx,9Dx,9Fx2538-CTO2539-CTO | 42T4797* | |
| 10Batterypack,Li-ion(9cell)55++•2516-CTO,ABx,AEx•2518-CTO,C4x,C5x,EWx,F2x,F5x,F6x,FGx,FLx•2519-CTO•2522-CTO,30x,23x,24x,2Bx,2Wx,3Ax,3Jx,3Lx,3Sx,3Tx,3Ux,3Wx,3Xx,43x,47x,4Ax,56x,64x•2537-CTO,23x,24x,9Ex•2538-CTO•2539-CTO | 42T4799* | |
| 10Batterypack,Li-ion(9cell)55++•2516-CTO,ABx,AEx•2518-CTO,C4x,C5x,EWx,F2x,F5x,F6x,FGx,FLx•2519-CTO•2522-CTO,30x,23x,24x,2Bx,2Wx,2AxA,3Jx,3Lx,3Sx,3Tx,3Ux,3Wx,3Xx,43x,47x,4Ax,56x,64x•2537-CTO,23x,24x,9Ex•2538-CTO•2539-CTO | 42T4801* | |
| 10Batterypack,Li-ion(9cell)55++•2516-CTO,ABx,AEx•2518-CTO,C4x,C5x,EWx,F2x,F5x,F6x,FGx,FLx•2519-CTO•2522-CTO,30x,23x,24x,2Bx,2WX,3Ax,3Jx,3Lx,3Sx,3Tx,3Ux,3Wx,3Xx,43x,47x,4Ax,56x,64x•2537-CTO,23x,24x,9Ex•2538-CTO•2539-CTO | 42T4803* | |
| 11Basecoverassembly60Y5471N | ||
| 12IntegratedMobileBroadband(Gobi20003GwithGPS)•2516-CTO•2518-CTO•2519-CTO•2522-CTO•2537-CTO•2538-CTO•2539-CTO | 60Y3183** | |
| 12IntegratedChinaMobileMobileBroadband(LeadcoreLC5370D)60Y3225** | ||
| 12IntegratedChinaTelecomMobileBroadband(HuaweiEM660)60Y3227** | ||
| 13HDDrubberrails41V9756 ** | ||
| 14SATaharddiskdrive,160GB,5,400rpm•2516-CTO,A6x•2518-CTO,CPx,CQx,CRx,CSx•2519-CTO•2522-CTO•2537-CTO•2538-CTO•2539-CTO | 45N7215** | |
| 14SATAharddiskdrive,160GB,5,400rpm•2516-CTO,A6x•2518-CTO,CPx,CQx,CRx,CSx•2519-CTO•2522-CTO•2537-CTO•2538-CTO•2539-CTO | 45N7205** | |
| 14SATAharddiskdrive,250GB,5,400rpm•2516-CTO,A7x,ADx,AFx,AHx,AKx•2518-CTO,C2x,CHx,CUx,CVx,CWx,CXx,CYx,CZx,D2x,D3x,DCx,DDx,DFx,DGx,DHx,DJx,DKx,DUx,EMx,F3x,FYx,G3x,GQx,GRx,GSx•2519-CTO,86x,87x,8Ax•2522-CTO,2Ax,2Nx,2Px,2Qx,2Rx,2Sx,2Tx,2Ux,2Vx,39x,3Bx,3Cx,3Dx,4Ax,52x,62x,63x•2537-CTO,92x,93x,94x,95x,96x,97x,98x,99x•2538-CTO•2539-CTO | 45N7217** | |
| 14SATAharddiskdrive,250GB,5,400rpm•2516-CTO,A7x,ADx,AFx,AHx,AKx•2518-CTO,C2x,CHx,CUx,CVx,CWx,CXx,CYx,CZx,D2x,D3x,DCx,DDx,DFx,DGx,DHX,DJx,DKx,DUx,EMx,F3x,FYx,G3x,GQx,GRx,GSx•2519-CTO,86x,87x,8Ax•2522-CTO,2Ax,2Nx,2Px,2Qx,2Rx,2Sx,2Tx,2Ux,2Vx,39x,3Bx,3Cx3Dx,4Ax,52x,62x,63x•2537-CTO,92x,93x,94x,95x,96x,97x,98x,99x•2538-CTO•2539-CTO | 45N7207** | |
| 14SATAharddiskdrive,320GB,5,400rpm•2516-CTO,A9x,AAx,AGx,AJx,ALx•2518-CTO,CAx,CBx,CJx,CKx,CLx,CMx,CNx,D4x,D5x,D6x,D7x,D8x,D9x,DAx,DBx,DLx,DMx,DNx,DPx,DQx,DRx,DSx,DTx,DVx,ENx,EPx,ETx,EUx,EXx,EYx,FDx,FEx,FHx,FJx,FMx,FNx,FZx,G2x,G4x,G7x,G8x,GBx,GCx,GEx,GFx,GHx,GJx,GLx,GNx,GTx•2519-CTO•2522-CTO,2Gx,2Xx,2Yx,2Zx,32x,33x,34x,35x,36x,37x,38x,3Hx,3Jx,3Kx,3Lx,3Mx,3Nx,3Px,3Qx,3Yx,3Zx,44x,45x,53x,55x,64x•2537-CTO•2538-CTO•2539-CTO | 45N7219** | |
| 14SATAharddiskdrive,320GB,5,400rpm•2516-CTO,A9x,AAx,AGx,AJx,ALx•2518-CTO,CAx,CBx,CJx,CKx,CLx,CMx,CNx,D4x,D5x,D6x,D7x,D8x,D9x,DAx,DBx,DLx,DMx,DNx,DPx,DQx,DRx,DSx,DTx,DVx,ENx,EPx,ETx,EUx,EXx,EYx,FDx,FEx,FHx,FJx,FMx,FNx,FZx,G2x,G4x,G7x,G8x,GBx,GCx,GEx,GFx,GHx,GJx,GLx,GNx,GTX•2519-CTO•2522-CTO,2Gx,2Xx,2Yx,2Zx,32x,33x,34x,35x,36x,37x,38x,3Hx,3Jx,3Kx,3Lx,3Mx,3Nx,3Px,3Qx,3Yx,3Zx,3Zx,44x,45x,53x,55x,64x•2537-CTO•2538-CTO•2539-CTO | 45N7209** |
Table39. Partslist—Overall(continued)
| No.FRU(Overall)FRUno.CRU | ID | ||
| 14SATAharddiskdrive,500GB,5,400rpm•2516-CTO•2518-CTO,G9x,GDx,GGx,GKx,GMx,GPx•2519-CTO•2522-CTO•2537-CTO•2538-CTO•2539-CTO | 45N7221** | ||
| 14SATAharddiskdrive,500GB,5,400rpm•2516-CTO•2518-CTO,G9x,GDx,GGx,GKx,GMx,GPx•2519-CTO•2522-CTO•2537-CTO•2538-CTO•2539-CTO | 45 N7211** | ||
| 14SATAharddiskdrive,250GB,7,200rpmFDE•2516-CTO•2518-CTO,EWx,F2x,FGx,FLx•2519-CTO•2522-CTO,3Fx,3Gx,43x,47x•2537-CTO•2538-CTO•2539-CTO | 45N7259** | ||
| 14SATAharddiskdrive,250GB,7,200rpmFDE•2516-CTO•2518-CTO,EWx,F2x,FGx,FLx•2519-CTO•2522-CTO,3Fx,3Gx,43x,47x•2537-CTO•2538-CTO•2539-CTO | 45N7279** | ||
| 14SATAharddiskdrive,320GB,7,200rpm•2516-CTO,A8x,ABx,ACx,AEx,AMx,ANx•2518-CTO,C3x,C4x,CCx,CDx,CEx,CFx,CGx,DWx,DXx,DYx,DZx,E4x,E9x,EAx,EBx,ECx,EDx,EEx,EFx,EGx,ELx,EQx,F4x,F7x,FAx,FPx,FQx,FSx,FTx,FUx,FVx,FWx,FXx,G5x•2519-CTO,88x,8Bx•2522-CTO,22x,23x,2Bx,2Hx,2Jx,2Kx,2Lx,2Mx,2Wx,30x,3Ax,3Ex,3Rx,3Tx,3Ux,3Vx,25x,48x,4Bx,54x,56x,60x•2537-CTO,22x,23x,25x,9Ax,9Bx,9Dx•2538-CTO•2539-CTO | 45N7255** | ||
| 14SATAharddiskdrive,320GB,7,200rpm•2516-CTO,A8x,ABx,ACx,AEx,AMx,ANx•2518-CTO,C3x,C4x,CCx,CDx,CEx,CFx,CGx,DWx,DXx,DYx,DZx,E4x,E9x,EAx, EBx,ECx,EDx,EEx,EFx,EGx,ELx,EQx,F4x,F7x,FAx,FPx,FQx,FSx,FTx,FUx,FVx,FWx,FXx,G5x•2519-CTO,88x,8Bx•2522-CTO,22x,23x,2Bx,2Hx,2Ix,2Kx,2Lx,2Mx,2Wx,30x,3Ax,3Ex,3Rx,3Tx,3Ux,3Vx,25x,48x,4Bx,54x,56x,60x•2537-CTO,22x,23x,25x,9Ax,9Bx,9Dx•2558-CTO•2539-CTO | 45N7275** | ||
| No.FR | U(Overall)FRUno.CRU | ID | |
| 14SAT | Aharddiskdrive,500GB,7,200rpm•2516-CTO•2518-CTO,E7x,E8x,ERx,ESx,EVx,EZx,F5x,F8x,F9x,FBx,FCx,FFx,FKx,G6x•2519-CTO,89x•2522-CTO,3Sx,3Wx,3Xx,42x,46x•2537-CTO,9Cx,9Ex,9Fx•2538-CTO•2539-CTO | 45N7257** | |
| 14SAT | Aharddiskdrive,500GB,7,200rpm•2516-CTO•2518-CTO,E7x,E8x,ERx,ESx,EVx,EZx,F5x,F8x,F9x,FBx,FCx,FFx,FKx,G6x•2519-CTO,89x•2522-CHTO,3Sx,3Wx,3Xx,42x,46x•2537-CTO,9Cx,9Ex,9Fx•2538-CTO•2539-CTO | 45N7277** | |
| —1.8"-2.5"storageconverter42W7888** | |||
| 14MicroSAT | Asolidstatedrive,80GB•2516-CTO•2518-CTO,F6x•2519-CTO•2522-CTO,26x,49x•2537-CTO,26x•2538-CTO•2539-CTO | 41W0516** | |
| 14MicroSAT | Asolidstatedrive,128GB•2516-CTO,A2x,A3x,A4x,A5x•2518-CTO,C5x,C6x,C7x,C8x,C9x•2519-CTO,82x,83x,84x,85x•2522-CTO,24x,2Cx,2Dx,2Ex,2Fx•2537-CTO,24x•2538-CTO•2539-CTO | 45N7953** | |
| 14MicroSAT | Asolidstatedrive,128GB•2516-CTO,A2x,A3x,A4x,A5x•2518-CTO,C5x,C6x,C7x,C8x,C9x•2519-CTO,82x,83x,84x,85x•2522-CTO,24x ,2Cx,2Dx,2Ex,2Fx•2537-CTO,24x•2538-CTO•2539-CTO | 45N8203** | |
| 14MicroSAT | Asolidstatedrive,256GB,FDE•2516-CTO•2518-CTO•2519-CTO•2522-CTO•2537-CTO•2538-CTO•2539-CTO | 45N7959** | |
| No.FRU(Overall)FRUno.CRU | ID | ||
| 14MicroSATAsolidstatedrive,256GB,FDE•2516-CTO•2518-CTO•2519-CTO•2522-CTO•2537-CTO•2538-CTO•2539-CTO | 45N8207** | ||
| 15Modemdaughtercard(MDC)43Y6463N | |||
| 16Systemboardassembly,integratedgraphics,iAMT,TPM•2516-CTO,A2x,A6x,A7x,A8x,ADx,AFx,AGx•2518-CTO,C2x,C3x,C6x,CAx,CBx,CCx,CDx,CHx,CJx,CKx,CLx,CMx,CNx,CPx,CQx,CRx,CSx,CUx,CVx,CWx,CXx,CYx,CZx,D2x,D3x,D4x,D5x,D6x,D7x,D8x,D9x,DAx,DBx,DCx,DDx,DFx,DGx,DHx,DJx,DKx,DLx,DMx,DNx,DPx,DQx,DRx,DSx,DTx,ELx,ETx,EXx,F3x,F4x,F6x,F7x,F8x,F9x,FDx,FHx,FPx,FQx,FZx,G7x,GBx,GEx,CHx,GLx,GNx•2519-CTO,82x,86x,87x,8Ax•2522-CTO,22x,2Ax,2Cx,2Gx,2Hx,2Jx,2Nx,2Px,2Qx,2Rx,2Xx,2Yx,2Zx,30x,32x,33x,34x,35x,36x,37x,38x,39x,3Bx,3Cx,3Dx,3Ex,3Hx,3Kx,3Mx,3Nx,3Px,3Ux,3Vx,3Yx,44x,25x,48x,49x,52x,53x,54x,60x,62x•2537-CTO,22x,25x,92x,93x,94x,95x,9Ax,9Dx•2538-CTO•2539-CTO | 60Y5713N | ||
| 16Systemboardassembly,integratedgraphics,iAMT,non-TPM•2516-CTO,A3x•2518-CTO,C7x,EMx,ENx,GQx,GRx,GTx•2519-CTO,83x•2522-CTO,2Dx•2537-CTO•2538-CTO•2539-CTO | 60Y5714N | ||
| 16Systemboardassembly,integratedgraphics,non-iAMT,TPM•2516-CTO•2518-CTO•2519-CTO•2522-CTO•2537-CTO•2538-CTO•2539-CTO | 60Y5715N | ||
| 16Systemboardassembly,integratedgraphics,non-iAMT,non-TPM•2516-CTO•2518-CTO•2519-CTO•2522-CTO•2537-CTO•2538-CTO•2539-CTO | 60Y5734N | ||
| 16Systemboardassembly,discretegraphics256MB,iAMT,TPM•2516-CTO,A4x,A9x,AAx,ABx,ACx,AEx,AHx,AJx,AKx,ALx,AMx,ANx•2518-CTO,C4x,C5x,C8x,CEx,CFx,CGx,DUx,DVx,DWx,DXx,DYx,DZx,E4x,E7x,E8x,E9x,EAx,EBx,ECx,EDx,EEx,EFx,EGx,EUx,EVx,EWx,EYx,EZx,F2x,F5x,FAx,FBx,FCx,FFx,FGx,FJx,FKx,FLx,FMx,FNx,FSx,FTx,FUx,FVx,FWx,FXx,FYx,G2x,G3x,G4x,G5x,G6x,G8x,G9x,GCx,GDx,GFx,GGx,GJx,GKx,GMx,GPx•2519-CTO,84x,88x,89x,8Bx•2522-CTO,23x,24x,2Bx,2Ex,2Kx,2Lx,2Mx,2Sx,2Tx,2Ux,2Vx,2Wx,3Ax,3Fx,3Gx,3Jx,3Lx,3Qx,3Rx,3Sx,3Tx,3Wx,3Xx,3Zx,42x,43x,45x,46x,47x,26x,4Ax,4Bx,55x,56x,63x,64x•2537-CTO,23x,24x,26x,96x,97x,98x,99x,9Bx,9Cx,9Ex,9Fx•2538-CTO•2539-CTO | 60Y5716N | ||
| 16Systemboardassembly,discretegraphics256MB,iAMT,non-TPM•2516-CTO,A5x•2518-CTO,C9x,EPx,EQx,ERx,ESx,GSx•2519-CTO,85x•2522-CTO,2Fx•2537-CTO•2538-CTO•2539-CTO | 60Y5718N | ||
| 17CPUassembly,Intel®CoreTMi5-520MProcessor(2.40GHz)•2516-CTO,A6x,A7x,A8x,ABx,ADx,AEx•2518-CTO,C2x,C4x,CAx,CBx,CJx,CKx,CPx,CQx,CRx,CSx,CUx,CVx,CWx,CXx,CYx,CZx,D2x,D3x,D4x,D5x,D6x,D7x,D8x,D9x,DAx,DBx,DUx,DVx,DWx,E9x,EAx,EDx,EEx,EMx,ENx,EPx,ETx,EUx,EXx,EYx,F3x,F6x,F7x,FAx,FDx,FEx, FHx,FJx•2519-CTO,86x,87x,8Ax,8Bx•2522-CTO,22x,23x,2Ax,2Bx,2Gx,2Qx,2Rx,2Xy,30x,39x,3Bx,3Hx,3Jx,3Kx,3Lx,3Px,3Qx,3Tx,3Ux,3Vx,3Wx,3Yx,3Zx,44x,45x,48x,49x,26x,4Ax,4Bx,52x,53x,54x,55x,56x,62x,63x•2537-CTO,22x,23x,26x,94x,95x,9Ax,9Dx,9Ex•2538-CTO•2539-CTO | 60Y5731N | ||
| 17CPUassembly,IntelCorei5-540MProcessor(2.53GHz)•2516-CTO,A2x,A3x,A9x,AAx•2518-CTO,C3x,C5x,C6x,C7x,CCx,CDx,CEx,CFx,CGx,CHx,CLx,CMx,CNx,DCx,DDx,DEx,DFx,DGx,DHx,DJx,DKx,DLx,DMx,DNx,DPx,DQx,DRx,DSx,DTx,DXx,DYx,DZx,E4x,EBx,EFx,ELx,EQx,EVx,EZx,F4x,F5x,F8x,FBx,FFx,FKx•2519-CTO,82x,83x,88x•2522-CTO,24x,2Cx,2Dx,2Hx,2Jx,2Kx,2Lx,2Nx,2Px,2Sx,2Tx,2Ux,2Vx,2Zx,32x,33x,34x,3Cx,3Dx,3Mx,3Rx,3Xx,42x,46x,25x,60x,64x•2537-CTO,24x,25x,92x,93x,96x,97x,98x,99x,9Bx,9Fx•2538-CTO•2539-CTO | 60Y5732N | ||
| 17CPUassembly,IntelCorei7-620MProcessor(2.66GHz)•2516-CTO,A4x,A5x,ACx•2518-CTO,C8x,C9x,E7x,E8x,ECx,EGx,ERx,ESx,EWx,F2x,F9x,FCx,FGx,FLx•2519-CTO,84x,85x,89x•2522-CTO,2Ex,2Fx,2Mx,2Wx,35x,36x,37x,38x,3Ax,3Ex,3Fx,3Gx,3Nx,3Sx,43x,47x•2537-CTO,9Cx•2538-CTO•2539-CTO | 60Y5733N | ||
Table39. Partslist—Overall(continued)
| No.FRU(Overall)FRUno.CRU | ID | ||
| 17CPUassembly,IntelCorei3-330MProcessor(2.13GHz)•2516-CTO,AFx,AGx,AHx,AJx•2518-CTO,FPx,FQx,FSx,FTx,FYx,FZx,G2x,G7x,G8x,GBx,GCx,GEx,GFx,GHx,GJx,GLx,GMx,GQx,GSx•2519-CTO•2522-CTO•2537-CTO•2538-CTO•2539-CTO | 63Y2174N | ||
| 17CPUassembly,IntelCorei3-350MProcessor(2.26GHz)•2516-CTO•2518-CTO•2519-CTO•2522-CTO•2537-CTO•2538-CTO•2539-CTO | 63Y2175N | ||
| 17CPUassembly,IntelCorei5-430MProcessor(2.26GHz)•2516-CTO,AKx,ALx,AMx,ANx•2518-CTO,FMx,FNx,FVx,FVx,FWx,FXx,G3x,G4x,G5x,G6x,G9x,GDx,GCx,GCx,GNx,GPx,GRx,GTx•2519-CTO•2522-CTO•2537-CTO•2538-CTO•2539-CTO | 63Y2176N | ||
| 18Intel®Centrino®Wireless-N1000•2516-CTO,A8x,A9x,AAx,AFx,AGx,AHx,AJx,AKx,ALx,AMx,ANx•2518-CTO,DUx,DVx,DWx,E9x,EAx,EBx,ECx,EDx,EEx,EFx,EGx,EMx,ENx,EPx,EQx,ESx,FMx,FNx,FPx,FQx,FSx,FTx,FUx,FVx,FVx,FXx,FYx,FZx,G2x,G3x,G4x,G5x,G6x,G7x,G8x,G9x,GBx,GCx,GDx,GEx,GFx,GGx,GHx,GJx,GMx,GPx,GQx,GRx,GSx,GTx•2519-CTO,88x•2522-CTO,3Qx•2537-CTO,9Ax•2538-CTO•2539-CTO | 60Y3203** | ||
| 18ThinkPad11b/g/nWirelessLANMini-PCIExpressAdapterII•2516-CTO,ACx,ADx,AEx•2518-CTO,C3x,C4x,C6x,C7x,C8x,C9x,CAX,CBx,ELx,F3x,GLx,GNx•2519-CTO,82x,83x,84x,85x,87x,89x•2522-CTO,2Cx,2Dx,2Ex,2Fx•2537-CTO•2538-CTO•2539-CTO | 43Y6553** | ||
| 18ThinkPad11b/g/nWirelessLANMini-PCIExpressAdapterII•2516-CTO,ACx,ADx,AEx•2518-CTO,C3x,C4x,C6x,C7x,C8x,C9x,CAX,CBx,ELx,F3x,GLx,GNx•2519-CTO,82x,83x.84x,85x,87x,89x•2522-CTO,2Cx,2Dx,2Ex,2Fx•2537-CTO•2538-CTO•2539-CTO | 60Y3177** |
Table39. Partslist—Overall(continued)
| No.FRU(Overall)FRUno.CRU | ID | |
| 18IntelCentrinoAdvanced-N6200•2516-CTO,A6x•2518-CTO,C2x,C5x,CCx,CDx,CEx,CFx,CGx,CHx,CKx,CLx,CMx,CPx,CQx,CRx,CSx,CUx,CVx,CWx,CXx,D4x,D5x,D6x,D7x,DCx,DDx,DFx,DLx,DMx,DNx,DPx,DXx,DYx,DZx,E4x,ETx,EXx,F4x,F6x,F7x,F8x,F9x,FAx,FBx,FCx,FDx,FHx•2519-CTO,86x,8Ax,8Bx•2522-CTO,22x,23x,24x,2Ax,2Bx,2Gx,2Hx,2Jx,2Nx,2Px,2Qx,2Rx,2Xx,2Yx,2Zx,30x,32x,35x,36x,39x,3Ax,3Hx,3Jx,3Kx,3Lx,3Mx,3Nx,3Px,3Rx,3Vx,3Wx,3Xx,3Yx,44x,25x,48x,26x,4Ax,4Bx,52x,53x,54x,55x,56x,60x,62x,63x,64x•2537-CTO,22x,23x,24x,25x,26x,92x,93x,94x,95x,9Bx,9Dx,9Ex,9Fx•2538-CTO•2539-CTO | 60Y3231** | |
| 18IntelCentrinoUltimate-N6300•2516-CTO,ABx•2518-CTO,E7x,E8x,EUx,EVx,EWx,EYx,EZx,F2x,FEx,FFx,FGx,FJx,FKx,FLx•2519-CTO•2522-CTO,2Kx,2Lx,2Mx,2Sx,2Tx,2Ux,2Vx,2Wx,3Bx,3Cx,3Dx,3Ex,3Fx,3Gx,3Sx,3Tx,3Ux,3Zx,42x,43x,45x,46x,47x,49x•2537-CTO,96x,97x,98x,99x,9Cx•2538-CTO•2539-CTO | 60Y3233** | |
| 18IntelCentrinoAdvanced-N+WiMAX6250,WWSKU•2516-CTO•2518-CTO,CNx,CYx,CZx,D2x,D3x,D8x,D9x,DAx,DBx,DGx,DHx,DJx,DKx,DQx,DRx,DSx,DTx,F5x•2519-CTO•2522-CTO,33x,34x,37x,38x•2537-CTO•2538-CTO•2539-CTO | 60Y3195** | |
| 18IntelCentrinoAdvanced-N+WiMAX6250,RussiaSKU•2516-CTO•2518-CTO,ERx•2519-CTO•2522-CTO•2537-CTO•2538-CTO•2539-CTO | 60Y3209** | |
| 19Backupbattery02K7078** | ||
| 20DC-incable45M2893N | ||
| 21FPCcable,SmartCardReader45M2894N | ||
| 22ContactlessSmartCardReader•2516-CTO•2518-CTO•2519-CTO•2522-CTO•2537-CTO•2538-CTO•2539-CTO | 60Y5031N |
Table39. Partslist—Overall(continued)
| No.FR | U(Overall)FRUno.CRU | ID | |
| 22SmartCardReader•2516-CTO•2518-CTO•2519-CTO•2522-CTO,2Ux,2Vx,30x,3Ex,62x,63x,64x•2537-CTO,98x,99x•2538-CTO•2539-CTO | 60Y5029N | ||
| 22SmartCardReader•2516-CTO•2518-CTO•2519-CTO•2522-CTO,2Ux,2Vx,30x,3Ex,62x,63x,64x•2537-CTO,98x,99x•2538-CTO•2539-CTO | 60Y5030N | ||
| 23Fanassembly,integrated•2516-CTO,A2x,A3x,A6x,A7x,A8x,ADx,AFx,AGx•2518-CTO,C2x,C3x,C6x,C7x,CAx,CBx,CCx,CDx,CHx,CJx,CKx,CLx,CMx,CNx,CPx,CQx,CRx,CSx,CUx,CVx,CWx,CXx,CYx,CZx,D2x,D3x,D4x,D5x,D6x,D7x,D8x,D9x,DAx,DBx,DCx,DDx,DEx,DFx,DGx,DHx,DJx,DKx,DLx,DMx,DNx,DPx,DQx,DRx,DSx,DTx,ELx,EMx,ENx,ETx,EXx,F3x,F4x,F6x,F7x,F8x,F9x,FDx,FHx,FPx,FQx,FZx,G7x,GBx,GEx,GHx,GLx,GNx,GQx,GRx,GTx•2519-CTO,82x,83x,86x,87x,8Ax•2522-CTO,22x,2Ax,2Cx,2Dx,2Gx,2Hx,2Jx,2Nx,2Px,2Qx,2Rx,2Xx,2Yx,2Zx,30x,32x,33x,34x,35x,36x,37x,38x,39x,3Bx,3Cx,3Dx,3Ex,3Hx,3Kx,3Mx,3Nx,3Px,3Ux,3Vx,3Yx,44x,25x,48x,49x,52x,53x,54x,60x,62x•2537-CTO,22x,25x,92x,93x,94x,95x,9Ax,9Dx•2538-CTO•2539-CTO | 45M2721N | ||
| 23Fanassembly,integrated•2516-CTO,A2x,A3x,A6x,A7x,A8x,ADx,AFx,AGx•2518-CTO,C2x,C3x,C6x,C7x,CAx,CBx,CCx,CDx,CHx,CJx,CKx,CLx,CMx,CNx,CPx,CQx,CRX,CSX,CUx,CVX,CWX,CXx,CYx,CZx,D2x,D3x,D4x,D5x,D6x,D7x,D8x,D9x,DAx,DBx,DCx,DDx,DEx,DFx,DGx,DHx,DJx,DKx,DLx,DMx,DNx,DPx,DQx,DRx,DSx,DTx,ELx,EMx,ENx,ETx,EXX,F3x,F4x,F6x,F7x,F8x,F9x,FDx,FHx,FPx,FQx,FZx,G7x,GBx,GEx,GHx,GLx,GNx,GQx,GRx,GTx•2519-CTO,82x,83x,86x,87x,8Ax•2522-CTO,22x,2Aa,2Cx,2Dx,2Gx,2Hx,2Jx,2Nx,2Px,2Qx,2Rx,2Xx,2Yx,2Zx,30x,32x,33x,34x,35x,36x,37x,38x,39x,3Bx,3Cx,3Dx,3Ex,3Hx, 3Kx,3Mx,3Nx,3Px,3Ux,3Vx,3Yx,44x,25x,48x,49x,52x,53x,54x,60x,62x•2537-CTO,22x,25x,92x,93x,94x,95x,9Ax,9D x•2538-CTO•2539-CTO | 45M2723N |
Table39. Partslist—Overall(continued)
| No.FRU(Overall)FRUno.CRU | ID | |
| 23Fanassembly,discrete•2516-CTO,A4x,A5x,A9x,AAx,ABx,ACx,AEx,AHx,AJx,AKx,ALx,AMx,ANx•2518-CTO,C4x,C5x,C8x,C9x,CEx,CFx,CGx,DUx,DVx,DWx,DXx,DYx,DZx,E4x,E7x,E8x,E9x,EAX,EBx,ECx,EDx,EEx,EFx,EGx,EPx,EQx,ERx,ESx,EUx,EVx,EWx,EYx,EZX,F2x,F5x,FAx,FBx,FCx,FEx,FFx,FGx,FJx,FKx,FLx,FMx,FNx,FSx,FTx,FUx,FVx,FVx,FXx,FYx,G2x,G3x,G4x,G5x,G6x,G8x,G9x,GCx,GDx,GFx,GGx,GJx,GKx,GMx,GPx,GSx•2519-CTO,84x,85x,88x,89x,8Bx•2522-CTO,23x,24x,2Bx,2Ex,2Fx,2Kx,2Lx,2Mx,2Sx,2Tx,2Ux,2Vx,2Wx,3Ax,3Fx,3Gx,3Jx,3Lx,3Qx,3Rx,3Sx,3Tx,3Wx,3Xx,3Zx,42x,43x,45x,46x,47x,26x,4Ax,4Bx,55x,56x,63x,64x•2537-CTO,23x,24x,26x,96x,97x,98x,99x,9Bx,9Cx,9Ex,9Fx•2538-CTO•2539-CTO | 45M2722N | |
| 23Fanassembly,discrete•2516-CTO,A4x,A5x,A9x,AAx,ABx,ACx,AEx,AHx,AJx,AKx,ALx,AMx,ANx•2518-CTO,C4x,C5x,C8x,C9x,CEx,CFx,CGx,DUx,DVx,DWx,DXx,DYx,DEx,E4x,E7x,E8x,E9x,EAX,EBx,ECx,EDx,EEx,EFx,EGx,EPx,EQx,ERx,ESx,EUx,EVx,EWx,EYx,EZX,F2x,F5x,FAx,FBx,FCx,FEx,FFx,FGx,FJx,FKx,FLx,FMx,FNx,FSx,FtX,FUx,FVx,FVx,FXx,FYx,G2x,G3x,G4x,G5x,G6x,G8x,G9x,GCx,CDx,GFx,GGx,GJx,GKx,GMx,GPx,GSx•2519-CTO,84x,85x,88x,89x,8Bx•2522-CTO,23x,24x,2Bx,2Ex,2Fx,2Kx,2Lx,2Mx,2Sx,2Tx,2Ux.2Vx,2Wx,3Ax,3Fx,3Gx,3Jx,3Lx,3Qx,3Rx,3Sx,3Tx,3Wx,3Xx,3Zx,42x,43x,45x,46x,47x,26x,4Ax,4Bx,55x,56x,63x,64x• 2537-CTO,23x,24x,26x,96x,97x,98x,99x,9Bx,9Cx,9Ex,9Fx•2538-CTO•2539-CTO | 45M2724N | |
| 24FPCable(touchpadwithfingerprintreaderandBluetooth)45M2892 | ||
| 25Bluetoothdaughtercard(BDC-2.1)•2516-CTO,A2x,A3x,A4x,A5x,A6x,A7x,A8x,A9x,AAx,ABx,ACx,AEx,AFx,AGx,AHx,AJx,AKx,ALx,AMx,ANx•2518-CTO,C2x,C3x,C4x,C5x,C6x,C7x,C8x,C9x,CAX,CBX,CCxCDX,CEx,CFx,CGx,CHx,CJx,CKx,CLx,CMx,CNX,CPx,CQx,CRx,CSX,CUX,CVx,CWX,CXx,CYx,CZX,D2x,D3x,D4x,D5x,D6x,D7x,D8x,D9x,DBx,DCx,DDx,DFx,DGx,DHX,DJx,DKx,DLx,DMx,DNX,DPx,DQx,DRx,DSx,DTx,DUX,DVx,DWX,DXx,DYZ,xE4x,E7x,E8x,E9x,EAX,EBx,ECx,EDx,EEx,EFx,EGx,ELx,EMx,ENx,EPx,EQx,ERx,ESx,ETx,EUX,EVx,EWX,EYx,EZX,F2x,F3x,F4x,F5x,F6x,F7x,F8x,F9x,FAX,FBx,FCx,FDx,FEx,FFx,FGx,FHX,FJx,FKx,FLx,FMx,FNX,FPx,FQx,FSx,FTx,FUX,FVX,FVX,FXy,FZX,G2x,G3x,G4x,G5x,G6x,G7x,G8x,G9x,GBx,GCx,GDx,GEx,GFX,GGX,GHX,GJx,GKx,GLx,GMx,GNx,GPx,GQx,GRx,GSx,GTx•2519-CTO,82x,83x,84x,85x,86x,87x,88x,89x,8AX,8Bx•2522-CTO,22x,23x,24x,2AX,2Bx,2Cx,2Dx,2Ex,2Fx,2GX,2Hx,2Jx,2Kx,2Lx,2MX,2NX,2Px,2Qx,2Rx,2Sx,2TX,2UX,2VX,2WX,2YX,2ZX,30X,32X,33X,34X,35X,36X,37X,38X,39X,3AX,3Bx,3Cx,3Dx,3Ex,3Fx,3GX,3HX,3Jx,3Kx,3Lx,3MX,3NX,3Px,3Qx,3Rx,3Sx,3TX,3UX,3VX,3Wx,3Xx,3YX,3ZX,42X,43X,44X,45X,46X,47X,25X,49X,26X,4AX,4Bx,53X,54X,55X,56X,60x•2537-CTO,22x,23x,24x,25x,26x,92X,93X,94X,95X,96X,97X,98X,99X,9AX,9Bx,9Cx,9Dx,9Ex,9Fx•2538-CTO•2539-CTO | 60Y3199N |
Table39. Partslist—Overall(continued)
| No.FR | U(Overall)FRUno.CRU | ID | |
| 25Bl | leutoothdaughtercard(BDC-2.1)•2516-CTO,A2x,A3x,A4x,A5x,A6x,A7x,A8x,A9x,AAx,ABx,ACx,AEx,AFx,AGx, AHx,AJx,AKx,ALx,AMx,ANx•2518-CTO,C2x,C3x,C4x,C5x,C6x,C7x,C8x,C9x,CAx,CBx,CCx,CDx,CEx,CFx, CGx,CHx,CJx,CKx,CLx,CMx,CNx,CPx,CQx,CRx,CSx,CUx,CVx,CWx,CXx, CYx,CZx,D2x,D3x,D4x,D5x,D6x,D7x,D8x,D9x,DAx,DBx,DCx,DDx,DFx,DFx, DGx,DHx,DJx,DKx,DLx,DMx,DNx,DPx,DQx,DRx,DSx,DTx,DUx,DVx,DWx, DXx,DYx,DZx,E4x,E7x,E8x,E9x,EAX,EBx,ECx,EDx,EEx,EFx,EGx,ELx,EMx, ENx,EPx,EQx,ERx,ESx,ETx,EUX,EVx,EWX,EXx,EYx,EZX,F2x,F3x,F4x,F5x,F6x, F7x,F8x,F9x,FAx,FBx,FCx,FDx,FEx,FFx,FGx,FHx,FJx,FKx,FLx,FMx,FNx,FPx, FQx,FSx,FTx,FUx,FVx,FWx,FXx,FYx,FZx,G2x,G3x,G4x,G5x,G6x,G7x,G8x, G9x,GBx,GCx,GDx,GEx,GFx,GGx,GHx,GJx,GKx,GLx,GMx,GNx,GPx,GQx, GRx,GSx,GTx•2519-CTO,82x,83x,84x,85x,86x,87x,88x,89x,8Ax,8Bx•2522-CTO,22x,23x,24x,2Ax,2Bx,2Cx,2Dx,2Ex,2Fx,2Gx,2Hx,2Jx,2Kx,2Lx,2Mx, 2Nx,2Px,2Qx,2Rx,2Sx,2Tx,2Ux,2Vx,2Wx,2Xy,2Zx,30x,32x,33x,34x,35x, 36x,37x,38x,39x,3Ax,3Bx,3Cx,3Dx,3Ex,3Fx,3Gx,3Hx,3Jx,3Kx,3Lx,3Mx,3Nx, 3Px,3Qx,3Rx,3Sx,3Tx,3Ux,3Vx,3Wx,3Xx,3Yx,3Zx,42x,43x,44x,45x,46x,47x, 25x,49x,26x,4Ax,4Bx,53x,54x,55x,56x,60x•2537-CTO,22x,23x,24x,25x,26x,92x,93x,94x,95x,96x,97x,98x,99x,9Ax,9Bx,9Cx, 9Dx,9Ex,9Fx•2538-CTO•2539-CTO | 60Y3213N | |
| 26Keyboard(see“Keyboard”onpage178.) | |||
| 27TrackPointcaps91P9642* | |||
| —Thermalgrease91P8835N | |||
| —ACadapter(see“ACadapters”onpage181.) | |||
LCDFRUs
InThinkPadT410andT410i,therearefollowingtypesofLCDs.
•14.1-inchWXGALED-backlightLCD(Table40onpage171)
-14.1-inchWXGA+LED-backlightLCD(Table41onpage175)
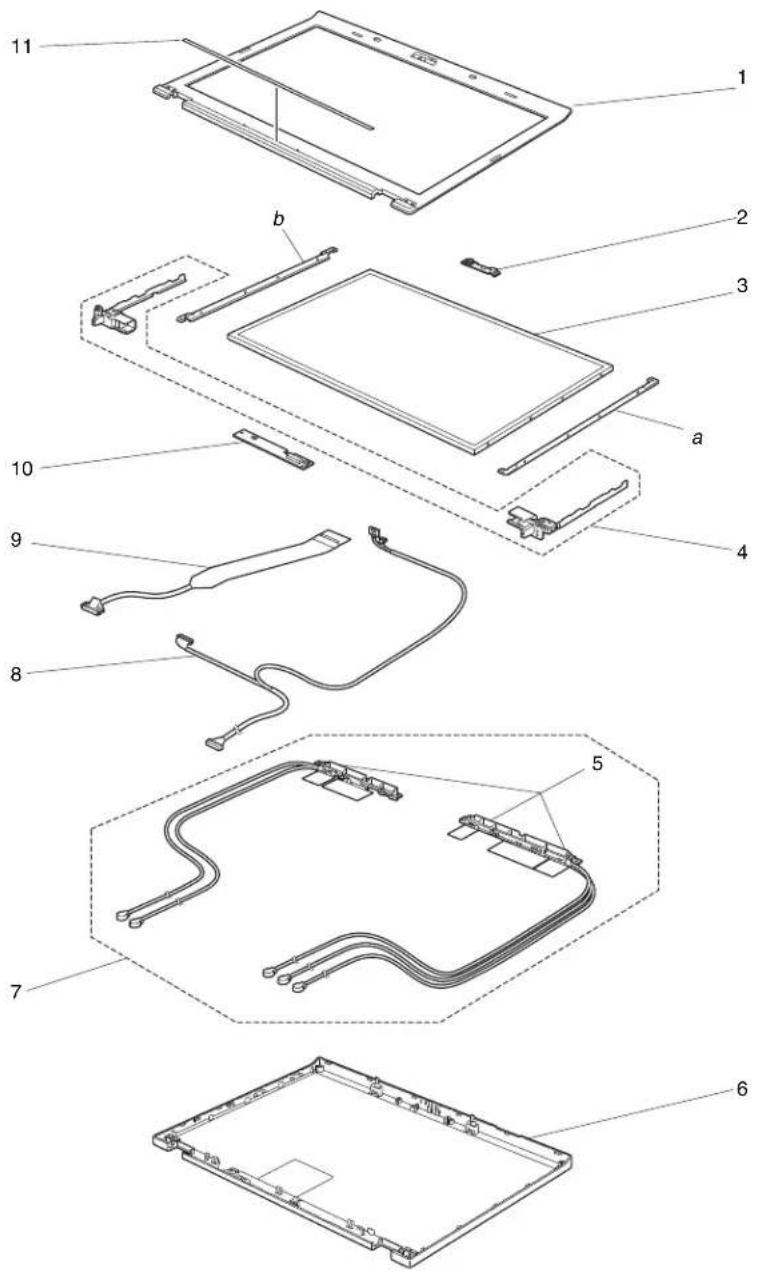
text_image
Exploded view diagram of a device showing 11 labeled components including screen, cable, and connector partsTable40. Partslist—14.1-inchWXGALED-backlightLCD
| No.FR | U(14.1-inchWXGALED-backlightLCD)FRUno.CRU | ID | |
| a,bSee | “Miscellaneousparts”onpage179. | ||
| 1LC | Dbezelassembly•2516-CTO,A2x,A3x,A4x,A5x,A6x,A7x,A8x,A9x,AAx,ACx,ADx,AEx,AFx,AGx, AHx,AJx,AKx,ALx,AMx,ANx•2518-CTO,C2x,C3x,C6x,C7x,C8x,C9x,CAx,CBx,CCx,CDx,CHx,CJx,CKx,CLx, CMx,CNx,CPx,CQx,CRx,CSx,DUx,DVx,DWx,E9x,EAx,EBx,ECx,ELx,EMx, ENx,EPx,EQx,ERx,ESx,ETx,EXx,F3x,F7x,F8x,F9x,FAx,FBx,FCx,FDx,FHx,FPx, FQx,FSx,FTx,FUx,FVx,FYx,FZx,G2x,G3x,G4x,G5x,G6x,G7x,GBx,GEx,GHx, GLx,GMx,GQx,GRx,GSx•2519-CTO,87x,88x,8Ax•2522-CTO,22x,23x,2Ax,2Gx,2Hx,2Nx,2Px,2Qx,2Rx,2Xy,2Zx,32x,33x,34x, 39x,3Ax,3Bx,3Cx,3Dx,3Ex,3Hx,3Jx,3Kx,3Lx,3Px,3Qx,3Ux,3Vx,3Wx,3Yx,44x, 48x,49x,4Ax,52x,53x,55x,62x,63x•2537-CTO,22x,23x,92x,93x,94x,95x,9Ax,9Bx,9Dx,9Ex•2538-CTO•2539-CTO | 60Y5464N | |
| 2Integratedcamera•2516-CTO,A2x,A3x,A4x,A5x,A6x,A8x,A9x,AAx,ACx,ADx,AEx,AGx,AJx,AKx, ALx,AMx,ANx•2518-CTO,C2x,C3x,C6x,C7x,C8x,C9x,CAx,CBx,CCx,CDx,CHx,DUx,DVx,DWx, E9x,EAx,EBx,ECx,ELx,EMx,ENx,EPx,EQx,ERx,ESx,ETx,EXx,F3x,F7x,F8x,F9x, FAx,FBx,FCx,FDx,FHx,FPx,FQx,FSx,FTx,FUx,FVx,FYx,FZx,G2x,G3x,G4x, G5x,G6x,G7x,GBx,GEx,GHx,GLx,GMx,GRx,GSx•2519-CTO,88x,8Ax•2522-CTO,2Ax,2Gx,2Hx,39x,3Ax,3Cx,3Dx,3Ex,3Hx,3Jx,3Kx,3Lx,3Px,3Qx,3Ux, 3Vx,3Wx,3Yx,44x,48x,49x,52x,53x,55x•2537-CTO,9Bx,9Dx,9Ex•2538-CTO•2539-CTO | 60Y9402N | ||
| 3LC | Dmodule,14.1-inchWXGALED-backlight•2516-CTO,A2x,A3x,A4x,A5x,A6x,A7x,A8x,A9x,AAx,ACx,ADx,AEx,AFx,AGx, AHx,AJx,AKx,ALx,AMx,ANx•2518-CTO,C2x,C3x,C6x,C7x,C8x,C9x,CAx,CBx,CX,CDx,CHx,CJx,CKx,CLx, CMx,CNx,CPx,CQx,CRx,CSx,DUx,DVx,DWx,E9x,EAx,EBx,ECx,ELx,EMx, ENx,EPx,EQx,ERx,ESx,ETx,EXx,F3x,F7x,F8x,F9x,FAx,FBx,PCx,FDx,FHx,FPx, FQx,FSx,FTx,FUx,FVx,FYx,FZx,G2x,G3x,G4x,G5x,G6x,G7x,GBx,GEx,GHx, GLx,GMx,GQx,GRx,GSx•2519-CTO,87x,88x,8Ax•2522-CTO,22x,23x,2Ax,2Gx,2Hx,2Nx,2Px,2Qx,2Rx,2Xy,2Zx,32x,33x,34x, 39X,3Ax,3Bx,3Cx,3Dx,3Ex,3Hx,3Jx,3Kx,3Lx,3Px,3Qx,3Ux,3Vx,3Wx,3Yx,44x, 48x,49x,4Ax,52x,53x,55x,62x,63x•2537-CT0,22x,23x,92x,93x,94x,95x,9Ax,9Bx,9Dx,9Ex•2538-CTO•2539-CTO | 42T0725N | |
Table40. Partslist—14.1-inchWXGALED-backlightLCD(continued)
| No.FRU(14.1-inchWXGALED-backlightLCD)FRUno.CRU | ID | |
| 2LCDmodule,14.1-inchWXGALED-backlight•2516-CTO,A2x,A3x,A4x,A5x,A6x,A7x,A8x,A9x,AAx,ACx,ADx,AEx,AFx,AGx,AHx,AJx,AKx,ALx,AMx,ANx•2518-CTO,C2x,C3x,C6x,C7x,C8x,C9x,CAX,CBX,CCx,CDx,CHx,CJx,CKx,CLx,CMx,CNx,CPx,CQx,CRx,CSx,DUx,DVx,DWx,E9x,EAX,EBx,ECx,ELx,EMx,ENx,EPx,EQx,ERx,ESx,ETx,EXx,F3x,F7x,F8x,F9x,FAx,FBx,FCx,FDx,FHx,FPx,FQx,FSx,FTx,FUx,FVx,FYx,FZx,G2x,G3x,G4x,G5x,G6x,G7x,GBx,GEx,GHx,GLx,GMx,GQx,GRx,GSx•2519-CTO,87x,88x,8Ax•2522-CTO,22x,23x,2Ax,2Gx,2Hx,2Nx,2Px,2Qx,2Rx,2Xy,2Zx,32x,33x,34x,39x,3Ax,3Bx,3Cx,3Dx,3Ex,3Hx,3Jx,3Kx,3Lx,3Px,3Qx,3Ux,3Vx,3Wx,3Yx,44x,48x,49x,4Ax,52x,53x,55x,62x,63x•2537-CTO,22x,23x,92x,93x,94x,95x,9Ax,9Bx,9Dx,9Ex•2538-CTO•2539-CTO | 42T0729N | |
| 3LCDmodule,14.1-inchWXGALED-backlight•2516-CTO,A2x,A3x,A4x,A5x,A6x,A7x,A8x,A9x,AAx,ACx,ADx,AEx,AFx,AGx,AHx,AJx,AKx,ALx,AMx,ANx•2518-CTO,C2x,C3x,C6x,C7X,C8x,C9x,CAX,CBX,CCx,CDx,CHx,CJx,CKx,CLx,CMx,CNx,CPx,CQx,CRx,CSx,DUx,DVx,DWx,E9x,EAX,EBx,ECx,ELx,EMx,ENx,EPx,EQx,ERx,ESx,ETx,EXx,F3x,F7x,F7x,F8x,F9x,FAx,FBx,FCx,FDx,FHx,FPx,FQx,FSx,FTx,FUx,FVx,FYx,FZx,G2x,G3x,G4x,G5x,G6x,G7x,GBx,GEx,GHx,GLx,GMx,GQx,GRx,GSx•2519-CTO,88x,8Ax•2522-CTO,22x,23x,2Ax,2Gx,2Hx,2Nx,2Px,2Qx,2Rx,2Xy,2Zx,32x,33x,34x,39x,3Ax,3Bx,3Cx,3Dx,3Ex,3Hx,3Jx,3KX,3Lx,3Px,3Qx,3Ux,3Vx,3Wx,3Yx,44x,48x,49x,4Ax,52x,53x,55x,62x,63x•2537-CTO,22x,23x,92x,93x,94x,95x,9Ax,9Aox,9Bx,9Dx,9Ex•2538-CTO•2539-CTO | 42T0733N | |
| 4Hinges•2516-CTO,A2x,A3x,A4x,A5x,A6x,A7x,A8x,A9x,AAx,ACx,ADx,AEx,AFx,AGx,AHx,AJx,AKx,ALx,AMx,ANx•2518-CTO,C2x,C3x,C6x,C7X,C8x,C9x,CAX,CBX,CCX,CDx,CHX,CJx,CKX,CLx,CMx,CNx,CPx,CQx,CRx,CSx,DUx,DVx,DWx,E9x,EAX,EBx,ECx,ELx,EMx,ENx,EPx,EQx,ERx,ESx,ETx,EXx,F3x,F7x,F8x,F9x,FAx,FBx,FCx,FDx,FHx,FPx,FQX,FSx,FTx,FUx,FVx,FYx,FZx,G2x,G3x,G4x,G5x,G6x,G7x,GBx,GEx,GHx,GLx,GMx,GQx,GRx,GSx•2519-CTO,87x,88x,8Ax•2522-CTO,22x,23x,2Ax,2GX,2Hx,2Nx,2Px,2Qx,2Rx,2Xy,2Zx,32x,33x,34x,39x,3Ax,3Bx,3Cx,3Dx,3Ex,3Hx,3Jx,3KX,3Lx,3Px,3Qx,3Ux,3Vx,3Wx,3Yx,46x,48x,49x,4Ax,52x,53x,55x,62x,63x•2537-CTO,22x,23x,92x,93x,94x,95x,9Ax,9Bx,9Dx,9Ex•2538-CTO•2539-CTO | 60Y5466N | |
| 4Hinges•2516-CTO,A2x,A3x,A4x,A5x,A6x,A7x,A8x,A9x,AAx,ACx,ADx,AEx,AFx,AGx, AHx,AJx,AKx,ALx,AMx,ANx•2518-CTO,C2x,C3x,C6x,C7x,C8x,C9x,CAx,CBx,CCx,CDx,CHx,CJx,CKx,CLx, CMx,CNx,CPx,CQx,CRx,CSx,DUx,DVx,DWx,E9x,EAX,EBx,ECx,ELx,EMx, ENx,EPx,EQx,ERx,ESx,ETx,EXx,F3x,F7x,F8x,F9x,FAx,FBx,FCx,FDx,FHx,FPx, FQx,FSx,FTx,FUx,FVx,FYx,FZx,G2x,G3x,G4x,G5x,G6x,G7x,GBx,GEx,GHx, GLx,GMx,GQx,GRx,GSx•2519-CTO,87x,88x,8Ax•2522-CTO,22x,23x,2Ax,2Gx,2Hx,2Nx,2Px,2Qx,2Rx,2Yx,2Zx,32x,33x,34x, 39x,3Ax,3Bx,3Cx,3Dx,3Ex,3Hx,3Jx,3Kx,3Lx,3Px,3Qx,3Ux,3Vx,3Wx,3Yx,44x, 48x,49x,4Ax,52x,53x,55x,62x,63x•2537-CTO,22x,23x,92x,93x,94x,95x,9Ax,9Bx,9Dx,9Ex•2538-CTO•2539-CTO | 60Y5467N | |
| 5Wirelessantenna(wirelessLAN/MIMO)•2516-CTO,A3x,A5x,A6x,ADx,AEx•2518-CTO,C7x,C9x,CAx,CBx,CCx,CDx,CHx,CJx,CKx,CLx,CMx,CNx,CPx,CQx, CRx,CSx,E9x,EAX,EBx,ECx,EMx,ENx,EPx,EQx,ERx,ESx,FPx,FQx,FSx,FTx, FUx,FVx,GQx,GRx,GSx•2519-CTO•2522-CTO,2Nx,2Qx,2Xx,2Yx,2Zx,32x,33x,34x,3Bx,3Cx,3Ux,52x,53x,55x,62x, 63x•2537-CTO,92x,94x•2538-CTO•2539-CTO | 45M2887N | |
| 6LC Drearcoverassembly•2516-CTO,A2x,A3x,A4x,A5x,A6x,A7x,A8x,A9x,AAx,ACx,ADx,AEx,AFx,AGx, AHx,AJx,AKx,ALx,AMx,ANx•2518-CTO,C2x,C3x,C6x,C7x,C8x,C9x,CAx,CBx,CX,CDx,CHx,CJx,CKx,CLx, CMx,CNx,CPx,CQx,CRx,CSx,DUx,DVx,DWx,E9x,EAX,EBx,ECx,ELx,EMx, ENx,EPx,EQx,ERx,ESx,ETx,EXx,F3x,F7x,F8x,F9x,FAx,FBx,PCx,FDx,FHx,FPx, FQx,FSx,FTx,FUx,FVx,FYx,FZx,G2x,G3x,G4x,G5x,G6x,G7x,GBx,GEx,GHx, GLx,GMx,GQx,GRx,GSx•2519-CTO,87x,88x,8Ax•2522-CT0,22x,23x,2Ax,2Gx,2Hx,2Nx,2Px,2Qx,2Rx,2Yx,2Zx,32x,33x,34x, 39x,3Ax,3Bx,3Cx,3Dx,3Ex,3Hx,3Jx,3Kx,3Lx,3Px,3Qx,3UX,3Vx,3Wx,3Yx,44x, 48x,49x,4Ax,52x,53x,55x,62x,63x•2537-CTO,22x,23x,92x,93x,94x,95x,9Ax,9Bx,9Dx,9Ex•2538-CTO•2539-CTO | 60Y5462N | |
| 7Wirelessantenna(wirelessLAN/MIMO/WAN)•2516-CTO,A2x,A4x,A7x,A8x,A9x,AAx,ACx,AFx,AGx,AHx,AJx,AKx,ALx,AMx, ANx•2518-CTO,C2x,C3x,C6x,C8x,DUx,DVx,DWx,ELx,ETx,EXx,F3x,F7x,F8x,F9x, FAx,FBx,FCx,FDx,FHx,FYx,FZx,G2x,G3x,G4x,G5x,G6x,G7x,GBx,GEx,GHx, GLx,GMx•2519-CTO,87x,88x,8Ax•2522-CTO,22x,23x,2Ax,2Gx,2Hx,2Px,2Rx,39x,3Ax,3Dx,3Ex,3Hx,3Jx,3Kx,3Lx, 3Px,3Qx,3Vx,3Wx,3Yx,44x,48x,49x,4Ax•2537-CTO,22x,23x,93x,95x,9Ax,9Bx,9Dx,9Ex•2538-CTO•2539-CTO | 45M2887N | |
| 8LEDcable45M2891N |
Table40. Partslist—14.1-inchWXGALED-backlightLCD(continued)
| No.FR | U(14.1-inchWXGALED-backlightLCD)FRUno.CRU | ID | |
| 9LCDcable•2516-CTO,A2x,A3x,A4x,A5x,A6x,A7x,A8x,A9x,AAx,ACx,ADx,AEx,AFx,AGx,AHx,AJx,AKx,ALx,AMx,ANx•2518-CTO,C2x,C3x,C6x,C7x,C8x,C9x,CAx,CBx,CCx,CDx,CHx,CJx,CKx,CLx,CMx,CNx,CPx,CQx,CRx,CSx,DUx,DVx,DWx,E9x,EAx,EBx,ECx,ELx,EMx,ENx,EPx,EQx,ERx,ESx,ETx,EXx,F3x,F7x,F8x,F9x,FAx,FBx,FCx,FDx,FHx,FPx,FQx,FSx,FTx,FUx,FVx,FYx,FZx,G2x,G3x,G4x,G5x,G6x,G7x,GBx,GEx,GHx,GLx,GMx,GQx,GRx,GSx•2519-CTO,87x,88x,8AX•2522-CTO,22x,23x,2AX,2GX,2HX,2NX,2PX,2Qx,2RX,2Xx,2Yx,2Zx,32x,33x,34x,39x,3AX,3BX,3CX,3DX,3Ex,3HX,3Jx,3Kx,3Lx,3PX,3Qx,3UX,3Vx,3Wx,3Yx,44x,48x,49x,4AX,52x,53x,55x,62x,63x•2537-CTO,22x,23x,92x,93x,94x,95x,9AX,9BX,9DX,9Ex•2538-CTO•2539-CTO | 45M2889N | ||
| 10LEDsubcard63Y2121N | |||
| 11Clearplatekit60Y5470N |
Table41. Partslist—14.1-inchWXGA+LED-backlightLCD
| No.FRU(14.1-inchWXGA+LED-backlightLCD)FRUno.CRU | ID | |
| a,bSee“Miscellaneousparts”onpage179. | ||
| 1LC Dbezelassembly•2516-CTO,ABx•2518-CTO,C4x,C5x,CEx,CFx,CGx,CUx,CVx,CWx,CXx,CYx,CZx,D2x,D3x,D4x,D5x,D6x,D7x,D8x,D9x,DAx,DBx,DCx,DDx,DFx,DGx,DHx,DJx,DKx,DLx,DMx,DNx,DPx,DQx,DRx,DSx,DTx,DXx,DYx,DZx,E4x,E7x,E8x,EDx,EEx,EFx,EGx,EUx,EVx,EWx,EYx,EZx,F2x,F4x,F5x,F6x,FEx,FFx,FGx,FJx,FKx,FLx,FMx,FNx,FWx,FXx,G8x,G9x,GCx,GDx,GFx,GGx,GJx,CKx,GNx,GPx,GTx•2519-CTO,82x,83x,84x,85x,86x,89x,8Bx•2522-CTO,24x,2Bx,2Cx,2Dx,2Ex,2Fx,2Jx,2Kx,2Lx,2Mx,2Sx,2Tx,2Ux,2Vx,2Wx,30x,35x,36x,37x,38x,3Fx,3Gx,3Mx,3Nx,3Rx,3Sx,3Tx,3Xx,3Zx,42x,43x,45x,46x,47x,25x,26x,4Bx,54x,56x,60x,64x•2537-CTO,24x,25x,26x,96x,97x,98x,99x,9Cx,9Fx•2538-CTO•2539-CTO | 60Y5464N | |
| 2Integratedcamera•2516-CTO,ABx•2518-CTO,C4x,C5x,CEx,CFx,CGx,DXx,DYx,DZx,E4x,E7x,E8x,EDx,EEx,EFx,EGx,EUx,EVx,EWx,EYx,EZx,F2x,F4x,F5x,F6x,FEx,FFx,FGx,FJx,FKx,FLx,FMx,FNx,FWx,FXx,G8x,G9x,GCx,GDx,GFx,GGx,GJX,CKx,GNx,GPx,GTx•2519-CTO,82x,83x,84x,85x,89x,8Bx•2522-CTO,24x,2Bx,2Cx,2Dx,2Ex,2Fx,2Jx,2Kx,2Lx,2Mx,2Wx,30x,3Fx,3Gx,3Mx,3Nx,3Rx,3Sx,3Tx,3Xx,3Zx,42x,43x,45x,46x,47x,26x,4Bx,54x,56x,60x•2537-CTO,24x,26x,9Cx,9Fx•2538-CTO•2539-CTO | 60Y9402N | |
| 3LC Dmodule,14.1-inchWXGA+LED-backlight•2516-CTO,ABx•2518-CTO,C4x,C5x,CEx,CFx,CGx,CUx,CVx,CWx,CXx,CYx,CZx,D2x,D3x,D4x,D5x,D6x,D7x,D8x,D9x,DAx,DBx,DCx,DDx,DFx,DGx,DHx,DJx, DKx,DLx,DMx,DNx,DPx,DQx,DRx,DSx,DTx,DXx,DYx,DZx,E4x,E7x,E8x,EDx,EEx,EFx,EGx,EUx,EVx,EWx,EYx,EZx,F2x,F4x,F5x,F6x,FEx,FFx,FGx,FJx,FKx,FLx,FMX,FNx,FWx,FXx,G8x,G9x,GCx,GDx,GFx,GGx,GJX,CKx,GNx,GPx,GTx•2519-CTO,82x,83x,84x,85x,86x,89x,8Bx•2522-CTO,24x,2Bx,2Cx,2Dx,2Ex,2Fx,2Jx,2Kx,2Lx,2Mx,2Sx,2Tx,2Ux,2Vx,2Wx,30x,35x,36x,37x,38x,3Fx,3Gx,3Mx,3Nx,3Rx,3Sx,3Tx,3Xx,3Zx,42x,43x,45x,46x,47x,25x,26x,4Bx,55x,56x,60x,64x•2537-CTO,24x,25x,26x,96x,97x,98x,99x,9Cx,9Fx•2538-CTO•2539-CTO | 42T0727N | |
| 3LC Dmodule,14.1-inchWXGA+LED-backlight•2516-CTO,ABx•2518-CTO,C4x,C5x,CEx,CFx,CGx,CUx,CVx,CWx,CXx,CYx,CZx,D2x,D3x,D4x,D5x,D6x,D7x,D8x,D9x,DAx,DBx,DCx,DDx,DFx,DGx,DHx,DJx, DKx,DLx,DMx,DNx,DPx,DQx,DRx,DSx,DTx,DXx,DYx,DZx,E4x,E7x,E8x,EDx,EEx,EFx,EGx,EUx,EVx,EWx,EYx,EZx,F2x,F4x,F5x,F5x,F6x,FEx,FFx,FGx,FJx,FKx,FLx,FMX,FNx,FWx,FXx,G8x,G9x,GCx,GDx,GFx,GGx,GJX,CKx,GNx,GPx,GTx•2519-CTO,82x,83x,84x,85x,86x,89X,8Bx•2522-CTO,24x,2Bx,2Cx,2Dx,2Ex,2Fx,2Jx,2Kx,2Lx,2Mx,2Sx,2Tx,2Ux,2Vx,2Wx,30x,35x,36x,37x,38x,3Fx,3Gx,3Mx | 42T0731N | |
Table41. Partslist—14.1-inchWXGA+LED-backlightLCD(continued)
| No.FR | U(14.1-inchWXGA+LED-backlightLCD)FRUno.CRU | ID | |
| 3LCDmodule,14.1-inchWXGA+LED-backlight•2516-CTO,ABx•2518-CTO,C4x,C5x,CEx,CFx,CGx,CUx,CVx,CWx,CXx,CYx,CZx,D2x,D3x,D4x,D5x,D6x,D7x,D8x,D9x,DAx,DBx,DCx,DDx,DFx,DGx,DHx,DJx,DKx,DLx,DMx,DNx,DPx,DQx,DRx,DSx,DTx,DXx,DYx,DZx,E4x,E7x,E8x,EDx,EEx,EFx,EGx,EUx,EVx,EWx,EYx,EZx,F2x,F4x,F5x,F6x,FEx,FFx,FGx,FJx,FKx,FLx,FMx,FNx,FWx,FXx,G8x,G9x,GCx,GDx,GFx,GGx,GJx,GKx,GNx,GPx,GTx•2519-CTO,82x,83x,84x,85x,86x,89x,8Bx•2522-CTO,24x,2Bx,2Cx,2Dx,2Ex,2Fx,2Jx,2Kx,2Lx,2Mx,2Sx,2Tx,2Ux,2Vx,2Wx,30x,35x,36x,37x,38x,3Fx,3Gx,3Mx,3Nx,3Rx,3Sx,3Tx,3Xx,3Zx,42x,43x,45x,46x,47x,25x,26x,4Bx,54x,56x,60x,64x•2537-CTO,24x,25x,26x,96x,97x,98x,99x,9Cx,9Fx•2538-CTO•2539-CTO | 42T0735 | ||
| 4Hinges•2516-CTO,ABx•2518-CTO,C4x,C5x,CEx,CFx,CGx,CUx,CVx,CWx,CXx,CYx,CZx,D2x,D3x,D4x,D5x,D6x,D7x,D8x,D9x,DAx,DBx,DCx,DDx,DFx,DGx,DHx,DJx, DKx,DLx,DMx,DNx,DPx,DQx,DRx,DSx,DTx,DXx,DYx,DZx,E4x,E7x,E8x,EDx,EEx,EFx,EGx,EUx,EVx,EWx,EYx,EZx,F2x,F4x,F5x,F6x,FEx,FFx,FGx,FJx,FKx,FLx, FMx,FNx,FWx,FXx,G8x,G9x,GCx,GDx,GFx,GGx,GJx,GKx,GNx,GPx,GTx•2519-CTO,82x,83x,84x,85x,86x,89x,8Bx•2522-CTO,24x,2Bx,2Cx,2Du,2Ex,2Fx,2Jx,2Kx,2Lx,2Mx,2Sx,2Tx,2Ux,2Vx,2Wx,30x,35x,36x,37x,38x,3Fx,3Gx,3Mx,3Nx,3Rx,3Sx,3Tx,3Xx,3Zx,42x,45x,46x,47x,25x,26x,4Bx,54x,56x,60x,64x•2537-CTO,24x,25x,26x,96x,97x,98x,99x,9Cx,9Fx•2538-CTO•2539-CTO | 60Y5466N | ||
| 4Hinges•2516-CTO,ABx•2518-CTO,C4x,C5x,CEx,CFx,CGx,CUx,CVx,CWx,CXx,CYx,CZx,D2x,D3x,D4x,D5x,D6x,D7x,D8x,D9x,DAx,DBx,DCx,DDx,DFx,DGx,DHx,DJx, DKx,DLx,DMx,DNx,DPx,DQx,DRx,DSx,DTx,DXx,DYx,DZx,E4x,E7x,E8x,EDx,EEx,EFx,EGx,EUx,EVx,EWx,EYx,EZx,F2x,F4x,F5x,F6x,FEx,FFx,FGx,FJx, FKx,FLx,FMx,FNx,FWx,FXx,G8x,G9x,GCx,GDx,GFx,GGx,GJx,GKx,GNx,GPx,GTx•2519-CTO,82x,83x,84x,85x,86x,89x,8Bx•2522-CTO,24x,2Bb,2Cx,2Dx,2Ex,2Fx,2Jx,2Kx,2Lx,2Mx,2Sx,2Tx,2Ux,2Vx,2Wx,30x,35x,36x,37x,38x,3Fx,3Gx,3Mx,3Nx,3Rx,3Sx,3Tx,3Xx,3Zy,42x,43x,45x,46x,47x,25x,26x,4Bb,54x,56x,60x,64x•2537-CTO,24x,25x,26x,96x,97x,98x,99x,9Cx,9Fx•2538-CTO•2539-CTO | 60Y5467N | ||
| 5Wirelessantenna(wirelessLAN/MIMO)•2516-CTO,ABx•2518-CTO,CEx,CFx,CUx,CVx,CWx,CXx,CYx,CZx,D2x,D3x,D4x,D5x,D6x,D7x,D8x,D9x,DAx,DBx,DCx,DDx,DFx,DGx,DHx,DJx, DKx,DLx,DMx,DNx,DPx,DQx,DRx,DSx,DTx,EDx,EEx,EFx,EGx,FMx,FWx,FXx,GTx•2519-CTO,83x,85x,86x,8Bx•2522-CTO,2Dx,2Fx,2Sx,2Ux,35x,36x,37x,38x,3Tx•2537-CTO,96x,98x•2538-CTO•2539-CTO | 45M2887N | ||
| 6LC | Drearcoverassembly•2516-CTO,ABx•2518-CTO,C4x,C5x,CEx,CFx,CGx,CUx,CVx,CWx,CXx,CYx,CZx,D2x,D3x,D4x,D5x,D6x,D7x,D8x,D9x,DAx,DBx,DCx,DDx,DFx,DFx,DGx,DHx,DJx,DKx,DLx,DMx,DNx,DPx,DQx,DRx,DSx,DTx,DXx,DYx,DZx,E4x,E7x,E8x,EDx,EEx,EFx,EGx,EUx,EVx,EWx,EYx,EZx,F2x,F4x,F5x,F6x,FEx,FFx,FGx,FJx,FKx,FLx,FMx,FNx,FWx,FXx,G8x,G9x,GCx,GDx,GFx,GGx,GJx,GKx,GNx,GPx,GTx•2519-CTO,82x,83x,84x,85x,86x,89x,8Bx•2522-CTO,24x,2Bx,2Cx,2Dx,2Ex,2Fx,2Jx,2Kx,2Lx,2Mx,2Sx,2Tx,2Ux,2Vx,2Wx,30x,35x,36x,37x,38x,3Fx,3Gx,3Mx,3Nx,3Rx,3Sx,3Tx,3Xx,3Zx,42x,43x,45x,46x,47x,25x,26x,4Bx,54x,56x,60x,64x•2537-CTO,24x,25x,26x,96x,97x,98x,99x,9Cx,9Fx•2538-CTO•2539-CTO | 60Y5462N | |
| 7Wirelessantenna(wirelessLAN/MIMO/WAN)•2516-CTO•2518-CTO,C4x,C5x,CGx,DXx,DYx,DZx,E4x,E7x,E8x,EUx,EVx,EWx,EYx,EZx,F2x,F4x,F5x,F6x,FEx,FFx,FGx,FJx,FKx,FLx,FNx,G8x,G9x,GCx,GDx,GFx,GGx,GJx,GKx,GNx,GPx•2519-CTO,82x,84x,89x•2522-CTO,24x,2Bx,2Cx,2Ex,2Jx,2Kx,2Lx,2Mx,2Tx,2Vx,2Wx,30x,3Fx,3Gx,3Mx,3Nx,3Rx,3Sx,3Xx,3Zx,42x,43x,45x,46x,47x,25x,26x,4Bx,54x,56x,60x,64x•2537-CTO,24x,25x,26x,97x,99x,9Cx,9Fx•2538-CTO•2539-CTO | 45M2887N | ||
| 8LEDcable45M2891N | |||
| 9LC | Dcableassembly•2516-CTO,ABx•2518-CTO,C4x,C5x,CEx,CFx,CGx,CUx,CVx,CWx,CXx,CYx,CZx,D2x,D3x,D4x,D5x,D6x,D7x,D8x,D9x,DAx,DBx,DCx,DDx,DFx,DFx,DGx,DHx,DJx,DKx,DLx,DMx,DNx,DPx,DQx,DRx,DSx,PTx,DXx,DYx,DZx,E4x,E7x,E8x,EDx,EEx,EFx,EGx,EUx,EVx,EWx,EYx,EZx,F2x,F4x,F5x,F6x,FEx,FFx,FGx,FJx,FKx,FLx,FMx,FNx,FWx,FXx,G8x,G9x,GCx,GDx,FGx,GGx,GJx,GKx,GNx,GPx,GTx•2519-CTO,82x,83x,84x,85x,86x,89x,8Bx•2522-CTO,24x,2Bx,2Cx,2Dx,2Ex,2Fx,2Jx,2Kx,2Lx,2Mn,2Sx,2Tx,2Ux,2Vx,2Wx,30x,35x,36x,37x,38x,3Fx,3Gx,3Mx,3Nx,3Rx,3Sx,3Tx,3Xx,3Zx,42x,43x,45x,46x,47x,25x,26x.4Bx,54x,56x,60x,64x•2537-CTO,24x,25x,26x,96x,97x,98x,99x,9Cx,9Fx•2538-CTO•2539-CTO | 45M2889N | |
| 10LEDsubcard63Y2121N | |||
| 11Clearplatekit60Y5470N |
Keyboard
Table42.Partslist—Keyboard
| LanguageFRUno.CRU | ID | |||
| Arabic45N207645N214645N2216* | ||||
| Belgian45N207745N214745N2217 | ||||
| BrazilianPortuguese45N207545N214545N2215 | ||||
| Bulgarian45N207845N214845N2218 | ||||
| CanadianFrench(058)45N207345N214345N2213 | ||||
| CanadianFrench(Acnor)45N207245N214245N2212 | ||||
| Czech45N207945N214945N2219 | ||||
| Danish45N208045N215045N2220 | ||||
| Dutch45N209045N216045N2230 | ||||
| Finnish,Swedish45N209745N216745N2237 | ||||
| French45N208245N215245N2222 | ||||
| German | 45N208345N215345N2223 | |||
| Greek(U.S.EnglishandGreeklayout) 45N208445N215445N2224 | ||||
| Hebrew | 45N208545N215545N2225 | |||
| Hungarian | 45N208645N215645N2226 | |||
| Icelandic | 45N208745N215745N2227 | |||
| Italian | 45N208845N215845N2228 | |||
| Japanese | 45N210245N217245N2242 | |||
| Kazakhstan | 45N208945N215945N2229 | |||
| Korean | 45N210345N217345N2243 | |||
| LatinAmericanSpanish | 45N207445N214445N2214 | |||
| Norwegian | 45N209145N216145N2231 | |||
| Polish45N209245N216245N2232 | ||||
| Portuguese | 45N209345N216345N2233 | |||
| Russian | 45N209445N216445N2234 | |||
| Slovak45N209545N216545N2235 | ||||
| Slovenian | 45N209645N216645N2236 | |||
| Spanish | 45N208145N215145N2221 | |||
| Swiss | 45N209845N216845N2238 | |||
| Thai | 45N210545N217545N2245 | |||
| TraditionalChinese | 45N210445N217445N2244 | |||
| Turkish | 45N209945N216945N2239 | |||
| U.K.English | 45N210045N217045N2240 | |||
| U.S.English | 45N207145N214145N2211 | |||
| U.S.English(International,withaEurosymbol) 45N210145N217145N2241 | ||||
Miscellaneousparts
Table43. Partslist—Miscellaneousparts
| FRUFRUno.CRU | ID | |
| Screwkit:•M2×3mm(silver),smallhead(50)•M2×3.5mm(black),waferhead(15)•M2×5mm(black),waferhead(15)•M2×10mm(black),waferhead(15)•M2×14mm(black),waferhead(10)•M2.5×6mm(black),flathead(20)•M3×2.8mm(black),flatheadHDD(8)•M3×3mm(black),flathead(forHDDcover)(2)•Hexstud(4) | 60Y5459N | |
| Sealkit60Y5460N | ||
| Basemiscellaneousparts:•Rubberfoot(front)•Rubberfoot(rear)•Lowershield•Insulationsheet,systemboard•Insulationsheet,subcard•Slidelock,eject•Bracket,pullereject•Pullever,eject•Coilspring,slidelever•Knob,wirelessswitch•Lever,wirelessswitch•Lens,LED(RJ-45)•Dustfilter1•Dustfilter2•Dustfilter3•BracketcornerR•BracketcornerL•Lcaseoddmylar | 60Y5456N | |
| Keyboardbezelmiscellaneousparts:•Magnet,suspendswitch•Bracket,keyboardsupport•Bracket,speakerRH•Bracket,keyboardbezel•LCDlatchRwithknob•LCDlatchL•Bar,latchlink•Spring•Speakermesh•Facesheet,touchpad•ThinkPadlogo•Poron,long•Poron,short•CUfoil,BT•Bracket,touchpad•Bracket,FPR•BrackettouchpadEMIgascket10x3x2black•Insulationsheet,touchpad•InsulationsheetFPR | 60Y5457N | |
| Systemmiscellaneousparts:(a)Expressdummycard(b)EMIbracket(c)RJ-11cableassembly,integrated(c)RJ-11cableassembly,discrete(d)DIMMslotdoor(e)HarddiskdrivecoverforSmartCardmodel(e)Harddiskdrivecoverfornon-SmartCardmodel(f)SmartCardspacer(g)Bracket,fanforvideo(h)LCDconnectorbracketInsulationsheetforCPUBracketassembly,CPUsupportDummycover,eSATADummycover,RJ-11Note: Italicized letters in parentheses are references to the exploded view in "Overall" on page 154. | 60Y5458N | |
| Systemboardmiscellaneousparts:Insulation(frontlouver)Insulation(top,hybrid)Insulation(top,integrated)Insulation(bottom)Insulation(DIMMtop)Insulation(BottomDIMMspring)Stud,MiniPCI,bottomBracket,SIMcardDummycard,SIMSheet,ejectInsulationsheet,SIMslotThermalrubberforPCH | 60Y5455N | |
| LCDmiscellaneousparts:Shield,EMCClearplate,rear(withicon)ThinkPadlogo(a)LCDlatch,right(b)LCDlatch,leftLens,LEDrear2x9T0.3rubberBezel,LCDLens,LEDBumperBracket,LCDsupportRBracket,LCDsupportLNote: Italicizedlettersinparenthesesarereferencestotheexplodedviewin"LCDFRUs"onpage170. | 60Y5461N |
ACadapters
Table44. Partslist—2-pinACadapters
| FRUFRUno.CRU | ID | |
| 2-pin(65W,20V)adapter(modelsCTO,xxE,xxF,xxJ,xxL,xxP,xxS,xxU,xxY)42T5282* | ||
| 2-pin(65W,20V)adapter(modelsCTO,xxE,xxF,xxJ,xxL,xxP,xxS,xxU,xxY)42T4423 | ||
| 2-pin(65W,20V)adapter(modelsCTO,xxE,xxF,xxJ,xxL,xxP,xxS,xxU,xxY)42T4419 | ||
| 2-pin(90W,20V)adapter(modelsCTO,xxE,xxF,xxJ,xxL,xxP,xxS,xxU,xxY)42T4427 | ||
| 2-pin(90W,20V)adapter(modelsCTO,xxE,xxF,xxJ,xxL,xxP,xxS,xxU,xxY)42T4431 | ||
| 2-pin(90W,20V)adapter(modelsCTO,xxE,xxF,xxJ,xxL,xxP,xxS,xxU,xxY)42T4435 | ||
| 2-pin(90W,20V)adapter(modelsCTO,xxE,xxF,xxJ,xxL,xxP,xxS,xxU,xxY)42T4439 |
Table45. Partslist—3-pinACadapters
| FRUFRUno.CRU | ID | |
| 3-pin(65W,20V)adapter(modelsCTO,xxA,xxB,xxG,xxH,xxK,xxM,xxQ,xxT,xxV)42T5283* | ||
| 3-pin(65W,20V)adapter(modelsCTO,xxA,xxB,xxG,xxH,xxK,xxM,xxQ,xxT,xxV)42T4421 | ||
| 3-pin(65W,20V)adapter(modelsCTO,xxA,xxB,xxG,xxH,xxK,xxM,xxQ,xxT,xxV)42T4417 | ||
| 3-pin(90W,20V)adapter(modelsCTO,xxA,xxB,xxG,xxH,xxK,xxM,xxQ,xxT,xxV)42T4425 | ||
| 3-pin(90W,20V)adapter(modelsCTO,xxA,xxB,xxG,xxH,xxK,xxM,xxQ,xxT,xxV)42T4429 | ||
| 3-pin(90W,20V)adapter(modelsCTO,xxA,xxB,xxG,xxH,xxK,xxM,xxQ,xxT,xxV)42T4433 | ||
| 3-pin(90W,20V)adapter(modelsCTO,xxA,xxB,xxG,xxH,xxK,xxM,xxQ,xxT,xxV)45N0068 |
Table46. Partslist—2pinACand3pinDCAdapters
| FRUFRUno.CRU | ID | |
| 2-pinAC(90W,100-240V)and3-pinDC(90W,10.5-18V)comboadapter(modelsCTO,xxE,xxF,xxJ,xxG,xxP,xxS,xxU,xxY) | 41R0140* |
Powercords
AThinkPadpowercordforaspecificcountryorregionisusuallyavailableonlyin thatcountryorregion:
Table47. Partslist—2-pinpowercords
| CountryorregionFRUno.CRU | ID | ||
| Argentina•models-CTO,xxY | 42T502042 | T5105* | |
| Brazil•models-CTO,xxP | 42T518042 | T5183 | |
| Canada,U.S.•models-CTO,xxF,xxL,xxS,xxU | 42T500842 | T5093 | |
| Japan•models-CTO,xxE,xxJ | 42T501442 | T5099 | |
Table48.Partslist—3-pinpowercords
| CountryorregionFRUno.CRU | ID | ||
| Australia,NewZealand•models-CTO,xxM | 42T505042 | T5135* | |
| Bangladesh,SriLanka,SouthAfrica•models-CTO,xxG | 42T505642 | T5141 | |
| Canada,U.S.•models-CTO,xxG,xxT | 42T500442 | T5089 | |
| China(P.R.C.)(otherthanHongKongS.A.R.)•models-CTO,xxC | 42T506542 | T5150 | |
| Denmark•models-CTO,xxG | 42T504142 | T5126 | |
| Europeancountries•models-CTO,xxG | 42T502942 | T5114 | |
| India•models-CTO,xxQ | 42T508342 | T5168 | |
| Israel•models-CTO,xxG | 42T506242 | T5147 | |
| Italy•models-CTO,xxG | 42T504742 | T5132 | |
| Korea•models-CTO,xxK | 42T507742 | T5162 | |
| Switzerland•models-CTO,xxG | 42T504442 | T5129 | |
| Taiwan•models-CTO,xxV | 42T507142 | T5156 | |
| U.K.,China(HongKongS.A.R.)•models-CTO,xxB,xxG,xxH | 42T503542 | T5120 | |
Recoverydiscs
WindowsXPProfessional(32bit)DVDs
WindowsXPProfessional(32bit)ispreinstalledastheoperatingsysteminthe followingmodels:
•2516-CTO
•2518-CTO,C3x,C5x,CAx,CCx,CEx,CRx,CSx,CWx,CXx,D2x,D3x,D6x,D7x,DAx,DBx,DEx,DFx,DJx,DKx,DNx,DPx,DSx,DTx,F4x
•2519-CTO
•2522-CTO,36x,38x,62x,63x
•2537-CTO,9Ax,9Bx,9Cx
•2538-CTO
•2539-CTO
Table49. Partslist—WindowsXPProfessional(32bit)recoveryDVDs
| LanguageP/NCRU | ID | |
| Arabic58Y4281* | ||
| BrazilianPortuguese58Y4282 | ||
| Danish58Y4284 | ||
| Dutch58Y4292 | ||
| English58Y4300 | ||
| English(modem-disabled) | 58Y4299 | |
| Finnish | 58Y4285 | |
| French | 58Y4286 | |
| German | 58Y4287 | |
| Hebrew | 58Y4288 | |
| Italian | 58Y4290 | |
| Japanese | 58Y4291 | |
| Norwegian | 58Y4293 | |
| Polish58Y4294 | ||
| Russian | 58Y4295 | |
| Russian(English-enabled) | 58Y4296 | |
| SimplifiedChinese | 58Y4283 | |
| Spanish | 58Y4297 | |
| Swedish | 58Y4298 | |
| TraditionalChinese(HongKongS.A.R.) | 58Y4289 |
WindowsVistaBusiness(32bit)DVDs
Windows Vista Business(32bit) is preinstalled as the operating system in the following models:
•2516-CTO
•2518-CTO
•2519-CTO
•2522-CTO
•2537-CTO
•2538-CTO
•2539-CTO
Table50. Partslist—Windows Vista Business(32bit) recovery DVDs
| LanguageP/NCRU | ID | |
| English58Y4301* | ||
| English(forIndia)58Y4853 |
Windows7HomeBasic(32bit)DVDs
Windows7HomeBasic(32bit)ispreinstalledastheoperatingsysteminthe followingmodels:
•2516-CTO,A2x,A3x,A4x,A5x,A7x,A9x,ACx,AFx,AHx,AJx,AKx,ALx,AMx
•2518-CTO,DUx,FYx,G3x
•2519-CTO,87x
•2522-CTO
•2537-CTO
•2538-CTO
•2539-CTO
Table51. Partslist—Windows7HomeBasic(32bit)recoveryDVDs
| LanguageP/NCRU | ID | |
| BrazilianPortuguese58Y4394* | ||
| English58Y4401 | ||
| English(forIndia)58Y4859 | ||
| Russian58Y4397 | ||
| Russian(English-enabled)58Y4396 | ||
| Serbian-Latin | 58Y4399 | |
| SimplifiedChinese | 58Y4395 | |
| Spanish58Y4398 | ||
| Turkish | 58Y4400 |
Windows 7 Home Premium (32 bit) DVDs
Windows7HomePremium(32bit)ispreinstalledastheoperatingsysteminthe followingmodels:
v 2516-CTO
v 2518-CTO,E9x,EDx,FSx,FUx,FWx,GLx
v 2519-CTO,82x,83x,84x,85x,89x
v 2522-CTO
v 2537-CTO
v 2538-CTO
v 2539-CTO
Table52. Partslist—Windows7HomePremium(32bit)recoveryDVDs
| Language P/N CRU | 1D | |
| BrazilianPortuguese58Y4402* | ||
| Danish58Y4405 | ||
| English58Y4419 | ||
| English(forIndia)58Y4860 | ||
| English(modem-disabled)58Y4418 | ||
| English,Finnish,andSwedish(inSweden) 58Y4421 | ||
| English,French,German,andDutch(inBelgiumandLuxemburg) 58Y4420 | ||
| English,French,German,andItalian(inSwitzerland) 58Y4422 | ||
| French | 58Y4406 | |
| German | 58Y4407 | |
| Hebrew | 58Y4408 | |
| Japanese | 58Y4410 | |
| Korean | 58Y4411 | |
| Norwegian | 58Y4412 | |
| Polish | 58Y4413 | |
| Russian | 58Y4415 | |
| Russian(English-enabled) | 58Y4414 | |
| SimplifiedChinese | 58Y4403 | |
| Spanish | 58Y4416 | |
| TraditionalChinese | 58Y4404 | |
| TraditionalChinese(HongKongS.A.R.) 58Y4409 | ||
| Turkish | 58Y4417 | |
Windows7HomePremium(64bit)DVDs
Windows7HomePremium(64bit)ispreinstalledastheoperatingsysteminthe followingmodels:
•2516-CTO
•2518-CTO
•2519-CTO
•2522-CTO
•2537-CTO
•2538-CTO
•2539-CTO
Table53. Partslist—Windows7HomePremium(64bit)recoveryDVDs
| LanguageP/NCRU | ID | |
| Czech58Y4506* | ||
| English58Y4521 | ||
| English(forIndia)58Y4865 | ||
| French58Y4507 | ||
| German58Y4509 | ||
| Greek | 58Y4508 | |
| Hungarian | 58Y4511 | |
| Japanese | 58Y4512 | |
| Polish58Y4513 | ||
| Portugese | 58Y4514 | |
| Romanian | 58Y4515 | |
| Serbian-Latin | 58Y4519 | |
| SimplifiedChinese | 58Y4505 | |
| Slovak | 58Y4516 | |
| Slovenian | 58Y4517 | |
| Spanish | 58Y4518 | |
| TraditionalChinese(HongKongS.A.R.) | 58Y4510 | |
| Turkish | 58Y4520 |
Windows7Professional(32bit)DVDs
Windows7Professional(32bit)ispreinstalledastheoperatingsysteminthe followingmodels:
•2516-CTO,A6x,A8x,AAx,ADx,AEx,AGx,ANx
•2518-CTO,C2x,C4x,C6x,C7x,C8x,C9x,CBx,CDx,CFx,CGx,CHx,CJx,CKx,CLx,CMx,CNx,CPx,CQx,CUx,CVx,CYx,CZx,D4x,D5x,D8x,D9x,DCx,DDx,DGx,DHx,DLx,DMx,DQx,DRx,DVx,DWx,DXx,DYx,DZx,E4x,E7x,ELx,EMx,ENx,EPx,EQx,ERx,ESx,EXx,EYx,EZx,F2x,F3x,F5x,F6x,FHx,FJx,FKx,FLx,FMx,FNx,FZx,G2x,G4x,G5x,G6x,GBx,GCx,GDx,GHx,GJx,GKx,GMx,GNx,GPx,GQx,GRx,GSx,GTx
•2519-CTO,86x,88x,8Ax,8Bx
•2522-CTO,30x,60x,22x,23x,24x,2Ax,2Bx,2Cx,2Dx,2Ex,2Fx,2Gx,2Hx,2Jx,2Kx,2Lx,2Mx,2Nx,2Px,2Qx,2Rx,2Sx,2Tx,2Ux,2Vx,2Wx,2Xx,2Yx,2Zx,32x,33x,34x,35x,37x,39x,3Ax,3Bx,3Cx,3Dx,3Ex,3Hx,3Jx,3Lx,3Qx,3Rx,3Sx,3Vx,3Wx,3Xx,44x,45x,46x,47x,25x,48x,49x,26x,4Ax,4Bx,52x,53x,54x,55x,56x,64x
•2537-CTO,22x,23x,24x,25x,26x,92x,93x,94x,95x,96x,97x,98x,99x,9Dx,9Ex,9Fx
•2538-CTO
•2539-CTO
Table54. Partslist—Windows7Professional(32bit)recoveryDVDs
| LanguageP/NCRU | ID | |
| BrazilianPortuguese58Y4304* | ||
| Czech58Y4307 | ||
| Danish58Y4308 | ||
| English58Y4330 | ||
| English(forIndia)58Y4856 | ||
| English(modem-disabled)58Y4329 | ||
| English,Finnish,andSwedish(inSweden)58Y4332 | ||
| English,French,German,andDutch(inBelgiumandLuxemburg)58Y4331 | ||
| English,French,German,andItalian(inSwitzerland)58Y4333 | ||
| French | 58Y4309 | |
| German | 58Y4311 | |
| Greek | 58Y4310 | |
| Hebrew | 58Y4312 | |
| Hungarian | 58Y4314 | |
| Italian | 58Y4315 | |
| Japanese | 58Y4316 | |
| Korean | 58Y4317 | |
| Norwegian | 58Y4318 | |
| Polish58Y4319 | ||
| Portuguese | 58Y4320 | |
| Romanian | 58Y4322 | |
| Russian | 58Y4323 | |
| Russian(English-enabled) | 58Y4321 | |
| Serbian-Latin | 58Y4327 | |
| SimplifiedChinese | 58Y4305 | |
| Slovak | 58Y4324 | |
| Slovenian | 58Y4325 | |
| Spanish | 58Y4326 | |
| TraditionalChinese | 58Y4306 | |
| TraditionalChinese(HongKongS.A.R.) | 58Y4313 | |
| Turkish | 58Y4328 |
Windows7Professional(64bit)DVDs
Windows7Professional(64bit)ispreinstalledastheoperatingsysteminthe followingmodels:
•2516-CTO,ABx
•2518-CTO,E8x,EAx,EBx,ECx,EEx,EFx,EGx,ETx,EUx,EVx,EWx,FDx,FEx,FFx,FGx,FQx,FTx,FVx,FXx,G7x,G8x,G9x,GEx,GFx,GGx
•2519-CTO
-2522-CTO,3Fx,3Gx,3Tx,3Ux,3Yx,3Zx,42x,43x
•2537-CTO
•2538-CTO
•2539-CTO
Table55. Partslist—Windows7Professional(64bit)recoveryDVDs
| LanguageP/NCRU | ID | |
| Czech58Y4425* | ||
| Danish58Y4426 | ||
| English58Y4447 | ||
| English(forIndia)58Y4862 | ||
| English,Finnish,andSwedish(inSweden)58Y4448 | ||
| English, French, German, and Italian (in Switzerland) | 58Y4449 | |
| French | 58Y4427 | |
| German | 58Y4429 | |
| Greek | 58Y4428 | |
| Hebrew | 58Y4430 | |
| Hungarian | 58Y4432 | |
| Italian | 58Y4433 | |
| Japanese | 58Y4434 | |
| Korean | 58Y4435 | |
| Norwegian | 58Y4436 | |
| Polish58Y4437 | ||
| Portugese | 58Y4438 | |
| Romanian | 58Y4440 | |
| Russian | 58Y4441 | |
| Russian(English-enabled) | 58Y4439 | |
| Serbian-Latin | 58Y4445 | |
| SimplifiedChinese | 58Y4423 | |
| Slovak | 58Y4442 | |
| Slovenian | 58Y4443 | |
| Spanish | 58Y4444 | |
| TraditionalChinese | 58Y4424 | |
| Traditional Chinese (Hong Kong S.A.R.) | 58Y4431 | |
| Turkish | 58Y4446 |
Commonservicetools
Table56. Partslist—Commonservicetools
| ToolP/N | |
| Screwdriverkit95F3598 | |
| 1/4"drivespinnerhandle1650840 | |
| 1/4"Sq.to1/4"hextorxadapter93F2838 | |
| TR7-TR-10tamperresistanttorxbits00P6967 | |
| RemovaltoolantennaRFconnector08K7159 | |
| USB2.0CD-RW/DVD-ROMcombodriveII40Y8687 | |
| USBcable40Y8704 | |
| USBfloppydiskettedriveformaintenancediskette05K9283 | |
| USBfloppydiskettedrivetoolkit27L3452 | |
| TestcardforintegratedSmartCard42W7820 | |
| LENOVOThinkPadHardwareMaintenanceDisketteVersion1.76orlaterNote:Download the file from the following Web site:http://www.lenovo.com/spn | — |
Notices
Lenovomaynotoffertheproducts, services, or features discussed in this document in all countries. Consult your local Lenovorepresentative for information on the products and services currently available in your area. Any reference to a Lenovo product, program, or service is not intended to state or imply that only that Lenovo product, program, or servicemaybe used. Any functionally equivalent product, program, or servicethat does not infringe any Lenovo intellectual property right maybe used instead. However, it is the user's responsibility to evaluate and verify the operation of any other product, program, or service.
Lenovomayhavepatentsorpendingpatentapplicationscoveringsubjectmatter describedinthisdocument. Thefurnishingofthisdocumentdoesnotgiveyou anylicensetothesepatents.Youcansendlicenseinquiries,inwriting,to:
Lenovo(UnitedStates), Inc.
1009ThinkPlace-BuildingOne
Morrisville, NC27560
U.S.A.
Attention: Lenovo Director of Licensing
LENOVOGROUPLTD.PROVIDESTHISPUBLICATION"ASIS"WITHOUT WARRANTYOFANYKIND,EITHEREXPRESSORIMPLIED,INCLUDING,BUT NOTLIMITEDTO,THEIMPLIEDWARRANTIESOFNON-INFRINGEMENT, MERCHANTABILITYORFITNESSFORAPARTICULARPURPOSE.Some jurisdictionsdonotallowdisclaimerofexpressorimpliedwarrantiesincertain transactions,therefore,thisstatementmaynotapplytoyou.
This information could include technical inaccuracies in typographical errors. Changes are periodically made to the information herein; these changes will be incorporated in new editions of the publication. Lenovomay make improvements and/or changes in the product(s) and/or the program(s) described in this publication at any time without notice.
Theproductsdescribedinthisdocumentarenotintendedforuseinimplantation orotherlifesupportapplicationswheremalfunctionmayresultininjuryordeath topersons.Theinformationcontainedinthisdocumentdoesnotaffectorchange Lenovoproductspecificationsorwarranties.Nothinginthisdocumentshall operateasanexpressorimpliedlicenseorindemnityundertheintellectual propertyrightsofLenovoorthirdparties.Allinformationcontainedinthis documentwasobtainedinspecificenvironmentsandispresentedasan illustration.Theresultobtainedinotheroperatingenvironmentsmayvary.
Lenovomayuseordistributeanyoftheinformationyousupplyinanywayit believesappropriatewithoutincurringanyobligationtoyou.
Anyreferencesinthispublicationtonon-LenovoWebsitesareprovidedfor convenienceonlyanddonotinanymannerserveasanendorsementofthoseWeb sites. ThematerialsatthoseWebsitesarenotpartofthematerialsforthisLenovo product, anduseofthoseWebsitesisatyourownrisk.
Any performed data contained herein was determined in a controlled environment. Therefore, the result obtained in other operating environments may
varysignificantly. Somemeasurementsmayhavebeenmadeondevelopment-level systemsandthereisnoguaranteethatthesemeasurementswillbethesameon generallyavailablesystems. Furthermore, somemeasurementsmayhavebeen estimatedthroughextrapolation. Actualresultsmayvary. Usersofthisdocument shouldverifytheapplicabledatafortheirspecificenvironment.
Trademarks
The following terms are trademark of Lenovo in the United States, other countries or both:
ActiveProtectionSystem
Lenovo®
RescueandRecovery ®
ThinkLight®
ThinkPad®
ThinkVantage®
TrackPoint®
Ultrabay
UltraNav®
IBM ^® (usedunderlicense)istrademarkoftheInternationalBusinessMachines CorporationintheUnitedStates,othercountries,orboth:
The following terms are trademark of Microsoft Corporation in the United States, other countries, or both:
Windows ^® WindowsVista ^®
The following terms are trademark of Intel Corporation or its subsidiaries in the United States, other countries, or both:
Intel ^® Intel ^® Centrino ^® Intel ^® Core
Othercompany,product,orservicenamesmaybethetrademarksorservicemarks ofothers.
ThinkPad
PartNumber:63Y0535
(1P) P/N: 63Y0535