B683 - Router HUAWEI - Free user manual and instructions
Find the device manual for free B683 HUAWEI in PDF.

User questions about B683 HUAWEI
0 question about this device. Answer the ones you know or ask your own.
Ask a new question about this device
Download the instructions for your Router in PDF format for free! Find your manual B683 - HUAWEI and take your electronic device back in hand. On this page are published all the documents necessary for the use of your device. B683 by HUAWEI.
USER MANUAL B683 HUAWEI
- The following illustrations are provided for your reference only. For details about the model you selected, please examine the actual device to determine where features are located.
- Check the information about the product and its accessories when you purchase it. Some accessories are not provided in the packaging box. If required, please contact your local dealer purchase them.
- This guide briefly describes the functions of the device. For details about how to set the management parameters, see the Help on the Web management page.
Getting to Know Your Device
Application Scenarios
Your computer or a Wi-Fi device can connect to the Internet through this device. The specific connection steps depend on Wi-Fi device or your computer's operating system; please follow specific steps to commence operation.

flowchart
graph TD
    A["Smart Phone"] --> B["USB Cable"]
    C["Game Machine"] --> B
    D["Laptop"] --> B
    B --> E["Computer"]
Appearance
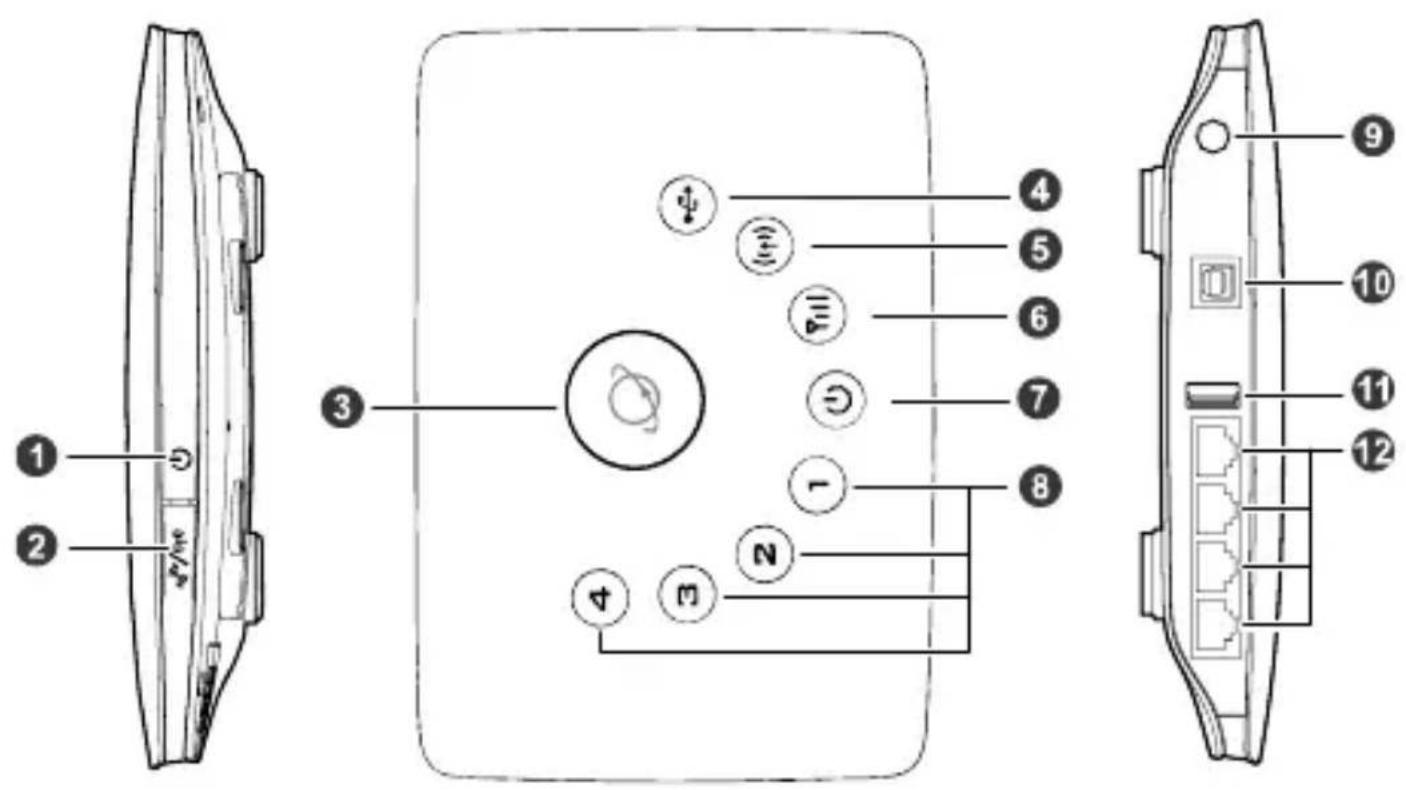
text_image
Diagram of a device rear panel with labeled components and internal wiring, showing front, side, and top views with numbered labels.- Power button
- Wi-Fi/WPS button
- Dial-up button
- USB indicator
- Wi-Fi/WPS indicator
-
Network status indicator
-
Power indicator
- LAN indicators
- External antenna port
- Power port
- USB port
- LAN ports
Note:
• LAN indicators correspond to LAN ports.
• Wi-Fi: Wireless Fidelity
• WPS: Wi-Fi Protected Setup
• LAN: Local Area Network
Indicators
| Indicator | Status |
 USB indicator USB indicator | Steady on: USB storage device connectedOff: USB storage device not connected |
 Wi-Fi/WPS indicator Wi-Fi/WPS indicator | Steady on: Wi-Fi activated or data transfer in progressBlinking: Establishing a WPS connectionOff: Wi-Fi not activated |
 Network status indicator Network status indicator | Red, fast-blinking: Faulty SIM card (SIM card not inserted or malfunctioned, or PIN verification failed)Yellow, steady on: Successfully registered to the networkGreen, steady on: Connected to the InternetOff: No signal |
 Power indicator Power indicator | Steady on: Device turned onOff: Device turned off |
 LAN indicators LAN indicators | Steady on: Network cable connectedBlinking: Data transfer in progressOff: Network cable not connected |
PC Configuration Requirements
Recommended PC configurations are as follows:
• CPU: Pentium 500 MHz or higher
• Memory: 128 MB RAM or higher
- Hard disk: 50 MB disk space available
- Operating system: Windows 2000, Windows XP, Windows Vista, or Windows 7
- LCD resolution: At least 800 x 600 pixels. A resolution of 1024 x 768 pixels is recommended
- Web browser: Microsoft Internet Explorer 6, Internet Explorer 7, or Internet Explorer 8, Firefox 3.5 or 3.6, Safari 3.0, Opera 10.5, or Chrome 5.1
Installation
Installing the SIM Card
Attention: Before inserting or removing the SIM card, please power off and unplug the device.
Remove the card cover. Slide the SIM card into the card slot with the golden contact facing downward. Replace the card cover.

text_image
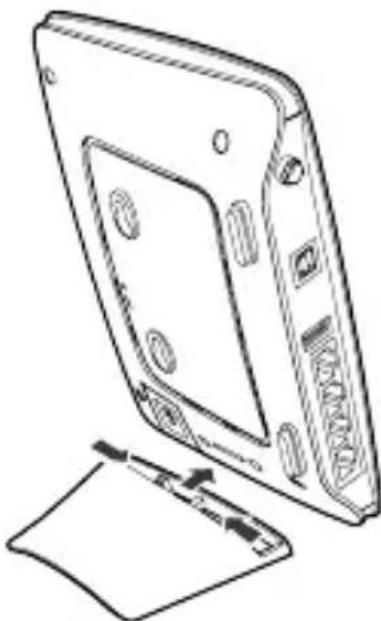
Diagram showing three labeled components (①, ②, ③) of a device with internal components and directional arrows indicating assembly or transformation.(Optional) Installing the Table Stand
Your device can be placed horizontally, be placed upright with the use of a table stand, or hung on the wall. Place your device on a surface well above the floor or near a window, so it can receive a strong signal.
Insert the latches on the table stand into the slots on the back of the device. The table stand allows the device to stand on a flat surface like a table or desk. See the following figures.
natural_image
Line drawing of a device rear panel with buttons and a paper holder (no text or symbols)Note: To avoid the interference caused by radio signals, place the device at least 1 meter (3.28 feet) away from other electrical devices.
(Optional) Installing the External Antenna
Connect the external antenna to the device's external antenna port. Install the antenna securely by screwing it completely into the antenna jack.
You need to first set the antenna mode to external on the management page (http://192.168.1.1). For details, see Help on the management page.

natural_image
Line drawing of a wireless router with antenna and ports (no text or symbols)Note:
- If you do not need to connect an external antenna, you can skip this step.
- The external antenna can be used indoor only.
- While a data transfer is in progress, you are unable to switch between the internal antenna and the external antenna.
Connecting the Device to a PC Using an Ethernet Cable
If the indicator for the LAN port to which the Ethernet cable is connected is on, the connection is active. The network cable connecting to the PC must not be longer than 100 meters (328 feet).
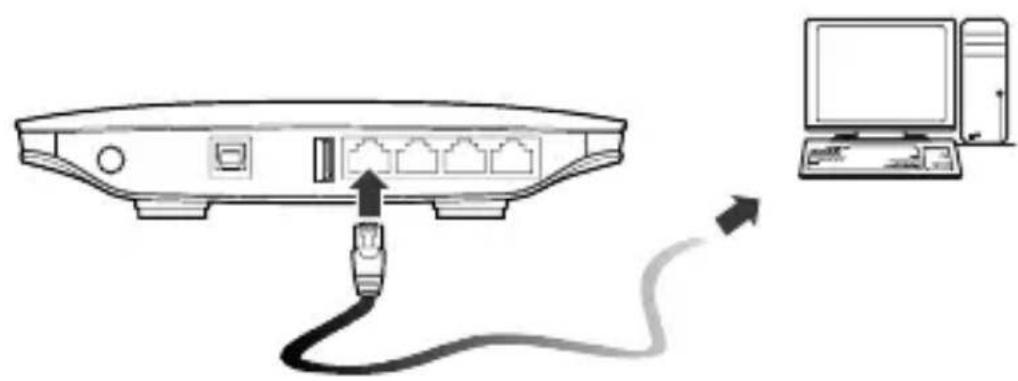
natural_image
Diagram showing a router connected to a computer via cable, with an arrow indicating the connection (no text or symbols present)Connecting the Device to a USB Disk, Mobile Disk, or USB Printer
Your device can be connected to a USB disk, mobile disk, or USB printer through the USB port.
Attention: The USB port provides only 500 ~mA of current.
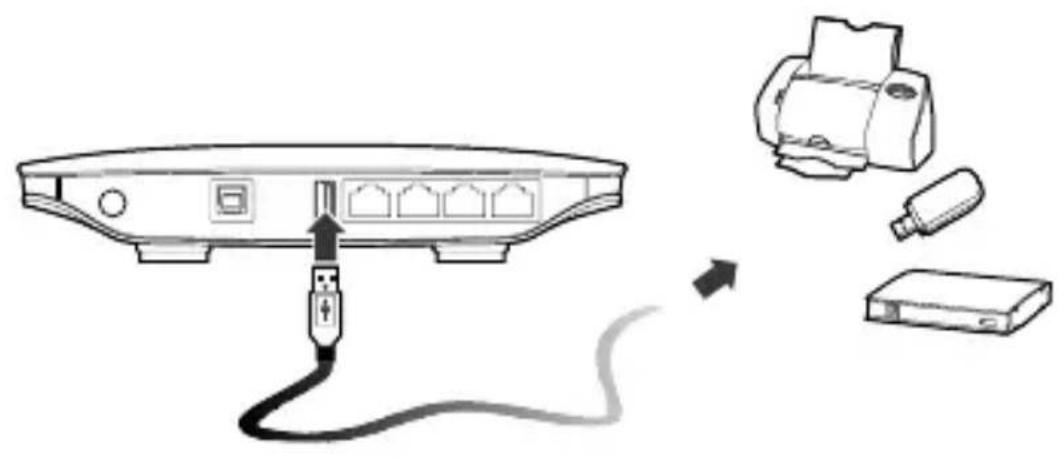
text_image
Diagram showing connection between a router and printer with USB cable, illustrating the process from port to printer.Connecting the Power Supply
Attention: Use a power adapter that is compatible with the device or else the device may be damaged.

text_image
Diagram showing connection between a power outlet and a network device with labeled ports and cable routingPowering On/Off the Device
- After connecting the power supply, the device will power on automatically.
- Press and hold ⏻ until all indicators turn off to power off the device.
- Press and hold ⏻ until all indicators turn on to power on the device.
Setting Up Wireless Connection
Step 1. Activating Wi-Fi
• After the device is powered on, Wi-Fi is activated by default.
- Press and hold 电^2 / (1)) for 2 seconds, and then stop the press. Then, (1)) is off, which indicates that Wi-Fi is deactivated.
- Press and hold ^i / (t) until (t) is steady on to activate Wi-Fi.
Step 2. Establishing a Wi-Fi Connection
Establishing a Wi-Fi Connection (Using a PC as an Example)
Note: Before establishing a Wi-Fi connection, you must ensure that your computer is equipped with a wireless network adapter. If it is clear that the computer has a wireless network connection, then the wireless network adapter can be used. Otherwise, you must ensure that the wireless network adapter is functioning properly.
- Make sure that (t) is steady on.
- View available wireless network connections on your PC.
- Connect to the wireless network connection consistent with your device's SSID.
Note:
- If the wireless network has security mechanism, you must enter the correct network key.
- The SSID and password are printed on the device label.
(Optional) Establishing a WPS Connection
If the Wi-Fi device to which your device connects supports WPS, a password is generated automatically; there is no need to enter it. To set up the WPS connection, do as follows:
- Make sure that (1) is steady on.
- Activate WPS on your device.
Note: Press and hold ^2/(19)e^2 until (17) is blinking to activate WPS.
- Activate WPS on the client.
Note: For details about operations on the client, see the user guide of the client.
Accessing the Internet
After a connection between your device and the client is active, you use the following modes to access the Internet.
Attention: Please select a proper Internet connection mode according to your network charges. For example, if you are using time-based service, Manual mode is recommended. Please consult your network operator for network charges.
| Mode | Operation |
| Auto After the device is powered up, no matter if there is data transmission or not, it will be connected to the Internet, and won't disconnect automatically. | |
| Manual | Press and hold  until until  is steady on in green.The Internet connection is active.After you are logged in to the management page, you can connect or disconnect using your interface prompt. is steady on in green.The Internet connection is active.After you are logged in to the management page, you can connect or disconnect using your interface prompt. |
| On Demand | After the device is powered up, and there is data transmission, it will automatically connect to the Internet.If there is no data transmission within the set time, the device will automatically disconnect from the Internet. |
Using the Management Page
You can set and manage the device parameters through the management page.
- Launch a web browser and enter http://192.168.1.1 in the address bar.
- Enter the password and click Login.
Note:
- The default password is admin.
- To protect your device, only allow one user to log in to the management page at the same time.
Restoring Factory Defaults
If you become uncertain of which parameters you have set or changed, you can restore the factory defaults which the device came with and set the parameters again.
RESET: Use a sharply pointed object to press and hold the RESET button until all indicators ( ), 1 and 3 are blinking. The device will automatically restart after the factory defaults are successfully restored.
Note: Restoring factory defaults removes all personal configurations and resets all configurations on the management page to their default values.

text_image
RESETFriendly Tips
If you are unable to use your device normally, do as follows:
• See Help on the management page.
- Restart the device.
- Restore the device to factory defaults.
- Contact your service provider.
Copyright © Huawei Technologies Co., Ltd. 2011. All rights reserved.
THIS DOCUMENT IS FOR INFORMATION PURPOSE ONLY, AND DOES NOT CONSTITUTE ANY KIND OF WARRANTIES.
Version: V100R001_03 Part Number: 96720310