Prodigy - Media player Xtreamer - Free user manual and instructions
Find the device manual for free Prodigy Xtreamer in PDF.

User questions about Prodigy Xtreamer
0 question about this device. Answer the ones you know or ask your own.
Ask a new question about this device
Download the instructions for your Media player in PDF format for free! Find your manual Prodigy - Xtreamer and take your electronic device back in hand. On this page are published all the documents necessary for the use of your device. Prodigy by Xtreamer.
USER MANUAL Prodigy Xtreamer
text_image
Xtreamer Media Player & Streamer User Manual Xtreamer Prodigy Ver.3.0.1.Xtreamer Media Player & Streamer
User Manual
Xstreamer Prodigy Ver.3.0.1.
Introduction
Congratulations on your purchase of the Xtreamer Prodigy media player, a state-of-the-art consumer electronic device that will enrich your home multimedia experience.
Xtreamer Prodigy is a new generation Realtek based media player equipped with enhanced top quality hardware commonly used in high-end computing and consumer electronic solution. It has an additional memory, USB 3.0 slave connection for high-speed data transfer, GB LAN and can be equipped with one 3.5" HDD.
With Xstreamer Prodigy media player you can bring your movies, music and images to your living room, get rid of that bulky DVD collection, access hundreds of internet feeds and channels, check your favorite online services and social nets, browse the web, use Android applications and so on.
This is the first media player that incorporates the full 3D support. Enjoy a full movie theater experience at home.
In Xstreamer Prodigy we also introduce Android 2.2.1 support opening you to the wide world of thousands of Android applications.
Due to the rapid development of our product we cannot possibly guarantee that this Guide will include all its features. So if you have questions please feel free to browse the Xstreamer Knowledge base or contact our staff.
Please make sure to visit our site www.xstreamer.net for the Xstreamer news, official announcements and firmware upgrade.
Table of contents
Page 5 – Hard Drive installation and connections
Page 11 – Remote Control Functions
Page 15 – Main Menu and Settings
Page 28 – Basic Functions
Movie, music and image playback
Page 36 – Advanced Functions
Internet, Android, Playlists etc
Page 43 – Network Setup
Page 47 – NFS Shortcut setup
Page 52 – Settings up Network Shares
Page 75 – Prodigy Bit-Torrent client
Page 78 – Android App installation
Page 83 – Firmware Upgrade and Emergency Procedure
Page 87 – Useful Links
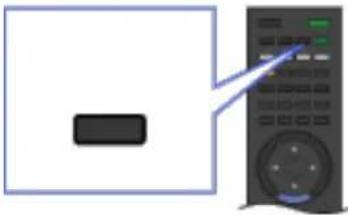
text_image
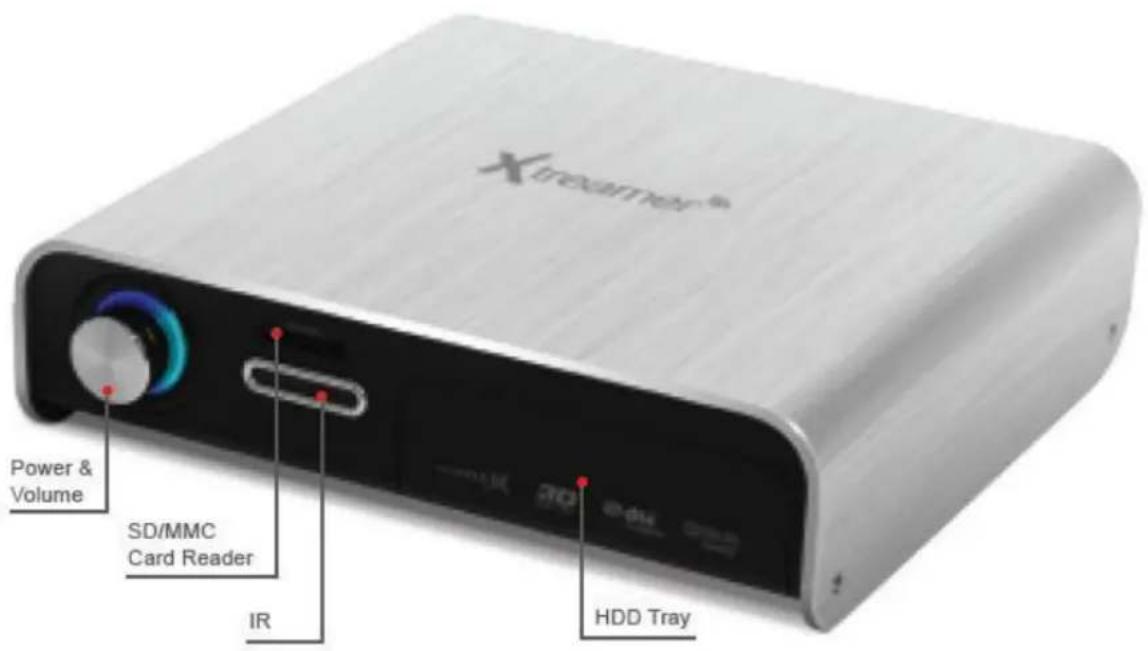
Xireamer® Power & Volume SD/MMC Card Reader IR 3D e du HDD Tray
text_image
USB2.0 Host USB3.0 Slave Composite/ Component Power Optical/ Coaxial Giga LAN HDMI
text_image
xtreamer Media Player & Streamer ConnectionsConnections
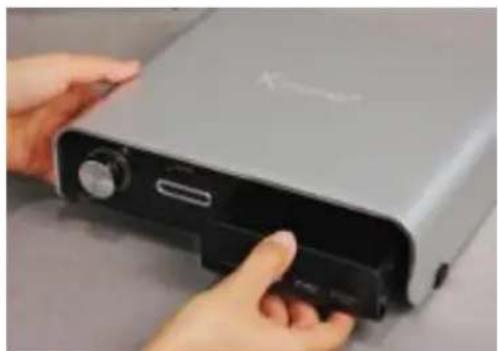
Hard-Disk Installation
natural_image
Close-up of hands holding a device with a black clip, no visible text or symbols- Open the hard disk cover on the front panel
natural_image
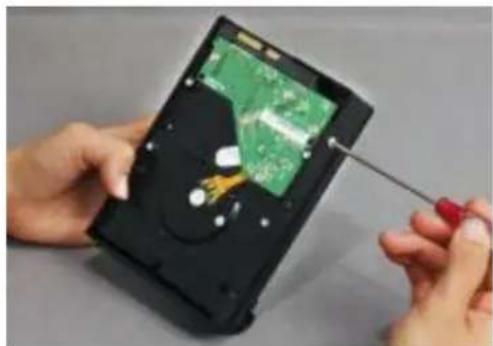
Close-up of hands using a screwdriver to adjust or install a green circuit board on a black hard disk (no text visible)- Connect the HDD guard to an HDD as shown on the picture. Fasten the screws.
natural_image
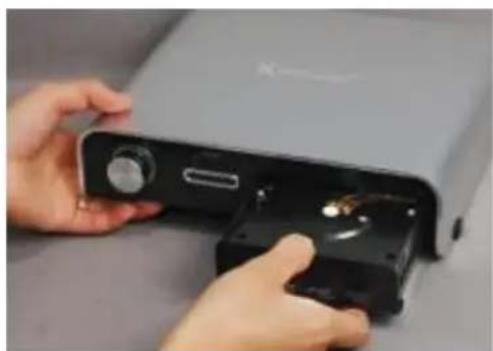
Close-up of hands holding a device with a close-up view of the internal components (no visible text or symbols)- As shown here, slowly and carefully push the HDD guard together with the HDD into the main body of Xtreamer Prodigy.
Connections
Video & Audio Output Connections
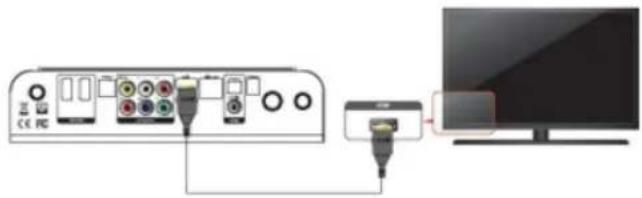
• HDMI cable connection
natural_image
Diagram showing connection between a computer monitor and an audio device via cable (no text or symbols visible)Connect HDMI cable to HDMI terminal at the back of product. Connect the remaining cable terminal to HDMI terminal at the back of a digital TV. Make sure to carefully distinguish between input and output terminals.
• Composite cable connection
Connection
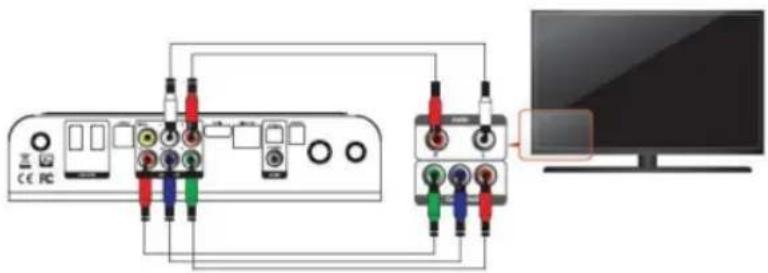
- Component cable connection
text_image
Diagram showing connections between a device interface and a monitor, with colored wires labeled for audio or signal processing.Connect the green, blue and red terminal cables to the Xtreamer Prodigy and TV in accordance with the color scheme; connect white AV cable to L terminal, and red AV cable to R terminal. (Component cable is an optional item)
English
Connection
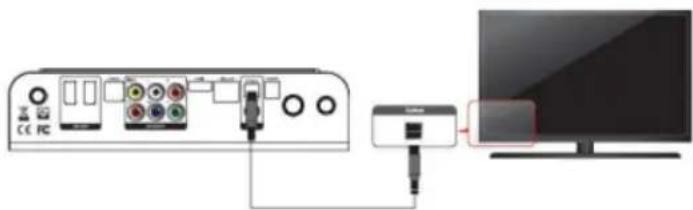
• Optical cable connection
natural_image
Diagram showing connection between a device and a monitor, with no visible text or symbolsYou can enjoy high-quality 5.1CH sound when connected to an amplifier or a receiver with optical cable. Connect optical cable to Optical port on Xstreamer Prodigy as shown above. Then, connect to an amplifier or a receiver. (Optical cable is optional)
• Coaxial cable connection
English
Connection
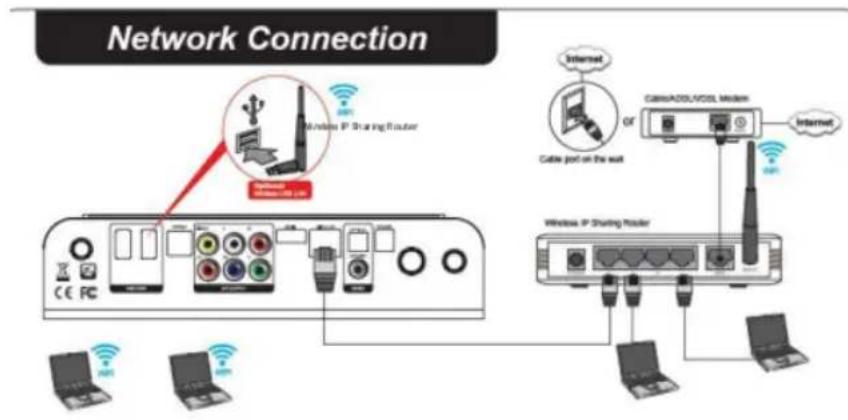
Connect to the Network
• Wired and Wireless Network
text_image
Network Connection Wireless IP Sharing Router CE PC Wireless IP Sharing Router Cable port on the wall Cable/ADSL/CDL medium Internet Internet OR Internet Laptops Laptops LaptopsEnglish

text_image
xtreamer Media Player & Streamer Remote FunctionsRemote Functions
Remote Control Functions

text_image
REC F1 F2 F3 F4 1 2 3 ASD DIRECT DELETE 4 5 6 JOSM STOP MENU 7 8 -9 SETUP HOME TVSAT 0 REFRESH BELOW BOOKMARK i IINS RETURN ENTER + HOME VOLUME - RADIO SHELLE RVD PAD SHELLY RESET AUTO LED SHOP HONG AMGIC SAUTE MOLEC PE CYC CNT ELECT TUE UN SEACH xtreamer®General Remote Control Functions
| POWER | Power on / off | |
 | ||
 | Page mode in browser, special functions | |
 | Bookmarks, playlist, special functions | |
 | Address bar input, special functions | |
 | Special functions, playlist operations | |
 | ||
 | ||
| ADD |  | Add |
| EJEC |  | Eject for DVD |
| DELI | [YXBX] | Delete |
| [ZBCD] | To enlarge and reduce screen/ repeatedly pressing for adjusting zooming percentage/moving to position of enlarged output by using direction keys./ Setup the X,Y position on screen | |
| ZOO |  | |
 | ||
| GOT | [2XX6] | To select file in the same title or to execute shortcut to the already designated chapter position/shortcut to the desired time position |
| [KBX4] | ||
| MEN |  | Opens a list of available functions in Media Library and during playback, allows access to DVD menu. |
| [2WOT] | Function available when playing media file or using menu's in VIDEO IN screen to display various setup screens | |
| SETUP |  | |
| FUN |  | Opens a list of available file functions in Media Library |
| TVOC |  | Toggle Video Output Modes and resolution (HDMI, AV) - double press |
 | ||
| REFRESH | Refreshes the lists | |
| PRE |  | To turn on/ off preview screen automatically displayed in media play file search mode |
 | ||
| BOOKMARK | Supports adding a file to bookmark and to show bookmark lists | |
 | Info |

General Remote Control Functions
| RETURN | Return to previous screen | |
 | NAVIGATION KEYS | To move the cursor and select files |
| ENTER | To confirm selection / play. When used to play a file toggles single-file playback. | |
| PLAYPAUSE | To play and pause a selected file. When used toggles consecutive (file-by-file) playback. | |
| STOP | To stop playback | |
| HOME | To return to the Main Menu. | |
| PGUP | To move to previous chapter or file (list) | |
| PGDN | To move to next chapter or file (list) | |
| VOLUME | Volume adjustment | |
| AUDIO | Option to change or select multiple audio tracks | |
| SUBTITLE | Opens Subtitle browser | |
 | RWD/FWD | 1.5x/2x/4x/8x/16x/32x speed, function available in movie files, mp3 as well sound output available in 2x speed |
 | SHUFFLE | To change play sequence to shuffle |
 | REPEAT | To repeat file in play or to repeat all media files in the corresponding folder |
 | A-B | To set zone repetition |
 | LED | Turns On/Off LED part of Xtreamer |
| SLEEP | Can be used to set the timer to turn off the player | |
 | 16:9 | Screen shifts into 16:9/16:10/4:3 ratio during playback |
| ANGI | Used if Angle is supported in a DVD file. | |
| MUTB | Mutes the sound | |
| NTSC | Change output to NTSC | |
| PAL | Change output to PAL | |
 | SYNC SUBTITLE | Adjust subtitle files to synch with a movie file(100ms/ 0.1sec) |
| EJ [7BDY] | Eject disc | |
| TITLE | Go to title menu (DVD-Video) | |
 | URL | This function will be supported in the future. |
SE  | This function will be supported in the future. |

text_image
Xtreamer® Media Player & Streamer Main Menu and Settingstreamer
Media Player & Streamer
Main Menu and Settings
Main Menu

text_image
Xtreamer Media Player & Streamer Nov 14 05:47 PM | VER 3.0.0 | IP: 192.168.123.37 Shortcuts Playlist Favourite History Media Library Android App Settings SearchFavorites
Under FAVORITES you can find the shortcuts to the files and folders you added to your Favorites list as well as the playlists you created
History
HISTORY tab gives you a quick access to the Recently Played and Recently Added files.
Media Library
MEDIA LIBRARY is your getaway to the contents of your local storage and the network.
Android
ANDROID tab is your conduit to the wide and exciting world of Android OS with its tens of thousands of applications.
Enjoy advanced web browsers, file managers, Internet Radio, online feeds and channels, reading documents, browsing Google maps and a more. Download and install new apps.
App
APP screen give you access to the built-in Internet applications and the Web-Browser
Settings
And finally SETTINGS which are very intuitive and user-friendly and allow you to easily configure your device to suit all your multi-media needs.
Basic Setup
1. Adjusting output mode with TV output and Video output
- Automatically adjust the TV output mode when connected via HDMI cable. Cycle through available resolutions.
Remote Control Key: TVOUT 9 // Press 2 times consecutively
- . Connect Component / Composite cable Please note that video might suffer when connected via analogue.
Remote Control Key: TVOUT 9 // Press 2 times consecutively
Different regions use different output standards:
-- PAL(B) : HDMI Auto, 576P 50Hz, 720P 50Hz, 1080i 50Hz, 1080P 50Hz Europe, South Africa, Middle East, China, Austria, India
-- NTSC : HDMI Auto, 480P 60Hz, 720P 60Hz, 1080i 60Hz, 1080P 60Hz Korea, Japan, US, Canada, Taiwan, Philippines, Colombia
2. Select OSD language menu (default : English)
Select the OSD language. Setting → Look and Feel → Menu Language → Select
3. Select Subtitle\ID3-Tag encoding(default : Unicode(UTF8))
Select the subtitle code. Setting → Look and Feel → Text Encoding → Select.
4. Select Audio Output.
Select the audio setting according to your audio system.
HDMI Outut
Setting → Audio → HDMI Output → Select
SPDIF Output
Setting → Audio → SPDIF Output → Select
Settings
Video

text_image
Video Audio Network System Configuration System Service Firmware Upgrade Look and Feel Search and Indexing HDMI Auto 1080P 24HZ Aspect Ratio Brightness Contrast Hue Saturation 16:9 25 25 25 25 Nov 14 05:49 PM | VER 3.0.0 | IP: 192.168.123.37TV System
You will be able to select proper display resolution and video output type.
| PAL (B) (50Hz) | Europe, Greenland, South Africa, the Middle East, China, Austria, India, Indonesia. |
| NTSC (60Hz) | Korea, the USA, Japan, Canada, Taiwan, the Philippines, Colombia. |
| Display Resolution | HDMI Auto / NTSC / PAL / 480P / 576P / 720P 50Hz / 720P 60Hz / 1080i 50Hz / 1080i 60Hz / 1080P 50Hz / 1080P Supported.※ In some cases, display resolution on your TV can not be supported due to inactivity; therefore, you should check your TV specification. |
text_image
HDMI Auto NTSC PAL 480P 576P 720P 50Hz 720P 60Hz 1080i 50Hz 1080i 60Hz1080P 24Hz
This feature allows you 1080P 24Hz output when playing Blu-ray files (BD); however, this function is only available when Xstreamer is connected using a HDMI cable to a TV that supports 24Hz frame rate.

Note for 1080p 24p
- TV, AV amp and media file you use must support 1080P 24Hz and your media file should be encoded 1080P 23.976fps.
- If video isn't properly played by selecting [ON], you will be required to select [Off].
- The initial TV screen can be flickering when you switch on "1080P 24Hz" mode
Settings
Video
text_image
TV System 1080P 24Hz Aspect Ratio Brightness Contrast Hue Saturation 1080i 50Hz On Off Pan Scan 4:3 Letter Box 4:3 16:09 16:10 25 25Aspect Ratio
You will be able to select Aspect Ratio type of movie screen for playback.
| PanScan 4:3 | 16:9 Ratio converted to 4:3 Ratio is referred to as high definition TV. It will reduce scan lines to 4:3. |
| LetterBox 4:3 | 16:9 Ratio converted to 4:3 Ratio is referred to as your TV. It will decompress image to 4:3. |
| 16:9 | Video is fully displayed in 16:9 DVD frame as well as 4:3 Ratio fully displayed. |
| 16:10 | It enables you to add letterboxing bars above and below video screen, meanwhile, your TV maintains its aspect ratio of 16:9, e.g. 16:9=1920x1080 / 16:10=1920x1200. |
Brightness
Brightness in video refers to the luminance portion of a video signal. It enables you to use Increase Brightness and Decrease Brightness commands by pressing [SETUP] button on your remote during playback.
Contrast
Allow you to adjust video contrast when using Increase Contrast and Decrease Contrast commands by pressing [SETUP] button on your remote during playback.
Hue
This option provides how to use the Hue adjustment to enhance your colors. Along the way, you will be able to use Increase Hue and Decrease Hue commands by pressing [SETUP] button on your remote during playback.
Saturation
This feature, saturation is one of three coordinates in the HSL and HSV color spaces. It enables you to use Increase Saturation and Decrease Saturation commands by pressing [SETUP] button on your remote while playback.
Settings
Audio
text_image
Audio Here you can configure your Xtreamer Audio related options and features. HDMI Output 2.1CH SPDIF Output 2.1CH Night Mode Comfort On Off Nov 14 05:49 PM | VER 3.0.0 | IP: 192.168.123.37HDMI Output
Select a desired configuration for your digital audio output.
SPDIF output
Select a desired configuration for your optical audio output.

text_image
HDMI Output SPDIF Output Night Mode 2.1CH 2.1CH 5.1CHNight Mode
| Off | Outputting raw sound. |
| On | It provides high-definition audio that is identical to, and every bit as spectacular as, the master recording. In spite of decreasing volume, you will be able to experience incredible surround sound that puts you right in the middle of the action without disturbing others. |
| Comfort | You will be able to hear every tiny sound in rich detail as well as comfortable sound levels solely for you. |
Settings
Network
text_image
Video Audio Network System Configuration System Service Firmware Upgrade Look and Feel Search and Indexing Network Here you can configure your Xtreamer Network related options and features. Wired Network 192.168.123.37 DHCP Wireless Network --- Off Device Name Prodigy Wired Lan Setup: Wireless Setting IP Address: 192.168.123.37 Off Subnet Mask: 255,255 255.0 Default Gateway: 192.168.123.254 DNS server IP address: 127.0.0.1 MAC Address: 00.CE.39.B4.FA.11 Nov 14 05:49 PM | VER 3.0.0 | IP: 192.168.123.37Set up Wired or Wireless Network
On the Settings -> Network screen you can setup your Xstreamer Prodigy to connect to your home network. You can use Wired or Wireless connection and give your Xstreamer a specific name under which it will appear on your Network.
Refer to the dedicated section of this guide (or refer to this article) for setting up network on Xstreamer Prodigy.
Accessing your Computer
Please note that in order to access your home computer you will need to set up Shared folders. Check the dedicated section below.
If you want learn how to setup shortcuts to NFS shares on Xstreamer Prodigy, please refer to the dedicated section (refer to this guide).
Settings
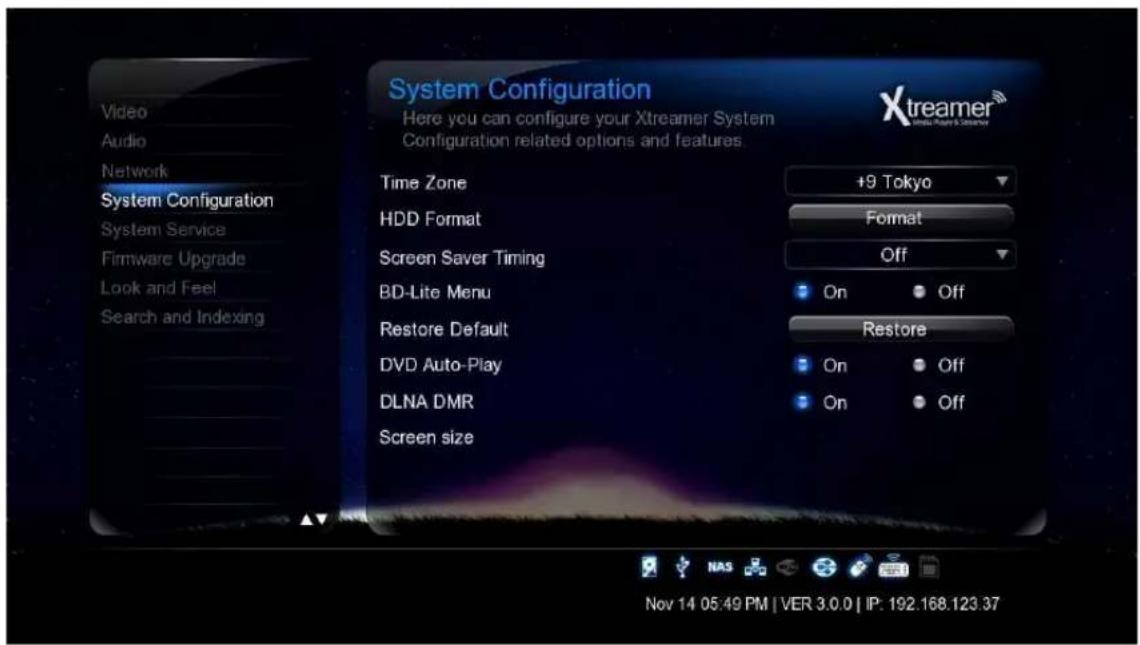
System Configuration

text_image
System Configuration Here you can configure your Xtreamer System Configuration related options and features. Time Zone +9 Tokyo HDD Format Format Screen Saver Timing Off BD-Lite Menu On Off Restore Default Restore DVD Auto-Play On Off DLNA DMR On Off Screen size Nov 14 05:49 PM | VER 3.0.0 | IP: 192.168.123.37Time Zone
Time zone selected time zone of Xstreamer. Select your time zone.
HDD Format
This feature supports internal HDD format function. Formatted file system is divided into Linux Swap partition and NTFS partition. By auto formatting, Linux swap partition is an independent section of hard disk used solely for swapping. The swap space is the amount of virtual memory available.
Screen Saver Timing
This is to set the time for automatic changing images on your screen during periods of user inactivity. Screensaver is designed to prevent phosphor burn-in on the LCD TV when the properties of the exposed areas of phosphor-coating on the inside of the screen gradually and permanently change, eventually leading to ghost image on the screen.
BD-Lite Menu
This feature toggles limited BD menu when playing a BD ISO file.
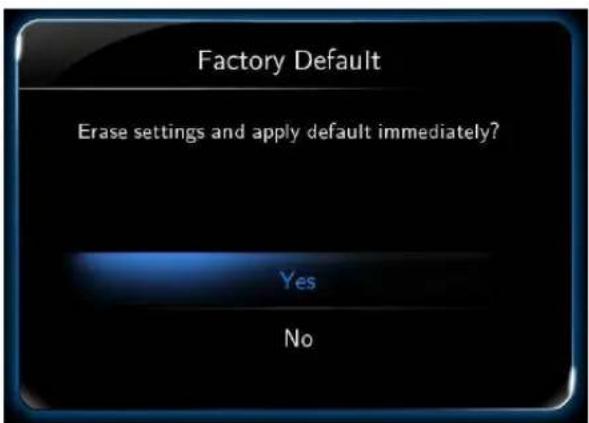
Factory Default
This option restores your player to the factory defaults. It will clear all the personal settings including passwords, favorites, custom skins etc.
- Using this option will not damage the data on your HDD
- Always reset your settings after a firmware upgrade
Settings
System configuration
text_image
System Configuration Here you can configure your Xtreamer System Configuration related options and features. Time Zone +9 Tokyo HDD Format Format Screen Saver Timing Off BD-Lite Menu On Off Restore Default Restore DVD Auto-Play On Off DLNA DMR On Off Screen size Nov 14 05:49 PM | VER 3.0.0 | IP: 192.168.123.37DVD Autoplay
The feature allows you to select automatic DVD play mode when inserting a DVD disk into the DVD ROM connected to your player via USB port
OFF
DVD Disk isn't automatically played
ON
DDVD Disk is automatically played.
DLNA DMR
Turn it on to automatically connect to DLNA devices
Screen size
Press ENTER button to adjust your video output to the size of your TV
text_image
Factory Default Erase settings and apply default immediately? Yes NoSettings
System Service
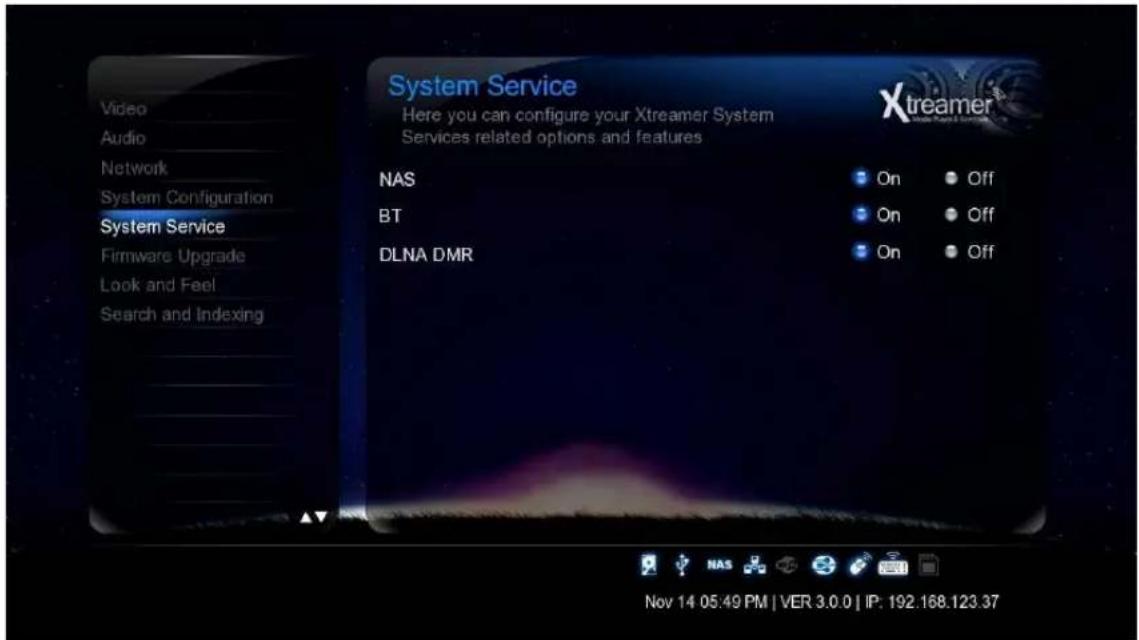
text_image
System Service Here you can configure your Xtreamer System Services related options and features Xtreamer® Video Audio Network System Configuration System Service Firmware Upgrade Look and Feel Search and Indexing NAS BT DLNA DMR On Off On Off On Off Nov 14 05:49 PM | VER 3.0.0 | IP: 192.168.123.37NAS - Network Drive(SAMBA)
Allows you to use your player as a NAS device on your network.
NAS network drive provides storing and copying files services.
BT
Use it to enable built-in bit-torrent client.
The client can by accessed from your computer via a browser program by typing Prodigy's internal IP/cgiuni
For more information please refer to the Bit-Torrent section of this guide.
DLNA DMR
This option enables DLNA service.

Note
If an option is not frequently used we recommend disabling it to reserve the memory and for security reasons.
Settings
Firmware Upgrade

text_image
Firmware Upgrade Here you can configure your Xtreamer Firmware Updates related options and features. System Firmware ( Current version 3.0.0 ) USB upgrade Check for Firmware Nov 14 05:50 PM | VER 3.0.0 | IP: 192.168.123.37Upgrading your Firmware
Under System Firmware you can see your current firmware version.
You can download the latest firmware file from our main site and install it Manually.
Check below for details.
IMPORTANT
Every Xstreamer media player has its own specific firmware. Please make sure you download the correct file before running the upgrade procedure.
Emergency Firmware
Emergency firmware can be a great help for de-bricking an unresponsive unit and fixing various problems. The procedure can be found here.
Settings
Look and Feel

text_image
Look and Feel Here you can configure your Xtreamer Look & Feel related options and features. Menu Language English Text Encoding 한어(EUC-KR) Resume Play On Key Tone Volume 3 Nov 14 05:50 PM | VER 3.0.0 | IP: 192.168.123.37Menu Language
You can specify UI language and enjoy operating the Xstreamer in you native language.
Text Encoding
You can specify the language used in subtitle files and ID3-tag in Mp3 files. Unicode [UTF-8] is an industry standard, and is set as default. If you are not using Unicode encoded files, select your preferred language.
Resume Play
You can begin playing Xstreamer from the point where you previously stopped it. Your system saves a record of the scene that was playing when you stopped playback so it knows where to resume playing.
Key Tone Volume
Use this option to regulate the sound the player makes when you are pressing the remote buttons.
Settings
Search and Indexing

text_image
Video Audio Network System Configuration System Service Firmware Upgrade Look and Feel Search and Indexing Search and Indexing Here you can configure your Xtreamer DB related options and features Auto scan Scan storage On Off Rescan storage Nov 14 05:50 PM | VER 3.0.0 | IP: 192.168.123.37Easily find your Media files
Scan your local storage for media files on your local storage devices in order to be able to find them easily in the Media Library.
Use Automatic scan or press Rescan Storage to manually update the database.
Note: When Auto scan is enabled the player might take some additional time loading the system.

text_image
xtreamer Media Player & Streamer Basic FunctionsMedia Library
Using Media Sources
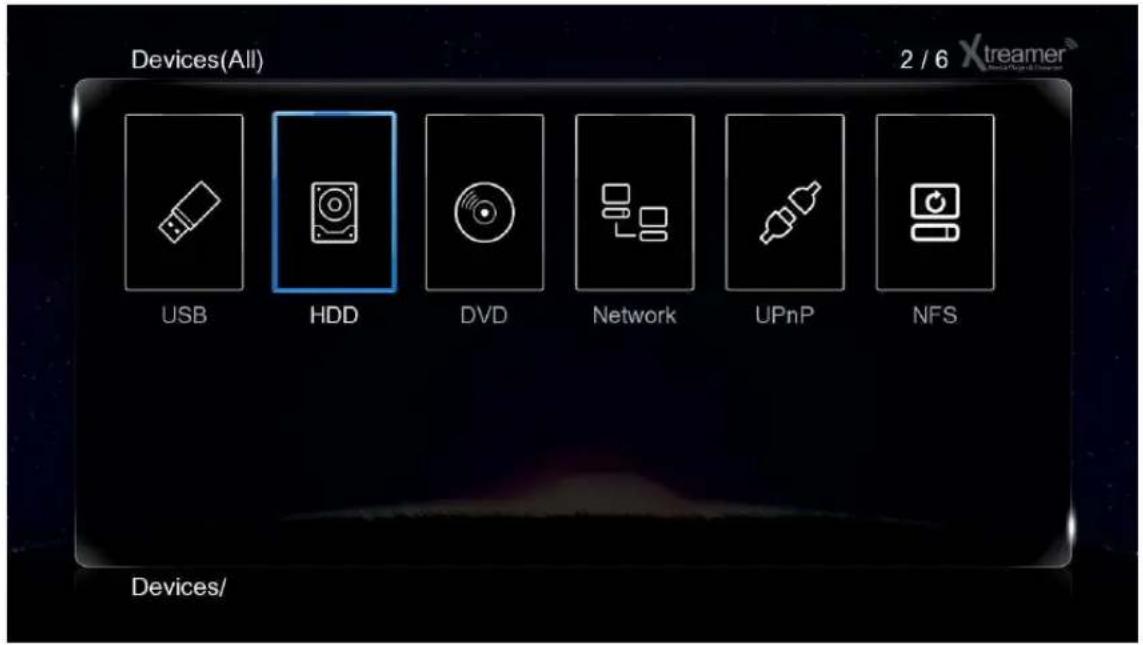
text_image
Devices(All) 2 / 6 Xtreamer USB HDD DVD Network UPnP NFS Devices/General remote functions in the Media Library
Cursor keys – use them to navigate the Media sources.
ENTER – to make a selection or to play a file.
MENU (6) – open a list of viewing options, file filtering, 3D playback functionality, Add to favorites feature, setup NFS shares, slideshow timing and effects, background music for image viewing and much more.
FUNC – this key provides you with the function of a file manager and creation of playlists.
RETURN – returns to the parent directory or the main screen
HOME – returns you to the main menu.
Play Movies

text_image
BigBuckBunny[DivX7]1080p H.264, AAC 5.1 Surround, AA... Audio: AAC 5.1ch 48KHz Title: 01/01 Chapter: 01/01 Video: H264 1920x1080 24.00fps Size: 507 MB 00:00:14:00 00:10 00:09:56Most control buttons are the same as everywhere else: Play, Pause, Stop, Fast-Forward, Next and so on.
Info button opens an time-bar with a relevant information about the file you are playing (see the picture above)
While watching a movie press MENU (6) to open a list of options including an access to subtitles browser, GOTO menu, repeat options, audio channels and, in relevant cases, a 3D options menu.

text_image
Subtitle... Audio... Go to Repeat Title Repeat All Repeat Off Video Setting Upload to YouTube Share to FacebookPlay Movies

text_image
DTS-MA 7.1 Introduction.m2ts Audio: DTS HD 5.1ch 48KHz Title: 01/01 Chapter: 01/01 Video: H264 1920x1080 29.98fps Size: 131 MB 00:00:23/00:00:29 00:00:48You can use LEFT and RIGHT cursor to skip – press ENTERT to jump to a desired location.
ZOOM button to enlarge the picture.

text_image
THE PEACH OPEN MOVIE PROJECT PRESENTSAudio button is used to switch between different audio channels and tracks.
Play Movies
Subtitles button will open the subtitles browser that will allow you to customize the way your subtitles look on TV and switch the subtitles file if needed. It allows you to open an external file, change the color or the font, outline, change the size and encoding etc.

text_image
ABC Chinese Off English French German Italian Polish *ABC: 0 A 20 -ABC- 0 ABC SChinese iGB TChinese iB... Western Turkish Central Euro... Greek A abc
text_image
I don't think so. You?
text_image
ABC OFF French German Italian Polish VABC1 49 37 1000 ABC NEW CNT 2015 SI 8 (20) 2015 PROFESSIONAL TOM: 191622 AVENUE: 2015 UNLESS: 1000 A (Howling wind)GOTO button provides additional options for navigation.
- Title: It shows movie title lists and change playback file.
- Chapter: It provides moving to next (or previous) Chapter.
- Time: It provides moving to the point where you want to start from.

text_image
Time · 00 · 00 · 16 00:00:16/00:00:16 Title · 001 /001 Chapter · 001 /001 00:00:48Play Movies. 3D playback
Xstreamer Prodigy is the first media player to support full 3D home experience.
Please remember that you might need to enable 3D playback on you TV in order to enjoy it. Use 3D button on your remote or the TV set.
Use MENU button on Xstreamer Prodigy remote for additional options.
natural_image
Illustration of a monitor with control buttons and a play button, no text or symbols present
text_image
ILVERL IMAL BESubtitle...
Audio...
Go to
Repeat Title
√ Repeat Off
2D
3D
Video Setting
Upload to YouTube
Share to Facebook

natural_image
Two-panel image showing a person in motion with confetti falling, one wearing a red and green flag, the other in a white costume (no text or symbols visible)Subtitle...
Audio...
Go to
Repeat Title
Repeat All
√ Repeat Off
√ 2D
3D simulation
3D Side By Side
3D Top Bottom
Video Setting
Upload to YouTube
Share to Facebook
Play Music
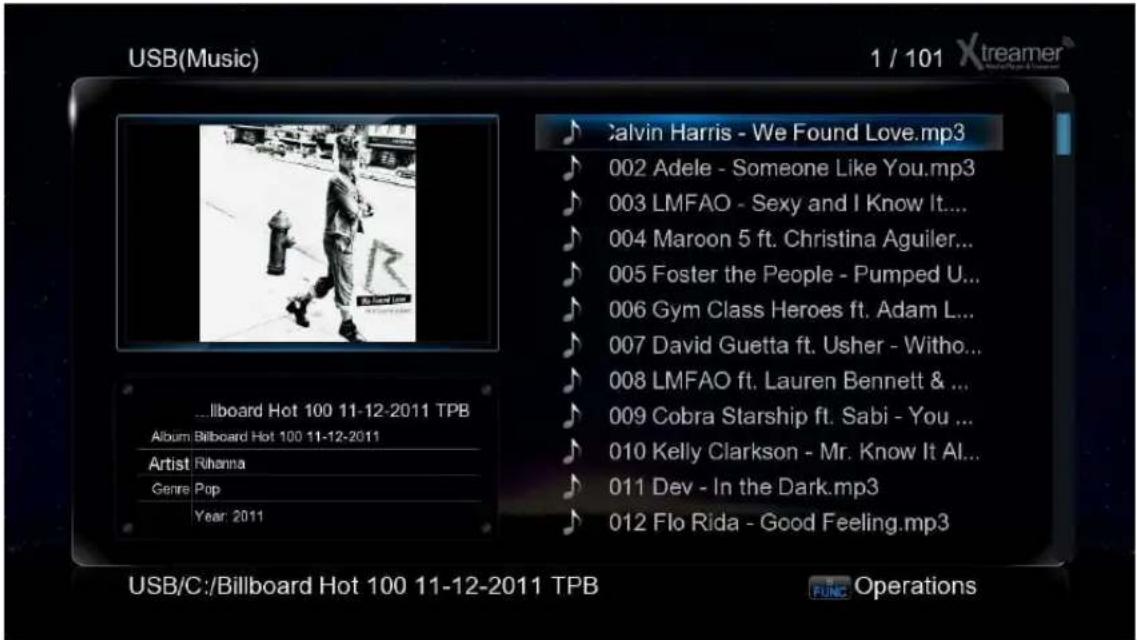
text_image
USB(Music) 1 / 101 Xtreamer ...llboard Hot 100 11-12-2011 TPB Album: Billboard Hot 100 11-12-2011 Artist: Rihanna Genre: Pop Year: 2011 Calvin Harris - We Found Love.mp3 002 Adele - Someone Like You.mp3 003 LMFAO - Sexy and I Know It... 004 Maroon 5 ft. Christina Aguiler... 005 Foster the People - Pumped U... 006 Gym Class Heroes ft. Adam L... 007 David Guetta ft. Usher - Witho... 008 LMFAO ft. Lauren Bennett & ... 009 Cobra Starship ft. Sabi - You ... 010 Kelly Clarkson - Mr. Know It Al... 011 Dev - In the Dark.mp3 012 Flo Rida - Good Feeling.mp3 USB/C:/Billboard Hot 100 11-12-2011 TPB FUNC OperationsWhile playing music press MENU (6) to open a list of options including repeat options such as play once, repeat all and so on.
Press SHUFFLE to toggle random playback.
Start the playback to initiate music jukebox.

text_image
1/100 Harris - We Found L 002 Adele - S... 003 LMFAO - S... 004 Maroon 5 ... 005 Foster th... 006 Gym Class... 007 David Gue... 000:00:15 0:00:35 REPEAT ALL REPEAT 1 SHUFFLE Now Playing 001 Rihanna ft. Calvin Harris Rihanna Billboard Hot 100 11-12-201* 2011 II PAUSE NEXT BACK FFWD FWD Xtreamer®You can use Cursor keys to navigate or regular command buttons such as Play, Pause, Fast-forward etc.
Press RETURN to go back to the media library file list.
Play Photo
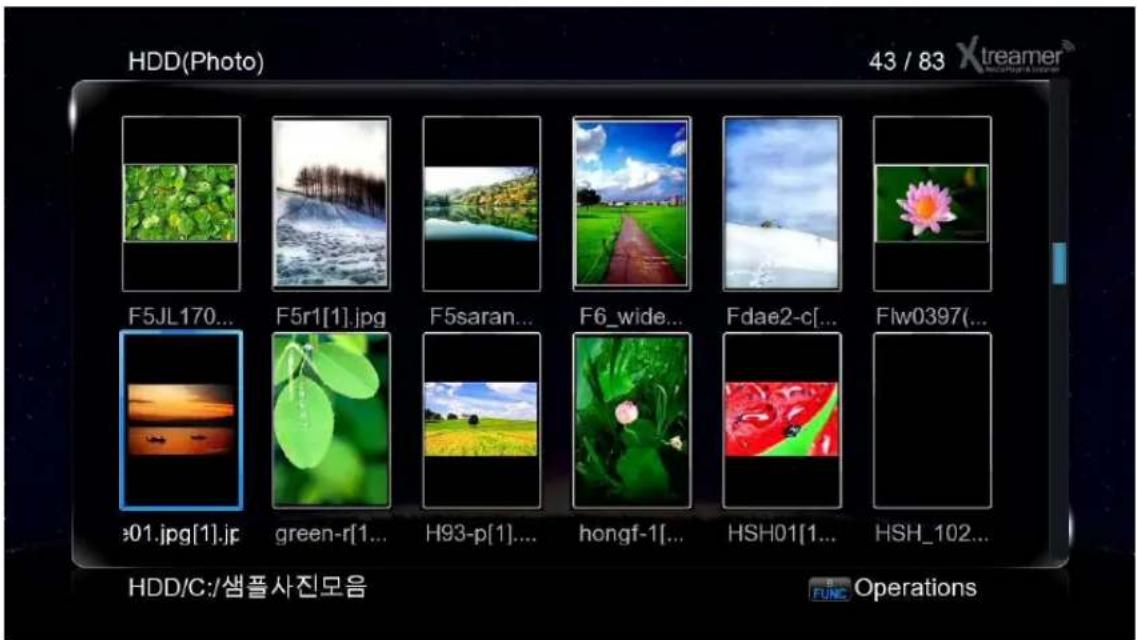
text_image
HDD(Photo) 43 / 83 Xtreamer F5JL170... F5r1[1].jpg F5saran... F6_wide... Fdae2-c[... Flw0397(... #01.jpg[1].jp green-r[1... H93-p[1]... hongf-1[... HSH01[1... HSH_102... HDD/C:/샘풀사진모음 OperationsUse MENU key to toggle view mode options.
To start a Slideshow open a file (ENTER or PLAY) and press MENU of a list of advanced options.
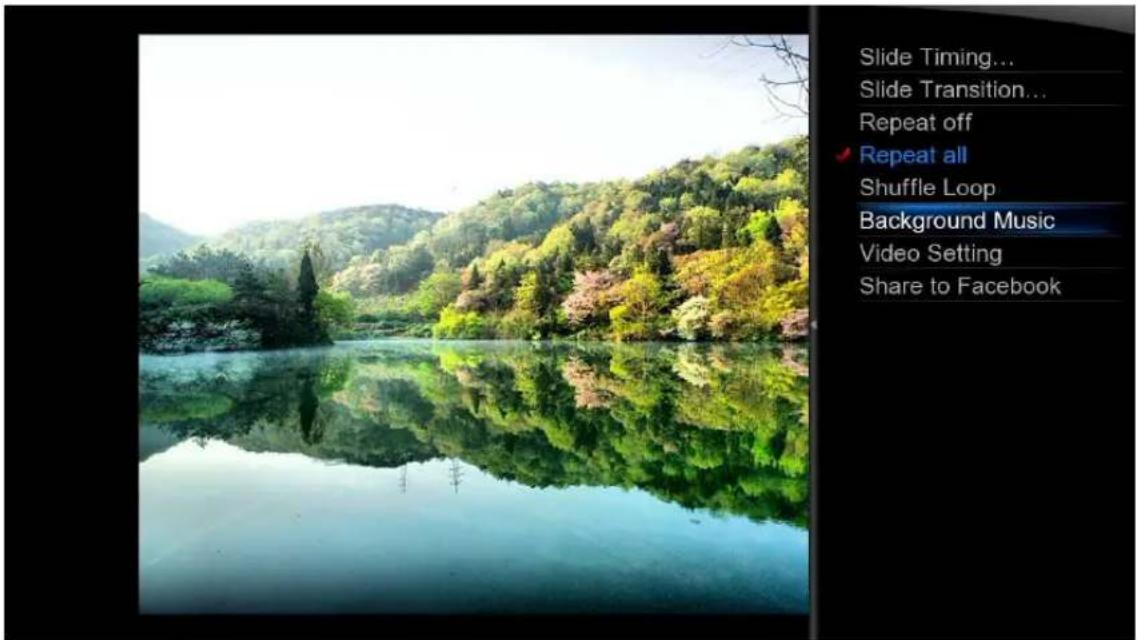
text_image
Slide Timing... Slide Transition... Repeat off ✓ Repeat all Shuffle Loop Background Music Video Setting Share to Facebook- You can set up the time intervals your images will be displayed using Slide Timing.
- Slide Transition lets you to setup transition effects
- Background music allows you to specify audio tracks for your Slideshow.

text_image
xtreamer Media Player & Streamer Advanced FeaturesDisplaying Cover art
In Media Sources (the library) the corresponding image files stored in the file folders will be displayed if the Preview or Thumbnail modes are activated.

text_image
HDD(All) 1 / 15 Xtreamer 2012 All good 1... Apollo18 Avatar Big Mom... Bridesm... Cars 2 Harry Po... Priest Skyline Star Trek The Eye HDD/C:/Sample Movie Operations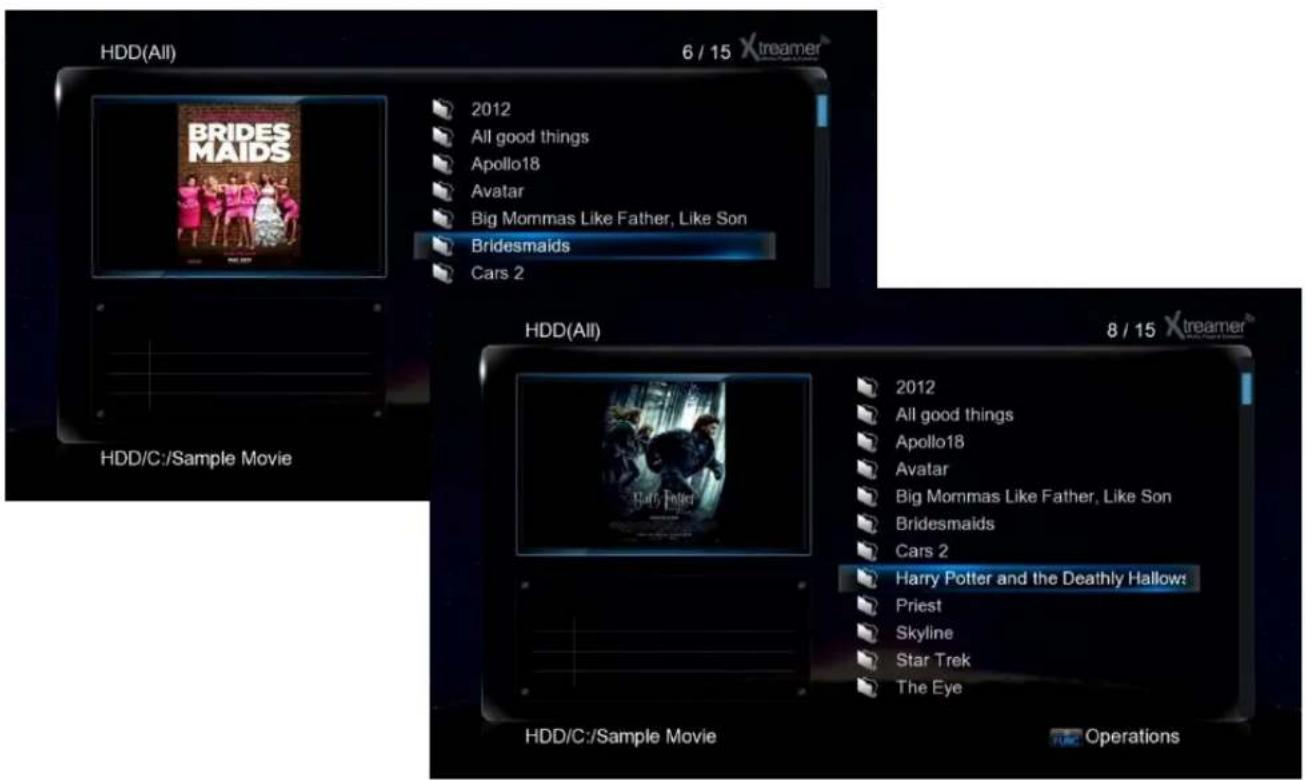
text_image
HDD(All) 6 / 15 Xtreamer BRIDES MAIDS 2012 All good things Apollo18 Avatar Big Mommas Like Father, Like Son Bridesmaids Cars 2 HDD/C:/Sample Movie HDD(All) 8 / 15 Xtreamer 2012 All good things Apollo18 Avatar Big Mommas Like Father, Like Son Bridesmaids Cars 2 Harry Potter and the Deathly Hallows: Priest Skyline Star Trek The Eye HDD/C:/Sample Movie OperationsSame the cover art file as folder.jpg in a relevant folder.
For additional information and tips please refer to this article.
Creating a playlist
You can use self-made M3U playlists on Xstreamer Prodigy. Just make sure that the paths are relative. You can also setup and save multiple playlists via Xstreamer user interface.

text_image
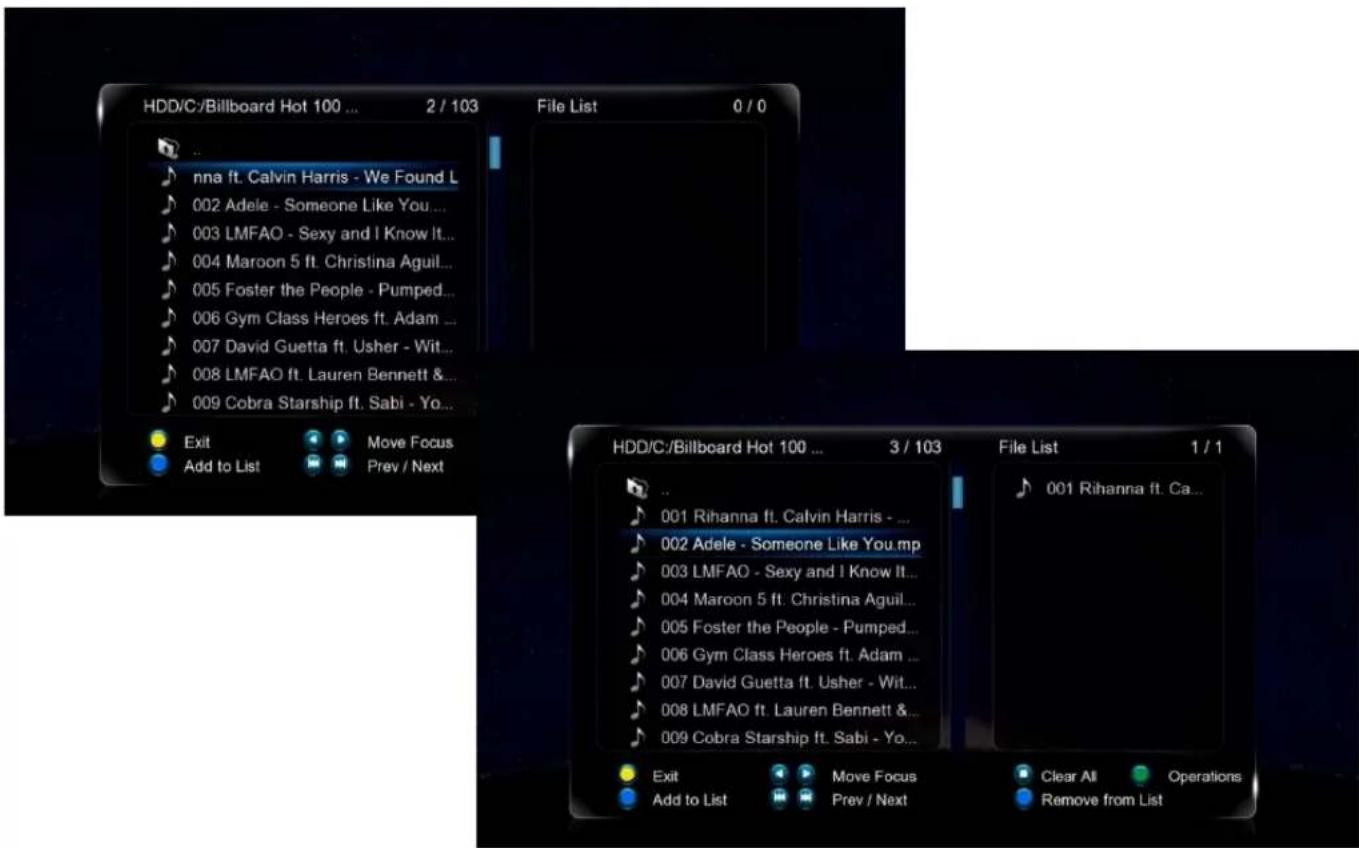
HDD(All) 001 Rihanna ft. Calvin Harris - We Found Love.mp3 002 Adele - Someone Like You.mp3 003 LMFAO - Sexy and I Know It.mp3 004 Maroon 5 ft. Christina Aguilera - Moves Like Jagger.mp3 005 Foster the People - Pumped Up Kicks.mp3 006 Gym Class Heroes ft. Adam Levine - Stereo Hearts.mp3 007 David Guetta ft. Usher - Without You.mp3 008 LMFAO ft. Lauren Bennett & GoonRock - Party Rock Anthem.m... 009 Cobra Starship ft. Sabi - You Make Me Feel...mp3 010 Kelly Clarkson - Mr. Know It All.mp3 011 Dev - In the Dark.mp3 012 Flo Rida - Good Feeling.mp3 HDD/C:/Billboard Hot 100 11-12-2011 TPB FUNC OperationsPress FUNC button while in media library and choose Multiple Select

text_image
HDD(All) 001 Rihanna ft. Calvin Harris - We Found Love.mp3 002 Adele - Someone L 003 LMFAO - Sexy and 004 Maroon 5 ft. Christ 005 Foster the People 006 Gym Class Heroes 007 David Guetta ft. U 008 LMFAO ft. Lauren 009 Cobra Starship ft. 010 Kelly Clarkson - M 011 Dev - In the Dark.r 012 Flo Rida - Good Fe File Editing Copy Delete Move Rename Edit Playlist Edit Photo Album Send to Buddy Multiple Select Jagger.mp3 Hearts.mp3 JPty Rock Anthem.m... .mp3 HDD/C:/Billboard Hot 100 1 FUNC OperationsCreating a playlist
Use the BLUE button to add files to the playlist (or to remove from the list)
text_image
HDD/C-/Billboard Hot 100 ... 2 / 103 File List 0 / 0 .. nna ft. Calvin Harris - We Found L 002 Adele - Someone Like You... 003 LMFAO - Sexy and I Know It... 004 Maroon 5 ft. Christina Aguil... 005 Foster the People - Pumped... 006 Gym Class Heroes ft. Adam ... 007 David Guetta ft. Usher - Wit... 008 LMFAO ft. Lauren Bennett & 009 Cobra Starship ft. Sabi - Yo... Exit Move Focus Add to List Prev / Next HDD/C-/Billboard Hot 100 ... 3 / 103 File List 1 / 1 .. 001 Rihanna ft. Calvin Harris - ... 002 Adele - Someone Like You.mp 003 LMFAO - Sexy and I Know It... 004 Maroon 5 ft. Christina Aguil... 005 Foster the People - Pumped... 006 Gym Class Heroes ft. Adam ... 007 David Guetta ft. Usher - Wit... 008 LMFAO ft. Lauren Bennett & 009 Cobra Starship ft. Sabi - Yo... Exit Move Focus Clear All Operations Add to List Prev / Next Remove from List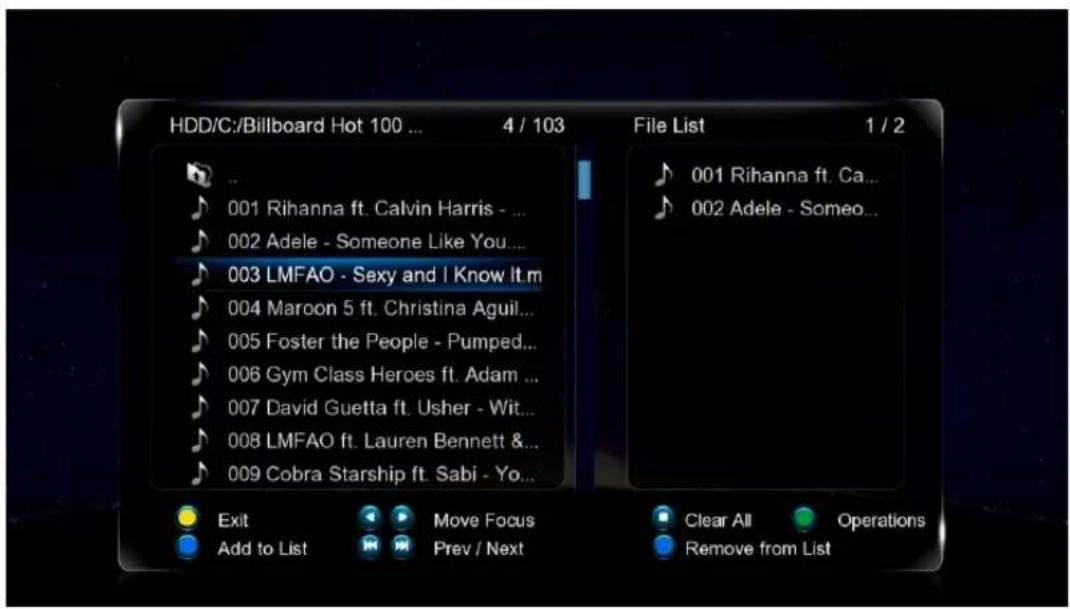
text_image
HDD/C:/Billboard Hot 100 ... 4 / 103 File List 1 / 2 001 Rihanna ft. Ca... 002 Adele - Someone... 003 LMFAO - Sexy and I Know It.m 004 Maroon 5 ft. Christina Aguil... 005 Foster the People - Pumped... 006 Gym Class Heroes ft. Adam ... 007 David Guetta ft. Usher - Wit... 008 LMFAO ft. Lauren Bennett & 009 Cobra Starship ft. Sabi - Yo... Exit Move Focus Clear All Operations Add to List Prev / Next Remove from ListPress FUNC button again once you are done.
Creating a playlist
Navigate to Save Playlist and press ENTER. Pick a name for your new playlist and press OK.
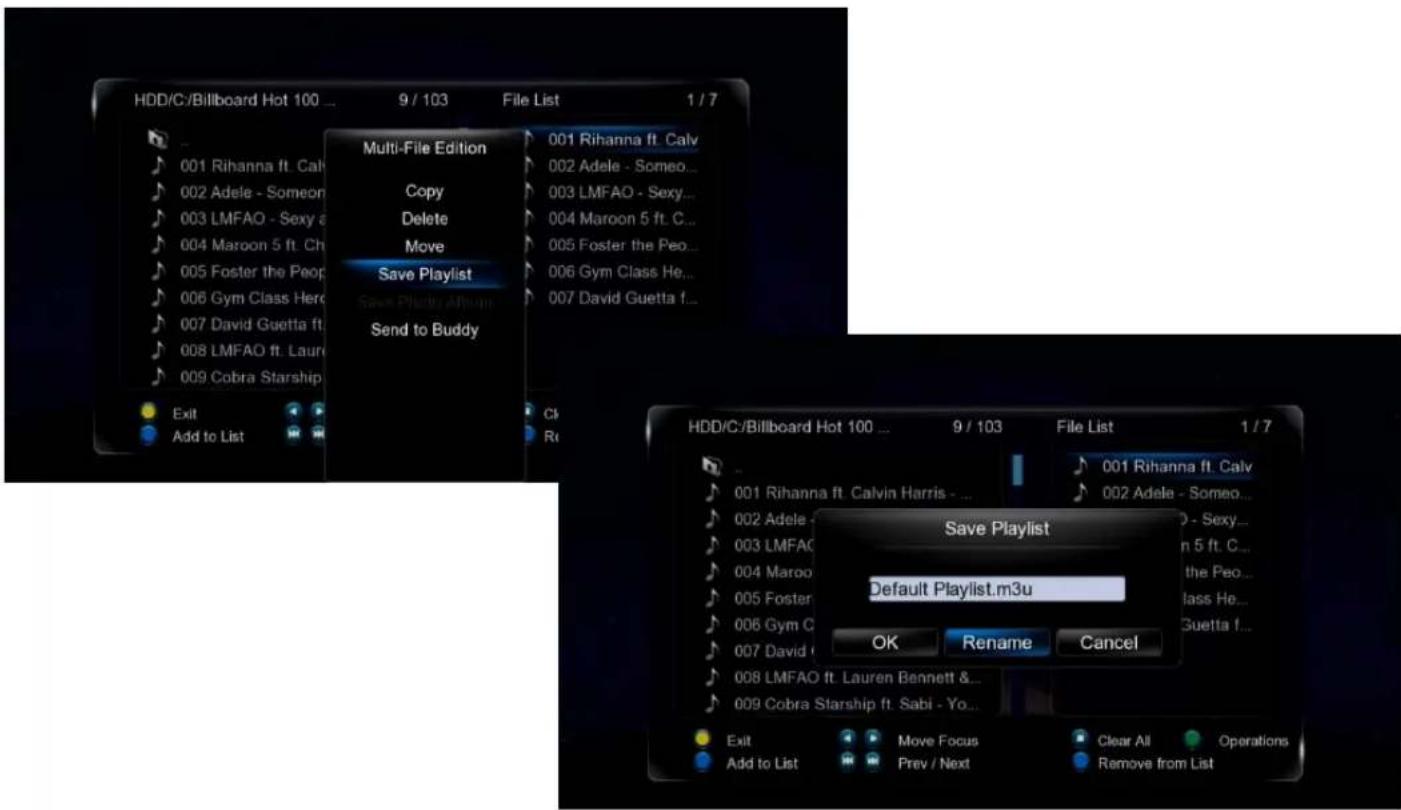
text_image
HDD/C:/Billboard Hot 100 ... 9 / 103 File List 1 / 7 Multi-File Edition 001 Rihanna ft. Calv Copy 002 Adele - Someo... Delete 003 LMFAO - Sexy... Move 004 Maroon 5 ft. C... Save Playlist 005 Foster the Peo... Save Playlist Album 006 Gym Class He... Send to Buddy 007 David Guetta f... Exit Cl Add to List R HDD/C:/Billboard Hot 100 ... 9 / 103 File List 1 / 7 Save Playlist Default Playlist.m3u OK Rename Cancel Exit Move Focus Clear All Operations Add to List Prev / Next Remove from ListNow you will be able to play the playlist from the media library.
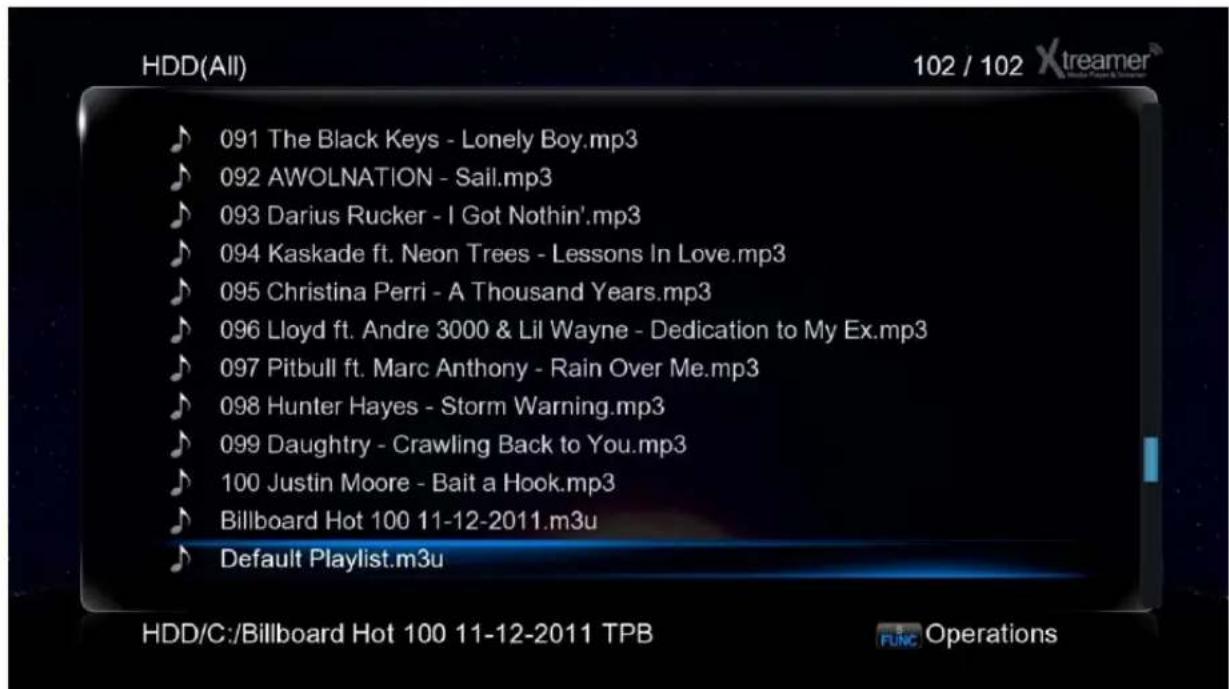
text_image
HDD(All) 102 / 102 Xtreamer 091 The Black Keys - Lonely Boy.mp3 092 AWOLNATION - Sail.mp3 093 Darius Rucker - I Got Nothin'.mp3 094 Kaskade ft. Neon Trees - Lessons In Love.mp3 095 Christina Perri - A Thousand Years.mp3 096 Lloyd ft. Andre 3000 & Lil Wayne - Dedication to My Ex.mp3 097 Pitbull ft. Marc Anthony - Rain Over Me.mp3 098 Hunter Hayes - Storm Warning.mp3 099 Daughtry - Crawling Back to You.mp3 100 Justin Moore - Bait a Hook.mp3 Billboard Hot 100 11-12-2011.m3u Default Playlist.m3u HDD/C:/Billboard Hot 100 11-12-2011 TPB FUNC OperationsAndroid on Prodigy
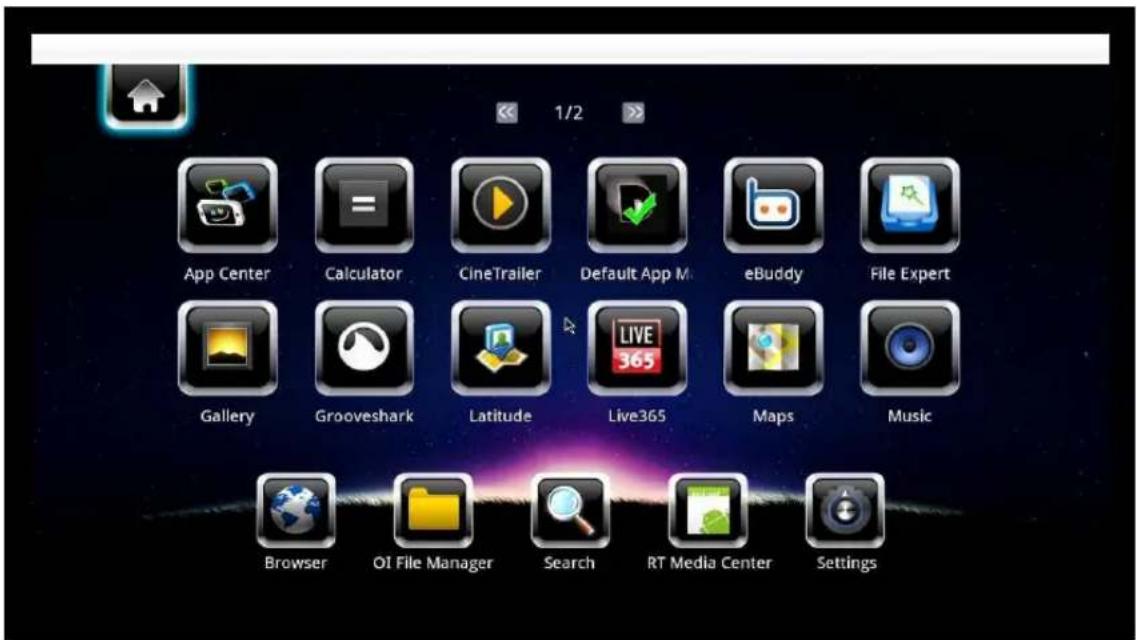
text_image
App Center Calculator CineTrailer Default App M eBuddy File Expert Gallery Grooveshark Latitude Live365 Maps Music Browser OI File Manager Search RT Media Center SettingsYou can use remote or a keyboard and mouse to use Android. Use the BLUE button for the Android option screen.
Choose a pre-installed application or install your own. Currently we recommend manual installation. We are constantly testing and will post the our picks on the main site and our forum.
text_image
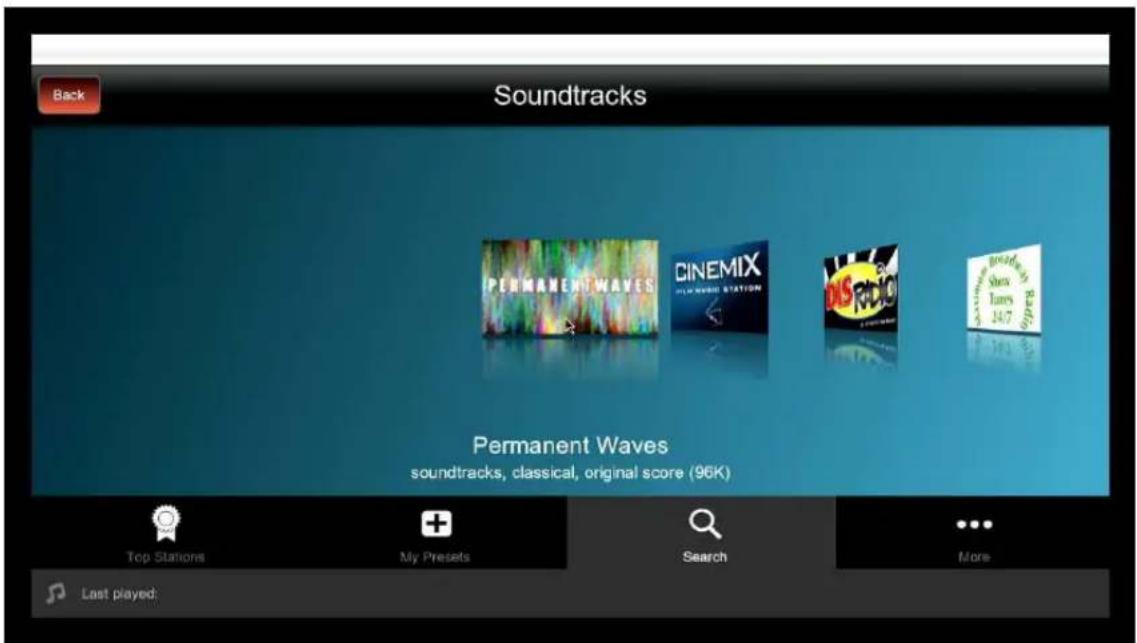
Back Soundtracks PERMANENT WAVES CINEMIX 14.7 Radio 14.7 Braze Show Tunes 14.7 Permanent Waves soundtracks, classical, original score (96K) Top Stations My Presets Search More Last played:For the guide on Android app installation please refer to a section below.
Web Browser
text_image
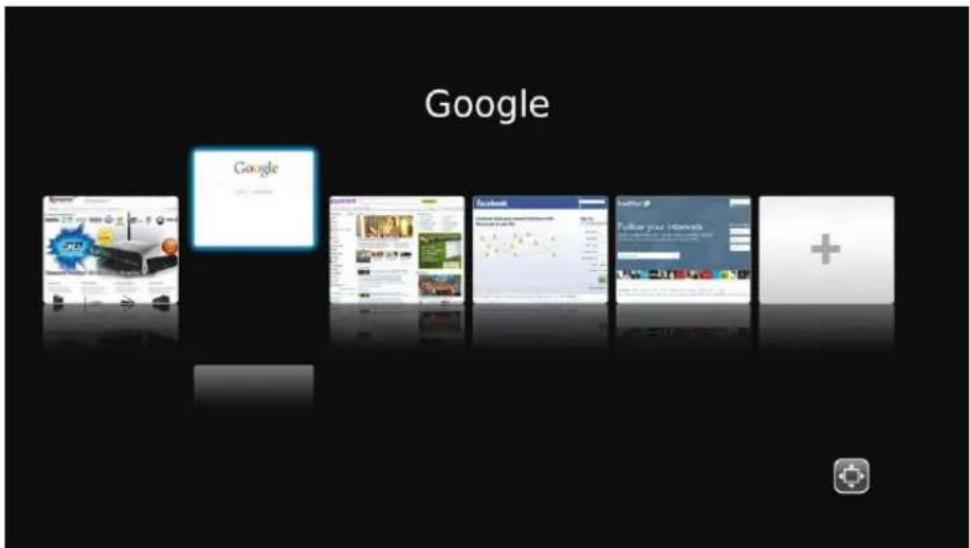
Google Google Search Search Facebook Facebook Follow your InternetWhen you choose Web Browser in the main menu the list of Bookmarks will open. Press LEFT or RIGHT to navigate and ENTER to load.
When viewing web pages you have two options - Page mode or Navigation mode. You can switch between the two of them using RED button.
When using Page mode you can move up, down, left and right using the CURSOR buttons. This mode is essentially used for reading.
Navigation mode allows you to pick links, check boxes, text areas etc. You can follow links, search the Web or enter personal information to login.
Pressing FUNCTION key takes you to the browsing options menu.
Press ENTER to type in an URL.
The left column on the virtual keyboard screen is used to store the latest Web addresses and logins.
GREEN button takes you to the Bookmarks list.
text_image
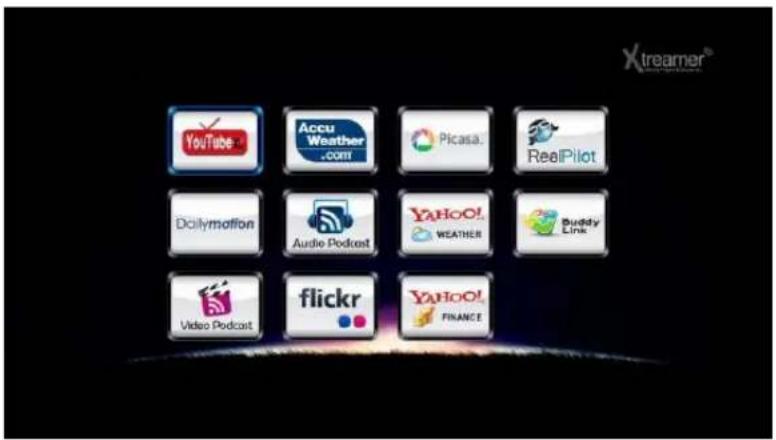
Xtreamer® YouTube Accu Weather .com Picasa... RealPilot Dcilymotion Audio Podcast YAHOO! WEATHER Buddy Link Video Podcast flickr YAHOO! FINANCEYou can access various Internet resources from the APP tab of the Main Menu.

text_image
xtreamer Media Player & Streamer Network SetupNetwork Setup
Settings Up Network on Xstreamer
1. Setting up Wired Network

text_image
Video Audio Network System Configuration System Service Firmware Upgrade Look and Feel Search and Indexing Network Here you can configure your Xtreamer Network related options and features. Wired Network 192.168.123.37 DHCP Wireless Network --- Off Device Name Prodigy Wired Lan Setup Wireless Setting IP Address: 192.168.123.37 Off Subnet Mask: 255.255.255.0 Default Gateway: 192.168.123.254 DNS server IP address: 127.0.0.1 MAC Address: 00.CE.39.B4.FA.11 Nov 14 05:49 PM | VER 3.0.0 | IP: 192.168.123.37DHCP IP (AUTO)
The Dynamic Host Configuration Protocol DHCP is a networking protocol used to automatically retrieve IP address assignments through Wired LAN. This feature is set as a default value so that IP address is automatically assigned by RJ45 connecting and rebooting. You need a network router in order to stream files from your PC.
※ IP address of DHCP IP may sometimes be unstable.
text_image
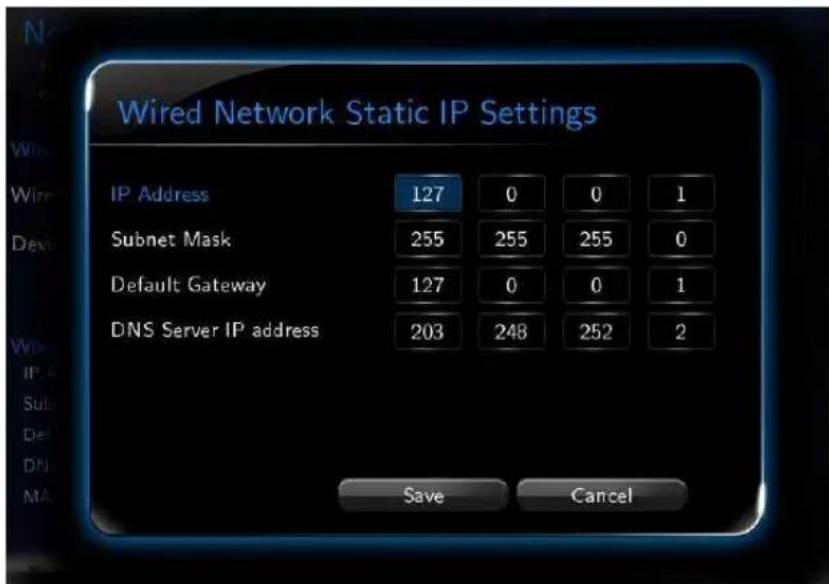
Wired Network Static IP Settings IP Address 127 0 0 1 Subnet Mask 255 255 255 0 Default Gateway 127 0 0 1 DNS Server IP address 203 248 252 2 Save CancelSTATIC IP (MANUAL)
Static IP is a manual way of obtaining an IP address, and is used for an assigned IP address that does not change often that being so it will most likely receive the same IP address through Wired LAN. IP will be allocated by users when a fixed IP address is needed or DHCP server isn't available.
Settings Up Network on Xstreamer
2. Wireless LAN Setup

text_image
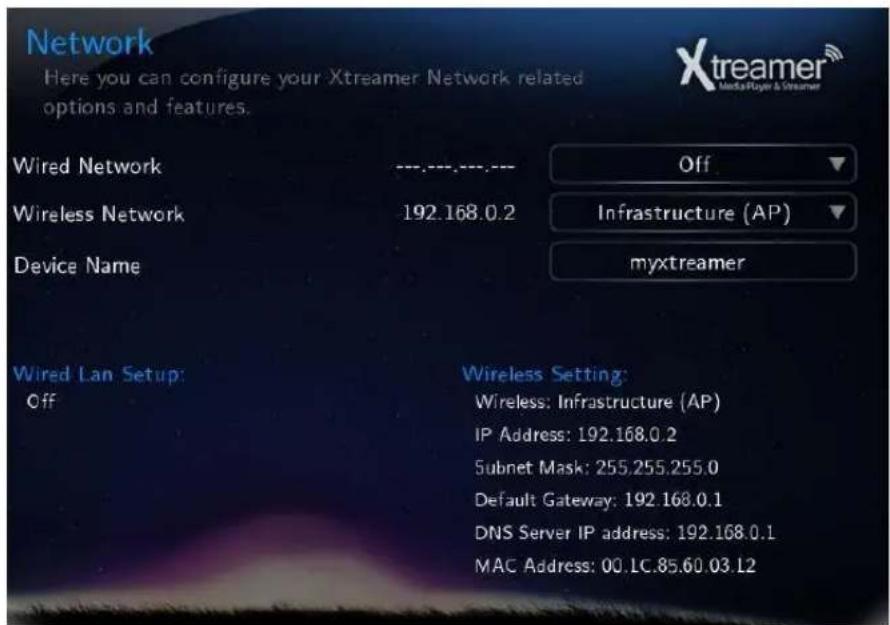
Network Here you can configure your Xstreamer Network related options and features. Wired Network Off Wireless Network 192.168.0.2 Infrastructure (AP) Device Name myxtreamer Wired Lab Setup Off Wireless Setting Wireless: Infrastructure (AP) IP Address: 192.168.0.2 Submit Mask: 255.255.255.0 Default Gateway: 192.168.0.1 DNS Server IP address: 192.168.0.1 MAC Address: 00.1C.85.60.03.12- Choose Wireless Network option.
- Select [Infrastructure (AP)].

text_image
Network Here you can configure your Xtreamer Network related options and features. Wired Network 192.168.123.49 DHCP Wireless Network Off Device Name myxtreamer Wired Lite Setup: Wireless Setting: IP Address: 192.168.123.49 Off Submit Mask: 255.255.255.0 Default Gateway: 192.168.123.254 DNS Server IP address: 203.248.252.2 MAC Address: 00.1C.8S.90.10.00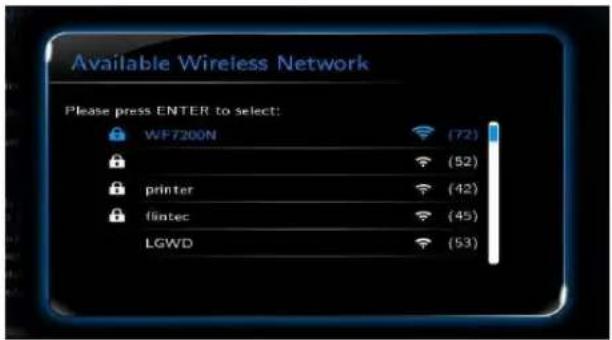
text_image
Available Wireless Network Please press ENTER to select: WF7200N (72) (52) printer (42) flintec (45) LGWD (53)- Select SSID type (available wireless network), you want to use.
- Enter correct passkey, and then press [OK].
text_image
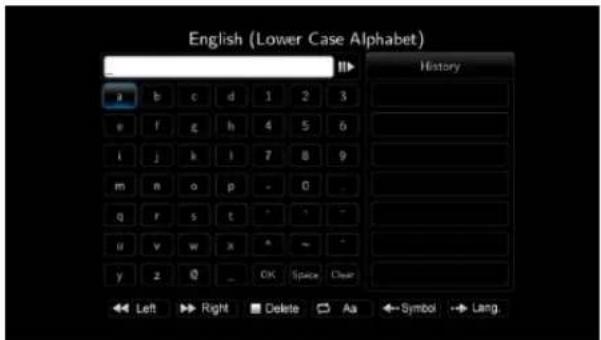
English (Lower Case Alphabet) History a b c d 1 2 3 e f g h 4 5 6 i j k l 7 8 9 m n o p - 0 q r s t ^ - - u v w x ^ - - y z 0 _ OK Space Clear Left Right Delete As Symbol Lang
Note
- Only "Web hex character codes" is supported.
- Web hex encoding supports 64-bit and 128-bit integers capable.
- If you have the problem of unstable wireless network or low speed, check your wireless channels for optimum signal strength. Changing channel is available through your router.
Settings Up Network on Xstreamer
2. Wireless LAN Setup

text_image
Network Key Wireless Network Name (SSID): printer WPA Key **************** Ok Save to File Cancel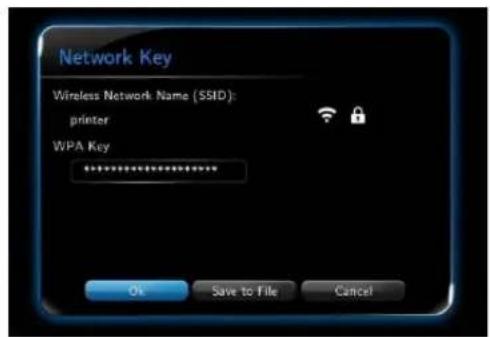
text_image
Network Key Wireless Network Name (SSID): printer WPA Key **************** Ok Save to File Cancel- Navigate to OK button and press ENTER to test the connection.
text_image
Network Here you can configure your Xtreamer Network related options and features. Wired Network ---,---,---,--- Off Wireless Network 192.168.0.2 Infrastructure (AP) myxtreamer Device Name Wired Lan Setup: Off Wireless Setting: Wireless: Infrastructure (AP) IP Address: 192.168.0.2 Subnet Mask: 255.255.255.0 Default Gateway: 192.168.0.1 DNS Server IP address: 192.168.0.1 MAC Address: 00.LC.85.60.03.12Device Name
Use this option to give your Xstreamer a unique name under which it will appear on your local Network.

text_image
X-treamer® Media Player & Streamer NFS Sharing SetupNFS Sharing Setup
NFS Share Setup
text_image
Xtreamer Media Player & Streamer Nov 14 05:48 PM | VER 3.0.0 | IP: 192.168.123.37 Media Sources Media Types » Favourite History Media Library Android App Settings SearchTo setup an NFS share please go to the list of Media Library resources.

text_image
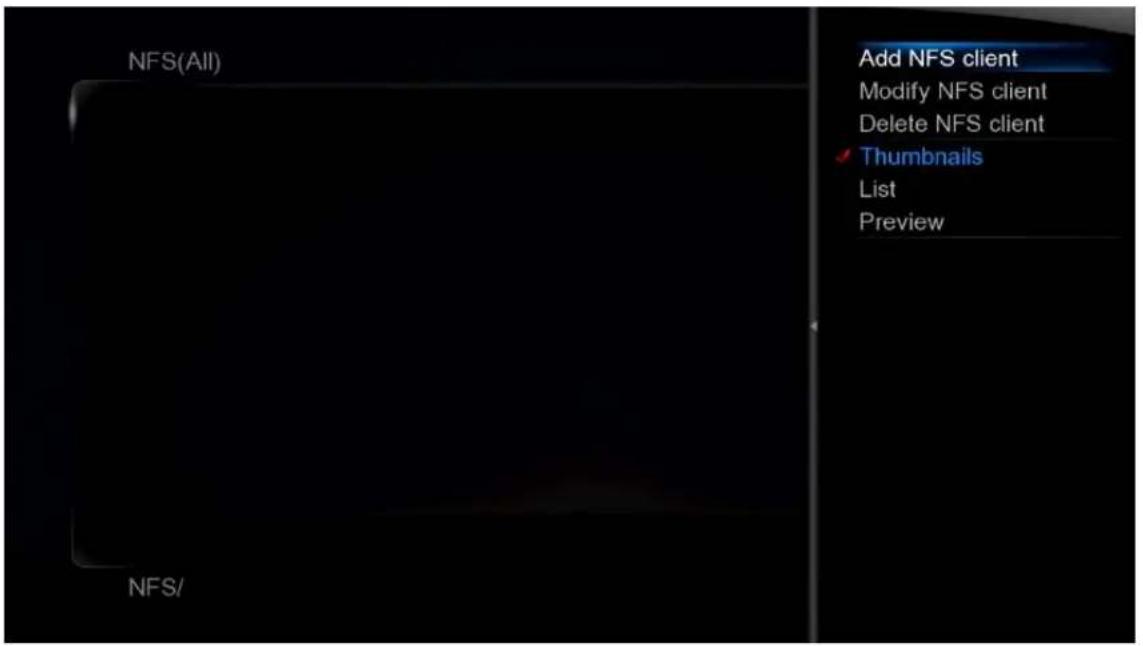
Devices(All) 4 / 4 Xtreamer HDD Network UPnP NFS Devices/Go to NFS and press MENU button
NFS Share Setup
text_image
NFS(All) Add NFS client Modify NFS client Delete NFS client Thumbnails List Preview NFS/Add NFS client
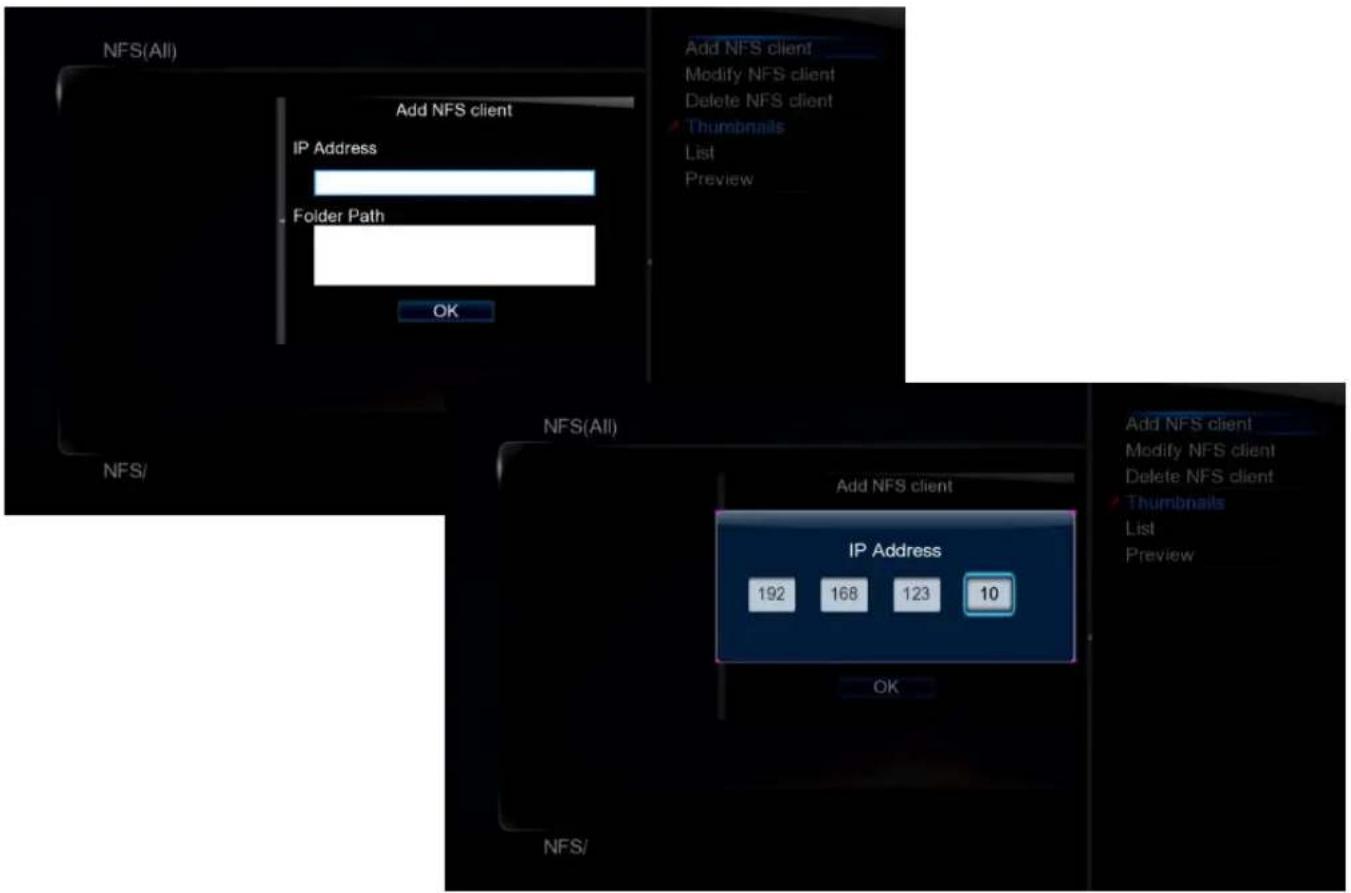
text_image
NFS(All) Add NFS client IP Address Folder Path OK Add NFS client Modify NFS client Delete NFS client Thumbnails List Preview NFS/ NFS(All) Add NFS client IP Address 192 168 123 10 OK Add NFS client Modify NFS client Delete NFS client Thumbnails List PreviewEnter IP address of the relevant device.
NFS Share Setup
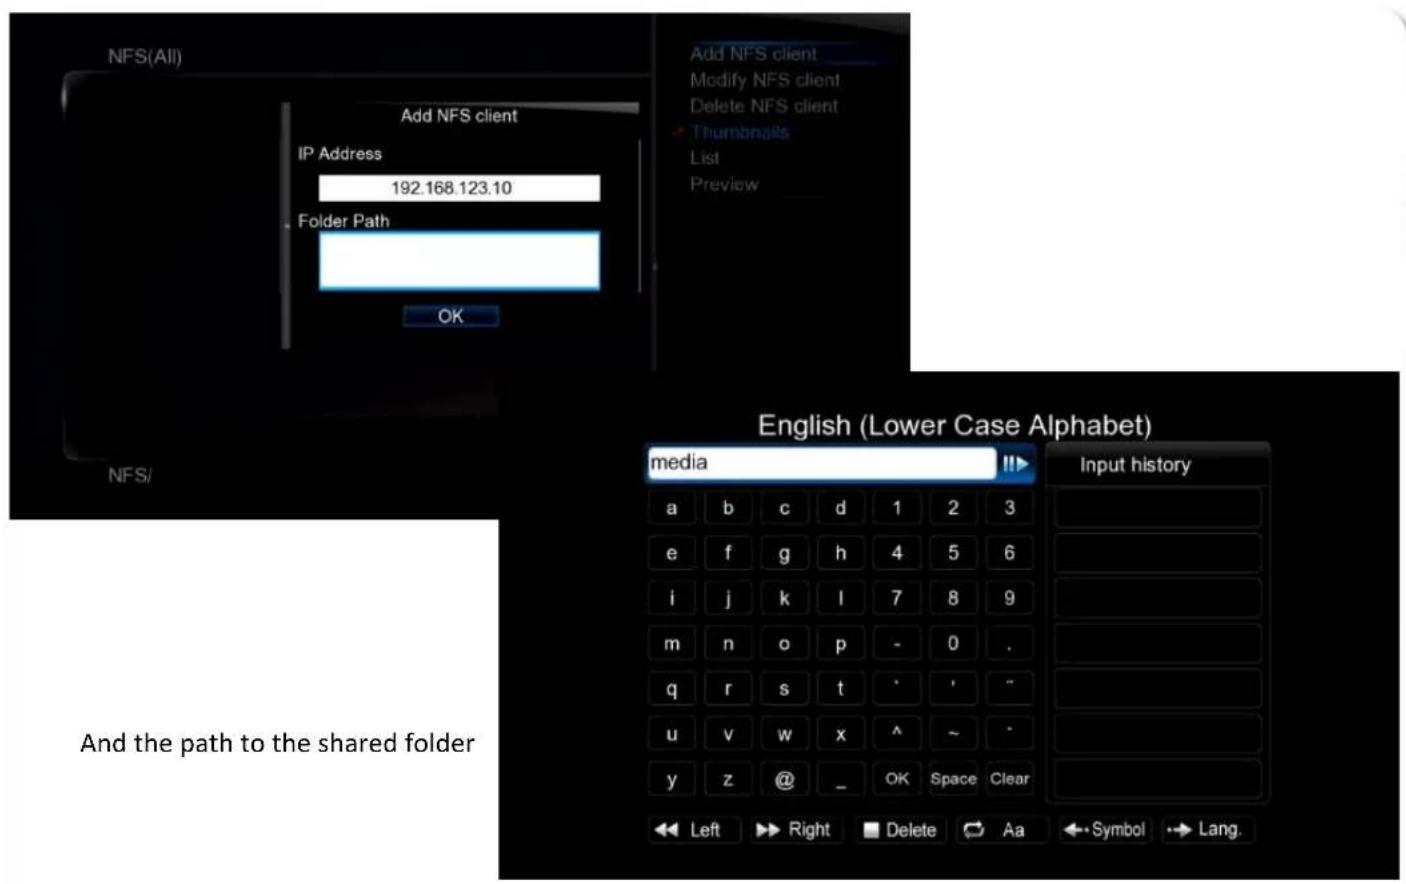
text_image
NFS(All) Add NFS client IP Address 192.168.123.10 Folder Path OK Add NFS client Modify NFS client Delete NFS client Thumbnails List Preview English (Lower Case Alphabet) media Input history a b c d 1 2 3 e f g h 4 5 6 i j k l 7 8 9 m n o p - 0 . q r s t · · - u v w x ^ ~ * y z @ _ OK Space Clear Left Right Delete Aa ← Symbol → Lang. And the path to the shared folder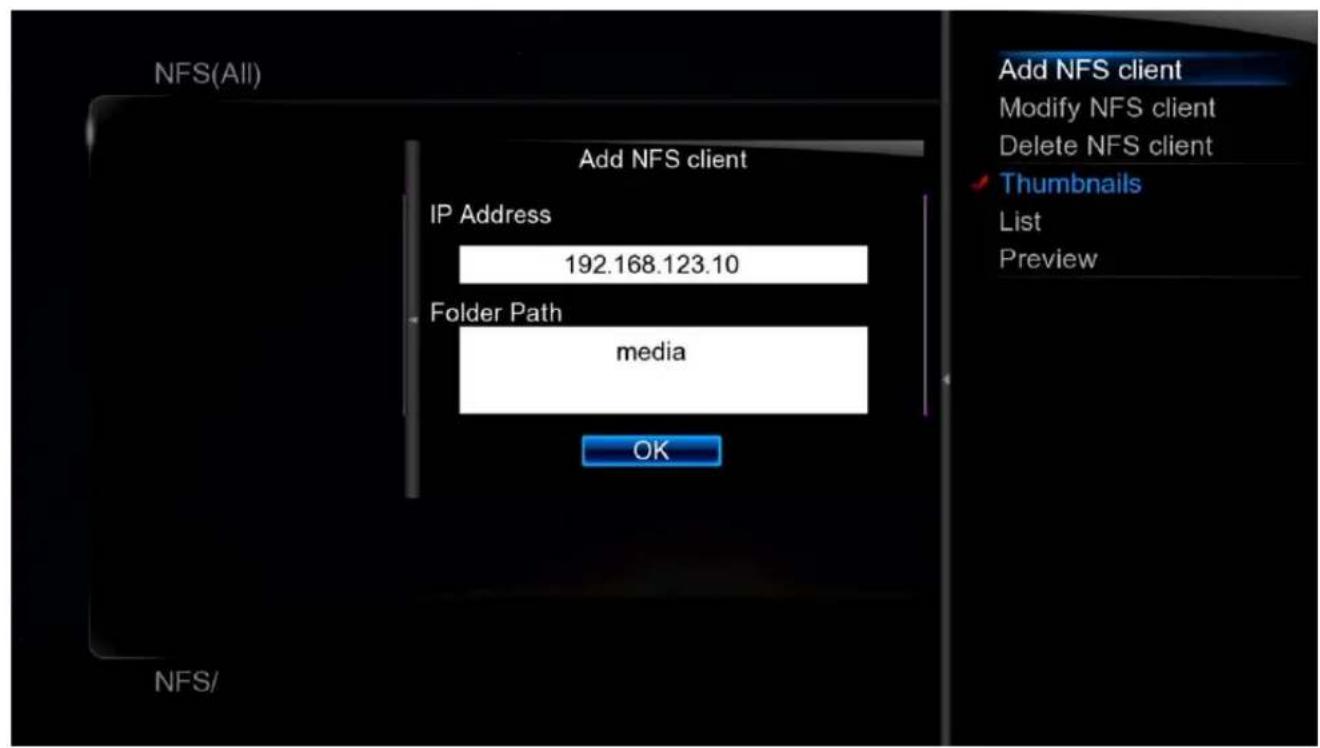
text_image
NFS(All) Add NFS client IP Address 192.168.123.10 Folder Path media OK Add NFS client Modify NFS client Delete NFS client Thumbnails List Preview NFS/NFS Share Setup
text_image
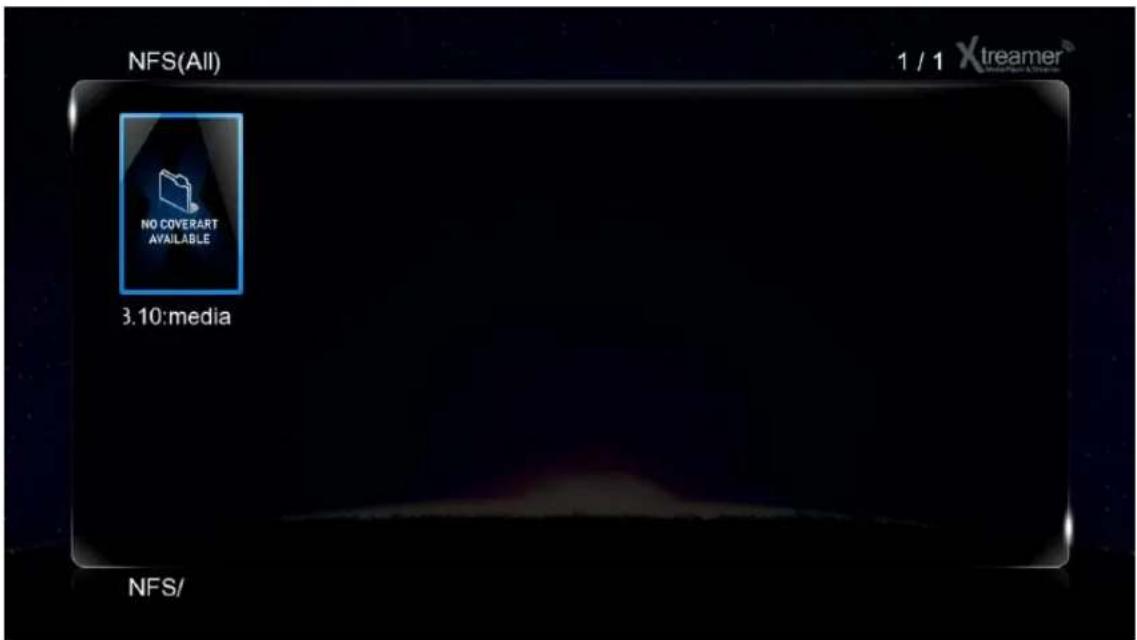
NFS(All) 1 / 1 Xtreamer NO COVERART AVAILABLE 3.10:media NFS/Press OK to confirm.
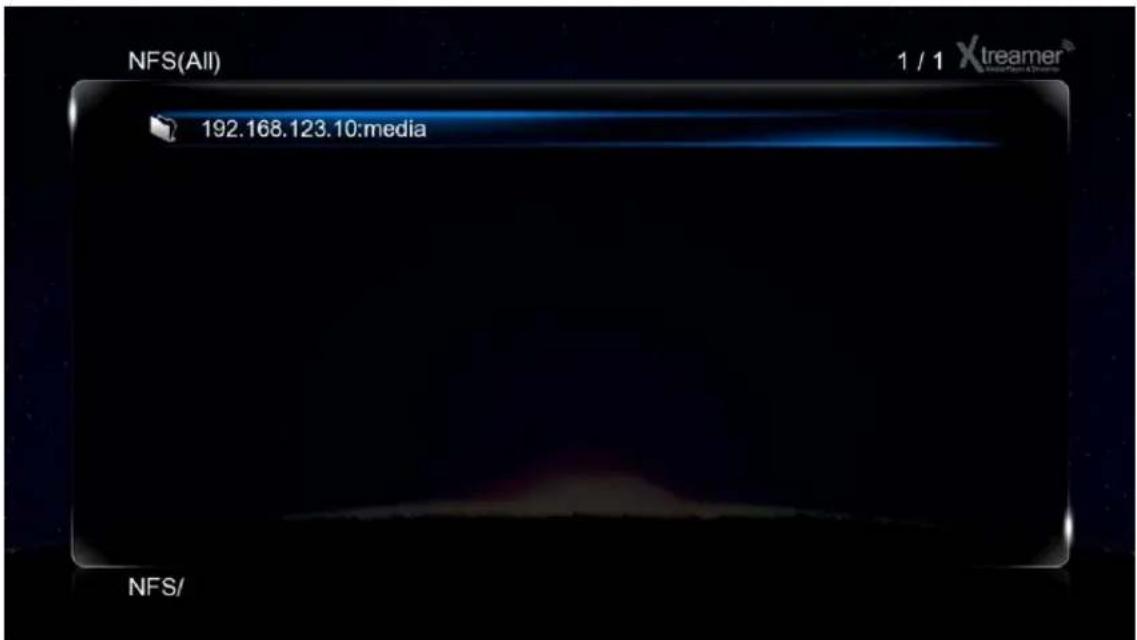
text_image
NFS(All) 1 / 1 Xtreamer 192.168.123.10:media NFS/The new entry will now be listed under NFS shortcuts in the Media Library.

text_image
xtreamer Media Player & Streamer Network SharingNetwork Sharing
Network Sharing
How to set-up Folder Sharing in Windows 7
This instruction is for Window 7 Ultimate.

text_image
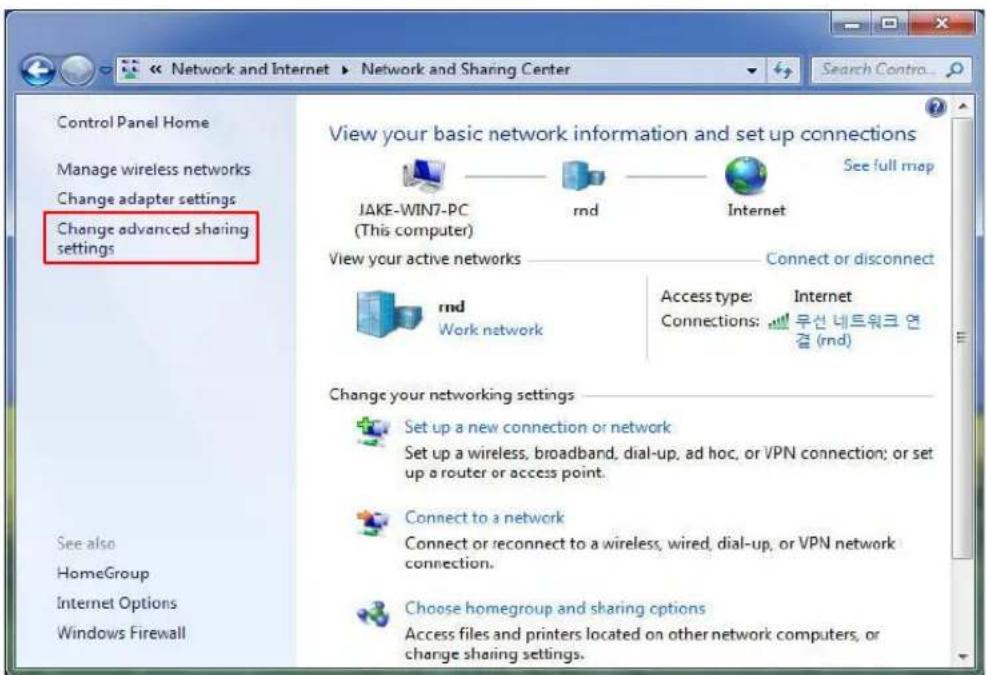
Adjust your computer's settings System and Security Review your computer's status Back up your computer Find and fix problems Network and Internet View network status and tasks Choose homegroup and sharing options Hardware and Sound View devices and printers Add a device Connect to a projector Adjust commonly used mobility settings Programs Uninstall a program View by: Category User Accounts and Family Safety Add or remove user accounts Set up parental controls for any user Appearance and Personalization Change the theme Change desktop background Adjust screen resolution Clock, Language, and Region Change keyboards or other input methods Change display language Ease of Access Let Windows suggest settings Optimize visual display- Click [Start] - [Control Panel] - [View network status and tasks in Network and Internet].
text_image
Control Panel Home Manage wireless networks Change adapter settings Change advanced sharing settings See also HomeGroup Internet Options Windows Firewall View your basic network information and set up connections JAKE-WIN7-PC (This computer) rnd Internet See full map View your active networks Connect or disconnect rnd Work network Access type: Internet Connections: ⬤우선 네트워크 연 결 (rnd) Change your networking settings Set up a new connection or network Set up a wireless, broadband, dial-up, ad hoc, or VPN connection; or set up a router or access point. Connect to a network Connect or reconnect to a wireless, wired, dial-up, or VPN network connection. Choose homegroup and sharing options Access files and printers located on other network computers, or change sharing settings.- Click [Change advanced sharing settings] on the right side of the screen after appearing Network and Sharing Centre.
Network Sharing
How to set-up Folder Sharing in Windows 7
Change sharing options for different network profiles
Windows creates a separate network profile for each network you use. You can choose specific options for each profile.
Home or Work (current profile)

Network discovery
When network discovery is on, this computer can see other network computers and devices and is visible to other network computers. What is network discovery?
Turn on network discovery
Turn off network discovery
File and printer sharing
When file and printer sharing is on, files and printers that you have shared from this computer can be accessed by people on the network.
Turn on file and printer sharing
Turn off file and printer sharing
Public folder sharing
When Public folder sharing is on, people on the network, including homegroup members, can access files in the Public folders. What are the Public folders?
Turn on sharing so anyone with network access can read and write files in the Public folders
Turn off Public folder sharing (people logged on to this computer can still access these folders)
Media streaming
When media streaming is on, people and devices on the network can access pictures, music, and videos on this computer. This computer can also find media on the network.
Media streaming is on.
Choose media streaming options...
File sharing connections
Windows 7 uses 128-bit encryption to help protect file sharing connections. Some devices don't support 128-bit encryption and must use 40- or 56-bit encryption.
- Use 128-bit encryption to help protect file sharing connections (recommended)
○ Enable file sharing for devices that use 40- or 56-bit encryption
Password protected sharing
When password protected sharing is on, only people who have a user account and password on this computer can access shared files, printers attached to this computer, and the Public folders. To give other people access, you must turn off password protected sharing.
Turn on password protected sharing
Turn off password protected sharing
HomeGroup connections
Typically, Windows manages the connections to other homegroup computers. But if you have the same user accounts and passwords on all of your computers, you can have HomeGroup use your account instead. Help me decide
- Allow Windows to manage homegroup connections (recommended)
Use user accounts and passwords to connect to other computers
Public

Save changes
Cancel
- Change sharing options (refer to the above image).
The sharing option needs to be applied in your home or company (Current Profile).
Network Sharing
How to set-up Folder Sharing in Windows 7

text_image
Organize Properties System properties Uninstall or change a program Search Comp... Favorites Libraries Homegroup Computer Network Hard Disk Drives (3) Local Disk (C:) Open Open in new window Share with Restore previous versions Include in library 압축파일에 추가(A)... "Archive.rar"에 추가(T) 압축해서 이메일 보내기... "Archive.rar"(으)로 압축해서 이메일 보내기 Format... Copy Create shortcut Rename Properties Local Disk (D:) Local Disk Space free: 5.91 GB File system: NTFS Local Disk (D:) 5.91 GB free of 48.9 GB- Select a folder you want to share, and click on the right side of mouse, then click [Properties] on pop-up menu.

text_image
Local Disk (D:) Properties Security Previous Versions Quota Customize General Tools Hardware Sharing Network File and Folder Sharing D:\W Shared Network Path: WWW.Jake-win7pcWd Share... Advanced Sharing Set custom permissions, create multiple shares, and set other advanced sharing options. Advanced Sharing... Password Protection People without a user account and password for this computer can access folders shared with everyone. To change this setting, use the Network and Sharing Center. OK Cancel Apply- Click [Sharing] on tap menu, and then click [Advanced Sharing...].
Network Sharing
How to set-up Folder Sharing in Windows 7
text_image
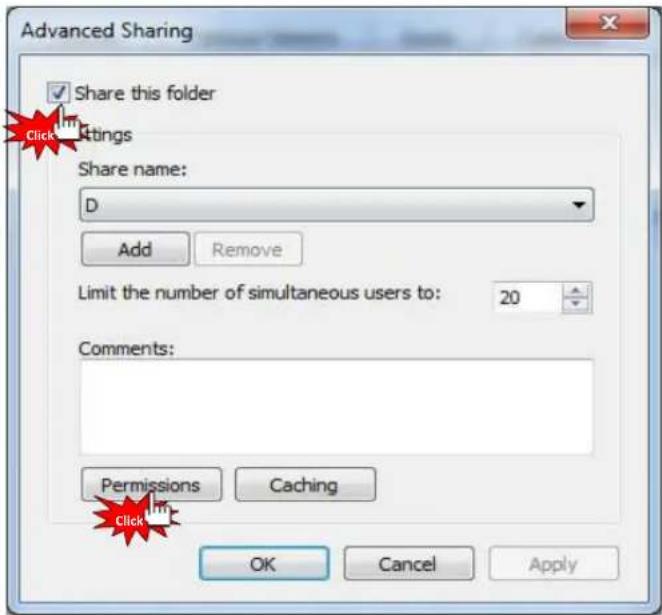
Advanced Sharing ✓ Share this folder Click Settings Share name: D Add Remove Limit the number of simultaneous users to: 20 Comments: Permissions Caching OK Cancel Apply- Check on [Share this folder], then click [Permissions].
text_image
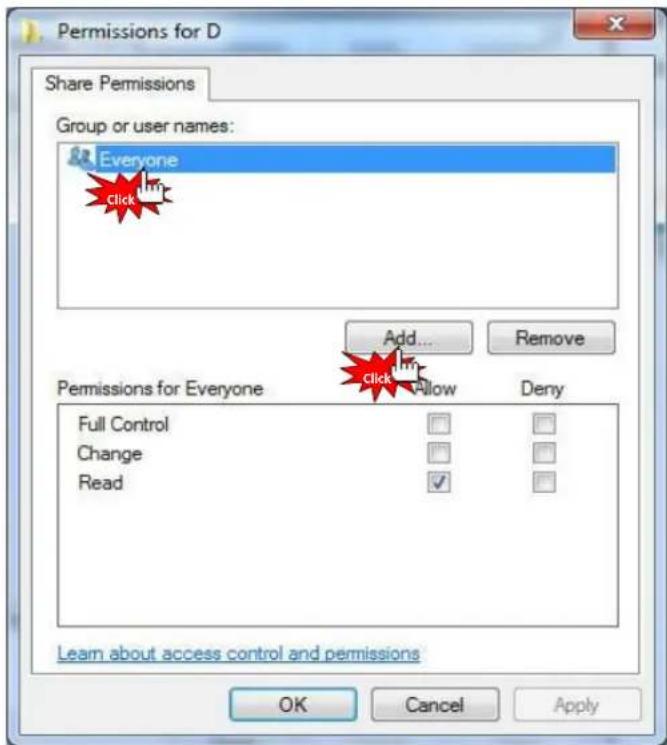
Permissions for D Share Permissions Group or user names: Everyone Click Add... Remove Permissions for Everyone Full Control Change Read Add... Remove Deny Learn about access control and permissions OK Cancel Apply- Click [Add] if there is no "Guest" account due to "Everyone" and "Guest" account is needed in order to Network sharing.
Network Sharing
How to set-up Folder Sharing in Windows 7
text_image
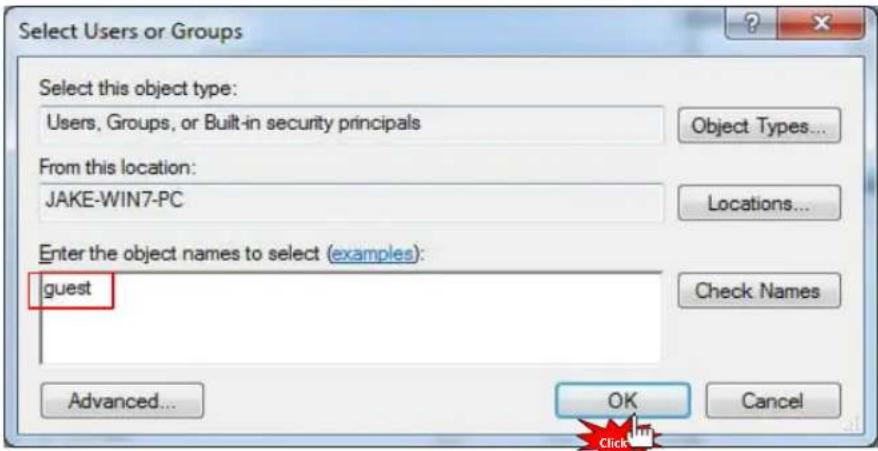
Select Users or Groups Select this object type: Users, Groups, or Built-in security principals Object Types... From this location: JAKE-WIN7-PC Locations... Enter the object names to select (examples): guest Check Names Advanced... OK Cancel- Click [OK] after entering [Guest] (refer to the above image).
text_image
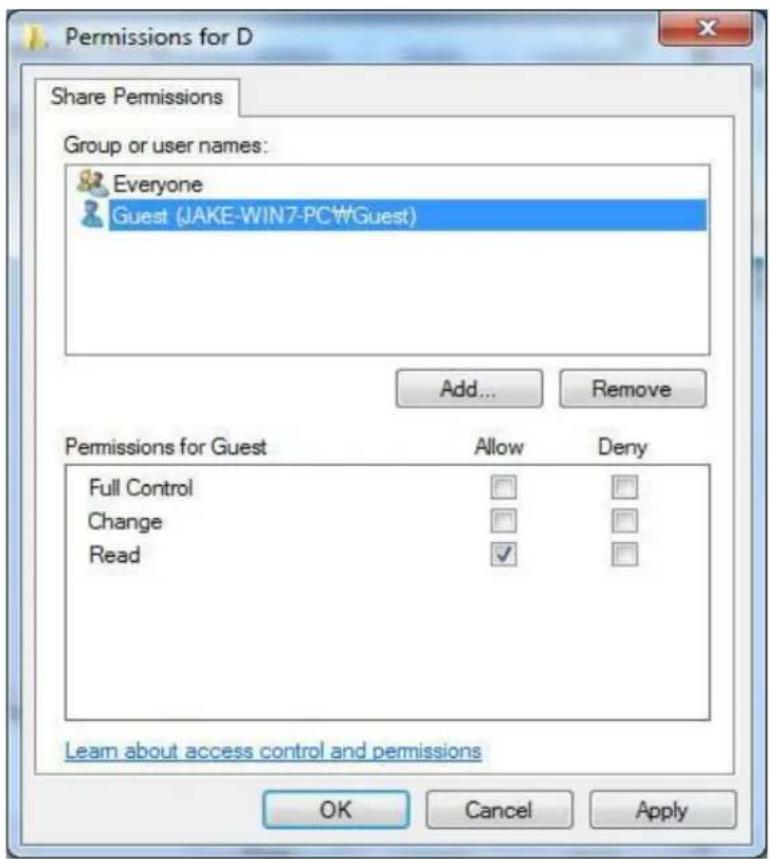
Permissions for D Share Permissions Group or user names: Everyone Guest (JAKE-WIN7-PC#Guest) Add... Remove Permissions for Guest Allow Deny Full Control Change Read ✓ Learn about access control and permissions OK Cancel Apply- Click [OK] - [Apply] - [OK] in order to confirm if "Guest" account is added or not. (Both Guest and Everyone account must be present).
Network Sharing
How to set-up Folder Sharing in Windows 7
text_image
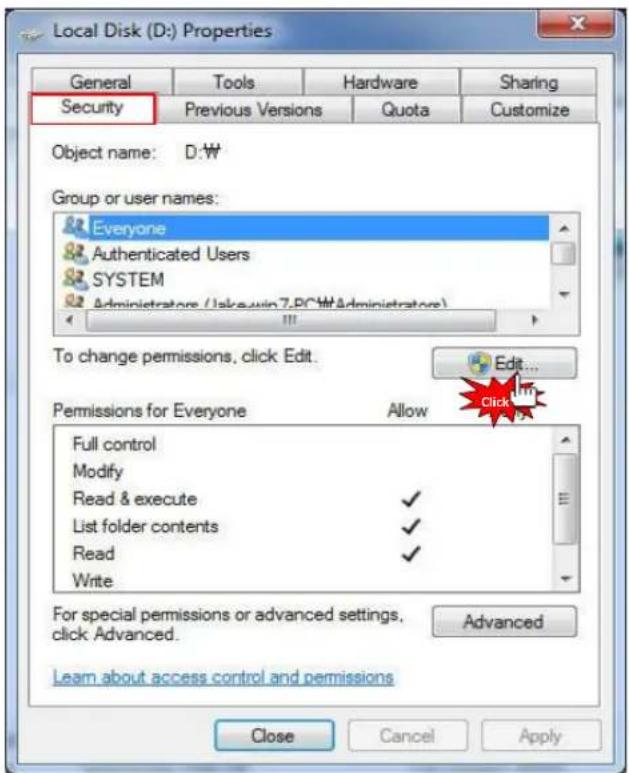
Local Disk (D:) Properties General Tools Hardware Sharing Security Previous Versions Quota Customize Object name: D:\W Group or user names: Everyone Authenticated Users SYSTEM Administrators (admin7.PCW\Administrators) To change permissions, click Edit. Edit... Permissions for Everyone Allow Full control Modify Read & execute ✓ List folder contents ✓ Read ✓ Write For special permissions or advanced settings, click Advanced. Advanced Learn about access control and permissions Close Cancel Apply- Plus, add [Guest] account on Security tap menu, then click [Edit...] (refer to the above image).
text_image
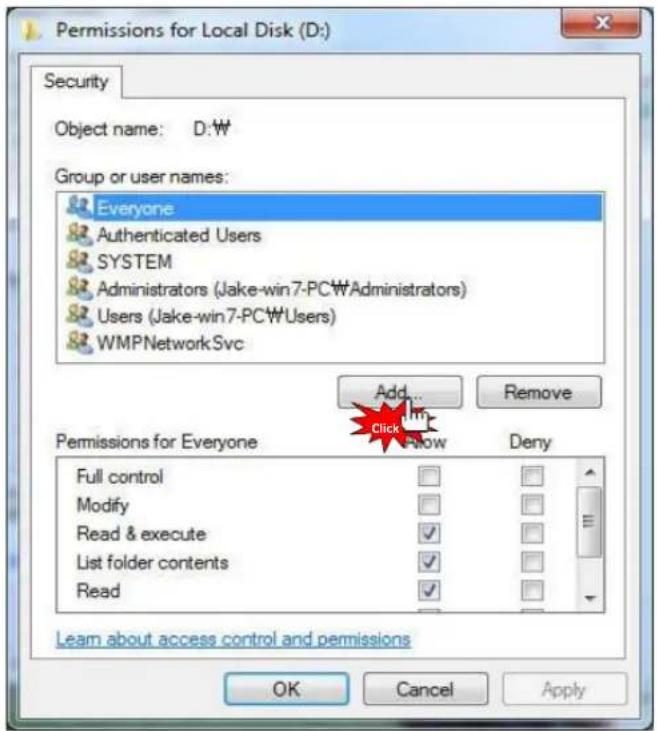
Permissions for Local Disk (D:) Security Object name: D:\W Group or user names: Everyone Authenticated Users SYSTEM Administrators (Jake-win7-PCWAdministrators) Users (Jake-win7-PCWUsers) WMPNetworkSvc Add... Remove Add... Add Remove Permissions for Everyone Full control Modify Read & execute List folder contents Read Deny Learn about access control and permissions OK Cancel Apply- Click [Add...] (refer to the above image).
Network Sharing
How to set-up Folder Sharing in Windows 7

text_image
Select Users or Groups Select this object type: Users, Groups, or Built-in security principals Object Types... From this location: JAKE-WIN7-PC Locations... Enter the object names to select (examples): guest Check Names Advanced... OK Cancel- Click [OK] after typing [Guest] account.
text_image
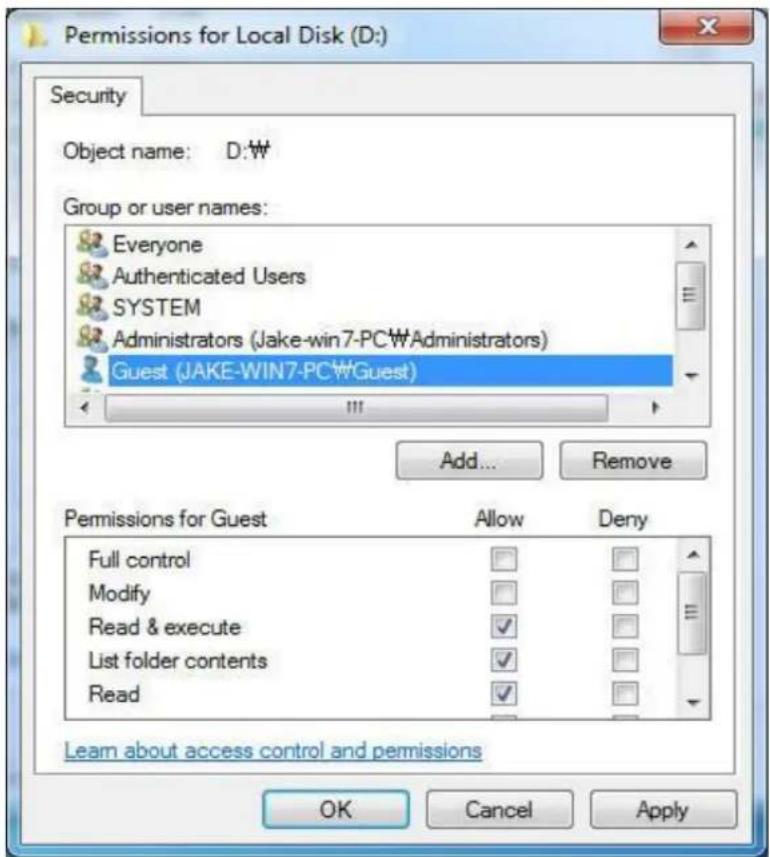
Permissions for Local Disk (D:) Security Object name: D:W Group or user names: Everyone Authenticated Users SYSTEM Administrators (Jake-win7-PC#Administrators) Guest (JAKE-WIN7-PC#Guest) Add... Remove Permissions for Guest Allow Deny Full control Modify Read & execute ✓ List folder contents ✓ Read ✓ Learn about access control and permissions OK Cancel Apply- Complete setup as confirming "Guest" account added by selecting [OK] - [Apply] - [OK] (Both Guest and Account must be present). If there is no "Everyone", you should add it.
Network Sharing
How to set-up Folder Sharing in Windows Vista
This instruction is for Window Visa Ultimate.
text_image
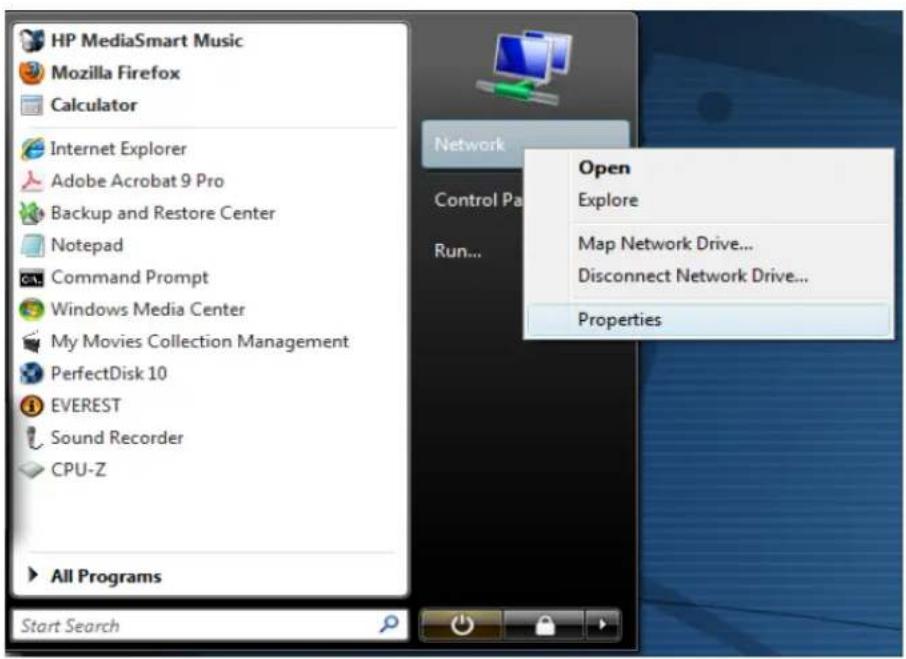
HP MediaSmart Music Mozilla Firefox Calculator Internet Explorer Adobe Acrobat 9 Pro Backup and Restore Center Notepad Command Prompt Windows Media Center My Movies Collection Management PerfectDisk 10 EVEREST Sound Recorder CPU-Z All Programs Start Search Network Control Pa Run... Open Explore Map Network Drive... Disconnect Network Drive... Properties- Click [Start] - [Network] - [Properties].
text_image
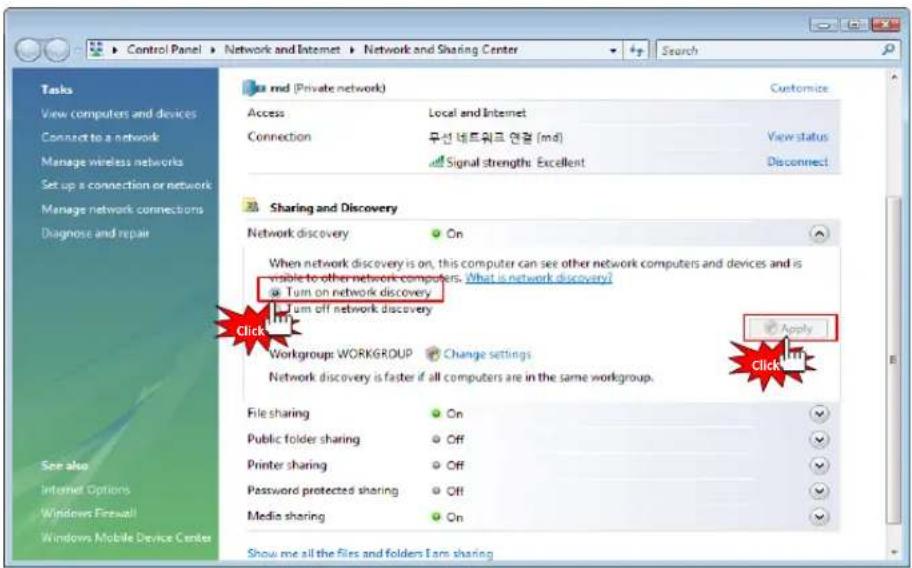
Control Panel Network and Internet Network and Sharing Center Search Tasks View computers and devices Connect to a network Manage wireless networks Set up a connection or network Manage network connections Diagnose and repair 32 md (Private network) Customize Access Local and Internet Connection 무선 네트워크 연결 (md) View status Signal strength: Excellent Disconnect Sharing and Discovery Network discovery On When network discovery is on, this computer can see other network computers and devices and is visible to other network computers. What is network discovery? Turn on network discovery Turn off network discovery Apply Click Workgroup: WORKGROUP Change settings Network discovery is faster if all computers are in the same workgroup. File sharing On Public folder sharing Off Printer sharing Off Password protected sharing Off Media sharing On Show me all the files and folders Earn sharing- Click [Network discovery] - [Turn on network discovery] and then, click [Apply].
Network Sharing
How to set-up Folder Sharing in Windows Vista
text_image
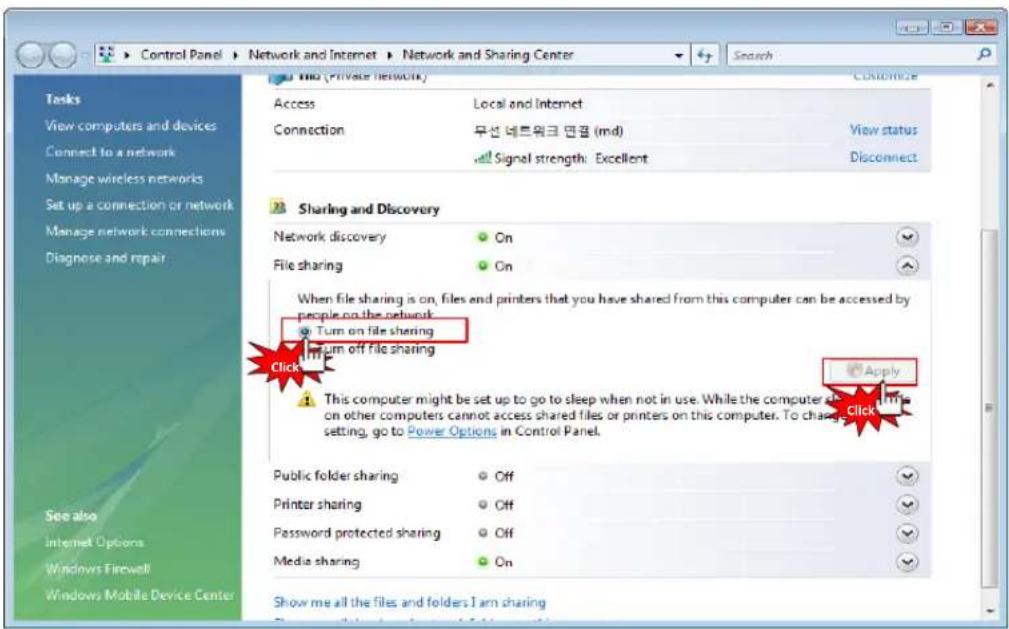
Control Panel Network and Internet Network and Sharing Center Search Customize Access Local and Internet Connection 무선 데트워크 면결 (md) View status Signal strength: Excellent Disconnect Sharing and Discovery Network discovery On File sharing On When file sharing is on, files and printers that you have shared from this computer can be accessed by people on the network: Turn on file sharing Turn off file sharing Apply Click This computer might be set up to go to sleep when not in use. While the computer also has a file on other computers cannot access shared files or printers on this computer. To change setting, go to Power Options in Control Panel. Public folder sharing Off Printer sharing Off Password protected sharing Off Media sharing On Show me all the files and folders I am sharing- Click [File sharing] – [Turn on file sharing], and then click [Apply].

text_image
Control Panel Network and Internet Network and Sharing Center Search Tasks View computers and devices Connect to a network Manage wireless networks Set up a connection or network Manage network connections Diagnose and repair md (Private network) Customize Access Local and Internet Connection 무선 데트워크 면疮 (md) View status Signal strength: Excellent Disconnect Sharing and Discovery Network discovery On File sharing On Public folder sharing Off Printer sharing Off Password protected sharing Off When password protection is on, only people who have a user account and password on this computer can access shared files, printers attached to this computer, and the Public folder. To give other people access, you must turn off password protection. Turn on password protected sharing Turn off password protected sharing Apply Media sharing On Click Show me all the files and folders I am sharing Show me all the shared network folders on this computer4. Important
Click [Password protected sharing] – [Turn off password protected sharing], and then click [Apply]. Once completed, close the window.
Network Sharing
How to set-up Folder Sharing in Windows Vista
text_image
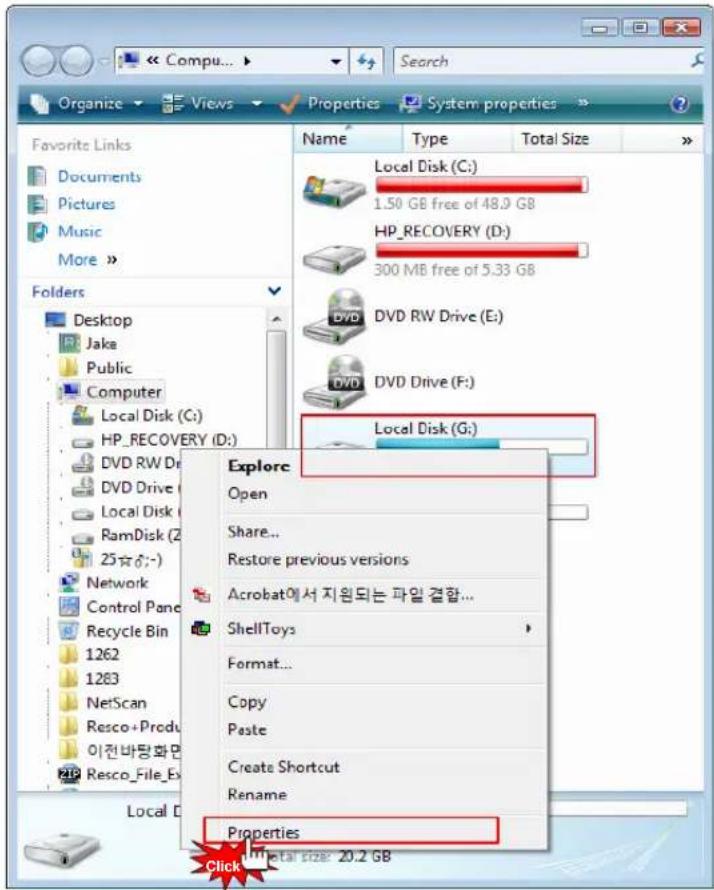
Organize Views Properties System properties Favorite Links Documents Pictures Music More Folders Desktop Jake Public Computer Local Disk (C:) HP_RECOVERY (D:) DVD RW Drive (E:) DVD Drive (F:) Local Disk (G:) Explore Open Share... Restore previous versions Acrobat에서 지원되는 파일 결합... ShellToys Format... Copy Paste Create Shortcut Rename Properties Click Total size: 20.2 GB- Move cursor to which folder you want to share and then go to the [Properties] on pop-up menu as clicking on the right side of mouse.
text_image
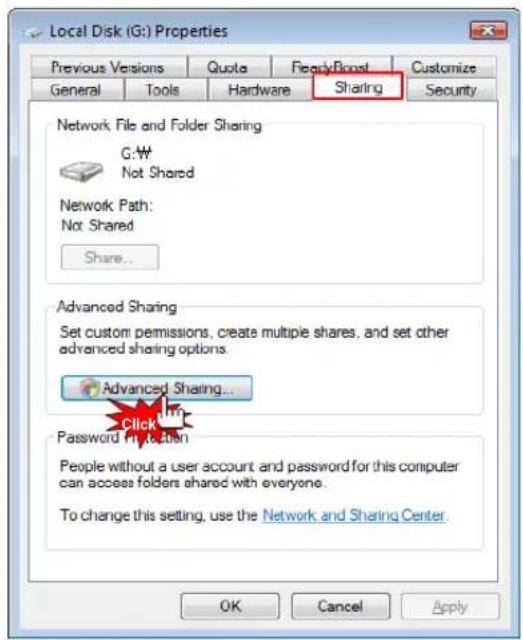
Local Disk (G:) Properties Previous Versions Quota FearlyBoost Customize General Tools Hardware Sharing Security Network File and Folder Sharing G:\W Not Shared Network Path: Not Shared Share... Advanced Sharing Set custom permissions, create multiple shares, and set other advanced sharing options. Advanced Sharing... Click Password Protection People without a user account and password for this computer can access folders shared with everyone. To change this setting, use the Network and Sharing Center. OK Cancel Apply- Click [Sharing] - [Advanced sharing...].
Network Sharing
How to set-up Folder Sharing in Windows Vista

text_image
Advanced Sharing ✓ Share this folder Click Settings Share name: G Add Remove Limit the number of simultaneous users to: 10 Comments: Permissions Caching Click OK Cancel Apply- Check on [Share this folder], then click [Permissions].
text_image
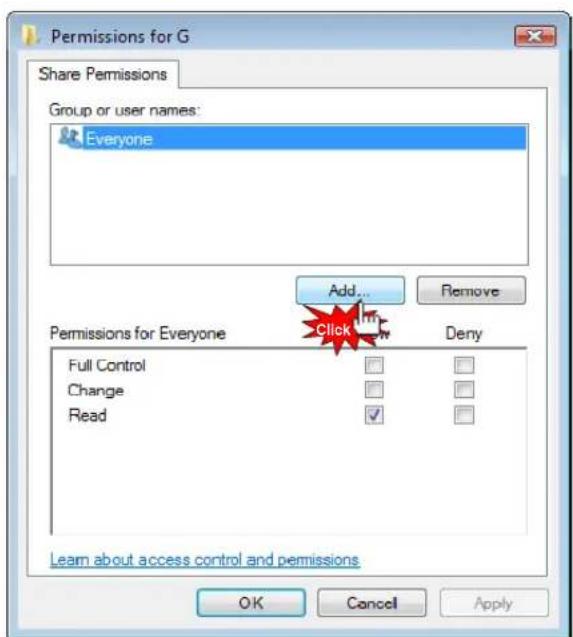
Permissions for G Share Permissions Group or user names: Everyone Add... Remove Permissions for Everyone Click Deny Full Control Change Read Learn about access control and permissions OK Cancel Apply- Click [Add...] button in order to add "Guest" account.
Network Sharing
How to set-up Folder Sharing in Windows Vista
text_image
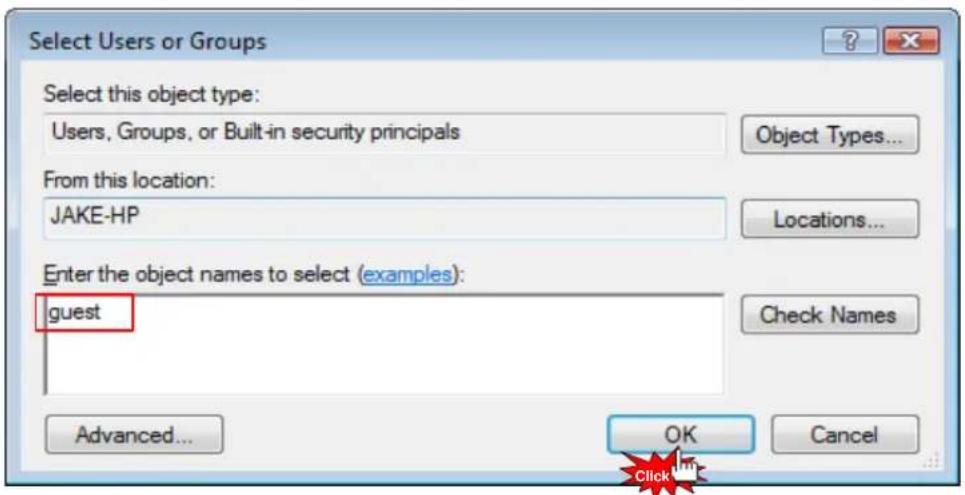
Select Users or Groups Select this object type: Users, Groups, or Built-in security principals Object Types... From this location: JAKE-HP Locations... Enter the object names to select (examples): guest Check Names Advanced... OK Cancel- Type [Guest], and then click [OK].
text_image
Permissions for Local Disk (G:) Security Object name: G:W Group or user names: Authenticated Users SYSTEM Guest (Jake-HP\Guest) Adm-click Us (Jake-HP\Administrators) Users (Jake-HP\Users) Add... Remove Permissions for Guest Allow Deny Full control Modify Read & execute ✓ List folder contents ✓ Read ✓ Learn about access control and permissions OK Cancel Apply Click Click- Once completed, check if there is "Guest" account or not, then [OK] - [Apply] - [OK].
Network Sharing
How to set-up Folder Sharing in Windows Vista

text_image
Advanced Sharing ✓ Share this folder Settings Share name: G Add Remove Limit the number of simultaneous users to: 10 Comments: Permissions Caching OK Cancel Apply- Click [Apply] – [OK] so you will complete adding "Guest" account on sharing tap menu.

text_image
Local Disk (G:) Properties Previous Versions Quota ReadyBoost Customize General Tools Hardware Sharing Security Object name: G:\W Group or user names: Authenticated Users SYSTEM Guest (Jake-HPW\Guest) Administrators (Jake-HPW\Administrators) To change permissions, click Edit. Edit... Click Permissions for Guest Allow Full control Modify Read & execute ✓ List folder contents ✓ Read ✓ Write For special permissions or advanced settings. click Advanced. Advanced Learn about access control and permissions Close Cancel Apply- Confirm if there are both "Guest" and "Everyone" accounts or not on "Security" tap menu. If there is no "Guest" account, click [Edit...] (Both accounts should be present).
Network Sharing
How to set-up Folder Sharing in Windows Vista
text_image
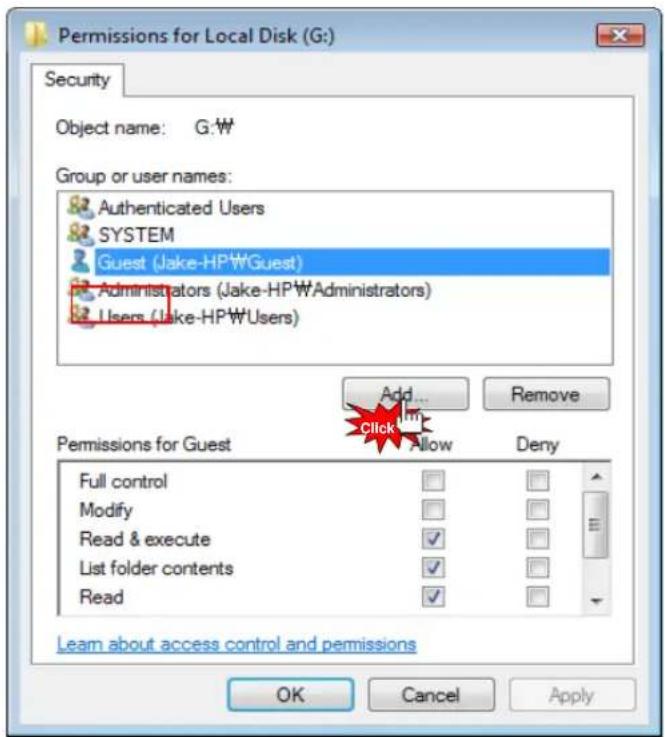
Permissions for Local Disk (G:) Security Object name: G:\W Group or user names: Authenticated Users SYSTEM Guest (Jake-HP\WGuest) Administrators (Jake-HP\WAdministrators) Users (Jake-HP\WUsers) Add... Remove Add... Add... Remove Permissions for Guest Full control Modify Read & execute List folder contents Read Allow Deny Learn about access control and permissions OK Cancel Apply- Click [Add] if there is no "Guest" account.
text_image
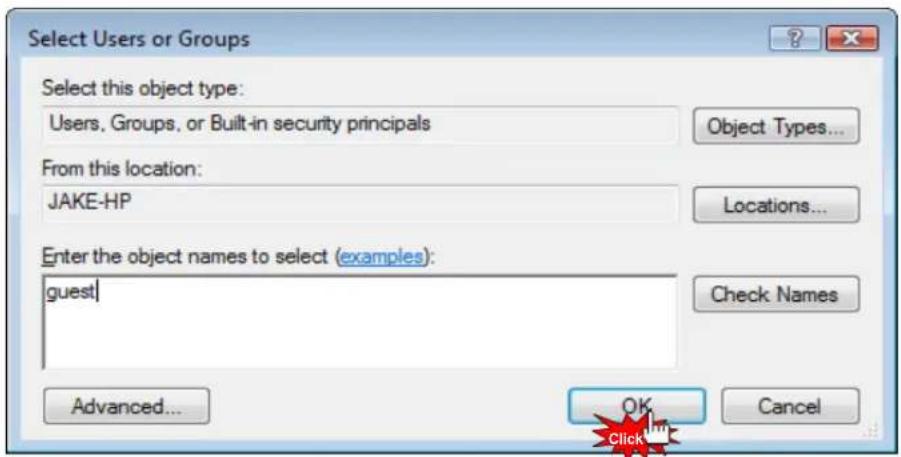
Select Users or Groups Select this object type: Users, Groups, or Built-in security principals Object Types... From this location: JAKE-HP Locations... Enter the object names to select (examples): guest Check Names Advanced... OK Cancel- Type [Guest] (refer to the above image), then click [OK].
Network Sharing
How to set-up Folder Sharing in Windows Vista

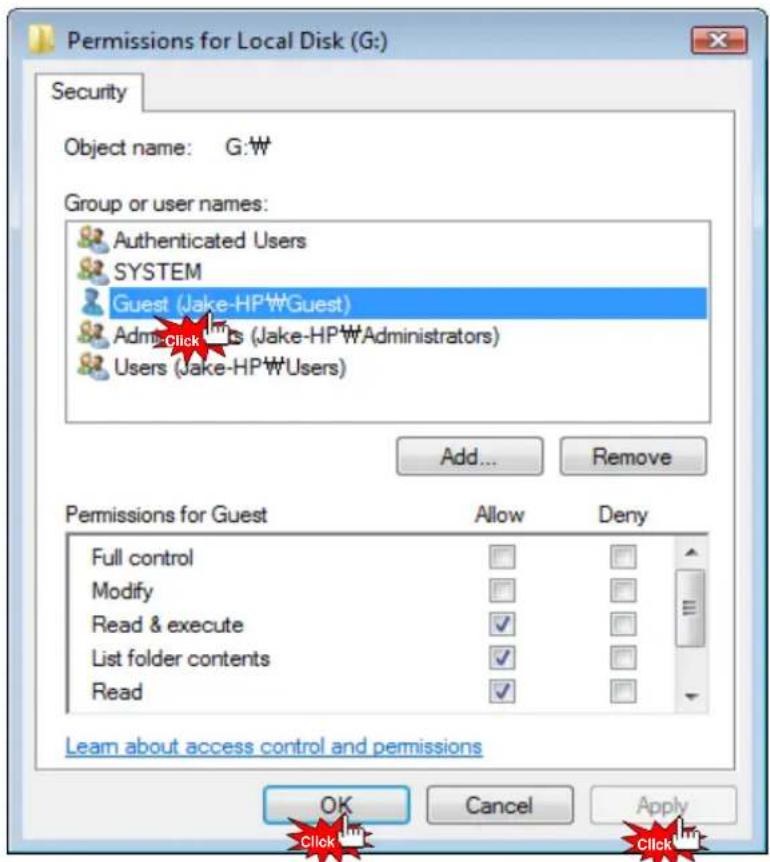
text_image
Permissions for Local Disk (G:) Security Object name: G:\W Group or user names: Authenticated Users SYSTEM Guest (Jake-HP\W\Guest) Administrators (Jake-HP\W\Administrators) Users (Jake-HP\W\Users) Add... Remove Permissions for Guest Allow Deny Full control Modify Read & execute ✓ List folder contents ✓ Read ✓ Learn about access control and permissions OK Cancel Apply- Check if "Guest" account is correctly added or not, then click [Apply] - [OK].

text_image
Local Disk (G:) Properties Previous Versions Quota ReadyBoost Customize General Tools Hardware Sharing Security Object name: G:\W Group or user names: Authenticated Users SYSTEM Guest (Jake-HP\WGuest) Administrators (Jake-HP\WAdministrators) To change permissions, click Edit. Edit... Permissions for Guest Allow Deny Full control Modify Read & execute ✓ List folder contents ✓ Read ✓ Write For special permissions or advanced settings, click Advanced. Advanced Learn about access control and permissions Close Cancel Apply- Click [Close] to set completed.
Network Sharing
If folder accessing in window XP isn't available.
The instruction is subject to there isn't any problem in Network Sharing
Network Workgroup, Computer's name, and so on. You, therefore, need to check Security set up part.

Note:
This instruction will be able to have effect on changing value, Network Sharing registry key correction in system, hence, you must not change other set value, incorrect setting value will be able to cause serious damage to your system].
- Click [Start] – [Control Panel] - [Administrative Tools] [Local Security Policy] – [User Rights Assignment].
1-1. Everyone, Users and Guest must be included in "Access this computer from network".
1-2. Add Everyone, Users and Guest if there is missing one in there.
1-3. If there are Everyone, Users and Guest in "Deny Access to this computer form the network", delete 3 of these accounts.
1-4. Users and Guest must be included in "Log on locally".
1-5. Users and Guest must not be included in "Deny log on locally".
1-6. everyone and Users must be included in "By pass traverse checking".
- Click [Start] – [Control Panel] – [Administrative Tools] – [Local Security Policy] – [Security Option].
2-1. Network Security: [Send LM & NTCM responses] in "Authentication Level".
2-2. Network Access: [Disabled] in "Don't allow anonymous enumeration of SAM accounts and shares".
- Click [Start] - [Control Panel] - [Firewall].
3-1. Check on [File and Printer Sharing] in "Exception" tap menu.
- Click [Start] – [Control Panel] – [Administrative Tools] – [Services].
4-1. Computer Browser: [Started in Status] - [Automatic in Startup type].
4-2. Server: [Started in Status] – [Automatic in Startup type].
4-3. Workstation: [Status Started] – [Startup type Automatic].
- Click [Start] - [Run] and type [regedit] then click [OK].
5-1 [HKEY_LOCAL_MACHINE] - [SYSTEM] - [Current Control Set] - [Control] - [Lsarestrictanonymous]
"Lsarestrictanonymous" Value must be [0]. If there is no item, which means the value is the same as "0".
- Once completed, you should reboot your computer so that setting value can be applied.
Network Sharing
How to configure Folder Sharing Permission in Windows XP
This instruction is for Windows XP Professional Users.
text_image
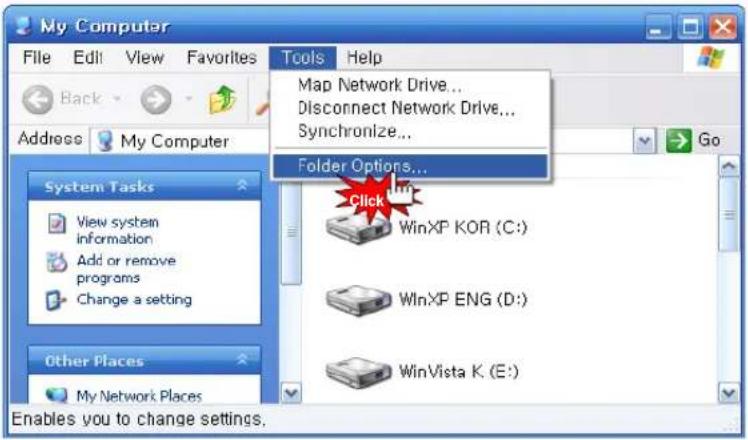
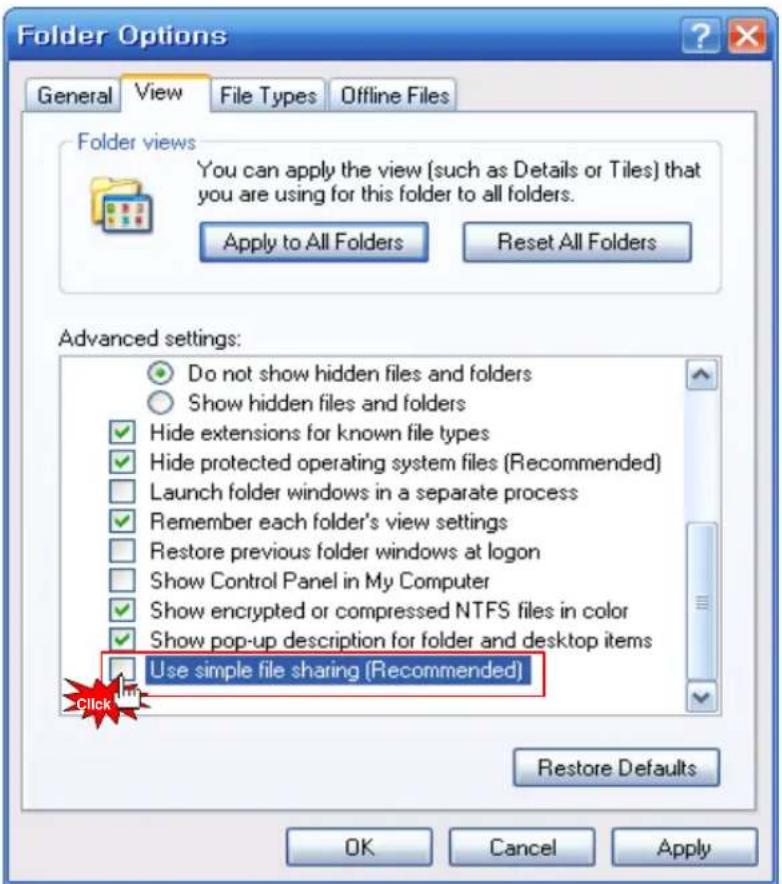
My Computer File Edit View Favorites Back Address My Computer System Tasks View system information Add or remove programs Change a setting Other Places My Network Places Enables you to change settings. Tools Help Map Network Drive... Disconnect Network Drive... Synchronize... Folder Options... Click WinXP KOR (C:) WinXP ENG (D:) WinVista K. (E:) Go- Click [My Computer] – [Tools] – [Folder Options...].
text_image
Folder Options General View File Types Offline Files Folder views You can apply the view (such as Details or Tiles) that you are using for this folder to all folders. Apply to All Folders Reset All Folders Advanced settings: Do not show hidden files and folders Show hidden files and folders Hide extensions for known file types Hide protected operating system files (Recommended) Launch folder windows in a separate process Remember each folder's view settings Restore previous folder windows at logon Show Control Panel in My Computer Show encrypted or compressed NTFS files in color Show pop-up description for folder and desktop items Use simple file sharing (Recommended) Click Restore Defaults OK Cancel Apply- Click [Folder Options...] – [View] – [Use Simple File Sharing (Recommended)] in "Advanced settings" – [OK].
※ Use Simple File Sharing (Recommended) must not be selected.
Network Sharing
How to configure Folder Sharing Permission in Windows XP
text_image
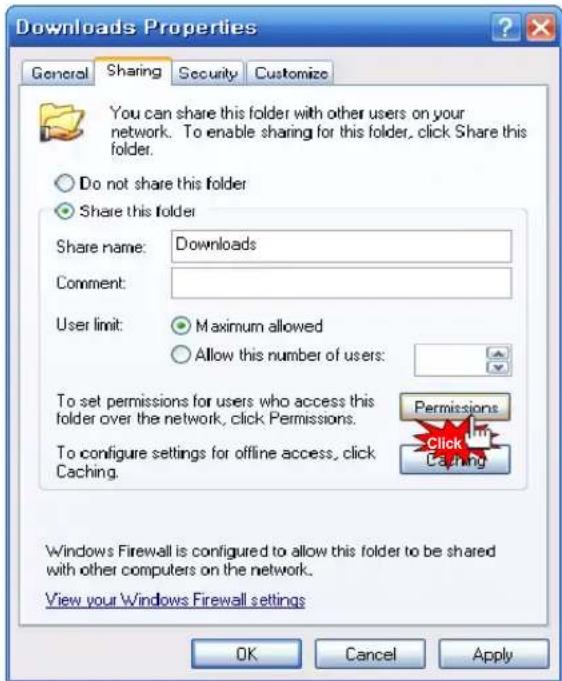
Downloads Properties General Sharing Security Customize You can share this folder with other users on your network. To enable sharing for this folder, click Share this folder. Do not share this folder Share this folder Share name: Downloads Comment: User limit: Maximum allowed Allow this number of users: To set permissions for users who access this folder over the network, click Permissions. To configure settings for offline access, click Caching. Permissions Click Caching Windows Firewall is configured to allow this folder to be shared with other computers on the network. View your Windows Firewall settings OK Cancel Apply- Select a folder you want to share in Network, then click [Properties] – [Sharing].
text_image
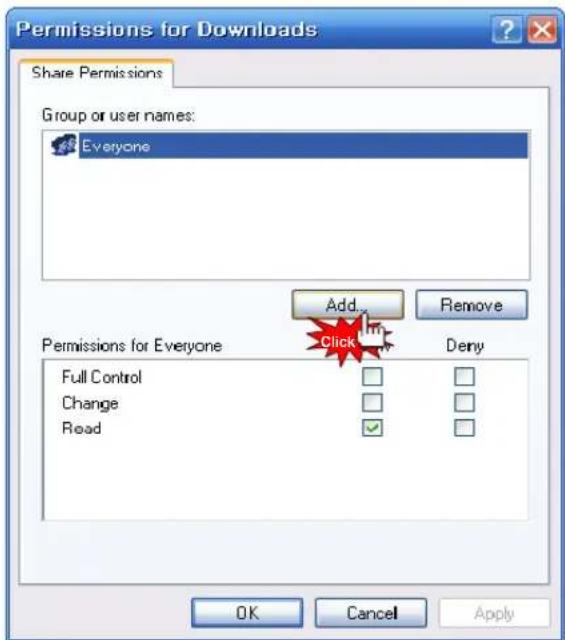
Permissions for Downloads Share Permissions Group or user names: Everyone Add... Remove Permissions for Everyone Click Deny Full Control Change Read OK Cancel Apply- Click [Share this folder] - [Permission].
If there is no "Guest" account, click [Add...] button.
Network Sharing
How to configure Folder Sharing Permission in Windows XP
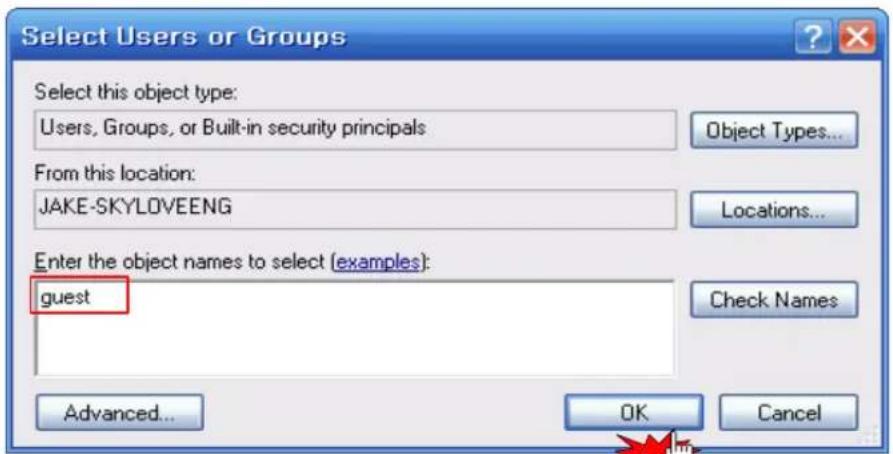
text_image
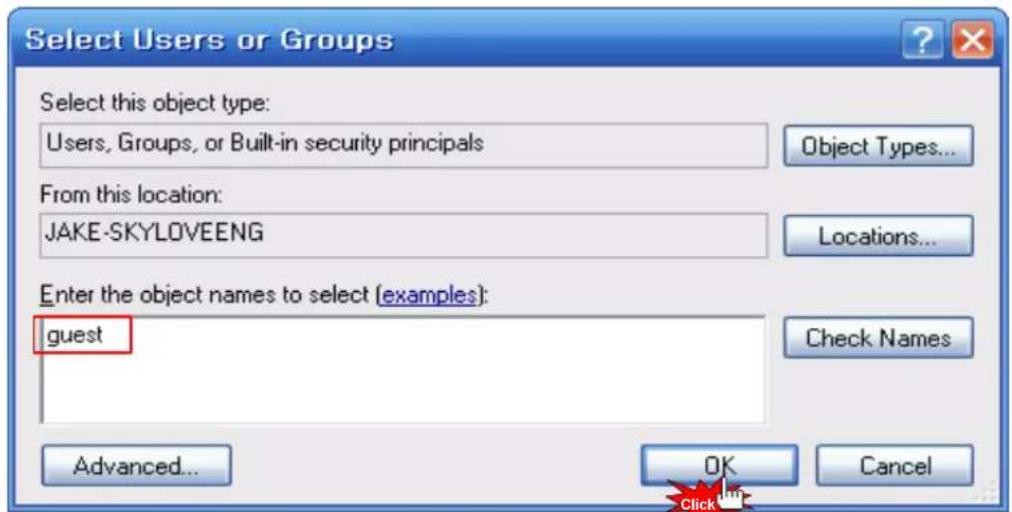
Select Users or Groups Select this object type: Users, Groups, or Built-in security principals Object Types... From this location: JAKE-SKYLOVEENG Locations... Enter the object names to select (examples): guest Check Names Advanced... OK Cancel- Type [Guest], and then click [OK].
text_image
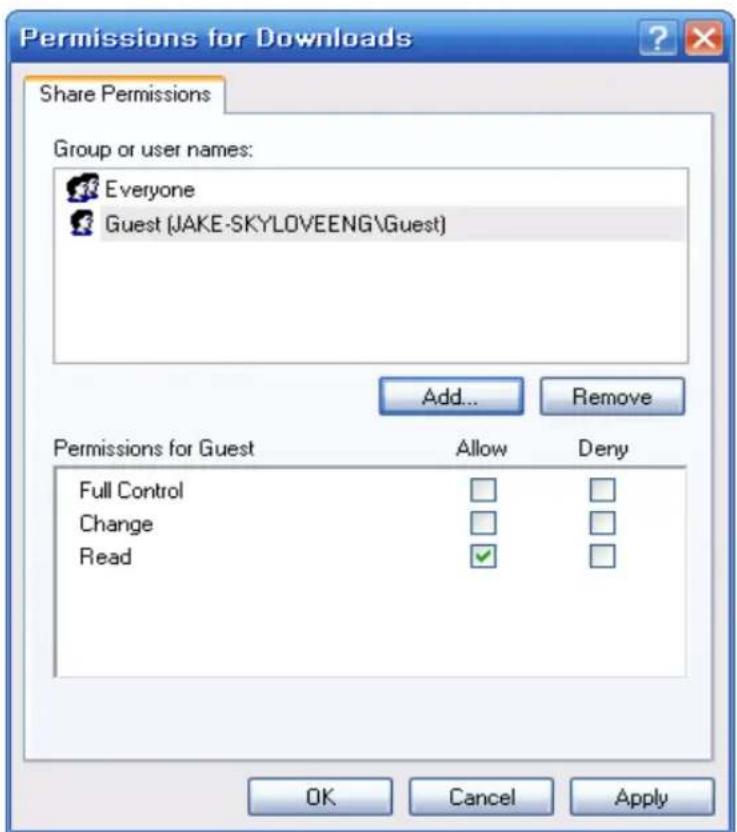
Permissions for Downloads Share Permissions Group or user names: Everyone Guest (JAKE-SKYLOVEENG\Guest) Add... Remove Permissions for Guest Allow Deny Full Control Change Read OK Cancel Apply- As you check "Guest" account added, the setting will be completed by clicking [OK] - [Apply] - [OK].
Network Sharing
How to configure Folder Sharing Permission in Windows XP

text_image
Downloads Properties General Sharing Security Customize Group or user names: Administrators (JAKE-SKYLOVEENG\Administrators) CREATOR OWNER S-1-5-21-1214440339-2139871995-1801674531-1003 SYSTEM Users (JAKE-SKYLOVEENG\Users) Add... Remove Permissions for Administrators Allow Deny Full Control ✓ Modify ✓ Read & Execute ✓ List Folder Contents ✓ Read ✓ Write ✓ Special Permissions ✓ For special permissions or for advanced settings, click Advanced. Advanced OK Cancel Apply- Click [Share permissions] - [Add].
text_image
Select Users or Groups Select this object type: Users, Groups, or Built-in security principals Object Types... From this location: JAKE-SKYLOVEENG Locations... Enter the object names to select (examples): guest Check Names Advanced... OK Cancel- Type [Guest] and then, click [OK].
Network Sharing
How to configure Folder Sharing Permission in Windows XP
text_image
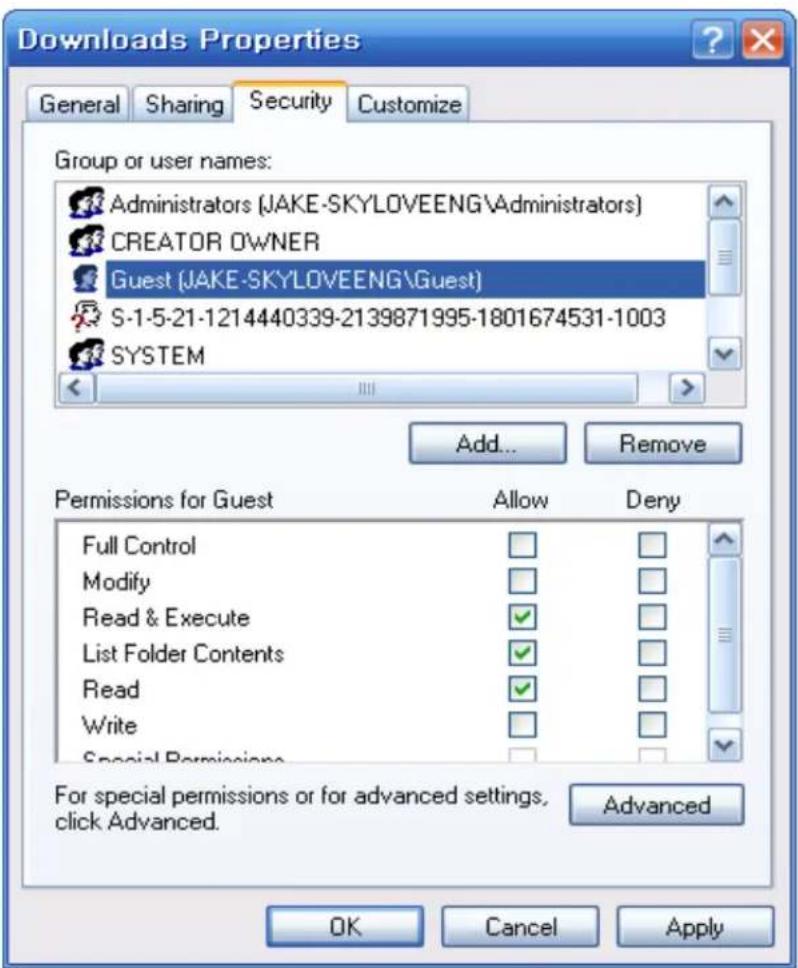
Downloads Properties General Sharing Security Customize Group or user names: Administrators (JAKE-SKYLOVEENG\Administrators) CREATOR OWNER Guest (JAKE-SKYLOVEENG\Guest) S-1-5-21-1214440339-2139871995-1801674531-1003 SYSTEM Add... Remove Permissions for Guest Allow Deny Full Control Modify Read & Execute ✓ List Folder Contents ✓ Read ✓ Write Special Permissions ✓ For special permissions or for advanced settings, click Advanced. Advanced OK Cancel Apply- As you check "Guest" account added in Security tap, setting will be completed by [Apply] - [OK].

Tip
You will be able to use this method in order to allow (or block) the access by someone.
Network Sharing
You can't access a share on your network
The main reason that you cannot access a network share is that a GUEST account is not enabled on your system.
In Windows 7 you might experience problems accessing your Network Shares if you have windows Live Essentials 2011 installed. In this case, try to access the folders via NET (MEDIA SOURCES)
How to display "Guest" account "on" for Windows
For Windows XP,
(1) Select [Start] - [Control Panel] - [User accounts]
(2) Change from [Guest accounts is off] to [Guest accounts is on]
For Windows Vista,
(1) Select [Start] - [Control Panel] - [User accounts] - [Manage another account]
(2) Click [Guest]
(3) Change from [Guest accounts is off] to [Turn on]
Reboot PC and Xstreamer, then you will be able to connect Network.

text_image
Xtreamer® Media Player & Streamer Bit Torrent guideBit Torrent guide
There is a built-in Bit-Torrent client on Xstreamer Prodigy that can be accessed via Web UI.
Step 1, Connect your Prodigy to the local network (with access to the Internet) via Settings.
Step 2, In the Settings turn BT on.
Step 3, To access the bit-torrent interface launch a web browser program on your computer and at the address bar, type in the local IP address of your Prodigy followed by /unicgi (for example - http://192.168.0.9/unicgi).
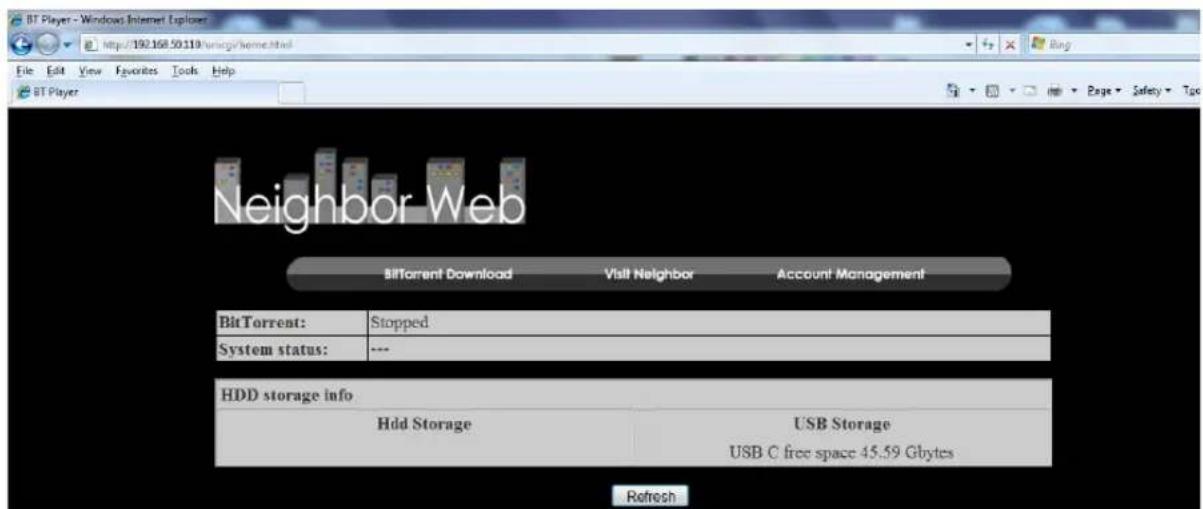
text_image
BT Player - Windows Internet Explorer http://192.168.50.119/swzqgs/home.html File Edit View Favorites Tools Help BT Player Neighbor Web BitTorrent Download Visit Neighbor Account Management BitTorrent: Stopped System status: --- HDD storage info Hdd Storage USB Storage USB C free space 45.59 Gbytes RefreshClick BitTorrent Download on the home page to enter the Bit-Torrent Download page.
3.11.1 Adding a new torrent
Click Add new torrent on the BitTorrent Download page.
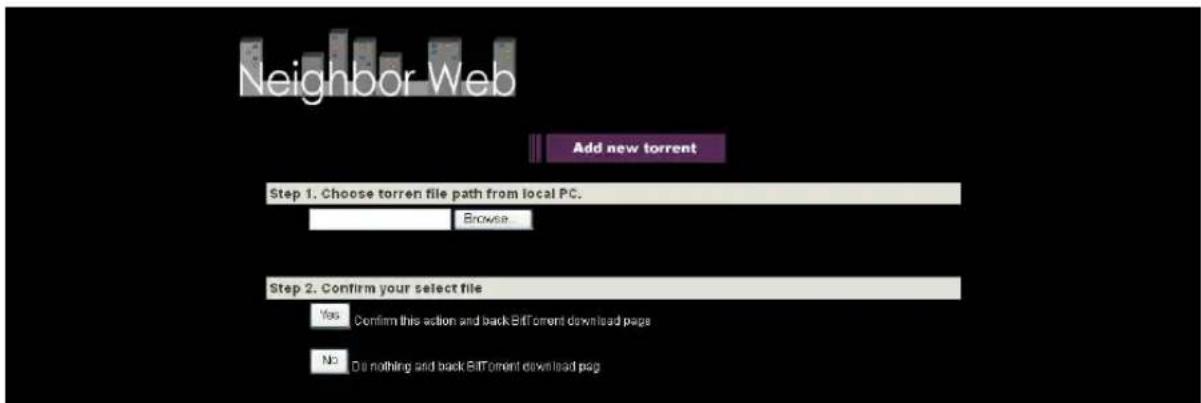
text_image
Neighbor Web Add new torrent Step 1. Choose torren file path from local PC. Browse Step 2. Confirm your select file Yes Confirm this action and back Bitoment download page No Do nothing and back Bitoment download page- Click Browse to upload a torrent file, and click Yes to confirm.
3.11.2 Managing the downloads
The BitTorrent Download page also allows you to start, stop, delete torrents, and set priorities for torrents, as well as view the status of current torrents.

text_image
Neighbor Web ▶ Start ▪ Stop × Delete L Refresh ↓ ↑ ! Setting +Add new torrent No Torrent file name Size(MB) Priority Percent Peers Speed(kb/s) □ [Chinald Sable OVAv2_0144 014ARV2] mkt 69.13 54% 2 18.13 kbit 2 □ 30 Rock S08E16 HDTV XvD-LOL.mkt 173.00 2 0% 0 0.00 kB/s 3 □ 600 War Aircraft Wallpaper 1004X 768 Great Collection 238.43 3 8% 19 18.61 kB/s 4 □ American (doi.S08E24.HDTV-XvD-2HD.mkt) 348.30 4 0% 0 0.00 kB/s 5 □ Skiss S03BJD WS FDTV XvD-RIVER.mkt 343.60 5 0% 0 0.00 kB/s Detail Priority 1 File name [Chinald] Seluri_OVAv2_0144[014AB815] mkt Status downloading Current size/File size 55.54M/99.85K Time left 0:3:38 Storage Path HDDQ Tupiah rate 2.76 KB- Click Start to begin download.
- Click Stop to stop download.
- Click Delete to delete the selected torrent.
- Click Refresh to refresh the current status.
- Click Down arrow to decrease the priority for the selected torrent.
- Click Up arrow to increase the priority for the selected torrent.

text_image
xtreamer® Media Player & Streamer Android App InstallationAndroid App Installation
Android App Installation
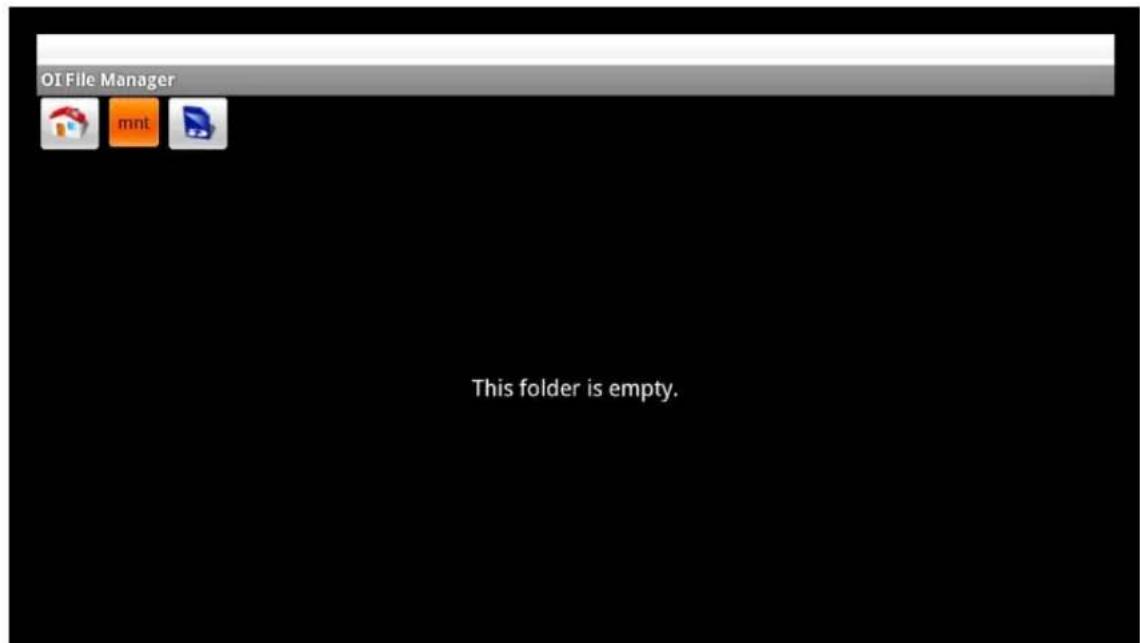
To manually install a new Android application you need to download an .apk file on a SD card, USB stick or internal drive.
Enter Android home screen

text_image
App Center Calculator CineTrailer Default App M eBuddy File Expert Gallery Grooveshark Latitude Live365 Maps Music Browser OI File Manager Search RT Media Center SettingsChoose the OI FILE MANAGER from the bar on the bottom
text_image
OI File Manager mnt This folder is empty.Android App Installation
Navigate to a folder with the APK files.
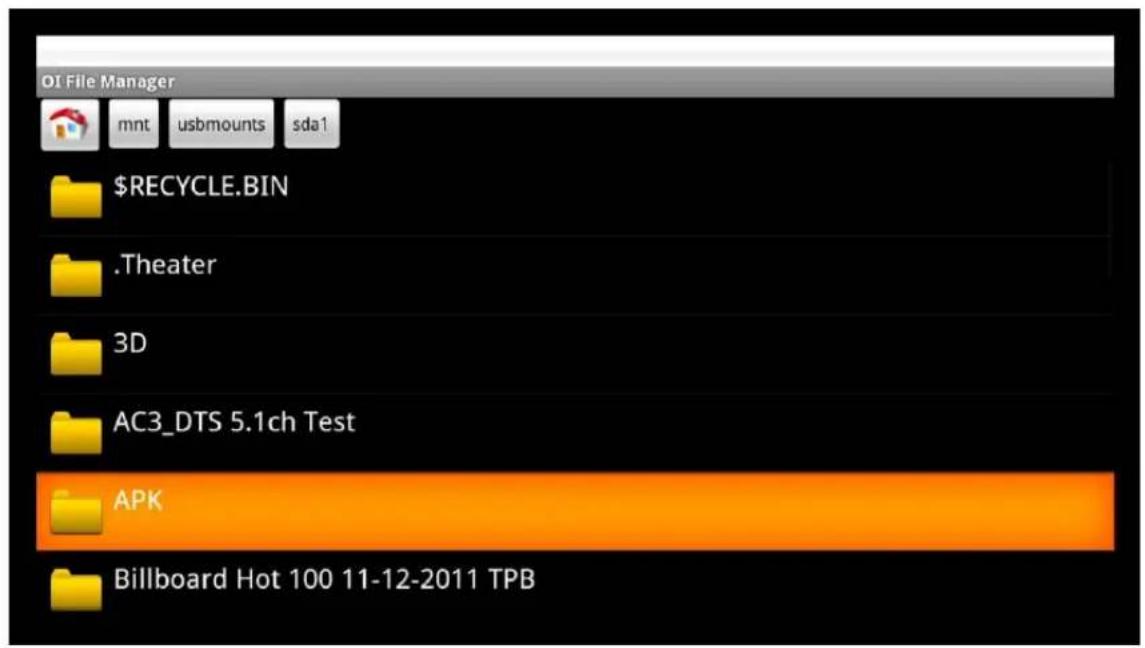
text_image
OI File Manager mnt usbmounts sda1 $RECYCLE.BIN .Theater 3D AC3_DTS 5.1ch Test APK Billboard Hot 100 11-12-2011 TPB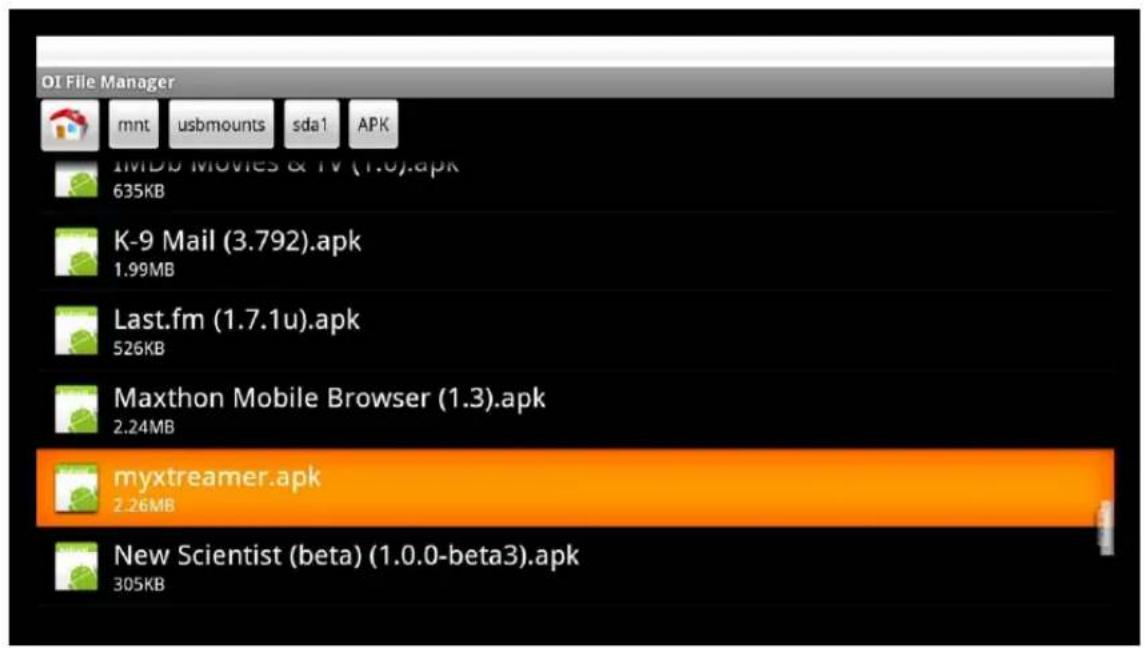
text_image
OI File Manager mnt usbmounts sda1 APK IMDB Movies & TV (1.0).apk 635KB K-9 Mail (3.792).apk 1.99MB Last.fm (1.7.1u).apk 526KB Maxthon Mobile Browser (1.3).apk 2.24MB myxtreamer.apk 2.26MB New Scientist (beta) (1.0.0-beta3).apk 305KBChoose an application to install and press ENTER.
Android App Installation
Press INSTALL

text_image
xMediaJukebox Do you want to install this application? Allow this application to: Your location fine (GPS) location Network communication full Internet access Install Cancel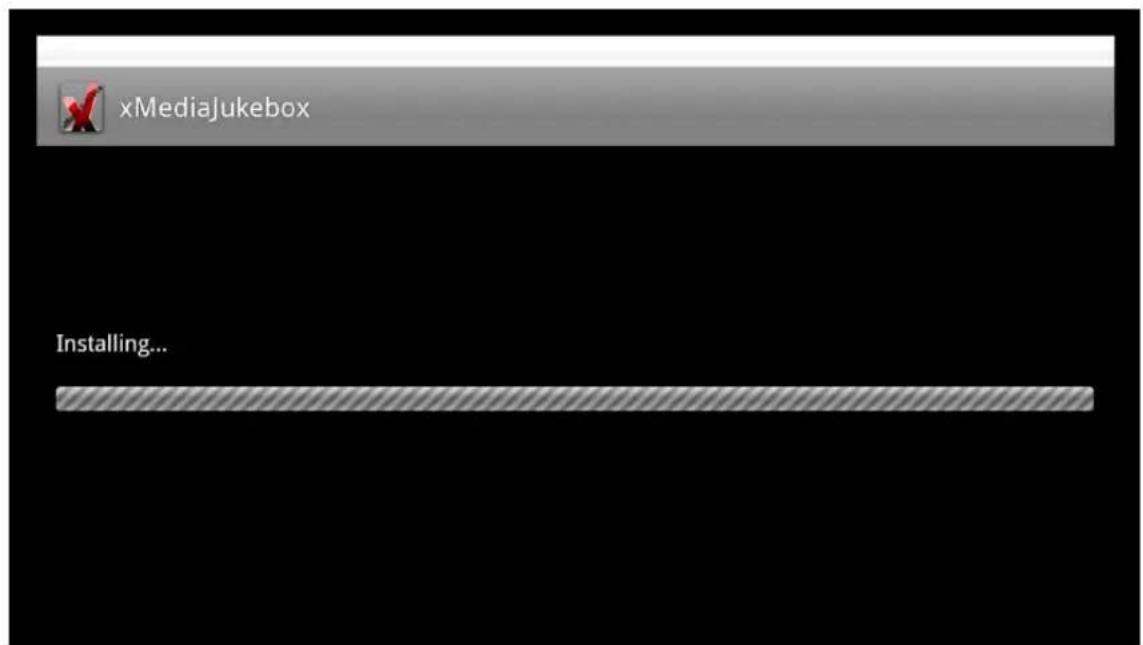
text_image
xMediaJukebox Installing...Android App Installation
Once the application is installed you can press OPEN to start it.
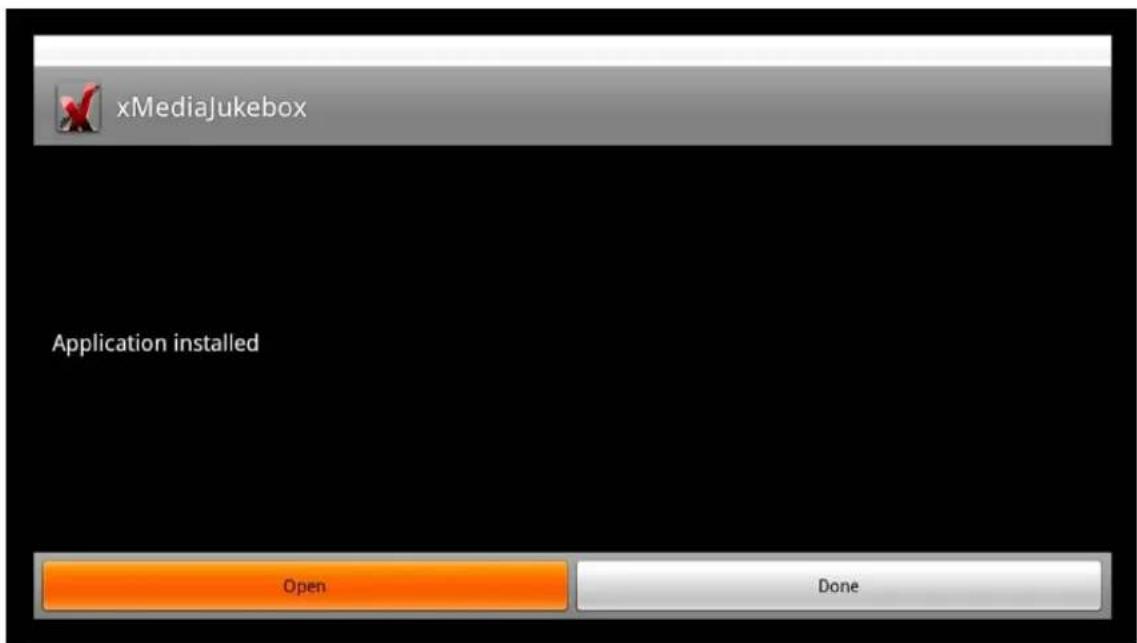
text_image
xMediaJukebox Application installed Open Done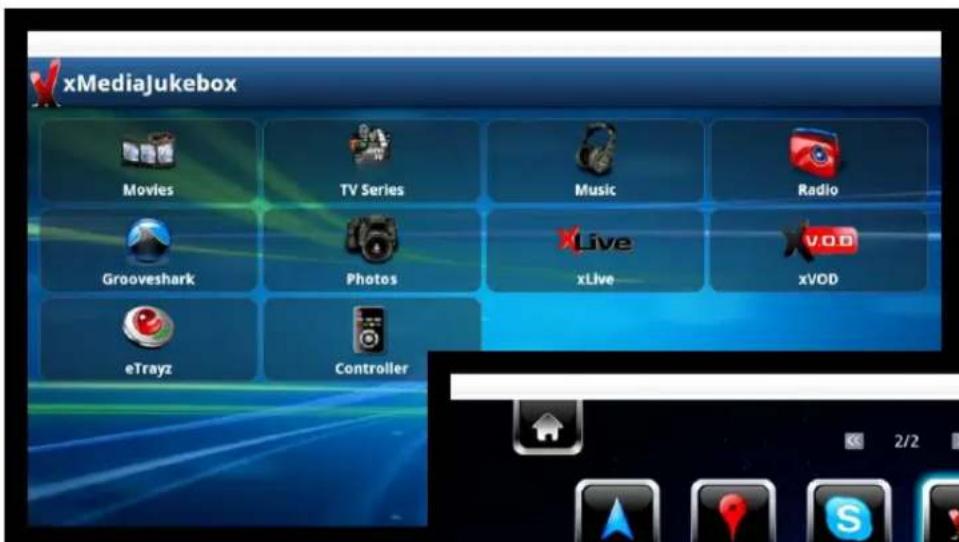
text_image
xMediaJukebox Movies TV Series Music Radio Grooveshark Photos xLive xVOD eTrayz ControllerIt will also appear on the main Android screen.
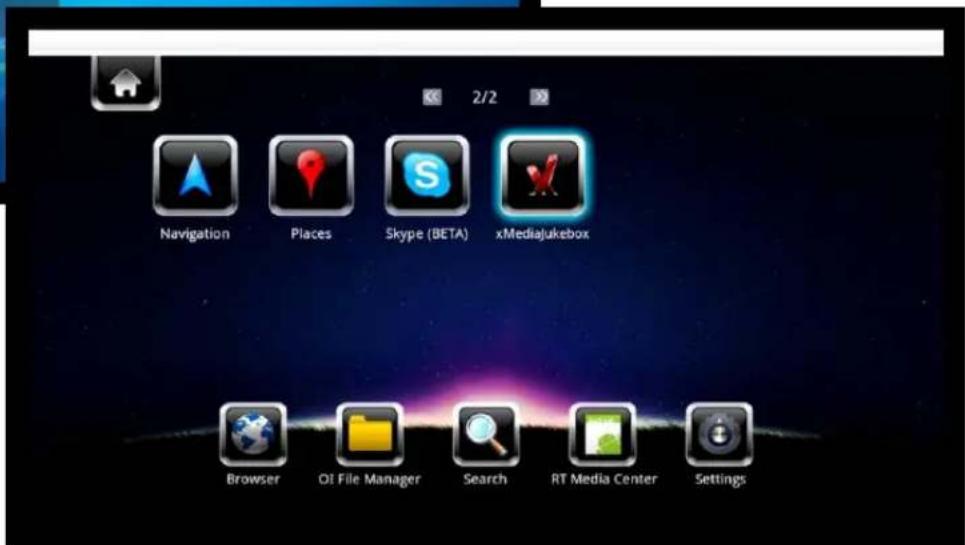
text_image
Navigation Places Skype (BETA) xMediaJukebox Browser OI File Manager Search RT Media Center Settings
text_image
Xtreamer® Media Player & Streamer Firmware UpgradeFirmware Upgrade
Firmware Upgrade
We constantly working to improve our devices. Firmware upgrades bring new features and fixes and will make your Prodigy even more interesting and diverse device.
Please check for new releases on our site in the Download section.
Download the firmware file and unzip it into the root of a USB stick. Plug the stick into one of USB ports.
text_image
Xtreamer® VR Headset & Smartphone Nov 23 02:25 AM | VER 3.0.1 | IP: 192.168.123.44 Video Audio Network System Configuration System Service Firmware Upgrade Look and Feel Search and Indexing Favourite History Media Library Android App Settings SearchGo to Settings -> Firmware Upgrade and choose Check for Firmware option. The device will automatically scan the USB stick for firmware files.
text_image
Firmware Upgrade Here you can configure your Xtreamer Firmware Updates relateds options and features System Firmware ( Current version 3.0.1 ) USB upgrade Check for Firmware Nov 23 02 25 AM | VER 3.0.1 | IP: 192.168.123.44Note: We recommend using a stick no bigger than 2GB. Format it FAT32
Firmware Upgrade
Once the upgrade file is detected, press OK to start the procedure.
text_image
USB upgrade Do you want to update? Current version 3.0.1 New version 3.0.1 OK Cancel Xtreamer® Prodigy Media Player & StreamerPlease be patient, the process takes time.

text_image
Start Installation: 3.0.1Once the procedure is finished the Prodigy will reboot.
Make sure to reset your player to factory default settings after a firmware upgrade (Settings -> System Configuration -> Restore Default).
EMERGENCY FIRMWARE
Emergency firmware is used for de-bricking unresponsive devices and fixing various issues.
- Download the firmware file from the Xstreamer main site.
- Unzip the file and copy (install.img) it to the root of a FAT32 formatted USB stick (we recommend a stick no bigger than 2GB).
- Disconnect all the cables, dongles, antennas, internal and external storage devices from your Prodigy.
Disconnect it from power for 10-15 minutes. - Plug the device into power and insert the USB stick into one of the ports on the back panel.
- Make sure the device is OFF and press the Power button on Prodigy for about 10 sec.
The device LED will initially turn ON and after few sec it will turn OFF.
Once the blue LED is OFF release your finger from the Power button and then the upgrade process screen will appear on your TV.
(This procedure and can be used to clear personal data and reset passwords)
Please be patient. It might be necessary to try the procedure several times.
You might have to use another USB stick if you are not successful.
Useful Links
Check the Prodigy section on our Knowledge base.
If you are new to the Media Players world you might consider subscribing to the Xtreamer4Dummies channel on Youtube.
Check the download section of our site for firmware updates.
For an updated version of this manual check here.
If you are interested to become a member of the Xstreamer community please register on our forum. You might be interested in tip and opinions of your fellow Xstreamer enthusiasts. You can also find custom applications and mods on the forum.