FRITZ!Fon MT-F - Phone AVM - Free user manual and instructions
Find the device manual for free FRITZ!Fon MT-F AVM in PDF.

User questions about FRITZ!Fon MT-F AVM
0 question about this device. Answer the ones you know or ask your own.
Ask a new question about this device
Download the instructions for your Phone in PDF format for free! Find your manual FRITZ!Fon MT-F - AVM and take your electronic device back in hand. On this page are published all the documents necessary for the use of your device. FRITZ!Fon MT-F by AVM.
USER MANUAL FRITZ!Fon MT-F AVM
Configuration and Operation
text_image
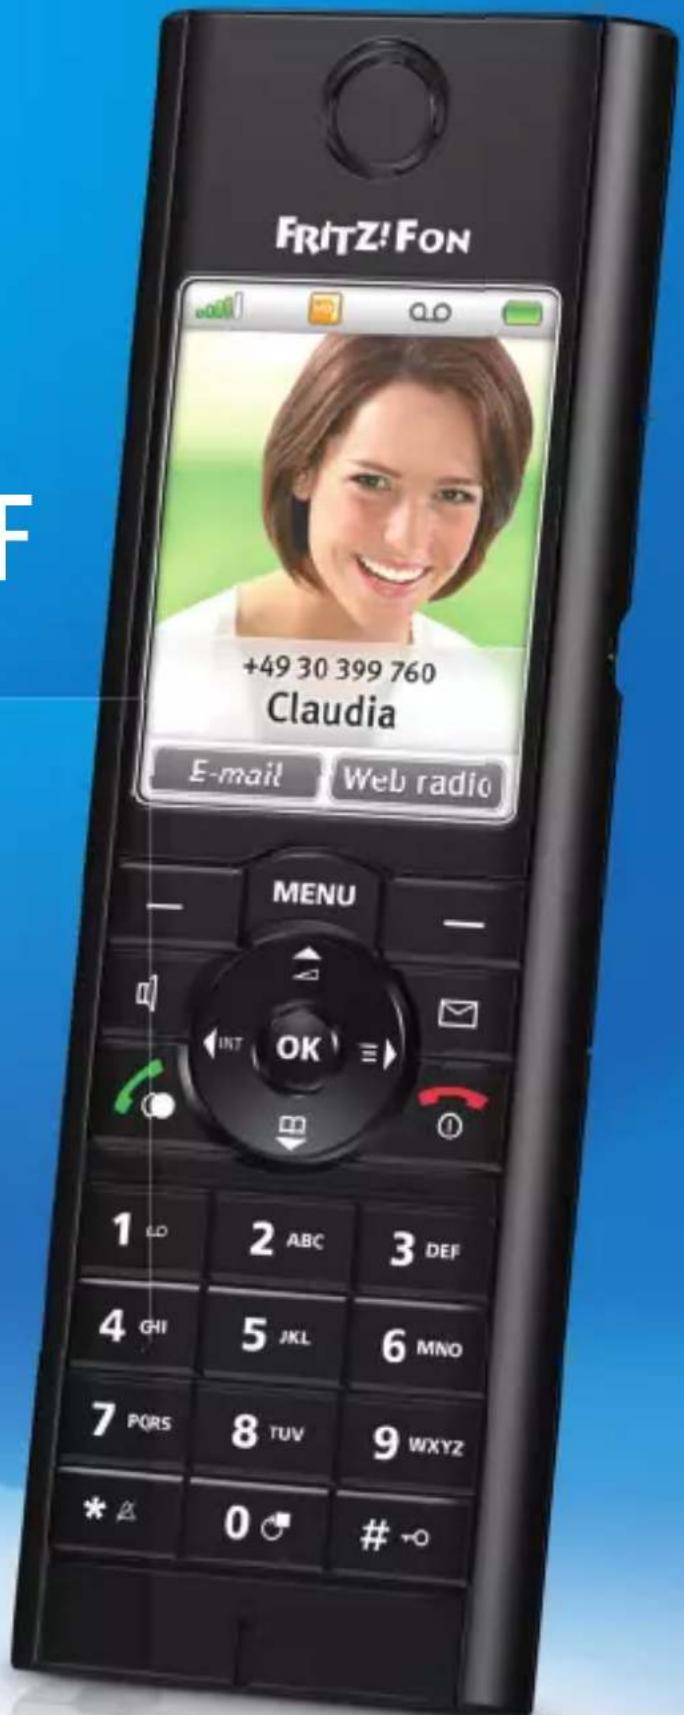
FRITZ! FON +49 30 399 760 Claudia E-mail Web radio MENU 1 LD 2 ABC 3 DEF 4 GHI 5 JKL 6 MNO 7 PORS 8 TUV 9WXYZ * A 0 # -OLegal Notice FRITZ!Fon MT-F
This documentation and the software it describes are protected by copyright. AVM grants the non-exclusive right to use the software, which is supplied exclusively in object code format. The licensee may create only one copy of the software, which may be used exclusively for backup use.
AVM reserves all rights that are not expressly granted to the licensee. Without previous approval in writing, and except for in cases permitted by law, it is particularly prohibited to
- copy, propagate or in any other manner make this documentation or this software publicly accessible, or
- process, disassemble, reverse engineer, translate, decompile or in any other manner open the software and subsequently copy, propagate or make the software publicly accessible in any other manner.
This documentation and software have been produced with all due care and checked for correctness in accordance with the best available technology. AVM GmbH disclaims all liability and warranties, whether express or implied, relating to the AVM product's quality, performance or suitability for any given purpose which deviates from the performance specifications contained in the product description. The licensee bears all risk in regard to hazards and impairments of quality which may arise in connection with the use of this product.
AVM will not be liable for damages arising directly or indirectly from the use of the manual or the software, nor for incidental or consequential damages, except in case of intent or gross negligence. AVM expressly disclaims all liability for the loss of or damage to hardware or software or data as a result of direct or indirect errors or destruction and for any costs (including connection charges) related to the documentation and the software and due to incorrect installations not performed by AVM itself.
The information in this documentation and the software are subject to change without notice for the purpose of technical improvement.
We offer a manufacturer's warranty for this original product. The warranty conditions are presented from page 63 of this manual.
© AVM GmbH 2009—2016. All rights reserved. Documentation release 06/2016
Unless otherwise indicated, all trademarks mentioned are legally protected trademarks owned by AVM. This includes product names and logos in particular. Microsoft, Windows and the Windows logo are trademarks owned by Microsoft Corporation in the USA and/or other countries. Bluetooth is a trademark of Bluetooth SIG Inc. licensed to AVM GmbH. All other products and company names are trademarks of their respective owners.
Table of Contents
Legal Notice 2
Important Instructions .... 7
1 FRITZ!Fon MT-F at a Glance ..... 10
1.1 Included with the Product..... 10
1.2 Getting to Know FRITZ!Fon MT-F.....11
1.3 Overview of Symbols 12
1.4 Technical Specifications .... 13
2 Starting Operation of the FRITZ!Fon MT-F ..... 15
2.1 Inserting the Battery 15
2.2 Charging the Battery 16
2.3 Registering FRITZ!Fon MT-F with the Base Station ..... 17
2.4 Navigating in the Menus ..... 20
3 Making Telephone Calls 22
3.1 Dialing Numbers Directly 23
3.2 Dialing from Telephone Book and Call Lists.....23
3.3 Finding a Telephone Book Entry 24
3.4 Creating a Telephone Book Entry 26
3.5 Copying Numbers from Call List to Telephone Book ..... 26
3.6 Using Multiple Telephone Books 27
3.7 Accepting Calls 28
3.8 Stop Ringing....29
3.9 Hands-Free Calling 29
3.10 Using the Mute Button 29
3.11 Adjusting the Volume 30
3.12 Using the Keylock 31
3.13 Finding FRITZ!Fon MT-F 31
4 Additional Functions for Telephone Connections32
4.1 Answering Machine .... 33
4.2 CLIR for One Call (Case by Case) 37
4.3 Making Internal Calls.... 38
4.4 Alternating Between Calls 39
4.5 Three-party Conference Call 40
4.6 Call Diversion....41
4.7 Alarm 43
4.8 Baby Monitor 44
5 Receiving e-Mail 46
5.1 Setting Up e-Mail Reception .... 46
5.2 Reading e-Mail....47
6 Receiving RSS Feeds 49
6.1 Setting Up RSS Feeds 49
6.2 Reading RSS Feeds 50
7 Receiving Podcasts .... 52
7.1 Setting Up a Podcast .... 52
7.2 Listening to a Podcast .... 53
8 Receiving Web Radio 54
8.1 Setting Up Web Radio 54
8.2 Listening to a Web Radio Station ..... 55
9 Device Settings .... 56
9.1 Performing a Firmware Update for FRITZ!Fon MT-F ..... 56
9.2 Performing a Firmware Update for FRITZ!Box ..... 57
9.3 Tailoring the FRITZ!Fon MT-F Settings . . . . . . . . . . . . . . . . . . . 57
9.4 Setting Up FRITZ!Fon MT-F in the FRITZ!Box ..... 58
9.5 Controlling the WLAN Function of Your FRITZ!Box. . . . . . . 59
9.6 Notifications 60
10 Customer Service Guide .... 61
Declaration of CE Conformity 62
Manufacturer's Warranty 63
Index 64
Important Instructions
Notation in this Manual

This symbol indicates important instructions that must be observed to avoid malfunctions.

This symbol indicates useful hints to assist you in working with the FRITZ!Fon MT-F.
This manual uses the following highlighting:
| Highlighting Function Examples | ||
| Quotation marks Keys | Buttons | “Start / Programs” or “entry” |
| Commands | ||
| Program icons | ||
| Menus | ||
| Settings pages | ||
Safety Instructions
When working with the FRITZ!Fon MT-F, follow the instructions below to protect yourself and the device from damage.

Never let liquids get inside the FRITZ!Fon MT-F. Otherwise, electric shocks or short circuits may result.

Do not leave the FRITZ!Fon MT-F lying in the sun for longer periods.
Explosion Hazard through Improper Battery Handling
If the battery is handled improperly, there is a danger of injury from explosion or burns.
- Replace the battery only with an original or identical battery. Details on the battery are listed in the Technical Specifications.
- Make sure that replacement batteries are inserted with the poles in the correct position.
Operation Requirements
For operation of FRITZ!Fon MT-F the following requirements must be fulfilled:
- Y ou need a DECT base station that is connected with a telephone line or the Internet and supports at least the DECT standard.
- The complete range of functions of the FRITZ!Fon MT-F is available when it is used in combination with a FRITZ!Box with integrated DECT base station.
All of the devices involved must have the latest firmware.
Note for Hearing Aid Users
If you wear a hearing aid, FRITZ!Fon can cause unpleasant noises. These are caused by radio signals coupled into the hearing aid.
Disposal Information

natural_image
Simple line drawing of a trash bin with diagonal lines crossing it, no text or symbols present.
In accordance with the Waste Electrical and Electronic Equipment Act (WEEE), FRITZ!Fon MT-F, the charging station, the power supply plug, and the cables may not be disposed with household waste. Please bring these to your local collection points for disposal.
The product contains rechargeable batteries. Rechargeable batteries may not be disposed with household waste. Please bring the discharged batteries to a local or retail collection point.
1 FRITZ!Fon MT-F at a Glance
FRITZ!Fon MT-F is a handset for wireless telephony via the DECT radio standards. Using the FRITZ!Fon MT-F you can make telephone calls via the Internet and the fixed-line network. FRITZ!Fon MT-F supports HD telephony for natural sound and can be operated with DECT base stations from other manufacturers, as long as these comply with the DECT standards.
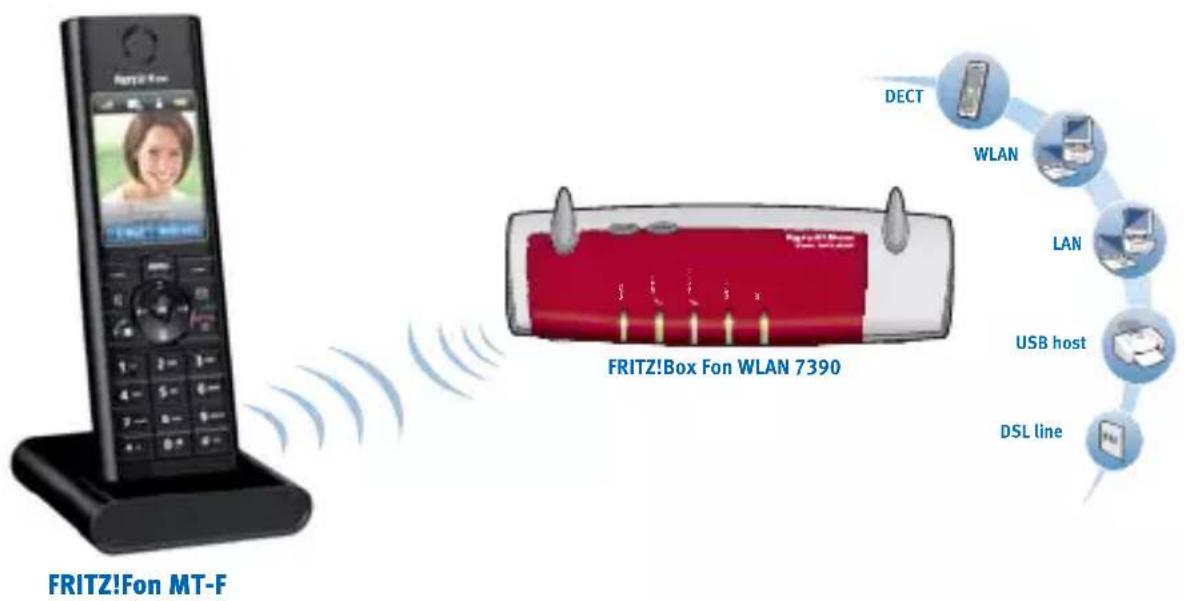
text_image
FRITZ!Fon MT-F FRITZ!Box Fan WLAN 7390 DECT WLAN LAN USB host DSL lineDECT radio connection between FRITZ!Fon MT-F and FRITZ!Box Fon WLAN 7390
1.1 Included with the Product
- one FRITZ!Fon MT-F
• one charging station
• one power supply unit
• one rechargeable battery
• one printed manual
1.2 Getting to Know FRITZ!Fon MT-F
FRITZ!Fon MT-F can be operated easily and conveniently using menus and function keys.
Get acquainted with FRITZ!Fon MT-F:
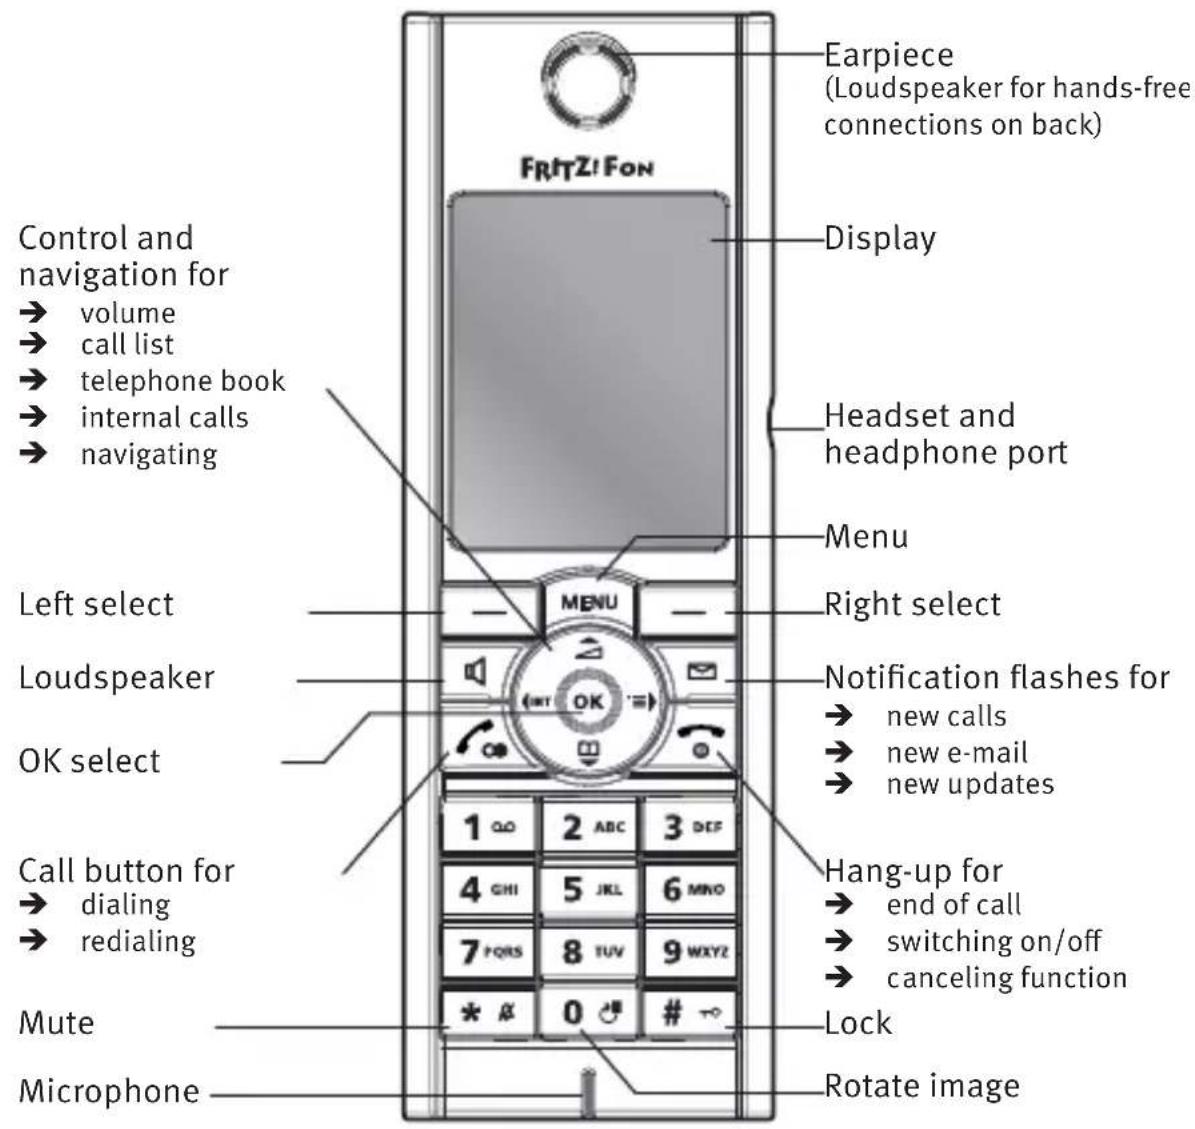
text_image
Control and navigation for → volume → call list → telephone book → internal calls → navigating Left select Loudspeaker OK select Call button for → dialing → redialing Mute Microphone FRTZ! FON Earpiece (Loudspeaker for hands-free connections on back) Display Headset and headphone port Menu Right select Notification flashes for → new calls → new e-mail → new updates Hang-up for → end of call → switching on/off → canceling function Lock Rotate image1.3 Overview of Symbols
In the FRITZ!Fon MT-F display, status conditions and functions are represented by the following symbols:
| Icon Meaning | |
 | Connection established |
 | Connection cleared |
 | Answering machine enabled |
 | Call diversion on |
 | Alarm on |
 | Keypad locked |
 | Do Not Disturb |
 | Microphone muted |
 | Loudspeaker/Handset muted |
 | Headset connected |
 | Call in HD |
 | Deletes the last entry |
 | New message waiting• missed calls• new message on the answering machine• new firmware update• new e-mail |
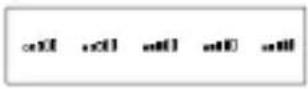 | Quality of connection with base |
 | Battery state of charge |
1.4 Technical Specifications
• Radio standard DECT
• Free-field range of up to 300 m
- Range in buildings of up to 40 m
• Standby time up to 180 hours
• Talking time up to 10 hours
• Display: 240 x 320 pixels, 262,000 colors, high-resolution
- Keypad with function keys, control keys and number keys
• 2 charging contacts on the bottom
- On/off switch above the hang-up key
- Loudspeaker/microphone
• Dimensions: approx. 150 x 50 x 14 mm
• Weight: 92 g
• Supply voltage of the charging station: 230 V / 50 Hz
• 1 Li-Ion battery, 750 mAh, 3.7 V
-charging station: charge time about 6 hours at 10^ to 30^
—deep discharge protection - Ambient conditions
– operating temperature: 0 °C to 35 °C
—storage temperature: -20°C to 45°C
–relative humidity: 5% to 95%, no condensation - Conform to CE standards
2 Starting Operation of the FRITZ!Fon MT-F
2.1 Inserting the Battery

WARNING

text_image
Yellow triangular warning sign with black exclamation mark symbolExplosion hazard!
Injuries caused by explosion or burns through inappropriate handling of the battery
Replace the battery only with an original or identical battery and make sure that replacement batteries are inserted with the poles in the correct position. Details on the battery are listed in the Technical Specifications.
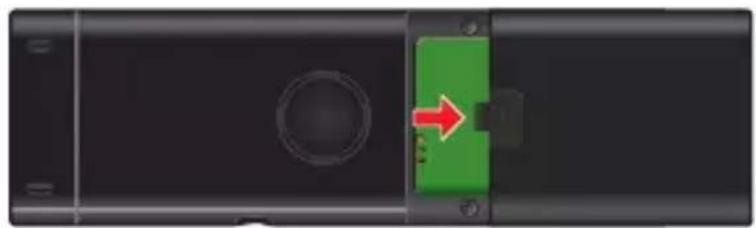
The battery compartment is located on the back of the FRITZ!Fon MT-F.
- Press the arrow to open the battery compartment.
natural_image
Top-down view of a black electronic device with a green component and a red arrow indicating direction (no text or symbols)Opening the battery compartment
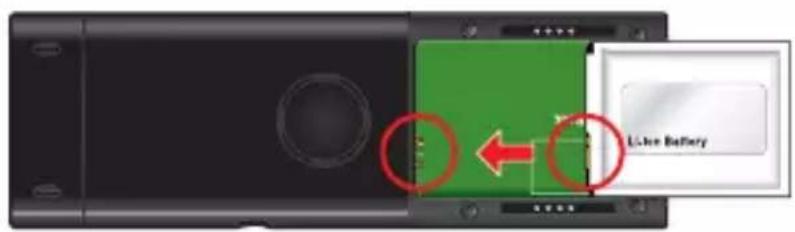
- Insert the battery so that the conductors are in contact with each other.
text_image
Li-ion BatteryInserting the battery
- Close the battery compartment
2.2 Charging the Battery
Proceed as follows to charge the battery of the FRITZ!Fon MT-F:
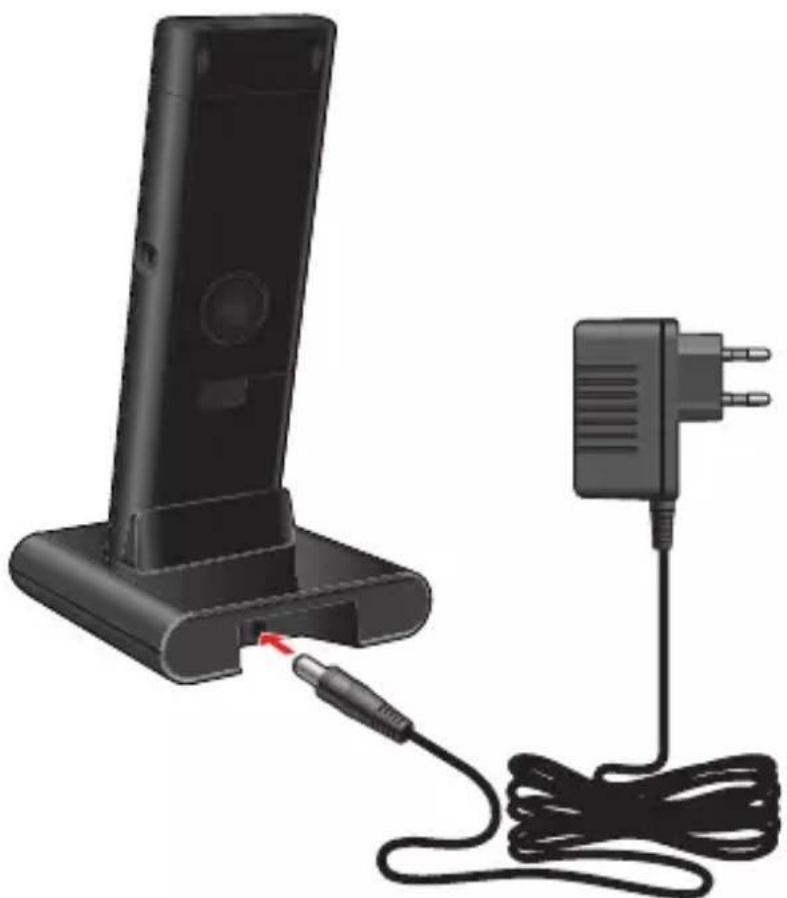
- Connect the power supply unit to the charging station of the FRITZ!Fon MT-F and plug it into a power outlet.
natural_image
Black electronic device with attached power strip connected to a charging plug (no text or symbols visible)Connect the FRITZ!Fon MT-F to the power supply for charging
- Place your FRITZ!Fon MT-F in the charging station. The battery will be charged.
2.3 Registering FRITZ!Fon MT-F with the Base Station
Register FRITZ!Fon MT-F with a base station so that the device can be used for telephone connections.
First Registration with a Base Station
Perform the following steps:
| Switch FRITZ!Fon MT-F on by pressing and holding down the hang-up button. | |
| Press the DECT button (also known as the Find or Paging button) on the base station and hold it down until FRITZ!Fon MT-F displays that registration has been successful.FRITZ!Fon MT-F is now connected with your base station and can be used to make telephone calls. |
If registration fails, register the FRITZ!Fon MT-F manually:
| Press “Register”. | |
| PIN | Use the keypad to enter the system PIN of the base station (“0000” upon delivery). Confirm with “OK”. |
| DECT | Press the DECT button on your base station until FRITZ!Fon MT-F displays that registration has been successful. |
FRITZ!Fon MT-F now will be connected with your base station and can be used to make telephone calls.
Registering FRITZ!Fon MT-F with Another Base Station
FRITZ!Fon MT-F can be registered with up to four different DECT base stations. During operation FRITZ!Fon MT-F can be connected with only one base station.
 | Press “Menu”. |
 | Select “Settings”. |
 | Select “Registration”. |
 | Select “Register”. The “Select Base” list is displayed. |
 | Select “Base 1” or another base station and then press “OK”. |
 | Use the keypad to enter the system PIN of the base station (“0000” upon delivery) and then press “OK”. |
 | |
 | Press the DECT button on the base station until FRITZ!Fon MT-F displays that registration has been successful.FRITZ!Fon MT-F is connected with the selected base station. |
Switching Base Stations
If you use multiple DECT base stations (on different floors of a building, for instance), it is easy to switch from one base station to another known base station with FRITZ!Fon MT-F.
To do so, perform the following steps:
 | Press “Menu”. |
 | Select “Settings” and then press “OK”. |
 | Select “Registration” and then press “OK”. |
 | Select “Select Base” and then press “OK”. |
 | Select the desired base station and click “OK”.FRITZ!Fon MT-F looks for the selected base station and connects to it automatically. This process takes just a few seconds. |
As soon as the device name appears in the display, FRITZ!Fon MT-F is ready for operation again.

If you use multiple FRITZ!Box devices as base stations, make sure to keep the firmware up to date on all devices.
Deregistering from the Base Station
 | Press “Menu”. |
 | Select “Settings”. |
 | Select “Registration”. |
 | Select “Deregister”. |
 | Select the base station from which the FRITZ!Fon MT-F should be deregistered and confirm by clicking “OK”. |
2.4 Navigating in the Menus
Use the control ring to navigate through the FRITZ!Fon MT-F menus.
- Navigate up and down to go to a menu entry.
- Navigate to the right or left, or press “OK” to open a menu entry.
- Navigate to the left or select “Back” to return to the higher-level menu.

text_image
FRITZ!Fon Back to menu Move down Menu OK 1 2 ABC 3 DEC 4 5 6 MIN 7 FURS 8 TUV 9 MXYZ * # 0 # → Selection button / Options Move up Further in menu Selection button OKNavigating in the FRITZ!Fon MT-F menus
3 Making T e l
With FRITZ!Fon MT-F it is easy to make telephone calls. You can call your conversation partner in the usual way by typing in the number, or select the number from the FRITZ!Box telephone book, from a Call List or from the redial list.
Function Keys for Making Phone Calls
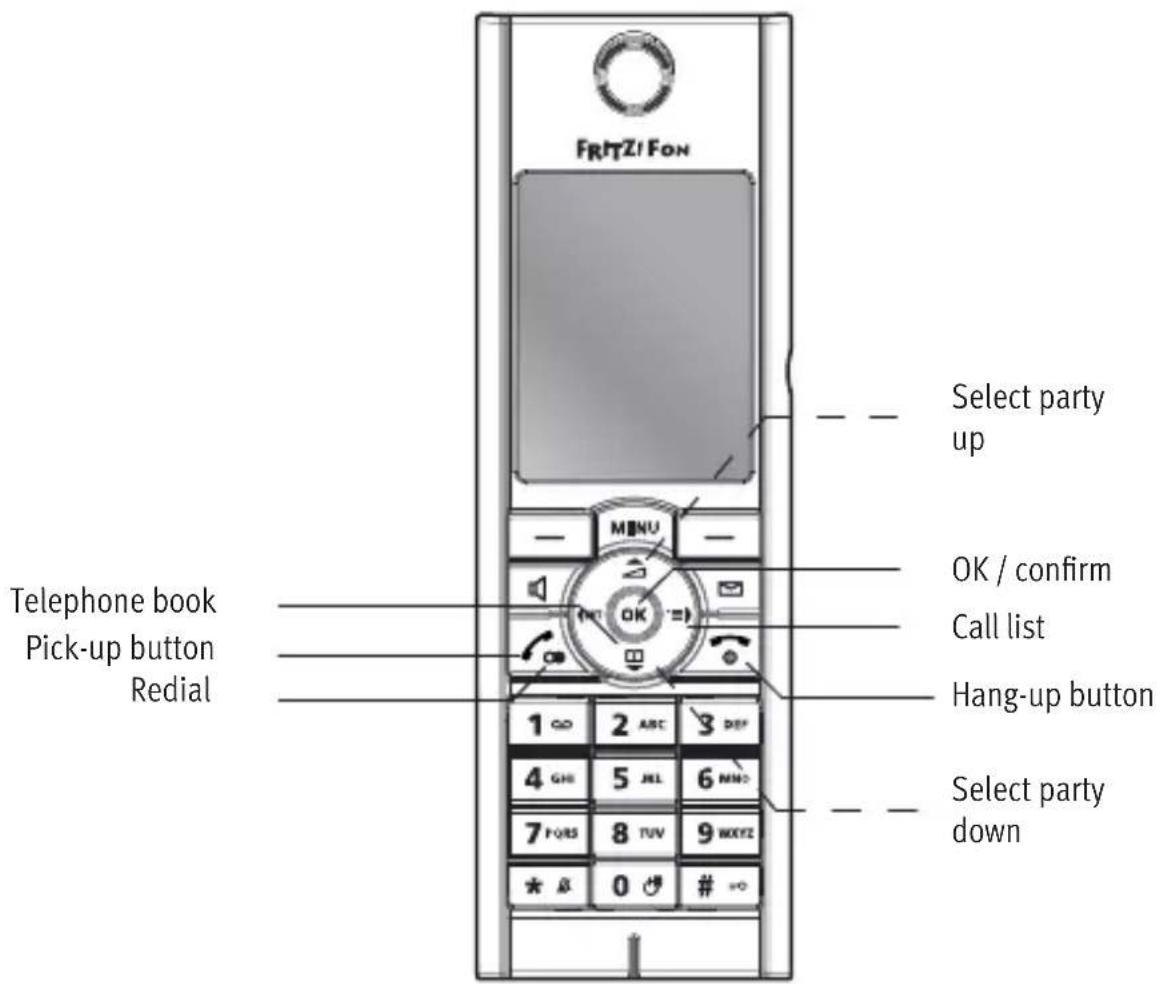
text_image
FR/TZ/Fon Select party up OK / confirm Call list Hang-up button Select party down Telephone book Pick-up button Redial 1∞ 2 ABC 3 DEF 4 GHI 5 JEL 6 MNO 7 FORS 8 TUV 9 WXYZ * & 0 # =03.1 Dialing Numbers Directly
| Enter the desired number. | |
| Press the pick-up button. |
Alternatively, press the pick-up button, wait for the dial tone and then enter the desired number.
3.2 Dialing from Telephone Book and Call Lists
With FRITZ!Fon MT-F you can use the telephone book of your FRITZ!Box and call lists. This makes it especially convenient to place telephone calls.
 | Open the telephone book |
 | or the call list |
 | or the redialing list. |
 | Select a party to call. |
 | Press the pick-up button. The connection will be established. |
 | To end the connection, press the hang-up button. |
3.3 Finding a Telephone Book Entry
With the search function it is easy to search for entries in your telephone book:

Open the telephone book.

Enter the first letter of the entry to search for. FRITZ!Fon MT-F jumps to this letter in the telephone book.
To search for “Lola”, for instance, enter an “L” by pressing the “5” button 3 times. To restrict the number of entries found, you can enter more letters, for instance “L” and “O”.
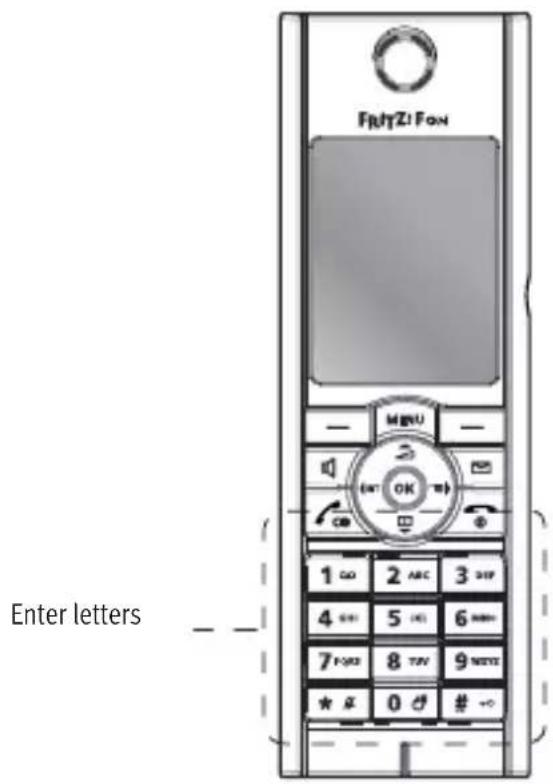
text_image
FRYZI FON Enter lettersIf more than one number is saved for an entry in the telephone book, you can use the following function:

Press on the right of the control ring to access the call list. All numbers saved for this telephone book entry will be displayed.

Select the desired telephone number and click "OK".
If you do not use this function, the number assigned as the main number will be dialed.
If you enable the “Simplified (Vanity) phone book search” option you have to press the numeric key only once for any letter. Then just press the given key, for instance “5”, to view all of the entries that begin with “J”, “K”, or “L”. The vanity telephone book search can be enabled in the FRITZ!Box:
- Start your computer and open a web browser.
- Enter fritz.box in the address field of the browser. The FRITZ!Box user interface opens.
- Click “Telephony / Telephony Devices”. FRITZ!Fon MT-F is displayed in the overview of connected telephones.
- Click the "Edit" button after the entry "FRITZ!Fon MT-F".
- Switch to the "Telephony Device Features" tab.
- Enable the “Simplified telephone book search (vanity)” setting and then click “OK”.
The simplified phone book search (vanity) is enabled.
3.4 Creating a Telephone Book Entry
Managing your telephone book is especially convenient in the user interface of your FRITZ!Box. It is also possible to make new telephone book entries directly on your FRITZ!Fon MT-F.
 | Open the telephone book. |
 | Press “Options”. |
 | Select “New entry” and then press “OK”. |
 | Enter a name and a telephone number. Confirm with “OK” to save the new entry. |
Entries made directly on your FRITZ!Fon MT-F will be entered in the telephone book selected for the FRITZ!Box. This means that the entries are available to all FRITZ!Fon MT-F handsets registered at the FRITZ!Box.
3.5 Copying Numbers from Call List to Telephone Book
Entries in the call list of your FRITZ!Fon MT-F can be copied directly to the telephone book:


Open a Call List and select an entry.
Press "Options".
Select "Copy" and then press "OK".
 | Select “New Entry” and enter a name. |
 | Define whether the number is a home number, business number, or mobile phone number and then press “Add”. |
 | Press “OK” to create the new entry. |
3.6 Using Multiple Telephone Books
In your FRITZ!Box you can configure a total of up to six telephone books and also adopt up to six telephone books from online providers. You can access all of these telephone books with FRITZ!Fon MT-F.
Here is how to select a telephone book:


Open the telephone book.
Press "Options".
Select "Change Phone Book"
Select the desired telephone book and click "OK".
3.7 Accepting Calls
There are several ways to accept a call. You can
| press the pick-up button. | |
| press the speaker button. | |
| press “Accept”. |
Picking Up Directly
FRITZ!Fon MT-F can accept a call automatically as soon as you take the handset out of the charging station. To do this, enable the “Pick up directly” function:
| MENU | Press “Menu”. |
| Select “Settings” and then press “OK”. | |
| Select “Telephony” and then press “OK”. | |
| Select “Pick up directly” and then press “OK”. |
3.8 Stop Ringing
With the “Stop ringing” function you can immediately disable the ring tone for incoming calls.

Press the mute button. The handset stops ringing, but you can still accept the call.
3.9 Hands-Free Calling
With the “Hands-free” function you can let several people participate in a call.

Press the speaker button before or during the call to switch on open listening.

Press the speaker button again to return to handset operation.
3.10 Using the Mute Button
If the other caller should not listen during part of a call, you can mute the microphone temporarily and then enable it again.

During the call, press “Mute” to switch off the microphone. Press “Loud” to switch the microphone back on.
3.11 Adjusting the Volume
The volume of a call can be adjusted during calls with the handset or a hands-free call.

text_image
FR/FTZ! FON Louder Quieter 1 OK 2 ABC 3 DEF 4 SH 5 JEL 6 MNO 7 PARS 8 TUV 9 WXYZ * * 0 # *0Setting the volume of the handset or phone speaker
3.12 Using the Keylock
With the keylock you can prevent numbers from being dialed inadvertently.

Emergency numbers can be dialed even when the keypad is locked. Calls can also be accepted at any time.
Switching on the Keylock

Press the lock key until FRITZ!Fon MT-F displays that the keypad is locked.
Switching off the Keylock

Press the lock key until FRITZ!Fon MT-F displays that the keypad is unlocked.
3.13 Finding FRITZ!Fon MT-F
If you cannot find your FRITZ!Fon MT-F, you can locate it by paging it.

Press the DECT button (Find button) on your base station. FRITZ!Fon MT-F will ring.

Press the DECT button (Find button) on your base station again, or the hang-up button on your FRITZ!Fon MT-F, to stop the ringing.
4 Additional Functions for Telephone Connections
With FRITZ!Fon MT-F you can use additional functions provided by your base station for telephone connections. FRITZ!Fon MT-F offers the entire range of functions with a FRITZ!Box Fon WLAN 7390, a FRITZ!Box Fon WLAN 7270 or a FRITZ!Box Fon WLAN 7240 as a base station. For optimum support the devices should always have the latest firmware, for which AVM regularly offers updates free of charge.

For more information on firmware updates for your FRITZ!Fon MT-F and your FRITZ!Box, see the section Device Settings from page 56.
It is no problem to connect the handset with DECT base stations from other manufacturers. Functions that are not supported by the base station cannot be provided by FRITZ!Fon MT-F.

For more information, see the documentation for your base station.
4.1 Answering Machine
With FRITZ!Fon MT-F it is especially convenient to use the digital answering machine in your FRITZ!Box.
Switching the Answering Machine On and Off
Perform the following steps to switch the answering machine on and off:
 | Press “Menu”. |
 | Select “Answering machine” and then press “OK”. |
 | Select “Settings” and then press “OK”. |
 | Define an operating mode for the answering machine:“With recording”: Callers are offered the option of leaving you a message.“Greeting only”: When you select the “Greeting only” operating mode, callers will hear a recording, but cannot leave any message for you.“Off”: The answering machine is switched off |
 | Press the hang-up button. |
With this the answering machine with the desired operating mode is switched on or off. For the operating modes “With recording” and “Greeting only” you can record your own messages. For more information, see the section Recording a Greeting from page 34.
Recording a Greeting
The answering machine of your FRITZ!Box, which you use with FRITZ!Fon MT-F, provides a standard start greeting and a standard end greeting. Perform the following to record your own greetings:
| MENU | Press “Menu”. |
| Select “Answering machine” and then press “OK”. | |
| Select “Settings” and then press “OK”. | |
| Select an operating mode and press “Options”. | |
| Only in the operating mode “With recording”: Select “Start greeting” and press “OK”. | |
| Select “Record” and then press “OK”. Speak the entire greeting and confirm that you have finished by clicking “OK”. | |
| Select “Listen” and “OK” to check your recording. | |
| Select “Recording delay” and define after how many seconds a call will be accepted. Press “OK”. |

Select "Enable" and "OK".

Select "Greeting" and then press "OK".

Press “Back” to set up an end greeting in the “With recording” operating mode.

Press the hang-up button to return to the start screen.
Listening to New Messages
The message button blinks red whenever new messages have arrived. You have various options for listening to the new messages:

Press and hold down the “1” key. All new messages will be played back.
or

Press the message button.

Select messages. The messages are displayed in reverse order, with the most recent message at the top of the list. The messages are displayed in reverse order, with the most recent message at the top of the list. Browse through the list to listen to the desired messages.

To listen to messages you have already heard again, select "Menu / Call list / Messages".
Deleting Messages
Perform the following steps to delete messages:
 | Press “Menu”. |
 | Select “Answering machine” and then press “OK”. |
 | Select “Messages” and then press “OK”. |
 | Select which message should be deleted. Press “OK”. |
 | Select “Delete” and then press “OK”. The message will be deleted.With the option “Delete all old” you can delete all messages that have been listened to already. |

To delete old messages, you can also open the "Messages" menu by holding the button down.
Voice-Controlled Menu
The answering machine of the FRITZ!Box can also be operated using a voice-operated menu. Here is how to get to the menu:

Press this sequence of keys.

Press the pick-up button. You have accessed the voice-controlled menu of the answering machine.

See the manual of your FRITZ!Box for a detailed description of the answering machine.
Picking Up a Call from the Answering Machine
With the “Pick up” function you can retrieve calls that the answering machine has already answered and accept them on your FRITZ!Fon MT-F.

Press "Options".

Select "Accept" and then press "OK".
4.2 CLIR for One Call (Case by Case)
If you transmit your telephone number to the other party during an outgoing telephone call (CLIP), you have the option of suppressing this transmission (CLIR) on a case-by-case basis. Then the number will no longer appear on the display of the other party to the call. To use the CLIR function (Calling Line Identification Restriction), make the telephone call according to the instructions below.

Press "Options".

Select "Anonymous call" and then press "OK".

Press "On".

Dial the desired telephone number.
Your number will not be transmitted for this call.

You can also permanently suppress transmission of your telephone number. To do this, open the FRITZ!Box user interface, select “Telephony Devices” and enable the “Calling line identification restriction (CLIR)” feature in the settings of the FRITZ!Fon MT-F.
4.3 Making Internal Calls
With FRITZ!Fon MT-F you can establish connections free of charge to all telephones connected to your FRITZ!Box or base station.
 | Press “Internal”. |
 | Select one of the connected telephones. |
 | Press the pick-up button. The connection will be established. |
4.4 Alternating Between Calls
While you are on the phone you can establish a second connection to another party and switch (alternate) between the two calls as often as desired.
 | You are speaking with one party. |
 | Press “R” (the Hold button). The first call is on hold. |
 | Enter the number to call the second party. The second connection will be established. |
 | Press “Options”. |
 | Select “Alternate” and press “OK” to switch between the two calls. |

If you would like the second connection to be established to an internal party, press the “Internal” button and select a connected telephone.

For more information on alternating between calls and other additional functions, see the manual of your FRITZ!Box.
4.5 Three-party Conference Call
Three parties can confer with each other in real time in a three-party conference call. Two external and one internal party, or two internal and one external party can participate in the three-party conference call.
 | You are speaking with one party. |
 | Press “R” (the Hold button). The first call is on hold. |
 | Enter the number to call a second party. The second connection will be established. |
 | Press “Options”. |
 | Select “Conference” and then press “OK”. The three-party conference will be set up with both of your conversation partners. |
 | To end the three-party conference, press the hang-up button. |

If you would like the second connection to be established to an internal party, press the “Internal” button and select a connected telephone.

For more information on three-party conferences and other additional functions, see the manual of your FRITZ!Box.
4.6 Call Diversion
With this function you can divert calls that arrive for FRITZ!Fon MT-F. You can define for which calls the call diversion is active and where the calls are diverted to.
You can set up call diversion for the following calls:
• for all calls to FRITZ!Fon MT-F
• for all calls that come from a certain telephone number
- for all anonymous calls in which the caller does not transmit a telephone number
The following destinations can be defined for call diversion:
- a different telephone connected to the FRITZ!Box
- an external telephone line
- an answering machine set up in the FRITZ!Box
Configuring Call Diversion
- Start your computer and open a web browser.
- Enter fritz.box in the address field of the browser. The FRITZ!Box user interface opens.
- Select "Telephony / Call Diversion".
-
Click "New Call Diversion".
-
Set up a new call diversion and confirm your settings by clicking "OK".
For comprehensive information on setting up call diversion, see the FRITZ!Box Online Help.
Switching Call Diversion On and Off
Call diversions that you set up for calls to the FRITZ!Fon MT-F can be switched on and off with FRITZ!Fon MT-F. To do this, perform the following steps:

Press "Menu".

Select “Additional services” and then press “OK”.

Select “Call diversion” and then press “OK”.

Select a call diversion setting.

Press “On” to switch the call diversion on.
Press “Off” to switch the call diversion off.

Press the hang-up button.
4.7 Alarm
The FRITZ!Fon MT-F can be used as an alarm. You can define different times at which the FRITZ!Fon MT-F should wake you.
Setting Up the Alarm
An alarm call is set up in the user interface of the FRITZ!Box connected to the FRITZ!Fon MT-F.
- Start your computer and open a web browser.
- Enter fritz.box in the address field of the browser. The FRITZ!Box user interface opens.
- Select "Telephony / Dialing Rules".
- Activate the alarm and set the time at which the alarm should ring (e.g. “6:30”).
- Select your FRITZ!Fon MT-F from the drop-down menu for the telephone.
- Define the weekdays on which the alarm should be activated. Confirm by clicking “Apply”.
The alarm has been set up and FRITZ!Fon MT-F will ring at the specified times.
Switching the Alarm On and Off
An alarm that you set up for calls to the FRITZ!Box can be switched on and off with FRITZ!Fon MT-F.
 | Press “Menu”. |
 | Select “Additional services” and then press “OK”. |
 | Select “Alarm” and then press “OK”. |
 | Select an alarm setting and then press “Options”. |
 | Select “Alarm on” to turn the alarm on. Select “Alarm off” to turn the alarm off. |
 | Press “OK”. |
4.8 Baby Monitor
FRITZ!Fon MT-F can be set up as a baby monitor so that you can use it to monitor sounds in a room.
 | Press “Menu”. |
 | Select “Additional services” and then press “OK”. |
 | Select “Baby monitor” and then press “OK”. |
 | Select “Destination no.” and then press “OK”. |
 | Enter the destination number,or press “Options” and select a telephone book entry or internal telephone number. |
 | |
 | Press OK. |
 | Select “Activation” and confirm by clicking “OK”. |
 | Define the noise level that should trigger a notification call:For greater sensitivity, press the top of the control ring; for lower sensitivity, press the bottom. |
 | Press “Back”. |
| Place the FRITZ!Fon MT-F near the child to be monitored. |
FRITZ!Fon MT-F is now set up as a baby monitor and will monitor the room for noise.
5 Receiving e-Mail
With FRITZ!Fon MT-F you can read the e-mail sent to your e-mail account with an e-mail provider. For this the POP3 protocol is used to retrieve your e-mail from your mailbox at the e-mail provider so that it can be displayed on the handset.
5.1 Setting Up e-Mail Reception
E-mail reception is set up in the user interface of the FRITZ!Box connected to your FRITZ!Fon MT-F.
- Open a web browser.
- Enter fritz.box in the address field of the browser. The FRITZ!Box user interface opens.
- Select "DECT / E-mail".
- Click the "New E-mail Account" button.
- Enter your e-mail address and the corresponding password.
- Only if several AVM cordless phones are registered at the FRITZ!Box:
Select the AVM cordless telephones on which e-mail for this e-mail address should be displayed.
- Confirm with "OK".
This concludes the setup of the e-mail account for e-mail reception with FRITZ!Fon MT-F. To change the settings for the e-mail account, click the “Edit” button next to the entry of the e-mail account in the FRITZ!Box user interface.
5.2 Reading e-Mail
To read e-mail that arrived for the configured e-mail address using FRITZ!Fon MT-F, perform the following steps:
| MENU | Press “Menu”. |
| Select “Internet services / E-mail” and then press “OK”. | |
| Select an e-mail message. Press “OK”. | |
| Use the arrows on the control ring to navigate upward and downward in the e-mail and to skip to the next or the previous e-mail.Click “OK” to page forward in the e-mail. |
Optimizing the Display of e-Mail
You can rotate the display of your FRITZ!Fon MT-F by 90° or 270° to make it easier to read long e-mail messages.
| Open an e-mail message. | |
 | Press the “Rotate Image” button to rotate the display clockwise. |
 | Press the “Rotate Image” button a second time to ro-tate the display another 90° clockwise. |
 | Use the arrows on the control ring to navigate upward and downward in the e-mail and to skip to the next or the previous e-mail.Click “OK” to page forward in the e-mail.Click the “Menu” button to return to the list of e-mail received. |
6 Receiving RSS Feeds
Many web pages that publish articles at regular intervals offer sub-scriptions in the form of headlines and short articles. FRITZ!Fon MT-F can access this message format, known as RSS feeds. This is particularly useful if you want to keep up with news without constantly visiting the associated web page.

The RSS icon indicates that a web page offers RSS feeds.
6.1 Setting Up RSS Feeds
To receive RSS feeds with FRITZ!Fon MT-F, first you must set up an RSS feed in the user interface of your FRITZ!Box:
- Open a web browser.
- Enter fritz.box in the address field of the browser. The FRITZ!Box user interface opens.
- Select "DECT / RSS Feeds".
Now you can select one of the preset RSS feeds from the drop-down menu for new RSS feeds.
If you would like to set up an RSS feed that is not preset, work through the following steps:
- In the drop-down menu for new RSS feeds, select the entry "other RSS feed...".
- Specify the name that should be used to display the RSS feed on the FRITZ!Fon MT-F.
- Enter the Internet address at which the RSS feed can be reached in the Internet.

For maximum convenience, open an RSS feed by clicking on the RSS icon on a web page, copying the address displayed in the address line and entering it in the user interface.
-
Specify here how often the RSS feeds are to be updated on the FRITZ!Fon MT-F display.
-
FRITZ!Fon MT-F can signal the reception of new messages with a flashing message key and the “New message waiting” icon on the display. For this notification, enable the setting “Automatically notify me on the FRITZ!Fon MT-F about new RSS feeds received.”
-
Confirm with "OK".
This concludes the setup of the new news feed station. To edit an RSS feed, click the “Edit” button next to the entry of the news feed in the FRITZ!Box user interface.
6.2 Reading RSS Feeds
To read RSS feeds from a configured RSS news feed with FRITZ!Fon MT-F, work through the following steps:
 | Press “Menu”. |
 | Select “Internet services” and then press “OK”. |
 | Select “RSS feed” and then press “OK”. |

Select a news source for RSS feeds:

Select an RSS message and then press "OK".

Use the control ring to navigate upward and downward in the message and to skip to the next or the previous message.
Click "OK" to page forward in the message.
Optimize Display of RSS Feed
The display of your FRITZ!Fon MT-F can be rotated 90° or 270° to improve readability.

Open an RSS message.
Press the “Rotate Image” button to rotate the display clockwise.

Press the “Rotate Image” button a second time to rotate the display another 90° clockwise.

Use the control ring to navigate upward and downward in the message and to skip to the next or the previous message.
Click "OK" to page forward in the message.
Click the “Menu” button to return to the list of RSS messages.
7 Receiving Podcasts
With FRITZ!Fon MT-F you can receive podcasts. A podcast is a series of media reports, for instance radio programs, that you can listen to whenever you want, regardless of when they are broadcast.
7.1 Setting Up a Podcast
To listen to a podcast with the FRITZ!Fon MT-F, first set up the desired podcast in the user interface of your FRITZ!Box:
- Open a web browser.
- Enter fritz.box in the address field of the browser. The FRITZ!Box user interface opens.
- Select "DECT / Podcast".
- Select one of the preset podcasts from the drop-down menu for new podcasts, or select the entry “Other news feed...” to set up a new podcast.

For a directory of international podcasts, for instance, go to www.podcast.com.
- Only if you selected “Other news feed...”
—Specify the name that should be used to display the podcast on the FRITZ!Fon MT-F.
— Enter the Internet address at which the podcast can be reached in the Internet.
–Specify here how often the podcast should be checked for updates.
6. Confirm with "OK".
This concludes the setup of the podcast. To edit a podcast, click the “Edit” button next to the entry of the podcast in the FRITZ!Box user interface.
7.2 Listening to a Podcast
Here is how to play back a configured podcast with FRITZ!Fon MT-F:
 | Press “Menu”. |
 | Select “Internet services” and then press “OK”. |
 | Select “Podcasts” and then press “OK”. |
 | Select a podcast. |
 | Select an entry and then press “OK”. The entry will be played back. |
 | Adjust the volume using the control ring:Press the top of the control ring to turn up the volume. |
 | Press the bottom of the control ring to turn down the volume. |
8 Receiving Web Radio
With FRITZ!Fon MT-F you can receive radio from the Internet, known as Internet or web radio.
8.1 Setting Up Web Radio
To listen to a web radio station with the FRITZ!Fon MT-F, first set up the desired radio station in the user interface of your FRITZ!Box:
- Open a web browser.
- Enter fritz.box in the address field of the browser. The FRITZ!Box user interface opens.
- Select "DECT / Web Radio".
- Select from the drop-down menu for new web radio stations a preselected web radio station, or select the “Other station...” entry to set up a new station.

Directories of web radio stations from all over the world are available, for instance, at www.shoutcast.com.
- Only if you selected "Other station...":
—Specify the name that should be used to display the radio station on the FRITZ!Fon MT-F.
—Enter the web address at which this radio station can be reached in the Internet. With FRITZ!Fon MT-F you can listen to radio stations stored in the formats “pls”, “m3u” and “mp3”.
- Confirm with "OK".
This concludes the setup of the new radio station. To edit a radio station, click the “Edit” button next to the entry of the radio station in the FRITZ!Box user interface.
8.2 Listening to a Web Radio Station
Here is how to play back a configured radio station with FRITZ!Fon MT-F:
 | Press “Menu”. |
 | Select “Internet services” and then press “OK”. |
 | Select “Web radio” and then press “OK”. |
 | Select a radio station and then press “OK”. The radio station will be played back. |
 | Adjust the volume using the control ring:Press the top of the control ring to turn up the volume. |
 | Press the bottom of the control ring to turn down the volume. |
9 Device Settings
With FRITZ!Fon MT-F you can use functions provided by your base station. FRITZ!Fon MT-F offers the entire range of functions with a FRITZ!Box Fon WLAN 7390, a FRITZ!Box Fon WLAN 7270 or a FRITZ!Box Fon WLAN 7240 as a base station. For optimum support the devices should always have the latest firmware, for which AVM regularly offers updates free of charge.
This section describes functions and settings that FRITZ!Fon MT-F supports only in combination with one of the mentioned FRITZ!Box models.
9.1 Performing a Firmware Update for FRITZ!Fon MT-F
 | Press “Menu”. |
 | Select “Settings” and then press “OK”. |
 | Select “Firmware update” and then press “OK”.FRITZ!Fon MT-F connects with the update server and checks whether new firmware is available. |
 | If a new firmware update is available, confirm the following queries by clicking “OK”. The firmware update will be transferred and then FRITZ!Fon MT-F will be re-started. |
9.2 Performing a Firmware Update for FRITZ!Box
 | Press “Menu”. |
 | Select “FRITZ!Box” and then press “OK”. |
 | Select “Firmware update” and then press “OK”. A connection to the update server will be established. |
 | If a new firmware update is available, confirm the following queries by clicking “OK”. The firmware update will be transferred and then FRITZ!Box will be restarted. |
9.3 Tailoring the FRITZ!Fon MT-F Settings
You can tailor the settings of your FRITZ!Fon MT-F. Many possibilities are presented in the “Settings” menu.


Press "Menu".
Select “Settings” and then press “OK”.
The “Settings” menu offers you the following settings options and device information:
• Audio: volume, set up headset, set ring and signal tones.
• Display: set brightness, start screen and power-saving mode.
• Telephony: set picking up directly and eavesdropping security for your DECT connection.
- Registration: register and deregister FRITZ!Fon MT-F with a base station and select a base station for FRITZ!Fon MT-F. FRITZ!Fon MT-F can be registered with up to four base stations.
- Firmware update: perform a firmware update for FRITZ!Fon MT-F.
- Firmware version: the firmware version of your FRITZ!Fon MT-F. Our staff requires the firmware version for support requests.
- Reset: the “Reset” command restores FRITZ!Fon MT-F to its factory settings. All settings you made for this device will be discarded.
9.4 Setting Up FRITZ!Fon MT-F in the FRITZ!Box
- Start your computer and open a web browser.
- Enter fritz.box in the address field of the browser. The FRITZ!Box user interface opens.
- Click “Telephony / Telephony Devices”. FRITZ!Fon MT-F is displayed in the overview of connected telephones.
- Click the "Edit" button after the entry "FRITZ!Fon MT-F".
- Select the telephone numbers to be used for outgoing and incoming connections.
This provides for optimum integration of your FRITZ!Fon MT-F in the telephony environment of your FRITZ!Box.
In addition, you can configure the following settings for FRITZ!Fon MT-F:
Name: the name of the device, to be displayed in the FRITZ!Fon MT-F display when the device is on standby.
- Ring tones: assign different ring tones to FRITZ!Fon MT-F and try them out.
- Properties of the Telephony Device: enable convenience features and other options, and change the sound settings for your FRITZ!Fon MT-F.
For more information on the settings for telephony devices, see the FRITZ!Box Help in the FRITZ!Box user interface.
9.5 Controlling the WLAN Function of Your FRITZ!Box
The WLAN function of your FRITZ!Box can be switched on and off using the FRITZ!Fon.

Press "Menu".

Select "FRITZ!Box" and then press "OK".

Select “WLAN” and then press “OK”.

Press “On” to switch the WLAN function on.
Press “Off” to switch the WLAN function off.

Press the hang-up button.
The WLAN function of your FRITZ!Box has been switched on or off.
9.6 Notifications
FRITZ!Fon MT-F can inform you about the following:
- missed calls
- new messages on the answering machine
- new firmware update for FRITZ!Fon MT-F
- new e-mail
- new RSS feeds
These conditions can be indicated on all connected FRITZ!Fon MT-F at the same time, through signal tones, a flashing message key, and the “New Messages Waiting” indicator in the display. The information is deleted as soon as it is retrieved from a FRITZ!Fon MT-F.
Perform the following steps to retrieve messages:

Press the selection button
The inbox list opens. New messages are displayed in black, messages that have already been read in gray.

Select an entry and press "OK".
10 Customer Service Guide
You can send us an English-language e-mail request at any time using the “Service” area of our web site. The “Service” area can be reached at:
www.avm.de/en/service
In the support area, select “FRITZ!Fon” as the product group and “FRITZ!Fon MT-F” as the product. Then specify your operating system and choose the area for which you need support. You will receive a selection of FAQs.
If you need more Help, click the “More” button to open the e-mail support form. Fill out the form and then send it to AVM. Our Support team will respond by e-mail as quickly as possible.
Declaration of CE Conformity
AVM declares herewith that the device is compliant with the basic requirements and the relevant rules in directives 2014/53/EU, 2009/125/EC and 2011/65/EU.
The declaration of CE conformity is available at en.avm.de/ce
Manufacturer's Warranty
We offer a manufacturer's warranty of 2 years on the hardware of this original product. Batteries constitute expendable material, which is not covered by the warranty. The warranty period begins with the purchase date from the first end user. Compliance with the warranty period can be proven by submission of the original invoice or comparable documents. This warranty does not restrict your warranty rights based on the contract of sale or other statutory rights.
Within the warranty period, we will remove defects to the product which are demonstrably due to faults in materials or manufacturing. Our warranty does not cover defects which occur due to incorrect installation, improper use, non-observance of instructions in the user manual, normal wear and tear or defects in the environment of the system (third-party hardware or software). We may, at our discretion, repair or replace the defective product. Claims other than the right to the removal of defects which is mentioned in these terms of warranty are not constituted.
We guarantee that the software conforms with general specifications, not, however, that the software meets your individual requirements. Delivery costs will not be reimbursed. Products which have been replaced revert to our ownership. Claims recognized under warranty entail neither an extension or recommencement of the warranty period. If we reject a warranty claim, this claim lapses no later than six months after being rejected by us.
This warranty shall be governed by German substantive law, to the exclusion of the United Nations Convention on Contracts for the International Sale of Goods (CISG).
Index
A
adjusting volume. 30
alarm 43
alternating between calls .... 39
answering machine......33
B
baby monitor 44
base station
additional functions.....32
registering with ..... 17
C
call
accepting 28
internal.....38
call diversion 41
call list, dialing from ..... 23
calling 22
CE conformity declaration....62
charging....16
CLIR 37
copyright 2
customer service guide.....61
D
declaration of CE conformity ..62
deregistering from DECT base station....20
device overview ..... 11
dialing
directly....23
from call list.....23
from telephone book ....23
display....11
disposal....9
E
e-mail, receiving.....46
F
finding
handset....31
in telephone book.....24
firmware update,
performing 56, 57
H
hands-free calling .....29
|
imprint..... 2
inserting battery ..... 15
instructions
on the manual .... 7
internal calls 38
Internet radio .... 54
K
keylock....31
keypad overview ..... 11
L
legal notice .... 2
listening....29
M
making calls .... 22
manufacturer's warranty ....63
menu operation....20
microphone off 29
mute button....29
N
navigating....20
notation in manual ..... 7
notice
legal 2
0 operating....22
P
package contents.....10
paging....31
picking up directly .....28
placing call 23
podcast....52
product overview .....10
R
radio station
listening to ....55
setup ....54
recovery
electrical equipment.....9
electronic partst.....9
rechargeable batteries....9
recycling....9
redialing....23
registering with DECT base station .....17
ringer off. 29
RSS feeds receiving .... 49
S
support. 61
suppress number......37
symbols 12
T
telephone book
creating entry ..... 26
finding entry.....24
telephone book,
dialing from 23
three-party conference call . . . 40
W
warranty....63
web radio....54