Midi - Hedge trimmers Garden Groom - Free user manual and instructions
Find the device manual for free Midi Garden Groom in PDF.

User questions about Midi Garden Groom
0 question about this device. Answer the ones you know or ask your own.
Ask a new question about this device
Download the instructions for your Hedge trimmers in PDF format for free! Find your manual Midi - Garden Groom and take your electronic device back in hand. On this page are published all the documents necessary for the use of your device. Midi by Garden Groom.
USER MANUAL Midi Garden Groom
text_image
Garden GROOM® PRO GARDEN GROOM "PRO" GGROOM03012011 G.GroomMNI. PRO Rv Inds 1-2 3/14/11 10:00 AM
natural_image
Abstract geometric shape with gradient shading and partial text 'HISTORY' (no readable document content)natural_image
Two men outdoors, one holding a circular object, surrounded by trees (no visible text or symbols)Graham Wilson - Inventor and Chairman of Garden Groom ^e
Several years ago, Graham Wilson a retired engineer was trimming hedges in his garden. After a long hard day he said to himself, "there must be an easier and safer way to do this job!"
So he set about trying to solve the problems that all gardeners face when they venture out to trim their hedges.
At first was a hobby, but as Graham got closer to solving the problem, the more determine he was to create a resolution. In 2000, he received a UK government grants for safety and innovation, which helped him fund the initial stages of the project. He
approached a number of leading garden tool manufacturers; in hopes of them buying his invention, they all rejected his concept.
Graham was determined to see his vision through, convinced he had a concept that would
dramatically benefit gardeners around the world, by eliminating a potentially dangerous and time consuming chore, into a far more pleasant and safe gardening function.
To achieve his goal Graham needed to raise substantial funds thus 1999, at the age of 53, he re-financed his home and poured all his savings into the development this invention.
After spending a small fortune on development, manufacturing and patent costs and with many disappointments and rejections along the way, Graham has succeeded in introducing the Garden Groom ^③ trimmer to gardeners around the world.
He has truly solved the problems associated with hedge trimming and with the Garden Groom ^® trimmer has presented a unique product that cuts, shreds and captures the majority of waste material and with its concealed blade, makes it virtually impossible to cut the power cord.
Great ideas are always worth fighting for!
Thanks Graham


TABLE OF CONTENTS
SAFETY INSTRUCTIONS 1
PRODUCT OVERVIEW 4
USING YOUR GARDEN GROOM ^® PRO 5
OPTIONAL GARDEN GROOM® MEGA BAG INSTRUCTIONS 10
USING THE OPTIONAL MEGA BAG ATTACHMENT 12
TROUBLESHOOTING 13
WARRANTY 14

natural_image
Abstract geometric shape with a curved, right-pointing triangle and a vertical line at the bottom (no text or symbols)
SAFETY INSTRUCTIONS
WARNING: When using electric hedge trimmers, basic safety precautions should always be followed to reduce the risk of fire, electric shock, and personal injury, including the following:
READ ALL INSTRUCTIONS
Polarized Appliance Connections - To reduce the risk of electric shock, this appliance has a polarized plug (one blade is wider than the other) and will require the use of a polarized extension cord. The appliance plug will fit into a polarized extension cord only one way. If the plug does not fit fully into the extension cord, reverse the plug. If the plug still does not fit, obtain a correct polarized extension cord. A polarized extension cord will require the use of a polarized wall outlet. This plug will fit into the polarized wall outlet only one way. If the plug does not fit fully into the wall outlet, reverse the plug. If the plug still does not fit, contact a qualified electrician to install the proper wall outlet. Do not change the equipment plug, extension cord receptacle, or extension cord plug in any way.
1) Avoid Dangerous Environment - Don't use hedge trimmers in damp or wet locations.
2) Don't Use In Rain.
3) Keep Children Away - All visitors should be kept at a distance from work area.
4) Dress Properly - Do not wear loose clothing or jewelry. They can be caught in moving parts. Use of rubber gloves and substantial footwear is recommended when working outdoors. Wear protective hair covering to contain long hair.
5) Use Safety Glasses - Always use face or dust mask if operation is dusty.
6) Ground Fault Circuit Interrupter (GFCI) protection should be provided on the circuit(s) or outlet(s) to be used for the hedge trimmer. Receptacles are available having built-in GFCI protection and may be used for this measure of safety.
7) Use Right Appliance - Do not use appliance for any job except that for which it is intended.
8) Warning - To reduce the risk of electric shock, use only with an extension cord intended for outdoor use, such as SW-A, SOW-A, STW-A, STOW-A, SJW-A, SJW-A, SJTW-A or SJTOW-A.
9) Extension Cord - Make sure your extension cord is in good condition. When using an extension cord, be sure to use one heavy enough to carry the current your product will draw. An undersized extension cord will cause a drop in line voltage resulting in loss of power and overheating. Table 1 shows the correct size to use depending on cord length and nameplate ampere rating. If in doubt, use the next heavier gauge. The smaller the gage number, the heavier the cord. To reduce the risk of disconnection of hedge trimmer cord from the extension cord during operating, please make a knot as shown on Page 3 - Figure 1.
10) Avoid Unintentional Starting - Don't carry plugged-in hedge trimmer with finger on switch. Be sure switch is off when plugging in.
11) Don't Abuse Cord - Never carry hedge trimmer by cord or yank it to disconnect from receptacle. Keep cord from heat, oil, and sharp edges.
12) Danger - Risk of Cut - Keep Hands Away From Blades - Keep both hands on handles when power is on.
13) Don't Force Hedge Trimmer - It will do the job better and with less likelihood of a risk of injury at the rate for which it was designed.
14) Don't Overreach - Keep proper footing and balance at all times.
15) Stay Alert - Watch what you are doing. Use common sense. Do not operate hedge trimmer when you are tired.
16) Disconnect Hedge Trimmer - Disconnect the hedge trimmer from the power supply when not in use or when changing accessories such as blades, and the like.
17) Store Idle Hedge Trimmer Indoors - When not in use, hedge trimmer should be stored indoors in dry, and high or locked-up place - out of reach of children.
18) Maintain Hedge Trimmer With Care - Inspect hedge trimmer cord periodically, and if damaged, have it repaired by an authorized electrician. Inspect extension cords periodically and replace if damaged. Keep handles dry, clean, and free from oil and grease.
19) Check Damaged Parts - Before further use of the hedge trimmer, a guard or other part that is damaged should be carefully checked to determine that it will operate properly and perform its intended function. Check for alignment of moving parts, binding of moving parts, breakage of parts, mounting, and any other condition that may affect its operation. If a guard or other part is damaged, immediately discontinue use of Garden Groom. Contact dealer or go to www.gardengroomusa.com


20) Wear proper apparel, keep both hands on the grasping surfaces and keep supply cord away from the cutting area.
21) The maximum diameter of stems intended to be cut with this hedge trimmer is 0.4".
22) When operating the trimmer, keep extension cord behind trimmer. Never drape it over hedge being trimmed.
SPECIFIC SAFETY WARNING
WARNING: Some dust created by this product contains chemicals known to the State of California to cause cancer, birth defects or other reproductive harm. Some examples of these chemicals are:
• Compounds in fertilizers
• Compounds in insecticides, herbicides and pesticides
• Arsenic and chromium from chemically treated lumber
To reduce your exposure to these chemicals, wear approved safety equipment such as dust masks that are specially designed to filter out microscopic particles.
WARNING: Before operating the Garden Groom ^® trimmer, read this manual and follow all safety and Operating Instructions.
•SAVE THIS MANUAL FOR FUTURE REFERENCE•

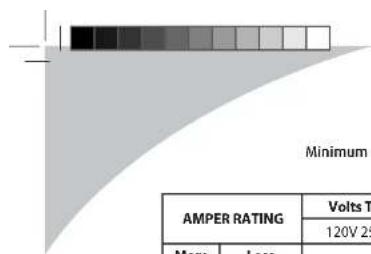
bar
| Category | AMPER RATING | |---|---| | 120V 25V | Volts T |Minimum guage for extension cords
| AMPER RATING | Volts Total length of cord in feet | |||||
| 120V 25 50 100 150 | ||||||
| More than | Less than | AWG | ||||
| 0613 | 161614 | |||||
FIGURE 1
Method of Securing Cord Set

text_image
CORD SET APPLIANCE SETTING (A) Tie Cord As Shown (B) Connect Plug & Receptacle3
G.GroamMNL PRO R4.Indo 3-4 3/14/11 10:00 AM


PRODUCT OVERVIEW

text_image
Front Handle Main Switch Powerlight Safety Switch Back Handle Power Cord Waste Container Head Main Switch Front Switch Interlock Peg Clipping Outlet Container Clip Static Blade Rotary Blade
4

text_image
USING THE G NOTE: Either the main collection bag or the Garden Groom® trimmer to operate.NOTE: Either the main collection bag or the optional Mega bag accessory must be attached for the Garden Groom® trimmer to operate.
1. SWITCH ARRANGEMENT
To operate the main switch and front switch, you must first push forward the safety switch.

text_image
Safety Switch Front Switch Main Switch2. HORIZONTAL TRIMMING (Top of Hedges)
Move the Garden Groom ^® trimmer in a sweeping pendulum motion from side to side. The flat underside of the trimmer provides a natural guide, so the most inexperienced gardener can achieve excellent results. The Garden Groom ^® trimmer is designed to cut up to 0.8" diameter of growth. Use on thicker material may result in damage to the machine.
natural_image
Illustration of hands using a tool to clean or brush a surface, with no visible text or symbols5
G.GroamMNL PRO R4.Indo 5-63/14/11 10:00 AM


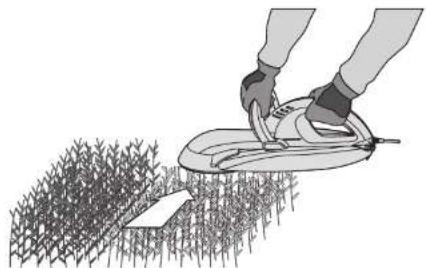
3. VERTICAL TRIMMING (Side of Hedge)
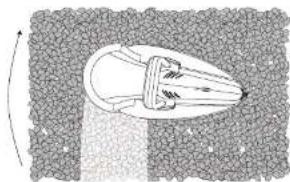
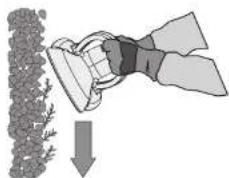
Move the Garden Groom® trimmer in a vertical sweeping motion, ensuring the flat underside of the machine is level with the surface of the hedge. Tip: For a lighter professional finish, bury the head of the machine into the hedge, to the desired depth, working the machine upwards. See Fig. 2 (below). To trim long stalks growing parallel with the surface of the hedge, move the head down in the opposite direction to the growth (Fig.3).
Please note: The capture rate of material is reduced when using this angle of cutting technique (Fig.3).
natural_image
Diagram of a pointed object with a curved arrow indicating direction, set against a textured background (no text or symbols)Figure 1

natural_image
Illustration of a hand using a tool to interact with a wall-mounted device, showing granular texture and an upward arrow (no text or symbols)Figure 2
natural_image
Illustration of a hand holding a tool next to a pile of granular material, with a downward arrow indicating compression or reduction (no text or symbols present)Figure 3

6
text_image
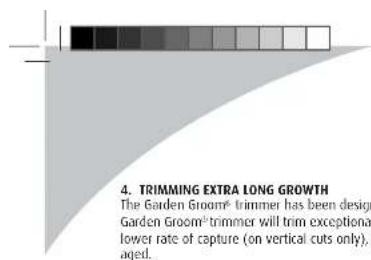
4. TRIMMING EXTRA LONG GROWTH The Garden Groom® trimmer has been design- Garden Groom® trimmer will trim exceptional- lower rate of capture (on vertical cuts only), aged.4. TRIMMING EXTRA LONG GROWTH
The Garden Groom ^® trimmer has been designed to trim hedge growth of 7 inches in length or less. The Garden Groom ^® trimmer will trim exceptionally long growth, but this operation will inevitably result in a lower rate of capture (on vertical cuts only), due to the sheer dynamics and volume of material to be managed.
To trim exceptionally long growth (within the recommended cutting diameter), we advise the following techniques: Trim the growth in several stages layering down until you arrive at the desired level.
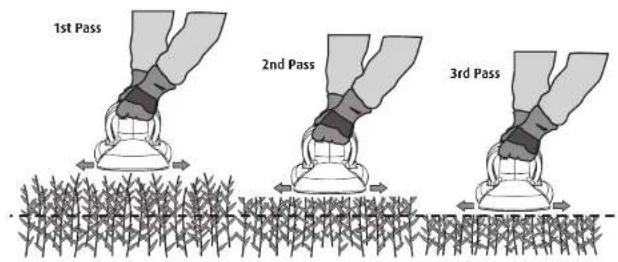
text_image
1st Pass 2nd Pass 3rd PassIn some circumstances you may wish to adopt a vertical technique (see fig 2 below), bringing the Garden Groom ^® trimmer down onto the growth in a cvertical action.

text_image
Action7
G.GroamMNL PRO R4.Indo 7-83/14/11 10:00 AM


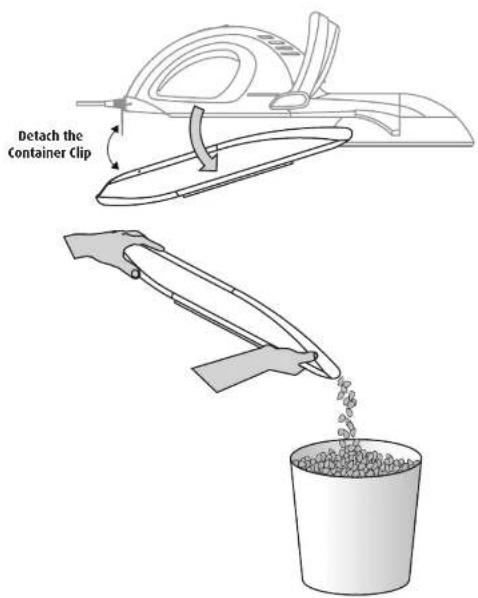
5. EMPTYING CONTAINER
For speed of operation, hold the Garden Groom® trimmer by the front handle, unclip and withdraw the container from the main body and deposit the waste material into an appropriate receptacle. To re-engage, push the front of the container over the exhaust, raise the rear of the container, ensuring alignment with clip, push clip forward with palm of hand to lock.
NOTE: The interlock peg MUST be connected to the interlock switch and the main switch powerlight must be lit for the machine to function.
text_image
Detach the Container Clip
8

text_image
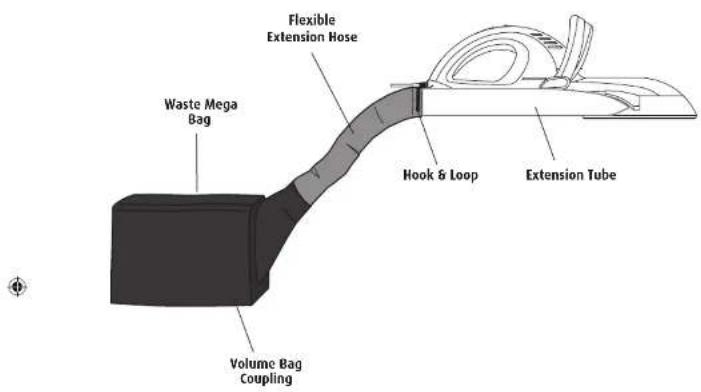
6. Optional Mega Bag Attachment For larger areas of hedge growth, the Mega Bag extension tube that fits to an exhaust hose, a nor as the standard container.6. Optional Mega Bag Attachment
For larger areas of hedge growth, the Mega Bag attachment has been developed. It has a specially refined extension tube that fits to an exhaust hose, and the Mega Bag attachment and is fitted in the same manner as the standard container.
TIP: It is necessary to periodically shake the debris down the hose to ensure smooth conveyance of waste material into the Mega Bag. When full, unzip the rear panel of the bag and empty into chosen receptacle.
text_image
Flexible Extension Hose Waste Mega Bag Hook & Loop Extension Tube Volume Bag Coupling9
G.GroamMNL PRO R4.Indd 9-10 3:14:11 10:05 AM


Optional Garden Groom® Mega Bag Instructions
Your Mega Bag Attachment
The Mega Bag is supplied with the extension hose pushed inside the exhausted end.
Check the assembly for damage and ensure all the component parts are in perfect condition and firmly connected together before proceeding
text_image
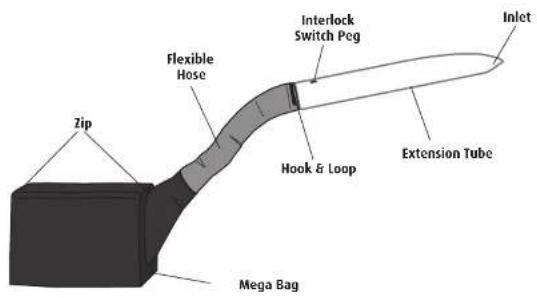
Zip Flexible Hose Interlock Switch Peg Hook & Loop Extension Tube Inlet Mega BagPreparing The Mega Bag
Connect the outlet of the extension tube to the flexible hose using the hook and loop band. Lay the hose extension tube bag out in a straight line adjacent to the hedge to be trimmed, positioning the bag behind the anticipated direction of progress. Ensure the hose is not twisted and the bag is sitting on its flat base.
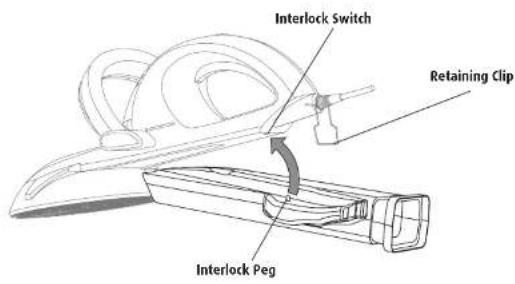
Attach the extension tube to the Garden Groom® trimmer as illustrated, by offering the inlet of the tube to the exhaust of the Groom. Lift the back of the tube up to the underside of the machine, ensuring the interlock peg is aligned with the interlock switch, in the same way as the waste container.
Secure the tube with the retaining clip.

text_image
Extension Tube Hook & Loop Flexible Hose Inlet Interlock Peg 10
text_image
Plug the Garden Groom® trimmer into the mode The Garden Groom® trimmer should now be correct, is correctly aligned with the switch and the connection. If the problem persists, refer to the TroubePlug the Garden Groom ^® trimmer into the main electrical supply and switch on.
The Garden Groom® trimmer should now be ready for use. If it does not operate, ensure the interlock peg is correctly aligned with the switch and the retaining clip is firmly placed and the main switch powerlight is on. If the problem persists, refer to the Troubleshooting page at the back of the Garden Groom® manual.
text_image
Interlock Switch Retaining Clip Interlock Peg1112
G.GroamMNL PRO R4.Indd 11-12 3/14/11 10:09 AM


Using The Mega Bag Attachment
Start up the Garden Groom ^® trimmer in the normal manner by operating the safety switch, main switch and front handle. The flexible hose and Mega Bag will inflate, providing a clear passage for the debris to flow from the Garden Groom ^® trimmer's exhaust to the bag.
As progress is made, to avoid any restriction of movement and strain on the tube/hose coupling, grab the hose and occasionally pull the bag along in advance of the cutting location.
During use, minor kinking of the hose is acceptable; however ensure the tube is not twisted as this will restrict the flow of waste material
It will be necessary to periodically shake the debris down the hose to ensure smooth conveyance of material into the Mega Bag. When the bag is sufficiently full unzip the flap at the rear of the bag and pour the shredded material into an appropriate receptacle or onto a compost area.
Working From A Platform
When working from a platform, always ensure it is stable on solid ground and never overreach.
Take care when positioning the platform there is sufficient freedom of movement during the hedge trimming operation.
Storage
Ensure the tube, hose and bag are completely free of waste material before storing away.
Store in a dry place free of hazards that could cause damage to any of the coponent parts.
Safety
Check periodically there are no breaks or damage to the Mega Bag assembly.
The Garden Groom® trimmer should never be used without the extension tube or hose position.
Never insert your hand up the extension tube.
Warning
Always unplug your Garden Groom® trimmer from the main electrical supply before performing any maintenance.
Damage
The three component parts of the Mega Bag attachment have been designed or easy detachment. If the extension tube is damaged simply detach the hose by untying the hook and loop.
If the hose is damaged unzip the coupling at the bag and untie the extension tube for volume bag damage simply unzip the hose.

Always wear
protective eyewear

natural_image
Abstract geometric shape with a curved gray line and two perpendicular lines at the bottom (no text or symbols)TROUBLE SHOOTING
| PROBLEM ACTION | |
| Machine won't start - Check to see that the machine is plugged in to a live supply- Check that the waste container or Mega Bag extension tube is correctly attached and the main switch powerlight is on. Remove and refit to be sure.- Check that you are pressing both main switch and front switch, ensuring the safety switch has released main switches.- Contact dealer. | |
| Machine does not collect - Check waste container is not full.- Check volume bag hose (accessory) is not unlocked.- Check exhaust is not blocked.NOTE: The percentage of collection will vary on the condition and type of hege being cut. | |
| Damage to static or rotary blade - Unplug the machine immediately.- Contact www.gardengroomusa.com |
MODEL NO.: GG21
Input Voltage: 120V-60 Hz
Rated Current: 3.8 A
No Load Speed: 2800 RPM


Double insulation is a design concept used in electric power tools which eliminates the need for the three-wire grounded power cord and grounded power supply system. It is recognized and approved by ETL and confirms to UL1448
Not to be operated by or around children. Any attempt to modify, disable or override any of the safety switches, will void all warranties and release the manufacturer and or distributor from any liability for injury or damage that could occur as a result.
1314
G.GroamMNL PRO R4.indd 13-14 3/14/11 10:09 AM

ONE YEAR LIMITED WARRANTY
The Garden Groom® trimmer is warranted to be free from defects in materials and workmanship for one year from the original purchase date. Should the product have a defect in materials or workmanship, we will repair or replace it without charge to you (a shipping and processing fee may apply). To obtain service under warranty, simply call our Customer Service Center toll-free at: 800-498-0422
This warranty does not cover any damage caused by accident, misuse or any use other than as intended and described in this owner's manual, or damage resulting from failure to maintain and clean this product as specified in this product manual. This warranty applies only to the original purchaser of the Garden Groom ^20 trimmer.
Contact Info for Warranty Service:
P.O. Box 9169 | Van Nuys, CA | 91409
800-198-0422 | www.gardengroomusa.com
© 2011 Garden Groom LLC. All Rights Reserved.
WIPD Patent Nos. WO/21813/020076; WO/2000/015024

natural_image
Abstract geometric shape with a curved gray base and vertical line segment (no text or symbols)ARBITRATION AGREEMENT
THIS ARBITRATION AGREEMENT ("AGREEMENT") AFFECTS YOUR LEGAL RIGHTS AND REMEDIES BY PROVIDING THAT DISPUTES BETWEEN YOU AND THE SELLER OF THIS PRODUCT ("COMPANY"); MUST BE RESOLVED THROUGH BINDING ARBITRATION, RATHER THAN IN A COURT. PLEASE READ THIS AGREEMENT CAREFULLY YOU ACCEPT THE TERMS OF THIS AGREEMENT BY RETAINING THE PRODUCT(S) SHIPPED IN CONNECTION WITH THIS AGREEMENT (THE "PRODUCT") FOR MORE THAN FOURTEEN (14) DAYS AFTER RECEIPT. IF YOU DO NOT AGREE TO THE TERMS OF THIS AGREEMENT, YOU MAY RETURN THE PRODUCT TO COMPANY WITHIN FOURTEEN (14) DAYS OF RECEIPT AT NO COST TO YOU.
- RESOLUTION OF CLAIMS OR DISPUTES.
Any claim or disputes between you and Company (or any of Company's subsidiaries or affiliates) arising out or relating in any way to the Product or this Agreement shall be resolved through final, binding arbitration. This arbitration obligation applies regardless of whether the claim or disputes involves a tort, fraud, misrepresentation, product liability, negligence, violation of a statute, or any other legal theory. Both you and Company specifically acknowledge and agree that you waive your right to bring a lawsuit based on such claims or disputes and to have such lawsuit resolved by a judge or jury.
- LIMITATION OF LEGAL REMEDIES.
All arbitrations under this Agreement shall be conducted on an individual (and not a class-wide) basis, and an arbitrator shall have no authority to award class-wide relief. You acknowledge and agree that this Agreement specifically prohibits you from commencing arbitration proceedings as a representative of others or joining in any arbitration proceedings brought by any other person.
- ARBITRATION PROCEDURES.
a. Before commencing any arbitration proceedings under this Agreement, you must first present the claim or dispute to Company by calling (818) 217.2500 and asking for the Legal Department and allowing Company the opportunity to resolve the claim or dispute. If your claim or dispute is not resolved within sixty (60) days, you may commence arbitration proceedings in accordance with the terms of this Agreement.
b. The arbitration of any claim or dispute under this Agreement shall be conducted pursuant to the American Arbitration Association's ("AAA") United States Commercial Dispute Resolution Procedures and Supplementary Procedures for Consumer-Related Disputes. These rules and procedures are available by calling the AAA or by visiting its web site at www.adr.org.
c. The arbitration of any claim or dispute under this Agreement shall be conducted in the State of California or the location in which you received this Agreement.
d. All administrative expenses of arbitration proceedings commenced under this Agreement shall be divided equally between you and Company, except that: (a) if the claim or dispute that is the subject of the arbitration proceedings is less than ten thousand dollars (US\10,000), you will be responsible for no more than one hundred twenty-five dollars (US\125) in administrative expenses; (b) if the claim or dispute that is the subject of the arbitration proceedings is more than ten thousand dollars (US\10,000) but less than seventy-five thousand dollars (US\15,000), you will be responsible for no more than three hundred seventy-five dollars (US\375) in administrative expenses; and (c) if the claim or dispute that is the subject of the arbitration proceedings is more than seventy-five thousand dollars (US\75,000), then you will be responsible for administrative expenses in accordance with the Commercial Fee Schedule provided by the AAA. You acknowledge and agree that each party shall pay the fees and costs of its own counsel, experts and witnesses.
- CHOICE OF LAW.
This Agreement shall be governed by the United States Federal Arbitration Act and the laws of the State of California.
- SEVERABILITY.
If any provision of this Agreement is declared or found to be unlawful, unenforceable or void, such provision will be ineffective only to the extent that it is found unlawful, unenforceable or void, and the remainder of the provision and all other provisions shall remain fully unenforceable.